
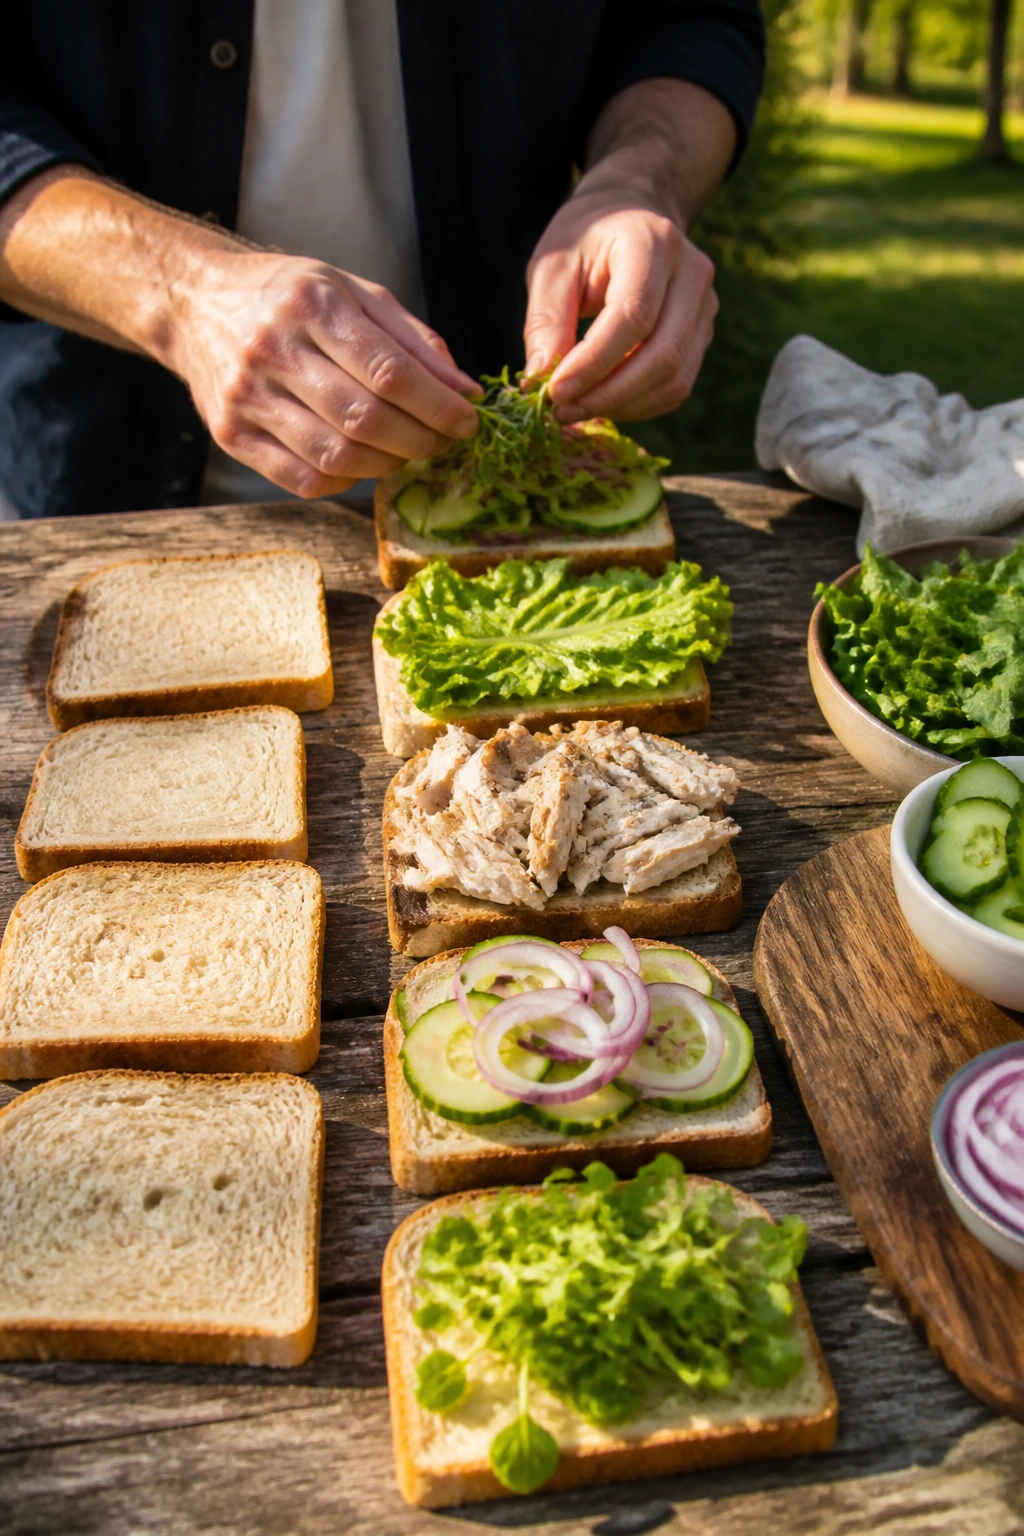
A good picnic sandwich has to do three jobs at once. It needs to taste bright after an hour in the cooler, stay together after you slice it, and avoid that soggy-bread situation that ruins a perfectly nice afternoon. That is a small order, and most sandwiches fail at one of those jobs.
The best picnic lunch sandwich recipes lean on a few smart moves: sturdy bread, fillings that aren’t too wet, and ingredients with enough salt, acid, or crunch to still taste lively once they’ve chilled. Think sliced pickles instead of dripping sauces, lettuce that protects the bread, and spreads that go thin rather than slathered. That’s the whole game.
And yes, there’s room for plenty of personality here. A ham-and-Swiss sandwich with dill pickles behaves differently from a chicken salad croissant, and a muffuletta has a completely different mood from cucumber tea sandwiches. Same category. Very different results.
Why These Picnic Lunch Sandwich Recipes Hold Up in a Cooler

- Bread that behaves: Soft rolls, ciabatta, sourdough, and pita all hold up better than flimsy sandwich bread once they’re wrapped and chilled.
- Fillings with backbone: Pickles, mustard, herbs, slaws, and sharp cheeses keep the flavor awake after a couple of hours.
- Make-ahead friendly: Most of these can be mixed, stacked, and wrapped the night before without turning limp by noon.
- Easy to scale: A few of these feed four; a few can be split into mini sandwiches for a bigger spread.
- Summer-proof texture: Crunchy celery, crisp lettuce, and sliced cucumbers keep each bite from feeling heavy.
- No-fuss transport: Every recipe below can go from cutting board to parchment wrap to cooler without much drama.
1. Classic Ham, Swiss, and Dill Pickle Sandwich
Thin ham, mild Swiss, and a sharp pickle slice are a classic trio for a reason. The salt from the ham and cheese wakes up soft bread, while the dill pickle keeps the whole thing from tasting sleepy after it sits wrapped for a bit.
Why It Works:
This sandwich is built on contrast: soft bread, chewy ham, creamy cheese, and a crisp pickle edge. A thin swipe of Dijon adds enough bite to keep it from feeling flat, and the pickles give it the kind of snap that still reads clearly after chilling.
Key Ingredients:
- 8 slices soft sandwich bread
- 8 ounces thin-sliced deli ham
- 4 slices Swiss cheese
- 4 dill pickle spears, sliced lengthwise
- 2 tablespoons Dijon mustard
- 2 tablespoons softened butter
- 1 cup shredded iceberg lettuce
Quick Steps:
- Spread 1/2 tablespoon Dijon on each slice of bread.
- Layer ham, Swiss, pickle slices, and lettuce on 4 slices.
- Top with the remaining bread slices and press gently.
- Butter the outside lightly if you want a toastier finish, then cut and wrap tightly in parchment.
Equipment for This Recipe:
- Serrated knife
- Cutting board
- Butter knife or small spatula
How to Serve This Dish:
Serve it with kettle chips and a few extra pickle chips on the side. Cut each sandwich in half on the bias; the layered cross-section looks better and makes it easier to pack.
Pro Tips for This Recipe:
- Use thin ham slices so the sandwich doesn’t fight back when you bite it.
- Pat the pickle spears dry with a paper towel.
- If the bread is very soft, add the lettuce directly against it as a moisture shield.
Variations on This Dish:
- Honey-Dijon Ham: Mix 1 teaspoon honey into the mustard for a softer, sweeter edge.
- Pastrami Swap: Use pastrami instead of ham for a darker, peppery sandwich.
- No-Dairy Version: Skip the Swiss and add extra mustard plus sliced cucumber.
Common Mistakes to Avoid with This Dish:
- Wet pickles: If they aren’t blotted dry, the bread goes tacky by lunch.
- Too much mustard: A heavy layer soaks the crumb and bulldozes the ham.
- Thick cheese slices: They make the sandwich bulky without improving flavor much.
2. Turkey Club Sandwich with Bacon and Tomato
A turkey club on a picnic tray feels a little fancy without becoming fussy. Bacon gives it smoke, tomato brings freshness, and the triple-layer build holds up nicely if you wrap it snug and keep the slices thin.
Why It Works:
The club sandwich has a sturdy structure, which matters when you’re eating outdoors. Toasted bread gives you a dry surface, and lettuce between the tomato and bread slows down moisture migration. That matters more than people think.
Key Ingredients:
- 6 slices sandwich bread, toasted
- 8 ounces sliced roast turkey
- 6 slices bacon, cooked until crisp
- 2 medium tomatoes, sliced and patted dry
- 4 leaves romaine lettuce
- 3 tablespoons mayonnaise
- 1 tablespoon Dijon mustard
Quick Steps:
- Mix mayo and Dijon.
- Spread the mixture on all toasted bread slices.
- Layer turkey, bacon, tomato, and lettuce, stacking two layers high.
- Secure with toothpicks, slice into triangles, and wrap tightly.
Equipment for This Recipe:
- Skillet or baking sheet for bacon
- Toaster
- Toothpicks
How to Serve This Dish:
Serve with potato chips and a few spears of crunchy celery. I like it cut into quarters; the toothpicks make it picnic-friendly, and the angles keep the layers from slipping.
Pro Tips for This Recipe:
- Dry the tomato slices well; they’re the usual culprit when clubs turn messy.
- Use center-cut bacon so you get crisp edges without too much shrinkage.
- Assemble close to departure time if the bread is very airy.
Variations on This Dish:
- Avocado Club: Add sliced avocado right before packing.
- Smoky Club: Swap Dijon for chipotle mayo.
- Open-Faced Style: Use only two slices of toast and make it a fork-and-knife picnic lunch.
Common Mistakes to Avoid with This Dish:
- Undertoasted bread: Soft bread collapses under tomato and turkey.
- Overstuffing: Too much filling makes the layers slide out when cut.
- Skipping the lettuce barrier: Direct tomato-on-bread contact means soggy corners.
3. Chicken Salad Sandwich with Grapes and Celery
Chicken salad on a picnic table is either pale and forgettable or crisp, cool, and worth going back for. Grapes and celery fix the first problem; a restrained hand with mayo fixes the second.
Why It Works:
This version stays bright because it has sweet grapes, crunchy celery, and enough lemon juice to keep the dressing from tasting heavy. Croissants are lovely, but a sturdy brioche bun or sandwich roll travels better if you’ll be eating outside for a while.
Key Ingredients:
- 3 cups cooked chicken, shredded or diced
- 1/2 cup mayonnaise
- 1 tablespoon lemon juice
- 1 cup seedless red grapes, halved
- 2 celery stalks, finely diced
- 2 tablespoons chopped parsley
- 1/2 teaspoon kosher salt
- 1/4 teaspoon black pepper
- 4 croissants or sandwich rolls
Quick Steps:
- Stir together mayo, lemon juice, salt, and pepper.
- Fold in chicken, grapes, celery, and parsley.
- Chill for 20 minutes so the flavors settle.
- Spoon into split rolls or croissants and close gently.
Equipment for This Recipe:
- Mixing bowl
- Rubber spatula
- Sharp knife
How to Serve This Dish:
Serve with cucumber slices and a handful of pretzels. If you’re using croissants, pack the filling separately and assemble right before eating so the pastry stays flaky.
Pro Tips for This Recipe:
- Chop the chicken into pieces that are small enough to stay put but not so tiny that the salad turns paste-like.
- A little lemon zest makes the whole bowl smell fresher.
- If the salad looks dry after chilling, add 1 more tablespoon mayo.
Variations on This Dish:
- Curry Chicken Salad: Add 1 teaspoon curry powder and 2 tablespoons chopped golden raisins.
- Pecan Crunch: Stir in 1/3 cup chopped toasted pecans.
- Lighter Yogurt Version: Replace half the mayo with plain Greek yogurt.
Common Mistakes to Avoid with This Dish:
- Warm chicken: It loosens the mayo and makes the salad greasy.
- Too much dressing: Chicken salad should hold together, not slump.
- Skipping the chill time: The lemon and parsley need a few minutes to round out.
4. Tuna Salad Sandwich with Celery and Capers
Tuna salad can go wrong fast. Too much mayo and it tastes dull; too little acid and it tastes flat. Capers, celery, and a squeeze of lemon keep this one sharp enough for a warm afternoon.
Why It Works:
Canned tuna is mild, so it needs a few loud flavors to carry the sandwich. Capers bring salinity, celery adds crunch, and lemon keeps the whole thing bright. Toasted sourdough gives it enough structure to handle a picnic wrap without turning soft.
Key Ingredients:
- 2 cans tuna in water, drained well
- 1/3 cup mayonnaise
- 1 tablespoon lemon juice
- 2 celery stalks, finely chopped
- 1 tablespoon capers, chopped
- 1 tablespoon minced red onion
- 1/4 teaspoon black pepper
- 8 slices sourdough or 4 sandwich rolls
Quick Steps:
- Flake tuna into a bowl with a fork.
- Stir in mayo, lemon juice, celery, capers, onion, and pepper.
- Taste and add a pinch of salt only if needed.
- Spoon onto bread, close, and wrap tightly.
Equipment for This Recipe:
- Mixing bowl
- Fork
- Serrated knife
How to Serve This Dish:
Serve it with tomato wedges and salty potato chips. I prefer sourdough here because the chewy crust gives the sandwich more backbone than plain white bread.
Pro Tips for This Recipe:
- Drain the tuna aggressively; watery tuna salad is the fastest way to ruin the bread.
- Chop capers finely so they season every bite.
- If you like it softer, add 1 teaspoon sweet relish.
Variations on This Dish:
- Mediterranean Tuna: Add chopped olives and parsley.
- Spicy Tuna: Mix in a few dashes of hot sauce and minced jalapeño.
- No-Mayo Version: Use olive oil, lemon juice, and a spoonful of mashed avocado.
Common Mistakes to Avoid with This Dish:
- Undrained tuna: The filling turns loose and drips.
- Overmixing: Tuna salad should look a little chunky.
- Too much onion: Raw onion can take over if it isn’t measured carefully.
5. Egg Salad Sandwich with Chives

Egg salad gets a bad reputation because people often treat it like wallpaper paste. Keep the dressing light, add chives, and the whole thing becomes a clean, creamy sandwich that still feels appropriate at a picnic.
Why It Works:
Hard-boiled eggs bring richness, but chives and Dijon keep them from tasting heavy. The filling is best when it’s cold and lightly seasoned, which makes it ideal for a shaded lunch blanket and a chilled cooler pack.
Key Ingredients:
- 6 large eggs
- 1/4 cup mayonnaise
- 1 teaspoon Dijon mustard
- 2 tablespoons chopped chives
- 1 teaspoon lemon juice
- 1/4 teaspoon salt
- 1/8 teaspoon black pepper
- 8 slices milk bread or soft sandwich bread
Quick Steps:
- Boil the eggs for 10 to 11 minutes, then cool in ice water.
- Peel and chop the eggs into small pieces.
- Fold together eggs, mayo, mustard, chives, lemon juice, salt, and pepper.
- Chill for 15 minutes, then spoon onto bread.
Equipment for This Recipe:
- Saucepan
- Slotted spoon
- Mixing bowl
How to Serve This Dish:
Cut the sandwiches into fingers or small triangles. Serve with sliced radishes and a little lettuce for crunch.
Pro Tips for This Recipe:
- Slightly undercooked yolks are a mess; fully set yolks make a cleaner filling.
- Mash only half the eggs if you want a mix of creamy and chunky texture.
- Chives beat onion here because they stay gentler after chilling.
Variations on This Dish:
- Dill Egg Salad: Replace chives with fresh dill.
- Pickle Egg Salad: Add 1 tablespoon finely chopped pickle.
- Curried Egg Salad: Add 1/2 teaspoon curry powder and a few raisins.
Common Mistakes to Avoid with This Dish:
- Hot eggs: They melt the mayo and make the filling runny.
- Too much mustard: A little bite is enough.
- Skimping on salt: Egg salad tastes bland without it.
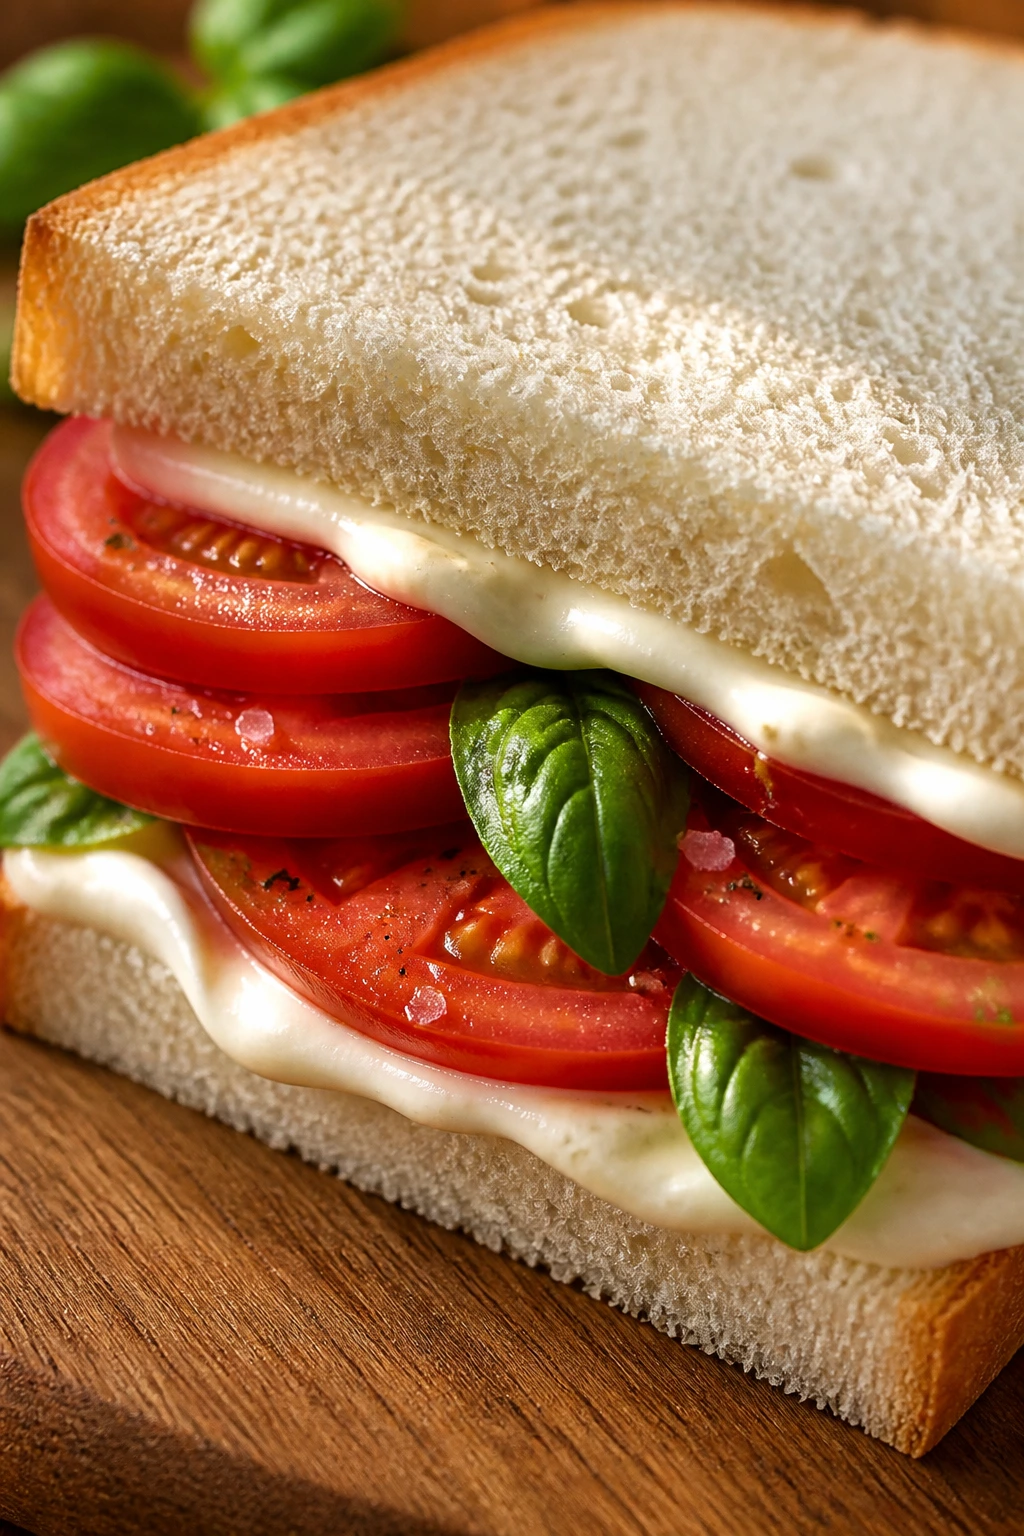
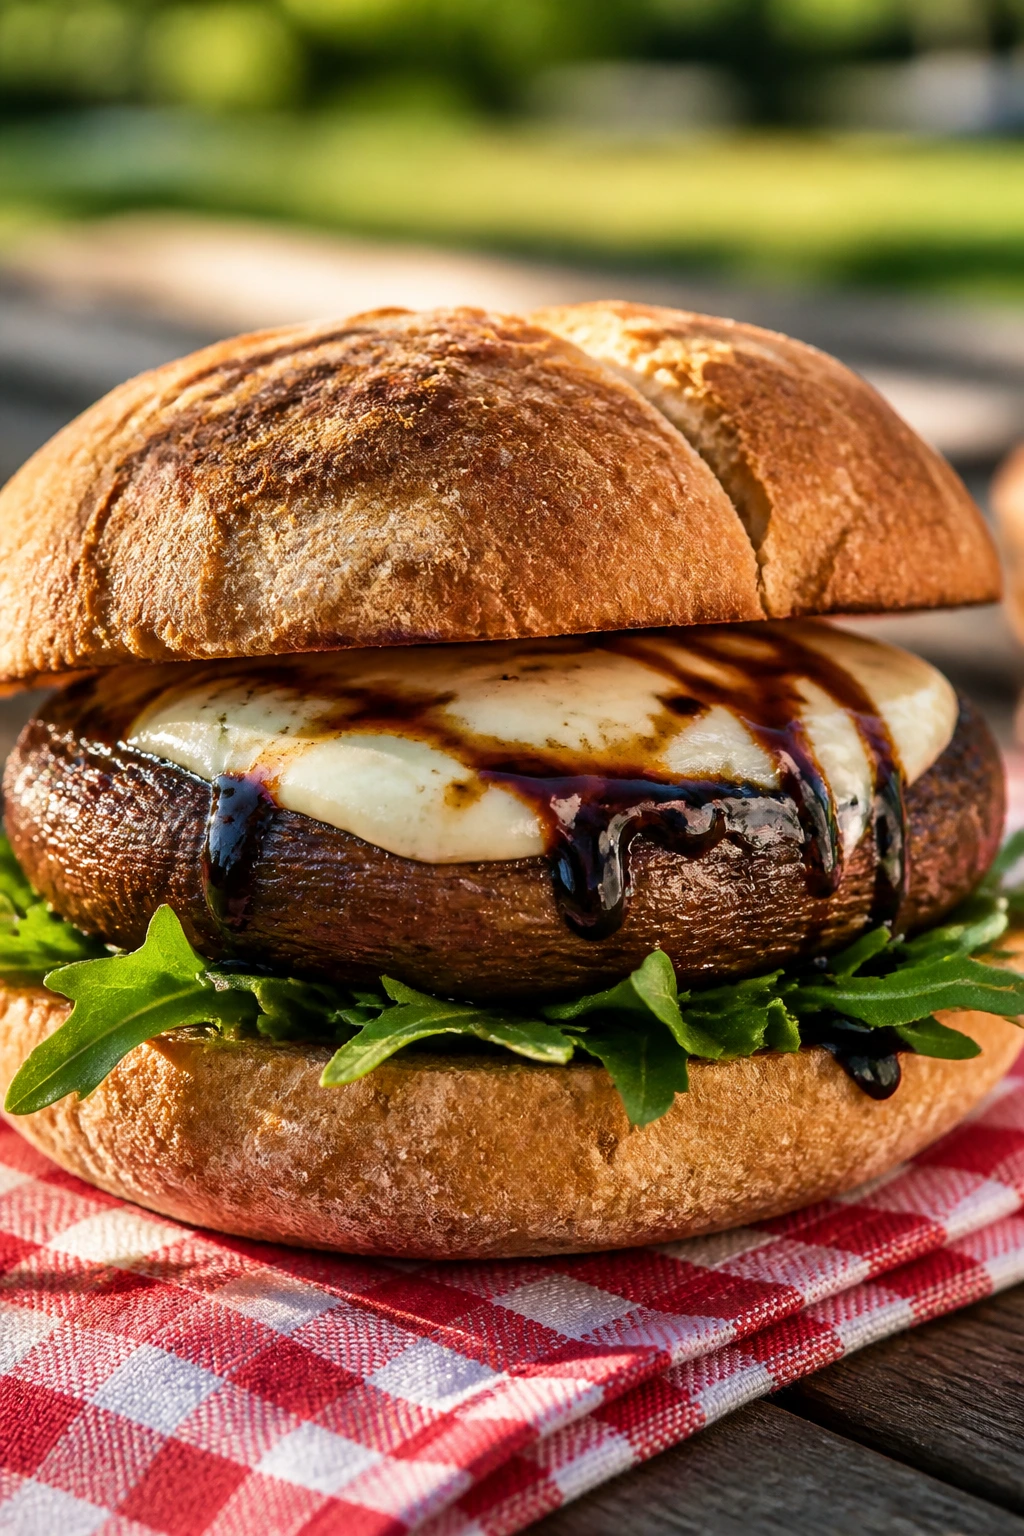
6. Caprese Sandwich with Pesto and Balsamic
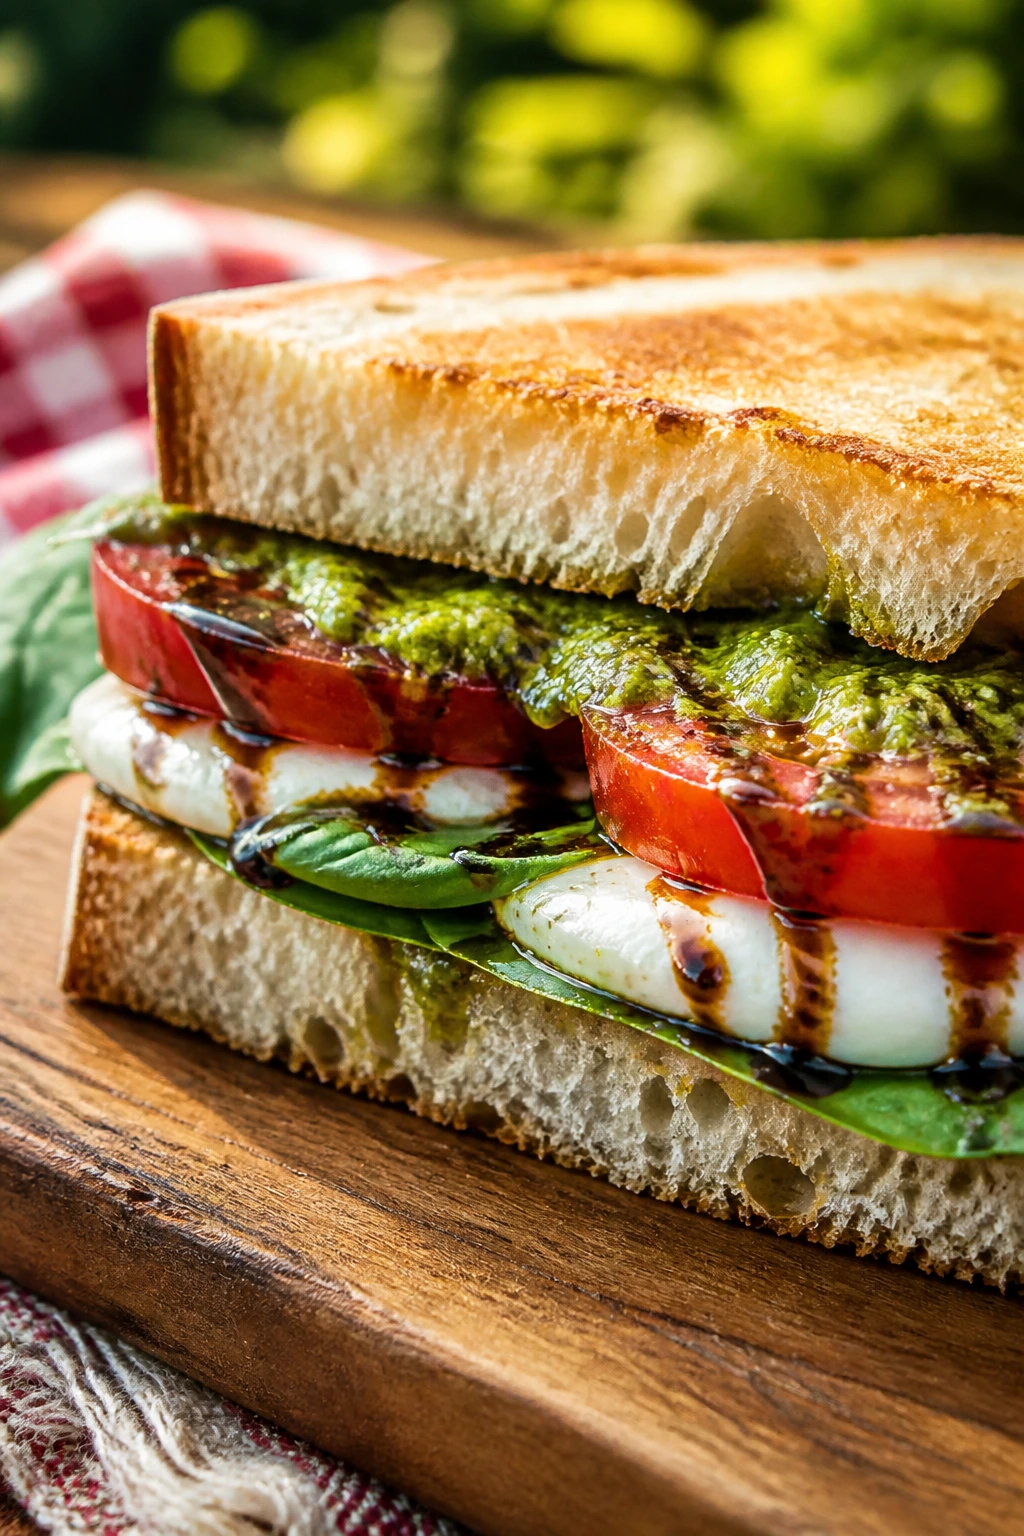
Tomato, mozzarella, basil, pesto. That’s the whole argument, and it’s a strong one. This sandwich tastes like a good tomato standing in a sunlit market, which is about as summer as it gets.
Why It Works:
Caprese fillings are naturally picnic-friendly because they’re simple and high-contrast: juicy tomatoes, soft cheese, and fresh basil. The trick is controlling moisture. Slice the tomatoes, salt them lightly, and let them sit while you prep the bread.
Key Ingredients:
- 1 large ciabatta loaf, split into 4 sandwiches
- 2 large tomatoes, sliced
- 8 ounces fresh mozzarella, sliced
- 1/4 cup basil pesto
- 2 tablespoons balsamic glaze
- 1 cup basil leaves
- 1 tablespoon olive oil
- Pinch of salt
Quick Steps:
- Salt the tomato slices and rest them on paper towels for 10 minutes.
- Spread pesto on both cut sides of the bread.
- Layer mozzarella, tomatoes, and basil.
- Drizzle with balsamic glaze, close, and slice.
Equipment for This Recipe:
- Bread knife
- Cutting board
- Paper towels
How to Serve This Dish:
Serve with olives or a simple green salad. Ciabatta is my pick because the crust holds up better than a soft roll once the tomatoes start releasing juice.
Pro Tips for This Recipe:
- Use the best tomatoes you can find; this sandwich is brutally honest.
- Tear basil by hand rather than chopping it if you want a fresher aroma.
- Don’t overdo the balsamic glaze or it turns syrupy fast.
Variations on This Dish:
- Roasted Tomato Caprese: Swap fresh tomatoes for cooled roasted slices.
- Arugula Bite: Add a handful of peppery arugula.
- Prosciutto Caprese: Add 4 ounces sliced prosciutto for a saltier version.
Common Mistakes to Avoid with This Dish:
- Wet tomatoes: They flood the bread.
- Too much pesto: It can bury the basil.
- Using flimsy bread: The sandwich needs a crust with some weight.
7. Italian Sub Sandwich with Salami and Provolone
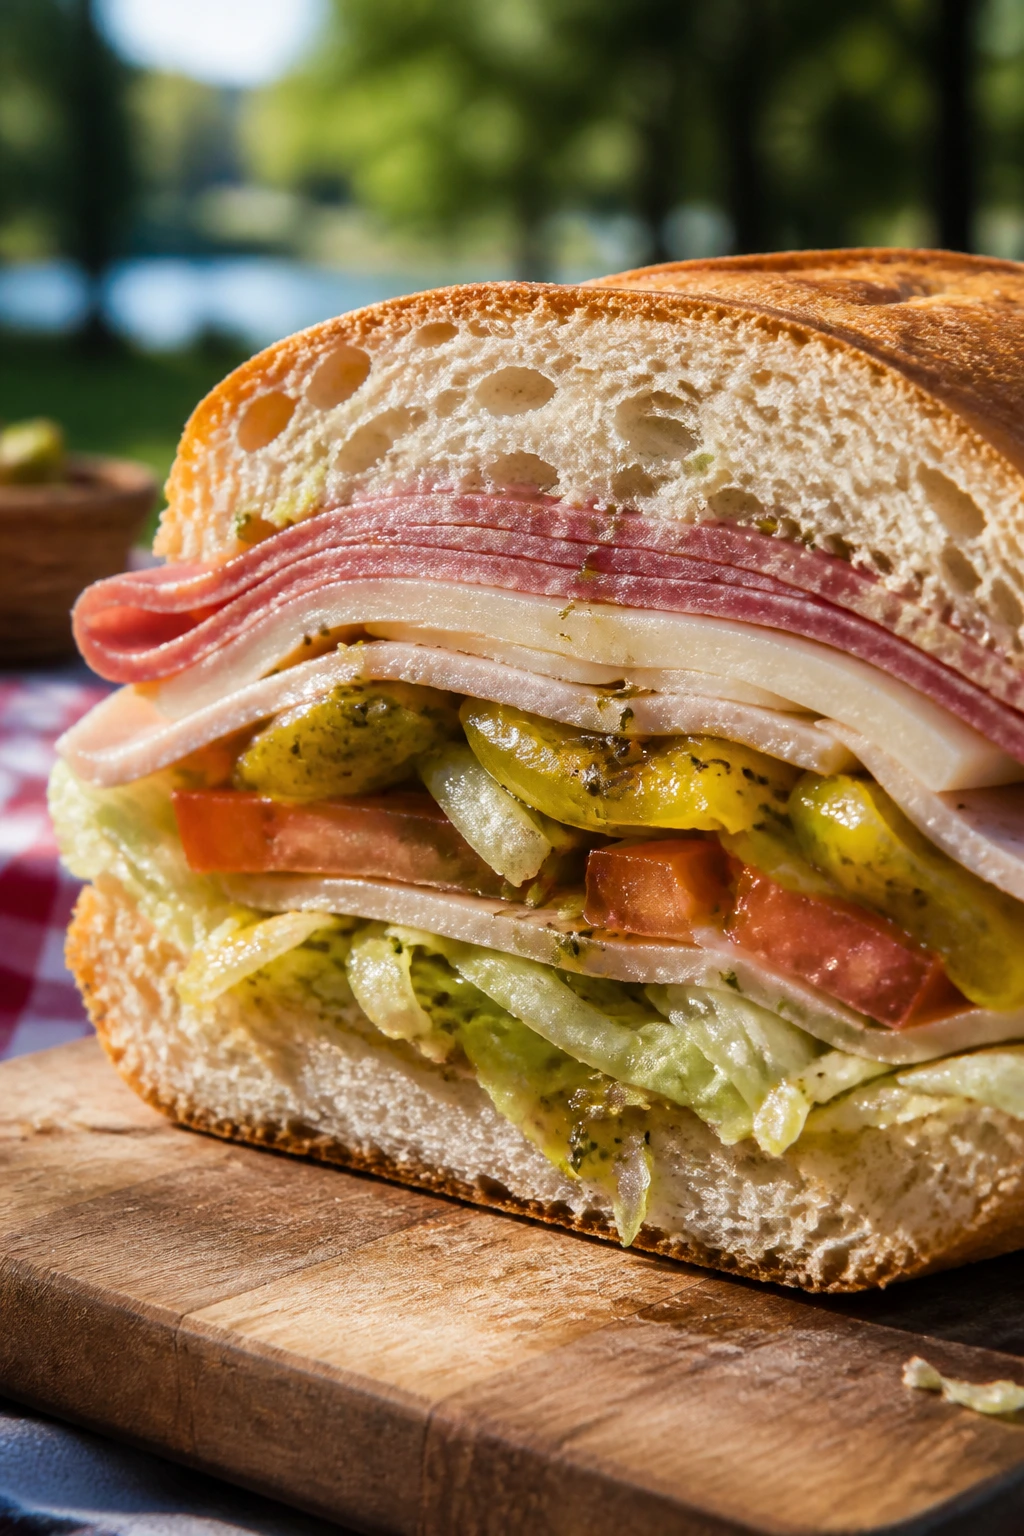
An Italian sub packed for a picnic should taste sharp, salty, and a little unruly. Pepperoncini, salami, and provolone do the heavy lifting, while a splash of vinaigrette keeps the whole thing from feeling dense.
Why It Works:
The flavor here comes from cured meat, tangy peppers, and a simple oil-and-vinegar dressing. The bread matters too: a hoagie roll with a thin crust is the sweet spot. Too soft and it collapses; too crusty and it scratches your mouth.
Key Ingredients:
- 2 hoagie rolls, split
- 4 ounces Genoa salami
- 4 ounces ham
- 4 ounces provolone, sliced
- 1/2 cup shredded iceberg lettuce
- 1/2 tomato, thinly sliced
- 2 tablespoons sliced pepperoncini
- 2 tablespoons olive oil
- 1 tablespoon red wine vinegar
- 1 teaspoon dried oregano
Quick Steps:
- Whisk olive oil, vinegar, and oregano.
- Layer salami, ham, provolone, lettuce, tomato, and pepperoncini.
- Drizzle lightly with dressing.
- Press, wrap, and rest 10 minutes before slicing.
Equipment for This Recipe:
- Small bowl
- Whisk or fork
- Serrated knife
How to Serve This Dish:
Serve with kettle chips and a few extra pepperoncini on the side. Resting the assembled sub for 10 minutes helps the bread catch the dressing without going soggy.
Pro Tips for This Recipe:
- Fold the salami slices instead of laying them flat; the texture feels better.
- Keep the dressing light.
- If you want extra crunch, add thin-sliced cucumber.
Variations on This Dish:
- Hot Sub Version: Add roasted red peppers and banana peppers.
- Mortadella Twist: Replace the ham with mortadella.
- Vinegar Bomb: Increase the vinegar slightly if you like a sharper sub.
Common Mistakes to Avoid with This Dish:
- Drenching the bread: Italian subs need a whisper of dressing, not a soak.
- Skipping the rest: The sandwich tastes better after a short pause.
- Too many wet vegetables: Keep the tomato layer thin.
8. Roast Beef and Horseradish Sandwich
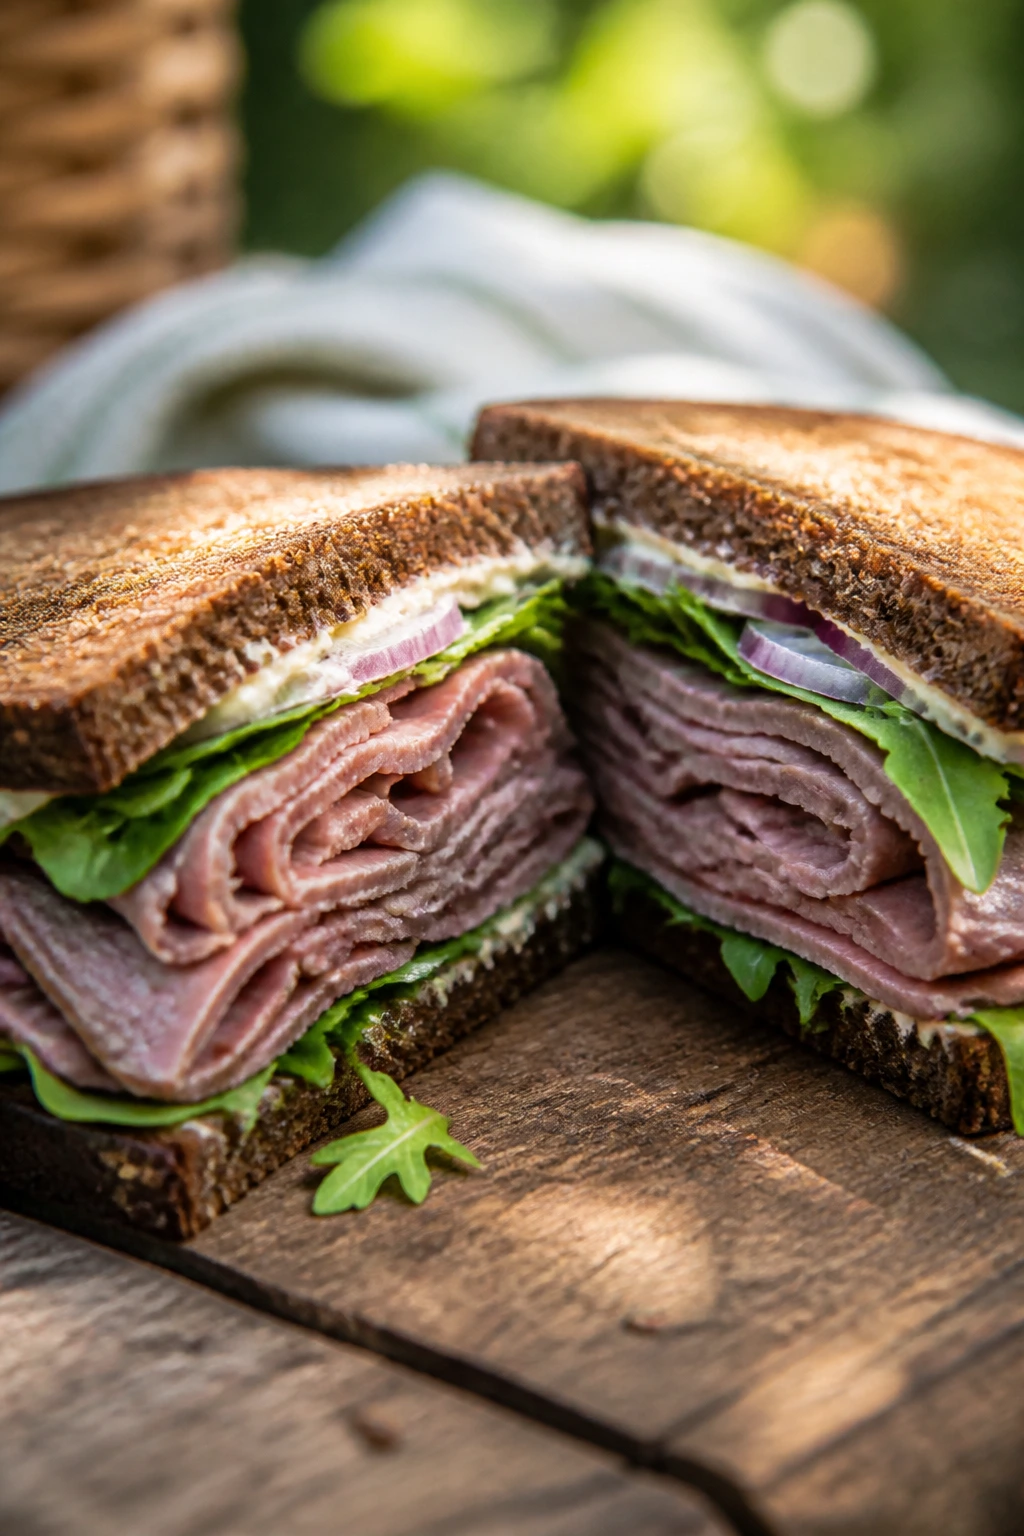
Roast beef likes a little bite. Horseradish cream gives it that without turning the sandwich into a fire alarm, and rye bread adds a dark, earthy note that stands up well in a cooler.
Why It Works:
Roast beef can taste flat if it’s paired with gentle flavors, so horseradish is doing the useful work here. Rye bread has enough flavor to matter, and lettuce or watercress adds freshness without making the sandwich wet.
Key Ingredients:
- 8 slices rye bread
- 10 ounces sliced roast beef
- 1/4 cup mayonnaise
- 1 tablespoon prepared horseradish
- 1 teaspoon Dijon mustard
- 1 cup arugula or watercress
- 1/2 small red onion, thinly sliced
Quick Steps:
- Stir together mayo, horseradish, and Dijon.
- Spread the mixture on bread slices.
- Layer roast beef, arugula, and onion.
- Close, press lightly, and cut.
Equipment for This Recipe:
- Mixing bowl
- Knife
- Cutting board
How to Serve This Dish:
Serve it with potato salad or a few dill pickles. I like this one slightly chilled; the horseradish stays cleaner when the sandwich is cool.
Pro Tips for This Recipe:
- Choose roast beef that’s sliced thin enough to fold.
- If your horseradish is mild, add a second teaspoon.
- Watercress has a peppery snap that works better here than iceberg.
Variations on This Dish:
- Cheddar Roast Beef: Add a thin slice of sharp cheddar.
- French Dip Picnic Style: Pack warm beef separately and add au jus in a thermos.
- Onion Jam Version: Swap raw onion for a spoonful of onion jam.
Common Mistakes to Avoid with This Dish:
- Thick roast beef slices: They make each bite clumsy.
- Too much horseradish: It should bite, not obliterate the beef.
- Soft bread: Rye with some structure works best.
9. BLT with Avocado
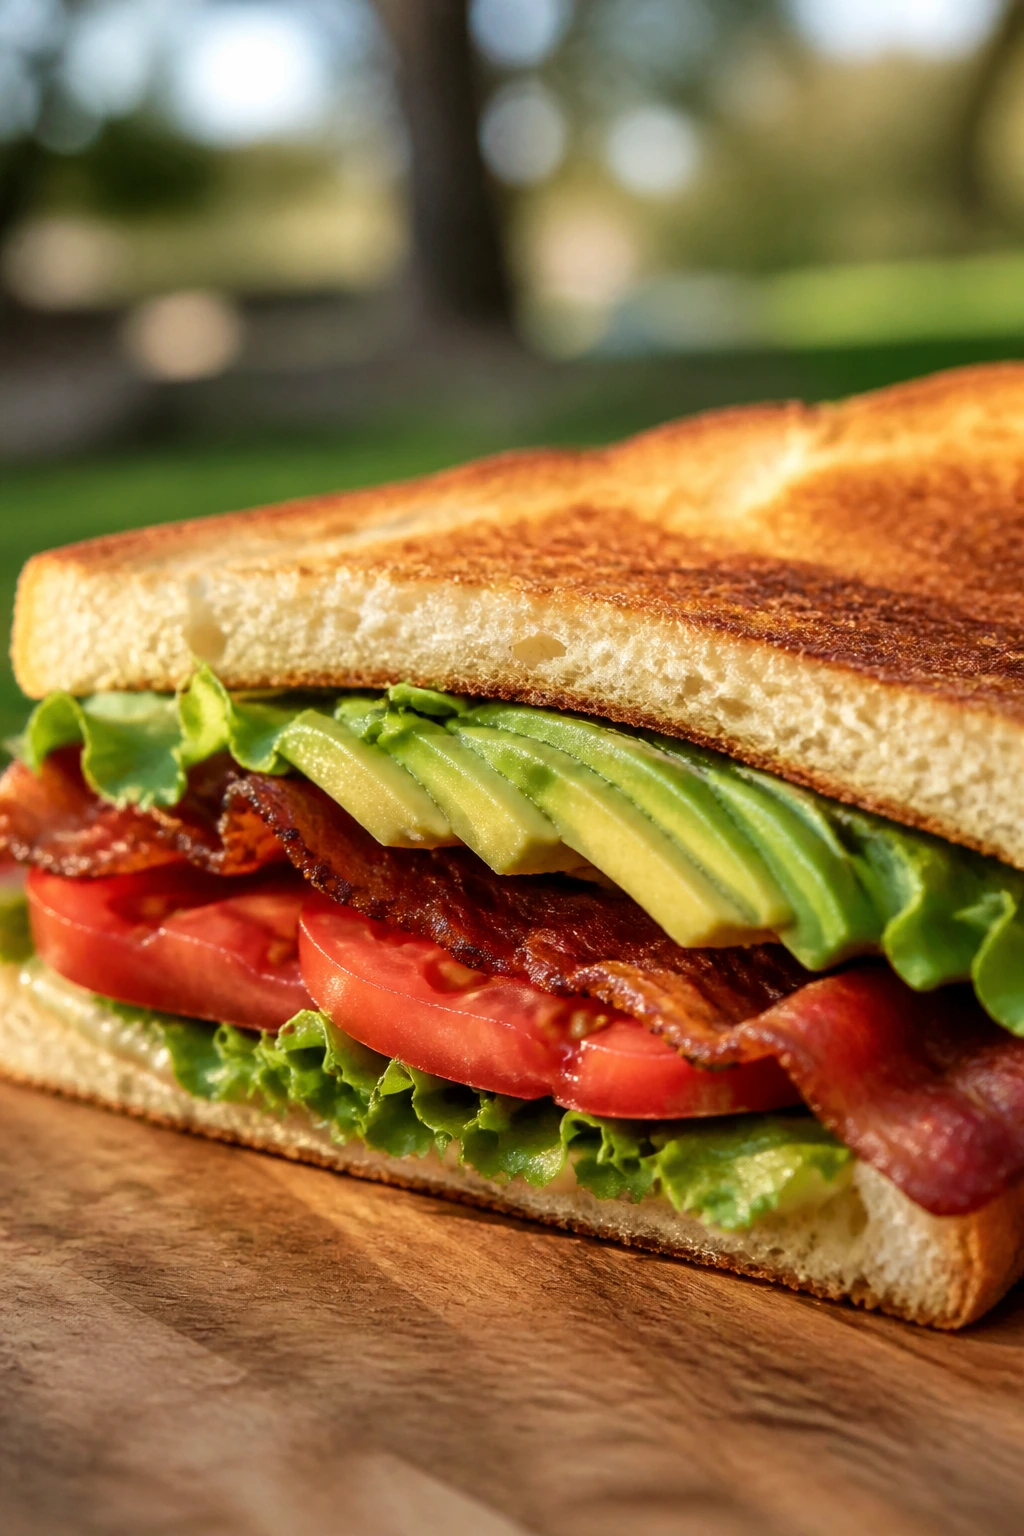
A BLT already knows how to please a crowd. Add avocado, and you get a sandwich that’s richer without becoming heavier, provided the tomato is dry and the bacon is crisp.
Why It Works:
The BLT lives and dies on texture. Crisp bacon, cool lettuce, and juicy tomato are the base; avocado fills the gaps with creaminess so every bite feels full. Toasted bread keeps the whole thing from getting floppy before lunch.
Key Ingredients:
- 8 slices sandwich bread, toasted
- 8 slices bacon, cooked crisp
- 2 large tomatoes, sliced and patted dry
- 4 lettuce leaves
- 1 avocado, sliced
- 3 tablespoons mayonnaise
- Pinch of salt and black pepper
Quick Steps:
- Spread mayo on the toast.
- Layer lettuce, tomato, bacon, and avocado.
- Season the tomato with a little salt and pepper.
- Top, press, and slice immediately.
Equipment for This Recipe:
- Skillet or oven tray
- Toaster
- Knife
How to Serve This Dish:
Serve with chilled grapes or corn chips. Eat it the same day you build it; this is not the sandwich to pack three hours ahead unless you’re careful with the tomato.
Pro Tips for This Recipe:
- Cool the bacon on paper towels so it stays crisp.
- Use ripe but not mushy avocado.
- Put lettuce against the bread to protect it from tomato juice.
Variations on This Dish:
- Fried Egg BLT: Add a fried egg for a brunch picnic.
- Chipotle BLT: Stir chipotle into the mayo.
- Turkey BLAT: Add sliced turkey if you want more protein.
Common Mistakes to Avoid with This Dish:
- Undried tomatoes: They turn toast into mush.
- Warm bacon: It steams the bread.
- Overripe avocado: It smears instead of slicing.
10. Cucumber and Herb Tea Sandwiches
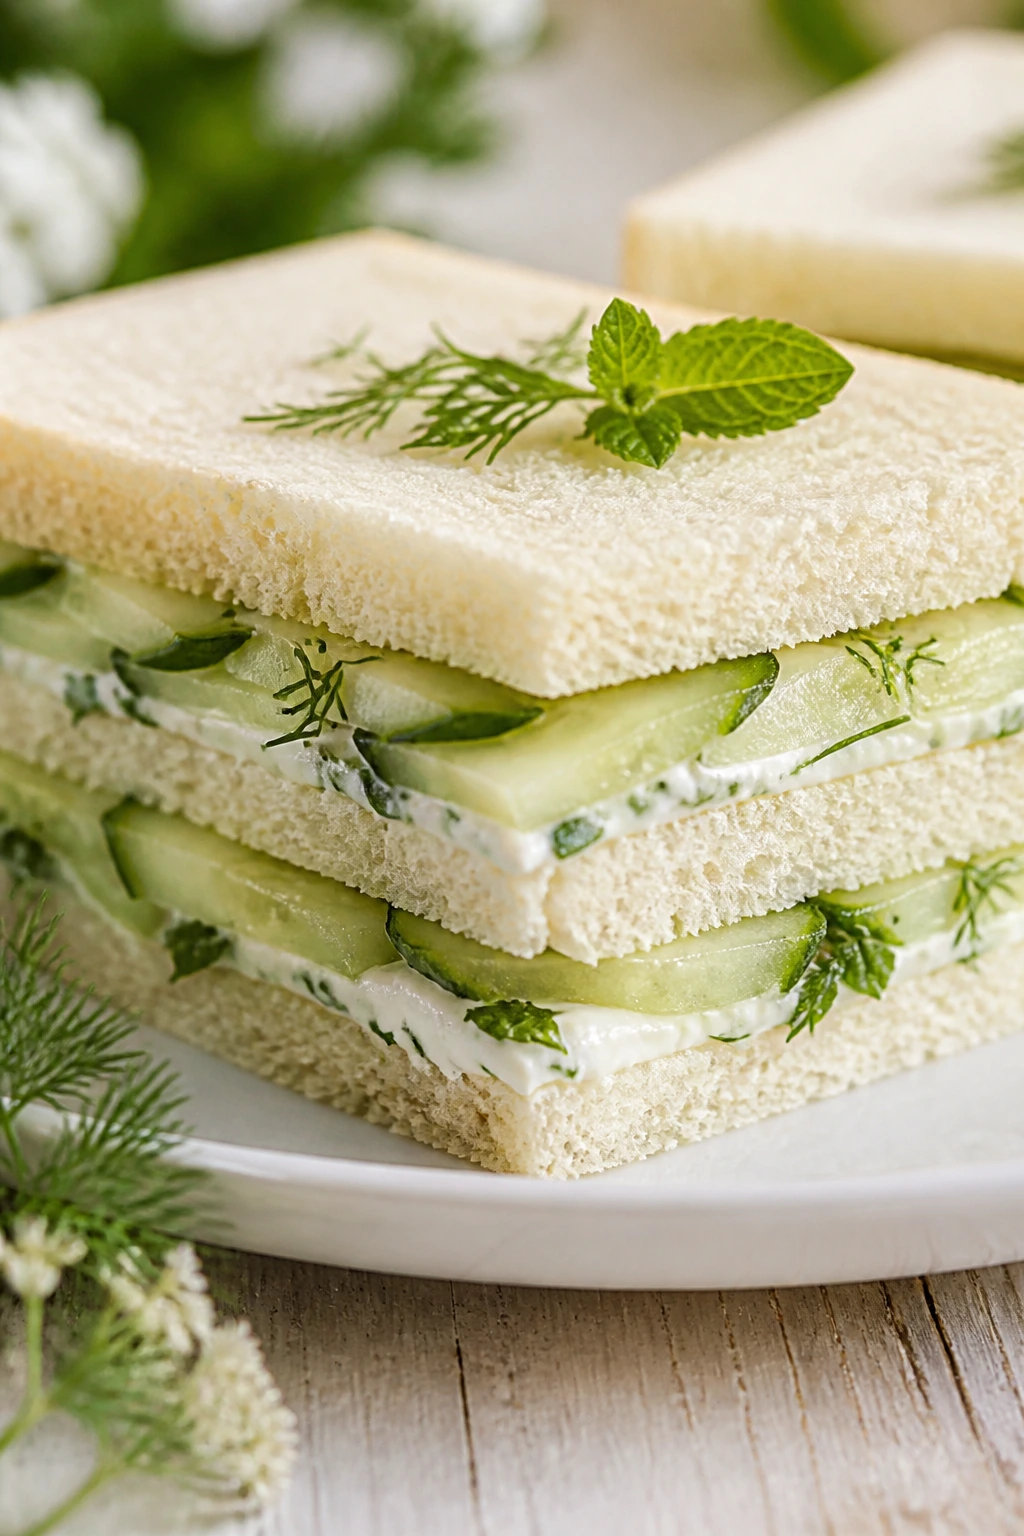
These little sandwiches are all about coolness. They’re the one you reach for when the heat is high, the table is crowded, and you want something crisp, pale green, and almost delicate.
Why It Works:
Cucumbers bring water and crunch, but they need cream cheese or butter underneath to keep the bread from sucking up moisture. Fresh dill and mint make the filling taste like it was made five minutes ago, which is exactly the point.
Key Ingredients:
- 12 slices soft white bread, crusts removed
- 8 ounces cream cheese, softened
- 1 tablespoon lemon juice
- 1 tablespoon chopped dill
- 1 tablespoon chopped mint
- 1 medium cucumber, very thinly sliced
- 1/4 teaspoon salt
- Pinch of black pepper
Quick Steps:
- Mix cream cheese, lemon juice, dill, mint, salt, and pepper.
- Spread a thin layer over 6 bread slices.
- Pat cucumber slices dry, then layer them neatly.
- Top with the remaining bread, press, and cut into fingers.
Equipment for This Recipe:
- Small bowl
- Offset spatula or butter knife
- Sharp serrated knife
How to Serve This Dish:
Serve these on a platter with strawberries or melon. Keep them chilled until the last minute; cucumber sandwiches are happiest when they’re cold and very fresh.
Pro Tips for This Recipe:
- Slice the cucumber so thin you can almost see through it.
- Trim crusts after assembly for the cleanest edges.
- A little lemon zest brightens the cream cheese nicely.
Variations on This Dish:
- Herb Garden Version: Add parsley and chives.
- Everything Bagel Version: Sprinkle seasoning inside the filling.
- Vegan Swap: Use whipped dairy-free cream cheese.
Common Mistakes to Avoid with This Dish:
- Wet cucumber slices: Blot them dry or the bread softens fast.
- Too much filling: These should be neat, not bulky.
- Heavy bread: Soft white bread is the right move here.
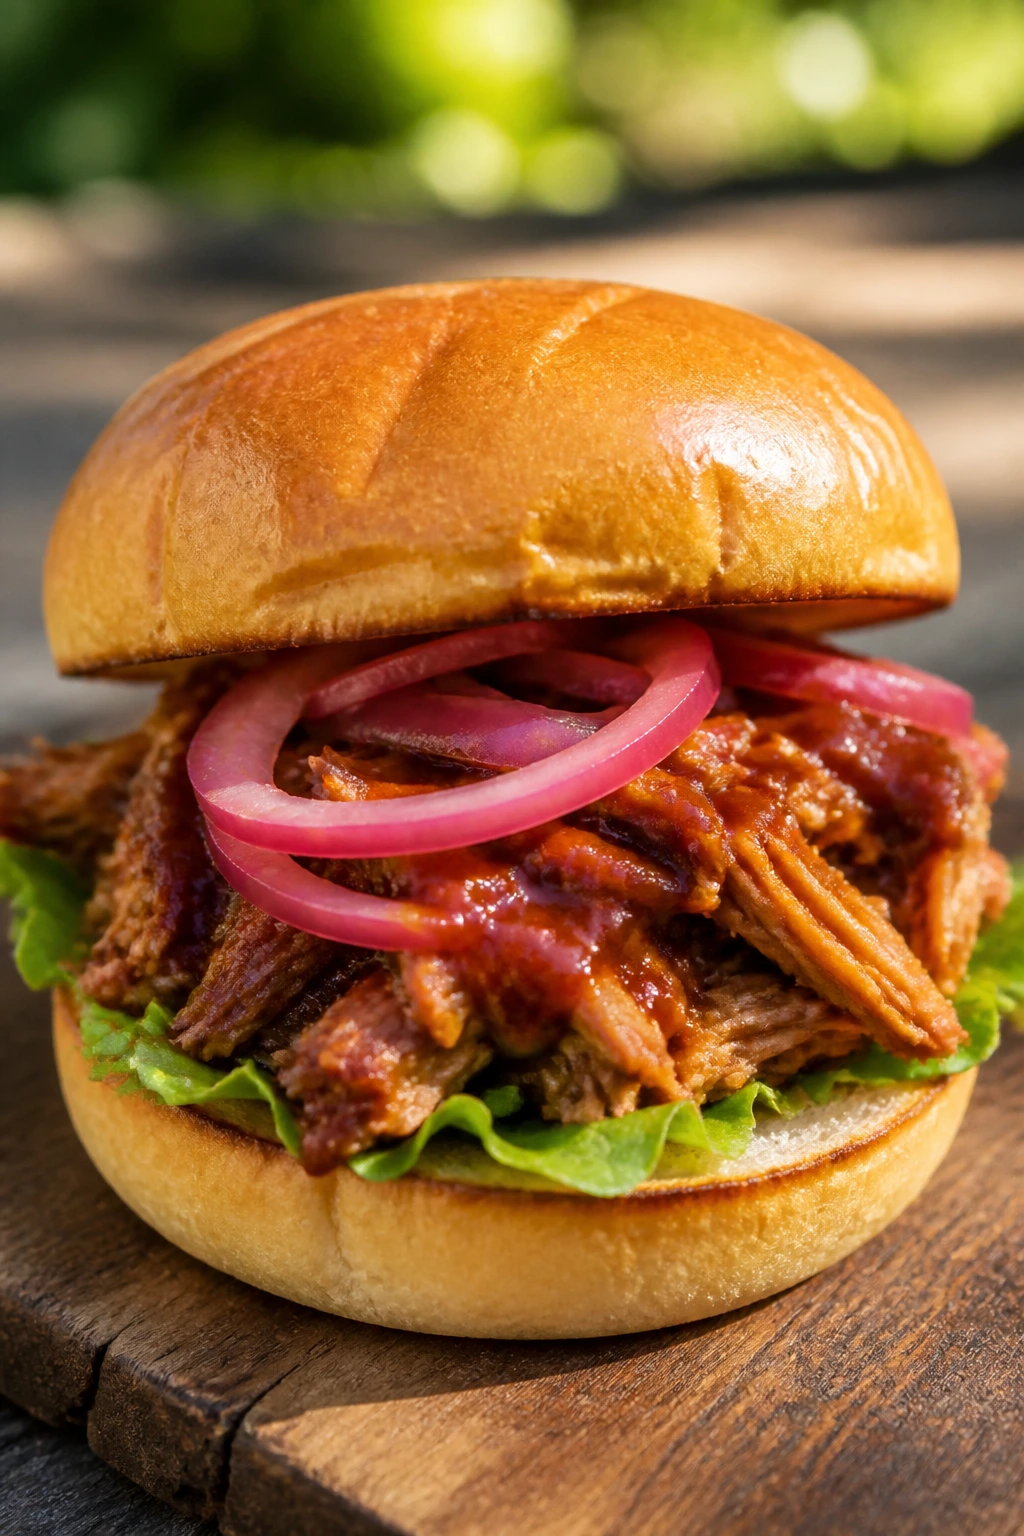
11. Pulled Pork Sandwich with Vinegar Slaw

Pulled pork makes a picnic feel like a plan, even if the rest of the day is improvised. Vinegar slaw cuts through the richness and keeps each bite from feeling sticky or too sweet.
Why It Works:
Pulled pork is rich and juicy, which means it needs acid and crunch. Vinegar slaw does both jobs. Potato rolls are a smart base because they’re soft but sturdy enough to catch the sauce without collapsing.
Key Ingredients:
- 3 cups cooked pulled pork
- 1/2 cup barbecue sauce
- 4 potato rolls
- 2 cups shredded cabbage
- 2 tablespoons apple cider vinegar
- 1 tablespoon olive oil
- 1 teaspoon sugar
- 1/4 teaspoon salt
Quick Steps:
- Toss cabbage with vinegar, oil, sugar, and salt.
- Warm pork with barbecue sauce until hot and glossy.
- Split the rolls and spoon pork inside.
- Top with slaw and close gently.
Equipment for This Recipe:
- Skillet or slow cooker
- Mixing bowl
- Tongs or fork
How to Serve This Dish:
Serve with pickles and baked beans if you’re building a bigger spread. Keep the slaw separate until serving if you want the buns to stay firmer.
Pro Tips for This Recipe:
- A little slaw goes a long way.
- Don’t drown the pork in sauce; you want it coated, not soupy.
- Split the rolls shallowly so the bottom half doesn’t tear.
Variations on This Dish:
- Carolina Style: Use more vinegar and less barbecue sauce.
- Spicy Pork: Add hot sauce to the pork.
- Apple Slaw: Add a handful of thin-sliced apple for extra crunch.
Common Mistakes to Avoid with This Dish:
- Too much sauce: It turns the roll soggy.
- Slaw mixed too early: It can wilt if it sits too long.
- Dry pork: Rewarm it with a splash of cooking juices or water.
12. BBQ Chicken Sandwich with Pickled Onion
Sweet barbecue chicken and pickled onion are a strong pair. One is sticky and smoky, the other is sharp enough to make the sandwich taste bright instead of heavy.
Why It Works:
Shredded chicken absorbs barbecue sauce without falling apart, and pickled onion gives you acid without extra moisture. Brioche buns are a little rich, which actually helps here because barbecue sauce can be assertive.
Key Ingredients:
- 3 cups cooked shredded chicken
- 1/2 cup barbecue sauce
- 4 brioche buns
- 1/2 red onion, thinly sliced
- 1/3 cup apple cider vinegar
- 1 tablespoon sugar
- 1 teaspoon salt
- 1 cup shredded lettuce
Quick Steps:
- Combine onion, vinegar, sugar, and salt; rest 20 minutes.
- Warm chicken with barbecue sauce.
- Pile chicken onto buns and top with lettuce and pickled onion.
- Close and wrap.
Equipment for This Recipe:
- Small bowl
- Skillet
- Knife
How to Serve This Dish:
Serve it with corn salad or dill pickles. Brioche is lovely, but wrap the sandwich in parchment so the glossy bun doesn’t slip all over your hands.
Pro Tips for This Recipe:
- Let the onions sit long enough to turn pink.
- Use a thicker barbecue sauce so the bun doesn’t soak through.
- Add lettuce under the chicken for a bit of insulation.
Variations on This Dish:
- Smoky Chipotle Chicken: Stir chipotle paste into the sauce.
- Pineapple BBQ Chicken: Add a slice of grilled pineapple.
- Slaw Version: Skip lettuce and use crunchy cabbage slaw.
Common Mistakes to Avoid with This Dish:
- Watery sauce: It soaks the bun fast.
- Undersalted chicken: Barbecue sauce needs a savory base.
- Skipping the pickle element: The sandwich tastes flatter without it.
13. Hummus Veggie Sandwich with Roasted Peppers
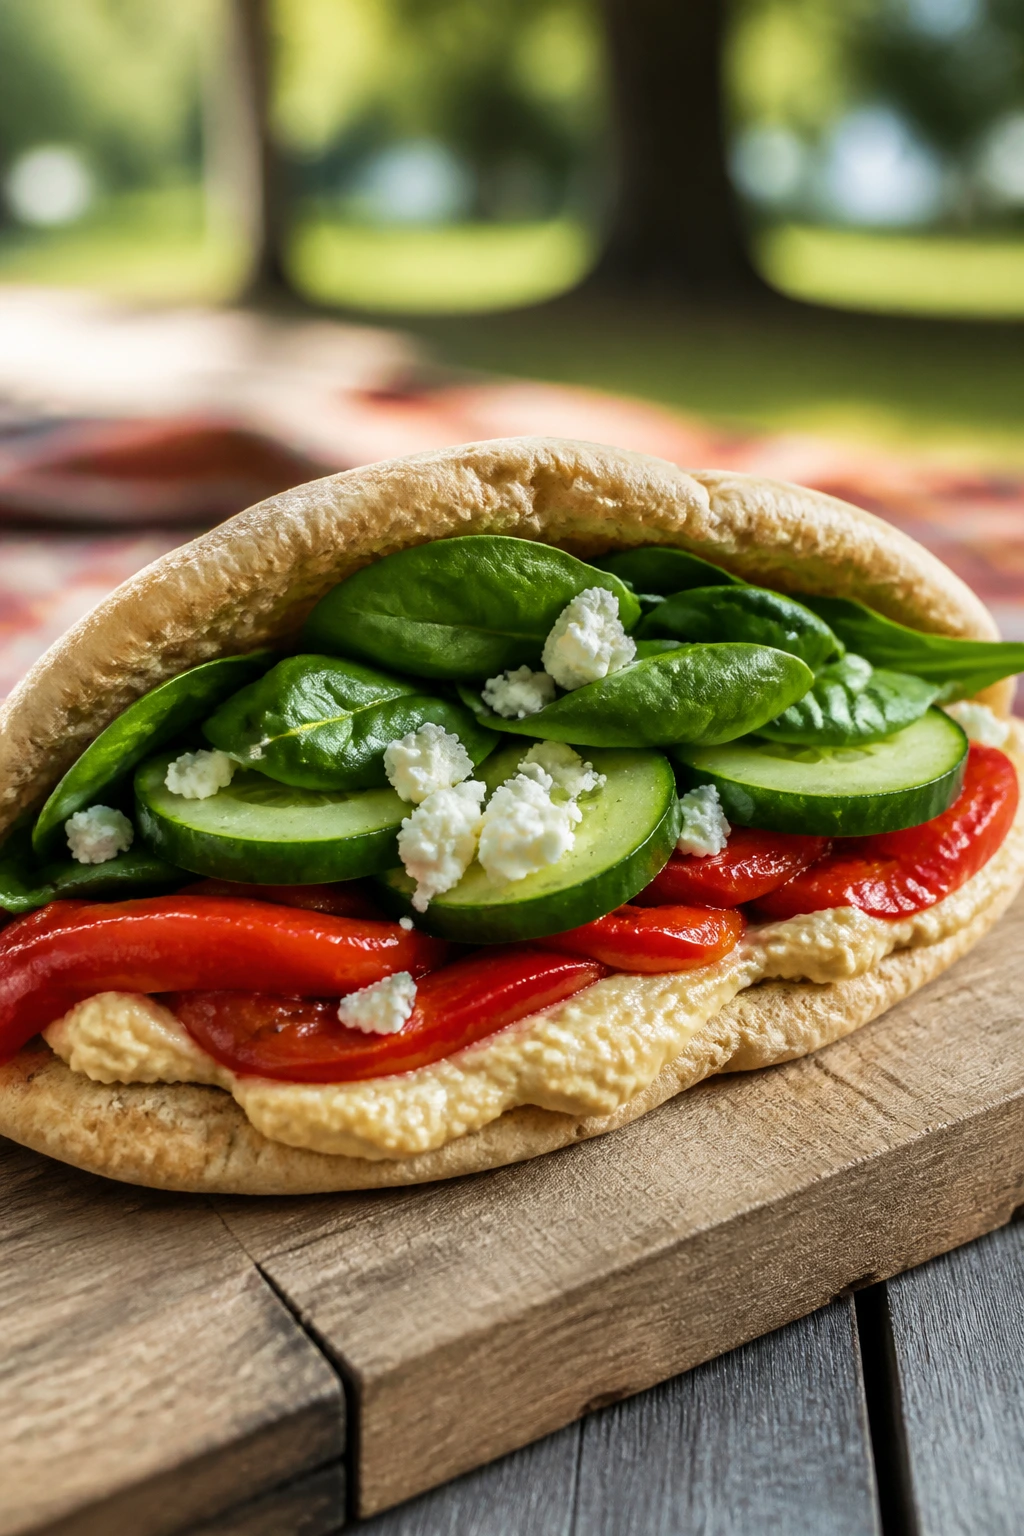
This is the vegetarian sandwich that never feels like an apology. Hummus gives it body, roasted peppers bring sweetness, and raw cucumber keeps the whole thing crisp.
Why It Works:
A good veggie sandwich needs layers with different jobs. Hummus seals the bread, roasted peppers add depth, and cucumbers or sprouts keep the bite fresh. Pita or a seeded roll works better than plain bread because the filling has a little weight.
Key Ingredients:
- 1 cup hummus
- 4 pita pockets or 8 slices seeded bread
- 1 roasted red pepper, sliced
- 1 cucumber, thinly sliced
- 1 carrot, shaved
- 1 cup baby spinach
- 2 tablespoons crumbled feta
- 1 tablespoon olive oil
Quick Steps:
- Spread hummus on the bread or inside pita pockets.
- Layer spinach, pepper, cucumber, carrot, and feta.
- Drizzle with olive oil.
- Close, press, and wrap.
Equipment for This Recipe:
- Knife
- Cutting board
- Peeler for carrot ribbons
How to Serve This Dish:
Serve with hummus extra on the side and a handful of olives. This one is best when it’s tightly packed, so the veggies don’t wander out with every bite.
Pro Tips for This Recipe:
- Pat the roasted peppers dry.
- Slice the cucumber very thin so it bends instead of falling out.
- If your pita is dry, warm it briefly so it opens without cracking.
Variations on This Dish:
- Greek Veggie: Add cucumber, tomato, and more feta.
- Avocado Hummus: Add sliced avocado for extra richness.
- Spicy Red Pepper: Use harissa hummus instead of plain.
Common Mistakes to Avoid with This Dish:
- Too much hummus: It can make the sandwich dense.
- Wet vegetables: Dry them before layering.
- Loose packing: Vegetarian sandwiches need tight assembly.
14. Grilled Halloumi and Tomato Sandwich
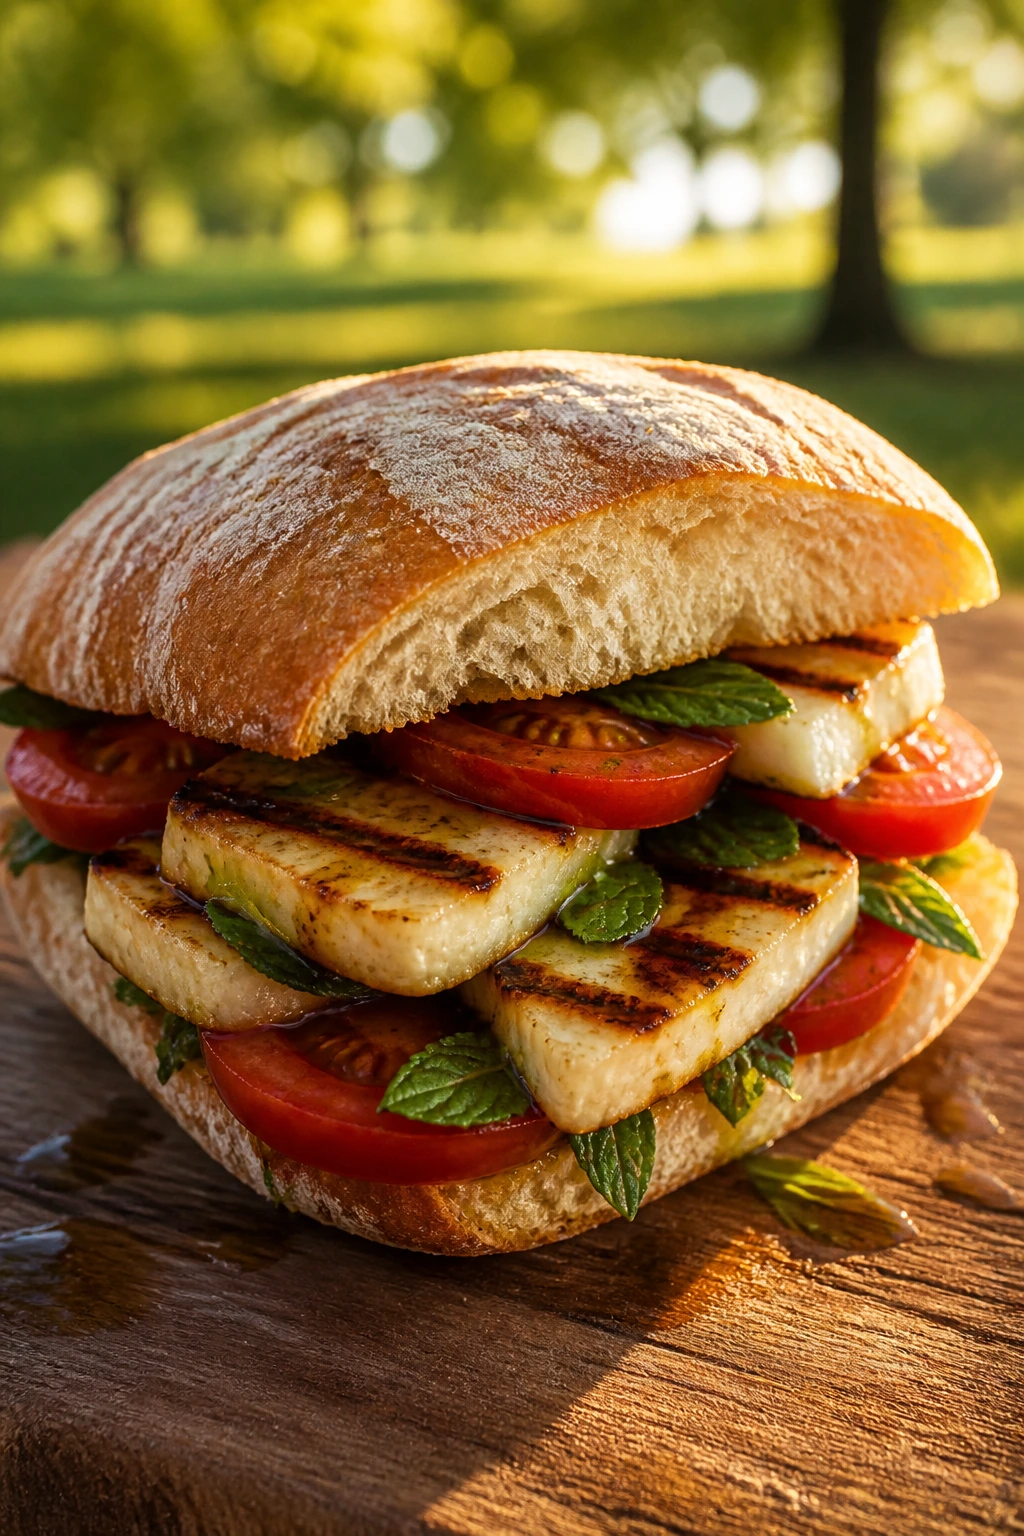
Halloumi is the cheese that behaves like it was designed for a picnic. It grills into salty, squeaky slabs that hold their shape, and that makes this sandwich much sturdier than it sounds.
Why It Works:
Halloumi gives you heat, chew, and salinity without melting into a mess. Tomato and mint keep it bright. A crusty roll or ciabatta gives the cheese something to grip, and a little olive oil ties everything together.
Key Ingredients:
- 8 ounces halloumi, sliced
- 2 ciabatta rolls
- 1 large tomato, sliced
- 1 handful mint leaves
- 1 tablespoon olive oil
- 1 teaspoon lemon juice
- Black pepper, to taste
Quick Steps:
- Sear halloumi in a dry skillet for 1 to 2 minutes per side.
- Split the rolls and drizzle with olive oil and lemon juice.
- Layer tomato, halloumi, mint, and black pepper.
- Close and wrap while still warm.
Equipment for This Recipe:
- Skillet
- Tongs
- Knife
How to Serve This Dish:
Serve it with cucumber salad or grilled corn. Eat it warm or at room temperature; halloumi keeps its shape better than most cheeses.
Pro Tips for This Recipe:
- Don’t crowd the skillet or the cheese steams.
- Salt the tomato lightly and let it sit briefly.
- Mint matters here; it keeps the sandwich from feeling too dense.
Variations on This Dish:
- Zucchini Version: Add grilled zucchini ribbons.
- Harissa Halloumi: Spread harissa on the bread.
- Honey Finish: Drizzle a little honey over the cheese for sweet-salty contrast.
Common Mistakes to Avoid with This Dish:
- Overcooking halloumi: It turns tough.
- Using very wet tomatoes: They make the roll soggy.
- Skipping acid: A squeeze of lemon makes the cheese taste cleaner.
15. Meatball Sub Sandwich

A meatball sub at a picnic is a little bold, but sometimes bold is the right move. The key is keeping the sauce thick and the bread strong enough to hold the meatballs without splitting open.
Why It Works:
Meatballs bring richness, marinara adds moisture, and provolone gives you a melty finish. A split hoagie roll can take the heat if it’s toasted lightly first, which is why this one still works in a park if you pack it with some care.
Key Ingredients:
- 12 cooked meatballs
- 1 1/2 cups marinara sauce
- 4 hoagie rolls
- 4 slices provolone
- 1 tablespoon chopped parsley
- 1 tablespoon grated Parmesan
Quick Steps:
- Warm meatballs in marinara until hot.
- Toast the hoagie rolls lightly.
- Spoon meatballs and sauce into the rolls.
- Top with provolone, parsley, and Parmesan.
Equipment for This Recipe:
- Skillet or saucepan
- Baking sheet
- Tongs
How to Serve This Dish:
Serve with napkins. Lots of napkins. This one is best for a picnic with a table, not a blanket, because the sauce deserves a little respect.
Pro Tips for This Recipe:
- Keep the sauce thick so it clings to the meatballs.
- Toast the rolls just enough to dry the inside.
- Pack the cheese separately if you want to keep it from sliding.
Variations on This Dish:
- Spicy Meatball Sub: Add red pepper flakes to the sauce.
- Chicken Meatball Version: Use poultry meatballs for a lighter feel.
- Garlic Bread Sub: Brush the roll with garlic butter before toasting.
Common Mistakes to Avoid with This Dish:
- Thin sauce: It floods the bread.
- Cold meatballs: The cheese won’t soften well.
- Weak rolls: They split under the weight.
16. Shrimp Salad Roll with Old Bay
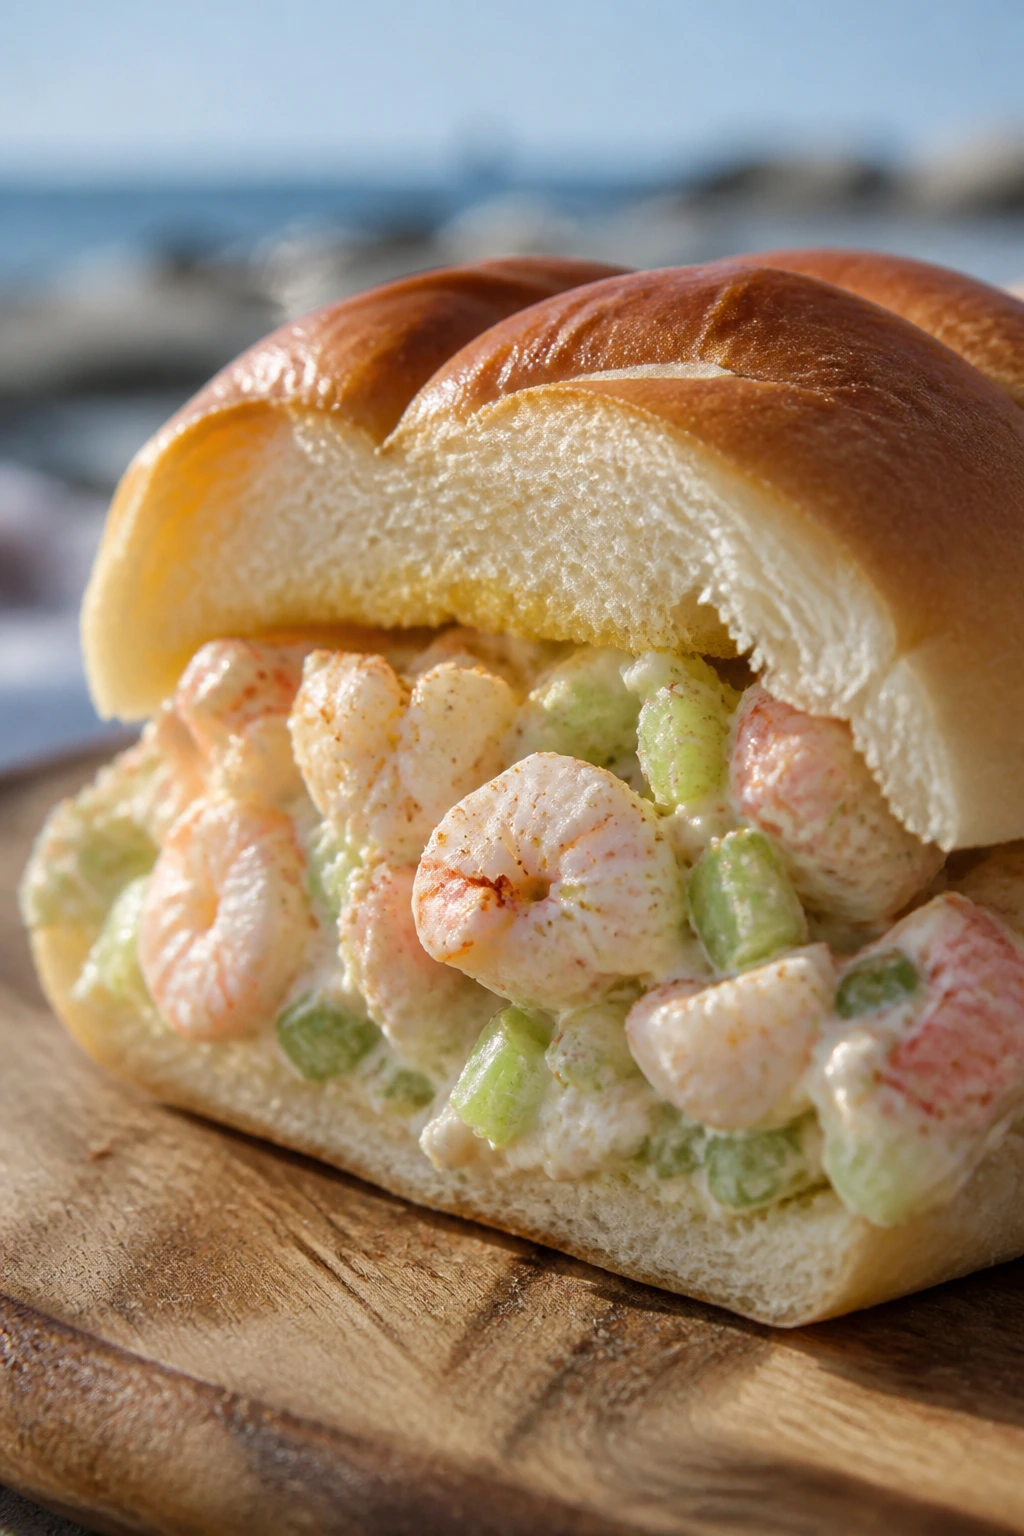
Shrimp salad has a seaside ease to it, and Old Bay gives it enough spice to keep it from tasting bland. This is one of the better picnic sandwiches if you keep it cold and don’t drown it in dressing.
Why It Works:
Shrimp has a sweet, clean flavor that pairs naturally with celery, lemon, and mayo. The goal is a light salad, not a heavy one. Split-top rolls or buttered buns are ideal because they cradle the filling without getting soggy too fast.
Key Ingredients:
- 1 pound cooked shrimp, chopped
- 1/3 cup mayonnaise
- 1 celery stalk, finely diced
- 1 tablespoon lemon juice
- 1 teaspoon Old Bay seasoning
- 1 tablespoon chopped dill
- 4 split-top rolls or hot dog buns
Quick Steps:
- Stir mayo, lemon juice, Old Bay, and dill together.
- Fold in shrimp and celery.
- Chill for 20 minutes.
- Spoon into rolls and serve cold.
Equipment for This Recipe:
- Mixing bowl
- Spoon or spatula
- Knife
How to Serve This Dish:
Serve with chips, pickles, or chilled cucumber spears. Keep the rolls lightly buttered if you want extra moisture control.
Pro Tips for This Recipe:
- Chop the shrimp into bite-size pieces so the roll stays neat.
- Don’t overmix; shrimp can get mushy fast.
- A little lemon zest makes the salad taste brighter.
Variations on This Dish:
- Avocado Shrimp Roll: Add sliced avocado just before serving.
- Spicy Shrimp: Add a touch of hot sauce.
- Lettuce Cup Version: Skip the roll and use butter lettuce leaves.
Common Mistakes to Avoid with This Dish:
- Overcooked shrimp: They go rubbery and lose sweetness.
- Too much mayo: The filling becomes heavy.
- Serving warm: Shrimp salad should stay cold.
17. Muffuletta Sandwich
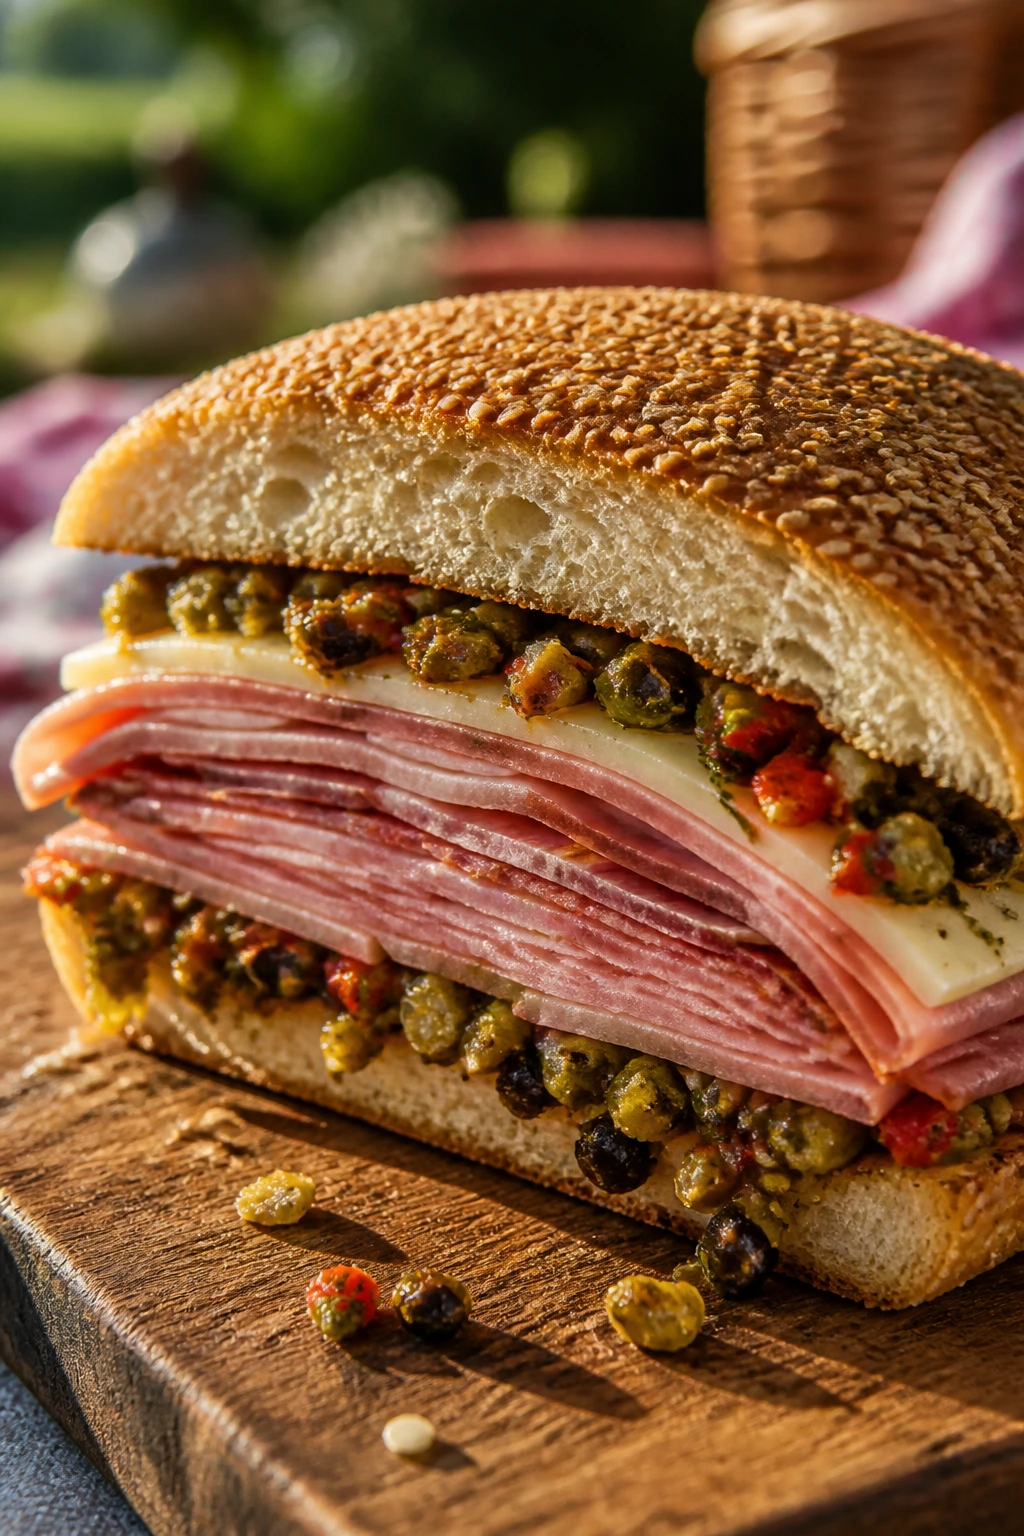
A muffuletta is a serious sandwich, the kind that gets better after it sits. Olive salad, cured meats, and provolone create a salty, oily, deeply flavored stack that belongs on a picnic table with confidence.
Why It Works:
The olive salad is the key. It seasons the bread from the inside and softens the whole sandwich just enough without making it collapse. Round sesame bread or a sturdy Italian loaf holds the filling better than a thin sub roll.
Key Ingredients:
- 1 round sesame loaf or Italian loaf
- 4 ounces salami
- 4 ounces mortadella
- 4 ounces ham
- 4 ounces provolone
- 1/2 cup olive salad
- 1 tablespoon olive oil
Quick Steps:
- Slice the bread in half horizontally.
- Drizzle each cut side with olive oil.
- Layer meats, provolone, and olive salad.
- Press the sandwich, wrap it tightly, and rest 30 minutes before slicing.
Equipment for This Recipe:
- Serrated knife
- Cutting board
- Parchment or foil
How to Serve This Dish:
Slice into wedges and serve with chips or marinated vegetables. Muffuletta gets better as it rests, so it’s one of the rare picnic sandwiches that rewards waiting.
Pro Tips for This Recipe:
- Let the olive salad drain a bit if it’s very loose.
- Use generous bread; tiny rolls can’t handle this filling.
- Pressing the sandwich matters. Don’t skip it.
Variations on This Dish:
- Turkey Muffuletta: Replace mortadella with turkey.
- Vegetarian Muffuletta: Use roasted vegetables and extra olive salad.
- Spicy Olive Version: Add chopped hot peppers.
Common Mistakes to Avoid with This Dish:
- Too little bread: The filling will dominate the slice.
- Rushing the rest time: The flavors need time to settle.
- Wet olive salad: Drain it lightly before assembly.
18. Chicken Bánh Mì
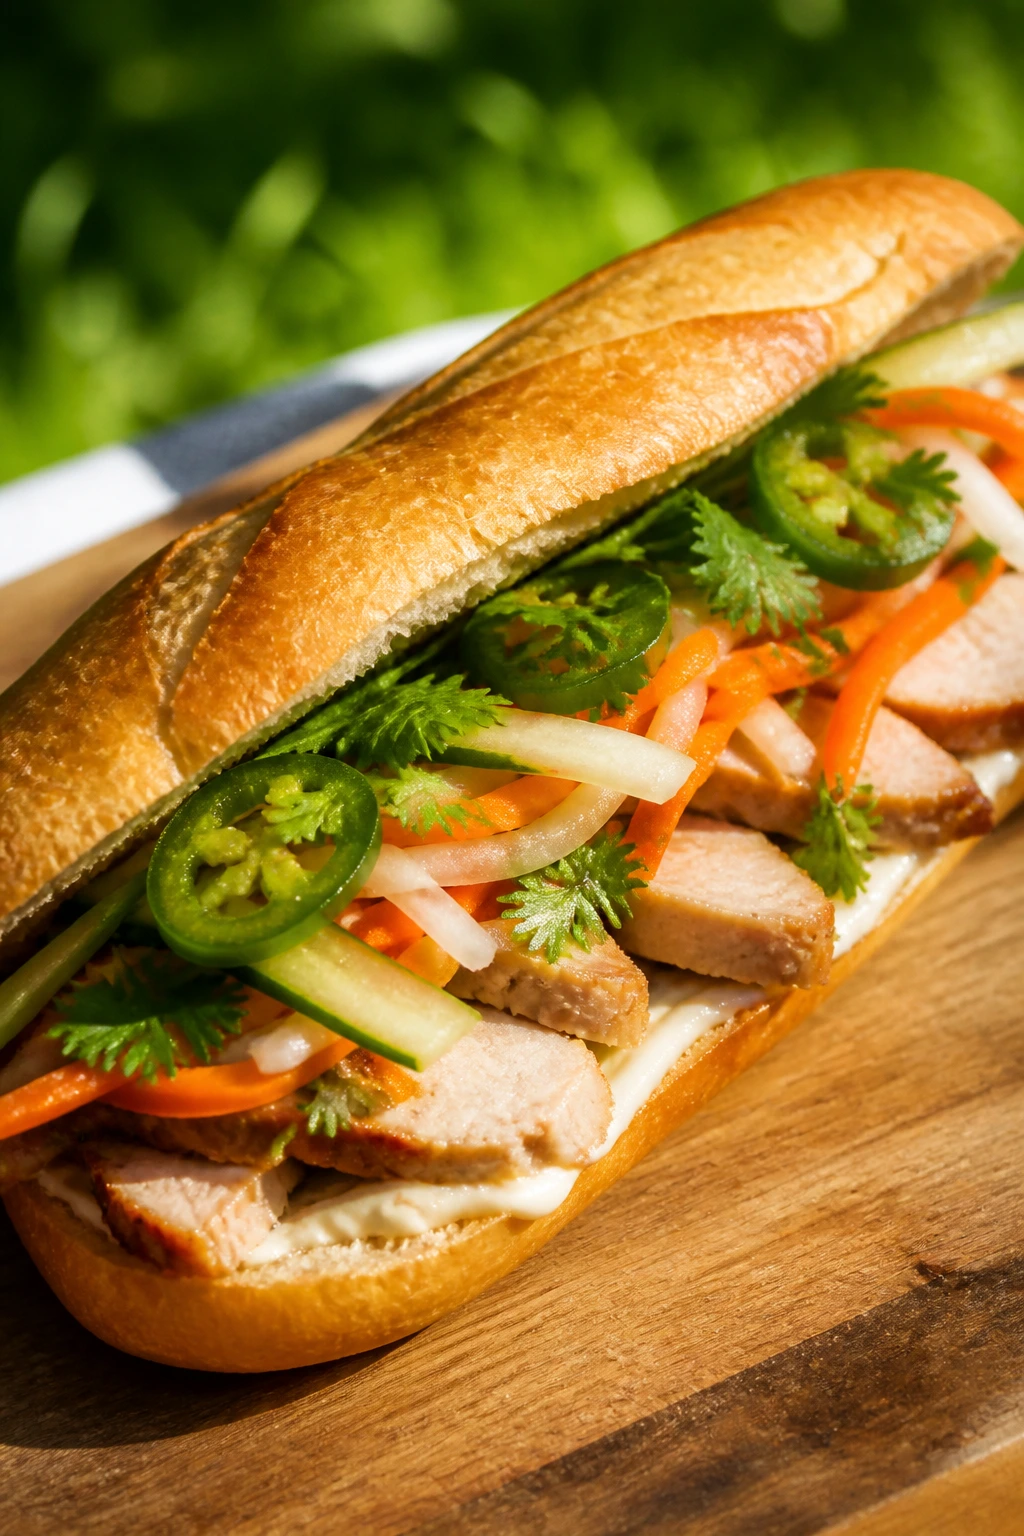
A bánh mì brings crunch, heat, and acid in a way few sandwiches can match. Pickled carrots and daikon keep the chicken lively, and a smear of mayo or pâté gives it a little richness without weighing it down.
Why It Works:
The contrast is the whole story: airy baguette, savory chicken, crisp pickles, fresh herbs, and a bit of chili. If the baguette is too thick or too crusty, it fights you; if it’s too soft, the sandwich gets bland. Somewhere in the middle is the sweet spot.
Key Ingredients:
- 1 baguette, cut into 4 sandwich portions
- 2 cups cooked chicken, sliced or shredded
- 1/2 cup pickled carrots and daikon
- 1/4 cup mayonnaise
- 1 cucumber, cut into matchsticks
- 1 jalapeño, thinly sliced
- 1/2 cup cilantro leaves
- 1 tablespoon soy sauce
Quick Steps:
- Stir soy sauce into the chicken.
- Split the baguette and spread mayo inside.
- Layer chicken, pickles, cucumber, jalapeño, and cilantro.
- Close, press gently, and wrap.
Equipment for This Recipe:
- Serrated knife
- Knife for vegetables
- Small bowl
How to Serve This Dish:
Serve with salted peanuts or a simple green mango salad if you want a sharper side. Bánh mì should be assembled close to eating time so the baguette stays crisp at the edges.
Pro Tips for This Recipe:
- Pat the pickles lightly before layering.
- Slice the chicken thin so it doesn’t tear the bread apart.
- A little extra cilantro helps with the final aroma.
Variations on This Dish:
- Pork Bánh Mì: Use sliced roast pork instead of chicken.
- Tofu Bánh Mì: Crisp tofu in a skillet and use the same pickles.
- Mayo-Free Version: Swap mayo for a thin layer of chili oil and a little avocado.
Common Mistakes to Avoid with This Dish:
- Overstuffing: The baguette should fold around the fillings, not split.
- No pickles: Without acid, the sandwich feels heavy.
- Very crusty bread: It can scrape your mouth and crack apart.
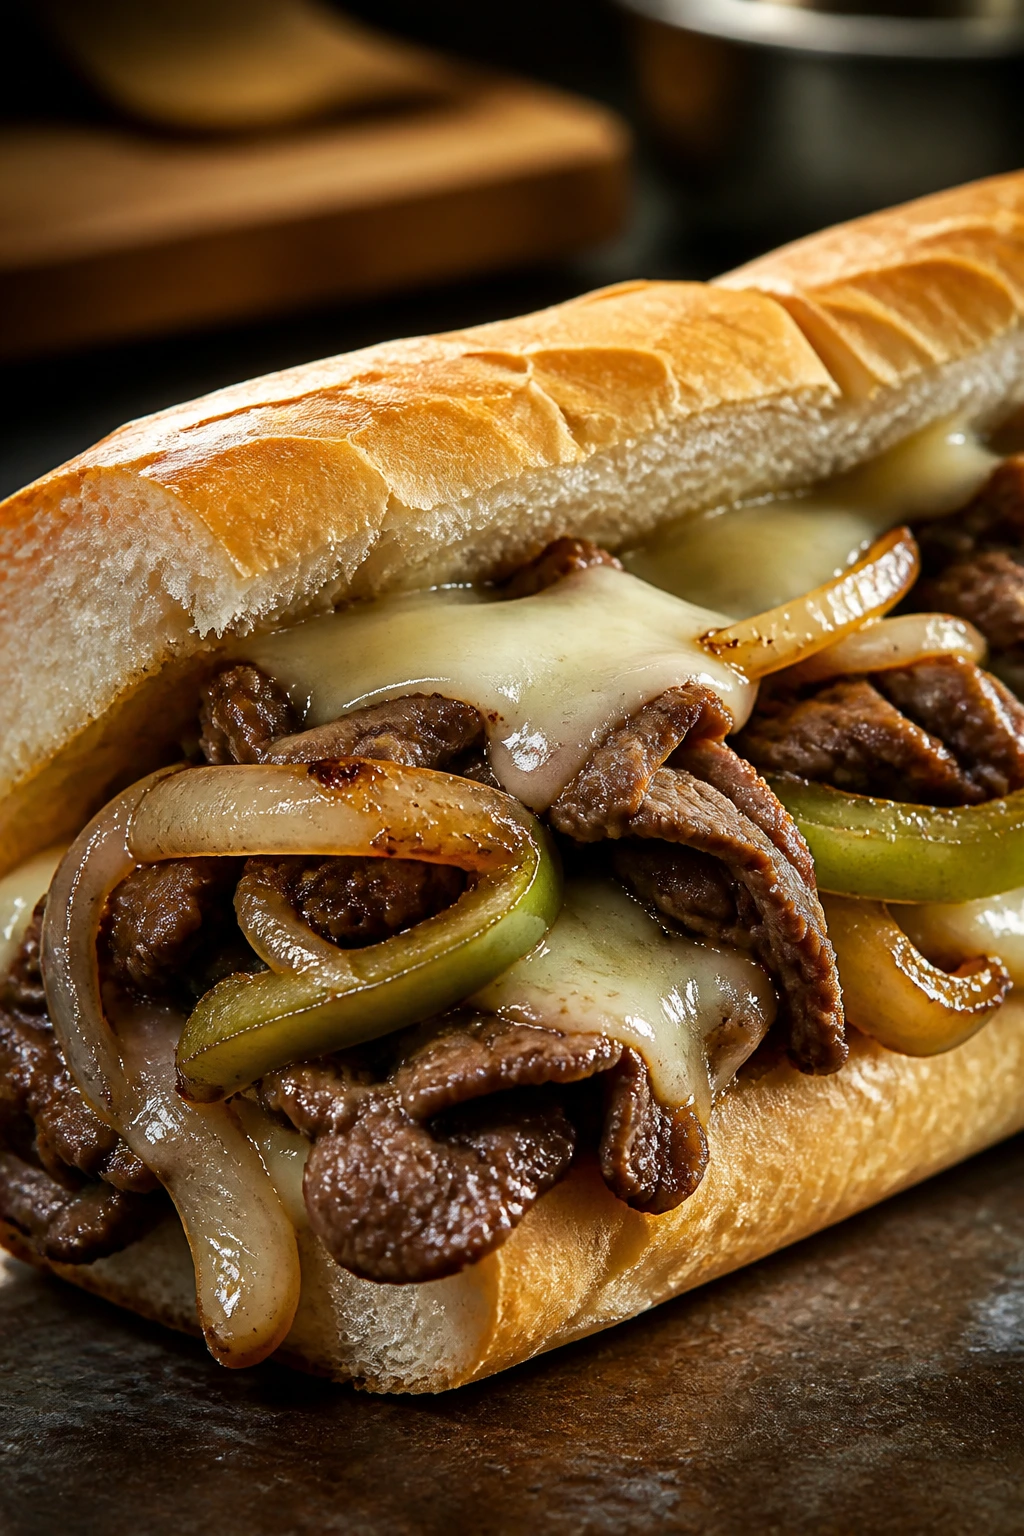
19. Steak and Peppers Hoagie
Steak and peppers on a hoagie bring a cooked, almost diner-like comfort to a picnic spread. The important part is cutting everything thin and keeping the onions soft, not browned to the point of bitterness.
Why It Works:
The beef gives the sandwich heft, peppers bring sweetness, and onions provide that savory base note. A toasted hoagie roll holds the juices better than a soft bun, and a little melted provolone rounds out the edges.
Key Ingredients:
- 1 pound thin-sliced steak
- 2 bell peppers, sliced
- 1 onion, sliced
- 4 hoagie rolls
- 4 slices provolone
- 2 tablespoons olive oil
- 1 teaspoon salt
- 1/2 teaspoon black pepper
Quick Steps:
- Sauté peppers and onion in olive oil until soft and lightly browned.
- Cook steak quickly in the same pan; season with salt and pepper.
- Layer steak, peppers, onion, and provolone in rolls.
- Wrap while warm.
Equipment for This Recipe:
- Large skillet
- Tongs
- Knife
How to Serve This Dish:
Serve with chips and a cold pickle spear. If you’re packing it for later, keep the filling and rolls separate until the last minute.
Pro Tips for This Recipe:
- Thin slicing makes everything easier to eat.
- Don’t overcook the steak; it keeps cooking from residual heat.
- A splash of Worcestershire in the pan adds depth.
Variations on This Dish:
- Mushroom Steak Hoagie: Add sliced mushrooms.
- Spicy Pepper Version: Use hot cherry peppers.
- Cheesesteak Style: Chop the steak after cooking for a more classic feel.
Common Mistakes to Avoid with This Dish:
- Thick steak pieces: They pull out of the sandwich.
- Watery peppers: Cook them down a bit first.
- Cold assembly: Warm filling tastes better here.
20. Falafel Pita Sandwich
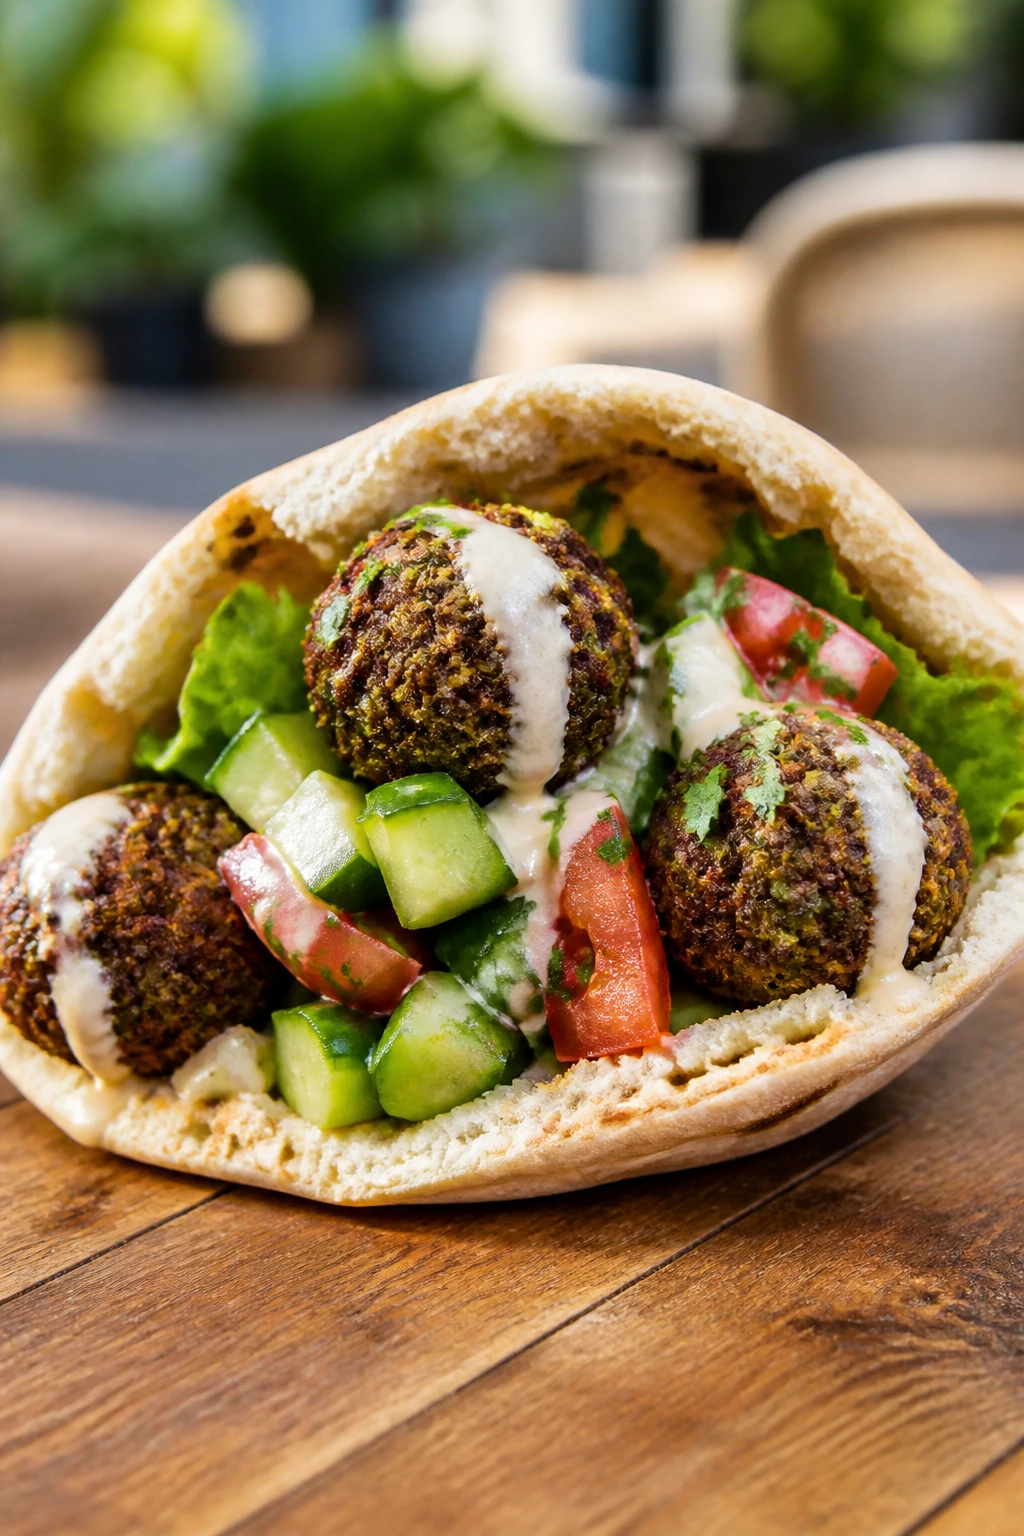
Falafel is one of those fillings that seems made for picnic lunches. It’s sturdy, handheld, and happy with herbs, tahini, and crisp vegetables.
Why It Works:
Falafel brings crunch and a nutty interior, while tahini adds creaminess without the weight of mayo. Pita is the right bread because it opens cleanly and contains the filling. Tomato, cucumber, and lettuce keep the sandwich from feeling dry.
Key Ingredients:
- 8 falafel balls, cooked
- 4 pita rounds
- 1/4 cup tahini
- 1 tablespoon lemon juice
- 1 cucumber, sliced
- 1 tomato, sliced
- 1 cup shredded lettuce
- 2 tablespoons chopped parsley
Quick Steps:
- Stir tahini with lemon juice and 1 to 2 tablespoons water.
- Warm the pita briefly so it opens.
- Fill with lettuce, falafel, cucumber, tomato, and parsley.
- Drizzle with tahini sauce and fold.
Equipment for This Recipe:
- Skillet or oven for falafel
- Small bowl
- Knife
How to Serve This Dish:
Serve with olives and a cucumber salad. Keep the tahini sauce in a separate container if you want the pita to stay drier.
Pro Tips for This Recipe:
- Don’t overfill the pita or it splits.
- Warm falafel before packing if you want a softer center.
- A pinch of cumin in the tahini helps tie it together.
Variations on This Dish:
- Spicy Tahini Falafel: Add harissa to the sauce.
- Pickled Turnip Version: Add tangy pink turnips.
- Lettuce Wrap Version: Use large lettuce leaves instead of pita.
Common Mistakes to Avoid with This Dish:
- Dry falafel: It needs sauce or it tastes chalky.
- Cold pita straight from the package: It cracks too easily.
- Too much tomato: It makes the wrap wet fast.
21. Peanut Butter, Banana, and Honey Sandwich
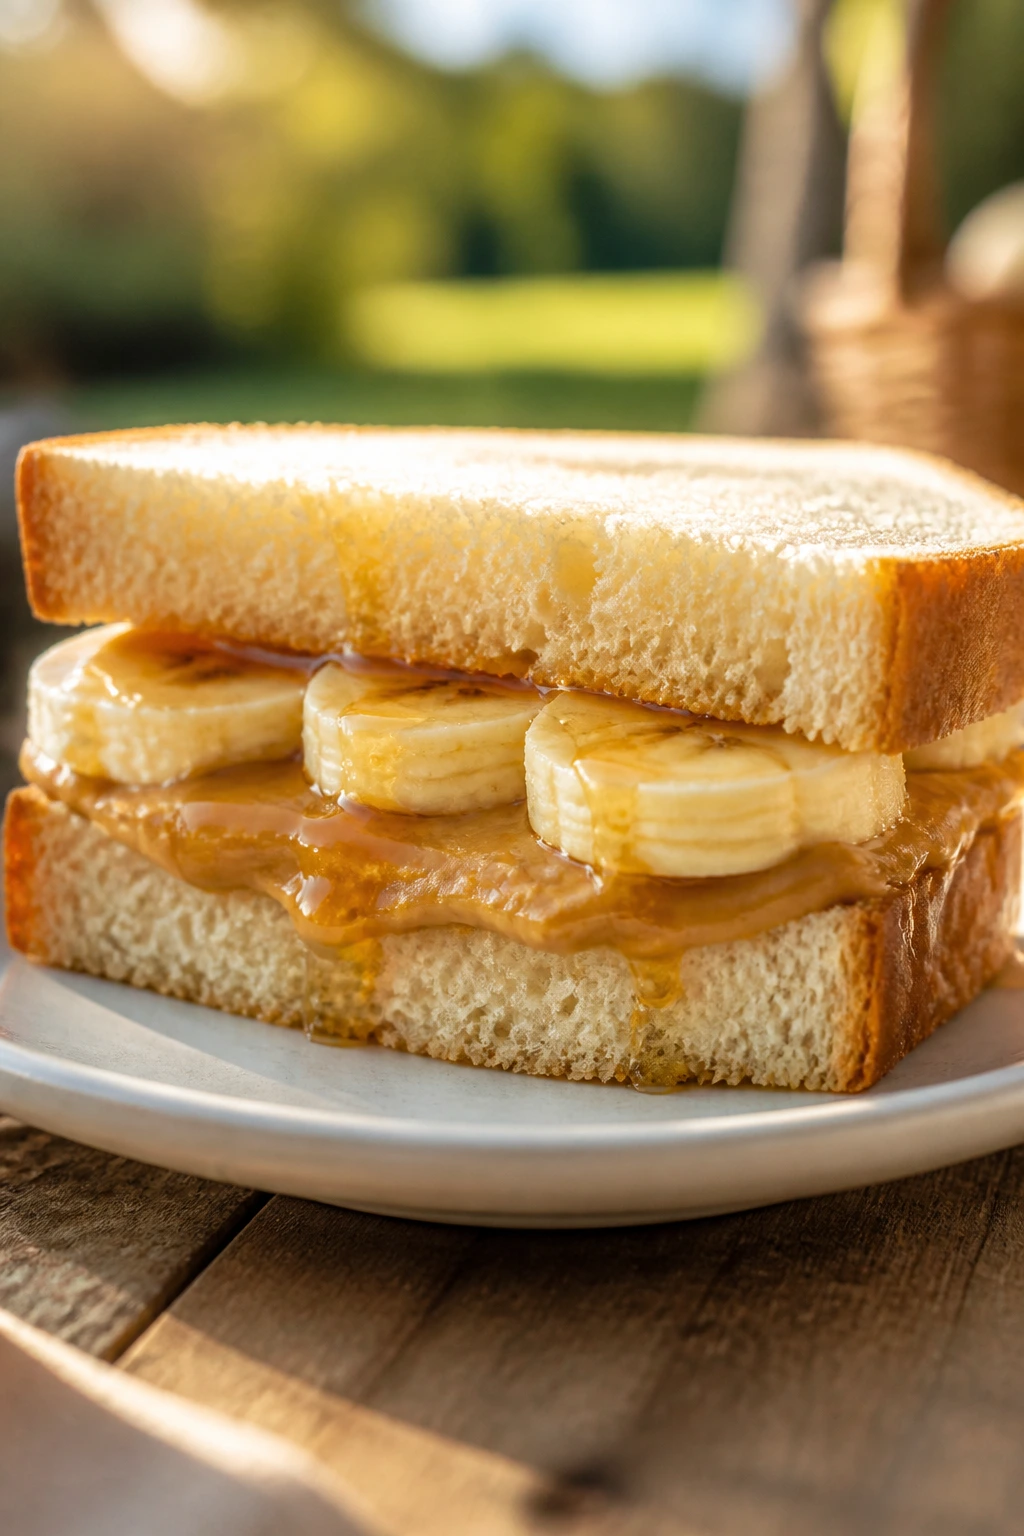
Some sandwiches are about engineering. This one is about comfort and a little sweetness. The trick is keeping the banana slices thin and not overloading the bread with peanut butter.
Why It Works:
Peanut butter acts like glue and gives the sandwich staying power. Banana adds creaminess, honey brings a clean sweetness, and cinnamon gives the whole thing a warmer smell. It’s a simple picnic sandwich that still feels complete.
Key Ingredients:
- 8 slices sandwich bread
- 1/2 cup creamy peanut butter
- 2 bananas, sliced
- 2 tablespoons honey
- 1/4 teaspoon cinnamon
Quick Steps:
- Spread peanut butter on all bread slices.
- Layer banana slices on 4 slices.
- Drizzle lightly with honey and dust with cinnamon.
- Close, press, and cut.
Equipment for This Recipe:
- Knife
- Cutting board
- Spoon
How to Serve This Dish:
Serve with apple slices or a few salty pretzels. This one packs well if you wrap it tightly and keep it out of direct heat.
Pro Tips for This Recipe:
- Use slightly firm bananas so they don’t smear.
- A thin layer of peanut butter works better than a thick one.
- Add a pinch of flaky salt if you want more contrast.
Variations on This Dish:
- Crunch Version: Use crunchy peanut butter.
- Chocolate Banana: Add a few chocolate chips.
- Sunflower Seed Swap: Use sunflower butter for nut-free lunches.
Common Mistakes to Avoid with This Dish:
- Overripe bananas: They slip everywhere.
- Too much honey: It leaks through the bread.
- Skimping on peanut butter: It keeps the sandwich from tasting complete.
22. Smoked Salmon and Dill Sandwich

Smoked salmon, cream cheese, and dill make a cold sandwich that feels polished without requiring much effort. It’s the kind of filling that likes rye, bagels, or thin slices of seeded bread.
Why It Works:
Smoked salmon brings salt and a silky texture, while cream cheese keeps the sandwich cool and rich. Dill and lemon do the job of brightening the fish so it doesn’t feel one-note. Thin cucumber slices help, too.
Key Ingredients:
- 8 slices rye or seeded bread
- 6 ounces smoked salmon
- 4 ounces cream cheese, softened
- 1 tablespoon lemon juice
- 1 tablespoon chopped dill
- 1/2 cucumber, thinly sliced
- 1 tablespoon capers
Quick Steps:
- Mix cream cheese, lemon juice, and dill.
- Spread on bread slices.
- Layer salmon, cucumber, and capers.
- Close and chill briefly before serving.
Equipment for This Recipe:
- Small bowl
- Butter knife
- Knife for cucumber
How to Serve This Dish:
Serve with potato chips or crisp crackers. Keep it cold and pack it close to the ice pack; smoked salmon tastes best when it stays cool and clean.
Pro Tips for This Recipe:
- Pat cucumber slices dry.
- Use bread with enough structure to hold the salmon’s moisture.
- A little black pepper gives it a sharper finish.
Variations on This Dish:
- Everything Seasoning Version: Sprinkle seasoning on the cream cheese.
- Lox and Onion: Add paper-thin red onion slices.
- Dairy-Free Version: Use dairy-free cream cheese.
Common Mistakes to Avoid with This Dish:
- Warm packing: Salmon and cream cheese should stay cold.
- Too much caper brine: It can overpower the fish.
- Soft bread: Rye or seeded bread holds up better.
23. Turkey, Cranberry, and Brie Sandwich
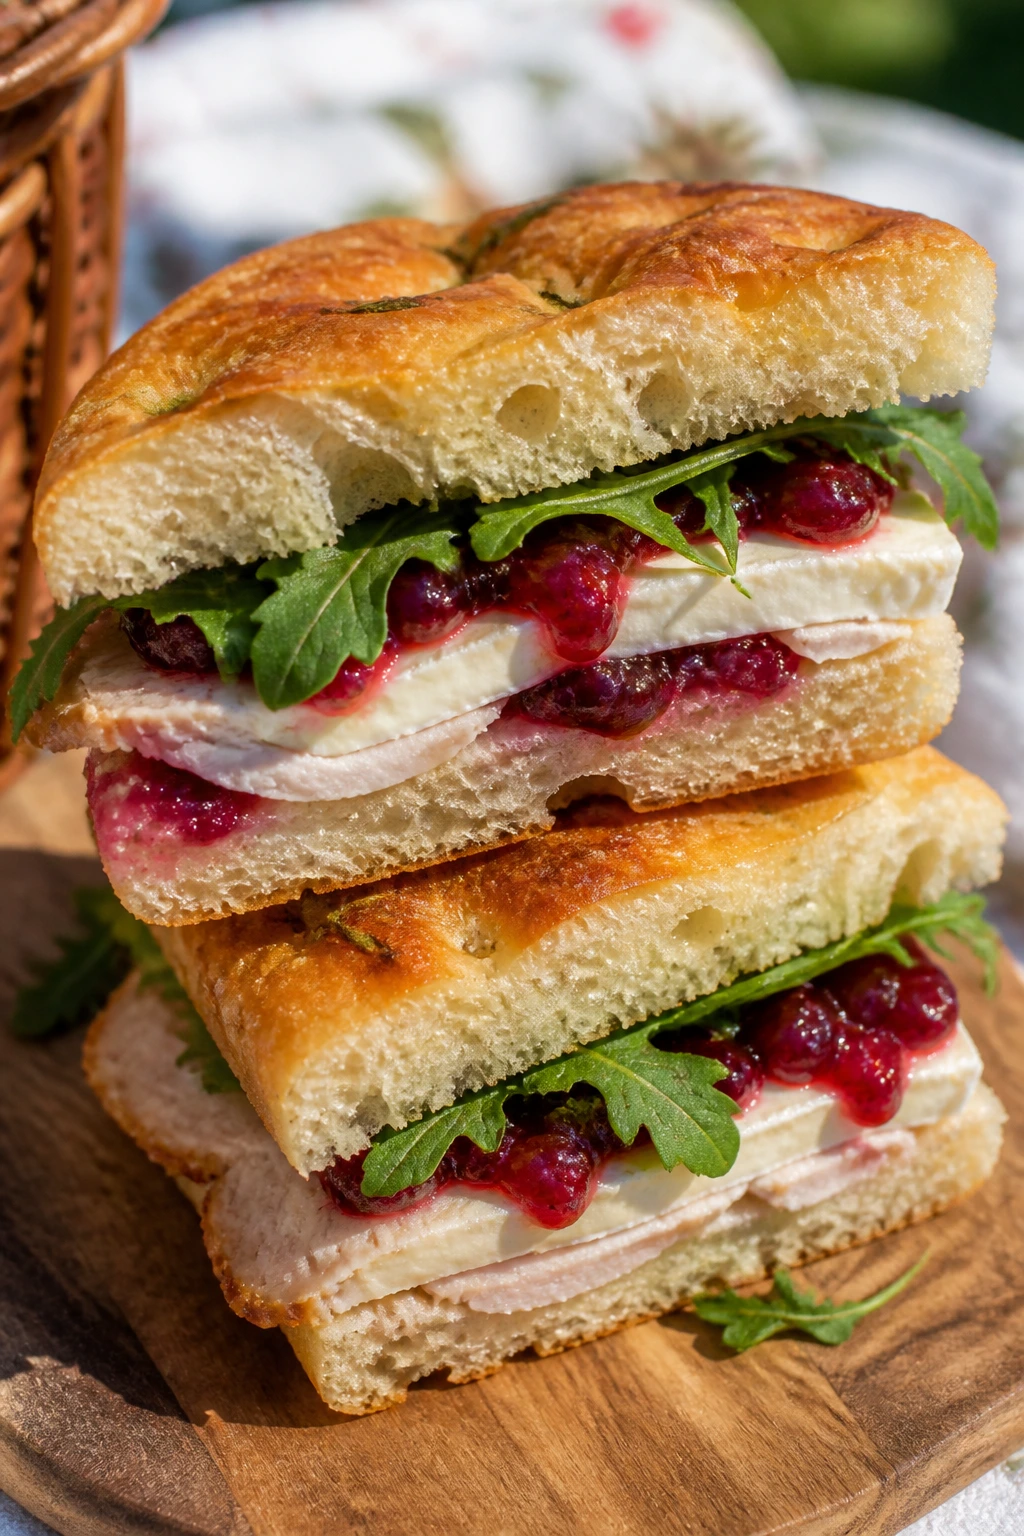
Turkey and cranberry can feel a little holiday-ish, but on soft bread with brie they turn into a sweet-savory picnic sandwich that still tastes fresh. It’s a good use for leftover turkey or deli slices.
Why It Works:
Brie softens the sharper edges of turkey, cranberry sauce gives the sandwich a bright tang, and arugula adds peppery bite. Focaccia or sturdy sliced bread is better than a fragile roll because brie can get slippery when it warms up.
Key Ingredients:
- 8 slices focaccia or sandwich bread
- 8 ounces sliced turkey
- 4 ounces brie, sliced
- 1/4 cup cranberry sauce
- 1 cup arugula
- 1 tablespoon mayonnaise
Quick Steps:
- Spread mayo on the bread.
- Layer turkey, brie, cranberry sauce, and arugula.
- Close and press gently.
- Slice and wrap.
Equipment for This Recipe:
- Knife
- Cutting board
- Spoon for cranberry sauce
How to Serve This Dish:
Serve with kettle chips and sliced apple. It’s especially good cut into smaller squares if you’re feeding a picnic group and want lighter portions.
Pro Tips for This Recipe:
- Use thin cranberry sauce, not a giant blob.
- Brie slices should be cold enough to cut cleanly.
- Arugula gives the sandwich a much-needed pepper note.
Variations on This Dish:
- Stuffing Style: Add a little sage or thyme.
- Apple Turkey: Add thin apple slices.
- Mustard Version: Replace mayo with grainy mustard.
Common Mistakes to Avoid with This Dish:
- Too much cranberry sauce: It turns sweet and sticky.
- Warm brie: It can squeeze out too easily.
- Thin bread: Focaccia or sturdy sliced bread works best.
24. Chicken Caesar Sandwich
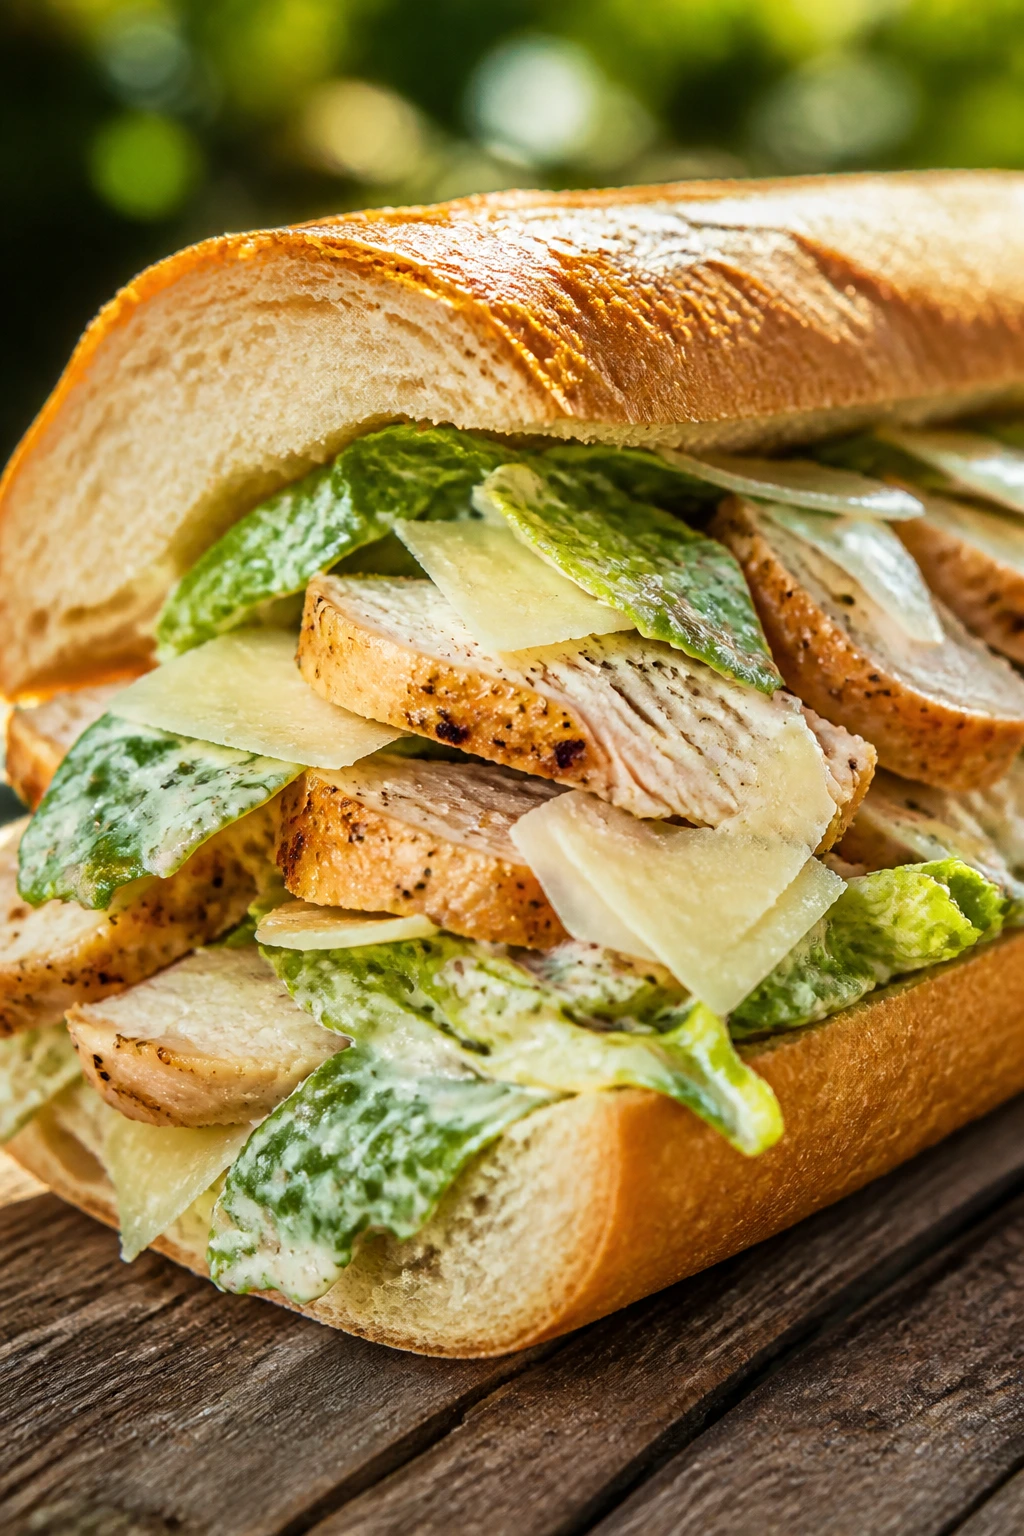
Chicken Caesar tastes familiar in a comforting way, but packed as a sandwich it becomes less fiddly and easier to eat outdoors. The key is controlling the dressing so the bread doesn’t soak through.
Why It Works:
Caesar dressing carries garlic, anchovy, and Parmesan in a way that makes grilled chicken taste fuller. Romaine gives crispness, and a split baguette or ciabatta loaf keeps the sandwich from falling apart under the dressing.
Key Ingredients:
- 2 cups cooked chicken, sliced
- 1/4 cup Caesar dressing
- 1/4 cup grated Parmesan
- 2 cups chopped romaine
- 1 baguette or ciabatta loaf
- 1 tablespoon lemon juice
- Black pepper, to taste
Quick Steps:
- Toss chicken with Caesar dressing and lemon juice.
- Fold in romaine and Parmesan.
- Split the bread and fill generously.
- Slice and wrap.
Equipment for This Recipe:
- Mixing bowl
- Knife
- Cutting board
How to Serve This Dish:
Serve with extra Parmesan chips or plain kettle chips. If you want the cleanest texture, pack the dressed filling separately and assemble close to eating time.
Pro Tips for This Recipe:
- Use less dressing than you think you need.
- Chop the romaine roughly so it doesn’t turn limp too fast.
- A few cracked peppercorns on top make the flavor sharper.
Variations on This Dish:
- Bacon Caesar: Add chopped crisp bacon.
- Wrap Version: Roll it in a tortilla instead of bread.
- Anchovy-Free Version: Use a milder Caesar dressing if needed.
Common Mistakes to Avoid with This Dish:
- Too much dressing: The bread softens quickly.
- Warm chicken: It makes the romaine droop.
- Over-chopping lettuce: You lose the crunch.
25. Cuban Sandwich
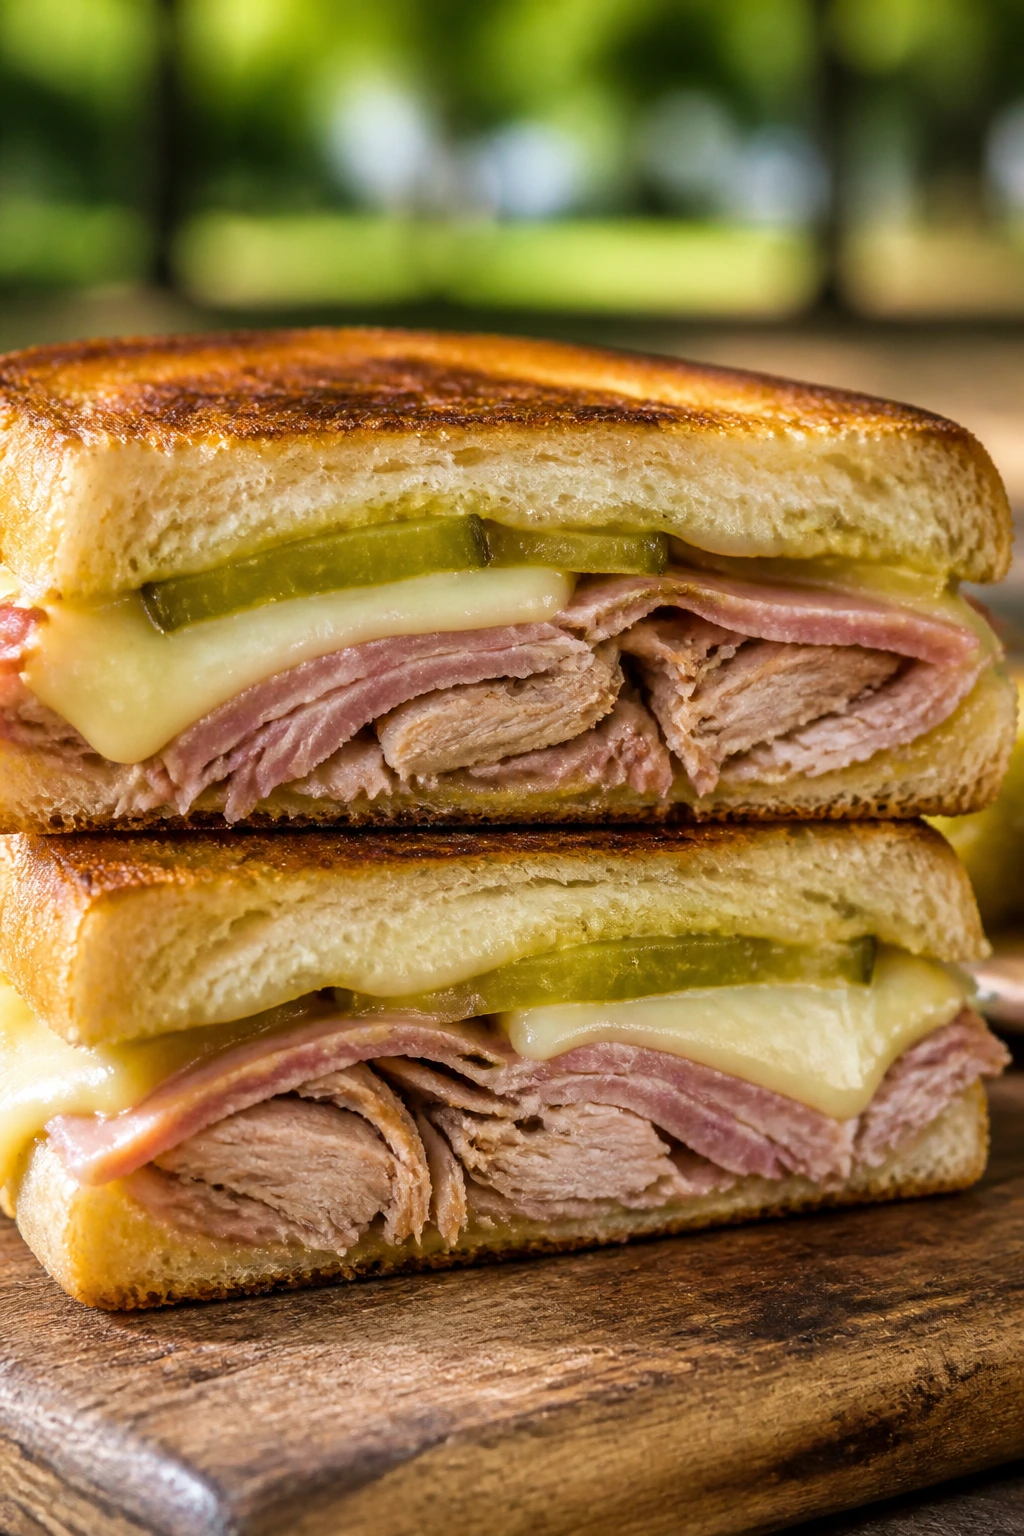
A Cuban sandwich brings ham, pork, pickles, mustard, and cheese together in a pressed package that is hard to beat. It’s not exactly delicate. Good. It shouldn’t be.
Why It Works:
The layers are built for balance: salty pork, ham, bright pickles, and melty Swiss. Pressing the sandwich melts the cheese into the meat and compresses the bread just enough to make each bite coherent.
Key Ingredients:
- 1 Cuban loaf or soft hoagie roll
- 4 ounces roasted pork, sliced
- 4 ounces ham
- 4 slices Swiss cheese
- 4 dill pickle slices
- 2 tablespoons yellow mustard
- 1 tablespoon softened butter
Quick Steps:
- Spread mustard on the bread.
- Layer pork, ham, Swiss, and pickles.
- Butter the outside of the sandwich.
- Press in a skillet or panini press until warm and flattened.
Equipment for This Recipe:
- Skillet or press
- Spatula
- Knife
How to Serve This Dish:
Serve it hot if you can, wrapped in parchment. If you’re taking it to a picnic, keep it slightly warm in foil and don’t overpack it with fillings.
Pro Tips for This Recipe:
- Use thin pickle slices so the press works evenly.
- Press with moderate weight, not a heavy smash.
- Yellow mustard is the right choice here; fancy mustard muddies the flavor.
Variations on This Dish:
- Turkey Cuban: Swap turkey for pork.
- Spicy Cuban: Add sliced jalapeños.
- Mojo Version: Use citrus-marinated pork for extra brightness.
Common Mistakes to Avoid with This Dish:
- Thick bread: The press can’t do its job.
- Too many pickles: They throw off the balance.
- Skipping the butter: The outside won’t crisp properly.
26. Jerk Chicken Sandwich with Pineapple Slaw
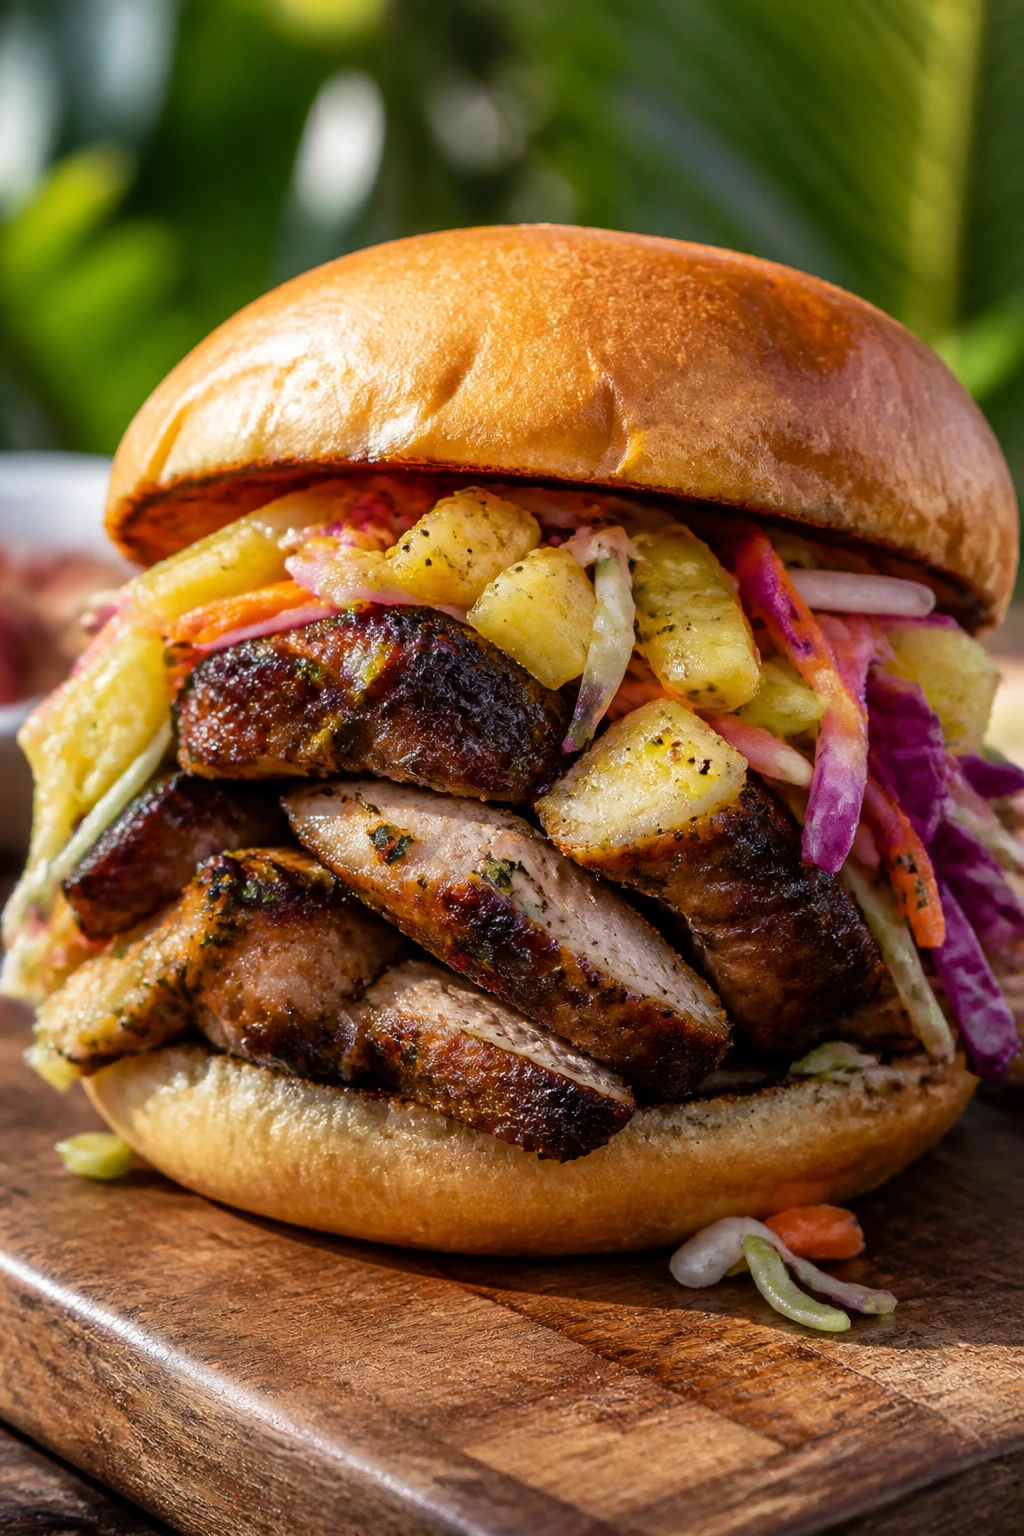
This sandwich has heat, sweetness, and crunch all at once. Jerk seasoning gives the chicken a dark, smoky edge, while pineapple slaw cools it off just enough.
Why It Works:
Spice needs contrast, and pineapple brings that in a way plain lettuce can’t. The slaw also helps the sandwich stay interesting as it sits, because the fruit and cabbage keep their texture longer than dressed greens.
Key Ingredients:
- 2 cups cooked jerk chicken, sliced or shredded
- 4 sandwich buns
- 1 cup shredded cabbage
- 1/2 cup diced pineapple
- 2 tablespoons mayonnaise
- 1 tablespoon lime juice
- 1 teaspoon sugar
- Pinch of salt
Quick Steps:
- Mix cabbage, pineapple, mayo, lime juice, sugar, and salt.
- Warm the chicken briefly.
- Fill buns with chicken and slaw.
- Wrap and serve.
Equipment for This Recipe:
- Bowl
- Knife
- Spoon
How to Serve This Dish:
Serve with plantain chips or a simple corn salad. Keep the slaw from getting too wet by draining pineapple juice if the fruit is very juicy.
Pro Tips for This Recipe:
- Jerk seasoning should be bold enough to survive a chilled lunch.
- Use shredded chicken for easier layering.
- A few slices of red onion add another sharp note.
Variations on This Dish:
- Mango Slaw: Swap pineapple for mango.
- Mild Jerk Version: Use less pepper and more allspice.
- Grilled Chicken Version: Use jerk-marinated grilled breasts.
Common Mistakes to Avoid with This Dish:
- Too much slaw dressing: It drips.
- Weak seasoning: The chicken should carry the flavor.
- Packing too early: The slaw can soften if it sits too long in the bun.
27. Mediterranean Veggie Sandwich with Feta

This is the sandwich that tastes like a bright lunch counter stop without the line. Feta, olives, cucumber, and tomato do the heavy lifting, and a swipe of hummus gives it the kind of base that keeps things together.
Why It Works:
Mediterranean fillings have built-in flavor: salt from feta, acidity from tomato, and briny olives. Hummus seals the bread and makes the sandwich less likely to go soggy. A seeded sub roll or pita pocket both work well.
Key Ingredients:
- 1 cup hummus
- 4 sub rolls or 4 pita rounds
- 1 cucumber, sliced
- 1 tomato, sliced
- 1/2 cup sliced kalamata olives
- 3 ounces feta, crumbled
- 1 cup spinach
- 1 tablespoon olive oil
Quick Steps:
- Spread hummus on the bread.
- Layer spinach, cucumber, tomato, olives, and feta.
- Drizzle with olive oil.
- Close and wrap tightly.
Equipment for This Recipe:
- Knife
- Cutting board
- Spoon or spreader
How to Serve This Dish:
Serve with olives and pita chips. This sandwich tastes best when it’s packed tightly, which keeps the vegetables from slumping out.
Pro Tips for This Recipe:
- Pat the tomato slices dry.
- Use a thicker hummus so it behaves like a seal.
- A little dried oregano on top is enough; don’t over-season.
Variations on This Dish:
- Roasted Eggplant Version: Add thin eggplant slices.
- Tahini Swap: Use tahini instead of hummus for a lighter filling.
- Pepperoncini Kick: Add sliced pepperoncini for more zip.
Common Mistakes to Avoid with This Dish:
- Wet tomato slices: They break the bread down.
- Too much olive brine: It overpowers everything.
- Loose packing: The filling needs to be compressed a bit.
28. Bratwurst Hoagie with Mustard Onions
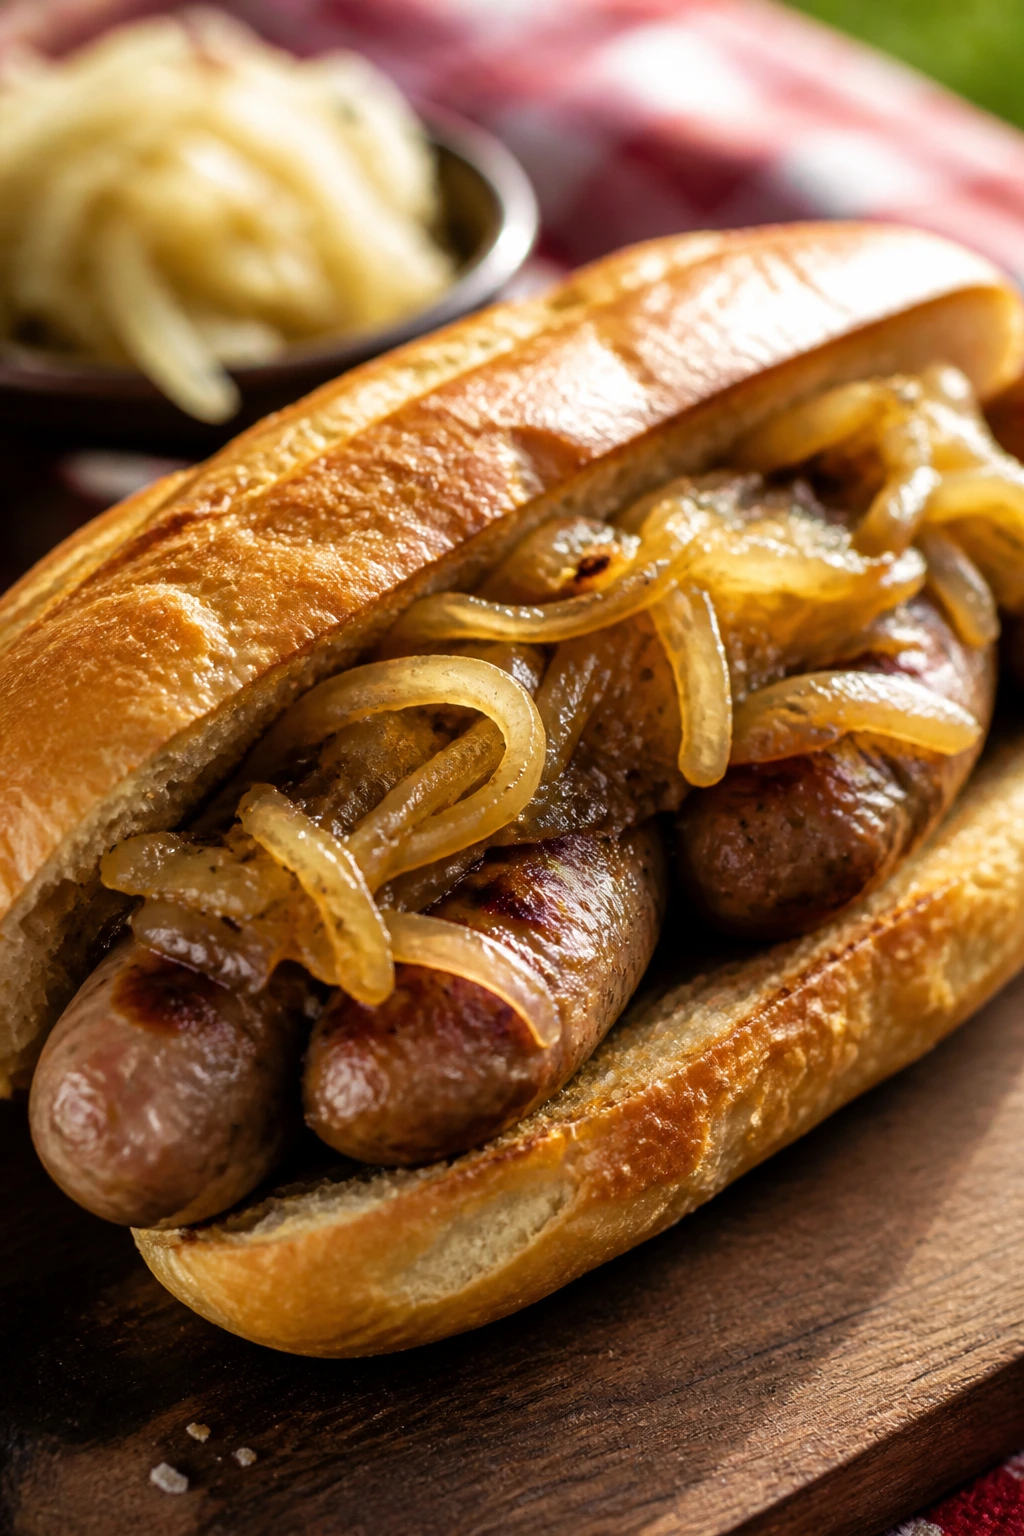
Bratwurst on a hoagie feels like picnic food with a little swagger. Mustard onions cut the richness and keep the sausage from tasting heavy, which is the whole trick.
Why It Works:
Brats are fatty, so they need acid and something with a bit of bite. Mustard onions give you both. A toasted hoagie roll is the right support system because it can take the juices and still hold shape.
Key Ingredients:
- 4 bratwursts
- 4 hoagie rolls
- 1 large onion, sliced
- 2 tablespoons yellow mustard
- 1 tablespoon apple cider vinegar
- 1 tablespoon butter
- 1/2 teaspoon salt
Quick Steps:
- Cook brats until browned and cooked through.
- Sauté onions in butter until soft.
- Stir mustard and vinegar into the onions.
- Nestle brats into rolls and top with onions.
Equipment for This Recipe:
- Skillet or grill
- Tongs
- Knife
How to Serve This Dish:
Serve with mustard potato salad or sauerkraut on the side. If you’re eating outdoors, wrap the brats separately and build the sandwiches just before serving.
Pro Tips for This Recipe:
- Don’t prick the bratwurst; you’ll lose juices.
- Thin onion slices cook faster and taste sweeter.
- A dab of coarse mustard can sit under the brat too.
Variations on This Dish:
- Beer-Onion Brat: Cook onions with a splash of beer.
- Cheese Brat: Add a slice of Swiss or provolone.
- Spicy Mustard Version: Use hot mustard instead of yellow.
Common Mistakes to Avoid with This Dish:
- Overcooked sausage: It turns dry and tight.
- Raw onions: They need to soften.
- Soft rolls: They can’t handle a juicy brat.
29. Lobster Roll
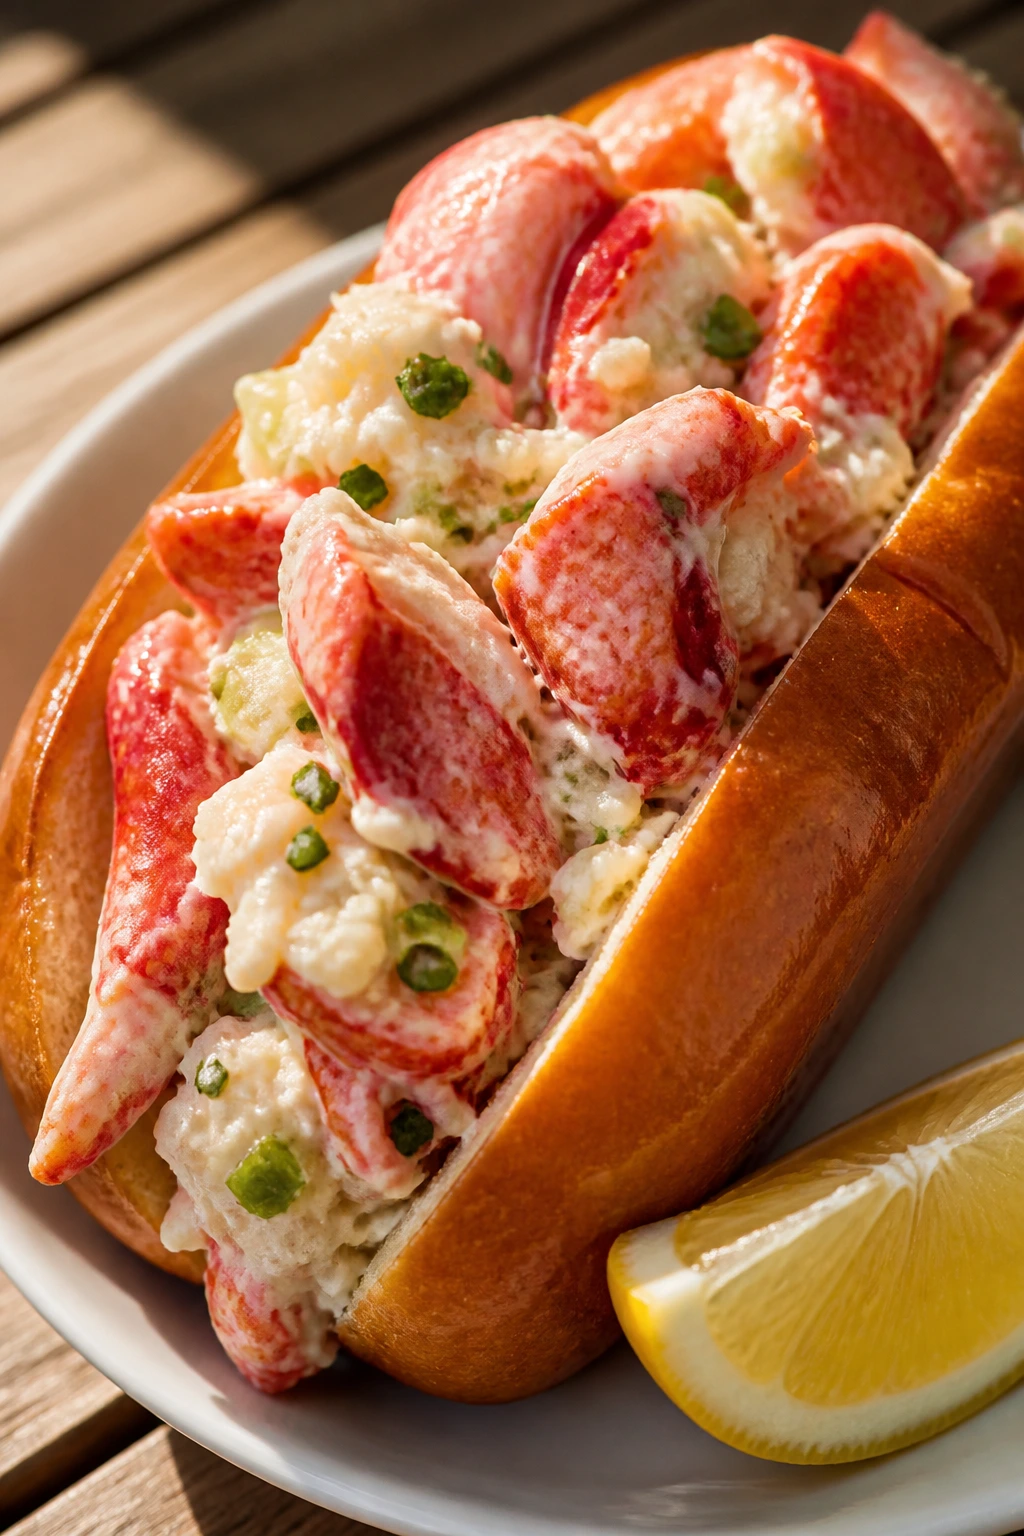
A lobster roll is the luxury pick here, but it’s also one of the cleanest picnic sandwiches if you keep the dressing restrained. The lobster should taste like lobster first, not mayo first.
Why It Works:
Cold lobster with a tiny amount of dressing, lemon, and celery is delicate in the best way. Split-top buns give you a buttery base without overwhelming the shellfish. Less is more here, and that’s not a slogan; it’s how the sandwich stays elegant.
Key Ingredients:
- 1 pound cooked lobster meat, chopped
- 1/4 cup mayonnaise
- 1 tablespoon lemon juice
- 1 celery stalk, finely diced
- 1 tablespoon chopped chives
- 4 split-top buns
- 2 tablespoons butter, softened
Quick Steps:
- Mix lobster with mayo, lemon juice, celery, and chives.
- Butter the buns lightly and toast until golden.
- Spoon lobster into each bun.
- Serve chilled or slightly cool.
Equipment for This Recipe:
- Mixing bowl
- Skillet or griddle
- Knife
How to Serve This Dish:
Serve with potato chips and a lemon wedge. Keep it cold until the last possible moment; lobster salad should never sit out in the sun for long.
Pro Tips for This Recipe:
- Cut the lobster into chunks, not shreds.
- Go easy on the mayo.
- Chives are better than onion here because they stay gentler.
Variations on This Dish:
- Warm Butter Version: Skip mayo and toss lobster with warm butter.
- Celery-Heavy Version: Add extra celery for crunch.
- Herbed Lobster: Add dill or tarragon.
Common Mistakes to Avoid with This Dish:
- Too much dressing: It hides the lobster.
- Warm holding: Shellfish needs to stay cold.
- Dense buns: Split-top buns are easier to eat.
30. Pimento Cheese Sandwich with Tomato
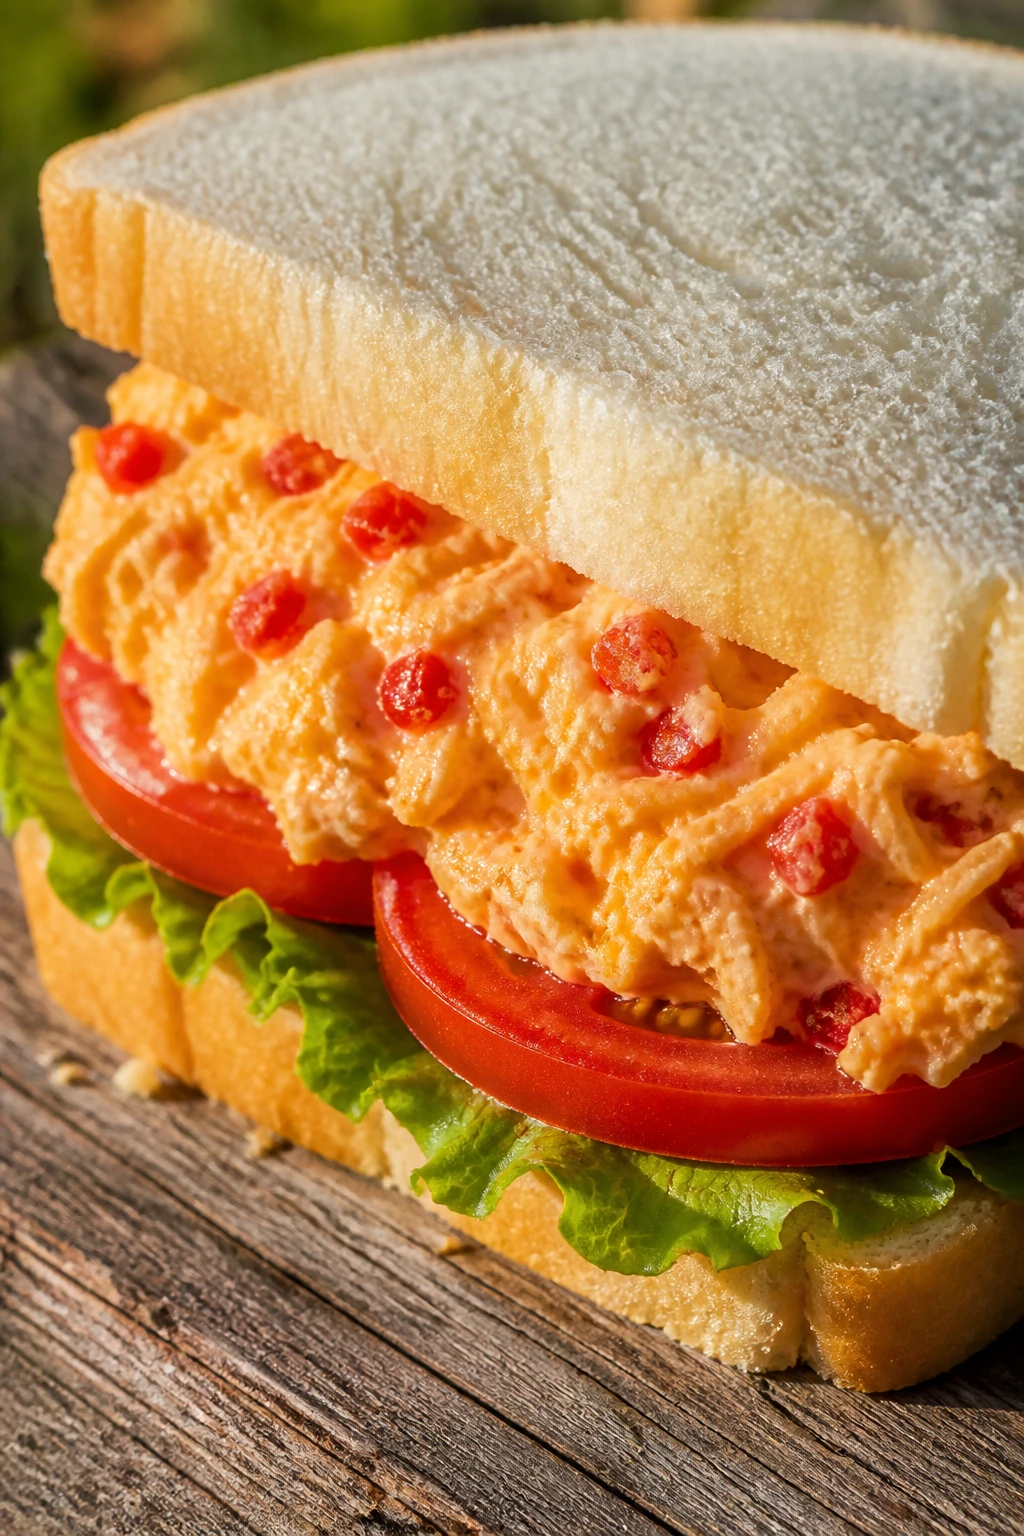
Pimento cheese is Southern picnic gold: sharp, creamy, a little peppery, and sturdy enough to spread without fuss. Add tomato, and the sandwich gets a juicy edge that makes it feel complete.
Why It Works:
Pimento cheese is thick enough to protect the bread from tomato moisture, which is useful in the heat. White bread or soft wheat bread works best because it gives the filling room to shine without competing.
Key Ingredients:
- 1 1/2 cups pimento cheese
- 8 slices white or wheat bread
- 1 large tomato, sliced and dried
- 1 cup lettuce
- Pinch of black pepper
Quick Steps:
- Spread pimento cheese on 4 bread slices.
- Layer tomato and lettuce.
- Season with black pepper.
- Close, press, and cut.
Equipment for This Recipe:
- Knife
- Cutting board
- Spatula
How to Serve This Dish:
Serve with celery sticks and sweet tea, if that’s your thing. It’s good cut into small squares for a picnic board because the filling is rich and a little goes far.
Pro Tips for This Recipe:
- Let the pimento cheese soften slightly before spreading.
- Dry the tomato slices.
- Add a swipe of mustard if you want more bite.
Variations on This Dish:
- Bacon Pimento Cheese: Add crisp bacon.
- Green Tomato Version: Use thin fried green tomatoes if you want more texture.
- Spicy Pimento Cheese: Stir in minced jalapeño.
Common Mistakes to Avoid with This Dish:
- Too much tomato juice: It can swamp the bread.
- Cold cheese spread: It tears the bread when you spread it.
- Weak bread: Soft sandwich bread works better than artisanal slices here.
31. Tomato, Mayo, and Basil Sandwich
This is the tomato sandwich, stripped down and honest. When tomatoes are good, they don’t need much help; the mayo, basil, and a little salt are there to sharpen what’s already there.
Why It Works:
The sandwich depends on a ripe tomato with enough flavor to carry the whole thing. Mayo gives the bread a protective layer, basil adds perfume, and white bread or potato bread keeps the texture soft and nostalgic.
Key Ingredients:
- 8 slices white bread
- 2 large ripe tomatoes, sliced
- 4 tablespoons mayonnaise
- 1/2 cup basil leaves
- Salt and black pepper, to taste
Quick Steps:
- Spread mayo on the bread.
- Layer tomato slices and basil.
- Season generously with salt and pepper.
- Close and eat soon after assembling.
Equipment for This Recipe:
- Knife
- Cutting board
- Paper towels
How to Serve This Dish:
Serve with corn chips or a few slices of watermelon. This is the sandwich to make when tomatoes are at their best and you don’t want to bury them under extras.
Pro Tips for This Recipe:
- Salt the tomato slices first and let them sit a minute.
- Tear basil by hand for a fresher smell.
- Use bread that’s soft enough to bite through cleanly.
Variations on This Dish:
- Mayo-Mustard Mix: Stir a little mustard into the mayo.
- Heirloom Version: Use mixed tomato varieties.
- Mozzarella Addition: Add one slice if you want a richer sandwich.
Common Mistakes to Avoid with This Dish:
- Bad tomatoes: This sandwich depends on ripe fruit.
- Too much mayo: Keep it thin.
- Assembling too early: It tastes best fresh.
32. Smashed Chickpea Sandwich with Dill Pickles
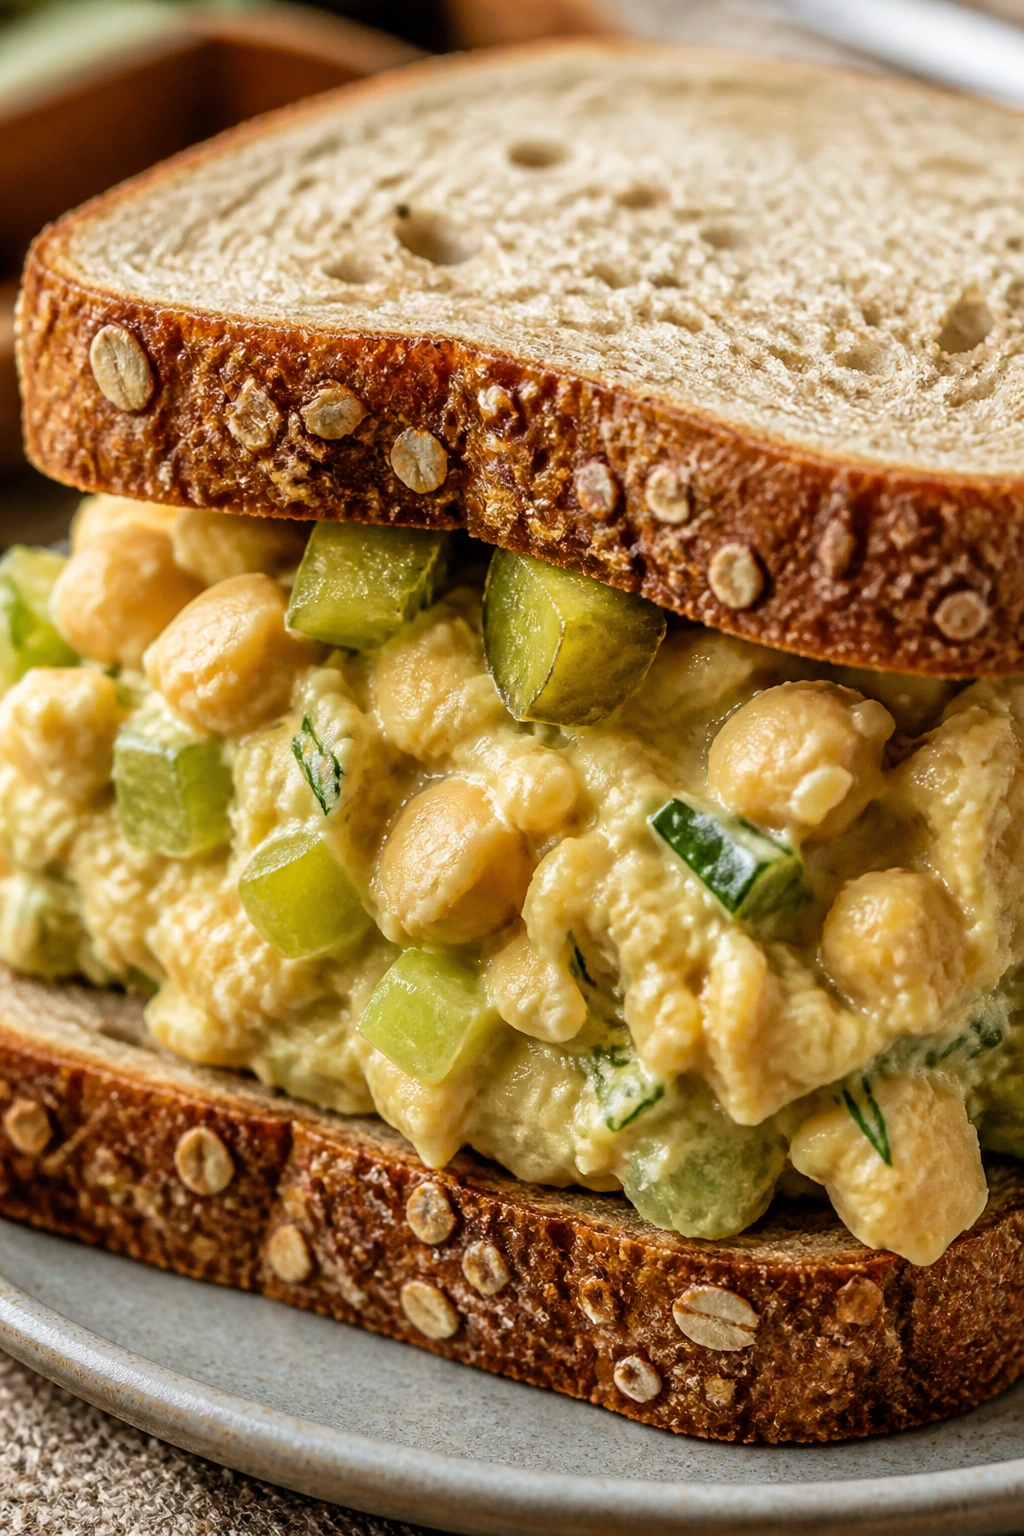
Smashed chickpeas make a picnic lunch that’s cheap, filling, and better than people expect. Dill pickles and mustard keep the chickpeas from tasting like a bland mash.
Why It Works:
Chickpeas have enough body to hold up in a sandwich, especially when partially mashed instead of turned into paste. Pickles, celery, and mustard bring crunch and acidity, which chickpeas need badly. Bread with some structure helps too.
Key Ingredients:
- 1 can chickpeas, drained and rinsed
- 2 tablespoons mayonnaise
- 1 teaspoon Dijon mustard
- 2 tablespoons finely chopped dill pickles
- 1 celery stalk, finely diced
- 1 tablespoon chopped parsley
- 8 slices whole grain bread
Quick Steps:
- Mash chickpeas lightly with a fork.
- Stir in mayo, mustard, pickles, celery, and parsley.
- Spoon onto bread.
- Close, press, and slice.
Equipment for This Recipe:
- Fork
- Mixing bowl
- Knife
How to Serve This Dish:
Serve with carrot sticks and extra pickles. This one packs well because the filling isn’t watery, which makes it a smart make-ahead choice.
Pro Tips for This Recipe:
- Leave some chickpeas partially whole for texture.
- A little pickle juice can sharpen the filling.
- Whole grain bread gives the sandwich more staying power.
Variations on This Dish:
- Curried Chickpea: Add curry powder and raisins.
- Avocado Chickpea: Add mashed avocado.
- Lemon Herb Version: Use lemon zest and dill instead of pickles.
Common Mistakes to Avoid with This Dish:
- Overmashing: It turns the filling pasty.
- Not seasoning enough: Chickpeas need salt.
- Using flimsy bread: Whole grain or seeded bread works better.
33. Curried Egg Salad Sandwich
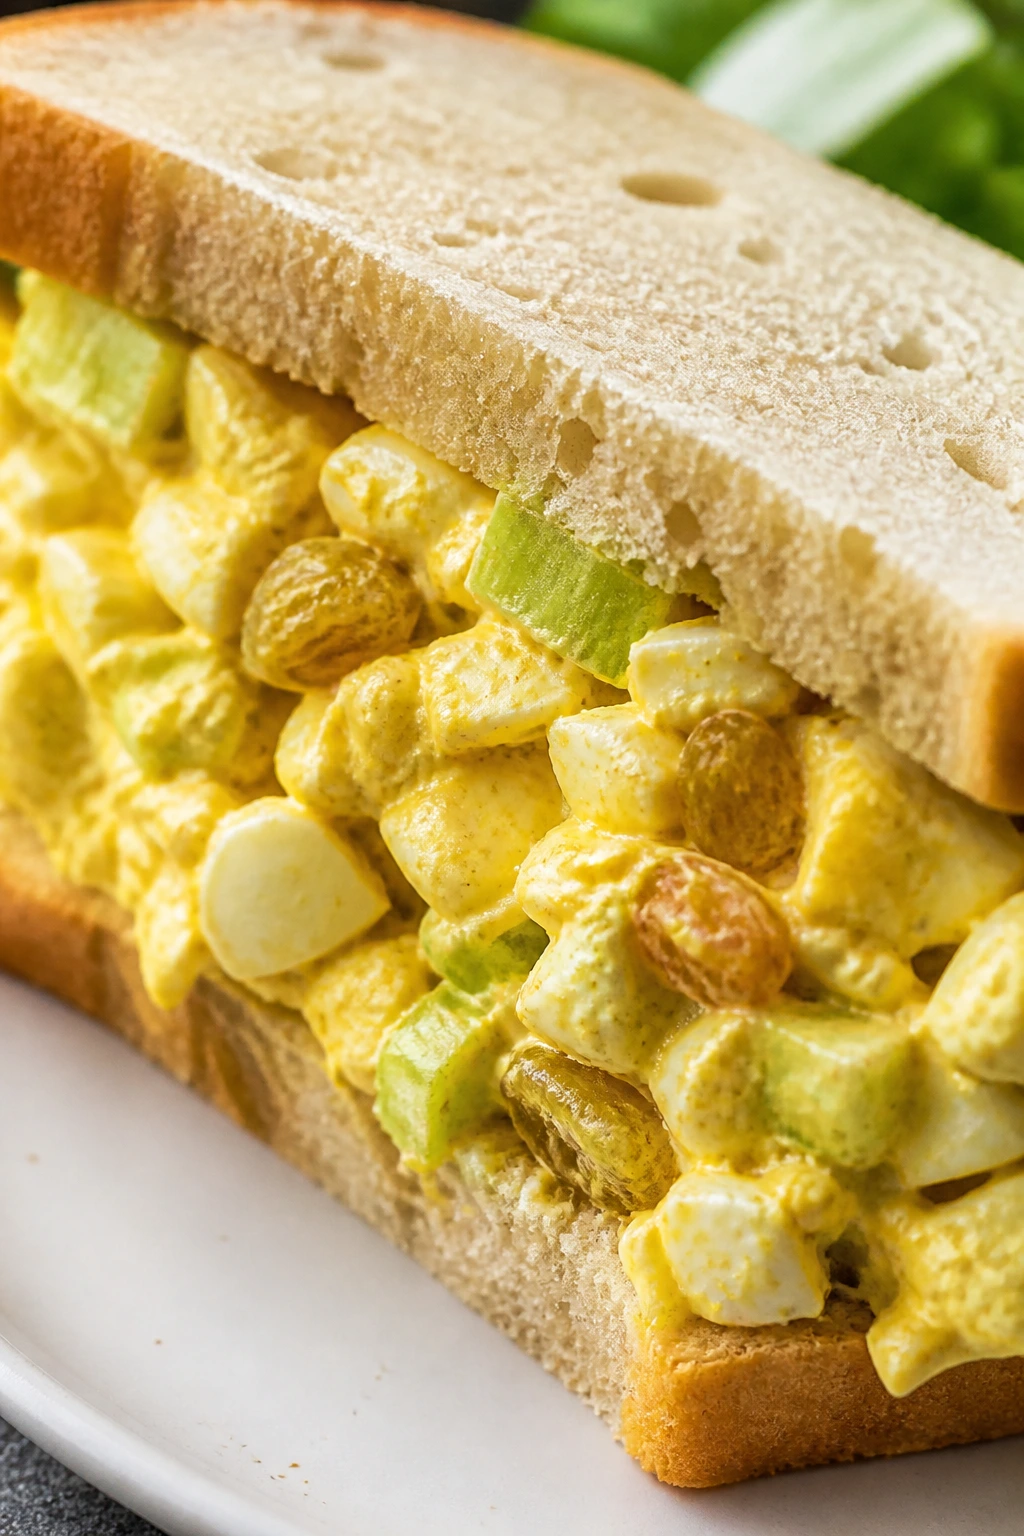
Curried egg salad has a warm spice note that plain egg salad lacks. A little curry powder, a touch of sweetness, and some celery make it taste layered instead of flat.
Why It Works:
Eggs are mild, so curry powder gives them structure. Raisins or chopped apple add sweetness if you want it, and celery keeps the sandwich crisp. This style is especially good when you want something different from standard picnic fare without making the filling complicated.
Key Ingredients:
- 6 large eggs
- 1/4 cup mayonnaise
- 1 teaspoon curry powder
- 1 tablespoon chopped celery
- 1 tablespoon chopped golden raisins
- 1 teaspoon lemon juice
- 1/4 teaspoon salt
- 8 slices soft bread
Quick Steps:
- Hard-boil, cool, peel, and chop the eggs.
- Mix mayo, curry powder, lemon juice, and salt.
- Fold in eggs, celery, and raisins.
- Spoon onto bread and close.
Equipment for This Recipe:
- Saucepan
- Bowl
- Fork
How to Serve This Dish:
Serve with cucumber slices or mango if you’re leaning into the sweet-spice angle. Cut into triangles and keep chilled until serving.
Pro Tips for This Recipe:
- Start with a small amount of curry powder; you can add more.
- Raisins should be finely chopped so they don’t clump.
- A pinch of black pepper sharpens the filling.
Variations on This Dish:
- Apple Curry Egg Salad: Replace raisins with chopped apple.
- Dill Curry Version: Add fresh dill for brightness.
- Spicy Curry Egg Salad: Add a little hot sauce.
Common Mistakes to Avoid with This Dish:
- Too much curry powder: It can turn bitter.
- Warm eggs: They loosen the dressing.
- Too much sweetness: The filling should stay savory first.
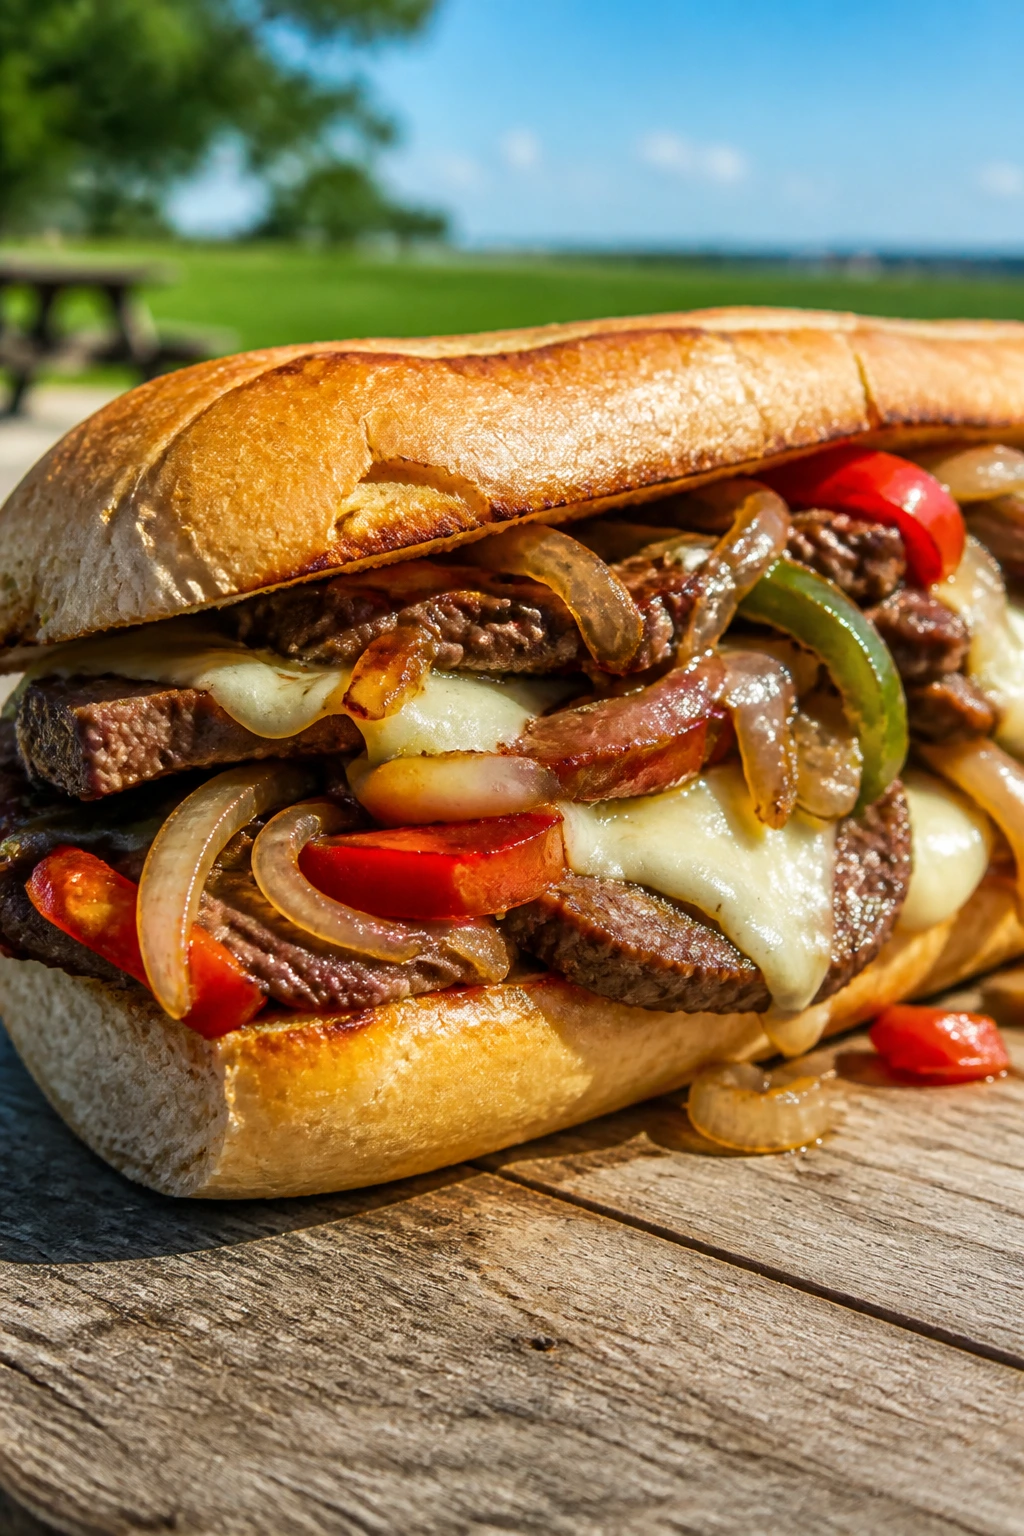
34. Philly Cheesesteak Sandwich
A cheesesteak is not a delicate sandwich, and that is its charm. Thin beef, onions, peppers, and melted cheese create a filling that’s messy in a controlled way if you build it right.
Why It Works:
The meat is sliced thin so it cooks fast and stays tender. Peppers and onions add sweetness, and provolone or American cheese gives the filling its signature melt. A hoagie roll with some chew is the right container.
Key Ingredients:
- 1 pound thin-sliced beef
- 1 onion, sliced
- 1 green bell pepper, sliced
- 4 hoagie rolls
- 4 slices provolone or American cheese
- 1 tablespoon oil
- Salt and pepper, to taste
Quick Steps:
- Cook onions and peppers in oil until soft.
- Add beef and season lightly.
- When the beef is just cooked, lay cheese on top to melt.
- Spoon into rolls and wrap.
Equipment for This Recipe:
- Large skillet
- Tongs
- Spatula
How to Serve This Dish:
Serve hot with chips or a crunchy slaw. If you’re bringing it to a picnic, keep the filling in foil and the rolls separate until you’re ready to eat.
Pro Tips for This Recipe:
- Freeze the beef for 20 minutes to make slicing easier if you’re cutting it yourself.
- Chop the meat after cooking if you want a more classic deli-style bite.
- Don’t overload the roll; cheesesteaks eat better when packed tightly, not piled sky-high.
Variations on This Dish:
- Mushroom Cheesesteak: Add sliced mushrooms.
- Whiz Style: Use cheese sauce instead of slices.
- Hot Pepper Version: Add pickled hot peppers.
Common Mistakes to Avoid with This Dish:
- Thick beef: It gets chewy.
- Dry roll: A little moisture from the filling is fine; too much is not.
- Overcooked onions: Soft is good, burnt is not.
35. Roasted Veggie and Goat Cheese Sandwich
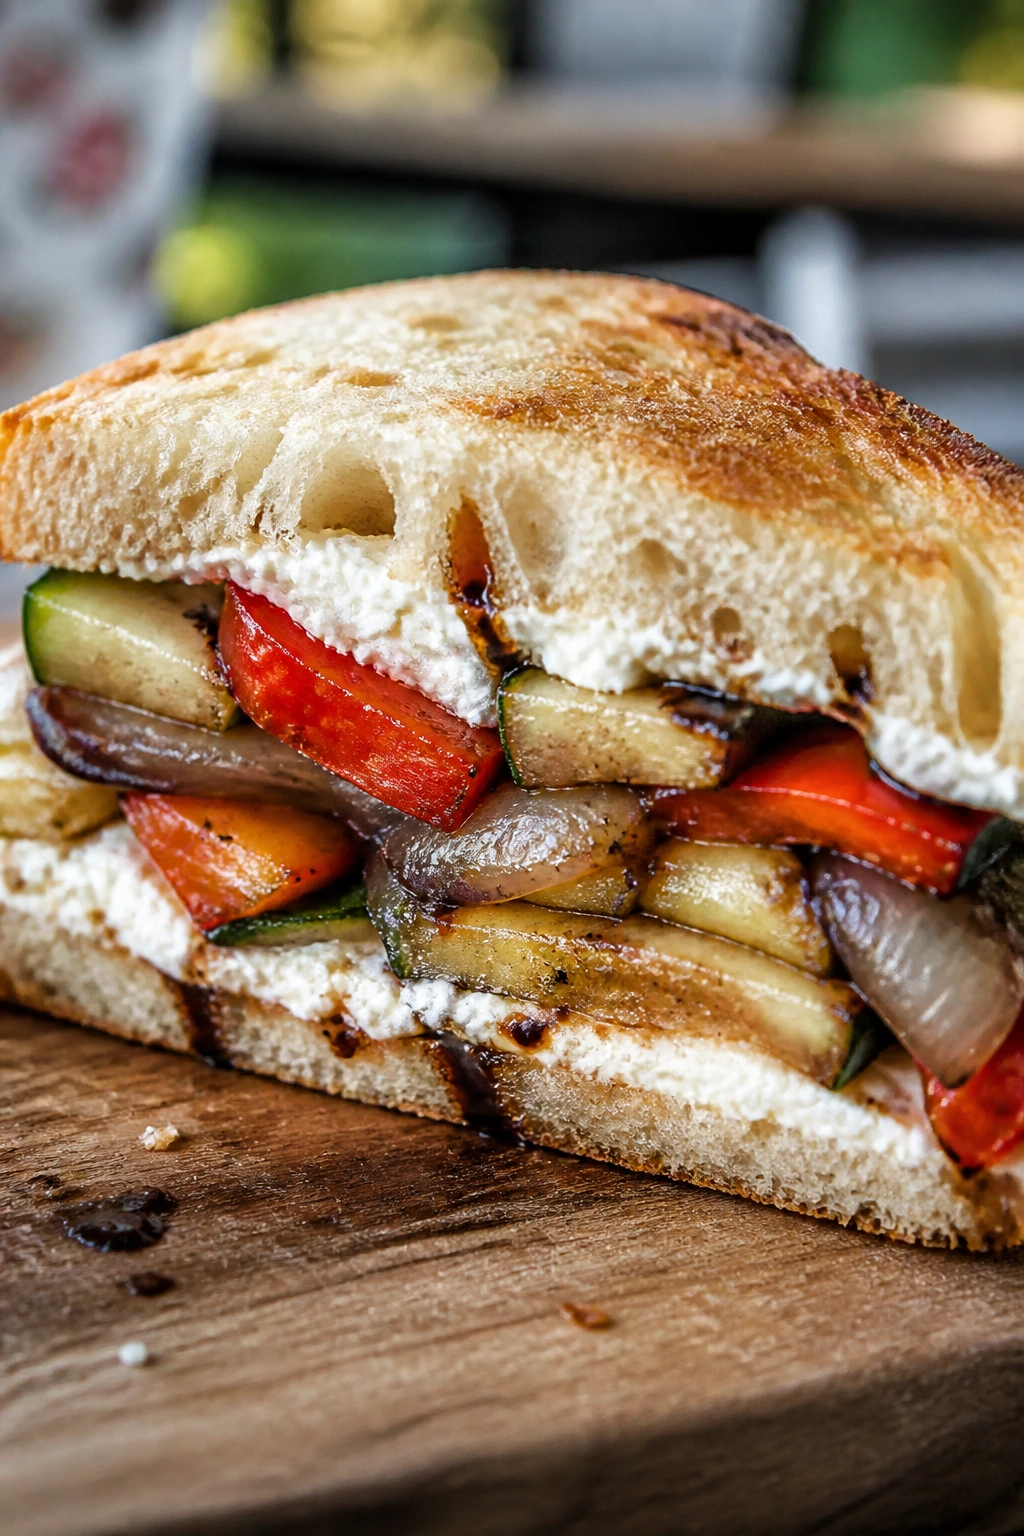
Roasted vegetables can make a cold sandwich feel warm in flavor even when it’s chilled. Goat cheese adds tang, and balsamic keeps the whole thing from reading as plain grilled vegetables on bread.
Why It Works:
Roasted zucchini, peppers, and onions bring sweetness and a little char. Goat cheese is soft enough to spread but sharp enough to stand out. Ciabatta or sourdough gives the sandwich the texture it needs.
Key Ingredients:
- 1 zucchini, sliced
- 1 red bell pepper, sliced
- 1 small onion, sliced
- 2 tablespoons olive oil
- 4 ounces goat cheese
- 1 tablespoon balsamic vinegar
- 4 ciabatta rolls
- 1 cup arugula
Quick Steps:
- Roast vegetables at 425°F until browned and tender, about 20 minutes.
- Mix goat cheese with balsamic vinegar.
- Spread onto the bread and layer veggies and arugula.
- Close and slice.
Equipment for This Recipe:
- Sheet pan
- Mixing bowl
- Knife
How to Serve This Dish:
Serve with grapes or a cold pasta salad. The vegetables can be roasted ahead and used cold or room temperature, which makes this one practical for a picnic cooler.
Pro Tips for This Recipe:
- Roast the vegetables until the edges pick up some color.
- Let them cool before assembling.
- A pinch of salt on the goat cheese makes it pop.
Variations on This Dish:
- Mozzarella Version: Use sliced fresh mozzarella instead of goat cheese.
- Eggplant Swap: Replace zucchini with eggplant.
- Peppery Version: Add more arugula or a little arugula pesto.
Common Mistakes to Avoid with This Dish:
- Undercooked vegetables: They taste watery.
- Too much balsamic: It can dominate.
- Soft bread: Ciabatta or sourdough holds better.
36. Crispy Tofu Bánh Mì
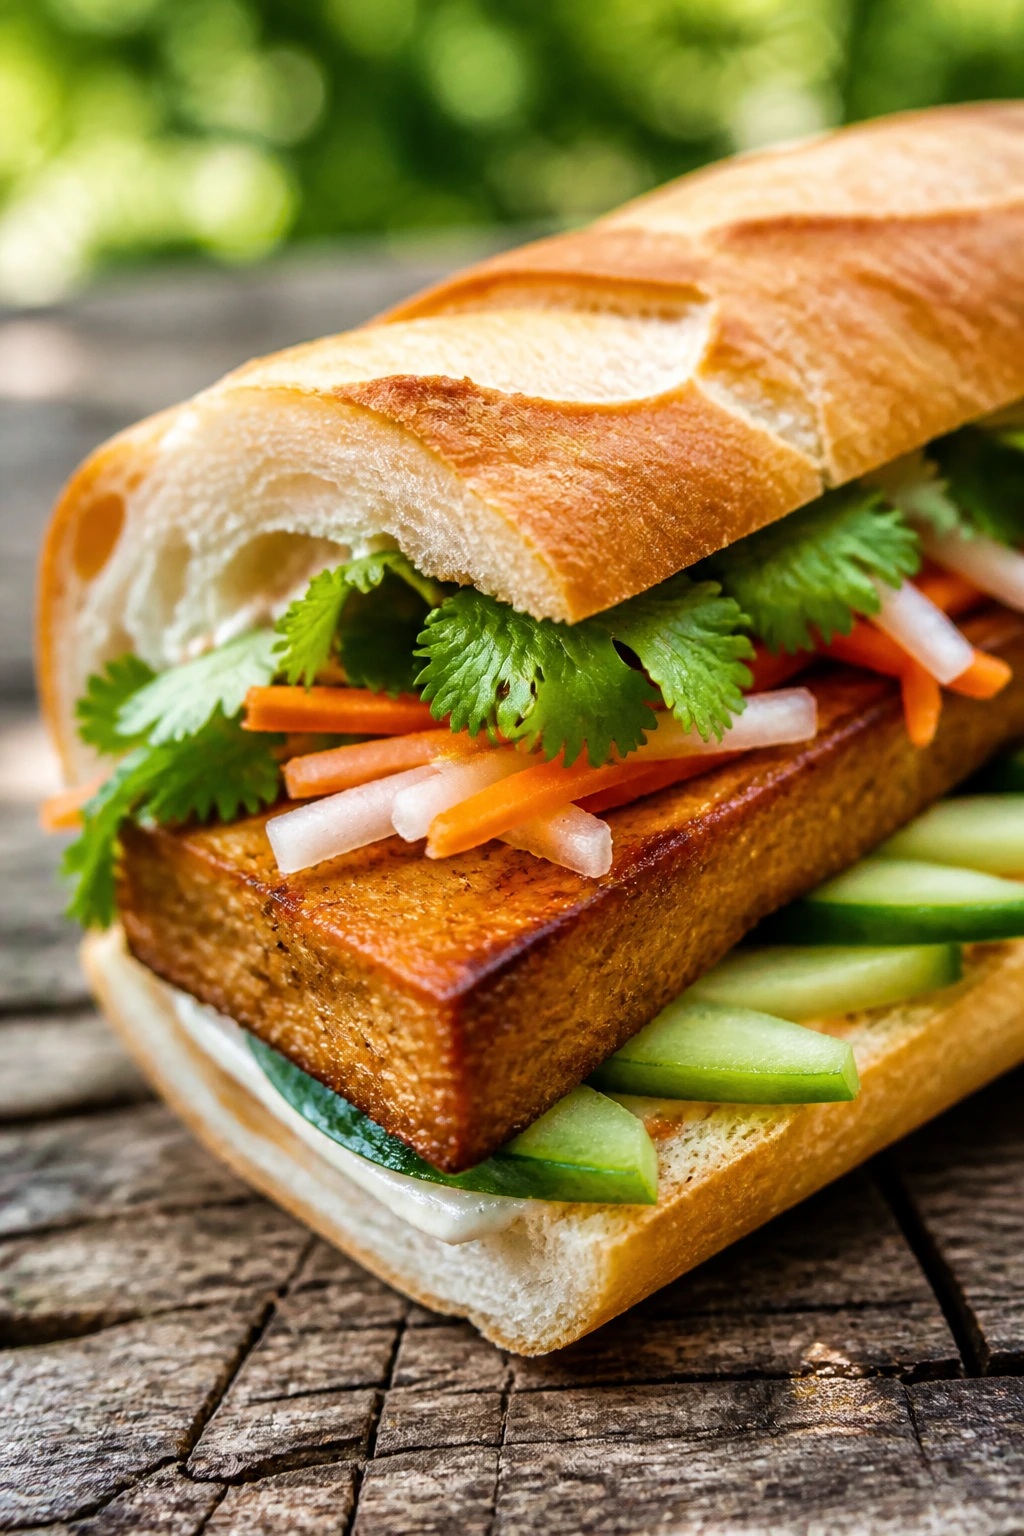
Tofu can absolutely do picnic duty if you crisp it properly. Once it’s golden and tucked into a baguette with pickles and herbs, it has the same bright crunch-and-acid personality you want from a bánh mì.
Why It Works:
Pressing and crisping tofu gives it a firm, chewy texture that reads as satisfying instead of bland. The pickled vegetables, cucumber, cilantro, and chili do the same balancing act they do in the chicken version, which keeps the sandwich lively.
Key Ingredients:
- 14 ounces firm tofu, pressed and sliced
- 1 tablespoon soy sauce
- 1 tablespoon cornstarch
- 2 tablespoons oil
- 1 baguette, cut into 4 portions
- 1/2 cup pickled carrots and daikon
- 1 cucumber, cut into sticks
- 1/2 cup cilantro leaves
- 1 tablespoon mayonnaise or vegan mayo
Quick Steps:
- Press tofu for 15 minutes, then slice and toss with soy sauce and cornstarch.
- Pan-fry in oil until crisp on both sides.
- Spread mayo on the baguette and layer tofu, pickles, cucumber, and cilantro.
- Wrap and serve.
Equipment for This Recipe:
- Skillet
- Tofu press or towels and a plate
- Knife
How to Serve This Dish:
Serve with salted peanuts or chilled noodles. Assemble close to eating time so the baguette keeps its edge.
Pro Tips for This Recipe:
- Pressing tofu matters. Skip it and the texture gets soft.
- Use enough oil to brown the crust, not deep-fry it.
- Thin pickles keep the sandwich tidy.
Variations on This Dish:
- Spicy Tofu: Add chili crisp or sliced jalapeño.
- Lemongrass Tofu: Marinate with lemongrass and soy sauce.
- Gluten-Free Version: Use gluten-free bread or lettuce wraps.
Common Mistakes to Avoid with This Dish:
- Unpressed tofu: It won’t crisp well.
- Too much mayo: The sandwich loses its brightness.
- Soft baguette: You want a roll that can crack a little.
37. Buffalo Chicken Sandwich with Ranch Slaw
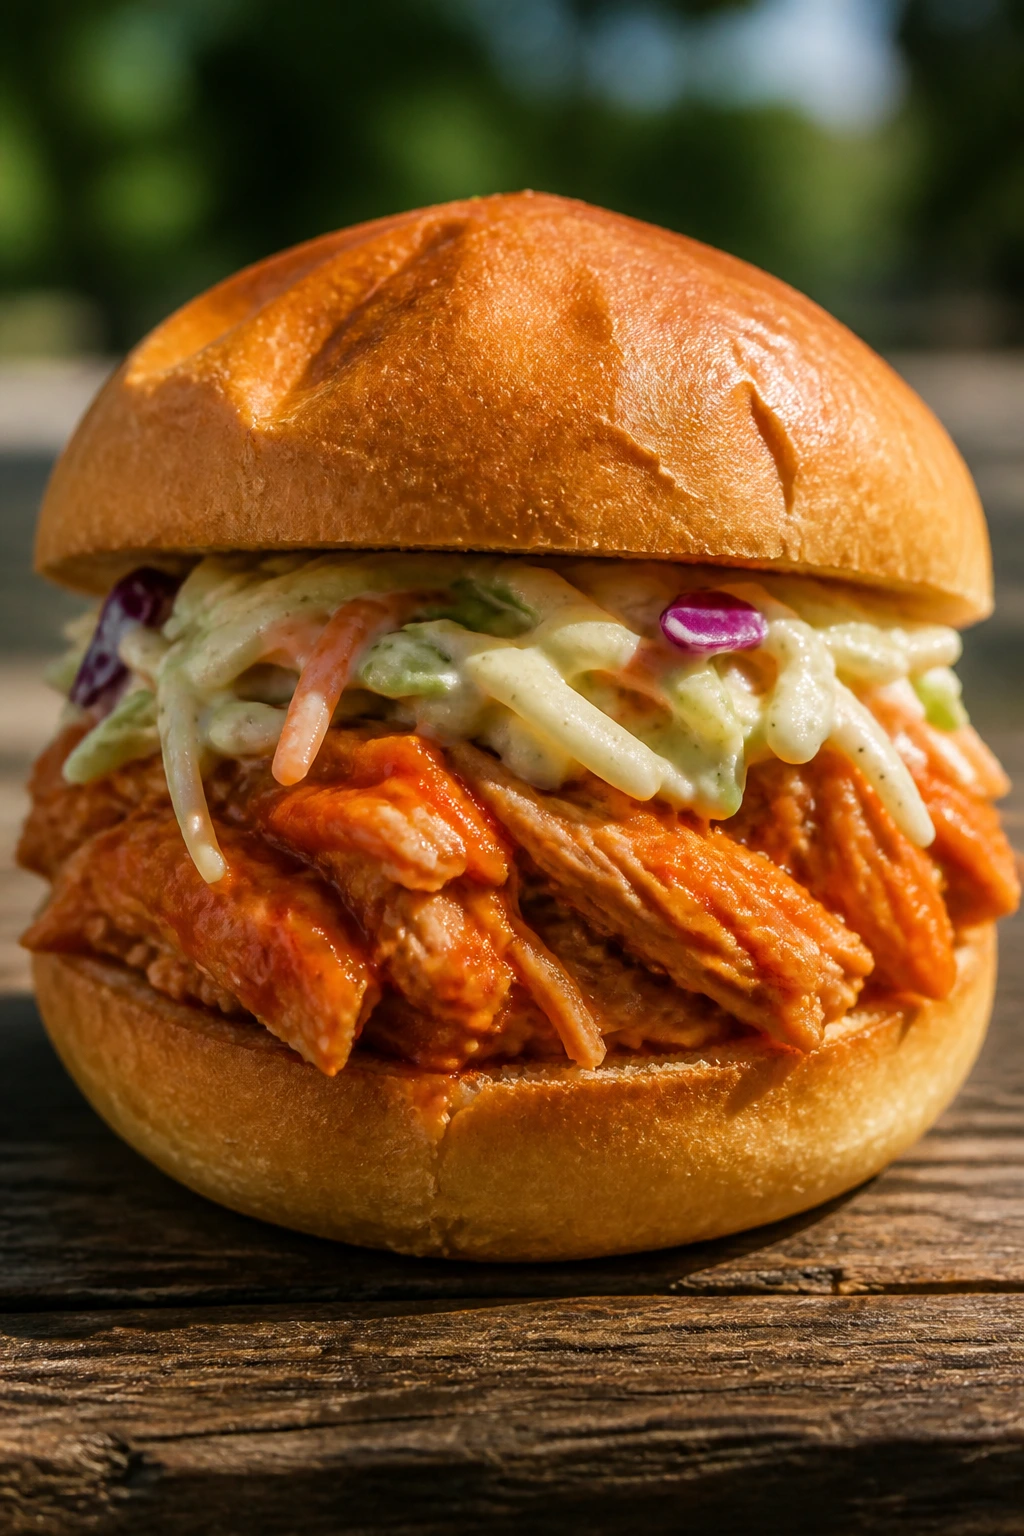
Buffalo chicken has a built-in picnic advantage: it tastes bold even when it’s cooled down a bit. Ranch slaw gives it a creamy crunch that keeps the heat from becoming one-dimensional.
Why It Works:
Buffalo sauce and chicken are a reliable pair because the sauce clings to shredded meat. The slaw adds cooling crunch, and a sturdy bun keeps the whole thing from sliding apart. It’s messy in the way a good buffalo sandwich should be.
Key Ingredients:
- 3 cups cooked shredded chicken
- 1/3 cup Buffalo sauce
- 1/2 cup shredded cabbage
- 2 tablespoons ranch dressing
- 4 sandwich buns
- 1/4 cup sliced celery
- 1 tablespoon chopped chives
Quick Steps:
- Toss chicken with Buffalo sauce.
- Mix cabbage with ranch, celery, and chives.
- Fill buns with chicken and slaw.
- Wrap tightly.
Equipment for This Recipe:
- Bowl
- Spoon
- Knife
How to Serve This Dish:
Serve with celery sticks and extra ranch for dipping. This sandwich is best when the chicken and slaw are packed separately until the final assembly.
Pro Tips for This Recipe:
- Choose a Buffalo sauce that isn’t too thin.
- Celery in the slaw echoes the classic wing plate.
- If you want less heat, mix in a little butter with the sauce.
Variations on This Dish:
- Blue Cheese Version: Replace ranch with blue cheese dressing.
- Mild Buffalo: Use less sauce and more butter.
- Cauliflower Swap: Use roasted cauliflower instead of chicken.
Common Mistakes to Avoid with This Dish:
- Sauce too thin: It soaks the bun.
- Overdoing the ranch: The slaw should support, not smother.
- Packing too early: Keep the slaw separate if possible.
38. Grilled Portobello Sandwich with Balsamic and Mozzarella
Portobello mushrooms bring a meaty texture that works well in a summer picnic sandwich, especially when balsamic and mozzarella are in the mix. This one eats like a warm lunch without needing meat to feel substantial.
Why It Works:
The mushroom’s wide cap holds marinade well and gives you a savory, juicy bite. Balsamic adds sweetness, mozzarella softens the edges, and arugula gives the final bite some pepper.
Key Ingredients:
- 4 large portobello caps, stems removed
- 2 tablespoons olive oil
- 1 tablespoon balsamic vinegar
- 4 slices mozzarella
- 4 ciabatta rolls
- 1 cup arugula
- Salt and black pepper, to taste
Quick Steps:
- Brush mushrooms with olive oil and balsamic.
- Grill or sauté until tender and browned.
- Add mozzarella briefly to melt.
- Layer onto rolls with arugula and season.
Equipment for This Recipe:
- Grill pan or skillet
- Tongs
- Knife
How to Serve This Dish:
Serve with tomato salad or corn on the cob. It’s good warm, but still holds up at room temperature for a picnic if you don’t drown the bread.
Pro Tips for This Recipe:
- Scrape out the mushroom gills if they’re very dark and wet.
- Salt at the end if you want to avoid pulling too much moisture out too early.
- Ciabatta gives you better grip than soft sandwich bread.
Variations on This Dish:
- Provolone Swap: Use provolone for a sharper melt.
- Garlic Herb Version: Add minced garlic to the oil.
- Roasted Pepper Addition: Layer in sliced roasted peppers.
Common Mistakes to Avoid with This Dish:
- Undercooking the mushroom: It should be tender, not rubbery.
- Too much balsamic: It can take over.
- Very soft bread: It can’t hold the mushroom juices well.
39. Breakfast Sandwich with Egg, Bacon, and Cheddar

Breakfast sandwiches aren’t limited to mornings, and a picnic spread can prove it. Bacon, cheddar, and a softly set egg make a sandwich that feels familiar and still earns its place at lunch.
Why It Works:
Egg and bacon bring salt and richness, while cheddar melts into the bread enough to hold everything together. An English muffin or soft bun gives you a compact shape that packs well and doesn’t mind being wrapped for a little while.
Key Ingredients:
- 4 English muffins, split and toasted
- 4 eggs
- 4 slices bacon, cooked crisp
- 4 slices cheddar
- 1 tablespoon butter
- Salt and black pepper, to taste
Quick Steps:
- Toast the muffins.
- Cook the eggs in a skillet until the whites set and yolks are still soft, if you like them that way.
- Layer bacon, cheddar, and egg on the muffins.
- Close and wrap in foil.
Equipment for This Recipe:
- Skillet
- Spatula
- Toaster or oven
How to Serve This Dish:
Serve with fruit and a little hot sauce. If you’re carrying it to a picnic, wrap it in foil so it stays warm longer.
Pro Tips for This Recipe:
- Salt the egg right after cooking.
- A slice of cheddar between the egg and muffin helps it melt into place.
- If you need to make many, keep them warm in a low oven for a short stretch.
Variations on This Dish:
- Sausage Swap: Use breakfast sausage instead of bacon.
- Veggie Version: Replace bacon with sautéed spinach and tomato.
- Hot Honey Finish: Drizzle a tiny bit over the bacon.
Common Mistakes to Avoid with This Dish:
- Overcooked eggs: A dry egg yolk makes the sandwich feel flat.
- Cold cheese: It won’t bind the sandwich as well.
- Skipping the toast: The muffin needs structure.
40. Salmon Salad Sandwich with Fennel and Lemon
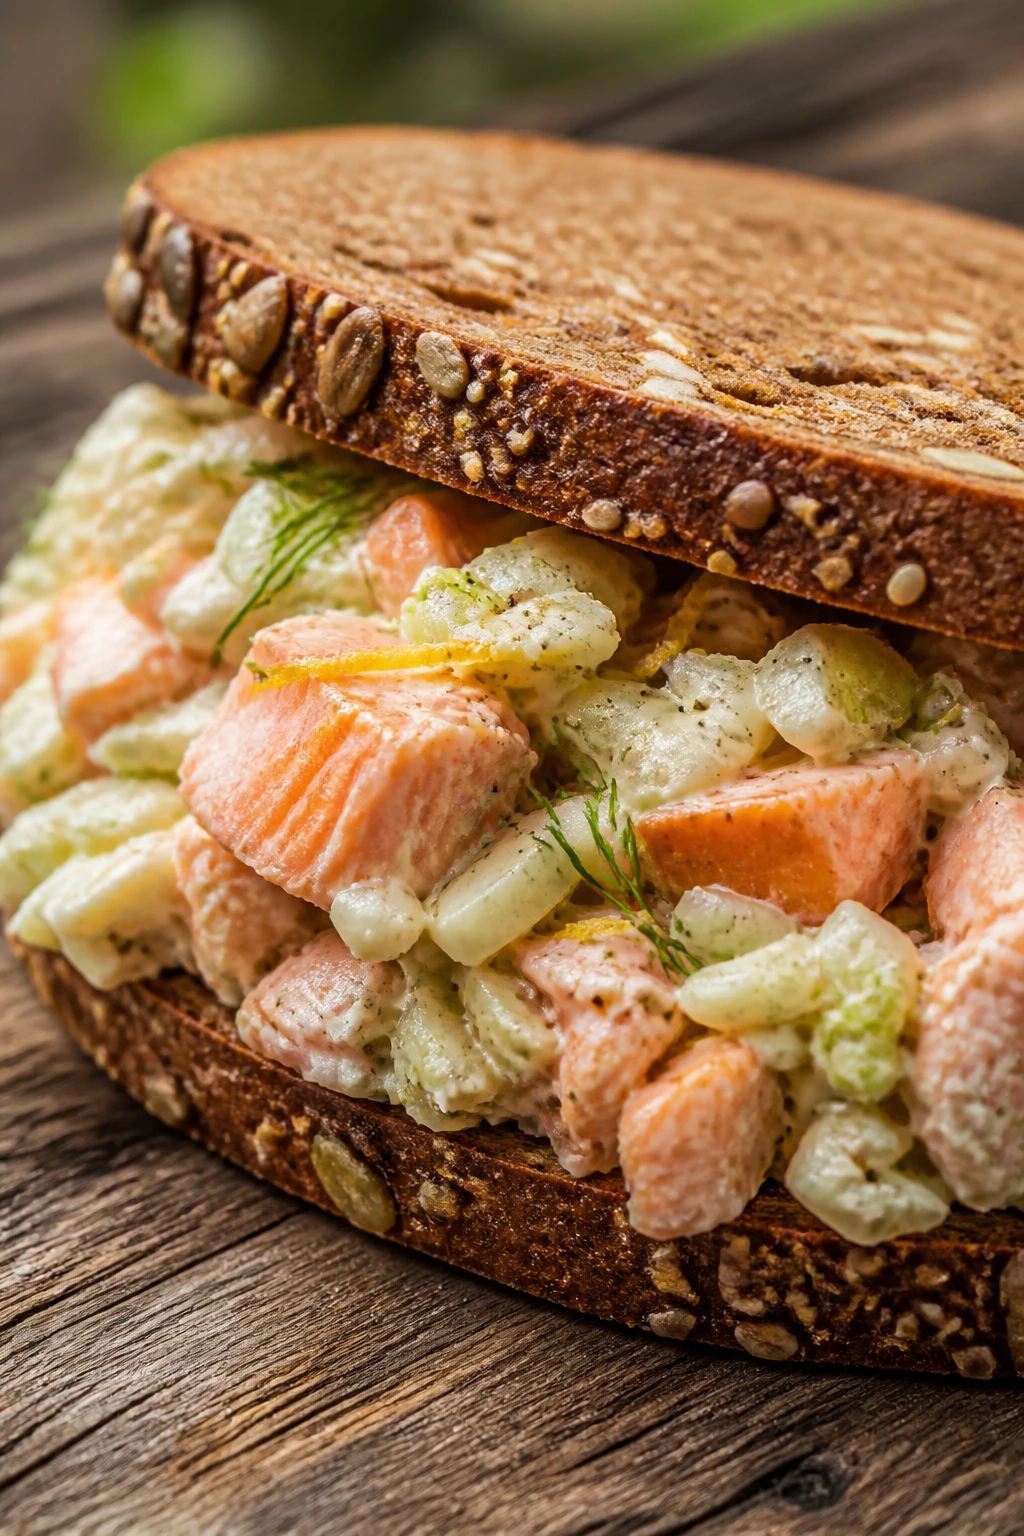
Salmon salad has a clean, cool flavor that works beautifully when the weather is warm and the cooler is packed with ice. Fennel gives it crunch and a faint anise note that feels more refined than celery.
Why It Works:
Cooked salmon has enough richness to stand in for tuna or chicken, but it tastes brighter when mixed with lemon and herbs. Fennel adds a crisp bite that stays firm, and rye bread or seeded bread gives the sandwich enough character to keep up.
Key Ingredients:
- 2 cups cooked salmon, flaked
- 1/4 cup mayonnaise
- 1 tablespoon lemon juice
- 1/2 cup fennel, finely diced
- 1 tablespoon chopped dill
- 8 slices rye or seeded bread
- 1/4 teaspoon black pepper
Quick Steps:
- Flake salmon into a bowl.
- Mix mayo, lemon juice, fennel, dill, and pepper into the salmon.
- Chill for 15 minutes.
- Spoon onto bread and close.
Equipment for This Recipe:
- Mixing bowl
- Fork
- Knife
How to Serve This Dish:
Serve with sliced cucumbers and lemon wedges. Keep it cold and eat it the same day if possible; salmon salad is at its best when the texture stays bright.
Pro Tips for This Recipe:
- Use chilled cooked salmon, not warm.
- Fennel should be diced finely so it doesn’t dominate.
- A few capers can sharpen the flavor if you want more salt.
Variations on This Dish:
- Dill Heavy Version: Add extra dill and a little chive.
- Smoked Salmon Swap: Use smoked salmon and cut back on the mayo.
- Avocado Salmon: Replace half the mayo with mashed avocado.
Common Mistakes to Avoid with This Dish:
- Too much mayo: Salmon salad should stay light.
- Large fennel pieces: They can overwhelm the sandwich.
- Warm fish: Keep it properly chilled.
Why Picnic Sandwiches Work Better With a Little Planning
The difference between a forgettable picnic sandwich and one people ask about later is usually not some heroic recipe trick. It’s planning. The bread needs a job. The filling needs a texture that can survive travel. The sharp bits—mustard, pickles, herbs, lemon, vinegar—need to be placed where they can do some work instead of disappearing under mayo.
I’ve always thought picnic sandwiches are more demanding than hot sandwiches, which sounds backwards until you’ve packed a cooler and watched a beautiful roll go limp from one overzealous spoonful of tomato. Heat gives you leeway. Cold air does not. Once you accept that, the recipes start making sense: thicker spreads, drier vegetables, sturdy bread, and a willingness to assemble some parts at the last minute.
The smartest approach is often to think in layers. Put a moisture barrier against the bread. Put a crunchy element next. Then the protein or main filling. Then the bright finish—pickles, herbs, onions, or something acidic. That order sounds fussy until you taste the difference. Then it just sounds practical.
Essential Equipment for These Recipes
- Serrated knife: The best tool for bread without crushing it.
- Cutting board: Use a large one so fillings don’t slide off the edge.
- Mixing bowls: You’ll want at least two, especially for chicken salad, tuna salad, and slaws.
- Skillet or griddle: Useful for bacon, halloumi, bratwurst, and toasted sandwiches.
- Sheet pan: Handy for roasting vegetables or toasting bread in batches.
- Paper towels: The unsung hero for drying tomatoes, cucumbers, pickles, and greens.
- Parchment paper or foil: Keeps sandwiches tight and tidy in a cooler.
- Toothpicks: Needed for club sandwiches and any stacked sandwich that wants to lean.
- Small spoon or offset spatula: Better than a blunt knife for spreading hummus, pesto, or cream cheese.
- Cooler packs: Not glamorous, but essential for chicken salad, tuna salad, seafood, and egg salad.
Smart Shopping and Ingredient Tips
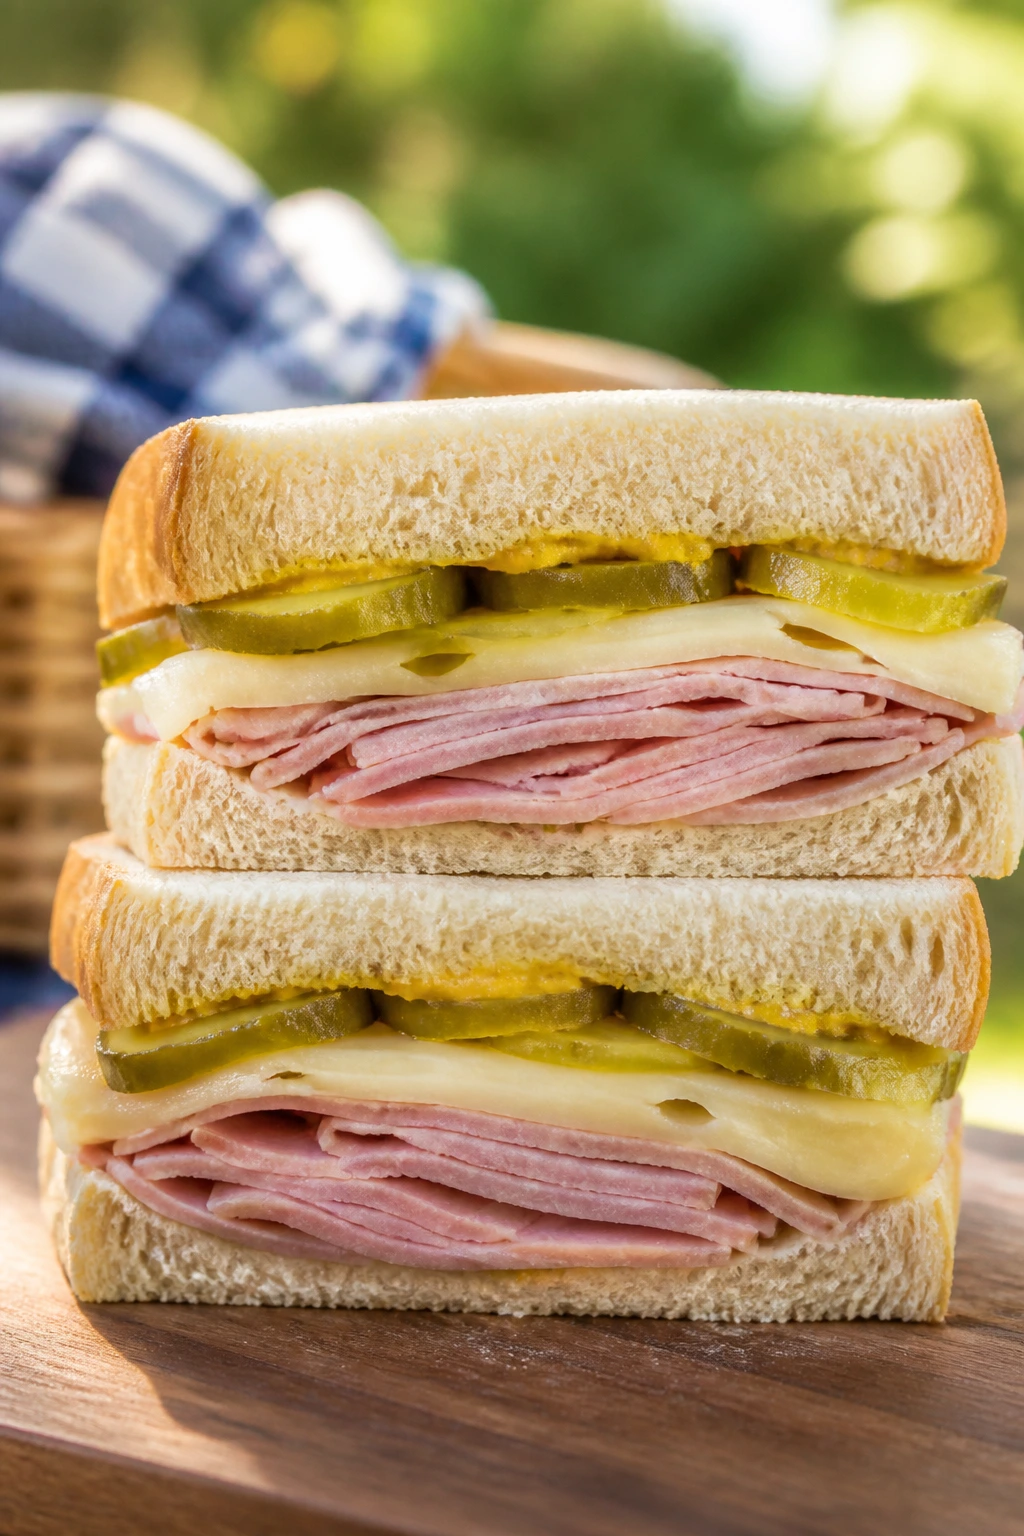
Pick bread with a little backbone. Soft sandwich bread is fine for tea sandwiches, tomato sandwiches, and egg salad, but most picnic lunch sandwich recipes do better with ciabatta, hoagie rolls, sourdough, rye, pita, or seeded buns. The bread should bend a little before it breaks.
For produce, buy tomatoes that smell like tomatoes. If they have no smell, they’re not bringing much to the sandwich. Cucumbers should feel firm and heavy for their size. Herbs need to be dry and perky, not limp and wet from sitting under a misting system.
When you’re buying deli meat, ask for thin slices. Thick-cut ham, turkey, or roast beef can be annoying in a sandwich that needs clean bites. For cheese, choose slices that match the bread: Swiss, provolone, cheddar, brie, and mozzarella all have different jobs, and none of them work as well when cut too thick.
Canned tuna, chickpeas, and hummus are worth buying in decent form because these sandwiches lean on them. A bland chickpea mash or watery tuna salad will show itself fast. With condiments, use the ones that do something specific: Dijon, horseradish, mustard, pesto, pickle relish, or hot sauce. Don’t let the jar collection get so big that the sandwich tastes muddy.
How to Serve These Recipes
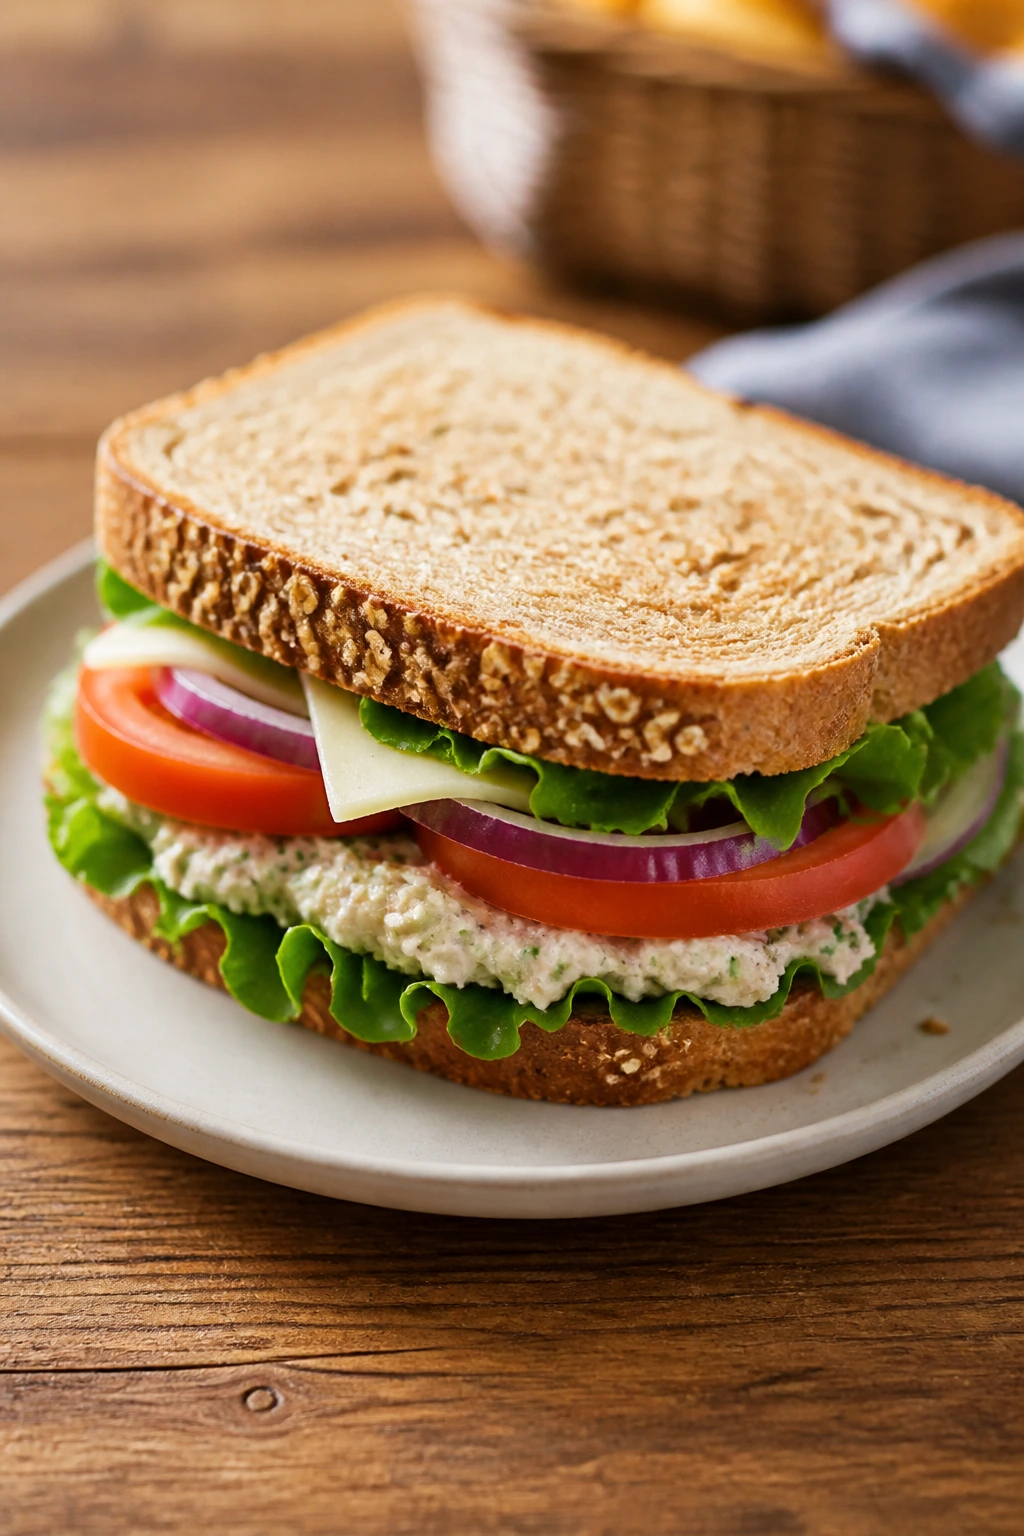
Presentation:
Cut sandwiches on the bias when you want them to look neat, or into fingers for tea sandwiches and picnic platters. Wrap each half in parchment if you’re packing them into a cooler; it keeps the edges cleaner and makes them easier to grab.
Accompaniments:
Potato chips, dill pickles, cucumber spears, fruit, pasta salad, and corn salad all make sense here. For the richer sandwiches—pulled pork, Cuban, cheesesteak, meatball sub—lean into something crisp or acidic on the side so the plate doesn’t feel heavy.
Portions:
For most adults, one full sandwich is enough when you add sides. The tea sandwiches and cucumber sandwiches are smaller, so plan on 2 to 3 per person. If you’re feeding a mixed group, mix one rich sandwich with one cold, crunchy one so the spread feels balanced.
Beverage Pairing:
Iced tea with lemon works across most of these. Sparkling water with cucumber or lime is a good backup, and a cold lager or pilsner suits the salty, savory sandwiches if you’re packing for an adults-only picnic.
Additional Tips and Flavor Boosters
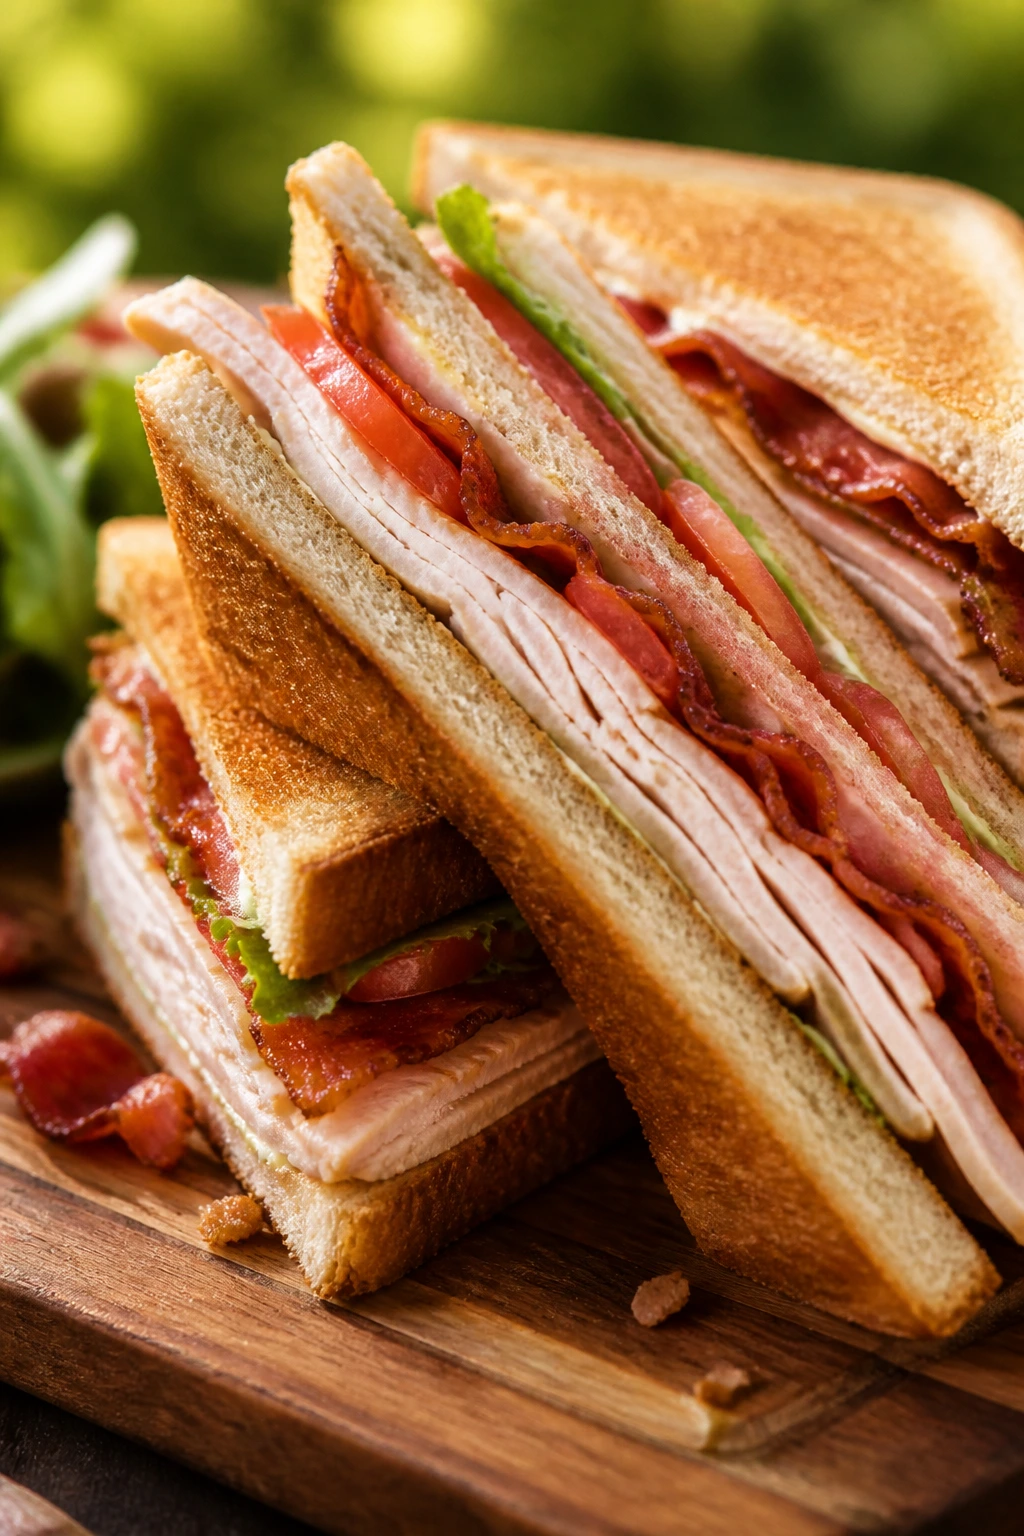
Flavor Enhancement:
A small amount of acid changes everything. Lemon juice, vinegar, pickled onions, or pepperoncini can make a sandwich taste sharper without making it wetter. If a filling feels flat, do not reach for more salt first; reach for something bright.
Customization:
Most of these recipes can absorb one extra crunchy element—cucumber, celery, lettuce, cabbage, or fennel. That one addition often fixes texture problems and makes the sandwich more picnic-proof.
Serving Suggestions:
Fresh herbs matter more than people think. Dill, basil, chives, parsley, and cilantro can turn a solid sandwich into one you remember. Add them at the end so they stay fragrant instead of bruised.
Make-It-Yours:
For dairy-free eaters, hummus, mustard, olive oil, and avocado can stand in for mayo or cheese in several of these sandwiches. For gluten-free needs, use sturdy gluten-free bread or lettuce wraps where the filling is already compact, like chicken salad, tuna salad, or smashed chickpeas.
Make-Ahead, Storage, and Reheating Guidance
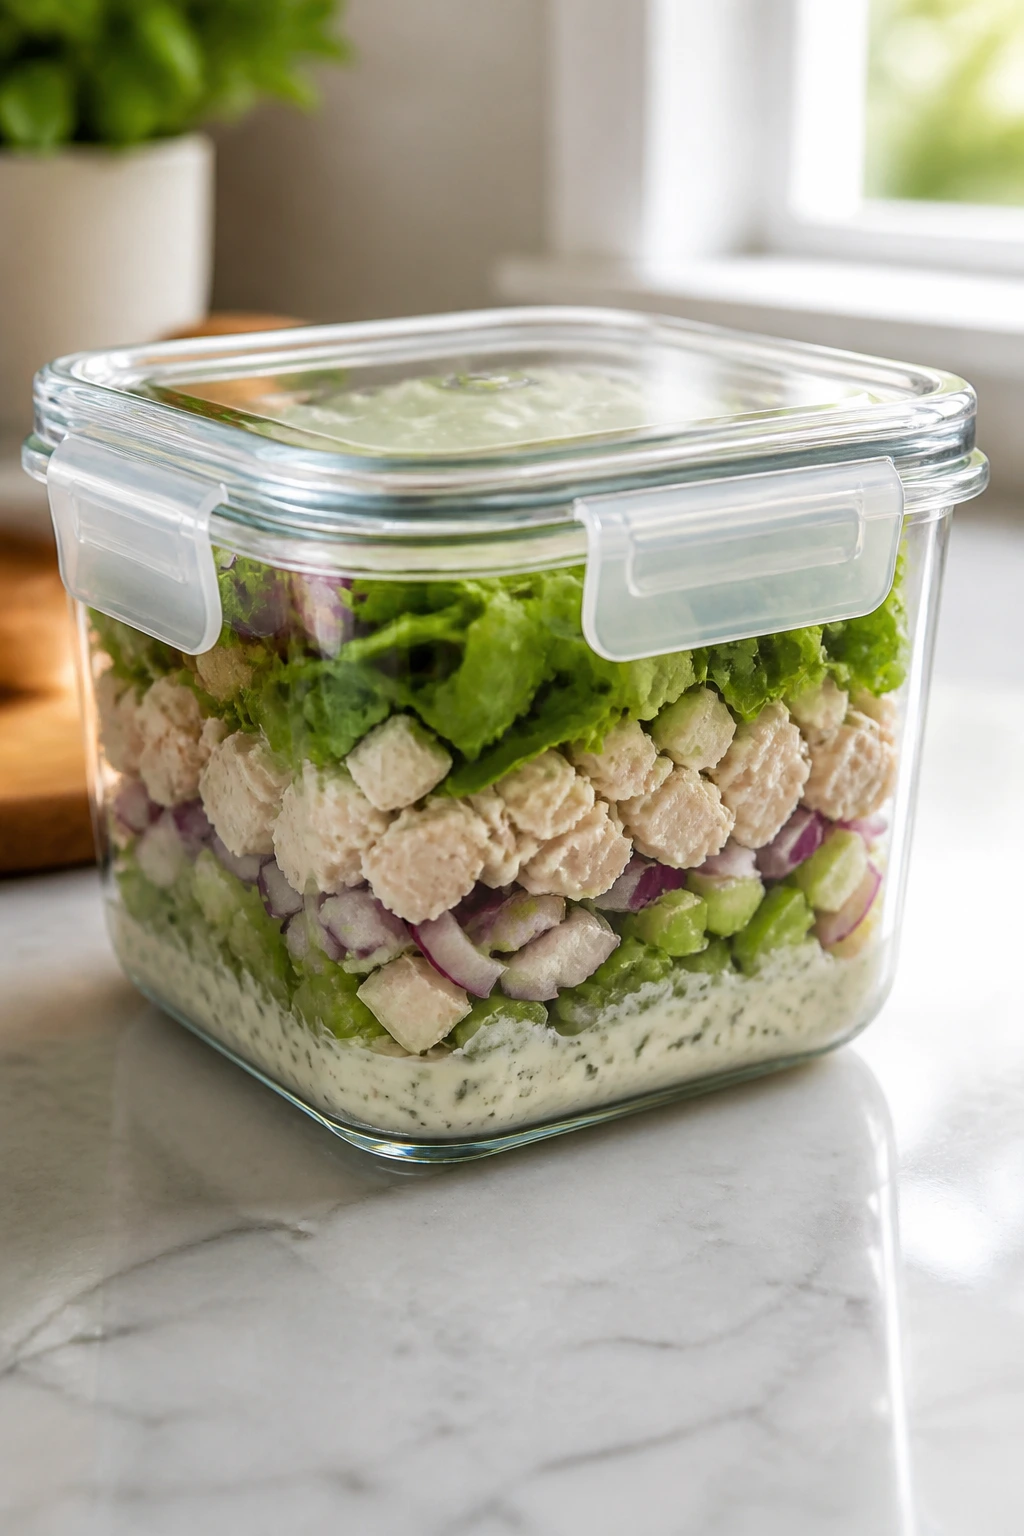
Most of the salad-style fillings—chicken salad, tuna salad, egg salad, salmon salad, chickpea salad—keep well in the refrigerator for 3 to 4 days in an airtight container. Pulled pork, BBQ chicken, steak, and meatballs usually hold for 3 to 4 days as well, and they freeze well for up to 2 months if you store the filling separately from the bread.
Refrigerated sandwiches made with delicate bread and wet fillings are best eaten the same day. Caprese, tomato, cucumber, and lobster roll sandwiches are the ones that need the tightest timing. If you have to hold them, keep bread and filling separate and assemble at the last minute.
For reheating, warm fillings gently in a skillet over low heat or in a 300°F oven until hot, not scorching. Meatball subs, pulled pork, cheesesteaks, bratwurst, and BBQ chicken all reheat well this way. Cover loosely with foil if you need to keep them from drying out. Cold sandwiches should stay cold; don’t try to “freshen” them in the microwave unless you want limp lettuce and warm mayo, which you do not.
Variations and Adaptations to Try
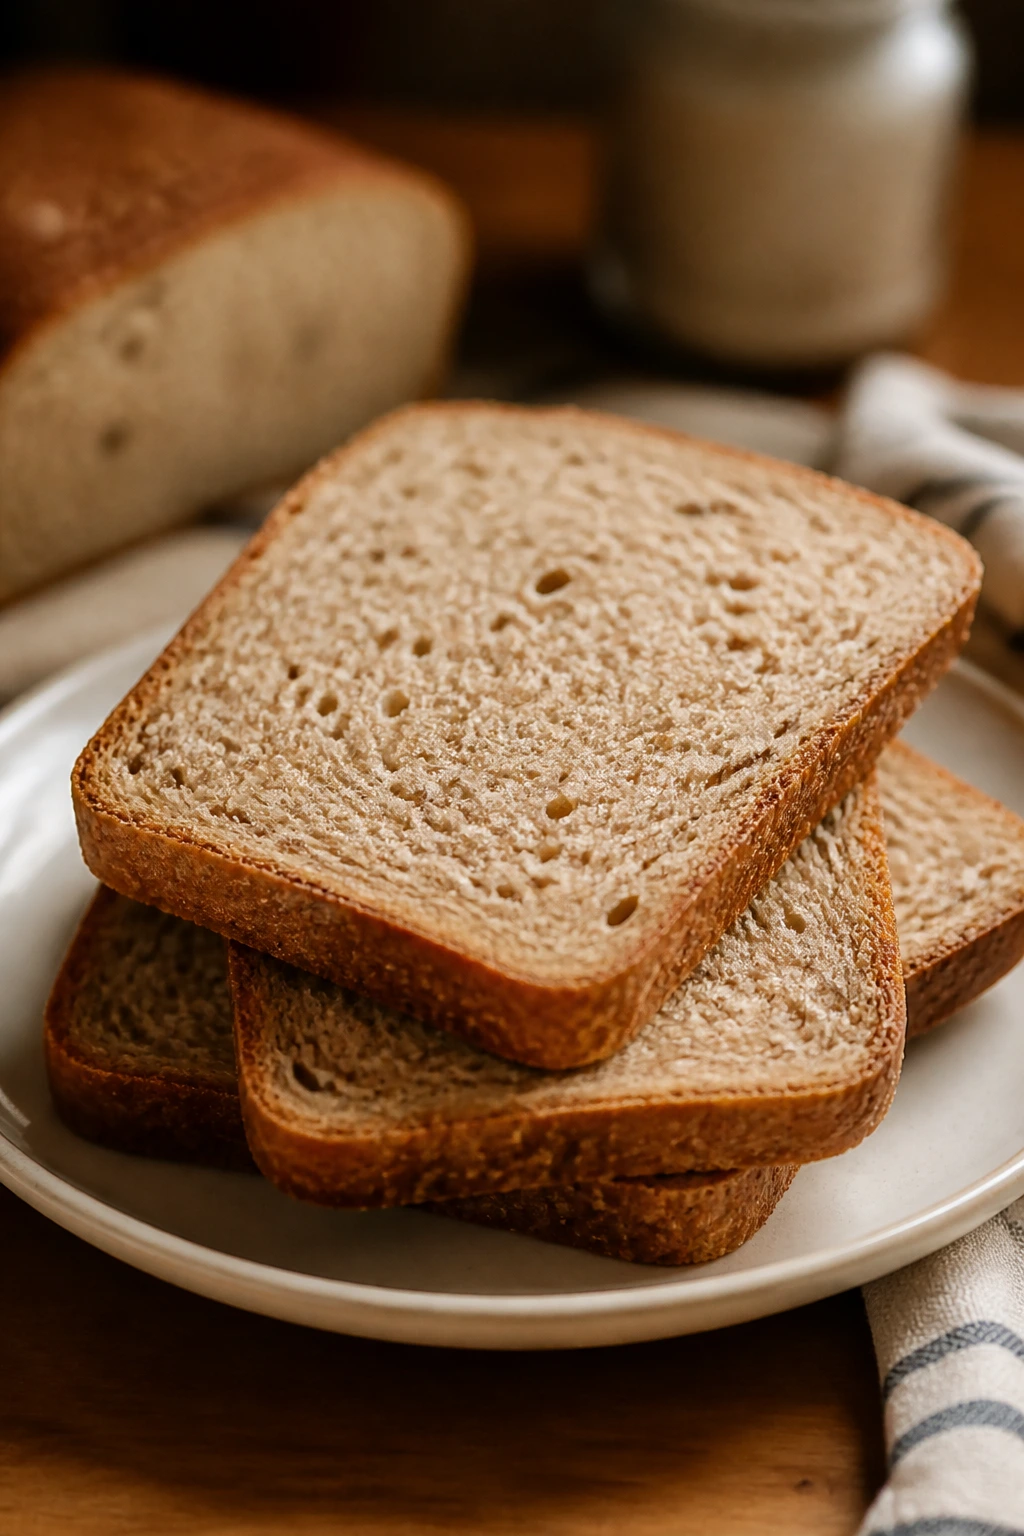
Gluten-Free Picnic Board:
Use gluten-free rolls, lettuce wraps, or gluten-free sliced bread for the sandwiches that can handle it. The safer choices are chicken salad, tuna salad, egg salad, hummus veggie, and smashed chickpea; the best texture comes from fillings that aren’t overly wet.
Dairy-Free Swaps:
Skip brie, Swiss, provolone, cream cheese, and halloumi, then lean on mustard, hummus, avocado, olive oil, and pickles. Sandwiches like Italian subs, bánh mì, veggie hummus, and roast beef adapt well without much fuss.
Lower-Sodium Builds:
Choose lower-sodium deli meat where possible, rinse capers and olives, and keep cured meats as a smaller part of the filling. Tomato, cucumber, herbs, avocado, and roasted vegetables carry a lot of flavor without needing much extra salt.
Kid-Friendly Versions:
Peanut butter and banana, ham and cheese, turkey and Swiss, and chicken salad are the easiest wins. Keep spicy sauces and sharp onions on the side so kids can build their own level of drama.
Heat-Level Control:
If you like spice, add jalapeños, hot sauce, Buffalo sauce, pepperoncini, or harissa to your sandwich. If you don’t, keep the vinegar, herbs, and mustard but leave the pepper heat out. The sandwich should still taste awake.
Regional Picnic Mix:
Lean Southern with pimento cheese and tomato. Go New Orleans with muffuletta. Push Mediterranean with hummus, olives, feta, and roasted vegetables. Each one tastes different enough to keep a long picnic spread from feeling repetitive.
Common Mistakes to Avoid with This Collection
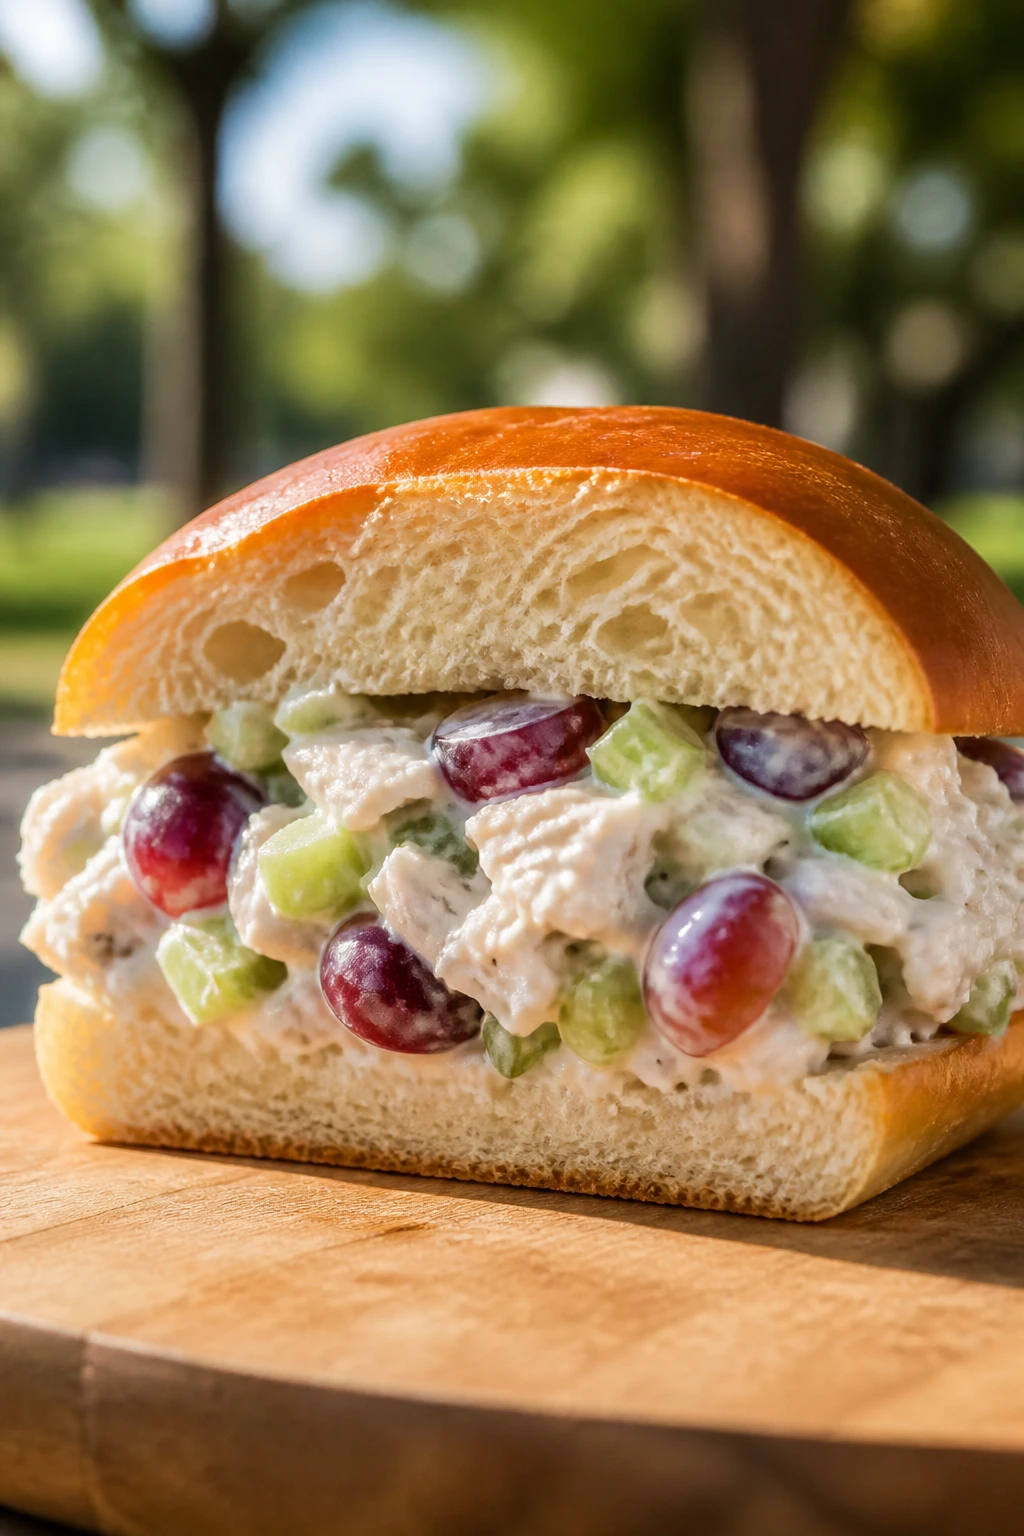
Using bread that’s too soft for the filling:
A flimsy slice may work for cucumber tea sandwiches, but not for roast beef, pulled pork, or a cheesesteak. If the filling has weight or moisture, move up to sourdough, ciabatta, hoagie rolls, rye, or pita.
Packing wet ingredients directly against bread:
Tomatoes, pickles, cucumbers, and dressed slaws can all soak through bread if they touch it too long. Put lettuce, cheese, hummus, or another spread between the moisture and the crumb.
Oversalting at the filling stage:
Cured meats, olives, pickles, feta, capers, and mustard already bring salt. Taste before adding more. A sandwich can go from lively to harsh fast.
Assembling too early:
Some sandwiches do benefit from a short rest, like the muffuletta or Italian sub. Most do not. If there’s mayo, tomato, avocado, or a very soft roll involved, assemble closer to serving time.
Cutting with a dull knife:
A crushed sandwich looks sad and leaks more. Use a serrated knife and a gentle sawing motion. That tiny bit of care changes the whole texture of the first bite.
Ignoring cooler placement:
Seafood, chicken salad, egg salad, and salmon salad should sit right next to the ice packs, not on top of warm drinks or fruit. Heat rises, and soggy bread does not forgive.
Frequently Asked Questions
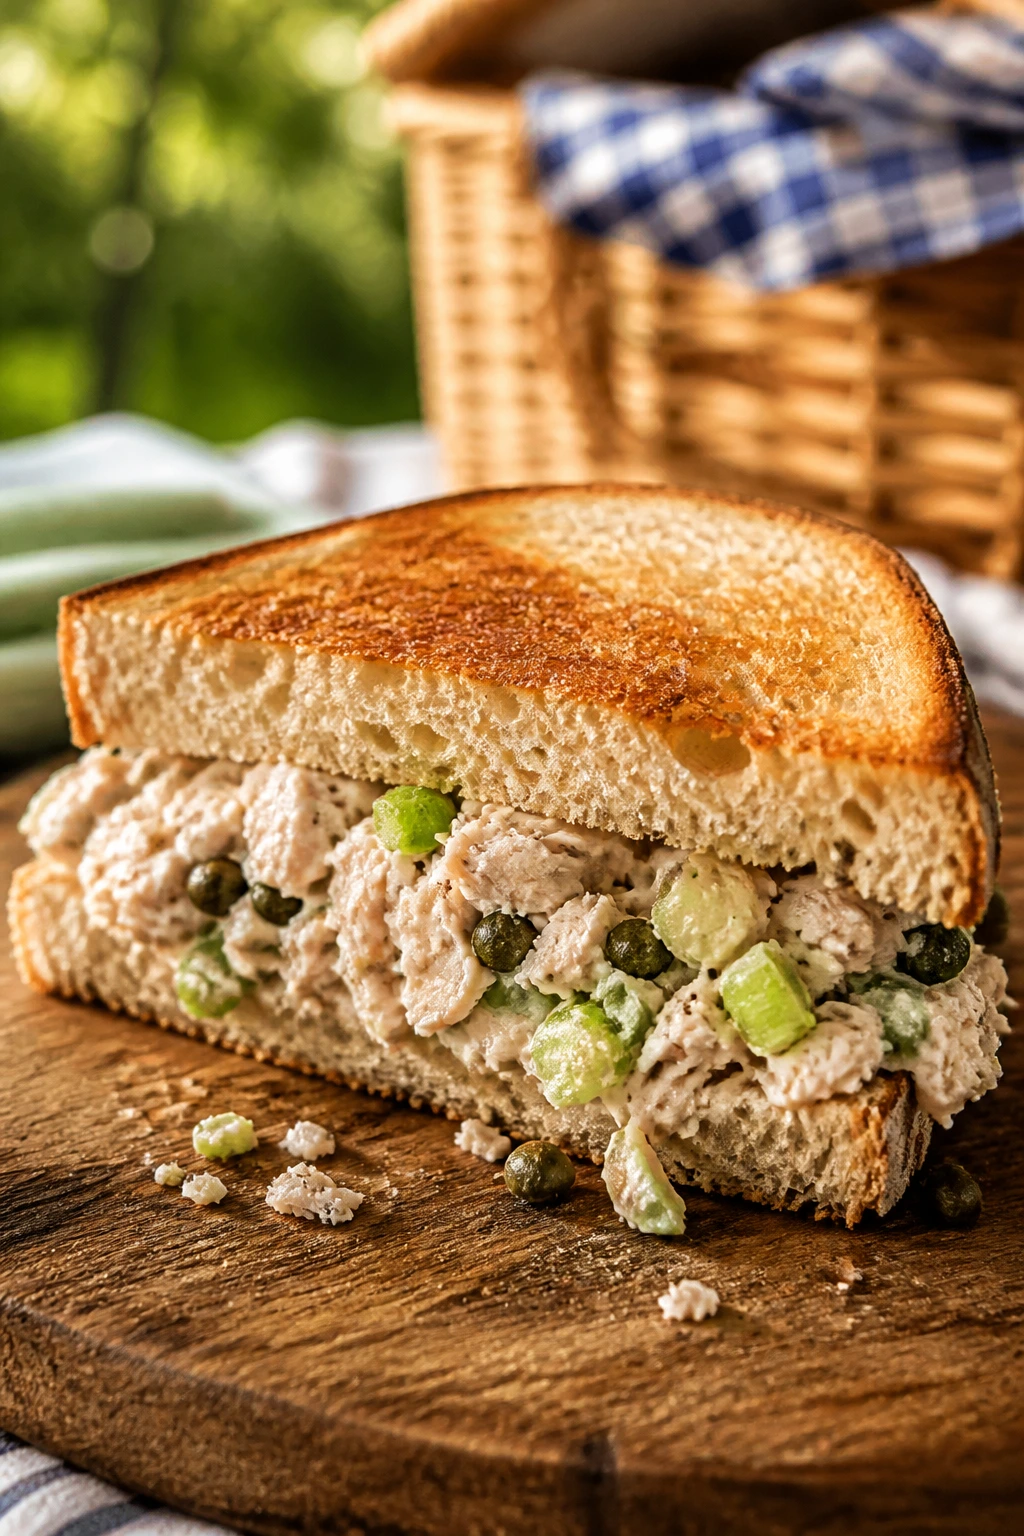
Which picnic sandwiches can be made the farthest ahead?
Muffuletta, Italian subs, pulled pork, and chicken salad hold up well if you build them smartly. For the best texture, keep very wet components slightly separate and assemble within a few hours of eating.
What breads are safest for a hot day picnic?
Ciabatta, sourdough, rye, hoagie rolls, pita, and split-top buns usually hold up better than fragile sliced bread. If you’re using white bread, keep the filling light and the sandwich tightly wrapped.
Can I make these sandwiches the night before?
Yes, for several of them. Chicken salad, tuna salad, egg salad, chickpea salad, and pulled pork fillings are all good overnight. Sandwiches with tomato, cucumber, avocado, or very crisp lettuce are better assembled closer to serving.
How do I keep sandwiches from getting soggy in the cooler?
Use parchment or foil, not loose plastic wrap. Add a moisture barrier like lettuce, cheese, or hummus against the bread, then pack the cooler tightly so the sandwiches don’t slide around and get crushed.
What’s the best sandwich if I’m feeding a mixed group?
Ham and Swiss, turkey club, chicken salad, hummus veggie, and peanut butter banana usually cover a lot of bases without much conflict. If you want one hot option and one cold option, pair something like pulled pork with cucumber tea sandwiches.
Can I use rotisserie chicken in these recipes?
Absolutely. It works well in chicken salad, BBQ chicken, Buffalo chicken, chicken Caesar, and bánh mì-style sandwiches. Shred it while it’s still a little warm so it pulls apart cleanly.
How long can seafood sandwiches sit out?
Keep lobster roll, shrimp salad, smoked salmon, and salmon salad sandwiches cold and move them out of the cooler only when you’re ready to eat. If the day is hot, don’t let them sit out long; seafood gets less forgiving by the minute.
What if my bread keeps falling apart when I slice the sandwiches?
Chill the assembled sandwich for 10 to 15 minutes before cutting, then use a serrated knife with a gentle sawing motion. Very soft fillings may need a sturdier loaf or a thinner layer of spread.
The Picnic Table Is Calling
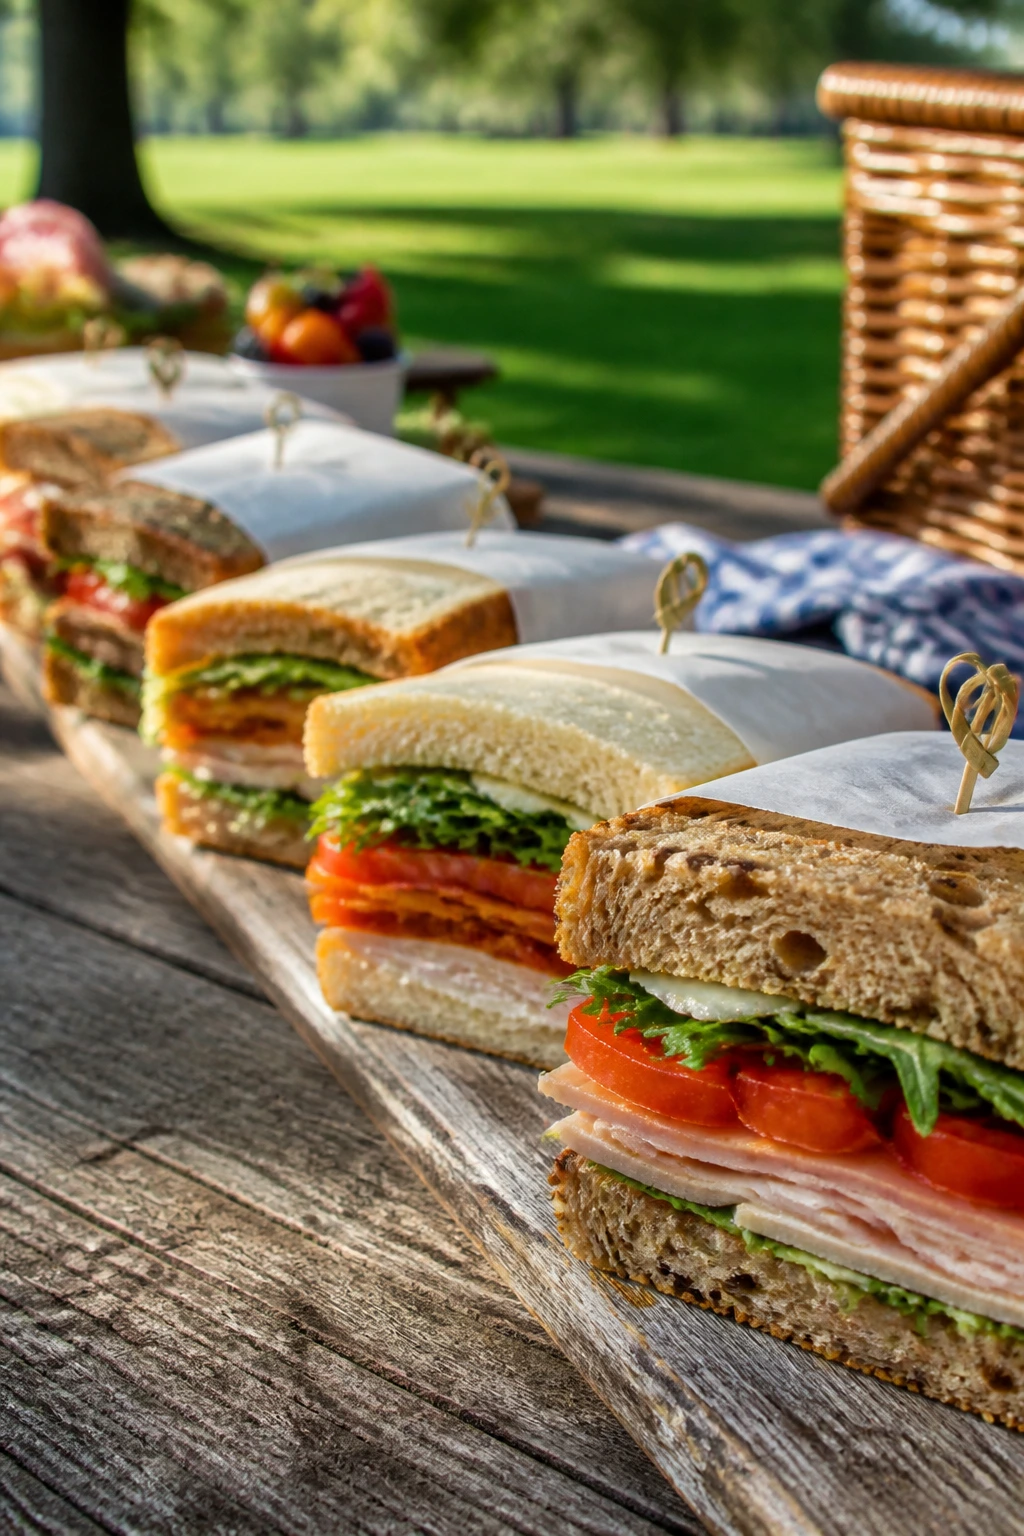
A good picnic sandwich doesn’t need to be fancy. It needs to be smart. Once you know how to balance moisture, texture, and flavor, you can build a spread that holds up through transport, shade, and a long pause while somebody hunts for napkins.
That’s the real appeal of these picnic lunch sandwich recipes: they’re practical, but they don’t taste practical. They taste like tomatoes that were actually ripe, pickles that actually matter, and bread that was chosen on purpose. Make a few cold ones, a few sturdy ones, and one or two that lean a little indulgent, and the whole table starts to feel more alive.
Pick the sandwiches that match your cooler and your crowd, wrap them well, and keep the ice packs close. The rest is just a very good lunch waiting to happen.