
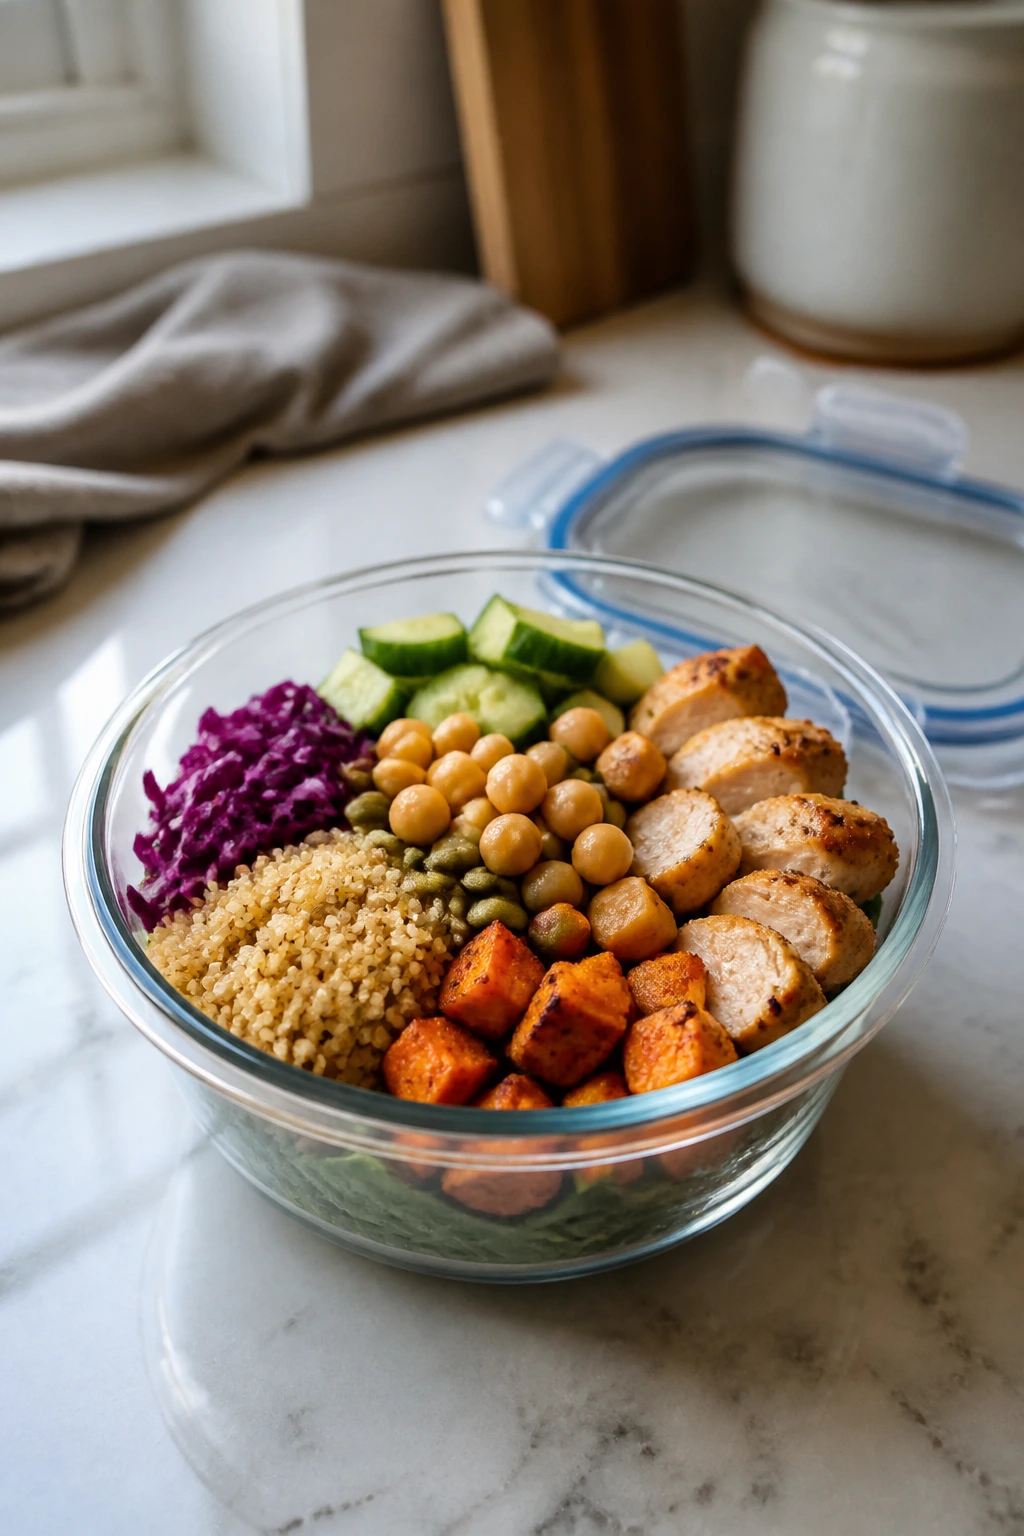
A bowl has a brutally honest job: it has to taste good cold, survive the fridge, and still feel like lunch when you open the lid on day three. That is why healthy bowls for meal prep Sundays work so well when they’re built with a little intention instead of hope and a leftover chicken breast.
The best ones are never fussy. They lean on grains that stay fluffy, vegetables that keep their shape, proteins that reheat without turning leathery, and sauces that wake everything up after the container has been sitting in the fridge. Rice and quinoa are steady. Farro has chew. Roasted sweet potatoes soften just enough to feel rich without collapsing. And a sharp dressing — lemon, tahini, yogurt, sesame, miso — does the heavy lifting that plain meal prep containers usually fail to do.
I like bowls because they solve the problem most meal prep plans ignore: food has to be eaten, not admired. A bowl gives you structure without boredom. One week it’s Mediterranean chicken with quinoa and cucumbers. Another week it’s salmon with rice and ginger. If you keep the building blocks smart, the flavors can wander all over the map while the prep stays calm and predictable.
Why These Bowls Earn Their Spot in the Fridge
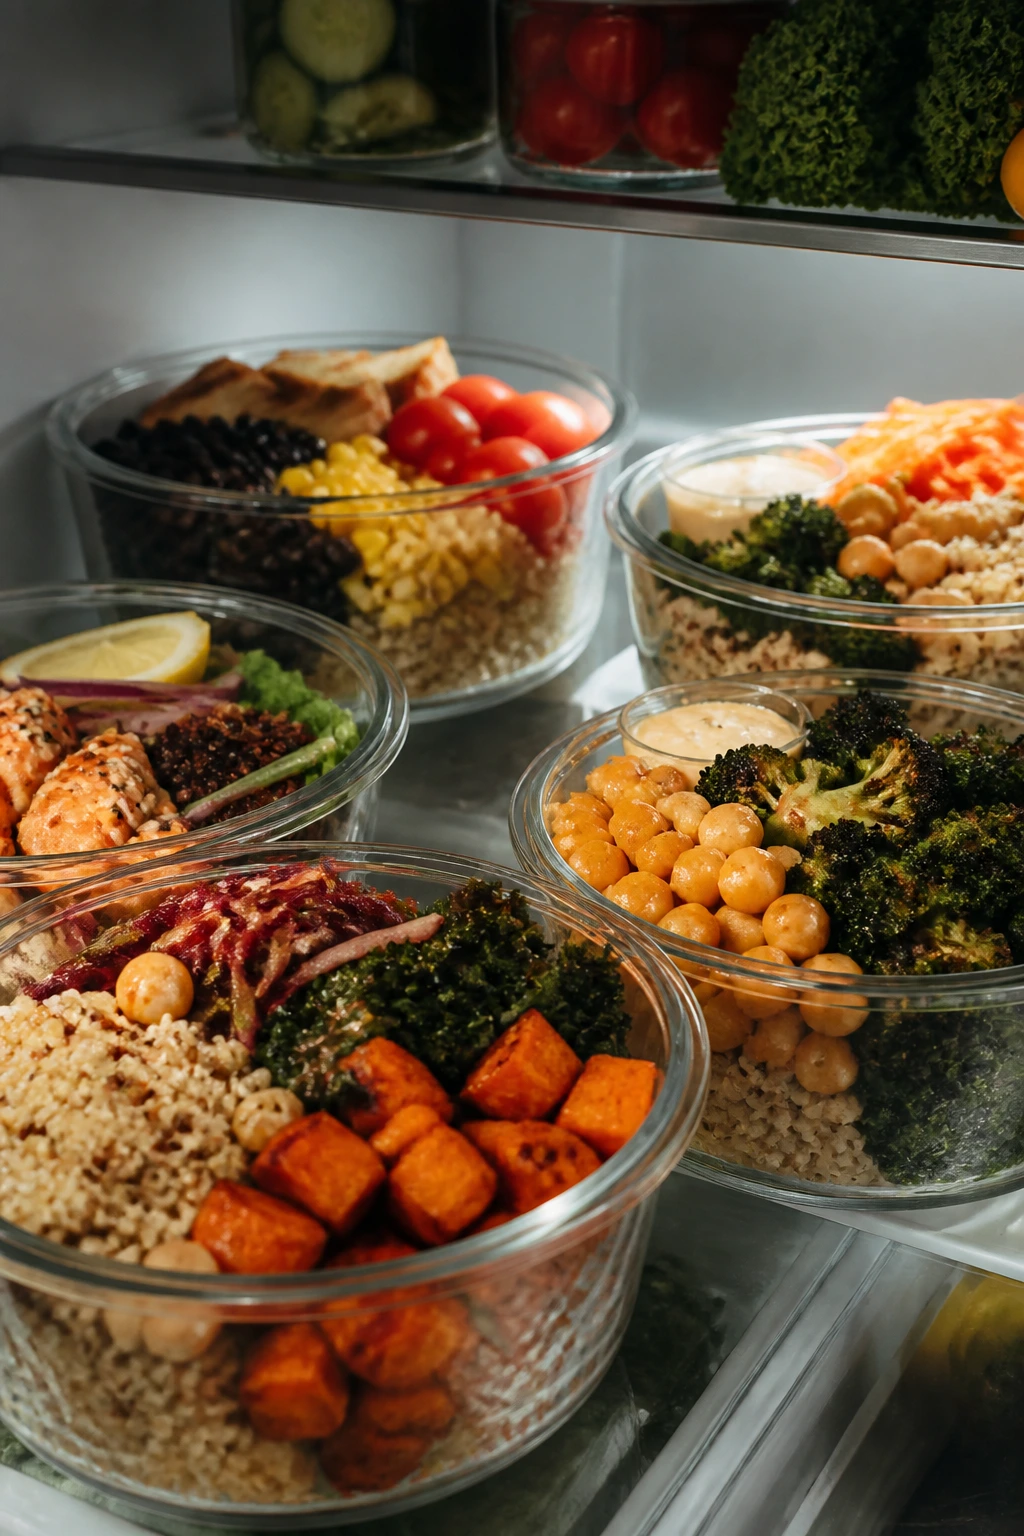
- Fridge-Friendly Texture: The grains, beans, and roasted vegetables in this collection hold up for 3 to 4 days without turning to mush.
- Real Balance: Each bowl puts protein, fiber, and a sharp sauce in the same container, so lunch tastes finished instead of assembled out of desperation.
- One Prep Session, Many Outcomes: Cook a grain, roast a tray of vegetables, and whisk one dressing; that same Sunday work can cover several meals.
- Cold or Reheated: Some of these bowls eat beautifully straight from the fridge, while others warm up in a minute or two and still keep their shape.
- Easy to Scale: Double the rice, add an extra protein portion, and you’ve got lunches for the week without changing the method.
- Less Midweek Guesswork: You do the chopping, cooking, and seasoning once, then the weekday version is basically open, top, eat.
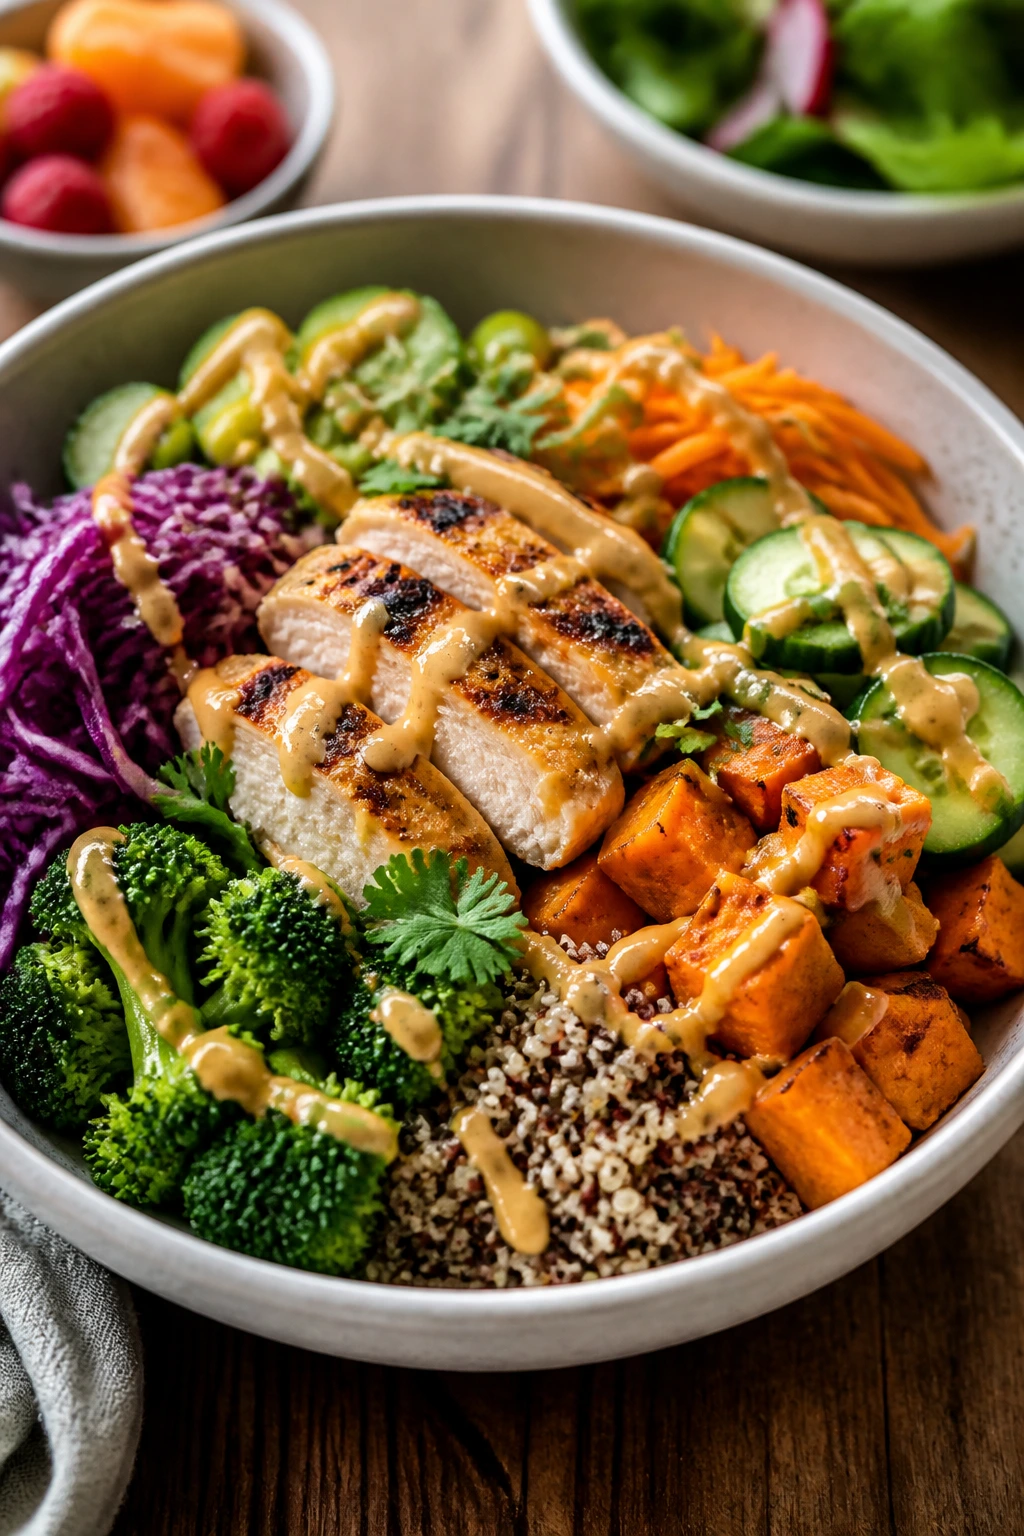
1. Mediterranean Chicken Quinoa Bowl
That lemony chicken-and-quinoa combo has a very specific kind of clean, bright comfort. The cucumbers stay crisp, the feta gives little salty bursts, and the yogurt dressing clings to the grains instead of sliding off into the bottom of the container.
Why It Works:
Quinoa keeps its shape after chilling, which matters when the bowl sits in the fridge for a few days. The chicken is seasoned aggressively enough to taste good cold, and the lemon-garlic yogurt brings moisture back without making the bowl heavy.
Key Ingredients:
- 1 cup dry quinoa, rinsed well
- 1 1/2 pounds boneless, skinless chicken breasts, cut into cutlets
- 1 tablespoon olive oil
- 1 teaspoon dried oregano
- 1 cucumber, diced
- 1 cup cherry tomatoes, halved
- 1/3 cup crumbled feta
- 1/2 cup plain Greek yogurt
- 1 tablespoon lemon juice plus 1 teaspoon zest
- 1 small garlic clove, finely grated
Quick Steps:
- Cook the quinoa in 2 cups water over medium heat, covered, for 15 minutes, until the grains are fluffy and the little spirals open.
- Season the chicken with olive oil, oregano, salt, and pepper, then sear it in a skillet over medium-high heat for 5 to 6 minutes per side. Cook until the thickest part reaches 165°F / 74°C.
- Stir the yogurt, lemon juice, zest, garlic, and a pinch of salt until smooth.
- Slice the chicken after a 5-minute rest so the juices stay in the meat, not the cutting board.
- Divide quinoa, cucumber, tomatoes, and chicken into containers, then spoon the dressing over the top or pack it separately.
Equipment for This Recipe:
- Medium saucepan with lid
- 10- to 12-inch skillet
- Small mixing bowl for the dressing
How to Serve This Dish:
Pile it into a wide bowl so the colors stay visible and the feta does not vanish under the chicken. A warm pita wedge on the side makes the bowl feel more like lunch and less like homework.
Pro Tips for This Recipe:
- Rinse the quinoa until the water runs mostly clear; it cuts the bitter edge that can show up in meal prep bowls.
- Cut the chicken into even cutlets so it cooks quickly and stays juicy.
- Keep the cucumbers dry after dicing; wet cucumbers water down the bowl by day two.
Variations on This Dish:
- Salmon Swap: Use roasted salmon fillets instead of chicken and shorten the cooking time to 10 to 12 minutes at 400°F / 205°C.
- Vegetarian Version: Replace the chicken with roasted chickpeas tossed in oregano and garlic.
Common Mistakes to Avoid with This Dish:
- Packing the dressing too early: The quinoa will soak it up and the bowl will taste flat. Keep the sauce separate if you want a brighter lunch.
- Overcooking the chicken: Dry chicken turns stringy when chilled. Pull it the second it hits 165°F / 74°C.
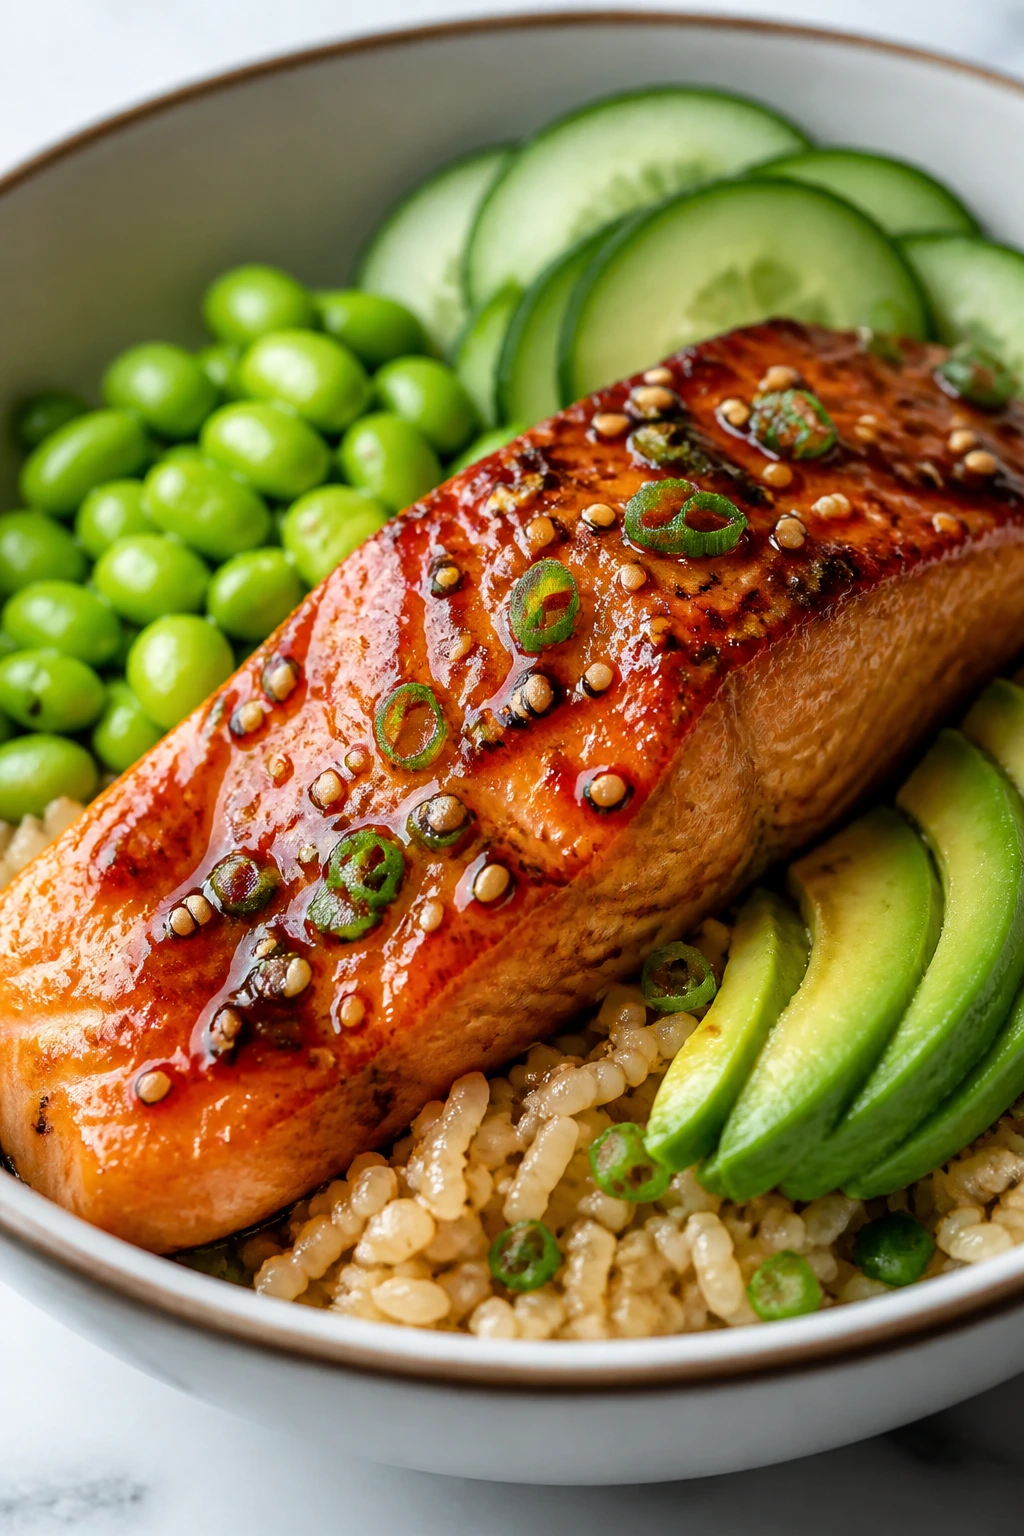
2. Ginger Miso Salmon Rice Bowl
Salmon does something useful in meal prep: it tastes rich without needing a big pile of ingredients. Here, the miso glaze turns sticky and savory in the oven, and the rice catches every drop of it.
Why It Works:
Brown rice or jasmine rice gives you a neutral base that can handle strong seasoning. Miso, ginger, and sesame oil bring enough salt and depth that you do not need a heavy sauce, which helps the bowl stay light even with salmon on top.
Key Ingredients:
- 1 1/2 cups cooked rice, warm or chilled
- 4 salmon fillets, about 5 ounces each
- 2 tablespoons white miso paste
- 1 tablespoon soy sauce or tamari
- 1 tablespoon honey
- 1 teaspoon grated fresh ginger
- 1 cup shelled edamame
- 1 cucumber, thinly sliced
- 1 avocado, sliced just before serving
- 1 teaspoon toasted sesame oil
Quick Steps:
- Whisk the miso, soy sauce, honey, ginger, and sesame oil into a smooth glaze.
- Place the salmon on a lined sheet pan and brush the tops with half the glaze.
- Bake at 400°F / 205°C for 10 to 12 minutes, until the fish flakes at the center and the glaze looks glossy.
- Warm or chill the rice and edamame, then layer them in bowls with cucumber and avocado.
- Spoon on the remaining glaze and finish with sesame seeds if you have them.
Equipment for This Recipe:
- Rimmed sheet pan
- Parchment paper
- Small whisk or fork
How to Serve This Dish:
This bowl looks best in a shallow container or bowl where the salmon can sit on top instead of being buried. A few scallions and a squeeze of lime make it taste fresher than the fridge suggests.
Pro Tips for This Recipe:
- Line the pan with parchment. Miso glaze sticks hard, and nobody enjoys scrubbing baked sugar off a sheet pan.
- Add the avocado only when you’re eating, not when you’re packing.
- If the salmon fillets are uneven, tuck the thin ends under so they cook at the same speed.
Variations on This Dish:
- Spicy Miso: Stir in 1 teaspoon of gochujang or chili paste for a little heat.
- Tofu Bowl: Use pressed tofu slices and bake them for 25 minutes instead of salmon.
Common Mistakes to Avoid with This Dish:
- Using too much glaze: A thick layer burns before the salmon finishes. Brush lightly, then add the rest at the end.
- Skipping the rest time for the fish: A 2- to 3-minute pause keeps the flakes intact.
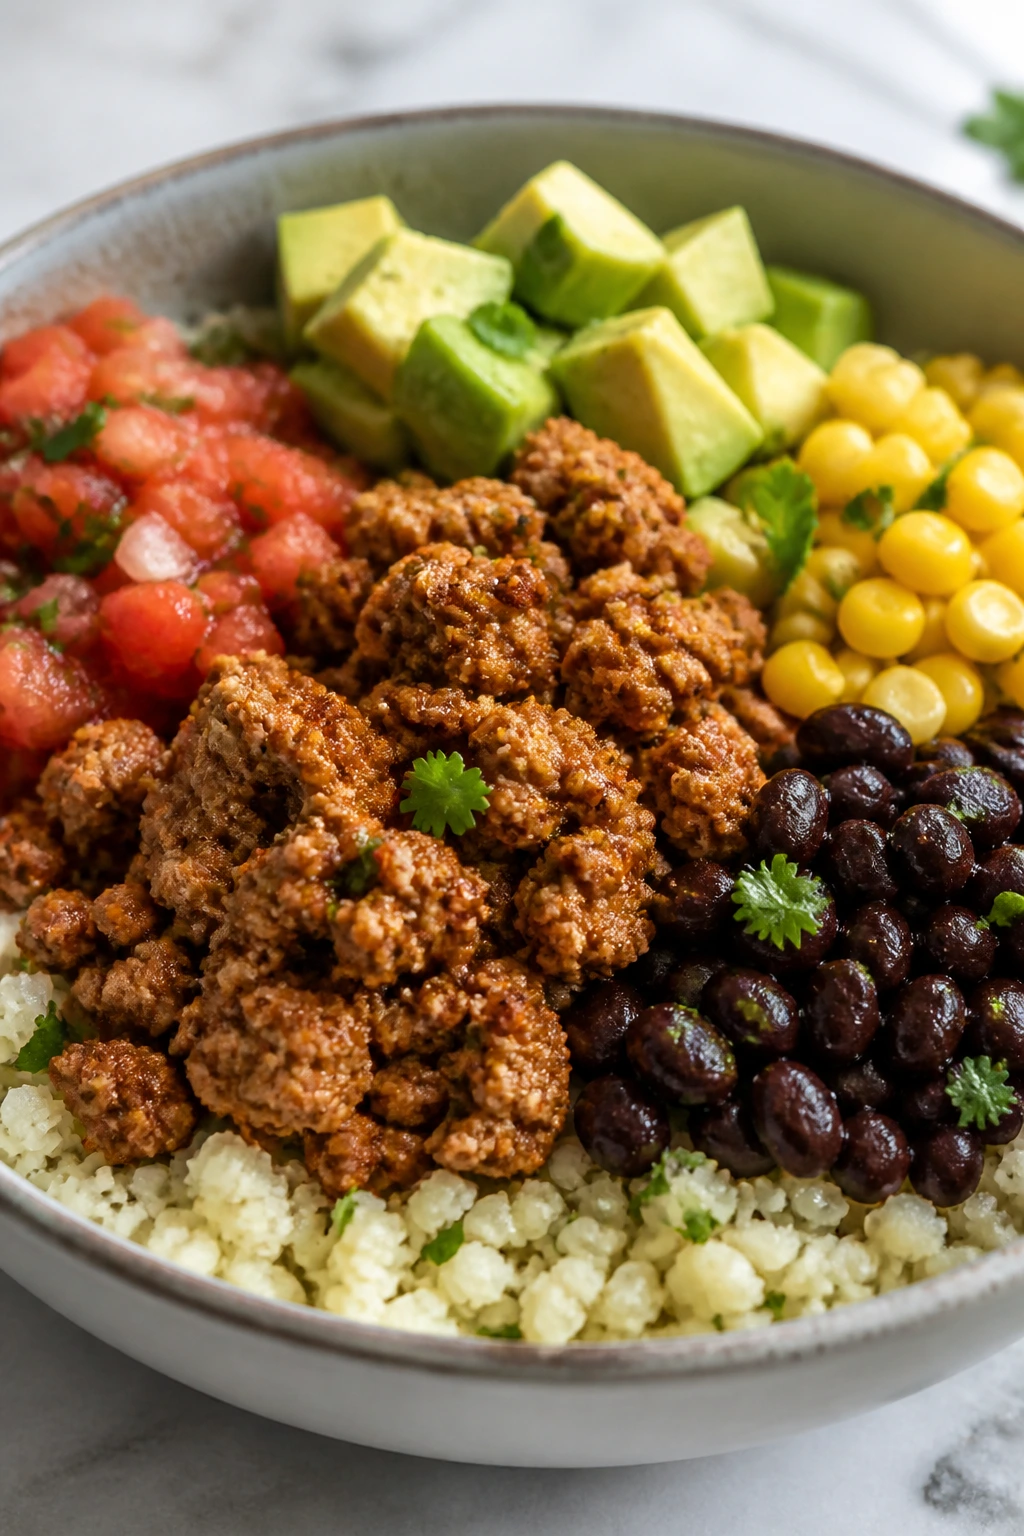
3. Taco Turkey Cauliflower Rice Bowl
This is the bowl you make when you want taco-night flavor without the tortilla pileup. The turkey stays crumbly and seasoned, the cauliflower rice soaks up salsa, and the avocado cools everything down.
Why It Works:
Ground turkey cooks fast, which makes it one of the easiest proteins to batch on a Sunday. Cauliflower rice keeps the bowl lighter than a burrito bowl loaded with extra starch, but black beans and corn bring enough substance that it still feels like lunch.
Key Ingredients:
- 1 pound ground turkey
- 4 cups cauliflower rice
- 1 tablespoon olive oil
- 2 teaspoons taco seasoning
- 1 can black beans, rinsed and drained
- 1 cup corn kernels, thawed if frozen
- 1/2 cup salsa
- 1 avocado, diced
- 1 lime, cut into wedges
- 2 tablespoons chopped cilantro
Quick Steps:
- Heat the oil in a skillet over medium-high heat and cook the turkey for 5 to 7 minutes, breaking it up with a spoon.
- Stir in taco seasoning and 2 tablespoons water, then cook 1 minute more until the meat smells warm and toasted.
- Sauté the cauliflower rice for 4 to 5 minutes in a separate pan until it is tender but not soggy.
- Warm the beans and corn, then divide the rice, turkey, beans, and corn into containers.
- Top with salsa, avocado, cilantro, and a squeeze of lime right before eating.
Equipment for This Recipe:
- Large skillet
- Secondary skillet or microwave-safe bowl
- Cutting board for the avocado and lime
How to Serve This Dish:
Serve it with a spoon, not a fork. The salsa and avocado make it loose enough to eat like a proper bowl, and a few crushed tortilla chips on top add crunch if you are eating it the same day.
Pro Tips for This Recipe:
- Brown the turkey until some of the edges get a little color; pale turkey tastes flat.
- Drain the beans well so the bowl does not turn watery in the fridge.
- Pack avocado separately if the lunch is more than a few hours away.
Variations on This Dish:
- Chipotle Version: Swap the salsa for chipotle salsa and add a pinch of smoked paprika.
- Vegetarian Version: Use crumbled tofu or extra black beans instead of turkey.
Common Mistakes to Avoid with This Dish:
- Overcooking cauliflower rice: Five minutes is enough. If it goes soft, the bowl gets gluey.
- Adding avocado too early: It browns and gets bruised-looking fast.
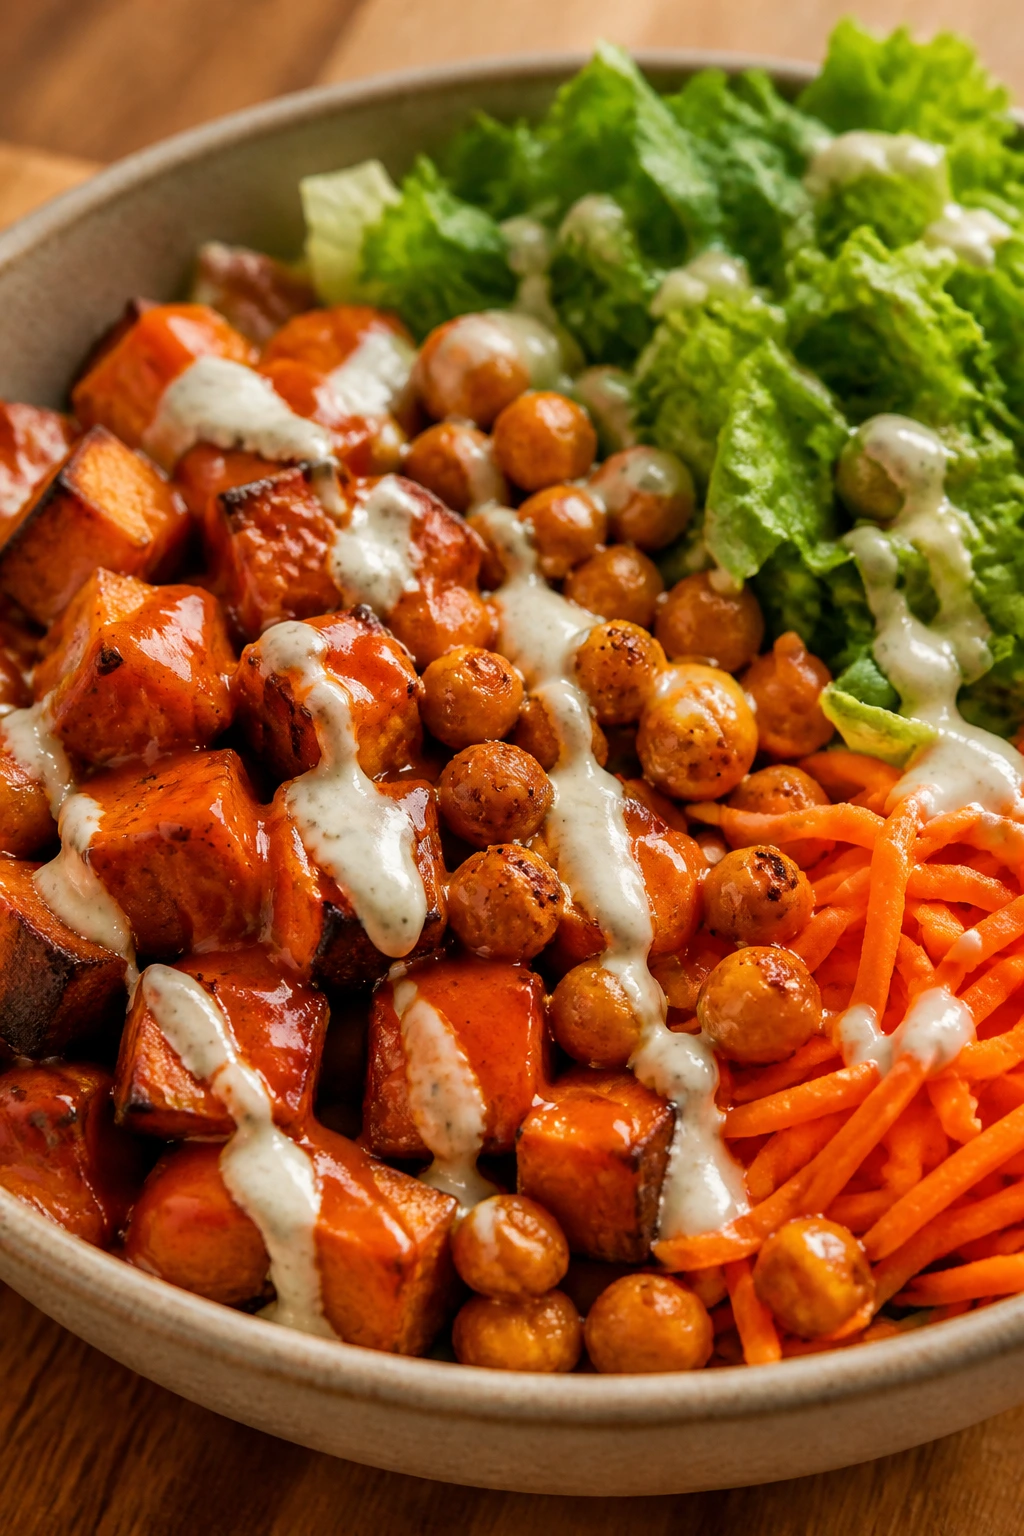
4. Buffalo Chickpea Sweet Potato Bowl
Buffalo sauce can feel loud, but it behaves nicely when you ground it with roasted sweet potato and chickpeas. The result is spicy, creamy, and a little tangy from the yogurt ranch.
Why It Works:
Chickpeas roast into crisp little edges when they’re dried well first, and sweet potatoes add the soft, caramelized sweetness that keeps buffalo heat from taking over. This bowl eats well cold, which is one reason it keeps showing up in lunch containers.
Key Ingredients:
- 2 medium sweet potatoes, peeled and cubed
- 1 can chickpeas, rinsed, drained, and patted dry
- 1 tablespoon olive oil
- 2 tablespoons buffalo sauce
- 2 cups chopped romaine or chopped kale
- 1/2 cup shredded carrots
- 1/3 cup plain Greek yogurt
- 1 tablespoon ranch seasoning or 1 teaspoon dill plus garlic powder
- 1 celery stalk, sliced
- Salt and black pepper
Quick Steps:
- Toss the sweet potatoes with olive oil, salt, and pepper, then roast at 425°F / 220°C for 20 minutes.
- Toss the chickpeas with buffalo sauce and roast them on the same pan for the last 12 to 15 minutes, until the edges look crisp.
- Mix the yogurt with ranch seasoning and a splash of water until it drizzles cleanly.
- Divide greens, carrots, sweet potatoes, and chickpeas into containers.
- Spoon the yogurt ranch over the top and finish with celery.
Equipment for This Recipe:
- Rimmed sheet pan
- Mixing bowl
- Small jar or cup for the ranch dressing
How to Serve This Dish:
This one needs height. Stack the sweet potatoes and chickpeas over the greens so the bowl looks hearty instead of like a salad with attitude. A few extra celery slices on top bring back the cold crunch you lose in the oven.
Pro Tips for This Recipe:
- Dry the chickpeas well before roasting or they steam instead of crisping.
- Roast the sweet potatoes in a single layer; crowded cubes soften.
- Keep the ranch separate if you want the greens to stay perky.
Variations on This Dish:
- Vegan Version: Use dairy-free yogurt and a vegan ranch blend.
- Extra-Filling Version: Add 1/2 cup cooked quinoa under the greens.
Common Mistakes to Avoid with This Dish:
- Using wet chickpeas: They turn leathery instead of crisp.
- Putting buffalo sauce on the sweet potatoes too early: The sugar in the sauce can scorch before the potatoes finish.
5. Korean Beef Broccoli Rice Bowl
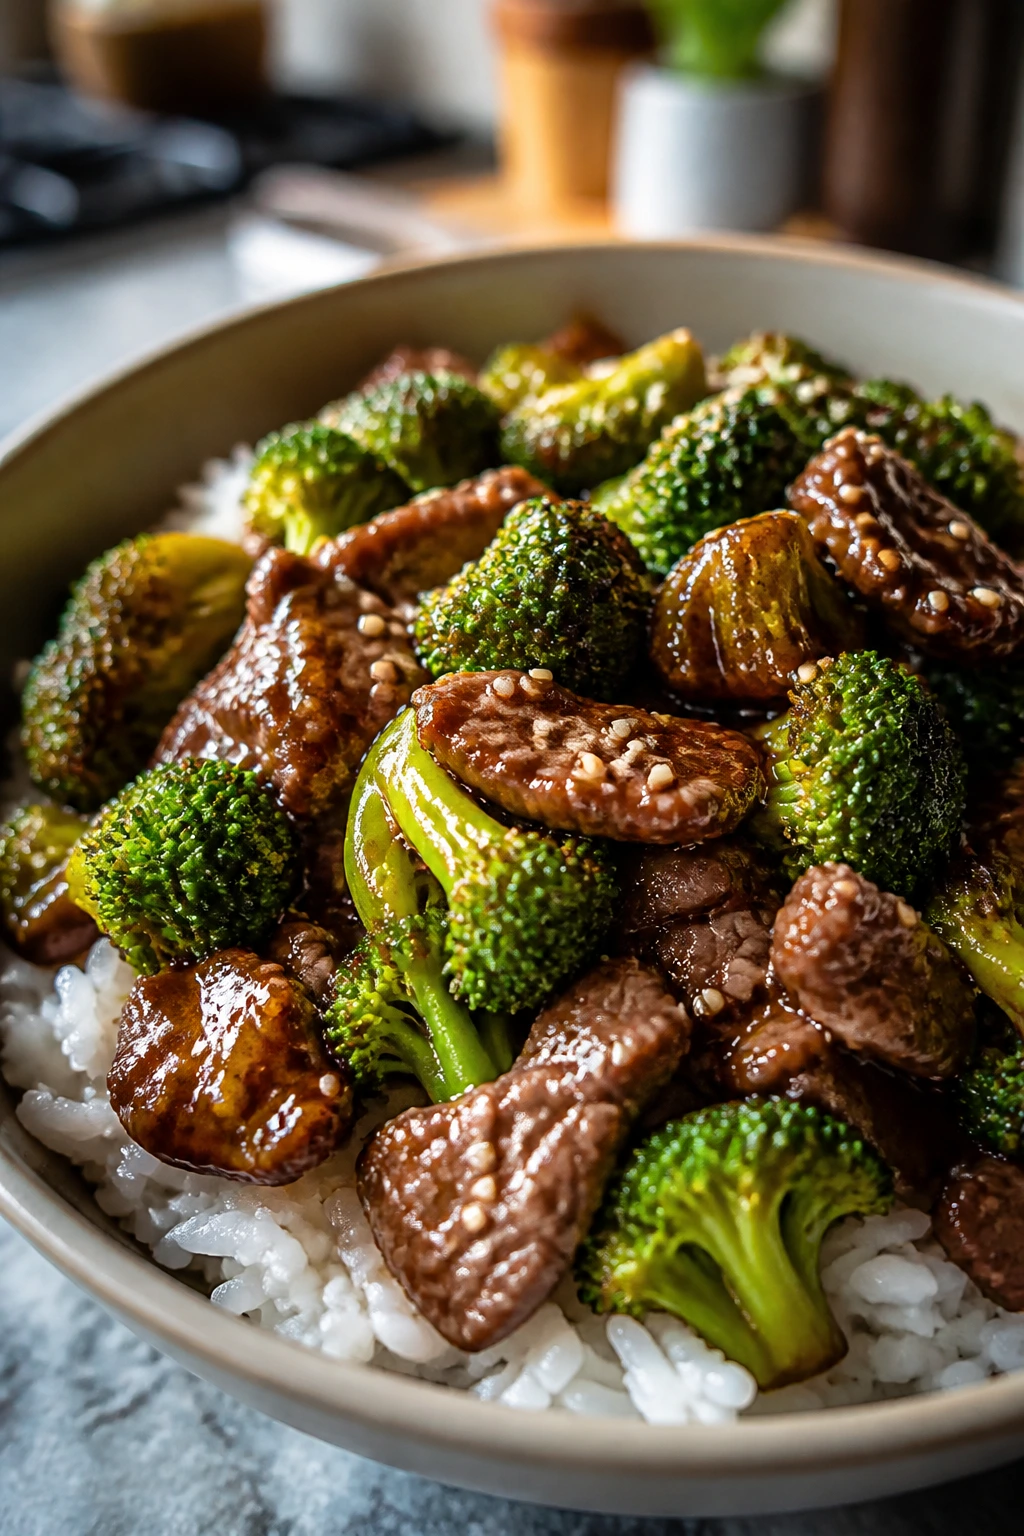
This bowl has that glossy, takeout-style look that makes lunch feel more deliberate than it really is. The beef is savory and a little sweet, the broccoli stays green, and the rice catches the sauce without getting drowned in it.
Why It Works:
Lean ground beef or thinly sliced sirloin cooks quickly, which is useful when you want flavor without a long stovetop session. A mix of soy, garlic, ginger, and a touch of sesame oil gives the bowl enough punch that you do not need to bury it in sauce.
Key Ingredients:
- 1 pound lean ground beef or 1 pound thinly sliced sirloin
- 3 cups cooked rice
- 3 cups broccoli florets
- 2 tablespoons soy sauce or tamari
- 1 tablespoon brown sugar or honey
- 1 teaspoon grated ginger
- 2 cloves garlic, minced
- 1 teaspoon sesame oil
- 1 carrot, cut into ribbons
- 1 tablespoon sesame seeds
Quick Steps:
- Steam or blanch the broccoli for 2 to 3 minutes until bright green and just tender.
- Brown the beef in a skillet over medium-high heat for 5 to 6 minutes, then add garlic and ginger for 30 seconds.
- Stir in soy sauce, brown sugar, and sesame oil, cooking until the sauce coats the meat.
- Divide rice into bowls and top with broccoli, beef, carrot ribbons, and sesame seeds.
- Pack a little extra sauce on the side if you like a wetter bowl.
Equipment for This Recipe:
- Large skillet
- Medium saucepan or steamer basket
- Peeler for the carrot ribbons
How to Serve This Dish:
I like this bowl with the beef piled in one section and the broccoli in another, because the colors look better that way and the rice stays visible. A few sliced scallions on top add sharpness that the fridge can’t fake.
Pro Tips for This Recipe:
- Use lean beef so the bowl doesn’t turn greasy after chilling.
- Don’t overcook the broccoli; it should still have a bit of bite for reheating.
- If you’re using sirloin, slice it thin against the grain so it stays tender.
Variations on This Dish:
- Turkey Swap: Ground turkey works if you add an extra teaspoon of sesame oil.
- Spicy Version: Stir in 1 to 2 teaspoons of gochujang.
Common Mistakes to Avoid with This Dish:
- Letting the garlic burn: It turns bitter in seconds. Add it after the beef has browned.
- Using too much sugar: A little gloss is enough; too much makes the bowl sticky instead of savory.
6. Thai Peanut Tofu Noodle Bowl
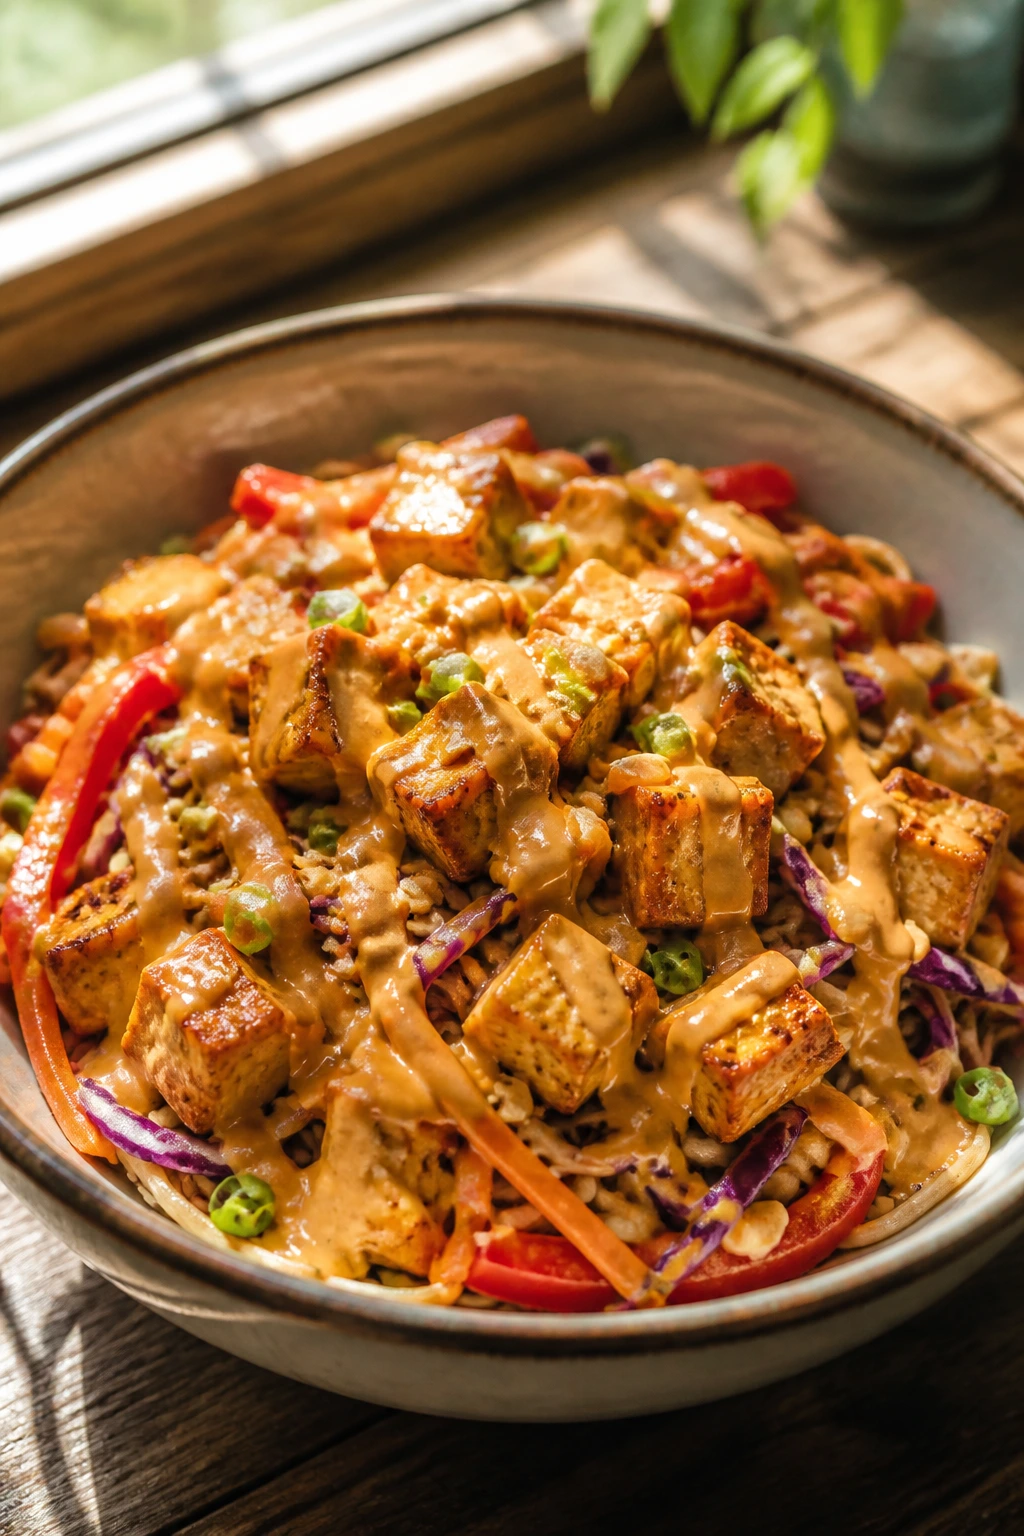
The peanut sauce is what makes this bowl feel like a proper lunch instead of a pile of noodles. It is creamy, a little salty, and sharp enough from lime that you keep going back for another forkful.
Why It Works:
Extra-firm tofu holds up better than soft tofu in the fridge, especially when it is baked until the edges firm up. Rice noodles or soba noodles carry the sauce well, and shredded cabbage stays crunchy even after a day or two.
Key Ingredients:
- 14 ounces extra-firm tofu, pressed and cubed
- 6 ounces soba noodles or rice noodles
- 2 cups shredded cabbage
- 1 red bell pepper, thinly sliced
- 1 carrot, julienned
- 3 tablespoons peanut butter
- 1 tablespoon soy sauce or tamari
- 1 tablespoon lime juice
- 1 teaspoon grated ginger
- 1 teaspoon sesame oil
Quick Steps:
- Press the tofu for 15 minutes, then cube it and bake at 425°F / 220°C for 20 minutes, flipping once.
- Cook the noodles according to the package directions, then rinse briefly under cool water so they do not clump.
- Whisk the peanut butter, soy sauce, lime juice, ginger, sesame oil, and 2 to 3 tablespoons warm water into a smooth sauce.
- Toss the noodles with cabbage, pepper, carrot, and half the sauce.
- Add tofu on top and spoon on the rest of the sauce before serving.
Equipment for This Recipe:
- Baking sheet
- Saucepan for noodles
- Large mixing bowl
How to Serve This Dish:
This is a fork-and-spoon bowl, not a formal pasta situation. A handful of chopped peanuts and cilantro gives it crunch and a fresher smell the day it comes out of the fridge.
Pro Tips for This Recipe:
- Press the tofu longer than you think you need to; extra water weakens the bake.
- Warm water helps the peanut sauce turn glossy instead of thick and stubborn.
- Rinse the noodles after cooking only enough to stop the cooking, not enough to make them cold and slippery.
Variations on This Dish:
- Chicken Version: Use sliced cooked chicken breast instead of tofu.
- Nut-Free Version: Swap peanut butter for sunflower seed butter.
Common Mistakes to Avoid with This Dish:
- Using too little sauce: Noodles drink it up. Make the full amount.
- Skipping the crunch vegetables: Without cabbage or peppers, the bowl turns soft and monotonous.
7. Greek Tuna Farro Bowl
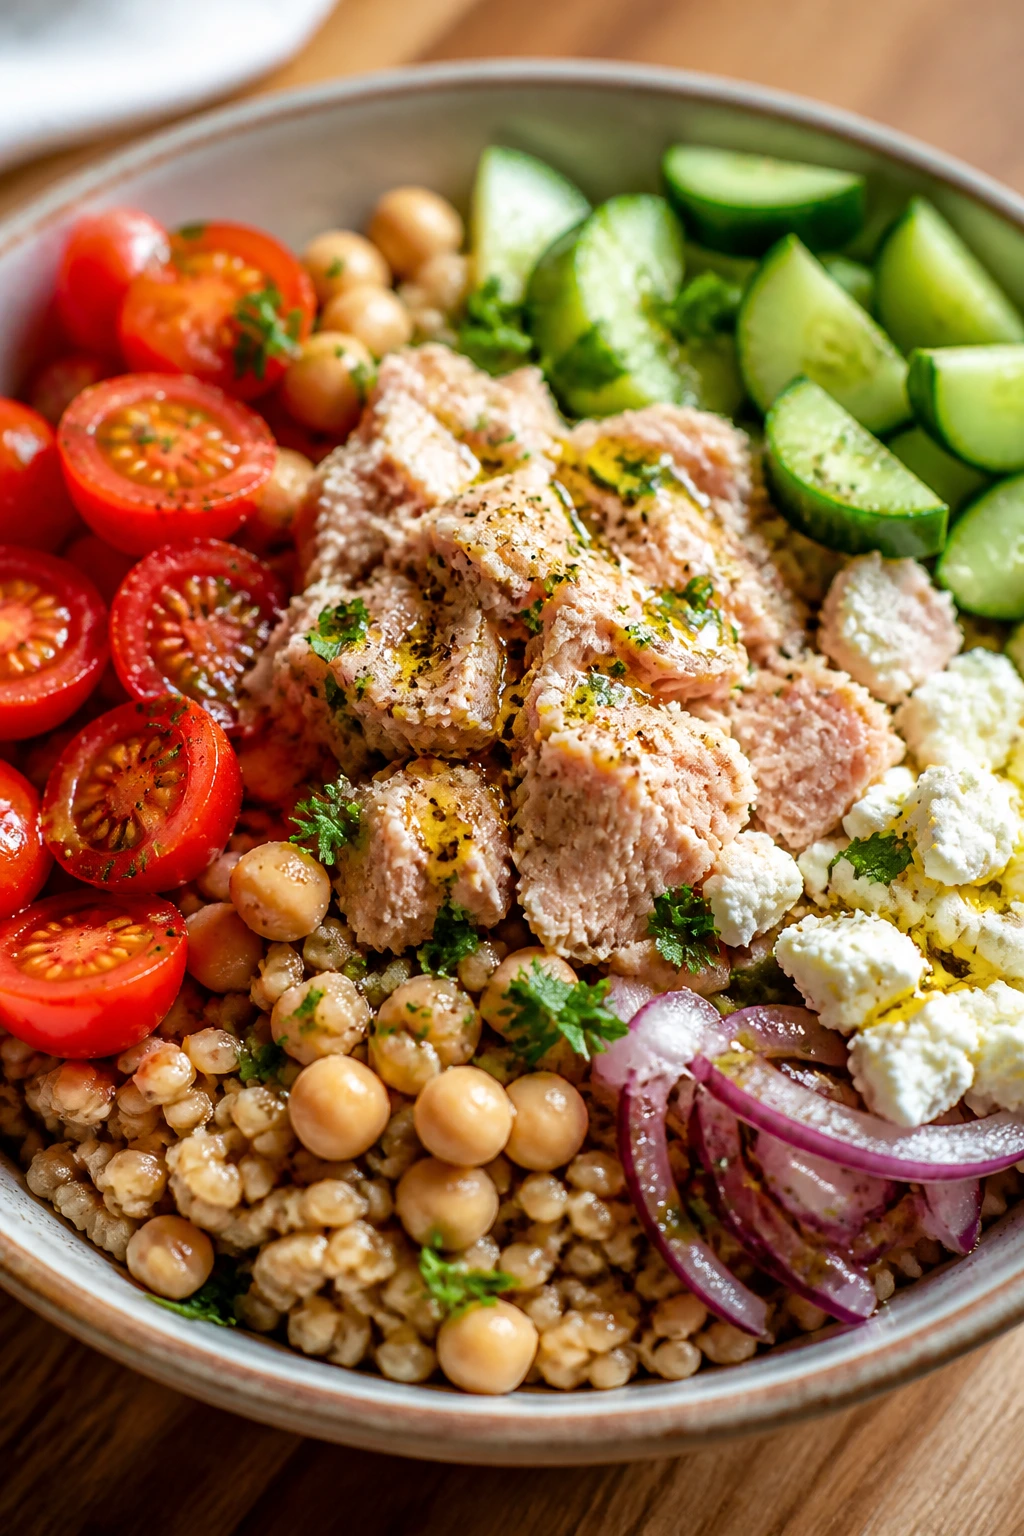
Canned tuna can be lazy in the wrong bowl and smart in the right one. Here, it gets dressed with lemon, dill, cucumber, and chickpeas, so the whole thing lands somewhere between lunch salad and proper grain bowl.
Why It Works:
Farro has a firm bite that stands up to canned fish better than softer grains. The lemon and olive oil keep the tuna from tasting dry, and chickpeas make the bowl filling enough that you won’t hunt for crackers two hours later.
Key Ingredients:
- 1 cup dry farro
- 2 cans tuna in olive oil or water, drained
- 1 cucumber, diced
- 1 cup cherry tomatoes, quartered
- 1/2 cup canned chickpeas, rinsed and drained
- 1/4 red onion, very thinly sliced
- 2 tablespoons olive oil
- 1 tablespoon lemon juice
- 1 tablespoon chopped dill
- 1/3 cup crumbled feta
Quick Steps:
- Simmer the farro in salted water for 20 to 25 minutes, until it’s chewy but not hard in the center.
- Mix the tuna with olive oil, lemon juice, dill, and a pinch of salt.
- Toss the cucumber, tomatoes, chickpeas, and onion in a separate bowl.
- Divide the farro into containers and pile the tuna and vegetables on top.
- Finish with feta just before eating so it stays crumbly.
Equipment for This Recipe:
- Medium saucepan
- Colander or fine sieve
- Mixing bowl
How to Serve This Dish:
This one is fine cold, which makes it a strong desk lunch. Add a few olives or a spoonful of hummus if you want the bowl to lean more Mediterranean and less pantry-driven.
Pro Tips for This Recipe:
- Salt the farro water well; the grain should taste like something, not like filler.
- Use tuna packed in olive oil if you want a richer bowl with less dressing.
- Slice the onion paper-thin or it can take over the whole container.
Variations on This Dish:
- White Bean Version: Swap chickpeas for cannellini beans.
- No-Feta Version: Use chopped parsley and a little extra lemon instead.
Common Mistakes to Avoid with This Dish:
- Overcooking the farro: Soft farro gets gluey in the fridge. Stop when it still has chew.
- Mixing tuna with wet vegetables too early: The bowl can get watery by day two.
8. Teriyaki Tempeh Edamame Bowl
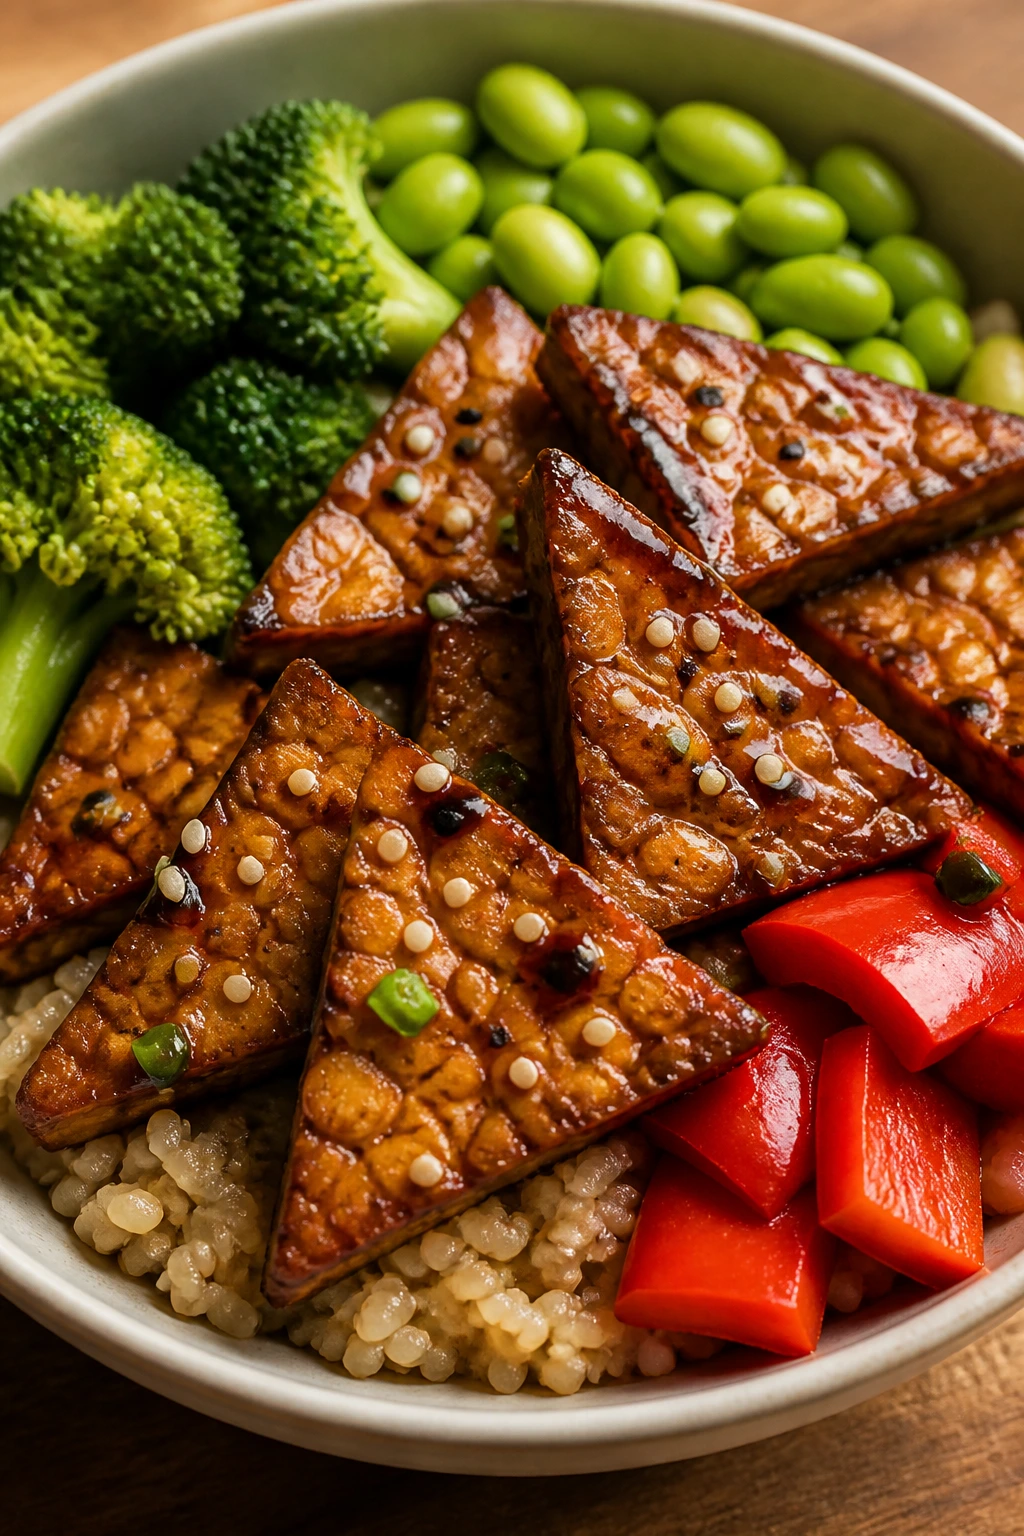
Tempeh has a nutty edge that tofu does not have, and that’s a good thing here. Once it gets a little browned and sticky with teriyaki sauce, it tastes sturdy enough to anchor the whole bowl.
Why It Works:
Tempeh keeps its shape during reheating, which makes it one of the better plant proteins for meal prep. Edamame and broccoli add more protein and texture, and the rice gives the sauce somewhere to settle.
Key Ingredients:
- 8 ounces tempeh, sliced into triangles
- 2 cups cooked brown rice
- 2 cups broccoli florets
- 1 cup shelled edamame
- 1 red bell pepper, sliced
- 3 tablespoons teriyaki sauce
- 1 teaspoon sesame oil
- 1 tablespoon rice vinegar
- 1 tablespoon sesame seeds
- 2 scallions, sliced
Quick Steps:
- Steam the tempeh for 10 minutes, then pat it dry. That step cuts the bitter edge.
- Sear the tempeh in a skillet with sesame oil for 3 to 4 minutes per side.
- Add teriyaki sauce and rice vinegar, then cook 1 minute more until glossy.
- Steam or roast the broccoli until bright green and tender.
- Build the bowls with rice, edamame, pepper, broccoli, and tempeh; finish with sesame seeds and scallions.
Equipment for This Recipe:
- Skillet
- Steamer basket or microwave-safe bowl
- Sharp knife for the tempeh and vegetables
How to Serve This Dish:
Serve it warm, because the teriyaki glaze tastes thicker and richer that way. A sprinkle of toasted sesame seeds is small, but it matters; the bowl needs that little bit of crunch.
Pro Tips for This Recipe:
- Don’t skip the steam on the tempeh. It changes the flavor more than most people expect.
- Cook the broccoli just to tender so it doesn’t collapse during reheating.
- Keep a little extra teriyaki sauce aside if you like a saucier bowl.
Variations on This Dish:
- Chicken Version: Use bite-size chicken thigh pieces and cook them through before adding sauce.
- Spicy Version: Stir in a teaspoon of sriracha or chili garlic sauce.
Common Mistakes to Avoid with This Dish:
- Using raw tempeh straight from the package: The flavor can be chalky. Steam it first.
- Letting the sauce reduce too far: Teriyaki turns syrupy fast and can glue the bowl together.
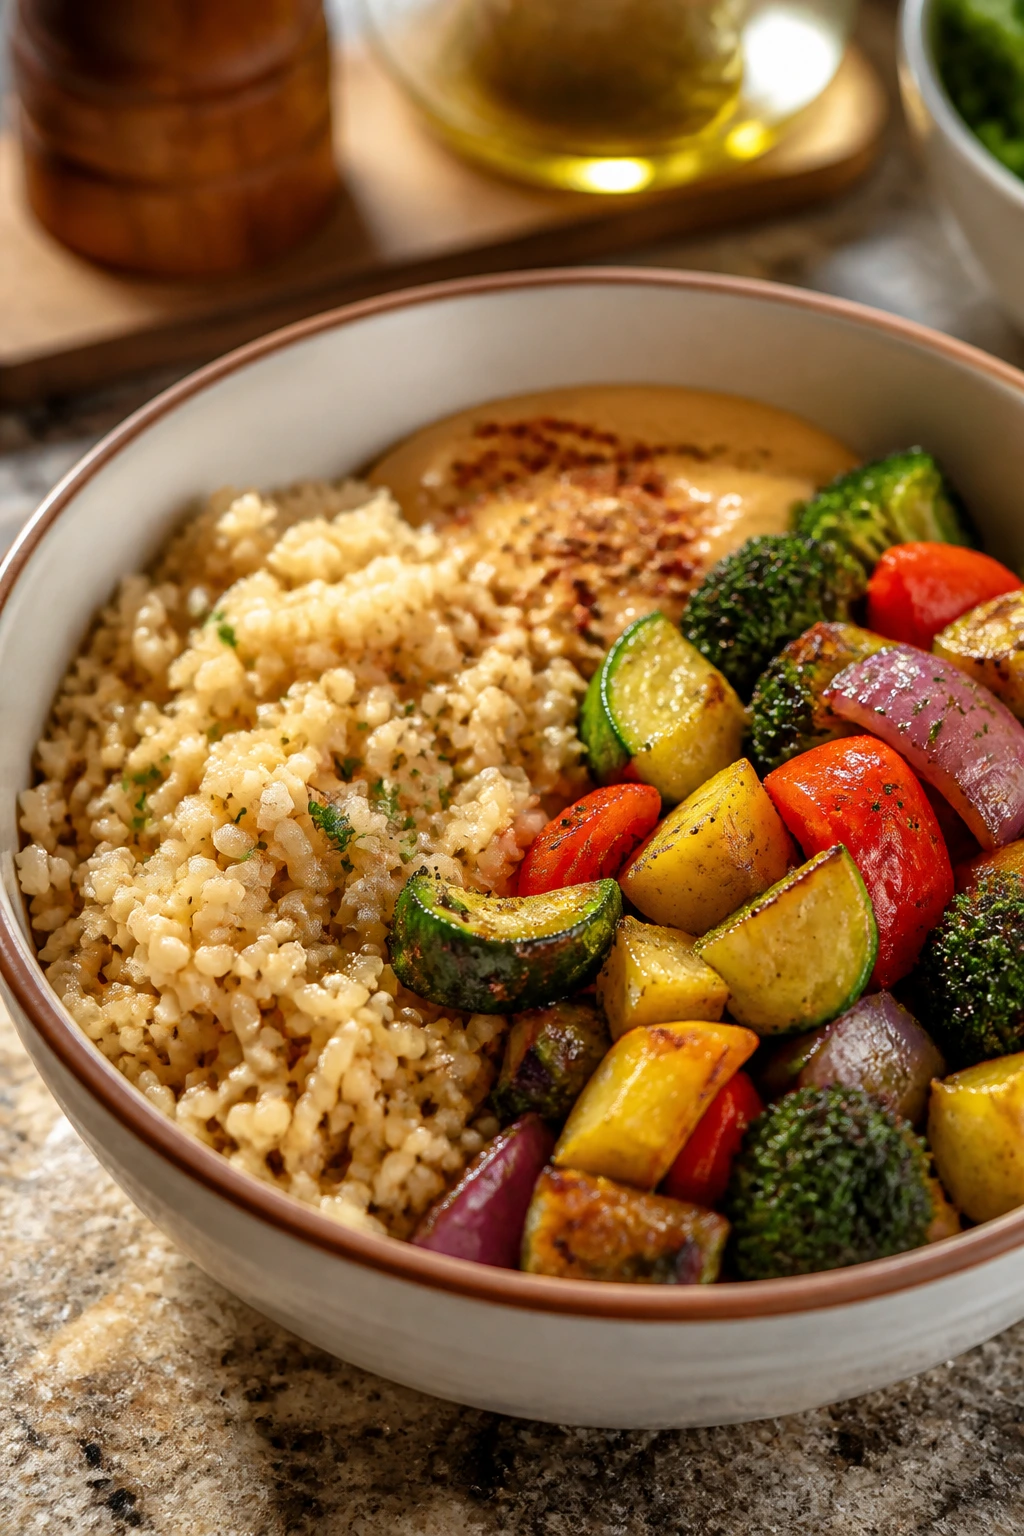
9. Lentil Roasted Vegetable Bowl
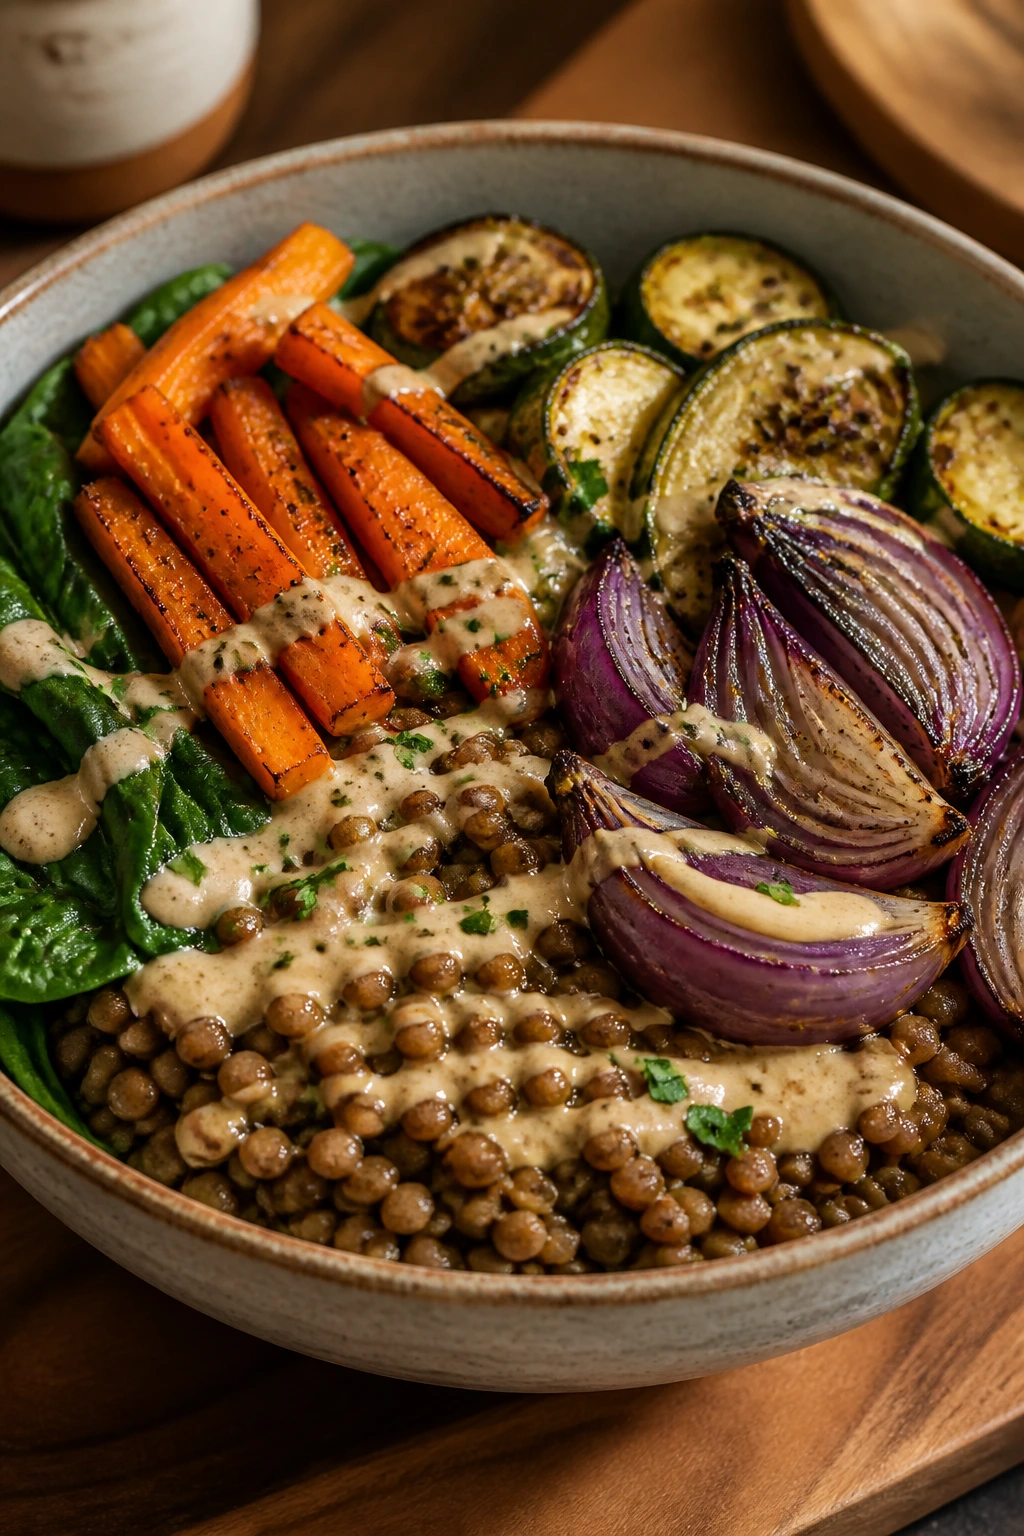
This is the quiet bowl in the group, and I mean that as a compliment. Earthy lentils, caramelized vegetables, and tahini dressing make a lunch that tastes like it was planned, even if Sunday afternoon was chaos.
Why It Works:
Lentils are one of the best meal prep proteins because they reheat cleanly and don’t dry out. Roasted vegetables add sweetness, and tahini gives the bowl the richness that beans sometimes need but do not naturally have.
Key Ingredients:
- 1 cup dry green or brown lentils
- 2 carrots, chopped
- 1 zucchini, chopped
- 1 red onion, cut into wedges
- 2 cups baby spinach
- 2 tablespoons olive oil
- 3 tablespoons tahini
- 1 tablespoon lemon juice
- 1 small garlic clove, grated
- Salt and pepper
Quick Steps:
- Simmer the lentils in salted water for 20 to 25 minutes until tender but not broken.
- Roast the carrots, zucchini, and onion at 425°F / 220°C for 20 to 25 minutes with olive oil, salt, and pepper.
- Whisk tahini, lemon juice, garlic, and 2 to 3 tablespoons water into a pourable sauce.
- Divide spinach, lentils, and roasted vegetables into containers.
- Spoon the tahini sauce over the top when you’re ready to eat.
Equipment for This Recipe:
- Medium pot
- Rimmed sheet pan
- Whisk or small fork
How to Serve This Dish:
A few toasted pumpkin seeds make this bowl feel finished and give it crunch without much effort. If you eat it warm, the spinach softens enough to feel like part of the dish instead of a garnish.
Pro Tips for This Recipe:
- Keep an eye on the lentils near the end; overcooked lentils split and go muddy.
- Roast the vegetables in a single layer so they brown instead of steaming.
- Thin the tahini sauce more than you think you should; it thickens as it sits.
Variations on This Dish:
- Feta Finish: Add crumbled feta right before eating.
- Middle Eastern Version: Use cumin and coriander on the vegetables and add chopped parsley.
Common Mistakes to Avoid with This Dish:
- Salting the lentils at the start with a heavy hand: A little salt is fine, but too much can make the texture dull.
- Packing the tahini sauce on hot vegetables too early: It can seize and look grainy.
10. Chipotle Chicken Black Bean Bowl
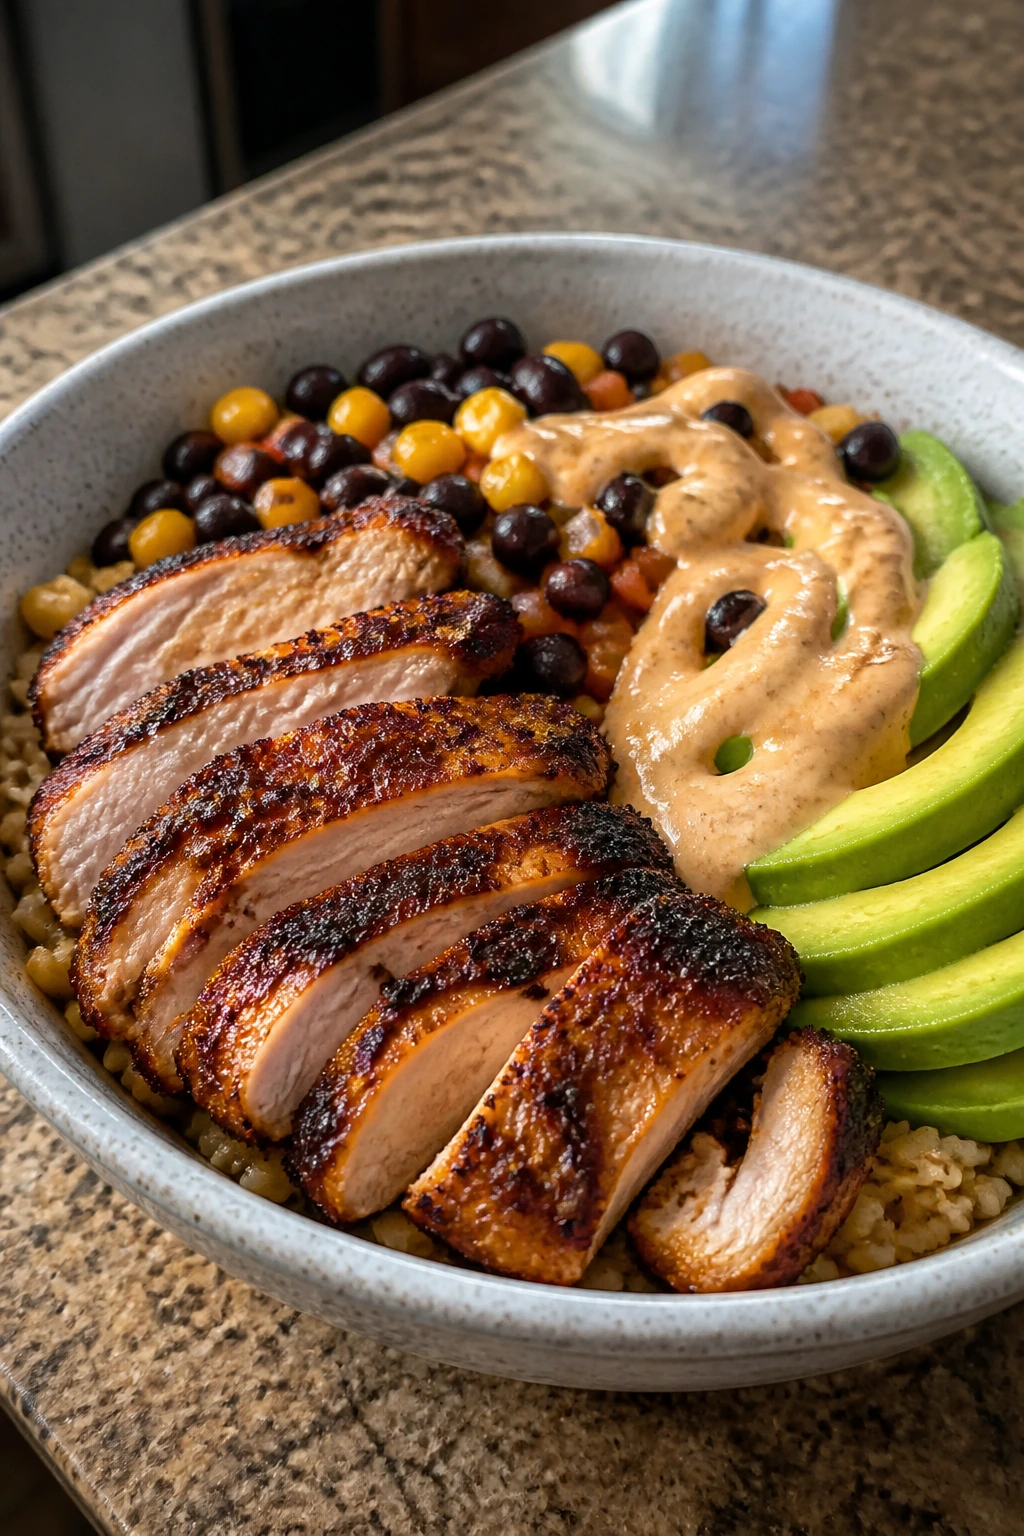
This one tastes like the cooked version of a good burrito bowl, minus the extra tortilla drama. The chipotle sauce brings smoke, the black beans bring heft, and the chicken gives the bowl a solid, meal-prep-friendly center.
Why It Works:
Chicken thighs stay juicier than breasts if you plan to reheat the bowl. Black beans and corn keep the mix soft and sweet, while chipotle yogurt adds heat without turning the whole thing greasy.
Key Ingredients:
- 1 1/2 pounds boneless chicken thighs
- 1 tablespoon olive oil
- 1 teaspoon chipotle powder or chili powder
- 2 cups cooked brown rice
- 1 can black beans, rinsed and drained
- 1 cup corn
- 1/2 cup plain Greek yogurt
- 1 tablespoon lime juice
- 1 tablespoon salsa
- 1 avocado, sliced
Quick Steps:
- Season the chicken with olive oil and chipotle powder, then roast at 425°F / 220°C for 18 to 22 minutes until cooked through.
- Stir the yogurt, lime juice, and salsa into a smooth chipotle sauce.
- Warm the beans and corn, or keep them chilled if you like the bowl cold.
- Divide the rice, chicken, beans, and corn into meal prep containers.
- Add avocado and sauce just before serving.
Equipment for This Recipe:
- Sheet pan
- Mixing bowl
- Knife for slicing the chicken after resting
How to Serve This Dish:
This bowl wants a little extra color, so I’d add chopped cilantro and maybe a spoon of pico de gallo. It eats well in a deep bowl, but it packs better in a container with divided sections if you have one.
Pro Tips for This Recipe:
- Roast the chicken on a sheet pan, not crowded in a dish, so it browns instead of steaming.
- Slice the thighs after resting; if you cut too early, the juices run out.
- Pack the avocado separately unless you want it soft and bruised.
Variations on This Dish:
- Turkey Version: Ground turkey works well with the same spice mix.
- Cauliflower Rice Version: Swap the brown rice for cauliflower rice if you want a lighter bowl.
Common Mistakes to Avoid with This Dish:
- Using too much chipotle powder: It can drown out the beans and corn. Start with less if your spice tolerance is modest.
- Reheating the avocado: Don’t. It gets odd and stringy.
11. Pesto White Bean Orzo Bowl
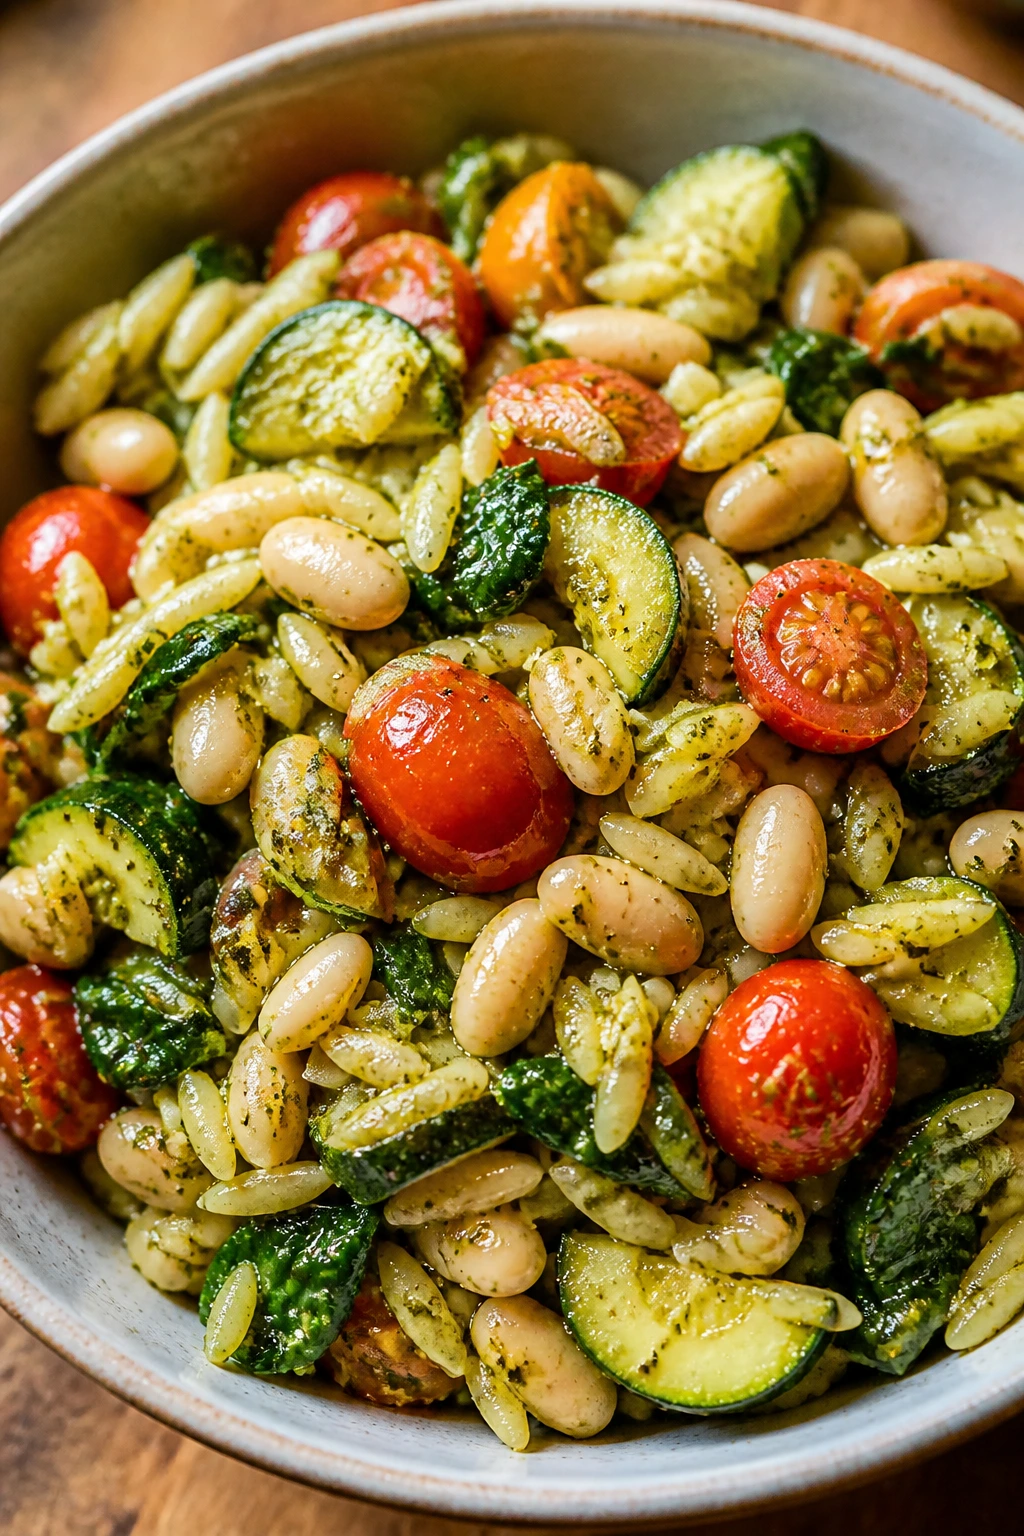
This bowl tastes like a lunch that remembered to include the green stuff and the comforting stuff. The pesto clings to the orzo, the white beans make it creamy without cream, and the tomatoes bring the acid you need.
Why It Works:
Orzo behaves like pasta and a grain at the same time, which makes it a neat meal prep base. White beans add protein and a soft texture that pairs well with roasted zucchini and sharp pesto.
Key Ingredients:
- 1 cup dry orzo
- 1 can cannellini beans, rinsed and drained
- 1 zucchini, sliced into half-moons
- 1 cup cherry tomatoes
- 2 cups baby spinach
- 1/3 cup pesto
- 1 tablespoon olive oil
- 1 tablespoon lemon juice
- 2 tablespoons grated parmesan
- Salt and pepper
Quick Steps:
- Cook the orzo in salted water until al dente, about 8 to 9 minutes, then drain.
- Roast the zucchini and tomatoes at 425°F / 220°C for 15 to 18 minutes with olive oil, salt, and pepper.
- Toss the warm orzo with pesto and lemon juice.
- Fold in the beans, spinach, and roasted vegetables.
- Finish with parmesan before packing or serving.
Equipment for This Recipe:
- Saucepan
- Sheet pan
- Large bowl
How to Serve This Dish:
Serve it slightly warm or at room temperature; that’s where pesto tastes the most open. A few basil leaves on top make it look fresher than a container lunch usually gets to look.
Pro Tips for This Recipe:
- Salt the pasta water well so the orzo tastes seasoned before the pesto even hits.
- Let the roasted tomatoes cool a bit before mixing; they hold their shape better.
- Use a little extra lemon if the pesto is heavy.
Variations on This Dish:
- Chicken Pesto Bowl: Add sliced grilled chicken for a bigger protein hit.
- Dairy-Free Version: Use a dairy-free pesto and skip the parmesan.
Common Mistakes to Avoid with This Dish:
- Overcooking the orzo: It softens fast in storage.
- Adding spinach to piping-hot orzo and sealing the container immediately: It can wilt into a slimy layer. Let it cool for a few minutes first.
12. Miso Mushroom Barley Bowl
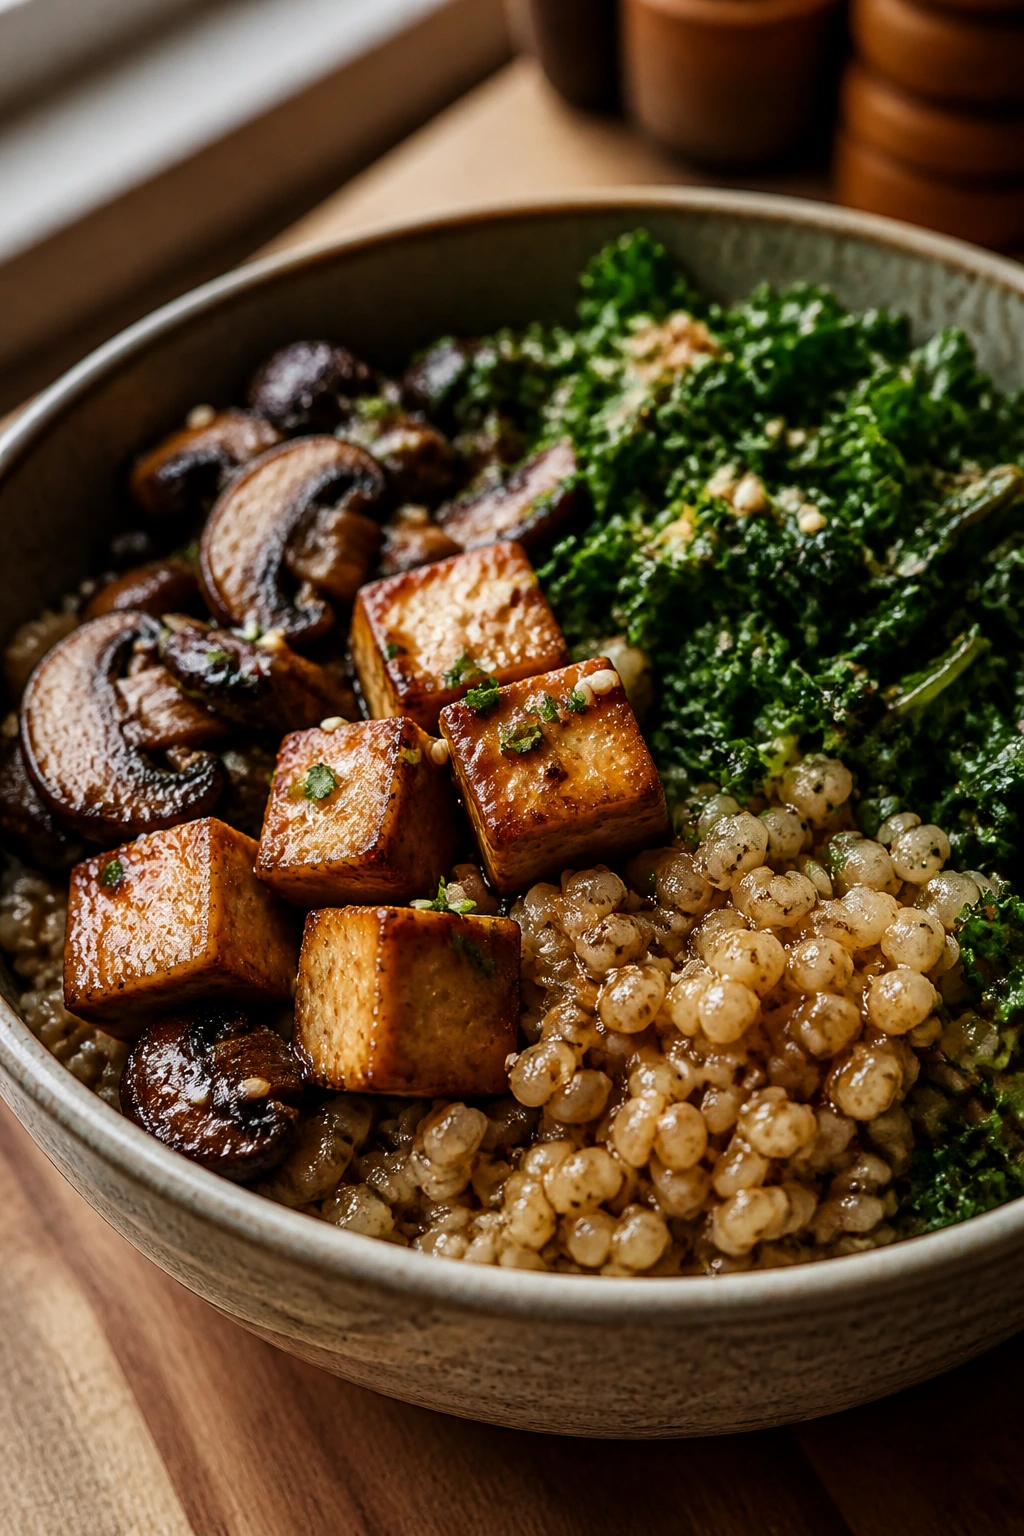
Mushrooms and barley are not flashy, and that is exactly the point. The bowl feels deep and savory, with enough chew from the barley to keep it interesting after reheating.
Why It Works:
Barley holds texture better than many grains, which makes it a smart choice for lunch containers. Miso and mushrooms create a broth-like savoriness without turning the dish into soup, and kale keeps a bit of toughness after cooking.
Key Ingredients:
- 1 cup pearl barley
- 12 ounces mushrooms, sliced
- 2 cups kale, chopped
- 1 block tofu, pressed and cubed, or 2 soft-boiled eggs
- 1 tablespoon olive oil
- 1 tablespoon white miso paste
- 1 teaspoon soy sauce
- 1 teaspoon sesame oil
- 2 scallions, sliced
- 1 tablespoon sesame seeds
Quick Steps:
- Cook the barley in salted water for 25 to 30 minutes until chewy.
- Sauté the mushrooms in olive oil over medium-high heat until browned and their liquid has cooked off.
- Stir in kale and cook for 2 minutes until it softens.
- Whisk miso, soy sauce, sesame oil, and 2 tablespoons warm water into a dressing.
- Divide barley, vegetables, and tofu or eggs into bowls, then spoon the dressing over top.
Equipment for This Recipe:
- Medium pot
- Large skillet
- Small bowl for the miso dressing
How to Serve This Dish:
This bowl is best warm, with the dressing drizzled after reheating. A few extra scallions make it feel brighter, which matters because barley can read a little stern on its own.
Pro Tips for This Recipe:
- Brown the mushrooms in batches if the pan gets crowded; otherwise they steam and go gray.
- If using eggs, cook them to jammy centers so they don’t dry out in the fridge.
- Stir the miso into warm, not boiling, liquid so it dissolves smoothly.
Variations on This Dish:
- Chicken Mushroom Version: Add sliced cooked chicken breast.
- Creamier Version: Add 1 tablespoon tahini to the miso dressing.
Common Mistakes to Avoid with This Dish:
- Treating barley like rice: It needs more time and more water.
- Adding miso directly to the hot pan: It can clump and lose that clean, salty taste.
13. Shrimp Mango Rice Bowl

This bowl tastes like it has one foot in lunch prep and one foot on vacation, which is rare and welcome. The shrimp cook fast, the mango brings sweetness, and the lime keeps the whole thing awake.
Why It Works:
Shrimp are quick enough to cook on a Sunday without taking over the kitchen. Mango and cabbage stay bright for a few days, and rice gives the bowl enough structure to hold the juices without getting soggy.
Key Ingredients:
- 1 pound large shrimp, peeled and deveined
- 2 cups cooked rice
- 1 ripe mango, diced
- 1 cup shredded cabbage
- 1 cup black beans, rinsed and drained
- 1 avocado, diced
- 1 tablespoon olive oil
- 1 teaspoon chili powder
- 1 lime, juiced
- 2 tablespoons chopped cilantro
Quick Steps:
- Toss the shrimp with olive oil, chili powder, salt, and pepper.
- Sear the shrimp in a hot skillet for 2 minutes per side until pink and opaque.
- Mix the mango with lime juice and cilantro.
- Divide rice, cabbage, beans, shrimp, and mango into containers.
- Add avocado right before eating.
Equipment for This Recipe:
- Skillet
- Cutting board for mango and avocado
- Small bowl for the mango-lime mix
How to Serve This Dish:
Serve it cold or barely warm. The mango does more work than a dressing here, and the bowl looks best when the colors stay separated instead of mashed together.
Pro Tips for This Recipe:
- Dry the shrimp before seasoning so they sear instead of steaming.
- Buy mango that yields slightly to pressure; hard mango tastes dull in a bowl.
- Keep the avocado out of the prep container until mealtime.
Variations on This Dish:
- Coconut Version: Add a spoon of coconut yogurt or a sprinkle of toasted coconut.
- Spicy Version: Use cayenne or hot sauce in the shrimp seasoning.
Common Mistakes to Avoid with This Dish:
- Overcooking shrimp: They turn rubbery fast. Stop as soon as they curl and turn opaque.
- Mixing mango with too much salt: It can taste flat and watery.
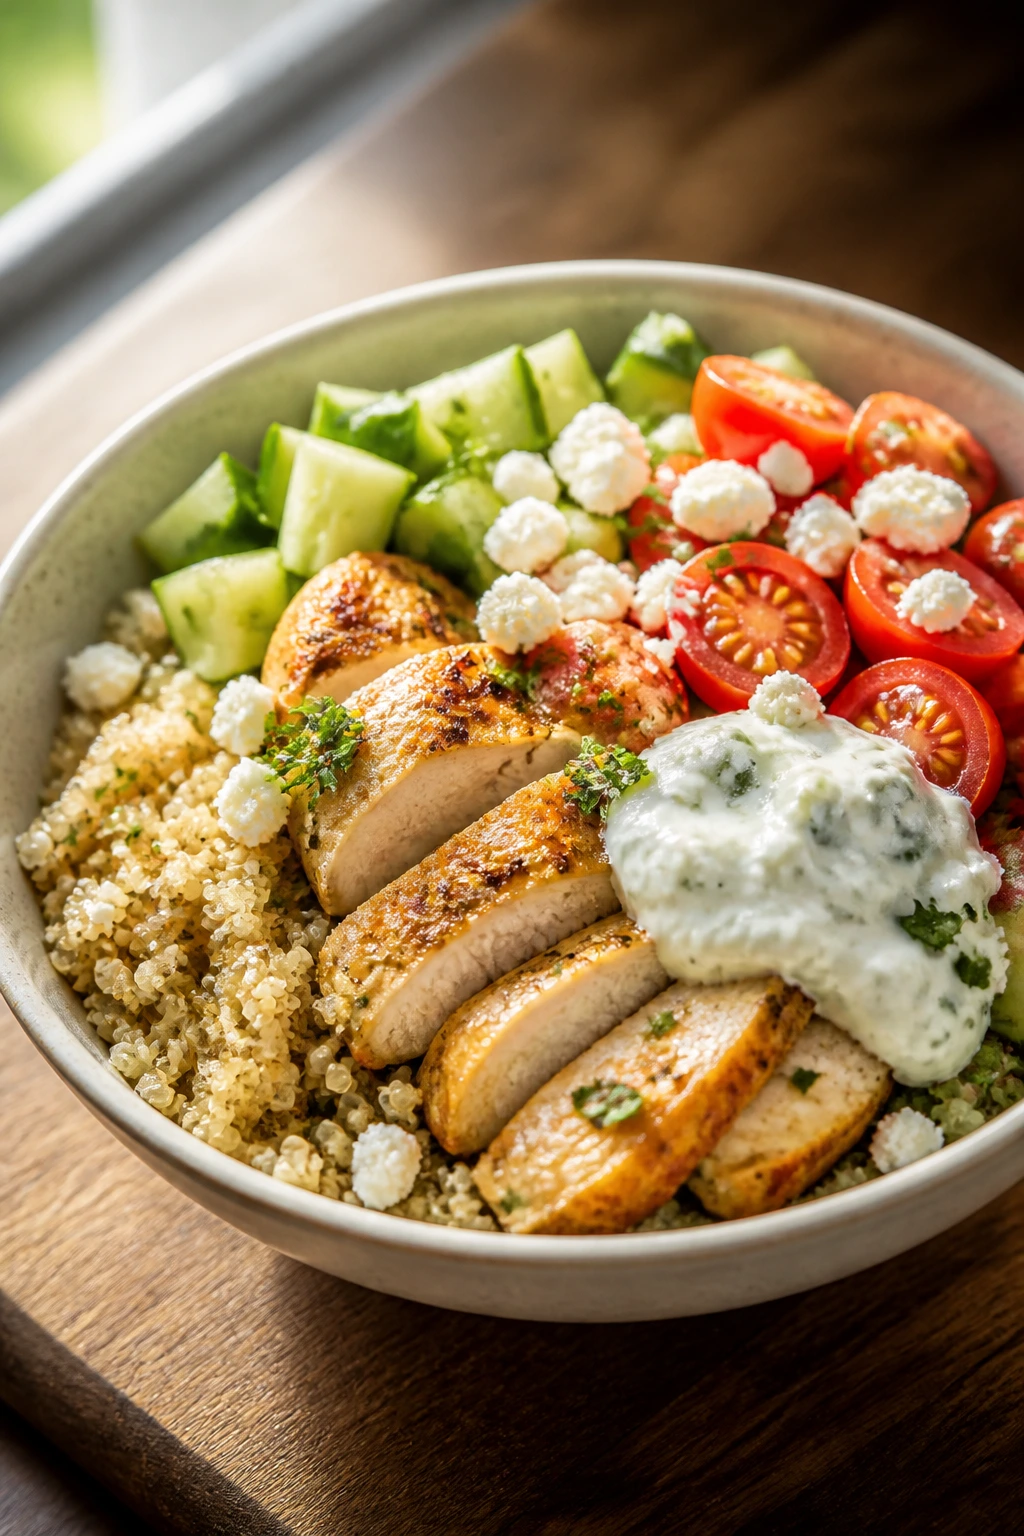
14. Shawarma Chicken Hummus Bowl
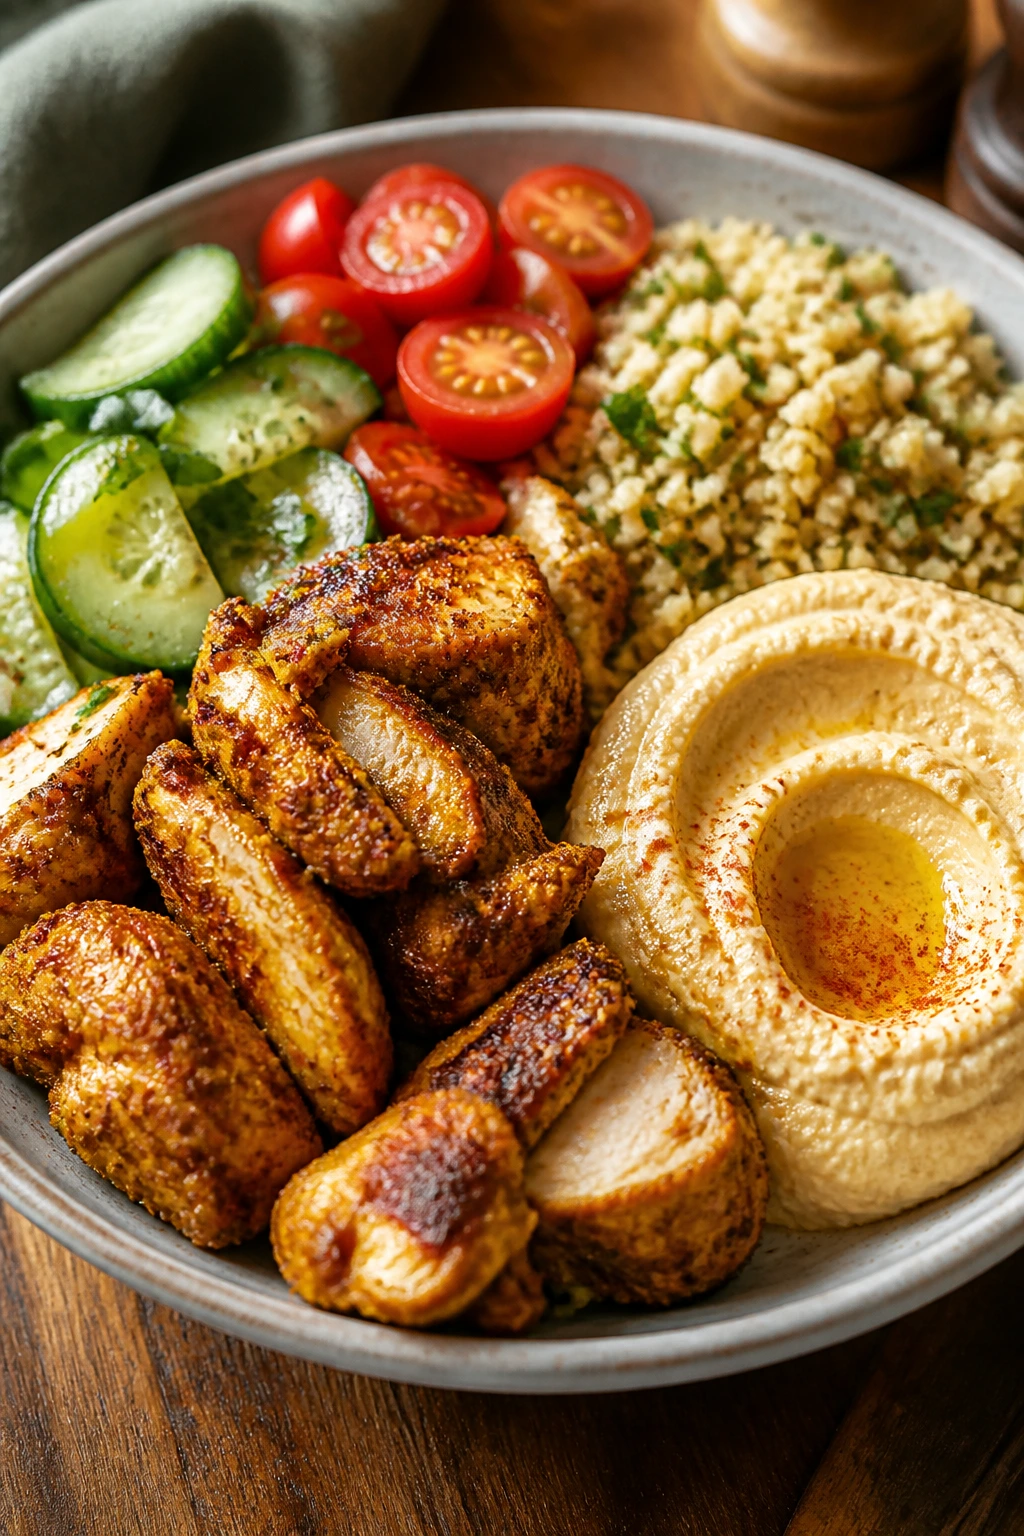
A good shawarma bowl should smell like garlic, cumin, and something toasty from the oven. This one leans hard into that, then softens the edges with hummus and cucumber so it does not eat like a spice cabinet.
Why It Works:
Chicken thighs stay juicy under high heat and still taste decent after reheating. Hummus acts like both sauce and binder, which means the bowl can travel without needing a separate dressing cup for every container.
Key Ingredients:
- 1 1/2 pounds boneless chicken thighs
- 2 tablespoons olive oil
- 2 teaspoons shawarma spice blend
- 1 cup cooked couscous or quinoa
- 1 cucumber, chopped
- 1 cup cherry tomatoes, halved
- 1/2 cup hummus
- 2 tablespoons pickled red onion
- 1 tablespoon lemon juice
- 2 tablespoons chopped parsley
Quick Steps:
- Rub the chicken with olive oil and shawarma spice, then roast at 425°F / 220°C for 20 to 25 minutes.
- Rest the chicken for 5 minutes before slicing.
- Cook the couscous or quinoa according to the package directions.
- Divide the grain, cucumber, tomatoes, and chicken into containers.
- Add hummus, pickled onion, lemon juice, and parsley just before serving.
Equipment for This Recipe:
- Sheet pan
- Sharp knife
- Medium saucepan
How to Serve This Dish:
This bowl wants a mound of hummus off to one side so it can melt into the grain slowly. Warm pita is optional, but I would not skip it if you’re eating at home.
Pro Tips for This Recipe:
- Use thighs, not breasts, if you want the chicken to stay tender after reheating.
- Pickled onion gives the bowl the acid it needs without extra dressing.
- Let the chicken cool before slicing if you want clean pieces for containers.
Variations on This Dish:
- Falafel Version: Replace chicken with baked falafel and keep the same vegetables.
- Spicier Version: Add a pinch of cayenne to the spice blend.
Common Mistakes to Avoid with This Dish:
- Using plain yogurt instead of hummus without adjusting the seasoning: The bowl can taste thin and underbuilt.
- Crowding the sheet pan: Shawarma seasoning tastes better when the edges brown.
15. BBQ Pork Slaw Bowl
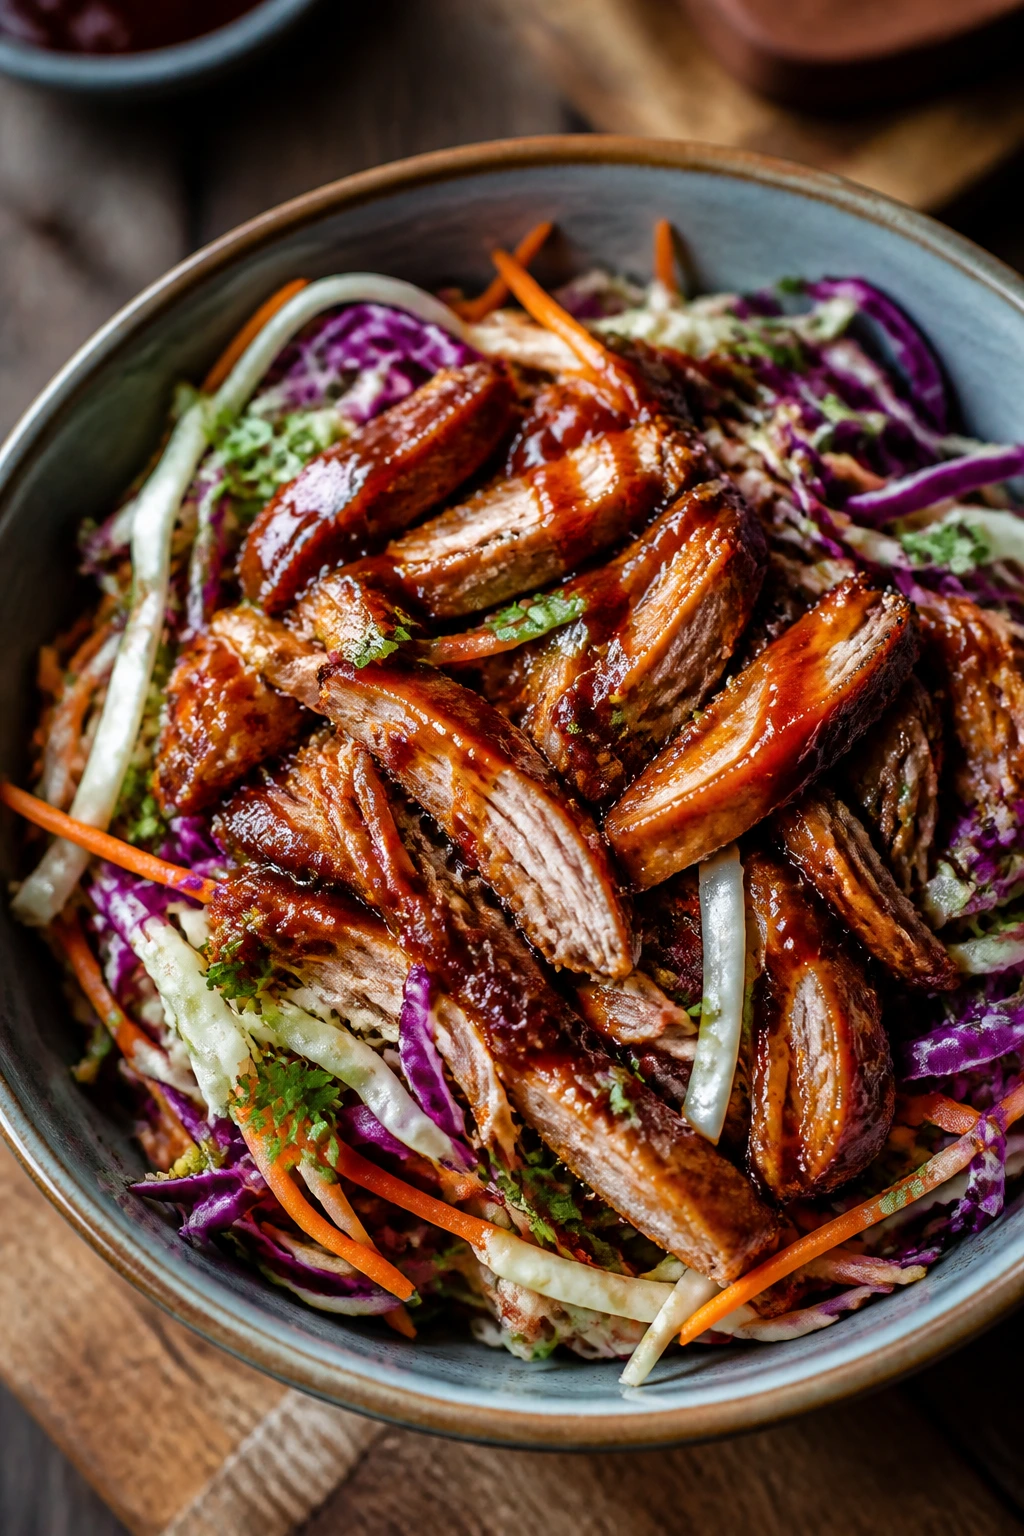
This is the bowl that proves barbecue flavor does not have to come with a pile of fries. The pork is tender, the slaw stays crunchy, and the tangy dressing cuts through the sweet sauce.
Why It Works:
Pork tenderloin is lean but still stays moist if you roast it correctly and let it rest. Slaw actually improves in the fridge for a day or two, because the vinegar softens the cabbage just enough to make it more comfortable to eat.
Key Ingredients:
- 1 1/2 pounds pork tenderloin
- 1 tablespoon olive oil
- 1 teaspoon smoked paprika
- 1/3 cup barbecue sauce
- 4 cups shredded cabbage slaw mix
- 1 carrot, grated
- 2 tablespoons apple cider vinegar
- 2 tablespoons Greek yogurt
- 2 cups cooked brown rice
- Salt and black pepper
Quick Steps:
- Rub the pork with olive oil, smoked paprika, salt, and pepper, then roast at 425°F / 220°C for 18 to 22 minutes.
- Rest the pork for 5 to 10 minutes, then slice thinly.
- Toss the cabbage, carrot, vinegar, and yogurt into a quick slaw.
- Warm the rice and divide it into containers.
- Top with pork, slaw, and a drizzle of barbecue sauce.
Equipment for This Recipe:
- Sheet pan
- Mixing bowl
- Box grater or food processor for the carrot
How to Serve This Dish:
Serve it in a deep bowl so the slaw stays on top and the barbecue sauce can streak down into the rice. A few dill pickle slices make a strange but excellent finishing touch.
Pro Tips for This Recipe:
- Pull the pork at temperature, not by color alone.
- Use a sturdy slaw mix so the cabbage does not turn limp by day three.
- Keep extra barbecue sauce separate if you like a stronger hit of smoke.
Variations on This Dish:
- Chicken Version: Use bone-in or boneless chicken thighs with the same seasoning.
- Sweet Potato Version: Swap the rice for roasted sweet potato cubes.
Common Mistakes to Avoid with This Dish:
- Overcooking pork tenderloin: It dries out fast and gets chalky after reheating.
- Dressing the slaw too heavily: Too much yogurt makes it watery.
16. Sesame Salmon Soba Bowl
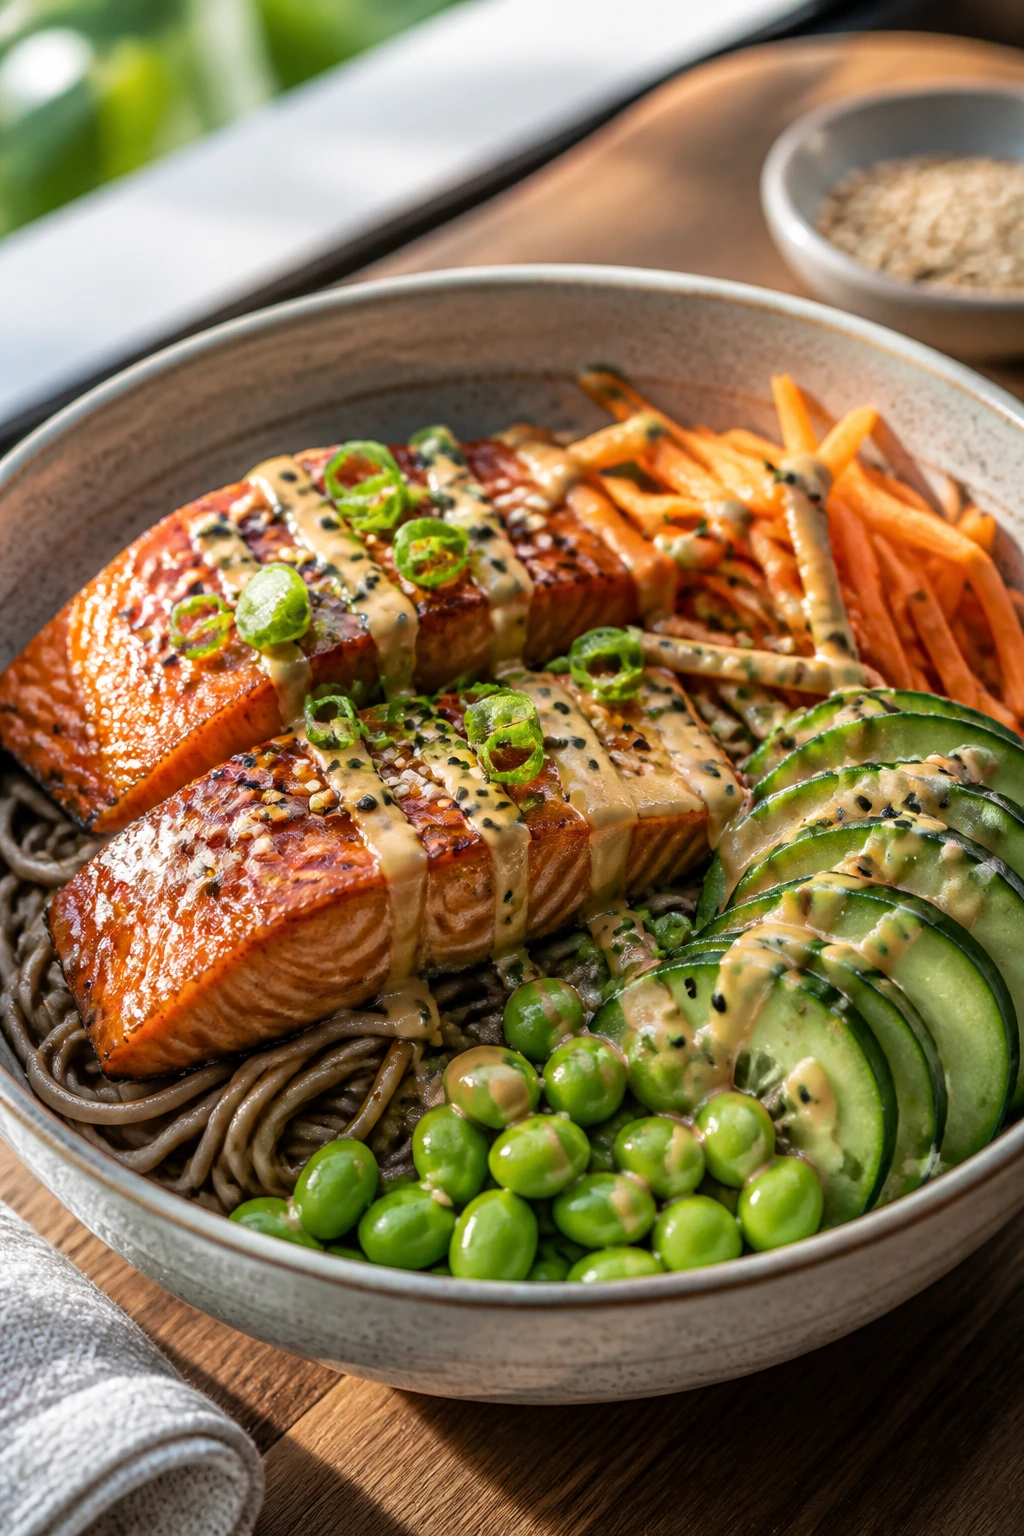
Soba noodles give this bowl a little more character than plain rice. The sesame dressing is nutty and sharp, and the flaked salmon holds onto it better than you’d think.
Why It Works:
Soba noodles chill well if you rinse them and toss them with a little oil. Salmon provides enough richness that the bowl feels complete, and cucumber with edamame keeps it from getting heavy.
Key Ingredients:
- 4 salmon fillets, about 5 ounces each
- 6 ounces soba noodles
- 1 cup shelled edamame
- 1 cucumber, julienned
- 1 carrot, julienned
- 2 tablespoons soy sauce or tamari
- 1 tablespoon rice vinegar
- 1 teaspoon sesame oil
- 1 teaspoon honey
- 1 tablespoon sesame seeds
Quick Steps:
- Bake the salmon at 400°F / 205°C for 10 to 12 minutes until just flaky.
- Cook the soba noodles according to the package directions, then rinse briefly and drain well.
- Whisk soy sauce, rice vinegar, sesame oil, and honey into a dressing.
- Toss the noodles with edamame, cucumber, carrot, and half the dressing.
- Top with salmon and sesame seeds, then add the rest of the dressing.
Equipment for This Recipe:
- Sheet pan
- Saucepan for noodles
- Tongs or chopsticks for tossing
How to Serve This Dish:
This bowl feels best when the noodles stay on the bottom and the salmon sits on top in one clean piece. A few torn nori strips make it taste more like a proper sushi-adjacent lunch.
Pro Tips for This Recipe:
- Rinse soba noodles just enough to stop the cooking and remove excess starch.
- Do not overbake the salmon; dry salmon flakes apart too aggressively in storage.
- Pack the cucumber separately if you want maximum crunch.
Variations on This Dish:
- Chicken Version: Use sliced grilled chicken and keep the sesame dressing.
- Spicy Version: Add chili crisp in tiny spoonfuls before eating.
Common Mistakes to Avoid with This Dish:
- Overdressing the noodles: They get slick and heavy. Start with half, then add more.
- Leaving the salmon in the fridge uncovered: It dries out and picks up other smells.
17. Turkey Meatball Orzo Bowl
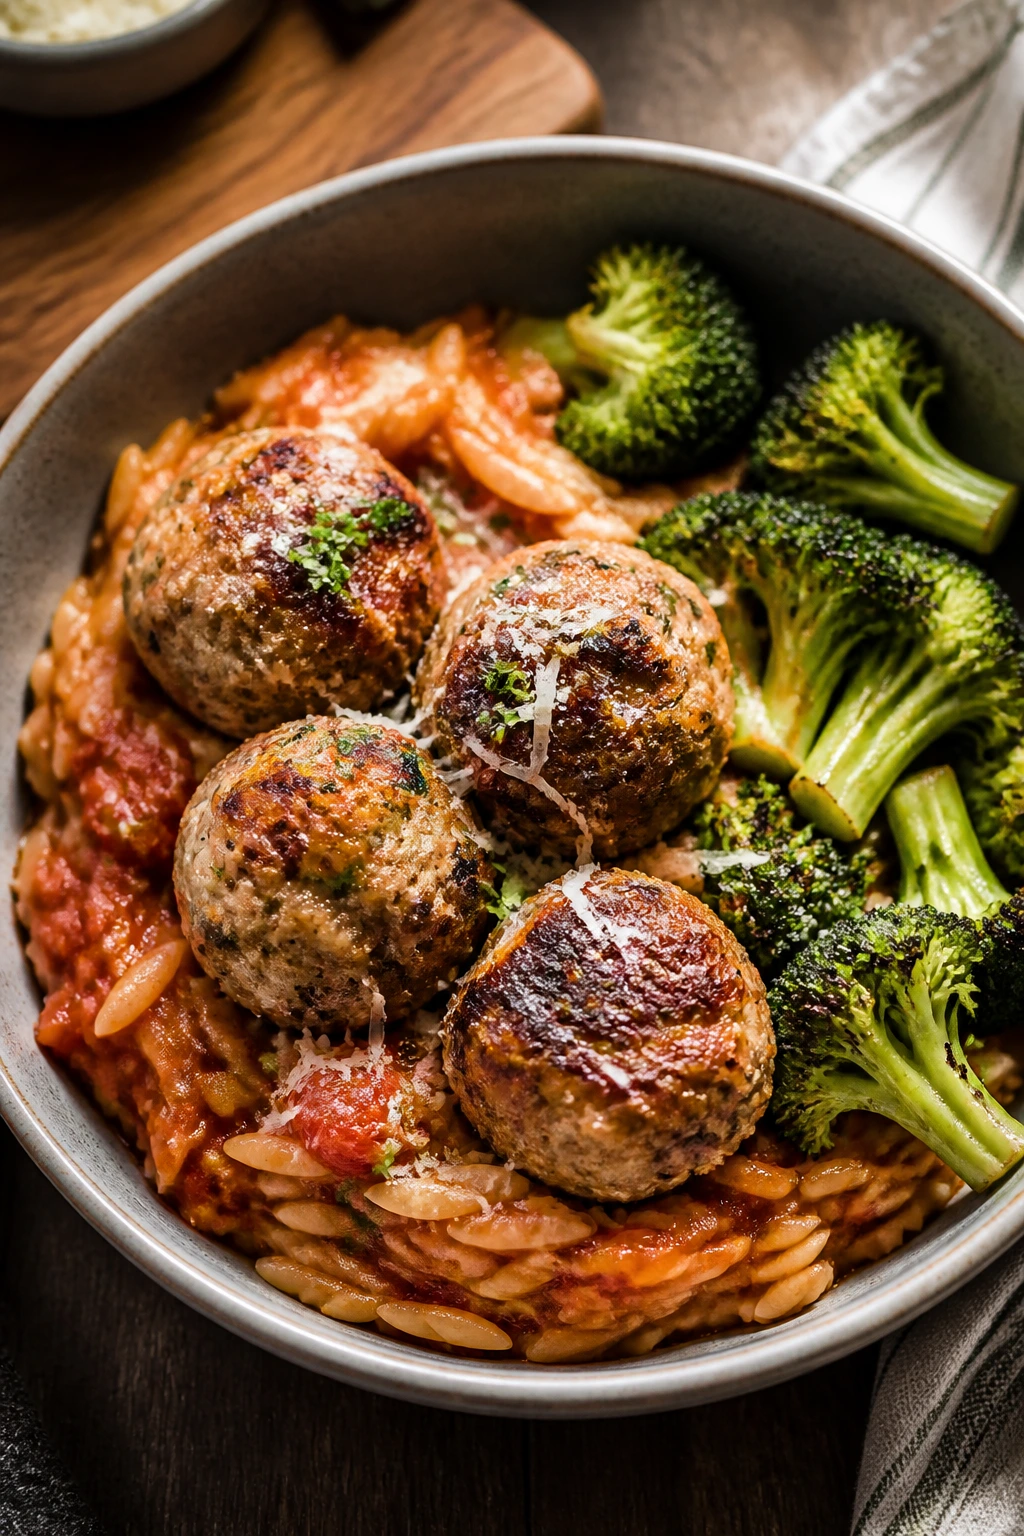
Turkey meatballs are handy because they portion cleanly and reheat without much drama. The orzo gives a soft, comforting base, while broccoli keeps the bowl from drifting too far into pasta territory.
Why It Works:
Meatballs are easier to batch than sliced meat, and they hold moisture better when frozen or chilled. Orzo soaks up sauce in a useful way, and roasted broccoli gives you a little char to keep the bowl from tasting soft all the way through.
Key Ingredients:
- 1 pound ground turkey
- 1/3 cup breadcrumbs
- 1 egg
- 1 teaspoon Italian seasoning
- 1 cup dry orzo
- 3 cups broccoli florets
- 1 cup marinara sauce
- 1 tablespoon olive oil
- 2 tablespoons grated parmesan
- Salt and pepper
Quick Steps:
- Mix turkey, breadcrumbs, egg, Italian seasoning, salt, and pepper, then form 12 meatballs.
- Bake at 400°F / 205°C for 15 to 18 minutes until the centers reach 165°F / 74°C.
- Roast the broccoli for 15 minutes with olive oil and salt.
- Cook the orzo until al dente and toss it with a few spoonfuls of marinara.
- Divide the orzo, meatballs, broccoli, and parmesan into containers.
Equipment for This Recipe:
- Rimmed sheet pan
- Mixing bowl
- Saucepan for the orzo
How to Serve This Dish:
This bowl is better warm than cold. The marinara loosens the orzo, and a little extra parmesan on top gives you that familiar finish without overcomplicating anything.
Pro Tips for This Recipe:
- Keep the meatball mix just combined; overmixing makes them dense.
- Space the meatballs out on the pan so they brown instead of steaming.
- Add a splash of water to the marinara if it gets too thick after chilling.
Variations on This Dish:
- Beef Version: Use lean ground beef instead of turkey.
- Dairy-Free Version: Skip the parmesan and use nutritional yeast if you want a cheesy note.
Common Mistakes to Avoid with This Dish:
- Making the meatballs too large: They take longer to cook and dry out before the center is done.
- Overcooking the orzo: It turns soft fast once it sits in sauce.
18. Black Bean Sweet Potato Bowl
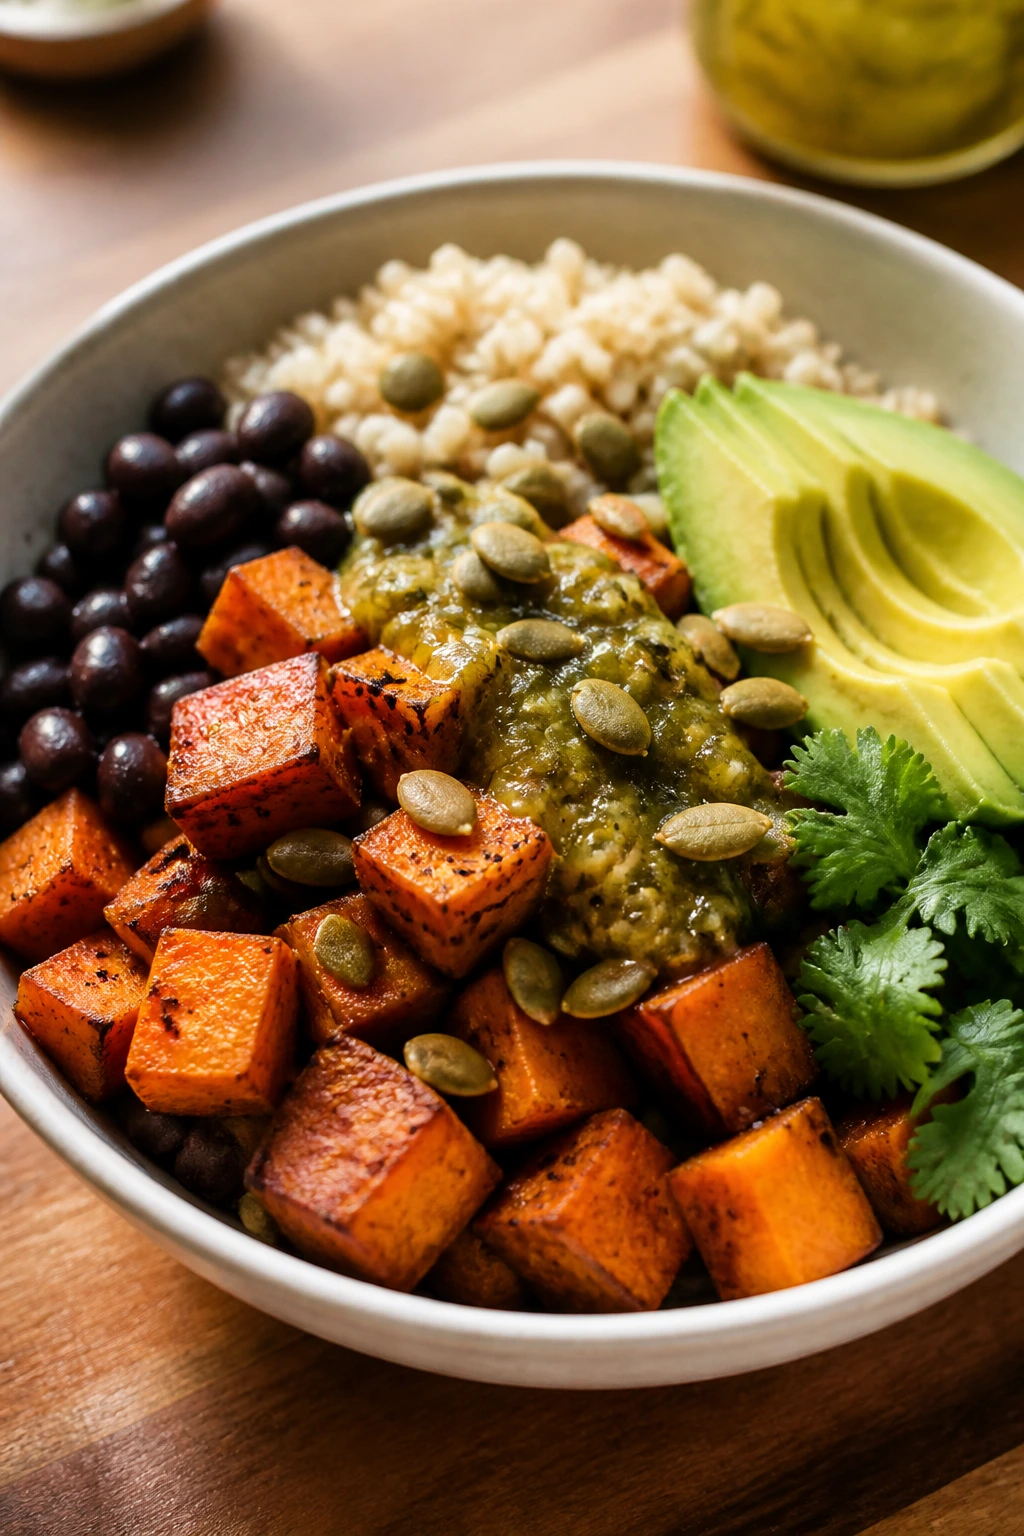
This is one of those bowls that looks almost plain until you taste it. Then the sweet potato, black bean, salsa verde, and avocado start working together, and it stops feeling like a side dish.
Why It Works:
Black beans and sweet potatoes are a sturdy pair for meal prep because neither one turns fragile in the fridge. A little salsa verde gives the bowl brightness, and pumpkin seeds add a crunch you would miss if you skipped them.
Key Ingredients:
- 2 medium sweet potatoes, cubed
- 1 can black beans, rinsed and drained
- 2 cups cooked brown rice
- 1/2 cup salsa verde
- 1 avocado, sliced
- 2 tablespoons pumpkin seeds
- 1 tablespoon olive oil
- 1/2 teaspoon cumin
- 2 tablespoons chopped cilantro
- Salt and pepper
Quick Steps:
- Toss the sweet potatoes with olive oil, cumin, salt, and pepper, then roast at 425°F / 220°C for 25 minutes.
- Warm the black beans with a pinch of salt.
- Divide the rice into bowls and top with sweet potatoes and beans.
- Spoon salsa verde over the top.
- Add avocado, pumpkin seeds, and cilantro just before eating.
Equipment for This Recipe:
- Sheet pan
- Saucepan
- Knife for the avocado
How to Serve This Dish:
This bowl tastes good cold, but I like it warm because the sweet potatoes get creamier. If you want more heat, add sliced jalapeño or a little hot sauce.
Pro Tips for This Recipe:
- Roast the sweet potatoes in one layer so they caramelize.
- Rinse the beans well; canned bean liquid muddies the flavor.
- Keep the avocado separate until the last minute.
Variations on This Dish:
- Quinoa Version: Use quinoa instead of rice for a little more chew.
- Egg Version: Add a fried or jammy egg on top.
Common Mistakes to Avoid with This Dish:
- Underseasoning the sweet potatoes: Salt matters here more than people think.
- Putting salsa verde on everything at once and letting it sit: The bowl gets soggy fast.
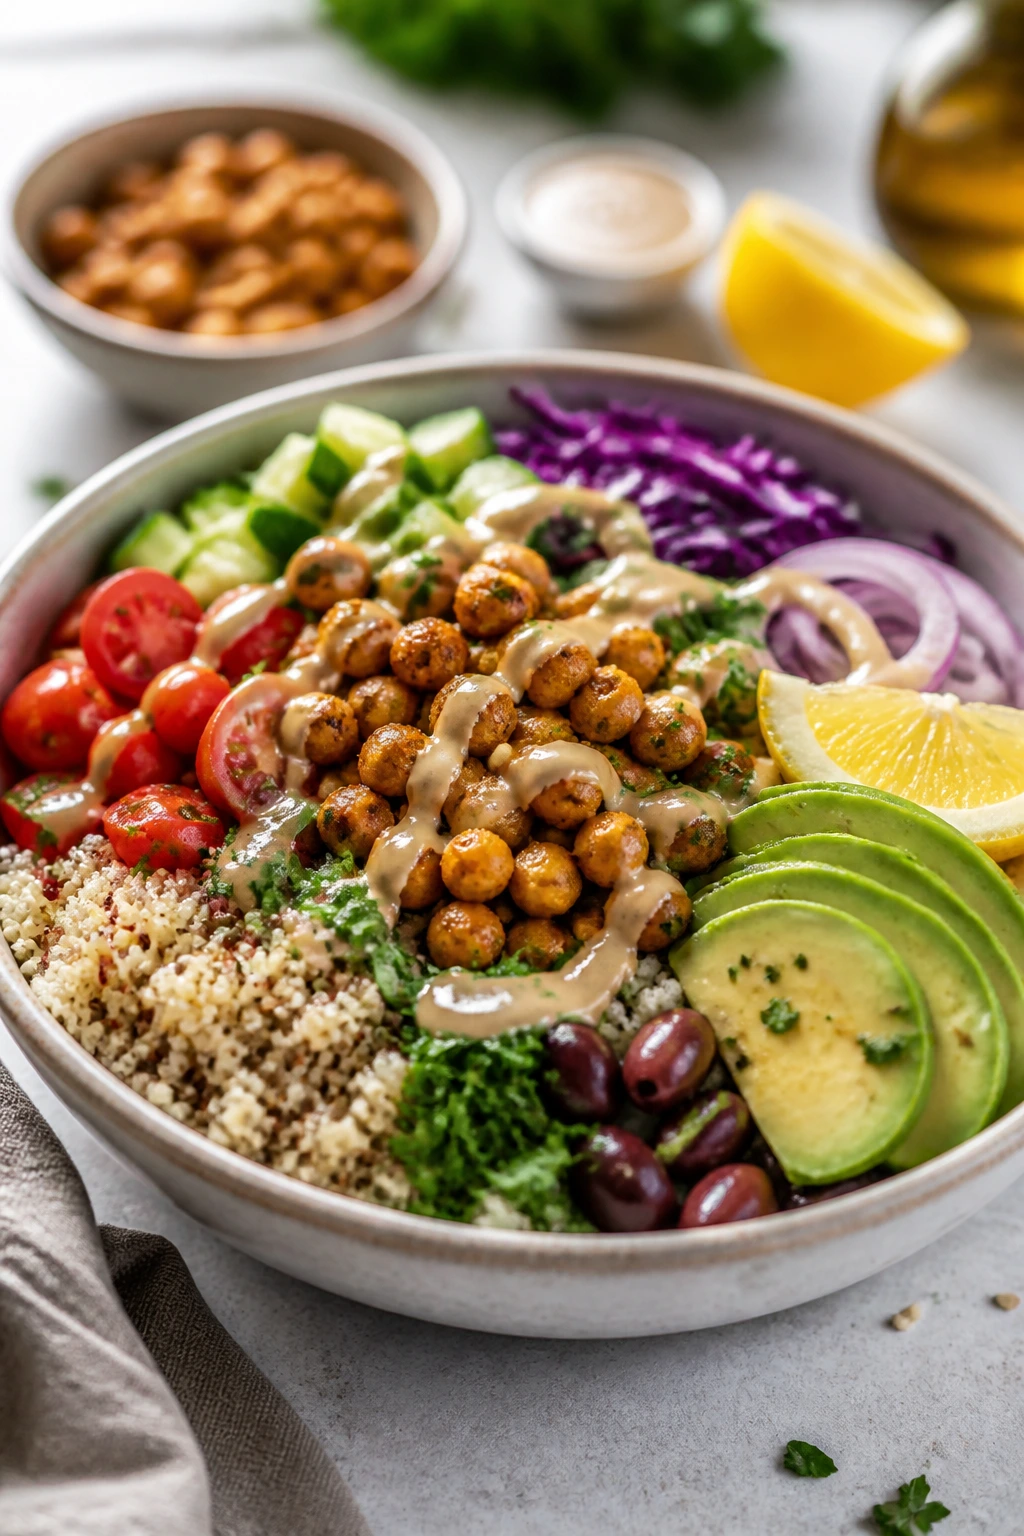
19. Harissa Chickpea Couscous Bowl
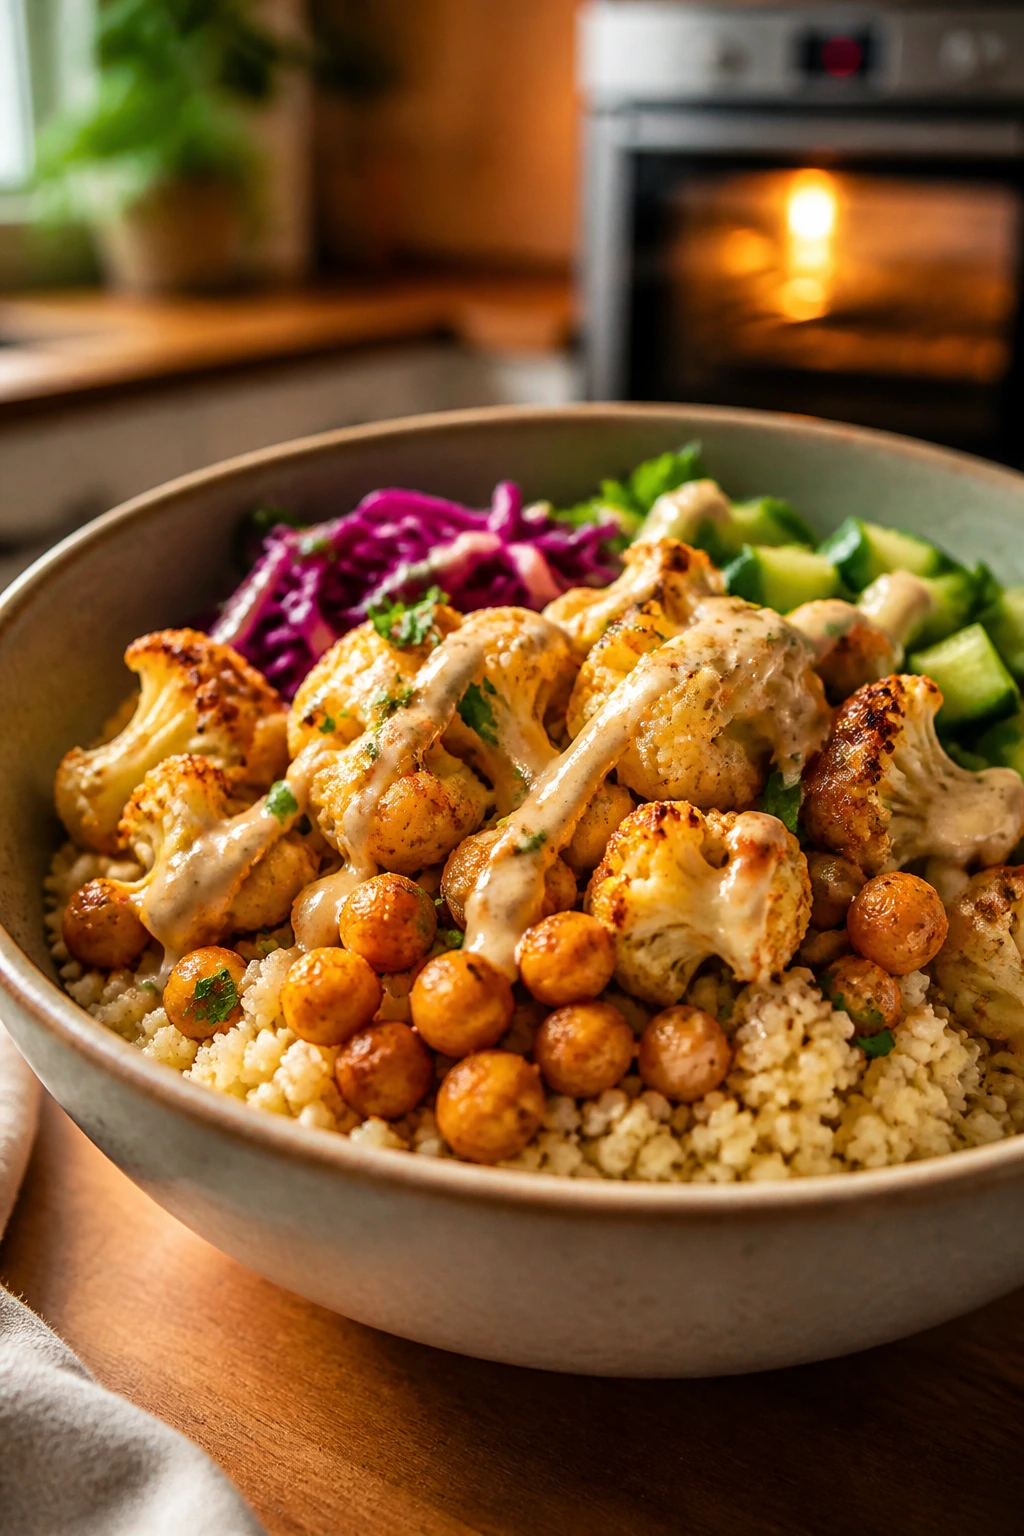
Harissa brings heat, but not the blunt kind. Paired with chickpeas, couscous, and roasted cauliflower, it gives the bowl enough smoky depth that the yogurt-tahini sauce can stay cool and creamy.
Why It Works:
Couscous cooks in minutes and stays light, which is useful when the rest of the bowl is built from roasted vegetables and chickpeas. Cauliflower and chickpeas both like high heat, so the oven does most of the work.
Key Ingredients:
- 1 head cauliflower, cut into florets
- 1 can chickpeas, rinsed and drained
- 1 tablespoon olive oil
- 1 to 2 tablespoons harissa paste
- 1 cup couscous
- 1 cup boiling water
- 1/3 cup plain yogurt
- 1 tablespoon tahini
- 1 tablespoon lemon juice
- 2 tablespoons chopped parsley
Quick Steps:
- Toss cauliflower and chickpeas with olive oil, harissa, salt, and pepper.
- Roast at 425°F / 220°C for 22 to 25 minutes, until the edges are browned.
- Pour boiling water over the couscous, cover it, and let it sit for 5 minutes, then fluff with a fork.
- Whisk yogurt, tahini, lemon juice, and a little water into a drizzleable sauce.
- Assemble the couscous, cauliflower, and chickpeas, then finish with parsley and sauce.
Equipment for This Recipe:
- Sheet pan
- Heatproof bowl with lid or plate for couscous
- Whisk
How to Serve This Dish:
A spoonful of pickled onion works wonders here if you have it. The bowl has enough warmth that it benefits from a bright, cold counterpoint.
Pro Tips for This Recipe:
- Use less harissa than you think on the first pass; some brands run hotter than others.
- Don’t crush the couscous when fluffing. Forks, not spoons.
- Roast the cauliflower until you see dark edges; that’s where the flavor lives.
Variations on This Dish:
- Chicken Version: Add roasted chicken thighs and reduce the chickpeas slightly.
- Dairy-Free Version: Use a tahini-only sauce and skip the yogurt.
Common Mistakes to Avoid with This Dish:
- Using too much water on the couscous: It turns pasty instead of fluffy.
- Skipping the lemon: Harissa without acid tastes heavy.
20. Sesame Ginger Pork Bowl
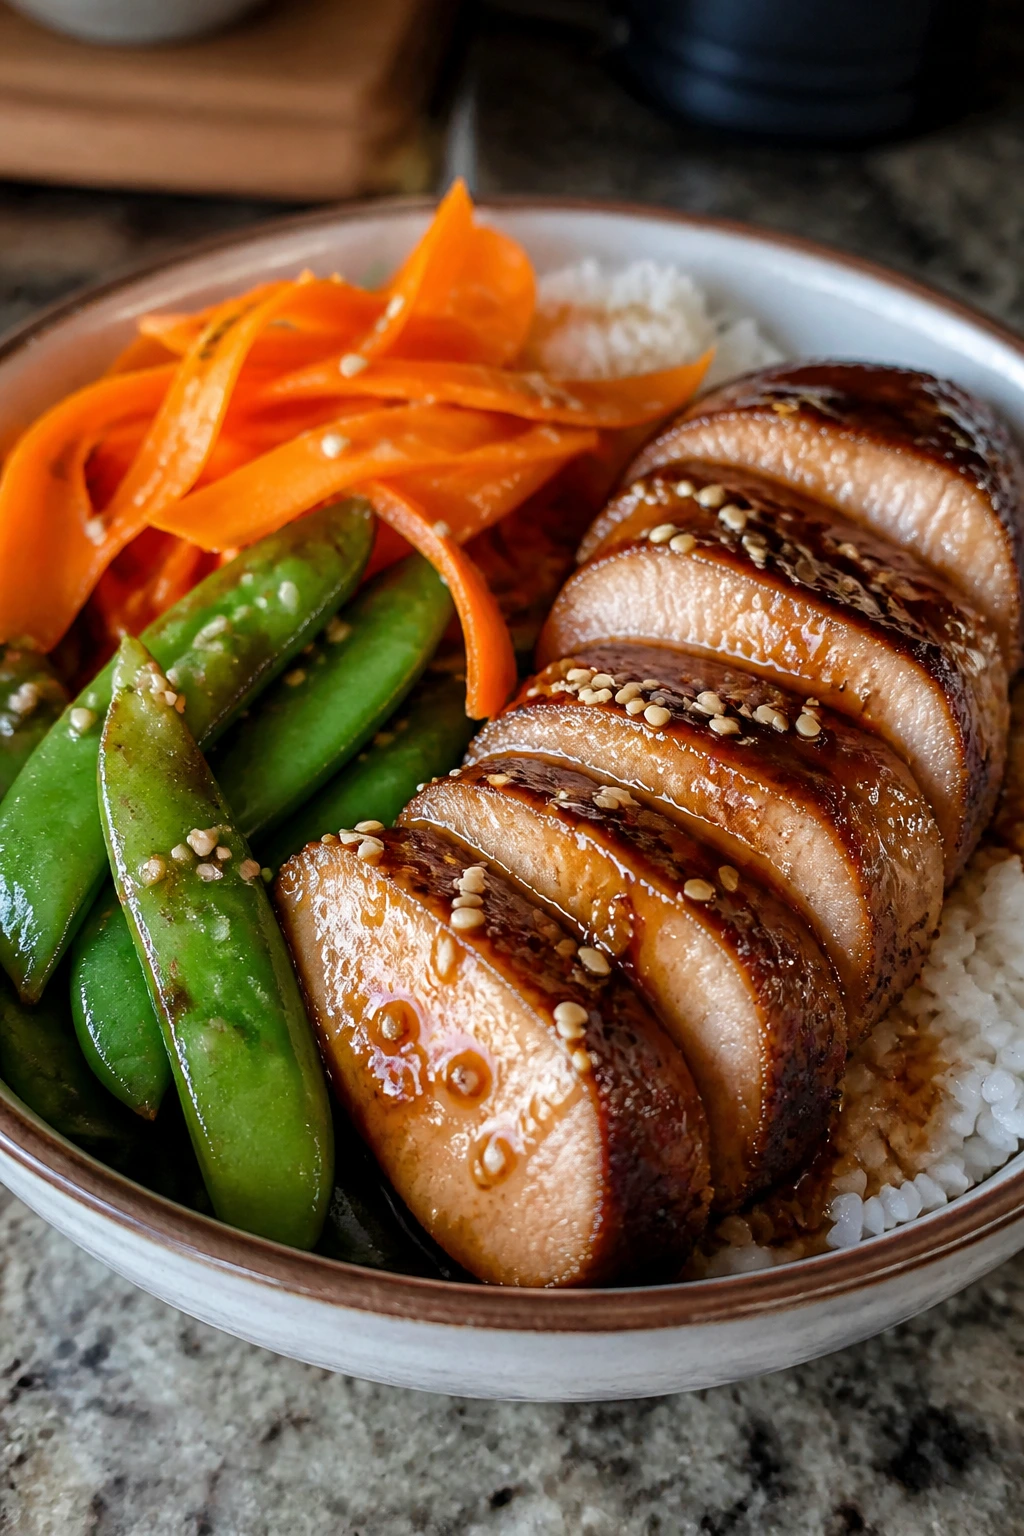
Pork tenderloin tends to get overlooked in meal prep, which is odd because it slices neatly and reheats well if you don’t overdo it. Sesame ginger sauce gives it a clean, savory edge, and the snap peas keep the bowl lively.
Why It Works:
Pork tenderloin is lean, so it needs a sauce that brings moisture back. Ginger and sesame do that without making the bowl feel heavy, and snap peas or green beans stay crisp enough to survive a few days in the fridge.
Key Ingredients:
- 1 1/2 pounds pork tenderloin
- 1 tablespoon olive oil
- 1 teaspoon garlic powder
- 2 tablespoons soy sauce or tamari
- 1 tablespoon honey
- 1 teaspoon grated ginger
- 2 cups cooked rice
- 1 cup snap peas
- 1 carrot, thinly sliced
- 1 teaspoon sesame seeds
Quick Steps:
- Rub the pork with olive oil, garlic powder, salt, and pepper.
- Roast at 425°F / 220°C for 18 to 20 minutes, until the center reaches 145°F / 63°C.
- Rest the pork for 5 to 10 minutes before slicing.
- Whisk soy sauce, honey, ginger, and a splash of water into a quick glaze.
- Build the bowls with rice, vegetables, pork slices, glaze, and sesame seeds.
Equipment for This Recipe:
- Sheet pan
- Small saucepan or microwave-safe cup for the glaze
- Sharp slicing knife
How to Serve This Dish:
This bowl looks best when the pork is sliced thin and fanned over the rice. A little scallion on top helps the whole thing feel fresher and less brown, which is a real benefit when pork and rice share a container.
Pro Tips for This Recipe:
- Pull the pork at 145°F / 63°C, not after it has been resting forever in the oven.
- Slice against the grain so the meat stays tender.
- Blanch the snap peas for 60 seconds if you want them brighter and a touch softer.
Variations on This Dish:
- Chicken Version: Boneless chicken thighs work with the same glaze.
- Spicy Version: Add chili flakes or chili crisp to the glaze.
Common Mistakes to Avoid with This Dish:
- Overcooking the tenderloin: It goes from juicy to dry in a short window.
- Pouring a thick glaze on cold pork: It clumps instead of coating.
21. Caprese Chicken Farro Bowl
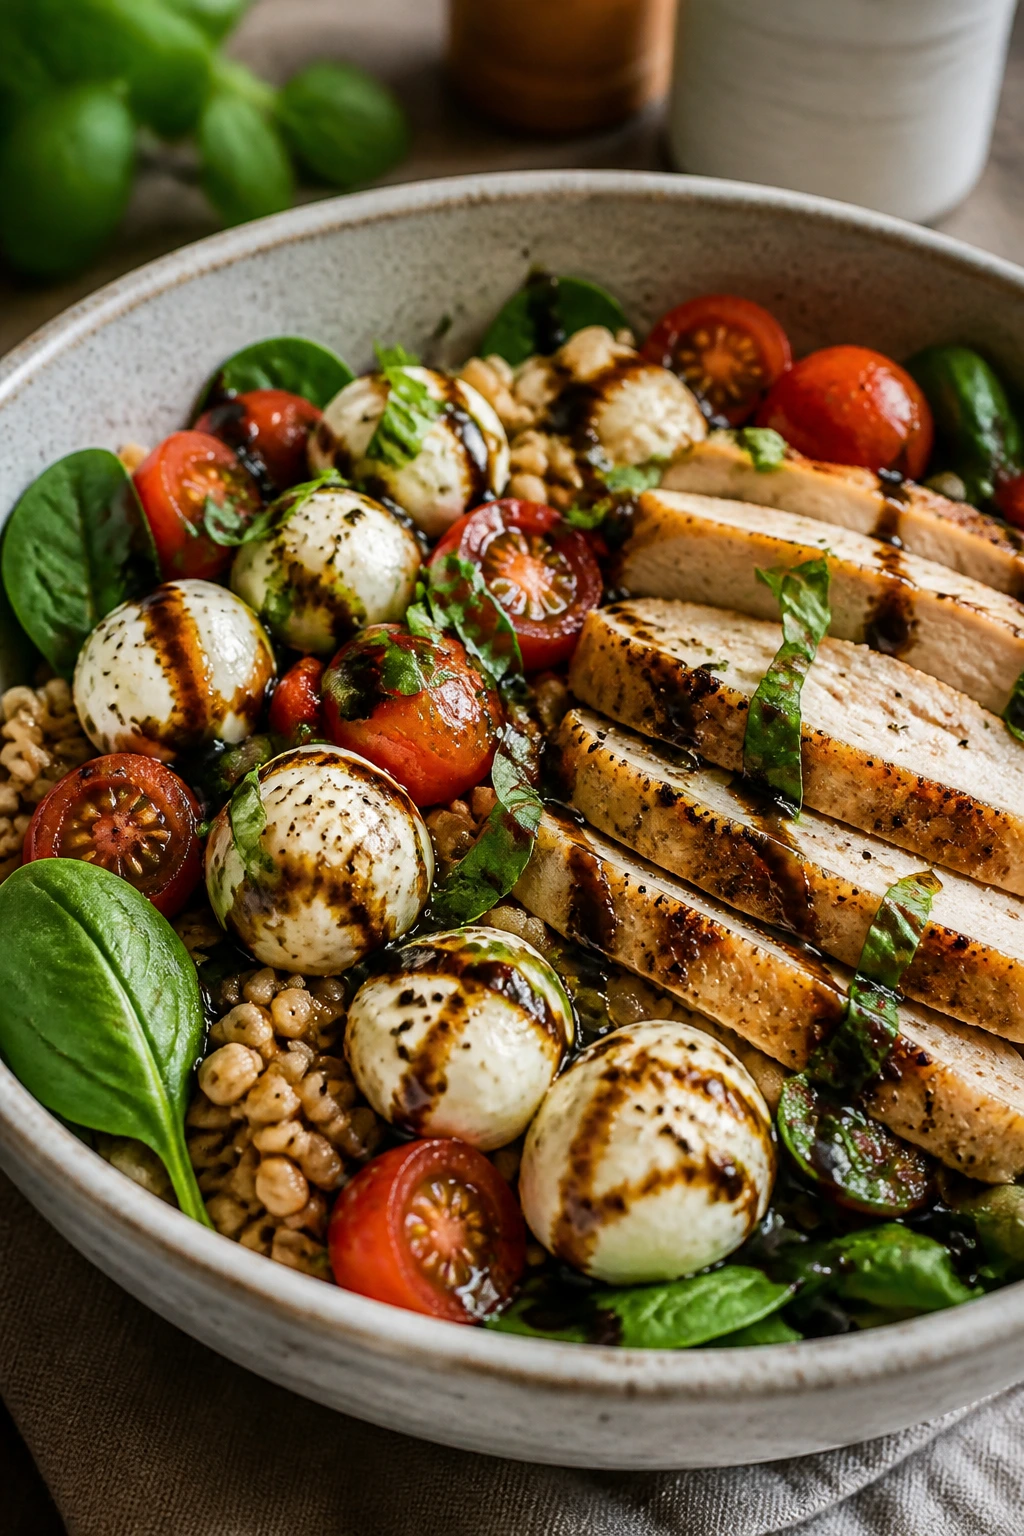
Caprese flavors are usually treated like a salad thing, but they behave well in bowl form too. Farro gives the dish chew, chicken gives it staying power, and balsamic cuts through the mozzarella.
Why It Works:
Farro has enough bite to hold juicy tomatoes and soft mozzarella without collapsing. Chicken breast works here because the balsamic and basil bring enough flavor that the meat does not need to be fatty to feel satisfying.
Key Ingredients:
- 1 cup dry farro
- 1 1/2 pounds chicken breasts
- 1 tablespoon olive oil
- 1 teaspoon Italian seasoning
- 1 cup cherry tomatoes, halved
- 1 cup fresh mozzarella pearls
- 2 cups baby spinach
- 1 tablespoon balsamic glaze
- 1/4 cup torn basil leaves
- Salt and pepper
Quick Steps:
- Cook the farro in salted water for 20 to 25 minutes until chewy.
- Season the chicken with olive oil, Italian seasoning, salt, and pepper, then sear or bake until it reaches 165°F / 74°C.
- Let the chicken rest before slicing.
- Toss the farro with spinach so the heat wilts it slightly.
- Divide into bowls and top with tomatoes, mozzarella, basil, and balsamic glaze.
Equipment for This Recipe:
- Medium saucepan
- Skillet or sheet pan
- Mixing bowl
How to Serve This Dish:
Serve it barely warm or at room temperature so the mozzarella softens a little without melting. A crusty piece of bread is nice if you’re eating at home, though it is not necessary.
Pro Tips for This Recipe:
- Use basil at the end, not during storage, or it darkens.
- Don’t drown the bowl in balsamic glaze; a little goes a long way.
- If the farro tastes bland, salt it more after cooking.
Variations on This Dish:
- Mozzarella-Free Version: Use shaved parmesan and extra basil.
- Vegetarian Version: Replace chicken with cannellini beans or roasted chickpeas.
Common Mistakes to Avoid with This Dish:
- Adding basil too early: It blackens and loses its smell.
- Using watery tomatoes: They make the farro soggy.
22. Thai Basil Turkey Bowl
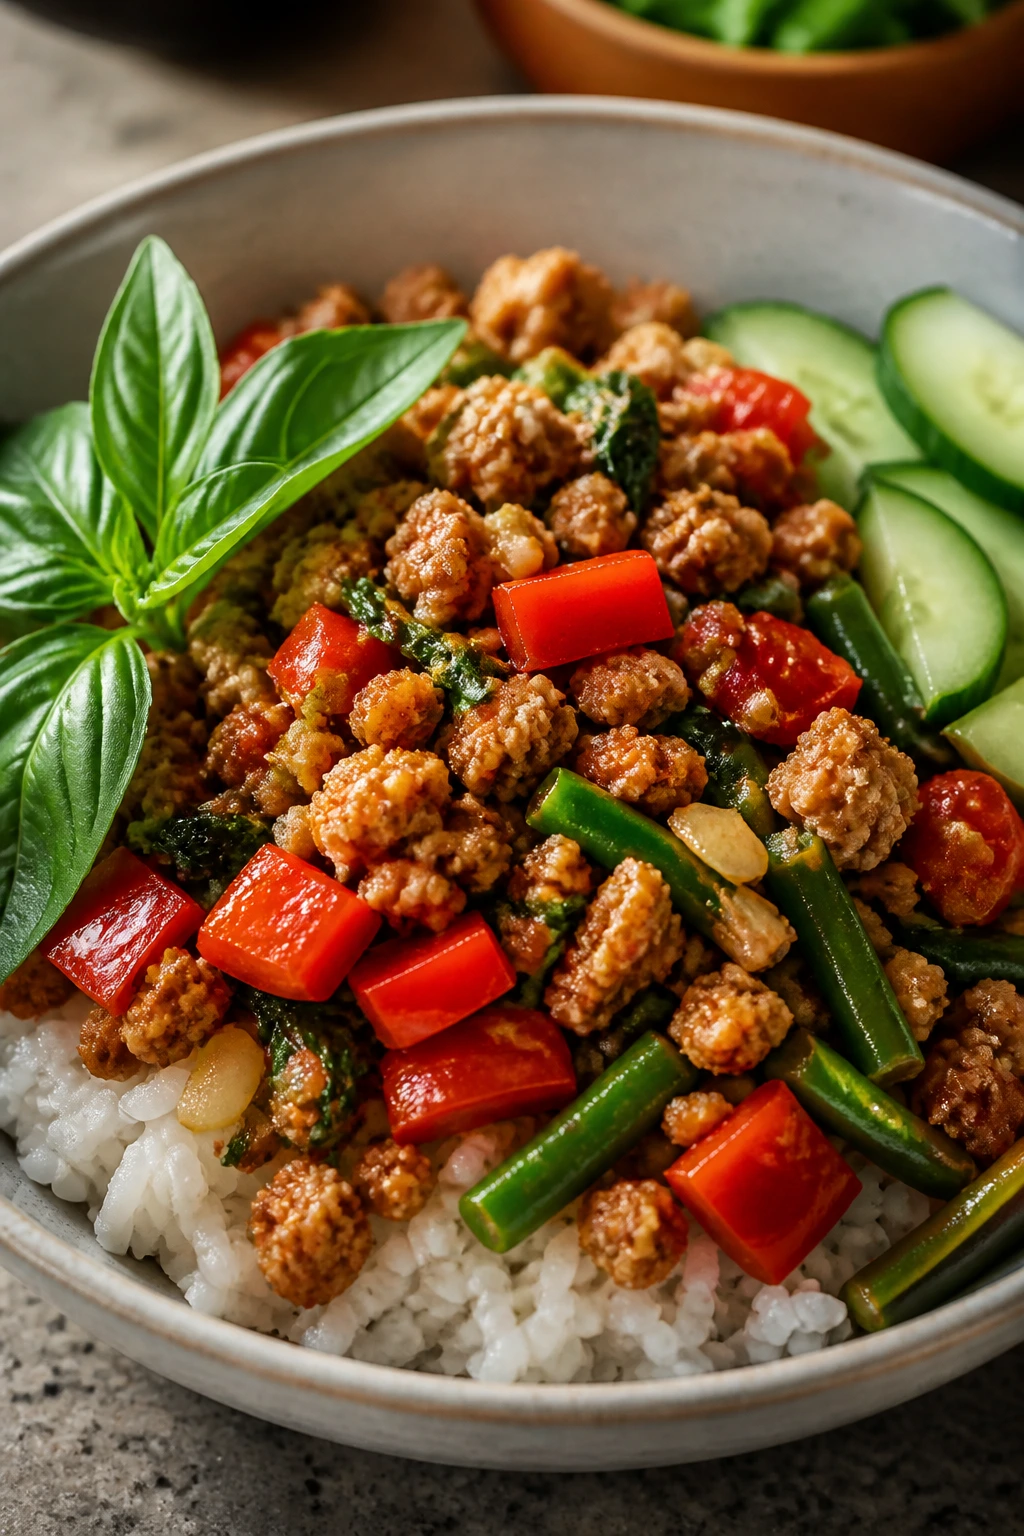
This bowl smells fantastic while it cooks. Garlic, chili, and basil hit the pan at the same time, and the turkey takes on that fragrant, slightly sweet edge that keeps you coming back for another bite.
Why It Works:
Ground turkey is lean, so it needs a sauce and aromatics to keep it from reading dry. Thai basil has a sharper, almost peppery note that regular basil does not give you, and that flavor holds up well against rice and vegetables.
Key Ingredients:
- 1 pound ground turkey
- 3 cups cooked jasmine rice
- 1 red bell pepper, sliced
- 1 cup green beans or snap peas
- 3 cloves garlic, minced
- 1 tablespoon soy sauce
- 1 tablespoon oyster sauce or vegetarian stir-fry sauce
- 1 teaspoon chili garlic sauce
- 1 cup Thai basil leaves
- 1 tablespoon neutral oil
Quick Steps:
- Heat the oil in a skillet over medium-high heat and cook the turkey for 5 to 6 minutes until browned.
- Add garlic, bell pepper, and green beans, then cook for 3 to 4 minutes until the vegetables are tender-crisp.
- Stir in soy sauce, oyster sauce, and chili garlic sauce.
- Turn off the heat and fold in the Thai basil so it wilts without burning.
- Serve over rice or pack into containers.
Equipment for This Recipe:
- Large skillet or wok
- Rice cooker or saucepan for the rice
- Wooden spoon or spatula
How to Serve This Dish:
This is a warm bowl with a little heat, so I like a squeeze of lime on top right before eating. If you want more crunch, a few cucumber slices on the side work better than extra rice.
Pro Tips for This Recipe:
- Add the basil off the heat so it stays fragrant.
- Use jasmine rice if you want the aroma to match the stir-fry.
- Keep the vegetables a little crisp; soft green beans are a drag in the fridge.
Variations on This Dish:
- Chicken Version: Ground chicken works almost the same way.
- Tofu Version: Crumbled tofu can replace the turkey if you season it well.
Common Mistakes to Avoid with This Dish:
- Cooking the basil too long: It loses the sharp, herbal smell that makes the bowl distinctive.
- Using too much sauce: The bowl should taste seasoned, not soupy.
23. Savory Breakfast Egg Potato Bowl
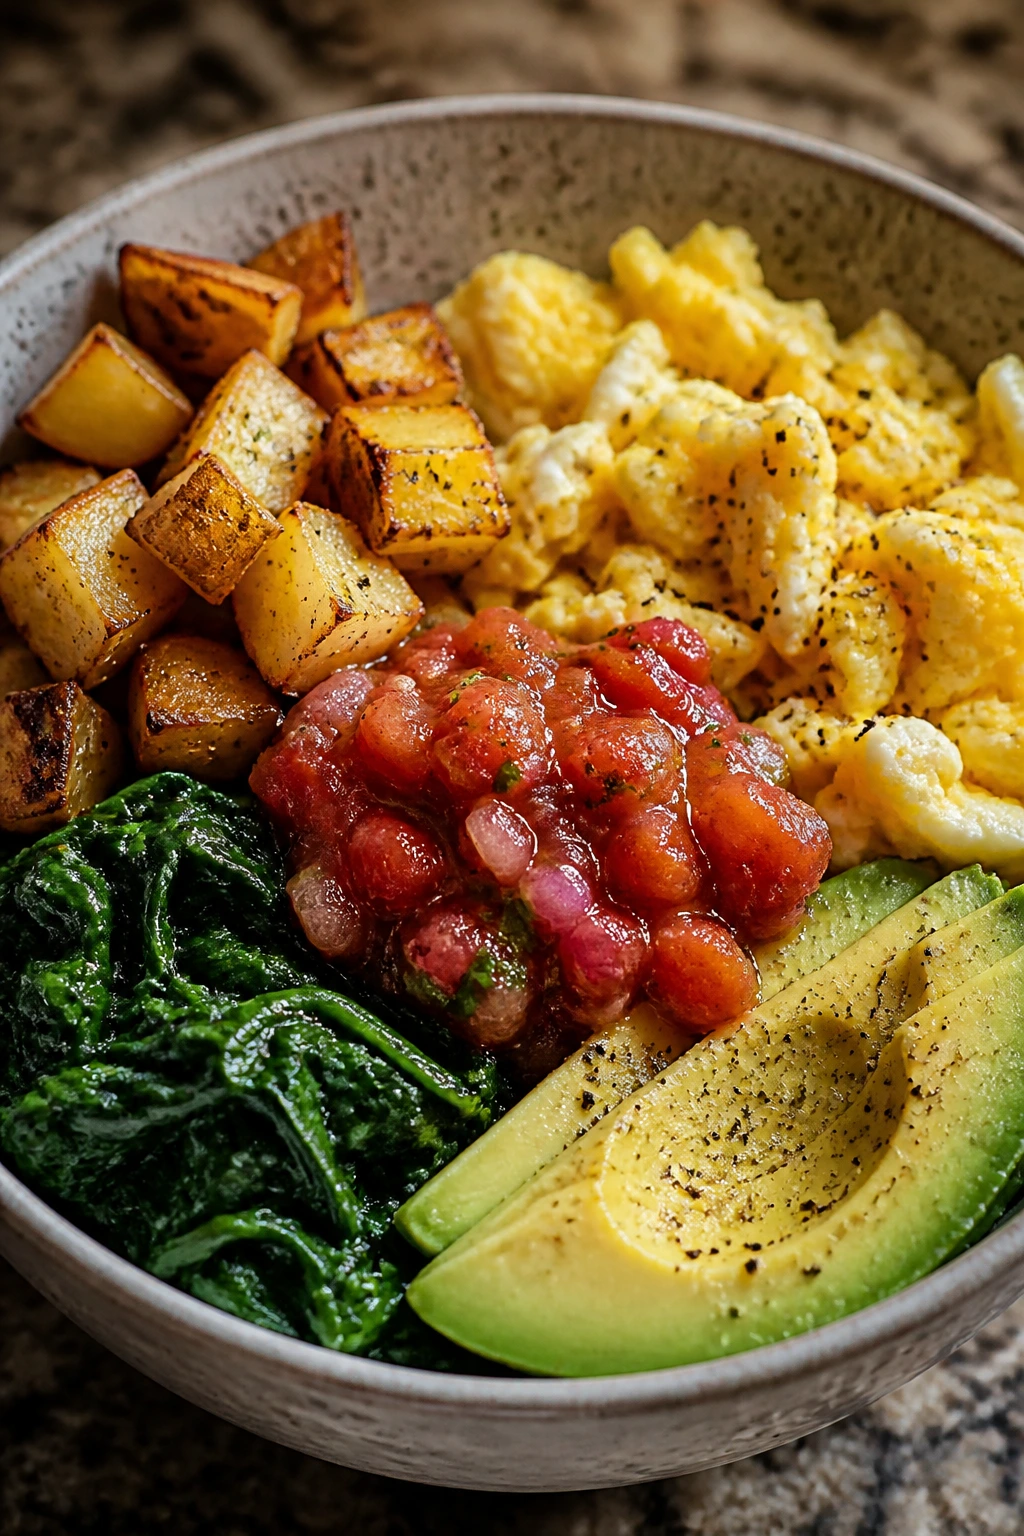
Breakfast bowls fail when they lean too hard toward either dry eggs or soggy potatoes. This one avoids both traps by keeping the potatoes roasted, the eggs soft, and the spinach just wilted enough.
Why It Works:
Roasted potatoes reheat better than pan-fried ones and keep their edges. Eggs provide the protein, spinach adds color without much volume, and a little salsa or yogurt gives the bowl a fast finish in the morning.
Key Ingredients:
- 3 medium potatoes, cubed
- 1 tablespoon olive oil
- 1/2 teaspoon paprika
- 6 large eggs
- 2 cups baby spinach
- 1/2 cup salsa
- 1 avocado, sliced
- 2 tablespoons plain Greek yogurt
- Salt and pepper
Quick Steps:
- Roast the potatoes with olive oil, paprika, salt, and pepper at 425°F / 220°C for 25 to 30 minutes until browned.
- Scramble the eggs gently over medium-low heat, or bake them into a sheet-pan scramble if you want fewer dishes.
- Wilt the spinach in the hot pan for 30 seconds, just until it collapses.
- Divide potatoes, eggs, and spinach into containers.
- Add salsa, yogurt, and avocado when serving.
Equipment for This Recipe:
- Sheet pan
- Nonstick skillet
- Spatula
How to Serve This Dish:
Breakfast bowls work best when the avocado and salsa are added fresh. A warm tortilla on the side turns it into a sturdy breakfast burrito situation without any extra work.
Pro Tips for This Recipe:
- Roast the potatoes in a single layer so they brown instead of steaming.
- Keep the eggs soft; they firm up a bit during reheating.
- Add yogurt after warming the bowl so it does not thin out.
Variations on This Dish:
- Egg White Version: Use whole eggs plus extra whites if you want a lighter bowl.
- Cheesy Version: Add a small handful of shredded cheddar while the eggs are still hot.
Common Mistakes to Avoid with This Dish:
- Overcooking the eggs: They turn rubbery fast in storage.
- Packing avocado with the hot potatoes: It browns and softens too quickly.
24. Berry Cottage Cheese Crunch Bowl
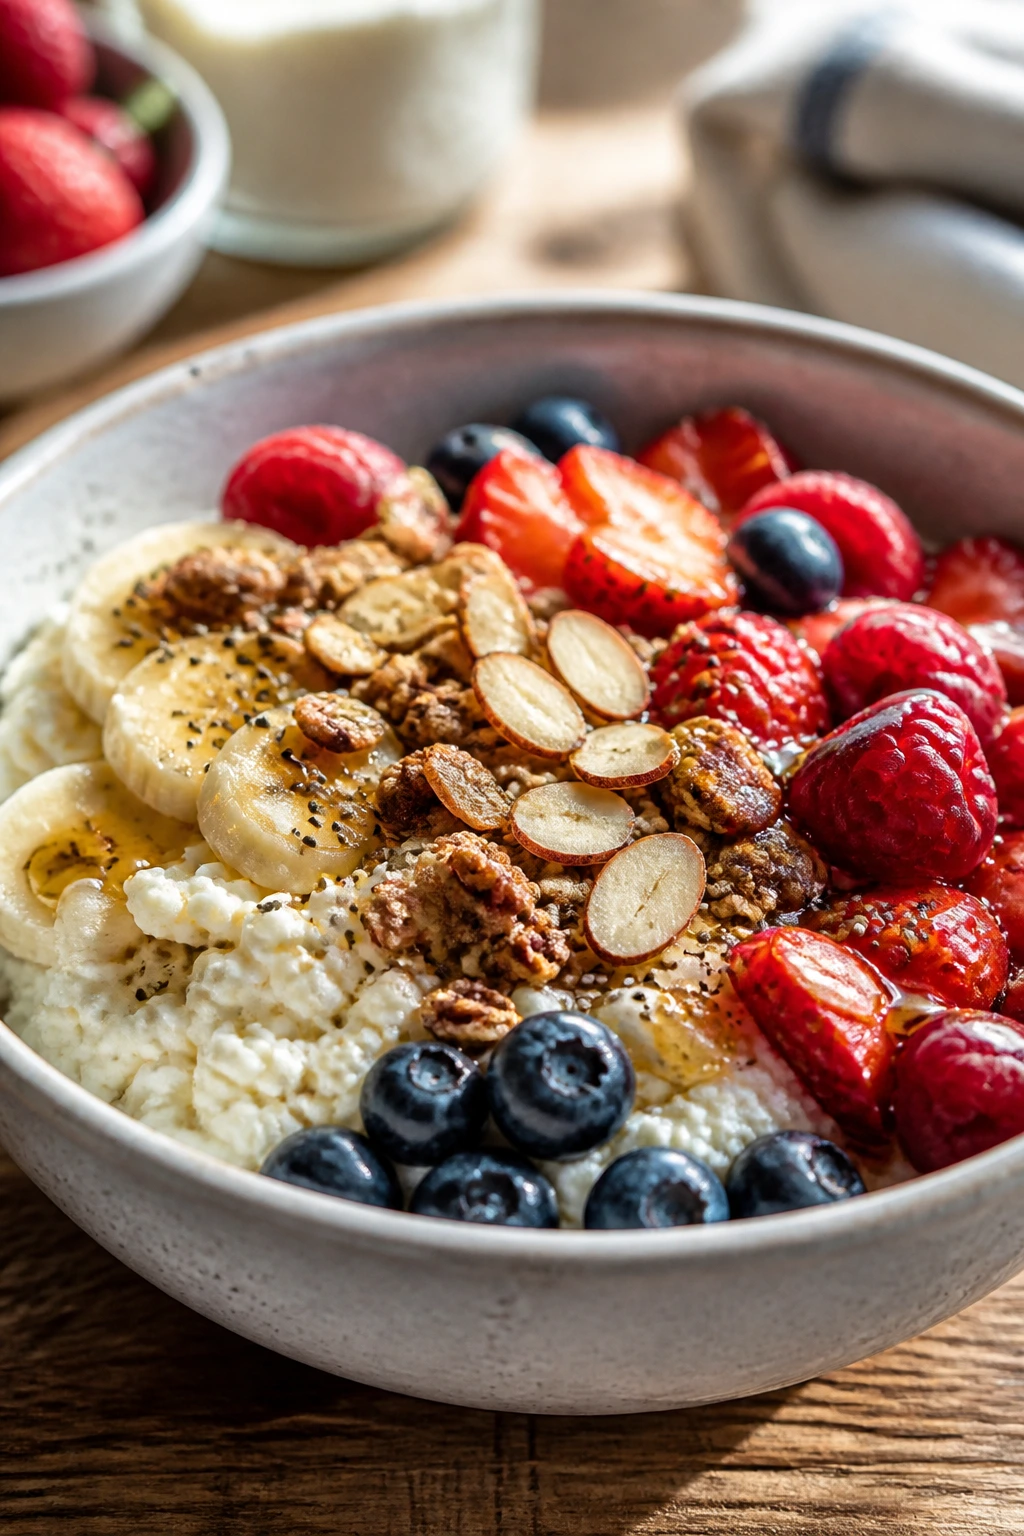
This is the bowl that proves a no-cook breakfast can still feel complete. Cottage cheese gives you protein, berries bring juice, and the crunch from nuts or granola keeps the texture from falling flat.
Why It Works:
Cottage cheese holds up well for a few days in the fridge and does not need reheating, which is handy on mornings when you barely want to think. The fruit adds sweetness, and a small amount of oats or nuts stops the bowl from tasting like a snack plate.
Key Ingredients:
- 2 cups cottage cheese
- 1 cup mixed berries
- 1 banana, sliced just before eating
- 1/4 cup sliced almonds
- 2 tablespoons chia seeds
- 1/4 cup low-sugar granola
- 1 teaspoon honey
- Pinch of cinnamon
Quick Steps:
- Portion the cottage cheese into containers.
- Add berries and chia seeds to the top.
- Store sliced almonds and granola separately so they stay crisp.
- Add banana, honey, and cinnamon just before eating.
- Stir lightly or leave layered, depending on how you like the texture.
Equipment for This Recipe:
- Small storage containers
- Spoon
- Knife for the banana
How to Serve This Dish:
Serve it cold, straight from the fridge. If you want it to feel a little more polished, use a shallow bowl instead of a tall container so the fruit sits on top instead of disappearing into the cheese.
Pro Tips for This Recipe:
- Keep crunchy toppings separate until the last second.
- Use berries that are dry and firm so they don’t bleed into the cottage cheese.
- A tiny pinch of salt can make the sweet flavors pop more.
Variations on This Dish:
- Peach Version: Swap berries for sliced peaches and add a little vanilla.
- Nut-Free Version: Use sunflower seeds instead of almonds.
Common Mistakes to Avoid with This Dish:
- Adding granola too early: It goes soft and sad by lunch.
- Using overripe bananas in the prep container: They brown fast and make the bowl mushy.
25. Peanut Butter Banana Overnight Oats Bowl
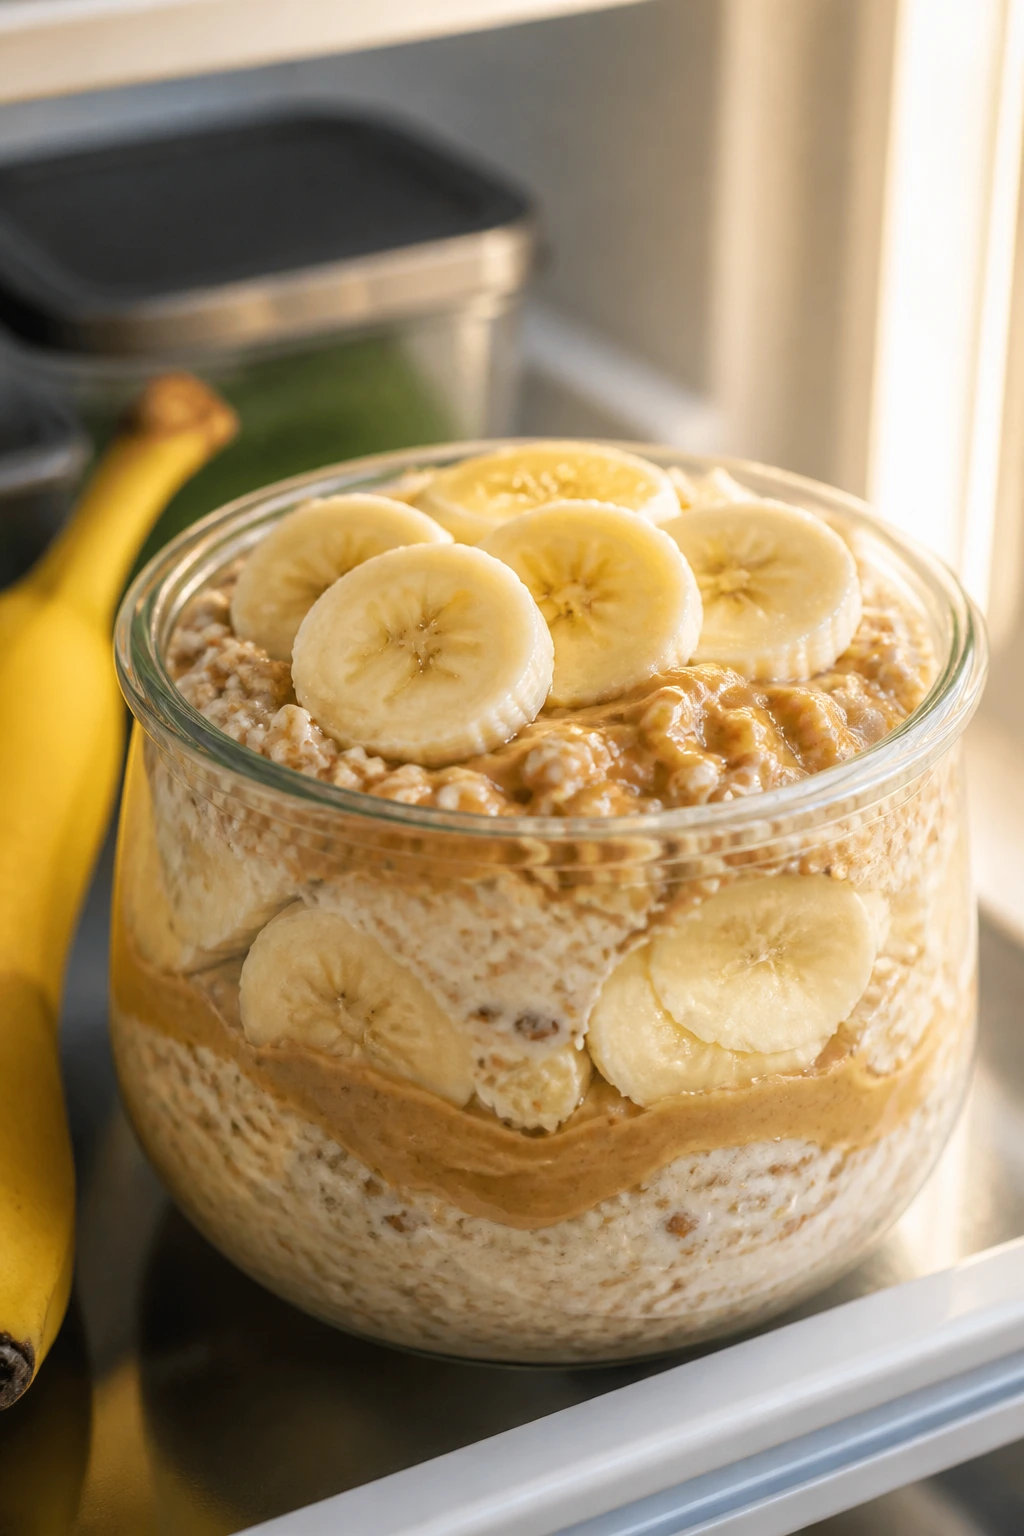
Overnight oats can taste bland if you treat them like a texture problem and ignore the flavor. Peanut butter and banana fix that fast, turning a fridge-cold breakfast into something with actual body and a little richness.
Why It Works:
Oats soften overnight but keep enough structure to feel spoonable. Peanut butter adds fat and flavor, chia seeds thicken the mix, and banana sweetens the bowl without needing much sugar.
Key Ingredients:
- 2 cups rolled oats
- 2 cups milk or unsweetened almond milk
- 1/2 cup plain Greek yogurt
- 1/4 cup peanut butter
- 2 tablespoons chia seeds
- 2 bananas, sliced, with one reserved for serving
- 1 tablespoon honey or maple syrup
- Pinch of salt
- 2 tablespoons chopped peanuts
Quick Steps:
- Stir the oats, milk, yogurt, peanut butter, chia seeds, honey, and salt in a large bowl until fully combined.
- Fold in one sliced banana, then divide the mixture into jars or containers.
- Cover and refrigerate for at least 6 hours, or overnight, until thick.
- Top with the remaining banana and chopped peanuts in the morning.
- Stir before eating if you want a looser texture.
Equipment for This Recipe:
- Large mixing bowl
- Jars or lidded containers
- Spoon or spatula
How to Serve This Dish:
This is cold breakfast by design. If you want a warmer texture, microwave it for 30 to 45 seconds, then add the banana and peanuts after heating so they stay fresh.
Pro Tips for This Recipe:
- Use rolled oats, not instant oats; instant oats can turn gummy.
- Add a pinch of salt. Peanut butter tastes flat without it.
- Keep the peanuts separate if you want crunch on day three.
Variations on This Dish:
- Chocolate Version: Stir in 1 tablespoon cocoa powder and a few dark chocolate chips.
- Berry Version: Swap banana for blueberries and use almond butter instead.
Common Mistakes to Avoid with This Dish:
- Using too much liquid: The oats stay loose and never thicken properly.
- Forgetting the salt: The whole bowl tastes oddly one-note without it.
Why Bowls Hold Up Better Than Loose Meal Prep
A bowl is more than a container of leftovers with a prettier name. The shape matters. When you build meal prep around a bowl, you can separate wet and dry components, keep the sauce visible, and avoid the sad little corner where everything turns gray by Thursday.
Grains do the quiet work. Rice, quinoa, farro, barley, and couscous each have a different texture, and that texture affects how the bowl behaves after chilling. Farro and barley stay chewy. Quinoa feels lighter. Rice is the safest neutral base when you want sauce to do the talking. Pick the grain for the texture you want three days later, not the texture you want in the first five minutes.
Then there’s the moisture problem. That is where most meal prep goes wrong. Tomatoes, cucumbers, avocado, yogurt sauces, and hot protein all have different lifespans inside a closed container. The fix is simple, though not glamorous: keep wet toppings separate when possible, let cooked components cool before sealing them up, and add herbs at the end so they don’t blacken and disappear.
I also like bowls because they forgive imperfect weeks. If one component runs short, you can stretch it with greens, beans, or extra rice. If lunch ends up cold instead of reheated, half these recipes still work. That flexibility is not a luxury. It is the thing that keeps your Sunday effort from becoming landfill by midweek.
Essential Equipment for These Recipes
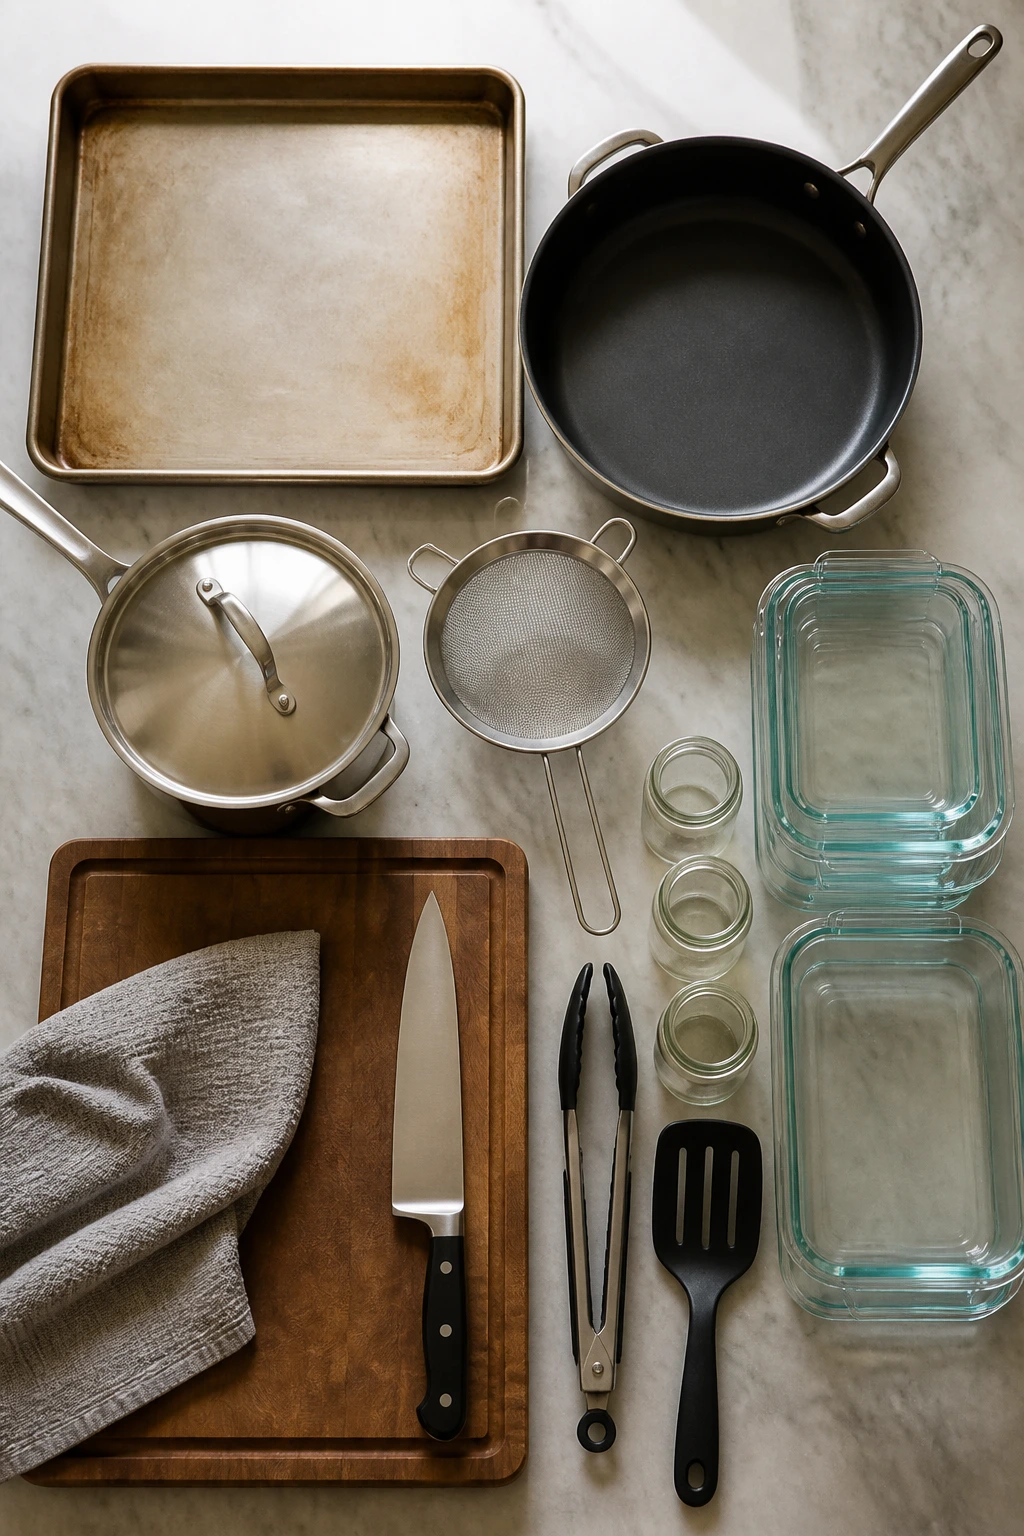
- Rimmed sheet pans: Roasting vegetables, chicken, salmon, and chickpeas works cleanly on a flat, high-sided pan.
- 12-inch skillet: Useful for ground meat, tofu, tempeh, and quick sauces that need browning.
- Medium saucepan with lid: Best for rice, quinoa, farro, barley, and oats.
- Fine-mesh strainer: Handy for rinsing quinoa, beans, lentils, and canned ingredients without losing half of them down the sink.
- Sharp chef’s knife: Uniform cuts matter more than people think, especially for carrots, cucumbers, and sweet potatoes.
- Cutting board with a damp towel underneath: Keeps it from skating around while you chop.
- Meal prep containers with tight lids: Glass or sturdy plastic both work; divided containers help when you want crisp and wet components separated.
- Small jars or dressing cups: Sauce storage gets easier when you can shake it before pouring.
- Tongs and a spatula: Simple, but they save time and keep roasted pieces intact.
- Rice cooker or pressure cooker, optional: Not required, but useful if you batch grains every week.
Smart Shopping and Ingredient Tips
The smartest shopping move is choosing ingredients that stay honest after chilling. That means sturdy greens like kale, romaine, cabbage, and spinach rather than delicate lettuces that collapse the second they touch dressing. It also means vegetables with texture — broccoli, carrots, sweet potatoes, cauliflower, cucumber, bell peppers, snap peas — because they keep their shape and don’t turn to paste.
Buy proteins with the fridge in mind. Chicken thighs are usually more forgiving than breasts, especially if you like to reheat bowls. Salmon works well, but it is better within a couple of days and should be cooked just to flake, not until dry. Canned beans, lentils, tofu, tempeh, and canned tuna are meal prep workhorses because they do not ask much and they keep their texture.
Grains deserve more attention than they get. Farro and barley hold chew, which makes them useful when the bowl has a strong sauce. Rice is neutral and easy. Quinoa is lighter and a little nutty. If you want the bowl to feel substantial after a few days, choose a grain that still tastes like a grain when cold.
Sauces are where the flavor budget should go. A jar of tahini, a block of miso, a bottle of soy sauce, a tub of Greek yogurt, sesame oil, vinegar, and a few lemons can cover a ridiculous amount of lunch territory. I would rather have one good sauce than three watery ones. Fresh herbs matter too, but only if you use them at the end. Basil, parsley, cilantro, dill, and scallions all fade quickly once they are chopped and buried.
How to Serve These Recipes
Presentation:
Layer the base first, then fan the protein or spoon it into a clean line rather than burying it. A little color separation matters. Rice on one side, roasted vegetables on another, sauce drizzled over the top — it looks better and helps you see what you’re eating.
Accompaniments:
Warm pita, seeded crackers, a simple green salad, sliced fruit, or a cup of plain yogurt all work well with these bowls. For more filling lunches, add a hard-boiled egg, a piece of sourdough, or a side of hummus and carrots.
Portions:
Most of these bowls serve one generous lunch or dinner portion, usually around 2 to 2 1/2 cups total food per bowl. If you want to scale up, increase the grain and vegetable base first; if you want to scale down, keep the protein portion steady and trim the starch.
Beverage Pairing:
Sparkling water with lemon fits almost every bowl here. For something more specific, iced green tea works with sesame and ginger bowls, while plain water with cucumber or mint suits the brighter Mediterranean and herb-heavy bowls.
Additional Tips and Flavor Boosters
Flavor Enhancement:
A finishing acid changes everything. Lemon juice, lime juice, rice vinegar, pickled onions, or even a teaspoon of the liquid from a jar of pickles can wake up a bowl that has been sitting in the fridge for two days.
Customization:
If a bowl feels too heavy, add a pile of shredded cabbage or chopped cucumbers. If it feels too light, add a jammy egg, extra beans, or a spoonful of hemp seeds. That small adjustment often matters more than changing the entire recipe.
Serving Suggestions:
Keep crunchy toppings separate until serving time: sesame seeds, nuts, pumpkin seeds, crushed tortilla chips, fried onions, and toasted coconut all lose their edge if they sit in sauce overnight. Herbs belong at the end too. Always.
Make-It-Yours:
For gluten-free bowls, use tamari instead of soy sauce and choose rice, quinoa, or certified gluten-free oats. For dairy-free bowls, lean on tahini, hummus, salsa, or avocado instead of yogurt and cheese. For lower-carb bowls, switch to cauliflower rice, extra greens, or shredded cabbage without losing the structure of the meal.
Make-Ahead, Storage, and Reheating Guidance
Most of these bowls keep well for 3 to 4 days in the refrigerator, though the seafood ones are best closer to 2 or 3 days. Grain bowls with roasted vegetables usually improve overnight because the sauce settles into the grains a bit. Cabbage-based bowls and bean bowls also hold up nicely, while avocado, cucumber, and delicate herbs need to be added fresh.
If you want to freeze components, freeze the grains, cooked meats, beans, meatballs, and roasted vegetables in flat containers or freezer bags for up to 2 months. Skip freezing cucumbers, lettuce, avocado, fresh tomatoes, and yogurt-based dressings; they break down into a sad mess. Peanut sauce, tahini sauce, and most tomato-based sauces freeze better than dairy-heavy ones.
For reheating, the microwave is fine if you use it carefully. Cover the bowl loosely and heat in 60-second bursts, stirring halfway through if the ingredients can handle it. Salmon, chicken, turkey, pork, rice, quinoa, and roasted vegetables all do better when they are warmed just until steaming, not until they feel scorching hot. If you want a better texture, reheat protein and grains in a skillet with a splash of water for 3 to 4 minutes, then add cold toppings after.
Make sauces and dressings ahead, but keep them in separate jars. Cooked grains can be made 3 days ahead and chilled. Roasted vegetables are best within 3 days. If you’re packing a week’s worth of lunches, freeze two portions and refrigerate the rest; that split keeps the last meals from turning limp before you get to them.
Variations and Adaptations to Try
Gluten-Free Grain Swap:
Use rice, quinoa, corn, or certified gluten-free oats in place of farro, barley, couscous, and regular soy sauce. Tamari is the easiest sauce swap. The bowl still has the same shape, just a different chew.
Dairy-Free Finish:
Trade Greek yogurt and feta for tahini, hummus, avocado, or a lemony vinaigrette. This works especially well in the Mediterranean, shawarma, and buffalo-style bowls where a creamy element matters but does not need to be dairy.
Lower-Carb Base:
Replace half or all of the grain with cauliflower rice, shredded cabbage, chopped greens, or roasted vegetables. That keeps the bowl filling without making it feel stripped down. A few beans or seeds help restore some substance.
Plant-Forward Protein Switch:
Swap chicken, turkey, pork, or salmon for roasted chickpeas, tofu, tempeh, lentils, or white beans. Keep the seasoning bold; plant proteins need it more than meat does. A good marinade or sauce makes the switch feel planned, not apologetic.
Kid-Friendly Mild Bowl:
Pull back on chili, harissa, buffalo sauce, and gochujang, then add a mild, creamy sauce instead. Rice, chicken, corn, avocado, and a little cheese usually go over well. If the bowl looks too mixed, separate the components in a divided container.
Heat-Lover’s Bowl:
Add chili crisp, jalapeños, cayenne, harissa, or extra chipotle sauce to any bowl here. I would not add heat to the whole batch unless you know everyone wants it. Better to keep the base moderate and let people finish their own bowl.
Common Mistakes to Avoid
The first mistake is packing everything at the same moisture level. A cucumber does not belong directly under hot chicken if you want it to stay crisp. Sauce should go somewhere it can work without flattening the rest of the bowl, and delicate herbs should be a last-minute job.
Another easy mistake is underseasoning the grain. Plain rice or quinoa can make even a good bowl taste vague and half-finished. Salt the cooking water, taste the grain after it cooks, and do not be shy about adding acid or sauce at the end. Bland grain is the fastest way to make meal prep feel like a chore.
Overcooked protein is a bigger problem than most people admit. Chicken breast gets dry, salmon gets chalky, shrimp gets rubbery, and pork tenderloin turns dense if you push it too far. Cook proteins just to the finish line, then stop. The refrigerator will do a little firming on its own.
The third trap is using ingredients that are too soft for storage. Overripe avocado, watery tomatoes, flimsy lettuce, and overcooked vegetables all lose their shape before the week is out. Pick sturdier produce or add the fragile pieces only when you eat.
Finally, don’t make the sauce an afterthought. A bowl without a strong dressing often tastes like good intentions and not much else. If you want people to eat the lunches you made, the sauce has to earn its place.
Frequently Asked Questions
Can I pack these bowls in advance and leave them at room temperature for a while?
Only for a short stretch. Once the bowl includes cooked meat, rice, or dairy, it should be kept cold and moved back to the fridge within 2 hours, or 1 hour if the room is warm. For work lunches, an insulated bag with a small ice pack does the job.
Which bowls hold up best for four days?
The lentil, chickpea, turkey, and grain-based bowls are the strongest long-haul options. Cabbage, farro, barley, black beans, and roasted vegetables stay dependable. Seafood bowls are better eaten earlier in the week.
Can I use frozen vegetables instead of fresh?
Yes, in a few places. Frozen broccoli, edamame, corn, and cauliflower rice work well because they are already prepped and hold texture after cooking. I would still buy fresh cucumbers, herbs, avocado, and tomatoes when those appear in the recipe.
How do I keep avocado from turning brown?
Add it just before eating if you can. If you must pack it, toss the slices with lemon or lime juice and press plastic wrap directly on the surface before sealing the container. Even then, it is a short-term fix.
What if I do not have a microwave at work?
Choose bowls that taste good cold: tuna farro, Greek chicken quinoa, peanut noodle bowls, salmon rice bowls, and berry breakfast bowls all work that way. For the warmer bowls, let the container sit on the counter for 20 minutes before eating so the flavors open up a little.
Can I swap one grain for another without wrecking the recipe?
Usually, yes. Rice, quinoa, farro, barley, couscous, and orzo each change the texture, but the bowl structure still works. Keep an eye on cooking time and liquid amounts, because barley and farro need more time than couscous or orzo.
What’s the easiest protein to batch for these bowls?
Chicken thighs, ground turkey, lentils, tofu, and canned beans are the least fussy. They cook quickly, hold seasoning well, and reheat without falling apart. Salmon and shrimp are better when you want a few fresher bowls early in the week.
How do I stop bowls from getting soggy?
Cool the hot parts before sealing the container, keep sauces separate when possible, and do not bury watery vegetables under grains. A paper towel tucked under leafy greens can help absorb extra moisture for a day or two.
Are these bowls enough for dinner, or are they lunch only?
They work for both. Dinner portions usually need a little more grain, extra vegetables, or a second protein serving. If you want a bigger plate, add bread, fruit, or a side salad instead of doubling the sauce.
Bowls That Keep Their Shape
A good meal prep bowl does not need to be clever. It needs to be sturdy, well seasoned, and built so the fridge does not ruin it by Tuesday. That is the whole trick here. Better grain, better sauce, better texture choices. That is what makes the lunches worth repeating.
If you keep the base flexible and the toppings honest, a Sunday prep session becomes a stack of lunches that still feel like food when you actually want them. And that is the goal, really: less waste, less midweek improvising, more bowls that earn their spot in the container.