
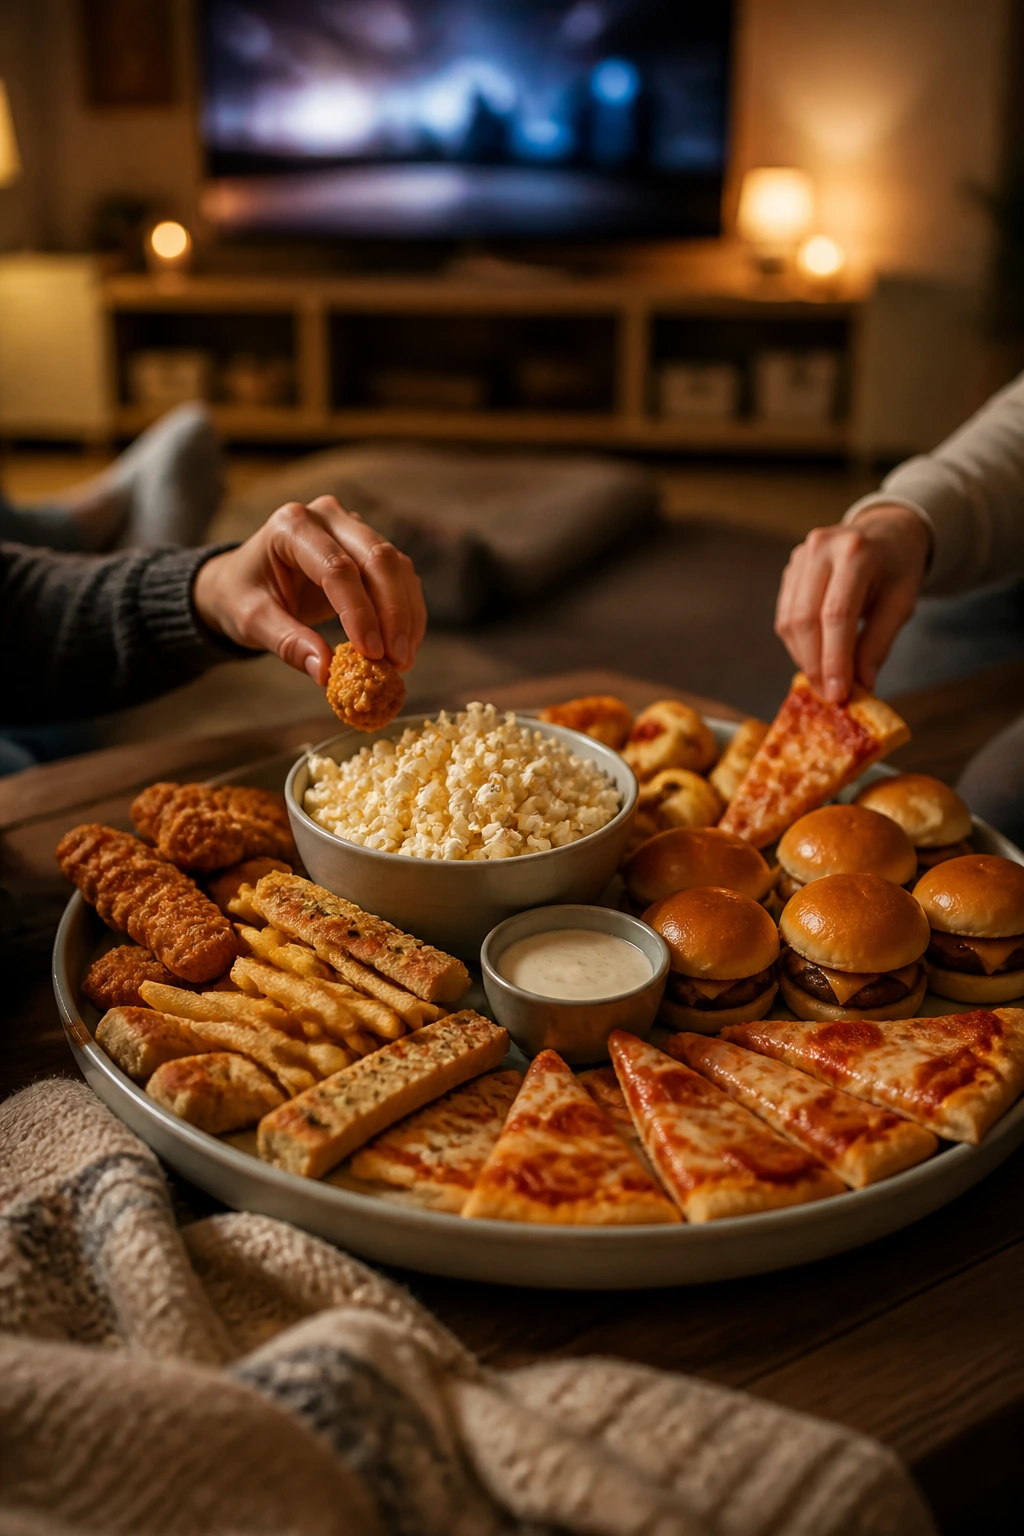
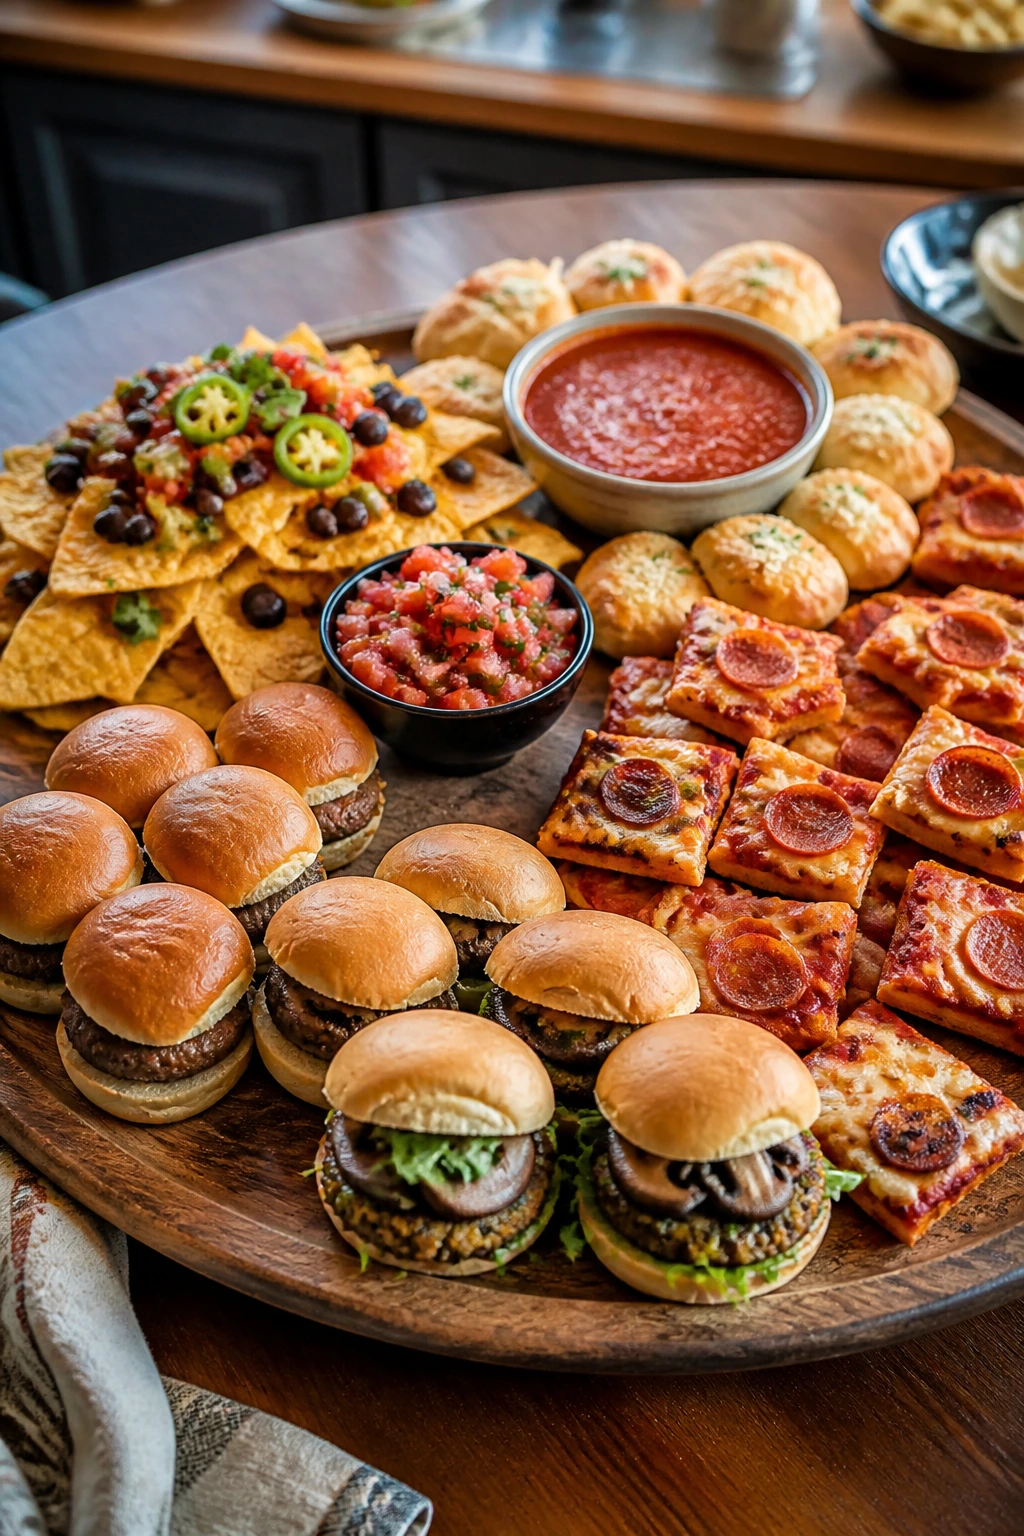
The best family movie night meals have one job: stay good while everyone argues over the remote, drops a fry on the floor, and pauses the film three times to find a lost blanket. You want food that can sit for a minute, travel from kitchen to couch without falling apart, and still taste like dinner instead of a compromise. That usually means crisp edges, a little cheese pull, a sauce thick enough to cling, and portions you can eat with one hand if you have to.
I like movie-night food that forgives a late start. A pan of baked ziti can wait under a loose foil tent. Sliders can be wrapped in a towel and still feel warm at the table. Nachos, if they’re built with restraint and not buried in wet toppings, keep their crunch longer than people expect. The trick is not making “snack food.” The trick is making meals that happen to work on a sofa.
And because no one wants a pile of dishes after the credits roll, the recipes below lean hard on sheet pans, skillets, baked casseroles, and handheld dinners that don’t turn into a mess halfway through the opening scene. Some are cheesy, some are saucy, some are the kind of thing kids quietly inhale before you’ve found the remote. All of them feel right for a living room dinner.
Why These Family Movie Night Meals Keep the Couch Calm

-
One-hand friendly: A lot of these dinners can be eaten from a plate, a parchment-lined tray, or a bun, which means fewer knife-and-fork gymnastics between scenes.
-
Built for make-ahead prep: Several of the casseroles, sliders, and bakes can be assembled before the film starts so you’re not trapped in the kitchen while everyone else is on the sofa.
-
Crowd-sized without drama: Ground beef, pasta, tortillas, chicken, and cheese stretch easily, which matters when the family table includes a second helping and then a surprise friend.
-
Leftovers that still taste like dinner: These recipes reheat cleanly because they rely on sturdy sauces, baked fillings, and noodles that hold up instead of turning to mush.
-
Kid magnet flavors: Pizza, tacos, meatballs, mac and cheese, and chicken tenders show up more than once for a reason. They’re familiar, and familiar food gets eaten fast.
-
Cleanup stays sane: Sheet pans, one skillet, and casserole dishes do most of the heavy lifting here. That matters when the movie ends and the kitchen still needs to be usable.
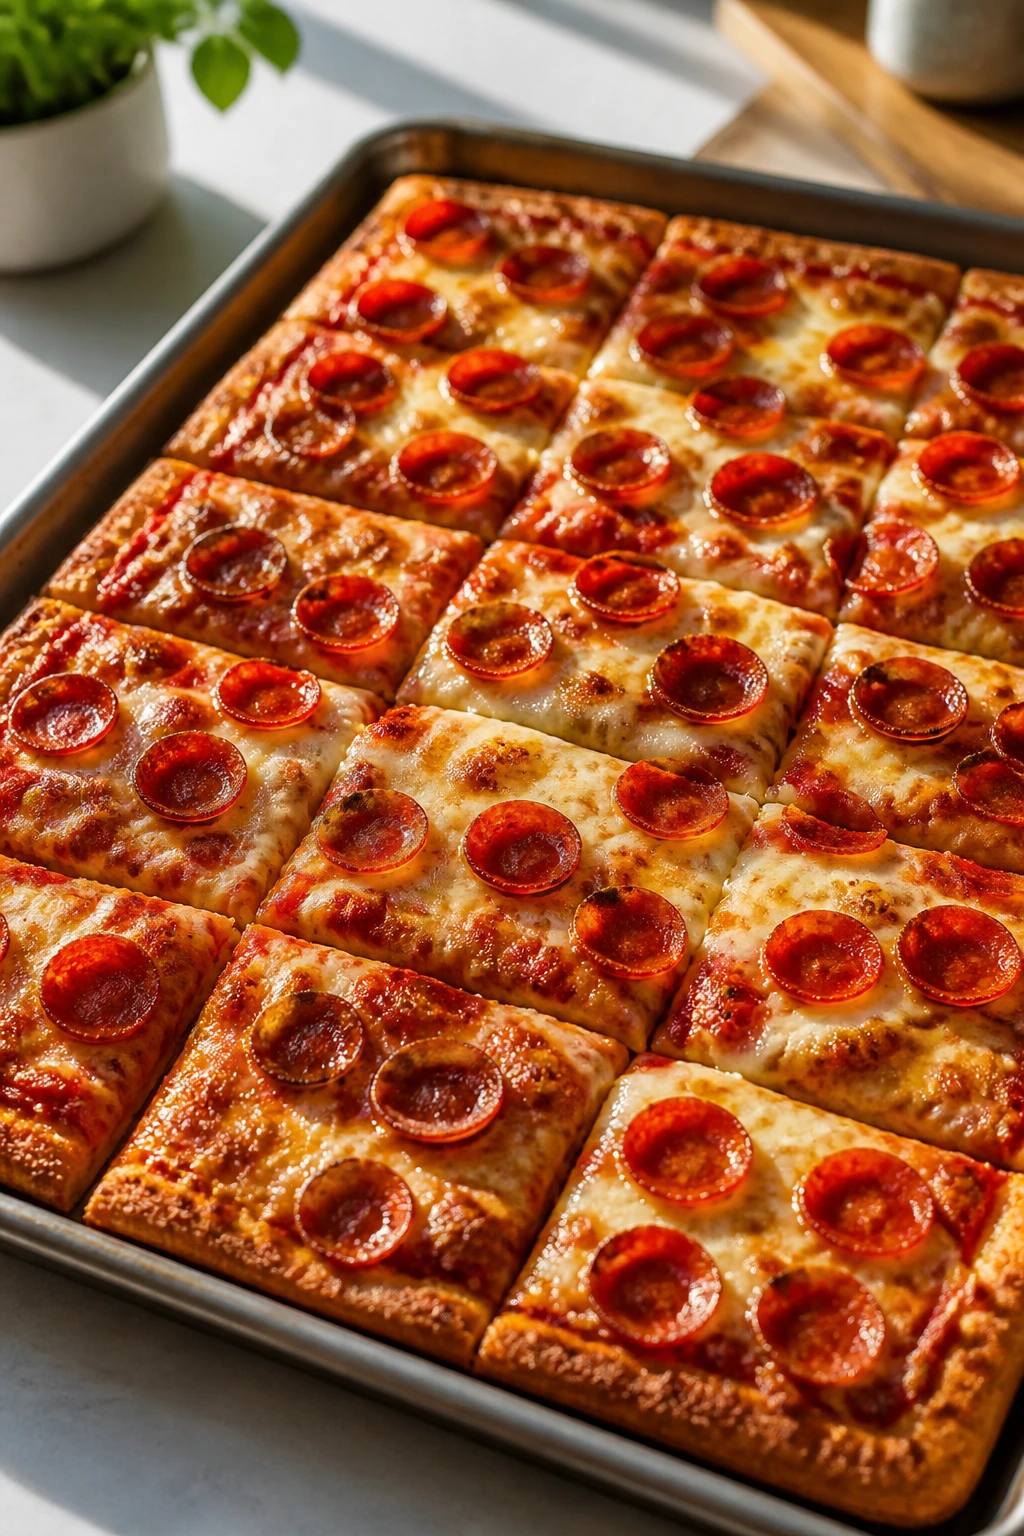
1. Mini Pepperoni Sheet-Pan Pizza
A sheet-pan pizza feels right for movie night because it slices into sturdy squares and never asks you to juggle a floppy slice over the couch. The crust gets crisp at the edges, the cheese bubbles into little brown freckles, and the pepperoni cups up just enough to hold a little oil in each one.
Why It Works:
A 13-by-18-inch pan gives you enough surface area for a family without making the crust too thick. Baking at 475°F pushes the bottom toward crisp while the cheese melts fast enough to avoid drying out the sauce.
Key Ingredients:
- 1 pound pizza dough, room temperature
- 1 tablespoon olive oil
- 1 cup pizza sauce
- 2 cups shredded low-moisture mozzarella
- 1 cup sliced pepperoni
- 1/2 teaspoon dried oregano
- 1/4 teaspoon garlic powder
Quick Steps:
- Preheat the oven to 475°F and oil a rimmed sheet pan.
- Stretch the dough into the pan; if it snaps back, rest it 5 minutes and try again.
- Brush with olive oil, then spread sauce in a thin layer.
- Scatter mozzarella, pepperoni, oregano, and garlic powder over the top.
- Bake 14 to 18 minutes until the crust is browned underneath and the cheese is bubbling.
- Let it sit 5 minutes before slicing into squares.
Equipment for This Recipe:
- Rimmed 13-by-18-inch sheet pan
- Rolling pin or your hands
- Pizza cutter or sharp knife
How to Serve This Dish:
Cut it into small squares and serve it right on a wooden board or parchment-lined tray. A simple green salad on the side keeps the plate from feeling too heavy, though most kids will skip straight to the pizza.
Pro Tips for This Recipe:
- Use low-moisture mozzarella, not fresh mozzarella, or the crust gets soggy fast.
- Don’t pile on toppings. Three or four ingredients is enough.
- If the bottom is pale, slide the pan onto a lower rack for the last 2 minutes.
Variations on This Dish:
- Sausage and Onion: Swap pepperoni for 3/4 pound cooked Italian sausage and a handful of thin onion slices.
- Veggie Corner: Use mushrooms, bell peppers, and olives, but sauté the mushrooms first so they don’t dump water onto the dough.
Common Mistakes to Avoid with This Dish:
- Adding too much sauce makes the crust soft in the middle. Use a thin layer.
- Cutting it the second it leaves the oven smears the cheese. Wait 5 minutes.
- Using cold dough makes stretching a fight. Let it warm up first.
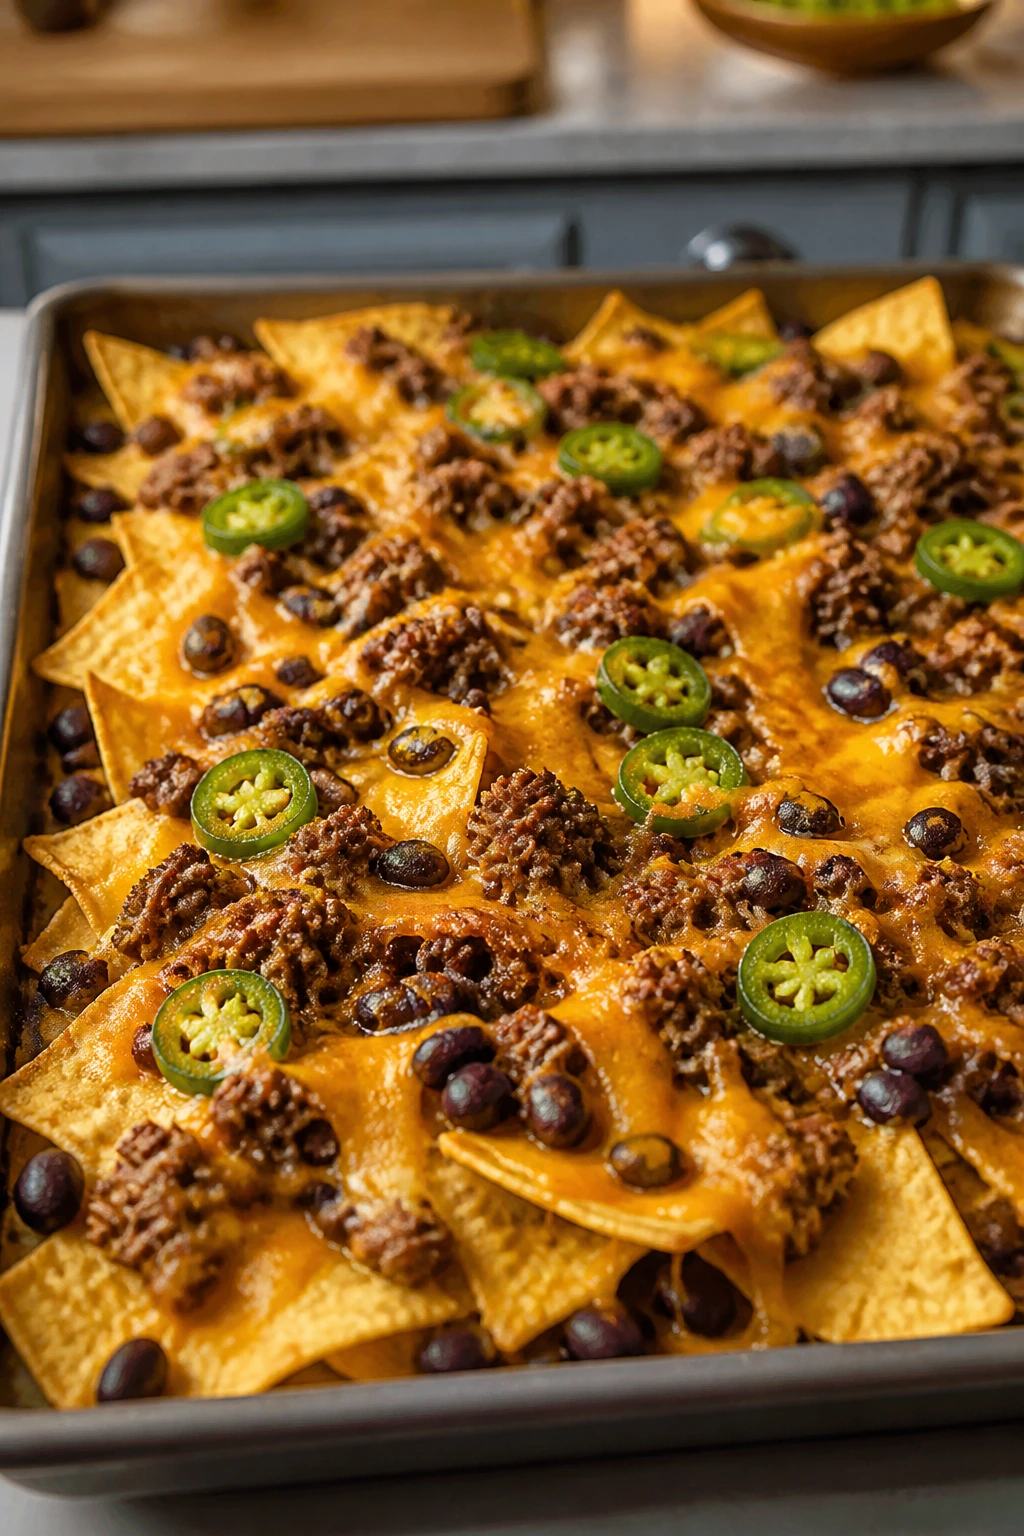
2. Cheesy Beef Nachos
Nachos work on movie night because they feel casual without being flimsy. The good ones have crispy chips under the center, browned cheese on top, and beef that’s seasoned enough to stand up to salsa without turning salty.
Why It Works:
Layering matters here. If you put everything on one pile, the middle turns to sludge. Two thinner layers of chips and cheese bake more evenly and keep a little crunch.
Key Ingredients:
- 1 pound ground beef
- 1 tablespoon taco seasoning
- 1/4 cup water
- 10 ounces sturdy tortilla chips
- 2 cups shredded cheddar or Mexican blend
- 1 cup canned black beans, rinsed
- 1/2 cup sliced jalapeños
- 1 cup salsa
Quick Steps:
- Preheat the oven to 425°F.
- Brown the beef in a skillet, drain the fat, then add taco seasoning and water.
- Spread half the chips on a sheet pan, then add half the beef, beans, and cheese.
- Repeat with the second layer.
- Bake 8 to 10 minutes until the cheese melts.
- Finish with jalapeños and salsa.
Equipment for This Recipe:
- Large skillet
- Rimmed sheet pan
- Spatula
How to Serve This Dish:
Serve immediately, while the chips still crack under the first bite. A bowl of sour cream and a little chopped cilantro on the side lets people build their own plate.
Pro Tips for This Recipe:
- Use thick chips. Thin ones fold under the toppings.
- Drain the beef well or the chips soften from the bottom up.
- Add salsa at the table, not before baking.
Variations on This Dish:
- Chicken Nachos: Swap beef for 3 cups shredded rotisserie chicken tossed with taco seasoning.
- White Bean Nachos: Use white beans, green chiles, and Monterey Jack for a milder tray.
Common Mistakes to Avoid with This Dish:
- Piling nachos too high turns the middle mushy. Keep the layer loose.
- Using watery toppings before baking softens everything. Save them for the finish.
- Baking too long browns the cheese into rubber. Pull it when it’s fully melted.
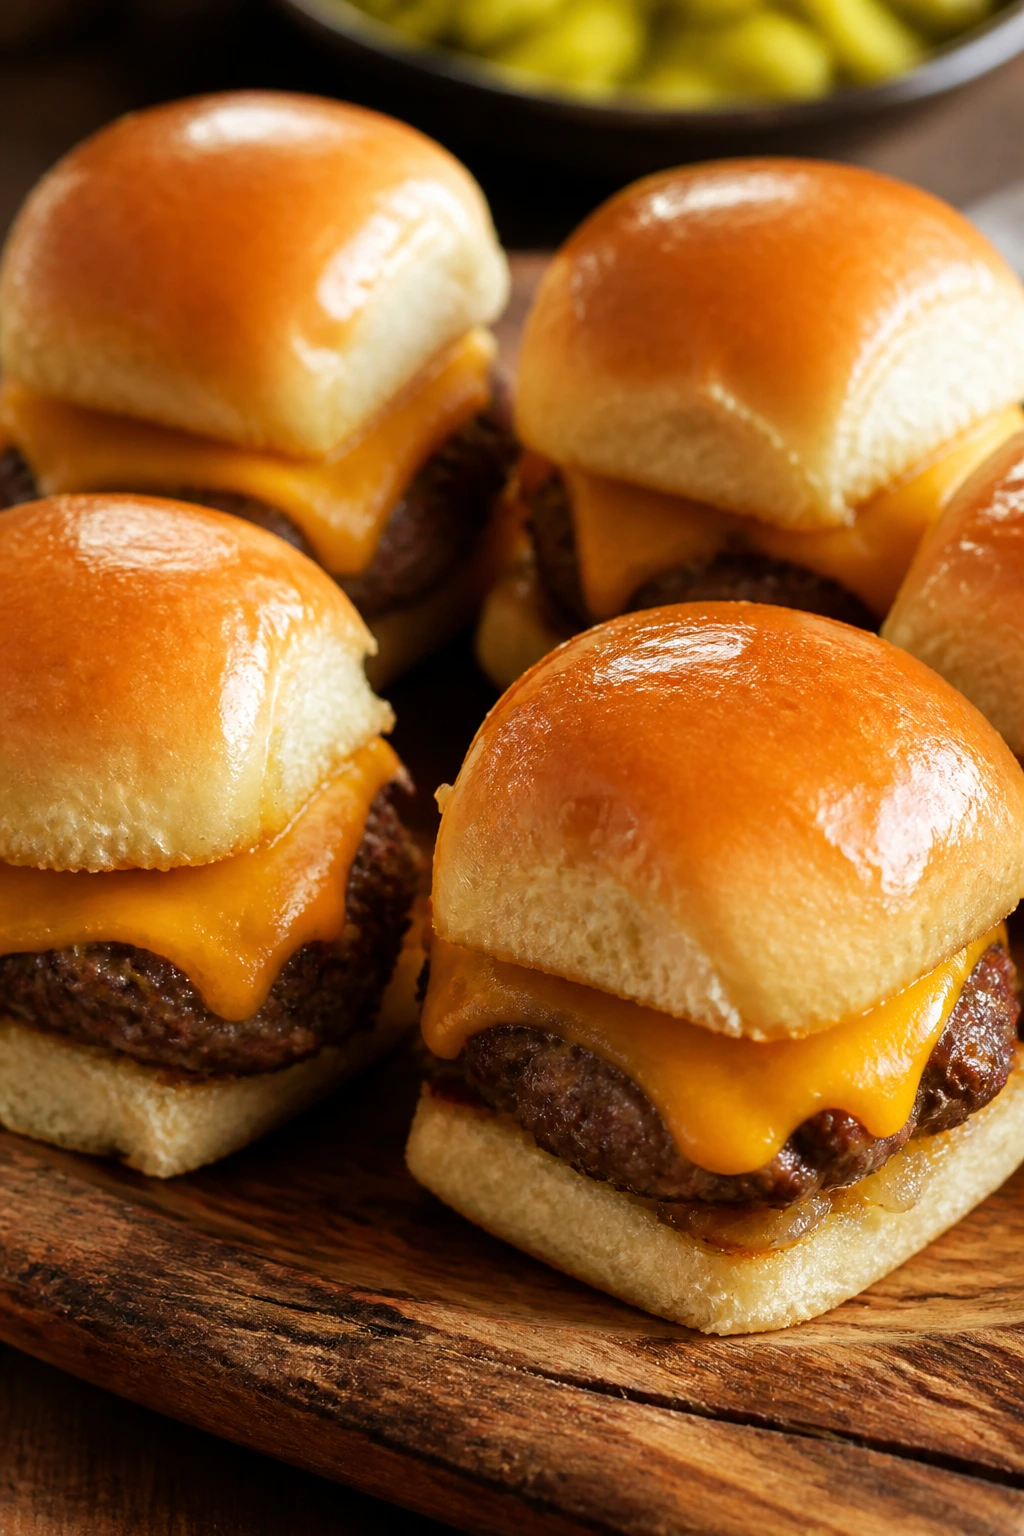
3. Classic Cheeseburger Sliders
Sliders hit the sweet spot between sandwich and snack. The tops get shiny and buttery, the beef stays juicy, and the melted cheese clings to the buns so no one ends up chasing runaway fillings across the couch.
Why It Works:
Baking the whole tray at once gives you the flavor of a diner burger without standing over a skillet flipping patties. The buns steam a little from the heat of the filling, which makes the whole thing soft in the best way.
Key Ingredients:
- 1 1/2 pounds ground beef
- 1 teaspoon salt
- 1/2 teaspoon black pepper
- 12 slider buns
- 8 slices cheddar cheese
- 1/2 cup diced onion
- 2 tablespoons ketchup
- 2 tablespoons mustard
Quick Steps:
- Preheat the oven to 350°F.
- Brown the beef with onion, salt, and pepper, then drain the excess fat.
- Split the buns and place the bottoms in a baking dish.
- Spread mustard and ketchup on the buns, then add beef and cheese.
- Cap with bun tops, brush with melted butter, and bake 12 to 15 minutes.
- Slice and serve warm.
Equipment for This Recipe:
- 9-by-13-inch baking dish
- Skillet
- Pastry brush
How to Serve This Dish:
Put the sliders on a platter with pickle chips tucked beside them. A pile of oven fries or carrot sticks keeps the meal balanced without changing the comfort-food feel.
Pro Tips for This Recipe:
- Use buns that are connected in one sheet if you can; it makes assembly faster.
- Drain the beef well so the bottoms don’t go soggy.
- Add the cheese before baking, not after, so it melts into the meat.
Variations on This Dish:
- Bacon Burger Sliders: Add cooked chopped bacon and a few extra pickle slices.
- Mushroom Melt Sliders: Fold in sautéed mushrooms and swap cheddar for Swiss.
Common Mistakes to Avoid with This Dish:
- Overfilling the buns makes them split when sliced. Keep the layer even.
- Skipping the butter on top leaves the rolls dry. Brush every top bun.
- Using too much mustard can dominate the whole tray. Stay light.
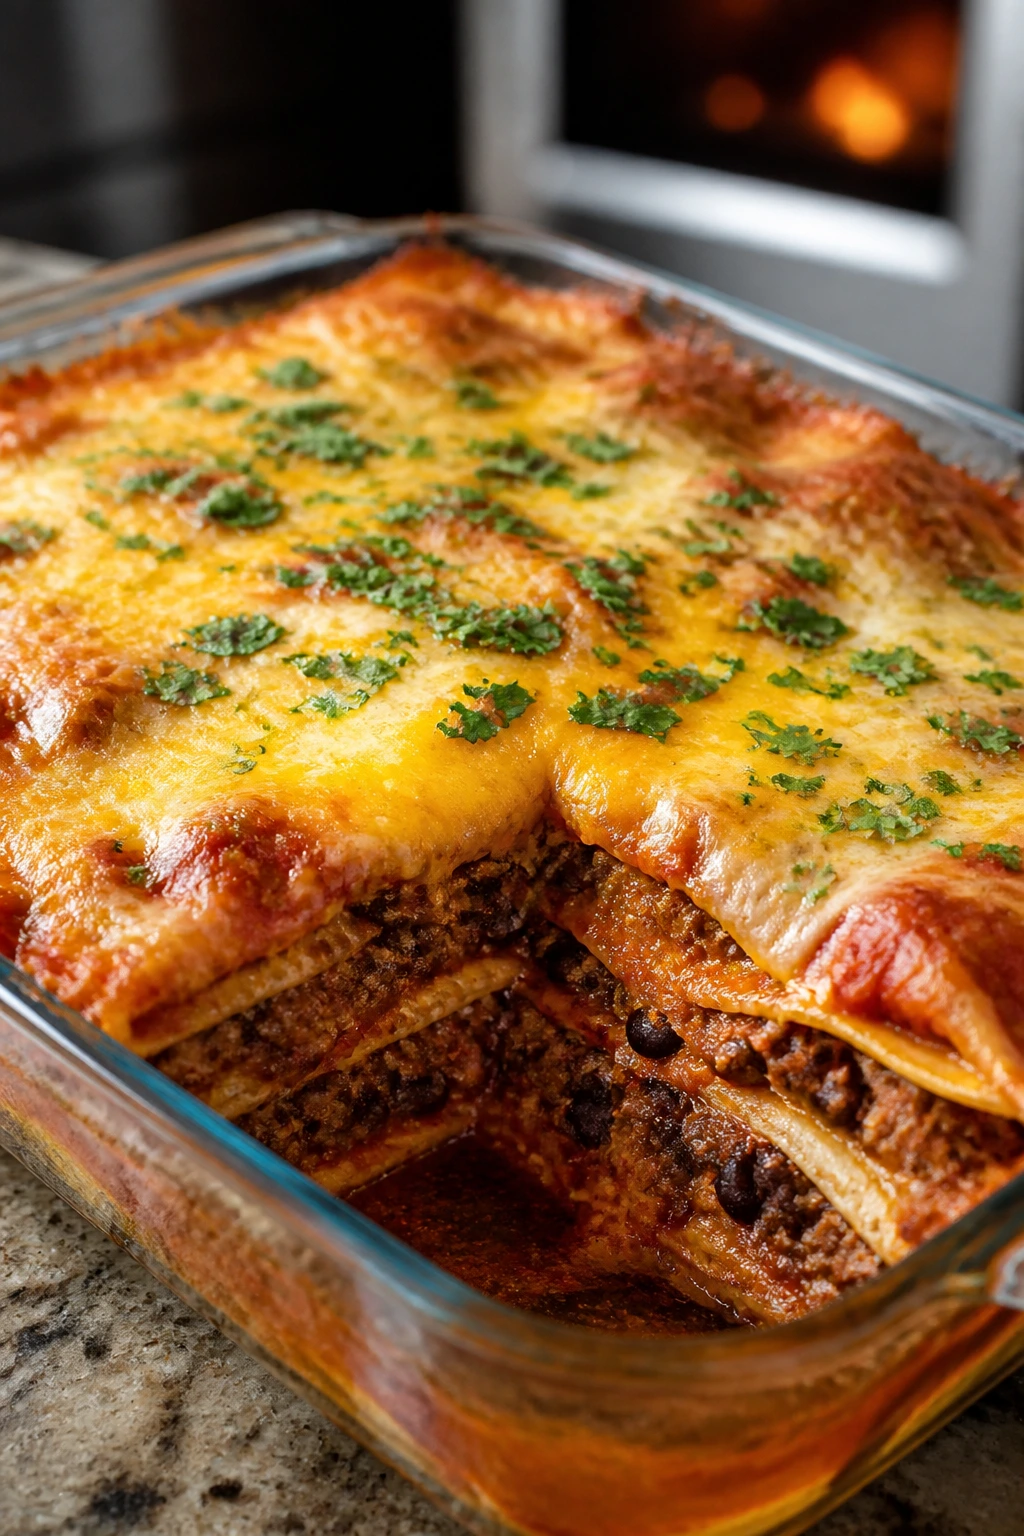
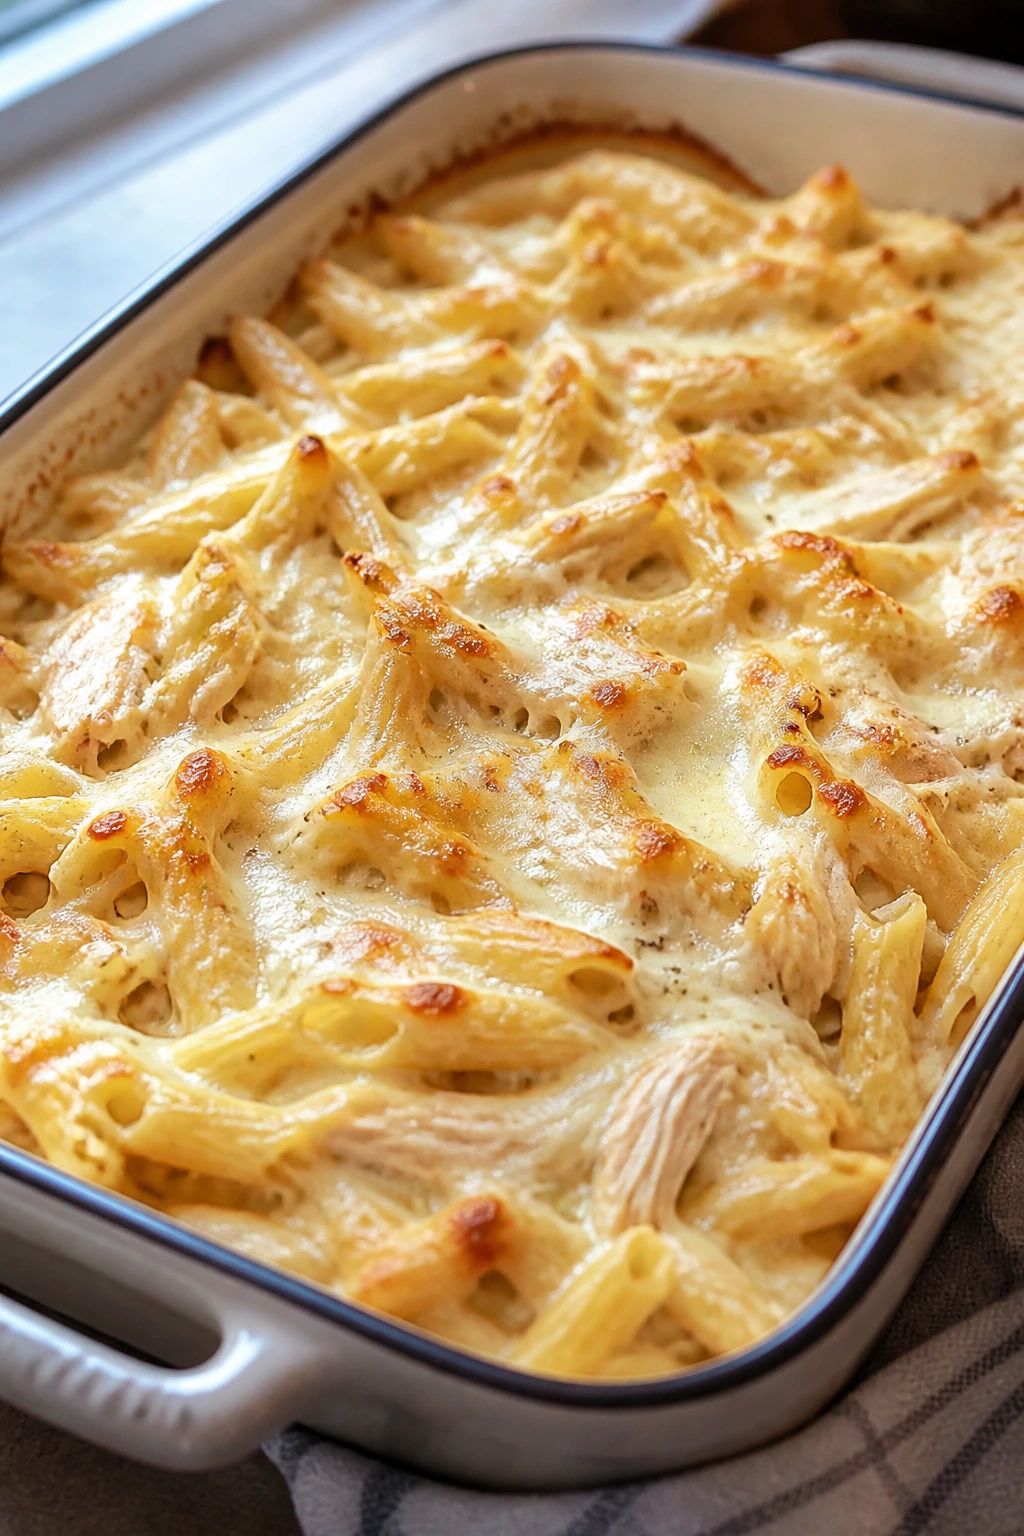
4. Baked Ziti with Mozzarella
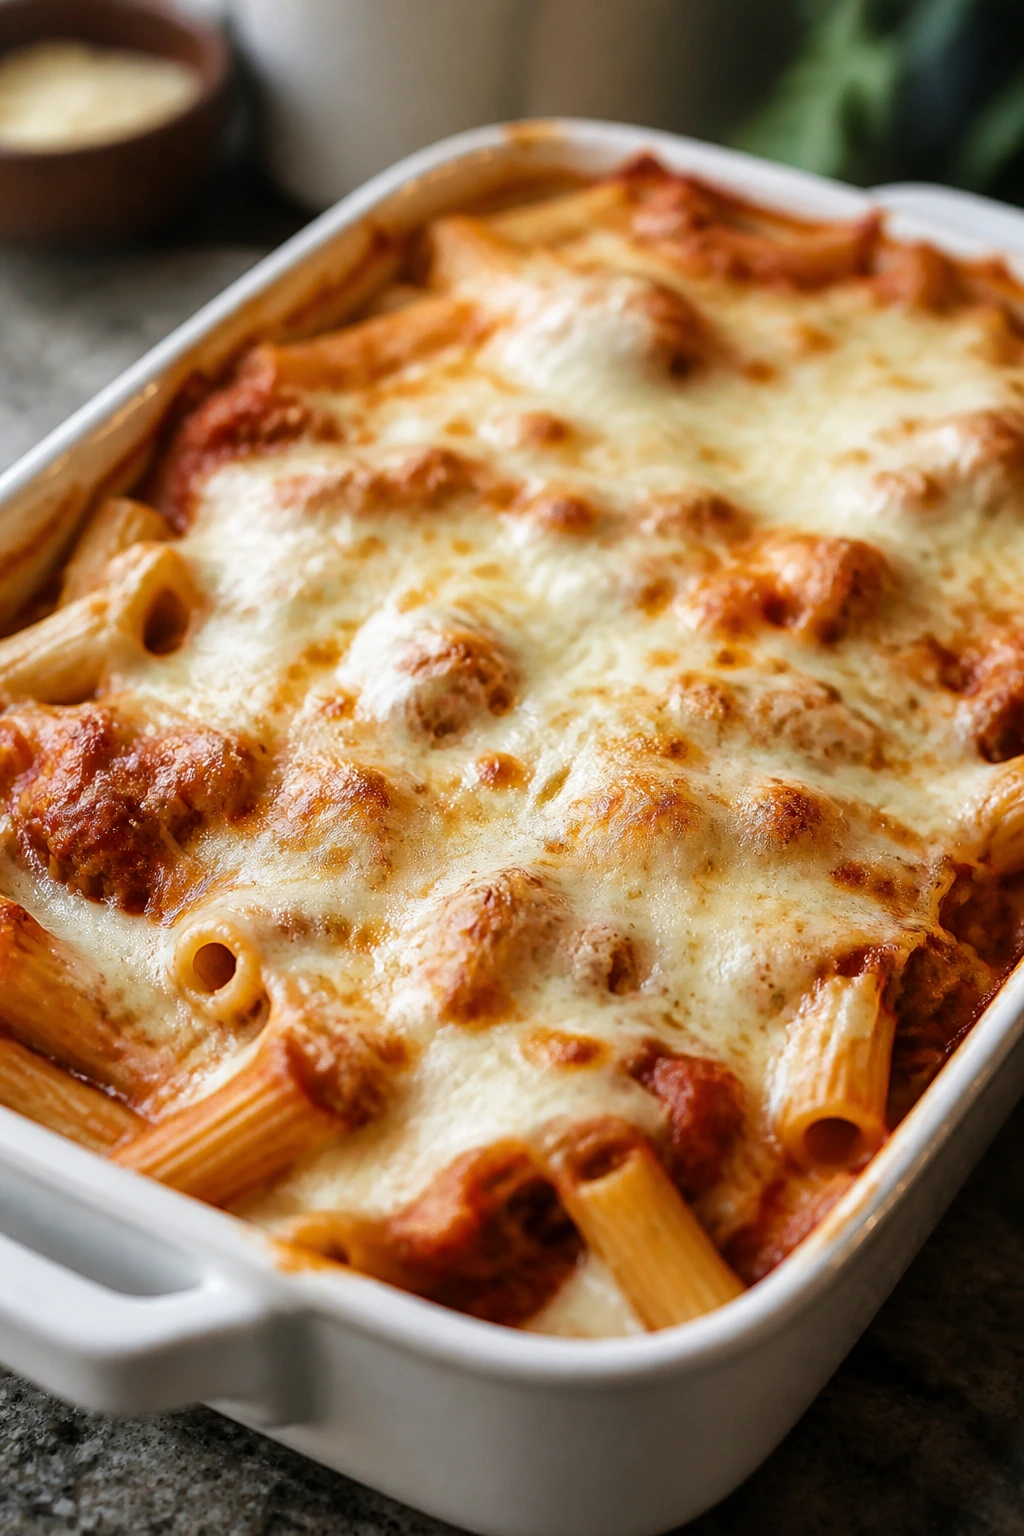
Baked ziti is the kind of dinner that makes the table go quiet for a second. The pasta comes out saucy, the cheese browns in spots, and the edges near the pan get a little chewy, which is exactly where I always want my first bite.
Why It Works:
Ziti holds sauce in its tubes, and that means every forkful tastes finished instead of plain. Baking it with mozzarella and ricotta gives you creamy pockets without needing a long sauce simmer.
Key Ingredients:
- 1 pound ziti
- 3 cups marinara sauce
- 15 ounces ricotta
- 2 cups shredded mozzarella
- 1/2 cup grated Parmesan
- 1 egg
- 1 teaspoon Italian seasoning
Quick Steps:
- Cook the ziti in salted water until just shy of al dente.
- Mix ricotta, egg, Parmesan, and seasoning in a bowl.
- Toss pasta with marinara, then fold in half the mozzarella.
- Layer half the pasta in a baking dish, spoon over ricotta mixture, and add the rest of the pasta.
- Top with the remaining mozzarella and bake at 375°F for 25 to 30 minutes.
- Rest 10 minutes before cutting.
Equipment for This Recipe:
- Large pot
- 9-by-13-inch baking dish
- Mixing bowl
How to Serve This Dish:
Serve with a simple Caesar salad or garlic bread if people still have room. The ziti cuts into neat squares, which makes couch plates easier than a loose bowl of pasta.
Pro Tips for This Recipe:
- Pull the pasta from the water early; it finishes in the oven.
- Use a thick marinara so the bake doesn’t turn watery.
- Let it rest. If you cut it too soon, the layers slump.
Variations on This Dish:
- Sausage Ziti: Brown 1 pound Italian sausage with the sauce.
- Spinach Ziti: Fold in 4 cups baby spinach while the pasta is still hot.
Common Mistakes to Avoid with This Dish:
- Overcooking the pasta leads to a soft, tired bake. Stop at barely al dente.
- Using too little sauce makes the top dry. Coat every noodle.
- Forgetting the rest time makes the slices collapse.
5. Crispy Oven Chicken Tenders
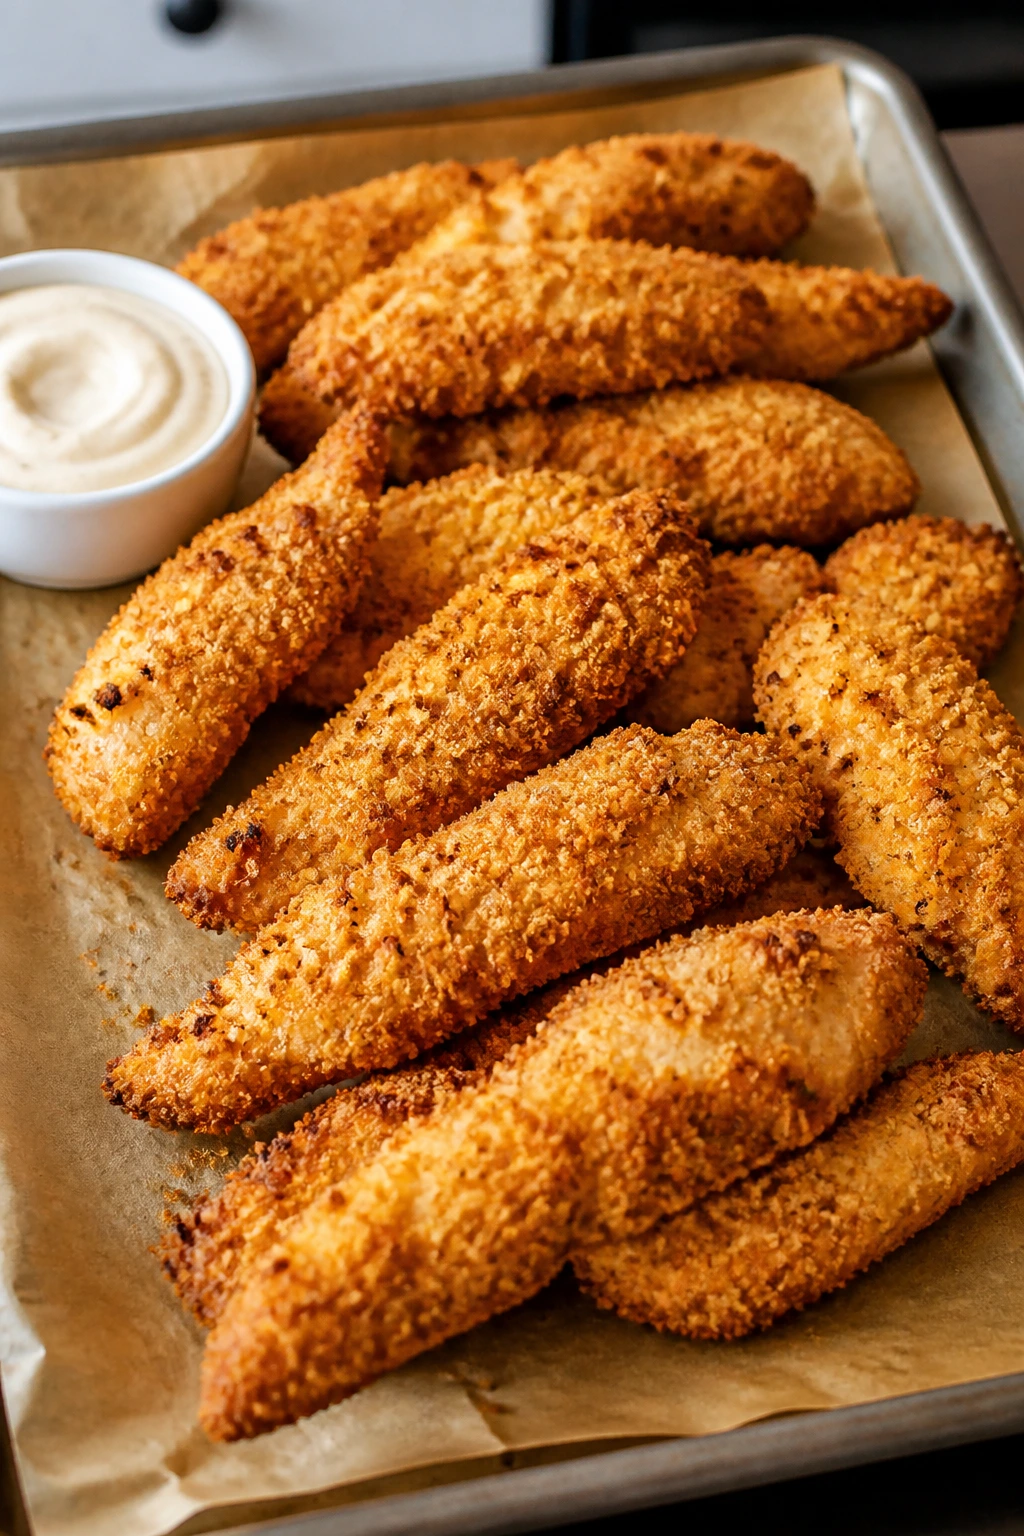
Chicken tenders disappear fast on movie night because they’re easy to hold, dip, and eat without looking away from the screen for long. The good ones have a crunchy coating that stays on the chicken instead of falling off at the first bite.
Why It Works:
A breadcrumb coating with a little oil bakes up crisp enough to satisfy without the mess of frying. Pounding the chicken into even strips helps everything cook at the same pace, so you don’t end up with dry ends and raw middles.
Key Ingredients:
- 1 1/2 pounds chicken tenders
- 1 cup flour
- 2 eggs
- 2 cups panko breadcrumbs
- 1/2 cup grated Parmesan
- 1 teaspoon paprika
- 1 teaspoon salt
Quick Steps:
- Preheat the oven to 425°F and line a sheet pan with parchment.
- Set up three bowls: flour, beaten eggs, and panko mixed with Parmesan and spices.
- Dredge each tender in flour, egg, then breadcrumb mixture.
- Lay on the sheet pan and drizzle lightly with oil.
- Bake 15 to 18 minutes, flipping once, until golden and the center reaches 165°F.
- Rest 3 minutes before serving.
Equipment for This Recipe:
- Sheet pan
- Parchment paper
- Three shallow bowls
How to Serve This Dish:
Pile the tenders beside honey mustard, ranch, or barbecue sauce. Add fries, steamed broccoli, or apple slices if you want the plate to feel more like dinner and less like a snack.
Pro Tips for This Recipe:
- Press the crumbs on firmly with your fingers.
- Don’t crowd the pan or the coating steams.
- A little oil on top helps the panko brown.
Variations on This Dish:
- Spicy Tenders: Add cayenne and hot sauce to the egg wash.
- Cornflake Crunch: Swap panko for crushed cornflakes for a louder crunch.
Common Mistakes to Avoid with This Dish:
- Skipping the flour means the coating slides off. Do all three layers.
- Baking on a crowded tray softens the crust. Leave space.
- Cutting into them too soon lets juices spill out. Rest first.
6. Chicken Quesadillas with Salsa
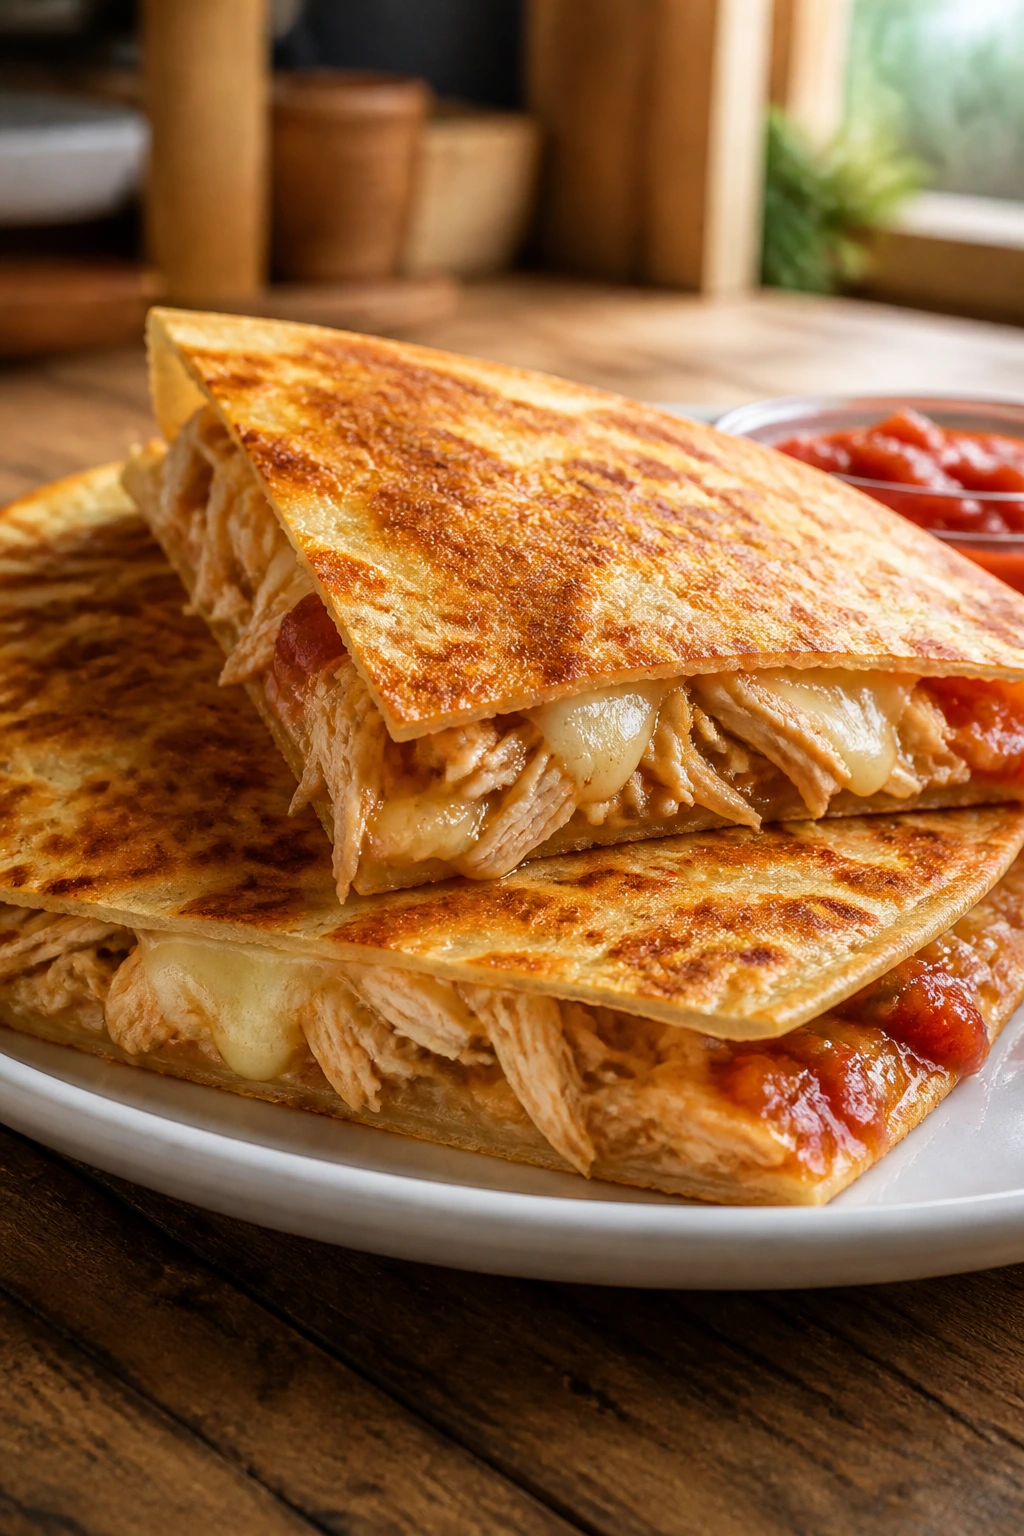
Quesadillas are one of those rare dinners that can be both fast and a little special. The tortilla gets bronzed and crisp, the cheese melts into the chicken, and every triangle feels built for a hand and a napkin.
Why It Works:
A hot skillet gives you a better crust than the oven, and the filling stays compact enough to slice neatly. Use cooked chicken and a modest amount of cheese, or the quesadilla turns slippery instead of crisp.
Key Ingredients:
- 2 cups shredded cooked chicken
- 1 1/2 cups shredded Monterey Jack
- 1/2 cup shredded cheddar
- 4 large flour tortillas
- 1/2 cup salsa
- 2 tablespoons chopped green onions
Quick Steps:
- Heat a skillet over medium heat.
- Place one tortilla in the pan, sprinkle cheese on half, add chicken, salsa, and green onions, then more cheese.
- Fold the tortilla over and cook 2 to 3 minutes per side until browned.
- Repeat with the rest.
- Cut into wedges and serve hot.
Equipment for This Recipe:
- Large skillet
- Spatula
- Sharp knife or pizza cutter
How to Serve This Dish:
Serve with sour cream and extra salsa for dipping. A simple cabbage slaw on the side cuts through the cheese and keeps the meal from feeling too heavy.
Pro Tips for This Recipe:
- Keep the filling toward one side so the fold stays even.
- Medium heat is enough; high heat burns the tortilla before the cheese melts.
- Use pre-cooked chicken that’s not too wet.
Variations on This Dish:
- Bean and Cheese: Replace chicken with 1 cup mashed pinto beans.
- BBQ Chicken: Swap salsa for barbecue sauce and add a little red onion.
Common Mistakes to Avoid with This Dish:
- Overstuffing makes the tortilla tear. Keep it thin.
- Cooking on high heat leaves the middle cold. Go slower.
- Using cold chicken from the fridge can keep the cheese from melting smoothly. Warm it first.
7. Meatball Sub Sandwiches
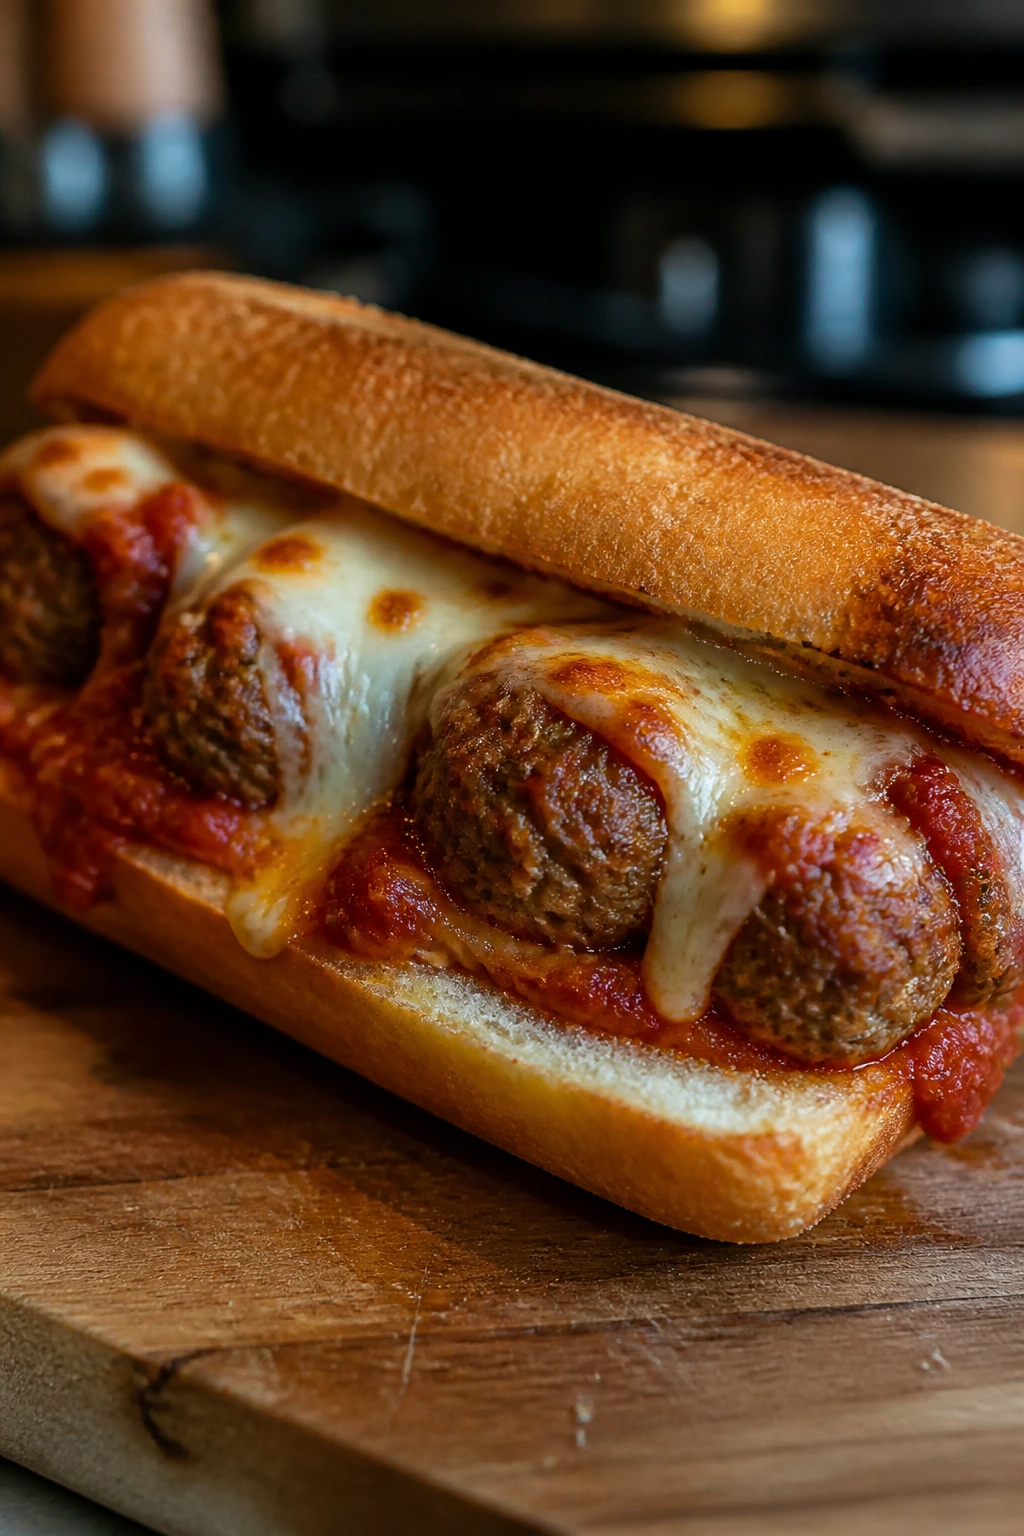
Meatball subs are messy in the best way, but they can still work on movie night if you build them carefully. The bread softens under the sauce, the meatballs stay tender, and the melted cheese ties everything together so it doesn’t slide apart in your lap.
Why It Works:
Using a thick marinara and toasted rolls keeps the sandwich from going soggy too fast. Once the cheese melts over the meatballs, the whole thing holds together better than people expect.
Key Ingredients:
- 18 to 20 cooked meatballs
- 3 cups marinara sauce
- 4 sub rolls
- 2 cups shredded mozzarella
- 2 tablespoons grated Parmesan
- 1 tablespoon butter
Quick Steps:
- Warm the meatballs in marinara over low heat for 10 minutes.
- Split the rolls and toast them lightly.
- Spoon meatballs and sauce into the rolls.
- Top with mozzarella and Parmesan.
- Broil 1 to 2 minutes until the cheese bubbles.
- Serve immediately.
Equipment for This Recipe:
- Saucepan
- Rimmed baking sheet
- Broiler-safe pan or baking dish
How to Serve This Dish:
Wrap each sub in parchment for easier movie-night eating. A few crunchy pepperoncini on the side add a sharp bite that keeps the sandwich from feeling too heavy.
Pro Tips for This Recipe:
- Toast the rolls first or they go limp fast.
- Use thick meatballs; tiny ones dry out.
- Watch the broiler closely. Cheese goes from melted to scorched in a blink.
Variations on This Dish:
- Spicy Sub: Stir red pepper flakes into the sauce.
- Chicken Meatball Sub: Use chicken meatballs and provolone.
Common Mistakes to Avoid with This Dish:
- Over-saucing the roll makes the bread collapse. Spoon, don’t flood.
- Skipping the toast step leaves the sandwich mushy. Don’t.
- Broiling too long burns the cheese. Two minutes can be enough.
8. Extra-Cheesy Mac and Cheese
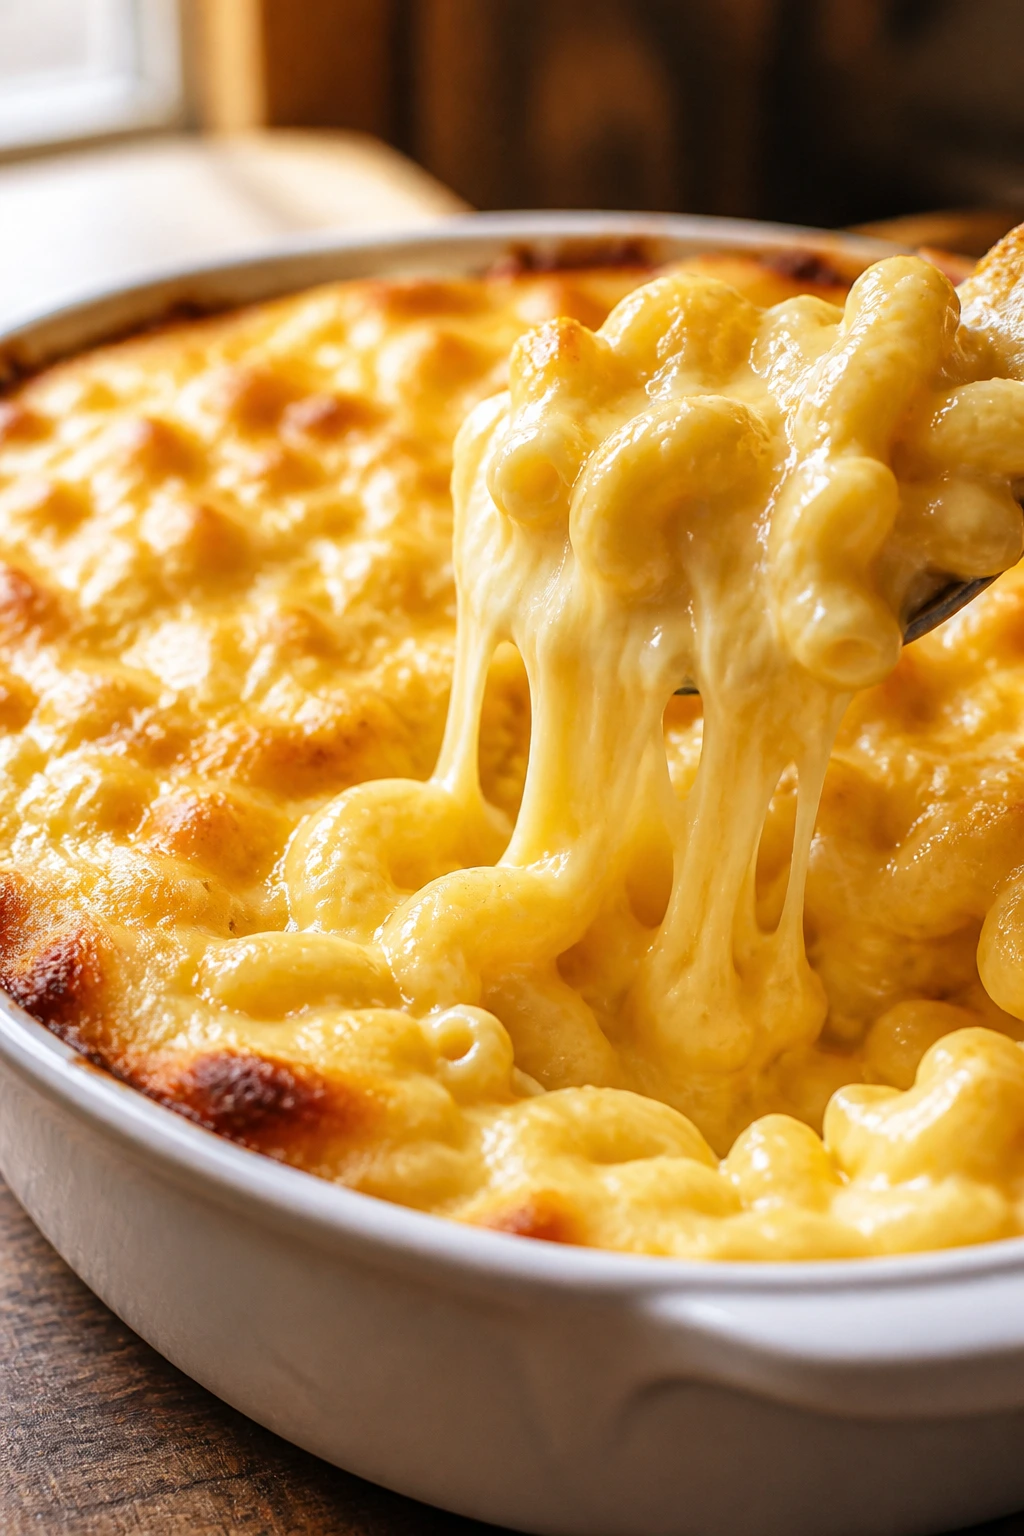
Mac and cheese is movie-night comfort food with almost no debate attached. The sauce should be creamy and a little stretchy, not gluey, and the baked top should give you a thin crust that cracks under the spoon.
Why It Works:
A mix of cheddar and Monterey Jack gives you sharp flavor and good melt. Baking it for a short time adds texture without drying out the sauce, which is where a lot of home mac and cheese goes wrong.
Key Ingredients:
- 1 pound elbow macaroni
- 4 tablespoons butter
- 1/4 cup flour
- 3 cups milk
- 2 cups shredded cheddar
- 1 cup shredded Monterey Jack
- 1 teaspoon mustard powder
Quick Steps:
- Cook the macaroni until barely al dente and drain.
- Make a roux with butter and flour, then whisk in milk until smooth.
- Stir in cheddar, Jack, mustard powder, salt, and pepper.
- Fold in the pasta and pour into a baking dish.
- Bake at 375°F for 18 to 20 minutes.
- Let it sit 5 minutes so the sauce thickens.
Equipment for This Recipe:
- Large pot
- Whisk
- Baking dish
How to Serve This Dish:
Serve it in shallow bowls with a spoon, because the sauce is the point. A side of roasted broccoli or sliced tomatoes keeps the plate from leaning too hard into pure beige.
Pro Tips for This Recipe:
- Shred your own cheese if you want a smoother sauce.
- Pull the pasta early; it keeps cooking.
- A pinch of mustard powder sharpens the cheese flavor without tasting like mustard.
Variations on This Dish:
- Bacon Mac: Add 1 cup chopped cooked bacon.
- Broccoli Mac: Stir in 2 cups tiny steamed broccoli florets.
Common Mistakes to Avoid with This Dish:
- Boiling the sauce after the cheese goes in can make it grainy. Keep the heat gentle.
- Overbaking dries the edges. Pull it when it’s just set.
- Using weak cheese gives you a bland pan. Cheddar should be in the mix.
9. Taco Bake Casserole
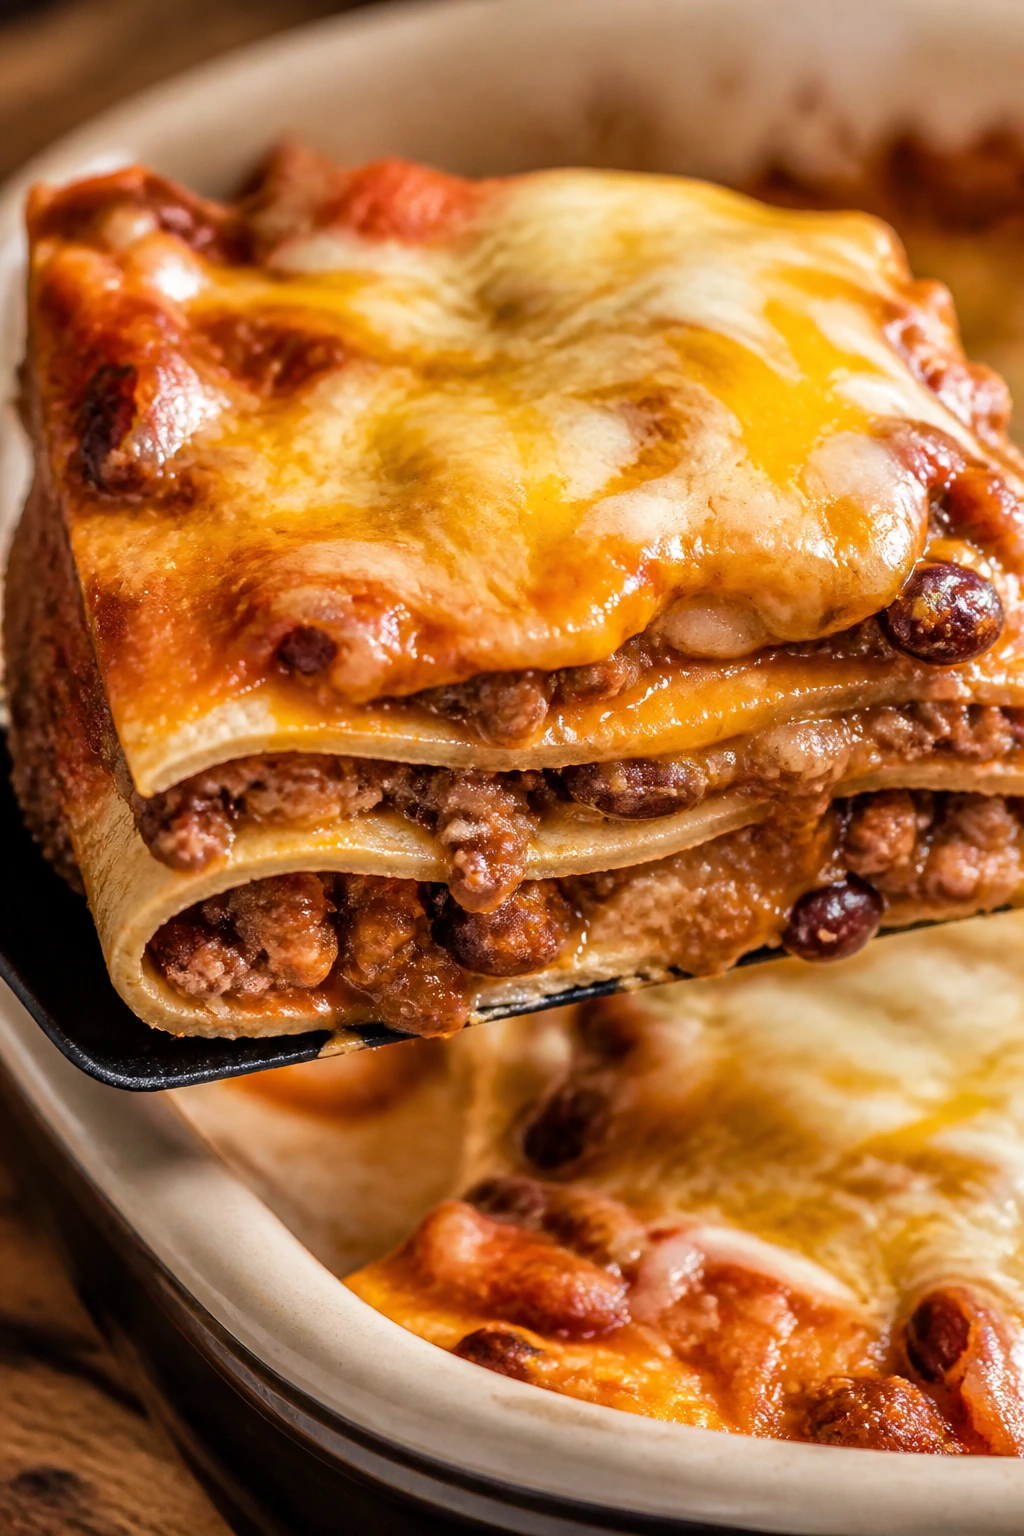
Taco bake casserole tastes like a weeknight taco truck got folded into one pan. The tortillas soften in the sauce, the beef stays seasoned, and the cheese seals the top into a bubbling lid that cuts cleanly after a short rest.
Why It Works:
Layering tortillas, meat, beans, and cheese turns taco filling into something you can slice. It’s easier to serve on a tray than taco shells, and nobody loses filling down the front of their shirt.
Key Ingredients:
- 1 pound ground beef
- 1 packet taco seasoning
- 1 cup salsa
- 1 can black beans, rinsed
- 6 corn tortillas
- 2 cups shredded cheddar
- 1 cup corn kernels
Quick Steps:
- Brown the beef, then stir in taco seasoning and salsa.
- Layer tortillas in a baking dish, then beef, beans, corn, and cheese.
- Repeat once more.
- Bake at 375°F for 20 to 25 minutes until bubbly.
- Rest 10 minutes before cutting.
Equipment for This Recipe:
- Skillet
- 9-by-13-inch baking dish
- Spoon
How to Serve This Dish:
Serve with lettuce, sour cream, and chopped tomatoes on top so people can build their own slice. A fork works better than trying to lift a wedge cleanly, and that’s fine.
Pro Tips for This Recipe:
- Keep salsa thick so the tortillas don’t turn soggy.
- Press each layer down lightly before adding the next.
- Resting time matters; it firms the casserole for serving.
Variations on This Dish:
- Chicken Taco Bake: Use shredded chicken and green salsa.
- Bean-Heavy Version: Add an extra can of pinto beans and skip the beef.
Common Mistakes to Avoid with This Dish:
- Too much liquid makes the casserole collapse. Use thick salsa.
- Cutting it too soon leaves a sloppy pan. Wait.
- Using crunchy taco shells instead of tortillas creates broken bits, not slices.
10. BBQ Chicken Flatbreads
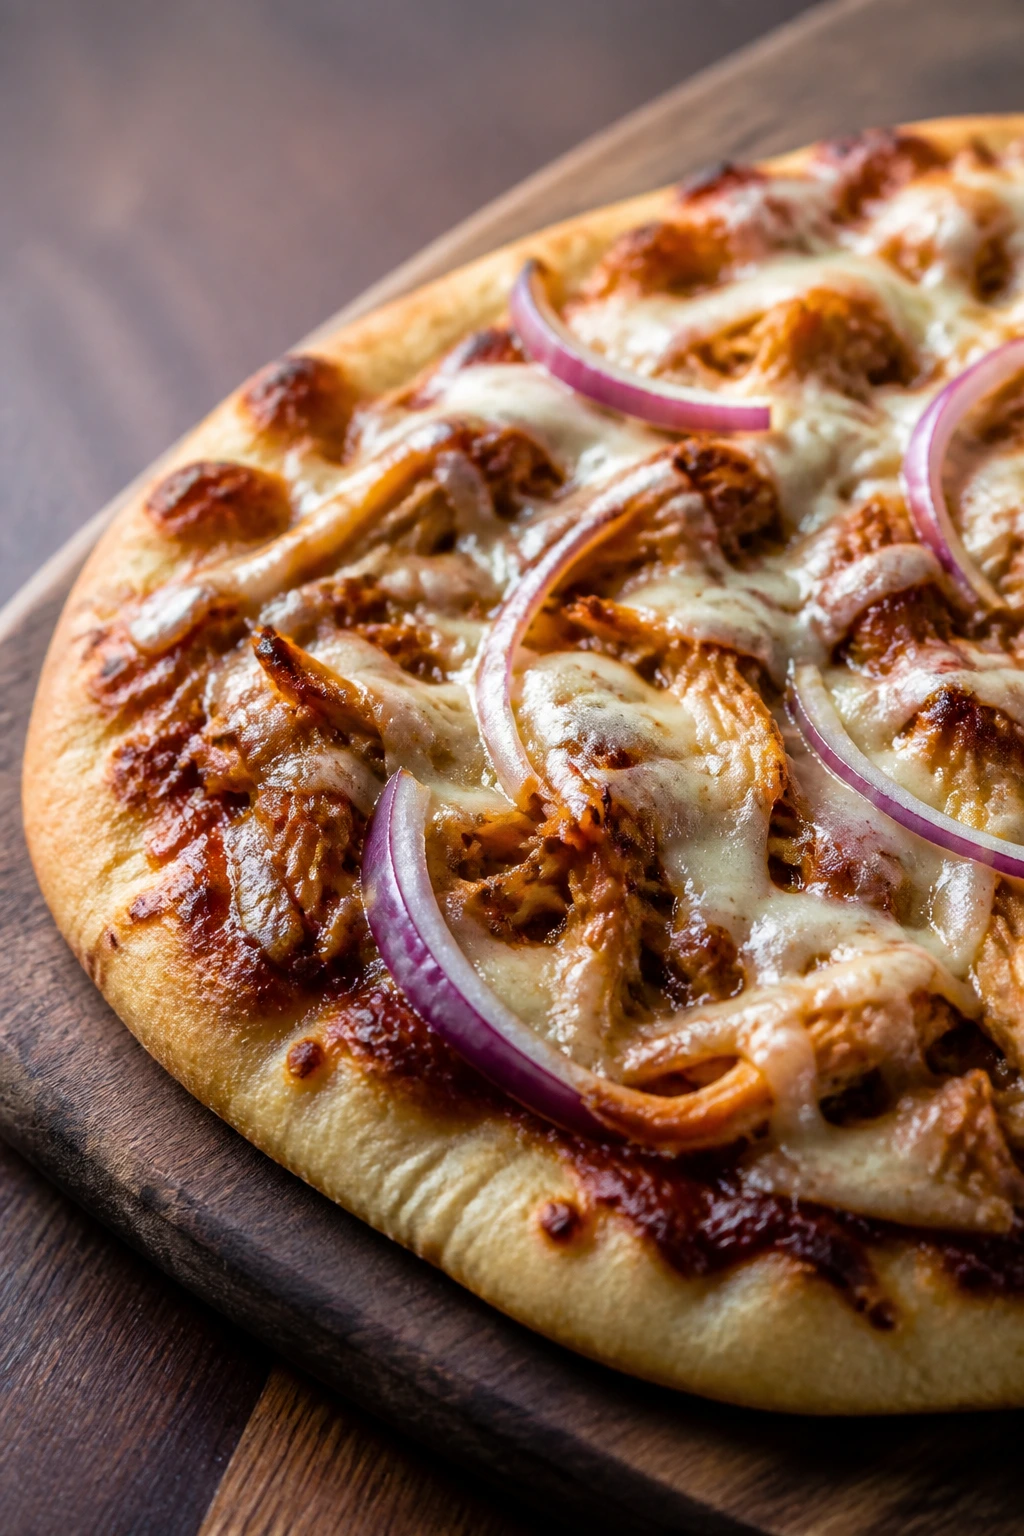
Flatbreads feel a little more relaxed than pizza, which is useful when the movie starts before everyone has sat down. They bake fast, get smoky-sweet from the barbecue sauce, and stay crisp enough to eat with two hands.
Why It Works:
Flatbread gives you a thinner base than pizza dough, so it cooks in less time and handles a lighter topping load. Rotisserie chicken keeps the dinner moving, which matters when people are hungry and impatient.
Key Ingredients:
- 2 store-bought flatbreads
- 1 1/2 cups shredded cooked chicken
- 1/2 cup barbecue sauce
- 1 1/2 cups shredded mozzarella
- 1/4 cup thin red onion slices
- 2 tablespoons chopped cilantro
Quick Steps:
- Heat the oven to 425°F.
- Toss chicken with barbecue sauce.
- Place flatbreads on a sheet pan and top with chicken, mozzarella, and onion.
- Bake 8 to 10 minutes until the cheese melts and edges crisp.
- Finish with cilantro and slice.
Equipment for This Recipe:
- Sheet pan
- Mixing bowl
- Sharp knife
How to Serve This Dish:
Cut each flatbread into narrow strips and serve them on a platter, almost like pizza bread. A side salad with a sharp vinaigrette keeps the sweetness from taking over the plate.
Pro Tips for This Recipe:
- Don’t drown the bread in sauce. The chicken should be coated, not swimming.
- Red onion should be thin enough to soften in the oven.
- A little cilantro at the end wakes up the whole thing.
Variations on This Dish:
- Pineapple BBQ: Add a few well-drained pineapple chunks.
- Spicy Ranch: Swap half the barbecue sauce for ranch and add jalapeños.
Common Mistakes to Avoid with This Dish:
- Too much topping makes the flatbread bend in the middle. Keep it light.
- Baking too long turns the bread hard. Pull it when the cheese melts.
- Using wet chicken dulls the crust. Pat it dry first.
11. Mini Chicken Pot Pies
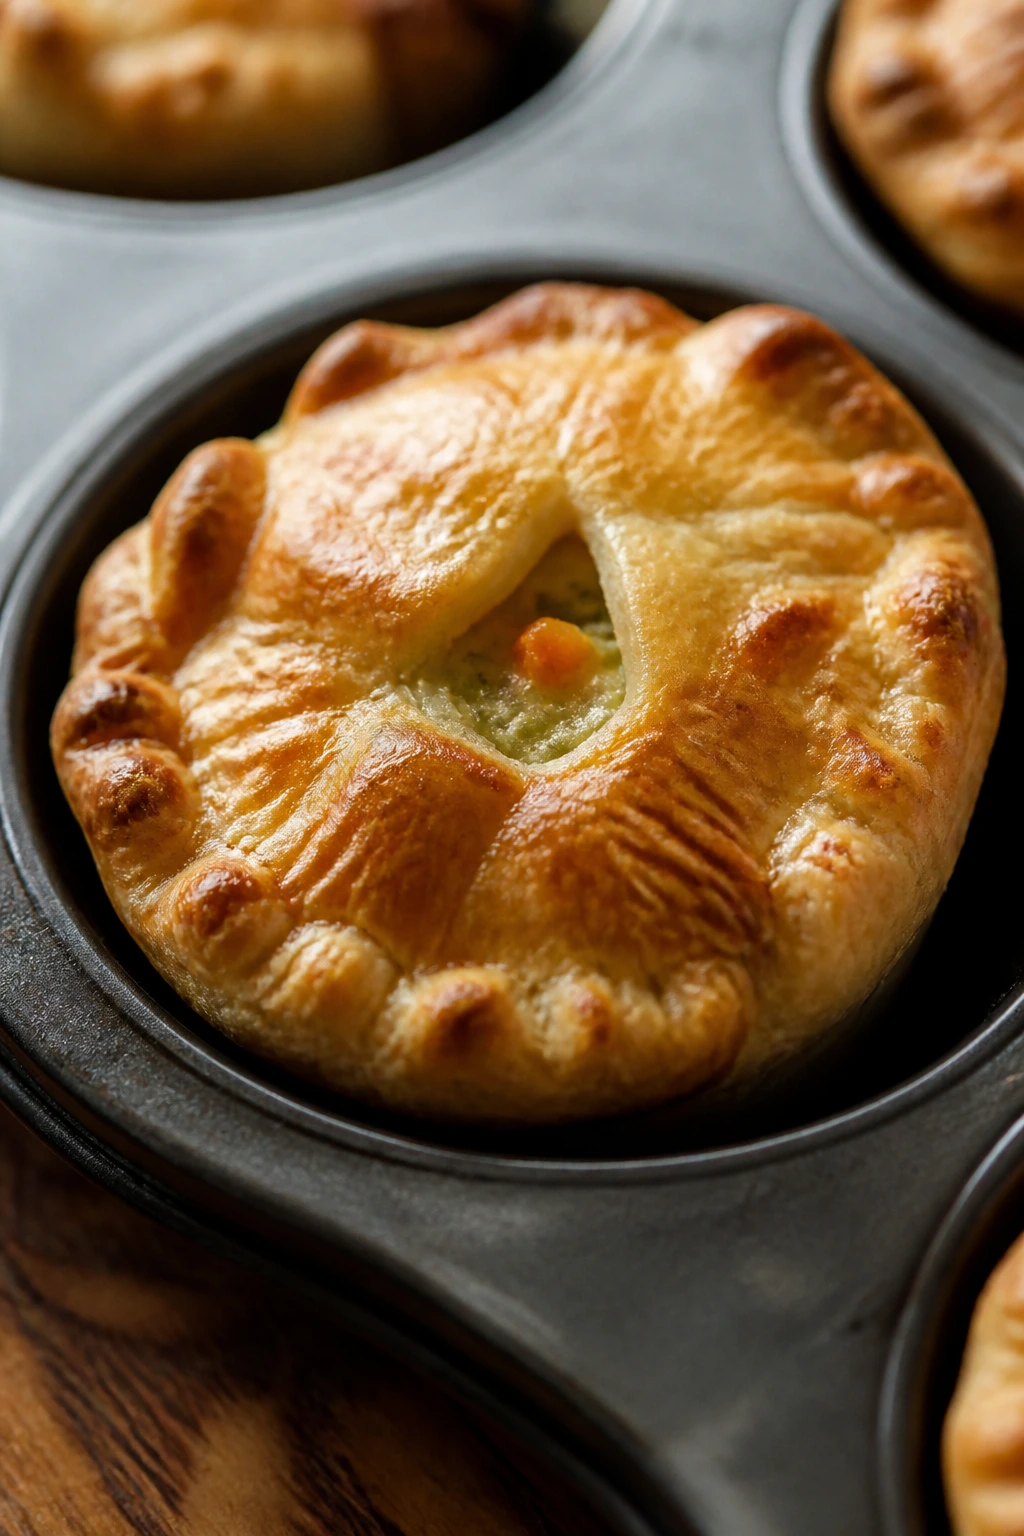
Mini chicken pot pies are cozy without needing a fork-and-knife situation at every bite. The pastry goes golden, the filling thickens into a creamy center, and each little round feels like its own self-contained dinner.
Why It Works:
Using muffin tins turns a soft filling into neat portions that are easy to hand around. The filling stays thick because it only needs a few minutes in the oven once it’s already cooked on the stove.
Key Ingredients:
- 2 cups cooked chicken, chopped
- 1 cup frozen mixed vegetables
- 1/2 cup diced onion
- 1/4 cup butter
- 1/4 cup flour
- 1 1/2 cups chicken broth
- 1/2 cup milk
- 1 package refrigerated pie crusts
Quick Steps:
- Cook onion in butter, then whisk in flour.
- Add broth and milk, stirring until thick.
- Fold in chicken and vegetables.
- Cut pie crust rounds and press into a muffin tin.
- Fill, top with crust circles, and cut a vent in each.
- Bake at 400°F for 18 to 22 minutes until golden.
Equipment for This Recipe:
- Muffin tin
- Saucepan
- Round cutter or glass
How to Serve This Dish:
Serve them warm from the pan with a spoonful of gravy or a little hot sauce for adults. A crisp apple salad works well beside the richness.
Pro Tips for This Recipe:
- Make the filling thick before it goes into the crusts.
- Use cold crust dough so it’s easier to shape.
- Don’t overfill the cups or they spill.
Variations on This Dish:
- Turkey Pot Pies: Use leftover turkey instead of chicken.
- Herbed Version: Add thyme and rosemary to the filling.
Common Mistakes to Avoid with This Dish:
- Thin filling leaks into the crust and turns it gummy. Thicken it first.
- Cutting the pie crust too small leaves gaps. Leave a little extra.
- Pulling them early gives you pale pastry. Wait for color.
12. Homemade Sloppy Joes
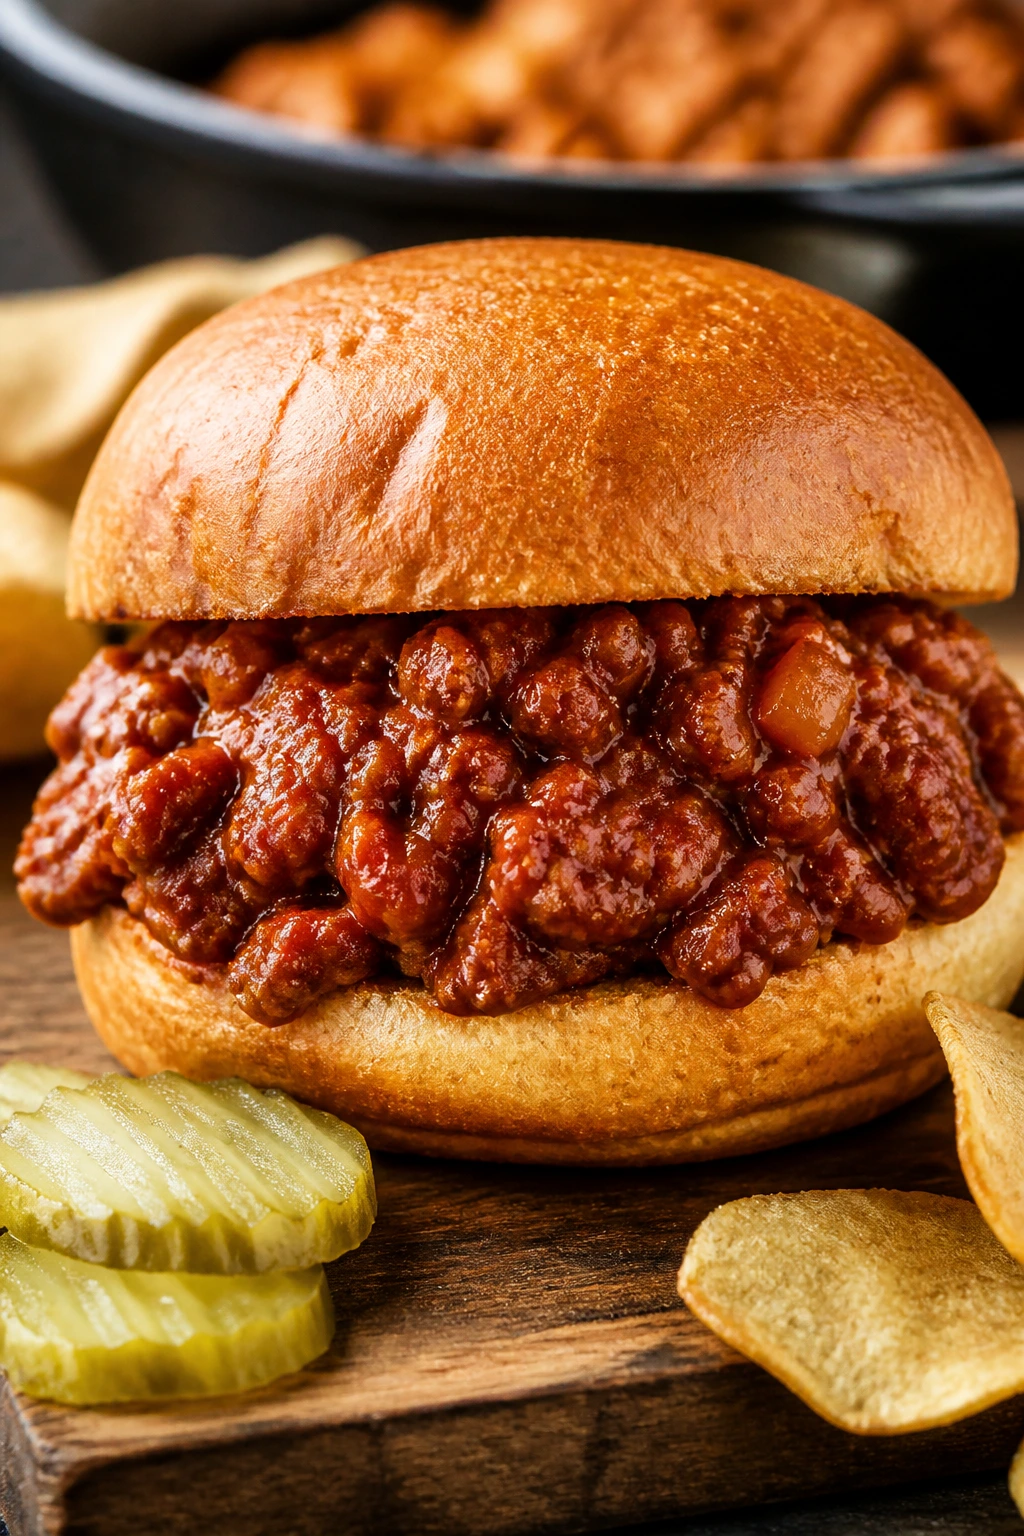
Sloppy Joes are messy by name, not by necessity. If you make the sauce thick enough, the beef clings to the bun instead of sliding to the plate, and the sweet-savory smell carries through the room in a way that usually brings people to the kitchen before you call them.
Why It Works:
The sauce needs enough tomato paste and simmer time to tighten up. That’s what keeps the sandwich from turning into a runoff problem the second someone takes a bite.
Key Ingredients:
- 1 1/2 pounds ground beef
- 1/2 cup diced onion
- 1/2 cup ketchup
- 2 tablespoons tomato paste
- 1 tablespoon Worcestershire sauce
- 1 tablespoon brown sugar
- 6 hamburger buns
Quick Steps:
- Brown beef and onion in a skillet, then drain excess fat.
- Stir in ketchup, tomato paste, Worcestershire, brown sugar, salt, and pepper.
- Simmer 8 to 10 minutes until thick.
- Toast buns lightly.
- Spoon on the filling and serve hot.
Equipment for This Recipe:
- Large skillet
- Wooden spoon
- Toaster or oven
How to Serve This Dish:
Add pickle chips and a handful of potato chips on the side. The sandwich is rich, so a crunchy, cold side makes sense.
Pro Tips for This Recipe:
- Simmer long enough for the sauce to lose its wet shine.
- Toasting the buns is not optional.
- Use lean beef so you’re not pouring off half a cup of grease.
Variations on This Dish:
- Turkey Joes: Swap in ground turkey and add a splash of olive oil.
- Peppy Joes: Stir in diced bell pepper for a little crunch.
Common Mistakes to Avoid with This Dish:
- A thin sauce runs everywhere. Cook it down.
- Skipping the bun toast makes it soggy. Do the toast.
- Too much sugar makes it taste flat and candy-like. Keep it modest.
13. Broccoli Cheddar Soup with Toast Dippers
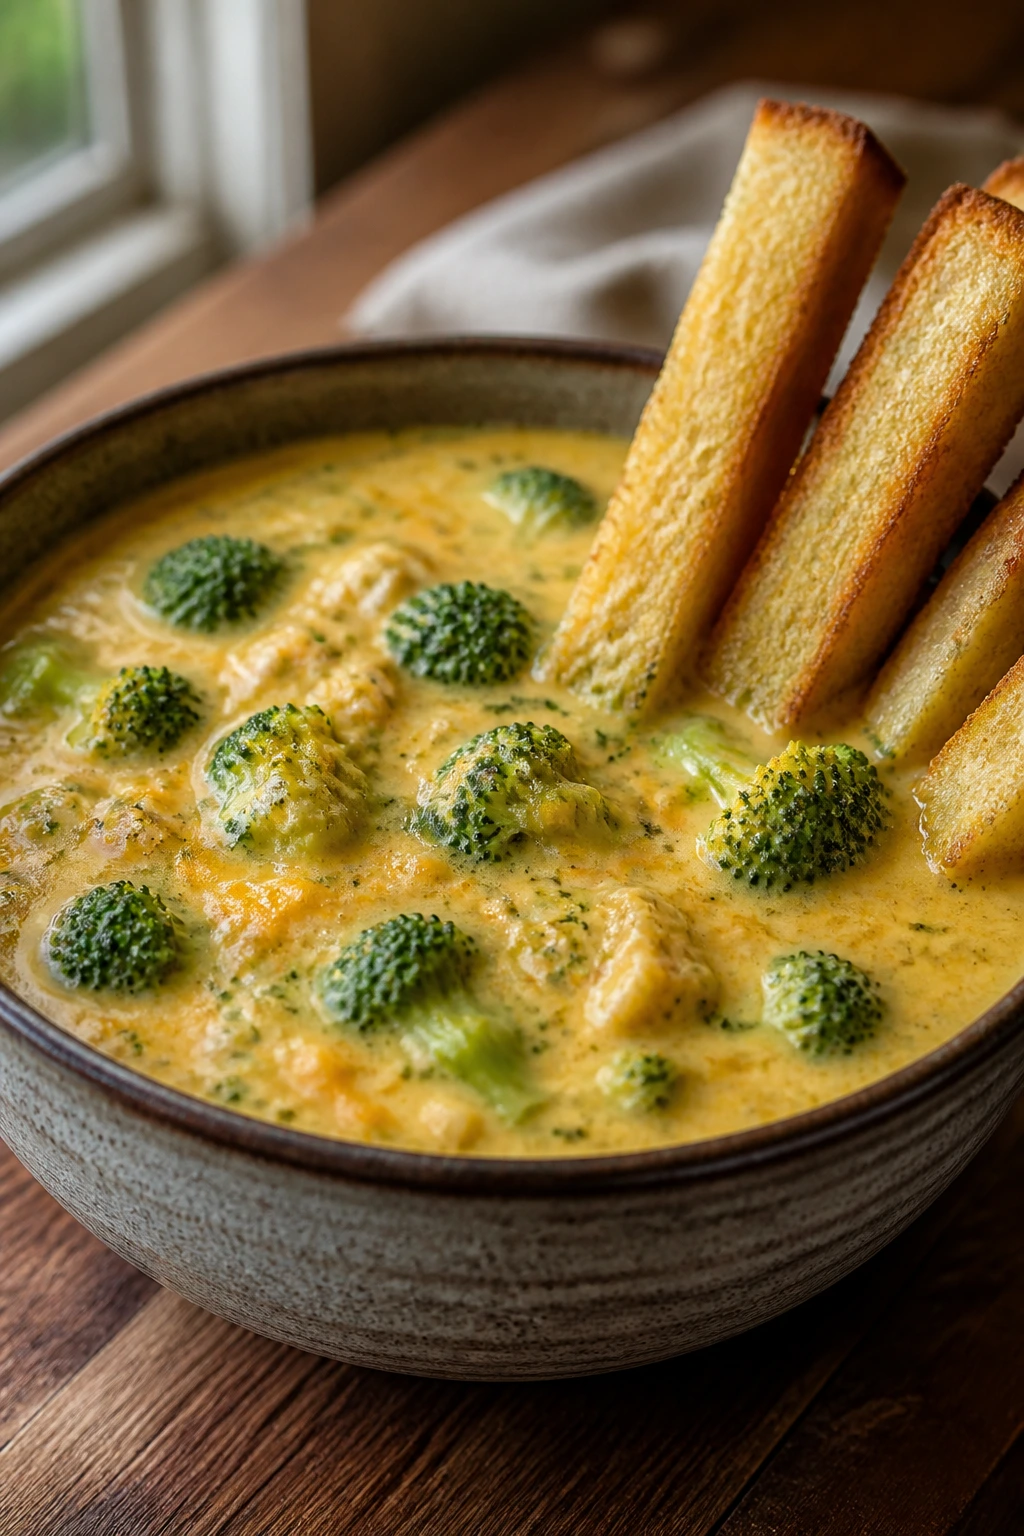
Soup on movie night sounds risky until you serve it in sturdy mugs or shallow bowls with thick toast dippers. Broccoli cheddar is rich, creamy, and full of little soft pieces that make each spoonful feel like a meal instead of a starter.
Why It Works:
The cheese and cream base thickens enough to coat the broccoli without getting grainy if you keep the heat low. Toasted bread cut into strips is cleaner than a giant loaf, and it gives you something to grab between scenes.
Key Ingredients:
- 4 cups broccoli florets
- 1 small onion, diced
- 2 tablespoons butter
- 2 tablespoons flour
- 3 cups chicken broth
- 1 1/2 cups milk
- 2 cups shredded cheddar
Quick Steps:
- Cook onion in butter until soft.
- Whisk in flour, then slowly add broth and milk.
- Simmer broccoli in the soup until tender, about 10 minutes.
- Stir in cheddar off the heat.
- Serve with toasted bread strips.
Equipment for This Recipe:
- Large pot
- Whisk
- Immersion blender, optional
How to Serve This Dish:
Serve in wide bowls with a few toast dippers leaned against the rim. If you want a fuller dinner, add a small ham sandwich or baked potato on the side.
Pro Tips for This Recipe:
- Add the cheese off the heat to avoid graininess.
- Chop the broccoli small so the soup eats cleanly.
- If you like a smoother texture, mash some of the broccoli with the spoon before serving.
Variations on This Dish:
- Smoky Version: Add a pinch of smoked paprika.
- Cauliflower Swap: Replace half the broccoli with cauliflower florets.
Common Mistakes to Avoid with This Dish:
- Boiling after the cheese goes in can split the soup. Turn the heat down.
- Big broccoli chunks are awkward in a couch bowl. Chop smaller.
- Thin soup doesn’t cling to bread. Let it thicken.
14. Baked Chicken Taquitos
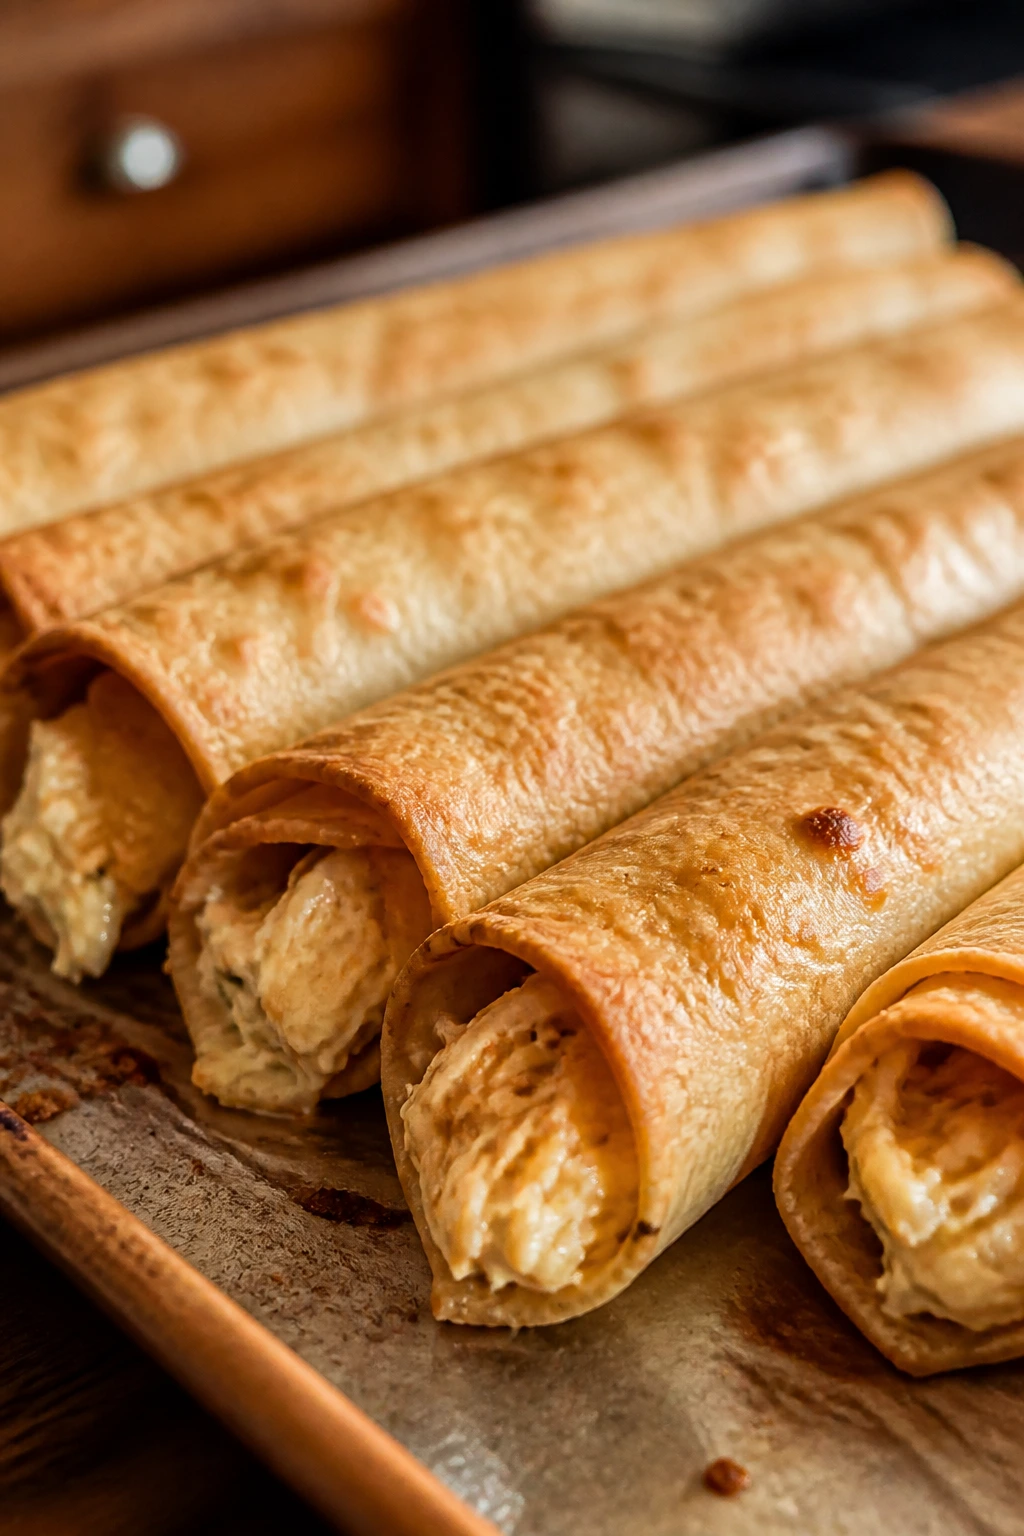
Taquitos are built for fingers, not forks, and that’s why they earn a place in a movie-night spread. The tortillas crisp up in the oven, the filling stays creamy, and the ends get brittle in a way that makes the first bite loud and satisfying.
Why It Works:
A tight roll keeps the filling in place, and baking at high heat gives you crunch without deep frying. They’re also easy to make ahead, which matters when the opening credits are already rolling.
Key Ingredients:
- 2 cups shredded cooked chicken
- 4 ounces cream cheese, softened
- 1 cup shredded cheddar
- 1/3 cup salsa
- 12 small corn tortillas
- 1 tablespoon oil
Quick Steps:
- Mix chicken, cream cheese, cheddar, and salsa.
- Warm tortillas so they don’t crack.
- Roll filling into each tortilla and place seam-side down on a sheet pan.
- Brush lightly with oil.
- Bake at 425°F for 15 to 18 minutes until crisp.
Equipment for This Recipe:
- Sheet pan
- Mixing bowl
- Pastry brush
How to Serve This Dish:
Serve with guacamole and salsa for dipping. A crisp shredded lettuce salad with lime keeps the plate bright.
Pro Tips for This Recipe:
- Warm the tortillas in a damp towel for flexibility.
- Don’t overfill or the rolls burst open.
- Place them seam-side down so they stay closed.
Variations on This Dish:
- Bean Taquitos: Add mashed black beans and skip half the chicken.
- Green Chile Taquitos: Use green salsa and pepper jack.
Common Mistakes to Avoid with This Dish:
- Cold tortillas crack and split. Warm them first.
- Too much filling leaks out. Keep it modest.
- Underbaking leaves them soft. Wait for gold edges.
15. Hot Honey Chicken Sandwiches
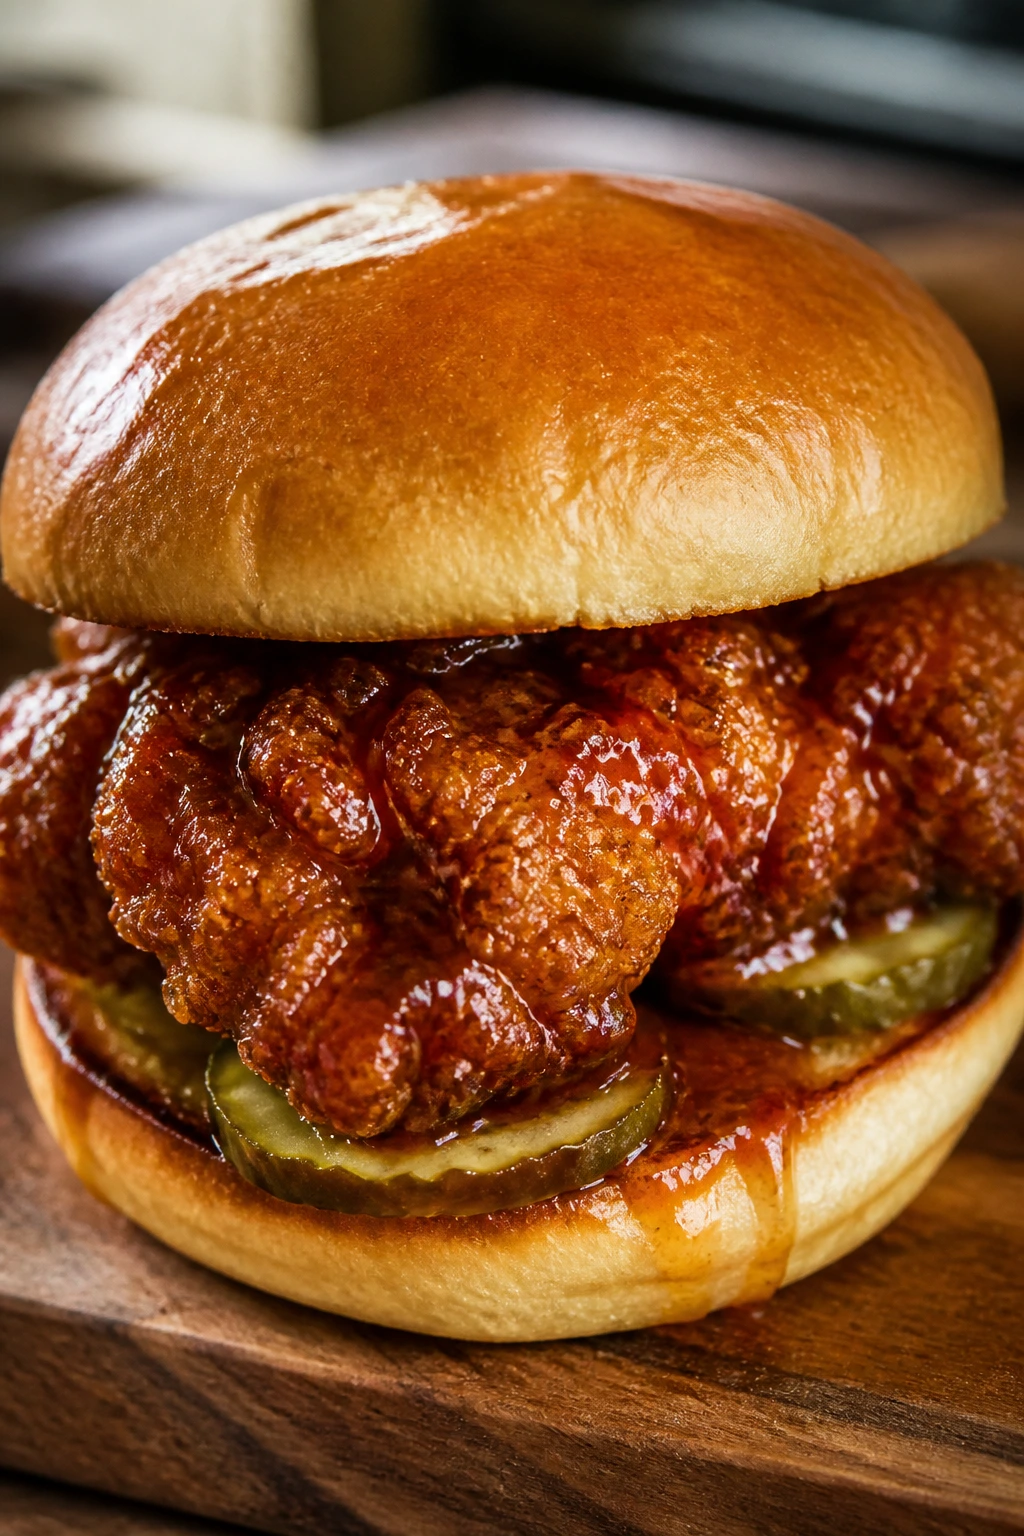
Hot honey chicken sandwiches bring a little heat, a little sweetness, and enough crunch to feel exciting without being a stunt. The chicken should be crisp outside, juicy inside, and glossy from the honey glaze.
Why It Works:
The hot honey clings to the crust instead of soaking through it if you brush it on right before serving. Using boneless thighs gives you more forgiveness than breasts and keeps the sandwich juicy even after a few minutes on the table.
Key Ingredients:
- 1 1/2 pounds boneless chicken thighs
- 1 cup buttermilk
- 1 cup flour
- 1 teaspoon paprika
- 1 teaspoon salt
- 4 sandwich buns
- 1/4 cup honey mixed with 1 to 2 teaspoons hot sauce
Quick Steps:
- Soak chicken in buttermilk for 20 minutes.
- Dredge in flour, paprika, and salt.
- Bake or fry until the chicken reaches 165°F and the crust is browned.
- Brush with hot honey.
- Stack on buns with pickles.
Equipment for This Recipe:
- Shallow bowl
- Baking sheet or skillet
- Tongs
How to Serve This Dish:
Serve with dill pickles and slaw tucked under or beside the sandwich. A pile of waffle fries fits the mood if nobody is counting.
Pro Tips for This Recipe:
- Thighs stay juicier than breasts here.
- Brush with hot honey at the end, not before cooking.
- Pickles matter. The sharp bite cuts the sweetness.
Variations on This Dish:
- Mild Honey Chicken: Use plain honey and black pepper.
- Extra-Spicy Version: Add cayenne to the flour and more hot sauce to the glaze.
Common Mistakes to Avoid with This Dish:
- Glazing too early can burn the honey. Finish at the end.
- Thick breading can fall off if the chicken is wet. Let excess drip off first.
- Using dry breast meat makes the sandwich less forgiving. Thighs are easier.
16. Pull-Apart Ham and Cheese Rolls
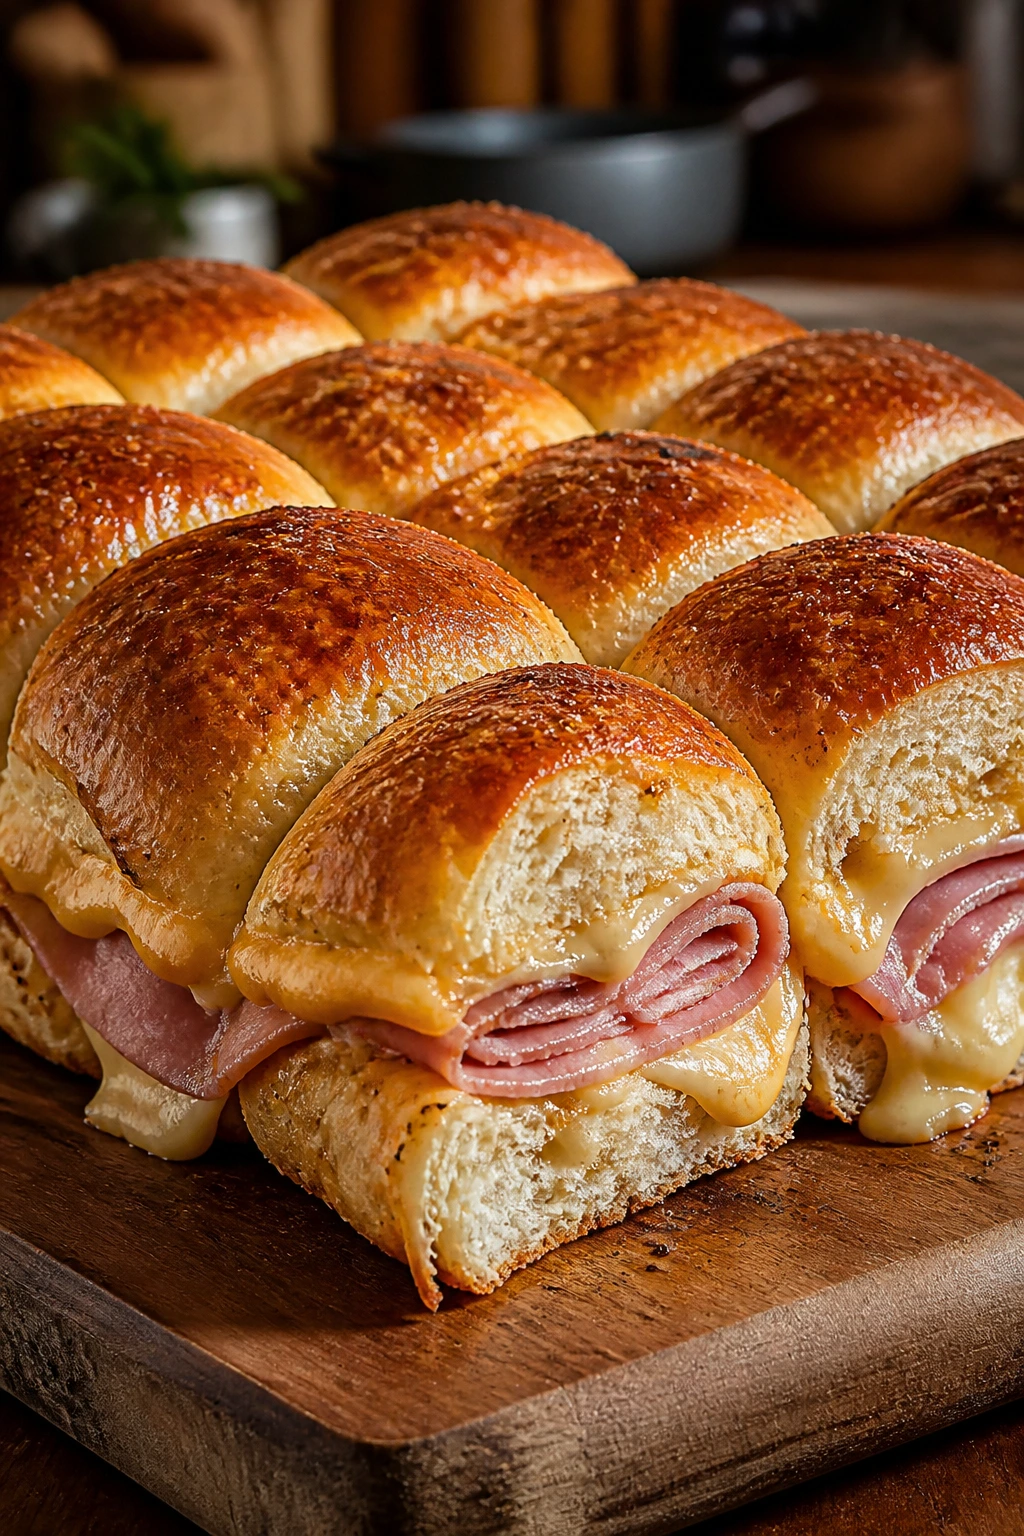
These rolls are what happen when a ham-and-cheese sandwich gets dressed up for the couch. The tops brown and shine, the cheese melts into the ham, and the whole tray can be torn apart one roll at a time.
Why It Works:
Baking the rolls together traps a little steam, which softens the buns without making them soggy. A buttery mustard glaze gives them the flavor of a deli sandwich with half the effort.
Key Ingredients:
- 12 dinner rolls
- 8 ounces sliced ham
- 8 slices Swiss or provolone
- 3 tablespoons butter
- 1 tablespoon Dijon mustard
- 1 teaspoon poppy seeds
Quick Steps:
- Preheat the oven to 350°F.
- Slice the rolls in half without separating them.
- Layer ham and cheese inside.
- Brush with melted butter mixed with mustard and sprinkle poppy seeds.
- Bake 12 to 15 minutes until warm and melty.
Equipment for This Recipe:
- Baking dish
- Pastry brush
- Sharp serrated knife
How to Serve This Dish:
Serve straight from the pan so people can pull apart their own portion. A bowl of tomato soup beside these rolls makes the dinner feel complete.
Pro Tips for This Recipe:
- Keep the rolls connected while slicing for easier assembly.
- Don’t overload the filling or the tops slide around.
- Swiss brings a sharper flavor; provolone stays milder.
Variations on This Dish:
- Turkey and Cheddar: Swap ham for sliced turkey.
- Garlic Herb Rolls: Add garlic powder and parsley to the butter glaze.
Common Mistakes to Avoid with This Dish:
- Separating the rolls before filling slows everything down. Leave the sheet intact.
- Dry rolls need more butter on top. Brush well.
- Baking too long dries out the bread. Pull when the cheese melts.
17. Teriyaki Chicken Rice Bowls
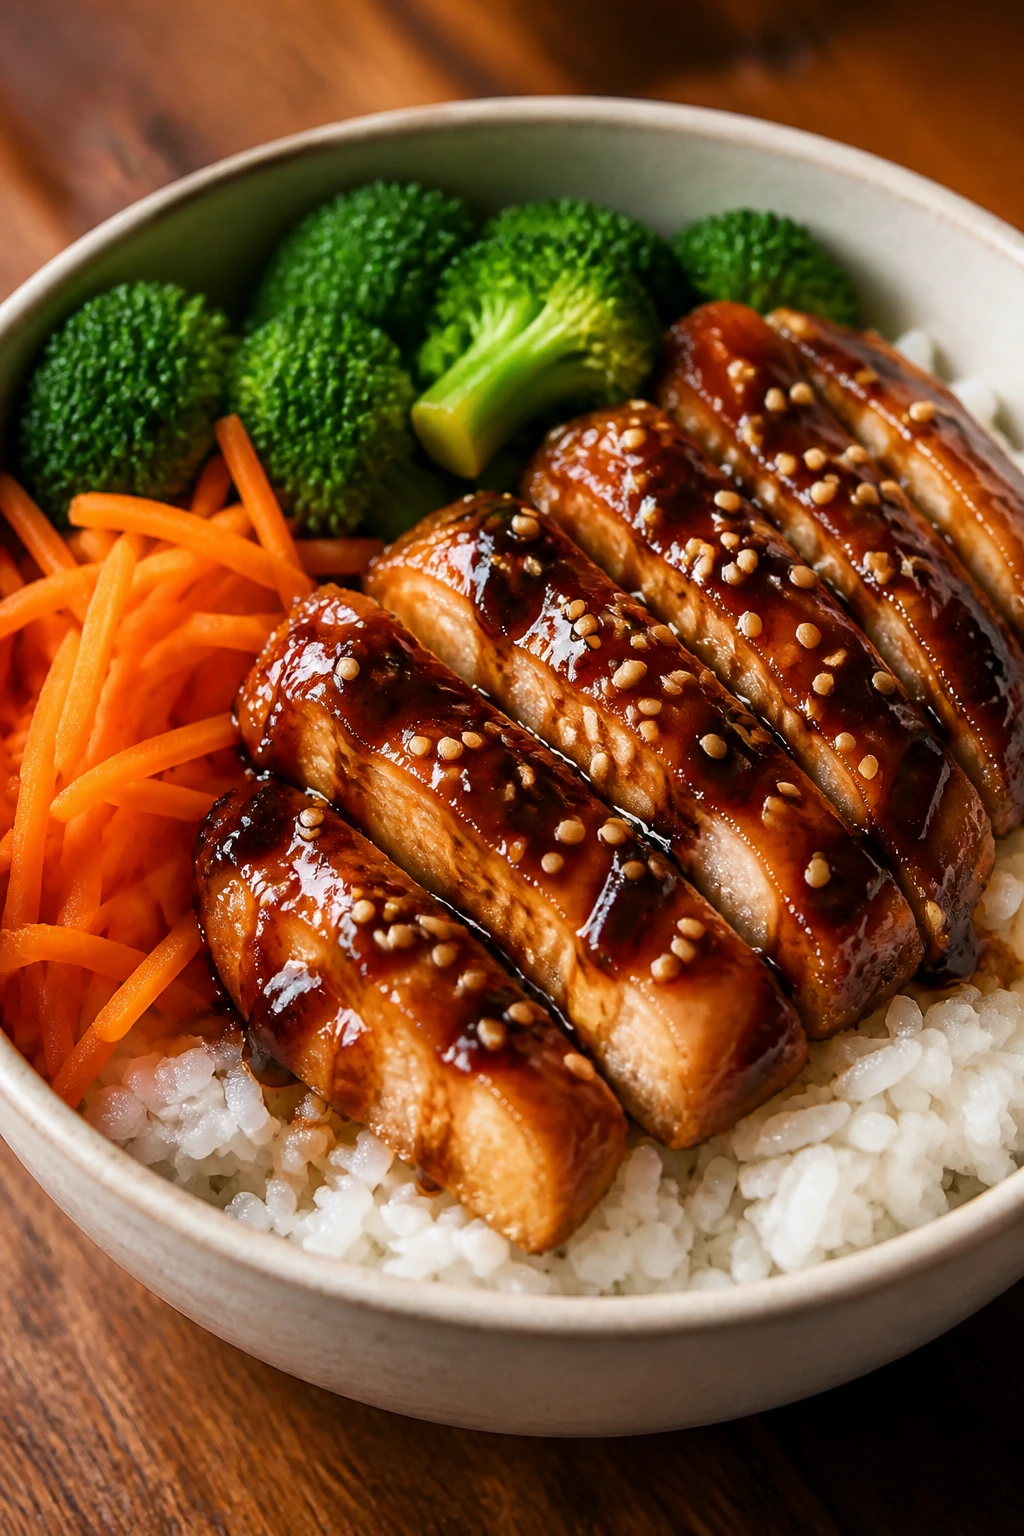
Rice bowls are quieter than sliders, but they’re a smart movie-night move if you want something warm and balanced. The teriyaki sauce gives the chicken a sticky gloss, and the rice catches every bit of it.
Why It Works:
A bowl format keeps the food contained, which is useful if your family is the type to eat while half-watching. The chicken cooks fast, and the vegetables can be whatever’s in the freezer or crisper.
Key Ingredients:
- 1 1/2 pounds chicken thighs, bite-size pieces
- 1 cup teriyaki sauce
- 3 cups cooked white rice
- 2 cups broccoli florets
- 1 cup shredded carrots
- 2 tablespoons sesame seeds
Quick Steps:
- Cook the chicken in a skillet until browned and done.
- Pour in teriyaki sauce and simmer until glossy.
- Steam or sauté the broccoli.
- Spoon rice into bowls.
- Top with chicken, broccoli, carrots, and sesame seeds.
Equipment for This Recipe:
- Large skillet
- Saucepan or rice cooker
- Serving bowls
How to Serve This Dish:
Set out the components and let people build their own bowls. A squeeze of lime or a few sliced scallions on top keeps the dish from feeling heavy.
Pro Tips for This Recipe:
- Cut the chicken evenly so it cooks at the same speed.
- Use thick teriyaki sauce; thin sauce runs off the rice.
- Cook the vegetables until bright, not limp.
Variations on This Dish:
- Pineapple Teriyaki: Add diced pineapple and a little extra sauce.
- Tofu Bowl: Swap in firm tofu, pressed and browned.
Common Mistakes to Avoid with This Dish:
- Overcooking the chicken makes it chewy. Pull it as soon as it’s done.
- Watery sauce pools at the bottom. Simmer until sticky.
- Mushy rice ruins the texture. Keep it fluffy.
18. Chili Cheese Dogs
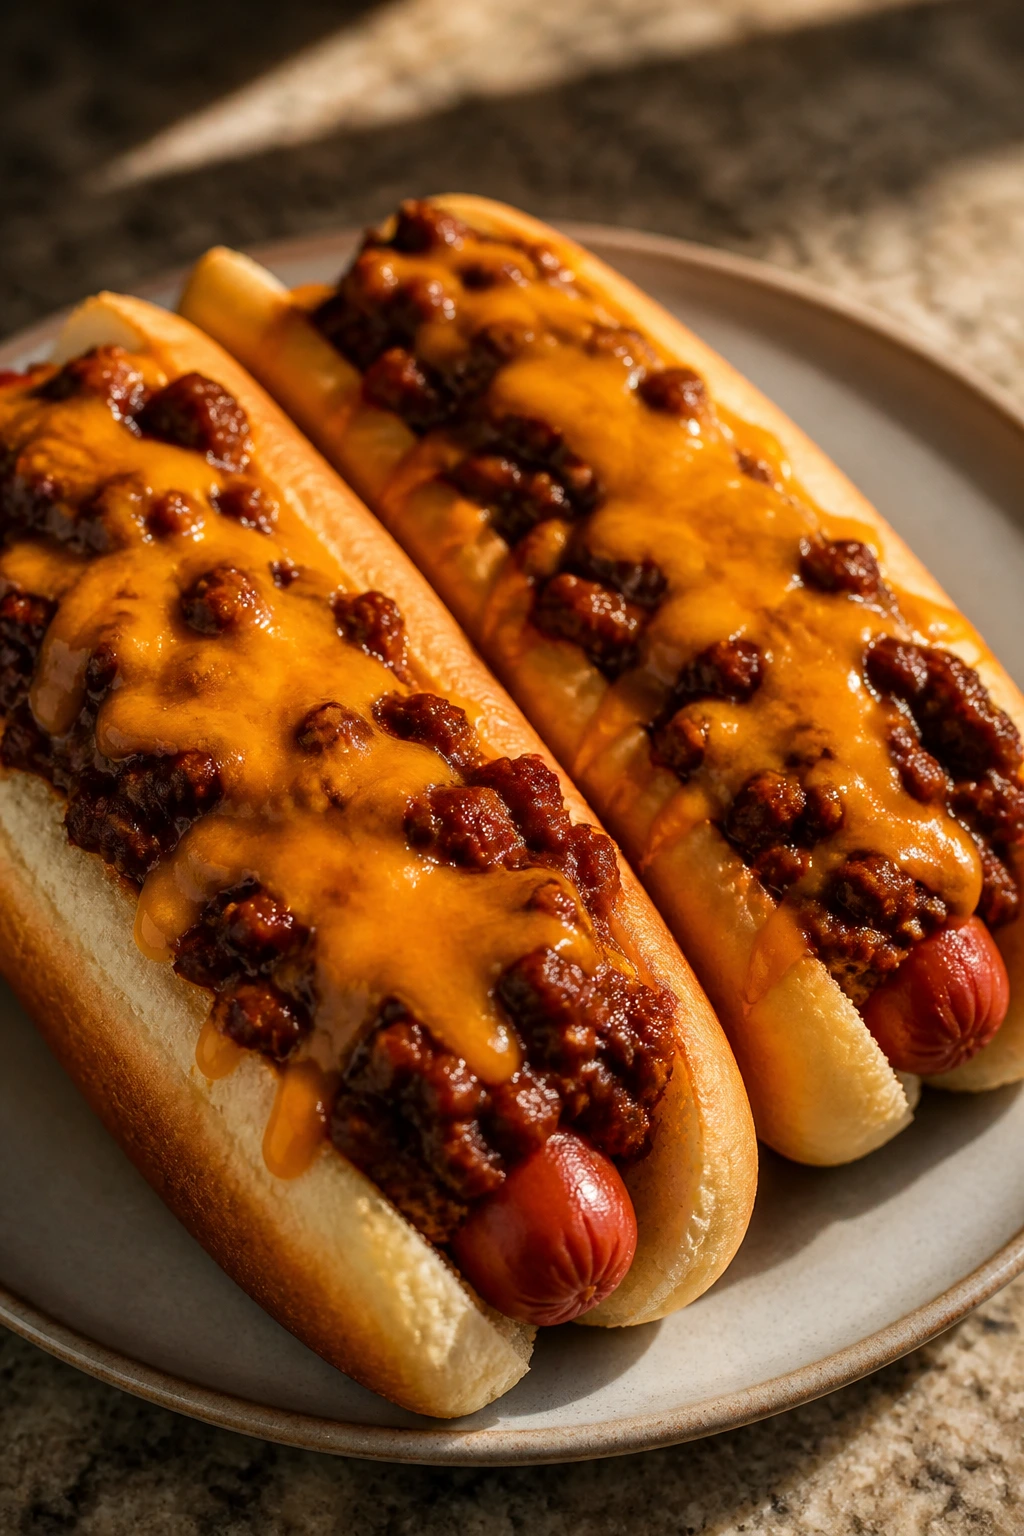
Chili cheese dogs are messy enough to feel like a treat and structured enough to hold together for a few bites. The bun gets soft, the hot dog stays snappy, and the chili drapes over the top like the whole thing was meant to be eaten fast.
Why It Works:
A thick chili is the difference between a dog you can eat and a plate that needs a spoon. Toasted buns help too; they slow down the sogginess and give the whole thing a little backbone.
Key Ingredients:
- 8 hot dogs
- 8 hot dog buns
- 2 cups chili, thick
- 1 1/2 cups shredded cheddar
- 2 tablespoons chopped onion
- 1 tablespoon mustard, optional
Quick Steps:
- Warm or grill the hot dogs.
- Toast the buns lightly.
- Fill each bun with a hot dog.
- Spoon on chili and cheese.
- Broil briefly until the cheese melts.
Equipment for This Recipe:
- Skillet or grill pan
- Baking sheet
- Spoon
How to Serve This Dish:
Serve with paper napkins and maybe even parchment under the dogs. A little chopped onion and mustard on the side lets each person tune theirs.
Pro Tips for This Recipe:
- Use a thick chili, not soup-like chili.
- Toasted buns hold up better.
- Broil just until the cheese softens.
Variations on This Dish:
- Turkey Dogs: Use turkey hot dogs and bean chili.
- Jalapeño Dogs: Add sliced pickled jalapeños on top.
Common Mistakes to Avoid with This Dish:
- Watery chili ruins the bun. Thicken it first.
- Skipping the toast step leads to collapse.
- Overloading with cheese makes the dog slip apart. Keep it sensible.
19. Stuffed Shells with Ricotta
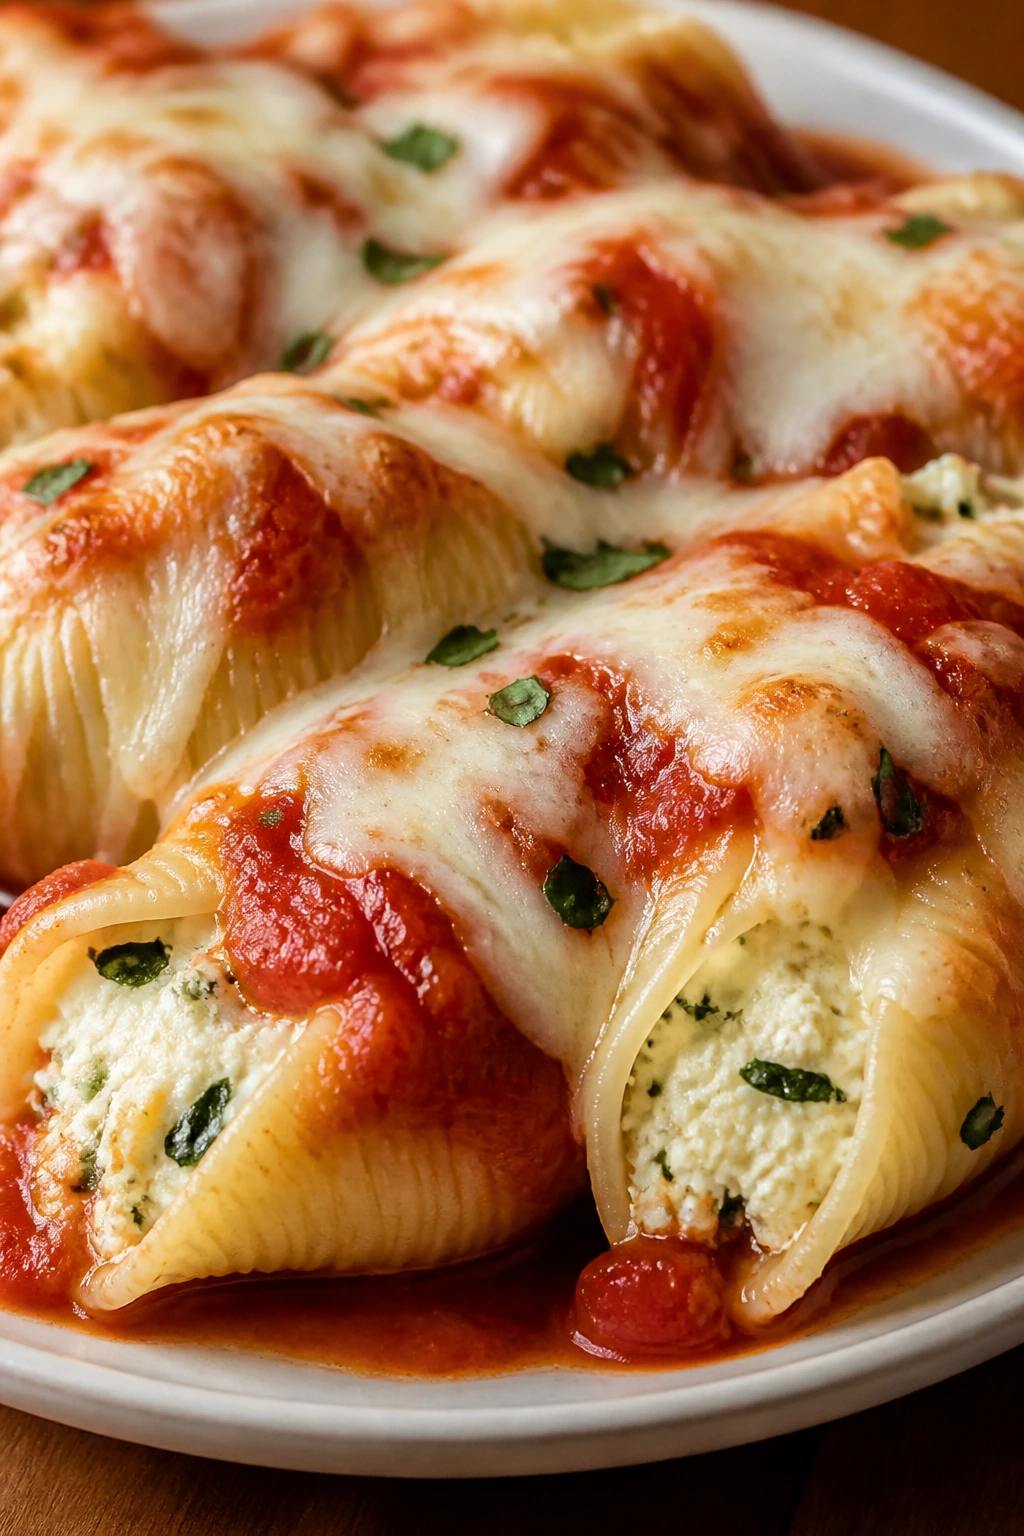
Stuffed shells look a little fancier than movie-night food, but they’re easy to serve and even easier to portion. The pasta shells hold the ricotta filling like little edible bowls, and the sauce keeps them from drying out in the oven.
Why It Works:
Large pasta shells bake into neat portions that don’t need carving. The ricotta filling stays creamy, while mozzarella on top gives you the browned, stretchy finish people usually fight over.
Key Ingredients:
- 20 jumbo pasta shells
- 2 cups ricotta
- 1 egg
- 1 1/2 cups shredded mozzarella
- 2 cups marinara sauce
- 1/4 cup Parmesan
- 1 teaspoon Italian seasoning
Quick Steps:
- Cook the shells until just tender and drain.
- Mix ricotta, egg, half the mozzarella, Parmesan, and seasoning.
- Fill the shells and place them in a baking dish with marinara.
- Top with remaining mozzarella.
- Bake at 375°F for 25 minutes until bubbly.
Equipment for This Recipe:
- Large pot
- Baking dish
- Spoon or piping bag
How to Serve This Dish:
Serve with garlic bread if you want a heavier dinner, or with a simple salad if the family already had popcorn. Three to four shells make a normal serving.
Pro Tips for This Recipe:
- Don’t overcook the shells or they tear while stuffing.
- A piping bag makes filling faster.
- Keep enough sauce under the shells so the bottoms don’t dry out.
Variations on This Dish:
- Spinach Shells: Add chopped cooked spinach to the filling.
- Meaty Shells: Mix in browned ground beef or sausage.
Common Mistakes to Avoid with This Dish:
- Broken shells are hard to fill. Cook them gently.
- Dry filling bakes up chalky. The egg helps bind it.
- Forgetting sauce under the shells leaves the pasta stuck to the pan.
20. Beef and Bean Enchilada Bake
This casserole has the cozy pull of enchiladas without the rolling and stuffing. The tortillas soften into layers, the beef and beans stay hearty, and the cheese on top turns into a browned blanket.
Why It Works:
A bake like this cuts into squares, which makes serving simple. The beans stretch the beef without making the dish feel cheap, and the red sauce keeps everything moist.
Key Ingredients:
- 1 pound ground beef
- 1 can refried beans
- 1 cup enchilada sauce
- 6 corn tortillas
- 2 cups shredded cheddar
- 1/2 cup diced onion
- 1 teaspoon cumin
Quick Steps:
- Brown beef with onion and cumin.
- Stir in a little enchilada sauce.
- Layer tortillas, beans, beef, sauce, and cheese in a baking dish.
- Repeat once.
- Bake at 375°F for 20 to 25 minutes.
Equipment for This Recipe:
- Skillet
- Baking dish
- Spatula
How to Serve This Dish:
Top with sour cream and chopped lettuce if you want some crunch. Serve with a fork; it cuts into tidy portions after a short rest.
Pro Tips for This Recipe:
- Warm the tortillas first so they layer without cracking.
- Use a thicker sauce if you want a sliceable casserole.
- Let it rest so the layers settle.
Variations on This Dish:
- Chicken Enchilada Bake: Replace beef with shredded chicken.
- Green Chile Bake: Swap red sauce for green and use jack cheese.
Common Mistakes to Avoid with This Dish:
- Too much sauce can make the casserole loose. Keep it balanced.
- Skipping the rest time makes it messy. Give it 10 minutes.
- Dry tortillas crack during layering. Warm them first.
21. French Bread Pizzas
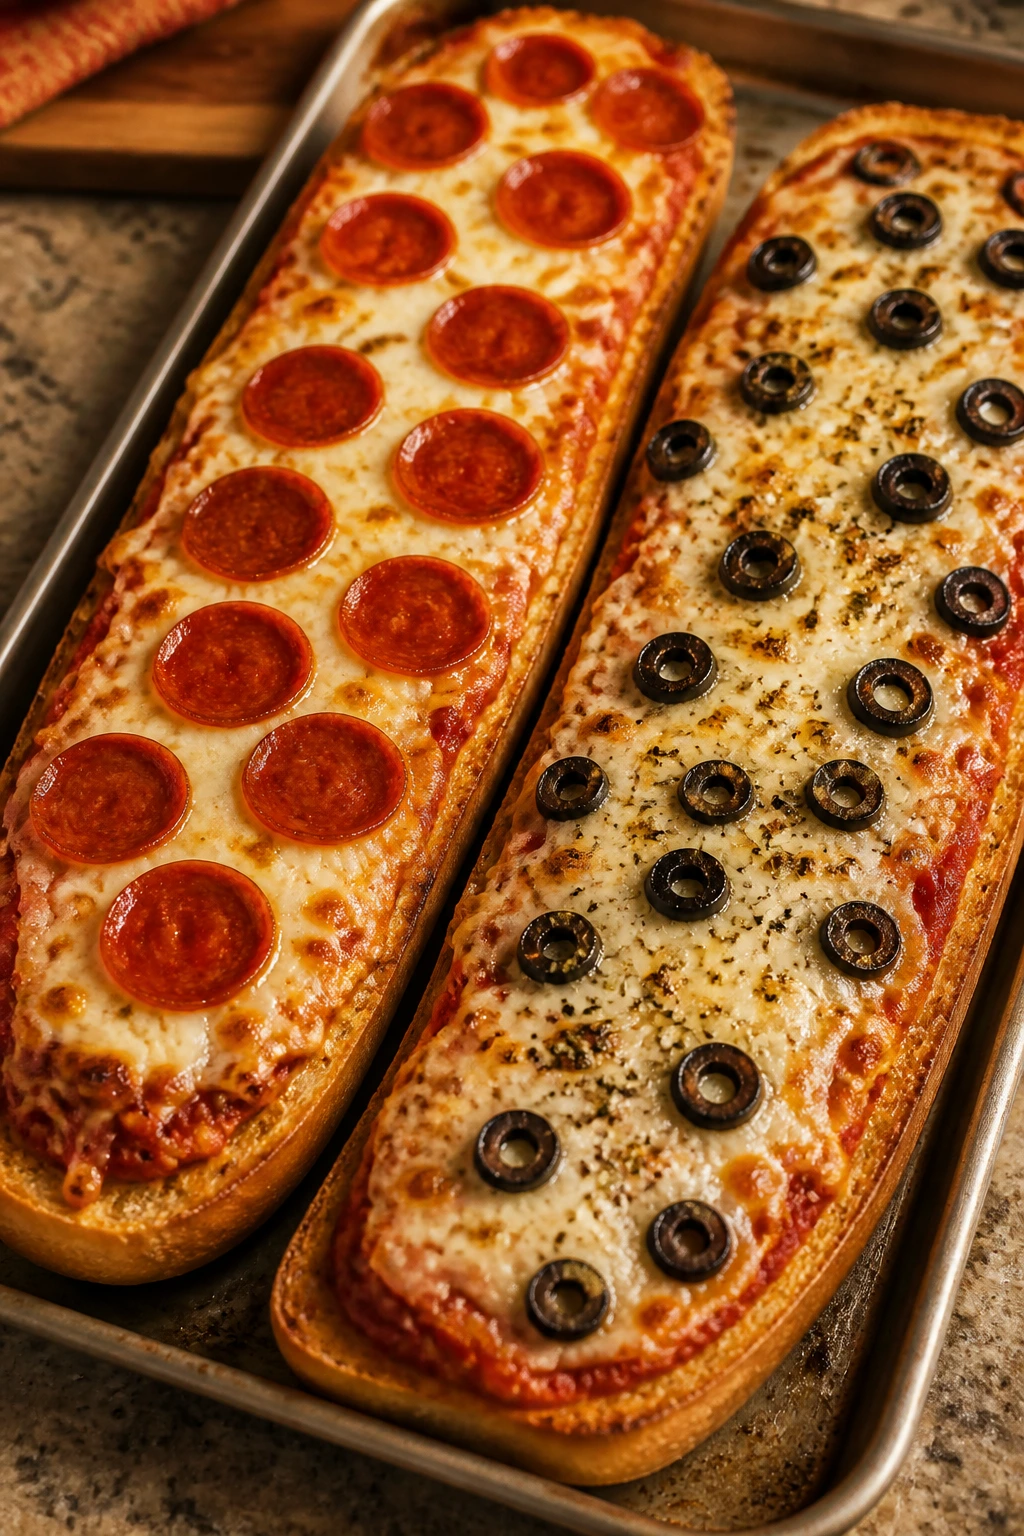
French bread pizza tastes a little nostalgic and a little practical, which is a good combination for movie night. The crust gets crisp, the middle stays tender, and you can top each half differently if the family can’t agree on one thing.
Why It Works:
The loaf acts like its own ready-made crust. You get edge-to-edge topping coverage, fast bake time, and a sturdy base that doesn’t flop.
Key Ingredients:
- 1 large French bread loaf
- 1 cup pizza sauce
- 2 cups shredded mozzarella
- 1 cup pepperoni or cooked sausage
- 1/4 cup sliced olives, optional
- 1 teaspoon dried oregano
Quick Steps:
- Split the loaf lengthwise and place it on a sheet pan.
- Toast the cut sides for 3 minutes.
- Add sauce, cheese, toppings, and oregano.
- Bake at 425°F for 10 to 12 minutes until melted.
- Slice into strips.
Equipment for This Recipe:
- Sheet pan
- Serrated knife
- Spoon
How to Serve This Dish:
Cut the loaf into narrow strips so it eats like pizza bread. A small bowl of marinara for dipping makes it even better.
Pro Tips for This Recipe:
- Toast the bread first or the sauce soaks in.
- Keep toppings thin so the loaf stays crisp.
- Use a loaf with a tight crumb, not an airy one.
Variations on This Dish:
- Margherita Bread Pizza: Use sliced tomatoes and basil.
- Supreme Style: Add peppers, onions, and sausage, but keep the layer light.
Common Mistakes to Avoid with This Dish:
- Skipping the pre-toast makes the bread soggy. Don’t.
- Overloading toppings weighs down the loaf. Less is better.
- Using too much sauce muddies the flavor. A thin spread is enough.
22. Baked Fish Sticks with Oven Fries
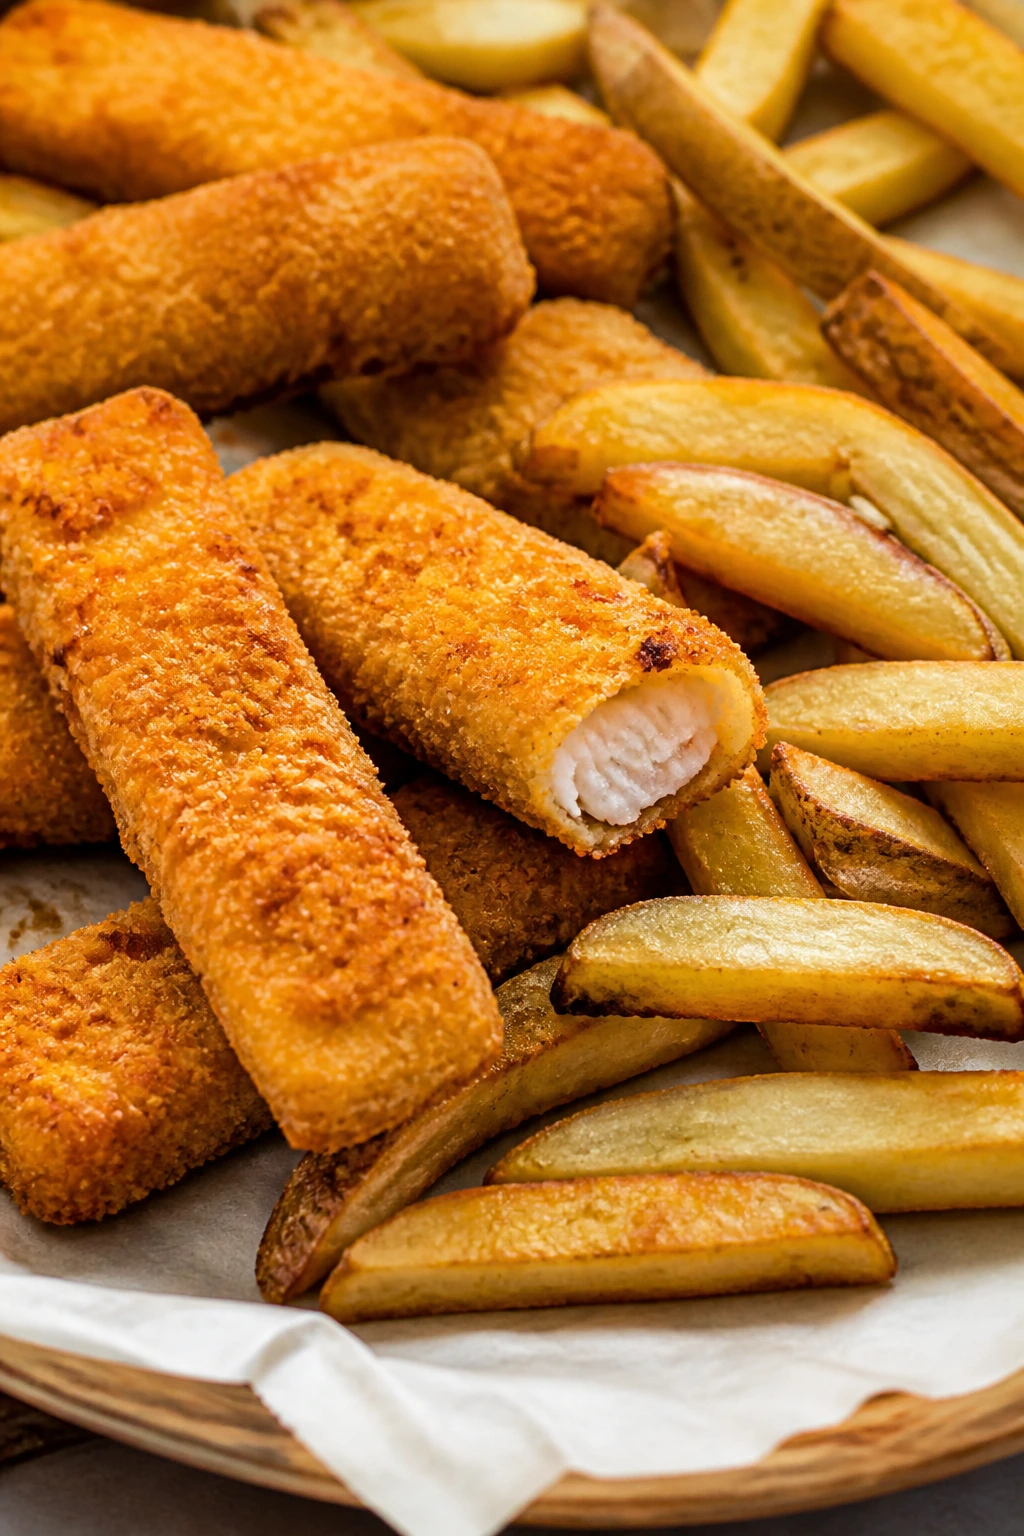
Fish sticks and fries can feel like a kid meal, but baked at home they come out with a crisp shell and a better potato flavor than the freezer aisle version. The fries need space, though. Crowding is what ruins them.
Why It Works:
Baking both on separate trays keeps the coating crisp and the potatoes browned. A little oil and a hot oven do most of the work.
Key Ingredients:
- 1 1/2 pounds white fish fillets, cut into strips
- 1 cup flour
- 2 eggs
- 2 cups breadcrumbs or panko
- 2 large russet potatoes
- 2 tablespoons olive oil
- Salt and pepper
Quick Steps:
- Heat the oven to 425°F.
- Toss potato wedges with oil, salt, and pepper and spread on a tray.
- Bread the fish in flour, egg, then crumbs.
- Put the fish on a second tray.
- Bake fries 30 to 35 minutes and fish 12 to 15 minutes, flipping once.
Equipment for This Recipe:
- Two sheet pans
- Three shallow bowls
- Tongs
How to Serve This Dish:
Serve with tartar sauce, ketchup, or lemon wedges. If you want the full movie-night effect, add coleslaw or peas on the side.
Pro Tips for This Recipe:
- Dry the fish well before breading.
- Leave space between the fries so they brown.
- A little paprika in the crumbs adds color.
Variations on This Dish:
- Cornmeal Crust: Mix cornmeal into the breading for extra crunch.
- Sweet Potato Fries: Swap in sweet potatoes, but cut them evenly.
Common Mistakes to Avoid with This Dish:
- Wet fish makes the breading slip off. Pat it dry.
- Crowding fries steams them instead of browning them. Use two trays if needed.
- Pulling the fish too late dries it out. Watch closely.
23. Breakfast-for-Dinner Pancake Sliders
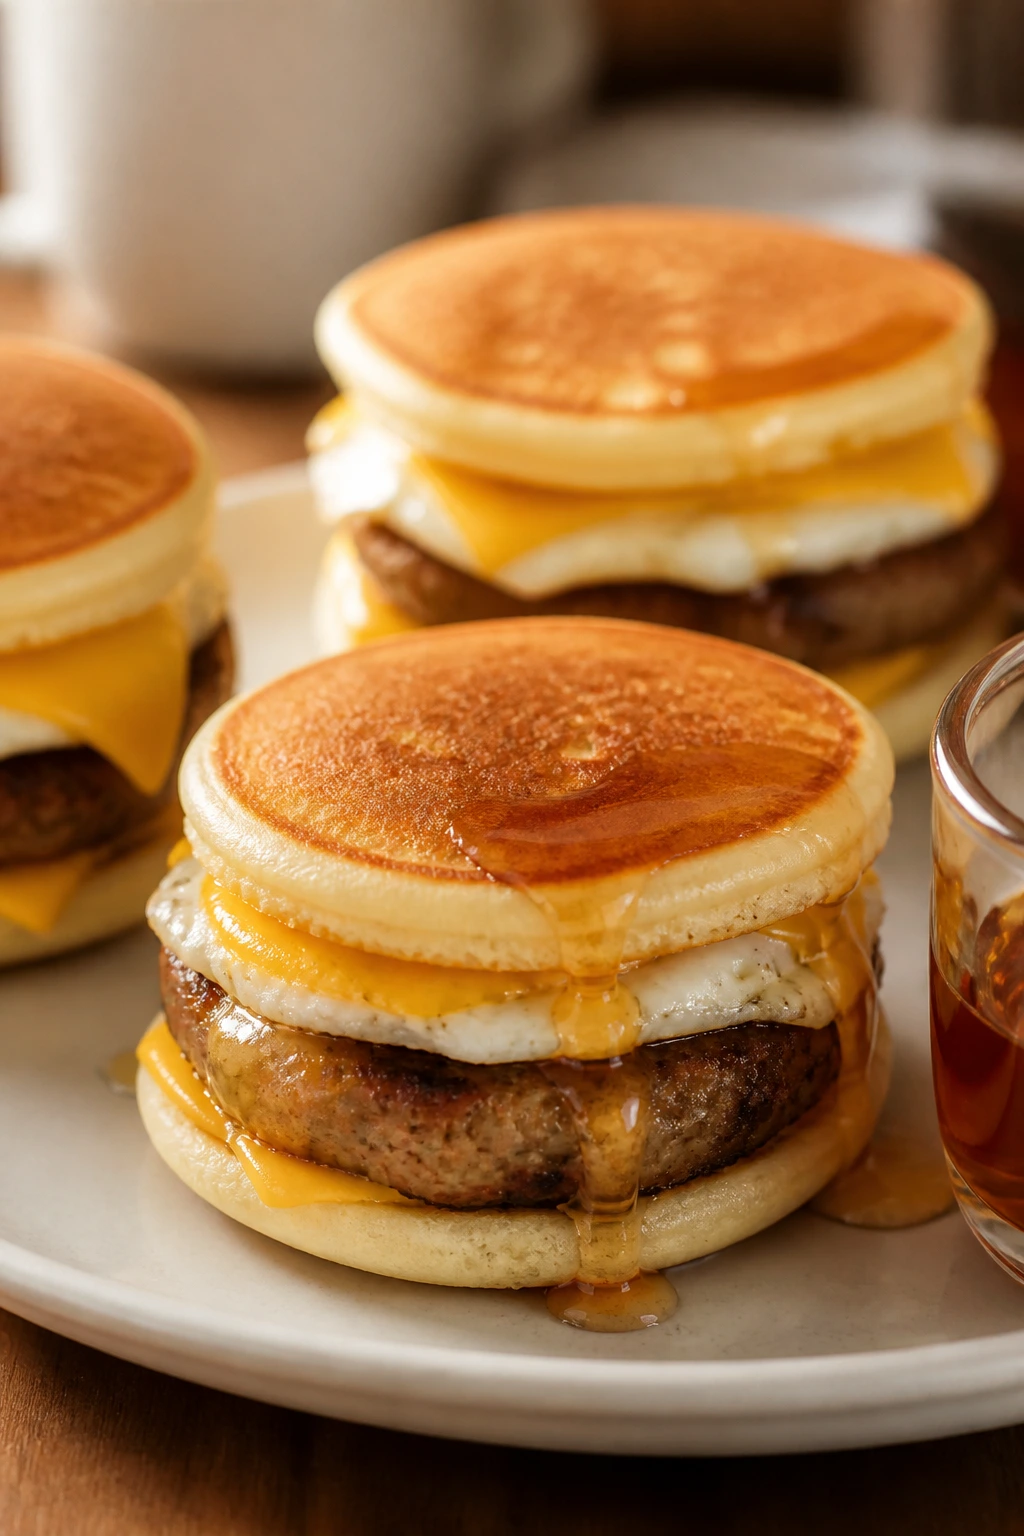
Pancake sliders sound playful because they are. They’re also practical if your family likes sweet-salty dinners that don’t need a lot of utensils. The pancakes become soft buns for sausage, egg, and cheese, and the maple syrup sneaks through just enough to matter.
Why It Works:
Mini pancakes keep the portions tidy and easy to stack. Using them as buns gives you a handheld meal that feels fun without being messy.
Key Ingredients:
- 2 cups pancake batter
- 8 breakfast sausage patties
- 4 eggs
- 4 slices cheddar
- 2 tablespoons butter
- Maple syrup, for serving
Quick Steps:
- Cook mini pancakes in a skillet until golden on both sides.
- Cook the sausage patties and fry or scramble the eggs.
- Layer sausage, egg, and cheese between two pancakes.
- Warm briefly so the cheese softens.
- Serve with maple syrup on the side.
Equipment for This Recipe:
- Skillet
- Spatula
- Small ring mold optional for even pancakes
How to Serve This Dish:
Stack them on a tray and let people dunk or drizzle with syrup. Fresh fruit helps balance the salty sausage and cheese.
Pro Tips for This Recipe:
- Keep the pancakes small so they fit in one hand.
- Cook the eggs just until set; overdone eggs make the sliders dry.
- Warm the assembled sliders for 1 minute to melt the cheese.
Variations on This Dish:
- Bacon Version: Use bacon instead of sausage.
- Veggie Version: Swap sausage for a veggie patty and add spinach.
Common Mistakes to Avoid with This Dish:
- Making pancakes too large turns them into sandwiches, not sliders. Keep them small.
- Overloading with syrup makes them slippery. Use a little.
- Dry eggs make the filling boring. Stop cooking while they’re still soft.
24. Rotisserie Chicken Alfredo Bake
This is the kind of dinner you make when the movie is good and the energy level in the house is low. Creamy Alfredo, tender chicken, and baked pasta come together in one casserole dish that tastes richer than the effort it takes.
Why It Works:
Rotisserie chicken saves time, and the pasta absorbs the sauce while it bakes. A little extra mozzarella on top gives the pan those browned spots that keep people coming back for seconds.
Key Ingredients:
- 1 pound penne
- 3 cups cooked rotisserie chicken
- 2 cups Alfredo sauce
- 1 cup milk
- 2 cups shredded mozzarella
- 1/2 cup grated Parmesan
- 1 cup steamed broccoli, optional
Quick Steps:
- Cook the penne until barely al dente.
- Mix pasta, chicken, Alfredo sauce, milk, and broccoli.
- Pour into a baking dish and top with mozzarella and Parmesan.
- Bake at 375°F for 20 minutes until bubbly.
- Rest 5 to 10 minutes before serving.
Equipment for This Recipe:
- Large pot
- Baking dish
- Mixing bowl
How to Serve This Dish:
Serve with a crisp salad and maybe garlic bread if the crowd is hungry enough. The pasta is rich, so a bright side keeps it from feeling heavy.
Pro Tips for This Recipe:
- Thin the sauce with a little milk so it coats the pasta.
- Don’t overcook the penne before baking.
- Broccoli should be steamed first or it stays too firm.
Variations on This Dish:
- Spinach Alfredo Bake: Add fresh spinach and a pinch of nutmeg.
- Chicken Bacon Alfredo: Stir in crisp chopped bacon.
Common Mistakes to Avoid with This Dish:
- Thick sauce clumps instead of coating. Loosen it a little.
- Overbaked pasta turns dry. Pull it when bubbly.
- Skipping the rest time makes it fall apart.
25. Gnocchi with Sausage and Spinach Bake
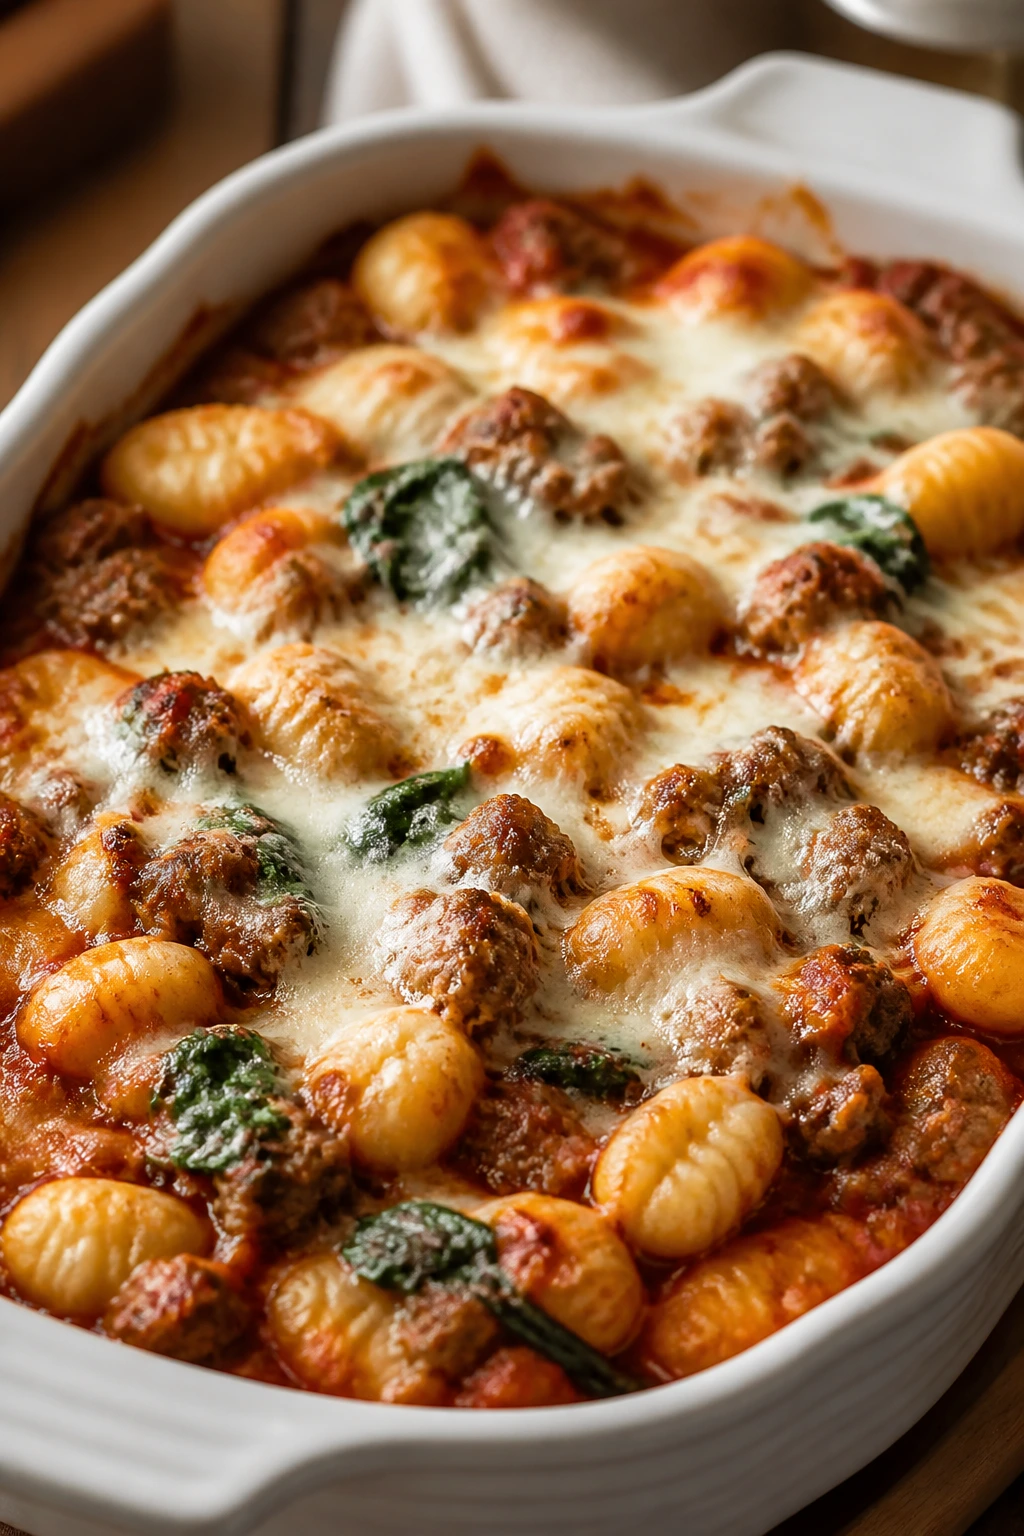
Gnocchi bake has a soft, pillowy texture that feels a little different from the usual pasta night. The sauce gets into the little ridges, the sausage gives it backbone, and the spinach melts down without stealing the show.
Why It Works:
Shelf-stable gnocchi bakes well because it softens in the sauce rather than needing a long boil. The whole dish lands in the sweet spot between casserole and pasta skillet.
Key Ingredients:
- 2 pounds potato gnocchi
- 1 pound Italian sausage
- 3 cups marinara sauce
- 3 cups baby spinach
- 2 cups shredded mozzarella
- 1/2 cup Parmesan
Quick Steps:
- Brown the sausage in a skillet.
- Stir in marinara, spinach, and gnocchi.
- Transfer to a baking dish.
- Top with mozzarella and Parmesan.
- Bake at 400°F for 18 to 20 minutes until bubbling.
Equipment for This Recipe:
- Large skillet
- Baking dish
- Wooden spoon
How to Serve This Dish:
Serve in shallow bowls so the sauce stays contained. A piece of crusty bread is enough on the side; the bake already does most of the work.
Pro Tips for This Recipe:
- Use fresh or shelf-stable gnocchi, not frozen ones that need different handling.
- Brown the sausage well for flavor.
- A little extra sauce helps keep the gnocchi from drying out.
Variations on This Dish:
- Chicken Sausage Bake: Use chicken sausage for a lighter flavor.
- Three-Cheese Version: Add ricotta dollops before baking.
Common Mistakes to Avoid with This Dish:
- Dry gnocchi bakes can happen if you skimp on sauce. Keep it saucy.
- Underbrowned sausage leaves the flavor flat. Give it color.
- Too much spinach can crowd the dish. Two or three handfuls is enough.
26. Mini Calzones
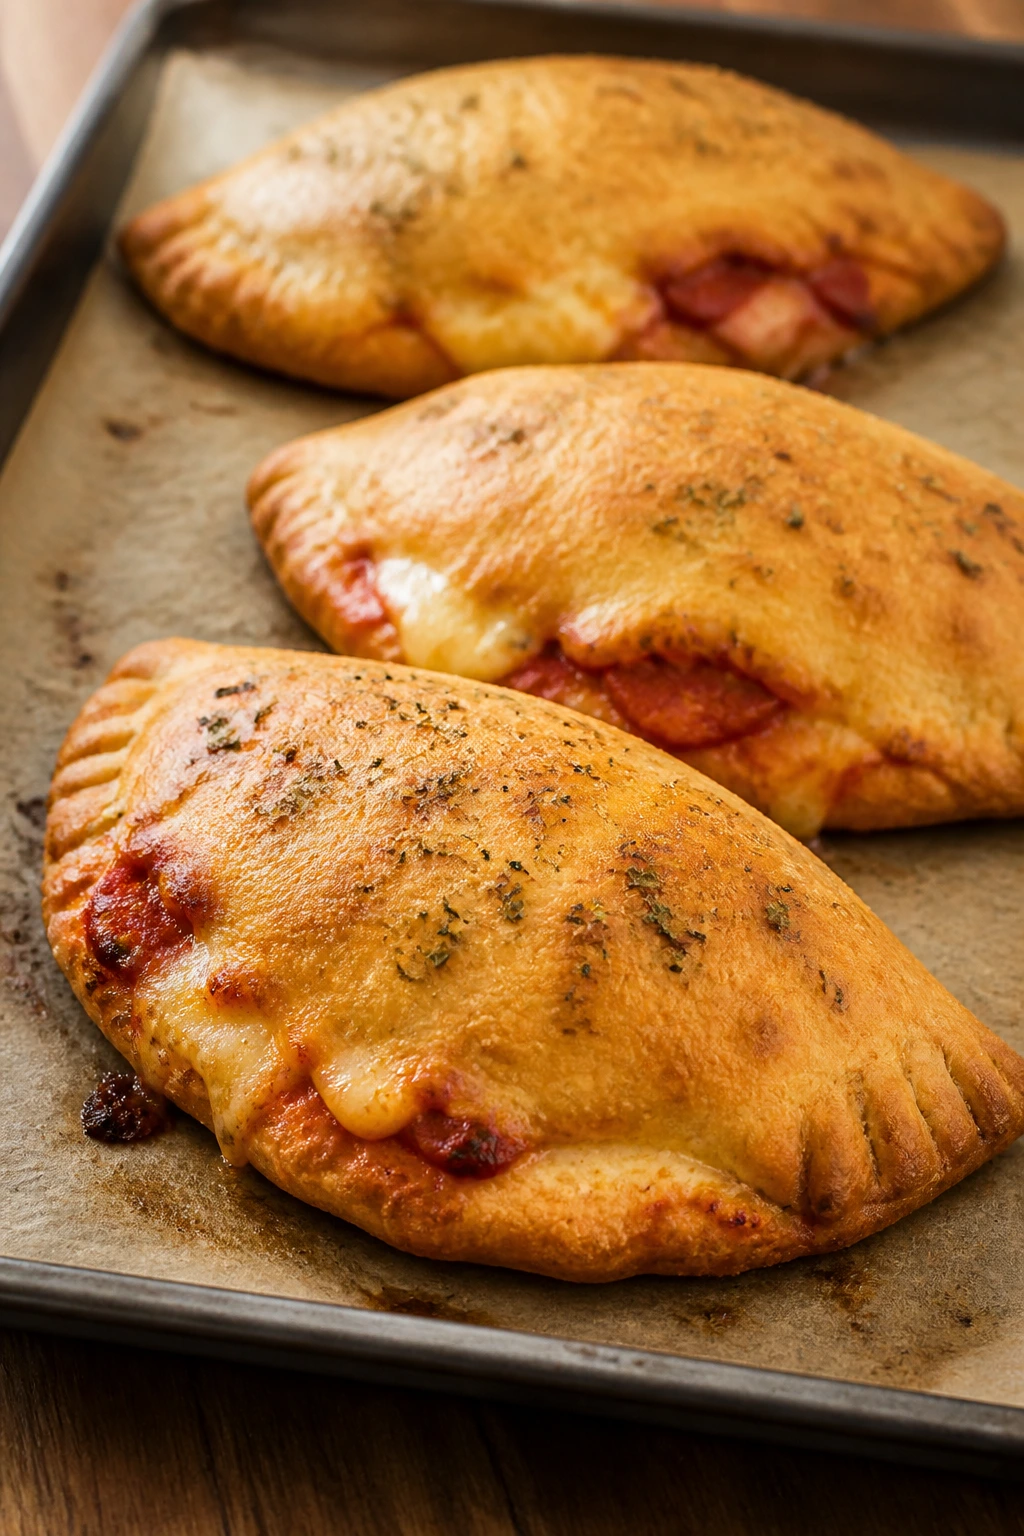
Mini calzones are pizza pockets with better manners. They seal in the filling, keep the cheese from running everywhere, and can be held in one hand while the other hand stays on the popcorn bowl.
Why It Works:
Smaller portions bake faster and are less likely to burst. A thick filling and a tight seal are the whole game here.
Key Ingredients:
- 1 pound pizza dough
- 1 cup ricotta
- 1 cup shredded mozzarella
- 1/2 cup chopped pepperoni or cooked sausage
- 1/2 cup pizza sauce
- 1 egg, beaten
Quick Steps:
- Heat the oven to 425°F.
- Divide dough into 8 pieces and roll each into a round.
- Fill with ricotta, mozzarella, pepperoni, and a spoonful of sauce.
- Fold over, seal the edges, and brush with egg wash.
- Bake 15 to 18 minutes until golden.
Equipment for This Recipe:
- Sheet pan
- Rolling pin
- Fork for sealing
How to Serve This Dish:
Serve with extra sauce for dipping. A tray of cut vegetables or olives makes the plate feel complete without adding much work.
Pro Tips for This Recipe:
- Don’t overfill or the seams split open.
- Pinch the edges firmly, then press with a fork.
- Let the calzones rest 3 minutes before eating; the filling is hot.
Variations on This Dish:
- Veggie Calzones: Use sautéed mushrooms, spinach, and olives.
- Buffalo Calzones: Add chicken and a little buffalo sauce.
Common Mistakes to Avoid with This Dish:
- Wet fillings make the dough leak. Keep the sauce light.
- Thin dough tears when folded. Roll evenly.
- Forgetting the egg wash leaves the crust pale. Brush it on.
27. Turkey Meatball Skillet
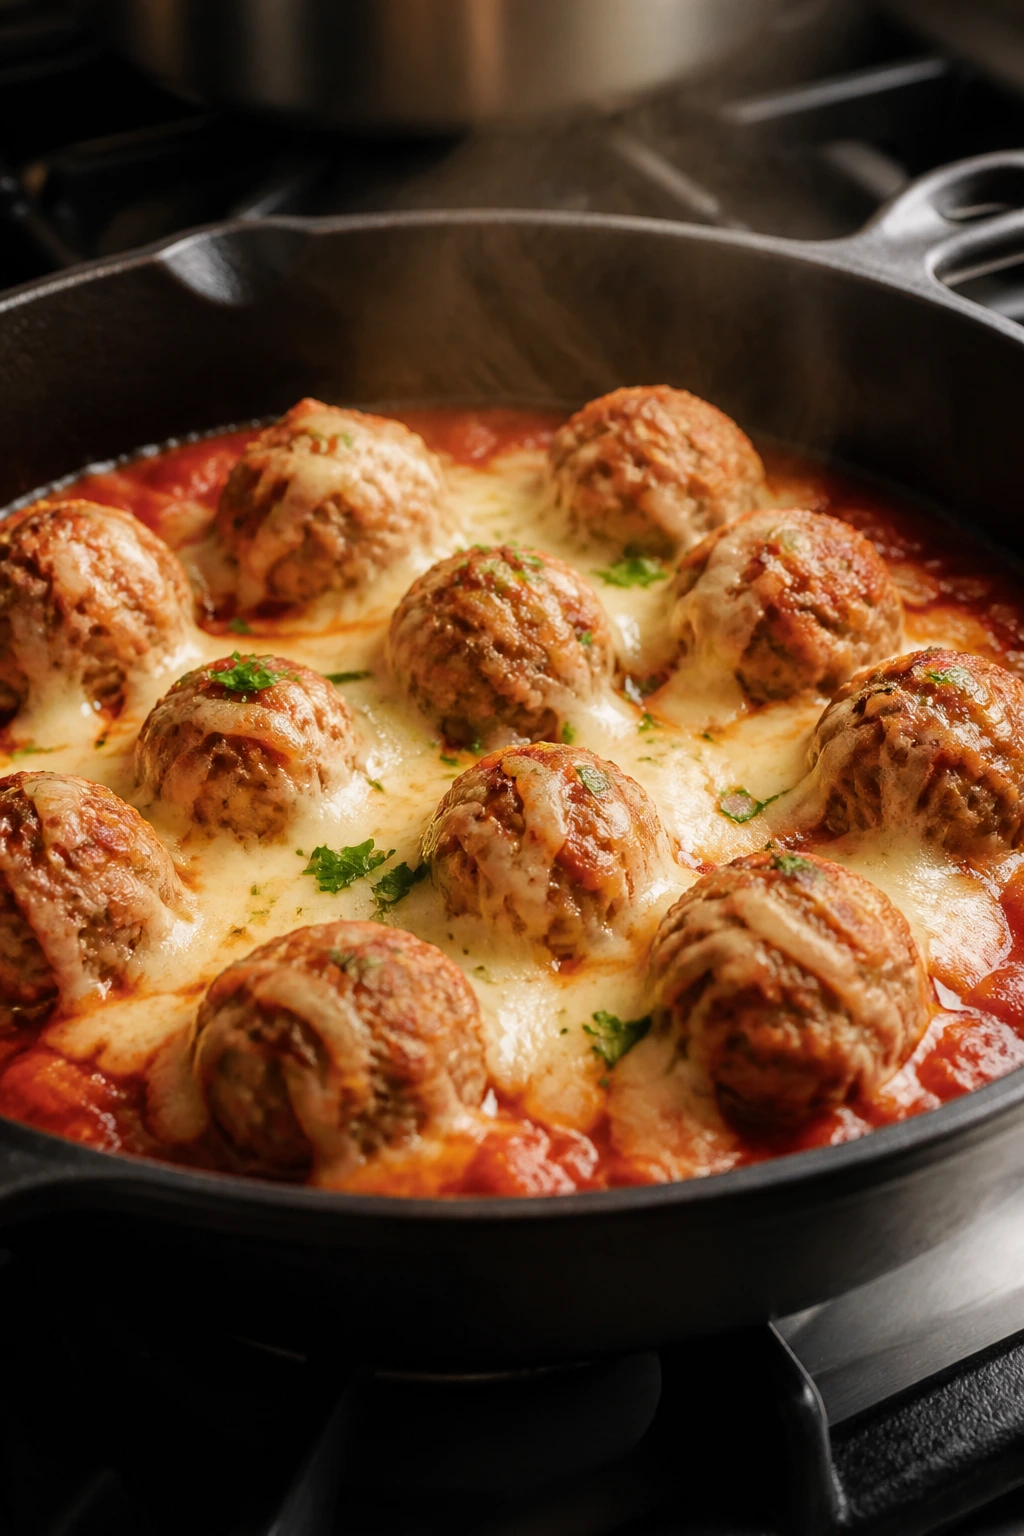
Turkey meatball skillet is the quieter cousin of meatball subs, but it’s still full of comfort. The meatballs simmer in sauce, the cheese melts on top, and the skillet goes right to the table like it means business.
Why It Works:
Ground turkey stays lighter than beef, and baking or simmering the meatballs in sauce keeps them from drying out. A skillet presentation means less fuss and a faster move from stove to couch.
Key Ingredients:
- 1 pound ground turkey
- 1 egg
- 1/2 cup breadcrumbs
- 1/4 cup grated Parmesan
- 2 cups marinara sauce
- 1 cup shredded mozzarella
- 1 teaspoon Italian seasoning
Quick Steps:
- Mix turkey, egg, breadcrumbs, Parmesan, and seasoning.
- Form small meatballs and brown them in a skillet.
- Pour in marinara and simmer 10 minutes.
- Top with mozzarella.
- Cover until melted.
Equipment for This Recipe:
- Large oven-safe skillet
- Mixing bowl
- Spoon
How to Serve This Dish:
Serve with toasted bread or over small pasta if you want it heartier. The skillet is also good with a spoon and a stack of napkins nearby.
Pro Tips for This Recipe:
- Keep the meatballs small so they cook through.
- Don’t stir too hard or they break apart.
- Let the sauce bubble gently, not violently.
Variations on This Dish:
- Spicy Turkey Meatballs: Add crushed red pepper.
- Herb Turkey Skillet: Mix in parsley and oregano.
Common Mistakes to Avoid with This Dish:
- Overmixing makes the meatballs dense. Stop once combined.
- Large meatballs need more time and dry out. Keep them small.
- Too much heat can scorch the sauce. Simmer gently.
28. Chicken Caesar Wraps
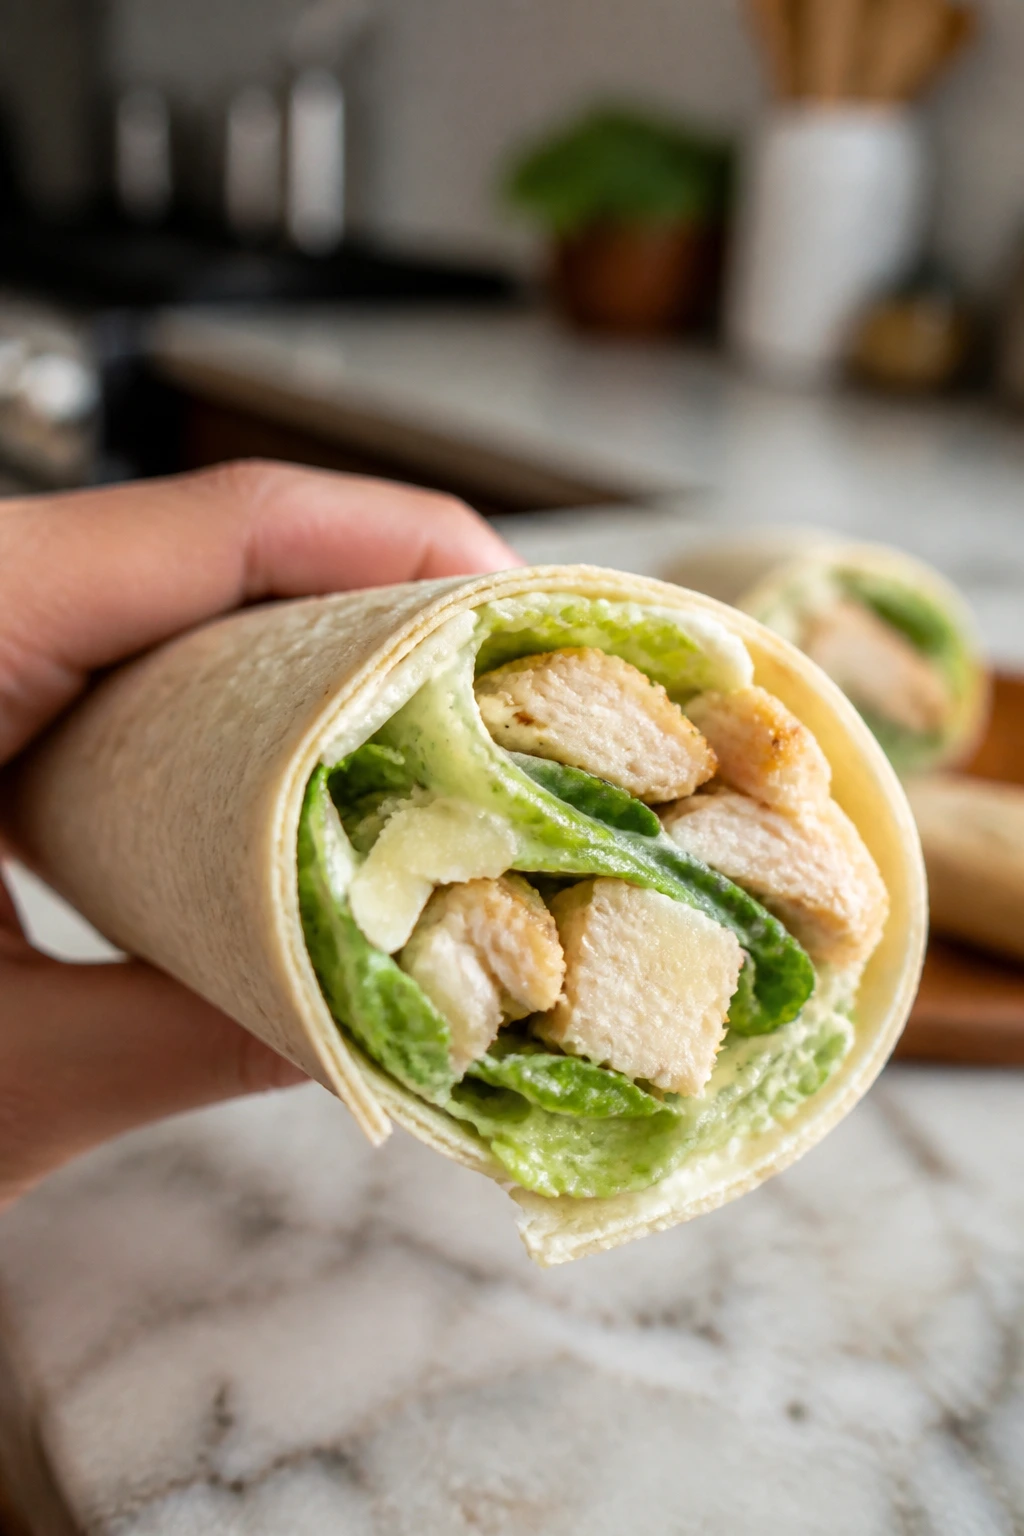
Chicken Caesar wraps are the most efficient dinner on this list if you need something that feels fresh but still fills people up. Crisp romaine, chicken, Parmesan, and dressing all tuck into a tortilla without much ceremony.
Why It Works:
A wrap keeps the Caesar salad from becoming a bowl situation. The tortilla contains the dressing and chicken so the whole thing eats cleanly, especially if you don’t overload it.
Key Ingredients:
- 2 cups cooked chicken, sliced
- 3 cups chopped romaine
- 1/3 cup Caesar dressing
- 1/4 cup grated Parmesan
- 4 large flour tortillas
- Croutons, crushed, optional
Quick Steps:
- Toss chicken, romaine, dressing, and Parmesan in a bowl.
- Spoon into tortillas.
- Add crushed croutons if you want crunch.
- Roll tightly and slice in half.
Equipment for This Recipe:
- Mixing bowl
- Knife
- Cutting board
How to Serve This Dish:
Serve the wraps cut on a bias so they look neat on the plate. A cup of soup or a few potato wedges makes the meal feel fuller.
Pro Tips for This Recipe:
- Dry the romaine well or the wrap slips.
- Don’t overload with dressing.
- Wrap tightly in parchment if you need to hold them for a few minutes.
Variations on This Dish:
- BLT Caesar Wrap: Add bacon and tomato.
- Grilled Chicken Caesar: Use warm grilled chicken for a heartier wrap.
Common Mistakes to Avoid with This Dish:
- Wet lettuce makes the tortilla soggy. Dry it.
- Too much filling causes tears. Keep it moderate.
- Dressing too far ahead softens the greens. Toss just before serving.
29. Bean and Cheese Burritos
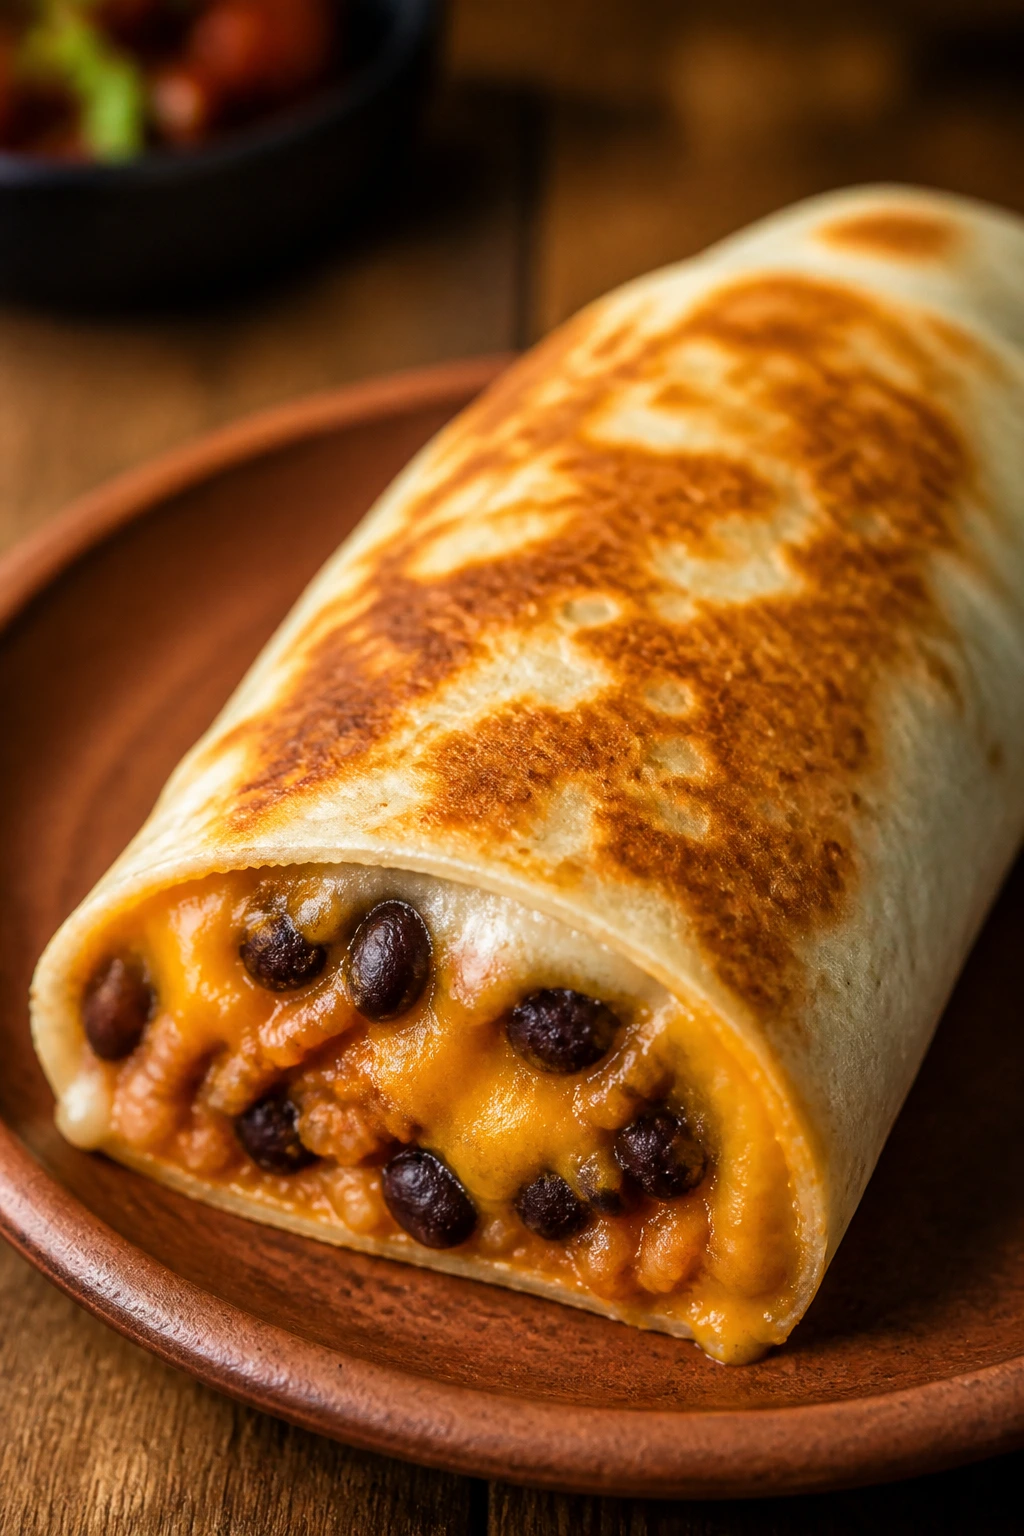
Bean and cheese burritos are dependable in the way movie night food should be. They’re cheap to make, easy to hold, and they heat up well if somebody gets distracted by the opening credits and wanders off.
Why It Works:
Refried beans and cheese make a filling that holds together in the tortilla, and a quick toast in the skillet adds a little crunch. They’re also easy to batch, which makes them a smart choice for bigger families.
Key Ingredients:
- 1 can refried beans
- 2 cups shredded cheddar
- 4 large flour tortillas
- 1/2 teaspoon cumin
- 1/4 cup salsa
- Butter or oil for the skillet
Quick Steps:
- Warm the beans with cumin and salsa.
- Spoon into tortillas and top with cheese.
- Roll tightly.
- Toast in a skillet with a little butter or oil until golden on both sides.
Equipment for This Recipe:
- Skillet
- Spoon
- Foil or parchment, if holding
How to Serve This Dish:
Serve with salsa, sour cream, and maybe a little chopped lettuce. Cut them in half if you want easier grabbing for kids.
Pro Tips for This Recipe:
- Warm tortillas fold better and don’t crack.
- Keep the filling low and centered.
- Toasting the seam side first helps them stay closed.
Variations on This Dish:
- Chicken Bean Burritos: Add shredded chicken.
- Rice Burritos: Add a spoonful of cooked rice for a bigger meal.
Common Mistakes to Avoid with This Dish:
- Overfilling tears the tortilla. Use less than you think.
- Cold beans don’t spread well. Warm them.
- Skipping the skillet toast leaves them floppy.
30. Pesto Tomato Grilled Cheese
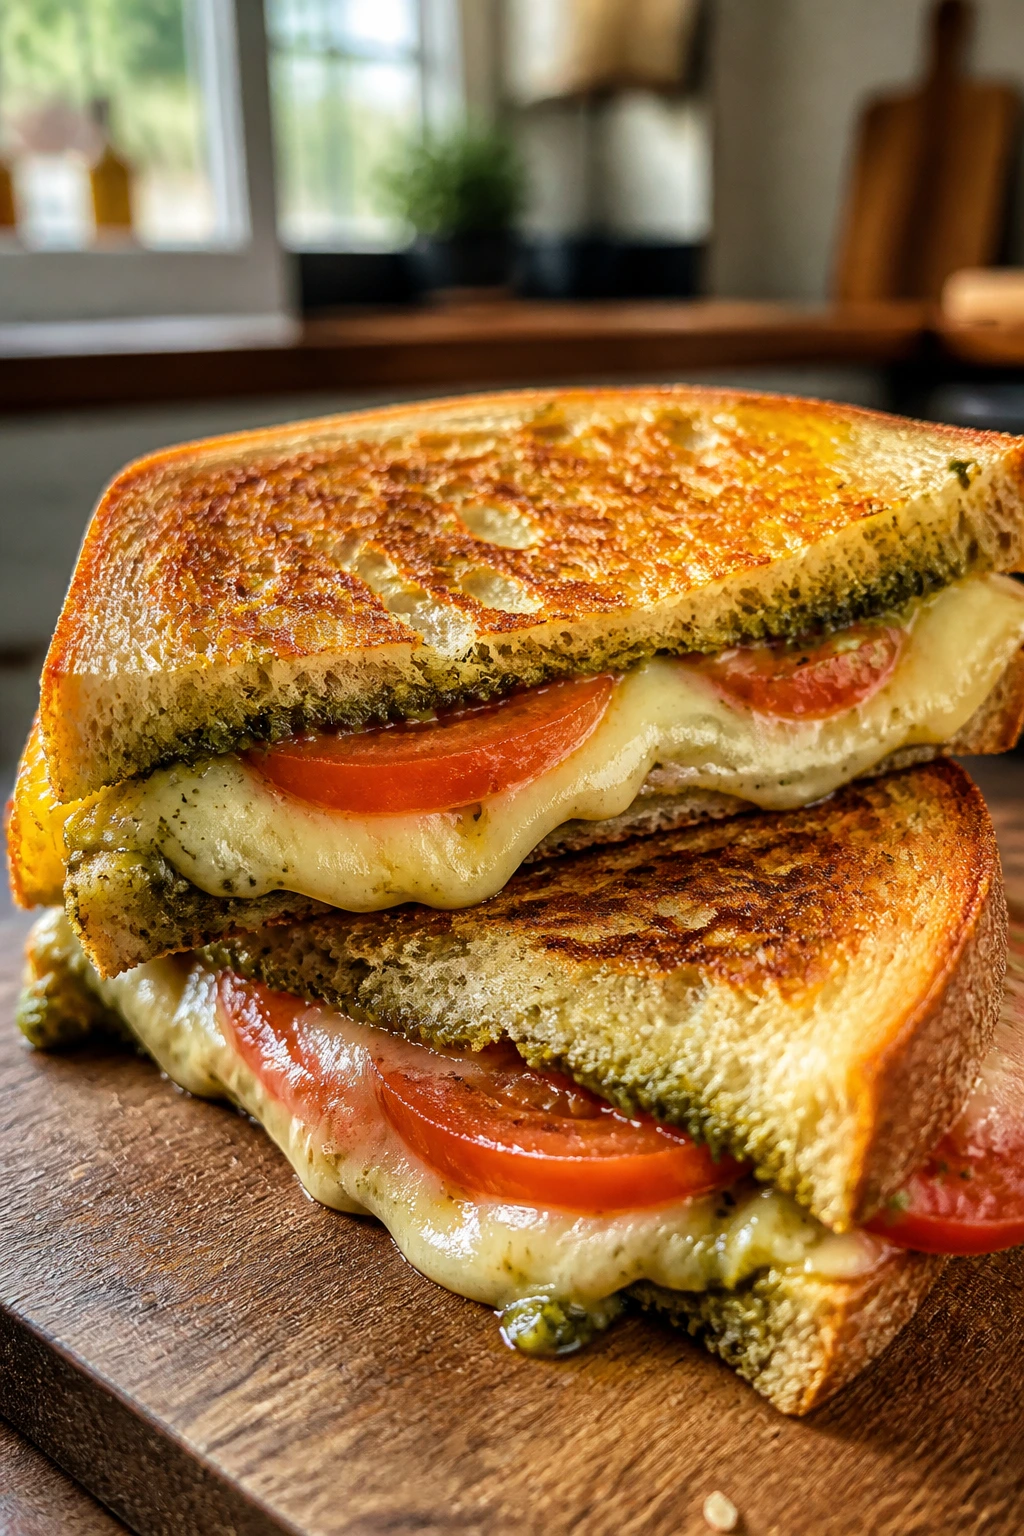
Grilled cheese is already a comfort classic, but pesto and tomato give it a little lift without turning it into a fussy sandwich. The bread goes deeply golden, the cheese stretches, and the tomato adds a juicy bite that keeps each piece from feeling one-note.
Why It Works:
A good grilled cheese needs controlled heat and enough fat on the outside of the bread to brown evenly. Pesto brings basil and garlic, which gives the sandwich more depth than plain cheddar alone.
Key Ingredients:
- 8 slices sourdough or sandwich bread
- 2 tablespoons butter, softened
- 1/4 cup pesto
- 8 slices mozzarella or provolone
- 1 medium tomato, thinly sliced
- Pinch of salt
Quick Steps:
- Spread butter on the outside of each bread slice.
- Spread pesto on the inside of four slices.
- Layer cheese and tomato, then salt lightly.
- Close the sandwiches.
- Cook in a skillet over medium-low heat, 3 to 4 minutes per side, until deep golden and melted.
Equipment for This Recipe:
- Skillet
- Spatula
- Butter knife
How to Serve This Dish:
Cut the sandwiches into triangles and serve with tomato soup or kettle chips. They’re also good with pickles if you want a sharp contrast.
Pro Tips for This Recipe:
- Medium-low heat gives you color without burning the bread.
- Salt the tomato lightly so the sandwich tastes brighter.
- Use enough cheese to create a real melt line between the bread halves.
Variations on This Dish:
- Turkey Pesto Melt: Add sliced turkey.
- Caprese Style: Add fresh basil and use mozzarella only.
Common Mistakes to Avoid with This Dish:
- High heat burns the bread before the cheese melts. Keep it low.
- Wet tomato slices can make the sandwich slippery. Pat them dry.
- Too little cheese leaves the center dry. Stack it generously.
Why These Family Movie Night Meals Work When the House Gets Quiet
A good movie-night dinner doesn’t need to be fancy. It needs to be sturdy. The recipes above share a few habits: they use ingredients that hold up under heat, they’re easy to portion without a carving knife, and they leave you with plates that can be cleared before the end credits if you move with purpose. That matters more than people admit.
You’ll also notice a bias toward food with some built-in texture. Crisp edges on pizza and flatbreads. Thick sauce on pasta and enchiladas. Soft, warm centers in sliders and pot pies. That contrast is what keeps a dinner interesting when everyone is half-watching the screen and reaching for another bite at the same time.
The bigger idea is simple. Family movie night food should feel easy to bring out, easy to pass around, and easy to eat without turning the couch into a crime scene. If a dinner can do those three things, it earns a repeat slot.
The Tools That Keep These Dinners Moving
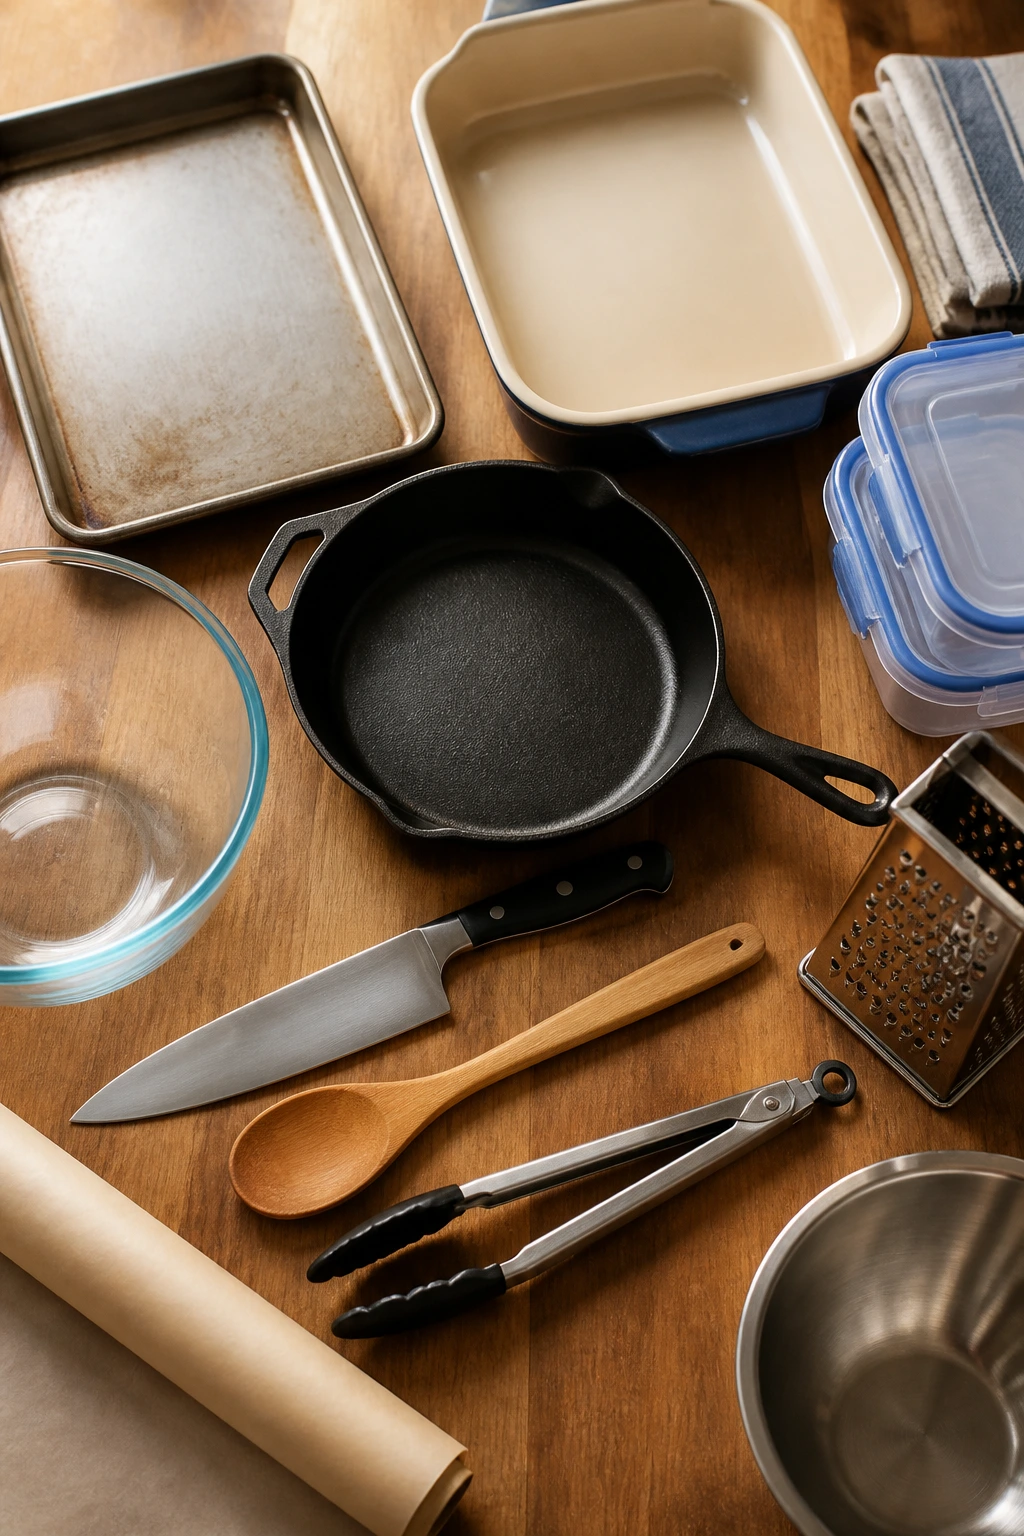
- Rimmed sheet pans: They handle pizza, nachos, tenders, fries, and flatbreads without spills.
- 9-by-13-inch baking dishes: Best for casseroles, baked ziti, enchilada bake, and stuffed shells.
- Large skillets: You’ll use one for sliders, sauces, quesadillas, meatballs, and grilled cheese.
- Sharp chef’s knife: Clean cuts matter when you’re slicing subs, pizza, wraps, and tomatoes.
- Wooden spoon or silicone spatula: Better than metal for stirring thick sauces and fillings.
- Tongs: Handy for chicken tenders, hot dogs, and anything you need to flip fast.
- Mixing bowls: At least two medium bowls save time when you’re breading or tossing fillings.
- Parchment paper: Useful for pizza, taquitos, tenders, and anything you want to lift cleanly.
- Box grater: Freshly shredded cheese melts better than the bagged stuff.
- Airtight containers: Leftovers keep their shape better when they’re not left loose in the fridge.
Smart Shopping Notes for a Less Chaotic Movie Night
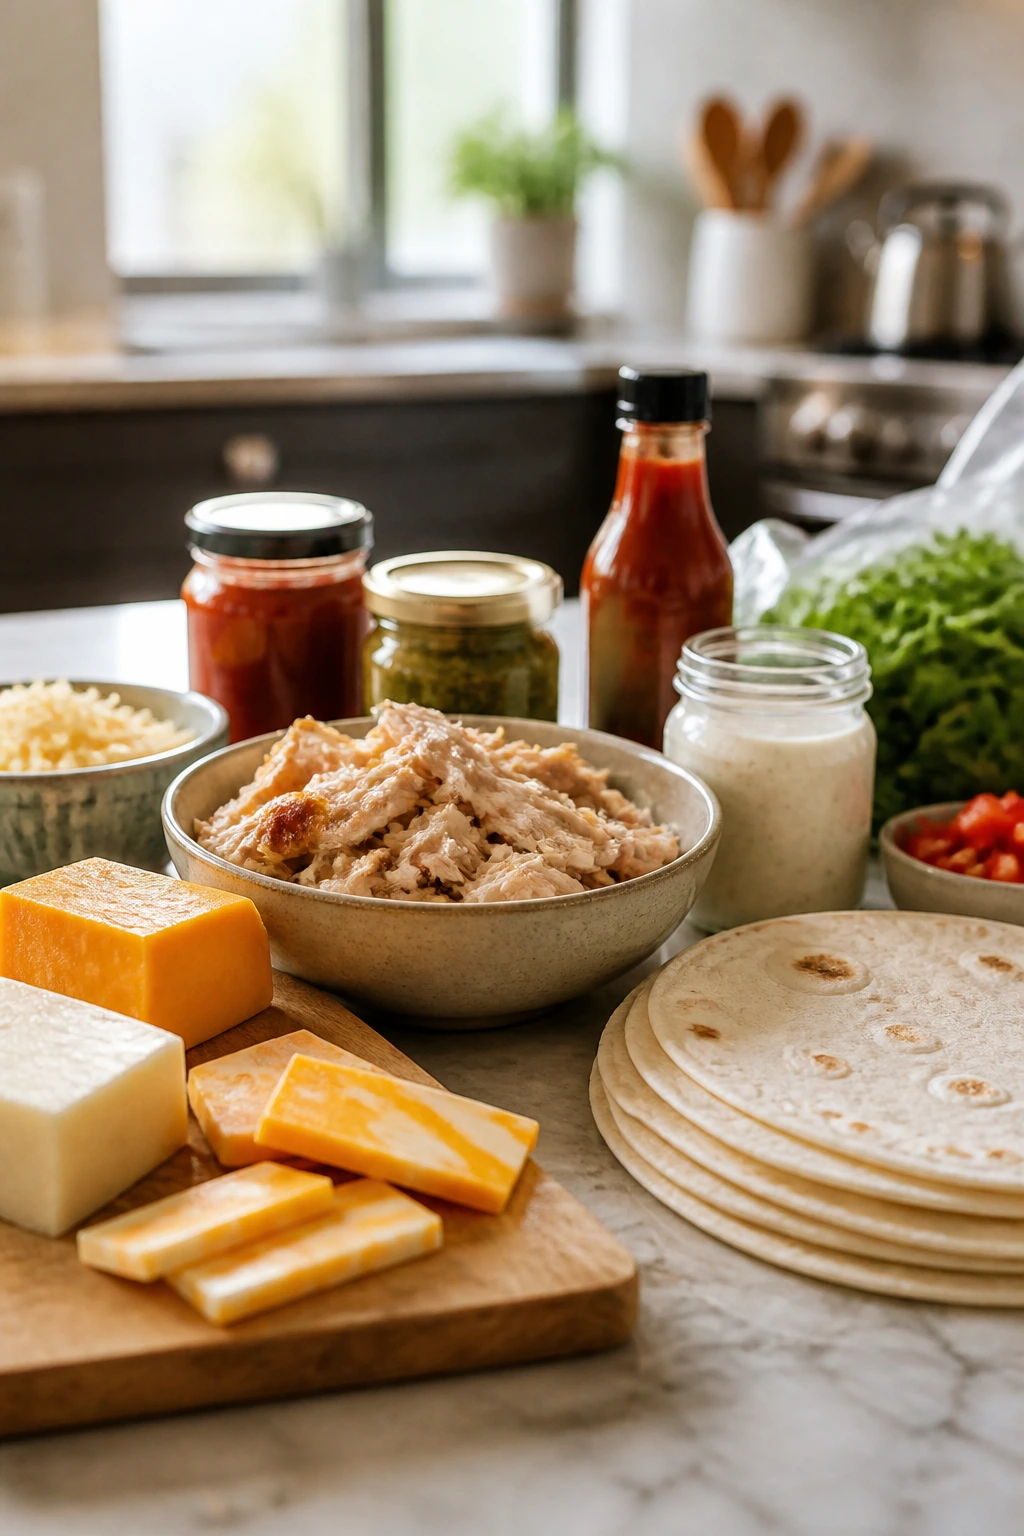
Start with foods that do more than one job. A block of mozzarella becomes pizza topping, casserole cheese, and grilled cheese filling. Tortillas can turn into quesadillas, taquitos, or burritos. Rotisserie chicken becomes flatbread topping, pasta bake filler, and quesadilla filling without asking for extra prep.
For cheese-heavy recipes, buy blocks and shred them yourself if you want smoother melts. The pre-shredded bags work in a pinch, but the coating on them can make sauces a little less silky. That matters in mac and cheese, Alfredo bake, and anything with a cream sauce. For a casserole or pizza where melting matters more than texture, bagged cheese is fine.
Pick sauces with body. Thin salsa, watery marinara, and loose chili all cause the same problem: soggy bottoms, sliding fillings, and a plate that looks rushed. Thick sauce clings to pasta and bread better. If your sauce seems loose, simmer it a few minutes longer before it goes into the dish.
For chicken, thighs are usually easier than breasts in family food like hot honey sandwiches, bowls, and skillet meals. They stay juicy after a little overtime, which is useful when the movie starts late and dinner waits. Ground beef around 85/15 gives enough flavor for tacos, sloppy joes, and casseroles without leaving the pan greasy.
And one small habit saves a lot of irritation: check the bread. Soft buns, sturdy sub rolls, and connected slider rolls matter more than people think. A flimsy bun falls apart under sauce. A sturdy one keeps the whole table calmer.
How to Serve These Family Movie Night Recipes Without a Pile of Dishes
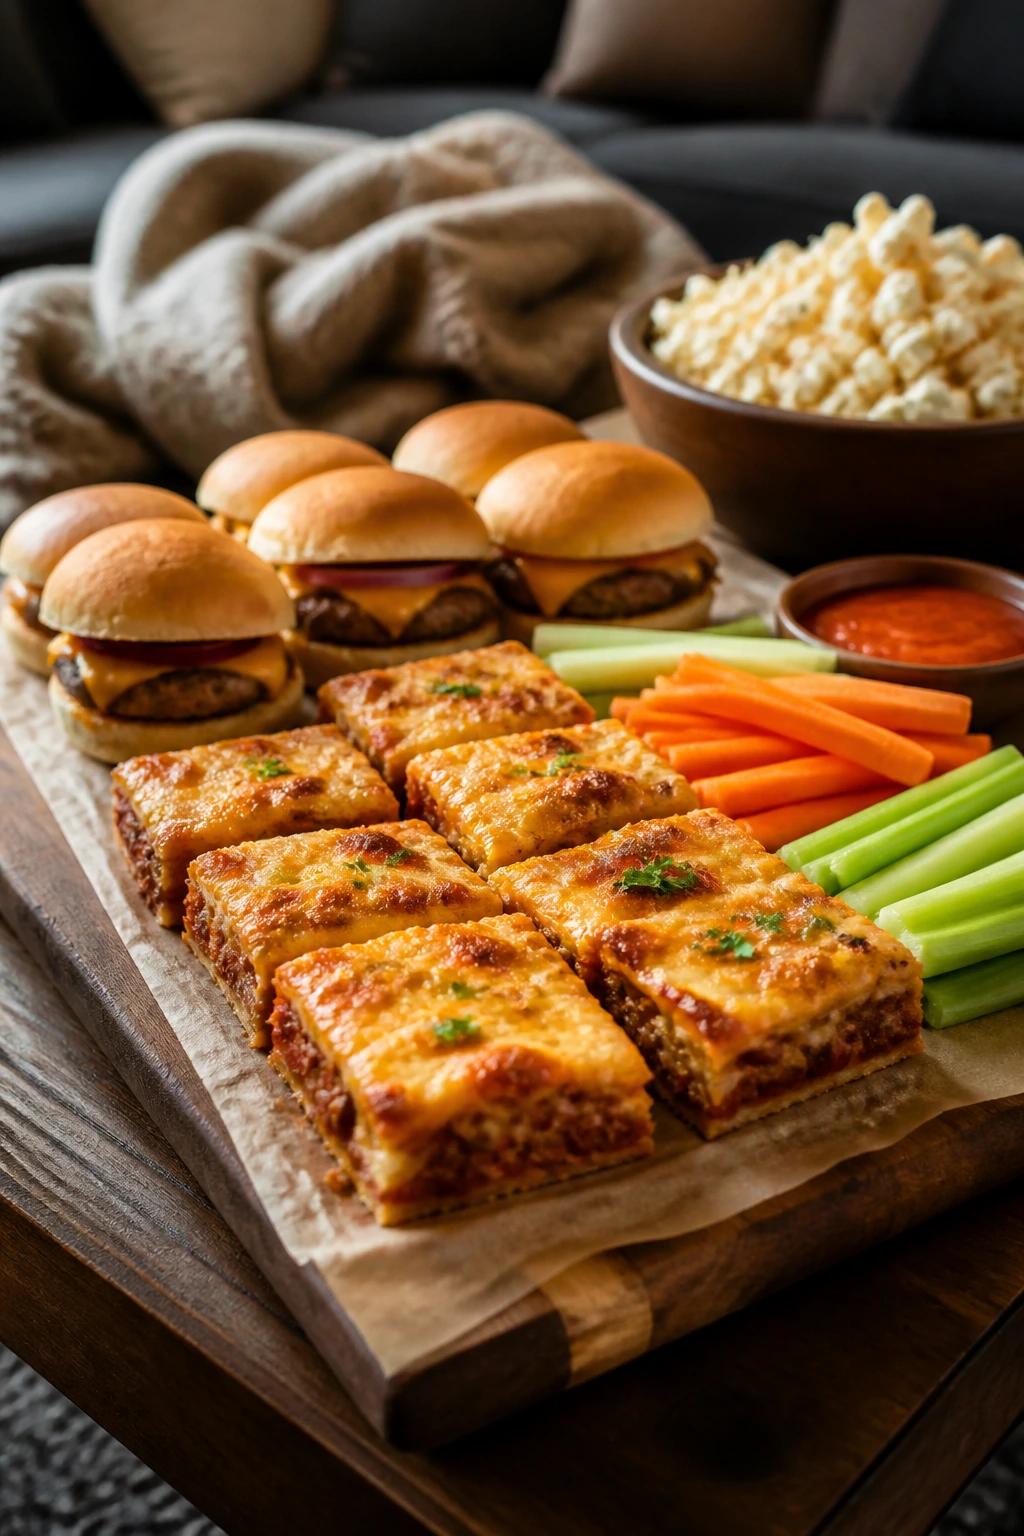
Presentation:
Use trays, wide platters, parchment-lined boards, and shallow bowls. Foods cut into squares, wedges, or strips are easier to pass around than loose piles. Keep sauces in small bowls instead of pouring them over everything before serving.
Accompaniments:
For richer dishes, add something crisp: sliced cucumbers, a green salad, carrot sticks, slaw, or apple slices. Garlic bread belongs next to baked pasta and soup. Fries, potato wedges, or chips make sliders, tenders, and sandwiches feel complete.
Portions:
For adults, most of these meals land well at 1 sandwich, 2 to 3 taquitos, 2 to 4 casserole squares, or 1 heaping bowl of pasta. For kids, smaller cuts and half portions usually work better, especially with sliders, wraps, and flatbreads. If the night includes popcorn first, scale dinner down a little.
Beverage Pairing:
Cold lemonade fits pizza, sliders, and grilled cheese. Unsweetened iced tea works well with casseroles and barbecue flavors. For something cozier, sparkling water with lime keeps the richer dishes from feeling too heavy.
Extra Tips and Flavor Boosters for Movie-Night Dinners

Flavor Enhancement: A little finishing acid changes everything. Pickle chips on burgers, lime on tacos, lemon on fish sticks, or a splash of vinegar in coleslaw cuts through cheese and fried coatings in a way that keeps the meal from flattening out.
Customization: Build one or two “same base, different topping” recipes for picky eaters. Pizza, flatbreads, nachos, and sliders all work this way. Keep the base simple, then add peppers, onions, jalapeños, or extra meat only to half the tray.
Serving Suggestions: Fresh herbs do more than look pretty. Chopped cilantro on tacos, parsley on pasta, basil on grilled cheese, or scallions on rice bowls gives the dish a cleaner finish right before it hits the table.
Make-It-Yours: If someone at the table wants lighter food, swap the bun or crust for lettuce wraps, tortillas, or bowls. If someone wants more protein, add chicken, beans, or sausage to the same dish instead of making a second meal. That’s the real trick. One dinner, two needs, no argument.
Make-Ahead, Storage, and Reheating Guidance
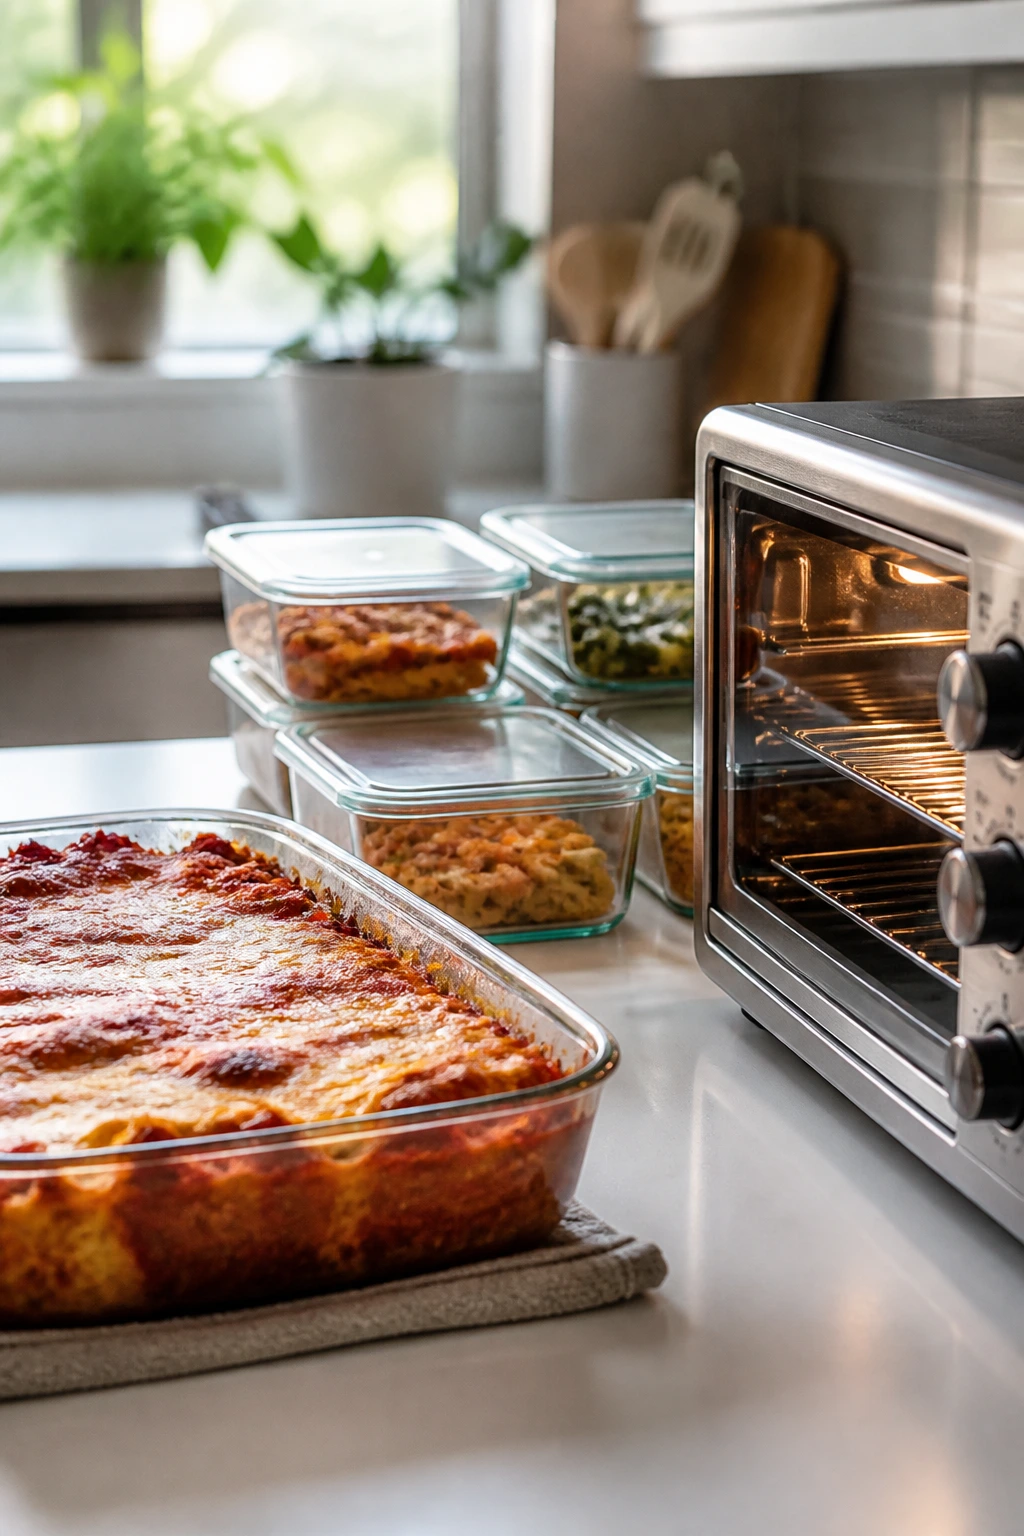
A few of these recipes are best built fresh, but many can be staged earlier in the day. Casseroles like baked ziti, taco bake, enchilada bake, stuffed shells, and mac and cheese can be assembled up to 1 day ahead, covered tightly, and held in the fridge. If you bake them straight from cold, give them an extra 10 to 15 minutes in the oven and watch for the center to bubble.
Sliders, burritos, quesadillas, taquitos, and calzones can be assembled a few hours ahead and refrigerated before cooking. Keep wet ingredients separate when possible. Salsa and tomatoes should wait until the last minute if you want a crisp crust or a sturdy tortilla.
Most leftovers keep 3 to 4 days in the refrigerator in airtight containers. Pizza, flatbread, and grilled cheese reheat best in a 375°F oven or toaster oven for 6 to 10 minutes so the bread crisps again. Pasta bakes and casseroles do well covered with foil at 350°F until hot through. Chicken tenders, fries, and taquitos need dry heat; a sheet pan works better than the microwave every time.
Freezing depends on the dish. Meatballs, sloppy joe filling, chili, baked ziti, enchilada bake, and stuffed shells freeze well for up to 2 months. Soft bread items like sliders and wraps don’t keep their texture as well, so I’d freeze the filling and build them fresh. Thaw overnight in the fridge when you can. Reheat sauces and casseroles slowly so the cheese doesn’t split.
Soup is the outlier. Broccoli cheddar can be refrigerated for 3 days, but it may thicken; loosen it with a splash of milk while reheating over low heat. If it gets grainy, the heat was too high. That’s usually the cause.
Variations and Adaptations to Try
-
Gluten-Free Movie Night: Use corn tortillas, gluten-free buns, rice bowls, and potato-based sides. The trick is to lean on dishes that already have a sturdy filling, like nachos, tacos, and chili.
-
Dairy-Light Tray: Choose tomato-based meals like sloppy joes, enchilada bake, and fish sticks, then cut the cheese in half or use a mild melt. A little cheese goes farther than people think when the sauce is thick.
-
Vegetarian Couch Dinner: Swap beef for beans, mushrooms, or plant-based crumbles in nachos, taco bake, sliders, and enchilada casserole. Add one extra pinch of salt and a little smoked paprika so the filling still tastes finished.
-
Mild Kid Mode: Keep hot sauce, jalapeños, and pepper flakes on the side. For families with mixed spice tolerance, build the base recipe plain and let adults finish their own plate at the table.
-
Big-Game Energy: Double the slider recipes, nachos, taquitos, and flatbreads, then use parchment or foil trays so you can move them fast. These are the kinds of dishes that disappear when people are standing around the coffee table.
Common Mistakes That Turn Movie Night Dinner Into a Mess
The biggest mistake is choosing food that needs too much attention once it’s served. If a recipe drips, crumbles, or requires a lot of cutting, it’ll fight the whole movie-night setup. Handheld, cutable, and scoopable food belongs here. Big roast-style dinners usually do not.
Soggy bottoms are the second problem. They show up when the sauce is too thin, the bread isn’t toasted, or the tray is overcrowded. Pizza, flatbread, sliders, taquitos, and nachos all need some space and a little dryness at the base if you want them to hold up.
Undersalting is a sneaky one. Cheese-heavy dishes especially need enough seasoning in the filling, not just at the table. A pinch in the sauce, a little in the meat, and a final seasoning at the end keeps the whole meal from tasting flat.
Another common miss: reheating everything in the microwave because it’s faster. That works for some casseroles, but it ruins crisp food. Sheet-pan heat, skillet heat, or a short oven blast brings back texture far better.
People also overcomplicate the menu. Movie night is not the time for three side dishes, a salad with twelve ingredients, and a dessert that needs assembly. Pick one main recipe, one simple side, and maybe one dip. That’s enough.
Finally, too many wet toppings at once can sink a whole tray. Salsa, tomatoes, sour cream, and extra sauce should usually sit on the side until the food is on the plate. The food stays better. The couch stays cleaner.
Frequently Asked Questions About Family Movie Night Meals
What foods are easiest to eat on the couch?
Handheld food wins: sliders, burritos, wraps, taquitos, quesadillas, and calzones. Pizza cut into squares and casseroles served in shallow bowls also work because they stay contained.
Can I make any of these recipes ahead of time?
Yes. Casseroles, sauces, meatballs, and fillings are the easiest to prep early. If you’re making anything crisp, like taquitos or chicken tenders, cook or reheat it right before serving so the coating stays sharp.
How do I keep food warm while the movie starts?
Use a low oven around 200°F for cooked items you want to hold for 20 to 30 minutes. Cover casseroles loosely with foil, and keep crisp items on a wire rack or sheet pan so steam doesn’t soften them.
What if my family likes different spice levels?
Make the base mild and keep hot sauce, jalapeños, red pepper flakes, and pickled peppers on the side. That lets everyone season their own plate without forcing the whole tray in one direction.
Which meals freeze the best?
Baked ziti, enchilada bake, stuffed shells, meatballs, chili, and sloppy joe filling freeze well. Sandwiches and wraps usually don’t, because the bread or tortilla changes texture after thawing.
How do I stop sliders from getting soggy?
Toast the buns first, use thick fillings, and add saucy toppings sparingly. If you’re making them ahead, keep the sauce separate until the last few minutes before baking.
Can I use rotisserie chicken in most of these recipes?
Yes, and it’s one of the best shortcuts for movie-night dinners. It works in quesadillas, flatbreads, Alfredo bake, chicken taquitos, wraps, and rice bowls without much fuss.
What’s the best way to reheat pizza or grilled sandwiches?
Use a skillet or toaster oven, not the microwave. A few minutes of dry heat brings back the crust and keeps the bread from turning rubbery.
How much food should I plan per person?
For casseroles and pasta bakes, plan about 1 1/2 cups per adult and a little less for kids. For handheld meals, one to two pieces or sandwiches per person usually works, depending on what else is on the table.
The Credits Roll, and Dinner Should Still Feel Easy
Movie night food should behave itself. It should hold together, heat well, and stay good long enough for somebody to pause the film, get a drink, and come back without finding a sad tray of limp food. That’s why these recipes lean on sturdy breads, thick sauces, baked fillings, and portions that can be grabbed without a fight.
Pick one that fits your crowd and your energy. A tray of sliders or pizza for the noisy nights. Baked ziti or enchilada casserole when you want the oven to do the work. Quesadillas, wraps, and taquitos when the couch is already full and you need dinner to move fast.
The best family movie night meals don’t demand attention. They let the movie play and the room settle while dinner disappears, piece by piece, until someone finally notices the tray is empty.