
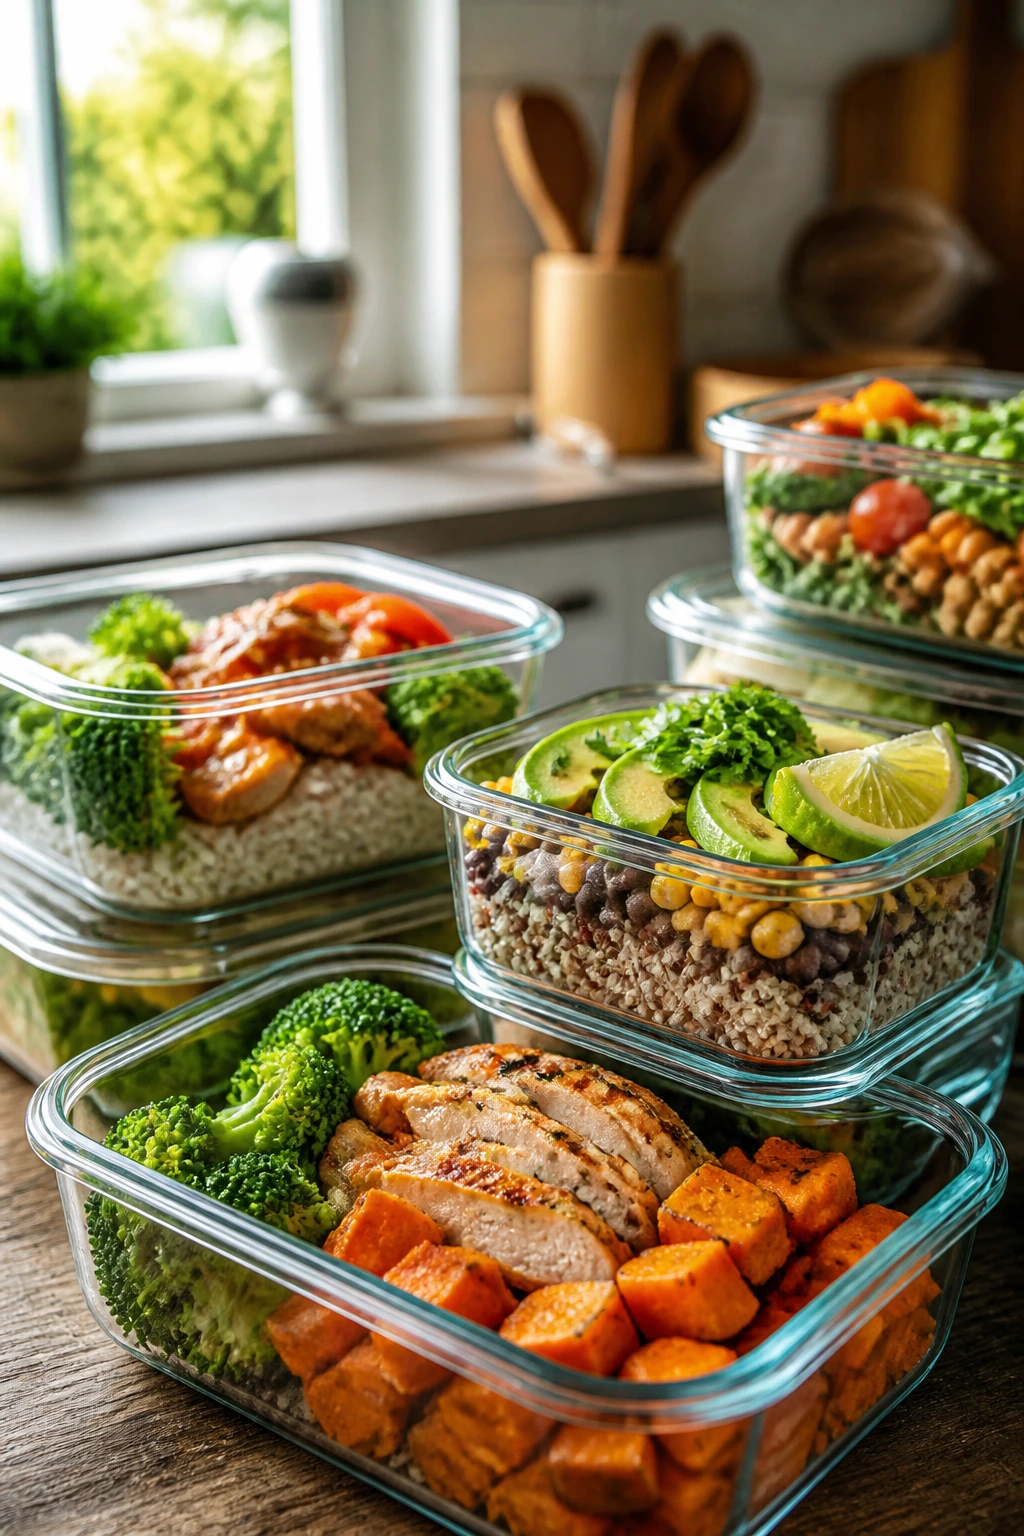
Meal prep Sundays work best when the food can survive a Tuesday lunchbox and still taste like somebody cared. That usually means lean proteins, sturdy vegetables, grains that don’t slump into paste, and sauces that stay separate until the moment you actually need them. The worst meal prep is the kind that looks organized on Sunday and limp by Wednesday. These healthy recipes for meal prep Sundays lean the other way: crisp where they should be crisp, saucy where they should be saucy, and practical enough to live in a stack of containers without turning into regret.
I like recipes that know their job. A good prep bowl should reheat without drying out. A good salad should survive a dressing swap. A good breakfast should still feel like breakfast after two days in the fridge, not like a kitchen science project you forgot to finish.
What follows is built around that standard. Some dishes are freezer-friendly and some are meant to stay cold; some want a sharp lemon finish, others need a spoonful of yogurt or salsa right before serving. Once the pieces are in place, the whole week gets easier to feed.
Why You’ll Love This Collection
- Built for real storage: These recipes are chosen because they hold texture for at least 3 days, and the fragile ones come with a fix.
- Breakfast, lunch, and dinner covered: You can prep a pan of egg muffins, a bowl of grains, a soup, and a wrap all in one session.
- Pantry-staple friendly: Oats, beans, rice, tuna, yogurt, frozen vegetables, and eggs do a lot of the heavy lifting here.
- Easy to scale up: Most of these recipes double cleanly in a sheet pan, pot, or muffin tin without changing the method.
- Better after a rest: A few of them, especially soups, chili, and bean salads, taste calmer and more integrated after a night in the fridge.
- Less weekday guessing: Container, label, grab, eat. That rhythm matters more than people admit.
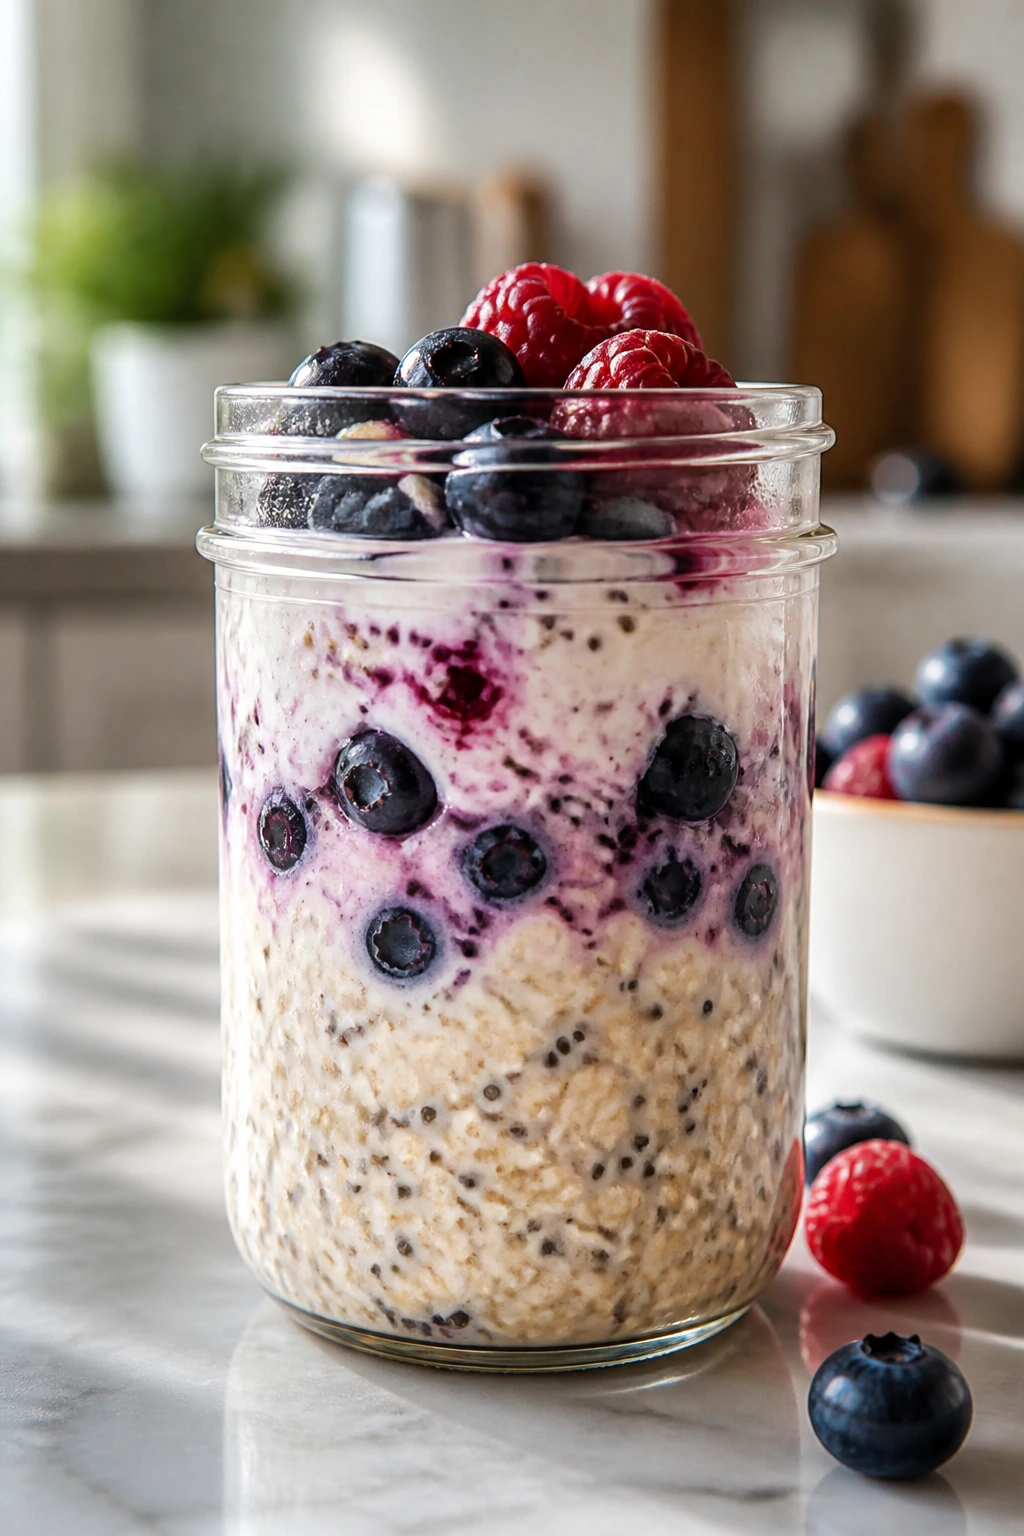
1. Berry Vanilla Overnight Oats
Cold oats get a bad reputation from the people who’ve only made them once. Give them enough vanilla, a little Greek yogurt, and berries that leak into the oats overnight, and the texture turns creamy instead of gluey.
Why It Works:
Rolled oats soften in milk without losing all their chew, which is the whole trick. Chia seeds thicken the mixture, Greek yogurt adds protein, and berries bring enough juice to keep the jar from tasting flat. It’s one of the few breakfasts that improves after a long chill.
Key Ingredients:
- 2 cups rolled oats
- 2 cups unsweetened almond milk or milk
- 1 cup plain Greek yogurt
- 2 tablespoons chia seeds
- 1 tablespoon maple syrup
- 1 teaspoon vanilla extract
- 1 cup mixed berries
- Pinch of fine salt
Quick Steps:
- Stir the oats, milk, yogurt, chia seeds, maple syrup, vanilla, and salt in a large bowl.
- Fold in half the berries so they bleed a little color into the mix.
- Cover and chill for at least 4 hours, or overnight, until thick.
- Portion into 4 containers.
- Top with the remaining berries just before eating.
Equipment for This Recipe:
- Large mixing bowl
- Measuring cups and spoons
- Spoon or flexible spatula
- 4 meal-prep containers or jars
How to Serve This Dish:
Eat it cold, straight from the fridge, or let it sit 10 minutes so the texture loosens a touch. A spoonful of almond butter on top gives it a richer finish.
Pro Tips for This Recipe:
- Use rolled oats, not quick oats; quick oats go soft fast.
- If your berries are tart, add another teaspoon of maple syrup.
- A spoon of chia gives body, but more than 2 tablespoons can make the oats stodgy.
Variations on This Dish:
- Peach Cobbler Version: Swap berries for diced peaches and add cinnamon.
- Chocolate Berry Jar: Add 1 tablespoon cocoa powder and a few cacao nibs.
Common Mistakes to Avoid with This Dish:
- Using instant oats: They collapse into a soft paste.
- Skipping salt: The oats taste dull without that pinch.
2. Veggie Egg Muffins
These bake up with set edges and soft centers, the way egg muffins should. If they puff in the oven and fall a little as they cool, that’s normal. It’s still a tidy breakfast.
Why It Works:
Eggs carry the protein; vegetables bring volume without much fuss. Baking in a muffin tin keeps portions even, which matters when you want breakfast ready to grab and reheat. They also freeze well, which is a small miracle on busy mornings.
Key Ingredients:
- 8 large eggs
- 1/2 cup milk
- 1 cup chopped spinach
- 1/2 cup diced bell pepper
- 1/2 cup shredded reduced-fat cheddar
- 1/4 cup diced onion
- 1/2 teaspoon kosher salt
- 1/4 teaspoon black pepper
Quick Steps:
- Heat the oven to 350°F and grease a 12-cup muffin tin well.
- Whisk the eggs, milk, salt, and pepper until smooth.
- Stir in the spinach, bell pepper, onion, and cheese.
- Divide the mixture among the cups and bake 18 to 20 minutes, until set in the center.
- Cool for 10 minutes before removing.
Equipment for This Recipe:
- 12-cup muffin tin
- Whisk
- Mixing bowl
- Measuring cup
- Cooling rack
How to Serve This Dish:
Serve 2 muffins with fruit or toast. For lunch, tuck them into a container with salsa and sliced avocado.
Pro Tips for This Recipe:
- Squeeze extra moisture from the spinach if it’s frozen.
- Don’t overfill the cups; they rise and dome.
- Reheat in 20-second bursts so the eggs stay tender.
Variations on This Dish:
- Southwest Muffins: Add corn, jalapeño, and a pinch of cumin.
- Mediterranean Muffins: Use feta, spinach, and chopped sun-dried tomatoes.
Common Mistakes to Avoid with This Dish:
- Using watery vegetables: The muffins weep and split.
- Baking too long: They turn rubbery fast.
3. Cinnamon Apple Baked Oatmeal
Warm, sliced, and lightly sweet, this is the breakfast I make when I want oats that can be cut into neat squares instead of eaten with a spoon. The apples soften into the top layer and leave little pockets of jammy fruit.
Why It Works:
Baked oatmeal sets because the eggs and oats bind as they cook. Apples hold enough shape to stay visible after baking, and cinnamon gives the whole pan a bakery smell without needing much sugar. It reheats well, which matters more than people think.
Key Ingredients:
- 3 cups rolled oats
- 2 apples, peeled and diced
- 2 large eggs
- 2 cups milk
- 1/4 cup maple syrup
- 2 teaspoons cinnamon
- 1 teaspoon baking powder
- 1/2 cup chopped walnuts
- 1/2 teaspoon salt
Quick Steps:
- Heat the oven to 375°F and grease an 8×8-inch baking dish.
- Whisk the eggs, milk, maple syrup, cinnamon, baking powder, and salt.
- Stir in the oats, apples, and walnuts.
- Pour into the dish and bake 35 to 40 minutes, until the center is set.
- Cool before slicing into squares.
Equipment for This Recipe:
- 8×8-inch baking dish
- Mixing bowl
- Whisk
- Knife and cutting board
How to Serve This Dish:
Serve warm with a dollop of yogurt. Cold slices work fine too, especially with a few berries beside them.
Pro Tips for This Recipe:
- Dice the apples small so they soften through the whole pan.
- If you want cleaner slices, chill it before cutting.
- Toast the walnuts first if you want a deeper flavor.
Variations on This Dish:
- Maple Pecan Version: Swap walnuts for pecans and add a pinch of nutmeg.
- Berry-Apple Mix: Use half apples and half blueberries.
Common Mistakes to Avoid with This Dish:
- Cutting it hot: The squares fall apart.
- Skipping the salt: The sweetness gets too flat.
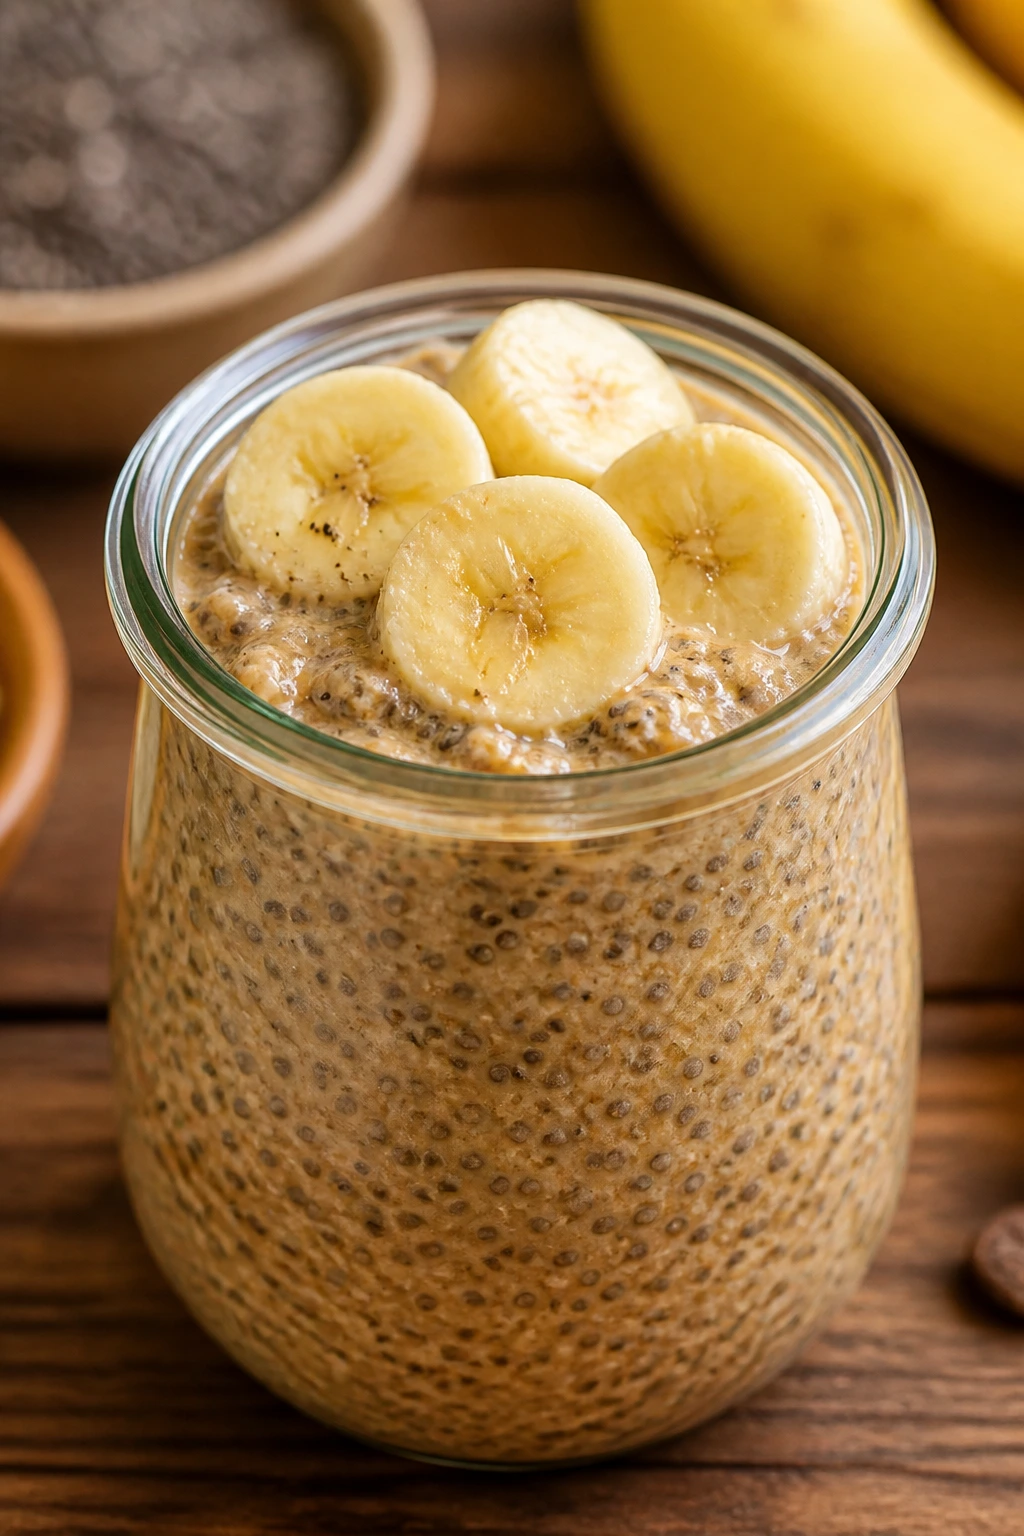
4. Peanut Butter Chia Pudding
Thick, cool, and a little nutty, this is the kind of breakfast that feels calm before the day starts making demands. Peanut butter makes chia pudding taste more like food and less like a health assignment.
Why It Works:
Chia seeds absorb liquid and form a pudding texture with no cooking at all. Peanut butter gives the mix body, while a bit of vanilla and banana keeps it from tasting dusty. It’s also one of the easiest recipes to portion into single-serve jars.
Key Ingredients:
- 1/2 cup chia seeds
- 2 cups milk
- 3 tablespoons peanut butter
- 1 tablespoon honey
- 1 teaspoon vanilla extract
- 1 banana, sliced
- Pinch of salt
- 1 tablespoon chopped peanuts, optional
Quick Steps:
- Whisk the milk, peanut butter, honey, vanilla, and salt until smooth.
- Stir in the chia seeds.
- Wait 10 minutes, stir again, then chill at least 4 hours.
- Portion into containers and top with banana and peanuts.
- Eat cold.
Equipment for This Recipe:
- Mixing bowl or jar
- Whisk
- Spoon
- Small containers
How to Serve This Dish:
Top with sliced banana right before eating so it stays fresh. A spoonful of berry compote changes the whole mood.
Pro Tips for This Recipe:
- Stir twice; otherwise the chia clumps.
- If it gets too thick, add a splash of milk.
- Use natural peanut butter if you want a cleaner finish.
Variations on This Dish:
- Chocolate PB Pudding: Add 1 tablespoon cocoa powder.
- Almond Butter Twist: Swap in almond butter and top with sliced strawberries.
Common Mistakes to Avoid with This Dish:
- Not stirring after 10 minutes: The seeds settle in patches.
- Adding fruit too early: Bananas brown fast in the jar.
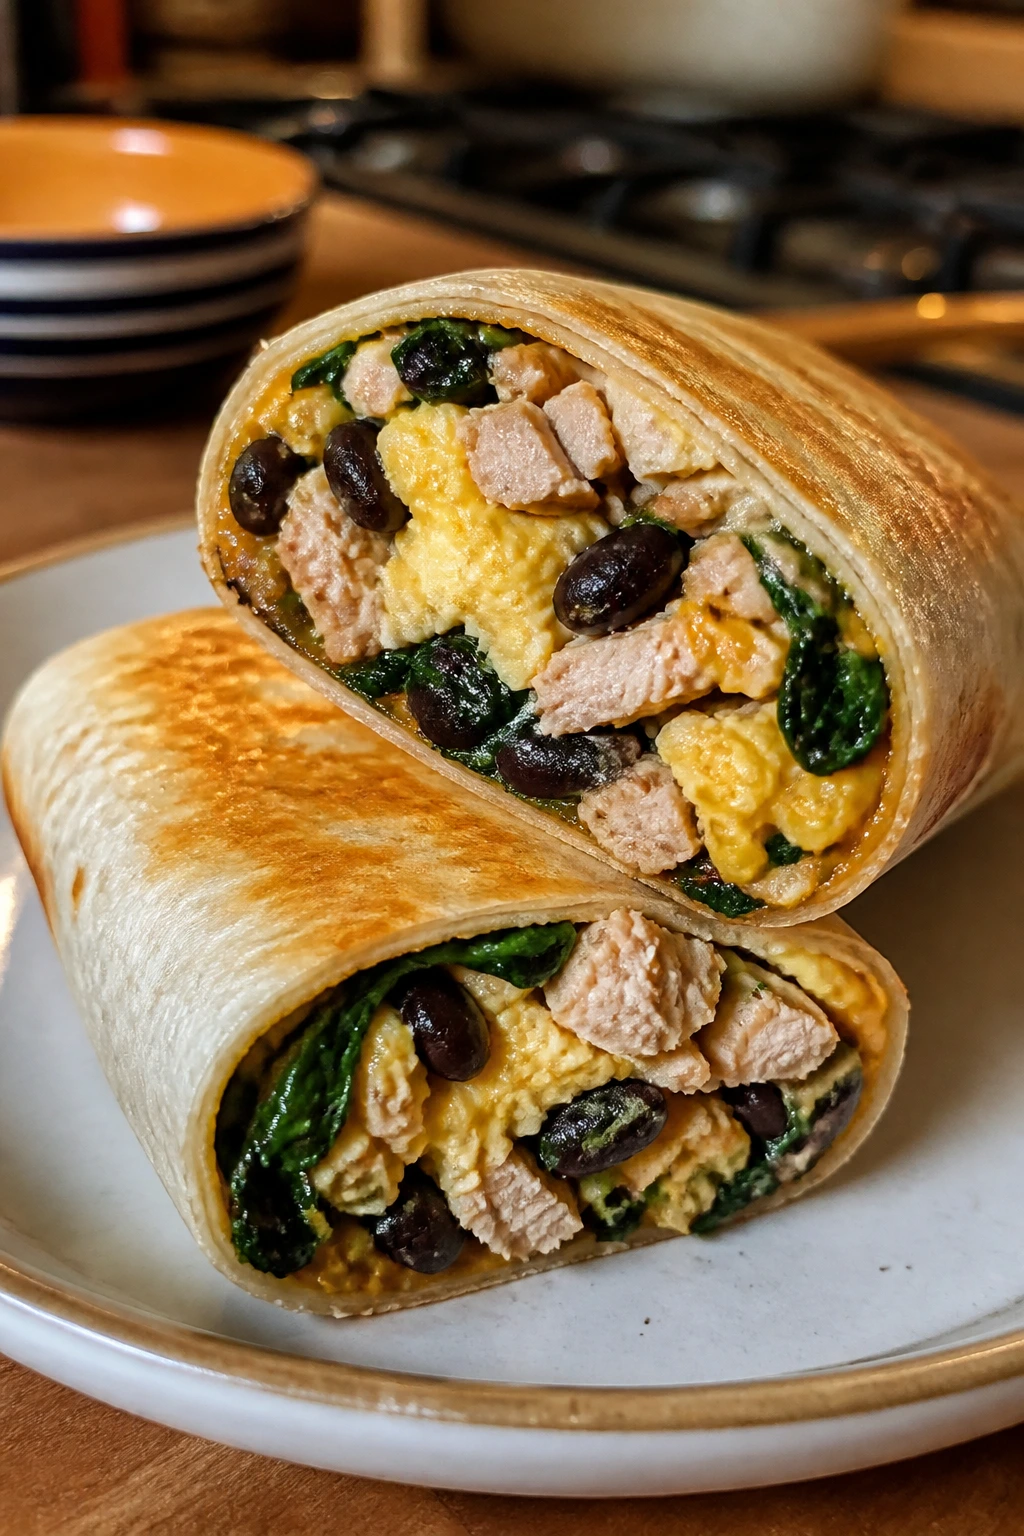
5. Turkey Breakfast Burritos
Wrapped tight and frozen flat, these burritos are the kind of meal prep that saves a rough morning. The eggs stay soft, the turkey keeps them satisfying, and the tortilla does the heavy lifting in the freezer.
Why It Works:
Turkey adds protein without making the burrito greasy. Eggs and black beans give it enough heft to feel like breakfast, and salsa wakes it up after reheating. If you wrap them well, they freeze for weeks without picking up that stale freezer smell.
Key Ingredients:
- 1 pound lean ground turkey
- 8 large eggs
- 1 cup black beans, drained
- 1 cup shredded cheese
- 1/2 cup salsa
- 2 cups baby spinach
- 6 large whole wheat tortillas
- 1 teaspoon chili powder
Quick Steps:
- Cook the turkey with chili powder until no pink remains.
- Scramble the eggs softly in a second skillet.
- Warm the tortillas so they bend without cracking.
- Fill each tortilla with turkey, eggs, beans, spinach, cheese, and salsa.
- Roll tightly, cool completely, then wrap and freeze.
Equipment for This Recipe:
- Large skillet
- Spatula
- Foil or parchment
- Freezer bags
How to Serve This Dish:
Reheat from frozen in the microwave, then crisp in a skillet if you want the outside to tighten up. A little extra salsa on the side helps.
Pro Tips for This Recipe:
- Cool the filling before rolling or the tortillas go soggy.
- Don’t overstuff; the seal matters more than size.
- Wrap each burrito in parchment before freezing so it unrolls cleanly.
Variations on This Dish:
- Veggie Burrito: Replace turkey with extra beans and sautéed mushrooms.
- Potato-Heavy Version: Add roasted diced potatoes for a more filling burrito.
Common Mistakes to Avoid with This Dish:
- Freezing while warm: Ice crystals make the tortilla wet.
- Using wet salsa inside: It leaks out during reheating.
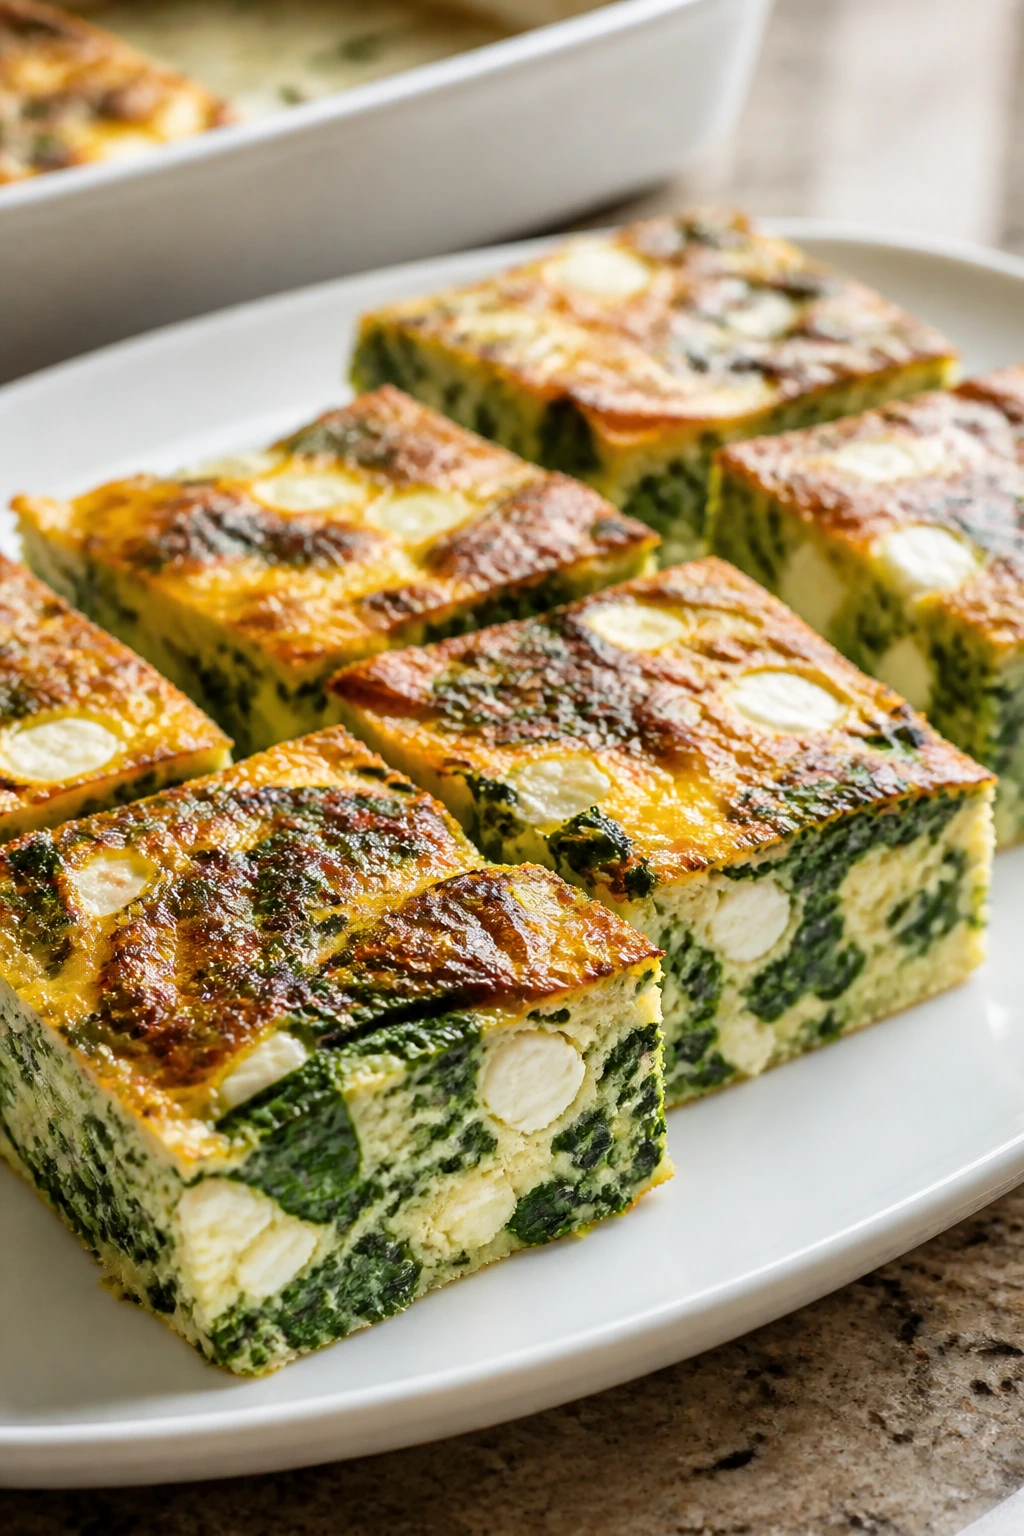
6. Spinach Feta Frittata Squares
This is the tray-bake version of a frittata, cut into neat squares that pack well and reheat without drama. Spinach and feta bring enough salt and tang that you don’t need much else.
Why It Works:
Eggs set into a sliceable slab when baked in a shallow dish. Feta gives punch in every bite, and spinach keeps the texture light instead of dense. Square pieces fit into lunch containers better than wedges. Small detail. Big difference.
Key Ingredients:
- 10 large eggs
- 1/4 cup milk
- 2 cups fresh spinach, chopped
- 1/2 cup crumbled feta
- 1/2 cup diced cherry tomatoes
- 1/4 cup diced red onion
- 1 tablespoon olive oil
- Salt and pepper
Quick Steps:
- Heat the oven to 375°F and oil an 8×8-inch dish.
- Whisk eggs, milk, salt, and pepper.
- Stir in spinach, feta, tomatoes, and onion.
- Bake 22 to 25 minutes, until the center is just set.
- Cool, then cut into squares.
Equipment for This Recipe:
- Baking dish
- Whisk
- Mixing bowl
- Knife
How to Serve This Dish:
Pair 2 squares with sliced tomatoes or a simple salad. They’re good warm or cold, which makes them easy to pack.
Pro Tips for This Recipe:
- Pat the tomatoes dry so the eggs don’t get watery.
- Let it rest before cutting, or the squares raggedly fall apart.
- A little dill works if you want a brighter finish.
Variations on This Dish:
- Greek Herb Squares: Add oregano and chopped parsley.
- Mushroom Spinach Version: Sauté mushrooms first so they don’t water down the eggs.
Common Mistakes to Avoid with This Dish:
- Overbaking: The eggs turn spongy.
- Using too much feta: The slices get salty fast.
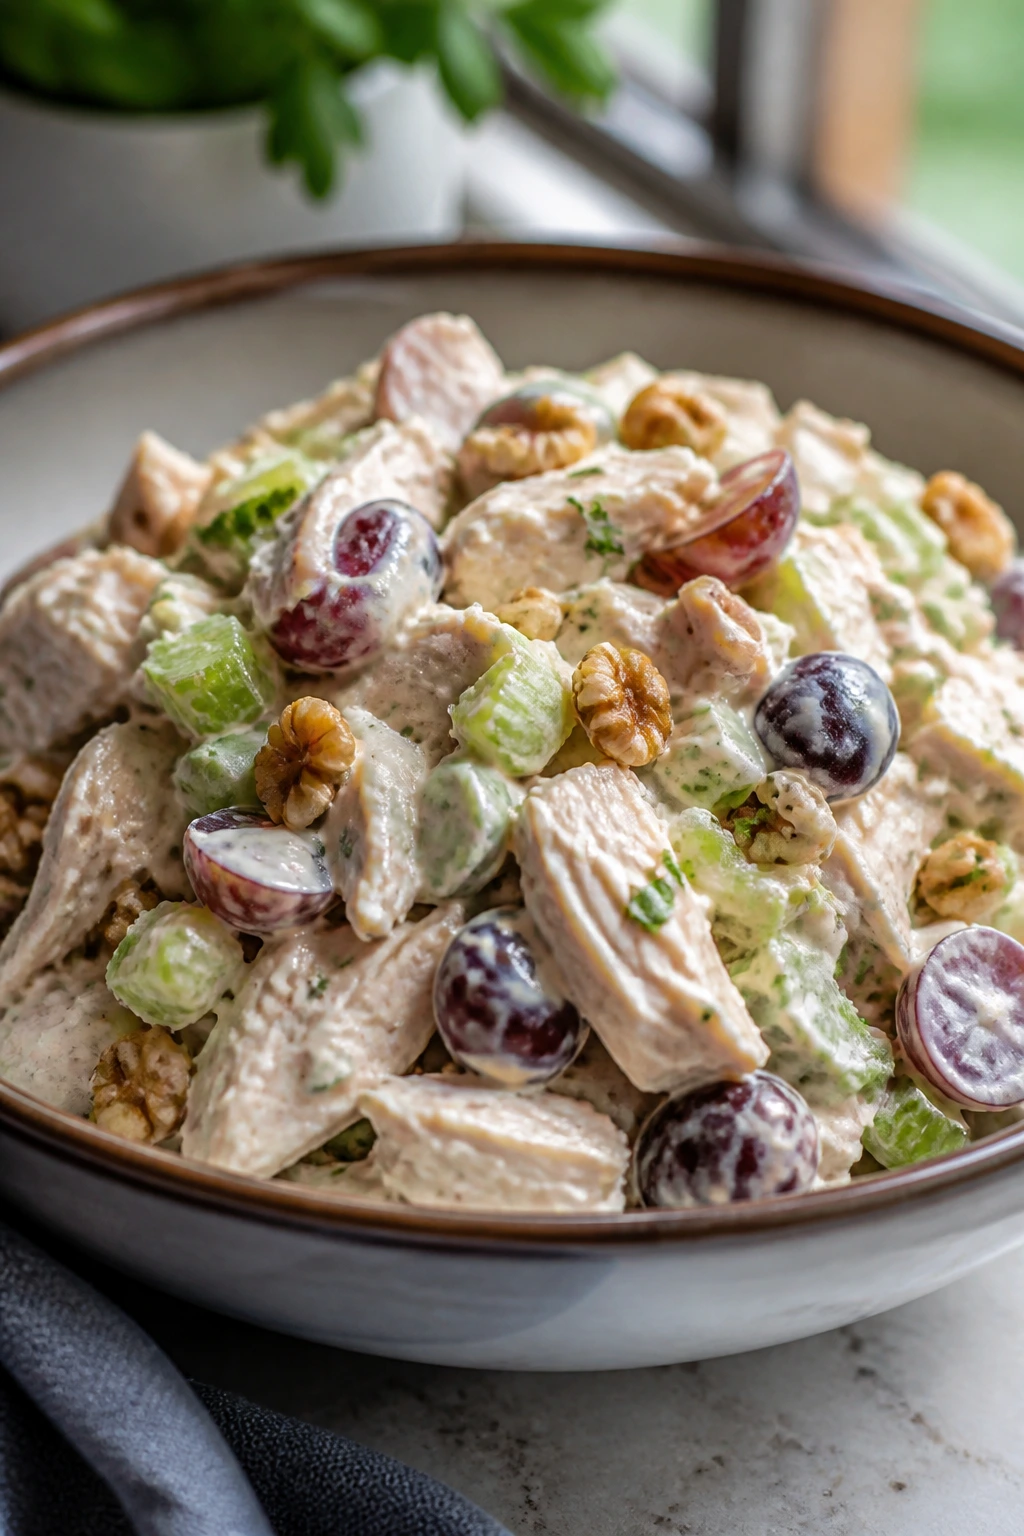
7. Greek Yogurt Chicken Salad
This version stays creamy without drowning the chicken in mayo. Celery gives it crunch, grapes bring little bursts of sweetness, and the yogurt keeps it light enough for lunch containers.
Why It Works:
Greek yogurt coats the chicken with protein and tang. A little Dijon and lemon cut through the richness, while grapes and celery keep the texture from going soft. It’s one of the easiest ways to turn leftover chicken into a lunch that doesn’t feel like leftovers.
Key Ingredients:
- 3 cups cooked chicken breast, chopped
- 3/4 cup plain Greek yogurt
- 2 celery stalks, diced
- 1 cup red grapes, halved
- 2 tablespoons Dijon mustard
- 1 tablespoon lemon juice
- 1/4 cup chopped walnuts
- Salt and pepper
Quick Steps:
- Stir the yogurt, Dijon, lemon juice, salt, and pepper together.
- Fold in the chicken, celery, grapes, and walnuts.
- Chill for 20 minutes so the flavors settle.
- Portion into containers or lettuce cups.
- Serve cold.
Equipment for This Recipe:
- Mixing bowl
- Spoon
- Knife and cutting board
- Storage containers
How to Serve This Dish:
Scoop it into romaine leaves, pile it on whole grain bread, or eat it with crackers. I like it best with something crisp under it.
Pro Tips for This Recipe:
- Use cold cooked chicken so the yogurt stays thick.
- Cut the celery small; big pieces make each bite awkward.
- Add the grapes at the end so they stay firm.
Variations on This Dish:
- Curry Chicken Salad: Add curry powder and chopped apple.
- Dill Pickle Version: Swap grapes for chopped pickles and add dill.
Common Mistakes to Avoid with This Dish:
- Using warm chicken: The dressing loosens and turns thin.
- Overmixing: The chicken breaks down into paste.
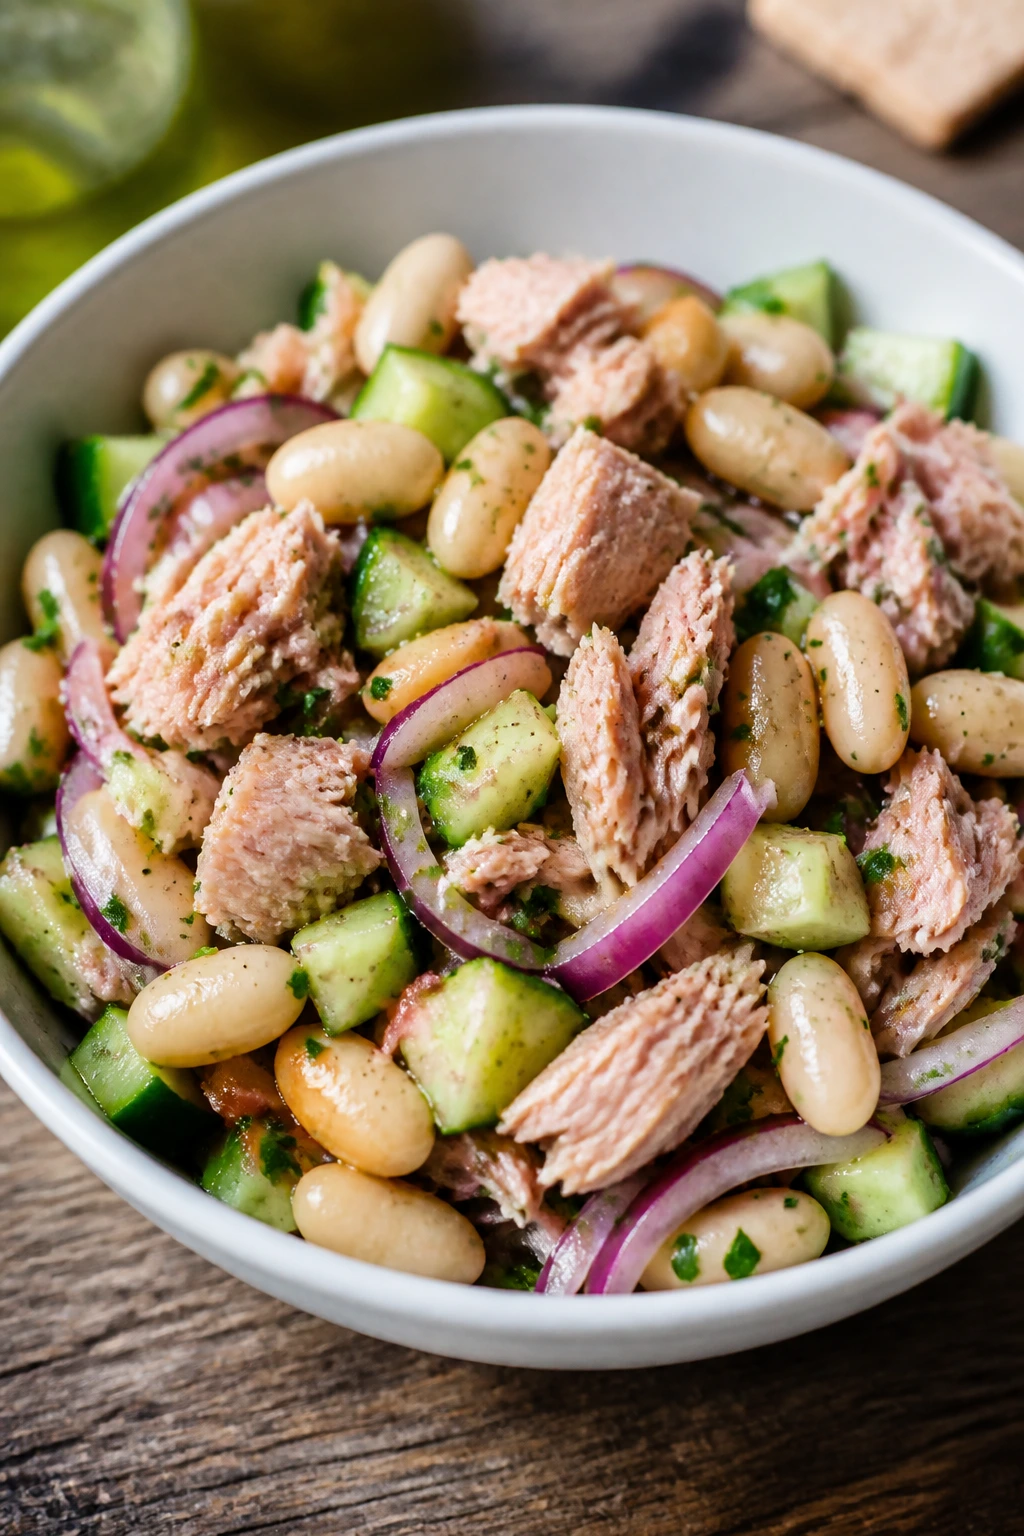
8. Tuna White Bean Salad
A can of tuna and a can of beans do not sound exciting. Then you add lemon, parsley, and good olive oil, and the whole thing stops behaving like a pantry emergency.
Why It Works:
White beans bring creaminess without mayonnaise. Tuna adds salt and protein, and the lemon dressing keeps the salad bright enough to eat cold all week. It also packs more cleanly than a leafy salad, which is one reason I trust it for meal prep.
Key Ingredients:
- 2 cans tuna in water, drained
- 1 can cannellini beans, rinsed
- 1 cucumber, diced
- 1/4 red onion, finely chopped
- 2 tablespoons olive oil
- 1 tablespoon lemon juice
- 2 tablespoons chopped parsley
- Salt and pepper
Quick Steps:
- Combine the tuna, beans, cucumber, onion, and parsley.
- Whisk the olive oil, lemon juice, salt, and pepper.
- Toss gently.
- Chill for 15 minutes.
- Pack into containers.
Equipment for This Recipe:
- Mixing bowl
- Fork or spoon
- Can opener
- Storage containers
How to Serve This Dish:
Serve it over greens, with crackers, or stuffed into a pita. A few tomato wedges on the side make it feel less bare.
Pro Tips for This Recipe:
- Rinse the beans well or the salad tastes tinny.
- Use albacore if you want firmer flakes; chunk light is softer.
- Add the cucumber just before packing if you hate any softness.
Variations on This Dish:
- Mediterranean Tuna Bowl: Add olives and chopped tomato.
- Spicy Pepper Version: Mix in chopped pepperoncini and red pepper flakes.
Common Mistakes to Avoid with This Dish:
- Too much onion: It takes over the tuna.
- Skipping acid: The beans make the salad feel heavy without lemon.
9. Quinoa Chickpea Salad
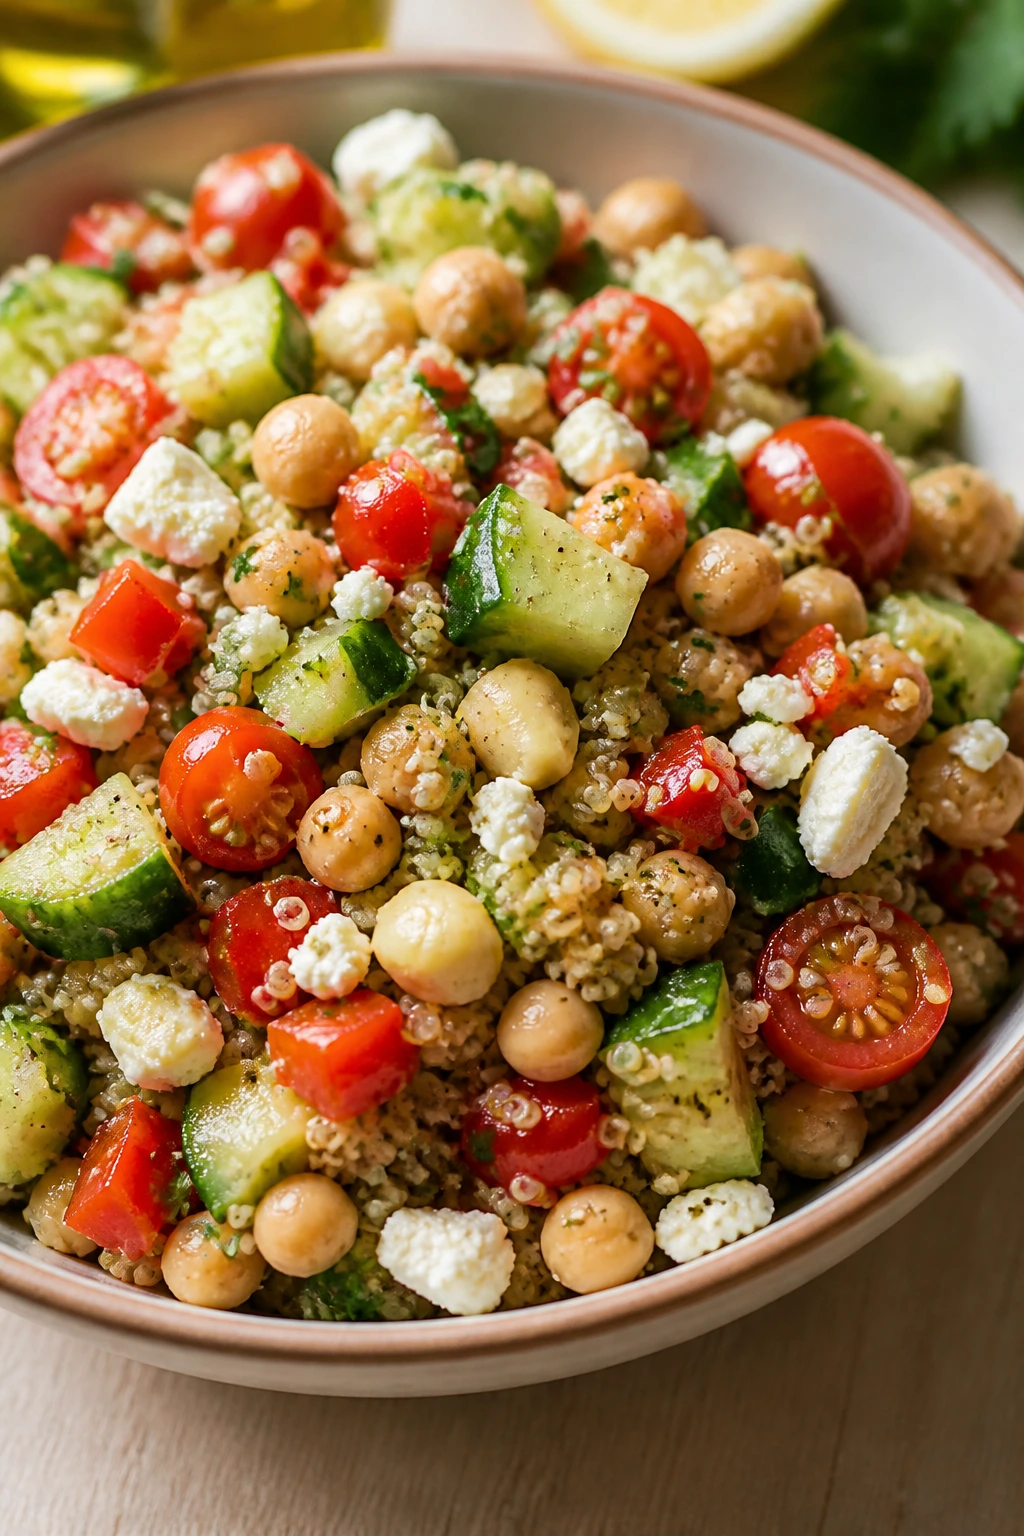
This is the kind of grain salad that still tastes like lunch after a night in the fridge. The quinoa stays fluffy, the chickpeas hold their shape, and the vegetables keep a bit of bite.
Why It Works:
Quinoa gives you a protein-rich base that doesn’t get soggy fast. Chickpeas add chew, and feta plus lemon keep the bowl sharp instead of dusty. The ingredients are sturdy enough to survive meal prep without needing last-minute rescue.
Key Ingredients:
- 1 cup dry quinoa
- 1 can chickpeas, rinsed
- 1 cucumber, diced
- 1 pint cherry tomatoes, halved
- 1 red bell pepper, diced
- 1/2 cup crumbled feta
- 2 tablespoons olive oil
- 2 tablespoons lemon juice
Quick Steps:
- Cook the quinoa and let it cool completely.
- Toss it with chickpeas, cucumber, tomatoes, and bell pepper.
- Whisk olive oil, lemon juice, salt, and pepper.
- Fold in feta and dressing.
- Chill and portion.
Equipment for This Recipe:
- Saucepan with lid
- Fine strainer
- Mixing bowl
- Spoon
How to Serve This Dish:
Serve chilled or at room temperature. It works as a stand-alone lunch, but it also sits nicely next to grilled chicken.
Pro Tips for This Recipe:
- Fluff the quinoa after cooking so it doesn’t clump.
- Cool it before dressing or the feta softens too much.
- A pinch of cumin works if you want more depth.
Variations on This Dish:
- Herb-Heavy Version: Add dill, parsley, and mint.
- No-Dairy Option: Leave out feta and add avocado at serving.
Common Mistakes to Avoid with This Dish:
- Dressing warm quinoa: It turns soggy fast.
- Undercooking quinoa: You’ll feel the crunch, and not in a good way.
10. Mason Jar Greek Salads
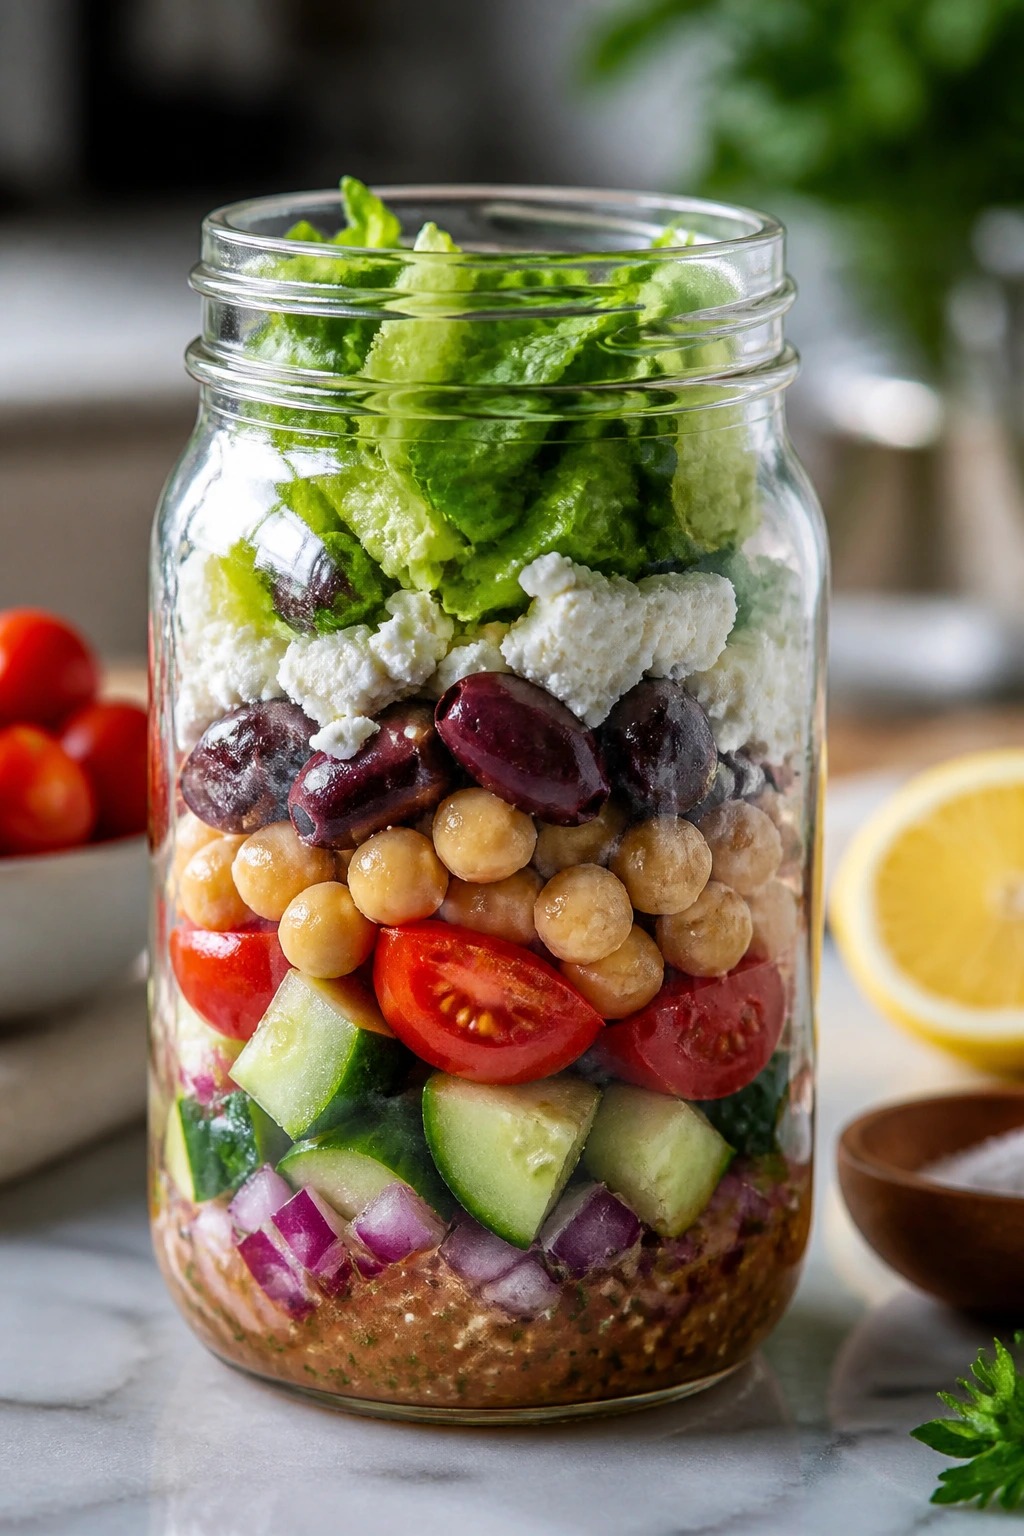
Jar salads only work if the layers make sense. Put the dressing where it belongs, keep the greens on top, and the whole thing stays crisp instead of collapsing into a wet mess.
Why It Works:
The jar keeps wet ingredients away from the lettuce until you shake it. Chickpeas or chicken add staying power, cucumbers and tomatoes bring crunch, and feta gives the final bite enough salt to matter. It’s one of the few lunch ideas that still looks organized after a few days in the fridge.
Key Ingredients:
- 1/2 cup Greek vinaigrette
- 1 cup chickpeas or chopped cooked chicken
- 1 cup cucumber, diced
- 1 cup cherry tomatoes, halved
- 1/4 cup red onion, sliced thin
- 1/2 cup olives
- 1/2 cup feta
- 4 cups chopped romaine
Quick Steps:
- Add dressing to the bottom of each jar.
- Layer chickpeas or chicken, cucumber, tomatoes, onion, olives, and feta.
- Pack romaine on top.
- Seal and refrigerate.
- Shake into a bowl before eating.
Equipment for This Recipe:
- Wide-mouth jars
- Knife and board
- Measuring cups
- Salad bowl for serving
How to Serve This Dish:
Dump the salad into a bowl and toss. If you want extra crunch, add toasted pita chips right before eating.
Pro Tips for This Recipe:
- Keep the greens dry before layering.
- Use wide-mouth jars or the salad gets annoying to eat.
- Don’t overpack the dressing; a little goes a long way.
Variations on This Dish:
- Chicken Pita Jar: Add chopped chicken and torn pita.
- Bean-Free Crunch Jar: Swap chickpeas for extra cucumber and peppers.
Common Mistakes to Avoid with This Dish:
- Putting greens in the middle: They wilt fast.
- Using soft tomatoes on the bottom: They leak into everything.
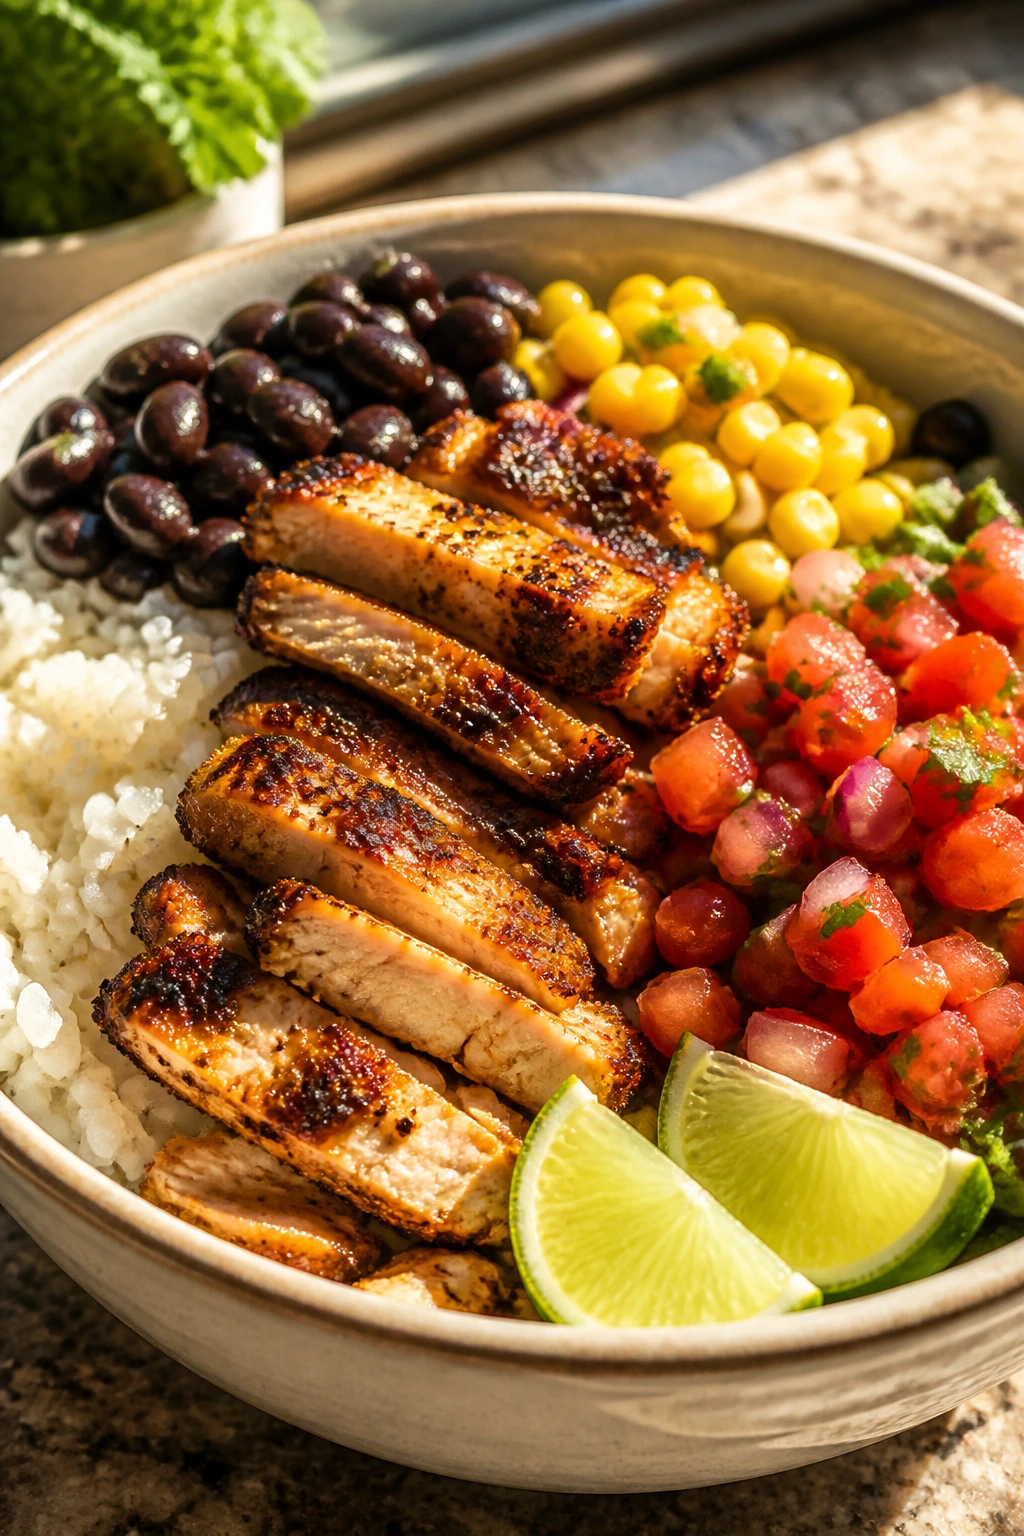
11. Turkey Taco Bowls
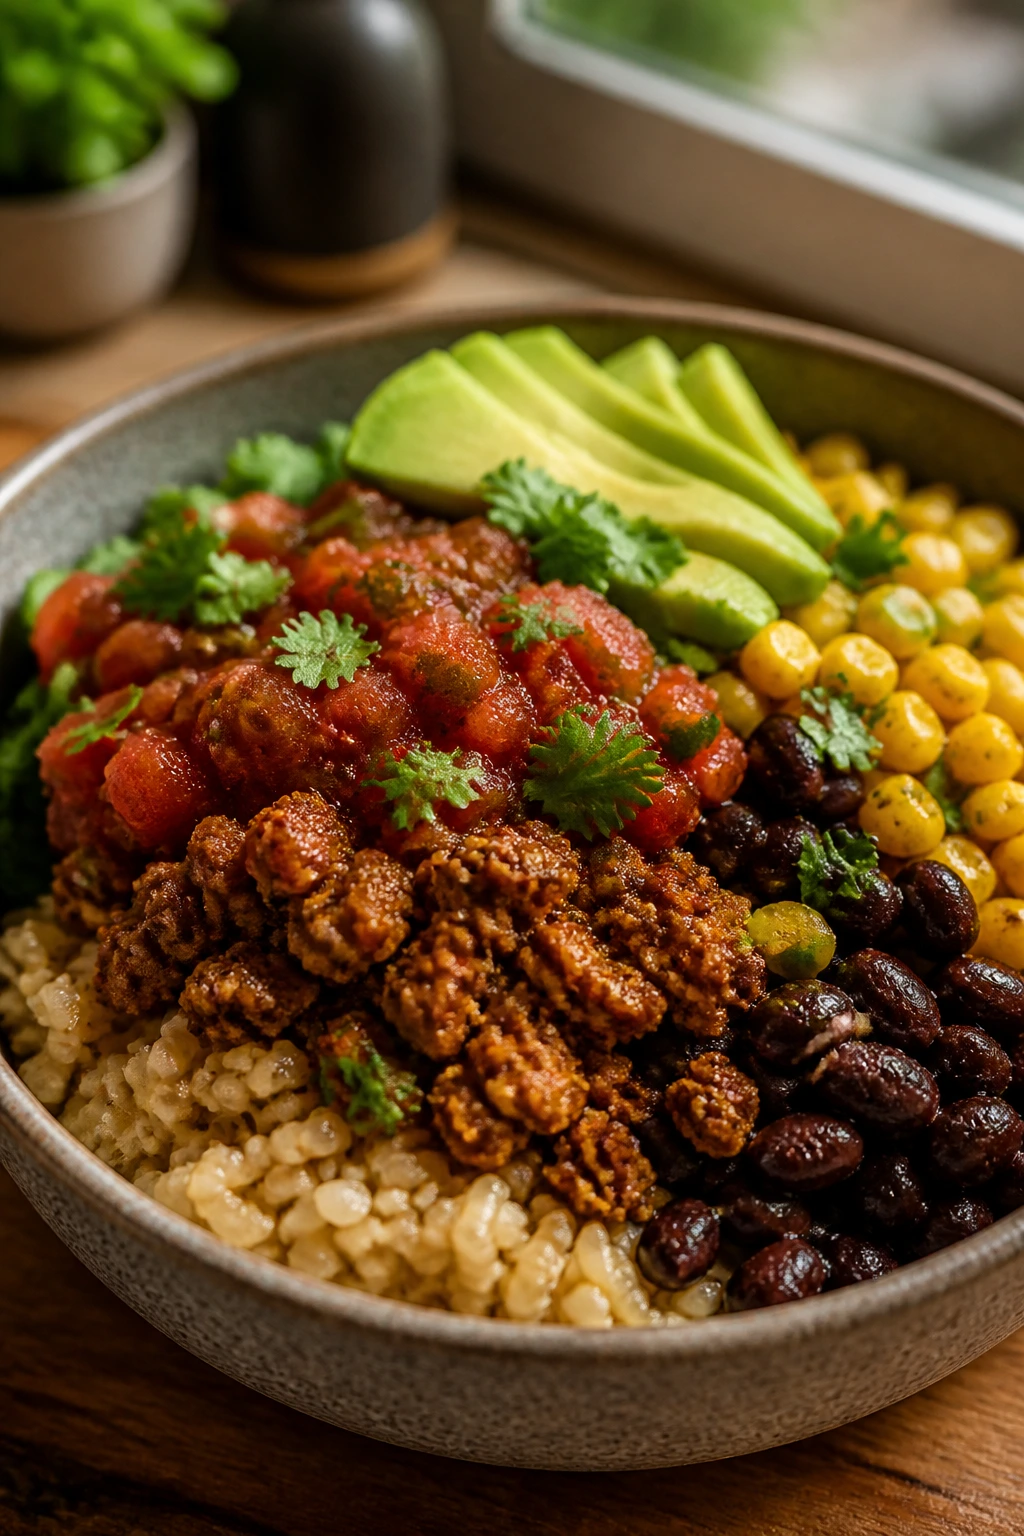
If taco night had better storage habits, it would look like this. Brown rice underneath, spiced turkey in the middle, and a few cold toppings waiting to be added after reheating.
Why It Works:
Ground turkey takes on taco seasoning quickly and holds up well in the fridge. Rice gives the bowl structure, beans add fiber, and the salsa-avocado finish keeps the whole thing from feeling boxed in. It reheats well because the wet and dry parts stay separated until serving.
Key Ingredients:
- 1 pound lean ground turkey
- 2 cups cooked brown rice
- 1 can black beans, rinsed
- 1 cup corn
- 2 tablespoons taco seasoning
- 1 cup salsa
- 1 avocado, sliced
- Lime wedges
Quick Steps:
- Brown the turkey with taco seasoning until cooked through.
- Warm the beans and corn briefly.
- Divide rice into containers.
- Top with turkey, beans, corn, and salsa.
- Add avocado and lime after reheating.
Equipment for This Recipe:
- Large skillet
- Wooden spoon
- Storage containers
- Rice cooker or saucepan
How to Serve This Dish:
Serve with shredded lettuce or a spoonful of Greek yogurt. The cold avocado should go on last, always.
Pro Tips for This Recipe:
- Use salsa as both moisture and flavor; it saves a step.
- Reheat the rice with a splash of water so it doesn’t dry out.
- Add cilantro after heating if you want freshness.
Variations on This Dish:
- Southwest Veggie Bowl: Skip turkey and add extra beans plus roasted peppers.
- Chipotle Bowl: Stir adobo sauce into the turkey for more heat.
Common Mistakes to Avoid with This Dish:
- Packing avocado too early: It browns and softens.
- Using bland rice: Season it with lime and salt.
12. Chicken Burrito Bowls
The point of a burrito bowl is control. You decide how much rice, how much chicken, how much salsa, and whether the whole thing needs a hit of lime or hot sauce to wake up.
Why It Works:
Chicken thighs stay juicy in the fridge and reheat better than most people expect. Black beans and corn give the bowl color and texture, while lime keeps the chicken from tasting like plain leftover poultry. It’s a sturdy lunch that holds its shape.
Key Ingredients:
- 1 1/2 pounds boneless chicken thighs
- 2 cups cooked rice
- 1 can black beans, rinsed
- 1 cup corn
- 2 teaspoons fajita seasoning
- 1 cup pico de gallo
- 1 lime, cut into wedges
- 1 tablespoon olive oil
Quick Steps:
- Season the chicken with olive oil and fajita seasoning.
- Sear or bake until cooked through, then slice.
- Divide rice into containers.
- Add chicken, beans, corn, and pico.
- Finish with lime.
Equipment for This Recipe:
- Skillet or sheet pan
- Cutting board
- Knife
- Meal-prep containers
How to Serve This Dish:
Top with shredded lettuce or a spoonful of guacamole after reheating. A little hot sauce never hurts.
Pro Tips for This Recipe:
- Thighs stay juicier than breasts here.
- Keep the pico separate if you want firmer rice.
- Reheat covered so the chicken doesn’t dry out.
Variations on This Dish:
- Salsa Verde Bowl: Use green salsa and add roasted zucchini.
- Bean-Heavy Bowl: Reduce chicken and add extra black beans.
Common Mistakes to Avoid with This Dish:
- Overcooking the chicken: It gets stringy after reheating.
- Skipping acid: Lime is what keeps the bowl awake.
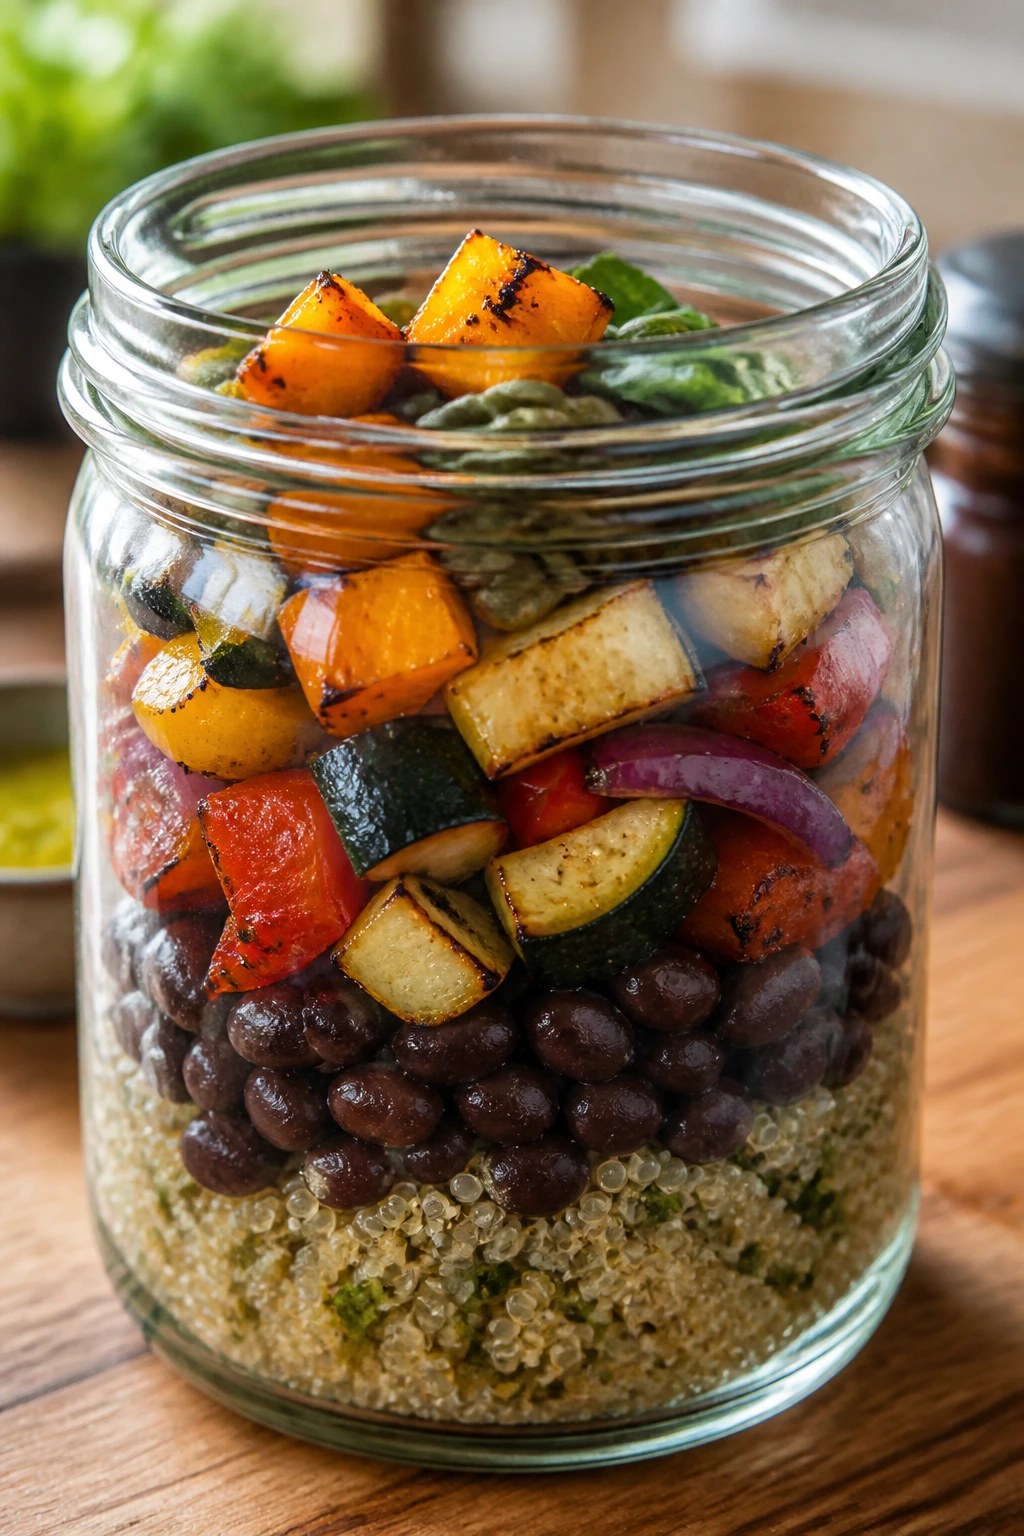
13. Roasted Veggie Farro Bowls
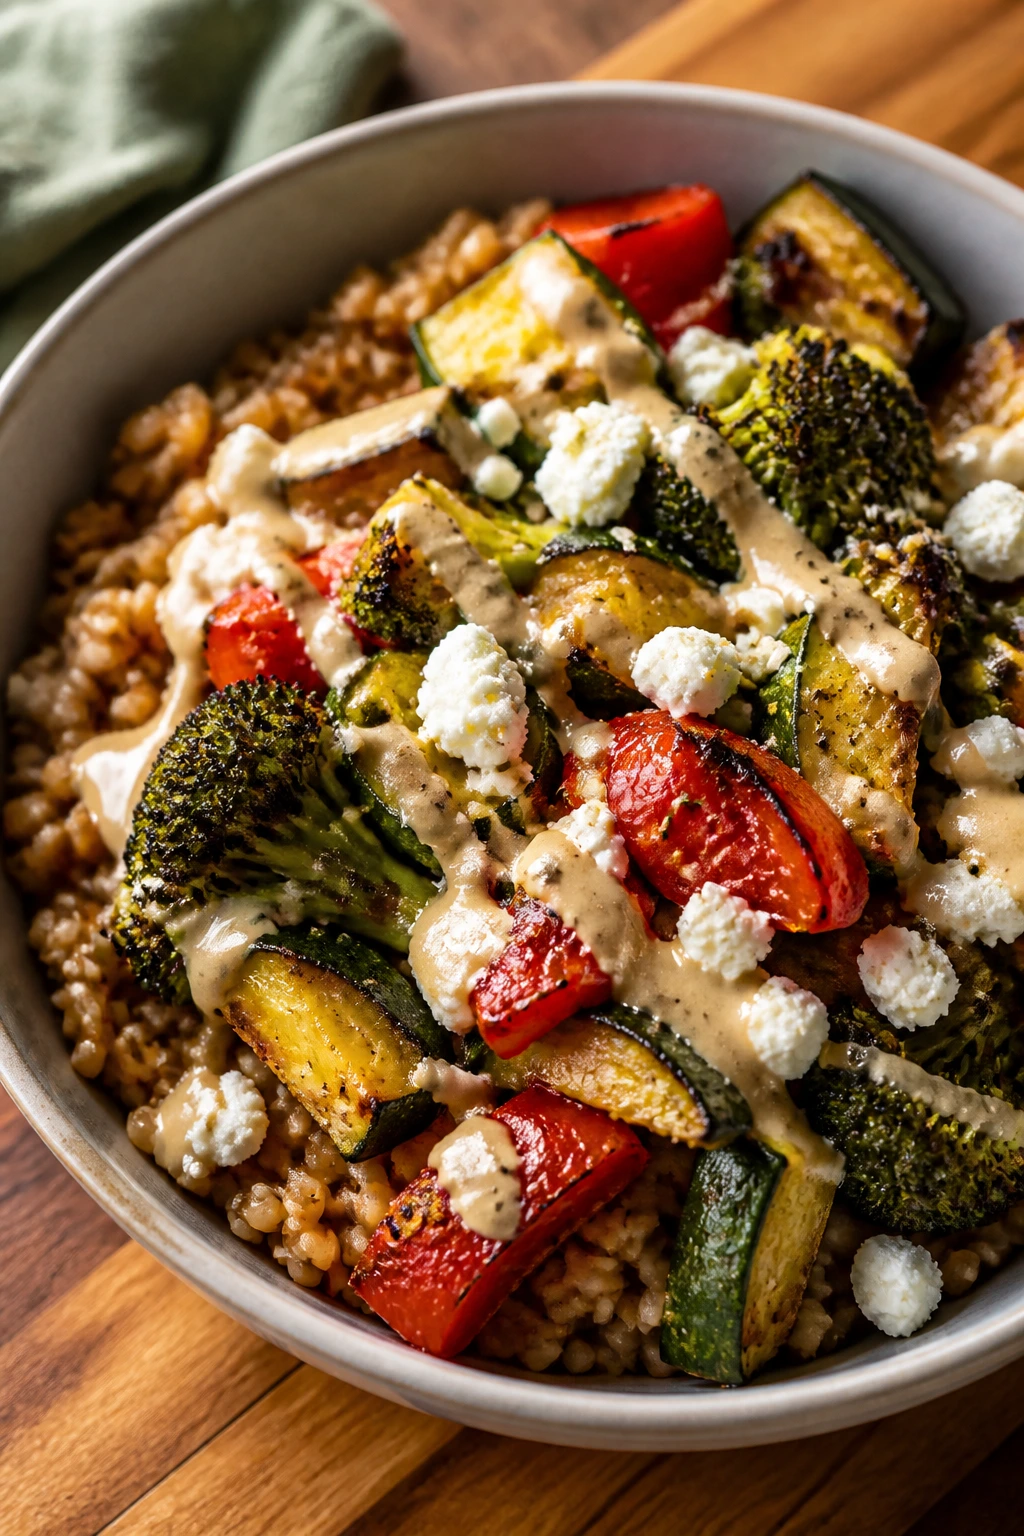
Farro has a chewy bite that some grains never manage. Pair it with roasted vegetables and a tahini drizzle, and you get a lunch that tastes deliberate instead of assembled out of leftovers.
Why It Works:
Farro stays firm in the fridge and doesn’t go mushy under dressing. Roasted vegetables bring sweetness and char, and tahini adds a creamy sauce without relying on dairy. The bowl is filling enough to count as dinner, which I appreciate.
Key Ingredients:
- 1 1/2 cups dry farro
- 1 zucchini, chopped
- 1 red bell pepper, chopped
- 2 cups broccoli florets
- 2 tablespoons olive oil
- 1/4 cup tahini
- 1 tablespoon lemon juice
- 1/4 cup crumbled feta
Quick Steps:
- Cook the farro until chewy, then cool it.
- Roast the zucchini, pepper, and broccoli at 425°F for 20 to 25 minutes.
- Whisk tahini, lemon juice, salt, and water until pourable.
- Combine farro and vegetables.
- Top with feta and sauce.
Equipment for This Recipe:
- Sheet pan
- Saucepan
- Mixing bowl
- Whisk
How to Serve This Dish:
Serve warm or room temperature. A handful of arugula under the farro gives it a peppery edge.
Pro Tips for This Recipe:
- Spread the vegetables out so they roast, not steam.
- Add the sauce after reheating, not before.
- Salt the farro while it’s still warm.
Variations on This Dish:
- Herby Version: Add parsley and dill.
- Protein Boost: Add roasted chicken or chickpeas.
Common Mistakes to Avoid with This Dish:
- Crowding the pan: The vegetables go soft.
- Using too much tahini straight from the jar: Thin it with water first.
14. Lentil Vegetable Soup
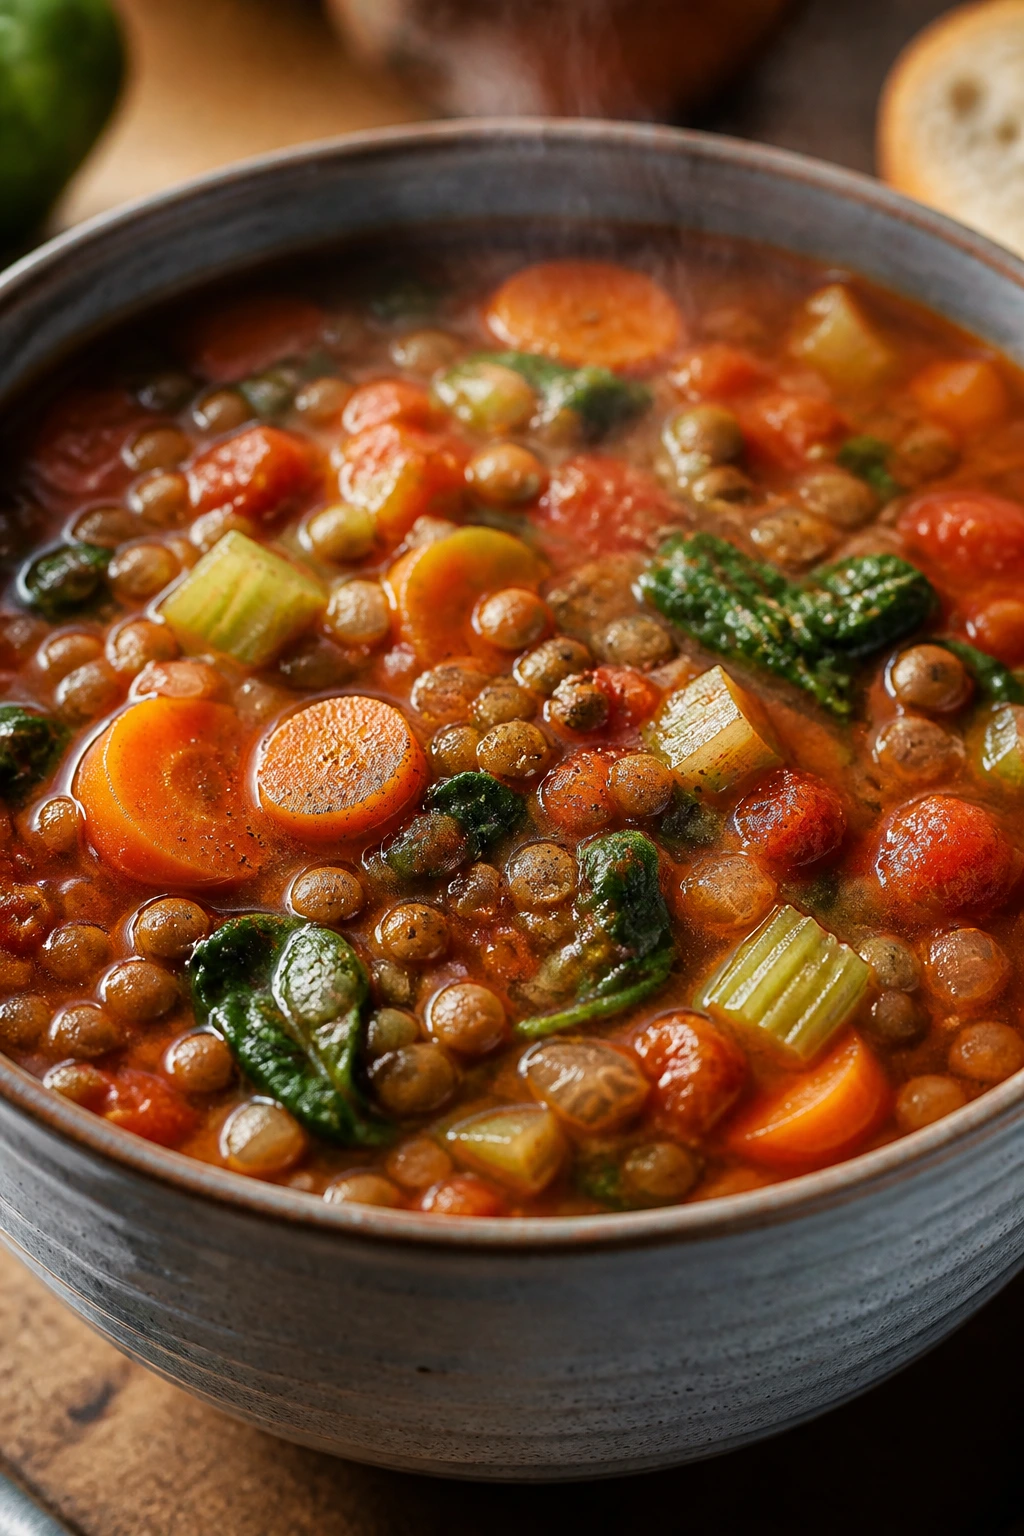
This is the kind of soup that gets more useful after a night in the fridge. The lentils thicken the broth, the vegetables stay honest, and the whole pot feels steady instead of fussy.
Why It Works:
Lentils cook fast and carry flavor well. Carrots, celery, onion, and garlic build the base, while tomatoes and spinach keep the soup bright. It freezes cleanly, which is handy because a big pot of soup is basically meal prep in liquid form.
Key Ingredients:
- 1 1/2 cups brown or green lentils
- 2 carrots, diced
- 2 celery stalks, diced
- 1 onion, diced
- 3 cloves garlic, minced
- 1 can diced tomatoes
- 6 cups vegetable broth
- 2 cups spinach
Quick Steps:
- Sauté onion, carrots, and celery until softened.
- Add garlic, lentils, tomatoes, and broth.
- Simmer 25 to 30 minutes until lentils are tender.
- Stir in spinach until wilted.
- Season and portion.
Equipment for This Recipe:
- Large pot
- Ladle
- Wooden spoon
- Storage containers
How to Serve This Dish:
Ladle it into bowls with whole grain toast. A squeeze of lemon at the end sharpens the broth nicely.
Pro Tips for This Recipe:
- Salt at the end if your broth is already salty.
- Keep the simmer gentle so the lentils hold shape.
- Add more broth when reheating if it thickens overnight.
Variations on This Dish:
- Smoky Lentil Soup: Add smoked paprika.
- Tomato-Herb Version: Stir in basil and oregano.
Common Mistakes to Avoid with This Dish:
- Boiling too hard: The lentils break apart.
- Forgetting acid: Lemon or vinegar makes the soup taste finished.
15. Turkey Chili
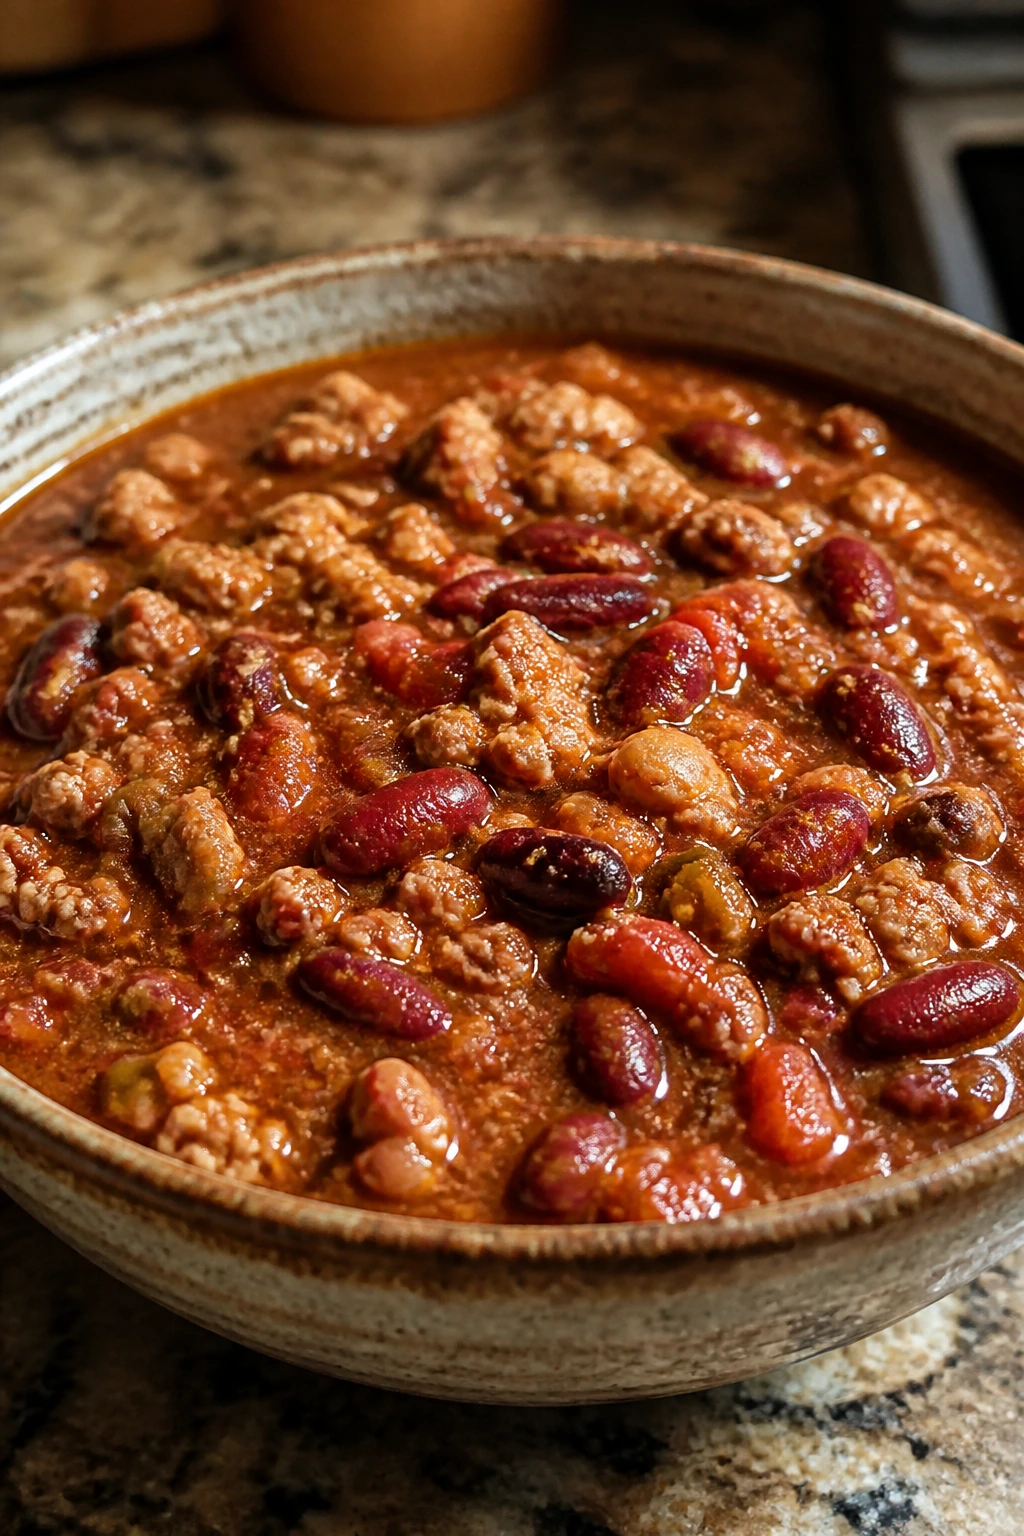
Turkey chili has a specific strength: it tastes even better after sitting, but it still reheats without turning gluey. That’s exactly why it belongs in a Sunday prep rotation.
Why It Works:
Ground turkey soaks up chili spices without needing much fat. Beans and tomatoes create a thick, spoonable texture, and the chili holds for several days without losing its shape. It’s one of the easier freezer meals on this list.
Key Ingredients:
- 1 pound ground turkey
- 1 onion, diced
- 2 cans beans, rinsed
- 1 can diced tomatoes
- 2 tablespoons chili powder
- 1 teaspoon cumin
- 2 cups broth
- Salt and pepper
Quick Steps:
- Brown the turkey with the onion.
- Stir in spices for 30 seconds.
- Add beans, tomatoes, and broth.
- Simmer 25 minutes until thick.
- Portion and cool before chilling or freezing.
Equipment for This Recipe:
- Dutch oven or large pot
- Wooden spoon
- Ladle
- Freezer-safe containers
How to Serve This Dish:
Top with Greek yogurt, chopped scallions, or avocado. Cornbread works too, if you want the more classic route.
Pro Tips for This Recipe:
- Let it cool before freezing to avoid extra ice.
- Mash a few beans into the pot if you want a thicker texture.
- Add more cumin than you think if your chili powder is mild.
Variations on This Dish:
- White Turkey Chili: Swap beans and use green chiles.
- Smoky Bean Chili: Add chipotle in adobo.
Common Mistakes to Avoid with This Dish:
- Underseasoning early: Chili needs salt in layers.
- Packing too soon: Steam makes the container watery.
16. Coconut Curry Chickpeas

Creamy curry can survive meal prep if you respect the vegetables and don’t drown everything in coconut milk. Chickpeas, spinach, and carrots hold up well, and the spices deepen as they sit.
Why It Works:
Chickpeas keep their shape, which matters in a dish like this. Coconut milk gives body, curry paste brings heat and depth, and a little lime at the end keeps the sauce from tasting sleepy. It’s a pantry recipe that still feels like dinner.
Key Ingredients:
- 2 cans chickpeas, rinsed
- 1 onion, sliced
- 2 carrots, sliced
- 2 tablespoons curry paste
- 1 can light coconut milk
- 2 cups spinach
- 1 tablespoon lime juice
- Cooked rice for serving
Quick Steps:
- Sauté onion and carrots until soft.
- Stir in curry paste for 1 minute.
- Add chickpeas and coconut milk; simmer 15 minutes.
- Stir in spinach and lime juice.
- Serve over rice.
Equipment for This Recipe:
- Large skillet or saucepan
- Spoon
- Knife and board
- Rice cooker or pot
How to Serve This Dish:
Serve with rice or quinoa. A sprinkle of cilantro and chopped peanuts gives it more life.
Pro Tips for This Recipe:
- Add lime at the end, not during the simmer.
- Use light coconut milk if you want a less heavy sauce.
- Let it rest before portioning so the sauce thickens.
Variations on This Dish:
- Sweet Potato Curry: Add diced sweet potato with the carrots.
- Green Curry Version: Use green curry paste and basil.
Common Mistakes to Avoid with This Dish:
- Cooking curry paste too briefly: It tastes raw.
- Skipping salt: Coconut milk blunts seasoning.
17. Sheet Pan Lemon Herb Chicken and Broccoli
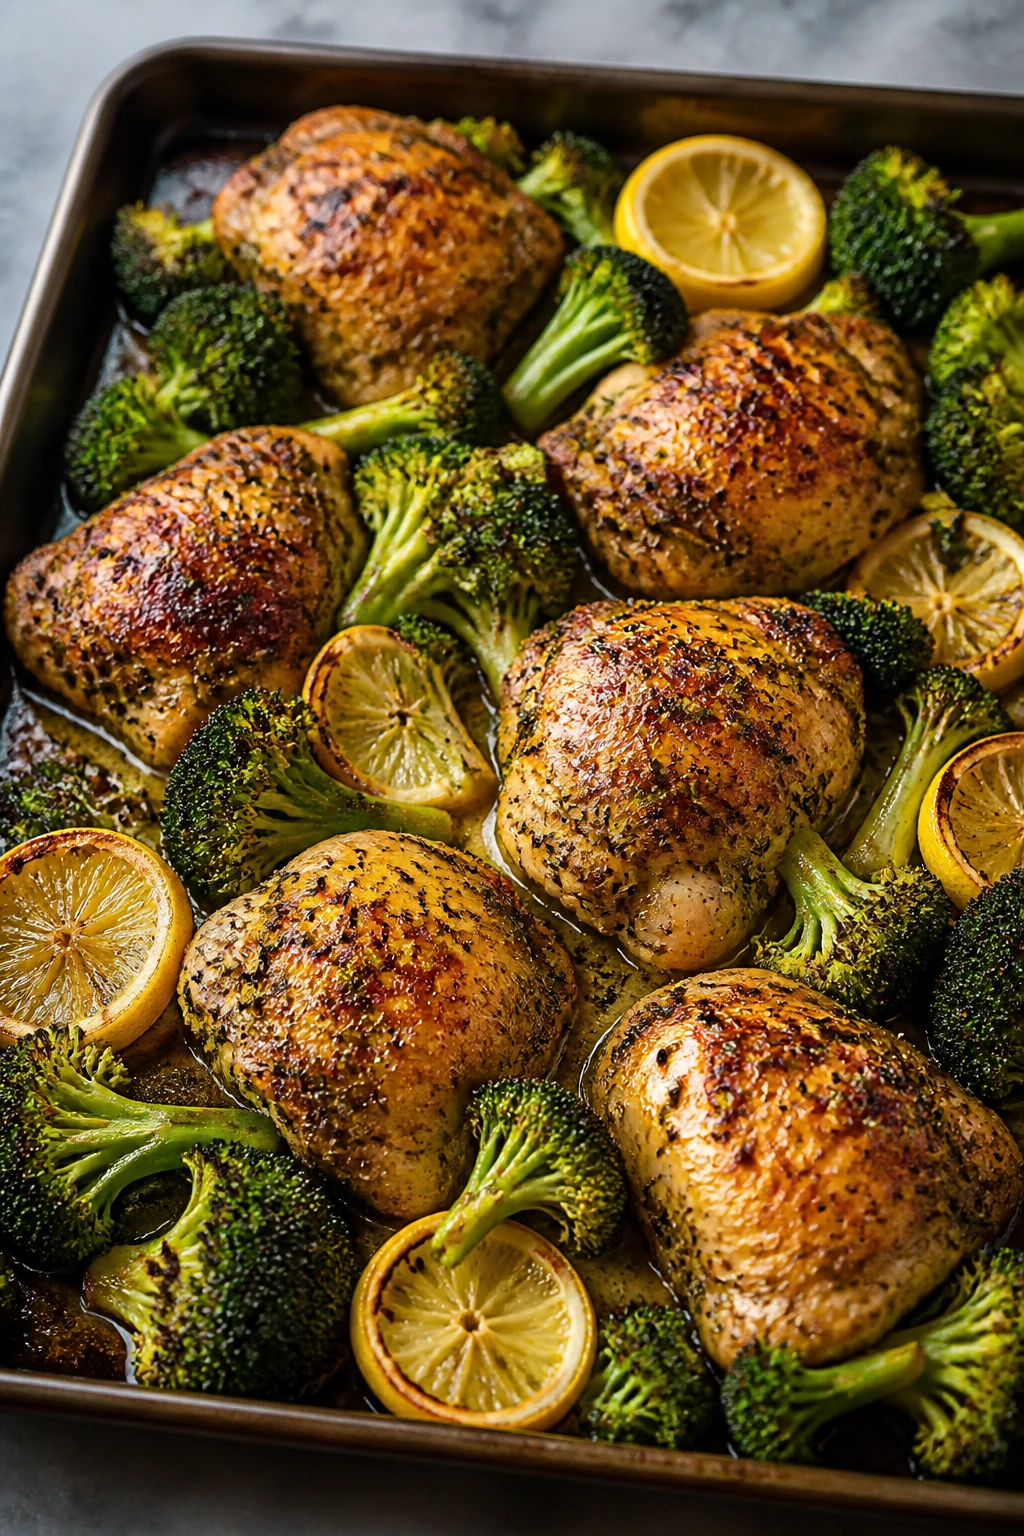
A sheet pan meal lives or dies on timing. Chicken and broccoli both need heat, but they need it for different reasons, and once you line that up, dinner becomes one pan and one cleanup.
Why It Works:
Chicken thighs stay juicy under higher heat, while broccoli picks up those browned edges everyone actually wants. Lemon and garlic keep the flavor sharp, and the pan drippings become a light sauce if you pay attention. It’s a clean, sturdy meal prep dinner.
Key Ingredients:
- 1 1/2 pounds chicken thighs
- 4 cups broccoli florets
- 2 tablespoons olive oil
- 2 cloves garlic, minced
- 1 lemon, sliced
- 1 teaspoon dried oregano
- 1 teaspoon paprika
- Salt and pepper
Quick Steps:
- Heat the oven to 425°F.
- Toss chicken with oil, garlic, oregano, paprika, salt, and pepper.
- Spread chicken and broccoli on a sheet pan.
- Roast 20 to 25 minutes until the chicken is cooked and the broccoli edges brown.
- Finish with lemon.
Equipment for This Recipe:
- Rimmed sheet pan
- Mixing bowl
- Tongs
- Instant-read thermometer
How to Serve This Dish:
Serve with rice, potatoes, or cauliflower rice. The lemon juice should go on at the very end so the broccoli stays bright.
Pro Tips for This Recipe:
- Give the broccoli room or it steams.
- Check the chicken at 165°F in the thickest part.
- Line the pan with parchment only if you don’t want much browning.
Variations on This Dish:
- Mediterranean Pan: Add cherry tomatoes and olives.
- Spicy Herb Version: Add red pepper flakes and extra paprika.
Common Mistakes to Avoid with This Dish:
- Overcrowding the pan: Nothing browns properly.
- Adding lemon too early: It dulls in the oven.
18. Teriyaki Salmon with Rice and Snap Peas
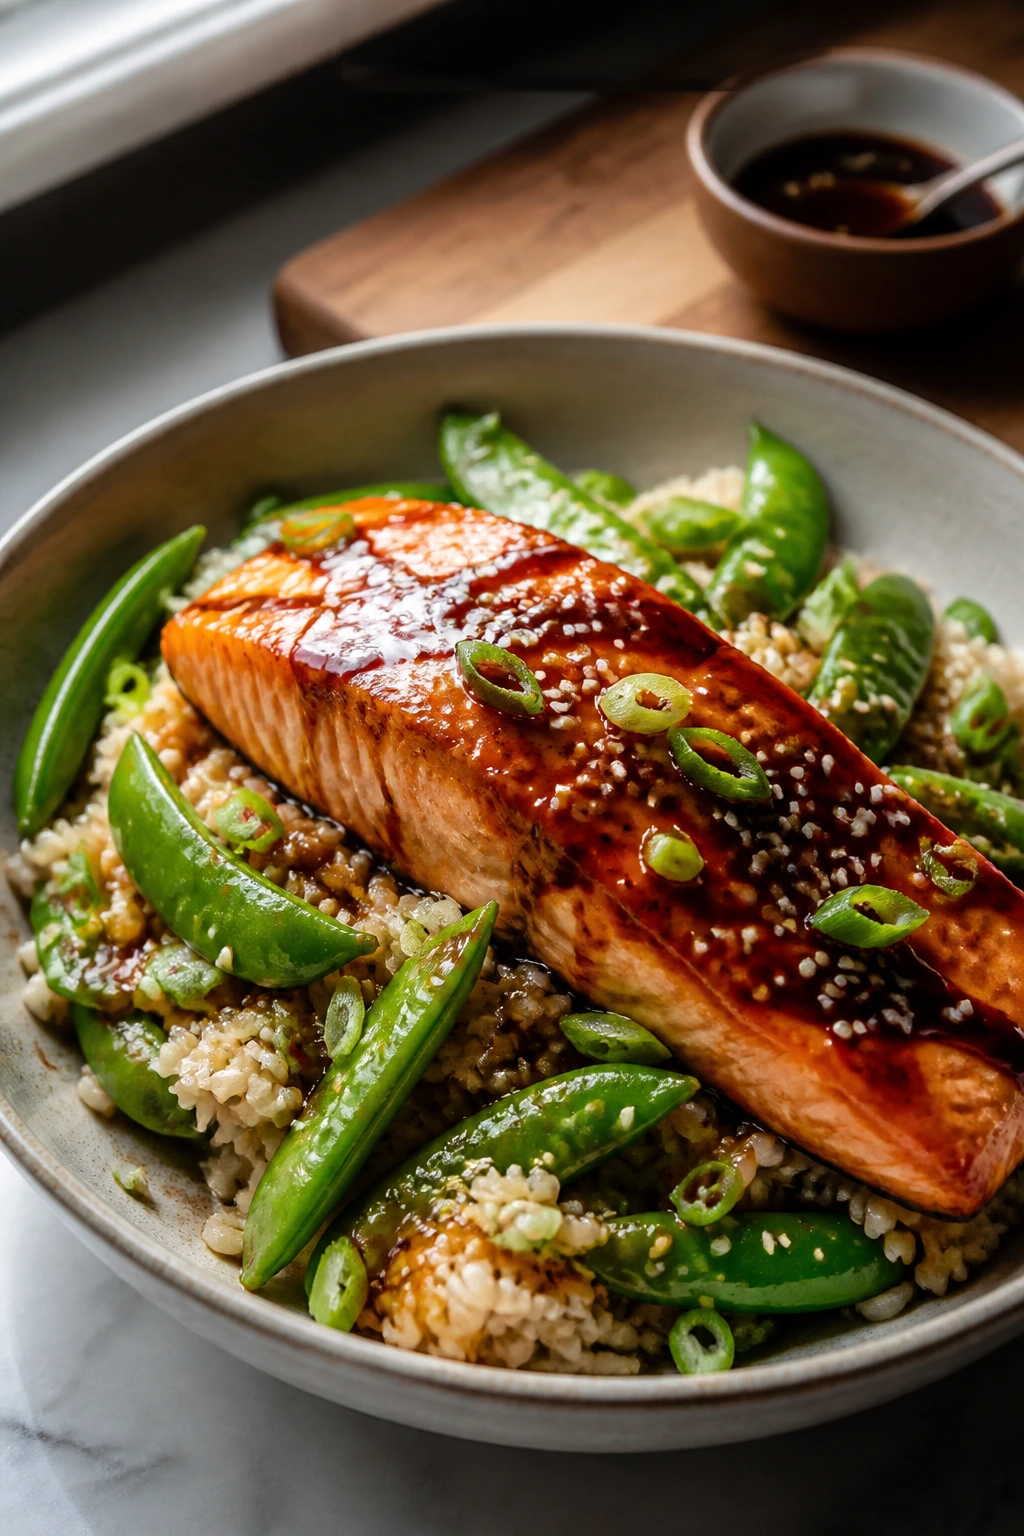
Salmon is one of the better meal prep proteins if you don’t overcook it. The teriyaki glaze keeps the fish moist, and the snap peas stay crisp enough to make the box feel fresh.
Why It Works:
Salmon reheats gently and still tastes rich the next day. Teriyaki sauce gives you sweetness and salt in one move, while snap peas and rice balance the bowl with texture. It’s a good choice when you want lunch to feel a little more polished.
Key Ingredients:
- 4 salmon fillets
- 2 cups cooked brown rice
- 2 cups snap peas
- 1/4 cup soy sauce
- 2 tablespoons honey
- 1 tablespoon grated ginger
- 1 teaspoon sesame oil
- Sesame seeds
Quick Steps:
- Mix soy sauce, honey, ginger, and sesame oil.
- Brush salmon with the glaze.
- Bake at 400°F for 12 to 15 minutes.
- Steam or blanch the snap peas briefly.
- Serve over rice with sesame seeds.
Equipment for This Recipe:
- Sheet pan
- Small bowl
- Brush or spoon
- Saucepan or steamer basket
How to Serve This Dish:
Serve warm or room temperature with extra sauce on the side. A few cucumber slices make the bowl feel lighter.
Pro Tips for This Recipe:
- Pull the salmon when it flakes, not when it dries out.
- Keep the peas under a minute if you want them bright.
- Use parchment for easy cleanup, but watch the glaze near the edges.
Variations on This Dish:
- Ginger-Scallion Version: Add scallions after baking.
- Spicy Teriyaki: Stir in chili paste.
Common Mistakes to Avoid with This Dish:
- Overcooking salmon: It turns chalky fast.
- Drowning the rice: Sauce belongs on top, not under everything.
19. Garlic Shrimp and Zucchini Skillet
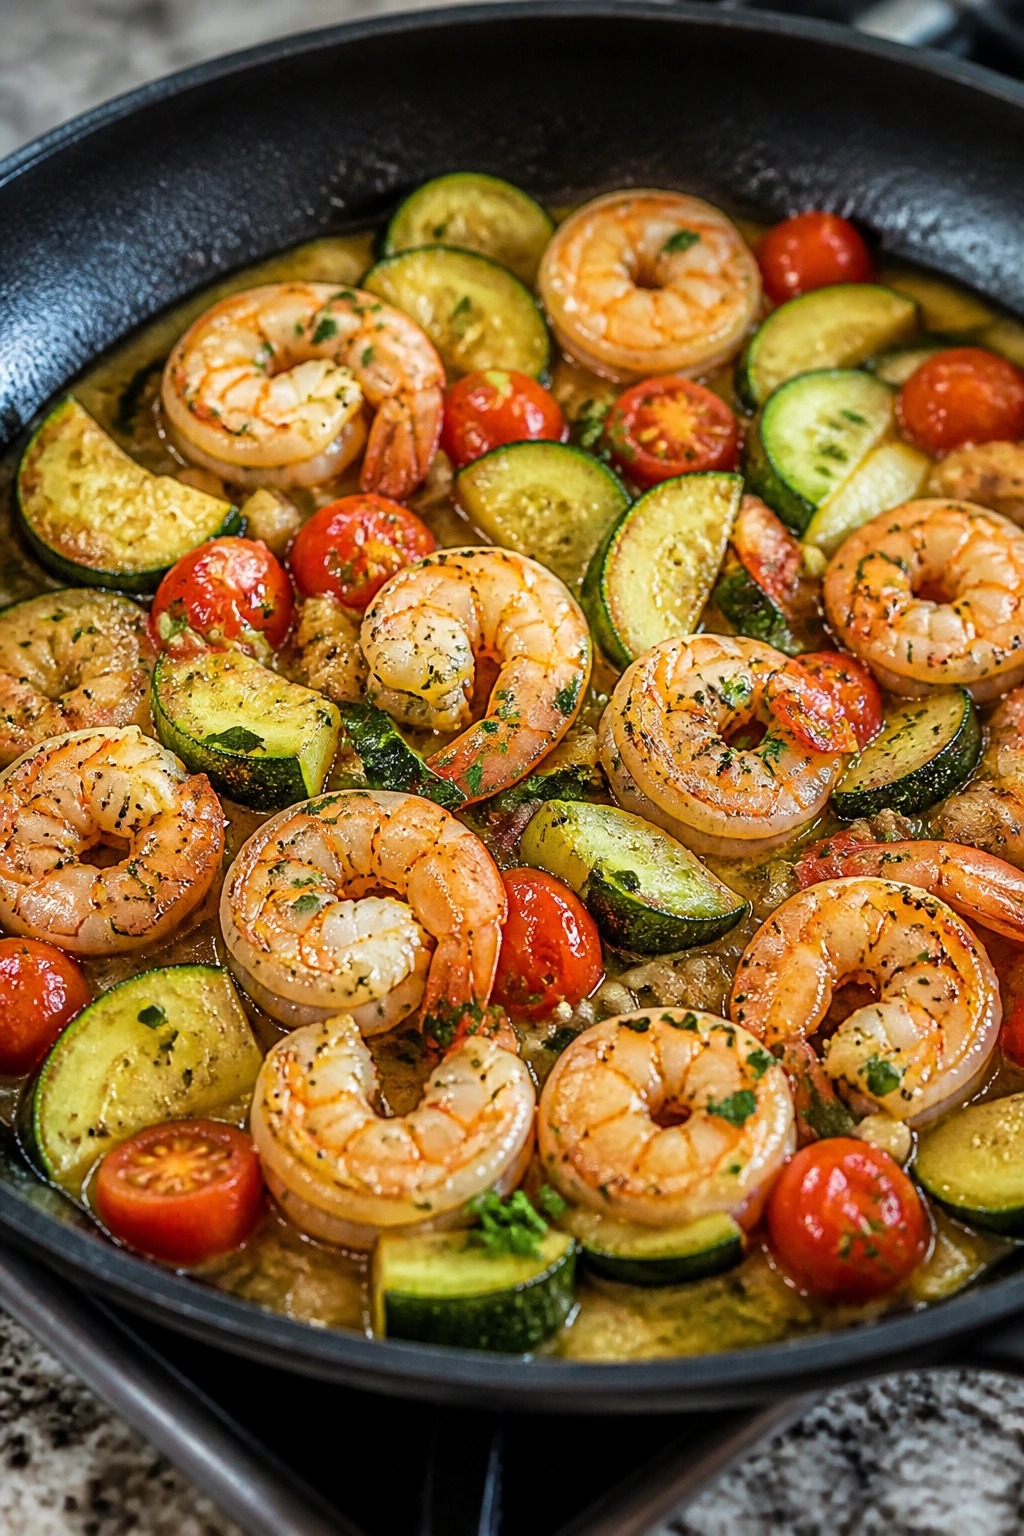
Shrimp cooks fast, which is either a gift or a trap. Keep the skillet hot, stop when the shrimp turn pink and curl, and you’ll have a meal-prep protein that doesn’t eat like rubber.
Why It Works:
Shrimp takes on garlic and lemon in minutes. Zucchini softens just enough to match the shrimp without going mushy, and cherry tomatoes add quick acidity. It’s a light dish that still feels like a real lunch.
Key Ingredients:
- 1 pound shrimp, peeled and deveined
- 2 zucchini, sliced
- 1 cup cherry tomatoes
- 3 cloves garlic, minced
- 2 tablespoons olive oil
- 1 tablespoon lemon juice
- 2 tablespoons parsley
- Salt and pepper
Quick Steps:
- Sauté zucchini in oil until just tender.
- Add garlic and tomatoes for 1 to 2 minutes.
- Add shrimp and cook 2 to 3 minutes per side.
- Finish with lemon and parsley.
- Portion with rice or couscous.
Equipment for This Recipe:
- Large skillet
- Tongs
- Knife and cutting board
- Storage containers
How to Serve This Dish:
Serve over rice, quinoa, or zucchini noodles. Don’t forget a wedge of lemon; it matters here.
Pro Tips for This Recipe:
- Pat shrimp dry before cooking so they sear.
- Do not crowd the skillet or they steam.
- Pull shrimp off the heat the second they turn opaque.
Variations on This Dish:
- Mediterranean Shrimp: Add olives and feta.
- Spicy Garlic Version: Add chili flakes and extra lemon zest.
Common Mistakes to Avoid with This Dish:
- Overcooking shrimp: They go tough fast.
- Cutting zucchini too thin: It melts into nothing.
20. Turkey Meatballs with Marinara and Spinach
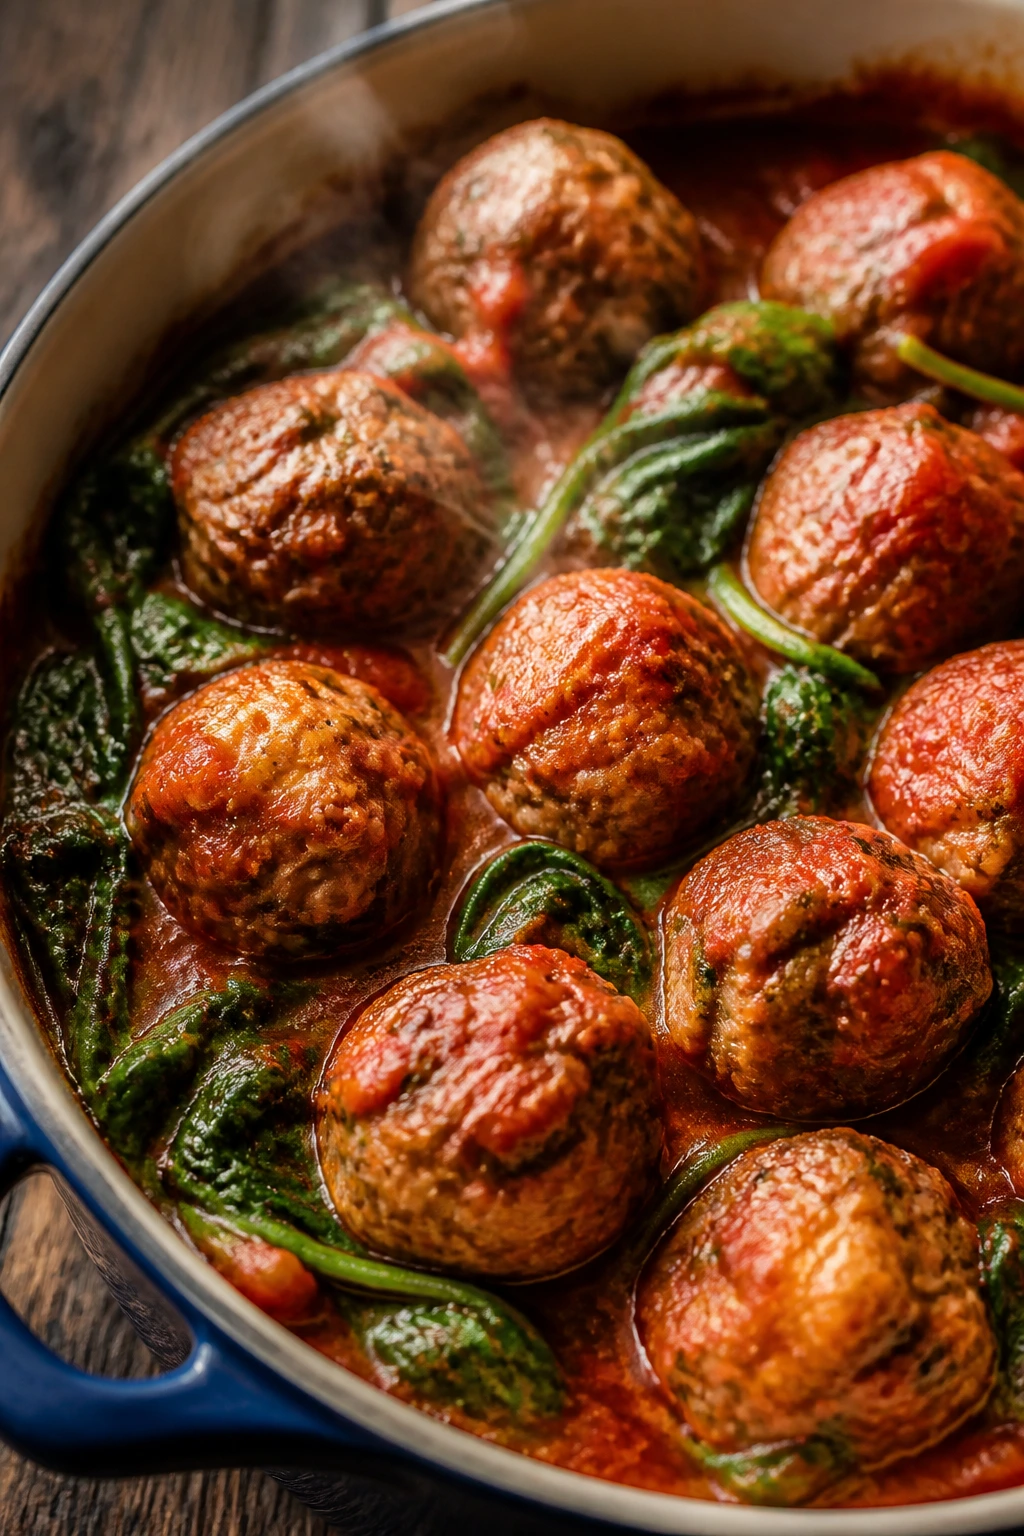
These meatballs are meant for containers, not fancy plates. They stay tender, take on sauce well, and pack enough protein to anchor a lunch without a pile of extras.
Why It Works:
Ground turkey needs help staying moist, so the egg and oats do real work here. Marinara coats the meatballs and keeps them juicy during reheating, while spinach gives the container some color and a little extra nutrition. Simple. Effective.
Key Ingredients:
- 1 pound ground turkey
- 1 egg
- 1/2 cup rolled oats
- 2 tablespoons grated Parmesan
- 1 teaspoon Italian seasoning
- 2 cups marinara sauce
- 2 cups spinach
- Salt and pepper
Quick Steps:
- Mix turkey, egg, oats, Parmesan, seasoning, salt, and pepper.
- Roll into meatballs.
- Bake at 400°F for 15 to 18 minutes.
- Warm marinara and fold in spinach.
- Toss meatballs in sauce and portion.
Equipment for This Recipe:
- Mixing bowl
- Sheet pan
- Saucepan
- Spatula
How to Serve This Dish:
Serve with pasta, zucchini noodles, or roasted vegetables. A little extra Parmesan on top makes the box feel finished.
Pro Tips for This Recipe:
- Wet your hands before rolling so the mixture doesn’t stick.
- Don’t overmix the turkey or the meatballs get dense.
- Cool in sauce for better flavor.
Variations on This Dish:
- Italian Turkey Subs: Serve on toasted rolls.
- Herbed Marinara Bowl: Add basil and rosemary.
Common Mistakes to Avoid with This Dish:
- Packing the sauce separately too late: The meatballs dry out.
- Making them too large: They cook unevenly.
21. Tofu Broccoli Stir-Fry
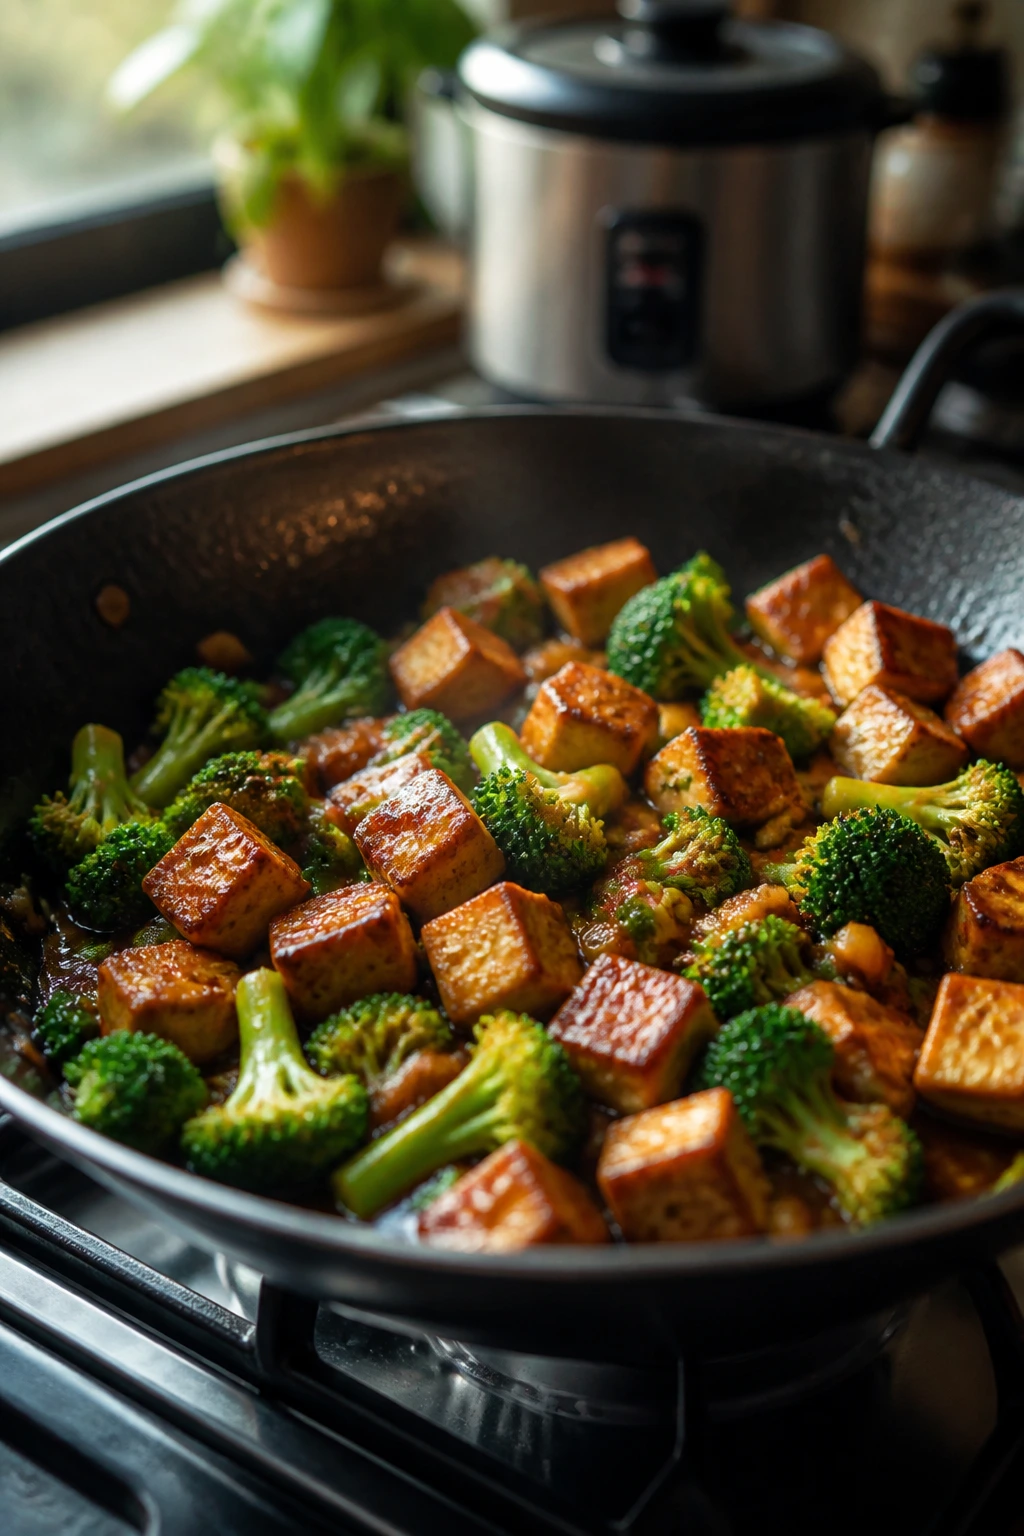
Tofu deserves better than a shrug. Press it, brown it, and coat it in a ginger-garlic sauce, and it becomes one of the easiest high-protein meal prep bases around.
Why It Works:
Extra-firm tofu absorbs sauce after it gets crisp edges in the pan. Broccoli brings structure, ginger and garlic keep the flavor sharp, and rice gives the whole thing somewhere to land. It reheats nicely because the sauce keeps everything from drying out.
Key Ingredients:
- 14 ounces extra-firm tofu
- 4 cups broccoli florets
- 2 carrots, sliced
- 2 tablespoons soy sauce
- 1 tablespoon ginger, grated
- 2 cloves garlic, minced
- 1 teaspoon sesame oil
- Cooked rice
Quick Steps:
- Press and cube the tofu.
- Pan-fry until golden on the edges.
- Stir-fry broccoli and carrots until crisp-tender.
- Add garlic, ginger, soy sauce, and sesame oil.
- Toss with rice and pack.
Equipment for This Recipe:
- Large skillet or wok
- Tofu press or towels
- Spatula
- Rice cooker or pot
How to Serve This Dish:
Serve over rice or noodles. A sprinkle of sesame seeds and scallions helps a lot.
Pro Tips for This Recipe:
- Press tofu for at least 15 minutes.
- Use high heat so the broccoli stays bright.
- Stir the sauce just long enough to coat, not drown.
Variations on This Dish:
- Peanut Stir-Fry: Add peanut butter to the sauce.
- Spicy Sriracha Version: Stir in chili paste.
Common Mistakes to Avoid with This Dish:
- Skipping the press: The tofu steams instead of browns.
- Saucing too early: The vegetables lose their bite.
22. Cauliflower Fried Rice
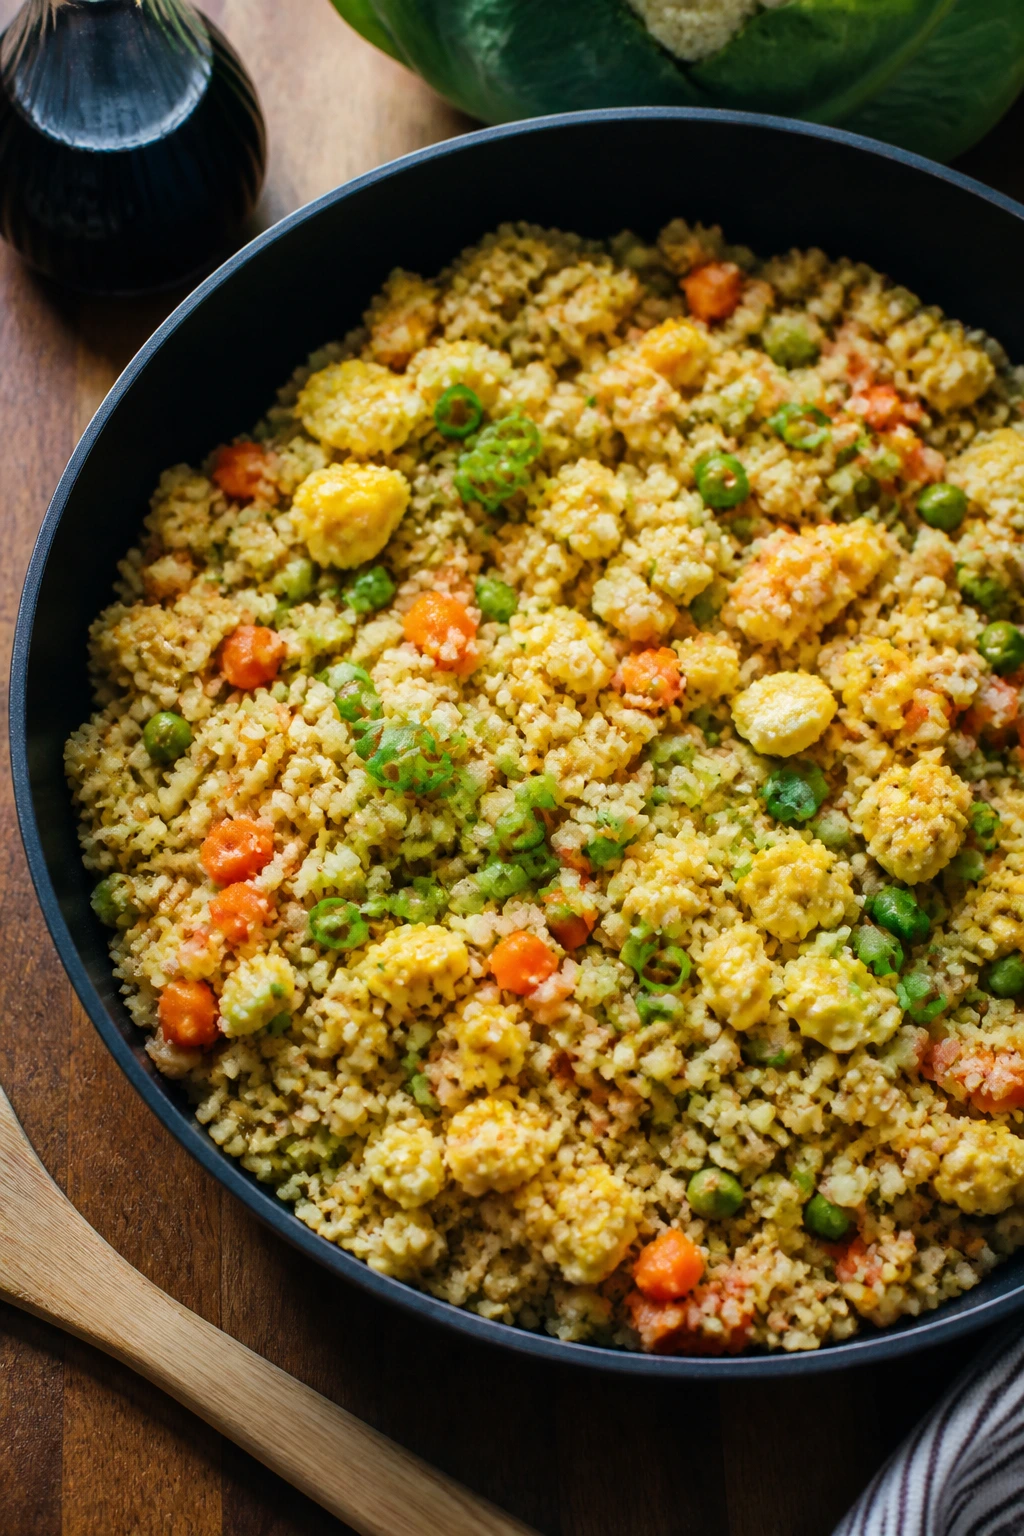
This is the cleanup meal that still tastes like a real dinner. The cauliflower keeps it light, the egg adds body, and the peas and carrots bring the classic fried-rice rhythm.
Why It Works:
Cauliflower rice cooks quickly and takes on seasoning without getting heavy. Eggs, peas, carrots, and scallions create familiar fried-rice flavor, and a little sesame oil gives the whole skillet its final note. It’s a solid way to use frozen cauliflower without apology.
Key Ingredients:
- 4 cups cauliflower rice
- 2 large eggs
- 1 cup peas and carrots
- 3 scallions, sliced
- 2 tablespoons soy sauce
- 1 teaspoon sesame oil
- 1 tablespoon neutral oil
- Salt and pepper
Quick Steps:
- Scramble the eggs in oil, then set aside.
- Sauté peas, carrots, and cauliflower rice over high heat.
- Add soy sauce and sesame oil.
- Fold in the eggs and scallions.
- Portion while still slightly steamy.
Equipment for This Recipe:
- Large skillet
- Spatula
- Bowl
- Storage containers
How to Serve This Dish:
Serve as a side or as a light main with chicken or tofu. A little chili crisp on top can wake it up.
Pro Tips for This Recipe:
- Cook over fairly high heat so the cauliflower dries a bit.
- Don’t thaw frozen cauliflower rice fully before cooking.
- Season at the end; soy sauce can reduce quickly.
Variations on This Dish:
- Chicken Fried Cauliflower Rice: Add diced cooked chicken.
- Thai-Inspired Version: Add lime and fish sauce.
Common Mistakes to Avoid with This Dish:
- Using too much oil: The rice gets slick.
- Overcooking cauliflower: It turns grainy and wet.
23. Chicken Shawarma Bowls
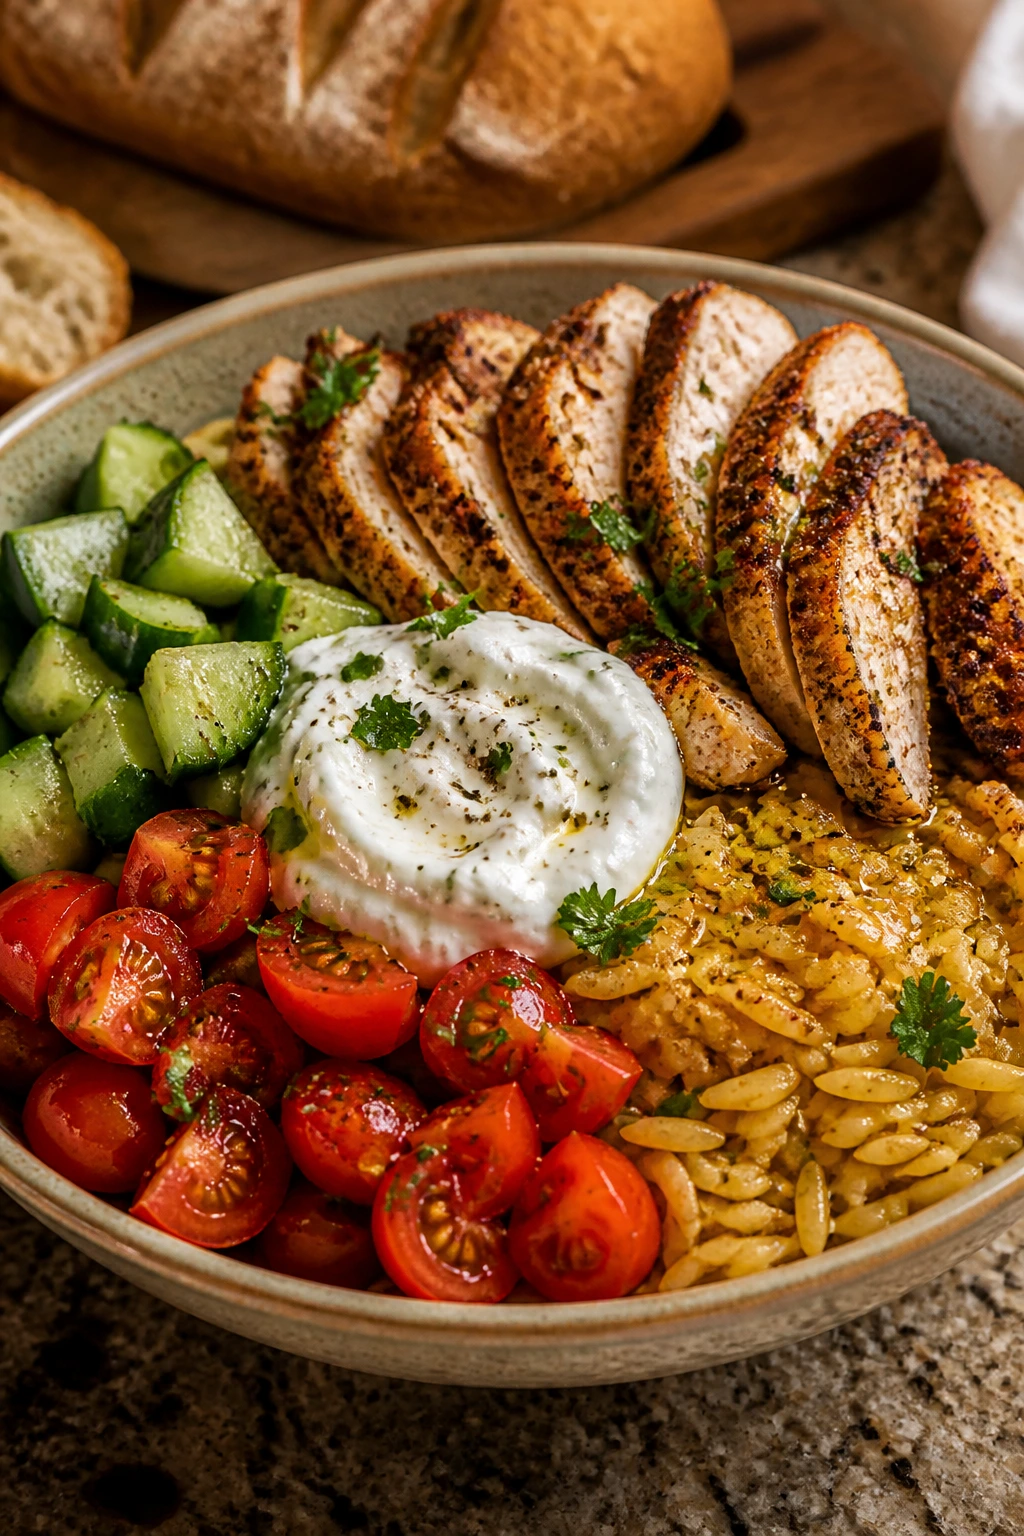
Shawarma spice makes plain chicken a lot more interesting without any complicated sauce. Add cucumber, tomato, and yogurt, and the bowl starts tasting like lunch with a point of view.
Why It Works:
Chicken thighs carry the warm spices better than lean breast meat. Rice or couscous gives the base, while yogurt sauce cools the garlic and cumin. Everything holds in the fridge well, and the bowl still feels fresh after a few days.
Key Ingredients:
- 1 1/2 pounds chicken thighs
- 2 teaspoons shawarma spice blend
- 2 cups cooked rice
- 1 cucumber, diced
- 1 cup cherry tomatoes, halved
- 3/4 cup plain yogurt
- 1 tablespoon lemon juice
- 1 tablespoon olive oil
Quick Steps:
- Coat chicken with oil and shawarma spices.
- Bake or sear until cooked through.
- Mix yogurt and lemon for sauce.
- Build bowls with rice, chicken, cucumber, and tomatoes.
- Spoon sauce over the top.
Equipment for This Recipe:
- Skillet or sheet pan
- Mixing bowl
- Knife and board
- Containers
How to Serve This Dish:
Add lettuce or pickled onions if you have them. Warm pita on the side turns it into a fuller lunch.
Pro Tips for This Recipe:
- Marinate the chicken for at least 20 minutes if you can.
- Slice the chicken against the grain for easier bites.
- Keep sauce separate if you want the cucumber to stay crisp.
Variations on This Dish:
- Cauliflower Rice Bowl: Use cauliflower rice instead of grains.
- Falafel-Style Bowl: Swap chicken for chickpeas and extra herbs.
Common Mistakes to Avoid with This Dish:
- Using too little spice: Shawarma needs a bold hand.
- Adding yogurt too early to hot chicken: The sauce thins out.
24. Soba Noodle Salad with Edamame
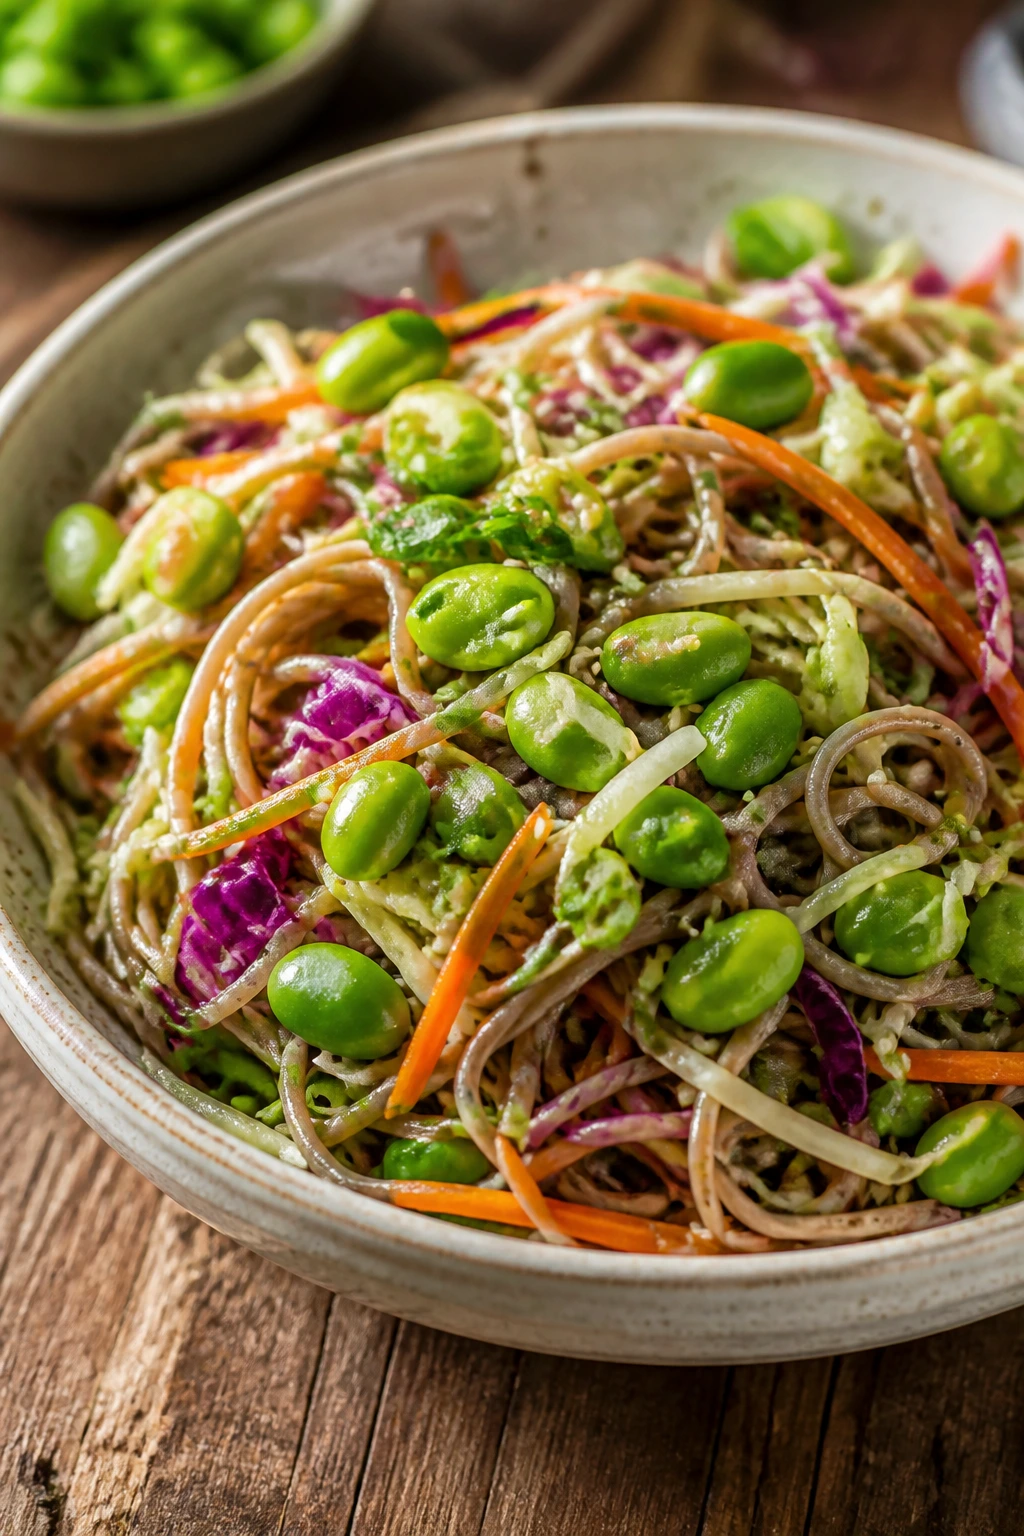
Cold noodles can get sticky if you don’t rinse them, so this salad starts there. Once the noodles are loose and the sesame dressing is on, the bowl holds together surprisingly well.
Why It Works:
Soba noodles bring a nutty bite that works cold. Edamame adds protein, cabbage gives crunch, and sesame dressing coats everything without making it soggy. It’s one of the few pasta-style salads that still feels sharp on day three.
Key Ingredients:
- 8 ounces soba noodles
- 1 cup shelled edamame
- 2 cups shredded cabbage
- 1 carrot, julienned
- 3 tablespoons sesame dressing
- 2 scallions, sliced
- 2 tablespoons chopped peanuts
- 1 teaspoon rice vinegar
Quick Steps:
- Cook soba noodles and rinse under cold water.
- Toss with edamame, cabbage, carrot, and scallions.
- Stir in sesame dressing and rice vinegar.
- Sprinkle with peanuts.
- Chill and portion.
Equipment for This Recipe:
- Pot
- Colander
- Mixing bowl
- Chopsticks or spoon
How to Serve This Dish:
Serve cold with extra scallions and chili flakes. A sliced cucumber on the side fits the mood.
Pro Tips for This Recipe:
- Rinse the noodles well or they clump.
- Cut the cabbage thin so it doesn’t feel bulky.
- Add peanuts right before serving if you want them crisp.
Variations on This Dish:
- Chicken Noodle Bowl: Add shredded chicken.
- Peanut-Sesame Version: Swap some dressing for peanut butter.
Common Mistakes to Avoid with This Dish:
- Skipping the rinse: The noodles glue together.
- Dressing too early with warm noodles: The salad turns gummy.
25. Stuffed Sweet Potatoes with Black Beans
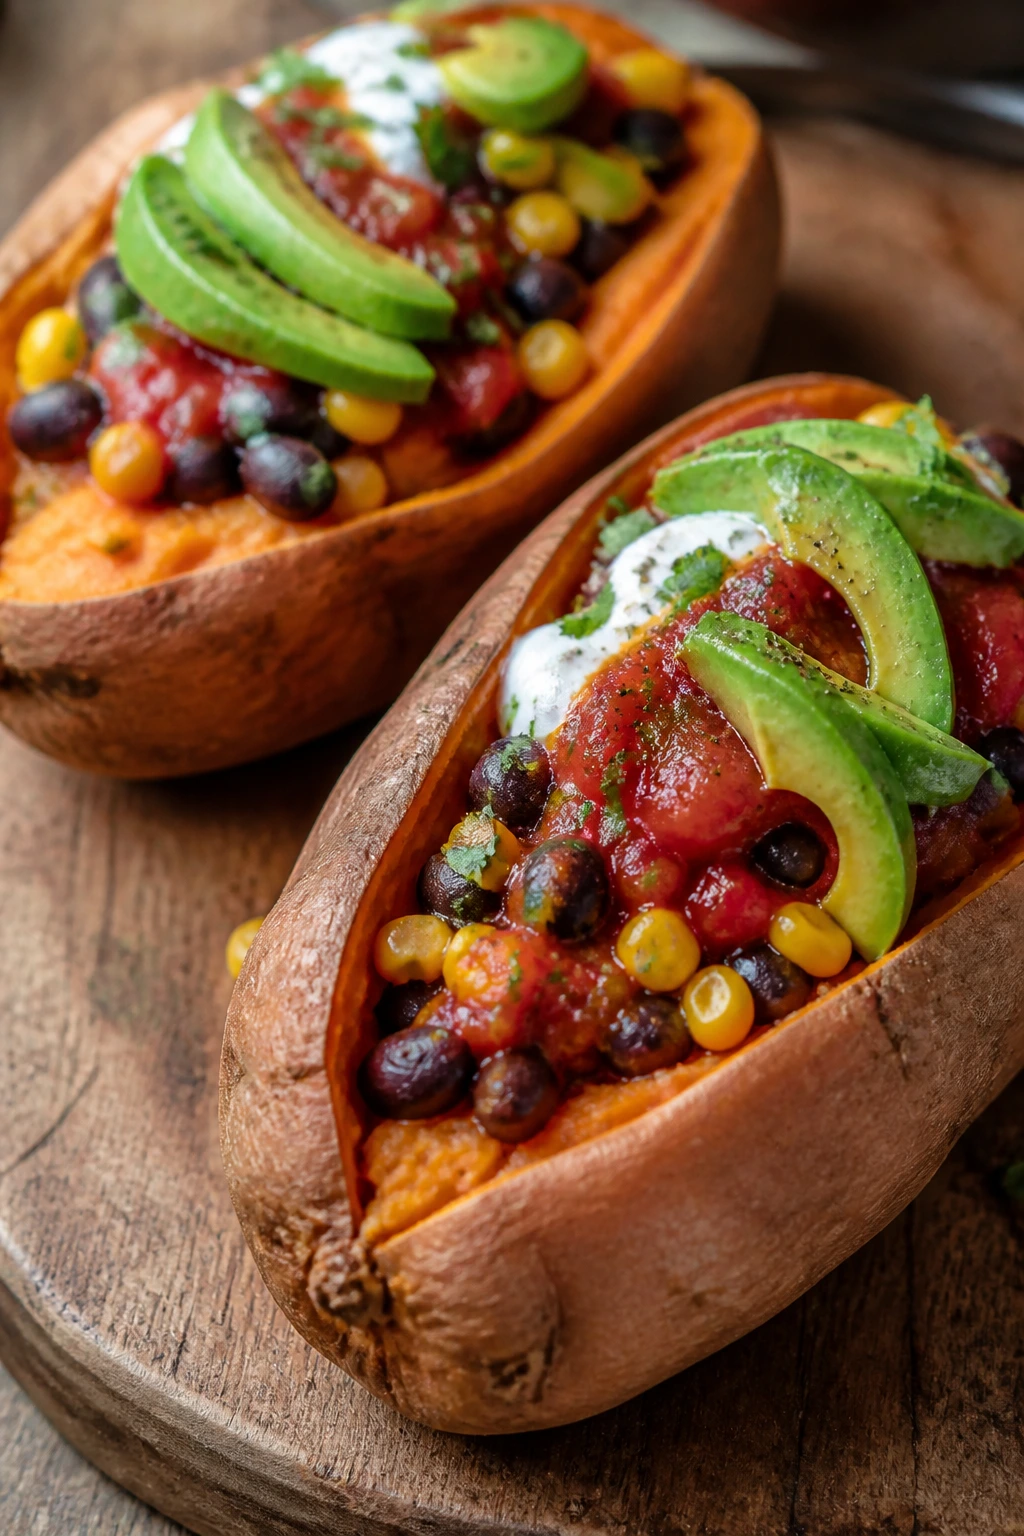
A baked sweet potato is a sturdy little container. Fill it with black beans, salsa, and a spoon of yogurt, and you get a meal that reheats in its own skin.
Why It Works:
Sweet potatoes hold their shape after baking and can be stuffed later without getting messy. Black beans add protein and fiber, while salsa keeps the filling moist. It’s one of the easiest vegetarian meal-prep dinners to pull off.
Key Ingredients:
- 4 medium sweet potatoes
- 1 can black beans, rinsed
- 1 cup corn
- 1 cup salsa
- 1/2 cup Greek yogurt
- 1 teaspoon cumin
- 1 avocado, sliced
- Salt
Quick Steps:
- Bake sweet potatoes at 400°F until tender.
- Warm black beans with cumin and corn.
- Split the potatoes open.
- Fill with beans and salsa.
- Top with yogurt and avocado.
Equipment for This Recipe:
- Sheet pan
- Fork
- Small saucepan
- Knife
How to Serve This Dish:
Serve with chopped cilantro or shredded lettuce. If you like heat, add hot sauce after reheating.
Pro Tips for This Recipe:
- Bake potatoes until the centers feel soft all the way through.
- Store toppings separately so the skins don’t go soggy.
- Use Greek yogurt in place of sour cream for a cleaner finish.
Variations on This Dish:
- Tex-Mex Version: Add cheddar and jalapeños.
- Smoky Black Bean Potatoes: Stir smoked paprika into the beans.
Common Mistakes to Avoid with This Dish:
- Undercooking the potatoes: They’re hard to split and fill.
- Packing avocado into the potato early: It browns and softens.
26. Hummus Veggie Wraps
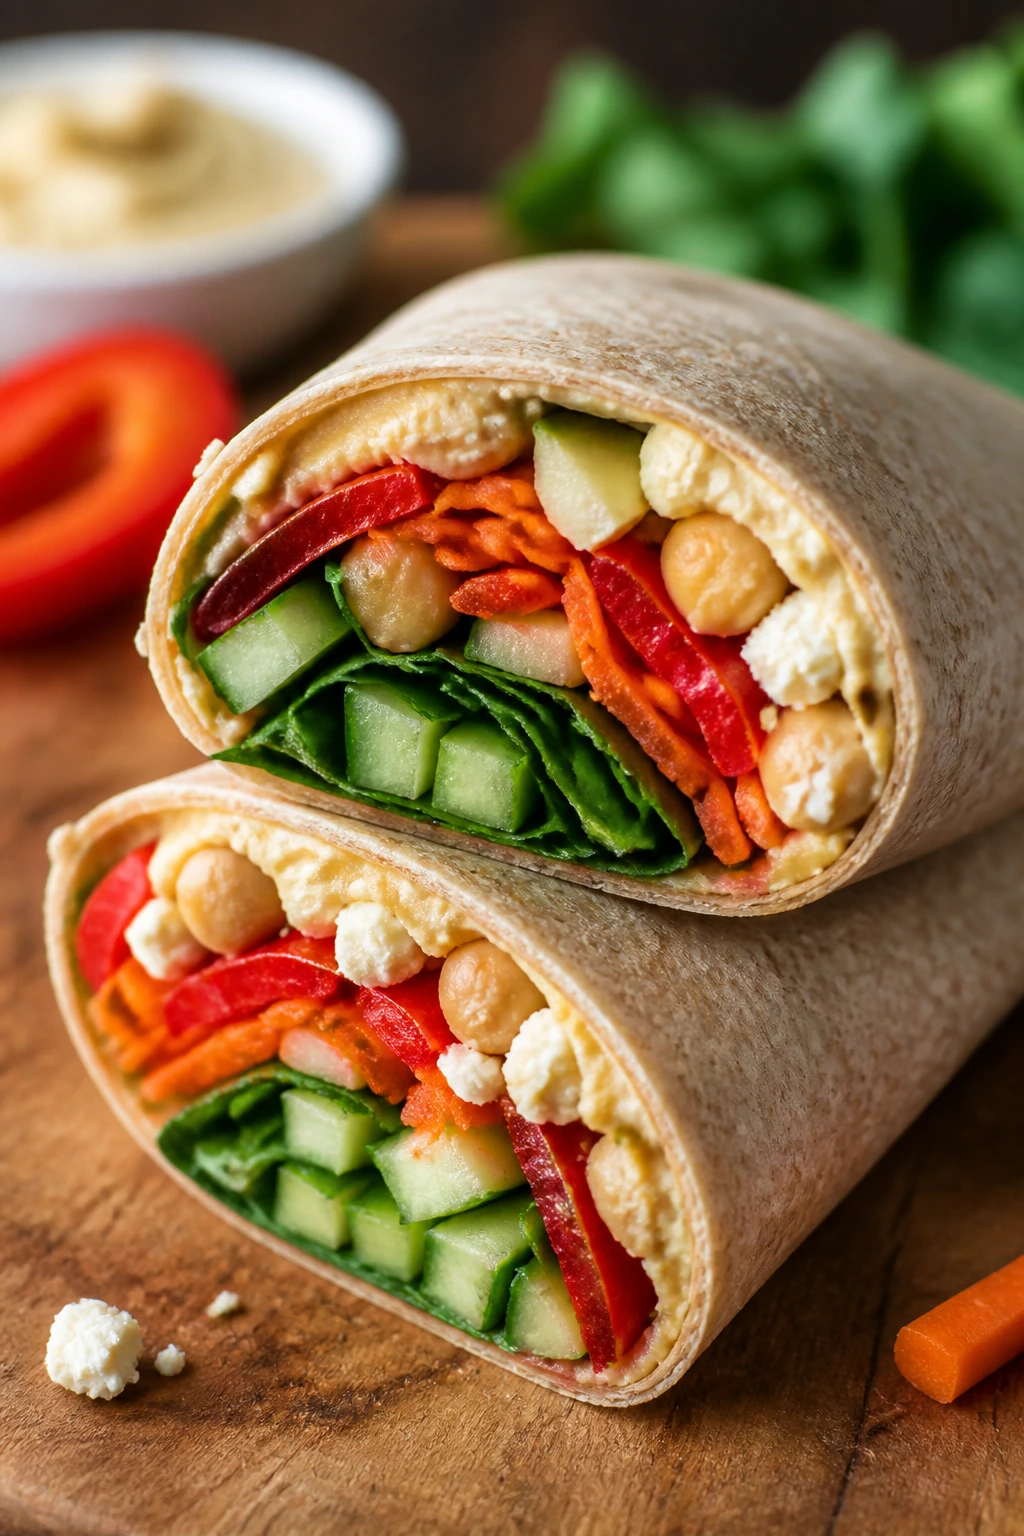
Some lunches need cooking; this one needs good layering. Hummus, vegetables, and a sturdy wrap give you a meal that stays neat if you don’t overload it.
Why It Works:
Hummus acts as both flavor and glue. Crisp vegetables add contrast, chickpeas bring protein if you want them, and a whole wheat tortilla holds everything in place. It’s a no-heat meal that still feels assembled on purpose.
Key Ingredients:
- 4 large whole wheat tortillas
- 1 cup hummus
- 1 cucumber, cut into thin sticks
- 2 carrots, shredded
- 2 cups spinach
- 1 roasted red pepper, sliced
- 1/2 cup chickpeas
- 1/4 cup feta
Quick Steps:
- Spread hummus over each tortilla.
- Layer spinach, cucumber, carrots, red pepper, chickpeas, and feta.
- Roll tightly, tucking the sides in.
- Slice in half if you want.
- Wrap and chill.
Equipment for This Recipe:
- Cutting board
- Knife
- Grater or peeler
- Wrap paper or containers
How to Serve This Dish:
Serve with fruit, olives, or a handful of nuts. Keep them cold until lunch or the tortilla gets soft.
Pro Tips for This Recipe:
- Pat the cucumber dry so the wrap doesn’t leak.
- Spread hummus edge to edge for a tighter seal.
- Wrap them in parchment first if you want better grab-and-go handling.
Variations on This Dish:
- Turkey Hummus Wrap: Add sliced turkey.
- Mediterranean Chickpea Wrap: Add olives and chopped parsley.
Common Mistakes to Avoid with This Dish:
- Overstuffing the tortilla: It tears on the roll.
- Using watery vegetables: The wrap goes soggy.
27. Greek Turkey Burgers
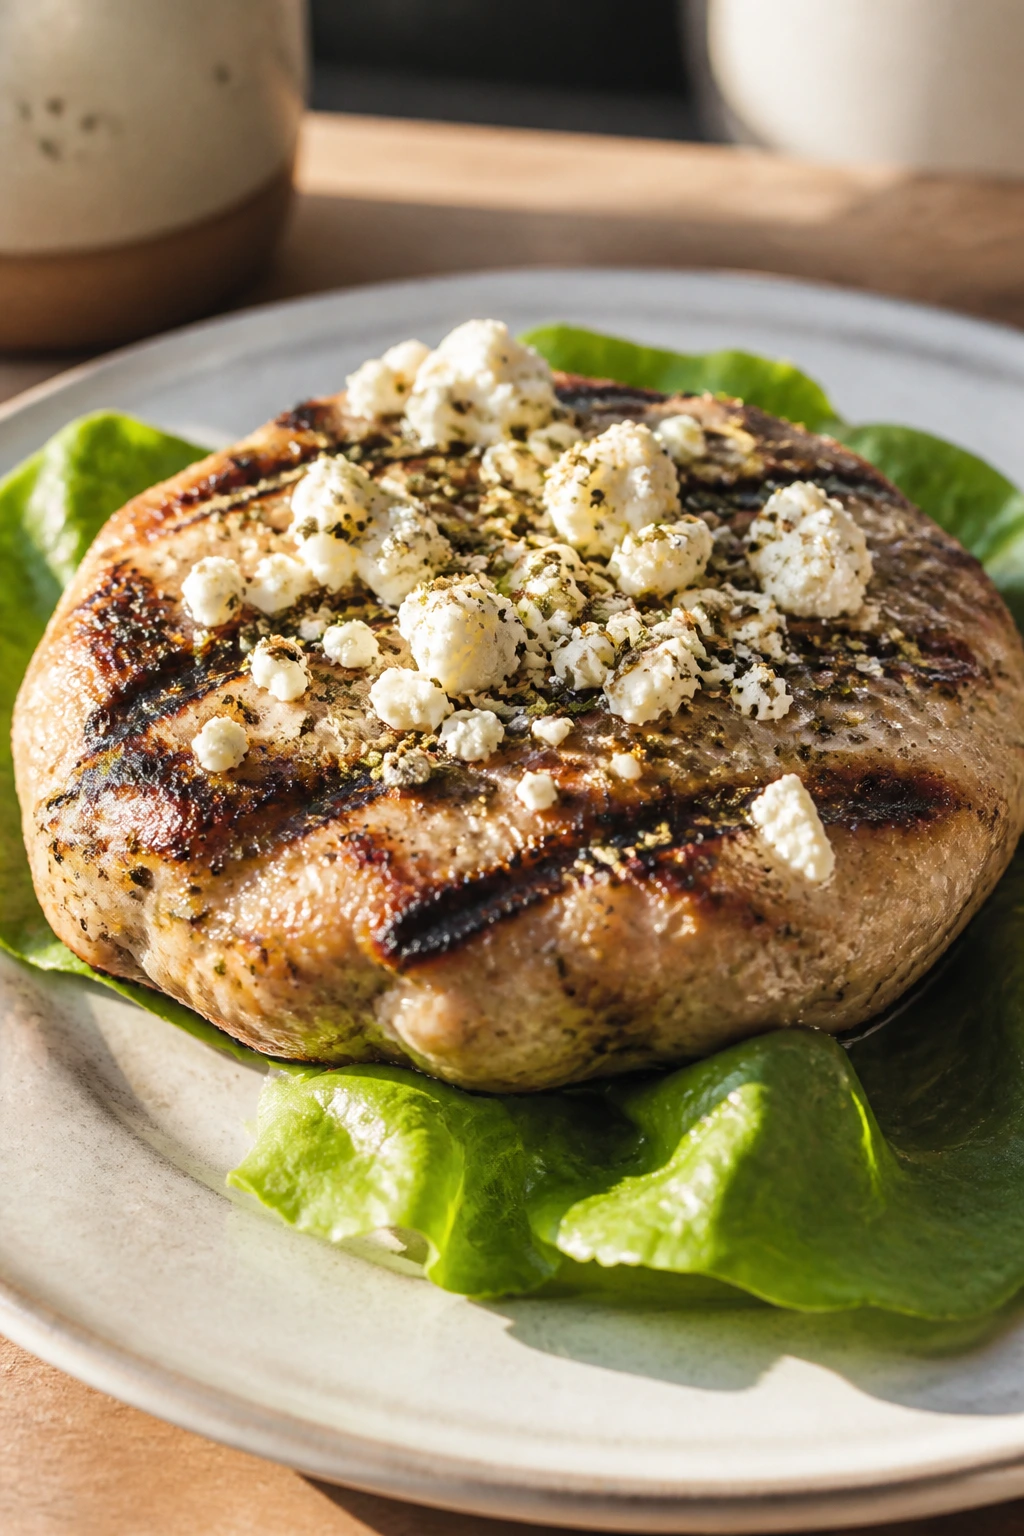
Turkey burgers can be dry if you let them be boring. Feta, onion, and oregano pull them in a better direction, and tzatziki keeps the meal from feeling dry on day two.
Why It Works:
Ground turkey needs salt, moisture, and a little fat to stay pleasant. Feta does all three jobs in a small way, while oregano and onion give the patties a Greek edge that stands up to meal prep. They reheat better than most burgers if you keep the toppings separate.
Key Ingredients:
- 1 pound ground turkey
- 1/3 cup crumbled feta
- 2 tablespoons grated red onion
- 1 teaspoon dried oregano
- 1 egg
- Salt and pepper
- Lettuce leaves
- Tzatziki for serving
Quick Steps:
- Mix turkey, feta, onion, oregano, egg, salt, and pepper.
- Form 4 patties.
- Pan-sear or grill until cooked through.
- Cool and store with lettuce and tzatziki separate.
- Reheat gently before serving.
Equipment for This Recipe:
- Mixing bowl
- Skillet or grill pan
- Spatula
- Containers
How to Serve This Dish:
Serve on lettuce leaves, whole grain buns, or over salad greens. Tzatziki should go on last so the patties stay firm.
Pro Tips for This Recipe:
- Grate the onion fine so it disappears into the meat.
- Don’t press the patties while cooking.
- Chill the formed patties for 15 minutes if they feel soft.
Variations on This Dish:
- Bunless Bowl: Serve over cucumber salad.
- Herb Burger: Add dill and parsley to the mix.
Common Mistakes to Avoid with This Dish:
- Overworking the meat: The burgers turn dense.
- Serving with wet toppings inside the storage box: The bun or lettuce goes limp.
28. Chickpea Pasta Salad
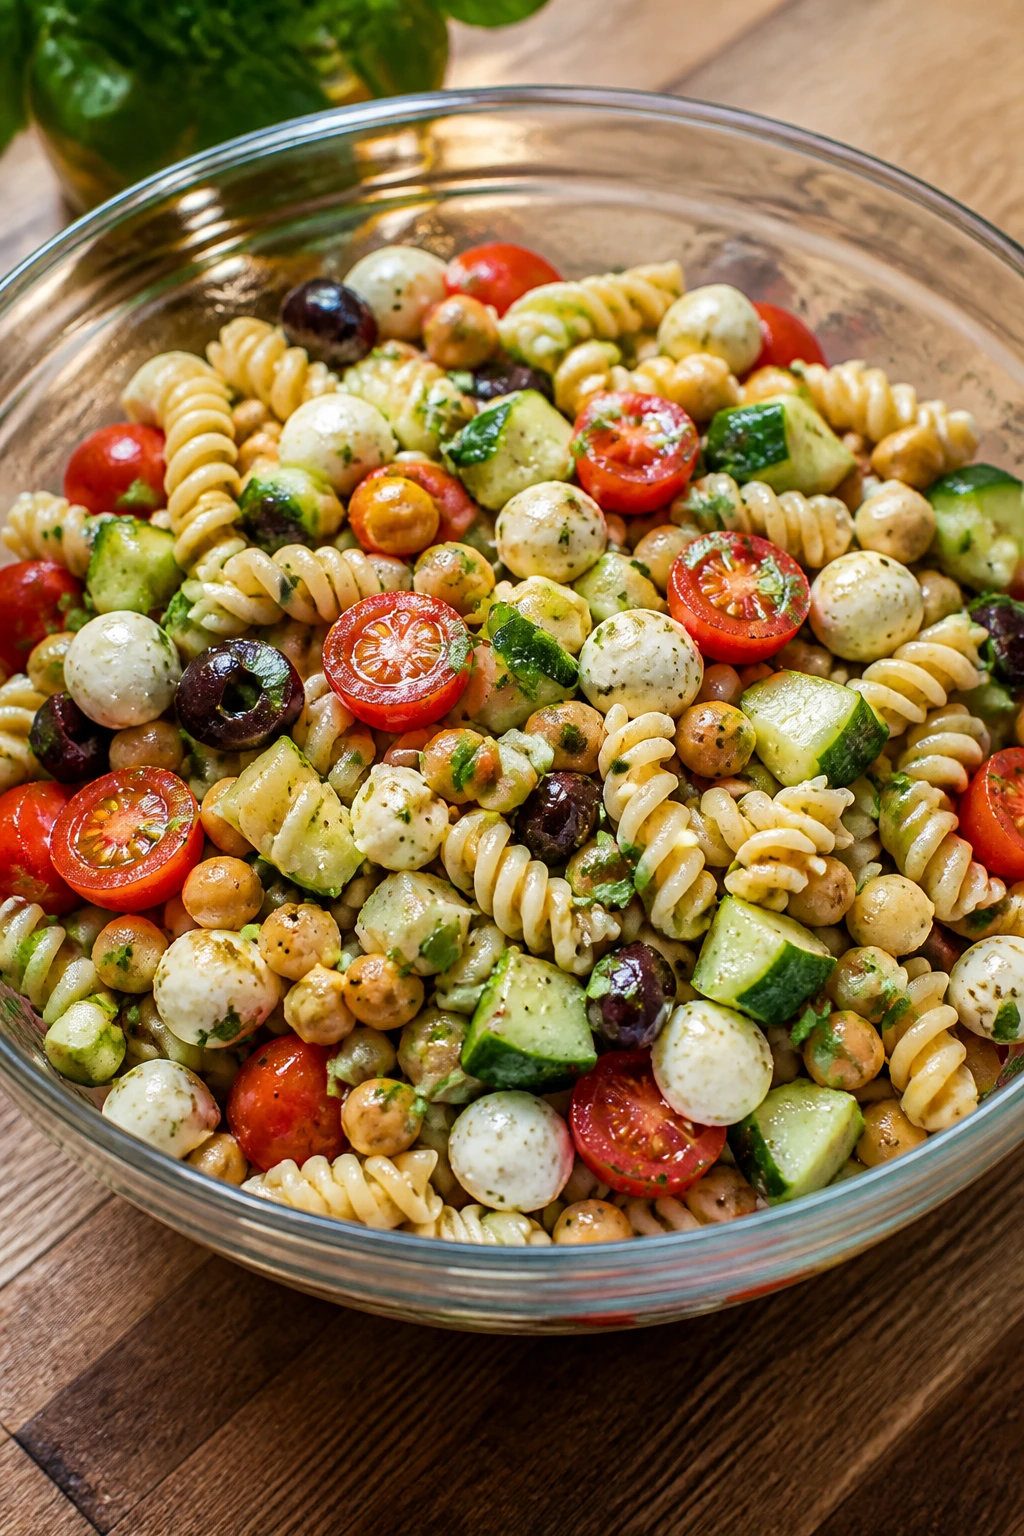
Chickpea pasta brings more protein than regular noodles and doesn’t disappear into the dressing as fast. Add crunchy vegetables and a sharp vinaigrette, and you’ve got a salad that keeps its shape.
Why It Works:
Chickpea pasta is sturdy enough for meal prep and higher in protein than standard pasta. Cucumbers, tomatoes, olives, and basil keep the bowl bright, and the vinegar-based dressing is less likely to turn it heavy overnight. This one is a lunchbox workhorse.
Key Ingredients:
- 8 ounces chickpea pasta
- 1 cup cherry tomatoes, halved
- 1 cucumber, diced
- 1/2 cup olives, sliced
- 1/4 cup basil, torn
- 1/4 cup Italian vinaigrette
- 1/3 cup mozzarella pearls
- Salt and pepper
Quick Steps:
- Cook the pasta and rinse it briefly if needed.
- Cool completely.
- Toss with vegetables, basil, and mozzarella.
- Add vinaigrette and season.
- Chill before packing.
Equipment for This Recipe:
- Pot
- Colander
- Mixing bowl
- Storage containers
How to Serve This Dish:
Serve chilled with grilled chicken or on its own. A little extra basil on top makes it feel fresher.
Pro Tips for This Recipe:
- Cool the pasta fully before dressing it.
- Salt the cooking water well or the pasta tastes flat.
- Add more vinaigrette right before eating if it tightens in the fridge.
Variations on This Dish:
- Pesto Pasta Salad: Swap vinaigrette for pesto thinned with lemon.
- Tuna Pasta Salad: Add canned tuna for more protein.
Common Mistakes to Avoid with This Dish:
- Overcooking chickpea pasta: It can get chalky.
- Using too much dressing at once: The pasta absorbs it and goes slick.
29. BBQ Chicken Lettuce Cups
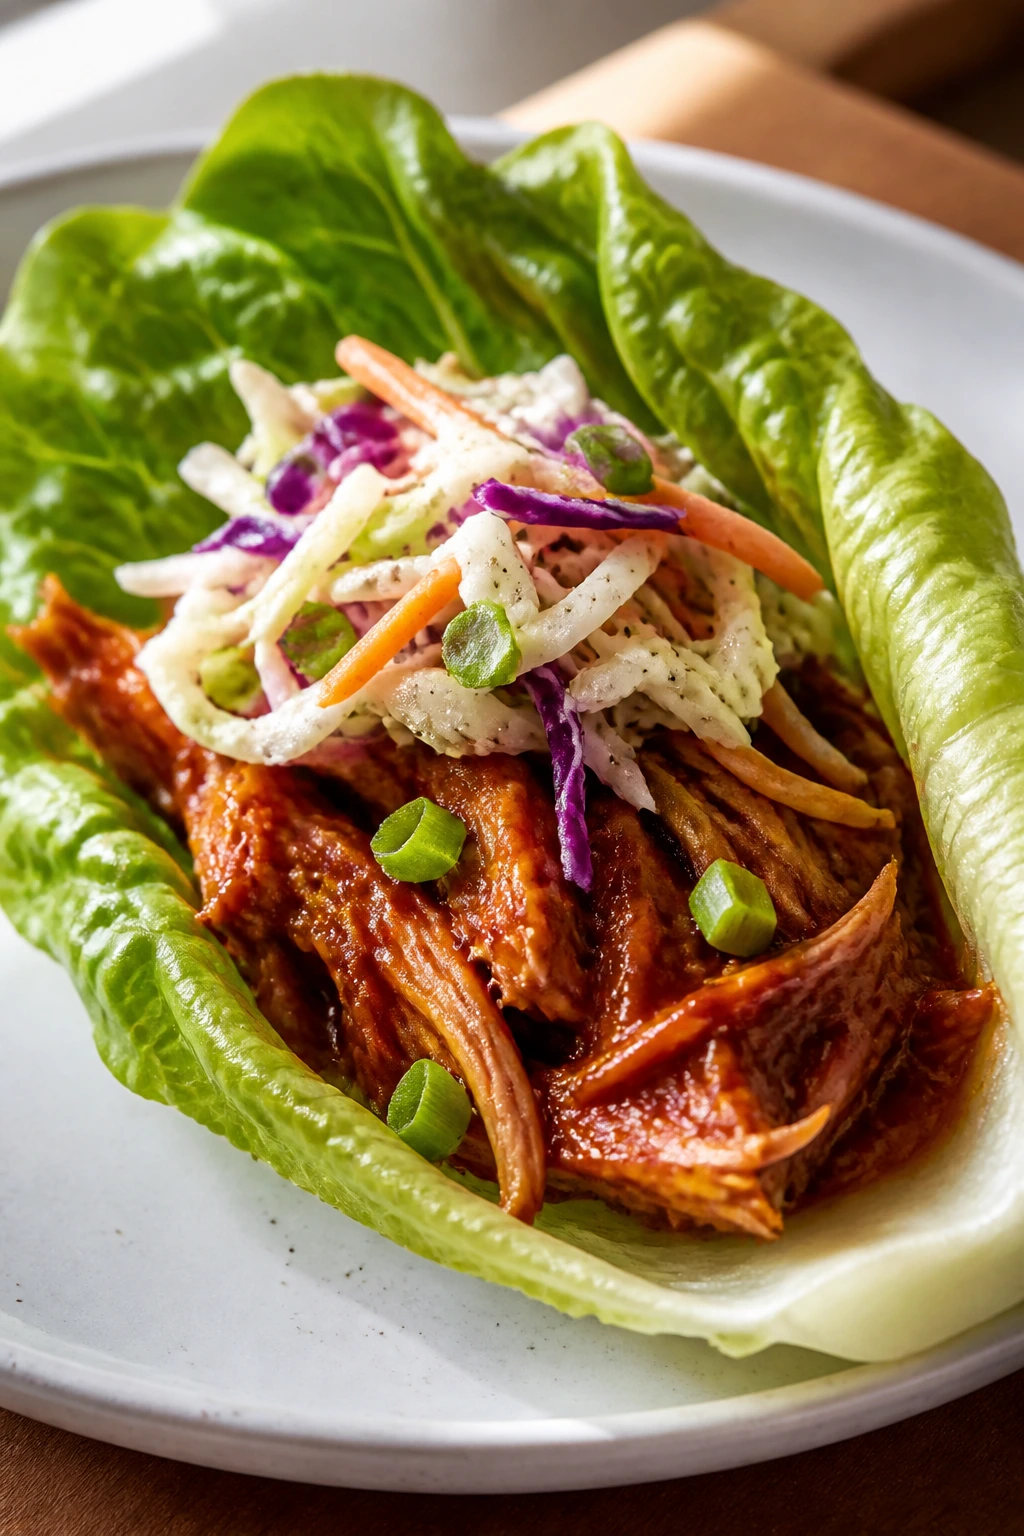
These are messy in the best way if you eat them right away, and still manageable in meal-prep containers if you keep the fillings separate until lunch.
Why It Works:
Shredded chicken catches BBQ sauce well, lettuce gives you a crisp shell, and a little slaw on top adds crunch. It’s lighter than a sandwich but still tastes like lunch with a personality.
Key Ingredients:
- 3 cups cooked shredded chicken
- 1/2 cup BBQ sauce
- 1 cup slaw mix
- 8 romaine or butter lettuce leaves
- 1/4 cup plain Greek yogurt
- 1 tablespoon lime juice
- Salt and pepper
Quick Steps:
- Warm the chicken with BBQ sauce.
- Mix slaw with yogurt, lime, salt, and pepper.
- Wash and dry the lettuce leaves.
- Pack chicken and slaw separately.
- Assemble in the leaves before eating.
Equipment for This Recipe:
- Skillet
- Bowl
- Salad spinner or towels
- Containers
How to Serve This Dish:
Pile the chicken into the leaves and top with slaw. Serve with corn or roasted sweet potatoes if you want a fuller meal.
Pro Tips for This Recipe:
- Use sturdy lettuce like romaine hearts.
- Keep the slaw dry until serving if you want more crunch.
- Add hot sauce if your BBQ sauce leans sweet.
Variations on This Dish:
- Carolina Style: Use vinegar-heavy BBQ sauce.
- Spicy Peach Version: Mix peach preserves into the sauce.
Common Mistakes to Avoid with This Dish:
- Assembling too early: The lettuce softens.
- Using loose leaves: They tear under the filling.
30. Miso Ginger Noodle Bowls
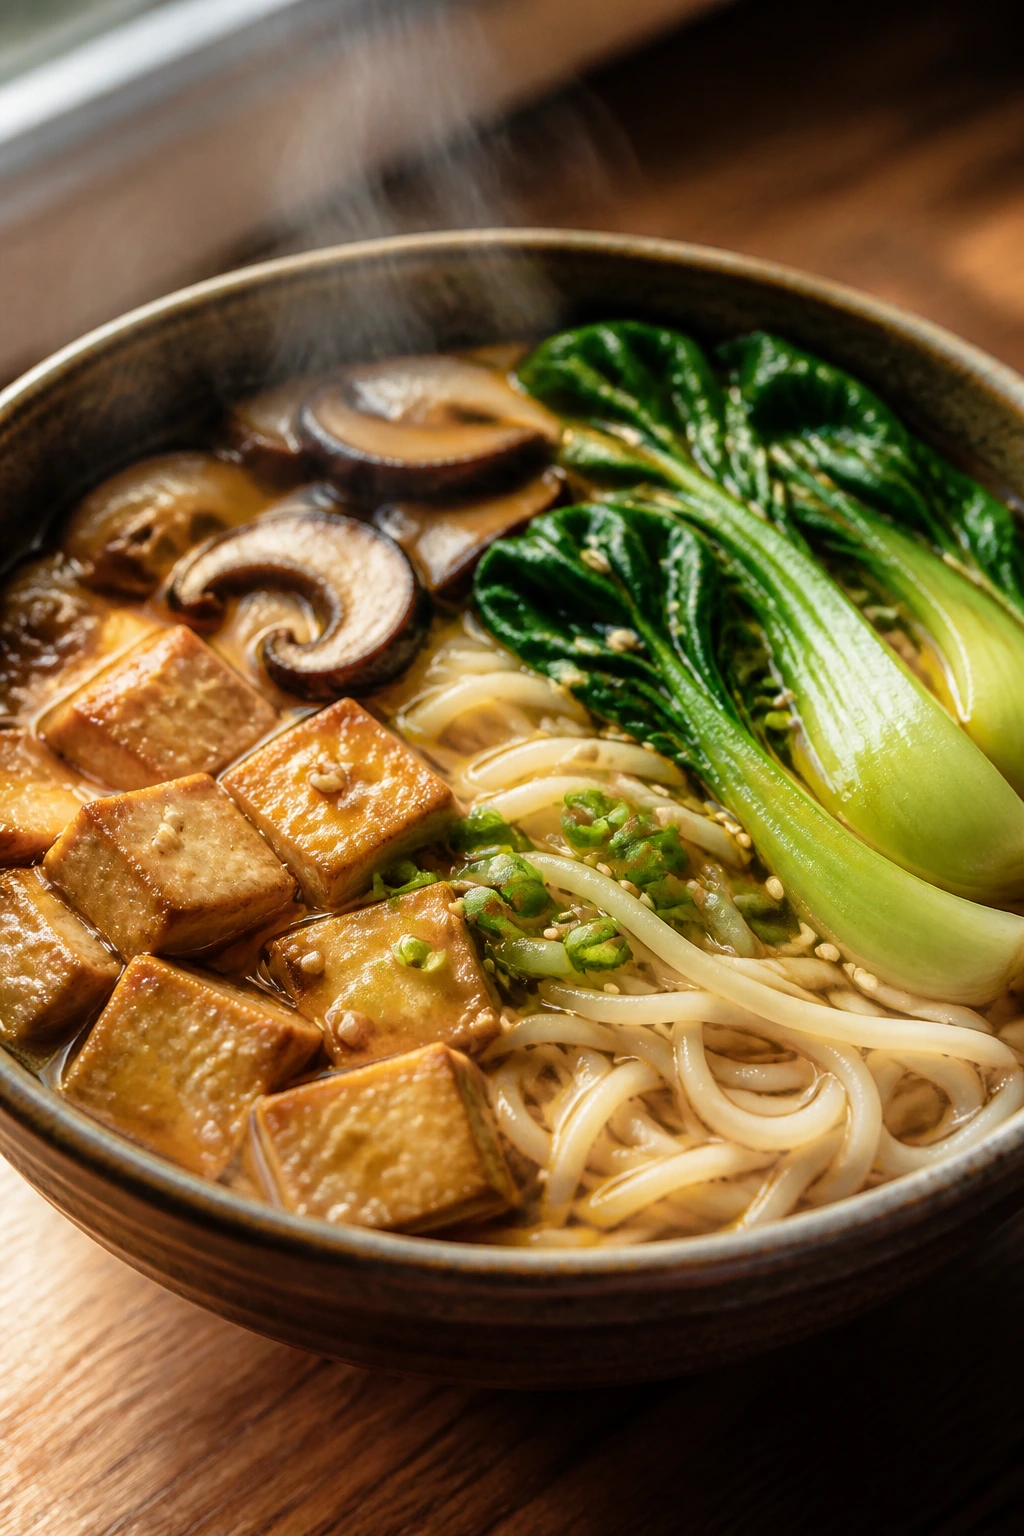
Miso adds salt and depth in a way plain soy sauce can’t quite match. Paired with ginger, noodles, and tender vegetables, it makes a lunch that tastes richer than the ingredient list looks.
Why It Works:
Miso dissolves into a slick, savory broth-like sauce. Ginger and garlic keep the flavor sharp, and noodles soak up the sauce without drying out. If you add tofu or chicken, it becomes a full meal that still reheats cleanly.
Key Ingredients:
- 8 ounces rice noodles or soba
- 2 tablespoons white miso
- 1 tablespoon grated ginger
- 2 cloves garlic, minced
- 2 cups bok choy or spinach
- 1 cup mushrooms, sliced
- 1 tablespoon sesame oil
- 1 cup tofu or shredded chicken
Quick Steps:
- Cook noodles and set aside.
- Sauté mushrooms, garlic, and ginger in sesame oil.
- Stir in miso with a splash of water.
- Add bok choy and protein until heated through.
- Toss with noodles and portion.
Equipment for This Recipe:
- Skillet or wok
- Pot for noodles
- Spoon
- Containers
How to Serve This Dish:
Serve warm, with scallions or sesame seeds if you have them. A squeeze of lime wakes up the miso nicely.
Pro Tips for This Recipe:
- Dissolve miso in liquid first so it doesn’t clump.
- Keep the bok choy slightly crisp.
- Add noodles last so they don’t overcook in the pan.
Variations on This Dish:
- Peanut Miso Bowl: Stir peanut butter into the sauce.
- Vegetable-Only Bowl: Skip the protein and add edamame.
Common Mistakes to Avoid with This Dish:
- Boiling miso hard: The flavor gets dull.
- Cooking noodles too soft: They turn gummy on storage.
31. Black Bean Enchilada Bake
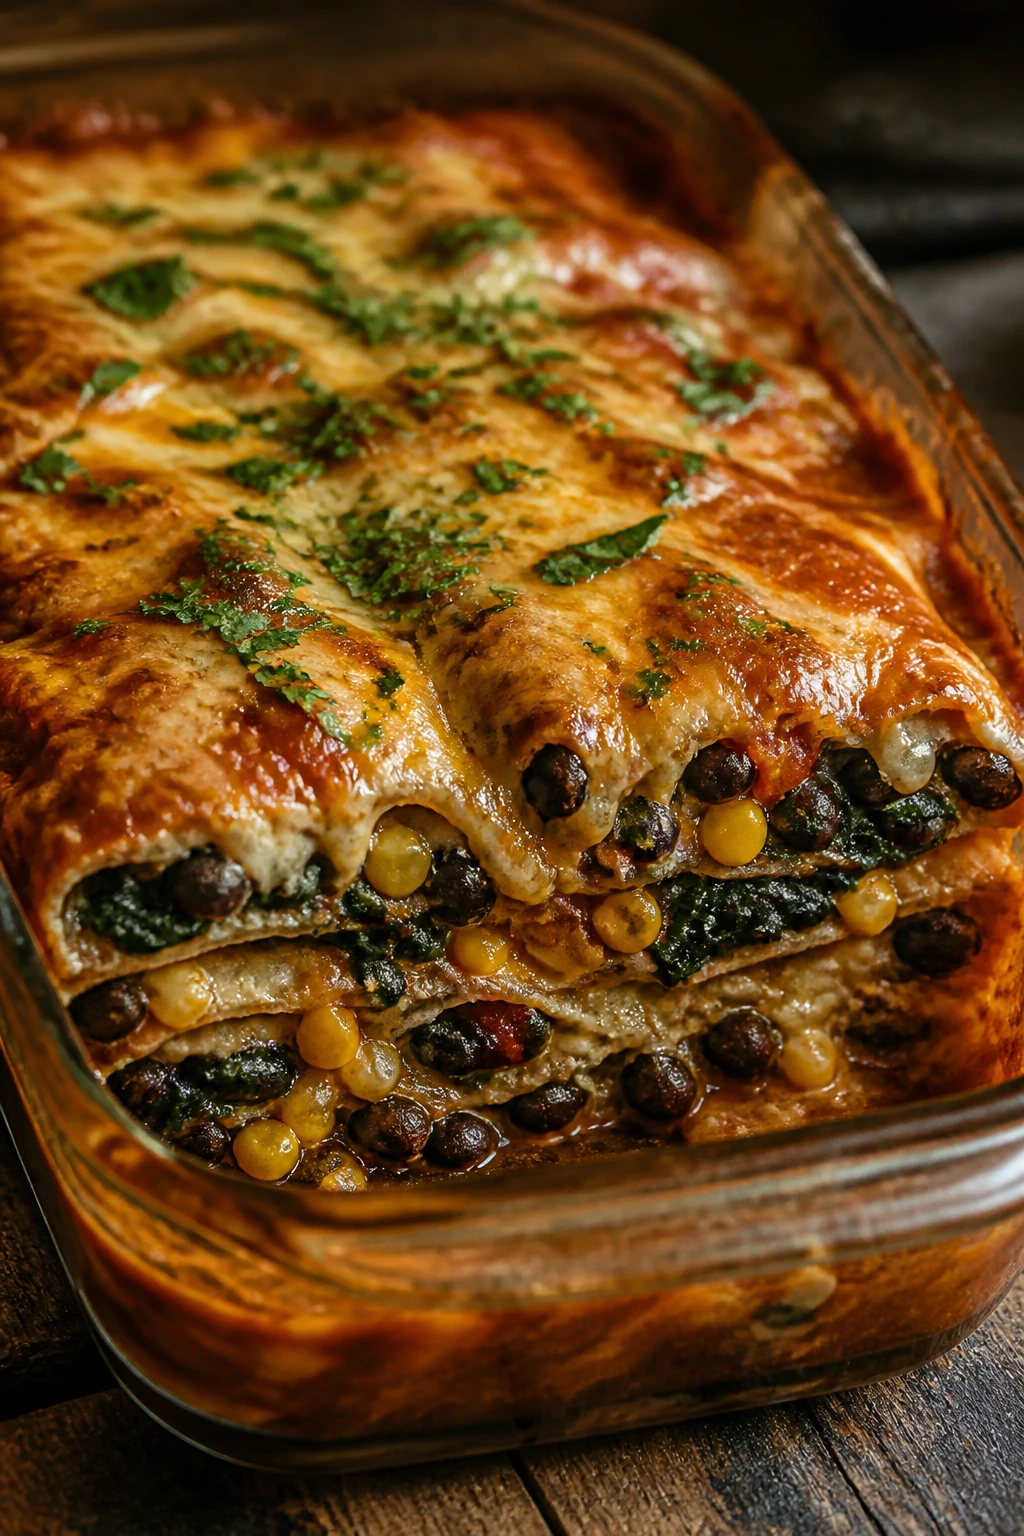
This is the casserole version of a weeknight rescue. Tortillas, beans, sauce, and cheese stack into layers that hold up in the fridge and reheat without much fuss.
Why It Works:
Black beans bring protein and structure. Enchilada sauce keeps the tortilla layers moist, while cheese gives the top that browned finish everyone reaches for first. It slices neatly after resting, which is what you want for meal prep.
Key Ingredients:
- 6 small tortillas
- 2 cans black beans, rinsed
- 2 cups enchilada sauce
- 1 cup corn
- 2 cups spinach
- 1 1/2 cups shredded cheese
- 1/2 onion, diced
Quick Steps:
- Sauté onion briefly.
- Layer tortillas, beans, corn, spinach, sauce, and cheese in a baking dish.
- Repeat the layers.
- Bake at 375°F for 25 to 30 minutes.
- Rest before slicing.
Equipment for This Recipe:
- Baking dish
- Skillet
- Spoon
- Knife
How to Serve This Dish:
Serve with a spoon of yogurt or avocado. A chopped tomato salad on the side keeps it from feeling too heavy.
Pro Tips for This Recipe:
- Let it rest so the slices stay together.
- Use a thick enchilada sauce, not a watery one.
- Add jalapeños if you want more bite.
Variations on This Dish:
- Chicken Enchilada Bake: Swap some beans for shredded chicken.
- Veggie-Heavy Bake: Add zucchini and peppers.
Common Mistakes to Avoid with This Dish:
- Cutting immediately: The layers slide.
- Using too much sauce between layers: The bake turns sloppy.
32. Mediterranean Baked Cod
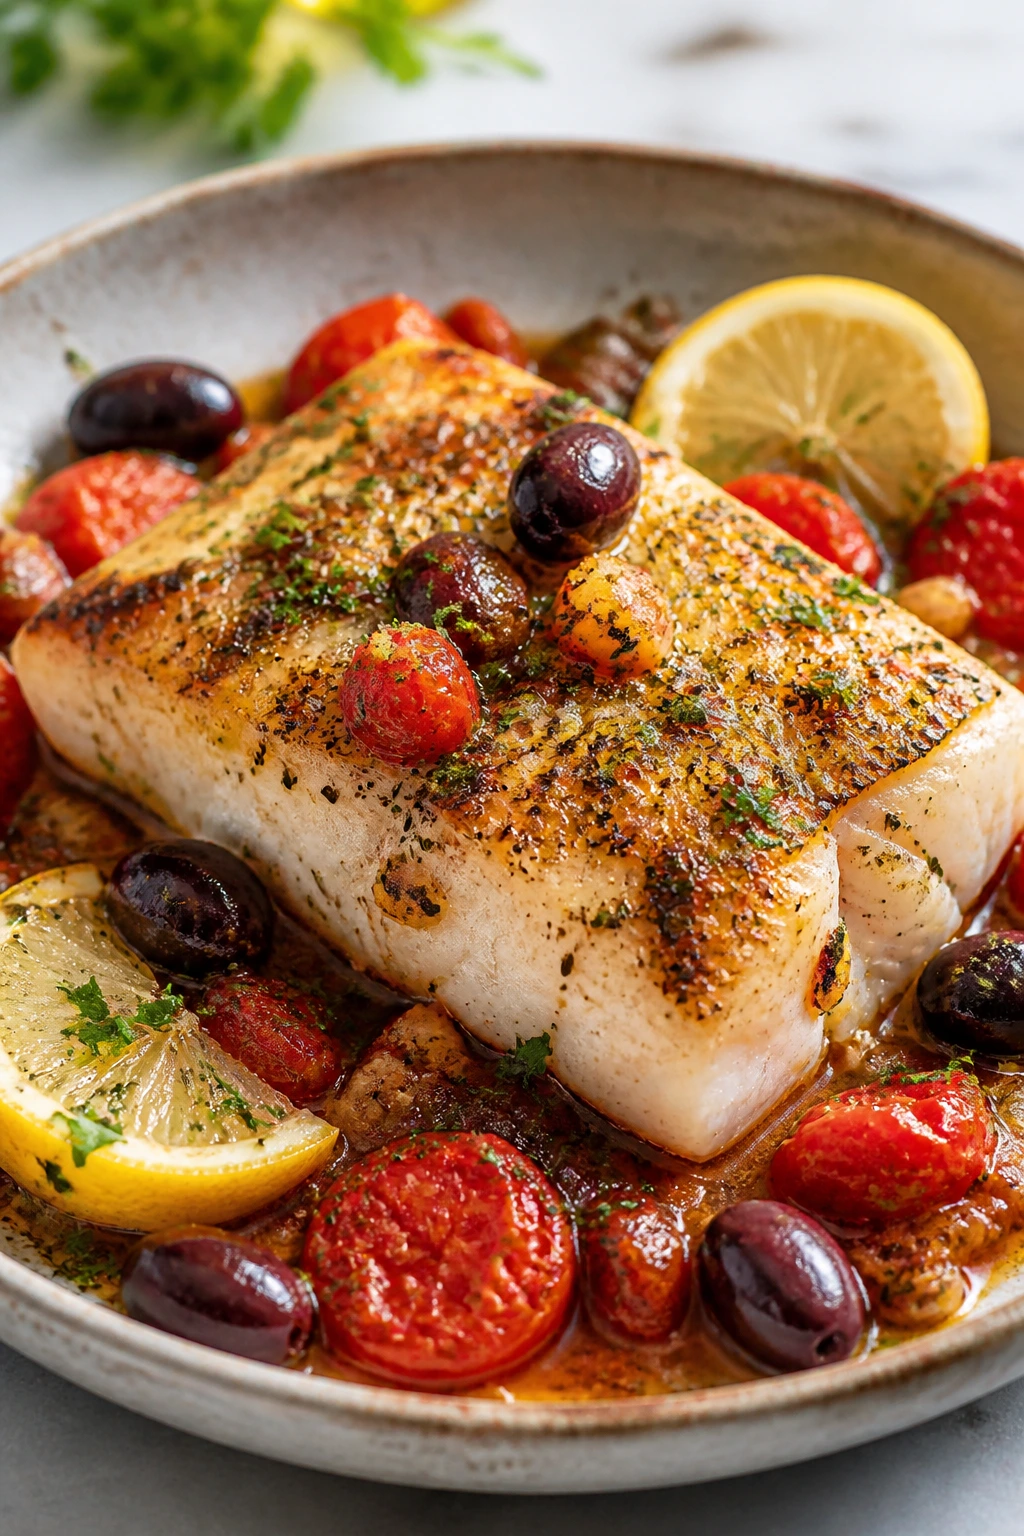
Cod is lean, mild, and a little too shy on its own. Tomatoes, olives, garlic, and lemon give it enough personality to survive meal prep without drying into flakes.
Why It Works:
Cod cooks fast and takes on surrounding flavor well. The tomato-olive mixture keeps the fish moist, and lemon finishes the whole dish with a clean edge. It’s a lighter dinner that still feels composed when you reopen the container.
Key Ingredients:
- 4 cod fillets
- 1 pint cherry tomatoes
- 1/2 cup olives
- 2 cloves garlic, sliced
- 2 tablespoons olive oil
- 1 lemon, sliced
- 2 tablespoons parsley
- Salt and pepper
Quick Steps:
- Scatter tomatoes, olives, garlic, and lemon in a baking dish.
- Set cod on top and season.
- Drizzle with oil.
- Bake at 400°F for 12 to 15 minutes.
- Finish with parsley.
Equipment for This Recipe:
- Baking dish
- Knife
- Spoon
- Fish spatula, optional
How to Serve This Dish:
Serve with couscous, rice, or roasted potatoes. Spoon the tomato juices over everything.
Pro Tips for This Recipe:
- Don’t overbake cod; it dries quickly.
- Use pitted olives so lunch doesn’t turn into a chore.
- Add capers if you want more punch.
Variations on This Dish:
- Herb Cod: Add oregano and dill.
- Spicy Tomato Cod: Add chili flakes.
Common Mistakes to Avoid with This Dish:
- Baking too long: Cod gets chalky.
- Skipping salt on the tomatoes: The sauce tastes thin.
33. Zucchini Turkey Skillet
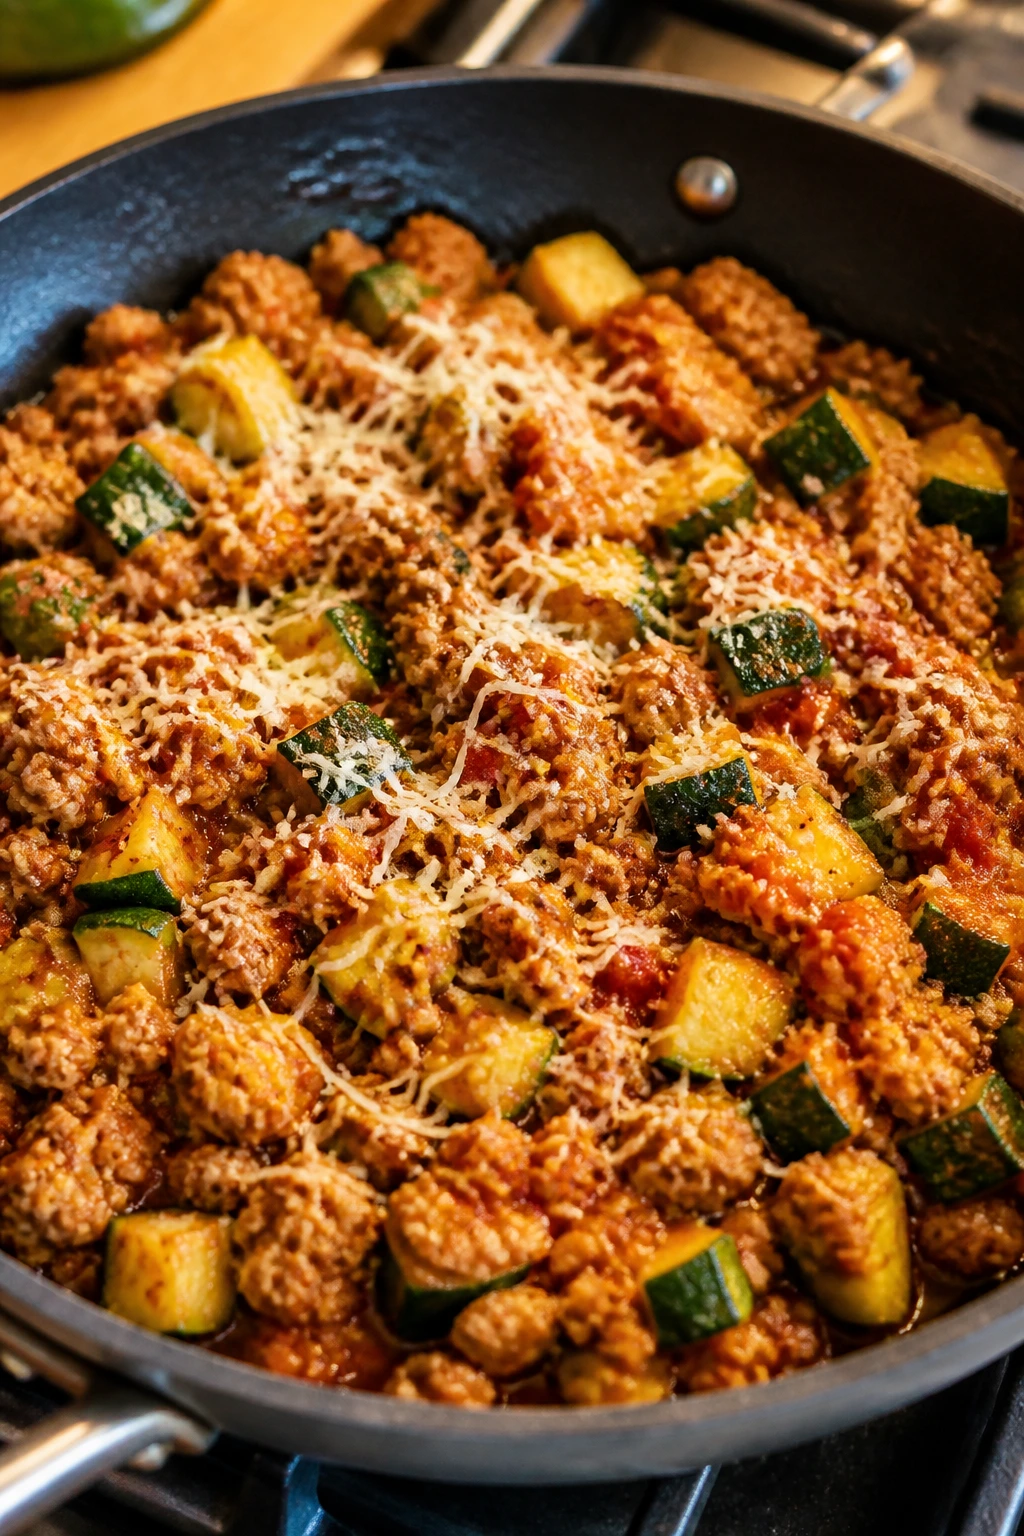
This is the kind of skillet dinner that exists because a zucchini or two are hanging around and you need them to matter. Ground turkey, tomato paste, and Italian seasoning make the whole pan taste more finished than it should.
Why It Works:
Zucchini cooks fast and softens into the turkey without falling apart. Tomato paste adds depth, garlic does the usual useful thing, and Parmesan gives the finished dish a salty edge. It’s one pan, but not a boring one.
Key Ingredients:
- 1 pound ground turkey
- 2 zucchini, diced
- 1 onion, diced
- 3 cloves garlic, minced
- 2 tablespoons tomato paste
- 1 teaspoon Italian seasoning
- 1/4 cup grated Parmesan
- Salt and pepper
Quick Steps:
- Brown the turkey with onion.
- Stir in garlic and tomato paste.
- Add zucchini and seasoning.
- Cook until the zucchini is just tender.
- Finish with Parmesan.
Equipment for This Recipe:
- Large skillet
- Spoon
- Knife and board
- Container set
How to Serve This Dish:
Serve over rice, pasta, or cauliflower rice. It’s also good tucked into a wrap.
Pro Tips for This Recipe:
- Dice zucchini into even pieces so it cooks at the same pace.
- Let the tomato paste cook for a minute before adding liquid.
- Add Parmesan after turning off the heat.
Variations on This Dish:
- Spicy Skillet: Add red pepper flakes.
- Cheesy Bake: Top with mozzarella and broil briefly.
Common Mistakes to Avoid with This Dish:
- Cooking zucchini until mushy: It should still have shape.
- Skipping seasoning layers: Turkey needs help at every stage.
34. Protein Pancake Bites

These are what I make when I want something pancake-adjacent that can be pulled from the fridge and eaten with one hand. They’re soft, lightly sweet, and a lot less fussy than a griddle full of batter.
Why It Works:
Oats, eggs, and cottage cheese give these bites protein and structure. Banana keeps them tender, and baking them in a mini muffin tin makes them easy to portion for breakfast or a snack. They also freeze without drama.
Key Ingredients:
- 1 cup oats
- 2 large eggs
- 1 cup cottage cheese
- 1 ripe banana
- 1 teaspoon baking powder
- 1 teaspoon cinnamon
- Pinch of salt
Quick Steps:
- Blend everything until smooth.
- Grease a mini muffin tin.
- Fill each cup about 3/4 full.
- Bake at 350°F for 12 to 15 minutes.
- Cool before storing.
Equipment for This Recipe:
- Blender
- Mini muffin tin
- Spoon or measuring scoop
- Cooling rack
How to Serve This Dish:
Serve with berries or a little nut butter. They’re easiest to eat warm, but they hold up cold too.
Pro Tips for This Recipe:
- Use a ripe banana for better sweetness.
- Don’t overfill the cups or they puff over the edges.
- Blend until the batter is smooth so the texture stays even.
Variations on This Dish:
- Blueberry Bites: Fold blueberries in after blending.
- Chocolate Chip Version: Add a small handful of chips.
Common Mistakes to Avoid with This Dish:
- Using too much cottage cheese texture: Blend it fully.
- Baking too long: The bites dry out.
35. Freezer Breakfast Burritos
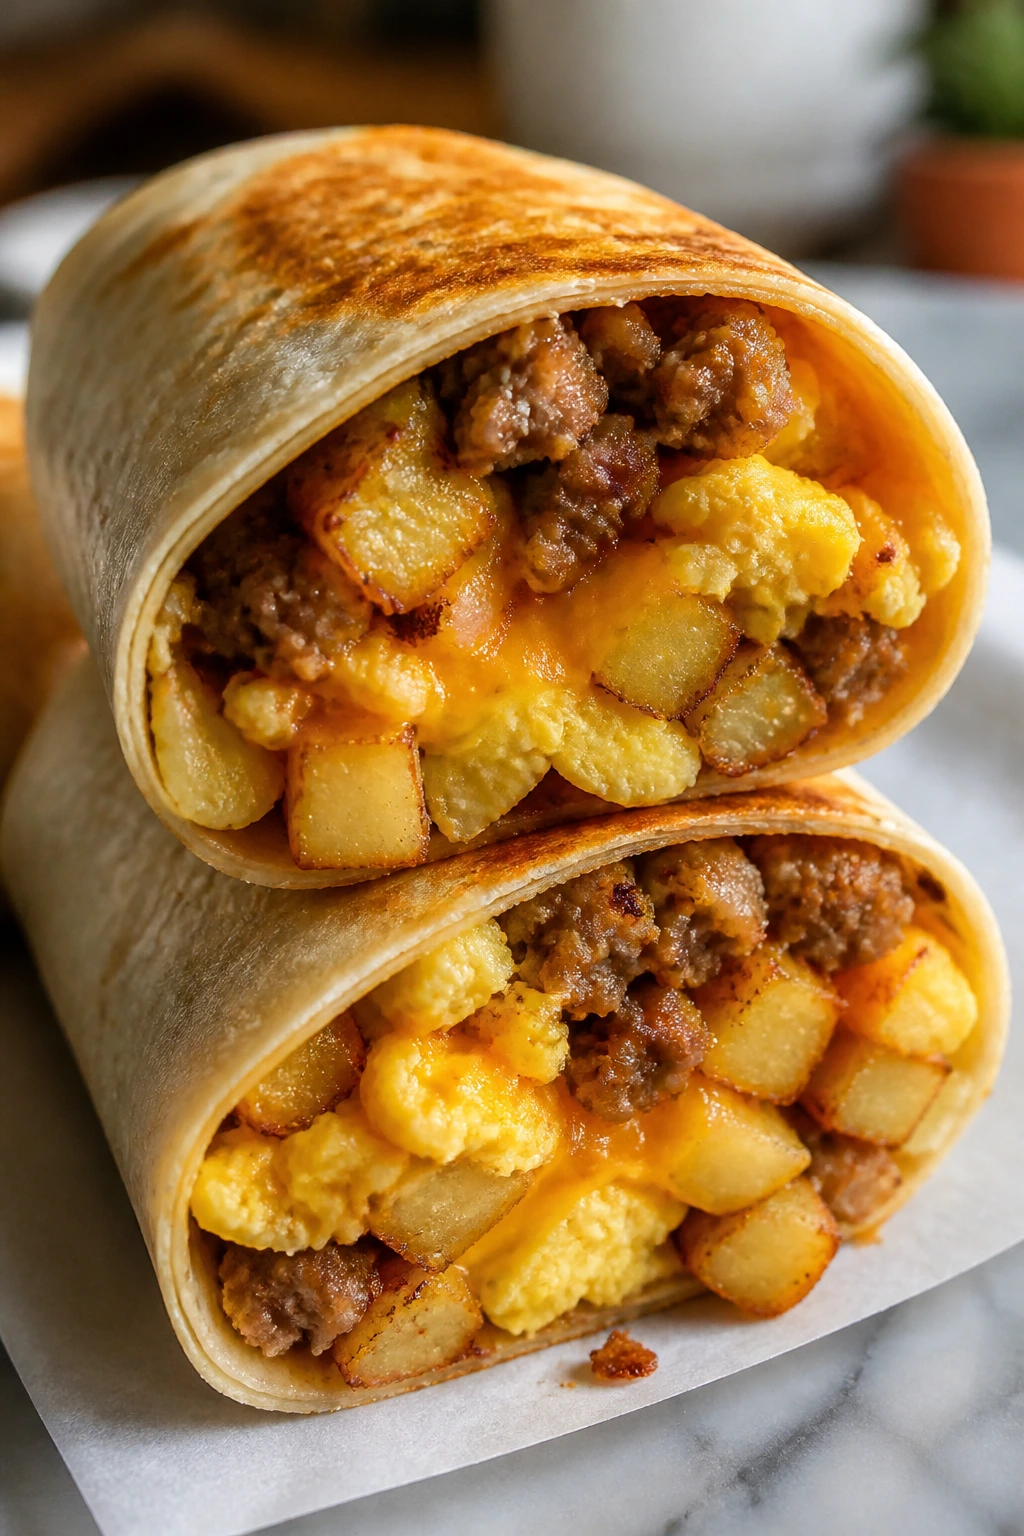
If there’s one recipe here that behaves like a favor to your future self, it’s this one. Potatoes, eggs, sausage or beans, and cheese freeze into burritos that reheat with a bit of dignity left.
Why It Works:
Potatoes keep the burrito from feeling thin. Eggs and sausage or beans add protein, the tortilla protects the filling, and the freezer does the waiting for you. These are best when wrapped tightly and reheated slowly.
Key Ingredients:
- 8 large eggs
- 2 cups diced roasted potatoes
- 1 cup cooked turkey sausage or black beans
- 1 cup shredded cheese
- 1/2 cup diced bell pepper
- 8 large flour tortillas
- Salt and pepper
- Salsa for serving
Quick Steps:
- Scramble the eggs softly.
- Warm the potatoes, sausage or beans, and peppers.
- Fill each tortilla with the mixture and cheese.
- Roll tightly and cool completely.
- Wrap, freeze, and reheat when needed.
Equipment for This Recipe:
- Skillet
- Baking sheet or microwave-safe bowl
- Foil or parchment
- Freezer bags
How to Serve This Dish:
Reheat from frozen in the microwave, then brown lightly in a skillet if you want the outside firmer. Salsa on the side keeps it from tasting flat.
Pro Tips for This Recipe:
- Cool the filling before rolling or the tortillas get soggy.
- Use roasted potatoes instead of boiled ones for better texture.
- Wrap each burrito individually before freezing.
Variations on This Dish:
- Veggie-Freezer Burrito: Use black beans, spinach, and peppers.
- Salsa Verde Burrito: Add green salsa and a little pepper jack.
Common Mistakes to Avoid with This Dish:
- Rolling too loosely: The filling escapes on reheating.
- Forgetting to cool completely: Ice crystals make the tortilla wet.
Why Sunday Prep Actually Works Better Than Random Weeknight Cooking
Sunday prep earns its keep because you can sequence the work instead of chasing it. Roast the things that need heat first, simmer the things that can sit on the stove, and cool the fragile stuff while the oven is busy with something else. That’s the part most people miss. Meal prep is less about cooking a giant mountain of food and more about giving each ingredient the right kind of attention once.
The texture issue matters more than the recipe itself sometimes. A grain bowl with undercooked quinoa feels gritty. A chicken salad made from warm chicken gets watery. A burrito wrapped before the filling cools turns damp at the seam. These are small mistakes, but they decide whether your container gets eaten or politely ignored.
I also like meal prep that splits into hot and cold components. A bowl with rice, beans, and roasted vegetables can hold up for days if the sauce stays separate. A salad stays crisp if the dressing lives at the bottom of the jar. A freezer burrito doesn’t need to be delicate at all; it just needs to be wrapped tightly and reheated with patience.
That’s the real advantage here. You’re not building one magic meal. You’re building a system that works from breakfast through dinner without making every container look or taste the same.
Essential Equipment for These Recipes

- Rimmed sheet pans: Roasting vegetables, chicken, salmon, and potatoes is much easier when the pan has a lip to catch juices.
- Large skillet or sauté pan: You’ll use this for turkey, shrimp, tofu, stir-fries, and skillet dinners.
- Dutch oven or soup pot: Soups, chili, and saucy beans need room to simmer without splashing.
- Muffin tin: Egg muffins and breakfast bites depend on even little wells.
- Meal-prep containers: Choose sturdy, lidded containers that stack cleanly and don’t leak dressing.
- Wide-mouth jars: Best for layered salads that need separation.
- Instant-read thermometer: Useful for chicken, turkey, and salmon so you don’t guess.
- Colander and fine strainer: Helpful for beans, pasta, and rinsing grains well.
- Sharp knife and cutting board: Meal prep is mostly chopping, and a dull knife slows everything down.
- Foil or parchment: Not fancy, but it saves cleanup and helps with freezing.
Smart Shopping and Ingredient Tips
Buy proteins with storage in mind. Chicken thighs stay juicier than breasts in the fridge, salmon needs gentle handling, and ground turkey benefits from a little moisture built into the recipe. If you’re leaning on tofu, choose extra-firm and press it; soft tofu has no business here.
Canned beans are one of the smartest shortcuts on a meal-prep Sunday. Rinse them until the water runs mostly clear, especially for salads and bowls, because that slick liquid from the can can make dressing taste flat. The same goes for canned tuna: drain it well or your salad gets watery before Monday ends.
Frozen vegetables are not a compromise in this kind of cooking. Peas, corn, spinach, cauliflower rice, and edamame all make sense here, and in a few recipes they’re better than fresh because they’re already trimmed and ready. Buy frozen when the fresh version would require extra work for no gain.
For grains, pick the texture you actually want to eat on day three. Farro stays chewy, quinoa stays fluffy if you cool it right, brown rice holds up in bowls, and soba noodles need a rinse or they’ll glue themselves together. Oats are forgiving, which is why they show up so often. They know how to wait.
Sauces matter more than most people think. Lemon juice, vinegar, yogurt, salsa, tahini, and mustard all keep meal prep from tasting tired. When a dish feels dull after reheating, it usually needs acid or salt, not more food piled on top.
How to Serve These Recipes

Presentation:
Keep the bowl structure obvious. Grains on the bottom, protein in one section, vegetables in another, and fresh toppings added after reheating. A neat container is not just prettier; it helps the food stay edible longer.
Accompaniments:
These recipes play well with simple sides: fruit, cut vegetables, whole grain toast, pita, crackers, or a basic green salad. For soups and chili, a slice of bread or a warm tortilla is enough. For bowls, a spoon of yogurt, salsa, or tahini changes the whole container.
Portions:
Most of these recipes are built as one-meal servings, though soups, chili, and grain bowls can stretch. If you’re packing for a larger appetite, increase the grain or potato portion first; that’s usually more useful than piling on extra sauce. If you want lighter meals, trim the starch and leave the protein and vegetables alone.
Beverage Pairing:
Cold water with lemon works across the whole collection. Unsweetened iced tea suits the savory lunches, and sparkling water with a citrus slice fits the brighter bowls and salads. For breakfast items, black coffee or plain tea keeps the flavor clean.
Additional Tips and Flavor Boosters

Flavor Enhancement:
Use one finishing acid after reheating: lemon juice, lime juice, red wine vinegar, or a spoon of yogurt. That last hit often matters more than another spice.
Customization:
Swap grains freely when the texture allows it. Rice can become quinoa, farro can become barley, and tortillas can become lettuce cups if you want something lighter. Just keep an eye on what gets soggy and what stays firm.
Serving Suggestions:
A handful of herbs goes farther than people expect. Parsley, cilantro, dill, basil, and scallions make leftovers feel fresh without asking much from you. Toasted seeds or nuts add a useful crunch to salads and bowls.
Make-It-Yours:
For higher protein, add chicken, tofu, eggs, tuna, or Greek yogurt. For dairy-free eating, lean on tahini, hummus, coconut milk, and avocado. For a lower-carb day, reduce the rice or bread and double the vegetables instead.
Make-Ahead, Storage, and Reheating Guidance
Most of the cooked dishes here keep 3 to 4 days in the fridge when sealed in airtight containers. Soups, chili, and saucy skillet meals often improve after a night, while salmon, shrimp, and delicate greens are best eaten within 2 to 3 days. Breakfast burritos and baked oatmeal travel well into the freezer, where they can stay for up to 2 months if wrapped tightly.
Reheat bowls, chili, soups, and skillet meals in the microwave with a loose lid and a spoonful of water if the food looks dry. Stop halfway through and stir so the heat spreads evenly. For chicken, turkey, and tofu, a skillet over medium heat keeps the texture better than blasting everything in the microwave.
Cold salads and jar salads are a different animal. Keep the dressing separate when you can, or build the jar with dressing at the bottom and greens on top. Once dressed, leafy salads are best within 24 hours, while grain salads and bean salads can usually go 3 days without getting sad.
Egg muffins and frittata squares reheat well in 20- to 30-second microwave bursts. Freezer burritos should be thawed overnight when possible, then reheated until steaming hot in the center. If you’re rushing, microwave first and finish in a skillet or toaster oven for a firmer exterior.
Variations and Adaptations to Try
The Gluten-Free Plate:
Use quinoa, rice, sweet potatoes, and certified gluten-free oats instead of wheat-based wraps and pasta where needed. This works especially well for the bowls, soups, and breakfasts, and nobody misses the flour if the seasoning is honest.
The Dairy-Light Swap:
Skip feta, Parmesan, and shredded cheese in favor of tahini, avocado, salsa, or a squeeze of lemon. Greek yogurt can often be replaced with a plant-based yogurt if you want to keep the creamy texture without the dairy.
The Lower-Sodium Route:
Rinse canned beans, use no-salt-added tomatoes, and rely more on garlic, lemon, herbs, and spices. That shift matters most in chili, soup, and tuna salad, where salt can sneak up on you fast.
The Kid-Friendly Build:
Keep spices gentler, separate sauces from the main food, and lean on familiar shapes like burritos, muffins, and meatballs. Kids often respond better to recognizable pieces than to mixed bowls with six components fighting for attention.
The Higher-Protein Track:
Add extra chicken, tofu, turkey, cottage cheese, Greek yogurt, or edamame. Breakfast items are especially easy to boost with an extra egg or a side of yogurt.
The Meatless Monday Stack:
Swap chicken and turkey for chickpeas, tofu, lentils, or beans in bowls, salads, and soups. The structure stays the same; only the protein changes.
Common Mistakes to Avoid
- Packing everything hot: Steam is the enemy of crisp vegetables, tight wraps, and clean containers. Let food cool before sealing it.
- Dressing too early: Leafy greens, grains, and noodles can turn limp fast if they sit in sauce all night. Keep wet and dry parts apart when the recipe allows it.
- Overcooking proteins on Sunday: Chicken, salmon, shrimp, and turkey all dry out more after reheating than they did in the pan. Pull them on time, not after they’ve turned tough.
- Ignoring texture contrast: A good meal-prep container needs at least two textures. Soft oats need fruit or nuts, bowls need a crunchy vegetable, and chili needs a topping.
- Using the wrong container size: Too much empty space lets food slide around; too small and you mash everything to fit. Pick containers that match the recipe’s shape.
- Forgetting acid at the end: Lemon, lime, vinegar, yogurt, and salsa are not decorative. They wake up leftovers.
Frequently Asked Questions
How long can these meal prep recipes stay in the fridge?
Most cooked bowls, soups, and grain dishes are good for 3 to 4 days in airtight containers. Fresh salads and seafood are shorter-lived, usually closer to 2 or 3 days, especially if you want the texture to stay clean.
Which recipes freeze the best?
Breakfast burritos, chili, turkey meatballs, lentil soup, and baked oatmeal freeze with very little drama. Dishes with cucumbers, lettuce, avocado, or yogurt sauce are better kept fresh and assembled later.
Can I swap chicken for tofu or beans in most of these recipes?
Yes, in a lot of them. Bowls, salads, and stir-fries usually welcome chickpeas, tofu, or lentils, though you may need to add more seasoning because plant proteins can be a little quieter than meat.
What containers work best for meal prep Sundays?
Use sturdy lidded containers for bowls and soups, wide-mouth jars for salads, and parchment-wrapped foil for freezer burritos. If the lid bends or leaks, it’s the wrong box for the job.
How do I keep rice and grains from drying out?
Cook them just to tender, cool them before sealing, and add a spoonful of water when reheating. A splash of broth works too, especially for brown rice and farro.
Do I need to reheat everything?
No. Overnight oats, chia pudding, chicken salad, tuna salad, wraps, and jar salads are meant to be eaten cold or room temperature. Trying to microwave those is how you get disappointment in a bowl.
What if my vegetables get soggy by day three?
Roast them a little harder next time and store the sauce separately. For salads, keep watery vegetables like tomatoes and cucumbers away from the greens until serving.
Can I prep these recipes if I only have one hour?
Yes, if you pick a smart mix. Start with a sheet pan dinner, a pot of grains, and one no-cook lunch like tuna salad or overnight oats. One hour is enough for a useful week if you don’t try to make every dish from scratch at once.
A Fridge That Works Harder
The best meal prep Sundays don’t end with a heroic stack of identical boxes. They end with a fridge that can answer different kinds of hunger: something cold, something warm, something spoonable, something you can eat with one hand while standing up. That’s what makes these healthy recipes worth repeating.
Pick a breakfast, a bowl, a soup, and one freezer item. That’s usually enough to make Monday feel less like an ambush and more like a routine you already handled.