
A Tuesday night dessert should not ask for a second sink full of dishes, a softened-stick-of-butter countdown, and a three-hour chill in the fridge. Easy weeknight treats earn their place by being quick, forgiving, and a little bit clever: the browned edges on a skillet cookie, the crackly top on a brownie, the cold spoon-through of panna cotta, the warm fruit juices running through a crisp. Those are the moments that matter.
The best easy weeknight desserts do something smart with pantry staples. They lean on oats, chocolate, citrus, apples, yogurt, frozen fruit, sweetened condensed milk, and the sort of dough you can buy without apologizing for it. They also know when to stop. No decorative piping, no finicky sugar work, no “rest overnight” nonsense unless the payoff is worth it.
A dessert that works on a weeknight has to fit between the last dish and the first yawn. That means simple steps, short ingredient lists, and a result that tastes like more effort than it took. The trick is knowing which desserts behave after 7 p.m., and which ones belong to a Saturday with nowhere to be.
Why These Weeknight Desserts Earn Their Keep
- Fast payoff: Most of these recipes go from bowl to table in 10 to 30 minutes, so you are not standing around waiting for a batter to become a personality.
- Pantry-friendly: Flour, sugar, butter, oats, chocolate, and fruit show up again and again, which keeps the shopping list short and the impulse to skip dessert low.
- Low-stress cleanup: Several of the recipes are no-bake, one-bowl, or baked in a single skillet, and that matters when the kitchen already looks used.
- Flexible by design: A lot of these treats forgive small swaps — berries for cherries, chocolate chips for chunks, yogurt for cream, biscuit dough for scratch pastry.
- Built for real life: These desserts are the kind you can make after dinner without turning the evening into a project. No one needs a project.
- Still worth serving: Quick does not mean flimsy; a hot apple crisp, a cold cheesecake cup, or a gooey brownie can feel like a proper finish to a plain weeknight meal.
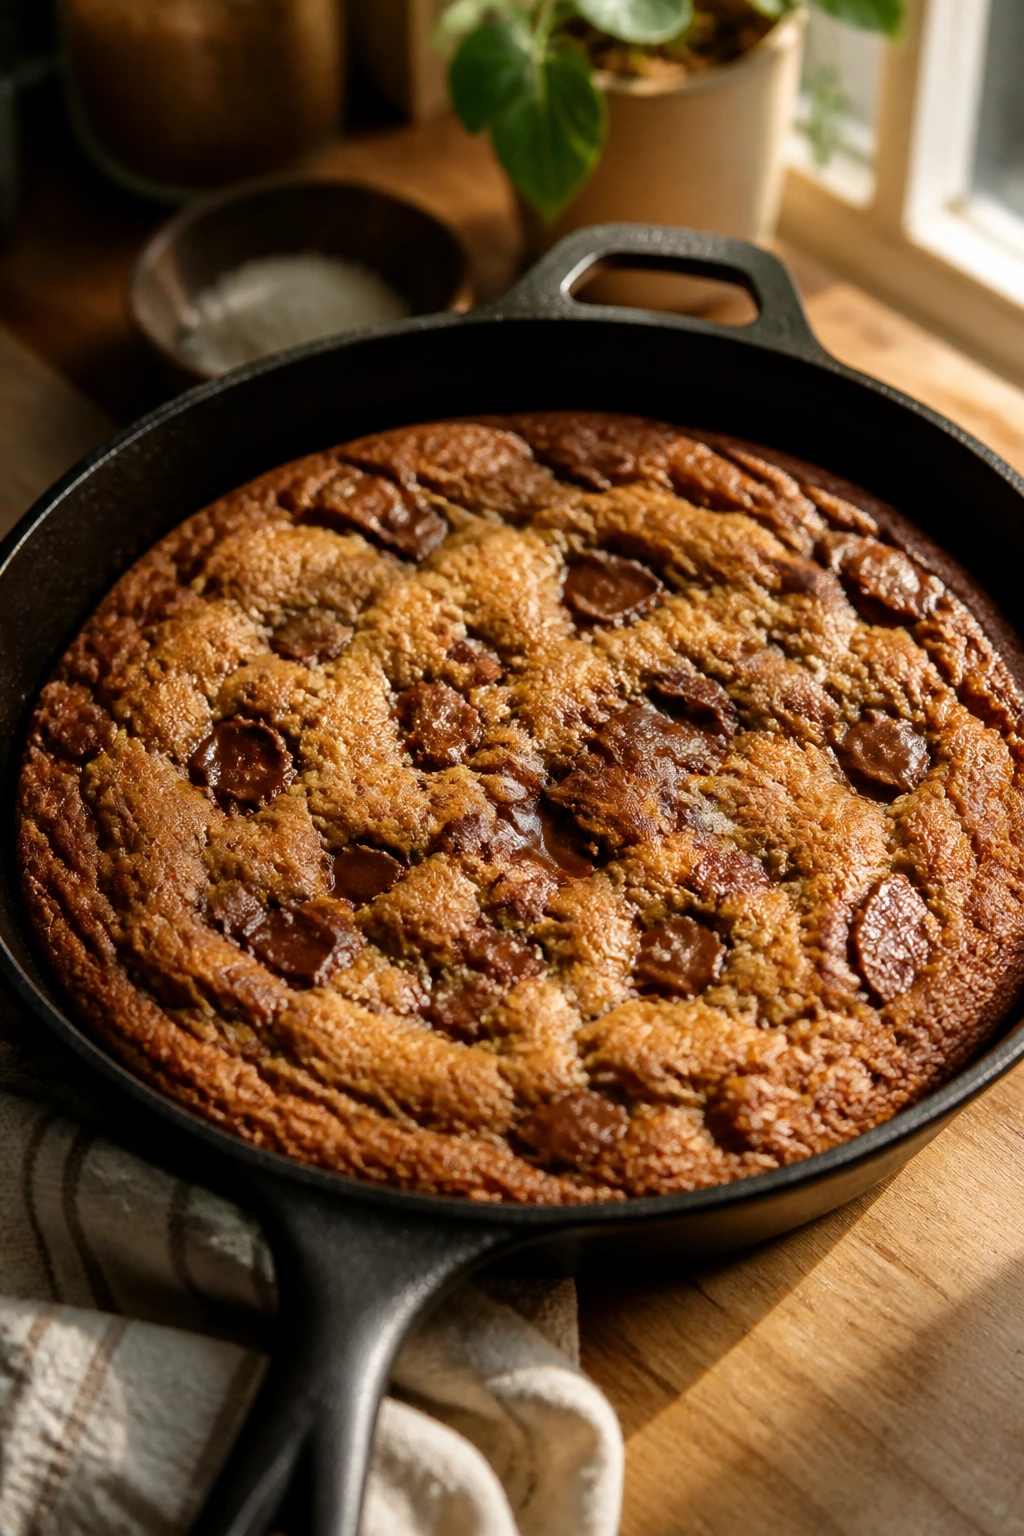
1. Brown Butter Chocolate Chip Skillet Cookie
Intro:
This is the dessert you make when a cookie sheet feels too small for the mood. The edges bake into a caramelized ring, the middle stays soft and spoonable, and the browned butter gives the whole pan a toasty, nutty smell that hits the room before the timer does. A scoop of vanilla ice cream on top turns the whole thing into a small, messy victory.
Why It Works:
Brown butter does the heavy lifting here. It gives the cookie a deeper flavor without adding a single extra step that feels fussy, and the cast-iron skillet helps the edges crisp while the center stays tender. You get the best part of a chocolate chip cookie — the hot, gooey middle — without shaping individual rounds.
Key Ingredients:
- 1/2 cup unsalted butter, browned and cooled slightly
- 3/4 cup packed light brown sugar
- 1/4 cup granulated sugar
- 1 large egg
- 1 teaspoon vanilla extract
- 1 cup all-purpose flour
- 1/2 teaspoon baking soda
- 1/2 teaspoon fine salt
- 1 cup semisweet chocolate chips
- Flaky salt, for finishing
Quick Steps:
- Preheat the oven to 350°F and grease a 10-inch ovenproof skillet.
- Brown the butter in a small saucepan until it smells nutty and the milk solids turn amber, then let it cool for 5 minutes.
- Stir in the brown sugar and granulated sugar, then whisk in the egg and vanilla until glossy.
- Fold in the flour, baking soda, salt, and chocolate chips just until no dry streaks remain.
- Press the dough into the skillet and bake for 18 to 22 minutes, until the edges are set and the center still looks slightly soft.
- Finish with flaky salt and let it rest for 10 minutes before scooping.
Equipment for This Recipe:
- 10-inch cast-iron or ovenproof skillet
- Small saucepan for browning butter
- Mixing bowl and wooden spoon
- Measuring cups and spoons
How to Serve This Dish:
Scoop it straight from the skillet while it is still warm and a little messy. Vanilla ice cream is the obvious move, but whipped cream and sliced strawberries work too if that is what you have.
Pro Tips for This Recipe:
- Brown the butter until you see tiny amber specks at the bottom; pale butter won’t give you the same depth.
- Pull it from the oven when the center still jiggles a little. It keeps cooking in the hot skillet.
- If your skillet runs dark and hot, start checking at 16 minutes.
- A few chopped walnuts make the texture more interesting without taking over.
Variations on This Dish:
- Dark Chocolate Walnut Version: Swap half the chocolate chips for chopped dark chocolate and add 1/2 cup walnuts.
- Espresso-Salt Finish: Stir 1 teaspoon instant espresso powder into the dry ingredients and finish with extra flaky salt.
- Mini-Skillet Pairing: Divide the dough between four small skillets and bake for 12 to 14 minutes.
Common Mistakes to Avoid with This Dish:
- Using butter that is too hot: It can scramble the egg and make the dough greasy. Let the butter cool for a few minutes first.
- Overbaking the center: The middle should look a little underdone when it comes out. If it looks dry in the oven, it will bake up hard.
- Skipping the rest time: Cutting it immediately makes a mess that slides apart. Ten minutes gives the cookie time to set.
2. Lemon Bars with a Shortbread Base
Intro:
A good lemon bar should snap a little at the top, then give way to a dense, tart filling that tastes like sunshine with teeth. The crust matters here; if it is sandy and buttery, the whole square tastes cleaner and sharper. Powdered sugar on top is not decoration. It softens the edge on the lemon.
Why It Works:
The shortbread base is sturdy enough to hold the filling without turning soggy, and the eggs in the lemon layer set into a smooth curd-like texture in the oven. That contrast — crumbly crust below, silky citrus above — is what makes the bar feel finished rather than merely sweet.
Key Ingredients:
- 1 1/2 cups all-purpose flour
- 1/2 cup powdered sugar, plus more for dusting
- 3/4 cup unsalted butter, softened
- 1/4 teaspoon fine salt
- 3 large eggs
- 1 cup granulated sugar
- 1/2 cup fresh lemon juice
- 1 tablespoon lemon zest
- 3 tablespoons all-purpose flour
- Pinch of salt
Quick Steps:
- Heat the oven to 350°F and line an 8-inch square pan with parchment.
- Mix the crust ingredients until crumbly, press them into the pan, and bake for 18 to 20 minutes.
- Whisk the eggs, sugar, lemon juice, zest, flour, and salt until smooth.
- Pour the filling over the hot crust and bake for 20 to 22 minutes, until the center no longer sloshes.
- Cool completely, chill for at least 1 hour, then dust with powdered sugar and cut clean squares.
Equipment for This Recipe:
- 8-inch square baking pan
- Parchment paper
- Mixing bowls
- Whisk and spatula
How to Serve This Dish:
Serve the bars cold or barely cool; the filling slices cleaner that way. A small square after dinner is plenty, and a few raspberries on the plate make the lemon taste brighter.
Pro Tips for This Recipe:
- Use fresh lemon juice. Bottled juice tastes flat here.
- Line the pan with parchment so you can lift the bars out in one piece.
- Chill before cutting if you want sharp edges.
- Dust with powdered sugar right before serving, not hours earlier.
Variations on This Dish:
- Lime Swap: Replace the lemon juice and zest with lime for a sharper, greener flavor.
- Berry Ripple Bars: Add 2 tablespoons of raspberry jam in thin streaks over the filling before baking.
- Gluten-Free Crust: Use a 1:1 gluten-free flour blend in both layers.
Common Mistakes to Avoid with This Dish:
- Pouring filling over a cold crust: The crust can separate and bake unevenly. Use it while still warm.
- Cutting before the bars are chilled: The filling will smear. Cold bars slice like clean-edged candy.
- Overbaking until the top browns hard: A pale top with a slight wobble in the center is what you want.
3. One-Bowl Fudgy Brownies
Intro:
These are the brownies that come out dense, dark, and a little shiny on top, the kind you can smell from the hallway. They are not cakey, and they should not be. The best part is the corner piece with the crackled edge and the almost truffle-like center.
Why It Works:
Melted butter and cocoa give the batter a tight, rich crumb, and a modest amount of flour keeps the texture from drifting into cake territory. You mix everything in one bowl, which is exactly the right amount of effort for a weeknight. No mixer. No drama.
Key Ingredients:
- 1/2 cup unsalted butter
- 1 cup granulated sugar
- 2 large eggs
- 1 teaspoon vanilla extract
- 1/2 cup unsweetened cocoa powder
- 1/2 cup all-purpose flour
- 1/4 teaspoon fine salt
- 1/2 cup chocolate chips, optional
- 1/2 cup chopped walnuts, optional
Quick Steps:
- Preheat the oven to 350°F and line an 8-inch square pan with parchment.
- Melt the butter and stir in the sugar until glossy.
- Whisk in the eggs and vanilla, then fold in the cocoa, flour, salt, and any chips or nuts.
- Spread the batter into the pan and bake for 22 to 26 minutes, until the center has just a few moist crumbs on a toothpick.
- Cool before slicing, or the middle will squish out.
Equipment for This Recipe:
- 8-inch square baking pan
- Parchment paper
- Heatproof mixing bowl
- Whisk and spatula
How to Serve This Dish:
Cut the brownies into small squares and serve them plain or with a scoop of ice cream. They also do well with sliced bananas and a spoon of warm peanut butter.
Pro Tips for This Recipe:
- Do not overbake. Brownies keep setting as they cool.
- A metal pan gives you sharper edges than glass.
- If you want a shinier top, whisk the sugar into the warm butter before adding the eggs.
- Add espresso powder if you want the chocolate flavor to taste darker.
Variations on This Dish:
- Mint Chip Brownies: Stir in 1/2 teaspoon peppermint extract and use mint chips.
- Salted Peanut Brownies: Swap the walnuts for roasted peanuts and finish with flaky salt.
- Double Chocolate Brownies: Use 3/4 cup chocolate chips in the batter and another handful on top.
Common Mistakes to Avoid with This Dish:
- Baking until the center is dry: That turns brownies into chocolate cake bars. Stop when a few crumbs cling to the tester.
- Skipping the parchment sling: You will regret it when the first square breaks apart in the pan.
- Using too much flour: Spoon and level it, or the batter gets thick and dull.
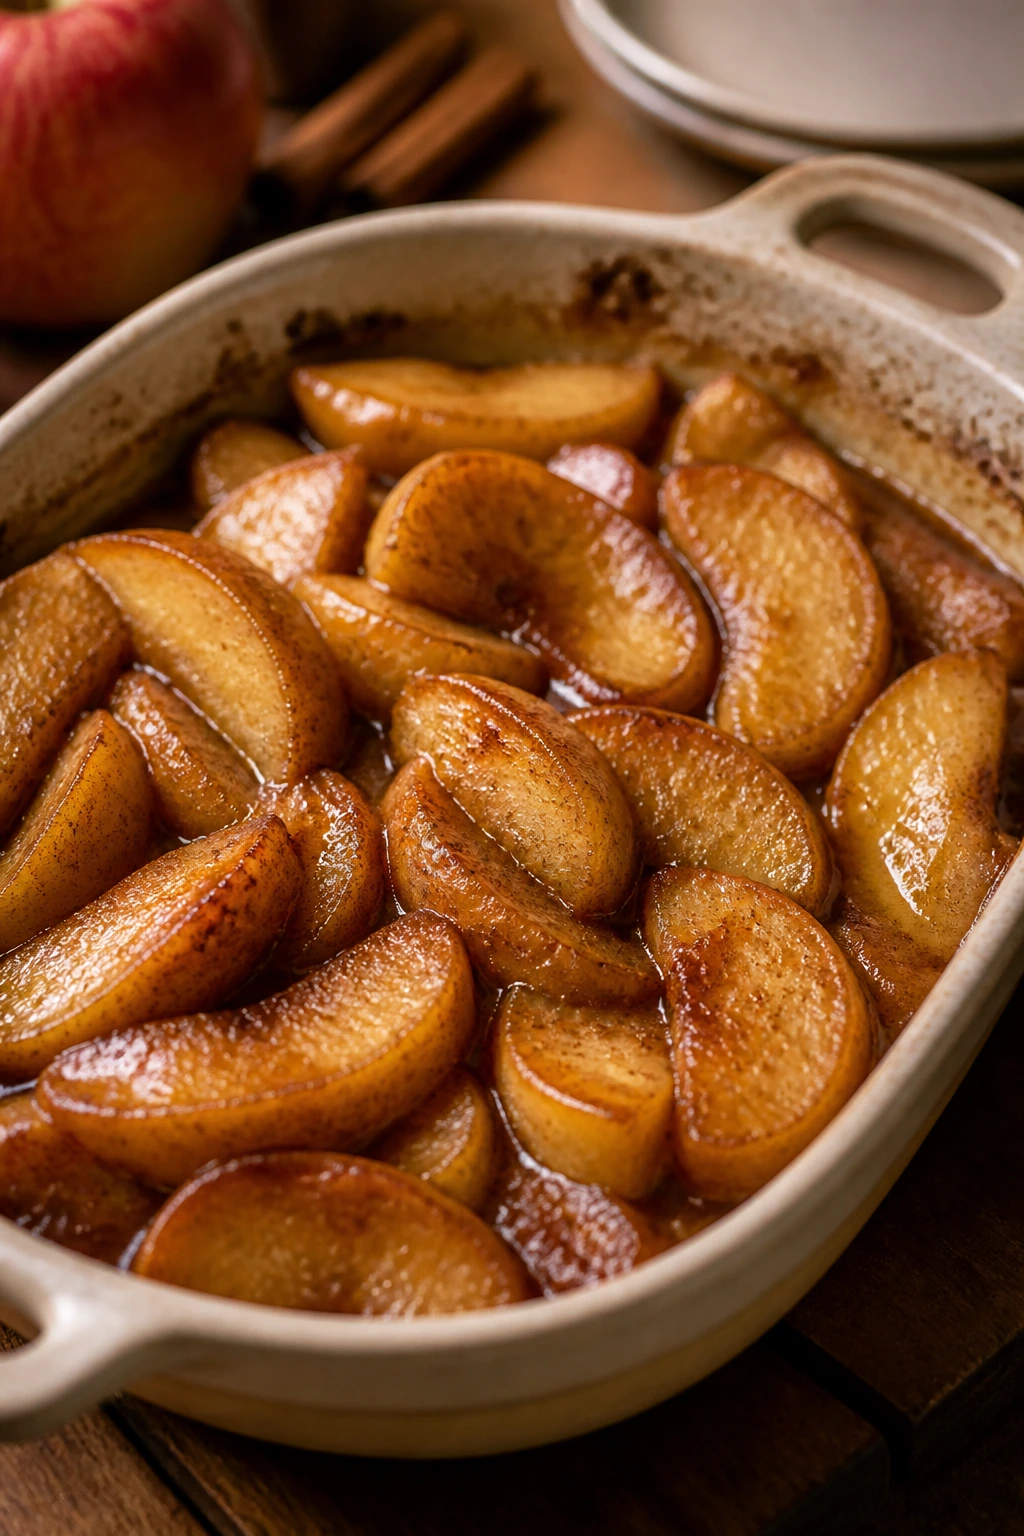
4. Cinnamon Apple Crisp

Intro:
If you want a dessert that smells like the kitchen has been opened up by a baker with good instincts, this is it. Soft apples, cinnamon, brown sugar, and a crumbly oat lid are enough. The edges bubble up around the fruit, and the topping turns into crunchy little ridges that you can hear when the spoon goes through them.
Why It Works:
Apples soften quickly under heat, especially when they are sliced thin, and the oat topping gives you contrast without asking for pastry skills. Lemon juice keeps the filling from tasting flat, while a small amount of flour helps catch the juices so the bottom does not turn soupy.
Key Ingredients:
- 6 cups peeled, sliced apples
- 2 tablespoons granulated sugar
- 1 tablespoon lemon juice
- 1 teaspoon ground cinnamon
- 1 tablespoon all-purpose flour
- 3/4 cup old-fashioned oats
- 1/2 cup all-purpose flour
- 1/2 cup packed brown sugar
- 1/2 cup unsalted butter, cold and cubed
- 1/4 teaspoon fine salt
Quick Steps:
- Heat the oven to 375°F and grease an 8-inch baking dish.
- Toss the apples with sugar, lemon juice, cinnamon, and flour, then spread them in the dish.
- Mix the oats, flour, brown sugar, butter, and salt until the texture looks like damp sand with pea-size bits.
- Scatter the topping over the apples and bake for 35 to 40 minutes, until the fruit bubbles at the edges and the top is golden.
- Rest for 10 minutes before serving.
Equipment for This Recipe:
- 8-inch baking dish
- Large mixing bowl
- Peeler and knife
- Pastry cutter or fork
How to Serve This Dish:
Warm crisp wants vanilla ice cream or a pour of cold cream. A small spoonful in a shallow bowl feels right; it is rich enough to stand alone, but a little dairy keeps the fruit from reading too sharp.
Pro Tips for This Recipe:
- Slice the apples evenly so they soften at the same pace.
- Granny Smith gives you tartness; Honeycrisp gives you softer sweetness. A mix is nice.
- Keep the butter cold for a crisper topping.
- If the top browns too fast, tent it loosely with foil for the last 10 minutes.
Variations on This Dish:
- Pear and Ginger Crisp: Swap half the apples for pears and add 1 teaspoon grated ginger.
- Berry-Apple Crisp: Mix in 1 cup of blueberries or raspberries for a juicier filling.
- Nutty Topping: Add 1/3 cup chopped pecans to the crumble.
Common Mistakes to Avoid with This Dish:
- Cutting the apples too thick: Thick slices stay hard in the center. Aim for 1/4-inch slices.
- Using melted butter in the topping: You will get a greasy sheet, not a crumble.
- Serving it immediately: The filling needs a short rest or it runs all over the bowl.
5. No-Bake Peanut Butter Oat Bars
Intro:
These are the bars you make when the oven is occupied, the clock is annoying, and a sweet fix needs to happen without negotiation. They set up in the fridge with a chewy, peanut-buttery bite and a little chocolate on top if you want it. They taste like a lunchbox treat that grew up.
Why It Works:
Warm peanut butter and honey bind the oats without baking, which keeps the texture dense and sliceable instead of crumbly. The oats give chew, the salt wakes up the peanut butter, and the bars firm up after a cold rest, not on the stove.
Key Ingredients:
- 1 cup creamy peanut butter
- 1/2 cup honey
- 2 tablespoons unsalted butter
- 1 teaspoon vanilla extract
- 2 1/2 cups old-fashioned oats
- 1/4 teaspoon fine salt
- 1/2 cup mini chocolate chips, optional
Quick Steps:
- Line an 8-inch square pan with parchment.
- Warm the peanut butter, honey, and butter in a saucepan over low heat until smooth.
- Stir in the vanilla and salt, then fold in the oats and chocolate chips.
- Press the mixture firmly into the pan in an even layer.
- Chill for 1 to 2 hours, then cut into bars with a sharp knife.
Equipment for This Recipe:
- 8-inch square pan
- Saucepan
- Parchment paper
- Rubber spatula
How to Serve This Dish:
Serve them cold so they hold their shape. A bar with coffee is enough for a late-night treat, and a drizzle of melted chocolate makes them feel more finished.
Pro Tips for This Recipe:
- Press hard. Loose packing gives you crumbly bars.
- Use old-fashioned oats, not instant oats, or the texture turns mushy.
- Warm the knife under hot water before cutting for cleaner edges.
- Store them chilled so they stay firm.
Variations on This Dish:
- Chocolate Swirl Bars: Spread melted chocolate across the top before chilling.
- Sunflower Seed Version: Swap the peanut butter for sunflower seed butter to avoid peanuts.
- Crunchy Add-In: Stir in 1/2 cup chopped roasted peanuts.
Common Mistakes to Avoid with This Dish:
- Not pressing firmly enough: The bars fall apart when sliced. Compact them like you mean it.
- Using runny natural peanut butter: It can make the bars oily. Stir very well, or use a thicker style.
- Skipping the chill: They need that cold set or they stay sticky.
6. Vanilla Mug Cake
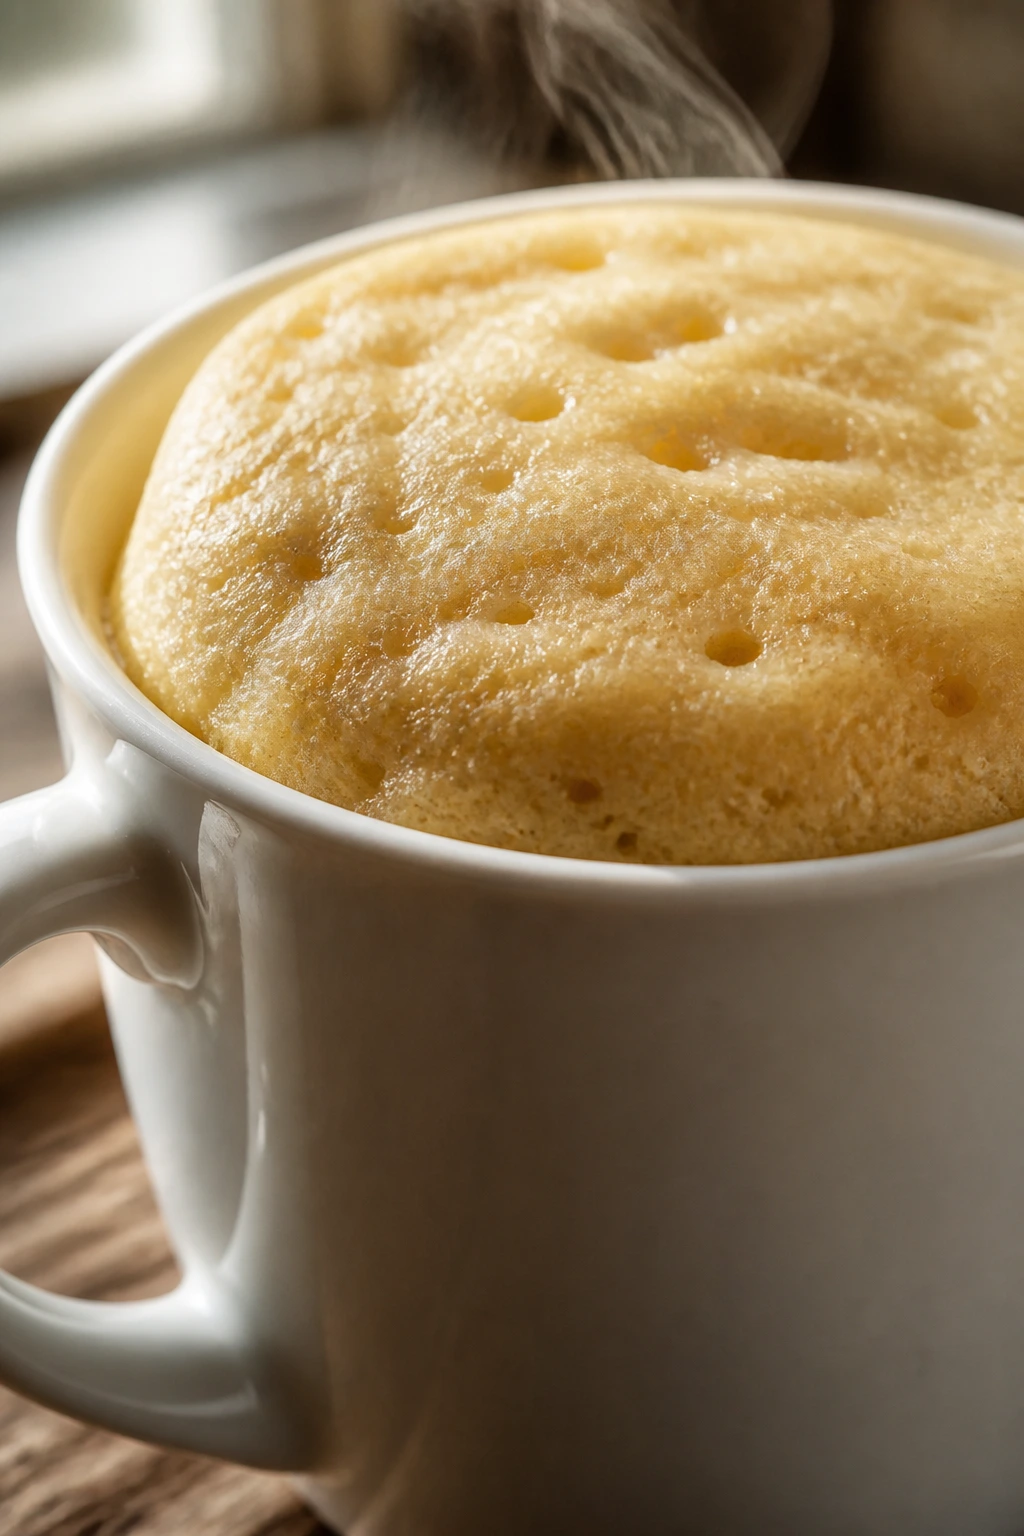
Intro:
Some nights call for a cake that appears in one mug and disappears just as quickly. This one is soft, springy, and plain in the best way, with a vanilla scent that fills the microwave-sized gap between dinner and dessert. Add jam or chocolate if you want, but the base is already doing enough.
Why It Works:
A mug cake works because the batter is tiny and the baking powder has only a short distance to lift it. Milk and oil keep the crumb tender, and the quick cook time stops the edges from drying out before the center is done.
Key Ingredients:
- 4 tablespoons all-purpose flour
- 2 tablespoons granulated sugar
- 1/4 teaspoon baking powder
- Pinch of fine salt
- 3 tablespoons milk
- 1 tablespoon neutral oil
- 1/4 teaspoon vanilla extract
- 1 teaspoon jam or chocolate chips, optional
Quick Steps:
- Grease a large microwave-safe mug.
- Stir the flour, sugar, baking powder, and salt together in the mug.
- Add the milk, oil, and vanilla, then mix until smooth and scrape the bottom for dry pockets.
- Stir in jam or chocolate chips if using.
- Microwave for 60 to 75 seconds, then rest for 1 minute before eating.
Equipment for This Recipe:
- Microwave-safe mug, at least 12 ounces
- Spoon
- Measuring spoons
- Small whisk, optional
How to Serve This Dish:
Eat it from the mug while it is warm. A spoonful of whipped cream or a scoop of ice cream on top makes it feel less like a shortcut and more like a choice.
Pro Tips for This Recipe:
- Stop the microwave early if yours runs hot. Mug cakes go from springy to rubbery fast.
- Use a big mug so the batter does not overflow.
- Mix until smooth, but do not beat it hard.
- A pinch of cinnamon makes the vanilla taste fuller.
Variations on This Dish:
- Chocolate Chip Mug Cake: Fold in 1 tablespoon mini chocolate chips.
- Berry Jam Center: Drop 1 teaspoon jam into the middle before microwaving.
- Lemon-Vanilla Mug Cake: Add 1/2 teaspoon lemon zest and skip the chocolate.
Common Mistakes to Avoid with This Dish:
- Overcooking by even 10 seconds: That is enough to make it tough.
- Using too-small mugs: Batter spills and scorches in the microwave.
- Leaving dry flour at the bottom: Scrape the mug well, or you get a floury bite.
7. Strawberry Shortcake Parfaits
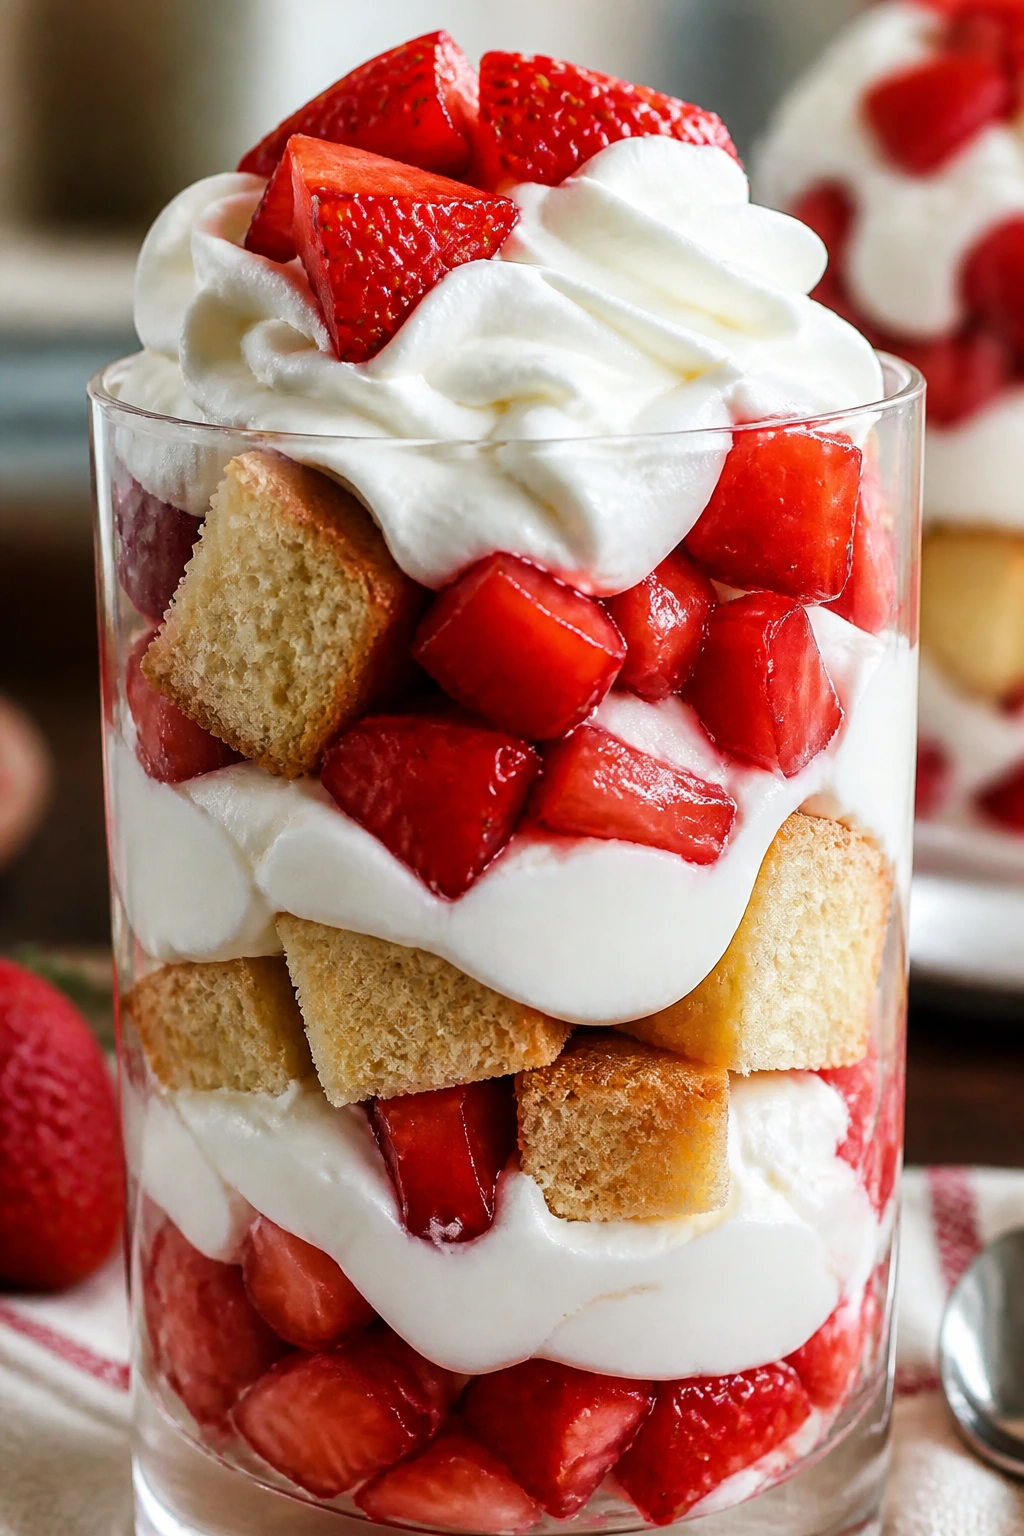
Intro:
These parfaits taste like shortcake without asking you to bake a whole pan of anything. Sweet berries, soft cake, and lightly whipped cream layer into a glass that looks casual but lands with enough sweetness to count as dessert. It is the kind of thing you build while the coffee is still warm.
Why It Works:
Macerating the strawberries with sugar pulls out their juice, which soaks into the cake and gives every spoonful a little syrup. The whipped cream adds air and keeps the dessert from feeling heavy after dinner.
Key Ingredients:
- 1 pound strawberries, hulled and sliced
- 2 tablespoons granulated sugar
- 8 ounces pound cake or angel food cake, cut into cubes
- 1 cup heavy cream
- 2 tablespoons powdered sugar
- 1 teaspoon vanilla extract
- Fresh mint, optional
Quick Steps:
- Toss the strawberries with sugar and let them sit for 10 minutes.
- Whip the cream, powdered sugar, and vanilla to soft peaks.
- Layer cake cubes, berries, berry juices, and whipped cream in glasses.
- Repeat the layers and finish with a berry on top.
- Chill for 10 minutes if you want the flavors to settle.
Equipment for This Recipe:
- Mixing bowl
- Hand mixer or whisk
- Parfait glasses or small bowls
- Knife and cutting board
How to Serve This Dish:
Serve in clear glasses so the layers show. One medium parfait after dinner is enough; if you are feeding a group, set the ingredients out and let everyone build their own.
Pro Tips for This Recipe:
- Use berries that are ripe but not mushy.
- Dry the cake cubes lightly if they are very soft, or the parfait gets soggy.
- Whip the cream only to soft peaks; stiff cream feels dense here.
- A little lemon zest in the berries makes the whole thing brighter.
Variations on This Dish:
- Chocolate Shortcake Parfait: Use brownie cubes instead of cake.
- Peach Version: Swap strawberries for sliced peaches and add a pinch of cinnamon.
- Yogurt Parfait Shortcut: Use thick Greek yogurt in place of whipped cream for a tangier finish.
Common Mistakes to Avoid with This Dish:
- Over-sugaring the berries: They should be juicy, not swimming.
- Using warm cake: It collapses the cream and smears the layers.
- Whipping the cream too far: Grainy cream makes the parfait feel heavy.
8. Coconut Macaroons
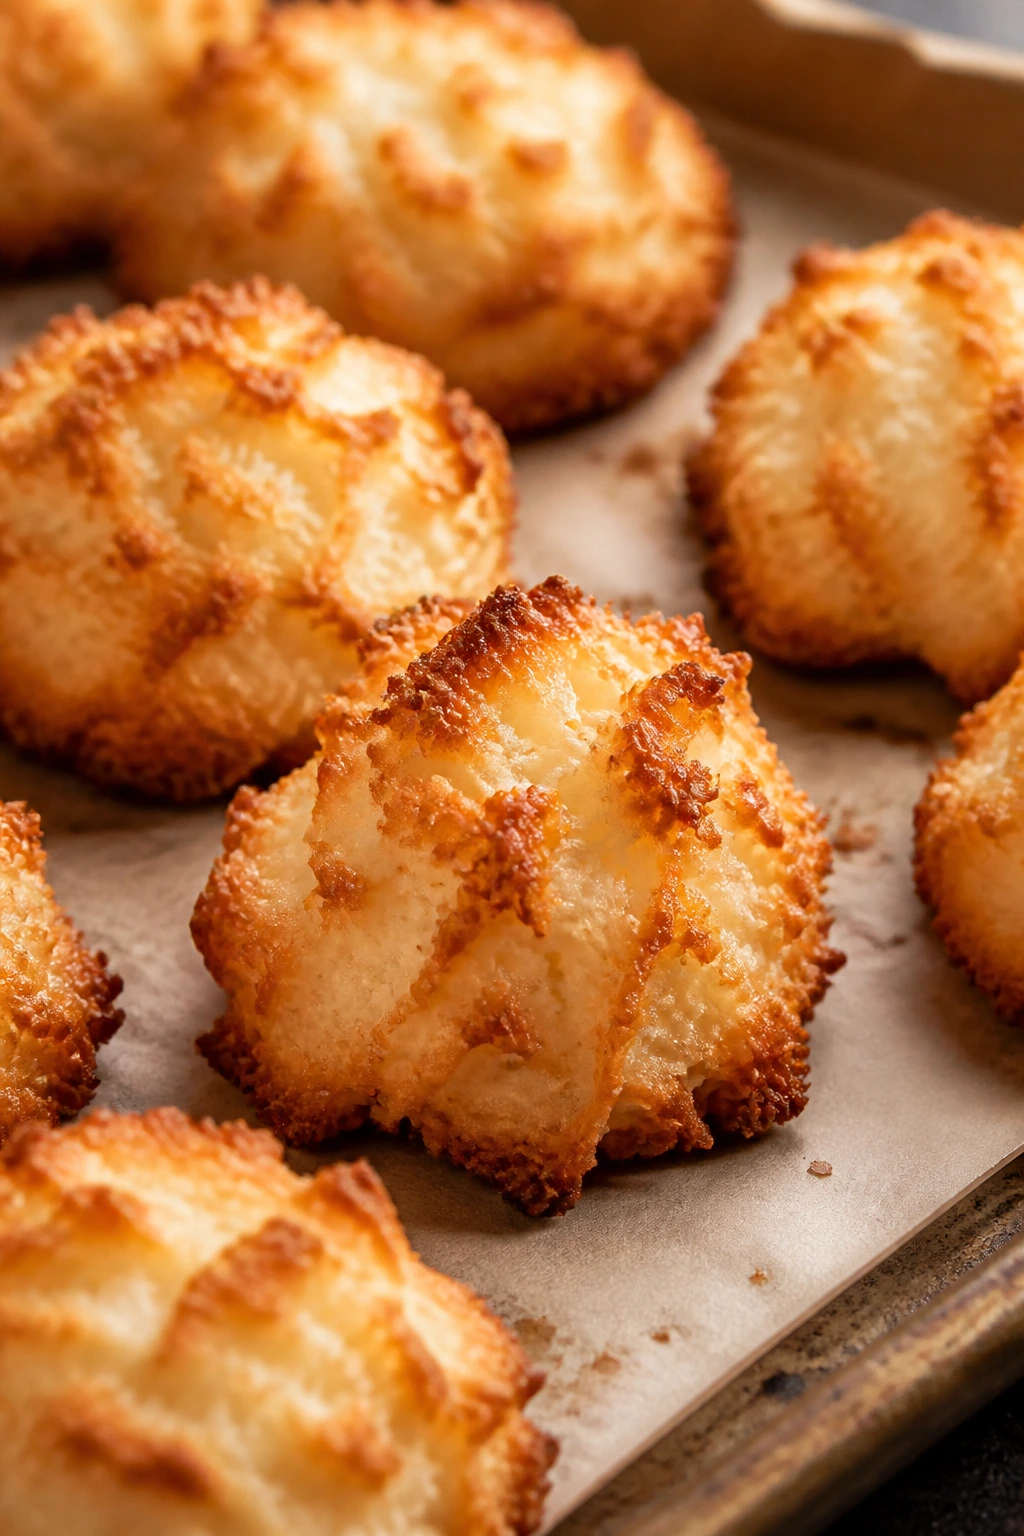
Intro:
Coconut macaroons are tiny, craggy, chewy things that make the kitchen smell like toasted sugar and coconut. They look fancy in a tray, but the method is almost stubbornly simple. Three bowls are not required. One is enough.
Why It Works:
Sweetened condensed milk binds the coconut without needing a long batter or a mixer, and egg whites help the mounds hold their shape in the oven. The outer edges toast while the centers stay moist, which gives each bite a nice contrast.
Key Ingredients:
- 3 cups sweetened shredded coconut
- 1/2 cup sweetened condensed milk
- 2 large egg whites
- 1 teaspoon vanilla extract
- Pinch of fine salt
- 4 ounces semisweet chocolate, melted, optional
Quick Steps:
- Heat the oven to 325°F and line a baking sheet with parchment.
- Stir the coconut, condensed milk, egg whites, vanilla, and salt until the mixture looks sticky and evenly coated.
- Scoop mounds onto the sheet and shape them lightly with damp fingers.
- Bake for 18 to 22 minutes, until the edges are golden.
- Cool completely before drizzling or dipping in chocolate.
Equipment for This Recipe:
- Baking sheet
- Parchment paper
- Mixing bowl
- Cookie scoop or spoon
How to Serve This Dish:
Serve them with coffee or tea after dinner. They are rich enough that two is usually enough, especially if you dip the bottoms in chocolate.
Pro Tips for This Recipe:
- Pack the coconut lightly into the measuring cup so the ratio stays right.
- Damp fingers keep the mixture from sticking when you shape the mounds.
- Cool fully before moving them, or the bottoms can tear.
- If you want deeper color, broil for 20 seconds at the end and watch them like a hawk.
Variations on This Dish:
- Chocolate-Drizzled Macaroons: Drizzle the tops with melted chocolate after cooling.
- Lemon Coconut Macaroons: Add 1 teaspoon lemon zest for a brighter flavor.
- Almond Coconut Macaroons: Stir in 1/4 teaspoon almond extract.
Common Mistakes to Avoid with This Dish:
- Overbaking until dry: They should be golden, not hard.
- Using unsweetened coconut without changing the liquid: The texture will be too dry.
- Moving them while warm: Let them cool on the tray first.
9. Chocolate-Dipped Pretzel Bark
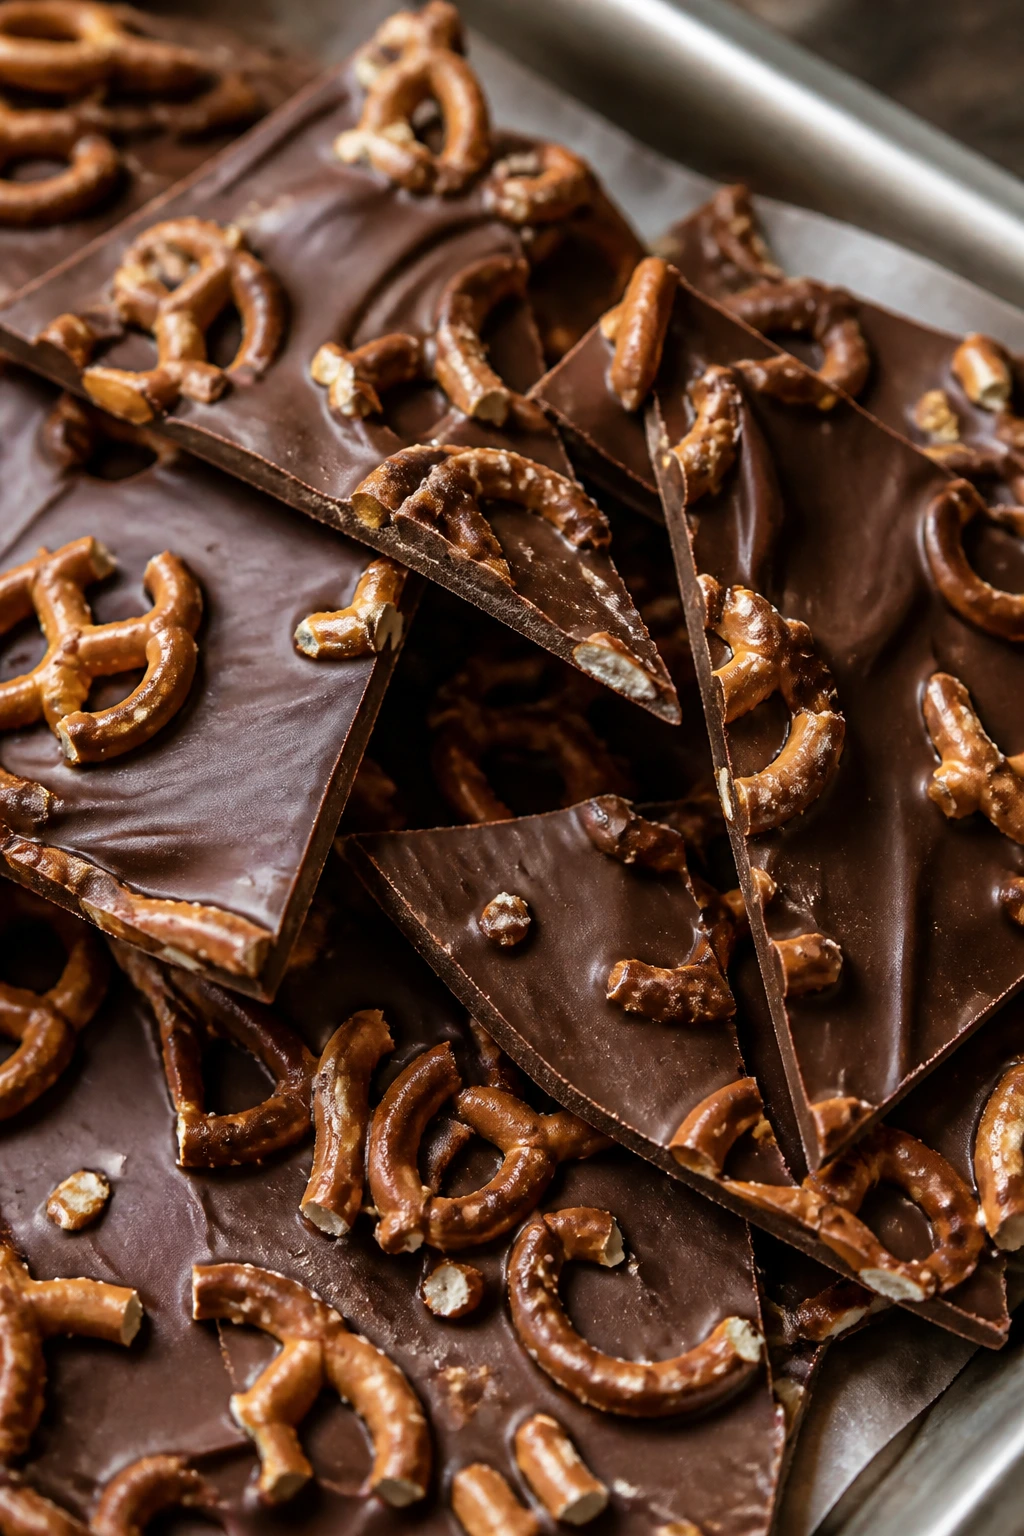
Intro:
This is the dessert for nights when the salt-sugar balance is doing exactly what it should. Crunchy pretzels, melted chocolate, and a few scattered toppings make a bark that breaks into sharp, satisfying shards. It is snacky in the best way, and it disappears fast from a plate.
Why It Works:
Pretzels bring the salt and the crunch, and chocolate does the binding. Bark is one of the cleanest no-bake desserts around because it only needs a tray, a fridge, and enough restraint not to eat the whole sheet before it sets.
Key Ingredients:
- 8 ounces semisweet chocolate chips
- 4 ounces white chocolate chips, optional
- 3 cups mini pretzel twists
- 1/4 cup chopped peanuts or almonds
- 2 tablespoons sprinkles or crushed candy, optional
- Flaky salt, for finishing
Quick Steps:
- Line a baking sheet with parchment.
- Melt the semisweet chocolate and spread it into a thin layer.
- Scatter pretzels, nuts, and any sprinkles over the top, pressing them in lightly.
- Drizzle with melted white chocolate if using and finish with flaky salt.
- Chill for 20 to 30 minutes, then break into pieces.
Equipment for This Recipe:
- Baking sheet
- Parchment paper
- Microwave-safe bowl or double boiler
- Offset spatula
How to Serve This Dish:
Pile the broken pieces in a bowl and set it on the counter. It works as a casual dessert or a late-night snack, which is probably why it vanishes so quickly.
Pro Tips for This Recipe:
- Use good chocolate. This is a very short recipe, so chocolate flavor matters.
- Don’t make the chocolate layer too thick or the bark gets hard to bite.
- Press the toppings in just a little so they stick when the chocolate sets.
- Store it in a cool spot so the chocolate stays glossy.
Variations on This Dish:
- Trail Mix Bark: Add dried cranberries and pumpkin seeds.
- Peppermint Bark Twist: Swap the sprinkles for crushed peppermint candies.
- Peanut Butter Swirl Bark: Drizzle warmed peanut butter over the chocolate before it sets.
Common Mistakes to Avoid with This Dish:
- Overheating the chocolate: It can seize and turn grainy. Melt gently.
- Using too many toppings: The bark becomes brittle and messy.
- Skipping parchment: You will scrape chocolate off the pan and curse lightly.
10. Blueberry Cobbler
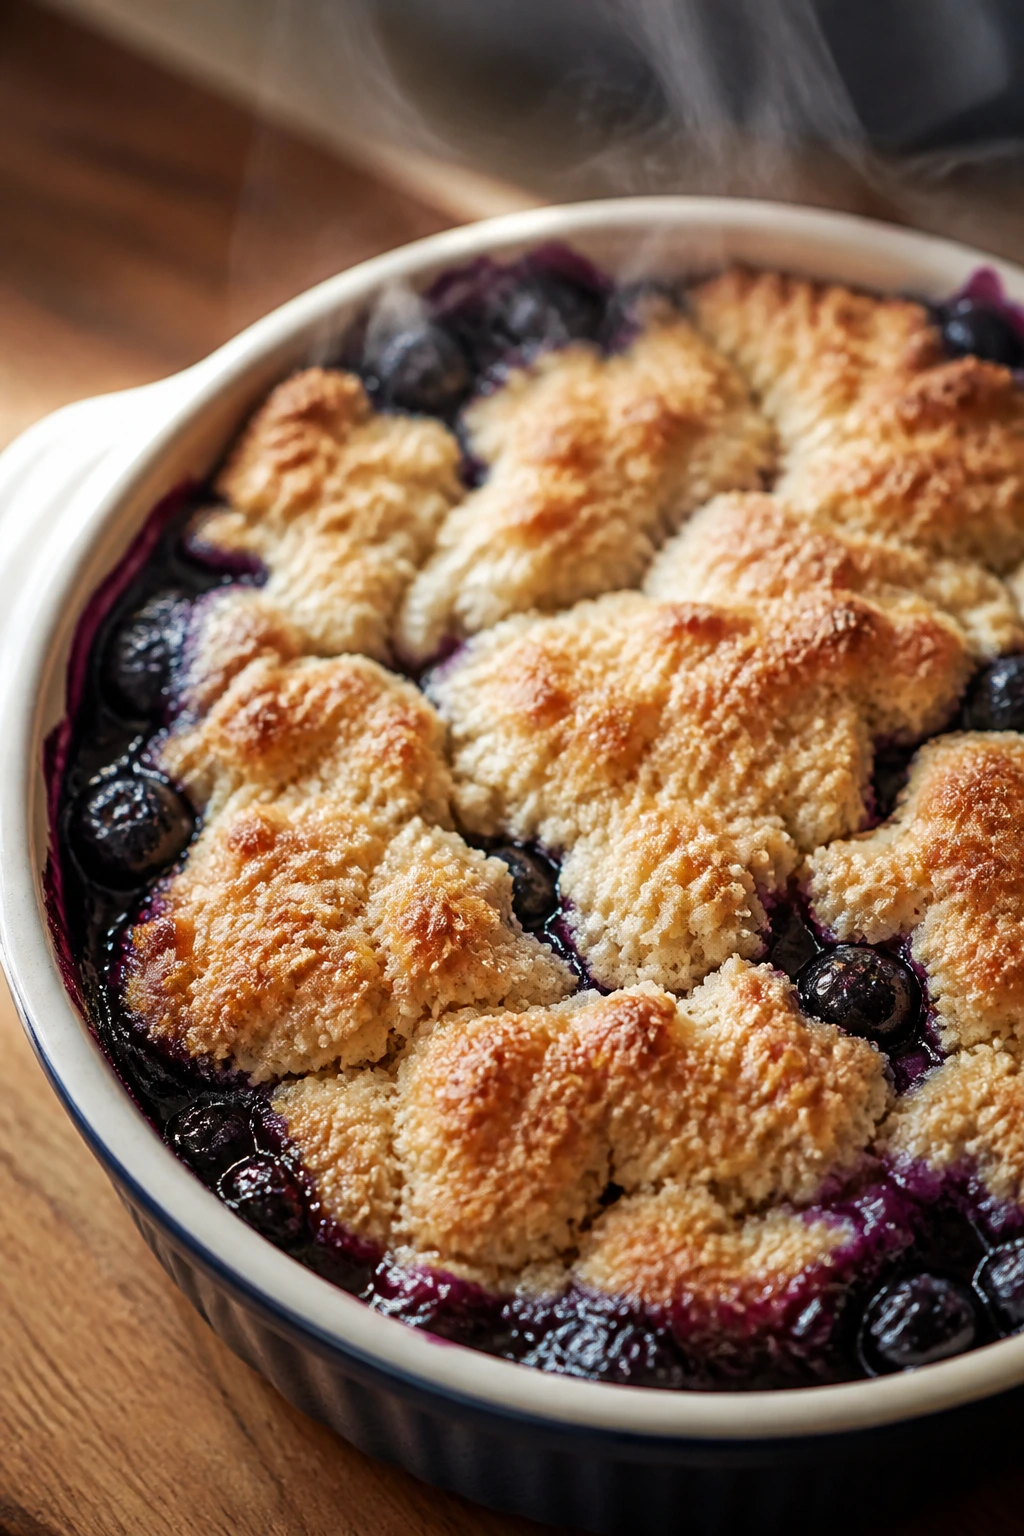
Intro:
Blueberry cobbler is a soft, bubbling pan of fruit with a biscuit topping that turns golden on top and tender underneath. The berries burst in the oven and make their own sauce, which is one of those small kitchen miracles that never gets old. It tastes like you worked harder than you did.
Why It Works:
Blueberries are high in juice, so a little cornstarch helps the filling thicken instead of running across the dish. The batter-style topping drops over the fruit in uneven spoonfuls, which bakes into a rough, craggy crust with a good mix of crisp and soft.
Key Ingredients:
- 4 cups fresh or frozen blueberries
- 1/4 cup granulated sugar
- 1 tablespoon lemon juice
- 1 tablespoon cornstarch
- 1 cup all-purpose flour
- 1/3 cup granulated sugar
- 1 1/2 teaspoons baking powder
- 1/4 teaspoon fine salt
- 1/2 cup milk
- 4 tablespoons melted butter
Quick Steps:
- Heat the oven to 375°F and grease a small baking dish.
- Toss the blueberries with sugar, lemon juice, and cornstarch, then spread them in the dish.
- Whisk the flour, sugar, baking powder, salt, milk, and melted butter into a thick batter.
- Spoon the batter over the fruit in patches.
- Bake for 30 to 35 minutes, until the topping is golden and the filling bubbles up around the edges.
Equipment for This Recipe:
- Small baking dish
- Mixing bowl
- Whisk
- Spoon
How to Serve This Dish:
Serve it warm in shallow bowls with vanilla ice cream. The cold cream melting into the hot berries is the whole point.
Pro Tips for This Recipe:
- Frozen blueberries work fine; do not thaw them first.
- If the berries are very sweet, reduce the sugar a little.
- A pinch of cinnamon in the topping gives it a bakery note.
- Let the cobbler rest for 10 minutes so the sauce thickens.
Variations on This Dish:
- Mixed Berry Cobbler: Use half blueberries and half raspberries.
- Lemon Cobbler: Add extra lemon zest for a sharper finish.
- Biscuit-Topped Cobbler: Use a drop biscuit dough if you want a more rustic top.
Common Mistakes to Avoid with This Dish:
- Using too much cornstarch: The filling turns gummy. One tablespoon is enough here.
- Overmixing the batter: You want a rough, thick spoonable topping, not a smooth cake batter.
- Serving immediately from the oven: The fruit needs a short rest or it pours everywhere.
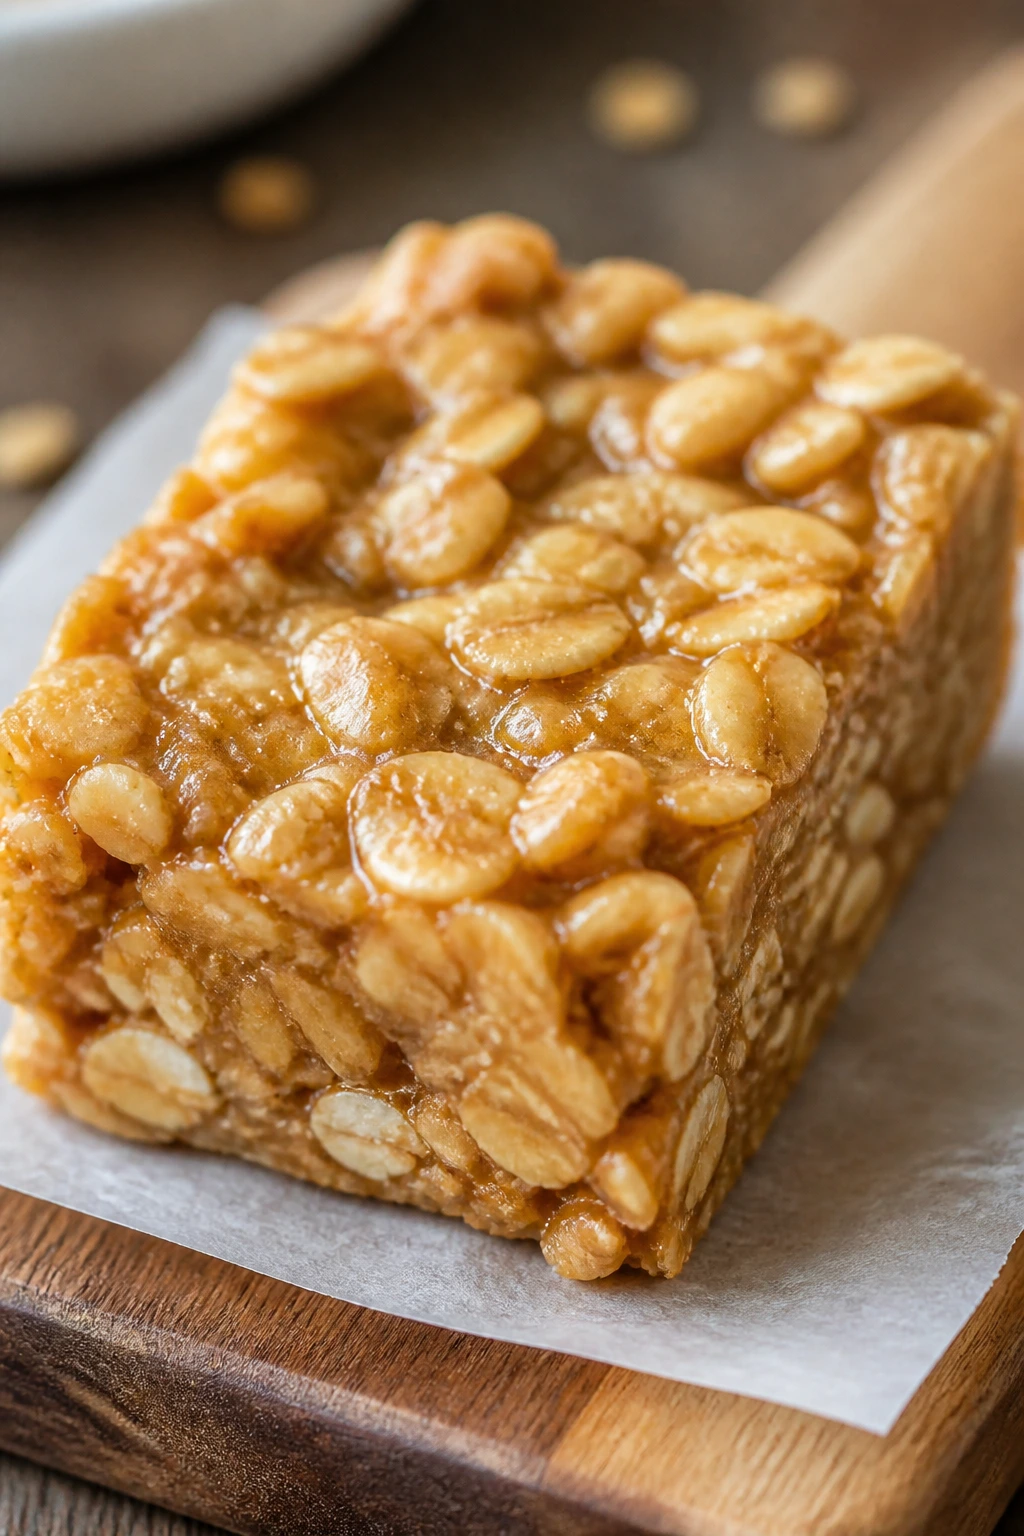
11. Salted Caramel Rice Krispie Treats
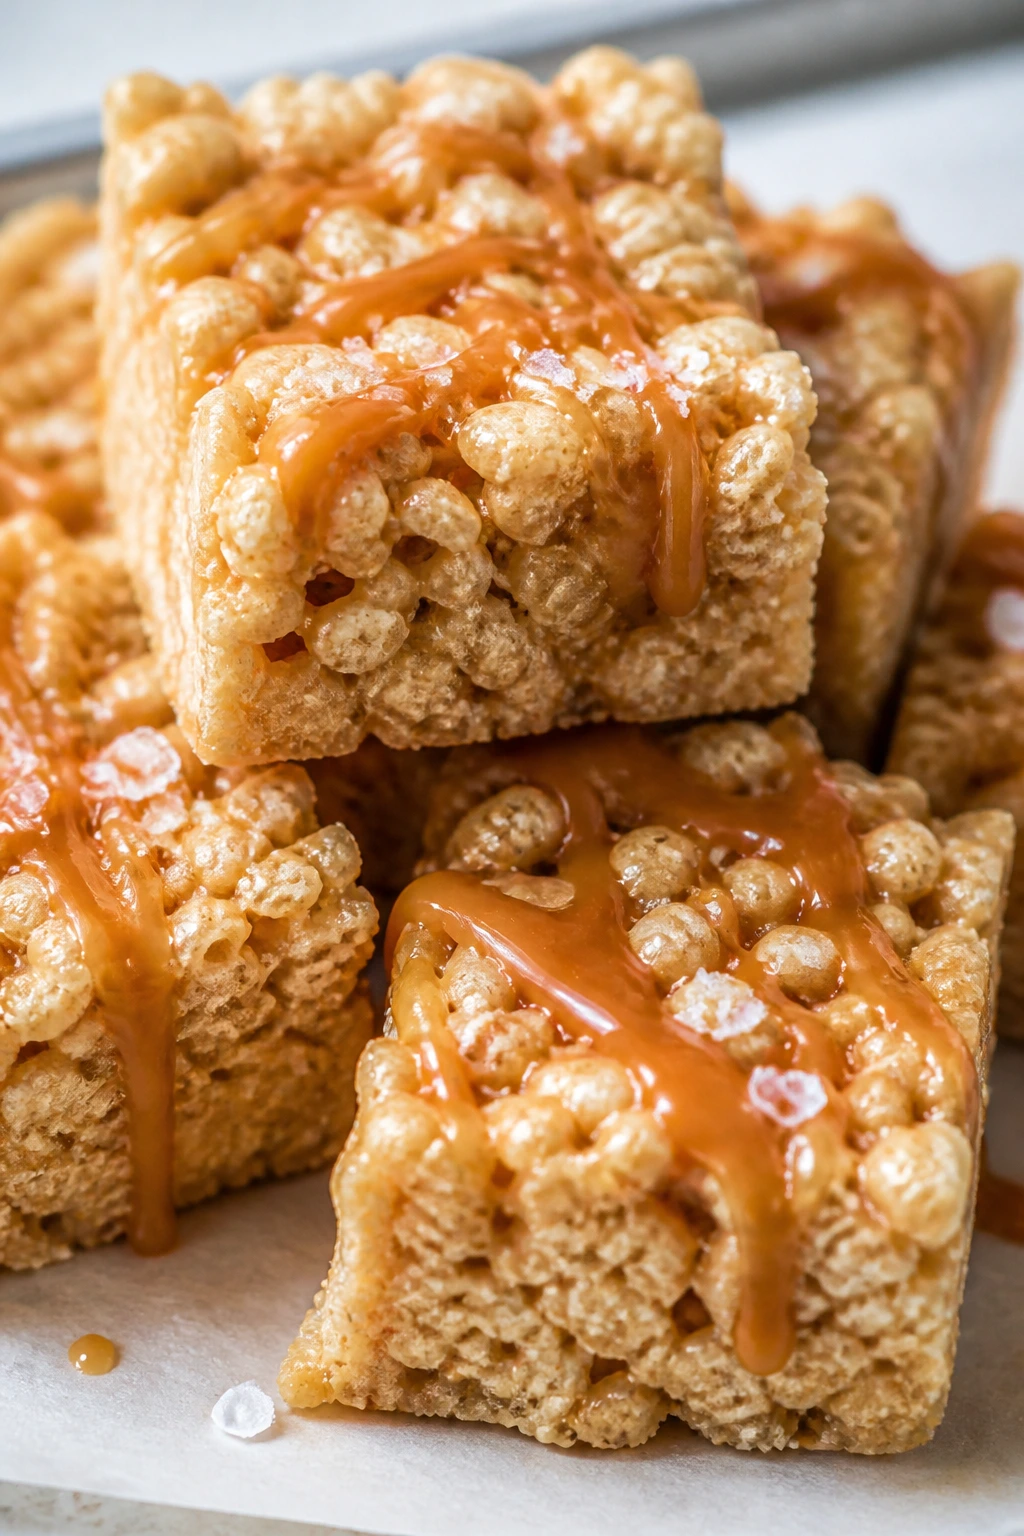
Intro:
Rice Krispie treats are already a shortcut, and this version leans into the caramel flavor hard enough to taste intentional. The marshmallows make the base chewy, the caramel sauce adds depth, and a little salt keeps the sweetness from flattening out. They cut clean when cooled, which is a nice bonus.
Why It Works:
Rice cereal brings the snap, marshmallows bring the stretch, and caramel gives the bars a deeper, butterier flavor than plain treats. Low heat matters here. If you rush it, the marshmallows get tough and the whole pan turns dense.
Key Ingredients:
- 4 tablespoons unsalted butter
- 1 bag mini marshmallows, 10 ounces
- 1/4 cup caramel sauce
- 1/2 teaspoon vanilla extract
- 6 cups crispy rice cereal
- 1/2 teaspoon flaky salt, plus more for topping
Quick Steps:
- Grease a 9-inch square pan.
- Melt the butter on low heat, then stir in the marshmallows until just melted.
- Mix in the caramel sauce, vanilla, and salt.
- Fold in the cereal and press the mixture into the pan with a buttered spatula.
- Sprinkle with flaky salt and let cool before slicing.
Equipment for This Recipe:
- 9-inch square pan
- Large saucepan
- Buttered spatula
- Mixing spoon
How to Serve This Dish:
Cut them into neat squares and serve at room temperature. They are sweet enough on their own, though a drizzle of extra caramel makes them feel more like dessert and less like a lunchbox memory.
Pro Tips for This Recipe:
- Keep the heat low so the marshmallows melt smoothly.
- Press the mixture gently; packing too hard makes them brick-like.
- Use fresh marshmallows. Stale ones melt badly.
- A little extra salt on top sharpens the caramel.
Variations on This Dish:
- Chocolate Caramel Treats: Stir in 1/2 cup mini chocolate chips after the mixture cools slightly.
- Pretzel Crunch Version: Add 1 cup broken pretzels for a salty edge.
- Brown Butter Treats: Brown the butter before melting the marshmallows for a nuttier flavor.
Common Mistakes to Avoid with This Dish:
- Cooking the marshmallows too hot: That makes them stiff once cool.
- Pressing too firmly into the pan: The squares get dense and hard.
- Using too much caramel sauce: It can make the bars sticky and under-set.
12. Mini Peach Galettes
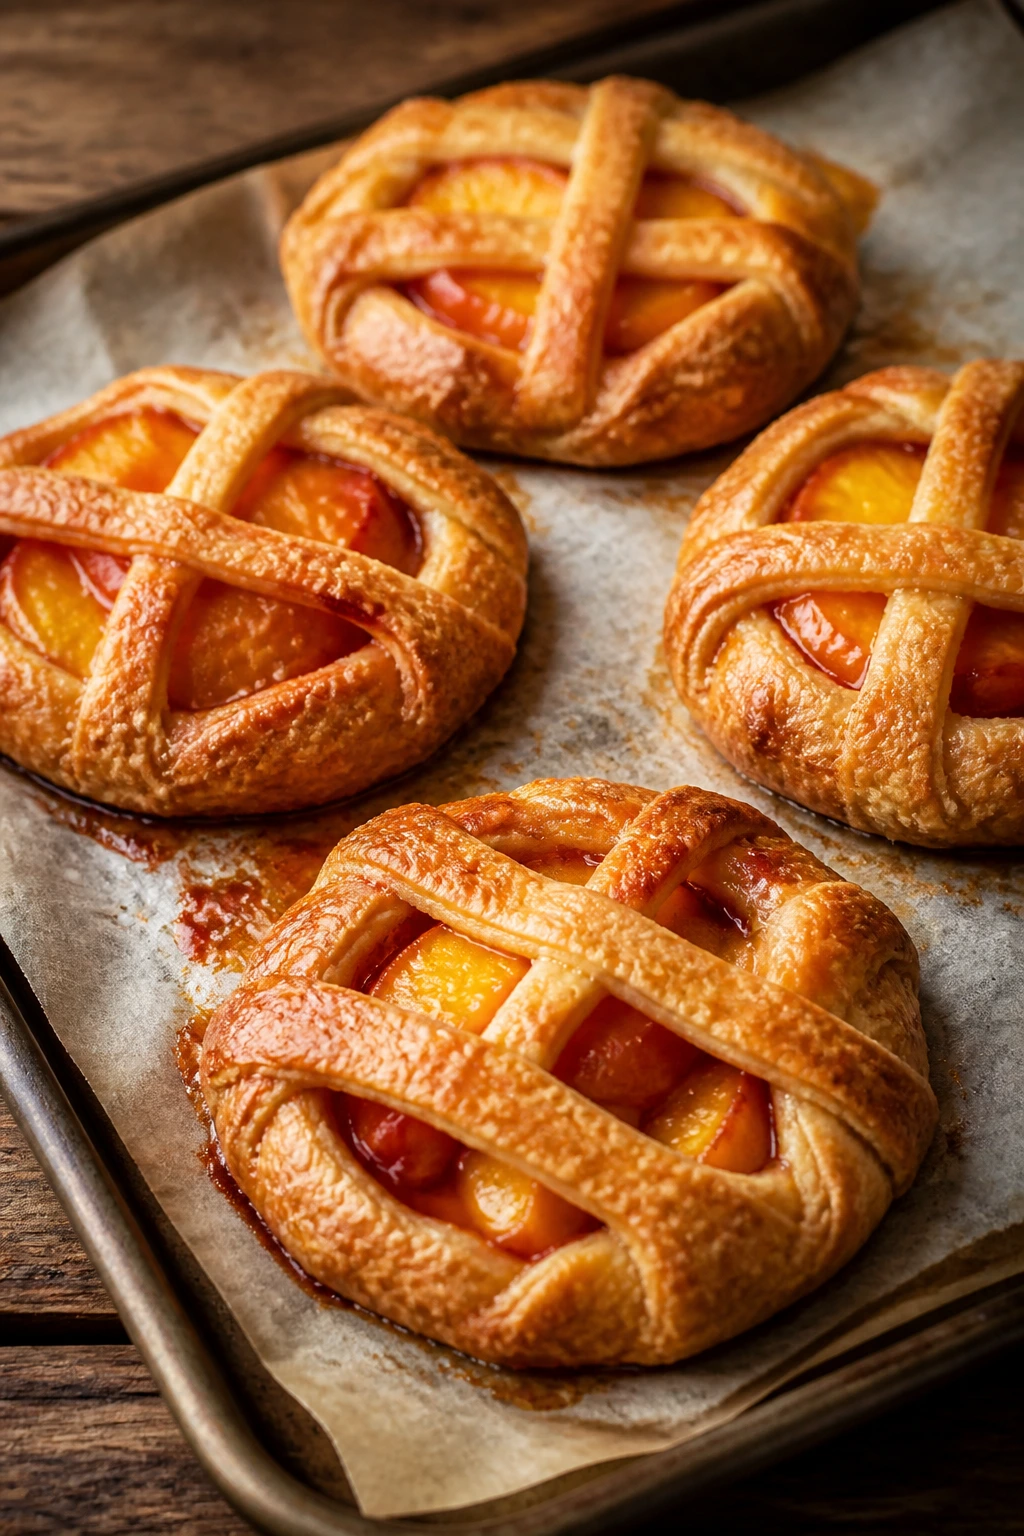
Intro:
Mini galettes are what happen when you want pie flavor without pretending you have time for pie. The crust folds in rough edges around the fruit, the peaches bubble up in the center, and the result looks charming without being precious. They are best warm, when the butter in the crust still tastes fresh.
Why It Works:
A galette is forgiving because the dough does not need a perfect shape. The peaches soften fast, and a little cornstarch keeps the juices from running everywhere. If you use store-bought pastry, the whole thing becomes a ten-minute assembly job.
Key Ingredients:
- 1 sheet pie dough or puff pastry, thawed
- 2 ripe peaches, sliced
- 2 tablespoons granulated sugar
- 1 tablespoon cornstarch
- 1 teaspoon lemon juice
- 1/4 teaspoon ground cinnamon
- 1 egg, beaten
- 1 tablespoon coarse sugar
Quick Steps:
- Heat the oven to 400°F and line a baking sheet with parchment.
- Toss the peaches with sugar, cornstarch, lemon juice, and cinnamon.
- Cut the dough into four circles or squares, then spoon the fruit into the center of each.
- Fold the edges over the fruit, brush with egg, and sprinkle with coarse sugar.
- Bake for 18 to 22 minutes, until the crust is golden and the fruit bubbles.
Equipment for This Recipe:
- Baking sheet
- Parchment paper
- Sharp knife
- Pastry brush
How to Serve This Dish:
Serve the galettes warm with a spoon of whipped cream or a scoop of vanilla ice cream. They also work well as a plated dessert with a few slices of fresh peach beside them.
Pro Tips for This Recipe:
- Keep the dough cold until you fill it.
- Slice the peaches evenly so they soften at the same pace.
- If the fruit is very juicy, add another teaspoon of cornstarch.
- Don’t overfill; the edges need room to fold.
Variations on This Dish:
- Plum Galettes: Swap peaches for plums and add a tiny pinch of cardamom.
- Berry Peach Galettes: Mix in a handful of blueberries for color and extra juice.
- Cinnamon Sugar Puff Pastry: Use puff pastry instead of pie dough for a flakier result.
Common Mistakes to Avoid with This Dish:
- Letting the dough warm too much: It can become hard to fold and greasy in the oven.
- Overfilling the center: The fruit leaks out and scorches.
- Skipping the egg wash: You lose the shiny, bronzed crust.
13. No-Bake Cheesecake Cups
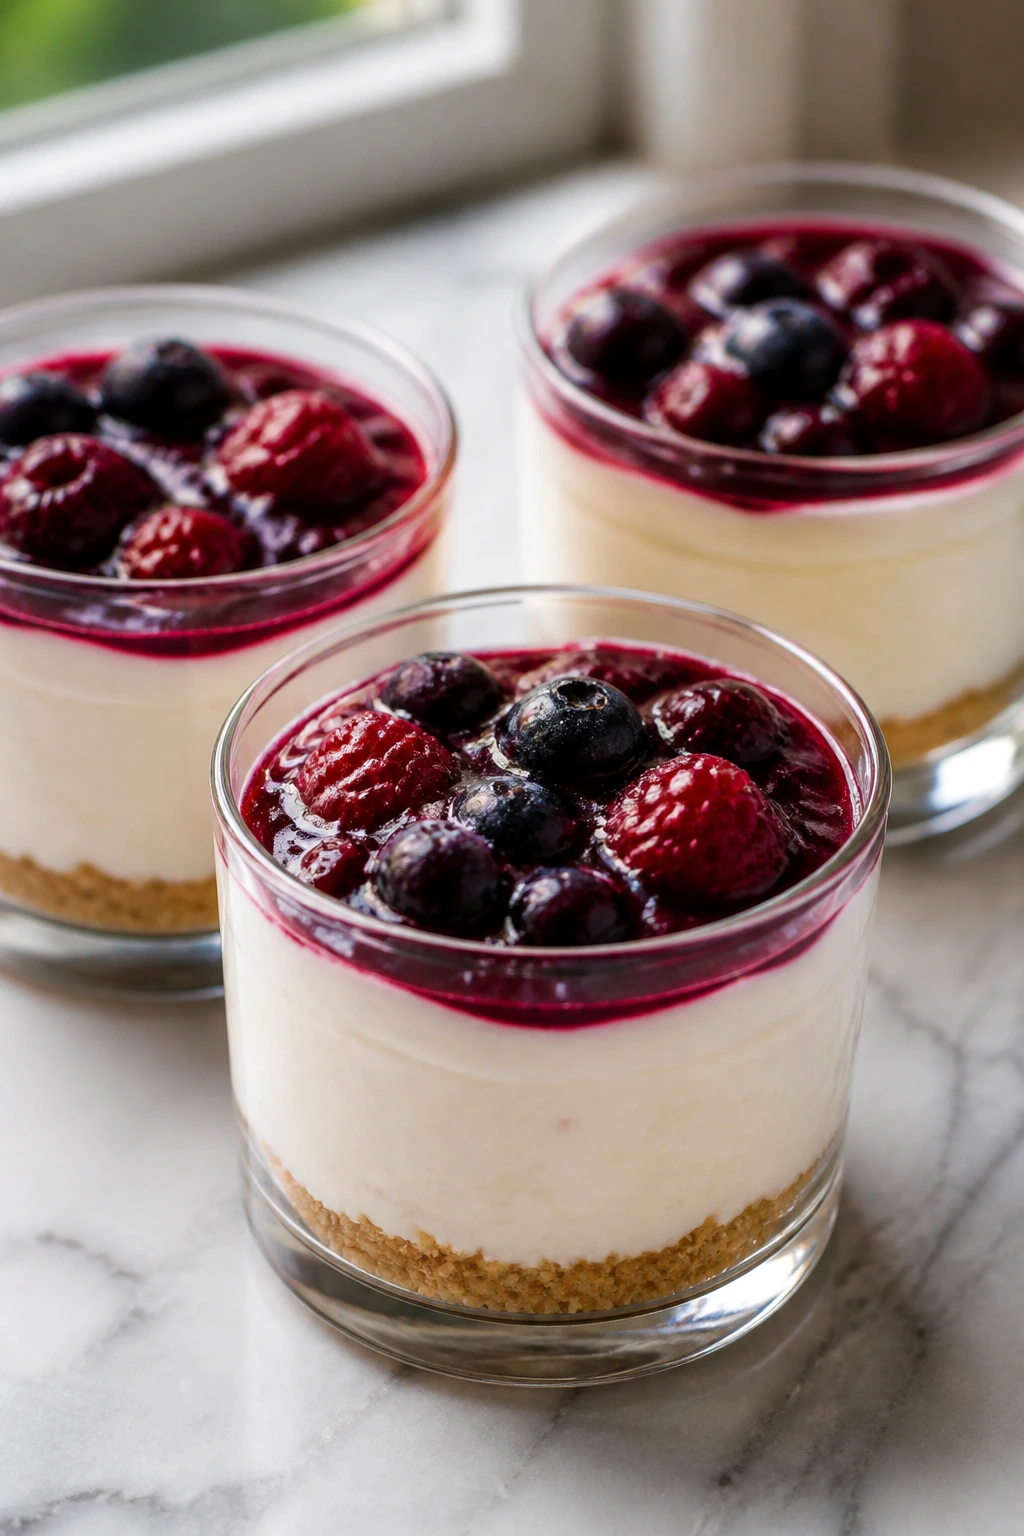
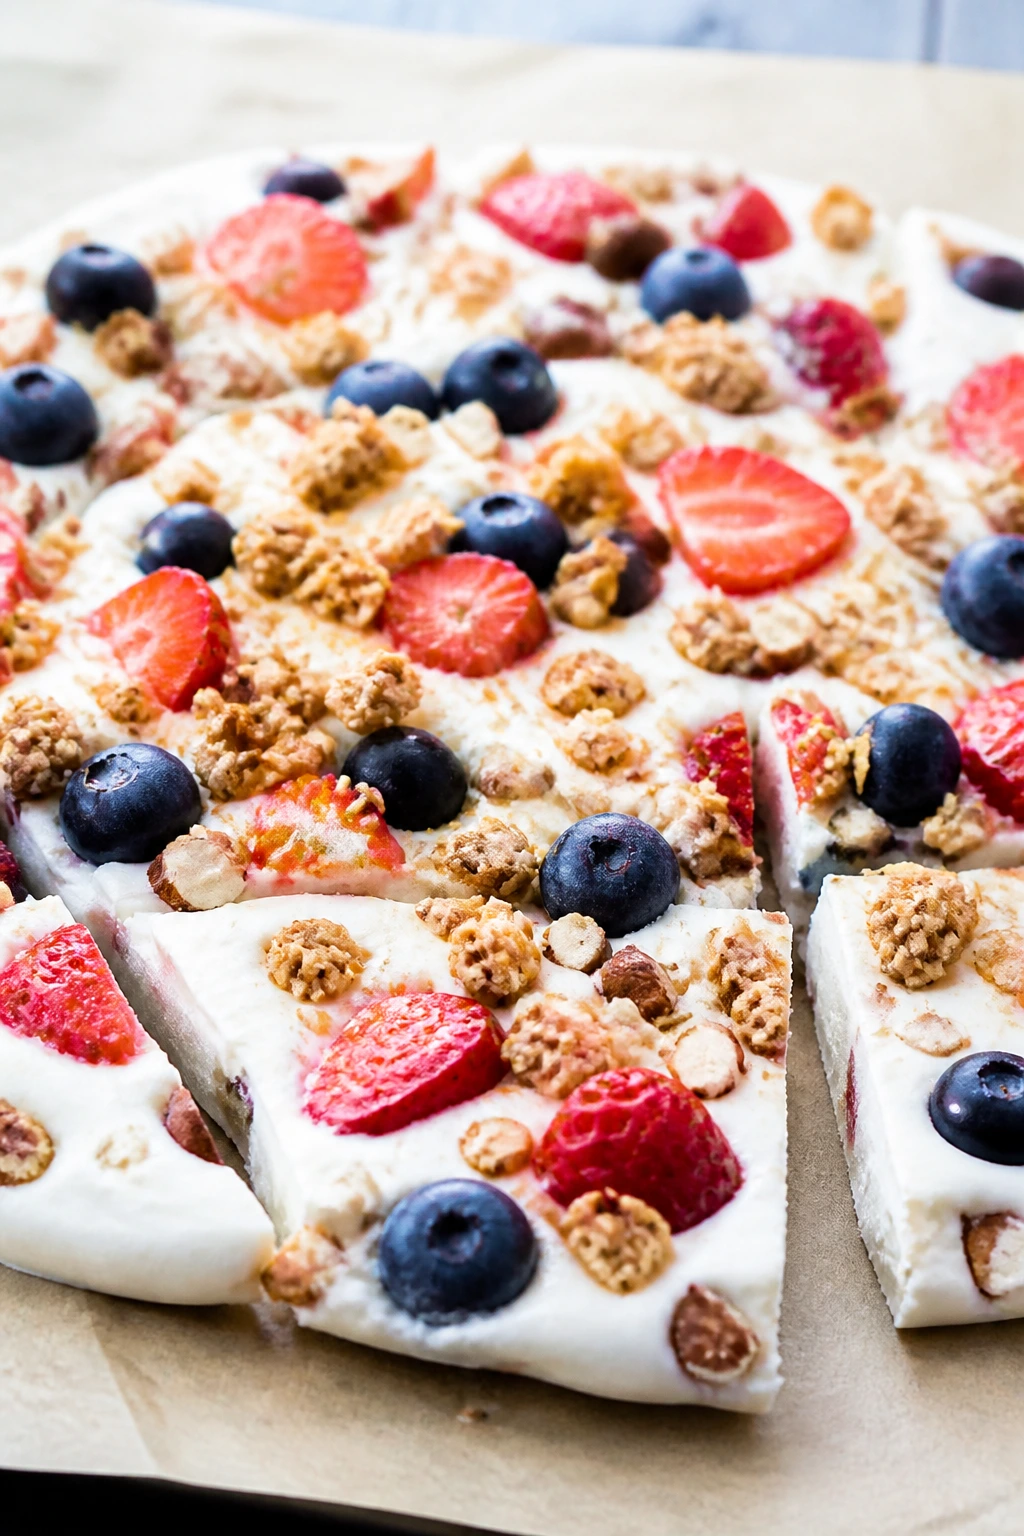
Intro:
These cups are for nights when cheesecake sounds right but a springform pan sounds like a lie. The filling is cool, tangy, and thick enough to hold a spoon upright, while the graham crust gives you the familiar buttery crunch. They feel more polished than they are.
Why It Works:
Cream cheese gives the dessert its body, whipped cream lightens it, and a little lemon juice keeps the flavor from tasting flat. Building them in small cups means the crust stays crisp on the bottom and the filling sets faster in the fridge.
Key Ingredients:
- 8 ounces cream cheese, softened
- 1/2 cup powdered sugar
- 1 teaspoon vanilla extract
- 1 teaspoon lemon juice
- 1 cup heavy cream, whipped to soft peaks
- 1 cup graham cracker crumbs
- 3 tablespoons melted butter
- 1 cup berries or fruit topping
Quick Steps:
- Mix the graham crumbs and melted butter, then spoon into small cups and press lightly.
- Beat the cream cheese, powdered sugar, vanilla, and lemon juice until smooth.
- Fold in the whipped cream.
- Spoon the filling over the crusts and top with berries.
- Chill for at least 1 hour before serving.
Equipment for This Recipe:
- Mixing bowls
- Hand mixer
- Small dessert cups or jars
- Spoon or piping bag
How to Serve This Dish:
Serve them cold, straight from the fridge. A few fresh berries on top is enough, though a little lemon zest over the filling makes them taste cleaner.
Pro Tips for This Recipe:
- Make sure the cream cheese is soft or the filling stays lumpy.
- Whip the cream separately; it gives you a lighter texture.
- Press the crust in lightly, not hard.
- If you are using jars, a spoonful of fruit sauce between layers looks nice.
Variations on This Dish:
- Chocolate Cheesecake Cups: Fold in 2 tablespoons cocoa powder.
- Strawberry Swirl Cups: Add a spoonful of strawberry jam to the filling.
- Gingersnap Base: Swap the graham crumbs for crushed gingersnaps.
Common Mistakes to Avoid with This Dish:
- Using cold cream cheese: The filling will not smooth out properly.
- Skipping the chill time: The cups need a set or they slump.
- Overwhipping the cream: It can turn grainy and heavy.
14. Snickerdoodle Blondies
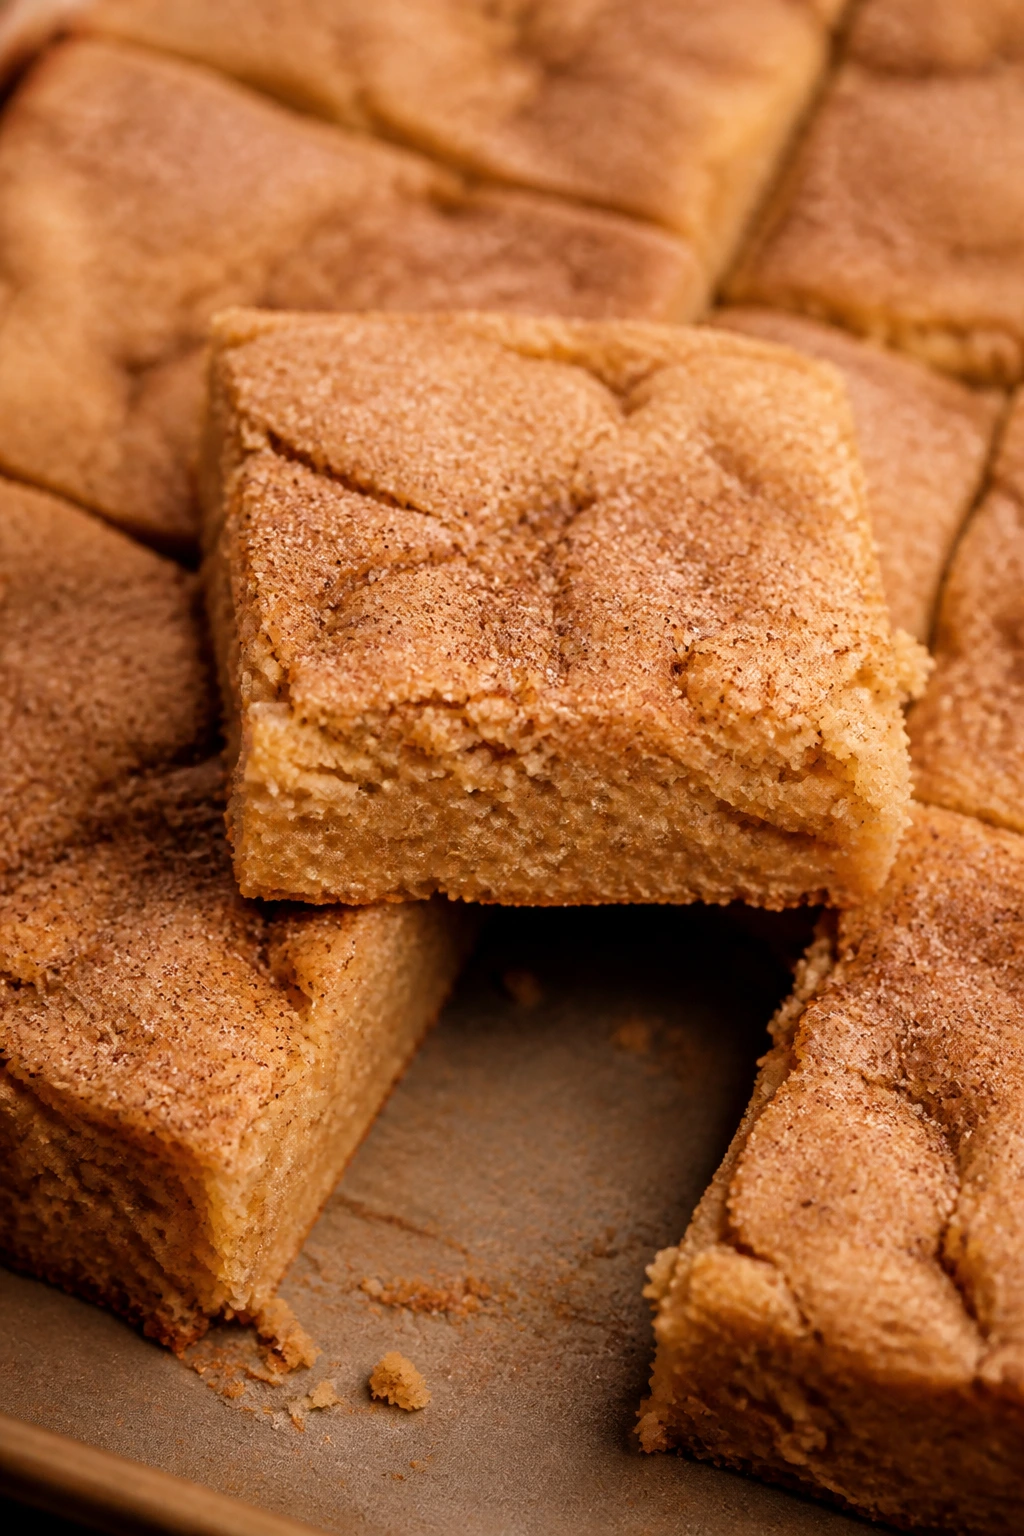
Intro:
Snickerdoodle blondies taste like the best part of a cookie bar: soft, buttery, and dusted with cinnamon sugar across the top. They bake into a chewy square with slightly crisp edges and a warm spice smell that tends to drift through the whole house. If you like the flavor of snickerdoodles without the scooping, this is the cleaner route.
Why It Works:
Brown sugar keeps the crumb soft, and the cinnamon sugar topping bakes into a thin crust that crackles a bit when you cut it. Blondies are easy to mix by hand, which matters on a night when using a stand mixer would feel ridiculous.
Key Ingredients:
- 1/2 cup unsalted butter, melted
- 1 cup packed brown sugar
- 1 large egg
- 1 teaspoon vanilla extract
- 1 cup all-purpose flour
- 1/2 teaspoon baking powder
- 1/4 teaspoon fine salt
- 1 teaspoon ground cinnamon
- 2 tablespoons granulated sugar
Quick Steps:
- Heat the oven to 350°F and line an 8-inch square pan.
- Mix the melted butter and brown sugar, then whisk in the egg and vanilla.
- Fold in the flour, baking powder, and salt.
- Spread the batter into the pan and sprinkle with cinnamon sugar.
- Bake for 22 to 25 minutes, until the center is set and the top is lightly crackled.
Equipment for This Recipe:
- 8-inch square pan
- Mixing bowl
- Whisk and spatula
- Parchment paper
How to Serve This Dish:
Let them cool, then cut into small squares. They are good warm or room temperature, and a mug of coffee makes the cinnamon pop.
Pro Tips for This Recipe:
- Melted butter gives you chew; softened butter changes the texture.
- Do not overbake or you lose the dense, soft center.
- A tiny pinch of nutmeg in the topping works well.
- Use parchment so the sugar crust does not glue itself to the pan.
Variations on This Dish:
- Chai Blondies: Add a pinch of cardamom and ginger to the batter.
- White Chocolate Blondies: Stir in 3/4 cup white chocolate chips.
- Apple Snickerdoodle Blondies: Add 1/2 cup very small diced apples.
Common Mistakes to Avoid with This Dish:
- Baking until the edges pull far from the pan: They will turn dry.
- Skipping the cinnamon sugar top: That crackly finish is half the point.
- Mixing too long after adding flour: The bars get tough.
15. Banana Bread
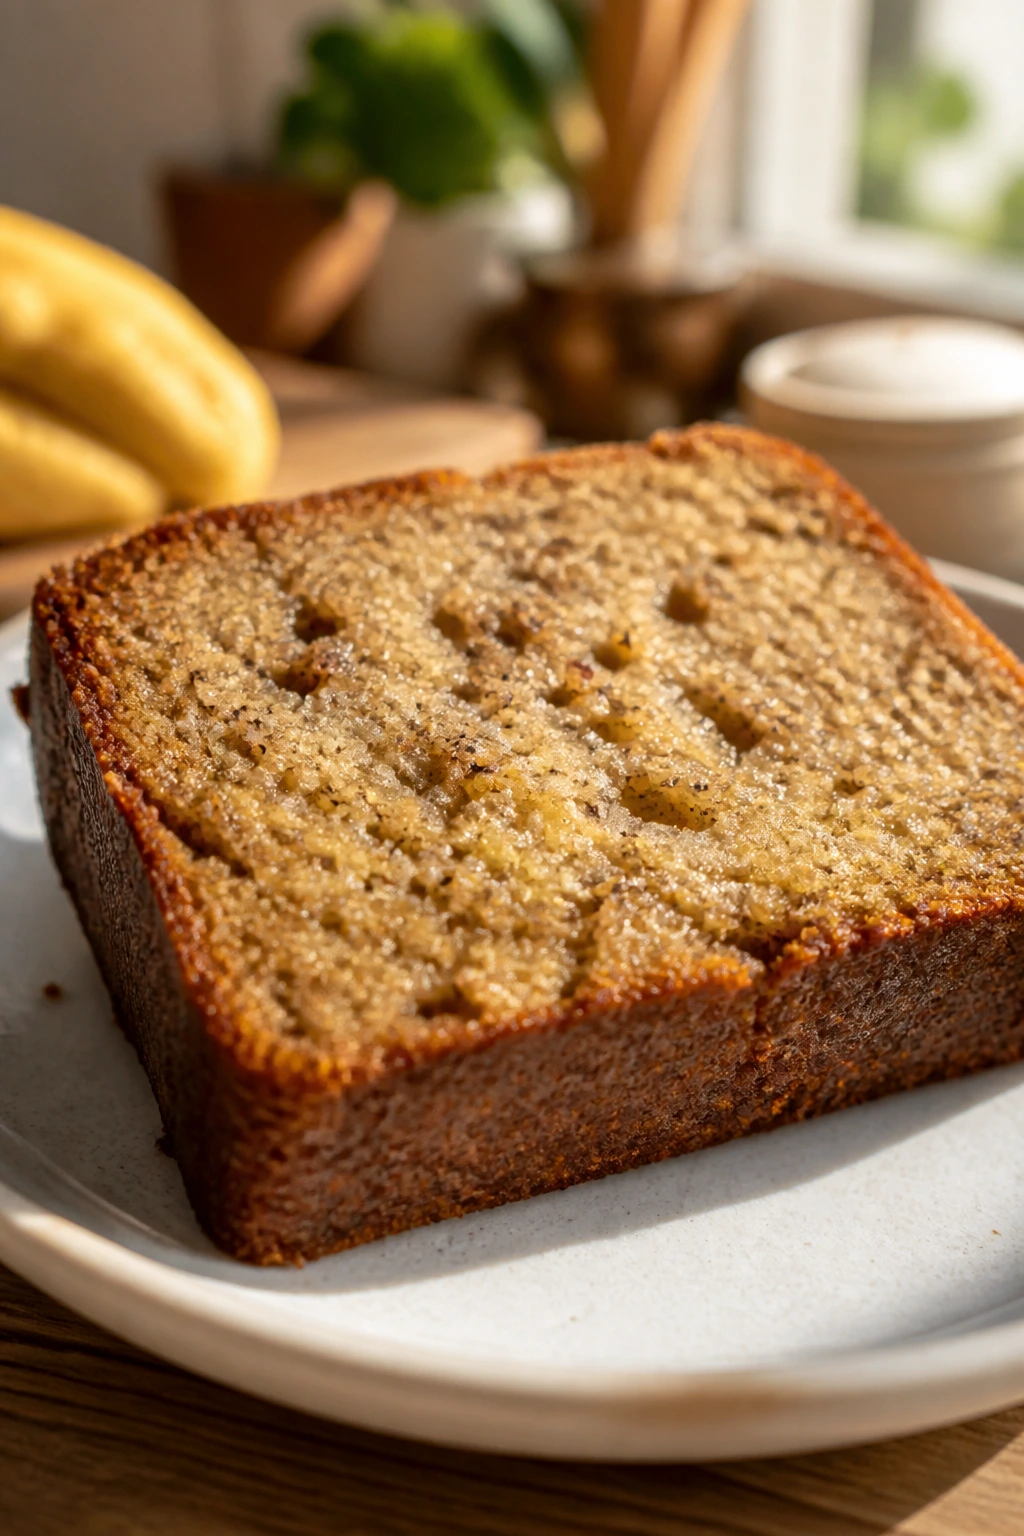
Intro:
Banana bread is the weeknight dessert that quietly solves a fruit bowl problem and a sweet tooth in one go. The loaf is moist, fragrant, and a little caramel-colored on top if your bananas are properly speckled and overripe. A warm slice with butter feels like a small kindness.
Why It Works:
Very ripe bananas bring sweetness and moisture, which lets you keep the recipe simple. The batter is forgiving, and you can mix it in one bowl without whipping air into it or fussing with layers.
Key Ingredients:
- 3 very ripe bananas, mashed
- 1/2 cup unsalted butter, melted
- 3/4 cup packed brown sugar
- 2 large eggs
- 1 teaspoon vanilla extract
- 1 1/2 cups all-purpose flour
- 1 teaspoon baking soda
- 1/2 teaspoon ground cinnamon
- 1/2 teaspoon fine salt
- 1/2 cup chopped walnuts, optional
Quick Steps:
- Heat the oven to 350°F and line a 9×5-inch loaf pan.
- Whisk the bananas, melted butter, brown sugar, eggs, and vanilla together.
- Fold in the flour, baking soda, cinnamon, salt, and nuts if using.
- Pour into the pan and bake for 50 to 60 minutes, until a tester comes out with a few moist crumbs.
- Cool for 20 minutes before slicing.
Equipment for This Recipe:
- 9×5-inch loaf pan
- Mixing bowl
- Fork for mashing bananas
- Spatula
How to Serve This Dish:
Serve thick slices plain, or toast them lightly and add butter. If you want dessert instead of breakfast in disguise, a drizzle of honey or a swipe of cream cheese does the job.
Pro Tips for This Recipe:
- The bananas should be almost black on the peel.
- Stop mixing once the flour disappears.
- If the top browns too fast, tent with foil for the last 15 minutes.
- Let it cool before cutting or the crumb tears.
Variations on This Dish:
- Chocolate Chip Banana Bread: Add 3/4 cup chocolate chips.
- Espresso Banana Bread: Stir in 1 teaspoon instant espresso powder.
- Cinnamon Swirl Banana Bread: Swirl cinnamon sugar through the top of the batter before baking.
Common Mistakes to Avoid with This Dish:
- Using bananas that are still firm: The loaf tastes dull and dry.
- Underbaking the center: Banana bread looks done before it is.
- Cutting while hot: It falls apart into gummy slices.
16. Cherry Clafoutis

Intro:
Cherry clafoutis looks elegant enough to fool people into thinking you planned ahead. It is really a baked custard with fruit tucked into it, and the edges puff while the center stays soft and slightly trembly. Fresh cherries give it a clean, almost floral sweetness.
Why It Works:
The batter is thin, almost like pancake batter, so it slips around the fruit and bakes into a custardy shell. Clafoutis is useful because it relies on eggs, milk, and flour you probably already have. It is one of the less fussy desserts on the list, and it knows it.
Key Ingredients:
- 2 cups pitted cherries
- 3 large eggs
- 1/2 cup granulated sugar
- 1 cup milk
- 1 teaspoon vanilla extract
- 1/2 cup all-purpose flour
- 1/4 teaspoon fine salt
- 1 tablespoon melted butter, for the dish
- Powdered sugar, for finishing
Quick Steps:
- Heat the oven to 350°F and butter a 9-inch pie dish.
- Scatter the cherries in the dish.
- Whisk the eggs, sugar, milk, vanilla, flour, and salt until smooth.
- Pour the batter over the cherries and bake for 35 to 40 minutes, until puffed and golden at the edges.
- Cool slightly, dust with powdered sugar, and serve warm.
Equipment for This Recipe:
- 9-inch pie dish
- Mixing bowl
- Whisk
- Cherry pitter or small knife
How to Serve This Dish:
Serve it warm in wedges, not perfectly neat slices. A spoonful of whipped cream or plain yogurt beside it keeps the custard from tasting too rich.
Pro Tips for This Recipe:
- Pit the cherries, but do not halve them unless they are very large.
- The custard will deflate as it cools. That is normal.
- A splash of almond extract works nicely with cherries.
- Use a shallow dish so the batter bakes evenly.
Variations on This Dish:
- Blueberry Clafoutis: Swap cherries for blueberries.
- Apricot Clafoutis: Use sliced apricots and a pinch of cardamom.
- Gluten-Free Version: Replace the flour with a 1:1 gluten-free blend.
Common Mistakes to Avoid with This Dish:
- Using a deep dish: The custard can stay raw in the middle.
- Overbaking until dry: The center should still wobble a little.
- Serving it cold from the fridge: The texture gets tight and loses its softness.
17. Affogato Sundaes
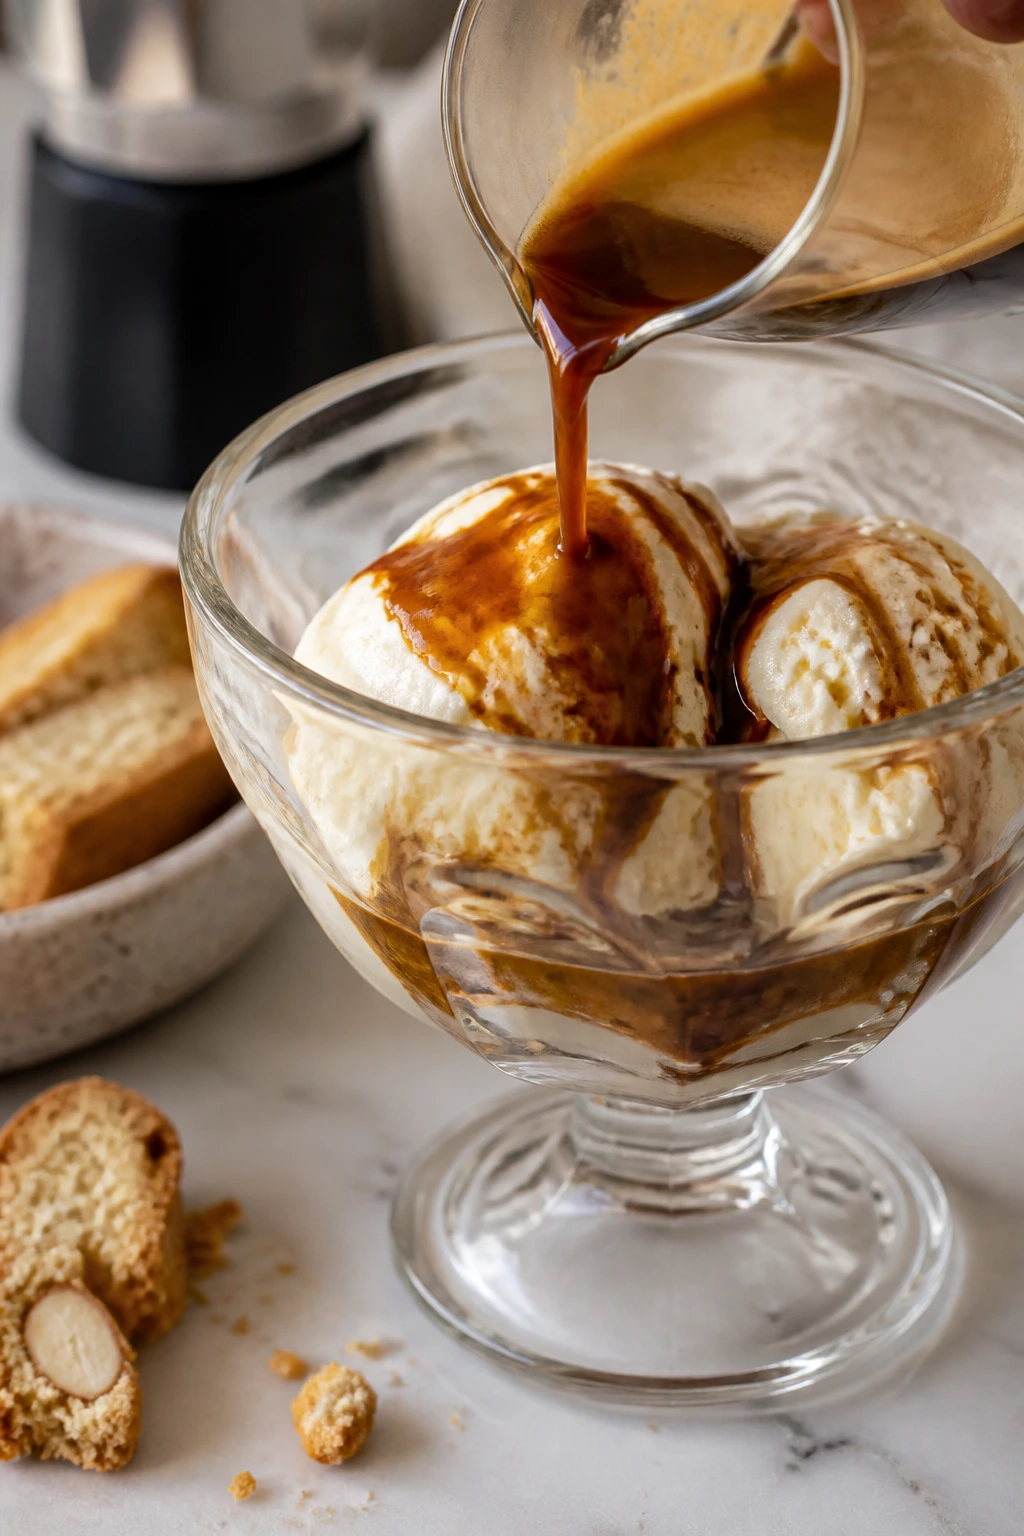
Intro:
Affogato is barely a recipe and that is part of the charm. Hot espresso poured over cold vanilla ice cream turns the top creamy and the edges coffee-dark in seconds. Add biscotti or chopped chocolate if you want, but even plain, it has enough contrast to feel like dessert with a sharp little edge.
Why It Works:
The heat of the espresso melts the ice cream just enough to make a sauce without turning the whole bowl into soup. Because the ingredients are so simple, quality matters: good ice cream, strong espresso, and a little crunch if you want texture.
Key Ingredients:
- 2 scoops vanilla ice cream per serving
- 1 fresh shot espresso per serving
- 1 biscotti or shortbread cookie per serving
- Shaved chocolate, optional
- Chopped hazelnuts, optional
Quick Steps:
- Scoop the ice cream into chilled glasses or bowls.
- Brew the espresso hot and strong.
- Pour the espresso over the ice cream just before serving.
- Add biscotti, chocolate, or nuts right away.
- Eat it immediately while the contrast is at its best.
Equipment for This Recipe:
- Espresso machine, moka pot, or strong coffee maker
- Small serving glasses or bowls
- Ice cream scoop
- Spoon
How to Serve This Dish:
Serve it straight away. Affogato does not wait for anyone, and that is the point. One scoop can be a finish after dinner; two scoops can stand in for dessert entirely.
Pro Tips for This Recipe:
- Chill the bowls so the ice cream melts a little slower.
- Use dense vanilla ice cream, not airy whipped-style ice cream.
- Brew the coffee strong enough to taste through the dairy.
- Keep the toppings simple; too much gets in the way.
Variations on This Dish:
- Mocha Affogato: Add a dusting of cocoa powder.
- Caramel Affogato: Drizzle salted caramel over the ice cream before pouring the espresso.
- Hazelnut Version: Use hazelnut ice cream and chopped toasted nuts.
Common Mistakes to Avoid with This Dish:
- Using weak coffee: It gets lost in the ice cream.
- Waiting too long to serve: The texture becomes flat and runny.
- Choosing overly sweet ice cream: The espresso needs a little space to show up.
18. Oatmeal Raisin Cookies
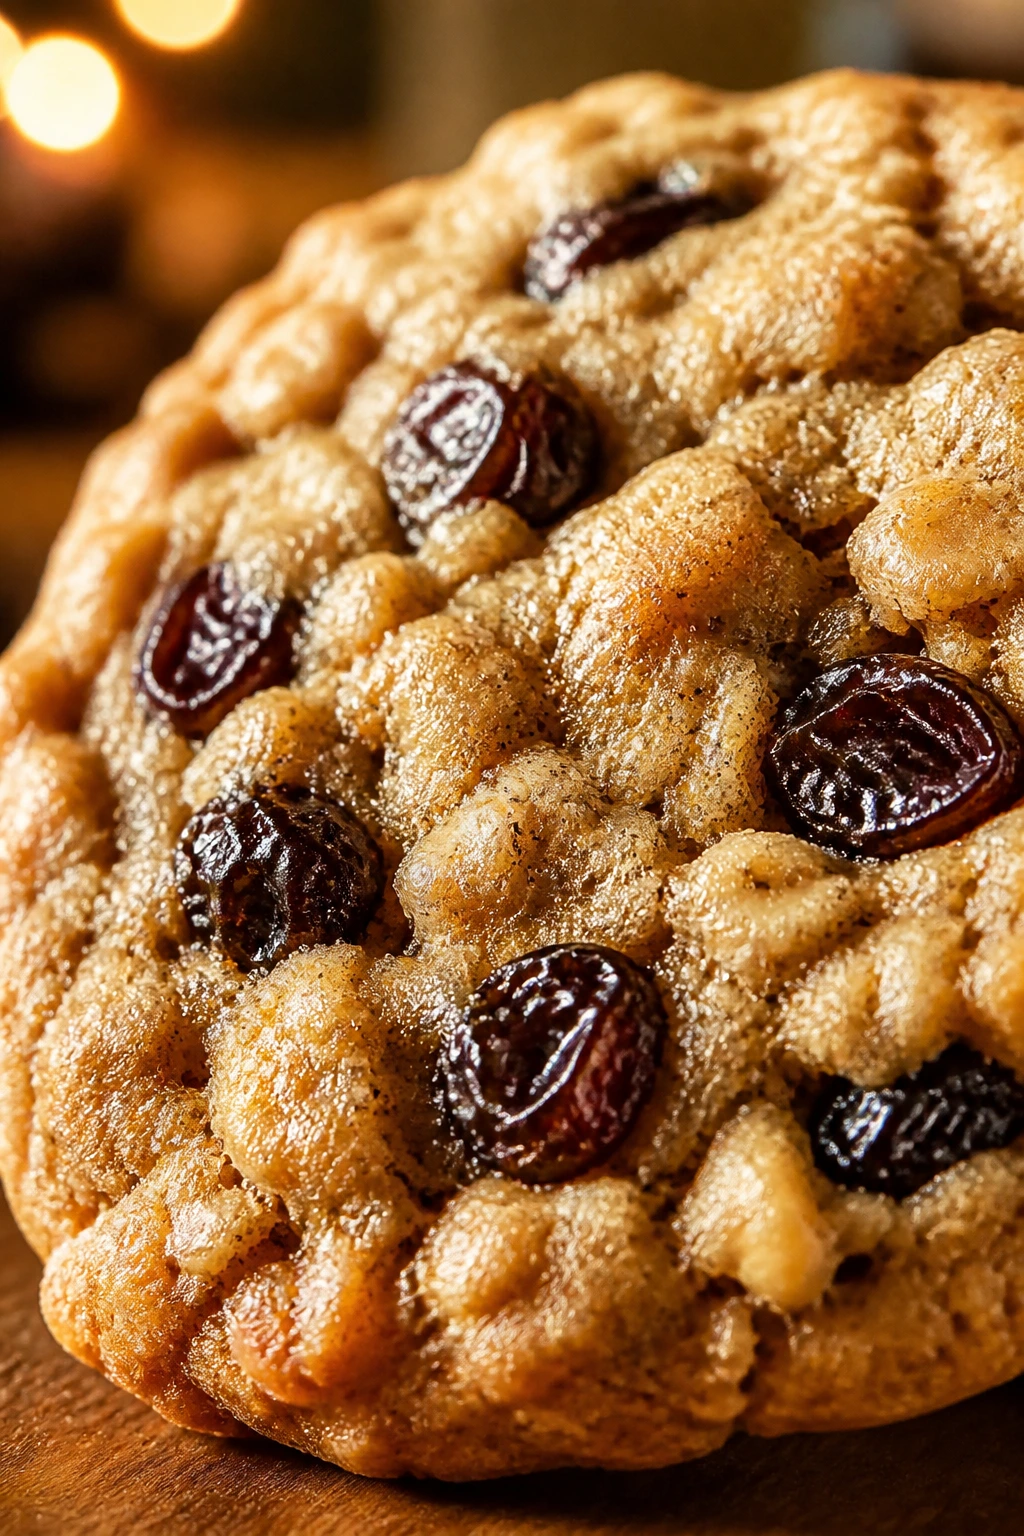
Intro:
Oatmeal raisin cookies get a bad reputation from people who have only had dry ones. A good batch is soft in the middle, gently chewy at the edges, and fragrant with cinnamon and brown sugar. The raisins should plump a little in the oven and keep the cookie from feeling bland.
Why It Works:
Oats give the cookies texture, brown sugar gives them chew, and raisins bring pockets of sweetness that break up the spice. The dough holds up well in the fridge, which makes this a nice “make now, bake later” option on a busy night.
Key Ingredients:
- 1/2 cup unsalted butter, softened
- 1/2 cup packed brown sugar
- 1/4 cup granulated sugar
- 1 large egg
- 1 teaspoon vanilla extract
- 3/4 cup all-purpose flour
- 1 teaspoon ground cinnamon
- 1/2 teaspoon baking soda
- 1/4 teaspoon fine salt
- 1 1/2 cups old-fashioned oats
- 3/4 cup raisins
Quick Steps:
- Heat the oven to 350°F and line a baking sheet.
- Cream the butter and sugars, then beat in the egg and vanilla.
- Fold in the flour, cinnamon, baking soda, salt, oats, and raisins.
- Scoop the dough onto the sheet and bake for 10 to 12 minutes, until the edges are set and the centers still look soft.
- Cool for 5 minutes before moving them.
Equipment for This Recipe:
- Baking sheet
- Mixing bowl
- Cookie scoop or spoon
- Parchment paper
How to Serve This Dish:
Serve them warm with milk or tea. They also make a very decent after-dinner cookie with a small square of sharp cheddar on the side, if you like odd but good things.
Pro Tips for This Recipe:
- Soak the raisins in hot water for 5 minutes if you want them extra plump.
- Pull the cookies early; they firm up as they cool.
- Chill the dough for 20 minutes if the kitchen is warm.
- A pinch of nutmeg makes the cinnamon taste fuller.
Variations on This Dish:
- Cranberry Oat Cookies: Swap the raisins for dried cranberries.
- Walnut Oatmeal Cookies: Add 1/2 cup chopped walnuts.
- Cinnamon Chip Version: Use cinnamon baking chips instead of raisins.
Common Mistakes to Avoid with This Dish:
- Overbaking until crisp: Oatmeal cookies should stay chewy.
- Using quick oats: The texture gets pasty and flat.
- Skipping the salt: The cookie tastes one-note without it.
19. Peanut Butter Blossoms
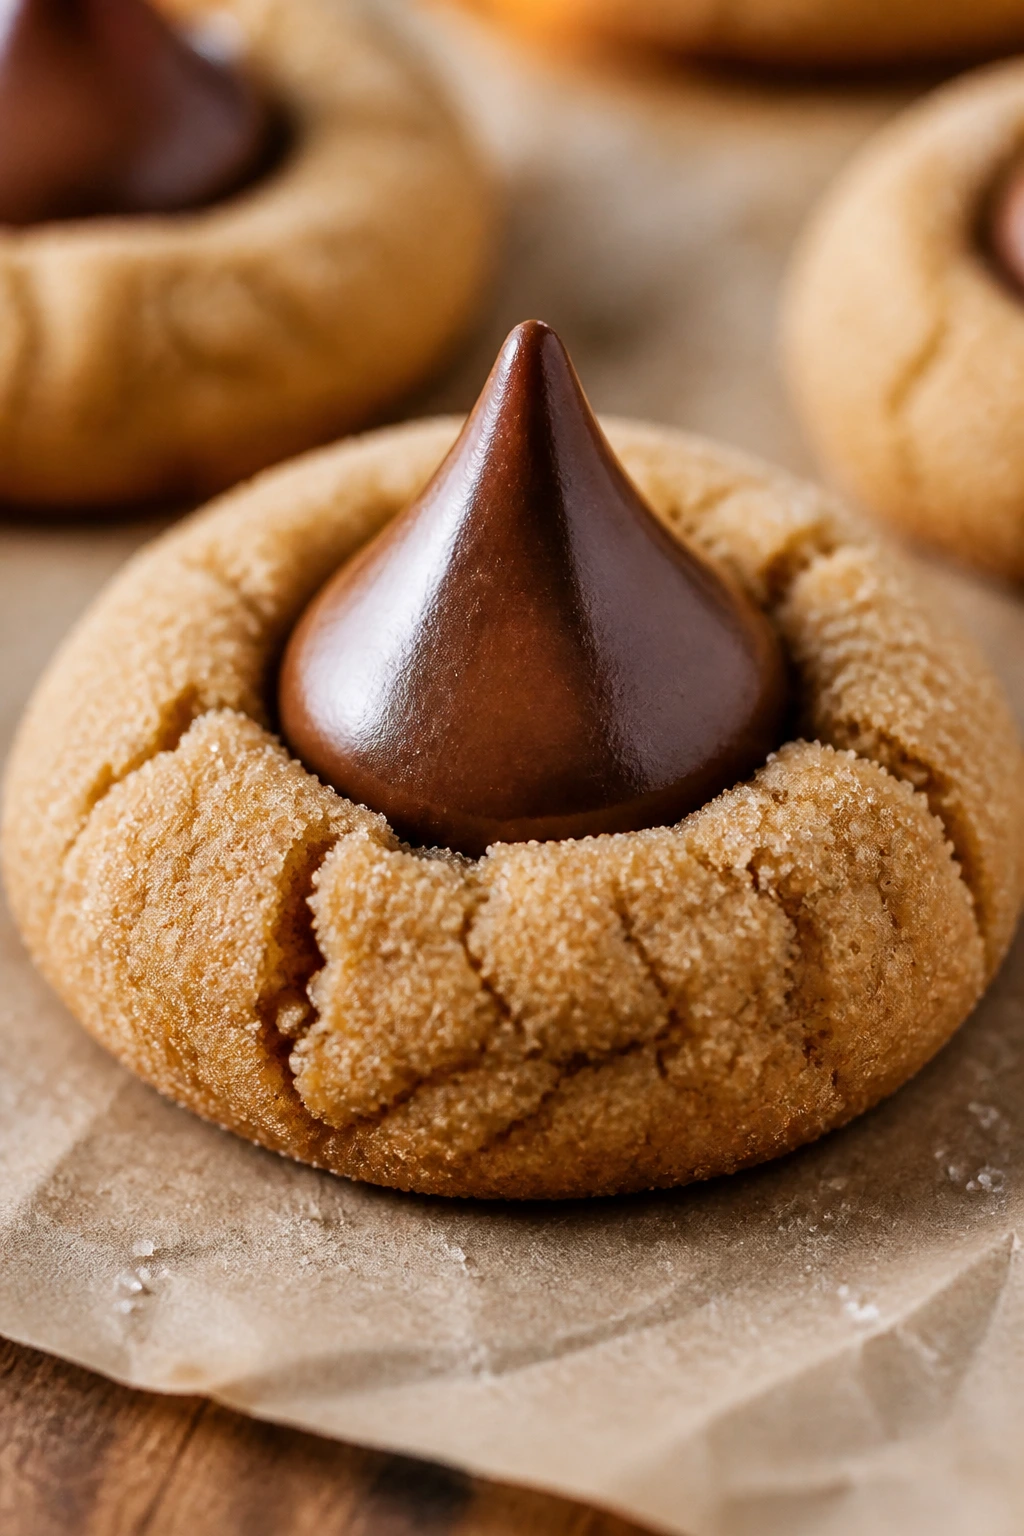
Intro:
There is a reason peanut butter blossoms keep showing up at gatherings: the salty dough and the chocolate center fit together so neatly. The cookie itself is soft and sandy in the middle, and the kiss on top melts just enough to look like it belongs there. They are quick, familiar, and a little nostalgic without being stale.
Why It Works:
Peanut butter gives the dough structure and flavor, while the sugar coating creates that classic crackled shell. Pressing the chocolate kiss into the cookie while it is still hot lets the candy soften slightly, so it anchors without sliding off.
Key Ingredients:
- 1/2 cup unsalted butter, softened
- 1/2 cup creamy peanut butter
- 1/2 cup granulated sugar
- 1/2 cup packed brown sugar
- 1 large egg
- 1 teaspoon vanilla extract
- 1 1/2 cups all-purpose flour
- 1/2 teaspoon baking soda
- 1/4 teaspoon fine salt
- 24 chocolate kisses, unwrapped
- Additional sugar for rolling
Quick Steps:
- Heat the oven to 375°F and line a baking sheet.
- Cream the butter, peanut butter, and sugars, then beat in the egg and vanilla.
- Mix in the flour, baking soda, and salt.
- Roll into balls, coat in sugar, and bake for 8 to 10 minutes.
- Press a chocolate kiss into each cookie right away, then cool on the sheet.
Equipment for This Recipe:
- Baking sheet
- Mixing bowl
- Cookie scoop
- Small bowl for sugar
How to Serve This Dish:
Serve them at room temperature once the chocolate has set enough to hold its shape. They look best piled on a plate rather than lined up like they are waiting for inspection.
Pro Tips for This Recipe:
- Freeze the kisses for 10 minutes before baking if your kitchen is warm.
- Roll the dough evenly so the cookies bake at the same speed.
- Don’t overbake; they should still look soft in the center.
- A second dusting of sugar before baking makes the crust sparkle a bit.
Variations on This Dish:
- Dark Chocolate Blossoms: Use dark chocolate kisses or squares.
- Pretzel Peanut Butter Blossoms: Press a tiny pretzel piece into the top with the chocolate.
- Mini Blossom Bites: Use mini muffin tins for a cup-shaped version.
Common Mistakes to Avoid with This Dish:
- Pressing the kiss too early: It melts and slides off.
- Baking too long: The cookies turn dry and the peanut butter flavor thins out.
- Skipping the sugar coating: You lose the crackly top.
20. Chocolate Whoopie Pies
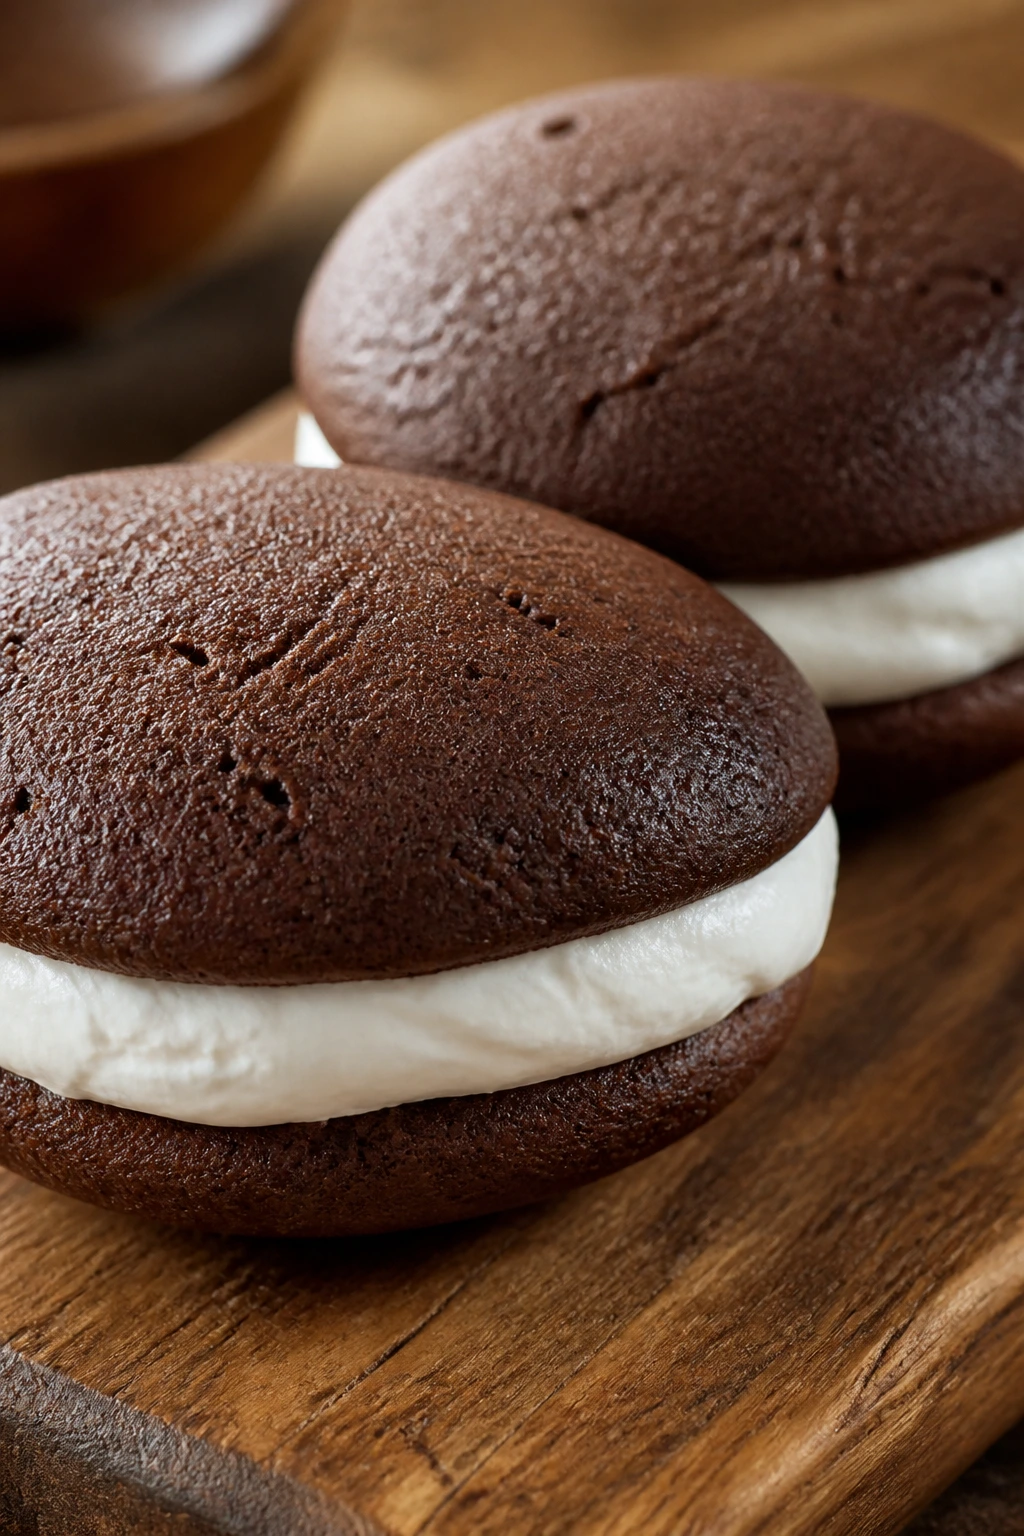
Intro:
Whoopie pies are two soft chocolate cakes with a creamy center, and they feel like a dessert that always traveled well in somebody’s lunchbox. The cakes should be tender, not dry, and the filling should be sweet but not so sweet that your teeth complain. They are richer than cookies, but not as formal as cake.
Why It Works:
The batter bakes into domed rounds that stay soft, and the filling gives you contrast without needing frosting bags or perfect layers. Buttermilk keeps the cake tender, and marshmallow creme gives the center that fluffy, old-school texture.
Key Ingredients:
- For the Cakes:
- 1/2 cup unsalted butter, softened
- 3/4 cup granulated sugar
- 1 large egg
- 1 teaspoon vanilla extract
- 1 3/4 cups all-purpose flour
- 1/3 cup unsweetened cocoa powder
- 1/2 teaspoon baking soda
- 1/4 teaspoon fine salt
- 1/2 cup buttermilk
- For the Filling:
- 1/4 cup unsalted butter, softened
- 1 cup powdered sugar
- 1 cup marshmallow creme
- 1 teaspoon vanilla extract
Quick Steps:
- Heat the oven to 350°F and line two baking sheets.
- Cream the butter and sugar, then beat in the egg and vanilla.
- Mix in the dry ingredients and buttermilk to make a thick batter.
- Drop spoonfuls onto the sheets and bake for 10 to 12 minutes.
- Beat the filling ingredients together, sandwich the cakes once cool, and chill briefly if needed.
Equipment for This Recipe:
- Two baking sheets
- Mixing bowls
- Hand mixer
- Cookie scoop
How to Serve This Dish:
Serve them whole, not sliced. One whoopie pie is enough for most people, though half of one with cold milk is the sort of simple pleasure that gets remembered.
Pro Tips for This Recipe:
- Keep the batter thick so the cakes puff instead of spreading flat.
- Cool the cakes completely before filling or the cream softens too much.
- Use a cookie scoop for evenly sized rounds.
- If the filling feels too soft, chill it for 10 minutes.
Variations on This Dish:
- Peppermint Whoopie Pies: Add 1/4 teaspoon peppermint extract to the filling.
- Mocha Whoopie Pies: Stir 1 teaspoon espresso powder into the batter.
- Cream Cheese Filling: Swap half the marshmallow creme for softened cream cheese.
Common Mistakes to Avoid with This Dish:
- Overbaking the cakes: They should spring back, not feel dry.
- Filling them while warm: The center melts and leaks out.
- Using batter that is too thin: The cakes will spread into pancakes.
21. Cinnamon Rice Pudding
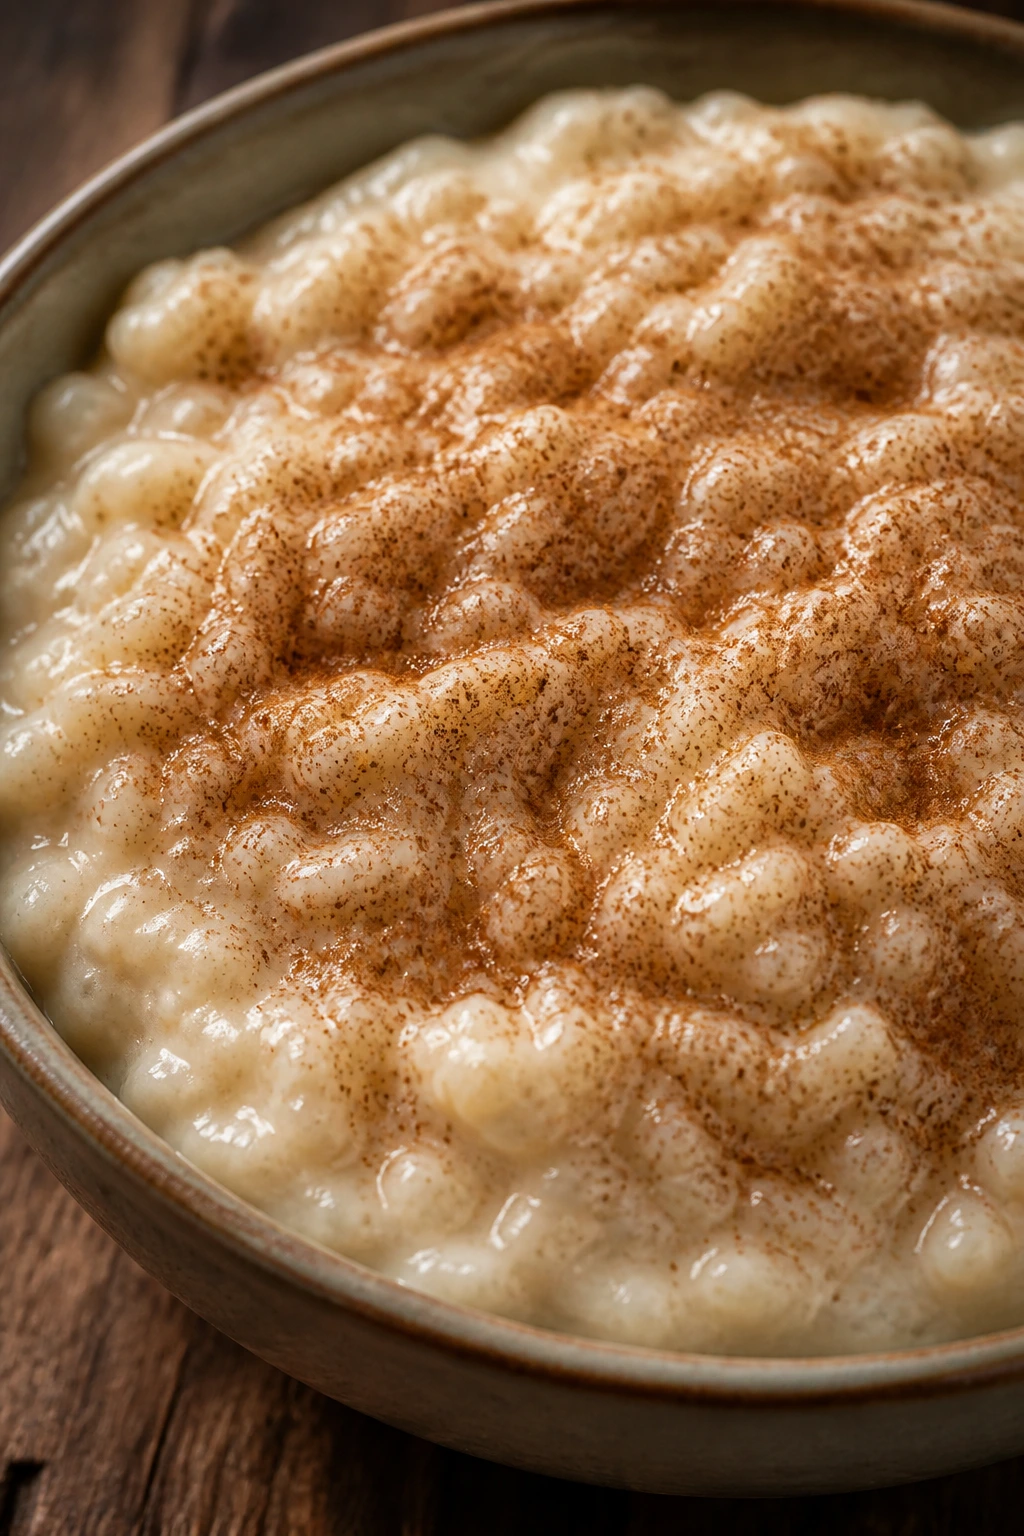
Intro:
Rice pudding is gentle in a way most desserts are not. The grains go soft and creamy, the milk thickens around them, and cinnamon gives the whole bowl a warm edge. It is the kind of thing you can make from a little leftover rice or a small pot of patience.
Why It Works:
Starch from the rice and milk works together to create the creamy texture, and a slow simmer keeps the bottom from scorching. A little sugar and vanilla are enough to make it taste finished, while raisins or butter can round it out if that is your style.
Key Ingredients:
- 1 cup cooked white rice
- 2 cups whole milk
- 1/2 cup heavy cream
- 1/4 cup granulated sugar
- 1/2 teaspoon ground cinnamon
- 1/4 teaspoon fine salt
- 1 teaspoon vanilla extract
- 2 tablespoons raisins, optional
- 1 tablespoon butter
Quick Steps:
- Combine the rice, milk, cream, sugar, cinnamon, salt, and butter in a saucepan.
- Simmer over low heat, stirring often, for 20 to 25 minutes.
- Stir in the vanilla and raisins, if using.
- Cook until the mixture looks thick and the rice is very tender.
- Serve warm or chill and serve cold.
Equipment for This Recipe:
- Medium saucepan
- Wooden spoon
- Measuring cups
- Ladle or spoon
How to Serve This Dish:
Serve it warm in small bowls with extra cinnamon on top. A spoon of jam or a few berries makes the bowl brighter if you want something a little less quiet.
Pro Tips for This Recipe:
- Stir often so the dairy does not scorch.
- Use whole milk for the best texture.
- The pudding thickens as it cools, so stop while it still looks a little loose.
- A strip of lemon zest simmered in the pot gives it lift.
Variations on This Dish:
- Cardamom Rice Pudding: Add 1/4 teaspoon ground cardamom.
- Coconut Rice Pudding: Replace half the milk with coconut milk.
- Orange Rice Pudding: Add orange zest and a tiny pinch of nutmeg.
Common Mistakes to Avoid with This Dish:
- Cooking on high heat: The bottom burns before the pudding thickens.
- Leaving out salt: The pudding tastes flat and overly sweet.
- Letting it boil hard: The milk can split or foam over.
22. Berry Panna Cotta
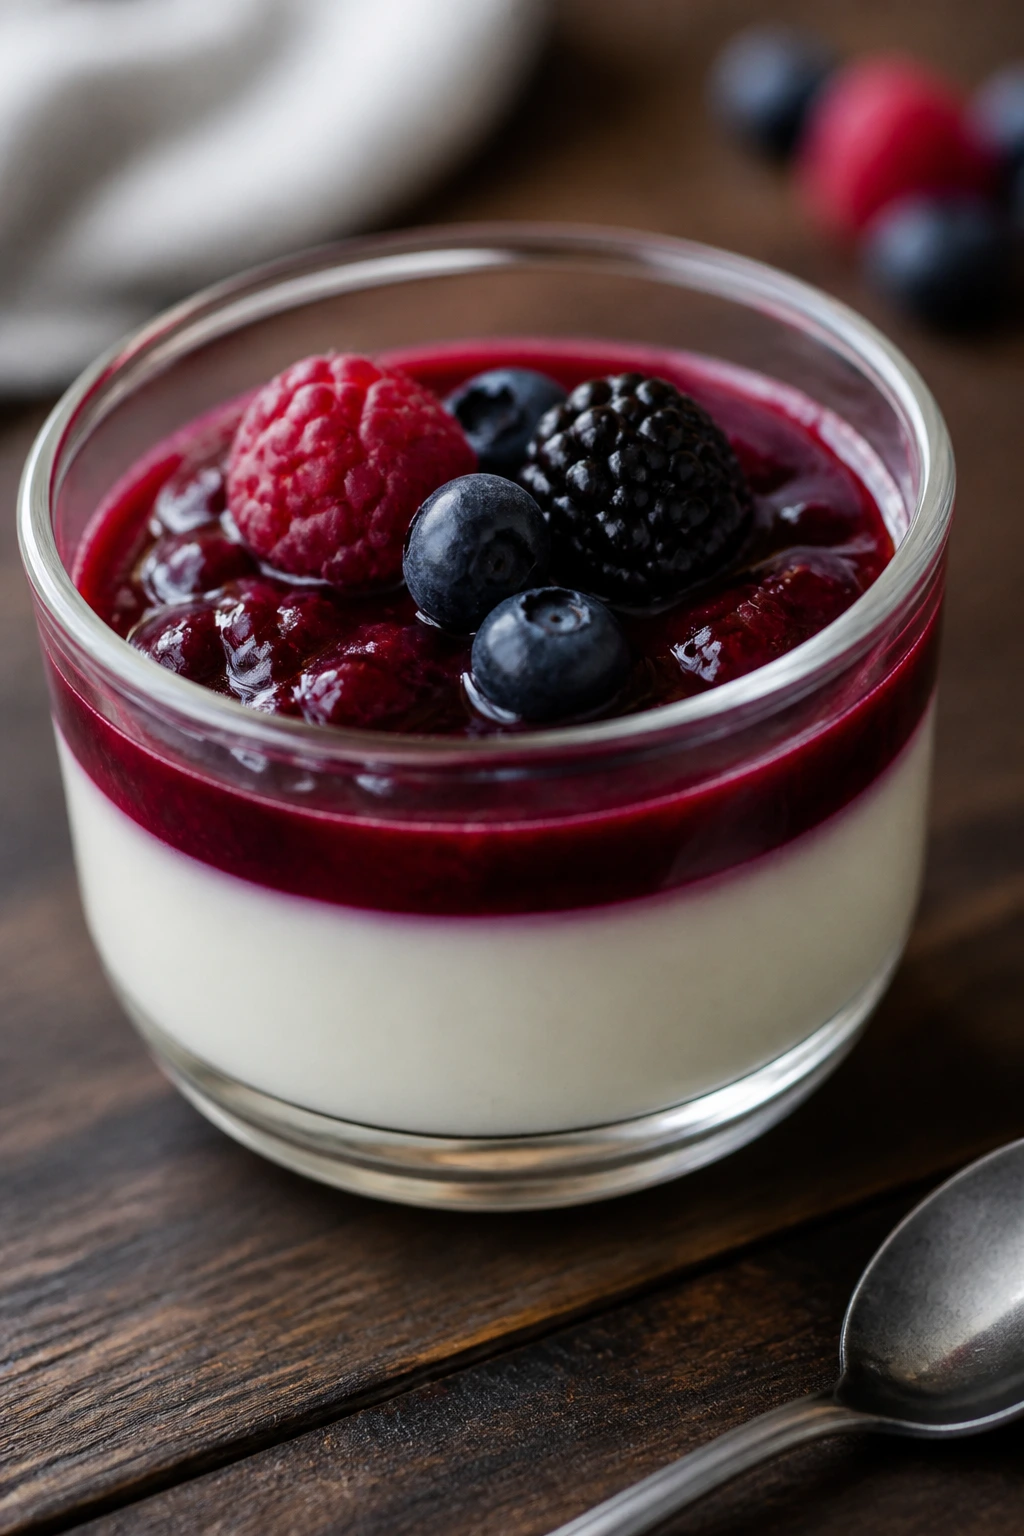
Intro:
Panna cotta is soft-set cream in its nicest form. It trembles on the spoon, carries vanilla well, and gives berries a cold, bright place to sit. It feels like a restaurant dessert, but it behaves like a Tuesday night project if you keep the steps simple.
Why It Works:
Gelatin sets the cream without baking, which gives panna cotta that smooth, custardy wobble. The berry sauce adds acidity and color, and because the dessert is mild, the topping really gets to shine instead of fighting the base.
Key Ingredients:
- 2 cups heavy cream
- 1 cup whole milk
- 1/3 cup granulated sugar
- 2 teaspoons powdered gelatin
- 3 tablespoons cold water
- 1 teaspoon vanilla extract
- 1 1/2 cups mixed berries
- 1 tablespoon lemon juice
- 1 tablespoon sugar for the sauce
Quick Steps:
- Sprinkle gelatin over the cold water and let it bloom for 5 minutes.
- Warm the cream, milk, and sugar until steaming, then whisk in the gelatin until dissolved.
- Stir in vanilla and pour into ramekins or glasses.
- Chill for at least 4 hours.
- Cook the berries, lemon juice, and sugar for the sauce, cool it, then spoon over the set panna cotta.
Equipment for This Recipe:
- Small saucepan
- Whisk
- Ramekins or glasses
- Fine strainer, optional
How to Serve This Dish:
Unmold it if you want a neat plated dessert, or serve it in glasses if you want less fuss. The berry sauce should be cool, not hot, or it softens the set.
Pro Tips for This Recipe:
- Do not boil the cream. Too much heat can weaken the gelatin.
- Strain the sauce if you want it smoother.
- Chill long enough; soft-set desserts need the full time.
- A little lemon zest in the cream keeps it from tasting too rich.
Variations on This Dish:
- Vanilla Bean Panna Cotta: Use a split vanilla bean instead of extract.
- Coffee Panna Cotta: Add 1 tablespoon espresso powder to the warm cream.
- Honey Panna Cotta: Replace part of the sugar with mild honey.
Common Mistakes to Avoid with This Dish:
- Adding gelatin to boiling cream: It can lose its setting power.
- Trying to unmold too early: The dessert can slump.
- Using too much topping: It should crown the panna cotta, not drown it.
23. S’mores Dip
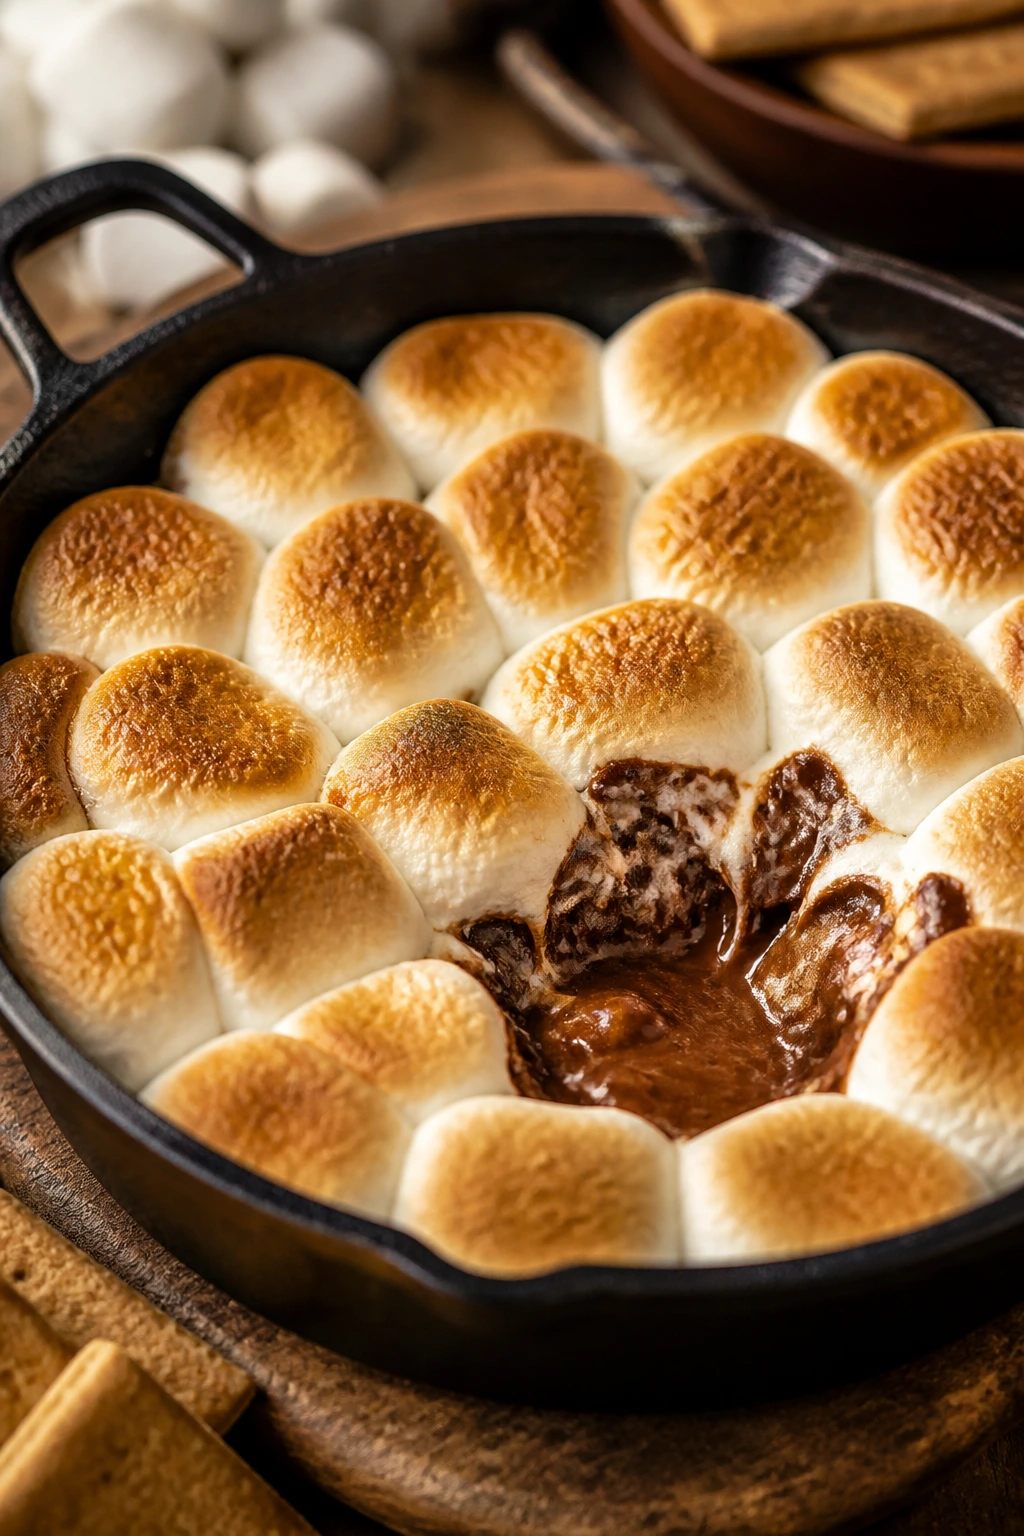
Intro:
S’mores dip is what happens when you decide the campfire part was optional. Melted chocolate sits under a sheet of toasted marshmallows, and the whole dish begs for graham crackers, though fruit works too. It is loud, quick, and gone fast.
Why It Works:
The chocolate melts into a smooth layer under the marshmallows, and the broiler gives the top that charred, sticky finish people chase in actual s’mores. Since it is served hot in one dish, there is almost no assembly once it comes out of the oven.
Key Ingredients:
- 1 cup semisweet chocolate chips
- 1/2 cup heavy cream
- 2 cups mini marshmallows
- Graham crackers, for dipping
- Strawberries or pretzels, optional
Quick Steps:
- Heat the oven to 450°F or set the broiler.
- Warm the chocolate chips and cream in an ovenproof skillet or baking dish until melted together.
- Scatter the marshmallows over the top.
- Broil for 1 to 2 minutes, watching closely, until the tops are toasted.
- Serve immediately with dippers.
Equipment for This Recipe:
- Small ovenproof skillet or baking dish
- Broiler-safe oven
- Spoon
- Graham crackers for serving
How to Serve This Dish:
Serve it hot from the dish with crackers, pretzels, and fruit around it. If you are sharing, put out extra napkins because marshmallow strings are part of the experience.
Pro Tips for This Recipe:
- Watch the broiler the whole time; marshmallows burn fast.
- Use a shallow dish so the chocolate stays easy to scoop.
- Let the dish sit for a minute before serving so the chocolate isn’t lava-hot.
- A pinch of salt in the chocolate sharpens the flavor.
Variations on This Dish:
- Peanut Butter S’mores Dip: Swirl peanut butter into the chocolate.
- Mint S’mores Dip: Add a little peppermint extract to the chocolate layer.
- Cookie Dip Version: Serve with chocolate wafers instead of graham crackers.
Common Mistakes to Avoid with This Dish:
- Walking away under the broiler: Marshmallows go from toasted to burnt in seconds.
- Using a deep dish: The chocolate can stay too thick and hard to scoop.
- Waiting too long to serve: The marshmallow top sets as it cools.
24. Chocolate Chip Cookie Bars
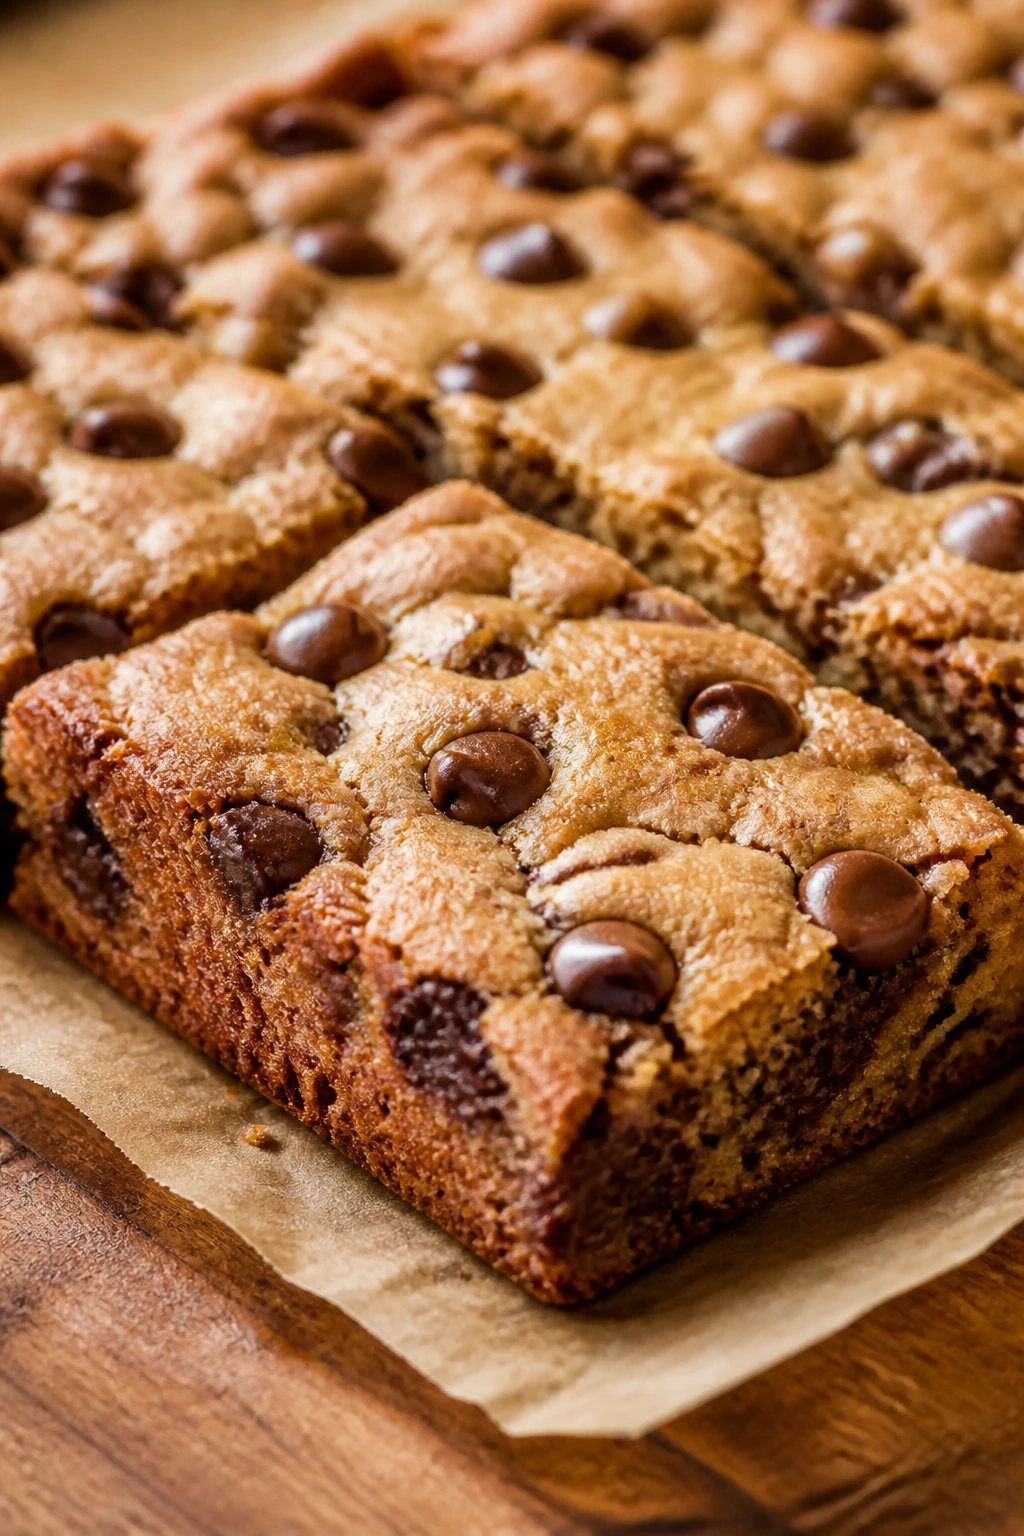
Intro:
Cookie bars are the easy answer to “I want cookies, but not a tray of individual rounds.” The center stays soft, the edges brown slightly, and the whole pan cuts into neat squares that taste like a better version of the standard cookie. If the week is already busy, this is the sensible move.
Why It Works:
The dough is thicker than drop cookie dough, so it bakes into one even slab with fewer chances for overbaking. Brown sugar keeps the bars chewy, and a fairly short bake time protects the chocolate from drying out.
Key Ingredients:
- 1/2 cup unsalted butter, melted
- 3/4 cup packed brown sugar
- 1/4 cup granulated sugar
- 1 large egg
- 1 teaspoon vanilla extract
- 1 1/4 cups all-purpose flour
- 1/2 teaspoon baking soda
- 1/4 teaspoon fine salt
- 3/4 cup chocolate chips
Quick Steps:
- Heat the oven to 350°F and line an 8-inch square pan.
- Stir together the melted butter and sugars, then whisk in the egg and vanilla.
- Fold in the flour, baking soda, and salt, then stir in the chocolate chips.
- Press the dough into the pan and bake for 20 to 24 minutes.
- Cool before slicing into bars.
Equipment for This Recipe:
- 8-inch square pan
- Mixing bowl
- Spatula
- Parchment paper
How to Serve This Dish:
Cut them into squares and serve at room temperature. A warm bar with ice cream is the more indulgent route, but they are solid straight off the counter too.
Pro Tips for This Recipe:
- Do not overmix after adding the flour.
- Pull the bars when the center still looks a touch soft.
- Save a few chips to press on top before baking.
- Parchment makes lifting the whole slab easier.
Variations on This Dish:
- Malted Cookie Bars: Add 2 tablespoons malted milk powder.
- Nutty Cookie Bars: Fold in 1/2 cup chopped pecans.
- Double Chocolate Version: Replace 1/4 cup flour with cocoa powder.
Common Mistakes to Avoid with This Dish:
- Baking until firm in the center: Bars set up as they cool.
- Using a pan that is too large: The bars turn thin and dry.
- Skipping the cool-down: You will get a crumbly mess.
25. Frozen Yogurt Bark
Intro:
Frozen yogurt bark is the coldest dessert on this list and maybe the most casual. Spread, sprinkle, freeze, break. That is the whole operation. The result is tart, creamy, crunchy, and easy to keep in the freezer for when you want something sweet without turning on the oven.
Why It Works:
Thick yogurt freezes into a firm base, and honey adds a bit of sweetness without making the bark icy. Toppings like berries and granola keep each shard different, which is half the fun.
Key Ingredients:
- 2 cups plain Greek yogurt
- 2 tablespoons honey
- 1 teaspoon vanilla extract
- 1 cup mixed berries
- 1/4 cup granola
- 2 tablespoons chopped nuts or chocolate chips
Quick Steps:
- Line a baking sheet with parchment.
- Mix the yogurt, honey, and vanilla, then spread it into a thin layer.
- Scatter berries, granola, and nuts over the top.
- Freeze for 3 to 4 hours until solid.
- Break into pieces and serve right away.
Equipment for This Recipe:
- Baking sheet
- Parchment paper
- Mixing bowl
- Spatula
How to Serve This Dish:
Serve it straight from the freezer, because it softens quickly. It works best as a snacky dessert after dinner rather than a plated finish.
Pro Tips for This Recipe:
- Use thick yogurt so the bark freezes creamy, not brittle.
- Do not overload it with toppings or the bark breaks unevenly.
- Freeze it flat and undisturbed.
- Keep the pieces in a freezer bag between sheets of parchment.
Variations on This Dish:
- Chocolate Berry Bark: Swirl in a little melted chocolate.
- Peach Yogurt Bark: Use sliced peaches and crushed almonds.
- Citrus Bark: Add orange zest and pistachios.
Common Mistakes to Avoid with This Dish:
- Using thin yogurt: It can freeze icy and weird.
- Leaving it out too long before breaking: It becomes floppy.
- Adding wet fruit in huge pieces: They make the bark brittle in the wrong places.
26. Matcha White Chocolate Cookies
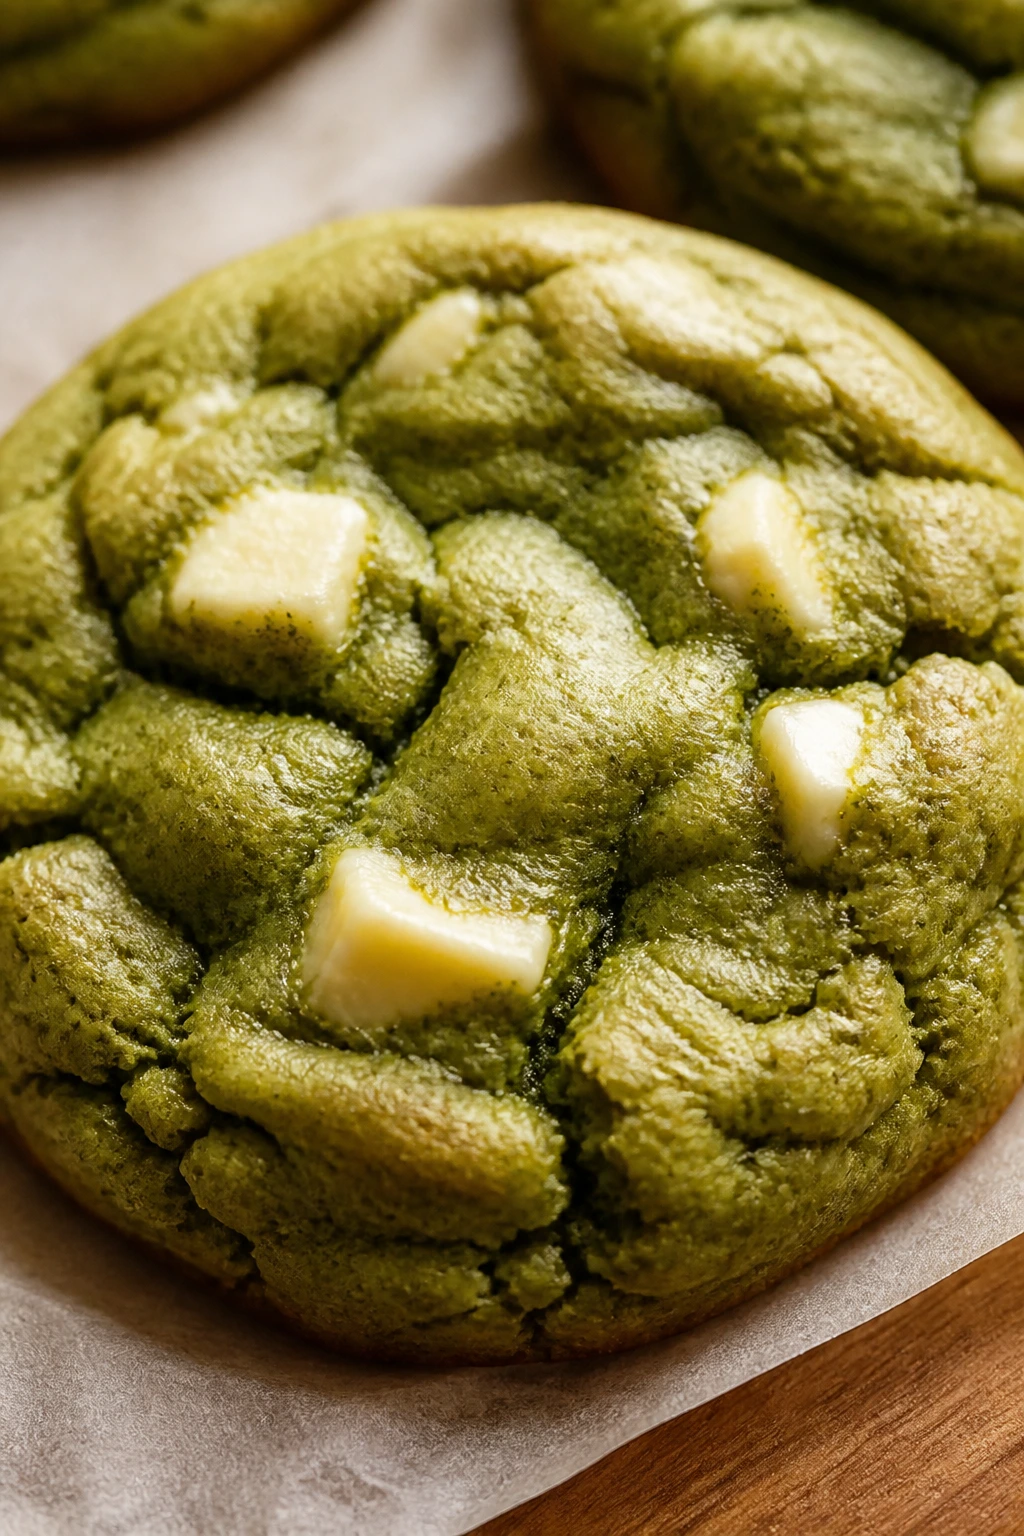
Intro:
These cookies are green in a calm, tea-room kind of way, not in a loud novelty way. Matcha brings a grassy bitterness that keeps the sweetness in check, and white chocolate adds little creamy pockets that soften the edges. They look more deliberate than the effort required.
Why It Works:
Matcha needs fat and sugar to taste balanced, which is why it plays so well in a cookie dough. White chocolate gives the right sweetness to round out the slight bitterness, and the dough bakes into soft centers with faintly crisp edges.
Key Ingredients:
- 1/2 cup unsalted butter, softened
- 1/2 cup granulated sugar
- 1/4 cup packed brown sugar
- 1 large egg
- 1 teaspoon vanilla extract
- 1 1/4 cups all-purpose flour
- 1 tablespoon matcha powder
- 1/2 teaspoon baking powder
- 1/4 teaspoon fine salt
- 3/4 cup white chocolate chunks
Quick Steps:
- Heat the oven to 350°F and line a baking sheet.
- Cream the butter and sugars, then beat in the egg and vanilla.
- Fold in the flour, matcha, baking powder, and salt.
- Stir in the white chocolate chunks.
- Scoop and bake for 10 to 11 minutes, until the centers look set but soft.
Equipment for This Recipe:
- Baking sheet
- Mixing bowl
- Cookie scoop
- Parchment paper
How to Serve This Dish:
Serve them with tea or milk. They are nice as-is, but a sprinkle of flaky salt gives the white chocolate a sharper finish.
Pro Tips for This Recipe:
- Sift the matcha if it tends to clump.
- Use good matcha; stale powder tastes dusty.
- Chill the dough briefly if it feels too soft.
- Pull them early for a softer center.
Variations on This Dish:
- Lemon Matcha Cookies: Add lemon zest for a brighter edge.
- Dark Chocolate Matcha Cookies: Swap half the white chocolate for dark chocolate.
- Nutty Matcha Cookies: Add chopped pistachios.
Common Mistakes to Avoid with This Dish:
- Using too much matcha: The cookies turn bitter and chalky.
- Overbaking: They should stay soft in the middle.
- Choosing low-quality white chocolate: It can taste waxy and flatten the flavor.
27. Poached Pears in Vanilla Syrup
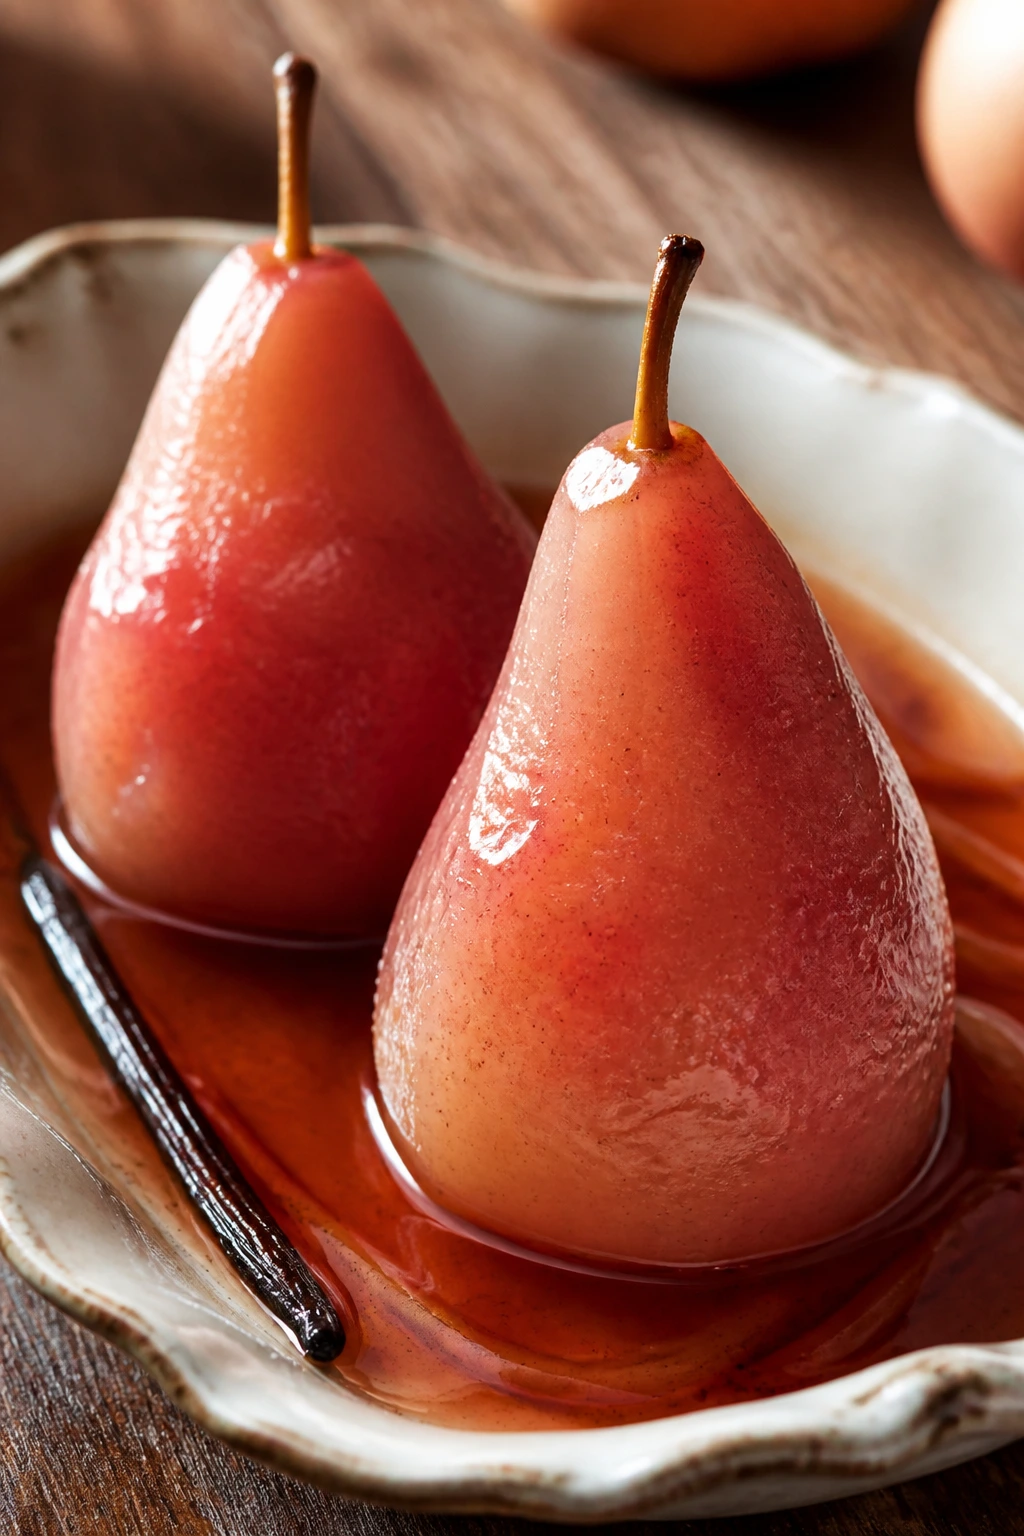
Intro:
Poached pears are what you make when you want dessert to look calm and composed. The fruit softens in a fragrant syrup, the skin deepens in color, and the whole thing feels polished with very little labor. A spoon of syrup over each pear is enough to make them feel dressed.
Why It Works:
Gentle simmering cooks the pears evenly without blowing them apart, and vanilla turns the syrup into something you’d actually want to eat with a spoon. The pears keep their shape while absorbing flavor from the liquid, which is why this dessert looks more elaborate than it is.
Key Ingredients:
- 4 firm pears, peeled with stems on
- 3 cups water
- 3/4 cup granulated sugar
- 1 teaspoon vanilla extract
- 1 strip lemon peel
- 1 cinnamon stick
- Greek yogurt or whipped cream, for serving
Quick Steps:
- Combine the water, sugar, vanilla, lemon peel, and cinnamon in a saucepan.
- Bring to a simmer, then add the pears.
- Cook gently for 20 to 30 minutes, turning occasionally, until the pears are tender but still hold shape.
- Remove the pears and reduce the syrup slightly if you want it thicker.
- Serve warm or chilled with a spoonful of yogurt or cream.
Equipment for This Recipe:
- Medium saucepan
- Peeler
- Slotted spoon
- Knife
How to Serve This Dish:
Serve one pear per person with some syrup spooned over the top. A little yogurt gives you a cool contrast, while whipped cream makes it richer.
Pro Tips for This Recipe:
- Choose pears that are firm, not ripe-soft.
- Keep the simmer gentle so they don’t break apart.
- Turn them now and then for even color.
- The syrup can be reused for tea or fruit the next day.
Variations on This Dish:
- Red Wine Pears: Replace part of the water with red wine.
- Ginger Pears: Add sliced ginger to the syrup.
- Citrus Pears: Use orange peel instead of lemon.
Common Mistakes to Avoid with This Dish:
- Using overripe pears: They collapse before they absorb flavor.
- Boiling hard: The outside cooks too fast and splits.
- Skipping the turning: You end up with pale spots.
28. Hot Fudge Sauce
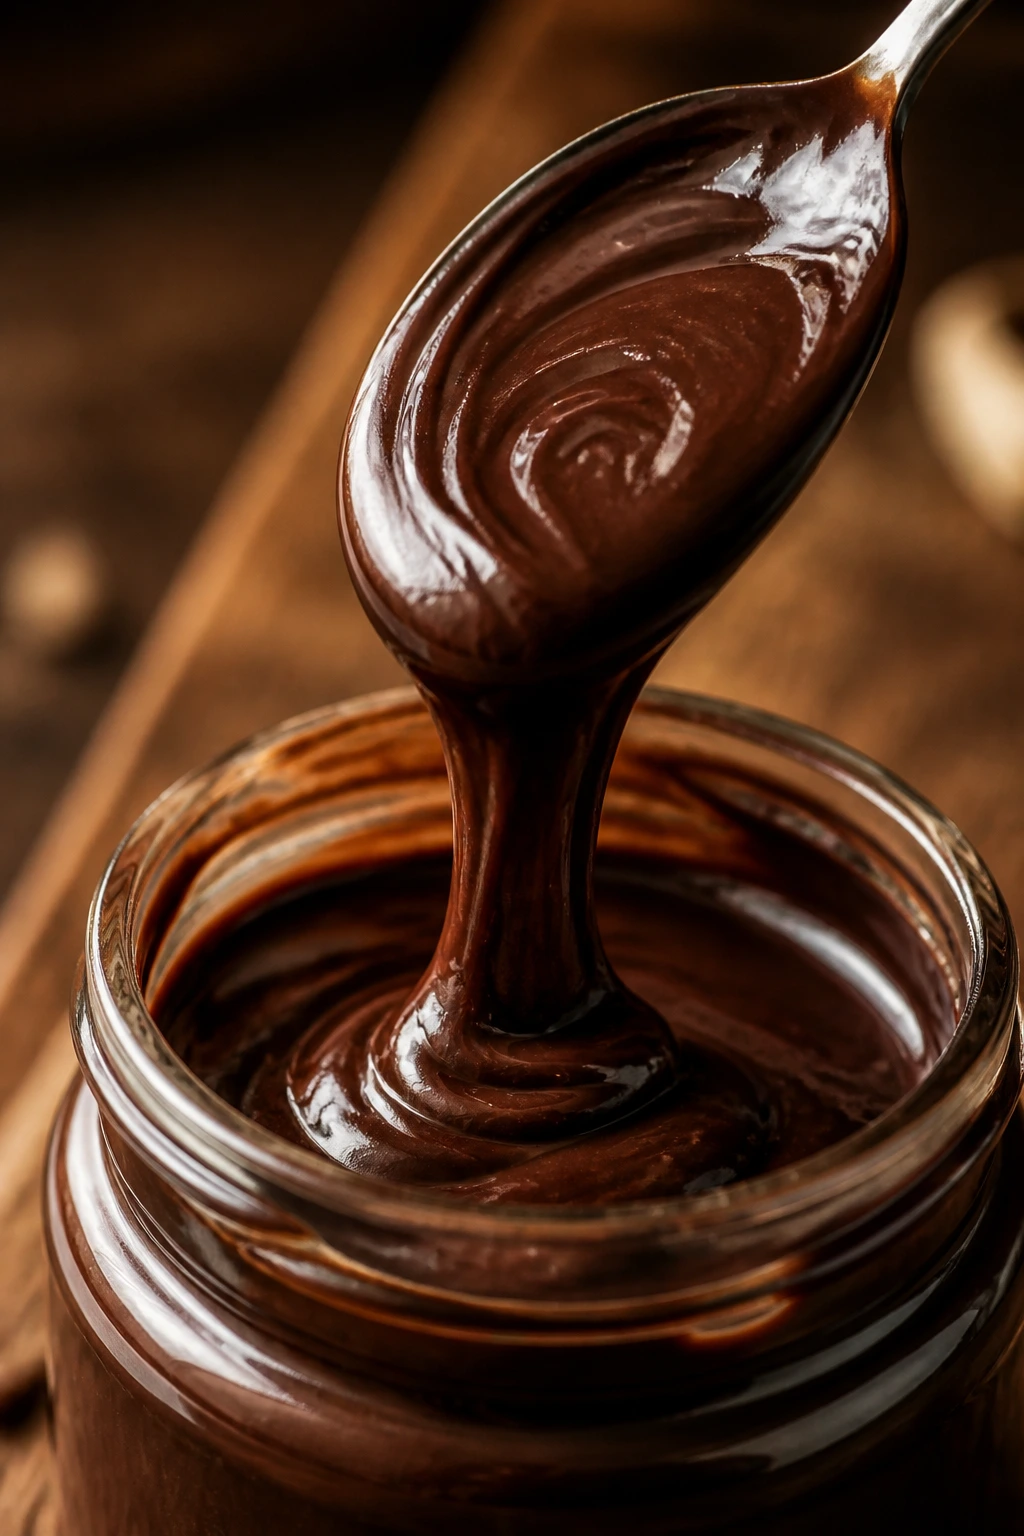
Intro:
Hot fudge sauce should be shiny, thick, and spoonable while still warm. It is the sort of thing that turns plain ice cream into a proper dessert without asking for much else. A jar in the fridge buys you a lot of good evenings.
Why It Works:
Cocoa, cream, sugar, and butter cook down into a sauce that coats the back of a spoon and firms slightly as it cools. Corn syrup keeps it smooth and glossy, which is why the finished sauce doesn’t go grainy in the fridge.
Key Ingredients:
- 1/2 cup heavy cream
- 1/2 cup granulated sugar
- 1/4 cup unsweetened cocoa powder
- 2 tablespoons light corn syrup
- 2 tablespoons unsalted butter
- 1/4 teaspoon fine salt
- 1 teaspoon vanilla extract
- 1/2 cup semisweet chocolate chips
Quick Steps:
- Combine the cream, sugar, cocoa, corn syrup, butter, and salt in a saucepan.
- Cook over medium heat, stirring, until smooth and lightly thickened.
- Stir in the chocolate chips until melted.
- Remove from the heat and add the vanilla.
- Serve warm, or cool and refrigerate for later.
Equipment for This Recipe:
- Small saucepan
- Whisk
- Heatproof jar or bowl
- Spoon
How to Serve This Dish:
Pour it over ice cream, brownies, banana slices, or pound cake. A little goes a long way, so a small spoonful is usually enough unless you are being honest with yourself.
Pro Tips for This Recipe:
- Stir constantly so the sauce doesn’t scorch.
- Add a splash of milk if it gets too thick on reheating.
- A pinch more salt helps the chocolate taste deeper.
- Warm it gently before serving.
Variations on This Dish:
- Espresso Fudge Sauce: Add 1 teaspoon instant espresso powder.
- Peanut Butter Fudge Sauce: Stir in 2 tablespoons peanut butter.
- Orange Fudge Sauce: Add orange zest at the end.
Common Mistakes to Avoid with This Dish:
- Boiling it hard: The sauce can turn grainy or too thick.
- Leaving out the salt: It tastes flatter than it should.
- Microwaving on high without stirring: It scorches fast.
29. Baked Cinnamon Apples
Intro:
Baked apples are one of those desserts that smell like the oven is doing you a favor. The fruit softens until the slices slouch into their syrup, cinnamon and butter melt into the centers, and the whole dish tastes warmer than the effort required to make it. That is a strong trade.
Why It Works:
Apples hold their shape while baking but soften enough to become spoonable, and the butter-brown sugar mixture turns into a quick syrup in the dish. A little cornstarch or oats can help, but the basic version already works because the apples bring their own structure.
Key Ingredients:
- 4 large apples, peeled, cored, and sliced
- 2 tablespoons melted butter
- 3 tablespoons brown sugar
- 1 teaspoon ground cinnamon
- 1 tablespoon lemon juice
- 1 tablespoon all-purpose flour or cornstarch
- Pinch of salt
Quick Steps:
- Heat the oven to 375°F and grease a small baking dish.
- Toss the apples with butter, brown sugar, cinnamon, lemon juice, flour, and salt.
- Spread them in the dish.
- Bake for 25 to 30 minutes, stirring once, until soft and syrupy.
- Serve warm.
Equipment for This Recipe:
- Small baking dish
- Mixing bowl
- Peeler and knife
- Spoon
How to Serve This Dish:
Serve the apples in bowls with yogurt, ice cream, or plain cream. They also make a good topping for oatmeal if you happen to have leftovers.
Pro Tips for This Recipe:
- Cut the slices evenly so they finish at the same time.
- Use tart apples if you want the dessert less sweet.
- Stir once mid-bake to coat the fruit in syrup.
- If the apples seem dry, add 1 tablespoon water before baking.
Variations on This Dish:
- Apple-Pear Mix: Add sliced pears for a softer texture.
- Oat Topping Apples: Sprinkle with oats before baking for a crispier top.
- Rum-Style Apples: Add a splash of rum extract or dark rum if serving adults.
Common Mistakes to Avoid with This Dish:
- Using apples that are too soft: They can turn to applesauce.
- Skipping the lemon juice: The flavor needs a little lift.
- Overbaking until mushy: Stop when the slices are tender, not collapsed.
30. Brownie Trifle Cups
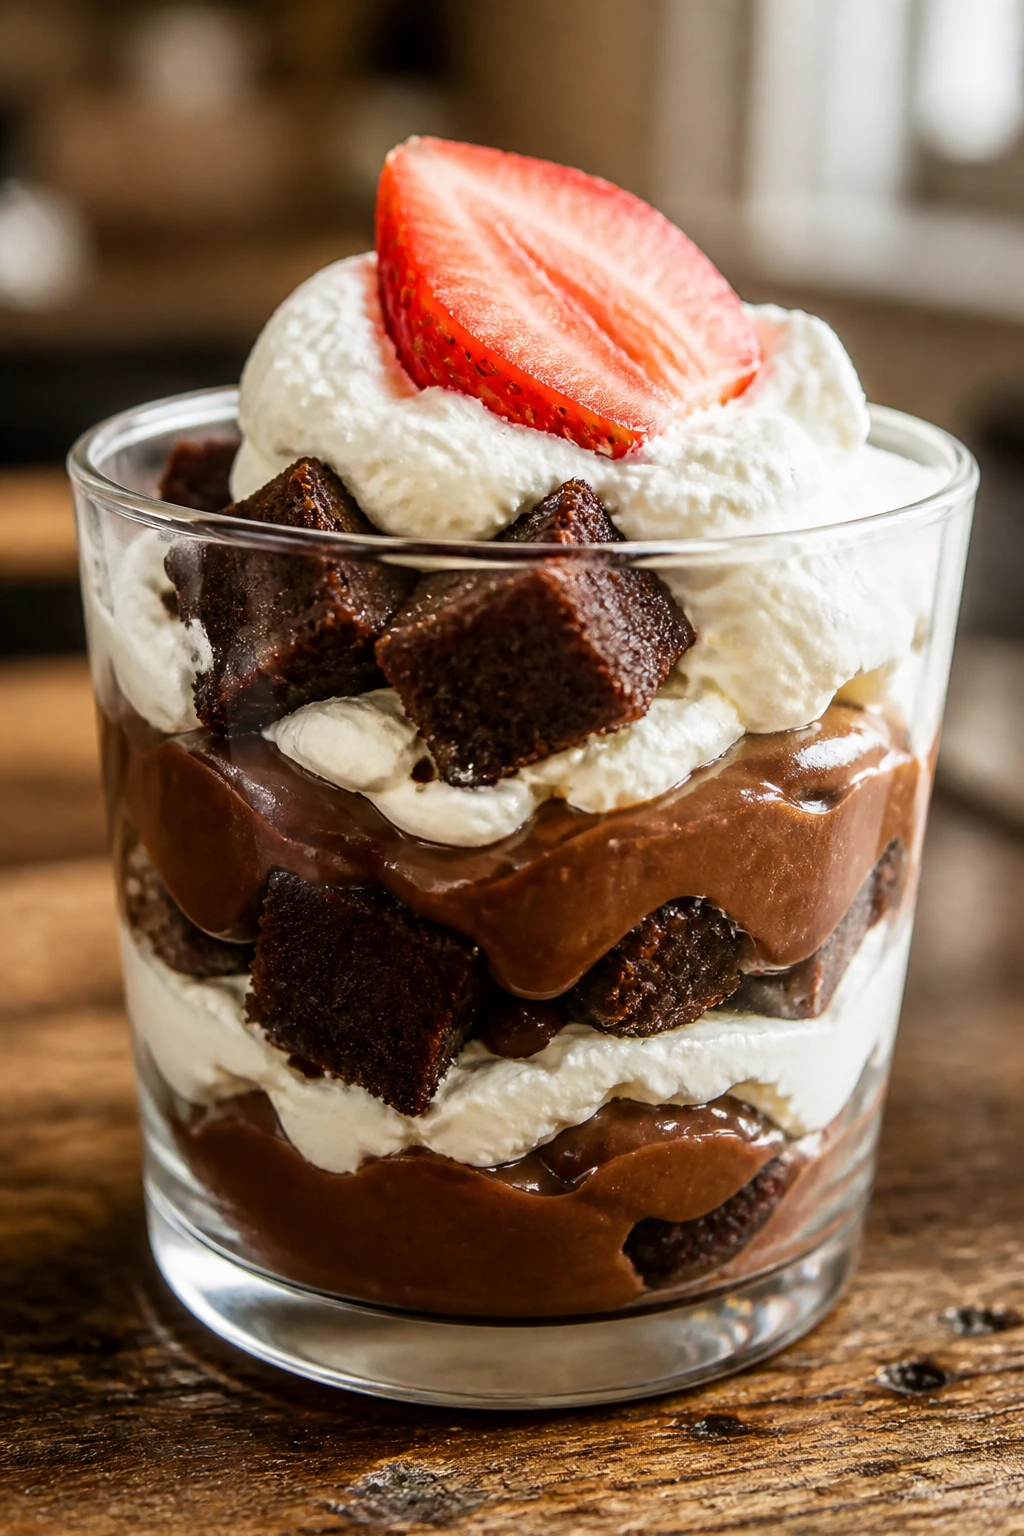
Intro:
Brownie trifle cups are a useful way to make leftovers look deliberate. Layer chocolate brownies with pudding or whipped cream, add fruit or caramel, and suddenly the bowl reads like a dessert plan instead of a rescue mission. They are not complicated. They just look that way.
Why It Works:
Trifle works because each layer brings a different texture: dense brownie, cool cream, something juicy or sticky in the middle. Small cups keep the layers neat and make it easy to serve on a weeknight without cutting slices.
Key Ingredients:
- 2 cups brownie cubes
- 1 1/2 cups chocolate pudding or vanilla pudding
- 1 cup whipped cream
- 1 cup sliced strawberries or raspberries
- 1/4 cup caramel sauce or chocolate sauce
- Crushed cookies, optional
Quick Steps:
- Cut cooled brownies into cubes.
- Spoon brownie cubes into the bottom of small cups.
- Add pudding, fruit, and whipped cream in layers.
- Repeat the layers and finish with sauce or cookie crumbs.
- Chill for 15 minutes if you want the layers to settle.
Equipment for This Recipe:
- Dessert cups or small glasses
- Spoon
- Knife and cutting board
- Mixing bowl, if making whipped cream
How to Serve This Dish:
Serve the cups chilled with a spoon. They are nice for a casual dinner because everyone gets their own little glass instead of fighting over the corner piece.
Pro Tips for This Recipe:
- Use brownies that are fully cool or the cream softens.
- Mix textures: a juicy fruit layer helps cut the richness.
- Keep the top layer simple so the cup does not look crowded.
- If using store-bought pudding, chill it first so it layers cleanly.
Variations on This Dish:
- Peanut Butter Trifle: Add peanut butter to the pudding.
- Mint Brownie Trifle: Use mint brownies and chocolate pudding.
- Berry-Only Version: Skip the sauce and use extra berries.
Common Mistakes to Avoid with This Dish:
- Building with warm brownies: The layers slide and melt.
- Using too much pudding: The cup turns heavy.
- Skipping the chill: A short rest helps the layers settle.
31. Coconut Lime Bars
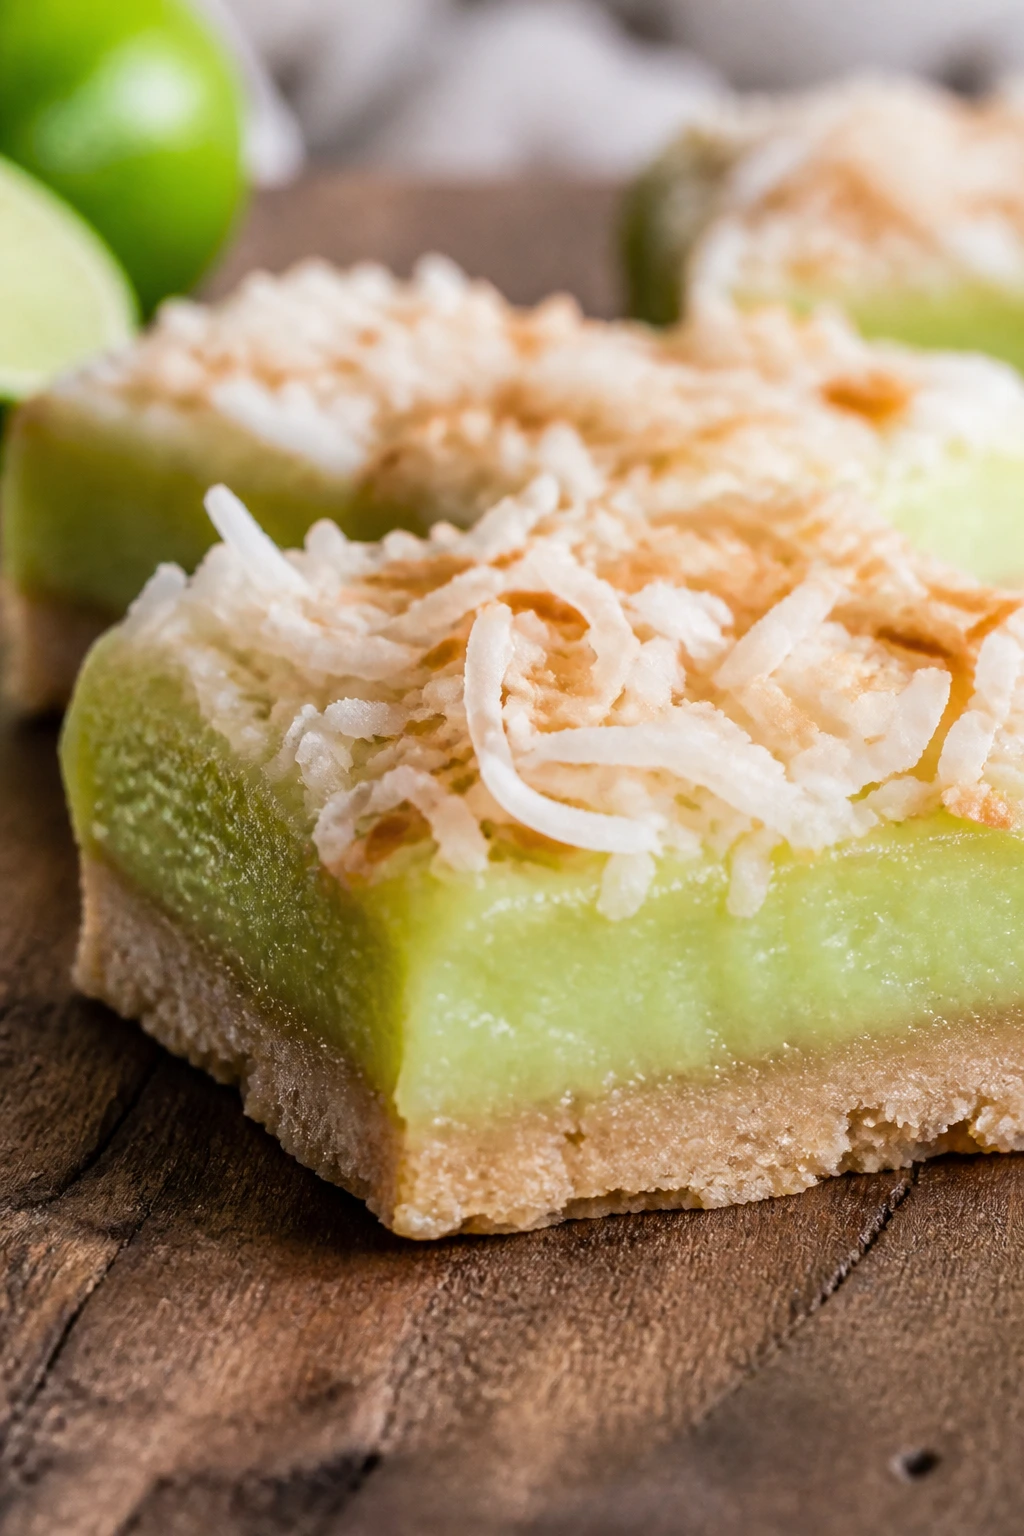
Intro:
Coconut lime bars are the brighter cousin of lemon bars, with a slightly softer, more tropical edge. The crust stays buttery, the filling sets with a clean tang, and the coconut keeps the flavor from going sharp. They taste especially good cold.
Why It Works:
Lime juice and zest give the filling its bite, while shredded coconut adds texture and a sweet background note. A shortbread base keeps the bars neat enough to cut, which matters when the filling is soft and citrusy.
Key Ingredients:
- For the Crust:
- 1 1/2 cups all-purpose flour
- 1/2 cup powdered sugar
- 3/4 cup unsalted butter, softened
- Pinch of salt
- For the Filling:
- 3 large eggs
- 1 cup granulated sugar
- 1/2 cup fresh lime juice
- 1 tablespoon lime zest
- 3 tablespoons all-purpose flour
- 1/2 cup sweetened shredded coconut
Quick Steps:
- Heat the oven to 350°F and line an 8-inch square pan.
- Mix and bake the crust for 18 minutes.
- Whisk the filling ingredients together until smooth.
- Pour over the warm crust and bake for 20 to 22 minutes.
- Cool fully, then chill before cutting.
Equipment for This Recipe:
- 8-inch square pan
- Whisk
- Mixing bowls
- Parchment paper
How to Serve This Dish:
Dust with powdered sugar and cut into small squares. They go nicely with berries on the side or a spoon of whipped cream if you want to soften the citrus.
Pro Tips for This Recipe:
- Use fresh lime juice for the cleanest flavor.
- Chill before slicing for sharp edges.
- Toast a little coconut for the top if you want more flavor.
- Do not overbake the filling or it loses its soft set.
Variations on This Dish:
- Meyer Lime Bars: Use sweeter citrus if you want a gentler finish.
- Pineapple Coconut Bars: Add a spoonful of crushed pineapple, well drained.
- Ginger Coconut Bars: Add 1 teaspoon grated ginger to the filling.
Common Mistakes to Avoid with This Dish:
- Using bottled lime juice: The flavor can taste dull.
- Skipping the cooling time: Warm bars collapse.
- Overloading the coconut: Too much makes the filling rough.
32. Millionaire Shortbread
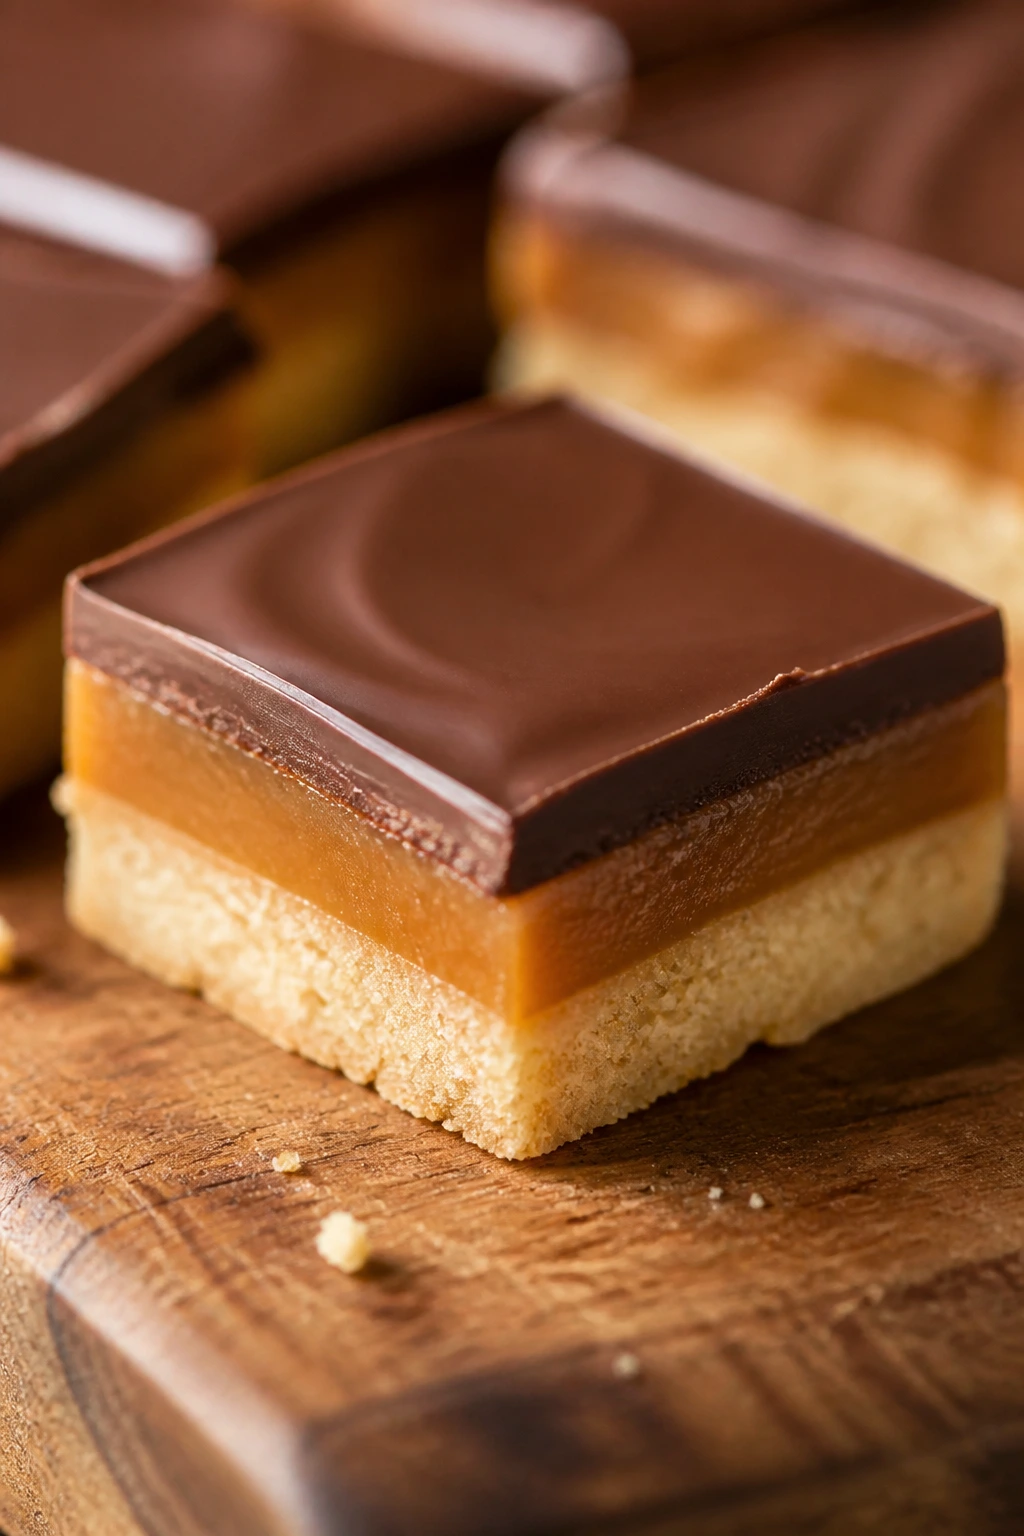
Intro:
Millionaire shortbread is a three-layer bar that earns its name through texture, not fuss. Buttery shortbread, soft caramel, and a glossy chocolate top make a square that cuts clean and tastes far richer than the ingredient list suggests. It is a small project, but not a complicated one.
Why It Works:
The shortbread base is dry enough to support the caramel, and the caramel cooks to a chewy stage that stays sliceable after chilling. Chocolate on top seals everything in and gives the finished bar that neat, bakery-case look.
Key Ingredients:
- For the Shortbread:
- 1 cup all-purpose flour
- 1/4 cup powdered sugar
- 1/2 cup unsalted butter, softened
- Pinch of salt
- For the Caramel:
- 1/2 cup unsalted butter
- 1/2 cup brown sugar
- 1/2 cup sweetened condensed milk
- 2 tablespoons golden syrup or corn syrup
- Pinch of salt
- For the Topping:
- 4 ounces semisweet chocolate, melted
- Flaky salt, optional
Quick Steps:
- Heat the oven to 350°F and line an 8-inch square pan.
- Bake the shortbread base for 18 to 20 minutes.
- Cook the caramel ingredients over low heat until smooth and slightly thickened, then pour over the crust.
- Chill until set.
- Spread melted chocolate on top, chill again, and cut into bars.
Equipment for This Recipe:
- 8-inch square pan
- Saucepan
- Spatula
- Parchment paper
How to Serve This Dish:
Cut into small squares; this is a rich bar, not a generous slab. It pairs well with black coffee or plain tea because the sweetness is doing enough already.
Pro Tips for This Recipe:
- Keep the caramel heat low so it does not split.
- Chill between layers so the bar slices cleanly.
- Use parchment with a long overhang.
- A pinch of salt in each layer keeps the sweetness in check.
Variations on This Dish:
- Sea Salt Caramel Shortbread: Add extra flaky salt over the chocolate.
- Dark Chocolate Shortbread: Use dark chocolate for a less sweet top.
- Nutty Version: Sprinkle chopped toasted pecans over the caramel before adding chocolate.
Common Mistakes to Avoid with This Dish:
- Cooking caramel too fast: It can separate or scorch.
- Slicing before it is fully chilled: The layers ooze.
- Using too thick a chocolate layer: It becomes hard to bite cleanly.
33. Peanut Butter Cup Bark
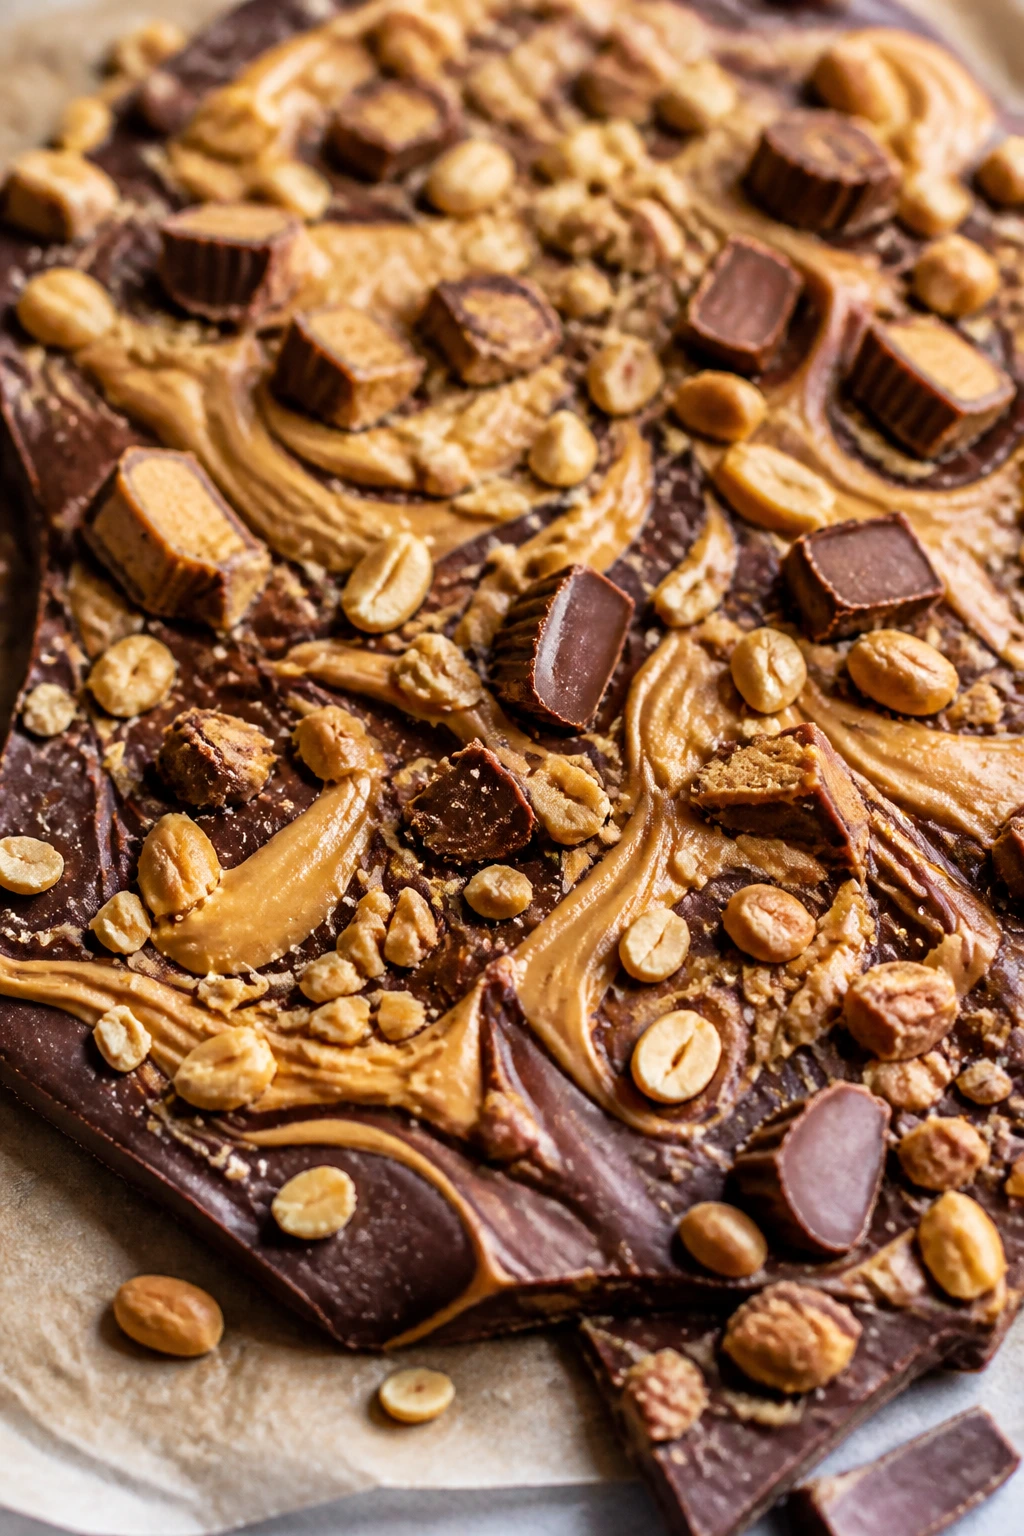
Intro:
If you like peanut butter cups, bark is the faster, looser version that does not pretend to be delicate. Chocolate, peanut butter, and a few chopped candies freeze into crackly sheets you can break by hand. It is a no-bake dessert that behaves almost suspiciously well.
Why It Works:
The peanut butter swirled into chocolate gives you that candy-bar flavor without needing molds. Powdered sugar thickens the peanut butter just enough so it swirls rather than sinking, and a quick chill sets the bark fast.
Key Ingredients:
- 8 ounces milk or semisweet chocolate chips
- 1/2 cup creamy peanut butter
- 1 tablespoon powdered sugar
- 1/4 cup chopped salted peanuts
- 4 mini peanut butter cups, chopped
- Flaky salt, optional
Quick Steps:
- Line a baking sheet with parchment.
- Melt the chocolate and spread it into a thin layer.
- Stir the powdered sugar into the peanut butter, then drop spoonfuls over the chocolate and swirl.
- Sprinkle with peanuts, peanut butter cups, and salt.
- Chill until firm, then break into pieces.
Equipment for This Recipe:
- Baking sheet
- Parchment paper
- Microwave-safe bowl or saucepan
- Spoon
How to Serve This Dish:
Pile the shards in a bowl or package them in wax paper for sharing. It is rich, so a few pieces per person is usually enough.
Pro Tips for This Recipe:
- Use thick peanut butter so the swirl holds.
- Don’t over-swirl or the design disappears.
- Keep the chocolate layer thin for easier snapping.
- Chill on a flat shelf so the bark sets evenly.
Variations on This Dish:
- Dark Chocolate Peanut Butter Bark: Use dark chocolate chips.
- Pretzel Peanut Butter Bark: Add crushed pretzels for salt and crunch.
- Honey Peanut Bark: Add a small drizzle of honey over the peanut butter before swirling.
Common Mistakes to Avoid with This Dish:
- Using too much peanut butter: The bark can stay soft.
- Trying to lift it before it sets: It will bend and crack badly.
- Overheating the chocolate: Melt gently or it can seize.
34. Ricotta Toast with Honey and Fruit
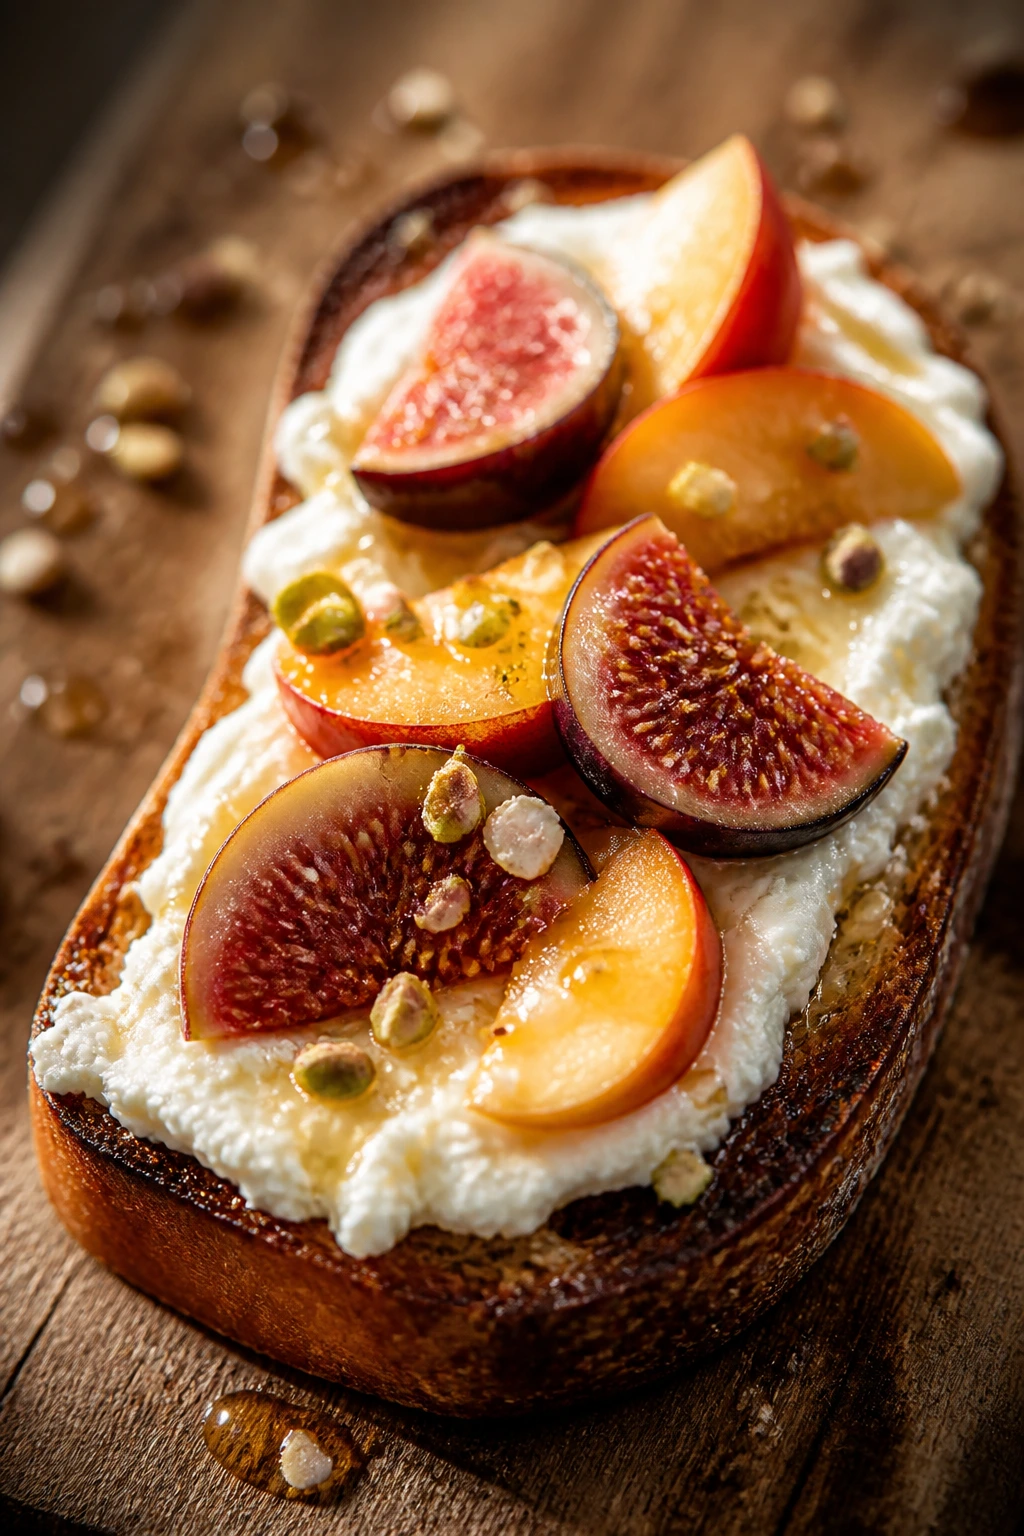
Intro:
This one sits on the edge between snack and dessert, which is why it works so well on a weeknight. Creamy ricotta spread on toasted bread, sweet fruit on top, and a thread of honey make a plate that feels calm instead of heavy. It is fast enough to assemble while the kettle boils.
Why It Works:
Ricotta gives you richness without the weight of frosting or whipped cream, and toast brings crunch. Honey ties the fruit and cheese together, while a little lemon zest or cinnamon keeps the slice from reading like breakfast in a nicer shirt.
Key Ingredients:
- 4 slices sturdy bread
- 1 cup whole-milk ricotta
- 2 tablespoons honey, plus more for drizzling
- 1 cup sliced fruit such as berries, peaches, or figs
- Pinch of salt
- Lemon zest or cinnamon, optional
Quick Steps:
- Toast the bread until deeply golden.
- Stir the ricotta with honey and salt.
- Spread the ricotta on the toast.
- Top with fruit, then drizzle with more honey.
- Finish with zest or cinnamon if using.
Equipment for This Recipe:
- Toaster or skillet
- Small bowl
- Spoon
- Knife
How to Serve This Dish:
Serve immediately while the toast is still warm. Two slices make a light dessert for one, and one slice cut in half works well after a heavier dinner.
Pro Tips for This Recipe:
- Use ricotta that tastes fresh and milky, not dry.
- Toast the bread well so it stands up to the topping.
- Salt matters here; it keeps the honey from becoming cloying.
- If the fruit is very juicy, drain it a little first.
Variations on This Dish:
- Berry Pistachio Toast: Add chopped pistachios on top.
- Citrus Toast: Use orange segments and a little orange zest.
- Fig and Thyme Toast: Add a few thyme leaves for a savory edge.
Common Mistakes to Avoid with This Dish:
- Using flimsy bread: It softens too fast.
- Skipping the salt: The toast tastes flat.
- Overloading the fruit: It slides off in a heap.
35. Churro Bites
Intro:
Churro bites bring the cinnamon-sugar rush without dragging out a full frying operation. Bite-size pieces get crisp outside, tender inside, and rolled in sugar while still warm so the coating sticks. They are messy in the best way and disappear just as fast.
Why It Works:
Using biscuit dough keeps the recipe short, and frying in small batches means the outside browns before the inside gets dense. Cinnamon sugar clings best when the bites are still hot, which is why the coating happens immediately after frying.
Key Ingredients:
- 1 can refrigerated biscuit dough, 8 biscuits
- 2 cups neutral oil, for frying
- 1/2 cup granulated sugar
- 1 teaspoon ground cinnamon
- 3 tablespoons melted butter
- Chocolate sauce, optional
Quick Steps:
- Cut each biscuit into 4 pieces.
- Heat the oil to 350°F in a heavy pot.
- Fry the pieces in batches for 2 to 3 minutes, until golden brown.
- Drain on paper towels, then toss in melted butter and cinnamon sugar.
- Serve warm with chocolate sauce if you like.
Equipment for This Recipe:
- Heavy saucepan or Dutch oven
- Thermometer
- Slotted spoon
- Paper towels
How to Serve This Dish:
Serve them piled in a bowl with chocolate sauce on the side. They are best eaten warm, before the sugar coating has time to disappear into the crust.
Pro Tips for This Recipe:
- Keep the oil at a steady 350°F.
- Fry in small batches so the temperature does not crash.
- Toss in sugar right away.
- A pinch of salt in the cinnamon sugar sharpens the flavor.
Variations on This Dish:
- Filled Churro Bites: Pipe dulce de leche into the centers after frying.
- Baked Version: Bake brushed dough pieces at 400°F until golden, then toss in butter and sugar.
- Orange Sugar Churros: Add orange zest to the sugar mixture.
Common Mistakes to Avoid with This Dish:
- Crowding the pot: The bites steam instead of crisping.
- Using oil that is too cool: They absorb too much fat.
- Waiting to coat them: The sugar will not stick well once they cool.
36. Blackberry Hand Pies
Intro:
Hand pies are pie you can hold in one hand without consulting a fork. The crust gets flaky and browned, the blackberry filling turns jammy inside, and the edges seal in just enough sweetness to keep the juice from running everywhere. They feel casual, which is part of the appeal.
Why It Works:
Blackberries break down quickly and make a thick filling with cornstarch and heat. Because each pie is small, the pastry cooks through before the fruit gets too soft. The egg wash gives you a bronzed top and helps the sugar stick.
Key Ingredients:
- 1 package pie dough, chilled
- 2 cups blackberries
- 1/4 cup granulated sugar
- 1 tablespoon cornstarch
- 1 teaspoon lemon juice
- 1 egg, beaten
- Coarse sugar, for topping
Quick Steps:
- Heat the oven to 400°F and line a baking sheet.
- Mix the blackberries, sugar, cornstarch, and lemon juice.
- Cut the dough into rounds or squares, add filling, and seal the edges.
- Brush with egg and sprinkle with coarse sugar.
- Bake for 18 to 22 minutes, until golden and bubbling.
Equipment for This Recipe:
- Baking sheet
- Parchment paper
- Pastry brush
- Fork for sealing
How to Serve This Dish:
Serve them warm or room temperature. They do not need cream, though a scoop of vanilla ice cream turns them into a much bigger deal.
Pro Tips for This Recipe:
- Keep the dough cold until assembly.
- Do not overfill or they burst open.
- Cut steam vents on top.
- Let them cool a little so the filling thickens.
Variations on This Dish:
- Blueberry Hand Pies: Swap blackberries for blueberries.
- Mixed Berry Hand Pies: Use half raspberries for sharper flavor.
- Lemon Blackberry Hand Pies: Add extra zest to the filling.
Common Mistakes to Avoid with This Dish:
- Filling the pies too generously: They leak in the oven.
- Skipping the crimp: The edges can open and spill.
- Baking on a warm tray: The pastry softens before it hits the oven.
37. Espresso Chocolate Pots de Crème
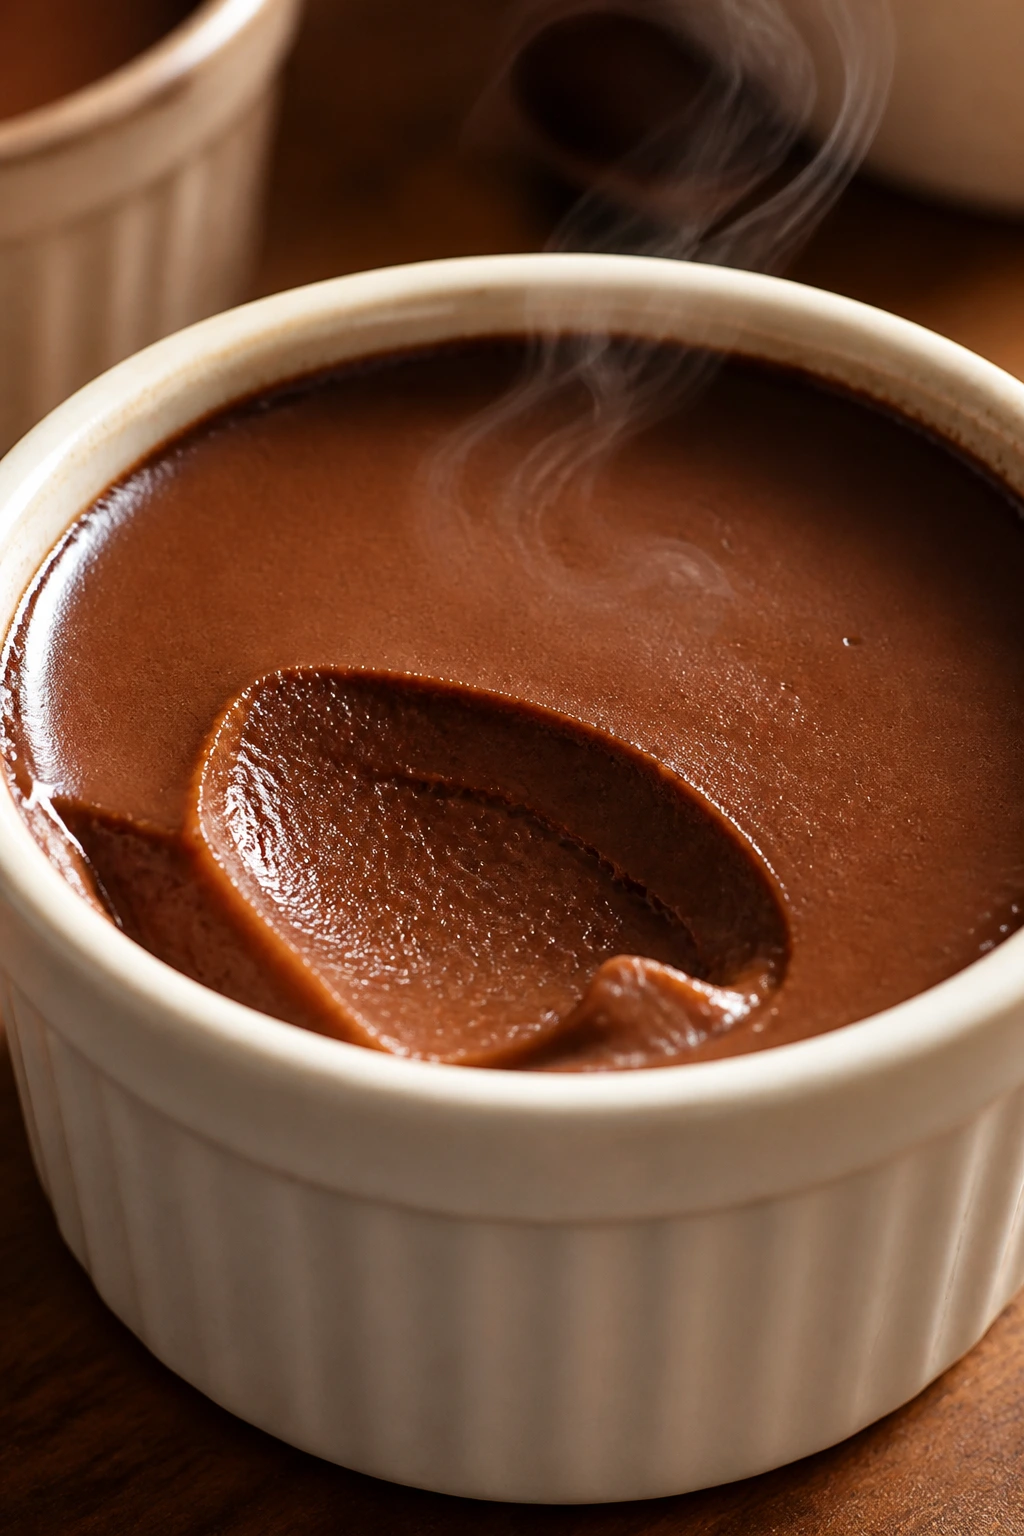
Intro:
These little custards are rich, smooth, and a little bit serious in the best way. Chocolate and espresso make a dark, silky spoonful that feels far fancier than the prep suggests. They need chilling, yes, but the work itself is mostly whisking and waiting for the oven.
Why It Works:
Egg yolks thicken the custard, cream gives it body, and espresso sharpens the chocolate so it tastes deeper instead of merely sweet. Baking in a water bath keeps the custards gentle and prevents the edges from setting too fast.
Key Ingredients:
- 4 large egg yolks
- 2 cups heavy cream
- 1/2 cup whole milk
- 1/3 cup granulated sugar
- 4 ounces semisweet chocolate, chopped
- 1 teaspoon espresso powder
- 1/4 teaspoon fine salt
- 1 teaspoon vanilla extract
Quick Steps:
- Heat the oven to 325°F and place ramekins in a baking dish.
- Warm the cream, milk, sugar, espresso powder, and salt until steaming.
- Pour the hot mixture over the chocolate, then whisk in the yolks and vanilla.
- Strain into the ramekins and add hot water to the baking dish halfway up the sides.
- Bake for 25 to 30 minutes, then chill until set.
Equipment for This Recipe:
- Ramekins
- Baking dish
- Whisk
- Fine-mesh strainer
How to Serve This Dish:
Serve cold with a little whipped cream or shaved chocolate. One small ramekin is enough after dinner; these are rich, not casual.
Pro Tips for This Recipe:
- Strain the custard for a smoother finish.
- Do not boil the cream.
- Chill long enough for the custard to firm fully.
- A tiny pinch more salt helps the chocolate taste cleaner.
Variations on This Dish:
- Orange Espresso Pots: Add orange zest to the cream.
- Mocha Pots de Crème: Increase the espresso powder slightly.
- Dark Chocolate Version: Use bittersweet chocolate for a less sweet result.
Common Mistakes to Avoid with This Dish:
- Baking without a water bath: The custard can curdle at the edges.
- Overbaking: The centers should still jiggle a little.
- Serving before chilling: The texture will not be set.
38. Olive Oil Cake
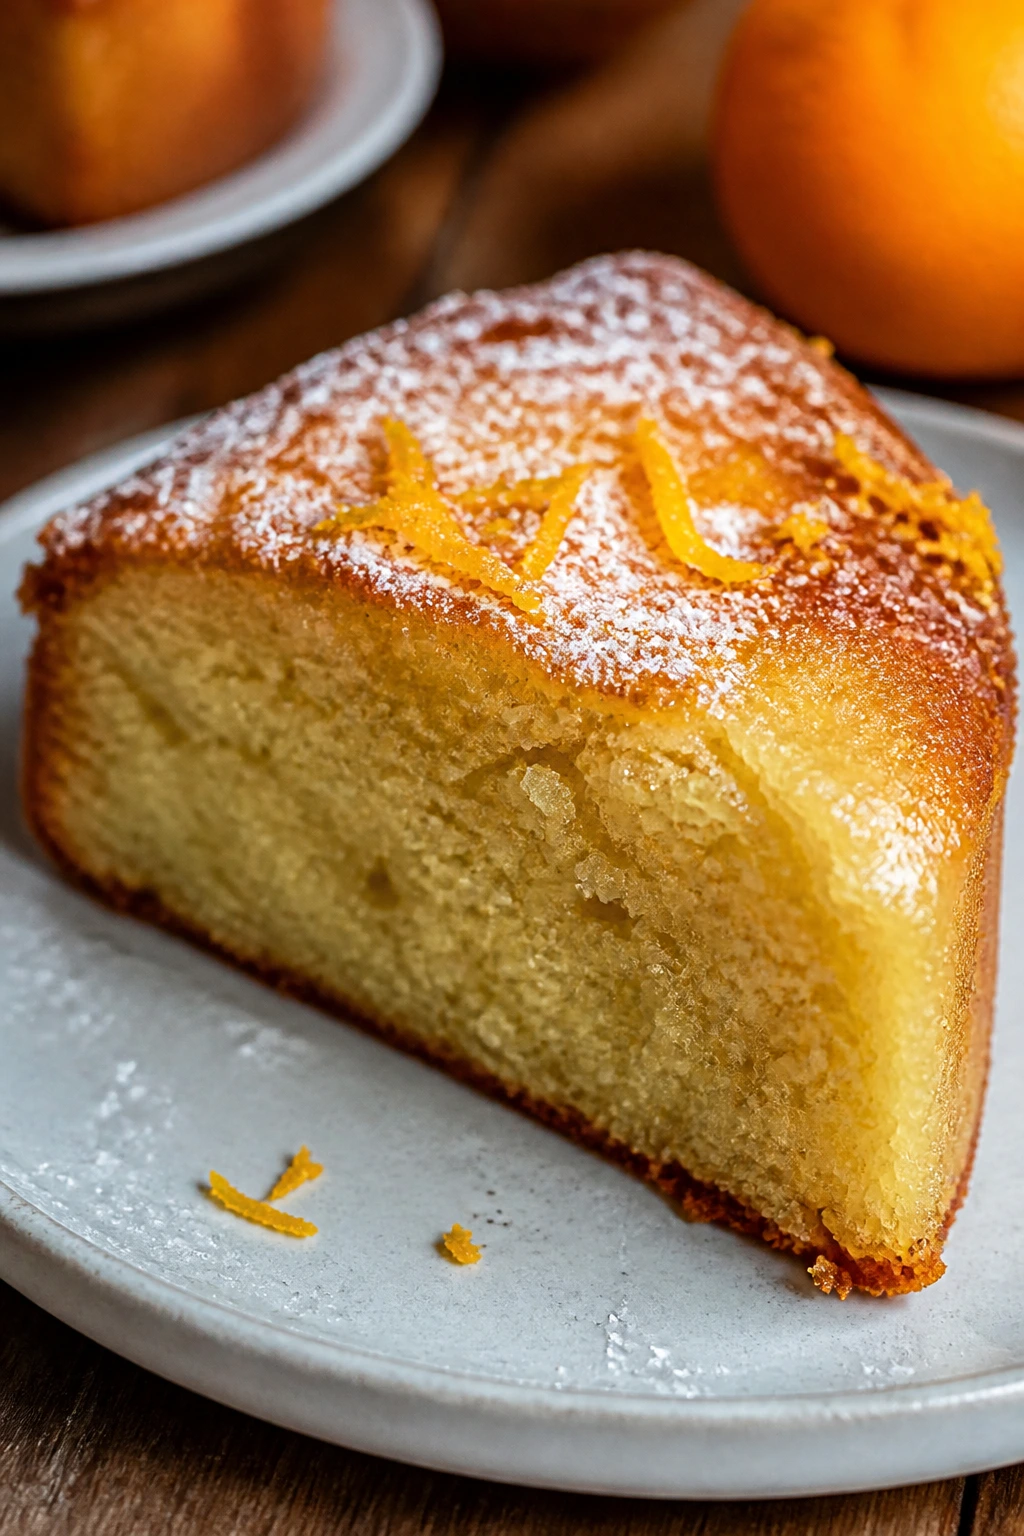
Intro:
Olive oil cake is what you make when you want something tender, not frosted, and lightly scented with citrus or vanilla. The crumb stays moist for days, which is part of why people keep coming back to it. A dusting of sugar or a spoon of berries is enough.
Why It Works:
Olive oil keeps the cake soft and gives it a faint savory note that balances sugar well. Yogurt or milk adds tang and moisture, and because the batter is simple, the cake mixes quickly without a lot of air whipped into it.
Key Ingredients:
- 1 1/2 cups all-purpose flour
- 1 cup granulated sugar
- 1 teaspoon baking powder
- 1/2 teaspoon baking soda
- 1/2 teaspoon fine salt
- 3 large eggs
- 3/4 cup olive oil
- 3/4 cup plain yogurt
- 1 teaspoon vanilla extract
- 1 tablespoon orange zest
Quick Steps:
- Heat the oven to 350°F and grease a 9-inch cake pan.
- Whisk the dry ingredients together.
- Beat the eggs, olive oil, yogurt, vanilla, and zest until smooth.
- Fold the wet ingredients into the dry, then pour into the pan.
- Bake for 30 to 35 minutes, until the top springs back and a tester comes out clean.
Equipment for This Recipe:
- 9-inch round cake pan
- Mixing bowls
- Whisk and spatula
- Parchment paper
How to Serve This Dish:
Serve plain, with berries, or with a little whipped cream. It cuts neatly into thin slices, which is handy when you want dessert without overcommitting.
Pro Tips for This Recipe:
- Use a mild olive oil if you want a softer flavor.
- Do not overmix the batter.
- Orange zest keeps the cake from tasting flat.
- The cake is even better the next day.
Variations on This Dish:
- Lemon Olive Oil Cake: Swap orange zest for lemon.
- Almond Olive Oil Cake: Add almond extract and sliced almonds on top.
- Chocolate Olive Oil Cake: Replace part of the flour with cocoa powder.
Common Mistakes to Avoid with This Dish:
- Using a harsh, peppery oil: It can overpower the cake.
- Baking in too small a pan: The center may stay wet.
- Cutting while hot: The crumb needs time to set.
39. No-Churn Vanilla Ice Cream
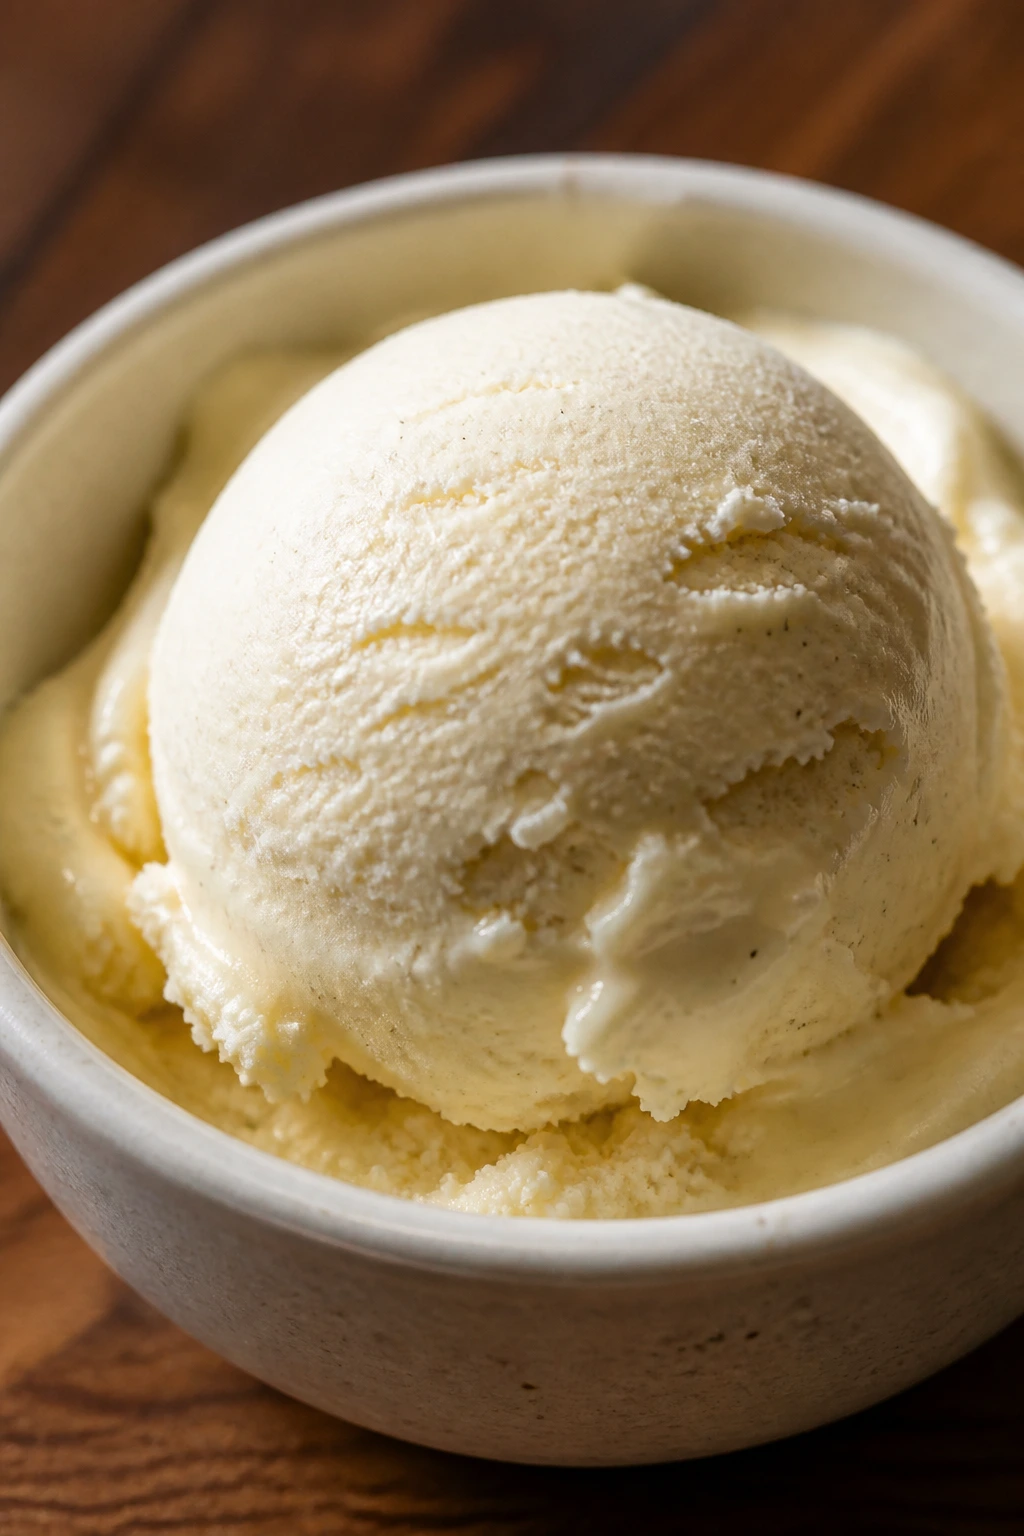
Intro:
No-churn ice cream is the easiest cold dessert on the list, and it earns that label honestly. Whipped cream and sweetened condensed milk freeze into a soft, scoopable base with a clean vanilla taste. It is the dessert you make ahead for future you, which feels generous.
Why It Works:
Sweetened condensed milk keeps the mixture from freezing into a hard block, while whipped cream gives it the airy texture of real ice cream without needing a machine. Vanilla is doing the flavor work here, so use the good kind.
Key Ingredients:
- 2 cups heavy cream, cold
- 1 can sweetened condensed milk, 14 ounces
- 2 teaspoons vanilla extract
- Pinch of fine salt
- 1/2 cup mix-ins such as chocolate chips, crushed cookies, or fruit, optional
Quick Steps:
- Whip the cold cream to stiff peaks.
- Fold in the condensed milk, vanilla, and salt.
- Stir in any mix-ins.
- Transfer to a loaf pan and smooth the top.
- Freeze for at least 6 hours before scooping.
Equipment for This Recipe:
- Mixing bowl
- Hand mixer or stand mixer
- Loaf pan or freezer container
- Spatula
How to Serve This Dish:
Let it sit at room temperature for 5 minutes before scooping. Serve it with fruit, warm brownies, or hot fudge if you want to make it feel like a full dessert.
Pro Tips for This Recipe:
- Whip the cream cold for the best volume.
- Fold gently so you do not knock out the air.
- Press parchment onto the surface before freezing if you want to prevent ice crystals.
- Add mix-ins sparingly or the texture gets heavy.
Variations on This Dish:
- Strawberry Ice Cream: Swirl in strawberry puree.
- Cookies and Cream: Fold in crushed sandwich cookies.
- Coffee Ice Cream: Add espresso powder to the condensed milk.
Common Mistakes to Avoid with This Dish:
- Underwhipping the cream: The ice cream turns dense.
- Overmixing after adding condensed milk: You lose the airy texture.
- Trying to scoop immediately: It needs a short thaw to soften.
40. Microwave Chocolate Lava Cake
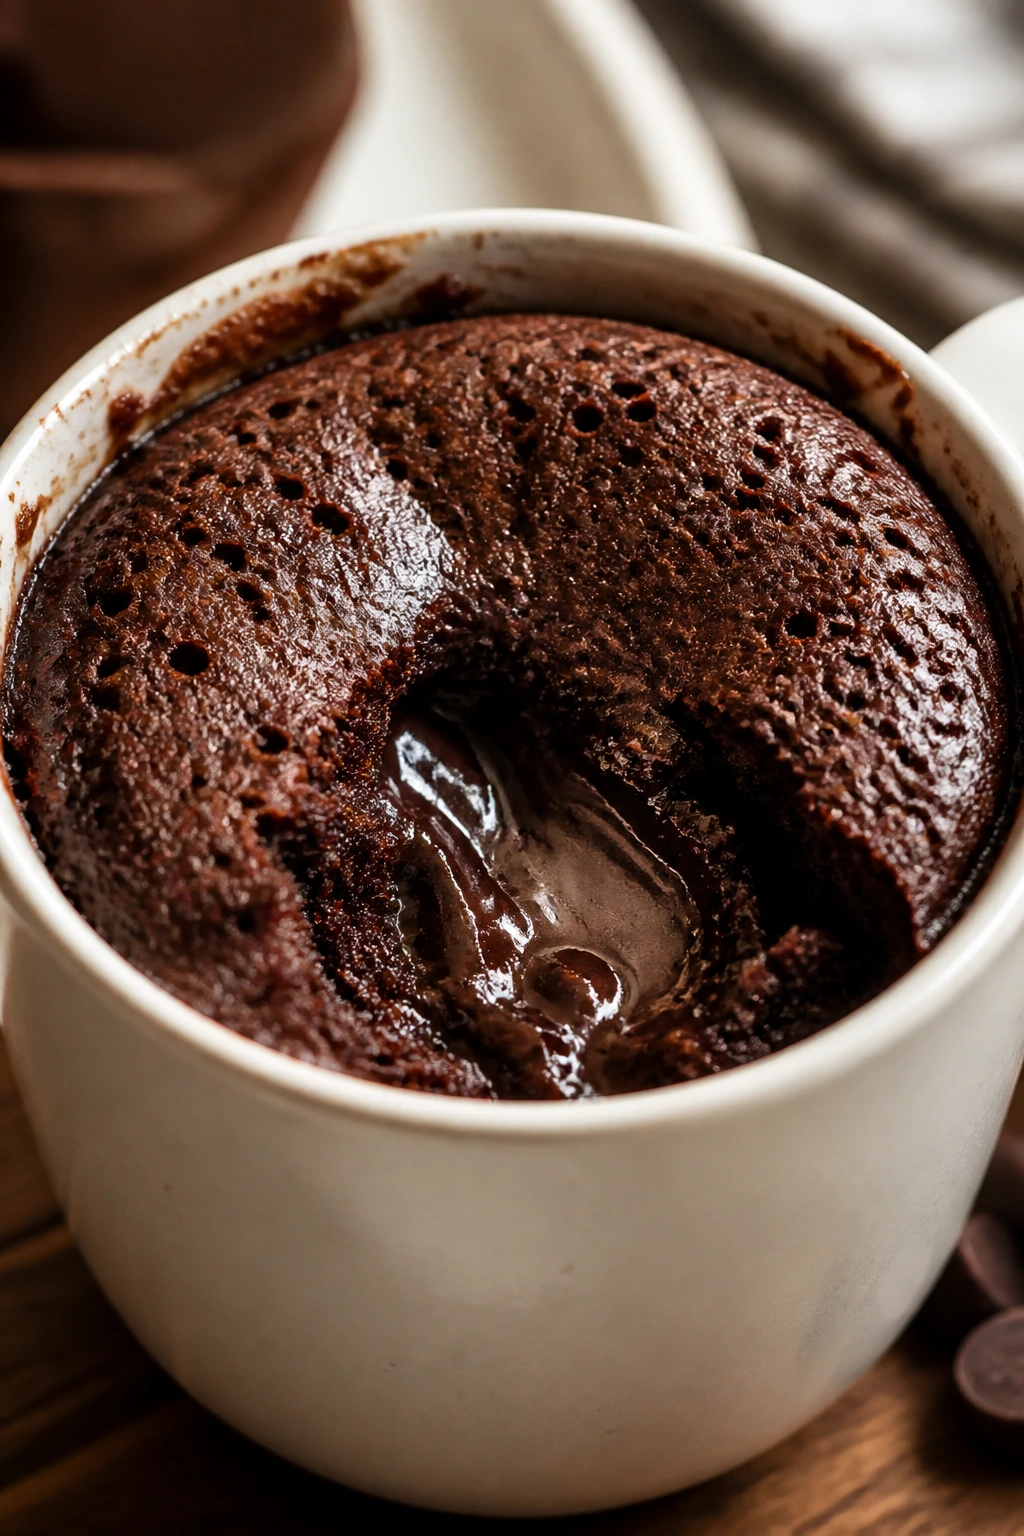
Intro:
A lava cake in a mug sounds like a stunt until you make one and realize how little effort is hiding in the middle. The outside sets into a tender cake, the center stays molten and glossy, and the whole thing is done before the kettle would have finished boiling. It is the dessert equivalent of a good comeback.
Why It Works:
The batter is small enough to cook fast, but the center gets a chocolate square that melts into sauce as the microwave heats the mug. Oil keeps the crumb soft, cocoa deepens the flavor, and the short cook time protects the molten middle.
Key Ingredients:
- 4 tablespoons all-purpose flour
- 2 tablespoons granulated sugar
- 2 tablespoons unsweetened cocoa powder
- 1/4 teaspoon baking powder
- Pinch of fine salt
- 3 tablespoons milk
- 1 tablespoon neutral oil
- 1 small square semisweet chocolate
- Ice cream, for serving
Quick Steps:
- Grease a large microwave-safe mug.
- Stir the flour, sugar, cocoa, baking powder, and salt in the mug.
- Add the milk and oil, then mix until smooth.
- Push the chocolate square into the center.
- Microwave for 45 to 60 seconds, rest for 30 seconds, then eat while warm.
Equipment for This Recipe:
- Large microwave-safe mug
- Spoon
- Measuring spoons
- Small square of chocolate
How to Serve This Dish:
Eat it from the mug with a scoop of ice cream on top. A few berries or a dusting of powdered sugar make it look less like an emergency and more like a plan.
Pro Tips for This Recipe:
- Use a roomy mug so the batter has space to rise.
- Start with less microwave time; you can always add 5 seconds.
- The center should look a little underdone when you stop.
- Serve immediately for the molten effect.
Variations on This Dish:
- Peanut Butter Lava Cake: Add a spoon of peanut butter with the chocolate.
- Salted Caramel Lava Cake: Use a caramel square or spoonful in the center.
- Orange Chocolate Lava Cake: Add a little orange zest to the batter.
Common Mistakes to Avoid with This Dish:
- Overcooking by 10 to 15 seconds: The lava disappears fast.
- Using a small mug: The batter can overflow.
- Eating it too late: The center firms up as it sits.
Why One-Bowl, One-Pan, and No-Bake Desserts Win on Busy Nights
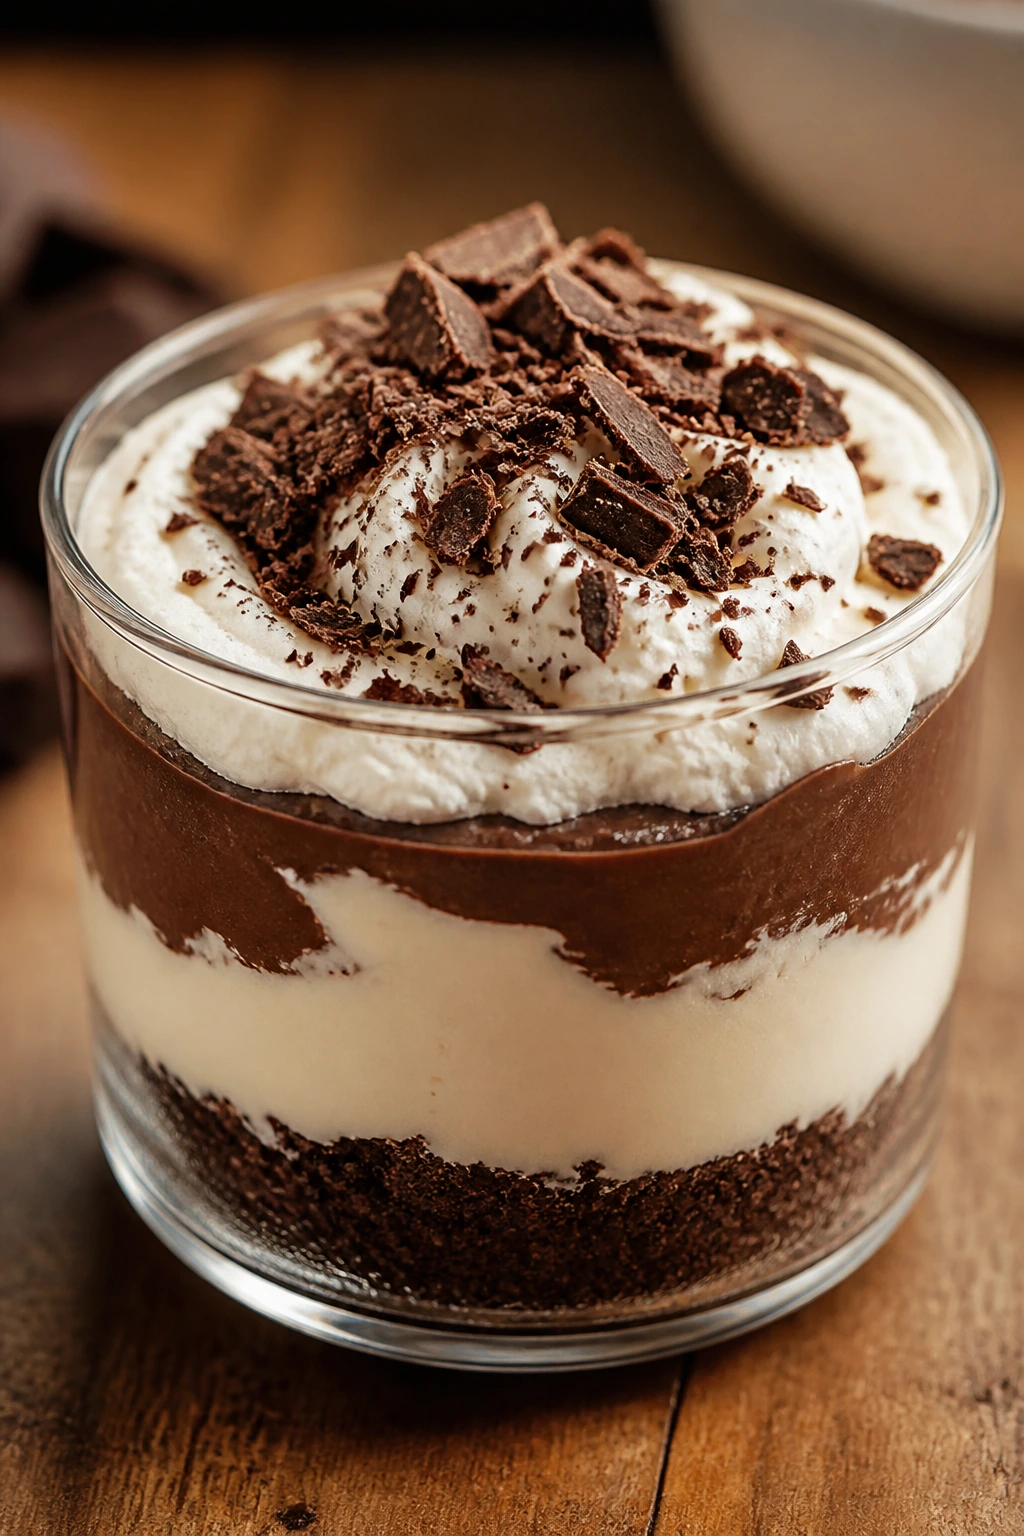
Weeknight desserts work best when they respect the shape of the evening. By the time dinner is over, nobody wants a sink full of bowls or a pastry project that needs a chilled dough, a blind bake, and a second round of cleanup. That is why one-pan cookies, tray bars, no-bake cups, and fruit desserts keep showing up here: they ask for a small amount of attention and give back a finished dessert with a clear flavor payoff.
There is also a texture reason these desserts make sense. A skillet cookie gives you browned edges and a soft middle without portioning. A crisp gives you bubbling fruit and a crunchy lid without rolling pastry. A no-bake cheesecake cup skips the oven entirely and still lands with enough body to feel like dessert, not pudding in disguise. That kind of efficiency matters after a day that already asked too much.
I like desserts that know their job. They should be comforting, but not clingy. They should taste deliberate, even when they are built from pantry odds and ends.
Essential Equipment for These Recipes
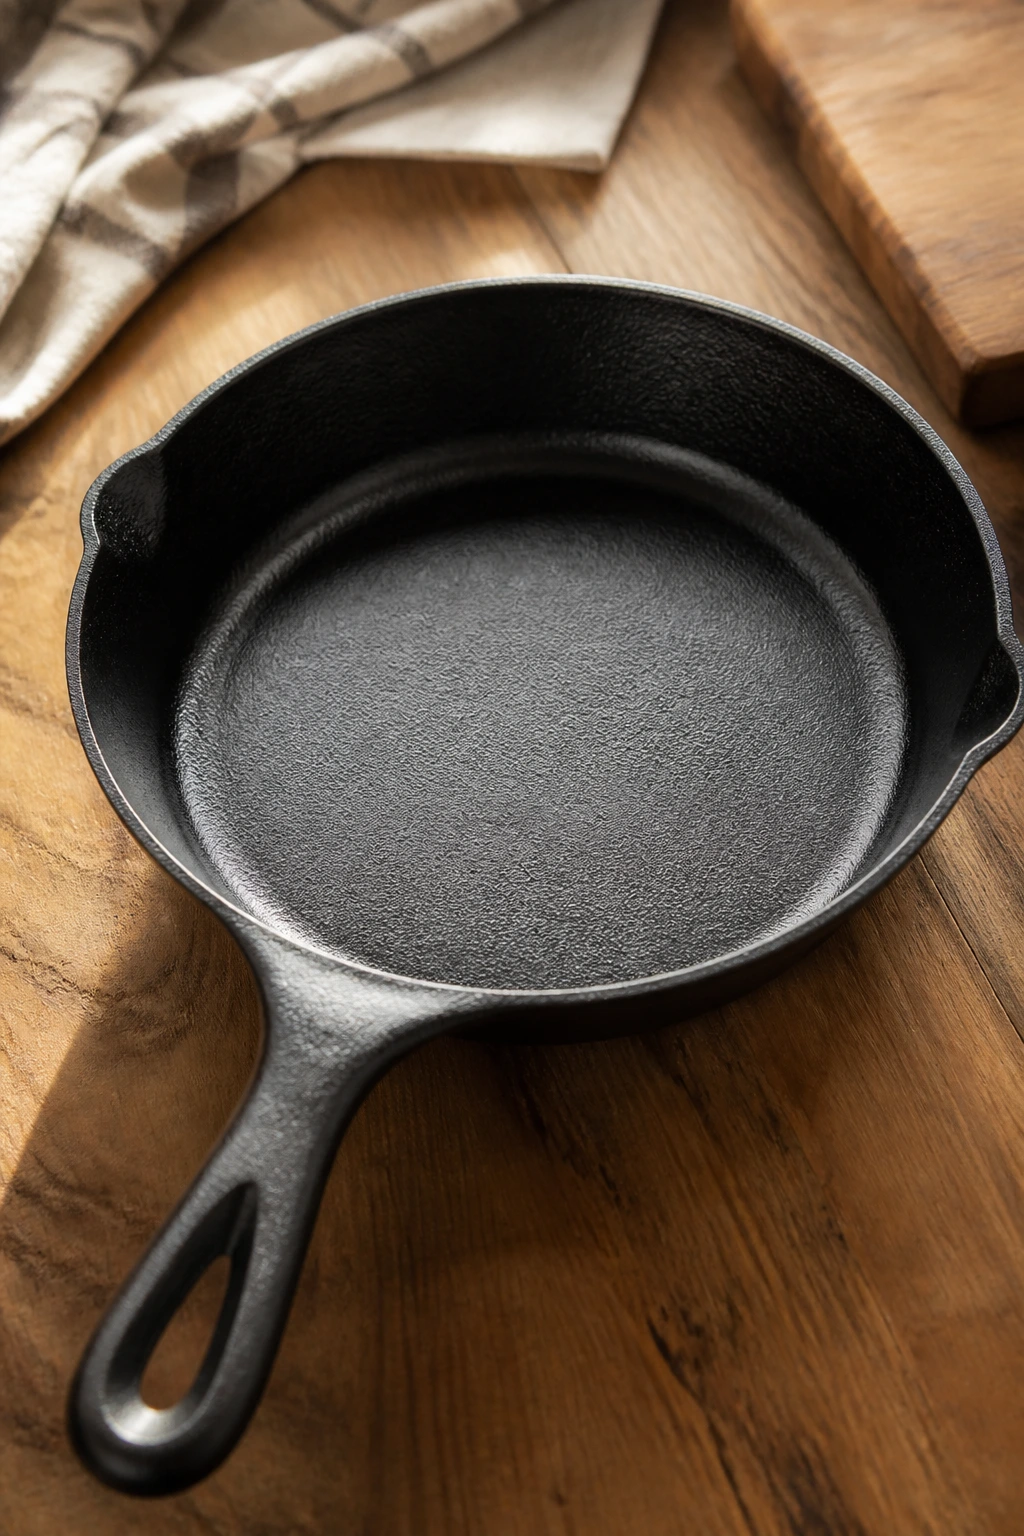
- 10-inch cast-iron skillet: Useful for skillet cookies, s’mores dip, and any dessert you want to serve hot from the pan.
- 8-inch square baking pan: The workhorse for brownies, blondies, bars, and most layered squares.
- Mixing bowls in two sizes: One large bowl and one medium bowl cover most of the recipes here.
- Whisk and rubber spatula: A whisk handles custards and batters; a spatula gets every last bit of brownie batter out of the bowl.
- Parchment paper: Makes lifting bars and bark much easier.
- Hand mixer: Helpful for whipped cream, cheesecake cups, and fillings that need more air.
- Baking sheet: Needed for cookies, hand pies, galettes, macaroons, and bark.
- Small saucepan: Good for browning butter, making sauces, and cooking caramel.
- Heatproof jars or ramekins: Handy for panna cotta, pots de crème, and parfaits.
- Microwave-safe mug: Keep one large mug around for mug cake and lava cake nights.
- Thermometer: Not required for every recipe, but worth having for frying churro bites and checking oil temperature.
- Fine-mesh strainer: Useful for silky custards and panna cotta sauces if you want them extra smooth.
Smart Shopping and Ingredient Tips
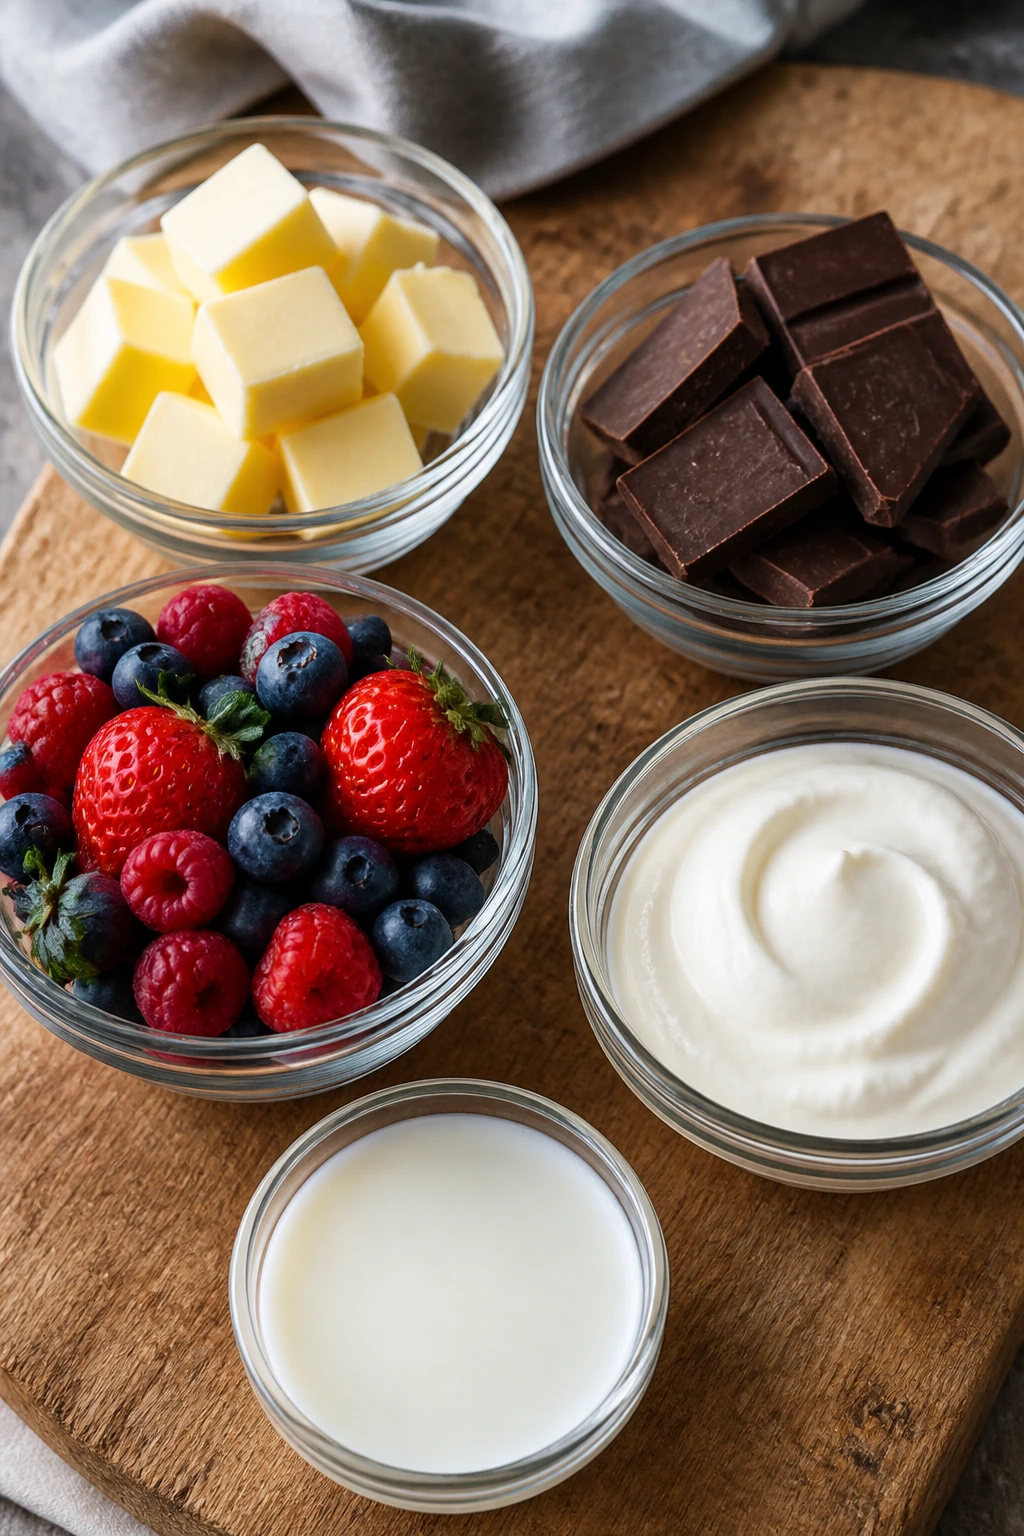
The fastest way to make weeknight desserts taste flat is to buy tired ingredients. Butter should smell sweet, not sour. Chocolate should taste like chocolate, not wax. Fruit should be ripe enough to give but not collapsing in the clamshell. That matters more here than in a long, decorated cake, because these recipes leave nowhere to hide.
For fruit desserts, look for apples that hold shape — Granny Smith, Honeycrisp, or a mix — and use firm pears if you plan to poach them. Berries should be dry on the outside and deeply colored. Frozen berries are fine for cobblers and crisps, and I use them often when fresh ones are expensive or pale. Just do not thaw them first unless the recipe tells you to, or you will be fighting a watery filling.
Dairy deserves the same care. Full-fat yogurt, cream cheese, heavy cream, and whole milk make a visible difference in no-bake desserts, custards, and puddings. Lower-fat versions can work, but they thin out the texture and often need extra chilling time. If you are buying sweetened condensed milk, check the can for dents and make sure the seal is intact. That sounds obvious. It is still worth saying.
Chocolate is another spot where small choices show up. Semisweet chips are the safest all-around buy because they melt cleanly and keep sweetness in check. For sauces and custards, chopped chocolate bars melt smoother than chips because they are made to hold shape in the package, not to disappear in heat. And if a recipe asks for cocoa powder, use unsweetened cocoa rather than hot chocolate mix. The mix brings sugar and milk powder along for the ride, which changes the whole balance.
For pantry items like oats, flour, brown sugar, and graham crackers, freshness is more useful than brand loyalty. Old oats can taste dusty. Brown sugar that has gone hard can still be saved, but it takes time. A small bag of flaky salt pays for itself quickly in desserts because it sharpens caramel, chocolate, and fruit without making anything taste “salty” in the obvious sense.
How to Serve These Recipes
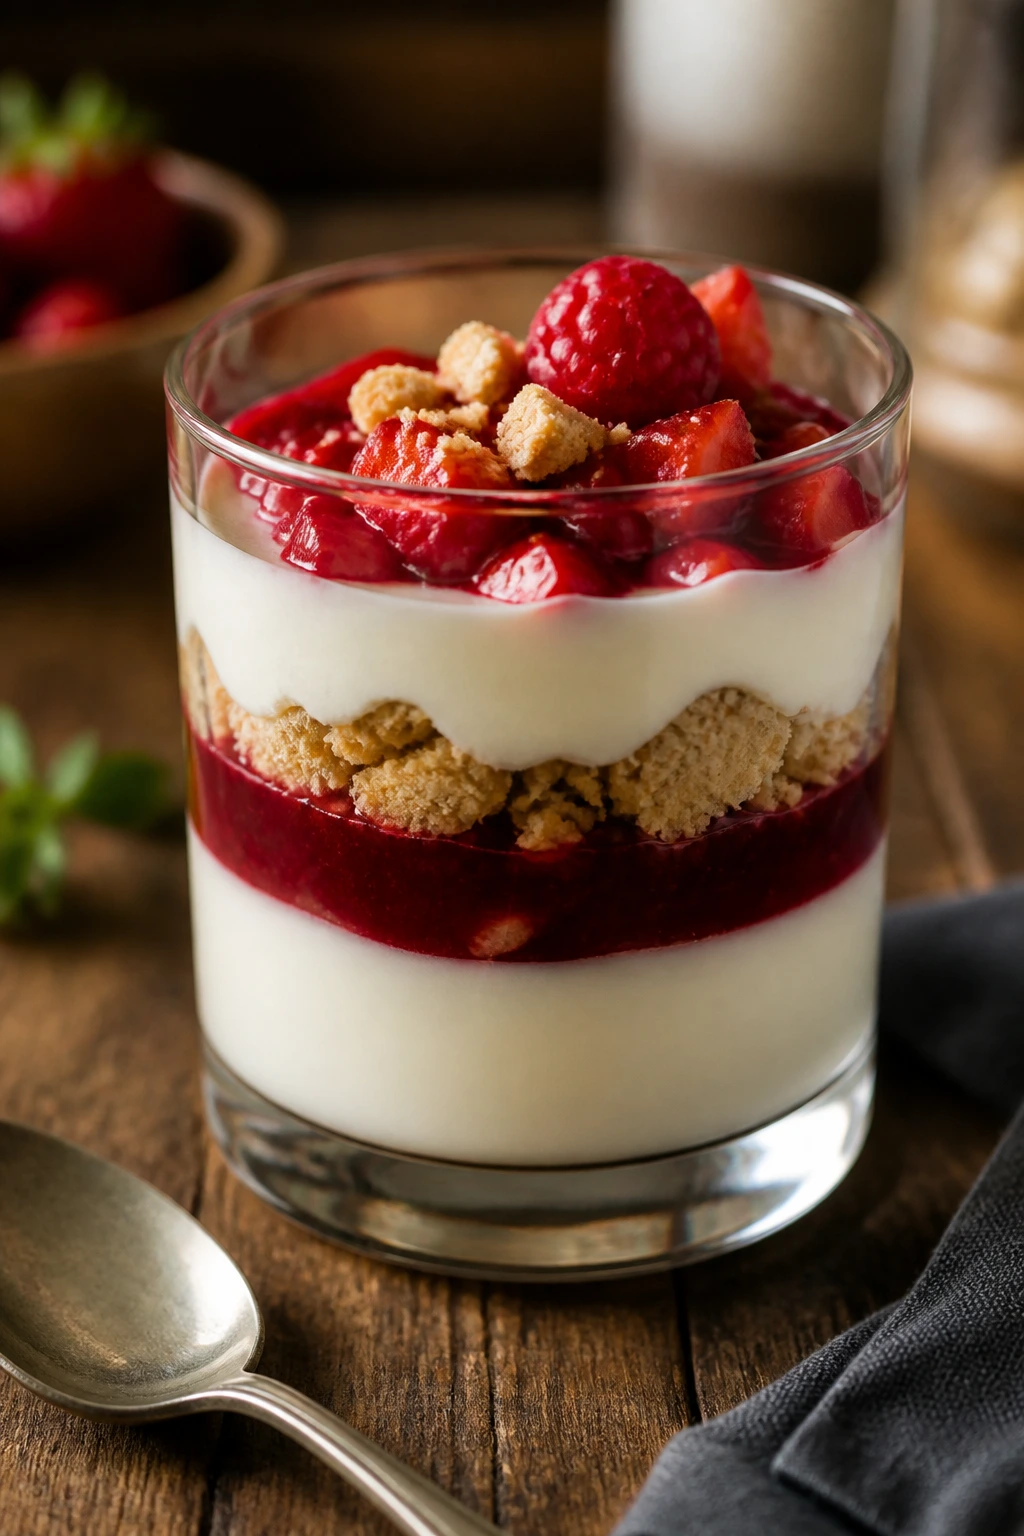
Presentation:
Serve hot desserts in shallow bowls or straight from the pan when the texture benefits from heat — skillet cookie, crisp, cobbler, s’mores dip, brownie lava cake. Cold desserts look better in clear glasses, ramekins, or small jars because the layers show: cheesecake cups, parfaits, panna cotta, trifle cups, and no-churn ice cream scoops all benefit from a tidy container.
Accompaniments:
Vanilla ice cream is the universal backup plan, but whipped cream, berries, toasted nuts, and a spoonful of jam do a lot of work across this collection. Coffee pairs with brownies, blondies, cookie bars, and affogato. Tea fits lemon bars, olive oil cake, and ricotta toast. If the dessert is already rich — millionaires shortbread, pots de crème, caramel bark — keep the side simple.
Portions:
Bars cut best when they are chilled and then brought back to room temperature for a few minutes. For richer desserts like fudgy brownies, millionaire shortbread, and hot fudge sundaes, smaller squares or scoops are smarter than generous slabs. Fruit desserts can be served a little larger because they are lighter on the palate.
Beverage Pairing:
Black coffee works with chocolate-heavy treats, espresso-based desserts, and anything with peanut butter. Milk is still the right answer for cookie bars and mug cakes. For citrus or fruit desserts, a cup of tea — Earl Grey, chamomile, or plain black tea — gives the sweet a cleaner finish.
Additional Tips and Flavor Boosters
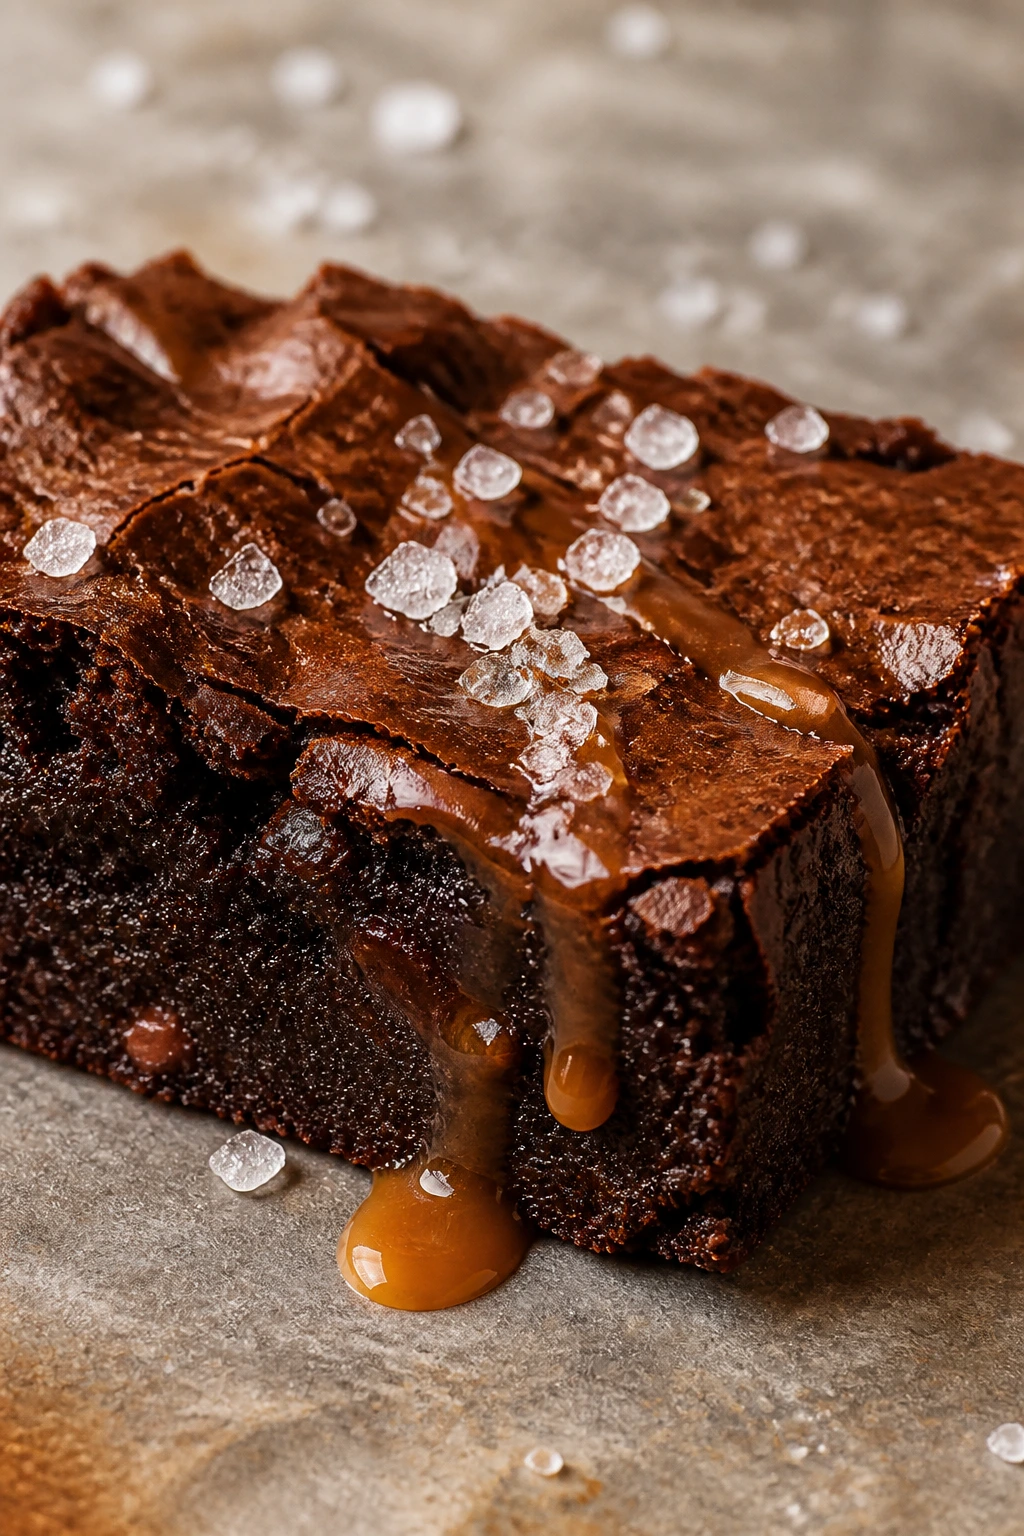
Flavor Enhancement:
A tiny pinch of flaky salt on brownies, caramel bars, bark, or cookie dough wakes up chocolate in a way vanilla alone cannot. For fruit desserts, a squeeze of lemon or lime before baking keeps the flavor from tasting sleepy.
Customization:
Add chopped nuts to crisps, bars, and barks when you want more crunch. Swapping one fruit for another is usually painless in cobblers, galettes, hand pies, and parfaits, as long as the fruit has enough body to hold together. If you like darker flavors, a spoon of espresso powder can deepen chocolate without making the dessert taste like coffee.
Serving Suggestions:
A few toasted coconut flakes, cacao nibs, sliced almonds, or mint leaves go a long way. So does a little drizzle — caramel over banana bread, chocolate over bark, berry sauce over cheesecake cups. Keep the garnish small. These are weeknight treats, not parade floats.
Make-It-Yours:
If you want a dairy-free path, olive oil cake, fruit crisps, poached pears, and several bark recipes adapt well with plant-based butter or coconut cream. For gluten-free versions, the cleanest swaps are in puddings, custards, panna cotta, rice desserts, and bark; bars and cookies can work too, but you need a decent 1:1 flour blend. For lower-sugar versions, lean on fruit-forward desserts and cut back in the filling rather than the crust or topping, where the structure is doing work.
Make-Ahead, Storage, and Reheating Guidance
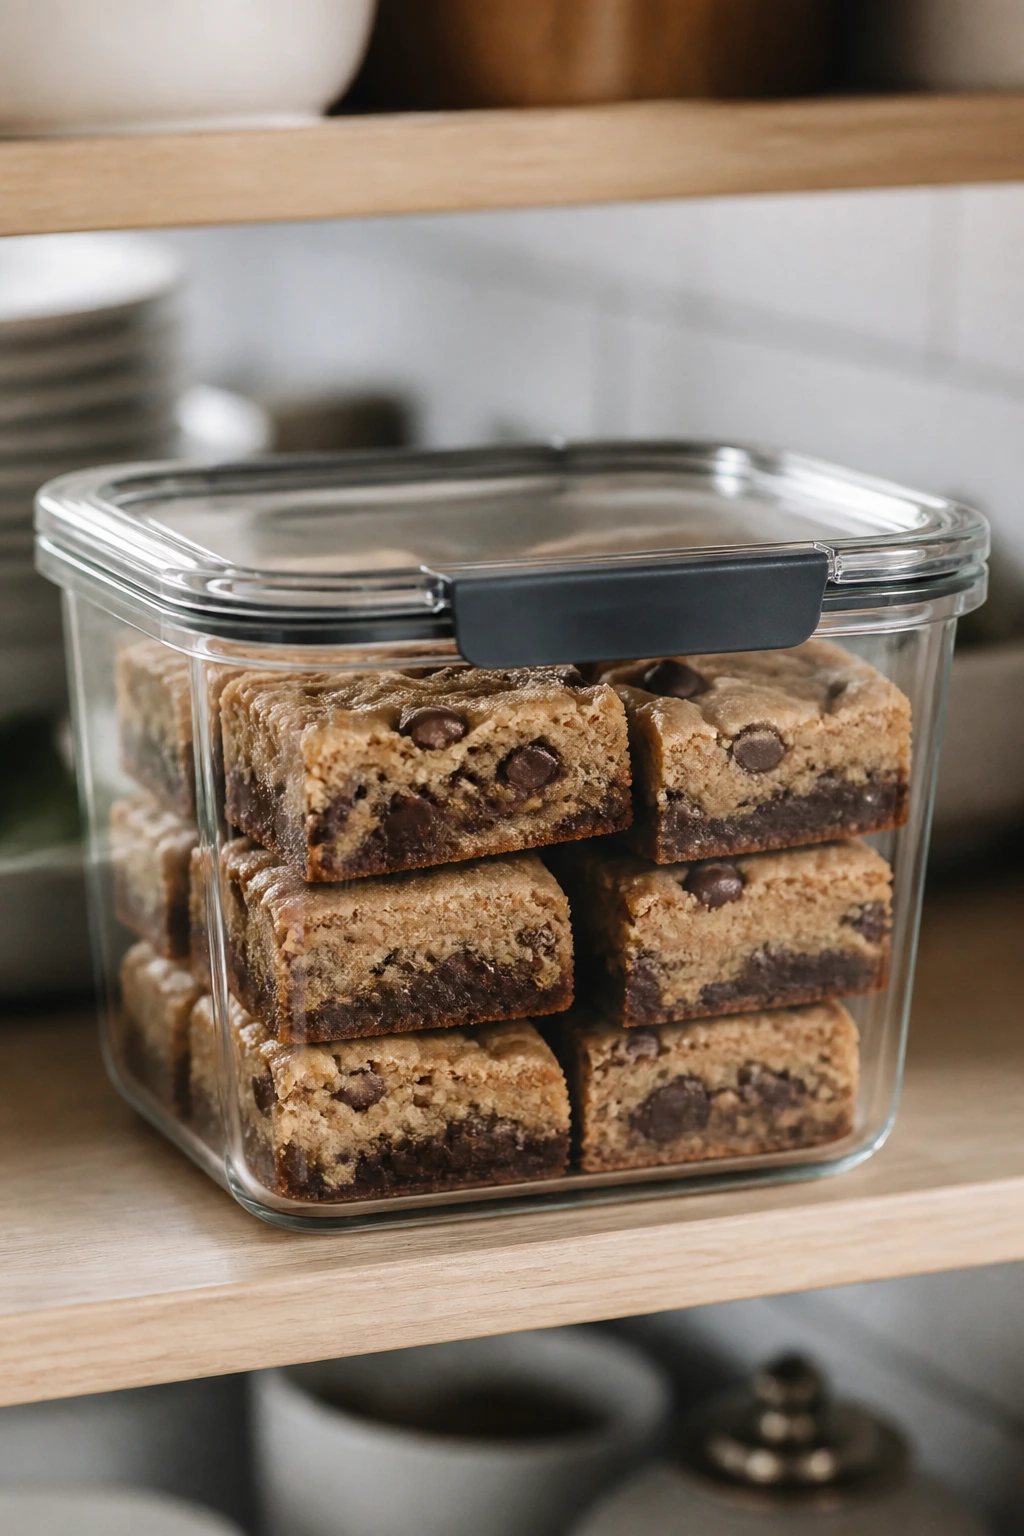
Some of these desserts are best fresh from the oven. Others improve after a night in the fridge. Knowing which is which keeps you from wrecking the texture by accident.
Bars, brownies, blondies, millionaires shortbread, and cookie bars usually keep 3 to 4 days refrigerated in a sealed container, and many hold well up to 2 months frozen if wrapped tightly and layered with parchment. Let frozen bars thaw in the fridge or on the counter until no longer icy at the center. Brownies and blondies often taste even denser and better the next day.
Cookies, macaroons, and bark should be stored in an airtight container at room temperature for 3 to 5 days, though bark stays snappier in a cool place. If you are stacking cookies, slip parchment between layers so the tops do not smear. Warm cookies can be revived for a few minutes in a low oven, around 300°F, but you only need that if you are chasing just-baked texture.
Fruit desserts like crisp, cobbler, baked apples, and galettes keep 3 days refrigerated. Reheat them at 325°F until warm and bubbling, or use short bursts in the microwave if you do not care about the topping staying crisp. The crisp and cobbler toppings soften in the fridge, so an oven is the better fix. If you want them to hold texture, reheat uncovered.
Custards, panna cotta, cheesecake cups, pots de crème, and rice pudding should be covered and chilled. Most stay good for 3 to 4 days refrigerated. Rice pudding can thicken a lot in the fridge, so splash in a little milk when reheating and warm it gently on the stove or in short microwave bursts. Panna cotta and pots de crème are best served cold or very slightly cool.
Ice cream, bark, and frozen yogurt bark belong in the freezer, tightly sealed. No-churn ice cream keeps up to 2 weeks with good texture if the container stays closed and the surface is covered. Let it sit out for 5 minutes before scooping. Frozen yogurt bark softens fast, so break off what you need and return the rest to the freezer right away.
Variations and Adaptations to Try
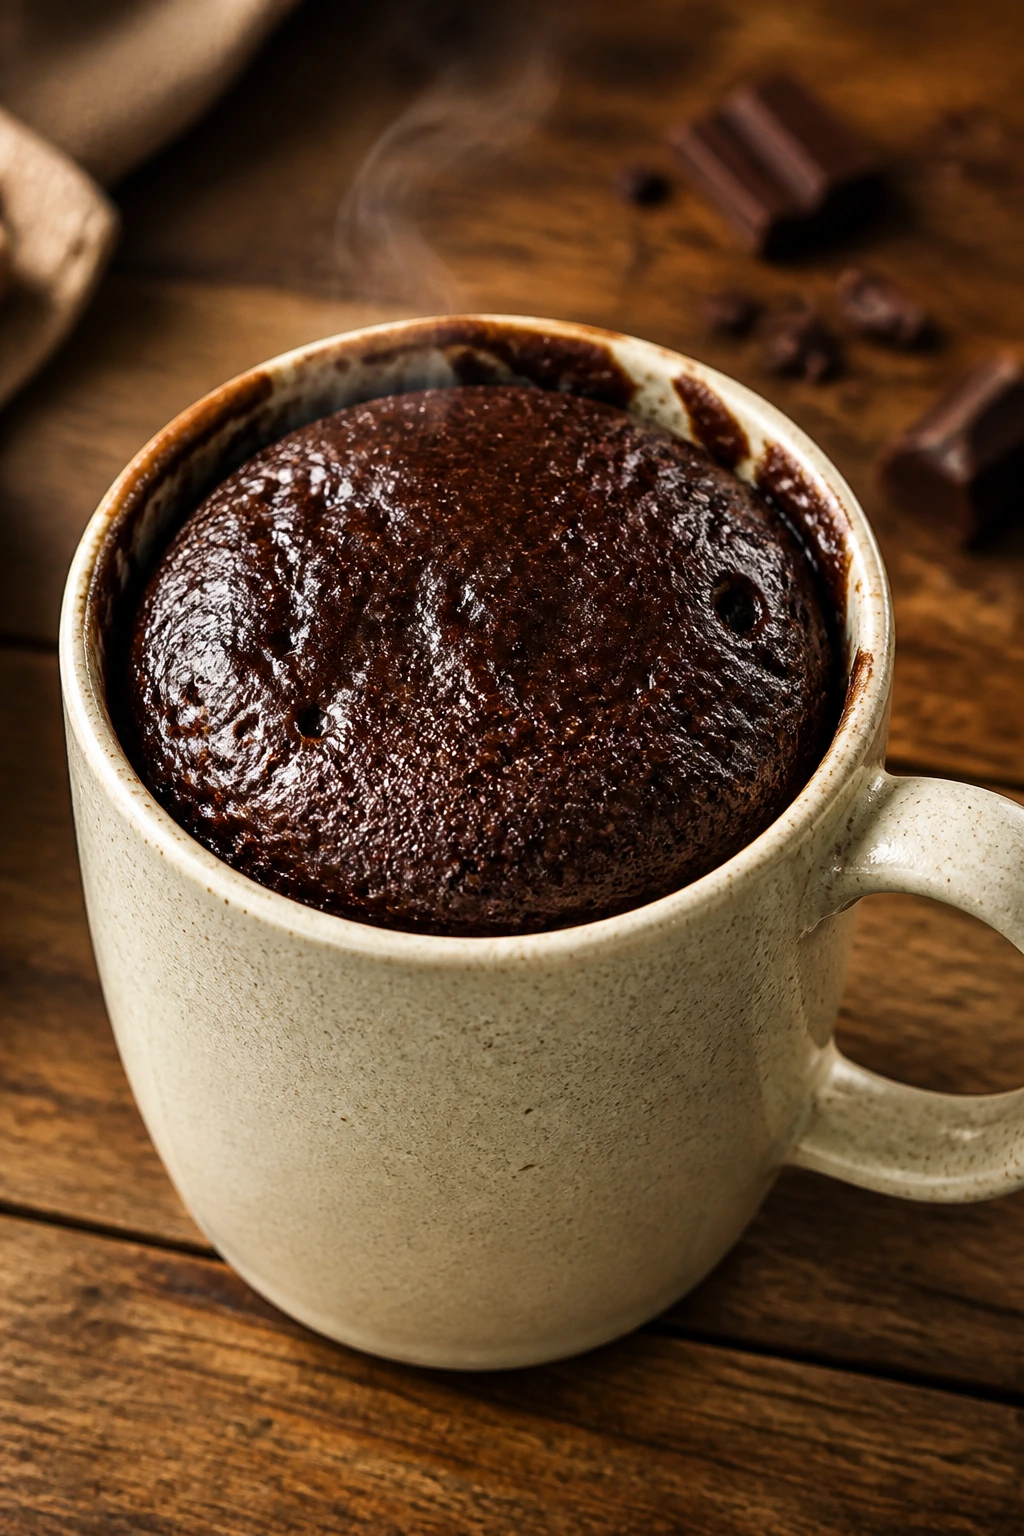
The Gluten-Free Pantry Route:
Use almond flour or a good 1:1 blend in cookie bars, blondies, brownies, and some bar cookies. Fruit desserts, custards, panna cotta, bark, and ice cream are already friendly to this path with little or no adjustment. The main thing is to watch texture, because gluten-free batters can go dry if overbaked by even a few minutes.
The Dairy-Free Shortcut:
Olive oil cake, poached pears, baked apples, fruit crisps, hand pies, and several fruit-forward desserts adapt neatly with plant-based butter or coconut cream. Coconut milk can stand in for cream in rice pudding or some custards, though the flavor shifts. Use it when you want richness, not when you need the dairy flavor itself.
The Chocolate-Lover’s Lane:
Swap in chocolate chips, cocoa powder, or chocolate sauce across brownies, cookie bars, trifle cups, bark, and mug cakes. This path is especially useful when you want a stronger finish after dinner and fewer fruit desserts. A little espresso powder often makes the chocolate taste bigger without making the dessert more complicated.
The Fruit-First Version:
Lean on crisps, cobblers, galettes, baked apples, poached pears, and parfaits when you want dessert that feels lighter. Fruit carries a lot of its own flavor, so you can keep sugar modest and still get a complete dessert. Add citrus zest or a pinch of salt if the fruit tastes flat.
The Kid-Friendly Finish:
Use sprinkles, mini chocolate chips, crushed cookies, or a drizzle of sauce to make the desserts feel more playful without changing the base recipe much. Bark, parfaits, mug cakes, cookie bars, and Rice Krispie treats are especially easy to dress up this way. Keep the spices mild and the portions small.
The Make-Ahead Fridge Batch:
Choose cheesecake cups, panna cotta, rice pudding, no-bake bars, and trifle cups when you want dessert waiting in the fridge. These are the recipes that quietly rescue a weeknight because the work happens before the craving hits. They also travel well to another room of the house, which counts for something.
Common Mistakes to Avoid
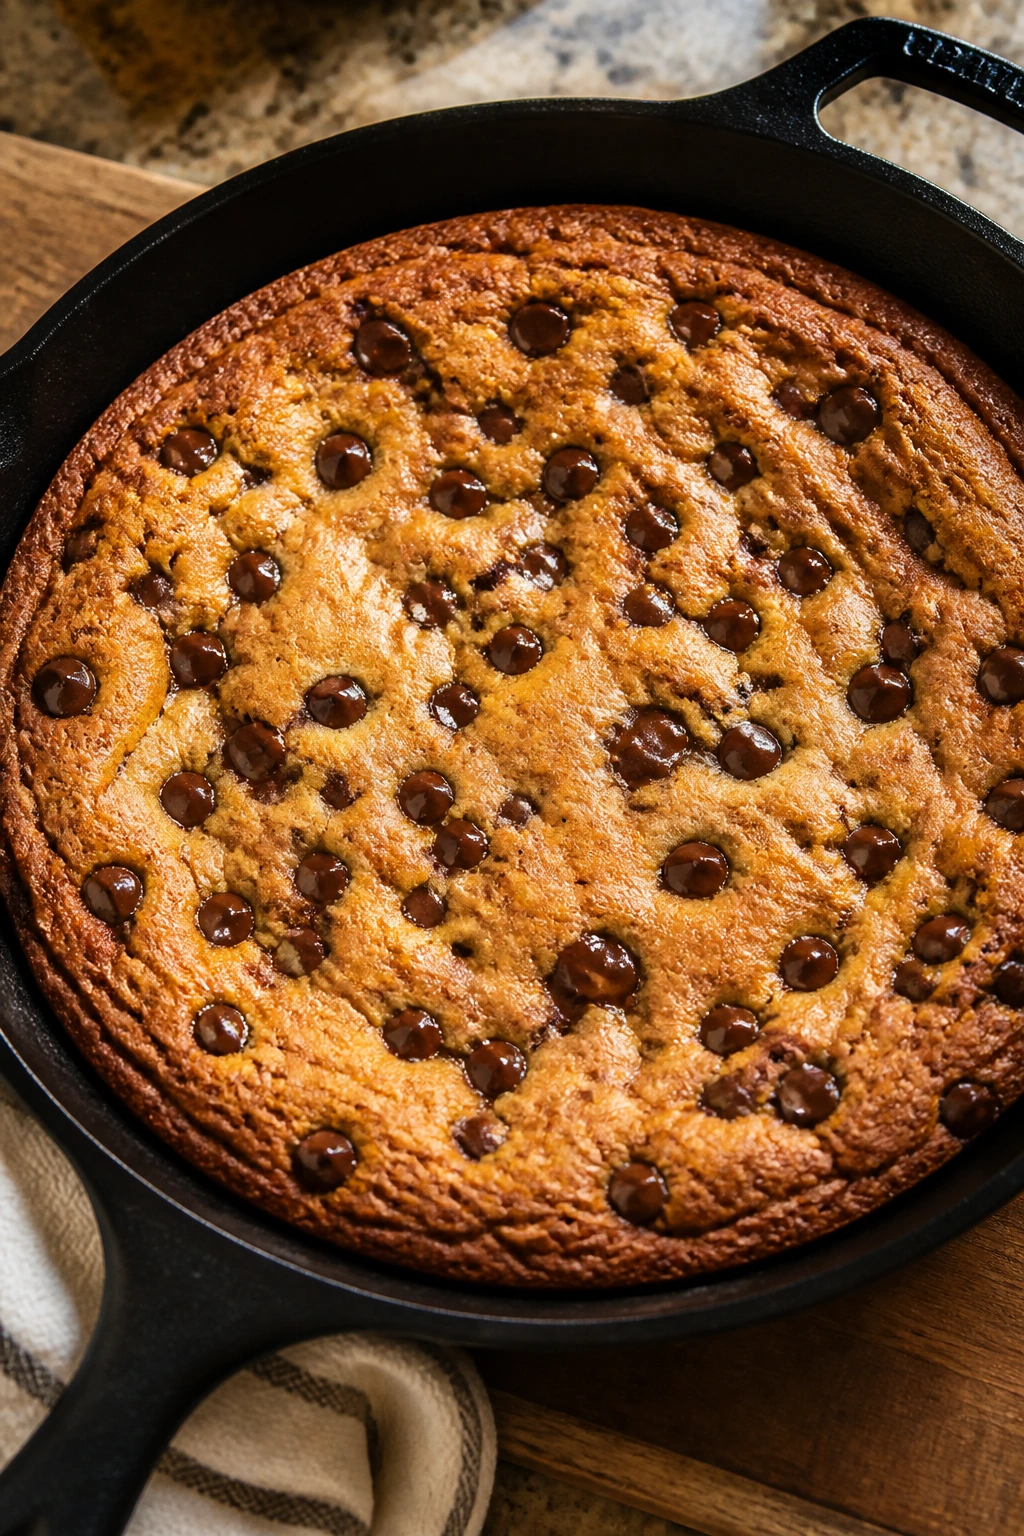
Treating every dessert like it needs a full production:
A weeknight dessert should be quick enough to fit the time you actually have. If the recipe asks for ten separate bowls or a dough that needs overnight chilling, it is not the right move for a Tuesday unless you planned ahead.
Overbaking because the center still looks soft:
This is the mistake that turns brownies into cake, cookies into bricks, and bars into dry squares. Most baked desserts keep setting after they leave the oven, so stop early enough that the middle still has a little give.
Ignoring the chill time on cold desserts:
Cheesecake cups, panna cotta, pots de crème, trifle, and frozen desserts need real time to set. If you rush them, the texture turns loose or slushy. Fridge desserts are not being difficult. They are doing their job.
Using tired pantry ingredients:
Old oats, stale nuts, flat cocoa, and hard brown sugar all show up in the final bite. That does not mean you need expensive ingredients. It means the ingredients you already own should still taste alive.
Fussing with fruit too much:
Fruit desserts work best when you let the fruit stay recognizable. If you chop apples too small, they disappear. If you drown berries in starch, the filling turns gummy. If you overfill hand pies and galettes, the juices burst out and burn.
Forgetting that temperature changes texture:
Warm brownies are soft, cold brownies are firmer, ice cream needs a few minutes before scooping, and caramel sauce thickens as it cools. If something seems off, check the temperature before assuming the recipe failed.
Frequently Asked Questions
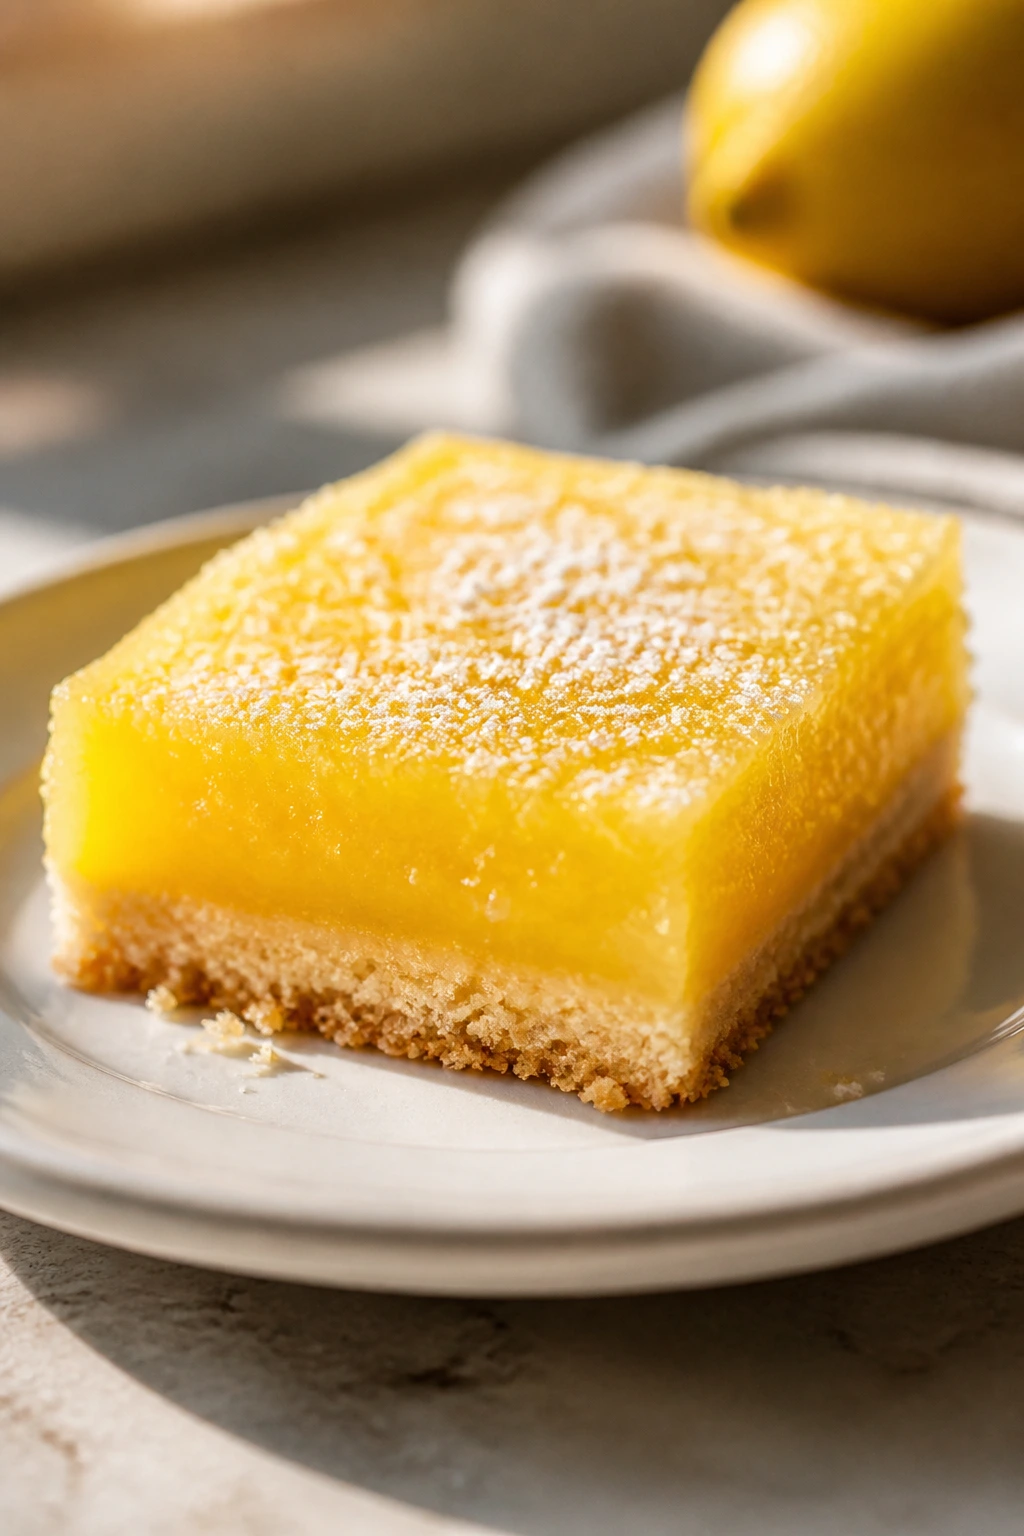
Can I make these desserts with what I already have in the pantry?
Most of them, yes. Brownies, cookie bars, Rice Krispie treats, bark, hot fudge sauce, and mug cakes are built for pantry ingredients, while fruit desserts and custards lean on whatever fresh produce or dairy you have on hand.
Which desserts are best if I do not want to turn on the oven?
No-bake peanut butter oat bars, cheesecake cups, panna cotta, affogato, bark, frozen yogurt bark, hot fudge sauce, and ricotta toast are the easiest choices. S’mores dip still uses the oven, but it is fast enough that it barely counts as a bake.
What can I make if I only have 20 minutes?
Mug cake, affogato, ricotta toast, hot fudge sauce, chocolate-dipped pretzel bark, and some parfaits fit neatly into that window. If you already have brownies or cake on hand, trifle cups are also a fast finish.
How do I keep bars and brownies from sticking to the pan?
Use parchment with an overhang on at least two sides so you can lift the whole slab out after cooling. A light coat of butter or spray under the parchment helps it stay put while you spread the batter.
Can I swap frozen fruit for fresh fruit in these desserts?
Absolutely, especially in cobblers, crisps, galettes, baked apples, and sauces. Use frozen fruit straight from the freezer unless a recipe says otherwise, and expect a little extra bake time or thickener if the fruit throws off a lot of juice.
What if my brownies or blondies come out dry?
They were probably baked a few minutes too long or mixed with too much flour. Next time, pull them when the center still has a few moist crumbs and measure flour lightly instead of packing it into the cup.
How far ahead can I make desserts with cream or custard?
Cheesecake cups, panna cotta, pots de crème, and rice pudding are fine for 3 to 4 days in the fridge. In fact, several of them taste better after an overnight chill because the flavor settles and the texture firms.
What is the easiest dessert to scale up for a small group?
Cookie bars, brownies, crisp, cobbler, bark, and parfaits scale well without much extra thinking. Skillet cookies and galettes can be doubled or split across pans, but you may need to adjust the bake time by a few minutes.
How do I reheat fruit desserts without ruining the topping?
Use a 325°F oven and rewarm uncovered until the center is hot and the top is back to life. Microwave reheating works in a pinch, but it softens crisp toppings and turns them a little soggy.
Sweet Ends to a Long Day
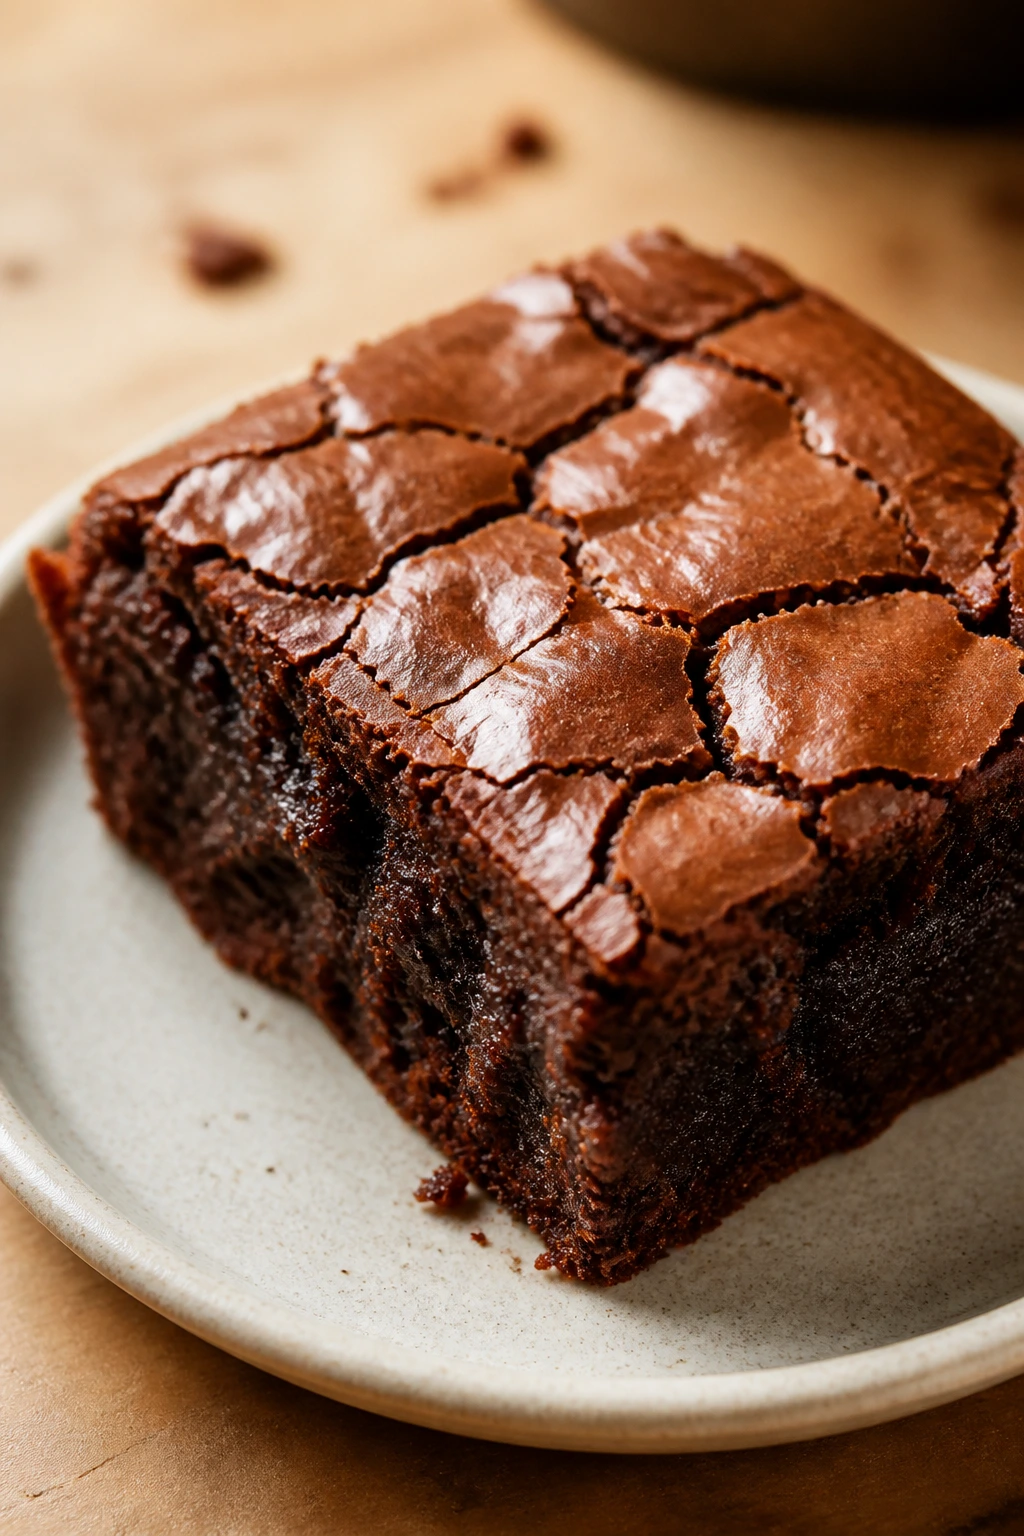
The nicest thing about easy weeknight desserts is that they do not ask for a special occasion. A hot skillet cookie after the dishes. A lemon bar pulled from the fridge. A cold spoon through panna cotta while the rest of the kitchen goes quiet. That is enough.
The best of these recipes are the ones you can keep in your back pocket without thinking too hard. Once you know which pan, which bowl, and which ingredients to reach for, dessert stops being a project and becomes a small, repeatable pleasure. That is the part worth keeping.