
A tray of pastel cookies can look fussy right up until you break the work into small, plain steps. That is the real trick behind festive Easter desserts for beginner bakers: pick recipes that get their charm from color, shape, fruit, coconut, and a little clever finishing, not from advanced pastry work or a dozen separate techniques.
The good news is that Easter baking does not have to mean nerve-wracking layers or sugar sculpture. A lemon Bundt cake with a pink glaze. Cookie bars packed with candy eggs. Coconut nests that look decorative the second you shape them. Those desserts do the heavy lifting for you, which is exactly what you want when you’re baking for brunch, a family table, or a dessert spread where people will definitely notice the first slice.
I like this kind of dessert lineup because it gives you room to breathe. If one item cracks a little, dust it with powdered sugar. If one tray bakes a touch dark on the edges, call it a rustic batch and move on. That is also why these Easter desserts for beginner bakers lean so hard on forgiving textures: bars, cupcakes, no-bake fillings, single-layer cakes, and meringue nests that can hide a wobble under whipped cream.
Why These Desserts Work for First-Time Bakers
- Simple shapes, big payoff: Bundt cakes, bars, cupcakes, nests, and trifles all look polished with very little decorating work.
- Forgiving batters and fillings: Several of these recipes bake in one pan or set in the fridge, so a small timing slip does not ruin the whole dessert.
- Built-in Easter color: Strawberries, lemon glaze, coconut, pastel candy, and pale frosting do most of the visual work without much effort.
- Easy to scale: Most of these recipes can be doubled for a crowd or cut in half for a smaller table without changing the method.
- Good make-ahead options: A few taste better after chilling, which means you can finish them before the rest of the meal turns chaotic.
- A mix of textures: You get crisp cookie edges, soft cakes, creamy fillings, and chewy bars instead of one long stretch of sameness.
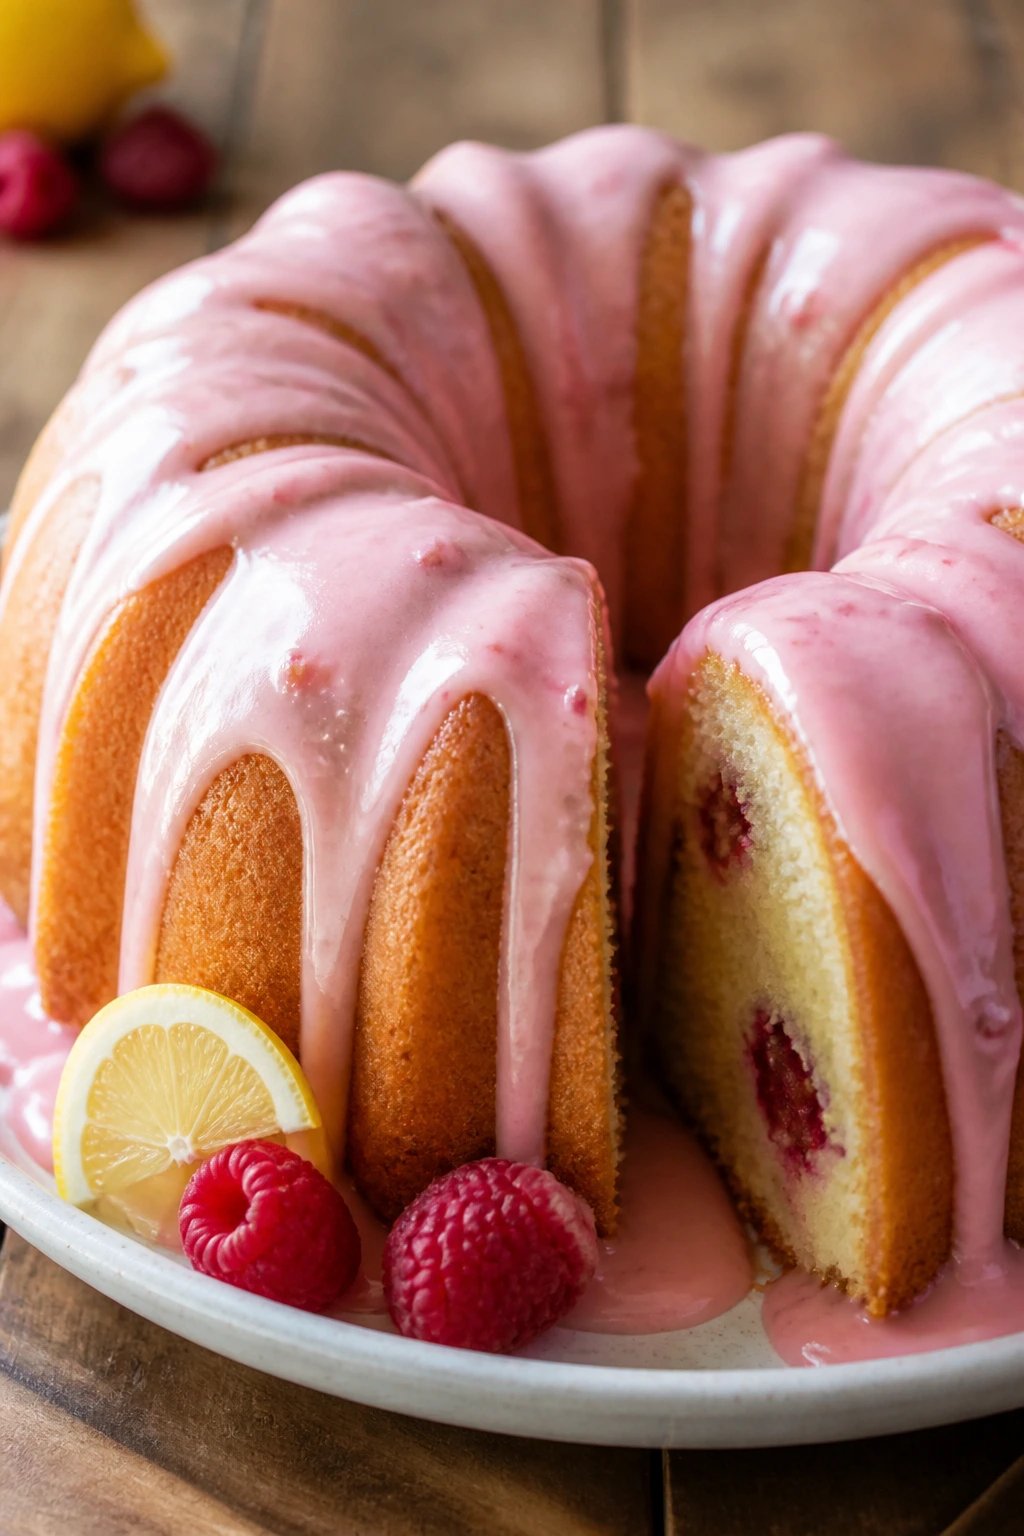
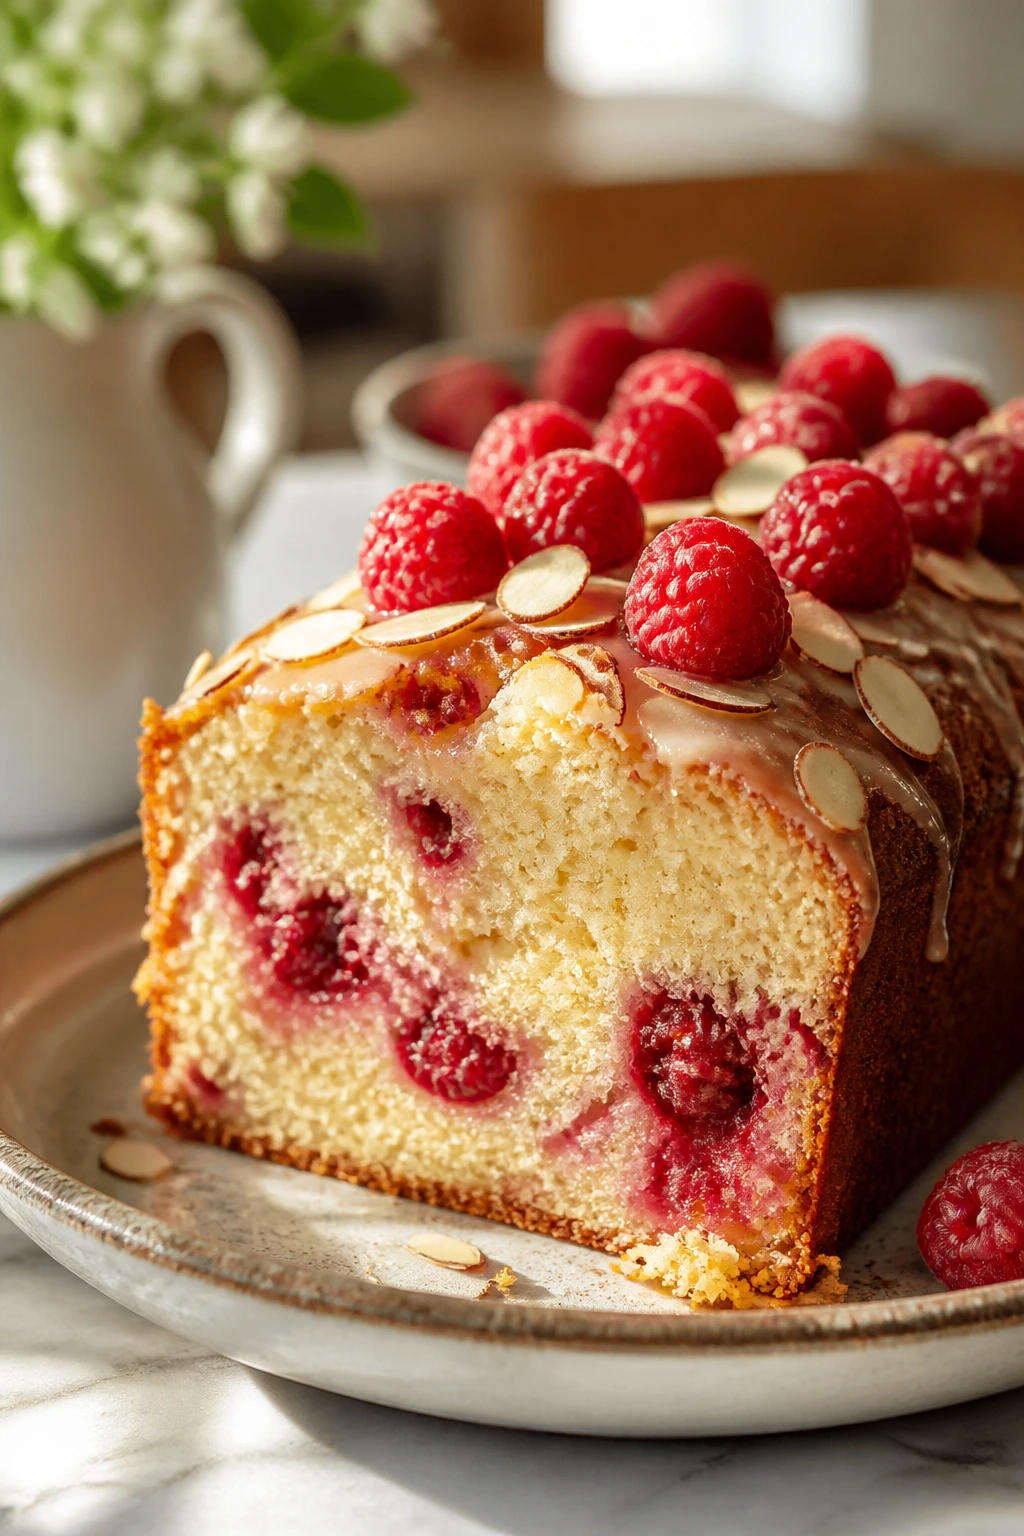
1. Lemon-Raspberry Bundt Cake
Bright lemon and tart raspberries make a strong pair here. The cake bakes into a tender, pale crumb, and the pink glaze slides into the ridges so the whole thing looks dressed up without much fuss. I reach for this style of cake when I want one centerpiece dessert that slices cleanly and does not demand a frosting session.
Why It Works:
The Bundt pan does half the decorating for you, which is a gift on a busy baking day. Sour cream keeps the crumb moist without making the cake heavy, and the raspberries stay put better when you toss them with a little flour first. The lemon zest in the batter and the lemon juice in the glaze give the cake a sharp top note, so it does not taste flat or overly sweet. If your oven runs hot, this cake can brown fast on the outside, so a loose sheet of foil at the 40-minute mark helps.
Key Ingredients:
- 2 1/2 cups all-purpose flour
- 2 teaspoons baking powder
- 1/2 teaspoon baking soda
- 1/2 teaspoon fine salt
- 1 cup unsalted butter, softened
- 1 3/4 cups granulated sugar
- 4 large eggs, room temperature
- 1 cup sour cream
- 2 tablespoons lemon zest
- 1/4 cup fresh lemon juice
- 1 teaspoon vanilla extract
- 1 1/2 cups fresh raspberries, tossed with 1 tablespoon flour
For the Raspberry-Lemon Glaze:
- 1 cup powdered sugar
- 2 tablespoons fresh lemon juice
- 1 tablespoon seedless raspberry jam
- 1 to 2 teaspoons milk or water, if needed
Quick Steps:
- Prep the pan and oven: Heat the oven to 350°F (175°C). Grease a 10-cup Bundt pan very well, getting into every ridge, then dust it lightly with flour.
- Mix the dry ingredients: Whisk the flour, baking powder, baking soda, and salt in a medium bowl.
- Build the batter: Beat the butter and sugar for 3 to 4 minutes until pale and fluffy. Add the eggs one at a time, then mix in the sour cream, lemon zest, lemon juice, and vanilla.
- Finish the batter: Add the dry ingredients on low speed and stop as soon as the flour disappears. Fold in the raspberries gently so they do not bleed everywhere.
- Bake the cake: Spoon the batter into the pan and smooth the top. Bake for 50 to 60 minutes, until a toothpick in the center comes out clean or with a few moist crumbs.
- Cool and glaze: Cool in the pan for 15 minutes, then turn onto a rack. Stir the glaze ingredients together and drizzle over the fully cooled cake.
Equipment for This Recipe:
- 10-cup Bundt pan
- Hand mixer or stand mixer
- Microplane or fine grater for zest
- Cooling rack
- Mixing bowls
How to Serve This Dish:
Slice the cake thickly and set each piece on a pale platter so the glaze shows off the pink streaks. A spoonful of extra raspberries or a few curls of lemon zest on the side keeps the plate from looking bare.
Pro Tips for This Recipe:
- Grease every groove: Bundt pans hide sticky corners, and missed spots are where cakes tear.
- Do not overmix after the flour goes in: Once the batter looks smooth, stop.
- Use fresh raspberries if you can: Frozen berries bleed more and can streak the crumb.
- Let the cake cool fully before glazing: Warm cake turns the glaze thin and runny.
Variations on This Dish:
- Blueberry Lemon Bundt: Swap the raspberries for 1 1/2 cups blueberries and keep the rest the same.
- Orange-Raspberry Version: Replace the lemon zest and juice with orange zest and juice for a softer citrus flavor.
- Almond Glaze Finish: Add 1/4 teaspoon almond extract to the glaze for a bakery-style note.
Common Mistakes to Avoid with This Dish:
- Skipping the flour toss for berries: The fruit sinks, leaving one soggy layer at the bottom.
- Turning the cake out too soon: Wait the full 15 minutes or the cake can split in the pan.
- Adding too much glaze at once: Start with half, then drizzle more after it sets.
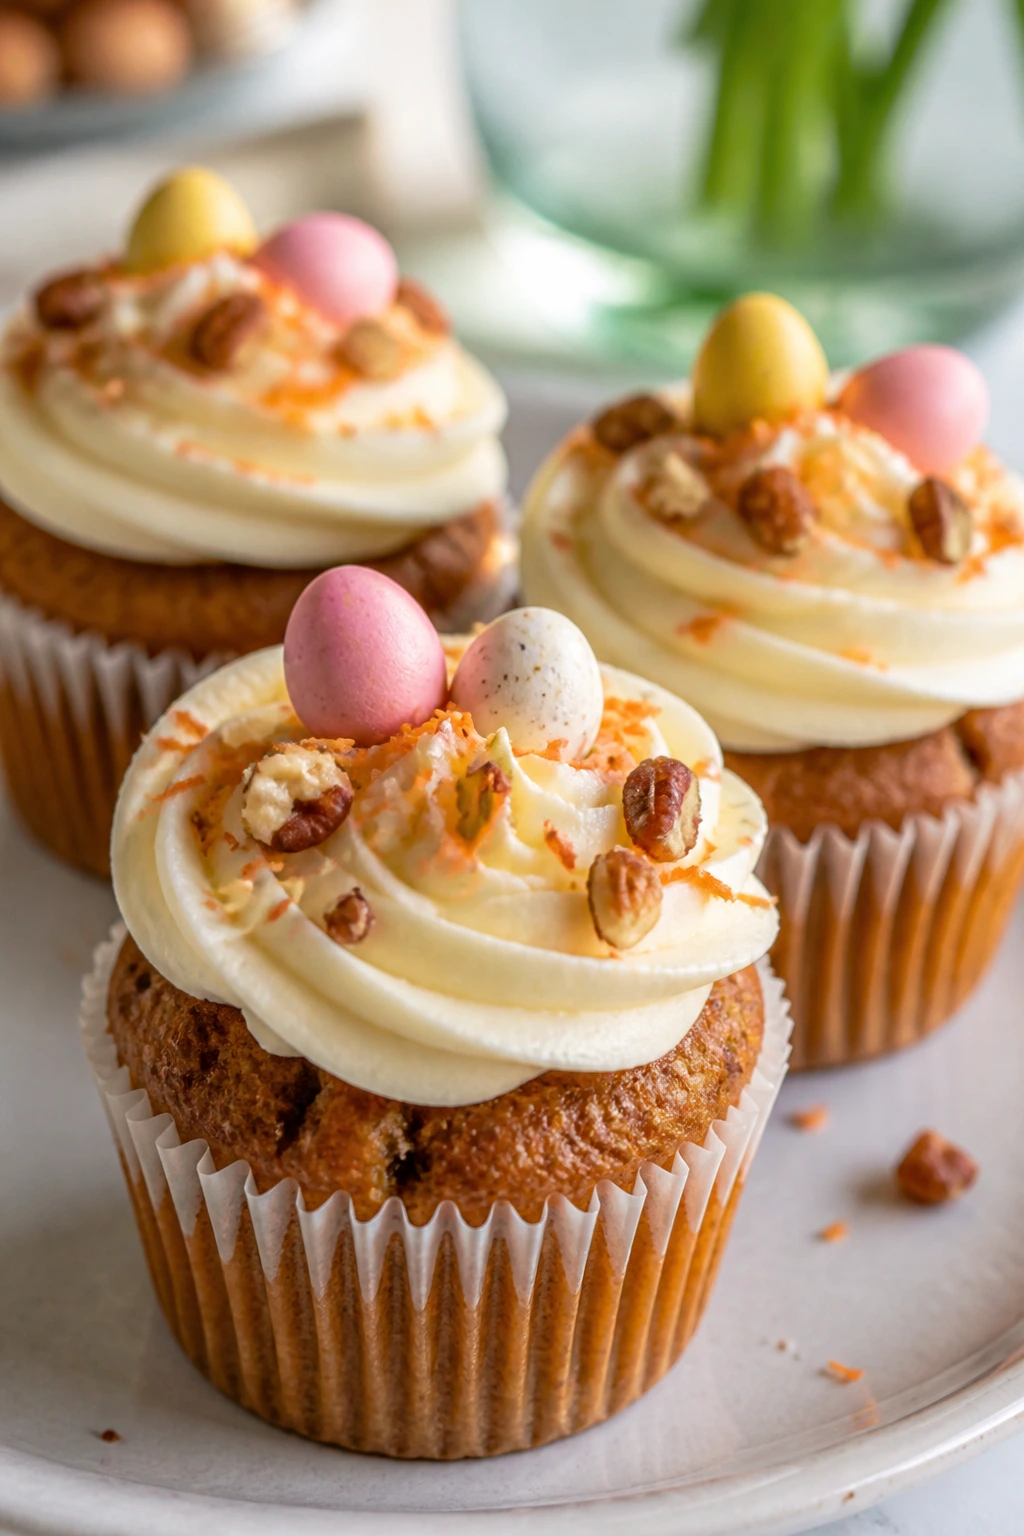
2. Carrot Cake Cupcakes with Cream Cheese Frosting
These are the cupcakes that smell like cinnamon as soon as they hit the oven. Grated carrot keeps the crumb soft, the frosting lands in thick swirls, and a few chopped nuts or tiny candy eggs on top make them feel like spring without turning into a decorating project.
Why It Works:
Carrot cake is a friendly place for beginners because the batter does not depend on a perfect creaming method or a delicate rise. Oil keeps the cupcakes tender even after a day in the fridge, and the carrots bring moisture you can actually see when you break one open. A little cinnamon and nutmeg is enough; pushing the spice too hard makes the cupcakes taste dusty instead of warm. The cream cheese frosting should be thick enough to hold a peak, so start with less milk or none at all.
Key Ingredients:
- 1 3/4 cups all-purpose flour
- 1 teaspoon baking powder
- 1 teaspoon baking soda
- 1 teaspoon ground cinnamon
- 1/4 teaspoon ground nutmeg
- 1/2 teaspoon fine salt
- 1/2 cup vegetable oil
- 1/2 cup granulated sugar
- 1/2 cup packed light brown sugar
- 3 large eggs
- 1 teaspoon vanilla extract
- 2 cups finely grated carrots
- 1/2 cup chopped walnuts or pecans, optional
For the Frosting:
- 8 ounces cream cheese, softened
- 1/2 cup unsalted butter, softened
- 3 cups powdered sugar
- 1 teaspoon vanilla extract
- Pinch of salt
Quick Steps:
- Preheat and line: Heat the oven to 350°F (175°C) and line a 12-cup muffin tin with paper liners.
- Whisk the dry ingredients: Combine the flour, baking powder, baking soda, cinnamon, nutmeg, and salt.
- Mix the wet base: Whisk the oil, granulated sugar, brown sugar, eggs, and vanilla until glossy and smooth.
- Finish the batter: Stir in the carrots and nuts, then fold in the dry ingredients until no flour streaks remain.
- Bake: Divide the batter among the liners, filling each about 2/3 full. Bake for 18 to 22 minutes, until the tops spring back when touched lightly.
- Frost when cool: Beat the frosting ingredients until smooth and pipe or spread onto the cooled cupcakes.
Equipment for This Recipe:
- 12-cup muffin tin
- Paper liners
- Box grater or food processor
- Hand mixer
- Piping bag or offset spatula
How to Serve This Dish:
Set these on a cake stand and finish each one with a pinch of chopped nuts or a tiny candy egg. They pair well with coffee, black tea, or a glass of cold milk, and one cupcake is usually enough after a bigger meal.
Pro Tips for This Recipe:
- Grate the carrots finely: Long carrot shreds can poke through the crumb and make the texture uneven.
- Cool completely before frosting: Even a slightly warm cupcake will melt cream cheese frosting into a slide.
- Use room-temperature cream cheese and butter: Cold dairy leaves tiny lumps that never quite disappear.
- Stop mixing once the flour disappears: Overworked batter makes dense cupcakes.
Variations on This Dish:
- Pineapple-Carrot Cupcakes: Add 1/2 cup well-drained crushed pineapple for a softer, sweeter crumb.
- Walnut-Free Version: Leave out the nuts and top with toasted coconut instead.
- Orange-Spice Frosting: Add 1 teaspoon orange zest to the frosting for a brighter finish.
Common Mistakes to Avoid with This Dish:
- Overfilling the liners: The tops spill over and lose the neat cupcake shape.
- Using pre-shredded carrots: They stay dry and stubborn; freshly grated carrots work far better.
- Icing warm cupcakes: The frosting melts, slides, and never sets right.
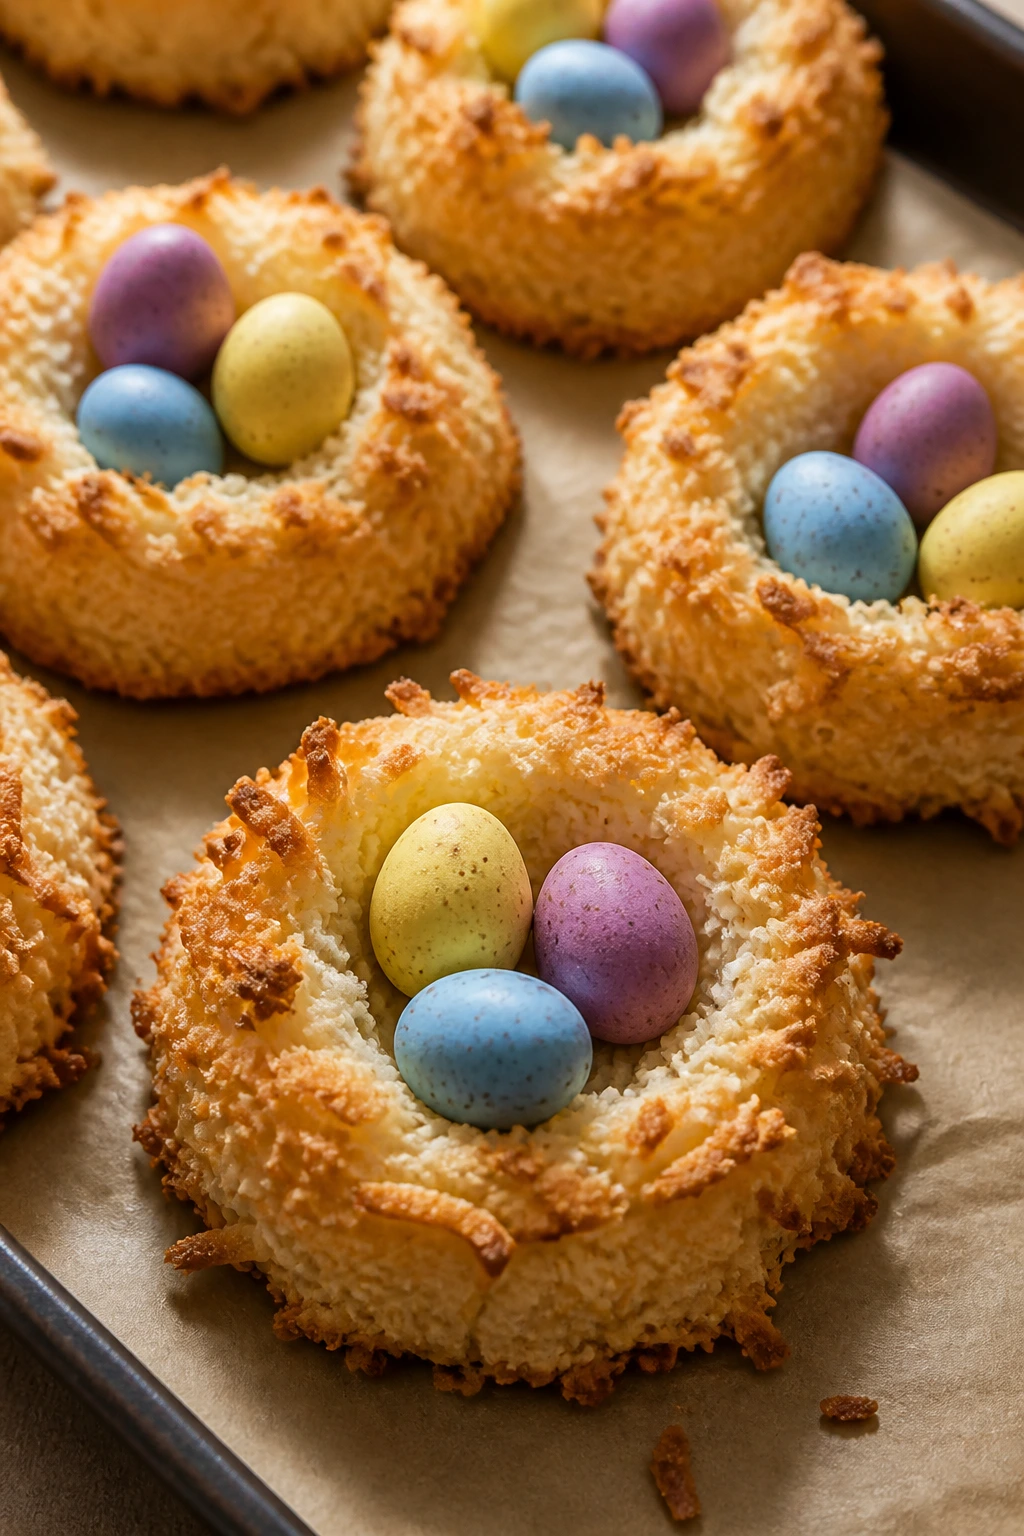
3. Coconut Macaroon Nests with Chocolate Eggs
If you want a dessert that looks like Easter without needing a single piping tip, this is the one. The coconut bakes into golden little nests with crisp edges, and the candy eggs sit in the center like they belong there. These are messy in a charming way. That is part of the appeal.
Why It Works:
Shredded coconut gives you structure and texture at the same time, which means the cookies hold their shape better than a lot of beginner meringues. Egg whites add lift, sugar keeps the centers chewy, and the nests bake at a low enough temperature that the coconut toasts instead of burning. Once they cool, the centers make a tiny bowl for mini chocolate eggs, and that final step does most of the Easter work for you. If you make them ahead, add the candy eggs at the last minute so the colors stay sharp.
Key Ingredients:
- 2 large egg whites
- 1/2 cup granulated sugar
- 1 teaspoon vanilla extract
- 1/4 teaspoon almond extract, optional
- 1/4 teaspoon fine salt
- 4 cups sweetened shredded coconut
- 2 tablespoons all-purpose flour
- 24 mini chocolate eggs
Quick Steps:
- Heat the oven and line the tray: Set the oven to 325°F (165°C) and line two baking sheets with parchment paper.
- Whisk the whites: Beat the egg whites, sugar, vanilla, almond extract if using, and salt until frothy and slightly thickened.
- Fold in the coconut: Stir in the coconut and flour until every strand looks coated.
- Shape the nests: Scoop heaping tablespoons onto the baking sheet, then press a small thumbprint in the center of each one.
- Bake: Bake for 18 to 22 minutes, until the edges are deep golden and the centers feel set.
- Cool and fill: Let the nests cool completely on the pan, then tuck 2 or 3 mini eggs into each center.
Equipment for This Recipe:
- Baking sheets
- Parchment paper
- Mixing bowl
- Small cookie scoop or tablespoon
- Spoon for shaping the centers
How to Serve This Dish:
Pile the nests on a cake plate with a little extra shredded coconut scattered underneath. They make a good small bite alongside coffee or tea, and they work especially well on a dessert table where you want something people can grab without a fork.
Pro Tips for This Recipe:
- Press the centers while the nests are still warm: The coconut holds the bowl shape better.
- Use sweetened coconut for the classic texture: Unsweetened coconut is drier and less tender here.
- Watch the last few minutes carefully: Coconut turns from golden to too dark fast.
- Add the candy eggs after cooling: Chocolate softens if you tuck it into the nests too soon.
Variations on This Dish:
- Chocolate Drizzle Nests: Drizzle cooled nests with melted white or dark chocolate before adding the eggs.
- Lemon Coconut Nests: Add 1 teaspoon lemon zest to the coconut mixture for a brighter flavor.
- Mini Nest Cups: Press the mixture into a mini muffin tin instead of free-shaping the nests.
Common Mistakes to Avoid with This Dish:
- Making the mounds too thin: They dry out instead of turning chewy in the center.
- Skipping parchment: Coconut can stick hard to an unlined tray.
- Filling warm nests with candy: The shells soften and the chocolate gets shiny in the wrong way.
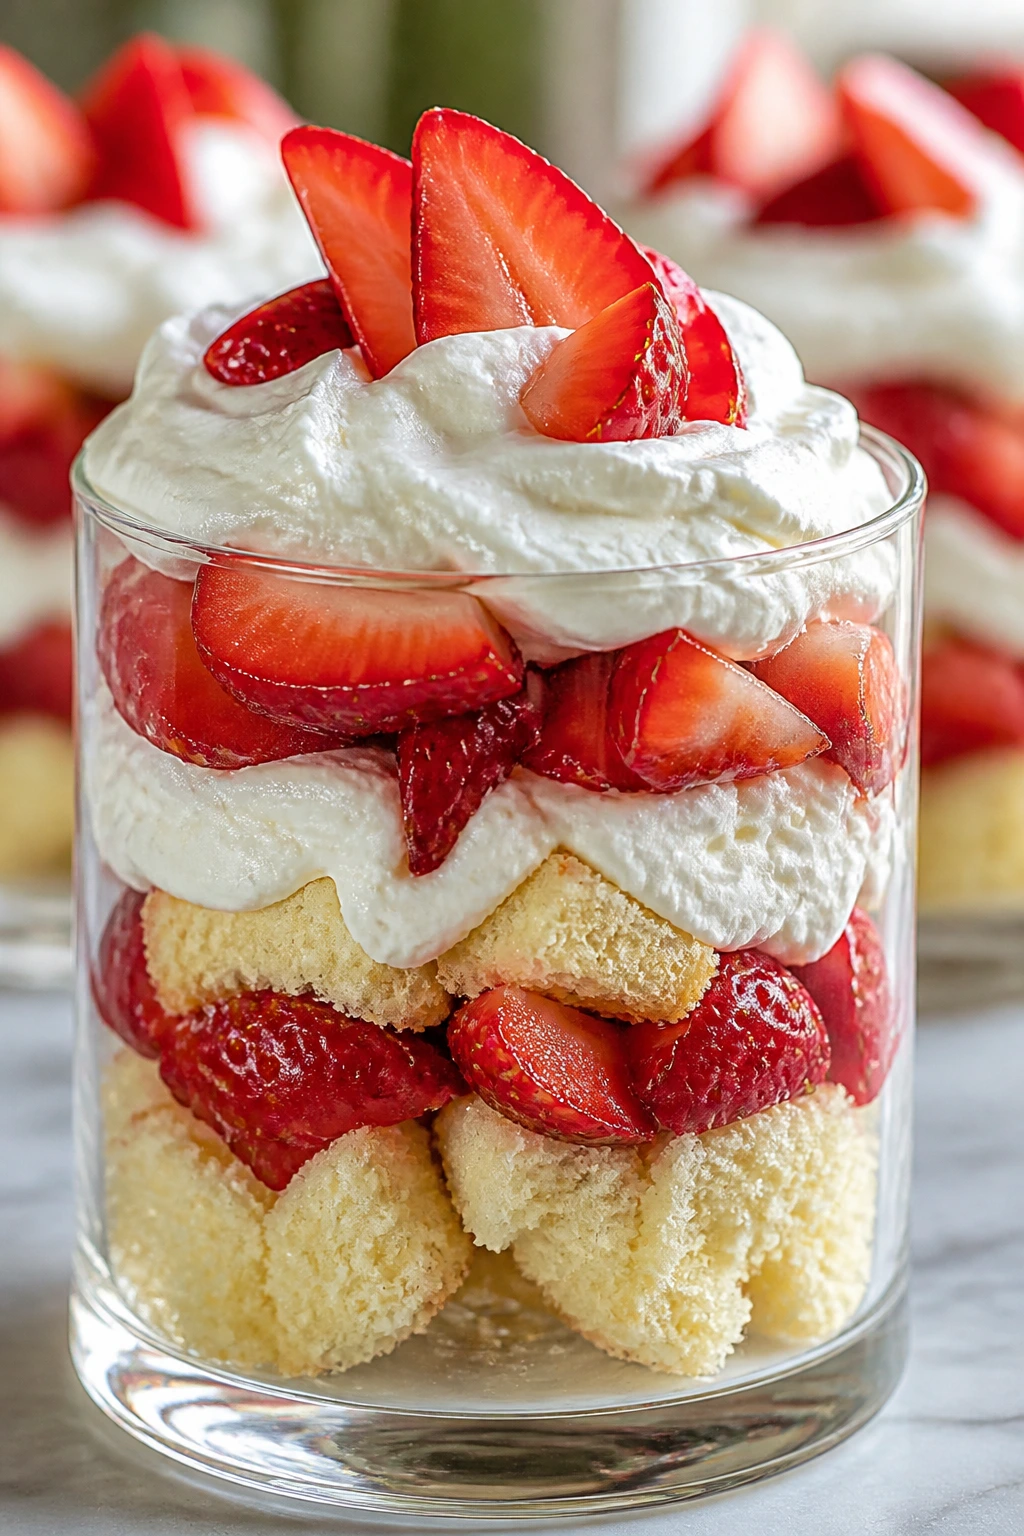
4. Strawberry Shortcake Trifles
Layered desserts sound fancy until you realize a trifle is mostly good timing and a clear glass. Cubes of pound cake soak up strawberry juice, whipped cream stays light, and the whole thing turns pink at the edges as it chills. I like this one because it looks abundant even when the method is almost laughably simple.
Why It Works:
A trifle gives you built-in forgiveness. If your cake cubes are uneven, nobody notices once they’re tucked between berries and cream. Strawberries tossed with sugar and lemon juice make their own syrup, which keeps the layers from tasting dry. A clear bowl or glass lets the color do the work, so you do not need a topping trick or a perfect swirl of cream. This is also one of the easier desserts to make ahead, though it should not sit so long that the cake turns mushy.
Key Ingredients:
- 1 prepared pound cake, about 12 ounces, cut into 1-inch cubes
- 1 1/2 pounds strawberries, hulled and sliced
- 2 tablespoons granulated sugar
- 1 teaspoon lemon juice
- 2 cups cold heavy cream
- 1/3 cup powdered sugar
- 1 teaspoon vanilla extract
Quick Steps:
- Macreate the strawberries: Toss the sliced strawberries with the granulated sugar and lemon juice. Let them sit for 15 to 20 minutes until glossy and juicy.
- Whip the cream: Beat the heavy cream, powdered sugar, and vanilla to soft peaks.
- Build the first layer: Spoon a layer of cake cubes into the bottom of a trifle bowl or 6 to 8 clear glasses.
- Add berries and cream: Top with strawberries and their syrup, then a layer of whipped cream.
- Repeat: Continue layering until the bowl is filled, finishing with cream and a few berries on top.
- Chill briefly: Refrigerate for 30 minutes if you want the layers to settle before serving.
Equipment for This Recipe:
- Trifle bowl or clear glasses
- Mixing bowls
- Hand mixer
- Sharp knife
- Rubber spatula
How to Serve This Dish:
Serve the trifle cold with a wide spoon so each portion gets cake, cream, and berries in one scoop. It fits well after brunch because it feels light on the fork even though it looks generous in the bowl.
Pro Tips for This Recipe:
- Use firm pound cake: A cake that is too soft can collapse once the berry juice hits it.
- Let the strawberries sit long enough to release syrup: That liquid is part of the dessert.
- Whip the cream only to soft peaks: Stiff cream can look grainy once layered.
- Assemble close to serving time: The texture stays better if the trifle does not sit overnight.
Variations on This Dish:
- Mixed Berry Trifle: Swap half the strawberries for blueberries or raspberries.
- Lemon Cream Trifle: Fold 2 tablespoons lemon curd into the whipped cream.
- Shortcut Trifle Cups: Build the layers in mason jars for easy serving.
Common Mistakes to Avoid with This Dish:
- Using berries that are too ripe: They collapse into juice and make the dessert soggy.
- Whipping cream too far: Grainy cream is hard to smooth back out.
- Assembling too early: The cake soaks up too much liquid and loses its texture.
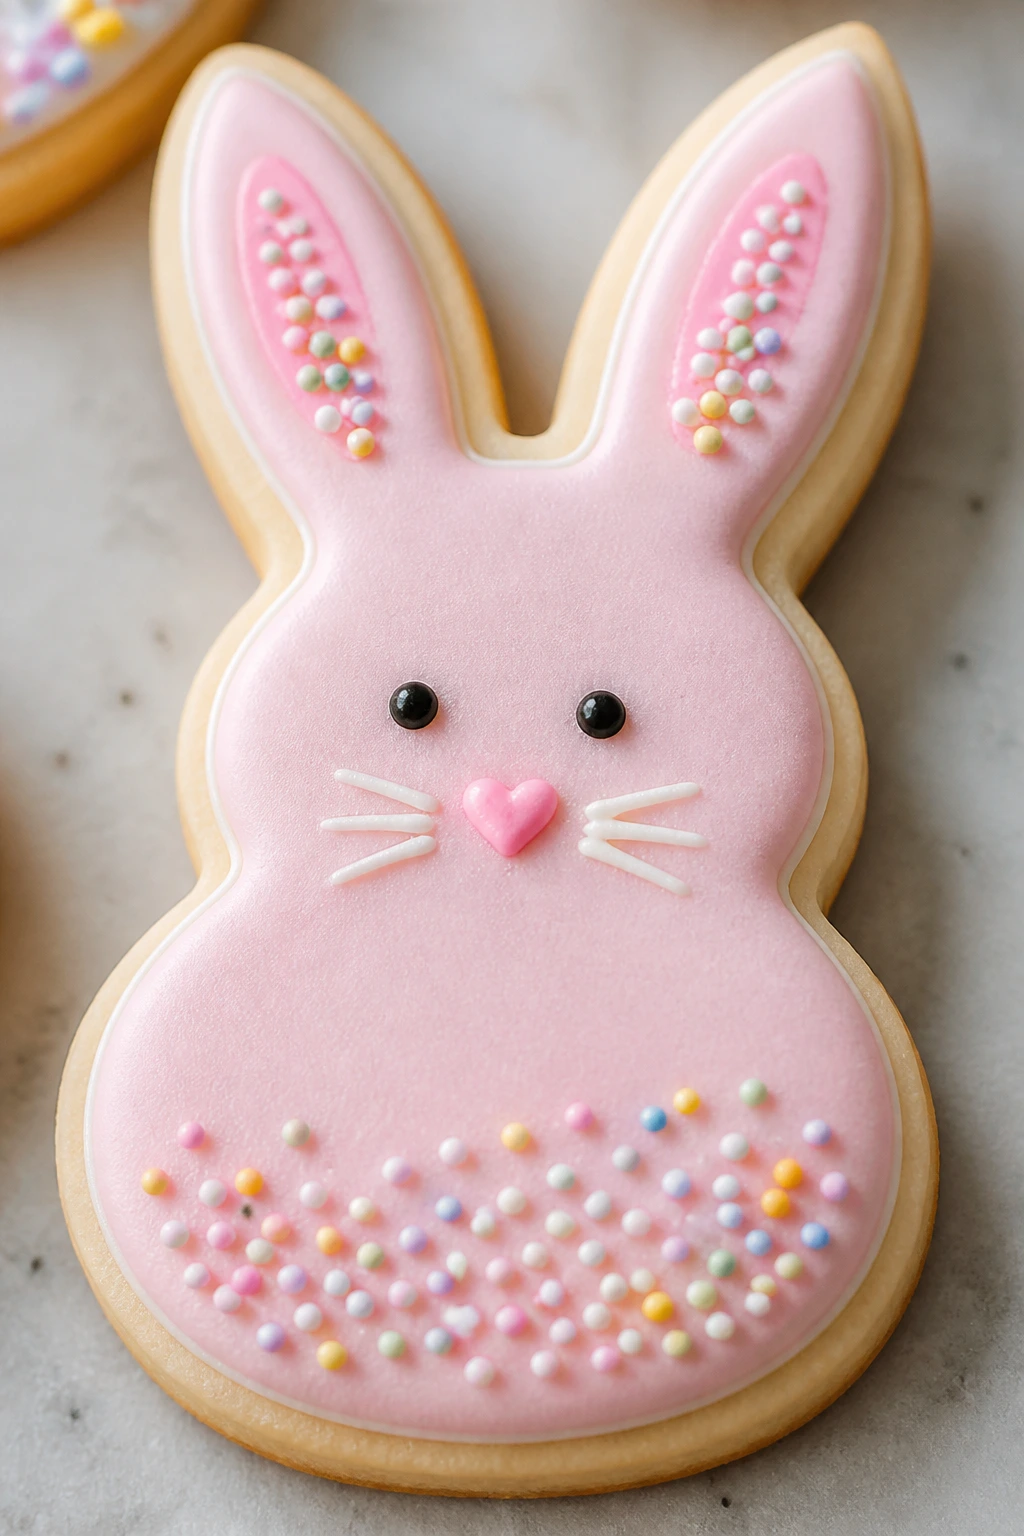
5. Bunny Sugar Cookies
Cutout cookies are where Easter baking gets playful. A simple vanilla dough rolls out cleanly, the bunny shapes hold their edges, and the icing gives you just enough room to decorate without needing fancy technique. You can keep them plain with sanding sugar or go full pastel, and both versions work.
Why It Works:
Sugar cookie dough has one job: stay workable enough to roll, then bake into a sturdy little surface for icing. Chilling the dough makes the shapes cleaner and keeps the cookies from spreading into blobby ovals. A small amount of almond extract adds a bakery-style note, but it should stay in the background; too much tastes like perfume. These cookies are also a nice project for kids or anyone who wants one dessert that doubles as decoration.
Key Ingredients:
- 2 3/4 cups all-purpose flour
- 1 teaspoon baking powder
- 1/2 teaspoon fine salt
- 1 cup unsalted butter, softened
- 1 cup granulated sugar
- 1 large egg
- 2 teaspoons vanilla extract
- 1/2 teaspoon almond extract, optional
For the Icing:
- 2 cups powdered sugar
- 2 to 3 tablespoons milk
- 1 teaspoon vanilla extract
- Pinch of salt
- Pastel sprinkles or sanding sugar
Quick Steps:
- Mix the dry ingredients: Whisk the flour, baking powder, and salt.
- Cream the butter and sugar: Beat them for 2 to 3 minutes until pale and fluffy, then add the egg, vanilla, and almond extract.
- Form the dough: Mix in the dry ingredients until a soft dough forms, then divide it in half and chill for 30 minutes.
- Roll and cut: Roll the dough to about 1/4 inch thick on a lightly floured surface and cut bunny shapes.
- Bake: Bake at 350°F (175°C) for 8 to 10 minutes, until the edges are just turning faintly golden.
- Cool and decorate: Let the cookies cool completely before icing and sprinkling.
Equipment for This Recipe:
- Baking sheets
- Parchment paper
- Bunny cookie cutter
- Rolling pin
- Mixing bowls
How to Serve This Dish:
Stack the cookies on a platter with a little cluster of pastel candies in the center. They work as a dessert and as table decoration, which is handy when you want something cheerful without baking a second thing.
Pro Tips for This Recipe:
- Chill the dough before cutting: Warm dough spreads and loses those bunny ears.
- Roll evenly: Cookies of different thickness bake at different speeds.
- Cool before icing: Even warm cookies turn glaze thin and runny.
- Use a small offset spatula or spoon for icing: You do not need a piping bag here.
Variations on This Dish:
- Lemon Bunny Cookies: Add 1 tablespoon lemon zest to the dough.
- Chocolate-Dipped Tails: Dip the bottom third of each cooled cookie in melted chocolate.
- Sparkle Sugar Finish: Skip the icing and brush with a little milk, then coat with sanding sugar.
Common Mistakes to Avoid with This Dish:
- Overflouring the dough: The cookies bake up dry and chalky.
- Skipping the chill time: The shapes blur in the oven.
- Decorating before they cool: The icing slides right off the cookie surface.
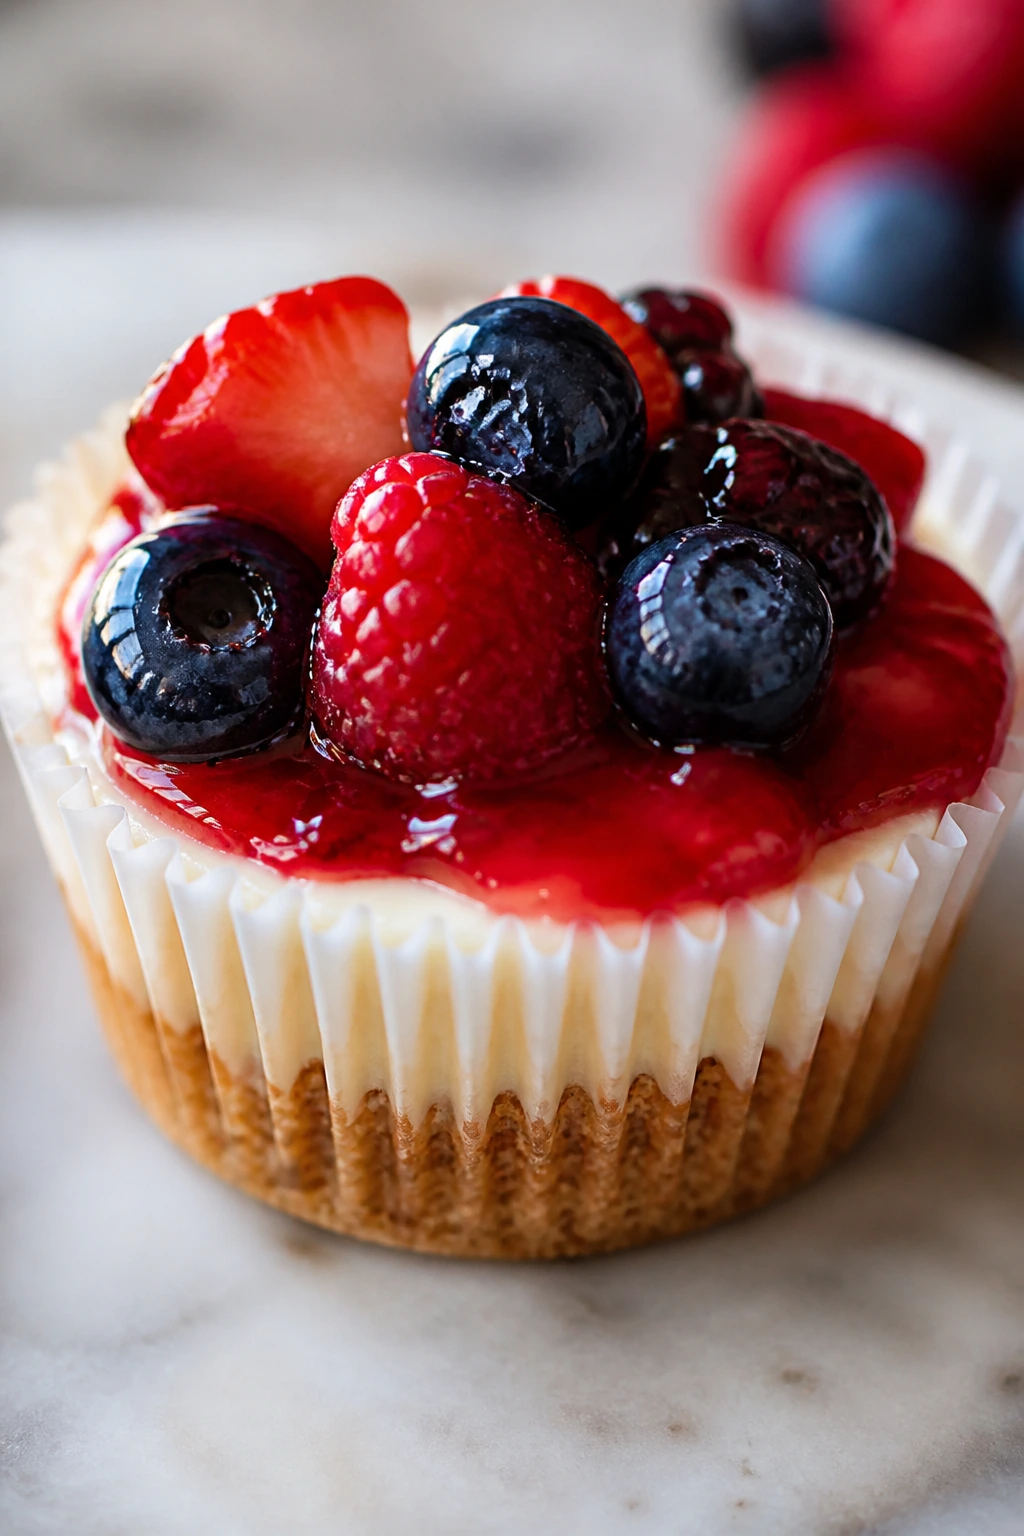
6. No-Bake Mini Cheesecakes with Berry Topping
These little cheesecakes are what I make when I want something cool, creamy, and not remotely stressful. The crust presses into muffin liners, the filling sets in the fridge, and the berry topping gives each cup a bright little crown. They’re tidy, portable, and easier than a full-size cheesecake by a mile.
Why It Works:
Mini cheesecakes set faster than one large cake, which makes them a solid choice for beginner bakers. The crumb crust stays crisp if you press it firmly and do not drown it in butter, and the filling gets its shape from whipped cream rather than a long bake. A little lemon juice helps the cream cheese taste lighter, not heavy. The berry topping can be as simple as sliced strawberries or a quick mixed berry spoon-over if you want a little shine.
Key Ingredients:
- 1 1/2 cups graham cracker crumbs
- 1/4 cup granulated sugar
- 6 tablespoons unsalted butter, melted
- 16 ounces cream cheese, softened
- 1/2 cup powdered sugar
- 1 teaspoon vanilla extract
- 1 tablespoon lemon juice
- 1 cup heavy cream, cold
- 1 1/2 cups mixed berries
- 2 tablespoons sugar
- 1 teaspoon lemon zest
Quick Steps:
- Make the crust: Stir the graham crumbs, sugar, and melted butter together, then divide among 12 lined muffin cups and press firmly.
- Whip the filling base: Beat the cream cheese, powdered sugar, vanilla, and lemon juice until smooth.
- Fold in the cream: Whip the cold heavy cream to soft peaks in a separate bowl, then fold it into the cream cheese mixture.
- Fill and chill: Spoon the filling over the crusts, smooth the tops, and refrigerate for at least 4 hours.
- Make the berry topping: Toss the berries with sugar and lemon zest. Let them sit until juicy.
- Finish and serve: Spoon berries over the chilled cheesecakes right before serving.
Equipment for This Recipe:
- 12-cup muffin tin
- Paper liners
- Hand mixer
- Mixing bowls
- Spoon or small scoop
How to Serve This Dish:
Unwrap each cheesecake and set it on a small dessert plate with a few extra berries around it. These are rich enough that one cupcake-sized cheesecake is plenty for most people.
Pro Tips for This Recipe:
- Line the pan well: Paper liners make removal clean and easy.
- Do not overbeat the filling: Too much air can make the texture loose.
- Chill long enough: Four hours is the minimum; overnight is even better.
- Add the berries at the end: They stay fresher and the tops do not weep.
Variations on This Dish:
- Lemon Cheesecake Cups: Add 2 teaspoons extra lemon zest to the filling.
- Chocolate Crumb Crust: Use chocolate cookie crumbs instead of graham crackers.
- Coconut Berry Cheesecakes: Add 1/2 teaspoon coconut extract to the filling.
Common Mistakes to Avoid with This Dish:
- Using cold cream cheese: It stays lumpy no matter how long you mix it.
- Skipping the chill time: The filling will not hold its shape.
- Adding wet berries too early: They soften the tops and make the presentation messy.
7. Easter Candy Blondies
Blondies are the dessert I recommend when someone wants something sweet but not delicate. The edges bake up chewy, the middle stays soft, and the candy eggs melt just enough to look glossy without disappearing into the dough. They cut neatly, which matters when you’re carrying dessert across a room.
Why It Works:
Brown sugar gives blondies that caramel smell and chewy bite, and melted butter keeps the batter simple. This recipe needs no mixer if you do not want one. The trick is to pull the pan when the center still looks a little underdone; blondies finish setting as they cool. Easter candy goes in two ways here: folded through the batter for pockets of color, then pressed on top so the finished bars look festive from the first glance.
Key Ingredients:
- 1/2 cup unsalted butter, melted
- 1 cup packed light brown sugar
- 1 large egg
- 1 large egg yolk
- 2 teaspoons vanilla extract
- 1 1/2 cups all-purpose flour
- 1/2 teaspoon baking powder
- 1/2 teaspoon fine salt
- 3/4 cup chopped mini chocolate eggs or candy-coated chocolates
- 1/2 cup white chocolate chips
Quick Steps:
- Prep the pan: Heat the oven to 350°F (175°C) and line an 8×8-inch pan with parchment paper.
- Mix the wet ingredients: Stir the melted butter and brown sugar together until glossy. Whisk in the egg, egg yolk, and vanilla.
- Add the dry ingredients: Fold in the flour, baking powder, and salt until just combined.
- Fold in the candy: Stir in most of the chopped candy eggs and white chocolate chips, then spread the batter in the pan.
- Top and bake: Press the remaining candy on top and bake for 22 to 26 minutes, until the edges are set and the center still looks slightly soft.
- Cool before cutting: Let the pan cool completely before lifting out the blondies and slicing.
Equipment for This Recipe:
- 8×8-inch baking pan
- Parchment paper
- Mixing bowl
- Spatula
- Sharp knife
How to Serve This Dish:
Cut the blondies into small squares and pile them on a plate with a few whole candy eggs around the edges. They are rich enough that small portions work better than big slabs, especially after a meal with a lot of food already on the table.
Pro Tips for This Recipe:
- Line the pan with parchment: It makes the bars easy to lift and slice.
- Do not bake until the center is firm: Blondies turn dry fast if you wait for a fully set middle.
- Reserve some candy for the top: It keeps the Easter look visible after baking.
- Cool all the way before cutting: Warm blondies smear instead of slicing cleanly.
Variations on This Dish:
- Chocolate Chip Blondies: Swap the candy eggs for extra chocolate chips.
- Peanut Butter Easter Blondies: Fold in 1/2 cup peanut butter chips if you like the sweet-salty mix.
- Salted Caramel Blondies: Drizzle cooled bars with a little caramel sauce and flaky salt.
Common Mistakes to Avoid with This Dish:
- Overbaking: The bars turn dry and crumbly instead of chewy.
- Skipping the egg yolk: It helps keep the texture soft.
- Cutting while warm: The bars lose their clean edges.
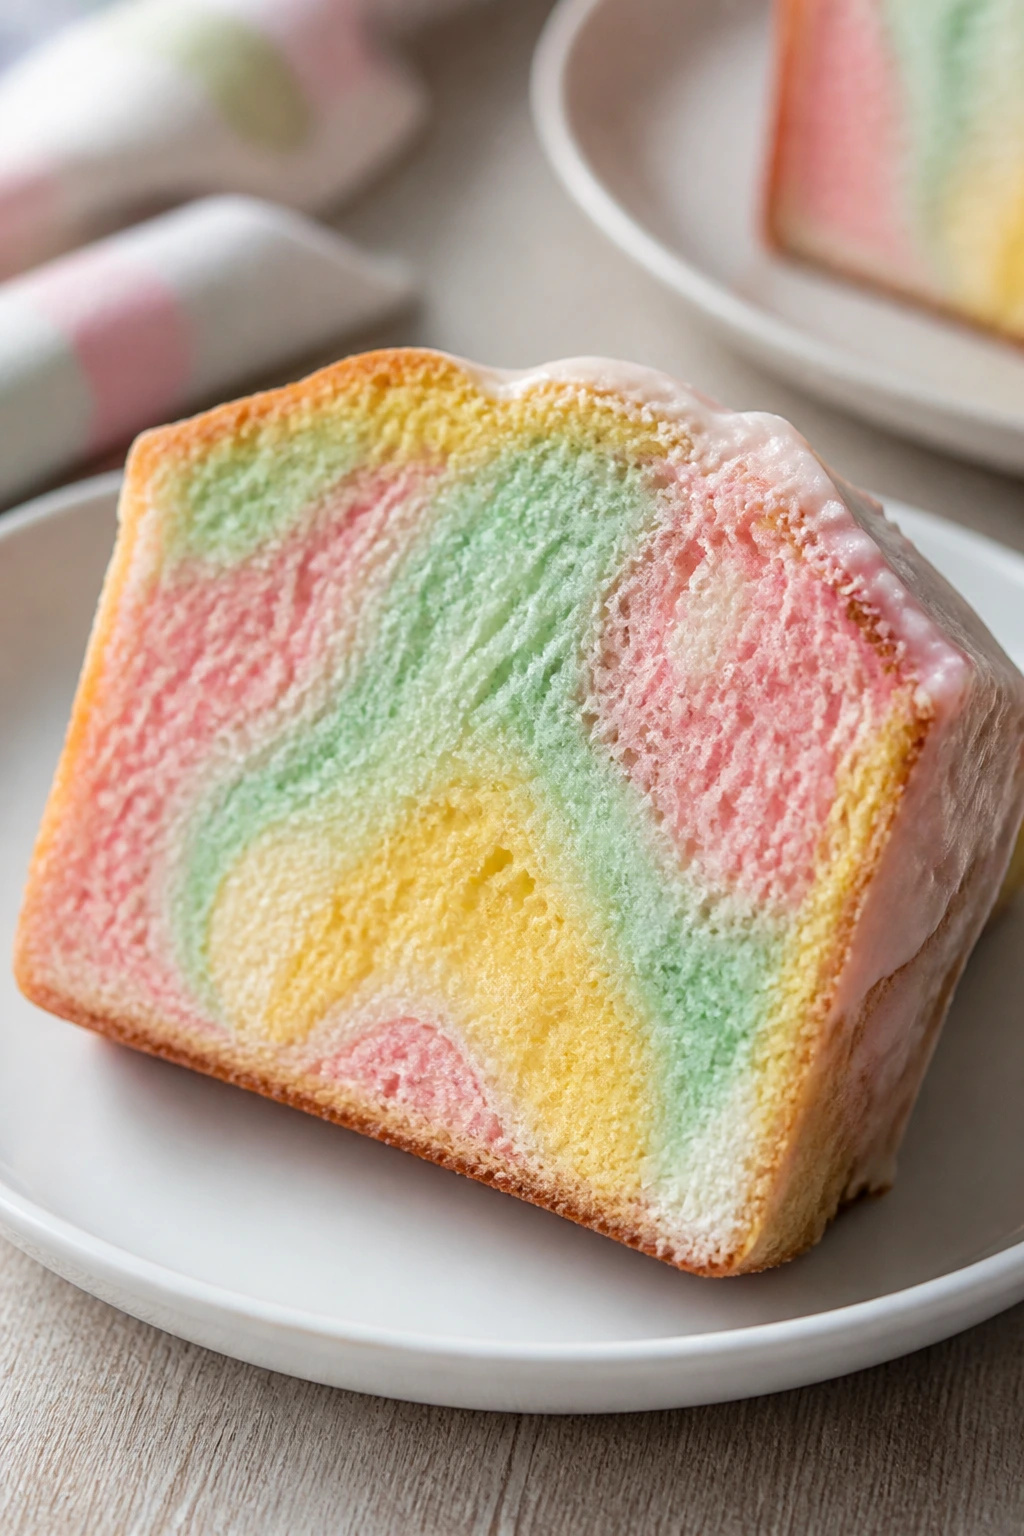
8. Pastel Marble Pound Cake
This is the sort of cake that looks far more technical than it is. The batter starts in one bowl, gets divided into a few pastel shades, and bakes into a soft loaf with streaks of pink, yellow, or mint running through it. The slices are cheerful without being loud.
Why It Works:
Pound cake is sturdy, which makes it ideal if you want a dessert that can travel or sit on the counter for a while. Butter gives it a tight, fine crumb, and the milk keeps it from drying out. The marble effect only needs a few drops of gel color and a light hand with a knife. Too much swirling ruins the pattern and turns it muddy, so resist the urge to keep dragging the blade through the batter.
Key Ingredients:
- 1 cup unsalted butter, softened
- 1 3/4 cups granulated sugar
- 4 large eggs, room temperature
- 2 1/2 cups all-purpose flour
- 1 teaspoon baking powder
- 1/2 teaspoon fine salt
- 1 cup whole milk
- 1 teaspoon vanilla extract
- Pink, yellow, or mint gel food coloring, optional
For the Glaze:
- 1 cup powdered sugar
- 2 to 3 tablespoons milk or lemon juice
Quick Steps:
- Preheat and prepare the pan: Heat the oven to 325°F (165°C). Grease a 9×5-inch loaf pan and line it with parchment.
- Cream the butter and sugar: Beat them for 3 to 4 minutes until pale and fluffy.
- Add eggs and vanilla: Beat in the eggs one at a time, then stir in the vanilla.
- Mix the batter: Add the flour, baking powder, salt, and milk in alternating additions, mixing on low until just combined.
- Color and marble: Divide the batter into 3 bowls, tint each one lightly, and spoon the batters into the pan in patches. Swirl once or twice with a knife.
- Bake and glaze: Bake for 60 to 70 minutes, until a tester comes out clean. Cool before drizzling with glaze.
Equipment for This Recipe:
- 9×5-inch loaf pan
- Parchment paper
- Hand mixer
- Small bowls for coloring
- Butter knife for marbling
How to Serve This Dish:
Slice the cake thin and fan the pieces on a plate so the pastel streaks show. A light glaze is enough; you do not need heavy frosting on this one. It works with tea, coffee, or a bowl of berries on the side.
Pro Tips for This Recipe:
- Use gel food coloring, not watery liquid dye: The batter stays thick enough to marble properly.
- Swirl sparingly: One or two passes through the batter are enough.
- Cool before slicing: Pound cake needs time to set or it can crumble.
- Line the loaf pan: It makes the cake easier to lift out cleanly.
Variations on This Dish:
- Lemon Marble Cake: Flavor the batter with lemon zest and use lemon juice in the glaze.
- Vanilla-Only Loaf: Leave the batter plain and top with pastel sprinkles instead.
- Almond Marble Cake: Add 1/2 teaspoon almond extract to the batter for a softer bakery flavor.
Common Mistakes to Avoid with This Dish:
- Over-swirling the batter: The colors blur into one shade.
- Using cold eggs: They do not mix as smoothly into the butter.
- Slicing too soon: The crumb tears before it has time to settle.
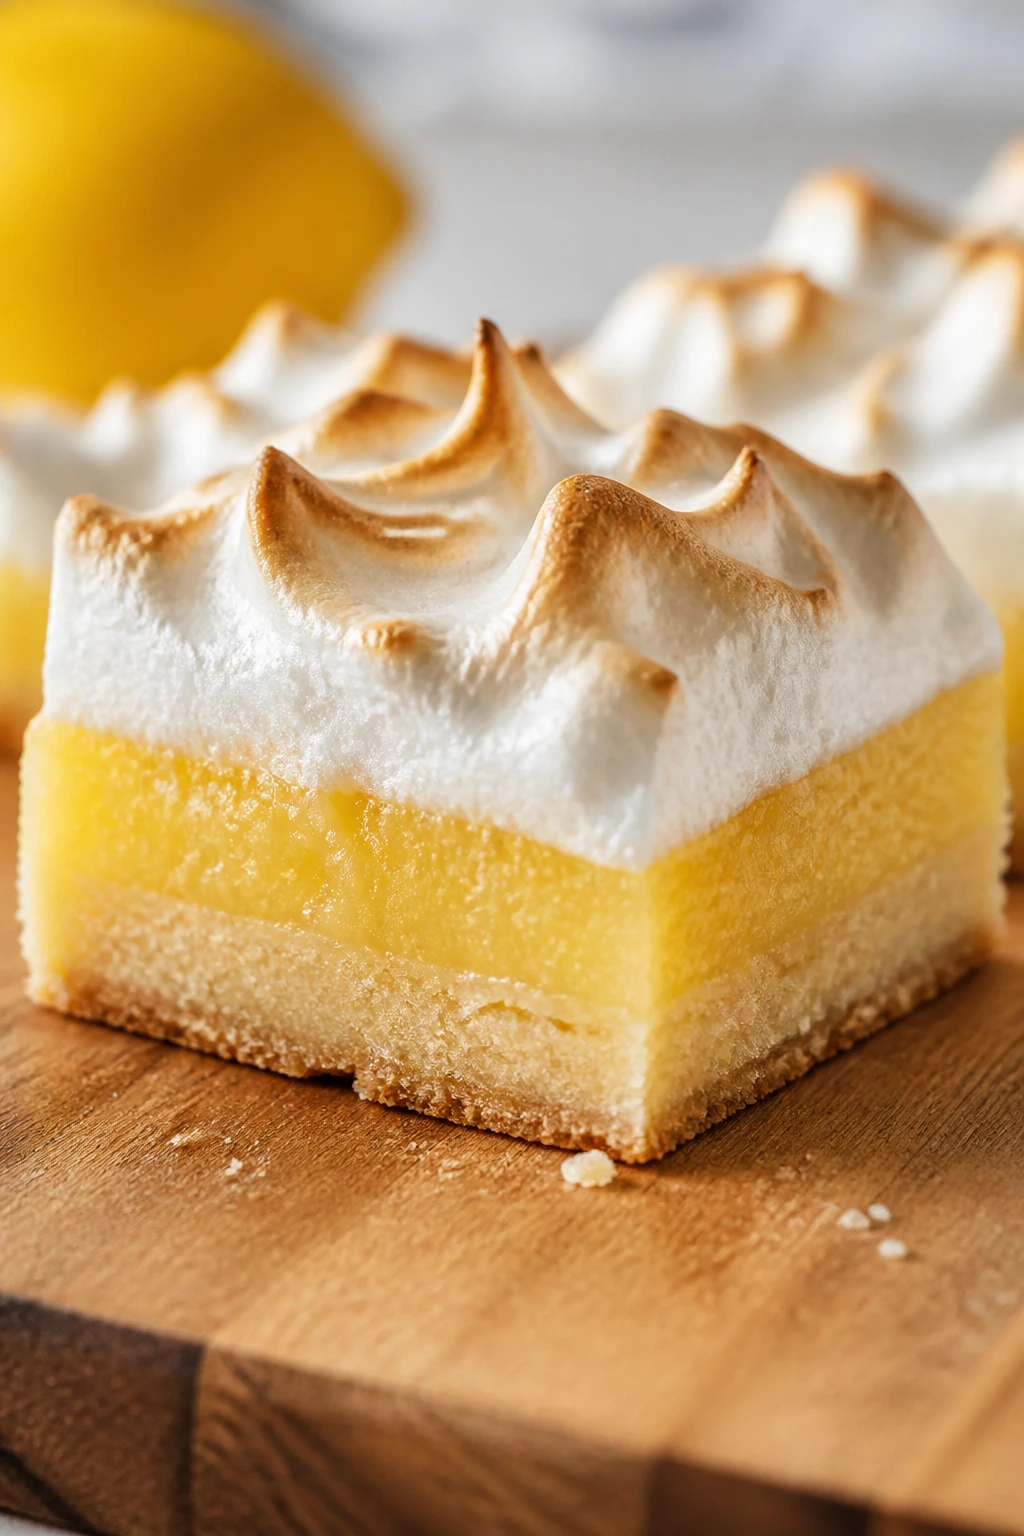
9. Lemon Meringue Bars
These bars bring the sharp, sunny lemon flavor people expect from spring desserts, but in a form you can cut into neat squares. The crust is buttery and crumbly, the filling is tart, and the meringue goes fluffy and lightly browned on top if you handle it with care. This is the most technical recipe in the bunch, but the steps are still manageable.
Why It Works:
A shortbread crust gives you a stable base under a filling that can otherwise feel soft and slippery. Lemon juice and zest keep the flavor bright, while the meringue turns the whole pan into a pie-like dessert you can serve in squares. The key is timing: the meringue should go on while the filling is still hot enough to help it adhere. If the filling cools first, the meringue can shrink and weep at the edges.
Key Ingredients:
- 1 1/2 cups all-purpose flour
- 1/4 cup powdered sugar
- 1/4 teaspoon fine salt
- 3/4 cup cold unsalted butter, cubed
- 4 large eggs, separated
- 1 1/2 cups granulated sugar
- 1/3 cup all-purpose flour
- 1/2 cup fresh lemon juice
- 1 tablespoon lemon zest
- 1/2 teaspoon cream of tartar
- 1/2 cup sugar for the meringue
- Pinch of salt
Quick Steps:
- Bake the crust: Heat the oven to 350°F (175°C). Mix the crust ingredients, press them into a parchment-lined 9×9-inch pan, and bake for 18 minutes until lightly golden.
- Make the filling: Whisk the egg yolks, granulated sugar, flour, lemon juice, and lemon zest until smooth.
- Cook the filling: Pour the lemon mixture over the hot crust and bake for 18 to 20 minutes, until the filling is just set and slightly wobbly in the center.
- Whip the meringue: Beat the egg whites, cream of tartar, and salt to soft peaks. Add the sugar gradually and beat to glossy, stiff peaks.
- Top and finish: Spread the meringue over the hot filling, touching the edges so it seals the surface. Return to the oven for 8 to 10 minutes, until the peaks are lightly golden.
- Cool completely: Chill before slicing into bars with a sharp knife wiped clean between cuts.
Equipment for This Recipe:
- 9×9-inch baking pan
- Parchment paper
- Mixing bowls
- Hand mixer
- Whisk
- Sharp knife
How to Serve This Dish:
Serve the bars chilled or cool, with the meringue top still intact and the lemon layer neatly visible in the cut edge. They taste sharp and sweet in equal measure, so small squares are enough.
Pro Tips for This Recipe:
- Seal the meringue to the crust edges: That helps prevent shrinking.
- Add the meringue while the filling is hot: It bonds better that way.
- Use room-temperature egg whites: They whip to more volume.
- Chill before cutting: The bars set much cleaner after refrigeration.
Variations on This Dish:
- Orange Meringue Bars: Swap lemon juice and zest for orange juice and zest.
- Coconut-Topped Bars: Sprinkle toasted coconut over the meringue after it browns.
- Berry-Lemon Bars: Spoon a thin layer of raspberry jam over the crust before adding the filling.
Common Mistakes to Avoid with This Dish:
- Underbaking the crust: A soft base makes the bars hard to slice.
- Letting the filling cool before adding meringue: The topping can slide.
- Using a wet knife: It drags the meringue instead of slicing through it.
10. Peeps Rice Krispie Nests
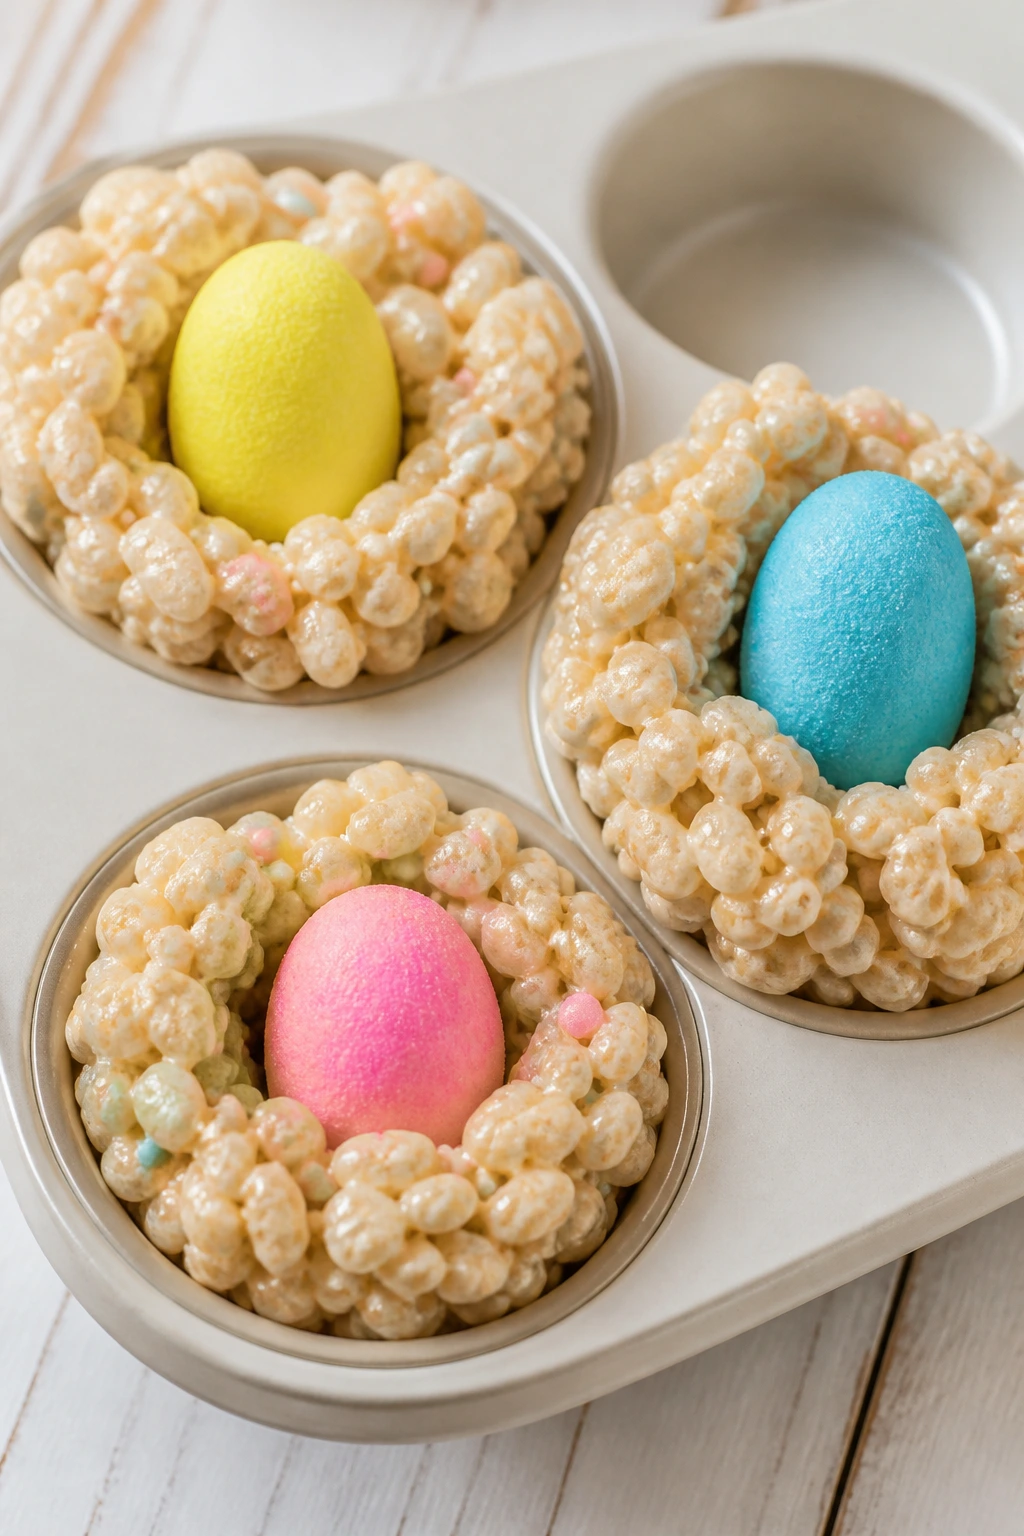
This is the least fussy recipe on the list, and sometimes that is exactly the right mood. Melted marshmallow binds the cereal, the nests are shaped in a muffin tin, and the Peeps or candy eggs turn them into a dessert that looks more elaborate than it is. You can finish a batch in under half an hour.
Why It Works:
Rice Krispie treats are nearly impossible to mess up if you keep the marshmallow mixture from getting too hot. A little salt keeps the sweetness from hitting flat, and the muffin tin does the shape work for you. Pressing a dip into the center while the mixture is still warm creates the nest effect with no carving or trimming later. These are especially useful if you want a kid-friendly dessert that people can pick up and eat with their hands.
Key Ingredients:
- 4 tablespoons unsalted butter
- 1 package mini marshmallows, about 10 ounces
- 6 cups crisp rice cereal
- 1/2 teaspoon vanilla extract
- 1/4 teaspoon fine salt
- 1/2 cup shredded coconut or green sanding sugar
- 15 to 18 Peeps or candy eggs
Quick Steps:
- Prep the pan: Grease a 12-cup muffin tin lightly with butter or nonstick spray.
- Melt the base: Melt the butter in a large pot over low heat, then add the marshmallows and stir until smooth.
- Add flavor and cereal: Stir in the vanilla, salt, and rice cereal until everything is coated.
- Shape the nests: Divide the mixture among the muffin cups. Butter your fingers and press a small well in the center of each cup.
- Decorate: Sprinkle the centers with coconut or green sanding sugar.
- Fill and serve: Once the nests cool, pop them out and add Peeps or candy eggs to the center.
Equipment for This Recipe:
- Large pot
- Wooden spoon or spatula
- Muffin tin
- Buttered fingers or the back of a spoon
- Measuring cups
How to Serve This Dish:
Arrange the nests in little clusters so they look like they rolled straight in from the Easter table. They’re sweet enough to stand alone, but they also work beside fruit or a cup of coffee if you want something light after dinner.
Pro Tips for This Recipe:
- Keep the heat low: Marshmallows scorch if you rush them.
- Butter your hands before shaping: The mixture stops sticking so badly.
- Work quickly: The cereal sets faster than you think.
- Add candy after cooling if it is chocolate-based: The pieces stay tidy.
Variations on This Dish:
- Chocolate Nest Version: Stir in 1/4 cup cocoa powder with the marshmallows for a darker treat.
- Peanut Butter Nests: Add 1/2 cup peanut butter to the melted marshmallow base.
- Pretzel Nest: Replace 1 cup of the cereal with crushed pretzels for a salty crunch.
Common Mistakes to Avoid with This Dish:
- Using high heat: The marshmallows turn tough and sticky.
- Pressing too hard into the cups: The nests become dense instead of light.
- Waiting too long to shape them: The mixture firms up and stops cooperating.
11. Hot Cross Bun Bread Pudding
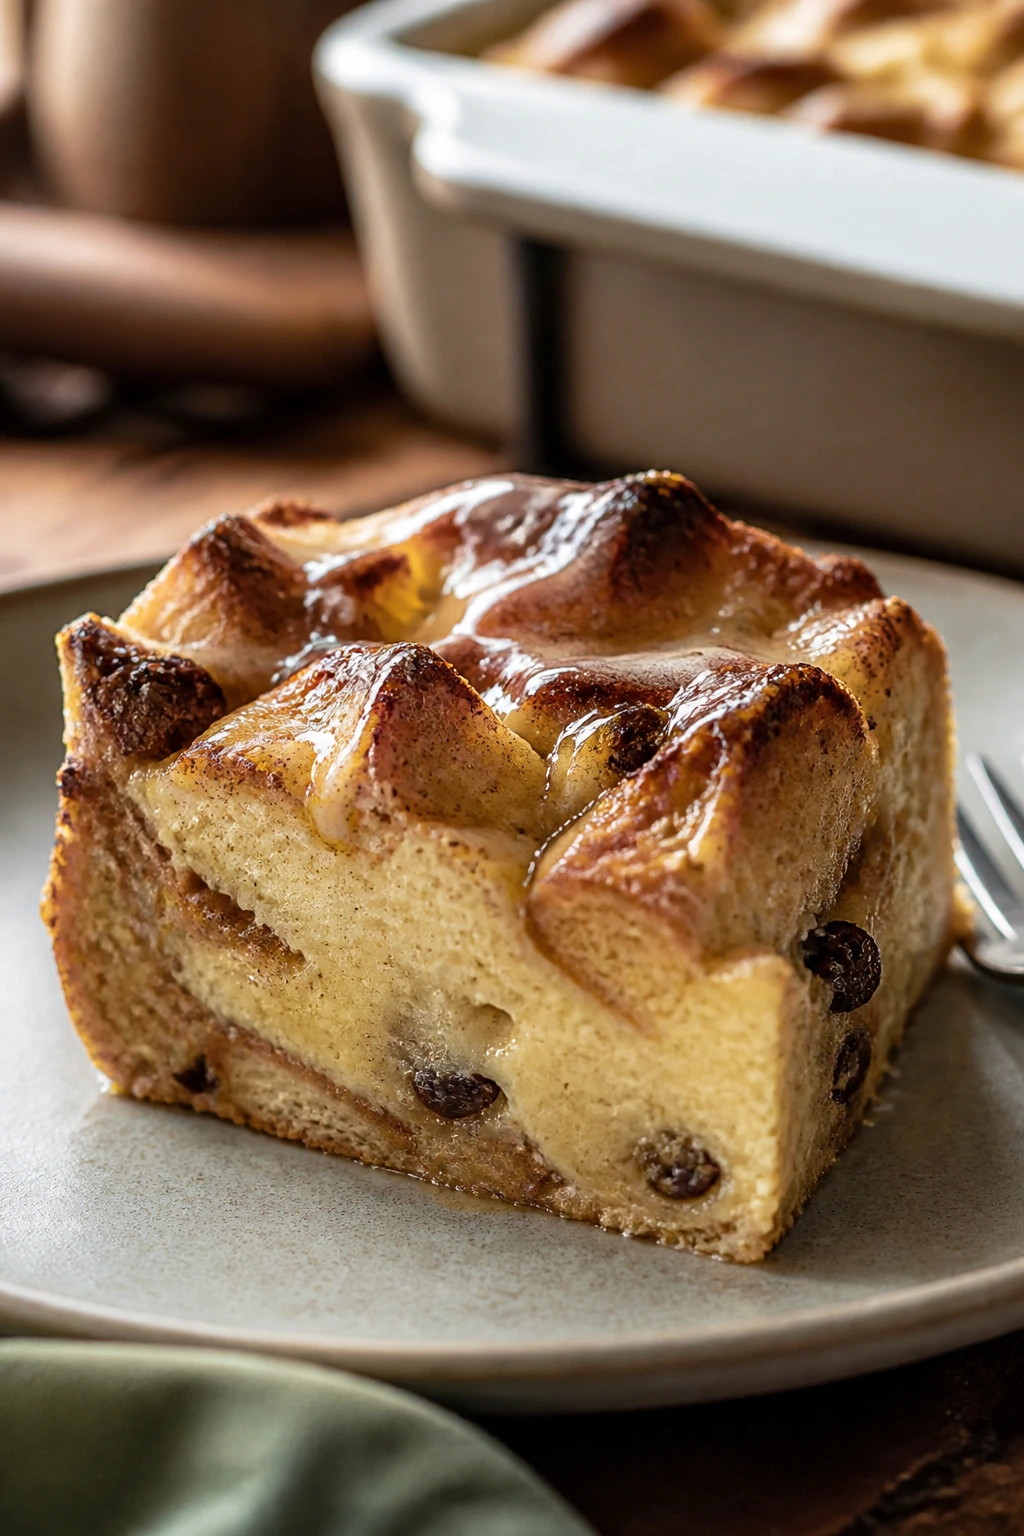
This dessert tastes like someone turned a bakery breakfast into a warm custard bake. The buns soak up milk and eggs, the spices bloom in the oven, and the top gets a little crisp while the center stays soft. It is a smart way to use day-old hot cross buns without pretending you bought them for that purpose.
Why It Works:
Bread pudding is built for slightly stale bread, which means this dessert gives you a real advantage if your buns are a little dry. The custard turns the crumb rich and soft, while the spices already in the buns keep the flavor linked to Easter without extra work. A light glaze on top is optional, but I like it because it sharpens the edges of the sweetness. You want the custard to soak in for at least 10 minutes before baking so the center is not dry and the top is not just floating on liquid.
Key Ingredients:
- 6 hot cross buns, sliced into 1-inch pieces
- 2 tablespoons unsalted butter, softened
- 3 large eggs
- 2 cups whole milk
- 1 cup heavy cream
- 1/2 cup granulated sugar
- 1 teaspoon vanilla extract
- 1 teaspoon ground cinnamon
- 1/4 teaspoon ground nutmeg
- Pinch of fine salt
For the Glaze, Optional:
- 1 cup powdered sugar
- 2 to 3 tablespoons milk or orange juice
Quick Steps:
- Prepare the dish: Heat the oven to 350°F (175°C) and grease a 9×9-inch baking dish with butter.
- Arrange the buns: Spread the sliced buns in the dish, tucking pieces in snugly.
- Whisk the custard: Beat the eggs, milk, cream, sugar, vanilla, cinnamon, nutmeg, and salt until smooth.
- Soak the bread: Pour the custard over the buns and press lightly with a spoon so every piece absorbs some liquid. Let it sit for 10 to 15 minutes.
- Bake: Bake for 35 to 40 minutes, until the top is golden and the center no longer sloshes when you shake the pan.
- Glaze and serve: Stir the glaze ingredients together and drizzle over the warm pudding if you want extra sweetness.
Equipment for This Recipe:
- 9×9-inch baking dish
- Mixing bowl
- Whisk
- Sharp knife
- Measuring cups
How to Serve This Dish:
Spoon it into bowls while it is still warm and a little custardy in the middle. A scoop of vanilla ice cream or a spoon of softly whipped cream is enough to make it feel like dessert instead of breakfast leftovers in disguise.
Pro Tips for This Recipe:
- Use buns that are at least a day old: They soak better than fresh bread.
- Let the custard sit in the bread before baking: Dry corners are the result of skipping this step.
- Do not overbake: Bread pudding should stay soft, not dry and rubbery.
- Add the glaze only after baking: It keeps the top from getting sticky before it’s done.
Variations on This Dish:
- Chocolate Chip Bread Pudding: Add 1/2 cup chocolate chips between the bread layers.
- Orange-Spice Version: Swap the vanilla glaze for orange juice in the glaze.
- Raisin-Heavy Version: Add 1/3 cup extra raisins if your buns are light on fruit.
Common Mistakes to Avoid with This Dish:
- Using too much custard for the dish size: The bread floats and the center stays watery.
- Skipping the soak time: The middle bakes up dry.
- Serving it straight from the oven: A 10-minute rest helps the custard settle.
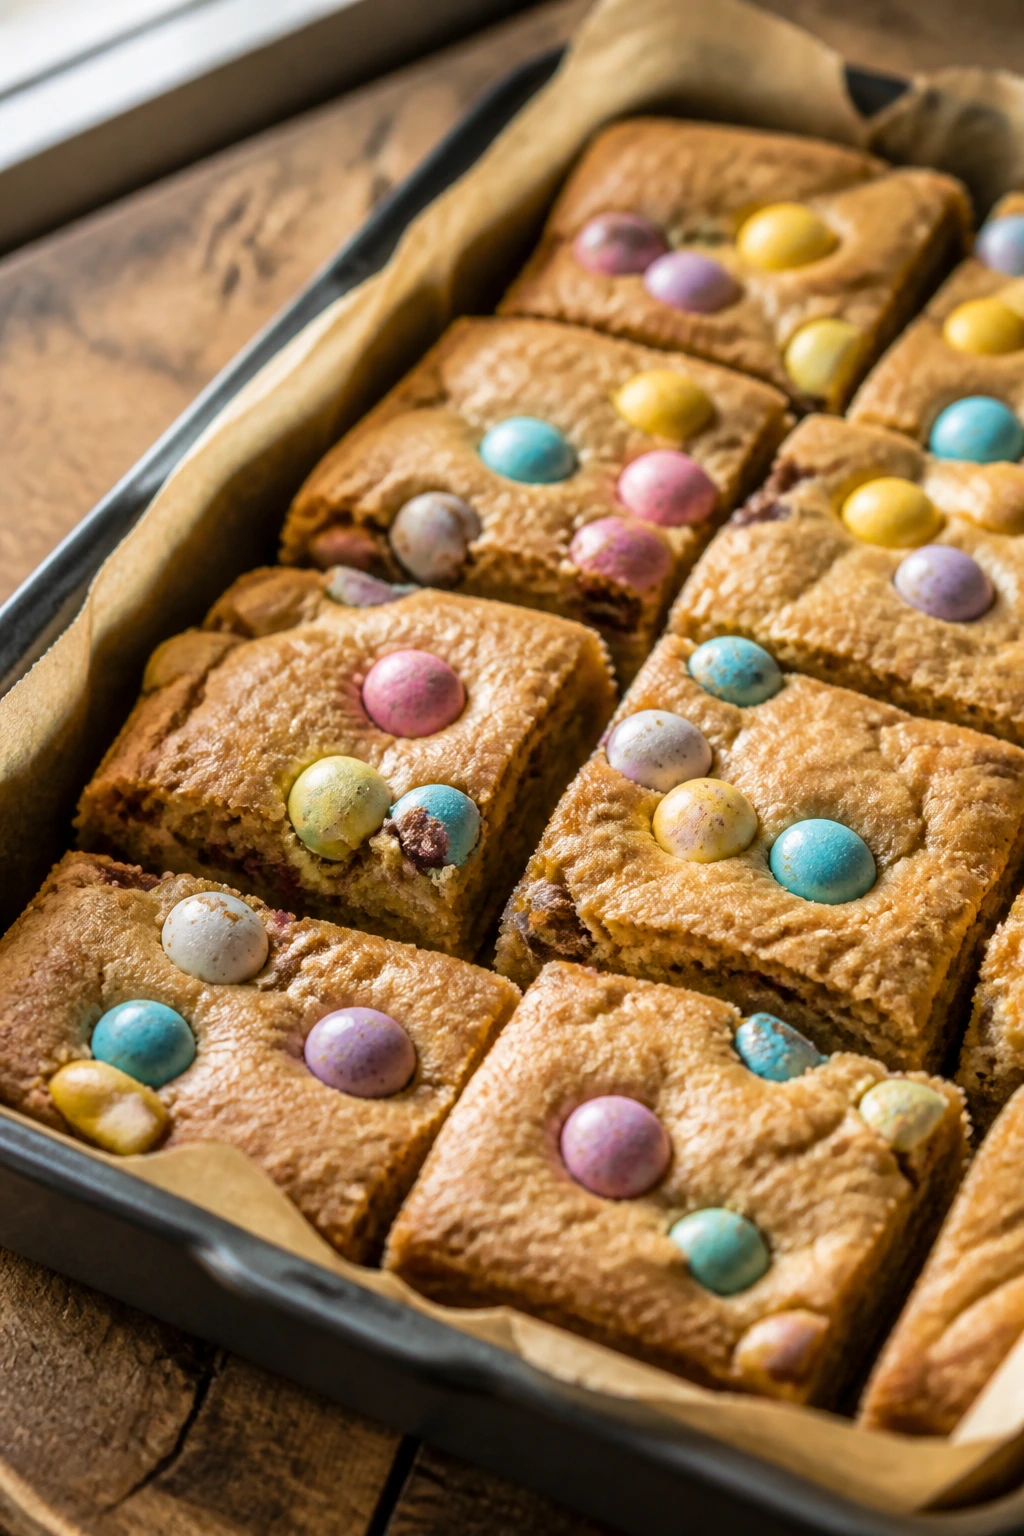
12. Chocolate Chip Cookie Bars with Easter M&M’s
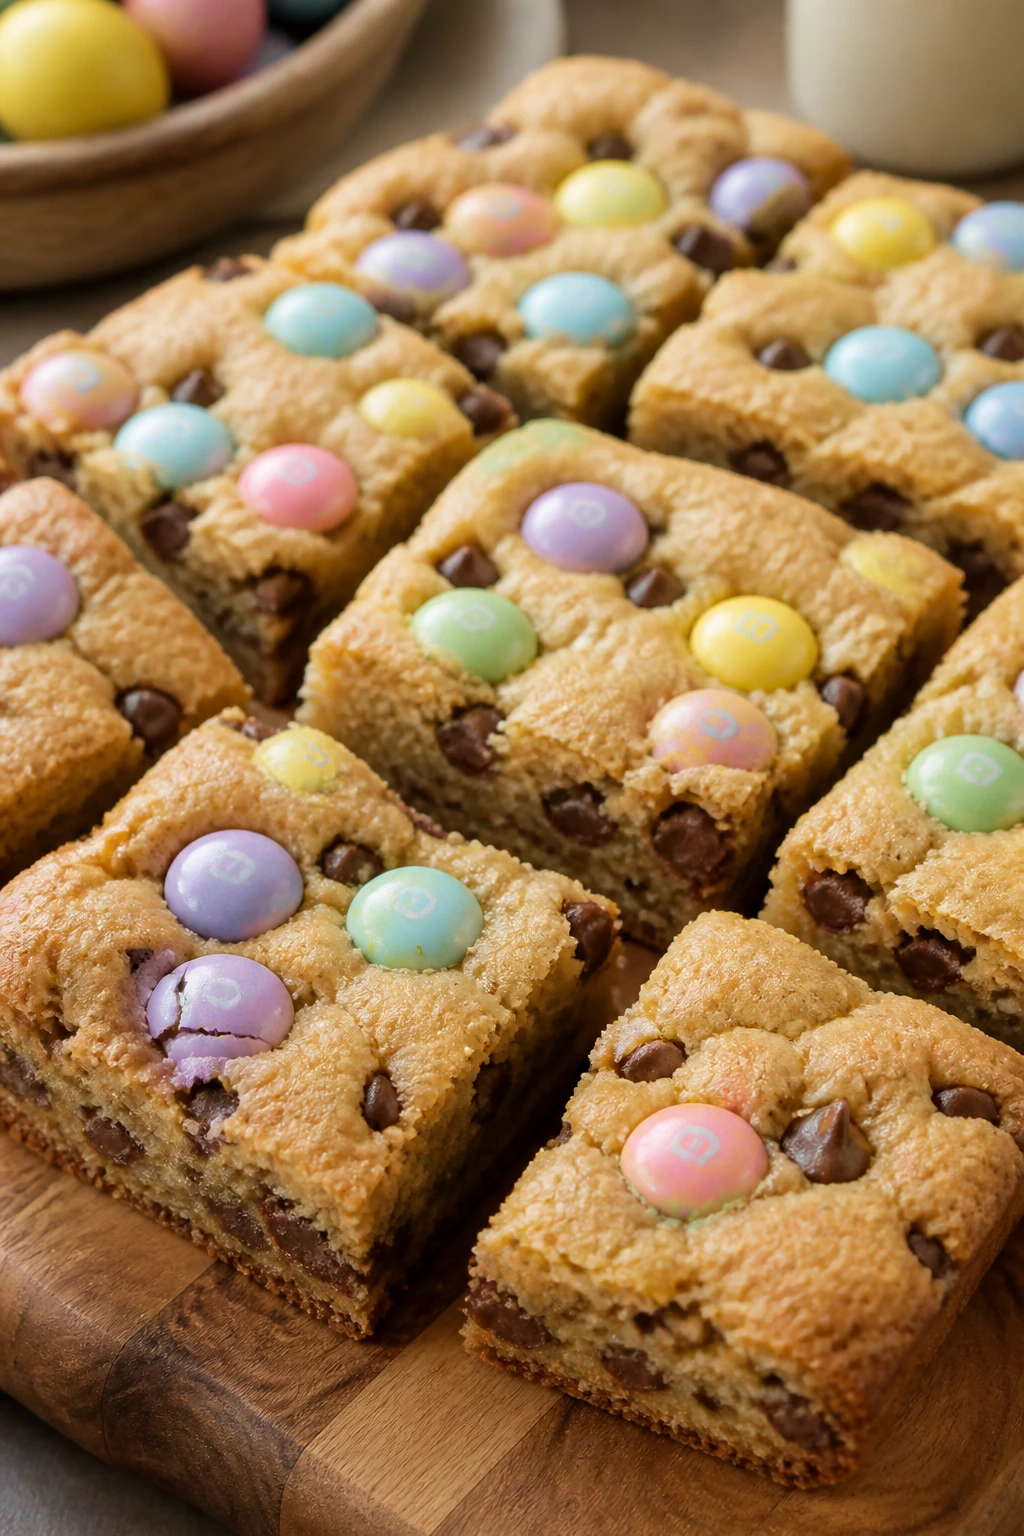
Cookie bars are the sensible answer to cookie cutouts when you want the flavor without the rolling. The dough spreads into one pan, the edges bake chewy, and the pastel candies on top make the whole slab feel Easter-ready. No chill time. No cutter. No pile of scraps.
Why It Works:
A bar cookie keeps the dough thick, which means you get soft centers and browned edges in one pan. Brown sugar deepens the flavor, while the extra chocolate chips help the bars feel rich even if the candy shell on the Easter M&M’s adds crunch. The trick is to underbake slightly and let the pan finish setting on the counter. If you bake until the middle looks fully dry, the bars will be firmer than you want.
Key Ingredients:
- 1 cup unsalted butter, softened
- 3/4 cup granulated sugar
- 1 cup packed light brown sugar
- 2 large eggs
- 2 teaspoons vanilla extract
- 3 cups all-purpose flour
- 1 teaspoon baking soda
- 1/2 teaspoon fine salt
- 1 cup chocolate chips
- 1 1/2 cups Easter M&M’s or candy-coated chocolate eggs
Quick Steps:
- Preheat and line the pan: Heat the oven to 350°F (175°C) and line a 9×13-inch pan with parchment.
- Cream the butter and sugars: Beat until light and fluffy, then add the eggs and vanilla.
- Mix the dry ingredients: Stir in the flour, baking soda, and salt until the dough comes together.
- Add the chocolate and candy: Fold in the chocolate chips and most of the Easter M&M’s.
- Press and bake: Spread the dough into the pan and press the remaining candies on top. Bake for 22 to 28 minutes, until the edges are golden and the center looks just set.
- Cool and cut: Cool completely before slicing into bars.
Equipment for This Recipe:
- 9×13-inch baking pan
- Parchment paper
- Hand mixer
- Spatula
- Sharp knife
How to Serve This Dish:
Cut the bars into squares or long rectangles and stack them on a tray where the candy colors show at the top. They are easy to pack for a brunch or picnic, and they stay tidy in the hand, which is underrated.
Pro Tips for This Recipe:
- Save some candy for the top: It makes the bars look finished right out of the pan.
- Do not overbake: The middle firms up as it cools.
- Use room-temperature butter: It creams more smoothly into the sugars.
- Line the pan for easier slicing: The bars lift out cleanly.
Variations on This Dish:
- Toffee Chip Bars: Replace half the candy with toffee bits.
- Peanut Butter Candy Bars: Add 1/2 cup peanut butter chips.
- Double Chocolate Bars: Swap 1/2 cup flour for cocoa powder and keep the rest the same.
Common Mistakes to Avoid with This Dish:
- Overmixing after the flour goes in: The bars get tough.
- Baking until the middle looks dry: They turn crumbly once cooled.
- Cutting too early: Warm bars smear and lose their clean edges.
13. Raspberry Almond Tea Cake
This loaf cake has a gentler feel than the big celebration cakes, which is part of its charm. The raspberries sink into the top in jewel-like pockets, the almond flavor runs through the crumb, and the glaze gives the slices a quiet sheen. It tastes like something you could serve at brunch or afternoon coffee without a second thought.
Why It Works:
Sour cream or milk gives the batter enough moisture to stay tender, and almond extract adds a little depth that makes berries taste brighter. Raspberries on top keep their shape better than fruit folded into the batter, so the cake cuts more neatly. A tea cake should not be heavy, and this one keeps its crumb soft without falling apart. The sliced almonds add a crisp top if you leave them in fairly loose clusters instead of blanketing the whole cake.
Key Ingredients:
- 1/2 cup unsalted butter, softened
- 1 cup granulated sugar
- 2 large eggs
- 1 teaspoon almond extract
- 1 teaspoon vanilla extract
- 1 1/2 cups all-purpose flour
- 1 1/2 teaspoons baking powder
- 1/2 teaspoon fine salt
- 1/2 cup sour cream or whole milk
- 1 1/2 cups fresh raspberries
- 1/4 cup sliced almonds
For the Glaze:
- 3/4 cup powdered sugar
- 1 to 2 tablespoons milk
- 1/4 teaspoon almond extract
Quick Steps:
- Heat the oven and prep the pan: Set the oven to 350°F (175°C). Grease and line an 8×8-inch square pan or a 9×5-inch loaf pan.
- Cream the butter and sugar: Beat them until pale and fluffy, then add the eggs, almond extract, and vanilla.
- Add the dry ingredients: Mix in the flour, baking powder, and salt, alternating with the sour cream or milk.
- Top the batter: Spread it into the pan, then scatter the raspberries over the top and press them in lightly. Finish with sliced almonds.
- Bake: Bake for 40 to 45 minutes, until the cake is golden and a tester comes out clean.
- Glaze when cool: Stir the glaze ingredients together and drizzle over the cooled cake.
Equipment for This Recipe:
- 8×8-inch pan or loaf pan
- Hand mixer
- Mixing bowls
- Cooling rack
- Spatula
How to Serve This Dish:
Slice it into neat squares or loaf slices and serve with tea, coffee, or a bowl of fresh berries. The almond glaze is enough sweetness for most people, so you do not need extra frosting.
Pro Tips for This Recipe:
- Press the raspberries in lightly: That keeps them from rolling off the top.
- Do not use too much almond extract: It can take over fast.
- Cool before glazing: Otherwise the glaze sinks in.
- Line the pan: The cake lifts out more cleanly.
Variations on This Dish:
- Blueberry Almond Cake: Swap the raspberries for blueberries.
- Lemon Almond Cake: Add 1 tablespoon lemon zest to the batter.
- No-Glaze Version: Dust the cooled cake with powdered sugar instead.
Common Mistakes to Avoid with This Dish:
- Overfilling the pan: The cake can dome too much and crack.
- Using frozen raspberries without adjusting: They bleed more than fresh berries.
- Glazing a warm cake: The drizzle disappears into the crumb.
14. Coconut Cream Pie Tartlets
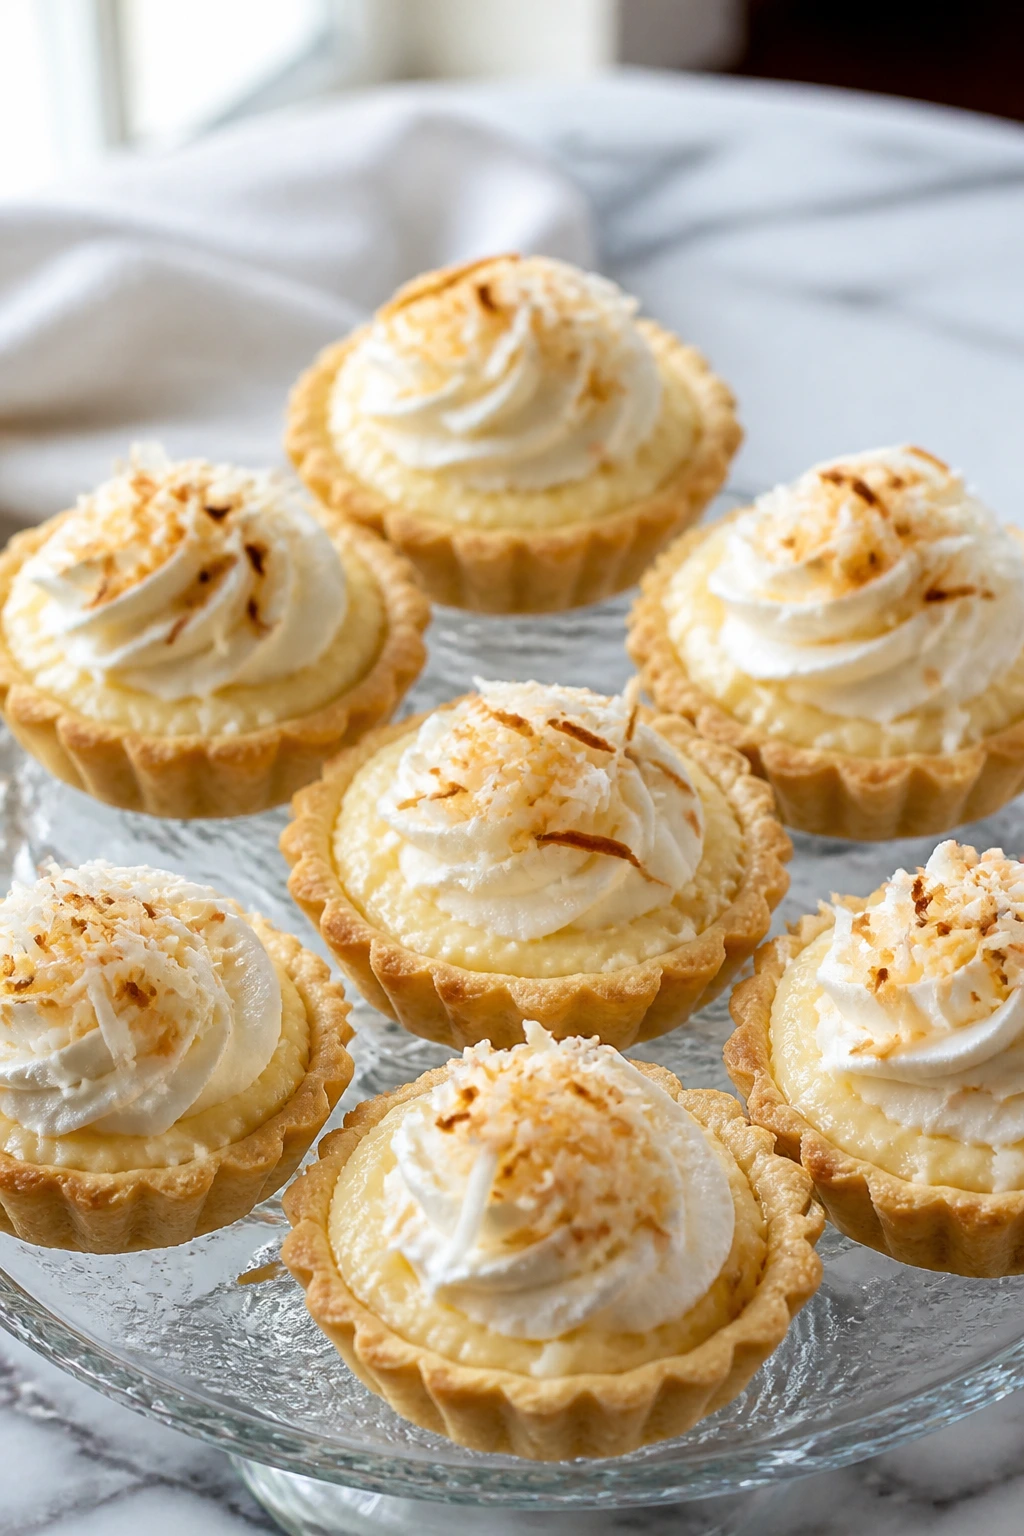
These little tartlets are creamy, cool, and a little bit old-school in the best way. Coconut pudding gets spooned into crisp shells, whipped cream goes on top, and toasted coconut gives every bite a little crunch. They look polished on a tray, but the method is straightforward once you have the custard on the stove.
Why It Works:
The filling thickens with cornstarch and egg yolks, which gives it the kind of clean slice you want in a small tart. Coconut milk adds body and a deeper coconut flavor than sweetened shredded coconut alone can manage. Using pre-baked mini tart shells keeps the whole recipe manageable, and the tartlets chill into a neat shape that does not run when you move them. If you like a firmer filling, let them rest overnight in the fridge.
Key Ingredients:
- 12 mini tart shells, baked and cooled
- 1 cup canned coconut milk
- 1 cup half-and-half
- 3/4 cup granulated sugar
- 1/4 cup cornstarch
- 4 large egg yolks
- 2 tablespoons unsalted butter
- 1 teaspoon vanilla extract
- 1 teaspoon coconut extract
- 1 cup sweetened shredded coconut, toasted and divided
- 1 cup heavy cream
- 2 tablespoons powdered sugar
Quick Steps:
- Warm the dairy base: In a saucepan, whisk the coconut milk, half-and-half, sugar, and half the toasted coconut over medium heat until steaming.
- Thicken the custard: Whisk the egg yolks and cornstarch in a bowl, then slowly pour in some hot liquid while whisking. Return everything to the pan and cook until thick and glossy.
- Finish the filling: Remove from the heat and stir in the butter, vanilla, and coconut extract.
- Chill the custard: Press plastic wrap directly onto the surface and cool completely.
- Fill the shells: Spoon the coconut custard into the tart shells.
- Top and chill: Whip the cream with powdered sugar, dollop on top, and finish with the remaining toasted coconut. Chill for at least 1 hour.
Equipment for This Recipe:
- Small saucepan
- Whisk
- Mixing bowl
- Mini tart shells
- Spoon or piping bag
How to Serve This Dish:
Set each tartlet on a small plate with a few toasted coconut flakes scattered nearby. They work best cold, and because they are small, one or two makes a neat finish after brunch.
Pro Tips for This Recipe:
- Whisk constantly while the custard thickens: It keeps the yolks from scrambling.
- Toast the coconut before using it: The flavor is deeper and less one-note.
- Press plastic wrap onto the surface: That prevents a skin from forming.
- Fill the shells close to serving time if possible: The crust stays crisper.
Variations on This Dish:
- Banana-Coconut Tartlets: Add thin banana slices under the custard.
- Chocolate-Coconut Tartlets: Brush the shells with melted chocolate before filling.
- Lime Coconut Tartlets: Add lime zest to the custard for a brighter edge.
Common Mistakes to Avoid with This Dish:
- Boiling the custard too hard: It can turn lumpy.
- Skipping the chill time: The filling won’t hold its shape.
- Overloading the whipped cream: A thick cap can slide off the tart shell.
15. Pavlova Nests with Berries and Whipped Cream
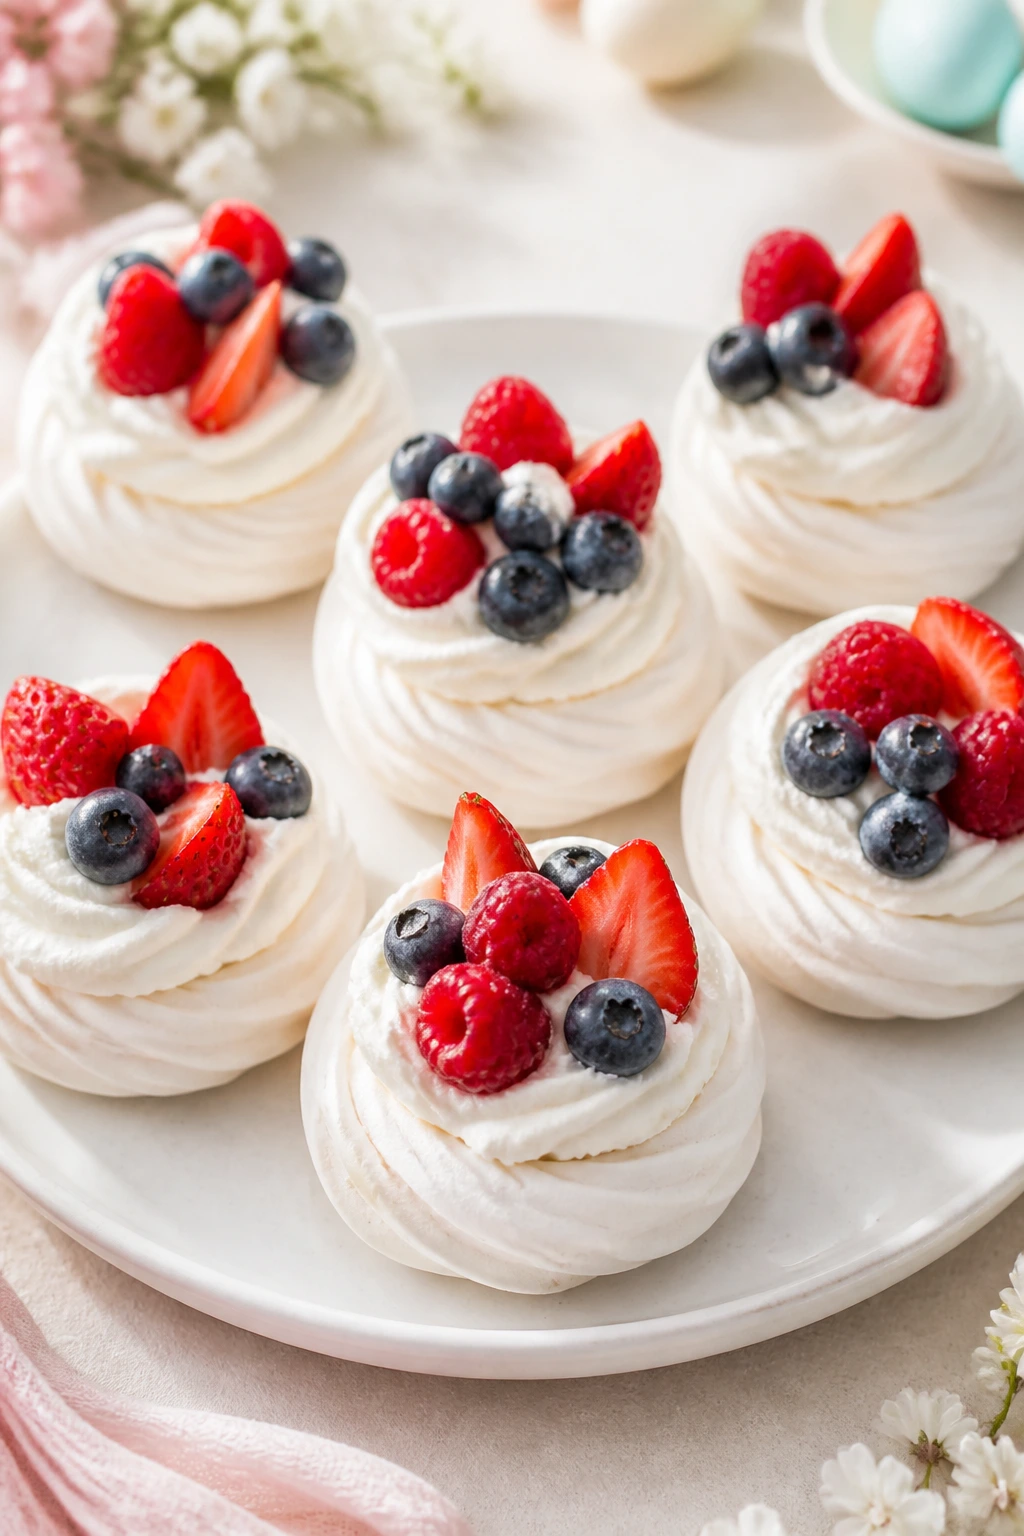
Pavlova sounds fancier than it is. You whisk egg whites, build a glossy meringue, shape little nests, and bake them low and slow until the outside is crisp and the middle stays marshmallow-soft. Topped with cream and berries, they look like tiny spring clouds.
Why It Works:
Pavlova is naturally festive because the white shell and bright fruit give you strong contrast with almost no decoration. The cornstarch and vinegar help the center stay soft, which is the whole point; you are not chasing a dry, brittle meringue here. Small nests are less intimidating than one giant pavlova, and they also bake more evenly. The biggest challenge is moisture, so keep the meringue in a dry kitchen and add the toppings just before serving.
Key Ingredients:
- 4 large egg whites, room temperature
- 1 cup superfine sugar
- 1 teaspoon cornstarch
- 1 teaspoon white vinegar or lemon juice
- 1 teaspoon vanilla extract
- 1 1/2 cups cold heavy cream
- 2 tablespoons powdered sugar
- 1 teaspoon vanilla extract
- 2 cups mixed berries
- Fresh mint, optional
Quick Steps:
- Prepare the oven: Heat the oven to 225°F (110°C) and line a baking sheet with parchment. Draw 6 small circles on the paper if you want even nests.
- Whip the meringue: Beat the egg whites until soft peaks form. Add the sugar gradually, then beat until glossy and thick. Fold in the cornstarch, vinegar, and vanilla.
- Shape the nests: Spoon the meringue onto the parchment and make a shallow dip in the center of each mound.
- Bake slowly: Bake for 60 to 75 minutes, until the outside feels dry and the shells lift from the paper. Turn off the oven and let them cool inside with the door cracked.
- Whip the cream: Beat the cream, powdered sugar, and vanilla to soft peaks.
- Assemble at the end: Fill each nest with cream and top with berries and mint.
Equipment for This Recipe:
- Stand mixer or hand mixer
- Baking sheet
- Parchment paper
- Spatula
- Mixing bowls
How to Serve This Dish:
Bring the nests to the table just after assembly so the shell keeps its crisp edge. A mix of strawberries, blueberries, and raspberries gives the brightest look, and one nest per person is enough because they are airy but still sweet.
Pro Tips for This Recipe:
- Make sure the bowl is grease-free: Even a little fat can flatten the whites.
- Add sugar slowly: Rushing this step can leave the meringue grainy.
- Do not open the oven too early: Sudden heat changes can crack the shells.
- Top only right before serving: The cream softens the meringue fast.
Variations on This Dish:
- Citrus Pavlova: Add a spoonful of lemon curd under the cream.
- Chocolate Pavlova Nests: Fold 1 tablespoon cocoa powder into the meringue.
- Stone Fruit Version: Use sliced strawberries and peaches if you want a softer fruit mix.
Common Mistakes to Avoid with This Dish:
- Using egg whites with yolk streaks: They will not whip properly.
- Adding toppings too early: The shells turn sticky.
- Baking at too high a temperature: The outside browns before the inside sets.
Why Beginner Bakers Do Better With Simple Shapes
There is a reason this collection leans so hard on bars, cupcakes, nests, loaf cakes, and chilled desserts. Those shapes forgive a crooked pour, a too-fast swirl, or a slight overbake far better than a layered cake ever will. They also look finished without needing a second round of work, which matters if you are already juggling glaze, frosting, or a main meal on the same day.
The other advantage is texture. Easter desserts do not need to be complicated to feel special; they need contrast. A crisp nest with candy eggs. A soft cupcake with tangy frosting. A lemon bar with a browned meringue top. Once you start thinking in those terms, the whole table gets easier to plan.
What You’ll Reach for in the Kitchen
- 9×13-inch baking pan: Best for bars, cookie slabs, and anything you want to cut into tidy pieces.
- 8×8-inch or 9×9-inch square pan: Useful for blondies, bread pudding, and smaller bakes that need a little height.
- Muffin tin: Perfect for cupcakes, mini cheesecakes, and Rice Krispie nests.
- Bundt pan: Makes a simple cake look finished with almost no decoration.
- Loaf pan: Great for pound cake and tea cake; it slices neatly and stores well.
- Mixing bowls in at least 2 sizes: You will use one for dry ingredients and one for the wet base in almost every recipe here.
- Hand mixer or stand mixer: Helpful for butter cakes, frosting, whipped cream, and meringue.
- Rubber spatula: The quiet workhorse for folding, scraping, and smoothing batter.
- Parchment paper: Makes lifting bars and cakes out of pans much easier.
- Cooling rack: Stops the bottoms from steaming and getting soggy.
- Microplane or fine grater: Best for lemon zest and orange zest.
- Cookie cutters: Handy for bunny sugar cookies and any cutout shape you want.
- Offset spatula or spoon: Enough for frosting, glazing, and spreading fillings cleanly.
- Sharp knife: You need one for clean slices in bars, cakes, and layered desserts.
Smart Shopping for Citrus, Chocolate, Coconut, and Berries

Good Easter baking starts in the produce aisle more than the baking aisle, which is funny but true. Lemons should feel heavy for their size and smell bright when you rub the skin. Strawberries should be red all the way through, not pale at the shoulders, because bland berries can drag down an otherwise good trifle or shortcake. If the berries are a little tart, that is fine; sugar can fix tart fruit, but it cannot rescue flavor that is missing entirely.
For dairy, buy block cream cheese instead of the spreadable tub kind. The tub version holds more water, and that makes frosting and no-bake fillings softer than they should be. Unsalted butter gives you control over salt, and if you use salted butter, keep the extra salt in the recipe on the lighter side. Heavy cream should be cold for whipping, but eggs for butter cakes and pound cakes should be room temperature so they blend smoothly.
Coconut matters more than people expect. Sweetened shredded coconut works best for macaroons and nests because it bakes into a chewy, golden texture. Unsweetened coconut is fine for a less sweet topping, but it behaves drier and a little more stubbornly. For candy eggs and chocolate pieces, buy enough for both the batter and the top decoration. You will always use more than you think once you start sampling and “arranging.”
How to Serve These Recipes
Presentation:
Mix heights and shapes on the table. Put the Bundt cake and pound cake on stands, keep bars and blondies on flat platters, and tuck the nests, cupcakes, and tartlets into smaller clusters so the spread does not look flat. A few extra berries, curls of citrus zest, or a dusting of powdered sugar can do a lot of work here.
Accompaniments:
A bowl of fresh berries, softly whipped cream, or vanilla ice cream fits across almost every dessert in this collection. Tea cakes and lemon desserts like black tea or Earl Grey. Chocolate-forward bars and blondies sit well beside coffee. The no-bake cheesecakes and trifle want a bright side, so keep them near fruit rather than richer sweets.
Portions:
For brunch-style serving, plan one small bar, one cupcake, one tartlet, or a 2-inch square of cake per person if there are several desserts on the table. If the dessert is the main event, serve slightly larger slices and let the fruit or whipped cream soften the sweetness. Pavlova nests and mini cheesecakes are already portioned well, which makes them easy to count.
Beverage Pairing:
Fresh coffee works for the chocolate and caramel desserts. Black tea or a citrus tea fits the lemon cakes, strawberry trifles, and almond tea cake. Sparkling lemonade or plain sparkling water with a slice of orange keeps the whole spread feeling bright and light.
Small Flavor Boosters That Make a Big Difference
Flavor Enhancement:
A pinch of flaky salt on blondies or cookie bars sharpens the chocolate and keeps the candy from tasting flat. On citrus bakes, a teaspoon of zest rubbed into the sugar before mixing gives you a stronger lemon flavor than juice alone.
Customization:
If you like stronger fruit flavor, spoon a thin layer of jam under the berries in the trifle or between the crust and filling in the cheesecake cups. If you want more texture, add toasted almonds to the tea cake, chopped pecans to the carrot cupcakes, or crushed pretzels to the cookie bars. Small changes like that keep the recipes from feeling repetitive.
Serving Suggestions:
Keep garnishes simple and choose ones that match the dessert’s texture. Toasted coconut belongs on the coconut tartlets and nests. Fresh mint looks right on berry desserts. A little extra glaze can dress up a loaf cake, but it should not drown the crumb.
Make-It-Yours:
For gluten-free baking, use a 1:1 gluten-free flour blend in the Bundt cake, blondies, bars, and tea cake. For dairy-free versions, use plant butter, coconut cream, and dairy-free whipped topping where the recipe allows it. For a less sweet table, trim the glaze and frosting by a third and lean harder on fruit, citrus, and toasted coconut.
Make-Ahead, Storage, and Reheating Guidance
A few of these desserts hold well at room temperature, but not all of them do. Cookie bars, blondies, sugar cookies, pound cake, and the Bundt cake can usually sit covered at room temperature for 1 to 2 days if the kitchen is cool. After that, move anything frosted or fruit-heavy to the fridge. Cream cheese frosting, whipped cream fillings, trifles, cheesecakes, tartlets, and anything topped with fresh berries should be refrigerated and served within 2 to 4 days.
The freezer is useful for some items and useless for others. Plain Bundt cake, pound cake, blondies, and cookie bars freeze well for up to 2 months if wrapped tightly in plastic and then foil. Thaw them at room temperature before glazing or serving. Cookie dough for the sugar cookies can be frozen in a flat disk or already cut into shapes; bake from chilled, not fully thawed, for cleaner edges.
The no-bake items need a little more care. Mini cheesecakes can be made a day ahead and kept cold, but berry toppings are better added closer to serving. Trifles are at their best the same day or the next day, before the cake gets too soft. Pavlova shells can be baked ahead and stored in a dry, airtight container at room temperature for a day, but do not assemble them until the last minute or the shells lose their crisp edge. Bread pudding reheats well in a 300°F oven for 15 to 20 minutes, covered loosely with foil so the top does not dry out.
Easy Swaps for Different Needs
-
Gluten-Free Easter Basket: Use a 1:1 gluten-free flour blend in the Bundt cake, blondies, cookie bars, tea cake, and sugar cookies. The texture changes a little, but the desserts still bake cleanly if you do not overmix the batter.
-
Dairy-Free Spring Spread: Choose plant butter, dairy-free cream cheese, coconut cream, and oat or almond milk where the recipe allows it. Coconut tartlets and pavlova are the easiest places to make that shift without changing the whole feel of the dessert.
-
Lower-Sugar Table: Cut the glaze by half, use less frosting on the cupcakes, and lean on berries and citrus for flavor. The desserts still feel festive, but they land lighter on the palate.
-
Kid-Decoration Station: Set out candy eggs, sprinkles, coconut, and small spoons so kids can finish the nests, sugar cookies, and cupcakes. Keep the actual baking plain and let the decorating carry the fun.
-
Berry-First Version: If strawberries are not what you want, swap in raspberries, blueberries, blackberries, or a mix. The trifle, mini cheesecakes, tea cake, and pavlova all handle berry changes well.
-
Chocolate-Forward Easter: Add chocolate drizzle to the nests, use chocolate crusts for the cheesecakes, and swap some of the chips into the cookie bars and blondies. That keeps the spread from leaning too citrus-heavy.
Common Mistakes to Avoid
The easiest mistake is overbaking. Easter desserts often look pale or lightly golden, so people wait for a deeper color than the recipe needs. That is how cupcakes dry out, blondies lose chew, and pound cake gets crumbly. If the recipe says the center should still have a little softness, trust it.
Cold dairy causes another round of headaches. Cold cream cheese stays lumpy, cold butter will not cream properly, and cold eggs can make butter batters look split before they recover. Give the ingredients a little time on the counter before you start. It saves more effort than it costs.
Another problem is decorating too early. Warm cakes melt glaze, warm cookies soften icing, and warm meringue shells collapse under whipped cream. Let the base cool fully first. It sounds basic, but this is the place where a lot of home bakers end up doing the same job twice.
Wet fruit can also wreck a dessert’s texture. Strawberries that sit too long turn into syrup, which is nice in moderation and awful in excess. If you are making trifles or cheesecake toppings ahead, drain the fruit a little and add the freshest pieces right before serving. Pavlova and meringue desserts have their own trap: humidity. If the kitchen feels sticky, keep the shells closed up until the very last minute and do not store them in the fridge.
Questions Bakers Ask Most
Which dessert on this list is easiest for a true beginner?
The Peeps Rice Krispie Nests and Easter Candy Blondies are the simplest starting points. Neither one needs fancy shaping, and both forgive a small timing mistake better than a delicate cake or meringue.
Can I make several of these the day before?
Yes. Pound cake, Bundt cake, blondies, cookie bars, sugar cookies, and mini cheesecakes all hold well overnight. I would leave pavlova shells, whipped-cream desserts, and trifle assembly for closer to serving time.
What if I do not have a Bundt pan or muffin tin?
Use a loaf pan for the pound cake or a 9×13-inch pan for many of the bar-style desserts. For the cupcake recipes, you can often bake the batter in a square pan, but you will need to adjust the time and watch the center carefully.
How do I keep the trifle from getting soggy?
Use a sturdy cake, not a delicate sponge, and let the strawberries release only enough juice to coat the fruit. Assemble within a few hours of serving, and keep the whipped cream thick but not stiff. A soggy trifle usually means too much liquid or too much time.
Can I freeze any of these desserts?
Yes, but not all parts freeze equally well. Cakes, blondies, bars, and cookie dough freeze best. Whipped cream, meringue, and fresh fruit toppings do not freeze in a useful way for serving later.
What should I do if my cream cheese frosting turns soft?
Chill it for 15 to 20 minutes, then beat it briefly again. If it still feels loose, add a little more powdered sugar, a tablespoon at a time. The issue is usually warm butter, warm cream cheese, or too much liquid.
How do I keep meringue from weeping?
Spread it onto a hot filling, make sure the sugar dissolves fully into the whites, and bake it until the peaks are lightly colored. Once it cools, keep it dry and serve it the same day if possible.
Can I use store-bought cake or cookie dough in these recipes?
Absolutely, and I am in favor of that when it helps. Store-bought pound cake, tart shells, or cookie dough can save time and still leave room for a homemade filling, glaze, or topping. That is not cheating. That is smart baking.
A Dessert Table That Does Not Ask Too Much
The nicest thing about a spring dessert table is that it can look generous without asking you to become a pastry wizard. A bright Bundt cake, a bowl of strawberry trifle, a tray of bunny cookies, and a nest of coconut macaroons already give you color, texture, and a little sense of occasion. That is enough.
Pick one recipe that feels steady, then add one that leans playful. That balance tends to work better than trying to make every dessert the star at once, and it keeps the baking day calm enough that you can actually enjoy the finished table.