
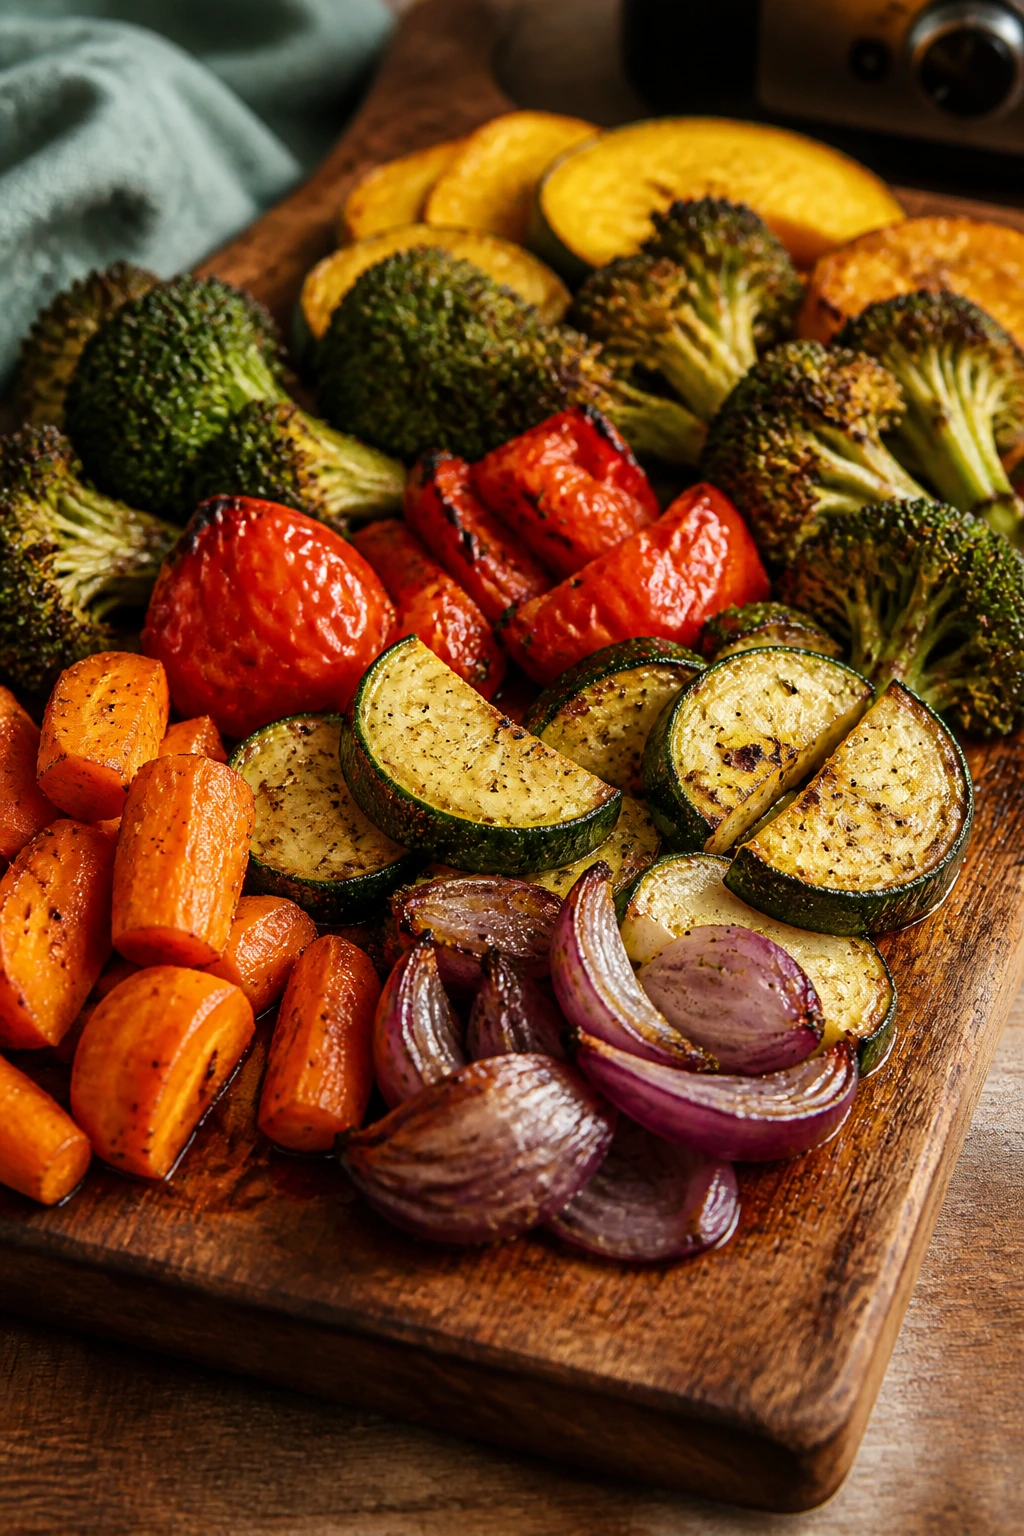
A hot air fryer can do to vegetables what a screaming-hot skillet does to onions: brown the edges before the centers give up their moisture. That is the whole trick, and it’s why air fried vegetable recipes can carry a Meatless Monday dinner instead of just sitting there like polite side dishes.
The difference is texture. Steamed broccoli is broccoli. Air-fried broccoli with blistered florets, a little salt, and a hit of lemon feels like a snack you’d steal off someone else’s plate. Same vegetable. Entirely different mood.
Meatless Monday works best when the vegetables don’t act like an apology for missing meat. They need crunch, salt, a little fat, and enough flavor to stand up to beans, grains, eggs, or a sharp sauce. This collection leans into that. You’ll find brassicas, roots, mushrooms, squash, and a few oddballs that only get interesting after 10 minutes in a hot basket.
Why This Collection Is Worth a Spot in Your Rotation
-
Fast browning: Most of these vegetable recipes need only 1 to 2 tablespoons of oil, yet the air fryer still gives you browned edges and a drier, crisper surface than the oven usually manages.
-
Dinner-friendly timing: A lot of these cook in 8 to 15 minutes, which matters when you want vegetables on the table before the grains, eggs, or noodles get cold.
-
Good with pantry seasonings: Garlic powder, smoked paprika, cumin, curry, za’atar, chili flakes, and lemon zest all do real work here; you do not need a special shopping trip.
-
Built for mix-and-match meals: A basket of roasted vegetables can sit beside hummus, fried eggs, lentils, rice, pasta, or pita and still feel like a complete plate.
-
Useful for picky eaters: The air fryer’s crisp finish makes vegetables less soft, less watery, and far easier to win over at the table.
-
Leftovers that still behave: Sturdy vegetables like Brussels sprouts, cauliflower, cabbage, mushrooms, potatoes, and carrots reheat well in the air fryer, not just the microwave.
1. Garlic-Parmesan Brussels Sprouts
These come out nutty at the cut edges and a little salty from the Parmesan, with the kind of dark green crunch Brussels sprouts need if they’re going to earn dinner real estate. A balsamic drizzle at the end keeps them sharp instead of heavy.
Why It Works: Halved Brussels sprouts get their best browning when the cut side faces the basket, where the hot air can hit the flat surface directly. Parmesan clings to the oil and forms a thin crust, so you get more flavor per bite than you would from a plain roast.
Key Ingredients:
- 1 lb Brussels sprouts, trimmed and halved
- 1½ tbsp olive oil
- 1 tsp garlic powder
- ½ tsp kosher salt
- ¼ tsp black pepper
- ¼ cup finely grated Parmesan
- 1 tsp balsamic glaze, for finishing
Quick Steps:
- Preheat the air fryer to 390°F.
- Toss the sprouts with oil, garlic powder, salt, pepper, and Parmesan.
- Air fry 10 to 12 minutes, shaking halfway, until the edges are browned and the centers are tender.
- Drizzle with balsamic glaze and serve hot.
Equipment for This Recipe:
- Air fryer basket or tray
- Large mixing bowl
- Tongs or a silicone spatula
How to Serve This Dish: Pile them beside lentil soup, or tuck them next to polenta and a fried egg. They also work as a sharp little side for pasta with olive oil and lemon.
Pro Tips for This Recipe:
- Dry the sprouts well after rinsing; wet leaves steam instead of crisp.
- Put smaller sprouts in the basket if you can. They cook more evenly.
- Add the balsamic after cooking, not before, or it will dull the crust.
Variations on This Dish:
- Lemon-Zest Finish: Add 1 teaspoon lemon zest with the Parmesan for a brighter edge.
- Chili Crunch Version: Stir in ½ teaspoon red pepper flakes and finish with chili crisp.
- Vegan Parm Swap: Use 2 tablespoons nutritional yeast and 1 tablespoon breadcrumbs instead of Parmesan.
Common Mistakes to Avoid with This Dish:
- Crowding the basket: Packed sprouts soften before they brown. Cook in two rounds if needed.
- Cutting them unevenly: Tiny halves burn before the big ones are done.
- Using too much glaze early: Sweet vinegar burns fast in hot air.
2. Lemon Pepper Broccoli Florets
Broccoli gets a little frilly and crisp when the florets are dry and the basket is hot. Lemon zest wakes up the grassy flavor, and black pepper gives it a mild bite that keeps the whole thing from tasting flat.
Why It Works: Broccoli has enough surface area to pick up browning fast, especially on the little tips. The lemon zest goes in before cooking, while the juice waits until the end so the florets stay crisp instead of slippery.
Key Ingredients:
- 1 large head broccoli, cut into florets
- 1½ tbsp olive oil
- 1 tsp lemon zest
- ¾ tsp kosher salt
- ½ tsp black pepper
- 1 small garlic clove, finely grated
- 1 tbsp lemon juice, for finishing
Quick Steps:
- Heat the air fryer to 385°F.
- Toss broccoli with oil, zest, salt, pepper, and garlic.
- Air fry 8 to 10 minutes, shaking once, until the tips are browned.
- Splash with lemon juice and serve right away.
Equipment for This Recipe:
- Air fryer basket
- Microplane or fine grater
- Mixing bowl
How to Serve This Dish: Serve with baked tofu, brown rice, or a bowl of white beans. It also makes a strong side for pasta with olive oil and toasted breadcrumbs.
Pro Tips for This Recipe:
- Cut the florets into similar sizes so the stems and tips finish together.
- A tiny bit of garlic goes far here; too much can burn.
- If your broccoli is thick, slice the stems lengthwise so they cook at the same rate as the crowns.
Variations on This Dish:
- Parmesan Lemon Pepper: Add 2 tablespoons grated Parmesan after cooking.
- Smoky Broccoli: Swap half the black pepper for smoked paprika.
- Sesame Citrus Version: Finish with sesame seeds and a few drops of toasted sesame oil.
Common Mistakes to Avoid with This Dish:
- Leaving the broccoli damp: Water turns the florets soft and pale.
- Skipping the shake: One-sided cooking gives you burned tips and raw stems.
- Adding lemon juice too soon: Acid before cooking can dull the browning.
3. Buffalo Cauliflower Bites
These are the vegetables people pretend not to order until the bowl hits the table and the smell of hot sauce and butter takes over. The florets turn tender in the middle, with a crunchy outer edge that catches the sauce instead of sliding off it.
Why It Works: Cauliflower handles high heat well, which means the exterior can brown while the inside goes soft. Tossing with buffalo sauce after the first air-fry keeps the coating from scorching and gives the florets that sticky, glossy finish people actually want.
Key Ingredients:
- 1 medium head cauliflower, cut into bite-size florets
- 1 tbsp olive oil
- ½ tsp kosher salt
- ½ tsp garlic powder
- ½ cup buffalo sauce
- 1 tbsp melted butter or vegan butter
- 1 tbsp chopped chives, for serving
Quick Steps:
- Preheat the air fryer to 390°F.
- Toss cauliflower with oil, salt, and garlic powder.
- Air fry 10 minutes, shaking halfway.
- Toss with buffalo sauce mixed with butter, then air fry 3 to 4 minutes more.
- Finish with chives.
Equipment for This Recipe:
- Air fryer basket
- Large bowl
- Tongs
How to Serve This Dish: Serve with celery sticks, ranch or blue cheese dip, and a bowl of rice if you want it to feel like dinner. They also sit well inside wraps with shredded lettuce.
Pro Tips for This Recipe:
- Keep the florets dry; extra moisture dilutes the sauce.
- Sauce them in the bowl, not straight in the basket, so the coating stays even.
- A little butter rounds out sharp hot sauce without turning it greasy.
Variations on This Dish:
- Garlic-Hot Version: Add 1 teaspoon garlic powder to the sauce.
- Honey Buffalo: Stir in 1 tablespoon honey for a sweeter edge.
- Gluten-Free Crunch: Toss the florets lightly in cornstarch before the first cook.
Common Mistakes to Avoid with This Dish:
- Saucing too early: The sauce can burn before the cauliflower softens.
- Overcrowding: Piled florets steam and stay pale.
- Using watery sauce: Thin sauces never cling as well.
4. Crispy Zucchini Coins
Zucchini is usually the vegetable that gets bullied by too much heat, so the trick is a fast cook and a light coating. These coins stay tender in the middle and crisp around the edges, like the best part of a summer fry without the oil bath.
Why It Works: Sliced zucchini has a lot of water, so a little salt and a dry coating help pull the surface moisture away before cooking. Panko gives the air fryer something to toast, which is what turns soft coins into proper crisp rounds.
Key Ingredients:
- 2 medium zucchini, sliced into ¼-inch rounds
- 1 tbsp olive oil
- ½ tsp kosher salt
- ½ tsp garlic powder
- ½ cup panko breadcrumbs
- 2 tbsp grated Parmesan
Quick Steps:
- Preheat the air fryer to 400°F.
- Toss zucchini with oil, salt, and garlic powder.
- Press the rounds into panko mixed with Parmesan.
- Air fry 8 to 9 minutes, flipping once, until golden.
Equipment for This Recipe:
- Air fryer basket
- Shallow bowl for crumbs
- Tongs
How to Serve This Dish: Serve with marinara, garlicky yogurt, or a quick lemon dip. They’re best as a snack or a side to tomato soup and pasta.
Pro Tips for This Recipe:
- Slice the zucchini evenly or some rounds will collapse before others crisp.
- Do not pile them in layers; give each round a chance to brown.
- Eat them fast. Zucchini is at its best right out of the basket.
Variations on This Dish:
- Italian Herb Coins: Add dried oregano and basil to the crumb mix.
- Spicy Snack Version: Stir cayenne into the panko.
- Dairy-Free Crust: Use nutritional yeast instead of Parmesan.
Common Mistakes to Avoid with This Dish:
- Cutting rounds too thick: Thick slices go limp before the coating browns.
- Using fine crumbs only: Panko gives a lighter, crunchier shell.
- Waiting too long to serve: They soften as they sit.
5. Smoky Carrot Fries
Carrots turn sweet when the heat hits them hard, and the air fryer brings that sweetness forward without making them mushy. With smoked paprika and a little cumin, they taste closer to a roasted root vegetable than a side dish kids pick at.
Why It Works: Cutting carrots into fry shapes gives more surface area for browning, which matters because carrots are dense and need a little time to soften. The spices cling to the oil and toast in the dry heat, so the flavor lands before the sweetness does.
Key Ingredients:
- 1 lb carrots, peeled and cut into fry shapes
- 1½ tbsp olive oil
- 1 tsp smoked paprika
- ½ tsp ground cumin
- ½ tsp kosher salt
- ¼ tsp black pepper
- 1 tbsp chopped parsley, for serving
Quick Steps:
- Preheat the air fryer to 390°F.
- Toss the carrot fries with oil, paprika, cumin, salt, and pepper.
- Air fry 12 to 15 minutes, shaking twice, until browned on the edges.
- Sprinkle with parsley and serve hot.
Equipment for This Recipe:
- Air fryer basket
- Vegetable peeler
- Sharp knife
How to Serve This Dish: Serve with tahini sauce, hummus, or a bowl of chickpeas and rice. They also work beside baked falafel or a simple omelet.
Pro Tips for This Recipe:
- Cut the fries roughly the same thickness or the thin ends will dry out.
- If the carrots are thick, split them lengthwise before slicing.
- A squeeze of lemon at the end makes the sweetness pop.
Variations on This Dish:
- Maple-Smoke Version: Add 1 teaspoon maple syrup for a sticky glaze.
- Harissa Carrots: Swap cumin for ½ teaspoon harissa powder.
- Herb Finish: Use dill or mint instead of parsley.
Common Mistakes to Avoid with This Dish:
- Making fries too thin: Thin carrots crisp fast but dry out fast, too.
- Skipping the shake: Carrots need movement to brown on more than one side.
- Using too much oil: The fries start to soften and lose their edge.
6. Garlicky Green Beans
Air-fried green beans have a blistered skin and a snappy middle, which is exactly what green beans should be doing when they’re not hiding under casserole soup. Garlic and a little lemon peel keep them sharp and fresh.
Why It Works: Green beans are thin enough to cook quickly but sturdy enough to take high heat. The air fryer chars the wrinkled spots first, which gives them a roasted taste instead of a boiled one.
Key Ingredients:
- 12 oz green beans, trimmed
- 1 tbsp olive oil
- 1 tsp garlic powder
- ½ tsp kosher salt
- ¼ tsp black pepper
- 1 tsp lemon zest
- 1 tbsp sliced almonds, optional
Quick Steps:
- Preheat the air fryer to 380°F.
- Toss the beans with oil, garlic powder, salt, pepper, and lemon zest.
- Air fry 7 to 9 minutes, shaking once, until blistered.
- Top with almonds if using.
Equipment for This Recipe:
- Air fryer basket
- Mixing bowl
- Zester
How to Serve This Dish: Good next to rice, roasted potatoes, or a plate of eggs. They also like a small spoon of pesto or a smear of mustard on the side.
Pro Tips for This Recipe:
- Trim the tough stem ends or the beans stay stringy.
- Keep the beans in one layer as much as possible.
- Almonds should go on after cooking so they stay crunchy.
Variations on This Dish:
- Sesame-Garlic Beans: Finish with sesame oil and sesame seeds.
- Chili-Lime Beans: Add lime juice after cooking and red pepper flakes before.
- Parmesan Almond Beans: Toss with Parmesan right after the basket comes out.
Common Mistakes to Avoid with This Dish:
- Overcooking: Green beans go limp fast once they start blistering.
- Too much lemon juice before cooking: Acid softens the surface.
- Skipping the trim: Woody ends ruin the first bite.
7. Chili-Lime Corn Ribs
Corn ribs are the messy, playful recipe in the bunch, and they taste like summer with a little more edge. The kernels blister, the cut edges curl, and the chili-lime finish keeps the sweetness from leaning too soft.
Why It Works: Cutting corn into long quarters exposes the kernels to direct heat, which lets them char instead of just warm through. A quick oil rub helps the spice mix stick and keeps the kernels from drying out.
Key Ingredients:
- 2 ears corn, cut into 8 ribs
- 1½ tbsp olive oil
- 1 tsp chili powder
- ½ tsp kosher salt
- ½ tsp lime zest
- 1 tbsp lime juice
- 1 tbsp chopped cilantro, optional
Quick Steps:
- Preheat the air fryer to 390°F.
- Coat the corn ribs with oil, chili powder, salt, and lime zest.
- Air fry 8 to 10 minutes, turning once, until curled and browned.
- Finish with lime juice and cilantro.
Equipment for This Recipe:
- Sharp chef’s knife
- Air fryer basket
- Kitchen towel for steady cutting
How to Serve This Dish: Serve with black beans, avocado, and rice, or pile them beside tacos. They disappear fast with a little crema or plain Greek yogurt on the side.
Pro Tips for This Recipe:
- Use a damp towel under the cutting board so the corn stays put.
- Cutting the cob lengthwise is easier if you microwave the ears for 2 minutes first.
- Do not skip the lime at the end; it wakes up the corn.
Variations on This Dish:
- Smoky Elote Ribs: Dust with smoked paprika and cotija after cooking.
- Garlic Butter Corn: Swap lime for melted butter and garlic powder.
- Vegan Street Corn: Use vegan mayo and nutritional yeast after cooking.
Common Mistakes to Avoid with This Dish:
- Forcing cold corn through the knife: It can slip and split poorly.
- Overloading the basket: The ribs need room to curl.
- Adding lime too early: The juice dulls the browning.
8. Eggplant Parmesan Rounds
Eggplant can go soggy fast, which is why this version keeps the slices thin, breaded, and aggressively hot. You get a crisp shell, a soft center, and a little marinara and mozzarella on top if you want dinner to feel like a small event.
Why It Works: Salt draws moisture out of eggplant so the crumb coating has a fighting chance. A fast blast in the air fryer browns the crumbs before the flesh turns watery, which is the whole game here.
Key Ingredients:
- 1 medium eggplant, sliced into ½-inch rounds
- 1 tsp kosher salt
- 1 tbsp olive oil
- ½ cup panko breadcrumbs
- ¼ cup grated Parmesan
- ½ cup marinara
- ½ cup shredded mozzarella
Quick Steps:
- Salt the eggplant slices and rest 10 minutes, then pat dry.
- Preheat the air fryer to 390°F.
- Brush with oil, then coat with panko and Parmesan.
- Air fry 10 minutes, flip, top with marinara and mozzarella, then cook 3 to 4 minutes more.
Equipment for This Recipe:
- Air fryer basket
- Paper towels
- Shallow bowl for crumbs
How to Serve This Dish: Serve over spaghetti, polenta, or a green salad with sharp dressing. It also works as a meatless sandwich filling on toasted rolls.
Pro Tips for This Recipe:
- Choose a firm eggplant with glossy skin and no soft spots.
- Pat the slices dry after salting or the crust slips.
- Keep the cheese on the surface in a thin layer so it melts instead of puddling.
Variations on This Dish:
- Herbed Eggplant Parm: Add oregano and basil to the crumb mix.
- Spicy Marinara Version: Stir red pepper flakes into the sauce.
- Vegan Bake: Use vegan mozzarella and skip the Parmesan.
Common Mistakes to Avoid with This Dish:
- Skipping the salt rest: The slices turn spongy.
- Cutting too thick: Thick rounds need longer heat and get soft before crisping.
- Drowning them in sauce: Too much sauce destroys the crust.
9. Honey-Sriracha Broccolini
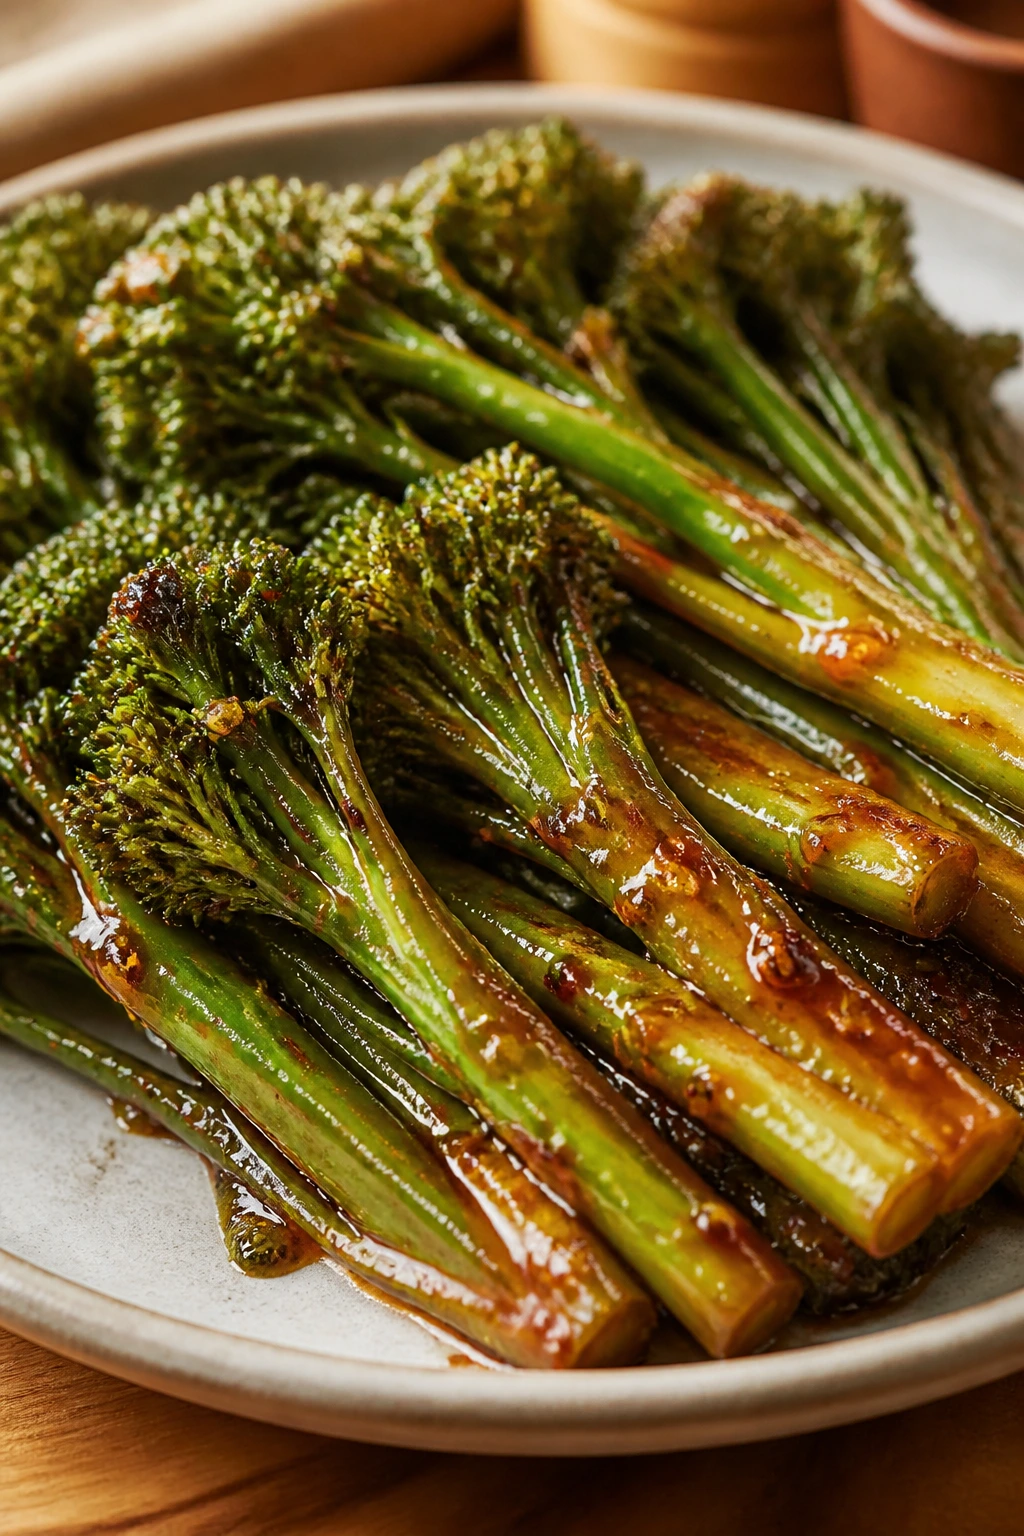
Broccolini cooks fast, and that tender stem with the tiny florets is made for a sticky glaze. Honey and sriracha give it a sweet burn that clings to the stems instead of disappearing into the basket.
Why It Works: Broccolini is thinner than broccoli, so it needs a shorter cook time and a hotter basket. The glaze goes on at the end, which keeps the honey from scorching and lets the florets stay bright.
Key Ingredients:
- 1 bunch broccolini, ends trimmed
- 1 tbsp olive oil
- ½ tsp kosher salt
- 2 tbsp honey
- 1 tbsp sriracha
- 1 tsp rice vinegar
Quick Steps:
- Preheat the air fryer to 390°F.
- Toss broccolini with oil and salt.
- Air fry 6 to 8 minutes, shaking once.
- Stir honey, sriracha, and vinegar together, then toss with the hot broccolini.
Equipment for This Recipe:
- Air fryer basket
- Small bowl for glaze
- Tongs
How to Serve This Dish: Serve with rice, tofu, or sesame noodles. It also plays well next to plain scrambled eggs if you want a fast dinner.
Pro Tips for This Recipe:
- Trim the woody bottoms; broccolini should feel tender from the first bite.
- If the stems are thick, split them lengthwise so they cook evenly.
- Toss the glaze while the broccolini is still hot so it sticks.
Variations on This Dish:
- Ginger-Soy Broccolini: Replace honey with soy sauce and grated ginger.
- Sesame Heat: Add toasted sesame oil and sesame seeds.
- Mild Sweet Glaze: Use chili garlic sauce sparingly if you want less heat.
Common Mistakes to Avoid with This Dish:
- Cooking too long: Broccolini goes floppy fast.
- Adding the glaze before cooking: Honey burns at the edges.
- Leaving thick stems whole: The tops burn before the stems soften.
10. Curried Cauliflower Steaks

Cauliflower steaks are what happen when you stop treating cauliflower like filler and give it a real sear. Curry powder and olive oil form a warm, fragrant crust, and the thick slices stay creamy inside.
Why It Works: Thick cauliflower slabs hold together better than florets, so they brown on the outside while staying meaty in the middle. Curry powder toasts in the oil and gives you layered spice without extra sauce.
Key Ingredients:
- 1 large head cauliflower, cut into 4 thick steaks
- 2 tbsp olive oil
- 1½ tsp curry powder
- ½ tsp kosher salt
- ¼ tsp black pepper
- 1 tbsp chopped cilantro
- 1 lime, cut into wedges
Quick Steps:
- Preheat the air fryer to 385°F.
- Brush the steaks with oil and season with curry powder, salt, and pepper.
- Air fry 12 to 14 minutes, flipping gently halfway.
- Finish with cilantro and a squeeze of lime.
Equipment for This Recipe:
- Air fryer tray or wide basket
- Sharp knife
- Small brush
How to Serve This Dish: Put them over rice or lentils, then spoon yogurt or chutney around the plate. They can also anchor a grain bowl with chickpeas and herbs.
Pro Tips for This Recipe:
- Cut from the center of the head so each steak holds together.
- Save loose florets and cook them alongside the steaks.
- Handle the slices gently; they break if you flip them too hard.
Variations on This Dish:
- Tandoori Spice: Swap curry powder for tandoori seasoning.
- Coconut-Lime Finish: Drizzle with coconut yogurt and lime.
- Smoky Curry Version: Mix in a pinch of smoked paprika.
Common Mistakes to Avoid with This Dish:
- Cutting steaks too thin: Thin slices crumble.
- Forgetting to oil the surface: Dry cauliflower tastes chalky.
- Moving them too often: Let one side brown before you flip.
11. Everything-Seasoned Asparagus
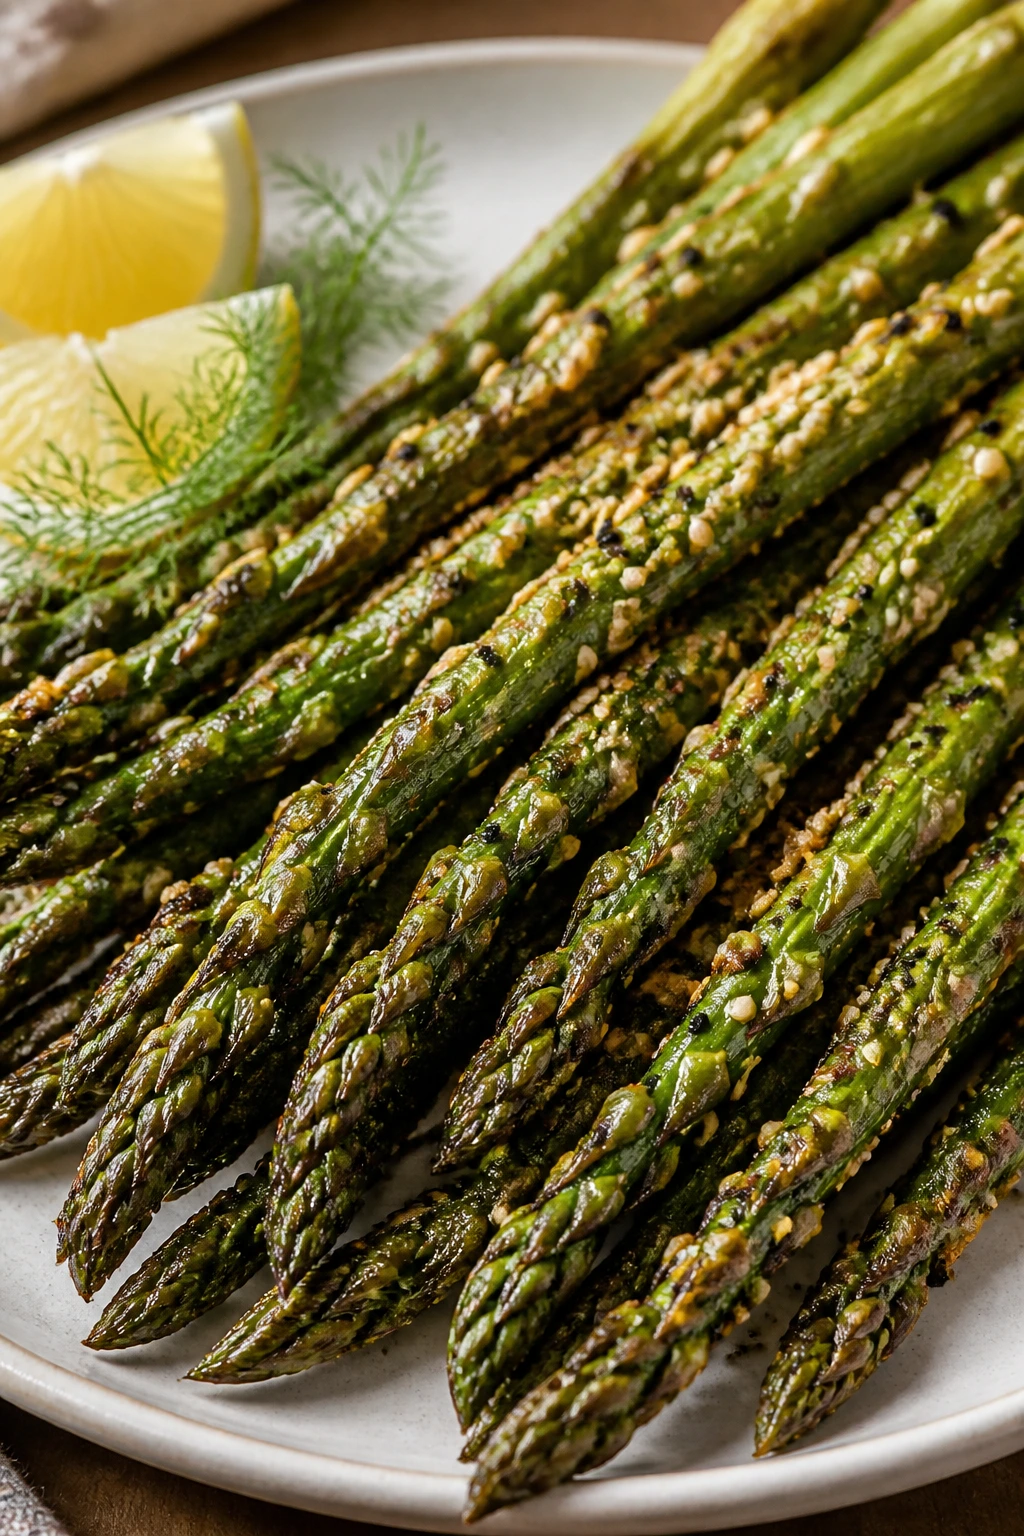
Asparagus needs barely any time in the basket, which is why it’s one of the best vegetables to keep in rotation. The stalks come out tender with snapped tips, and everything seasoning gives you garlic, sesame, and poppy in one go.
Why It Works: Thin asparagus cooks fast, and the air fryer keeps the tips from collapsing the way they can in a pan. A short cook and a hot basket preserve the snap.
Key Ingredients:
- 1 lb asparagus, woody ends trimmed
- 1 tbsp olive oil
- 1½ tsp everything bagel seasoning
- ½ tsp kosher salt
- 1 tsp lemon juice
- 1 tbsp chopped dill, optional
Quick Steps:
- Preheat the air fryer to 380°F.
- Toss asparagus with oil, seasoning, and salt.
- Air fry 6 to 8 minutes, until tender and lightly browned.
- Finish with lemon juice and dill.
Equipment for This Recipe:
- Air fryer basket
- Tongs
- Mixing bowl
How to Serve This Dish: Serve with eggs, smoked salmon if you’re not keeping it vegetarian, or a bowl of quinoa. It also works as a bright side for creamy pasta.
Pro Tips for This Recipe:
- Choose stalks close in thickness so they finish together.
- Very thin asparagus needs only 5 to 6 minutes.
- Lemon goes on at the end to keep the seasoning from sliding off.
Variations on This Dish:
- Garlic-Dill Version: Use dried dill and garlic powder instead of everything seasoning.
- Sesame Lemon: Add sesame seeds and extra lemon zest.
- Cheesy Finish: Top with crumbled feta after cooking.
Common Mistakes to Avoid with This Dish:
- Overcooking: Asparagus turns stringy and limp fast.
- Using very thick and very thin stalks together: They will not finish at the same time.
- Skipping the oil: The seasoning won’t cling.
12. Maple-Dijon Sweet Potato Cubes
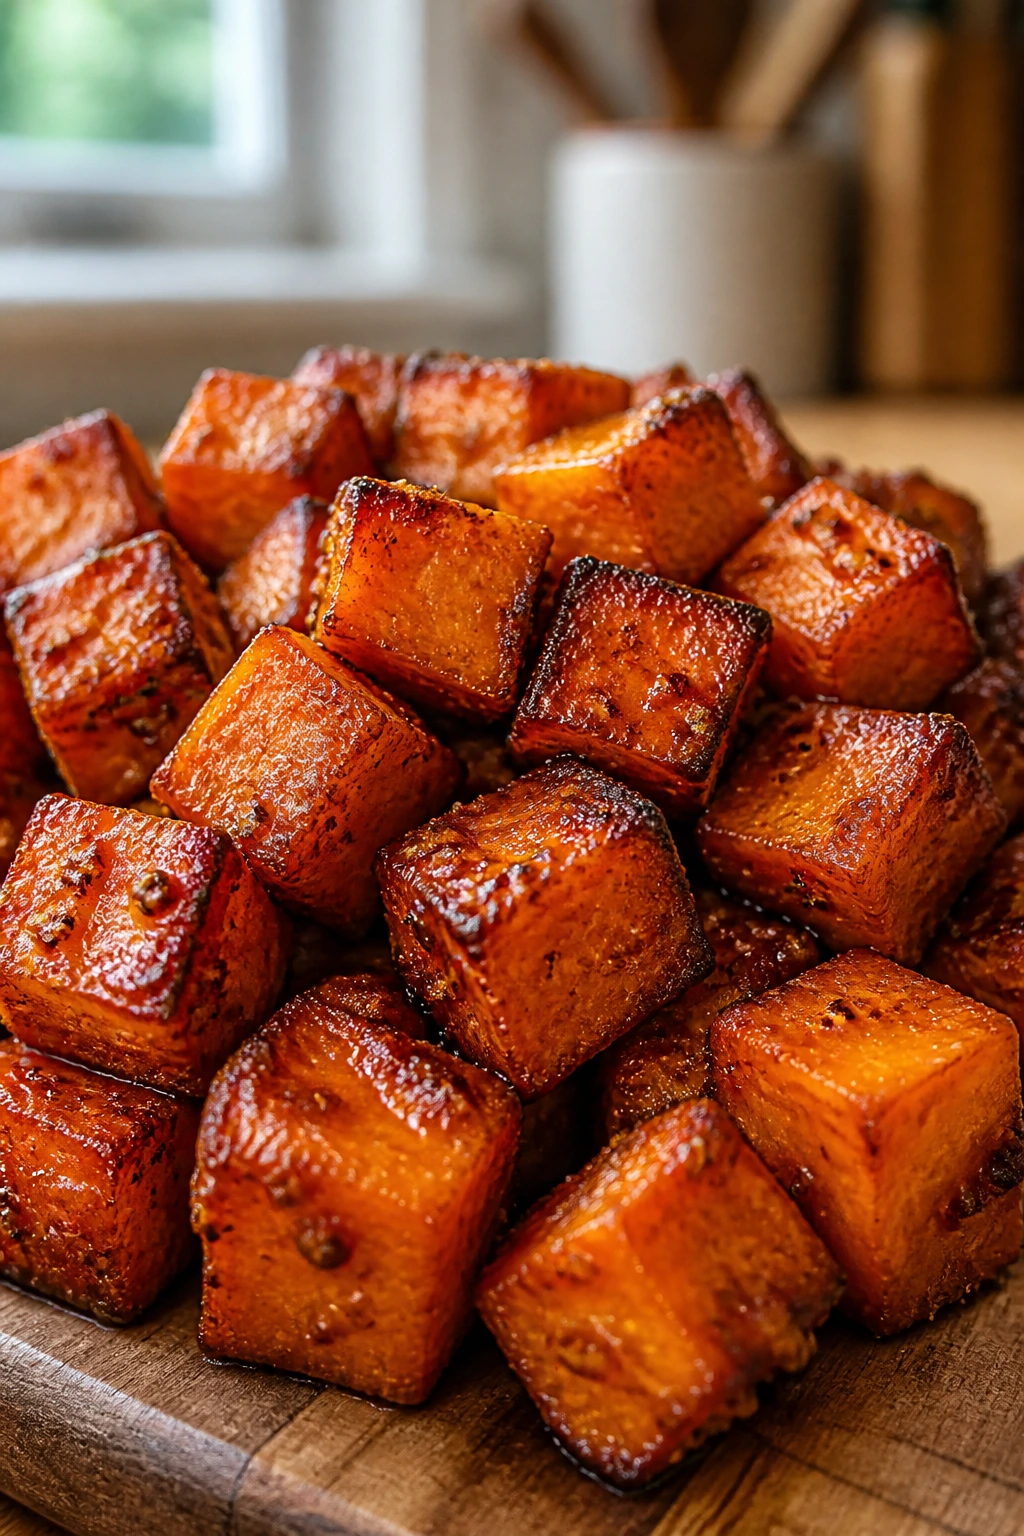
Sweet potatoes caramelize in the air fryer in a way that makes them taste like they were cooked for much longer than they were. Maple and Dijon pull the sweetness in two directions, which keeps each cube from turning flat.
Why It Works: Cubes give sweet potatoes enough flat sides to brown, and the air fryer keeps them from turning soggy the way a crowded oven pan might. The maple-Dijon mix adds surface flavor without drowning the vegetable.
Key Ingredients:
- 2 medium sweet potatoes, peeled and cut into ¾-inch cubes
- 1½ tbsp olive oil
- 1 tbsp maple syrup
- 1 tsp Dijon mustard
- ½ tsp kosher salt
- ¼ tsp cinnamon
Quick Steps:
- Preheat the air fryer to 390°F.
- Toss the cubes with oil, maple syrup, Dijon, salt, and cinnamon.
- Air fry 14 to 16 minutes, shaking twice, until browned and tender.
- Serve warm.
Equipment for This Recipe:
- Air fryer basket
- Large bowl
- Peeler
How to Serve This Dish: Serve with black beans, rice, or a fried egg. They also work in grain bowls with goat cheese and arugula.
Pro Tips for This Recipe:
- Cut the cubes the same size or you’ll get mush and hard centers in the same basket.
- Do not add extra maple syrup after cooking unless you want them sticky.
- A pinch of chili powder can keep the sweetness from leaning too soft.
Variations on This Dish:
- Savory Herb Cubes: Swap maple for rosemary and garlic powder.
- Warm Spice Version: Add coriander and a pinch of nutmeg.
- Vegan Bowl Base: Toss with tahini and roasted chickpeas after cooking.
Common Mistakes to Avoid with This Dish:
- Making the cubes too small: They dry out before the centers soften.
- Packing the basket: Sweet potatoes need space to caramelize.
- Overloading with syrup: Too much sugar burns.
13. Tahini Cabbage Wedges
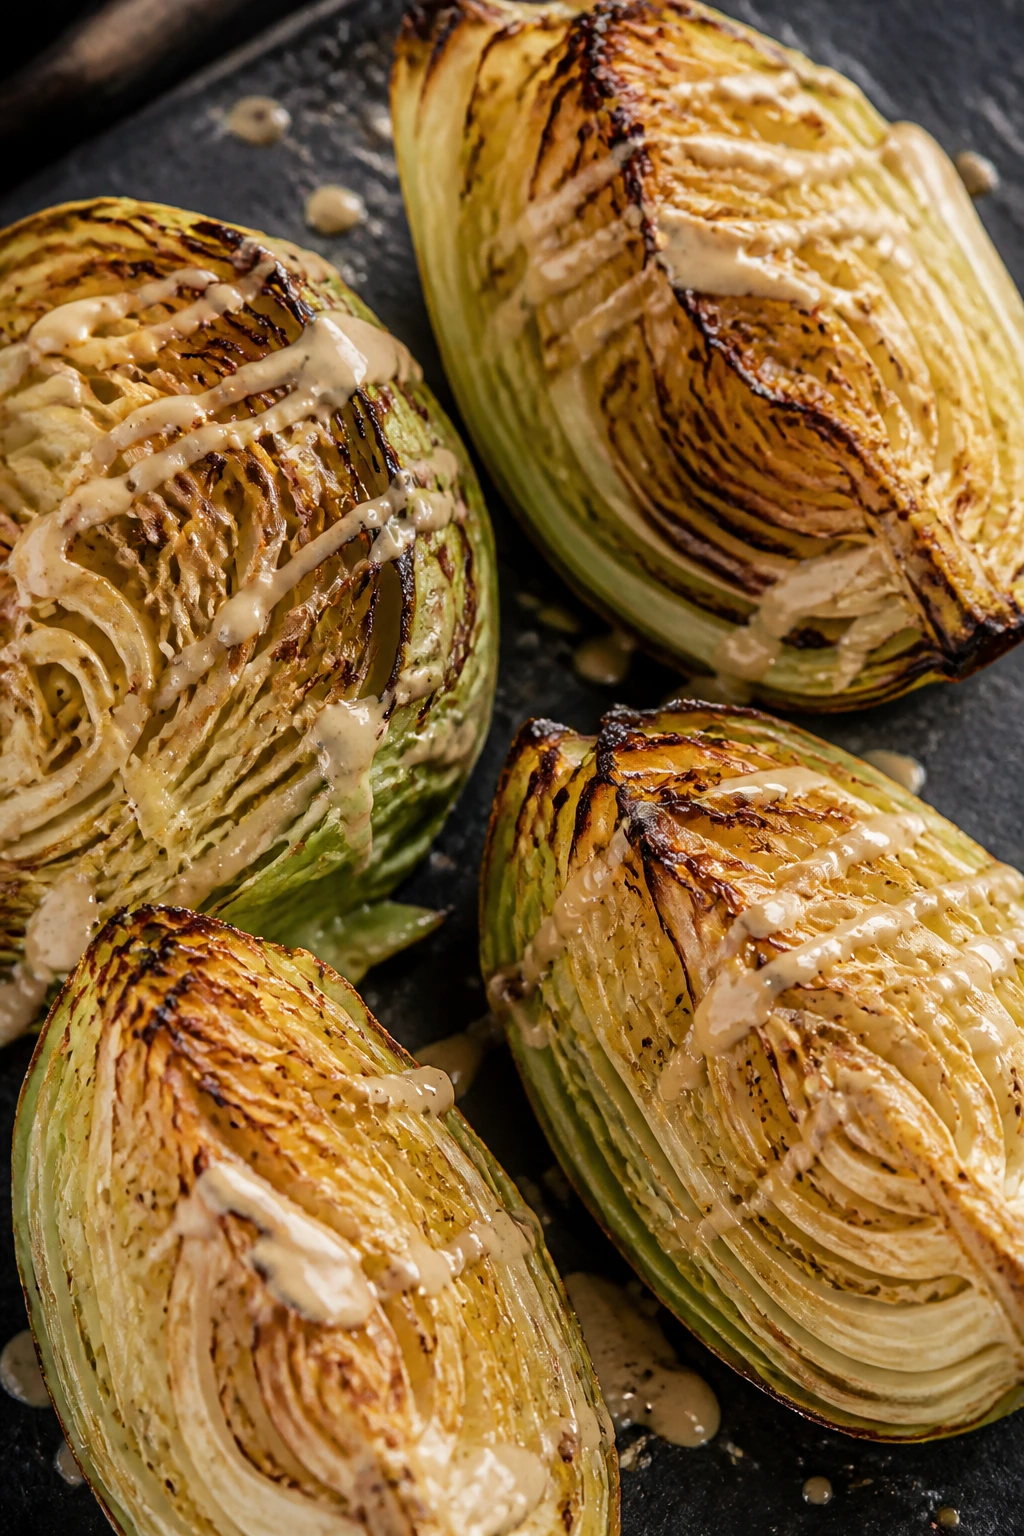
Cabbage turns sweet and almost silky in the middle when the outer leaves catch heat and brown. Tahini, garlic, and lemon make it feel like a real dish instead of the vegetable people push around their plate.
Why It Works: Thick wedges hold together better than shredded cabbage and keep their shape long enough to brown. The tahini sauce finishes the dish after cooking, so it stays creamy instead of separating in the basket.
Key Ingredients:
- 1 small green cabbage, cut into 4 wedges
- 1½ tbsp olive oil
- ½ tsp kosher salt
- ¼ tsp black pepper
- 2 tbsp tahini
- 1 tbsp lemon juice
- 1 small garlic clove, grated
Quick Steps:
- Preheat the air fryer to 385°F.
- Brush the wedges with oil, salt, and pepper.
- Air fry 12 to 14 minutes, flipping once, until browned on the edges.
- Mix tahini, lemon juice, and garlic, then drizzle over the cabbage.
Equipment for This Recipe:
- Air fryer basket or tray
- Small bowl for sauce
- Sharp knife
How to Serve This Dish: Serve with rice, lentils, or chickpeas. It also works with flatbread and a spoonful of yogurt on the side.
Pro Tips for This Recipe:
- Leave a bit of core in each wedge so the cabbage stays intact.
- If the outer leaves pop loose, tuck them back onto the wedge.
- Thin the tahini with a teaspoon of water if it feels too thick.
Variations on This Dish:
- Sesame Chili Cabbage: Add sesame oil and chili crisp.
- Herby Yogurt Version: Swap tahini for yogurt, dill, and lemon.
- Smoky Cabbage: Dust with smoked paprika before cooking.
Common Mistakes to Avoid with This Dish:
- Cutting wedges too thin: They fall apart.
- Skipping the oil on the cut faces: The edges won’t brown.
- Saucing before cooking: The tahini burns.
14. Balsamic Herb Mushroom Caps
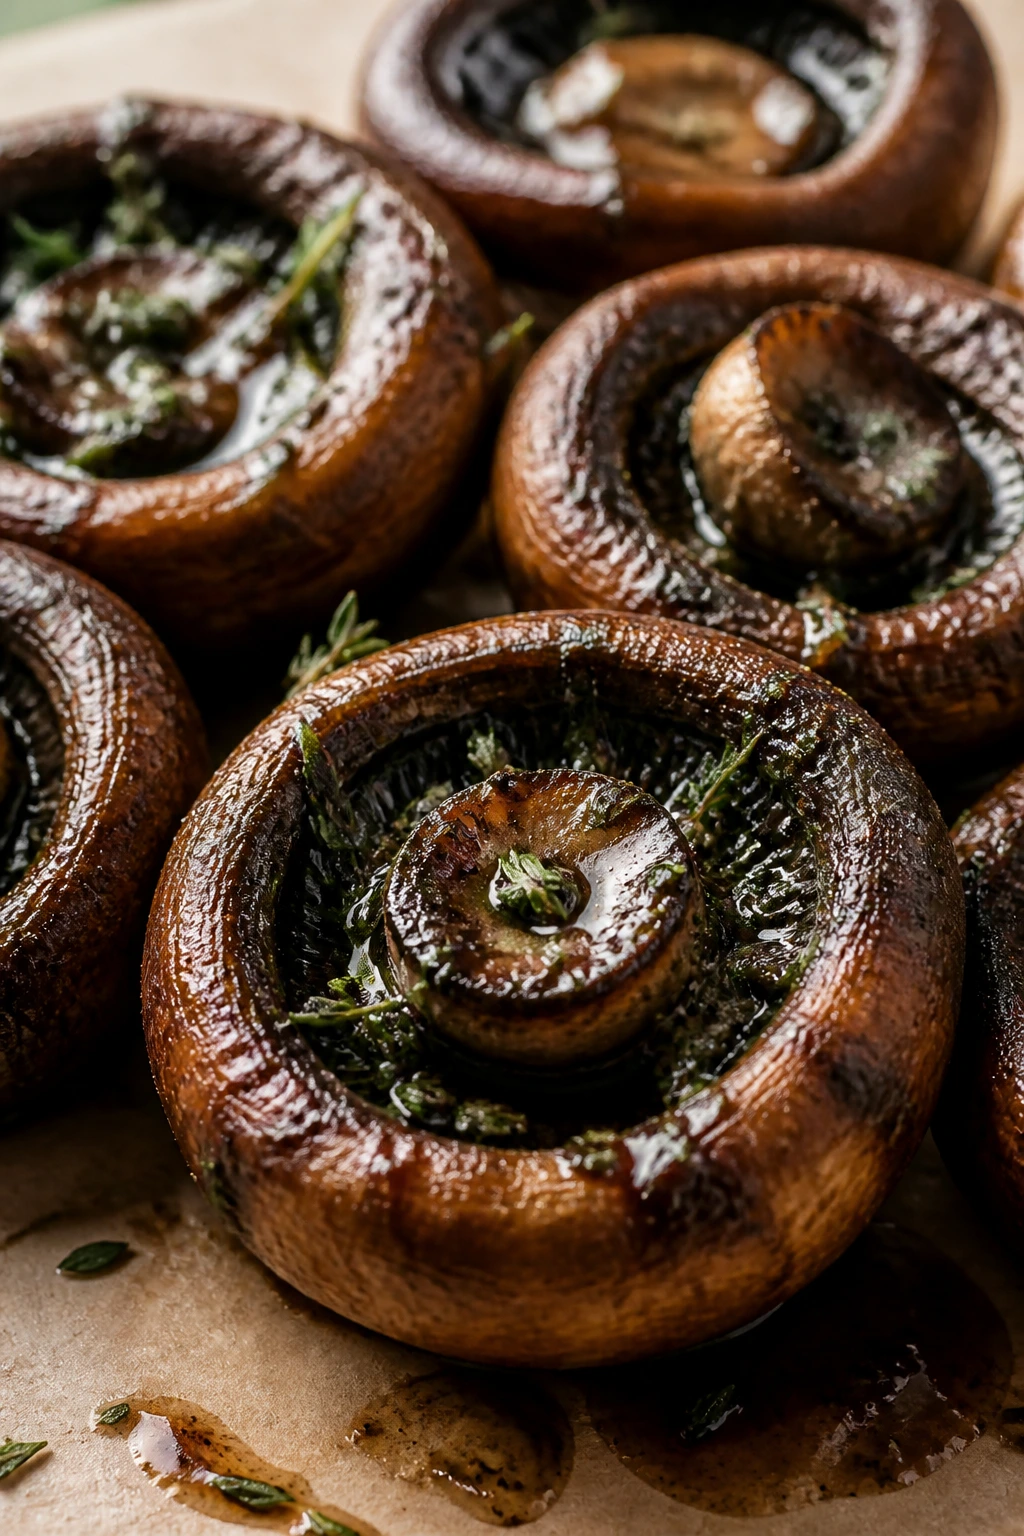
Mushrooms are one of the few vegetables that get meatier in the air fryer. Their edges shrivel a little, the centers stay juicy, and balsamic with herbs gives them the dark, savory flavor they’re already halfway to making.
Why It Works: Mushrooms release moisture as they cook, so a hot basket and some space between them help that liquid evaporate instead of pooling. Balsamic finishes the job with a glossy coat after the mushrooms have browned.
Key Ingredients:
- 12 oz cremini mushrooms, stems trimmed
- 1½ tbsp olive oil
- 1 tbsp balsamic vinegar
- 1 tsp dried thyme
- ½ tsp kosher salt
- ¼ tsp black pepper
Quick Steps:
- Preheat the air fryer to 390°F.
- Toss mushrooms with oil, balsamic, thyme, salt, and pepper.
- Air fry 8 to 10 minutes, shaking once.
- Serve hot.
Equipment for This Recipe:
- Air fryer basket
- Mixing bowl
- Spoon for tossing
How to Serve This Dish: Spoon them over polenta, toast, or rice. They also sit nicely beside pasta with garlic oil and spinach.
Pro Tips for This Recipe:
- Wipe mushrooms clean with a damp cloth rather than soaking them.
- Do not slice them too small or they’ll collapse.
- If there’s liquid in the bowl after tossing, leave it behind.
Variations on This Dish:
- Garlic Herb Caps: Add minced garlic for the last 2 minutes.
- Soy-Glazed Mushrooms: Replace balsamic with soy sauce and a touch of maple.
- Rosemary Version: Use chopped rosemary instead of thyme.
Common Mistakes to Avoid with This Dish:
- Washing them like potatoes: Mushrooms absorb water and steam.
- Packing the basket: They need room or they stew.
- Using too much vinegar: The caps turn sharp instead of savory.
15. Sesame Snap Peas
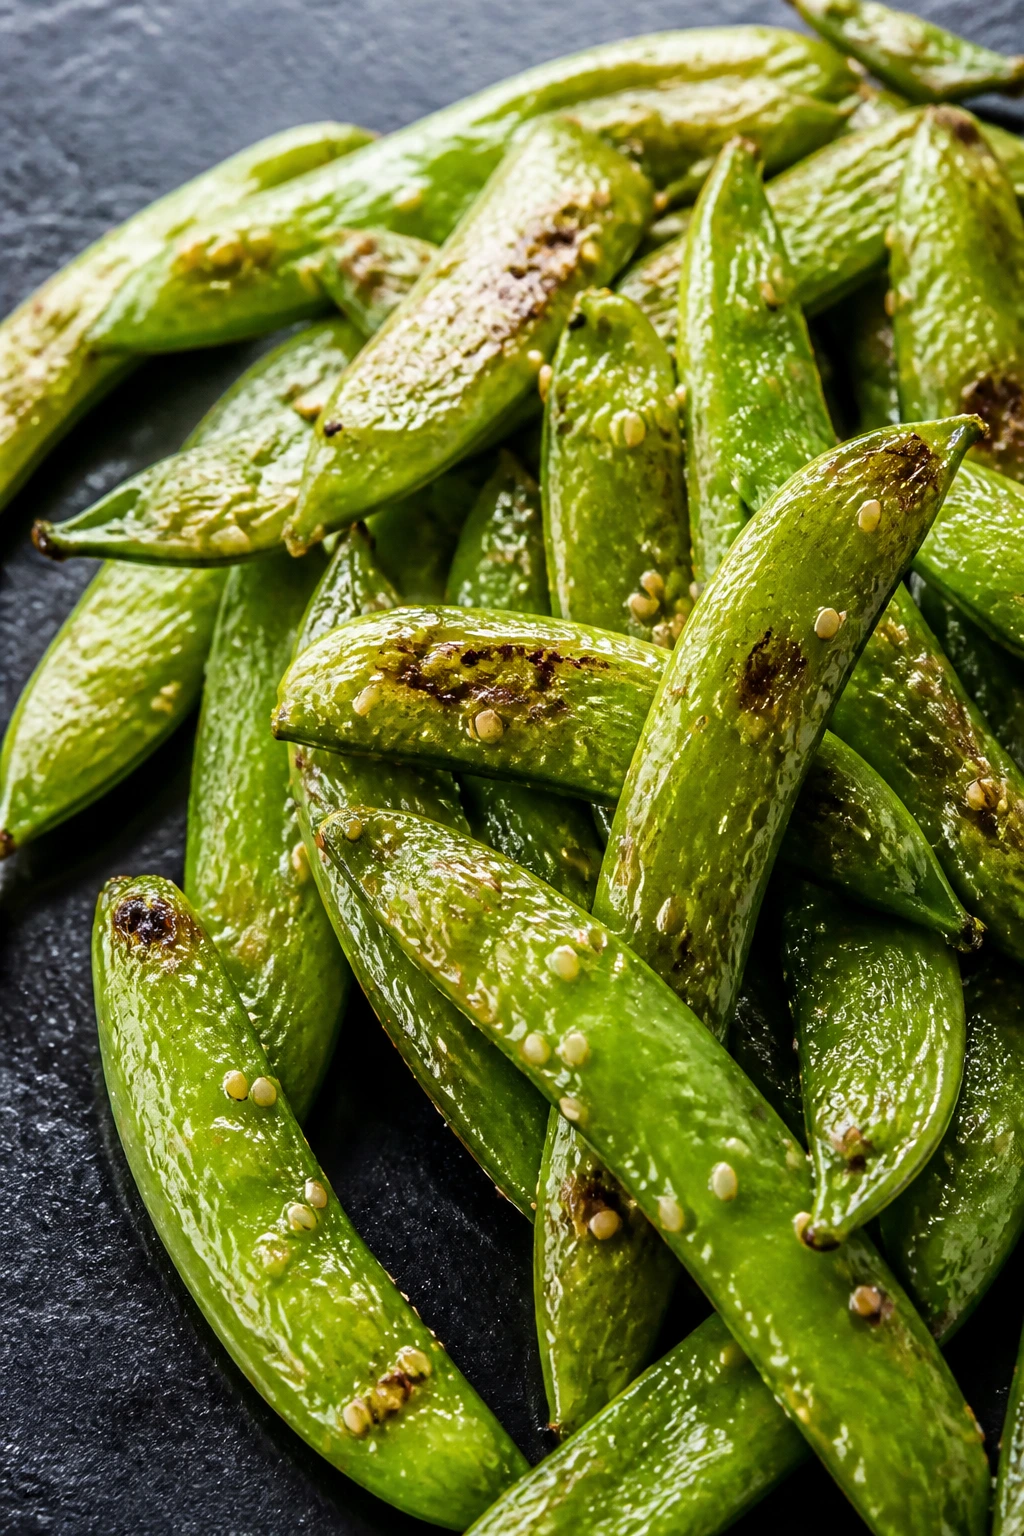
Snap peas are best when they still pop between your teeth, and the air fryer gives them a quick blister without wrecking that crunch. Sesame oil, a little soy, and toasted seeds make them taste like something from a takeout box, only brighter.
Why It Works: Snap peas cook fast because the pods are thin, so short heat is enough to char the surface and keep the inside snappy. Sesame oil adds a toasty note that reads as more than simple salt and pepper.
Key Ingredients:
- 10 oz snap peas, strings removed if needed
- 1 tsp neutral oil
- 1 tsp sesame oil
- 1 tsp soy sauce
- ½ tsp garlic powder
- 1 tbsp toasted sesame seeds
Quick Steps:
- Preheat the air fryer to 380°F.
- Toss snap peas with oils, soy sauce, and garlic powder.
- Air fry 5 to 6 minutes, shaking once.
- Sprinkle with sesame seeds.
Equipment for This Recipe:
- Air fryer basket
- Small bowl
- Tongs
How to Serve This Dish: Serve with fried rice, noodles, or tofu. They’re also good cold the next day in a lunchbox salad.
Pro Tips for This Recipe:
- Keep the cook time short or the peas wrinkle and lose their pop.
- Use just enough oil to coat; too much softens the pods.
- Toast the sesame seeds first if you want a stronger nutty smell.
Variations on This Dish:
- Ginger-Sesame Peas: Add grated ginger and a squeeze of lime.
- Chili Crisp Finish: Toss with 1 teaspoon chili crisp after cooking.
- Garlic-Lemon Version: Swap soy sauce for lemon juice and extra garlic powder.
Common Mistakes to Avoid with This Dish:
- Cooking too long: Snap peas collapse fast.
- Leaving strings on tough pods: The bite gets annoyingly fibrous.
- Adding seeds before cooking: They can burn.
16. Cornmeal Okra
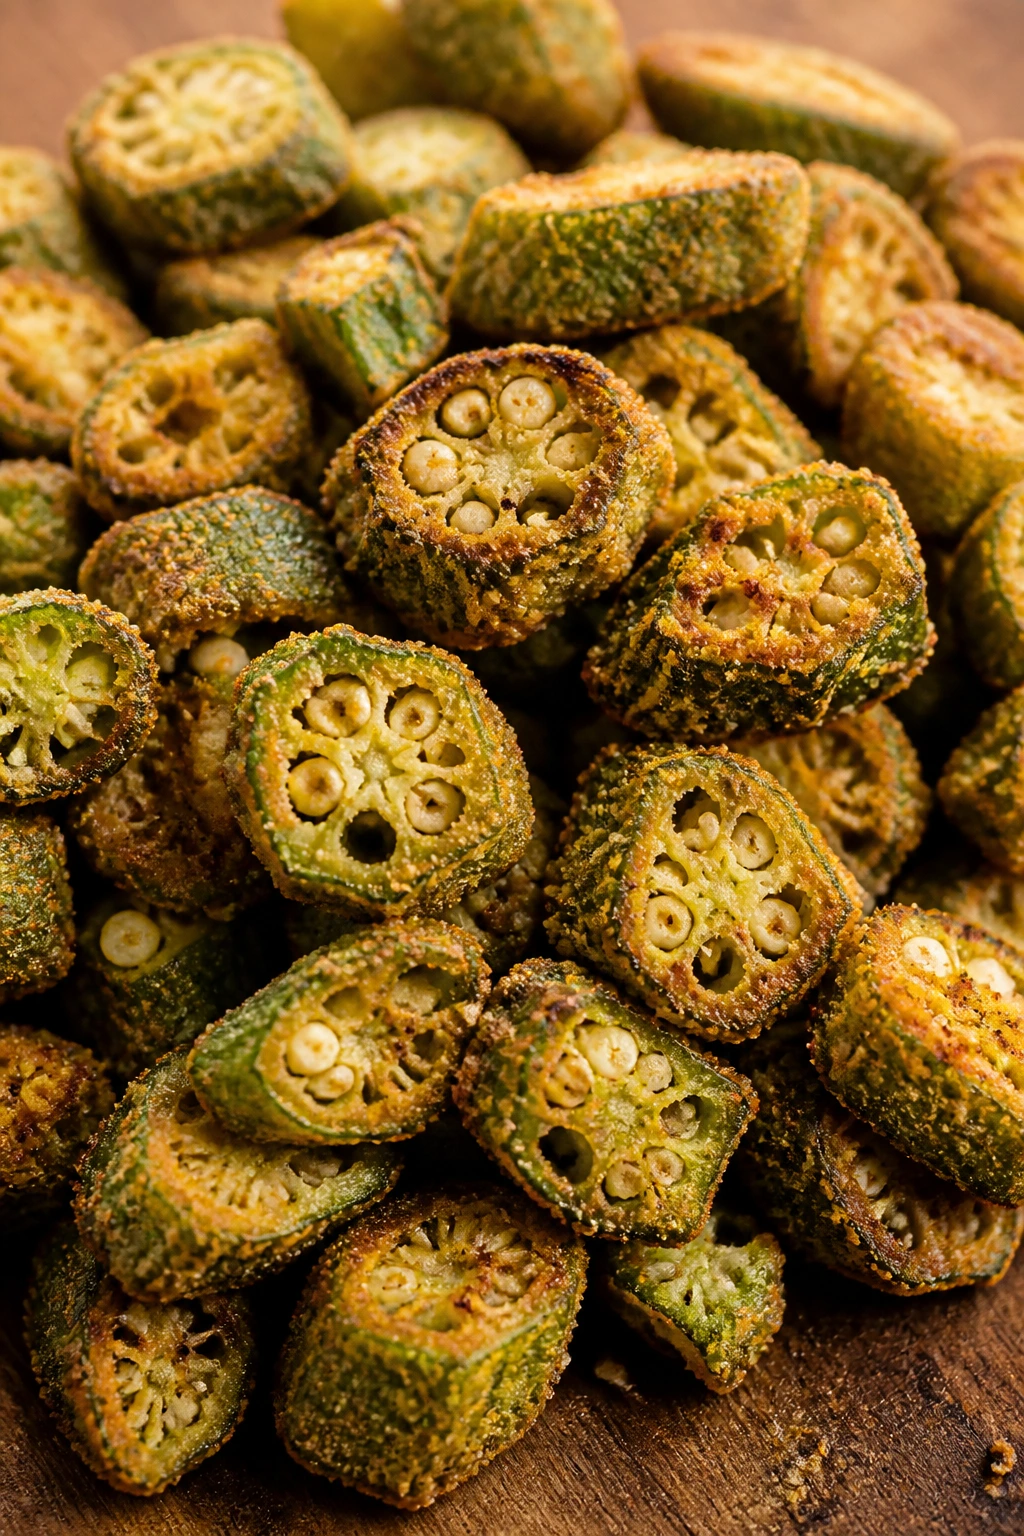
Okra gets a bad reputation when it’s slimy, but high heat fixes that problem fast. The cornmeal coating gives you a sandy crunch, and the pods come out with a toasted, almost nutty flavor.
Why It Works: Slicing okra and coating it lightly in cornmeal helps absorb surface moisture before the air fryer gets to it. That dry crust is what keeps the pods crisp instead of sticky.
Key Ingredients:
- 1 lb okra, trimmed and sliced into ½-inch pieces
- 1 tbsp olive oil
- ½ tsp kosher salt
- ½ tsp paprika
- ¼ cup cornmeal
- 2 tbsp all-purpose flour
Quick Steps:
- Preheat the air fryer to 400°F.
- Toss okra with oil, salt, paprika, cornmeal, and flour.
- Air fry 10 to 12 minutes, shaking twice, until crisp and browned.
- Serve immediately.
Equipment for This Recipe:
- Air fryer basket
- Mixing bowl
- Measuring cups
How to Serve This Dish: Serve with hot sauce, ranch, or a tomato salad. It also works with grits and collard greens for a meatless Southern plate.
Pro Tips for This Recipe:
- Dry the okra well before cutting it.
- Use medium pods; huge okra can be woody.
- Shake the basket gently so the coating stays on.
Variations on This Dish:
- Cajun Okra: Add cayenne and Cajun seasoning.
- Gluten-Free Okra: Use rice flour instead of all-purpose flour.
- Lemon Pepper Version: Swap paprika for lemon pepper seasoning.
Common Mistakes to Avoid with This Dish:
- Starting with wet okra: Moisture makes slime.
- Using too much flour: The coating turns pasty.
- Letting it sit in the basket: It softens fast once cooked.
17. Ricotta-Stuffed Mini Peppers
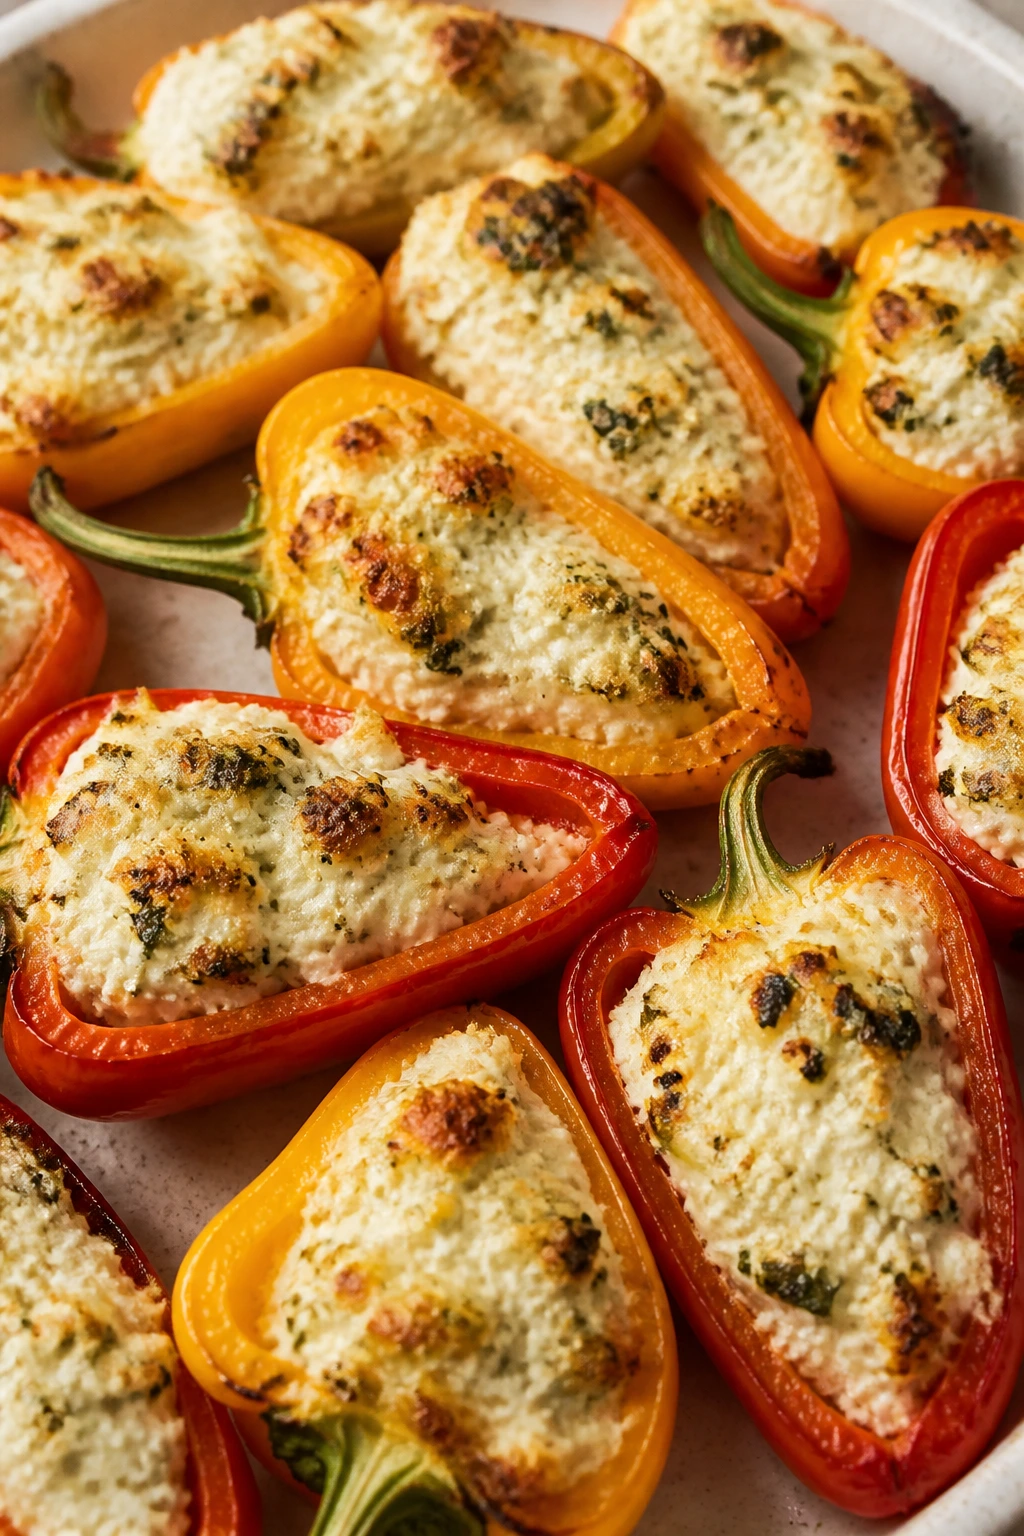
Sweet mini peppers blister nicely in the air fryer, and a ricotta filling keeps them creamy without turning the whole tray heavy. They look like little bright boats when they come out, with golden edges and soft centers.
Why It Works: The peppers cook quickly, while ricotta and herbs warm through without separating. A little Parmesan in the filling gives the cheese body so it doesn’t slump out of the peppers.
Key Ingredients:
- 12 mini sweet peppers, halved and seeded
- 1 cup ricotta
- ¼ cup grated Parmesan
- 1 tbsp chopped basil
- ½ tsp kosher salt
- ¼ tsp black pepper
- 1 tsp olive oil for brushing
Quick Steps:
- Preheat the air fryer to 360°F.
- Mix ricotta, Parmesan, basil, salt, and pepper.
- Fill the pepper halves and brush the outsides with oil.
- Air fry 7 to 9 minutes, until the peppers are tender and the tops are lightly browned.
Equipment for This Recipe:
- Air fryer tray or basket
- Small bowl
- Spoon
How to Serve This Dish: Serve as a starter, or put them beside salad and bread for a light dinner. They also work as a side with soup.
Pro Tips for This Recipe:
- Pat the pepper halves dry so the filling stays put.
- Use a piping bag or zip-top bag if you want neater filling.
- Add lemon zest to the ricotta if you want more lift.
Variations on This Dish:
- Spinach-Ricotta: Fold in finely chopped cooked spinach.
- Herbed Goat Cheese: Swap ricotta for soft goat cheese.
- Spicy Pepper Boats: Stir in red pepper flakes or chopped jalapeño.
Common Mistakes to Avoid with This Dish:
- Overfilling the peppers: The cheese spills and burns.
- Using watery ricotta: The filling loosens and slides out.
- Cooking too hot: The pepper skins char before the centers warm.
18. Sage Butternut Squash Cubes
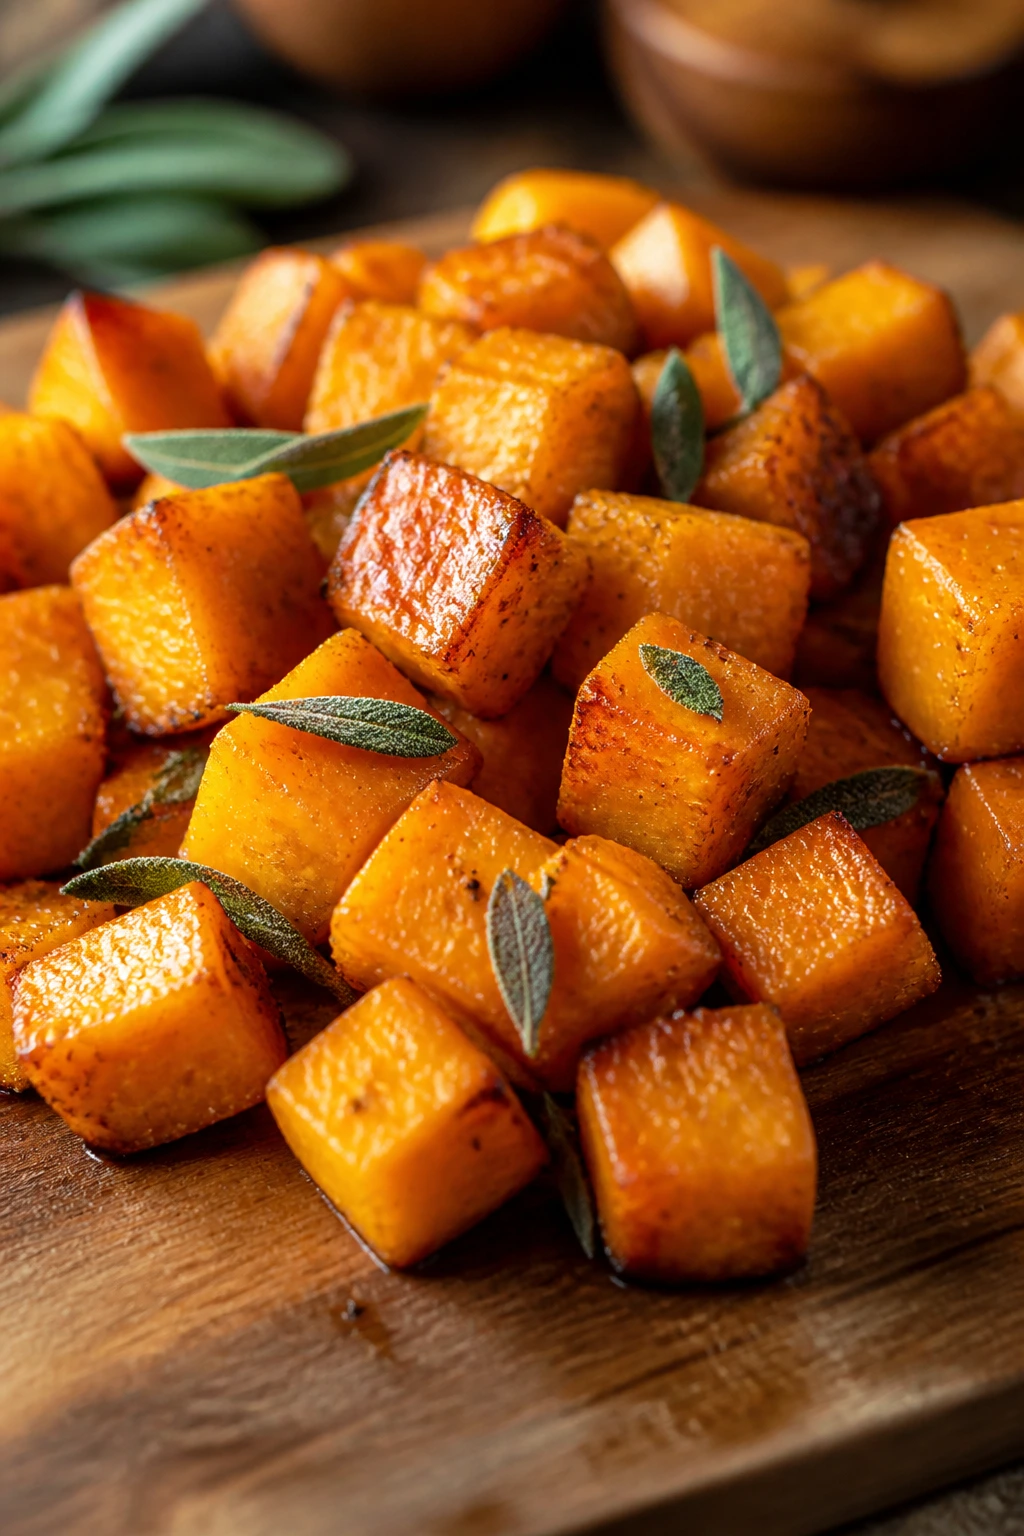
Butternut squash turns almost candy-like in the air fryer, but the sage and salt keep it from crossing over into dessert. The edges brown, the centers soften, and the whole thing smells like roasted autumn without the long oven wait.
Why It Works: Squash cubes need direct heat on several sides, and the air fryer gives that without constant stirring. Sage is sturdy enough to stand up to the hot basket, so it perfumes the squash instead of fading away.
Key Ingredients:
- 1 small butternut squash, peeled and cut into ¾-inch cubes
- 1½ tbsp olive oil
- 1 tsp chopped fresh sage
- ½ tsp kosher salt
- ¼ tsp black pepper
- 1 tsp maple syrup, optional
Quick Steps:
- Preheat the air fryer to 390°F.
- Toss squash with oil, sage, salt, pepper, and maple syrup if using.
- Air fry 14 to 16 minutes, shaking twice, until browned and tender.
- Serve warm.
Equipment for This Recipe:
- Air fryer basket
- Vegetable peeler
- Sharp knife
How to Serve This Dish: Serve with farro, goat cheese, or roasted lentils. It also makes a good filling for warm grain salads.
Pro Tips for This Recipe:
- Cut the cubes evenly so the edges brown at the same pace.
- Do not peel too aggressively; just get the skin off and move on.
- A splash of vinegar after cooking keeps the squash from tasting too sweet.
Variations on This Dish:
- Brown Butter Sage: Toss with browned butter after cooking.
- Chili-Sage Squash: Add a pinch of red pepper flakes.
- Vegan Glaze: Finish with maple and tahini.
Common Mistakes to Avoid with This Dish:
- Cubes that are too small: They dry out before they soften.
- Crowding the basket: The squash steams and stays pale.
- Too much maple syrup: Sugar can darken too fast.
19. Cajun Brussels and Potatoes
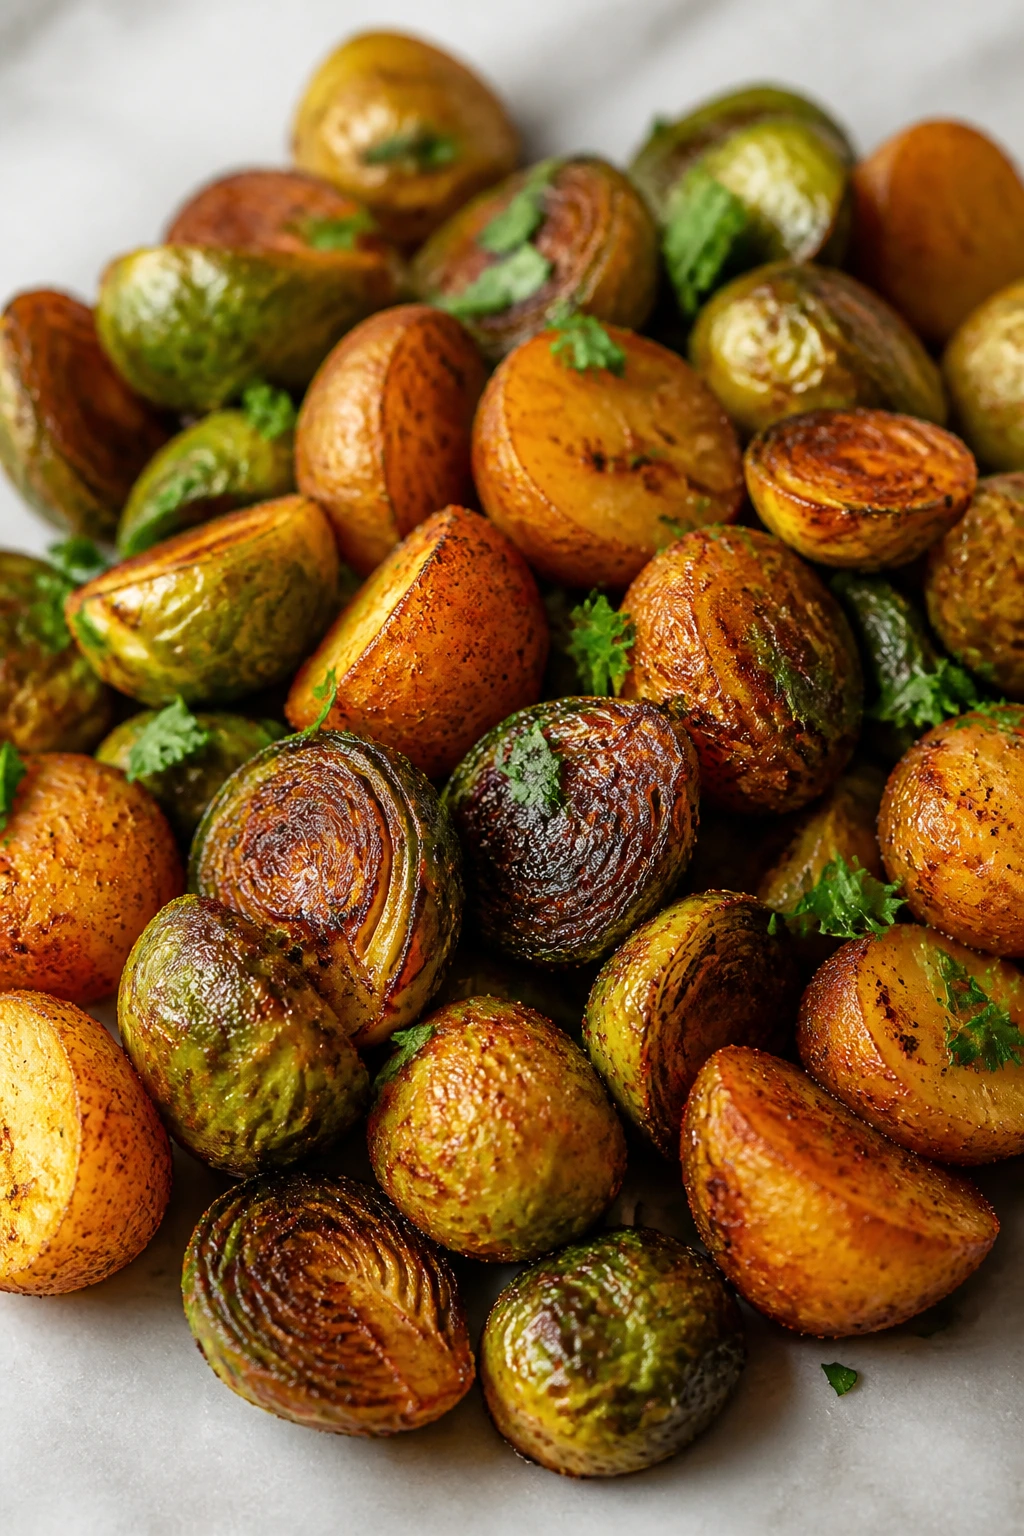
This is the kind of tray that can pass for dinner with almost no extra effort: crisp potatoes, browned Brussels sprouts, and a Cajun spice coating that does the heavy lifting. It’s smoky, salty, and a little fiery at the edges.
Why It Works: Potatoes and Brussels sprouts like the same heat range, so they can cook together without one turning mushy. The spice blend blooms in the oil and coats both vegetables evenly.
Key Ingredients:
- 1 lb baby potatoes, halved
- 12 oz Brussels sprouts, halved
- 1½ tbsp olive oil
- 1½ tsp Cajun seasoning
- ½ tsp kosher salt
- 1 tbsp chopped parsley
Quick Steps:
- Preheat the air fryer to 390°F.
- Toss potatoes and Brussels sprouts with oil, seasoning, and salt.
- Air fry 16 to 18 minutes, shaking twice, until the potatoes are tender and the sprouts are browned.
- Finish with parsley.
Equipment for This Recipe:
- Air fryer basket
- Large bowl
- Tongs
How to Serve This Dish: Serve with a fried egg, beans, or a bowl of yogurt dip. It also works as a side for seared halloumi or baked tofu.
Pro Tips for This Recipe:
- Cut the potatoes small enough to match the Brussels cook time.
- Put potatoes cut-side down early for better browning.
- If the seasoning is very salty, cut the added salt in half.
Variations on This Dish:
- Garlic-Cajun Version: Add garlic powder to the oil.
- Cheesy Finish: Sprinkle with Parmesan after cooking.
- Mild Family Batch: Use paprika and thyme instead of Cajun seasoning.
Common Mistakes to Avoid with This Dish:
- Different cut sizes: One vegetable finishes too soon.
- Not shaking the basket: The potatoes need rotation.
- Using wet sprouts: They brown poorly.
20. Crispy Artichoke Hearts
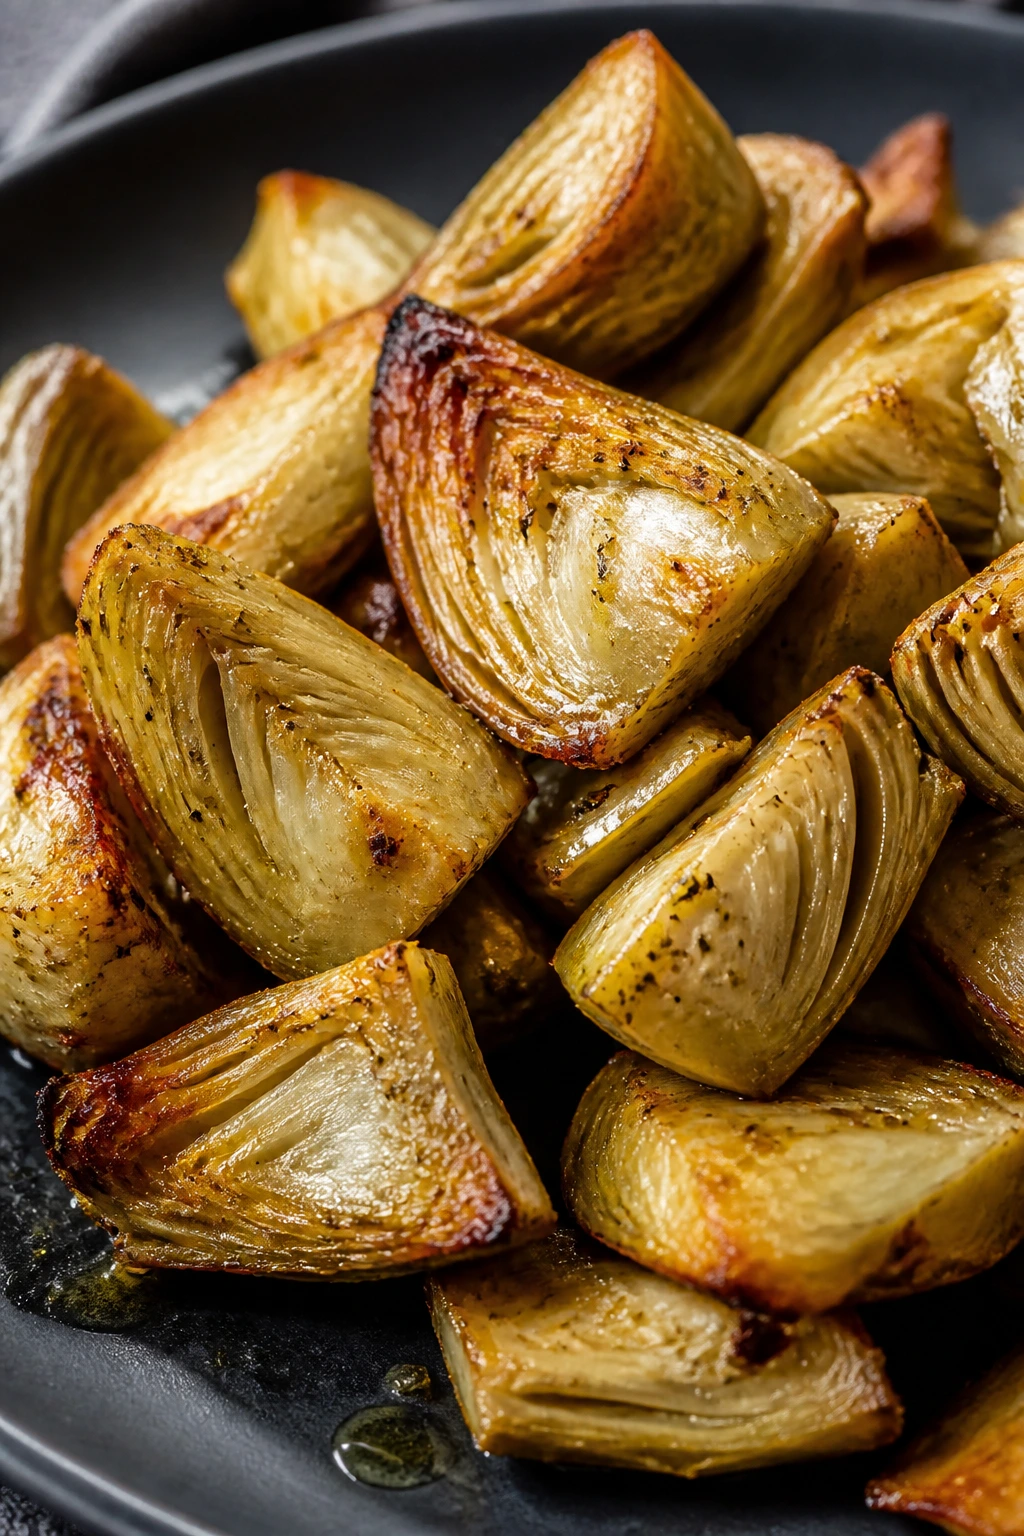
Canned or jarred artichoke hearts become something else in the air fryer: crisp edges, tender centers, and a salty tang that makes them feel snacky in the best way. They’re the vegetable equivalent of turning a pantry shortcut into a real dish.
Why It Works: Artichoke hearts already have a soft interior, so the air fryer’s job is mostly to dry and brown the outside. A thin coating of oil and seasoning helps them crisp instead of shrinking into stringy bits.
Key Ingredients:
- 1 can artichoke hearts, drained and patted dry
- 1 tbsp olive oil
- ½ tsp garlic powder
- ½ tsp kosher salt
- ¼ tsp black pepper
- 1 tbsp grated Parmesan, optional
Quick Steps:
- Preheat the air fryer to 390°F.
- Toss artichoke hearts with oil, garlic powder, salt, and pepper.
- Air fry 8 to 10 minutes, shaking once, until crisp at the edges.
- Sprinkle with Parmesan if using.
Equipment for This Recipe:
- Air fryer basket
- Paper towels
- Mixing bowl
How to Serve This Dish: Serve with lemon aioli, tucked into salads, or alongside pasta. They also work as a warm starter with olives and bread.
Pro Tips for This Recipe:
- Dry them very well after draining; extra liquid ruins the texture.
- Split large hearts in half so they crisp evenly.
- Add cheese only at the end or it can burn.
Variations on This Dish:
- Lemon Herb Hearts: Add lemon zest and thyme.
- Spicy Artichokes: Dust with paprika and red pepper flakes.
- Vegan Snack Version: Finish with nutritional yeast.
Common Mistakes to Avoid with This Dish:
- Skipping the dry-off step: Wet hearts steam.
- Leaving them whole if they’re large: The centers stay soft while the outsides overcook.
- Too much oil: They turn limp instead of crisp.
21. Herb-Roasted Radishes
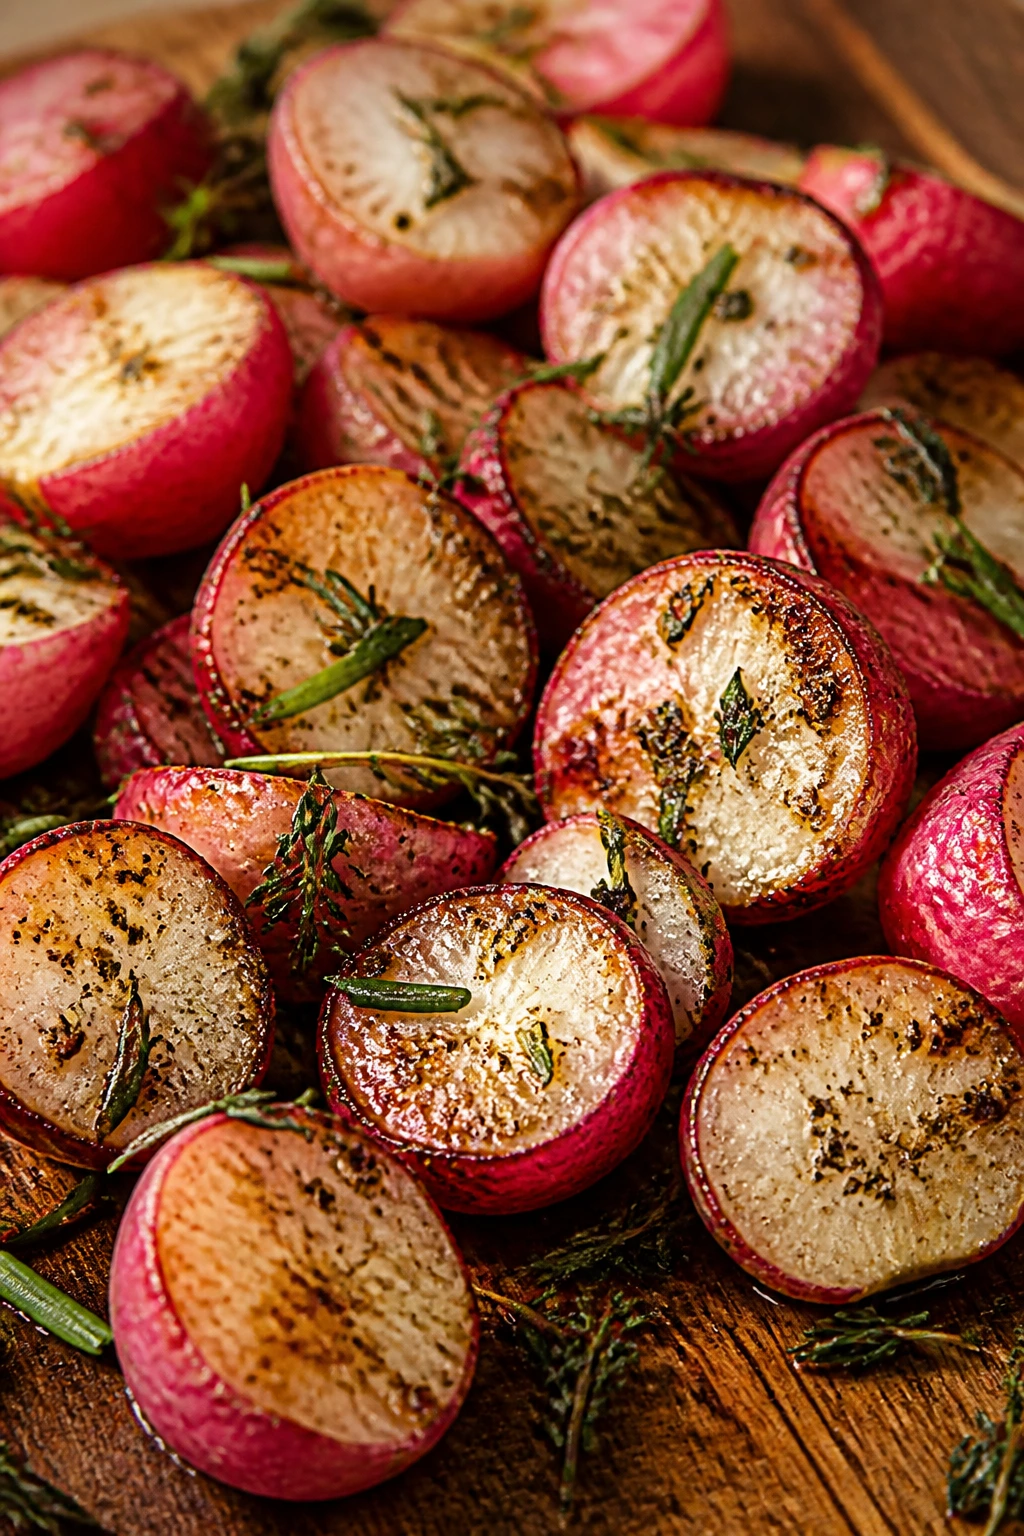
Radishes are best known for crunch, but air frying takes the sharp bite down a notch and turns the inside buttery. With herbs and salt, they stop acting like salad filler and start tasting like a mild roasted potato with a peppery finish.
Why It Works: Radishes lose some of their raw heat in high dry heat, which makes them more approachable. Cut them in halves or quarters and the surfaces brown while the centers soften.
Key Ingredients:
- 1 bunch radishes, trimmed and halved
- 1 tbsp olive oil
- ½ tsp kosher salt
- ¼ tsp black pepper
- 1 tsp dried thyme
- 1 tbsp chopped chives
Quick Steps:
- Preheat the air fryer to 390°F.
- Toss radishes with oil, salt, pepper, and thyme.
- Air fry 10 to 12 minutes, shaking once, until browned and tender.
- Top with chives.
Equipment for This Recipe:
- Air fryer basket
- Knife
- Mixing bowl
How to Serve This Dish: Serve with roast chicken if you’re cooking for mixed eaters, or keep it vegetarian with lentils and yogurt. They’re also good with eggs and toast.
Pro Tips for This Recipe:
- Smaller radishes taste milder; big ones can stay a little peppery.
- Cut through the root end if a radish is especially thick.
- A dab of butter after cooking makes them taste rounder.
Variations on This Dish:
- Garlic-Dill Radishes: Swap thyme for dill and garlic powder.
- Mustard Herb Version: Add a teaspoon of Dijon before cooking.
- Brown Butter Finish: Toss with brown butter and chives.
Common Mistakes to Avoid with This Dish:
- Expecting them to taste raw: The point is the transformation.
- Cutting uneven pieces: Tiny radishes dry out first.
- Overcooking: They go soft fast once they hit the tender stage.
22. Garlic Butter Smashed Potatoes
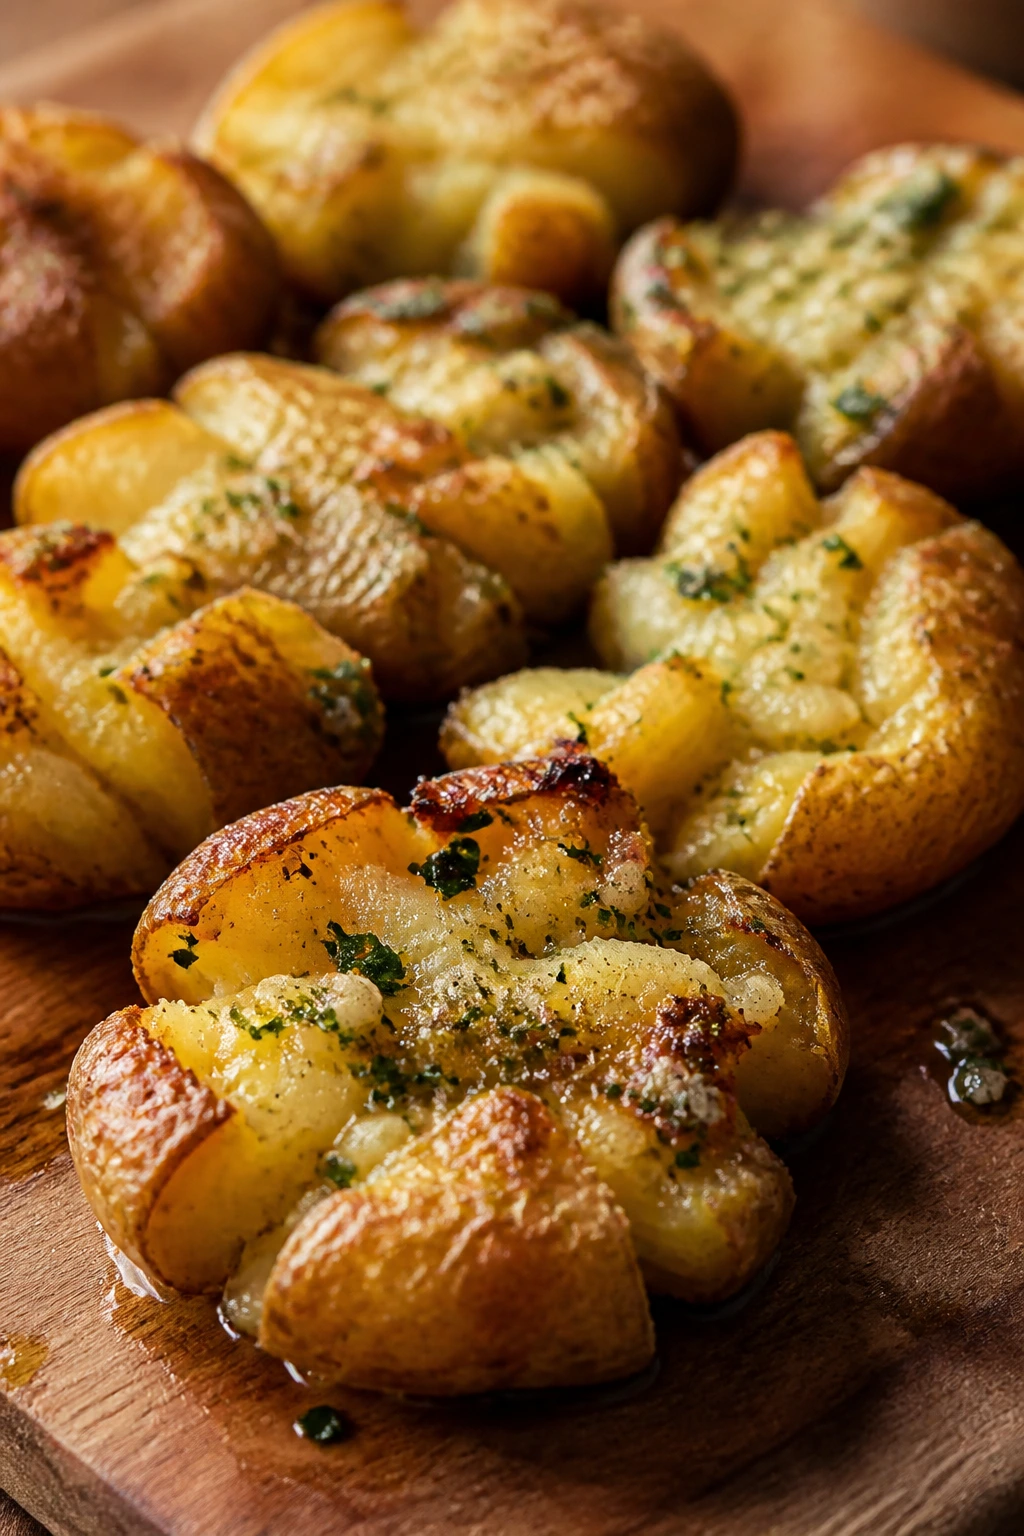
Smashed potatoes are all about surface area, and the air fryer rewards that generosity with sharp, crunchy edges. Garlic butter gives them a rich, salty finish that tastes like they took more work than they did.
Why It Works: Boiling the potatoes first makes the centers soft, then smashing opens up rough edges that brown quickly in hot air. Butter carries garlic and salt across all those creases.
Key Ingredients:
- 1 lb baby potatoes
- 1 tbsp olive oil
- 2 tbsp melted butter
- 1 tsp garlic powder
- ¾ tsp kosher salt
- ¼ tsp black pepper
- 1 tbsp chopped parsley
Quick Steps:
- Boil potatoes in salted water until tender, about 15 minutes, then drain.
- Smash each potato to about ½-inch thick.
- Preheat the air fryer to 400°F, brush with oil, butter, garlic, salt, and pepper.
- Air fry 10 to 12 minutes until crisp and browned.
Equipment for This Recipe:
- Air fryer basket
- Pot or saucepan
- Potato masher or flat-bottomed glass
How to Serve This Dish: Serve under a scoop of yogurt or next to sautéed greens. They also work as a breakfast side with eggs.
Pro Tips for This Recipe:
- Don’t smash them too thin or they fall apart.
- If the potatoes are larger, cut them in half before boiling.
- Fresh parsley goes on at the end for color and lift.
Variations on This Dish:
- Rosemary Garlic Version: Add chopped rosemary to the butter.
- Cheddar Smashers: Finish with shredded cheddar for the last 2 minutes.
- Vegan Butter Swap: Use olive oil and vegan butter together.
Common Mistakes to Avoid with This Dish:
- Skipping the boil: Raw potatoes won’t smash cleanly.
- Using too much butter too early: It can pool and slow browning.
- Crowding the basket: The edges won’t crisp properly.
23. Paprika Onion Petals
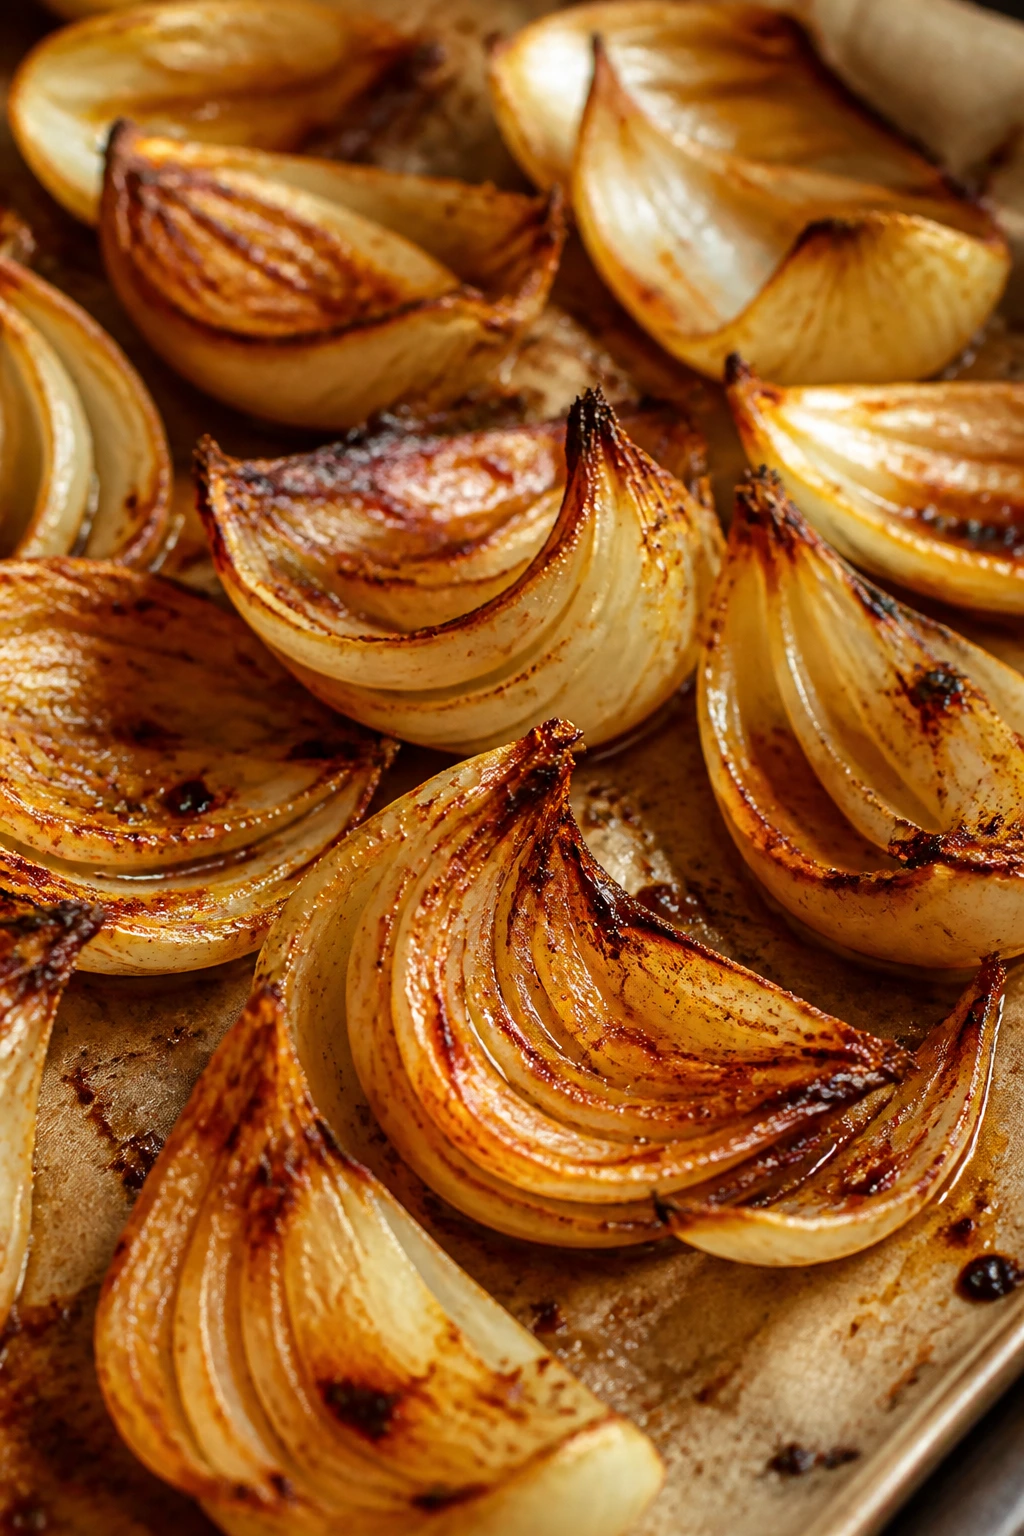
Onion petals separate into crisp, caramel-tipped layers in the air fryer, and paprika gives them a gentle smokiness that feels deeper than plain roasted onions. They’re a little messy, a little sweet, and worth the paper towels.
Why It Works: Onion layers naturally fan out, so the air fryer can catch the cut edges and brown them fast. A light coating keeps the petals from drying out before the centers soften.
Key Ingredients:
- 2 large yellow onions, cut into petals
- 1½ tbsp olive oil
- 1 tsp smoked paprika
- ½ tsp kosher salt
- ¼ tsp black pepper
- 1 tbsp flour or cornstarch
Quick Steps:
- Preheat the air fryer to 380°F.
- Toss onions with oil, paprika, salt, pepper, and flour.
- Air fry 10 to 12 minutes, shaking twice, until browned and tender.
- Serve warm.
Equipment for This Recipe:
- Air fryer basket
- Sharp knife
- Mixing bowl
How to Serve This Dish: Serve as a side to burgers, grain bowls, or a simple plate of beans and rice. They also make a good topping for baked potatoes.
Pro Tips for This Recipe:
- Keep some of the root end attached so the petals don’t fall apart.
- A little cornstarch gives a crisper finish than flour alone.
- Spread the petals out after cooking so steam can escape.
Variations on This Dish:
- French Onion Style: Add thyme and top with a little melted Gruyère.
- Cajun Onion Petals: Use Cajun seasoning instead of paprika.
- Vegan Crispy Version: Use cornstarch and serve with dairy-free dip.
Common Mistakes to Avoid with This Dish:
- Slicing the root end off: The petals separate too soon.
- Overdoing the flour: It clumps and tastes pasty.
- Leaving them piled together after cooking: They soften from trapped steam.
24. Beet Chips with Thyme Salt
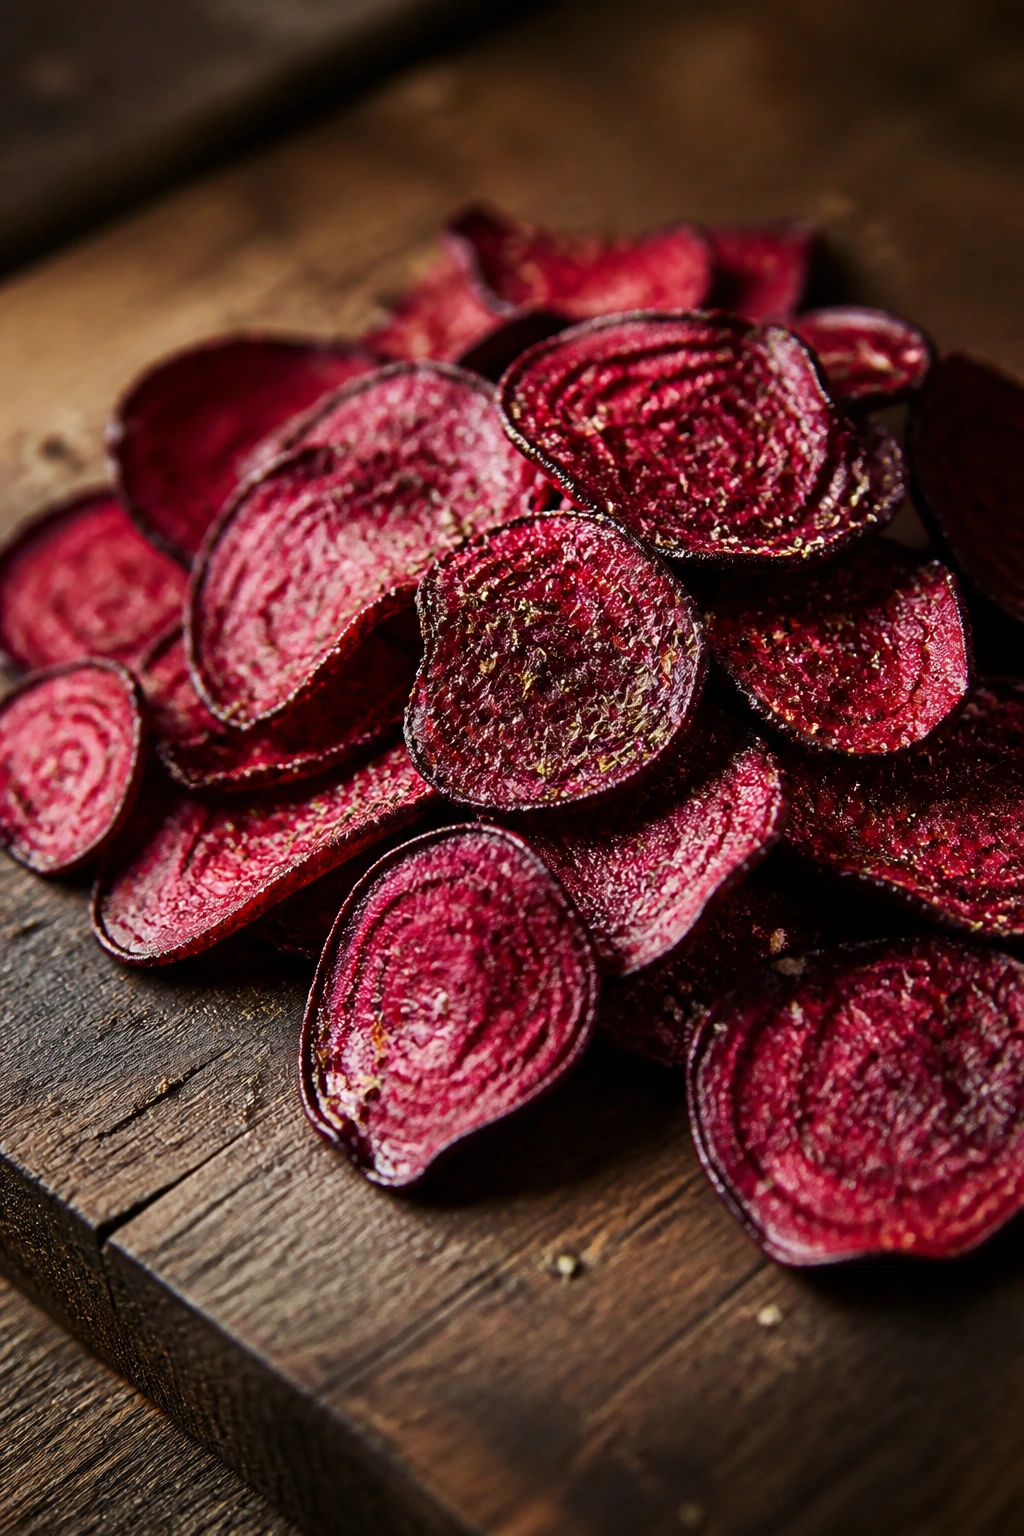
Beets can be earthy and sweet at the same time, and thin chips bring that out without turning them into a heavy roast. The thyme salt sharpens the flavor and keeps the chips from tasting like plain dirt, which is the complaint people always skip to.
Why It Works: Thin slices give beets enough exposure to dry out and crisp before they burn. The air fryer’s speed is useful here because beets need a lot of browning to become snackable.
Key Ingredients:
- 2 medium beets, peeled and sliced very thin
- 1 tbsp olive oil
- ½ tsp kosher salt
- 1 tsp dried thyme
- ¼ tsp black pepper
Quick Steps:
- Preheat the air fryer to 360°F.
- Toss beet slices with oil, salt, thyme, and pepper.
- Air fry 12 to 15 minutes, shaking carefully, until crisp at the edges.
- Cool for 2 minutes before eating.
Equipment for This Recipe:
- Mandoline or very sharp knife
- Air fryer basket
- Mixing bowl
How to Serve This Dish: Serve as a snack with yogurt dip or scatter over salads for crunch. They also make a good side for a cheese board if you’re building a vegetarian spread.
Pro Tips for This Recipe:
- Slice the beets evenly; uneven chips burn fast.
- Don’t skip the cooling time. They crisp as they sit.
- Use red and golden beets together if you want a mixed tray.
Variations on This Dish:
- Rosemary Beet Chips: Swap thyme for finely chopped rosemary.
- Salt-and-Vinegar Style: Add a tiny splash of vinegar after cooking.
- Spiced Beet Crisps: Dust with cumin and coriander.
Common Mistakes to Avoid with This Dish:
- Slicing too thick: Thick slices dry slowly and stay chewy.
- Overloading the basket: Chips need space or they wilt.
- Expecting them to crisp right away: They often finish crisping on the counter.
25. Pesto Portobello Caps
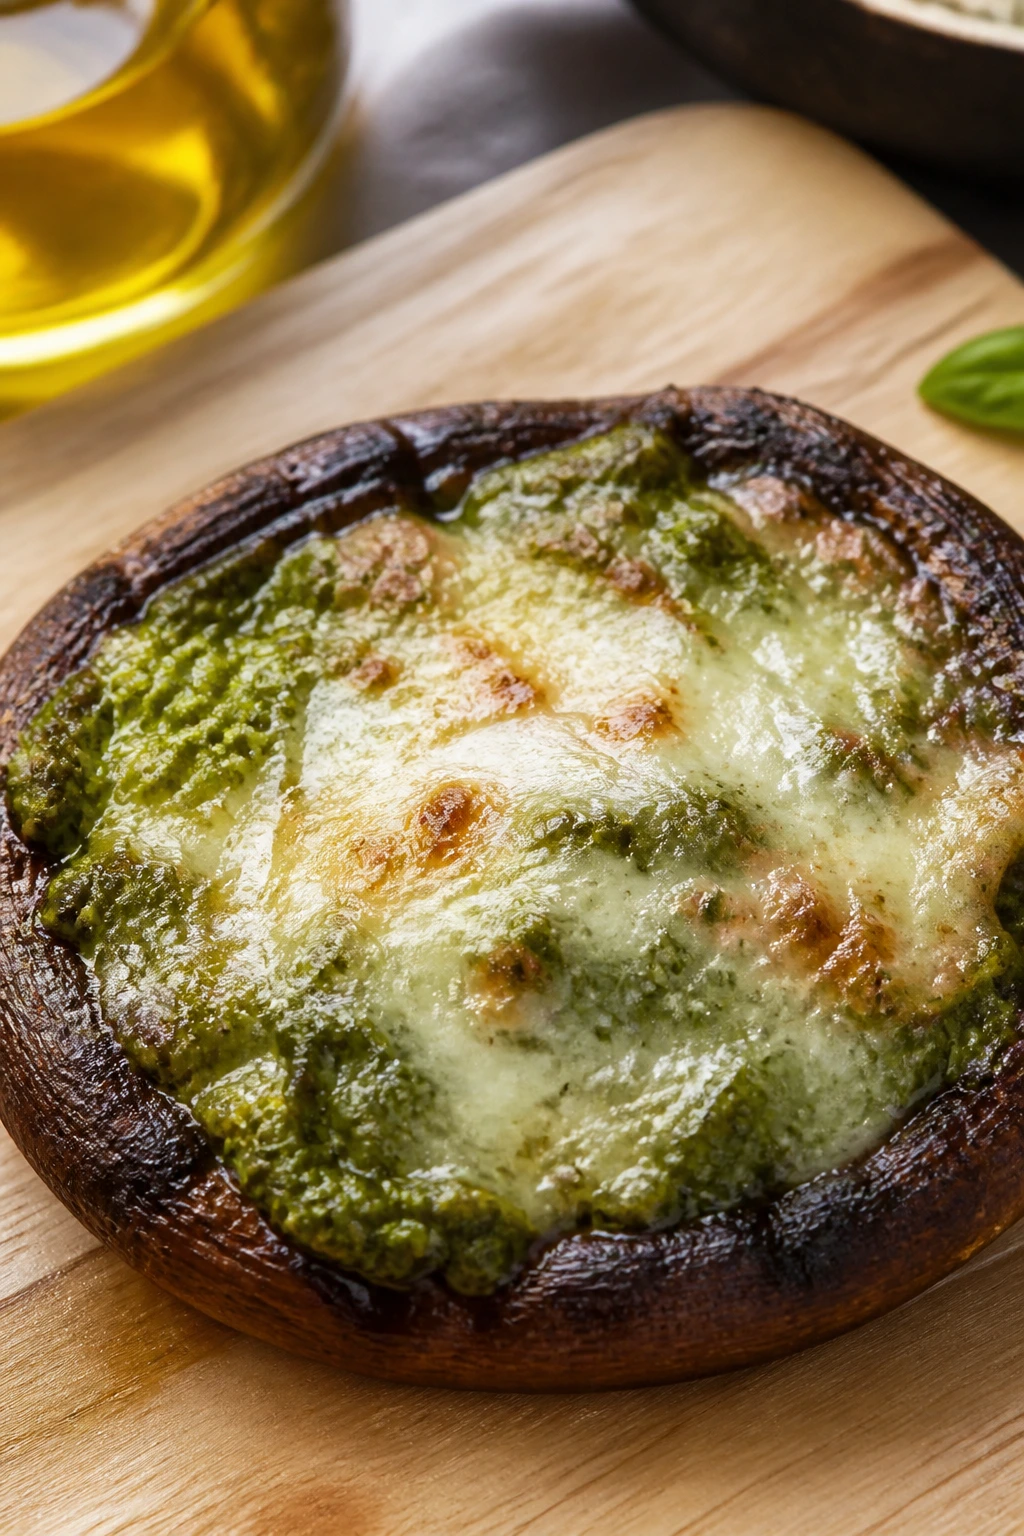
Portobello caps turn rich and juicy when the air fryer trims away the excess moisture and browns the edges. Pesto gives them basil, garlic, and cheese all at once, which is a good thing when you want a fast vegetarian main.
Why It Works: Portobellos are thick enough to hold sauce, but they also shed water, so the basket has to be hot enough to dry them while the pesto flavors the surface. A brief cook keeps the caps meaty instead of leathery.
Key Ingredients:
- 4 large portobello caps, stems removed
- 1 tbsp olive oil
- 2 tbsp pesto
- ¼ tsp kosher salt
- ¼ cup shredded mozzarella or dairy-free shreds
- 1 tbsp pine nuts, optional
Quick Steps:
- Preheat the air fryer to 380°F.
- Brush caps with oil and salt.
- Air fry 6 minutes, then spread with pesto and top with cheese.
- Cook 2 to 3 minutes more until the cheese melts.
Equipment for This Recipe:
- Air fryer basket or tray
- Small brush
- Spoon
How to Serve This Dish: Serve on toasted bread, over polenta, or with a green salad and beans. They also work as a vegetarian sandwich filling.
Pro Tips for This Recipe:
- Wipe the caps clean; don’t soak them.
- Remove the gills if you want the pesto to taste brighter.
- Add pine nuts after cooking so they stay crunchy.
Variations on This Dish:
- Sun-Dried Tomato Pesto: Use a red pesto instead of basil pesto.
- Vegan Cap: Skip the cheese and finish with nutritional yeast.
- Garlic Mushroom Version: Add minced garlic to the oil.
Common Mistakes to Avoid with This Dish:
- Cooking too long: The caps get rubbery.
- Using wet mushrooms: They steam and leak.
- Overloading with pesto: Too much sauce slips off and burns.
26. Elote-Style Corn on the Cob
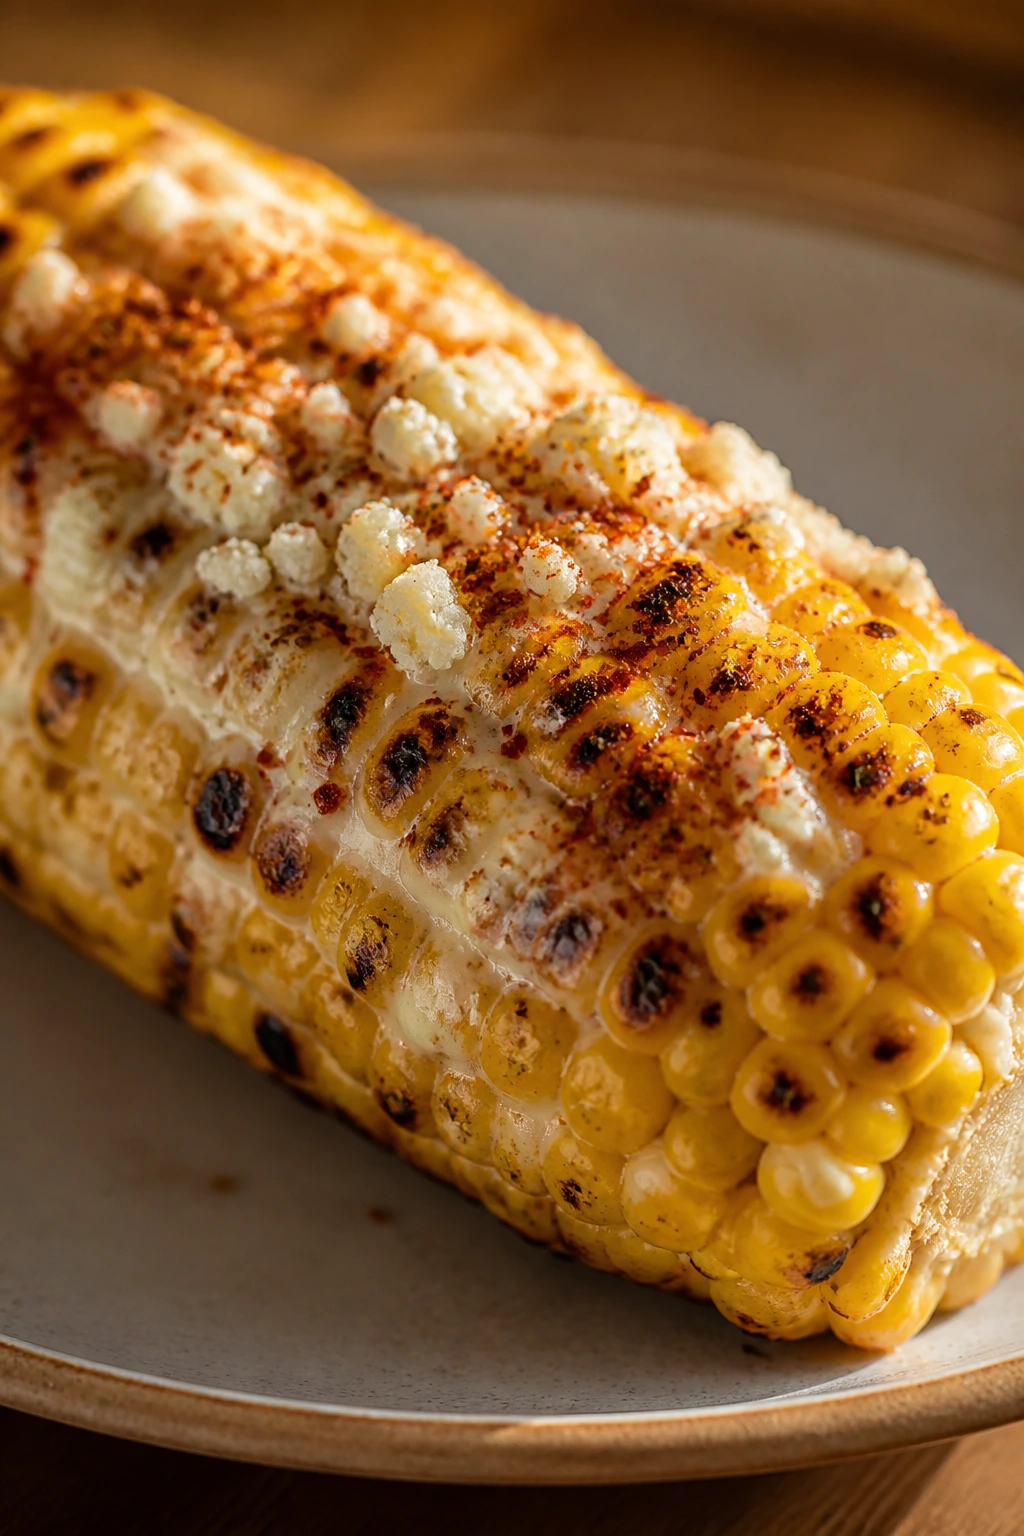
Corn on the cob does not need a grill to taste charred and sweet. The air fryer blisters the kernels, and the lime, mayo, cotija, and chile powder finish turns it into a proper street-corn situation without dragging out a pan.
Why It Works: Corn likes direct heat and a little dry browning, so the air fryer gives you enough caramelization to make the topping make sense. The creamy finish goes on after cooking, which keeps the dairy from splitting.
Key Ingredients:
- 2 ears corn, husked
- 1 tsp neutral oil
- 2 tbsp mayonnaise or yogurt
- 2 tbsp crumbled cotija
- ½ tsp chili powder
- 1 tbsp lime juice
Quick Steps:
- Preheat the air fryer to 390°F.
- Rub the corn with oil.
- Air fry 10 to 12 minutes, turning once, until lightly browned.
- Spread with mayo or yogurt, then top with cotija, chili powder, and lime juice.
Equipment for This Recipe:
- Air fryer basket
- Brush or spoon
- Tongs
How to Serve This Dish: Serve with tacos, black beans, or rice bowls. It also works as a side for bean chili and avocado salad.
Pro Tips for This Recipe:
- Turn the ears once so the kernels blister on more than one side.
- If using yogurt, choose thick Greek yogurt so it sticks.
- Lime juice goes on last or it runs off.
Variations on This Dish:
- Garlic Elote: Add garlic powder to the topping.
- Vegan Street Corn: Use vegan mayo and omit cotija or use a vegan cheese.
- Smoky Lime Version: Add smoked paprika to the chili powder.
Common Mistakes to Avoid with This Dish:
- Skipping the turn: One side browns while the other stays pale.
- Putting the topping on early: The mayo can separate.
- Using too much liquid topping: It slides off the cob.
27. Harissa Cauliflower Florets
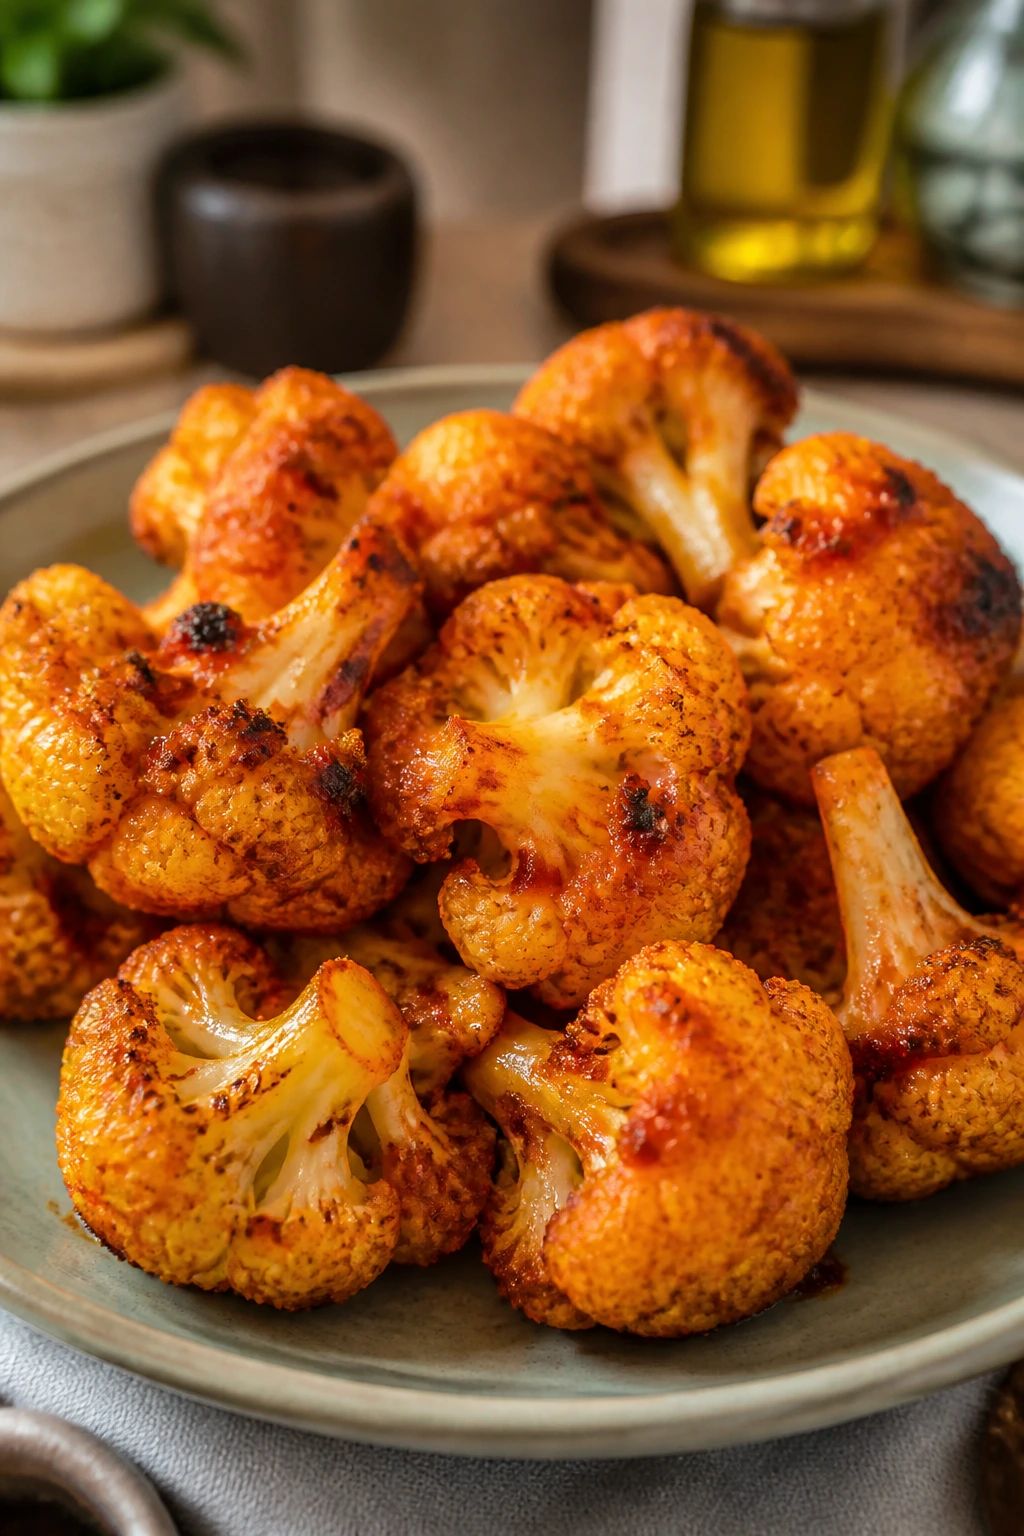
Harissa gives cauliflower a warm, peppery heat that sticks around after the first bite. The florets brown on the edges and stay tender inside, and the whole basket smells like spice paste and toasted garlic.
Why It Works: Cauliflower takes on paste-based seasonings well because the rough surface holds onto oil and spice. A short cook at high heat gives the harissa time to deepen without scorching.
Key Ingredients:
- 1 medium head cauliflower, cut into florets
- 1½ tbsp olive oil
- 1 tbsp harissa paste
- ½ tsp kosher salt
- ¼ tsp black pepper
- 1 tbsp chopped parsley or mint
Quick Steps:
- Preheat the air fryer to 390°F.
- Toss cauliflower with oil, harissa, salt, and pepper.
- Air fry 10 to 12 minutes, shaking once, until browned.
- Finish with herbs.
Equipment for This Recipe:
- Air fryer basket
- Mixing bowl
- Tongs
How to Serve This Dish: Serve with couscous, yogurt, or hummus. It also makes a strong filling for pita with cucumbers and herbs.
Pro Tips for This Recipe:
- Start with a mild harissa if you don’t know the brand’s heat level.
- Add mint if you want the spice to feel cleaner.
- Break florets into similar sizes so they cook evenly.
Variations on This Dish:
- Lemony Harissa: Add lemon zest before cooking.
- Harissa Yogurt Bowl: Toss the finished cauliflower with a spoonful of yogurt.
- Sweet-Spice Version: Add a tiny drizzle of honey after cooking.
Common Mistakes to Avoid with This Dish:
- Using too much harissa: The florets turn bitter and dark too fast.
- Leaving florets too large: Big pieces brown outside and stay raw inside.
- Skipping the shake: Paste-coated spots can scorch.
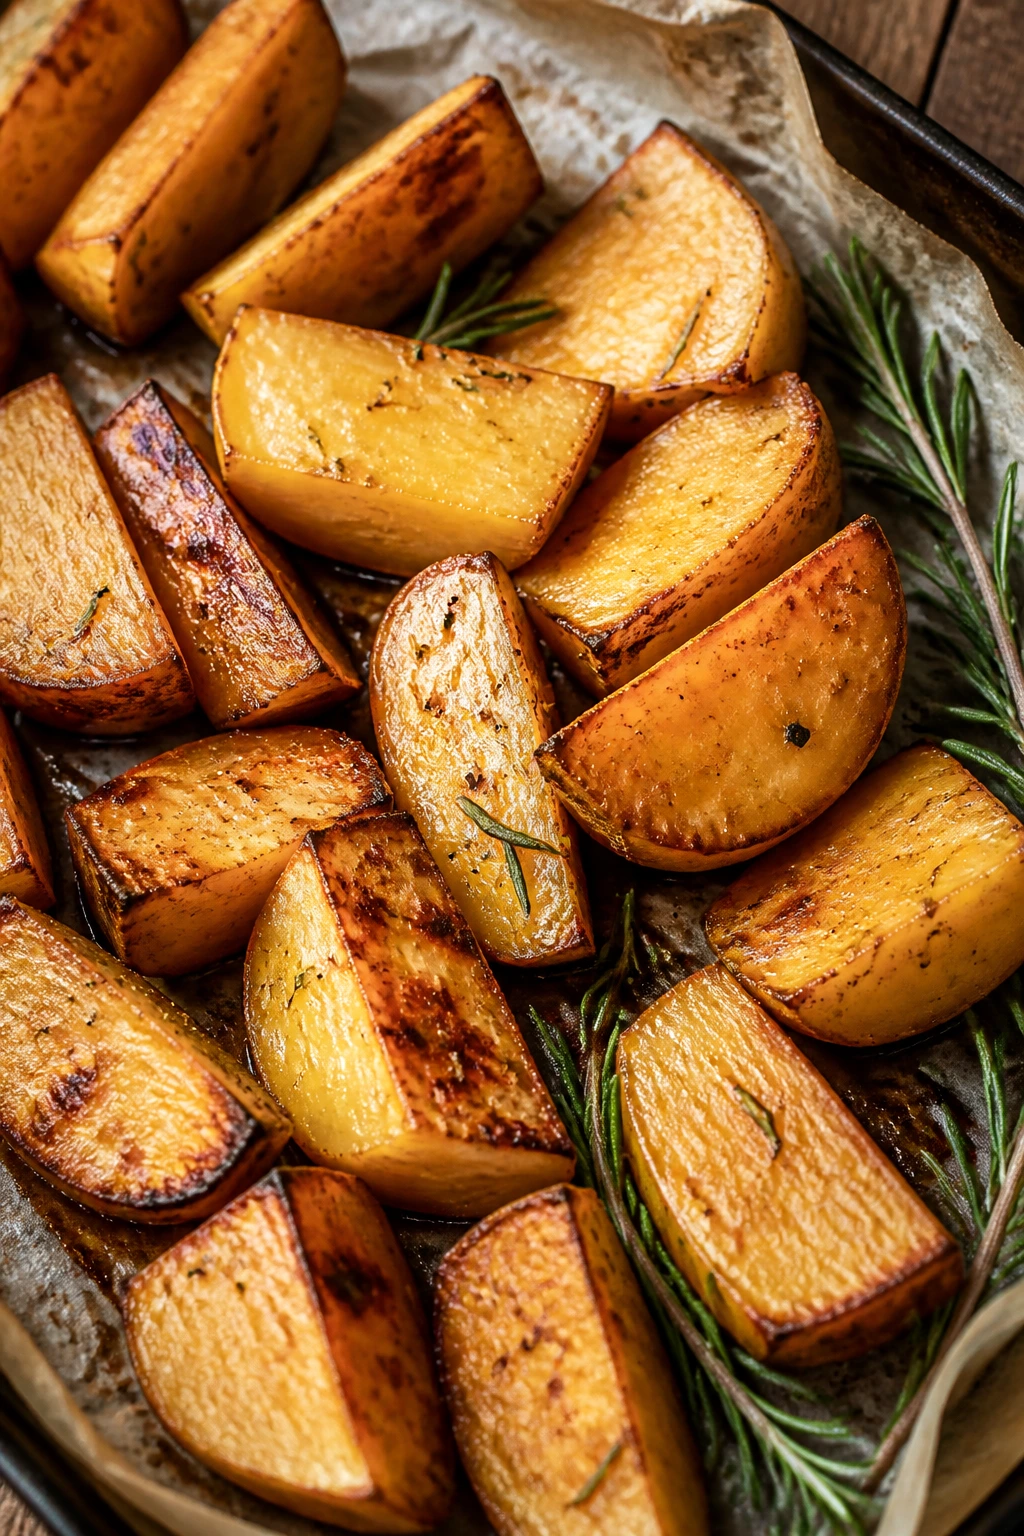
28. Ranch-Seasoned Potato Wedges
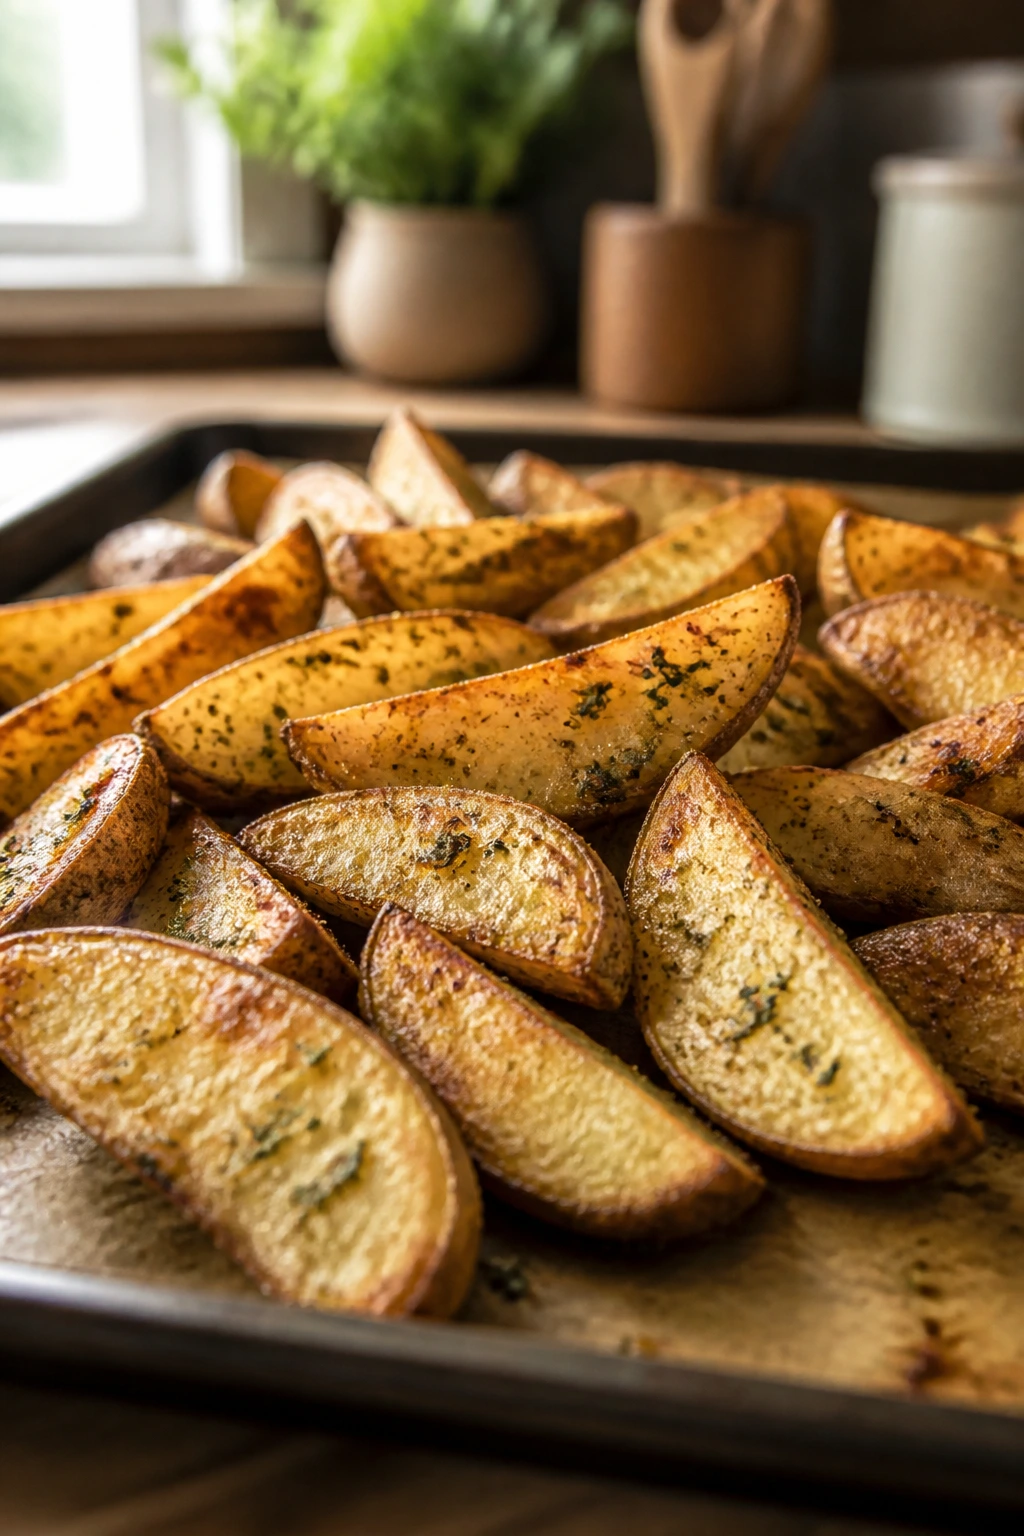
Potato wedges belong in the air fryer. They brown on the cut sides, stay fluffy in the middle, and ranch seasoning gives them that herb-salt hit people keep reaching for. No fries stand a chance.
Why It Works: Potatoes need strong heat and enough space to let moisture escape from the cut sides. Ranch seasoning brings dried dill, garlic, onion, and salt, which clings well to the oil.
Key Ingredients:
- 2 medium russet potatoes, cut into wedges
- 1½ tbsp olive oil
- 1 tbsp ranch seasoning
- ½ tsp black pepper
- ¼ tsp kosher salt, if needed
- 1 tbsp chopped chives
Quick Steps:
- Preheat the air fryer to 400°F.
- Toss wedges with oil, ranch seasoning, and pepper.
- Air fry 16 to 18 minutes, shaking twice, until crisp and browned.
- Top with chives.
Equipment for This Recipe:
- Air fryer basket
- Large bowl
- Sharp knife
How to Serve This Dish: Serve with bean burgers, salad, or scrambled eggs. They also pair well with a sour cream dip or plain yogurt.
Pro Tips for This Recipe:
- Soak the wedges in cold water for 15 minutes if you want extra crispness, then dry thoroughly.
- Keep the wedges skin-on for better texture.
- Choose potatoes that are close in size.
Variations on This Dish:
- Loaded Wedge Finish: Add cheddar and scallions after cooking.
- Spicy Ranch: Stir cayenne into the seasoning.
- Dairy-Free Ranch: Use a dairy-free seasoning blend and dip.
Common Mistakes to Avoid with This Dish:
- Not drying the potatoes after soaking: The wedges steam.
- Cutting wedges too thin: They dry out before the centers soften.
- Adding salt too heavily: Ranch seasoning already carries salt.
29. Teriyaki Eggplant Cubes
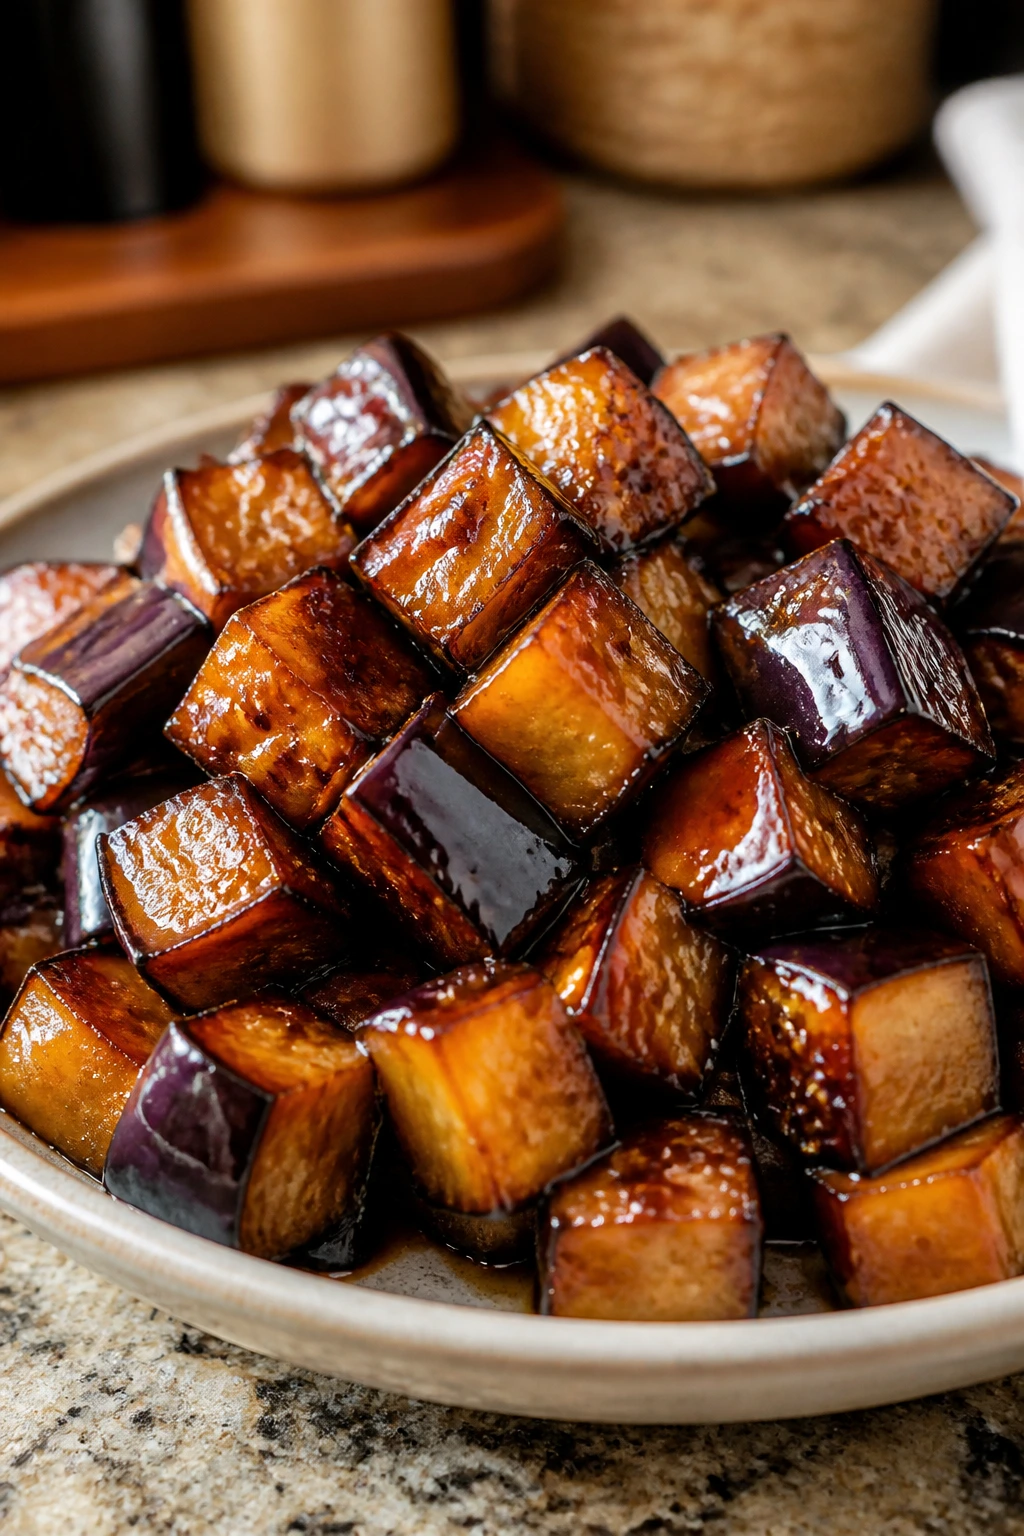
Eggplant cubes are soft in the middle and darkly browned on the outside when the air fryer does its job. Teriyaki turns them glossy and a little sticky, which is exactly what you want when the vegetable has a reputation for going bland.
Why It Works: Cubes give eggplant more edges to caramelize. The teriyaki sauce goes on after the first cook so the sugar doesn’t burn before the flesh turns silky.
Key Ingredients:
- 1 medium eggplant, cut into 1-inch cubes
- 1½ tbsp neutral oil
- ¼ tsp kosher salt
- ¼ cup teriyaki sauce
- 1 tsp sesame seeds
- 1 tbsp sliced scallions
Quick Steps:
- Preheat the air fryer to 390°F.
- Toss eggplant with oil and salt.
- Air fry 10 minutes, shaking once.
- Toss with teriyaki sauce, then air fry 2 minutes more.
- Finish with sesame seeds and scallions.
Equipment for This Recipe:
- Air fryer basket
- Mixing bowl
- Spoon or spatula
How to Serve This Dish: Serve over rice, noodles, or lettuce cups. It also works beside tofu and steamed greens.
Pro Tips for This Recipe:
- Choose eggplant with tight skin and a heavy feel.
- Cubes should be big enough to hold shape, not tiny dice.
- Add the scallions after cooking so they stay fresh.
Variations on This Dish:
- Gochujang Eggplant: Swap teriyaki for gochujang and a splash of soy.
- Garlic-Soy Version: Use soy sauce, garlic, and a touch of maple.
- Thai-Style Finish: Add lime juice and chopped basil.
Common Mistakes to Avoid with This Dish:
- Saucing too early: Sugar burns in hot air.
- Using old eggplant: It turns spongy and bitter.
- Crowding the basket: The cubes stew instead of browning.
30. Cumin-Lime Turnip Fries
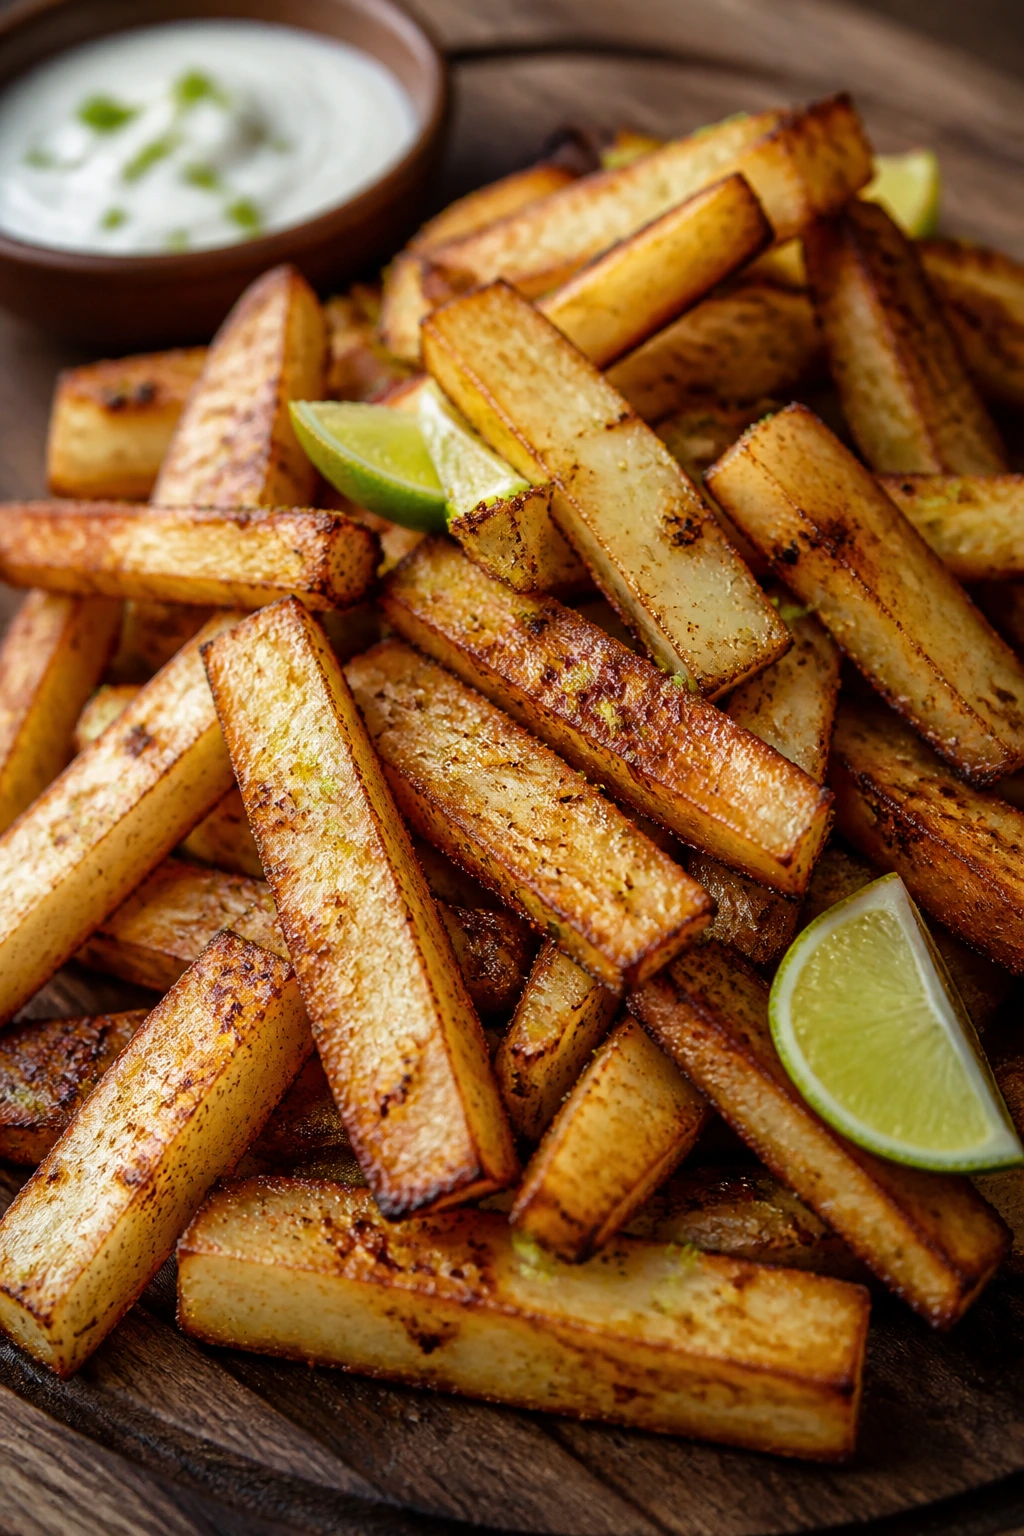
Turnips don’t taste like much until you treat them like fries and give them enough heat to sweeten up. Cumin and lime make the earthiness cleaner, and the edges come out with a satisfying dry crunch.
Why It Works: Turnips have a firmer structure than potatoes, so they hold fry shapes well in the air fryer. The lime goes on at the end because acid brightens the flavor without blocking browning.
Key Ingredients:
- 2 large turnips, peeled and cut into fries
- 1½ tbsp olive oil
- 1 tsp ground cumin
- ½ tsp kosher salt
- ¼ tsp black pepper
- 1 tbsp lime juice
Quick Steps:
- Preheat the air fryer to 390°F.
- Toss turnips with oil, cumin, salt, and pepper.
- Air fry 12 to 14 minutes, shaking twice, until browned.
- Finish with lime juice.
Equipment for This Recipe:
- Air fryer basket
- Peeler
- Sharp knife
How to Serve This Dish: Serve with yogurt dip, hummus, or a plate of beans and rice. They also work in a bowl with avocado and chopped cilantro.
Pro Tips for This Recipe:
- Cut the fries to similar thickness so they brown evenly.
- Turnips can be a little sharp raw; the heat softens that.
- Lime juice at the end makes them taste less rooty.
Variations on This Dish:
- Smoky Cumin Fries: Add smoked paprika.
- Garlic-Lime Turnips: Add garlic powder to the oil.
- Herbed Version: Finish with chopped dill or parsley.
Common Mistakes to Avoid with This Dish:
- Expecting potato texture: Turnips stay firmer and lighter.
- Cutting them too thin: They dry out fast.
- Forgetting the lime: The flavor stays flat without it.
31. Parmesan Green Tomato Slices
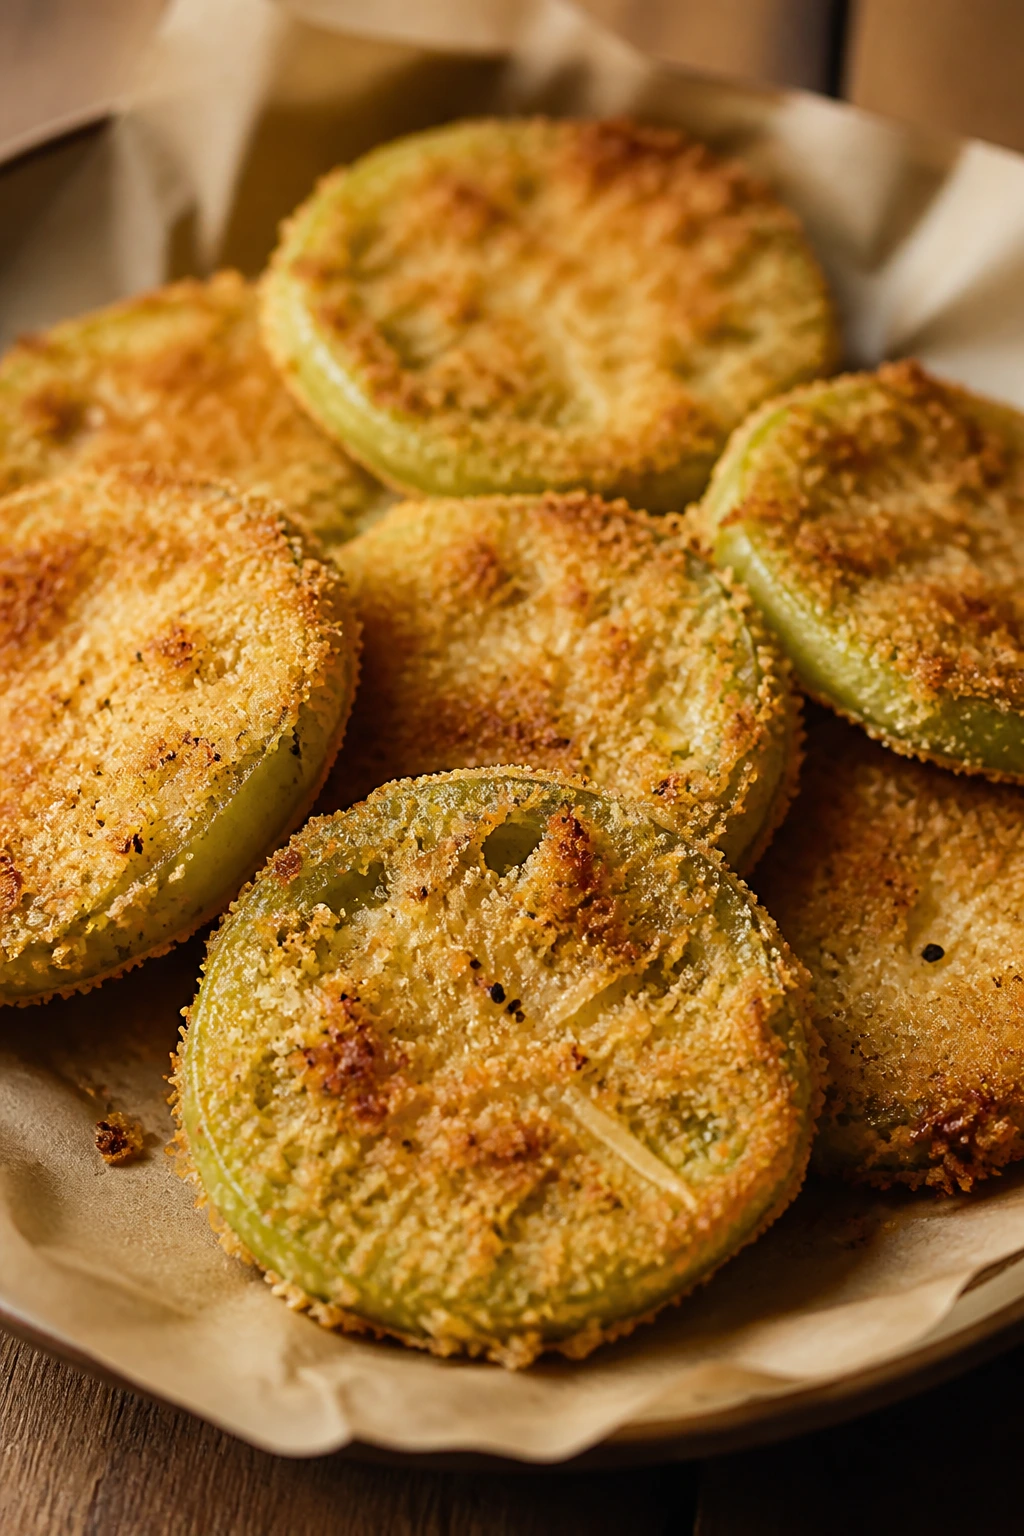
Green tomatoes are firm, tart, and built for breading. The air fryer gives them the crunch you want without a full skillet of oil, and Parmesan adds a savory crust that plays well with the tomato’s sharp bite.
Why It Works: Green tomatoes are dense enough to handle breading and high heat, so they don’t collapse the way ripe tomatoes would. The crumb coating needs a dry surface to cling to, which is why a quick pat-down matters.
Key Ingredients:
- 2 green tomatoes, sliced into ½-inch rounds
- 1 tbsp olive oil
- ½ cup panko breadcrumbs
- ¼ cup grated Parmesan
- ½ tsp kosher salt
- ¼ tsp black pepper
Quick Steps:
- Preheat the air fryer to 400°F.
- Brush tomato slices with oil.
- Press into panko mixed with Parmesan, salt, and pepper.
- Air fry 8 to 10 minutes, flipping once.
Equipment for This Recipe:
- Air fryer basket
- Shallow bowl
- Tongs
How to Serve This Dish: Serve with remoulade, aioli, or a simple salad. They also work as a side for bean soup or grits.
Pro Tips for This Recipe:
- Slice fairly thick or the tomatoes turn soft before the crust browns.
- Use firm green tomatoes only; ripe tomatoes are too wet here.
- Flip gently so the crust stays put.
Variations on This Dish:
- Cornmeal Green Tomatoes: Swap half the panko for cornmeal.
- Spicy Parmesan: Add cayenne to the crumb mix.
- Vegan Crust: Use nutritional yeast instead of Parmesan.
Common Mistakes to Avoid with This Dish:
- Using ripe tomatoes: They leak and slump.
- Cutting too thin: The slices won’t hold their shape.
- Adding sauce too early: The crust softens fast.
32. Romanesco with Chili Oil
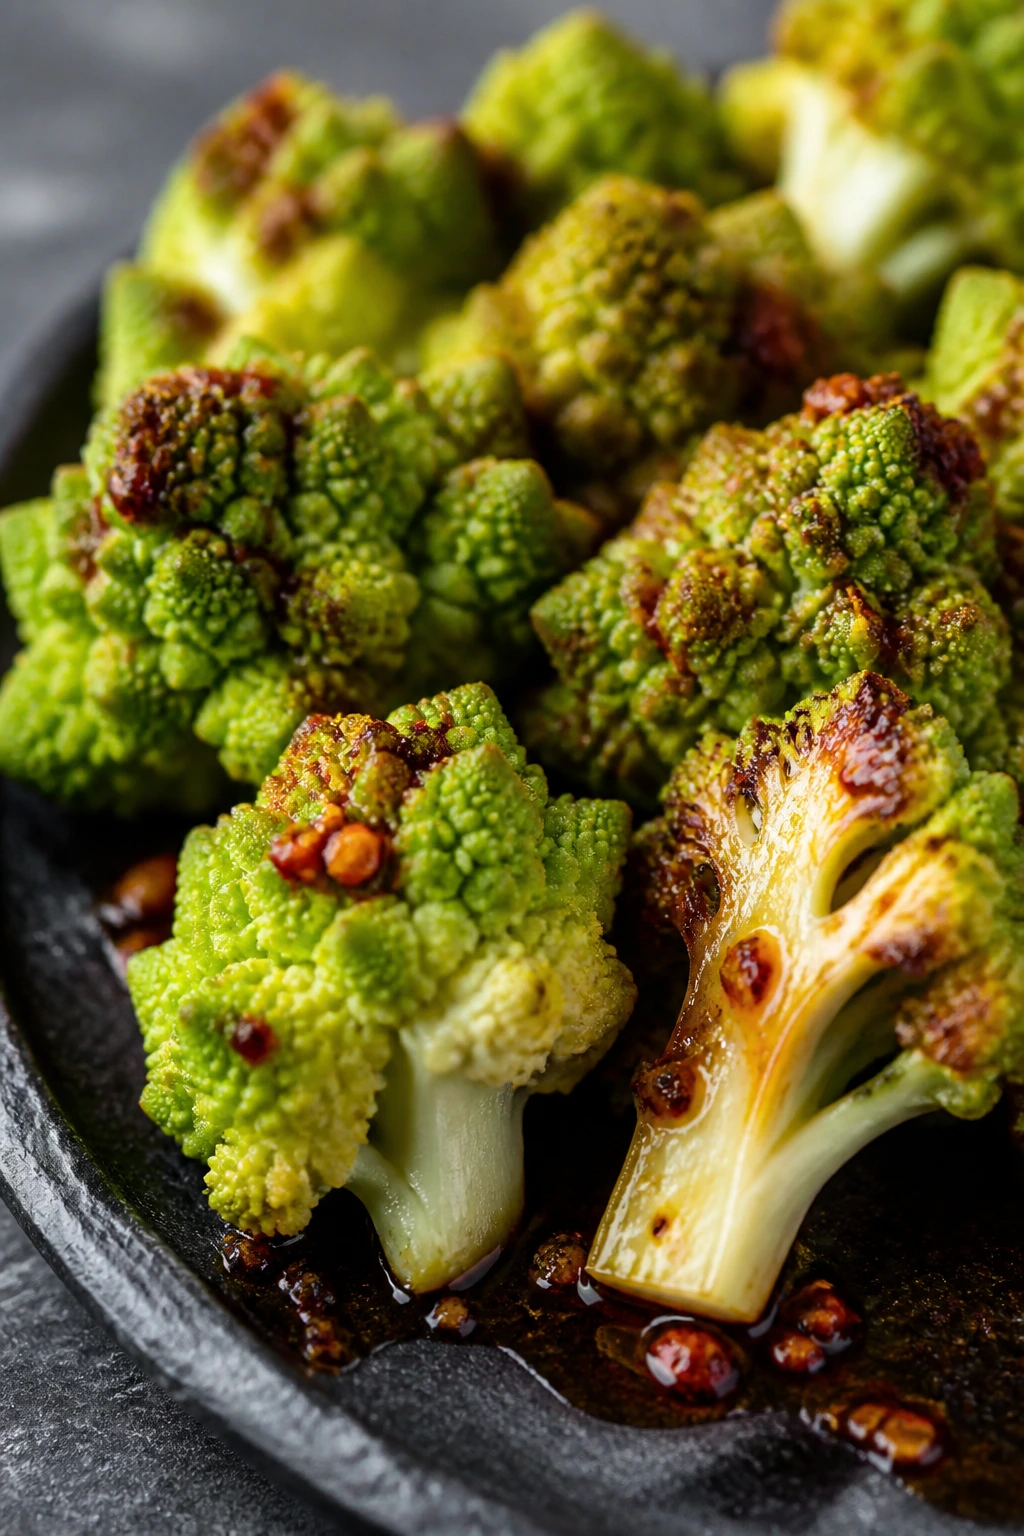
Romanesco has the crunch of cauliflower with a shape that looks engineered rather than grown. A little chili oil brings out its nutty side and leaves the florets crisp, green, and a bit wild-looking.
Why It Works: Romanesco is a brassica like broccoli and cauliflower, so it tolerates fast, dry heat. The ridges on the florets catch oil and spice, which gives you more flavor per bite.
Key Ingredients:
- 1 head romanesco, cut into florets
- 1½ tbsp olive oil
- 1 tsp chili oil
- ½ tsp kosher salt
- ¼ tsp black pepper
- 1 tsp lemon zest
Quick Steps:
- Preheat the air fryer to 390°F.
- Toss romanesco with oils, salt, pepper, and zest.
- Air fry 9 to 11 minutes, shaking once.
- Serve hot.
Equipment for This Recipe:
- Air fryer basket
- Mixing bowl
- Tongs
How to Serve This Dish: Serve alongside grains, pasta, or roasted chickpeas. It also works under a drizzle of yogurt and herbs.
Pro Tips for This Recipe:
- Break florets into similar sizes; the spiky pieces burn fast if they’re tiny.
- Add only a little chili oil; too much gets greasy.
- A squeeze of lemon at the end sharpens the whole tray.
Variations on This Dish:
- Garlic Chili Romanesco: Add garlic powder to the oil.
- Tahini Finish: Drizzle with tahini and lemon after cooking.
- Parmesan Crunch: Finish with a dusting of Parmesan.
Common Mistakes to Avoid with This Dish:
- Using too much chili oil: The flavor gets heavy.
- Cutting uneven florets: Small pieces burn before big ones soften.
- Packing the basket: The tips need air to crisp.
33. Greek Stuffed Mushrooms
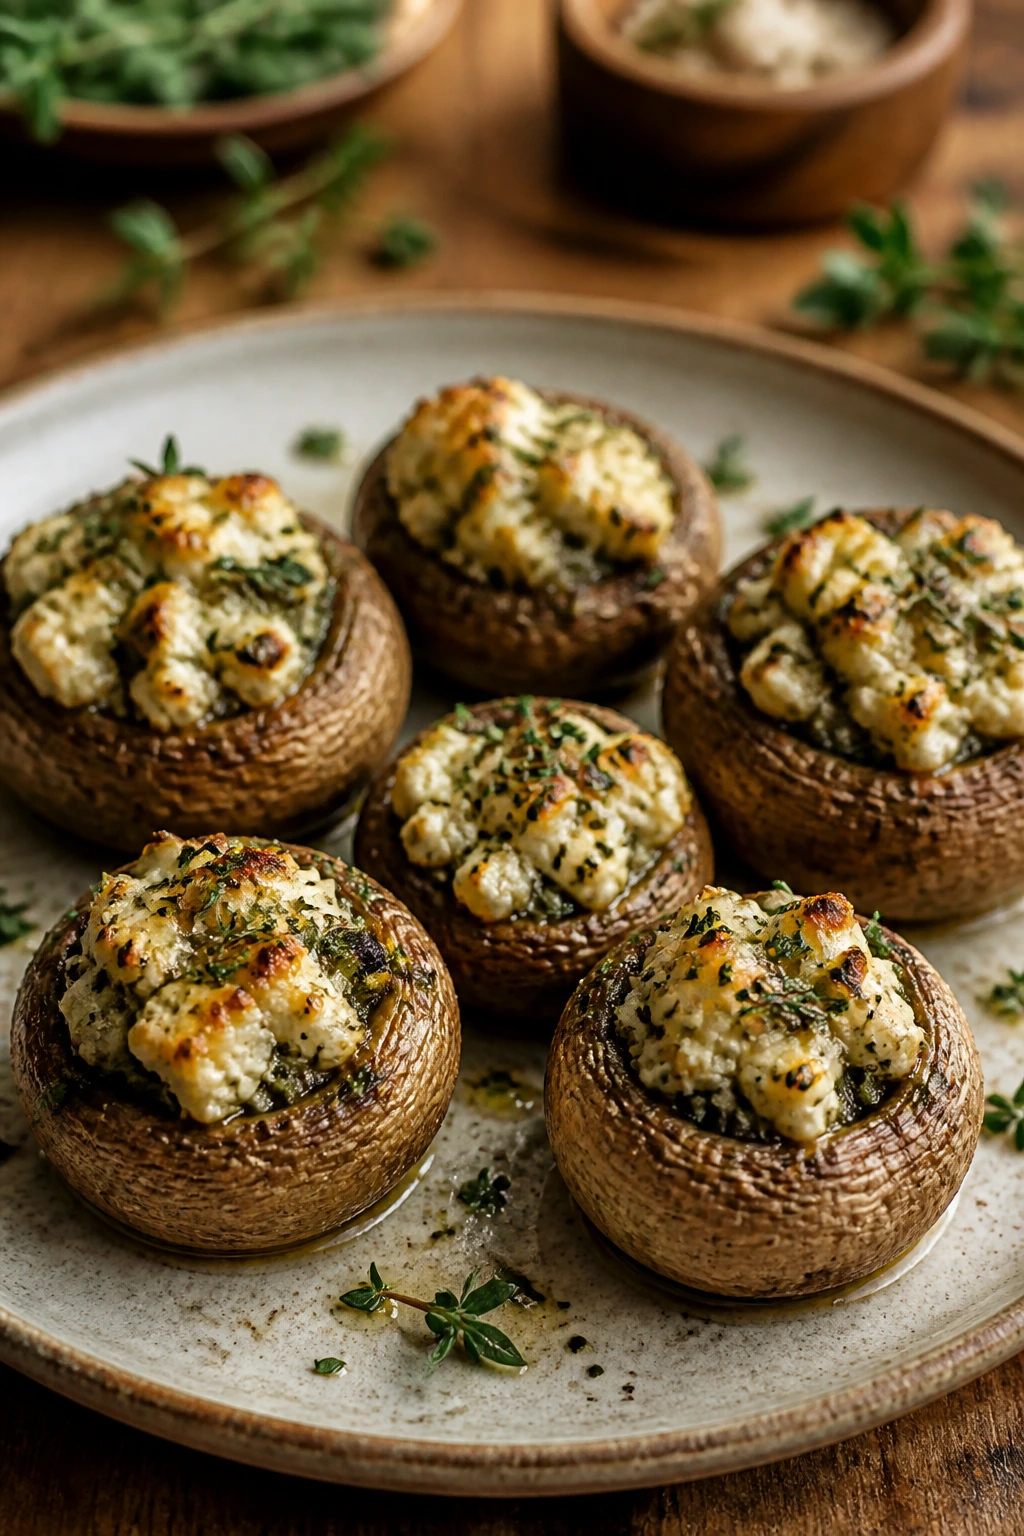
These mushrooms are small, savory, and loaded with the kind of filling that keeps a meatless plate from feeling thin. Feta, herbs, and a little garlic make them taste like a warm appetizer from a very efficient tavern kitchen.
Why It Works: Mushroom caps are sturdy enough to hold a filling, and the air fryer cooks the tops while the bottoms release just enough liquid to stay juicy. Feta helps the filling keep its shape.
Key Ingredients:
- 12 large button mushrooms, stems removed
- 1 tbsp olive oil
- ½ cup crumbled feta
- 2 tbsp chopped parsley
- 1 small garlic clove, grated
- ¼ tsp black pepper
- 1 tbsp breadcrumbs
Quick Steps:
- Preheat the air fryer to 370°F.
- Mix feta, parsley, garlic, pepper, and breadcrumbs.
- Fill the mushrooms and brush the tops with oil.
- Air fry 8 to 10 minutes until tender and lightly browned.
Equipment for This Recipe:
- Air fryer basket
- Small bowl
- Spoon
How to Serve This Dish: Serve as a starter, or make a meal with salad and pita. They also work with roasted potatoes and olives.
Pro Tips for This Recipe:
- Wipe the mushrooms clean, don’t soak them.
- If the filling seems dry, add a teaspoon of olive oil.
- Choose mushrooms with wide caps so the filling sits neatly.
Variations on This Dish:
- Spinach-Feta: Fold in finely chopped cooked spinach.
- Tomato Olive Version: Add minced sun-dried tomato and chopped olives.
- Vegan Stuffed Caps: Use dairy-free feta and more breadcrumbs.
Common Mistakes to Avoid with This Dish:
- Overfilling the caps: The filling spills and burns.
- Using wet filling: It slides off and makes the mushrooms soggy.
- Cooking too long: The caps shrink and toughen.
34. Truffled Parsnip Fries
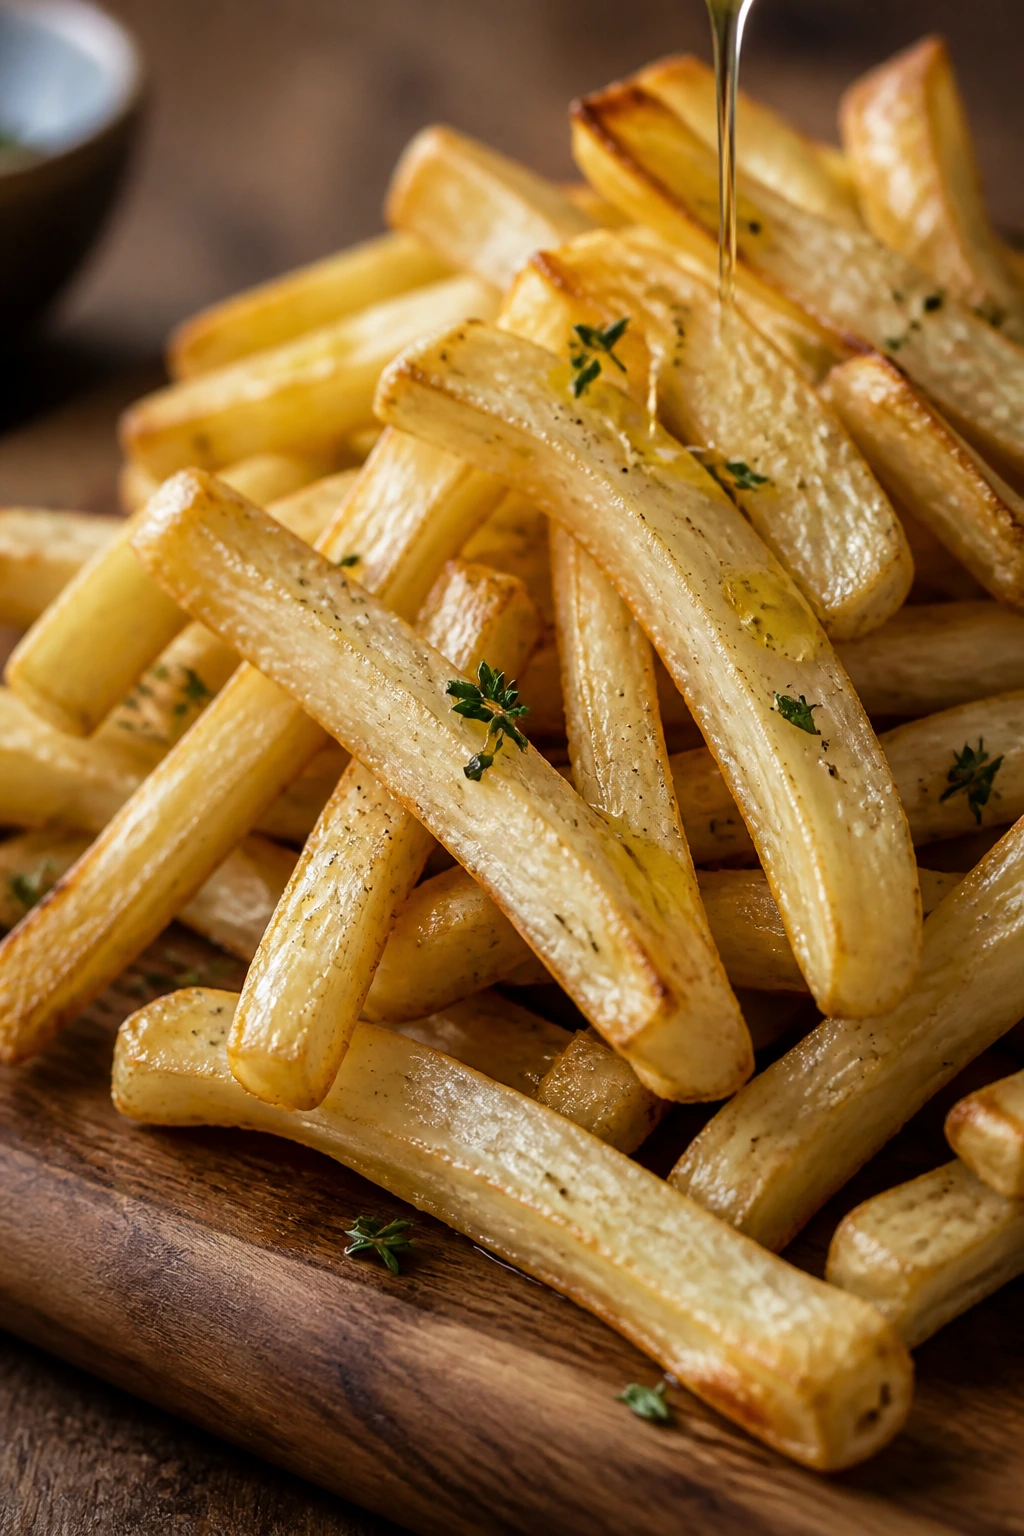
Parsnips go sweet and nutty when they meet high heat, and the air fryer gives them a fry-like shape with a cleaner finish. Truffle oil is optional, but a tiny amount makes the whole basket smell rich and earthy.
Why It Works: Parsnips are dense root vegetables, so cutting them into fries helps them brown before they dry out. A light dusting of salt and a small finish of truffle oil keeps the flavor focused.
Key Ingredients:
- 2 large parsnips, peeled and cut into fries
- 1½ tbsp olive oil
- ½ tsp kosher salt
- ¼ tsp black pepper
- ¼ tsp garlic powder
- ½ tsp truffle oil, optional
Quick Steps:
- Preheat the air fryer to 390°F.
- Toss parsnips with oil, salt, pepper, and garlic powder.
- Air fry 12 to 14 minutes, shaking twice.
- Drizzle with truffle oil if using.
Equipment for This Recipe:
- Air fryer basket
- Peeler
- Sharp knife
How to Serve This Dish: Serve with aioli or yogurt dip, or use them as a side for lentils and greens. They also sit well next to mushroom dishes.
Pro Tips for This Recipe:
- Cut them evenly; parsnips vary more than potatoes.
- Add truffle oil after cooking or it loses its aroma.
- A squeeze of lemon can keep them from tasting too sweet.
Variations on This Dish:
- Rosemary Parsnip Fries: Add chopped rosemary before cooking.
- Parmesan Truffle: Finish with Parmesan.
- Curry Parsnips: Swap garlic powder for curry powder.
Common Mistakes to Avoid with This Dish:
- Using too much truffle oil: It takes over the whole tray.
- Cutting tapering ends too thick: They finish late while skinny ends burn.
- Skipping the shake: Fries need movement to brown.
35. Za’atar Delicata Squash Rings
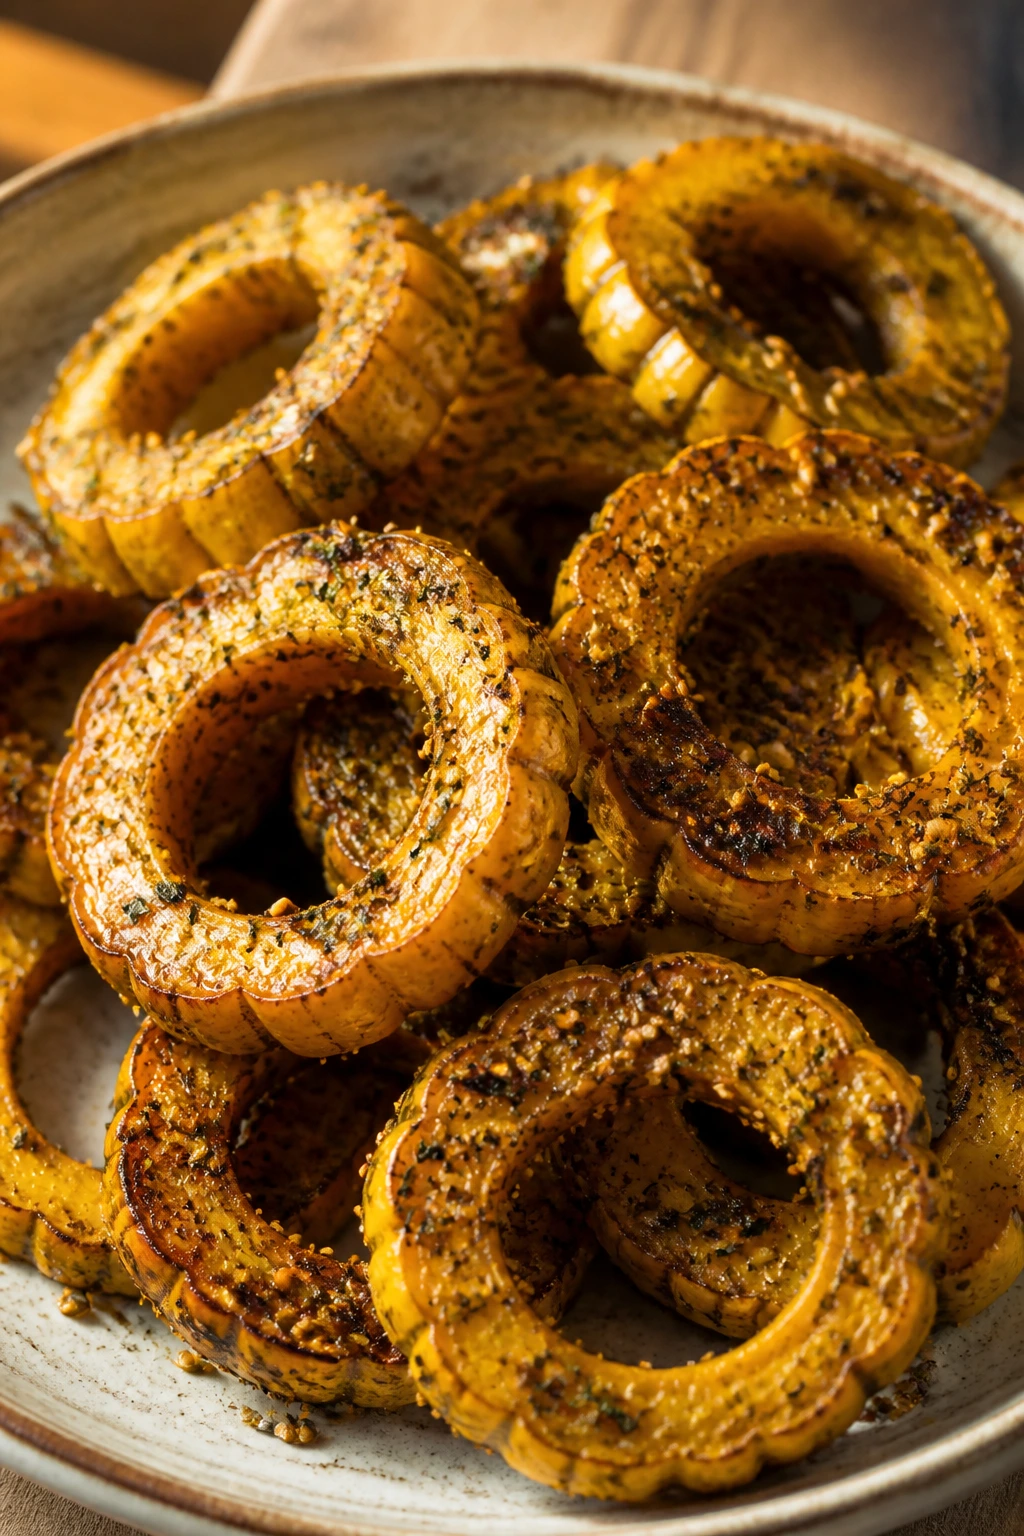
Delicata squash is one of the easiest winter squashes to work with because you can eat the skin. In the air fryer, the rings turn sweet and tender, and za’atar gives them sesame, thyme, and sumac in one smart sweep.
Why It Works: Rings cook faster than wedges and expose more surface to heat. Za’atar toasts lightly in the oil, so the spice tastes warm and lemony instead of dusty.
Key Ingredients:
- 1 delicata squash, sliced into rings and seeded
- 1½ tbsp olive oil
- 1 tsp za’atar
- ½ tsp kosher salt
- ¼ tsp black pepper
- 1 tbsp crumbled feta, optional
Quick Steps:
- Preheat the air fryer to 390°F.
- Toss rings with oil, za’atar, salt, and pepper.
- Air fry 10 to 12 minutes, flipping once.
- Finish with feta if using.
Equipment for This Recipe:
- Air fryer basket
- Sharp knife
- Spoon for seeding
How to Serve This Dish: Serve with yogurt, chickpeas, or a grain bowl. They’re also good beside roast chicken if you’re feeding mixed tables.
Pro Tips for This Recipe:
- Slice the rings about ¾-inch thick so they keep their shape.
- The skin is edible, so don’t peel it.
- If your za’atar blend is salty, ease up on the added salt.
Variations on This Dish:
- Maple Za’atar: Add a teaspoon of maple syrup for a sweeter glaze.
- Chili Za’atar: Dust with Aleppo pepper.
- Tahini Finish: Drizzle with tahini and lemon.
Common Mistakes to Avoid with This Dish:
- Cutting rings too thin: They collapse.
- Removing all the skin: You lose texture and ease.
- Adding cheese too early: Feta can dry out.
36. Orange Fennel Wedges
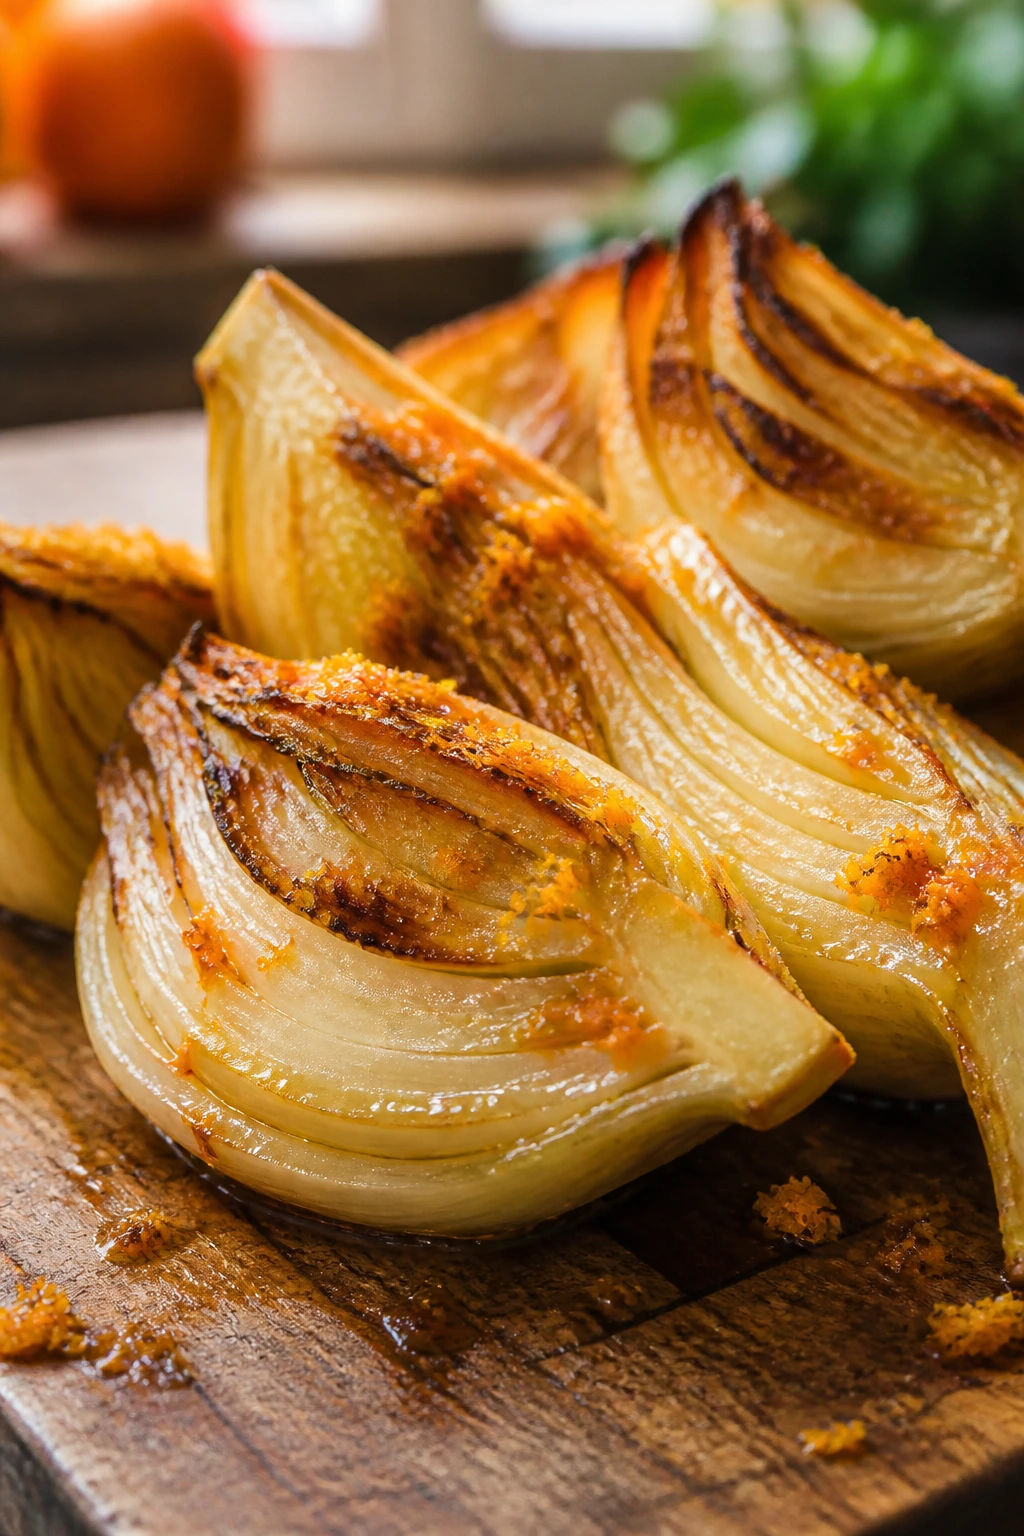
Fennel gets sweeter and less sharp after a hot air-fryer pass, and the orange juice gives it a citrus lift that makes the licorice note feel cleaner. The result is tender, bronzed wedges with a bright finish.
Why It Works: Fennel is sturdy enough to hold wedge shape, so it browns on the cut sides while the interior softens. Orange juice and zest at the end keep the flavor fresh instead of muddy.
Key Ingredients:
- 2 fennel bulbs, trimmed and cut into wedges
- 1½ tbsp olive oil
- ½ tsp kosher salt
- ¼ tsp black pepper
- 1 tsp orange zest
- 1 tbsp orange juice
Quick Steps:
- Preheat the air fryer to 385°F.
- Toss fennel with oil, salt, and pepper.
- Air fry 12 to 14 minutes, flipping once.
- Finish with orange zest and juice.
Equipment for This Recipe:
- Air fryer basket
- Sharp knife
- Mixing bowl
How to Serve This Dish: Serve with grains, white beans, or baked fish if that fits the table. It also works with a yogurt sauce and herbs.
Pro Tips for This Recipe:
- Keep some core in each wedge so it stays together.
- Don’t let the fronds go to waste; they make a good garnish.
- A few fennel fronds chopped over the top are better than extra salt.
Variations on This Dish:
- Garlic Orange Fennel: Add garlic powder to the oil.
- Anise Herb Version: Finish with dill and parsley.
- Balsamic Fennel: Swap orange juice for a small balsamic drizzle.
Common Mistakes to Avoid with This Dish:
- Cutting the wedges too skinny: They fall apart.
- Overcooking: Fennel can turn mushy quickly.
- Skipping the citrus finish: The flavor stays too heavy.
37. Miso Cabbage Steaks

Miso is a smart match for cabbage because both are savory in a way that feels deeper than salt alone. The outer leaves caramelize, the center stays juicy, and the finish tastes like something much more deliberate than it is.
Why It Works: Miso paste brings salt, umami, and a little sweetness, all of which cling to the cabbage’s cut surfaces. Thick steaks hold together long enough to brown instead of unraveling.
Key Ingredients:
- 1 small green cabbage, cut into 4 steaks
- 1 tbsp olive oil
- 1 tbsp white miso
- 1 tsp rice vinegar
- ½ tsp black pepper
- 1 tsp sesame seeds
Quick Steps:
- Preheat the air fryer to 385°F.
- Mix oil, miso, and vinegar, then brush onto the cabbage.
- Air fry 12 to 15 minutes, flipping carefully once.
- Finish with pepper and sesame seeds.
Equipment for This Recipe:
- Air fryer tray or basket
- Small bowl
- Brush
How to Serve This Dish: Serve over rice with tofu or a fried egg. They also work with noodles and scallions.
Pro Tips for This Recipe:
- Whisk the miso until smooth so it brushes on evenly.
- Leave part of the core in each steak.
- If the outer leaves darken too fast, tent loosely with foil after air frying.
Variations on This Dish:
- Ginger Miso: Add grated ginger to the paste.
- Spicy Miso: Stir in chili crisp.
- Lemon Miso: Finish with a few drops of lemon juice.
Common Mistakes to Avoid with This Dish:
- Using too much miso paste: It gets salty and sticky in a bad way.
- Cutting steaks too thin: They shred.
- Handling too roughly when flipping: They break apart.
38. Sesame Eggplant Fries
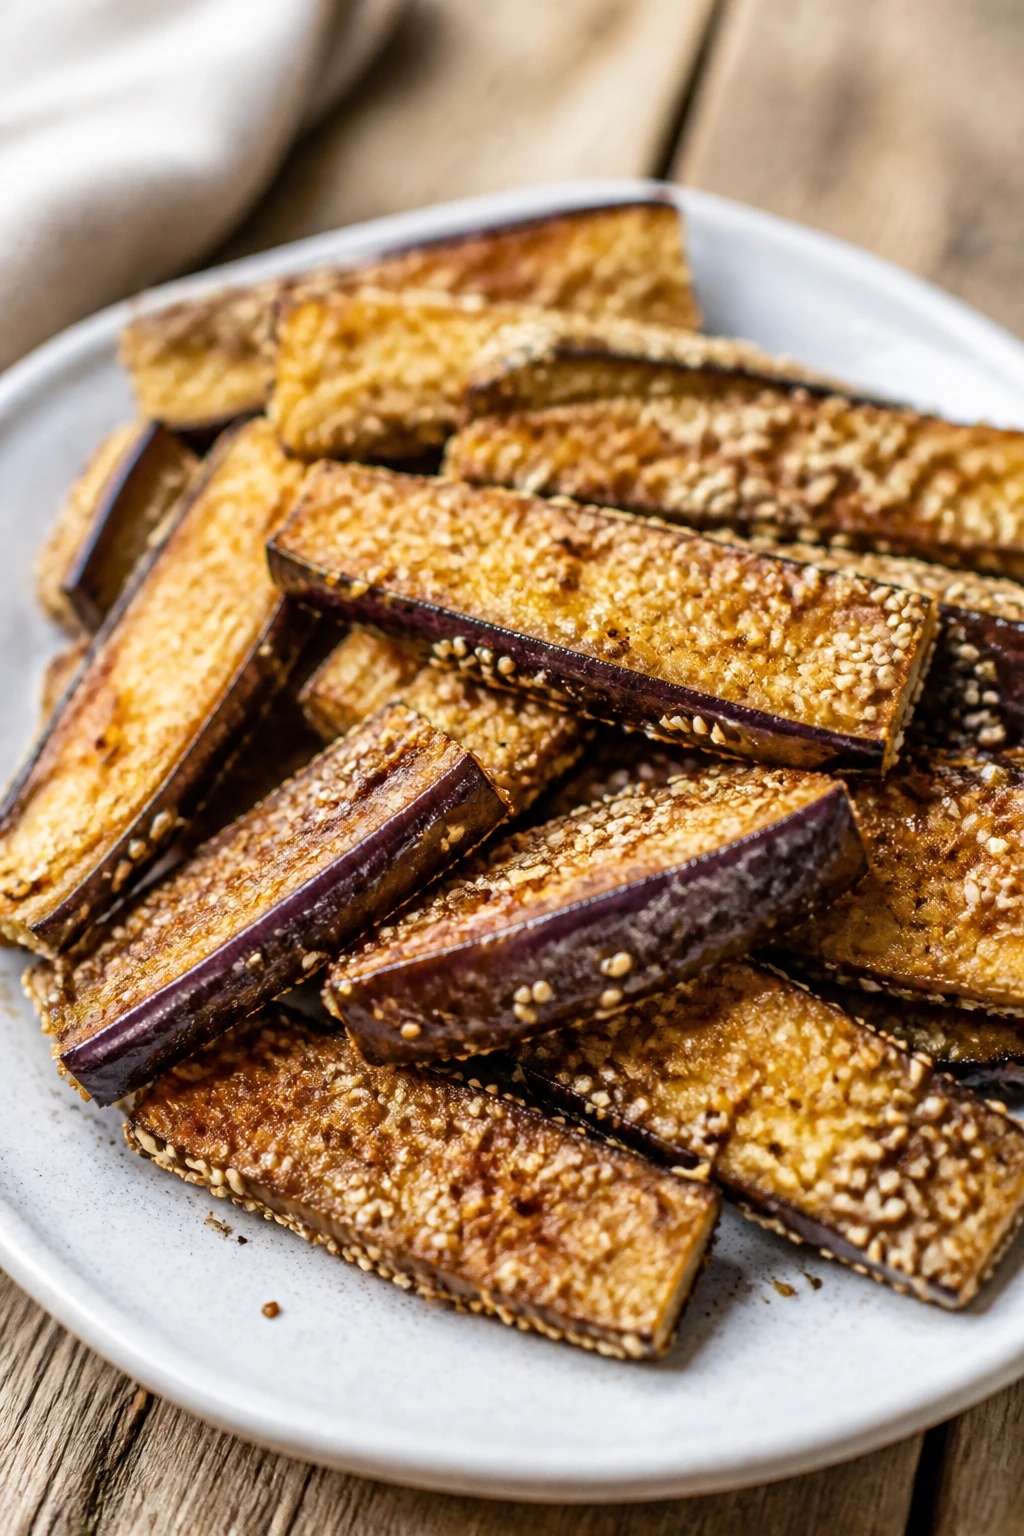
Eggplant fries sound indulgent because they are, at least a little. The sesame coating gives the soft interior a crisp shell, and the soy-ginger finish keeps the whole tray from tasting like plain fried breading.
Why It Works: Eggplant needs both heat and something dry on the surface to stand up to the soft flesh inside. Sesame and panko give the air fryer a crust to toast without drowning the wedges in oil.
Key Ingredients:
- 1 medium eggplant, cut into fries
- 1 tbsp olive oil
- ½ cup panko breadcrumbs
- 2 tbsp sesame seeds
- 1 tsp soy sauce
- ½ tsp garlic powder
Quick Steps:
- Preheat the air fryer to 390°F.
- Toss eggplant with oil and soy sauce.
- Press into panko mixed with sesame seeds and garlic powder.
- Air fry 10 to 12 minutes, flipping once.
Equipment for This Recipe:
- Air fryer basket
- Shallow bowl
- Tongs
How to Serve This Dish: Serve with sesame mayo, sweet chili sauce, or rice and cucumber salad. They also make a good snack with sparkling water and lime.
Pro Tips for This Recipe:
- Eggplant should be cut thick enough to stay creamy inside.
- Press the coating on firmly so it does not fall off.
- Serve the fries right away; they soften if they sit too long.
Variations on This Dish:
- Spicy Sesame Fries: Add red pepper flakes to the crumbs.
- Parmesan Sesame: Mix Parmesan into the panko.
- Vegan Dip Version: Serve with tahini-lime sauce.
Common Mistakes to Avoid with This Dish:
- Making fries too thin: They dry out.
- Not pressing the coating on: The crust falls off.
- Overcrowding: They steam and go limp.
39. Rosemary Rutabaga Wedges
Rutabaga has a firmer, slightly sweeter flavor than turnip, and the air fryer turns it into a root vegetable with real bite. Rosemary and garlic push it into roast-dinner territory without the long oven wait.
Why It Works: Rutabaga is dense, so wedges give enough mass to soften before the edges burn. Rosemary handles the heat well, which means you keep its piney aroma through the whole cook.
Key Ingredients:
- 1 medium rutabaga, peeled and cut into wedges
- 1½ tbsp olive oil
- 1 tsp chopped rosemary
- ½ tsp kosher salt
- ¼ tsp black pepper
- ½ tsp garlic powder
Quick Steps:
- Preheat the air fryer to 390°F.
- Toss rutabaga with oil, rosemary, salt, pepper, and garlic powder.
- Air fry 14 to 16 minutes, shaking twice.
- Serve hot.
Equipment for This Recipe:
- Air fryer basket
- Peeler
- Sharp knife
How to Serve This Dish: Serve with beans, lentils, or a simple herb dip. It also works under a spoonful of caramelized onions.
Pro Tips for This Recipe:
- Rutabaga is hard; cut carefully and keep the wedges even.
- If the pieces are too large, par-cook for 3 minutes in the microwave first.
- Fresh rosemary tastes cleaner than dried here.
Variations on This Dish:
- Smoky Rutabaga: Add smoked paprika.
- Mustard Herb Wedges: Toss with Dijon after cooking.
- Lemon Rosemary: Finish with lemon zest.
Common Mistakes to Avoid with This Dish:
- Cutting uneven wedges: Some stay hard while others overcook.
- Expecting potato speed: Rutabaga needs a few extra minutes.
- Using too much rosemary: It can taste resinous.
40. Stuffed Jalapeño Halves with Corn and Cheddar

These are the kind of hot little bites that make a meatless spread feel like a party. The jalapeños soften, the corn brings sweetness, and the cheddar melts into the filling instead of running everywhere.
Why It Works: Jalapeños need enough heat to soften their walls but not so much that they collapse. The corn and cheese filling stays inside the pepper halves and gives each bite a little sweetness against the heat.
Key Ingredients:
- 8 jalapeños, halved and seeded
- ½ cup corn kernels
- ½ cup shredded cheddar
- 2 tbsp cream cheese
- ½ tsp kosher salt
- 1 tbsp chopped scallions
Quick Steps:
- Preheat the air fryer to 360°F.
- Mix corn, cheddar, cream cheese, and salt.
- Fill the jalapeño halves and air fry 7 to 9 minutes, until softened and golden.
- Top with scallions.
Equipment for This Recipe:
- Air fryer basket
- Small bowl
- Spoon or piping bag
How to Serve This Dish: Serve with salsa, rice, or beans, or keep them as a starter with cold drinks. They also work beside a simple salad.
Pro Tips for This Recipe:
- Wear gloves when seeding jalapeños if your skin is sensitive.
- Choose peppers that can sit flat so the filling stays put.
- Add a little lime zest to the filling if you want brightness.
Variations on This Dish:
- Black Bean Version: Fold in a spoonful of black beans.
- Smoky Chipotle Fill: Add chipotle powder to the cheese.
- Vegan Pepper Bites: Use vegan cream cheese and dairy-free cheddar.
Common Mistakes to Avoid with This Dish:
- Leaving too much pith in the peppers: They stay brutally hot.
- Overfilling the halves: The filling bubbles over.
- Using too high a temperature: The tops burn before the peppers soften.
41. Fajita Portobello Caps
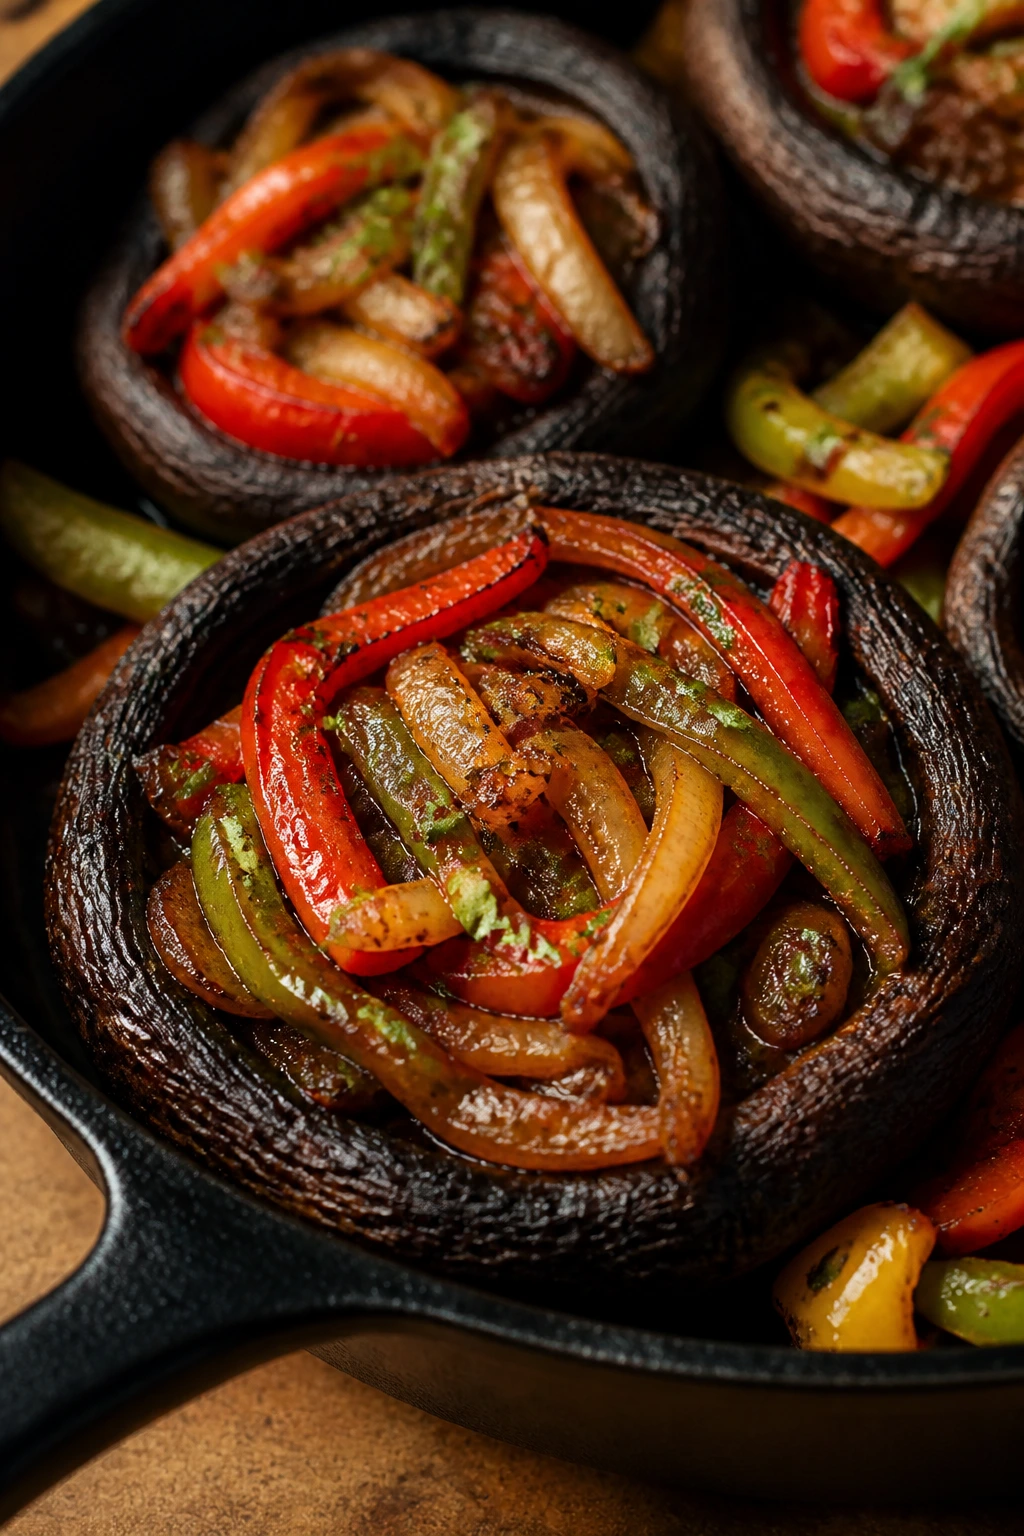
Portobello caps are built for char, which is why they’re so useful when you want a meatless main that still feels sturdy. Bell peppers and onions soften around them, and fajita seasoning gives the whole tray some smoke and lime energy.
Why It Works: Portobellos have enough mass to cook like a main ingredient, not a garnish. The air fryer dries the cap surface while keeping the inside juicy, and the vegetables around it pick up the same seasoning.
Key Ingredients:
- 4 portobello caps, stems removed
- 1 red bell pepper, sliced
- 1 small onion, sliced
- 1½ tbsp olive oil
- 1 tbsp fajita seasoning
- 1 tbsp lime juice
Quick Steps:
- Preheat the air fryer to 390°F.
- Toss mushrooms, pepper, and onion with oil and seasoning.
- Air fry 8 minutes, shake, then cook 3 to 4 minutes more.
- Finish with lime juice.
Equipment for This Recipe:
- Air fryer basket
- Mixing bowl
- Tongs
How to Serve This Dish: Serve in tortillas, over rice, or on salad greens. It also works with avocado and salsa for a fast fajita bowl.
Pro Tips for This Recipe:
- Slice the onions thick enough to avoid burning.
- If the caps hold water, wipe them before seasoning.
- Lime juice after cooking keeps the vegetables bright.
Variations on This Dish:
- Chipotle Fajita: Add chipotle powder to the seasoning.
- Vegan Fajita Bowl: Serve over rice with beans and avocado.
- Cheesy Skillet Style: Add shredded cheese at the end.
Common Mistakes to Avoid with This Dish:
- Using wet mushrooms: They steam and shrink.
- Cutting onions too thin: They burn.
- Adding lime too early: The seasoning turns muddy.
42. Blackened Okra and Tomatoes
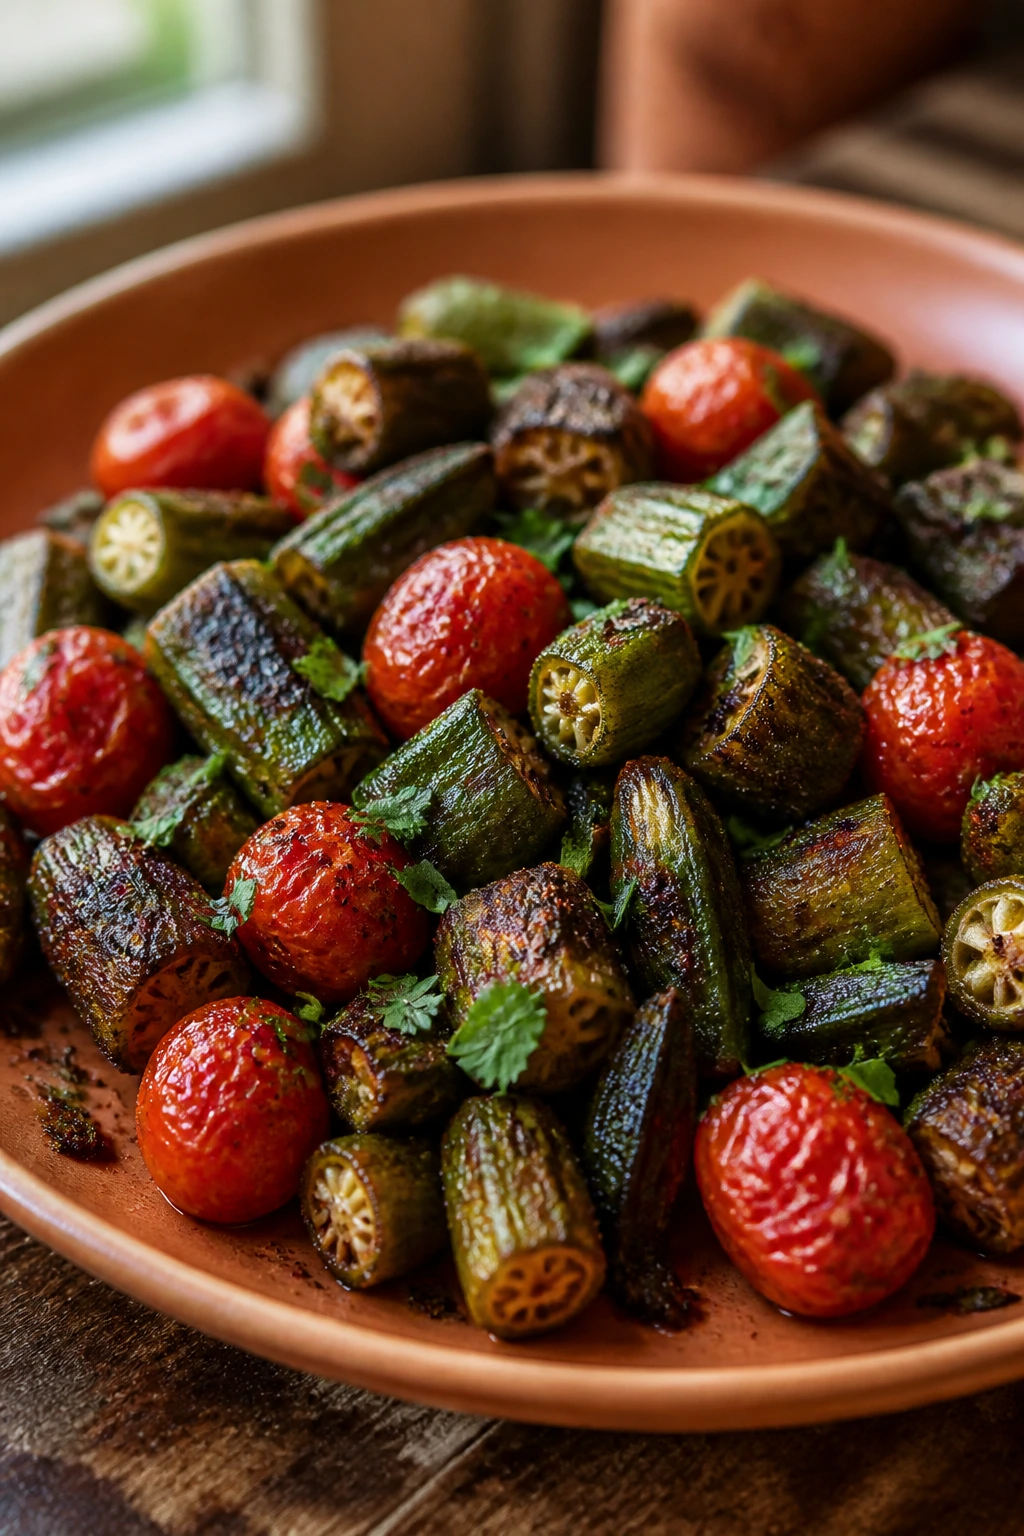
Okra and tomatoes can be a slippery pair if they’re cooked badly, but the air fryer gives them enough dryness to behave. The seasoning goes deep, the edges darken, and the tomatoes soften just enough to make the okra feel rounded instead of slimy.
Why It Works: Okra needs dry heat to tame the texture people complain about, and tomatoes bring enough acid and juice to balance the spice. The key is to keep both in a single layer so the air can work on each piece.
Key Ingredients:
- 8 oz okra, trimmed and halved lengthwise
- 1 cup cherry tomatoes
- 1 tbsp olive oil
- 1 tsp blackened seasoning
- ½ tsp kosher salt
- 1 tbsp chopped parsley
Quick Steps:
- Preheat the air fryer to 400°F.
- Toss okra and tomatoes with oil, seasoning, and salt.
- Air fry 8 to 10 minutes, shaking once.
- Finish with parsley.
Equipment for This Recipe:
- Air fryer basket
- Mixing bowl
- Tongs
How to Serve This Dish: Serve with rice, grits, or cornbread. It’s also a good side for a bean-heavy plate.
Pro Tips for This Recipe:
- Halve the okra lengthwise for better browning.
- Add the tomatoes only if they’re firm enough to hold shape.
- Parsley at the end keeps the color fresh.
Variations on This Dish:
- Creole Okra: Use Creole seasoning instead of blackened seasoning.
- Garlic Tomato Finish: Add garlic powder and extra parsley.
- Spicy Skillet Swap: Finish with a little hot sauce.
Common Mistakes to Avoid with This Dish:
- Using very wet tomatoes: They burst too soon.
- Crowding the basket: The okra gets slippery.
- Under-seasoning: Okra needs bold spice to taste finished.
43. Chile-Garlic Snap Peppers
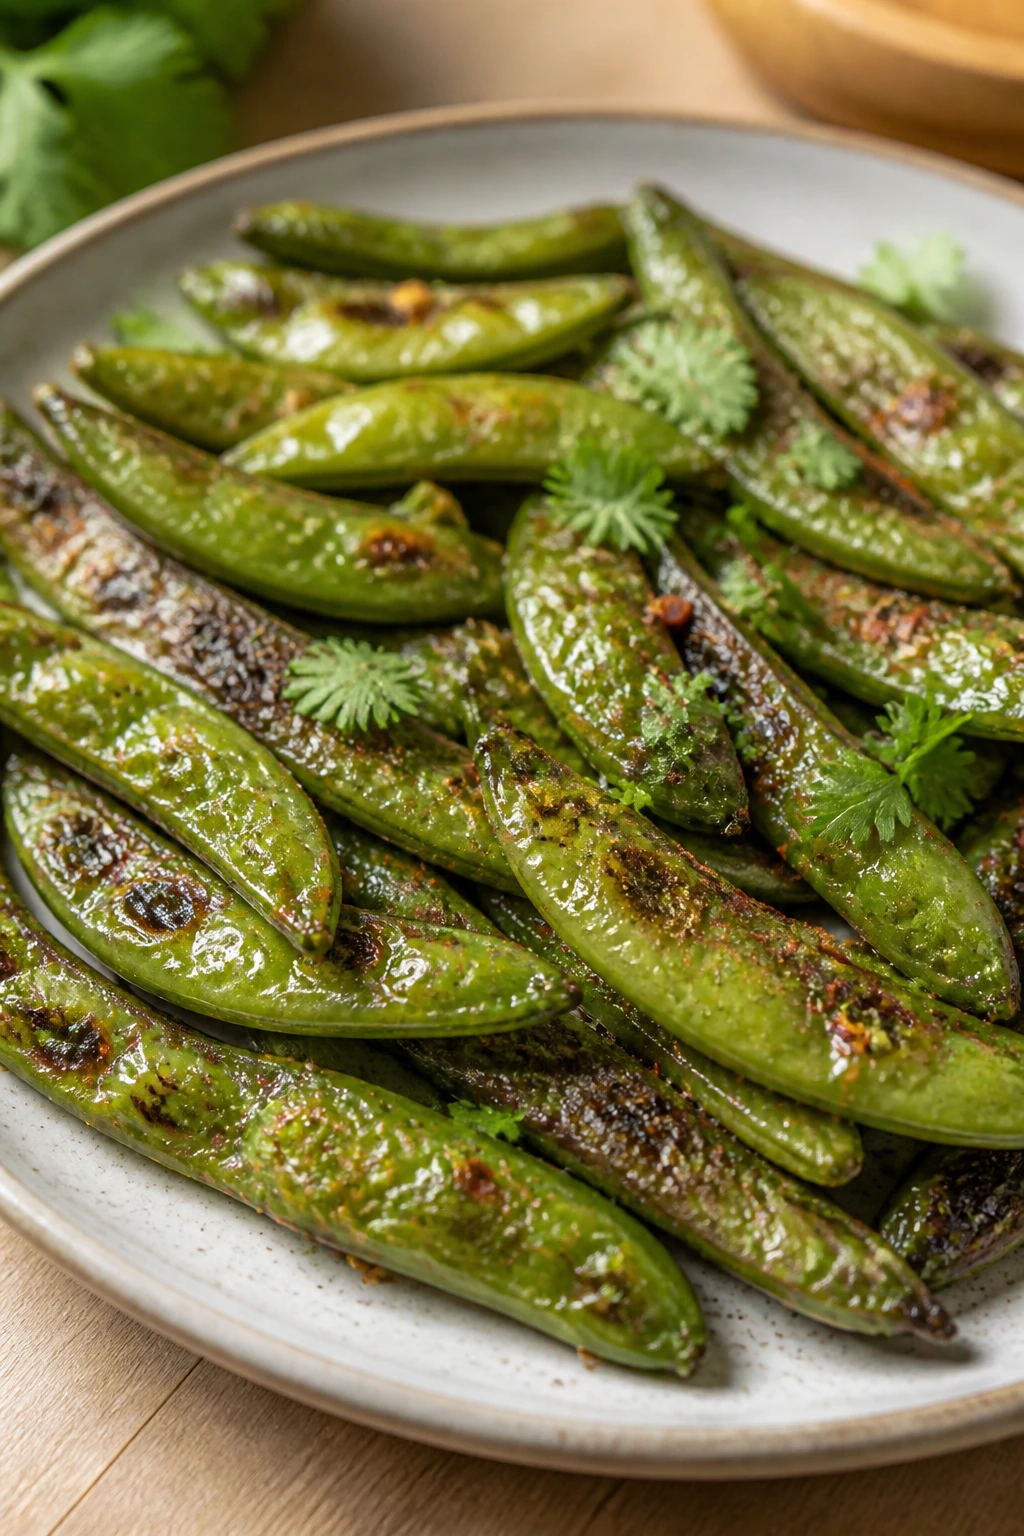
Snap peppers are sweet, thin-skinned, and fast-cooking, so they’re a natural fit for the air fryer. Chile and garlic turn them into a bright, snacky side with a little heat and a lot of crunch.
Why It Works: Snap peppers blister quickly because their walls are thin, so short high heat is enough. Garlic powder gives the peppers a savory edge without risking burnt fresh garlic bits.
Key Ingredients:
- 12 oz snap peppers, whole
- 1 tbsp olive oil
- 1 tsp garlic powder
- ½ tsp chili flakes
- ½ tsp kosher salt
- 1 tbsp chopped cilantro, optional
Quick Steps:
- Preheat the air fryer to 385°F.
- Toss peppers with oil, garlic powder, chili flakes, and salt.
- Air fry 6 to 8 minutes, shaking once, until blistered.
- Finish with cilantro.
Equipment for This Recipe:
- Air fryer basket
- Mixing bowl
- Tongs
How to Serve This Dish: Serve with hummus, rice bowls, or tacos. They also work as a side for fried eggs or toast.
Pro Tips for This Recipe:
- Keep the peppers whole so they blister instead of collapsing.
- If the peppers are very small, cut the cook time by 1 minute.
- A squeeze of lime at the end works well if you want more bite.
Variations on This Dish:
- Lime-Chile Version: Finish with lime zest and juice.
- Sesame Garlic Peppers: Add sesame oil and seeds.
- Mild Version: Skip the flakes and use smoked paprika.
Common Mistakes to Avoid with This Dish:
- Cooking too long: Thin peppers lose their snap.
- Using too much oil: They soften instead of blistering.
- Adding fresh garlic directly: It can burn before the peppers are done.
44. Curry Brussels and Cauliflower
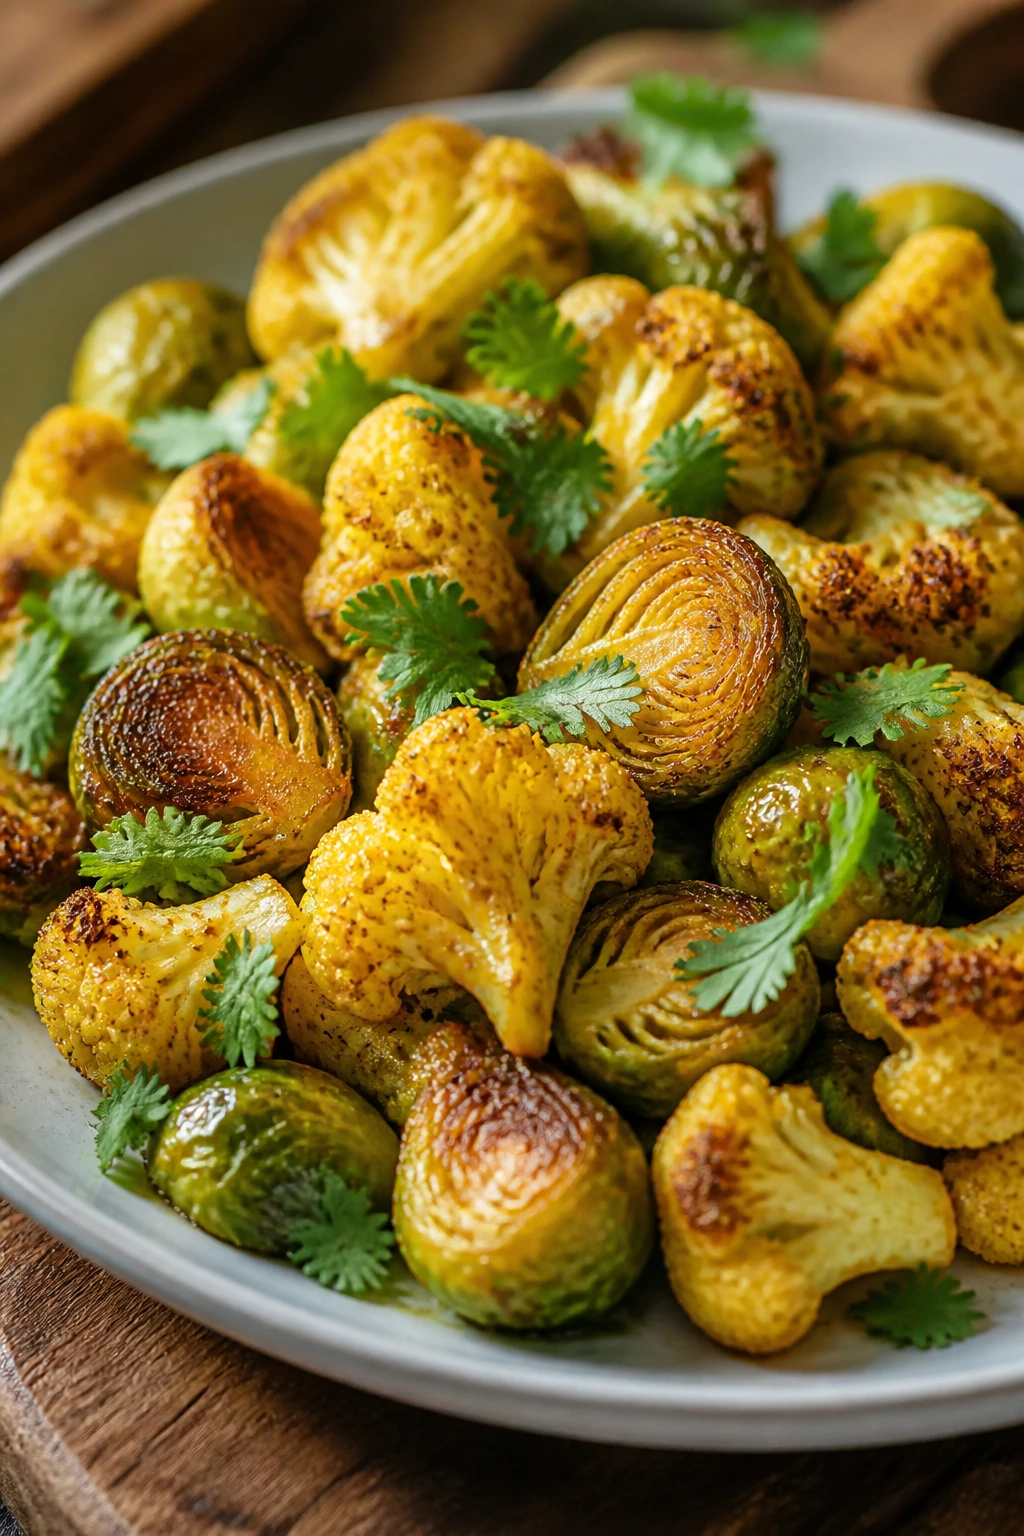
This tray is what happens when two sturdy brassicas agree to share the same spice bowl. Brussels sprouts bring the bitterness, cauliflower brings the soft bite, and curry powder ties them together in a warm, roasted mix.
Why It Works: Both vegetables handle similar air-fryer temperatures, so they can cook together without one turning mushy. Curry powder toasts in the oil and picks up the browned edges of both vegetables.
Key Ingredients:
- 8 oz Brussels sprouts, halved
- 8 oz cauliflower florets
- 1½ tbsp olive oil
- 1½ tsp curry powder
- ½ tsp kosher salt
- 1 tbsp chopped cilantro
Quick Steps:
- Preheat the air fryer to 390°F.
- Toss vegetables with oil, curry powder, and salt.
- Air fry 10 to 12 minutes, shaking twice.
- Finish with cilantro.
Equipment for This Recipe:
- Air fryer basket
- Large bowl
- Tongs
How to Serve This Dish: Serve with rice, naan, or lentils. It also works well with a yogurt drizzle and chopped cucumber.
Pro Tips for This Recipe:
- Cut the cauliflower into bite-size florets so it matches the Brussels timing.
- A squeeze of lemon after cooking keeps the spices from feeling dusty.
- If the curry powder is hot, use a little less and add more at the table.
Variations on This Dish:
- Coconut Curry Bowl: Serve with coconut yogurt.
- Garlic Curry Mix: Add garlic powder to the oil.
- Hot Curry Version: Add cayenne or chili flakes.
Common Mistakes to Avoid with This Dish:
- Using wildly different cut sizes: One vegetable overcooks.
- Adding lemon before cooking: The vegetables brown less.
- Skipping the shake: The spice clumps in one corner.
45. Maple Acorn Squash Halves
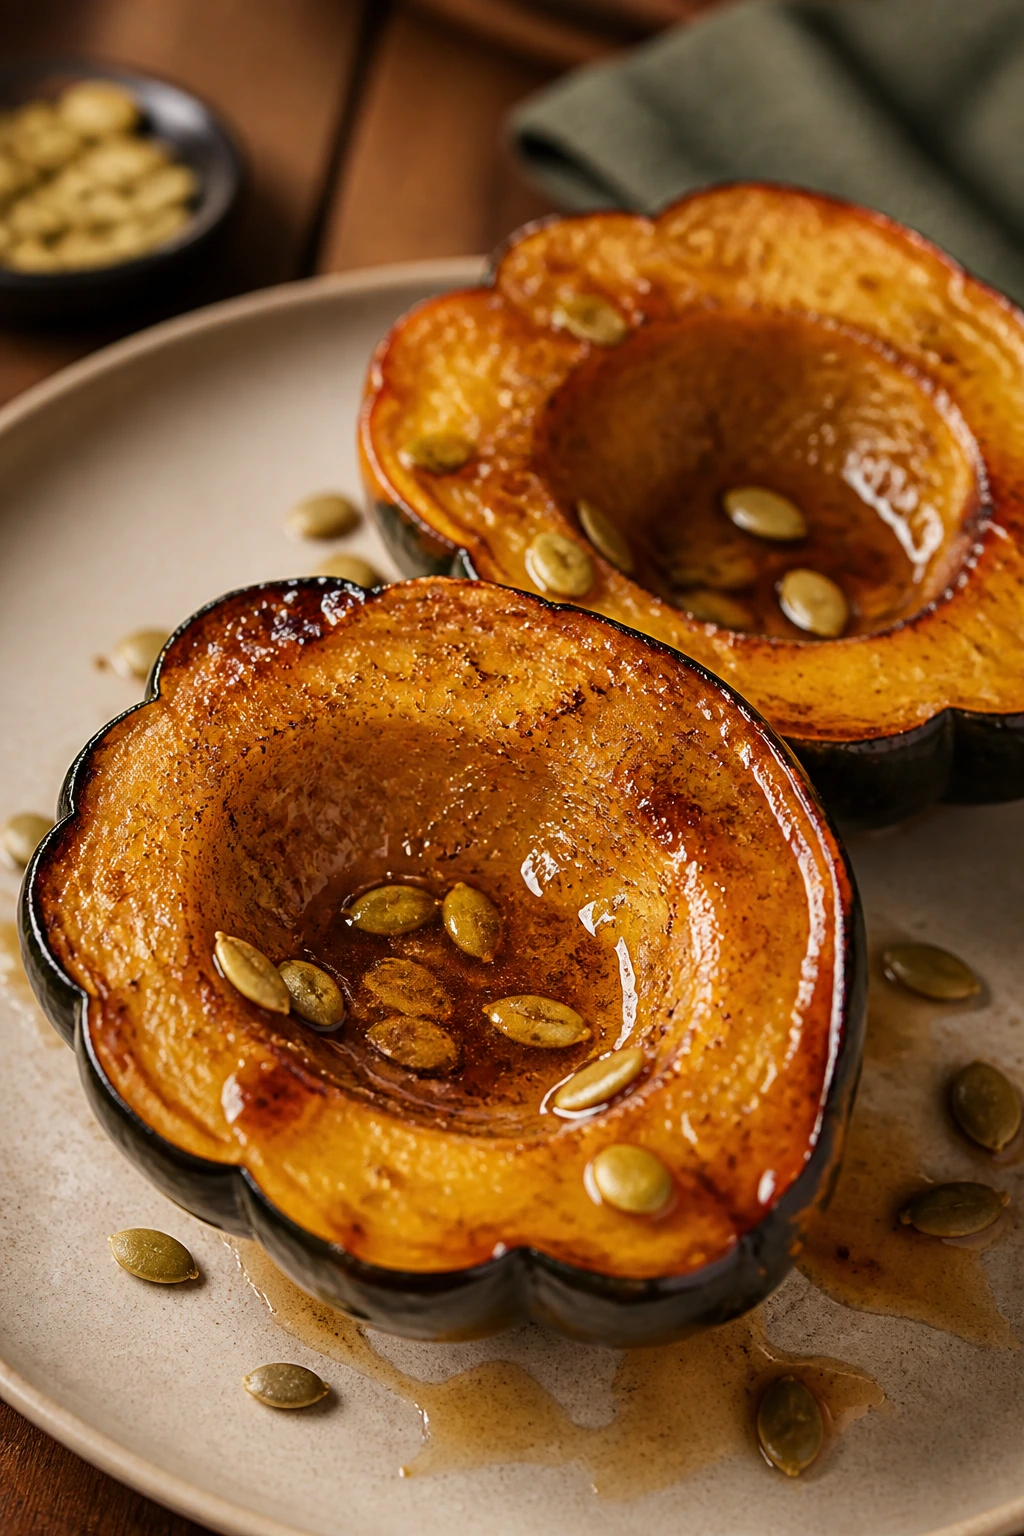
Acorn squash halves are one of the easiest ways to make a vegetable feel like a proper main or a very respectable side. The flesh softens into a spoonable texture, and maple with cinnamon gives it a clean sweet edge without turning it into dessert.
Why It Works: Cutting the squash in halves exposes the flesh while keeping the structure intact. The air fryer softens the interior and gives the cut edges enough browning to keep the sweetness from becoming one-note.
Key Ingredients:
- 1 acorn squash, halved and seeded
- 1 tbsp melted butter or olive oil
- 1 tbsp maple syrup
- ½ tsp kosher salt
- ¼ tsp cinnamon
- 1 tbsp chopped pepitas, optional
Quick Steps:
- Preheat the air fryer to 375°F.
- Brush the squash with butter or oil, maple syrup, salt, and cinnamon.
- Air fry 18 to 22 minutes, until a knife slides in easily.
- Top with pepitas if using.
Equipment for This Recipe:
- Air fryer basket or tray
- Sharp knife
- Spoon for seeding
How to Serve This Dish: Serve with grains, beans, or as a base for yogurt and herbs. It also works beside a green salad with sharp vinaigrette.
Pro Tips for This Recipe:
- If the halves wobble, trim a thin slice off the skin side so they sit flat.
- Scoop a little extra maple into the cavity only if you want a sweeter result.
- Pepitas add crunch after cooking, so keep them out of the basket.
Variations on This Dish:
- Savory Squash: Skip maple and use sage, garlic, and black pepper.
- Ginger Maple: Add grated ginger to the brush-on mixture.
- Tahini Finish: Drizzle with tahini and lemon after cooking.
Common Mistakes to Avoid with This Dish:
- Cutting through a slippery squash badly: Take your time and steady it first.
- Expecting a fast cook: Acorn squash needs more time than florets.
- Using too much maple: The surface can darken too quickly.
46. Celery Root Fries
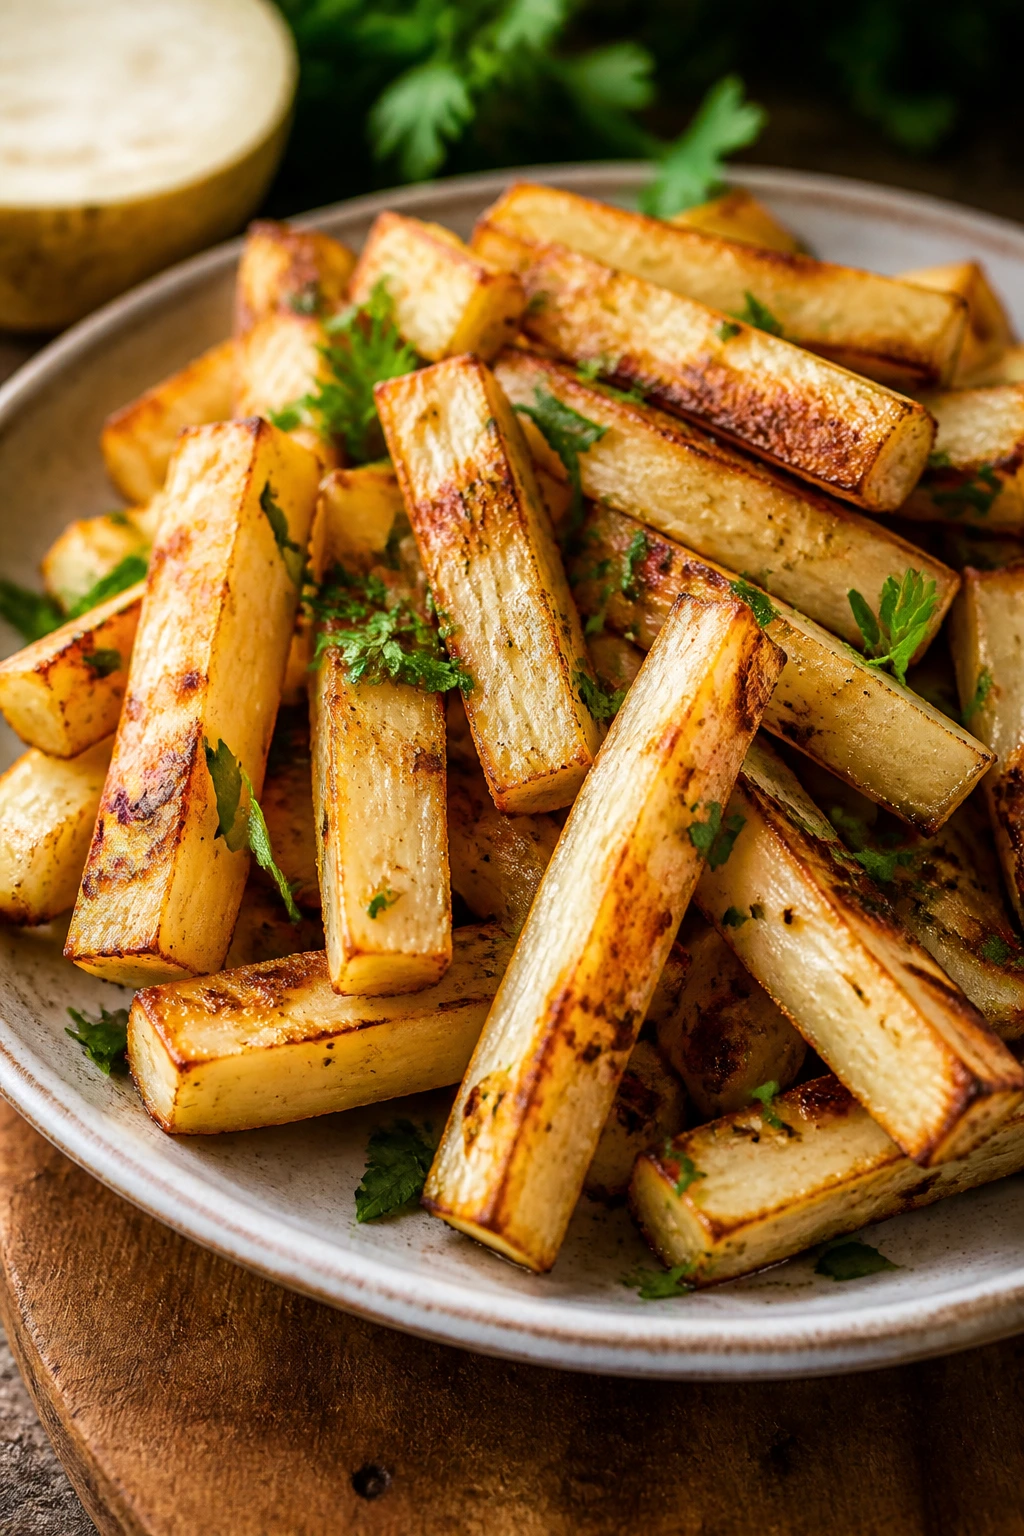
Celery root looks awkward, but it fries up beautifully. The flavor is mild, a little celery-like, and the air fryer gives it a crisp shell that makes the texture feel much friendlier than its knobby skin suggests.
Why It Works: Celeriac is dense, so fry shapes help it brown while the centers soften. A light seasoning keeps the earthy flavor in check without burying it.
Key Ingredients:
- 1 medium celery root, peeled and cut into fries
- 1½ tbsp olive oil
- ½ tsp kosher salt
- ¼ tsp black pepper
- ½ tsp garlic powder
- 1 tbsp chopped parsley
Quick Steps:
- Preheat the air fryer to 390°F.
- Toss fries with oil, salt, pepper, and garlic powder.
- Air fry 14 to 16 minutes, shaking twice, until browned.
- Finish with parsley.
Equipment for This Recipe:
- Air fryer basket
- Vegetable peeler
- Sharp knife
How to Serve This Dish: Serve with aioli, mustard dip, or alongside soup. They also work with a steak-style vegetarian plate like mushrooms and greens.
Pro Tips for This Recipe:
- Celery root browns best when the pieces are dry.
- Peel deeply enough to get past the rough outer skin.
- Keep the fries on the thick side so they stay creamy inside.
Variations on This Dish:
- Rosemary Fries: Add chopped rosemary before cooking.
- Parmesan Celeriac: Finish with Parmesan and pepper.
- Spicy Garlic Version: Add cayenne to the seasoning.
Common Mistakes to Avoid with This Dish:
- Leaving peel behind: It stays tough.
- Cutting too thin: The fries dry out.
- Skipping the toss halfway: Browning gets uneven.
47. Kohlrabi Chips with Dill Salt
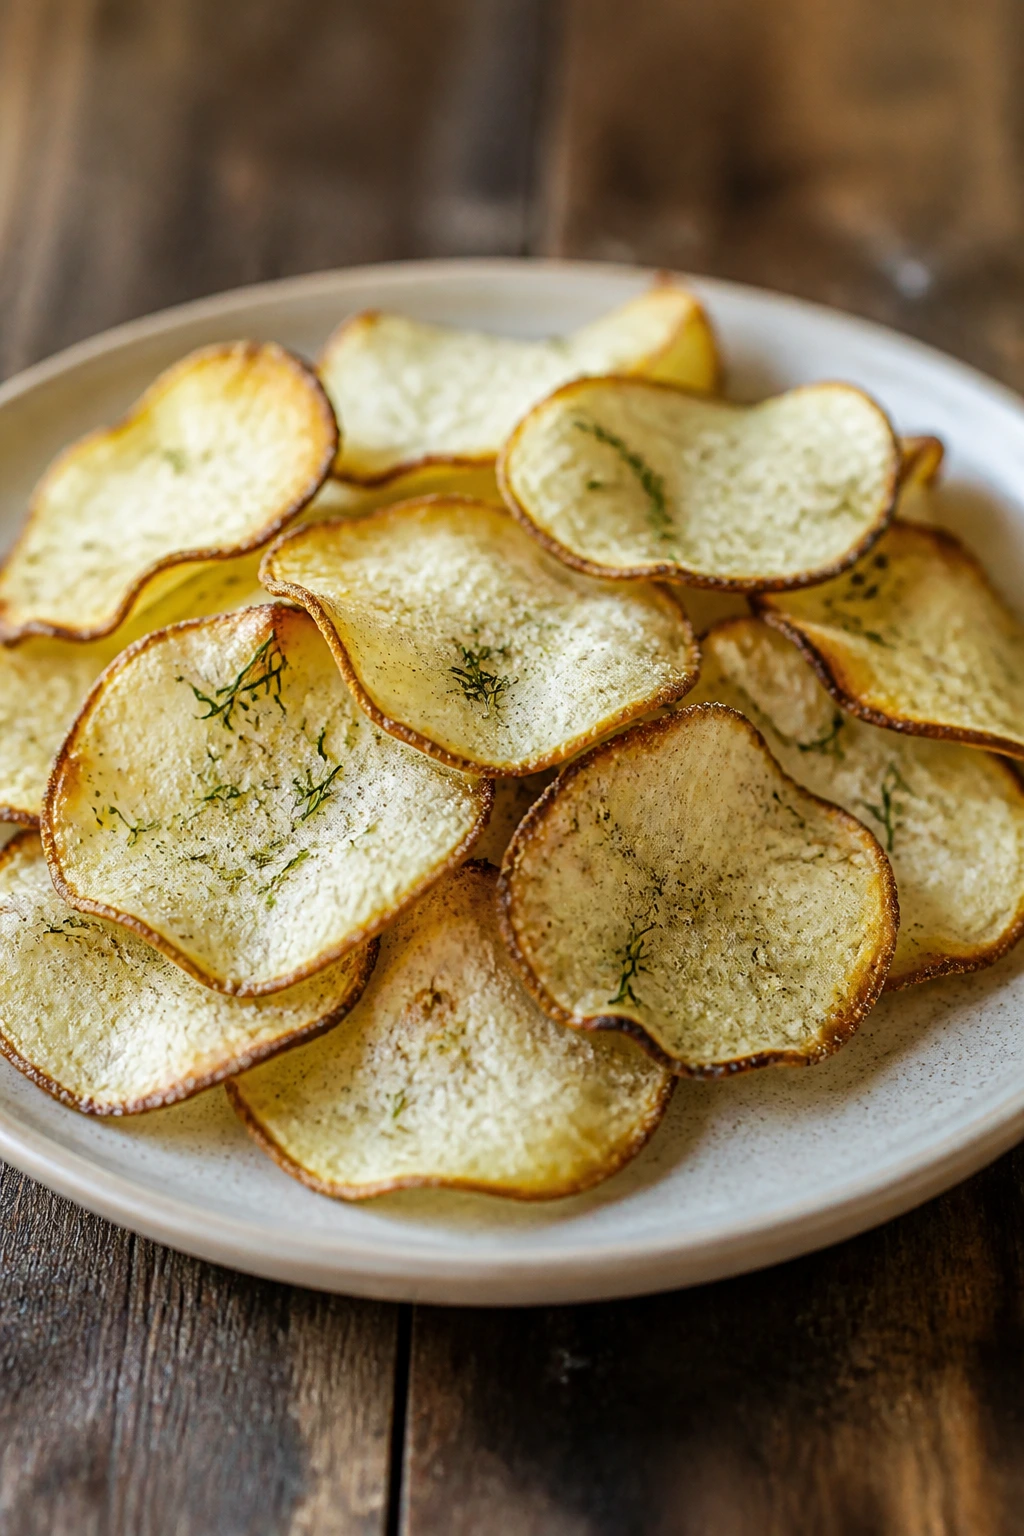
Kohlrabi is one of those vegetables people buy once and then hesitate over. Sliced thin and air-fried, it turns into a pale, crisp chip with a mild, peppery bite that dill salt makes much more interesting.
Why It Works: Thin slices dry quickly, which is what makes chips instead of limp rounds. Dill salt adds a fresh note that keeps kohlrabi from tasting too plain.
Key Ingredients:
- 2 kohlrabi bulbs, peeled and sliced thin
- 1 tbsp olive oil
- ½ tsp kosher salt
- 1 tsp dried dill
- ¼ tsp black pepper
Quick Steps:
- Preheat the air fryer to 360°F.
- Toss slices with oil, salt, dill, and pepper.
- Air fry 10 to 12 minutes, shaking gently.
- Cool 2 minutes before serving.
Equipment for This Recipe:
- Mandoline or sharp knife
- Air fryer basket
- Mixing bowl
How to Serve This Dish: Serve as a snack with yogurt dip or scatter over soups for crunch. They also work in a lunchbox with carrots and hummus.
Pro Tips for This Recipe:
- Slice as evenly as you can; thin chips burn fast.
- Let the chips cool a minute or two before judging crispness.
- Use a mandoline guard or keep your fingers far back.
Variations on This Dish:
- Garlic Dill Chips: Add garlic powder.
- Smoked Salt Version: Use smoked salt instead of regular salt.
- Lemon Herb Chips: Finish with a little lemon zest.
Common Mistakes to Avoid with This Dish:
- Cutting thick slices: They stay chewy.
- Cooking on too high a heat: The edges burn before the centers dry.
- Packing the basket: Chips need space.
48. Smoked Paprika Potato Wedges
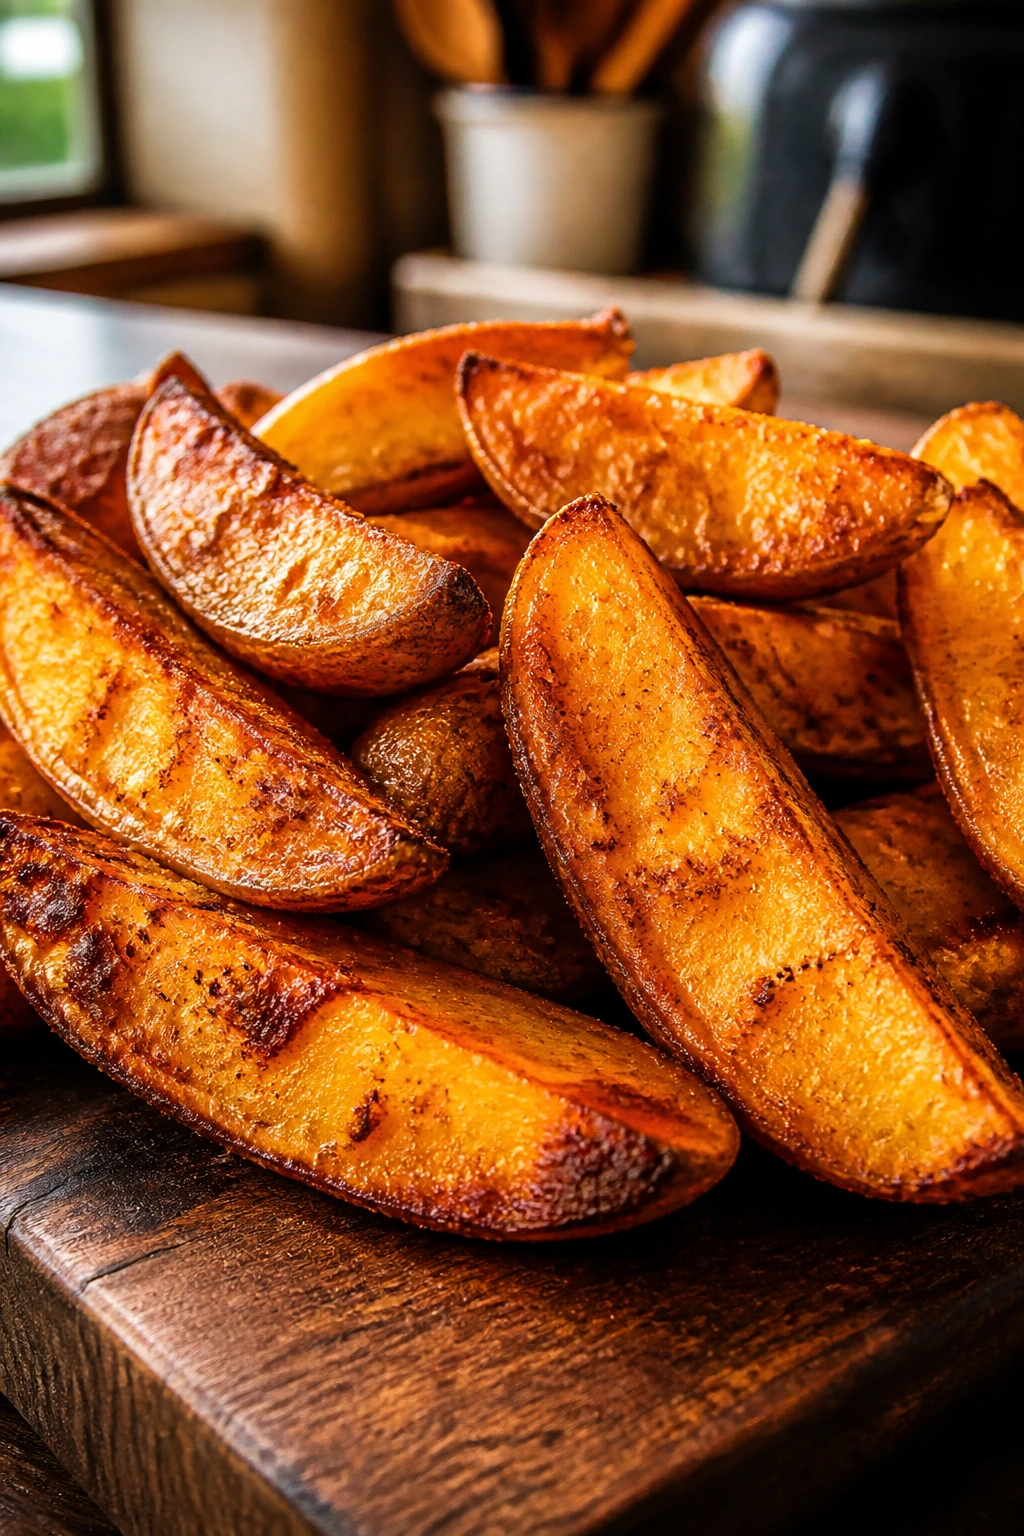
Potato wedges are a classic because they work. The air fryer gives them browned skins and soft centers, while smoked paprika makes the whole batch taste deeper and a little campfire-like.
Why It Works: Russet potatoes have enough starch to crisp on the outside while staying fluffy inside. Smoked paprika clings to the oil and adds color before the wedges even finish cooking.
Key Ingredients:
- 2 russet potatoes, cut into wedges
- 1½ tbsp olive oil
- 1 tsp smoked paprika
- ½ tsp garlic powder
- ¾ tsp kosher salt
- ¼ tsp black pepper
Quick Steps:
- Preheat the air fryer to 400°F.
- Toss wedges with oil and seasonings.
- Air fry 16 to 18 minutes, shaking twice, until crisp and tender.
- Serve hot.
Equipment for This Recipe:
- Air fryer basket
- Large bowl
- Sharp knife
How to Serve This Dish: Serve with ketchup, aioli, or bean chili. They also work as a sturdy side for salads and sandwiches.
Pro Tips for This Recipe:
- Soak wedges in cold water if you want a crisper skin, then dry them well.
- Place the wedges cut-side down first.
- Keep the seasoning simple so the paprika stays noticeable.
Variations on This Dish:
- Rosemary Potato Wedges: Add chopped rosemary.
- Cheesy Paprika Wedges: Finish with Parmesan.
- Spicy Wedges: Add cayenne or chili powder.
Common Mistakes to Avoid with This Dish:
- Skipping the dry-off after soaking: That creates steam.
- Cutting wedges too small: They dry out before the centers soften.
- Using too little oil: The skins don’t crisp.
49. Rainbow Veggie Medley
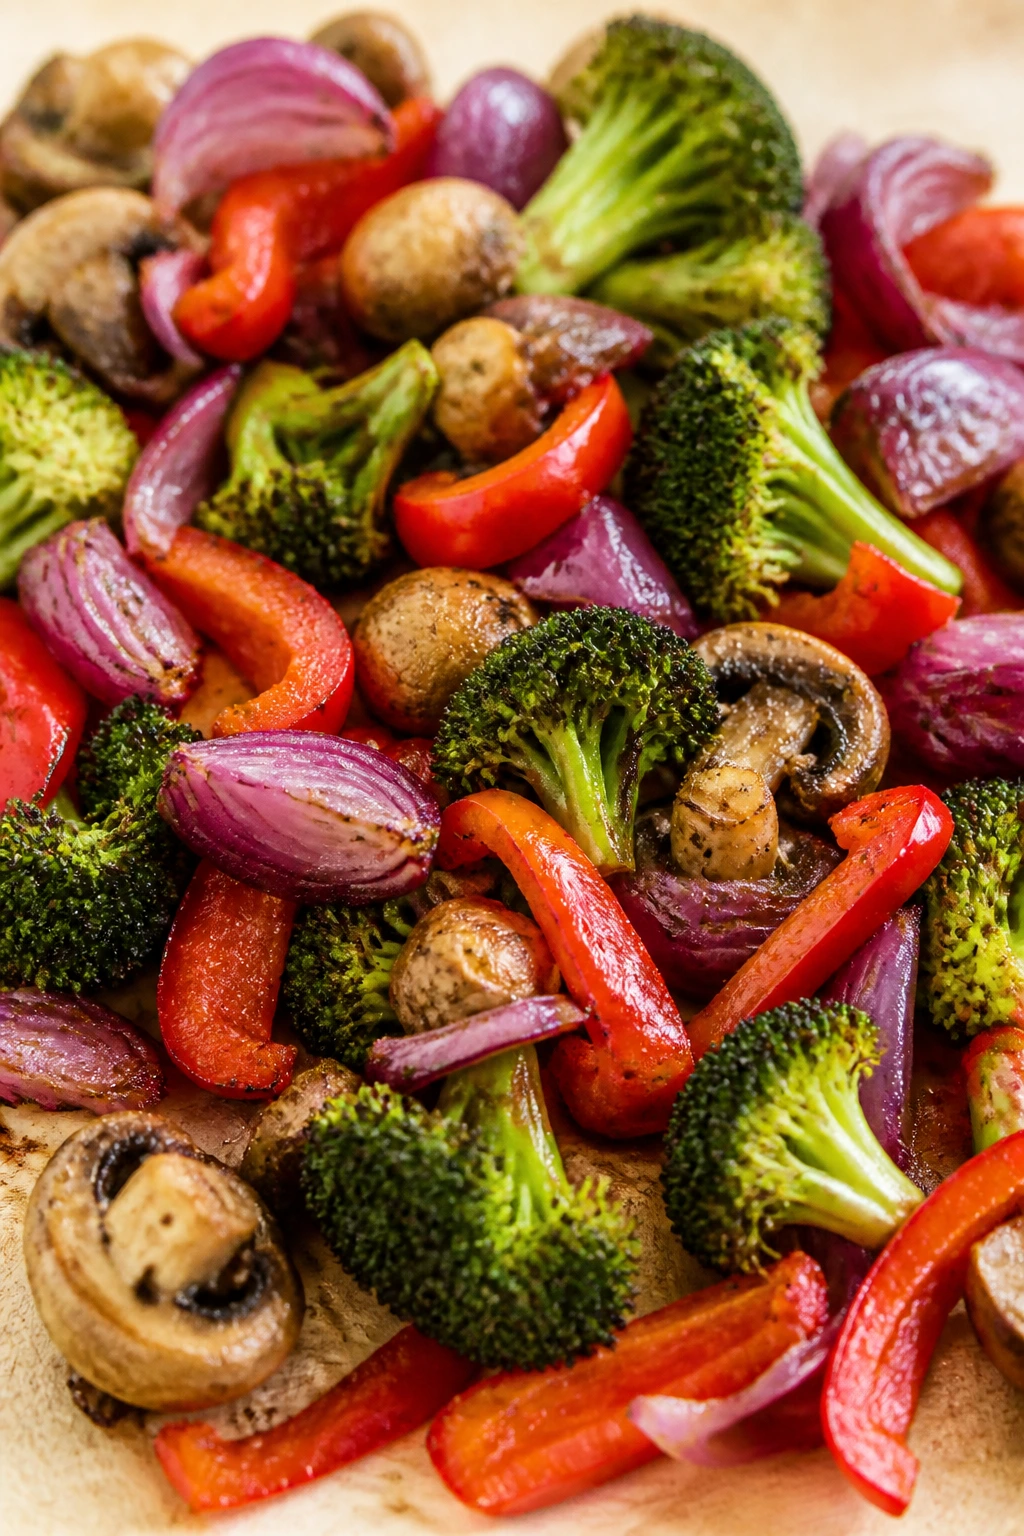
This is the tray you make when the fridge has odds and ends and you want them to act like they were planned together. Broccoli, peppers, onions, and mushrooms all take the seasoning differently, which keeps every bite a little varied.
Why It Works: Mixing vegetables with similar cook times prevents any one of them from going soft before the others brown. The air fryer gives you good edge color on everything, which is harder to get on a crowded sheet pan.
Key Ingredients:
- 1 cup broccoli florets
- 1 red bell pepper, sliced
- ½ red onion, sliced
- 1 cup mushrooms, halved
- 1½ tbsp olive oil
- 1 tsp garlic powder
- ½ tsp kosher salt
Quick Steps:
- Preheat the air fryer to 390°F.
- Toss all vegetables with oil, garlic powder, and salt.
- Air fry 10 to 12 minutes, shaking twice.
- Serve hot.
Equipment for This Recipe:
- Air fryer basket
- Large bowl
- Tongs
How to Serve This Dish: Serve over quinoa, rice, or pasta, or use it as the base for a grain bowl. It also works with tahini, pesto, or vinaigrette.
Pro Tips for This Recipe:
- Cut everything to a similar thickness so it cooks together.
- If one vegetable is wetter than the others, keep it separate until you’re ready.
- A finishing sauce changes this from side dish to dinner.
Variations on This Dish:
- Italian Medley: Add oregano and finish with Parmesan.
- Sesame Medley: Use soy sauce and sesame oil.
- Curry Medley: Toss with curry powder before cooking.
Common Mistakes to Avoid with This Dish:
- Mixing wildly different cooking times: Soft pieces vanish while hard ones stay raw.
- Using too many mushrooms: They release extra moisture.
- Skipping the final sauce: The tray can taste plain.
50. Shishito Peppers with Lime Salt
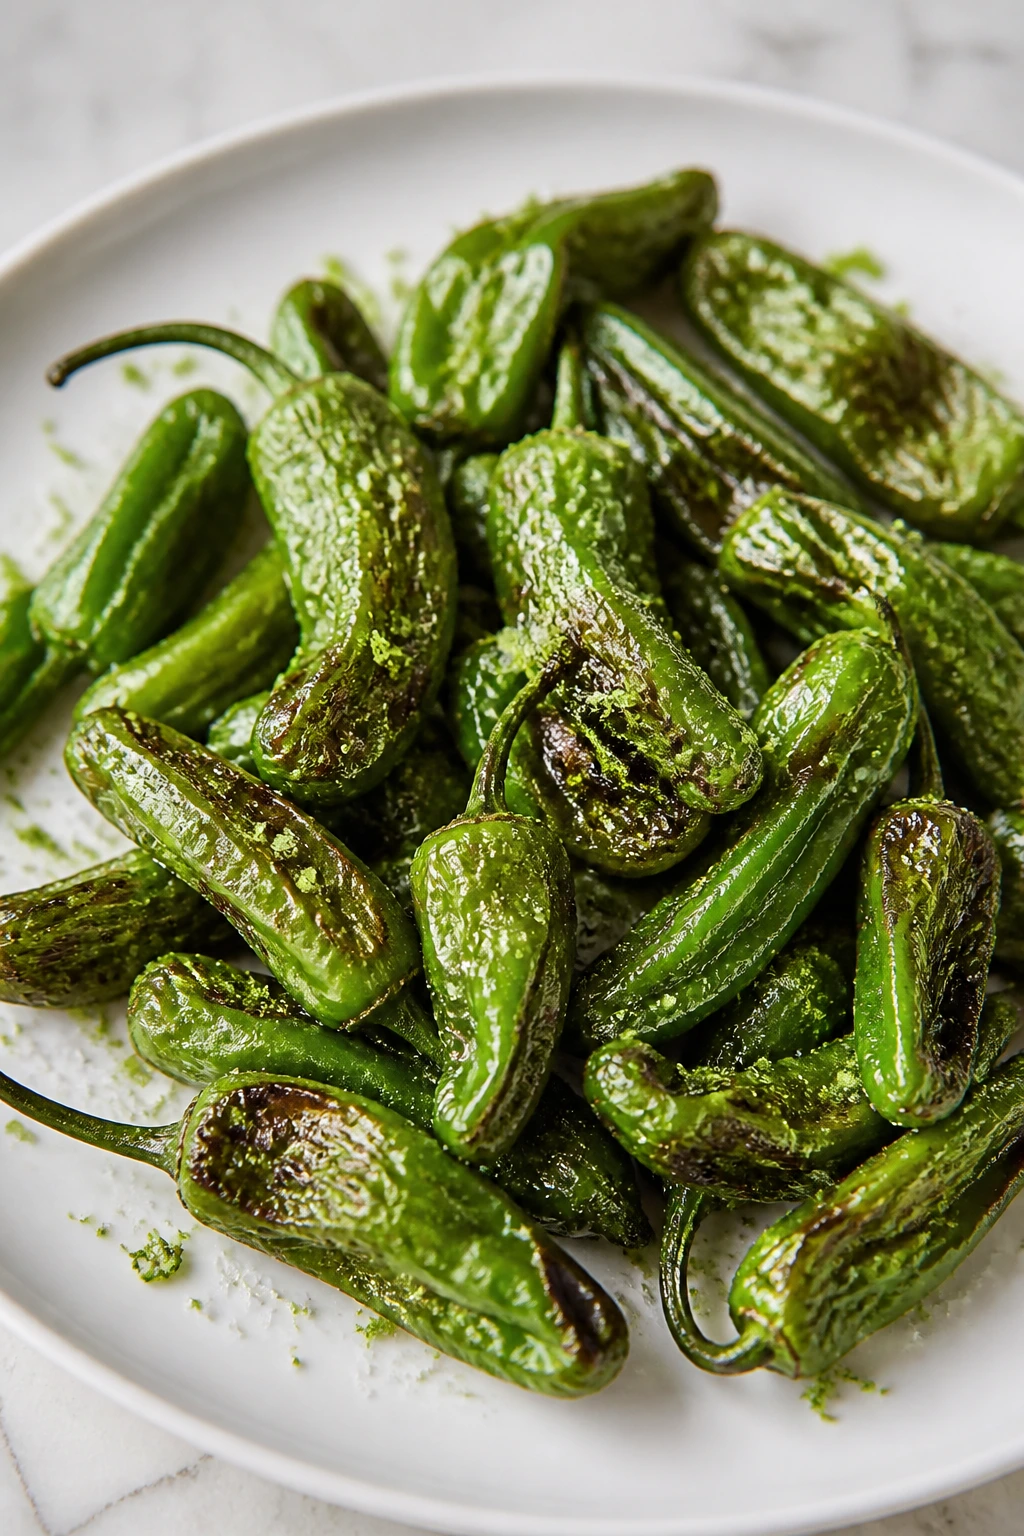
Shishitos are the easiest kind of drama: a blistered skin, a smoky smell, and the occasional hot one if you’re lucky or unlucky. Lime salt at the end keeps them bright and makes them disappear faster than you planned.
Why It Works: Shishitos blister fast because they’re thin-skinned and mostly hollow. High heat gives you charred spots without overcooking the peppers, and the lime salt wakes up their sweetness.
Key Ingredients:
- 8 oz shishito peppers
- 1 tsp neutral oil
- ½ tsp kosher salt
- ½ tsp lime zest
- 1 tsp lime juice
- Flaky salt, optional
Quick Steps:
- Preheat the air fryer to 400°F.
- Toss peppers with oil and kosher salt.
- Air fry 6 to 8 minutes, shaking once, until blistered.
- Toss with lime zest and juice, then add flaky salt if you want more crunch.
Equipment for This Recipe:
- Air fryer basket
- Mixing bowl
- Tongs
How to Serve This Dish: Serve as a snack, starter, or side to rice bowls and noodles. They’re also good with a cool yogurt dip.
Pro Tips for This Recipe:
- Leave the stems on so they’re easy to grab.
- Dry peppers brown better than damp ones.
- A tiny pinch of flaky salt at the end feels more useful than more oil.
Variations on This Dish:
- Sesame-Lime Shishitos: Finish with sesame seeds.
- Chili-Lime Version: Add red pepper flakes.
- Garlic Shishitos: Dust with garlic powder before cooking.
Common Mistakes to Avoid with This Dish:
- Overcooking: They lose their snap fast.
- Using too much oil: The skins soften instead of blistering.
- Skipping the lime finish: The flavor stays one-dimensional.
Why the Air Fryer Wins on Vegetable Night
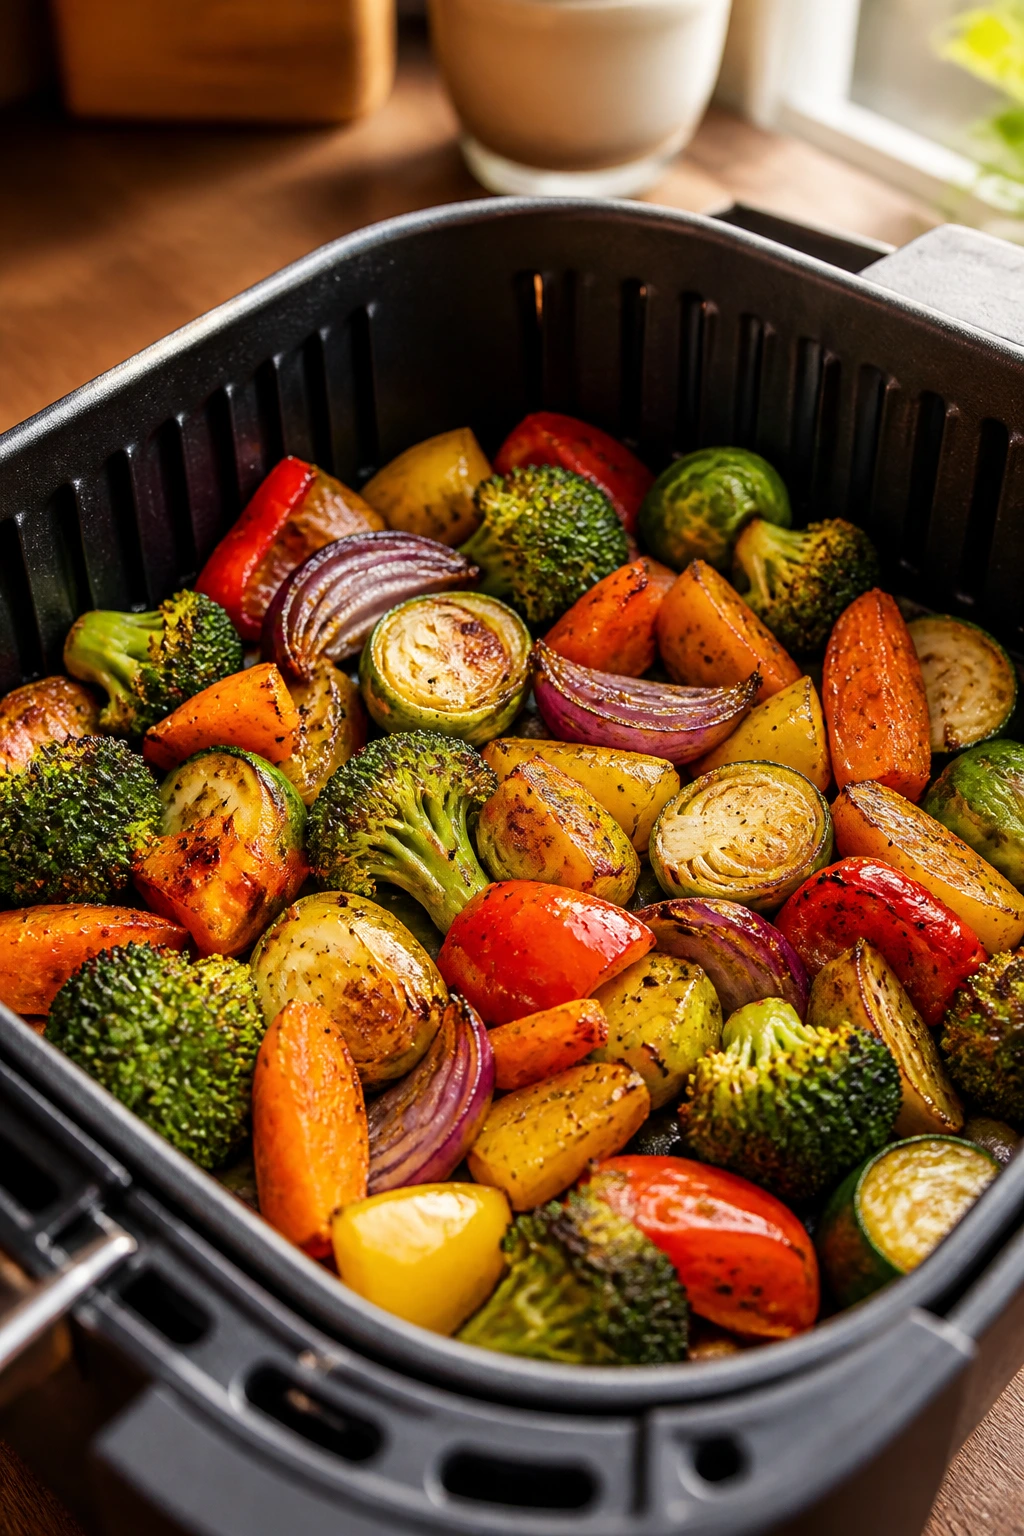
The air fryer works so well for vegetables because it solves a basic problem: vegetables are full of water, and water slows browning. A hot circulating basket pushes moisture off the surface faster than a crowded skillet or a cool oven tray, which means you get color before everything turns soft. That matters most with vegetables that can go limp in a hurry, like zucchini, asparagus, green beans, and snap peas.
Size matters, too. Cut a vegetable into wedges, coins, florets, fries, or steaks, and you change how much surface area the hot air can hit. More flat edges mean more browning. That is why a cauliflower steak behaves differently from loose florets, and why potato wedges need less fuss than a big baked potato.
A small amount of oil makes a real difference here. You are not deep frying. You are creating a thin film that helps salt, spices, and crumbs cling to the vegetable while also improving browning. If you skip oil entirely, the vegetables can turn dry before they turn crisp. If you use too much, they drift toward greasy and heavy. There’s a middle lane, and it works.
The other quiet advantage is speed. Once the basket preheats, most of these recipes cook in under 20 minutes, which makes it easier to build a dinner around them instead of treating them like a side note. That’s why air fried vegetables are useful for Meatless Monday: they can carry a plate, not just decorate it.
Essential Equipment for These Recipes

-
Air fryer basket or tray: A basket-style fryer gives better circulation for small pieces like florets, fries, and chips; trays work well for larger pieces and delicate items.
-
Large mixing bowls: You’ll use these to coat vegetables evenly without crushing them, especially for coated recipes like zucchini coins and Parmesan tomato slices.
-
Tongs or a silicone spatula: These help with shaking, turning, and moving hot vegetables without scraping away the crust.
-
Sharp chef’s knife: Uniform cuts matter more than people think. Even pieces cook at the same pace, which keeps the tray from mixing raw and burnt.
-
Vegetable peeler: Useful for carrots, parsnips, rutabaga, kohlrabi, celery root, and squash.
-
Mandoline or slicer: Handy for beet chips, kohlrabi chips, and green tomato slices. A guard is not optional if your fingers like staying attached.
-
Microplane or fine grater: Good for lemon zest, garlic, Parmesan, and quick sauces.
-
Small bowls: You’ll want these for dipping sauces, spice mixes, and finishing glazes.
-
Perforated parchment liners: Optional, but helpful for sticky items like sauced cauliflower or glazed eggplant. Use liners made for air fryers, not solid parchment that blocks airflow.
Smart Shopping and Ingredient Picks
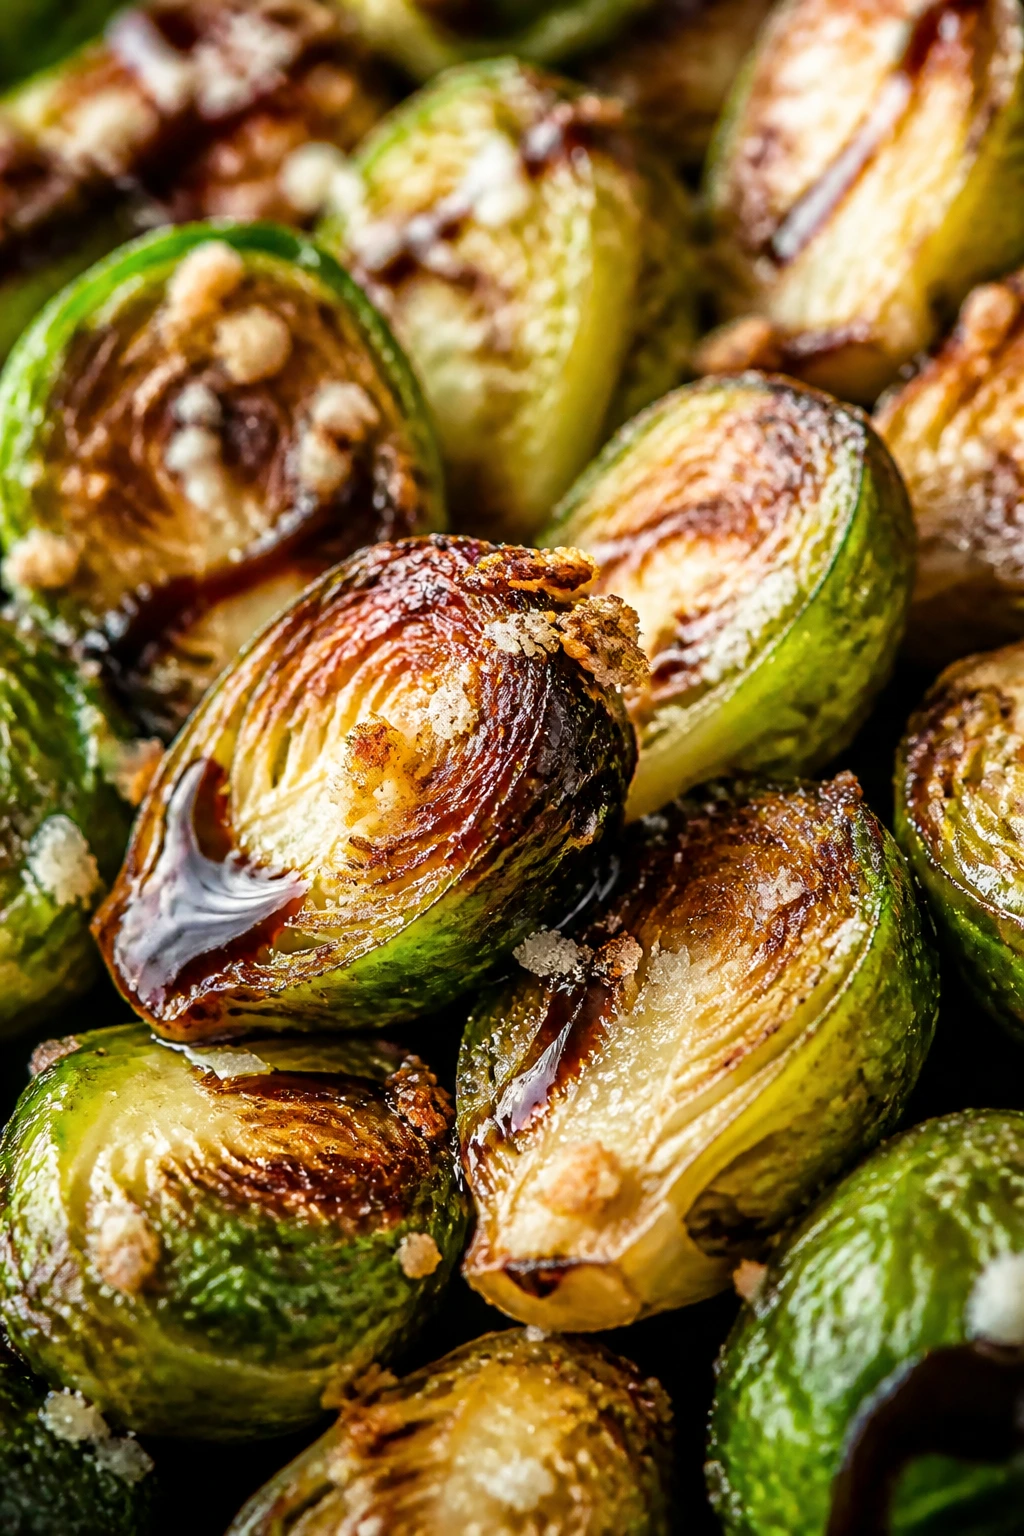
The best air-fried vegetable recipes start before the basket gets hot. You want vegetables that are dry, firm, and cut to match the recipe, not just whatever was lying in the drawer. Choose Brussels sprouts that feel tight and heavy, broccoli with deep green florets and firm stems, and cauliflower with compact white heads instead of loose, bruised ones. With mushrooms, look for caps that are dry to the touch, not slimy or cracked.
For roots, size and shape matter more than perfection. Carrots, parsnips, turnips, rutabaga, celery root, and sweet potatoes should be firm and free of soft spots. The smoother the shape, the easier it is to cut even wedges or fries. Squashes like delicata, acorn, and butternut should feel heavy for their size, which usually means the flesh will be dense and worth cooking.
Pay attention to moisture. Zucchini, eggplant, tomatoes, and mushrooms all carry enough water to sabotage browning if you ignore them. Pat them dry, salt them when a recipe asks for it, and give the air fryer room to breathe. If you buy pre-cut vegetables, use them fast; once a cut surface dries out in the fridge, the texture goes a little weird in the basket.
Spices should be fresh enough to smell when you open the jar. Smoked paprika, curry powder, cumin, za’atar, and chili flakes all lose edge over time, and old seasoning tends to taste dusty instead of warm. That matters more here than people expect because the vegetable itself is often simple. The seasoning has to carry a bit of the story.
How to Serve These Recipes
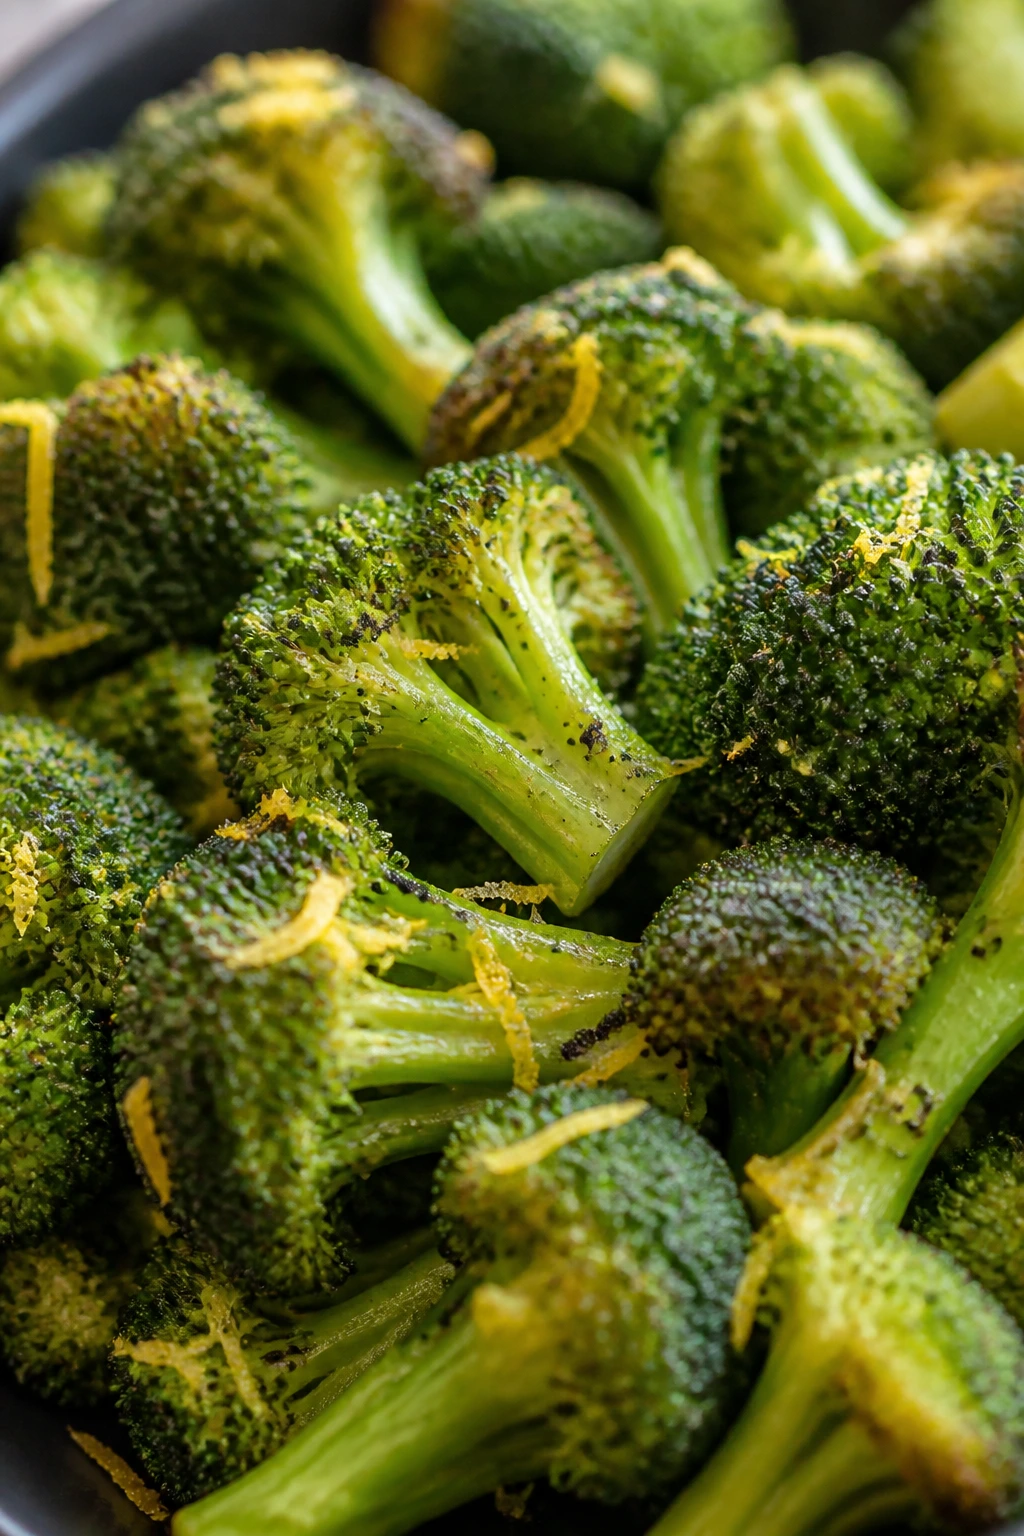
Presentation: Stack the vegetables on a warm platter instead of dumping them into a bowl. A scatter of herbs, sesame seeds, chopped scallions, lemon zest, or flaky salt turns a basket of vegetables into something that looks deliberate. Sauces belong on the side or drizzled at the very end so the crust stays visible.
Accompaniments: These recipes pair naturally with rice, farro, couscous, pasta, lentils, beans, pita, flatbread, yogurt sauces, tahini, hummus, pesto, or a sharp vinaigrette. For Meatless Monday, I like building a plate around one hot vegetable, one grain, and one creamy or acidic element. That combination keeps the meal from feeling thin.
Portions: As a side, plan on about 1 to 1½ cups per person. As a main plate with grains or eggs, 2 cups per person is a better starting point. For a crowd, make two or three vegetables with different textures; a tray of only soft vegetables can get dull fast.
Beverage Pairing: Sparkling water with lime keeps nearly everything here feeling fresh. If you want something more structured, a dry white wine, an unfussy pilsner, or an iced herbal tea all sit nicely beside roasted vegetables without fighting the spices.
Additional Tips and Flavor Boosters

Flavor Enhancement: A finishing acid changes everything. Lemon juice, lime juice, rice vinegar, balsamic glaze, or a quick splash of hot sauce makes roasted vegetables taste finished instead of merely cooked. Use it at the end so the browning stays intact.
Customization: Swap spices by mood, not by rules. Garlic and Parmesan turn up the savory side; cumin and paprika push root vegetables toward warm and smoky; za’atar, sesame, and tahini make cabbage and squash feel more Mediterranean; harissa and chili crisp bring heat without much effort.
Serving Suggestions: Don’t underestimate small toppings. Chopped herbs, toasted nuts, sesame seeds, crumbled feta, grated cheese, scallions, yogurt, or a spoonful of pesto can change the whole plate. I’m partial to something crunchy on top of something soft. That contrast never gets old.
Make-It-Yours: For vegan plates, use olive oil, tahini, nutritional yeast, vegan cheese, or a quick cashew sauce instead of dairy-heavy finishes. For gluten-free batches, use cornmeal, cornstarch, rice flour, or gluten-free panko where a crust is needed. For lower-sodium cooking, lean harder on lemon zest, fresh herbs, garlic, and vinegar so the dish still tastes awake.
Make-Ahead, Storage, and Reheating Guidance

Most air-fried vegetables are best the day they’re cooked, especially delicate ones like zucchini coins, asparagus, snap peas, and shishitos. They lose their snap if they sit around too long. Sturdier vegetables — Brussels sprouts, cauliflower, cabbage, carrots, potatoes, mushrooms, and squash — hold up better and can be refrigerated in airtight containers for 3 to 4 days.
Room temperature is a short stop, not a holding pattern. Keep cooked vegetables out no longer than 2 hours, and less if the room is warm. After that, they start losing both texture and food safety margin.
For reheating, the air fryer is the best tool. Use 350°F to 375°F for 3 to 6 minutes, depending on thickness, and shake once halfway through. Thicker potatoes, squash, and cabbage may need 6 to 8 minutes. Small, delicate pieces like green beans and broccoli often need only 2 to 4 minutes or they’ll dry out.
Freezing works only for some of these recipes. Cauliflower, Brussels sprouts, potatoes, squash, and some roasted mushrooms can be frozen for up to 2 months, though the texture softens a little after thawing. Zucchini, tomatoes, asparagus, and snap peas do not freeze well once cooked; they tend to go watery. If you know a batch will be frozen, undercook it by a minute or two so the second heating doesn’t push it over the edge.
If a recipe includes a sauce or glaze, store the sauce separately when possible. That keeps the vegetables from sitting in liquid and getting sad overnight. Reheat the vegetables first, then add the sauce once they’re hot again.
Variations and Adaptations to Try

Low-Oil Crisping: Cut the oil to 1 teaspoon per pound and use an oil spray for the last light coat. This works best for vegetables that already carry moisture, like broccoli, cauliflower, mushrooms, and peppers. You still get browning, just a little less gloss.
Dairy-Free Finishes: Replace Parmesan, feta, mozzarella, or ricotta with nutritional yeast, vegan cheese, tahini sauce, or a cashew cream. The goal is to keep a creamy or salty finish on the plate, not to copy cheese flavor exactly.
Heat-Lover’s Batch: Add chili flakes, cayenne, chili crisp, harissa, or hot sauce to one side of the tray and keep the other side milder. This works well when you’re feeding people with different spice tolerances and don’t want to cook separate meals.
Herb Garden Swap: Use what you actually have — parsley, dill, basil, cilantro, chives, thyme, rosemary, or mint. Fresh herbs should usually go on at the end, while dried herbs can go into the oil before cooking.
Meal-Builder Mode: Turn the vegetables into dinner by pairing them with lentils, chickpeas, eggs, tofu, farro, quinoa, rice, or warm flatbread. A good vegetable side becomes a real meal the minute you add one sturdy protein or grain.
Common Mistakes to Avoid
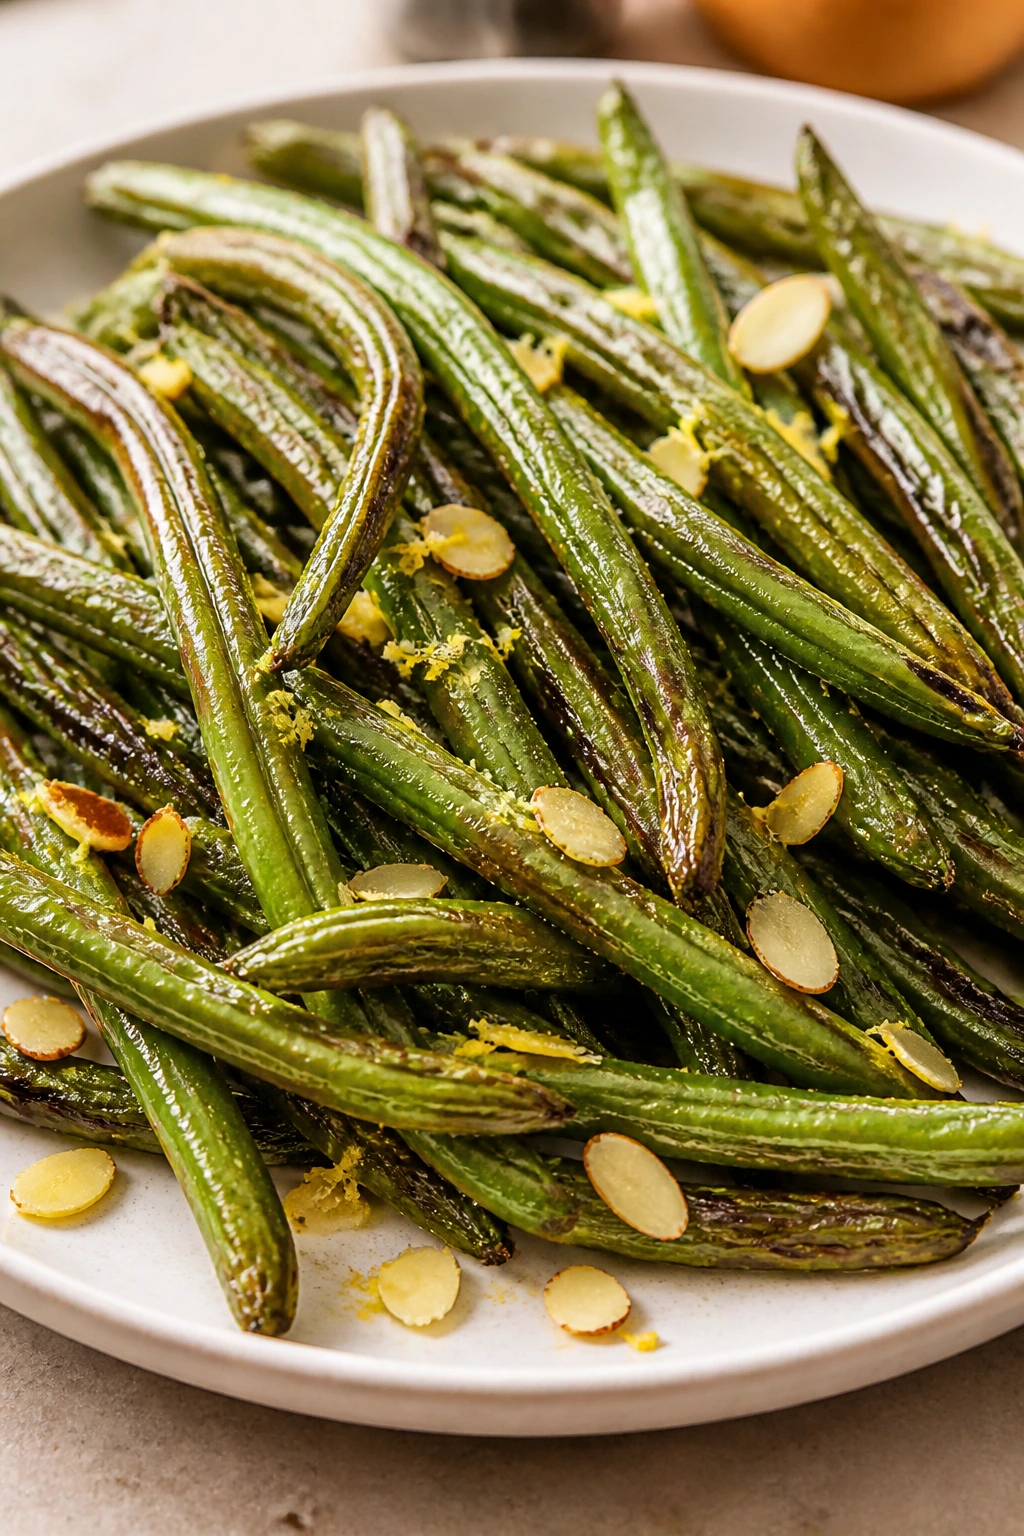
The first mistake is simple: starting with wet vegetables. Water is the enemy of browning. If your florets, pods, slices, or wedges go into the basket damp from washing, they steam before they crisp. Dry them with a clean towel or paper towels, and don’t skip that step for mushrooms or zucchini, which are especially slippery.
The second mistake is crowding the basket. Air fryers need open space. If the vegetables pile up, the hot air can’t move around them, and you get pale soft spots instead of browning. Cook in two batches if you need to. That extra 6 minutes is almost always worth it.
The third mistake is treating every vegetable the same. Thin asparagus doesn’t need the same time as potato wedges. Eggplant wants sauce late; cabbage wants it after browning; delicate greens need a very short cook. If you ignore those differences, one part of the tray gets ruined while the rest barely reaches the table.
The fourth mistake is using too much sugar or sauce too early. Honey, maple syrup, balsamic glaze, and teriyaki all burn faster than plain oil. They’re excellent finishes, not first-step ingredients in most cases. Add them at the end unless the recipe tells you otherwise.
The fifth mistake is cutting everything at random sizes. A basket full of jagged chunks cooks unevenly, which means some pieces stay hard while others break down into mush. Spend the extra minute on the knife work. It pays you back every time.
Frequently Asked Questions

Can I cook frozen vegetables in the air fryer?
Yes, but the texture is different. Frozen broccoli, cauliflower, Brussels sprouts, and green beans usually need a few extra minutes and a light coating of oil, and they brown better if you shake the basket more than once. Delicate vegetables like zucchini, asparagus, and tomatoes are a poor match for frozen cooking.
Do I need to preheat the air fryer for vegetables?
For most of these recipes, yes. Preheating helps the vegetables start browning right away instead of sitting in a cool basket and losing moisture slowly. If your air fryer runs hot, shave a minute off the cook time instead of skipping the preheat.
Why do my vegetables come out soggy?
Usually it’s one of three things: the vegetables were wet, the basket was too full, or the cook time was too short. Some vegetables also need a higher temperature than people expect; zucchini at 360°F can stay floppy, while zucchini at 400°F can crisp more quickly.
How do I keep zucchini and eggplant from turning mushy?
Salt them when the recipe calls for it, cut them into even pieces, and keep the cook time short. Both vegetables hold a lot of water, so they do better with quick heat and a finishing sauce added after cooking rather than before.
Can I line the basket with parchment?
Yes, if it’s perforated parchment made for air fryers. Solid parchment can block airflow, which defeats the point of using the machine. I use liners mainly for sticky or sauced recipes, not for dry vegetables that need maximum circulation.
Which vegetables are best for a Meatless Monday main dish?
Cauliflower steaks, stuffed peppers, portobello caps, cabbage steaks, squash halves, and potato wedges all hold enough substance to carry a plate. Pair them with grains, beans, eggs, or a creamy sauce and they stop feeling like an afterthought.
How do I scale these recipes for a bigger group?
Do not just double the basket volume. Cook in batches so the vegetables have room, then hold the first batch on a warm sheet pan while the second finishes. If you crowd too much at once, the texture goes soft and you lose the browning that makes these recipes worth doing.
Can I reheat leftovers without wrecking the texture?
Yes. The air fryer is best for most of these recipes, usually at 350°F to 375°F for a few minutes. Sauced vegetables may need a quick reheat first, then a fresh drizzle of sauce so they don’t dry out.
A Better Monday Basket

A good meatless dinner does not need to be built from substitutes and apologies. It needs vegetables with crisp edges, a little salt, and a plan for how they’ll show up on the plate. That’s what the air fryer does best: it turns ordinary produce into something with bite, color, and enough personality to hold its own.
Pick one recipe, not ten. Make a tray of Brussels sprouts, broccoli, or cabbage wedges first, then work your way into the stranger roots and the stuffed peppers when the rhythm feels familiar. After that, Meatless Monday stops being a compromise and starts looking like a smart habit.