
A kid-friendly dinner does not need fancy ingredients to win a table. What usually works better is a hot pan, a familiar shape, and one sauce that clings instead of sliding off. That’s why the dinners that get eaten fastest tend to look almost plain on purpose: chicken tenders, meatballs, sliders, pasta bakes, rice bowls, taco cups. They give kids a clear starting point, and they give adults room to add heat, herbs, pickles, or chili crisp at the end.
The pattern shows up again and again in real kitchens. Warm food. Soft where it should be. Crisp where it counts. Nothing with twelve competing flavors and a mystery ingredient lurking in the back. A broccoli floret tucked into cheddar sauce has a better shot than a broccoli salad shouting from the center of the plate, and a baked pasta that scoops cleanly will usually beat a “healthy” dinner that falls apart the second the spoon hits it.
These 50 dinners lean into that logic without turning dinner into a bland relay race. Some are baked in one dish, some are skillet meals, some hide vegetables in plain sight, and some rely on shapes kids already trust. Keep a few in rotation and weeknight dinner gets less fragile. The plates come back with fewer negotiations. That matters more than any glossy food trend ever will.
Why These Dinners Earn a Spot on the Weeknight Lineup
- Familiar shapes: Tenders, sliders, shells, wraps, and meatballs are easier for kids to trust than a bowl full of anonymous pieces.
- Sauce that stays put: Most of these recipes use enough sauce to coat the food, not drown it, so the first bite still has texture.
- Vegetables tucked in smartly: Finely chopped, grated, or roasted vegetables blend into the meal instead of sitting there like a warning sign.
- Fast enough for real life: A lot of these land in the 25-to-40-minute range once the oven is hot and the skillet is ready.
- Leftovers that hold up: Pasta bakes, meatballs, chili, and rice dishes reheat without turning into dry, sad leftovers.
- Easy to customize: Adults can pile on hot sauce, herbs, pickles, or extra pepper while kids keep the milder version on their plates.
1. Cheesy Baked Chicken Tenders
A tray of chicken tenders with a craggy crust and a little parmesan baked into the crumbs disappears fast. The chicken stays juicy because the strips are thin, and the coating gives you that crisp-salty bite kids tend to chase first.
Why It Works: Thin chicken strips cook fast at 425°F, so the crust browns before the meat dries out. Panko gives the outside a rough, crunchy edge, while parmesan adds salt and a little nutty flavor.
Key Ingredients:
- 2 pounds chicken tenders
- 1/2 cup all-purpose flour
- 2 large eggs
- 2 tablespoons milk
- 1 1/2 cups panko breadcrumbs
- 1/2 cup finely grated parmesan
- 1 teaspoon garlic powder
- 1 teaspoon paprika
- 1 teaspoon kosher salt
- Olive oil spray, for the pan and tops
Quick Steps:
- Preheat the oven to 425°F and set a wire rack over a rimmed sheet pan.
- Set up three bowls: flour in one, beaten eggs and milk in the second, panko, parmesan, garlic powder, paprika, and salt in the third.
- Dredge each strip in flour, dip in egg, then press into the crumb mix so it sticks in a thick layer.
- Arrange the tenders on the rack, spray lightly with oil, and bake for 18 to 20 minutes.
- Pull them when the coating is deep golden and the thickest piece reaches 165°F.
Equipment for This Recipe:
- Rimmed sheet pan
- Wire rack
- Three shallow bowls
- Tongs
How to Serve This Dish: Serve with ketchup, honey mustard, or ranch, plus peas or cucumber slices on the side. They also slide neatly into lunch boxes the next day if you pack them cold and reheat briefly.
Pro Tips for This Recipe:
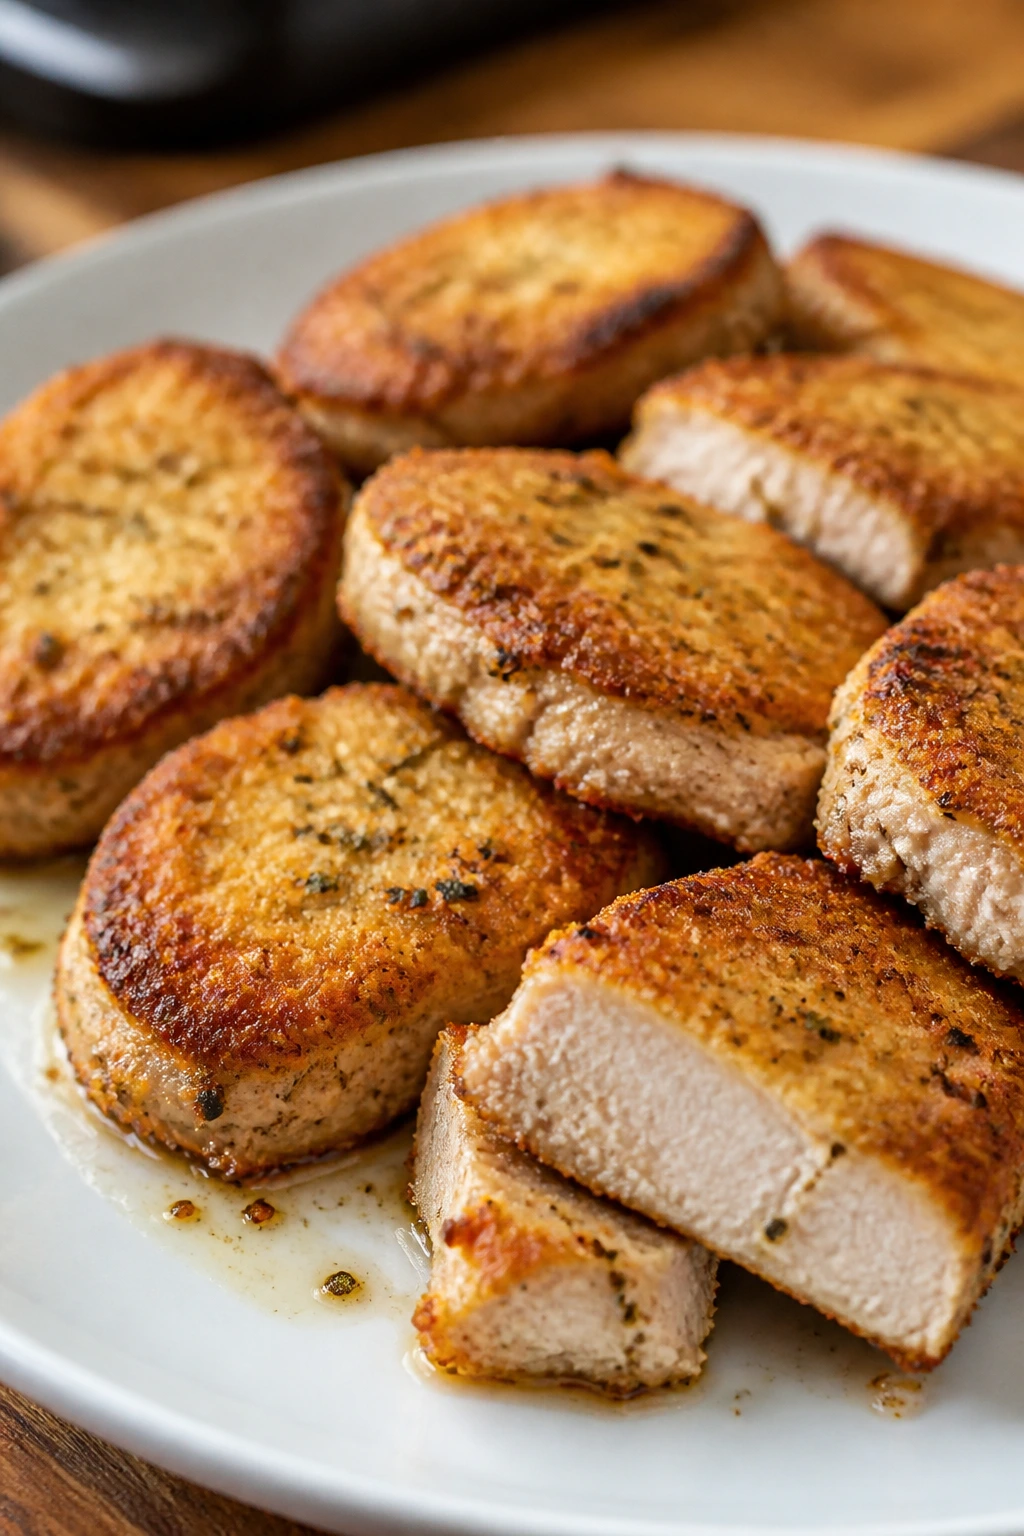
- Press the crumbs on firmly; loose crumbs fall off in the oven.
- A rack keeps the underside crisp. A flat pan does not.
- If the coating looks pale at 18 minutes, give it 2 more minutes instead of cranking the heat.
Variations on This Dish:
- Parmesan Herb Tenders: Add 1 tablespoon dried Italian seasoning to the crumbs for a more herby crust.
- Gluten-Free Tenders: Use gluten-free flour and gluten-free panko; the baking time stays the same.
Common Mistakes to Avoid with This Dish:
- Skipping the rack: The bottoms turn soft and patchy. Use a rack or flip once halfway.
- Crowding the pan: Steam ruins crunch. Leave space between each strip.
2. One-Pan Taco Pasta
This is the kind of skillet dinner that smells like taco night and eats like mac and cheese. The sauce clings to the pasta, the beef gives it heft, and the whole thing lands in one pan with almost no drama.
Why It Works: The pasta cooks right in the seasoned broth, so it picks up flavor instead of getting boiled separately and drained away. A little sour cream at the end smooths out the spices and gives the sauce a creamy finish.
Key Ingredients:
- 1 pound ground beef
- 1 small onion, finely diced
- 2 cloves garlic, minced
- 2 tablespoons taco seasoning
- 12 ounces rotini
- 1 can (14.5 ounces) diced tomatoes
- 2 1/2 cups low-sodium beef broth
- 1 cup shredded cheddar
- 1/2 cup sour cream
- 2 tablespoons chopped cilantro, optional
Quick Steps:
- Brown the beef and onion in a deep skillet over medium-high heat until the meat loses its pink color.
- Stir in the garlic and taco seasoning for 30 seconds until fragrant.
- Add rotini, tomatoes, and broth, then bring the pan to a simmer.
- Cook uncovered for 12 to 14 minutes, stirring often, until the pasta is tender and the liquid is mostly absorbed.
- Stir in cheddar and sour cream off the heat, then finish with cilantro if you want it.
Equipment for This Recipe:
- Deep 12-inch skillet with a lid
- Wooden spoon
- Measuring cups
How to Serve This Dish: Serve it straight from the skillet with tortilla chips or a scoop of avocado on the side. A few sliced cherry tomatoes or shredded lettuce on top gives the plate some freshness.
Pro Tips for This Recipe:
- Stir often near the end so the pasta does not stick and scorch.
- If the skillet looks dry before the pasta is tender, add 1/4 cup broth.
- Use rotini or shells; both catch the sauce better than long noodles.
Variations on This Dish:
- Chicken Taco Pasta: Swap in 1 pound ground chicken for a lighter version.
- Bean-Heavy Version: Add 1 cup black beans with the broth for more texture.
Common Mistakes to Avoid with This Dish:
- Walking away from the simmer: Pasta at the edge of the pan sticks first. Stir.
- Adding cheese while boiling: It can turn grainy. Take the pan off the heat first.
3. Hidden-Veggie Meatloaf Muffins
These little meatloaves look like dinner and behave like portion control. The carrot and zucchini disappear into the mix, and the ketchup glaze turns glossy in the oven instead of drying into a tacky lid.
Why It Works: Muffin tins cook meatloaf faster than a big loaf, so the edges brown before the centers overcook. Grated vegetables keep the meat moist and soften into the background.
Key Ingredients:
- 2 pounds ground turkey or ground beef
- 1 cup grated zucchini, squeezed dry
- 1 cup finely grated carrot
- 1 large egg
- 3/4 cup breadcrumbs
- 1/4 cup ketchup, plus more for topping
- 1 tablespoon Worcestershire sauce
- 1 teaspoon kosher salt
- 1/2 teaspoon black pepper
Quick Steps:
- Preheat the oven to 400°F and grease a 12-cup muffin tin.
- Mix the meat, zucchini, carrot, egg, breadcrumbs, ketchup, Worcestershire, salt, and pepper until just combined.
- Divide the mixture into the muffin cups and press it down lightly.
- Spoon a little ketchup over each cup.
- Bake for 20 to 22 minutes, until the tops are browned and the centers reach 165°F.
Equipment for This Recipe:
- 12-cup muffin tin
- Large mixing bowl
- Box grater
How to Serve This Dish: Put them beside mashed potatoes or buttered noodles, and add peas if you want a simple green side. The muffin shape makes them easy for smaller hands to grab without cutting.
Pro Tips for This Recipe:
- Squeeze the zucchini hard; wet zucchini makes soggy meatloaf.
- Mix only until the ingredients disappear into one another.
- Let the muffins rest for 5 minutes before lifting them out.
Variations on This Dish:
- BBQ Meatloaf Muffins: Swap the ketchup glaze for barbecue sauce.
- Mini Loaf Version: Bake the mix in a small loaf pan for 30 to 35 minutes.
Common Mistakes to Avoid with This Dish:
- Leaving the vegetables watery: The muffins won’t hold together well. Squeeze the zucchini dry.
- Packing the mixture too tightly: It turns dense. Press lightly.
4. Creamy Mac and Cheese with Peas
There’s a reason mac and cheese keeps coming back to the table. Done well, it has that soft, stretchy, salty thing kids notice immediately, and the peas make the bowl look a little less like a one-note carb pile.
Why It Works: A simple roux thickens the sauce so it coats the noodles instead of pooling underneath. Frozen peas warm through in the pasta’s heat and keep their bright color.
Key Ingredients:
- 12 ounces elbow macaroni
- 3 tablespoons butter
- 3 tablespoons all-purpose flour
- 3 cups milk
- 1 teaspoon dry mustard
- 3 cups shredded sharp cheddar
- 1 cup frozen peas
- 1/2 teaspoon salt
- 1/2 cup breadcrumbs, optional for topping
- 1 tablespoon melted butter, optional for topping
Quick Steps:
- Cook the macaroni in salted water until just shy of tender, then drain.
- Melt the butter in a saucepan, whisk in the flour, and cook for 1 minute.
- Whisk in the milk and mustard, then simmer until the sauce thickens enough to coat a spoon.
- Stir in the cheddar, peas, salt, and macaroni.
- If you want a browned top, transfer to a baking dish, scatter breadcrumbs mixed with butter over the surface, and bake at 375°F for 10 minutes.
Equipment for This Recipe:
- Medium saucepan
- Whisk
- Large pot
- Baking dish, optional
How to Serve This Dish: Serve it hot with apple slices or carrot sticks on the side. A little extra cheddar on top makes the bowl look finished without changing the flavor much.
Pro Tips for This Recipe:
- Shred the cheese yourself; it melts smoother than pre-shredded bags.
- Undercook the pasta by a minute because it keeps softening in the sauce.
- If the sauce tightens too much, add a splash of milk.
Variations on This Dish:
- Broccoli Swap: Use 1 cup small broccoli florets instead of peas.
- Bacon Finish: Stir in 4 chopped cooked bacon slices for a smoky edge.
Common Mistakes to Avoid with This Dish:
- Boiling the cheese sauce hard: It can turn grainy. Keep it at a gentle simmer.
- Using too little salt: Mac and cheese tastes flat without it.
5. Crispy Baked Fish Sticks
These are the fish sticks that change minds. The coating is crisp, the fish stays flaky, and the lemon on the table keeps the plate bright enough that even skeptical eaters usually give one piece a try.
Why It Works: Cod cooks fast and stays mild, which makes it easier for kids to accept. Baking on a rack gives the coating a dry, crisp finish instead of the soft bottom you get on a flat tray.
Key Ingredients:
- 1 1/2 pounds cod fillets, cut into strips
- 1/2 cup all-purpose flour
- 2 large eggs
- 1 tablespoon water
- 1 1/2 cups panko breadcrumbs
- 1/2 cup finely grated parmesan
- 1 teaspoon kosher salt
- 1/2 teaspoon black pepper
- Olive oil spray
- Lemon wedges, for serving
Quick Steps:
- Heat the oven to 425°F and set a wire rack over a sheet pan.
- Pat the fish dry, then set out flour, beaten eggs mixed with water, and the panko-parmesan mix.
- Coat each strip in flour, egg, and crumbs.
- Arrange on the rack, spray lightly with oil, and bake for 14 to 16 minutes.
- The fish is ready when the coating is golden and the center flakes easily with a fork.
Equipment for This Recipe:
- Sheet pan
- Wire rack
- Three shallow bowls
- Fish spatula or thin spatula
How to Serve This Dish: Serve with tartar sauce, ketchup, or a little ranch, plus peas or roasted potato wedges. Lemon wedges are not optional; the squeeze at the end wakes up the whole plate.
Pro Tips for This Recipe:
- Dry fish equals crisp coating.
- Do not flip too early; wait until the crust releases easily.
- If the pieces are thick, cut them thinner so they bake evenly.
Variations on This Dish:
- Salmon Sticks: Use salmon and shorten the bake by 1 to 2 minutes.
- Cornflake Crust: Swap panko for crushed cornflakes for extra crunch.
Common Mistakes to Avoid with This Dish:
- Skipping the drying step: Wet fish makes a gummy coating.
- Overbaking: Fish dries out fast. Watch the flakes, not the clock alone.
6. Sloppy Joe Sliders
Sweet, tangy, and a little messy in the best way, these sliders have the exact energy a kid dinner sometimes needs. The filling stays thick enough to pile onto the buns without turning the bottoms into mush.
Why It Works: The sauce cooks down until it clings to the beef, which keeps the sliders from sliding apart. Small buns make the portions feel manageable, and that matters when the main enemy is plate overwhelm.
Key Ingredients:
- 1 pound ground beef
- 1 small onion, finely diced
- 1 cup ketchup
- 1/2 cup tomato sauce
- 1 tablespoon Worcestershire sauce
- 1 tablespoon brown sugar
- 1/2 teaspoon salt
- 12 slider buns
- 1 cup shredded cheddar, optional
Quick Steps:
- Brown the beef and onion in a skillet over medium heat.
- Stir in ketchup, tomato sauce, Worcestershire, brown sugar, and salt.
- Simmer for 8 to 10 minutes until thick and glossy.
- Spoon the mixture onto the slider buns, add cheddar if you want it, and cap with the tops.
- Warm at 350°F for 5 minutes if you want the buns a little toasty.
Equipment for This Recipe:
- Large skillet
- Wooden spoon
- Sheet pan, optional for warming
How to Serve This Dish: Put carrot sticks, apple wedges, or cucumber spears next to the sliders. A few pickle chips on the side give adults the punch they usually want without changing the filling.
Pro Tips for This Recipe:
- Let the sauce reduce until it mounds on a spoon.
- Toast the bun bottoms lightly if you hate sogginess.
- Use lean beef so you do not have to drain much fat.
Variations on This Dish:
- Turkey Joe Sliders: Swap in ground turkey and add 1 tablespoon olive oil to the pan.
- BBQ Sliders: Replace half the ketchup with barbecue sauce.
Common Mistakes to Avoid with This Dish:
- Leaving the filling watery: It will leak through the buns.
- Overstuffing each slider: Two heaping tablespoons is plenty.
7. Chicken and Rice Bake
This is the casserole that smells like home before it comes out of the oven. The rice cooks under the chicken, soaking up broth and seasoning, while the top gets browned enough to feel like dinner instead of therapy food.
Why It Works: The rice cooks in the same pan as the chicken, so it picks up all the drippings and broth. Covered baking traps steam first, then uncovering lets the chicken skin or top finish with a little color.
Key Ingredients:
- 2 pounds boneless, skinless chicken thighs
- 1 1/2 cups long-grain white rice
- 3 cups low-sodium chicken broth
- 1 can (10.5 ounces) cream of chicken soup
- 1 cup diced carrots
- 1 small onion, chopped
- 1 cup frozen peas
- 1 teaspoon dried thyme
- 1 teaspoon salt
- 1/2 teaspoon black pepper
Quick Steps:
- Heat the oven to 375°F and grease a 9×13-inch baking dish.
- Stir rice, broth, soup, carrots, onion, peas, thyme, salt, and pepper together in the dish.
- Nestle the chicken thighs on top and season them lightly with more salt and pepper.
- Cover tightly with foil and bake for 45 minutes.
- Uncover and bake 15 minutes more until the chicken reaches 165°F and the rice is tender.
Equipment for This Recipe:
- 9×13-inch baking dish
- Aluminum foil
- Mixing bowl
How to Serve This Dish: Spoon it into shallow bowls and add a little chopped parsley if you have it. A green salad or steamed broccoli works well beside it without competing for attention.
Pro Tips for This Recipe:
- Use long-grain rice, not instant.
- Keep the foil sealed tight for the first part of baking.
- If the rice looks dry after uncovering, splash in 1/4 cup broth and bake 5 more minutes.
Variations on This Dish:
- Mushroom Chicken Rice Bake: Add 1 cup sliced mushrooms to the rice mix.
- Cheesy Version: Stir 1 cup shredded cheddar into the rice before baking.
Common Mistakes to Avoid with This Dish:
- Using the wrong rice: Quick-cook rice turns mushy here.
- Underseasoning the base: The chicken needs the rice to taste like something.
8. Mini Turkey Meatballs with Spaghetti
Small meatballs are one of those rare dinners that feel playful without being childish. The turkey stays light, the sauce pulls everything together, and spaghetti gives the whole plate enough stretch to feel like a real meal.
Why It Works: Baking the meatballs first keeps them intact and saves you from babysitting a skillet full of fragile little rounds. Simmering them in sauce after baking gives them flavor without making them fall apart.
Key Ingredients:
- 1 pound ground turkey
- 1/2 cup breadcrumbs
- 1 large egg
- 1/4 cup grated parmesan
- 2 cloves garlic, minced
- 1 teaspoon salt
- 1/2 teaspoon black pepper
- 24 ounces marinara sauce
- 12 ounces spaghetti
Quick Steps:
- Heat the oven to 400°F and line a sheet pan with parchment.
- Mix turkey, breadcrumbs, egg, parmesan, garlic, salt, and pepper until just blended.
- Roll into 1 1/2-inch meatballs and bake for 14 to 16 minutes.
- Warm the marinara in a saucepan, add the meatballs, and simmer for 5 minutes.
- Serve over cooked spaghetti.
Equipment for This Recipe:
- Sheet pan
- Parchment paper
- Large bowl
- Saucepan
How to Serve This Dish: Twirl the spaghetti into bowls and spoon the meatballs over the top with extra sauce. Garlic bread is a fine side here, but a simple green bean dish keeps the plate from getting too heavy.
Pro Tips for This Recipe:
- Wet your hands before rolling to keep the mix from sticking.
- Do not pack the meatballs too tightly.
- If turkey mixes feel too soft, chill the bowl for 10 minutes first.
Variations on This Dish:
- Chicken Meatballs: Use ground chicken in place of turkey.
- Gluten-Free Version: Swap in gluten-free breadcrumbs and pasta.
Common Mistakes to Avoid with This Dish:
- Overmixing the meat: It makes the meatballs dense.
- Boiling the sauce after adding meatballs: Gentle heat keeps them tender.
9. Sheet Pan Sausage and Potatoes
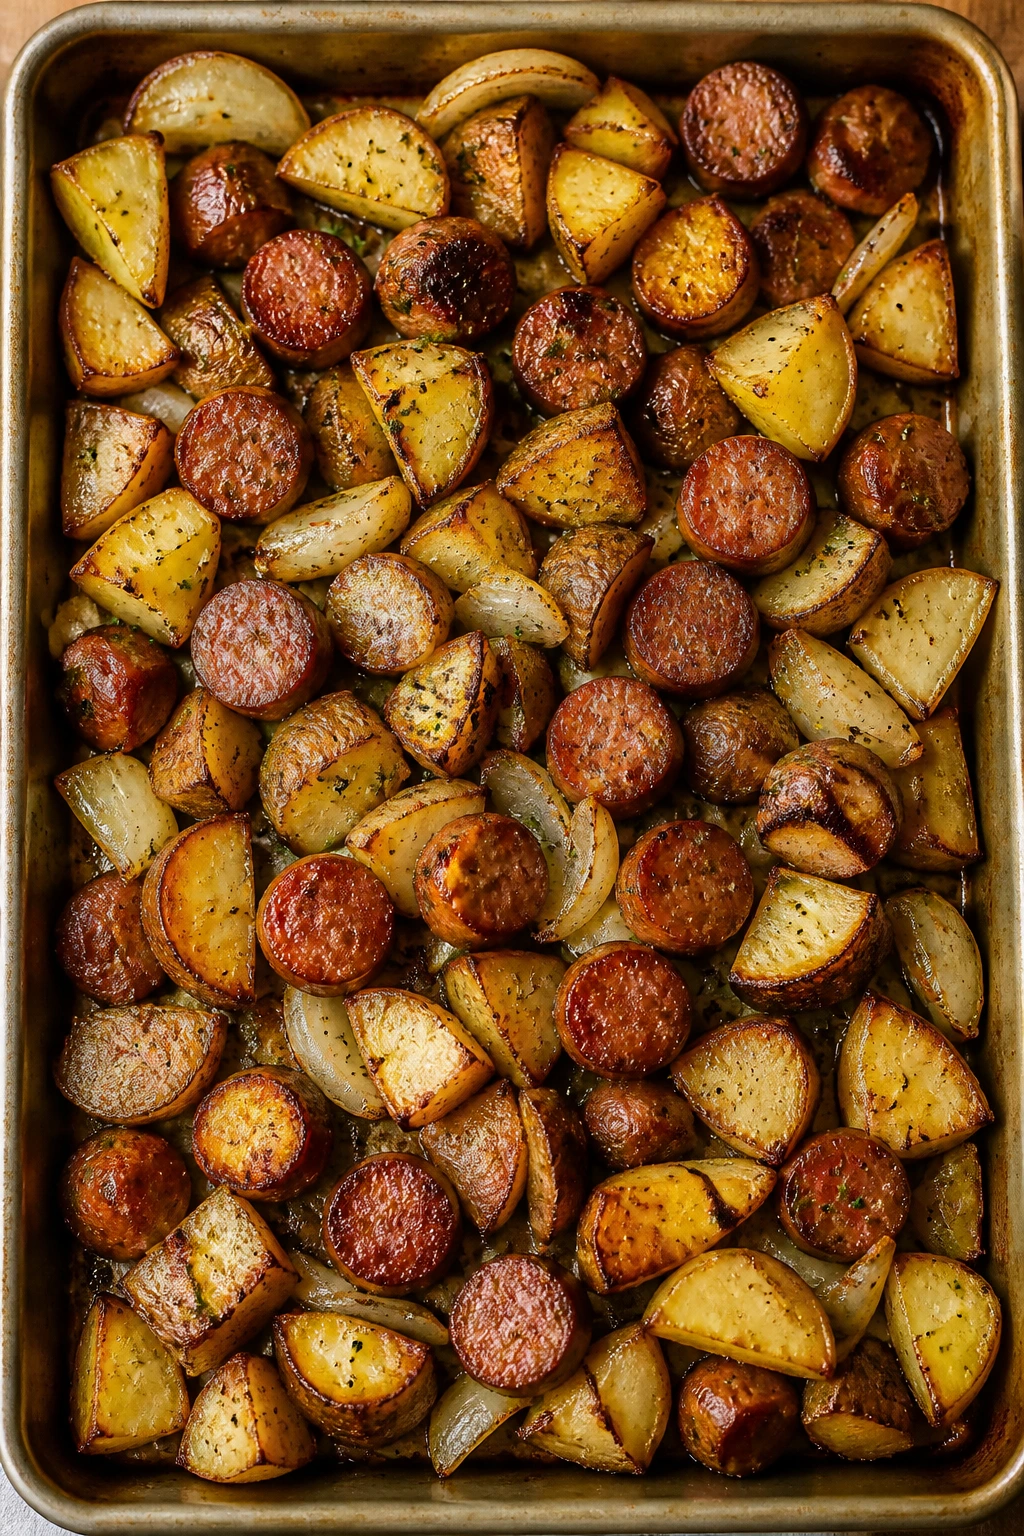
This is one of those tray dinners that fills the kitchen with the smell of browned sausage and roasted onions. The potatoes go crisp on the edges, the peppers turn sweet, and nobody has to stand over a stove to make it happen.
Why It Works: A hot oven caramelizes the vegetables while the sausage releases enough fat to flavor the pan. Cutting the potatoes small is the difference between crispy and still-too-hard.
Key Ingredients:
- 1 1/2 pounds smoked sausage, sliced into thick coins
- 1 1/2 pounds baby potatoes, halved
- 2 bell peppers, cut into strips
- 1 large onion, sliced
- 2 tablespoons olive oil
- 1 teaspoon Italian seasoning
- 1 teaspoon salt
- 1/2 teaspoon black pepper
Quick Steps:
- Heat the oven to 425°F and line a sheet pan with parchment.
- Toss potatoes, peppers, onion, oil, seasoning, salt, and pepper together.
- Spread everything on the pan and roast for 20 minutes.
- Add the sausage, toss lightly, and roast 10 to 15 minutes more.
- Pull it when the potatoes are tender and the edges are browned.
Equipment for This Recipe:
- Large rimmed sheet pan
- Mixing bowl
- Spatula
How to Serve This Dish: Serve with mustard, ketchup, or a spoonful of sour cream on the side. If you want more color on the plate, add a crisp green salad or a few apple slices.
Pro Tips for This Recipe:
- Keep the potatoes in a single layer.
- Add sausage halfway through so it browns without drying out.
- If your pan is small, use two pans instead of crowding one.
Variations on This Dish:
- Sweet Potato Swap: Use diced sweet potatoes for a softer, sweeter bite.
- Spicy Version: Choose andouille or another peppery sausage for adults.
Common Mistakes to Avoid with This Dish:
- Cutting the potatoes too big: They will lag behind the sausage.
- Squeezing the pan full: The vegetables steam instead of roast.
10. Pizza Quesadillas

This is what happens when pizza and a quesadilla decide not to argue. The outside goes crisp in the skillet, the cheese melts into the sauce, and pepperoni gives every slice a familiar pizza smell before it even hits the plate.
Why It Works: Tortillas brown faster than pizza dough, so the whole thing gets dinner on the table with almost no waiting. The filling stays contained because the cheese melts and acts like glue.
Key Ingredients:
- 8 flour tortillas
- 1 cup pizza sauce
- 3 cups shredded mozzarella
- 24 slices pepperoni
- 1 teaspoon dried oregano
- 2 tablespoons butter or oil, for the skillet
Quick Steps:
- Spread pizza sauce over half of each tortilla.
- Add mozzarella, pepperoni, and oregano, then fold the tortilla in half.
- Melt a little butter in a skillet over medium heat.
- Cook each quesadilla for 2 to 3 minutes per side until crisp and golden.
- Slice into wedges and serve warm.
Equipment for This Recipe:
- Large skillet
- Spatula
- Knife or pizza cutter
How to Serve This Dish: Put marinara or ranch on the table for dipping. A bowl of grapes or sliced cucumbers rounds out the plate without making dinner feel fussy.
Pro Tips for This Recipe:
- Keep the heat at medium so the tortilla browns before the cheese burns.
- Use a light hand with sauce; too much makes the tortilla soggy.
- Press the quesadilla gently with the spatula while it cooks.
Variations on This Dish:
- Veggie Pizza Quesadillas: Add finely chopped mushrooms or peppers.
- Chicken Pizza Quesadillas: Swap in chopped cooked chicken and a few basil leaves.
Common Mistakes to Avoid with This Dish:
- Overfilling the tortilla: The filling leaks out when you flip it.
- Cooking too hot: The outside burns before the cheese melts.
11. Beef and Broccoli Rice Bowls
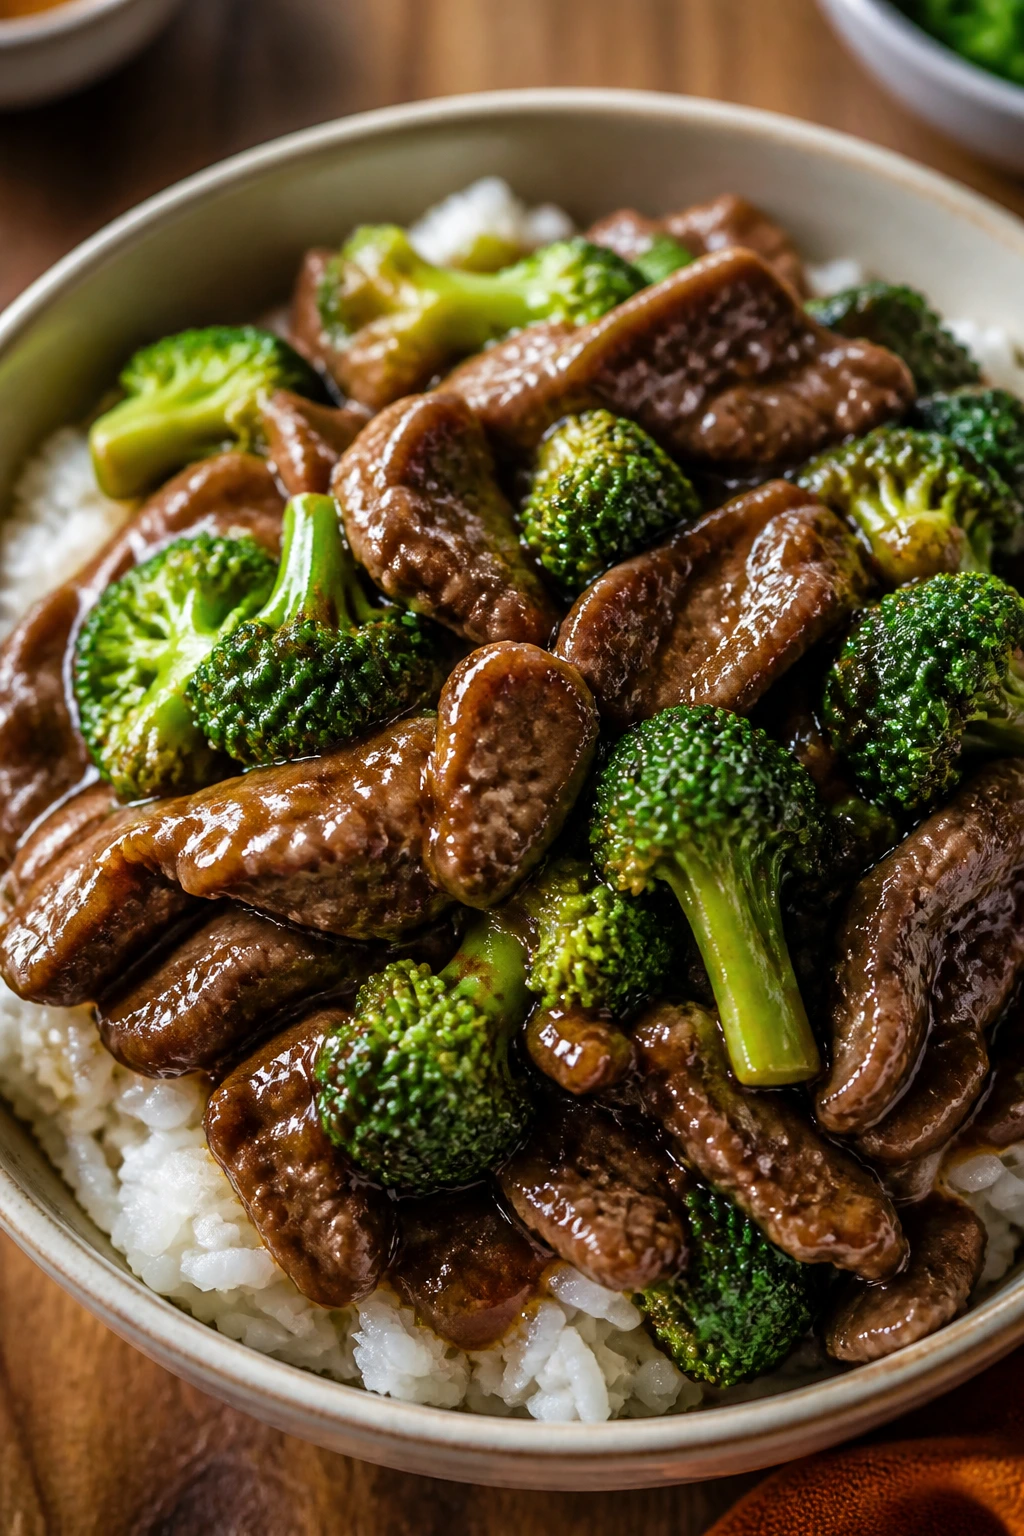
A bowl like this gives you the sweet-savory sauce kids tend to accept and the crisp-tender broccoli that keeps the texture from going flat. It tastes like takeout without the extra sauce puddle at the bottom of the carton.
Why It Works: Thin beef cooks fast and stays tender when you sear it hot and fast. A quick cornstarch sauce thickens just enough to coat the rice and broccoli.
Key Ingredients:
- 1 pound sirloin, thinly sliced
- 4 cups broccoli florets
- 2 cups cooked white rice
- 1/4 cup soy sauce
- 2 tablespoons honey
- 2 cloves garlic, minced
- 1 teaspoon grated ginger
- 1 tablespoon cornstarch
- 1/2 cup water
- 1 tablespoon oil
Quick Steps:
- Mix soy sauce, honey, garlic, ginger, cornstarch, and water in a small bowl.
- Sear the beef in oil over high heat for 2 to 3 minutes, then set it aside.
- Cook the broccoli in the same pan with a splash of water until bright green and crisp-tender.
- Return the beef, pour in the sauce, and cook until glossy and thick.
- Serve over warm rice.
Equipment for This Recipe:
- Large skillet or wok
- Small bowl
- Sharp knife
How to Serve This Dish: Spoon it over rice and sprinkle with sesame seeds if you have them. A few cucumber sticks on the side keep the meal feeling fresh.
Pro Tips for This Recipe:
- Slice the beef thin against the grain.
- Do not overcook the broccoli; it should still have a little snap.
- Stir the sauce just before pouring so the cornstarch does not settle.
Variations on This Dish:
- Chicken Bowl: Use thin sliced chicken breast instead of beef.
- Tofu Bowl: Swap in firm tofu cubes and sear them until golden.
Common Mistakes to Avoid with This Dish:
- Crowding the beef: It steams instead of sears.
- Waiting too long to serve: The sauce thickens as it sits.
12. Teriyaki Chicken Drumsticks
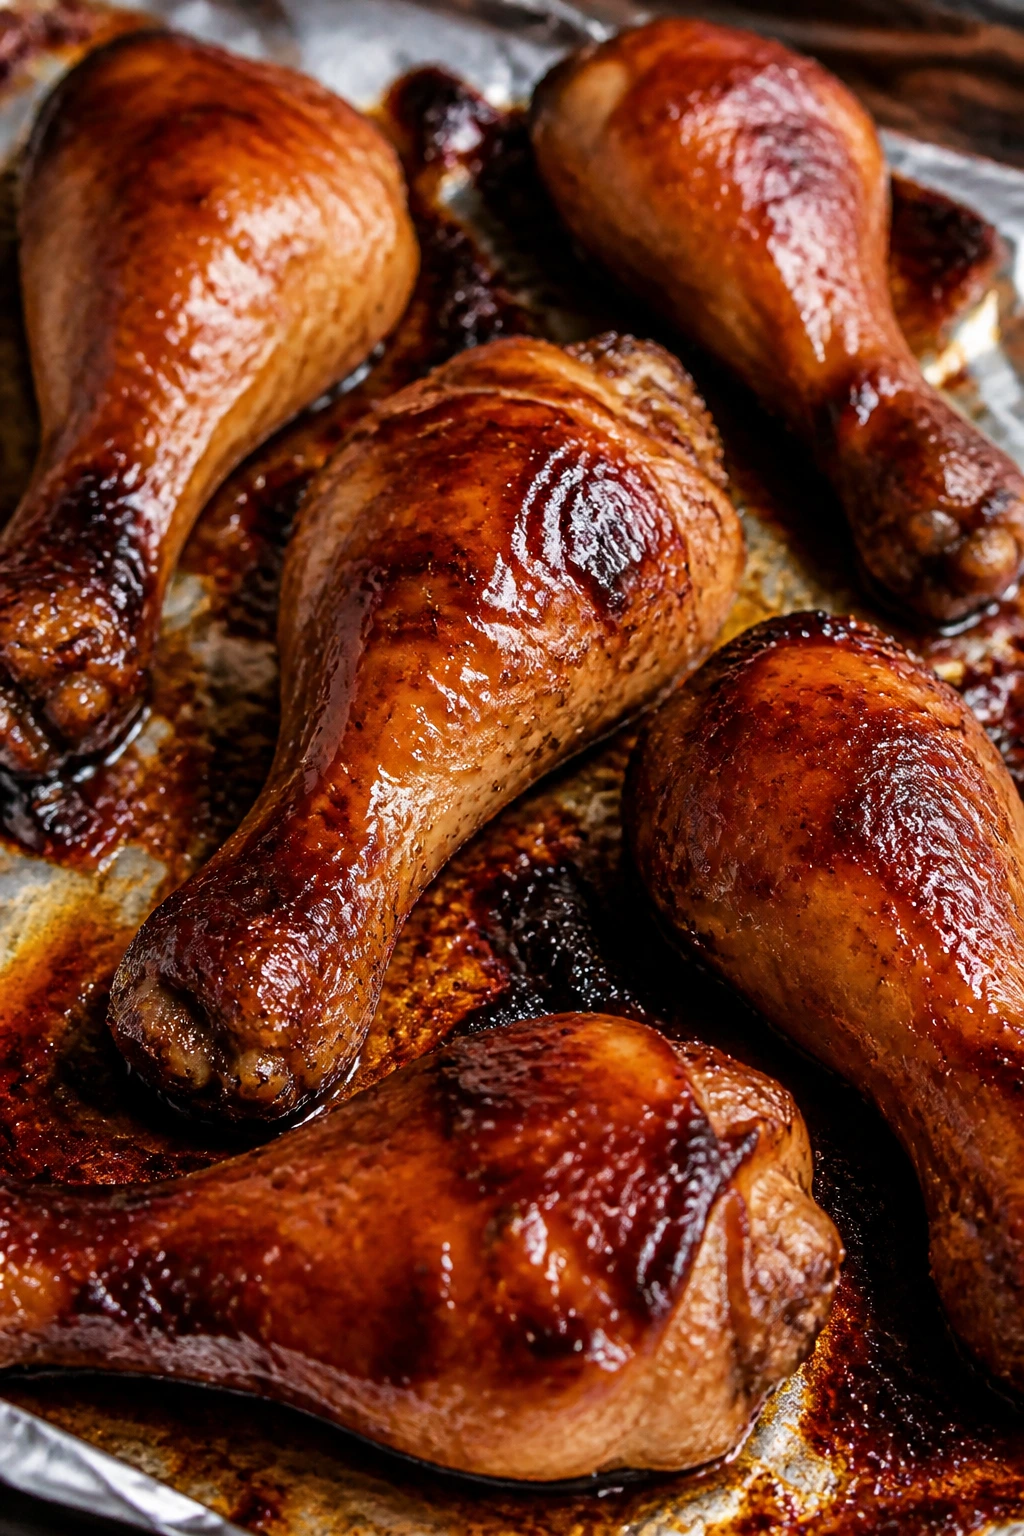
Chicken drumsticks are a smart move when you want dinner that looks like effort but behaves like a weeknight. The skin gets sticky, the meat stays juicy, and the sweet glaze makes the whole tray smell like dinner is already halfway done.
Why It Works: Drumsticks handle baking well because the dark meat stays tender even if you give them a few extra minutes. The glaze reduces in the oven and clings to the skin instead of running off.
Key Ingredients:
- 3 pounds chicken drumsticks
- 1/3 cup soy sauce
- 1/4 cup honey
- 2 tablespoons rice vinegar
- 2 cloves garlic, minced
- 1 teaspoon grated ginger
- 1 tablespoon sesame seeds
- 2 teaspoons cornstarch mixed with 2 tablespoons water
Quick Steps:
- Heat the oven to 400°F and line a sheet pan with foil.
- Mix soy sauce, honey, vinegar, garlic, ginger, and cornstarch slurry in a bowl.
- Coat the drumsticks with the sauce and arrange them on the pan.
- Bake for 35 to 40 minutes, turning once and basting with extra sauce halfway through.
- Finish when the skin is glossy and the chicken reaches 175°F to 185°F.
Equipment for This Recipe:
- Sheet pan
- Foil
- Basting brush, optional
How to Serve This Dish: Serve with rice and steamed broccoli or snap peas. A few sliced cucumbers on the side help cut through the glaze.
Pro Tips for This Recipe:
- Bake on foil for easier cleanup.
- Turn the drumsticks once so the glaze coats both sides.
- If you want a thicker glaze, simmer a little extra sauce on the stove for 2 minutes.
Variations on This Dish:
- Orange Teriyaki: Stir in 2 tablespoons orange juice.
- Garlic-Sesame Finish: Add extra sesame seeds and sliced green onions at the end.
Common Mistakes to Avoid with This Dish:
- Using only high heat: The glaze can burn before the chicken cooks through.
- Skipping the turn: One-sided baking leaves patchy color.
13. Broccoli Cheddar Stuffed Baked Potatoes
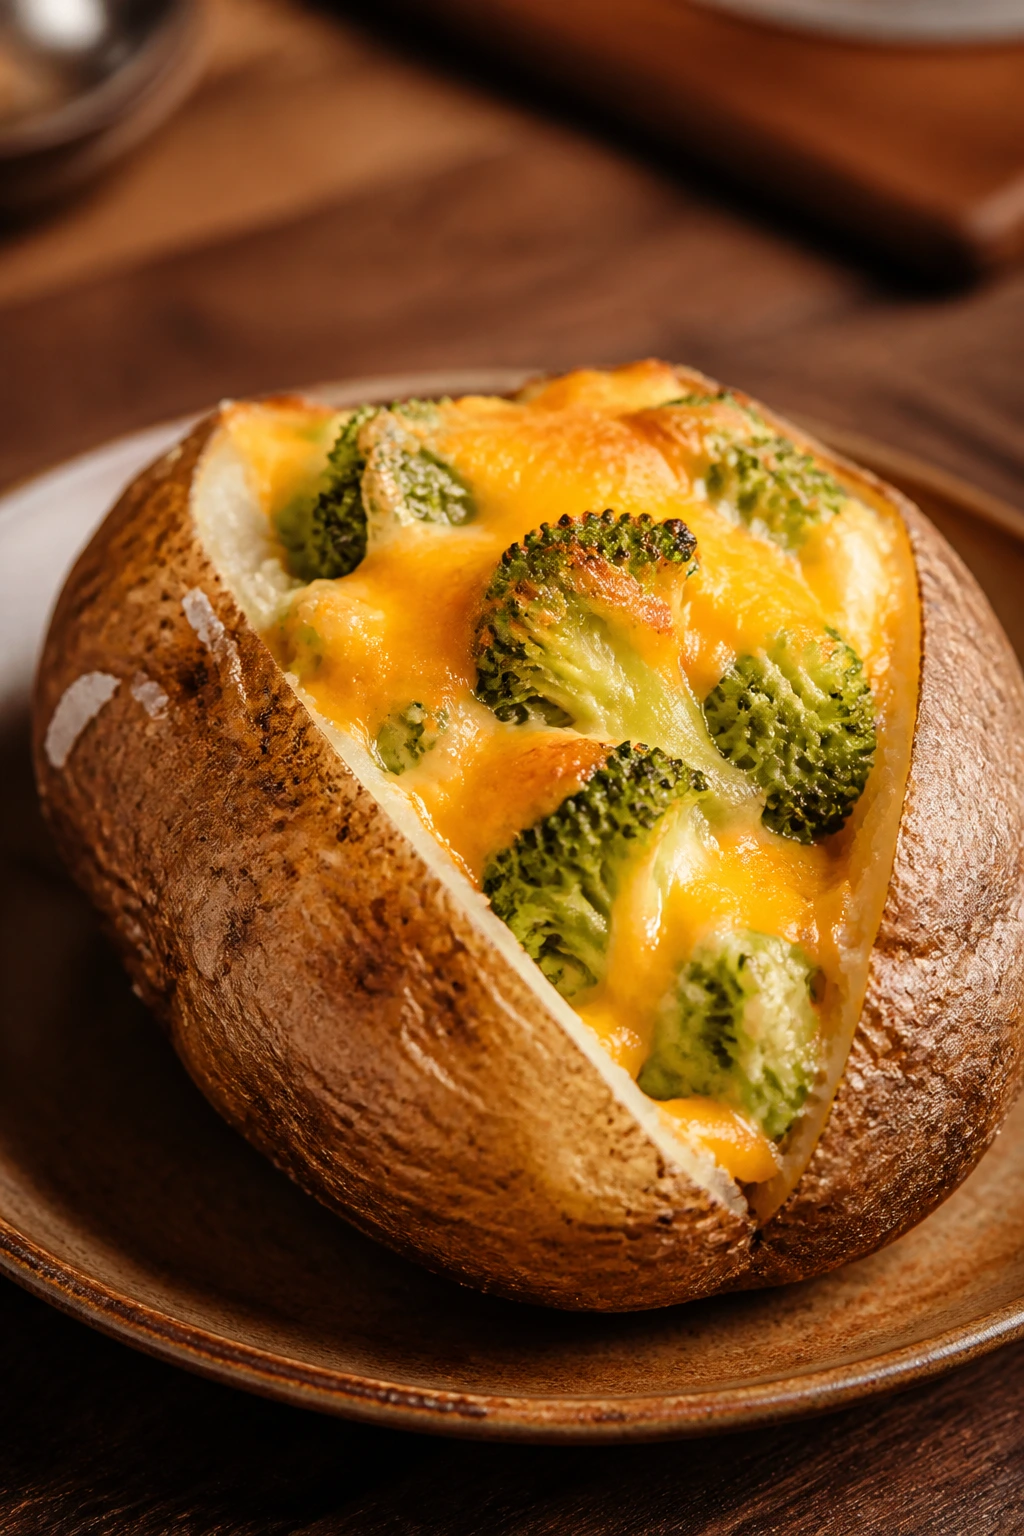
A baked potato with broccoli and cheddar turns a plain side into dinner without much fuss. The potato skin goes crisp, the inside stays fluffy, and the cheese melts into the broccoli instead of sitting on top like an afterthought.
Why It Works: Russets have a fluffy center that mashes well with butter and milk. Broccoli softens enough to blend into the filling, which helps if a kid is suspicious of big green pieces.
Key Ingredients:
- 4 large russet potatoes
- 2 cups broccoli florets, chopped small
- 2 tablespoons butter
- 1/2 cup milk
- 2 cups shredded cheddar
- 1/2 cup sour cream
- 1 teaspoon salt
- 1/2 teaspoon black pepper
Quick Steps:
- Bake the potatoes at 400°F for 50 to 60 minutes until the skins are crisp and the centers are soft.
- Steam the broccoli until just tender.
- Split the potatoes open and fluff the centers with butter, milk, salt, and pepper.
- Stir in broccoli, sour cream, and half the cheddar.
- Top with the rest of the cheese and bake 5 more minutes.
Equipment for This Recipe:
- Baking sheet
- Fork
- Small saucepan or steamer
How to Serve This Dish: Serve with a fried egg on top if you want to make it heavier, or keep it beside grilled chicken for a fuller dinner. A little extra sour cream helps the filling feel rich without much effort.
Pro Tips for This Recipe:
- Prick the potatoes before baking so they do not split.
- Chop the broccoli small enough to fit in a forkful.
- Salt the potato filling while it is still hot.
Variations on This Dish:
- Bacon Version: Stir in chopped cooked bacon.
- Cauliflower Swap: Use steamed cauliflower instead of broccoli for a milder flavor.
Common Mistakes to Avoid with This Dish:
- Undercooking the potatoes: The filling will be dense and gluey.
- Adding cold milk straight from the fridge: It cools the filling too much.
14. BBQ Chicken Flatbread
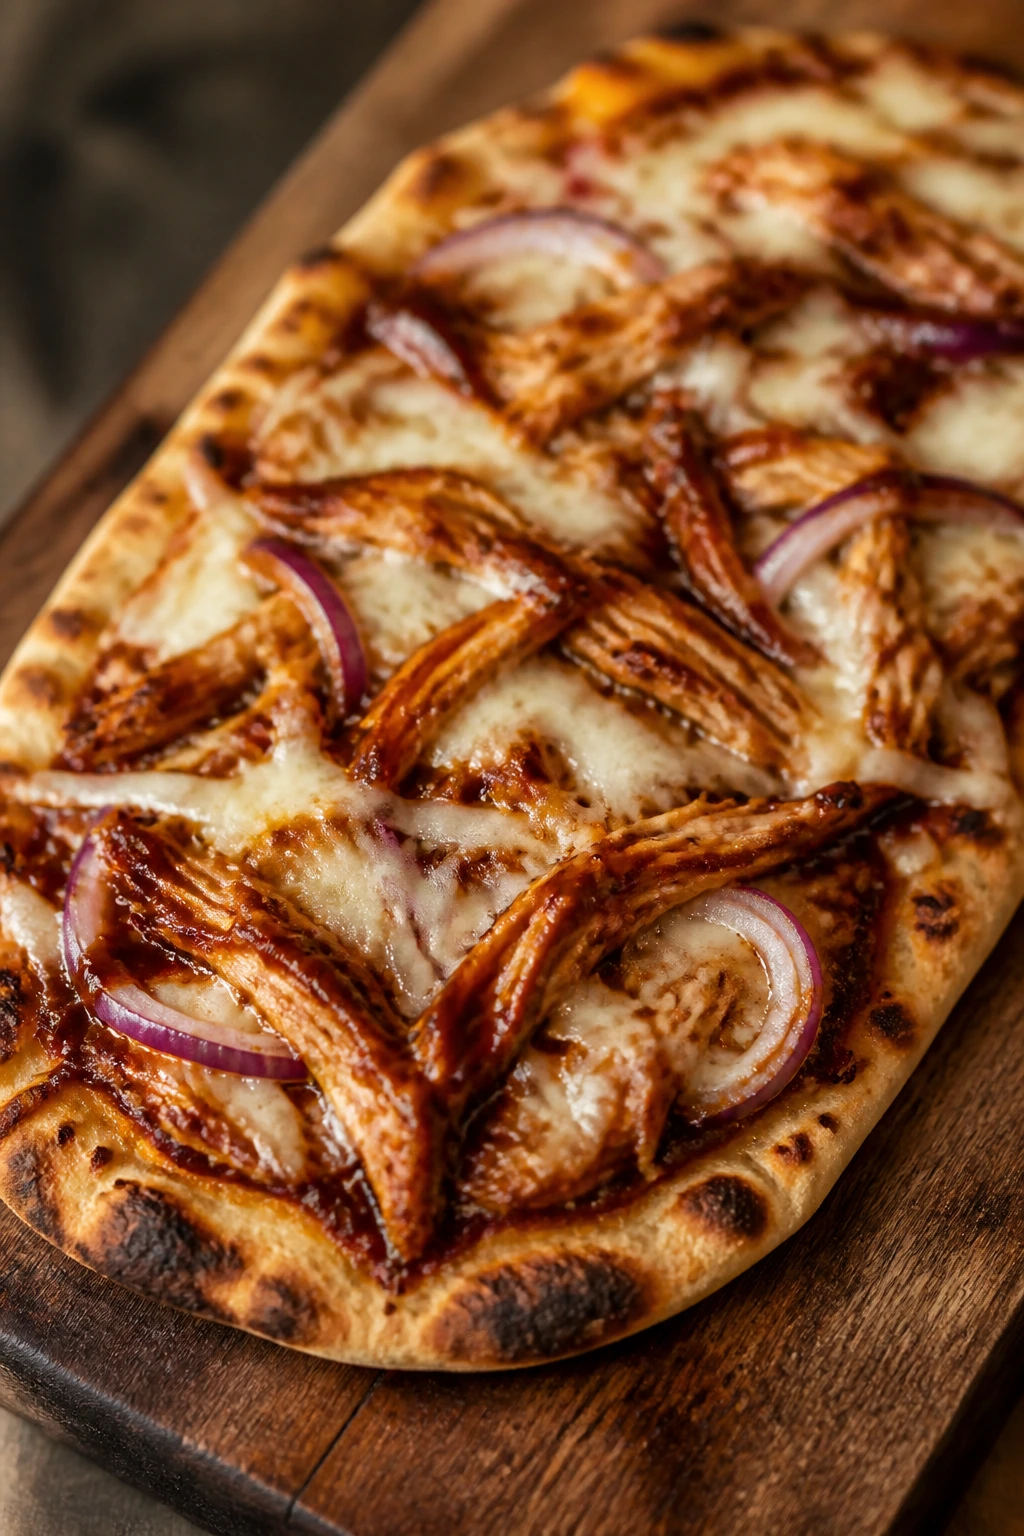
Flatbread makes dinner feel like a shortcut in a good way. The barbecue sauce stays sweet and sticky, the cheese melts fast, and shredded chicken turns into something that tastes a lot more deliberate than it looks.
Why It Works: Thin flatbread bakes quickly, so the cheese melts before the crust dries out. The toppings are already cooked, which means you only need enough oven time to warm everything through and give the edges a little color.
Key Ingredients:
- 2 flatbreads or naan
- 2 cups shredded cooked chicken
- 1/2 cup barbecue sauce
- 2 cups shredded mozzarella
- 1/4 red onion, thinly sliced
- 2 tablespoons chopped cilantro, optional
Quick Steps:
- Heat the oven to 425°F.
- Mix the chicken with barbecue sauce.
- Spread the chicken over the flatbreads and top with mozzarella and onion.
- Bake for 8 to 10 minutes until the cheese melts and the edges crisp.
- Finish with cilantro if you like it.
Equipment for This Recipe:
- Baking sheet
- Spoon
- Knife
How to Serve This Dish: Cut into wide strips and serve with celery sticks or a quick salad. The shape makes it feel like pizza, which is usually half the battle.
Pro Tips for This Recipe:
- Do not overload the flatbread or the middle stays soft.
- Use pre-cooked chicken if you want this on the table fast.
- A light drizzle of extra barbecue sauce after baking gives it a fresh finish.
Variations on This Dish:
- Hawaiian Version: Add pineapple chunks before baking.
- Buffalo Chicken Flatbread: Swap barbecue sauce for buffalo sauce and ranch drizzle.
Common Mistakes to Avoid with This Dish:
- Using too much sauce: The bread goes limp.
- Skipping the hot oven: The crust needs the blast of heat to crisp.
15. Turkey Chili with Cornbread Toppers
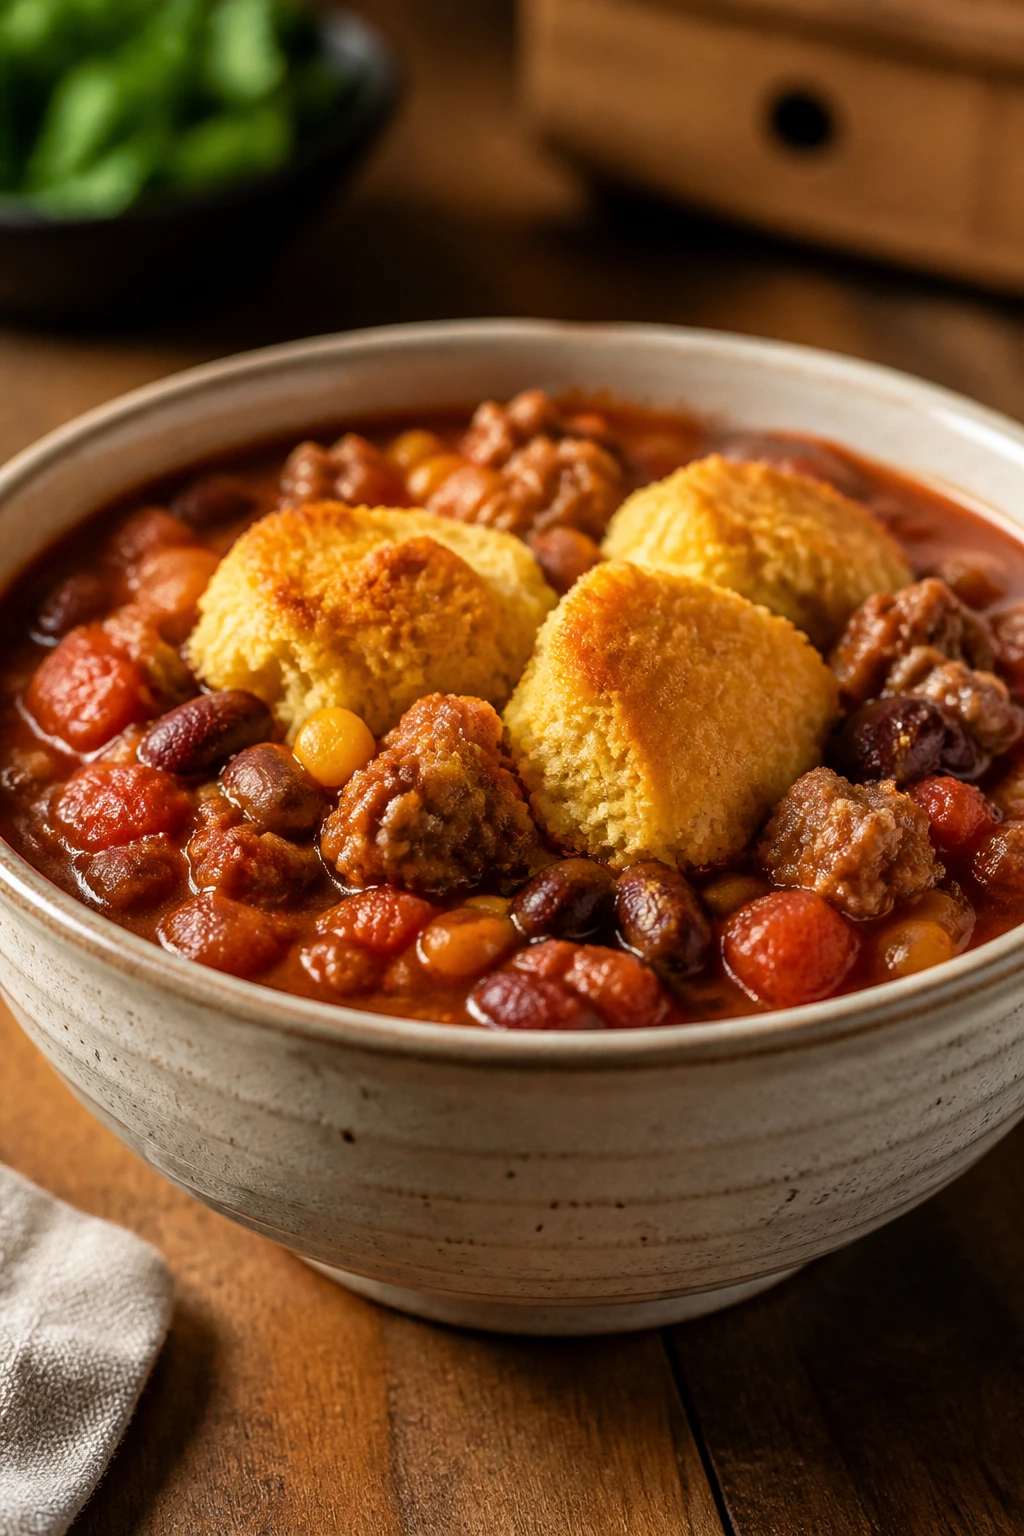
Chili gives you a bowl that can sit on the table without panic, and the cornbread topping makes it feel like dinner with a little personality. It’s mild enough for kids, but adults can always put hot sauce on their own bowls.
Why It Works: Ground turkey keeps the chili lighter and picks up flavor from the beans, tomatoes, and spices. Cornbread on the side soaks up the sauce without turning the meal into soup.
Key Ingredients: For the Chili:
- 1 pound ground turkey
- 1 small onion, diced
- 2 cloves garlic, minced
- 2 cans beans, drained and rinsed
- 1 can (14.5 ounces) diced tomatoes
- 2 cups low-sodium chicken broth
- 2 tablespoons chili powder
- 1 teaspoon cumin
- 1 teaspoon salt
For the Cornbread Toppers:
- 1 box corn muffin mix, about 8.5 ounces
- 1 large egg
- 1/3 cup milk
Quick Steps:
- Brown the turkey and onion in a pot over medium heat.
- Stir in garlic, chili powder, cumin, salt, beans, tomatoes, and broth, then simmer for 20 to 25 minutes.
- Mix the cornbread batter in a bowl while the chili simmers.
- Bake the cornbread muffins according to the box directions.
- Serve the chili in bowls with a warm muffin on the side or split on top.
Equipment for This Recipe:
- Large soup pot
- Muffin tin
- Mixing bowl
How to Serve This Dish: Ladle the chili into shallow bowls and let everyone break off cornbread as they go. Shredded cheese and sour cream make a mild bowl feel even softer.
Pro Tips for This Recipe:
- Simmer long enough for the beans to soften and the broth to thicken.
- If the chili tastes flat, add a pinch more salt before serving.
- Bake the cornbread while the chili simmers so both finish together.
Variations on This Dish:
- Corn-Heavy Version: Add 1 cup frozen corn with the beans.
- Milder Bowl: Use half the chili powder and a little more cumin.
Common Mistakes to Avoid with This Dish:
- Stopping the simmer too early: The flavors need time to come together.
- Serving the cornbread too dry: Warm it with butter if needed.
16. Lemon Butter Salmon Nuggets

Salmon nuggets are the kind of dinner that feels a little playful and a little grown-up at the same time. The lemon butter gives the fish a bright finish, and the small cubes cook fast enough to stay tender.
Why It Works: Cutting salmon into nuggets shortens the bake time and keeps the inside soft. The panko coating gives enough crunch to make the fish feel familiar even to cautious eaters.
Key Ingredients:
- 1 1/2 pounds salmon fillet, skin removed and cut into cubes
- 1/2 cup all-purpose flour
- 2 large eggs
- 1 1/2 cups panko breadcrumbs
- 1 teaspoon salt
- 1/2 teaspoon black pepper
- 3 tablespoons butter
- 1 lemon, juiced
- 1 teaspoon chopped dill, optional
Quick Steps:
- Heat the oven to 425°F and line a sheet pan with parchment.
- Coat the salmon cubes in flour, egg, and panko.
- Bake for 10 to 12 minutes until the coating is crisp and the fish flakes.
- Melt the butter with lemon juice and dill.
- Toss the nuggets lightly in the butter or drizzle it over the top.
Equipment for This Recipe:
- Sheet pan
- Parchment paper
- Small saucepan
How to Serve This Dish: Serve with rice and peas or a cucumber salad. A few lemon wedges on the side give the plate a clean, bright finish.
Pro Tips for This Recipe:
- Cut the salmon into even cubes so they cook at the same speed.
- Do not bake much past the point where the fish flakes.
- Toss with butter right before serving so the coating stays crisp.
Variations on This Dish:
- Garlic Butter Version: Add 1 minced garlic clove to the butter.
- Herb Crumb Version: Mix parsley into the panko.
Common Mistakes to Avoid with This Dish:
- Overbaking salmon: It goes dry fast.
- Using wet salmon straight from the package: Pat it dry first.
17. Cheeseburger Pasta Skillet
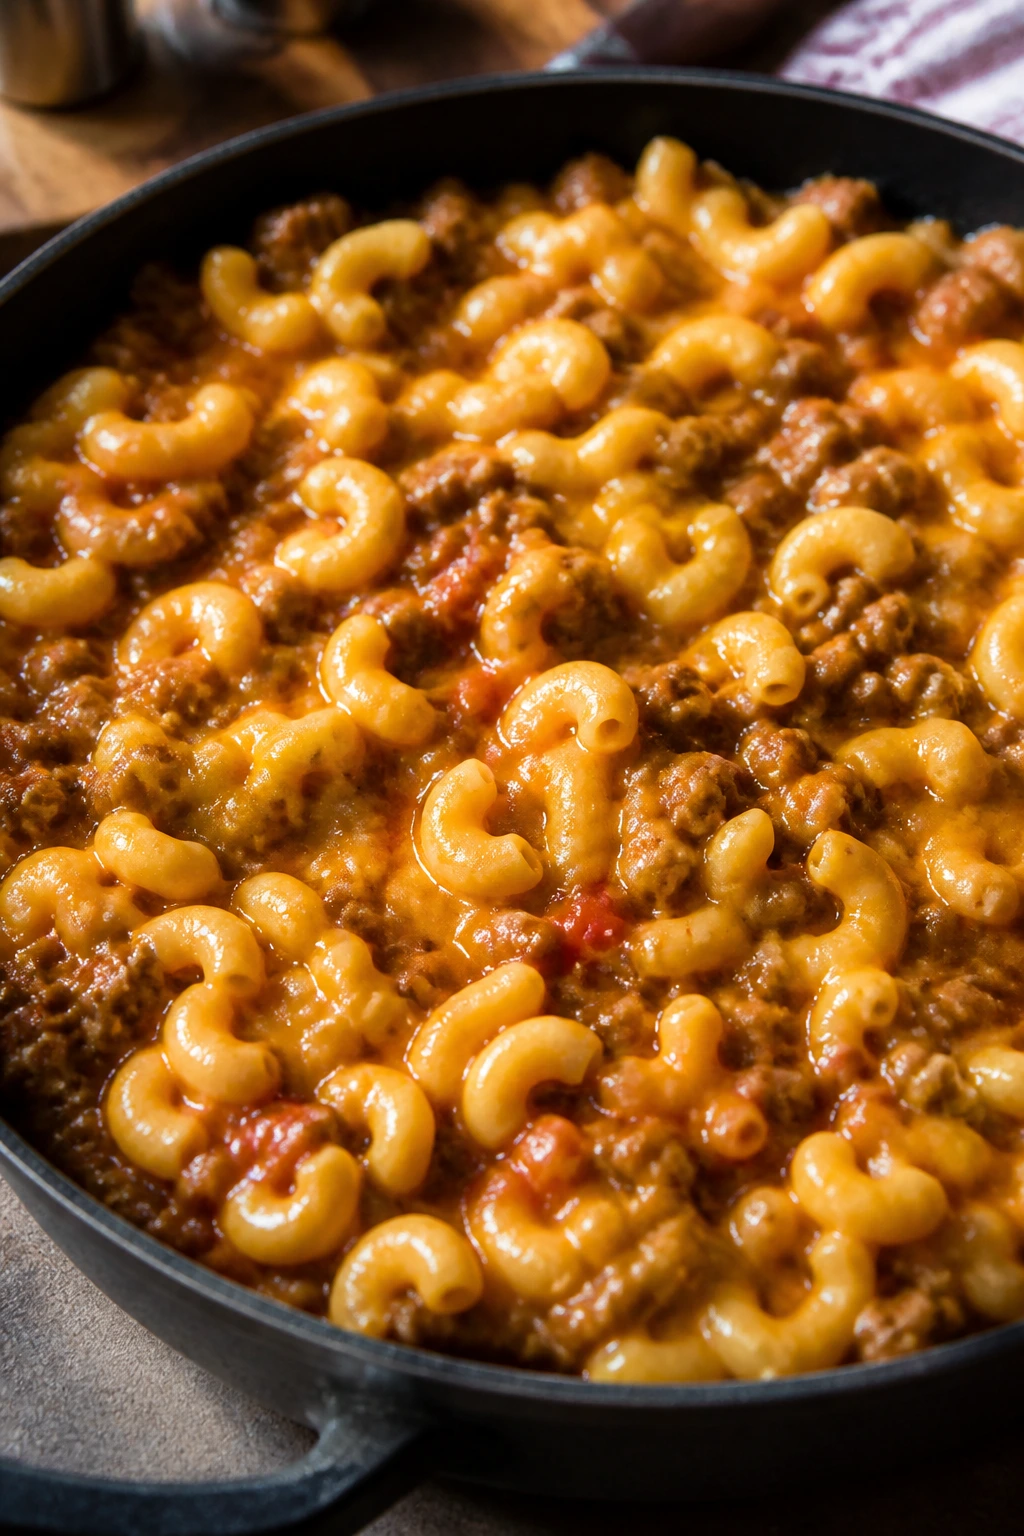
This is what you make when a cheeseburger craving shows up but you do not want to fire up the grill. It tastes like the burger side of the drive-thru, only folded into pasta so every bite carries sauce and cheese.
Why It Works: The beef cooks first, then the pasta simmers in the same pan and picks up the burger-seasoned broth. Cheddar melts into the sauce at the end, which gives the skillet that familiar cheeseburger finish.
Key Ingredients:
- 1 pound ground beef
- 1 small onion, diced
- 2 cups elbow macaroni
- 2 1/2 cups beef broth
- 1 cup milk
- 2 cups shredded cheddar
- 2 tablespoons ketchup
- 1 tablespoon mustard
- 1/2 teaspoon salt
Quick Steps:
- Brown the beef and onion in a deep skillet.
- Stir in ketchup, mustard, salt, macaroni, broth, and milk.
- Simmer uncovered for 12 to 14 minutes, stirring, until the pasta is tender.
- Turn off the heat and stir in cheddar until melted.
- Serve right away.
Equipment for This Recipe:
- Deep skillet
- Wooden spoon
- Measuring cups
How to Serve This Dish: A few pickle slices on the side make the flavor read more cheeseburger-like for adults. Serve it with steamed broccoli or sliced tomatoes if you want something fresh beside it.
Pro Tips for This Recipe:
- Stir near the end so the pasta does not catch.
- Let the cheese melt off the heat.
- Add 1/4 cup broth if the skillet gets too thick too soon.
Variations on This Dish:
- Bacon Cheeseburger Pasta: Stir in chopped cooked bacon at the end.
- Turkey Burger Version: Use ground turkey and a tablespoon of oil.
Common Mistakes to Avoid with This Dish:
- Using high heat the whole time: The pasta can scorch.
- Adding cheese too early: It melts better once the pan comes off the burner.
18. Enchilada Roll-Up Casserole
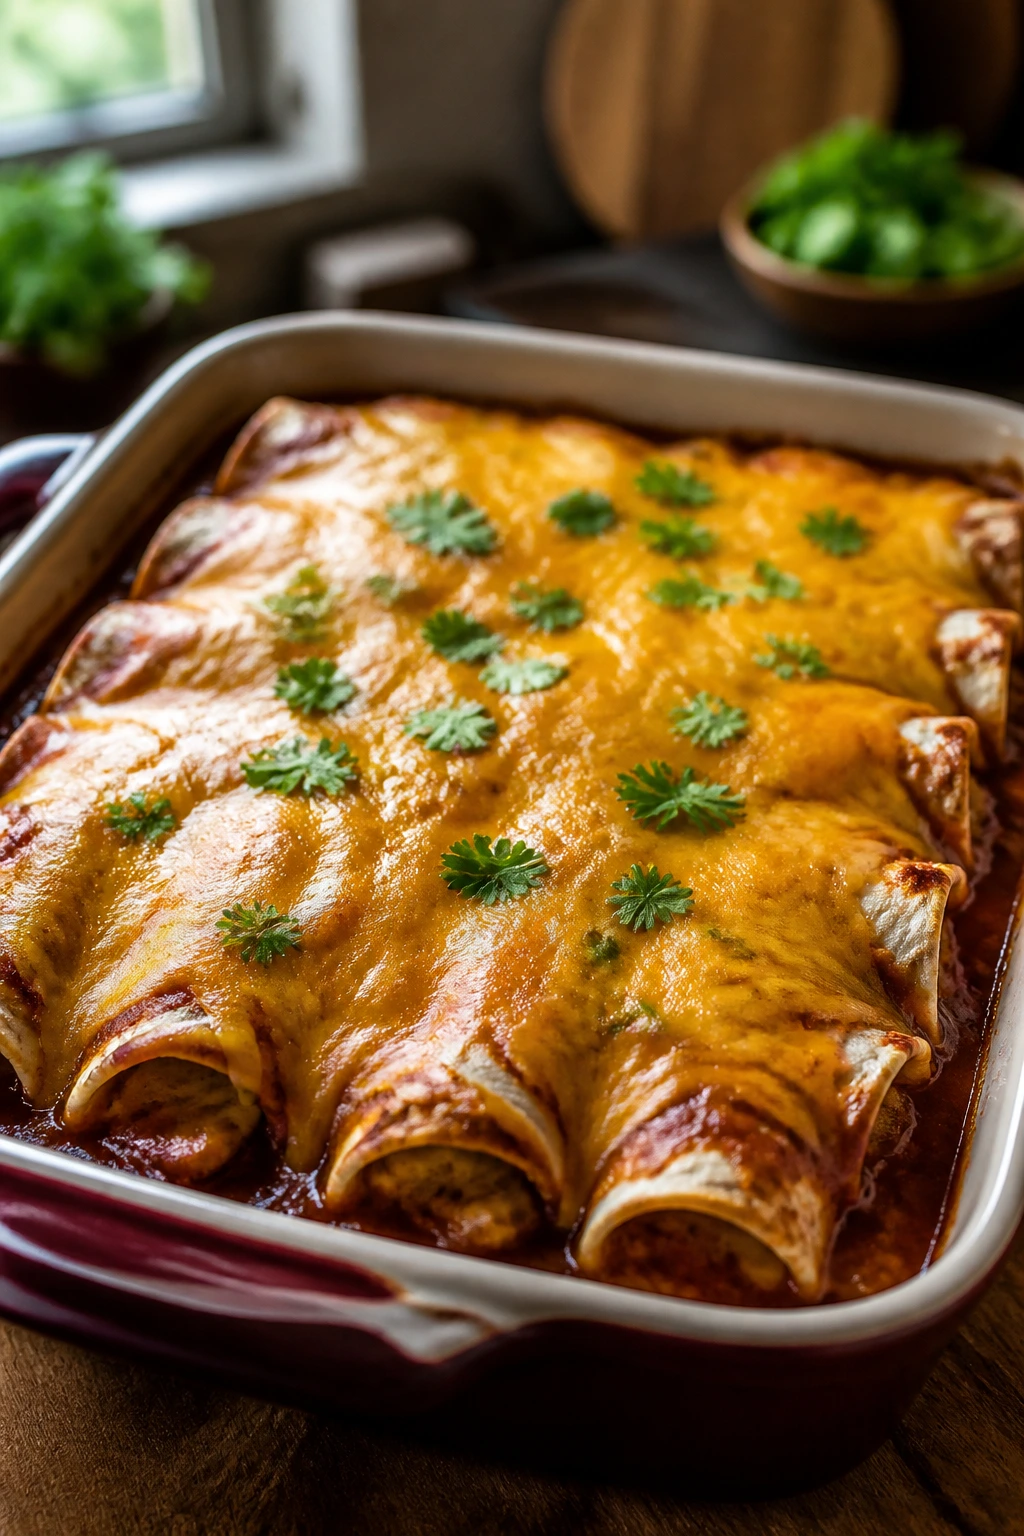
This casserole gives you the flavor of enchiladas without the stack-and-fold mess. The tortillas soak up sauce around the edges, but the centers stay soft, and the melted cheese ties everything together in one tray.
Why It Works: Rolling the tortillas before baking keeps the filling tidy and helps the sauce coat the outside evenly. Using cooked chicken means the casserole only needs enough oven time to heat through and melt the cheese.
Key Ingredients:
- 2 cups shredded cooked chicken
- 1 can black beans, drained and rinsed
- 1 cup shredded cheddar
- 1 cup shredded Monterey Jack
- 1 cup enchilada sauce
- 4 ounces cream cheese, softened
- 8 small flour tortillas
Quick Steps:
- Heat the oven to 375°F and grease a baking dish.
- Mix chicken, beans, cream cheese, and half the cheddar.
- Roll the filling into the tortillas and place them seam-side down in the dish.
- Pour enchilada sauce over the top and scatter on the remaining cheese.
- Bake for 20 to 25 minutes until hot and bubbly.
Equipment for This Recipe:
- Baking dish
- Mixing bowl
- Spoon
How to Serve This Dish: Spoon extra sauce over the top and add shredded lettuce or diced avocado if you want more color. Rice on the side turns this into a bigger dinner without extra work.
Pro Tips for This Recipe:
- Warm the tortillas for a few seconds so they roll without cracking.
- Keep the filling mild unless your table likes heat.
- Let the casserole rest for 5 minutes before slicing.
Variations on This Dish:
- Beef Version: Swap in 2 cups cooked shredded beef.
- Bean-Only Version: Leave out the chicken and add 1 more can of beans.
Common Mistakes to Avoid with This Dish:
- Overfilling the tortillas: They split open.
- Skipping the rest time: The casserole falls apart when cut too soon.
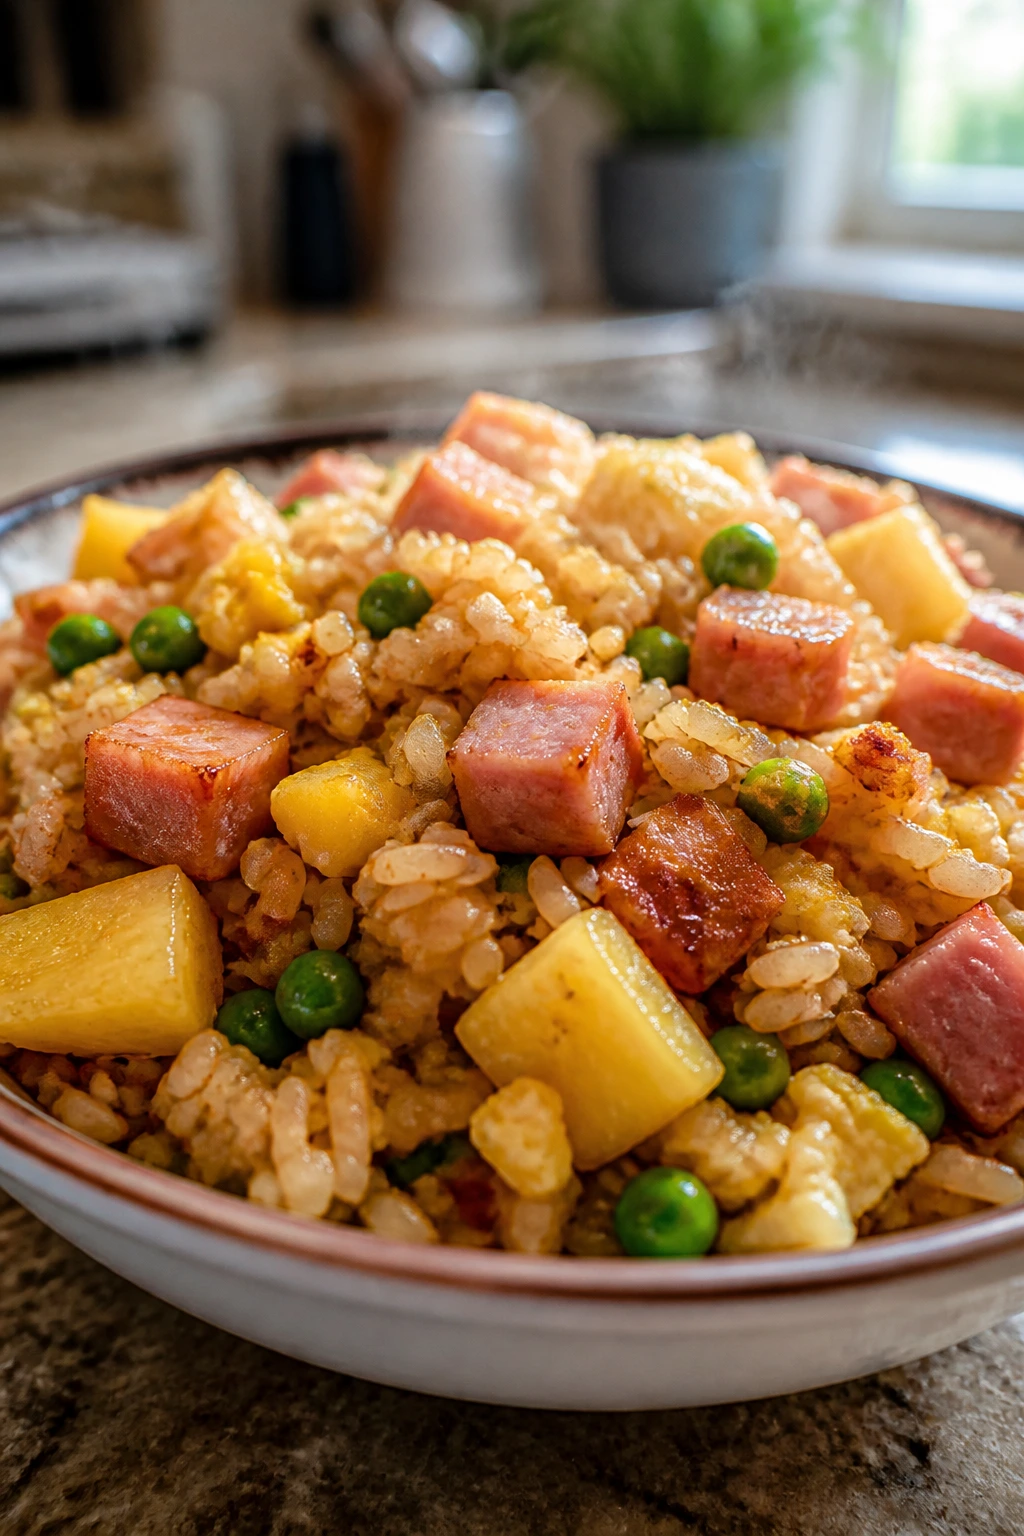
19. Breakfast-for-Dinner Egg Fried Rice
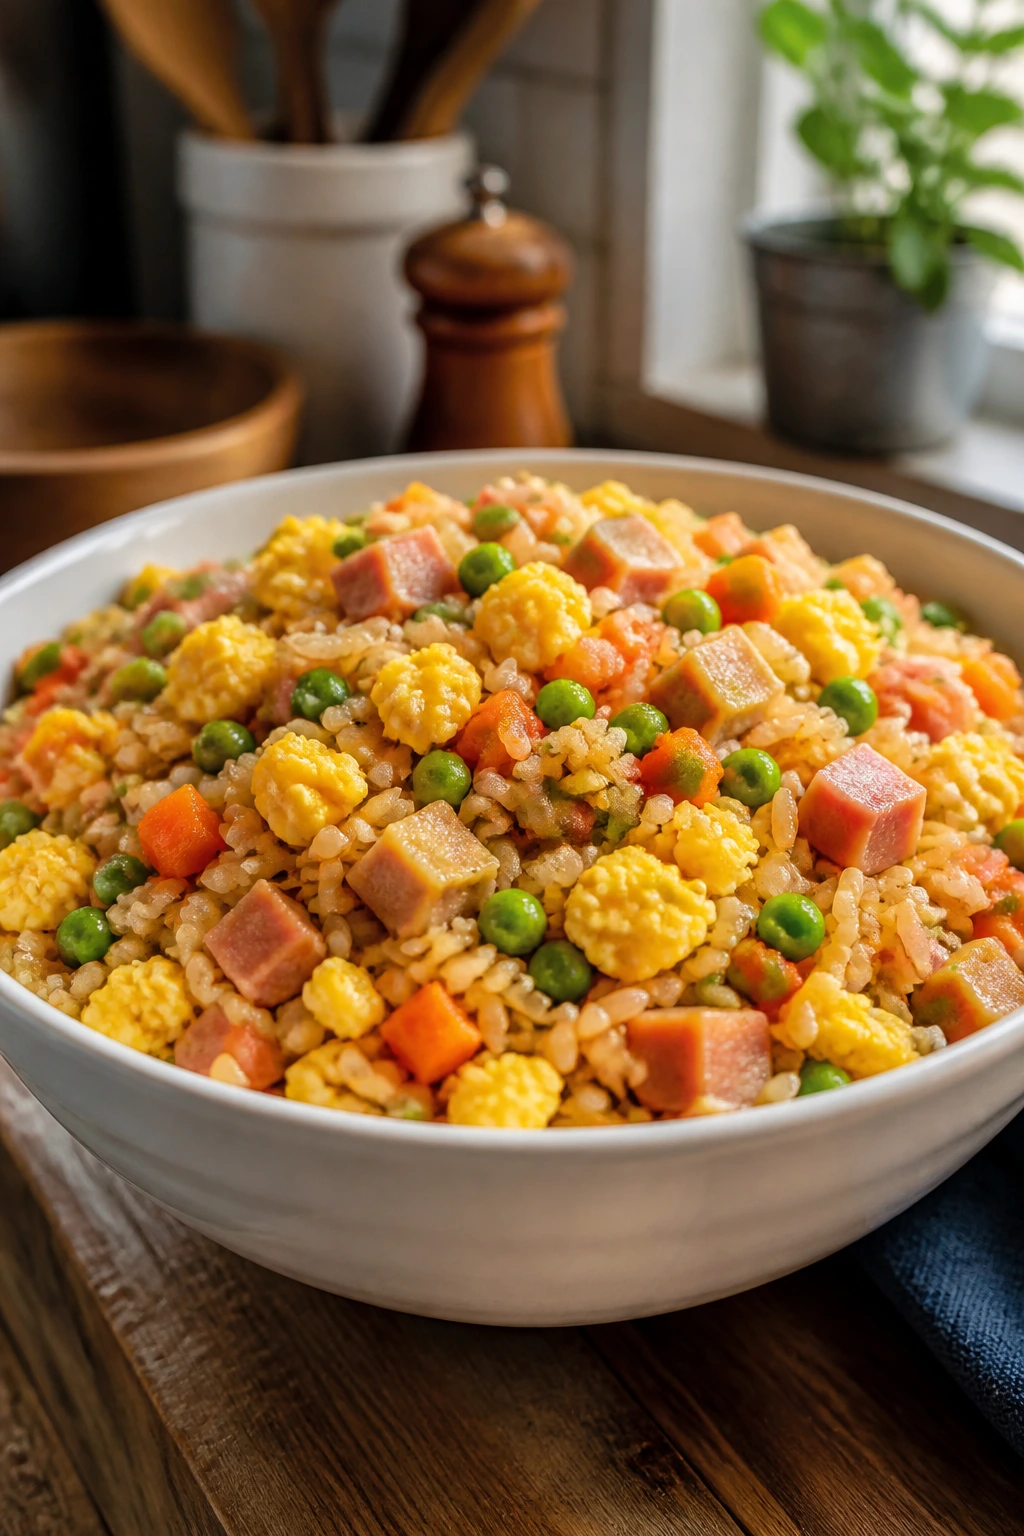
Egg fried rice is a quick fix that feels like a complete meal, not a side dish wearing a disguise. The eggs make it soft and familiar, the ham adds salt, and the peas and carrots break up the rice so it does not feel monotonous.
Why It Works: Cold rice fries better than warm rice because it dries out a little and stays separate. The eggs cook first, then everything else gets tossed in the same pan, which keeps the texture loose.
Key Ingredients:
- 3 cups cooked white rice, chilled
- 4 large eggs
- 1 cup diced ham
- 1 cup frozen peas and carrots
- 3 tablespoons soy sauce
- 1 tablespoon sesame oil
- 2 tablespoons sliced green onions
- 1 tablespoon neutral oil
Quick Steps:
- Heat oil in a large skillet over medium-high heat.
- Scramble the eggs and set them aside.
- Add ham and frozen vegetables to the pan and cook until warmed through.
- Stir in the rice, soy sauce, sesame oil, and eggs.
- Toss until everything is hot and the rice turns lightly golden in spots.
Equipment for This Recipe:
- Large skillet or wok
- Spatula
- Bowl for the eggs
How to Serve This Dish: Serve it in bowls with cucumber slices or orange wedges on the side. A little extra soy sauce on the table lets adults adjust the salt without changing the main pan.
Pro Tips for This Recipe:
- Use rice that has chilled long enough to dry out.
- Push the rice around the pan so some grains toast.
- Keep the heat high enough to fry, not steam.
Variations on This Dish:
- Chicken Fried Rice: Use diced cooked chicken instead of ham.
- Vegetable-Heavy Version: Add chopped broccoli or corn.
Common Mistakes to Avoid with This Dish:
- Using fresh rice: It clumps and turns soft.
- Adding too much soy sauce at once: The rice gets soggy and dark.
20. Crispy Chicken Parmesan Sliders

Chicken parm works on sliders because the ratio shifts in your favor: more crunchy bread, more cheese pull, less knife work. The sauce stays where it belongs, and the buns soak up just enough of it to taste seasoned instead of soggy.
Why It Works: Breaded chicken cutlets bake faster than whole breasts and hold their crunch better. Melting the cheese on top after the sauce goes on keeps the filling from sliding out of the bun.
Key Ingredients:
- 2 pounds chicken cutlets
- 1/2 cup flour
- 2 large eggs
- 1 1/2 cups breadcrumbs
- 1/2 cup grated parmesan
- 1 cup marinara sauce
- 2 cups shredded mozzarella
- 12 slider buns
- 1 teaspoon salt
Quick Steps:
- Heat the oven to 425°F and line a sheet pan.
- Bread the chicken in flour, egg, and breadcrumb-parmesan mixture.
- Bake for 15 to 18 minutes until cooked through.
- Top each cutlet with marinara and mozzarella, then bake 3 more minutes.
- Place the chicken on slider buns and serve warm.
Equipment for This Recipe:
- Sheet pan
- Shallow bowls
- Spatula
How to Serve This Dish: Serve with a green salad or roasted zucchini so the plate does not feel too heavy. A little extra marinara on the side keeps the buns from going dry.
Pro Tips for This Recipe:
- Pound the cutlets thin so they bake evenly.
- Use a sturdy bun that can handle sauce.
- Let the chicken rest a minute before stacking it.
Variations on This Dish:
- Eggplant Version: Use thin eggplant slices in place of chicken.
- Spicy Adult Finish: Add red pepper flakes to the marinara on the grown-up sandwiches.
Common Mistakes to Avoid with This Dish:
- Baking thick chicken pieces: The coating burns before the center cooks.
- Adding too much sauce: The sliders collapse.
21. Ham and Cheese Pasta Bake
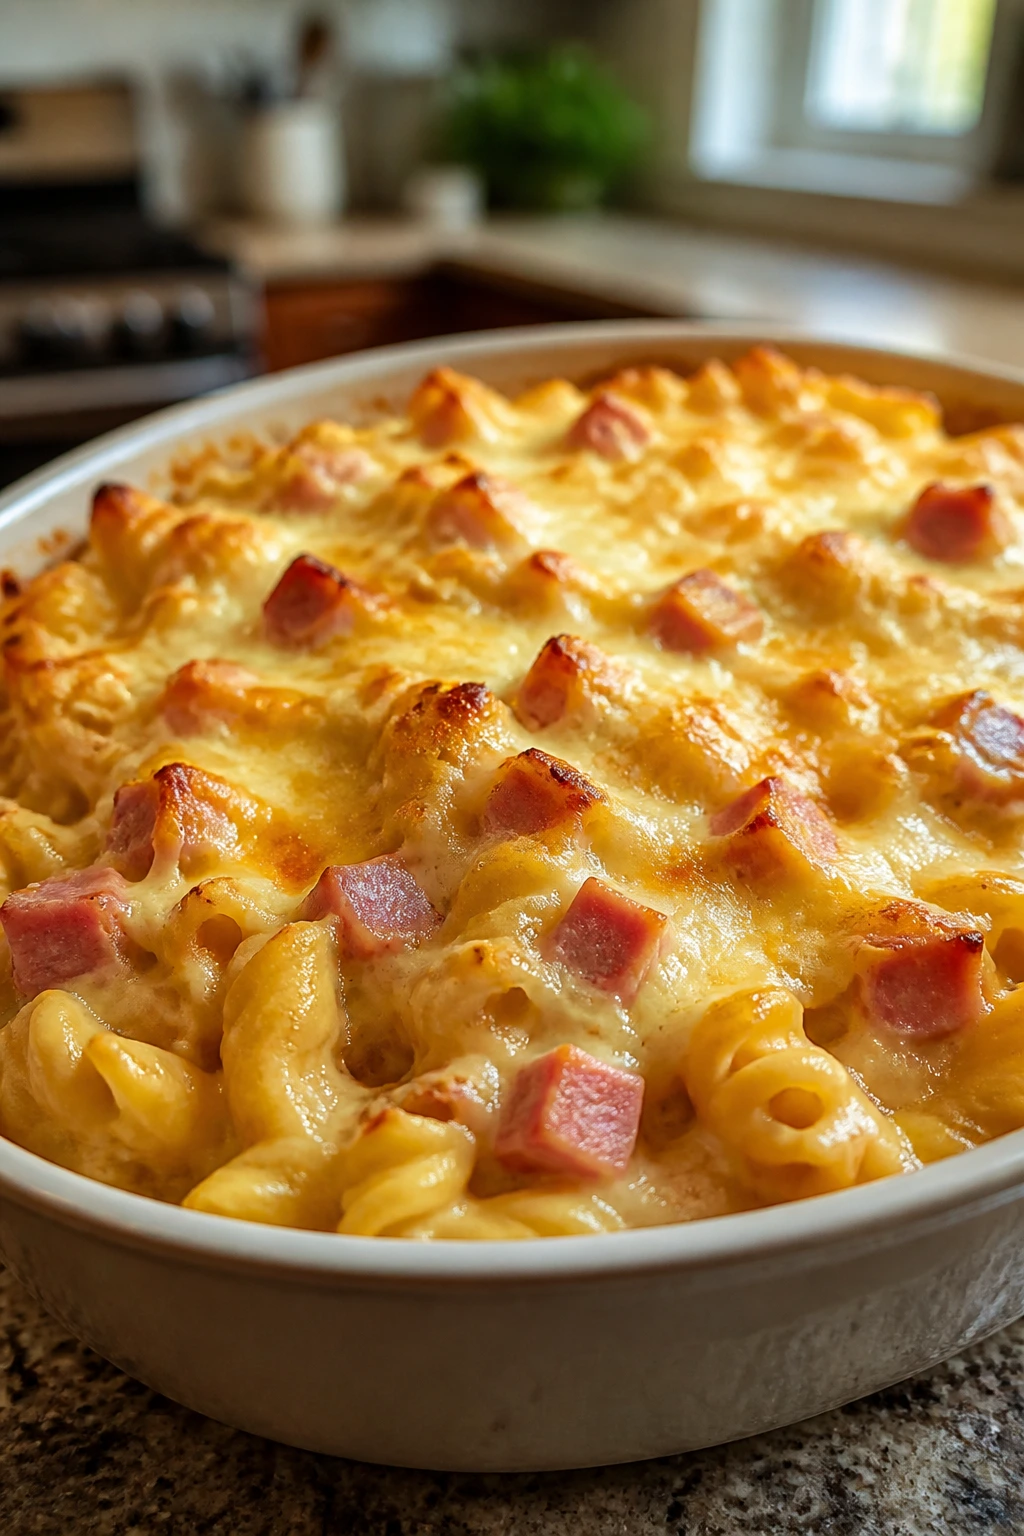
This is the dish that turns leftover ham into something people actually cheer for. The peas bring a little color, the cheese sauce wraps around the noodles, and the baked top adds the browned edge that makes casserole feel finished.
Why It Works: A simple white sauce keeps the pasta from drying out in the oven. Ham has enough salt and smoke on its own, so you do not need to pile on a lot of extra seasoning.
Key Ingredients:
- 12 ounces pasta shells or rotini
- 2 cups diced ham
- 2 cups frozen peas
- 3 tablespoons butter
- 3 tablespoons flour
- 3 cups milk
- 2 cups shredded cheddar
- 1/2 cup breadcrumbs, optional
- 1/2 teaspoon black pepper
Quick Steps:
- Cook the pasta until just tender, then drain.
- Make a roux with butter and flour, whisk in milk, and simmer until thick.
- Stir in cheddar, ham, peas, pasta, and pepper.
- Transfer to a baking dish and top with breadcrumbs if using.
- Bake at 375°F for 20 minutes until bubbling.
Equipment for This Recipe:
- Large pot
- Saucepan
- Baking dish
How to Serve This Dish: Serve with a simple cucumber salad or apple slices. The pasta already covers most of the meal, so a crisp side is enough.
Pro Tips for This Recipe:
- Salt cautiously; the ham brings its own saltiness.
- If you want more color, add a handful of chopped parsley at the end.
- Keep the pasta slightly underdone before baking.
Variations on This Dish:
- Broccoli Swap: Use chopped broccoli instead of peas.
- Swiss Version: Replace half the cheddar with Swiss cheese.
Common Mistakes to Avoid with This Dish:
- Using too much ham salt: The bake tastes harsh. Taste before adding more salt.
- Overbaking: The sauce can tighten up too much.
22. Veggie-Packed Queso Chicken Skillet
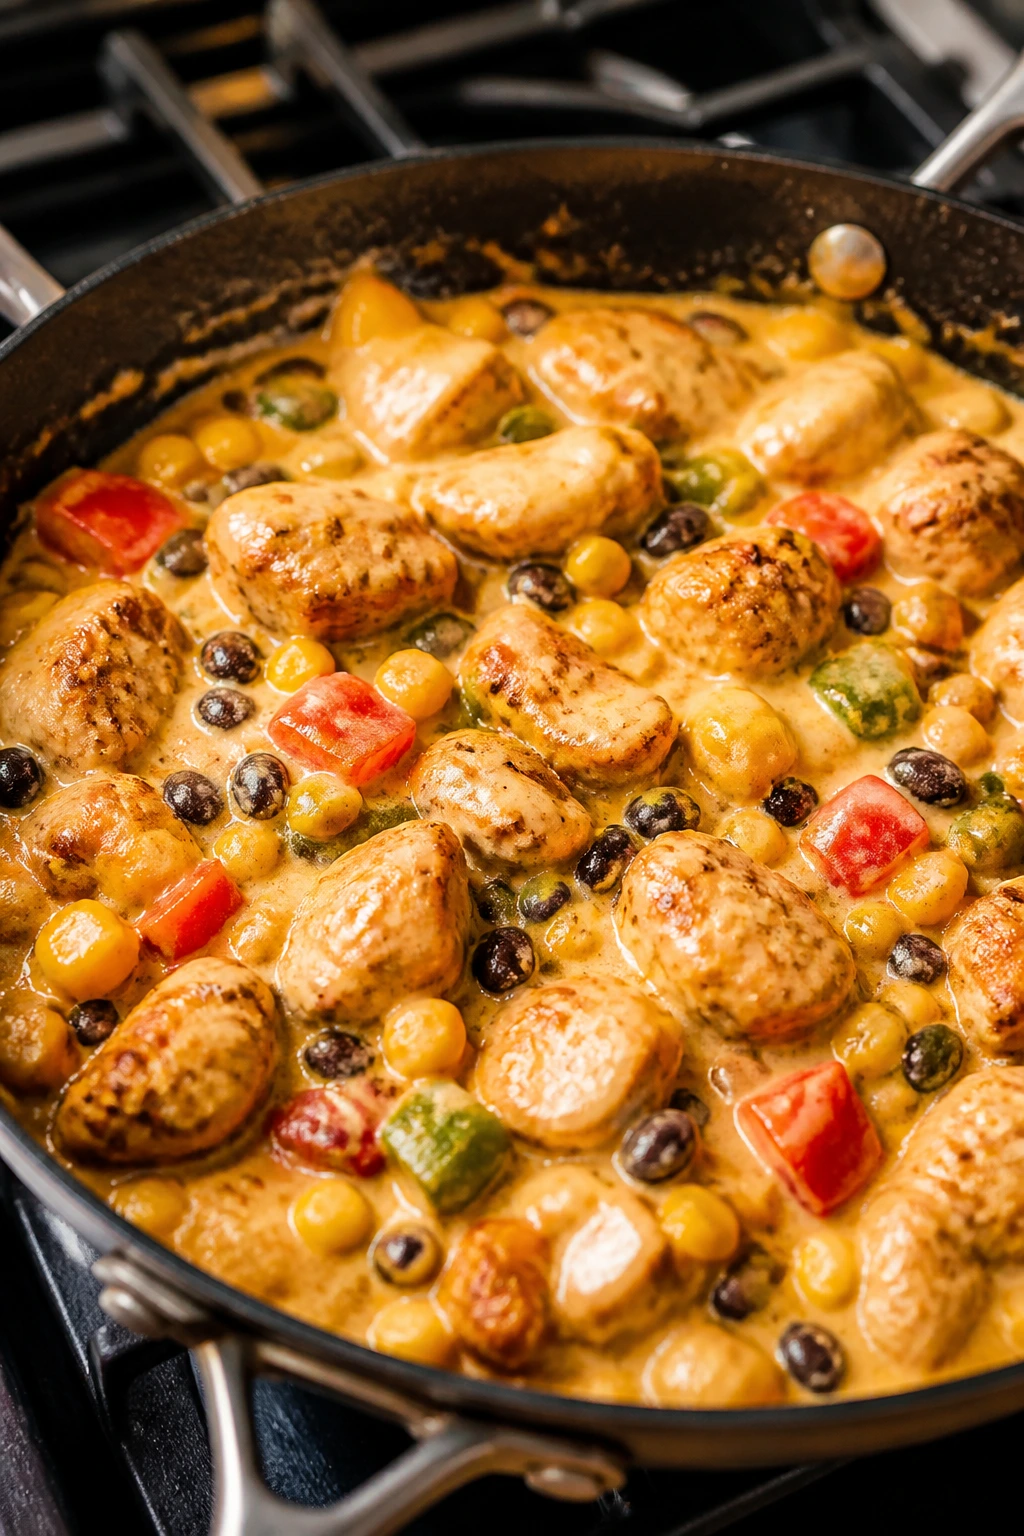
This skillet has the cozy, melty pull of queso with enough chicken and vegetables to read like a real dinner. The salsa and cream cheese make the sauce smooth, and the beans give it body without turning the pan heavy.
Why It Works: The cheese sauce clings to the chicken and vegetables, which keeps each bite from feeling separated. Using pre-cooked or quickly sautéed chicken makes this a fast skillet meal.
Key Ingredients:
- 1 pound chicken breast, cut into bite-size pieces
- 1 bell pepper, diced
- 1 cup corn
- 1 cup black beans, drained and rinsed
- 1 cup salsa
- 4 ounces cream cheese
- 1 cup shredded cheddar
- 1 teaspoon cumin
- 1 tablespoon oil
Quick Steps:
- Brown the chicken in oil over medium-high heat.
- Add the pepper and corn and cook until the pepper softens.
- Stir in salsa, cream cheese, cumin, and black beans.
- Once smooth, add cheddar and stir until melted.
- Serve hot with tortillas, rice, or chips.
Equipment for This Recipe:
- Large skillet
- Wooden spoon
- Knife and cutting board
How to Serve This Dish: Spoon it over rice or let everyone scoop with tortilla chips. A few diced tomatoes or sliced avocado on top make the bowl feel brighter.
Pro Tips for This Recipe:
- Cut the chicken small so it cooks fast.
- Let the cream cheese soften first so the sauce comes together smoothly.
- If it gets too thick, add a splash of milk.
Variations on This Dish:
- Turkey Skillet: Use ground turkey instead of chicken.
- Mild White Queso Version: Swap salsa for mild green chiles and use Monterey Jack.
Common Mistakes to Avoid with This Dish:
- Adding cheddar before the cream cheese melts: The sauce can clump.
- Overcooking the peppers: They should stay a little crisp.
23. Hawaiian Ham Fried Rice
Sweet pineapple and salty ham are a strong pair when the rice is hot and the pan is fast. This dish feels playful enough for kids, but it still eats like dinner instead of a side dish wearing a party shirt.
Why It Works: Fried rice wants cold rice, which fries instead of steaming. Pineapple adds moisture and sweetness, so you do not need a heavy sauce.
Key Ingredients:
- 3 cups cooked rice, chilled
- 1 1/2 cups diced ham
- 1 cup pineapple tidbits, drained
- 1 cup frozen peas
- 3 large eggs
- 3 tablespoons soy sauce
- 1 tablespoon oil
- 2 tablespoons sliced green onions
Quick Steps:
- Scramble the eggs in oil and set them aside.
- Cook the ham and peas in the same pan until hot.
- Add the rice and break up the clumps.
- Stir in pineapple, soy sauce, and eggs.
- Toss until the rice is hot and lightly browned in places.
Equipment for This Recipe:
- Large skillet or wok
- Spatula
- Bowl for eggs
How to Serve This Dish: Serve it in bowls with extra green onions on top. A side of sliced cucumbers keeps the meal light and crisp.
Pro Tips for This Recipe:
- Drain the pineapple well so the rice does not go wet.
- Use medium-high heat for the best fried texture.
- Add soy sauce around the edges of the pan so it sizzles a little.
Variations on This Dish:
- Chicken Pineapple Rice: Use diced cooked chicken instead of ham.
- Carrot Version: Add tiny diced carrots with the peas.
Common Mistakes to Avoid with This Dish:
- Using warm rice: It clumps and steams.
- Adding too much pineapple juice: The rice turns soft.
24. Creamy Tomato Tortellini Soup
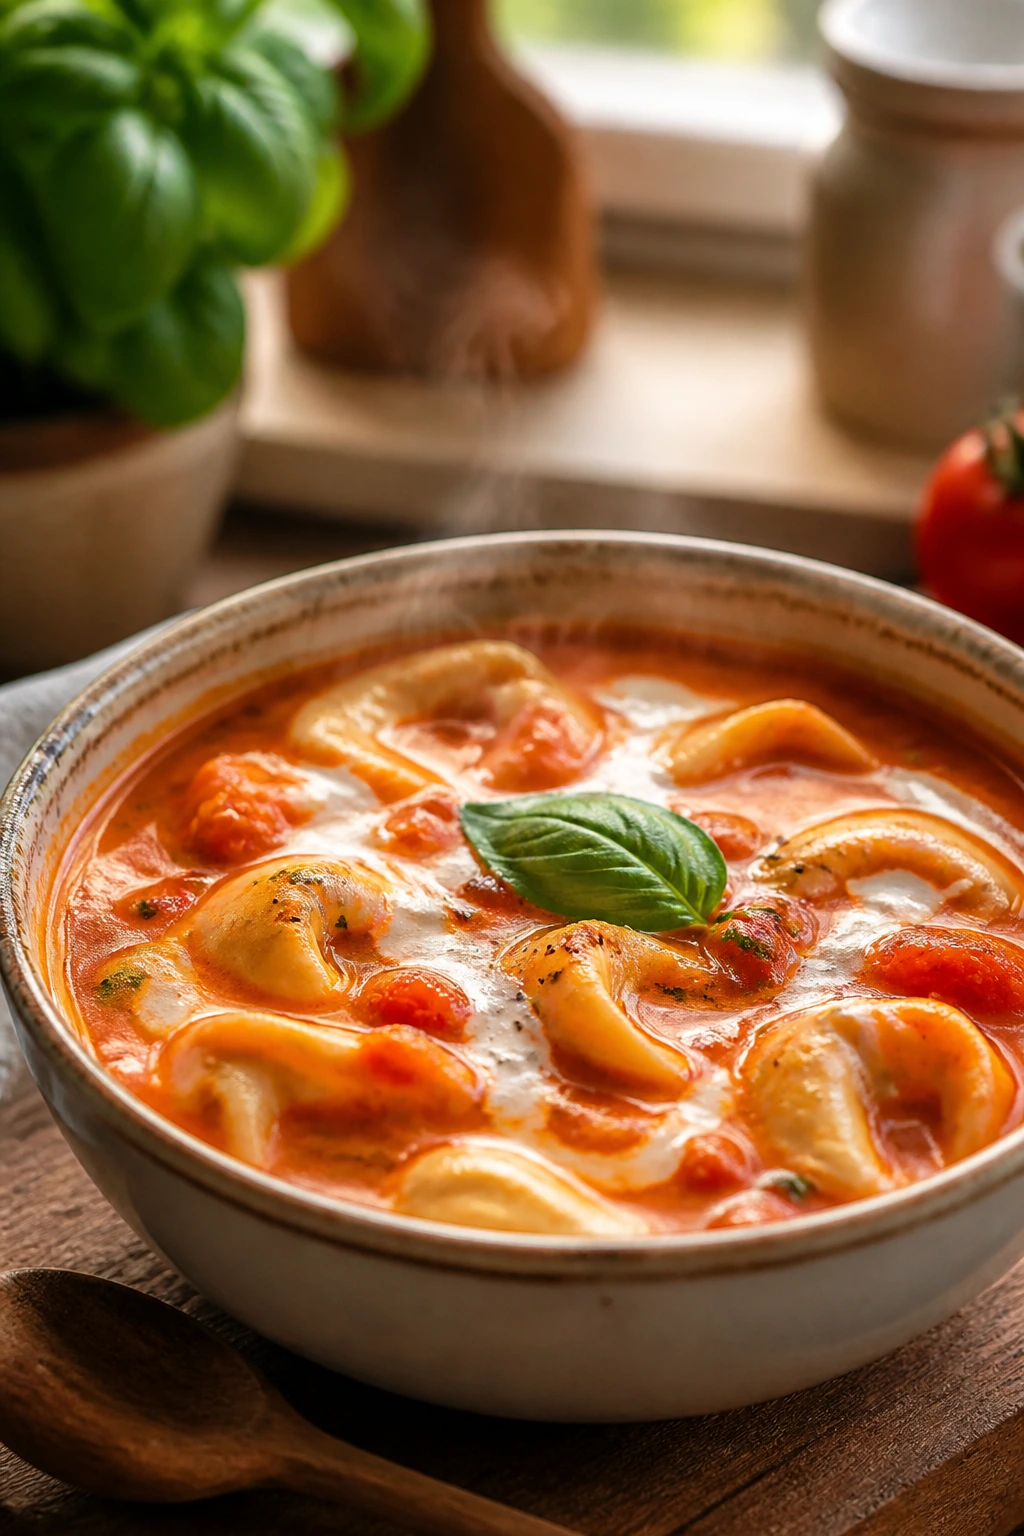
This is the soup kids often accept because it tastes like tomato pasta in a bowl. The tortellini make it filling, the cream rounds off the tomato sharpness, and the whole pot comes together without a lot of fuss.
Why It Works: Tortellini cook right in the broth, which thickens the soup as the pasta releases starch. A splash of cream at the end softens the tomatoes and gives the broth a richer finish.
Key Ingredients:
- 1 small onion, diced
- 2 cloves garlic, minced
- 1 can (28 ounces) crushed tomatoes
- 4 cups low-sodium chicken broth
- 1 pound cheese tortellini
- 1 cup heavy cream
- 1 teaspoon dried basil
- 1 teaspoon salt
- 1 tablespoon oil
Quick Steps:
- Sauté onion in oil until soft, then add garlic for 30 seconds.
- Stir in tomatoes, broth, basil, and salt and bring to a simmer.
- Add tortellini and cook according to the package, usually 4 to 6 minutes.
- Stir in cream and heat through without boiling.
- Serve warm.
Equipment for This Recipe:
- Large soup pot
- Wooden spoon
- Ladle
How to Serve This Dish: Put grilled cheese on the side if you want the classic soup-and-sandwich move. A few basil leaves or a dusting of parmesan makes the bowls feel finished.
Pro Tips for This Recipe:
- Do not boil the soup after adding cream.
- Use cheese tortellini if you want the mildest flavor.
- If it thickens in the pot, add a little broth before serving.
Variations on This Dish:
- Spinach Version: Stir in chopped spinach during the last minute.
- Chicken Tortellini Soup: Add shredded cooked chicken with the tortellini.
Common Mistakes to Avoid with This Dish:
- Overcooking tortellini: They split and lose shape.
- Forgetting to taste before serving: Tomato soups need a final salt check.
25. Baked Ziti with Spinach
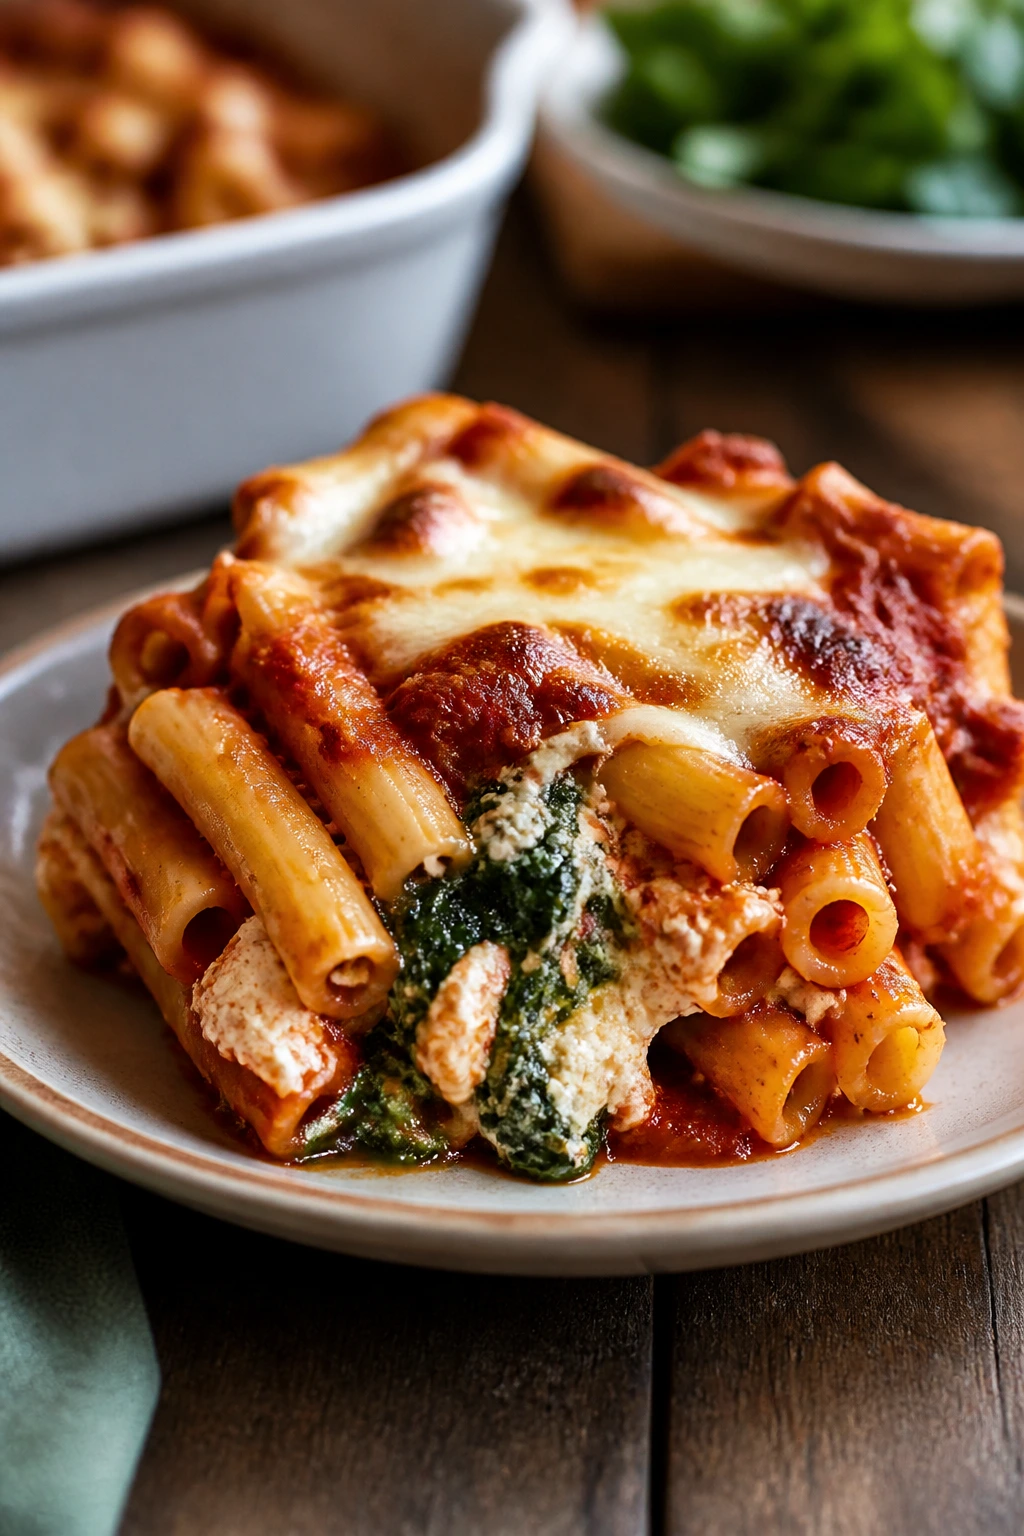
Baked ziti is one of those dishes that looks like a lot more work than it is. The pasta bakes in sauce, the ricotta turns creamy, and the spinach melts into the gaps so it doesn’t read like a salad in disguise.
Why It Works: Ziti holds sauce in the tube and along the ridges, so every bite has flavor. Baking it once gives the top that browned cheese layer kids tend to notice first.
Key Ingredients:
- 1 pound ziti
- 3 cups marinara sauce
- 1 pound ricotta
- 2 cups shredded mozzarella
- 1 cup chopped spinach
- 1 large egg
- 1/2 cup grated parmesan
- 2 cloves garlic, minced
- 1 teaspoon salt
Quick Steps:
- Cook the ziti until just underdone.
- Mix ricotta, egg, spinach, garlic, parmesan, and salt.
- Toss pasta with marinara and fold in the ricotta mixture.
- Transfer to a baking dish and top with mozzarella.
- Bake at 375°F for 25 minutes until bubbling and browned.
Equipment for This Recipe:
- Large pot
- Mixing bowl
- Baking dish
How to Serve This Dish: Serve with garlic bread and a simple green salad if you want a full spread. A spoonful of extra marinara on top never hurts.
Pro Tips for This Recipe:
- Undercook the pasta by 2 minutes before baking.
- Chop the spinach finely so it disappears into the sauce.
- Let the pan rest for 10 minutes before cutting.
Variations on This Dish:
- Sausage Ziti: Add 1 pound cooked Italian sausage.
- Roasted Veggie Version: Fold in chopped roasted zucchini or peppers.
Common Mistakes to Avoid with This Dish:
- Using dry ricotta straight from the tub: Stir it well so it spreads.
- Serving immediately: It falls apart if you cut too soon.
26. Chicken Pot Pie Hand Pies

Hand pies give you pot pie without the giant casserole commitment. The filling is creamy and savory, the pastry gets golden and crisp, and each pocket feels like a neat little dinner package.
Why It Works: The filling is cooked first so it’s thick enough not to leak. Puff pastry bakes quickly and turns flaky around the edges, which is half the charm.
Key Ingredients: For the Filling:
- 2 cups shredded cooked chicken
- 1 cup diced carrots
- 1 cup frozen peas
- 1/2 cup diced celery
- 2 tablespoons butter
- 2 tablespoons flour
- 1 cup chicken broth
- 1/2 cup milk
- 1 teaspoon salt
For the Pastry:
- 2 sheets puff pastry, thawed
- 1 large egg, beaten
Quick Steps:
- Cook carrots and celery in butter, then whisk in flour for 1 minute.
- Stir in broth, milk, salt, chicken, and peas and cook until thick.
- Cool the filling a bit so it does not melt the pastry.
- Cut the pastry into squares, fill, fold, seal, and brush with egg.
- Bake at 400°F for 20 to 22 minutes until puffed and golden.
Equipment for This Recipe:
- Baking sheet
- Parchment paper
- Small saucepan
- Fork
How to Serve This Dish: Serve two hand pies per adult or one per child, with fruit or a green salad on the side. They also pack well for lunches if you chill them first.
Pro Tips for This Recipe:
- Cool the filling before assembly.
- Seal the edges with a fork so the filling stays put.
- Cut steam vents in the top of each pie.
Variations on This Dish:
- Turkey Pot Pies: Use cooked turkey after a holiday meal.
- Biscuit Dough Version: Replace puff pastry with refrigerated biscuit dough squares.
Common Mistakes to Avoid with This Dish:
- Overfilling the pastry: The pies leak in the oven.
- Putting hot filling into the dough: It softens the pastry before baking.
27. Mini Shepherd’s Pies
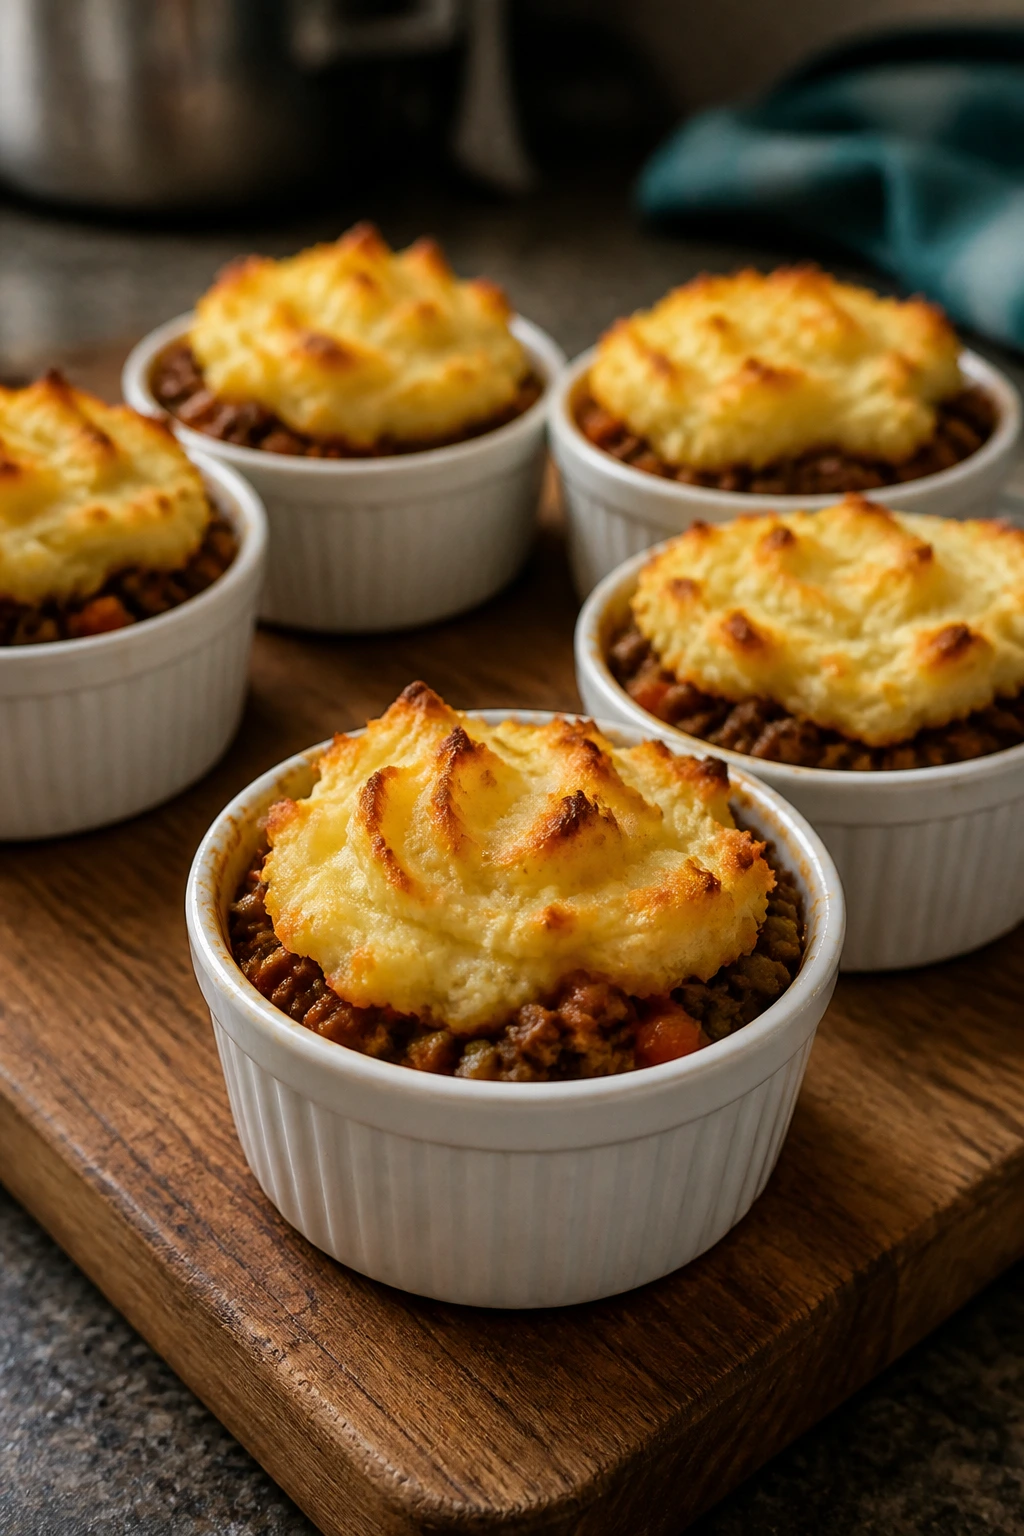
These are the little casserole cups that make mashed potatoes feel exciting. The beef filling is savory and soft, the peas add color, and the potato top browns enough to give each bite a little crust.
Why It Works: Smaller portions bake faster and give you more browned surface area. The mashed potatoes act like a lid, which keeps the filling juicy underneath.
Key Ingredients:
- 1 pound ground beef
- 1 small onion, diced
- 1 cup diced carrots
- 1 cup frozen peas
- 1 cup beef broth
- 1 tablespoon flour
- 2 cups mashed potatoes
- 1 tablespoon butter
- 1/2 teaspoon salt
- 1/2 teaspoon black pepper
Quick Steps:
- Brown the beef and onion in a skillet.
- Stir in carrots, flour, broth, peas, salt, and pepper and simmer until thick.
- Divide the filling into greased ramekins or a muffin tin.
- Spoon mashed potatoes on top and dot with butter.
- Bake at 400°F for 15 minutes until the tops are lightly browned.
Equipment for This Recipe:
- Skillet
- Ramekins or muffin tin
- Spoon
How to Serve This Dish: Serve with a spoon, not a knife, and a few extra peas or green beans on the side. The individual cups make a nice plate for smaller appetites.
Pro Tips for This Recipe:
- Thicken the filling before baking or the tops sink.
- Pipe or spoon the potatoes in swirls if you want more browning.
- A tiny bit of grated parmesan on the potatoes adds color fast.
Variations on This Dish:
- Turkey Pie Cups: Use ground turkey and chicken broth.
- Cheddar Top Version: Mix cheddar into the mashed potatoes.
Common Mistakes to Avoid with This Dish:
- Filling the cups with thin gravy: It floods the potatoes.
- Skipping the brown top: That little crust is the point.
28. Sweet and Sour Meatballs
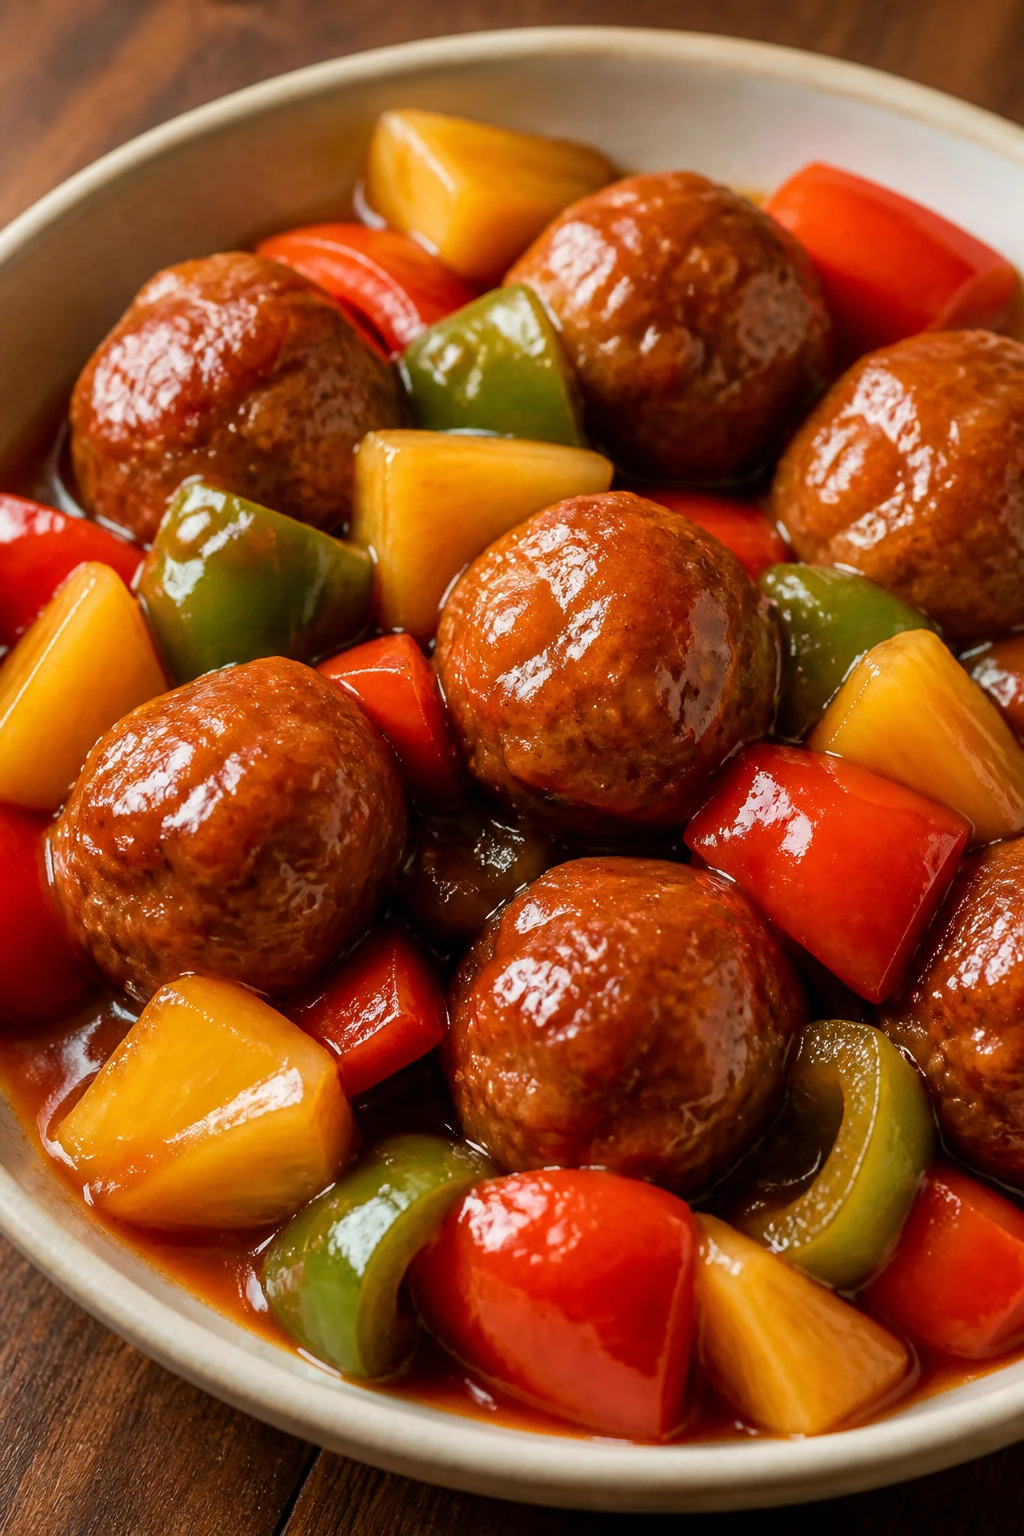
Sweet and sour meatballs have that takeout feel without requiring a delivery fee or a long wait. The sauce hits sweet first, then sharp, and the pineapple keeps it bright enough that the bowl doesn’t taste heavy.
Why It Works: Meatballs give you a tender base that holds sauce well. Pineapple and bell pepper add both color and a little bite, which keeps the dish from feeling like plain meat in syrup.
Key Ingredients:
- 1 pound frozen or homemade meatballs
- 1 bell pepper, cut into strips
- 1 cup pineapple chunks, drained
- 1/2 cup ketchup
- 1/4 cup rice vinegar
- 2 tablespoons brown sugar
- 1 tablespoon soy sauce
- 1 tablespoon cornstarch mixed with 2 tablespoons water
- 2 cups cooked rice
Quick Steps:
- Warm the meatballs in a skillet or saucepot.
- Stir in ketchup, vinegar, brown sugar, soy sauce, and cornstarch slurry.
- Add pepper and pineapple and simmer until the sauce thickens.
- Heat until the peppers are tender but still a little crisp.
- Serve over rice.
Equipment for This Recipe:
- Large skillet or saucepan
- Wooden spoon
- Measuring cups
How to Serve This Dish: Serve with rice and a few sliced green onions if you have them. A side of steamed broccoli makes the sweetness feel balanced.
Pro Tips for This Recipe:
- Drain the pineapple well so the sauce thickens properly.
- Use frozen meatballs if you want the fastest version.
- Let the sauce simmer long enough to lose the sharp vinegar edge.
Variations on This Dish:
- Turkey Meatball Version: Use turkey meatballs for a lighter feel.
- Vegetable-Forward Version: Add snap peas or carrots to the skillet.
Common Mistakes to Avoid with This Dish:
- Leaving the sauce thin: It slides off the meatballs.
- Overcooking the peppers: Keep them crisp, not limp.
29. Buttered Noodle Chicken Soup
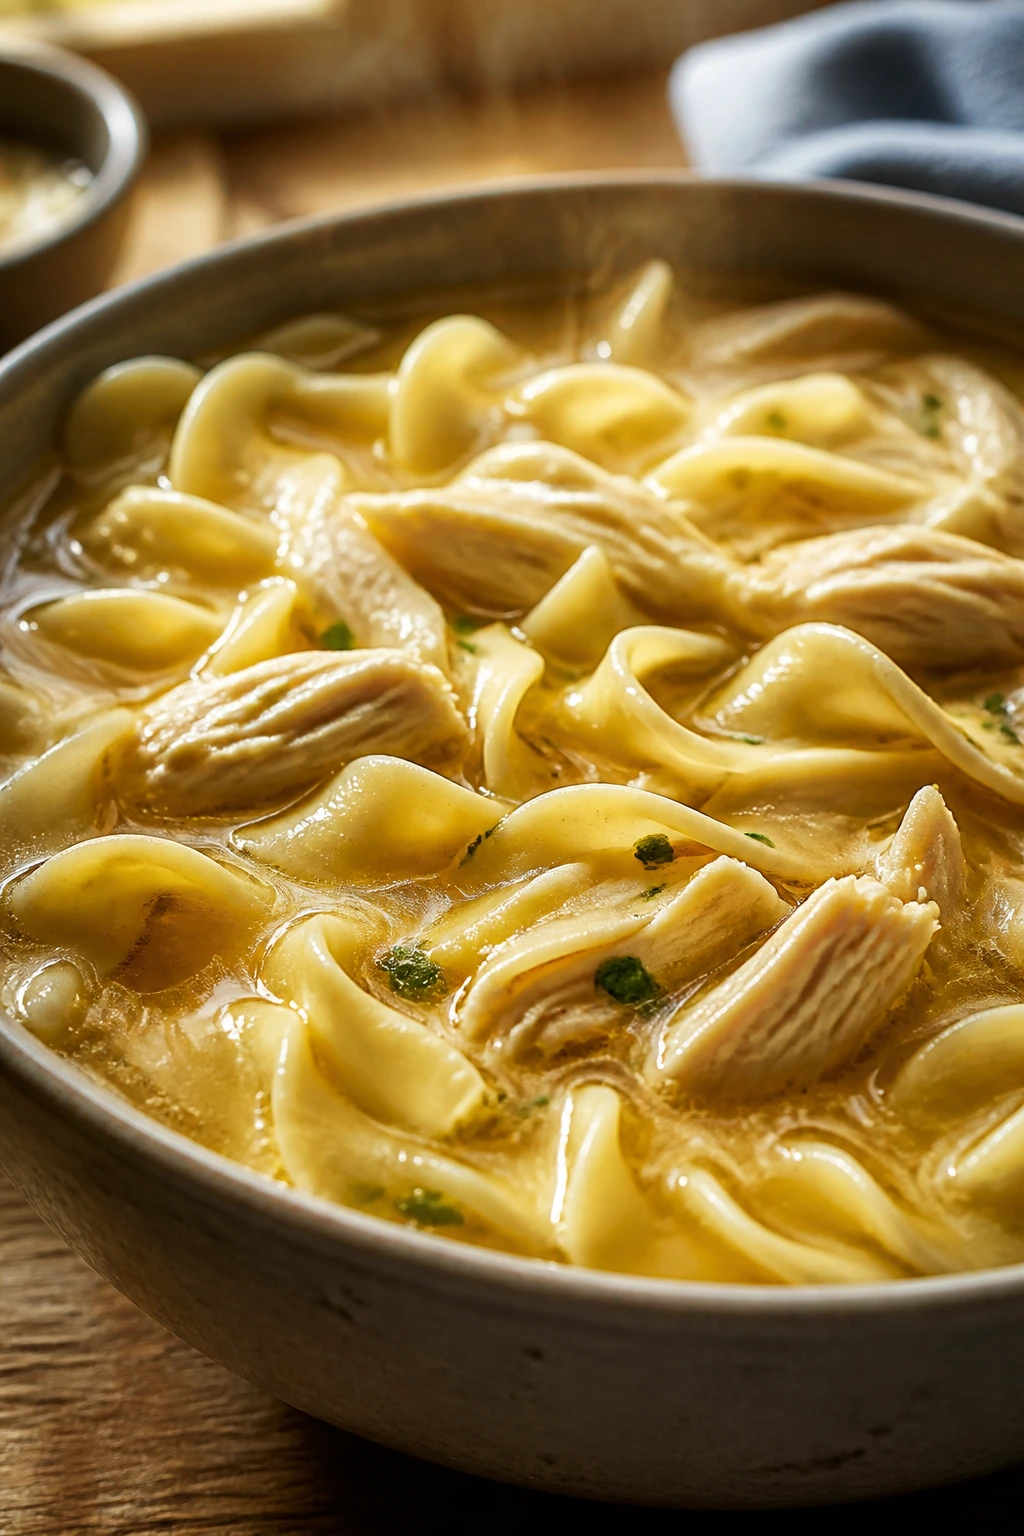
There’s something disarmingly plain about buttered noodle chicken soup, and that’s part of why it works. The broth is soft and familiar, the noodles are slippery in the best way, and the whole pot tastes like someone meant to take care of you.
Why It Works: Egg noodles soak up broth quickly, which gives the soup body without a lot of ingredients. Butter rounds out the broth and keeps it from tasting thin.
Key Ingredients:
- 1 tablespoon butter
- 2 carrots, sliced
- 2 celery stalks, sliced
- 6 cups chicken broth
- 2 cups shredded cooked chicken
- 2 cups egg noodles
- 1 teaspoon salt
- 1/2 teaspoon black pepper
- 2 tablespoons chopped parsley
Quick Steps:
- Sauté carrots and celery in butter until softened.
- Pour in broth and bring to a boil.
- Add chicken and egg noodles, then simmer until the noodles are tender.
- Season with salt and pepper.
- Finish with parsley and serve hot.
Equipment for This Recipe:
- Soup pot
- Ladle
- Wooden spoon
How to Serve This Dish: Pair it with crackers, toast, or a grilled cheese sandwich if you want more heft. The broth is gentle enough that even smaller appetites usually handle it well.
Pro Tips for This Recipe:
- Add noodles near the end so they do not get bloated.
- Taste the broth before serving; chicken soup needs salt.
- Rotisserie chicken makes this fast without changing the flavor much.
Variations on This Dish:
- Lemon Version: Add a squeeze of lemon at the end.
- Rice Noodle Version: Swap in cooked rice noodles if that’s what you have.
Common Mistakes to Avoid with This Dish:
- Boiling the noodles too long: They go mushy.
- Underseasoning the broth: It tastes watery instead of cozy.
30. Sausage, Apple, and Rice Skillet
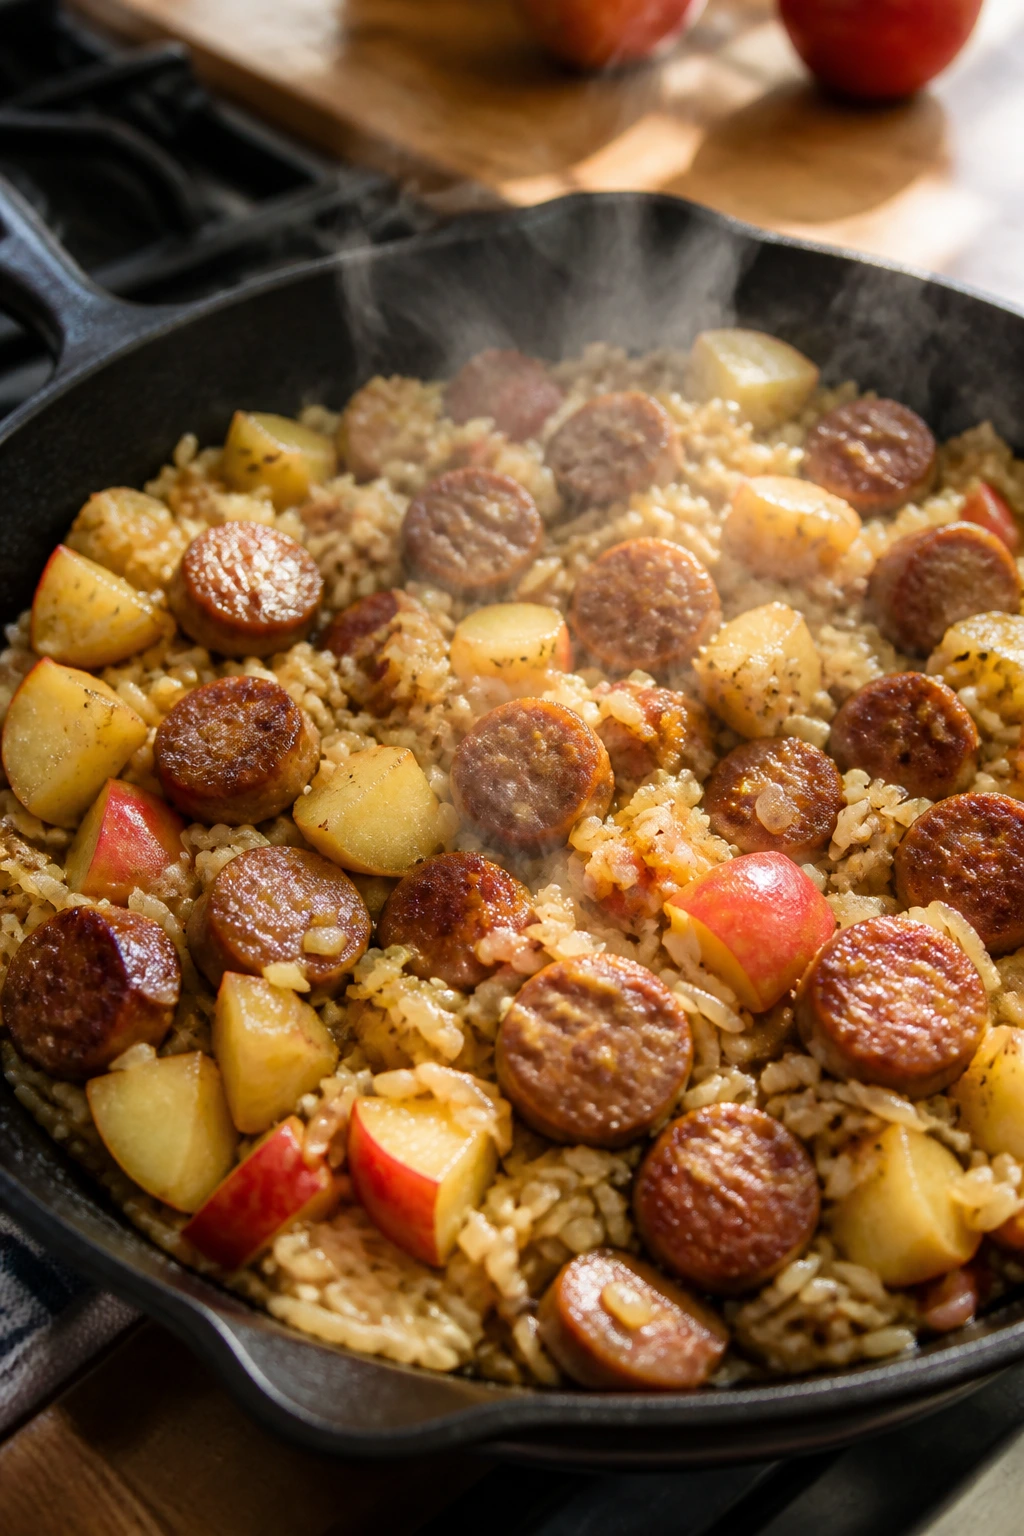
This skillet walks the line between savory and a little sweet, and that’s what makes it interesting. The sausage browns, the apples soften just enough, and the rice soaks up the pan juices without turning mushy.
Why It Works: Sausage gives the pan fat and flavor right away. Apples add a soft sweetness that kids often accept more easily than a stronger vegetable note.
Key Ingredients:
- 1 pound chicken sausage or mild pork sausage, sliced
- 1 onion, sliced
- 2 apples, cored and diced
- 1 cup long-grain rice
- 2 cups chicken broth
- 1 teaspoon dried sage
- 1 teaspoon salt
- 1 tablespoon oil
- 1 cup spinach, optional
Quick Steps:
- Brown the sausage in oil in a large skillet.
- Add onion and apples and cook until the onion softens.
- Stir in rice, broth, sage, and salt.
- Cover and simmer on low for 18 to 20 minutes until the rice is tender.
- Stir in spinach if using and let it wilt.
Equipment for This Recipe:
- Large skillet with a lid
- Wooden spoon
- Sharp knife
How to Serve This Dish: Serve it in bowls with a spoonful of applesauce on the side if you want a stronger sweet note. A simple green bean side helps balance the skillet.
Pro Tips for This Recipe:
- Use firm apples so they hold shape.
- Keep the lid on while the rice cooks.
- If the skillet dries out too soon, add 1/4 cup broth.
Variations on This Dish:
- Sausage and Pears: Swap pears for apples if you want a softer sweetness.
- Cranberry Finish: Stir in a handful of dried cranberries at the end.
Common Mistakes to Avoid with This Dish:
- Using quick rice: It can turn soft too fast.
- Cooking apples until they vanish: You want some chunks left.
31. Baked Chicken Taquitos
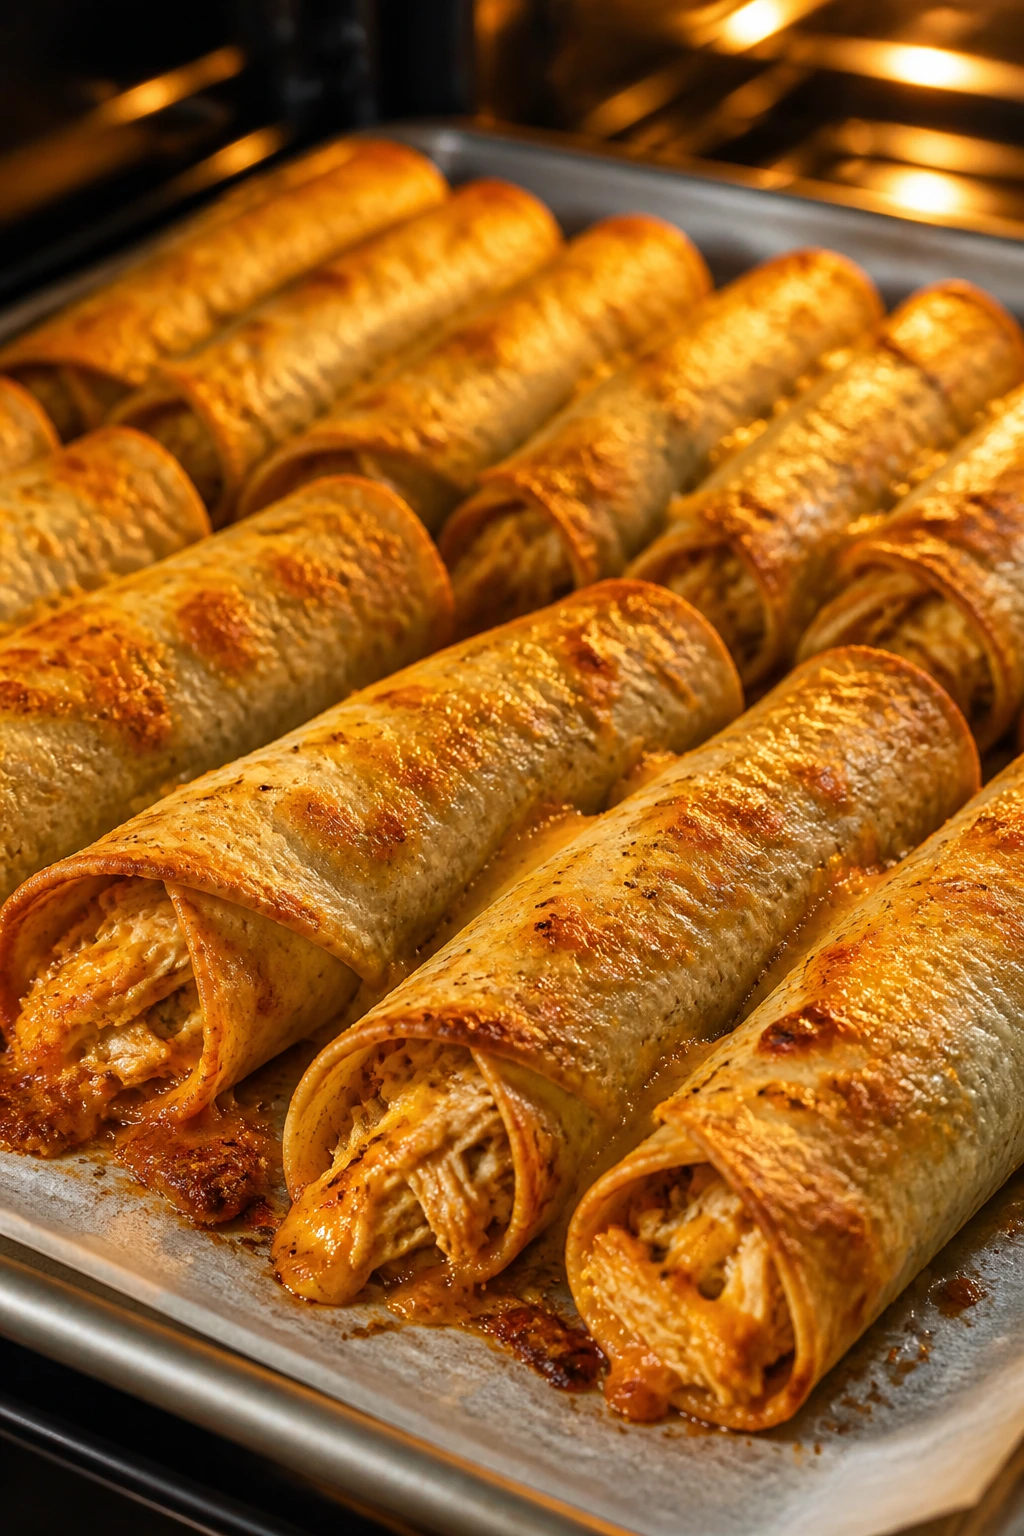
Taquitos are a strong move when kids want something handheld and you want dinner to stay neat. The filling is creamy and cheesy, the shells crisp up in the oven, and the tray usually empties before anyone gets bored.
Why It Works: Shredded chicken and cream cheese make a filling that rolls without falling apart. Baking instead of frying keeps the taquitos crisp enough without the mess of a pot of oil.
Key Ingredients:
- 2 cups shredded cooked chicken
- 4 ounces cream cheese, softened
- 1 cup shredded cheddar
- 1/4 cup salsa
- 12 small flour tortillas
- 1 tablespoon oil or melted butter
- 1/2 teaspoon salt
Quick Steps:
- Heat the oven to 425°F and line a sheet pan.
- Mix chicken, cream cheese, cheddar, salsa, and salt.
- Spoon the filling into tortillas, roll them tight, and place seam-side down.
- Brush lightly with oil or butter.
- Bake for 12 to 15 minutes until crisp and golden.
Equipment for This Recipe:
- Sheet pan
- Mixing bowl
- Pastry brush, optional
How to Serve This Dish: Serve with salsa, sour cream, or guacamole for dipping. A salad or some sliced peppers on the side keeps the meal feeling balanced.
Pro Tips for This Recipe:
- Warm the tortillas first so they do not crack.
- Roll them tightly so the filling stays inside.
- Bake seam-side down for the first few minutes.
Variations on This Dish:
- Bean Taquitos: Add mashed black beans to the filling.
- Buffalo Taquitos: Swap salsa for mild buffalo sauce and ranch.
Common Mistakes to Avoid with This Dish:
- Overfilling the tortillas: They burst open.
- Baking at too low a heat: They dry out before crisping.
32. Ground Beef and Bean Burrito Bowls
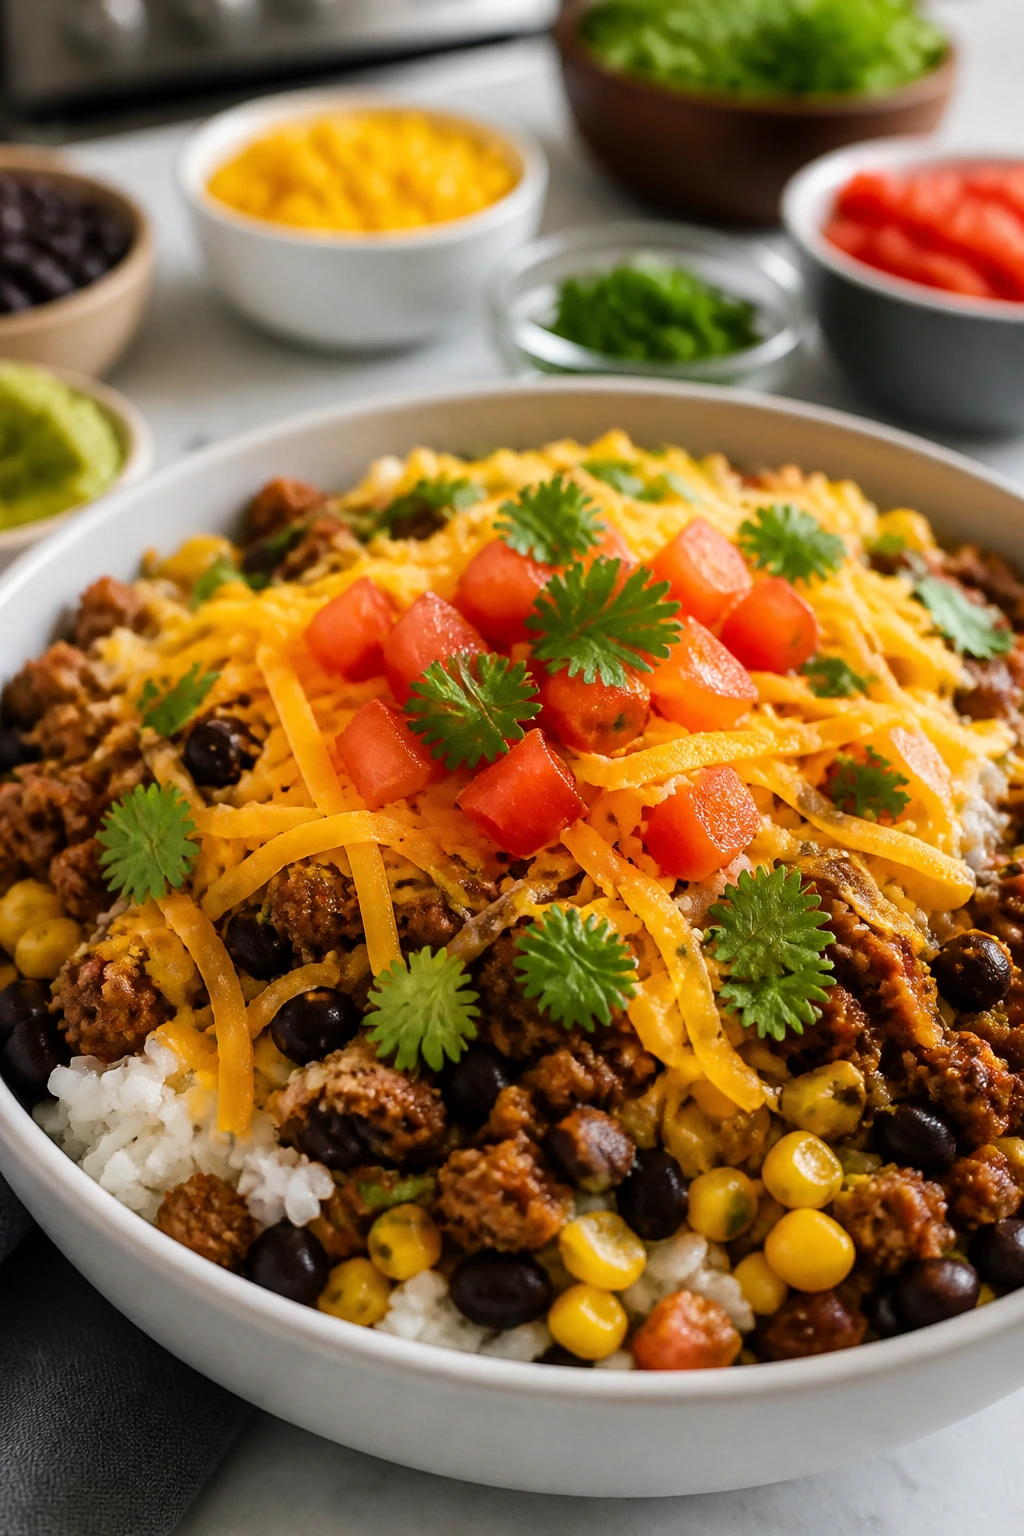
Burrito bowls let everyone build the version they’ll actually eat, which is half the win. The beef is seasoned enough to taste like dinner, the beans add body, and the rice keeps the whole thing from feeling too sharp or too spicy.
Why It Works: Separating the ingredients keeps picky eaters from having to sort through mixed textures. Kids can take rice, beef, cheese, and corn in whatever order makes sense to them.
Key Ingredients:
- 1 pound ground beef
- 1 packet mild taco seasoning
- 2 cups cooked rice
- 1 can black beans, drained and rinsed
- 1 cup corn
- 1 cup shredded cheddar
- 1 cup salsa
- 1 cup shredded lettuce
Quick Steps:
- Brown the beef and stir in taco seasoning with a splash of water.
- Warm the beans and corn in a small pot or microwave.
- Fill bowls with rice, beef, beans, and corn.
- Top with cheddar, salsa, and lettuce.
- Serve immediately.
Equipment for This Recipe:
- Skillet
- Small saucepan or microwave-safe bowl
- Serving bowls
How to Serve This Dish: Set toppings in separate bowls if you want everyone to build their own. Tortilla chips make a good crunch on the side.
Pro Tips for This Recipe:
- Keep the seasoning mild and let hot sauce stay separate.
- Warm the beans; cold beans are a bad surprise.
- A squeeze of lime helps the bowls taste fresher.
Variations on This Dish:
- Chicken Bowls: Use shredded chicken and the same toppings.
- Cauliflower Rice Version: Swap in cauliflower rice for part of the rice.
Common Mistakes to Avoid with This Dish:
- Mixing everything together too early: Picky eaters tend to reject that.
- Serving the rice cold: The bowl feels unfinished.
33. Spinach Ricotta Stuffed Shells

Stuffed shells are the kind of pasta dinner that looks fancier than the effort it takes. The ricotta stays soft, the spinach disappears into the cheese, and the sauce bubbles up around the edges in a way that feels unmistakably dinner.
Why It Works: Jumbo shells hold a decent amount of filling without falling apart. Ricotta and mozzarella give you a soft center, while the marinara keeps the top from drying out in the oven.
Key Ingredients:
- 20 jumbo pasta shells
- 1 pound ricotta
- 1 cup chopped spinach, squeezed dry
- 1 cup shredded mozzarella
- 1/2 cup grated parmesan
- 1 large egg
- 2 cloves garlic, minced
- 3 cups marinara sauce
- 1 teaspoon salt
Quick Steps:
- Cook the shells until just tender, then drain.
- Mix ricotta, spinach, mozzarella, parmesan, egg, garlic, and salt.
- Spoon the filling into the shells.
- Spread marinara in a baking dish, nestle the shells in, and spoon more sauce over them.
- Bake at 375°F for 25 minutes.
Equipment for This Recipe:
- Large pot
- Baking dish
- Spoon
How to Serve This Dish: Serve three to four shells per person with garlic bread or a green salad. A little extra parmesan on top goes a long way.
Pro Tips for This Recipe:
- Drain the spinach well so the filling does not turn wet.
- Cook extra shells in case a few tear.
- Let the dish rest before serving so the filling settles.
Variations on This Dish:
- Meat Sauce Version: Add browned ground beef to the marinara.
- Four-Cheese Version: Swap in fontina or provolone for part of the mozzarella.
Common Mistakes to Avoid with This Dish:
- Overcooking the shells: They tear when stuffed.
- Using watery spinach: It loosens the filling.
34. Honey Mustard Pork Chops
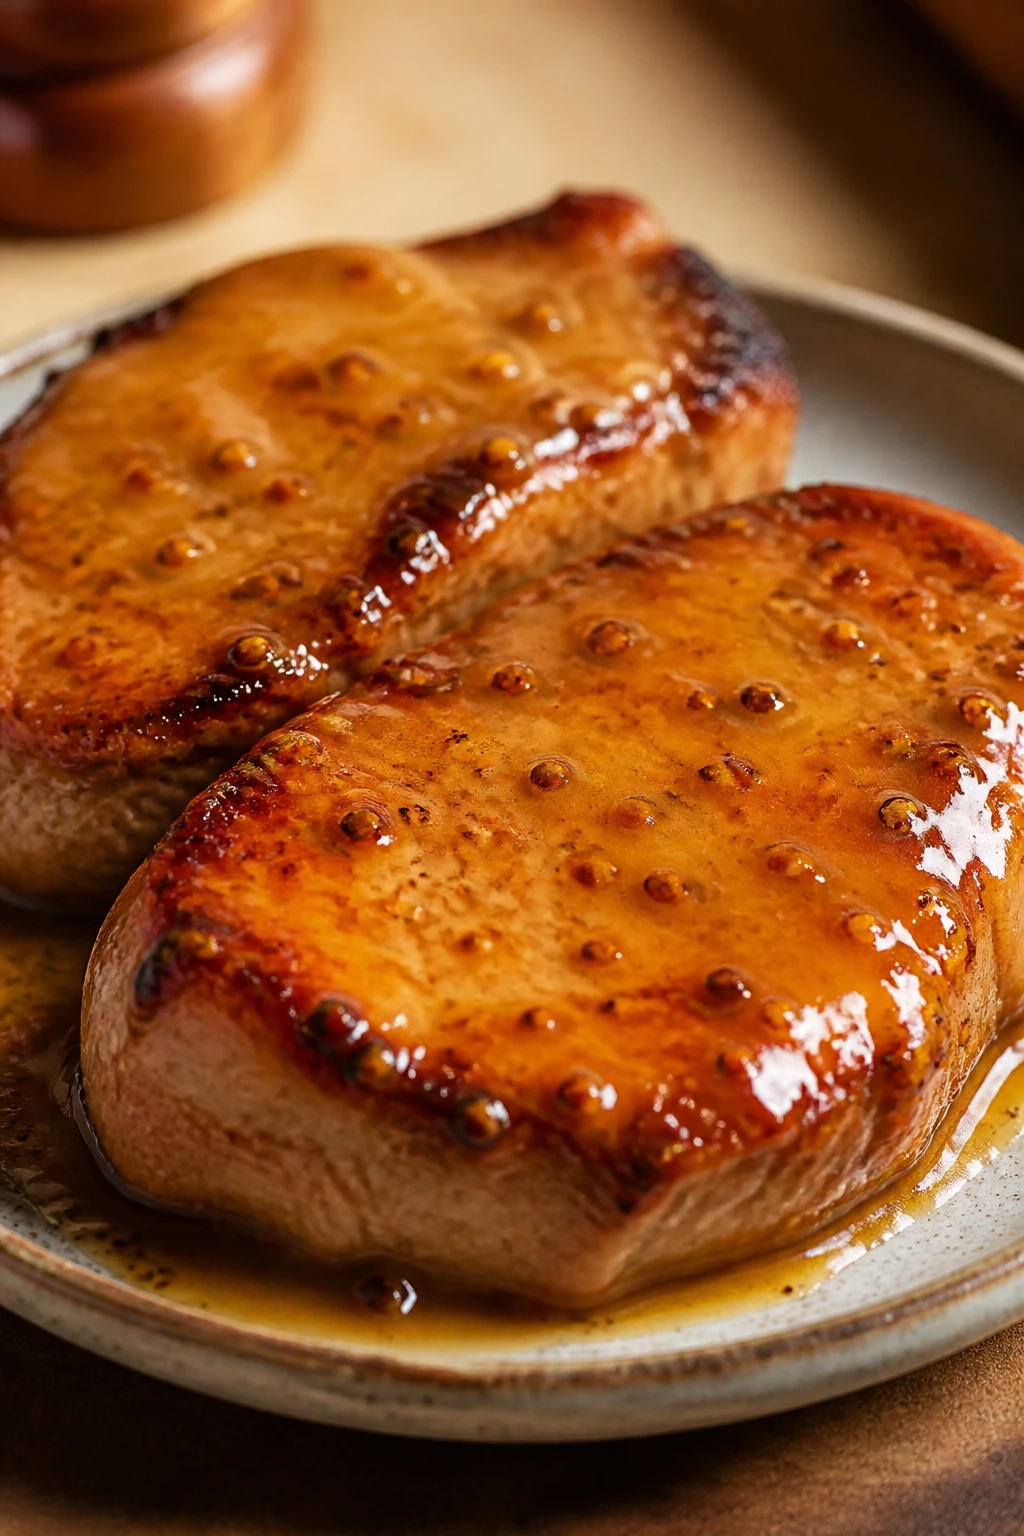
These pork chops have a sweet-salty glaze that tends to win over kids faster than a plain seared chop. Honey softens the Dijon, the garlic keeps it from tasting one-note, and the pan sauce picks up the browned bits underneath.
Why It Works: Pork chops cook fast, especially if they are boneless and not too thick. A simple honey mustard glaze gives you flavor without a long marinade.
Key Ingredients:
- 4 boneless pork chops, about 1 inch thick
- 2 tablespoons Dijon mustard
- 2 tablespoons honey
- 1 clove garlic, minced
- 1 tablespoon olive oil
- 1 teaspoon salt
- 1/2 teaspoon black pepper
Quick Steps:
- Heat the oven to 400°F.
- Mix mustard, honey, garlic, salt, and pepper.
- Sear the chops in oil for 2 minutes per side.
- Brush with the glaze and bake for 8 to 10 minutes until the center reaches 145°F.
- Rest for 5 minutes before serving.
Equipment for This Recipe:
- Oven-safe skillet
- Small bowl
- Spoon or brush
How to Serve This Dish: Serve with mashed potatoes, roasted carrots, or applesauce. The sweet glaze likes a simple side more than a complicated one.
Pro Tips for This Recipe:
- Pull the chops at 145°F and let them rest; they finish cooking as they sit.
- Boneless chops are easier for this glaze than very thick bone-in ones.
- Brush on a little extra glaze right before serving.
Variations on This Dish:
- Pork and Apples: Add sliced apples to the skillet for the last 8 minutes.
- Dijon Herb Version: Add thyme or rosemary to the glaze.
Common Mistakes to Avoid with This Dish:
- Overcooking pork: It turns dry fast.
- Using a thick glaze on raw chops only: Sear first so the sauce does not burn.
35. Turkey Taco Stuffed Peppers
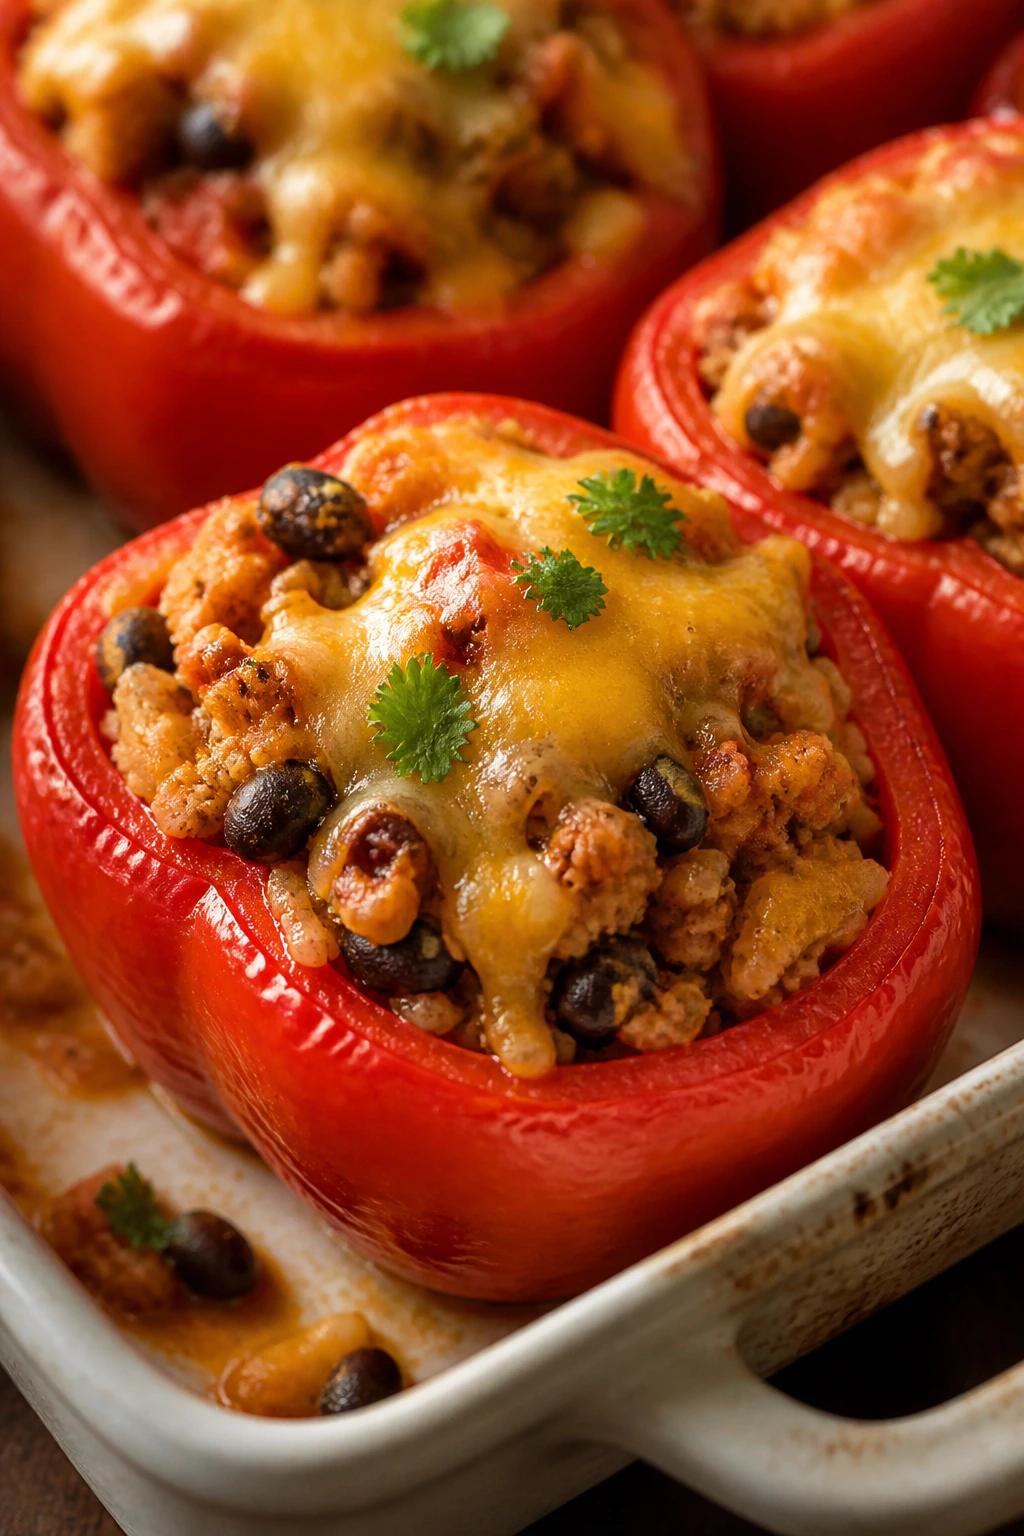
Stuffed peppers can be a tough sell if they are overloaded or too sharp, so this version keeps the filling familiar. Taco seasoning, rice, beans, and cheese make the peppers feel like a bowl of burrito filling with the sides held up for you.
Why It Works: The peppers become soft and sweet in the oven, which balances the seasoned turkey. The rice stretches the filling so the peppers don’t collapse under their own weight.
Key Ingredients:
- 4 large bell peppers
- 1 pound ground turkey
- 1 packet mild taco seasoning
- 1 cup cooked rice
- 1 cup black beans, drained and rinsed
- 1 cup salsa
- 1 cup shredded cheddar
- 1 tablespoon oil
- 1/2 teaspoon salt
Quick Steps:
- Heat the oven to 375°F.
- Halve and seed the peppers, then place them in a baking dish.
- Brown the turkey with oil and taco seasoning, then mix in rice, beans, and salsa.
- Fill the peppers and top with cheddar.
- Bake for 30 to 35 minutes until the peppers are tender.
Equipment for This Recipe:
- Baking dish
- Skillet
- Spoon
How to Serve This Dish: Serve with a little sour cream on top and extra salsa on the side. Chips make a good crunchy side if you want the meal to stretch further.
Pro Tips for This Recipe:
- Pre-bake the peppers for 10 minutes if you like them softer.
- Dice the filling ingredients small so every bite is balanced.
- Keep the seasoning mild; kids notice heat fast.
Variations on This Dish:
- Beef Version: Use ground beef instead of turkey.
- Corn Version: Add 1 cup corn to the filling.
Common Mistakes to Avoid with This Dish:
- Leaving the peppers underbaked: They stay too firm.
- Overstuffing them: The filling spills over the pan.
36. Tuna Noodle Casserole
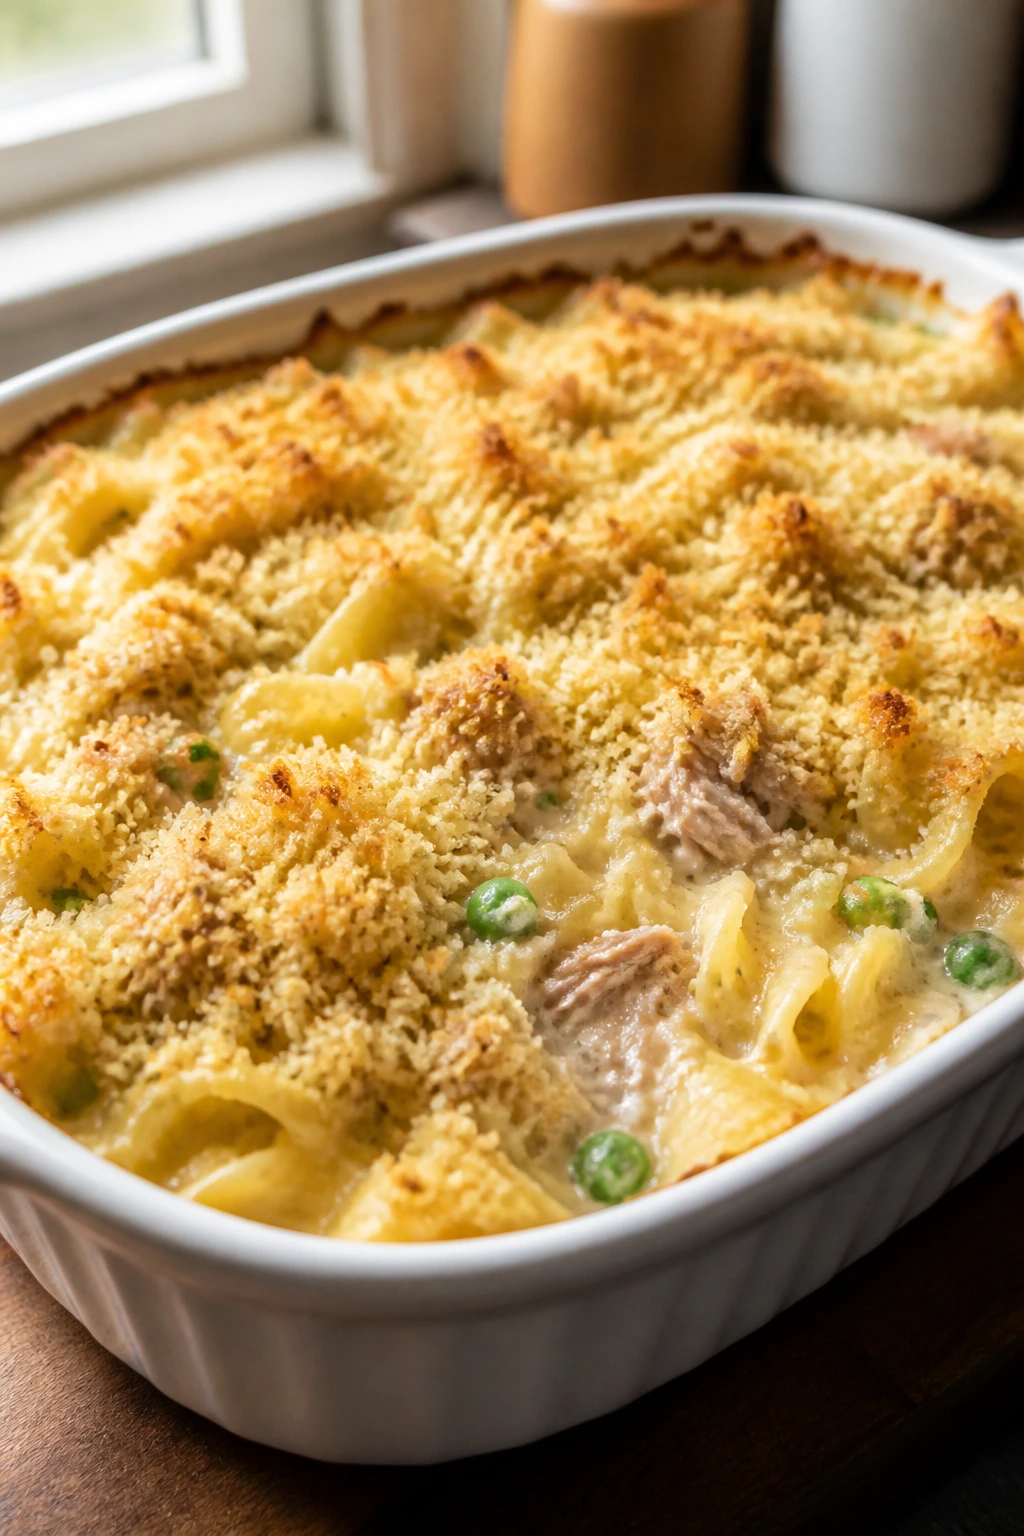
Tuna noodle casserole has been around because it solves a real problem: dinner that is cheap, warm, and filling without needing a trip to the store. This version keeps the sauce creamy, the peas tucked in quietly, and the top a little crisp.
Why It Works: Pasta, tuna, and peas all do fine in a creamy bake, and the breadcrumbs give the top enough texture to keep it from feeling soft all the way through. A simple white sauce keeps the tuna from tasting dry.
Key Ingredients:
- 12 ounces egg noodles
- 2 cans tuna, drained
- 1 cup frozen peas
- 3 tablespoons butter
- 3 tablespoons flour
- 3 cups milk
- 1 1/2 cups shredded cheddar
- 1/2 cup breadcrumbs
- 1 teaspoon salt
Quick Steps:
- Cook the noodles and drain.
- Make a white sauce with butter, flour, and milk.
- Stir in tuna, peas, cheddar, noodles, and salt.
- Transfer to a baking dish and top with breadcrumbs.
- Bake at 375°F for 20 minutes until bubbly.
Equipment for This Recipe:
- Large pot
- Saucepan
- Baking dish
How to Serve This Dish: Serve with tomato slices or a crisp green salad. A little hot sauce on the grown-up plates keeps the casserole from feeling too soft.
Pro Tips for This Recipe:
- Drain the tuna well or the casserole gets loose.
- Leave the noodles slightly underdone before baking.
- Toast the breadcrumbs with a little butter if you want a better top.
Variations on This Dish:
- Mushroom Version: Add sautéed mushrooms to the sauce.
- Light Version: Use extra milk and less cheese for a looser bake.
Common Mistakes to Avoid with This Dish:
- Using too much liquid: The casserole turns soupy.
- Skipping the breadcrumb top: The texture falls flat.
37. Parmesan Crusted Pork Tenderloin Medallions
Pork tenderloin cut into medallions cooks fast and stays tender if you do not fuss with it. The parmesan crust gives you a salty edge, and the small rounds are easier for kids than a whole carved roast.
Why It Works: Thin medallions cook evenly in a short time, which keeps the pork from drying out. The parmesan and breadcrumbs form a crisp shell that holds the juices in.
Key Ingredients:
- 1 1/2 pounds pork tenderloin
- 1/2 cup flour
- 2 large eggs
- 1 cup breadcrumbs
- 1/2 cup grated parmesan
- 1 teaspoon garlic powder
- 1 teaspoon salt
- 1/2 teaspoon black pepper
- 2 tablespoons oil
Quick Steps:
- Slice the tenderloin into 1-inch medallions.
- Coat each piece in flour, egg, then breadcrumbs mixed with parmesan, garlic powder, salt, and pepper.
- Sear in oil over medium heat for 2 minutes per side.
- Transfer to the oven at 400°F for 6 to 8 minutes.
- Serve after a short rest.
Equipment for This Recipe:
- Oven-safe skillet
- Knife
- Three shallow bowls
How to Serve This Dish: Serve with applesauce, mashed potatoes, or roasted green beans. The medallions also work well with a simple pan gravy if you want more sauce.
Pro Tips for This Recipe:
- Do not overcook the tenderloin; it goes dry.
- Cut even slices so the medallions finish together.
- Let them rest before cutting or the juices run out.
Variations on This Dish:
- Herb Crust: Add Italian seasoning to the crumb mix.
- Pork Cutlet Version: Pound the meat thinner and shorten the sear.
Common Mistakes to Avoid with This Dish:
- Using thick uneven slices: They cook at different speeds.
- Crowding the skillet: The crust browns unevenly.
38. Mac and Cheese Pizza Bake
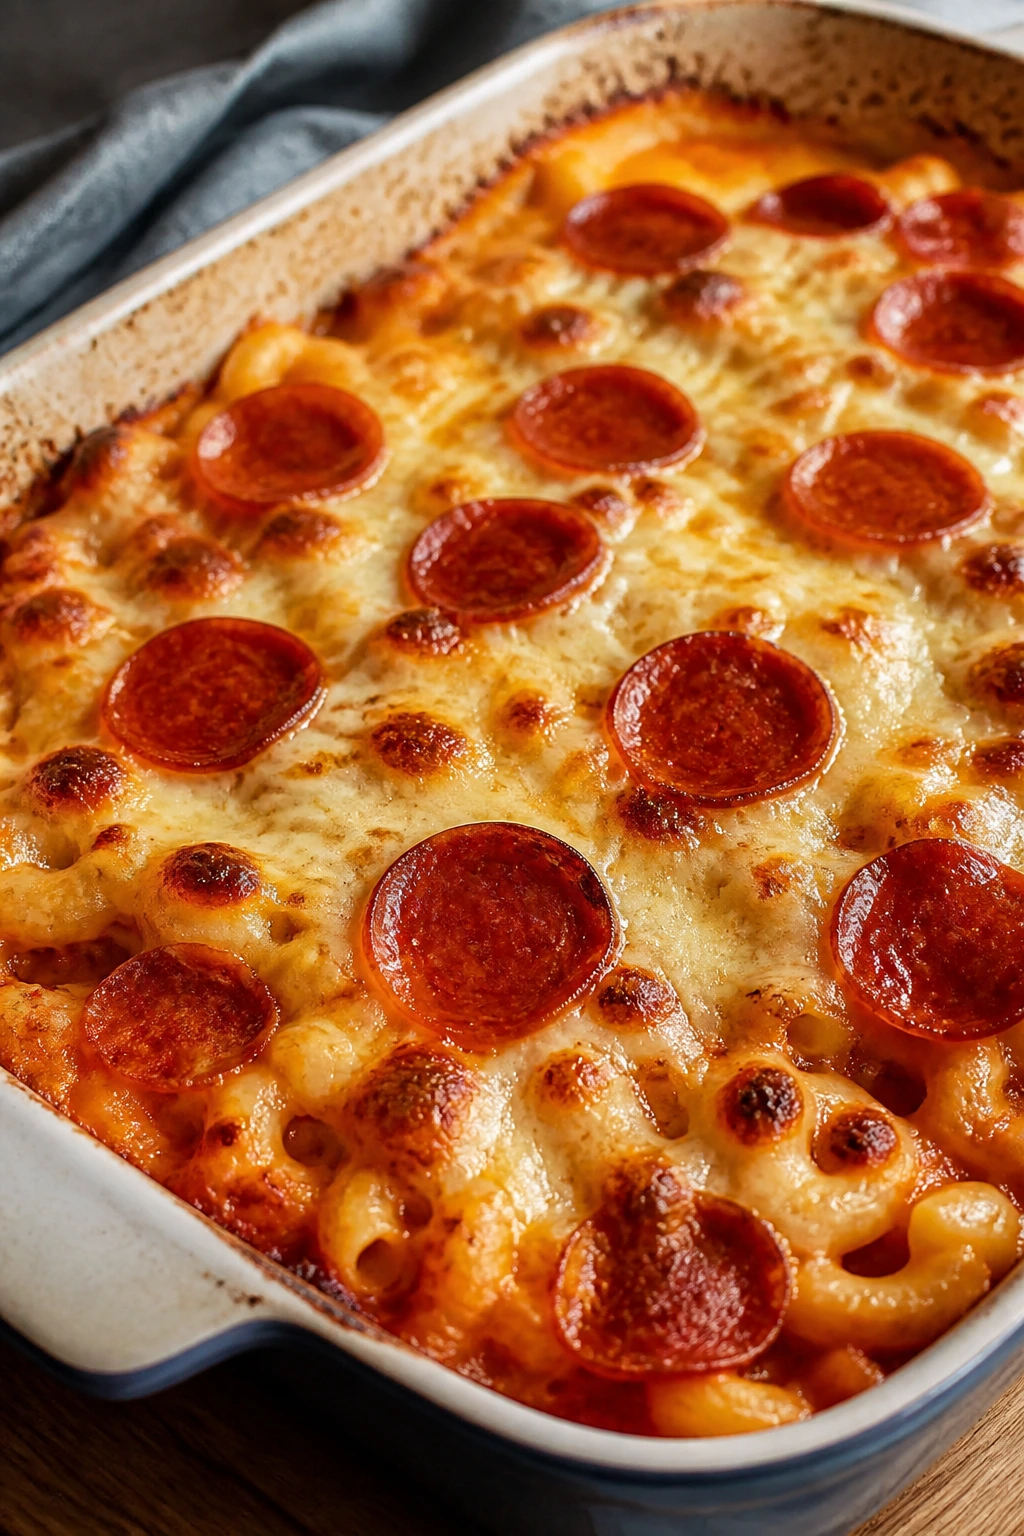
This is the kind of dinner that makes kids light up before they sit down. The macaroni keeps it creamy, the pizza sauce keeps it familiar, and the pepperoni on top gives it a little crisp edge.
Why It Works: Mac and cheese acts like a soft base that holds pizza flavors well. Baking it in a dish gives the top enough heat to brown the cheese without drying the pasta below.
Key Ingredients:
- 12 ounces elbow macaroni
- 3 tablespoons butter
- 3 tablespoons flour
- 3 cups milk
- 2 cups shredded cheddar
- 1 cup pizza sauce
- 1 1/2 cups shredded mozzarella
- 1/2 cup sliced pepperoni
- 1 teaspoon Italian seasoning
Quick Steps:
- Cook the macaroni and drain.
- Make a cheddar sauce with butter, flour, milk, and cheddar.
- Stir in the macaroni and spread half into a baking dish.
- Spoon on pizza sauce, mozzarella, pepperoni, and Italian seasoning, then add the rest of the macaroni.
- Bake at 375°F for 20 minutes until hot and lightly browned.
Equipment for This Recipe:
- Pot
- Saucepan
- Baking dish
How to Serve This Dish: Serve with a salad or some sliced peppers so the plate is not all pasta. A few parmesan shavings on top make it feel more finished.
Pro Tips for This Recipe:
- Keep the cheese sauce loose enough to bake again.
- Use mini pepperoni if you want better coverage.
- Let it rest before scooping or the layers slide.
Variations on This Dish:
- Sausage Pizza Bake: Use crumbled cooked sausage instead of pepperoni.
- Veggie Version: Add finely chopped mushrooms or olives.
Common Mistakes to Avoid with This Dish:
- Letting the macaroni go soft before baking: It turns pasty.
- Using too much sauce in one layer: The bake gets slippery.
39. Chicken Caesar Wraps
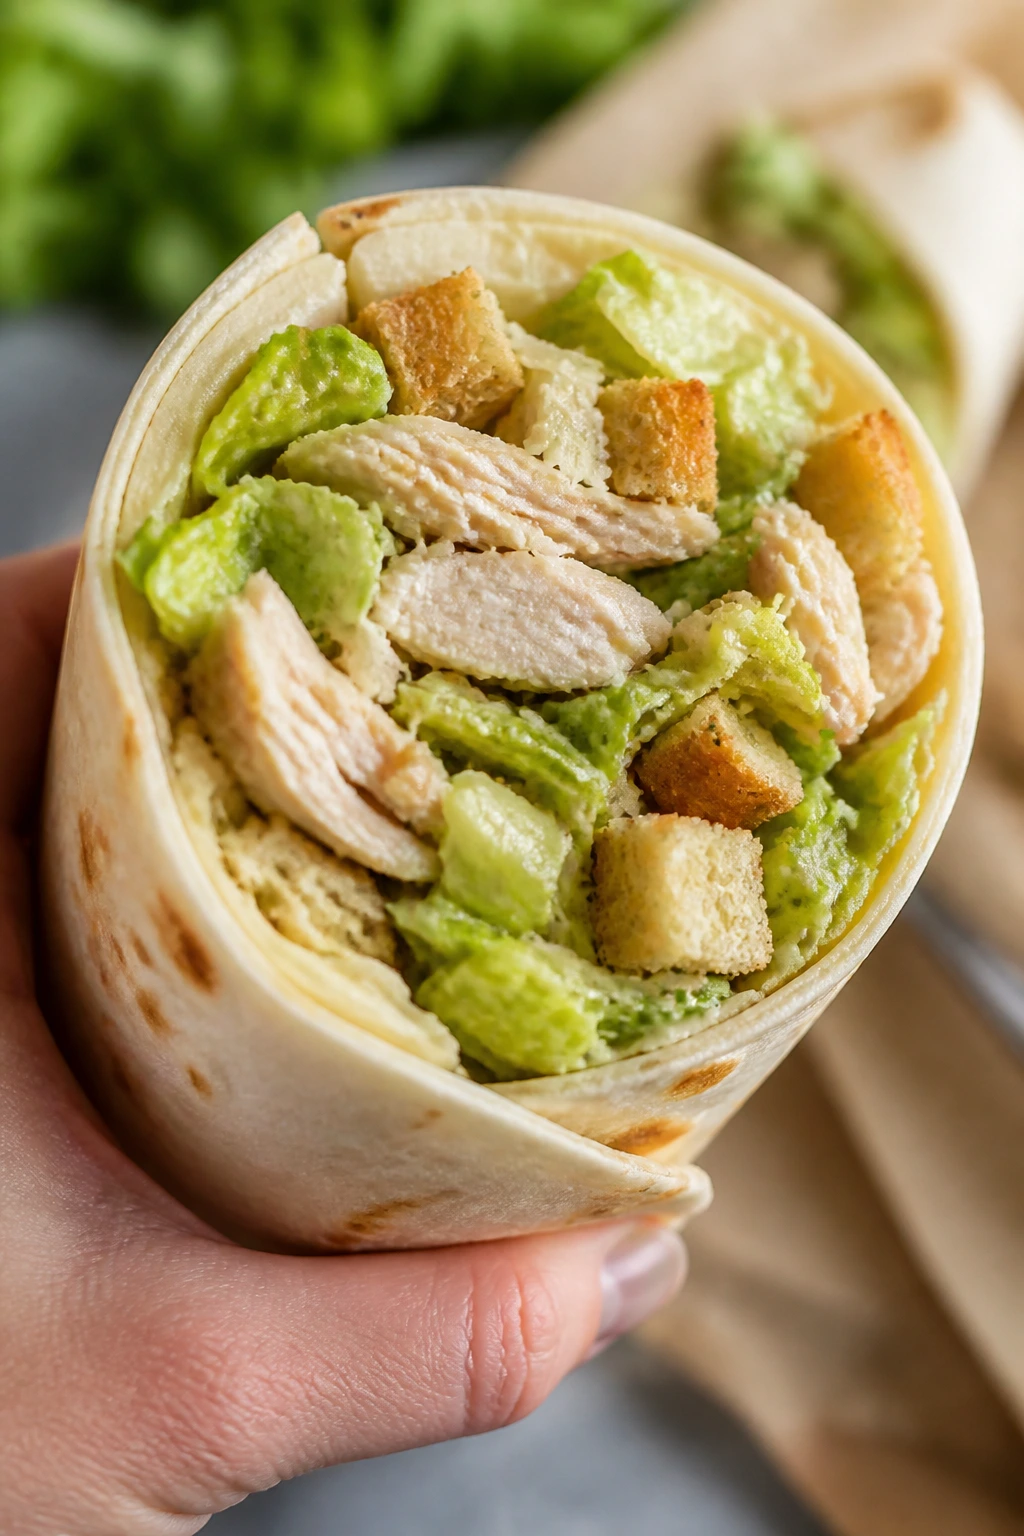
Chicken Caesar wraps work when the table wants something handheld and the cook wants something fast. The romaine stays crisp, the dressing coats without drowning, and the parmesan gives the wrap enough salt to feel complete.
Why It Works: Using cooked chicken keeps the wrap assembly quick. The cold, crisp lettuce adds texture that balances the soft tortilla and creamy dressing.
Key Ingredients:
- 2 cups cooked chicken, chopped
- 4 large tortillas
- 3 cups chopped romaine
- 1/3 cup Caesar dressing
- 1/4 cup grated parmesan
- 1/2 cup croutons, lightly crushed
- 1 teaspoon black pepper
Quick Steps:
- Toss chicken with Caesar dressing, parmesan, and pepper.
- Add romaine and crushed croutons right before assembling.
- Spoon the filling into tortillas.
- Roll tightly and slice in half.
- Serve right away.
Equipment for This Recipe:
- Mixing bowl
- Knife
- Cutting board
How to Serve This Dish: Serve with grapes or carrot sticks for a light dinner. If you want more heft, add a cup of tomato soup on the side.
Pro Tips for This Recipe:
- Keep the lettuce dry so the wraps do not get soggy.
- Add the croutons at the last second for crunch.
- Warm the tortillas briefly if they feel stiff.
Variations on This Dish:
- Bacon Caesar Wraps: Add chopped cooked bacon.
- Grilled Chicken Version: Use warm grilled chicken for a hotter wrap.
Common Mistakes to Avoid with This Dish:
- Assembling too far ahead: The lettuce wilts.
- Overfilling the tortilla: It tears when rolled.
40. Creamy Pesto Tortellini with Chicken

This dinner feels a little richer than a plain pasta bowl, but it still lands fast enough for a weekday. The pesto gives it a green, garlicky backbone, and the tortellini brings soft cheese pockets that kids usually notice first.
Why It Works: Tortellini cook in minutes, so you only need enough time to warm the chicken and coat everything in sauce. A little cream smooths the pesto and helps it cling.
Key Ingredients:
- 1 pound cheese tortellini
- 2 cups cooked chicken, chopped
- 1/2 cup basil pesto
- 1/2 cup heavy cream
- 1 cup cherry tomatoes, halved
- 1/2 cup grated parmesan
- 1 tablespoon butter
Quick Steps:
- Cook the tortellini according to the package directions.
- Warm the butter, pesto, and cream in a large skillet over low heat.
- Stir in chicken and tomatoes.
- Add the tortellini and toss until coated.
- Finish with parmesan.
Equipment for This Recipe:
- Large skillet
- Pot for pasta
- Spoon
How to Serve This Dish: Serve with a green salad or sliced cucumbers so the plate has some crunch. A little extra parmesan over the top is enough garnish.
Pro Tips for This Recipe:
- Keep the heat low after adding pesto so it stays bright.
- Use cooked chicken that is already seasoned lightly.
- Add a splash of pasta water if the sauce gets thick.
Variations on This Dish:
- Spinach Pesto Version: Stir in a handful of baby spinach.
- Shrimp Version: Swap chicken for quick-cooked shrimp.
Common Mistakes to Avoid with This Dish:
- Boiling the pesto: It turns dull and heavy.
- Overcooking tortellini: They split and leak.
41. Mild Coconut Chicken Curry with Rice
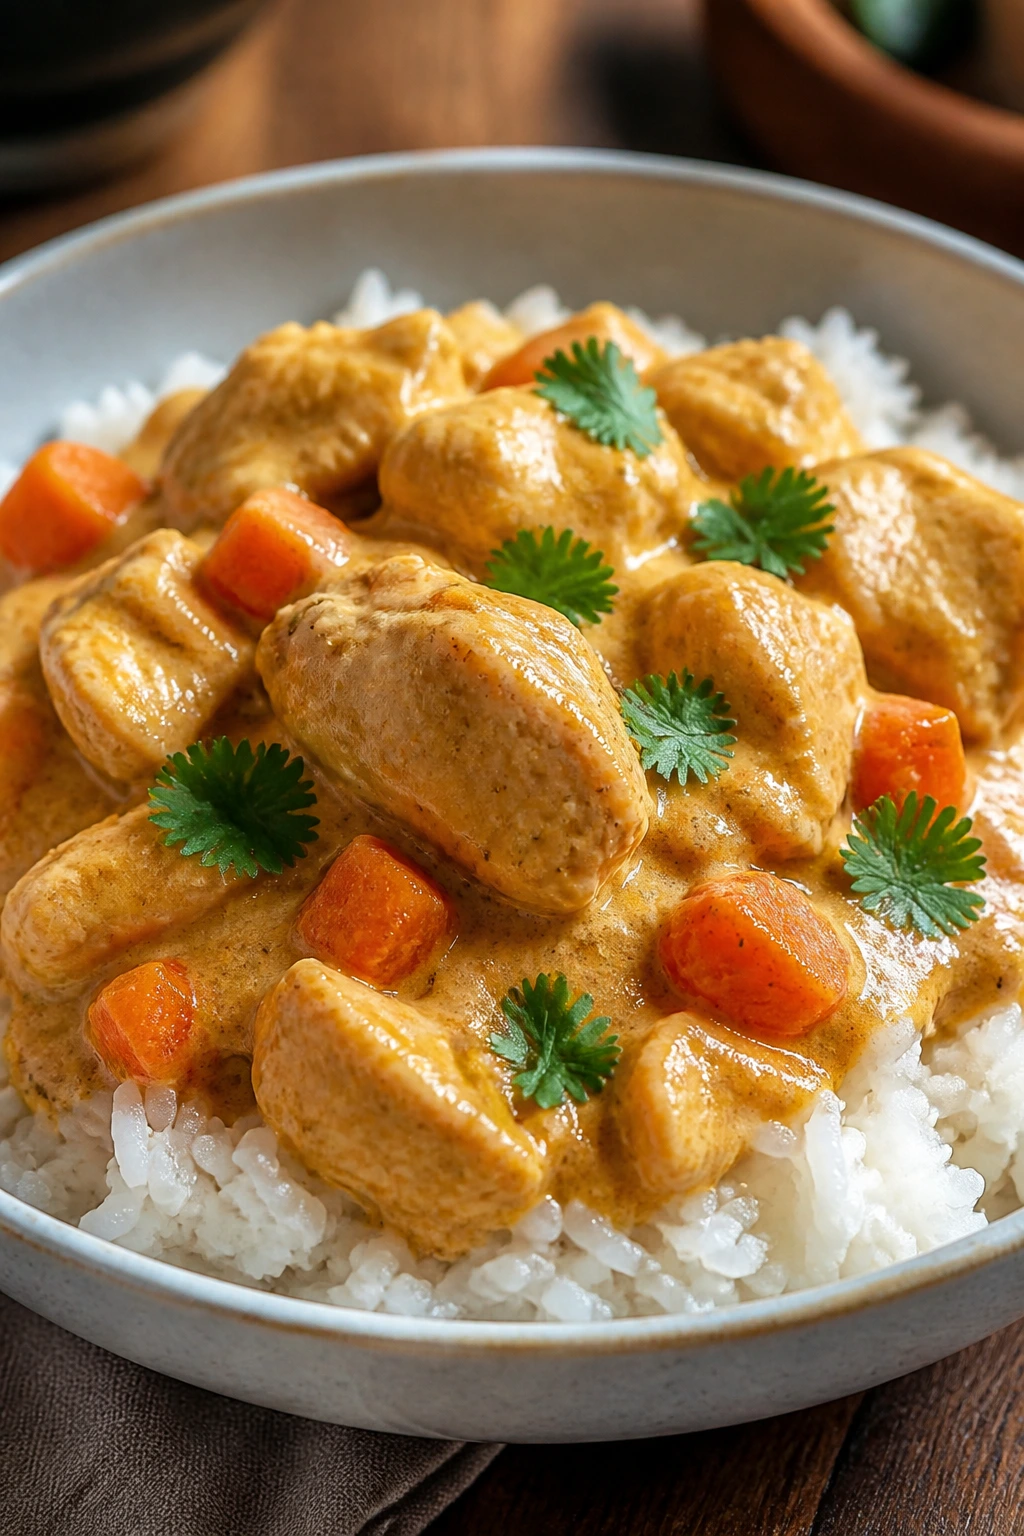
Curry does not need to be hot to have character. This version keeps the spices soft, the sauce creamy, and the chicken tender enough that kids can eat it without feeling like they stepped into a challenge.
Why It Works: Coconut milk rounds off the spices and gives the sauce a silky feel. Mild curry powder adds color and warmth without the burn that usually sends children looking for water.
Key Ingredients:
- 1 1/2 pounds chicken breast, cut into pieces
- 1 onion, diced
- 2 cloves garlic, minced
- 2 teaspoons mild curry powder
- 1 can (13.5 ounces) coconut milk
- 1 cup chicken broth
- 1 cup diced carrots
- 1 cup frozen peas
- 2 cups cooked rice
- 1 tablespoon oil
Quick Steps:
- Sauté onion in oil until soft, then add garlic and curry powder for 30 seconds.
- Add chicken and carrots and cook until the outside loses its raw color.
- Pour in coconut milk and broth and simmer for 12 to 15 minutes.
- Stir in peas for the last 2 minutes.
- Serve over rice.
Equipment for This Recipe:
- Large skillet or saucepan
- Spoon
- Knife
How to Serve This Dish: Spoon it over rice and serve with naan or flatbread if you want another starch. A few cucumber slices on the side cool the plate down nicely.
Pro Tips for This Recipe:
- Keep the curry powder mild; you can always add heat later.
- Simmer gently so the coconut milk stays smooth.
- Dice the carrots small enough to soften in time.
Variations on This Dish:
- Turkey Curry: Use diced turkey breast instead of chicken.
- Vegetable Version: Add cauliflower florets and chickpeas.
Common Mistakes to Avoid with This Dish:
- Boiling hard after adding coconut milk: The sauce can separate.
- Using too much curry powder: It overpowers the mild coconut base.
42. Chili Cheese Baked Potato Bar
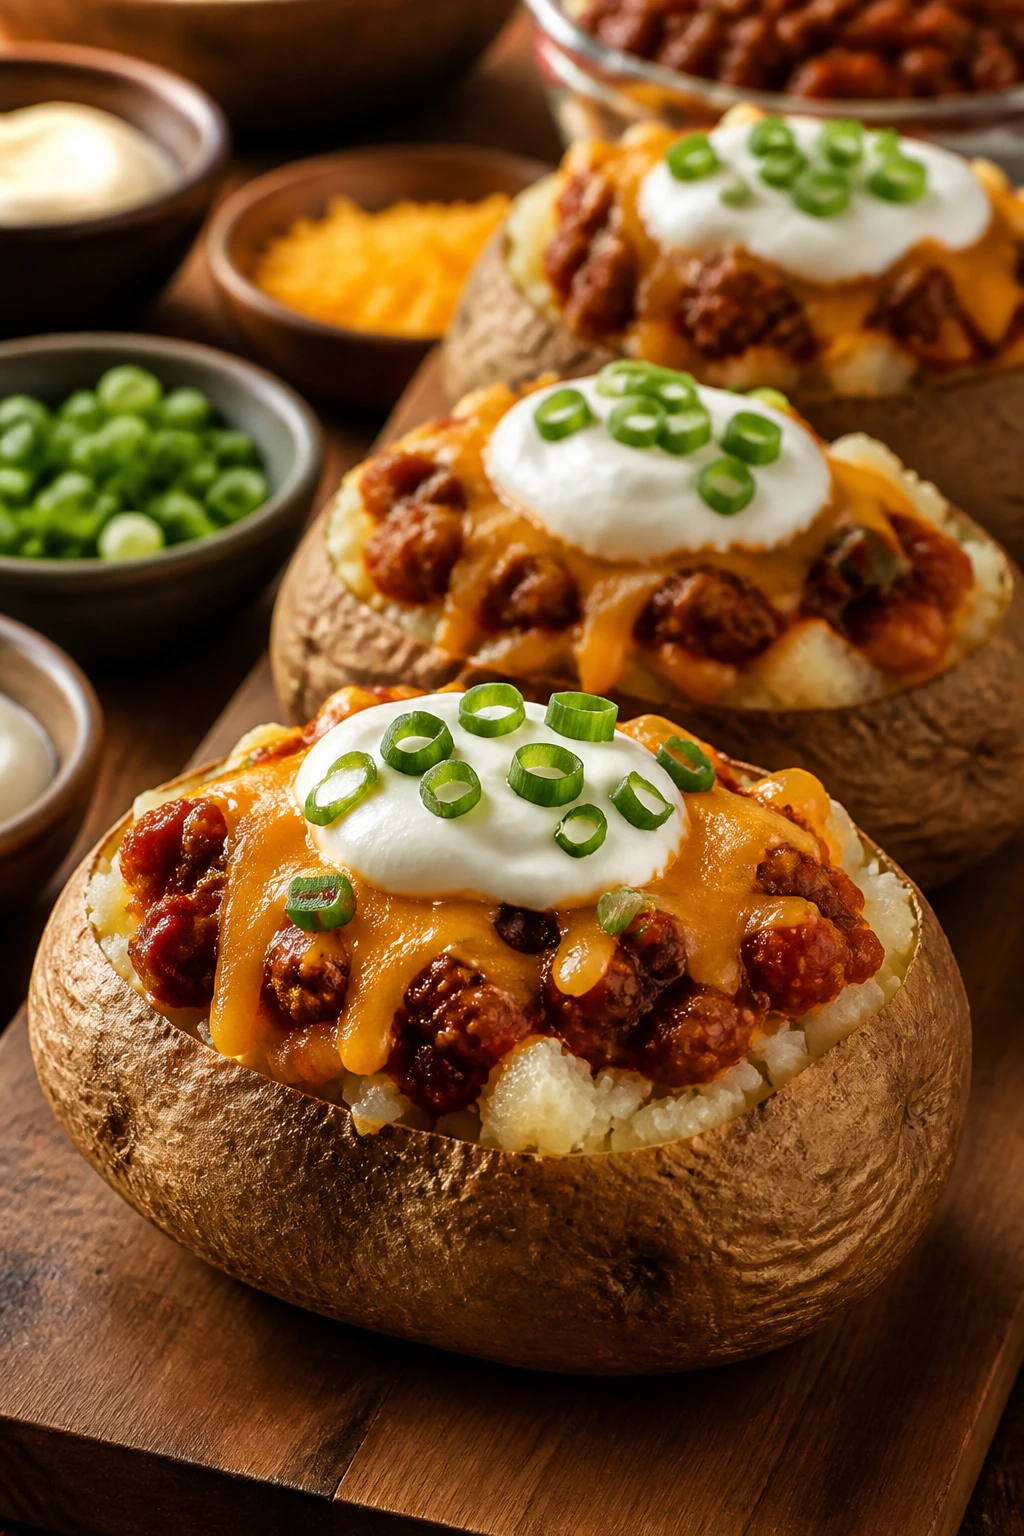
A baked potato bar solves dinner by letting everyone choose the amount of topping they actually want. Chili, cheese, and sour cream do the heavy lifting, and the potatoes stay simple and warm underneath.
Why It Works: Potatoes hold heat well, so they can sit on the counter while you finish the toppings. The build-your-own setup helps with picky eaters because nothing is forced together.
Key Ingredients:
- 4 large russet potatoes
- 4 cups chili, homemade or store-bought
- 2 cups shredded cheddar
- 1 cup sour cream
- 2 tablespoons sliced green onions
- 1 tablespoon butter
- 1/2 teaspoon salt
Quick Steps:
- Bake the potatoes at 400°F for 50 to 60 minutes until soft.
- Warm the chili in a pot.
- Split the potatoes open and fluff the insides with butter and salt.
- Top with chili, cheddar, sour cream, and green onions.
- Serve immediately.
Equipment for This Recipe:
- Baking sheet
- Soup pot
- Fork
How to Serve This Dish: Set the toppings out in small bowls so everyone can build their own. A side salad or steamed broccoli keeps the meal from turning into pure starch.
Pro Tips for This Recipe:
- Bake the potatoes directly on the oven rack if you want crisp skins.
- Warm the chili well before topping.
- Offer toppings separately so the potatoes do not get soggy.
Variations on This Dish:
- Turkey Chili Bar: Use turkey chili instead of beef.
- Loaded Version: Add bacon bits and diced tomatoes.
Common Mistakes to Avoid with This Dish:
- Serving undercooked potatoes: They should collapse when squeezed.
- Putting toppings on too early: The skins soften.
43. Ground Turkey Stir-Fry Noodles
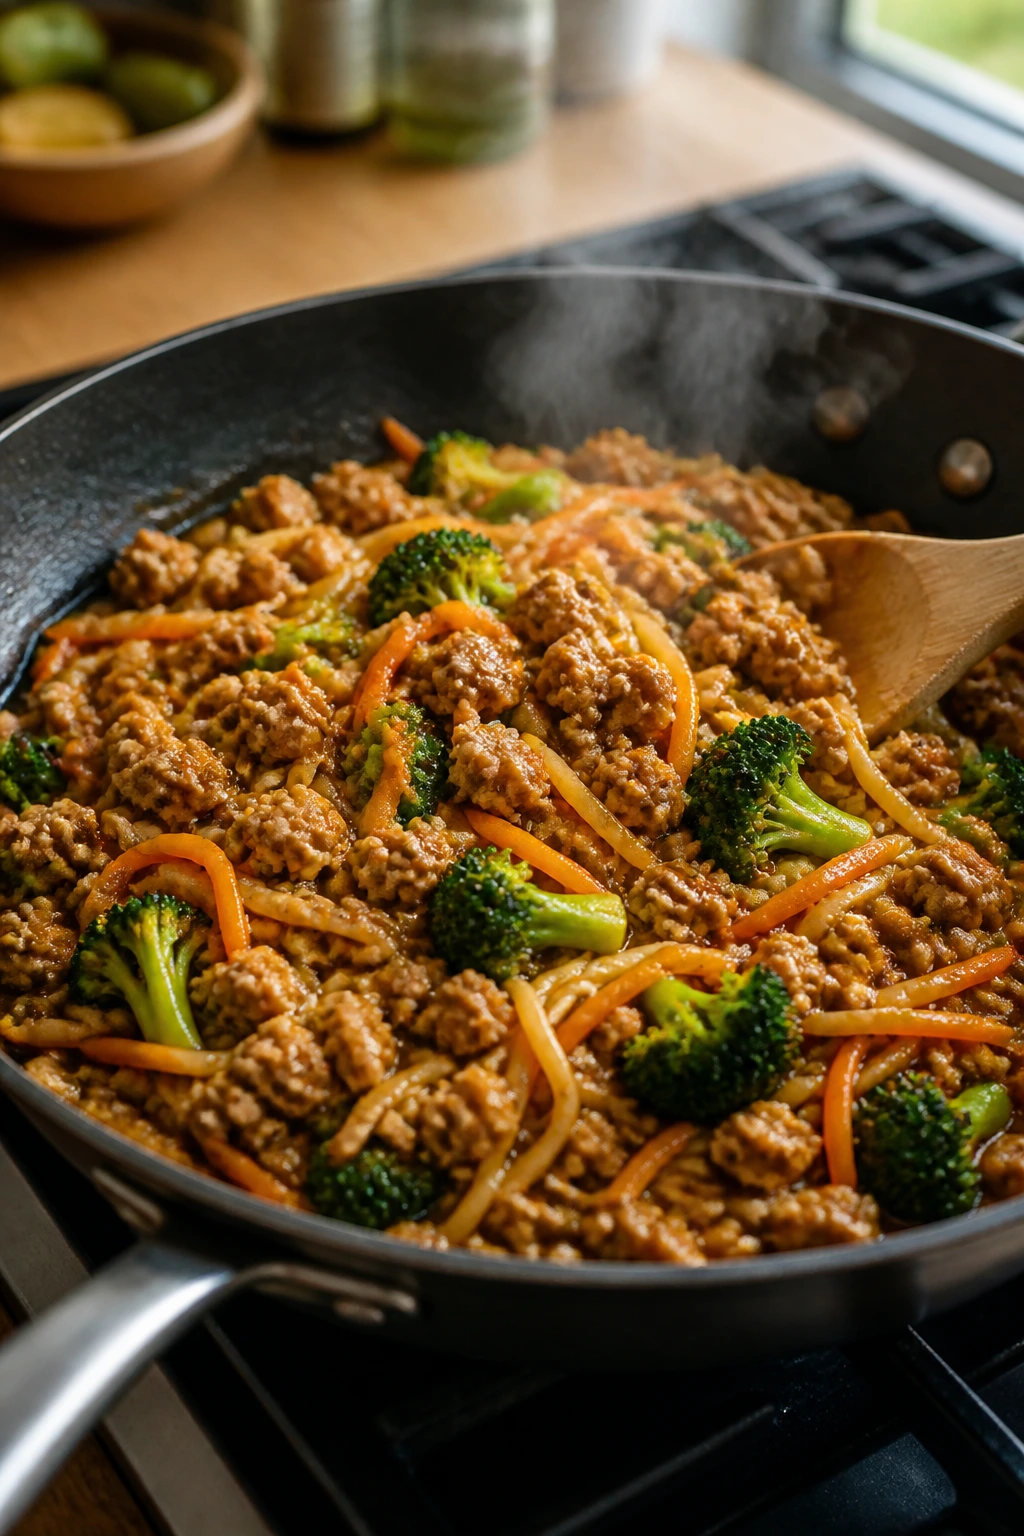
Stir-fry noodles are useful because they can absorb a sauce without becoming a wet mess. The turkey keeps the pan light, the vegetables stay bright, and the noodles give kids something they already understand by sight.
Why It Works: Ground turkey cooks fast and picks up sauce well. Noodles fry better if they are already cooked and drained, which means the skillet stays focused on flavor instead of boiling water.
Key Ingredients:
- 1 pound ground turkey
- 8 ounces noodles or lo mein noodles
- 2 cups broccoli florets
- 1 cup shredded carrots
- 1/4 cup soy sauce
- 2 tablespoons honey
- 2 cloves garlic, minced
- 1 teaspoon grated ginger
- 1 tablespoon oil
Quick Steps:
- Cook the noodles and set them aside.
- Brown the turkey in oil.
- Add broccoli, carrots, garlic, and ginger and stir-fry until the broccoli turns bright.
- Stir in soy sauce and honey.
- Toss in the noodles and heat through.
Equipment for This Recipe:
- Large skillet or wok
- Colander
- Spatula
How to Serve This Dish: Serve in bowls with sesame seeds if you have them. Sliced cucumbers or edamame make an easy side.
Pro Tips for This Recipe:
- Keep the vegetables crisp so the noodles have texture.
- Toss the noodles quickly so they do not break.
- Add a splash of water if the pan looks dry.
Variations on This Dish:
- Chicken Noodles: Swap turkey for chopped chicken.
- Peanut Version: Add a spoonful of peanut butter to the sauce for a richer finish.
Common Mistakes to Avoid with This Dish:
- Using soggy noodles: They clump in the pan.
- Cooking on low heat: The vegetables go limp instead of staying bright.
44. Mushroom and Beef Stroganoff

Stroganoff is the kind of dinner that feels soft and rich without asking for a long list of ingredients. The mushrooms add depth, the sour cream keeps the sauce tangy, and egg noodles catch every bit of it.
Why It Works: Sliced beef or ground beef both work because the sauce is doing most of the work. Mushrooms soften into the pan juices and make the gravy taste fuller without making it harder for kids to eat.
Key Ingredients:
- 1 pound ground beef or thinly sliced beef
- 8 ounces mushrooms, sliced
- 1 small onion, diced
- 2 tablespoons flour
- 2 cups beef broth
- 1/2 cup sour cream
- 12 ounces egg noodles
- 1 tablespoon oil
- 1 teaspoon salt
Quick Steps:
- Cook the noodles and drain.
- Brown the beef with onion and mushrooms in oil.
- Stir in flour, then add broth and simmer until thick.
- Turn off the heat and stir in sour cream.
- Toss with noodles and serve.
Equipment for This Recipe:
- Large skillet
- Pot for noodles
- Wooden spoon
How to Serve This Dish: Serve with peas or green beans if you want a little brightness. A sprinkle of parsley helps the bowl look less beige.
Pro Tips for This Recipe:
- Add sour cream off the heat so it stays smooth.
- Slice mushrooms thin so they cook down fast.
- If using sliced beef, do not overcook it before the sauce goes in.
Variations on This Dish:
- Chicken Stroganoff: Use diced chicken breast.
- Paprika Version: Add 1 teaspoon paprika to the sauce.
Common Mistakes to Avoid with This Dish:
- Boiling after the sour cream goes in: It can curdle.
- Not cooking the flour long enough: The sauce tastes raw.
45. Oven-Baked Chicken Drumsticks with Corn
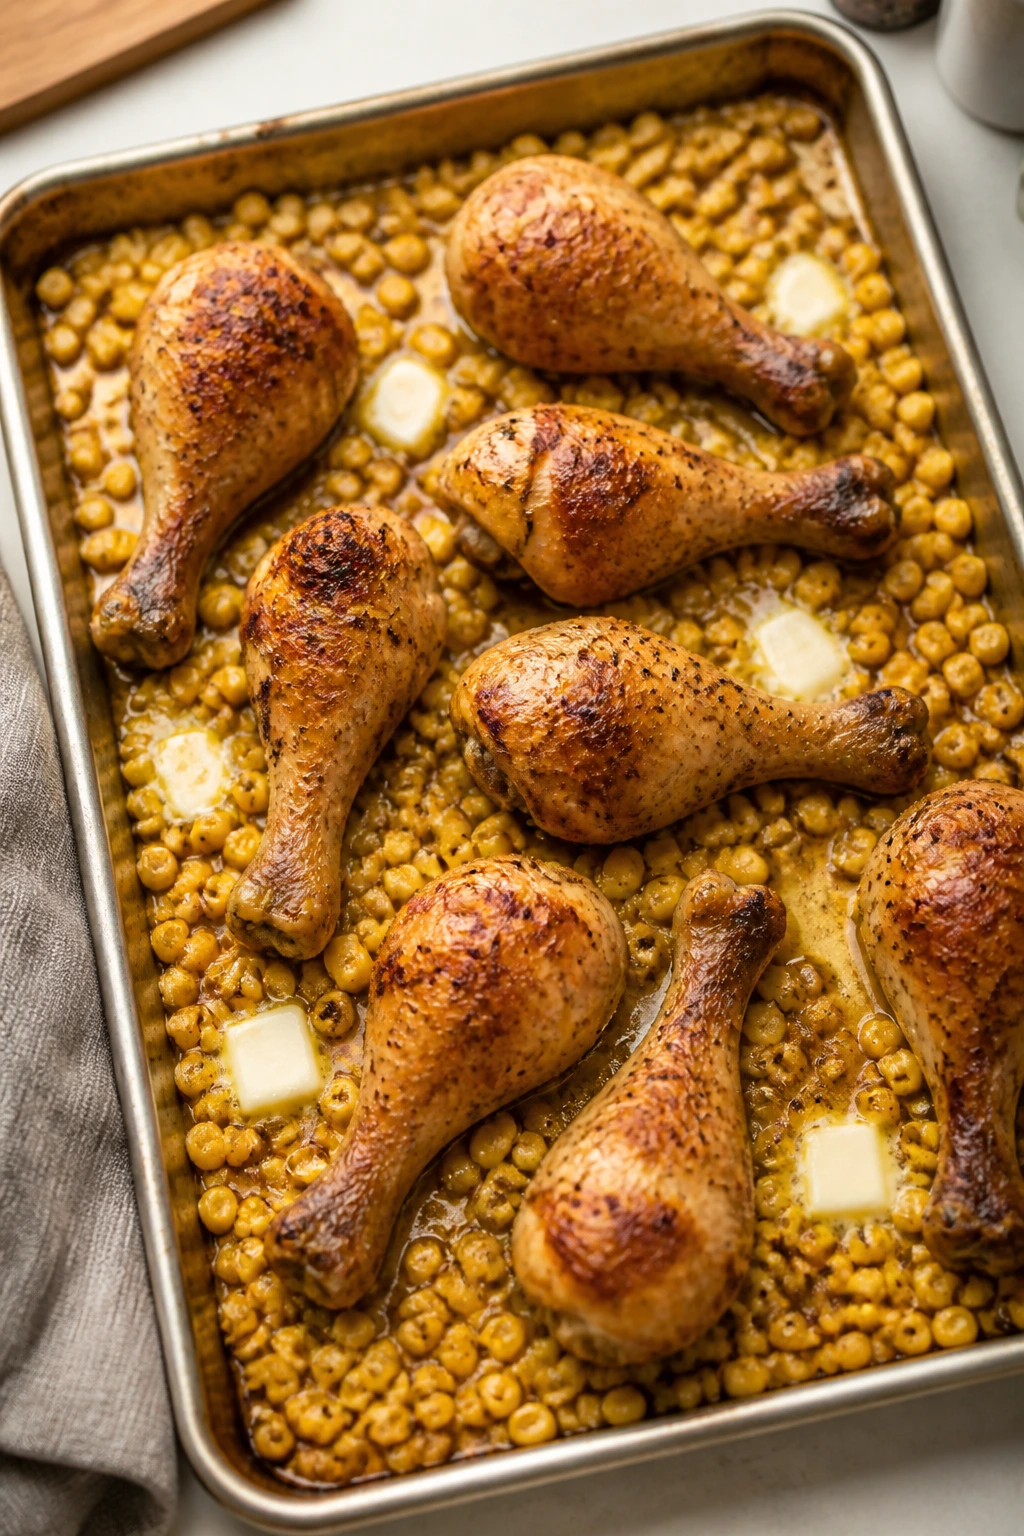
This tray dinner has the rare quality of being plain in the right way. The drumsticks get seasoned and browned, the corn turns sweet, and you end up with a plate that feels complete without extra juggling.
Why It Works: Drumsticks hold up to oven heat, and the skin protects the meat while it cooks. Corn can roast beside them and pick up a little of the chicken seasoning.
Key Ingredients:
- 3 pounds chicken drumsticks
- 2 tablespoons oil
- 1 teaspoon paprika
- 1 teaspoon garlic powder
- 1 teaspoon salt
- 1/2 teaspoon black pepper
- 4 cups corn kernels or 4 ears corn
- 2 tablespoons butter, melted
Quick Steps:
- Heat the oven to 425°F.
- Toss the drumsticks with oil, paprika, garlic powder, salt, and pepper.
- Arrange them on a sheet pan and bake for 25 minutes.
- Add the corn tossed with melted butter and bake 15 minutes more.
- Cook until the chicken reaches 175°F and the skin is browned.
Equipment for This Recipe:
- Sheet pan
- Mixing bowl
- Tongs
How to Serve This Dish: Add mashed potatoes or dinner rolls if you want the meal to feel fuller. A squeeze of lime over the corn gives the plate a little lift.
Pro Tips for This Recipe:
- Pat the drumsticks dry so the skin browns better.
- Turn them once if your oven browns unevenly.
- Use a thermometer instead of guessing.
Variations on This Dish:
- BBQ Drumsticks: Brush with barbecue sauce during the last 10 minutes.
- Herbed Corn: Add chopped parsley or chives to the corn after baking.
Common Mistakes to Avoid with This Dish:
- Pulling the chicken too early: Dark meat needs time.
- Adding corn too soon: It can overcook and shrivel.
46. Mini Taco Cups

These little taco cups are the kind of dinner kids usually reach for without asking questions. They are crisp, tidy, and filled with all the taco flavors people expect, just in a shape that stays contained.
Why It Works: Wonton wrappers or biscuit dough crisp up in a muffin tin and create a built-in shell. Small portions make the filling feel more approachable than a full taco with everything tumbling out.
Key Ingredients:
- 12 wonton wrappers or refrigerated biscuit dough rounds
- 1 pound ground beef
- 1 packet mild taco seasoning
- 1/4 cup water
- 1 cup shredded cheddar
- 1/2 cup salsa
- 1/2 cup shredded lettuce
- 1/2 cup diced tomatoes
Quick Steps:
- Heat the oven to 375°F and press wrappers into a greased muffin tin.
- Brown the beef with taco seasoning and water until thick.
- Spoon beef into the cups and top with cheddar.
- Bake for 10 to 12 minutes until the edges are crisp.
- Add salsa, lettuce, and tomatoes after baking.
Equipment for This Recipe:
- Muffin tin
- Skillet
- Spoon
How to Serve This Dish: Serve three or four cups per person, with extra salsa on the side. A bowl of corn or fruit balances the salty filling.
Pro Tips for This Recipe:
- Press the wrappers down firmly so they hold shape.
- Add cold toppings after baking so the shells stay crisp.
- Use muffin tins with shallow cups if you want easier lifting.
Variations on This Dish:
- Chicken Taco Cups: Swap in shredded chicken.
- Bean Taco Cups: Use mashed black beans instead of beef.
Common Mistakes to Avoid with This Dish:
- Overfilling the cups: The filling spills over.
- Adding lettuce before baking: It wilts and turns sad.
47. Creamy Tuna Melt Bake
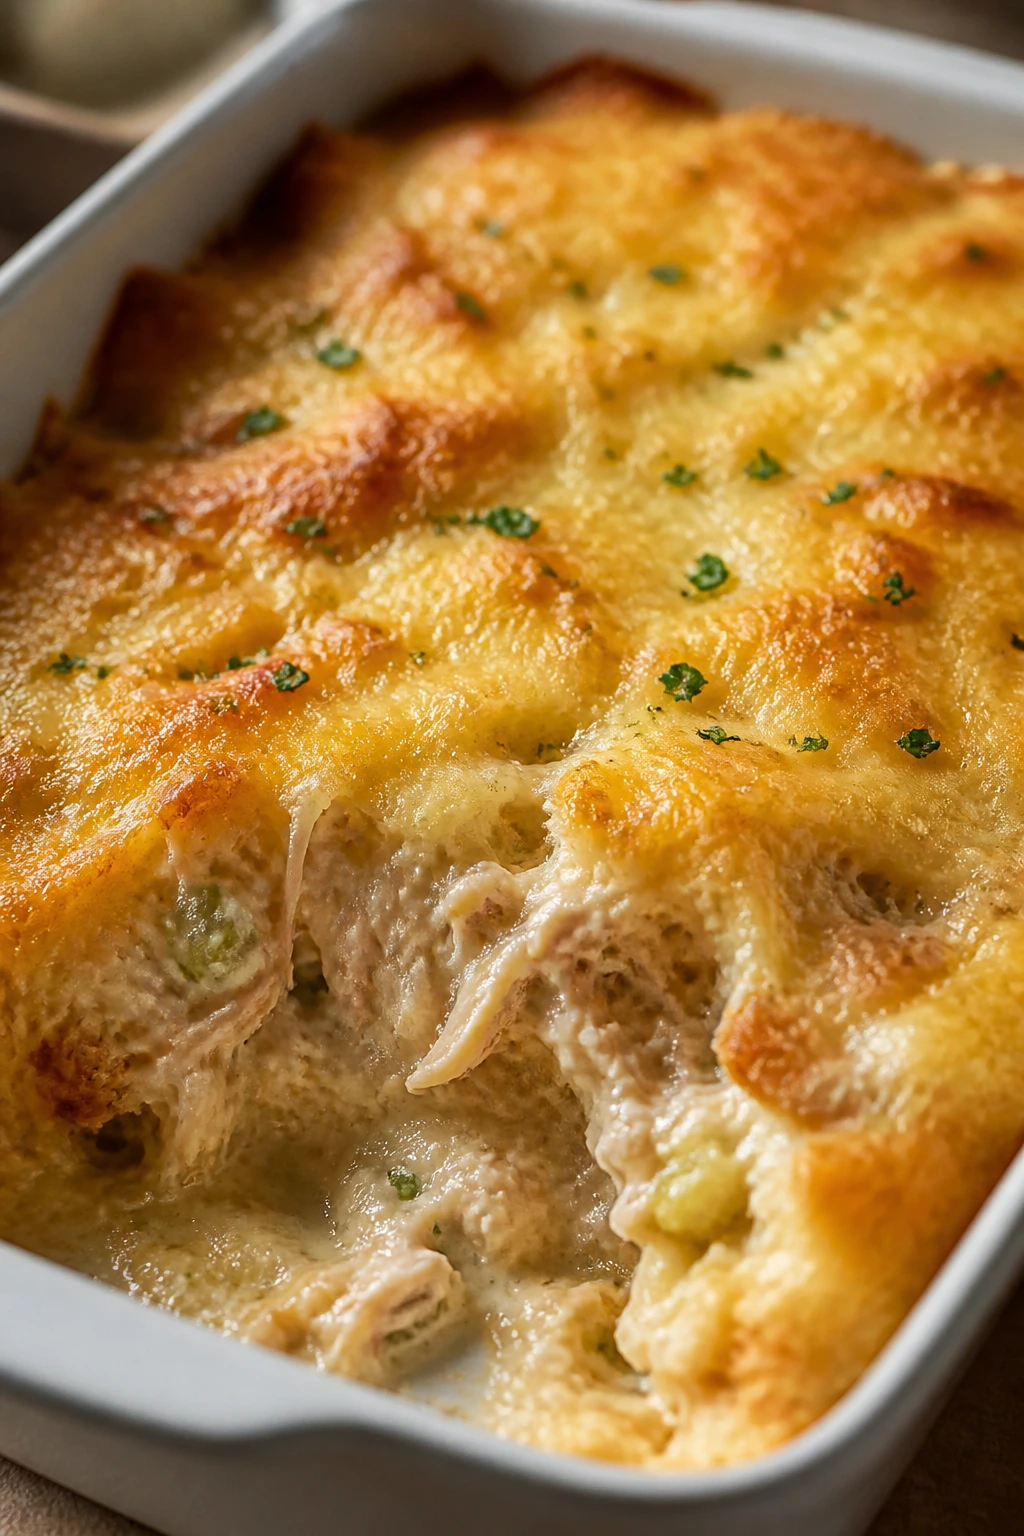
This is tuna melt energy in casserole form, which means it hits that toasted-cheesy note without requiring 12 separate sandwiches. The bread softens underneath, the top gets golden, and the tuna stays creamy instead of dry.
Why It Works: Tuna mixed with a creamy base bakes into a cohesive layer instead of falling apart. Topping with cheese and breadcrumbs gives you the same browned finish people like in a toasted sandwich.
Key Ingredients:
- 2 cans tuna, drained
- 4 cups bread cubes or chopped sandwich bread
- 1 cup diced celery
- 1/2 cup mayonnaise
- 1/2 cup milk
- 1 cup shredded cheddar
- 1/2 cup breadcrumbs
- 1 teaspoon salt
- 1/2 teaspoon black pepper
Quick Steps:
- Heat the oven to 375°F and grease a baking dish.
- Mix tuna, celery, mayonnaise, milk, salt, and pepper.
- Fold in the bread cubes and half the cheddar.
- Spread in the dish and top with the remaining cheddar and breadcrumbs.
- Bake for 20 to 25 minutes until bubbly and browned.
Equipment for This Recipe:
- Baking dish
- Mixing bowl
- Spoon
How to Serve This Dish: Serve with sliced tomatoes or pickles to echo the tuna melt flavor. A crisp salad keeps the meal from feeling too soft.
Pro Tips for This Recipe:
- Drain the tuna well.
- Use sturdy bread so the casserole keeps some texture.
- Let it rest a few minutes before scooping.
Variations on This Dish:
- Pickle Version: Stir in chopped dill pickles.
- Corn Version: Add 1 cup frozen corn for sweetness and color.
Common Mistakes to Avoid with This Dish:
- Using too much mayonnaise: The bake turns heavy.
- Skipping the breadcrumb top: You lose the melt part of the tuna melt feel.
48. Stuffed Shells with Meat Sauce
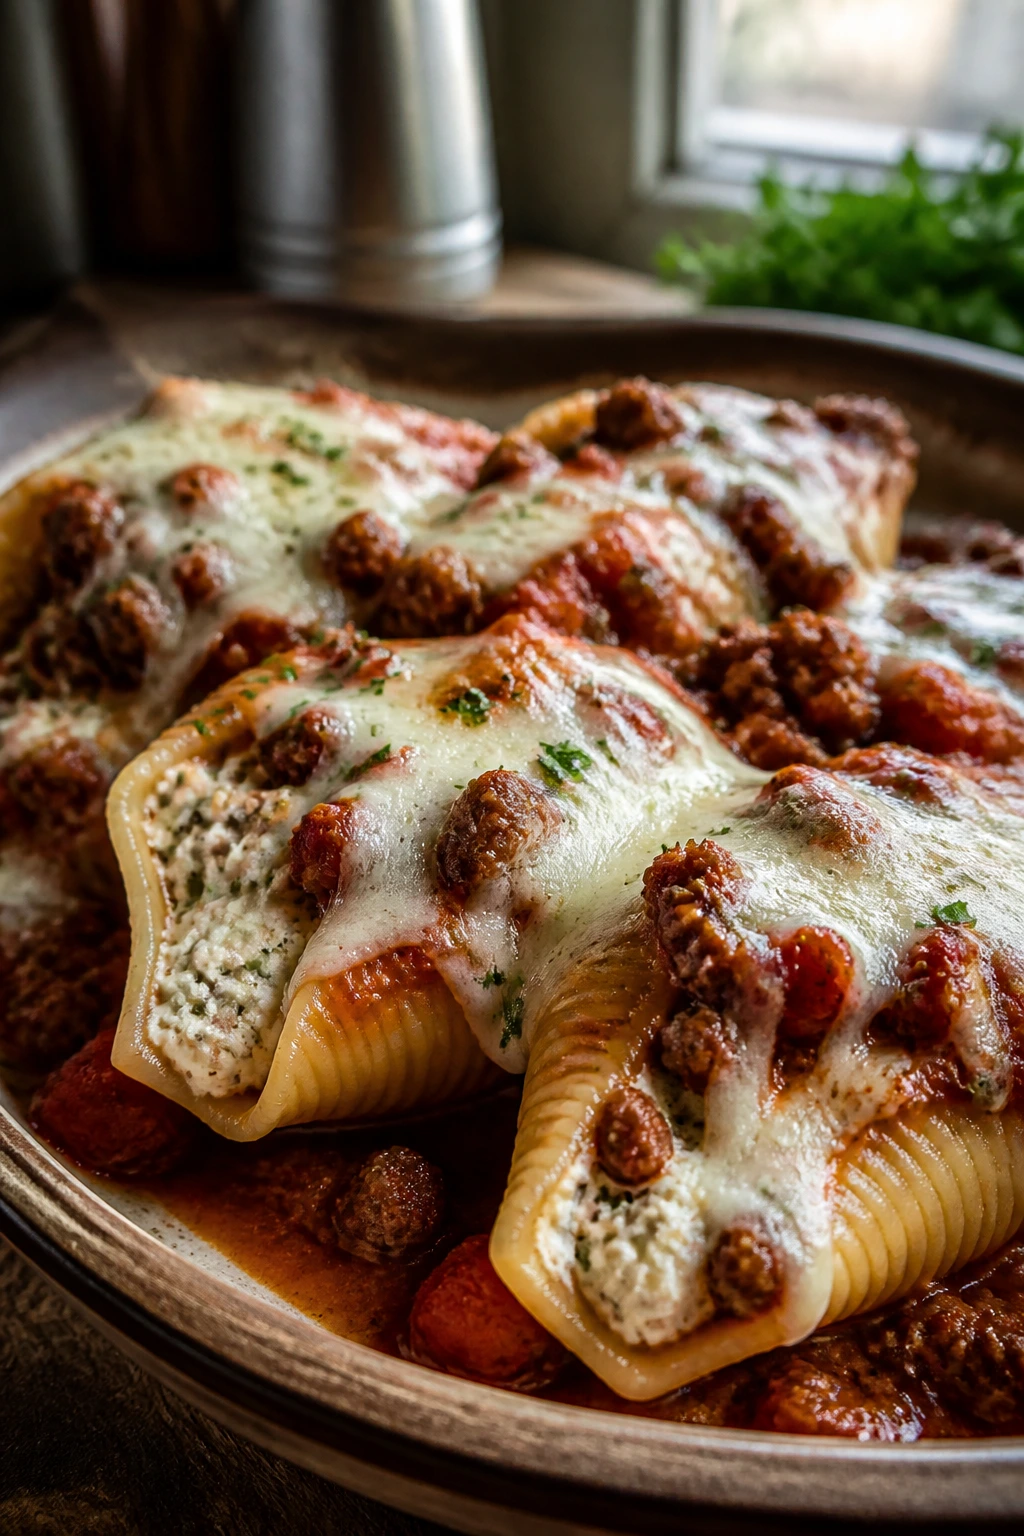
These shells lean a little heartier than the spinach version, and that’s useful when you want dinner to feel more like a main event. Ricotta keeps the filling soft, the meat sauce adds depth, and the shells hold onto everything in neat little bites.
Why It Works: The pasta shell cups the filling and sauce in one place, which keeps each bite balanced. Meat sauce underneath prevents the shells from drying out in the oven.
Key Ingredients:
- 20 jumbo pasta shells
- 1 pound ground beef
- 3 cups marinara sauce
- 1 pound ricotta
- 1 egg
- 1 cup shredded mozzarella
- 1/2 cup grated parmesan
- 1 teaspoon salt
- 1/2 teaspoon black pepper
Quick Steps:
- Cook the shells until just tender, then drain.
- Brown the beef and stir in 2 cups marinara.
- Mix ricotta, egg, mozzarella, parmesan, salt, and pepper.
- Fill the shells, place them over the meat sauce, and spoon the remaining sauce on top.
- Bake at 375°F for 25 minutes.
Equipment for This Recipe:
- Large pot
- Baking dish
- Spoon
How to Serve This Dish: Serve with garlic bread and a green vegetable if you want more balance. A little extra parmesan on top makes the dish look finished.
Pro Tips for This Recipe:
- Do not overcook the shells or they tear when stuffed.
- Make sure the sauce covers the bottom of the dish.
- Let it sit before serving so the filling stays in place.
Variations on This Dish:
- Italian Sausage Version: Replace the beef with sausage.
- Milder Version: Use plain marinara and leave out extra garlic.
Common Mistakes to Avoid with This Dish:
- Stuffing shells while they are too hot: They break.
- Using too little sauce: The pasta dries out in the oven.
49. Garlic Butter Shrimp and Rice
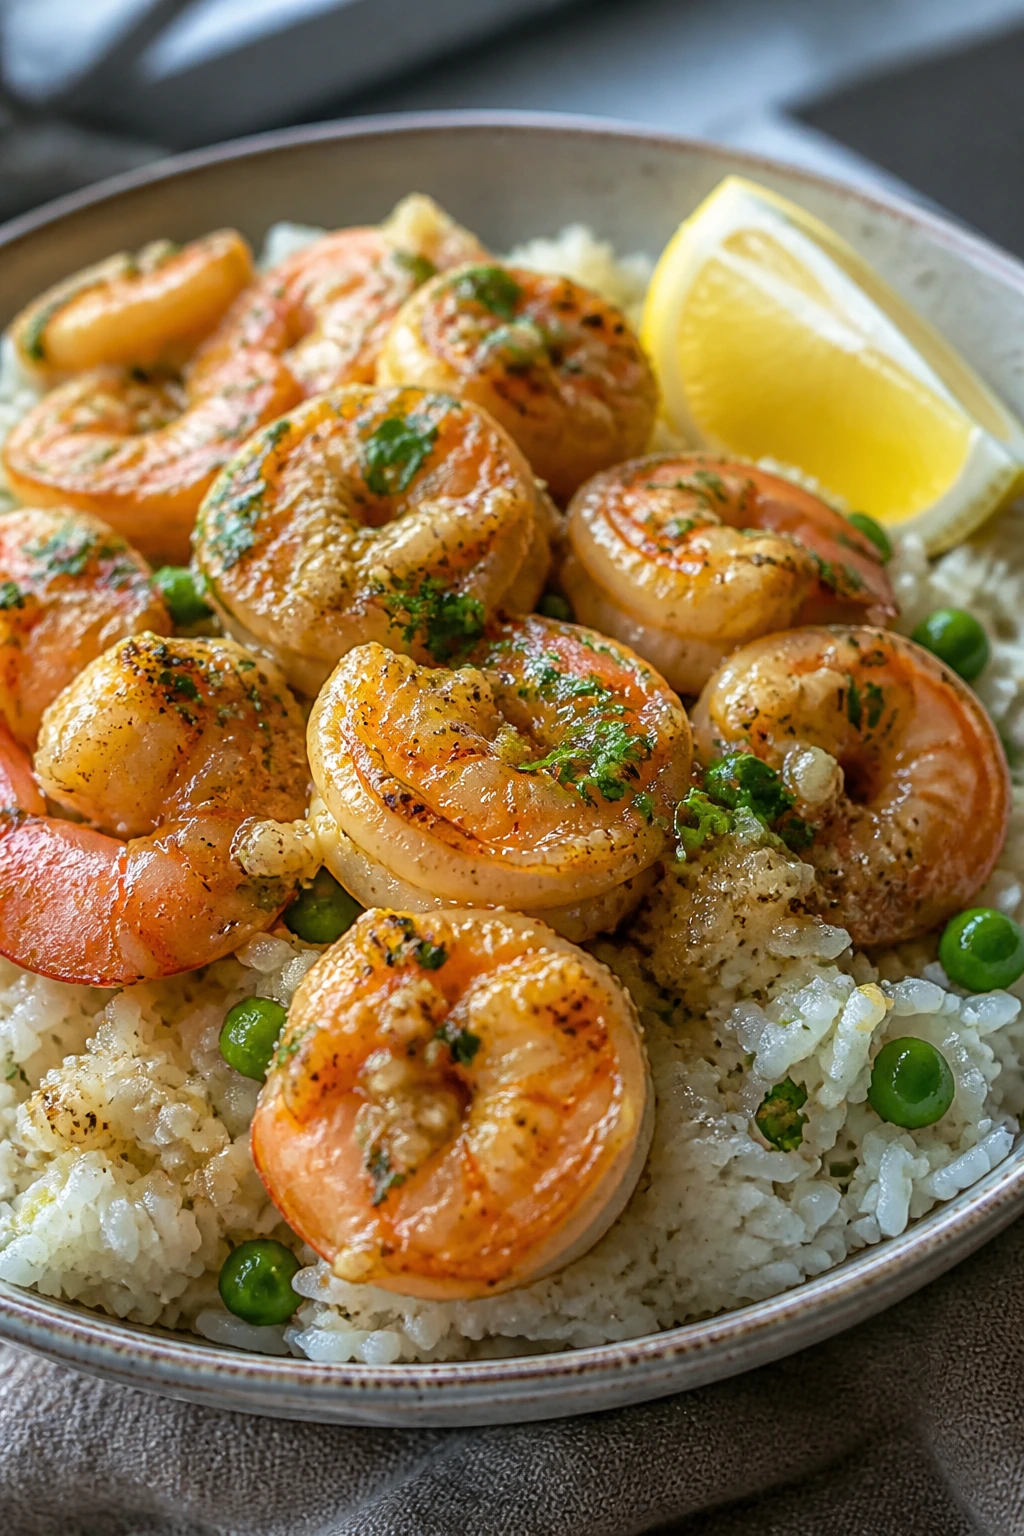
Shrimp and rice can look fancy, but this version keeps the flavors plain enough for a family table. The butter and garlic give the rice a rich smell, and the shrimp cook fast enough that they stay tender instead of rubbery.
Why It Works: Shrimp need very little cooking time, which makes them ideal when you want dinner quick. Rice gives the bowl enough heft that the shrimp feel like the star instead of a garnish.
Key Ingredients:
- 1 1/2 pounds shrimp, peeled and deveined
- 2 cups cooked rice
- 3 tablespoons butter
- 3 cloves garlic, minced
- 1 cup frozen peas
- 1 lemon, juiced
- 1 teaspoon salt
- 1/2 teaspoon black pepper
- 2 tablespoons parsley, chopped
Quick Steps:
- Melt the butter in a skillet and cook the garlic for 30 seconds.
- Add the shrimp, salt, and pepper and cook until pink, about 2 to 3 minutes per side.
- Stir in peas and warm through.
- Add lemon juice and parsley.
- Serve over rice.
Equipment for This Recipe:
- Large skillet
- Spoon
- Knife
How to Serve This Dish: Spoon the shrimp and butter sauce over rice and add a green vegetable if you want more on the plate. A little extra lemon on the side brightens the butter without making the dish sharper.
Pro Tips for This Recipe:
- Do not overcook the shrimp; they curl and firm up fast.
- Use medium shrimp if you want a kid-friendly bite size.
- Warm the rice before serving so the butter melts into it.
Variations on This Dish:
- Garlic Parmesan Shrimp: Add parmesan at the end for a richer finish.
- Lemon Herb Version: Add dill or chives with the parsley.
Common Mistakes to Avoid with This Dish:
- Overcooking shrimp: They go tough fast.
- Using cold rice straight from the fridge: The butter won’t coat it well.
50. Sheet Pan Chicken Fajitas
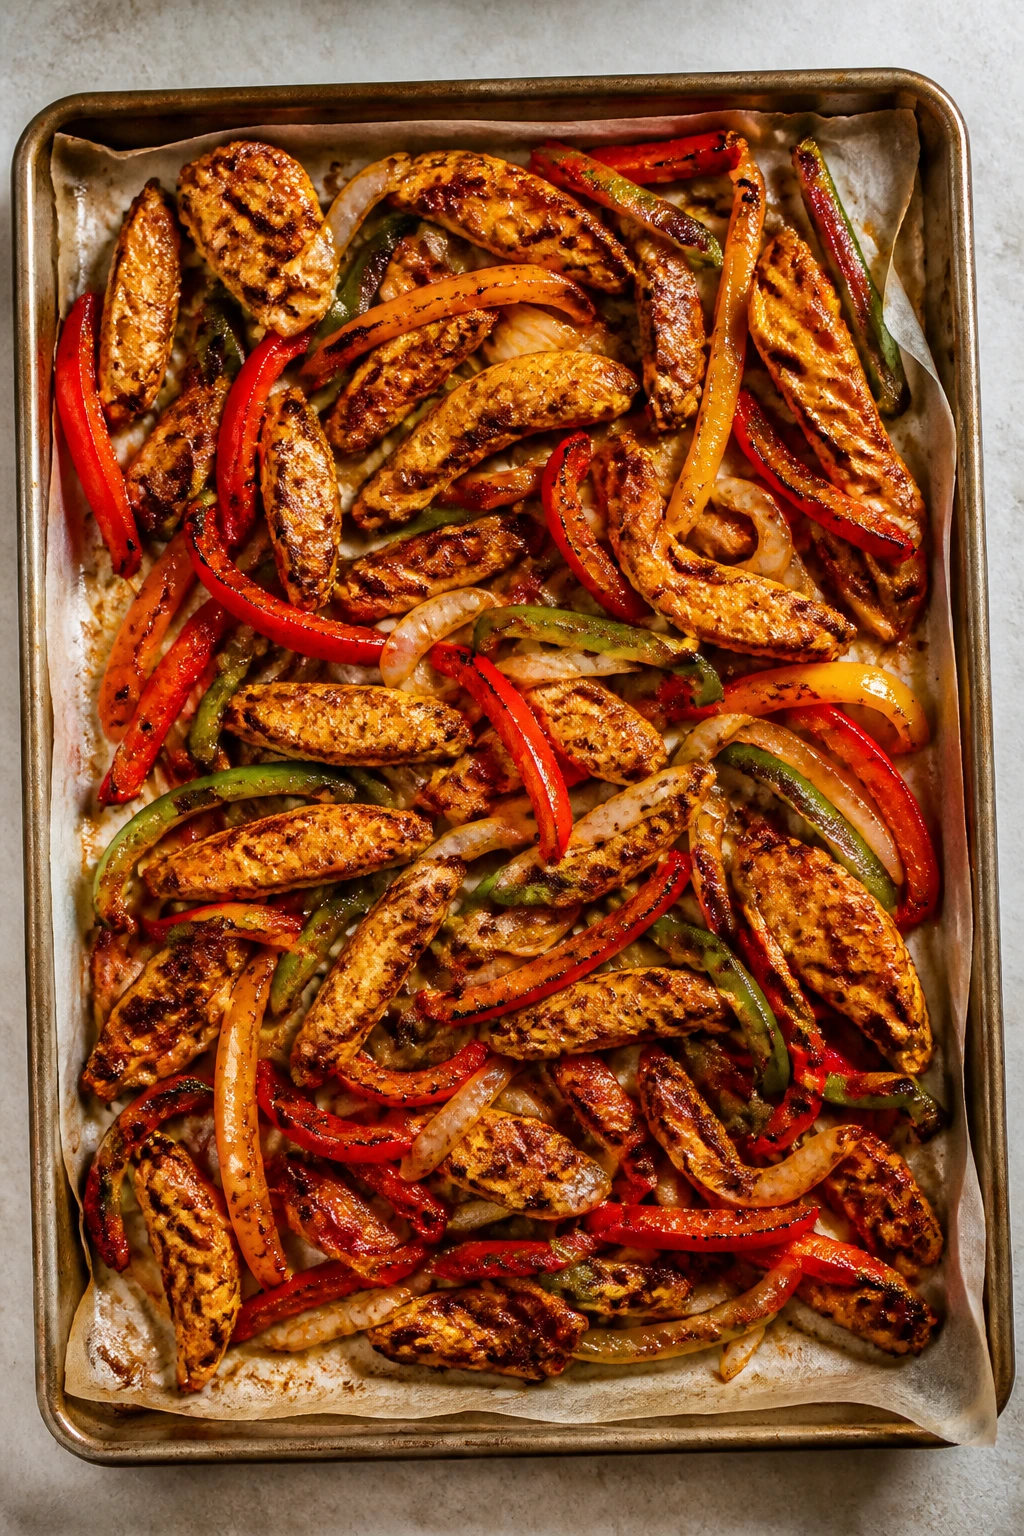
Sheet pan fajitas are useful because they bring color, smell, and dinner all at once. The chicken and peppers roast together, the onions soften into sweetness, and the tortillas let everyone build their own plate without the usual fight over the “right” mix.
Why It Works: High heat browns the chicken and lightly chars the vegetables, which gives the fajitas their familiar flavor. Keeping everything on one pan means the seasoning stays concentrated instead of spreading out.
Key Ingredients:
- 1 1/2 pounds chicken breast, sliced into strips
- 3 bell peppers, sliced
- 1 large onion, sliced
- 2 tablespoons oil
- 2 tablespoons fajita seasoning
- 1 teaspoon salt
- 8 small tortillas
- 1 lime, cut into wedges
Quick Steps:
- Heat the oven to 425°F and line a sheet pan.
- Toss chicken, peppers, onion, oil, fajita seasoning, and salt together.
- Spread everything out and roast for 20 to 22 minutes.
- Stir once halfway through so the edges brown evenly.
- Serve with warm tortillas and lime wedges.
Equipment for This Recipe:
- Sheet pan
- Mixing bowl
- Tongs
How to Serve This Dish: Put tortillas, salsa, sour cream, and cheese on the table and let everyone build their own. Rice or beans can stretch the meal if you need a bigger dinner.
Pro Tips for This Recipe:
- Slice the chicken and vegetables in similar widths so they cook at the same pace.
- Use a hot oven or the peppers will soften before they brown.
- Warm the tortillas briefly so they fold without cracking.
Variations on This Dish:
- Steak Fajitas: Swap the chicken for thinly sliced flank steak.
- Veggie Fajitas: Use mushrooms and zucchini instead of chicken.
Common Mistakes to Avoid with This Dish:
- Crowding the pan: The vegetables steam.
- Underseasoning the peppers: They need the seasoning as much as the chicken.
What Makes These Kid-Approved Dinners Work So Well
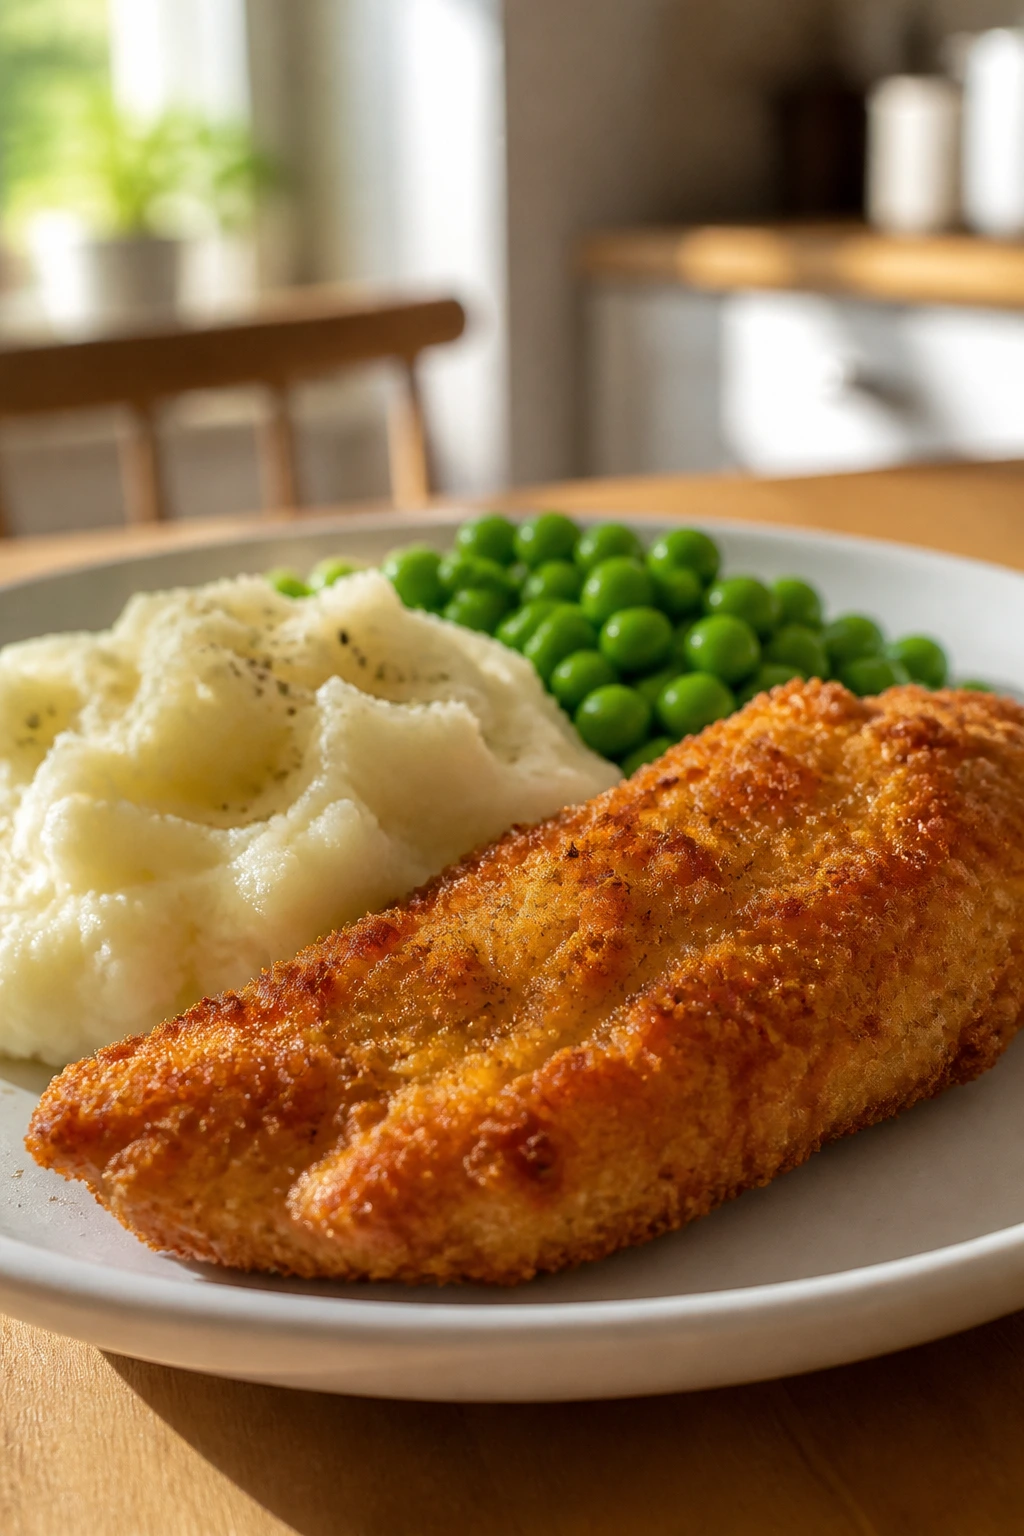
Kid-friendly dinners usually succeed for the same handful of reasons, even when the recipes look different on paper. The food is recognizable. The texture is predictable. The flavor stays on the mild side until the grown-ups decide to push it somewhere bolder. That does not mean boring. It means the dinner gives kids a stable starting point instead of asking them to solve a puzzle at the table.
Texture matters more than people admit. Crispy chicken tenders, soft baked potatoes, creamy pasta, sticky meatballs, and hand-held sliders all give a child something concrete to chew, tear, dip, or scoop. A bowl full of mixed soft things can lose a kid in the first bite. A plate with one crispy element and one soft element usually does better.
There’s also a practical reason these dinners keep showing up on family tables: they reheat well and they scale. If you make one tray of ziti or a double batch of meatballs, you have lunch tomorrow without cooking twice. That sort of efficiency matters more than perfect plating when someone is asking for a snack ten minutes after dinner.
Essential Equipment for These Recipes
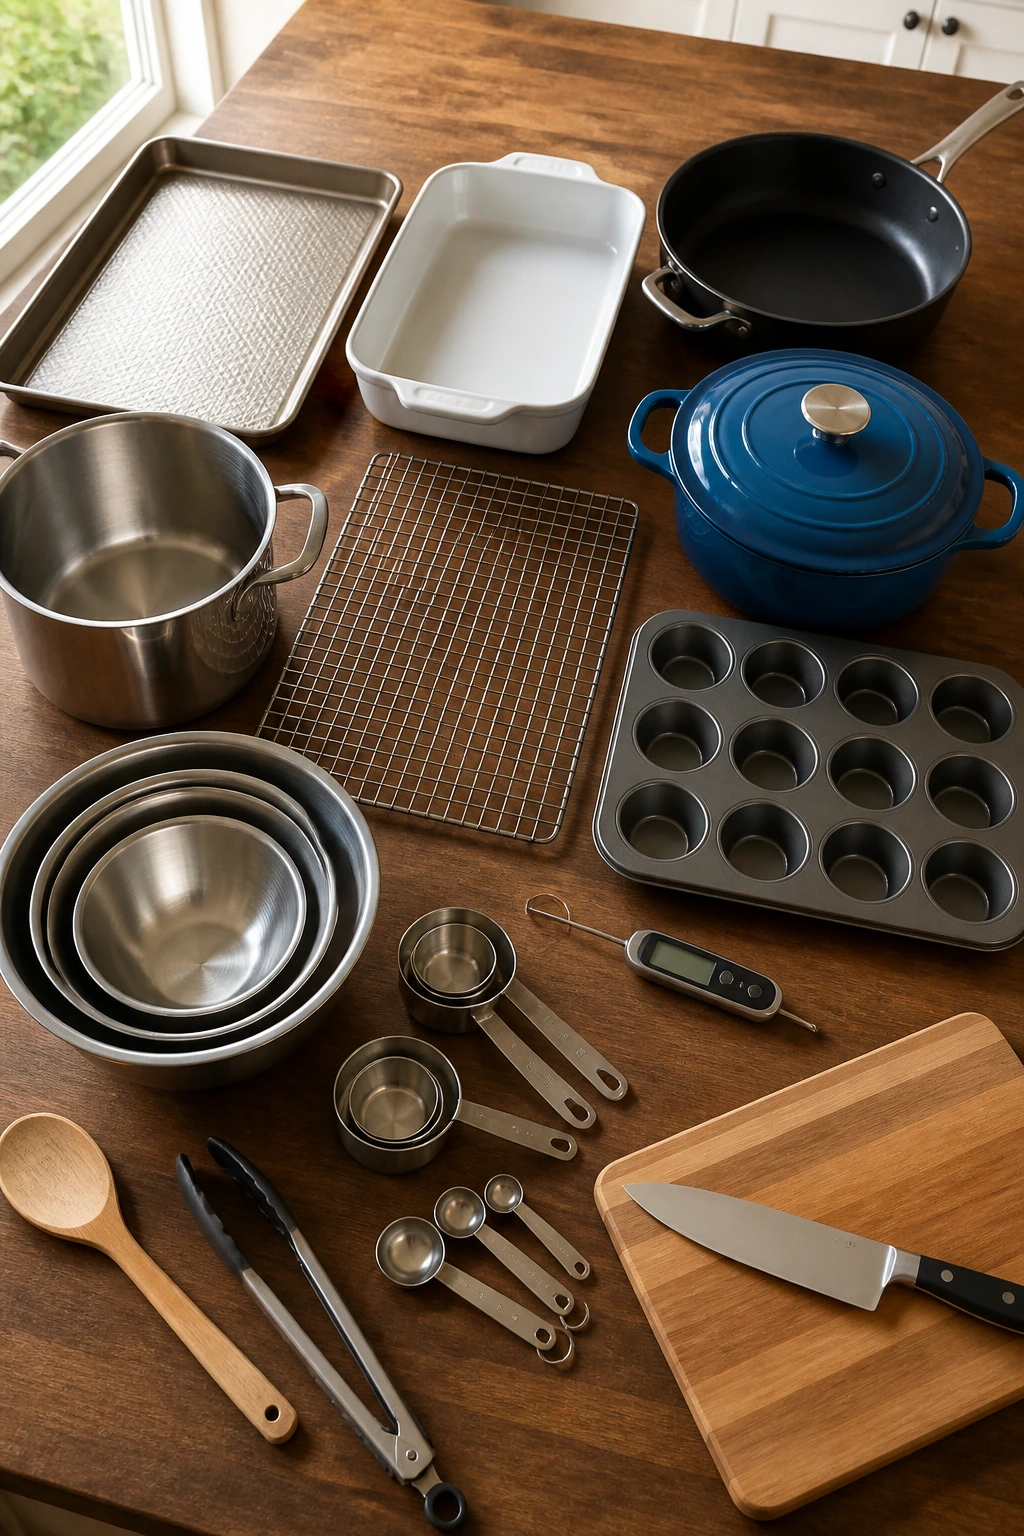
- Rimmed sheet pans: You’ll use these for tenders, drumsticks, fajitas, fish sticks, taquitos, and any bake that needs airflow.
- 9×13-inch baking dish: This is the workhorse for casseroles, baked pasta, stuffed shells, and chicken-and-rice bakes.
- Large deep skillet: The taco pasta, stroganoff, fried rice, and queso skillet all need a pan with enough room to stir.
- Dutch oven or soup pot: Best for chili, soups, curry, and sauces that need a steady simmer.
- Large pot for pasta: A wide pot keeps noodles from clumping together before they hit the sauce.
- Wire rack: Worth owning for anything breaded, because it keeps the bottoms crisp.
- Muffin tin: Handy for meatloaf muffins, mini shepherd’s pies, and taco cups.
- Mixing bowls in two or three sizes: You’ll need them for breading, batters, fillings, and quick sauces.
- Measuring cups and spoons: The sweet sauces, cheese sauces, and seasoning blends depend on them.
- Instant-read thermometer: The easiest way to avoid dry chicken or undercooked pork.
- Wooden spoon and spatula: One for stirring sauces, one for flipping and scraping.
- Tongs: Useful for chicken, sausage, shrimp, and anything you don’t want to stab with a fork.
- Sharp knife and cutting board: Most of the work here comes down to clean, even cuts.
- Colander: Needed for pasta, noodles, and draining peas or beans.
- Foil and parchment paper: Both save time on cleanup and help breaded or roasted dishes behave.
Smart Shopping and Ingredient Tips
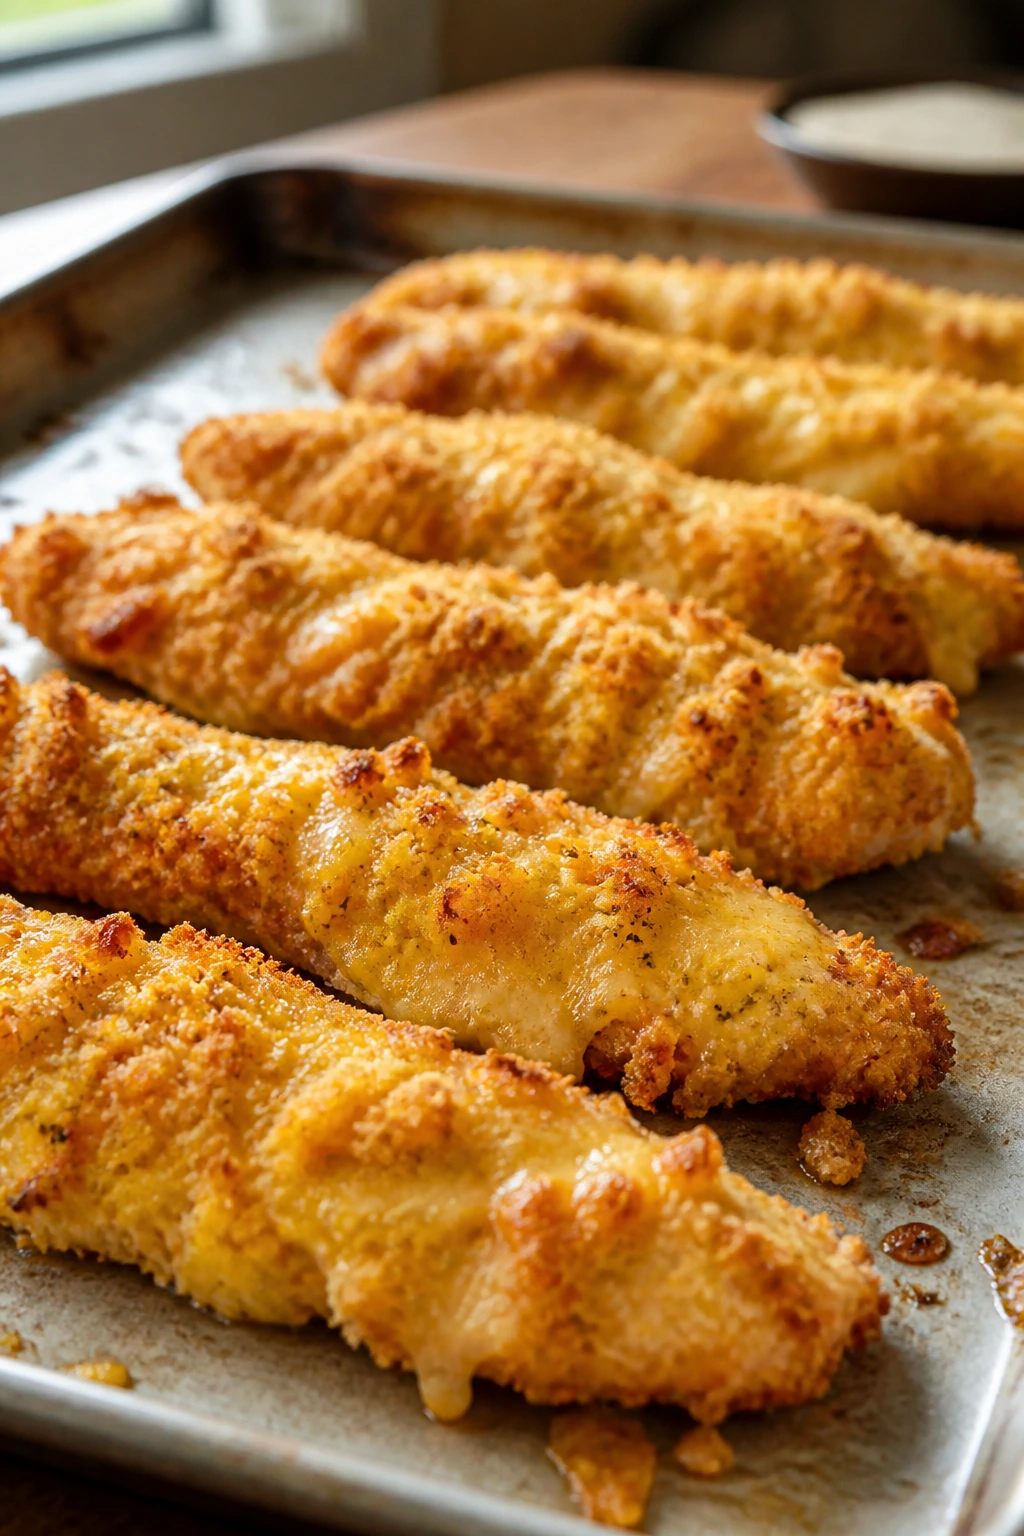
The easiest way to make kid-friendly dinners more dependable is to buy ingredients that behave well under heat. Ground beef, ground turkey, chicken thighs, chicken drumsticks, and sausage all stay forgiving when you cook them a little longer than planned. Thin chicken cutlets and fish fillets need more attention, but they cook fast and fit the “familiar shape” idea kids usually trust.
Cheese is worth thinking about, too. Block cheese grated at home melts smoother in mac and cheese, pasta bakes, quesadillas, and queso-style skillets. Pre-shredded cheese works in a pinch, and sometimes that convenience matters more than a perfect melt. Use the block when you want a smoother sauce; use the bag when the goal is getting dinner out fast.
Frozen vegetables are not second-rate here. Peas, corn, broccoli florets, spinach, and mixed carrots can land in a pan or casserole with almost no prep, and they hold their shape better than many fresh vegetables once the oven gets involved. Frozen peas in mac and cheese or fried rice are the kind of thing that quietly make dinner easier without changing the flavor profile much.
For sauces, canned tomatoes, low-sodium broth, salsa, pizza sauce, marinara, and coconut milk do a lot of heavy lifting. Look for broth that tastes clean and not overly salty, because cheese, ham, sausage, and bacon already bring plenty of salt to the party. Tortillas, slider buns, pasta shapes, and rice should match the dish’s job: rotini and shells grab sauce, tortillas fold cleanly, and rice stretches a bowl without drawing attention to itself.
How to Serve These Recipes

Presentation: Keep the plates simple and obvious. Kids usually eat better when the food is separated enough to understand, so a slider with a side of fruit, a pasta bowl with one green thing beside it, or taco cups lined up on a tray all work better than a crowded restaurant-style plate.
Accompaniments: The easiest sides are the ones that don’t fight the main dish: cucumber spears, apple slices, peas, broccoli, green beans, carrots, dinner rolls, tortilla chips, simple salad, or a bowl of fruit. When a meal already has sauce, choose a side that brings crunch.
Portions: Most of these recipes feed 4 to 6 in a normal family setting, though some can stretch further if you add rice, bread, or a second vegetable. For smaller kids, start with one protein portion and one modest starch, then keep the extras nearby so second helpings feel like a choice rather than a pile.
Beverage Pairing: Milk works surprisingly well with many of these dinners, especially anything cheesy or spicy. For adults, sparkling water with lemon, iced tea, or a cold lager alongside the more savory trays and skillets keeps the meal from feeling heavy.
Additional Tips and Flavor Boosters
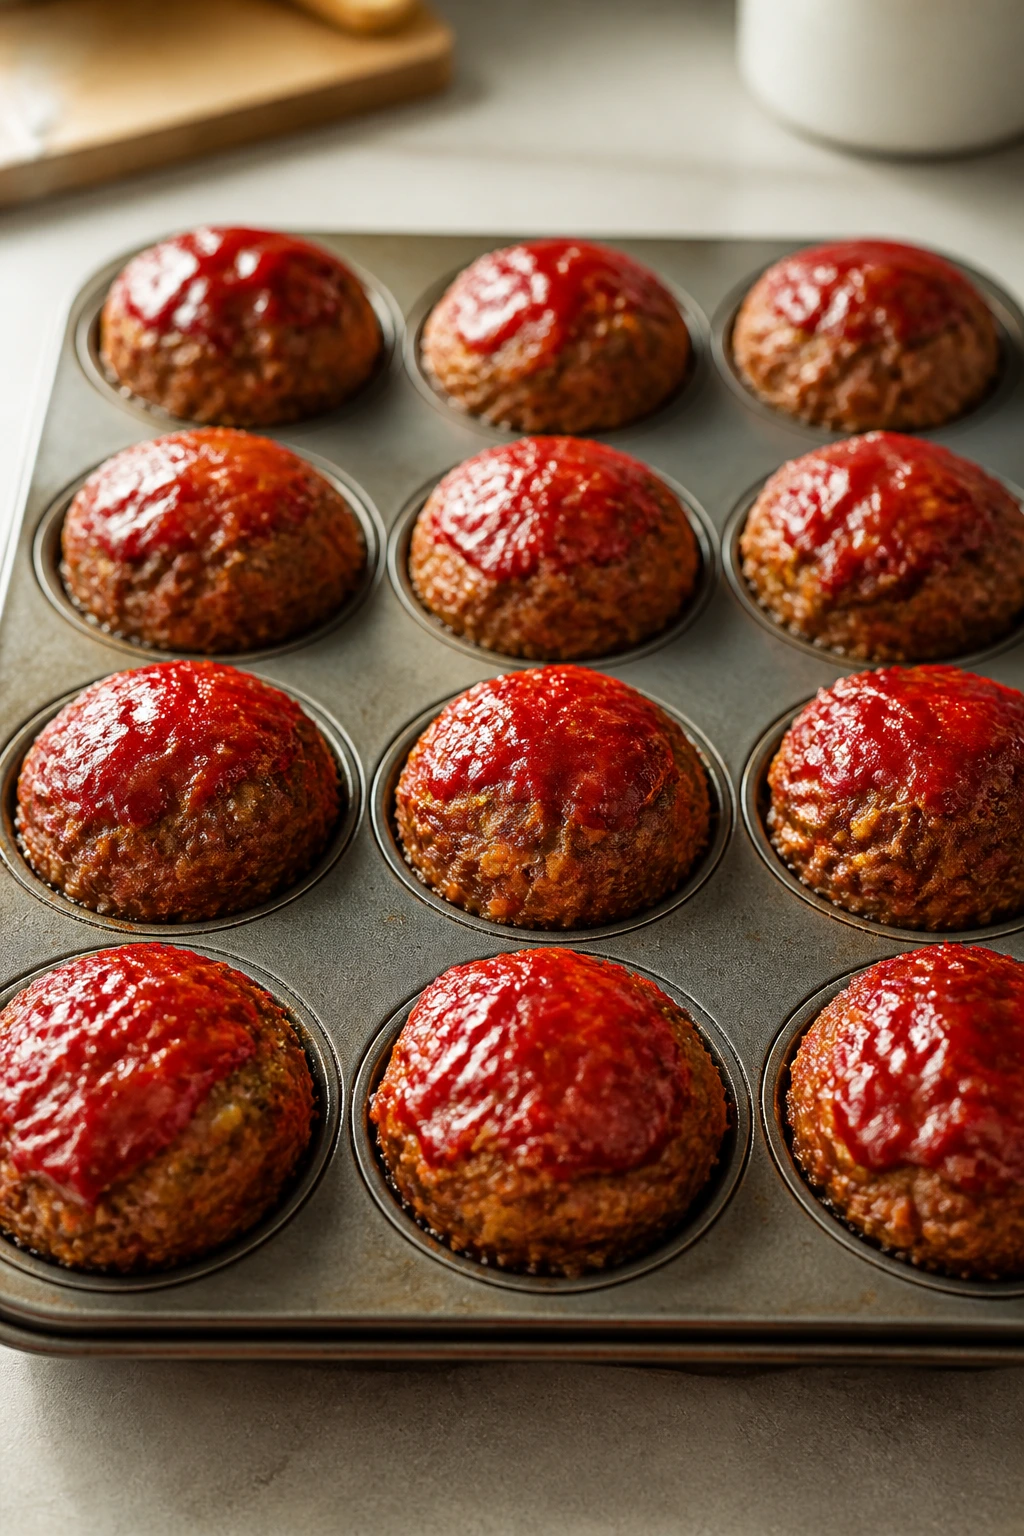
Flavor Enhancement: A small finish goes a long way. A squeeze of lemon on fish, a dusting of parmesan on pasta, a spoonful of sour cream on taco bowls, or a scatter of chopped parsley over soup can pull a dinner together fast.
Customization: Keep the base mild and offer the louder stuff on the side. Hot sauce, pickled jalapeños, chili crisp, sliced scallions, extra barbecue sauce, or crushed red pepper can sit on the table for adults without making the kid version harder to eat.
Serving Suggestions: Crunch matters. Toasted breadcrumbs, crushed tortilla chips, crispy onions, or a handful of fresh cucumber slices can keep soft dinners from turning into a blur of mushy textures.
Make-It-Yours: If you need dairy-free dinners, lean on olive oil, broth, salsa, tomato sauce, and coconut milk where they fit. For gluten-free plates, swap in gluten-free pasta, corn tortillas, cornstarch, and gluten-free breadcrumbs. For lower-salt versions, choose low-sodium broth and season in layers instead of dumping the salt in all at once.
Make-Ahead, Storage, and Reheating Guidance

Most of these dinners keep well for 3 to 4 days in the refrigerator if they include pasta, rice, chicken, or beef. Soups and chili often last that long without losing their shape, while creamy casseroles and baked pasta are best reheated with a splash of milk or broth so they do not tighten into a brick. Seafood dishes like salmon nuggets, tuna bakes, or shrimp and rice are best eaten within 2 days, because they lose their best texture sooner.
Freezing works well for meatballs, chili, stuffed shells, casseroles, burrito fillings, and most saucy pasta dishes. Pack them in airtight containers or freezer bags for up to 2 months. Breaded chicken, fish sticks, and taquitos freeze best before or just after baking on a tray, then moving to a bag once firm; that keeps them from sticking together and lets you reheat them on a sheet pan instead of making them limp in the microwave.
For reheating, use the method that matches the texture. Casseroles and pasta bakes do best covered in a 325°F oven with a splash of milk or broth. Skillet dinners warm better over medium-low heat with a spoonful of water added to loosen the sauce. Fried rice, noodles, and taco fillings can go in the microwave in 60-second bursts, stirred between rounds. Breaded items need dry heat, so use an oven or toaster oven rather than steam-heavy reheating.
If you plan ahead, a few of these dishes can be assembled in the morning and baked at dinner. Meatballs, chili, casseroles, stuffed shells, and pasta bakes all handle that kind of prep well. The exception is anything crisp and breaded; those should usually be assembled close to cooking time so the coating stays dry and sharp.
Variations and Adaptations to Try
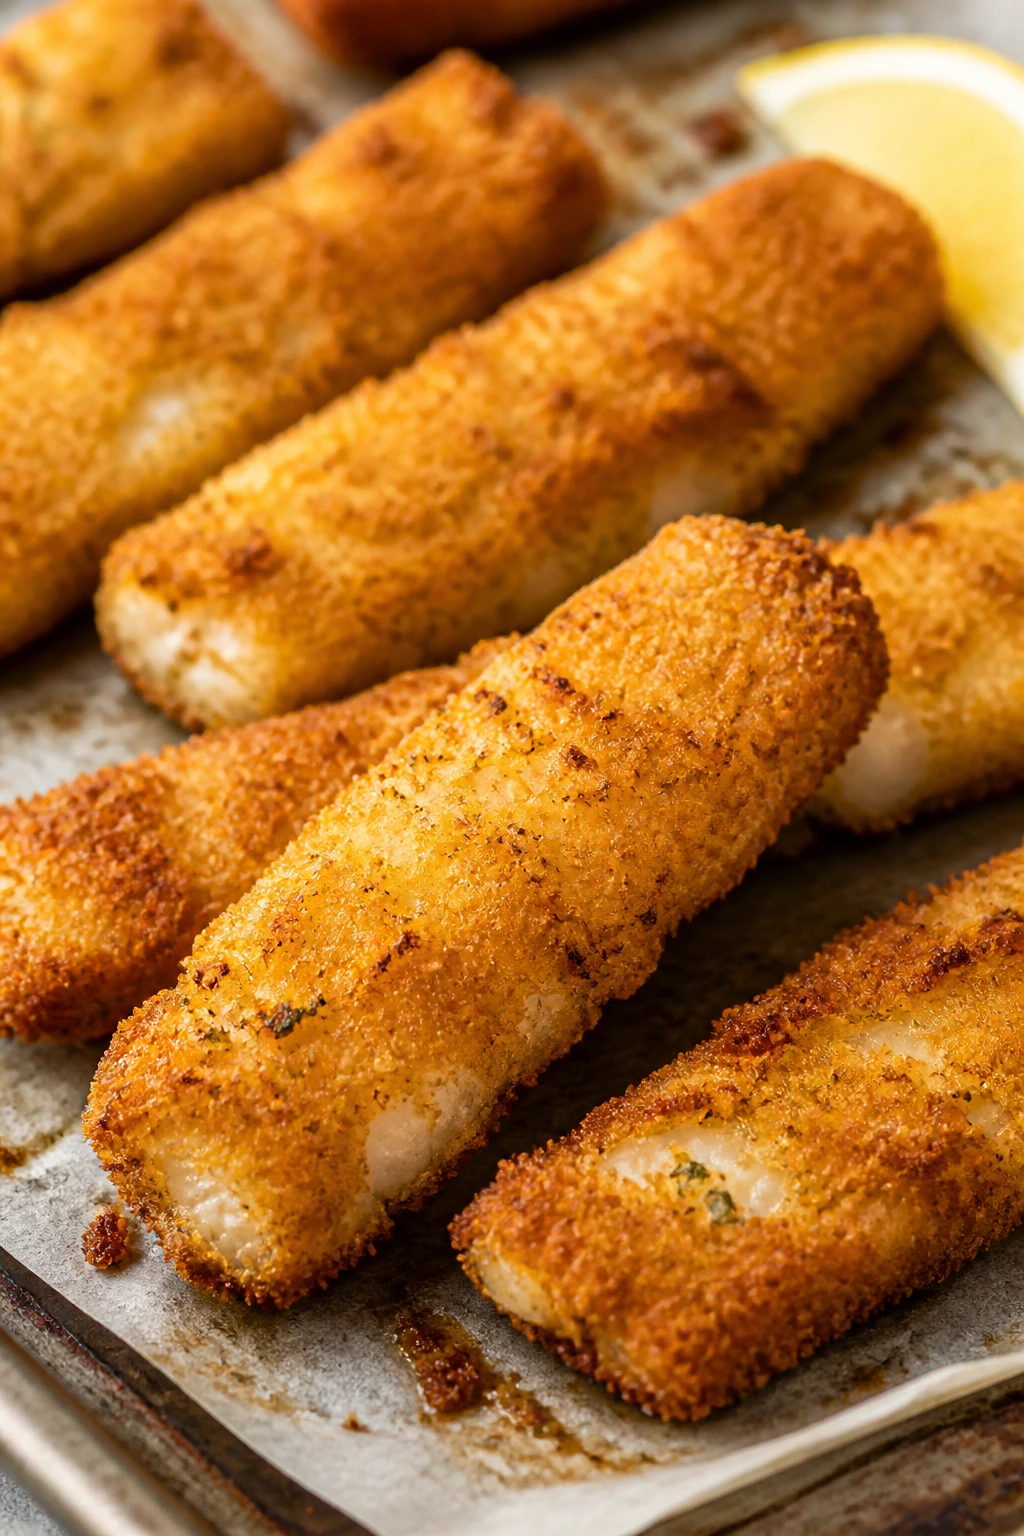
-
Gluten-Free Swap Basket: Use gluten-free pasta, corn tortillas, cornstarch, and gluten-free breadcrumbs where the recipe asks for flour or wheat crumbs. This works best in pasta bakes, skillet meals, and breaded chicken or fish. Keep an eye on the liquid, because gluten-free pasta can drink more sauce than standard pasta.
-
Dairy-Free Dinner Night: Choose olive oil, coconut milk, tomato sauce, salsa, and broth-based recipes, then skip the cheese or use it lightly. Chicken fajitas, fried rice, chili, and some skillet dinners adapt well without losing their shape. The main trick is keeping enough seasoning in the base so the dish doesn’t feel hollow after the dairy disappears.
-
Vegetable-First Version: Fold grated zucchini, carrots, chopped spinach, cauliflower rice, or minced mushrooms into fillings and sauces. The key is to chop small and cook off the moisture before the vegetables go into the pan. That keeps the texture from turning watery, which is the fastest way to lose a kid’s trust.
-
Heat-On-The-Side Plan: Keep the main dish mild and put hot sauce, chili crisp, jalapeños, or crushed red pepper on the table separately. This is the cleanest way to feed kids and adults from the same pan without making two separate dinners. It also keeps the first bite friendly.
-
Budget Pantry Version: Use frozen vegetables, canned beans, broth, pasta, rice, and leftover chicken or turkey to stretch nearly any of these meals. A rotisserie chicken can also carry a lot of them without adding extra cooking time. This is the lane where casserole, chili, fried rice, and pasta really earn their keep.
Common Mistakes to Avoid
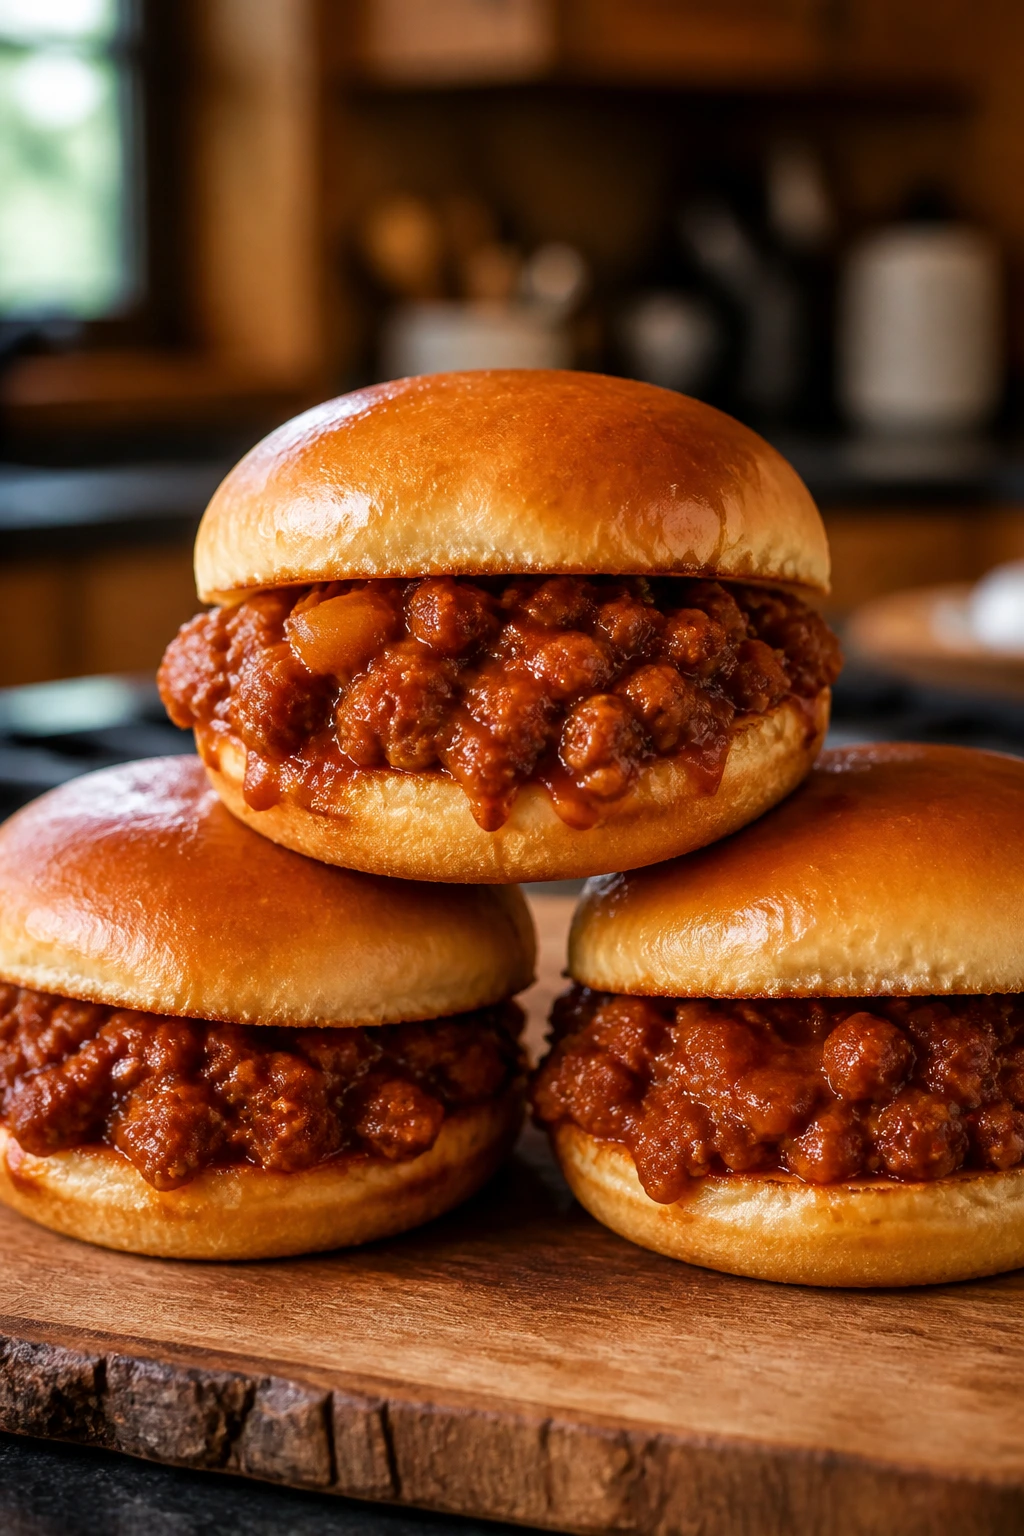
-
Overcooking the “kid food” pieces: Chicken tenders, fish sticks, pork chops, shrimp, and drumsticks dry out fast if you leave them in while you finish “just one more thing.” Use the thermometer, not guesswork, and pull things the minute they hit the right temperature.
-
Making the sauce too loose: Soggy filling is a fast route to a plate full of rejected food. Whether it’s sloppy joes, taco pasta, or tuna casserole, reduce the liquid until it coats a spoon instead of running like soup.
-
Hiding vegetables so hard that the texture breaks: Grated zucchini, spinach, and carrots work because they disappear into the meal, but they still need to be squeezed, chopped, or cooked properly. Wet vegetables make casseroles thin and breaded coatings soft.
-
Serving everything too hot or too cold: Freshly baked pasta and rice look fine for a minute, then they tighten or clump. Let the dish sit for a few minutes before serving, and give rice or noodles a little heat if they’ve been waiting on the counter.
-
Skipping salt in layers: A lot of family dinners taste flat because the cook salts only once at the end. Season the meat, taste the sauce, and check again after the cheese or broth goes in.
Frequently Asked Questions
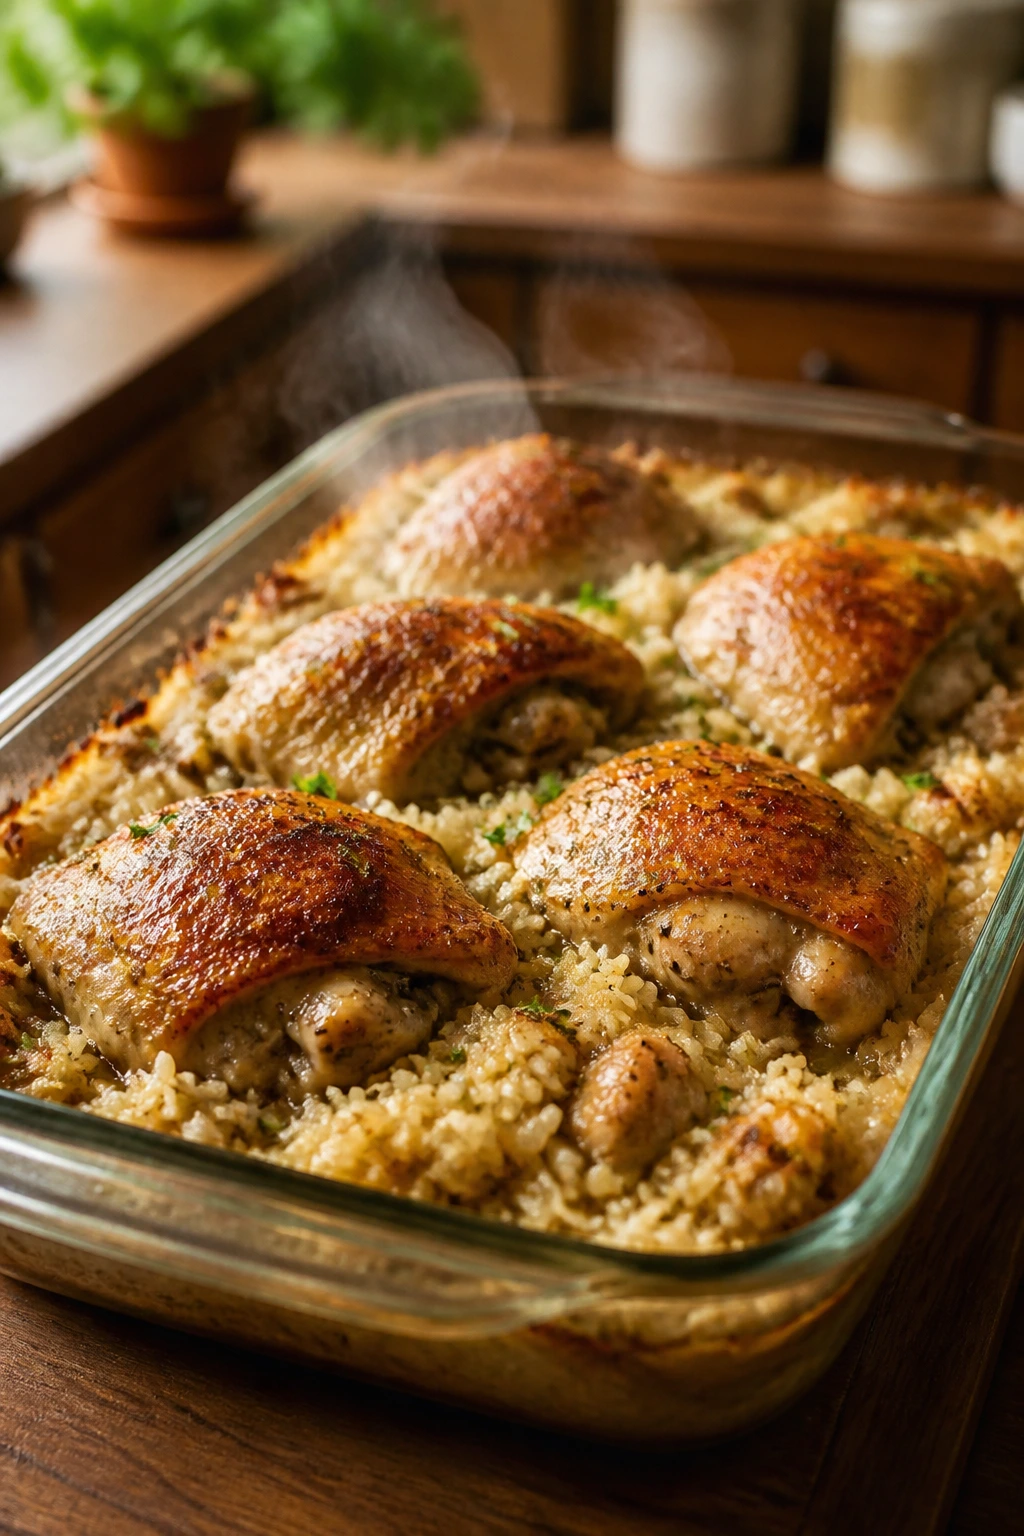
How do I make these dinners work for a kid who hates mixed food?
Give that child the most separated version you can. Bowls, sliders, taco cups, wrapped tortillas, and build-your-own plates let kids touch each part separately before committing to the whole thing.
Which of these recipes freeze the best?
Meatballs, chili, stuffed shells, taco fillings, casseroles, and pasta bakes freeze well because the sauce protects the texture. Breaded chicken and fish can freeze too, but they stay best when reheated in the oven instead of the microwave.
Can I use rotisserie chicken instead of cooking chicken from scratch?
Yes, and it’s a smart shortcut for many of these recipes. It works especially well in casseroles, wraps, taquitos, tortellini bowls, pot pies, and skillet meals where the chicken only needs to be heated through.
What’s the easiest way to hide vegetables without making dinner mushy?
Grate carrots and zucchini, chop spinach finely, and cook out the moisture before mixing them into the dish. Frozen peas, corn, and broccoli florets also behave well because they keep their shape and don’t turn to paste.
How do I keep breaded foods crisp after baking?
Use a wire rack, not a flat tray, and avoid covering the food while it sits. If you need to hold it for a few minutes, keep it on the rack in a warm oven instead of piling it into a bowl.
Can I make these dinners less salty without making them bland?
Yes. Use low-sodium broth, choose mild cheese, and season in small steps so you can stop when the food tastes right. A squeeze of lemon, a bit of acid from tomato sauce or vinegar, and fresh herbs can bring flavor without extra salt.
What if the sauce gets too thick before dinner is done?
Add a splash of broth, milk, or water and stir. That works for pasta bakes, skillet meals, soups, and rice dishes; just add a little at a time so you don’t swing too far the other way.
Which recipes are best when I need dinner on the table fast?
Pizza quesadillas, fried rice, taquitos, wraps, sliders, skillet tacos, and most stir-fries are the quickest. They lean on pre-cooked components or fast-cooking ingredients, which keeps them useful on busy nights without asking for a long oven time.
The Plates Come Back Clean
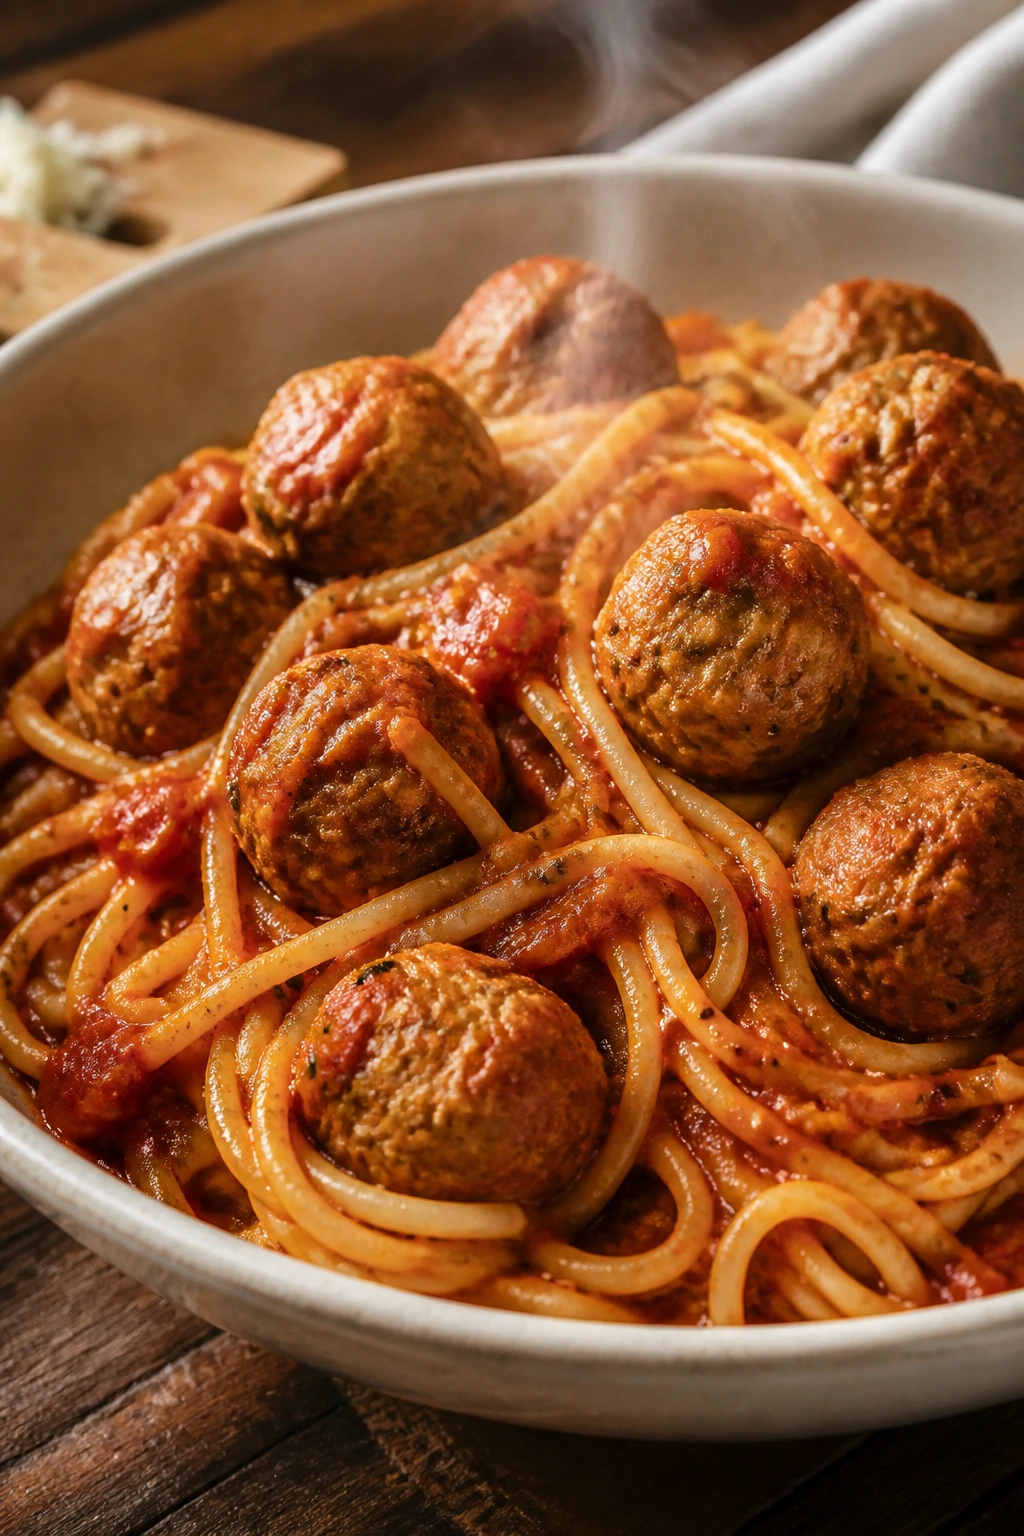
The best kid dinners do not win by being fancy. They win by landing in the middle of the table with the right texture, the right temperature, and nothing too bossy in the flavor department. A crisp edge, a soft center, a sauce that stays put — that’s the kind of food people remember to finish.
Keep a few of these recipes in your back pocket and weeknight dinner stops feeling like a test you have to pass. You get more meals that disappear for the right reason, and fewer nights where somebody negotiates for crackers instead.