
By the time the front door bangs shut and the backpack lands in a heap, most kids are not looking for a tiny nibble. They want something that feels like a real answer to the empty-belly problem — warm cheese, cold fruit, a little crunch, a little salt, and enough heft to keep the next hour from becoming a snack parade. That’s what good after-school snacks do. They calm the room down.
The tricky part is that the usual “snack” ideas fall apart fast. A lone apple disappears into boredom. A bowl of dry cereal leaves crumbs on the counter and no one satisfied. A cookie tray looks cheerful, sure, but it does not do much for the 4 p.m. hunger crash. The best after-school snacks sit in the middle ground: easy enough for a tired adult to pull together, solid enough to count as a small meal, and familiar enough that kids do not give you the side-eye before the first bite.
I like this category because it rewards common sense. You do not need fancy ingredients or clever plating tricks. You need a few smart builds — tortilla plus cheese, yogurt plus fruit, bread plus protein, fruit plus fat — and the confidence to keep them simple. A lot of what works here is about texture. Kids who won’t touch a floppy wrap might happily devour a crisp quesadilla triangle. The same child who claims not to like yogurt may inhale a parfait if the granola stays crunchy and the berries are cold.
Why These Snacks Earn a Spot in the After-School Lineup
-
They solve the 3:30 hunger problem fast: Most of these recipes come together in 10 to 20 minutes, which matters when somebody is already asking, “What’s for snack?” before the shoes are off.
-
They mix protein with something familiar: Cheese, yogurt, beans, turkey, eggs, or hummus show up beside bread, fruit, or crackers so the snack sticks around longer than sugar alone.
-
They are easy to scale up or down: Make one quesadilla for one kid or a full sheet pan of sliders for the whole crew. The math stays friendly.
-
They work with pantry food, not just special shopping trips: Tortillas, bagels, oats, crackers, bananas, apples, and shredded cheese do most of the heavy lifting.
-
They give you warm and cold options: Some kids want melty and crisp. Others want cool and creamy. Keeping both in the mix saves a lot of arguing.
-
They leave room for picky eaters: Every recipe here can be toned down, simplified, or built in pieces so kids can assemble the parts they trust.
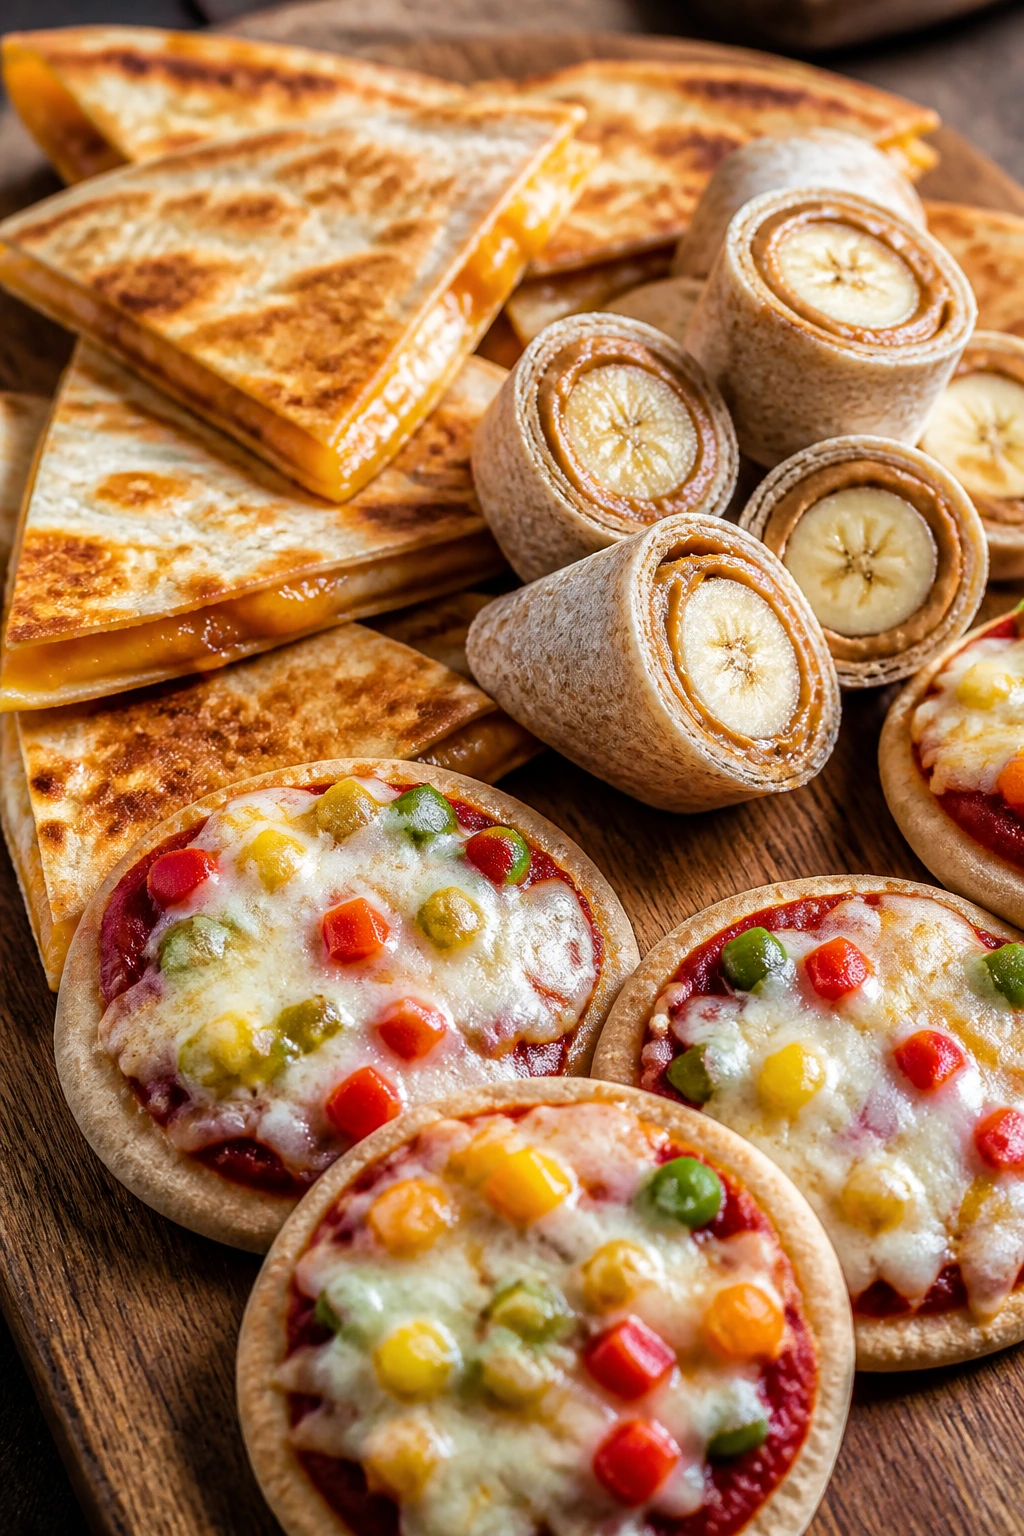
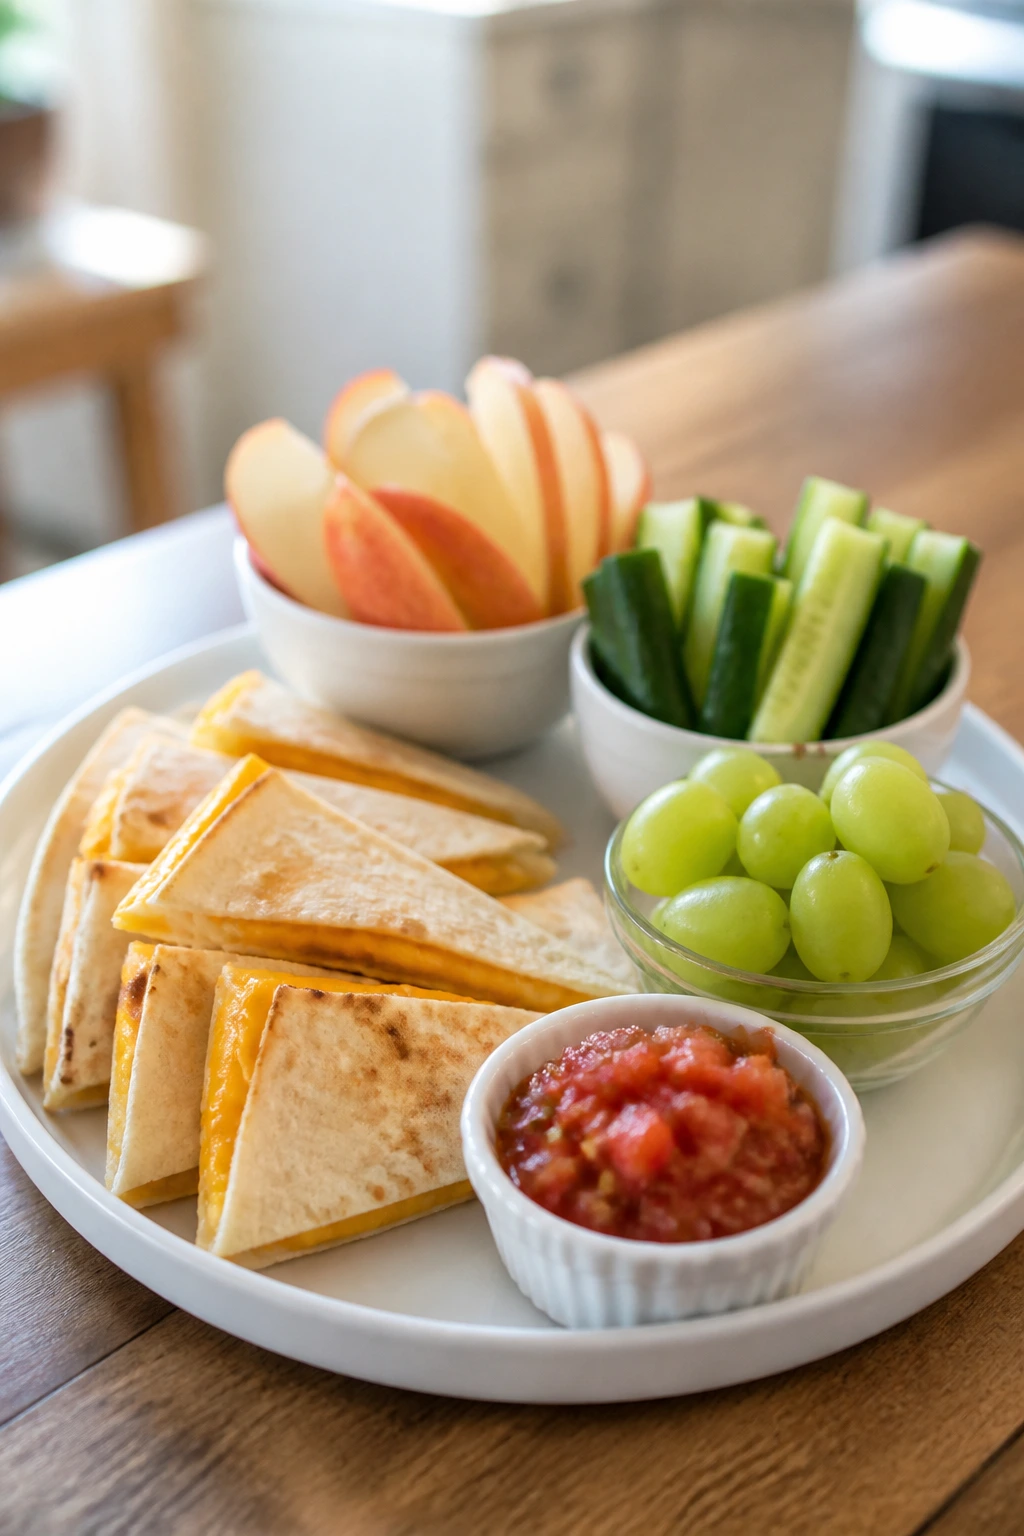
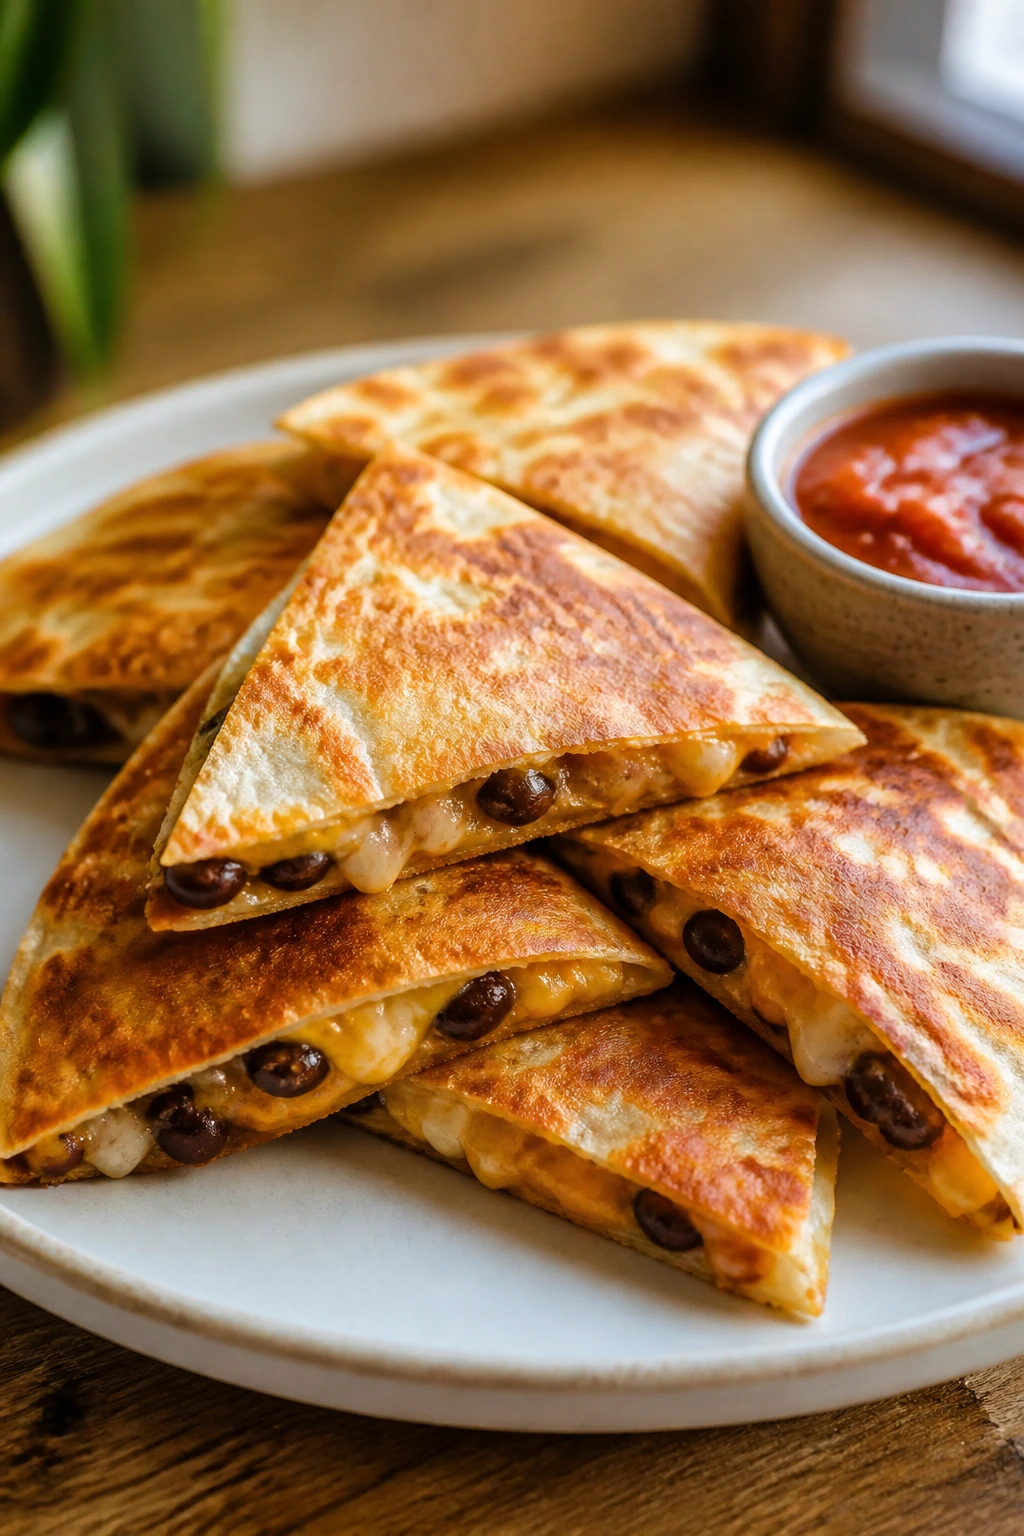
1. Cheesy Bean Quesadilla Triangles
A good quesadilla smells like lunch and comfort at the same time. The tortilla goes golden in the skillet, the cheese softens into those stretchy edges kids always seem to chase, and the beans make the whole thing feel more like food and less like a placeholder. Cut into small triangles, it looks friendly instead of heavy.
Why It Works:
Beans and cheese give this snack enough staying power to carry a kid through homework or sports practice. The tortilla crisps on the outside while the filling stays soft, which is a useful contrast for children who dislike mush. If you use medium heat and give the tortilla 2 to 3 minutes per side, the cheese melts before the outside burns. That balance matters more than speed.
Key Ingredients:
- 4 8-inch flour tortillas — soft tortillas fold cleanly and brown well in a skillet.
- 1 cup refried beans — choose smooth beans so the filling spreads without tearing the tortilla.
- 1 1/2 cups shredded cheddar or Monterey Jack — pre-shredded is fine here, and it melts fast.
- 1/4 cup mild salsa — a little salsa brightens the beans without making the tortilla soggy.
- 1 tablespoon butter or neutral oil — helps the outside crisp evenly.
- 1/4 teaspoon fine salt, optional — only if your beans are very mild.
- 1/4 teaspoon ground cumin, optional — adds a gentle taco smell without extra heat.
Quick Steps:
- Spread 1/4 cup beans over half of each tortilla.
- Sprinkle 1/4 cup cheese over the beans, then add a spoonful of salsa if using.
- Fold the tortillas into half-moons and press lightly.
- Heat a skillet over medium heat and melt the butter or oil.
- Cook the quesadillas for 2 to 3 minutes per side, until deep golden and the cheese is fully melted.
- Rest them for 1 minute, then cut into triangles with a sharp knife or pizza wheel.
Equipment for This Recipe:
- 10- or 12-inch skillet
- Spatula
- Sharp knife or pizza cutter
- Cutting board
How to Serve This Dish:
Serve the triangles on a plate with a little bowl of salsa or sour cream for dipping. They work well with apple slices or cucumber spears on the side, which keeps the plate from feeling too heavy.
Pro Tips for This Recipe:
- Warm the beans for 20 to 30 seconds in the microwave first; they spread more smoothly.
- Keep the heat at medium, not high, or the tortilla will brown before the cheese gives in.
- If the kids like extra crunch, press the quesadilla gently with the spatula while it cooks.
Variations on This Dish:
- Chicken Bean Fold-Over: Add 1/2 cup shredded cooked chicken to the filling for a more filling version.
- Corn and Cheese Version: Mix in 1/3 cup thawed frozen corn for pops of sweetness.
- Mild Taco Style: Add a pinch of taco seasoning to the beans and skip the salsa.
Common Mistakes to Avoid with This Dish:
- Overfilling the tortilla: If the beans spill when you fold, the quesadilla will leak in the skillet. Use a thin layer.
- Cooking on high heat: The outside burns before the cheese melts. Medium heat is the safe zone.
- Cutting it too soon: Let it sit for a minute or the filling will slide out in one sad heap.
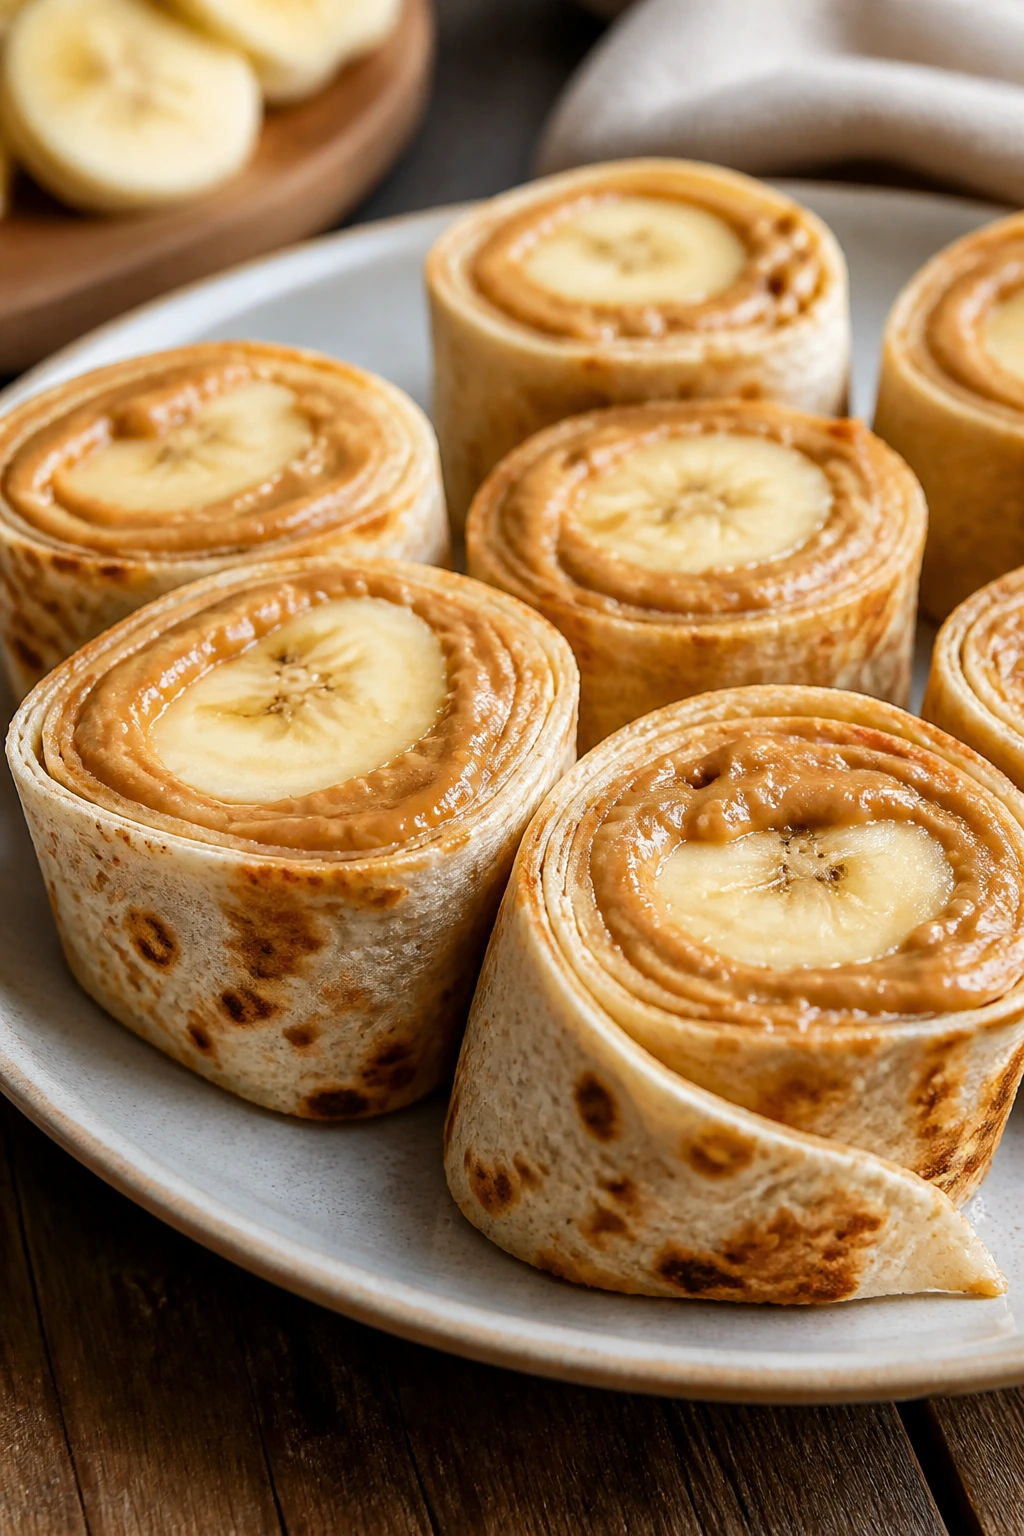
2. Peanut Butter Banana Roll-Ups
These taste like a lunchbox treat but work harder than that. Soft tortillas, creamy peanut butter, and banana slices give you sweet, salty, and filling in one tight package. Rolled up and cut into pinwheels, they look like something kids can grab with one hand while they argue about homework.
Why It Works:
Peanut butter brings fat and protein, which makes this snack more satisfying than fruit alone. Banana adds soft sweetness without extra prep. If you toast the roll-ups in a dry skillet for 1 to 2 minutes per side, the tortilla warms and the filling turns a little more fragrant — not gooey, just cozier. That tiny bit of heat makes a big difference.
Key Ingredients:
- 4 soft flour tortillas, 8-inch size — choose flexible tortillas so they roll without cracking.
- 1/2 cup peanut butter — creamy spreads easiest; crunchy adds more texture if your kids like it.
- 2 medium bananas, sliced — ripe but not mushy bananas hold their shape better.
- 1 tablespoon honey — optional, but it gives the roll-ups a dessert-like edge.
- 1 teaspoon ground cinnamon — a small amount makes the banana taste deeper.
- 1 tablespoon mini chocolate chips, optional — for kids who need a little extra pull.
Quick Steps:
- Lay the tortillas flat and spread each one with about 2 tablespoons peanut butter.
- Arrange banana slices down the center of each tortilla.
- Drizzle with honey and sprinkle with cinnamon, if using.
- Roll each tortilla tightly from one side to the other.
- Slice into 1-inch pinwheels or leave whole for easier handling.
- Eat right away, or toast briefly in a dry skillet for a warmer version.
Equipment for This Recipe:
- Cutting board
- Butter knife or small spatula
- Sharp knife
- Skillet, optional for toasting
How to Serve This Dish:
Serve the roll-ups with cold milk or a small handful of berries. If you slice them into pinwheels, stack them in a low bowl so the banana spirals show.
Pro Tips for This Recipe:
- Spread the peanut butter all the way to the edges so the tortilla seals better when rolled.
- If your tortillas tear, warm them for 10 seconds in the microwave first.
- A tiny pinch of salt on the peanut butter makes the bananas taste sweeter.
Variations on This Dish:
- Sunflower Seed Swap: Use sunflower seed butter for a nut-free version that still tastes rich.
- Apple-Cinnamon Roll-Up: Replace banana with thin apple slices and add a dusting of cinnamon.
- Frozen Treat Style: Freeze the rolled tortilla for 15 minutes before slicing; it cuts cleaner.
Common Mistakes to Avoid with This Dish:
- Using overly ripe bananas: They turn slippery and make the roll-up fall apart.
- Piling on too much filling: One extra spoonful seems harmless, then the tortilla splits.
- Serving them hours later without wrapping: The tortilla dries out fast, so wrap leftovers tightly.
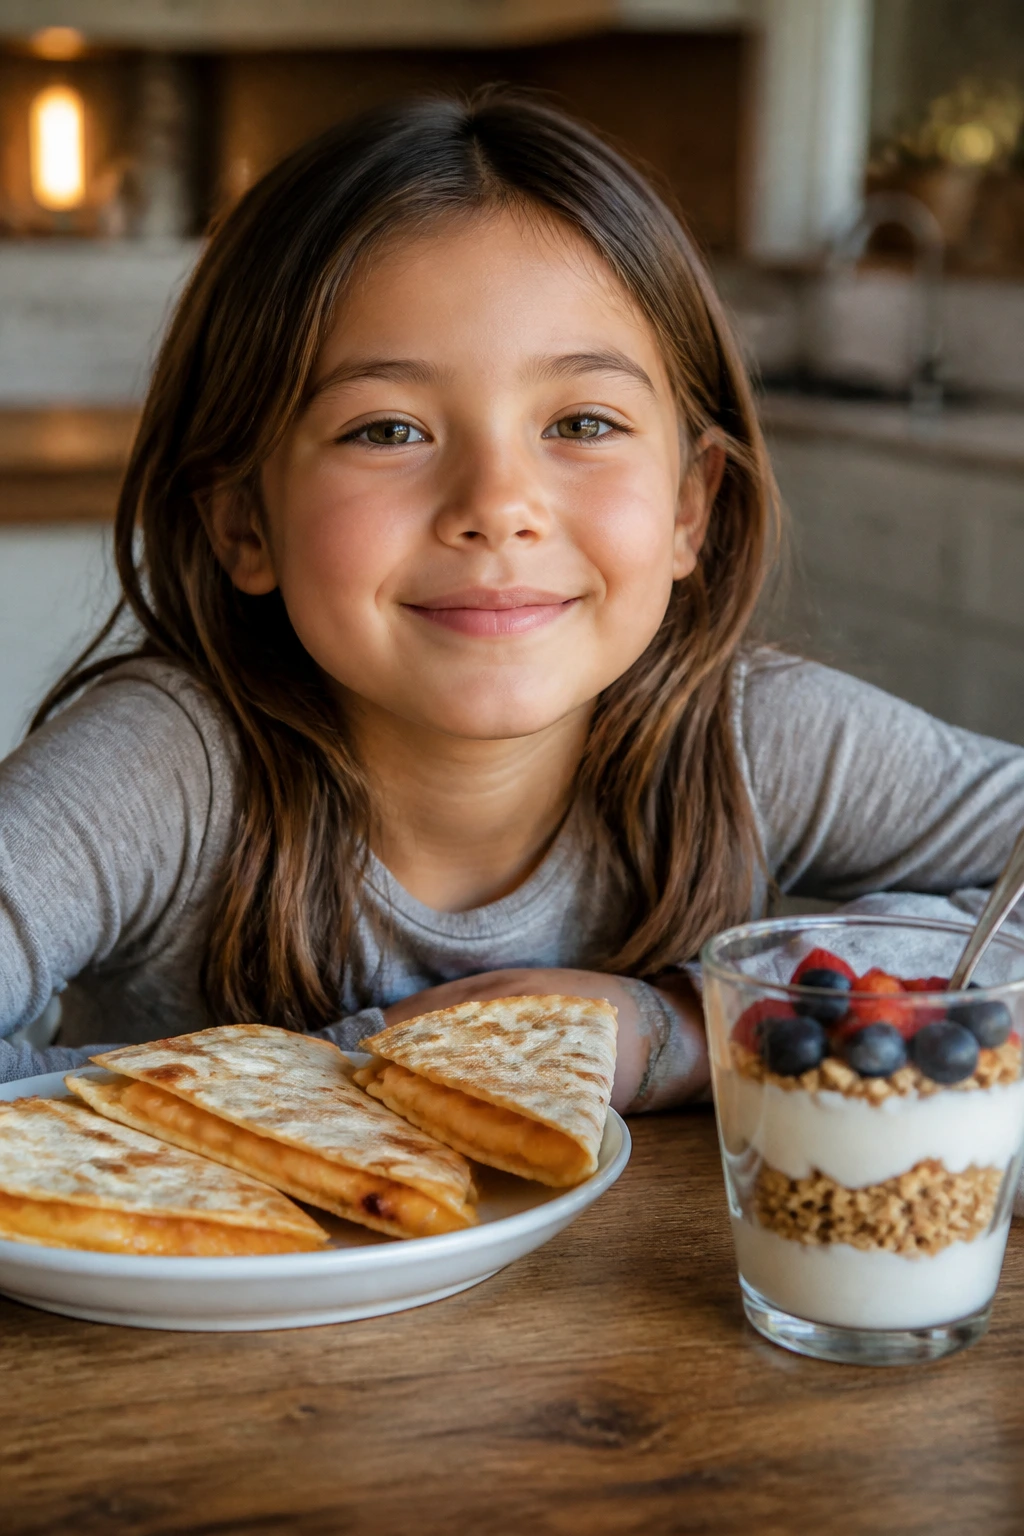
3. Mini Pita Pizzas
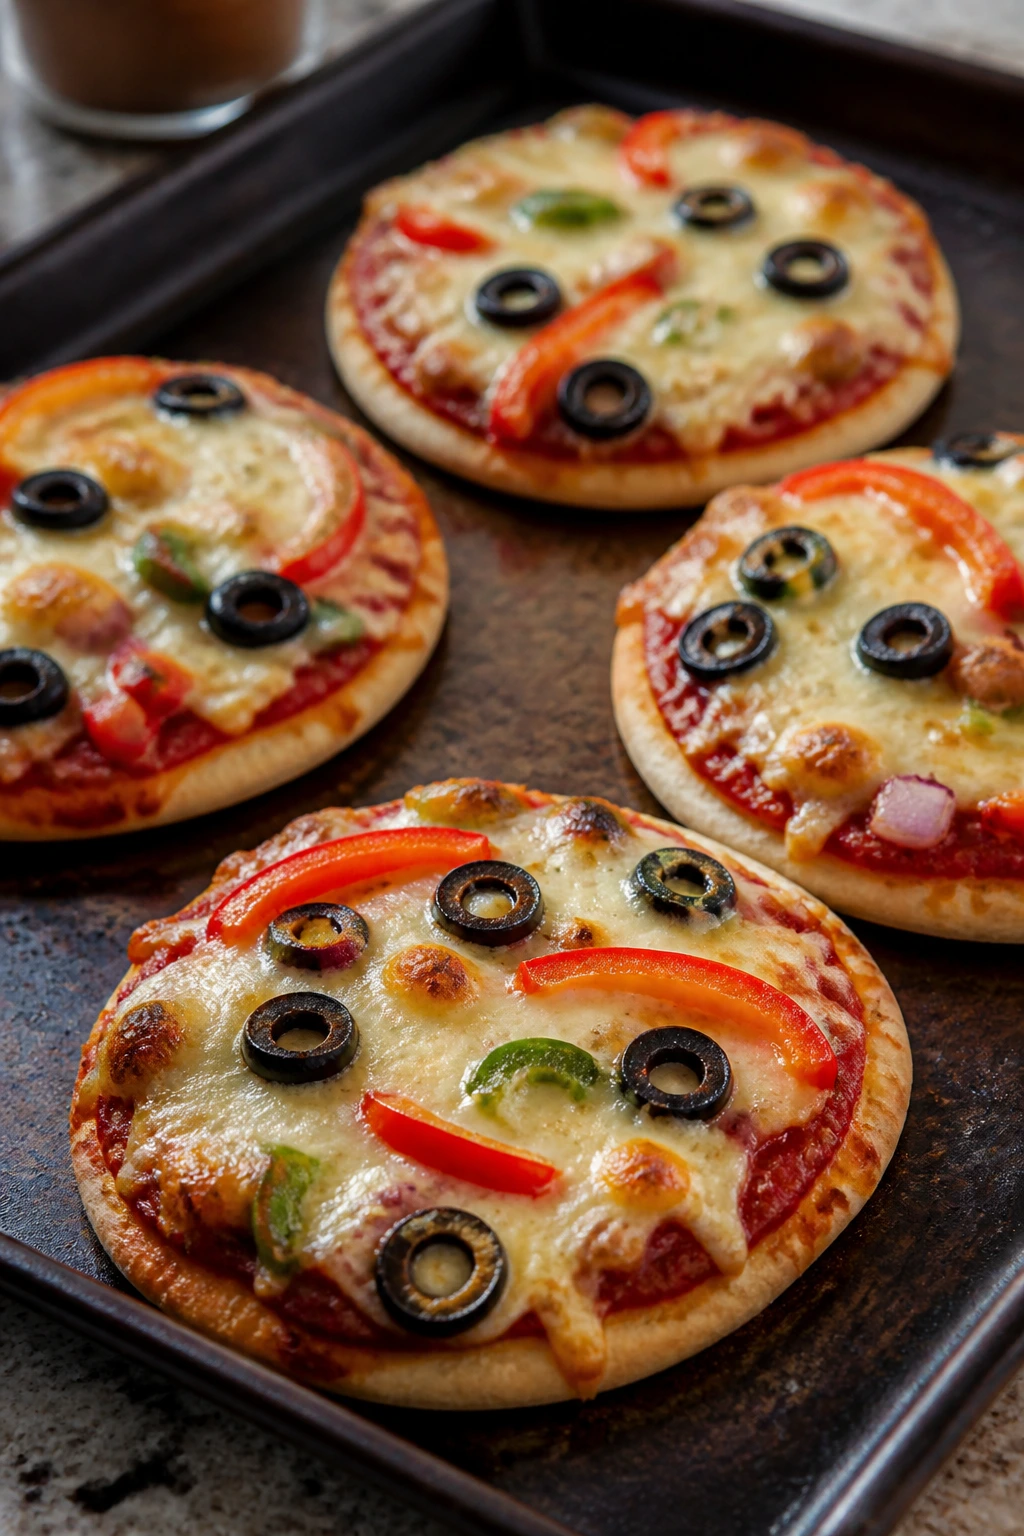
Pizza tastes like a yes before anyone has finished the question. Mini pita pizzas keep that energy but shrink the mess. The edges crisp, the cheese bubbles, and the sauce stays contained instead of sliding all over the tray. Kids usually notice the shape first — small, neat, and easy to hold.
Why It Works:
Pita breads are sturdy enough to carry sauce and cheese without going floppy. They bake fast, which is what you want on an afternoon when the kitchen is already busy. A hot oven at 425°F gives you browned cheese in about 8 to 10 minutes and keeps the pita from drying out. That quick bake is the whole point.
Key Ingredients:
- 4 mini pitas or 2 regular pitas cut in half — choose whole-wheat if you want a little more fiber.
- 1/2 cup pizza sauce — use a thicker sauce so the bread does not get soggy.
- 1 1/2 cups shredded mozzarella — low-moisture mozzarella melts best.
- 1/2 cup mini pepperoni, chopped bell pepper, or both — use toppings kids already trust.
- 1 teaspoon olive oil — brushed lightly on the edges for better browning.
- 1 tablespoon grated Parmesan, optional — gives the top a saltier finish.
Quick Steps:
- Heat the oven to 425°F and line a baking sheet with parchment.
- Arrange the pitas on the sheet and brush the edges lightly with olive oil.
- Spread each pita with about 2 tablespoons pizza sauce.
- Scatter mozzarella over the sauce, then add toppings.
- Bake for 8 to 10 minutes, until the cheese melts and the edges are crisp.
- Cool for 2 minutes before slicing into wedges.
Equipment for This Recipe:
- Rimmed baking sheet
- Parchment paper
- Spoon for sauce
- Pizza cutter or sharp knife
How to Serve This Dish:
Cut the pizzas into small wedges and set them beside carrot sticks or grapes. A little side salad works for older kids, but younger ones usually just want the pizza and a few cold fruit pieces.
Pro Tips for This Recipe:
- Pre-bake the pitas for 2 minutes if you want a firmer bottom.
- Keep toppings light; overloaded pitas slump in the middle.
- Use a thicker sauce, not a watery one from the back of the fridge.
Variations on This Dish:
- Veggie Confetti Pizza: Add finely chopped mushrooms, peppers, and spinach for a more colorful top.
- White Pizza Pita: Skip the red sauce and spread with ricotta plus mozzarella.
- Pepperoni-Only Shortcut: For very picky eaters, use sauce, cheese, and a few pepperoni slices and stop there.
Common Mistakes to Avoid with This Dish:
- Soaking the pita with sauce: Too much sauce makes the crust limp.
- Using too many toppings: The cheese can’t hold everything in place.
- Pulling them from the oven too soon: Wait until the cheese has little browned spots around the edges.
4. Greek Yogurt Parfait Cups
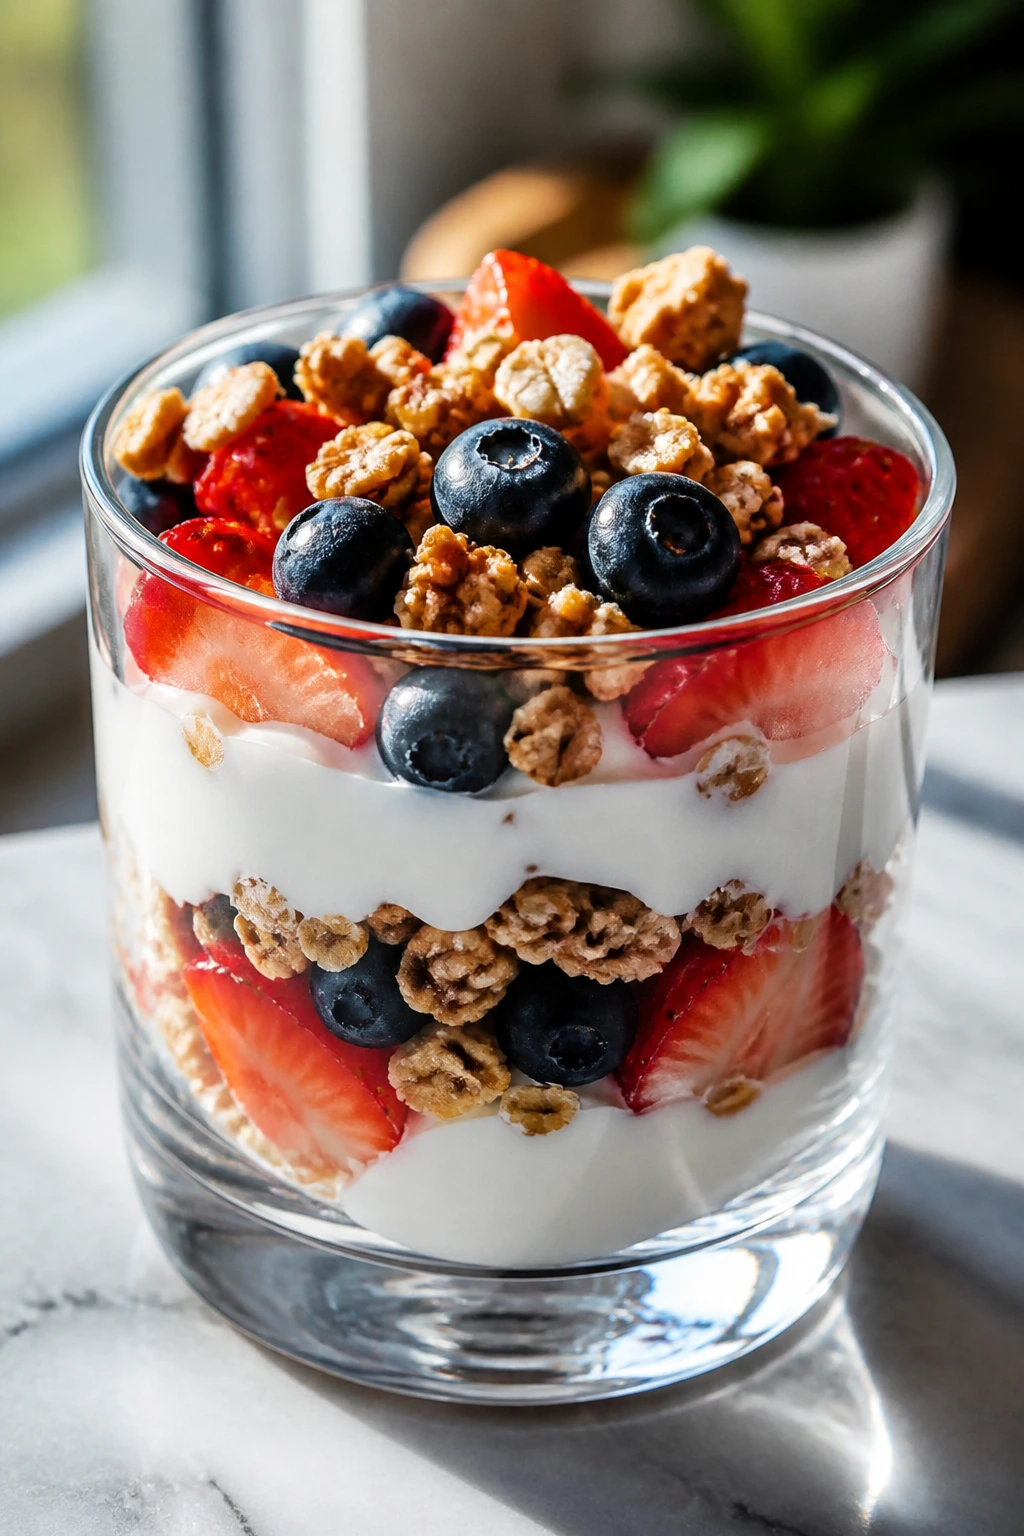
A parfait cup works because it gives kids permission to eat dessert for snack — even though it is mostly yogurt, fruit, and granola. The layers matter. Creamy on the bottom, cold fruit in the middle, crunchy on top. That mix is the difference between “healthy snack” and “gone in two minutes.”
Why It Works:
Greek yogurt gives this snack protein, which helps it last longer than a cup of fruit alone. Honey smooths out the tang, and granola adds the crunch kids often want more than sweetness. If you build the cups right before serving, the granola stays crisp; if you build them too early, it turns soft. That little timing detail is the whole game.
Key Ingredients:
- 2 cups plain Greek yogurt — full-fat or 2% tastes richer and feels less sharp.
- 2 tablespoons honey — enough to sweeten without making the yogurt runny.
- 1 teaspoon vanilla extract — optional, but it makes the yogurt taste less plain.
- 1 cup sliced strawberries — fresh berries hold up better than juicy thawed ones.
- 1 cup blueberries — small enough for easy spooning.
- 1 cup granola — choose a chunky one for better crunch.
- 2 tablespoons chia seeds or chopped nuts, optional — for extra texture.
Quick Steps:
- Stir the yogurt with honey and vanilla in a bowl.
- Spoon a layer of yogurt into each cup or jar.
- Add fruit, then another layer of yogurt if you want a taller parfait.
- Finish with granola and any seeds or nuts.
- Serve right away so the topping stays crisp.
Equipment for This Recipe:
- Mixing bowl
- Spoon
- 4 clear cups or small jars
- Measuring cups
How to Serve This Dish:
Serve the cups cold with a small spoon and a napkin — granola has a habit of escaping. A banana on the side makes the snack feel more complete if the kids have just come home starving.
Pro Tips for This Recipe:
- Keep the granola in a separate bowl until the last second.
- If the yogurt is very thick, loosen it with 1 tablespoon milk.
- Chop bigger fruit into bite-sized pieces so little kids are not wrestling with a strawberry.
Variations on This Dish:
- Berry-Only Cup: Use raspberries and blueberries for a tarter version.
- Peach Crumble Parfait: Swap in diced peaches and a cinnamon granola.
- Dairy-Free Cup: Use a thick coconut yogurt and a nut-free granola.
Common Mistakes to Avoid with This Dish:
- Assembling too far ahead: The granola goes soft and the whole thing gets dull.
- Using watery yogurt: Thin yogurt makes the layers slide.
- Forgetting texture: Fruit and yogurt alone can feel flat; the crunch matters.
5. Baked Pizza Bagels
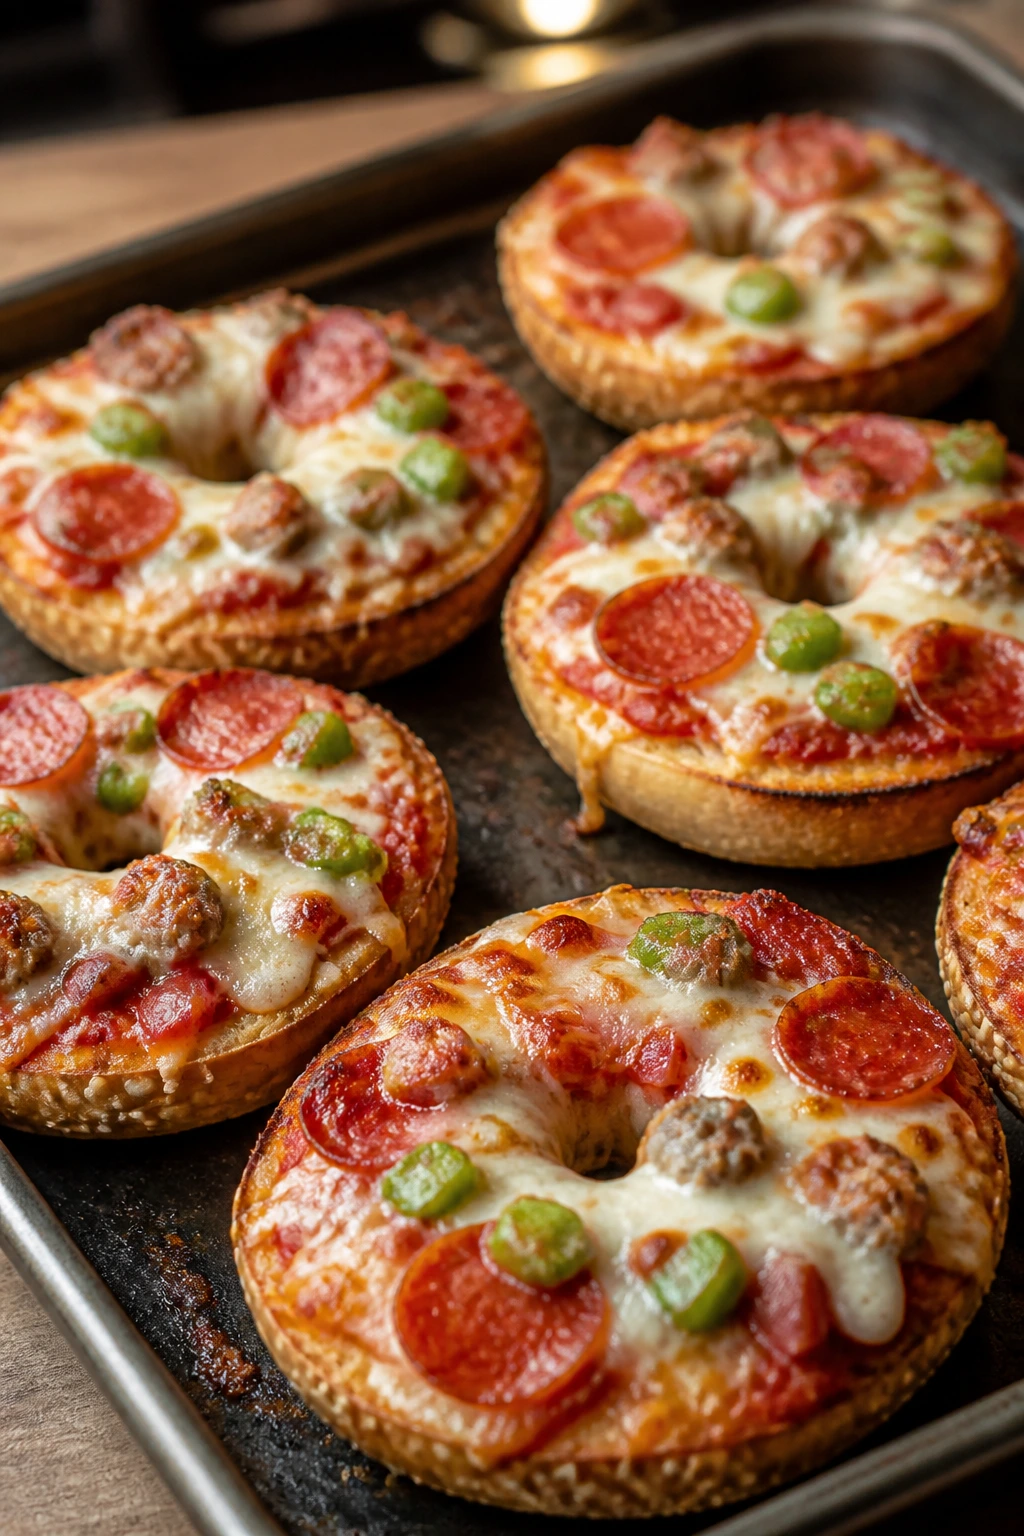
Pizza bagels belong to the sort of afternoon where nobody wants a long explanation. They are familiar, small, and sturdy, which means kids can eat them without sauce running down their wrists. The bagel gives you a chewy base under the melted cheese, and that chew is part of the appeal.
Why It Works:
Bagels hold sauce better than a slice of bread and feel more substantial than toast. Baking them at 400°F for about 10 minutes melts the cheese before the top dries out. If you split and lightly toast the bagels first, they stay firmer under the sauce. That is the trick most people skip.
Key Ingredients:
- 4 bagels, split in half — mini bagels work too if you want smaller portions.
- 1/2 cup pizza sauce — use a thick jarred sauce or leftover marinara.
- 1 1/2 cups shredded mozzarella — enough to cover the sauce without burying it.
- 1/2 cup mini pepperoni or finely chopped vegetables — keep the pieces small.
- 1 teaspoon dried oregano — a little on top gives the bagels that pizza smell.
- 1 tablespoon grated Parmesan, optional — adds a salty finish.
Quick Steps:
- Heat the oven to 400°F and line a baking sheet with parchment.
- Split the bagels and set them cut-side up on the sheet.
- Spread each half with sauce, then top with mozzarella and toppings.
- Sprinkle oregano and Parmesan over the top.
- Bake for 8 to 10 minutes until the cheese is melted and the edges are lightly crisp.
- Let cool for 2 minutes before serving.
Equipment for This Recipe:
- Baking sheet
- Parchment paper
- Spoon or small spreader
- Oven mitts
How to Serve This Dish:
Set the bagels on a plate with cucumber spears or a small bowl of fruit. They are small enough for an after-school snack but sturdy enough that older kids may eat two.
Pro Tips for This Recipe:
- Toast the bagel halves for 2 minutes before topping if you like a firmer bite.
- Use a little less sauce than you think you need.
- Let the bagels cool briefly so the cheese does not slide off.
Variations on This Dish:
- Mild Veggie Bagels: Use chopped mushrooms and peppers for a plant-heavy version.
- Pepperoni Classic: Keep it plain with sauce, mozzarella, and pepperoni only.
- Cheese-Only Shortcut: For very picky eaters, use sauce and a heavy cheese layer and skip the toppings.
Common Mistakes to Avoid with This Dish:
- Over-saucing the bagel: The middle turns soggy fast.
- Using thick toppings: Big chunks fall off when kids bite in.
- Baking too long: The cheese should be melted and spotted, not dried into rubber.
6. Apple Nachos with Peanut Butter and Granola
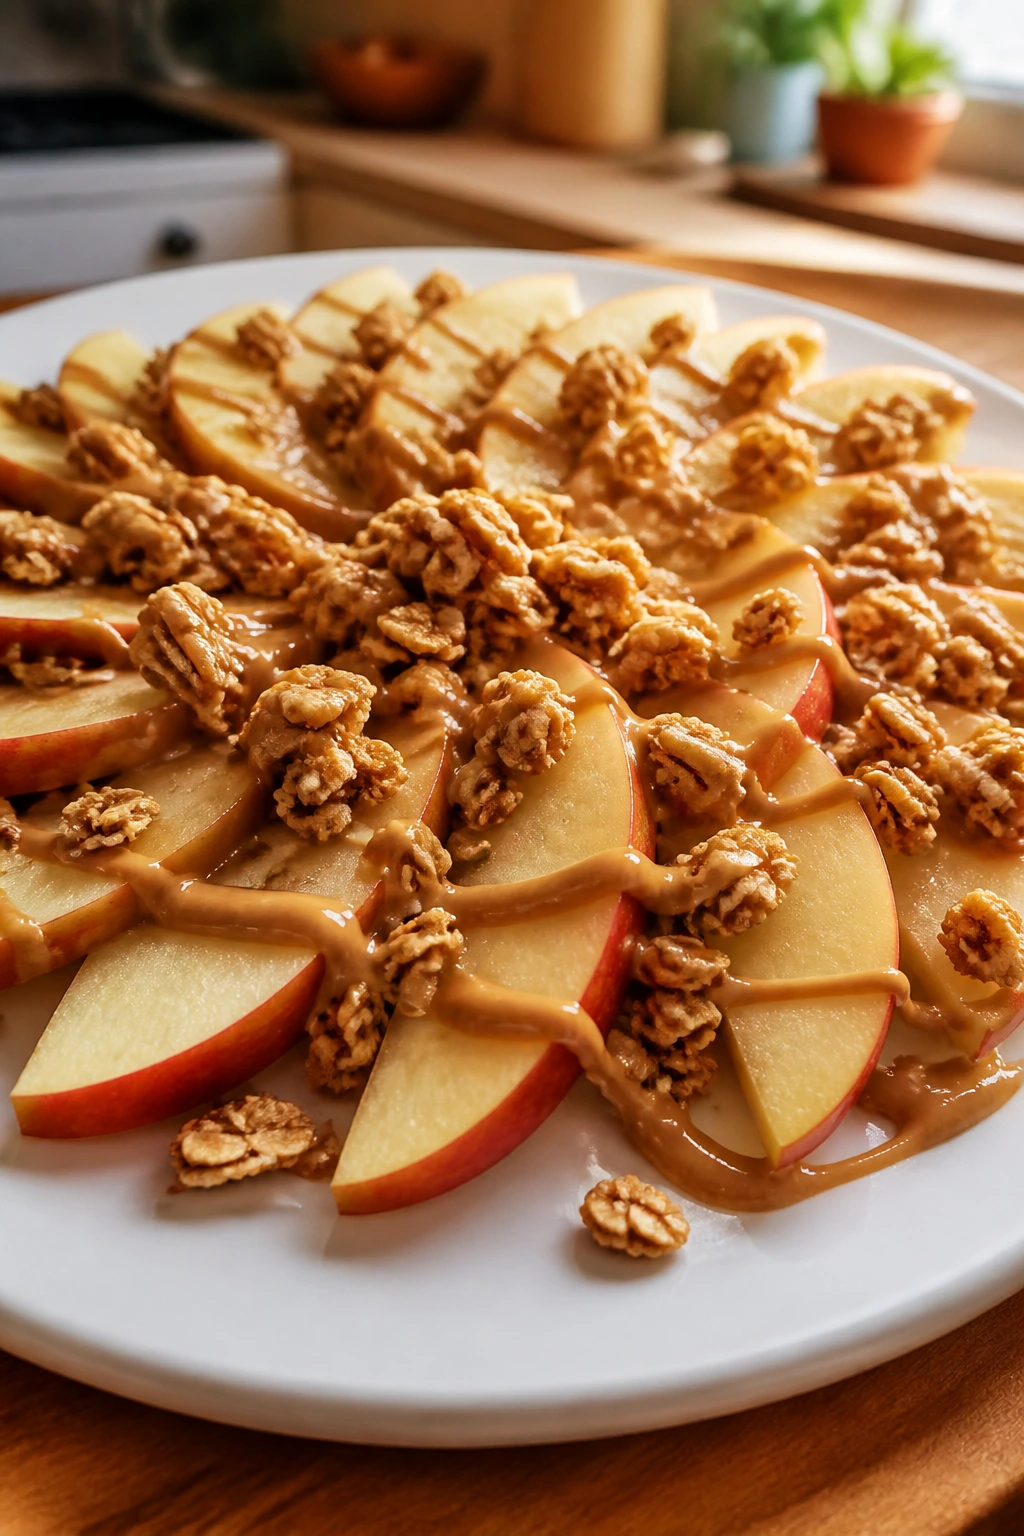
Apple nachos look playful, which helps more than people admit. Thin apple slices fan across a plate, the peanut butter gets drizzled over the top, and the granola sticks in little clusters like edible confetti. It feels more fun than a plain apple, and that matters with kids.
Why It Works:
Apples bring crunch and freshness, peanut butter adds staying power, and granola gives the snack a cereal-like feel kids already know. A little lemon juice keeps the apple slices from browning while you assemble everything. If you warm the peanut butter for 10 to 15 seconds, it drizzles instead of clumping, which makes the whole plate easier to eat.
Key Ingredients:
- 3 crisp apples — Honeycrisp, Gala, or Fuji all slice well.
- 1/3 cup peanut butter or sunflower seed butter — the drizzle needs to be smooth.
- 1 teaspoon lemon juice — helps keep the apple slices fresh-looking.
- 1/2 cup granola — choose a not-too-sweet kind so the plate does not turn dessert-like.
- 2 tablespoons raisins or dried cranberries — optional, but they add chew.
- 1 tablespoon mini chocolate chips, optional — for kids who need a stronger sell.
- Pinch of cinnamon, optional — adds a pie-like smell.
Quick Steps:
- Slice the apples thinly and toss them lightly with lemon juice.
- Fan the slices across a wide plate or platter.
- Warm the peanut butter for 10 to 15 seconds in the microwave.
- Drizzle the peanut butter over the apples.
- Sprinkle on granola, dried fruit, and chocolate chips if using.
- Serve right away while the apples are crisp.
Equipment for This Recipe:
- Sharp knife or apple slicer
- Cutting board
- Wide plate or platter
- Small microwave-safe bowl
How to Serve This Dish:
Serve the nachos as a shared plate in the middle of the table or portion them into small bowls. A cold glass of milk makes the peanut butter feel less heavy.
Pro Tips for This Recipe:
- Slice the apples just before serving if you want the best crunch.
- Mix the lemon juice with a tablespoon of water if you do not want a strong citrus taste.
- If the peanut butter is thick, stir in 1 teaspoon oil or warm water to loosen it.
Variations on This Dish:
- Caramel Apple Style: Replace some peanut butter with a thin caramel drizzle.
- Tahini Crunch Version: Use tahini and a pinch of cinnamon for a more grown-up taste.
- Cheddar Apple Plate: Add small cubes of cheddar on the side for a salty bite.
Common Mistakes to Avoid with This Dish:
- Slicing apples too early: Brown edges make the plate look tired.
- Using a granola that is too hard: Giant clumps can be awkward for little kids.
- Pouring on too much nut butter: The apples get buried and stop being easy to eat.
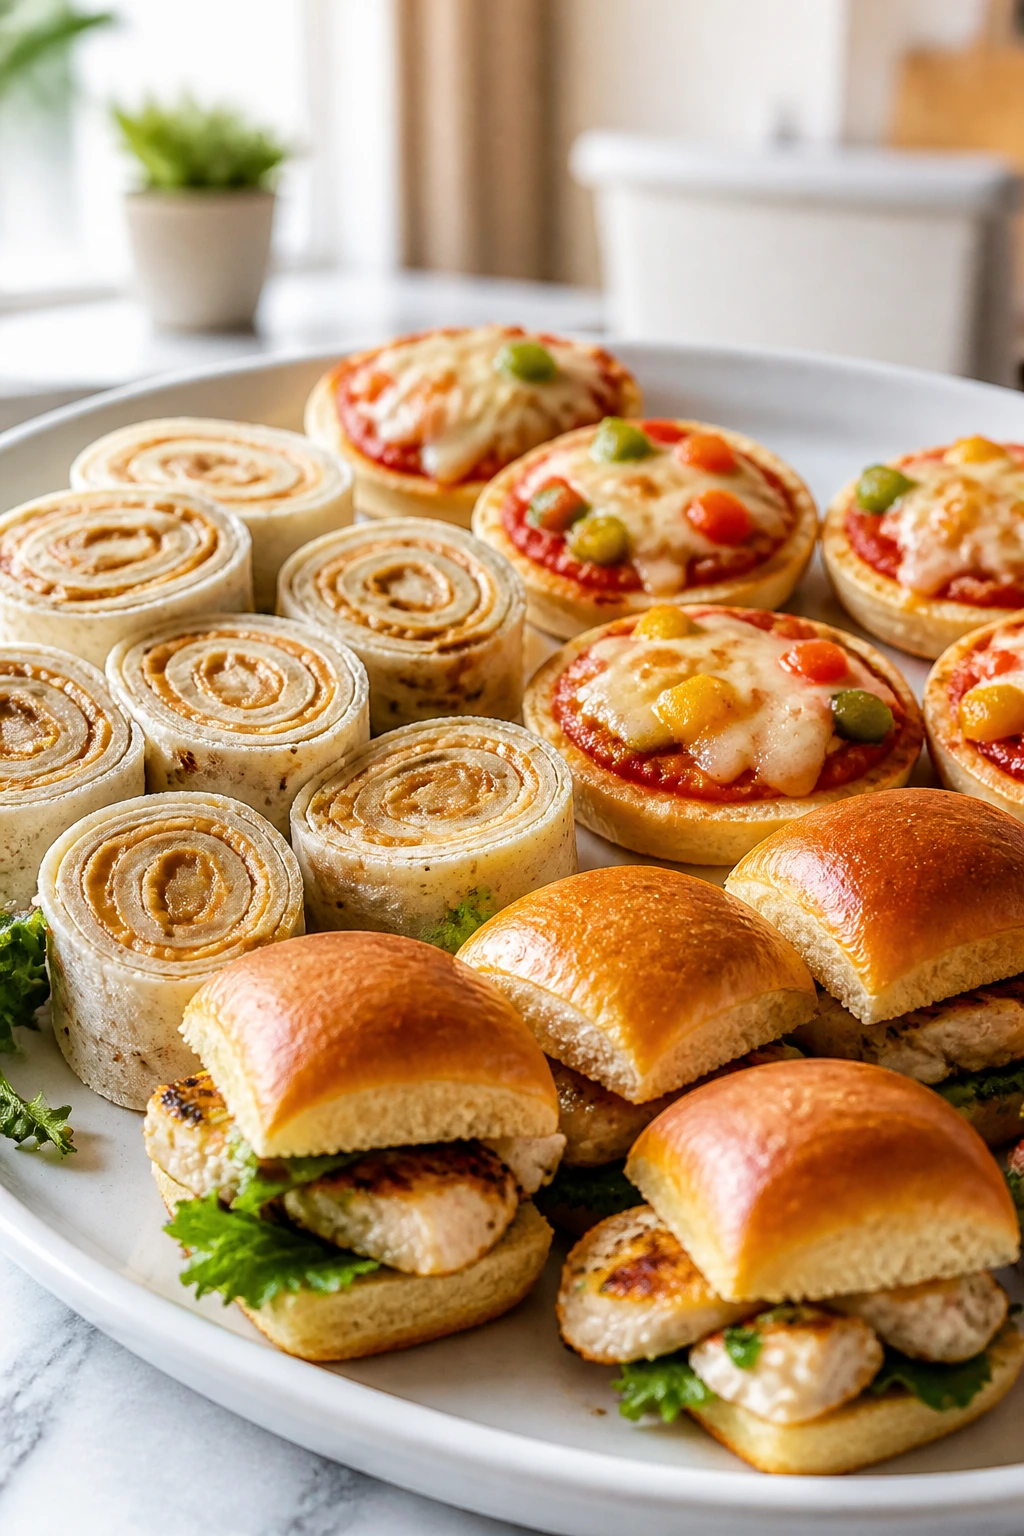
7. Ham and Cheese Pinwheels

These are the sort of bites that disappear from a plate without anyone making a speech about them. Tortillas rolled around cream cheese, ham, and cheddar cut into neat spirals — simple, cold, and dependable. They feel a little like party food, which is part of the charm after a long school day.
Why It Works:
Cream cheese acts like glue, keeping the fillings in place and making the roll sturdy enough to slice. The ham adds salt, the cheddar adds bite, and the tortilla keeps everything handheld. Chilling the roll for 15 minutes before slicing is what gives you clean pinwheels instead of ragged ends. That chill time matters.
Key Ingredients:
- 4 large flour tortillas — soft tortillas roll tighter than thin crisp ones.
- 8 ounces cream cheese, softened — it spreads better when it is not cold from the fridge.
- 2 teaspoons Dijon mustard, optional — adds a little tang without making the filling spicy.
- 8 ounces thinly sliced deli ham — choose slices that are easy to layer flat.
- 1 cup shredded cheddar cheese — small shreds distribute better in the roll.
- 1 tablespoon chopped chives, optional — for a mild onion note.
Quick Steps:
- Stir the cream cheese and mustard together until smooth.
- Spread the mixture over each tortilla, leaving a small border on the edge.
- Layer ham and cheddar evenly over the cream cheese.
- Roll each tortilla tightly and wrap in plastic or parchment.
- Chill for 15 to 20 minutes, then slice into 1-inch pinwheels.
- Serve cold or at cool room temperature.
Equipment for This Recipe:
- Mixing bowl
- Spatula or butter knife
- Sharp knife
- Plastic wrap or parchment
How to Serve This Dish:
Pile the pinwheels on a plate with grapes or cherry tomatoes. They also travel well on a snack tray if the kids are eating in shifts.
Pro Tips for This Recipe:
- Pat the ham dry if it seems damp; extra moisture loosens the roll.
- Roll tightly from the first turn or the center will gap.
- Use a very sharp knife and wipe it between cuts for neater spirals.
Variations on This Dish:
- Turkey Ranch Pinwheels: Swap the ham for turkey and add a smear of ranch.
- Veggie Cream Cheese Roll-Up: Use shredded carrots and cucumber ribbons instead of meat.
- Swiss and Ham Version: Replace cheddar with Swiss for a milder, nuttier taste.
Common Mistakes to Avoid with This Dish:
- Softening the cream cheese too much: If it gets runny, the wraps slide apart.
- Skipping the chill time: Warm rolls cut badly and smudge.
- Stuffing in too much filling: The tortilla will split before you finish rolling.
8. Mini Mac and Cheese Cups
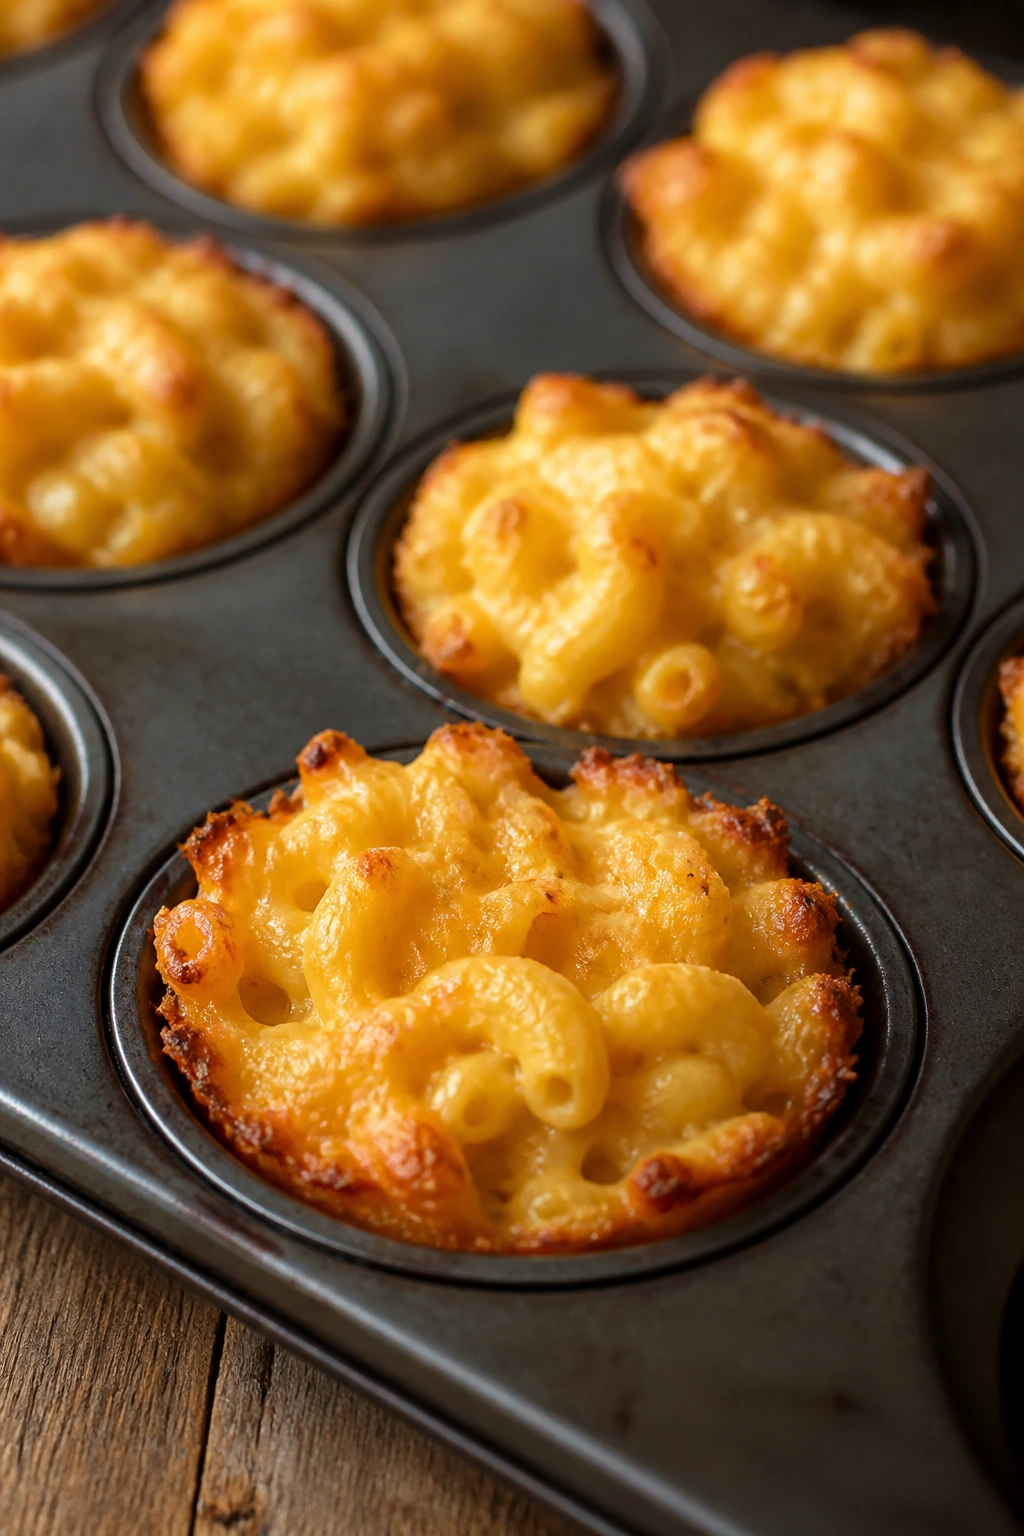
Mac and cheese in a muffin tin sounds a little extra until you see the results. Each cup gets a browned top, a crisp edge, and a soft center that kids can pick up or stab with a fork. It turns a bowl of noodles into a snack with shape, which helps more than you’d think.
Why It Works:
The muffin tin portion keeps the mac and cheese from feeling like a loose pile. Baking the filled cups for a short time sets the edges and gives you the crispy bits kids usually fight over. A simple cheddar sauce holds together well if you do not overcook the pasta. Slightly undercooked noodles are the right move here because they finish in the oven.
Key Ingredients:
- 8 ounces elbow macaroni — small shapes fit the cups better than long pasta.
- 2 tablespoons butter — starts the sauce.
- 2 tablespoons all-purpose flour — thickens the cheese sauce.
- 1 1/2 cups milk — whole milk makes the sauce creamier.
- 2 cups shredded cheddar cheese — sharp cheddar brings enough flavor.
- 1/2 teaspoon fine salt — season the sauce so it does not taste flat.
- 1/4 teaspoon black pepper — optional, but it keeps the flavor from going dull.
- 1/4 cup breadcrumbs — for the top if you want crunch.
Quick Steps:
- Cook the macaroni until just shy of tender, then drain.
- Melt the butter in a saucepan, whisk in the flour, and cook for 1 minute.
- Slowly whisk in the milk and simmer until thick enough to coat a spoon.
- Stir in the cheddar, salt, and pepper until smooth, then fold in the pasta.
- Grease a muffin tin and spoon the mac and cheese into the cups.
- Sprinkle breadcrumbs on top and bake at 375°F for 12 to 15 minutes, until set and lightly browned.
Equipment for This Recipe:
- Medium saucepan
- Whisk
- Muffin tin
- Spoon or small scoop
How to Serve This Dish:
Serve two cups per child with fruit or steamed peas on the side. They are best eaten warm, when the cheese is still soft and the top has a little crunch.
Pro Tips for This Recipe:
- Drain the pasta well so the sauce does not thin out.
- Pack the mac into the cups a little; loose filling does not hold its shape.
- Let them cool for 5 minutes before lifting them out of the pan.
Variations on This Dish:
- Broccoli Cheddar Cups: Stir in finely chopped cooked broccoli for a little green.
- Bacon Top Version: Add a sprinkle of crisp bacon bits before baking.
- Mozzarella Melt Cups: Use half mozzarella for a stretchier, milder result.
Common Mistakes to Avoid with This Dish:
- Overcooking the pasta: It turns soft again in the oven.
- Making the sauce too thin: The cups won’t hold together cleanly.
- Skipping the rest time: Hot mac cups fall apart when you try to lift them too soon.
9. Chicken Nugget Pita Pockets
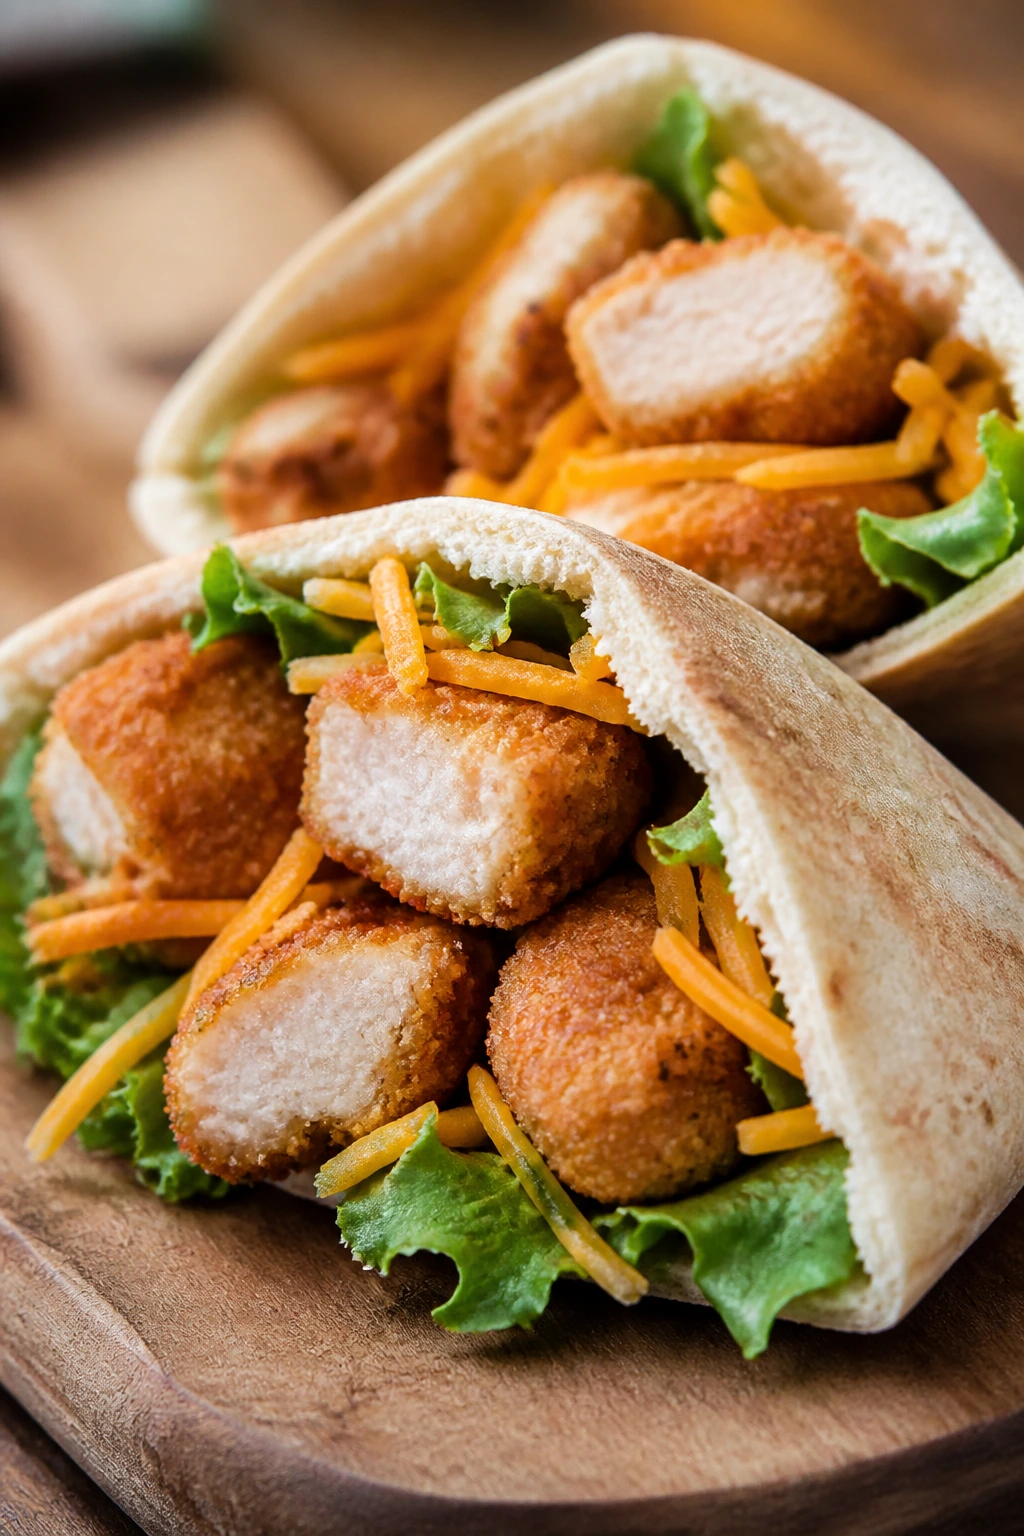
This is the kind of snack that feels like a mini meal without asking for much from you. Crisp chicken nuggets tucked into warm pita with a little cheese and lettuce give you crunch, salt, and a soft wrap all in one bite. The kids who live on nuggets usually recognize this immediately.
Why It Works:
Chicken nuggets bring the protein and the familiar flavor, which removes a lot of the negotiation. Pita pockets are easier to stuff than sandwich bread and less messy than a full wrap. If you warm the pitas for 20 seconds, they open without tearing. That small step helps more than any fancy sauce.
Key Ingredients:
- 12 frozen chicken nuggets — bake them until crisp, not pale.
- 4 small pita pockets — whole-wheat pitas add a little extra fiber.
- 1 cup shredded lettuce — optional, but it adds a cool crunch.
- 1/2 cup shredded cheddar — melts slightly into the warm nuggets.
- 1/3 cup ranch dressing or plain yogurt sauce — for moisture and dip power.
- 1 tablespoon butter, optional — for warming the pita in a skillet.
Quick Steps:
- Bake the chicken nuggets according to the package directions until crisp.
- Warm the pita pockets for a few seconds so they open cleanly.
- Split each pita pocket and layer in 3 nuggets, a little lettuce, and cheese.
- Drizzle with ranch or serve it on the side.
- Eat right away while the nuggets are still crisp.
Equipment for This Recipe:
- Baking sheet
- Oven or air fryer
- Knife
- Spoon for stuffing
How to Serve This Dish:
Serve the pockets with cucumber sticks or apple slices. If you cut them in half, they look less like a sandwich and more like a fun handheld snack.
Pro Tips for This Recipe:
- Let the nuggets rest for a minute before stuffing so the pita does not steam.
- Slice the lettuce thinly; large pieces slip out.
- Keep the ranch on the side if you want the nuggets to stay crunchy.
Variations on This Dish:
- Buffalo Nugget Pocket: Toss the nuggets lightly in mild buffalo sauce before stuffing.
- Veggie Nugget Version: Use plant-based nuggets and the same fillings.
- Cheesy Meltdown Pocket: Add a thin slice of cheese to the warm nuggets so it softens before serving.
Common Mistakes to Avoid with This Dish:
- Packing the pita too full: It splits at the seam before the first bite.
- Stuffing hot nuggets into cold pita: The steam makes the pocket limp.
- Using too much sauce inside: It turns the bread soggy fast.
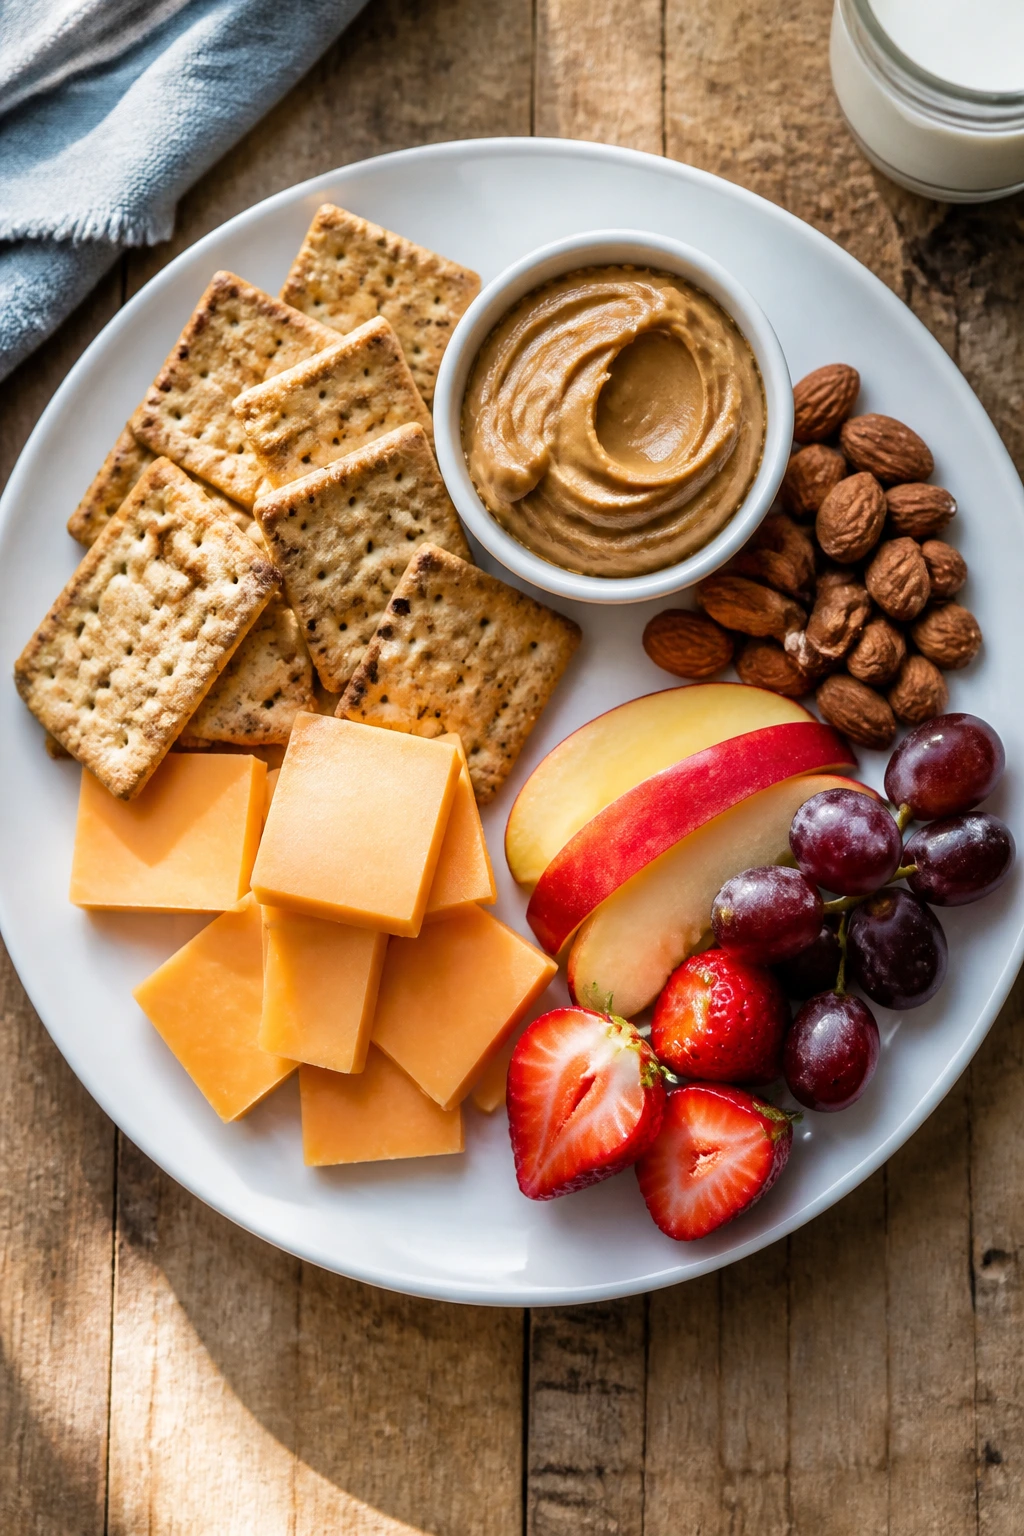
10. DIY Snack Boxes with Hummus, Cheese, and Crunch
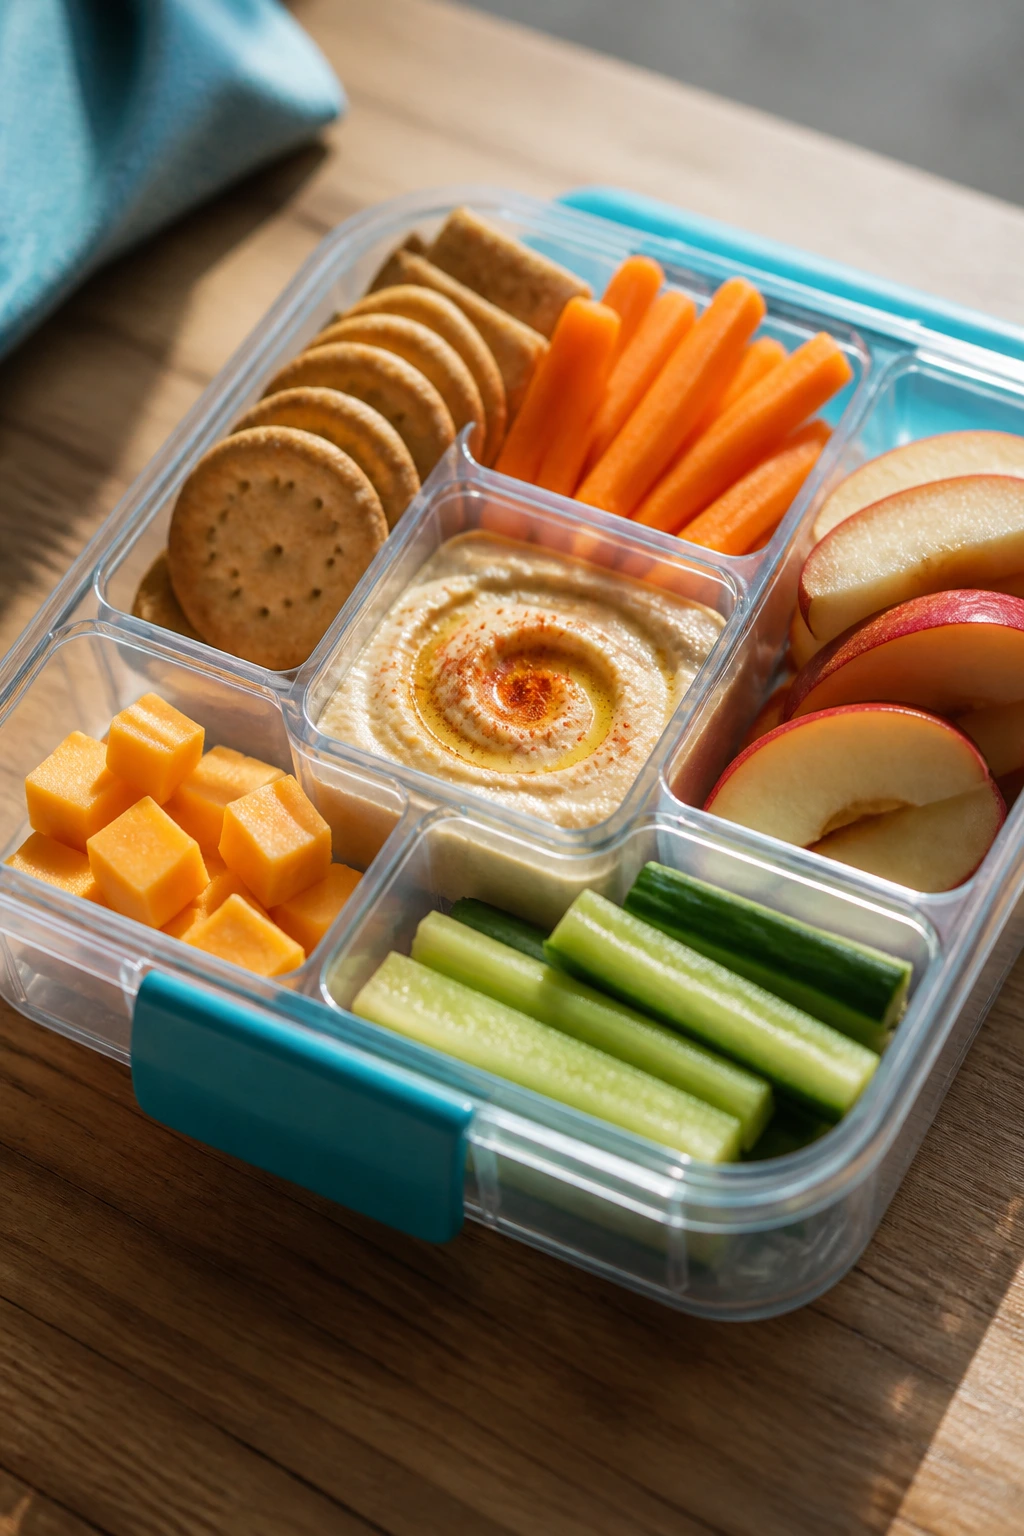
Snack boxes are not flashy, and that is exactly why they work. You get a few crisp things, a creamy dip, something salty, something sweet, and enough variety to make the plate feel like a choice instead of a demand. Kids who pick at food often do better with little compartments than with one mixed bowl.
Why It Works:
A snack box gives you balance without asking for cooking. Hummus brings protein and fat, cheese adds salt, crackers add crunch, and fruit or vegetables bring freshness. The trick is keeping everything dry and separate so the crackers don’t wilt and the fruit doesn’t leak into the dip. Good snack boxes are more about packing than cooking.
Key Ingredients:
- 1 cup hummus — mild classic hummus is the easiest sell for most kids.
- 8 ounces cheese cubes or string cheese pieces — choose a mild cheddar or mozzarella.
- 2 cups baby carrots — rinse and dry well.
- 2 cups apple slices or grapes — use one fruit with less mess.
- 1 1/2 cups whole-grain crackers — sturdy crackers hold up better in a box.
- 1 cup cucumber sticks or bell pepper strips — optional, for a fresh crunch.
- 4 small lidded containers — one box per child or one big tray for sharing.
Quick Steps:
- Wash, dry, and cut the produce into snack-size pieces.
- Portion the hummus into small cups or one central dip section.
- Divide the cheese, crackers, fruit, and vegetables into compartments.
- Seal the boxes and chill them until snack time.
- Serve cold with a spoon or small dipper if needed.
Equipment for This Recipe:
- Cutting board
- Sharp knife
- Small storage containers or divided lunch boxes
- Measuring cups
How to Serve This Dish:
Set the boxes on the counter and let kids choose their own order. If you want the plate to look more intentional, add one small square of dark chocolate or a clementine to each box.
Pro Tips for This Recipe:
- Dry washed produce with a towel so water does not soften the crackers.
- Put apples in lemon water for a minute if you’re packing ahead.
- Keep juicy fruit like berries in a separate cup when possible.
Variations on This Dish:
- Mediterranean Box: Add pita chips, olives, and cucumber instead of crackers.
- Nut-Free Energy Box: Use sunflower seeds, cheese, pretzels, and fruit.
- Ranch Veggie Box: Swap hummus for ranch dip if that is the flavor kids trust.
Common Mistakes to Avoid with This Dish:
- Packing wet produce with crackers: Everything turns soft before snack time.
- Forgetting a dip: Dry carrots and crackers feel less inviting without hummus.
- Using too many new foods at once: One unfamiliar item is easier than three.
11. Banana Oat Muffins
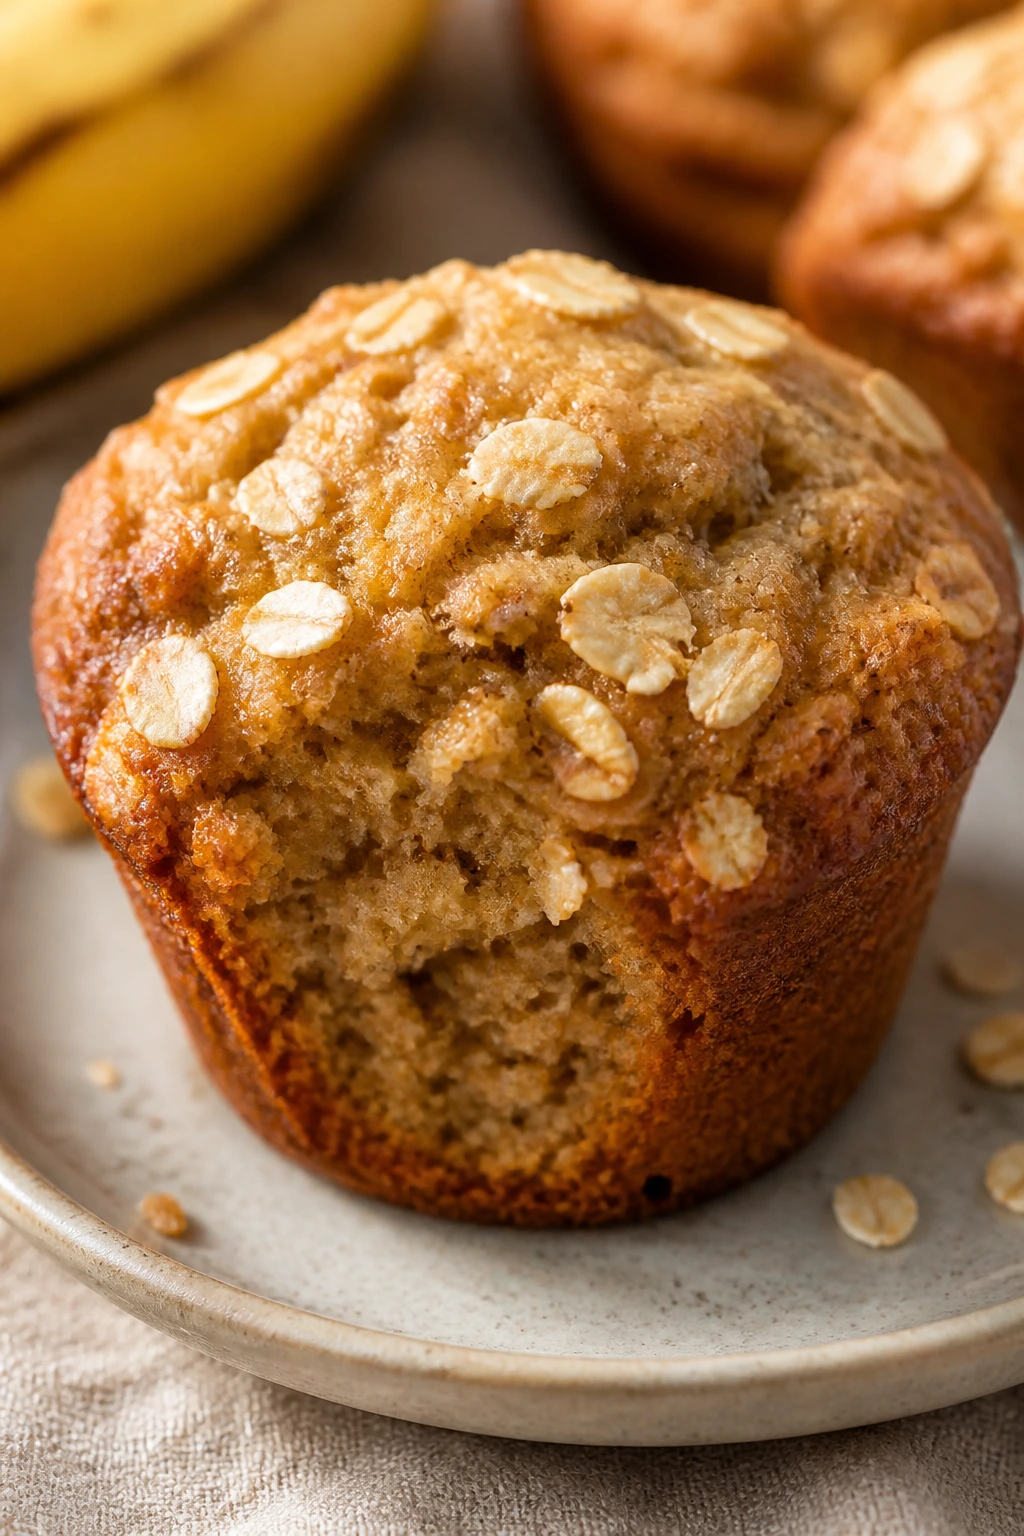
Banana muffins smell like the kitchen has been working for you. They come out soft, lightly sweet, and sturdy enough to eat with one hand while somebody else is asking for help with a zipper. Oats make them feel a little more substantial than a cupcake, which is exactly what an after-school snack should do.
Why It Works:
Very ripe bananas bring sweetness and moisture, so the muffins stay soft for a few days. Oats add a hearty texture that keeps them from feeling too delicate or sugary. If you mix the batter only until the flour disappears, the muffins stay tender instead of rubbery. That restraint matters.
Key Ingredients:
- 3 very ripe bananas, mashed — brown-speckled bananas work best.
- 2 cups rolled oats — they add chew and make the muffins feel fuller.
- 1 1/2 cups all-purpose flour — keeps the muffins light enough to eat easily.
- 1/2 cup brown sugar — gives a mellow sweetness.
- 1/3 cup melted butter or neutral oil — keeps the crumb soft.
- 2 large eggs — help the muffins rise and hold together.
- 1 teaspoon baking soda — gives lift.
- 1 teaspoon cinnamon — makes the bananas smell warmer.
- 1/2 teaspoon salt — keeps the sweetness from tasting flat.
- 1 teaspoon vanilla extract — rounds everything out.
Quick Steps:
- Heat the oven to 350°F and line a muffin tin with liners.
- Mash the bananas, then whisk in the eggs, melted butter, and vanilla.
- Stir in the oats, flour, sugar, baking soda, cinnamon, and salt until just combined.
- Spoon the batter into the muffin cups, filling each about 3/4 full.
- Bake for 18 to 22 minutes, until the tops spring back when pressed lightly.
- Cool for 10 minutes before moving them to a rack.
Equipment for This Recipe:
- Muffin tin
- Mixing bowls
- Whisk
- Measuring cups and spoons
How to Serve This Dish:
Serve one muffin with fruit or yogurt for a snack that feels more complete. They are good warm, but they also hold up well at room temperature in a lunchbox-style setup.
Pro Tips for This Recipe:
- Use bananas with dark spots; pale bananas do not bring enough flavor.
- Let the batter sit for 5 minutes before baking so the oats soften a little.
- If you want taller muffins, start the oven at 375°F for 5 minutes, then lower it to 350°F.
Variations on This Dish:
- Chocolate Chip Banana Muffins: Fold in 1/2 cup mini chips for a sweeter finish.
- Blueberry Oat Muffins: Swap half the banana for blueberries if you want a fruitier muffin.
- Whole-Wheat Version: Replace half the flour with whole-wheat flour for a nuttier taste.
Common Mistakes to Avoid with This Dish:
- Overmixing the batter: That makes the muffins dense and tough.
- Using under-ripe bananas: The muffins end up bland and dry.
- Baking too long: The tops should be set, not hard.
12. Egg and Cheese Muffin Cups
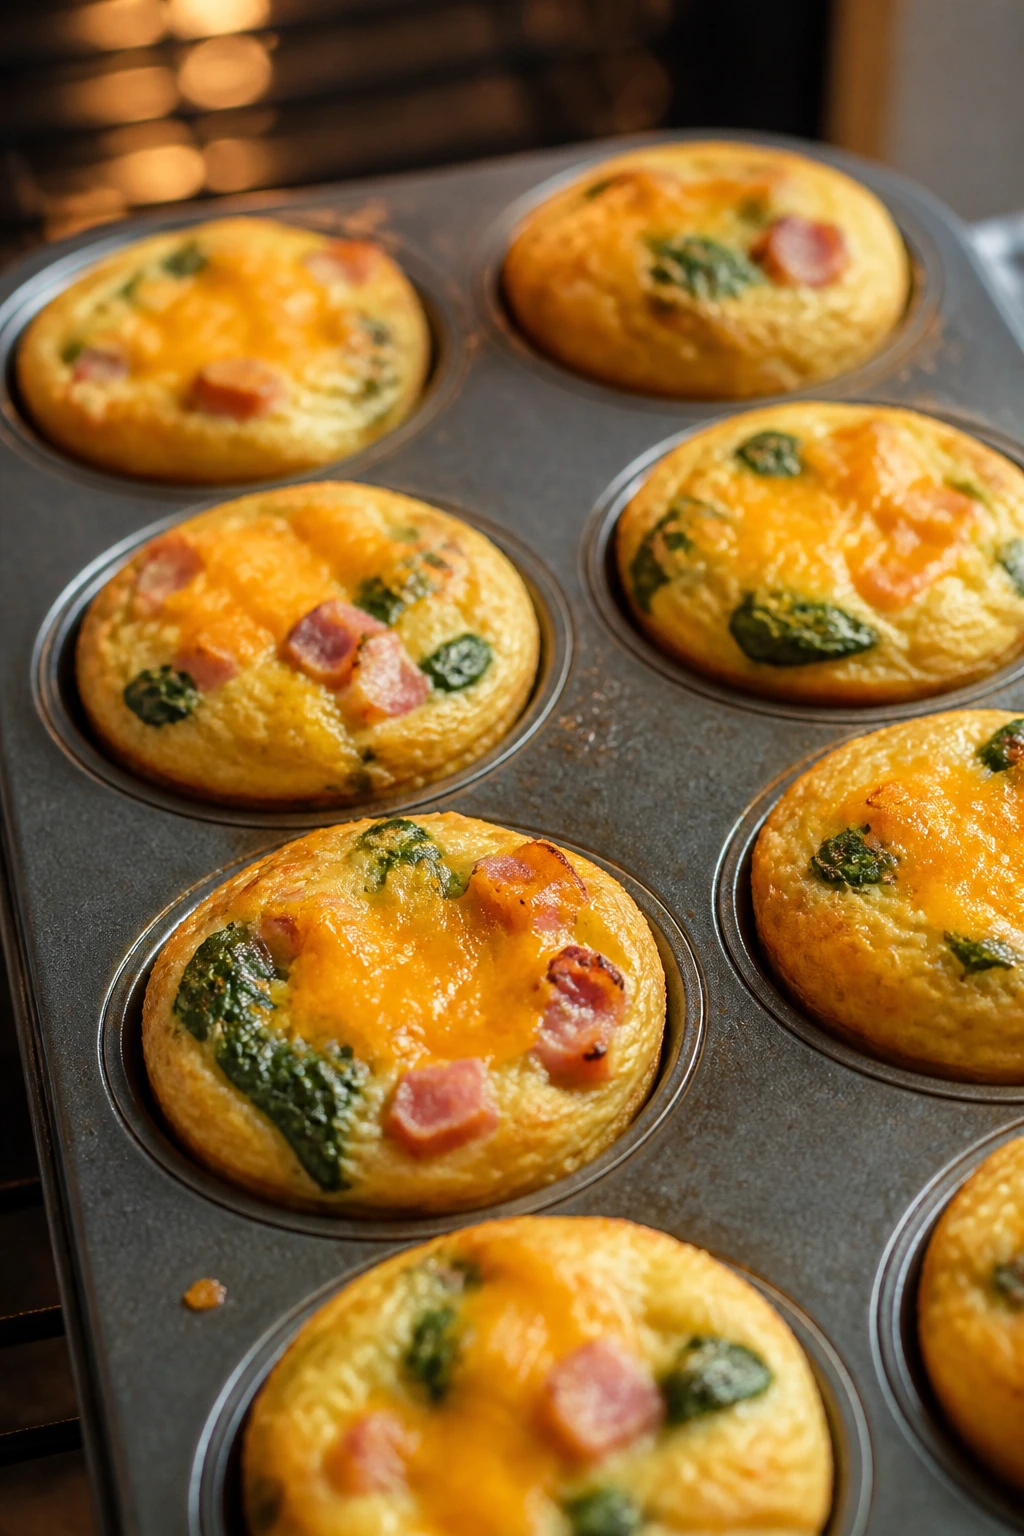
Egg muffins are the quiet workhorse of after-school food. They are warm, protein-heavy, and easy to reheat, which helps on days when everyone walks in hungry at once. The cheese melts into the eggs, and the little cups hold their shape better than scrambled eggs on a plate.
Why It Works:
Eggs give this snack enough protein to feel like a small meal. Baking them in a muffin tin turns them into neat portions that kids can hold or eat with a fork. If you do not overbake them, they stay tender instead of spongy. The oven should do the work, not your patience.
Key Ingredients:
- 8 large eggs — enough for 8 muffin cups.
- 1/4 cup milk — makes the eggs a little softer.
- 1 cup shredded cheddar — sharp cheddar gives the most flavor.
- 1/2 cup diced ham, bell pepper, or spinach — keep the pieces tiny.
- 1/2 teaspoon salt — season the eggs or they taste flat.
- 1/4 teaspoon black pepper — optional, but helpful.
- Cooking spray or butter — keeps the muffins from sticking.
Quick Steps:
- Heat the oven to 350°F and grease a muffin tin well.
- Whisk the eggs, milk, salt, and pepper until smooth.
- Stir in the cheese and chopped add-ins.
- Pour the mixture into the muffin cups, filling each about 3/4 full.
- Bake for 16 to 18 minutes, until the centers are set and no longer glossy.
- Cool for a few minutes before lifting them out.
Equipment for This Recipe:
- Muffin tin
- Mixing bowl
- Whisk
- Measuring cup
How to Serve This Dish:
Serve the egg cups with toast fingers, cherry tomatoes, or fruit. If you want them to feel more like a mini meal, add a slice of buttered bread on the side.
Pro Tips for This Recipe:
- Grease the pan well, especially if you skip liners.
- Chop add-ins finely so the cups slice cleanly.
- Let them cool before storing or they will steam and turn rubbery.
Variations on This Dish:
- Spinach and Cheddar Cups: Add chopped cooked spinach for a greener bite.
- Ham and Swiss Cups: Swap cheddar for Swiss and add diced ham.
- Sausage Breakfast Cups: Use cooked breakfast sausage if you want a richer snack.
Common Mistakes to Avoid with This Dish:
- Overfilling the cups: They puff and spill into each other.
- Baking until the eggs are dry: They should look set, not cracked.
- Skipping the grease: Egg cups stick fiercely to a dry tin.
13. Grilled Cheese Dippers
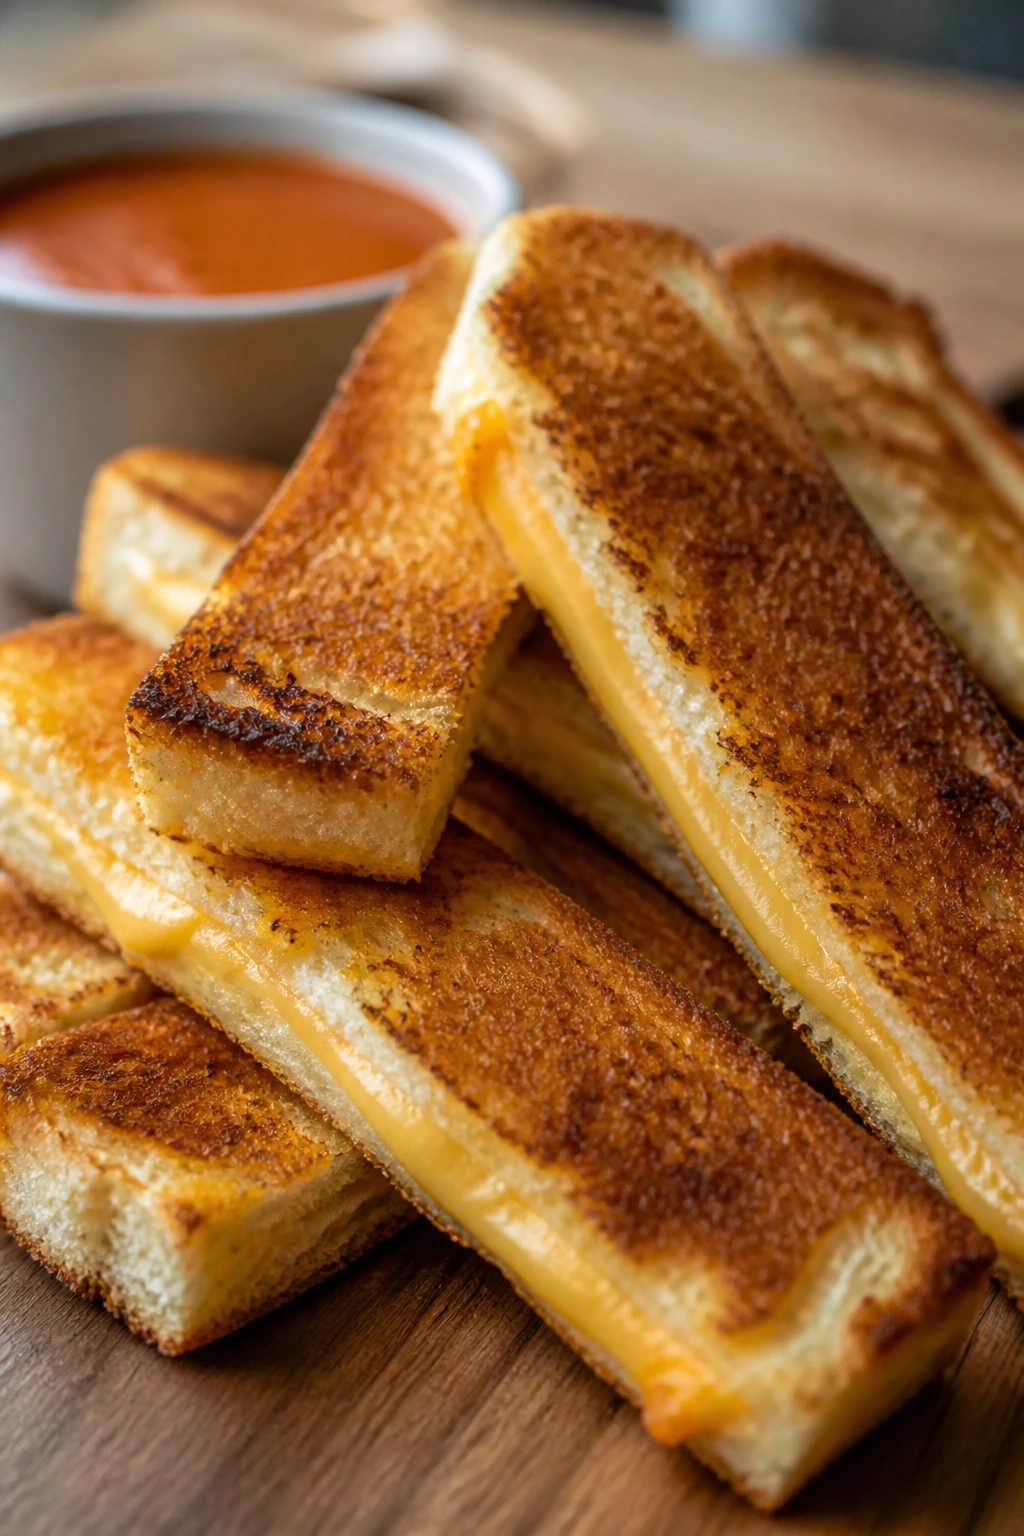
Grilled cheese has a kind of built-in trust with kids. Cut it into strips and it becomes something else entirely — dunkable, slower to eat, and just a bit more fun. The buttered bread turns crisp, the cheese melts into the middle, and a cup of warm tomato soup makes the whole plate feel deliberate.
Why It Works:
This snack is mostly about texture. Crisp bread outside, molten cheese inside, and a dip that adds warmth without making the sandwich feel soggy. Medium-low heat is the trick because it gives the cheese time to melt before the bread turns too dark. Too much heat ruins grilled cheese fast. There’s no rescue step for a burnt crust.
Key Ingredients:
- 8 slices sandwich bread — white or wheat both work.
- 8 slices cheddar, American, or a mix — cheese that melts smoothly is the right move.
- 2 tablespoons butter, softened — spreads more evenly than cold butter.
- 1 cup tomato soup, warmed, optional — for dipping.
- 1 teaspoon mayonnaise, optional — a thin smear on the outside browns nicely.
Quick Steps:
- Heat a skillet over medium-low heat.
- Butter the outside of each slice of bread.
- Place cheese between two slices to make sandwiches.
- Cook the sandwiches for 3 to 4 minutes per side, pressing gently, until golden and the cheese melts.
- Slice into strips or triangles.
- Serve with warm tomato soup for dipping if you like.
Equipment for This Recipe:
- Skillet
- Spatula
- Butter knife
- Small pot for soup, optional
How to Serve This Dish:
Serve the strips in a mug or low bowl with soup on the side. For older kids, add pickle spears or carrot sticks to cut through the richness.
Pro Tips for This Recipe:
- Keep the skillet at medium-low. Patient heat wins here.
- Use pre-sliced cheese that melts well if you want fewer gaps.
- Let the sandwich sit for 1 minute before cutting or the cheese will run out.
Variations on This Dish:
- Pesto Grilled Cheese: Add a thin layer of pesto inside for a herby note.
- Tomato Slice Version: Add one thin tomato slice if the kids will eat it.
- Three-Cheese Mix: Combine cheddar, mozzarella, and American for more stretch.
Common Mistakes to Avoid with This Dish:
- Cooking on high heat: The bread burns before the cheese softens.
- Using too much filling: The sandwich tears when you flip it.
- Cutting immediately: The cheese needs a minute to settle.
14. Turkey and Cheese Sliders
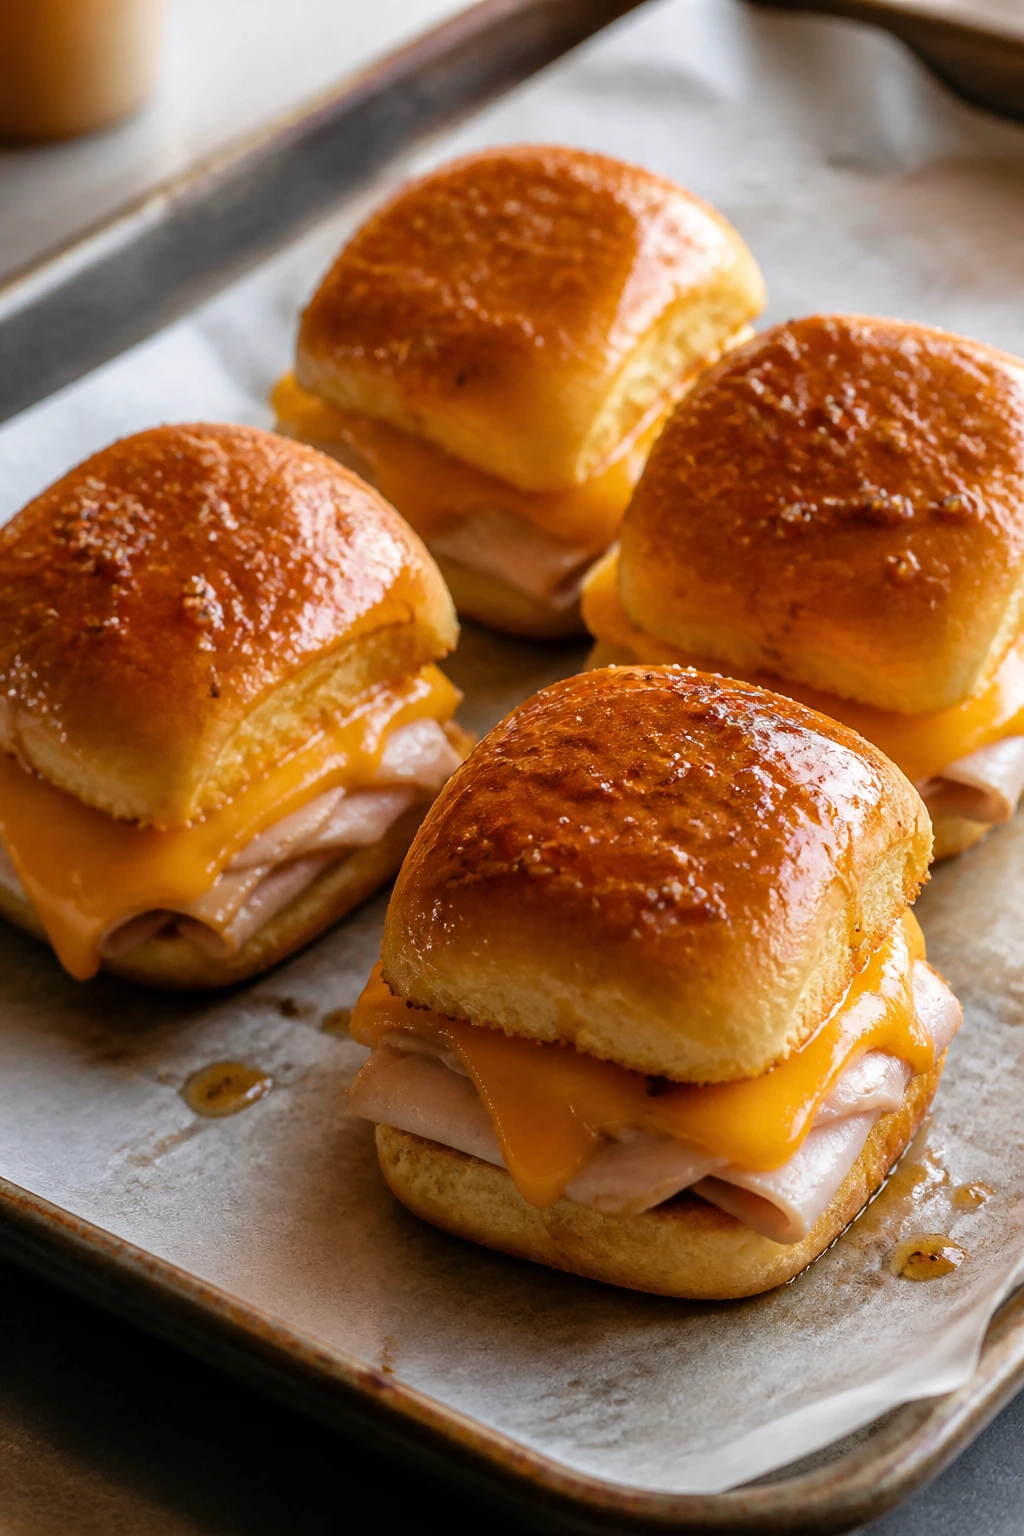
Sliders are useful because they feel like a little event. You get soft rolls, salty turkey, melted cheese, and a buttery top that smells like a proper kitchen. They are a smart choice when one kid is starving and two others are “not hungry” until they see the tray.
Why It Works:
Slider buns are soft enough for kids to chew easily but sturdy enough to hold meat and cheese. A quick bake melts everything together, and the butter glaze gives the tops a salty, bakery smell. If you cover the pan loosely with foil for part of the bake, the cheese melts before the buns brown too much. That keeps the tops from getting too dark.
Key Ingredients:
- 12 slider buns or Hawaiian rolls — soft rolls work best.
- 8 ounces sliced turkey — fold the slices so they fit in the buns.
- 6 slices cheddar or Swiss — choose a cheese that melts without splitting.
- 2 tablespoons mayonnaise, optional — adds moisture under the turkey.
- 3 tablespoons butter, melted — brushed over the tops.
- 1 teaspoon Dijon mustard — mixed into the butter for a mild bite.
- 1 teaspoon poppy seeds or sesame seeds, optional — for the top.
Quick Steps:
- Heat the oven to 350°F and line a baking dish or sheet pan.
- Slice the rolls in half as a connected slab if possible.
- Spread the bottom layer lightly with mayo, then add turkey and cheese.
- Replace the top buns and brush with the melted butter and mustard mixture.
- Sprinkle seeds on top, cover loosely with foil, and bake for 10 minutes.
- Remove the foil and bake 5 more minutes until the tops are lightly browned.
Equipment for This Recipe:
- Baking dish or sheet pan
- Pastry brush
- Sharp knife
- Foil
How to Serve This Dish:
Cut the sliders apart and serve them warm with carrot sticks or grapes. They also work well with a small bowl of mustard or ranch for dipping.
Pro Tips for This Recipe:
- Fold the turkey instead of laying it flat; it keeps the layers from sliding.
- Use enough butter on top to soak into the buns a little.
- If the rolls are very soft, set them on parchment so they lift cleanly.
Variations on This Dish:
- Ham and Cheddar Sliders: Swap turkey for ham and keep the rest the same.
- BBQ Chicken Sliders: Use shredded cooked chicken and a little barbecue sauce.
- Veggie Melt Sliders: Replace the meat with roasted peppers and extra cheese.
Common Mistakes to Avoid with This Dish:
- Skipping the butter glaze: The tops end up dry and dull.
- Overstuffing the buns: The filling spills out before the cheese melts.
- Baking uncovered the whole time: The tops can brown too quickly.
15. Berry Smoothie Bowls
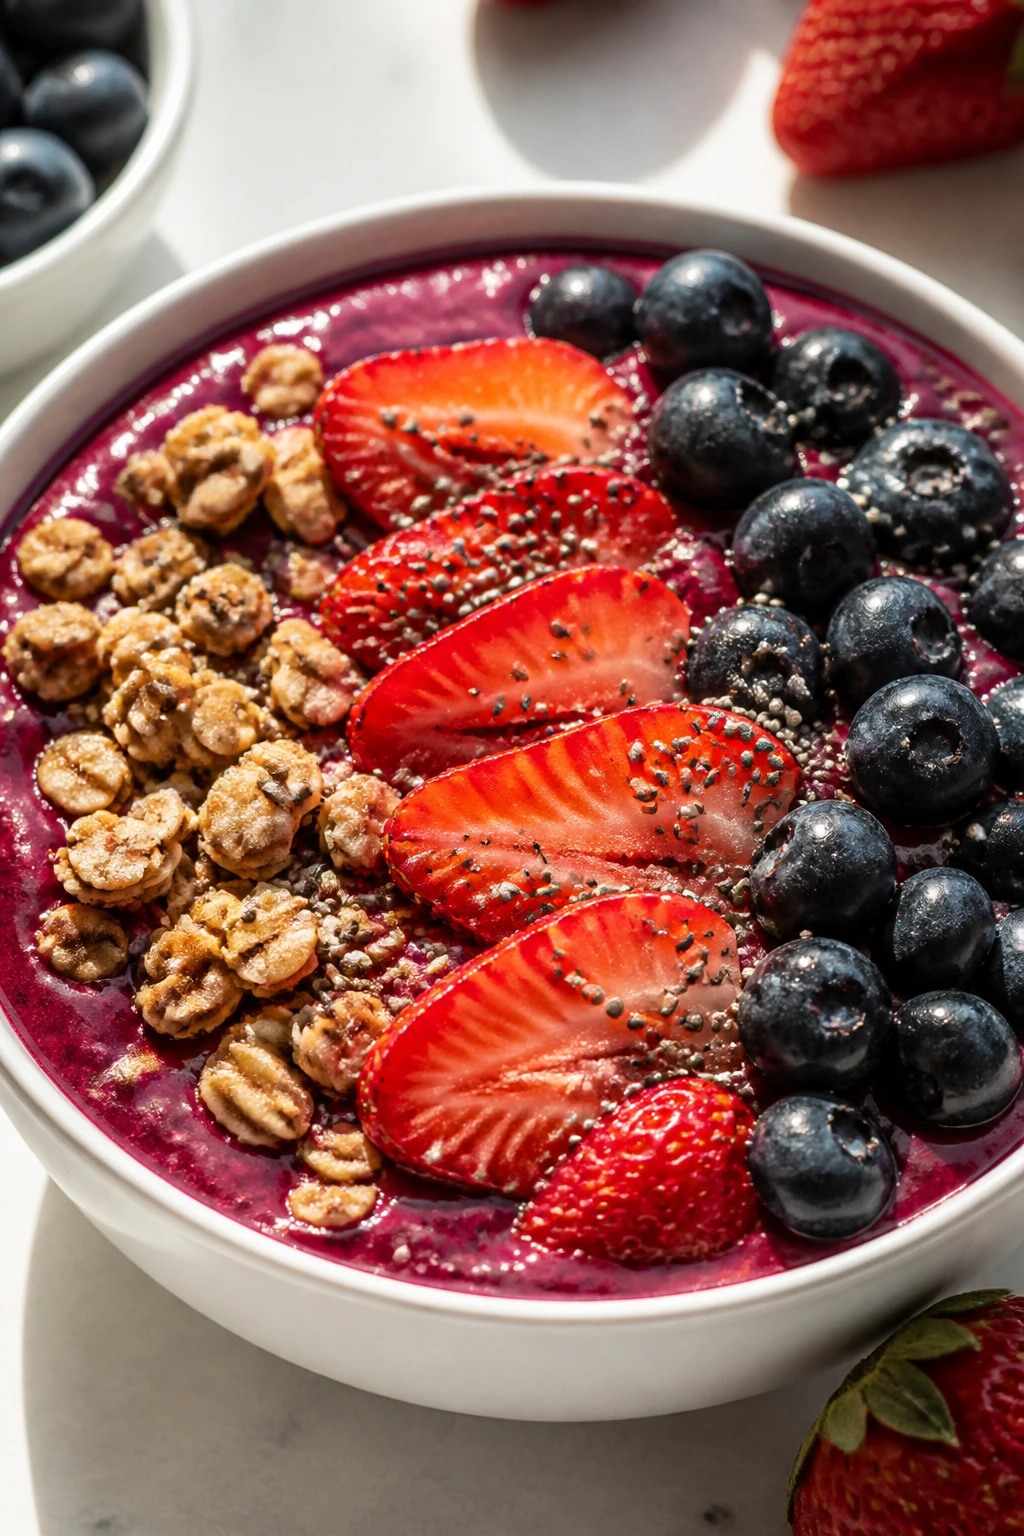
A smoothie bowl is for the kids who want something cold and spoonable after a long day. It looks bright and a little playful, like breakfast that wandered into snack time and decided to stay. The toppings matter here — without crunch, it turns into just a thick drink in a bowl.
Why It Works:
Frozen fruit gives the bowl a thick, spoonable texture instead of a pourable one. Greek yogurt adds body and a little protein, while the toppings create the contrast kids expect from a snack. If the blender has to work too hard, a splash more milk helps, but too much liquid turns the whole thing soupy. That balance is the only thing to watch.
Key Ingredients:
- 2 frozen bananas — they make the base thick and naturally sweet.
- 2 cups frozen mixed berries — blueberries, strawberries, and raspberries all work.
- 3/4 cup plain Greek yogurt — adds creaminess and protein.
- 1/2 cup milk or orange juice — just enough to get the blender moving.
- 1/2 cup granola — for the top.
- 1/4 cup sliced fresh strawberries — for a fresh finish.
- 1 tablespoon chia seeds or shredded coconut, optional — adds texture.
Quick Steps:
- Put the frozen bananas, berries, yogurt, and milk into a blender.
- Blend on low, stopping to scrape down the sides as needed, until thick and smooth.
- Spoon the mixture into bowls right away.
- Top with granola, sliced strawberries, and chia seeds or coconut if using.
- Serve immediately before the bowl starts to soften.
Equipment for This Recipe:
- Blender
- Spatula
- Bowls
- Spoon
How to Serve This Dish:
Serve it with a spoon that can handle thick frozen fruit. If you want the bowl to feel more substantial, put a slice of toast or a hard-boiled egg on the side.
Pro Tips for This Recipe:
- Use frozen fruit, not fresh, or the bowl will be too thin.
- Start with less liquid than you think you need.
- Add toppings right before serving so the granola stays crunchy.
Variations on This Dish:
- Tropical Bowl: Use mango and pineapple instead of berries.
- Chocolate-Banana Bowl: Add 1 tablespoon cocoa powder to the base.
- Green Berry Bowl: Blend in a handful of spinach; the berries cover the color.
Common Mistakes to Avoid with This Dish:
- Adding too much liquid: The bowl turns into a smoothie in a bowl, which is not the same thing.
- Letting it sit too long: It melts fast, so serve it right away.
- Skipping the crunchy topping: Without texture, the bowl feels flat.
Why the 3:30 Snack Needs Protein, Carbs, and a Little Fat
Kids are not usually asking for nutrition lectures when they come home hungry. They are asking for food that will stop the edge-of-hunger crankiness without taking forty minutes to appear. That’s why the best after-school snacks do a neat little balancing act: carbs for quick energy, protein for staying power, and a little fat for texture and satisfaction.
A banana by itself is fine. A banana with peanut butter is a different thing. Yogurt alone can feel sharp and unfinished, but yogurt with granola and berries suddenly becomes a snack worth stopping for. Cheese on bread, turkey in a slider, beans inside a quesadilla — each of those combinations works because the ingredients slow each other down a little. The snack does not vanish in one minute.
I also like recipes that give kids choices without turning snack time into a restaurant. Some want warm food. Some want cold. Some want to dip, others want to grab and go. If you keep a few of each style in rotation, you spend less time negotiating and more time getting dinner ready, which is probably the real prize here.
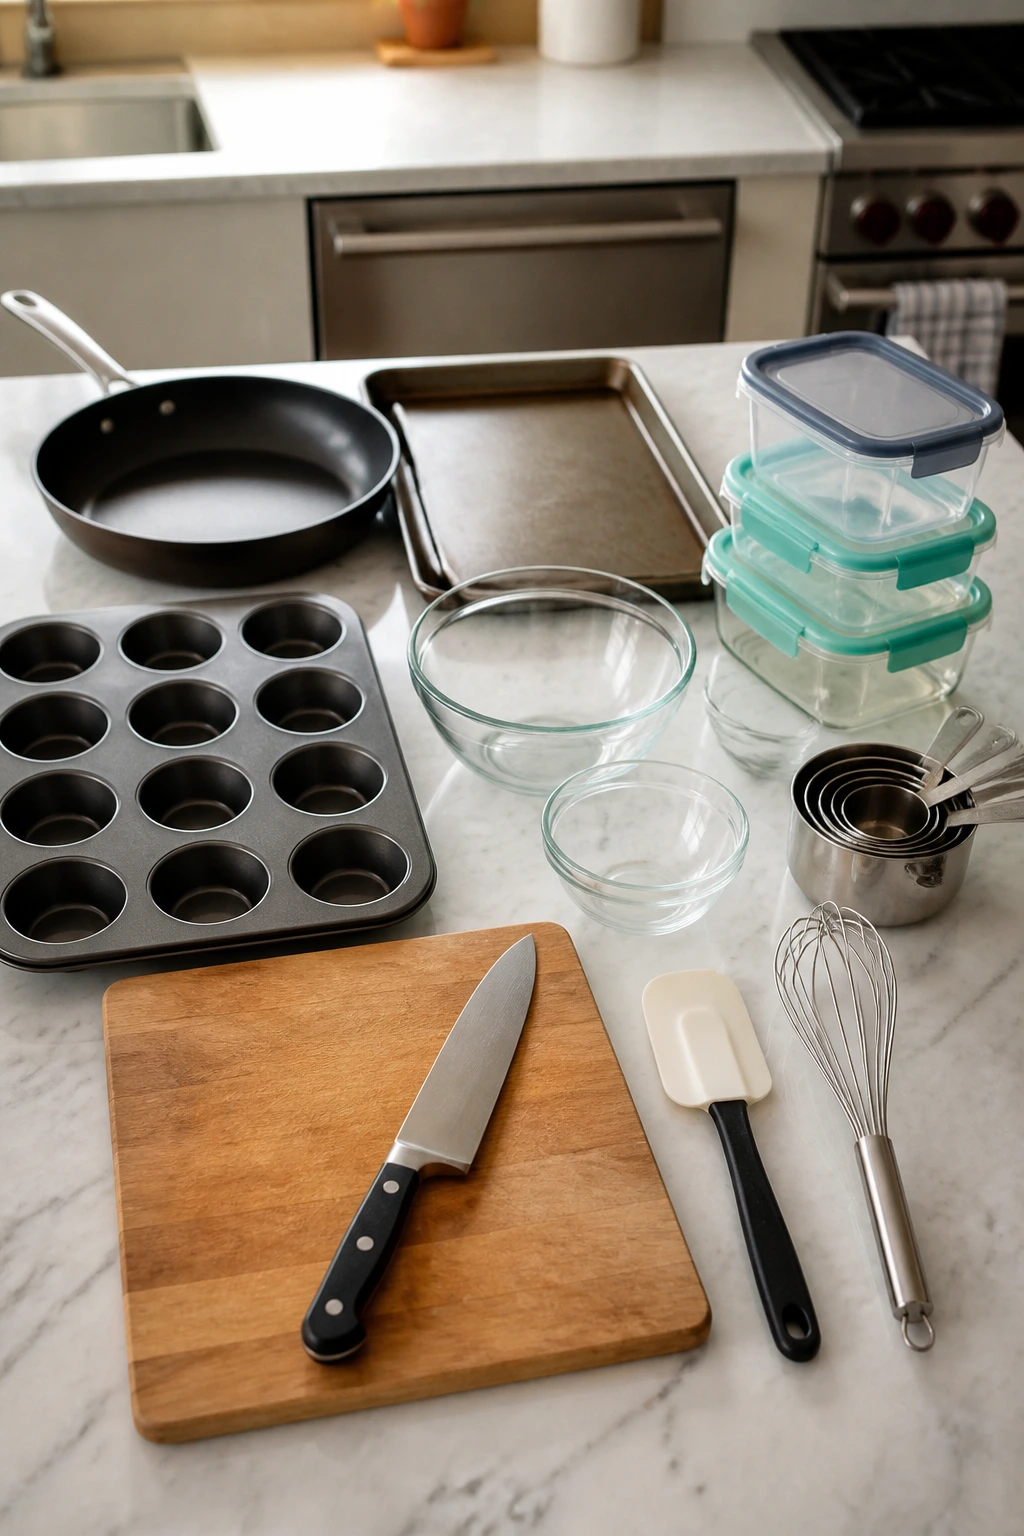
The Equipment That Makes After-School Food Faster
-
Large skillet or griddle: Best for quesadillas and grilled cheese because it gives you enough flat space to work without crowding.
-
Rimmed baking sheet: Useful for pizza bagels, pita pizzas, sliders, and any snack that needs a quick oven finish.
-
Muffin tin: The right tool for banana muffins, egg cups, and mac and cheese cups. A standard 12-cup pan covers most of these.
-
Mixing bowls in two sizes: One small bowl for sauces and one larger bowl for batters or yogurt mixtures keeps the counter less chaotic.
-
Sharp knife and cutting board: You’ll use these for apples, fruit, pinwheels, and anything that needs clean slices.
-
Spatula and whisk: Small tools, huge payoff. A whisk makes egg cups and cheese sauce smoother, and a thin spatula helps flip sandwiches without tearing them.
-
Measuring cups and spoons: Not glamorous, but important when you’re portioning cheese, sauce, and oats.
-
Storage containers with lids: Divided containers are especially handy for snack boxes, leftovers, and pre-cut fruit.
-
Parchment paper: Makes cleanup easier on the pizza and slider trays. Worth keeping on hand.
Smart Shopping for Kid-Friendly Ingredients
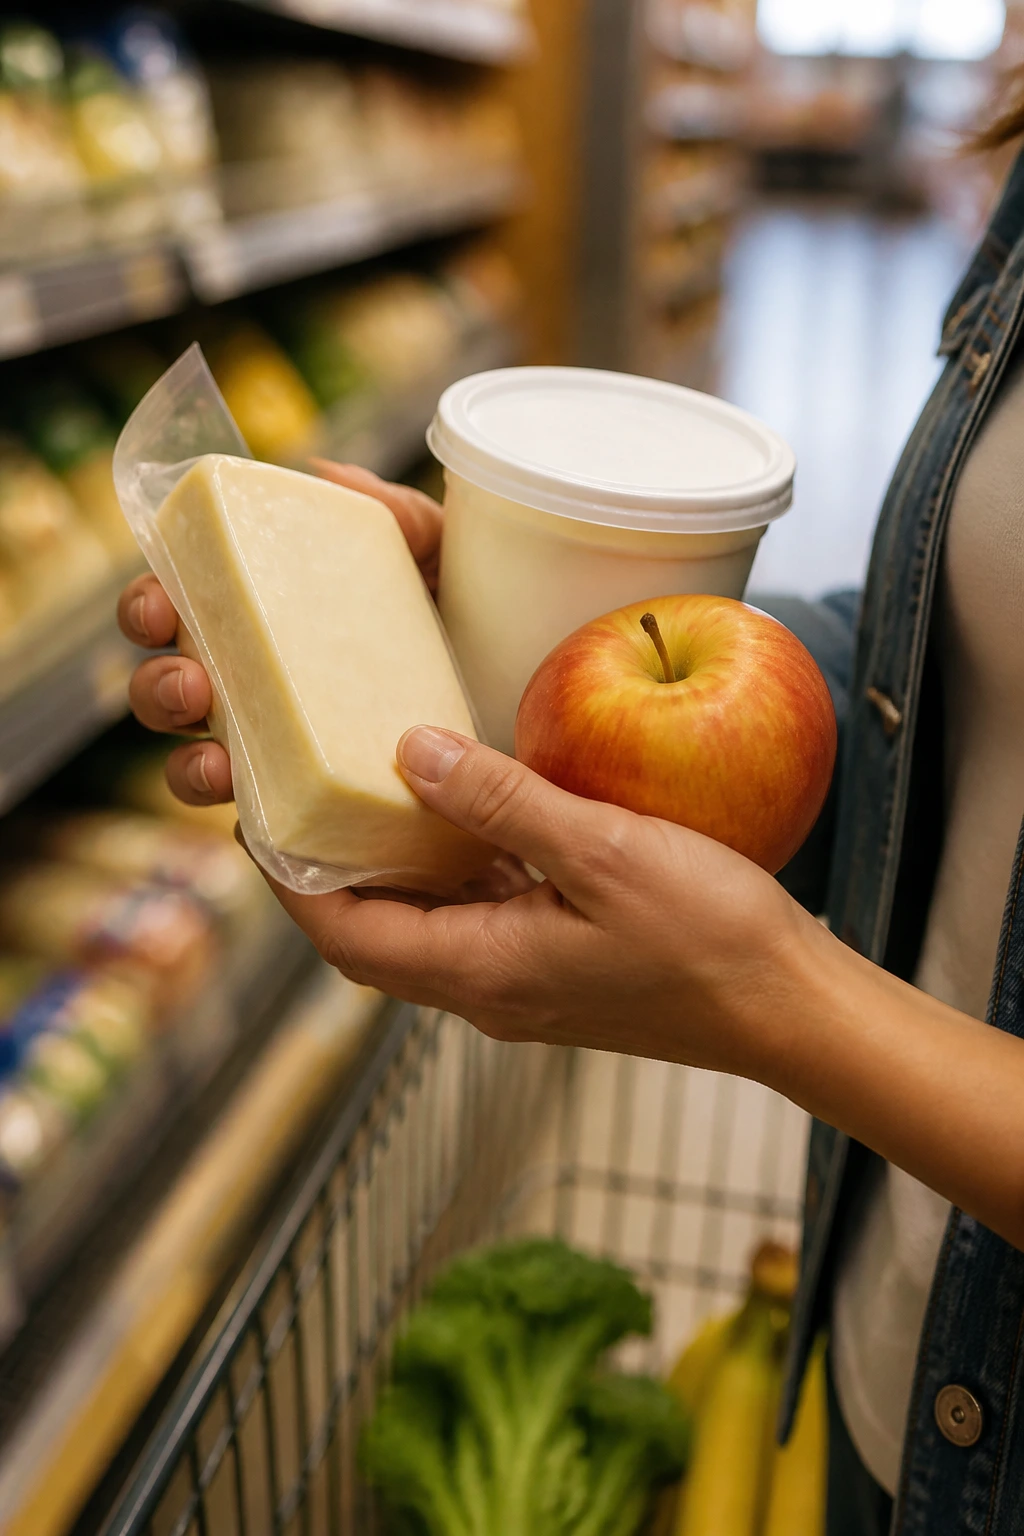
When you shop for after-school snacks, think like a person who has to cook at 3:45, not like a magazine spread. That means buying ingredients that do not need a long pep talk before they become food. Tortillas, bagels, bread, pita, oats, yogurt, apples, bananas, hummus, cheese, and deli turkey do most of the work in this collection. If you already keep those things around, you’re halfway done.
Cheese deserves a small note. Block cheese that you shred yourself melts a little smoother, especially for quesadillas and mac and cheese cups, but pre-shredded cheese saves time and still works well. For pizzas and sliders, low-moisture mozzarella and mild cheddar behave best because they melt without turning greasy. On the yogurt side, plain Greek yogurt gives you more body than flavored yogurt, which can run thin when you add fruit.
Fruit matters more than people think. Apples should be crisp, not mealy. Bananas should have brown speckles for muffins and roll-ups, but not so many soft spots that they turn slippery. Frozen berries are worth buying for smoothie bowls because they create thickness, while fresh berries make better parfaits and snack boxes when you want the texture to stay firm. For crackers and granola, choose sturdy versions. Fragile ones break before snack time starts.
If you need to watch allergens, read the labels on hummus, granola, crackers, and deli meats. A lot of the ingredients here are flexible, but a few packaged foods hide ingredients that matter in kid settings. Plain foods are often the safest place to start.
How to Serve These Snacks So Kids Actually Reach for Them
Presentation:
Small portions on small plates win here. Cut quesadillas, pizza, and grilled cheese into triangles or strips so they feel bite-size instead of dinner-size. Use bowls, cups, and divided containers for the cold snacks; a little separation makes the food look intentional instead of dumped out.
Accompaniments:
A good after-school plate usually needs one cold, crisp thing beside the main snack. Apple slices, grapes, cucumber sticks, carrot sticks, or a few cherry tomatoes all play that role well. For the warmer snacks, a small dip — salsa, ranch, hummus, or tomato soup — gives kids a second thing to dip and keeps the meal from feeling too plain.
Portions:
Younger kids often do fine with one quesadilla, one muffin, two sliders halves, or a small snack box. Older kids coming off sports practice might eat two sliders, two egg cups, or a full bowl of smoothie. If you are not sure, serve a moderate portion first and keep the rest visible. Kids tend to ask for more when the second round is easy to see.
Beverage Pairing:
Cold milk works with most of these, especially the cheesy ones and the muffins. Water with sliced fruit is the most neutral fallback, and it keeps the snack from feeling sugar-heavy. For smoothie bowls and parfaits, plain water or milk is usually enough — no need to overcomplicate the drink.
Tiny Flavor Upgrades That Change the Whole Plate
Flavor Enhancement:
A small finishing move goes farther than people expect. A pinch of cinnamon on banana recipes, a dusting of Parmesan on pizza snacks, or a little flaky salt on apple slices can make the food taste more awake. For savory snacks, a smear of Dijon in the butter or a few drops of hot sauce in adult portions gives the food a more layered taste without scaring off kids.
Customization:
You can bend these snacks around the child in front of you. Add beans or chicken to quesadillas, swap turkey for ham in the pinwheels, or tuck a spoonful of pesto into grilled cheese for the kids who already like that flavor. If one child is a texture detective, keep the components separate and let them build their own plate.
Serving Suggestions:
Use toothpicks for sliders if the buns are sliding apart. Serve parfaits in clear cups so the layers show. Put smoothie bowls in chilled bowls if the room is warm; it slows the melt and keeps the top from running away. These are tiny moves, but they make snack time feel less like rescue food and more like a real break.
Make-It-Yours:
For nut-free homes, sunflower seed butter replaces peanut butter in the roll-ups and apple nachos without much fuss. For dairy-free eaters, use nondairy yogurt, plant-based cheese, and hummus-heavy snack boxes. For extra-hungry kids, add a second protein piece — an egg cup beside the muffin, turkey beside the hummus box, or cheese alongside the fruit. That extra bit often saves you from making a second snack thirty minutes later.
Make-Ahead, Storage, and Reheating Guidance

A few of these snacks are best made and eaten in the same breath. Apple nachos, smoothie bowls, and grilled cheese dippers are in that camp. Once the toppings go on or the cheese cools, they start losing the texture that makes them worth making. Serve those right away, or prep the parts separately and assemble at the table.
Baked items are easier to plan ahead. Banana oat muffins, egg and cheese muffin cups, mini mac and cheese cups, sliders, pizza bagels, and mini pita pizzas keep well in the refrigerator for 3 to 4 days in airtight containers. Most of them also freeze for up to 2 months. Reheat muffins in the microwave for 15 to 20 seconds or in a 300°F oven for about 8 minutes. Reheat egg cups and mac cups in the microwave in short bursts so they do not turn rubbery.
Warm sandwiches and quesadillas do best in a skillet or toaster oven rather than a straight microwave. A skillet over medium heat brings the crisp back in about 2 to 3 minutes per side. The toaster oven is handy for pizza bagels and pita pizzas because it dries the top less than a microwave and does not demand much attention. Sliders reheat well covered in foil at 325°F for 10 to 12 minutes.
For cold snacks, keep components separate whenever possible. Hummus boxes stay fresh for 3 to 4 days if the produce is dry and the container seals well. Parfaits hold for 1 day if the granola is packed separately. Peanut butter roll-ups are best within a few hours, though the wrapped tortillas stay fine overnight in the fridge. Most food should not sit at room temperature for more than 2 hours, and less if the room is warm.
Twists for Nut-Free, Gluten-Free, and Extra-Hungry Kids
-
Nut-Free Backpack Swap: Replace peanut butter with sunflower seed butter in the roll-ups and apple nachos, then choose nut-free granola and crackers. The flavor stays familiar, and the texture barely changes. This is the easiest swap in the whole group.
-
Gluten-Free Build: Use corn tortillas for quesadillas, gluten-free bread for grilled cheese, gluten-free bagels or English muffins for pizza, and certified gluten-free oats for muffins. The only real watch-out is texture; gluten-free bread browns faster and can dry out, so keep an eye on the skillet.
-
Dairy-Free Version: Use nondairy yogurt in parfaits and smoothie bowls, plant-based cheese in quesadillas and pizza snacks, and hummus or avocado as the creamy part in snack boxes. Some dairy-free cheeses melt poorly, so for hot snacks, keep expectations realistic and choose brands made for melting.
-
Extra-Protein After-School Fix: Add turkey to sliders, chicken to quesadillas, an egg cup beside a muffin, or a second spoonful of Greek yogurt in the parfaits. This is the version to reach for on sports days or when dinner will be late.
-
Veggie-Forward Snack Tray: Fold spinach into egg cups, add peppers to pizza bagels, tuck cucumber into snack boxes, and put shredded carrots inside pinwheels. The kids who accept vegetables are often fine with them when they are cut small and tucked into familiar food.
-
Mild Flavor Only: Keep the salsa mild, skip mustard if needed, and use plain cheese-forward recipes for younger eaters. A lot of children do not need more seasoning; they need less surprise.
The Mistakes That Make Good Snacks Sit Untouched
The first mistake is making everything too soft. A soggy tortilla, limp cracker, or warm apple slice loses the texture that keeps kids interested. The fix is simple: keep crunchy things dry until the last minute and choose thicker sauces whenever a recipe calls for them.
Another common problem is overstuffing. People do it because it feels generous, but a too-full quesadilla, slider, or pita pocket splits before the child reaches the table. Better to make a tidy filling and let the snack stay intact than to create a minor kitchen collapse.
A third issue is forgetting that kids often eat with their hands first and their appetite second. If the food is messy, awkward, or too hot, they pause. Cut things into smaller shapes, let baked snacks cool for a minute or two, and put the dip on the side instead of flooding the plate.
Skipping protein is another easy way to miss the mark. Fruit is fine, but it usually does not quiet the after-school hunger for long. Cheese, yogurt, beans, hummus, eggs, turkey, or chicken give the snack more staying power, which means fewer complaints an hour later.
Finally, there’s the make-ahead trap. Not every snack should be assembled far in advance. Granola softens, banana browns, and crunchy bread goes limp. If you want a snack to survive the fridge, store the parts separately and assemble only the pieces that can take the wait.
Frequently Asked Questions
Which of these snacks holds up best if I make it earlier in the day?
The best make-ahead options are banana oat muffins, egg and cheese muffin cups, turkey sliders, hummus snack boxes, and pinwheels. They keep their shape and texture for a few hours or overnight if stored properly. The fresh fruit-heavy ones are better assembled closer to snack time.
What can I make if I only have 10 minutes?
Peanut butter banana roll-ups, apple nachos, yogurt parfait cups, and snack boxes are the fastest choices. If you already have fruit washed and cheese portioned, you can get food on the table almost immediately.
How do I keep wraps and quesadillas from getting soggy?
Use thicker fillings, not watery ones, and cook them just long enough to set the outside. For wraps, keep wet ingredients like salsa or ranch on the side if you know the food will sit for a while. For quesadillas, let them rest on a cutting board instead of sealing them in a container while they are still hot.
Can I freeze any of these?
Yes. Banana muffins, egg cups, mac and cheese cups, sliders, and even some pizza snacks freeze well for up to 2 months. Reheat them in the oven or toaster oven when you want better texture than a microwave gives.
What if my child refuses mixed food?
Serve the components separately. Put the tortilla, cheese, beans, and salsa in neat piles instead of making a quesadilla, or keep the hummus, crackers, and produce in divided compartments. Kids who resist mixed textures often eat the same ingredients when they can control the order.
How do I make these nut-free for school-style snack rules?
Use sunflower seed butter in the roll-ups and apple nachos, choose nut-free granola, and check labels on hummus and crackers. Snack boxes, cheese-based snacks, egg cups, and turkey sliders are already easy to adapt.
Which of these works best for a really hungry kid after sports?
Turkey sliders, egg cups, quesadillas with beans or chicken, and mac and cheese cups are the strongest choices. They have enough protein and starch to feel like a small meal, which is what most sport-day kids actually need.
Can I turn these into a mini dinner instead of a snack?
Absolutely. Serve two quesadillas with fruit, a full slider portion with vegetables, or a larger snack box with extra cheese and hummus. The recipes are flexible enough to move from snack plate to small meal without much effort.
A Calmer After-School Table
The best thing about these after-school snacks is not that they are clever. It’s that they give the afternoon some shape. A warm quesadilla, a cold parfait, a muffin pulled from the freezer, a snack box built from whatever’s left in the fridge — those small routines make the hour after school feel less like a scramble and more like something you have handled on purpose.
And honestly, that’s the real win. Not perfection. Not a Pinterest tray with seventeen components. Just a few good choices that fit the time, the mood, and the kid standing in the kitchen asking for “something to eat” with the urgency of a tiny executive. Keep three or four of these in rotation, and snack time stops being a daily debate.