
The best family dinners for busy school mornings do two jobs at once: they feed everybody tonight and leave the kitchen calm enough that breakfast can happen without a scavenger hunt for the lunchbox lids. When the evening meal is sturdy enough to survive a second heat-up, you get a quieter morning by default. Less chopping. Less cleanup. Fewer decisions when the clock is already winning.
I trust food that holds its shape. Pasta baked under sauce, chicken thighs instead of dry breasts, meatballs tucked into marinara, rice casseroles that soften instead of splitting — those are the dishes that still taste like dinner after a night in the fridge. Delicate food can be lovely. It is also needy. School-week dinner does not need needy.
The recipes below lean hard into that idea. You will see sheet pans, slow cookers, casseroles, skillet meals, and big-batch soups that make smart use of leftovers, because the real luxury on a school week is not fancy garnish; it is not having to think too hard when everybody is hungry.
Why These Dinners Earn a Spot on the School-Week Calendar
-
Leftovers that behave: These meals reheat without turning into a watery mess, which matters when one portion is headed to a lunchbox and another is getting zapped at 6:40 a.m.
-
Cleanup stays small: Most of the list uses one pan, one pot, one skillet, or one baking dish, and that matters more than people admit when the dishwasher is already full.
-
Ingredients you can keep on hand: Canned beans, pasta, rice, tortillas, broth, frozen vegetables, and ground meat show up over and over because they save a trip to the store.
-
Kid-friendly without being bland: Cheese, mild spice, tomato sauce, roast chicken, and crispy edges do the heavy lifting here. Nobody needs a separate “adult dinner” and “kid dinner” when the seasoning is handled well.
-
Easy to stretch: Several of these dishes take on extra vegetables or a second starch without complaint, which is handy when a household suddenly grows three more appetites at the table.
-
Built for the next day: A pan of ziti or a pot of chili does not just solve one evening. It quietly hands you lunch, snack, or another dinner portion without demanding fresh effort.
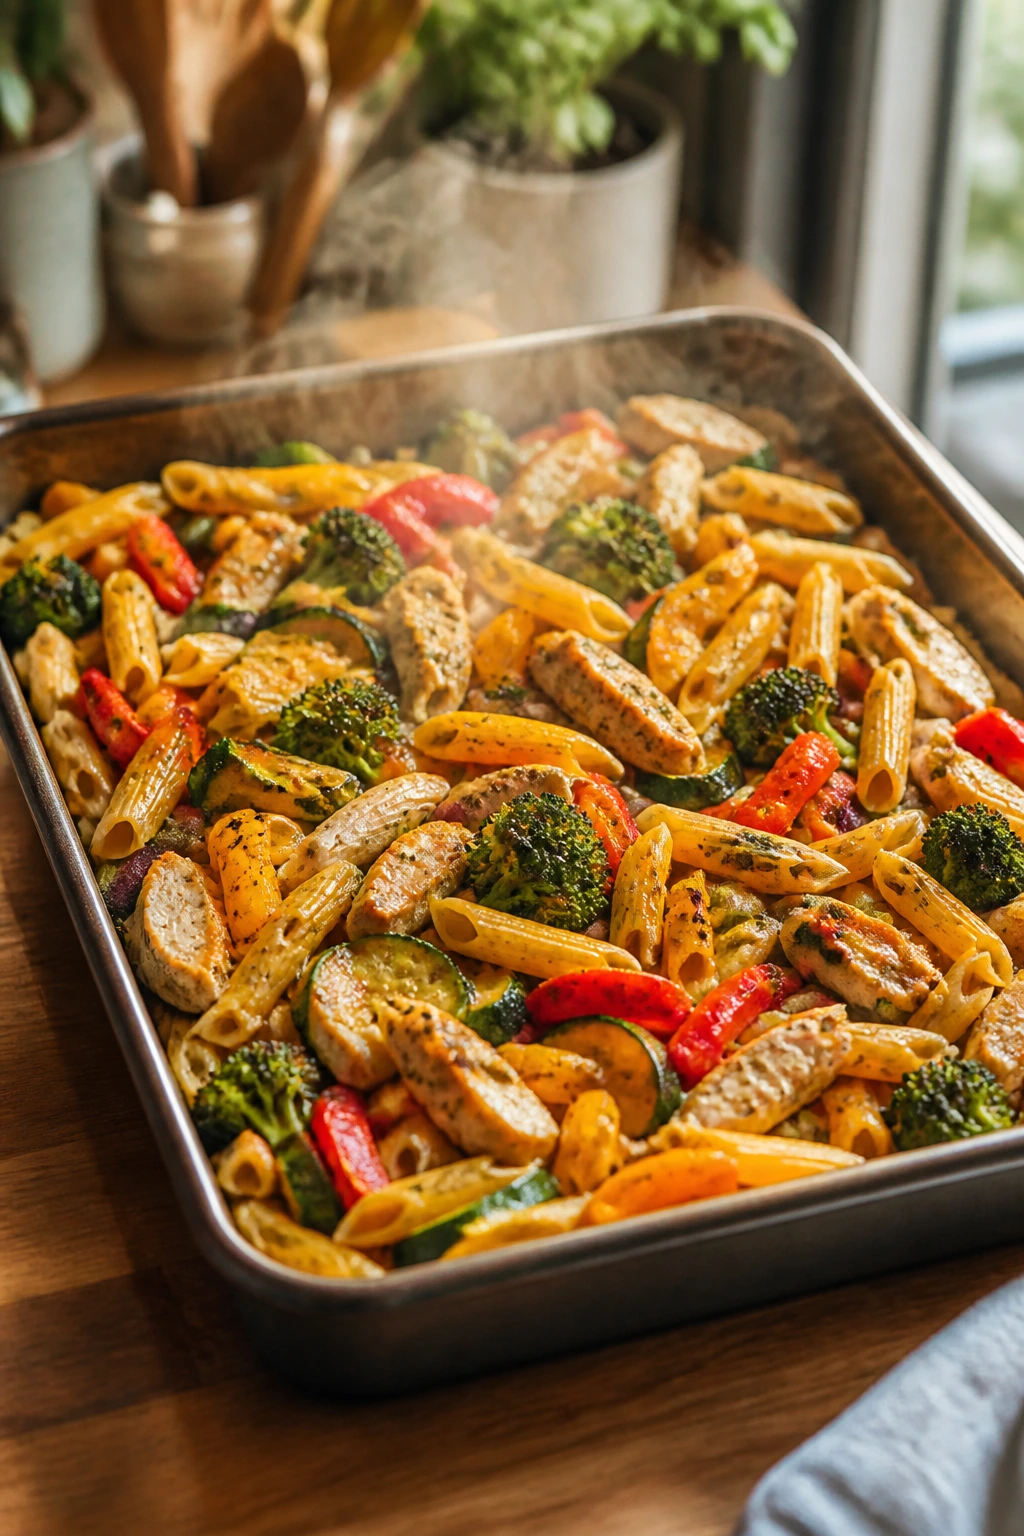
1. Sheet-Pan Chicken Fajitas
A hot sheet pan gives chicken fajitas the kind of browned edges that make the whole kitchen smell like you actually planned dinner. The peppers soften, the onions get sweet, and the chicken stays juicy if you cut it thin enough before it goes in. This is one of those dinners that feels fast without tasting rushed.
Why It Works:
The oven does the work at 425°F, which is hot enough to char the vegetables a little without drying out the chicken. Chicken thighs hold up better than breasts here, especially if the pan sits for a few minutes before serving. The leftovers tuck neatly into tortillas or rice bowls the next day, and that matters on a school week.
Key Ingredients:
- 1½ lb boneless, skinless chicken thighs, sliced into thin strips
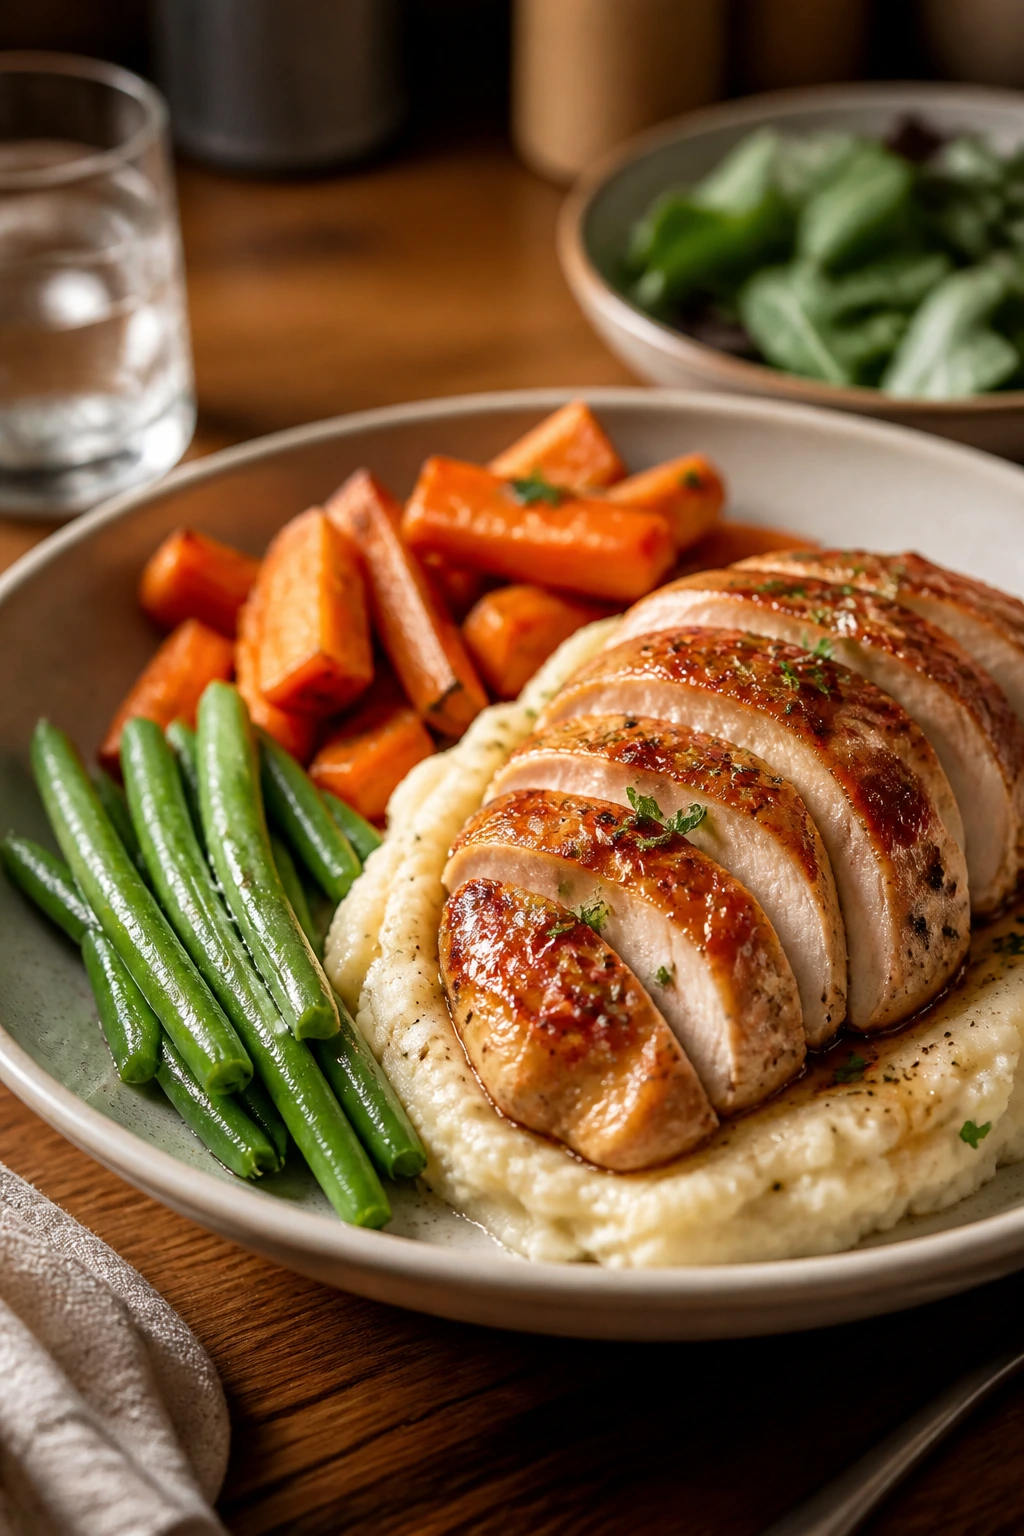
- 3 bell peppers, sliced into strips
- 1 large yellow onion, sliced
- 2 tablespoons olive oil
- 2 teaspoons chili powder
- 1 teaspoon ground cumin
- 1 teaspoon garlic powder
- 1 teaspoon kosher salt
- 8 small flour tortillas, warmed
- 1 lime, cut into wedges
Quick Steps:
- Preheat the oven to 425°F (220°C) and line a rimmed sheet pan with parchment or foil.
- Toss the chicken, peppers, and onion with olive oil, chili powder, cumin, garlic powder, salt, and black pepper.
- Spread everything in one layer and roast for 18 to 20 minutes, stirring once halfway through, until the chicken reaches 165°F and the peppers have browned edges.
- Warm the tortillas in a dry skillet or wrapped in foil in the oven for the last 5 minutes.
- Finish with lime juice and serve right away.
Equipment for This Recipe:
- Rimmed sheet pan
- Large mixing bowl
- Sharp knife and cutting board
- Tongs or a spatula
How to Serve This Dish:
Pile the fajita mix into warm tortillas and add a spoonful of rice or black beans if you want the meal to stretch. A little sour cream or sliced avocado cools the heat nicely, and the leftovers make a strong lunch wrap.
Pro Tips for This Recipe:
- Slice the chicken and peppers to a similar thickness so they finish at the same time.
- Don’t crowd the pan. If the vegetables pile up, they steam instead of roasting.
- A squeeze of lime at the end wakes up the whole tray.
- If your oven runs cool, give the pan another 2 to 3 minutes before serving.
Variations on This Dish:
- Bean-Stretch Fajitas: Add 1 can of drained black beans during the last 5 minutes for a bigger meal.
- Mild School-Night Fajitas: Cut the chili powder in half and add extra cumin for flavor without heat.
- Steak Night Swap: Use 1½ lb thin-sliced flank steak and roast it for only 10 to 12 minutes.
Common Mistakes to Avoid with This Dish:
- Overcrowding the pan: If the ingredients sit in a mound, they steam and turn soft. Use two pans if needed.
- Cutting the chicken too thick: Thick strips can dry out before the vegetables are done. Thin strips cook evenly.
- Skipping the lime: The fajitas taste flatter without acid at the end.
2. One-Pot Cheeseburger Pasta
This one tastes like a cheeseburger met a bowl of mac and decided to settle down. It’s beefy, tomato-kissed, and creamy enough to make a weeknight feel less brittle. The pasta drinks up the sauce instead of floating in it, which is exactly what you want when leftovers matter.
Why It Works:
Cooking the pasta right in the pot means the starch stays in the sauce instead of disappearing down the drain. The combination of broth, tomatoes, ketchup, mustard, and cheddar gives you that burger flavor without having to shape patties. It reheats into a thick, spoonable lunch, which is why I keep it in the rotation.
Key Ingredients:
- 1 lb ground beef
- 1 small yellow onion, diced
- 2 cloves garlic, minced
- 2 cups beef broth
- 1 can (14.5 oz) diced tomatoes
- 2 cups elbow macaroni
- 1 cup milk
- 2 cups shredded sharp cheddar
- 2 tablespoons ketchup
- 1 tablespoon yellow mustard
Quick Steps:
- Brown the beef and onion in a large pot over medium-high heat until the meat loses its pink color and the onion turns translucent.
- Stir in the garlic and cook for 30 seconds.
- Add the broth, diced tomatoes, ketchup, mustard, salt, pepper, and macaroni.
- Simmer uncovered for 10 to 12 minutes, stirring often, until the pasta is tender and most of the liquid is absorbed.
- Lower the heat, stir in the milk and cheddar, and cook until the sauce looks glossy and thick.
Equipment for This Recipe:
- Large Dutch oven or heavy pot
- Wooden spoon
- Measuring cups
- Box grater or cheese shredder
How to Serve This Dish:
Serve it in shallow bowls with dill pickles or a simple cucumber salad on the side. It is rich enough to stand on its own, but a crisp vegetable keeps the plate from feeling heavy.
Pro Tips for This Recipe:
- Shred your own cheese if you can; it melts smoother than bagged shreds.
- Keep the pot at a gentle simmer so the pasta doesn’t stick.
- If the mixture looks dry before the pasta is tender, add ¼ cup broth.
- Let it sit for 5 minutes before serving so the sauce tightens up.
Variations on This Dish:
- Bacon Burger Pot: Stir in 4 chopped cooked bacon strips at the end.
- Taco Burger Pasta: Swap the mustard for taco seasoning and add ½ cup corn.
- Lighter Turkey Version: Use ground turkey and add 1 extra tablespoon ketchup for more body.
Common Mistakes to Avoid with This Dish:
- Adding the cheese over high heat: It can turn grainy. Lower the heat first.
- Using too much broth: The sauce should coat the pasta, not drown it.
- Cooking the pasta until it’s mushy: Stop when it still has a little bite; it softens more as it rests.
3. Baked Ziti with Spinach and Sausage
Baked ziti is the kind of casserole that behaves itself in the fridge and still arrives at the table looking generous. The sausage gives it backbone, the ricotta makes the middle creamy, and the top turns bronzed in the oven. If you want a dinner that feels like it took more effort than it did, this is the one.
Why It Works:
Ziti has enough shape to stay intact after baking, which is why it outperforms fussy noodles in casseroles. Undercooking the pasta by a couple of minutes keeps it from collapsing later. This dish also makes excellent leftovers because the sauce has time to settle into the pasta overnight.
Key Ingredients:
- 1 lb ziti
- 1 lb Italian sausage
- 24 oz marinara sauce
- 15 oz ricotta cheese
- 5 oz fresh spinach
- 2 cups shredded mozzarella
- ½ cup grated Parmesan
- 1 egg
Quick Steps:
- Boil the ziti in salted water for 2 minutes less than the package says.
- Brown the sausage in a skillet until cooked through, then stir in the marinara and spinach until the spinach wilts.
- Mix the ricotta, egg, half the Parmesan, salt, and pepper in a bowl.
- Toss the pasta with the sausage sauce, then layer half into a greased 9×13-inch baking dish, dollop on the ricotta mixture, and finish with the remaining pasta and mozzarella.
- Bake at 375°F (190°C) for 25 to 30 minutes until bubbly, then rest for 10 minutes before cutting.
Equipment for This Recipe:
- 9×13-inch baking dish
- Large pot
- Skillet
- Mixing bowl
How to Serve This Dish:
Cut it into squares and serve with a simple green salad and garlic bread. It’s hearty enough that a small square goes a long way, especially after a big school day.
Pro Tips for This Recipe:
- Drain the sausage well so the casserole doesn’t turn greasy.
- Use whole-milk ricotta if you want the filling to taste lush instead of watery.
- Let the bake rest before serving; otherwise the layers slide apart.
- If your spinach is wet, squeeze it dry before stirring it in.
Variations on This Dish:
- Meatless Marinara Ziti: Skip the sausage and add sautéed mushrooms and zucchini.
- Spicy Sausage Ziti: Use hot Italian sausage and a pinch of red pepper flakes.
- Veggie-Heavy Ziti: Add roasted peppers or eggplant for more texture.
Common Mistakes to Avoid with This Dish:
- Overcooking the pasta before baking: It turns mushy in the oven.
- Using too much sauce in one layer: The ziti should be coated, not floating.
- Cutting too early: Give the casserole time to set or it will spill everywhere.
4. Slow Cooker BBQ Pulled Pork
This is the kind of dinner that smells like you did something heroic while the slow cooker was doing the actual work. Pork shoulder becomes soft enough to shred with a fork, and the BBQ sauce clings to every strand. It’s one of the easiest ways to feed a crowd and still have sandwiches left over.
Why It Works:
Pork shoulder has enough fat and connective tissue to turn tender during a long, slow cook. The vinegar keeps the sauce from tasting flat, and the onion melts down into the juices. Pulled pork also freezes well in its sauce, which makes it a useful fallback meal.
Key Ingredients:
- 3 lb pork shoulder or pork butt
- 1 large onion, sliced
- 1 cup BBQ sauce
- ½ cup apple cider vinegar
- ½ cup chicken broth
- 2 teaspoons smoked paprika
- 1 teaspoon kosher salt
- 8 sandwich buns
Quick Steps:
- Put the onion in the bottom of the slow cooker.
- Rub the pork with salt, pepper, and smoked paprika, then set it on top of the onions.
- Mix the BBQ sauce, vinegar, and broth, then pour it around the pork.
- Cook on low for 8 hours or high for 5 to 6 hours, until the meat shreds easily.
- Remove the pork, shred it, skim excess fat from the sauce, and stir the meat back in before serving.
Equipment for This Recipe:
- Slow cooker
- Two forks for shredding
- Measuring cup
- Cutting board
How to Serve This Dish:
Pile it onto buns with slaw, or serve it over baked potatoes with extra sauce spooned on top. The next-day version makes a strong lunch sandwich, especially if you toast the bread first.
Pro Tips for This Recipe:
- Choose pork shoulder, not tenderloin; the lean cut dries out.
- Add the slaw at the table, not in the slow cooker.
- Shred the pork after it rests for 10 minutes so it stays juicy.
- If the sauce tastes sharp, stir in 1 tablespoon brown sugar.
Variations on This Dish:
- Carolina Tang: Add extra vinegar and a spoonful of yellow mustard.
- Sweet Kid Version: Use a sweeter BBQ sauce and skip the paprika.
- Pulled Pork Taco Night: Serve it in tortillas with pickled onions.
Common Mistakes to Avoid with This Dish:
- Using too lean a cut: The meat turns stringy and dry.
- Drowning the pork in sauce at the start: It needs some space to braise, not boil.
- Shredding too soon: Let the pork rest briefly so the juices settle.
5. Turkey Meatballs with Marinara
These meatballs are compact, tender, and friendly to the sort of night when you want a dinner that can slide into pasta, subs, or a lunchbox the next day. Turkey can go dry fast, so the trick is keeping the mix light and the sauce generous. The result tastes cleaner than beef meatballs, but not bland.
Why It Works:
Breadcrumbs and egg keep the turkey from tightening into little rubber balls. Baking the meatballs first gives them color without standing over a skillet for 20 minutes. Once they simmer in marinara, they pick up moisture and become even better the next day.
Key Ingredients:
- 1½ lb ground turkey
- 1 egg
- ½ cup breadcrumbs
- ¼ cup grated Parmesan
- 2 cloves garlic, minced
- 2 tablespoons chopped parsley
- 24 oz marinara sauce
- 12 oz spaghetti, optional
Quick Steps:
- Mix the turkey, egg, breadcrumbs, Parmesan, garlic, parsley, salt, and pepper in a bowl until just combined.
- Form into 1½-inch meatballs and place on a lined baking sheet.
- Bake at 400°F (205°C) for 12 to 15 minutes, until the centers reach 165°F.
- Warm the marinara in a skillet, add the meatballs, and simmer for 5 to 10 minutes.
- Serve over spaghetti or with crusty bread.
Equipment for This Recipe:
- Rimmed baking sheet
- Parchment paper
- Large bowl
- Skillet or saucepan
How to Serve This Dish:
Serve the meatballs over spaghetti, polenta, or tucked into toasted rolls with a slice of mozzarella. A green salad with a sharp vinaigrette cuts through the sauce nicely.
Pro Tips for This Recipe:
- Mix gently; overworking the meat makes the meatballs dense.
- Wet your hands before rolling so the mixture doesn’t stick.
- Bake them first so they hold their shape in the sauce.
- Add a splash of pasta water to the sauce if it gets too thick.
Variations on This Dish:
- Chicken Meatballs: Swap ground chicken for turkey and keep the rest the same.
- Hidden-Spinach Version: Finely chop 1 cup spinach and mix it in.
- Herb-and-Lemon Twist: Add lemon zest and extra parsley for a brighter finish.
Common Mistakes to Avoid with This Dish:
- Packing the meat too tightly: The centers turn tough.
- Skipping the bake step: Meatballs can fall apart in the sauce if they go straight to the pan.
- Saucing too little: Turkey meatballs need moisture, not a dry simmer.
6. Chicken and Broccoli Rice Casserole
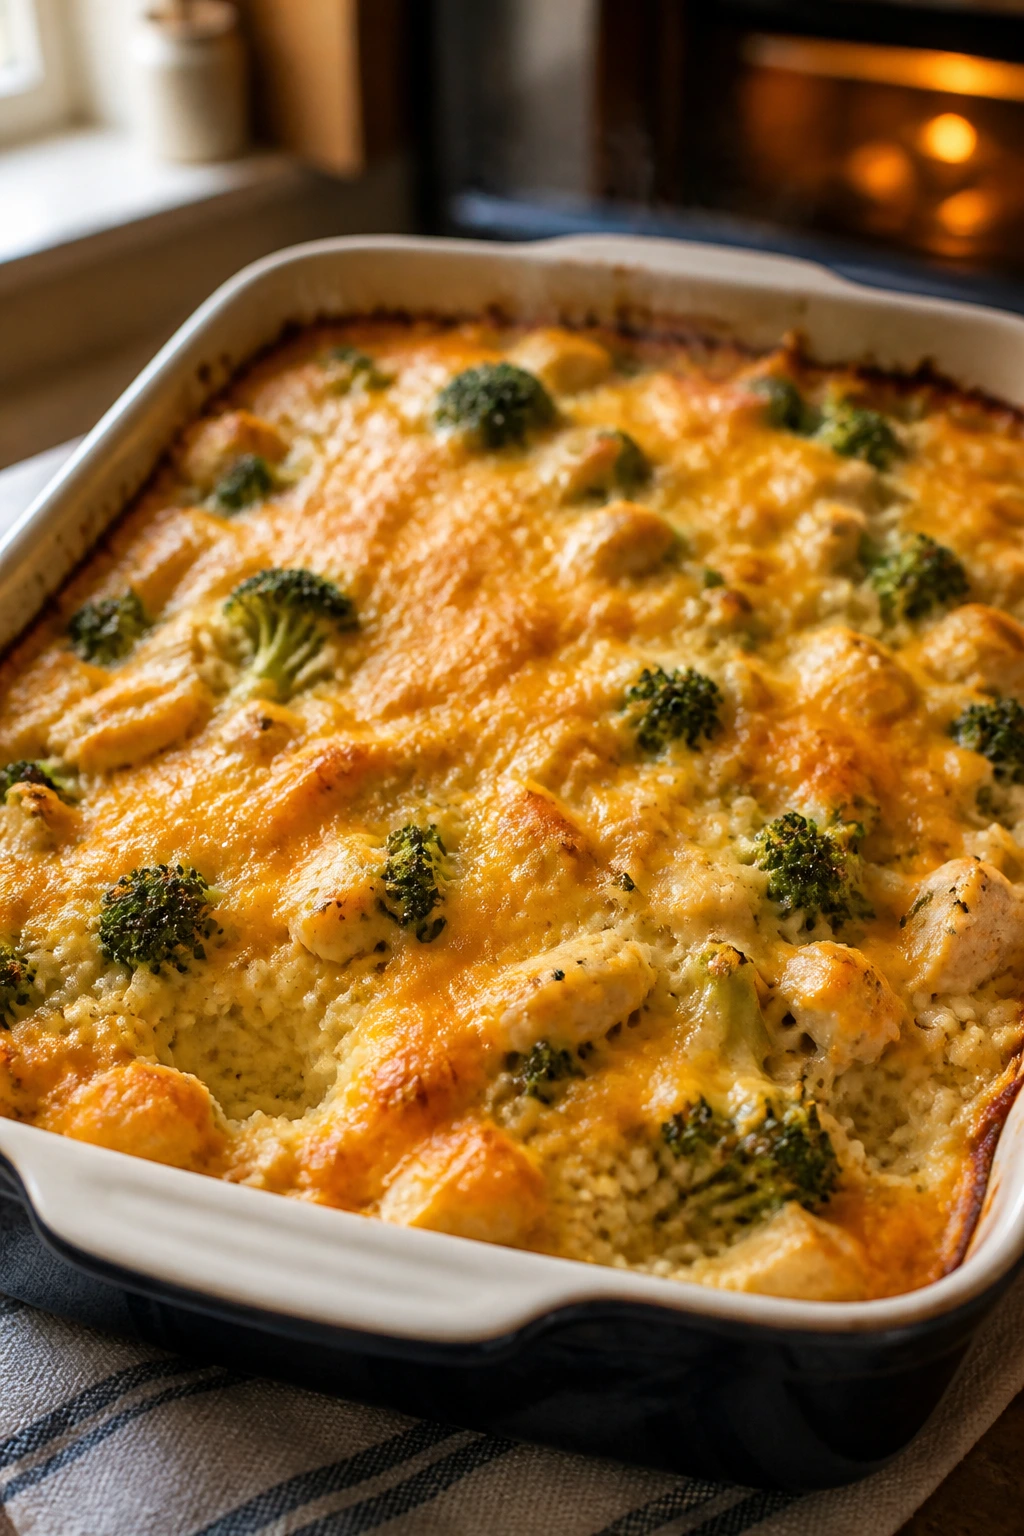
This casserole is pure practical dinner energy. It’s creamy, filling, and built to turn leftover rice into something people will actually eat without complaint. The broccoli gives it some structure, and the cheese top crisps around the edges if you give it enough oven time.
Why It Works:
Cooked rice is the base that keeps the casserole from getting soupy. Broccoli adds a little bite, but it needs a quick steam or blanch first so it doesn’t stay raw inside the bake. Chicken thighs work better than breasts if you want leftovers that stay moist after reheating.
Key Ingredients:
- 2 cups cooked white rice
- 1½ lb cooked chicken, chopped
- 4 cups broccoli florets
- 1 can cream of chicken soup or 1½ cups homemade white sauce
- 1 cup sour cream
- 2 cups shredded cheddar
- 1 small onion, finely diced
- 2 cloves garlic, minced
Quick Steps:
- Steam or blanch the broccoli for 2 minutes so it turns bright green but stays firm.
- Mix the rice, chicken, broccoli, soup, sour cream, onion, garlic, half the cheddar, salt, and pepper in a large bowl.
- Spread into a greased 9×13-inch dish and top with the remaining cheese.
- Bake at 375°F (190°C) for 30 to 35 minutes until the edges bubble and the top browns.
- Rest for 10 minutes before serving.
Equipment for This Recipe:
- 9×13-inch baking dish
- Large mixing bowl
- Saucepan or steamer basket
- Rubber spatula
How to Serve This Dish:
Serve it with sliced tomatoes or a crunchy salad to balance the creaminess. It’s solid lunchbox food the next day, too, especially if you portion it into shallow containers.
Pro Tips for This Recipe:
- Use rice that has cooled completely so the casserole doesn’t turn gummy.
- Chop the chicken into bite-size pieces for easier scooping.
- If the top browns too fast, lay foil loosely over the dish for the last 10 minutes.
- Add a little Dijon mustard to the sauce if you want more depth.
Variations on This Dish:
- Broccoli Cheddar Rice Bake: Use extra broccoli and skip the chicken.
- Cauliflower-Rice Swap: Replace half the rice with cauliflower rice for a lighter base.
- Mushroom Version: Add sautéed mushrooms for a more savory flavor.
Common Mistakes to Avoid with This Dish:
- Using raw broccoli: It stays hard inside the casserole.
- Starting with hot rice: It can make the bake gluey.
- Not seasoning enough: Creamy casseroles need salt more than people expect.
7. Black Bean Enchilada Bake
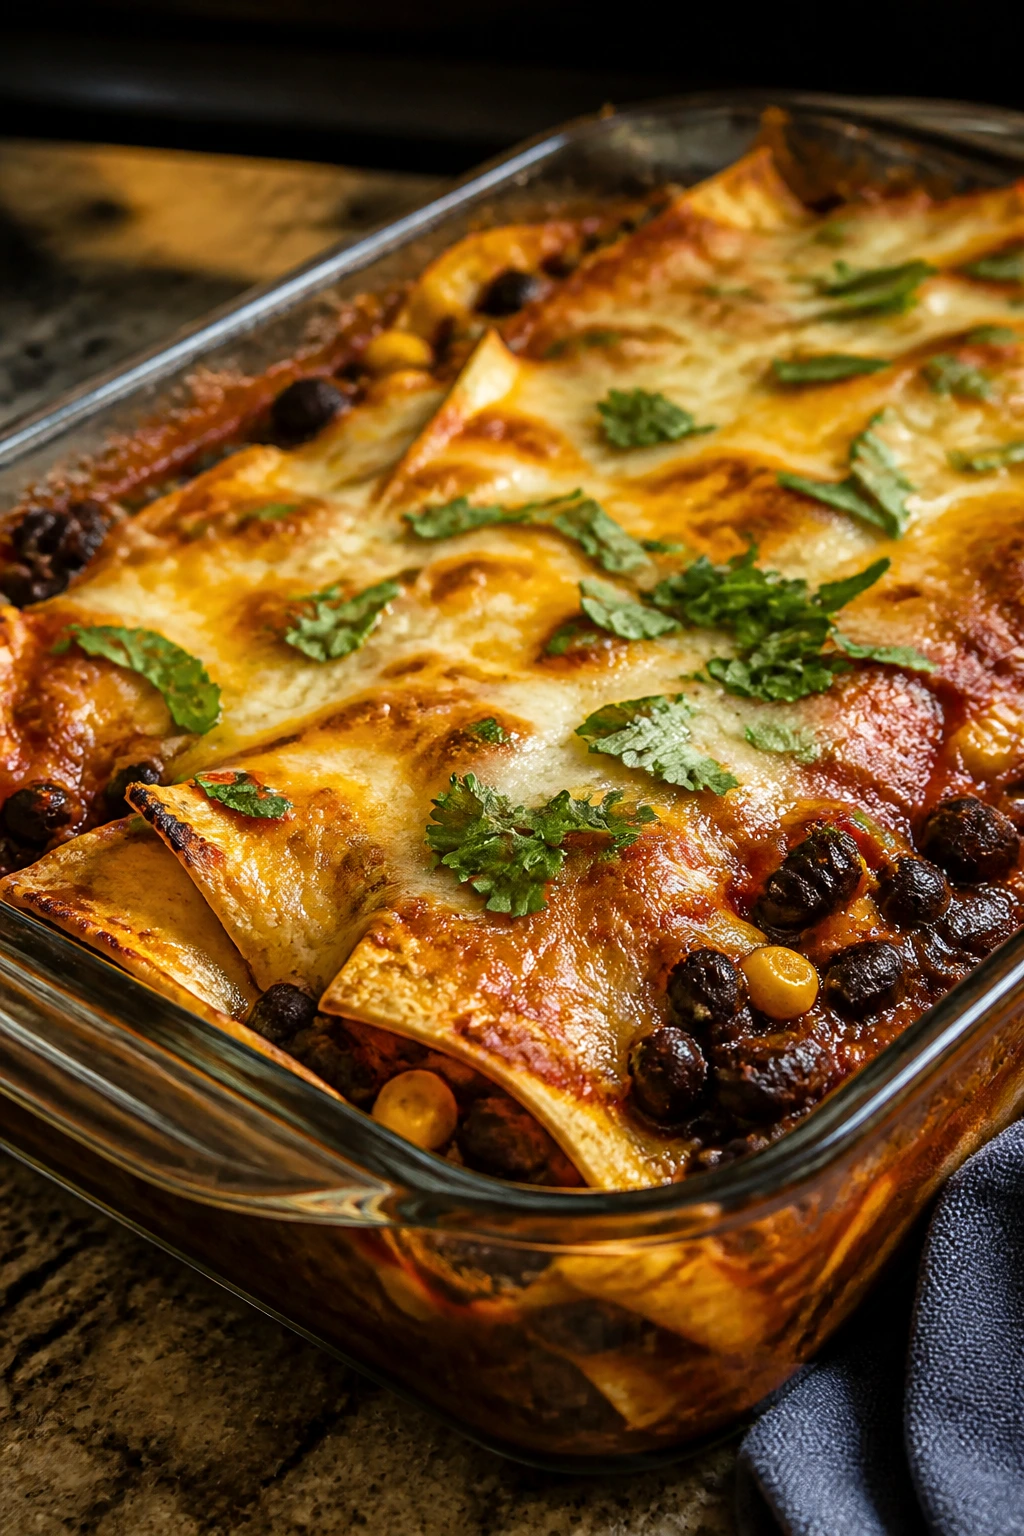
This is layered, saucy, and deeply unfussy, which is how a weeknight casserole should behave. The tortillas soak up enchilada sauce, the beans give it heft, and the cheese locks everything together. It’s also one of the easiest vegetarian dinners in the list.
Why It Works:
Black beans and corn make the filling sturdy enough that you do not miss meat. Corn tortillas soften in the sauce and create a texture that feels like enchiladas without the rolling. Leftovers slice cleanly after resting, so lunch the next day is almost automatic.
Key Ingredients:
- 8 corn or flour tortillas
- 2 cans black beans, drained and rinsed
- 1 cup corn, fresh or frozen
- 1 small onion, diced
- 2 cups enchilada sauce
- 2 cups shredded Monterey Jack or cheddar
- 1 bell pepper, diced
- 1 teaspoon ground cumin
Quick Steps:
- Sauté the onion and bell pepper in a little oil until soft, about 5 minutes.
- Stir in the beans, corn, cumin, salt, and pepper.
- Spread a thin layer of enchilada sauce in a greased baking dish, then layer tortillas, bean filling, sauce, and cheese.
- Repeat the layers, ending with sauce and cheese.
- Bake at 375°F (190°C) for 25 to 30 minutes until bubbling and browned at the edges.
Equipment for This Recipe:
- 9×13-inch baking dish
- Skillet
- Wooden spoon
- Foil, optional
How to Serve This Dish:
Serve with avocado, cilantro, and a spoonful of sour cream. A simple cabbage slaw or orange slices on the side gives the plate some crunch and freshness.
Pro Tips for This Recipe:
- Warm corn tortillas first so they don’t crack as you layer.
- Drain the beans well or the bake turns watery.
- Rest the casserole before slicing or the layers will slide apart.
- Add chopped chicken if you want a meat version without changing the method.
Variations on This Dish:
- Chicken Enchilada Shortcut: Add 2 cups shredded rotisserie chicken to the bean mix.
- Green Sauce Version: Swap red enchilada sauce for green salsa verde.
- Extra Bean Stretch: Add pinto beans and a handful of chopped spinach.
Common Mistakes to Avoid with This Dish:
- Using too much sauce in one layer: The tortillas get soggy fast.
- Skipping the rest time: You need those layers to settle.
- Forgetting to season the bean filling: The sauce alone won’t carry the flavor.
8. Honey Garlic Salmon and Green Beans
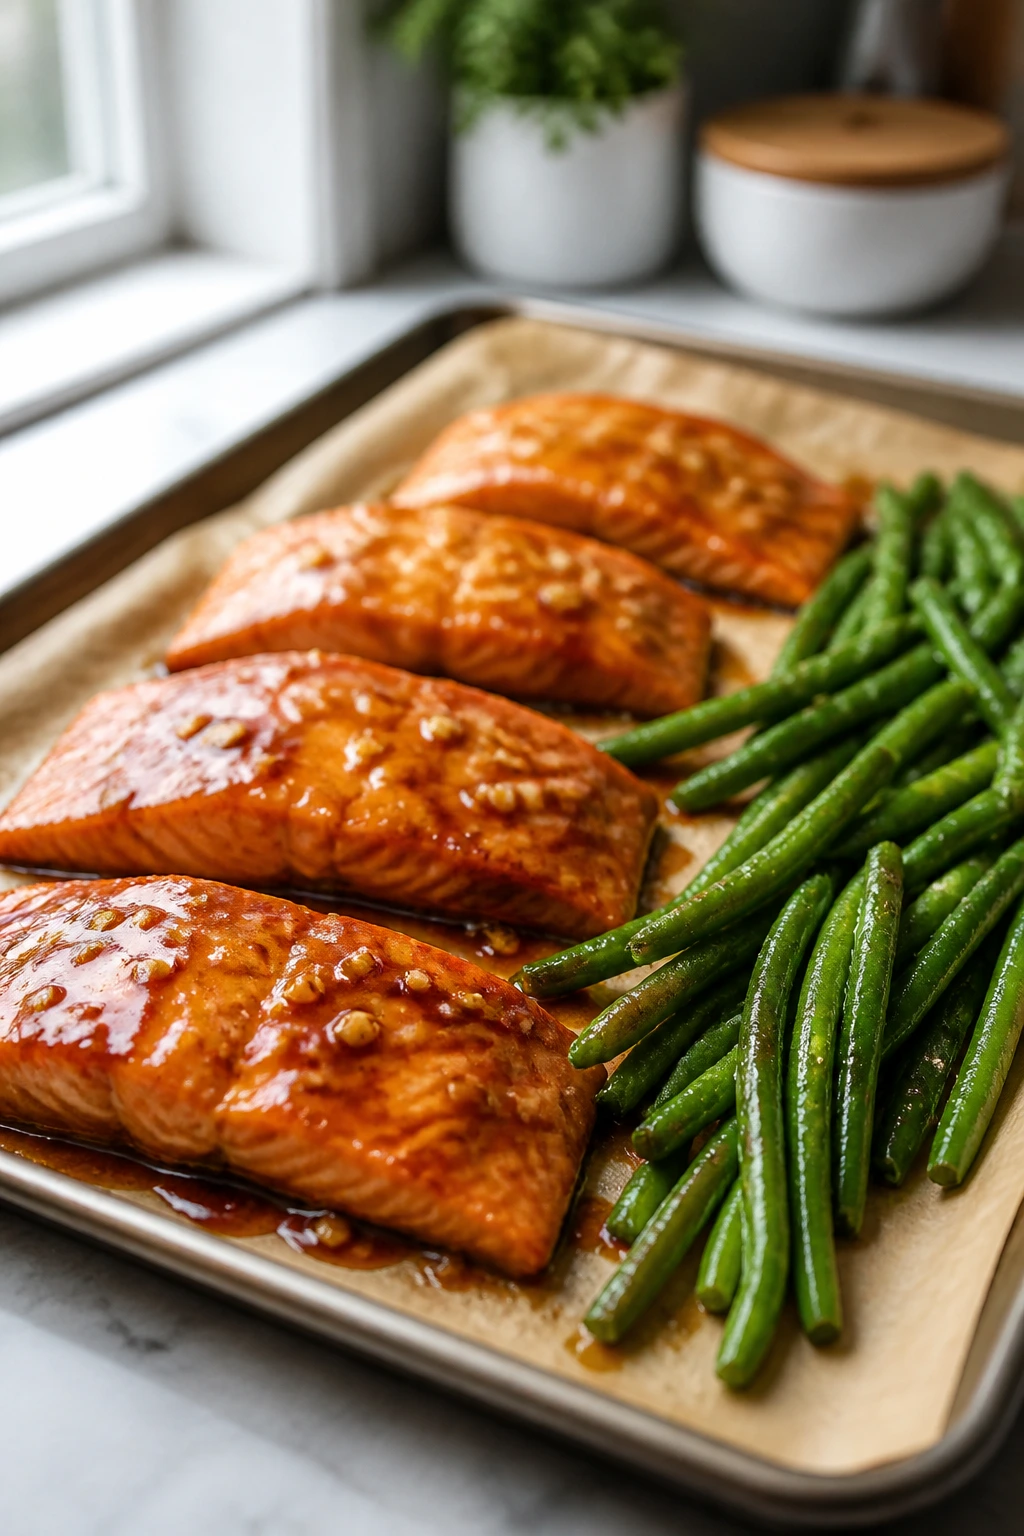
Salmon cooks fast enough to fit on the tightest school-night schedule, and the honey-garlic glaze gives it enough sheen to feel special without acting fussy. The green beans roast on the same pan, picking up a little of the glaze at the edges. I like this one when I want dinner to feel light but still complete.
Why It Works:
Salmon only needs a short roast at 400°F, which keeps the flesh moist and flaky. A mix of honey, soy sauce, garlic, and ginger gives you sweet-salty balance without requiring a separate sauce pan. The leftovers are best within a day or two, which makes this a good “tonight matters most” meal.
Key Ingredients:
- 4 salmon fillets, about 6 oz each
- 1 lb green beans, trimmed
- 3 tablespoons honey
- 2 tablespoons soy sauce
- 3 cloves garlic, minced
- 1 teaspoon grated ginger
- 1 tablespoon olive oil
- 1 lemon, cut into wedges
Quick Steps:
- Preheat the oven to 400°F (205°C) and line a sheet pan.
- Toss the green beans with olive oil, salt, and pepper, then spread them on the pan.
- Stir together the honey, soy sauce, garlic, and ginger, then brush half over the salmon.
- Roast the beans for 5 minutes, add the salmon, and roast for 10 to 12 minutes more, until the fish flakes easily and reaches 125 to 130°F for medium or 145°F for fully cooked.
- Finish with the remaining glaze and lemon.
Equipment for This Recipe:
- Sheet pan
- Pastry brush or spoon
- Instant-read thermometer
- Small bowl
How to Serve This Dish:
Serve over rice or with roasted potatoes if you want a fuller plate. The salmon is best paired with a simple vegetable, not a heavy side that fights the glaze.
Pro Tips for This Recipe:
- Pat the salmon dry before glazing so it browns instead of steaming.
- Use thicker fillets if you can; thin ones overcook quickly.
- Line the pan for easier cleanup because the honey can stick.
- A little sesame seed sprinkle at the end adds texture.
Variations on This Dish:
- Maple Dijon Salmon: Swap the honey-garlic glaze for maple syrup and Dijon mustard.
- Broccoli Swap: Roast broccoli florets instead of green beans.
- Lemon Garlic Version: Leave out the honey and go brighter with lemon zest and extra garlic.
Common Mistakes to Avoid with This Dish:
- Overcooking the fish: Salmon turns dry fast once it goes past the right point.
- Crowding the pan: The beans need space to roast.
- Using too much glaze: A thin coat gives shine; a heavy coat can burn.
9. Beef and Vegetable Stir-Fry
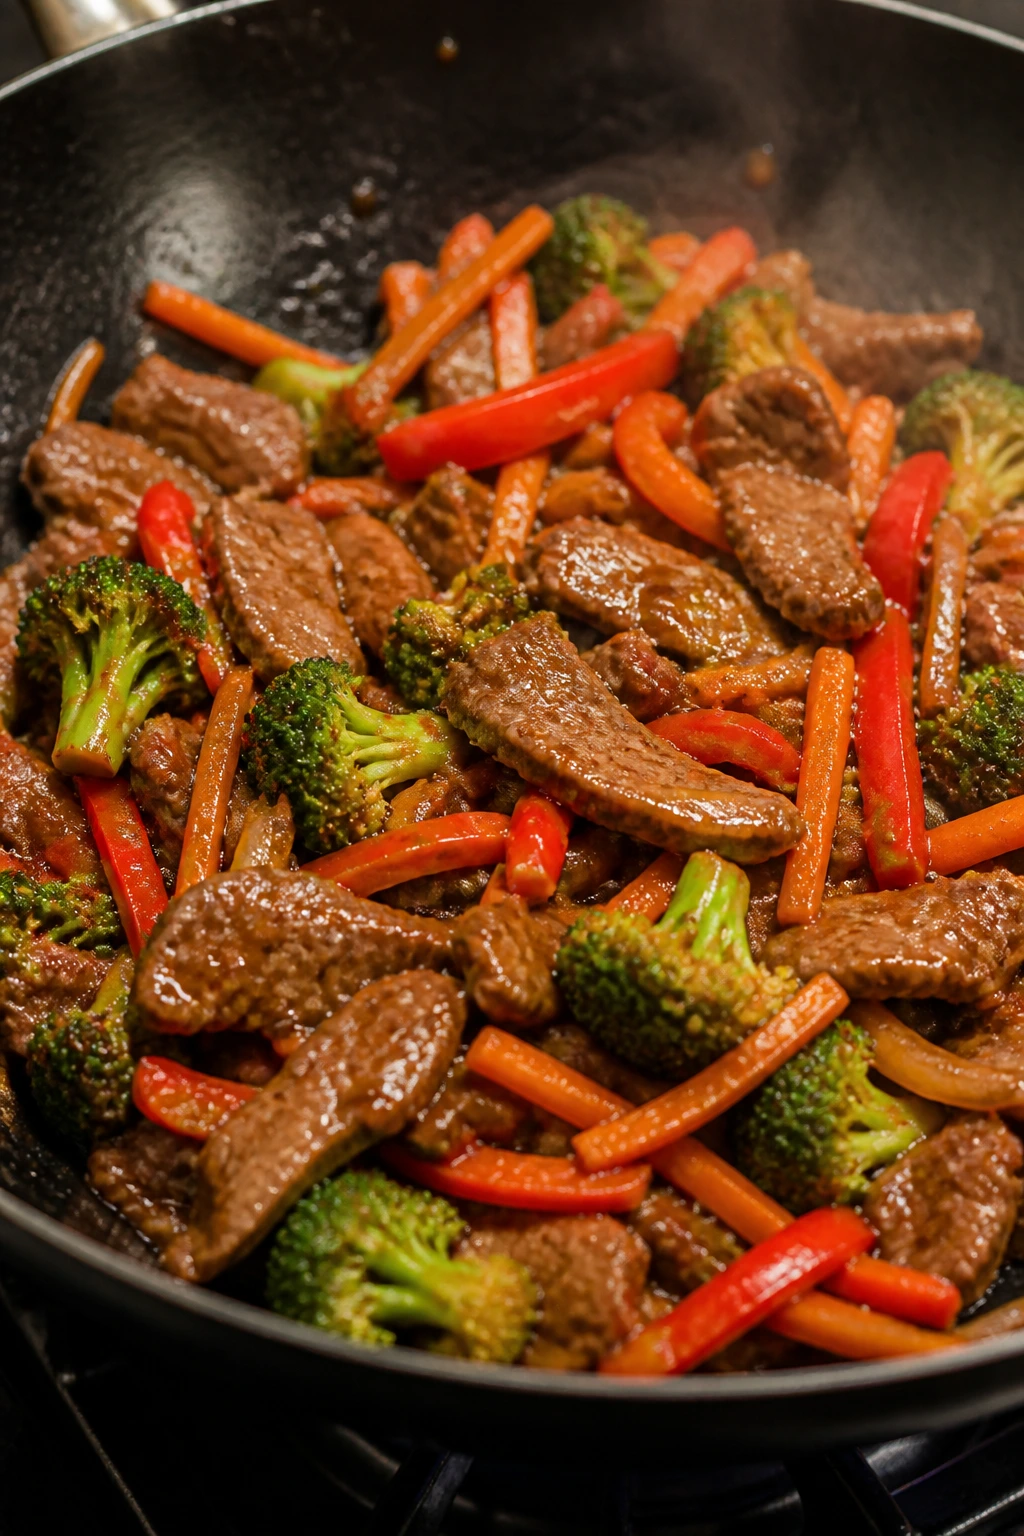
A good stir-fry is quick, but a good one also has contrast: crisp vegetables, seared beef, and sauce that clings instead of pooling. This version works because it keeps the cook time short and the vegetables bright. It’s one of the best ways to turn a random broccoli crown into dinner.
Why It Works:
Slicing the beef thin and across the grain keeps it tender even after a fast sear. A little cornstarch in the sauce helps it cling to the meat and vegetables. Serve it over rice, and the leftovers become a very decent lunch.
Key Ingredients:
- 1¼ lb flank steak or sirloin, thinly sliced
- 2 cups broccoli florets
- 1 red bell pepper, sliced
- 1 carrot, thinly sliced
- 3 tablespoons soy sauce
- 1 tablespoon cornstarch
- 2 cloves garlic, minced
- 1 teaspoon grated ginger
- Cooked rice, for serving
Quick Steps:
- Toss the beef with 1 tablespoon soy sauce and the cornstarch.
- Heat a skillet or wok over high heat with a little oil and sear the beef for 1 to 2 minutes per side; remove it to a plate.
- Add the broccoli, pepper, and carrot and stir-fry for 4 to 5 minutes until crisp-tender.
- Stir in the garlic, ginger, remaining soy sauce, and a splash of water.
- Return the beef to the pan and toss until the sauce turns glossy and coats everything.
Equipment for This Recipe:
- Large skillet or wok
- Sharp knife
- Mixing bowl
- Wooden spatula or tongs
How to Serve This Dish:
Serve over steamed rice or noodles with sesame seeds on top. If you want a lunchbox version, keep the sauce on the lighter side so the rice does not get soggy.
Pro Tips for This Recipe:
- Freeze the beef for 15 minutes before slicing to make thin cuts easier.
- Cook in batches if your pan is small.
- Have the vegetables prepped before you turn on the heat.
- A splash of rice vinegar at the end sharpens the sauce.
Variations on This Dish:
- Chicken Stir-Fry: Use sliced chicken thighs and cook them through before the vegetables.
- Shrimp Stir-Fry: Use peeled shrimp and add them near the end.
- Spicy Chili Garlic Version: Add chili paste for heat and a little extra garlic.
Common Mistakes to Avoid with This Dish:
- Overloading the skillet: The beef steams instead of searing.
- Adding sauce too early: The vegetables lose their crunch.
- Cutting the beef with the grain: It turns chewy.
10. Sausage and Peppers Hoagie Skillet
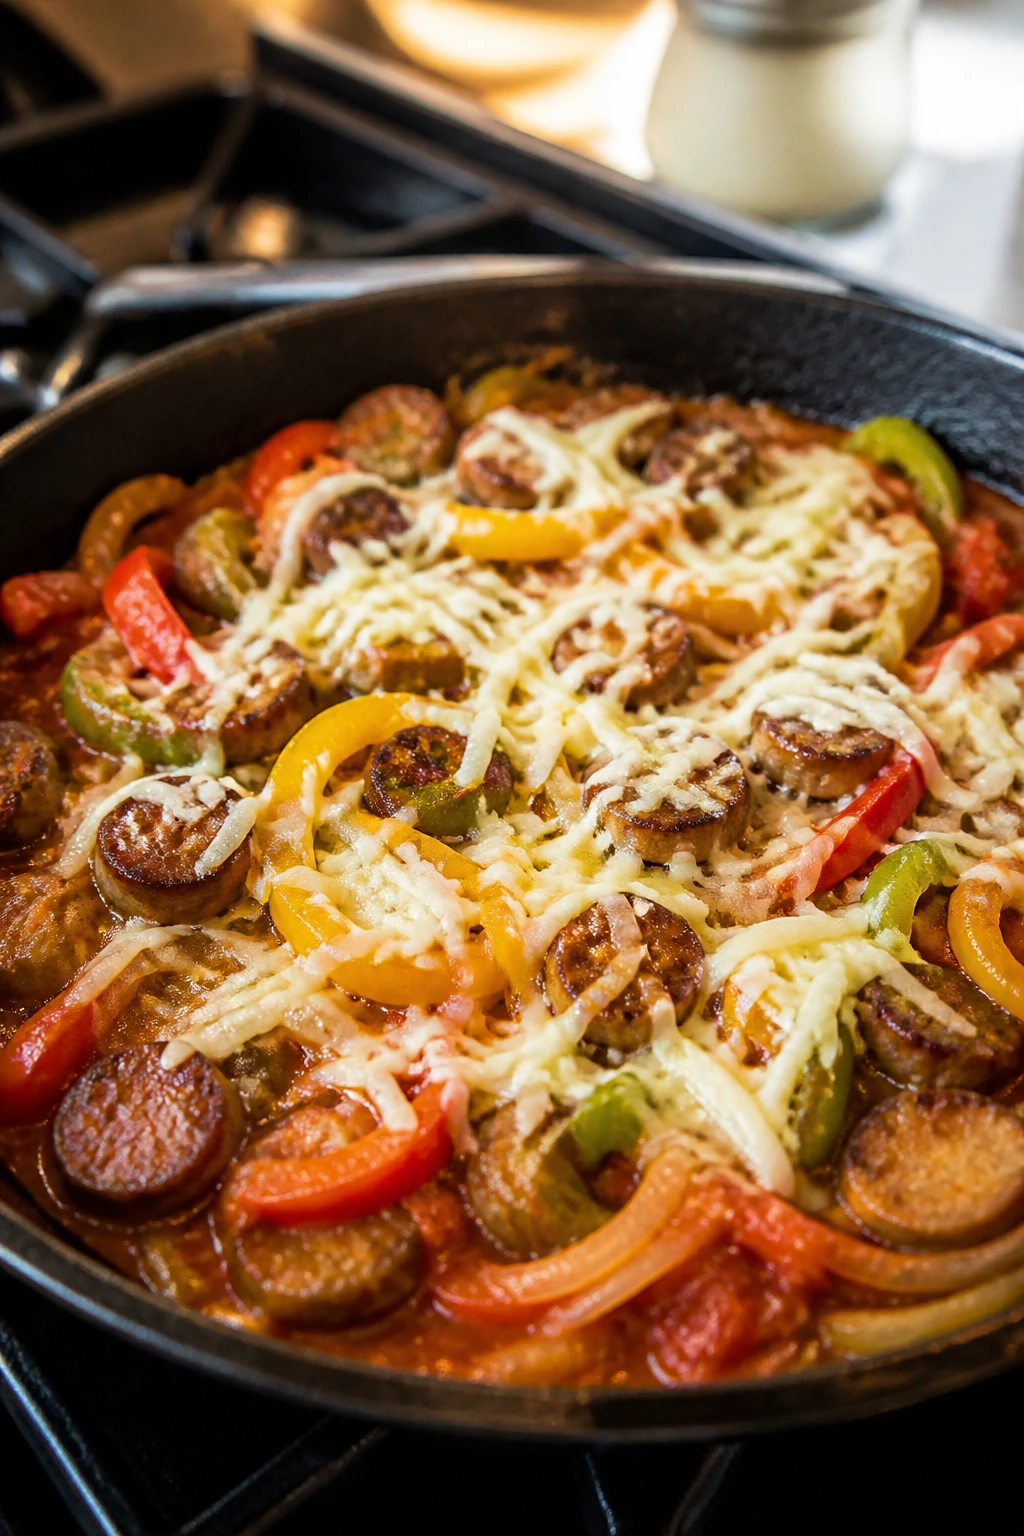
This is a sandwich dinner that tastes like somebody did more work than they actually did. Sausage gets browned, peppers collapse into sweetness, and the marinara ties the whole skillet together. It’s messy in the best way.
Why It Works:
Italian sausage brings seasoning with very little extra effort. Peppers and onions soften into a glossy filling that sits nicely in toasted rolls. A brief broil at the end melts the cheese and gives the tops a little chew.
Key Ingredients:
- 1½ lb Italian sausage links or bulk sausage
- 3 bell peppers, sliced
- 1 large onion, sliced
- 1 cup marinara sauce
- 6 hoagie rolls
- 6 slices provolone
- 1 tablespoon olive oil
- 1 teaspoon dried oregano
Quick Steps:
- Brown the sausage in a skillet until it gets color on the outside.
- Add the peppers and onion, along with the olive oil and oregano, and cook for 8 to 10 minutes until softened.
- Stir in the marinara and simmer for 5 minutes.
- Split the hoagie rolls, spoon in the sausage mixture, and top with provolone.
- Broil for 1 to 2 minutes until the cheese melts and the rolls toast at the edges.
Equipment for This Recipe:
- Large skillet
- Baking sheet
- Tongs
- Knife
How to Serve This Dish:
Serve the sandwiches with potato chips or a crisp salad. If you want to stretch the meal, tuck a few extra peppers into the rolls and let the sauce do the talking.
Pro Tips for This Recipe:
- If you’re using links, slice them after browning so they stay juicy.
- Toast the rolls before filling them if they tend to go soggy.
- A little splash of broth helps if the pan dries out.
- Provolone melts cleaner than some sharp cheeses here.
Variations on This Dish:
- Meatball Sub Skillet: Use cooked meatballs instead of sausage.
- Mild Chicken Sausage: Swap in chicken sausage for a lighter version.
- No-Bread Bake: Serve the skillet filling over polenta or rice.
Common Mistakes to Avoid with This Dish:
- Skipping the browning step: You lose flavor right away.
- Overfilling the rolls: The filling spills out before everyone sits down.
- Using raw peppers only briefly: They need time to soften or the sandwich feels clunky.
11. Chicken Pot Pie Skillet

Chicken pot pie in a skillet gives you the cozy filling without demanding a perfect crust. The sauce should be thick enough to hold a spoon upright for a second, and the biscuit topping bakes into something that can soak up gravy without collapsing. It’s the kind of dinner that feels useful.
Why It Works:
A skillet filling cooks faster than a traditional pie and still gives you the same chicken-and-vegetable comfort. Thickening the gravy before the topping goes on prevents a soupy middle. If you use rotisserie chicken, the whole dish lands in the “practical, not precious” category, which I approve of.
Key Ingredients:
- 1½ lb cooked chicken, chopped
- 1 cup carrots, diced
- 1 cup celery, diced
- 1 cup peas
- 1 small onion, diced
- 2 cups chicken broth
- 1 cup milk
- 3 tablespoons flour
- Biscuit dough or puff pastry for the top
Quick Steps:
- Cook the onion, carrots, and celery in a large oven-safe skillet until they start to soften.
- Stir in the flour and cook for 1 minute.
- Slowly pour in the broth and milk, stirring until the sauce thickens.
- Add the chicken and peas, then top with biscuit dough or puff pastry.
- Bake at 400°F (205°C) for 18 to 25 minutes, until the topping is golden and the filling bubbles at the edges.
Equipment for This Recipe:
- Oven-safe skillet
- Wooden spoon
- Measuring cups
- Rolling pin, if using pastry
How to Serve This Dish:
Serve it straight from the skillet with a simple green salad. The filling is rich enough that you do not need much else, though a few pickles on the side are oddly good.
Pro Tips for This Recipe:
- Make the filling thick before the topping goes on.
- Cut biscuit dough into smaller pieces if you want more even baking.
- Rotisserie chicken saves time and still tastes right here.
- Let the skillet rest for 5 minutes so the gravy settles.
Variations on This Dish:
- Turkey Pot Pie: Use leftover turkey instead of chicken.
- Mushroom and Herb Version: Add sautéed mushrooms and thyme.
- Puff Pastry Top: Use a sheet of pastry for a crisper lid.
Common Mistakes to Avoid with This Dish:
- Thin filling: The pot pie turns runny.
- Undercooked topping: Biscuit dough needs enough oven time to brown.
- Too much liquid from frozen vegetables: Thaw and drain them first if they’re icy.
12. Veggie-Laden Sloppy Joes
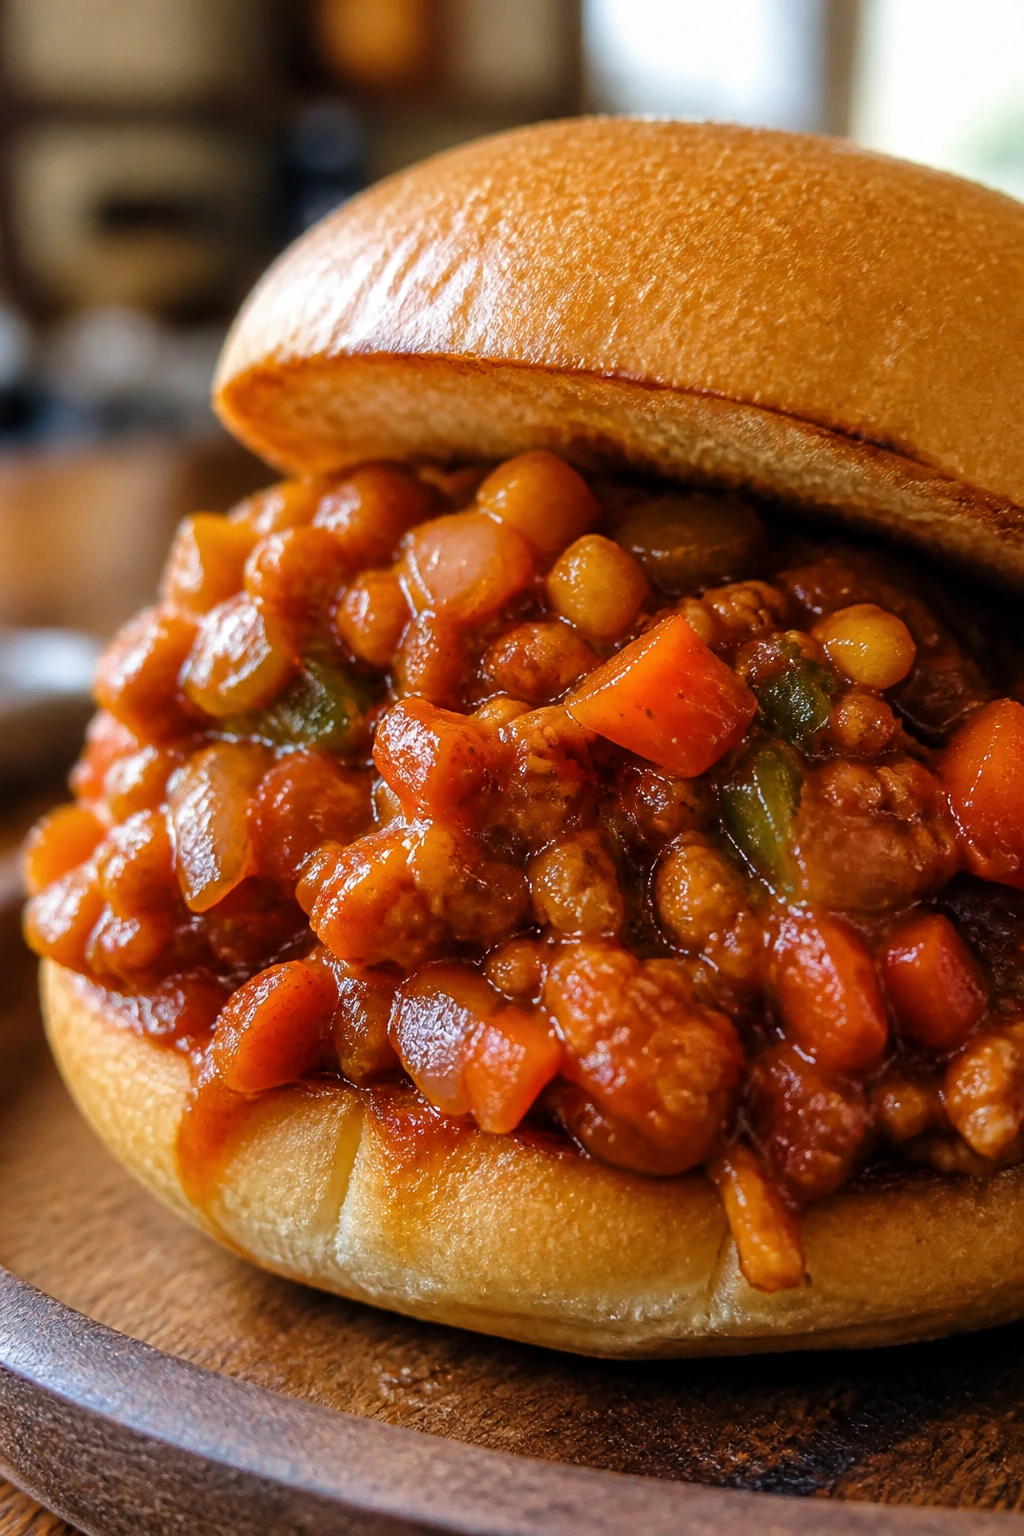
Sloppy Joes are supposed to be a little messy, but they should still taste structured. The carrots and bell pepper melt into the sauce, which makes the filling richer and gives it body without announcing themselves loudly. Kids notice the sweetness. Adults notice the extra vegetables.
Why It Works:
Ground meat browns fast, and the vegetables disappear into the sauce if you chop them small enough. Tomato paste, ketchup, and Worcestershire give the filling that familiar tangy-sweet note. The mixture also freezes neatly, which is handy when you want a no-thought dinner later.
Key Ingredients:
- 1 lb ground turkey or beef
- 1 small onion, diced
- 1 bell pepper, diced
- 1 carrot or small zucchini, grated
- ½ cup ketchup
- 1 tablespoon tomato paste
- 1 tablespoon Worcestershire sauce
- 6 hamburger buns
Quick Steps:
- Brown the meat with the onion, bell pepper, and grated vegetable in a skillet.
- Stir in the ketchup, tomato paste, Worcestershire, mustard, salt, and pepper.
- Add ¼ cup water and simmer for 10 minutes until the sauce thickens and the vegetables disappear into it.
- Toast the buns if you can.
- Spoon the filling onto the buns and serve hot.
Equipment for This Recipe:
- Large skillet
- Grater
- Wooden spoon
- Toaster or oven, optional
How to Serve This Dish:
Serve with potato wedges, coleslaw, or sliced apples. The filling also works on baked potatoes if you want to skip the bun completely.
Pro Tips for This Recipe:
- Grate the vegetables finely so they melt into the sauce.
- Toast the buns or they will go soft fast.
- If the sauce tastes too sharp, add 1 teaspoon brown sugar.
- A spoon of Dijon gives the filling more depth.
Variations on This Dish:
- BBQ Sloppy Joes: Replace part of the ketchup with barbecue sauce.
- Lentil Version: Swap in cooked lentils for half the meat.
- Spicy Mustard Version: Add a little hot sauce and extra mustard.
Common Mistakes to Avoid with This Dish:
- Skipping the simmer: The sauce needs a few minutes to thicken.
- Using soft buns straight from the bag: They collapse fast.
- Leaving the vegetables chunky: They can feel odd in a sandwich this loose.
13. Taco Soup
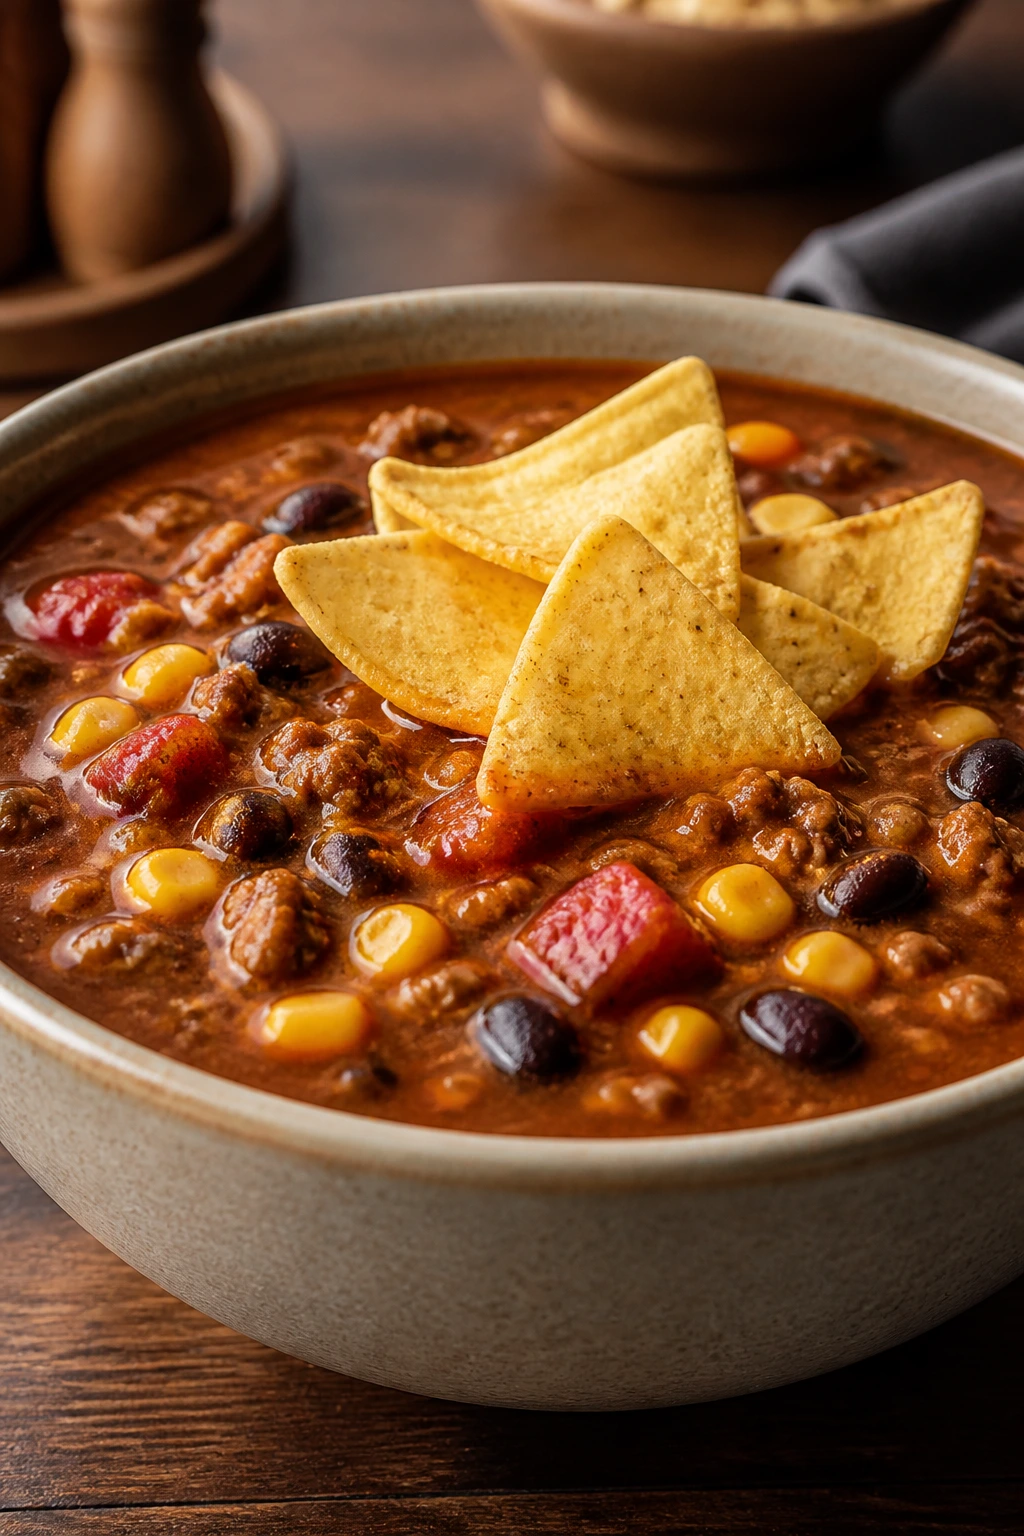
Taco soup is what happens when dinner decides to be both easy and forgiving. It tastes like taco night in a bowl, but it asks for a fraction of the effort and reheats better than most skillet meals. A handful of chips on top is enough to make it feel finished.
Why It Works:
Beans, tomatoes, corn, and broth create a soup with enough body to feel like a meal, not starter food. Ground turkey or beef adds richness, while taco seasoning keeps the flavor familiar. It freezes beautifully, which is one of the reasons I like keeping a pot around.
Key Ingredients:
- 1 lb ground turkey or beef
- 1 small onion, diced
- 2 cans black beans, drained and rinsed
- 1 can corn, drained
- 2 cans diced tomatoes
- 1 packet taco seasoning
- 4 cups chicken or beef broth
- Tortilla chips, sour cream, and cilantro for serving
Quick Steps:
- Brown the meat and onion in a large pot until the onion softens.
- Stir in the taco seasoning and cook for 30 seconds.
- Add the beans, corn, tomatoes, and broth.
- Simmer for 20 to 25 minutes so the flavors settle.
- Ladle into bowls and top with chips, sour cream, and cilantro.
Equipment for This Recipe:
- Large soup pot
- Wooden spoon
- Can opener
- Ladle
How to Serve This Dish:
Serve with tortilla chips, shredded cheese, and avocado. It’s one of the easiest dinners to turn into a lunch because it only gets better after sitting overnight.
Pro Tips for This Recipe:
- Drain and rinse the beans so the broth stays clean-tasting.
- Add a squeeze of lime at the end.
- Keep the toppings separate if you’re packing lunch.
- If you want more body, stir in ½ cup cooked rice.
Variations on This Dish:
- Chicken Taco Soup: Use shredded chicken instead of ground meat.
- Vegetarian Bean Bowl: Skip the meat and add extra beans.
- Creamy Taco Soup: Stir in ½ cup sour cream off the heat.
Common Mistakes to Avoid with This Dish:
- Too much broth: Soup should be hearty enough to hold toppings.
- Forgetting acid: Lime or a splash of vinegar sharpens the flavor.
- Skipping toppings entirely: Chips and cheese give it needed texture.
14. Teriyaki Chicken Thighs with Rice
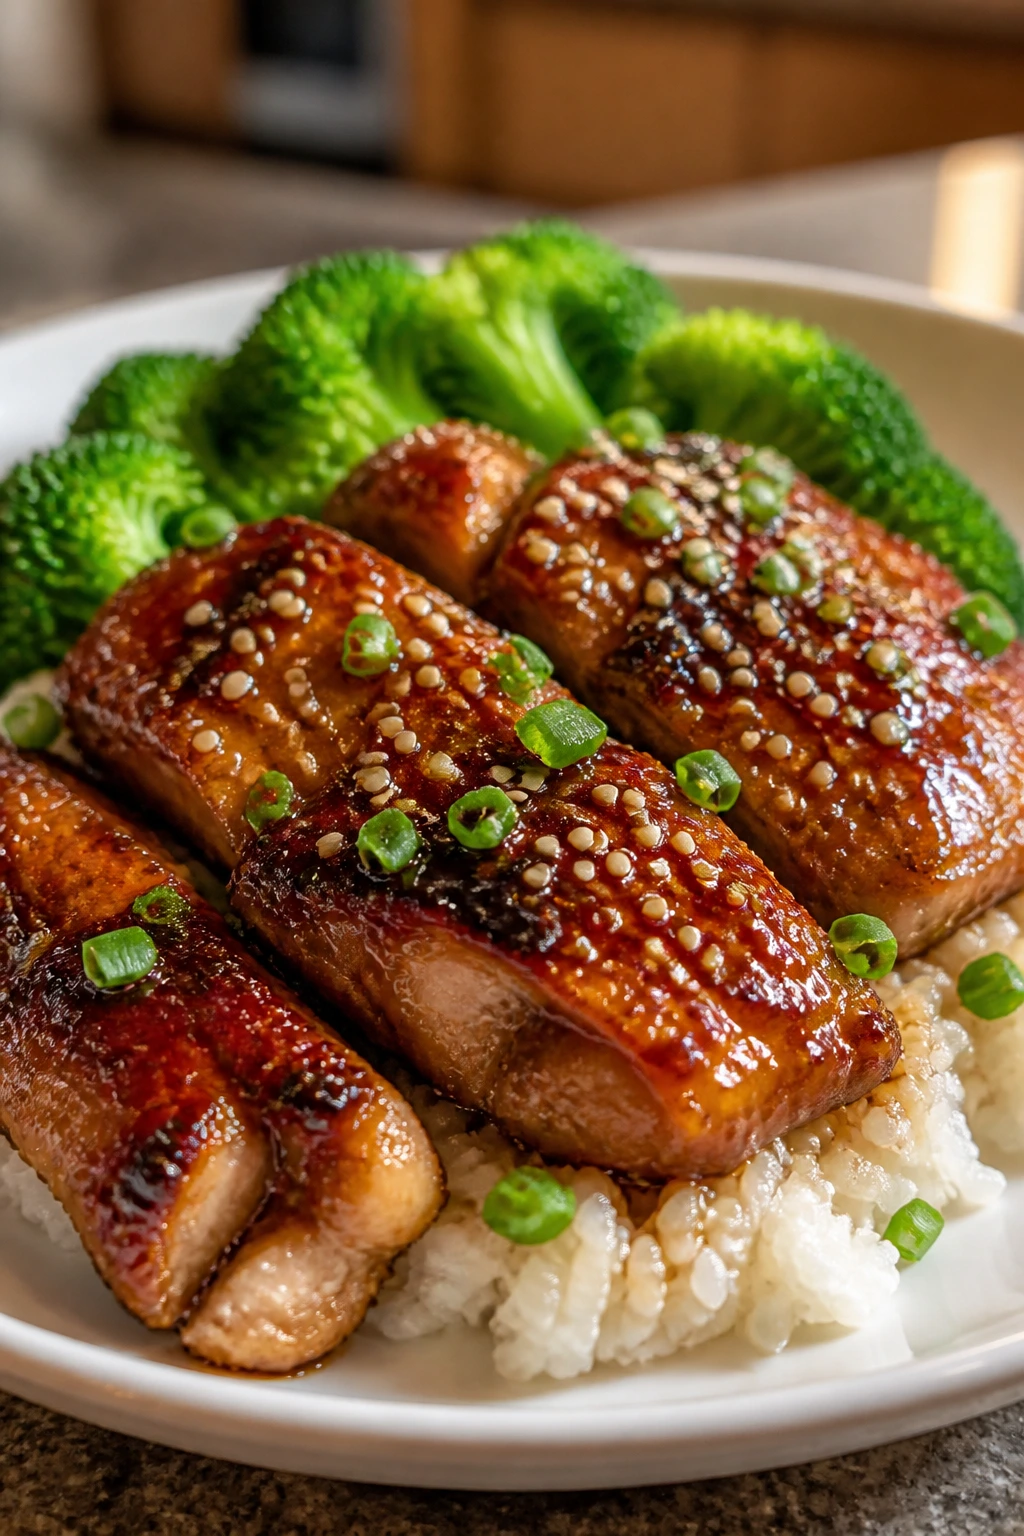
Teriyaki chicken thighs are sweet, sticky, and just saucy enough to make plain rice feel like a real plan. The glaze caramelizes around the edges, and chicken thighs stay forgiving even if the oven runs a little hot. This is one of my favorite “serve it now, eat it again tomorrow” dinners.
Why It Works:
Chicken thighs stay moist under a teriyaki glaze, which matters because the sauce has sugar in it and can brown quickly. A little rice vinegar keeps the glaze from feeling cloying. Serve it with broccoli or snap peas, and you’ve got a dinner that holds up in a lunch container without getting sad.
Key Ingredients:
- 2 lb boneless chicken thighs
- ¼ cup soy sauce
- 3 tablespoons honey
- 1 tablespoon rice vinegar
- 2 cloves garlic, minced
- 1 teaspoon grated ginger
- 1 teaspoon sesame oil
- Cooked rice, for serving
- 2 cups broccoli florets
Quick Steps:
- Mix the soy sauce, honey, vinegar, garlic, ginger, and sesame oil.
- Arrange the chicken in a baking dish or skillet and pour half the sauce over it.
- Bake at 400°F (205°C) for 20 to 25 minutes, or until the chicken reaches 165°F.
- Steam or roast the broccoli while the chicken cooks.
- Spoon the remaining sauce over the chicken and serve over rice.
Equipment for This Recipe:
- Baking dish or oven-safe skillet
- Small bowl
- Measuring spoons
- Rice cooker or saucepan, optional
How to Serve This Dish:
Serve the chicken sliced over rice with broccoli on the side and a sprinkle of sesame seeds. It makes a tidy lunch bowl the next day, which I appreciate more than I should admit.
Pro Tips for This Recipe:
- Don’t let the sauce sit too long on the raw chicken if your pan is small; the sugar can grab.
- Use thighs instead of breasts for a juicier result.
- Add the broccoli in the last 10 minutes if you want it roasted in the same pan.
- A little chili flakes brings balance if you like a tiny kick.
Variations on This Dish:
- Baked Drumstick Version: Use chicken drumsticks and add 5 to 10 minutes.
- Broccoli Bowl: Add extra broccoli and skip the rice for a lighter plate.
- Ginger-Lime Swap: Replace the sesame oil with lime juice for a brighter finish.
Common Mistakes to Avoid with This Dish:
- Overbaking the chicken: Thighs are forgiving, but not immortal.
- Using too much honey: The glaze burns if it’s too sweet.
- Serving without rice or another starch: The sauce needs something to cling to.
15. Shepherd’s Pie

Shepherd’s pie has a way of making leftovers feel intentional. The filling is savory and a little saucy, the mashed potatoes form a lid that browns in the oven, and every scoop gives you meat, vegetables, and starch in one go. It’s old-school in the best sense.
Why It Works:
The mashed potato top seals in moisture while picking up color on the ridges. A beefy filling with peas, carrots, and onion holds together well after chilling. If you make it early, the slices cut cleaner the next day, which is a nice bonus when mornings are loud.
Key Ingredients:
- 1¼ lb ground beef or lamb
- 1 onion, diced
- 1 cup carrots, diced
- 1 cup peas
- 2 tablespoons tomato paste
- 1 tablespoon Worcestershire sauce
- 2 cups beef broth
- 6 cups mashed potatoes
- 2 tablespoons butter
Quick Steps:
- Brown the meat with the onion and carrots until the onion softens.
- Stir in the tomato paste and Worcestershire sauce.
- Add the broth and simmer until the filling thickens.
- Stir in the peas, spread the filling in a baking dish, and top with mashed potatoes.
- Bake at 400°F (205°C) for 20 minutes, until the top browns in spots.
Equipment for This Recipe:
- Skillet
- Baking dish
- Potato masher
- Spatula
How to Serve This Dish:
Serve with a simple green salad or steamed green beans. A wedge of shepherd’s pie on a plate looks substantial in a way that shuts down the “what’s for dinner?” question fast.
Pro Tips for This Recipe:
- Make the filling thick enough that it doesn’t run.
- Rough up the mashed potatoes with a fork so the top browns.
- Add a splash of milk to the potatoes if they seem stiff.
- Let the pie rest 10 minutes before cutting.
Variations on This Dish:
- Sweet Potato Topping: Use mashed sweet potatoes instead of white potatoes.
- Turkey Cottage Pie: Swap in ground turkey.
- Cauliflower Mash Top: Replace half the potatoes with cauliflower mash.
Common Mistakes to Avoid with This Dish:
- Watery filling: It soaks the potatoes and turns the pie loose.
- Cold mashed potatoes spread too thick: They can bake unevenly.
- Skipping the rest: The layers need a few minutes to settle.
16. Lemon Parmesan Orzo with Shrimp
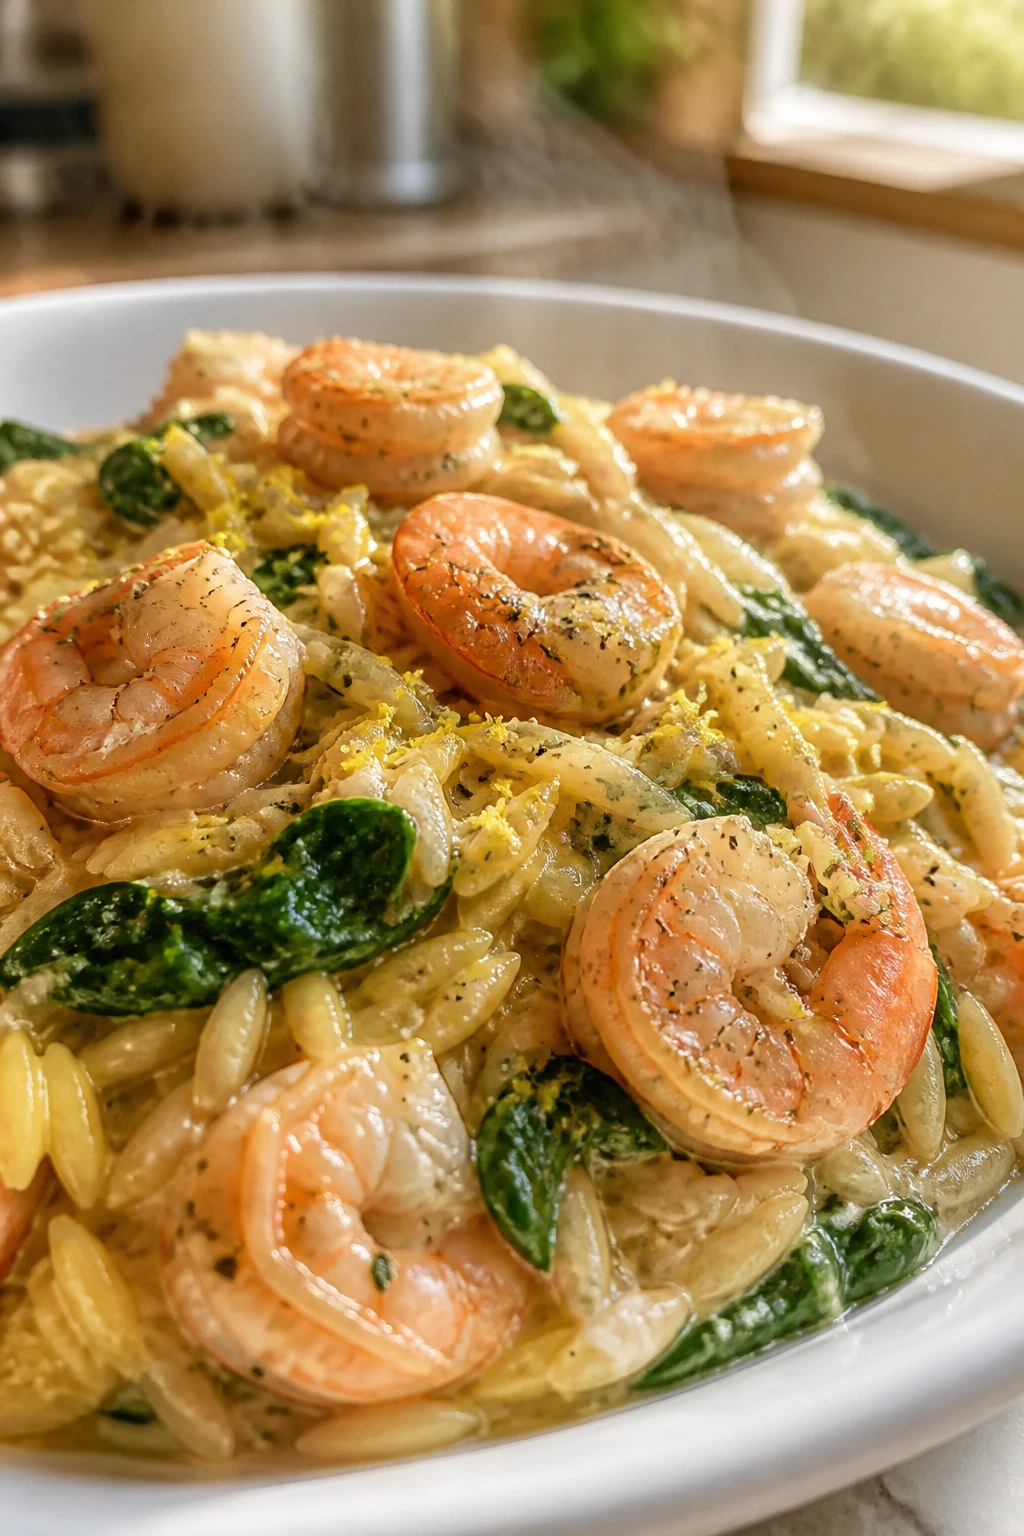
Orzo cooks into a silky little pile that feels fancier than it is, and shrimp gives the whole dish a quick, briny lift. Lemon keeps it bright, Parmesan adds salt and body, and spinach disappears into the pan without asking for attention. It’s fast enough for a tight evening and polished enough to feel like you tried.
Why It Works:
Shrimp cook in minutes, so the dish stays fast from start to finish. Orzo absorbs broth and lemon without turning heavy, which makes the texture creamy rather than mushy. I like this one for nights when the family needs dinner but not a giant plate of food.
Key Ingredients:
- 1¼ lb shrimp, peeled and deveined
- 1½ cups orzo
- 3 cups chicken broth
- 3 cloves garlic, minced
- 1 lemon, zested and juiced
- 1½ cups spinach
- ½ cup grated Parmesan
- 1 tablespoon olive oil
Quick Steps:
- Season the shrimp with salt and pepper.
- Warm the olive oil in a skillet and cook the shrimp for 1 to 2 minutes per side until pink, then remove them.
- Add the garlic and orzo and cook for 30 seconds.
- Pour in the broth and simmer for 8 to 10 minutes, stirring often, until the orzo is tender.
- Stir in the spinach, lemon, Parmesan, and shrimp, then serve right away.
Equipment for This Recipe:
- Large skillet or sauté pan
- Wooden spoon
- Microplane or zester
- Measuring cup
How to Serve This Dish:
Serve it in shallow bowls with extra lemon wedges. It is best with a crisp salad or roasted asparagus, not another creamy side.
Pro Tips for This Recipe:
- Don’t overcook the shrimp; they should curl, not tighten into little rings.
- Stir the orzo often so it doesn’t stick.
- Add a splash more broth if the pan looks dry before the pasta is tender.
- Finish with lemon zest after the heat is off for a brighter flavor.
Variations on This Dish:
- Chicken Orzo: Use diced cooked chicken instead of shrimp.
- Asparagus Swap: Stir in asparagus tips instead of spinach.
- Dairy-Light Version: Use a little less Parmesan and more lemon.
Common Mistakes to Avoid with This Dish:
- Cooking the shrimp too long: They go rubbery fast.
- Letting the orzo sit dry in the pan: Stir and add broth as needed.
- Adding Parmesan over high heat: It can clump.
17. French Bread Pizza Boats

French bread pizza boats are what you make when everyone wants pizza energy and you want dinner to happen before an argument starts. The bread gets crisp on the bottom, the sauce stays tucked in, and the cheese melts into the pepperoni or vegetables. It’s a pantry dinner with enough structure to feel like a plan.
Why It Works:
A quick pre-toast keeps the bread from going soggy under the sauce. The open-face format lets each person choose toppings without turning dinner into a full custom order. Leftovers reheat well in a toaster oven, which is more than I can say for takeout slices sometimes.
Key Ingredients:
- 1 large loaf French bread
- 1 cup pizza sauce
- 2 cups shredded mozzarella
- 1 cup pepperoni or chopped vegetables
- 1 teaspoon Italian seasoning
- 1 tablespoon olive oil
Quick Steps:
- Split the bread lengthwise and brush the cut sides with olive oil.
- Toast the bread at 425°F (220°C) for 5 minutes.
- Spread the sauce over each half, then add cheese, toppings, and Italian seasoning.
- Bake for 8 to 12 minutes until the cheese bubbles and the edges turn crisp.
- Slice into pieces and serve hot.
Equipment for This Recipe:
- Baking sheet
- Serrated knife
- Spoon
- Oven mitts
How to Serve This Dish:
Serve with a salad or a pile of carrot sticks so the meal feels complete. The boats cut into clean pieces, which is handy when people are eating in shifts.
Pro Tips for This Recipe:
- Toast the bread first or the middle gets soft.
- Use toppings that are already cooked if they need a long bake.
- A little Parmesan on top gives the cheese more bite.
- Slice after a minute or two so the cheese doesn’t slide off.
Variations on This Dish:
- Breakfast Pizza Boats: Add scrambled eggs and cooked sausage.
- Veggie Supreme Boats: Use mushrooms, peppers, and olives.
- BBQ Chicken Boats: Swap pizza sauce for barbecue sauce and add shredded chicken.
Common Mistakes to Avoid with This Dish:
- Overloading the bread: It gets heavy and falls apart.
- Skipping the pre-toast: That’s how you get soggy pizza bread.
- Cutting immediately: The cheese needs a brief pause.
18. Creamy Tomato Tortellini Soup
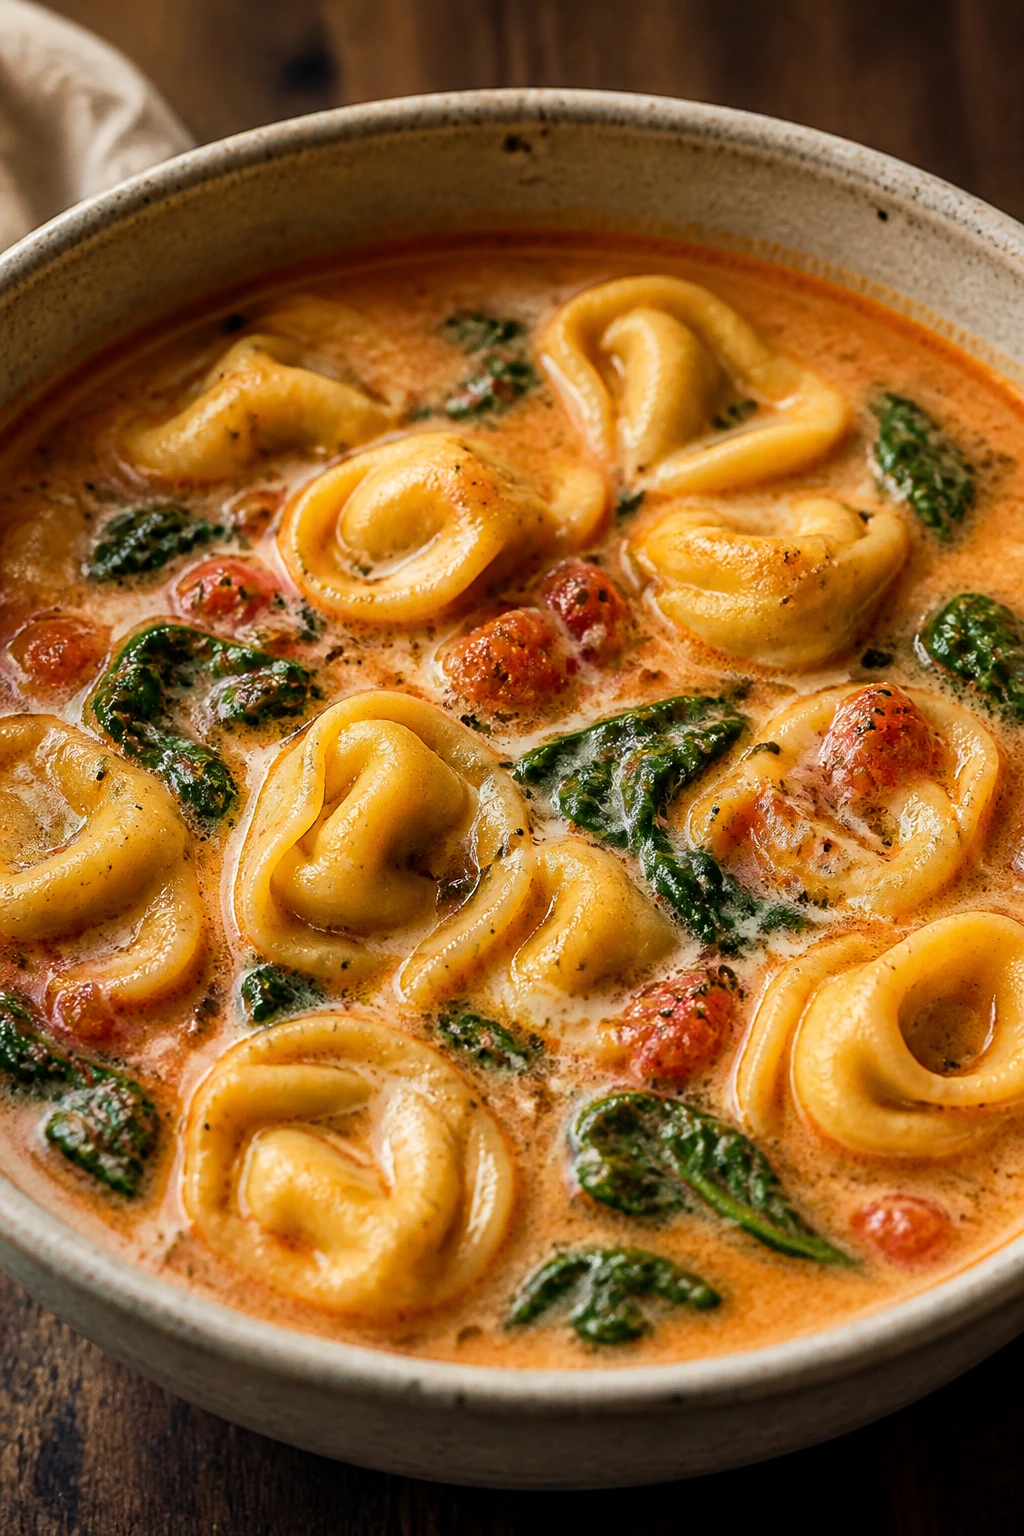
Creamy tomato tortellini soup has the kind of texture that makes people lean over their bowls. The broth is rich but not heavy, the tortellini bob around like little dumplings, and the spinach softens in the last minute. It’s a soup that eats like dinner.
Why It Works:
Cheese tortellini makes the soup filling without a separate starch. Crushed tomatoes and broth keep the base bright, while cream rounds out the sharp edges. It reheats well if you keep the heat gentle, though the tortellini is best not pushed too far.
Key Ingredients:
- 1 onion, diced
- 3 cloves garlic, minced
- 1 can (28 oz) crushed tomatoes
- 4 cups chicken or vegetable broth
- 1 package cheese tortellini, about 20 oz
- 1 cup heavy cream or half-and-half
- 2 cups spinach
- 1 teaspoon dried basil
Quick Steps:
- Sauté the onion in a soup pot until soft, then add the garlic for 30 seconds.
- Stir in the crushed tomatoes, broth, and basil, and simmer for 10 minutes.
- Add the tortellini and cook according to the package, usually 4 to 6 minutes.
- Lower the heat and stir in the cream and spinach.
- Taste, adjust salt, and serve hot.
Equipment for This Recipe:
- Large soup pot
- Ladle
- Wooden spoon
- Measuring cup
How to Serve This Dish:
Serve with grilled cheese or garlic toast. The soup is soft and rich, so a crisp, cheesy side gives it the crunch it wants.
Pro Tips for This Recipe:
- Keep the simmer gentle once the cream goes in.
- Add the tortellini near the end so it doesn’t split.
- A pinch of red pepper flakes adds a nice edge.
- Fresh basil works well if you have it.
Variations on This Dish:
- Sausage Tomato Soup: Brown Italian sausage with the onion first.
- Rosemary Version: Use rosemary instead of basil for a woodier flavor.
- Dairy-Free Choice: Use coconut cream for a different but still silky finish.
Common Mistakes to Avoid with This Dish:
- Boiling the cream: It can separate.
- Overcooking the tortellini: They break and go bloated.
- Salting too early: The broth reduces, and the salt can creep up.
19. Slow Cooker Beef Stew

A proper beef stew should taste like it spent the day getting better, and this one does. The broth thickens a little, the potatoes soften at the edges, and the beef turns spoon-tender without falling apart into shreds. It’s a cold-weather kind of meal, but it works any time you need dinner to think for you.
Why It Works:
Chuck roast has the fat and connective tissue needed for slow braising. Browning the meat first gives the stew a darker, deeper taste, and the vegetables hold up if they’re cut into chunks instead of tiny pieces. It is one of the best make-ahead dinners in the whole list.
Key Ingredients:
- 2 lb chuck roast, cut into chunks
- 3 potatoes, peeled and chopped
- 3 carrots, sliced
- 2 celery stalks, sliced
- 1 onion, chopped
- 4 cups beef broth
- 2 tablespoons tomato paste
- 1 teaspoon dried thyme
- 1 bay leaf
- 2 tablespoons flour
Quick Steps:
- Brown the beef in a skillet if you have time.
- Place the beef, vegetables, tomato paste, thyme, bay leaf, flour, salt, pepper, and broth in the slow cooker.
- Cook on low for 8 hours or high for 5 to 6 hours.
- Stir in peas during the last 15 minutes if you want them.
- Remove the bay leaf and serve hot.
Equipment for This Recipe:
- Slow cooker
- Skillet, optional for browning
- Cutting board
- Ladle
How to Serve This Dish:
Serve in deep bowls with crusty bread or over mashed potatoes if you want it even heartier. Stew makes a strong next-day lunch, especially when packed in a thermos.
Pro Tips for This Recipe:
- Cut the vegetables large enough that they do not dissolve.
- Browning the meat adds flavor, but the stew will still work if you skip it.
- Add the peas late so they stay green.
- A splash of Worcestershire deepens the broth if it tastes thin.
Variations on This Dish:
- Red Wine Stew: Replace 1 cup broth with red wine.
- Mushroom Stew: Add 8 oz mushrooms for more savoriness.
- Gluten-Free Thickener: Use cornstarch instead of flour.
Common Mistakes to Avoid with This Dish:
- Tiny vegetables: They disappear after hours of cooking.
- Skipping enough seasoning: Slow-cooked food needs salt at the end.
- Opening the lid too often: The stew loses heat and takes longer.
20. Crispy Baked Fish Tacos
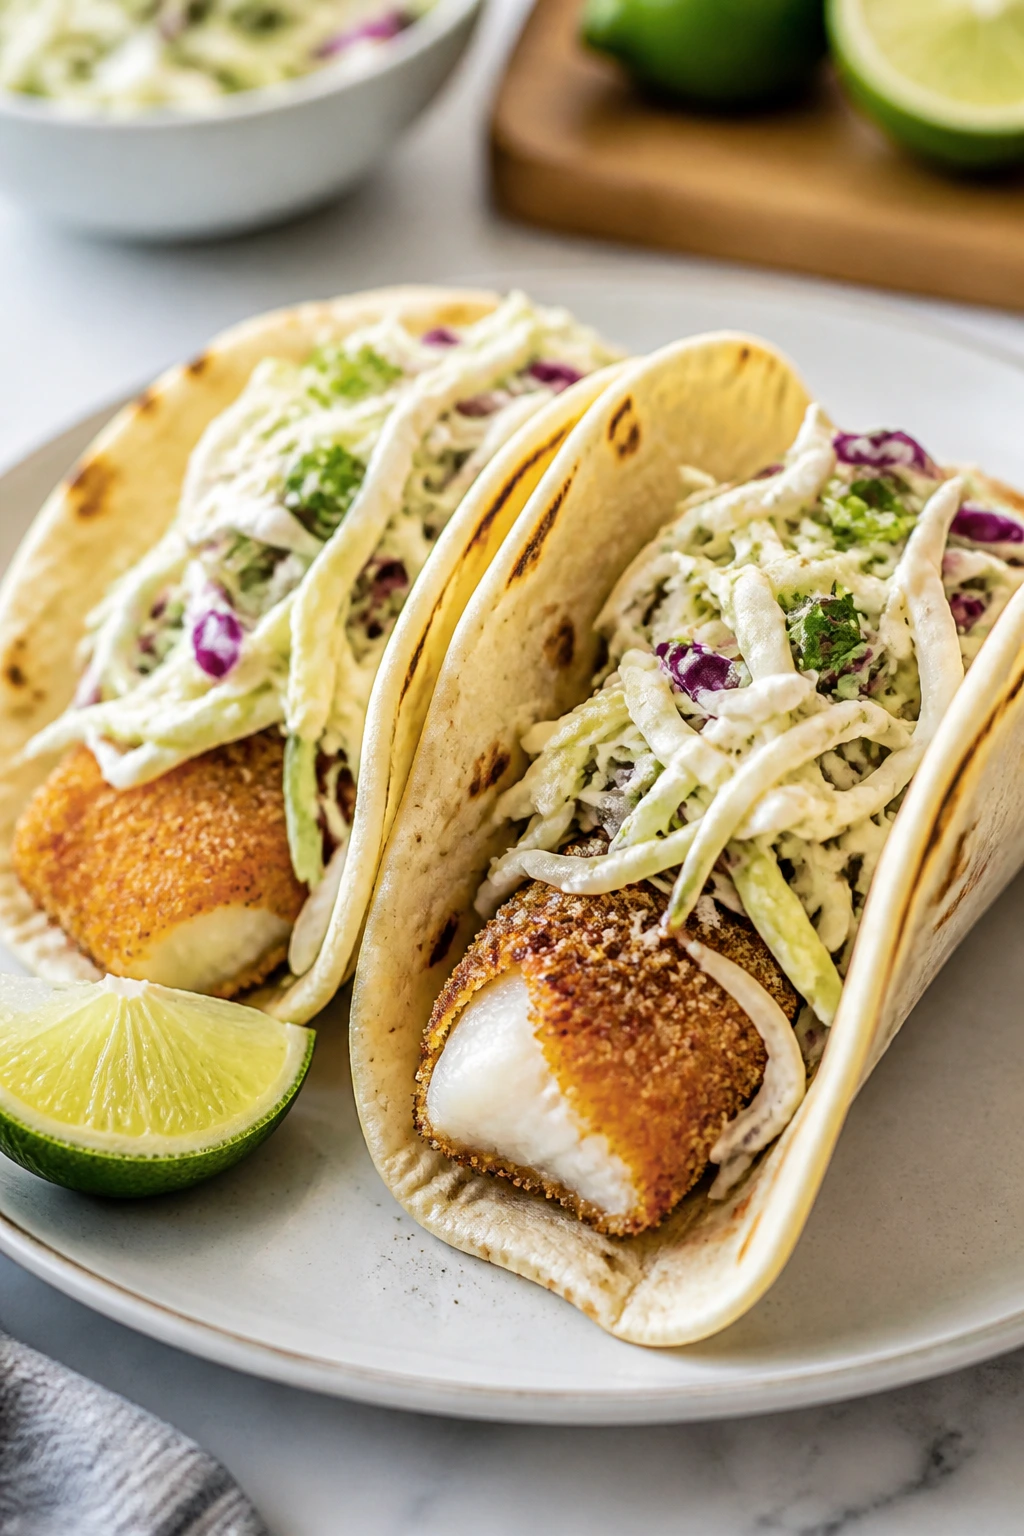
Fish tacos are at their best when the fish has a crisp edge and the toppings stay cold and bright. Baking instead of frying keeps the cleanup easy and still gives you a good crunch if you use panko. This is a fun dinner, but it is also one that asks for a little timing.
Why It Works:
White fish cooks quickly and stays tender if you pull it as soon as it flakes. Panko crumbs give the fish a crackly coating without a deep fryer. The cabbage slaw adds the needed crunch, and lime keeps the tacos from tasting heavy.
Key Ingredients:
- 1½ lb white fish fillets, such as cod or tilapia
- 1 cup panko breadcrumbs
- 1 teaspoon chili powder
- 1 teaspoon garlic powder
- 8 small tortillas
- 3 cups shredded cabbage
- ½ cup plain yogurt
- 1 lime, juiced
- 1 tablespoon olive oil
- Cilantro and avocado, optional
Quick Steps:
- Preheat the oven to 425°F (220°C) and line a baking sheet.
- Mix the panko, chili powder, garlic powder, salt, and pepper.
- Brush the fish lightly with oil, press on the crumbs, and bake for 12 to 15 minutes until the fish flakes easily.
- Toss the cabbage with yogurt, lime juice, and a pinch of salt.
- Warm the tortillas and build the tacos with fish, slaw, and any toppings you like.
Equipment for This Recipe:
- Baking sheet
- Shallow bowl
- Tongs
- Knife
How to Serve This Dish:
Serve with rice or black beans if you want the meal to stretch. The fish is best eaten right away, which makes this a good “dinner tonight, simpler dinner tomorrow” recipe rather than a long-lasting leftover dish.
Pro Tips for This Recipe:
- Dry the fish well before breading.
- Use two baking sheets if the fillets crowd each other.
- Warm the tortillas so they bend instead of crack.
- Keep the slaw cold and crisp until the last minute.
Variations on This Dish:
- Chipotle Fish Tacos: Add chipotle powder to the crumb mix.
- Shrimp Swap: Use peeled shrimp and bake for a shorter time.
- Cornmeal Crust: Mix half cornmeal with the panko for extra grit.
Common Mistakes to Avoid with This Dish:
- Wet fish: The coating slides off.
- Overcooking: Fish goes dry fast.
- Assembling too early: The tortillas soften and lose their shape.
21. Chicken Alfredo Bake
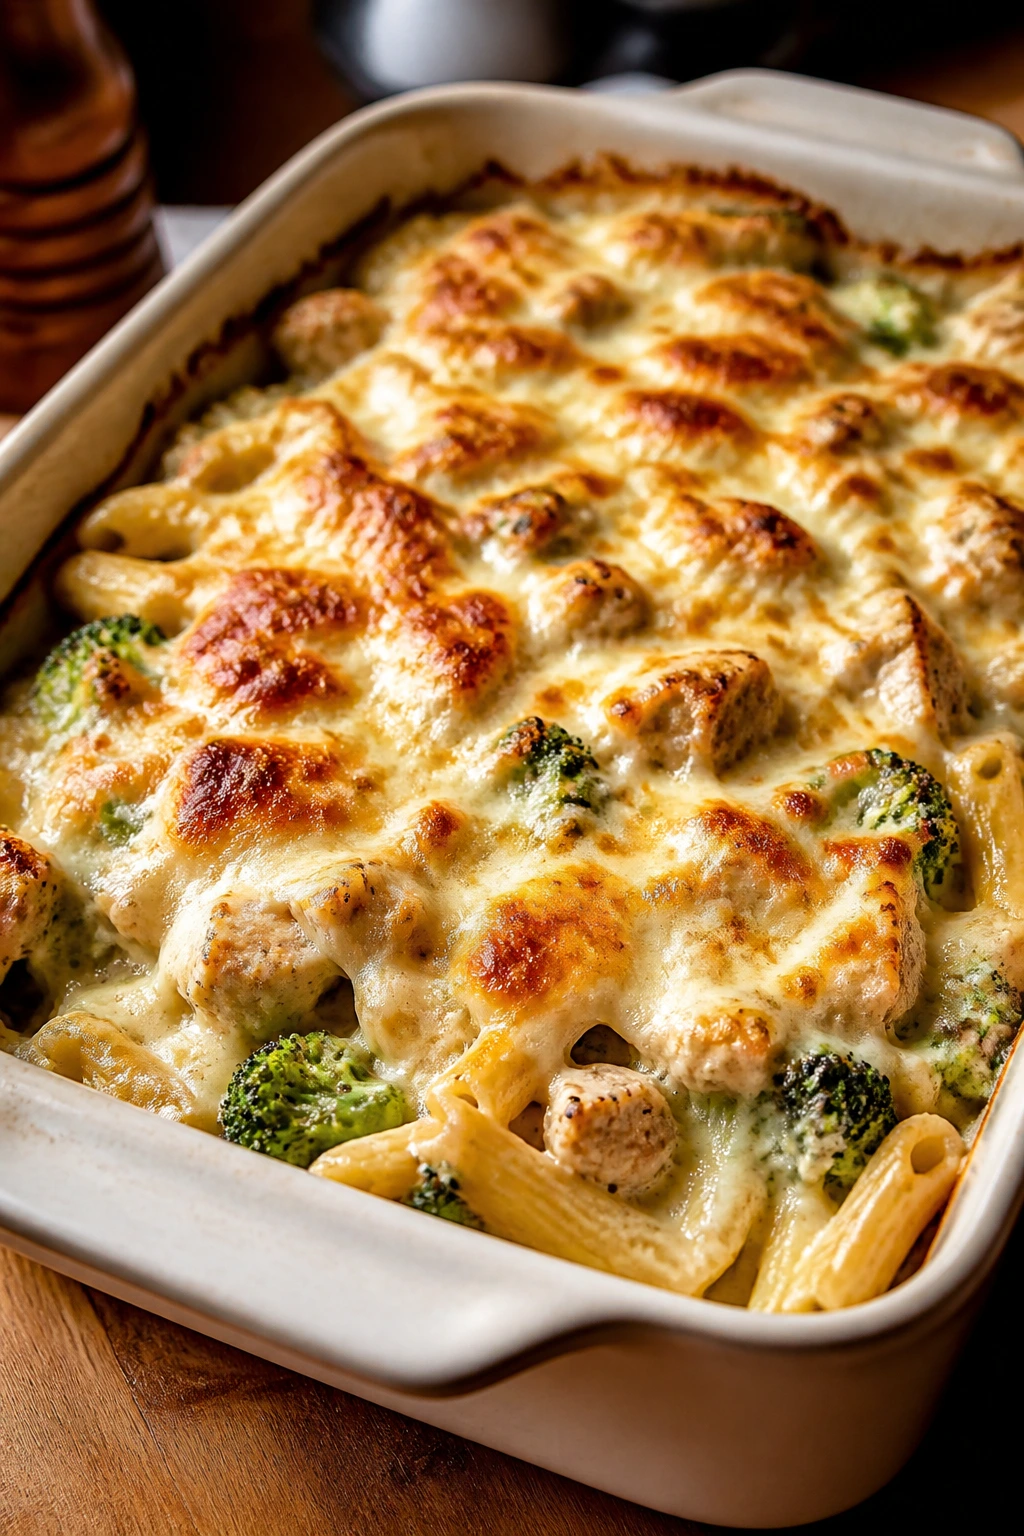
Chicken Alfredo Bake is rich without becoming chaotic, which is a useful quality in a family dinner. The pasta holds the sauce, the chicken adds substance, and the top gets a little browned if you give it enough oven time. It’s the kind of casserole that makes leftovers look planned.
Why It Works:
Pasta baked in sauce absorbs flavor instead of getting watery. Broccoli or peas give the dish some green without fighting the creamy base. If you cook the pasta slightly under, it finishes in the oven and keeps a good bite.
Key Ingredients:
- 1 lb penne
- 2 cups cooked chicken, chopped
- 2 cups Alfredo sauce
- 2 cups broccoli florets or peas
- 1 cup shredded mozzarella
- ½ cup grated Parmesan
- 1 tablespoon butter
Quick Steps:
- Boil the penne for 2 minutes less than package directions.
- Toss the pasta with the Alfredo sauce, chicken, broccoli, butter, and half the Parmesan.
- Spread into a greased baking dish and top with mozzarella and the remaining Parmesan.
- Bake at 375°F (190°C) for 20 to 25 minutes until hot and bubbly.
- Rest for 5 to 10 minutes before serving.
Equipment for This Recipe:
- Pot for pasta
- 9×13-inch baking dish
- Mixing bowl
- Colander
How to Serve This Dish:
Serve with a crisp Caesar salad or plain steamed vegetables. The casserole is creamy enough that a sharp side helps keep the plate from feeling one-note.
Pro Tips for This Recipe:
- Add a splash of pasta water if the sauce feels too thick.
- Use rotisserie chicken to cut the prep time down.
- Broccoli should be small so it cooks through.
- Cover with foil if the cheese starts browning too quickly.
Variations on This Dish:
- Spinach Alfredo Bake: Swap broccoli for spinach.
- Sun-Dried Tomato Version: Add chopped sun-dried tomatoes for tang.
- Turkey Swap: Use chopped turkey instead of chicken.
Common Mistakes to Avoid with This Dish:
- Overcooking the pasta first: It becomes mushy after baking.
- Using too little sauce: The bake dries out.
- Cutting immediately: The sauce needs a few minutes to settle.
22. Pork Tenderloin with Apples and Onions
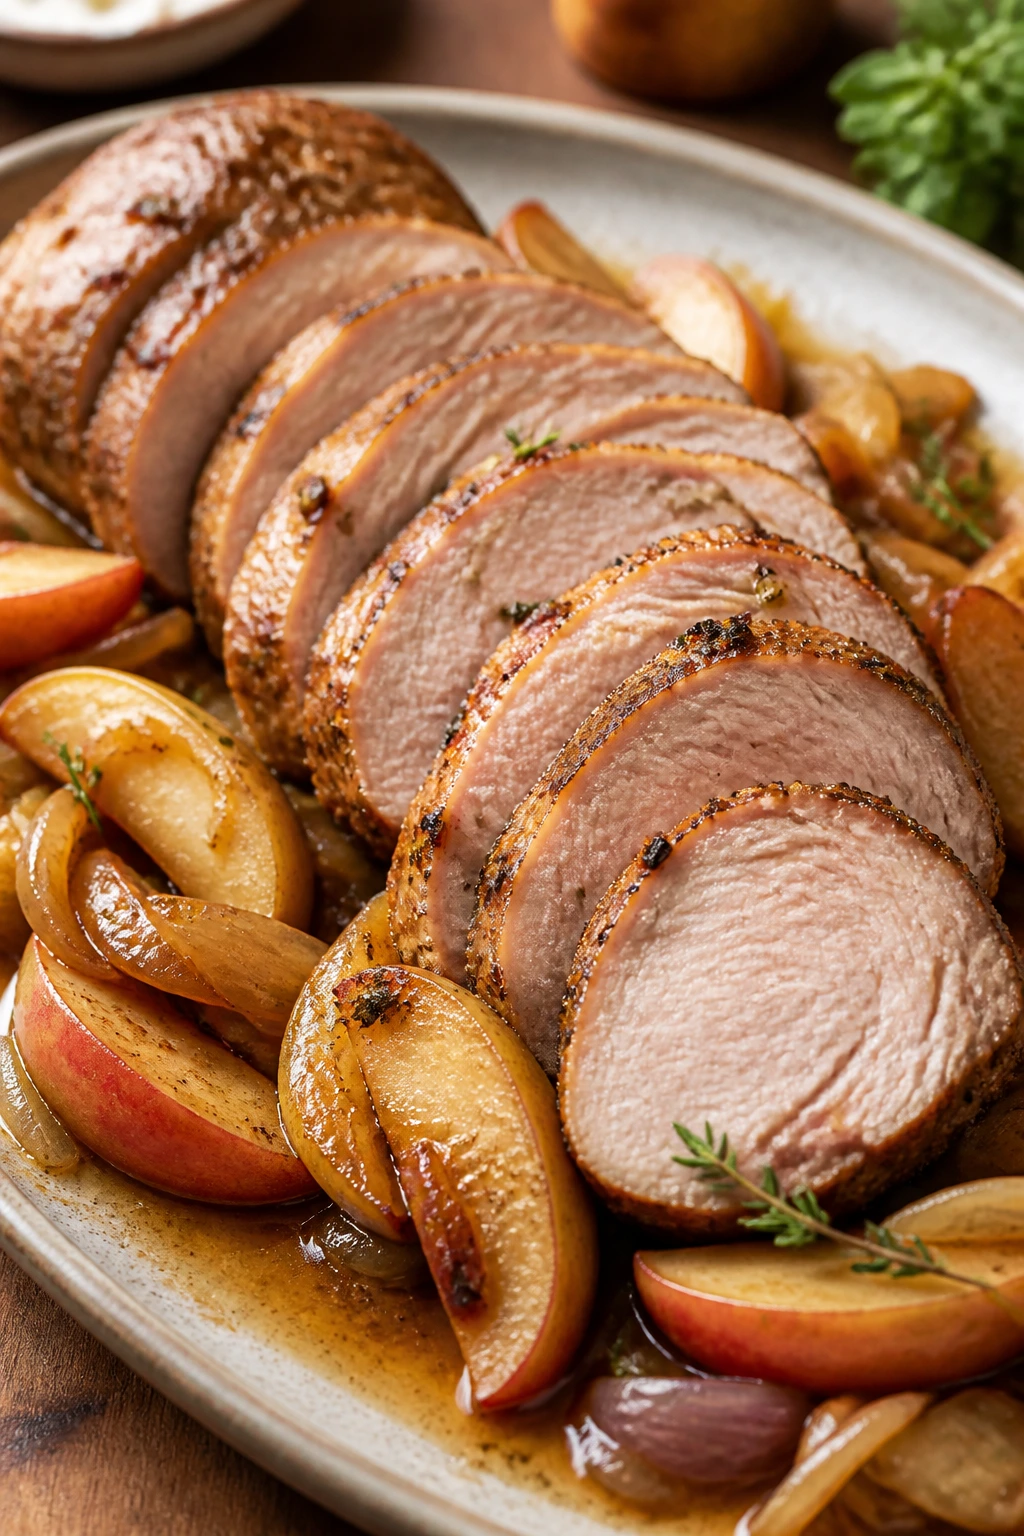
Pork tenderloin is lean, which means you have to treat it with a little respect, but it rewards you with neat slices and a mild flavor that takes on the sweet onions and apples beautifully. The pan juices make a quick sauce that tastes more complicated than it is. This is a calm, tidy dinner.
Why It Works:
A fast roast keeps pork tenderloin from drying out. Apples and onions soften in the same pan and pick up the pork drippings, so the side and main dish are connected without extra work. A thermometer matters here; guessing is how tenderloin gets overcooked.
Key Ingredients:
- 1½ lb pork tenderloin
- 2 apples, sliced
- 1 large onion, sliced
- 1 tablespoon Dijon mustard
- 1 teaspoon dried thyme
- ½ cup chicken broth
- 1 tablespoon olive oil
- Salt and pepper
Quick Steps:
- Sear the pork in a hot skillet with olive oil until browned on all sides.
- Add the onions and apples around the pork.
- Stir the Dijon, thyme, broth, salt, and pepper together and pour it into the pan.
- Roast at 425°F (220°C) for 15 to 20 minutes, until the pork reaches 145°F.
- Rest the pork for 10 minutes, then slice and serve with the onions and apples.
Equipment for This Recipe:
- Oven-safe skillet or roasting pan
- Instant-read thermometer
- Knife
- Cutting board
How to Serve This Dish:
Serve with mashed potatoes, rice, or buttered noodles to catch the juices. The pan itself does most of the flavor work, so you do not need a heavy side dish.
Pro Tips for This Recipe:
- Don’t cook past 145°F if you want the pork juicy.
- Slice apples thick enough that they keep their shape.
- Resting the pork matters more than people think.
- A spoon of pan juices over the slices finishes the plate nicely.
Variations on This Dish:
- Mustard Herb Pork: Add more Dijon and fresh rosemary.
- Maple Apple Version: Stir in a teaspoon of maple syrup.
- Pear Swap: Use pears instead of apples for a softer sweetness.
Common Mistakes to Avoid with This Dish:
- Overcooking the tenderloin: It turns dry fast.
- Cutting right away: The juices run out.
- Slicing apples too thin: They fall apart before serving.
23. One-Pan Meatloaf and Potatoes
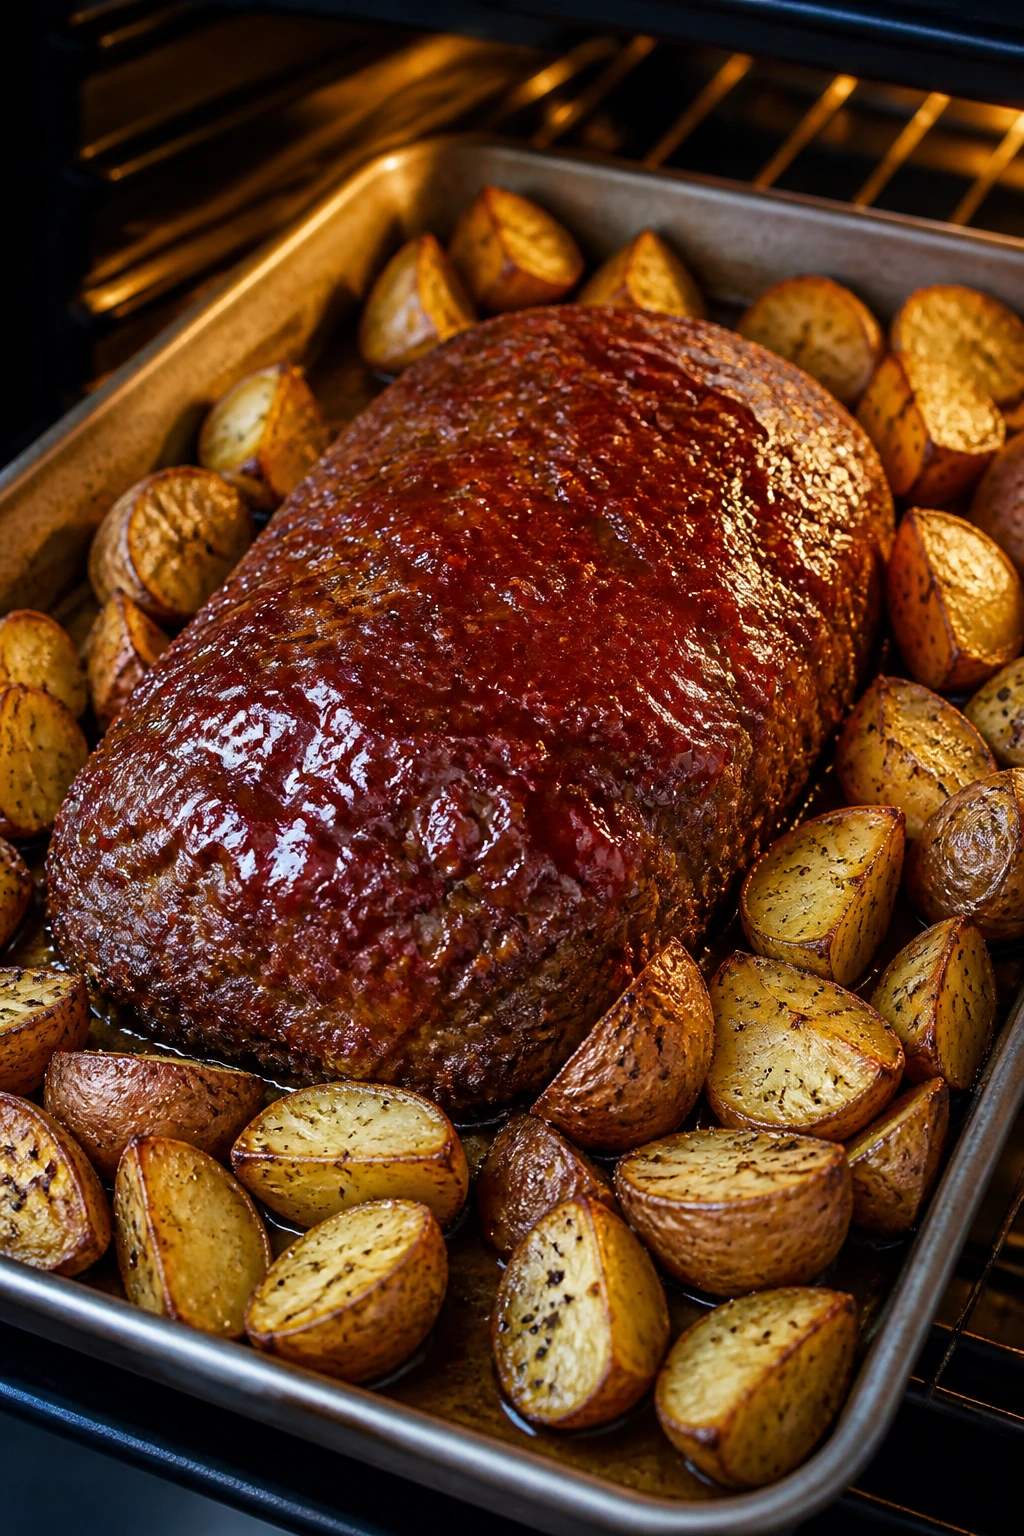
Meatloaf gets a bad rap from people who remember the dry versions, but a well-seasoned pan loaf with potatoes roasting beside it is an entirely different animal. The glaze caramelizes, the potatoes soak up drippings, and the whole pan comes out looking like a complete plan. It is efficient in a very satisfying way.
Why It Works:
Ground beef mixed with breadcrumbs and egg stays tender if you don’t compress it into a brick. Small potatoes roast at the same pace as the loaf, so one pan feeds the table without separate side dishes. This is also a strong leftover dinner because meatloaf slices reheat better than many other mains.
Key Ingredients:
- 1½ lb ground beef
- 1 egg
- ½ cup breadcrumbs
- 1 small onion, finely diced
- 2 tablespoons Worcestershire sauce
- 1 tablespoon ketchup
- 1½ lb baby potatoes, halved
- 2 carrots, cut into chunks
- ¼ cup ketchup for the glaze
Quick Steps:
- Heat the oven to 400°F (205°C).
- Mix the beef, egg, breadcrumbs, onion, Worcestershire, 1 tablespoon ketchup, salt, and pepper gently.
- Form into a loaf on a parchment-lined sheet pan and arrange the potatoes and carrots around it with oil, salt, and pepper.
- Brush the loaf with the glaze and bake for 40 to 45 minutes until the center reaches 160°F.
- Rest for 10 minutes before slicing.
Equipment for This Recipe:
- Rimmed sheet pan
- Parchment paper
- Mixing bowl
- Instant-read thermometer
How to Serve This Dish:
Serve with the roasted vegetables and a spoon of extra pan juices. A green vegetable or salad adds color if you want the plate to look less brown, which is fair.
Pro Tips for This Recipe:
- Mix just until the ingredients come together.
- Keep the potatoes small so they finish on time.
- Brush the glaze on near the end too if you want it stickier.
- Let the loaf rest or it will crumble when sliced.
Variations on This Dish:
- Turkey Meatloaf Pan: Swap in ground turkey and add a splash of milk.
- BBQ Glaze Version: Use barbecue sauce instead of ketchup.
- Mini Loaf Tins: Shape into smaller loaves for faster baking.
Common Mistakes to Avoid with This Dish:
- Packing the meat too tightly: The loaf turns dense.
- Using potatoes that are too large: They won’t finish in time.
- Slicing while hot: The juices need a pause to settle.
24. Veggie Fried Rice with Egg
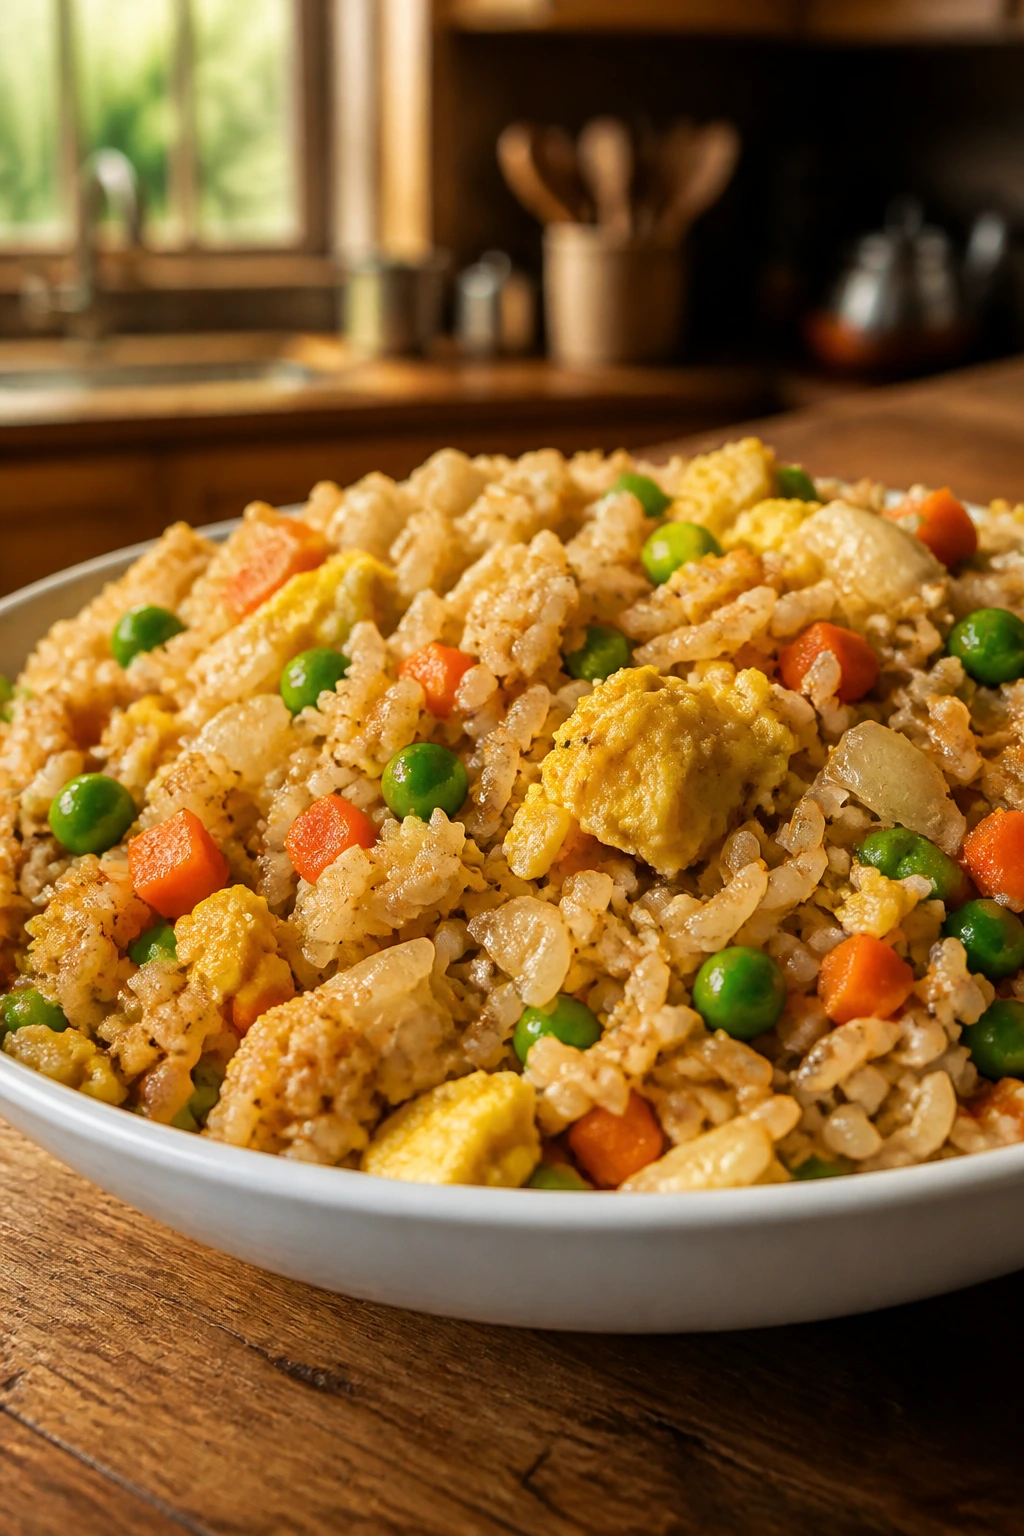
Veggie fried rice is one of those useful dinners that makes sense only if the rice is cold. Fresh rice clumps and sulks, while day-old rice fries up grainy and separate. Toss in eggs, frozen vegetables, and a little soy sauce, and you have a fast meal that can also become breakfast-for-dinner in a different mood.
Why It Works:
Cold rice dries out enough to fry instead of steam. Eggs add protein and help the rice feel finished, and frozen peas and carrots keep the prep short. It’s one of the easiest ways to rescue leftover rice from the back of the fridge.
Key Ingredients:
- 3 cups cooked, chilled rice
- 3 eggs, beaten
- 1½ cups frozen peas and carrots
- 1 small onion, diced
- 2 cloves garlic, minced
- 3 tablespoons soy sauce
- 1 teaspoon sesame oil
- 2 scallions, sliced
Quick Steps:
- Scramble the eggs in a hot skillet and set them aside.
- Cook the onion and frozen vegetables until the moisture cooks off.
- Add the garlic, then the cold rice, breaking up clumps with a spatula.
- Stir in the soy sauce and sesame oil, and fry for 3 to 4 minutes until the rice looks hot and a little toasted.
- Fold the eggs back in and finish with scallions.
Equipment for This Recipe:
- Large skillet or wok
- Spatula
- Small bowl
- Cutting board
How to Serve This Dish:
Serve it straight from the skillet with soy sauce or chili crisp at the table. It’s also easy to box up for lunch, which is one reason fried rice keeps showing up in my kitchen.
Pro Tips for This Recipe:
- Use rice that has had time to chill fully.
- Keep the heat high enough that the rice sizzles.
- Scrape the pan often so nothing sticks.
- Add a little ham or chicken if you want a fuller dinner.
Variations on This Dish:
- Chicken Fried Rice: Add diced cooked chicken with the rice.
- Kimchi Version: Stir in chopped kimchi and a splash of the brine.
- Pineapple Twist: Add small pineapple chunks for sweetness.
Common Mistakes to Avoid with This Dish:
- Using fresh rice: It turns gummy.
- Adding too much soy sauce: The rice gets wet and dark.
- Not breaking up the clumps: You end up with steamed chunks instead of fried grains.
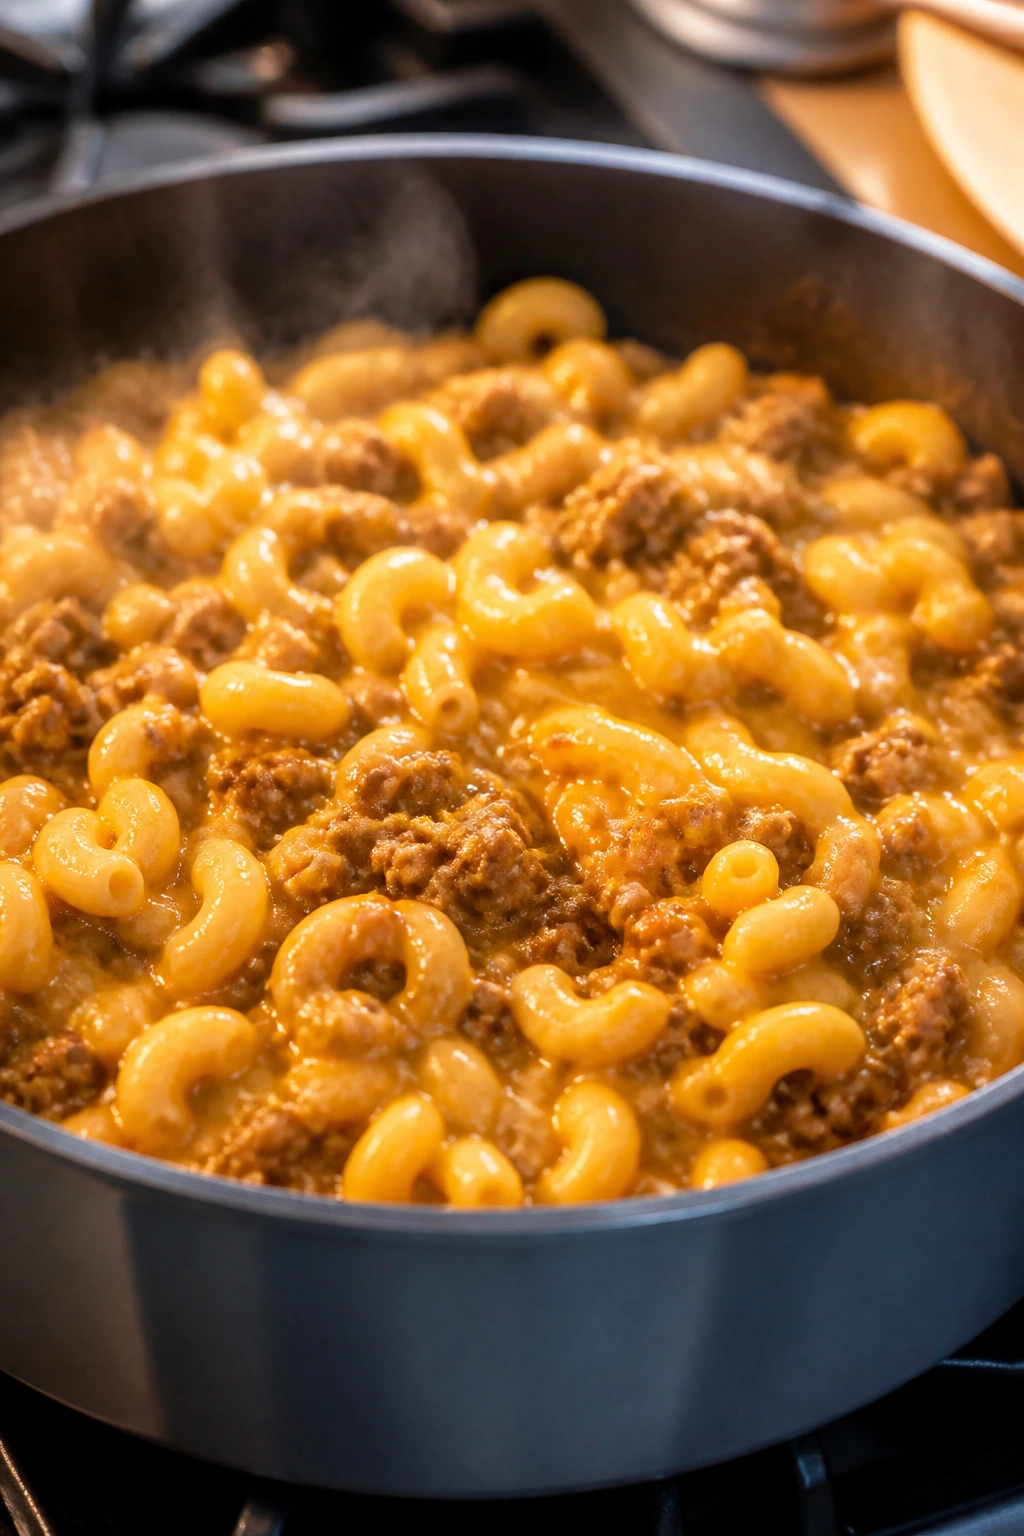
25. Chili Mac
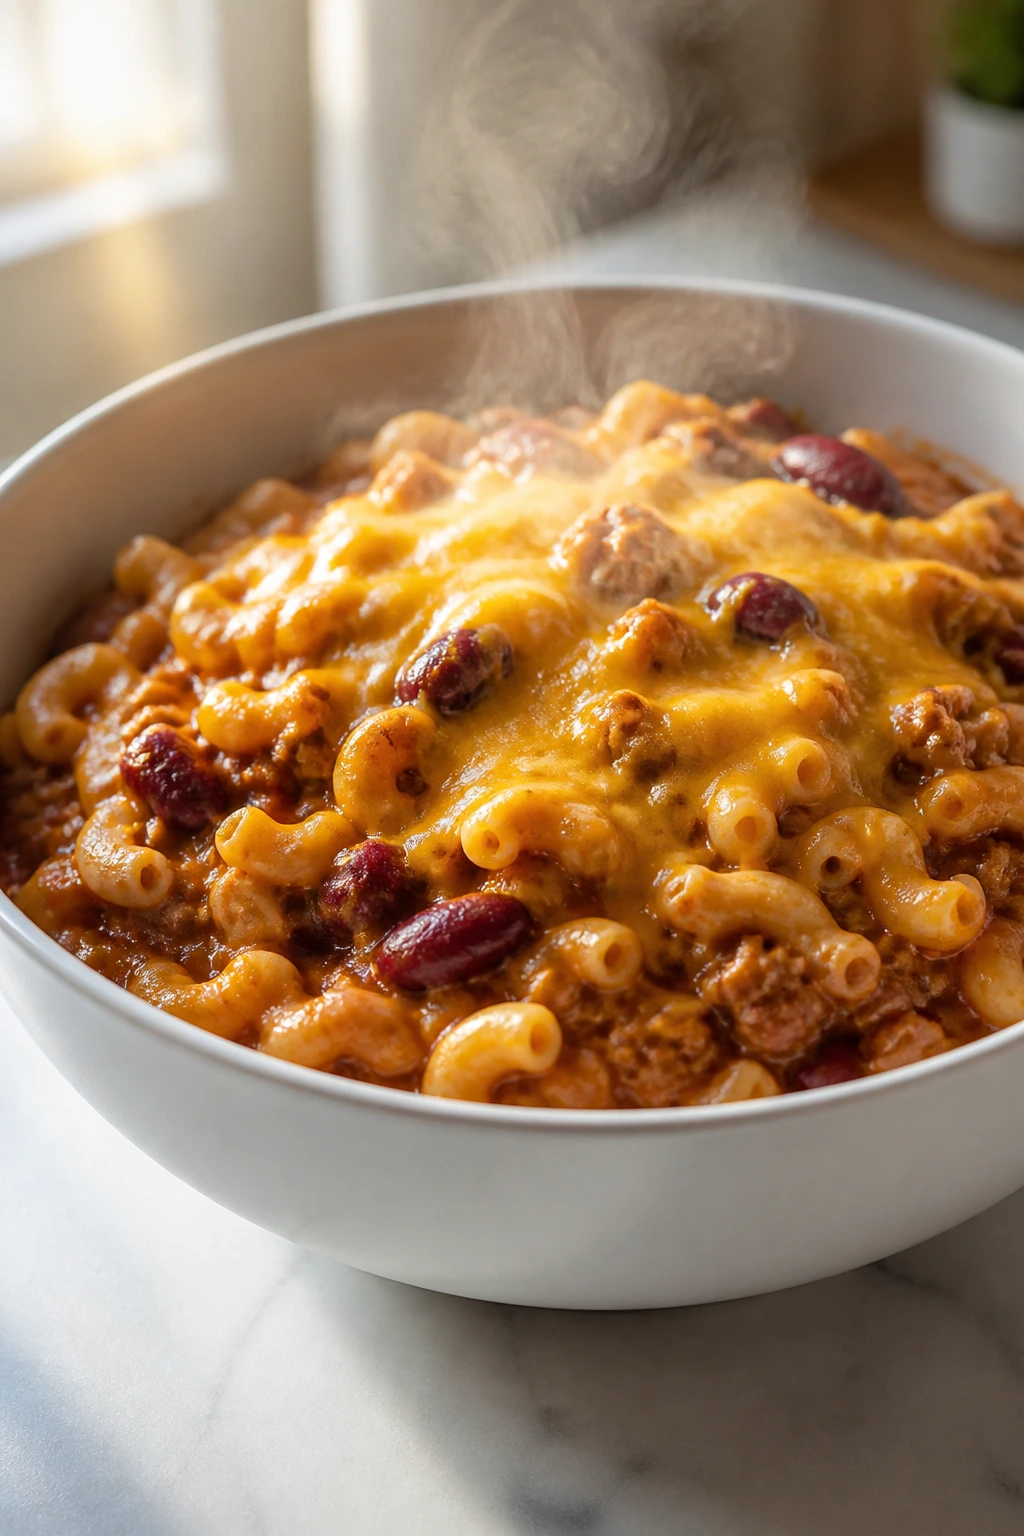
Chili mac is the dinner version of a good backup plan. It has the comfort of chili, the pull of macaroni, and enough cheese to make everybody stop asking for something different. It is also one of the easiest big-batch meals to reheat without fuss.
Why It Works:
Beans, beef, tomatoes, and pasta all live happily in the same pot because the sauce is thick enough to coat them. The macaroni soaks up flavor as it cooks, which gives the dish a richer taste than chili served over plain noodles. Leftovers hold together in a way that makes lunch feel easy.
Key Ingredients:
- 1 lb ground beef or turkey
- 1 small onion, diced
- 1 can kidney beans, drained and rinsed
- 1 can diced tomatoes
- 1 can tomato sauce
- 2 cups elbow macaroni
- 2 teaspoons chili powder
- 1½ cups shredded cheddar
Quick Steps:
- Brown the meat and onion in a large pot.
- Stir in the chili powder, tomatoes, tomato sauce, beans, and 2 cups water.
- Bring to a simmer, then add the macaroni and cook for 10 to 12 minutes, stirring often.
- When the pasta is tender and the sauce has thickened, stir in most of the cheddar.
- Top with the remaining cheese and serve.
Equipment for This Recipe:
- Large pot
- Wooden spoon
- Measuring cup
- Ladle
How to Serve This Dish:
Serve with cornbread, tortilla chips, or a simple green salad. It’s thick enough that a bowl stands on its own, which is useful when everyone is eating in different places.
Pro Tips for This Recipe:
- Stir often once the pasta goes in or it will stick.
- Keep extra broth nearby in case it thickens too fast.
- Add a pinch of cumin if you want more chili flavor.
- Let it sit 5 minutes before serving so the sauce settles.
Variations on This Dish:
- Turkey Chili Mac: Use ground turkey and a little extra chili powder.
- Three-Bean Version: Add black beans and pinto beans.
- Jalapeño Twist: Stir in chopped jalapeños for heat.
Common Mistakes to Avoid with This Dish:
- Overcooking the pasta: It turns limp fast.
- Too little sauce: The macaroni drinks more than you expect.
- Adding cheese while boiling: It can turn stringy.
26. Tuna Noodle Casserole
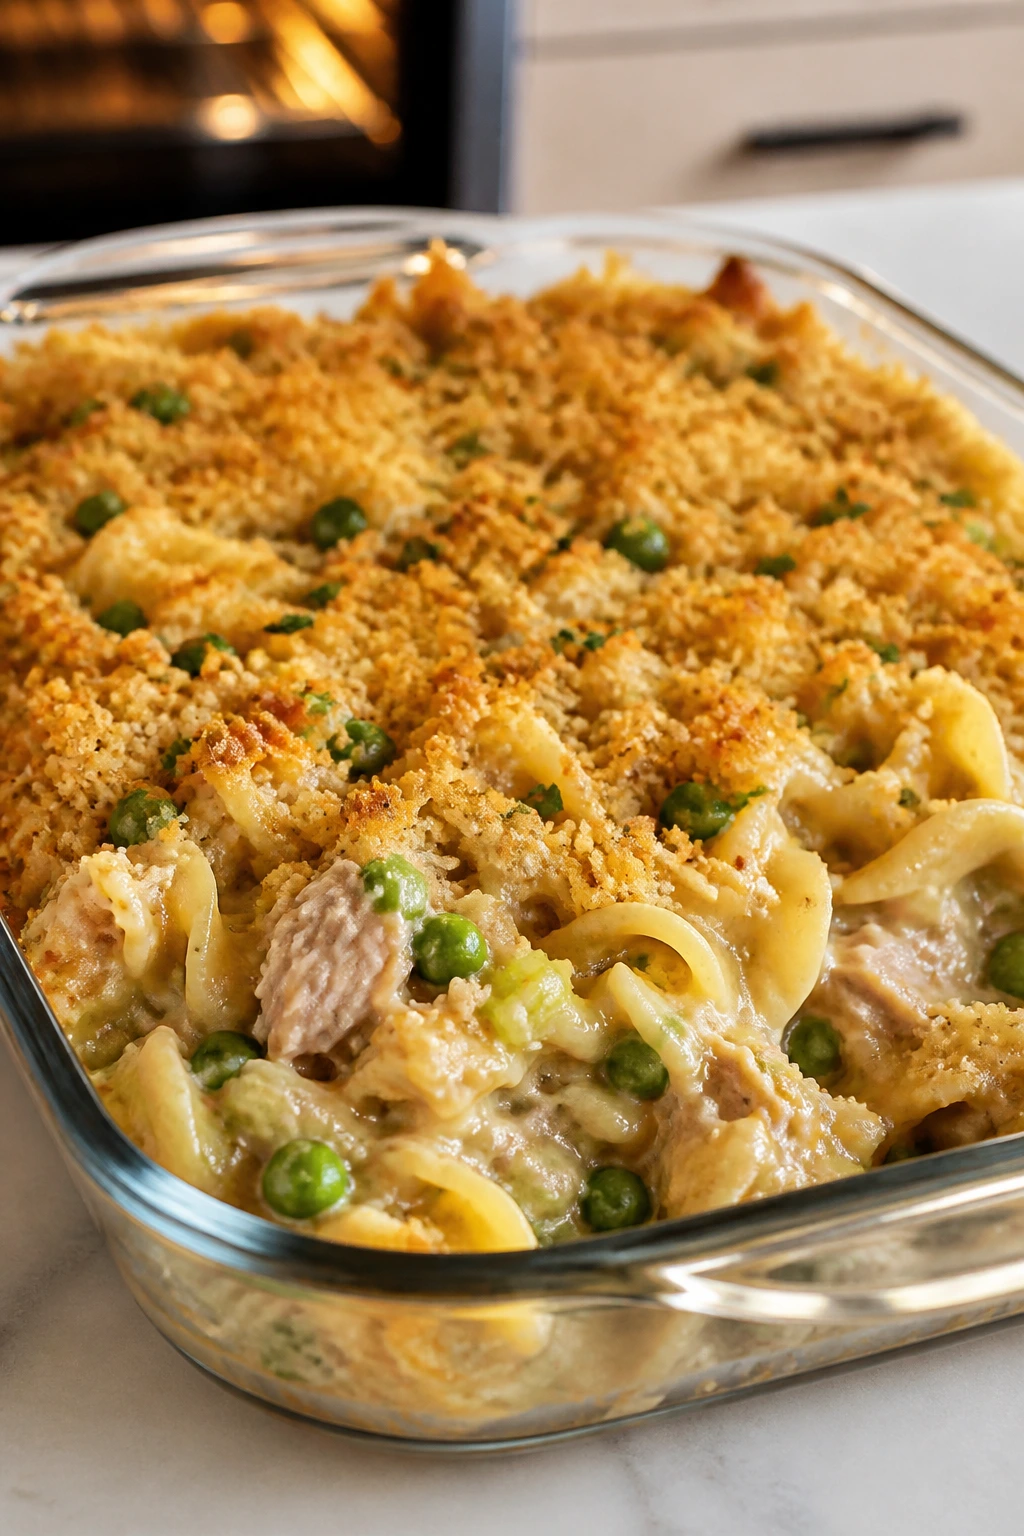
Tuna noodle casserole is pantry cooking with a point. It is soft, creamy, and topped with something crunchy, which is the right amount of contrast for a dish built from shelf-stable pieces. The tuna should be well drained, the noodles should stay a little firm, and the breadcrumb top should make noise when the spoon goes in.
Why It Works:
Egg noodles are built for creamy casseroles and soak up sauce without turning dense if you undercook them a little. Tuna gives the dish protein without adding much prep time. Peas and celery keep the texture from collapsing into one soft note.
Key Ingredients:
- 12 oz egg noodles
- 2 cans tuna, drained
- 1 cup frozen peas
- 1 celery stalk, diced
- 1 can cream of mushroom soup or 2 cups white sauce
- ½ cup milk
- 1 cup shredded cheddar
- ½ cup breadcrumbs
Quick Steps:
- Cook the noodles for 2 minutes less than package directions.
- Mix the noodles, tuna, peas, celery, soup, milk, and half the cheddar.
- Spread into a greased baking dish.
- Top with breadcrumbs and remaining cheddar.
- Bake at 375°F (190°C) for 20 to 25 minutes until bubbling and golden.
Equipment for This Recipe:
- Pot for noodles
- Mixing bowl
- Baking dish
- Colander
How to Serve This Dish:
Serve with sliced tomatoes or a crisp salad so the plate doesn’t feel too soft. It’s a classic “make it once, eat it twice” casserole and doesn’t mind being reheated.
Pro Tips for This Recipe:
- Drain the tuna well or the sauce turns loose.
- Add a little pepper or paprika to wake it up.
- Breadcrumbs toasted in a little butter give a better top.
- Let it rest before scooping.
Variations on This Dish:
- Chicken Noodle Bake: Swap tuna for cooked chicken.
- Dill Pickle Version: Add a spoonful of chopped pickles for tang.
- Panko Crunch Top: Use panko instead of breadcrumbs for more crunch.
Common Mistakes to Avoid with This Dish:
- Wet tuna: It makes the casserole soupy.
- Mushy noodles: Undercook them first.
- Skipping salt: The dish needs a little help to taste alive.
27. Roast Chicken with Carrots and Potatoes
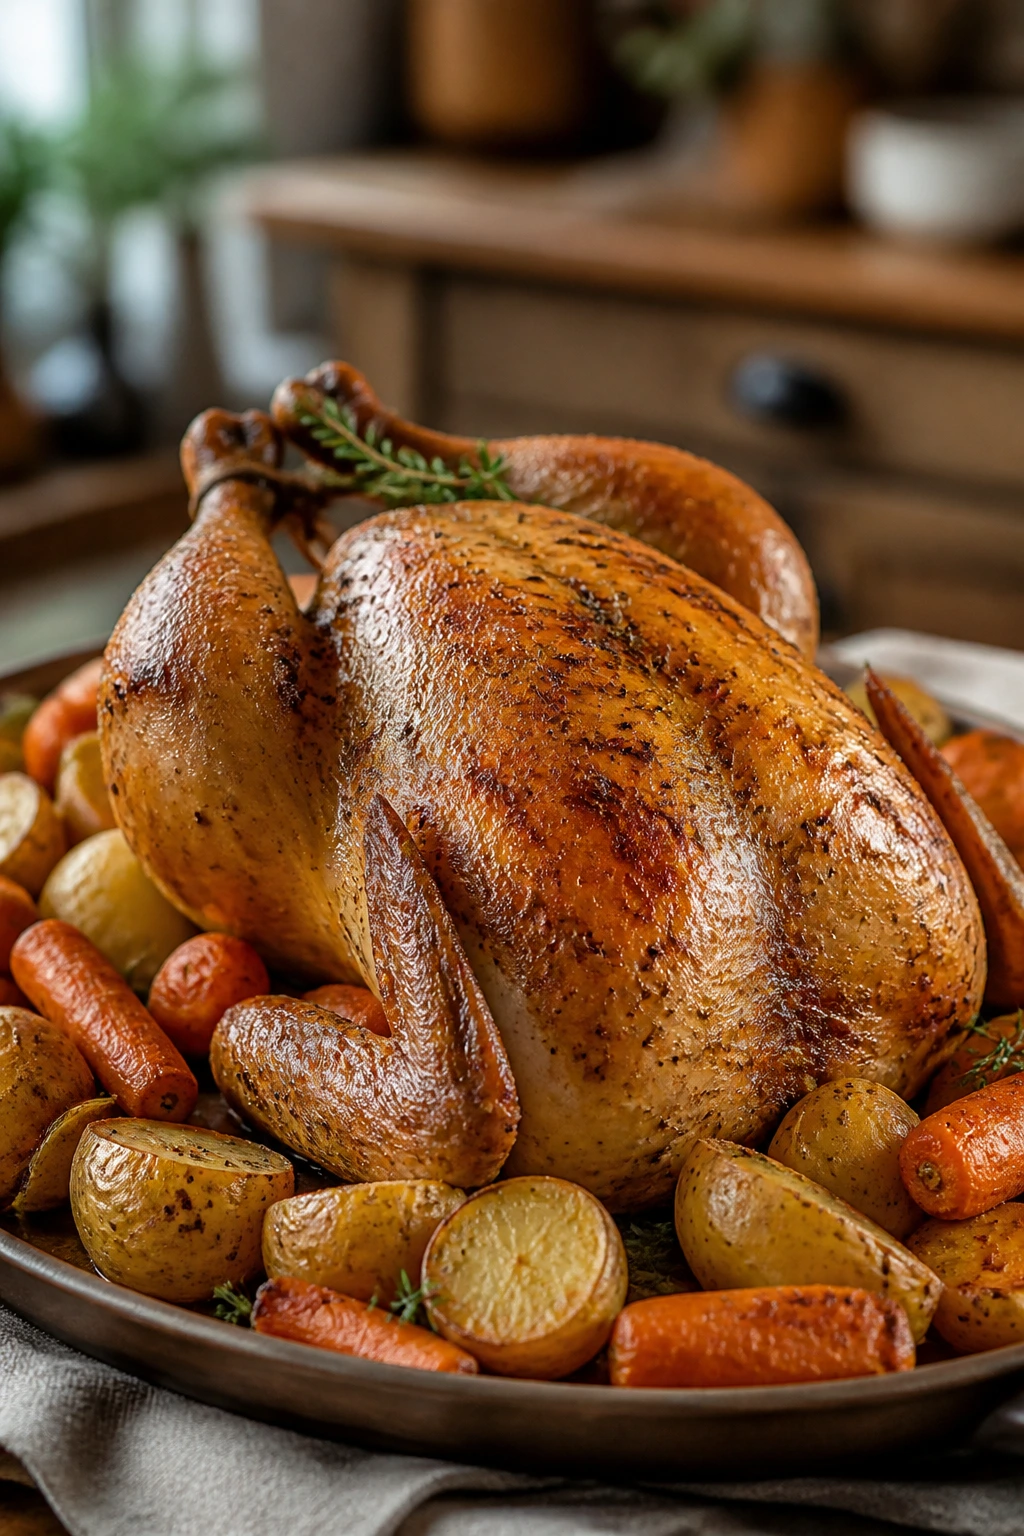
A roast chicken is one of those dinners that still feels like an event even when the ingredients are plain. The skin browns, the potatoes soak up the drippings, and the carrots turn sweet at the edges. It also leaves behind meat for sandwiches, salads, or tomorrow’s lunchbox.
Why It Works:
A whole chicken gives you both dinner and leftovers from one roast. The vegetables cook underneath or around the bird and catch the fat that drips down, which is where half the flavor lives. An instant-read thermometer keeps the chicken juicy instead of guessing and hoping.
Key Ingredients:
- 1 whole chicken, 4 to 5 lb
- 3 potatoes, cut into chunks
- 4 carrots, cut into large pieces
- 1 onion, quartered
- 1 lemon, halved
- 3 tablespoons butter or olive oil
- 2 teaspoons dried thyme
- 3 cloves garlic, smashed
Quick Steps:
- Heat the oven to 425°F (220°C).
- Pat the chicken dry and season it well inside and out.
- Set the vegetables in a roasting pan, nestle the chicken on top, and tuck the lemon and garlic inside the cavity.
- Roast for 20 minutes, then lower the heat to 375°F (190°C) and continue for 35 to 50 minutes until the thigh reaches 165°F.
- Rest the chicken for 15 minutes before carving.
Equipment for This Recipe:
- Roasting pan or Dutch oven
- Instant-read thermometer
- Sharp carving knife
- Cutting board
How to Serve This Dish:
Serve with the roasted vegetables and spoon over the pan juices. Leftover chicken makes strong sandwiches, quesadillas, or salad toppers the next day.
Pro Tips for This Recipe:
- Dry skin browns better than damp skin.
- Resting is not optional if you want juicy slices.
- Cut the vegetables large so they don’t go mushy.
- Save the carcass for stock if you like making broth later.
Variations on This Dish:
- Garlic Herb Roast: Add rosemary and extra garlic.
- Lemon Pepper Version: Use more lemon and black pepper.
- Root Veg Swap: Use parsnips or sweet potatoes instead of carrots.
Common Mistakes to Avoid with This Dish:
- Roasting a wet bird: The skin steams instead of crisping.
- Cutting too early: The juices run out.
- Using tiny vegetables: They overcook before the chicken is done.
28. Sausage, Potato, and Kale Skillet
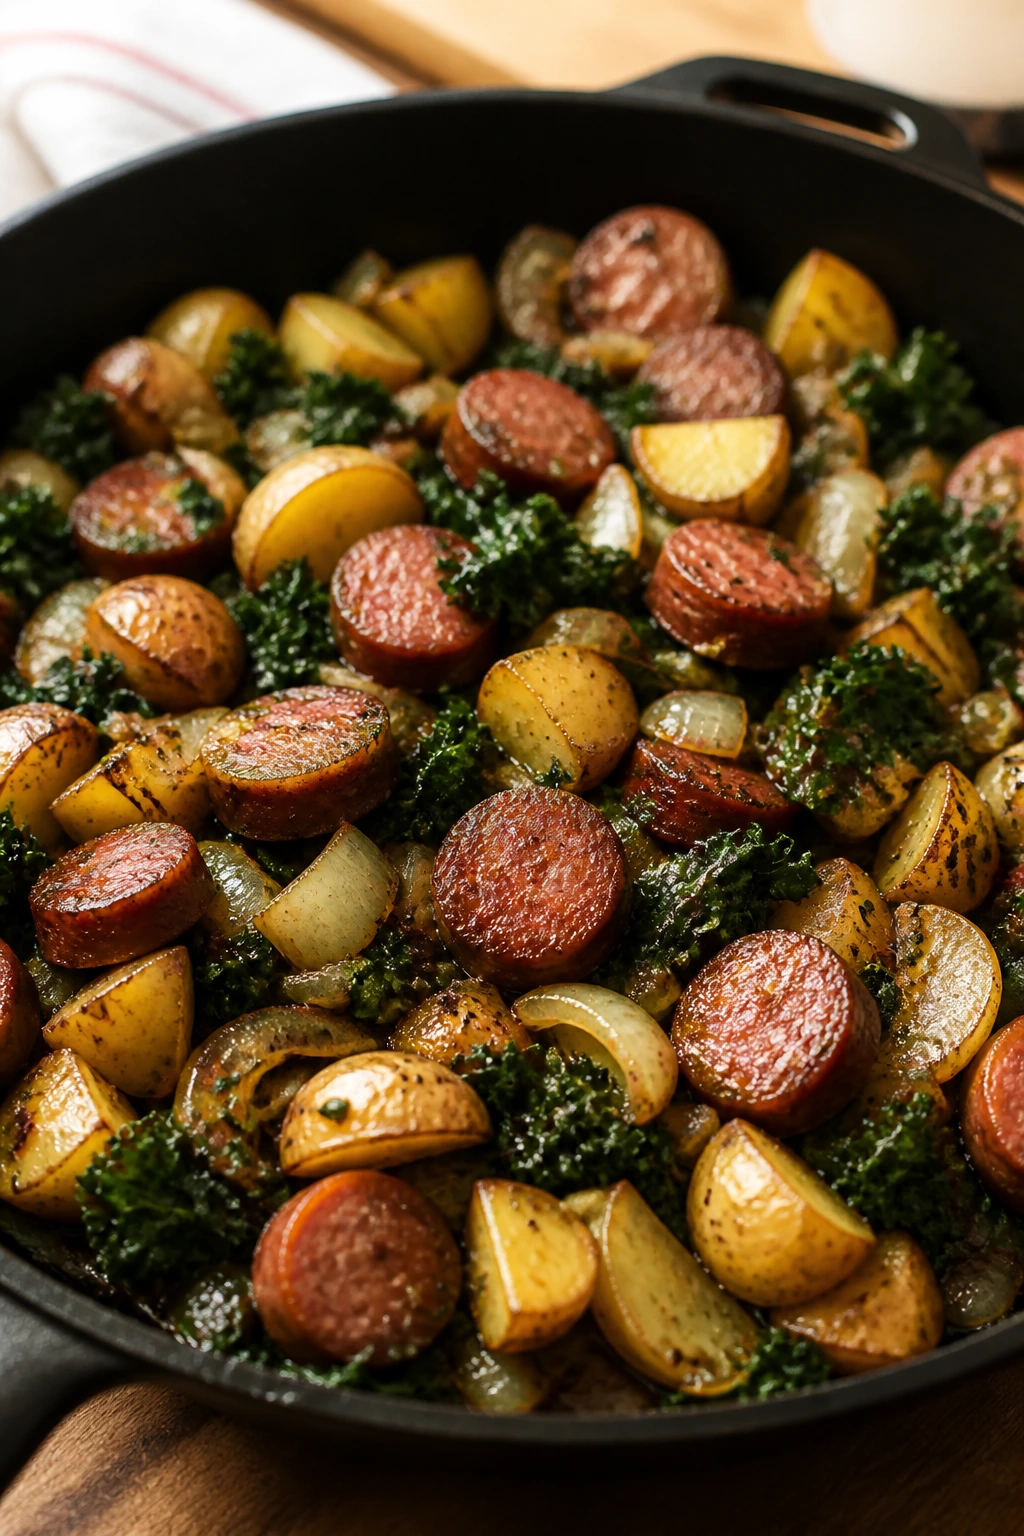
This skillet dinner is sturdy, salty, and fast enough to rescue a night that got away from you. The potatoes crisp a little, the sausage brings seasoning, and the kale softens just enough to stop arguing with the rest of the pan. It’s plain in the best possible way.
Why It Works:
Smoked sausage cooks quickly and carries a lot of flavor on its own. Potatoes give you the starch you need without requiring a separate side, and kale wilts down into the pan instead of crowding it. This is one of those dinners that also reheats well for breakfast, which is oddly useful.
Key Ingredients:
- 14 oz smoked sausage, sliced
- 1½ lb potatoes, diced small
- 1 small onion, sliced
- 3 cloves garlic, minced
- 4 cups kale, stems removed and chopped
- ½ cup chicken broth
- 1 teaspoon Dijon mustard
- 1 tablespoon olive oil
Quick Steps:
- Heat the olive oil in a large skillet and brown the sausage for 3 to 4 minutes.
- Add the potatoes and onion and cook, stirring often, until the potatoes start to brown.
- Pour in the broth, cover, and cook for 8 to 10 minutes until the potatoes are tender.
- Stir in the garlic, kale, Dijon, salt, and pepper, and cook until the kale wilts.
- Serve hot straight from the skillet.
Equipment for This Recipe:
- Large skillet with lid
- Wooden spoon
- Knife and cutting board
- Measuring cup
How to Serve This Dish:
Serve it as-is, or add fried eggs on top if you want to push it toward breakfast-for-dinner. A little mustard on the side works surprisingly well.
Pro Tips for This Recipe:
- Dice the potatoes small so they cook fast enough.
- Don’t skip the lid; it helps the potatoes soften before the kale goes in.
- Use smoked sausage with good seasoning since it drives the flavor.
- A splash of vinegar at the end brightens the pan.
Variations on This Dish:
- Chicken Sausage Version: Swap in chicken sausage for a lighter skillet.
- Sweet Potato Swap: Use sweet potatoes for a sweeter base.
- Creamy Mustard Finish: Stir in a spoonful of sour cream and extra Dijon.
Common Mistakes to Avoid with This Dish:
- Undercooking the potatoes: They should be tender before the kale joins in.
- Overcooking the kale: It only needs a short wilt.
- Not seasoning the potatoes: They need salt more than the sausage does.
Why These Dinners Make the Next Morning Easier
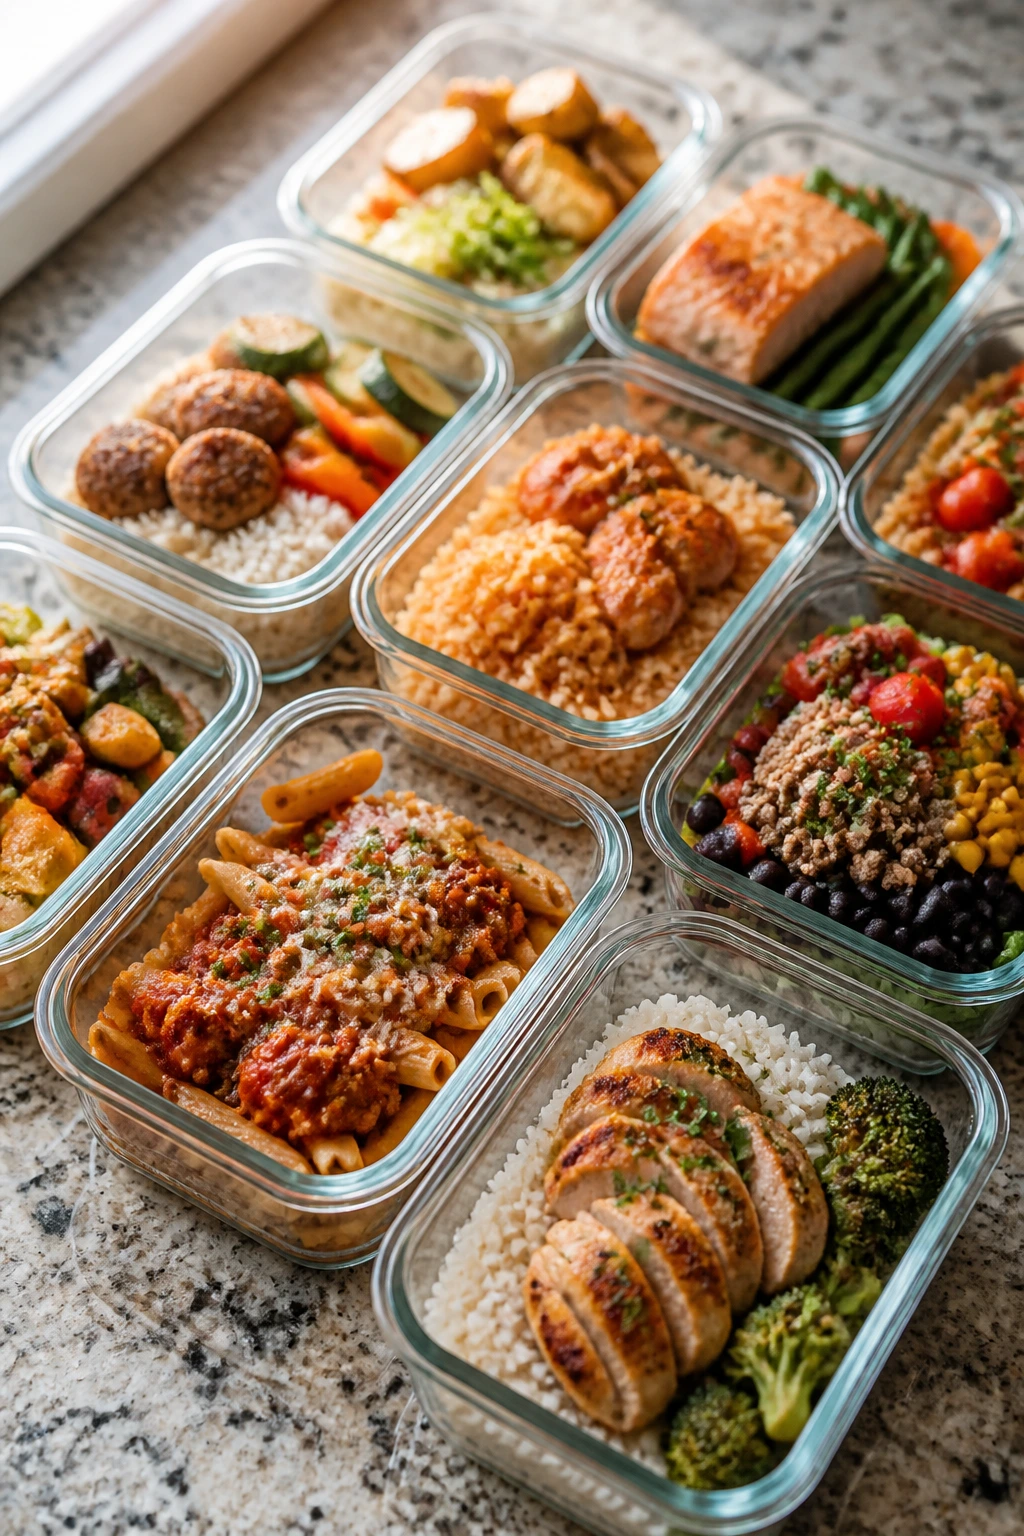
The real trick with family dinners for busy school mornings is not flash. It’s a texture that holds, a sauce that survives the fridge, and a pan that can be wiped out before everyone is hunting for homework folders. When dinner is built from sturdy pieces — roasted vegetables, braised meat, baked pasta, soup with body — the next day starts softer. Less scrambling. Fewer fresh dishes. More room for the part of the morning that actually matters.
I also like the way these meals let you cook once and eat twice without tasting like you are eating the same thing on repeat. A casserole becomes lunch. A roast chicken becomes sandwiches. A pot of chili mac becomes something the microwave can rescue while someone searches for a shoe. That kind of utility is not glamorous, but it is deeply satisfying.
Essential Equipment for These Recipes

- Rimmed sheet pans: They handle fajitas, fish, chicken, and roasted vegetables without spilling sauce into the oven.
- 12-inch skillet: Useful for stir-fries, sausage dishes, skillet casseroles, and fast sauces.
- Large Dutch oven or soup pot: Best for chili, soup, cheeseburger pasta, and anything that needs room to simmer.
- 9×13-inch baking dish: The workhorse for baked ziti, casseroles, enchilada bakes, and Alfredo bake.
- Slow cooker: A must for pulled pork and beef stew when you want dinner to cook itself.
- Instant-read thermometer: Especially useful for chicken, pork tenderloin, and salmon so you do not guess and regret it.
- Sharp chef’s knife: Slicing peppers, onions, cabbage, and chicken evenly makes a real difference.
- Cutting board with a damp towel underneath: Keeps it from sliding when you’re moving fast.
- Mixing bowls: At least two, because so many of these recipes rely on tossing before cooking.
- Measuring cups and spoons: The sauces here depend on actual ratios, not a loose shrug.
- Wooden spoon or silicone spatula: Better than metal for sauces and casseroles.
- Tongs: Handy for turning chicken, sausage, or shrimp without tearing them.
- Colander: Needed for pasta, rice, and noodles.
- Airtight storage containers: Shallow ones cool leftovers faster and reheat more evenly.
Smart Shopping for Busy School-Week Cooking
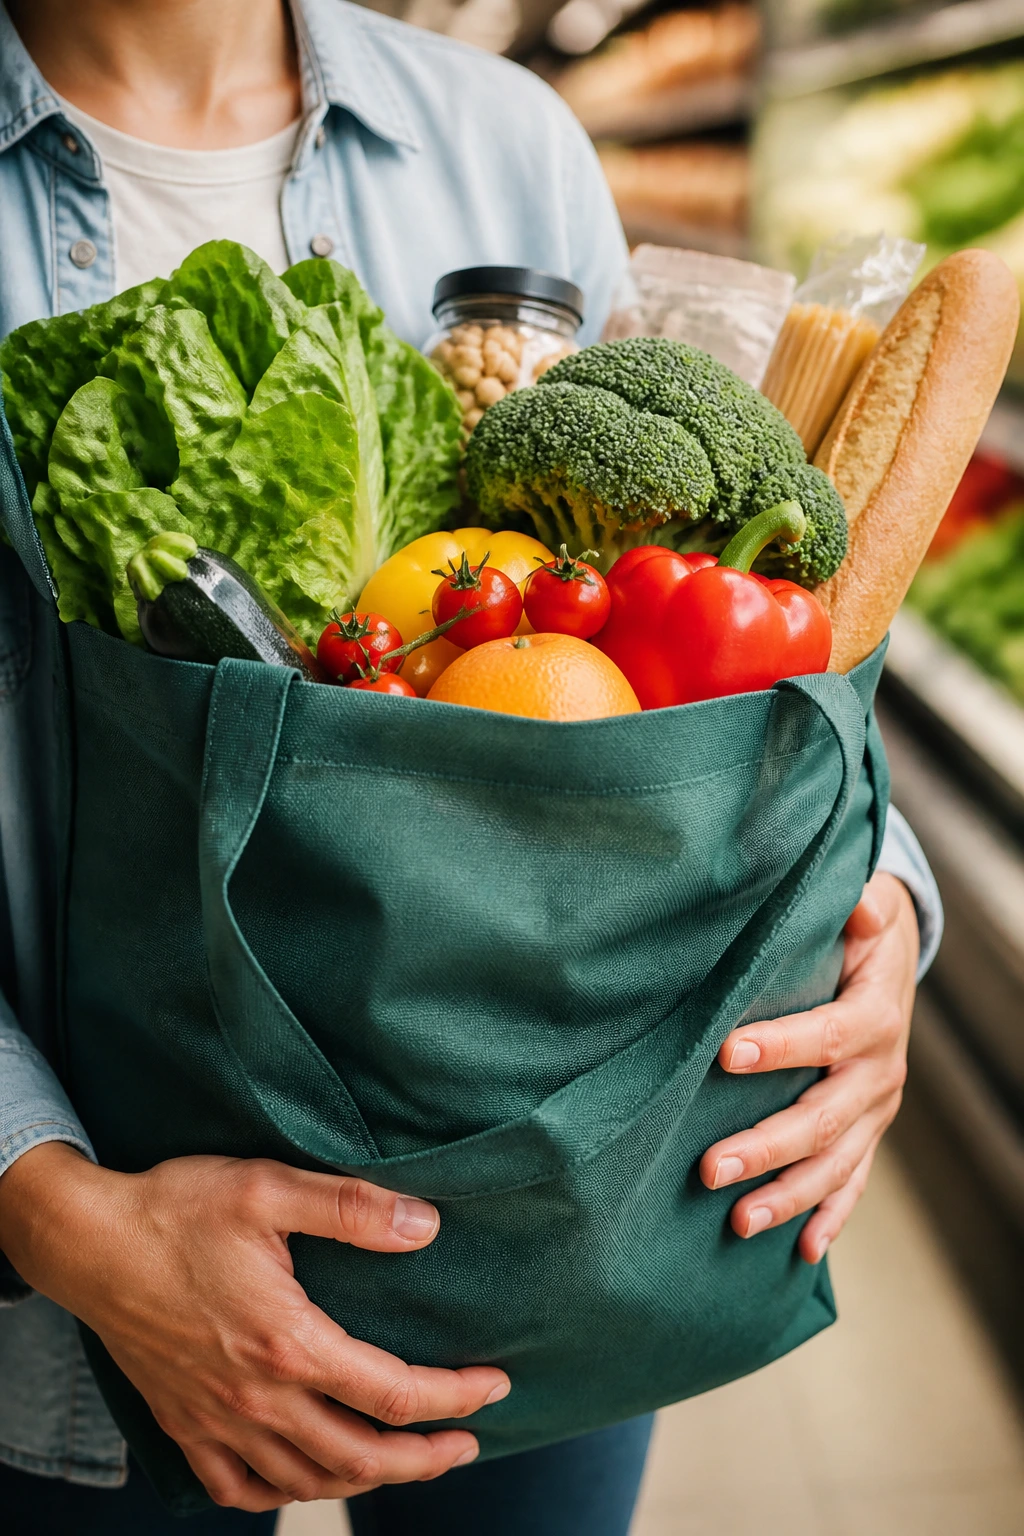
A few ingredients show up again and again in this kind of cooking, and that is not an accident. Chicken thighs are worth buying when a dish needs to be reheated later, because they stay moister than breasts and forgive a little extra oven time. Ground beef at 85/15 gives you enough flavor for chili mac, sloppy joes, and cheeseburger pasta without drowning the pan in grease. If you prefer turkey, buy the plain version and add enough seasoning to wake it up.
Frozen vegetables are not a compromise here. Peas, corn, broccoli florets, and spinach are often better than the sad version lingering in the fridge drawer, because they go straight from freezer to pan or casserole without extra chopping. For soup and casserole, that matters. For stir-fry, fresh vegetables still win on crunch, so use both depending on the dish.
Choose short pasta shapes — ziti, penne, elbows, tortellini, or orzo — for bakes and saucy one-pot meals. They hold their shape better than spaghetti, and they are easier to portion into school lunches. For rice dishes, cook a little extra the night before and chill it in a shallow container. Cold rice is the difference between fried rice and clumps.
Canned goods deserve a better look than they usually get. Pick diced tomatoes, crushed tomatoes, enchilada sauce, beans, and broth with no long ingredient list if possible. Low-sodium versions give you more control, and that control matters because these recipes often reduce down in the pot. For cheese, buy blocks when you want a clean melt, but bagged shreds are fine when convenience wins.
How to Serve These Recipes
Presentation:
Keep serving bowls shallow for pasta, soup, and rice dishes so the food looks generous instead of buried. Casseroles cut better if you let them sit a few minutes, and sheet-pan dinners look best when the browned edges stay visible instead of being buried under extra sauce.
Accompaniments:
A simple green salad, sliced cucumbers, apple wedges, steamed green beans, or buttered bread can round out almost every dinner on this list. I especially like crunchy sides with creamy casseroles and crisp salads with roasted chicken or pasta bakes.
Portions:
Most of these recipes feed 4 to 6 people comfortably, with the casserole and soup recipes stretching farther. For kids, I plan about ½ to ¾ cup starch, 3 to 4 oz protein, and a vegetable side; for adults, closer to 1 to 1½ cups of the finished dish is more realistic for a full dinner portion.
Beverage Pairing:
Sparkling water with lemon, unsweetened iced tea, or plain milk all fit this collection without fighting the food. For soup, chili, and enchilada bakes, a cold glass of water with lime is boring in the best way.
Additional Tips and Flavor Boosters

Flavor Enhancement:
A squeeze of lemon, lime, or a small splash of vinegar at the end helps almost every recipe here, especially casseroles, soups, and roasted vegetables. Acid wakes up sauce that has been simmering for a while and keeps cheese-heavy dishes from tasting flat.
Customization:
If your household likes more vegetables, add broccoli to Alfredo bake, spinach to ziti, extra beans to taco soup, or carrots to shepherd’s pie. If someone wants more heat, serve hot sauce, chili flakes, or sliced jalapeños at the table instead of forcing the whole pan to be spicy.
Serving Suggestions:
Fresh herbs matter more than they seem. Chopped parsley on meatballs, cilantro on fajitas, scallions on fried rice, and basil on tomato soup all make the food taste sharper and less heavy. A crunchy topping — breadcrumbs, toasted tortilla strips, or fried onions — gives casseroles a better finish.
Make-It-Yours:
For dairy-free meals, lean on broth-based soups, fajitas, stir-fries, pulled pork, and roast chicken first. For gluten-free cooking, use rice, potatoes, corn tortillas, and cornstarch-thickened sauces. For kid-first plates, keep sauce on the side when possible and let them build their own tacos, sandwiches, or bowls.
Make-Ahead, Storage, and Reheating Guidance
Most cooked family dinners keep 3 to 4 days in the refrigerator when stored in shallow airtight containers. Soup, stew, pulled pork, chili mac, baked ziti, and meatloaf all freeze well for up to 2 to 3 months. Shrimp, salmon, and fish tacos are the exceptions; they are best eaten within 1 to 2 days, and I would not freeze them if texture matters to you.
Reheat casseroles and pasta bakes in the oven at 350°F covered with foil until hot in the center, usually 15 to 25 minutes depending on size. Add a spoonful of water, broth, or sauce before reheating if the dish looks dry. For microwaving, use a lower power setting and stop once to stir or rotate the container so the edges do not overcook before the middle warms through.
For sheet-pan dinners and roasted chicken, the oven is your friend if you want crisp edges back. Warm them at 375°F to 400°F for a few minutes on a lined tray instead of blasting them in the microwave. Fried rice, stir-fry, and skillet meals usually reheat best in a skillet with a splash of water or broth, because the pan helps bring the texture back.
If you’re making food ahead on purpose, think in terms of texture. Saucy foods improve overnight. Crisp foods do not. Chop vegetables and mix sauces ahead, then cook quickly when the time comes. That small split between prep and cooking is where a lot of the stress disappears.
Cooked rice deserves one extra note: cool it promptly and refrigerate it soon after dinner, because rice is the one ingredient in this list that needs a little more care. Spread it in a shallow dish, chill it fast, and reheat until steaming.
Variations and Adaptations to Try
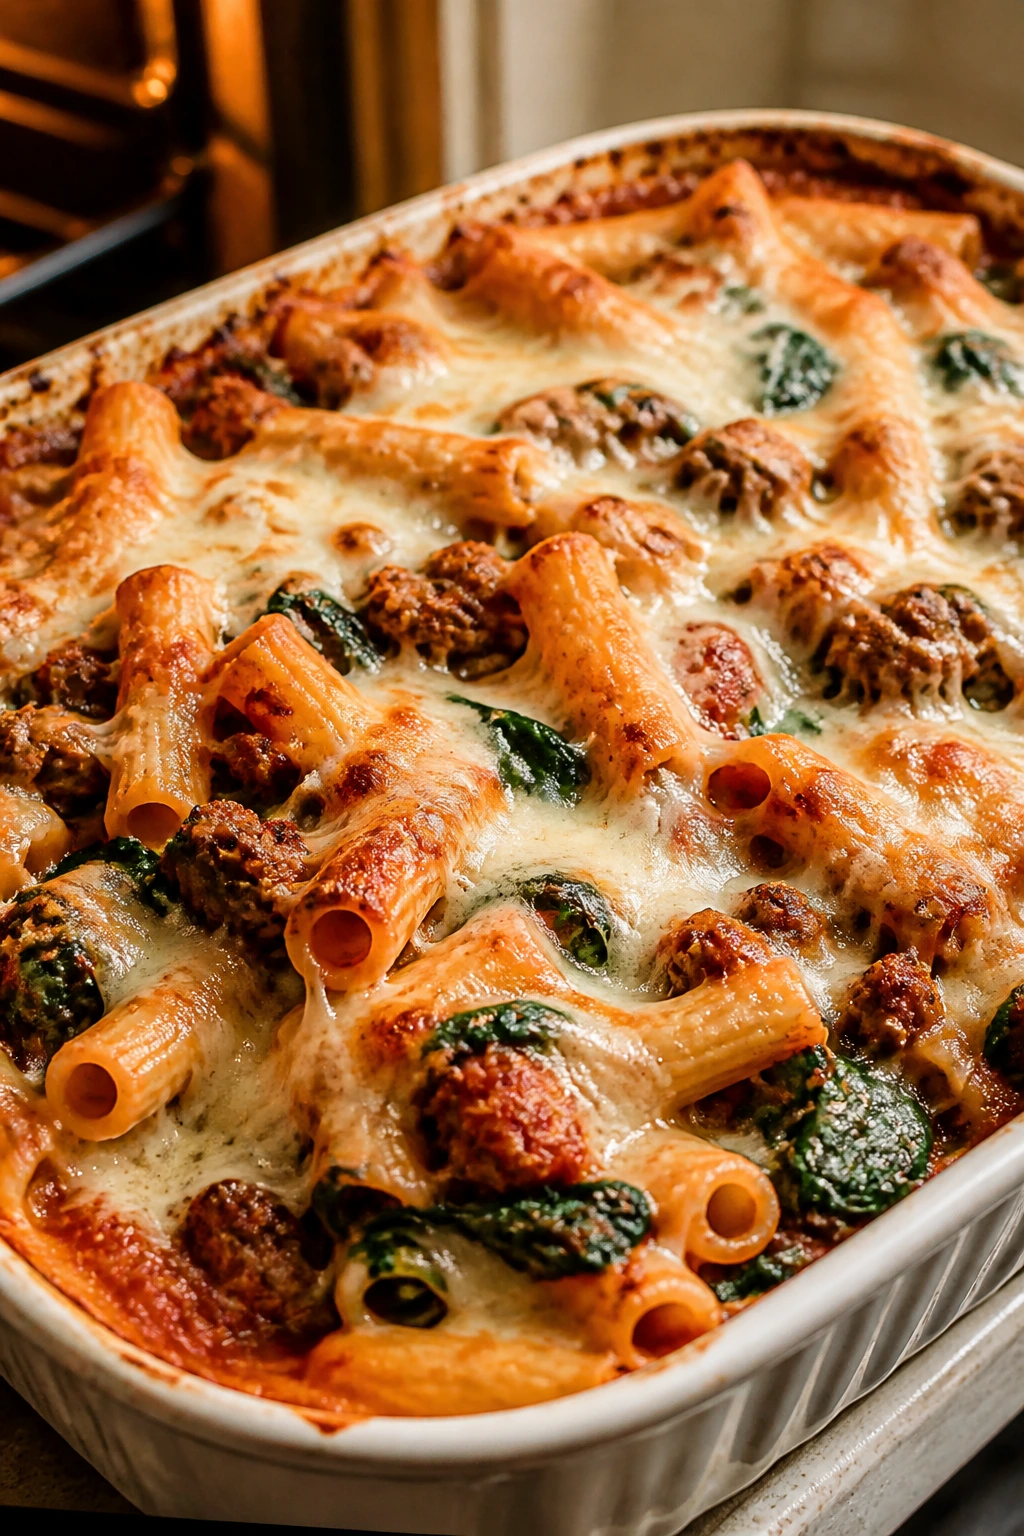
Gluten-Free Pantry Swap:
Use corn tortillas, rice, potatoes, and naturally thick sauces for the easiest gluten-free path through this collection. Black bean enchilada bake, taco soup, roast chicken, salmon with green beans, and stir-fries work especially well with only minor adjustments.
Dairy-Free Weeknight Plan:
Skip the cream sauces and lean into tomato-based, broth-based, and roasted dinners. Fajitas, pulled pork, taco soup, stir-fry, roast chicken, and beef stew all fit naturally, and a little olive oil or avocado gives back the richness you miss.
Lower-Sodium Kitchen:
Choose low-sodium broth, rinse canned beans, use less packaged seasoning, and add acid and herbs to sharpen flavor. Teriyaki chicken, taco soup, and cheeseburger pasta can all be made more balanced this way without tasting stripped down.
Vegetable-Heavy Version:
Double the onions, add carrots to sloppy joes, fold spinach into Alfredo bake, and toss extra broccoli into rice casserole. A lot of these dinners are already forgiving, and a few more vegetables usually make them better, not worse.
Spice-Level Control:
Keep the base mild and put heat on the table instead of in the pot. That works well for fajitas, taco soup, chili mac, fish tacos, and sausage dishes, especially when different people at the table want different levels of fire.
Common Mistakes to Avoid with This Theme
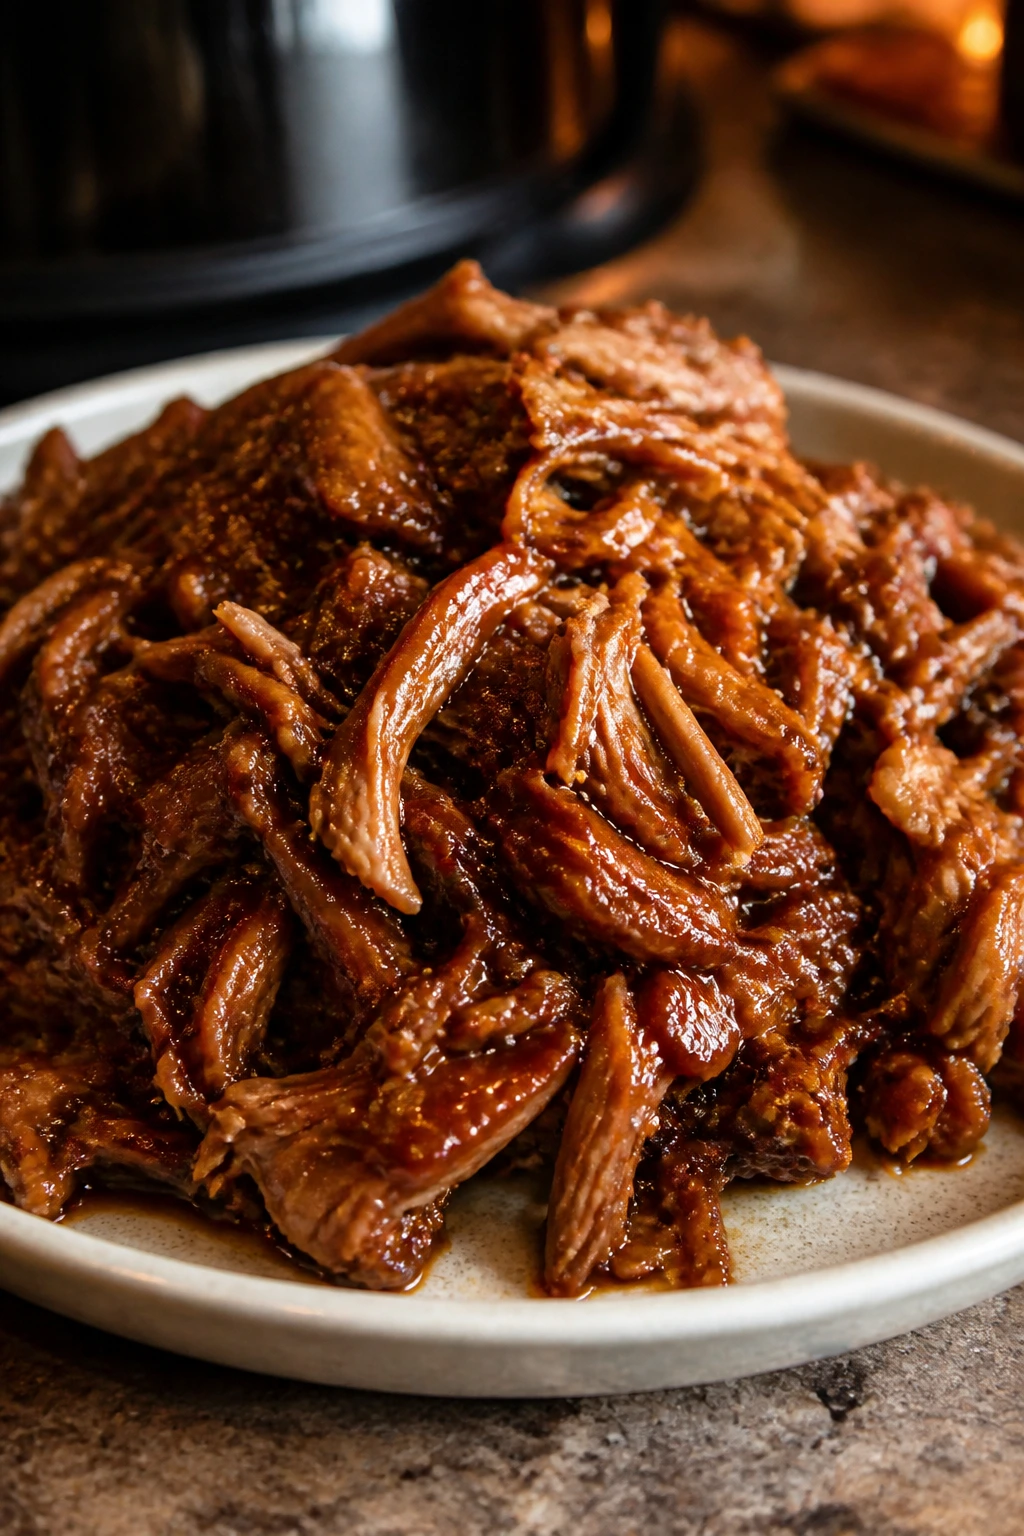
-
Making everything too wet: Casseroles, pasta bakes, and rice dishes all need moisture, but too much liquid turns them mushy. Start with the suggested amounts, then add only if the pan looks dry.
-
Forgetting that leftovers need structure: Food that tastes fine at the table can fall apart the next morning if it is overcooked. Slightly underdone pasta, firm vegetables, and saucy meats usually reheat better.
-
Using the wrong cut of meat: Chicken thighs, pork shoulder, chuck roast, and sausage all hold up better in these recipes than lean cuts that dry out. If you use a leaner ingredient, shorten the cook time and watch it closely.
-
Skipping seasoning because the recipe looks simple: Simple dinners need salt, pepper, and one bright finish more than complicated dinners do. A squeeze of lime, a spoon of mustard, or a handful of herbs is not decoration; it is flavor.
-
Reheating everything the same way: Pasta bakes belong in the oven, stir-fries in the skillet, and soups on the stovetop or in the microwave. Using the wrong method is how crispy food turns limp and creamy food turns split.
-
Packing leftovers while they are still steaming: Put hot food into shallow containers and let it cool a bit before sealing. That keeps condensation from turning the top layer soggy.
Frequently Asked Questions
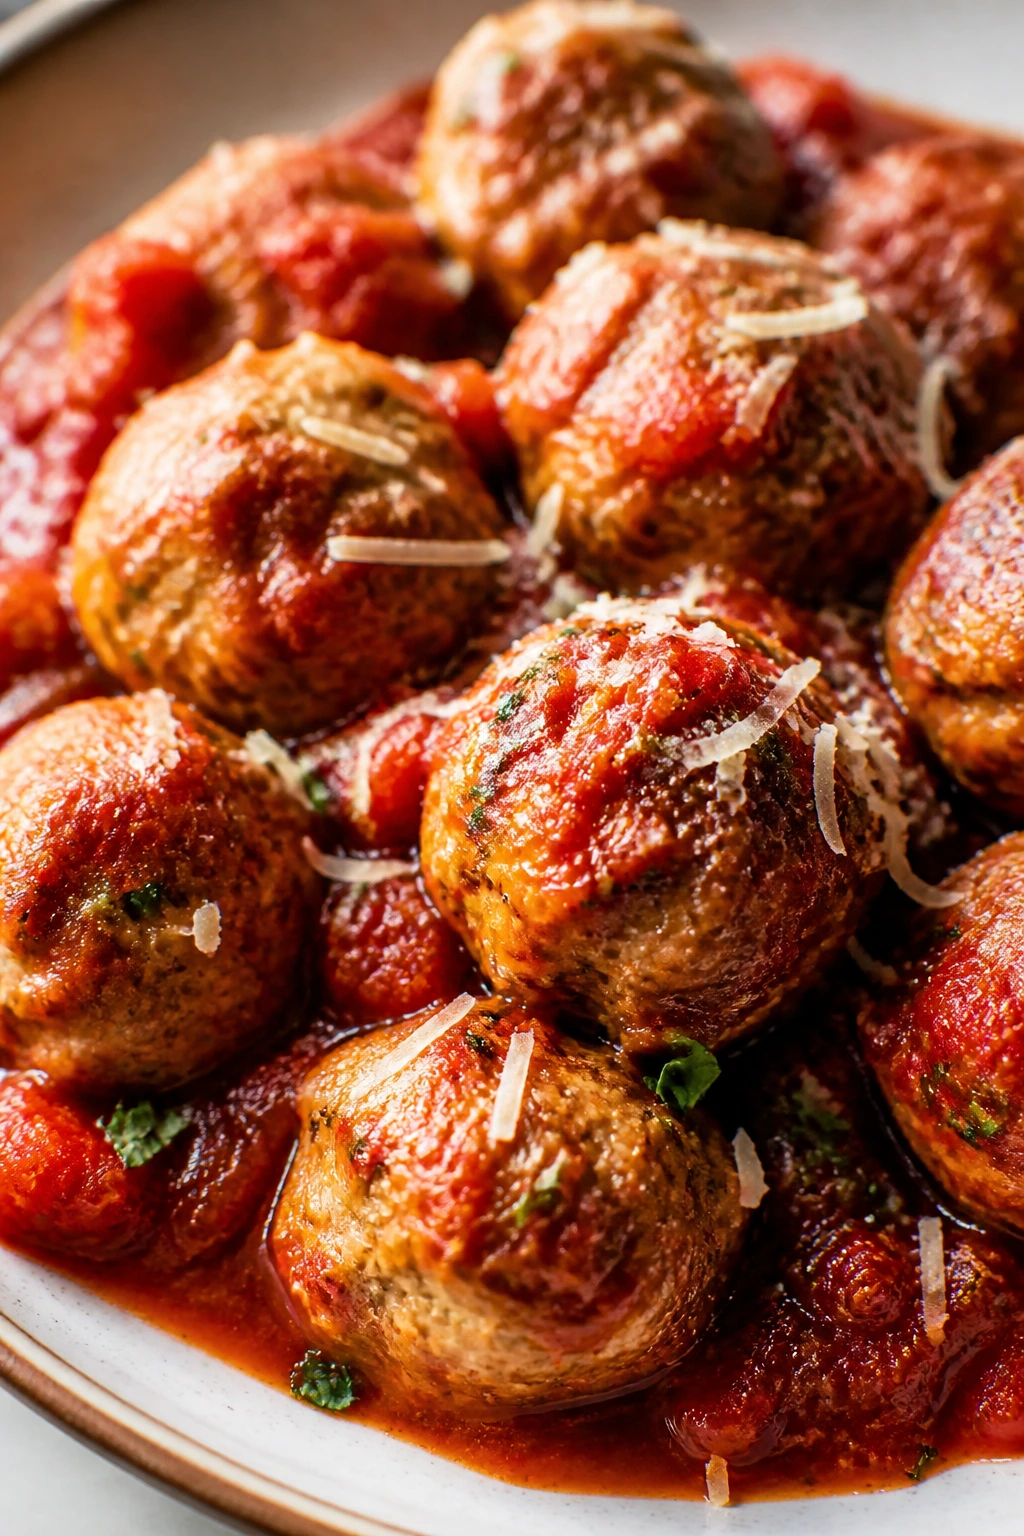
Which of these dinners reheat best for school lunches?
Baked ziti, chili mac, pulled pork, shepherd’s pie, taco soup, and meatloaf are my top picks. They hold texture, travel well, and do not get weird after a night in the fridge.
Can I make any of these ahead on the weekend?
Yes. Casseroles, soups, stew, pulled pork, meatballs, and chopped stir-fry ingredients are the easiest wins. Assemble or cook them fully, then portion them into shallow containers so they cool quickly.
What if I only have 30 minutes?
Go for sheet-pan fajitas, cheeseburger pasta, veggie fried rice, French bread pizza boats, fish tacos, or teriyaki chicken thighs. Those are the shortest routes here, and they do not need long oven time.
Can I swap frozen vegetables for fresh ones?
Absolutely, especially in casseroles, soups, and fried rice. Frozen broccoli, peas, corn, and spinach often save time and work just as well if you drain off extra moisture first.
How do I keep chicken from drying out when I reheat it?
Reheat it gently with a little sauce, broth, or covered foil. Chicken thighs, shredded chicken in sauce, and baked casseroles usually survive better than plain chicken breast slices.
Which dinners freeze the best?
Pulled pork, beef stew, taco soup, chili mac, shepherd’s pie, baked ziti, meatballs in sauce, and chicken pot pie filling freeze well. Fish and shrimp dishes are better eaten fresh because their texture changes more after freezing.
What can I do if my casserole comes out watery?
Let it rest longer, then cut cleaner portions after the liquid settles. Next time, reduce the sauce slightly, drain vegetables better, or use a thicker base like cooked rice, pasta, or a roux-thickened sauce.
Do I need special equipment to make these work?
No, but a thermometer helps with chicken, pork, and salmon, and an oven-safe skillet makes life easier for pot pie and skillet dinners. If you have a good sheet pan, a big pot, and a casserole dish, you can make most of this list.
Are these good for picky eaters?
Several are. French bread pizza boats, cheeseburger pasta, sloppy joes, pulled pork sandwiches, and meatballs tend to land well because the flavors are familiar and the kids can see exactly what is on the plate.
The Quiet Payoff of a Well-Stocked Dinner Routine
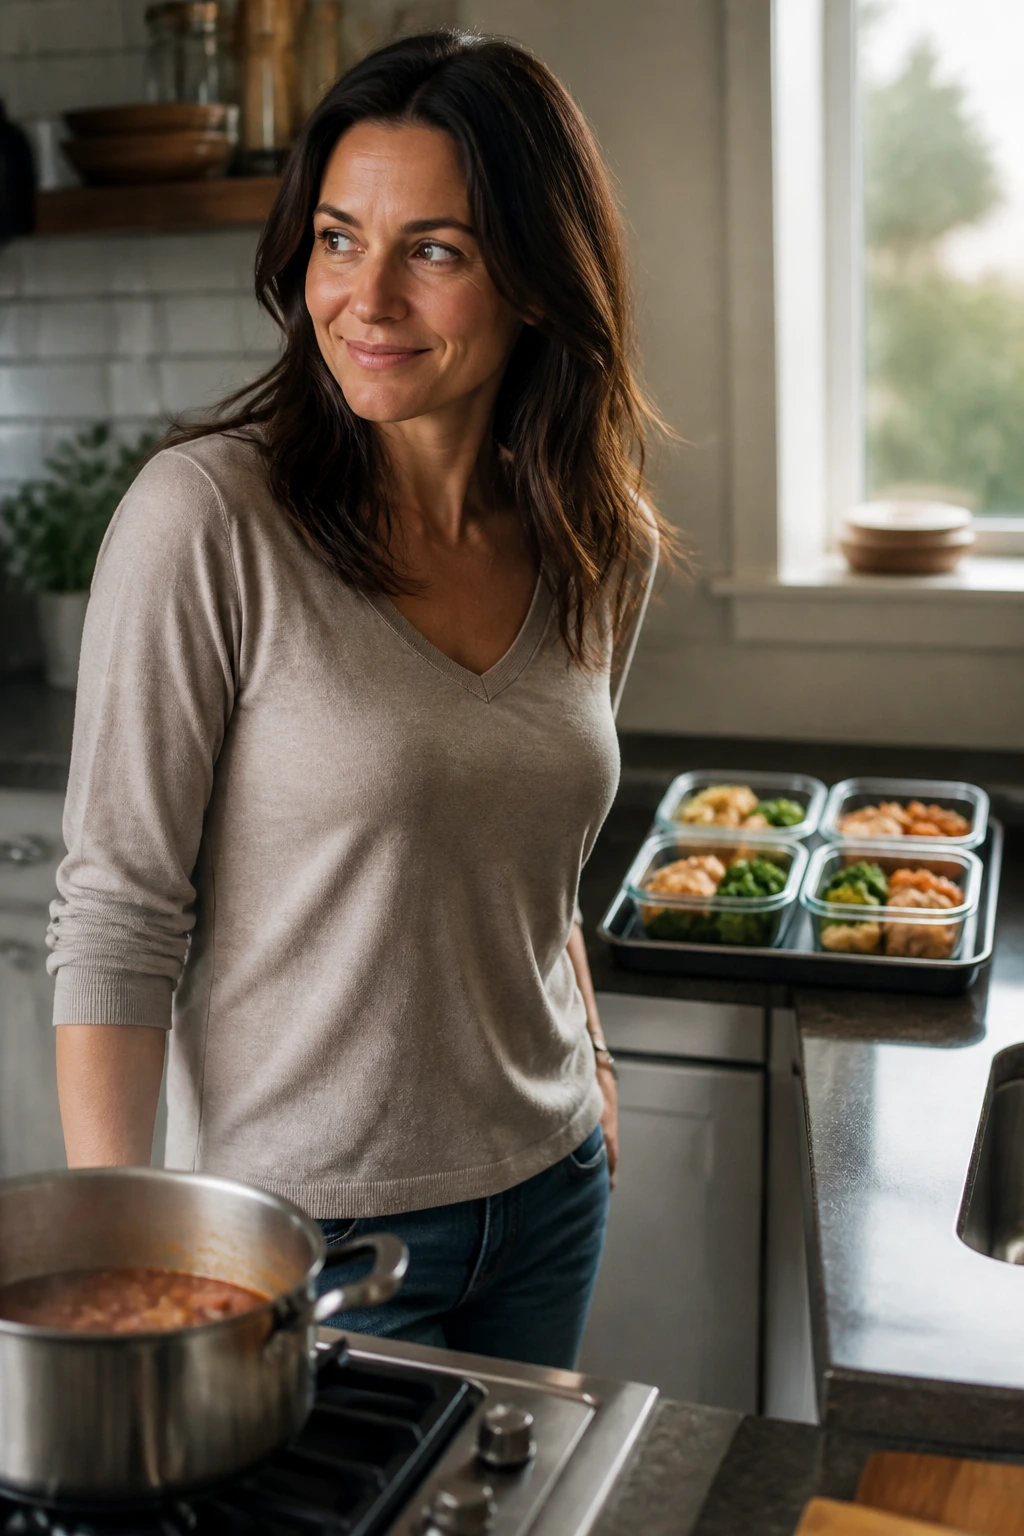
A dinner routine that can handle school mornings does not need to be glamorous. It needs to be sturdy, repeatable, and kind to the person standing in the kitchen with one eye on a clock. That is the point of this collection: it gives you meals that feed tonight, survive the fridge, and show up tomorrow without drama.
And honestly, that is enough. A sheet pan of fajitas, a casserole waiting in the fridge, or a pot of soup that only needs warming can take a surprising amount of pressure off an ordinary week. Keep a few of these in rotation, and the mornings start feeling less like a scramble and more like a routine that finally knows what it is doing.