
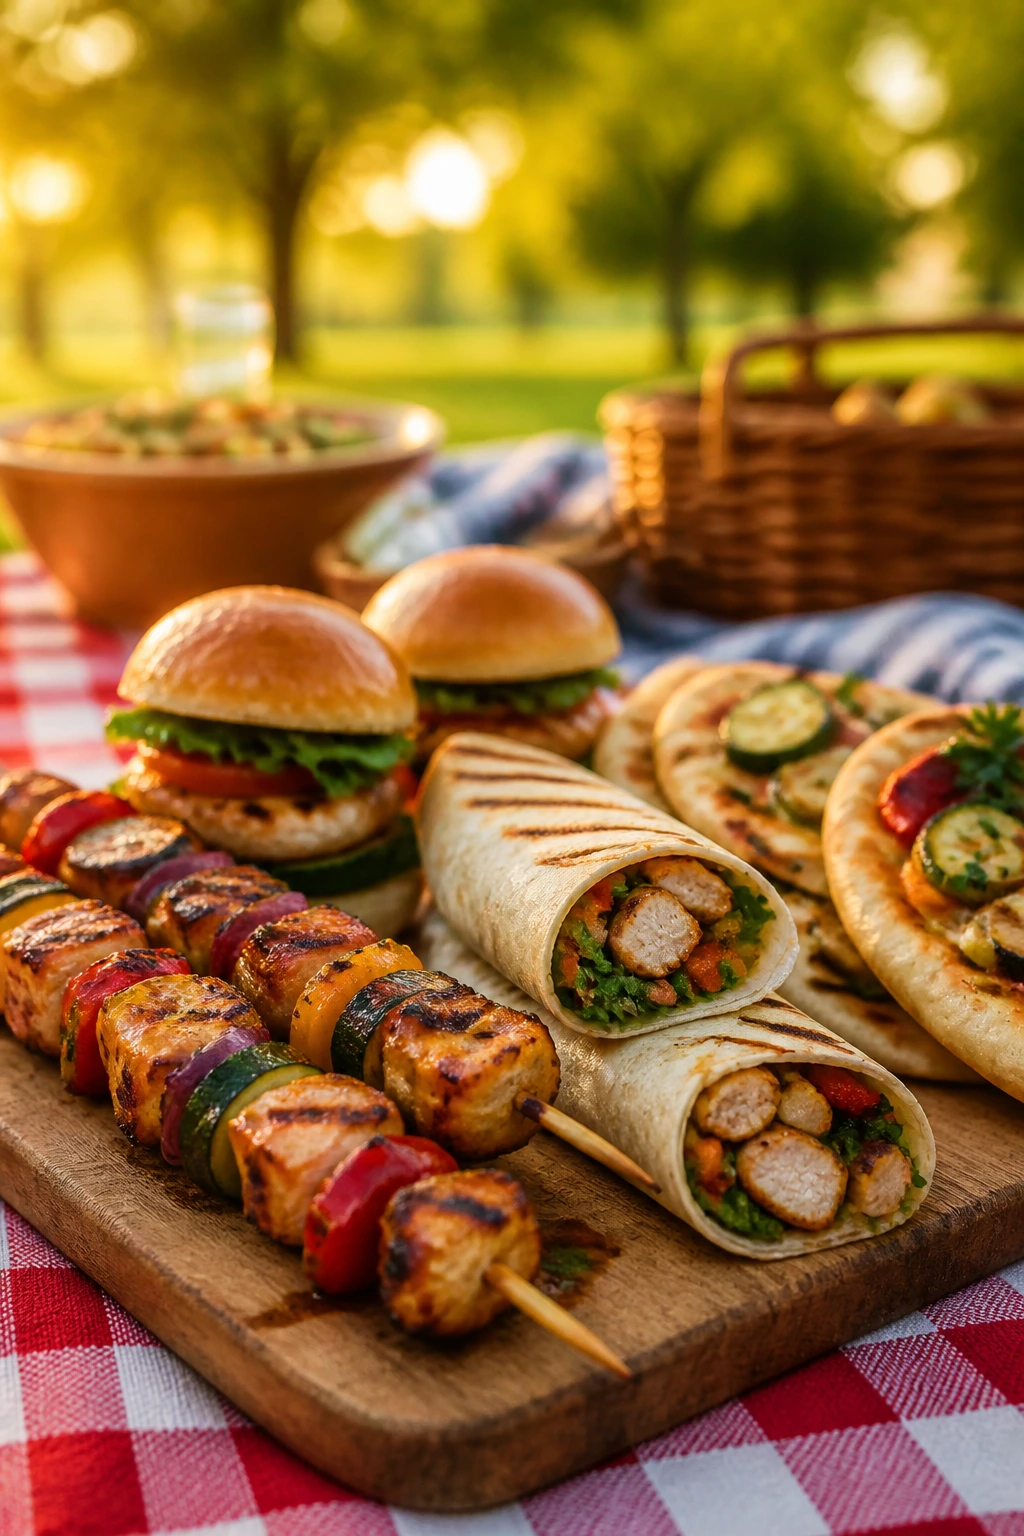
A picnic food that comes off the grill needs to do a few jobs at once. It has to taste good while it’s still warm, hold together after a short ride in a cooler, and survive the half-hour when everybody is standing around the blanket asking whether it’s ready yet. That’s the real test. Not the photo. Not the platter. The bite you take with a paper napkin in one hand and tongs in the other.
That’s why grilled food earns a place in a summer picnic spread so easily. The grill gives you char, smoke, and heat in a way that flatters chicken thighs, salmon, peaches, halloumi, flatbread, corn, and even watermelon if you’re willing to treat it properly. A little browning changes everything. A couple of good grill marks and a squeeze of citrus can make a plain ingredient taste like somebody planned the whole afternoon around it.
There’s also the practical part people forget. Picnic food should be forgiving. You want things that can sit for a bit, travel without turning limp, and still feel worth eating when the plates are paper-thin and the wind keeps trying to steal your napkins. That’s the sweet spot here: foods that come off the grates with enough personality to stand up to the outdoors, but not so delicate that one bump in the car ruins them.
Why These Picnic Grilling Ideas Work So Well
- Portable by design: These recipes lean on skewers, wraps, sliders, flatbreads, and sturdy salads, which means fewer awkward knife-and-fork moments on a blanket.
- Good at more than one temperature: A lot of grilled foods are best warm, but they don’t fall apart if they cool to room temperature for a bit.
- Built-in flavor from the fire: Char, smoke, and a little blistering do more heavy lifting than another complicated sauce ever will.
- Easy to batch: Most of these scale cleanly for a crowd, so you can cook in rounds instead of scrambling one portion at a time.
- Less soggy, more satisfying: Grilling dries the surface just enough to keep breads, vegetables, and proteins from turning mushy by the time you serve them.
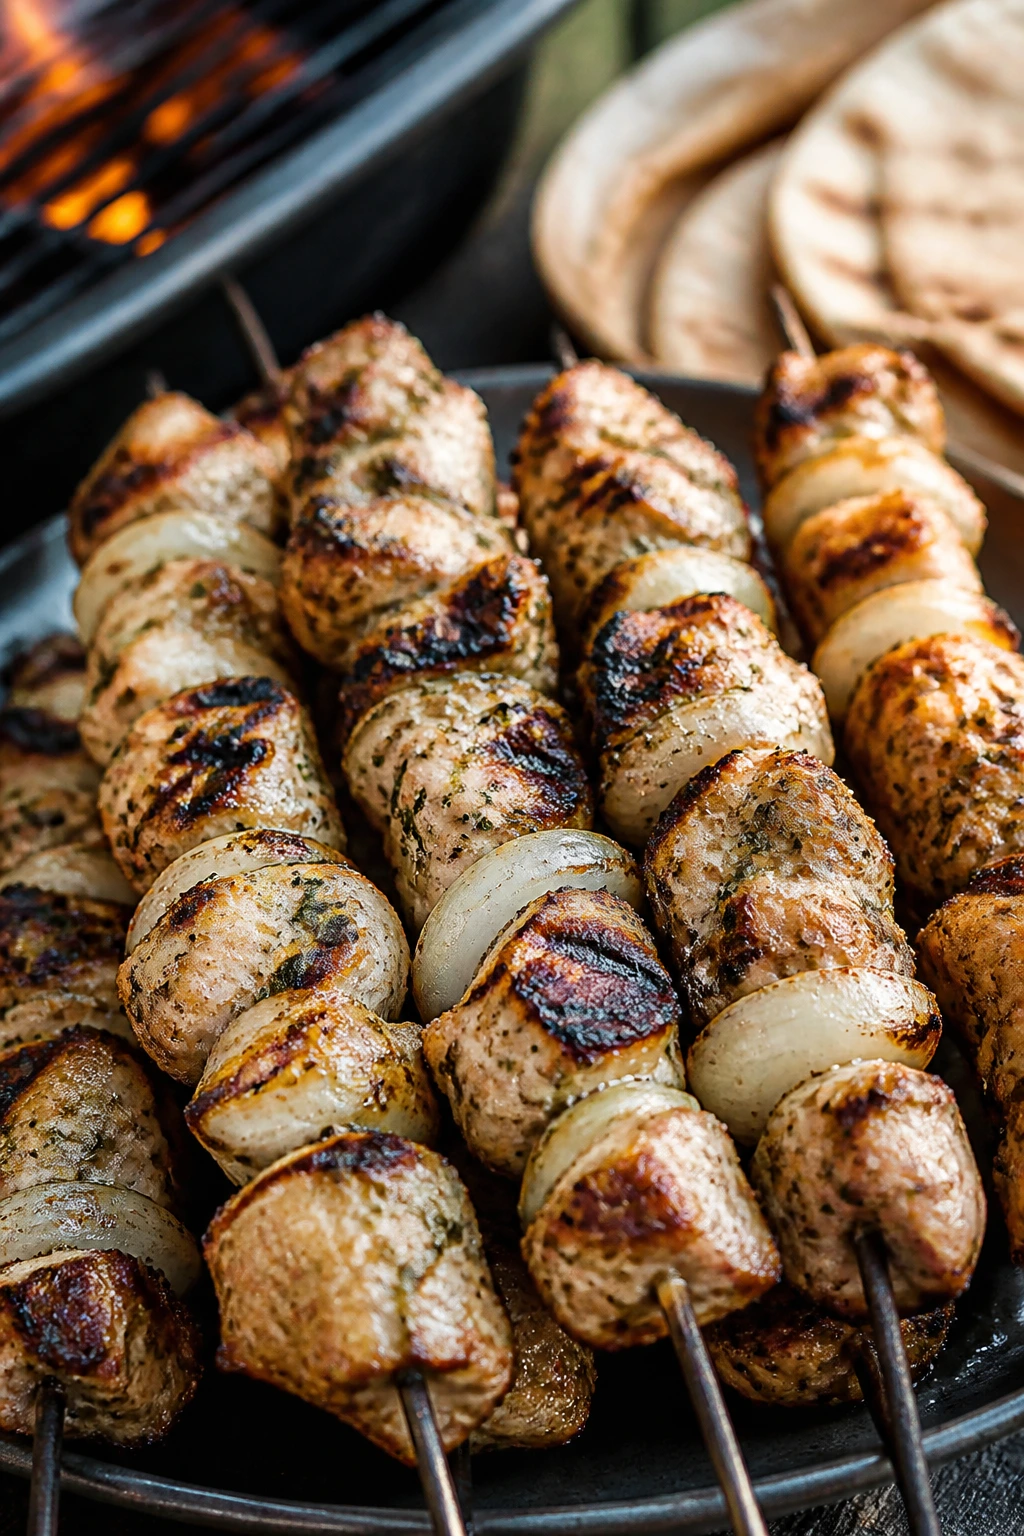
1. Lemon-Garlic Chicken Thigh Skewers
Chicken thighs are the sweet spot for picnic grilling. They stay juicy, take on smoke fast, and don’t punish you if they sit for ten minutes while you sort out plates and drinks.
Why It Works: Thigh meat has enough fat to handle direct heat, and the lemon-garlic marinade gives you brightness without flooding the fire. The pieces cook fast on skewers, which means you get crisp edges before the center dries out.
Key Ingredients:
- 2 lb boneless, skinless chicken thighs, cut into 1½-inch pieces
- 3 tbsp olive oil
- 2 tbsp lemon juice
- 2 tsp lemon zest
- 4 garlic cloves, grated
- 1 tsp kosher salt
- 1 tsp black pepper
- 1 tsp dried oregano
Quick Steps:
- Whisk the oil, lemon juice, zest, garlic, salt, pepper, and oregano in a bowl.
- Toss the chicken in the marinade and chill for 30 minutes to 4 hours.
- Thread the pieces onto 8 skewers, leaving tiny gaps for even browning.
- Grill over medium-high heat for 4 to 5 minutes per side until the edges char and the center reaches 165°F.
- Rest for 5 minutes before packing or serving.
Equipment for This Recipe:
- Grill or grill pan
- 8 metal or soaked wooden skewers
- Instant-read thermometer
How to Serve This Dish: Stack the skewers on a tray with tzatziki, pita wedges, and cucumber salad. They’re good warm, but they hold up well at room temperature too.
Pro Tips for This Recipe:
- Cut the chicken into even pieces so nothing burns before the rest is done.
- If the marinade looks too wet, pat the chicken lightly before skewering.
- Keep a clean platter for cooked skewers; raw chicken juice and picnic towels do not mix.
Variations on This Dish:
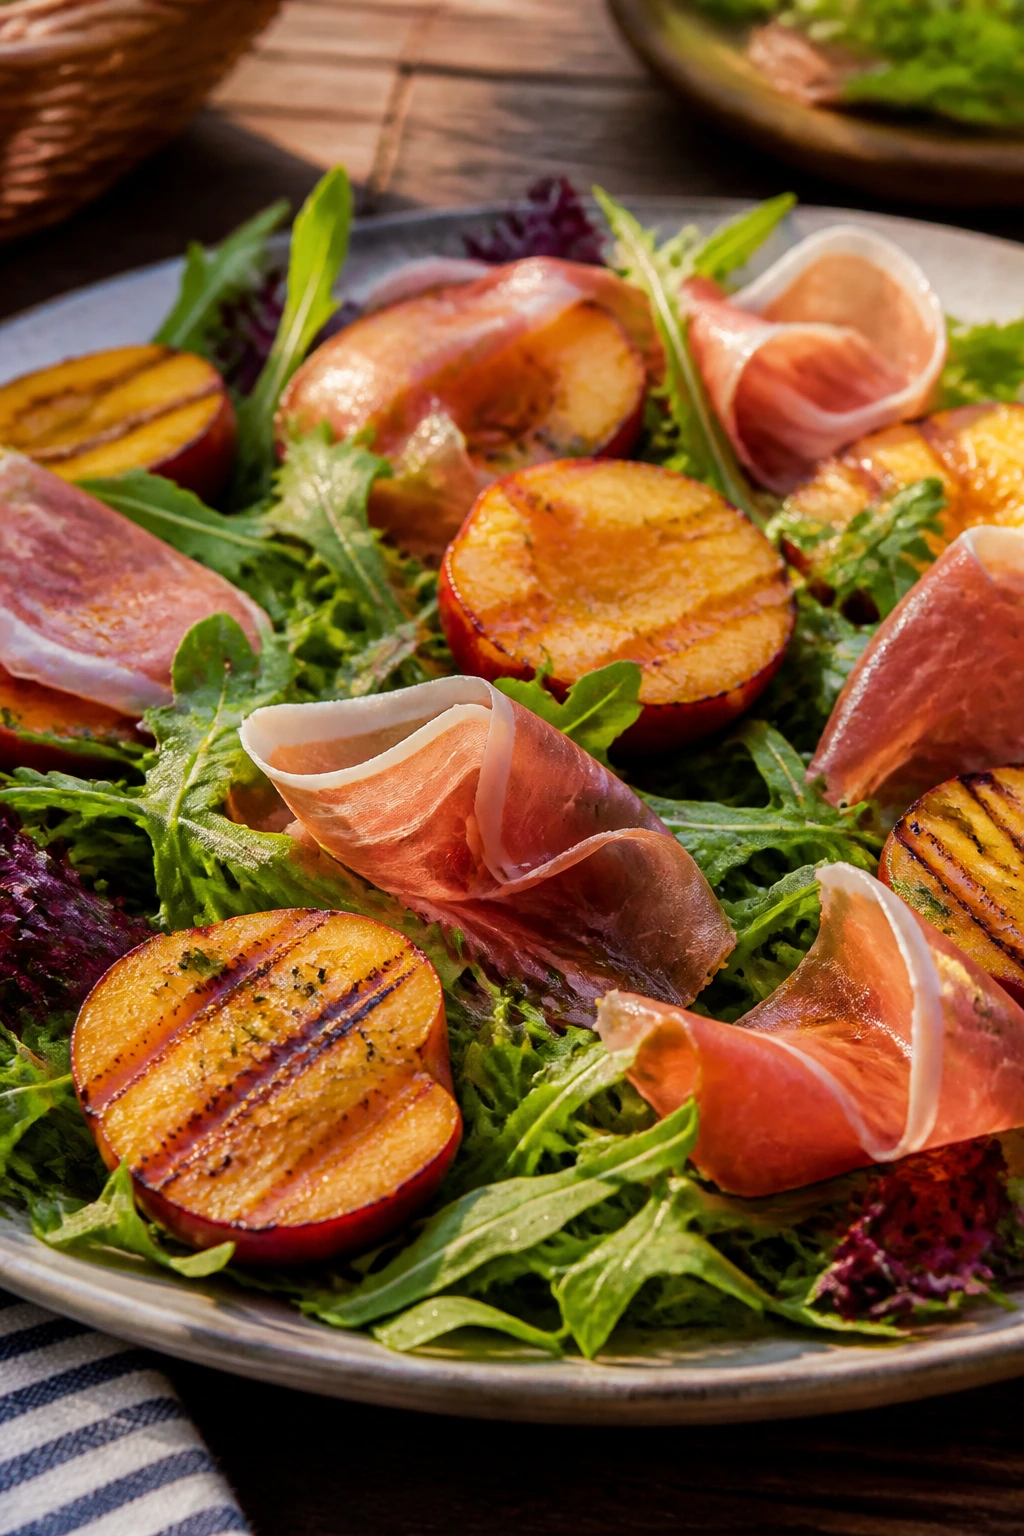
- Smoky Paprika Version: Add 1 teaspoon smoked paprika for a deeper grill-house flavor.
- Herb-Heavy Version: Swap oregano for chopped parsley and dill.
- Spicy Lemon Version: Add a pinch of red pepper flakes and extra black pepper.
Common Mistakes to Avoid with This Dish:
- Overcrowding the skewers: Packed pieces steam instead of browning. Leave a little space.
- Using too much lemon overnight: The acid can dull the texture. Four hours is plenty.
- Skipping the rest: A few minutes off the grill keeps the juices in the meat, not on the plate.
2. Honey-Chipotle Chicken Drumsticks
Drumsticks are messy in the best way. They’re the kind of food people grab with both hands and stop talking for a minute.
Why It Works: The dark meat stays tender through indirect heat, and the honey-chipotle glaze clings to the skin instead of running straight into the coals. You get sticky edges, a little smoke, and enough sweetness to balance the heat.
Key Ingredients:
- 2½ lb chicken drumsticks
- 2 tbsp olive oil
- 2 tbsp chipotle in adobo, minced
- 3 tbsp honey
- 1 tbsp apple cider vinegar
- 1 tsp kosher salt
- 1 tsp garlic powder
- ½ tsp black pepper
Quick Steps:
- Stir the oil, chipotle, honey, vinegar, salt, garlic powder, and pepper into a glaze.
- Coat the drumsticks and marinate for 1 to 4 hours.
- Grill over indirect medium heat for 30 to 35 minutes, turning every 8 to 10 minutes.
- Brush with more glaze during the last 5 minutes over direct heat.
- Cook until the skin is browned and the meat reaches 165°F near the bone.
Equipment for This Recipe:
- Grill with indirect heat zone
- Long-handled tongs
- Basting brush
How to Serve This Dish: Pile them beside crunchy slaw and cold potato salad. Keep extra napkins nearby; these belong on a picnic, not on a white shirt.
Pro Tips for This Recipe:
- Wait until the last few minutes to add the honey so it does not burn.
- If the grill runs hot, move the drumsticks to the cooler side sooner.
- A quick dusting of salt right after grilling sharpens the glaze.
Variations on This Dish:
- Mild Smoked Version: Use smoked paprika instead of chipotle.
- Maple Barbecue Version: Swap honey for maple syrup and add barbecue sauce.
- Garlic-Lime Version: Add lime zest and skip the adobo.
Common Mistakes to Avoid with This Dish:
- Glazing too early: Sugar scorches before the meat finishes.
- Too much direct heat: The skin blackens before the inside cooks through.
- Not checking near the bone: That’s where undercooked drumsticks hide.
3. Greek Chicken Souvlaki
Greek souvlaki tastes like it was invented for outdoor eating. Cubes of chicken, lemon, oregano, and onion on a skewer. That’s already a picnic.
Why It Works: The marinade is bright, salty, and light enough that the chicken still chars instead of steaming. Serve it with pita and cucumber, and you have something that eats cleanly with one hand.
Key Ingredients:
- 1¾ lb boneless chicken thighs or breasts, cut into 1½-inch cubes
- 3 tbsp olive oil
- 2 tbsp lemon juice
- 2 tsp dried oregano
- 3 garlic cloves, minced
- 1 small red onion, cut into chunks
- 1 tsp kosher salt
- ½ tsp black pepper
Quick Steps:
- Whisk the oil, lemon juice, oregano, garlic, salt, and pepper.
- Toss the chicken with the marinade and let it sit for at least 30 minutes.
- Thread the chicken and onion onto skewers.
- Grill over medium-high heat for 10 to 12 minutes, turning every few minutes.
- Pull when the chicken is browned at the edges and reaches 165°F.
Equipment for This Recipe:
- Skewers
- Grill
- Tongs
How to Serve This Dish: Pack with warm pita, sliced tomatoes, and tzatziki. I like it with a fistful of parsley on top and nothing too fussy.
Pro Tips for This Recipe:
- Thighs are friendlier than breasts if the picnic is running late.
- Keep the onion pieces large so they don’t fall apart on the grill.
- A sprinkle of flaky salt after grilling makes the lemon pop.
Variations on This Dish:
- Lamb Swap: Use lamb shoulder cubes and keep the same marinade.
- Dairy-Free Plate: Skip yogurt sauce and serve with tahini.
- Spicy Greek Style: Add a pinch of crushed red pepper.
Common Mistakes to Avoid with This Dish:
- Tiny chicken cubes: They dry out before the skewer gets any color.
- Over-marinating breasts: Lemon can make them soft and stringy.
- Turning too often: Let the grill mark form before you move it.
4. Teriyaki Pineapple Chicken Skewers
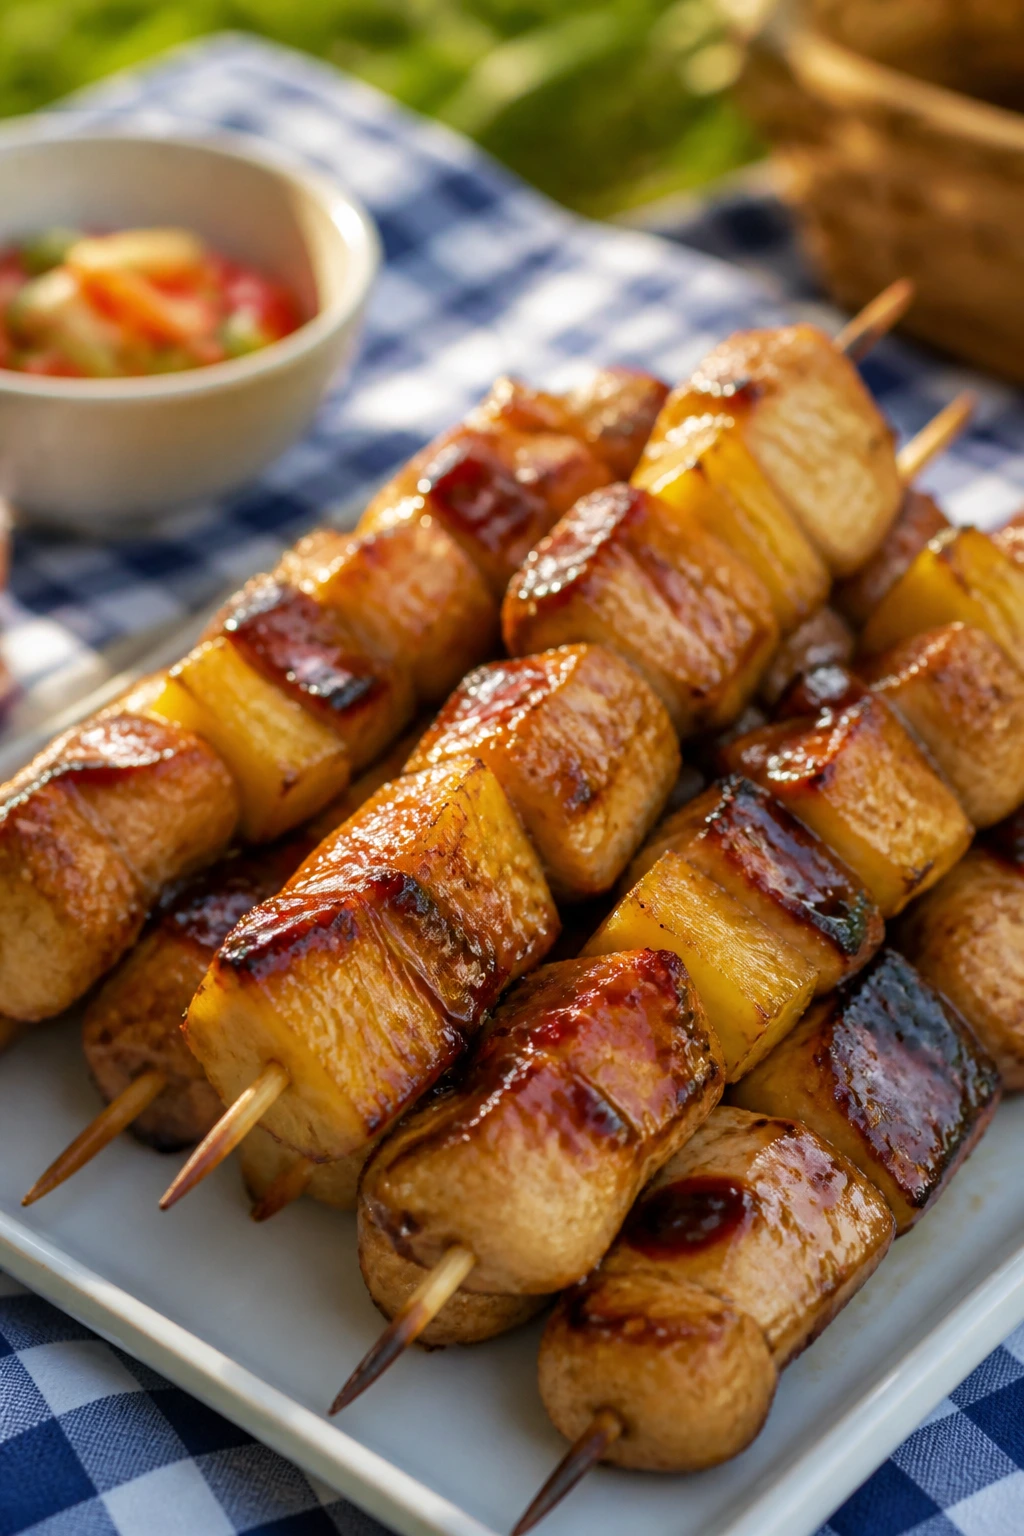
Sweet pineapple and salty teriyaki are one of those pairings that makes people keep reaching back to the tray.
Why It Works: The pineapple caramelizes at the edges, and the chicken picks up a lacquered finish from the sauce. It’s a clean, sticky, portable skewer that tastes good even after it cools.
Key Ingredients:
- 2 lb boneless chicken thighs, cut into chunks
- 2 cups fresh pineapple chunks
- 1 red bell pepper, cut into squares
- ⅓ cup soy sauce
- 3 tbsp brown sugar
- 1 tbsp grated ginger
- 2 garlic cloves, minced
- 1 tbsp sesame oil
Quick Steps:
- Stir the soy sauce, brown sugar, ginger, garlic, and sesame oil into a marinade.
- Toss the chicken and chill for 30 minutes.
- Thread chicken, pineapple, and pepper onto skewers.
- Grill over medium-high heat for 8 to 10 minutes, turning and brushing with extra marinade in the last 2 minutes.
- Cook until the chicken is cooked through and the pineapple has browned edges.
Equipment for This Recipe:
- Skewers
- Grill basket or grill grates
- Basting brush
How to Serve This Dish: Serve over chilled rice or alongside sesame slaw. It’s also good tucked into lettuce cups if you want fewer sticky fingers.
Pro Tips for This Recipe:
- Pat the pineapple dry so it caramelizes instead of steaming.
- Use thighs, not breasts, if you want a little more forgiveness.
- Keep extra sauce separate unless you boil it first.
Variations on This Dish:
- Spicy Teriyaki: Add sriracha or chili flakes to the glaze.
- Vegetable-Heavy Version: Add zucchini and mushrooms.
- Pork Swap: Use pork tenderloin instead of chicken.
Common Mistakes to Avoid with This Dish:
- Too much sauce on raw meat: It drips and burns.
- Using wet pineapple: You lose the caramel edge.
- Leaving it on too long: Sugar turns bitter fast on high heat.
5. Grilled Chicken Caesar Wrap Halves
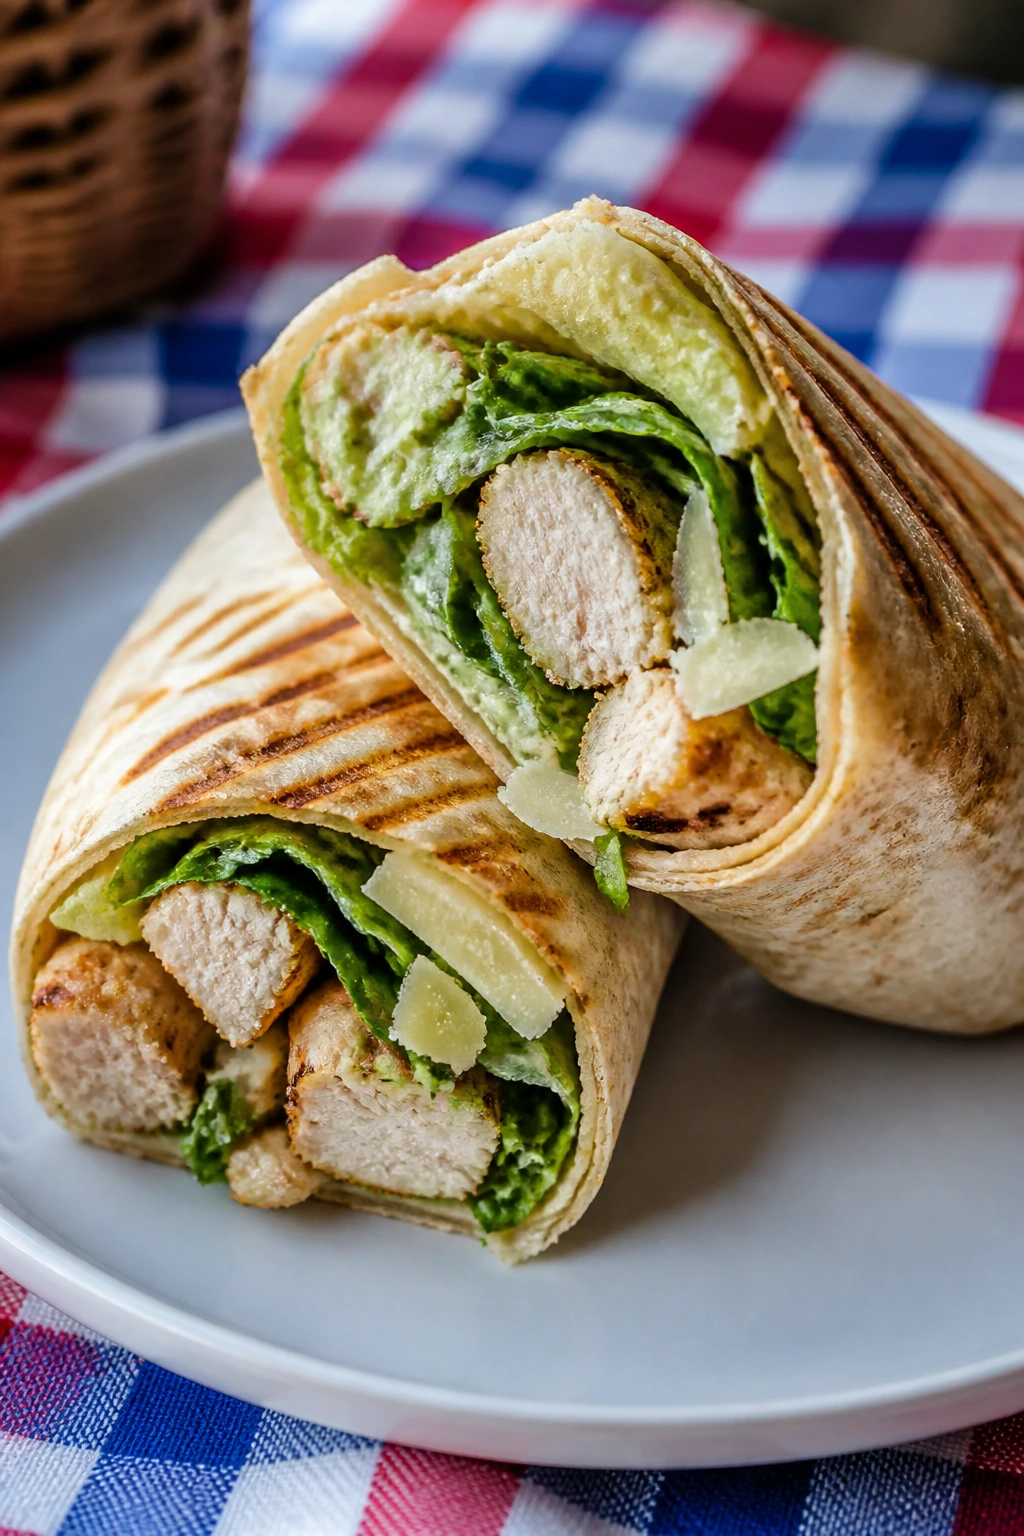
A Caesar wrap can be picnic food if you build it with a little discipline. Grill the chicken, keep the lettuce dry, and cut the wraps after they’ve had a minute to settle.
Why It Works: The grill gives the chicken char and the tortillas a little warmth without turning them brittle. Packing the dressing separately until the last second keeps the wrap from collapsing into a sad, damp tube.
Key Ingredients:
- 2 boneless chicken breasts, about 1½ lb total
- 1 tbsp olive oil
- 1 tsp kosher salt
- ½ tsp black pepper
- 4 large flour tortillas
- 3 cups chopped romaine
- ½ cup Caesar dressing
- ½ cup shaved Parmesan
Quick Steps:
- Rub the chicken with oil, salt, and pepper.
- Grill over medium-high heat for 5 to 6 minutes per side until the center reaches 165°F.
- Rest the chicken, then slice it thinly.
- Toss romaine with Caesar dressing and Parmesan.
- Fill tortillas, wrap tightly, and cut each one in half.
Equipment for This Recipe:
- Grill
- Sharp knife
- Large cutting board
How to Serve This Dish: Wrap the halves in parchment so they hold together in a basket. A side of grapes or cherry tomatoes keeps the plate bright.
Pro Tips for This Recipe:
- Dry the lettuce well; wet romaine wrecks the wrap.
- Warm tortillas for 10 seconds on the grill so they fold cleanly.
- Slice the chicken against the grain for softer bites.
Variations on This Dish:
- Grilled Bacon Caesar: Add crisp bacon strips.
- Anchovy-Free Version: Use extra Parmesan and lemon in the dressing.
- Crunchier Version: Add thin cucumber ribbons.
Common Mistakes to Avoid with This Dish:
- Overdressing the lettuce: It leaks fast.
- Skipping the rest on the chicken: The juice runs out when you slice it.
- Using cold, stiff tortillas: They crack when you roll.
6. Chimichurri Flank Steak
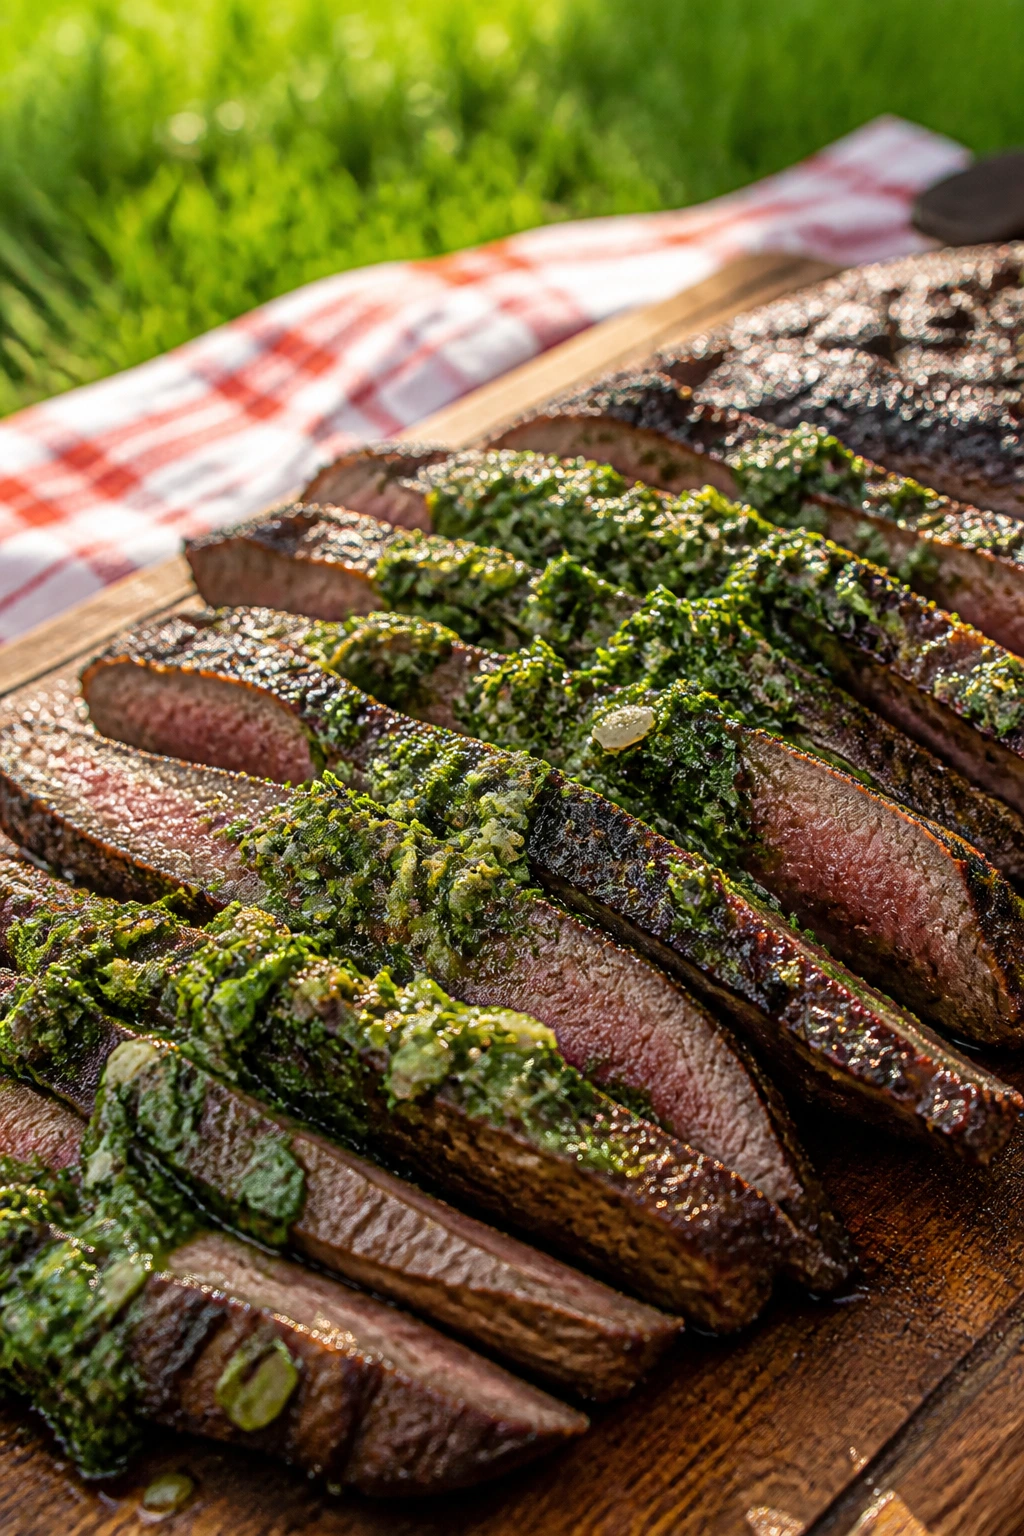
Flank steak is built for big flavor and quick grilling. The trick is the slice. Get that right and the whole dish feels sharper.
Why It Works: Chimichurri gives you herbs, vinegar, and garlic without a heavy sauce, which keeps the steak bold and picnic-friendly. Flank steak sears fast and serves well at room temperature if you slice it thin.
Key Ingredients:
- 2 lb flank steak
- 2 tbsp olive oil
- 1½ tsp kosher salt
- 1 tsp black pepper
- 1 cup parsley, finely chopped
- ¼ cup cilantro, finely chopped
- 3 garlic cloves, minced
- 2 tbsp red wine vinegar
Quick Steps:
- Rub the steak with oil, salt, and pepper.
- Mix parsley, cilantro, garlic, and vinegar for the chimichurri.
- Grill over high heat for 4 to 6 minutes per side for medium-rare.
- Rest the steak for 10 minutes.
- Slice thinly against the grain and spoon the chimichurri over the top.
Equipment for This Recipe:
- Grill
- Sharp slicing knife
- Small bowl for sauce
How to Serve This Dish: Serve with grilled potatoes or crusty bread to catch the juices. It looks best fanned across a platter, not stacked in a heap.
Pro Tips for This Recipe:
- Pat the steak dry before grilling; wet meat won’t sear cleanly.
- Slice against the grain or it turns chewy fast.
- Make the sauce while the steak rests so the herbs stay bright.
Variations on This Dish:
- Skirt Steak Version: Use skirt steak and shave a minute or two off the grill time.
- Spicy Chimichurri: Add red pepper flakes.
- Mint Version: Swap some parsley for mint.
Common Mistakes to Avoid with This Dish:
- Cutting with the grain: The steak feels stringy.
- Skipping the rest: The slices flood the board with juice.
- Overcooking flank steak: It gets tough before you know it.
7. Steak Fajita Skewers
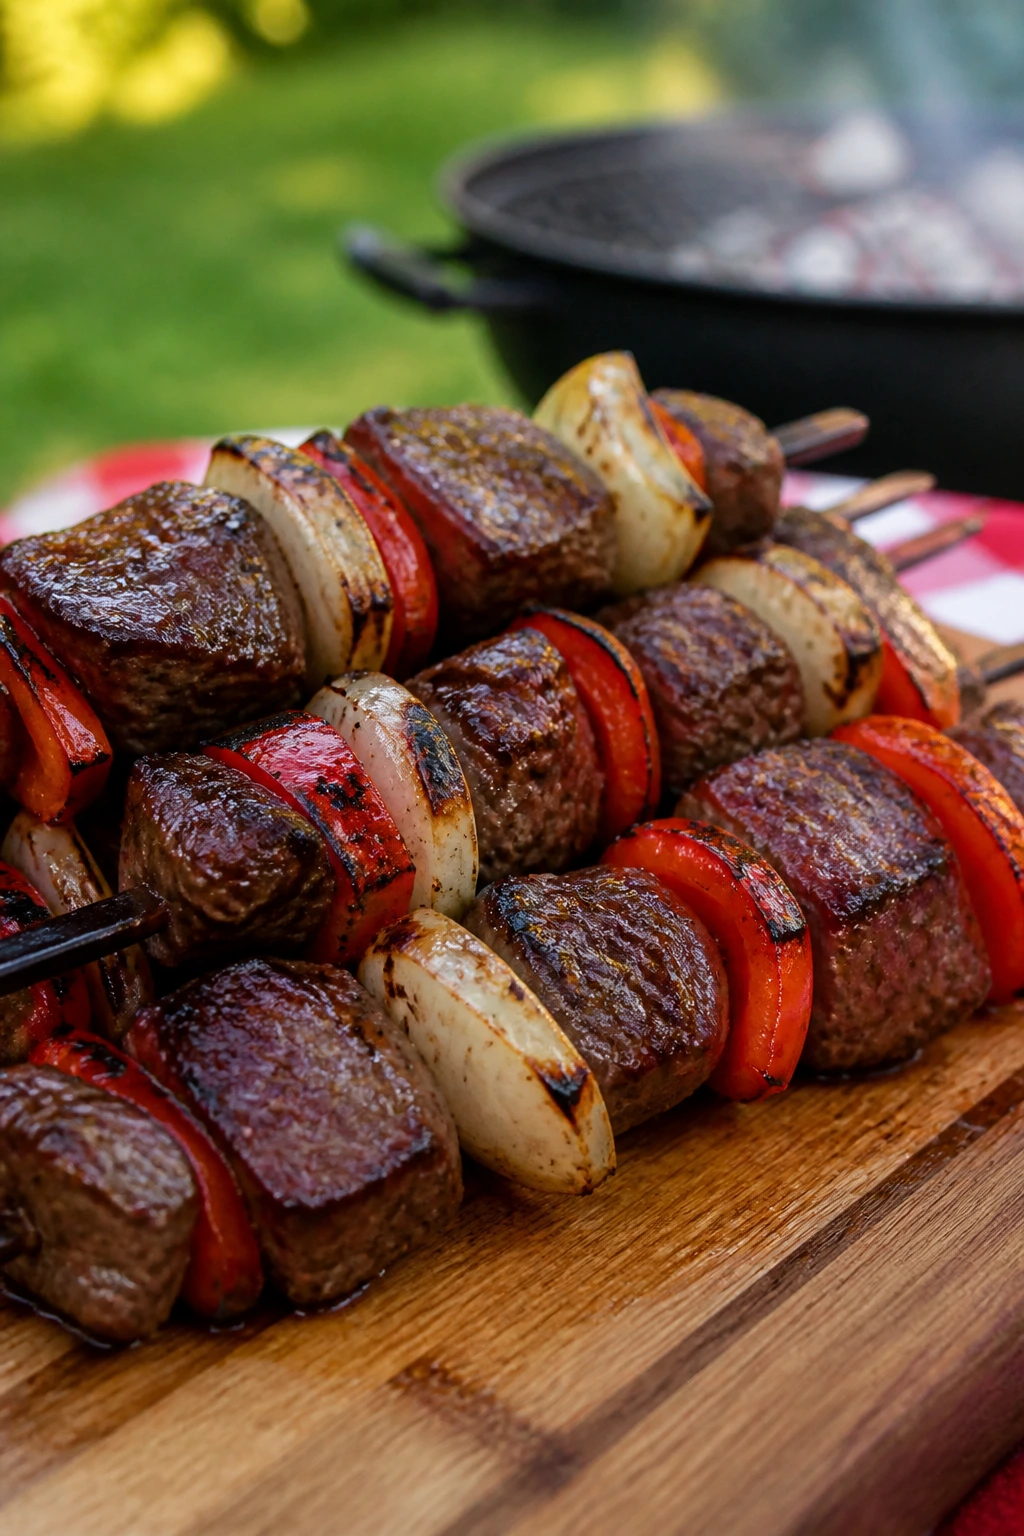
Steak fajita skewers give you all the good parts of a skillet fajita without the pan fumes. You get peppers, onion, and char in every bite.
Why It Works: Cubes of steak cook at the same pace as peppers if you keep the pieces close in size. A cumin-chili-lime marinade adds enough punch that you do not need a pile of sauce at the picnic table.
Key Ingredients:
- 1½ lb sirloin or strip steak, cut into 1-inch cubes
- 2 bell peppers, cut into squares
- 1 red onion, cut into wedges
- 2 tbsp olive oil
- 1 tsp cumin
- 1 tsp chili powder
- 2 tbsp lime juice
- 1 tsp kosher salt
Quick Steps:
- Toss the steak with oil, cumin, chili powder, lime juice, and salt.
- Marinate for 20 minutes to 2 hours.
- Thread steak, peppers, and onion onto skewers.
- Grill over medium-high heat for 8 to 10 minutes, turning often.
- Rest for 5 minutes before serving with tortillas.
Equipment for This Recipe:
- Skewers
- Grill
- Tongs
How to Serve This Dish: Pack with tortillas, salsa, and sliced avocado. The skewers can come off onto a tray or straight to the blanket.
Pro Tips for This Recipe:
- Keep the steak cubes similar in size to the peppers.
- Don’t crowd the skewer; hot air needs a path.
- A squeeze of lime right before serving wakes everything up.
Variations on This Dish:
- Chicken Fajita Swap: Use chicken thighs instead of steak.
- Vegetarian Version: Replace steak with portobello chunks.
- Smoky Version: Add smoked paprika to the marinade.
Common Mistakes to Avoid with This Dish:
- Too much marinade: It drips and kills the sear.
- Uneven cutting: The beef and vegetables finish at different times.
- Skipping the rest: The steak loses its juices too quickly.
8. Korean-Style Short Rib Skewers
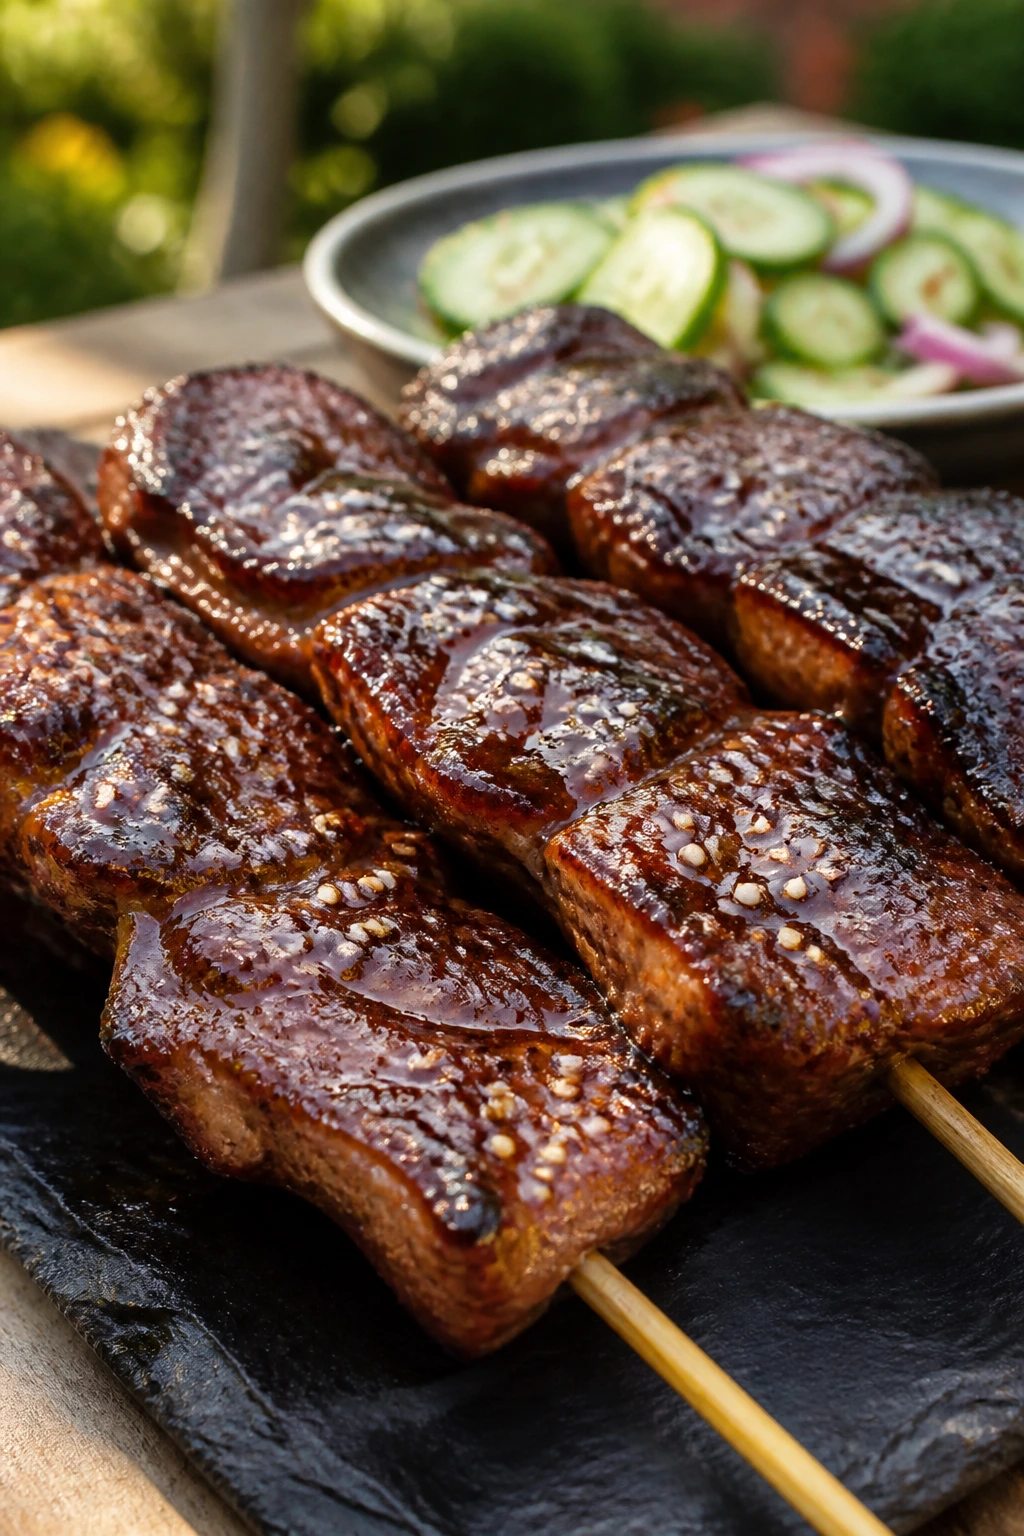
Short ribs on the grill have a way of disappearing before the platter lands. The glaze turns glossy, the edges darken, and people suddenly care a lot about dinner.
Why It Works: The marinade brings salt, sweet pear, and sesame together, which helps the beef brown quickly over high heat. Thin-cut short ribs are rich enough to stay juicy and small enough for picnic fingers.
Key Ingredients:
- 2 lb flanken-cut short ribs
- ¼ cup soy sauce
- 2 tbsp grated Asian pear or apple
- 2 tbsp brown sugar
- 1 tbsp sesame oil
- 3 garlic cloves, minced
- 1 tsp grated ginger
- 1 tbsp sesame seeds
Quick Steps:
- Mix soy sauce, pear, sugar, sesame oil, garlic, and ginger.
- Marinate the ribs for 1 to 6 hours.
- Thread or lay them flat on the grill if they’re too thin to skewer.
- Grill over high heat for 2 to 3 minutes per side until caramelized.
- Finish with sesame seeds and let them rest briefly.
Equipment for This Recipe:
- Grill
- Tongs
- Shallow dish for marinade
How to Serve This Dish: Serve with cucumber salad and steamed rice in small containers. It’s rich, so a crisp side matters.
Pro Tips for This Recipe:
- Thin-cut ribs need hot grates or they stew.
- A tiny bit of sugar is enough; too much burns fast.
- Let the marinade cling, but wipe off extra liquid before grilling.
Variations on This Dish:
- Gochujang Version: Add 1 tablespoon gochujang for heat.
- Pineapple Version: Swap the pear for crushed pineapple.
- Garlic-Soy Version: Keep it simple with extra garlic and no fruit.
Common Mistakes to Avoid with This Dish:
- Low heat: The ribs won’t caramelize.
- Too long on the grill: Thin beef turns dry in a minute.
- Skipping the sweet fruit component: You lose the signature lacquer.
9. BBQ Burger Sliders
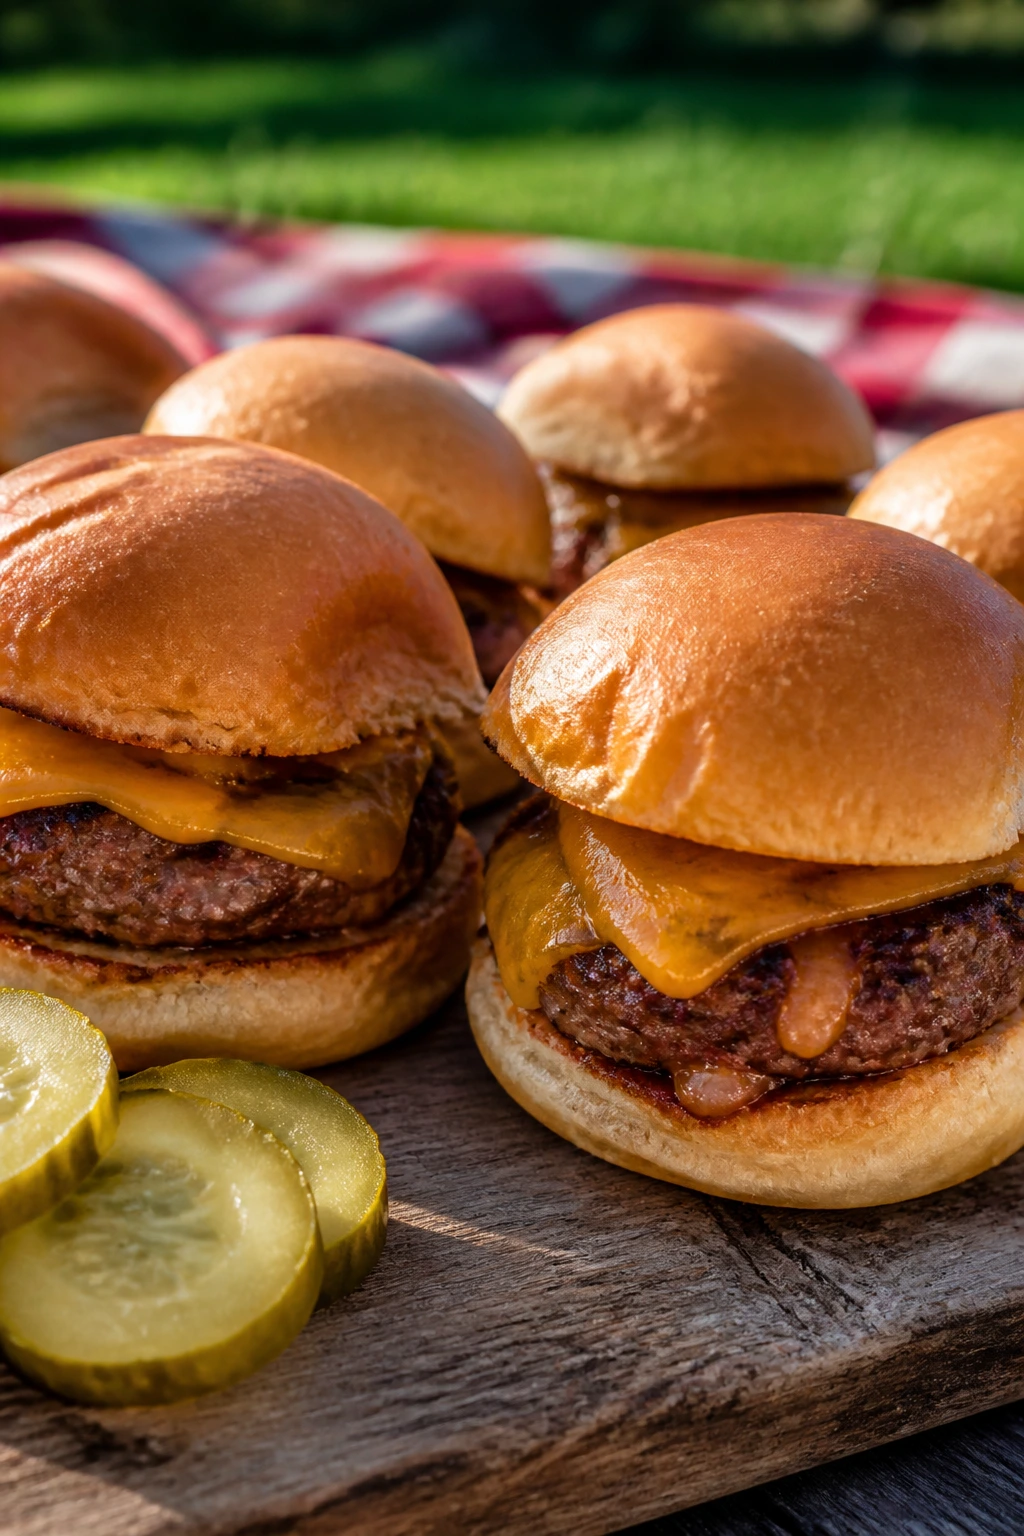
Sliders belong on picnic tables. They’re small enough to handle, but still feel like a real meal when you stack them with cheese and pickles.
Why It Works: Ground beef with enough fat gives you a juicy patty that won’t dry out in a few minutes of grilling. Slider size means you can cook a whole batch fast and still serve them hot.
Key Ingredients:
- 2 lb ground beef, 80/20
- 1 tsp kosher salt
- 1 tsp black pepper
- 1 tsp onion powder
- 1 tbsp Worcestershire sauce
- 12 slider buns
- 6 slices cheddar, halved
- Pickles and barbecue sauce
Quick Steps:
- Mix the beef gently with salt, pepper, onion powder, and Worcestershire.
- Form 12 small patties with a slight dimple in the center.
- Grill over medium-high heat for 3 to 4 minutes per side.
- Add cheddar during the last minute to melt.
- Assemble on buns with pickles and barbecue sauce.
Equipment for This Recipe:
- Grill
- Spatula
- Tray for assembling
How to Serve This Dish: Line the sliders on a tray and keep them loose, not squashed. They’re easy to grab with one hand while the other holds a drink.
Pro Tips for This Recipe:
- Don’t overwork the meat or the patties tighten up.
- The dimple keeps the center from puffing.
- Toast the buns for 20 seconds on the grill for better structure.
Variations on This Dish:
- Bacon Cheddar Version: Add crisp bacon and a smoky sauce.
- Turkey Slider Version: Use ground turkey and add a little grated onion.
- Spicy Version: Mix in chopped jalapeño.
Common Mistakes to Avoid with This Dish:
- Pressing the patties with a spatula: You squeeze out the juices.
- Using lean beef: Sliders get dry fast.
- Assembling too early: The buns soften before people eat.
10. Turkey Burgers with Herb Mayo
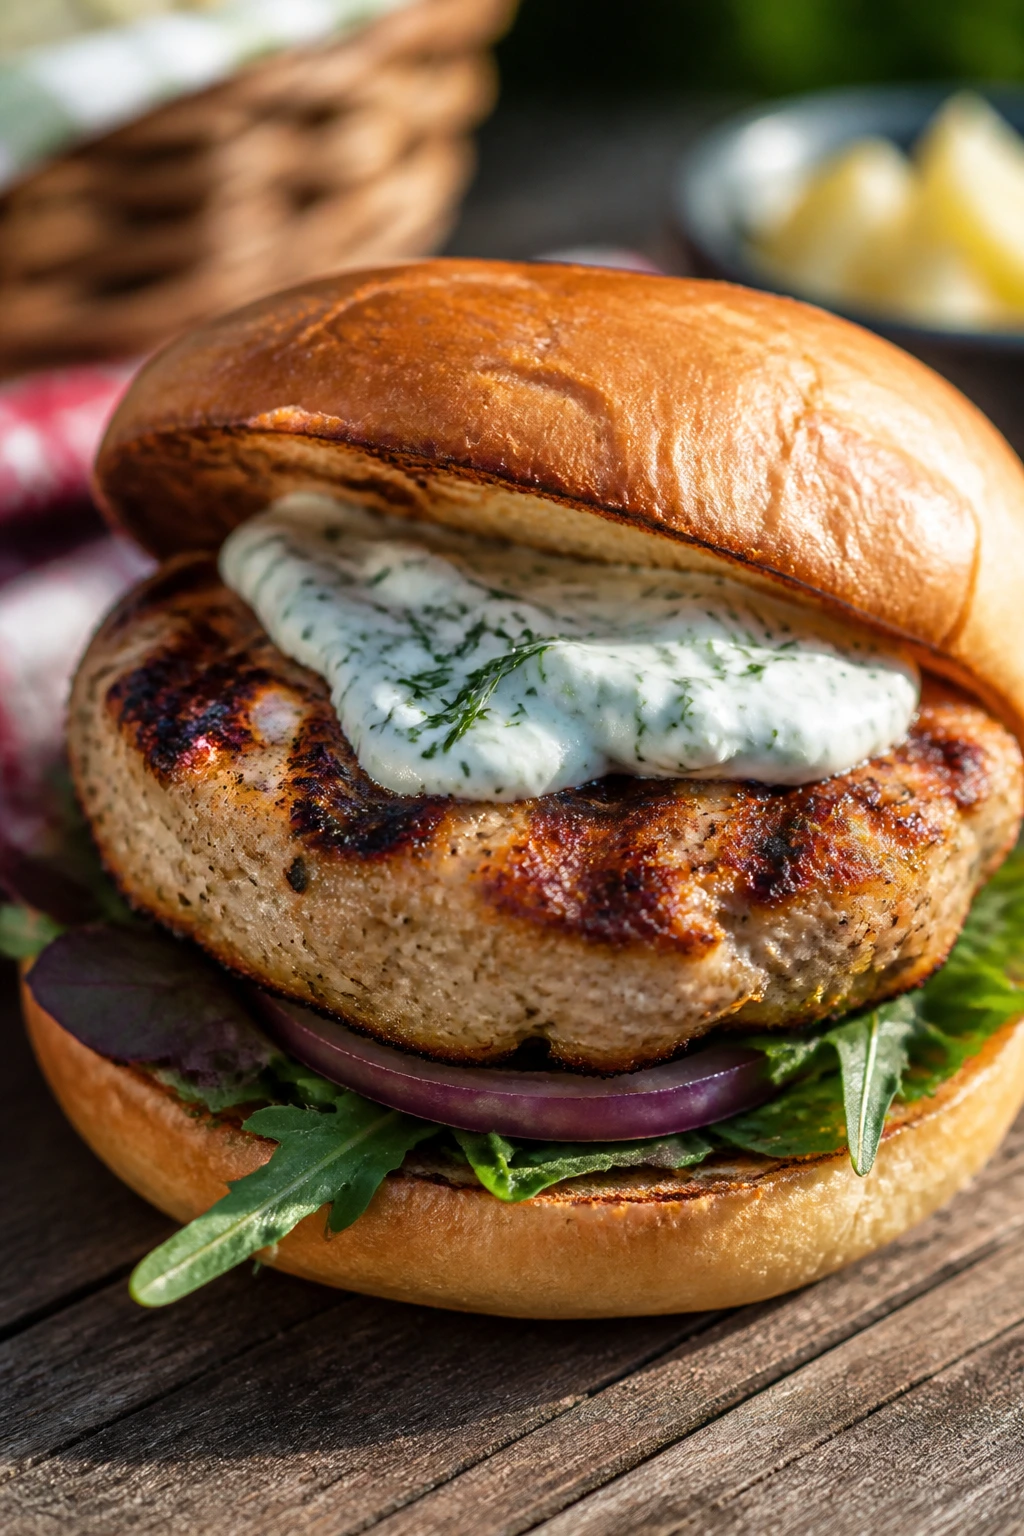
Turkey burgers can be bland if you let them be bland. Fix the inside first, not just the toppings.
Why It Works: Grated onion and herbs keep the turkey moist, and the grill adds a little char that leans the flavor toward savory instead of dry. Herb mayo gives the whole thing a cooler, picnic-friendly finish.
Key Ingredients:
- 2 lb ground turkey
- 1 small onion, grated
- ¼ cup breadcrumbs
- 1 egg
- 2 tbsp chopped parsley
- 1 tsp kosher salt
- ½ tsp black pepper
- ½ cup mayonnaise mixed with dill and lemon
Quick Steps:
- Combine turkey, onion, breadcrumbs, egg, parsley, salt, and pepper gently.
- Form 6 patties and chill for 15 minutes.
- Grill over medium heat for 5 to 6 minutes per side to 165°F.
- Rest 5 minutes.
- Serve on buns with herb mayo and lettuce.
Equipment for This Recipe:
- Grill
- Spatula
- Mixing bowl
How to Serve This Dish: Pack the herb mayo separately if you want a firmer bun. A slice of tomato and a pile of lettuce keep it fresh.
Pro Tips for This Recipe:
- Grated onion gives moisture without chunks falling out.
- Chill the patties before grilling so they hold together.
- Pull them at 165°F, not a second later.
Variations on This Dish:
- Mediterranean Version: Add chopped dill and feta.
- Smoky Version: Mix in smoked paprika.
- Lettuce-Wrapped Version: Skip the bun and serve cold.
Common Mistakes to Avoid with This Dish:
- Dry turkey mix: The burger crumbles and eats like sawdust.
- Overcooking: Turkey goes from juicy to chalky fast.
- Too-soft buns: Toast them or they collapse.
11. Sausage and Peppers Hoagies
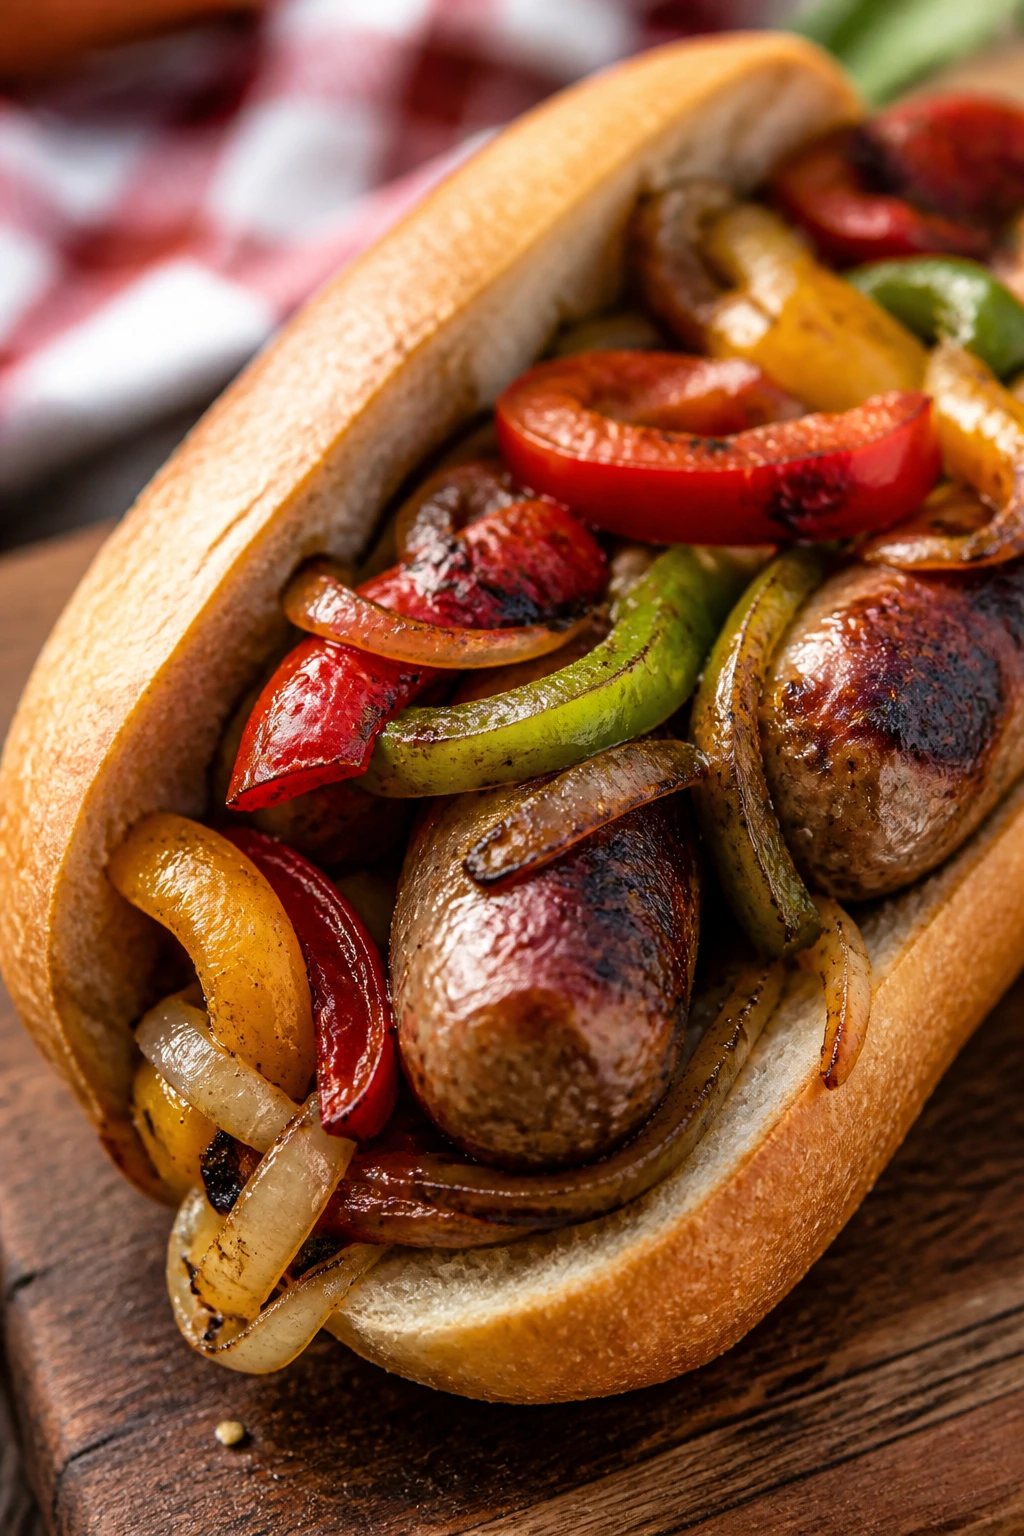
There’s a reason sausage and peppers show up at outdoor gatherings. They hold their shape, taste better with a little smoke, and don’t ask for a fork.
Why It Works: The sausage gives you fat and spice, while peppers and onions sweeten as they blister. Stuffed into hoagie rolls, the filling stays tidy enough for a picnic bench.
Key Ingredients:
- 6 Italian sausages
- 2 bell peppers, sliced
- 1 large onion, sliced
- 2 tbsp olive oil
- 1 tsp kosher salt
- ½ tsp black pepper
- 6 hoagie rolls
- Mustard or marinara, if you like
Quick Steps:
- Toss peppers and onion with oil, salt, and pepper.
- Grill sausages over medium heat, turning often, for 12 to 15 minutes.
- Grill the vegetables in a basket or foil packet until tender and blistered.
- Split the rolls and toast briefly on the grill.
- Fill with sausage, peppers, and sauce.
Equipment for This Recipe:
- Grill
- Grill basket or foil
- Tongs
How to Serve This Dish: Wrap each hoagie in parchment or foil for easy hands-on eating. Serve with pickles or mustard potato salad.
Pro Tips for This Recipe:
- Use medium heat so the casing doesn’t split too soon.
- A grill basket keeps the vegetables from slipping through.
- Toasting the rolls makes a big difference here.
Variations on This Dish:
- Hot Sausage Version: Use spicy sausage and skip extra sauce.
- Chicken Sausage Version: Lighter, but still sturdy.
- Onion-Heavy Version: Add more onions than peppers for sweetness.
Common Mistakes to Avoid with This Dish:
- Poking the sausages: You lose the juices.
- Using flimsy rolls: They fall apart under the filling.
- Burning the peppers: They should char, not turn to ash.
12. Pork Tenderloin with Mustard-Herb Glaze
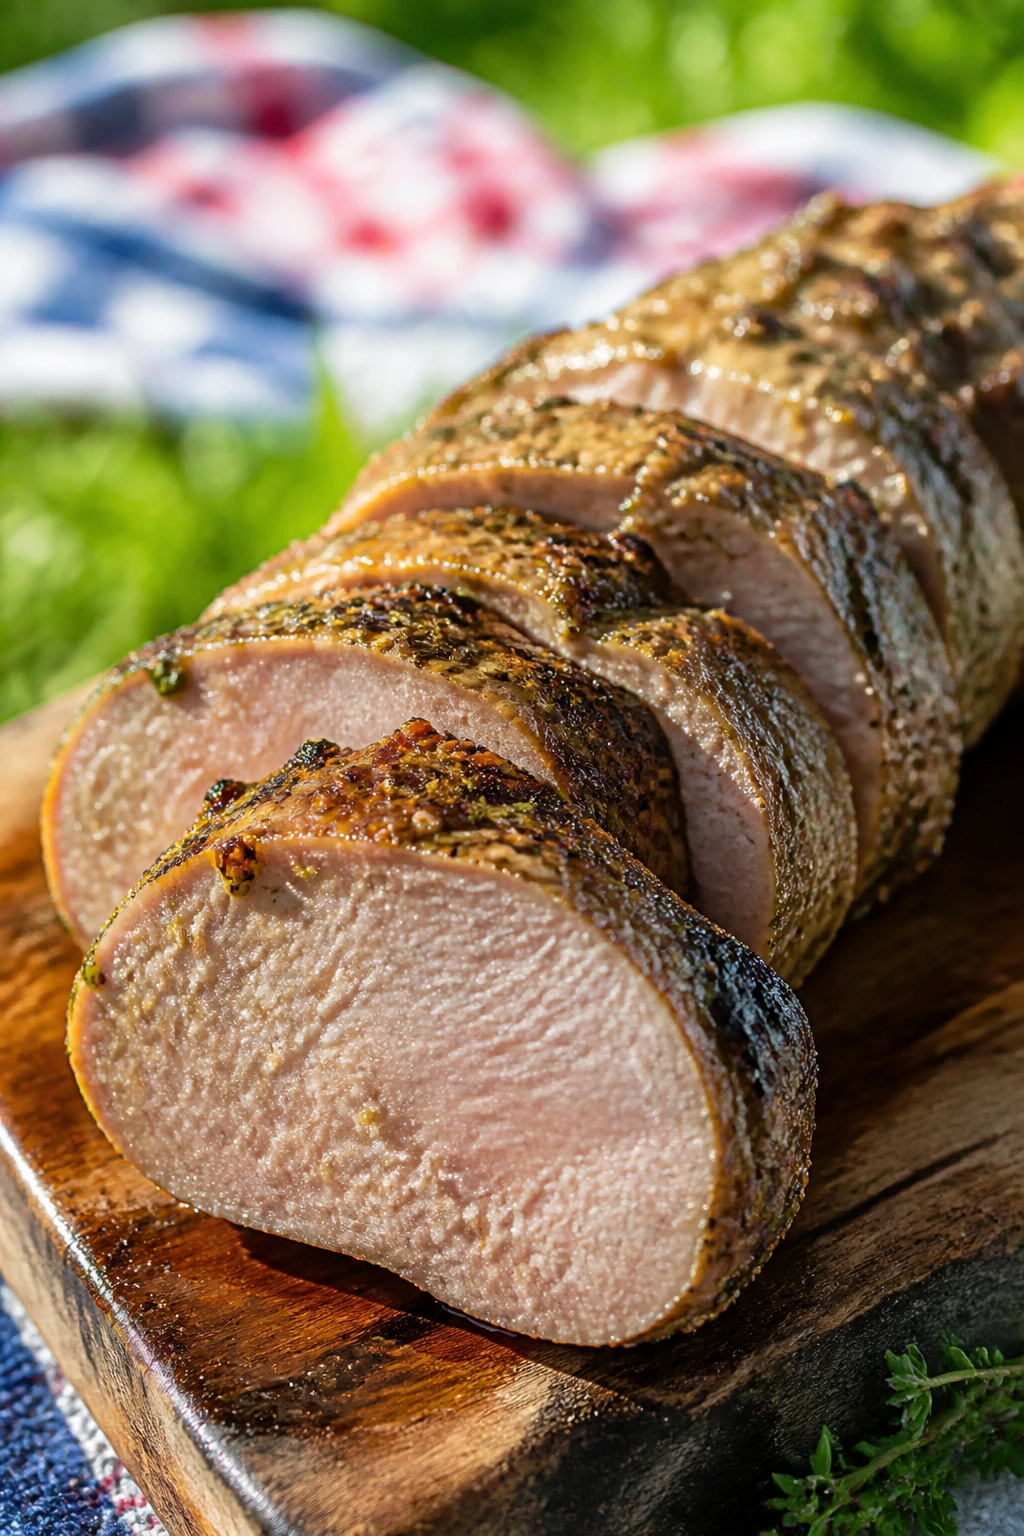
Pork tenderloin is neat, trim, and easy to slice once it rests. The glaze gives it enough personality for a picnic without making it messy.
Why It Works: Tenderloin cooks quickly over indirect heat, and a mustard-herb glaze gives you a sharp, savory crust. It slices cleanly into medallions, which makes serving easier than wrestling with ribs.
Key Ingredients:
- 2 pork tenderloins, about 1½ lb total
- 2 tbsp olive oil
- 2 tbsp Dijon mustard
- 1 tbsp honey
- 2 garlic cloves, minced
- 1 tsp chopped rosemary
- 1 tsp kosher salt
- ½ tsp black pepper
Quick Steps:
- Mix oil, mustard, honey, garlic, rosemary, salt, and pepper.
- Rub over the pork and let it sit for 20 to 30 minutes.
- Grill over medium heat, using indirect heat if needed, for 18 to 22 minutes.
- Turn once and brush with extra glaze near the end.
- Pull at 145°F and rest 10 minutes before slicing.
Equipment for This Recipe:
- Grill with indirect zone
- Instant-read thermometer
- Sharp slicing knife
How to Serve This Dish: Slice it thick and fan it on a platter with mustard greens or potato salad. It travels well and tastes good warm or room temperature.
Pro Tips for This Recipe:
- Don’t confuse tenderloin with loin; they cook differently.
- Resting matters here or the slices dry out.
- Brush glaze late so the honey doesn’t scorch.
Variations on This Dish:
- Apple Version: Add grated apple to the glaze.
- Herb Garden Version: Use thyme and sage instead of rosemary.
- Spicy Mustard Version: Add a spoon of hot mustard.
Common Mistakes to Avoid with This Dish:
- Overcooking tenderloin: It goes dry before it looks it.
- Skipping the thermometer: Guessing is how pork gets ruined.
- Cutting too soon: The juices need time to settle.
13. Lamb Kofta with Yogurt Sauce
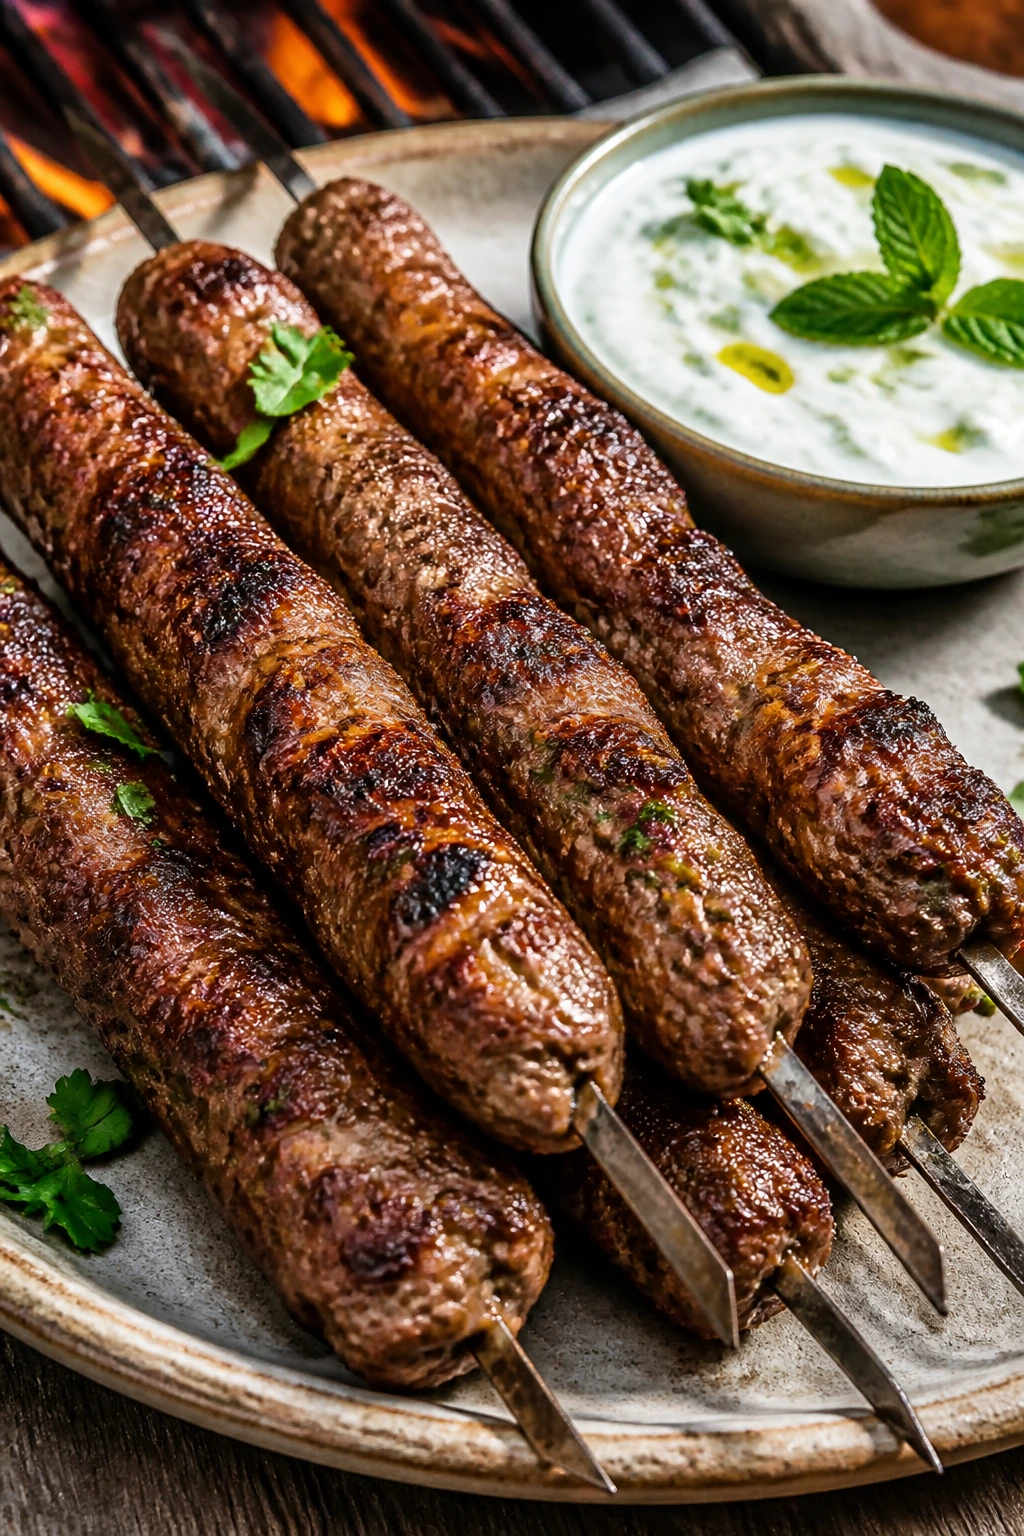
Kofta brings a deep, savory flavor that feels made for charcoal. It’s hand-held, rich, and easy to serve with flatbread.
Why It Works: Ground lamb handles cumin, garlic, and herbs without fading, and shaping it around skewers gives you surface area for crisp browning. Yogurt sauce cools the spice and keeps the plate from feeling heavy.
Key Ingredients:
- 2 lb ground lamb
- 1 small onion, grated
- 2 garlic cloves, minced
- 2 tsp cumin
- 1 tsp coriander
- 1 tsp kosher salt
- ½ tsp black pepper
- ½ cup plain yogurt mixed with mint and lemon
Quick Steps:
- Mix lamb, onion, garlic, cumin, coriander, salt, and pepper gently.
- Shape onto skewers or into small logs.
- Chill for 20 minutes so they hold together.
- Grill over medium-high heat for 8 to 10 minutes, turning once or twice.
- Serve with yogurt sauce after a short rest.
Equipment for This Recipe:
- Skewers
- Grill
- Small bowl for sauce
How to Serve This Dish: Wrap the kofta in flatbread with cucumber, tomato, and sauce. It’s rich enough that a crisp salad on the side helps.
Pro Tips for This Recipe:
- Grated onion gives flavor without making the mix wet.
- A light hand keeps the kofta tender.
- Chill before grilling or they can slump on the grates.
Variations on This Dish:
- Beef-Lamb Blend: Use half beef, half lamb.
- Mint-Heavy Version: Add extra mint to the meat and sauce.
- No-Skewer Version: Shape into small patties for easier flipping.
Common Mistakes to Avoid with This Dish:
- Mixing too hard: The kofta turns dense.
- Skipping the chill: They break when you flip them.
- Grilling too hot: The outside darkens before the center cooks.
14. Cedar-Plank Salmon with Dill
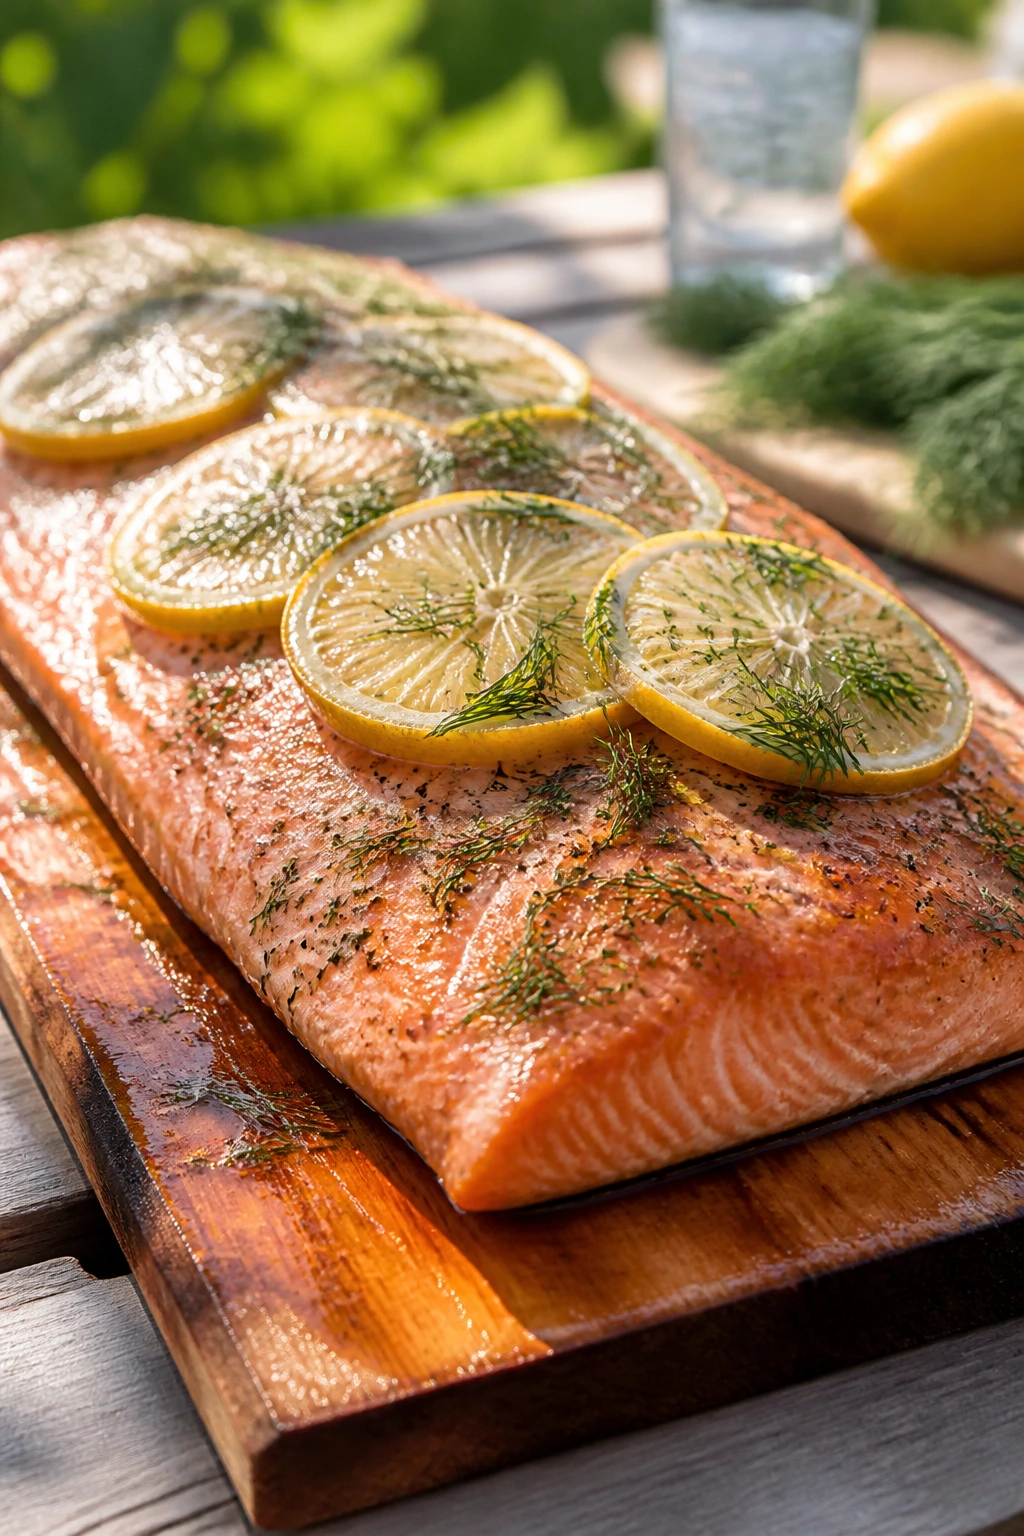
Salmon on a cedar plank looks fancy until you realize it’s mostly a smart way to keep the fish from sticking and drying out.
Why It Works: The plank perfumes the fish with wood smoke while the salmon stays moist underneath. Dill and lemon keep it bright, which is exactly what a picnic needs when the rest of the spread leans rich.
Key Ingredients:
- 2 salmon fillets, about 2 lb total
- 1 cedar plank, soaked for 1 hour
- 2 tbsp olive oil
- 1 tsp kosher salt
- ½ tsp black pepper
- 1 lemon, sliced
- 2 tbsp chopped dill
- 1 tbsp Dijon mustard
Quick Steps:
- Soak the cedar plank until it’s heavy and saturated.
- Brush the salmon with oil and mustard, then season with salt and pepper.
- Set the fish on the plank with lemon slices and dill.
- Grill over medium heat with the lid closed for 15 to 20 minutes.
- Pull when the fish flakes and the center is just opaque.
Equipment for This Recipe:
- Cedar plank
- Grill with lid
- Fish spatula
How to Serve This Dish: Slide the salmon onto a platter with cucumbers and potatoes. It’s good warm, but not bad at room temperature either.
Pro Tips for This Recipe:
- Soak the plank long enough or it will catch.
- Pick salmon with even thickness so it cooks together.
- Don’t over-handle the fish once it starts to flake.
Variations on This Dish:
- Maple Version: Add a thin maple glaze near the end.
- Herb Mix Version: Use parsley and tarragon with the dill.
- Foil Version: Use heavy foil if you don’t have a plank.
Common Mistakes to Avoid with This Dish:
- Dry plank: It can scorch.
- Overcooking the fish: Salmon dries fast past opaque.
- Lifting it too soon: Let it finish gently under the lid.
15. Chili-Lime Shrimp Skewers
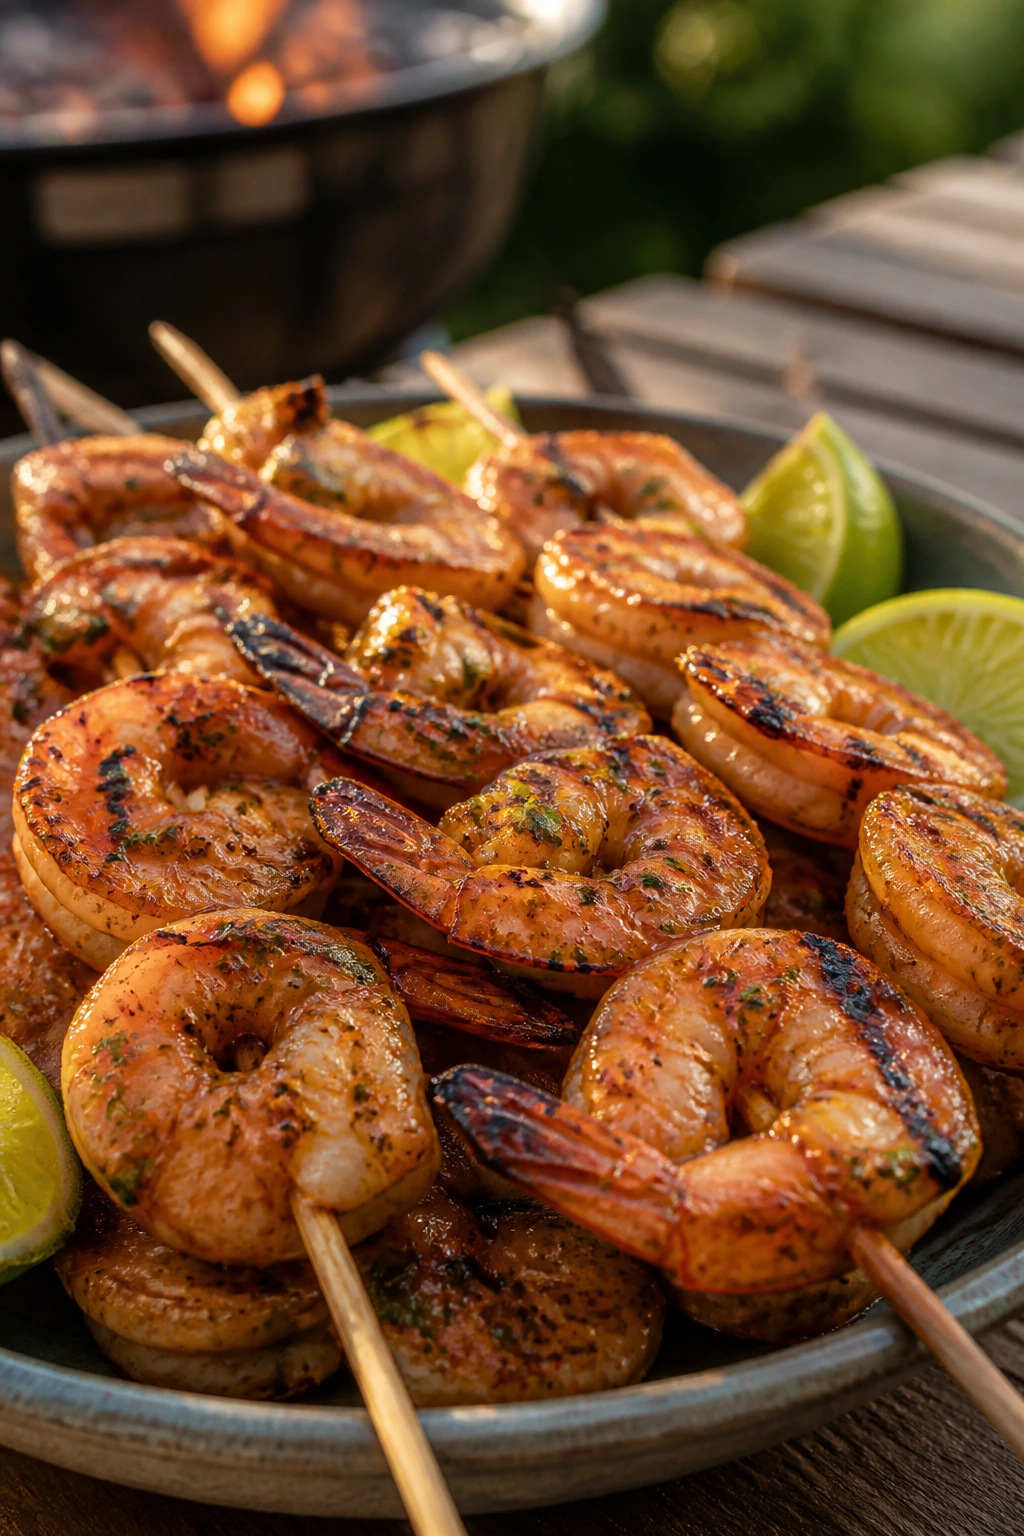
Shrimp are the fastest thing on this list, which is useful when the cooler is already open and people are circling.
Why It Works: Shrimp take on grill marks in minutes, and chili-lime seasoning gives them enough edge that they don’t need a sauce to taste finished. The quick cook time also keeps them tender instead of rubbery.
Key Ingredients:
- 2 lb large shrimp, peeled and deveined
- 2 tbsp olive oil
- 1 tbsp lime juice
- 1 tsp chili powder
- 1 tsp kosher salt
- ½ tsp garlic powder
- ¼ tsp cayenne, optional
- Lime wedges for serving
Quick Steps:
- Toss shrimp with oil, lime juice, chili powder, salt, garlic powder, and cayenne.
- Thread onto skewers.
- Grill over high heat for 1 to 2 minutes per side until pink and just firm.
- Pull immediately once the shrimp curl into a loose C.
- Serve with lime wedges.
Equipment for This Recipe:
- Skewers
- Grill or grill basket
- Tongs
How to Serve This Dish: Serve with rice salad or tuck into tortillas. Shrimp are at their best fresh off the fire, so do not let them sit forever.
Pro Tips for This Recipe:
- Pat the shrimp dry before tossing in oil.
- Use large shrimp so they don’t overcook instantly.
- The loose C-shape means done; tight O-shape means overdone.
Variations on This Dish:
- Garlic Butter Version: Brush with garlic butter after grilling.
- Mango Version: Add diced mango salsa on top.
- Smoky Version: Add smoked paprika to the seasoning.
Common Mistakes to Avoid with This Dish:
- Cooking too long: Shrimp turn tough fast.
- Using tiny shrimp: They overcook before you can blink.
- Marinating too long in acid: The texture goes mushy.
16. Sesame-Soy Tuna Steaks
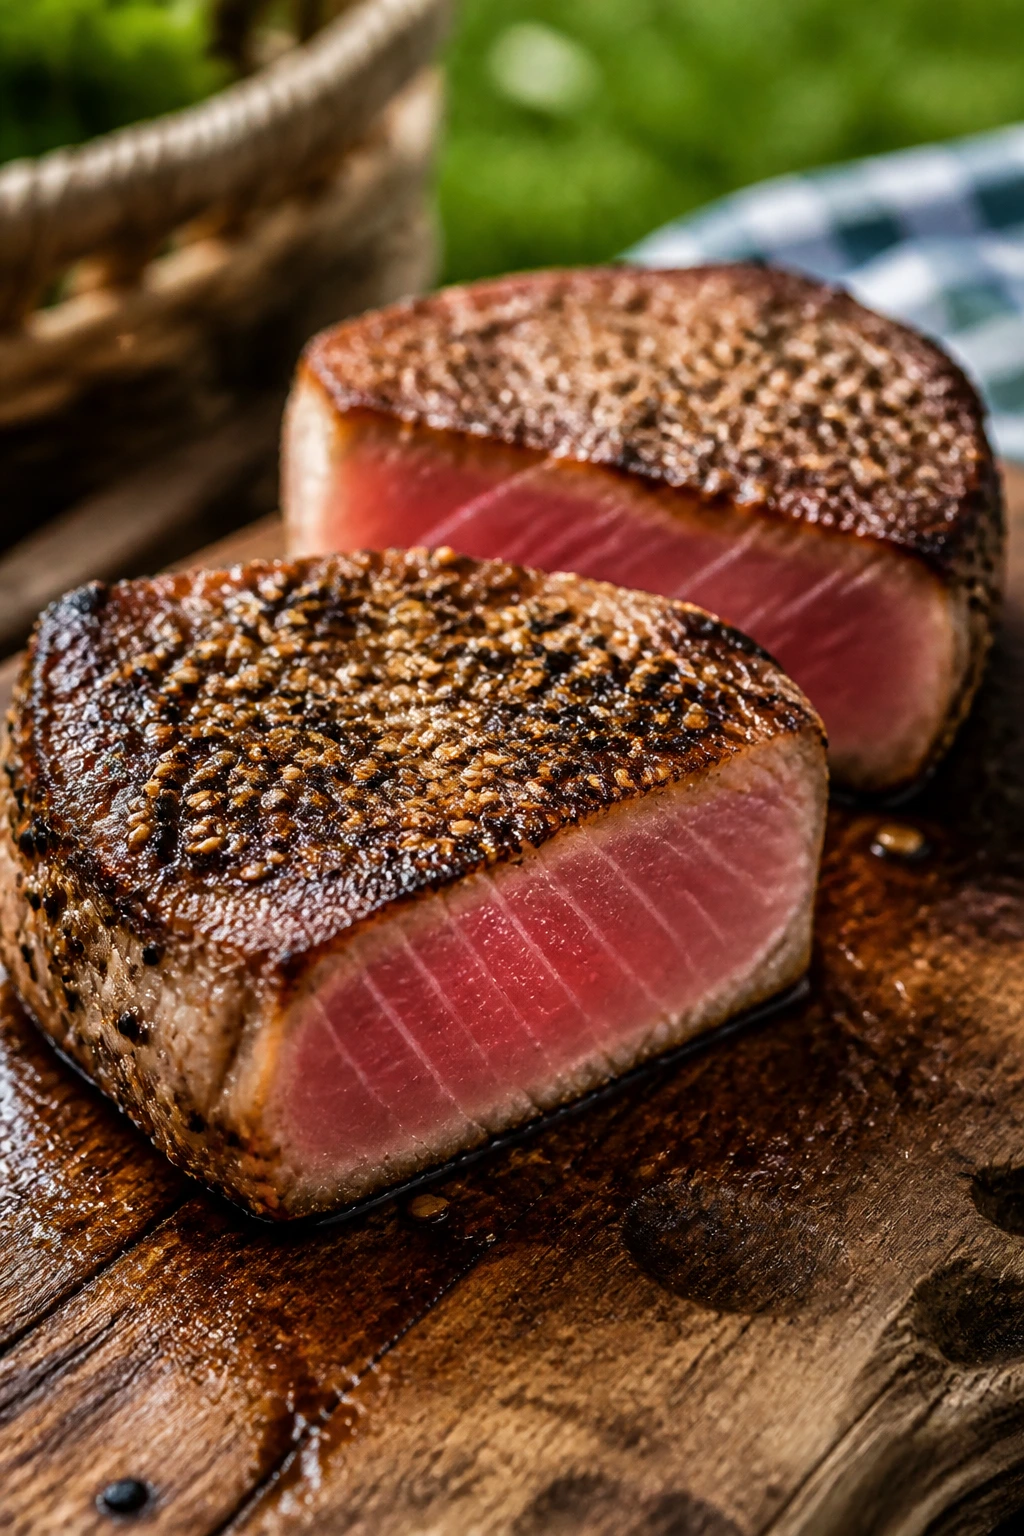
Tuna steaks are one of those picnic ideas that feel a little sharper and cleaner than the usual grill crowd. They’re best if you like a center that stays rosy.
Why It Works: A sesame-soy marinade gives tuna enough salt and fragrance without masking the fish. High heat sears the outside fast, which is exactly what you want for a steak that should stay tender inside.
Key Ingredients:
- 4 tuna steaks, about 6 oz each
- 2 tbsp soy sauce
- 1 tbsp sesame oil
- 1 tbsp rice vinegar
- 1 tsp grated ginger
- 1 tsp sesame seeds
- 1 tbsp neutral oil
- Sliced scallions for finishing
Quick Steps:
- Mix soy sauce, sesame oil, vinegar, ginger, and sesame seeds.
- Coat the tuna for 15 to 20 minutes.
- Pat lightly and brush with neutral oil.
- Grill over very high heat for 1½ to 2 minutes per side for medium-rare.
- Rest briefly, then slice thick.
Equipment for This Recipe:
- Grill
- Metal spatula or fish turner
- Small bowl for marinade
How to Serve This Dish: Slice it over rice or serve with cucumber noodles. A dab of wasabi mayo works if you want a little bite.
Pro Tips for This Recipe:
- Tuna needs a hot grill and a short stay.
- Keep the center from going past rosy unless you prefer it firmer.
- A light oiling stops the fish from clinging to the grates.
Variations on This Dish:
- Pepper Crusted Version: Add cracked black pepper before grilling.
- Citrus Version: Swap rice vinegar for orange juice.
- Spicy Version: Add a touch of chili paste.
Common Mistakes to Avoid with This Dish:
- Overmarinating: The surface can get mushy.
- Turning too late: The fish sticks if the grate wasn’t hot enough.
- Cooking through: Tuna gets dry quickly past medium-rare.
17. Swordfish with Tomato Relish
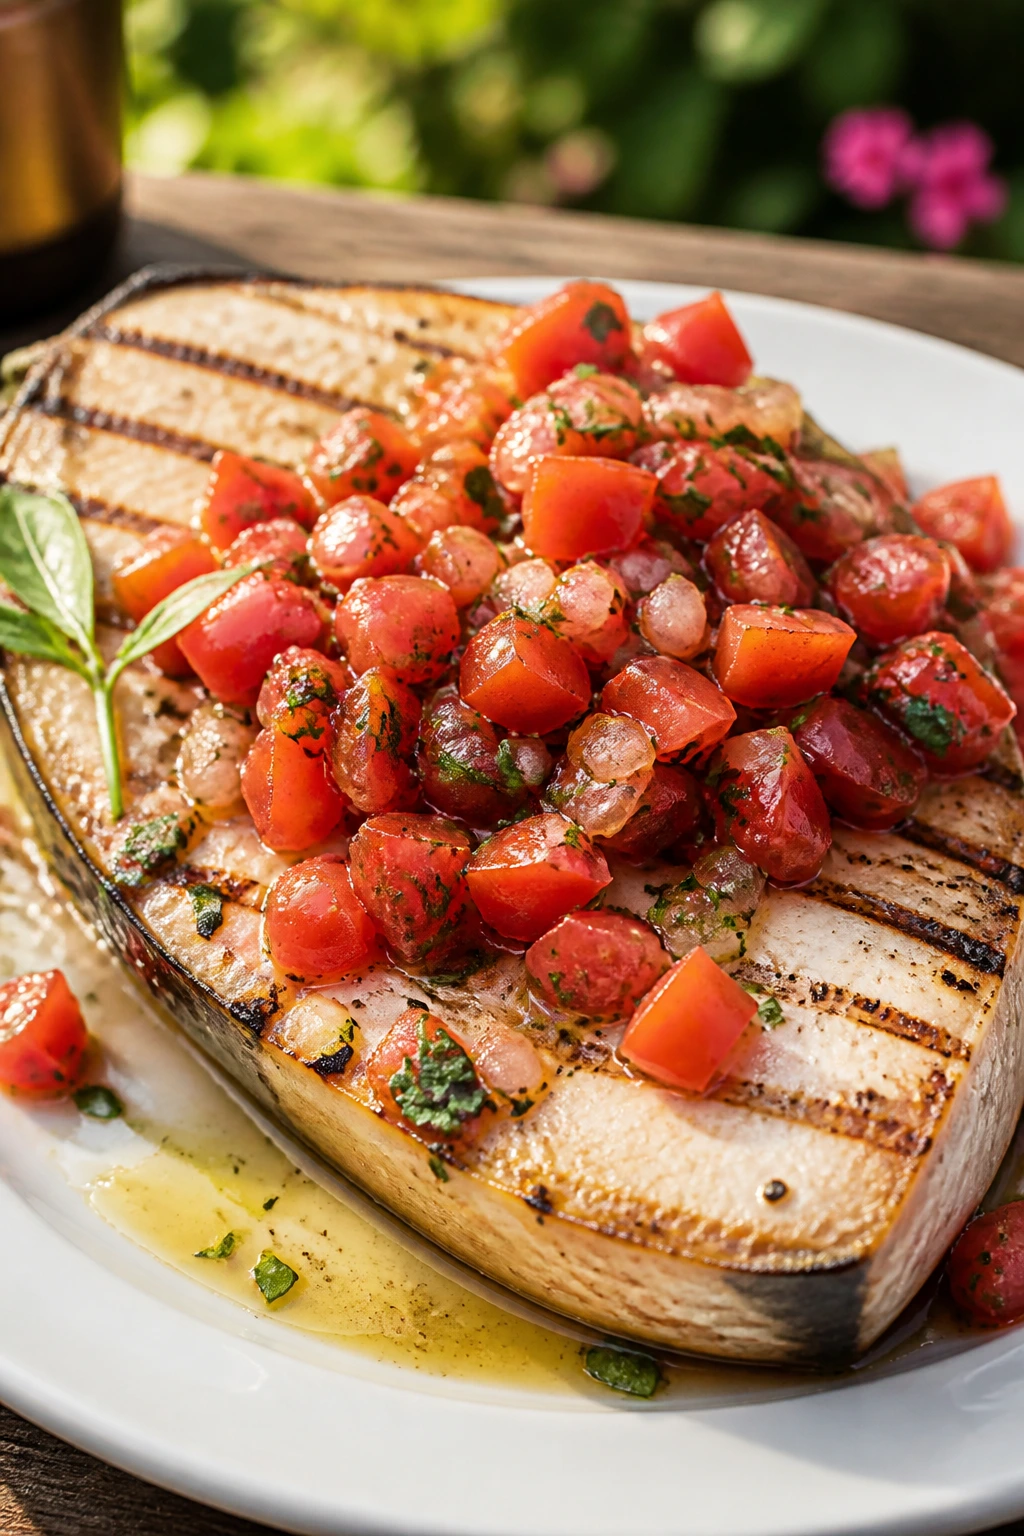
Swordfish is meaty enough to stand up to the grill and sturdy enough to carry a bright relish. That makes it picnic-friendly in a way delicate fish never is.
Why It Works: The steaks hold their shape over direct heat, and the tomato relish brings acid and freshness so the fish doesn’t feel heavy. It’s a clean plate, which is rare and useful outdoors.
Key Ingredients:
- 4 swordfish steaks, about 6 oz each
- 2 tbsp olive oil
- 1 tsp kosher salt
- ½ tsp black pepper
- 1 cup diced tomatoes
- 2 tbsp chopped parsley
- 1 tbsp red wine vinegar
- 1 garlic clove, minced
Quick Steps:
- Mix tomatoes, parsley, vinegar, and garlic for the relish.
- Brush swordfish with oil and season with salt and pepper.
- Grill over medium-high heat for 4 to 5 minutes per side.
- Pull when the center is just opaque and flakes easily.
- Spoon the relish over the top before serving.
Equipment for This Recipe:
- Grill
- Fish spatula
- Bowl for relish
How to Serve This Dish: Serve with grilled zucchini or couscous salad. The relish should be bright and chunky, not watery.
Pro Tips for This Recipe:
- Don’t overcook swordfish or it turns dry and fibrous.
- Make the relish ahead so the flavors mingle.
- Oil the fish, not the grill grates, if they’re already hot and clean.
Variations on This Dish:
- Capers Version: Add chopped capers to the relish.
- Olive Version: Mix in chopped olives.
- Herb Swap: Use basil instead of parsley.
Common Mistakes to Avoid with This Dish:
- Cooking past opaque: Swordfish gets chalky.
- Using watery relish: It slides right off the fish.
- Flipping too much: Let the grill do its work.
18. Halloumi and Zucchini Skewers
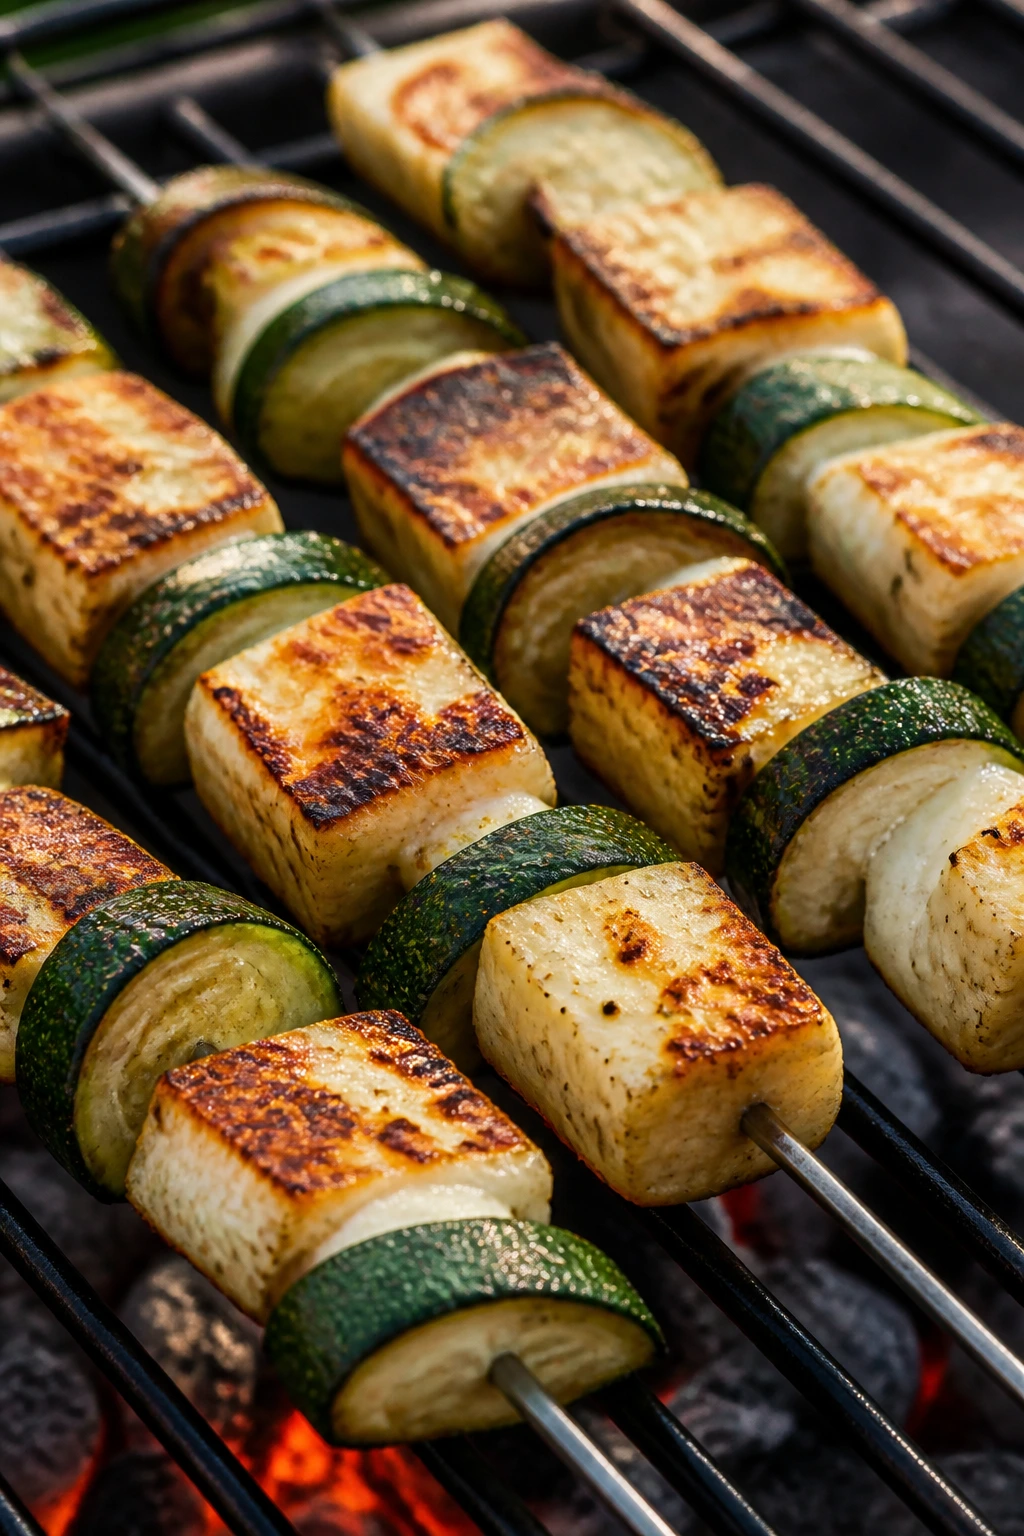
Halloumi is one of the few cheeses that likes the grill. It browns, it softens, and it keeps its shape instead of running away.
Why It Works: The cheese gets salty edges and a chewy center, while zucchini picks up char fast enough to keep pace. Together they make a vegetarian skewer that doesn’t feel like an apology.
Key Ingredients:
- 12 oz halloumi, cut into cubes
- 2 medium zucchini, cut into thick half-moons
- 2 tbsp olive oil
- 1 tbsp lemon juice
- 1 tsp dried oregano
- ½ tsp black pepper
- Cherry tomatoes, optional
- Wooden or metal skewers
Quick Steps:
- Toss zucchini with oil, lemon juice, oregano, and pepper.
- Thread halloumi and zucchini onto skewers, adding tomatoes if using.
- Grill over medium-high heat for 2 to 3 minutes per side.
- Turn carefully until the cheese is browned and the zucchini is tender.
- Serve right away.
Equipment for This Recipe:
- Skewers
- Grill
- Tongs
How to Serve This Dish: Slide the skewers onto a platter with hummus and flatbread. They work as a side or as the vegetarian center of the plate.
Pro Tips for This Recipe:
- Cut halloumi thick enough to avoid breakage.
- Dry the cheese lightly before grilling.
- Use medium-high heat; too hot and the outside goes bitter.
Variations on This Dish:
- Mint Version: Add chopped mint after grilling.
- Pepper Version: Include bell pepper chunks.
- Spicy Honey Version: Drizzle with chili honey at the end.
Common Mistakes to Avoid with This Dish:
- Too-thin cheese slices: They melt off the skewer.
- Overcooking zucchini: It turns limp and watery.
- Skipping the oil: The halloumi sticks fast.
19. Portobello Burger Caps
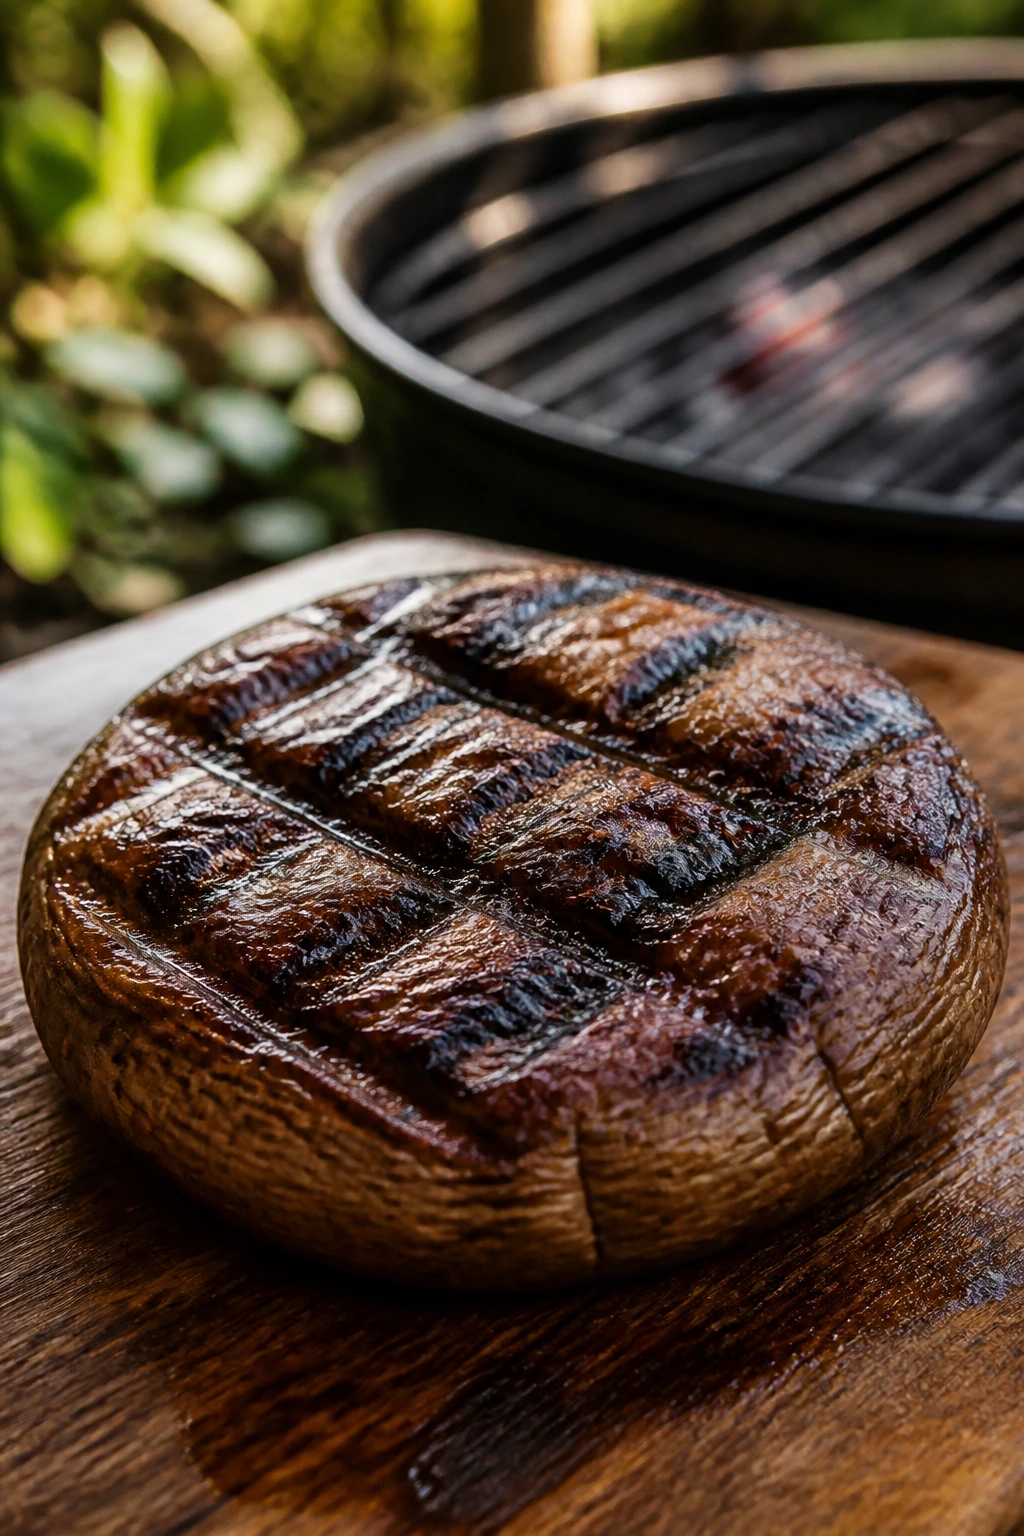
Portobellos are the rare mushroom that can pretend to be the main event. Grill them well and they turn meaty, smoky, and just a little juicy.
Why It Works: The caps hold marinade like little bowls, and their size makes them perfect for buns or lettuce wraps. They’re sturdy enough to stack with cheese and tomato without collapsing.
Key Ingredients:
- 4 large portobello caps
- 3 tbsp olive oil
- 1 tbsp balsamic vinegar
- 2 garlic cloves, minced
- 1 tsp kosher salt
- ½ tsp black pepper
- 4 burger buns
- Sliced cheese or avocado, optional
Quick Steps:
- Wipe the mushroom caps clean and trim the stems.
- Mix oil, vinegar, garlic, salt, and pepper.
- Brush over both sides and let sit for 10 to 15 minutes.
- Grill over medium-high heat for 4 to 5 minutes per side.
- Serve on buns with toppings.
Equipment for This Recipe:
- Grill
- Basting brush
- Tongs
How to Serve This Dish: Keep it simple with lettuce, tomato, and cheese. The mushroom does enough work on its own.
Pro Tips for This Recipe:
- Don’t soak mushrooms in water; wipe them clean.
- Remove the gills if you want a cleaner look and less moisture.
- A bun toasted on the grill keeps the sandwich from sliding apart.
Variations on This Dish:
- Blue Cheese Version: Add a little blue cheese after grilling.
- Pesto Version: Brush with pesto instead of balsamic.
- Lettuce Wrap Version: Skip the bun entirely.
Common Mistakes to Avoid with This Dish:
- Waterlogged mushrooms: They steam instead of grill.
- Too much marinade: The caps get slippery.
- Skipping the toast: Soft buns collapse under the cap.
20. BBQ Tofu Skewers

Tofu needs help from heat, seasoning, and a little patience. The grill gives it a crust that makes it worth bothering with.
Why It Works: Extra-firm tofu soaks up barbecue sauce without falling apart, and skewering it with vegetables gives you more surface area for browning. This is one of the rare tofu dishes that actually belongs at a picnic.
Key Ingredients:
- 2 blocks extra-firm tofu, pressed and cut into cubes
- ½ cup barbecue sauce
- 2 tbsp soy sauce
- 1 tbsp olive oil
- 1 bell pepper, cut into chunks
- 1 red onion, cut into chunks
- 1 tsp smoked paprika
- Skewers
Quick Steps:
- Press the tofu for 20 minutes, then cube it.
- Mix barbecue sauce, soy sauce, oil, and paprika.
- Toss tofu in the sauce and thread with peppers and onion.
- Grill over medium-high heat for 3 to 4 minutes per side.
- Baste near the end and serve once the edges caramelize.
Equipment for This Recipe:
- Tofu press or paper towels
- Skewers
- Grill
How to Serve This Dish: Serve with rice, slaw, or warm pita. It’s sturdy enough to sit on a platter without losing its shape.
Pro Tips for This Recipe:
- Press the tofu or it tastes wet and plain.
- Use extra-firm, not silken.
- Brush on sauce late so the sugars don’t scorch.
Variations on This Dish:
- Peanut Version: Add peanut sauce after grilling.
- Jerk Version: Use jerk seasoning instead of barbecue sauce.
- All-Veggie Version: Add mushrooms and zucchini.
Common Mistakes to Avoid with This Dish:
- Unpressed tofu: It won’t brown well.
- Too much handling: Cubes break apart.
- Sauce too early: The sugars burn before the tofu cooks.
21. Tempeh Sandwiches with Pickles
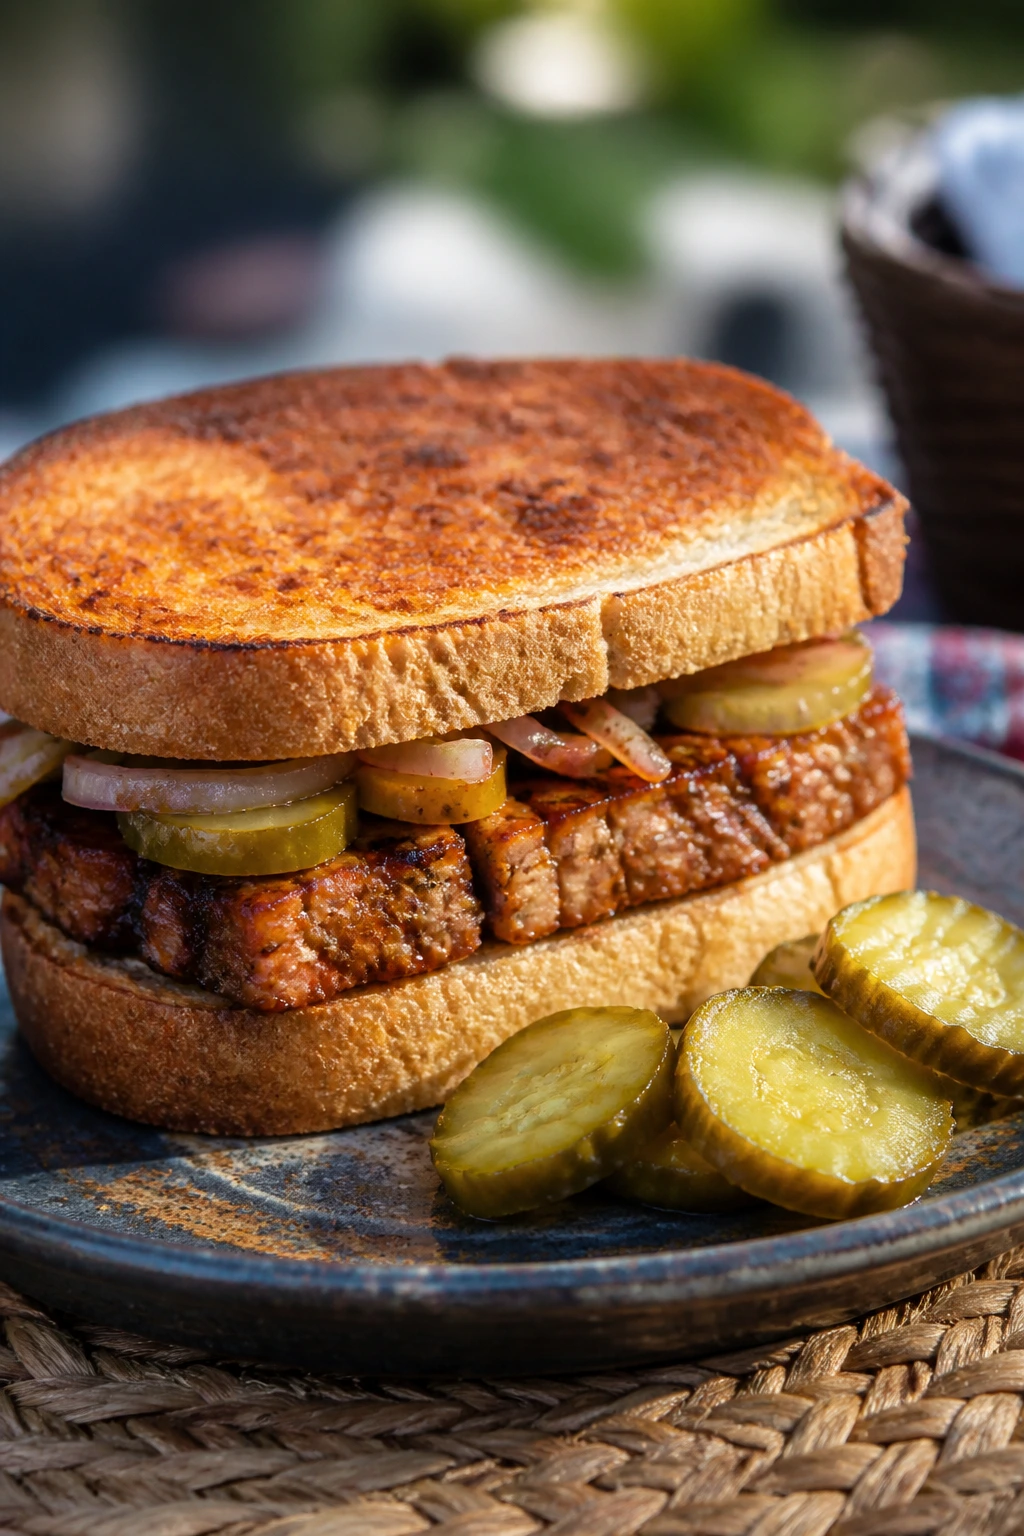
Tempeh has a nutty, chewy bite that holds up well on the grill, especially when you pair it with vinegar and pickles.
Why It Works: The fermented soy block takes on smoke well, and a quick marinade gives it a savory edge without needing meat to carry the sandwich. Pickles cut the richness and keep the bite bright.
Key Ingredients:
- 16 oz tempeh, sliced into ½-inch planks
- 2 tbsp soy sauce
- 1 tbsp olive oil
- 1 tbsp maple syrup
- 1 tsp smoked paprika
- 4 sandwich rolls
- Pickles and mustard
- Lettuce, optional
Quick Steps:
- Steam the tempeh for 10 minutes to soften its flavor.
- Mix soy sauce, oil, maple syrup, and paprika.
- Brush over the tempeh and grill over medium heat for 3 to 4 minutes per side.
- Warm the rolls briefly on the grates.
- Build sandwiches with mustard, pickles, and lettuce.
Equipment for This Recipe:
- Grill
- Small saucepan or steamer
- Tongs
How to Serve This Dish: Wrap the sandwiches in parchment so the pickles don’t slide out. They’re a good pick for a picnic where someone wants something sturdier than a salad.
Pro Tips for This Recipe:
- Steaming tempeh first takes the edge off.
- Don’t slice it too thin or it crumbles.
- A hot grill gives you the best surface color.
Variations on This Dish:
- BBQ Tempeh: Use barbecue sauce instead of the maple mixture.
- Spicy Mustard Version: Add hot mustard on the sandwich.
- Open-Face Version: Serve on toast with slaw.
Common Mistakes to Avoid with This Dish:
- Skipping the steam: Tempeh can taste bitter.
- Weak seasoning: Tempeh needs salt and smoke.
- Dry rolls: Toast or the sandwich feels flat.
22. Veggie Quesadillas on the Grill
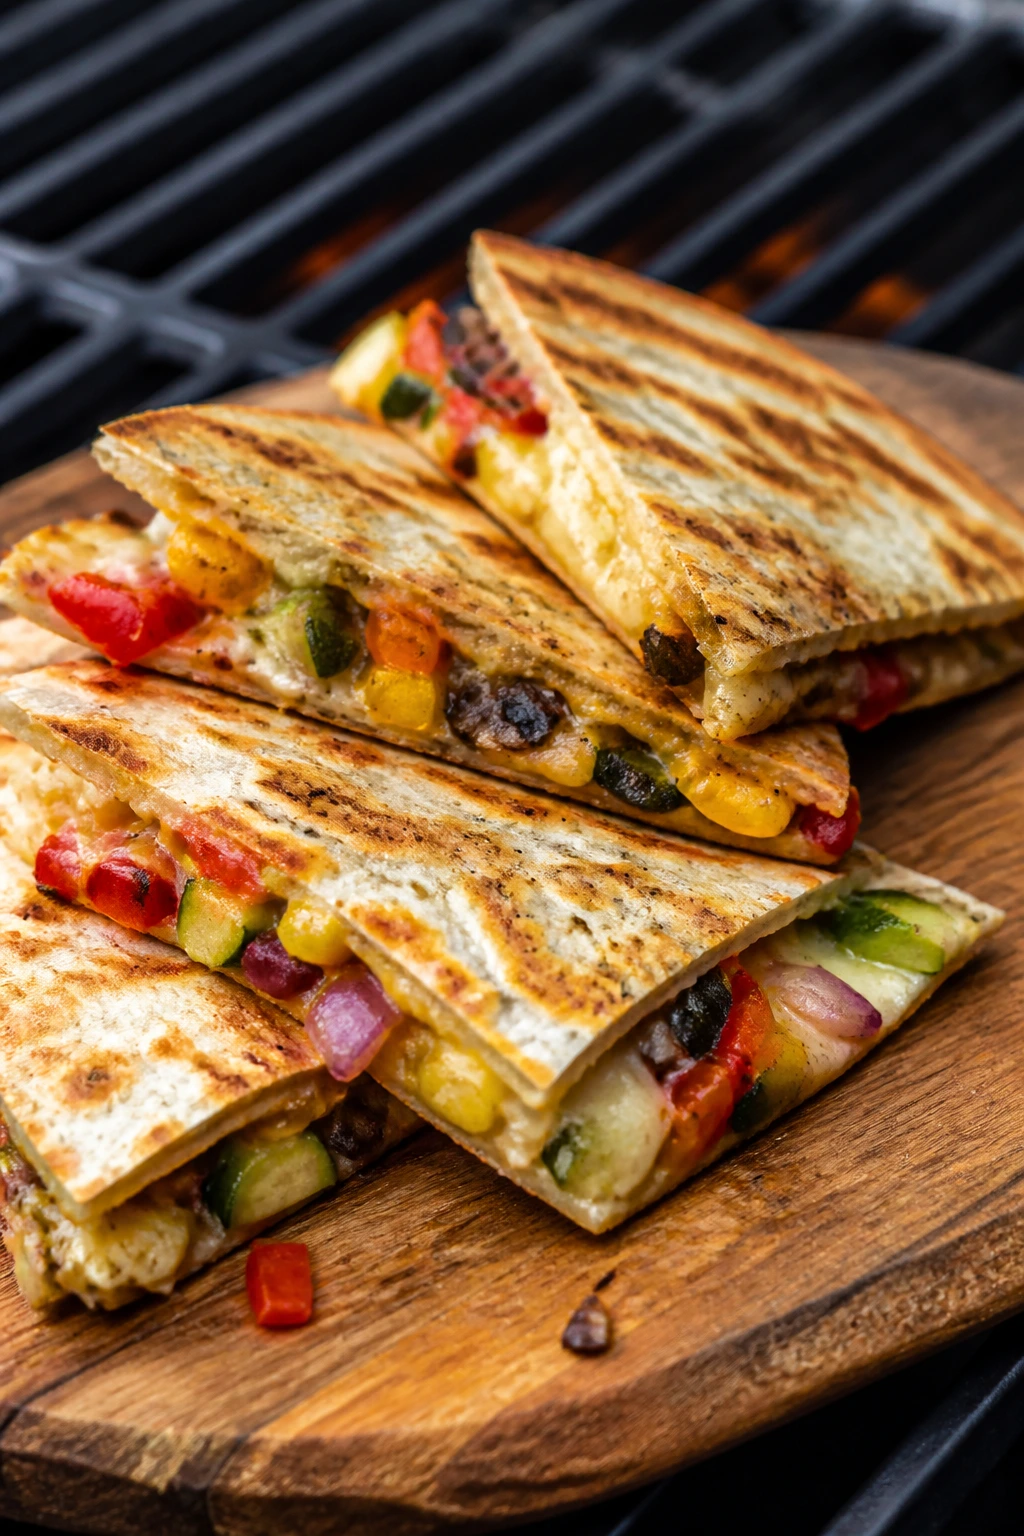
Grilled quesadillas are less about finesse and more about good timing. Melted cheese, blistered peppers, and a crisp tortilla make a very workable picnic lunch.
Why It Works: The grill gives the tortilla a toasty shell while the filling stays hot and stretchy. Because the ingredients are already cooked or quick-cooking, you can make a whole batch without a lot of fuss.
Key Ingredients:
- 8 flour tortillas
- 2 cups shredded Monterey Jack
- 1 red bell pepper, sliced
- 1 zucchini, thinly sliced
- 1 cup sautéed or grilled onions
- 2 tbsp olive oil
- 1 tsp cumin
- Salsa for serving
Quick Steps:
- Grill the vegetables with oil and cumin until tender and lightly charred.
- Lay tortillas open and fill half with cheese and vegetables.
- Fold and brush the outside lightly with oil.
- Grill over medium heat for 2 to 3 minutes per side until crisp and melted.
- Cut into wedges.
Equipment for This Recipe:
- Grill
- Spatula
- Grill basket or foil, if you want easier veg handling
How to Serve This Dish: Stack the wedges in a napkin-lined basket with salsa. They’re best eaten warm, but they still hold up once they cool.
Pro Tips for This Recipe:
- Use enough cheese to glue the tortilla shut.
- Don’t overfill or the filling leaks out.
- Cook over medium heat so the tortilla crisps before it burns.
Variations on This Dish:
- Black Bean Version: Add drained black beans.
- Corn Version: Mix in grilled corn kernels.
- Chili Version: Add sliced jalapeños.
Common Mistakes to Avoid with This Dish:
- High heat: The tortilla burns before the cheese melts.
- Wet vegetables: They make the quesadilla soggy.
- Cutting too soon: The filling runs everywhere.
23. Grilled Stuffed Peppers
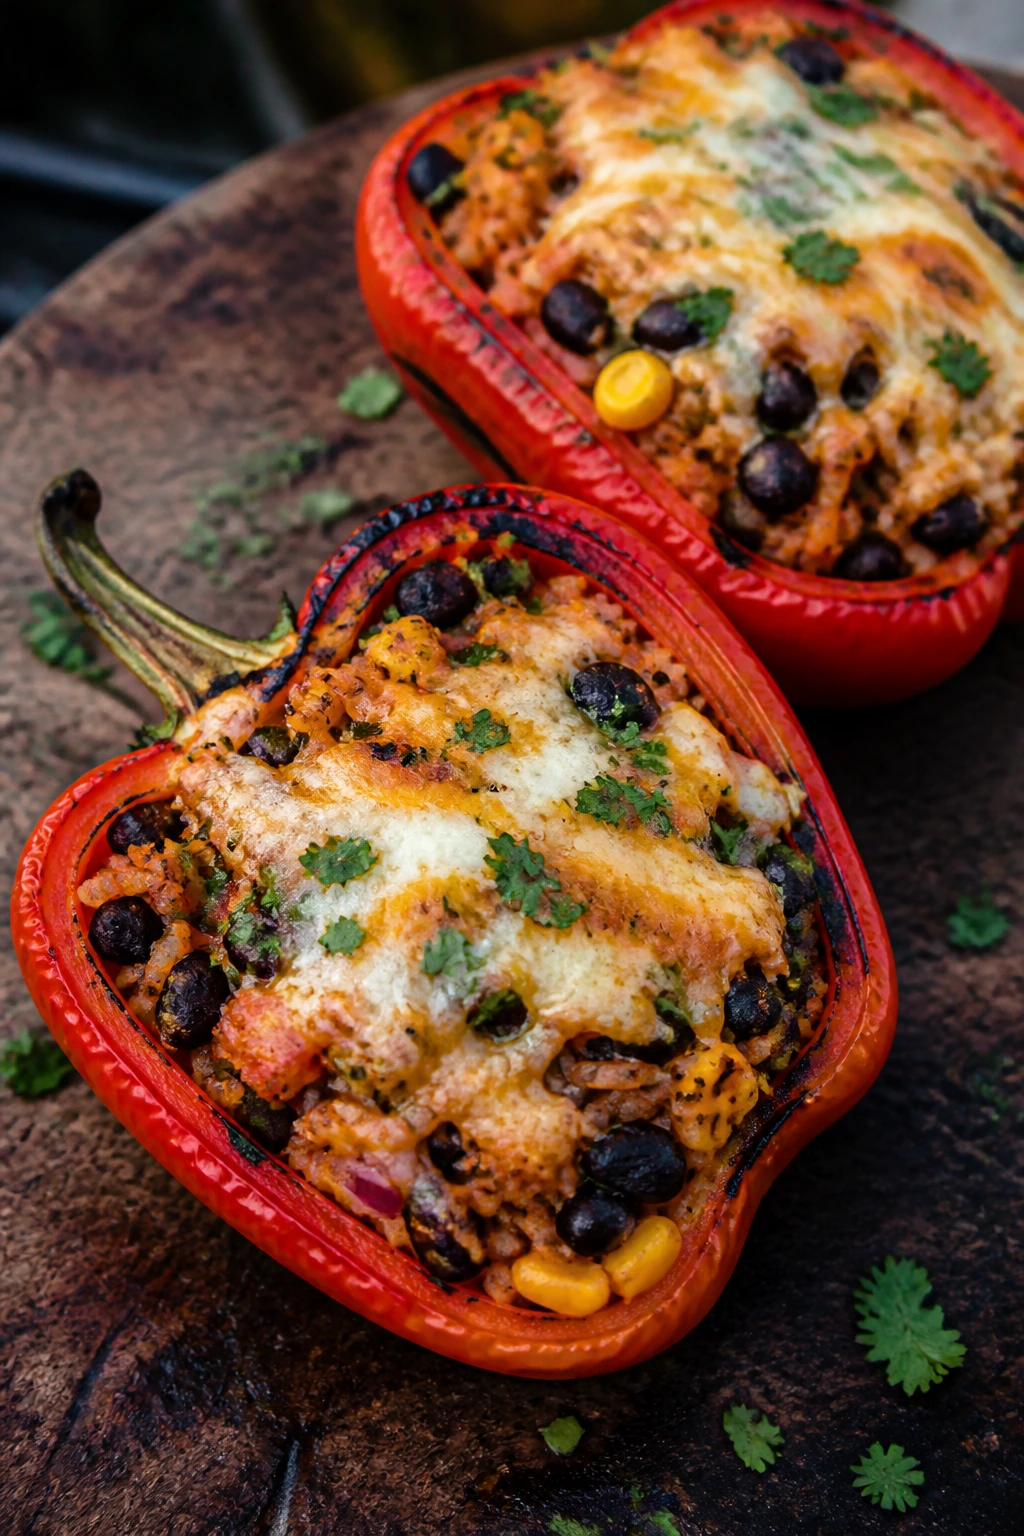
Stuffed peppers are easier on the grill than in the oven because the smoky skin does half the flavor work for you.
Why It Works: Bell peppers soften on the outside while the filling warms through inside, and the grill adds a little blister that the oven never quite matches. They’re tidy, which is a nice quality at a picnic.
Key Ingredients:
- 4 large bell peppers, halved and seeded
- 1½ cups cooked rice
- 1 cup black beans, drained
- 1 cup shredded cheese
- ½ cup salsa
- 1 tsp cumin
- 1 tbsp olive oil
- Salt and pepper
Quick Steps:
- Mix rice, beans, cheese, salsa, cumin, salt, and pepper.
- Fill the pepper halves and brush the outside with oil.
- Grill over medium heat, cut-side up first, for 15 to 20 minutes.
- Close the lid so the filling warms through.
- Serve once the peppers are tender and the tops are melted.
Equipment for This Recipe:
- Grill
- Foil pan or grill-safe tray
- Spoon for filling
How to Serve This Dish: Serve two halves per plate with a green salad. They carry well in a lidded container, which makes them a smart picnic main.
Pro Tips for This Recipe:
- Slightly precook the filling so the peppers don’t overcook waiting on the rice.
- Use a tray if the pepper halves wobble.
- A little extra salsa on top after grilling wakes them up.
Variations on This Dish:
- Southwest Version: Add corn and jalapeños.
- Turkey Version: Stir in cooked ground turkey.
- Vegetarian Version: Add extra beans and chopped spinach.
Common Mistakes to Avoid with This Dish:
- Raw filling: The pepper gets soft before the filling is hot.
- Overstuffing: The filling spills out.
- Too much direct flame: The skin blisters before the inside is ready.
24. Grilled Romaine Caesar
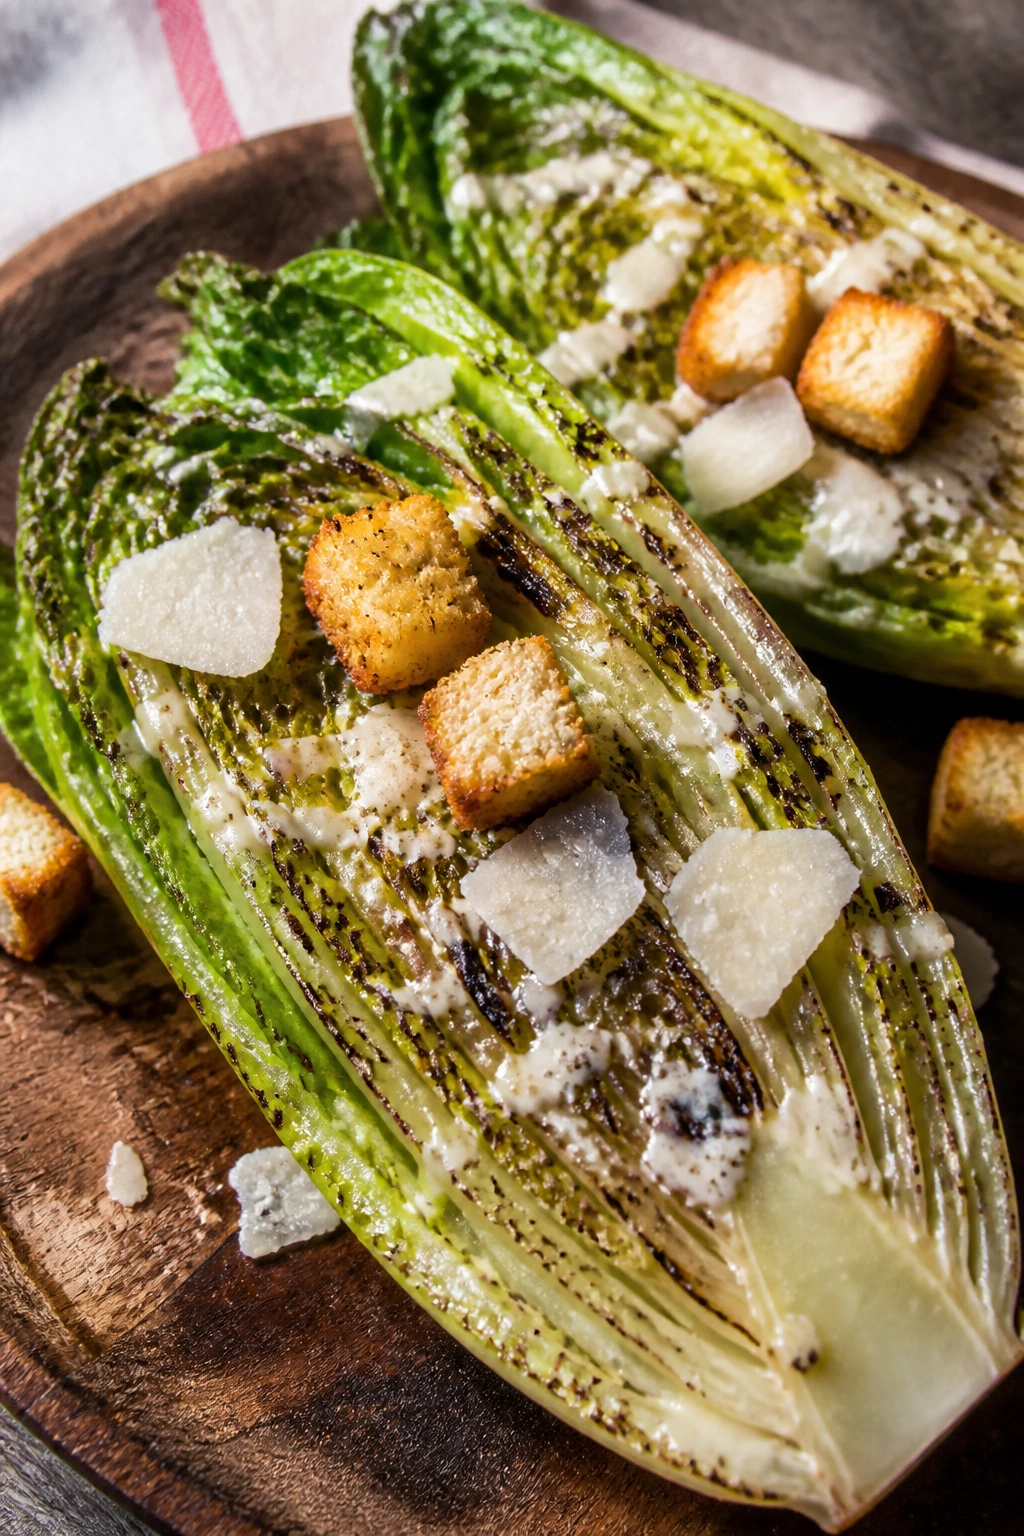
Grilled romaine sounds like a trick until you taste it. The edges char, the center stays crisp, and the Caesar dressing catches in all the little ridges.
Why It Works: A brief kiss of heat gives romaine a smoky edge without turning it limp. The contrast between crisp lettuce, salty cheese, and crunchy croutons is better than it has any right to be.
Key Ingredients:
- 3 romaine hearts, halved lengthwise
- 2 tbsp olive oil
- ½ tsp kosher salt
- ½ cup Caesar dressing
- ½ cup shaved Parmesan
- 1 cup croutons
- Black pepper
Quick Steps:
- Brush romaine halves with oil and a little salt.
- Grill cut-side down for 1 to 2 minutes, just until charred.
- Flip briefly, then move to a platter.
- Drizzle with dressing and scatter Parmesan, croutons, and pepper.
- Serve right away.
Equipment for This Recipe:
- Grill
- Tongs
- Serving platter
How to Serve This Dish: Serve the romaine as a side to steak, chicken, or burgers. It’s cleaner if you dress it right before the picnic table, not earlier.
Pro Tips for This Recipe:
- Keep the heat high and the time short.
- Use whole romaine hearts, not chopped leaves.
- Dress lightly so the lettuce stays crisp.
Variations on This Dish:
- Lemon Caesar: Add extra lemon to the dressing.
- Anchovy-Forward Version: Use a stronger dressing if you like bite.
- Bacon Version: Add crisp bacon bits on top.
Common Mistakes to Avoid with This Dish:
- Over-grilling: The lettuce collapses.
- Dressing too early: It wilts fast.
- Using chopped romaine: The pieces dry out before serving.
25. Grilled Corn with Chili Butter

This is the kind of picnic side people eat before the rest of the food lands. Corn on the grill always feels slightly festive, even when it’s just butter and salt.
Why It Works: The kernels blister and sweeten over direct heat, and chili butter clings to the warm surface. You get smoke, sweetness, and salt in each bite without a lot of work.
Key Ingredients:
- 6 ears corn, husked
- 4 tbsp butter, softened
- 1 tsp chili powder
- ½ tsp kosher salt
- 1 lime, cut into wedges
- 2 tbsp chopped cilantro, optional
- Cotija, optional
Quick Steps:
- Mix butter, chili powder, and salt.
- Grill corn over medium-high heat, turning often, for 10 to 12 minutes.
- Wait until kernels are browned in spots and lightly tender.
- Slather on the chili butter.
- Finish with lime juice and cilantro or cotija.
Equipment for This Recipe:
- Grill
- Tongs
- Small bowl for butter
How to Serve This Dish: Serve the ears whole or cut into halves for easier picnic eating. Keep extra napkins close; corn gets messy.
Pro Tips for This Recipe:
- If you keep the husks on, soak the corn first.
- Rotate often so the kernels char evenly.
- Salt right after grilling helps the butter stick.
Variations on This Dish:
- Elote Version: Add mayo and cotija.
- Garlic Butter Version: Add minced garlic.
- Smoked Version: Use smoked paprika instead of chili powder.
Common Mistakes to Avoid with This Dish:
- Too low heat: You miss the char.
- Burning the butter: Add it after the corn comes off.
- Undercooking the ears: Hard kernels are a picnic buzzkill.
26. Corn Ribs with Lime and Cotija
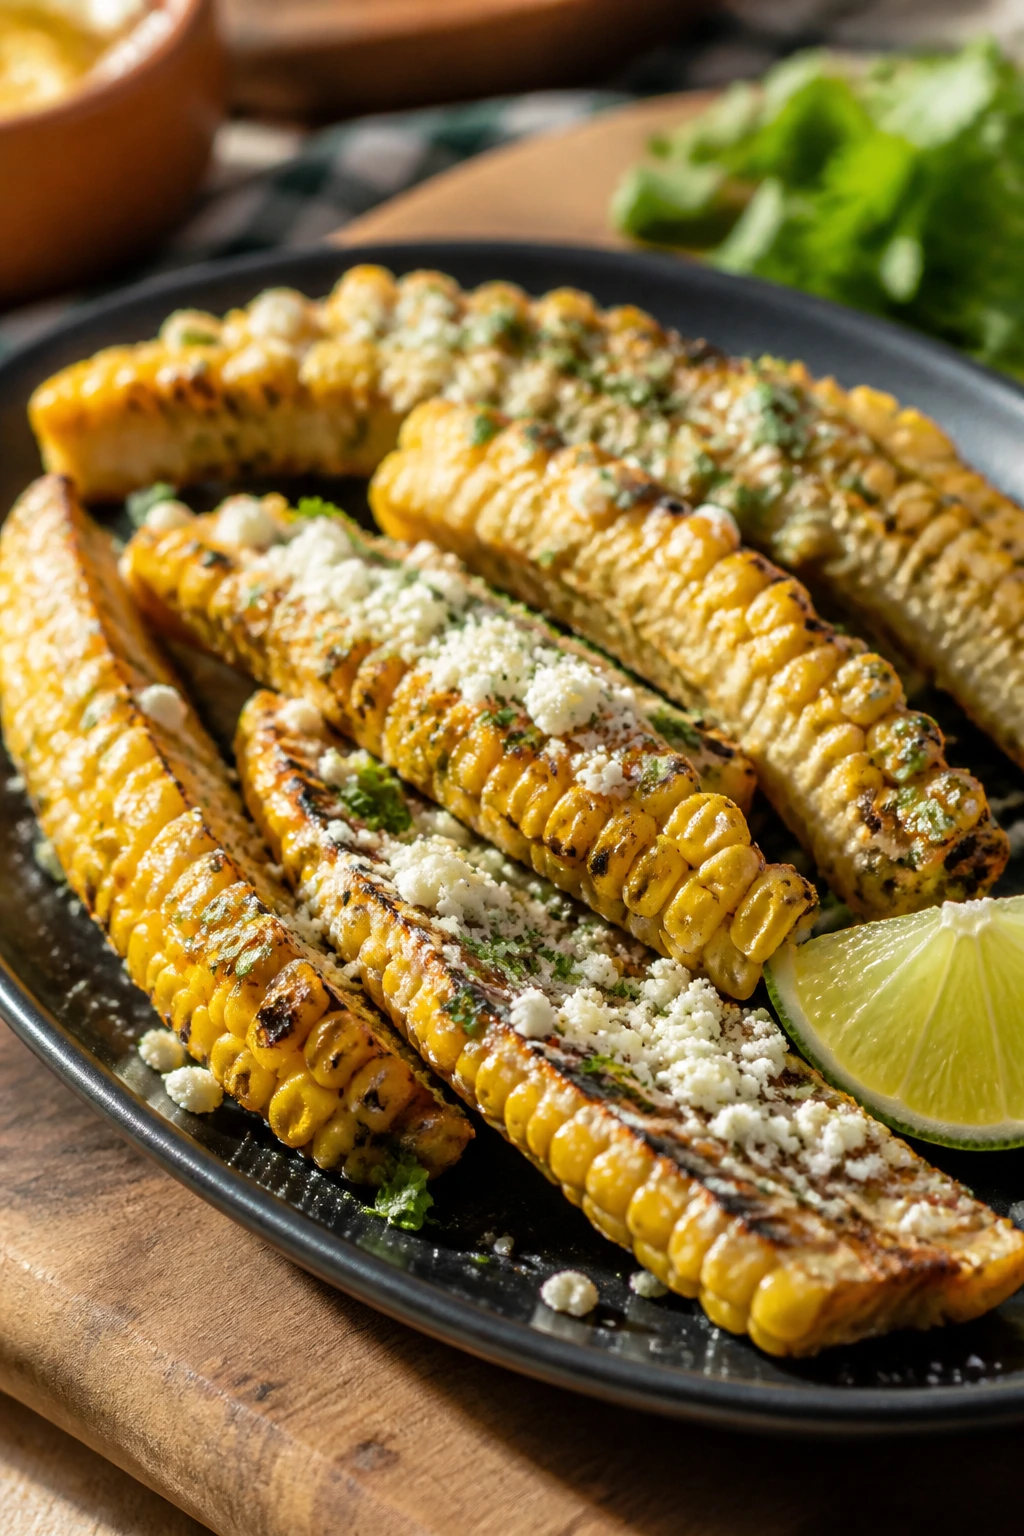
Corn ribs are mostly about the shape. Split the ears and they curl on the grill like little edible handles.
Why It Works: Cutting corn into ribs creates more edges for browning and seasoning, which means each piece tastes more intense than a whole cob. Lime and cotija keep the whole thing sharp and salty.
Key Ingredients:
- 4 ears corn
- 2 tbsp olive oil
- 1 tsp chili powder
- ½ tsp salt
- 1 lime, juiced
- ¼ cup cotija
- 1 tbsp chopped cilantro
Quick Steps:
- Carefully cut the corn into ribs with a sharp knife.
- Toss with oil, chili powder, and salt.
- Grill over medium-high heat for 8 to 10 minutes, turning until curled and browned.
- Finish with lime juice.
- Scatter cotija and cilantro on top.
Equipment for This Recipe:
- Sharp chef’s knife
- Grill
- Tongs
How to Serve This Dish: Serve the ribs on a tray with extra lime wedges. They’re fun to eat with your hands, which is half the point.
Pro Tips for This Recipe:
- Stabilize the corn before cutting; it’s awkward and needs respect.
- A hot grill helps the ribs curl.
- Season after grilling too, not only before.
Variations on This Dish:
- Garlic-Lime Version: Add garlic powder.
- Spicy Mayo Version: Drizzle with chili mayo.
- Cheese-Free Version: Skip cotija and finish with herbs.
Common Mistakes to Avoid with This Dish:
- Rushing the cut: Corn ribs require a careful knife.
- Too much oil: They can get greasy.
- Not enough heat: The curl won’t happen.
27. Grilled Asparagus with Lemon
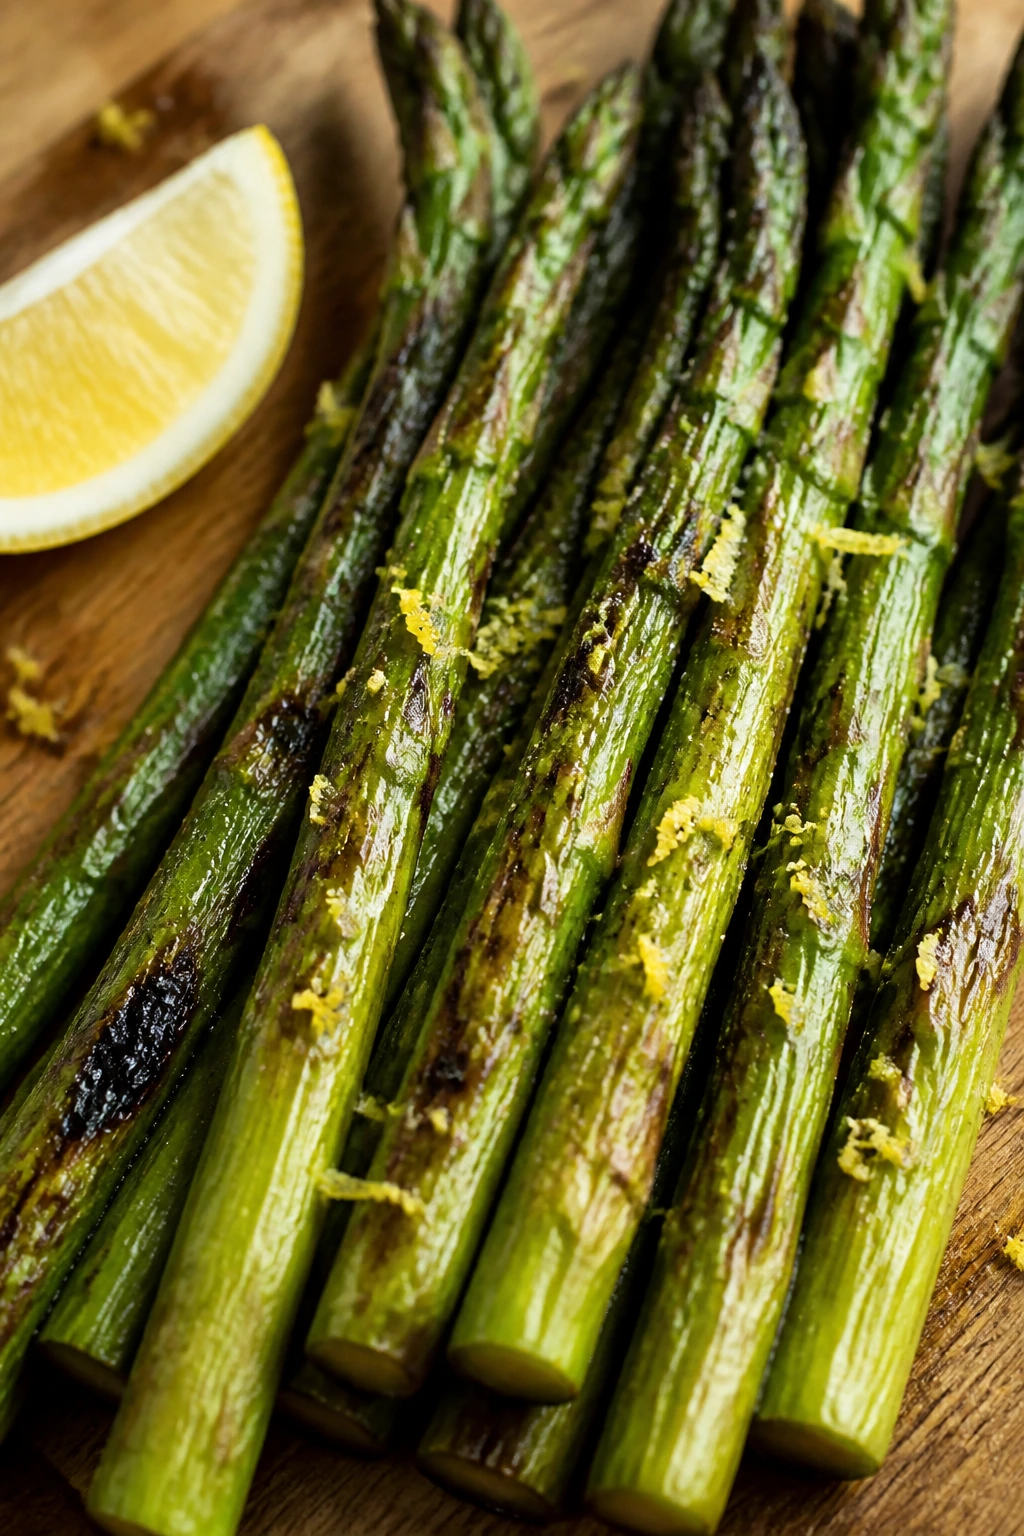
Asparagus is one of the easiest vegetables to improve with a grill. A minute too long and it goes limp; a minute too short and it feels raw. The middle is the sweet spot.
Why It Works: The spears get fast char on the outside while staying snappy in the center. Lemon at the end gives enough brightness that you don’t need a sauce.
Key Ingredients:
- 2 lb asparagus, trimmed
- 2 tbsp olive oil
- 1 tsp kosher salt
- ½ tsp black pepper
- 1 lemon, zested and juiced
- 2 tbsp shaved Parmesan, optional
Quick Steps:
- Toss asparagus with oil, salt, pepper, and lemon zest.
- Grill over medium-high heat for 3 to 5 minutes, turning once or twice.
- Pull when the spears are tender but still firm.
- Finish with lemon juice.
- Add Parmesan if you want extra salt.
Equipment for This Recipe:
- Grill
- Tongs
- Shallow tray or grill basket
How to Serve This Dish: Lay the spears across a platter instead of stacking them. They make a bright side for steak, chicken, or salmon.
Pro Tips for This Recipe:
- Choose medium-thick spears so they don’t overcook instantly.
- Oil lightly; too much makes them slippery.
- Finish with lemon after grilling, not before.
Variations on This Dish:
- Garlic Version: Add garlic powder to the oil.
- Bacon Version: Wrap small bundles in bacon.
- Herb Version: Add chopped basil or parsley.
Common Mistakes to Avoid with This Dish:
- Thin spears on high heat: They burn fast.
- Overcooking: Asparagus should still have snap.
- Too much lemon before grilling: It weakens the char.
28. Charred Broccoli with Parmesan
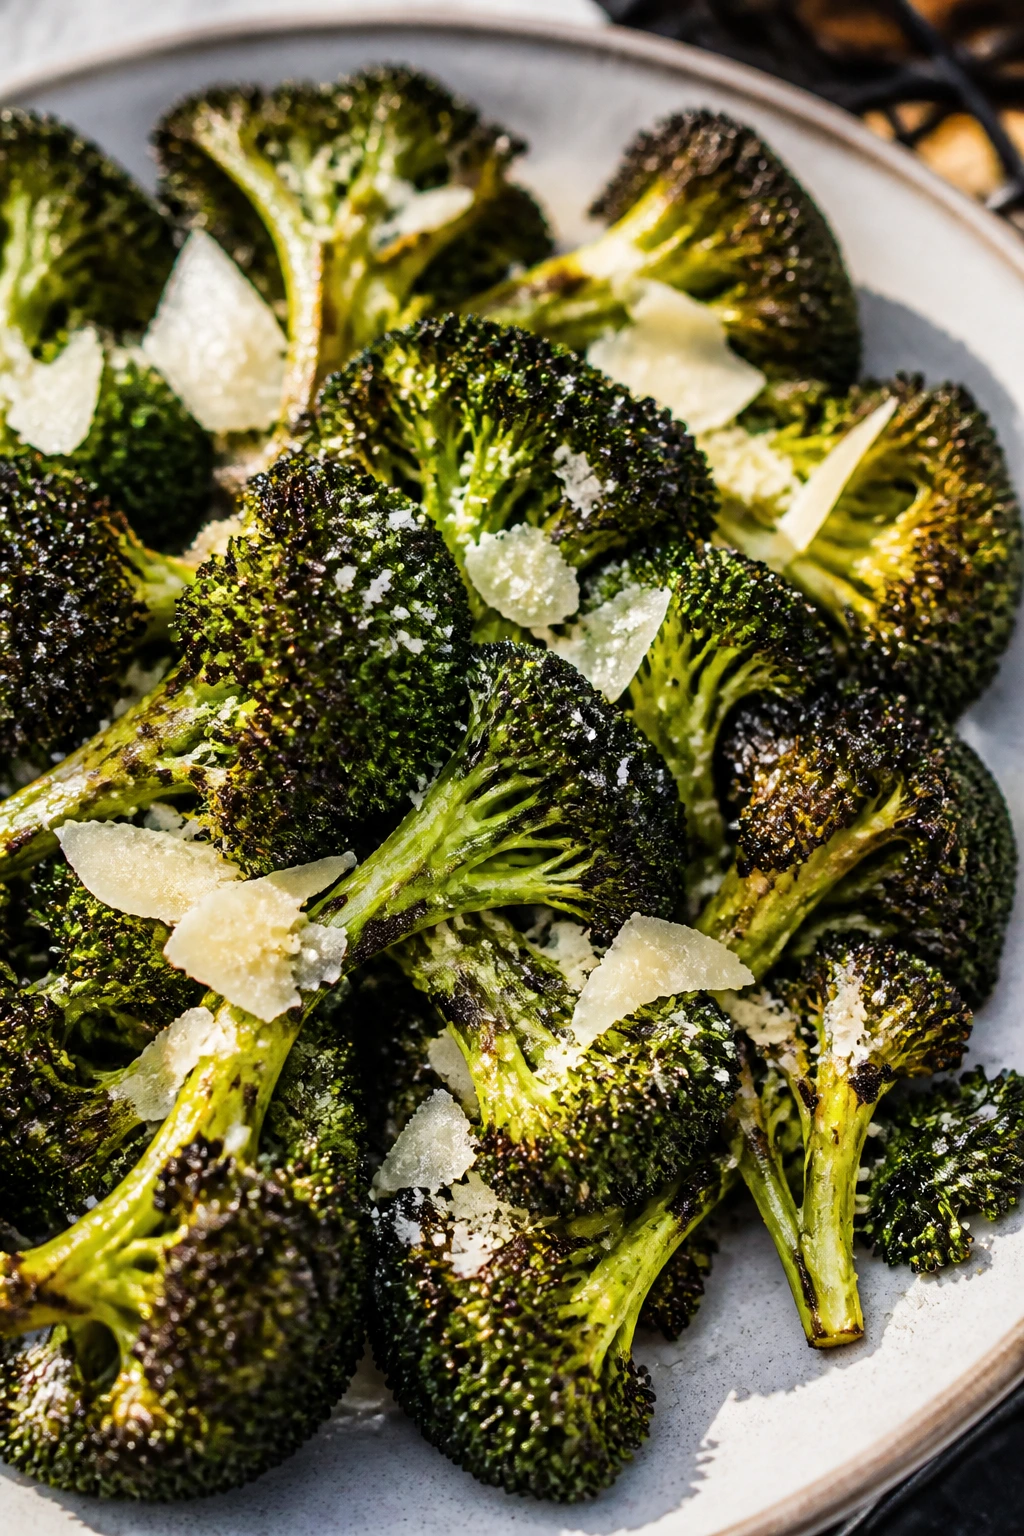
Broccoli gets sharper and more interesting when the edges char. The stems stay tender, and the florets pick up crispy bits that disappear fast.
Why It Works: High heat dries the surface just enough for browning, which gives broccoli more depth than steaming or roasting alone. Parmesan at the end adds salt and a little nutty finish.
Key Ingredients:
- 2 large heads broccoli, cut into florets
- 3 tbsp olive oil
- 1 tsp kosher salt
- ½ tsp black pepper
- 1 garlic clove, minced
- ¼ cup grated Parmesan
- Lemon wedges
Quick Steps:
- Toss broccoli with oil, salt, pepper, and garlic.
- Grill in a basket or on a grill pan over medium-high heat for 6 to 8 minutes.
- Turn until the edges darken and the stems soften.
- Move to a platter.
- Top with Parmesan and a squeeze of lemon.
Equipment for This Recipe:
- Grill basket or grill pan
- Tongs
- Serving bowl
How to Serve This Dish: Serve it warm, not piping hot. It works beside burgers and sausages when you want something greener than potato salad.
Pro Tips for This Recipe:
- Cut florets large enough to stay on the grill.
- A basket keeps the tiny bits from falling through.
- Lemon at the end makes the char taste cleaner.
Variations on This Dish:
- Chili Version: Add red pepper flakes.
- Cheesy Version: Use Pecorino instead of Parmesan.
- Sesame Version: Finish with sesame oil and seeds.
Common Mistakes to Avoid with This Dish:
- Tiny florets: They burn before they soften.
- Crowding the basket: You lose char.
- Skipping salt: Broccoli tastes flat without it.
29. Grilled Potatoes in Herb Foil
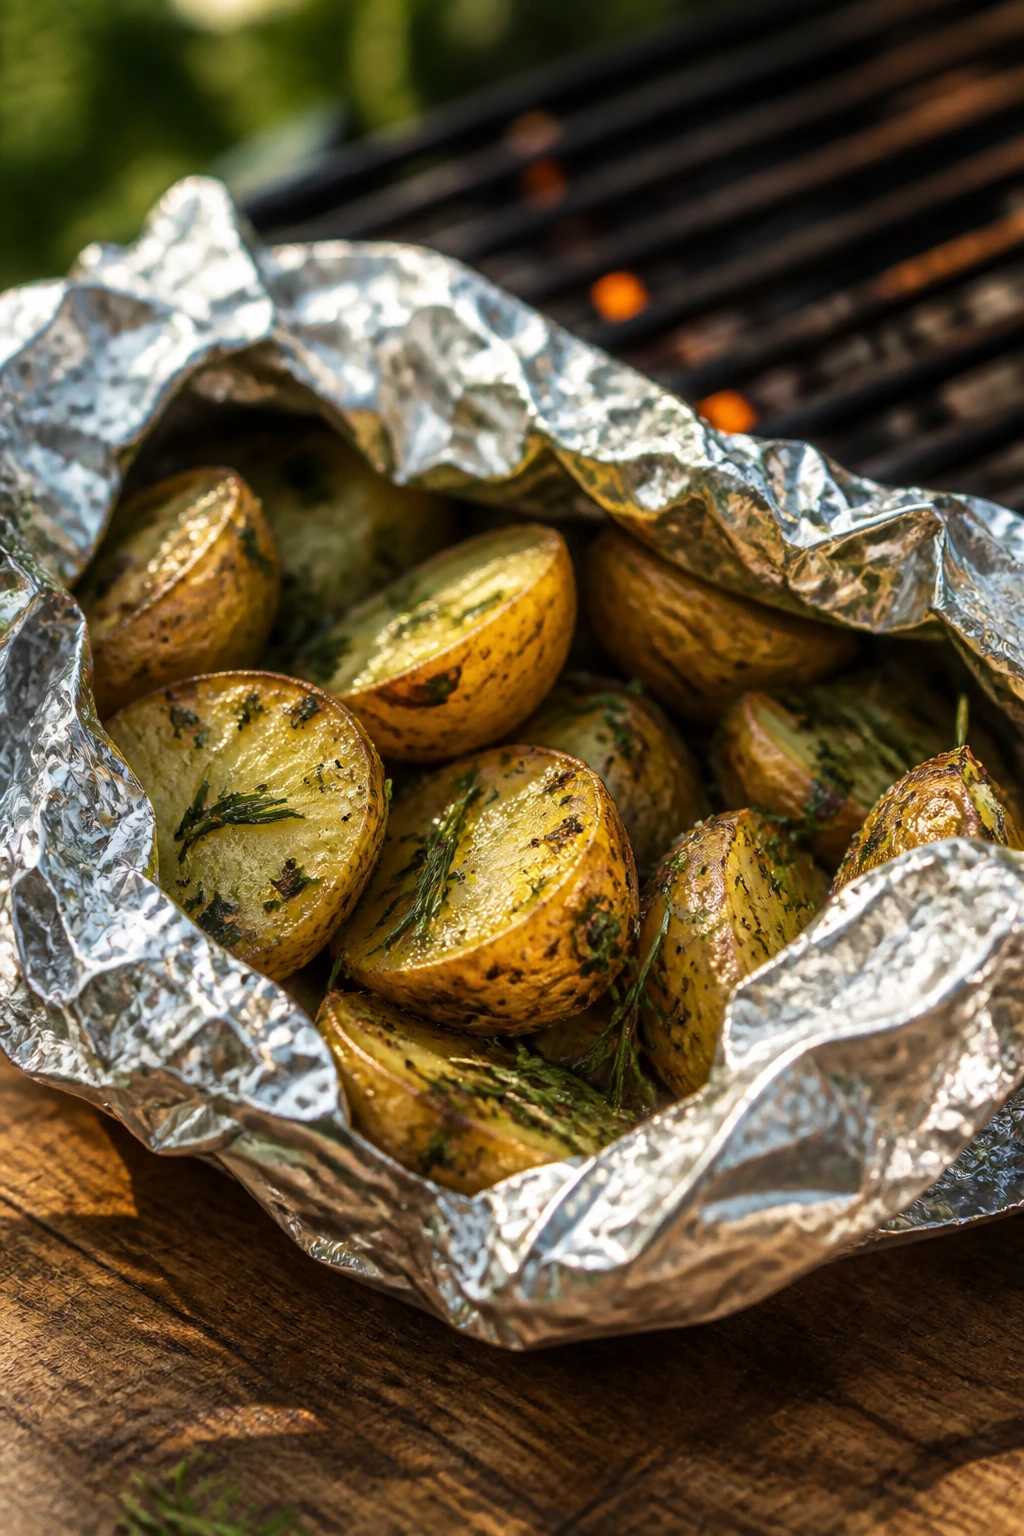
Potatoes in foil are picnic food because they stay hot, travel well, and don’t ask for much. The grill gives them a smoky edge that the oven can’t fake.
Why It Works: Foil traps steam so the potatoes cook through, while a little time over the grates gives you browned edges and herb flavor. It’s a side that tolerates delay better than most.
Key Ingredients:
- 2 lb baby potatoes, halved
- 2 tbsp olive oil
- 1 tsp kosher salt
- ½ tsp black pepper
- 2 garlic cloves, minced
- 1 tbsp chopped rosemary
- 1 tbsp chopped parsley
- Heavy-duty foil
Quick Steps:
- Toss potatoes with oil, salt, pepper, garlic, and herbs.
- Seal into a double layer of foil.
- Grill over medium heat for 25 to 30 minutes, turning once.
- Open the packet carefully and let a little steam escape.
- Serve as is or brown briefly uncovered.
Equipment for This Recipe:
- Heavy-duty foil
- Grill
- Tongs
How to Serve This Dish: Dump them into a bowl or serve straight from the packet. A spoonful of sour cream or mustard works well on the side.
Pro Tips for This Recipe:
- Cut potatoes evenly so they finish together.
- Use heavy-duty foil or the packet can tear.
- If you want more browning, open the packet for the last few minutes.
Variations on This Dish:
- Mustard Herb Version: Add a spoonful of Dijon.
- Onion Version: Add sliced onion to the packet.
- Butter Version: Swap oil for melted butter.
Common Mistakes to Avoid with This Dish:
- Tiny foil packets with no space: The potatoes steam unevenly.
- Not sealing well: You lose the steam that cooks them.
- Skipping the salt: Potatoes need it or they taste hollow.
30. Sweet Potatoes with Lime Yogurt
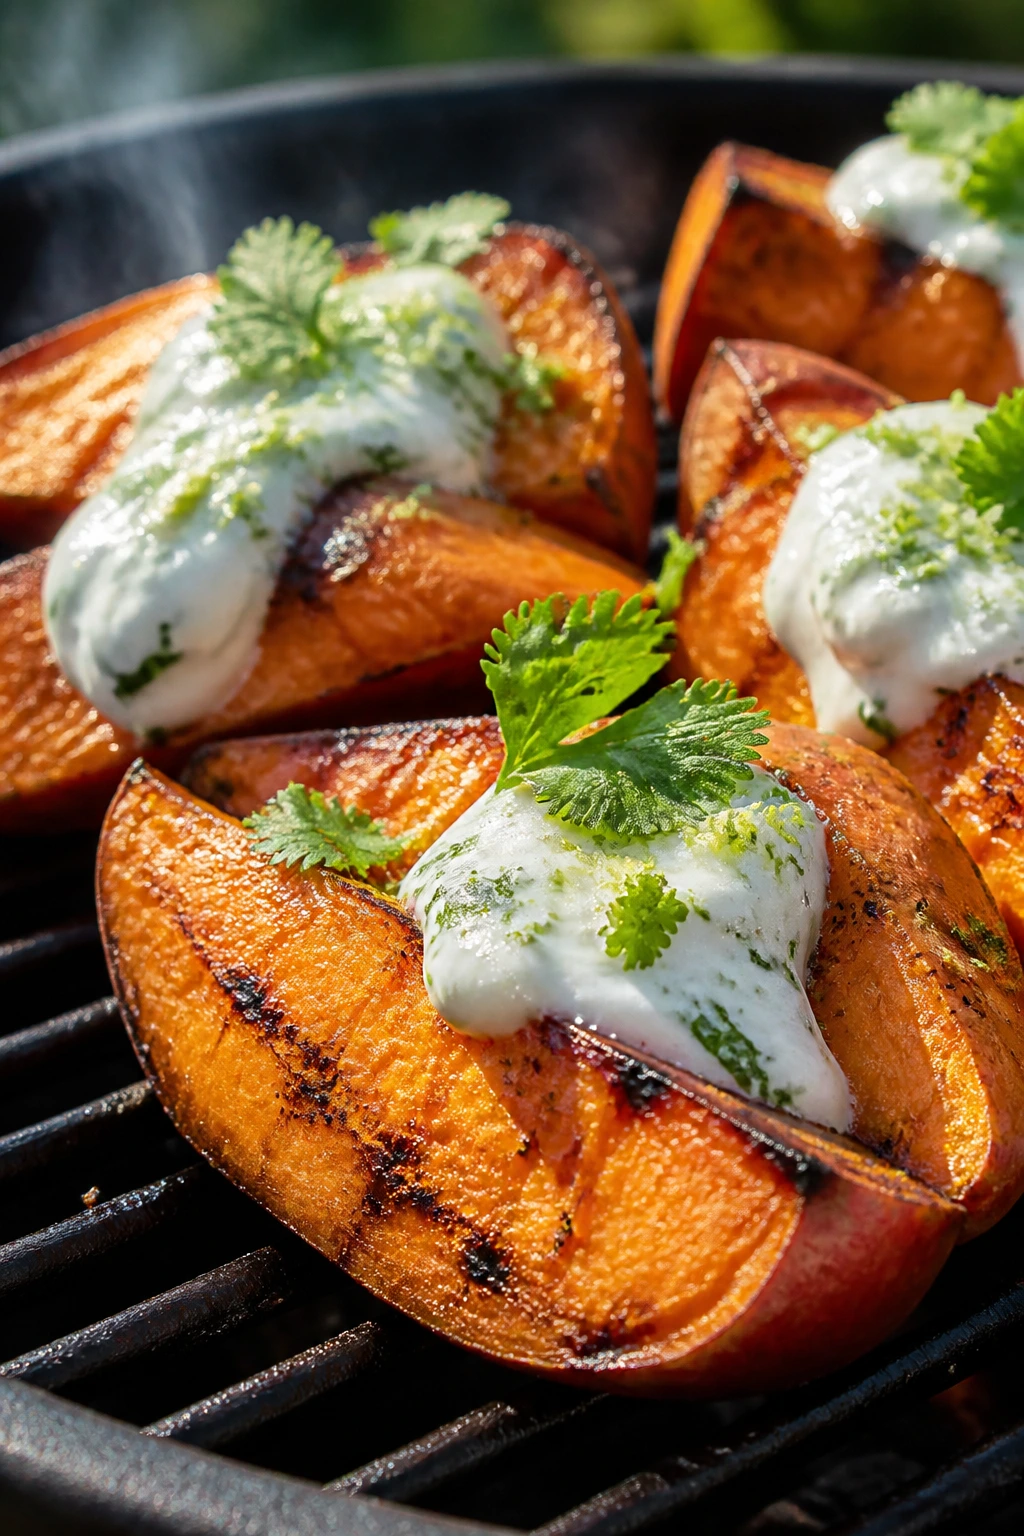
Sweet potatoes on the grill get smoky edges and a creamy center. With lime yogurt, they move from side dish to something people remember.
Why It Works: Slices or wedges hold their shape on the grill, and the natural sweetness plays nicely with smoke. The yogurt cools the char and keeps the dish from feeling heavy.
Key Ingredients:
- 2 large sweet potatoes, cut into wedges
- 2 tbsp olive oil
- 1 tsp kosher salt
- ½ tsp cumin
- ½ cup plain yogurt
- 1 lime, juiced
- 1 tbsp chopped cilantro
Quick Steps:
- Toss sweet potato wedges with oil, salt, and cumin.
- Grill over medium heat, covered if needed, for 15 to 20 minutes.
- Turn until the wedges are tender and browned at the edges.
- Stir yogurt with lime juice.
- Serve the potatoes with yogurt and cilantro on top.
Equipment for This Recipe:
- Grill
- Tongs
- Small bowl
How to Serve This Dish: Serve warm with the yogurt spooned over at the last minute. It’s a strong side for chicken, pork, or tofu.
Pro Tips for This Recipe:
- Par-cook the wedges in the microwave if you want them faster.
- Cut them thick enough to handle flipping.
- Add the yogurt after grilling so it stays cool and creamy.
Variations on This Dish:
- Chili Version: Add chili powder to the seasoning.
- Tahini Version: Swap yogurt for tahini sauce.
- Honey Version: Drizzle with a little honey at the end.
Common Mistakes to Avoid with This Dish:
- Too-thick wedges: They take forever.
- High heat from the start: The outside burns before the middle softens.
- Sauce too early: Yogurt gets watery.
31. Tomato-Mozzarella Flatbread
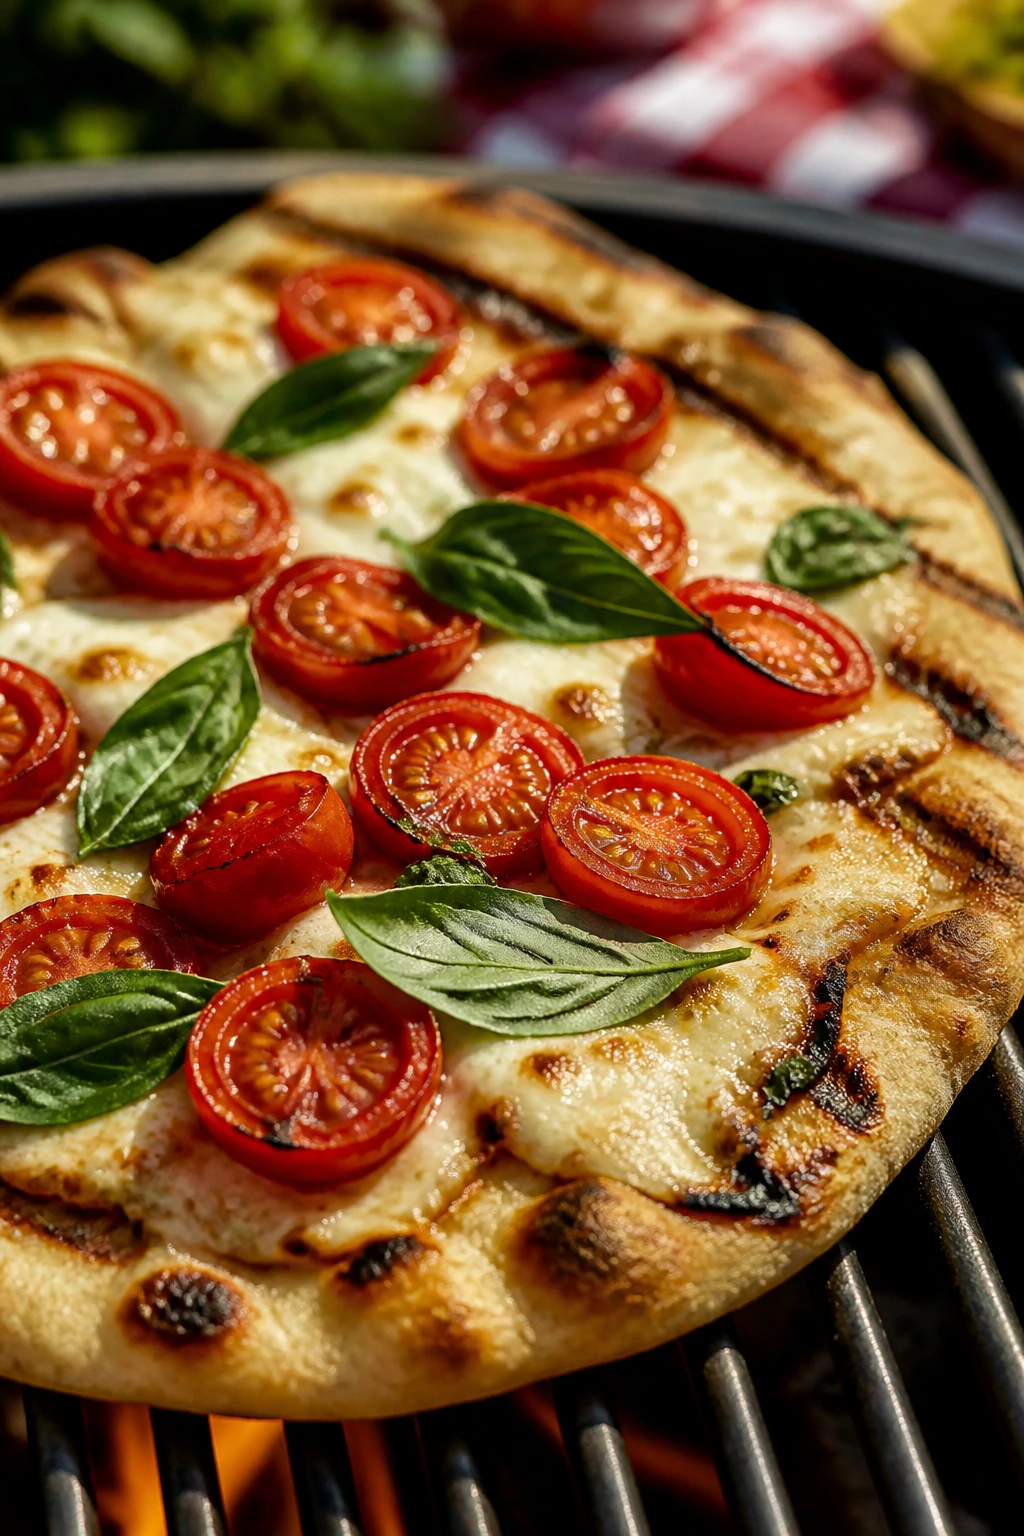
Flatbread belongs on a grill. It picks up char fast, and the toppings can be kept simple enough to eat on a lap.
Why It Works: The dough crisps on the underside while the cheese melts and the tomatoes soften just enough. This is one of the easiest ways to make grilled food feel like a proper picnic course.
Key Ingredients:
- 2 balls pizza dough, about 1 lb total
- 2 tbsp olive oil
- 1 cup shredded mozzarella
- 1 cup cherry tomatoes, halved
- 1 tbsp balsamic glaze
- ¼ cup basil leaves
- Salt and pepper
Quick Steps:
- Stretch the dough into two thin ovals.
- Brush with oil and grill one side until it sets.
- Flip, add mozzarella and tomatoes, then close the lid.
- Grill until the cheese melts and the crust has char spots.
- Finish with basil, balsamic, salt, and pepper.
Equipment for This Recipe:
- Grill
- Pizza peel or baking sheet
- Spatula
How to Serve This Dish: Cut into long strips for easier picnic sharing. It tastes best when the crust still has a little crunch.
Pro Tips for This Recipe:
- Keep the dough thin or it stays gummy.
- Oil the side that touches the grates.
- Add basil after grilling so it stays green.
Variations on This Dish:
- Prosciutto Version: Add thin slices after grilling.
- Pesto Version: Spread pesto instead of oil.
- Ricotta Version: Dot with ricotta before serving.
Common Mistakes to Avoid with This Dish:
- Too much topping: The flatbread sinks.
- Thick dough: The center stays raw.
- No preheat: The crust won’t set fast enough.
32. Margherita Pizza on the Grill
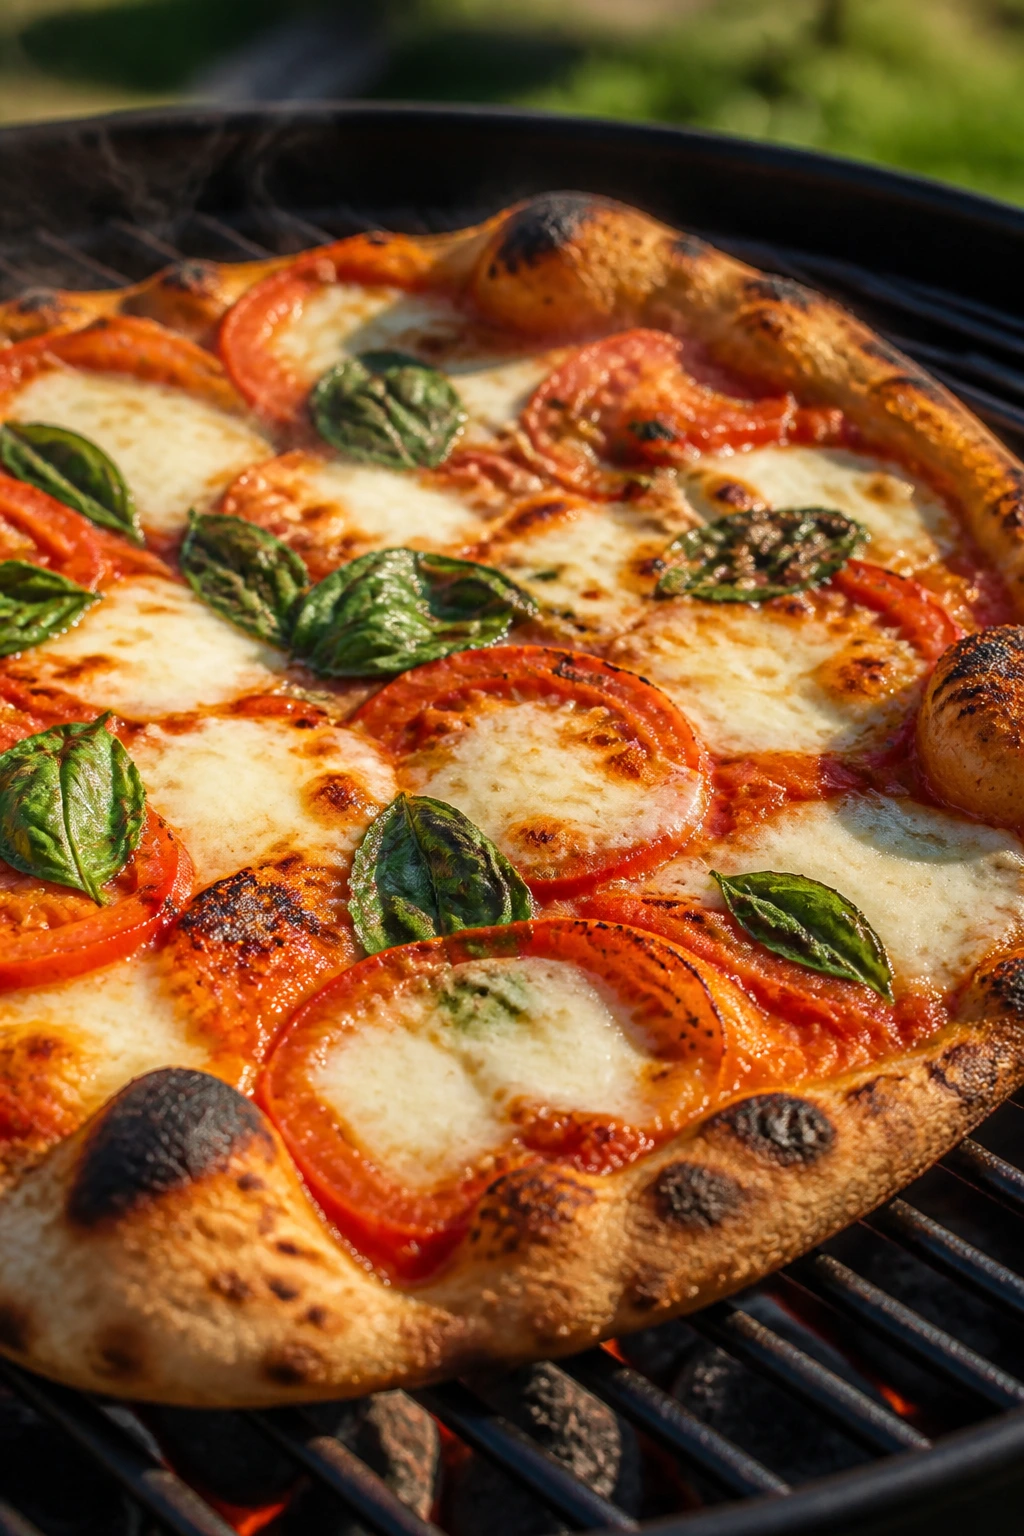
A grill makes pizza feel less precious. The crust blisters, the cheese bubbles, and the whole thing picks up a faint smoky edge.
Why It Works: High heat gives the crust the quick blast it needs, and tomato sauce plus mozzarella keep the toppings simple enough to cook through fast. It’s a little more hands-on than the oven, but the payoff is worth it.
Key Ingredients:
- 1 lb pizza dough
- ½ cup tomato sauce
- 1½ cups shredded mozzarella
- 2 tbsp olive oil
- Fresh basil leaves
- ½ tsp kosher salt
- Cornmeal, for the peel
Quick Steps:
- Stretch the dough and brush one side with oil.
- Grill that side first until it firms up.
- Flip, spread with sauce, and top with mozzarella.
- Close the lid until the cheese melts and the crust chars in spots.
- Finish with basil and salt.
Equipment for This Recipe:
- Grill
- Pizza peel or sheet pan
- Spatula
How to Serve This Dish: Slice it into squares or strips for picnic grabbing. It’s best eaten hot, but it still holds together once it cools.
Pro Tips for This Recipe:
- Keep toppings sparse.
- Work quickly once the dough is on the grill.
- Cornmeal on the peel helps the dough slide.
Variations on This Dish:
- Garlic Version: Add garlic oil to the crust.
- Pepper Version: Top with roasted peppers.
- White Pizza Version: Skip tomato sauce and use ricotta.
Common Mistakes to Avoid with This Dish:
- Sticky dough: It won’t release cleanly.
- Too much sauce: The center gets wet.
- Closing the lid too late: The cheese won’t melt evenly.
33. Garlic Bread with Parsley Butter
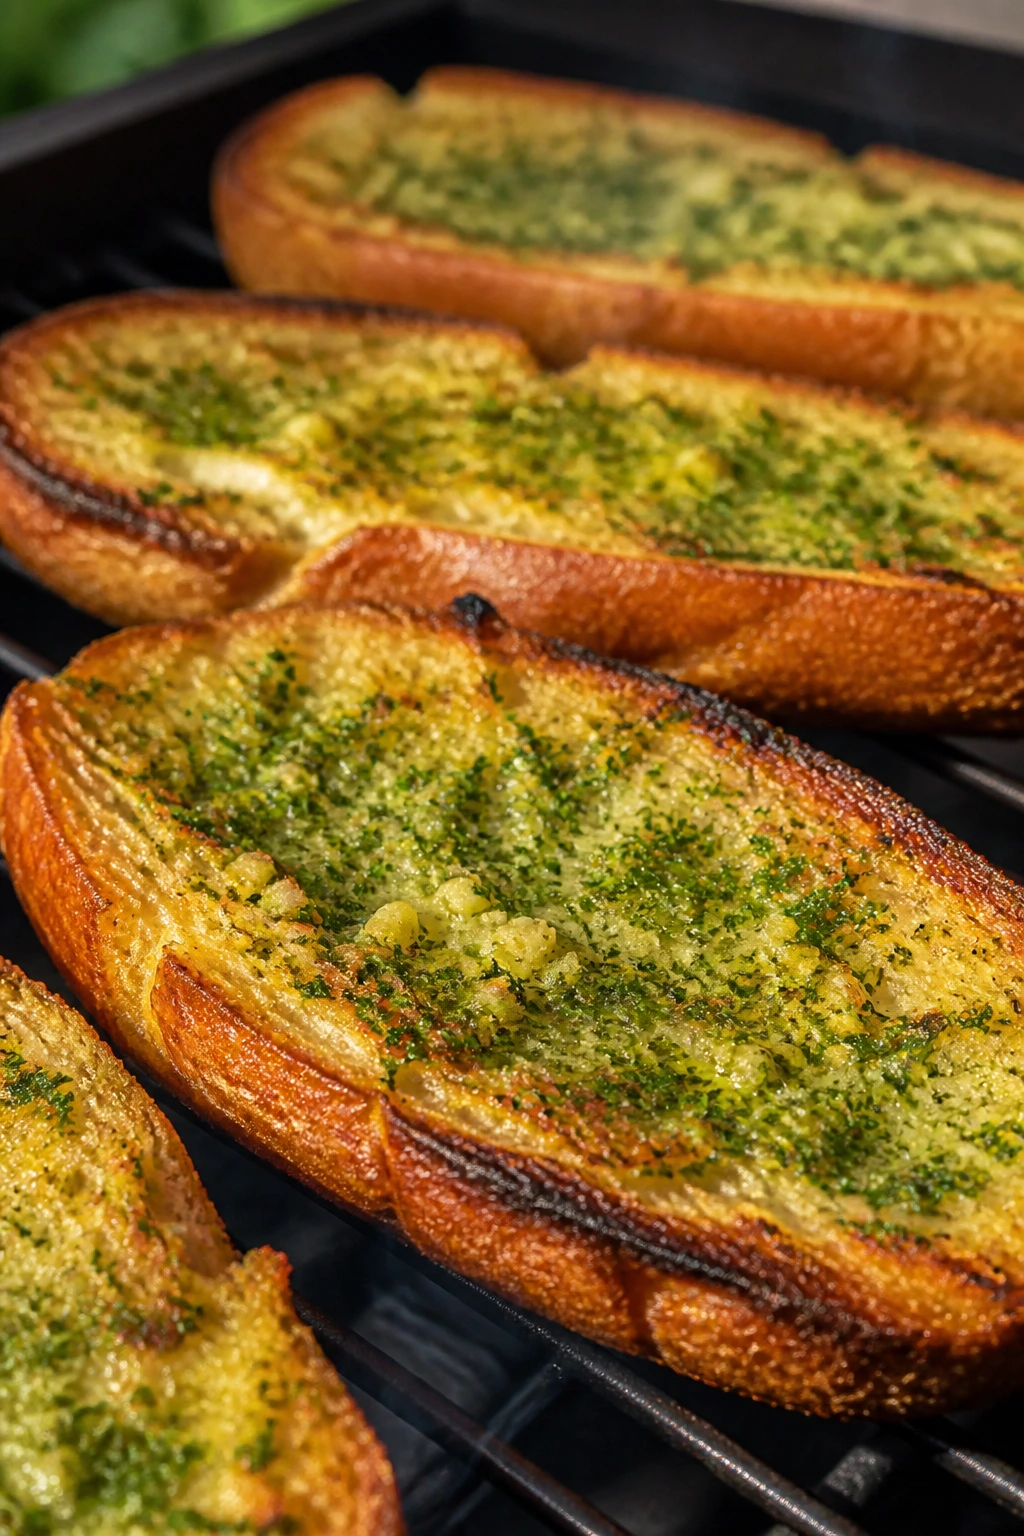
Garlic bread on the grill gets the same crisp edge people want from an oven, but with a little smoke and better timing.
Why It Works: The direct heat toasts the cut side fast while the butter melts into the bread instead of soaking straight through. Parsley keeps it fresh, and the grill means you can make it in a minute.
Key Ingredients:
- 1 large baguette, split lengthwise
- 6 tbsp softened butter
- 3 garlic cloves, minced
- 2 tbsp chopped parsley
- ¼ tsp salt
- 1 tbsp grated Parmesan, optional
Quick Steps:
- Mix butter, garlic, parsley, and salt.
- Spread on the cut sides of the baguette.
- Grill cut-side down for 1 to 2 minutes until toasted.
- Flip briefly to warm the outer crust.
- Sprinkle with Parmesan if you like.
Equipment for This Recipe:
- Grill
- Butter knife
- Tongs
How to Serve This Dish: Cut into thick slices and tuck beside grilled meats or salads. It’s a strong picnic side because it disappears fast.
Pro Tips for This Recipe:
- Use softened butter, not melted, so it spreads evenly.
- Watch it closely; bread can go from toast to black in no time.
- Add Parmesan after grilling for better texture.
Variations on This Dish:
- Herb Version: Use basil or chives.
- Cheesy Version: Add shredded mozzarella under the lid.
- Spicy Version: Mix in red pepper flakes.
Common Mistakes to Avoid with This Dish:
- Melted butter running off: It wastes flavor.
- Burning the garlic: It gets bitter fast.
- Over-toasting the crust: You want crisp, not brittle.
34. Cornbread Wedges with Honey Butter
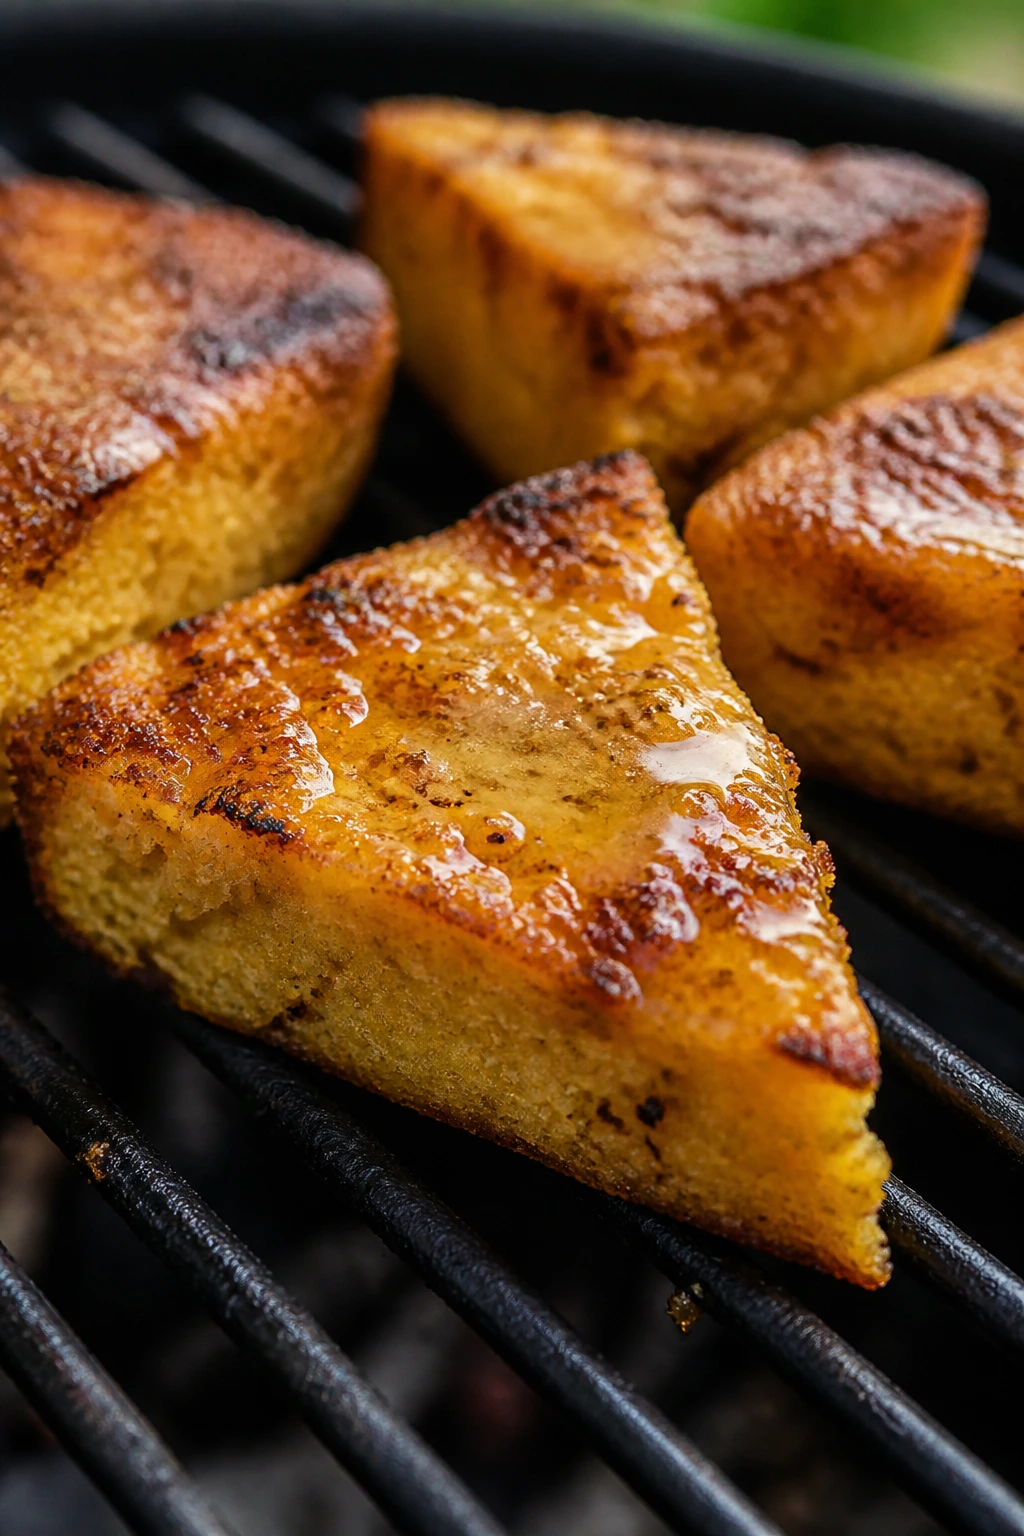
Cornbread on the grill is a little unusual, which is part of the charm. The edges pick up smoke, and the honey butter melts into every crumb.
Why It Works: A thick cornbread batter or pre-baked wedge can handle grill heat without falling apart, and the char adds something the oven can’t. Honey butter turns it into a side that feels finished, not just baked.
Key Ingredients:
- 1 batch cornbread, baked and cooled, cut into wedges
- 2 tbsp melted butter
- 1 tbsp honey
- 1 pinch salt
- Extra honey for serving
Quick Steps:
- Mix butter, honey, and salt.
- Brush the cornbread wedges lightly.
- Grill over medium heat for 1 to 2 minutes per side until toasted.
- Warm just enough to get grill marks.
- Serve with extra honey or butter.
Equipment for This Recipe:
- Grill
- Pastry brush
- Spatula
How to Serve This Dish: Pack in a lined basket and serve beside chili, ribs, or grilled chicken. It works best in thick wedges, not tiny cubes.
Pro Tips for This Recipe:
- Use day-old cornbread so it holds together.
- Keep the heat moderate or the sugar burns.
- Brush again after grilling if you want extra shine.
Variations on This Dish:
- Jalapeño Version: Fold peppers into the batter.
- Savory Version: Serve with herb butter instead of honey.
- Skillet Version: Use cast iron on the grill.
Common Mistakes to Avoid with This Dish:
- Too-fresh cornbread: It crumbles when moved.
- Too much honey before grilling: It burns.
- Thin slices: They fall apart on the grates.
35. Watermelon Feta Skewers
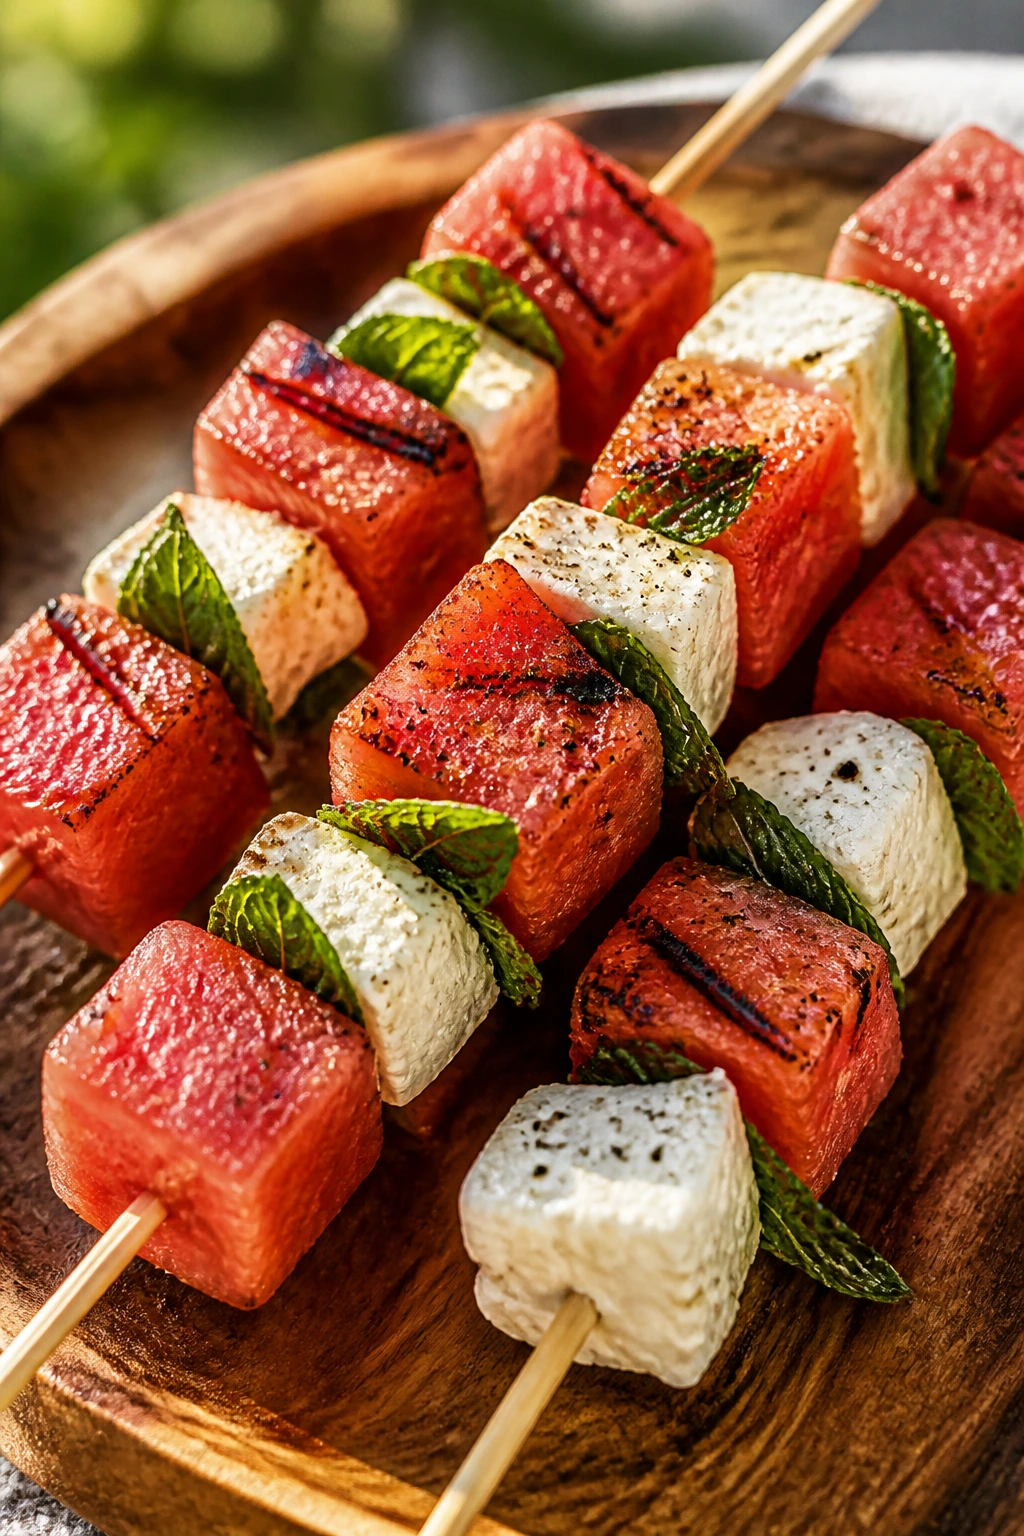
Watermelon on the grill is one of those ideas that sounds odd until the first bite. A little char changes the fruit without making it heavy.
Why It Works: The heat concentrates the melon’s sweetness and gives the surface a slight caramel note. Paired with feta and mint, it turns into a salty-sweet starter that feels tailored to hot weather.
Key Ingredients:
- 4 cups watermelon, cut into thick cubes
- 2 tbsp olive oil
- 1 tbsp lime juice
- 4 oz feta, cubed
- Mint leaves
- Pinch of salt
- Skewers
Quick Steps:
- Brush watermelon lightly with oil and lime juice.
- Grill for 30 to 60 seconds per side, just until marked.
- Thread onto skewers with feta and mint.
- Add a pinch of salt.
- Serve chilled or just slightly warm.
Equipment for This Recipe:
- Skewers
- Grill
- Tray for chilling
How to Serve This Dish: These make a good first bite before the heavier food appears. Serve them cold in a shallow bowl or upright in a tray.
Pro Tips for This Recipe:
- Use firm watermelon, not mushy fruit.
- Keep the grill hot so the melon marks quickly.
- Don’t over-handle the cubes once they’re warm.
Variations on This Dish:
- Basil Version: Use basil instead of mint.
- Balsamic Version: Add a tiny drizzle of balsamic glaze.
- Cucumber Version: Thread cucumber between melon pieces.
Common Mistakes to Avoid with This Dish:
- Leaving the melon on too long: It turns soft.
- Using overly salty feta: It overwhelms the fruit.
- Warm skewers in the sun: Chill them until serving.
36. Grilled Peach Burrata Salad

Peaches on a grill smell like dessert and taste like a side dish pretending to be fancy without trying too hard.
Why It Works: The heat makes the peaches softer and sweeter, while burrata adds a cool, creamy contrast. A little pepper and basil keep the whole thing from turning sugary.
Key Ingredients:
- 4 ripe peaches, halved and pitted
- 2 tbsp olive oil
- 8 oz burrata
- 2 cups arugula
- 1 tbsp balsamic glaze
- Basil leaves
- Pinch of flaky salt
Quick Steps:
- Brush peach halves with oil.
- Grill cut-side down for 2 to 3 minutes until marked.
- Toss arugula on a platter and set the peaches on top.
- Tear burrata over the salad.
- Finish with balsamic glaze, basil, and salt.
Equipment for This Recipe:
- Grill
- Tongs
- Serving platter
How to Serve This Dish: Serve it right after grilling so the peaches stay warm against the burrata. It works as a starter or a light picnic side.
Pro Tips for This Recipe:
- Peaches should be ripe but still firm.
- Keep the grill clean so the fruit doesn’t pick up old flavors.
- Add the basil at the end so it stays fresh.
Variations on This Dish:
- Prosciutto Version: Add thin prosciutto slices.
- Goat Cheese Version: Swap burrata for goat cheese.
- Nectarine Version: Use nectarines if peaches aren’t firm enough.
Common Mistakes to Avoid with This Dish:
- Too-soft fruit: It falls apart on the grate.
- Too much glaze: It gets syrupy.
- Serving too late: The contrast disappears.
37. Nectarine and Prosciutto Salad
This one is all about balance: sweet fruit, salty ham, peppery greens, and a little grill smoke on the nectarines.
Why It Works: Nectarines take heat without collapsing, and prosciutto gives the plate salt and chew. The grill marks make the fruit taste deeper, which is a nice trick for a simple salad.
Key Ingredients:
- 4 nectarines, halved and pitted
- 1 tbsp olive oil
- 4 oz prosciutto
- 4 cups mixed greens
- 2 tbsp red wine vinegar
- 2 tbsp olive oil
- Salt and pepper
Quick Steps:
- Brush nectarines lightly with oil.
- Grill cut-side down for 2 minutes until marked.
- Whisk vinegar, olive oil, salt, and pepper for the dressing.
- Toss greens with dressing and top with nectarines and prosciutto.
- Serve immediately.
Equipment for This Recipe:
- Grill
- Bowl for dressing
- Platter
How to Serve This Dish: Serve on a flat platter rather than a deep bowl. The prosciutto should drape over the fruit, not get buried.
Pro Tips for This Recipe:
- Keep the nectarines a little firm.
- Tear the prosciutto so every bite gets a piece.
- Dress the greens lightly; you’re not making soup.
Variations on This Dish:
- Burrata Version: Add cheese for a richer salad.
- Balsamic Version: Use balsamic instead of red wine vinegar.
- Vegetarian Version: Skip the prosciutto and add toasted almonds.
Common Mistakes to Avoid with This Dish:
- Overripe nectarines: They collapse.
- Too much dressing: It drowns the greens.
- Letting the salad sit: The fruit softens too much.
38. Grilled Pineapple with Tajin
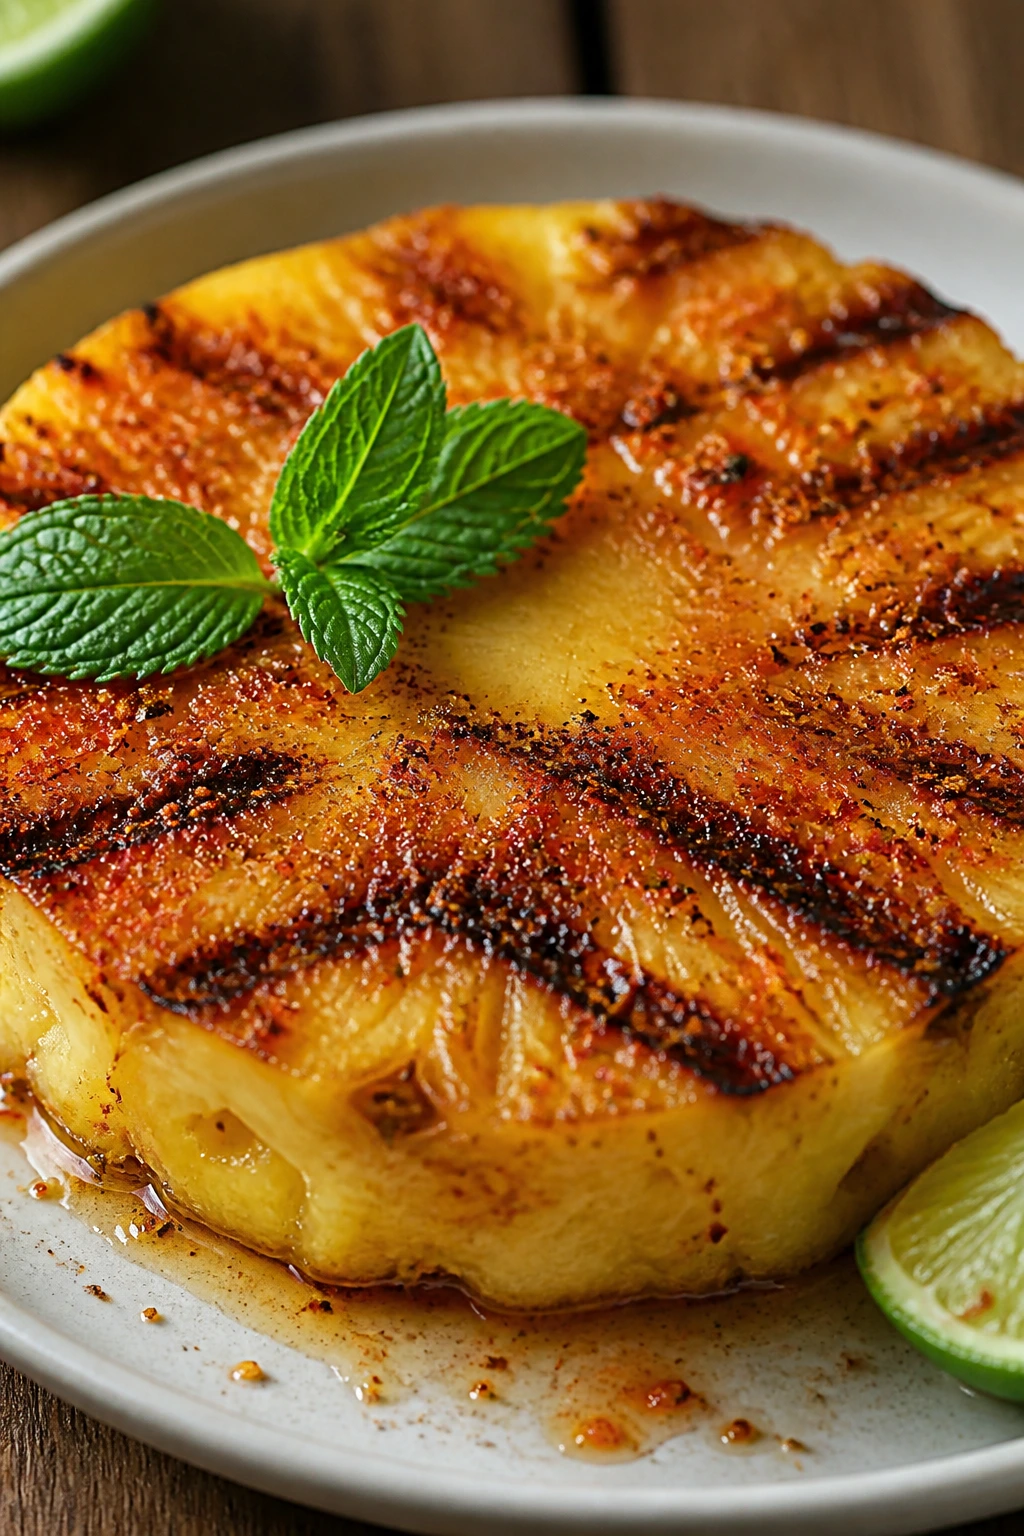
Pineapple is already loud. Grill it, and it gets deeper, sweeter, and a little smoky around the edges.
Why It Works: Heat concentrates the fruit’s sugars, and Tajin brings salt, chili, and acid to the surface. The result tastes like a snack and a dessert had a decent idea together.
Key Ingredients:
- 1 large pineapple, peeled, cored, and sliced
- 1 tbsp olive oil
- 1 to 2 tsp Tajin
- 1 tbsp lime juice
- Mint, optional
- Honey, optional
Quick Steps:
- Brush pineapple slices with oil.
- Grill over medium-high heat for 2 to 3 minutes per side until marked.
- Move to a platter.
- Sprinkle with Tajin and lime juice.
- Drizzle with honey if you want extra sweetness.
Equipment for This Recipe:
- Grill
- Tongs
- Knife and cutting board
How to Serve This Dish: Serve as a side with grilled pork or chicken, or as a sweet finish after the main food. It’s best warm, but still fine after cooling.
Pro Tips for This Recipe:
- Slice the pineapple thick so it doesn’t fall apart.
- A clean grate helps the fruit release cleanly.
- Add Tajin after grilling so the spice stays bright.
Variations on This Dish:
- Cinnamon Version: Sprinkle with cinnamon instead.
- Rum-Style Version: Add a little brown sugar glaze.
- Skewer Version: Thread chunks instead of slices.
Common Mistakes to Avoid with This Dish:
- Too-thin slices: They shred on the grill.
- Overcooking: The pineapple turns mushy.
- Seasoning too early: The Tajin can darken too much.
39. Charred Plums with Mascarpone
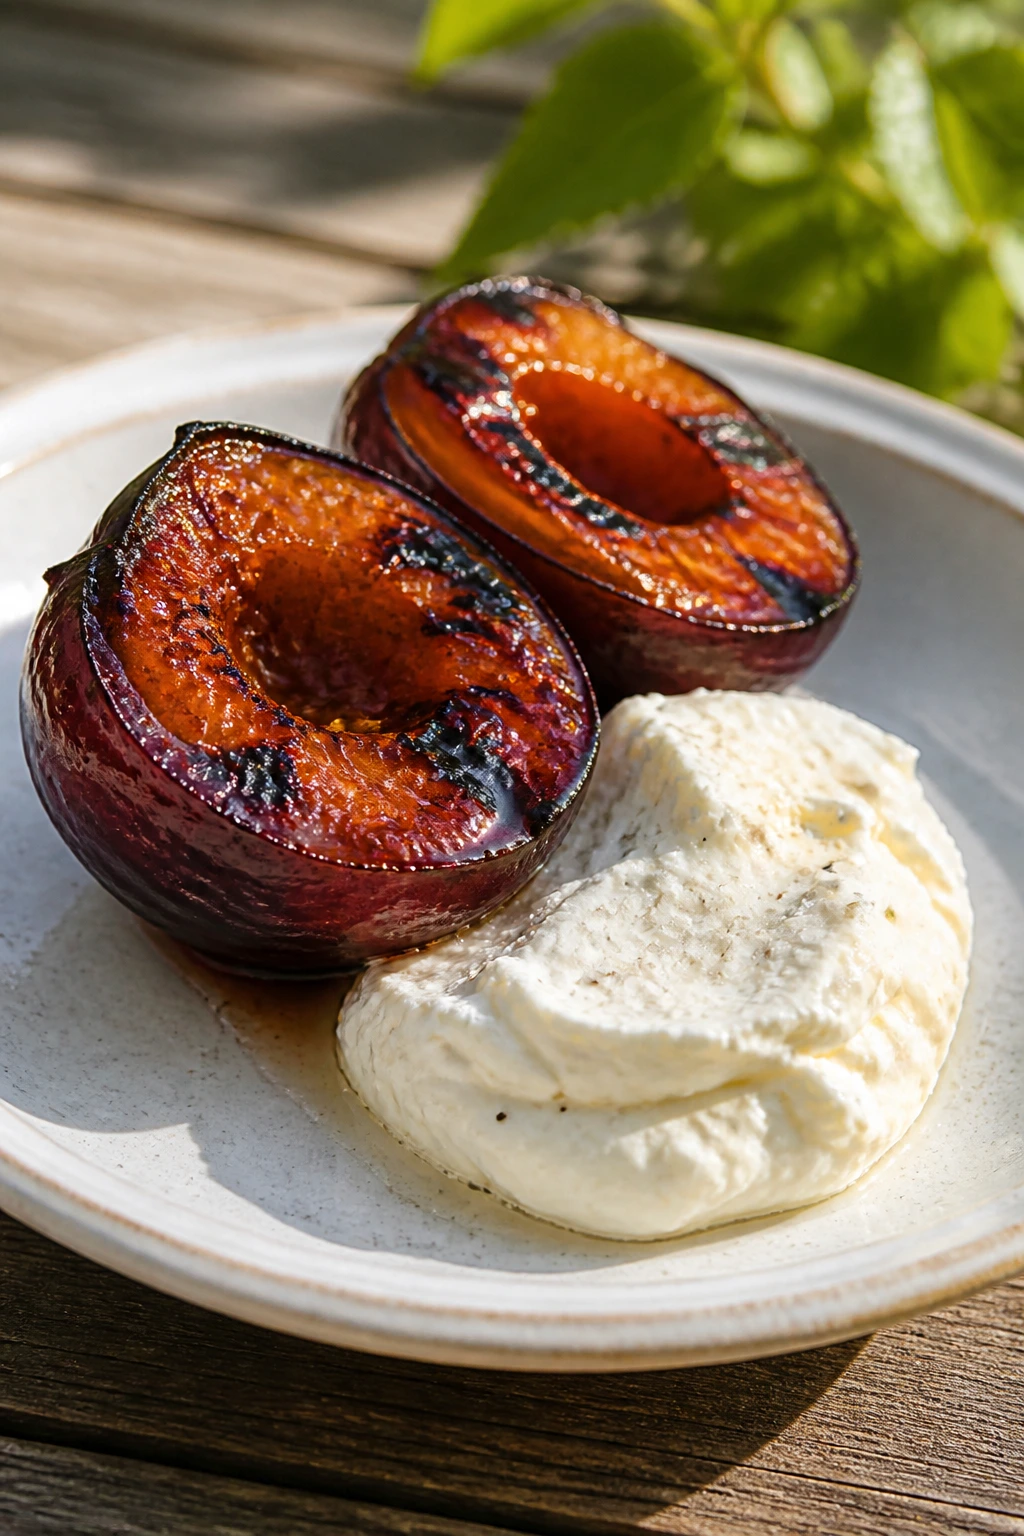
Plums on the grill sound like a dessert person’s move, and that’s fine. They deserve it.
Why It Works: The sugars in the fruit caramelize fast, and the heat softens the flesh just enough to make it syrupy. Mascarpone gives you a cool, rich base that makes the fruit taste louder.
Key Ingredients:
- 6 ripe but firm plums, halved and pitted
- 1 tbsp olive oil
- 1 tbsp honey
- 1 cup mascarpone
- 1 tsp vanilla extract
- Pinch of salt
Quick Steps:
- Brush plums with oil.
- Grill cut-side down for 2 minutes until marked.
- Stir mascarpone with vanilla and salt.
- Spoon the cheese onto a plate and set plums on top.
- Drizzle with honey.
Equipment for This Recipe:
- Grill
- Spoon
- Serving platter
How to Serve This Dish: Serve as a dessert or a late picnic snack. A few crushed nuts on top add crunch if you want it.
Pro Tips for This Recipe:
- Choose plums that are firm enough to handle heat.
- Let the grill marks be dark but not burnt.
- Chill the mascarpone if the day is hot.
Variations on This Dish:
- Yogurt Version: Swap mascarpone for thick Greek yogurt.
- Cinnamon Version: Add cinnamon to the honey.
- Stone Fruit Mix: Use peaches or apricots too.
Common Mistakes to Avoid with This Dish:
- Overripe plums: They turn to jam.
- Too much honey before grilling: It burns.
- Serving with no salt: The flavor gets flat.
40. Grilled Pound Cake with Berries
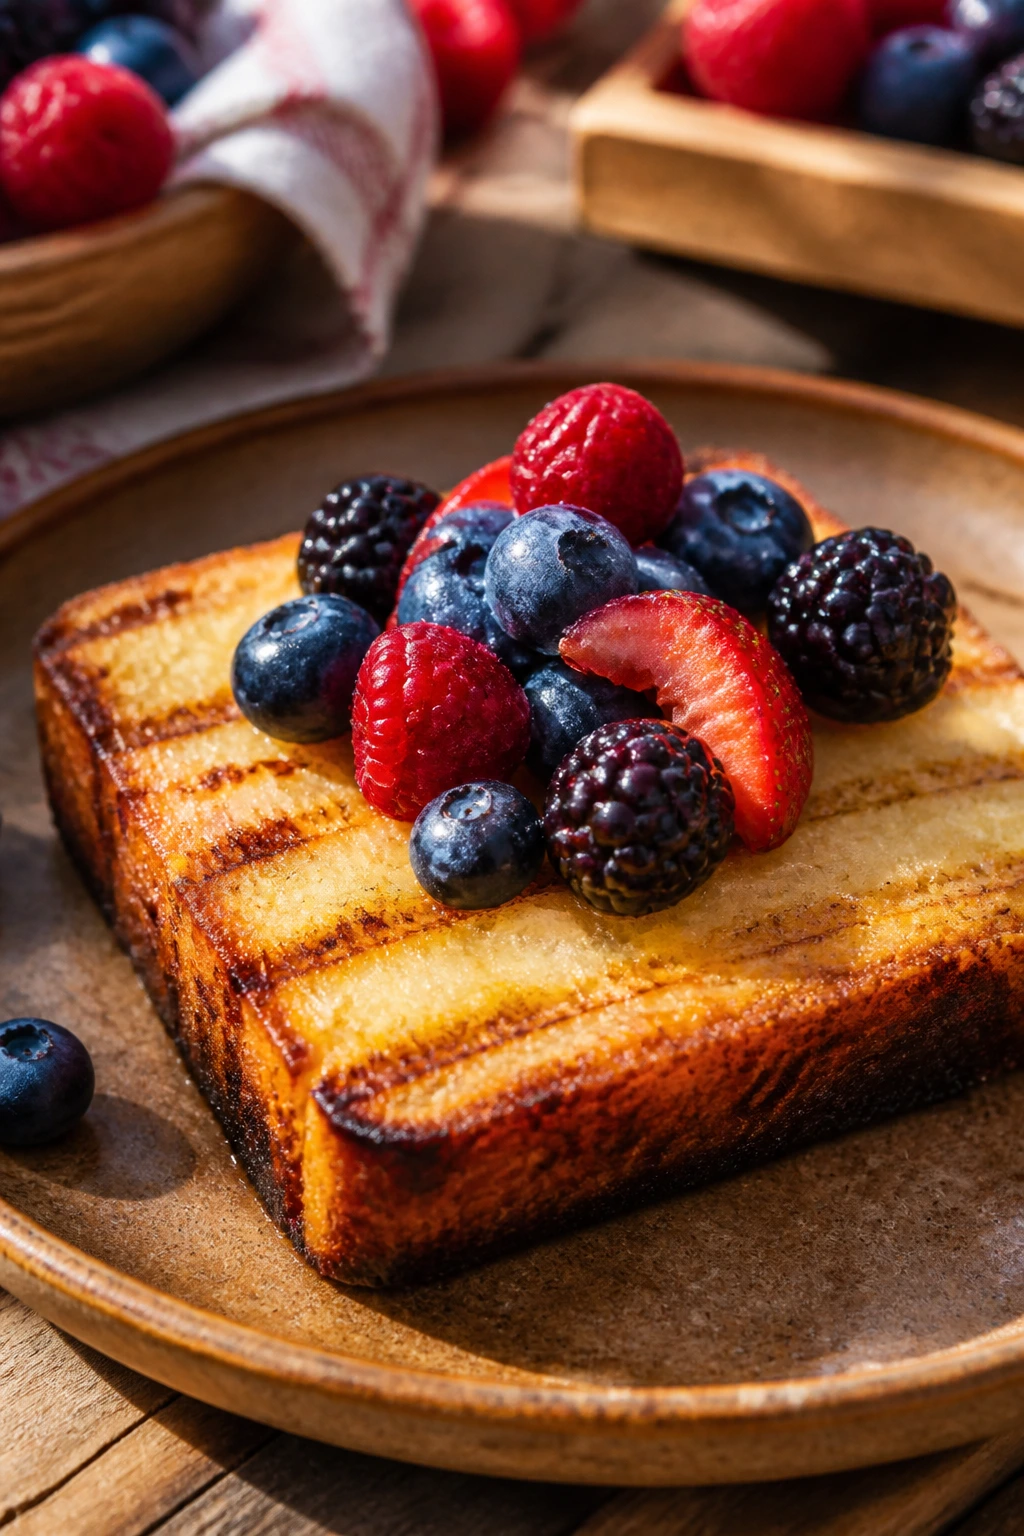
Pound cake on the grill gets crisp edges and a warm center, which is a far better use of leftover cake than letting it dry out in a container.
Why It Works: The grill toasts the outside fast while keeping the inside soft, and berries bring freshness so the cake doesn’t feel heavy. It’s a simple dessert, but the texture shift makes it feel intentional.
Key Ingredients:
- 1 pound cake, sliced into 1-inch thick pieces
- 2 tbsp melted butter
- 2 cups mixed berries
- 1 tbsp sugar
- 1 tsp lemon juice
- Whipped cream, optional
Quick Steps:
- Toss berries with sugar and lemon juice.
- Brush cake slices with melted butter.
- Grill over medium heat for 1 to 2 minutes per side until toasted.
- Top with berries.
- Add whipped cream if you want.
Equipment for This Recipe:
- Grill
- Pastry brush
- Bowl for berries
How to Serve This Dish: Serve on a tray with small forks or napkins. It’s best as a no-fuss dessert after the grill has cooled a little.
Pro Tips for This Recipe:
- Use cake that is firm, not fragile.
- Watch closely; sugar in the cake browns quickly.
- Berries with a little juice make the plate better.
Variations on This Dish:
- Peach Version: Use grilled peaches instead of berries.
- Lemon Version: Add lemon zest to the whipped cream.
- Chocolate Version: Drizzle with melted chocolate.
Common Mistakes to Avoid with This Dish:
- Thin cake slices: They fall apart.
- Too-hot grates: The outside burns before the inside warms.
- Skipping the butter: The cake sticks.
41. Banana Boats with Chocolate and Peanut Butter
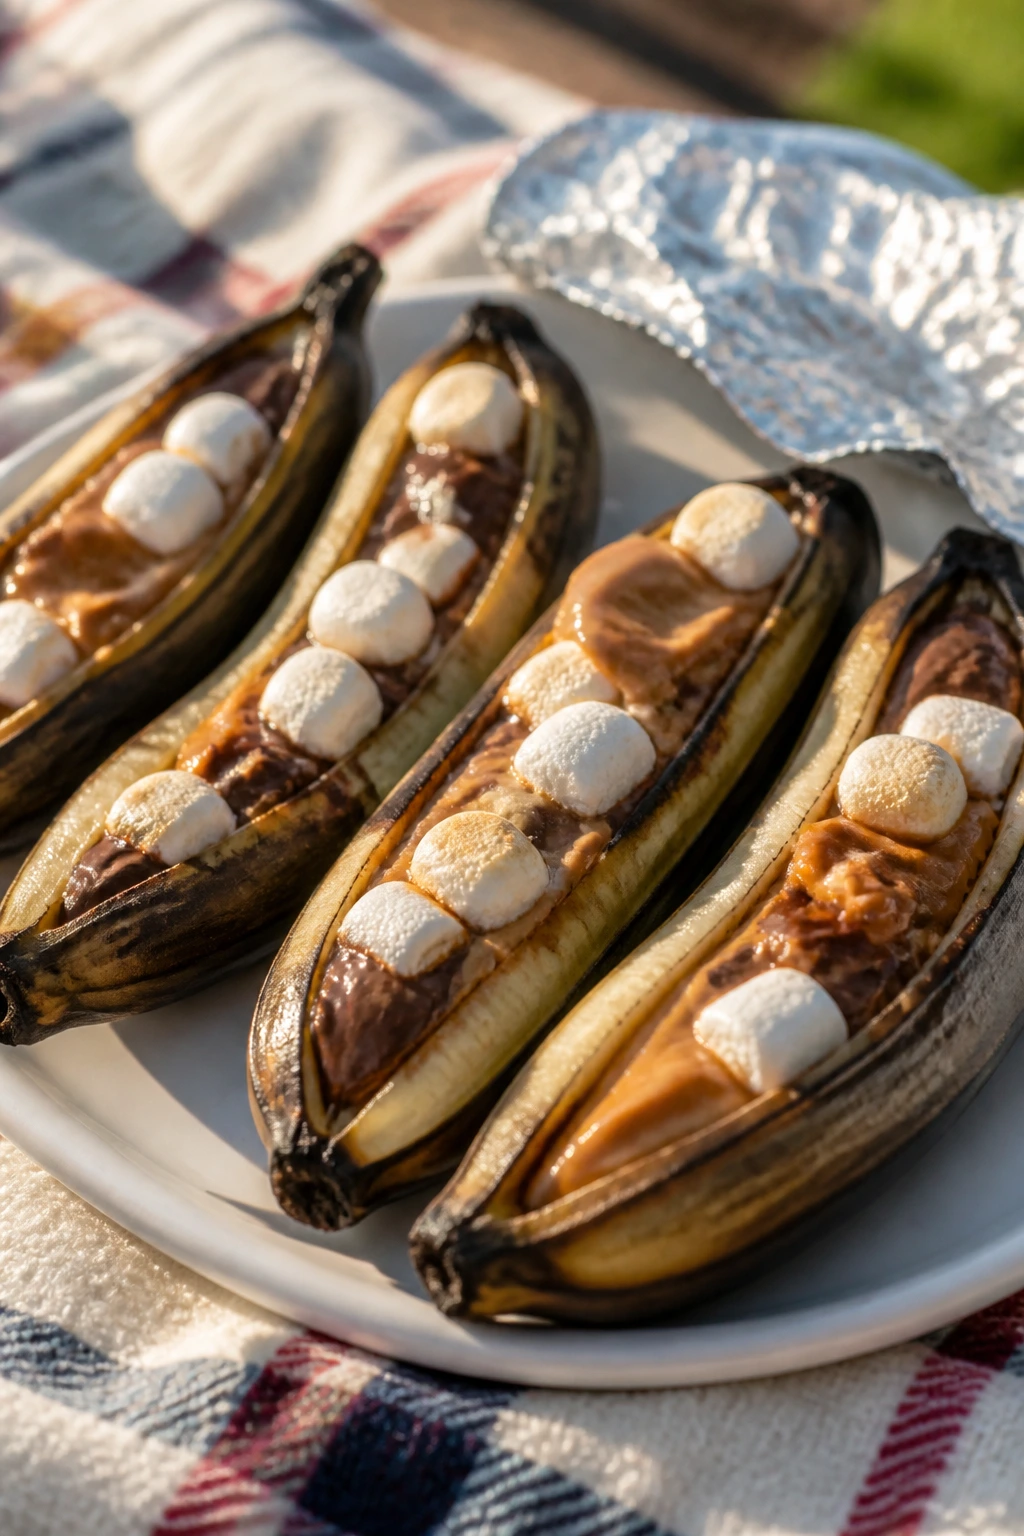
Banana boats are picnic dessert with almost no gear and a pleasing amount of mess. They’re sweet, warm, and impossible to overthink.
Why It Works: The banana softens into a creamy shape while the chocolate melts inside the slit. Peanut butter adds body so the dessert feels more like a finished bite than a novelty.
Key Ingredients:
- 4 bananas, unpeeled
- ¼ cup chocolate chips
- ¼ cup peanut butter
- ¼ cup mini marshmallows
- Crushed peanuts, optional
- Foil
Quick Steps:
- Slice a slit down the length of each banana, keeping the peel on.
- Stuff with chocolate chips, peanut butter, and marshmallows.
- Wrap each banana in foil.
- Grill over medium heat for 8 to 10 minutes.
- Open carefully and top with peanuts.
Equipment for This Recipe:
- Foil
- Grill
- Spoon
How to Serve This Dish: Serve in the foil or transfer carefully to plates. A fork helps, but honestly, a spoon and a little patience work fine.
Pro Tips for This Recipe:
- Use bananas that are yellow with a few brown spots.
- Seal the foil well so the filling melts evenly.
- Let them cool a minute before opening.
Variations on This Dish:
- Nut-Free Version: Use sunflower seed butter.
- S’mores Version: Add graham cracker crumbs.
- Berry Version: Add sliced strawberries.
Common Mistakes to Avoid with This Dish:
- Overripe bananas: They collapse.
- Too much filling: It spills out.
- Forgetting the foil: The peel chars too hard.
42. Apple Crisp Packets

Apple crisp in foil packets feels old-school in the best way. Warm fruit, cinnamon, and a crumb topping are hard to argue with outdoors.
Why It Works: The foil traps steam so the apples soften, while the topping toasts enough to keep some crunch. It’s a good grill dessert because the packets can sit safely while the rest of dinner finishes.
Key Ingredients:
- 4 apples, peeled if you like, sliced
- 2 tbsp brown sugar
- 1 tsp cinnamon
- 2 tbsp butter, cut into bits
- ½ cup oats
- ¼ cup flour
- 2 tbsp chopped nuts, optional
- Foil
Quick Steps:
- Toss apples with brown sugar and cinnamon.
- Mix oats, flour, butter, and nuts for the topping.
- Divide into foil packets and seal tightly.
- Grill over medium heat for 12 to 15 minutes.
- Open carefully and serve warm.
Equipment for This Recipe:
- Foil
- Grill
- Small bowl
How to Serve This Dish: Spoon into bowls or eat straight from the packet. Vanilla ice cream turns it into a proper dessert if you have a cooler for it.
Pro Tips for This Recipe:
- Slice apples evenly so they soften together.
- Seal the packets well or you lose the steam.
- Tart apples give the best contrast.
Variations on This Dish:
- Pear Version: Use pears instead of apples.
- Cinnamon-Raisin Version: Add raisins to the filling.
- Maple Version: Swap brown sugar for maple syrup.
Common Mistakes to Avoid with This Dish:
- Too much filling: The packet leaks.
- Thin apple slices: They turn mushy.
- Loose foil wrap: The steam escapes.
43. Grilled Donut Sundaes

This is the one I reach for when the picnic wants a ridiculous dessert and nobody is pretending otherwise.
Why It Works: The grill warms the dough, caramels the surface, and makes plain donuts feel deliberate. Add ice cream and fruit and the whole thing becomes a hot-cold mess in the best possible way.
Key Ingredients:
- 4 plain cake donuts, split
- 2 tbsp melted butter
- 2 cups vanilla ice cream
- 1 cup berries or sliced peaches
- Chocolate sauce, optional
- Chopped nuts, optional
Quick Steps:
- Brush donuts lightly with butter.
- Grill cut-side down for 30 to 45 seconds.
- Flip briefly to warm the outside.
- Top with ice cream and fruit.
- Finish with sauce or nuts.
Equipment for This Recipe:
- Grill
- Tongs
- Spoon
How to Serve This Dish: Serve immediately in bowls or paper boats. It’s a dessert for people who don’t mind a little drip.
Pro Tips for This Recipe:
- Keep the grill very clean so the donuts don’t pick up savory flavors.
- Use plain donuts, not filled ones.
- Have the ice cream ready before the donuts leave the grill.
Variations on This Dish:
- Cinnamon Version: Dust with cinnamon sugar.
- Peach Melba Version: Use peaches and raspberry sauce.
- Chocolate Version: Add shaved chocolate.
Common Mistakes to Avoid with This Dish:
- Too much heat: The sugar burns.
- Grilling too long: Donuts dry out fast.
- Waiting too long to serve: Ice cream loses the point.
44. Grilled Apricot Goat Cheese Crostini
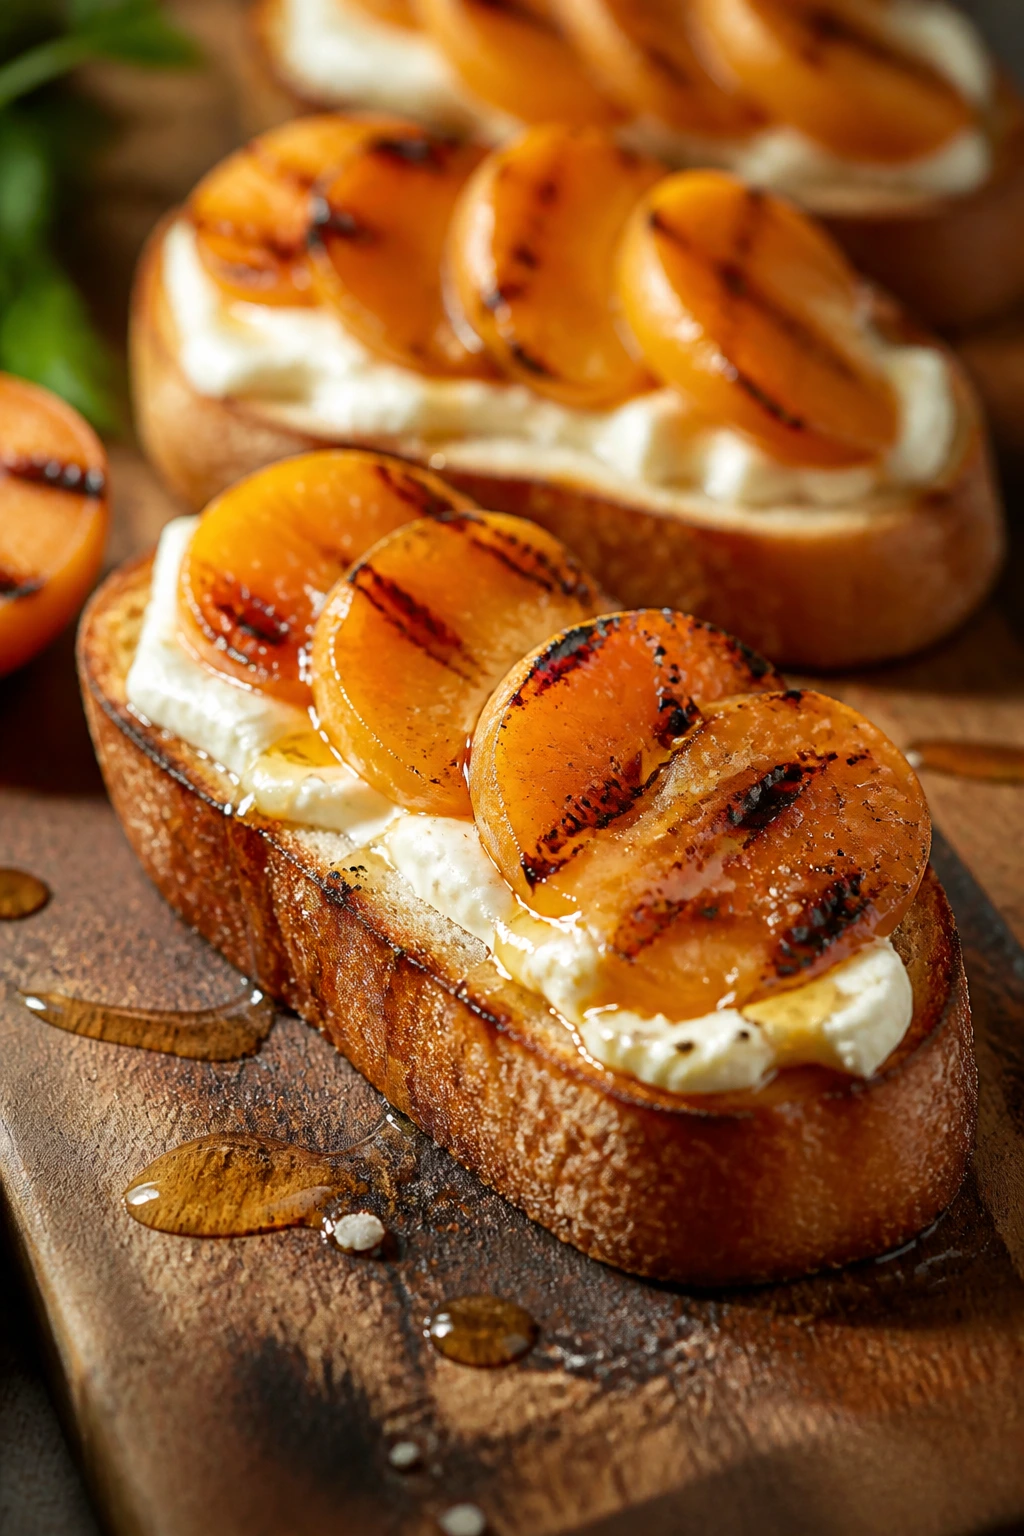
Grilled toast with fruit and cheese is easy to love because it hits three textures at once. Crisp bread, soft fruit, and tangy cheese do the work for you.
Why It Works: Apricots get sweeter on the grill, and goat cheese gives the toast enough sharpness to keep it from feeling sugary. It’s a smart starter if you want something that looks polished but still eats casually.
Key Ingredients:
- 8 apricots, halved and pitted
- 1 baguette, sliced
- 2 tbsp olive oil
- 4 oz goat cheese
- 1 tbsp honey
- Fresh thyme, optional
Quick Steps:
- Brush apricots and baguette slices lightly with oil.
- Grill apricots cut-side down for 2 minutes.
- Toast baguette slices for 30 to 60 seconds per side.
- Spread with goat cheese and top with apricots.
- Drizzle with honey and thyme.
Equipment for This Recipe:
- Grill
- Basting brush
- Tray
How to Serve This Dish: Serve on a wide board so the crostini don’t slide around. They work best as a pre-meal nibble or light picnic starter.
Pro Tips for This Recipe:
- Choose apricots that are firm, not mushy.
- Toast the bread right before serving.
- A small pinch of salt on the cheese helps the fruit taste brighter.
Variations on This Dish:
- Ricotta Version: Use ricotta instead of goat cheese.
- Balsamic Version: Add a tiny balsamic drizzle.
- Herb Version: Use basil rather than thyme.
Common Mistakes to Avoid with This Dish:
- Soft bread: It won’t hold the topping.
- Overripe apricots: They fall apart.
- Too much honey: The crostini gets sticky.
45. Smoked Paprika Mushrooms on Toast
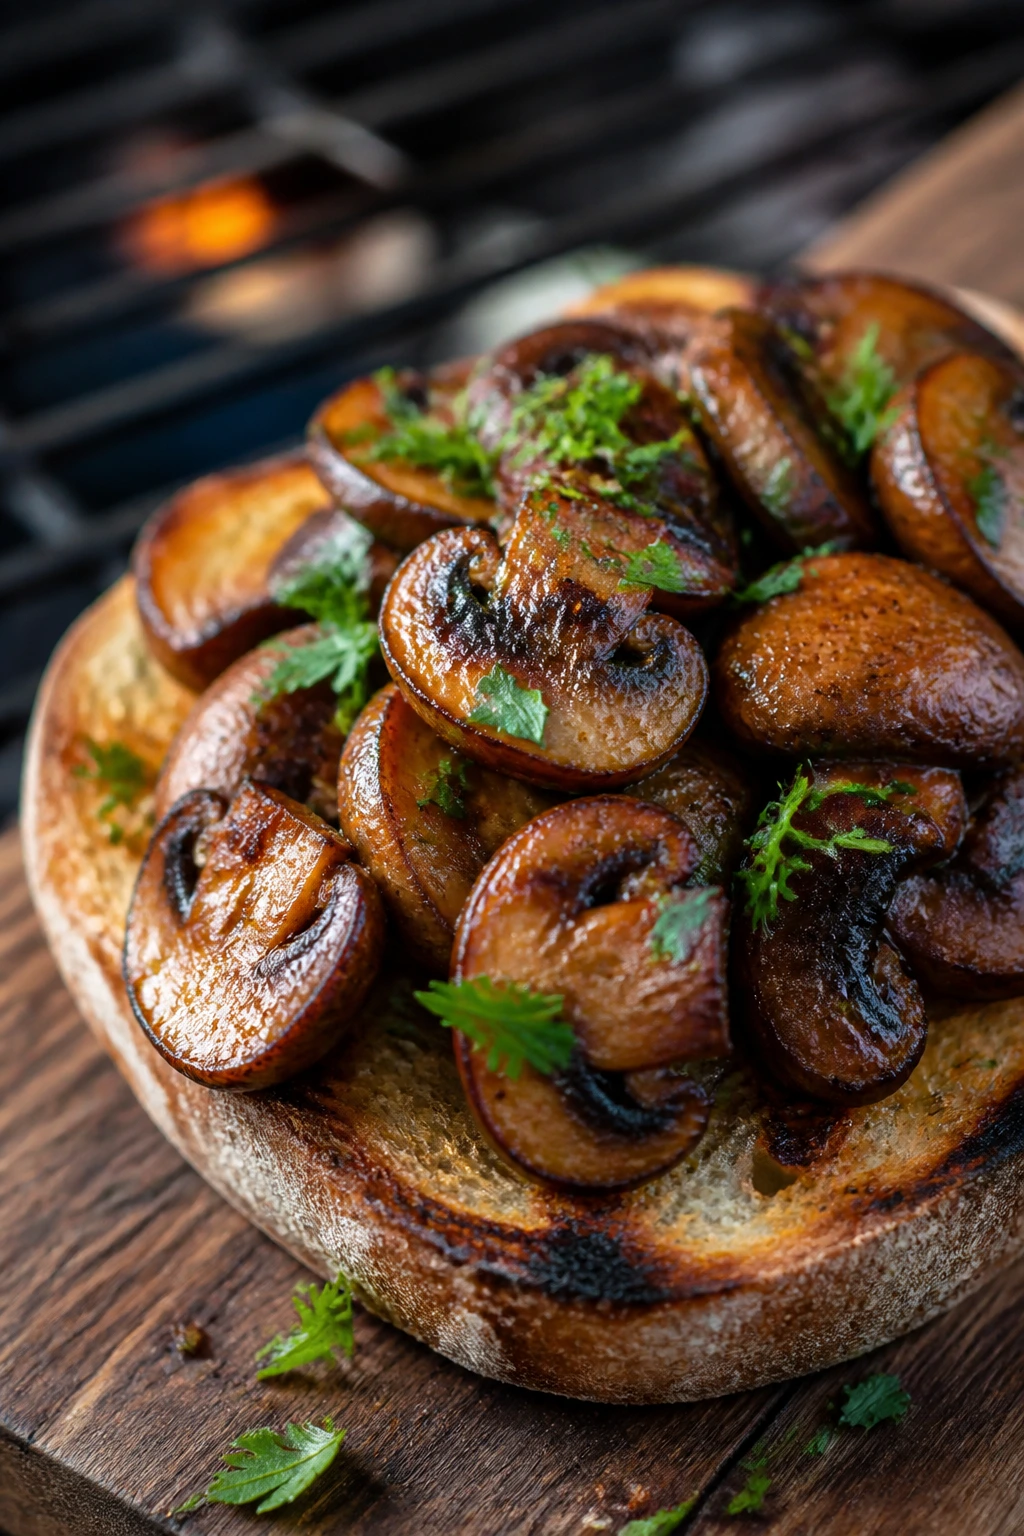
Mushrooms love a grill, especially if you give them enough seasoning to lean savory instead of soggy.
Why It Works: The mushrooms release moisture, then pick up browning as they lose it, which makes them taste meatier than they have any right to. Toast gives you a sturdy base that handles the juices.
Key Ingredients:
- 1½ lb cremini mushrooms
- 3 tbsp olive oil
- 1 tsp smoked paprika
- 2 garlic cloves, minced
- 1 tsp kosher salt
- 4 slices thick bread, toasted
- Parsley for finishing
Quick Steps:
- Toss mushrooms with oil, paprika, garlic, and salt.
- Grill in a basket over medium-high heat for 6 to 8 minutes.
- Stir once or twice until browned.
- Spoon onto toasted bread.
- Finish with parsley.
Equipment for This Recipe:
- Grill basket
- Grill
- Toasting rack or bread slices
How to Serve This Dish: Serve as a snack or as a side next to grilled meat. A squeeze of lemon on top is worth doing.
Pro Tips for This Recipe:
- Don’t wash mushrooms under running water; wipe them clean.
- Use thick bread so the juice doesn’t soak through instantly.
- A hot basket gives better browning than a crowded grate.
Variations on This Dish:
- Balsamic Version: Add a splash after grilling.
- Cheese Version: Top with shaved Parmesan.
- Herb Version: Add thyme with the parsley.
Common Mistakes to Avoid with This Dish:
- Too much moisture: The mushrooms steam.
- Thin toast: It gets soggy.
- Underseasoning: Mushrooms need salt.
46. Radicchio and Orange Salad
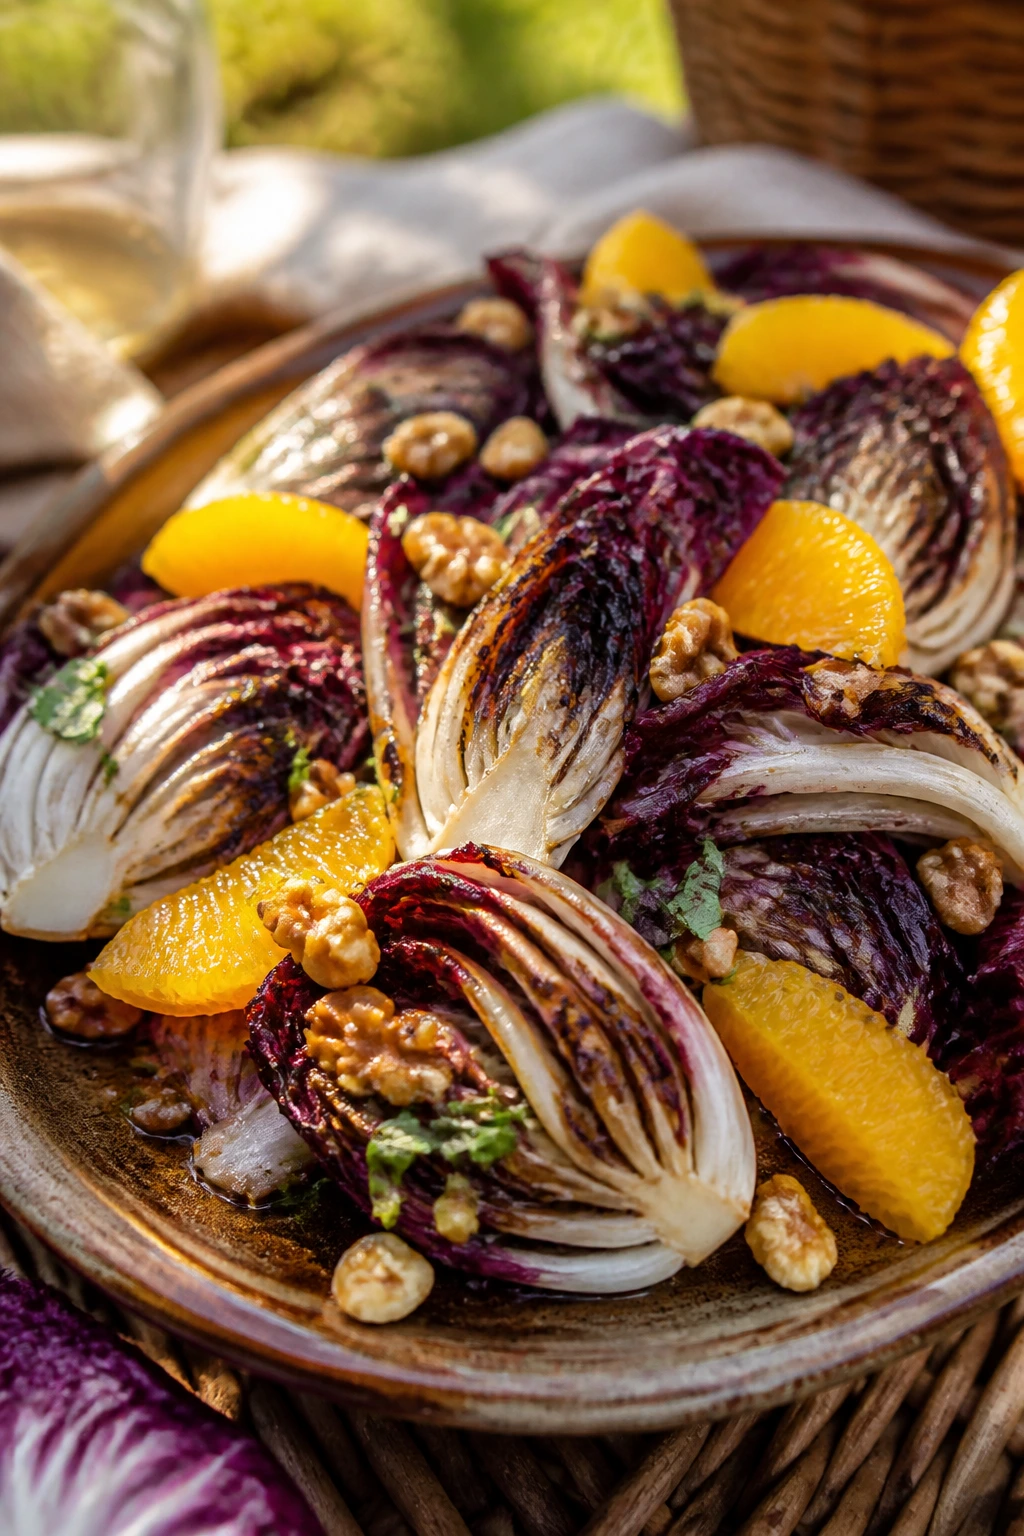
Radicchio is bitter, orange is sweet, and the grill softens the edge just enough to make the pair work.
Why It Works: A quick char tames the bitterness and gives the leaves a smoky backbone. Orange segments and a simple dressing keep the salad bright and sharp.
Key Ingredients:
- 2 heads radicchio, quartered
- 2 oranges, peeled and segmented
- 2 tbsp olive oil
- 1 tbsp red wine vinegar
- ½ tsp kosher salt
- ¼ cup toasted walnuts
- Black pepper
Quick Steps:
- Brush radicchio lightly with oil.
- Grill cut-side down for 1 to 2 minutes until lightly charred.
- Whisk oil, vinegar, and salt for a dressing.
- Arrange radicchio with orange segments and walnuts.
- Drizzle and pepper before serving.
Equipment for This Recipe:
- Grill
- Tongs
- Serving platter
How to Serve This Dish: Serve this as a sharp side next to rich meats or creamy cheese. It wakes up the whole plate.
Pro Tips for This Recipe:
- Keep the grill time short or the leaves wilt too far.
- Toast the walnuts for more flavor.
- Segment the oranges cleanly so the juice doesn’t flood the plate.
Variations on This Dish:
- Fennel Version: Add shaved fennel.
- Cheese Version: Crumble feta or goat cheese on top.
- Pomegranate Version: Swap oranges for pomegranate seeds.
Common Mistakes to Avoid with This Dish:
- Too much heat: Radicchio gets floppy.
- Skipping acid: The bitterness takes over.
- Using soggy nuts: They don’t add much.
47. Green Bean Almond Salad
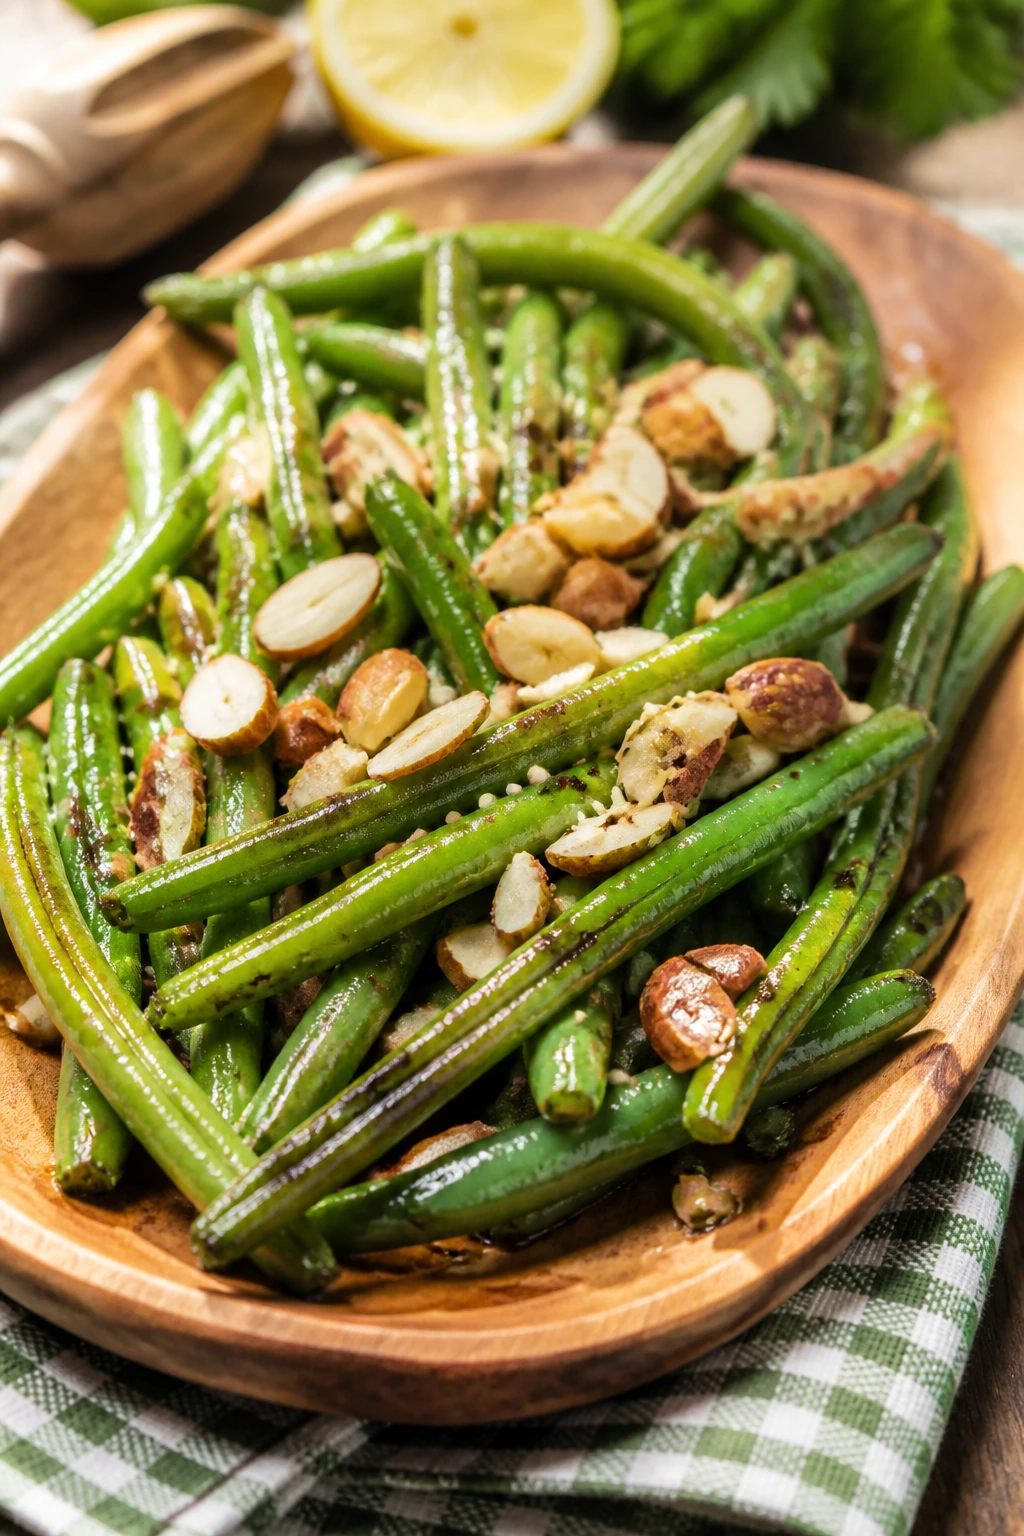
This is the salad that still tastes alive after a picnic ride. Green beans keep their shape, and almonds bring the crunch.
Why It Works: A quick grill blister adds depth to the beans without destroying their snap. The vinaigrette keeps the salad bright, and the nuts give it a useful crunch.
Key Ingredients:
- 2 lb green beans, trimmed
- 2 tbsp olive oil
- 1 tsp kosher salt
- ½ tsp black pepper
- 2 tbsp lemon juice
- 1 tbsp Dijon mustard
- ¼ cup sliced almonds, toasted
Quick Steps:
- Toss beans with oil, salt, and pepper.
- Grill in a basket over medium-high heat for 5 to 7 minutes.
- Whisk lemon juice and Dijon into a quick dressing.
- Toss warm beans with dressing.
- Top with toasted almonds.
Equipment for This Recipe:
- Grill basket
- Bowl for dressing
- Tongs
How to Serve This Dish: Serve warm or room temperature. It sits neatly next to grilled chicken or fish without getting heavy.
Pro Tips for This Recipe:
- Choose beans that are slim and firm.
- Toast the almonds ahead so they stay crunchy.
- Dress the beans while warm; they soak up flavor better.
Variations on This Dish:
- Garlic Version: Add minced garlic to the dressing.
- Herb Version: Add dill or parsley.
- Feta Version: Crumble feta on top.
Common Mistakes to Avoid with This Dish:
- Overcooking beans: They go limp.
- Skipping the basket: Small beans fall through grates.
- Heavy dressing: It weighs down the salad.
48. Citrus Cod Tacos
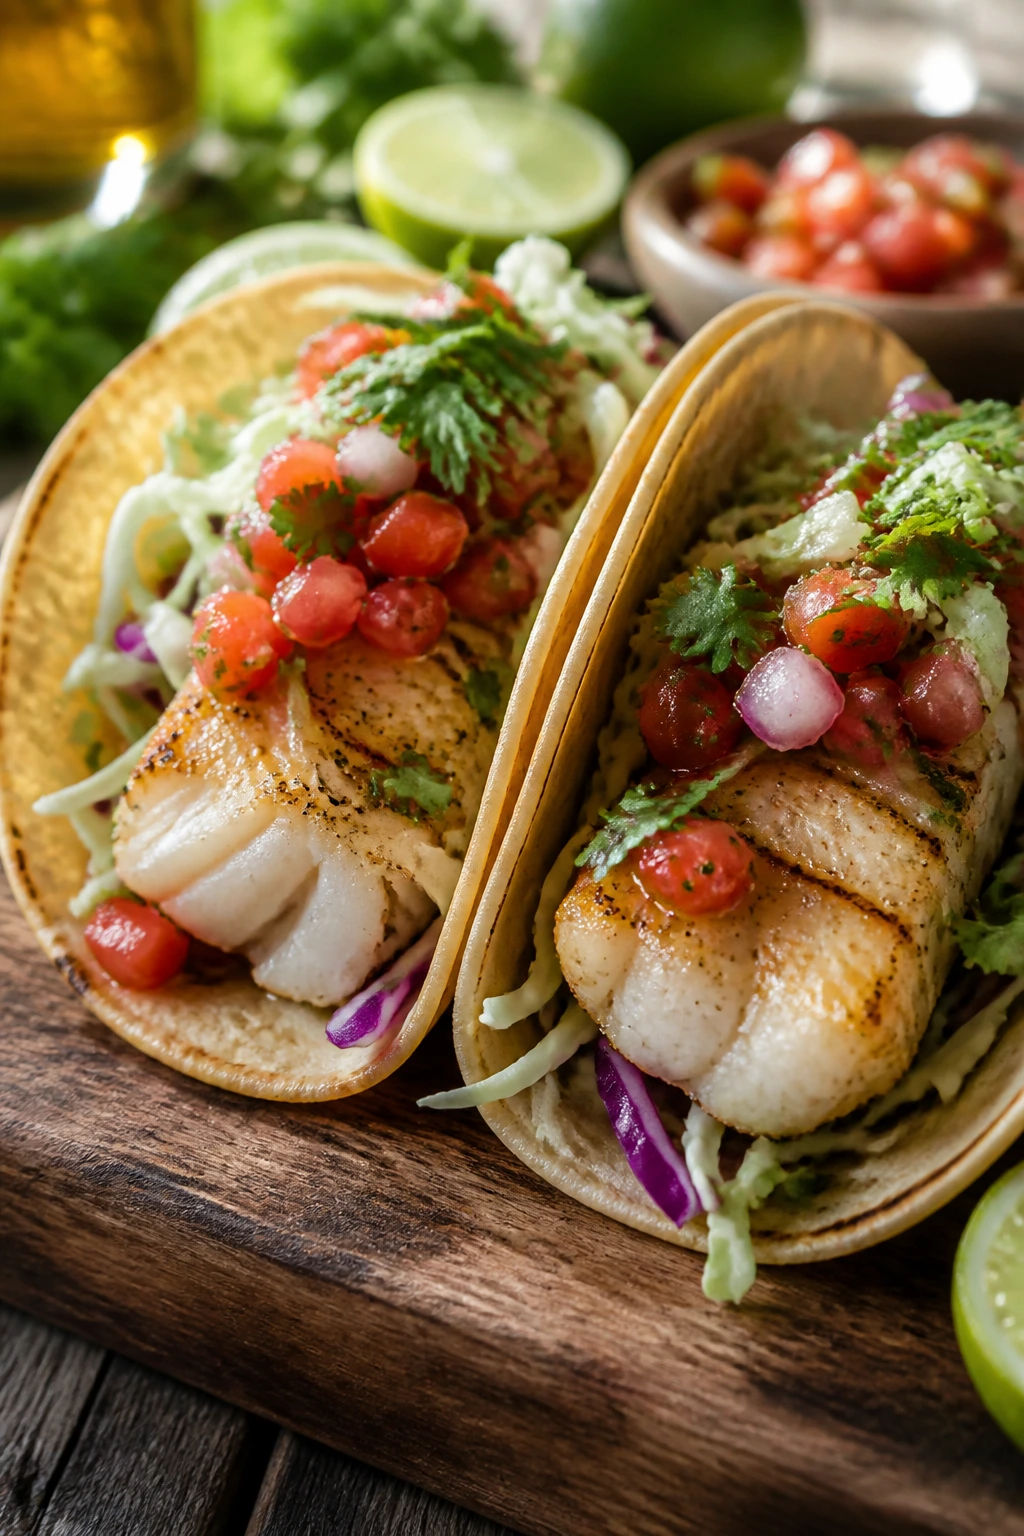
Cod on the grill needs a gentler hand than steak, but it pays you back with clean, flaky meat that works well in tortillas.
Why It Works: Citrus and cumin give cod enough flavor to hold its own against the fire, and the tacos keep the portions easy to handle. It’s a light picnic main that still feels substantial.
Key Ingredients:
- 2 lb cod fillets
- 2 tbsp olive oil
- 1 tbsp lime juice
- 1 tsp cumin
- 1 tsp kosher salt
- 8 small tortillas
- Cabbage slaw
- Salsa and cilantro
Quick Steps:
- Brush cod with oil, lime juice, cumin, and salt.
- Grill over medium-high heat for 3 to 4 minutes per side, or until it flakes.
- Warm tortillas on the grill.
- Flake the fish into tortillas with slaw.
- Finish with salsa and cilantro.
Equipment for This Recipe:
- Grill
- Fish spatula
- Tortilla warmer or foil
How to Serve This Dish: Pack the fish, tortillas, and slaw separately, then assemble at the picnic. That keeps the tacos from turning soggy.
Pro Tips for This Recipe:
- Oil the fish and grill grates well.
- Don’t fuss with the fish while it cooks.
- Warm tortillas right before serving.
Variations on This Dish:
- Chipotle Version: Add chipotle powder to the spice mix.
- Mango Version: Top with mango salsa.
- Lettuce Wrap Version: Use lettuce cups instead of tortillas.
Common Mistakes to Avoid with This Dish:
- Overturning the fish: It breaks apart.
- Overcooking: Cod dries out fast.
- Assembling too early: The tortillas soften too much.
49. Grilled Hot Dogs with Quick Pickle Relish
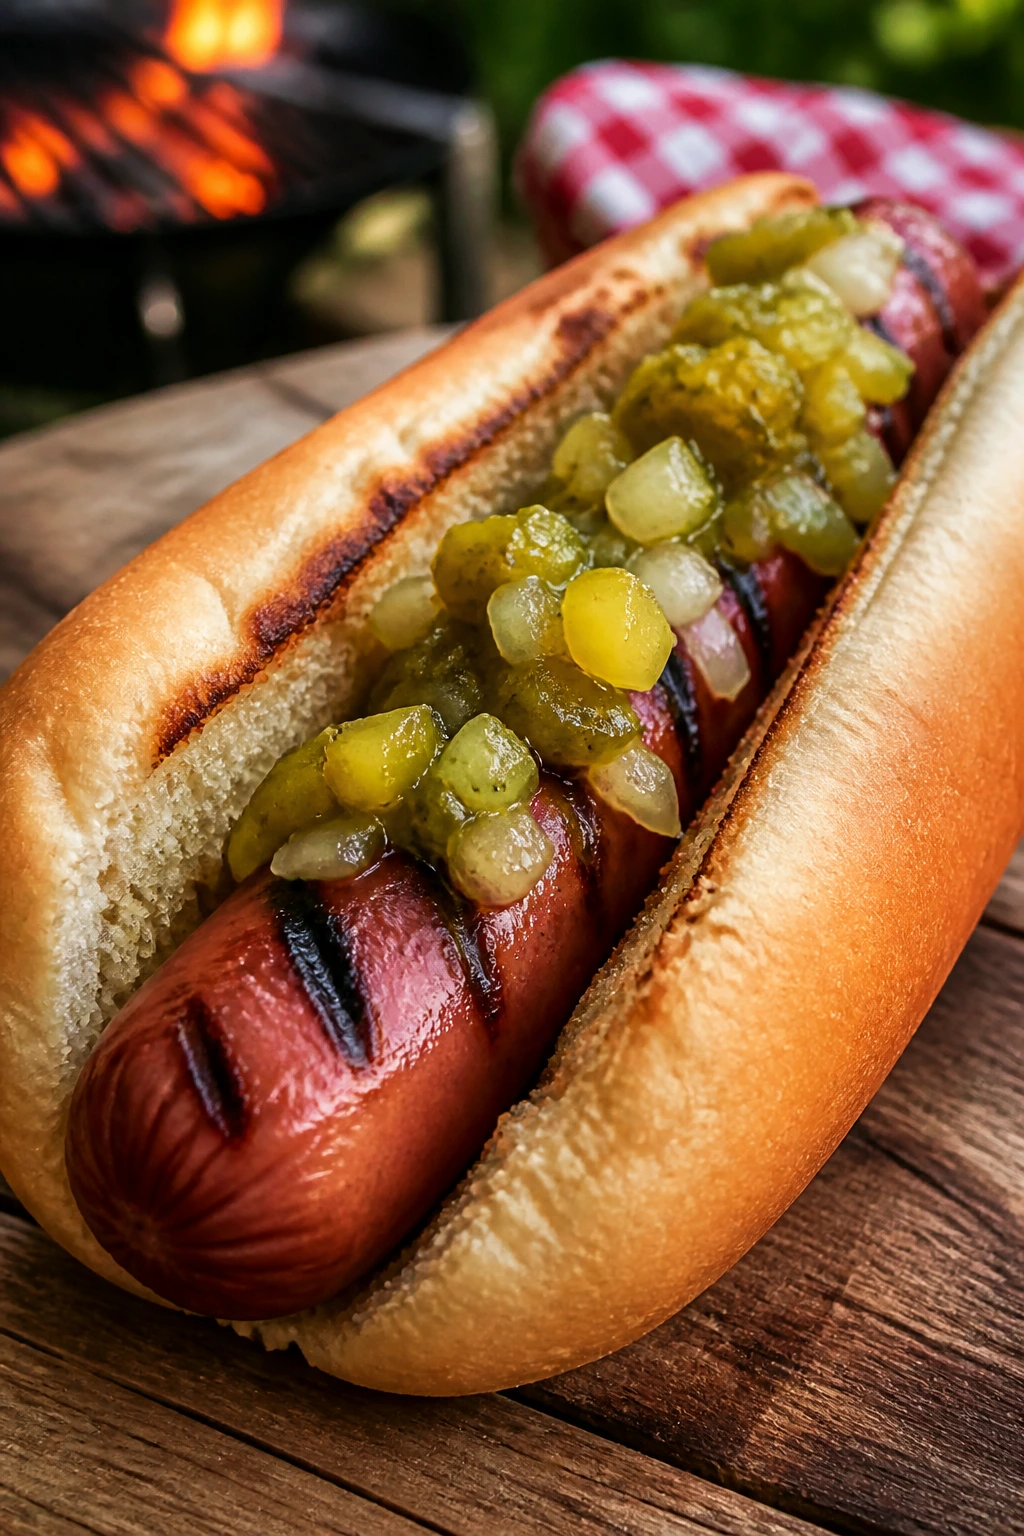
Hot dogs are not fancy, and that’s the point. When you grill them well and give them a sharp relish, they become exactly what a picnic wants.
Why It Works: High heat gives the dogs snappy skin and a little char, while the relish cuts through the richness. The whole thing is simple, fast, and hard to mess up if you keep the buns warm.
Key Ingredients:
- 8 hot dogs
- 8 buns
- 1 cup chopped pickles
- 2 tbsp chopped onion
- 1 tbsp mustard
- 1 tbsp pickle juice
- 1 tbsp butter, for buns
- Ketchup or sauerkraut, optional
Quick Steps:
- Mix pickles, onion, mustard, and pickle juice for the relish.
- Grill hot dogs over medium-high heat for 5 to 7 minutes, turning until browned.
- Butter and toast the buns for 20 to 30 seconds.
- Place the dogs in the buns.
- Spoon on relish and any extra toppings.
Equipment for This Recipe:
- Grill
- Tongs
- Small bowl for relish
How to Serve This Dish: Keep toppings in separate bowls and let people build their own. It’s easy, and it prevents soggy bun chaos.
Pro Tips for This Recipe:
- Roll the hot dogs instead of leaving one side charred.
- Toast the buns or they go soft fast.
- Make the relish while the grill heats.
Variations on This Dish:
- Chicago-ish Version: Add mustard, onions, and pickles.
- Chili Version: Add warm chili and cheese.
- Spicy Version: Use pepper relish instead.
Common Mistakes to Avoid with This Dish:
- Cold buns: They feel stale.
- Overloading toppings: The dog slides out.
- Burning the buns: Toast lightly, not deeply.
50. Grilled Eggplant Parmesan Melts
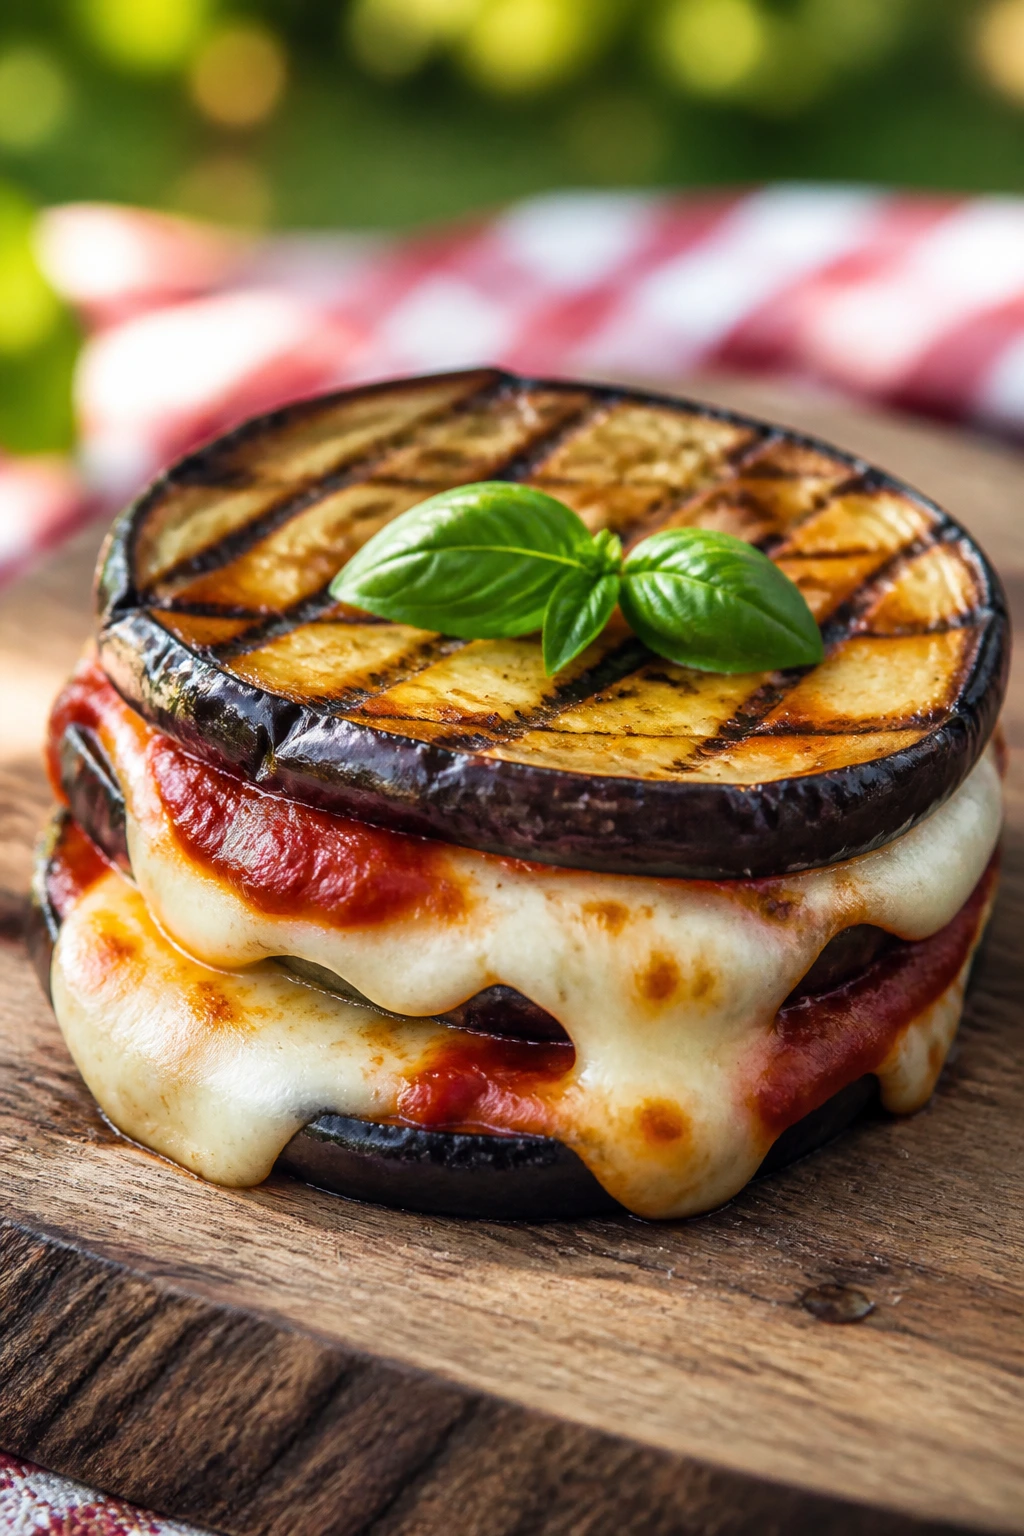
Eggplant Parmesan usually shows up in a casserole dish, but the grill gives it a better edge and makes it picnic-friendly in sandwich form.
Why It Works: Grilled eggplant gets meaty and smoky, and melted mozzarella holds the layers together without making the sandwich slippery. It’s one of the few vegetarian picnic sandwiches that feels built to last.
Key Ingredients:
- 2 large eggplants, sliced into ½-inch rounds
- 3 tbsp olive oil
- 1 tsp kosher salt
- ½ tsp black pepper
- 1 cup marinara sauce
- 8 slices mozzarella
- 4 sandwich rolls or ciabatta pieces
- Basil leaves
Quick Steps:
- Salt the eggplant rounds for 10 minutes, then pat dry.
- Brush with oil and grill over medium-high heat for 4 to 5 minutes per side.
- Spoon marinara over the rounds and top with mozzarella.
- Close the grill lid until the cheese melts.
- Stack into rolls with basil and serve.
Equipment for This Recipe:
- Grill
- Spatula
- Baking sheet or tray
How to Serve This Dish: Wrap each sandwich in foil or parchment for the picnic. A side of crunchy salad keeps it from feeling too soft.
Pro Tips for This Recipe:
- Salt the eggplant first or it can taste watery.
- Use sturdy bread that can hold the layers.
- Let the cheese melt under the lid, not over blazing heat.
Variations on This Dish:
- Pesto Version: Swap marinara for pesto.
- Spicy Marinara Version: Add red pepper flakes to the sauce.
- Zucchini Version: Mix in grilled zucchini slices.
Common Mistakes to Avoid with This Dish:
- Skipping the salt step: The eggplant can be spongy.
- Too much sauce: The sandwich slips apart.
- Burning the bread: Warm it gently, not fiercely.
Why the Grill Wins for Picnic Food
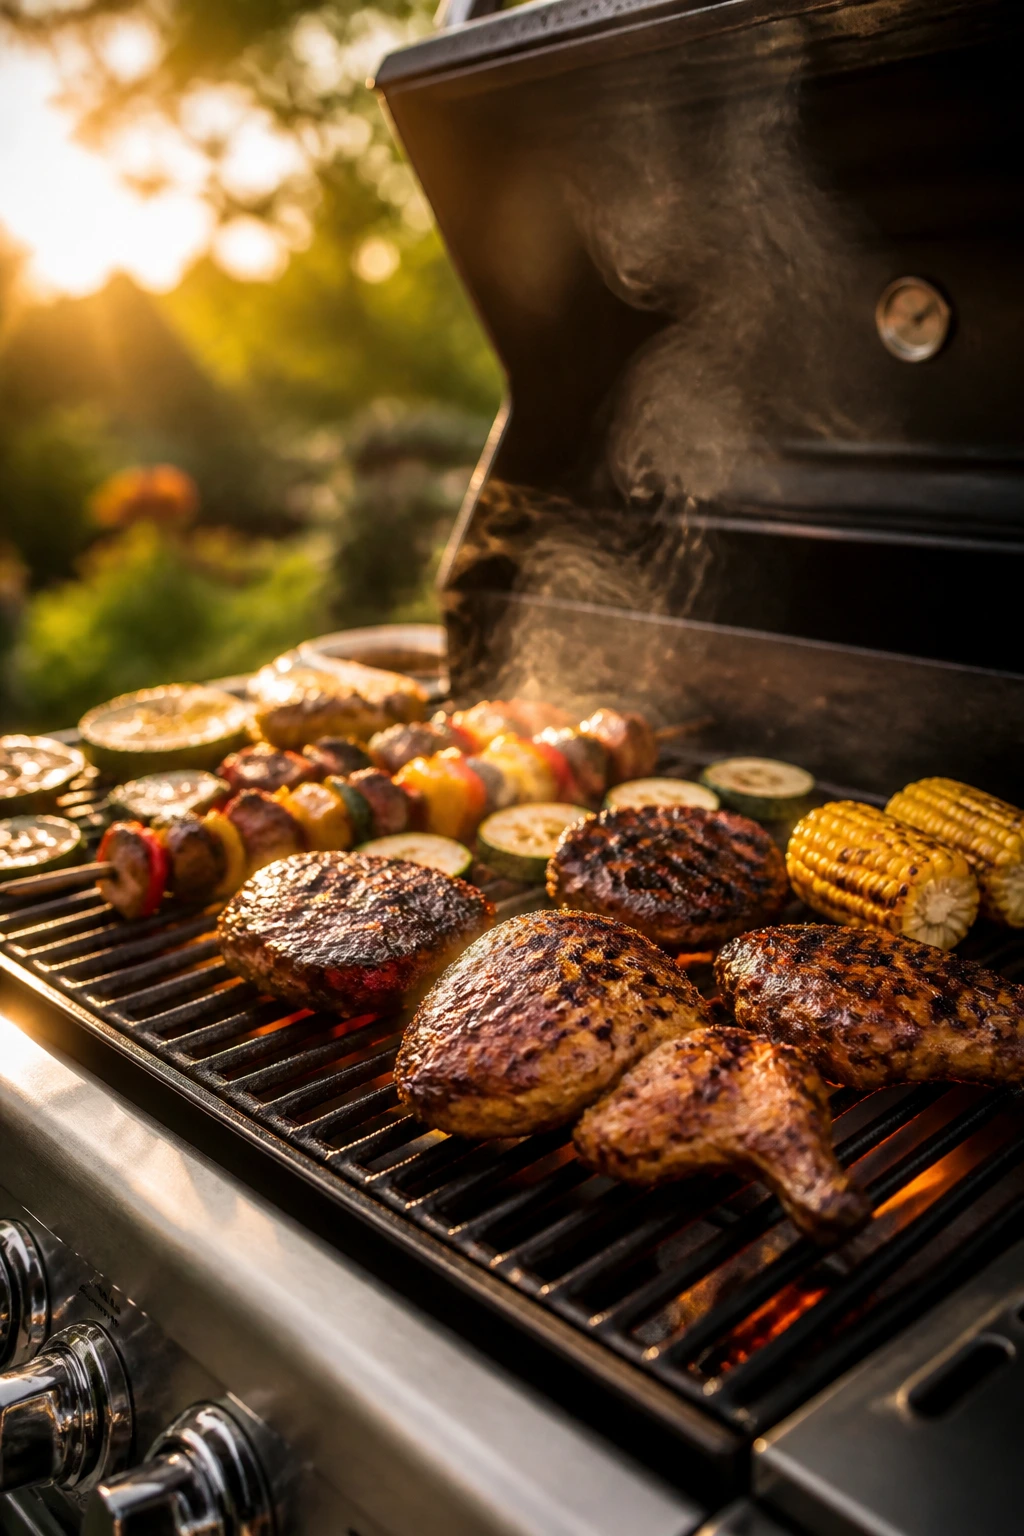
A grill is good at the exact things picnic food needs most: speed, browning, and a little toughness. That sounds unromantic, but it matters. Chicken thighs, corn, steak, peaches, halloumi, flatbread, and mushrooms all do better when the surface gets hot enough to change them. The outside picks up color. The inside stays recognizable. You’re not chasing tenderness at all costs; you’re building food that keeps its shape when it leaves the backyard.
The other advantage is practical. A grill keeps the kitchen cooler, which sounds minor until you try to build a picnic spread inside while the stove is running and the sink is full of salad greens. Outdoor cooking lets you batch foods in stages: vegetables first, proteins second, bread and fruit last. That pacing works especially well when you’re cooking for a group because not everything needs to land at once.
There’s also a texture thing people overlook. Grill marks are not decoration. They’re little zones of caramelization that give peaches more sweetness, asparagus more snap, and salmon more edge. With picnic food, texture keeps the menu from blurring together. You need some crunch, some chew, some softness, and at least one thing that’s cold enough to reset your palate.
Essential Equipment for These Recipes
- A gas or charcoal grill: Either works; charcoal gives deeper smoke, gas gives easier control.
- Instant-read thermometer: The easiest way to keep chicken, pork, and fish from being overcooked.
- Long-handled tongs: Short tools get too close to the heat and make flipping awkward.
- Metal skewers or soaked wooden skewers: Metal is easier for repeated use; wood works if soaked first.
- Grill basket: Useful for asparagus, broccoli, beans, mushrooms, and small vegetables.
- Heavy-duty foil: Foil packets and potato bundles need the thicker kind or they tear.
- Basting brush: Good for glazes, butter, and oiling bread.
- Sharp knife and sturdy cutting board: You’ll use both for slicing steak, fruit, and bread.
- Serving platters with rims: Helpful when juices from peaches, salads, or meat start moving around.
- Cooler or insulated food carrier: Picnic food needs a safe ride more than it needs a dramatic entrance.
Smart Shopping and Ingredient Tips
Picnic grilling works best when you buy for structure, not just flavor. Chicken thighs are more forgiving than breasts. Flank steak and skirt steak need slicing against the grain, so look for cuts with visible muscle lines you can read before you buy. For burgers, 80/20 ground beef gives you enough fat to stay juicy; leaner beef dries out before the picnic blanket is even spread.
Vegetables need the same kind of thought. Choose zucchini, asparagus, green beans, and broccoli that are firm and not floppy. For fruit, peaches, nectarines, plums, and apricots should be ripe enough to smell fragrant but still firm in your hand. Too soft and they melt on the grate. Too hard and they taste dull.
With seafood, buy pieces that are thick enough to handle the fire: salmon fillets, swordfish steaks, tuna steaks, large shrimp, and cod fillets all make sense here. Thin fillets can work, but they need more attention than a picnic line usually allows. If you can smell strong fish before cooking, pass. Clean seafood smells like the ocean, not the dock.
Bread matters too. Pick buns and rolls that have a little structure. Soft is fine, but floppy is a problem once juices, sauces, and melted cheese show up. For flatbreads and pizzas, use dough that can stretch thin without tearing. And when a marinade calls for sugar, use enough for browning, not enough to build a syrup explosion on the grates.
How to Serve These Recipes
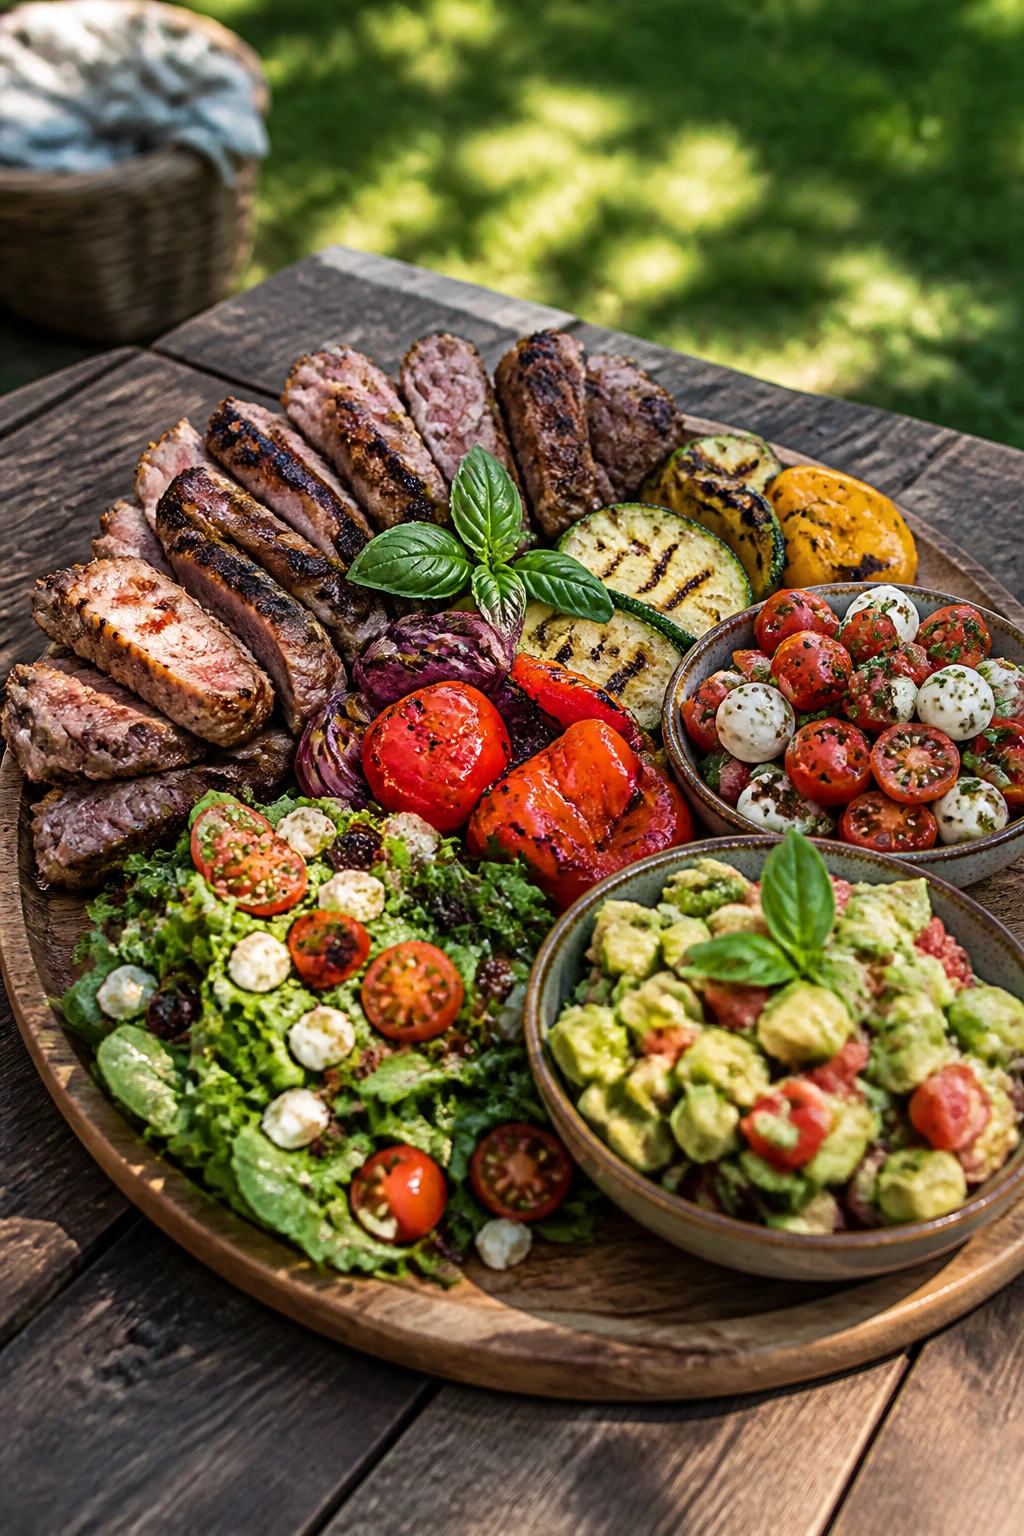
Presentation: Build picnic platters in layers that make sense from a distance. Put grilled meats on one tray, vegetables on another, and cold or room-temp salads in shallow bowls so people can see what they’re choosing. A little basil, parsley, or dill on top makes the spread look finished without turning it fussy.
Accompaniments: Pair the richer items with crunchy sides: slaw, potato salad, cucumber salad, green beans, grilled corn, or a simple romaine salad. Bread-heavy items like sliders, hoagies, and flatbreads work well with pickles or a sharp vinaigrette. Fruit dishes need almost nothing beside them except maybe whipped cream, yogurt, or ice cream if you’re carrying a cooler.
Portions: For picnic mains, plan on 1½ sandwiches, 2 sliders, 2 skewers, or 1 steak portion per adult if there are sides. For vegetables and salads, smaller servings go farther than people expect because the grill brings out more flavor. If the crowd is big and grazing, make a little extra of the quick dishes like corn, skewers, and fruit.
Beverage Pairing: Iced tea with lemon, sparkling water with lime, chilled rosé, crisp lager, or a light lemonade all work across most of these recipes. Anything too sweet can fight the smoke; anything too heavy can flatten the fresh herbs and fruit.
Additional Tips and Flavor Boosters
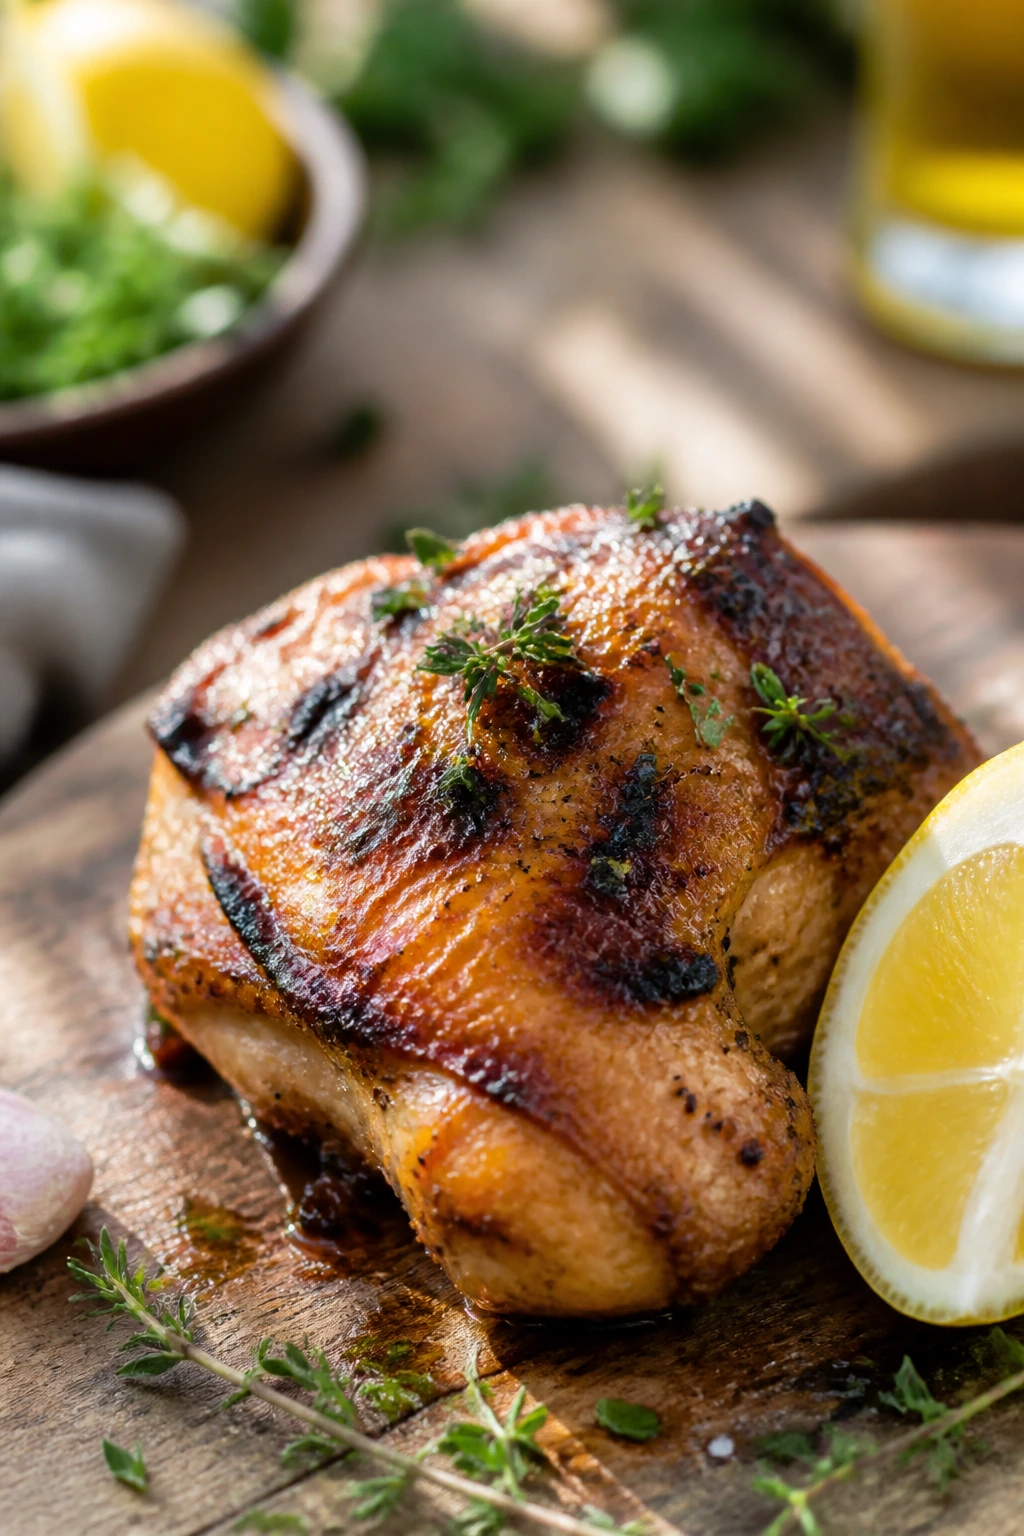
Flavor Enhancement: A finishing splash of acid changes almost every grilled picnic dish. Lemon over chicken, lime over corn, vinegar over steak, or balsamic over peaches gives the food a brighter edge right before serving.
Customization: Keep a few small add-ins on the side: sliced jalapeños, hot sauce, chopped herbs, pickled onions, extra cheese, and flaky salt. People love building their own plate, and it saves you from having to make one version of every dish.
Serving Suggestions: Use parchment paper under sliders, sandwiches, and flatbread strips so grease doesn’t soak through the platter. For fruit, a spoonful of yogurt, mascarpone, or whipped cream turns a grilled topping into dessert without much effort.
Make-It-Yours: For gluten-free eaters, swap buns and bread for lettuce cups, rice bowls, or skewers. For dairy-free plates, use olive oil, tahini, or herb vinaigrette instead of cheese-heavy finishes. For heat-lovers, keep chili flakes, hot honey, and adobo sauce handy; they fit nearly everything here.
Make-Ahead, Storage, and Reheating Guidance
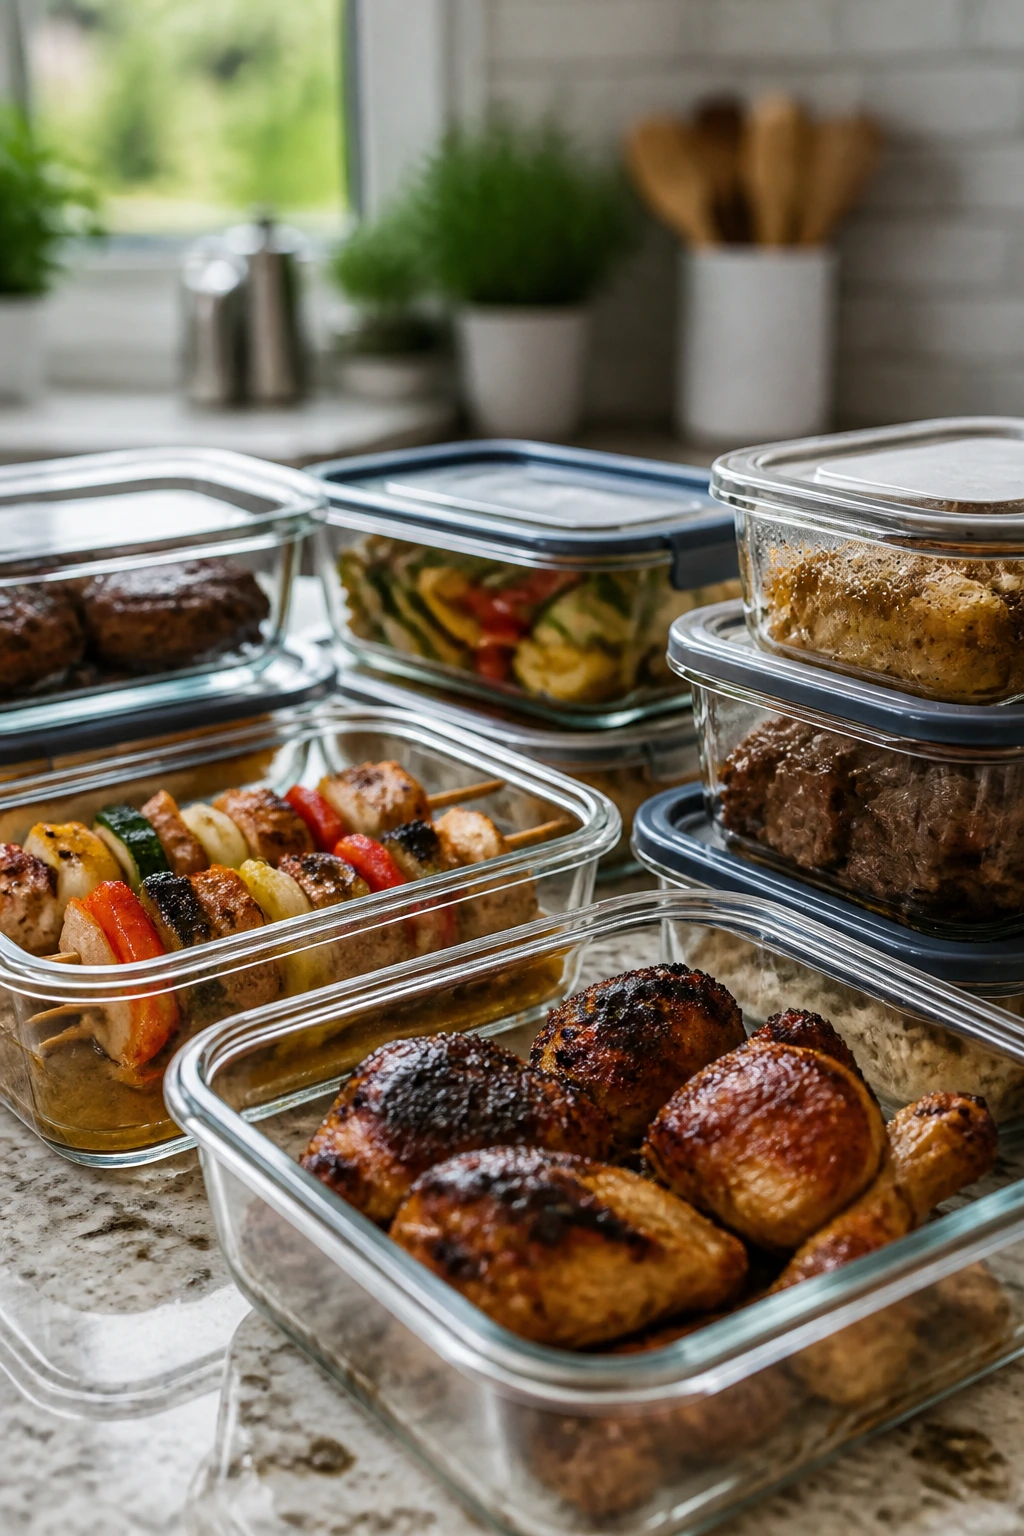
A good picnic menu gets easier when some parts are made ahead. Marinades can usually be mixed the day before, and many proteins can sit in them for a few hours without trouble. Chicken, pork, burgers, and tofu can be shaped or skewered ahead and chilled, covered, for several hours. Fish and shrimp are better seasoned closer to grilling so they keep their texture.
Cooked grilled meats hold well in the fridge for 3 to 4 days in airtight containers. Seafood is best within 2 days. Vegetables and grains can usually go 3 days, and grilled flatbreads or bread-based items are fine for 1 to 2 days if wrapped well. For freezing, cooked chicken, pork, and burgers can usually go up to 2 months; fruit salads and lettuce-based dishes are not freezer candidates.
Reheat meats in a 300°F oven, covered loosely with foil, until warmed through. That keeps chicken and pork from drying out. For burgers and sausages, a few minutes on low grill heat or in a skillet works better than the microwave. Seafood is trickier; reheat gently or serve it cold if it’s already cooked. Vegetables are best warmed quickly in a skillet or eaten room temperature. Most picnic fruit desserts are better made the day of, though grilled pound cake and fruit packets can be reheated briefly and still behave.
One useful habit: pack sauces, dressings, and soft cheeses separately until the last minute. That keeps wraps crisp, salads lively, and bread from collapsing in the cooler.
Variations and Adaptations to Try
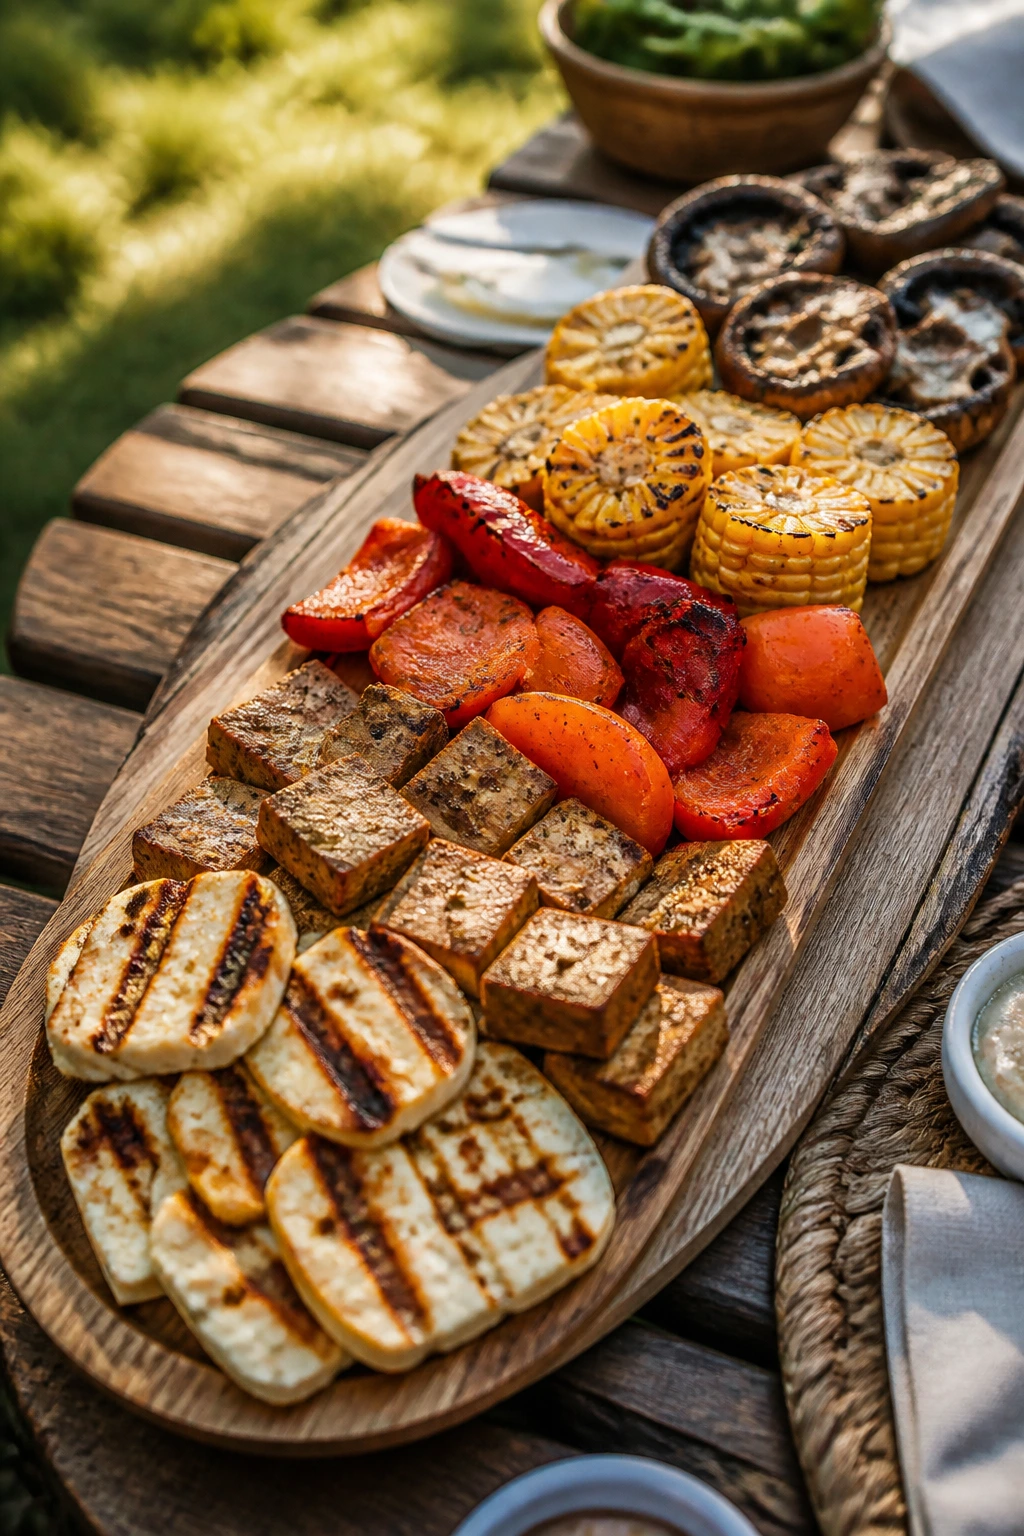
Gluten-Free Picnic Basket: Swap buns and wraps for lettuce cups, corn tortillas, rice, or skewers. Grill the filling as usual, then lean on slaw, salsa, or herb sauces to replace the bread’s job.
Dairy-Free Picnic Lineup: Use tahini, chimichurri, vinaigrettes, hot honey, or mustard sauces instead of burrata, feta, yogurt, and mascarpone. Many of the grilled vegetables and meats already fit this path with almost no changes.
Mild Kid-Friendly Version: Keep the spice low, use honey or maple in glazes, and set hot sauce on the side instead of mixing it in. Sliders, corn, grilled chicken, and fruit tend to be the easiest wins.
Spice-Lover’s Spread: Add chipotle, cayenne, chili crisp, jalapeños, or gochujang to marinades and finishing sauces. Keep a cool, crunchy side nearby so the heat doesn’t take over the whole table.
Vegetarian Main Route: Halloumi, tofu, tempeh, portobello caps, grilled flatbread, stuffed peppers, and corn all carry a picnic menu without feeling like filler. The key is giving them enough salt and smoke to stand beside the meat dishes, not hiding them in the corner.
Lower-Sodium Approach: Rely more on citrus, vinegar, herbs, garlic, and pepper, then salt the finished dish lightly at the table. Grilled fruit, vegetables, and fish can all handle that treatment well.
Common Mistakes to Avoid
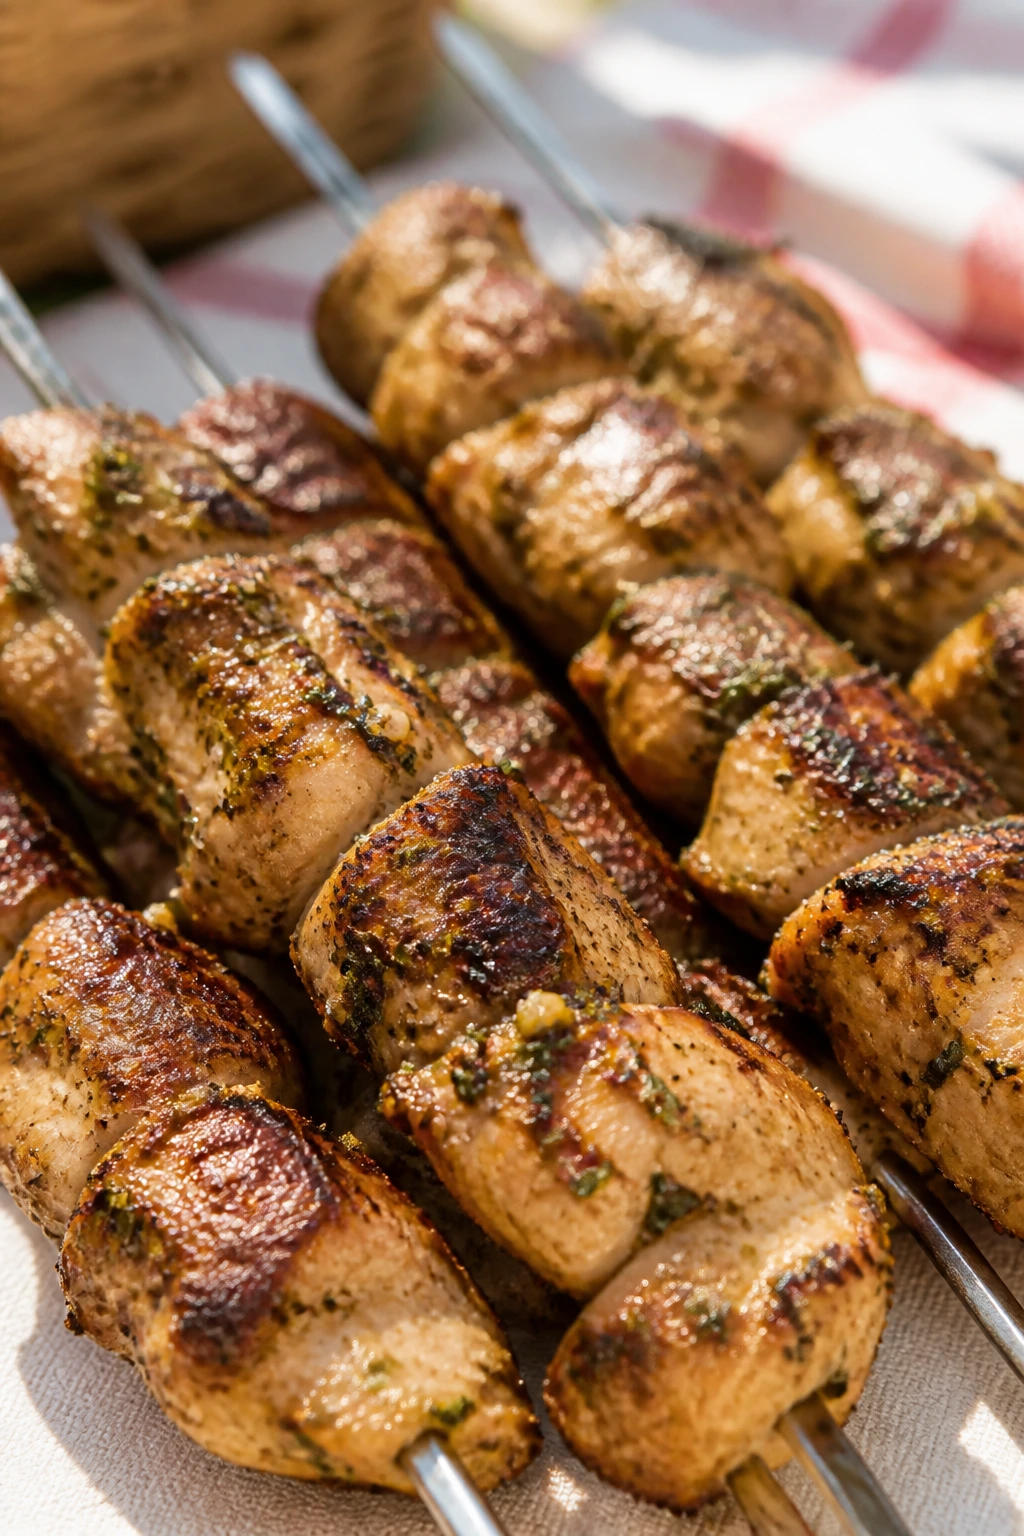
The biggest mistake is starting with a grill that isn’t hot enough. Food sits and sweats instead of searing, and then it tastes dull no matter how good the marinade was. Let the grates preheat fully, then clean them before the first batch goes on.
A second problem is using too much sugar too early. Honey glazes, barbecue sauces, and fruit marinades burn fast over direct heat. If the sauce contains a lot of sugar, wait until the last few minutes or brush it on after the main cook.
Crowding is another one. A packed grill trap steam, and steam is the enemy of the char you’re trying to build. Give skewers and vegetables room, and cook in batches if you need to.
People also tend to under-season picnic food because they’re worried about “too much” on the outside. Grilling tends to mute flavors a little, so protein, vegetables, and bread need more salt than they would in a raw salad. Taste the finished sauce and finishing salt before you serve anything.
The last trap is packing everything together too soon. Sauces make buns soggy, salads wilt, and crisp vegetables lose their snap. Keep the parts separate until the blanket is spread.
Frequently Asked Questions
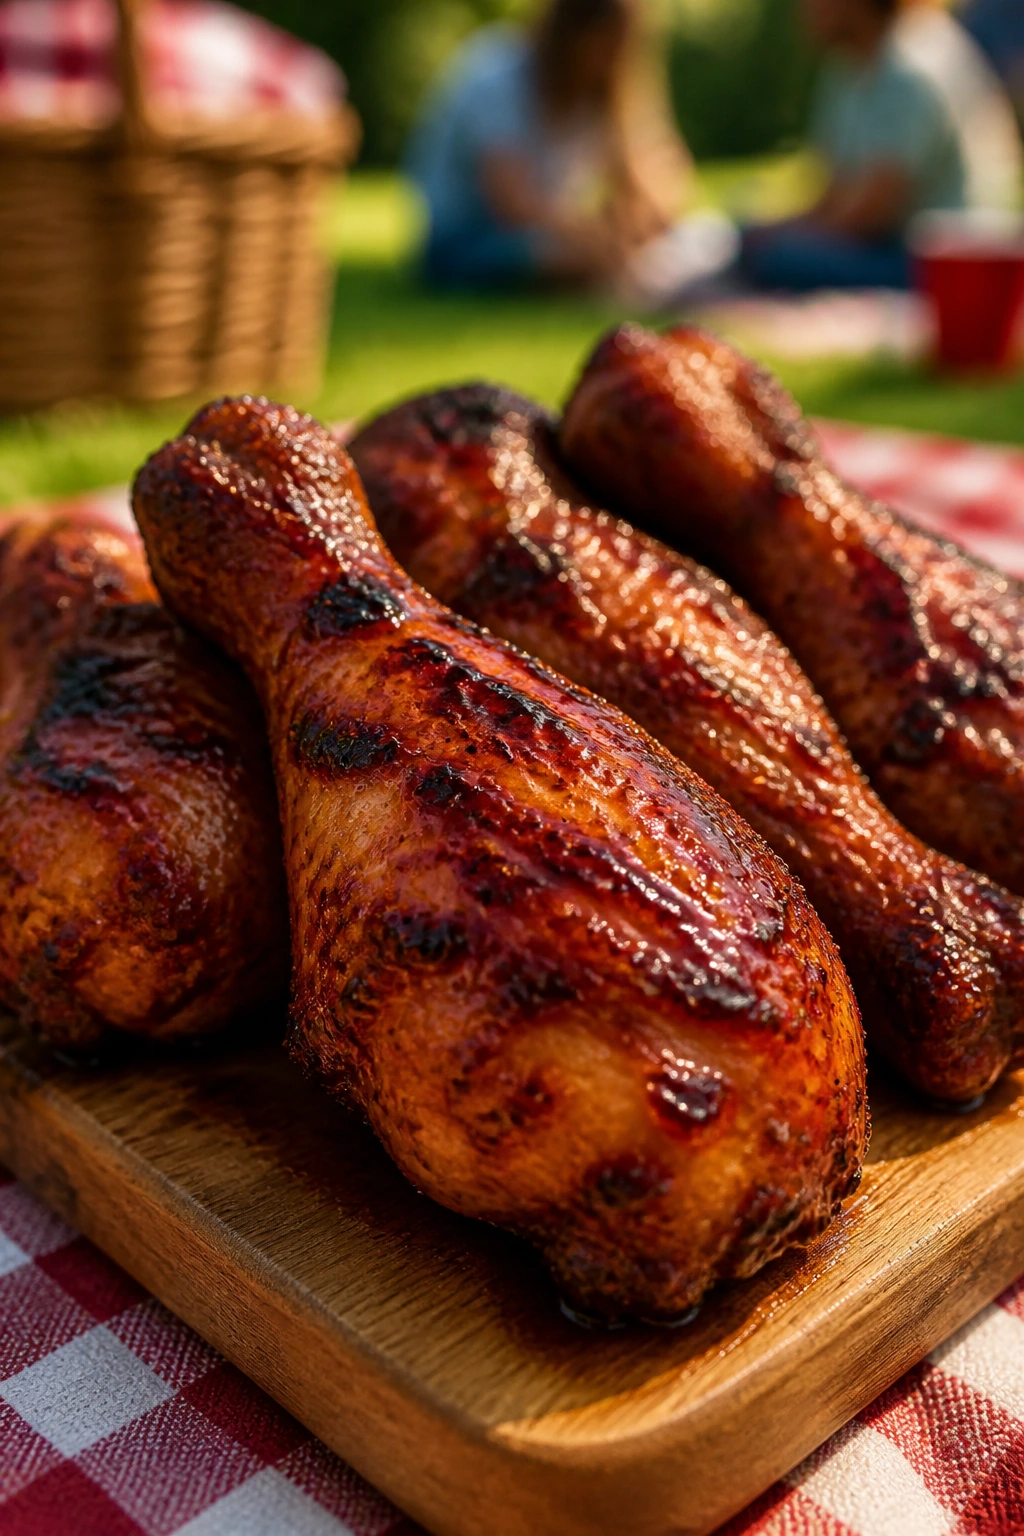
What grilled foods hold up best at a picnic?
Chicken thighs, burgers, skewers, grilled corn, flatbread, potatoes, and sturdy salads are all good bets. They stay recognizable after a little travel and still taste like themselves at room temperature.
Can I use a gas grill instead of charcoal?
Yes. Gas is easier to control, which helps with fish, vegetables, and sugary glazes. Charcoal gives a deeper smoky edge, but it is not required for these recipes.
How do I keep grilled food warm without drying it out?
Wrap the cooked food loosely in foil and keep it in a warm insulated carrier or turned-off oven for a short time. Don’t seal it tight or you’ll trap steam and lose the texture you worked for.
Which recipes should be served right away?
Shrimp, grilled fish, grilled romaine, flatbreads, and fruit desserts are best very fresh. They still taste fine after a short wait, but their texture is at its peak right off the grill.
Can I prep these dishes the day before?
Absolutely. Marinades, chopped vegetables, sauces, and even skewers can be assembled ahead. Keep wet ingredients and bread separate until grilling or serving time.
How do I stop skewers from burning?
If you’re using wooden skewers, soak them for at least 30 minutes and keep the exposed ends away from the flames. Metal skewers avoid the problem entirely and are easier for repeated use.
What if my picnic food needs to sit out for a while?
Choose foods that are sturdy at room temperature and keep anything creamy or seafood-based chilled until the last minute. Use separate containers for sauces and dressings so the cooked food doesn’t soften too early.
Can I reheat leftover grilled food the next day?
Yes, but gently. Use a low oven, a skillet, or the grill itself for meats and vegetables; seafood should be reheated carefully or eaten cold if the texture is already delicate.
Do I need a grill basket for vegetables?
Not always, but it helps a lot with small or slippery pieces like green beans, broccoli, and chopped mushrooms. If you don’t have one, heavy-duty foil or larger cuts solve most of the same problems.
Pack the Cooler, Light the Grill
The best thing about grilled picnic food is that it doesn’t feel overplanned once it lands on the blanket. A skewer, a sandwich, a fruit salad with smoke on it, a tray of corn, a stack of sliders — all of it behaves like food that knows the setting. It is a little rough around the edges. That’s the charm.
If you build your menu around foods that can take heat, hold their shape, and still taste good after a short wait, you’ve already done most of the work. The rest is just a clean grill, a decent cooler, and a little restraint with the sauce until the last minute. That’s usually enough.