
Some cookies are built to vanish from a tray; this one is built to get pointed at. A buttery Easter cookie with cream cheese frosting does that with pale gold edges, a soft center, and a frosting that tastes rich without feeling heavy. The butter shows up first. Then the vanilla. Then that little tang from the cream cheese that keeps each bite from tipping into sugar overload.
A lot of holiday cookie recipes miss by a mile because they try to do too much. Too much flour. Too much sweetness. Too much decoration. This one keeps the dough simple and lets the texture do the work: enough butter for flavor, a touch of almond extract for that bakery smell, and a chilled dough that cuts cleanly instead of slumping into odd shapes.
If you’ve ever opened the oven to find your cut-outs have spread into one another, you already know how fussy these cookies can be. They do not need drama. They need a cool dough, a steady 350°F oven, and frosting that’s soft enough to spread but firm enough to sit in a neat swoop. Get those three things right and the whole batch behaves.
Why This Buttery Easter Cookie Feels Like Easter on a Plate
There’s a reason cut-out cookies turn up around Easter more than almost any other holiday. They’re bright, easy to shape into eggs or bunnies or flowers, and they hold color well when the frosting is clean and simple. This version leans into that tradition without becoming fussy or stiff.
The dough is more tender than a standard sugar cookie. A full cup of butter gives it that rich, melt-away bite, while the egg yolk adds a little extra softness that you notice most on day two, when the crumb settles into itself and stops feeling freshly baked. That’s the good stuff. Not cakey. Not brittle. Just soft enough to sink your teeth into without crumbling all over the table.
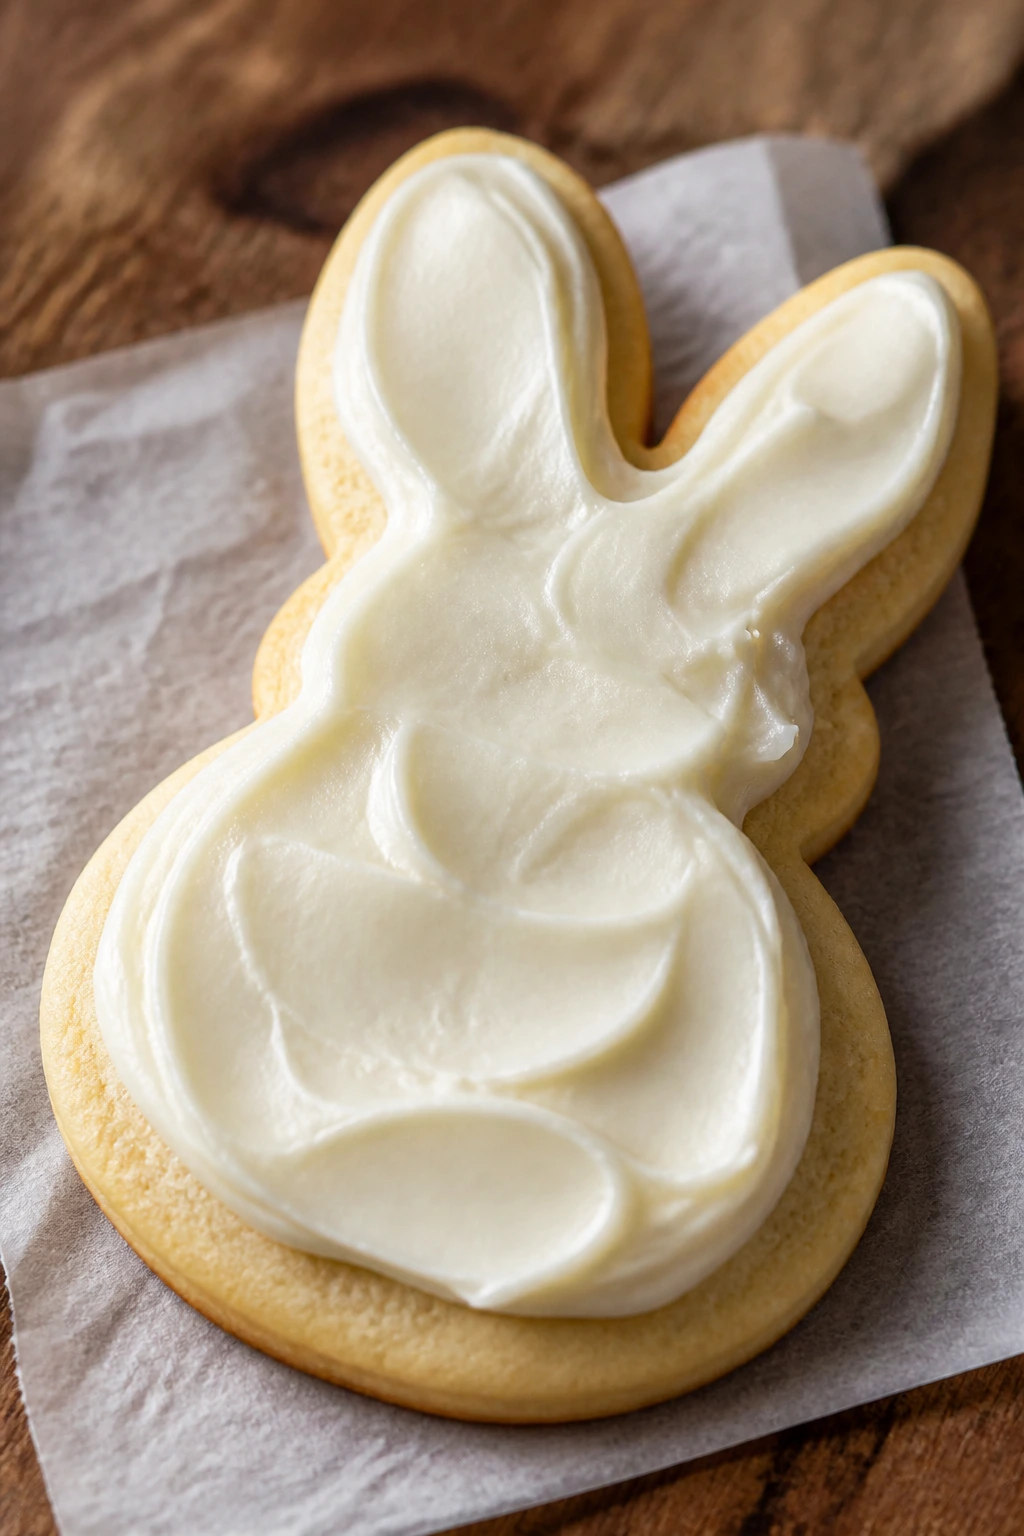
Cream cheese frosting changes the whole mood. Royal icing gives you crisp lines, but it also gives you a hard shell and a candy-like finish. Here, the frosting stays plush and spreadable, with enough tang to make each cookie taste like an actual dessert rather than colored sugar in disguise. It’s the kind of frosting that feels at home on a cookie shaped like a tulip or a rabbit ear.
And yes, these cookies look cheerful on a platter. But more than that, they eat well. That matters. A pretty cookie that tastes dry after one bite is mostly decoration. This one keeps its flavor after the first minute, which is the real test.
Why You’ll Keep Coming Back to This Batch
-
Tender Cutouts: The dough rolls to 1/4-inch thick and bakes in under 10 minutes, so the centers stay soft instead of turning snappy and dry.
-
Tangy Frosting: Cream cheese frosting keeps the sweetness in check, which matters when you’re already decorating with pastel colors and sprinkles.
-
Easy Holiday Shapes: Bunny cutters, egg cutters, flowers, even a plain round cookie all work here because the dough keeps its edges without fighting you.
-
Make-Ahead Friendly: The dough chills well, the frosting holds in the fridge, and the baked cookies stack cleanly after the icing sets.
-
Pretty Without Fuss: A simple swirl of frosting and a few sanding sugars turn the same base dough into a tray that looks varied without extra baking.
-
Party-Friendly Texture: These cookies stay soft for days if you store them correctly, which means you can bake them before the rest of the dessert spread gets chaotic.
Timing, Yield, and the Chill Window for Easter Cookies

Yield: 24 to 30 cookies, depending on cutter size and thickness
Prep Time: 25 minutes
Cook Time: 8 to 10 minutes per batch
Total Time: 1 hour 35 minutes, not counting long chilling
Chill/Rest Time: 1 hour for the dough, plus 20 minutes for frosting to set
Difficulty: Intermediate — the method is straightforward, but rolling evenly and keeping the dough cool take a little attention.
Best Served: Cooled, frosted, and rested long enough for the icing to firm up slightly.
The timing looks modest on paper, but the chill matters. Warm dough spreads. Soft frosting smears. Rushed decorating turns neat bunnies into glossy little accidents. If your kitchen runs warm, give the dough closer to 75 minutes in the fridge and chill the cut shapes for 10 minutes before baking.
This is one of those recipes where a little patience pays back fast. The dough becomes easier to roll after chilling, the cookies hold their edges better, and the frosting settles into a smooth layer instead of sliding around the moment you touch it.
The Ingredients That Build a Soft, Buttery Crumb
For the Cookies
- 2 3/4 cups all-purpose flour, spooned and leveled
- 1 teaspoon baking powder
- 1/2 teaspoon fine salt
- 1 cup unsalted butter, softened to cool room temperature
- 3/4 cup granulated sugar
- 1 large egg, room temperature
- 1 large egg yolk, room temperature
- 1 teaspoon vanilla extract
- 1/2 teaspoon almond extract
- 2 tablespoons whole milk or heavy cream
For the Cream Cheese Frosting
- 8 ounces block cream cheese, softened
- 1/2 cup unsalted butter, softened
- 3 1/2 cups powdered sugar, sifted
- 1 teaspoon vanilla extract
- 1/8 teaspoon fine salt
- 1 to 2 tablespoons whole milk or cream, as needed
For Decorating
- Gel food coloring, optional
- Pastel sprinkles or sanding sugar, optional
The ingredient list is short on purpose. There’s no cornstarch, no sour cream, no complicated glaze. The texture comes from butter, egg, and controlled baking, which is a far better place to spend your attention than on a pantry full of extras.
What Each Ingredient Does in the Bowl
Cookie Dough
What to use: 2 3/4 cups all-purpose flour, 1 teaspoon baking powder, 1/2 teaspoon fine salt, 1 cup unsalted butter, 3/4 cup granulated sugar, 1 large egg, 1 large egg yolk, 1 teaspoon vanilla extract, 1/2 teaspoon almond extract, and 2 tablespoons milk or cream.
Preparation: Bring the butter and egg to cool room temperature before you start. The butter should give slightly when pressed, not look oily or shiny. That small difference matters more than people think.
Substitutions: If you don’t like almond extract, use an extra teaspoon of vanilla instead. A good 1:1 gluten-free baking flour can work here too, though the dough will feel a little more fragile when you roll it.
Tips: Spoon and level the flour instead of digging the cup into the bag. Too much flour is the fastest way to make these cookies dry, and it also makes the dough harder to roll cleanly after chilling.
Cream Cheese Frosting
What to use: 8 ounces block cream cheese, 1/2 cup unsalted butter, 3 1/2 cups powdered sugar, 1 teaspoon vanilla extract, 1/8 teaspoon fine salt, and 1 to 2 tablespoons milk or cream.
Preparation: Soften the cream cheese and butter before beating them together. If either one is cold, the frosting turns lumpy and takes longer to smooth out.
Substitutions: If you want a sharper tang, swap 2 tablespoons of the cream cheese for mascarpone? No. Skip that move. It softens the frosting too much. Stick with block cream cheese, or use a dairy-free block-style cream cheese if needed. That version usually needs a little extra powdered sugar to hold its shape.
Tips: Beat the cream cheese and butter first until there are no visible lumps, then add the sugar in two additions. That makes the frosting smoother and keeps powdered sugar from puffing all over your counter.
Decorating Extras
What to use: Gel food coloring, pastel sprinkles, or sanding sugar.
Preparation: Set the colors and sprinkles in small bowls before the frosting comes out. Frosting waits for nobody, and the first batch of cookies always gets decorated faster than the last.
Substitutions: Skip the coloring and leave the frosting white if you want a cleaner tray. A plain white frosting with a few colored sugars can look sharper than a heavily tinted batch.
Tips: Use gel coloring rather than liquid drops. Liquid thins the frosting, and thin frosting is annoying when you’re trying to keep bunny ears from smearing into the next cookie.
The Tools That Keep Cut-Out Cookies Neat
-
Stand mixer or hand mixer: Either one works; you just want enough power to cream the butter and sugar well.
-
Large mixing bowl: Use one roomy bowl for the dough so you can fold in the flour without chasing dry pockets around the sides.
-
Measuring cups and spoons: Precise flour and sugar measurements matter here, especially with a soft dough.
-
Rolling pin: A straight, sturdy rolling pin makes it easier to keep the dough at a steady 1/4-inch thickness.
-
Parchment paper: Roll the dough between sheets of parchment to cut down on sticking and excess flour.
-
Baking sheets: Rimmed sheet pans are ideal. They give the cookies a stable surface and catch any tiny butter seepage.
-
Cookie cutters: Easter shapes are fun, but a round cutter works just as well if that’s what you own.
-
Offset spatula or thin metal spatula: This helps lift the cut-outs without stretching the edges.
-
Wire rack: Cookies cool fast and evenly on a rack, which matters before frosting.
-
Small bowl and spoon or piping bag: Use what feels easiest for decorating. You do not need a pastry cabinet setup to make these look good.
Mixing and Chilling the Dough
Whisk the dry ingredients.
- In a medium bowl, whisk together the flour, baking powder, and salt for 20 to 30 seconds until the mixture looks even. Set it aside.
Cream the butter and sugar.
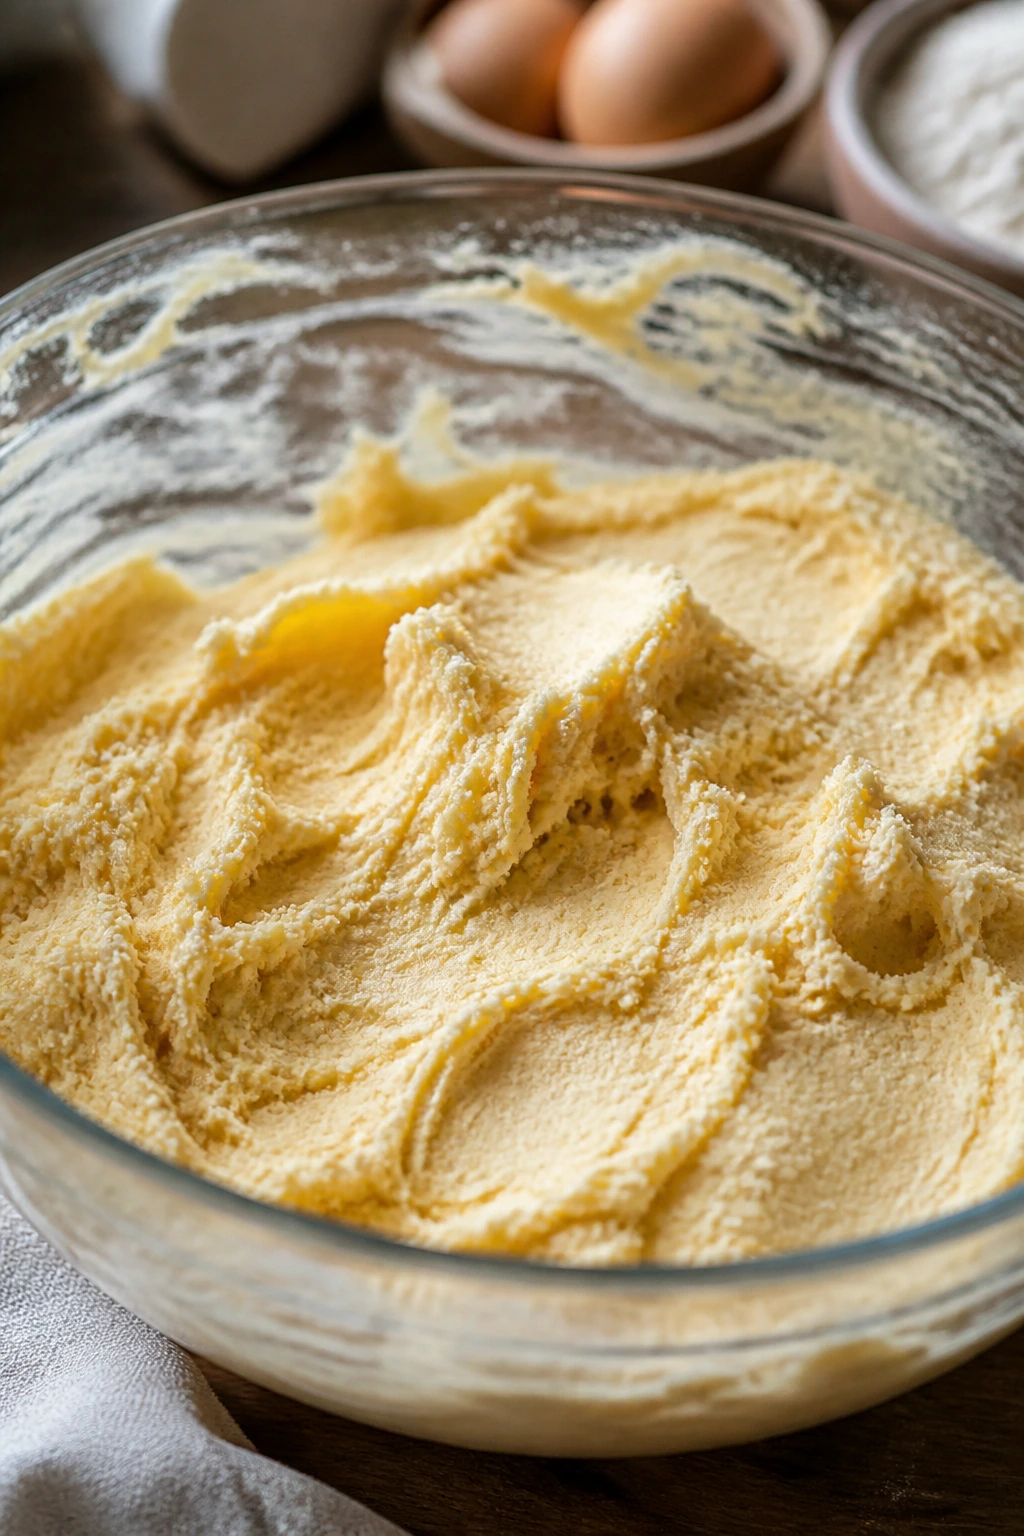
- In a large bowl or stand mixer fitted with the paddle attachment, beat the butter and sugar on medium speed for 3 to 4 minutes, until the mixture turns pale, fluffy, and a little lighter in volume. Do not rush this step; the air you build here helps the cookies stay tender instead of heavy.
Add the eggs and flavorings.
- Beat in the egg, egg yolk, vanilla extract, almond extract, and milk. Mix for 20 to 30 seconds, just until the batter looks smooth and slightly glossy. If it looks a touch curdled, that’s fine.
Bring in the flour.
- Reduce the mixer to low and add the dry ingredients in two additions, mixing only until the last streaks of flour disappear. Stop the mixer the moment the dough comes together; overmixing makes the cookies tough and can make them spread less evenly.
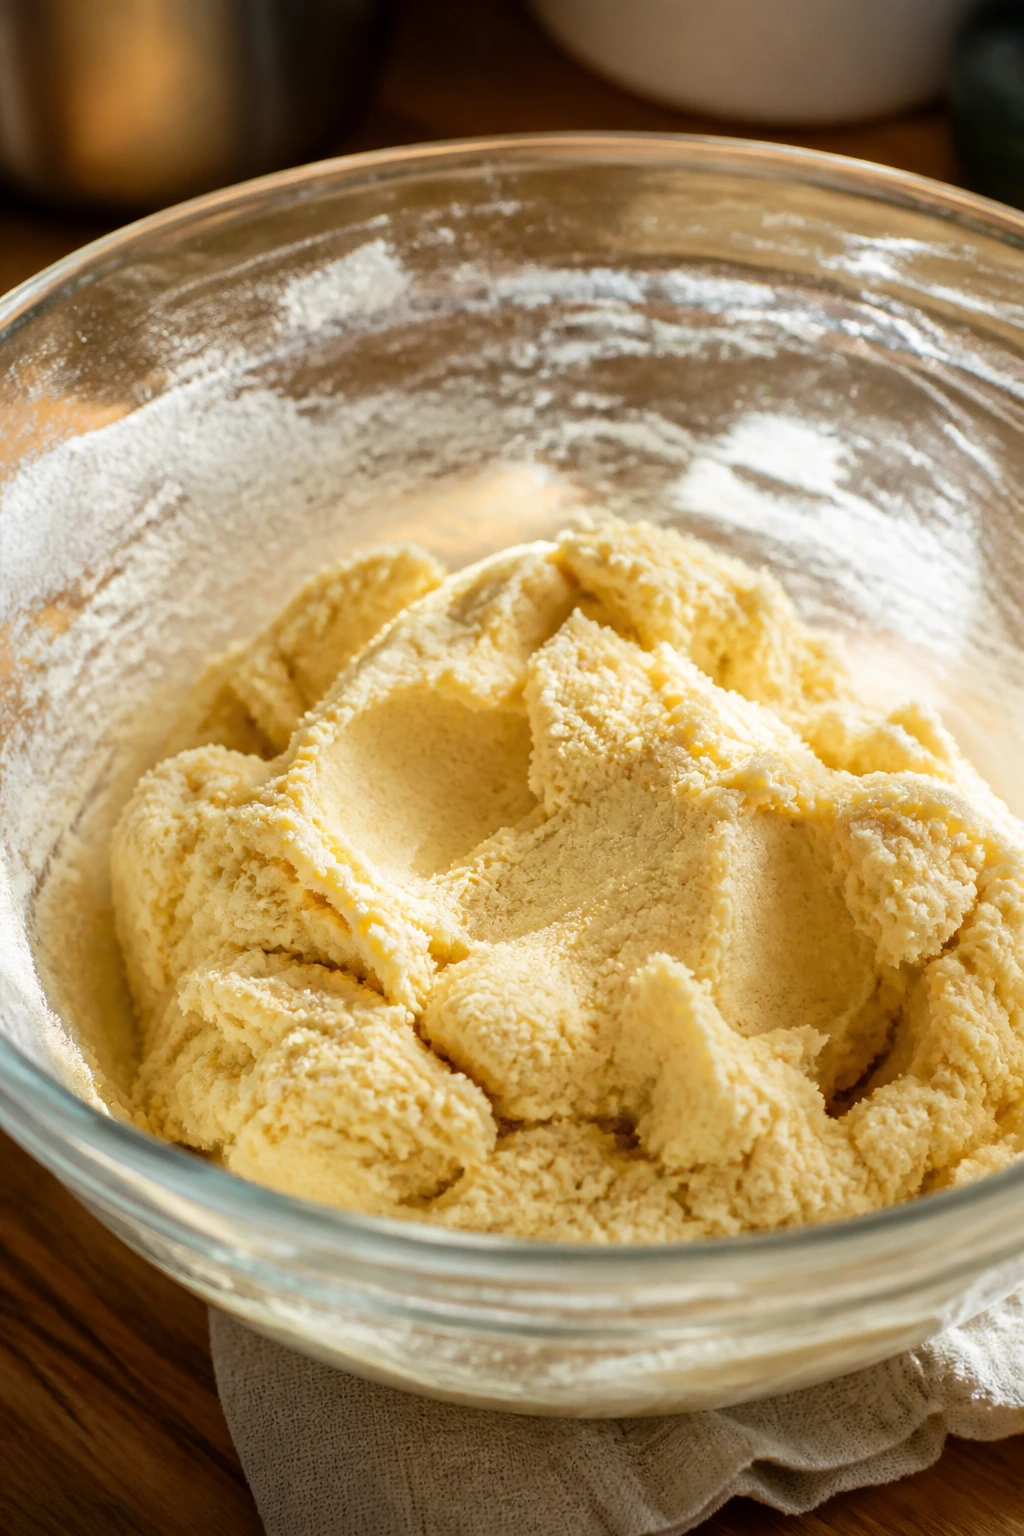
Shape and chill.
- Divide the dough in half, press each half into a flat disk about 1 inch thick, wrap tightly in plastic wrap, and chill for at least 1 hour. If you’re planning ahead, the dough can rest in the fridge for up to 24 hours. A longer chill makes the dough easier to roll and cut.
The dough should feel soft when it comes together, but not sticky enough to cling to your fingers in thick patches. If it feels wet after mixing, dust in 1 tablespoon of flour at a time. Stop as soon as it behaves. There’s no prize for making the dough drier than it needs to be.
Flattening the disks before chilling sounds like a small thing. It isn’t. A round ball takes forever to soften in the middle. Flat disks chill faster and roll out with less cracking.
Baking the Cookies Until the Centers Stay Tender

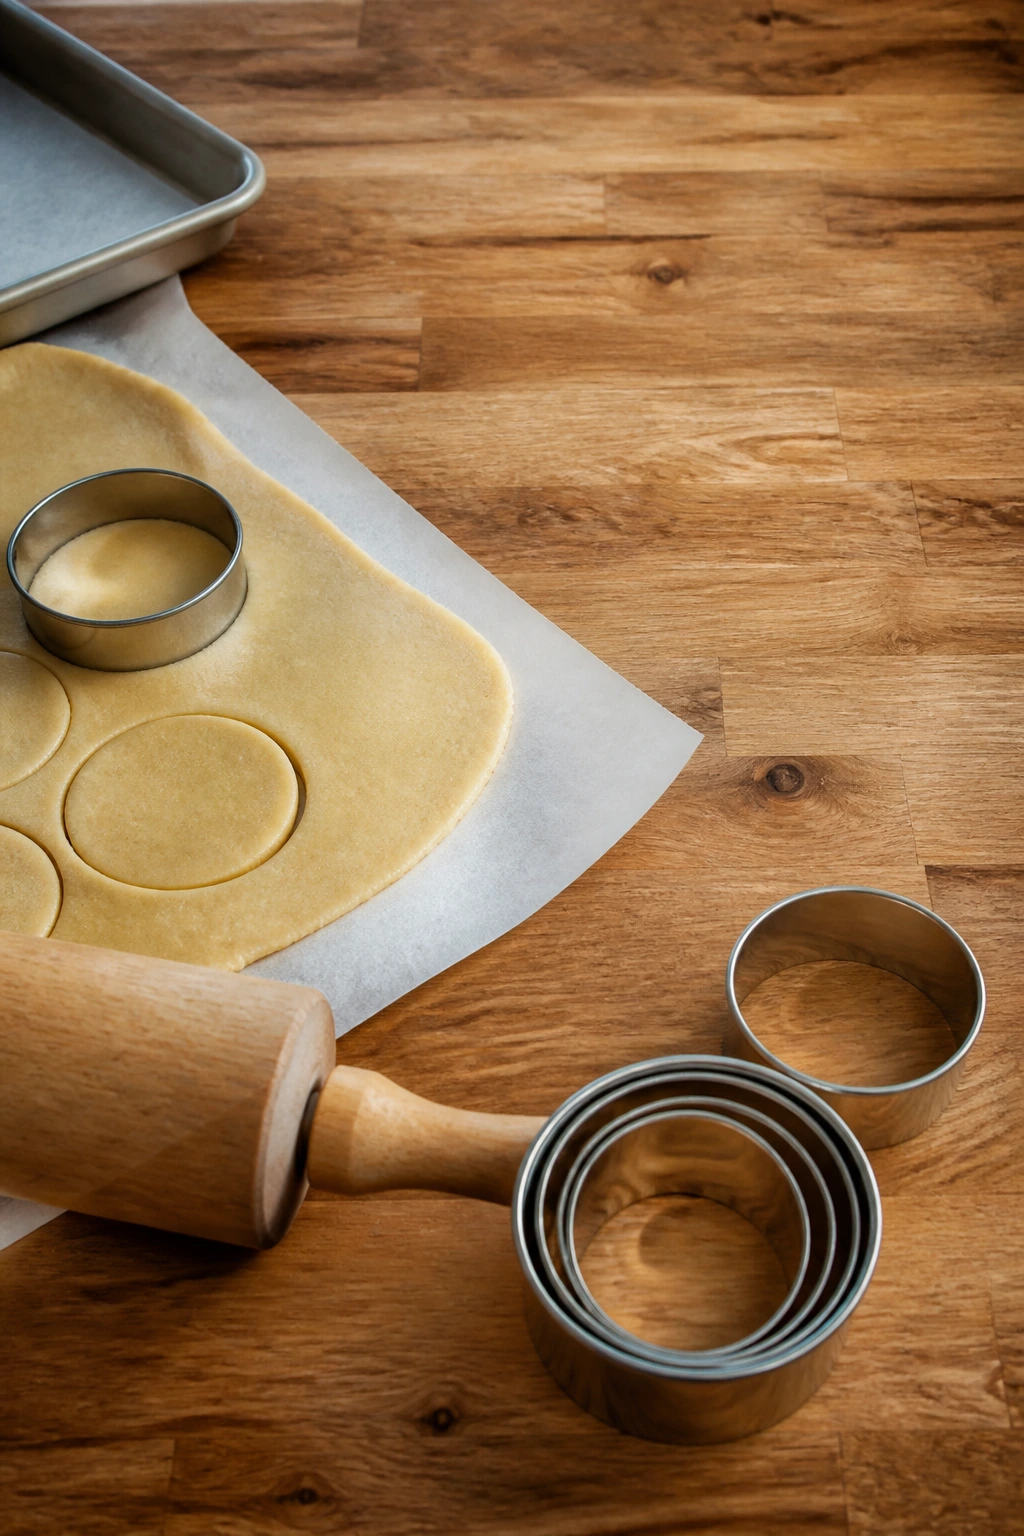
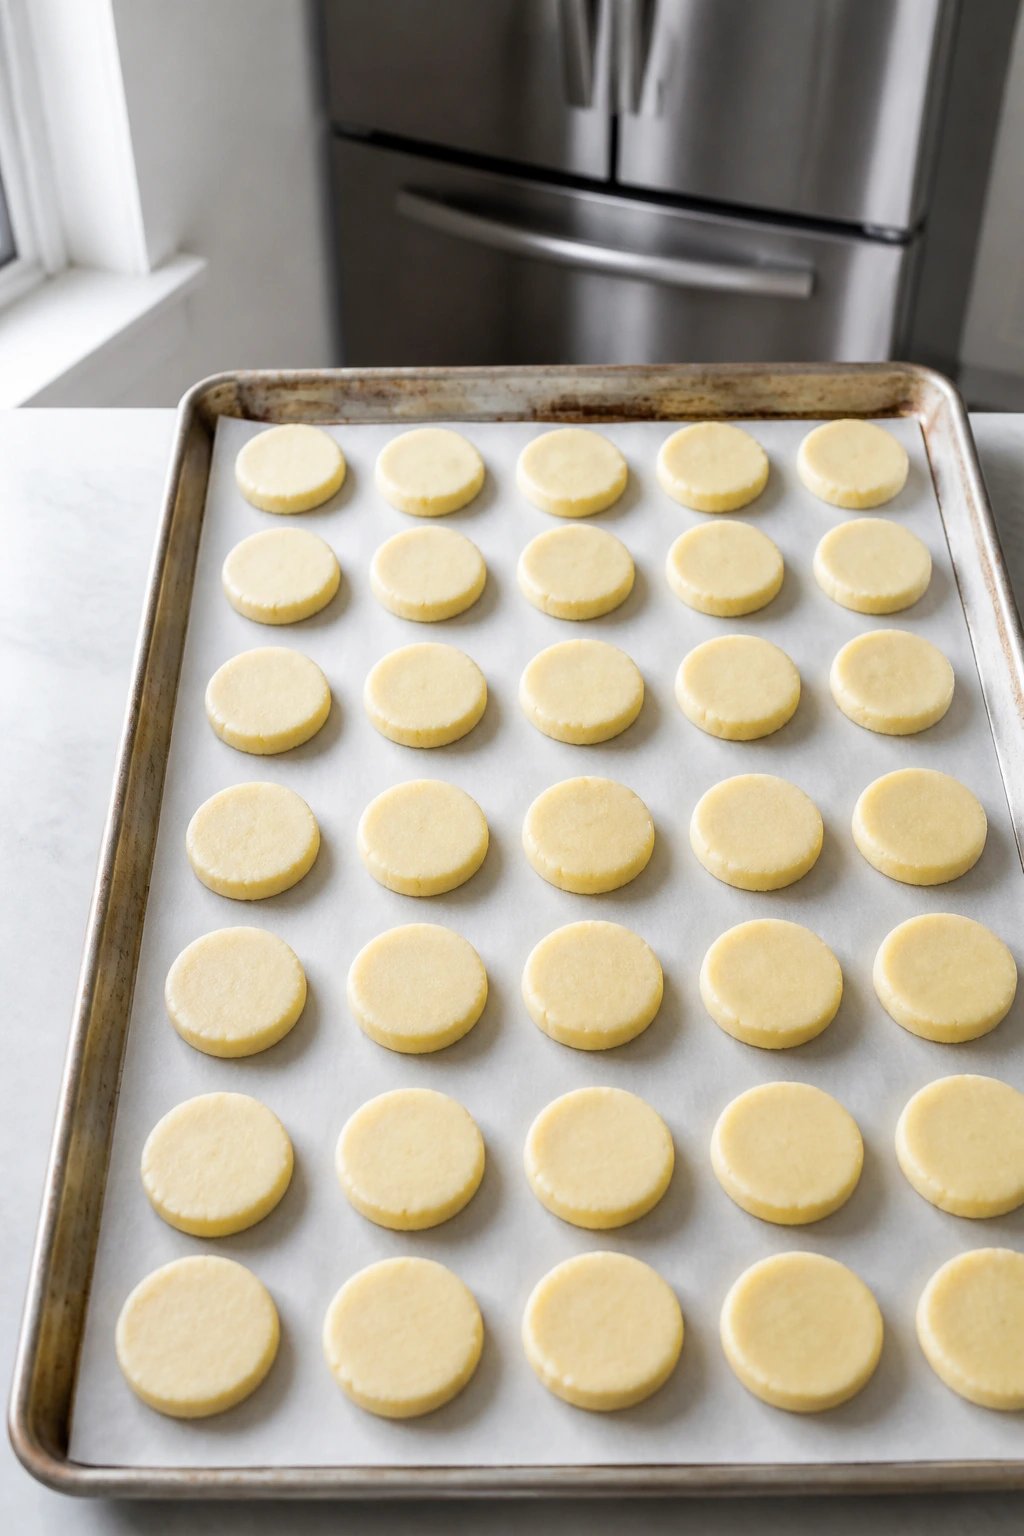
Roll the dough.
- Preheat the oven to 350°F (175°C) and line two baking sheets with parchment paper. Working with one disk at a time, roll the dough between two sheets of parchment to about 1/4-inch thickness. If the dough starts to feel greasy or sticky, slide it onto a baking sheet and chill it for 10 minutes before cutting.
Cut clean shapes.
- Dip the cutter in flour lightly, then cut the shapes straight down without twisting. Lift each cookie with an offset spatula and place it on the prepared baking sheet, leaving about 1 inch between cookies. Gather the scraps once, reroll gently, and cut the remaining shapes. If the dough warms up, chill the tray for 10 minutes before baking.
Bake with an eye on the edges.
- Bake for 8 to 10 minutes, rotating the pans halfway through if your oven has hot spots. Pull the cookies when the edges look set and the bottoms are just barely golden. The tops should still look pale. If you wait for deep color, the centers go dry before the edges even tell you they’re done.
Cool before decorating.
- Let the cookies rest on the baking sheet for 5 minutes, then move them to a wire rack to cool completely. That extra five minutes keeps them from bending or breaking while they’re still soft.
The smell at this stage is half the fun. Butter, sugar, and almond extract start to smell warm and toasty, but the cookies themselves should still look almost underdone in the center. That’s the sweet spot.
Cream Cheese Frosting and the Decorating Step
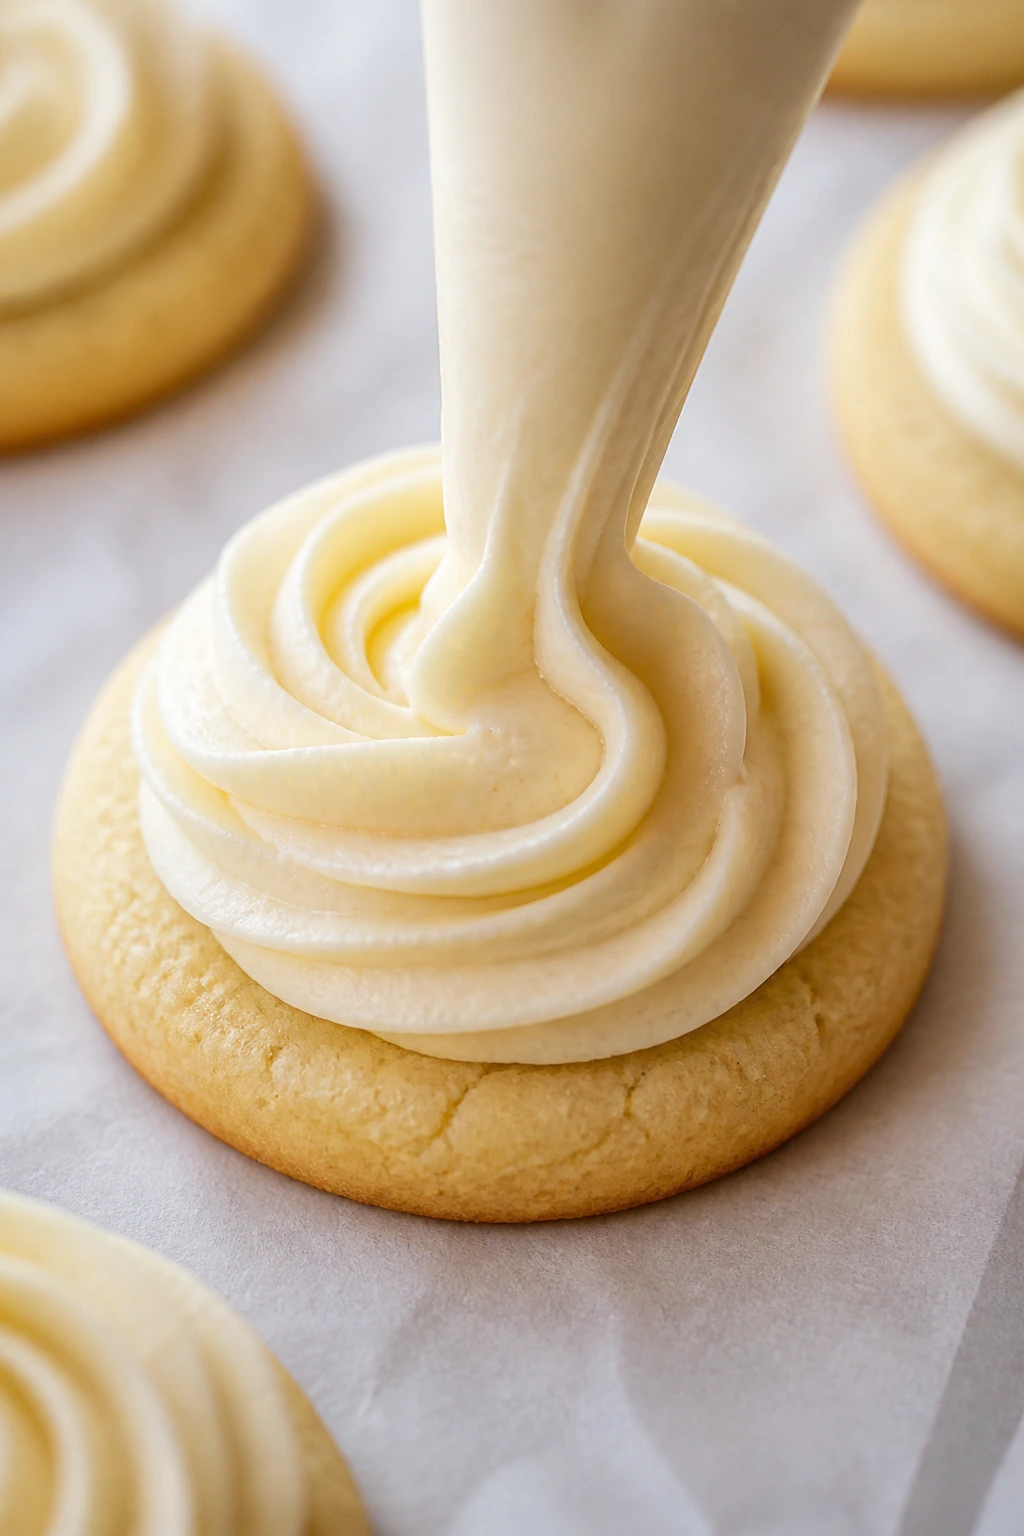
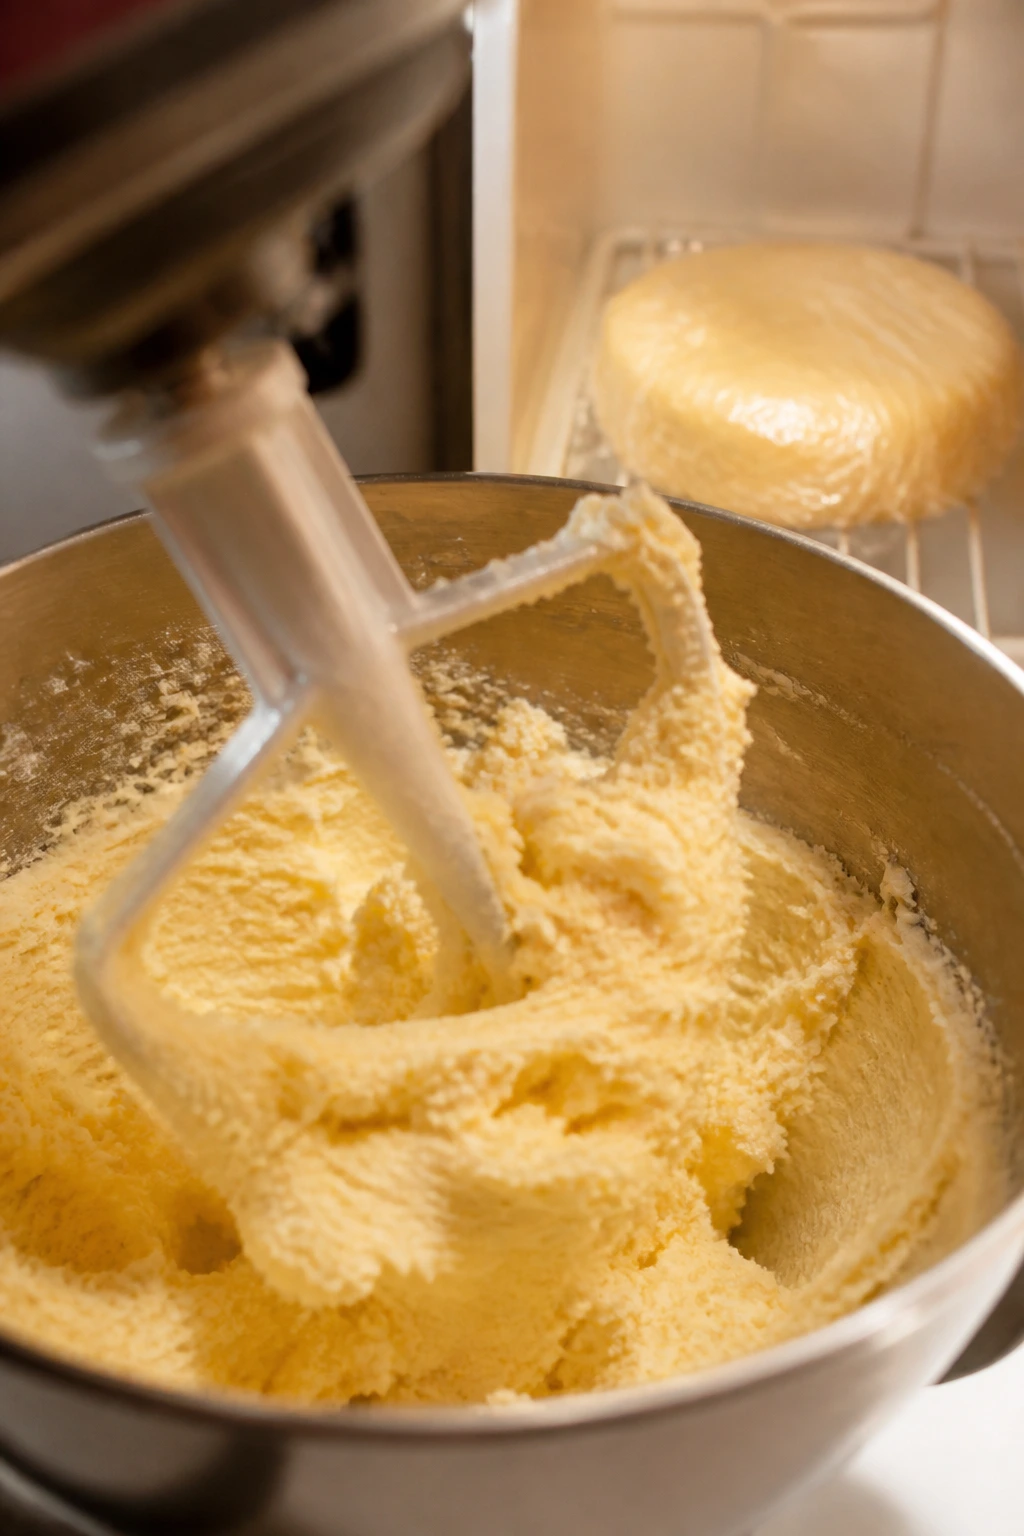
Beat the frosting base.
- In a medium bowl, beat the cream cheese and butter on medium speed for 2 to 3 minutes until the mixture is smooth and there are no visible lumps. Scrape down the bowl once or twice. A smooth base now saves you from grainy frosting later.
Finish the frosting.
- Add the powdered sugar in two additions, beating on low speed at first so the sugar doesn’t fly everywhere. Add the vanilla, salt, and 1 tablespoon of milk or cream. Beat for 30 to 45 seconds, then check the texture. If you want a stiffer frosting for piping, stop there. If you want it a little softer for spreading, add the second tablespoon of milk a teaspoon at a time.
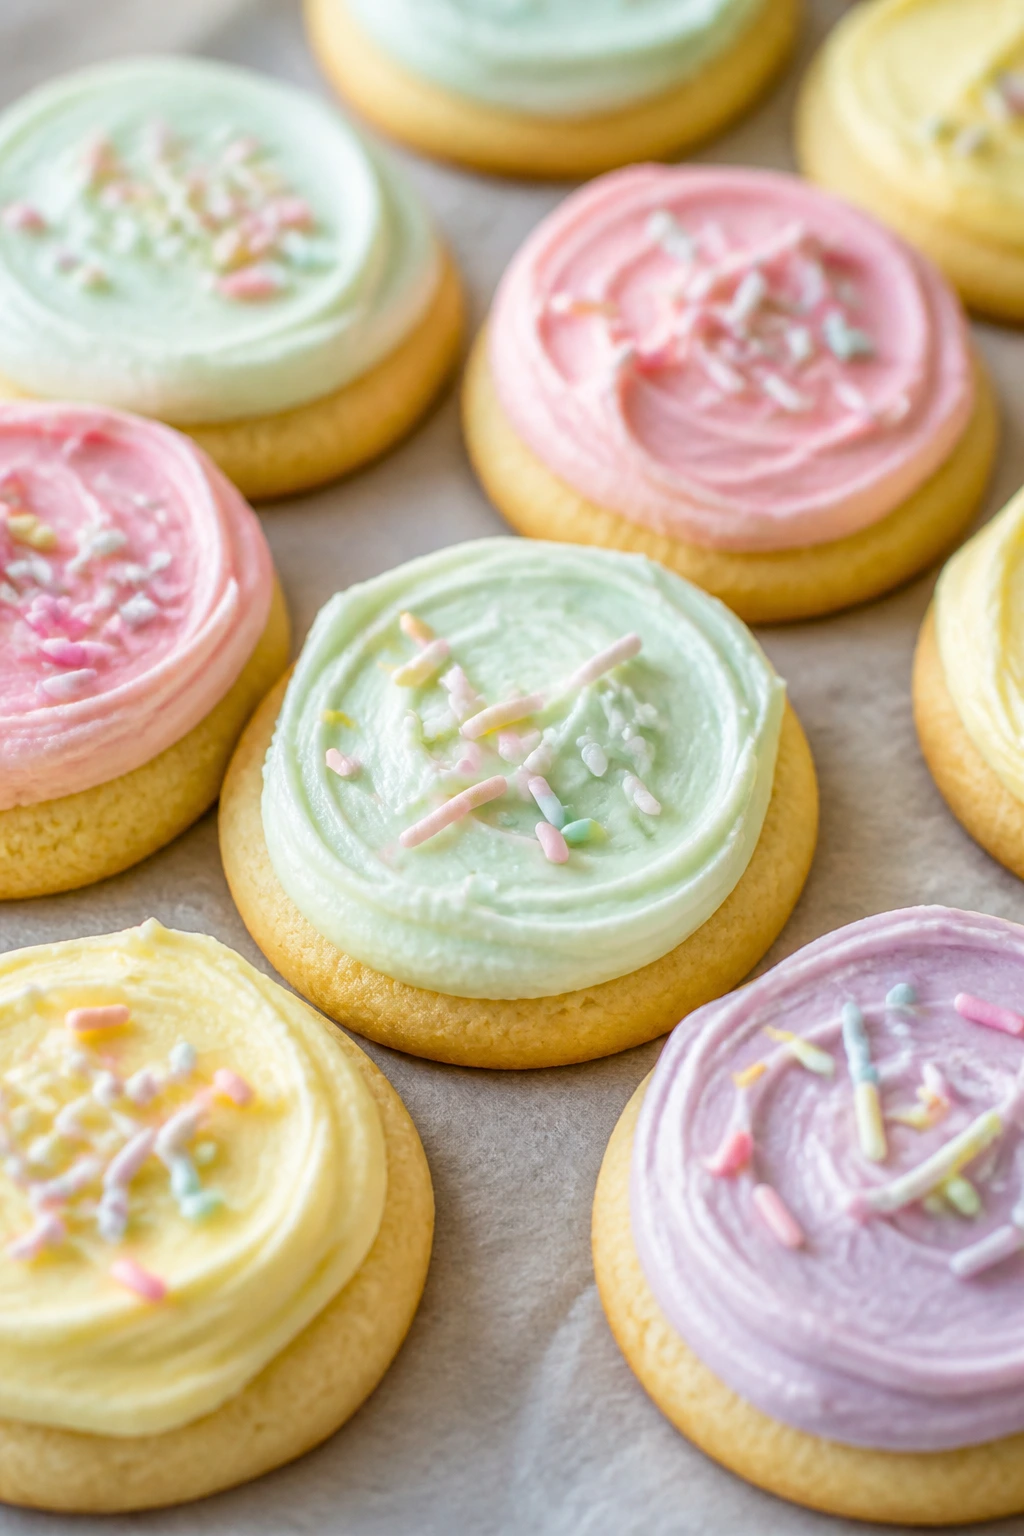
Tint and decorate.
- Divide the frosting into bowls if you want different colors. Add gel coloring a little at a time until you get the shade you want. Frost each cooled cookie with a small offset spatula or pipe a border and fill the center. Add sprinkles or sanding sugar right away, before the surface starts to set.
Set the frosting.
- Let the cookies sit at room temperature for 20 minutes so the frosting firms slightly. If you need to stack them, chill them briefly on a tray until the frosting feels set to the touch.
This frosting is at its best when it stays cool. If the bowl starts to feel warm while you’re decorating, tuck it into the fridge for 5 to 10 minutes. That tiny pause makes the frosting easier to handle and keeps it from slumping off the cookie edges.
How to Serve Them on a Spring Dessert Tray

Presentation: Arrange the cookies in loose groups rather than straight lines. Put the bunny and egg shapes near the center, then fill the edges with flowers or simple rounds so the tray doesn’t look crowded. A white platter or a pale cake stand keeps the frosting colors from fighting with the background.
Accompaniments: Fresh strawberries, raspberries, or a bowl of lemon curd sit well beside these cookies because they cut through the richness. If you’re serving them after a meal, a few sliced pears or a small bowl of fruit salad helps the tray feel balanced without turning it into another heavy dessert.
Portions: Plan on 1 to 2 cookies per person for a dessert spread, or 2 to 3 if these are the main sweet on the table. If you’re baking for children, smaller cutters are your friend. They finish more cleanly, and the frosting to cookie ratio stays pleasant.
Beverage Pairing: Hot coffee, Earl Grey tea, or cold milk all work. Earl Grey is the one I keep coming back to because the bergamot gives the cream cheese frosting a little lift without making the pairing fussy.
If you’re taking these to a gathering, chill the cookies first, then pack them in a single layer or between sheets of parchment. Cream cheese frosting behaves better when it starts out cold.
Small Details That Improve Texture and Shape

Flavor Enhancement: Add 1 teaspoon of finely grated lemon zest to the frosting if you want the tang to feel brighter. The cookie still tastes buttery, but the finish gets a cleaner snap.
Color Control: Use gel food coloring in tiny amounts. A toothpick dipped into the color paste usually gives you enough. Liquid coloring changes the frosting texture faster than people expect.
Cleaner Edges: Cut the shapes straight down and lift them without twisting the cutter. Twisting seals the edges and can make the cookies puff unevenly in the oven.
Better Decorating Flow: Frost half the batch with a thin layer spread flat, then pipe the rest with simple borders. That mix gives the tray some texture without adding work.
Make the Batch Last Longer: If you want the cookies to stay extra soft, store them with a slice of bread in the container. The bread gives off moisture and keeps the cookies from drying out, but use a fresh slice and replace it after a day.
Shortcut for Small Hands: If you’re baking with kids, cut the dough into circles rather than delicate shapes. It’s easier to handle, the cookies bake more evenly, and the frosting is still the fun part.
Common Mistakes That Flatten or Dry Them Out
-
Starting with butter that’s too soft: If the butter looks glossy or oily, the dough will spread before the oven sets it. The fix is simple: the butter should be soft enough to press, but it should still hold its shape.
-
Measuring flour with a heavy hand: Scooping flour straight from the bag packs in too much and makes the cookies dry and dull. Spoon the flour into the cup and level it off, or weigh it if you keep a scale near the mixer.
-
Skipping the chill: Warm dough almost always spreads, especially after rerolling scraps. If the cut-outs feel floppy on the tray, give them 10 minutes in the fridge before baking.
-
Overbaking for color: These cookies should not look deeply brown when they come out. If you wait for that, the edges get hard and the centers lose the soft bite that makes the recipe worth making.
-
Frosting cookies before they cool: Even a little warmth can turn cream cheese frosting loose and shiny. Let the cookies cool all the way to room temperature, not “mostly” cool.
-
Using tub cream cheese: The spreadable kind contains more water and less structure, which makes the frosting slack. Use block cream cheese so the frosting holds a clean swirl and stacks well.
Flavor Swaps for Buttery Easter Cookies
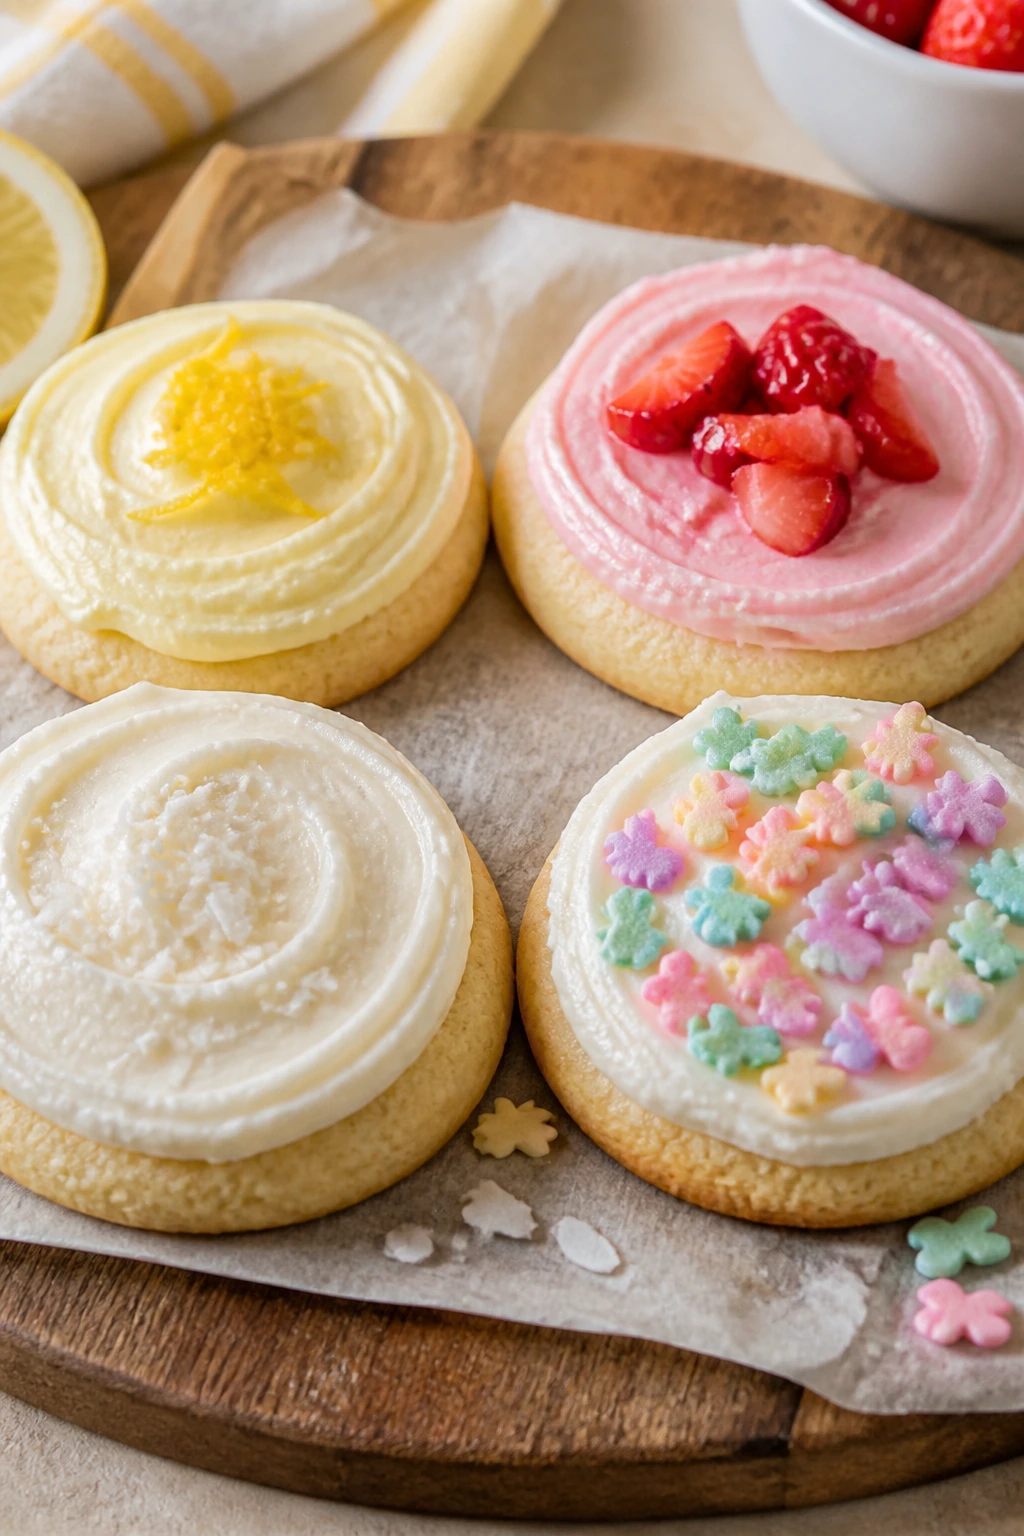
Lemon Ribbon Frosting
Add 1 tablespoon of lemon zest to the frosting and replace 1 tablespoon of milk with lemon juice. The result tastes brighter and a little sharper, which works well if your dessert table leans heavy on chocolate or candy.
Strawberry Patch Pink
Mix 2 tablespoons of finely ground freeze-dried strawberry powder into the frosting and tint it a soft pink. This version tastes like strawberries, not artificial candy, and it looks especially good on flower-shaped cookies.
Dairy-Free Basket Cookie
Swap in plant-based butter and a block-style dairy-free cream cheese. The frosting will usually need a little extra powdered sugar to set, and the dough may need 5 to 10 extra minutes in the fridge before rolling, but the cookie still bakes up with a soft center.
Mini Tea-Time Shapes
Cut the dough into 2-inch bunnies, eggs, or rounds and bake for 7 to 8 minutes instead of the full time. Smaller cookies are easier to stack on a party tray, and they make the frosting-to-cookie ratio feel a little more indulgent.
Make-Ahead, Storage, and Freezing Notes
The dough is easy to make ahead. Wrapped tightly, the disks keep in the refrigerator for up to 24 hours without losing quality. If you need more time, freeze the disks for up to 2 months, then thaw them overnight in the fridge before rolling. Cold dough rolls cleaner than freshly mixed dough anyway, so this recipe doesn’t mind a pause.
Baked cookies without frosting keep well in an airtight container at room temperature for 3 days. Once frosted with cream cheese icing, move them to the refrigerator if they’ll sit longer than 2 hours. They keep for up to 4 days chilled, and the texture stays pleasant if you bring them to cool room temperature before serving. If you’re stacking them, place parchment squares between layers so the frosting doesn’t smear.
Freezing works best before frosting. Freeze the baked cookies on a sheet pan until firm, then transfer them to a freezer bag or airtight box with parchment between layers. They keep for up to 2 months. Thaw them uncovered in the fridge or on the counter, then frost once they’re fully dry and cool.
You can freeze frosted cookies too, but the finish is never quite as tidy after thawing. If you go that route, freeze them in a single layer until the frosting hardens, then wrap gently and store for up to 1 month. Thaw them in the refrigerator, still wrapped, so condensation forms on the wrapper instead of the frosting.
The frosting itself can be made 3 days ahead and kept in the fridge. Beat it again for 15 to 20 seconds before using it so it softens back into a spreadable texture. If it seems too stiff after chilling, add a teaspoon of milk and beat again.
Questions Bakers Ask Before the First Batch of Easter Cookies

Can I make the dough a day ahead?
Yes. In fact, a night in the fridge can make the dough easier to handle because the butter firms up and the flour hydrates more evenly. If the dough feels too hard after chilling, let it sit on the counter for 10 to 15 minutes before rolling.
Do I have to use almond extract?
No. Leave it out and add an extra teaspoon of vanilla if that’s the flavor you prefer. The almond note adds a bakery-style smell, but the cookie still works fine without it.
Why did my cookies spread?
The usual culprits are warm butter, skipped chilling, or too little flour. A hot baking sheet can also cause trouble, so work with cool pans and give the cut shapes a quick chill if the dough feels soft.
Can I pipe the frosting instead of spreading it?
Yes, if you keep the frosting thick enough. Use less milk, beat until fluffy, and pipe with a round or star tip. If the frosting starts to droop, chill it for 10 minutes and beat it once more before filling the bag.
How do I keep the frosting from getting too sweet?
The salt matters more than people think. That 1/8 teaspoon keeps the frosting from tasting flat, and the cream cheese gives it enough tang to balance the powdered sugar. If you still want less sweetness, use a thinner layer of frosting and finish with sanding sugar instead of a heavy swirl.
Can I freeze decorated cookies?
You can, but the frosting finish softens a little after thawing. Freeze them flat first, then wrap them carefully. If neat decorating matters more than convenience, freeze the baked cookies plain and frost them after thawing.
What if I only have salted butter?
Use it and reduce the added salt in the cookie dough to a scant 1/4 teaspoon. The frosting can usually handle salted butter without much adjustment, though you may want to keep the added salt at a pinch.
A Bright Tray Worth Repeating

A cookie like this earns its place because it does two jobs at once. It looks cheerful on a dessert tray, and it still tastes like a real cookie after the frosting has been smoothed and the sprinkles have done their little parade. That balance matters more than perfect piping or a dozen colors.
The best part is how forgiving the recipe becomes once you learn its rhythm. Cold dough, light flouring, a short bake, cool cookies, soft frosting. That’s the whole dance. Once you’ve made one batch, the rest feels easy in the right way — not careless, just familiar.
Buttery Easter Cookie with Cream Cheese Frosting — Recipe Card
Recipe Name: Buttery Easter Cookie with Cream Cheese Frosting
Description: Soft, buttery cut-out cookies with a tender crumb and a tangy cream cheese frosting that spreads smoothly and sets just enough for stacking. Perfect for Easter shapes, pastel colors, and a tray that looks cheerful without requiring royal icing.
Prep Time: 25 minutes
Cook Time: 8 to 10 minutes per batch
Total Time: 1 hour 35 minutes, not counting longer chilling
Course: Dessert
Cuisine: American
Servings: 24 to 30 cookies
Calories: About 240 kcal per frosted cookie
Ingredients
For the Cookies
- 2 3/4 cups all-purpose flour, spooned and leveled
- 1 teaspoon baking powder
- 1/2 teaspoon fine salt
- 1 cup unsalted butter, softened to cool room temperature
- 3/4 cup granulated sugar
- 1 large egg, room temperature
- 1 large egg yolk, room temperature
- 1 teaspoon vanilla extract
- 1/2 teaspoon almond extract
- 2 tablespoons whole milk or heavy cream
For the Cream Cheese Frosting
- 8 ounces block cream cheese, softened
- 1/2 cup unsalted butter, softened
- 3 1/2 cups powdered sugar, sifted
- 1 teaspoon vanilla extract
- 1/8 teaspoon fine salt
- 1 to 2 tablespoons whole milk or cream, as needed
For Decorating
- Gel food coloring, optional
- Pastel sprinkles or sanding sugar, optional
Instructions
-
Whisk the flour, baking powder, and salt in a medium bowl. Set aside.
-
Beat the butter and granulated sugar on medium speed for 3 to 4 minutes until pale and fluffy.
-
Beat in the egg, egg yolk, vanilla extract, almond extract, and milk until smooth.
-
Mix in the dry ingredients on low speed until the dough just comes together. Do not overmix.
-
Divide the dough in half, flatten into disks, wrap tightly, and chill for at least 1 hour.
-
Preheat the oven to 350°F (175°C) and line two baking sheets with parchment paper. Roll the dough to 1/4-inch thickness, cut shapes, and place them on the sheets.
-
Bake for 8 to 10 minutes, rotating once halfway through, until the edges are set and the bottoms are just barely golden.
-
Cool the cookies on the baking sheet for 5 minutes, then transfer to a wire rack to cool completely.
-
Beat the cream cheese and butter until smooth. Add the powdered sugar, vanilla, salt, and milk, then beat until fluffy and spreadable. Tint with gel color if desired.
-
Frost the cooled cookies and add sprinkles right away. Let the frosting set for 20 minutes before stacking.
Notes: Chill the dough if it gets sticky, use block cream cheese for the frosting, and keep frosted cookies refrigerated if they’ll sit out longer than 2 hours.