
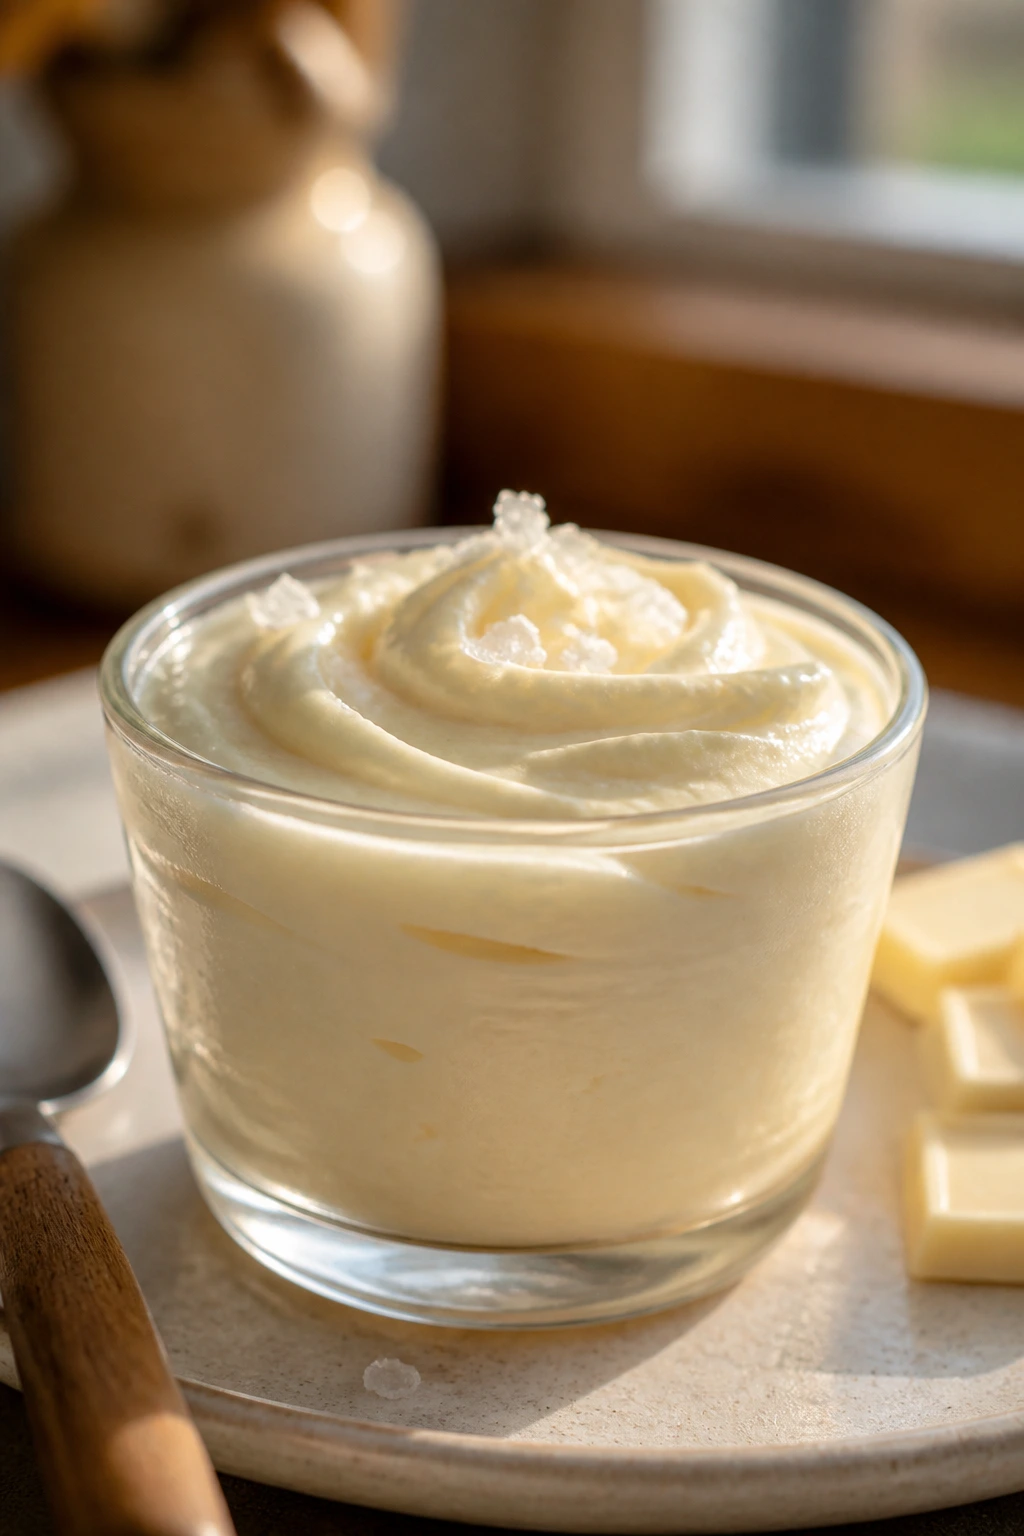
What keeps this dessert from tipping into candy-store sweetness is the contrast. Buttery white chocolate mousse with cream cheese frosting sounds rich because it is rich, but the right version has a clean line through the middle of it: soft dairy, glossy white chocolate, a little salt, and just enough tang from the frosting to stop the whole thing from feeling sticky on the tongue.
That balance is not accidental. White chocolate needs restraint. Heat it too hard and it turns pasty; fold it into whipped cream while it’s still hot and the mousse goes slack in a way no garnish can save. When it’s handled well, though, the texture lands somewhere between whipped ganache and a cloud that holds its shape in the fridge.
I keep coming back to desserts like this because they look fussy and behave politely. A few crumb layers in small cups, a pale mousse spooned in with almost no drama, a swirl of frosting, maybe berries if you like a sharp edge. That’s enough. The next step is getting the parts to work together without losing the texture that makes the first bite worth it.
Why This White Chocolate Mousse Feels Rich Instead of Cloying
-
The salt matters more than people think: A pinch in the mousse and another in the frosting keeps the white chocolate from tasting like melted candy bars, which is the usual failure point.
-
The cream cheese frosting changes the whole mood: It adds a little bite and a cool, tangy finish, so each spoonful feels rounded instead of one-note sweet.
-
The texture stays light if you respect the temperature: White chocolate that cools to barely warm before folding keeps the whipped cream airy instead of collapsing into a heavy paste.
-
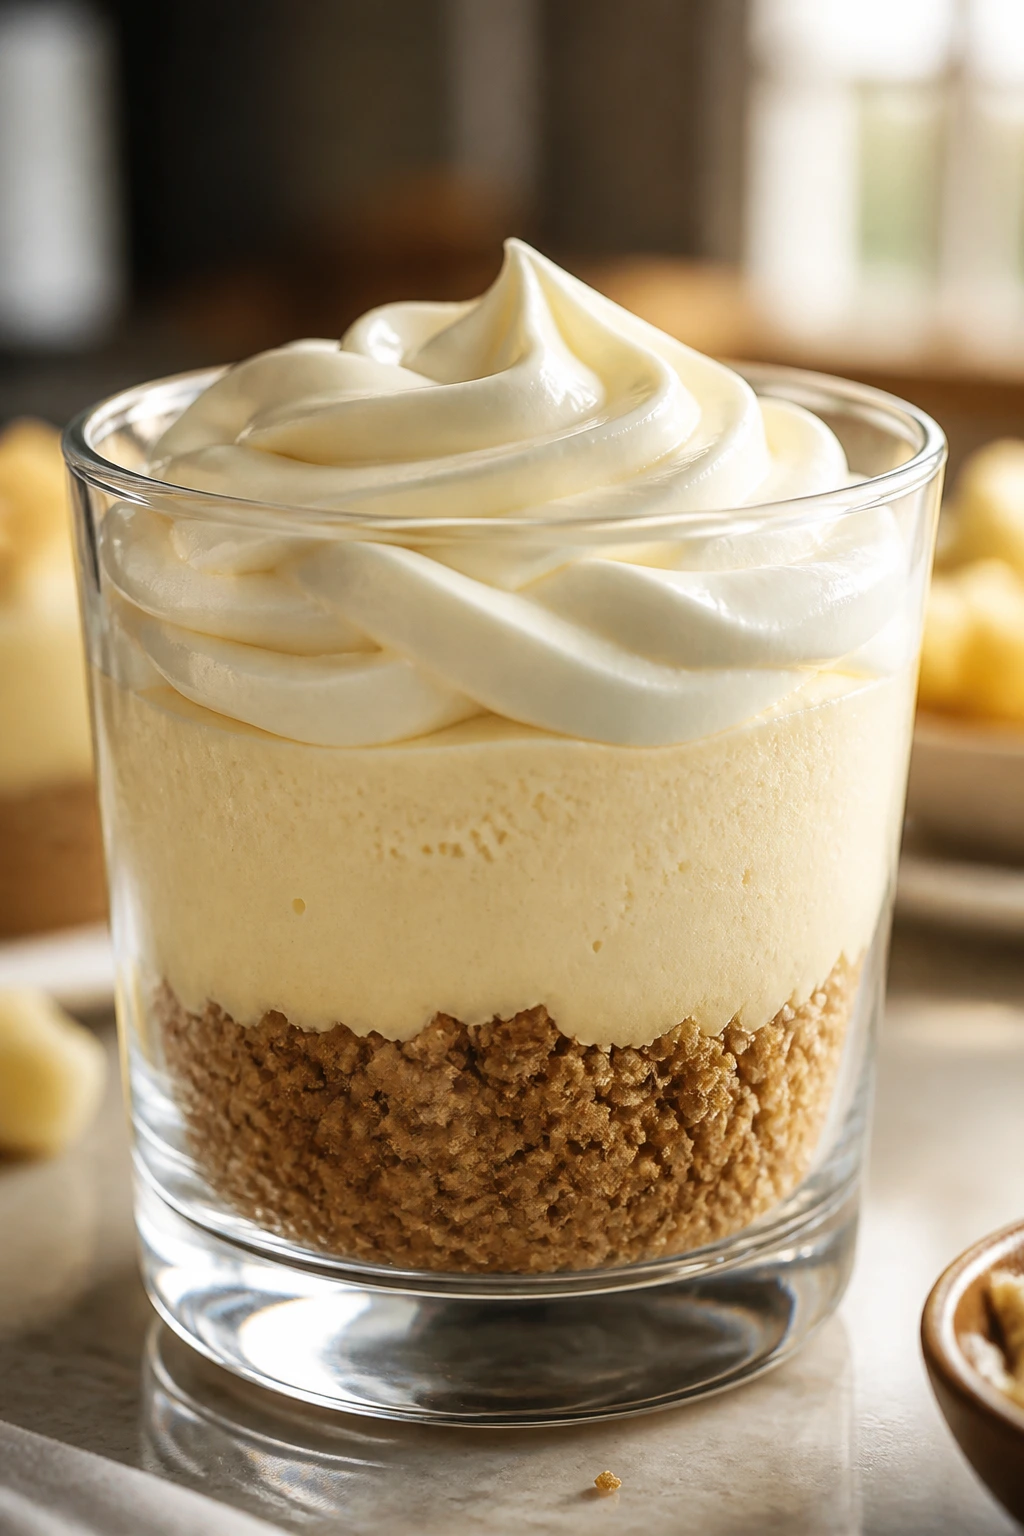
The cups make serving clean and easy: Individual portions mean the crumb base stays where it belongs and the frosting doesn’t get dragged through a slice.
-
The dessert works well ahead of time: A few hours in the fridge help the mousse set, and the flavor actually settles down after it chills.
-
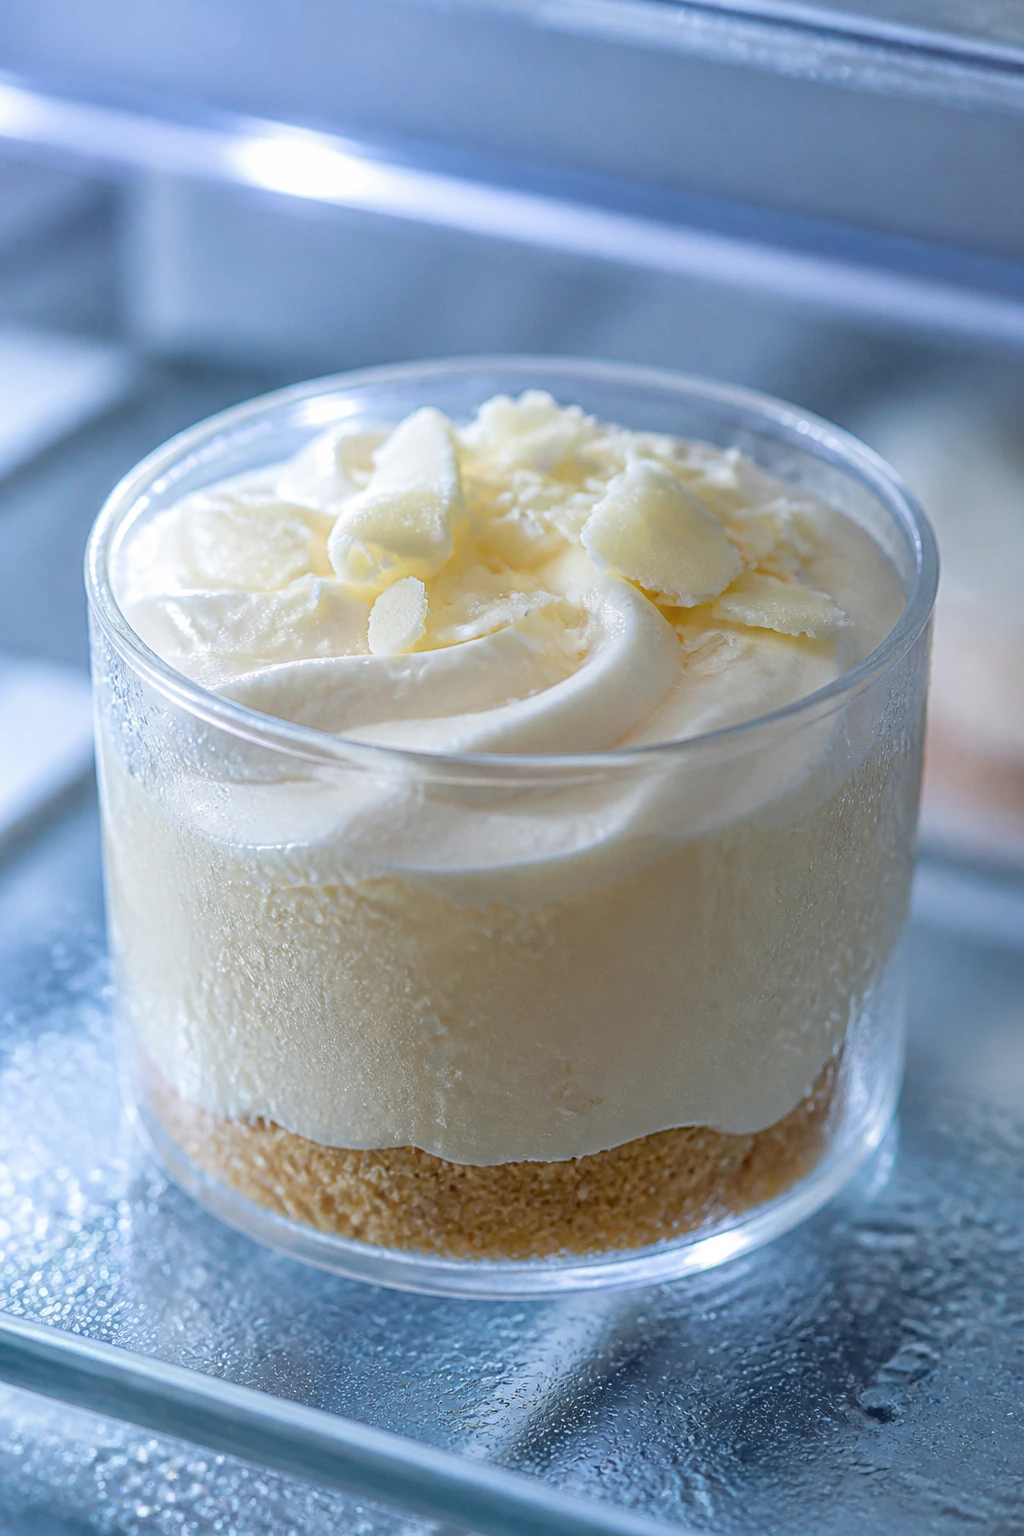
You can dress it up or keep it plain: Raspberries, curls of white chocolate, or nothing at all — the base recipe carries the whole thing either way.
How Many Cups You’ll Get and How Long It Takes

A dessert like this benefits from a clear plan before you touch a whisk. The mousse itself comes together fast, but the chill time is what turns it from loose cream into something you can spoon neatly through.
Yield: Serves 6 to 8; makes 8 dessert cups if you use 6-ounce glasses or jars.
Prep Time: 30 minutes
Cook Time: 8 minutes
Total Time: 38 minutes active, plus 4 hours chilling
Difficulty: Intermediate — the steps are simple, but the white chocolate and whipped cream need careful handling so the mousse stays light.
Chill/Rest Time: At least 4 hours, or overnight if you want the cleanest set.
Best Served: Very cold, with the frosting piped or spooned on after the mousse has firmed up.
If you want to serve this for guests, do the work in two stages. Make the cups early, let them chill, then finish the tops close to serving time. That tiny bit of timing makes the dessert look cleaner than if everything is finished hours ahead.
What Goes Into the Crust, Mousse, and Frosting
For the Graham Cracker Crust:
- 1 1/2 cups graham cracker crumbs, finely crushed
- 2 tablespoons granulated sugar
- 1/8 teaspoon fine sea salt
- 4 tablespoons unsalted butter, melted and slightly cooled
For the Buttery White Chocolate Mousse:
- 10 ounces white chocolate, finely chopped
- 1/2 cup heavy cream
- 2 tablespoons unsalted butter
- 1 teaspoon pure vanilla extract
- 1/4 teaspoon fine sea salt
- 1 cup cold heavy whipping cream
For the Cream Cheese Frosting:
- 8 ounces full-fat cream cheese, softened to cool room temperature
- 1/2 cup unsalted butter, softened
- 2 cups powdered sugar, sifted
- 1 tablespoon fresh lemon juice
- 1 teaspoon pure vanilla extract
- Pinch of fine sea salt
- 1 to 2 tablespoons heavy cream, only if needed for piping
For Finishing:
- 1/2 cup fresh raspberries or sliced strawberries
- 2 ounces white chocolate, shaved into curls or fine shavings
Why Each Ingredient Needs to Be There
The Crumb Base
What to use: 1 1/2 cups graham cracker crumbs, 2 tablespoons sugar, 1/8 teaspoon salt, and 4 tablespoons melted butter.
Preparation: Crush the crumbs finely so they pack down in the cups without leaving sharp, dusty bits. The mixture should look like damp sand and clump when squeezed.
Substitutions: Vanilla wafers, shortbread cookies, digestive biscuits, or even finely crushed almond cookies all work. If you want a sharper edge, use chocolate wafer crumbs instead.
Tips: Toasting the crumb mix for a few minutes brings out the butter and keeps it from tasting raw. I like that extra step because it gives the dessert a deeper, bakery-style smell the second the cups are opened.
The White Chocolate Mousse
What to use: 10 ounces white chocolate, 1/2 cup heavy cream, 2 tablespoons butter, 1 teaspoon vanilla, 1/4 teaspoon salt, and 1 cup cold heavy whipping cream.
Preparation: Chop the white chocolate finely so the hot cream melts it evenly. The cold cream should stay in the refrigerator until the last possible minute.
Substitutions: Use a white chocolate bar instead of chips whenever you can; bars melt more smoothly. If you only have chips, choose a brand that lists cocoa butter instead of a long list of fillers.
Tips: The melted white chocolate base should cool until it feels barely warm, not hot, before you fold in the whipped cream. That one detail keeps the mousse airy instead of heavy.
The Cream Cheese Frosting
What to use: 8 ounces cream cheese, 1/2 cup butter, 2 cups powdered sugar, 1 tablespoon lemon juice, 1 teaspoon vanilla, a pinch of salt, and 1 to 2 tablespoons cream if needed.
Preparation: Both the cream cheese and butter need to be soft enough to beat without lumps, but not oily or glossy. A cool room-temperature block is ideal.
Substitutions: Mascarpone can replace half the cream cheese if you want a softer, rounder flavor. For a less sweet top, reduce the powdered sugar to 1 3/4 cups and keep the lemon juice.
Tips: Sift the powdered sugar unless you enjoy chasing little dry clumps around the bowl. Grainy frosting is usually a sugar problem, not a mixing problem.
The Finish
What to use: Fresh berries and white chocolate shavings.
Preparation: Wash and dry the berries completely; surface water will bleed into the frosting and make the tops look muddy. Shave the white chocolate with a vegetable peeler or microplane.
Substitutions: A drizzle of raspberry sauce, a few candied citrus peels, or toasted almond slivers can replace the berries if that’s what you have.
Tips: If you want a sharper look, garnish at the very end. Fruit that sits on frosting for hours starts to leak, and the dessert loses its clean edges.
The Tools That Make the Layers Neat
A dessert like this doesn’t need specialty gear, but a few basic tools make the difference between tidy cups and a bowl of half-mixed chaos.
- 8 dessert cups or small jars, 6 ounces each — Clear glass shows off the layers and makes portioning simple.
- Electric hand mixer or stand mixer — You can whip by hand, but the cream and frosting are much easier with a mixer.
- Heatproof bowl — Needed for melting the white chocolate base without scorching it.
- Small saucepan — For warming the cream just enough to melt the chocolate smoothly.
- Rubber spatula — Essential for folding the mousse without knocking the air out.
- Fine-mesh sieve — Handy for sifting powdered sugar if you want a smoother frosting.
- Piping bag or zip-top bag — Makes the cream cheese frosting look neat on top of the cups.
- Measuring cups and spoons — Because mousse is a texture game, and texture starts with the right ratios.
Toasting the Crumb Base
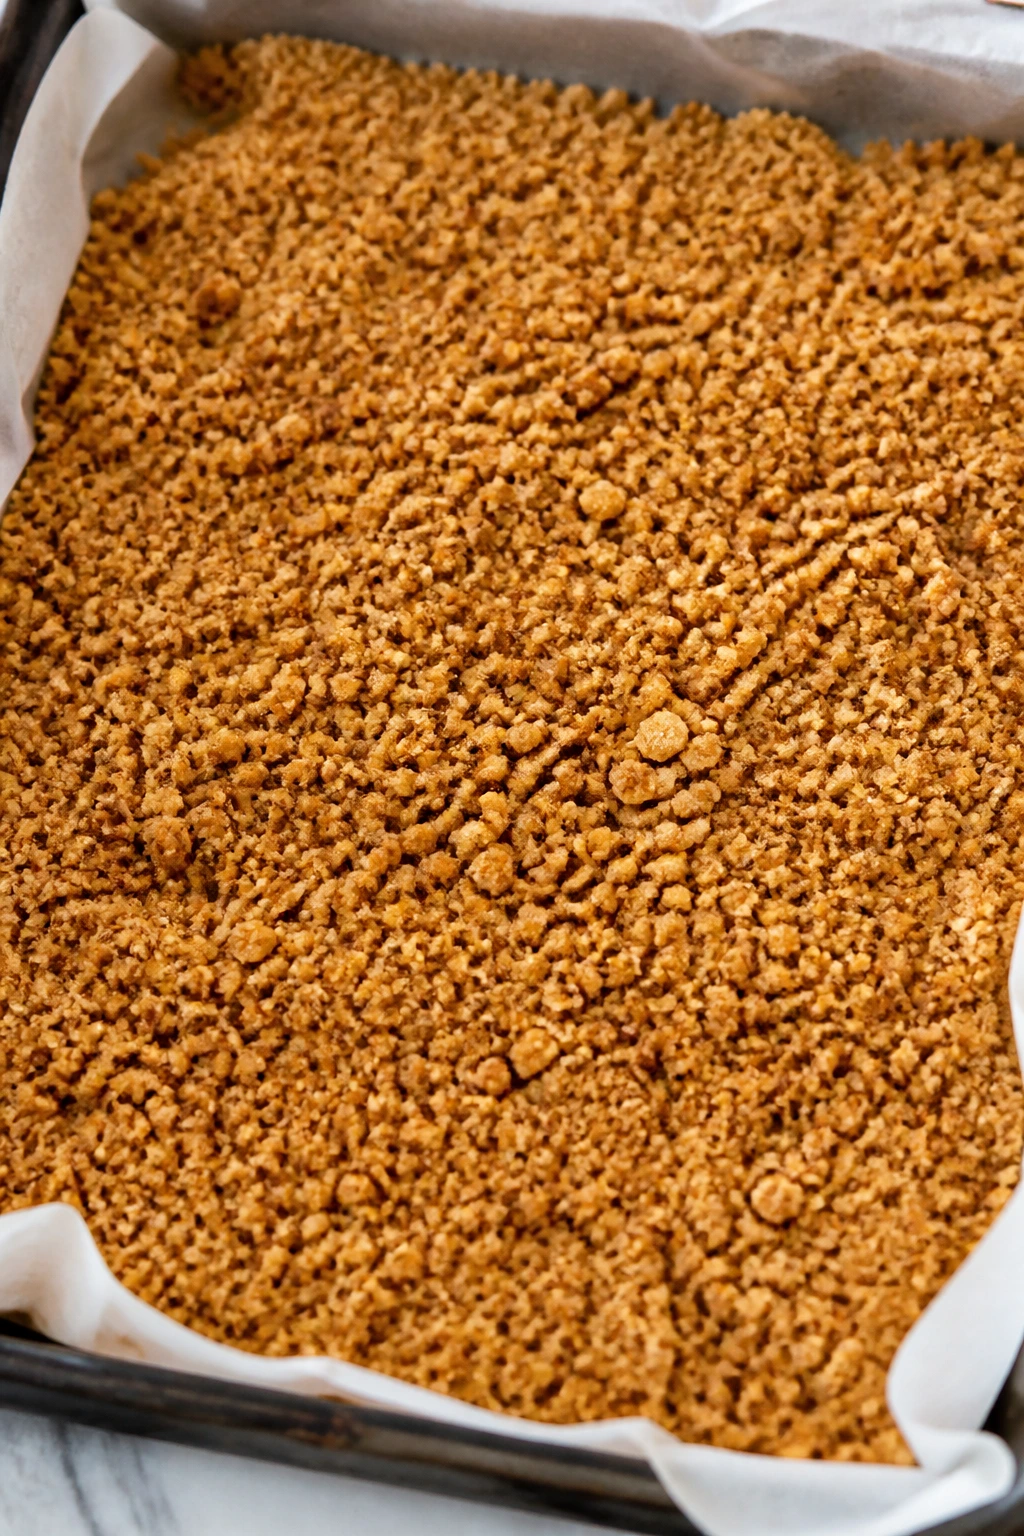
Warm crumbs smell like toasted cereal and butter. That smell matters here. It tells you the crust is no longer raw, and it gives the dessert a little backbone before the mousse softens everything above it.
Build the Crumb Layer
-
Preheat the oven to 350°F (175°C) and line a rimmed baking sheet with parchment paper.
-
Mix the crust ingredients in a medium bowl: 1 1/2 cups graham cracker crumbs, 2 tablespoons granulated sugar, 1/8 teaspoon fine sea salt, and 4 tablespoons melted unsalted butter. Stir until every crumb looks lightly coated and the mixture resembles damp sand.
-
Toast the crumbs by spreading them in an even layer on the baking sheet. Bake for 6 to 8 minutes, stirring once halfway through, until they smell nutty and the edges look a shade darker. Do not walk away at the end; buttered crumbs can go from toasted to scorched fast.
-
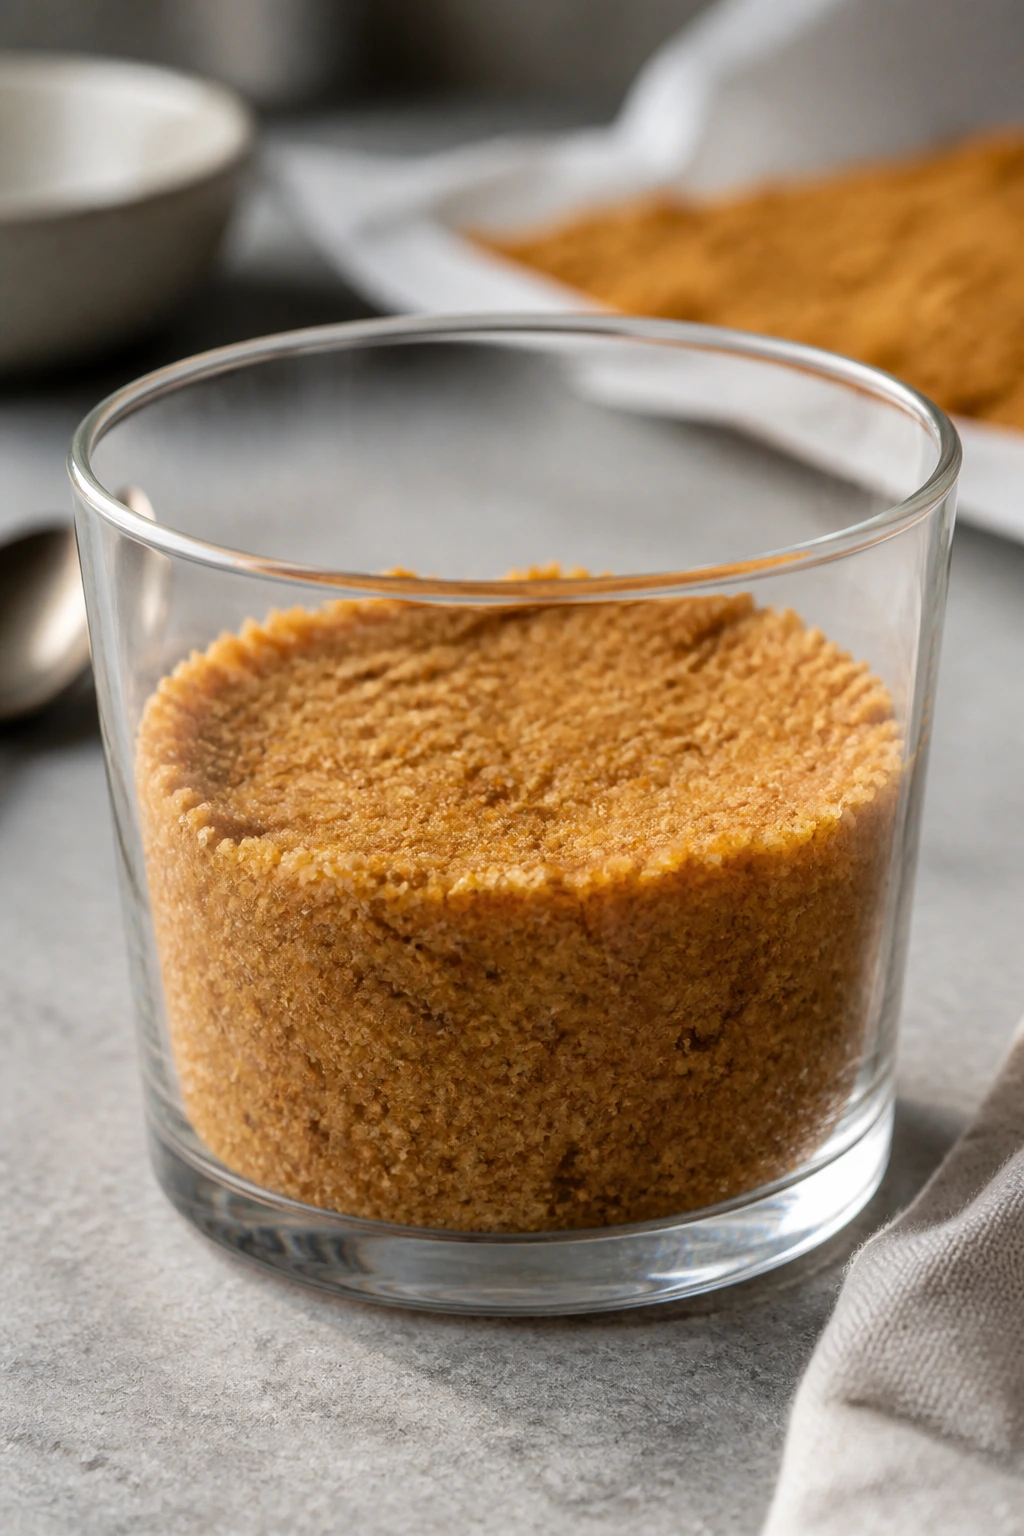
Cool completely before spooning them into the cups. The base should feel dry and loose, not warm or oily, or it will steam the mousse later.
Pack the Cups
- Divide the crumb mixture among 8 dessert cups or jars. Use the back of a spoon to press it lightly into an even layer at the bottom of each cup. You want a compact base, not a brick.
A little pressure is enough. Hard packing makes the base dense and chewy, which is not the goal here.
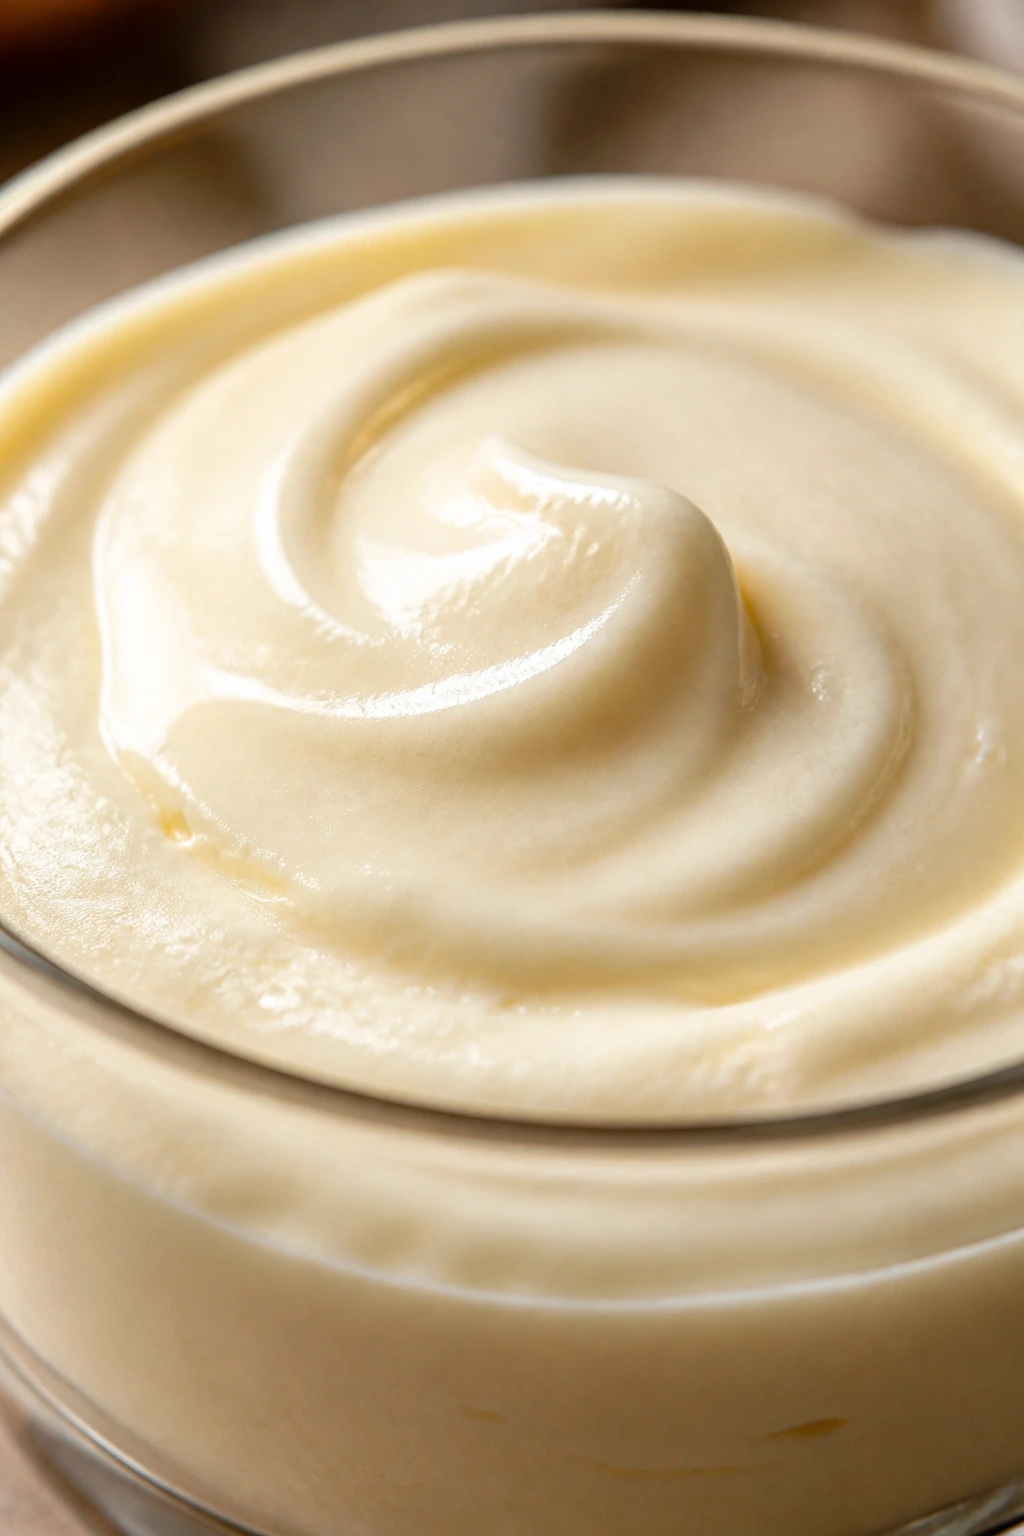
Stirring the White Chocolate Base Until It Turns Glossy
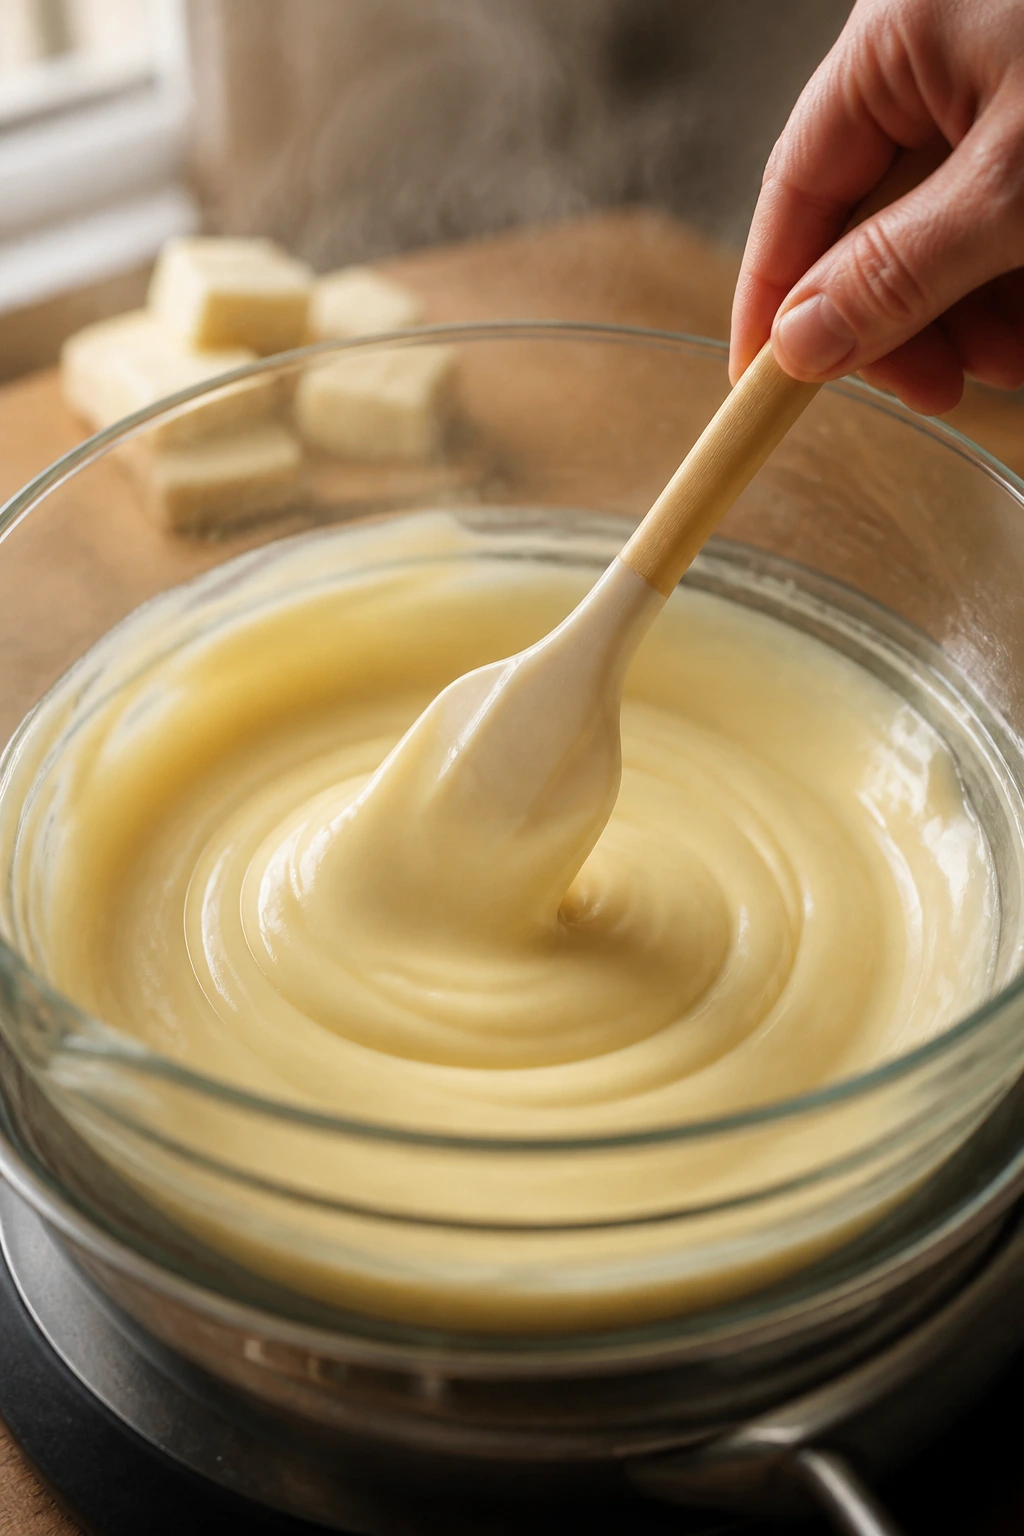
White chocolate is touchy in a way dark chocolate isn’t. It wants gentle heat and a patient hand. Rush it, and the texture turns grainy; respect it, and it becomes glossy enough to make the whole dessert look polished.
Make the White Chocolate Ganache
-
Warm the cream in a small saucepan over medium heat until steam rises and tiny bubbles form around the edges. Do not let it boil.
-
Pour the hot cream over the chopped white chocolate and 2 tablespoons of butter in a heatproof bowl. Let it sit untouched for 2 minutes so the heat can work from the outside in.
-
Stir from the center outward with a rubber spatula until the mixture turns smooth and shiny. Add 1 teaspoon vanilla extract and 1/4 teaspoon fine salt, then stir again. If a few bits remain, set the bowl over a pan of barely simmering water for 5 to 10 seconds at a time and stir between bursts. Never let water splash into the bowl; even a few drops can seize the chocolate.
-
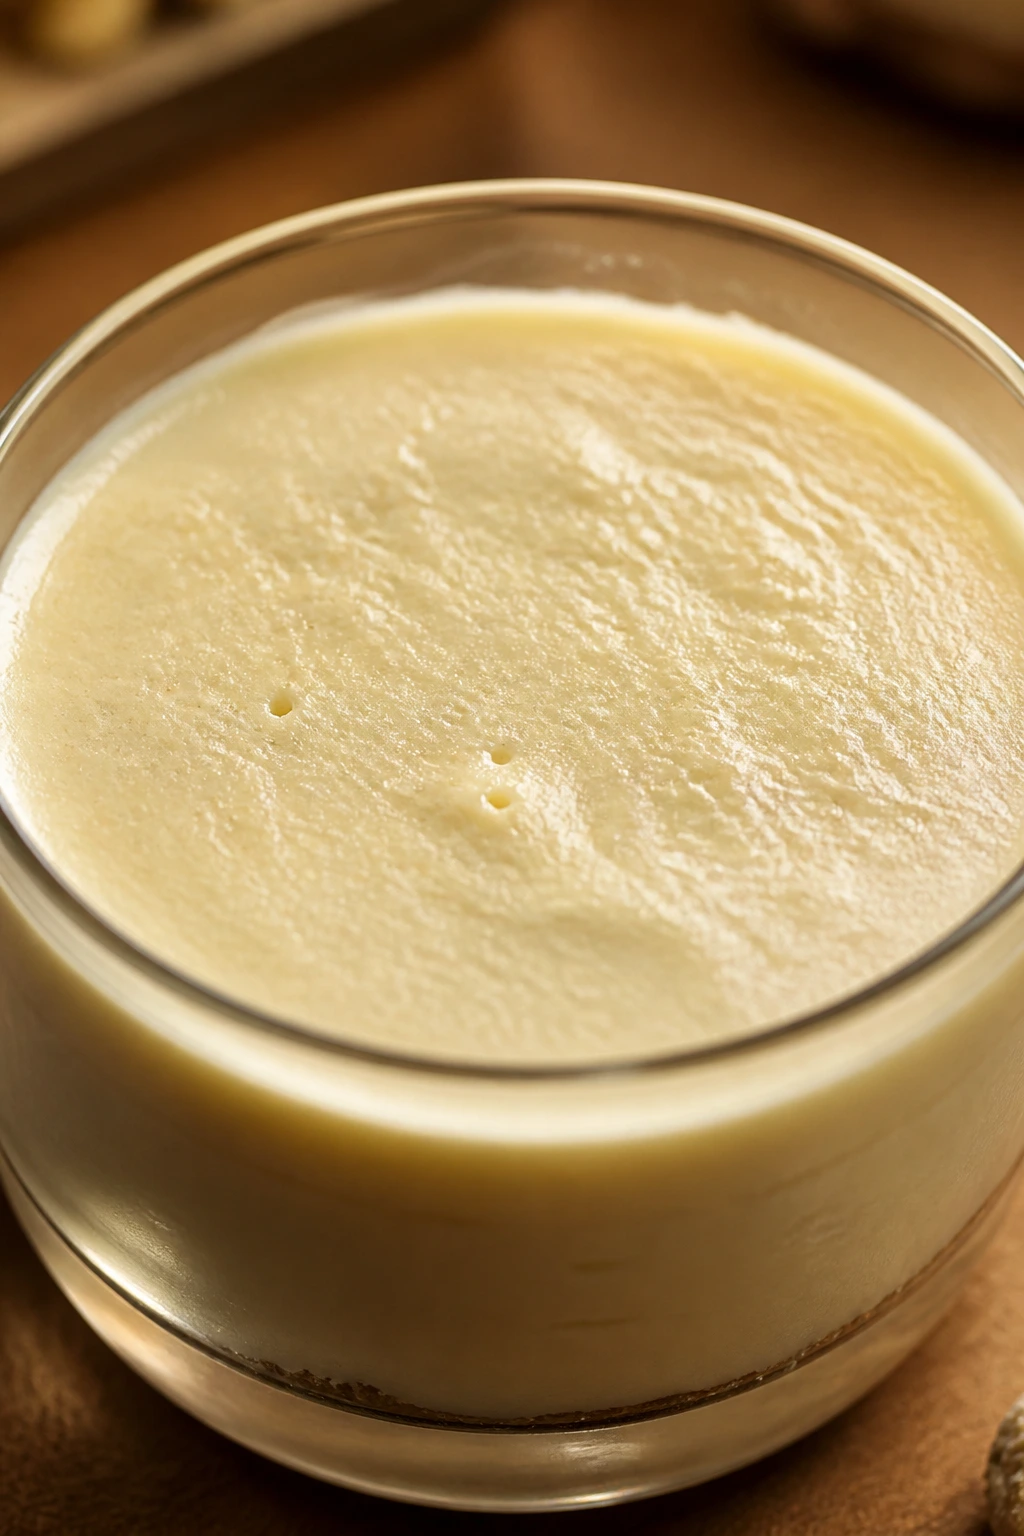
Cool the base until it feels barely warm to the touch, about 10 minutes. It should be fluid and glossy, not hot. If you test it on the inside of your wrist and it feels warmer than body temperature, wait a little longer.
That pause matters. It’s the line between a mousse that holds a soft scoop and one that puddles in the cup.
Whipping and Folding the Mousse
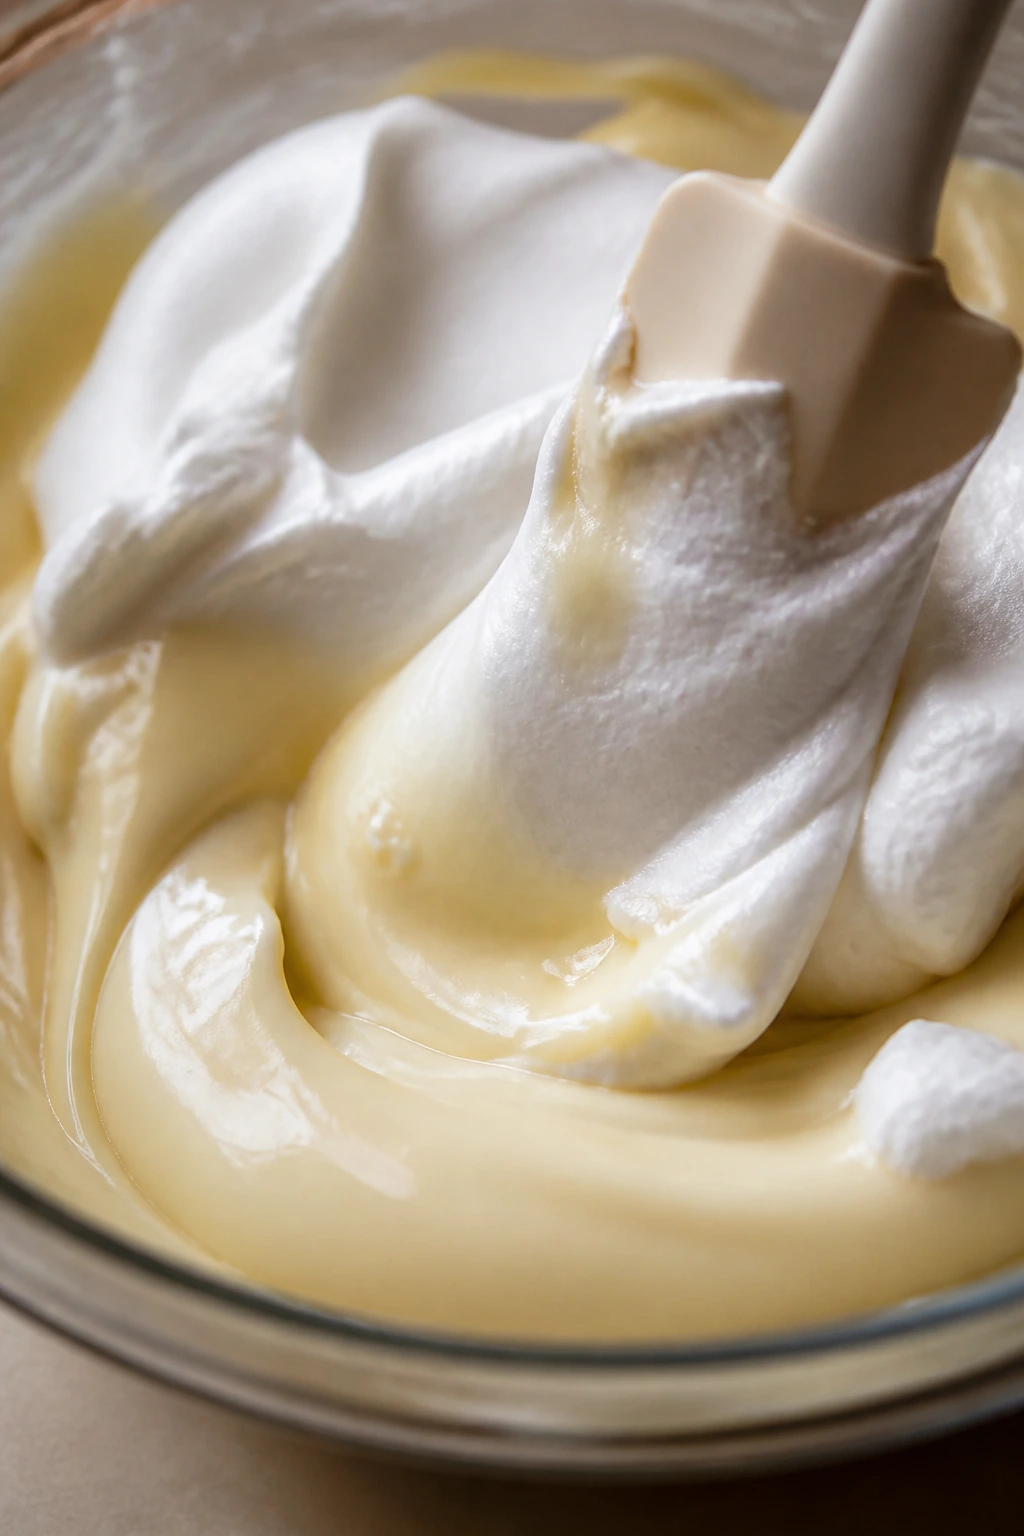
The mousse depends on air. Not a ton of it. Just enough to make the spoon slide through like it’s moving through cold silk.
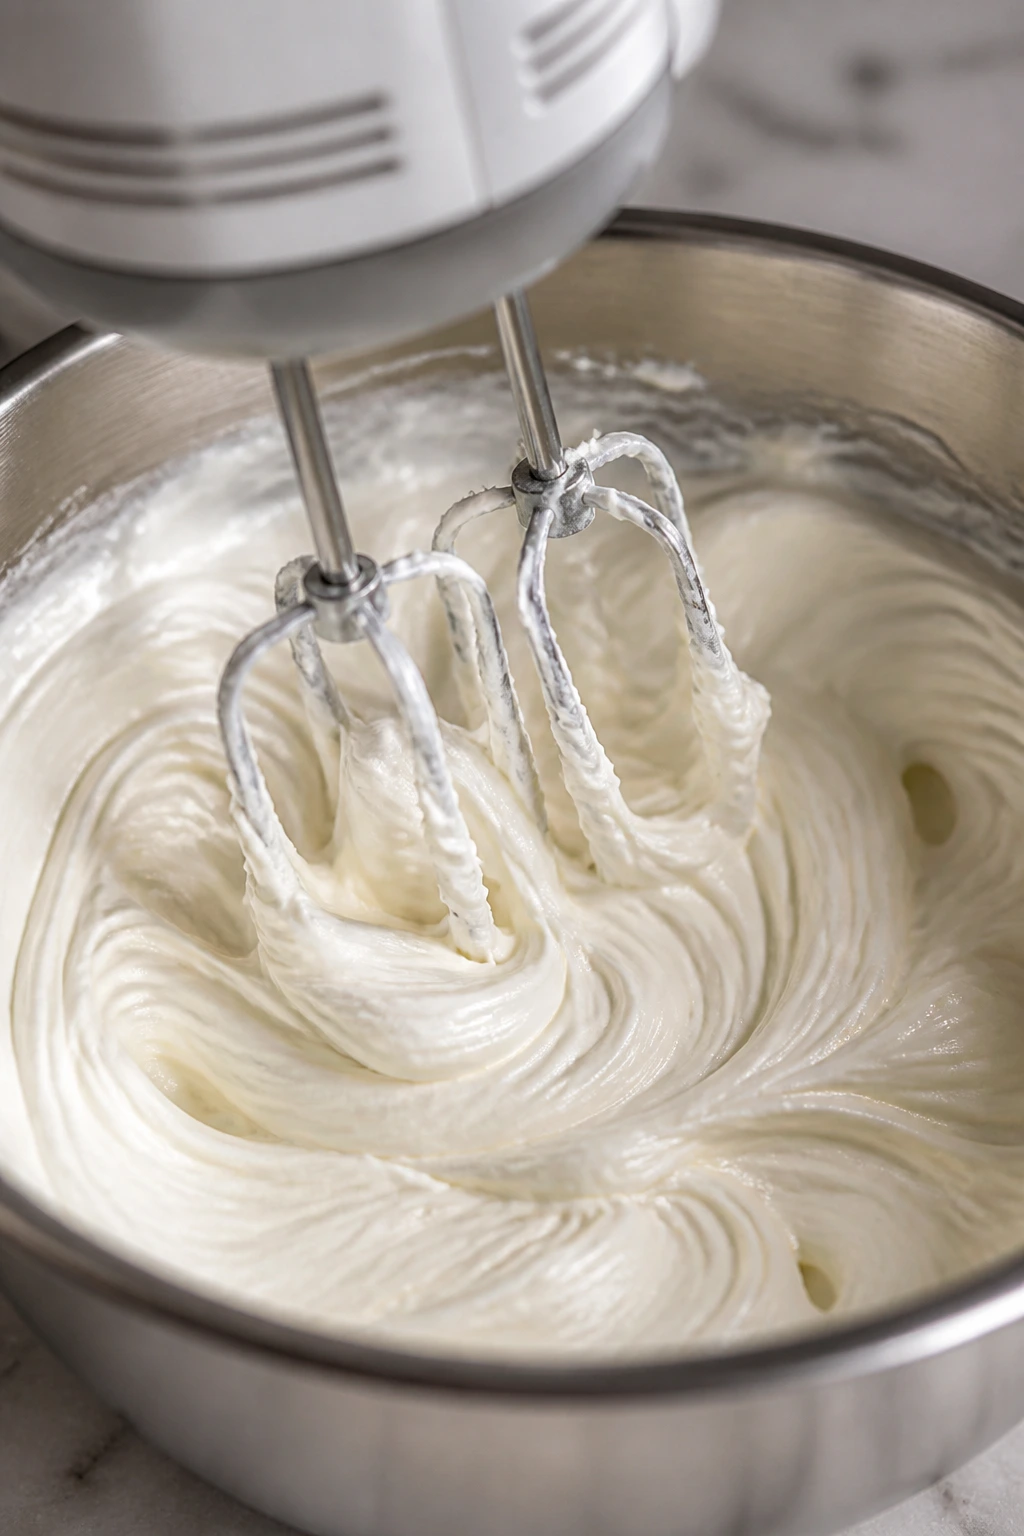
Whip the Cream
- Beat 1 cup cold heavy whipping cream in a clean bowl with an electric mixer on medium-high speed until soft peaks form. The cream should hold a gentle point when you lift the beaters, but the tip should curl over. If the peaks stand stiff and dry, you’ve gone too far.
Fold It Together
-
Lighten the ganache by folding in about one-third of the whipped cream with a spatula. Use broad, slow strokes from the bottom of the bowl upward. The mixture will loosen and turn paler.
-
Fold in the remaining cream in two additions until no streaks remain. Stop the second the mousse looks uniform. Do not stir vigorously; that knocks out the air and leaves you with a dense filling instead of a mousse.
-
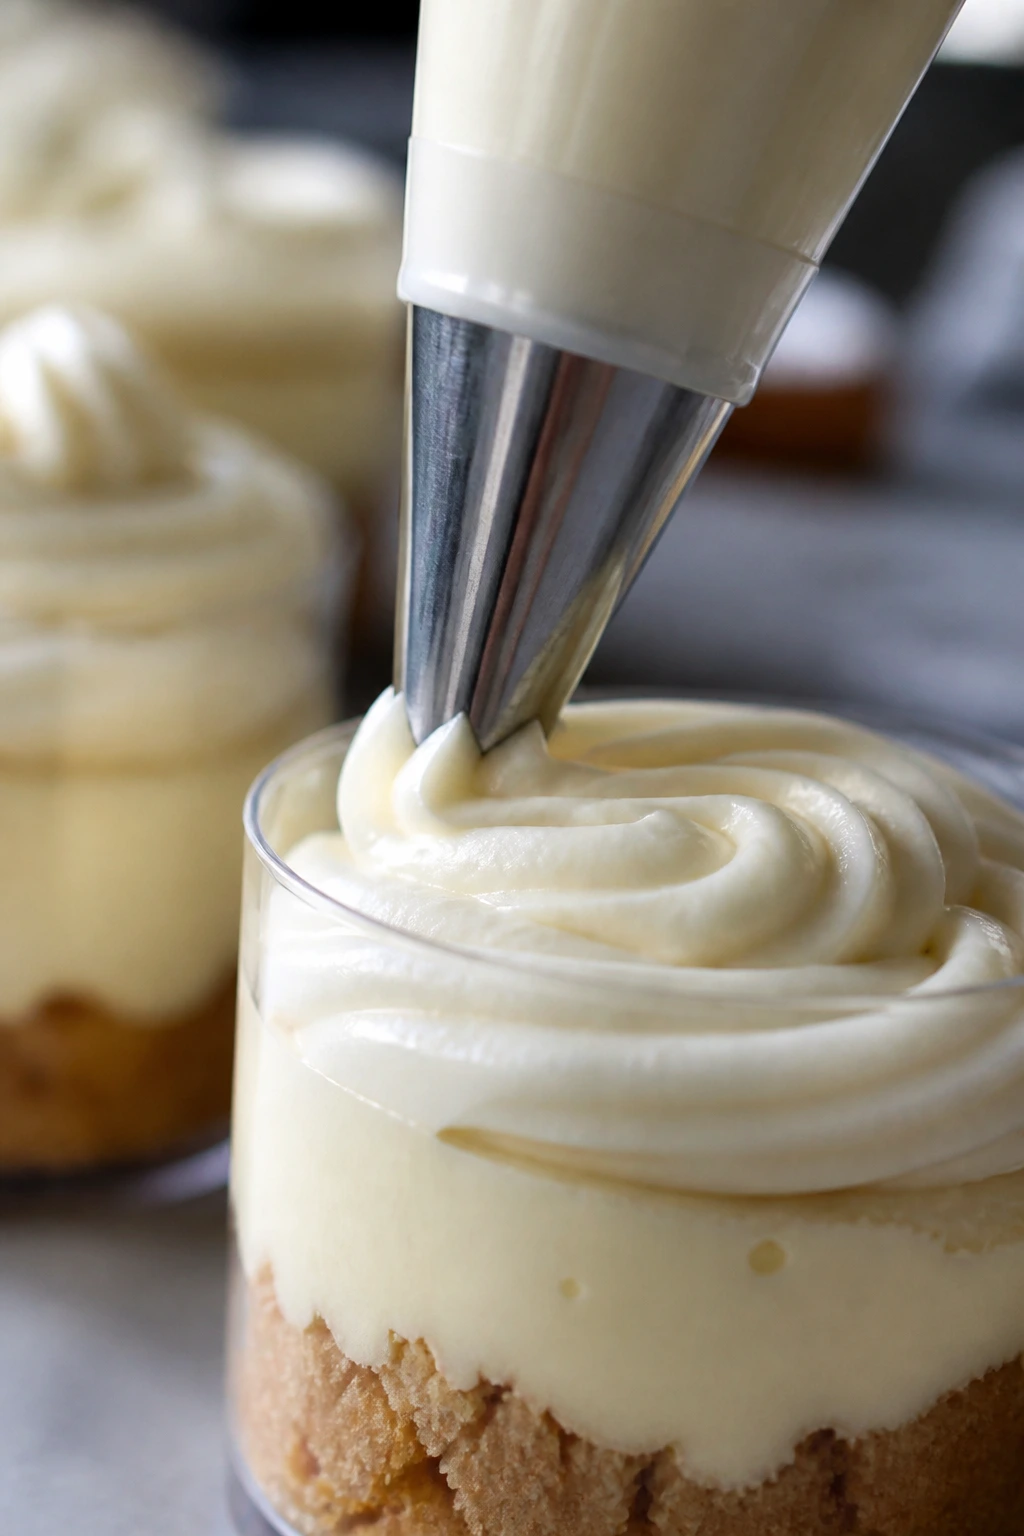
Spoon or pipe the mousse over the crumb layer in each cup, dividing it evenly. Tap each cup once on the counter to settle the surface, then smooth the tops with the back of a spoon if needed.
-
Chill the cups for 2 hours before adding frosting. The mousse should feel set and slightly springy when touched lightly.
The surface does not have to look perfect at this stage. The frosting will hide minor imperfections, and honestly, a few soft swirls underneath give the cups a more relaxed look.
Beating the Cream Cheese Frosting Smooth
Cream cheese frosting can go wrong in two annoying ways: it can stay lumpy, or it can turn too loose and glossy. The fix for both is the same. Beat the base until smooth before the sugar goes in, and stop once it turns fluffy enough to pipe.
Make the Frosting
-
Beat the cream cheese and butter in a medium bowl on medium speed for 2 to 3 minutes until completely smooth and pale. Scrape down the sides of the bowl once or twice. There should be no visible streaks of butter or little hard lumps from the cream cheese.
-
Add the powdered sugar, lemon juice, vanilla, and salt. Start on low speed so the sugar doesn’t blow out of the bowl, then increase to medium and beat until thick and fluffy. If the frosting looks too stiff to pipe, add heavy cream 1 teaspoon at a time until it moves easily through a piping bag but still holds shape.
-
Taste and adjust if needed. A small pinch more salt or a few drops more lemon juice can make the frosting taste less sugary and more balanced.
Finish the Cups
-
Pipe or spoon the frosting onto the chilled mousse. Use a gentle spiral or a simple dollop; either works. Don’t press the frosting down into the mousse or the clean line between layers will disappear.
-
Top with berries and white chocolate shavings. Add them right before serving, or after the cups have chilled another 30 minutes if you want the tops to look extra tidy.
That last chill is optional, but it gives the frosting a firmer feel and helps the garnish stay put.
How to Serve a Cold Dessert Without Smudging the Layers
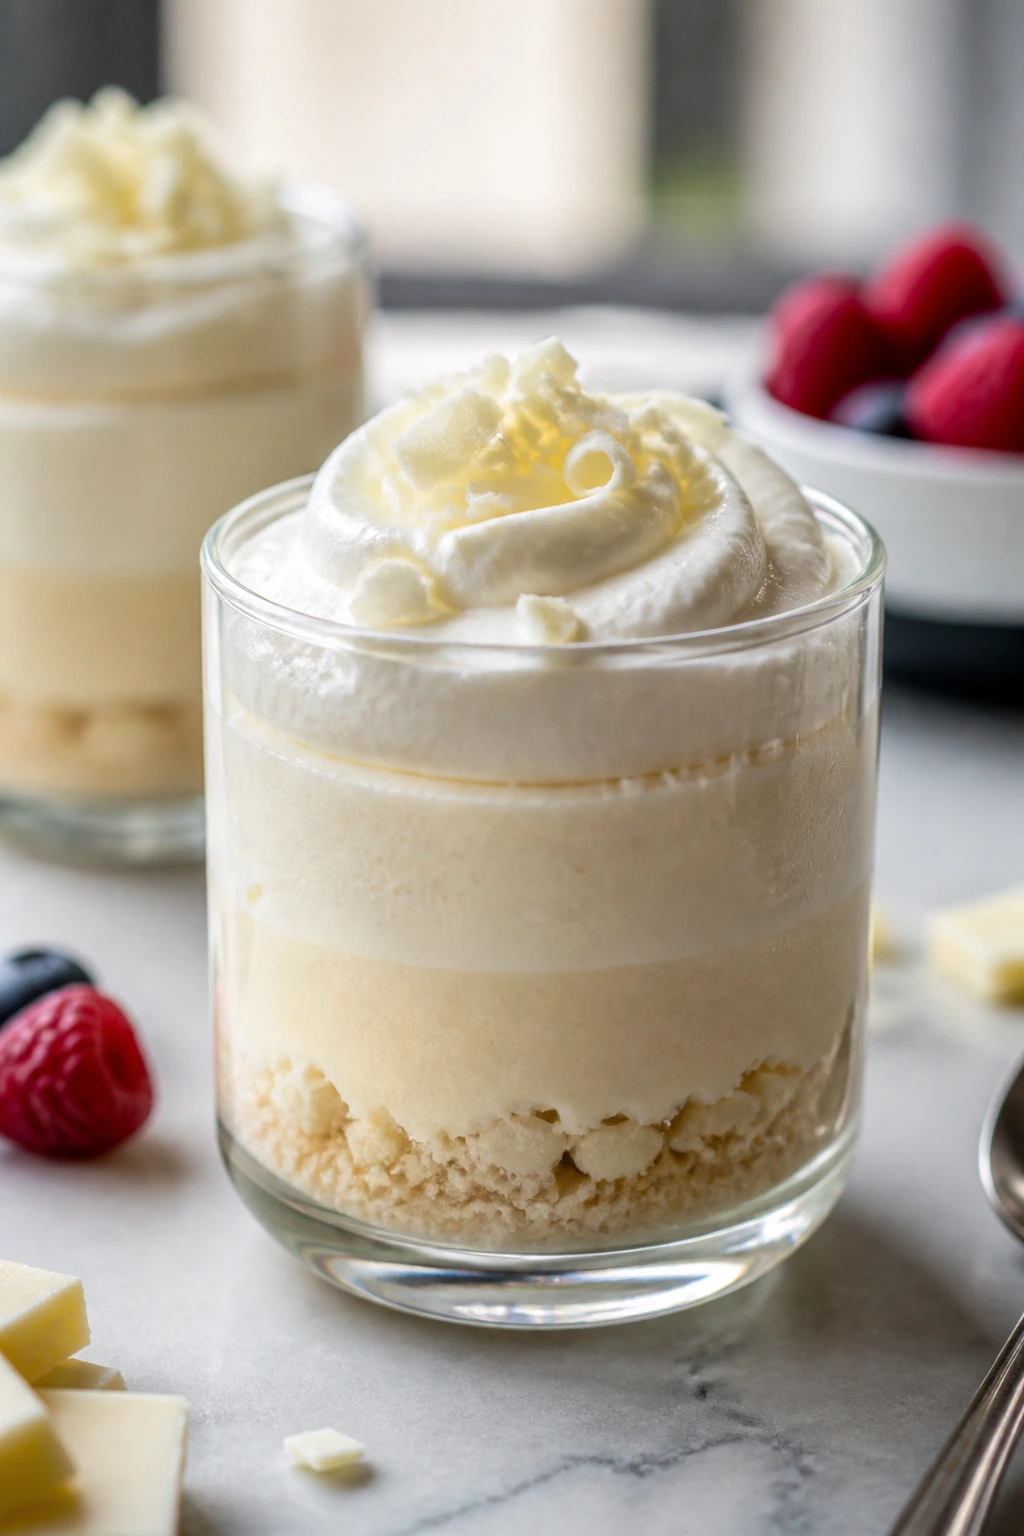
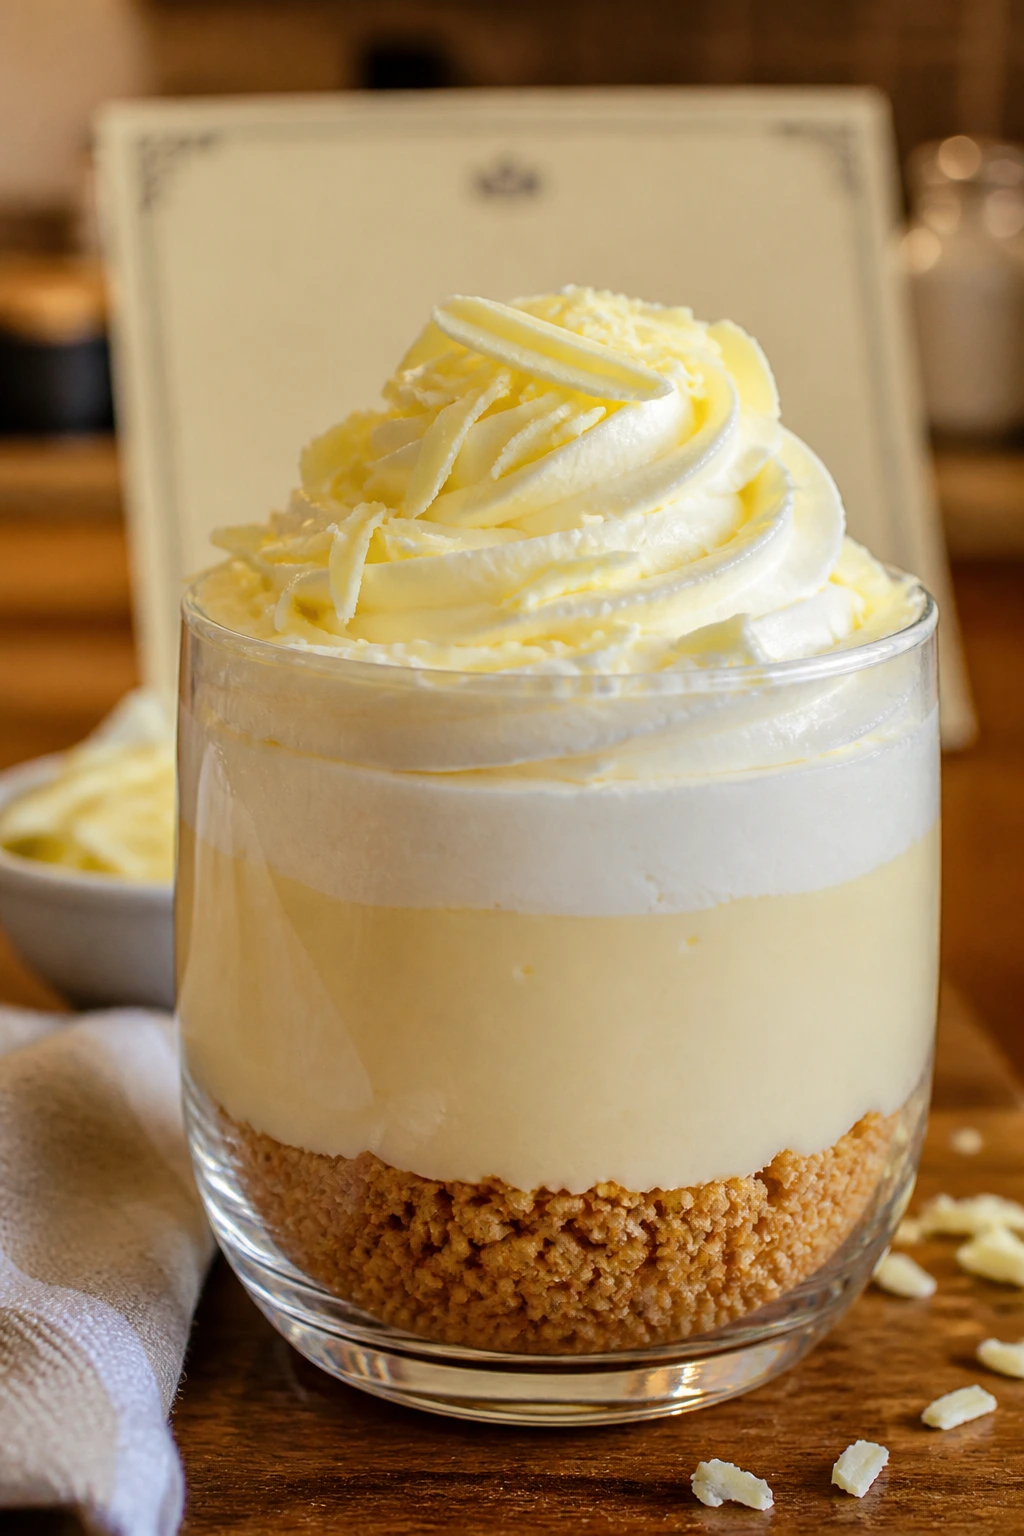
Presentation: Clear cups are the move here. The pale crumb base, ivory mousse, and cream cheese frosting look best when the layers are visible through the glass. If you want the dessert to feel a little more dressed up, use stemless wine glasses or short wide jars and add only 2 or 3 berries per cup.
Accompaniments: A small spoon is enough, but a crisp cookie on the side works well if you want something with bite. I like butter cookies, almond biscotti, or a few thin shortbread rounds because they don’t fight the mousse. If you want a sharper contrast, serve the cups with a spoonful of tart berry sauce or a few extra raspberries on the plate.
Portions: Six-ounce cups make a comfortable portion after dinner. Eight-ounce glasses make the dessert feel larger and are better if this is the main sweet on the table. If you need to stretch the recipe, fill each cup a little less deeply and keep the frosting swirl modest.
Beverage Pairing: Coffee is the safest choice because the bitterness cuts the white chocolate. Unsweetened black tea, espresso, or a dry sparkling wine also works. Skip very sweet drinks; they make the dessert taste heavier than it is.
Small Moves That Improve Flavor and Texture
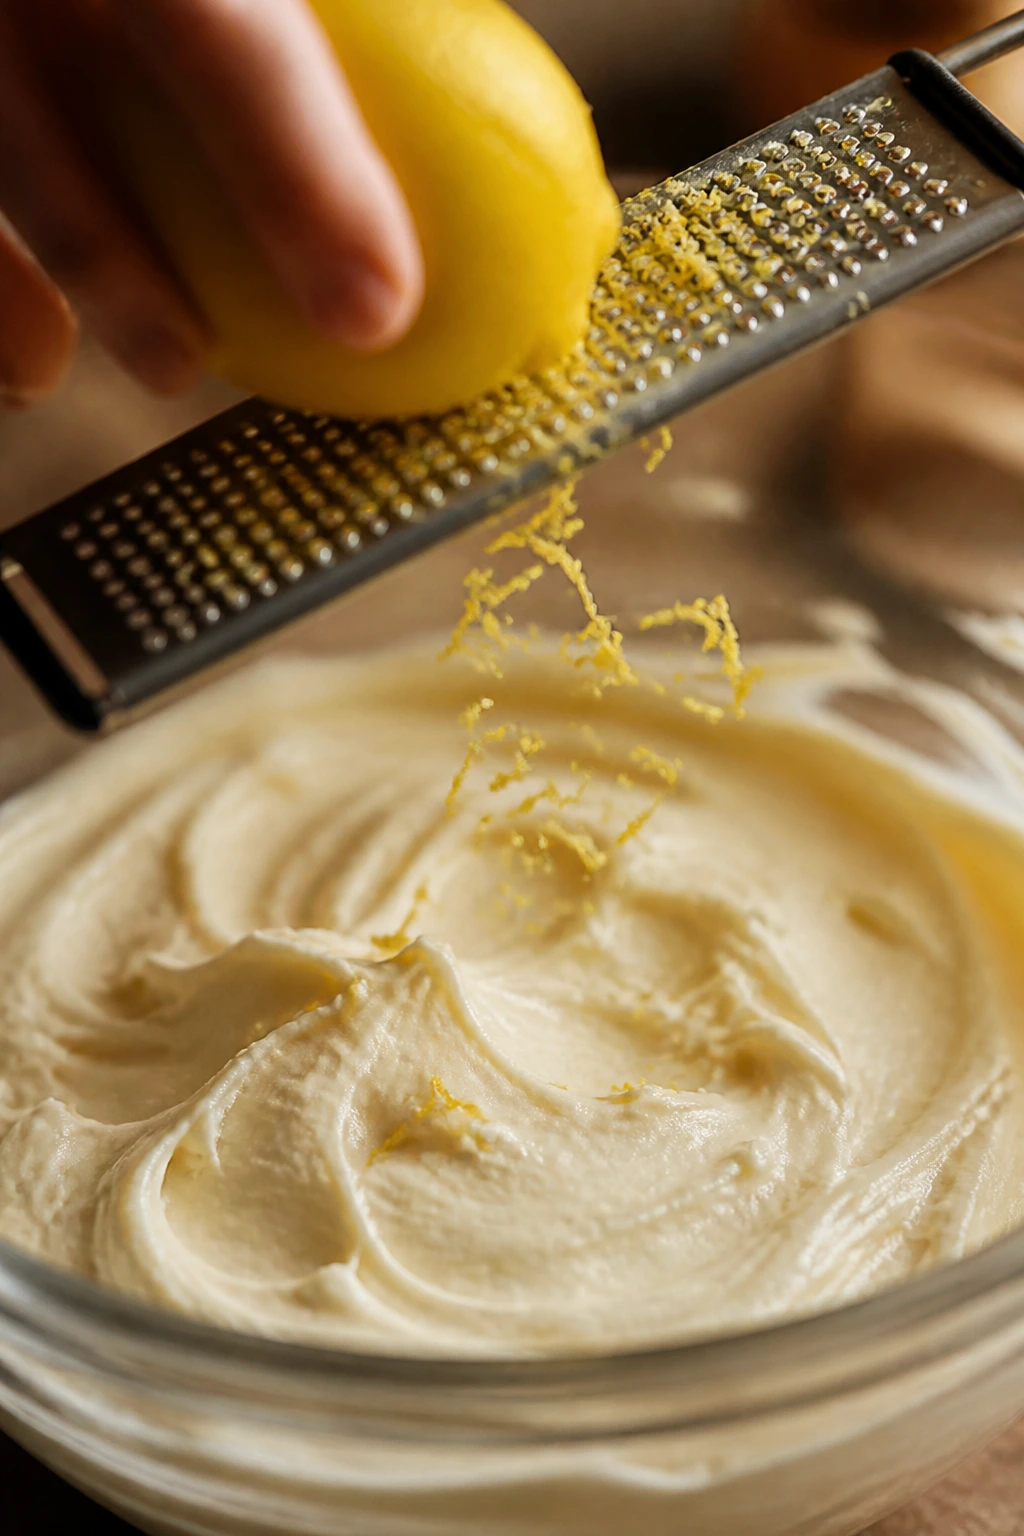
Flavor Enhancement: A tiny hit of lemon zest in the frosting changes the whole thing. You don’t need much — 1/2 teaspoon, maybe less — but the brightness keeps the white chocolate from turning flat. A pinch of flaky salt on top does the same job in a different way.
Time-Saver: Make the crumb base and frosting a day ahead if you want to break the work into smaller pieces. The crumb mix can sit in an airtight container at room temperature, and the frosting can chill in the fridge; just let it soften for 10 to 15 minutes and beat it briefly before piping.
Pro Move: If you’re using a piping bag, fill it only halfway. An overfilled bag warms up in your hand and gets sloppy fast, especially with cream cheese frosting. Smaller batches are easier to control and give cleaner swirls.
Cost-Saver: Spend money on the white chocolate, not on fancy add-ons. A decent bar with cocoa butter gives you a smoother mousse than bargain white chips, and the berries or shavings are optional. The dessert still works if the garnish is simple.
Make-It-Yours: If you like a little crunch, sprinkle crushed toasted almonds over the frosting. If you want a sharper contrast, use raspberries instead of strawberries. If you need gluten-free cups, swap in gluten-free cookies or almond-flour shortbread for the crust.
Mistakes That Make the Mousse Dense or the Frosting Loose
-
Overheating the white chocolate base: Grainy or thick white chocolate usually means the cream was too hot or the chocolate sat over heat too long. Melt it gently, stir in short bursts, and stop as soon as it’s smooth.
-
Folding whipped cream into a warm base: If the mousse turns thin and shiny, the ganache was still hot when the cream went in. Wait until the bowl feels barely warm before folding; that one pause saves the texture.
-
Starting with cold cream cheese: Lumpy frosting is usually just cold dairy. Let the cream cheese and butter soften fully, then beat them until smooth before adding sugar.
-
Beating the frosting too long after the sugar goes in: Once it looks fluffy and pipeable, stop. Extra mixing can make the frosting glossy and loose, which is annoying to pipe and even worse to stack.
-
Adding berries too early: Wet fruit bleeds, and that bleed shows up fast on pale frosting. Dry the berries well and add them close to serving, not the night before.
-
Skipping the chill time: The mousse needs time to set in the cups. If you frost too early, the spoon sinks through the top layer and the dessert looks messy before it reaches the table.
Variations That Fit Different Tastes
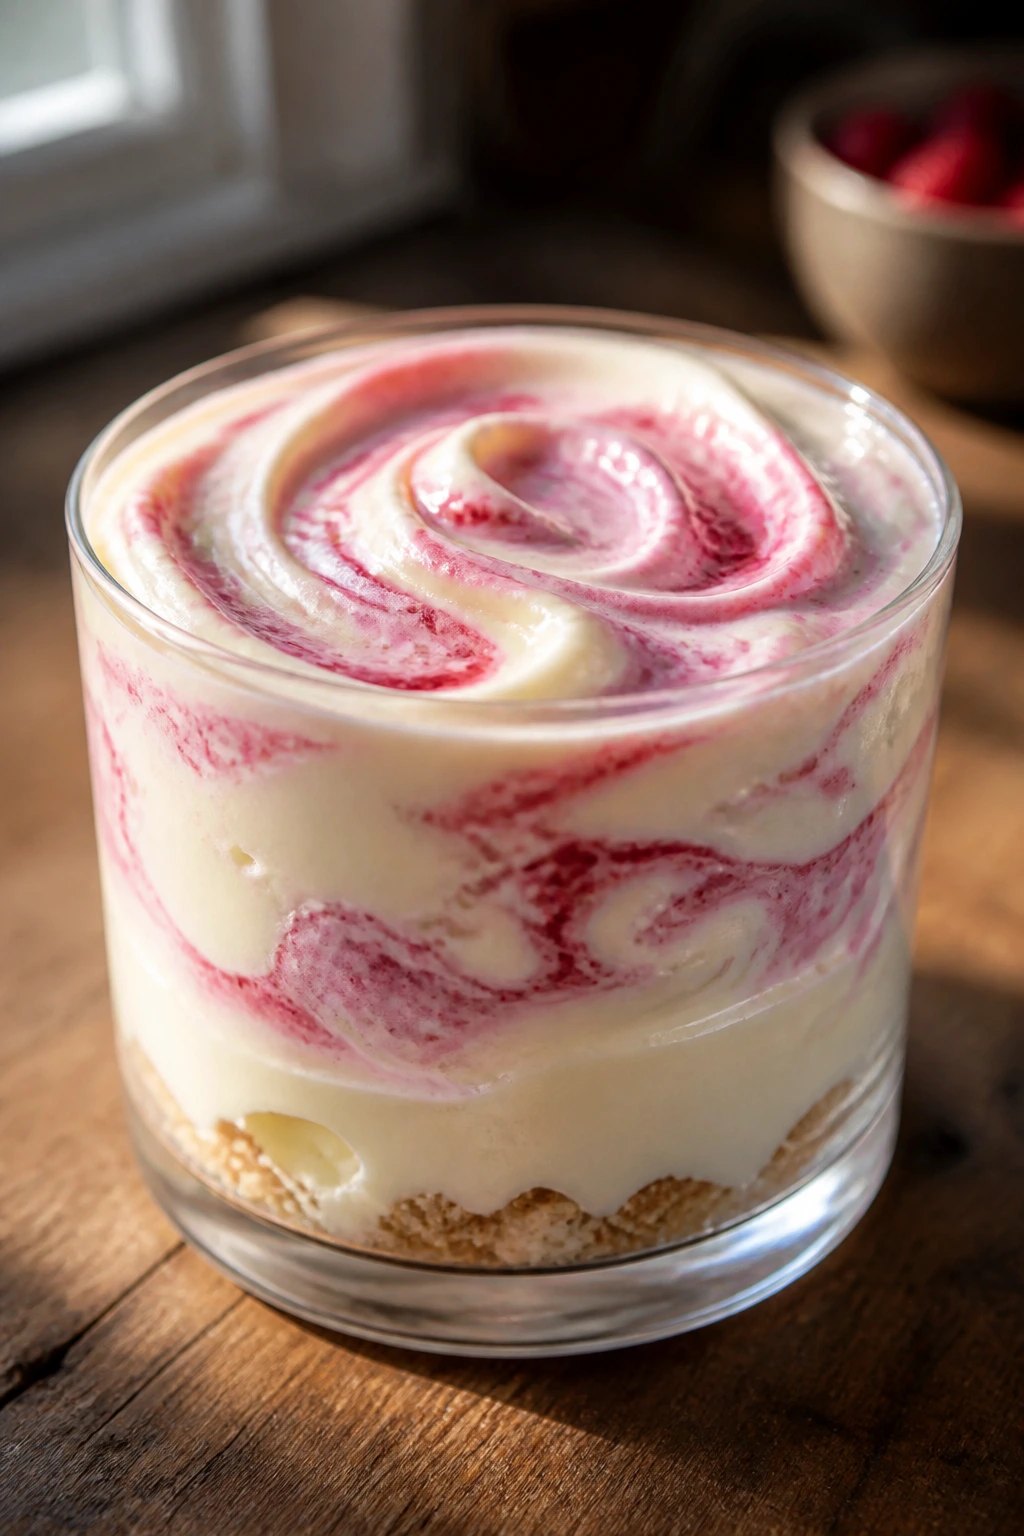
Raspberry Ripple Cups
Fold 3 tablespoons of raspberry jam into the finished mousse in just 2 or 3 loose streaks, not fully mixed. The pale pink swirls look good against the white chocolate, and the tart fruit cuts the sweetness without changing the texture.
Lemon-Cut Version
Add an extra 1/2 teaspoon lemon zest to the frosting and keep the lemon juice in place. The result tastes sharper and cleaner, which is useful if you’re serving the cups after a rich meal.
Chocolate Cookie Crust
Swap the graham crumbs for chocolate wafer crumbs and keep the butter amount the same. The darker base gives the dessert a deeper flavor and makes the white chocolate pop more clearly.
Salted Pretzel Base
Replace half the crumbs with finely crushed pretzels. The salty edge is a good move if you like desserts that lean sweet-salty instead of plain sweet, and the texture stays crisp if you toast the crumbs as written.
Dairy-Free Swap
Use dairy-free white chocolate, coconut cream whipped to soft peaks, and a dairy-free cream cheese alternative for the frosting. The texture will be a touch softer and the flavor a little less clean, but it still gives you a layered cold dessert with the same basic shape.
Make-Ahead, Storage, and Freezer Notes
These cups are happiest when they stay cold. Room temperature is not their friend, and neither is a warm kitchen. If they sit out for more than 2 hours, the mousse softens and the frosting starts to slump; if the room is warm, cut that window down to about 1 hour.
In the fridge, the assembled cups keep well for up to 3 days when covered tightly with plastic wrap or stored in a lidded container. The crumb base softens a little over time, which is normal, and some people actually like that texture because it blends more with the mousse.
The freezer is possible, but it’s not my first choice for the fully finished cups. If you do freeze them, leave off the berries and shavings, cover them well, and freeze for up to 1 month. Thaw overnight in the fridge, then add fresh garnish before serving. The mousse may lose a little of its airy feel after freezing, but it stays pleasant if you let it thaw slowly.
For make-ahead planning, the crumb base can be toasted and cooled 1 day ahead. The frosting can be made 2 days ahead and kept chilled; beat it briefly before piping if it firms up too much. The mousse is best assembled the same day you want to serve it, but the fully layered cups can be made the day before without trouble.
Questions People Ask Before Making It

Can I use white chocolate chips instead of a bar?
Yes, but the result depends on the brand. Chips with cocoa butter melt much smoother than chips loaded with stabilizers, so read the label if you can. A bar still gives the cleanest texture.
Why did my white chocolate turn grainy?
Usually because it got too hot or a few drops of water got into the bowl. Once it seizes badly, it’s hard to save for mousse, so it’s better to start fresh than force it through.
Can I make this in one dish instead of cups?
You can layer it in a small trifle bowl or an 8-inch square dish, but the serving will be softer and messier. Cups hold the layers better, especially if you want the frosting on top to stay neat.
How far ahead can I frost the cups?
I’d frost them up to 12 hours before serving if you want the tops to stay clean. After that, the fruit starts to weep and the frosting gets a slightly firmer skin from sitting in the fridge.
Can I make the frosting less sweet?
Yes. Drop the powdered sugar to 1 3/4 cups, keep the lemon juice, and add a pinch more salt. The frosting will still pipe well, but it tastes less sugary and sits better against the white chocolate.
What if my mousse seems too loose?
Chill it for 20 to 30 minutes before portioning. If it’s still soft, the white chocolate base was probably too warm when you folded in the whipped cream, but a short chill often brings it back to a spoonable texture.
Do I need a piping bag?
No. A spoon and a light hand work fine. The piping bag just gives the frosting a cleaner top, which matters if you’re serving these in clear glasses and want the layers to look crisp.
A Soft Finish for a Cold Dessert
A dessert like this rewards patience more than fancy technique. Keep the chocolate gentle, keep the cream cold, and let the fridge do the part that only the fridge can do. That’s the whole trick, and it’s a good one.
What you end up with is not brittle, not gummy, not overly sweet. It’s cold and creamy with a little tang on top, which is exactly where this kind of mousse should land. Serve it after the cups have had time to settle, and the spoon will do the rest.
Buttery White Chocolate Mousse with Cream Cheese Frosting — Recipe Card
Recipe Name: Buttery White Chocolate Mousse with Cream Cheese Frosting
Description: Creamy white chocolate mousse layered over a buttery graham crumb base and finished with tangy cream cheese frosting. Served in cups, it chills into a soft, elegant dessert with clean layers and a rich, cool finish.
Prep Time: 30 minutes
Cook Time: 8 minutes
Total Time: 38 minutes active, plus 4 hours chilling
Course: Dessert
Cuisine: American
Servings: 6 to 8 servings
Calories: About 430 kcal per serving
Ingredients
For the Graham Cracker Crust:
- 1 1/2 cups graham cracker crumbs, finely crushed
- 2 tablespoons granulated sugar
- 1/8 teaspoon fine sea salt
- 4 tablespoons unsalted butter, melted and slightly cooled
For the Buttery White Chocolate Mousse:
- 10 ounces white chocolate, finely chopped
- 1/2 cup heavy cream
- 2 tablespoons unsalted butter
- 1 teaspoon pure vanilla extract
- 1/4 teaspoon fine sea salt
- 1 cup cold heavy whipping cream
For the Cream Cheese Frosting:
- 8 ounces full-fat cream cheese, softened to cool room temperature
- 1/2 cup unsalted butter, softened
- 2 cups powdered sugar, sifted
- 1 tablespoon fresh lemon juice
- 1 teaspoon pure vanilla extract
- Pinch fine sea salt
- 1 to 2 tablespoons heavy cream, only if needed for piping
For Finishing:
- 1/2 cup fresh raspberries or sliced strawberries
- 2 ounces white chocolate, shaved into curls or fine shavings
Instructions
-
Preheat the oven to 350°F (175°C) and line a rimmed baking sheet with parchment paper.
-
Mix the graham cracker crumbs, sugar, salt, and melted butter in a bowl until the mixture looks like damp sand.
-
Spread the crumb mixture on the baking sheet and bake for 6 to 8 minutes, stirring once halfway through. Cool completely.
-
Divide the cooled crumbs among 8 dessert cups or jars and press lightly into an even base.
-
Warm the heavy cream in a saucepan over medium heat until steam rises and tiny bubbles form around the edges.
-
Pour the hot cream over the chopped white chocolate and butter in a heatproof bowl. Let sit for 2 minutes, then stir until smooth. Stir in the vanilla and salt, then cool until barely warm.
-
Beat the cold heavy whipping cream to soft peaks in a clean bowl.
-
Fold one-third of the whipped cream into the white chocolate mixture, then fold in the rest until no streaks remain.
-
Spoon or pipe the mousse over the crumb bases and chill for 2 hours until set enough to hold frosting.
-
Beat the cream cheese and butter until smooth, then add the powdered sugar, lemon juice, vanilla, and salt. Beat until fluffy and pipeable; add cream if needed.
-
Pipe or spoon the frosting onto the chilled mousse, then garnish with berries and white chocolate shavings.
-
Chill for at least 30 minutes more if you want the frosting to firm up slightly before serving.
Notes: Use a white chocolate bar with cocoa butter for the smoothest mousse. Keep the cups refrigerated and garnish close to serving time for the cleanest look.