
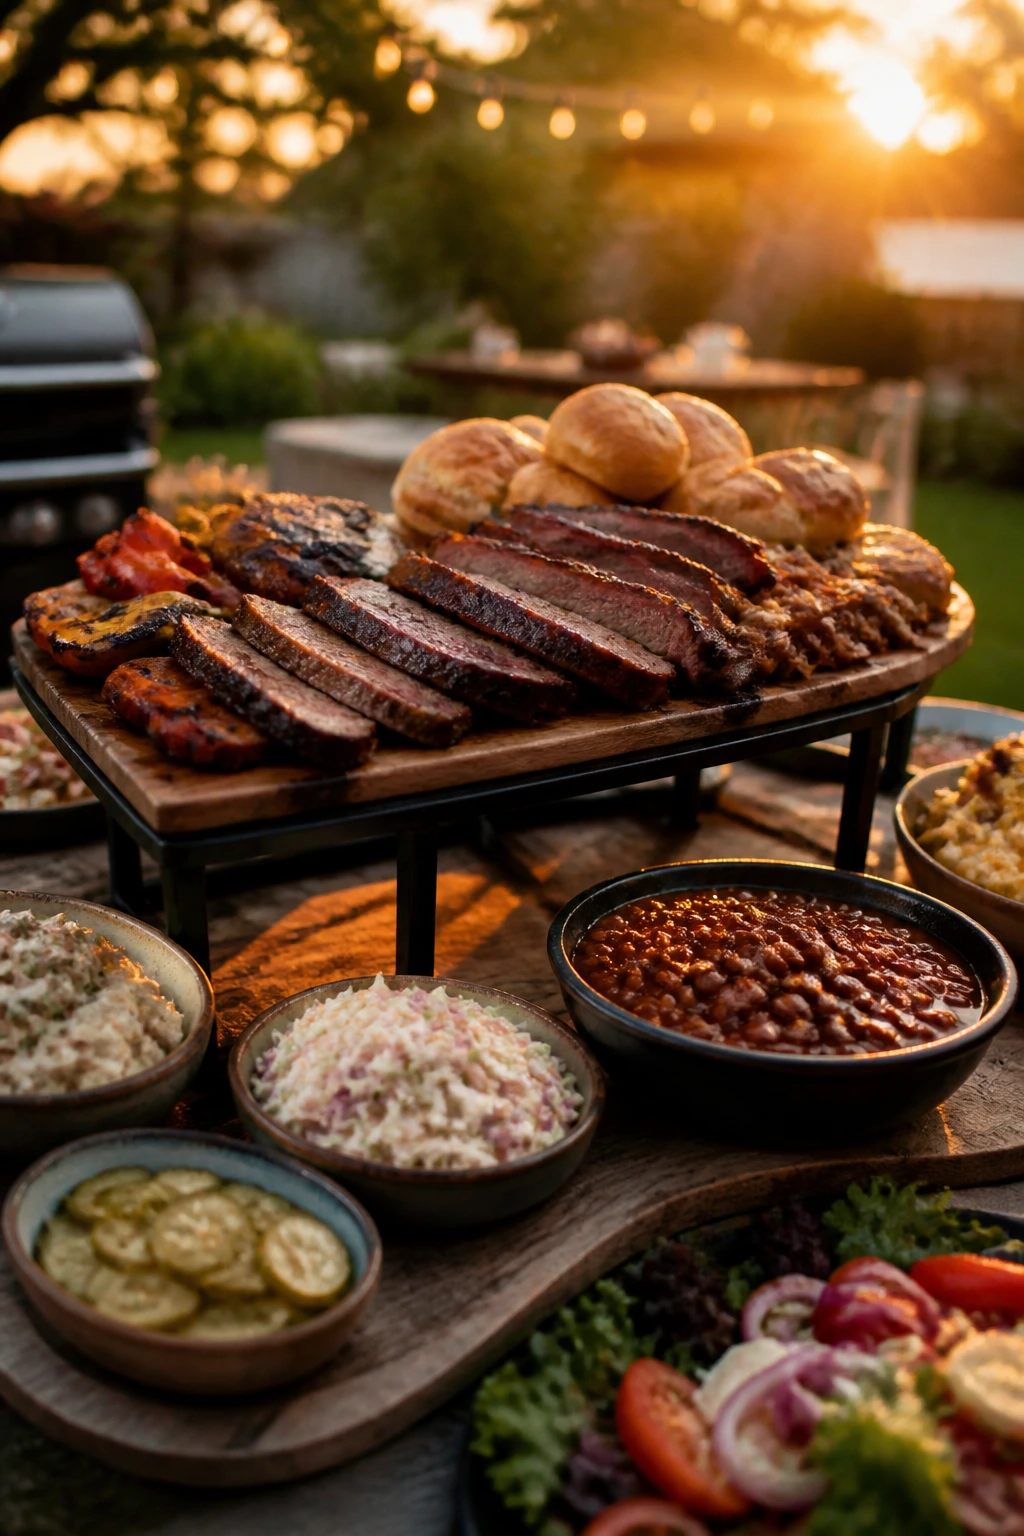
A backyard cookout can look busy and still feel flat. The grill is hot, the music is on, people are holding paper plates, and yet the food somehow lands on the table looking like it needs a nap. A juicy BBQ food display for backyard cookouts fixes that problem fast, because it treats the spread like part of the meal instead of an afterthought. Smoke, shine, char, and color do half the selling before anybody lifts a fork.
That matters more than most people admit. A tray of ribs with a little gloss on the surface, a pile of sliced brisket with the grain lined up neatly, a bowl of pickles that actually looks sharp and cold — those details change the mood of the whole party. The food feels cared for. Guests move toward the table faster. They hover. They take smaller bites at first, which is exactly what happens when something looks properly handled.
And there’s a practical side to it, too. Backyard food sits in awkward conditions: sun, wind, bugs, sticky fingers, and that one guest who always opens every lid. If you know how to present barbecue so it stays juicy, readable, and safe, the display doesn’t just look better. It buys you time, keeps the meat from drying out, and makes the whole operation feel calmer.
Why This Juicy BBQ Food Display Wins Before the Grill Is Even Cold

- Juicy food looks freshly made: A thin sheen of sauce, rested meat juices, and a little steam at the right moment tell people the grill just did its job.
- Height makes a small spread feel abundant: One deep platter, one low tray, and one raised bowl often look more generous than a table covered in flat plates.
- Color keeps the smoke from taking over: Vinegar slaw, pickled onions, charred corn, and green herbs break up all the brown in a way that feels intentional, not fussy.
- A clean layout protects texture: Sauce on the side, bread in a dry spot, and cold toppings away from the heat keep buns from going limp and slaw from turning watery.
- The table shapes traffic: A well-set buffet moves people in a single direction, which means fewer elbows near the ribs and fewer accidents with hot pans.
- The right display buys you breathing room: When platters are arranged well, you can refill one section at a time instead of scrambling to rebuild the whole table.
Why a Juicy BBQ Food Display Works Better Than a Bare Buffet
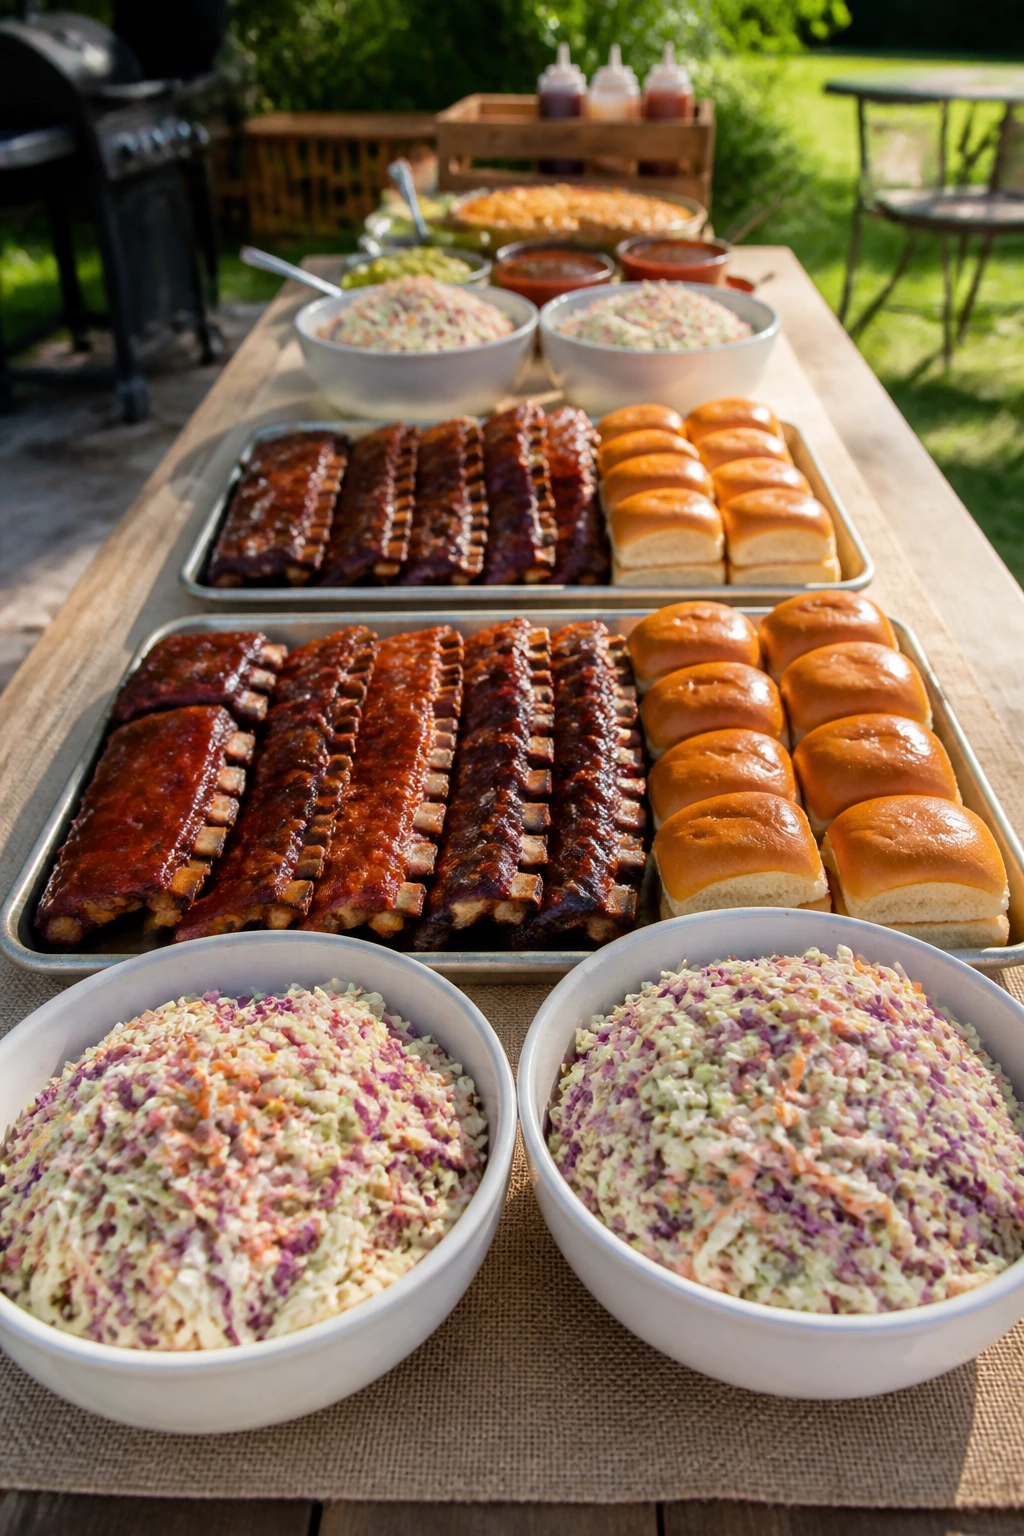
A bare buffet feels like a grocery run that got tired halfway through. A good barbecue display does the opposite. It makes the food look like it belongs together, even when the menu is simple: ribs, buns, slaw, beans, pickles, maybe corn. That sense of abundance does not come from buying more. It comes from arranging what you already have so the table reads clearly from a few steps away.
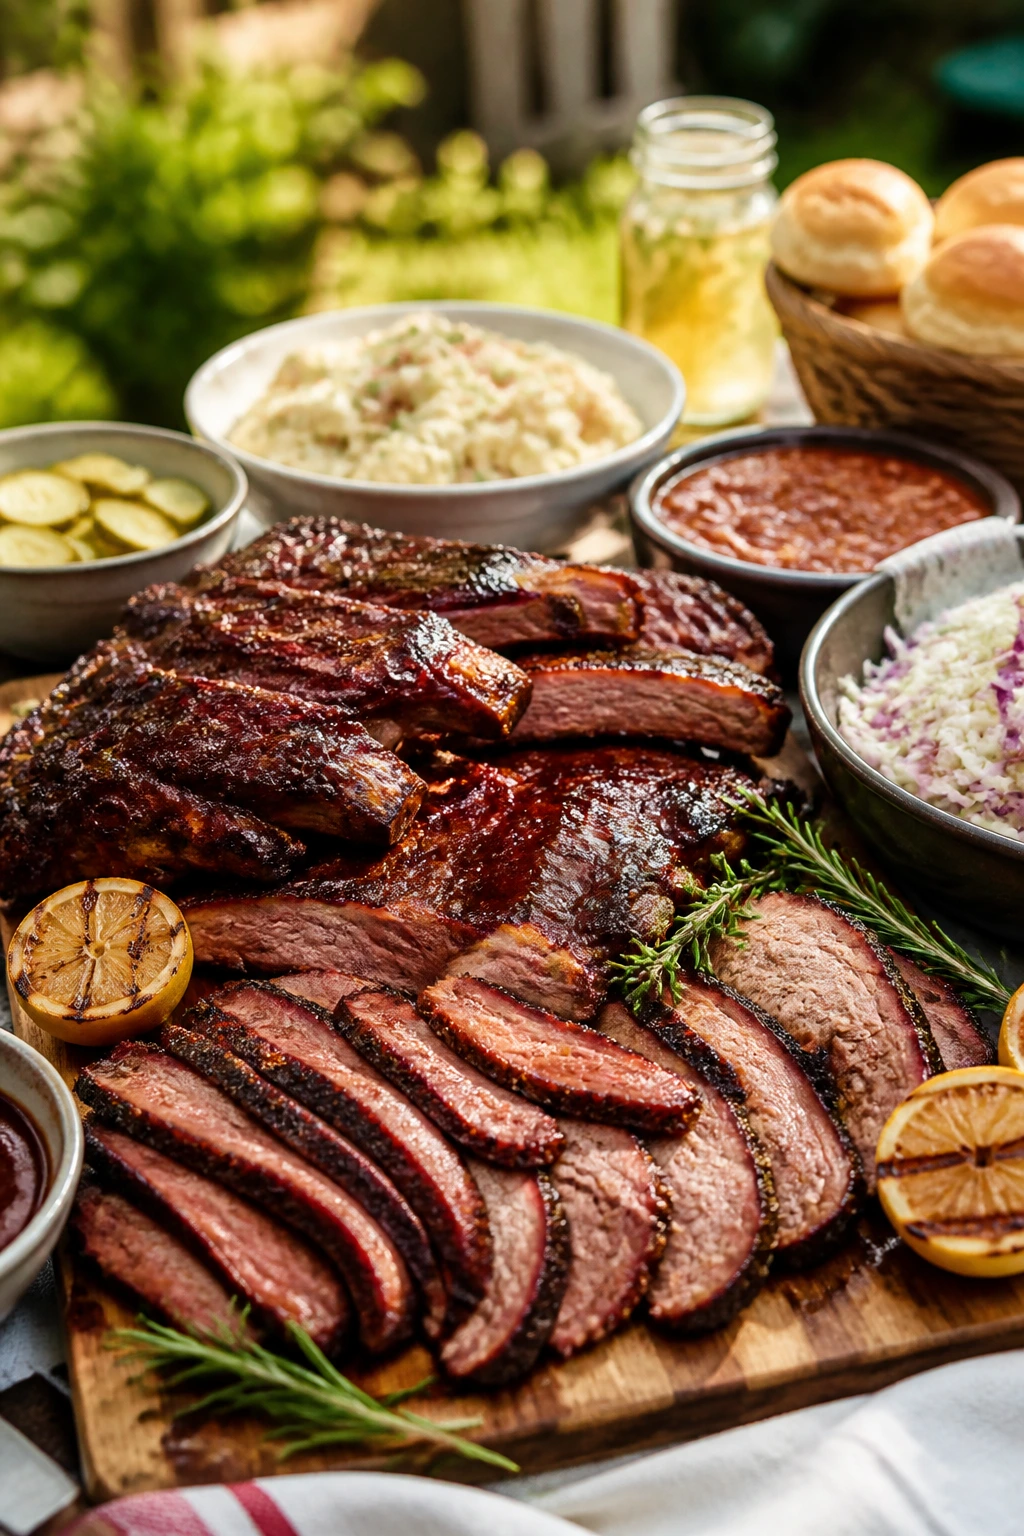
The eye wants a focal point first. In barbecue, that usually means the meat tray. Brisket with a dark bark and a pink smoke ring is doing a lot of heavy lifting, so give it the center spot and let the sides support it instead of competing. A pile of sliced chicken thighs in one corner of a platter can look limp and lonely; fanned into a shallow arc with herbs and pickles tucked nearby, it looks like a plan.
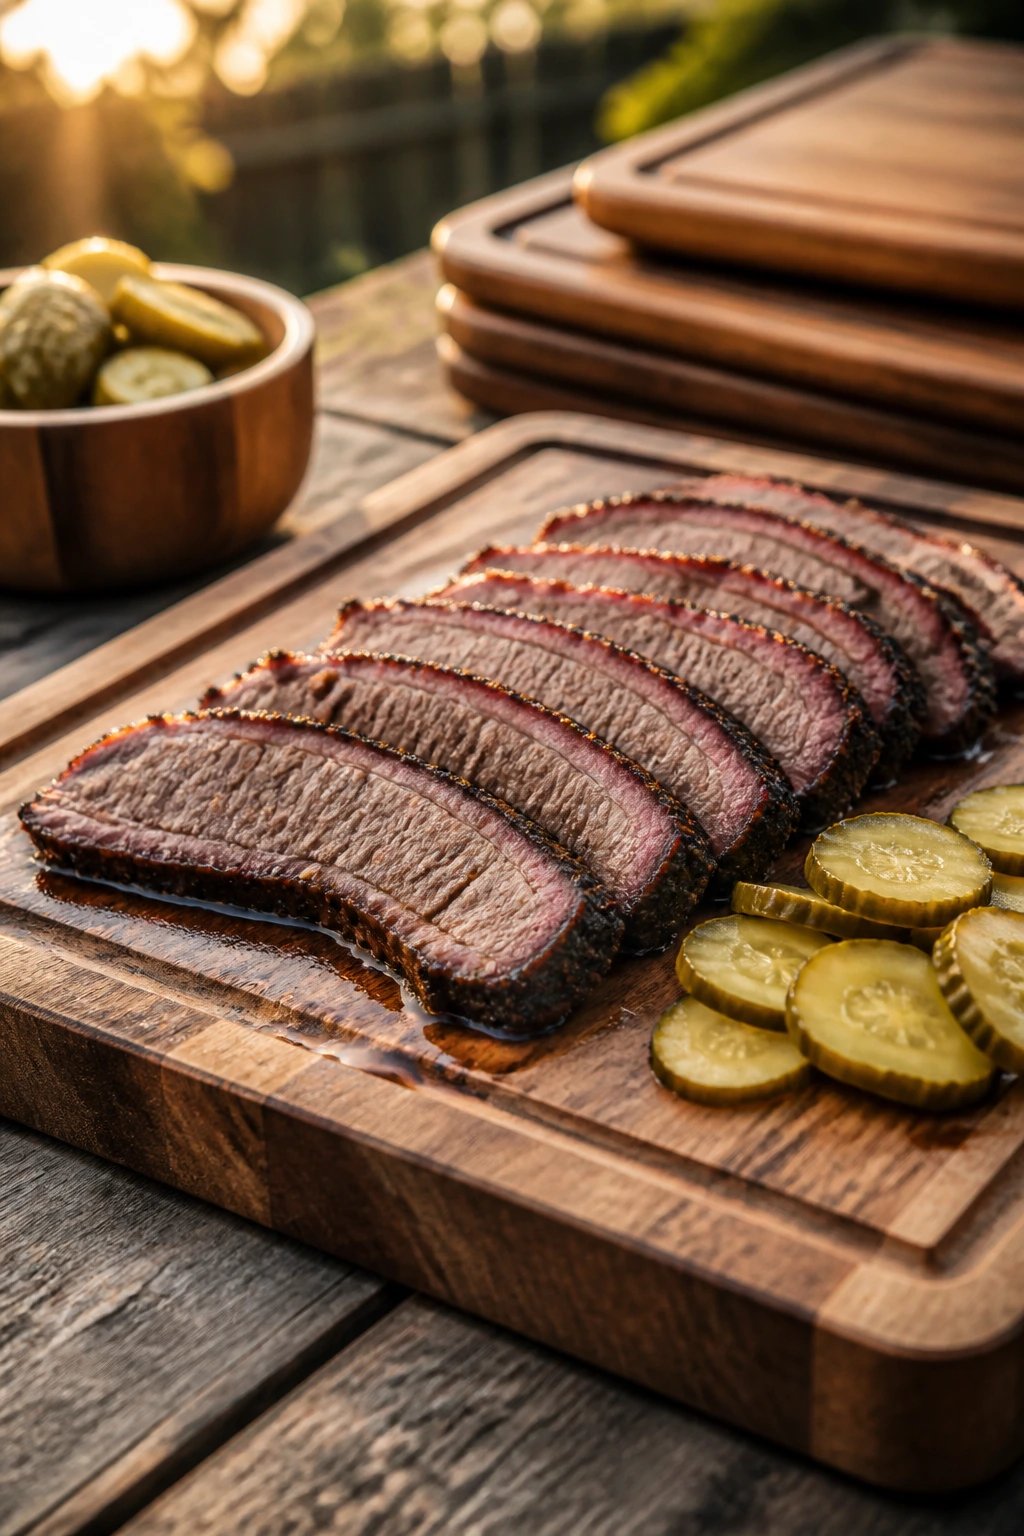
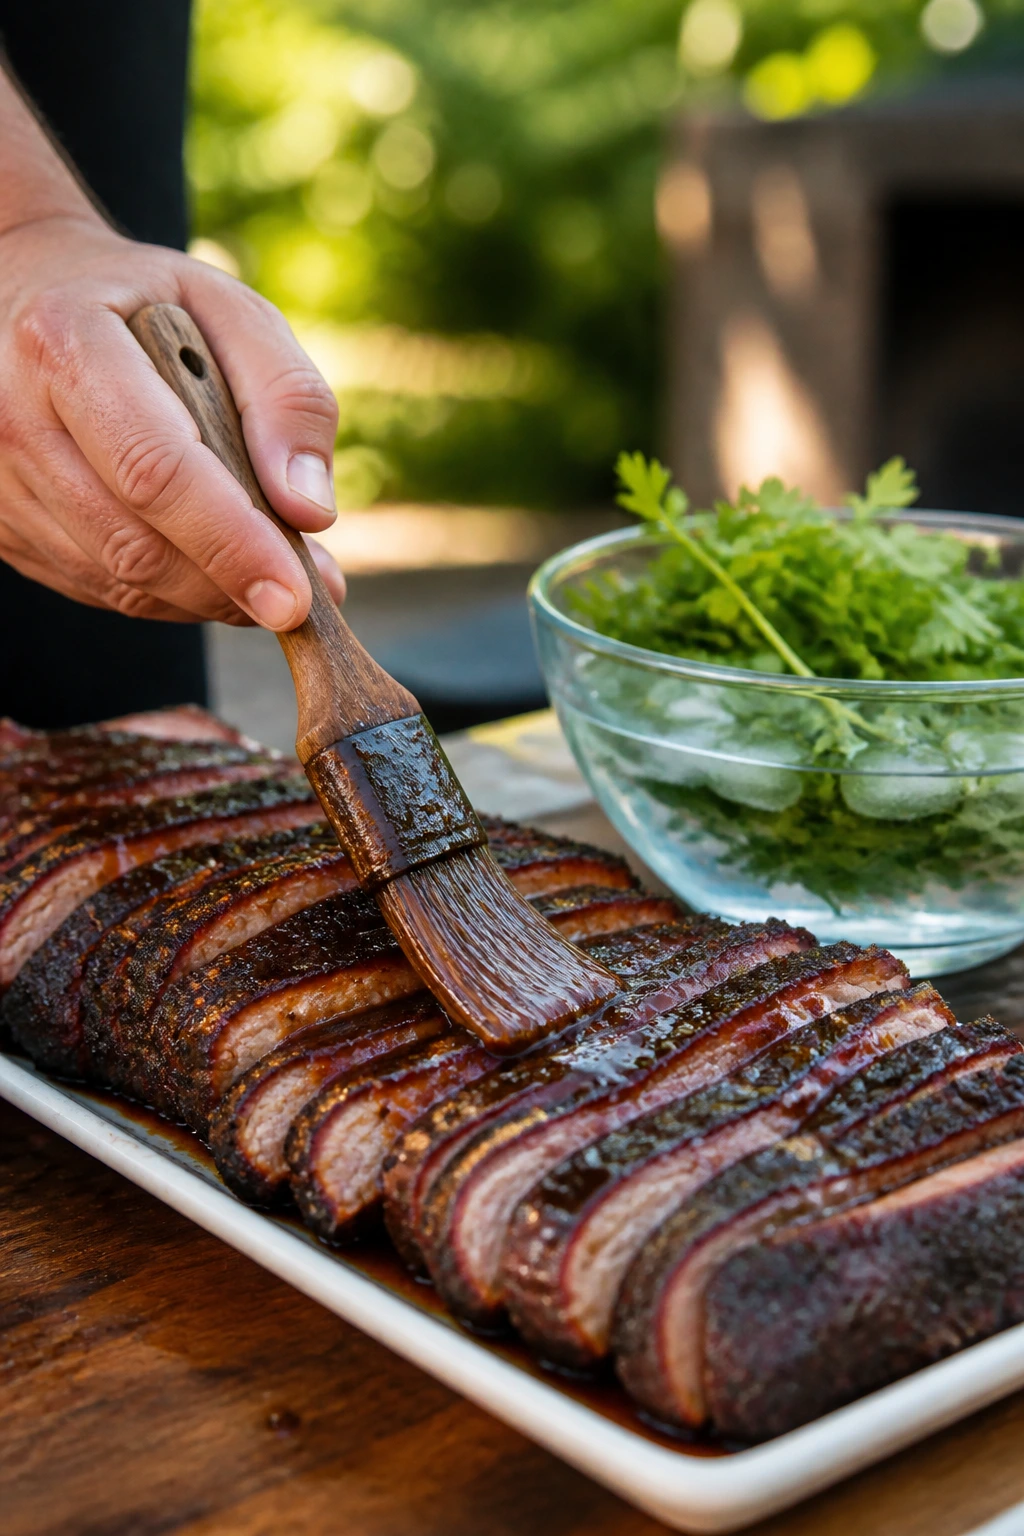
Juiciness has a visual language. Gloss says the meat was sauced or rested properly. A little pooled jus in the corner of a board says the meat was carved at the right time, not hacked up fifteen minutes too early. Dry edges, by contrast, look old fast. That is why I’m so picky about carving boards and serving platters: the surface they sit on changes how the meat reads.
A one-sentence truth: the table should look like the grill just finished working, not like the food is waiting for a ride home.
Build the Table Around Heat, Height, and Motion
Flat tables make barbecue look smaller than it is. A little height fixes that immediately. Put the main platter on a board, a reversed sheet pan, or a sturdy riser, then let the sides sit lower so the whole spread has a clear center of gravity. You do not need a fancy serving stand. A wrapped crate, a heavy bowl under a platter, even a couple of overturned ramekins hidden beneath a tray can work if they stay stable.
Heat is the other piece. Warm meat looks lively; cold platters make barbecue go dull in a hurry. If you want the spread to hold that just-off-the-grill feeling, preheat serving plates in a low oven, or keep a covered tray in a warm spot while you finish the rest of the table. A platter that starts warm but not scorching helps the meat stay glossy for a little longer.
Motion matters more than people expect. The eye likes curves, lines, and slight overlap. A row of ribs should not be laid out like fence posts. A basket of buns should not sit stiffly at attention. Angle things. Fan them. Let one thing lean against another. That small amount of looseness makes the display feel alive.
A Layout Trick That Works
I like to think in zones rather than in dishes. One zone for the meat. One for the cold crunch. One for the sauces. One for the bread. The table gets easier to read when each zone has a job, and guests stop asking where to put the tongs every forty seconds.
Plates, Boards, and Trays That Can Handle Grease Without Looking Sloppy
Paper plates are fine for eating. They are not fine for display. A good cookout table needs serving surfaces that can take grease, sauce, heat, and repeated handling without collapsing into a damp mess. That means sturdy platters with rims, cutting boards with grooves, rimmed sheet pans, and a few bowls that won’t tip over if someone bumps the table.
Wood boards are still my favorite for barbecue because they make slices of meat look grounded and a little rustic in the best way. They also absorb some visual chaos. Brisket scattered on a white plate can look raw or heavy; on a wood board with a few pickles and mustard-colored sauce nearby, it looks deliberate. Just don’t use a board that’s precious or badly sealed. If it’s going to sit under juice, it should be the kind of board you’re happy to wash thoroughly afterward.
Metal trays have their own place. They’re excellent for holding heat, and rimmed sheet pans can hide a lot of serving drama. If you line them with parchment first, cleanup gets much easier, and the paper also gives the meat a clean backdrop. Enamel trays are another strong option because they read casual without looking disposable.
For sides, bowls matter as much as the food inside them. A big bowl of slaw looks more substantial than the same slaw spread thinly in a shallow dish. Small bowls for pickles, onions, mustard, and sauces keep the table from turning wet. Wet is the enemy here. Wet makes everything seem later than it is.
How to Slice, Carve, and Stack Meat So It Stays Juicy
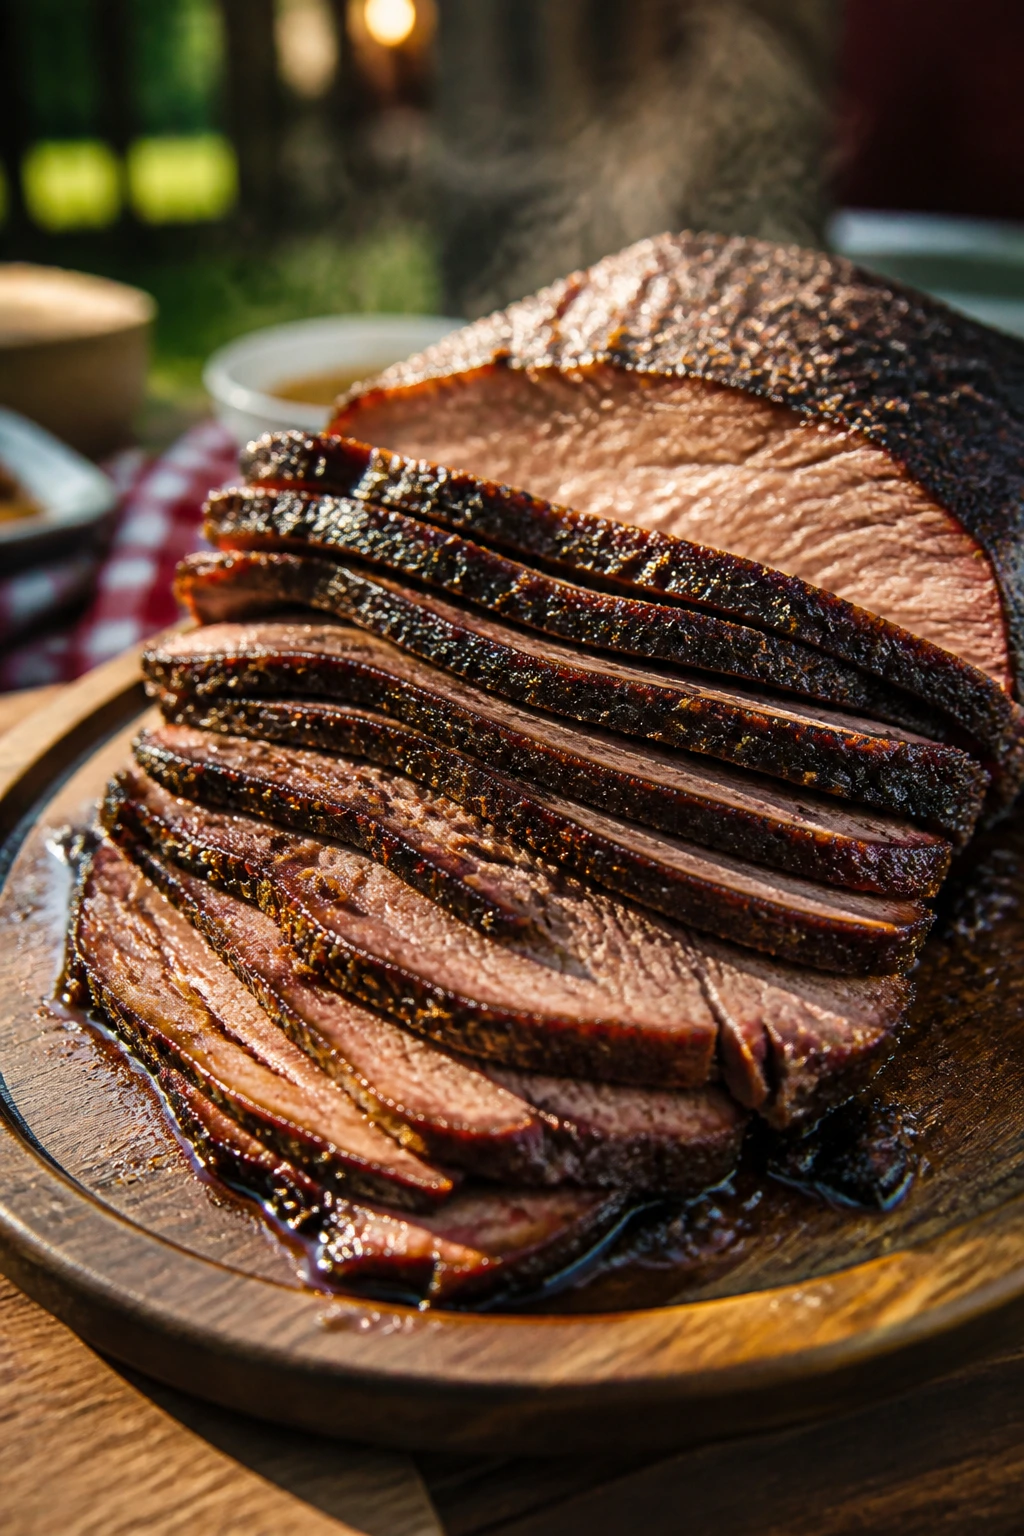
Slicing is where a lot of good barbecue gets sabotaged. The meat may have rested properly, the bark may be beautiful, and then somebody cuts it too soon or in the wrong direction and lets the juice spill onto the board where it can’t do any visual work at all. That’s a tragedy in barbecue terms.
Brisket gets sliced against the grain, and the grain can change direction between the flat and the point. If you are serving it on a display platter, slice only what you need for the first round and keep the rest wrapped and warm. A neat stack of slices looks abundant, but only if the edges stay intact. If the slices are too thin, they dry out fast. If they’re too thick, the platter looks clumsy. About a quarter-inch to half-inch per slice is a good practical range for most tables.
Chicken has a different problem. It can look dry even when it tastes fine. For display, I like to leave thighs whole or cut breasts on a slight diagonal so the interior stays visible without exposing every bit of muscle to the air. A spoonful of pan juices brushed over the cut surface gives the meat a fresh sheen. Not a flood. Just enough to catch the light.
Ribs are their own animal. You can stack them in a shallow overlap, but don’t pile them high enough to crush the glaze. If the rack is sauced, let the sauce set for a few minutes before moving it. That way it won’t smear into a muddy layer the second it hits the platter.
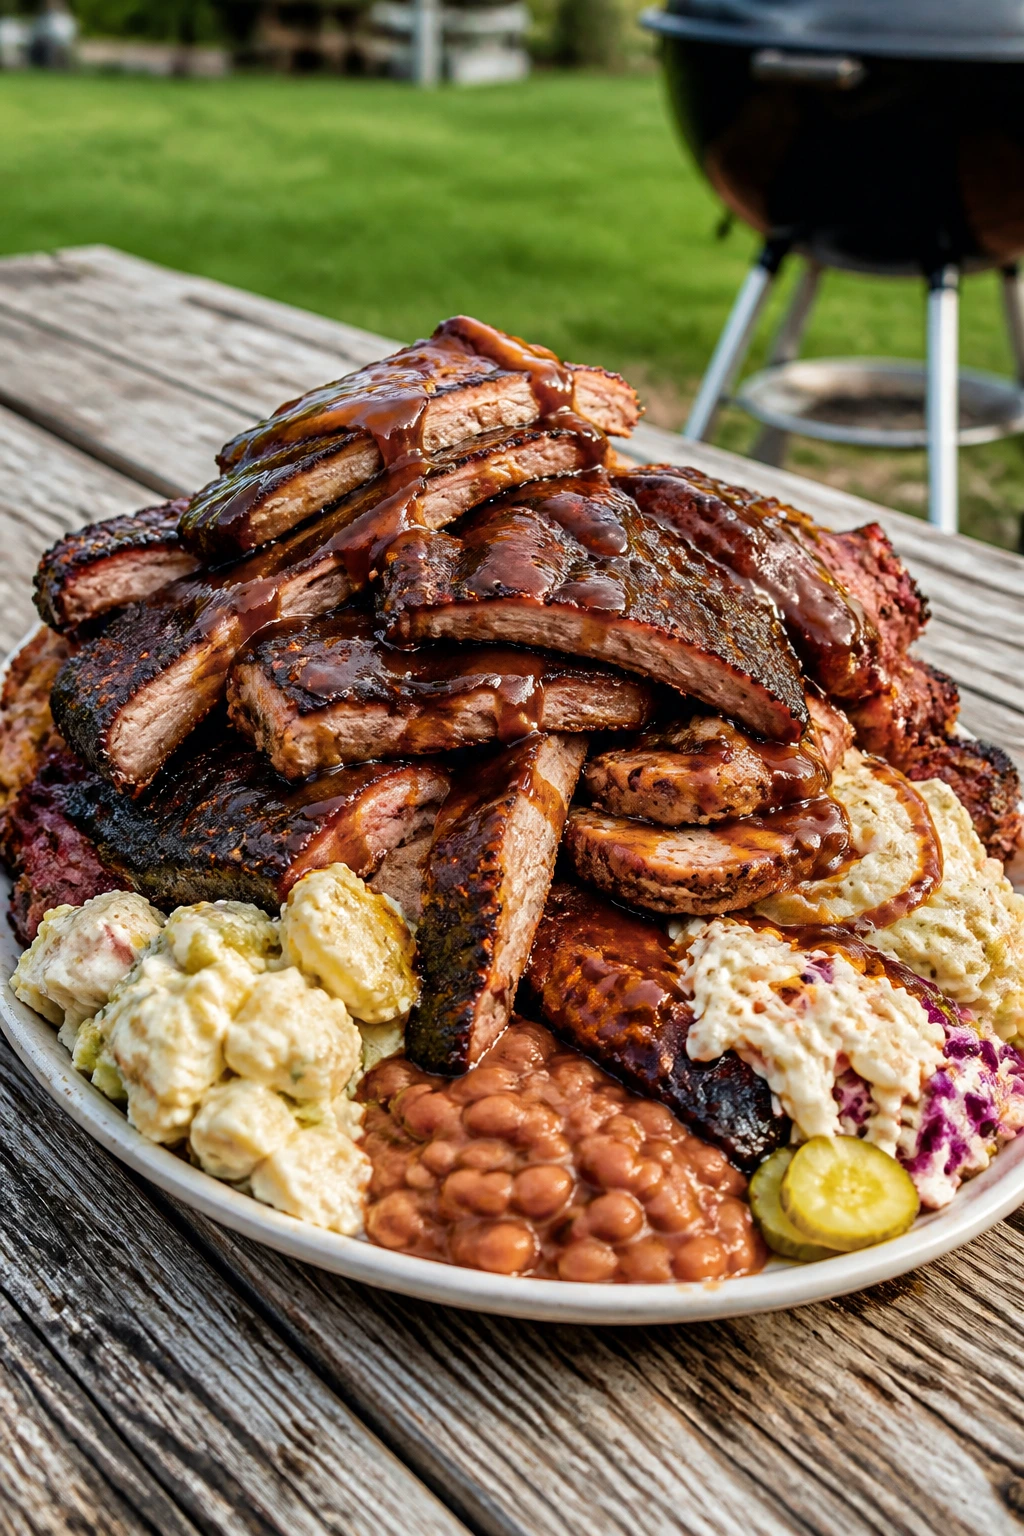
Brisket, Chicken, and Ribs Each Need Different Treatment
- Brisket: Rest it at least 30 minutes before slicing, then fan the pieces slightly so the dark bark stays visible.
- Chicken: Keep dark and white meat separate if you can; the contrast helps the platter read cleaner, and the juicier cuts won’t make the leaner pieces look drier than they are.
- Ribs: Lay them with a slight curve rather than a tight stack so the glaze and bark stay in view.
- Sausages: Slice only if the skin has a crisp snap; otherwise, keep them whole and arrange them in a zigzag pattern.
One blunt note: if the meat is still bleeding onto the board, it is too early to plate it.
Building a Platter Around the Main Meats
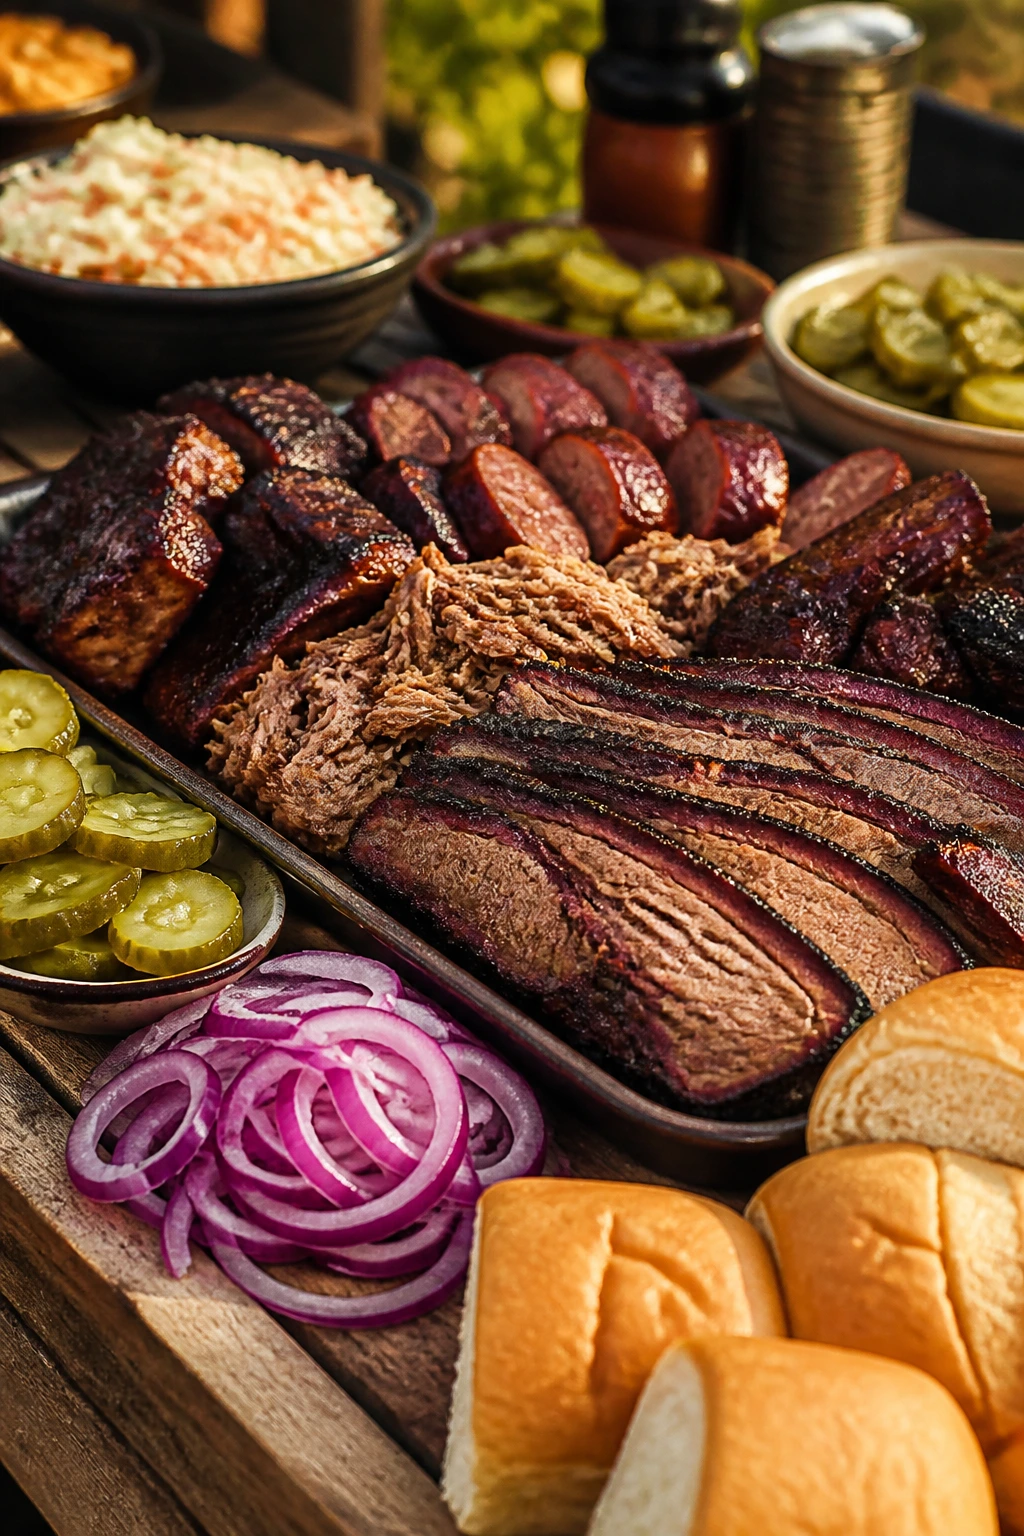
The meat tray is the anchor, but it should never float alone. A good barbecue platter needs supporting pieces that frame the protein and keep it from looking heavy. That does not mean burying the meat under herbs or treating the board like a salad bar. It means choosing a few smart companions and letting them do specific visual work.
Pickles are one of the best tools in the whole cookout setup. They cut through the brown, add sheen, and tell the eye that the meat is rich on purpose. Pickled red onions do a similar job, but they bring more color. If you want a platter to feel awake, a small pile of something bright and acidic does more than a whole extra bowl of beans.
Bread belongs nearby, but not crowded into the meat. Split buns, sliced rolls, or a basket of warmed flatbreads should sit close enough to feel connected, yet far enough away that they do not soak up grease. A paper towel or cloth liner under the bread helps keep the bottoms dry. I prefer buns that are split and lightly toasted, because they hold up better and look more cared for than buns that were thrown onto a tray straight from the bag.
You can also use the platter itself to create visual paths. Place the meat slightly off-center. Tuck the pickles or onions to one side. Leave a small patch of board visible. That empty space keeps the arrangement from feeling packed and lets the meat do the talking.
Side Dishes That Bring Color, Crunch, and Relief From All That Smoke
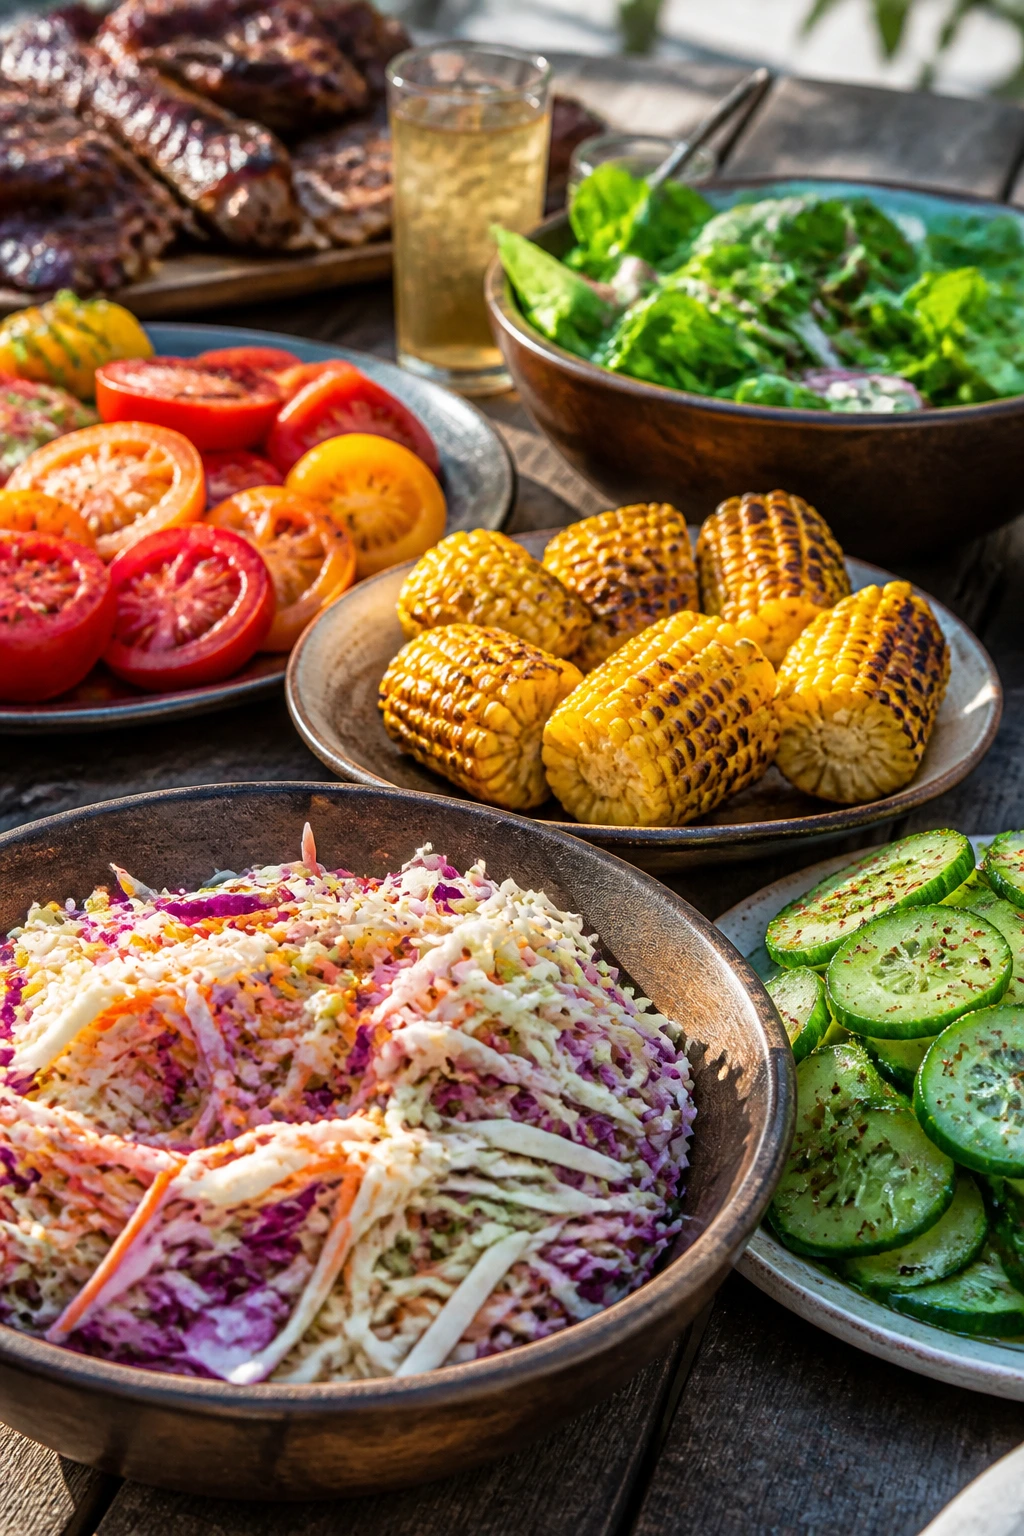
Sides should not fade into the background. On a barbecue table, they are what keep the whole spread from becoming a one-note brown parade. A bright side dish changes how the meat looks next to it. A creamy slaw next to dark ribs makes the ribs look darker and richer. A bowl of green beans or charred corn makes a plate feel fresher and less heavy.
Cold crunch is valuable here. Vinegar slaw has bite. Cucumber salad brings a clean snap. Pickled vegetables add shape and shine. These things do more than taste good. They give the table a different texture, which makes the barbecue itself feel more layered. Even a simple plate of sliced tomatoes with salt and a little black pepper can make a spread look like somebody thought about it for more than ten minutes.
Warm sides can help, too, but they need more discipline. Baked beans should sit in a sturdy bowl with a spoon that won’t disappear into the sauce. Mac and cheese needs a dish with enough depth to hold its shape; a shallow tray looks sloppy fast once people start serving themselves. Cornbread is best in squares or wedges arranged loosely, not stacked like bricks. Give each side enough room to breathe.
Side Dishes That Keep Their Shape
- Vinegar slaw: stays crisp longer than creamy slaw and brightens the whole table.
- Grilled corn salad: adds yellow and green without sliding into mush.
- Pickled cucumbers or onions: stay sharp for hours if they’re drained well.
- Roasted potato salad: holds better than mayo-heavy versions in warm weather.
- Watermelon wedges: if you want one cold, clean item that resets the palate, this is the one.
A cold side that holds its shape is worth its weight in napkins.
Sauce Stations, Garnish Bowls, and the Drip Zone That Saves the Table
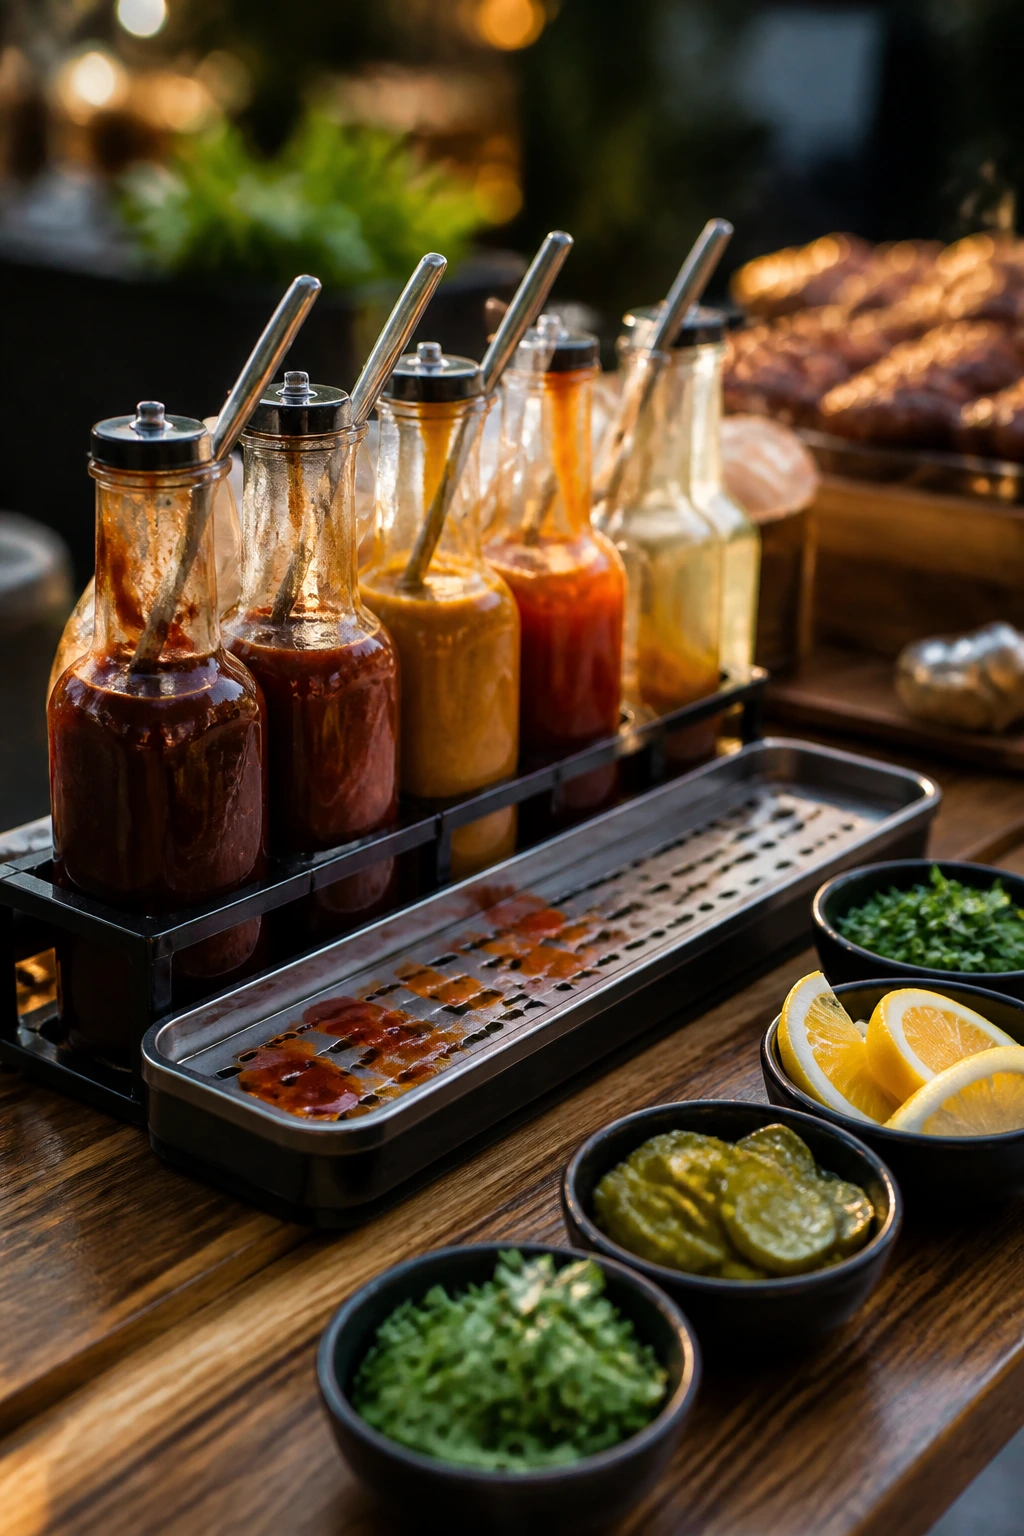
Sauce is where many cookout tables turn into a mess. The trick is to treat it like a station, not a splash zone. One bottle or bowl per sauce, each with its own spoon, brush, or squeeze top, keeps flavors from crossing over and prevents the table from becoming a sticky crime scene by the end of the first round.
I like a drip zone under the main sauce bottles. That can be a rimmed tray, a parchment-lined sheet pan, or even a shallow wooden tray if the sauces are not too wet. If a bottle leaks, it leaks in one place. The same idea works for serving utensils. Keep the spoon handles all pointing in the same direction, and guests are less likely to grab the wrong one with barbecue sauce on their fingers.
Garnish bowls deserve a little respect. Chopped herbs, sliced scallions, lemon wedges, and extra pickles are more than decoration. They let people adjust the plate without sending them back to the kitchen. That matters when the table is far from the grill or when you’re trying to stay out of traffic while things are still hot.
Sauce should never be the thing that hides poor meat. That’s the part a lot of people get backwards. You want enough sauce to make the food shine, not enough to erase the texture underneath. Thin, brushed-on sauce reads differently from a heavy ladle of it. The first says intention. The second says panic.
Food Safety Rules That Matter Once the Grill Is Lit
Outdoor food safety is dull until it isn’t. Then it’s the only thing anybody cares about. The basic rules are not glamorous, but they keep the cookout pleasant: hot food hot, cold food cold, and nothing perishable lounging in the danger zone longer than it should.
USDA guidance is still the standard most home cooks should respect. Hot foods should be held at 140°F or above, cold foods at 40°F or below, and perishable items should not sit out for more than 2 hours. If the air temperature is above 90°F, that safe window drops to 1 hour. That’s not a punishment. It’s just how bacteria work when the weather gets sticky.
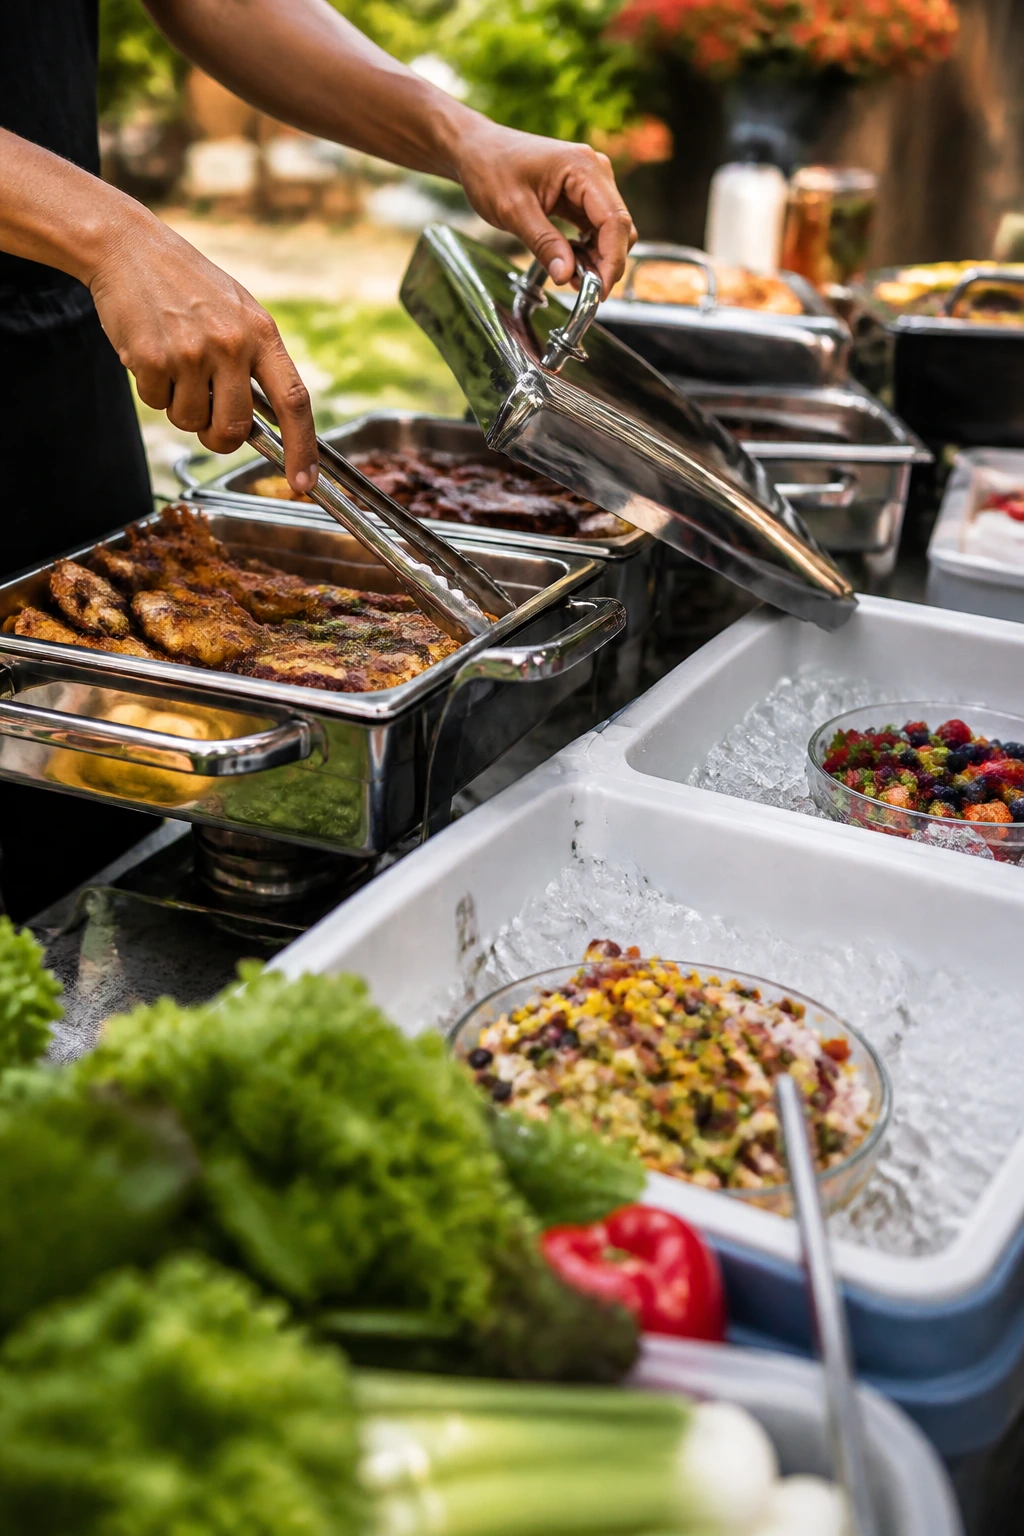
A display can still look beautiful while staying safe. Use warming trays, chafing dishes, or covered platters for hot meat. Keep slaw, salads, and desserts on ice or in insulated containers until they’re ready to serve. A cheap instant-read thermometer is worth keeping near the table, because guessing by feel is how people end up with dry chicken or lukewarm beans.
Hot-Holding Without Drying the Meat
Brisket and chicken do not need to be blasted with heat forever. They need gentle holding, enough to keep them above the danger zone without cooking them into sawdust. Covered trays and a little resting liquid help. If you have to hold sliced meat for a while, keep some jus back and spoon a little over the top right before it goes out.
Cold Items Need Their Own Territory
Do not park potato salad or mayo-heavy slaw next to a steaming tray of ribs. The table is not a warm zone and a cold zone at the same time just because the dishes are pretty. Give chilled sides a bed of ice, a cooler, or a shaded serving area. It’s a small thing. It saves the whole spread.
Setting the Buffet So Guests Move in One Clean Direction
Buffet flow sounds boring until you’ve watched six people try to reach the same serving spoon at once. The layout matters because barbecue is messy by nature. If the plates, tongs, and sauces are placed badly, the first person through the line leaves fingerprints on everything and the whole spread starts looking tired.
Start with plates. Then utensils. Then the mains. Then sides. Then condiments and napkins at the end. That way people don’t load a plate with wet sauce before they’ve even reached the meat. I also like to place drinks slightly away from the food line. A cold can in one hand and a hot plate in the other is a recipe for disaster on uneven patio furniture.
Think about handedness, too. Most buffet lines move more smoothly when guests can reach from their dominant side without crossing over the food. That sounds small. It isn’t. The fewer awkward reaches you create, the cleaner the table stays.
If the line wraps around a corner or under a tree, use visible anchors. A tall bowl of citrus at one end, a stack of buns at the other, or a labeled sauce board can tell guests where to begin and where to stop. People like a path. They may not admit it, but they do.
How to Scale the Display for Six People, Twenty People, or a Packed Backyard
The size of the crowd changes the display more than the menu does. A small cookout should feel intentional and easy to refill. A larger one needs repetition and structure so the table doesn’t collapse into a pile of half-empty bowls and lonely tongs. Same food. Different rhythm.
For six to eight people, one centerpiece platter and three supporting dishes usually works. Think a cutting board of sliced brisket, one bowl of slaw, one tray of buns, one bowl of pickles, and a sauce station nearby. Keep it compact. A tiny spread looks nicer when the pieces aren’t spread too far apart across a giant table.
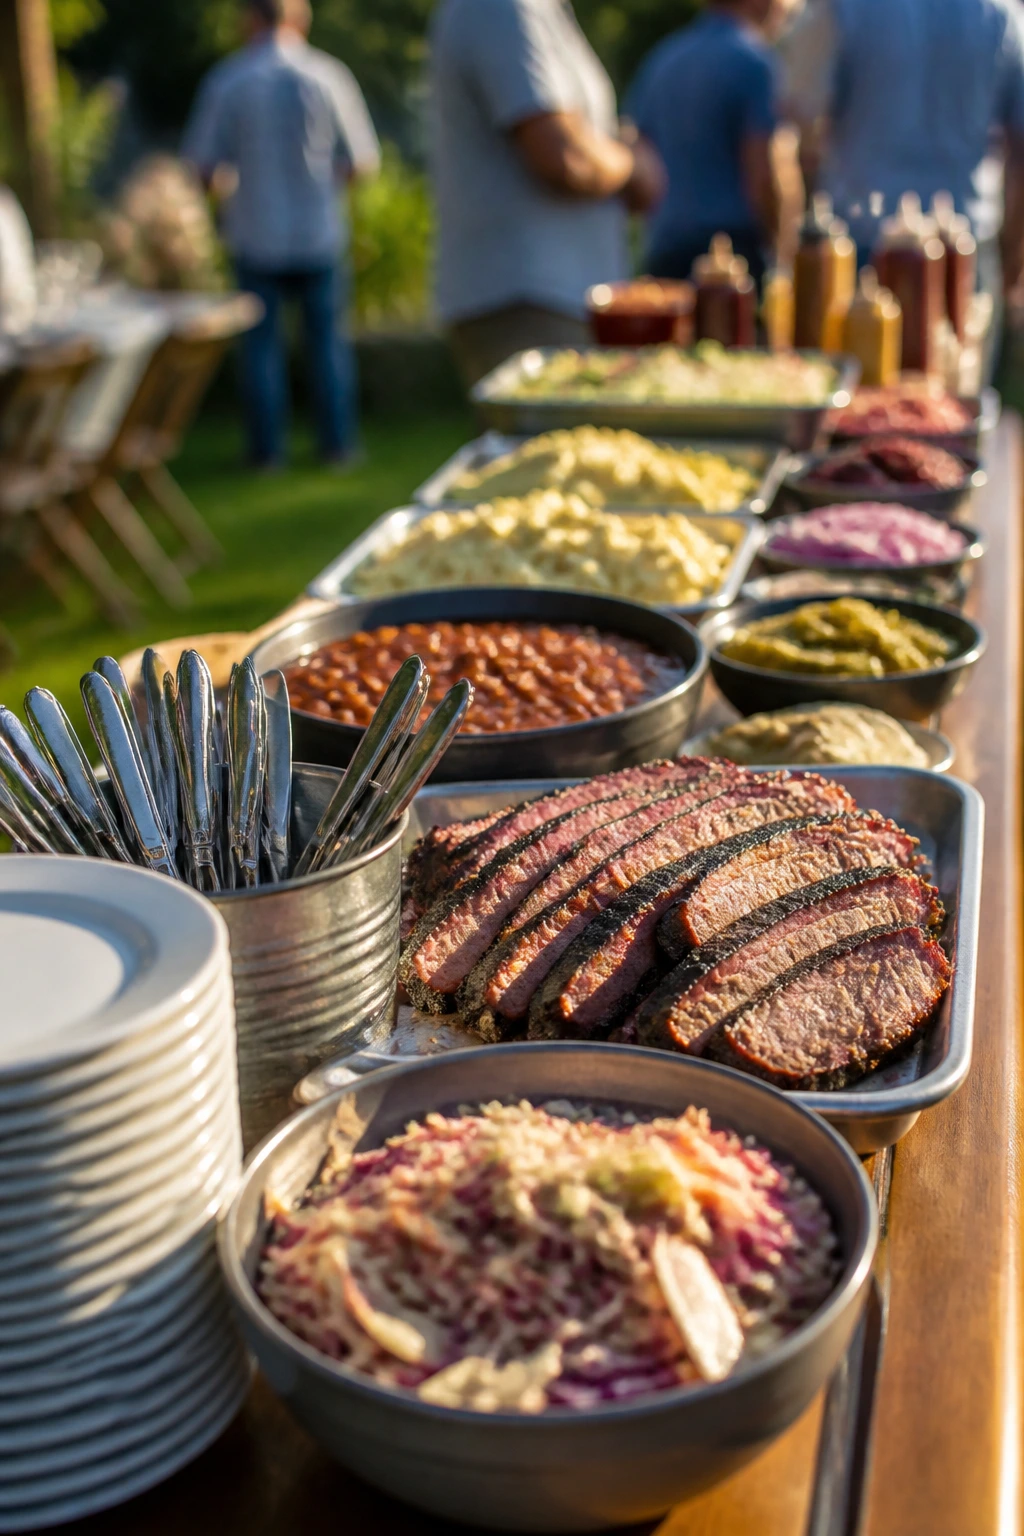
For a larger crowd, duplication is your friend. Two identical bowls of slaw look better than one overfilled bowl. Two trays of ribs make the table feel stocked even if the total amount of food is the same. Guests don’t count platters from across the yard. They read abundance from spacing and repetition.
A really crowded backyard needs staging. Put the first wave of food on the table, keep backup trays warm or chilled, and refill in clean sections instead of dumping fresh food on top of old. That keeps the display from looking exhausted halfway through the party.
Match the Table to the Guest Count
- Small group: fewer dishes, tighter spacing, stronger focus on one or two meats.
- Medium group: one centerpiece meat platter, one secondary meat tray, and two to four sides.
- Large group: duplicated platters, separate sauce stations, and a clear refill system.
- All-day gathering: plan on a fresh reset once the first wave starts to look battered.
Small Moves That Keep a Juicy BBQ Food Display Looking Fresh
The little moves are the ones people notice without knowing why. A platter wiped at the rim. A fresh brush of sauce on the meat right before service. A towel under the cutting board so it doesn’t slide. These are tiny, unglamorous habits, and they save the whole display from looking like it has been open too long.
Flavor Enhancement: Warm a little of the meat’s own jus or a thinned finishing sauce and brush it lightly over sliced brisket, chicken, or pulled pork just before it hits the platter. That thin coat gives the surface a wet look without drowning the bark.
Time-Saver: Keep one clean platter reserved for refills. When the first tray starts to look cluttered, swap it out instead of scraping and rebuilding in front of everyone. The table looks cleaner and the meat stays better organized.
Pro Move: Put herbs and garnishes in ice water for a few minutes, then dry them well. They curl tighter and look crisper on the platter. Flat, limp herbs make the whole spread feel older than it is.
Cost-Saver: Use cabbage, onions, and pickles as visual fillers around the meat. They cost less than extra protein and they make the table look fuller without pretending to be something they’re not.
Weather Plan: Keep a mesh cover, foil tent, or clean tray lid within reach. Wind is not a detail; it is a force. It steals napkins, blows ash, and turns a pretty garnish into confetti.
Where Backyard BBQ Displays Usually Fall Apart
The first mistake is overloading the platter. People think a mound of meat looks generous, but if the slices are stacked too high, the bottom ones steam themselves into mush and the top ones dry out. A flatter arrangement with a little overlap almost always looks better and lasts longer.
The second mistake is mixing hot and cold too casually. Potato salad beside a hot tray of ribs will warm up faster than you think, and mayo-based sides are not the place to be improvisational. Give cold items their own area. The table will look more organized, and the texture will hold.
Another common problem is drowning the meat in sauce too early. Sauce set in a heavy layer can turn sticky and dark, then start to look burnt around the edges if it sits under heat. A light finish before service is usually enough. Put extra sauce nearby and let people choose how much they want.
People also forget about tools. One tong for the brisket, one spoon for the beans, one knife for the bread — it sounds obvious until the line starts and everybody is hunting. Cross-contamination is the practical problem, but the visual problem is worse. A table with no clear tools looks underprepared, even if the food is excellent.
Last one. Ignoring the weather. Sun, wind, and humidity all change how barbecue behaves on a table. If your cookout is outdoors for more than a short stretch, you need shade, covers, and a plan for refreshes. No display survives raw weather by luck.
Display Styles Worth Borrowing for Different Kinds of Cookouts

Rustic Board-and-Bowl Spread: This style leans into wood boards, enamel bowls, and parchment-lined trays. It works especially well for smaller gatherings where the food can be arranged in loose clusters and the table doesn’t need to carry fifty moving parts.
Chafing-Station Crowd Setup: Best for bigger groups or longer parties. Hot meat goes into chafing dishes or covered warming trays, while sides stay in separate bowls nearby. It’s less charming than a fully styled board, but it keeps the food in better shape when people are eating over time.
Picnic-Style Tailgate Display: Think cooler bags, insulated containers, reusable trays, and simple labels. This works when the cookout is happening away from the kitchen or when the table has to be set up and broken down fast. It’s practical, and practical can still look good if the surfaces are clean and the colors are balanced.
Garden-Party BBQ: White platters, bright herbs, lots of citrus, and a little more breathing room between dishes. This version suits a quieter gathering where the table should feel fresh and open rather than crowded and smoky.
Family-Style Meat Parade: One long table, several big platters, and a clear path for plates to move around. This style is less about ornament and more about abundance. It’s the one I’d choose when the menu includes multiple meats and you want the whole setup to feel generous without becoming chaotic.
Tools That Earn Their Spot on the Table
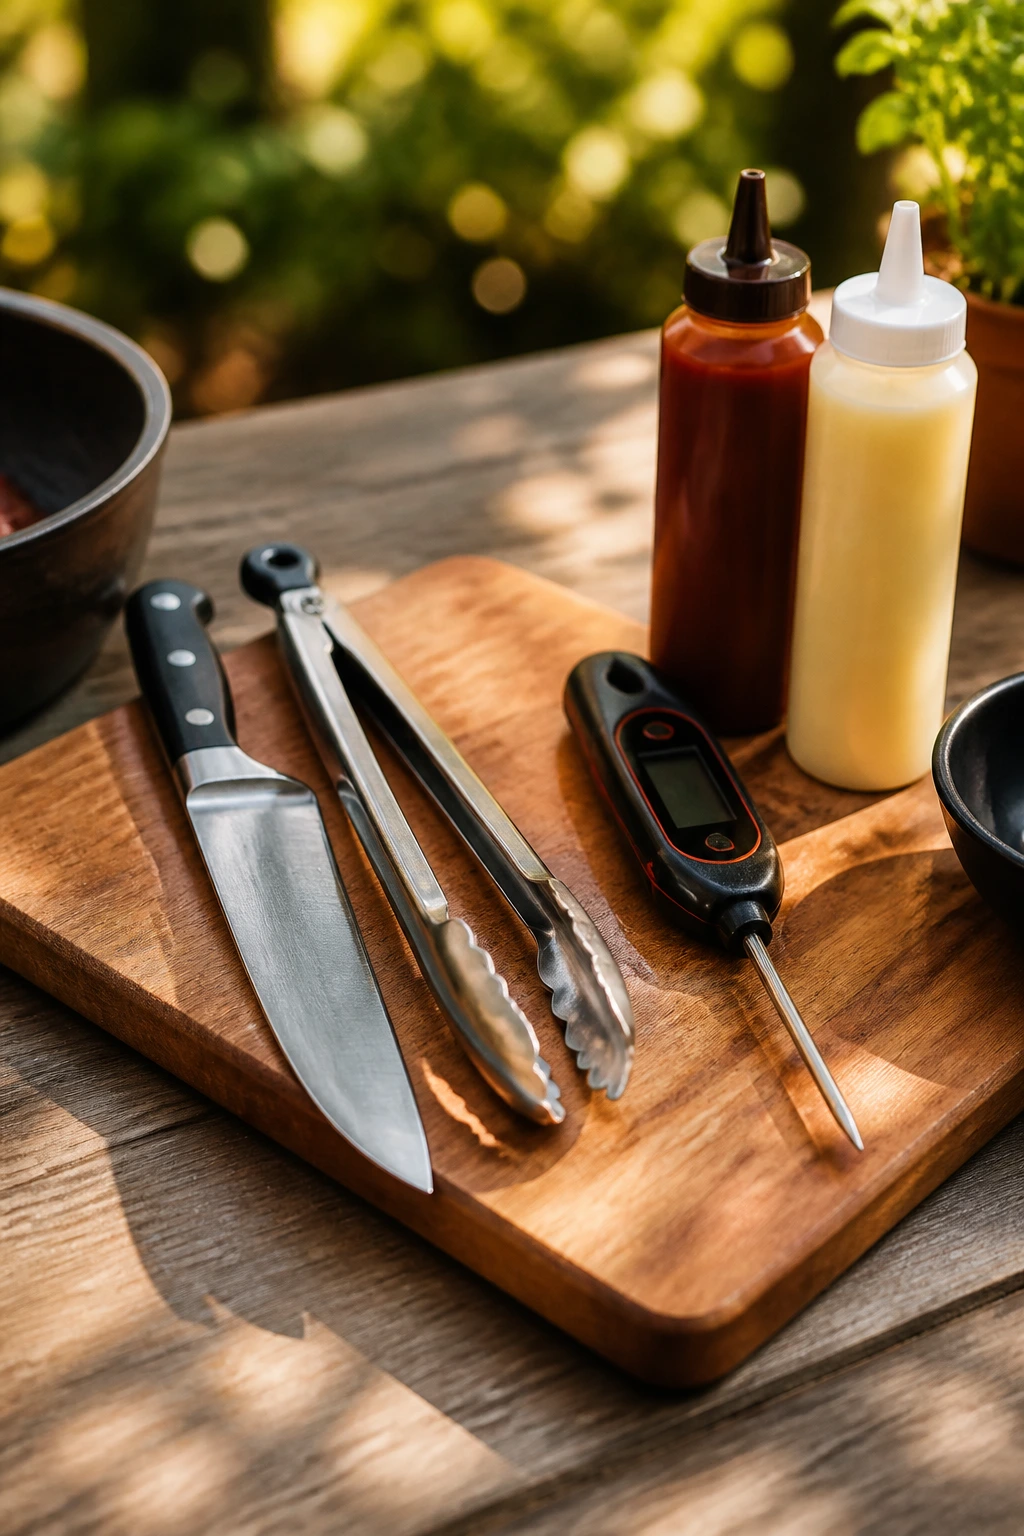
- Large cutting board with a juice groove — keeps carving liquid in one place instead of running across the table.
- Instant-read thermometer — useful for holding meats safely and checking whether hot food is still in range.
- Rimmed sheet pans — ideal for backup trays, bread, or food that needs a little structure.
- Wide serving platters — give sliced meat room to fan out instead of stacking into a heap.
- Mixing bowls in three sizes — good for slaw, pickles, sauces, and garnishes.
- Carving knife and tongs — one clean knife makes brisket and chicken slices look much sharper.
- Squeeze bottles or ladles — keep barbecue sauce tidy and make portioning easier.
- Mesh food covers — help protect outdoor food from insects without trapping too much heat.
- Foil and parchment paper — cheap, useful, and worth having in a stack near the grill.
- Cooler or insulated carrier — essential for cold sides, dessert, or backup trays.
- Clean kitchen towels — for stabilizing boards, wiping rims, and handling hot pans.
- Small labels or tent cards — optional, but useful if you have more than one sauce or if guests keep asking what the slaw is made of.
Make-Ahead, Holding, Cleanup, and Leftovers
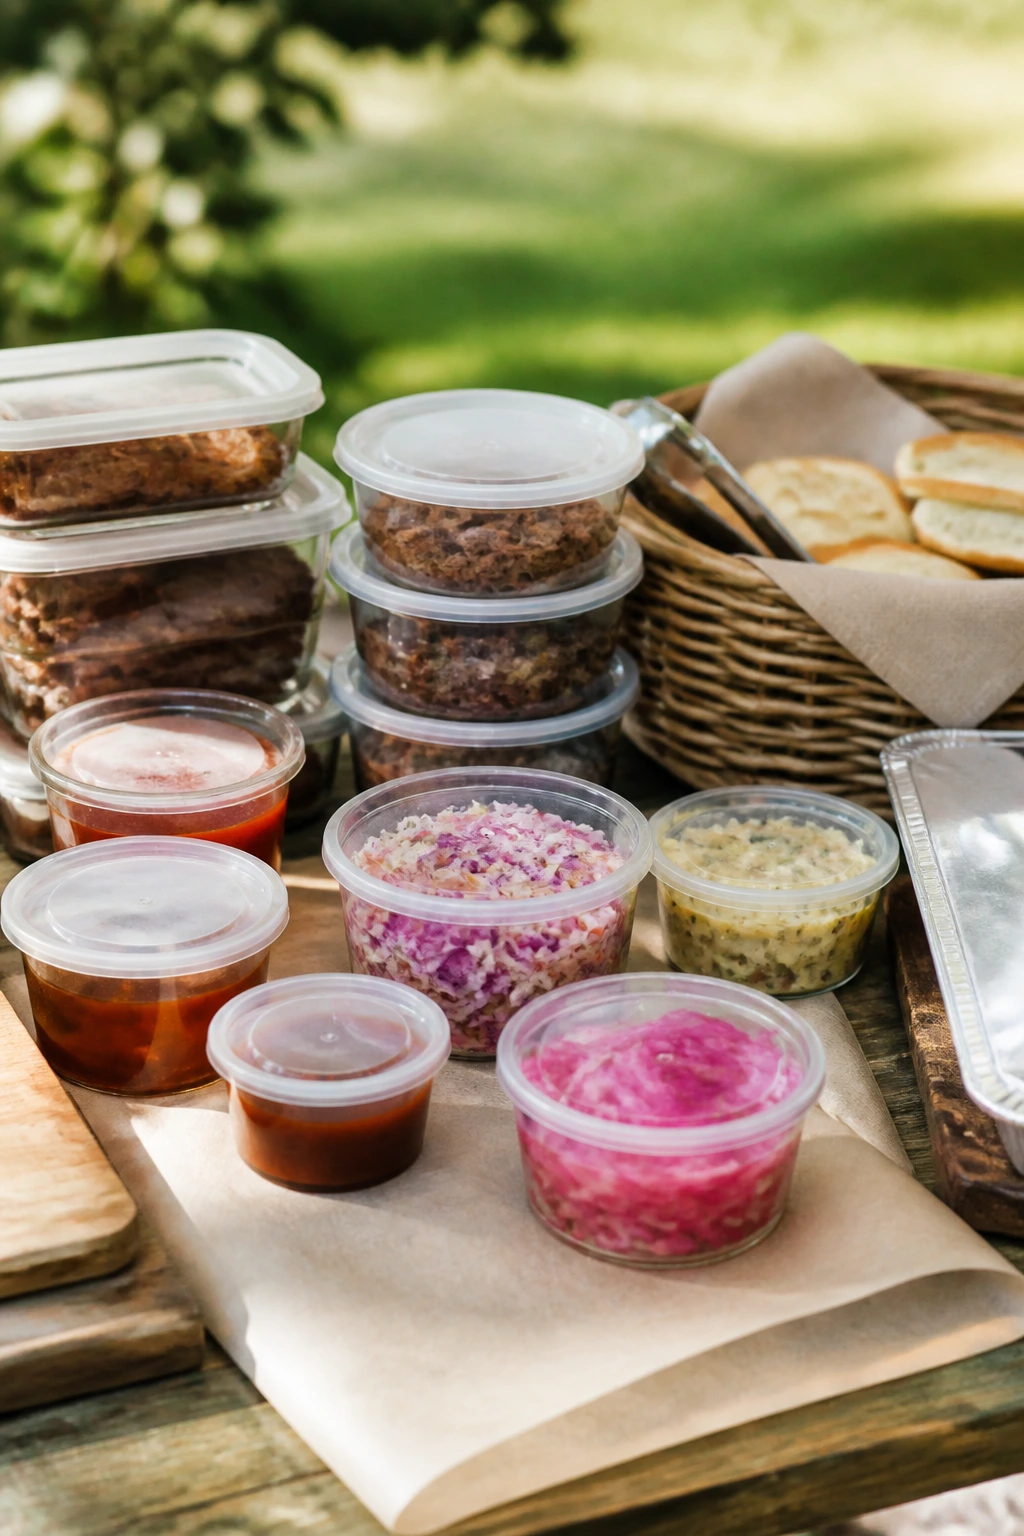
The best BBQ display is partly built the day before anyone arrives. Sauces can be mixed ahead and stored in sealed containers. Pickled onions, cucumber salad, slaws with vinegar dressings, and bread baskets can all be prepped before the grill starts. That makes the day-of setup feel like arranging pieces instead of scrambling to cook and style at once.
For hot food, timing matters. Meat should be cooked and rested close enough to service that it still has life in it when it hits the platter. If you need to hold it, keep it covered and above 140°F. Sliced barbecue is best served soon after carving, but if you must hold it for a while, keep a little jus or sauce nearby and refresh the surface lightly before it goes out again.
Cold items should be kept at 40°F or below until they’re needed. If a side dish has mayo, dairy, or cut fruit in it, don’t leave it sitting on the picnic table all afternoon. Rotate smaller bowls from the cooler instead of putting out one giant serving dish and hoping for the best. That is how people end up with warm potato salad and a lot of regret.
Cleanup is easier if you separate the zones while you’re serving. Meat boards should be washed promptly with hot soapy water. Wooden boards need to dry fully before they’re oiled or stored. Squeeze bottles should be emptied, wiped, and capped tightly. Rimmed trays lined with parchment can go straight to the sink after the paper comes off. The goal is not to make cleanup elegant. The goal is to make it not miserable.
Leftovers usually keep well if they’re handled promptly. Sliced meat can be refrigerated in shallow containers for 3 to 4 days and frozen for up to 2 months if wrapped tightly. Reheat gently, covered, with a splash of broth or sauce so the meat doesn’t turn leathery. Cold sides keep a little differently: slaws and salads are best within a couple of days, while pickles and sauces often last longer if they’re stored in clean, sealed jars.
Questions People Ask After the First Tray of Ribs Disappears
How do you keep barbecue meat from looking dry on a platter?
Rest the meat before slicing, keep a little jus or finishing sauce back, and brush the cut surface lightly right before serving. Dry-looking barbecue usually needs better timing and a better surface, not more sauce dumped on top.
What kind of platter works best outdoors?
Wide platters with rims are the safest bet because they catch drips and give the food room to sit without sliding around. Wood boards are strong for presentation, but they need to be clean, sealed, and handled carefully if juices are involved.
Can I set the whole display up before guests arrive?
Some parts, yes. Sauces, pickles, bread, and sturdy sides can be arranged ahead of time, but hot meat should be plated close to serving so it keeps its texture and shine. The best-looking spread usually has a few pieces staged and a few held back.
How long can food sit out at a backyard cookout?
The standard safe window is 2 hours, or 1 hour if it’s above 90°F. Hot foods need to stay at 140°F or above, and cold foods at 40°F or below. If the table is in direct sun, treat the timing as stricter, not looser.
What sides make barbecue look better without stealing the spotlight?
Vinegar slaw, pickles, grilled corn, and roasted potato salad are strong choices because they bring color and shape without turning the table into a second main course. They also help break up the heavy brown tones that barbecue naturally brings.
Should brisket be sliced before or after it goes on the table?
Slice what you need for the first round right before service, then keep the rest wrapped and warm. Brisket loses heat and moisture fast once it’s cut, so a fully pre-sliced platter tends to look flatter after a short wait.
How do I make a small cookout spread look full?
Use fewer dishes, but give each one enough room to breathe. A compact table with one main meat platter, one big side bowl, and one clear sauce station often looks richer than a crowded table with too many tiny containers.
What if the weather turns windy or hot?
Use covers, place napkins and lightweight garnish away from direct wind, and move cold sides back into a cooler between servings. On very hot days, the display should be refilled in smaller batches so the food stays safe and the table does not get battered by the heat.
A Backyard Table People Keep Circling Back To
A good barbecue spread does not need gold-rimmed platters or a lot of decorative noise. It needs meat that still looks alive, sides that hold their shape, and a layout that lets people move without trampling the table. That is what makes a juicy BBQ food display for backyard cookouts feel memorable instead of merely full.
The best setups look easy because somebody made a series of smart choices before the first guest walked up. A warm platter here. A cold bowl there. A little space around the meat. A few sharp, bright things to break up all that smoke and char. Small decisions. Big payoff.
And the nice part is that you can build it with ordinary stuff if you know what matters. A board, a bowl, a thermometer, a stack of clean towels, and a little restraint go a long way. The next time the grill comes out, the table can look as good as the food tastes.