
A hot grill does strange things to fruit. A peach half hits the grate, the cut face turns glossy in seconds, and the smell shifts from fresh and floral to something closer to jam with a little smoke in it. That’s the part people remember, even if they don’t know why it works so well. Grilled fruit for backyard cookouts isn’t a gimmick; it’s one of the cleanest ways to turn a hot grate into a finishing tool instead of a one-trick machine.
Most cookouts treat fruit like an afterthought. A melon bowl shows up sweating in the shade. A pineapple ring gets ignored until dessert. But fruit on the grill has its own logic. Heat concentrates the sugars, softens the edges, and leaves a char that tastes more like toasted sugar than actual fire. Done well, it can sit beside ribs, burgers, chicken, halloumi, or a scoop of vanilla ice cream without feeling forced.
The catch is that fruit is not all built the same. A firm peach behaves nothing like a watermelon wedge. Pineapple can take a little punishment; figs and bananas need a gentler hand. Get the cut, the heat, and the timing right, though, and you end up with something that disappears fast from the platter. Start with the fruit itself, because that choice decides almost everything else.
- Fast finish: Most grilled fruit needs only 1 to 5 minutes per side, so it fits neatly into the space between burgers resting and guests wandering back with empty plates.
- Sweet with a little smoke: The grill gives fruit a browned edge and a warmer aroma, which keeps it from tasting flat or sugary in a one-note way.
- Works across the meal: Grilled peaches can sit next to pork, grilled pineapple can sharpen spicy chicken, and watermelon with salt and mint can cool down a heavier plate.
- Cheap, flexible, and forgiving: Slightly bruised peaches, plums that are a little soft, and pineapple with odd shape all improve once they hit the grates.
- Dessert or side dish: The same platter can lean savory with herbs and feta or lean sweet with yogurt, honey, and toasted nuts.
- Grill-friendly by design: Gas, charcoal, or even a cast-iron grill pan can do the job if the fruit is cut thick enough and the heat is steady.
Why Grilled Fruit Belongs on the Cookout Table
Fruit on the grill earns its place because it solves a very specific backyard problem: the main food is usually savory, salty, and rich, and the plate needs something that wakes your mouth back up. A hot peach or a charred pineapple ring gives you acid, sweetness, and a little bitterness all at once. That mix cuts through pork fat, burger drippings, creamy cheese, and even a heavy potato salad.
There’s also the timing, which people overlook. The grill is already hot. The coals are already burning. Adding fruit at the end is cheap in both time and effort, and it lets you use the final wave of heat without dragging out another cooking project. I like that part a lot. It feels economical in the best sense of the word.
Fruit changes in a way vegetables don’t always do. The cut surface dries just enough to brown, the inside warms without collapsing, and the natural sugars pull closer to the surface. On a peach, that means something almost jammy. On pineapple, it means the tang gets sharper and the edges go golden-brown instead of wet and dull. On watermelon, a fast sear gives you a smoky shell around a cool interior, which sounds odd until you taste it.
The nicest thing, though, is how well grilled fruit handles the rest of the plate. It can be a side dish, sure, but it can also be a salsa ingredient, a topping, or the entire dessert if you add yogurt or ice cream and stop fussing. That flexibility matters at a cookout, where nobody wants a separate, fussy second menu.
Choosing Fruit That Can Take the Heat
Not every fruit wants the same treatment, and the difference starts at the market. You want fruit that is ripe enough to taste like itself but firm enough to hold its shape when the grate gets involved. Too soft, and you get mush. Too hard, and you get something that tastes underdeveloped even after grilling.
Firm-ripe beats soft-ripe
A peach should yield slightly at the shoulders, not cave under your thumb. A plum should feel heavy and give just a little near the stem. Pineapple should smell sweet at the base. Bananas should be yellow with a few freckles, not mostly black. That small amount of structure matters more than sugar content alone because the grill will concentrate sweetness anyway.
Shape matters more than people think
Thick slices are easier to turn than thin ones. Halves and wedges are easier to manage than tiny chunks. If you’re working with fruit that likes to slump, a cut face can sit on the grate long enough to develop marks before the interior goes soft. That’s why a 1/2-inch peach wedge behaves better than a pile of little cubes.
When to skip a fruit
If the fruit is already dripping, collapsing, or bruised through the middle, save it for a salsa, sauce, or compote. That fruit can still be useful, just not on a hot grate. Grilling rewards structure. It doesn’t fix a fruit that has already given up.
I also like to think about water content. Watermelon, cantaloupe, and honeydew can work, but they need a short blast of heat and a dry surface. A wet slice steams before it chars. That’s the whole problem in one sentence.
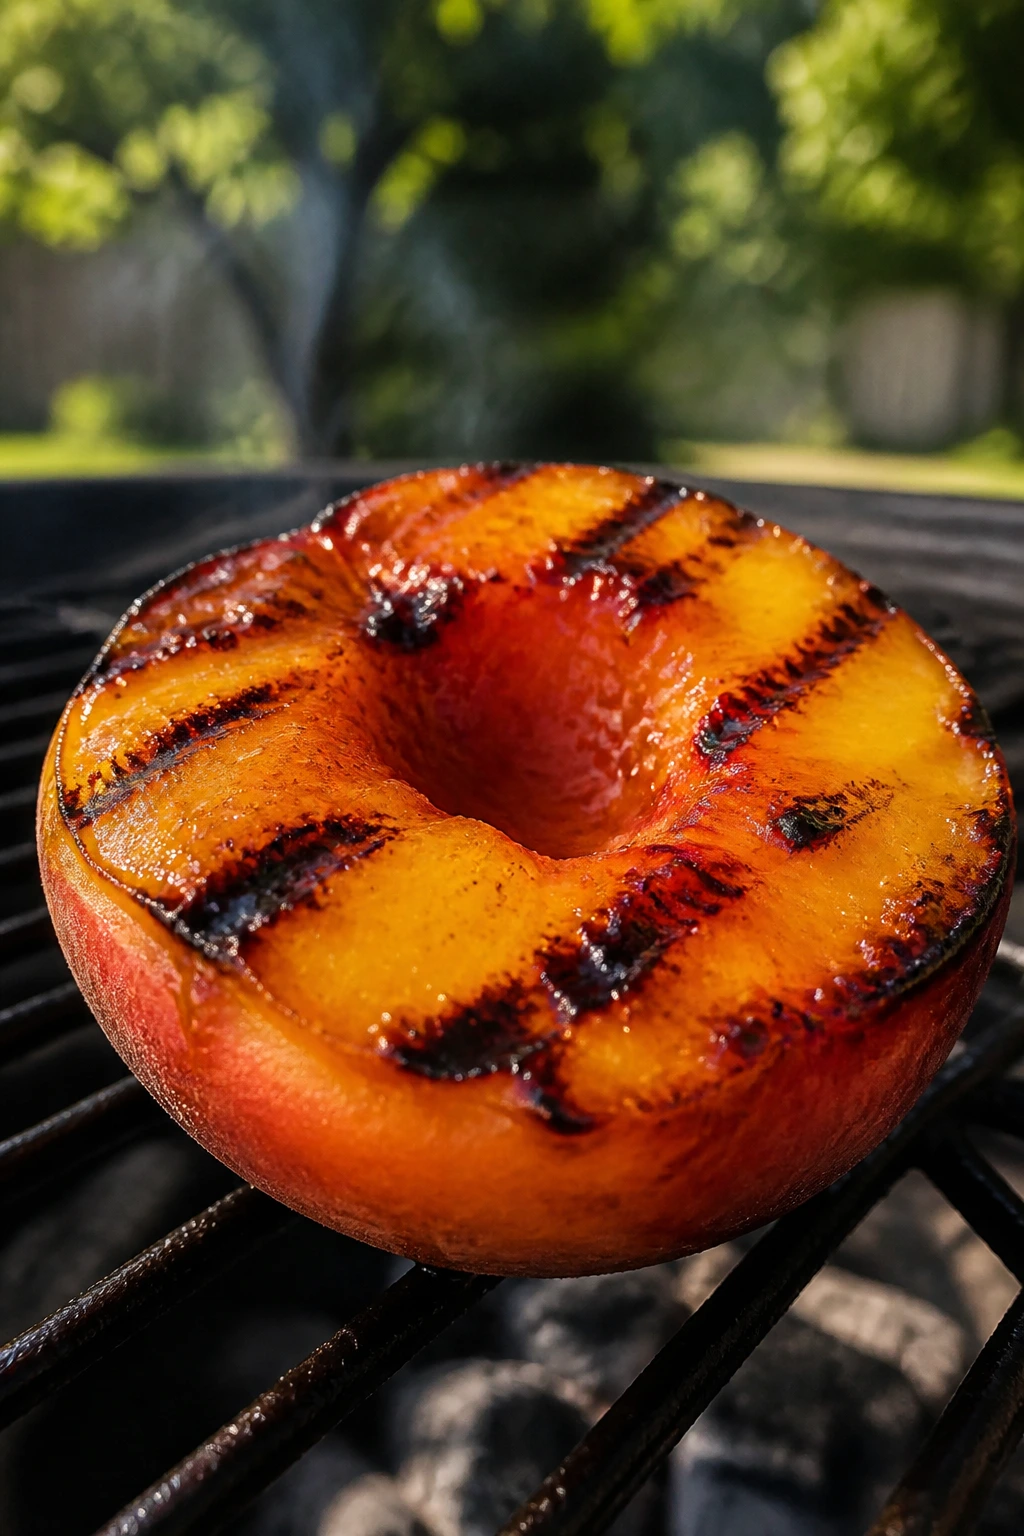
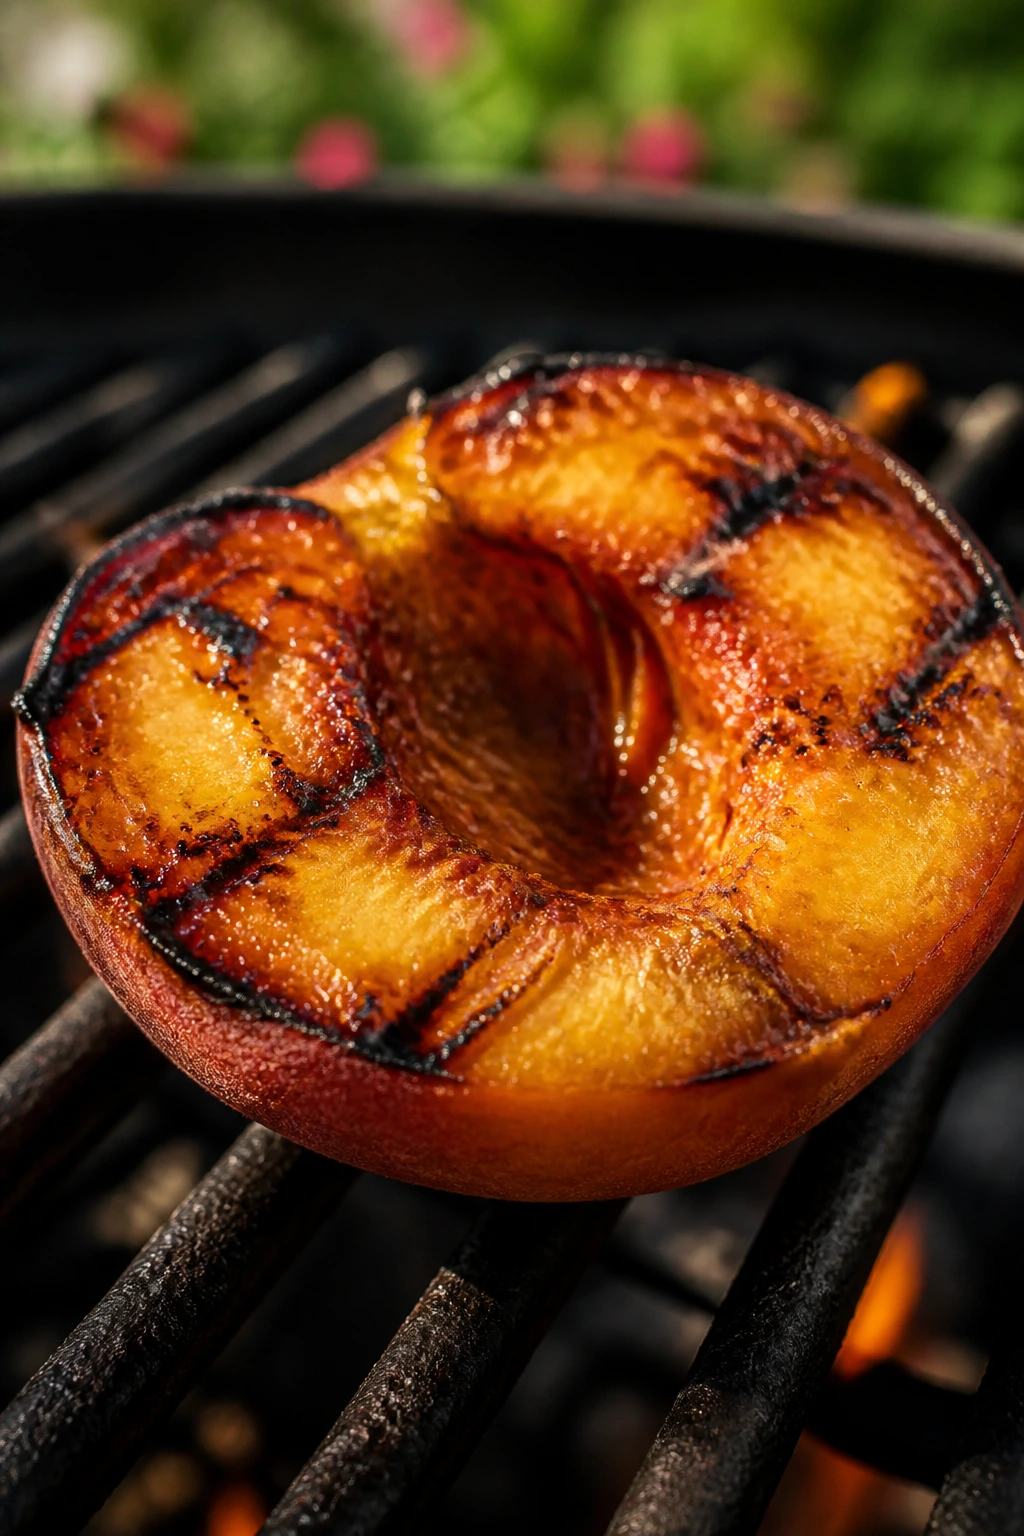
Peaches, Nectarines, and Plums on the Grates
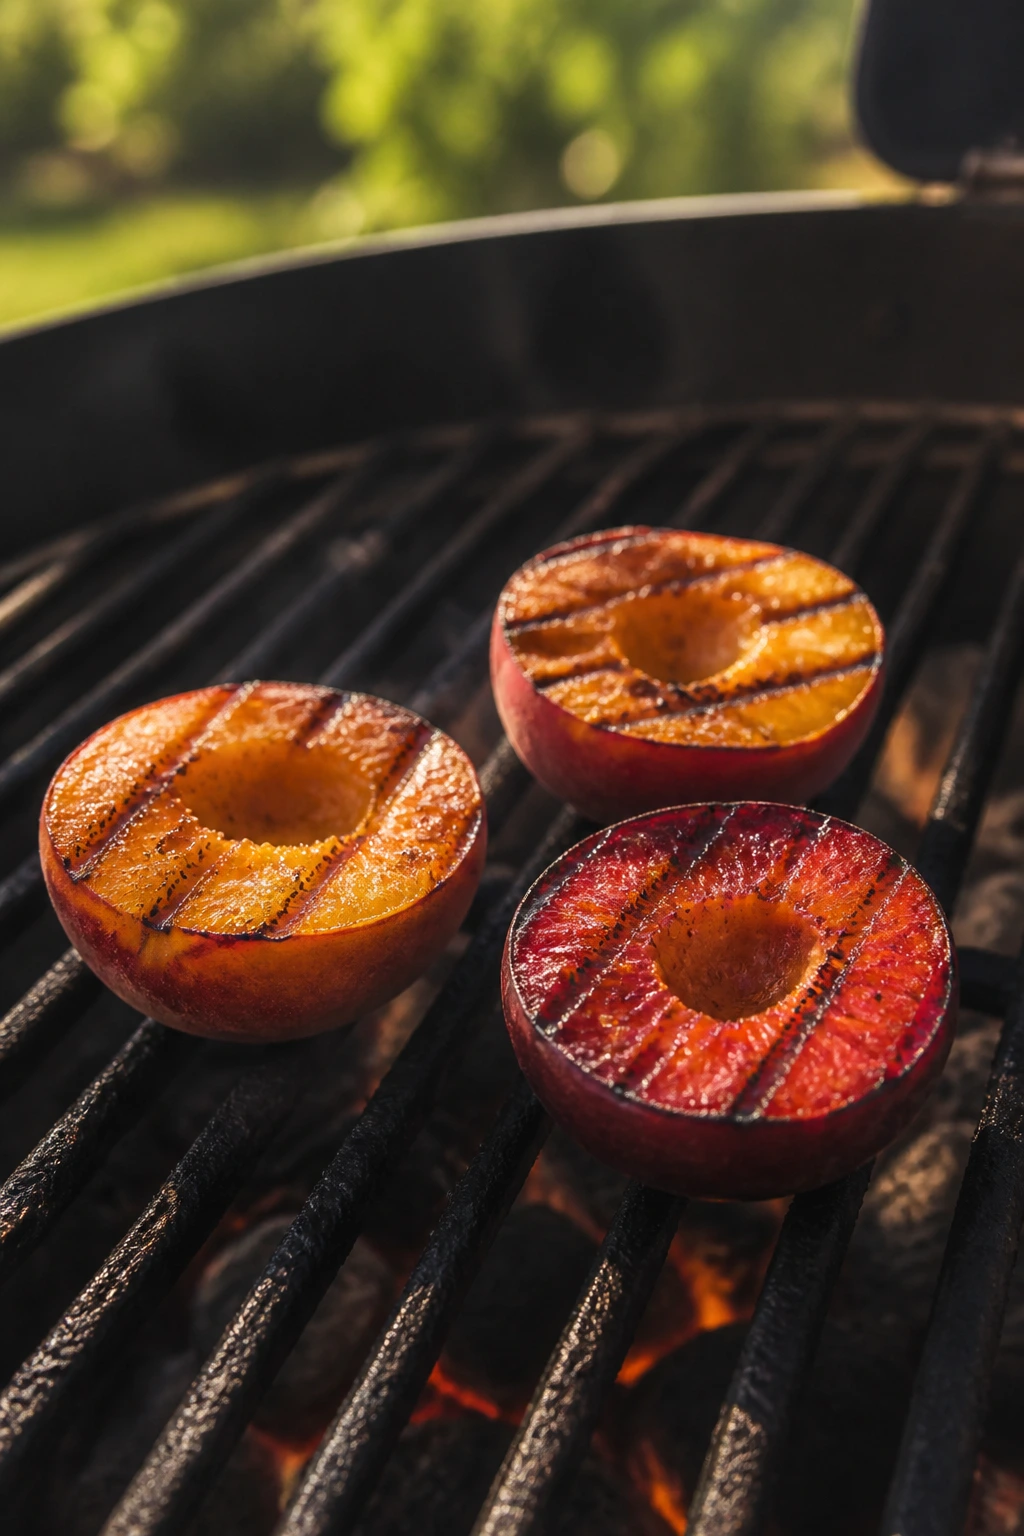
Stone fruit is where grilled fruit starts to feel like a real cookout move. Peaches bring floral sweetness. Nectarines are a touch firmer and a little brighter. Plums go deeper and tarter, which is handy when everything else on the table leans rich.
Halves, wedges, or slices?
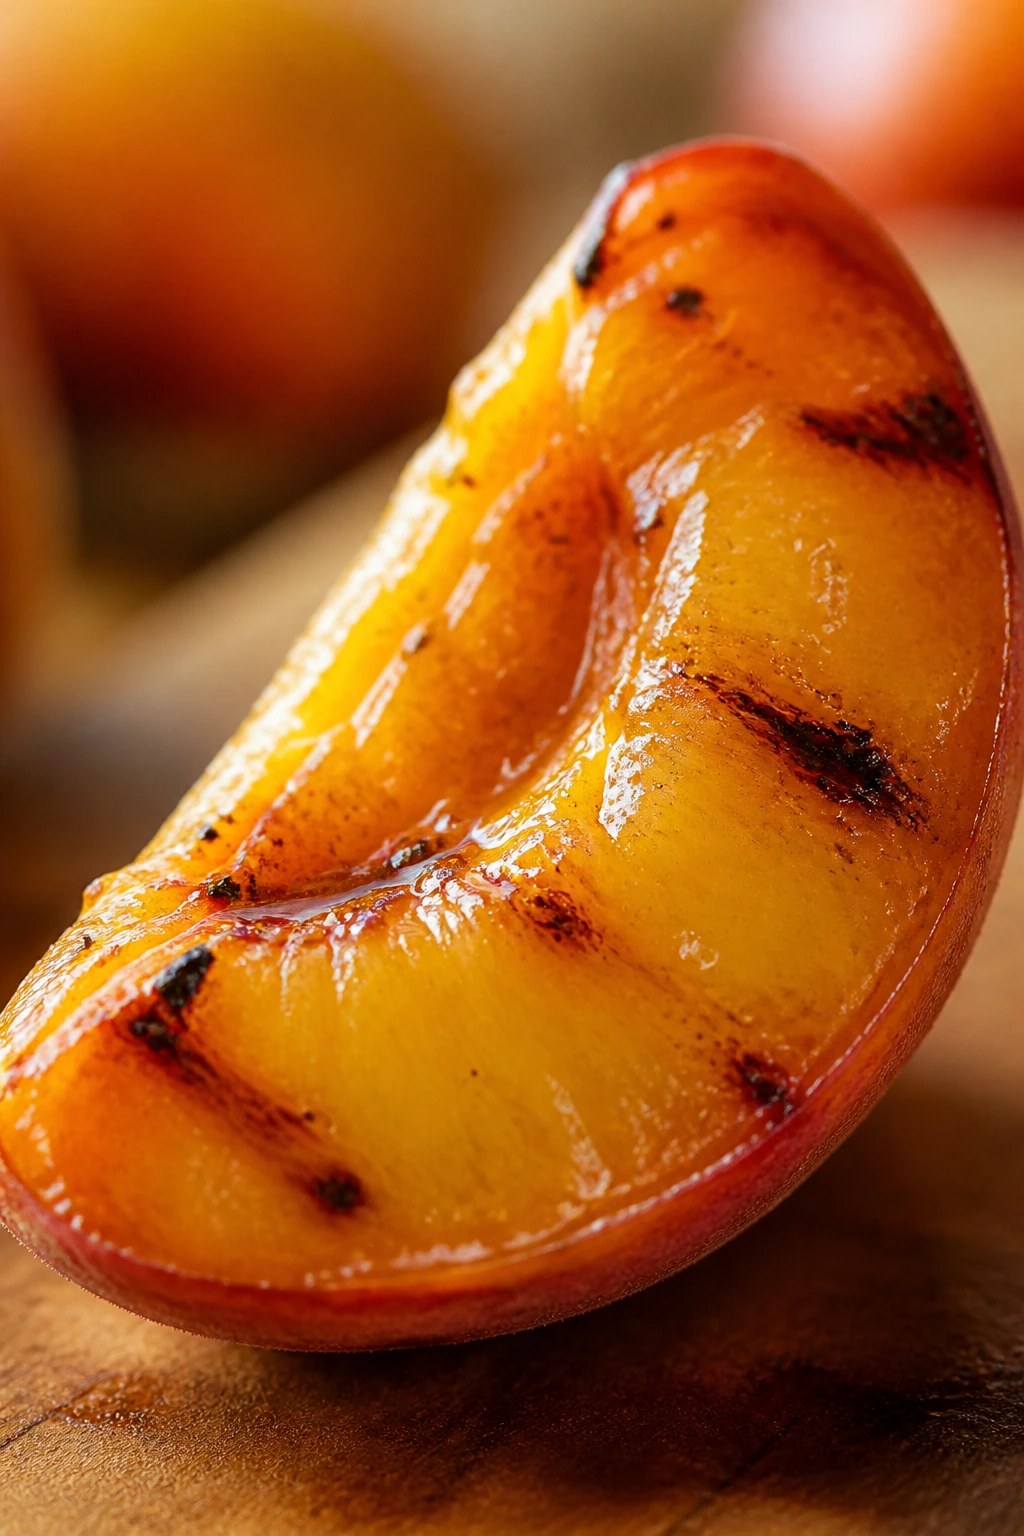
Halves are the easiest place to start. Cut around the pit, twist, and pull the fruit apart. If the peach is a clingstone and the pit won’t give, wedges are easier than a wrestling match. For plums and nectarines, wedges about 3/4-inch thick are a sweet spot: big enough to stay together, small enough to pick up with tongs.
I leave the skin on. Every time. It protects the flesh from getting too soft, and once the fruit is grilled, the skin is less annoying than people expect. On peaches, it softens and loosens a bit. On plums and nectarines, it adds a nice little bite.
How long they need
A medium-hot grill, around 400°F to 450°F, is the right zone. Brush the cut side with a thin film of oil, lay it cut-side down, and don’t fuss with it for 2 to 4 minutes. You want dark grill marks and a surface that lifts cleanly when you nudge it with tongs. Flip for another 30 seconds to 1 minute if you want the skin side warmed through.
What to serve with stone fruit
These are the fruit I reach for when the plate needs balance. Grilled peaches with burrata and basil are almost unfair. Plums with ricotta and a drizzle of honey work if you want dessert with less sugar. Nectarines next to grilled pork or chicken are excellent because they bring acidity without screaming for attention.
A little flaky salt changes everything here. Not a lot. Just enough to make the sweetness taste more defined.
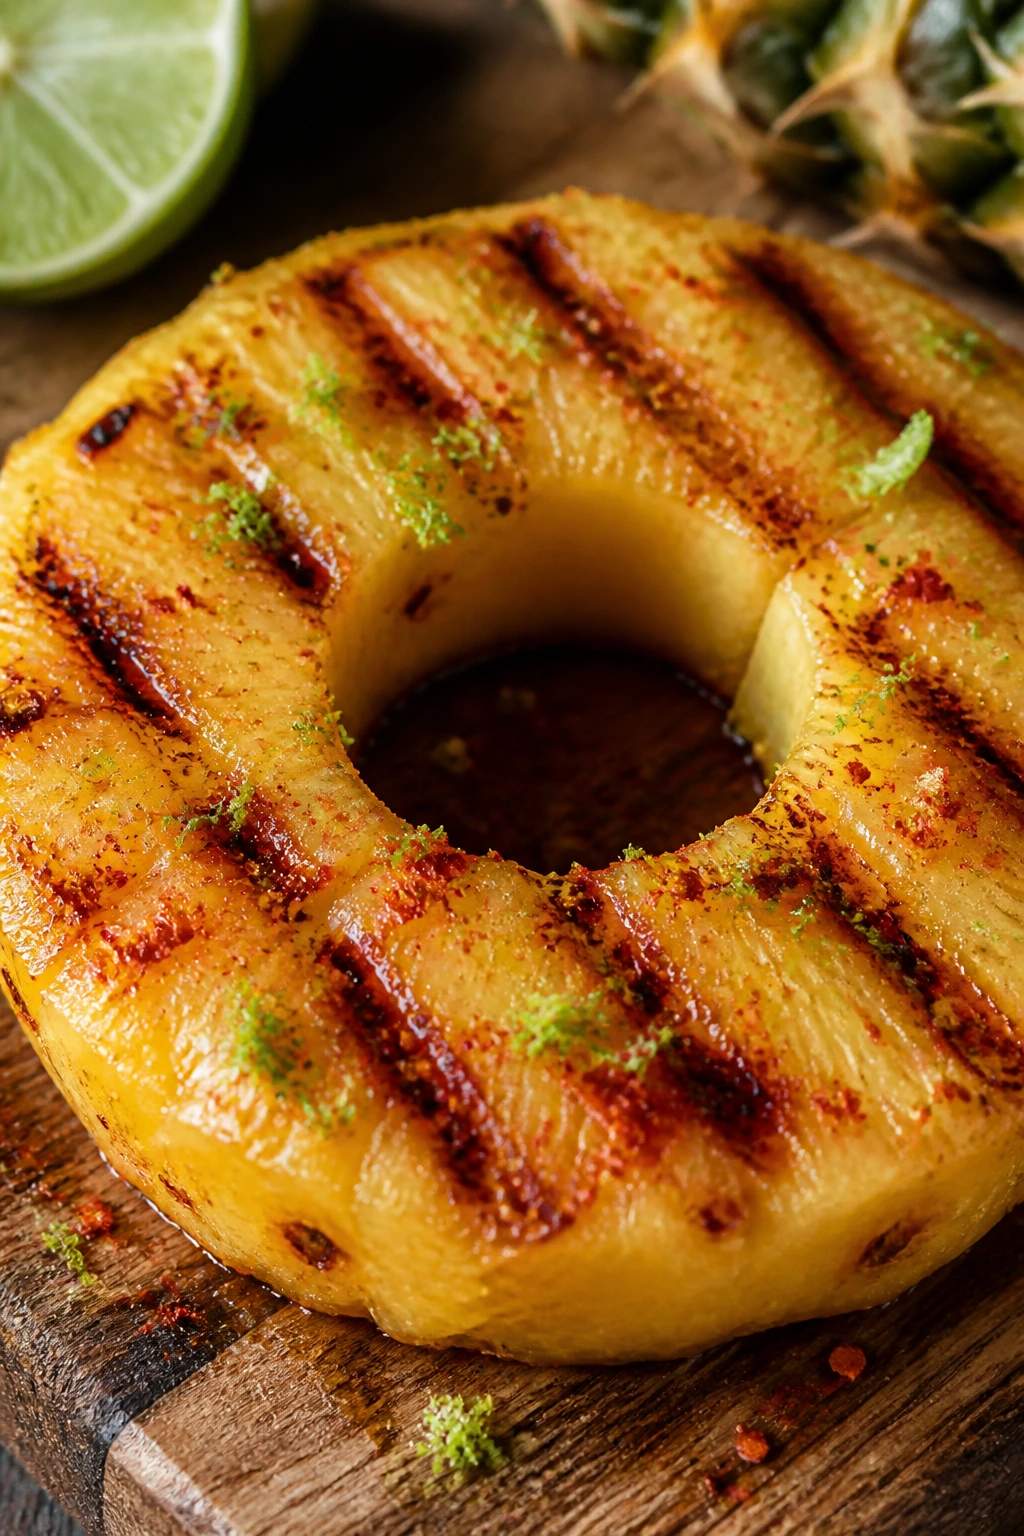
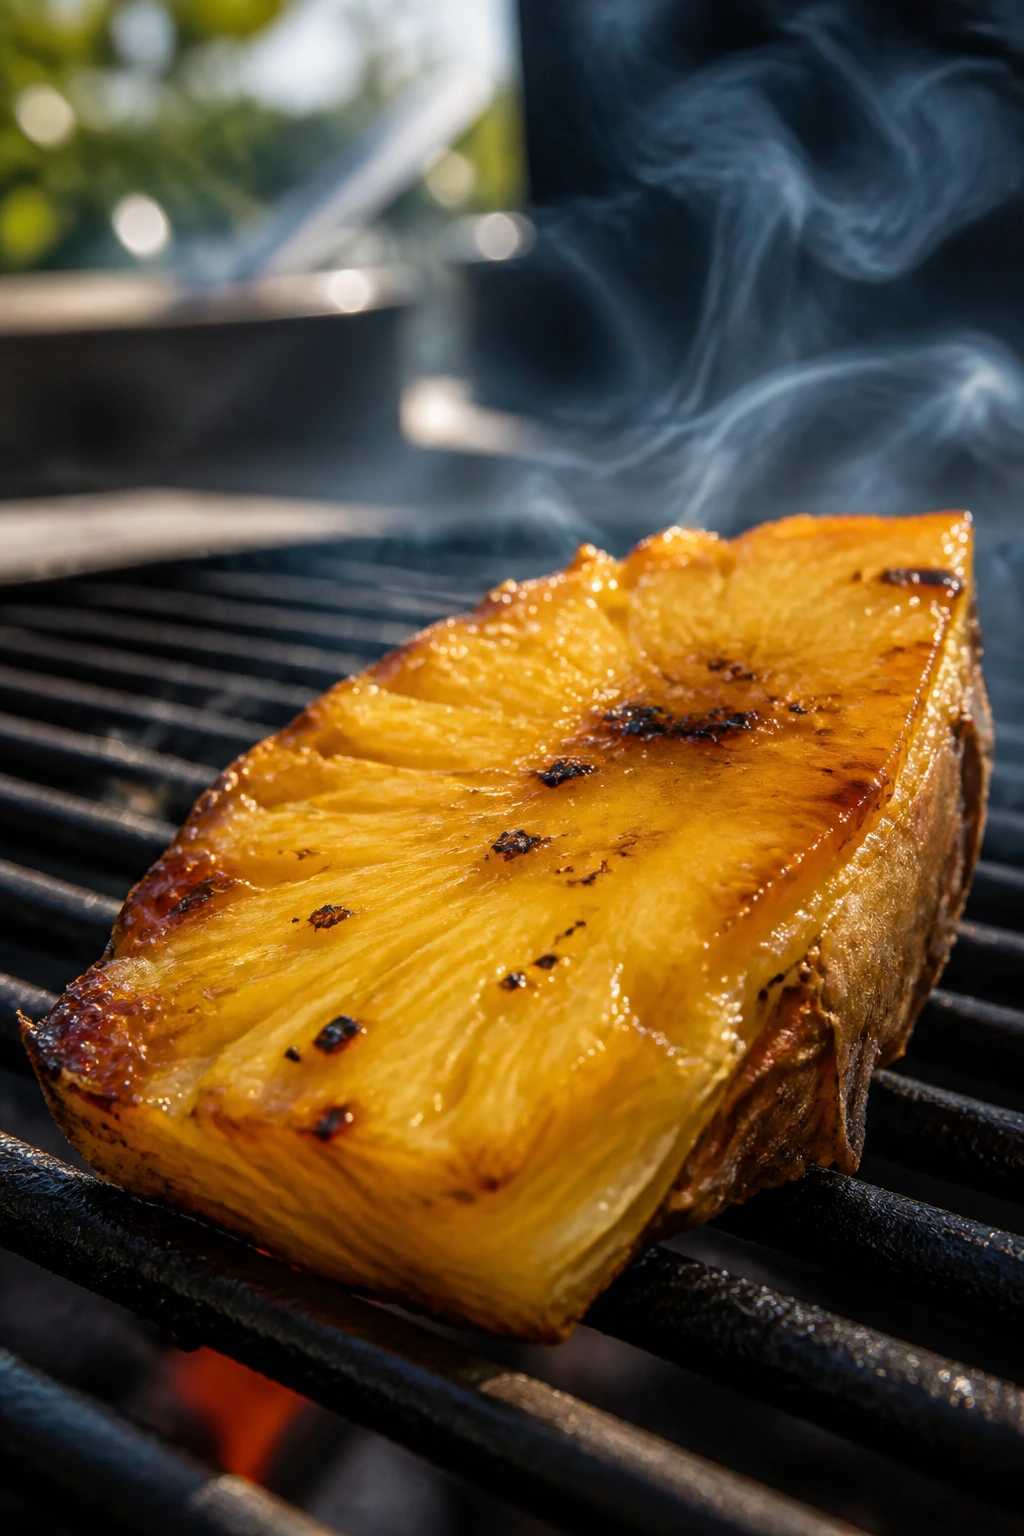
Pineapple: The Brightest Char on the Grill
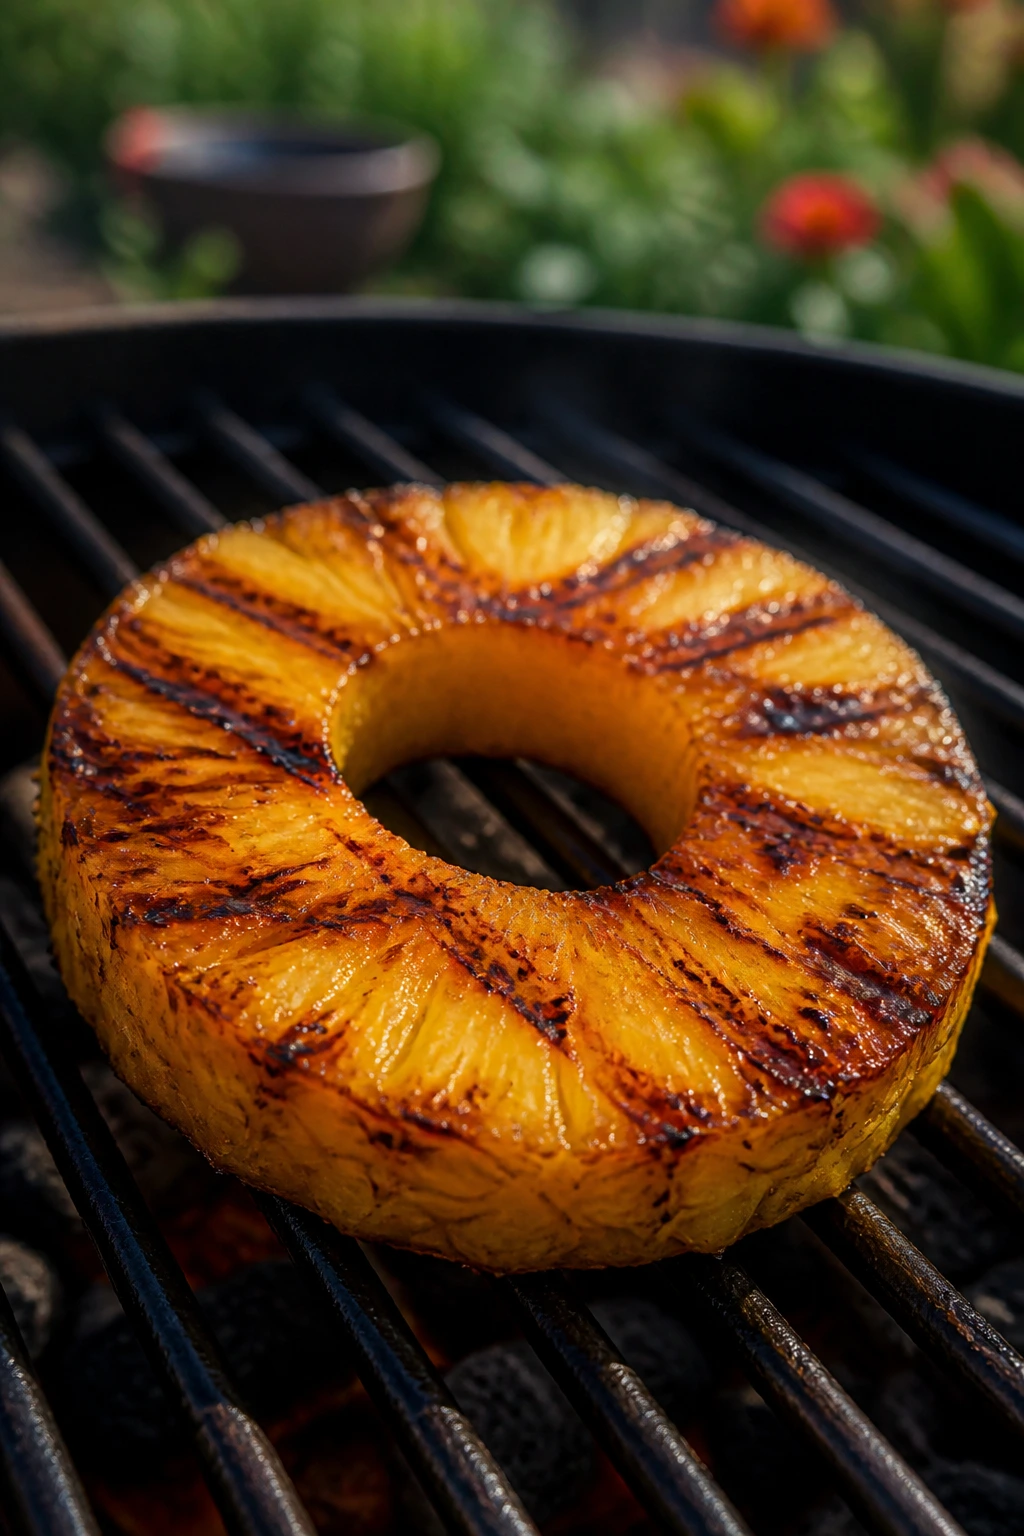
Pineapple is the most reliable fruit on the grill, and I say that partly because it behaves and partly because it forgives sloppy timing better than most fruit. Its fibers hold shape, its sugars caramelize in a useful way, and the acid keeps it from turning cloying.
If you want one fruit that can be cut in advance, moved from counter to patio, and grilled without drama, this is it.
Rings, planks, or spears
Rings look tidy and cook evenly. Planks are easier for stacking on a platter or sliding into a sandwich. Spears are useful if you want handheld pieces or if the fruit is destined for a sauce or salsa. I like 1-inch thickness. Thinner than that, pineapple can get floppy. Thicker than that, and you spend too long on the grill for not much gain.
Fresh pineapple is the best choice. Canned rings can work in a pinch, but they need to be drained very well and patted dry. They’re wetter, so they brown faster and stick more easily. Not impossible. Just less graceful.
What good pineapple smells and looks like
A ripe pineapple smells sweet at the base, not fermented. The leaves should pull with a little resistance, not fly off like a party trick. Once cut, the flesh should look bright and moist, not stringy and hollow. If it’s pale and bland raw, grilling won’t magically fix it, though the grill can sharpen what’s already there.
Best seasonings
Pineapple handles heat and spice better than most fruit. A dusting of chile powder, a squeeze of lime, and a pinch of salt is enough to make it feel finished. If you want dessert, a brush of honey in the last 30 seconds on the grate gives you shine without making the sugars burn black.
It’s also one of the few grilled fruits that sits naturally beside savory food without needing an explanation. On a burger. On a ham sandwich. On a skewer with shrimp. Pineapple never complains.
Watermelon and Other Melons That Need a Short, Hot Kiss
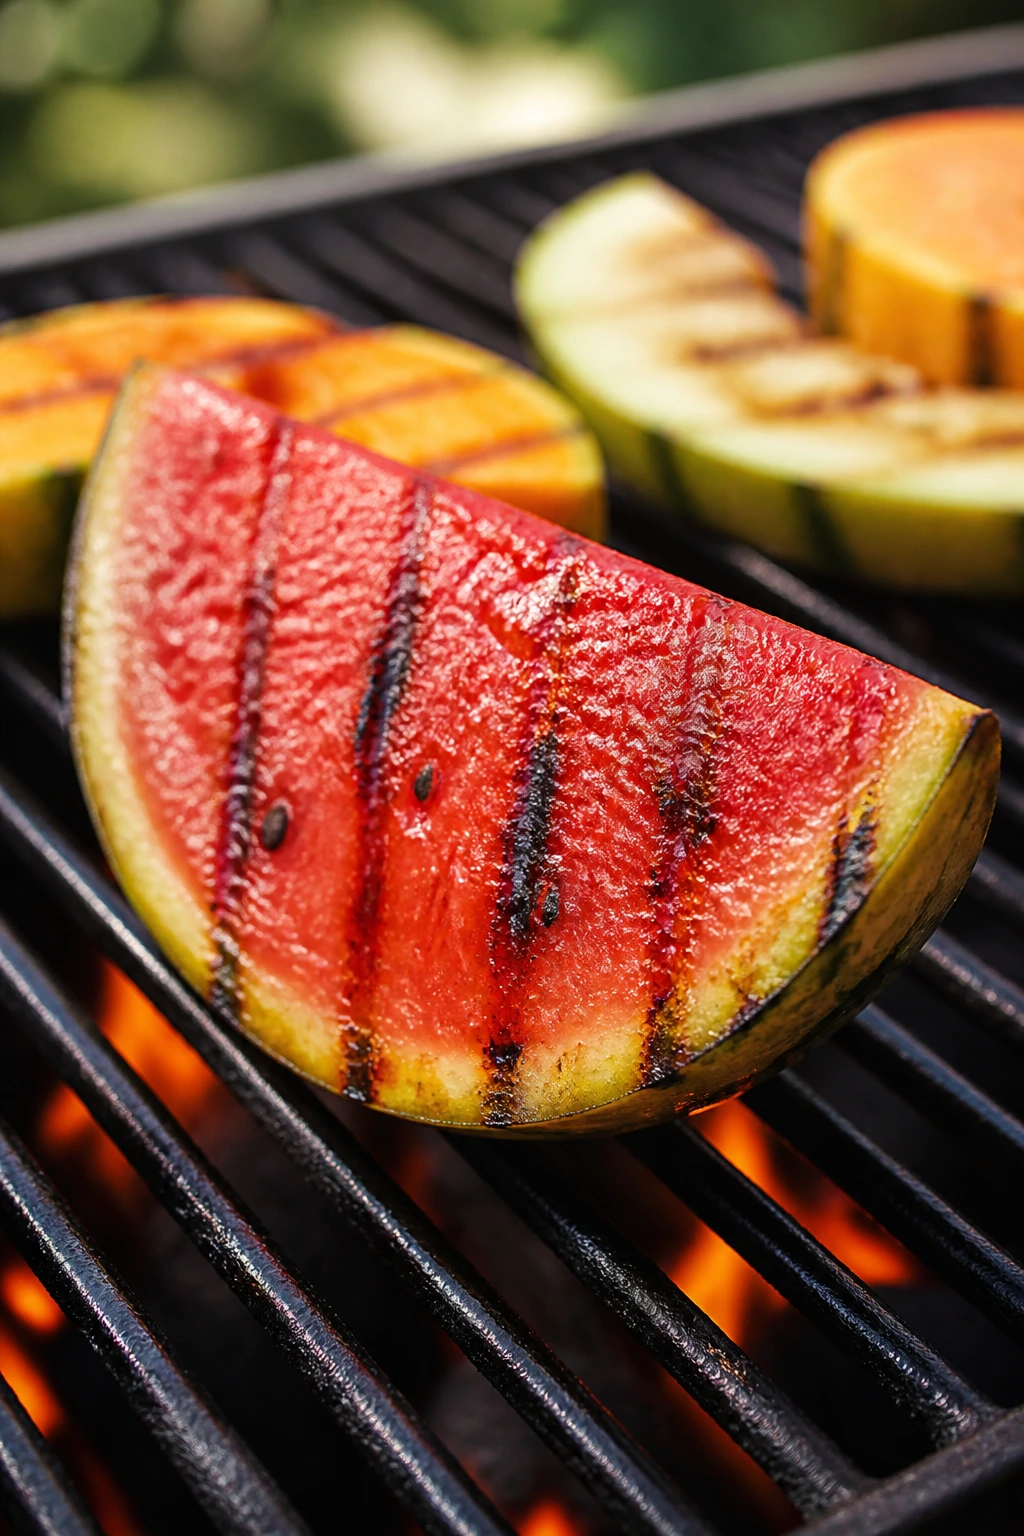
Watermelon on the grill still surprises people, which tells me it’s worth doing. The trick is not to try to cook it through. You are not making watermelon soft in the way a peach softens. You’re giving the surface a little smoke, a little color, and a different texture so the cold middle stays vivid against it.
Use thick slices and dry them well
Cut watermelon into 1-inch slabs or wide wedges. Pat both sides dry with paper towels. If the surface is wet, it will steam before it marks, and you’ll get a limp piece with no real char. That’s the difference between interesting and forgettable.
A very light brush of oil helps, but not much. Watermelon already has a high water content, so too much oil can make it slick instead of browned. The piece should go onto a hot grate and come off quickly — usually 30 to 60 seconds per side.
What about cantaloupe and honeydew?
They can work, but I prefer them in bigger chunks or wedges. Cantaloupe gets a little muskier with heat, which can be excellent next to prosciutto or salty cheese. Honeydew is milder and sometimes needs help from lime, mint, or a vinegary dressing. I wouldn’t grill tiny cubes unless you’re using a basket. They’re too eager to vanish between the grates.
The best pairings
Grilled watermelon is terrific with feta, mint, and black pepper. A little olive oil and flaky salt on top make the sweetness behave. Cantaloupe with basil and a splash of balsamic leans more savory and reads like a salad rather than dessert. I like that shift. It means one fruit can do two jobs without much extra work.
The whole category lives or dies on restraint. Short heat. Dry surface. Big slices. That’s the formula.
Apples, Pears, Bananas, Figs, and Mangoes
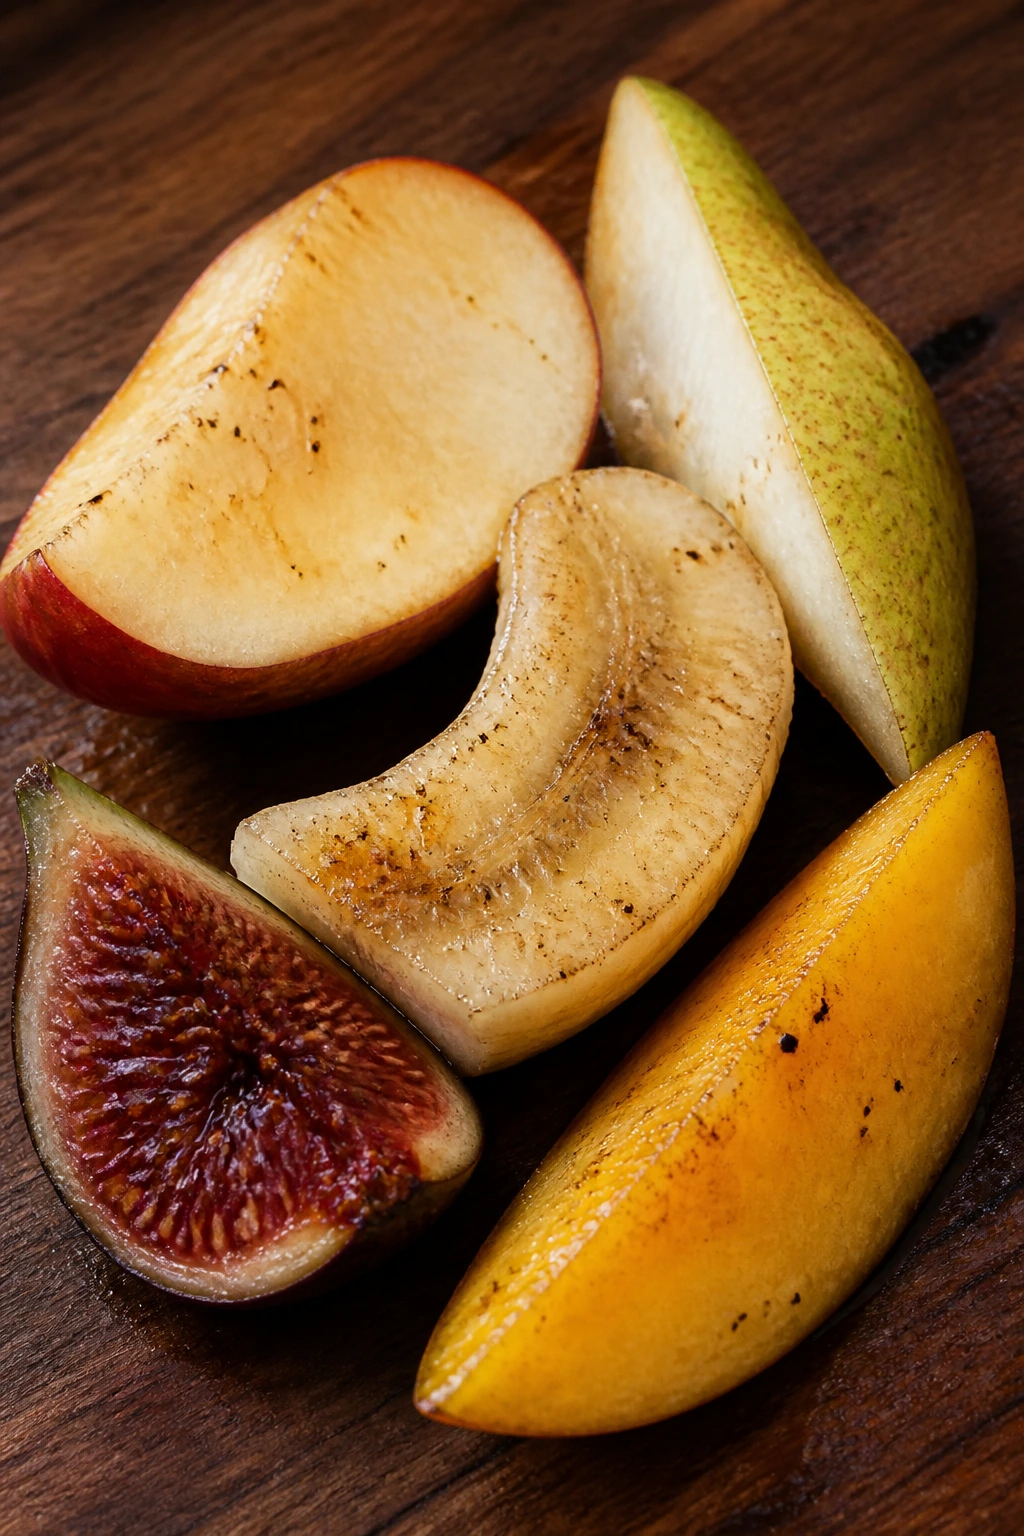
This is the section where backyard cookout fruit stops being obvious and starts getting fun. These fruits all have different personalities, but they share one useful trait: they can take on smoke and still keep enough shape to serve.
Apples and pears need firmer flesh
If I’m grilling apples, I reach for Honeycrisp, Pink Lady, or Granny Smith. For pears, Bosc and firm Anjou are safer than something very soft. Slice them about 1/2-inch thick, core them, and brush with a little oil or melted butter mixed with oil. They need 2 to 3 minutes per side over medium heat, not screaming heat.
These are the fruit I use when the air has a little evening chill and I want something with more bite. They go well with cheddar, blue cheese, walnuts, and honey. That combo sounds old-fashioned for a reason. It works.
Bananas are a different animal
A banana can be grilled in its peel, slit lengthwise on top, for 4 to 6 minutes over medium heat. The peel blackens. The flesh turns creamy and warm. You can also peel and split bananas lengthwise, but they get fragile fast, so the peel is the easier path.
This is the fruit I use when dessert needs almost no effort. Spoon a little Greek yogurt or vanilla ice cream over the warm banana, and you’ve got something that feels richer than it is.
Figs and mangoes disappear fast
Figs need only a minute or two, cut-side down, just enough to loosen the sugars and warm the flesh. Mango works best when it’s ripe but still firm enough to slice into thick slabs. It needs a gentle hand because it softens quickly. A few grill marks are enough.
If peaches are the cookout classic, figs and mangoes are the quiet flex. They don’t need much. They just need heat and a good finishing touch.
The Brush-On Layer: Oil, Butter, Honey, and Citrus
The coating matters more than people think. Fruit can go on the grill naked, but a thin brush of fat or glaze changes both the color and the texture of the final bite. It also changes the way the fruit releases from the grate, which is the practical part nobody wants to hear until their peach wedges are stuck to the bars.
Oil first, sugar later
I almost always brush fruit with a neutral oil before grilling. Grapeseed, avocado, or a light olive oil all work. You want a film so thin it barely shines. Too much oil makes the fruit greasy and can blur the grill marks.
Butter tastes lovely, but it burns faster. If I’m using butter, I mix it with a little oil or save it for the end. A brush of melted butter over warm peaches is excellent. Butter on the grate itself is not the move.
Honey and maple need timing
Sweet glazes should not go on too early. Brush them on during the last 30 seconds of grilling or right after the fruit comes off. If you add them at the start, the sugars darken too fast and the fruit gets bitter in spots. That bitter edge can be useful in tiny doses. In large doses, it tastes like a mistake.
Citrus is the brightener
Lemon or lime juice works best after the grill, not before. A little zest is even better. Zest gives fragrance without soaking the fruit or making the surface watery. If you want a cleaner finish, add citrus at the end with flaky salt and maybe a few torn herbs.
A small pinch of salt belongs here too. Not as a gimmick. As a correction. Salt makes peach, pineapple, and melon taste more like themselves.
Skewers, Grill Baskets, and Foil—Which Tool Solves Which Problem
The right tool depends on the fruit, which sounds fussy until you’ve tried grilling strawberries through the grate and watched one fall into the fire like a bad idea. Big slabs can go straight on the bars. Small pieces need help.
Direct grates are best for large fruit
Peach halves, pineapple rings, plum wedges, thick pear slices, and banana halves in their peels can go right on the grates. That gives you the best marks and the cleanest browning. A properly preheated grill is doing the work here, not the gadget.
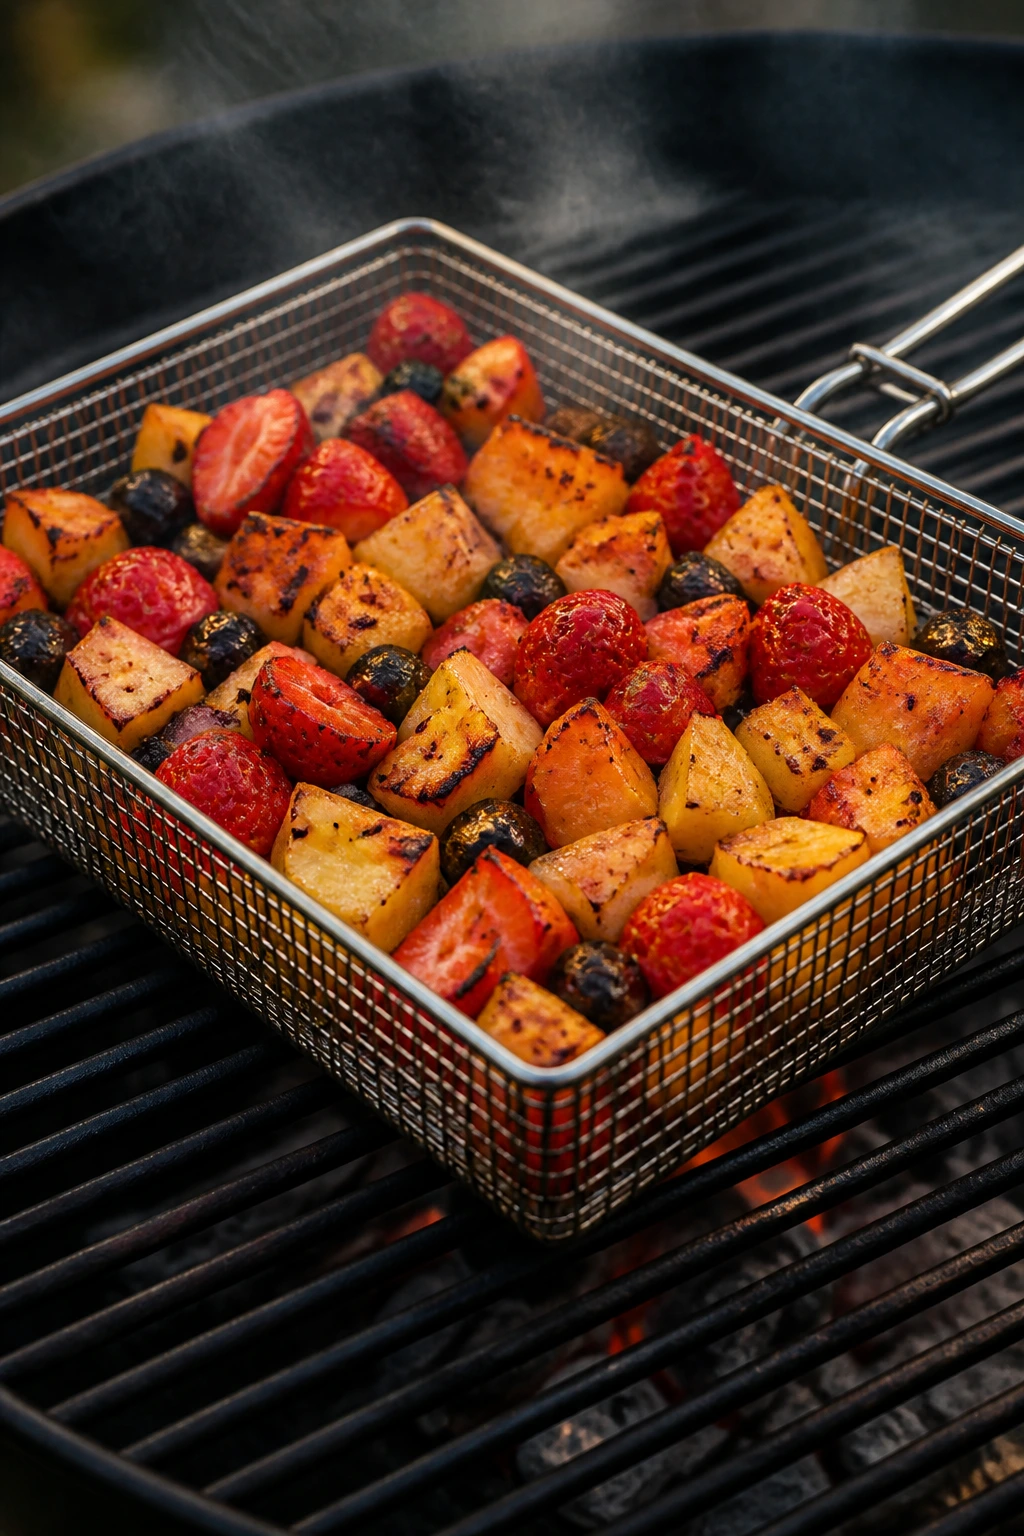
Grill baskets help with smaller pieces
A grill basket is the safest option for melon cubes, strawberry halves, cherry tomatoes if you drift into salsa territory, and mixed fruit meant for skewering later. It gives you color without losing pieces into the flames. I like baskets with holes small enough to hold a grape if needed. Otherwise, the whole point gets lost.
Skewers are for structure, not decoration
Metal skewers are better than wooden ones because they don’t burn, snap, or soak up marinade. If you use wooden skewers, soak them for at least 20 minutes before threading fruit. Thread firmer pieces together: pineapple chunks, firm plum wedges, mango cubes, strawberries with some stem left on. Don’t pack the fruit too tightly or the center pieces won’t brown properly.
Foil is a backup, not a first choice
Foil traps steam, and steam softens fruit in a dull way. If your grill is truly awful or the fruit is extremely delicate, foil can keep things from dropping through, but you lose the good texture. A grill pan or basket is better. I’d rather own one decent basket than rescue fruit with foil every time.
Serving Grilled Fruit So It Feels Like Part of the Meal
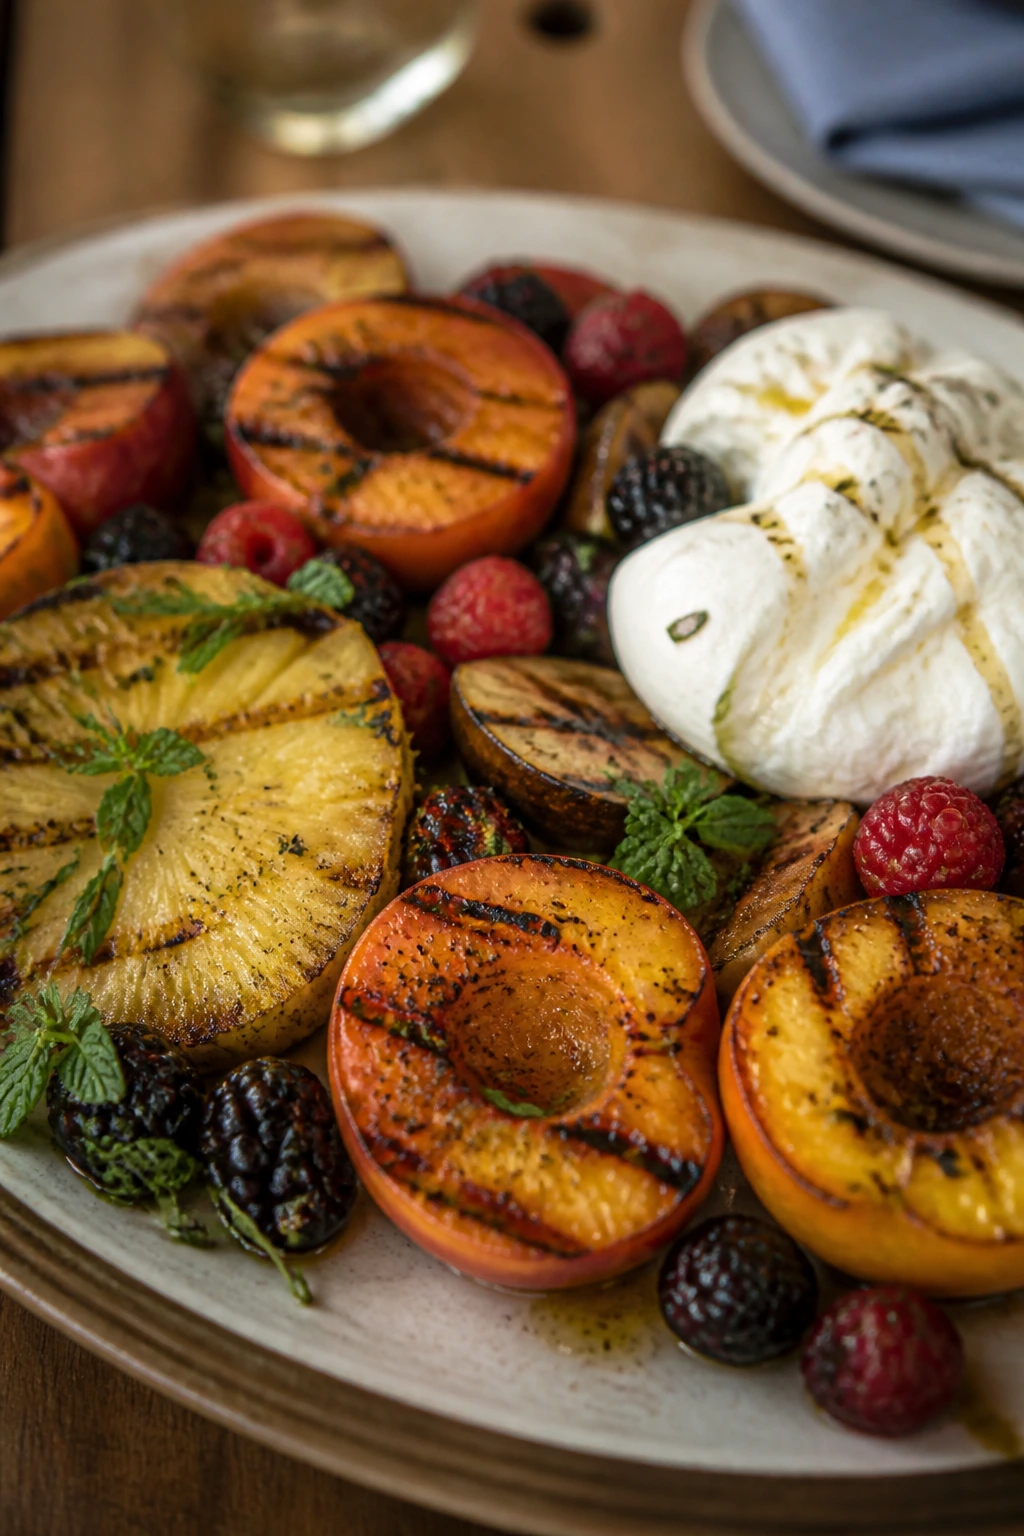
Presentation: Lay the fruit in a single layer on a warm platter so the char stays visible instead of getting buried under toppings. I like to keep a few of the darker grill marks facing up; they look honest, not messy. If the fruit gave off a little juice, spoon it back over the top. That glossy stuff is flavor, not waste.
Accompaniments: Think about contrast. Grilled peaches want burrata, ricotta, whipped yogurt, basil, toasted almonds, or prosciutto. Pineapple goes with chili-lime salt, coconut, mint, or a sharp salsa. Watermelon likes feta, black pepper, and herbs. Apples and pears sit nicely with cheddar, walnuts, and a drizzle of honey. If you’re serving the fruit with dinner instead of dessert, keep one salty element on the plate. That’s the thing that keeps the whole dish from drifting into candy territory.
Portions: For a side dish, plan on 1 to 2 pieces of fruit per person, depending on size. One peach half, one pineapple ring, or two thick melon wedges is usually enough when the platter is sharing space with meat and vegetables. For dessert, people take more. Two or three smaller pieces per person is realistic, especially if there’s ice cream or yogurt on the table. If you’re cooking for a crowd, grill in batches and move the finished fruit to a warm platter; don’t pile hot fruit on top of itself or the bottoms turn soggy.
Beverage Pairing: Crisp drinks work best. Unsweetened iced tea with lemon, sparkling water with lime, a dry rosé, or a cold pilsner all keep the fruit from feeling heavy. If the fruit leans dessert-like, a lightly sweet iced mint tea or a glass of chilled Prosecco can make sense. Keep it fresh. Keep it cold.
Small Tweaks That Change the Whole Platter
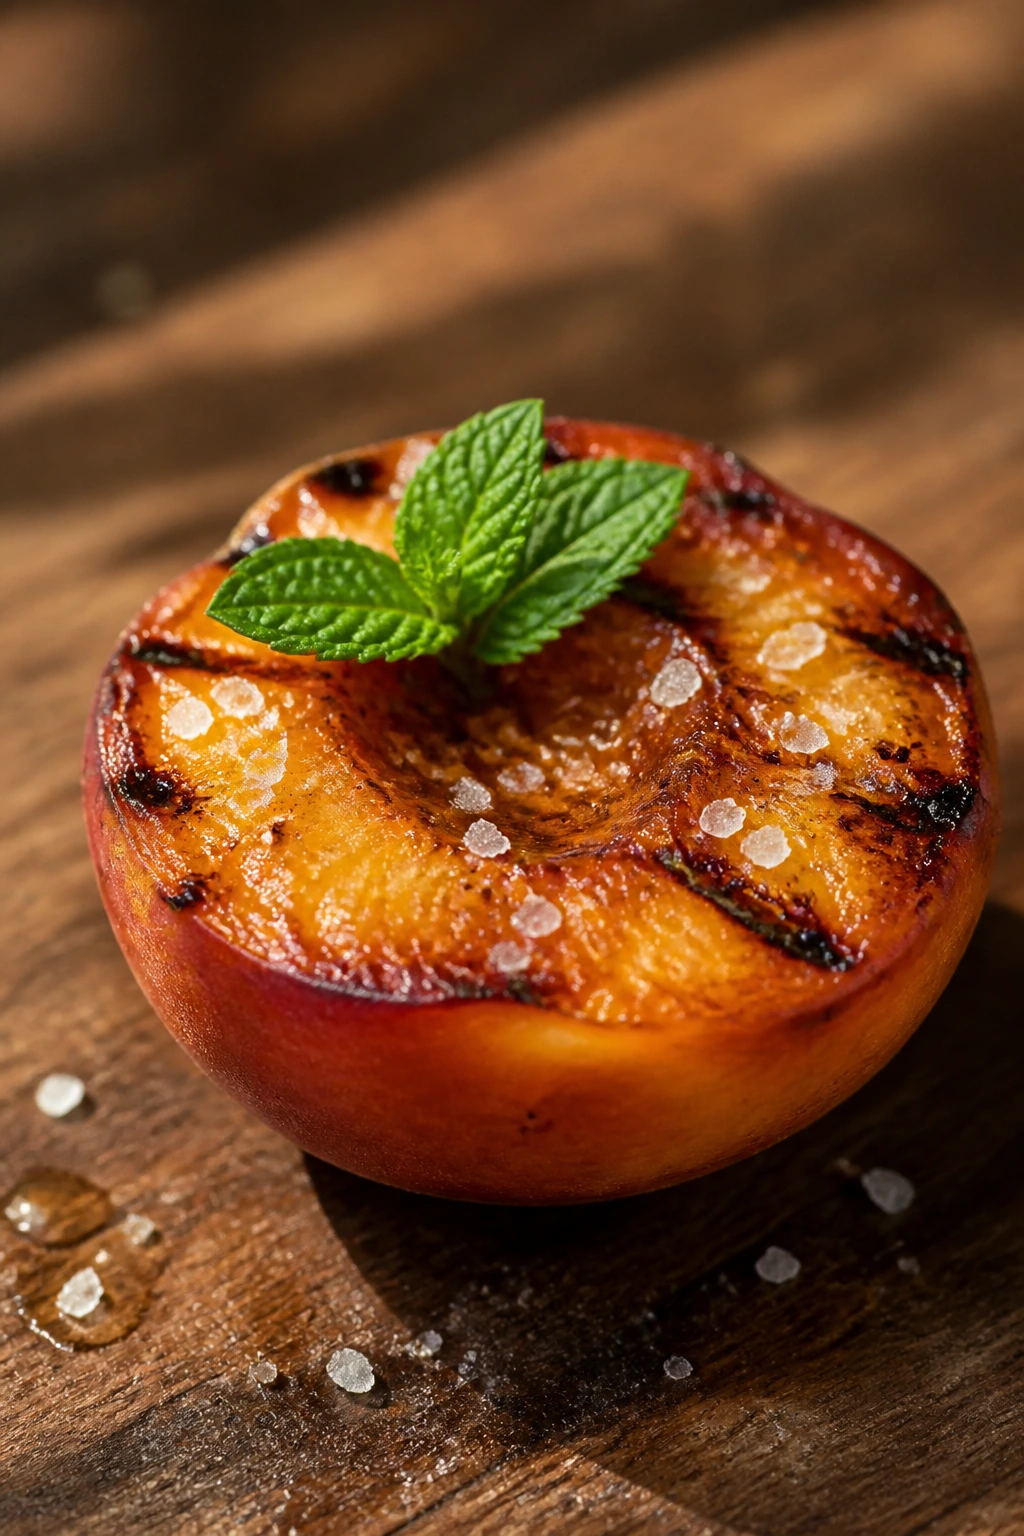
Flavor Enhancement: One of my favorite finishing moves is a pinch of flaky salt plus one herb. Mint on watermelon is classic for a reason. Basil on peaches or pineapple gives a sharper, greener edge. Rosemary can work with pears or apples, but use almost none; it can bully the fruit if you’re heavy-handed.
Customization: If you want more richness, add cheese. Burrata with peaches is excellent, and feta with watermelon is practically built for summer heat. If you want crunch, add toasted pistachios, almonds, or pumpkin seeds. If you want heat, use chili flakes, a dusting of ancho chile, or a few drops of hot honey right before serving.
Serving Suggestions: Warm grilled fruit over Greek yogurt is an easy breakfast-to-dessert move. Over vanilla ice cream, it turns into a softer, more grown-up sundae. On a savory board, set the fruit beside grilled bread, cheese, and cured meat so guests can build their own plates. That’s more useful than trying to force everything into one tidy bowl.
Make-It-Yours: For dairy-free plates, coconut yogurt or whipped coconut cream holds up well. For nut-free gatherings, skip the toasted nuts and use seeds or crisped coconut. If you want to lower the sugar, skip the glaze and rely on salt, herbs, and good fruit instead. Grilled fruit doesn’t need much help when the base fruit is ripe.
Common Mistakes That Turn Fruit to Slop
The first mistake is choosing fruit that’s too soft. A peach that feels mushy in your hand will turn into a slide on the grill, not a neat slice. Same with overripe plums and bananas that are nearly black before they even hit the grate. Fix it by buying firmer fruit and letting it ripen only until it gives slightly under pressure.
Another common error is putting wet fruit on a dry, dirty, or underheated grill. Wet surfaces steam. Dirty grates grab and tear. Underheated metal just leaves you with pale, sticky fruit that refuses to release. Preheat the grill for 10 to 15 minutes, clean the bars, and brush the fruit lightly with oil before it goes on.
People also add sweet glaze too early. Honey, maple, and brown sugar can go from shiny to bitter in a minute if they sit over direct heat too long. Brush them on near the end, or wait until the fruit is off the grill. That keeps the sugars useful instead of burnt.
Cutting fruit too thin causes its own mess. Thin slices dry out or fall through the grate. Thick slices give you enough time to get color without collapse. Aim for 1/2-inch to 1-inch pieces, depending on the fruit.
And then there’s the impatience problem. Fruit needs a minute on one side before you move it. If you keep flipping it, you never get marks and you never get that little concentrated edge that makes grilled fruit worth doing. Let it sit. Then turn it once.
Flavor Directions and Variations Worth Trying
Chili-Lime Pineapple: Brush pineapple rings with oil, grill until marked, then finish with lime zest, chili powder, and flaky salt. This one leans savory and is especially good next to chicken, shrimp, or tacos.
Peach, Basil, and Burrata: Grill peach halves, then top them with torn burrata, basil leaves, and a thin thread of balsamic glaze. It eats like a side and a starter at the same time, which is useful when the table is crowded.
Watermelon, Feta, and Mint: Grill thick watermelon wedges for less than a minute per side, then top with crumbled feta, mint, black pepper, and a touch of olive oil. The salt and cool herbs keep the melon from reading as dessert.
Cinnamon-Honey Apples: Grill thick apple slices or halved apples, then brush with warm honey and dust lightly with cinnamon. This works well with vanilla ice cream, but it’s also solid with cheddar if you want the sweet-salty thing to go further.
Banana Split on the Grill: Leave bananas in their peels, grill until the skins blacken and the fruit softens, then split them open and add yogurt, chopped nuts, and a little chocolate drizzle. It’s messy in a fun way, which is exactly the point.
Essential Equipment for Grilled Fruit
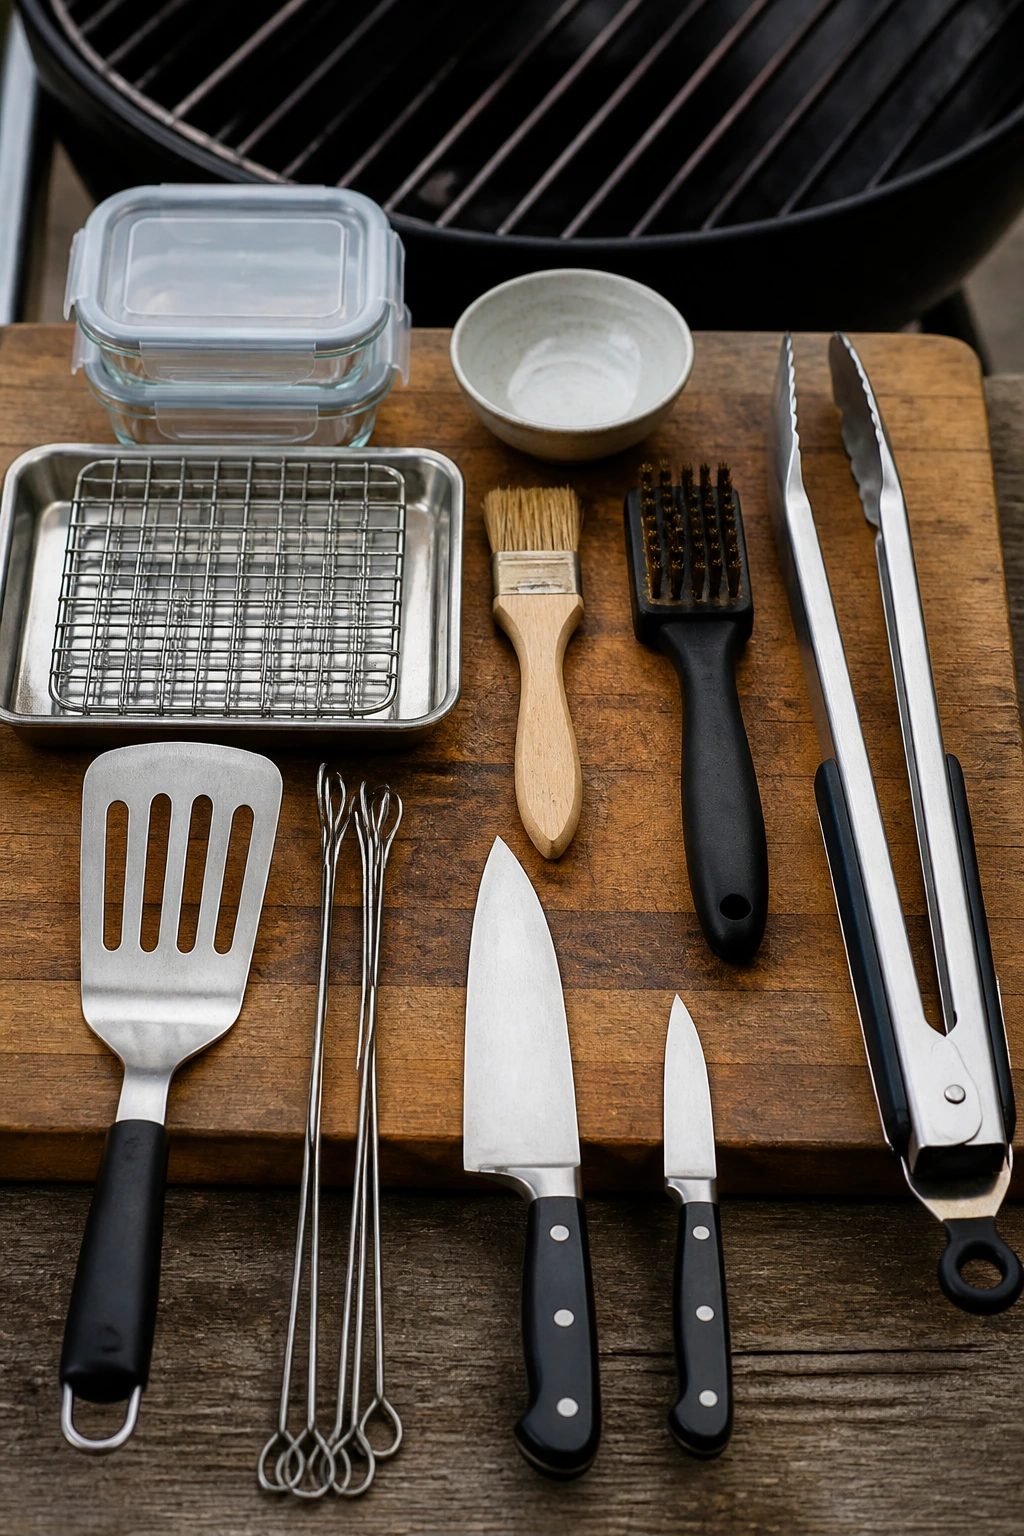
- Gas or charcoal grill: Either one works; the main thing is steady medium-high heat and clean grates.
- Long-handled tongs: You need enough reach to turn fruit without getting your hands right over the fire.
- Grill brush: A clean grate is the difference between neat marks and torn fruit.
- Pastry brush: Good for a thin coat of oil, butter, or glaze.
- Sharp chef’s knife or paring knife: Use it for clean halves, wedges, and thick slices that hold together.
- Cutting board with a stable grip: A damp towel under the board helps keep slippery melon and pineapple from sliding.
- Grill basket: Best for small or delicate pieces that would otherwise fall through the bars.
- Metal skewers: Better than wooden ones for repeated use and more even cooking.
- Rimmed tray or sheet pan: Useful for carrying prepped fruit to and from the grill without losing juice.
- Thin spatula or fish spatula: Handy for lifting soft fruit cleanly when the tongs feel too blunt.
- Small bowl and whisk: Useful for mixing quick glazes, citrus dressing, or herb oil.
- Airtight storage containers: Keep leftovers from drying out or picking up smoke from the fridge.
Make-Ahead, Storage, and Reheating Guidance
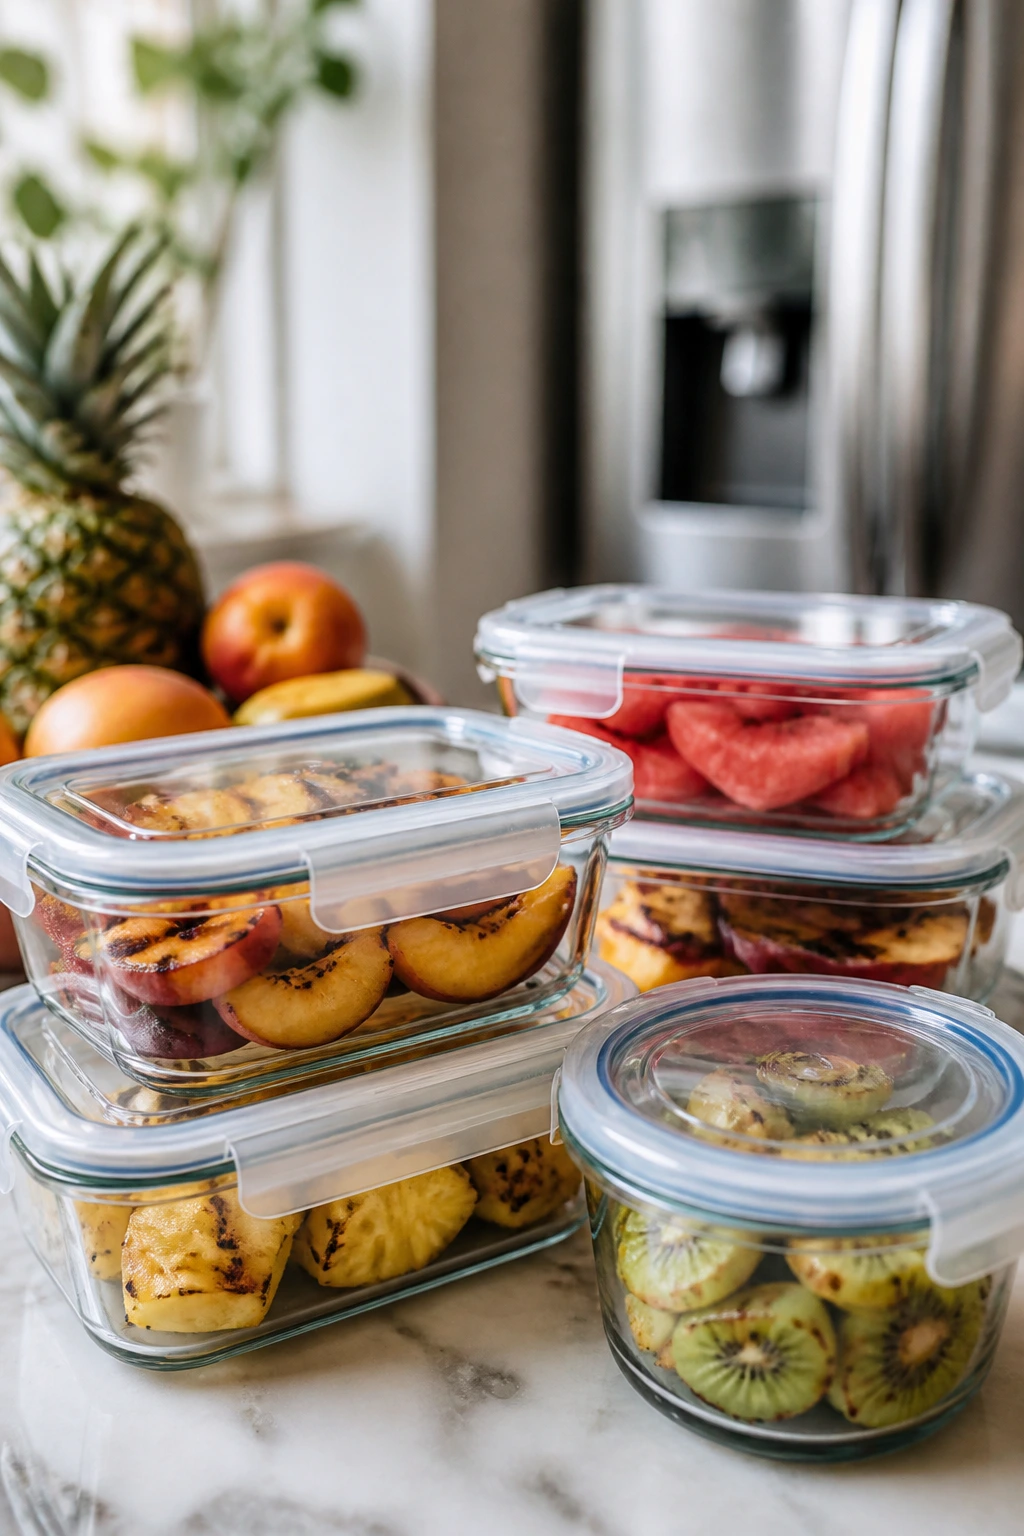
You can prep most fruit a little ahead, but the timing matters. Peaches, plums, nectarines, and pineapple can be cut 1 to 4 hours before grilling if they’re kept covered and chilled. Watermelon and other melons are best cut closer to grilling time because they weep more water as they sit. Apples and pears brown faster, so toss them lightly with lemon juice if they need to wait even 20 or 30 minutes.
Grilled fruit itself keeps for about 2 to 3 days in the fridge in a sealed container. Pineapple holds up a little better, usually 3 to 4 days. Watermelon is the short-lived one; I’d eat that within 1 to 2 days, and honestly it is better the day you grill it. Keep any dairy toppings separate so the fruit does not turn watery or pick up fridge smells.
Room temperature is useful only for serving. Once the fruit is cooked and plated, it can sit out for about 2 hours, and less if the patio is hot. After that, move it back to the fridge. That plain food-safety rule is boring, but it saves you from making a picnic into a science project.
Reheating is gentle work. A low grill or a skillet over medium-low heat for 30 to 60 seconds per side is enough for most fruit. You are not trying to cook it again, just take the chill off. Microwave heat tends to make fruit collapse, so I skip it unless the fruit is going into compote or sauce.
If you want to get ahead for a party, make the glaze, chop the herbs, toast the nuts, and chill the serving platter. Grill the fruit close to the moment you plan to serve it. That’s where the flavor lives.
Grilled Fruit FAQs
Which fruit is easiest to grill first?
Pineapple and peach halves are the easiest place to start. Both hold together well, both make clear grill marks, and both taste better after a short exposure to heat.
Do I need to oil the fruit or the grates?
Lightly oiling the fruit is usually enough if the grill is clean and preheated. If the grates are older or a little stubborn, a wiped-on film of oil on the bars helps, but keep it thin or you’ll get flare-ups.
Can I grill fruit on a gas grill or a grill pan instead of charcoal?
Yes. Gas gives you control, and a cast-iron grill pan gives you useful marks indoors. The method matters less than the heat: hot enough to brown quickly, not so hot that the sugars burn before the fruit warms through.
What temperature should the grill be for fruit?
Medium-high heat, roughly 400°F to 450°F, works for most fruit. Softer fruit like bananas or figs can handle a little less heat if you want more control over the finish.
Why does my fruit stick even when I oil it?
Usually the grill wasn’t hot enough, the fruit was too wet, or you tried to turn it too soon. Dry the cut surfaces, heat the grate well, and let the fruit sit long enough to release on its own.
Should I peel fruit before grilling?
Not usually. Peels help keep slices together, especially with peaches, nectarines, apples, and pears. Bananas are the big exception because grilling them in the peel is often the easiest method.
Can I use frozen fruit on the grill?
I wouldn’t if you want clean marks and good texture. Frozen fruit lets out too much water as it thaws, which leads to steaming and slipping. Save frozen fruit for sauces, smoothies, or compote.
What if the fruit gets mushy before it browns?
The fruit is probably too ripe or the pieces are too thin. Switch to firmer fruit, cut thicker slices, and shorten the cooking time. A hotter, cleaner grill helps too, because the surface sears faster before the inside loses shape.
The Last Thing to Hit the Grates
The best grilled fruit doesn’t shout. It comes off the heat with a little char, a little gloss, and enough sweetness to stand up to salt, smoke, and whatever else is already on the table. That’s what makes it so useful at a backyard cookout. It can be the last side standing, or the first dessert gone, and it never asks for much.
Keep the slices thick, the surface dry, and the glaze light. That’s the whole trick, really. Once you get that rhythm, fruit stops being the thing you serve because you feel like you should and starts being the thing people keep reaching for with the tongs while the grill is still warm.