
The best picnic food has a narrow, honest job description: it has to leave the kitchen intact, survive a cooler, and still taste like somebody cared when you eat it on a blanket with the sun dropping low. That’s harder than it sounds. Soft bread gets sweaty. Creamy salads go flat if you overdress them. Anything too delicate turns into picnic mush before the first napkin is even unfolded.
So the list that works for easy summer nights isn’t built around restaurant drama. It’s built around sturdy potatoes, glossy pasta, cold salads with enough acid to wake them up, sandwiches that hold their shape, and a few hot items that still behave when they’re warm instead of piping hot. I’ve got a soft spot for picnic food that tastes better after a little rest — not because it’s fancy, but because it’s practical.
And practical matters. If you’ve ever packed a beautiful spread only to open the container and find soggy bread, warm mayo, limp herbs, or chicken skin that went from crisp to steamy in ten minutes, you already know the difference between food that looks cute online and food that actually gets eaten outside. The recipes below lean hard toward the second camp. They travel. They hold. They don’t throw a tantrum the minute the plate leaves the counter.
Why You’ll Love This Collection
-
Packability: Every dish here survives a lid, a cooler, and a little bumping around in the car without falling apart into sad little pieces.
-
Heat-Friendly Flavor: The salads, skewers, sliders, and hand-held bites use salt, acid, herbs, or sauces that still taste bright when the food is no longer cold from the fridge.
-
Make-Ahead Ease: Most of these can be cooked or assembled earlier in the day, and several are better after a short chill because the flavors settle in.
-
Balanced Basket: You get creamy, crunchy, savory, sweet, and fresh options, so the whole spread doesn’t taste like one big note repeated fifteen times.
-
Low-Fuss Serving: These are the kinds of picnic foods you can eat from a paper plate with one fork, a skewer, or two hands and zero ceremony.
-
Flexible for Real Life: If you need a vegetarian swap, a gluten-free change, or a spice bump, these recipes take the adjustment without turning into a science project.
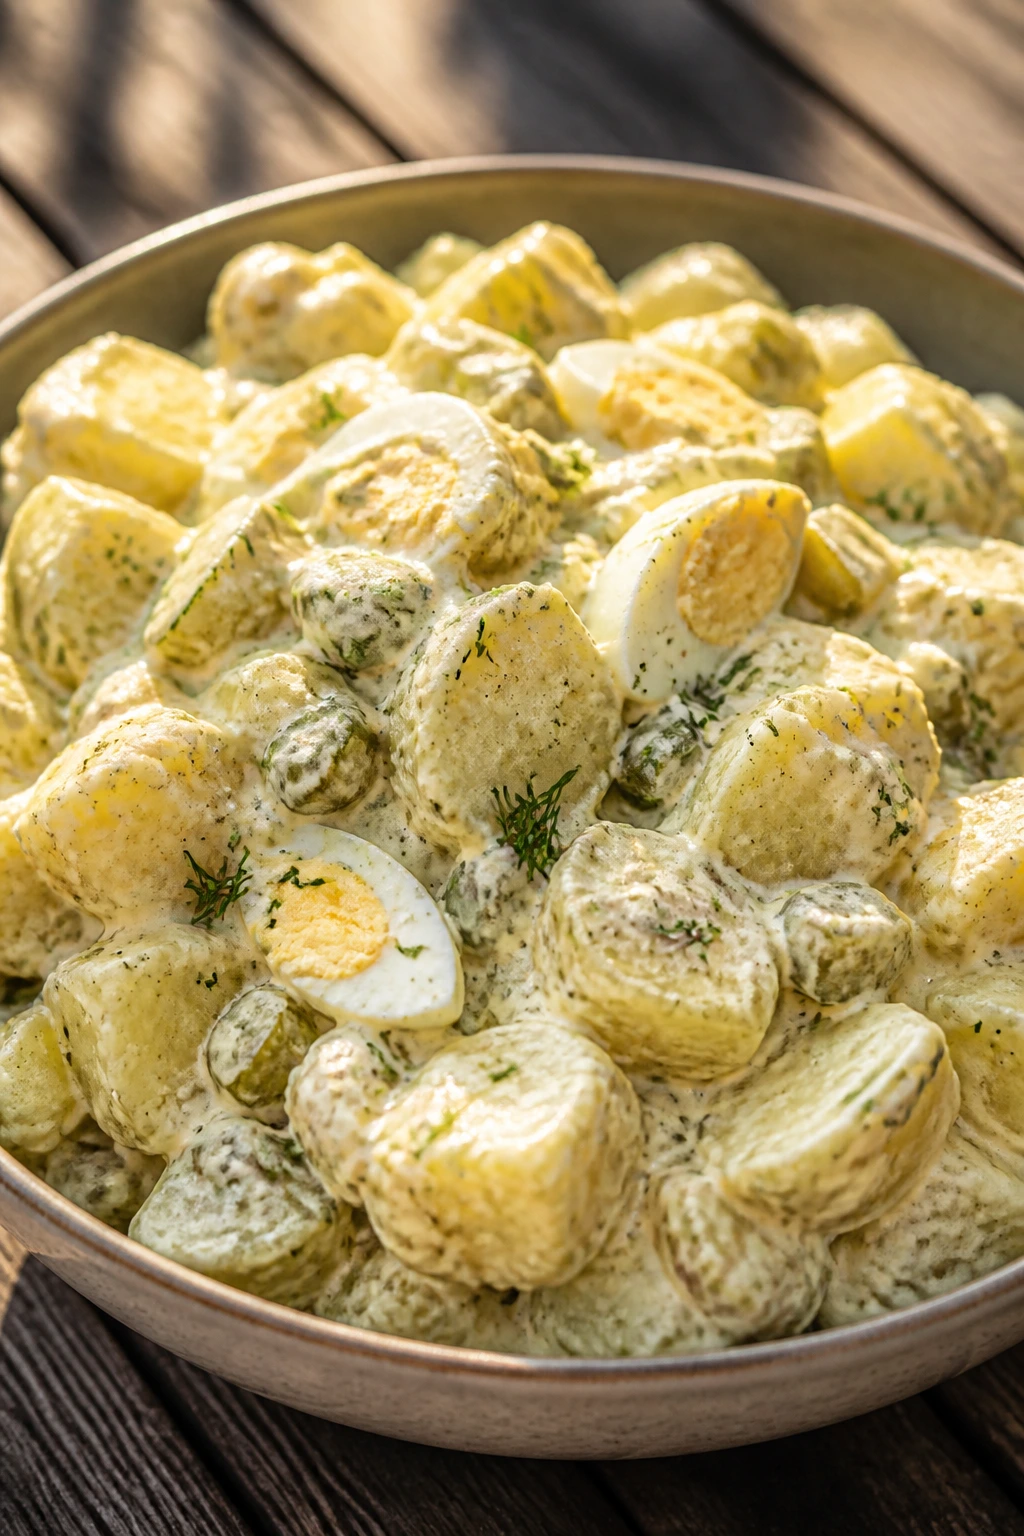
1. Classic Creamy Potato Salad
Cold potato salad gets a bad reputation when it’s bland, gluey, or drowned in mayo. The good version has bite from mustard, a little snap from celery, and potatoes that hold their shape instead of collapsing into mash. I like Yukon Golds here because they stay creamy without turning fluffy in a way that gets weird once you add dressing.
Why It Works:
This salad tastes better when the potatoes are cooked until just tender, then dressed while they’re still a little warm. That lets the vinegar and mustard sink into the potato surface instead of sliding off. The eggs add richness, the pickles give sharpness, and the dill makes the whole bowl smell like summer before you even take a bite.
Key Ingredients:
- 2 pounds Yukon Gold potatoes, scrubbed and cut into 1-inch chunks — they hold their shape and stay creamy.
- 4 large eggs — for the classic picnic-style richness.
- 1/2 cup mayonnaise — use full-fat if you want the dressing to cling.
- 2 tablespoons Dijon mustard — for clean, sharp flavor.
- 2 tablespoons pickle brine — this wakes up the dressing fast.
- 2 celery ribs, finely diced — keep the crunch small and even.
- 1/3 cup finely diced red onion — rinse it if yours is fierce.
- 1/4 cup chopped dill pickles — not sweet relish; you want the snap.
- 2 tablespoons chopped fresh dill — fresh dill beats dried by a mile.
- Kosher salt and black pepper — season more boldly than you think.
- Paprika, for finishing — mostly for color, but it helps.
Quick Steps:
- Boil the potatoes: Put the potatoes in a large pot, cover with cold water by 1 inch, add 1 tablespoon salt, and bring to a boil over high heat. Cook 12 to 14 minutes, until a knife slides in with a little resistance, not collapse.
- Cook the eggs: Place the eggs in a saucepan, cover with cold water by 1 inch, bring to a boil, then turn off the heat, cover, and let them sit for 10 minutes. Move them to ice water so the yolks stay yellow and the shells release cleanly.
- Mix the dressing: Stir the mayonnaise, Dijon, pickle brine, 1/2 teaspoon salt, and 1/4 teaspoon pepper in a large bowl until smooth.
- Fold everything together: Add the warm potatoes, diced eggs, celery, onion, pickles, and dill. Fold gently until coated. Do not stir hard or you’ll smash the potatoes.
- Chill and finish: Cover and chill for at least 1 hour. Taste again before serving, then add salt, pepper, and a dusting of paprika.
Equipment for This Recipe:
- Large stockpot — room matters when potatoes need space to cook evenly.
- Medium saucepan — for the eggs.
- Colander — drain the potatoes fast so they don’t keep steaming.
- Large mixing bowl — wide bowls make folding easier.
- Sharp knife and cutting board — for even chunks and a clean dice.
How to Serve This Dish:
Spoon it into a chilled bowl and finish with extra dill and paprika, not a thick blanket of garnish. It sits nicely beside fried chicken, sliced tomatoes, or anything smoky from the grill, and it also works as the cold anchor on a plate loaded with fruit and bread.
Pro Tips for This Recipe:
- Salt the potato water like pasta water. Bland potatoes make bland salad.
- Dress the potatoes while they’re still warm enough to absorb flavor, but not so hot that the mayo breaks.
- If you want cleaner slices, chill the salad overnight. The texture tightens up nicely.
- A teaspoon of yellow mustard adds old-school picnic flavor if Dijon feels too sharp.
Variations on This Dish:
- Bacon-and-Chive Picnic Salad: Add 6 slices cooked bacon and swap dill for 2 tablespoons chopped chives.
- Greek-Style Potato Salad: Use olive oil, lemon juice, chopped parsley, and crumbled feta instead of mayo and pickles.
- No-Egg Version: Skip the eggs and add extra celery plus a spoonful of sour cream for body.
Common Mistakes to Avoid with This Dish:
- Turning the potatoes mushy: If the cubes split when you stir, they went too far. Pull them as soon as a knife meets only light resistance.
- Adding dressing too cold: Cold potatoes won’t soak up flavor as well. Warm, not hot, is the sweet spot.
- Underseasoning the bowl: Potatoes can take more salt than people expect. Taste after chilling and fix it before the bowl hits the table.
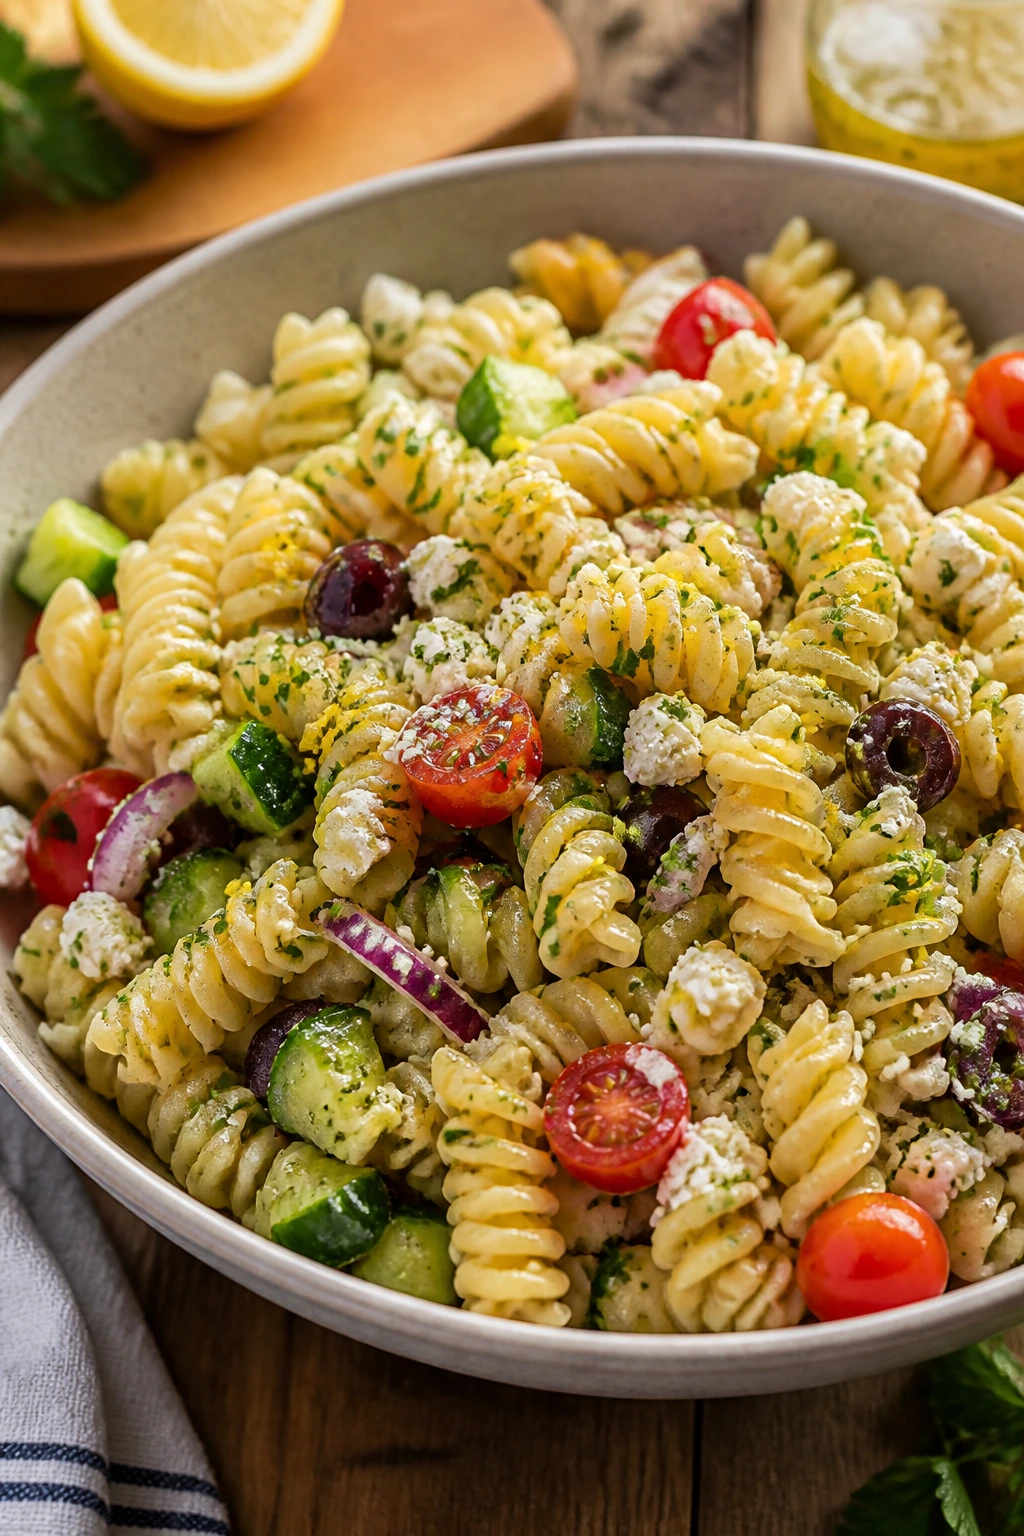
2. Lemon Herb Pasta Salad
A good pasta salad should taste bright, not heavy, and it should have enough texture that every forkful feels slightly different. Rotini, bow ties, or short spirals all work because the dressing catches in the curves, and a few chopped vegetables keep the whole thing from going soft and one-note.
Why It Works:
The trick is cooking the pasta until just al dente and cooling it fast so it doesn’t keep steaming itself into mush. A lemon-olive oil dressing gives the salad lift, while feta and olives bring salt in a way that feels sharper than mayo ever could. This is the bowl people keep going back to after the first serving is technically “enough.”
Key Ingredients:
- 12 ounces rotini pasta — the twists grab dressing well.
- 1 cup cherry tomatoes, halved — use firm tomatoes that won’t collapse.
- 1 medium cucumber, seeded and diced — seeds out means less watery salad.
- 1/2 cup kalamata olives, sliced — salty, dark, and worth it.
- 4 ounces feta, crumbled — choose a block if you can.
- 1/4 cup thinly sliced red onion — soak in cold water if it’s too sharp.
- 1/3 cup olive oil — the dressing needs enough body to coat.
- 3 tablespoons fresh lemon juice — bottled lemon juice tastes flat here.
- 1 teaspoon honey — just enough to round the acid.
- 1 teaspoon dried oregano — or 1 tablespoon fresh.
- 1 small garlic clove, grated — keep it fine so nobody bites into a chunk.
- Salt and black pepper — use both.
Quick Steps:
- Cook the pasta: Boil the rotini in well-salted water until al dente, usually 8 to 10 minutes. Drain and rinse briefly under cool water so it stops cooking and loosens up.
- Whisk the dressing: Combine olive oil, lemon juice, honey, oregano, garlic, 1 teaspoon salt, and 1/2 teaspoon pepper in a large bowl.
- Toss the base: Add the cooled pasta and toss until lightly coated.
- Fold in the add-ins: Stir in tomatoes, cucumber, olives, onion, and feta. Add the feta last so it doesn’t disappear into the dressing.
- Chill and refresh: Cover and chill for 30 to 60 minutes. Taste again before serving and add a pinch more salt or lemon if it needs brightness.
Equipment for This Recipe:
- Large pot — for boiling the pasta without crowding.
- Colander — you want the pasta drained quickly.
- Large serving bowl — enough room to toss without breaking the pasta.
- Whisk — for emulsifying the dressing.
- Chef’s knife — for clean tomato and cucumber cuts.
How to Serve This Dish:
Pile it into a wide bowl and finish with a few extra feta crumbles and a drizzle of olive oil. It plays well with grilled chicken, cold roast vegetables, or a loaf of crusty bread if you want to round out the picnic without making everything feel heavy.
Pro Tips for This Recipe:
- Salt the pasta water generously. Plain pasta tastes dead in a salad.
- Rinse only long enough to stop the cooking. You want cool pasta, not washed-out pasta.
- If the bowl looks dry after chilling, stir in 1 tablespoon olive oil and a squeeze of lemon.
- Chopped parsley or basil adds freshness right before serving.
Variations on This Dish:
- Italian Deli Pasta Salad: Add chopped salami, pepperoncini, and diced provolone.
- Dairy-Free Lemon Pasta Salad: Skip the feta and add extra olives plus 1 tablespoon capers.
- Veggie-Heavy Version: Fold in diced bell pepper, blanched green beans, and shredded carrot.
Common Mistakes to Avoid with This Dish:
- Overcooking the pasta: Soft pasta turns gummy after sitting in dressing. Stop at al dente.
- Using too much cucumber juice: Seed the cucumber if it’s watery, or the whole bowl gets slick.
- Skipping the second seasoning check: Pasta drinks up salt and acid while it chills. Taste again before the basket closes.
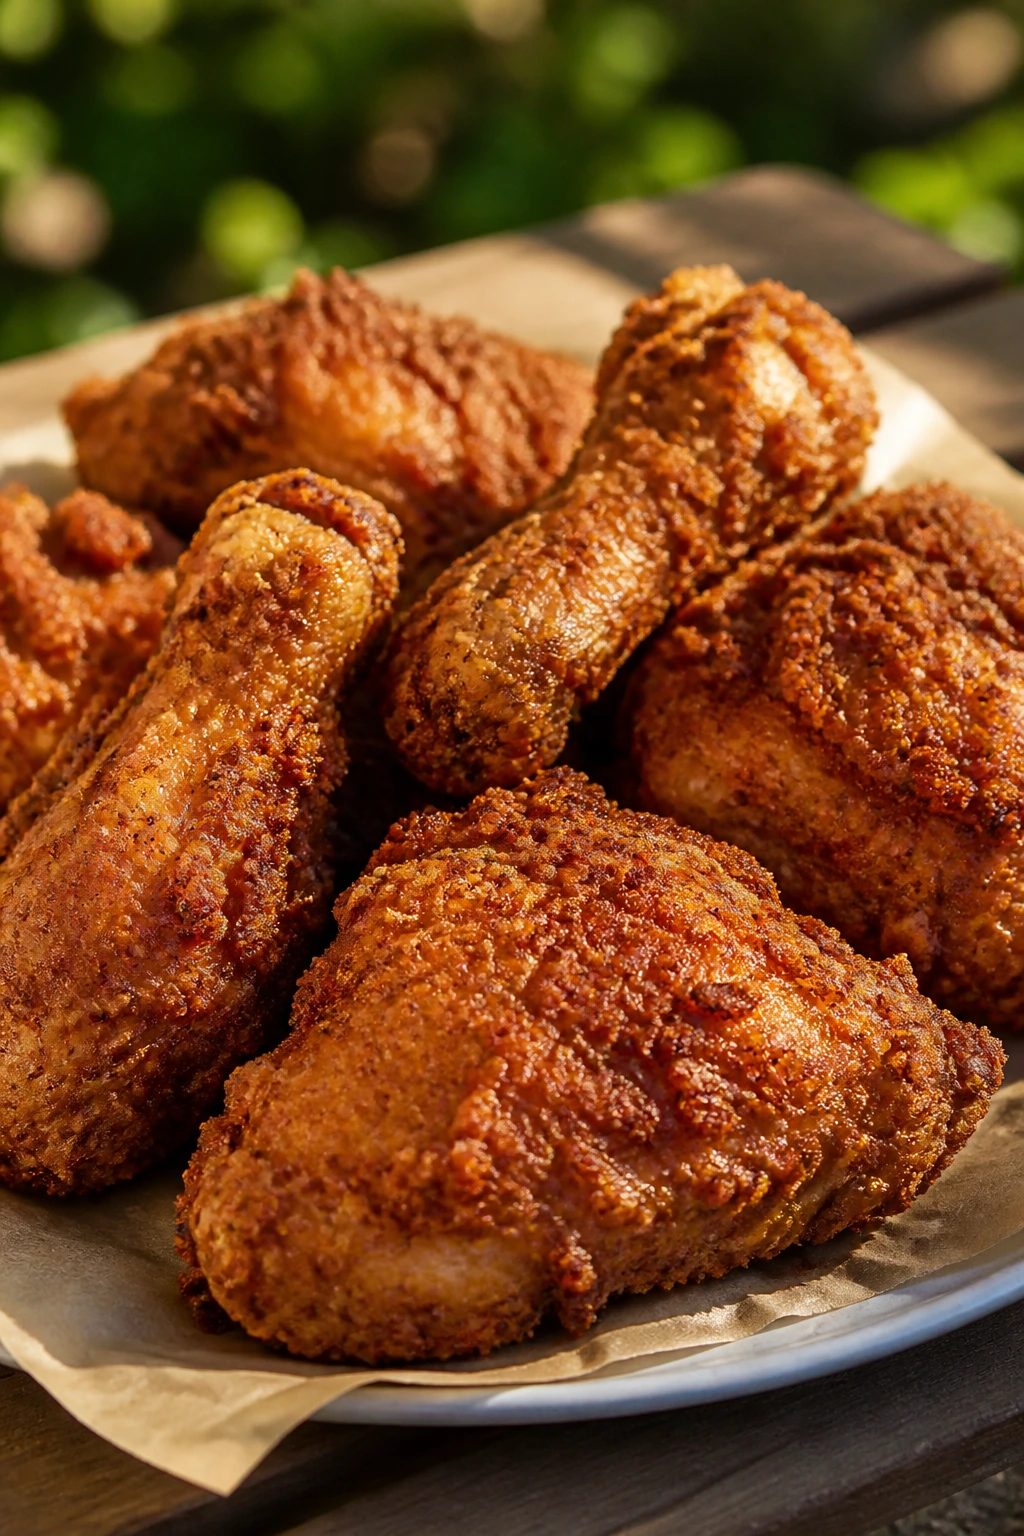
3. Crispy Buttermilk Fried Chicken
Fried chicken earns its place at a picnic when it stays crisp enough to crack under your teeth even after it cools down. Thighs and drumsticks are the best choice because they hold onto their juices while the crust dries into something sturdy instead of greasy.
Why It Works:
Buttermilk softens the meat and gives the coating something tangy to cling to, while a little cornstarch in the flour keeps the crust lighter and craggier. Frying at 350°F gets you a shell that sets quickly without soaking up oil like a sponge. And yes, it still tastes good at room temperature, which is the whole point.
Key Ingredients:
- 2 pounds bone-in, skin-on chicken thighs and drumsticks — the picnic-friendly cut.
- 2 cups buttermilk — for the overnight soak or at least 4 hours.
- 1 tablespoon hot sauce — optional, but it helps the marinade.
- 2 cups all-purpose flour — the main coating.
- 1/2 cup cornstarch — for extra crunch.
- 2 teaspoons paprika — for color and warmth.
- 1 teaspoon garlic powder — keep it fine.
- 1 teaspoon onion powder — don’t skip it.
- 1 teaspoon black pepper — use more if you like bite.
- 2 teaspoons kosher salt — season the flour well.
- 2 quarts neutral oil, for frying — enough to come 1 1/2 to 2 inches up the pot.
Quick Steps:
- Marinate the chicken: Combine the chicken, buttermilk, and hot sauce in a bowl or zip-top bag. Refrigerate for at least 4 hours and up to overnight.
- Mix the dredge: Stir together flour, cornstarch, paprika, garlic powder, onion powder, pepper, and salt in a large shallow dish.
- Coat the pieces: Lift each piece from the marinade, let the excess drip off, and press it firmly into the flour mixture. Rest the coated chicken on a rack for 10 minutes so the crust hydrates and sticks better.
- Fry the chicken: Heat the oil to 350°F in a heavy pot or Dutch oven. Fry in batches for 14 to 18 minutes, turning once, until deep golden and the thickest part reaches 165°F. Do not crowd the pot or the temperature will crash.
- Drain and cool: Set the chicken on a wire rack over a sheet pan. Let it cool for at least 20 minutes before packing so steam doesn’t soften the crust.
Equipment for This Recipe:
- Large Dutch oven or heavy pot — stable heat matters.
- Deep-fry thermometer — oil temperature is not a guessing game.
- Wire rack set over a sheet pan — keeps the crust from getting soggy.
- Tongs — for turning pieces safely.
- Paper towels — for a quick blot if needed, but not as the only resting spot.
How to Serve This Dish:
Serve it at room temperature or barely warm with pickle chips, potato salad, and a simple green salad. If you want the picnic spread to look intentional, stack the pieces on brown paper or parchment instead of crowding them in a bowl.
Pro Tips for This Recipe:
- Let the coated chicken rest before frying. That little pause helps the crust stay put.
- Keep the oil steady at 350°F. Too low and the crust absorbs grease; too high and the coating burns before the meat cooks.
- Season the flour boldly. Fried chicken without enough salt tastes flat the moment it cools.
- If you’re packing it for later, skip the airtight container until the chicken is no longer steaming.
Variations on This Dish:
- Hot Honey Fried Chicken: Drizzle with a light hot honey glaze right before serving.
- Oven-Fried Version: Bake on a greased rack at 425°F for 35 to 40 minutes, flipping once, if you want less mess.
- Boneless Picnic Strips: Use chicken tenders and fry for 5 to 7 minutes for easier handheld eating.
Common Mistakes to Avoid with This Dish:
- Frying straight from wet coating: If the flour looks paste-like, it’ll fall off in the oil. Let the breaded pieces rest.
- Packing it hot: Steam is the enemy of crisp skin. Cool on a rack first.
- Cooking by color alone: Deep golden is good, but the internal temperature has to hit 165°F. Use a thermometer.
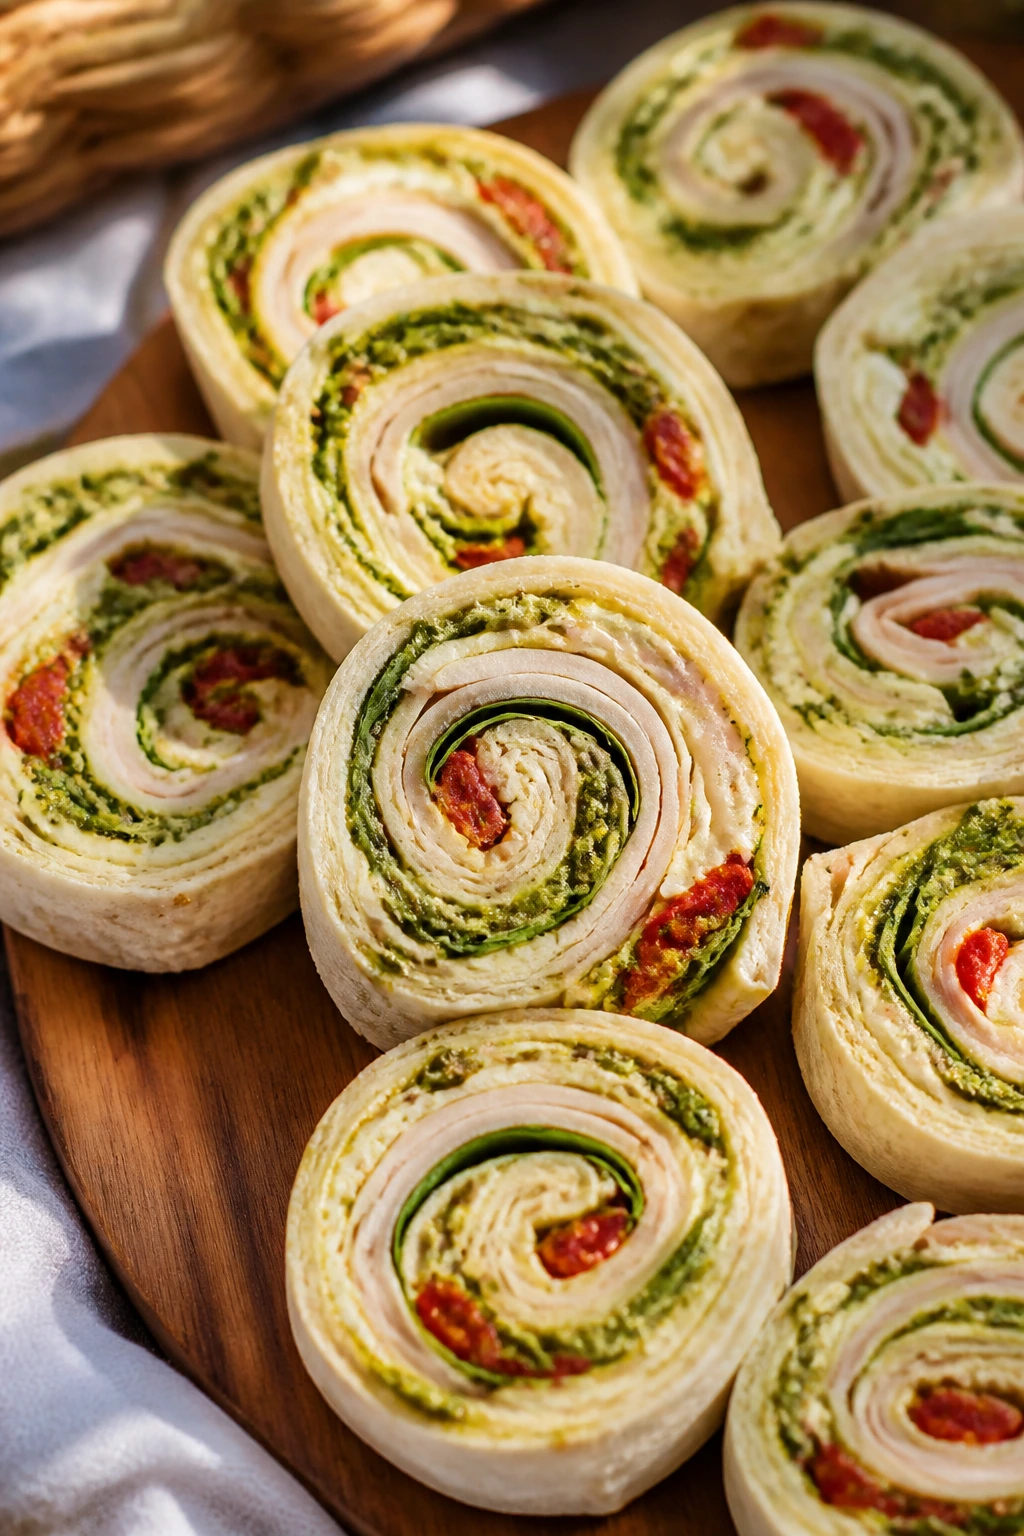
4. Turkey and Pesto Pinwheels
Pinwheels are the kind of picnic food that looks fancier than it is, which is a useful trick when you want something handheld and neat. The filling has to be spreadable, the tortillas have to be flexible, and the roll has to be tight enough that the slices don’t unravel like a bad spiral notebook.
Why It Works:
Cream cheese acts like edible glue, pesto brings salt and herbs, and turkey gives the wraps enough heft to feel like lunch instead of a snack. Spinach and roasted red pepper keep the rolls from tasting heavy. Chill them before slicing and the spirals come out clean instead of squashed.
Key Ingredients:
- 4 large flour tortillas, 10-inch size — soft and flexible.
- 8 ounces cream cheese, softened — it needs to spread without tearing the tortilla.
- 1/3 cup basil pesto — use a thick pesto, not a watery one.
- 8 ounces sliced deli turkey — thin slices roll better.
- 2 cups baby spinach, patted dry — moisture is the enemy here.
- 1 roasted red pepper, sliced thin — jarred is fine if drained well.
- 1/2 cup shredded provolone — or mozzarella if that’s what you have.
- 1 tablespoon lemon juice — keeps the spread from tasting flat.
- Black pepper — just enough to wake up the turkey.
Quick Steps:
- Make the spread: Stir the cream cheese, pesto, lemon juice, and a few grinds of black pepper until smooth and green.
- Assemble the tortillas: Spread the mixture all the way to the edges of each tortilla, leaving a thin bare strip at one side so the roll seals cleanly.
- Layer the filling: Add turkey, spinach, roasted pepper, and provolone in an even layer. Don’t pile the filling in the center or the roll will bulge and split.
- Roll tightly: Roll each tortilla into a firm log, wrap in plastic, and chill for 20 to 30 minutes.
- Slice and pack: Use a sharp serrated knife to cut 1-inch pinwheels. Wipe the blade between cuts if the filling starts dragging.
Equipment for This Recipe:
- Cutting board — a stable surface matters for rolling.
- Rubber spatula — for spreading the filling evenly.
- Plastic wrap — helps the rolls firm up before slicing.
- Serrated knife — the cleanest way to cut the pinwheels.
- Small mixing bowl — for the pesto spread.
How to Serve This Dish:
Arrange the pinwheels on a platter with the spiral side up so the layers show. They sit well next to grapes, sliced cucumbers, and a handful of kettle chips, which gives the picnic box a little crunch against the soft filling.
Pro Tips for This Recipe:
- Pat the spinach dry with a towel. Wet leaves make the tortillas slippery.
- Use room-temperature cream cheese so the spread doesn’t tear the wrap.
- Chill before slicing. Warm pinwheels wander apart.
- If the tortilla feels stiff, warm it for 10 seconds in the microwave so it bends instead of cracking.
Variations on This Dish:
- Chicken Caesar Pinwheels: Swap turkey for cooked chicken, use Caesar dressing, and add romaine.
- Vegetarian Garden Roll-Ups: Replace the turkey with cucumber ribbons, shredded carrot, and extra provolone.
- Sun-Dried Tomato Spin: Stir chopped sun-dried tomatoes into the cream cheese for a sweeter, deeper flavor.
Common Mistakes to Avoid with This Dish:
- Overfilling the wrap: The first cut will look fine, then the rest explode. Keep the layer thin.
- Using soggy vegetables: Dry everything well before rolling.
- Slicing too soon: If you don’t chill the log, the filling smears instead of forming neat rounds.
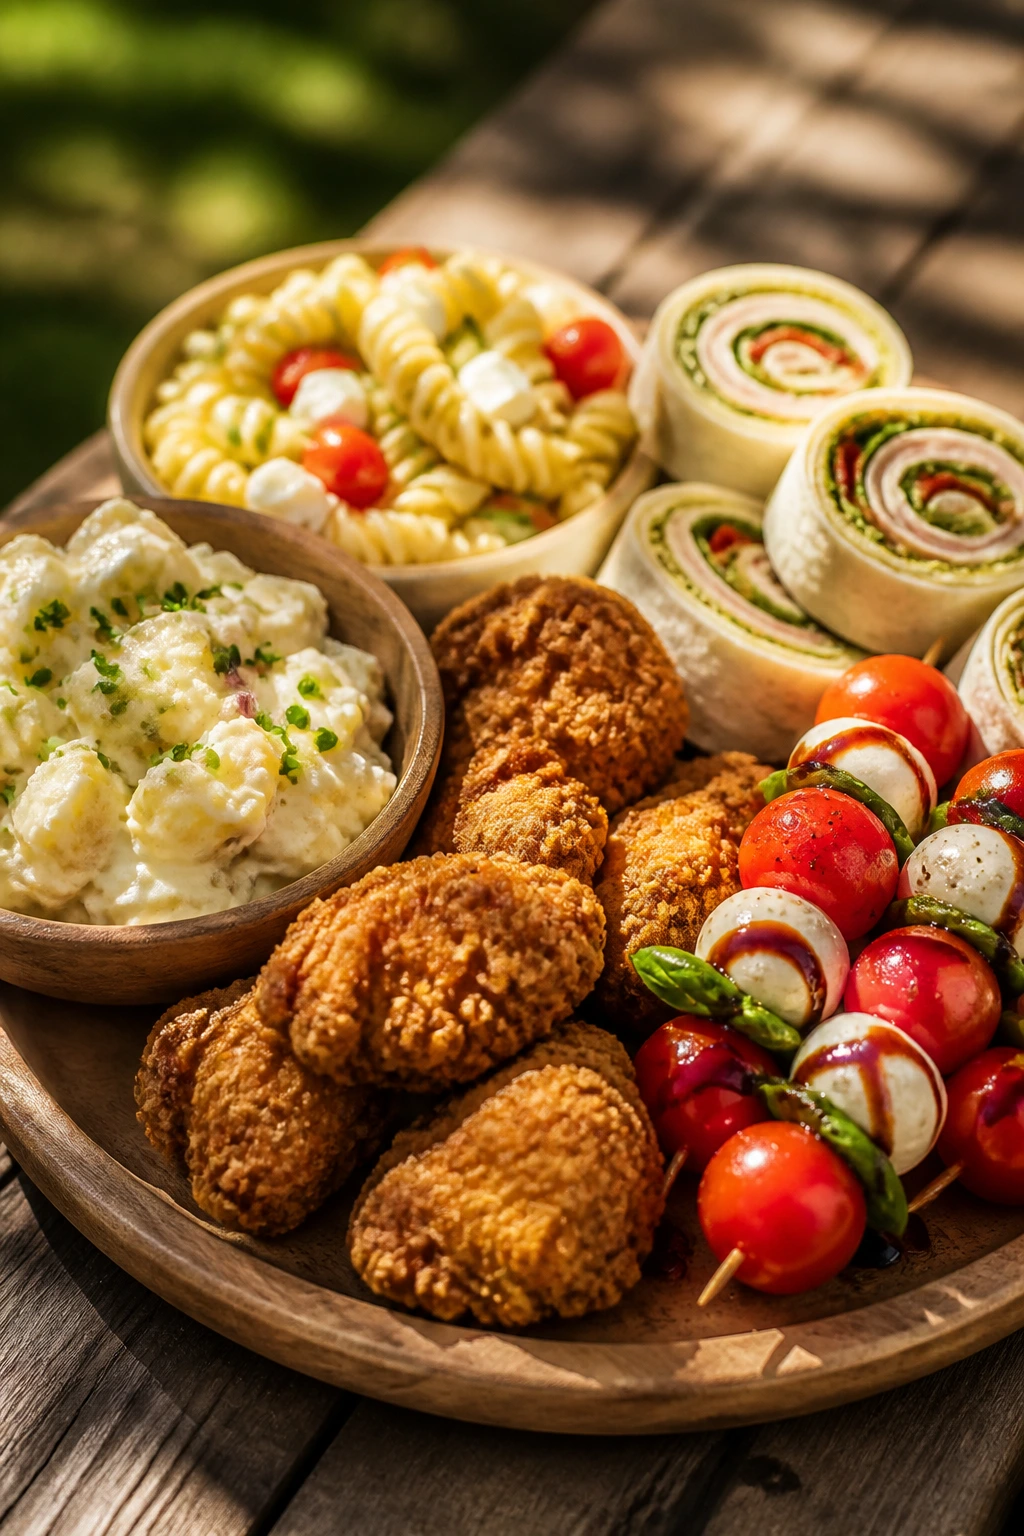
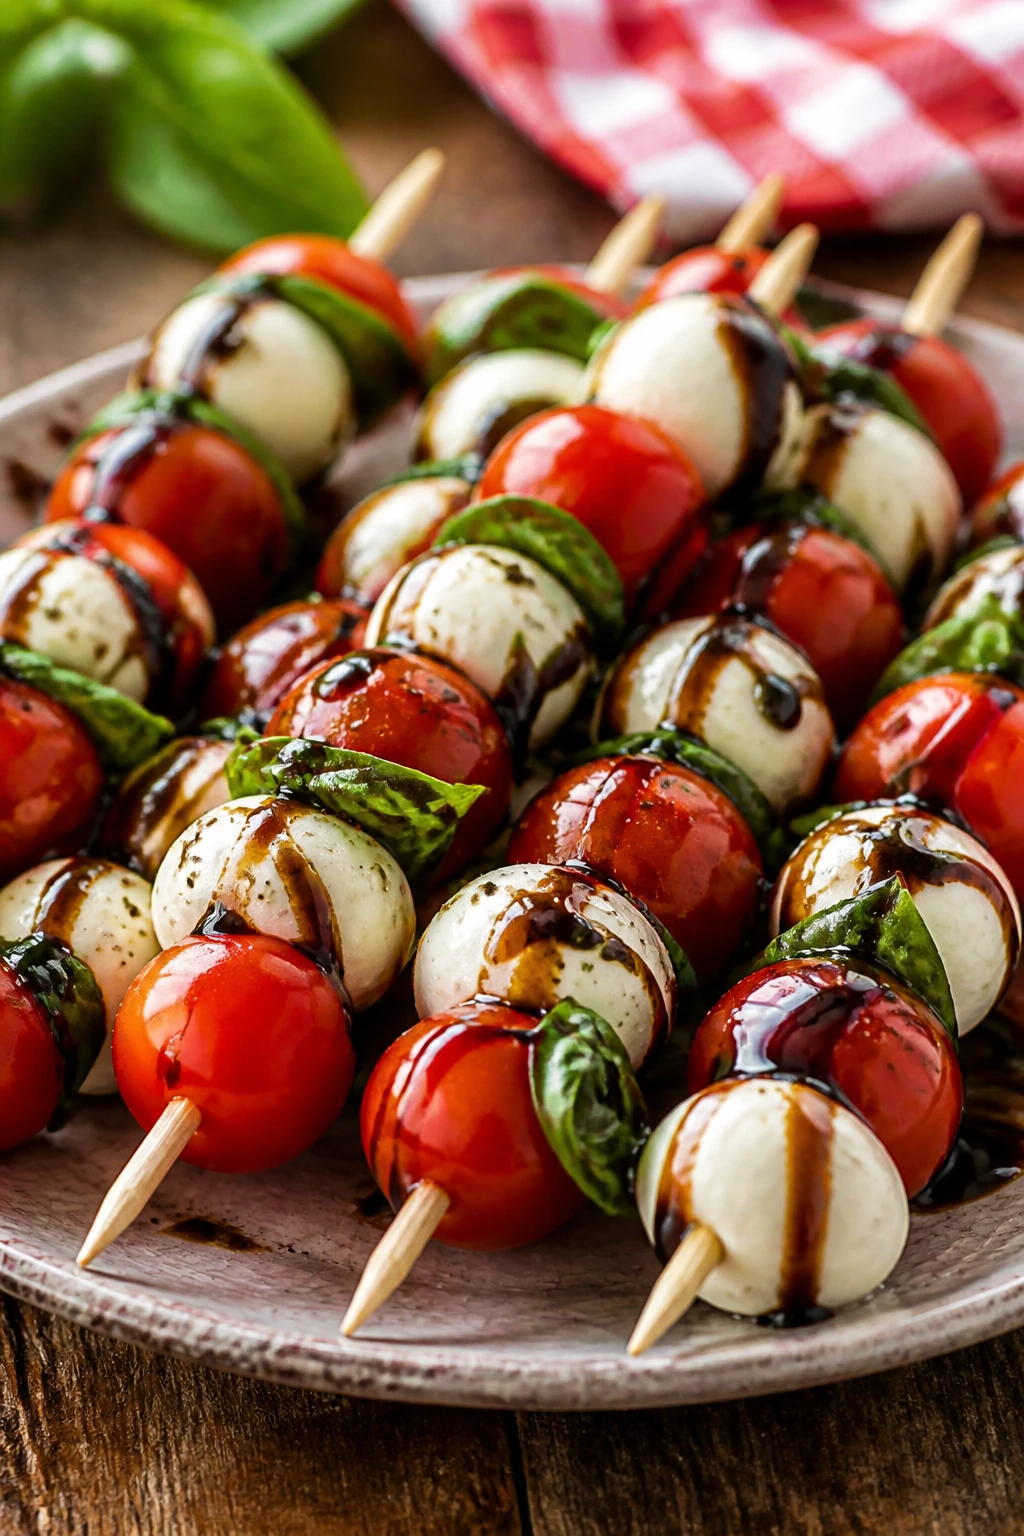
5. Caprese Skewers with Balsamic Glaze
Caprese skewers are what I make when I want something that feels fresh without asking for utensils or a lot of attention. They’re clean, bright, and sturdy enough to sit out for a while as long as you add the basil and glaze at the right moment.
Why It Works:
The tomato, mozzarella, and basil combo is simple, but the proportions matter. Cherry tomatoes give a juicy pop, mozzarella pearls bring mellow richness, and balsamic glaze adds enough sweetness and acidity to keep the bites from tasting flat. A pinch of salt at the end does more than people expect.
Key Ingredients:
- 1 pint cherry tomatoes — pick firm ones with skin that doesn’t wrinkle.
- 8 ounces mozzarella pearls or mini bocconcini — drain them well.
- 1 bunch fresh basil leaves — choose small to medium leaves if possible.
- 2 tablespoons olive oil — enough for a light sheen.
- 2 tablespoons balsamic glaze — thicker is better for skewers.
- Flaky salt — use a light pinch at the end.
- Freshly ground black pepper — optional, but useful.
- 20 to 24 small skewers or toothpicks — depending on size.
Quick Steps:
- Prep the ingredients: Wash and dry the tomatoes and basil thoroughly. Drain the mozzarella and pat it dry so the skewers don’t weep.
- Build the skewers: Thread one tomato, one folded basil leaf, and one mozzarella pearl onto each skewer. Repeat once if the skewer is long enough.
- Arrange and dress: Lay the skewers on a serving tray and drizzle lightly with olive oil.
- Finish before serving: Add balsamic glaze and flaky salt right before the tray goes out. If you dress them too early, the basil bruises and the tomatoes get slippery.
- Pack carefully: If transporting, keep the glaze in a small separate container and drizzle on site.
Equipment for This Recipe:
- Small skewers or toothpicks — simple and efficient.
- Paper towels — for drying the cheese and tomatoes.
- Serving platter — a flat tray shows off the colors.
- Small spoon or squeeze bottle — for the balsamic glaze.
How to Serve This Dish:
Serve them in a single layer on a chilled platter so they don’t roll around. They’re good alongside crackers, cured meat, or grilled vegetables, and they make a nice first bite before the heavier picnic dishes land.
Pro Tips for This Recipe:
- Dry the mozzarella. Water on the cheese thins the glaze.
- Fold the basil leaves instead of spearing them flat so they look full and hold better.
- If your balsamic glaze is too thin, simmer it for a few minutes until it coats a spoon.
- Use a tiny pinch of salt. Caprese needs it to taste alive.
Variations on This Dish:
- Peach Caprese Skewers: Add a slice of ripe peach between the tomato and basil for a sweeter summer version.
- Prosciutto Caprese: Wrap a small strip of prosciutto around the mozzarella for extra salt.
- Pesto Drizzle Version: Swap balsamic glaze for a thin pesto drizzle when you want more herb flavor.
Common Mistakes to Avoid with This Dish:
- Using wet basil: Wet leaves bruise and darken fast.
- Overdoing the glaze: Too much balsamic buries the tomato and cheese.
- Making them hours ahead with no cover: Basil wilts quickly in heat, so assemble close to serving.
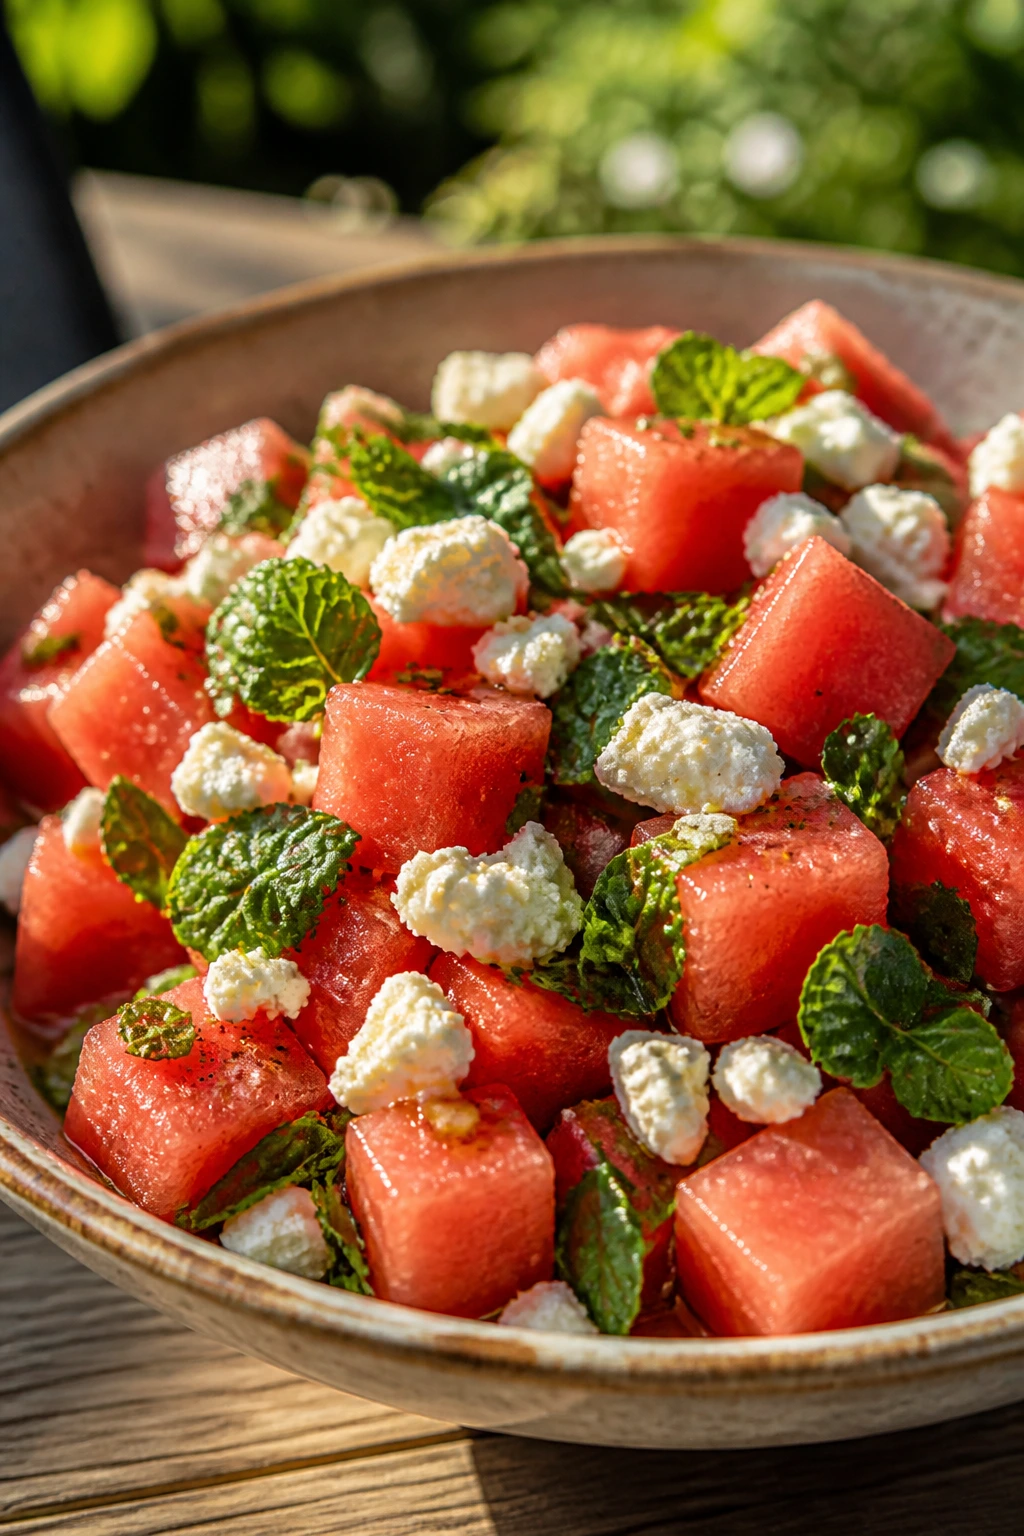
6. Watermelon Feta Mint Salad
Watermelon salad sounds almost too simple until you eat one that’s balanced properly. The melon should stay crisp, the feta should break into salty little pockets, and the mint should smell bright the second you open the container. If the bowl turns watery, the whole thing goes sleepy.
Why It Works:
Watermelon brings sweetness and crunch, feta gives salt, mint gives lift, and lime juice keeps the fruit from tasting syrupy. A small amount of olive oil rounds the edges and helps the salt cling. This is one of those salads that disappears first when the air is hot and nobody wants anything heavy.
Key Ingredients:
- 6 cups cubed seedless watermelon — cut into bite-sized chunks.
- 1 medium cucumber, peeled if the skin is thick, and diced — adds a cool, crisp note.
- 4 ounces feta, crumbled — don’t use the pre-dry, dusty stuff if you can avoid it.
- 2 tablespoons fresh mint, thinly sliced — a little goes a long way.
- 2 tablespoons lime juice — fresh squeezed only.
- 1 tablespoon olive oil — optional, but it helps.
- Pinch of kosher salt — tiny, not aggressive.
- Pinch of black pepper — optional, for a little edge.
Quick Steps:
- Cut and chill the fruit: Cube the watermelon and cucumber, then chill both if you have time. Cold fruit tastes cleaner here.
- Mix the dressing: Whisk the lime juice, olive oil, salt, and pepper in a small bowl.
- Combine gently: Put the watermelon and cucumber in a large bowl, drizzle with the dressing, and toss once or twice.
- Add the feta and mint: Scatter them over the top and fold very lightly. If you stir hard, the melon breaks and the bowl turns pink.
- Serve right away: This salad is best within 20 to 30 minutes of dressing.
Equipment for This Recipe:
- Sharp chef’s knife — clean cuts matter with melon.
- Large bowl — wide enough to toss gently.
- Small whisk or fork — for the dressing.
- Slotted spoon — useful if any juice pools at the bottom.
How to Serve This Dish:
Spoon it into a shallow bowl so the colors stay visible and the liquid doesn’t hide at the bottom. It works as a cooling side beside grilled meat, salty sandwiches, or fried chicken, and it does a nice job resetting the palate between richer bites.
Pro Tips for This Recipe:
- Use seedless watermelon with firm flesh. Soft melon falls apart fast.
- Add the feta near the end so it stays in distinct crumbles.
- If the melon is especially juicy, drain off a little liquid before serving.
- A whisper of lime zest gives the salad more aroma than extra juice does.
Variations on This Dish:
- Spicy Watermelon Salad: Add thin-sliced jalapeño and a pinch of chili flakes.
- Berry-Mint Swap: Replace half the watermelon with strawberries or blueberries.
- No-Dairy Version: Skip the feta and add toasted pumpkin seeds for salt and crunch.
Common Mistakes to Avoid with This Dish:
- Letting it sit dressed too long: The juices pool fast. Dress close to serving.
- Cutting the melon too small: Tiny cubes break down and make the salad watery.
- Salting too early: Salt draws moisture out of the melon, so season lightly and late.
7. Dill Deviled Eggs
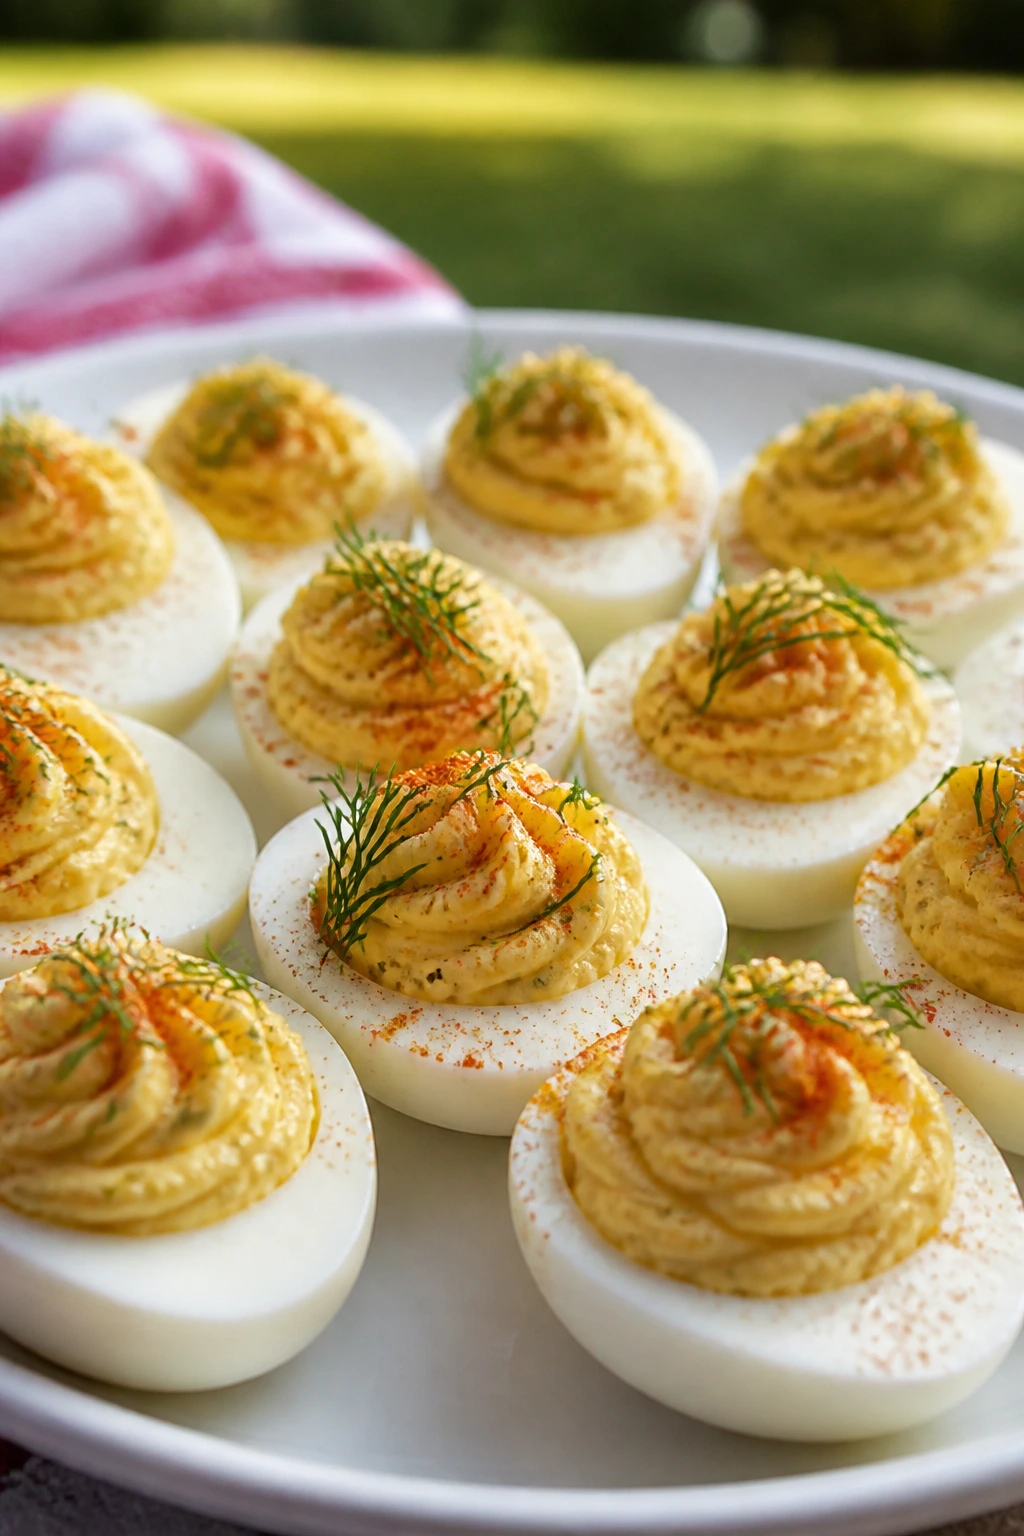
Deviled eggs are the first tray to empty if you make them properly, and the wrong version is easy to spot. The filling should be smooth and creamy, the yolks should taste rich but not sulfur-heavy, and the paprika on top should look like a little wink, not a dust storm.
Why It Works:
Eggs are naturally portable, and the filling gets more rounded when you add Dijon, lemon, and dill. The acid keeps the yolks from feeling heavy, while a little mayo gives the texture that soft, pipeable finish. They’re one of the few picnic foods that can feel polished without asking for much.
Key Ingredients:
- 6 large eggs — use older eggs if you can; they peel easier.
- 1/4 cup mayonnaise — enough to make the filling smooth.
- 1 teaspoon Dijon mustard — for a little bite.
- 1 teaspoon lemon juice — wakes up the yolks.
- 1 tablespoon chopped fresh dill — the signature flavor.
- 1 tablespoon chopped chives — optional, but useful.
- 1/8 teaspoon kosher salt — plus more to taste.
- Black pepper, to taste — keep it light.
- Paprika, for dusting — sweet or smoked both work.
Quick Steps:
- Hard-boil the eggs: Cover the eggs with cold water, bring to a boil, turn off the heat, cover, and rest for 10 minutes. Transfer to ice water immediately.
- Peel and halve: Peel the eggs under cool running water if needed, then slice them lengthwise.
- Make the filling: Pop the yolks into a bowl and mash them with mayo, Dijon, lemon juice, dill, chives, salt, and pepper until smooth.
- Fill the whites: Spoon or pipe the mixture back into the egg halves. If the filling looks loose, chill it for 10 minutes before piping.
- Finish and chill: Dust with paprika and refrigerate for at least 30 minutes before packing.
Equipment for This Recipe:
- Small saucepan — for boiling the eggs.
- Bowl of ice water — stops the cooking fast.
- Fork or small whisk — for the filling.
- Piping bag or zip-top bag — optional, but tidy.
- Serving tray with a lid — keeps the tops clean in transit.
How to Serve This Dish:
Arrange them on a tray lined with lettuce, herbs, or a paper doily if you want them to stay put. They sit well beside sliced cucumbers, ham sandwiches, or anything that needs a creamy, salty counterpoint.
Pro Tips for This Recipe:
- Don’t overcook the eggs. Gray yolks taste harsh and look worse.
- Mash the yolks until completely smooth before you add too much mayo.
- If the filling tastes flat, add a few drops more lemon juice instead of more salt.
- Pack them in a single layer so the tops don’t smear.
Variations on This Dish:
- Pickle-Dill Eggs: Stir in 1 tablespoon very finely chopped dill pickles.
- Smoked Paprika Eggs: Use smoked paprika and a little cayenne for a deeper, warmer flavor.
- Avocado Deviled Eggs: Replace half the mayo with mashed avocado and serve the same day.
Common Mistakes to Avoid with This Dish:
- Filling the eggs before they’re fully cool: Warm whites sweat and loosen the filling.
- Making the yolks dry and crumbly: Add mayo little by little so the texture stays silky.
- Overhandling during transport: They bruise easily, so keep them nested in one layer.
8. BBQ Chicken Sliders
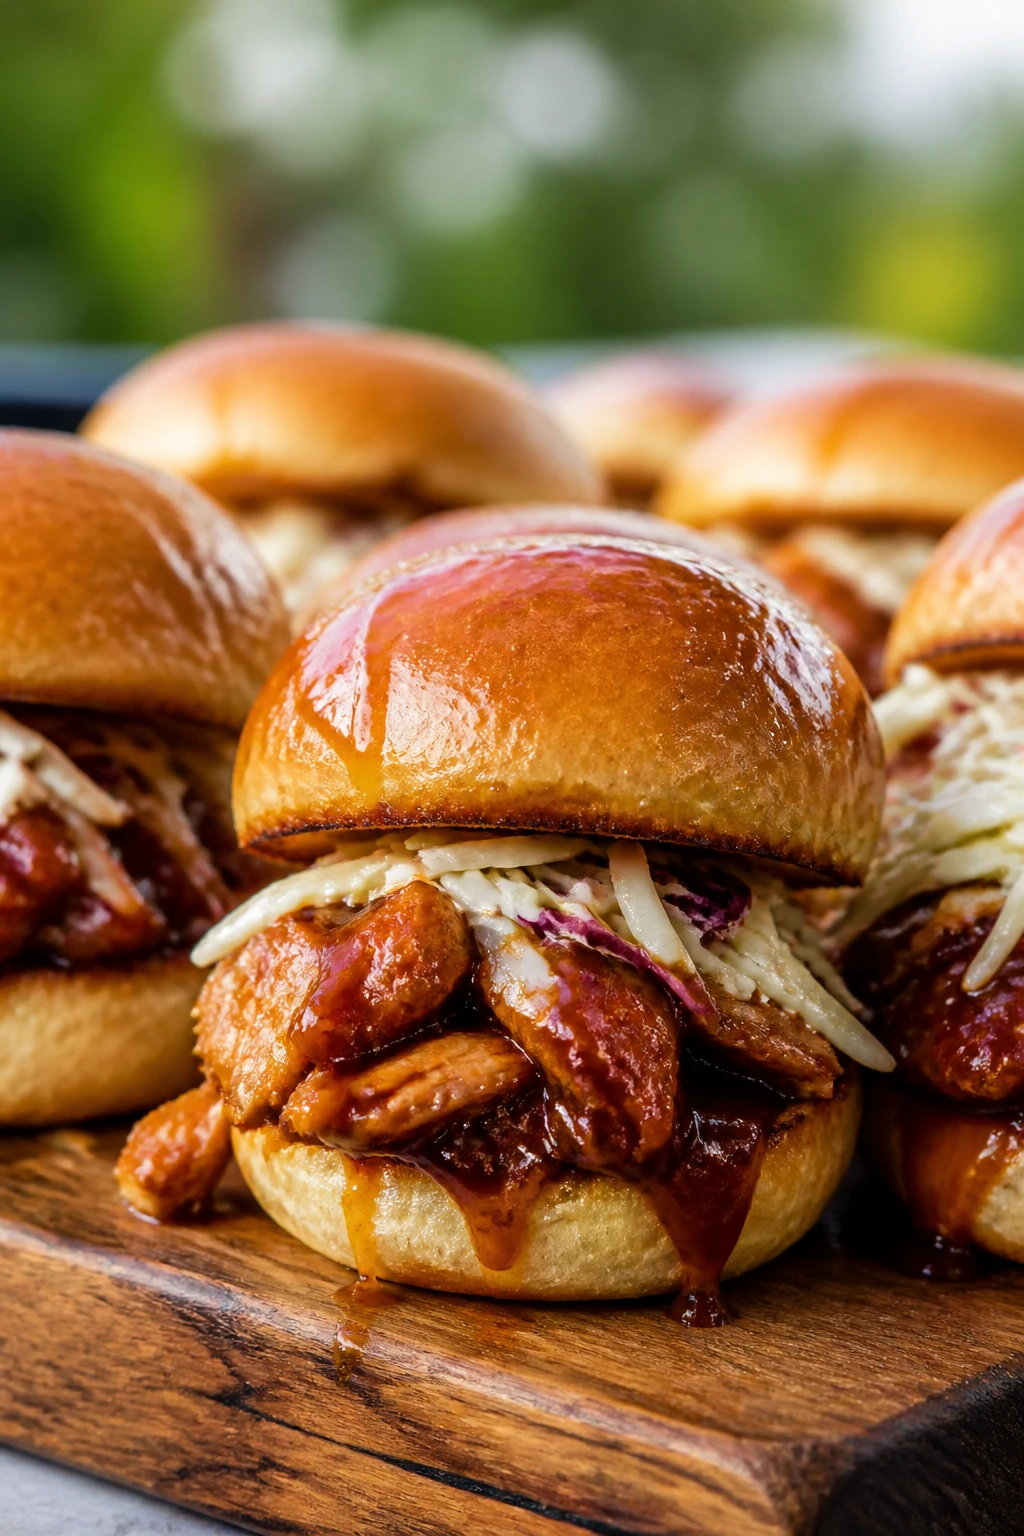
Sliders are useful picnic food because they solve the “I want something filling, but I do not want a full plate” problem. The chicken should be saucy but not wet, the buns should be lightly toasted, and the slaw should bring crunch so the sandwich doesn’t taste like a soft pile.
Why It Works:
Shredded chicken absorbs barbecue sauce without turning chewy, and slider buns make the portions easy to hand out. A little slaw on top cuts through the sauce and keeps the sandwich from feeling sticky. These are the kind of sandwiches that still taste right after ten minutes on a paper tray, which is more than I can say for a lot of picnic fare.
Key Ingredients:
- 2 pounds cooked shredded chicken — rotisserie chicken works well.
- 1 cup barbecue sauce — use one you’d actually eat off a spoon.
- 12 slider buns — soft but sturdy.
- 2 cups coleslaw mix — the bagged stuff saves time.
- 2 tablespoons mayonnaise — for the slaw.
- 1 tablespoon apple cider vinegar — keeps the slaw bright.
- 1 teaspoon sugar — optional, if your sauce is sharp.
- Salt and black pepper — just enough to season the slaw.
- 2 tablespoons butter, melted — for toasting the buns.
- Dill pickle chips — for a sharp, salty layer.
Quick Steps:
- Make the slaw: Toss the coleslaw mix with mayo, vinegar, sugar, salt, and pepper. Chill while you handle the chicken.
- Warm the chicken: Put the shredded chicken and barbecue sauce in a skillet over medium heat. Stir until the chicken is hot and glossy, about 5 minutes.
- Toast the buns: Brush the cut sides with melted butter and toast in a skillet or under a broiler until lightly golden.
- Build the sliders: Spoon chicken onto the bottom buns, top with a little slaw and pickle chips, then cap with the tops.
- Pack smart: If transporting, keep the filling and buns separate until just before serving. Assembled sliders go soft fast.
Equipment for This Recipe:
- Large skillet — for warming the chicken.
- Mixing bowl — for the slaw.
- Baking sheet or grill pan — for toasting buns.
- Sharp knife — if you’re splitting buns from a loaf.
- Tongs or spoon — for assembling.
How to Serve This Dish:
Set the sliders on a tray and tuck a pickle chip beside each one if you want the platter to look deliberate. They go well with pasta salad, corn salad, or a handful of chips, and they’re easy to scale up when the guest list grows by two or three people.
Pro Tips for This Recipe:
- Toast the buns lightly. You want structure, not croutons.
- Make the slaw ahead so the vinegar softens the cabbage just a little.
- Use thighs if you cook the chicken yourself; they stay juicier than breast meat.
- Warm the chicken in sauce, not dry in a microwave, or it turns stringy.
Variations on This Dish:
- Spicy Chipotle Sliders: Stir chipotle in adobo into the barbecue sauce.
- Carolina-Style Sliders: Use a vinegar-heavy sauce and skip the mayo slaw.
- Pulled Jackfruit Version: Swap in seasoned jackfruit for a vegetarian tray.
Common Mistakes to Avoid with This Dish:
- Assembling too early: The buns absorb sauce and go limp.
- Using too much slaw: A little crunch is good; a mountain of slaw slides out.
- Skipping the toast: Soft buns collapse under the filling.
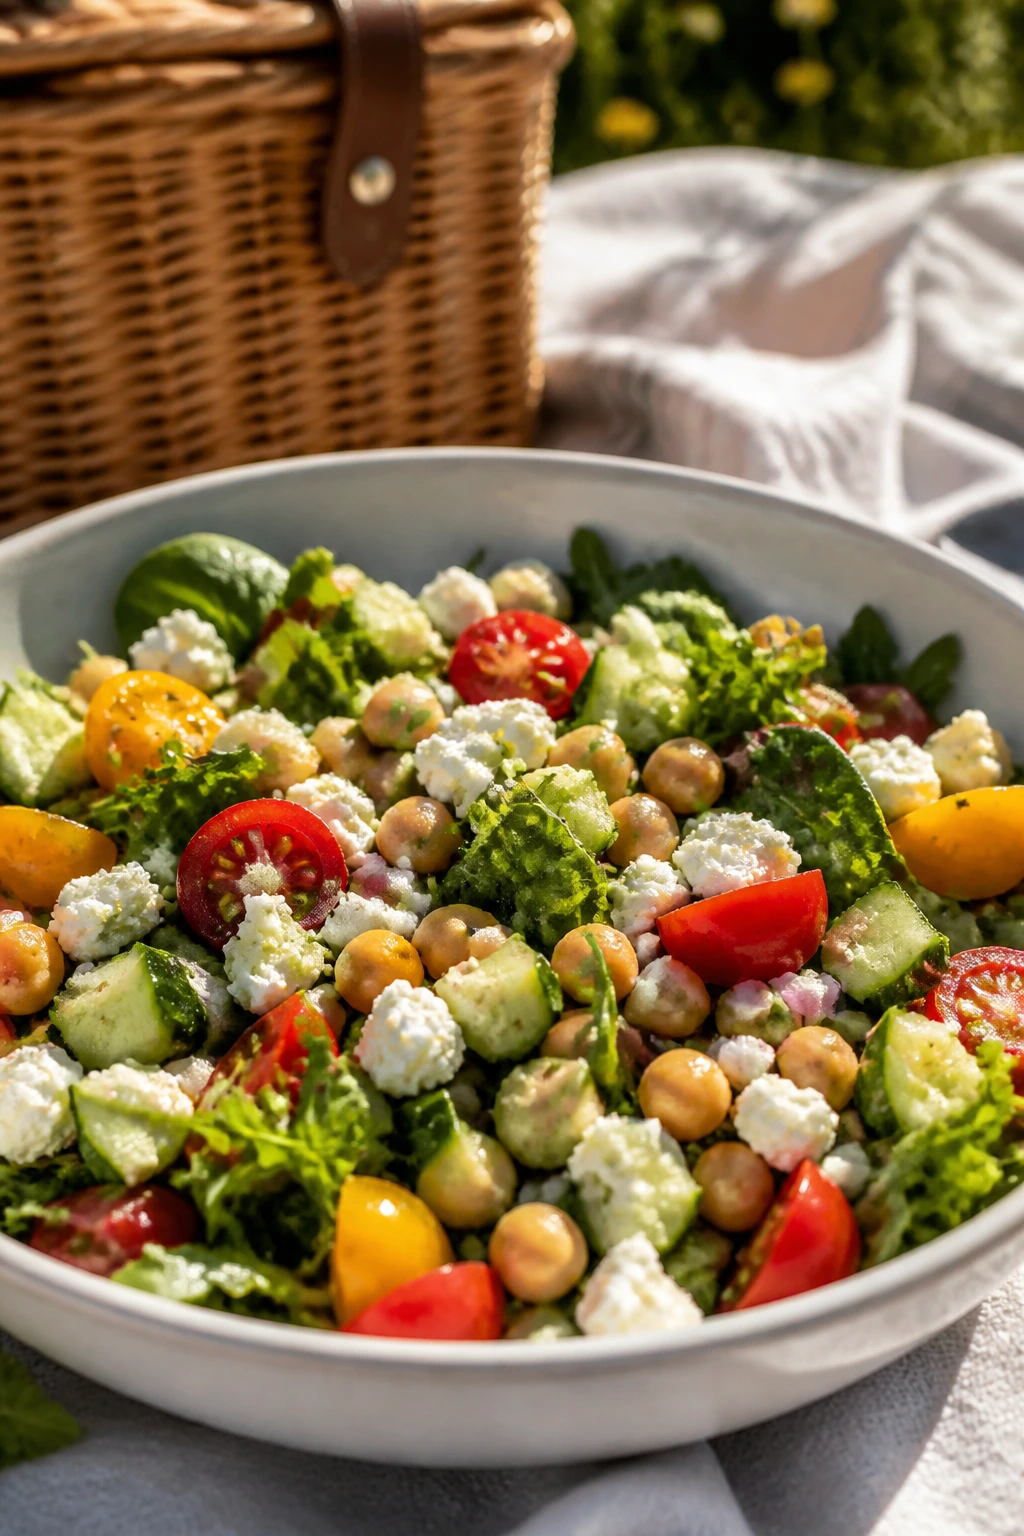
9. Mediterranean Chickpea Salad
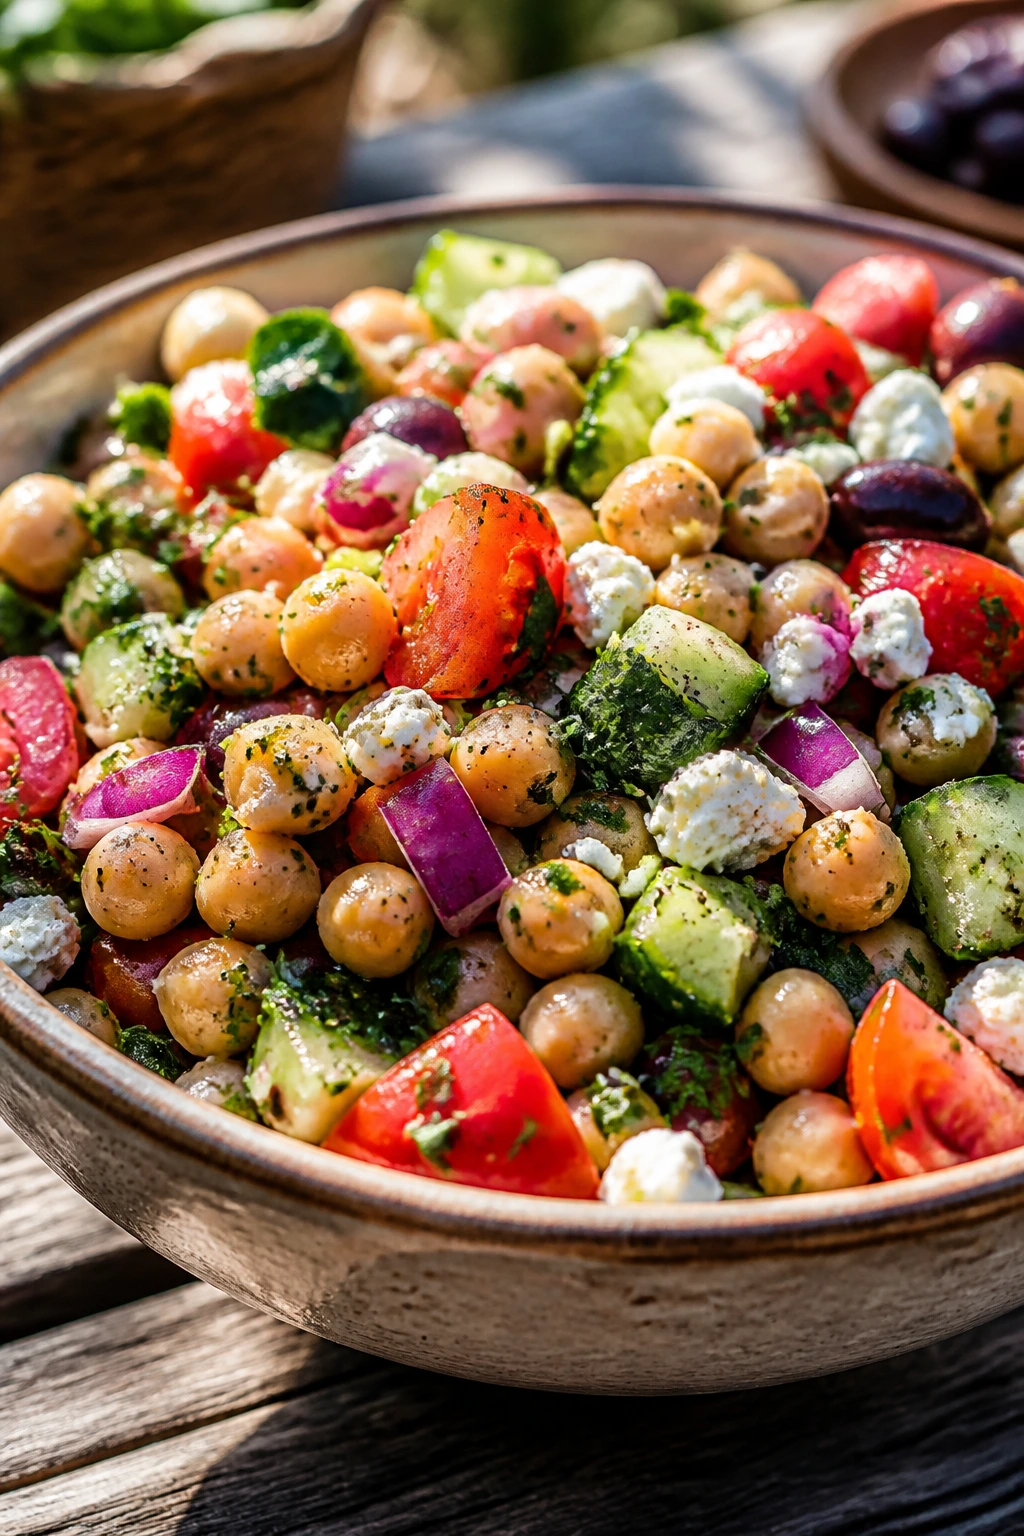
Chickpea salad is one of those bowls that gets better with a little time, which makes it a picnic workhorse. It tastes nutty, salty, and bright all at once, and the chickpeas give it enough body that it can stand in for a side or a light meal.
Why It Works:
Rinsed chickpeas hold onto vinaigrette well once they’re dried a bit, and the mix of cucumber, tomato, feta, and herbs keeps each bite from feeling repetitive. Lemon and red wine vinegar do the heavy lifting here. It’s sturdy without being heavy — the sweet spot for a night outdoors.
Key Ingredients:
- 2 cans chickpeas, drained and rinsed — about 3 cups.
- 1 cup cherry tomatoes, halved — use ripe but still firm tomatoes.
- 1 medium cucumber, diced — peel if the skin is thick.
- 1/3 cup red onion, finely diced — soak in cold water if needed.
- 1/2 cup bell pepper, diced — any color you like.
- 4 ounces feta, crumbled — optional, but useful.
- 1/4 cup chopped parsley — flat-leaf parsley is best.
- 3 tablespoons olive oil — the base of the dressing.
- 2 tablespoons red wine vinegar — sharp enough to matter.
- 2 tablespoons lemon juice — keeps the salad lively.
- 1 teaspoon dried oregano — or 1 tablespoon fresh.
- Salt and black pepper — season generously.
Quick Steps:
- Dry the chickpeas: After rinsing, pat the chickpeas dry with a towel so the dressing clings.
- Mix the dressing: Whisk the olive oil, vinegar, lemon juice, oregano, salt, and pepper in a large bowl.
- Add the vegetables: Stir in the tomatoes, cucumber, onion, and bell pepper.
- Fold in chickpeas and feta: Add the chickpeas, feta, and parsley, then toss gently until everything is coated. Don’t mash the chickpeas while stirring.
- Chill and adjust: Let the salad rest for 20 to 30 minutes, then taste and add more lemon or salt if it needs a lift.
Equipment for This Recipe:
- Colander — for rinsing the chickpeas.
- Clean kitchen towel or paper towels — to dry them.
- Large bowl — roomy enough for tossing.
- Whisk — for the dressing.
- Sharp knife — for clean vegetable cuts.
How to Serve This Dish:
Scoop it into a shallow bowl and finish with extra parsley or feta. It plays nicely with pita chips, grilled chicken, or a basket of sliced vegetables, and it’s one of the better picnic choices if you need something that can sit comfortably at room temperature for a bit.
Pro Tips for This Recipe:
- Dry the chickpeas. Wet beans dilute the dressing fast.
- Salt after the first chill. The flavors sharpen as they rest.
- Dice the cucumber and pepper to about the same size so the bites feel balanced.
- A little caper brine can stand in for part of the vinegar if you want extra punch.
Variations on This Dish:
- Tuna Chickpea Salad: Add a drained can of tuna for a fuller main dish.
- No-Cheese Version: Skip the feta and add olives or toasted sunflower seeds.
- White Bean Swap: Cannellini beans make a softer, creamier version.
Common Mistakes to Avoid with This Dish:
- Leaving the chickpeas wet: The dressing slides off and pools at the bottom.
- Using too much onion raw: Soak it first if you want a softer bite.
- Serving it ice-cold from the fridge: Let it sit 10 minutes so the herbs and lemon can show up.
10. Cold Soba Noodle Salad with Sesame Dressing
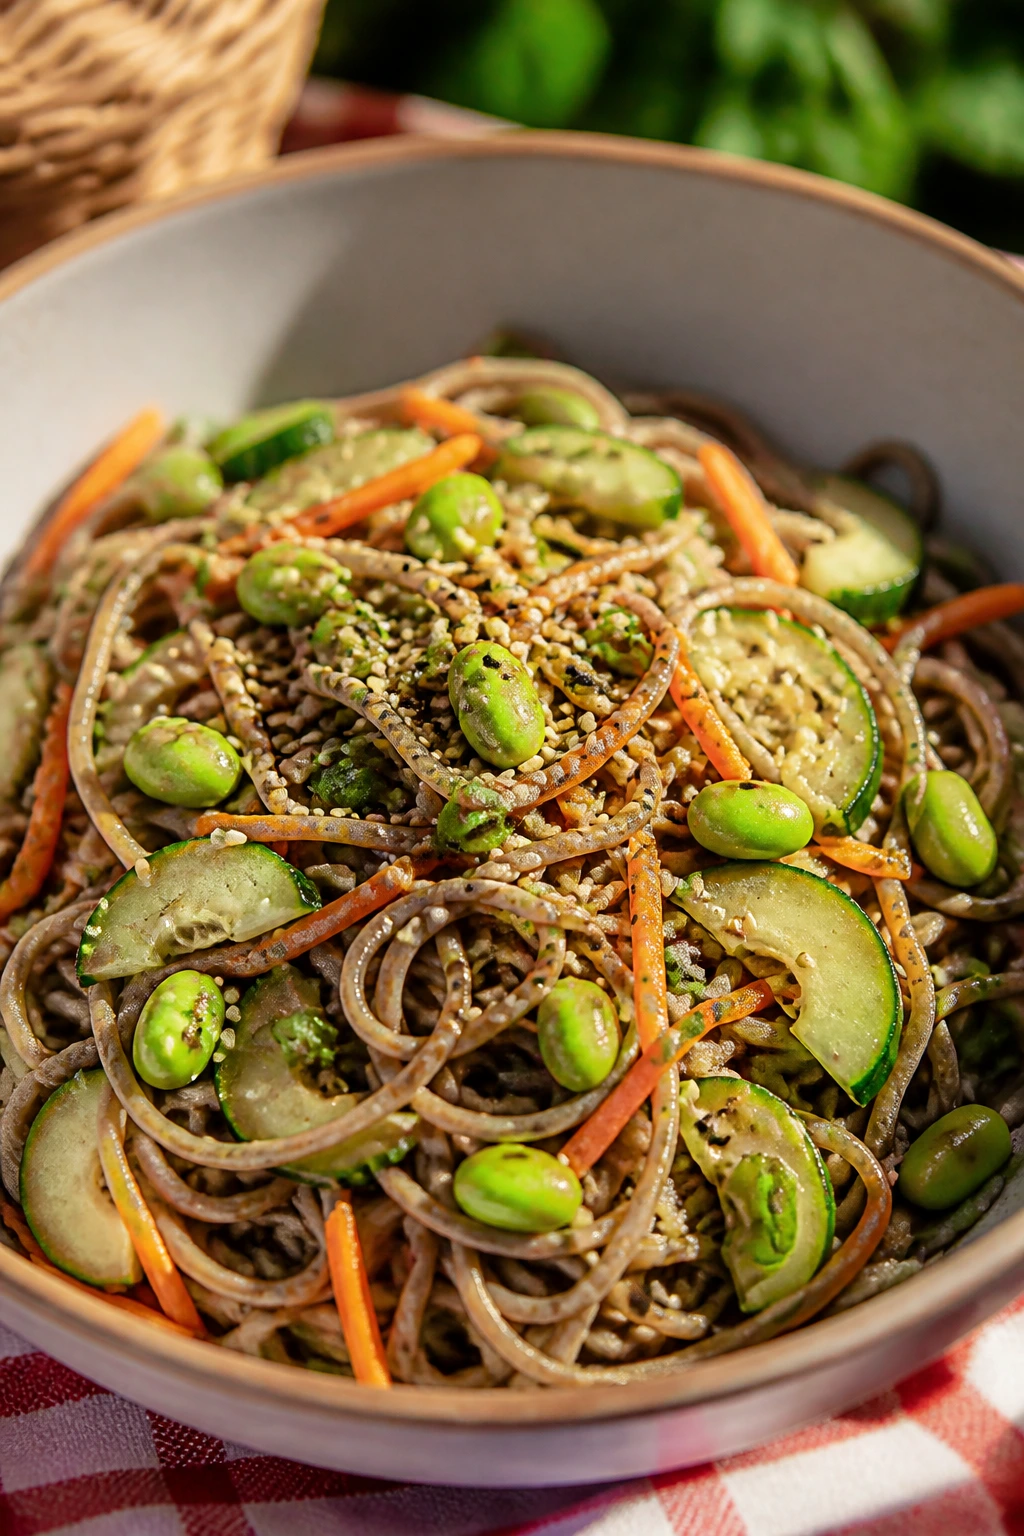
Soba noodle salad has a clean, cool feel that works when the air is heavy and you want something that doesn’t lean on mayo. The noodles should taste nutty, the dressing should be savory with a little sweetness, and the vegetables should stay crisp enough to crack under the fork.
Why It Works:
Buckwheat soba brings more flavor than plain wheat noodles, and sesame dressing clings nicely once the noodles are rinsed and tossed with a little oil. Edamame, carrots, and cucumbers add crunch and color, while ginger and garlic keep the dressing from feeling sleepy. It’s the kind of dish that tastes better after an hour in the fridge.
Key Ingredients:
- 8 ounces soba noodles — check the package if you want 100% buckwheat.
- 1 cup shelled edamame, cooked and chilled — adds protein and color.
- 2 medium carrots, shredded or julienned — keep the strips thin.
- 1 medium cucumber, julienned — long strips look and eat well.
- 3 scallions, thinly sliced — both white and green parts.
- 2 tablespoons sesame oil — a little goes a long way.
- 2 tablespoons soy sauce — use low-sodium if you prefer.
- 2 tablespoons rice vinegar — gives the dressing its sharp edge.
- 1 tablespoon tahini — for a creamy body.
- 1 tablespoon honey — balances the soy.
- 1 teaspoon grated fresh ginger — fine grating matters.
- 1 small garlic clove, grated — keep it subtle.
- 1 teaspoon toasted sesame seeds — for finishing.
Quick Steps:
- Cook the noodles: Boil the soba according to package directions, usually 4 to 5 minutes, until just tender.
- Rinse well: Drain and rinse under cold water until the noodles feel cool and no longer sticky. Toss with a few drops of sesame oil.
- Whisk the dressing: Combine sesame oil, soy sauce, rice vinegar, tahini, honey, ginger, garlic, and 1 tablespoon water until smooth.
- Toss the salad: Add noodles, edamame, carrots, cucumber, and scallions to a large bowl. Pour over the dressing and toss gently.
- Chill and finish: Refrigerate for 20 to 30 minutes, then top with sesame seeds before packing or serving.
Equipment for This Recipe:
- Saucepan — for the noodles.
- Colander — to drain and rinse thoroughly.
- Large bowl — for tossing without breaking the noodles.
- Whisk — to smooth out the tahini.
- Vegetable peeler or julienne tool — optional, but handy for the carrots and cucumber.
How to Serve This Dish:
Serve it in a wide bowl with sesame seeds on top and a few scallions scattered over the surface. It pairs well with skewers, fried chicken, or a simple fruit salad, and it holds up nicely in a picnic box if the dressing is kept tight.
Pro Tips for This Recipe:
- Rinse the noodles well enough to remove starch, but not so hard that they lose all body.
- Thinly sliced cucumber tastes better here than big chunks.
- If the dressing is too thick, loosen it with 1 to 2 teaspoons water.
- A spoonful of chili crisp is a good move if you want heat.
Variations on This Dish:
- Peanut Sesame Version: Swap tahini for peanut butter and add a splash of lime.
- Gluten-Free Noodle Salad: Use rice noodles and certified gluten-free tamari.
- Crunchy Cabbage Swap: Replace half the cucumber with shredded Napa cabbage for more bite.
Common Mistakes to Avoid with This Dish:
- Skipping the rinse: Hot soba sticks together and turns gummy.
- Using too much dressing at once: Start with most of it, then add the rest after tossing.
- Overcooking the noodles: A soft noodle loses its shape fast once mixed.
11. Cucumber Tea Sandwiches
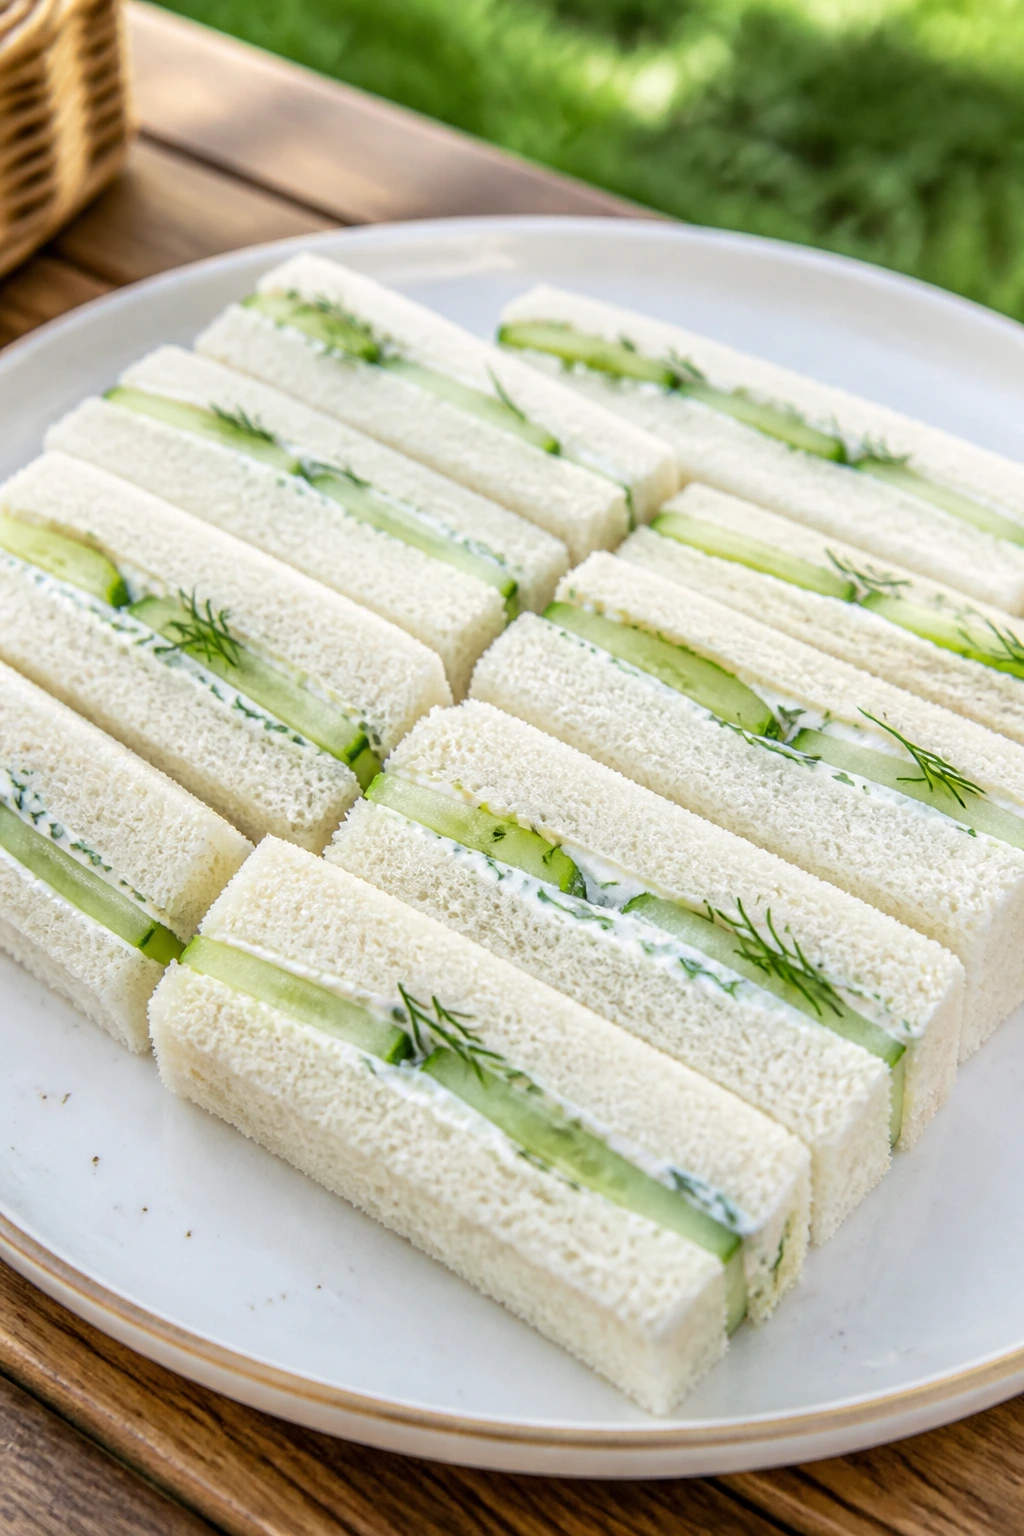
Tea sandwiches can feel old-fashioned in the nicest way when they’re made with care. The bread needs to be soft but not flimsy, the cucumber slices need to be paper-thin, and the filling has to stay cool and spreadable so the sandwiches don’t slump before you even get to the grass.
Why It Works:
Cream cheese gives the filling structure, dill and lemon make it taste fresh instead of plain, and salting the cucumber briefly keeps the bread from getting damp. Removing the crusts makes the pieces neat and easy to eat with one hand. These are picnic sandwiches for people who like their food tidy.
Key Ingredients:
- 8 ounces cream cheese, softened — it must spread cleanly.
- 2 tablespoons mayonnaise — optional, for a lighter spread.
- 1 tablespoon fresh dill, finely chopped — the flavor anchor.
- 1 teaspoon lemon zest — more aroma than juice.
- 1 medium cucumber, peeled if the skin is tough — slice very thin.
- 1/2 teaspoon kosher salt — for the cucumber slices.
- 12 slices soft white bread — a tight crumb works best.
- Black pepper — a few grinds, not a flood.
- Butter, softened, for the bread — a thin layer keeps things dry.
Quick Steps:
- Prep the cucumber: Slice the cucumber as thinly as you can, salt lightly, and let it sit for 10 minutes. Blot dry with a towel.
- Make the spread: Stir the cream cheese, mayo, dill, lemon zest, and pepper until smooth.
- Butter and spread: Spread a thin layer of butter on the bread slices, then add the cream cheese mixture.
- Layer the cucumber: Arrange cucumber slices in a slightly overlapping line and top with the second slice of bread. Don’t pile the cucumbers in the center or the sandwich bows in the middle.
- Trim and cut: Remove crusts, cut into fingers or triangles, and chill briefly before packing.
Equipment for This Recipe:
- Sharp knife — for very thin cucumber slices.
- Mixing bowl — to smooth the spread.
- Offset spatula or butter knife — for even spreading.
- Cutting board — a stable surface helps with clean cuts.
- Paper towels — for blotting the cucumber dry.
How to Serve This Dish:
Stack them neatly on a tray or tuck them into a lined container in a single layer. They work as a lighter component next to richer picnic food, and they make the whole spread feel a little more deliberate than a grab bag of leftovers.
Pro Tips for This Recipe:
- Thin slices matter more than fancy garnish.
- Butter the bread lightly before the filling. It’s a small shield against moisture.
- Use very soft bread, not squishy bread. There’s a difference.
- Make them close to serving time if the weather is warm.
Variations on This Dish:
- Smoked Salmon Tea Sandwiches: Add a thin layer of smoked salmon and a few capers.
- Mint-Cucumber Version: Replace dill with mint for a fresher, cooler flavor.
- Rye Bread Swap: Use soft rye or pumpernickel for a deeper, earthier sandwich.
Common Mistakes to Avoid with This Dish:
- Too much cucumber moisture: Salt and blot them first.
- Thick filling: A heavy layer squeezes out on the first bite.
- Packing them too early in warm weather: They can dry out on the outside and sweat on the inside, which is a terrible little trick.
12. Corn and Black Bean Salad
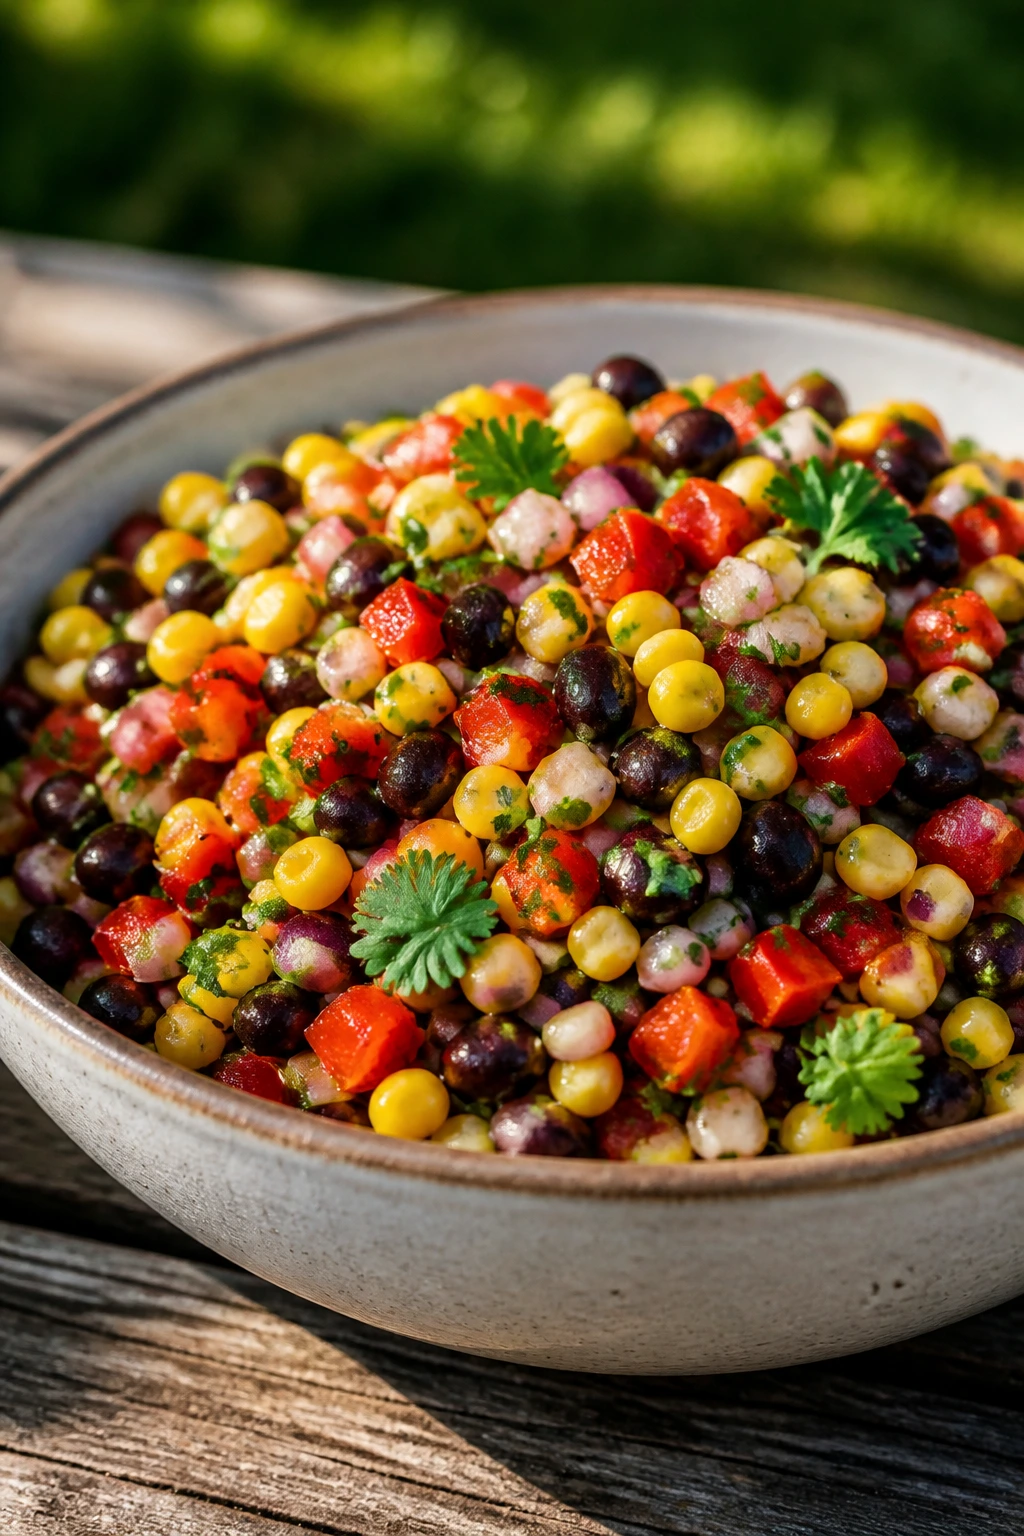
Corn and black bean salad is one of the easiest picnic bowls to make because the ingredients don’t fight each other. Sweet corn, earthy beans, crisp peppers, and lime dressing create a mix that feels hearty without turning dense. It also holds up well after a chill, which is worth a lot when you’re juggling blankets and folding chairs.
Why It Works:
Beans give the salad structure, corn adds sweetness, and lime juice keeps the flavor awake. Cilantro and cumin make it taste a little smoky even if you never touched a grill. It’s one of the few side dishes that can sit near a hot main without getting boring.
Key Ingredients:
- 3 cups corn kernels — grilled, blanched, or thawed frozen corn all work.
- 2 cans black beans, rinsed and drained — about 3 cups.
- 1 red bell pepper, diced — use a firm one.
- 1/2 red onion, finely diced — soak if it tastes too sharp.
- 1/2 cup chopped cilantro — stems included if they’re tender.
- 1 jalapeño, minced — optional, but useful.
- 3 tablespoons olive oil — for the dressing.
- 3 tablespoons lime juice — fresh squeezed.
- 1 teaspoon ground cumin — enough for warmth, not heaviness.
- 1/2 teaspoon kosher salt — more to taste.
- Black pepper — a few grinds.
Quick Steps:
- Prep the corn: If using fresh or frozen corn, cook just until tender, then cool. If it’s grilled corn, cut the kernels off once it’s cool enough to handle.
- Mix the dressing: Whisk olive oil, lime juice, cumin, salt, and pepper in a large bowl.
- Combine the vegetables: Add corn, beans, bell pepper, onion, cilantro, and jalapeño.
- Toss gently: Stir until everything is evenly coated. Don’t mash the beans or the bowl turns muddy.
- Chill and taste: Let it rest 20 minutes, then add more lime or salt if the flavor needs a lift.
Equipment for This Recipe:
- Large bowl — for mixing.
- Sharp knife — for dicing the vegetables.
- Small whisk — for the dressing.
- Colander — for rinsing the beans.
- Cutting board — roomy enough for corn kernels if you’re cutting off the cob.
How to Serve This Dish:
Serve it in a bowl with a spoon, or pile it onto lettuce leaves if you want a slightly cleaner hand-held option. It goes nicely with grilled meat, tortilla chips, or avocado sliced at the last second.
Pro Tips for This Recipe:
- Rinse canned beans until the water runs clear; the salad tastes cleaner.
- If you grill the corn, let it char in spots for a deeper flavor.
- Add avocado only if you’re serving right away.
- Lime zest gives more punch than extra lime juice alone.
Variations on This Dish:
- Southwest Chicken Bowl: Add shredded rotisserie chicken and extra cumin.
- Avocado Corn Salad: Fold in avocado just before serving.
- Feta-Lime Version: Add feta for a salty edge if you want more richness.
Common Mistakes to Avoid with This Dish:
- Using underseasoned canned beans: They need salt and acid to taste like something.
- Cutting the onion too large: Big raw onion chunks take over.
- Adding avocado too early: It browns and softens fast.
13. No-Mayo Coleslaw
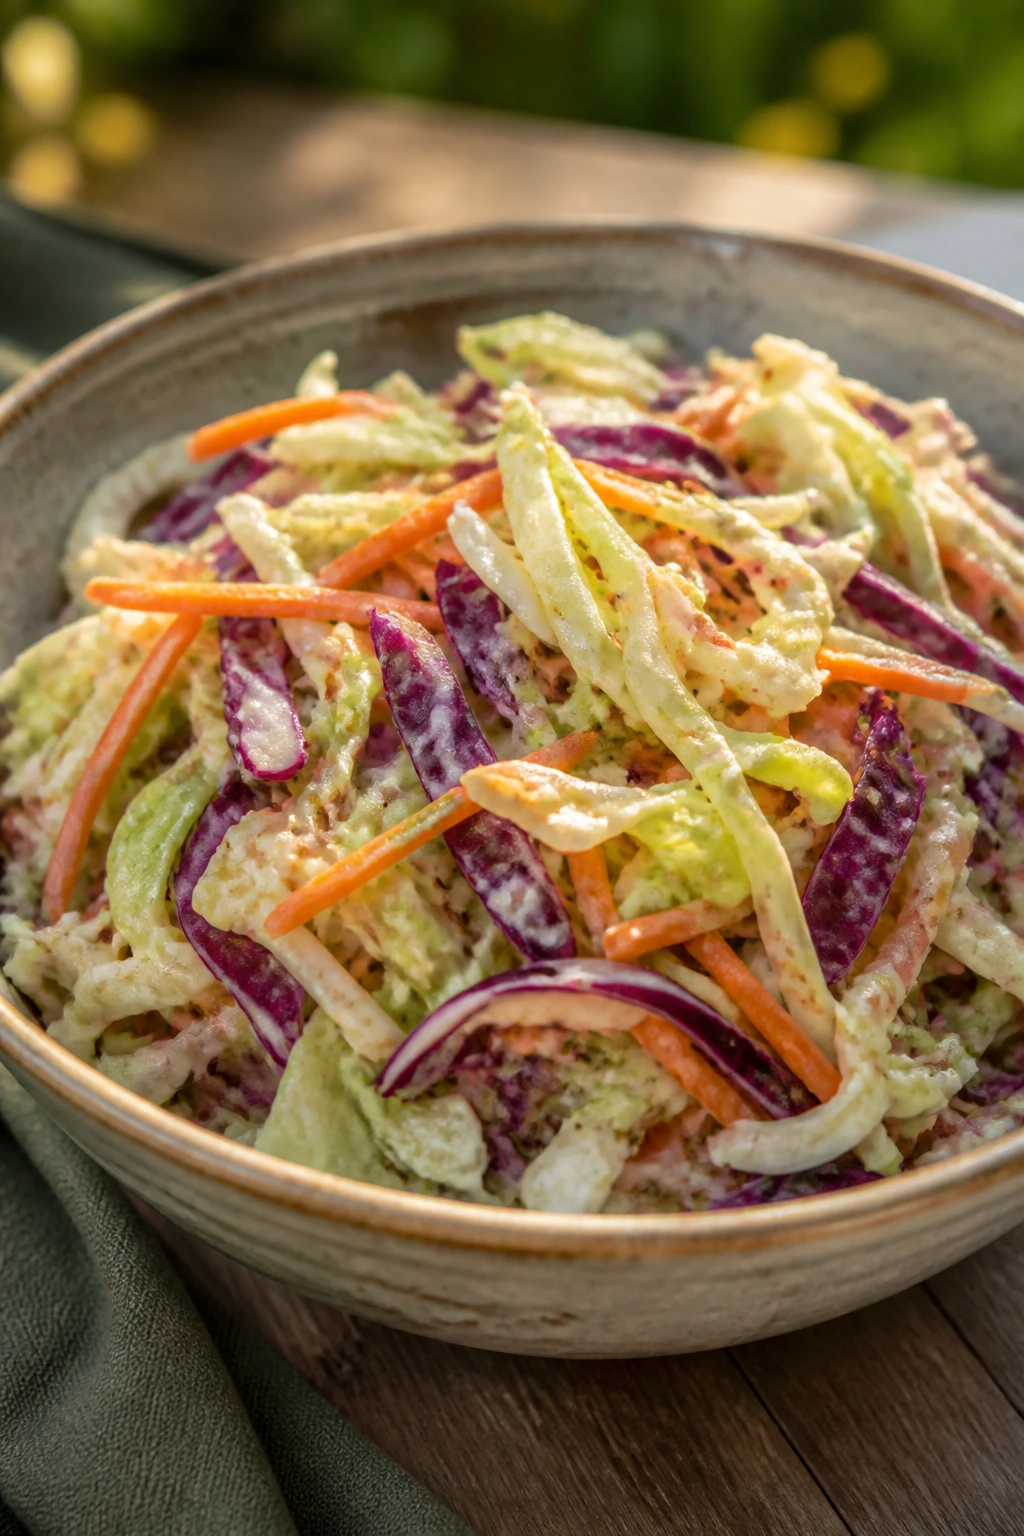
No-mayo coleslaw earns its keep in hot weather because it stays crisp longer and doesn’t feel heavy. Vinegar, a little honey, and Dijon make a dressing that coats the cabbage without turning it into a wet mound. I like this version when the rest of the picnic already has enough richness.
Why It Works:
Salt pulls a little moisture from the cabbage so the dressing can cling instead of sliding off. The vinegar keeps the flavor sharp, honey rounds the edges, and celery seed adds that old picnic flavor that makes people ask what’s in it even though the answer is mostly cabbage. It’s crunchy, clean, and still tastes good after sitting for a while.
Key Ingredients:
- 6 cups green cabbage, thinly sliced — a half head is usually enough.
- 2 cups red cabbage, thinly sliced — for color and a slightly peppery note.
- 2 carrots, grated or shredded — adds sweetness and texture.
- 1/4 cup apple cider vinegar — the main acid.
- 2 tablespoons olive oil — for smoothness.
- 2 tablespoons honey — balances the sharpness.
- 1 tablespoon Dijon mustard — helps the dressing cling.
- 1 teaspoon celery seed — classic coleslaw flavor.
- 3/4 teaspoon kosher salt — more to taste.
- Black pepper — a few grinds.
Quick Steps:
- Slice and salt the cabbage: Put the cabbage and carrots in a large bowl, sprinkle with 1/2 teaspoon salt, and toss. Let it sit for 10 minutes.
- Make the dressing: Whisk vinegar, olive oil, honey, Dijon, celery seed, salt, and pepper in a small bowl.
- Toss the slaw: Pour the dressing over the cabbage mixture and toss well.
- Rest briefly: Chill for 15 to 20 minutes so the cabbage softens slightly. Don’t let it sit for hours before serving or the crunch goes dull.
- Taste before packing: Add a pinch more salt or a splash more vinegar if needed.
Equipment for This Recipe:
- Large mixing bowl — for tossing.
- Sharp knife or mandoline — for slicing the cabbage thinly.
- Box grater — for the carrots.
- Small whisk — for the dressing.
- Tongs or clean hands — for mixing without bruising the vegetables.
How to Serve This Dish:
Serve it beside barbecue chicken, sliders, or fried fish, or tuck it right into a sandwich for crunch. It’s one of the easiest ways to give a picnic plate structure without reaching for mayo.
Pro Tips for This Recipe:
- Slice the cabbage thin. Thick pieces stay awkward and stiff.
- Let the salt sit for a few minutes before dressing. It softens the edges a bit.
- Taste after chilling. Vinegar can feel sharper cold than it did in the bowl.
- If you want more body, add a spoonful of plain yogurt, but don’t make it creamy unless that’s the point.
Variations on This Dish:
- Caraway Slaw: Add 1/2 teaspoon caraway seed for a deli-style note.
- Spicy Slaw: Stir in sliced jalapeño or a pinch of red pepper flakes.
- Apple-Fennel Version: Add thinly sliced apple and fennel for a sweeter crunch.
Common Mistakes to Avoid with This Dish:
- Shredding the cabbage too thick: It needs to be thin enough to bend.
- Overdressing it: A glossy coat is good; a puddle is not.
- Making it too far ahead: The crunch fades after a long soak.
14. Mini Ham and Cheese Quiche Cups

Mini quiche cups are useful because they behave like a savory snack and a small meal at the same time. The pastry should be crisp, the filling should set without puffing over the edges, and the ham should stay in small pieces so every bite feels balanced.
Why It Works:
Egg and cheese bake into a tidy filling that can be eaten warm or at room temperature, which is a gift for picnics. Puff pastry gives the cups enough structure to feel special without requiring a full crust situation. A little spinach cuts the richness and makes the filling taste less heavy after a few bites.
Key Ingredients:
- 1 sheet puff pastry, thawed — cut into squares or rounds.
- 6 large eggs — the base of the filling.
- 1/2 cup whole milk — or half-and-half for a richer cup.
- 1 cup diced ham — small dice works best.
- 1 cup shredded cheddar cheese — sharp cheddar holds the flavor.
- 1/2 cup chopped spinach — squeeze out extra moisture.
- 2 tablespoons chopped chives — for freshness.
- 1/2 teaspoon kosher salt — adjust if the ham is salty.
- 1/4 teaspoon black pepper — keep it light.
Quick Steps:
- Prep the oven and tin: Heat the oven to 375°F and grease a 12-cup muffin tin well.
- Shape the pastry: Cut the puff pastry into 12 squares and press each one into a muffin cup, letting the corners rise a little.
- Mix the filling: Whisk the eggs, milk, salt, and pepper until smooth, then stir in ham, cheese, spinach, and chives.
- Fill and bake: Spoon the mixture into the pastry cups, filling each about 3/4 full. Bake 18 to 22 minutes, until the centers are set and the pastry is deep golden. If the tops jiggle like liquid, they need more time.
- Cool before packing: Let them rest in the pan for 5 minutes, then move to a rack so the bottoms stay crisp.
Equipment for This Recipe:
- 12-cup muffin tin — the cups need support.
- Rolling pin — optional if your pastry needs a small flattening.
- Mixing bowl — for the egg filling.
- Whisk — to smooth the eggs.
- Pastry brush — useful if you want to brush the edges with egg wash.
How to Serve This Dish:
Serve the quiche cups warm or at room temperature with sliced fruit, a green salad, or a handful of cherry tomatoes. They make a good bridge between finger food and a proper meal, which is useful when the evening runs long.
Pro Tips for This Recipe:
- Squeeze the spinach dry or the filling goes watery.
- Don’t overfill the cups. The egg expands a little as it bakes.
- Let them cool in the tin for a few minutes so the pastry sets.
- If the pastry puffs too much in the center, press it down gently with a spoon after baking.
Variations on This Dish:
- Bacon and Swiss Cups: Swap ham for cooked bacon and cheddar for Swiss.
- Broccoli Cheddar Cups: Replace ham with very small broccoli florets.
- Mushroom Herb Version: Use sautéed mushrooms and thyme for a lighter cup.
Common Mistakes to Avoid with This Dish:
- Wet filling: Spinach and mushrooms must be cooked down or squeezed dry.
- Undercooked centers: The middle should look set, not sloshy.
- Skipping the greasing step: Puff pastry sticks faster than people think.
15. Lemon Blueberry Hand Pies

Hand pies are the dessert answer to picnic gravity. They don’t need forks, they travel better than slices, and the filling stays put if you keep it thick enough. The best ones crack slightly at the seam and leak just a little jammy blueberry at the edge.
Why It Works:
Blueberries cook down into a thick filling when you add a little cornstarch, and lemon zest keeps the sweetness from getting syrupy. A sealed pastry pocket means the fruit stays contained, which matters when you’re carrying dessert in a basket instead of a kitchen. They’re tidy, portable, and still feel like a treat when the air cools.
Key Ingredients:
- 2 pie crusts, homemade or refrigerated — enough for 8 small hand pies.
- 2 cups blueberries — fresh or thawed frozen, but thawed berries need draining.
- 1/3 cup granulated sugar — enough to sweeten without turning candy-like.
- 1 tablespoon cornstarch — thickens the filling.
- 1 tablespoon lemon juice — brightens the berries.
- 1 teaspoon lemon zest — use the fine side of a grater.
- 1/4 teaspoon salt — tiny, but necessary.
- 1 egg, beaten with 1 tablespoon water — for the egg wash.
- 1 tablespoon coarse sugar — for the tops.
- Powdered sugar and lemon juice, for a glaze — optional, but nice.
Quick Steps:
- Make the filling: Stir blueberries, sugar, cornstarch, lemon juice, lemon zest, and salt in a saucepan over medium heat. Cook for 4 to 6 minutes, until the berries burst and the mixture looks thick and glossy. Cool completely.
- Roll and cut the dough: Roll the crusts to about 1/8 inch thick and cut into 4- to 5-inch circles or rectangles.
- Fill and seal: Spoon 1 to 1 1/2 tablespoons of filling onto half of each piece, brush the edges with egg wash, fold over, and crimp with a fork.
- Bake the pies: Brush the tops with egg wash, sprinkle with coarse sugar, and bake at 400°F for 18 to 22 minutes, until golden and crisp.
- Glaze and cool: If using glaze, drizzle it over cooled pies. Glazing while hot makes the icing run off and disappear.
Equipment for This Recipe:
- Saucepan — for the filling.
- Baking sheet — lined with parchment.
- Rolling pin — for the dough.
- Fork — for sealing the edges.
- Pastry brush — for egg wash.
- Round cutter or knife — to portion the pies evenly.
How to Serve This Dish:
Stack them on parchment-lined trays or tuck each one into a paper wrapper for easy handing out. They’re good with berries on the side, a cold drink, or nothing else at all — they’re self-contained, which is part of the charm.
Pro Tips for This Recipe:
- Cool the filling fully before assembling or the dough softens.
- Don’t overfill. A small spoonful is enough.
- Seal the edges firmly so the fruit doesn’t leak out.
- If your crust is very soft, chill the assembled pies for 15 minutes before baking.
Variations on This Dish:
- Peach Hand Pies: Swap blueberries for diced peaches and keep the lemon.
- Mixed Berry Version: Use half blueberries, half raspberries for a tarter filling.
- Gluten-Free Crust Swap: Use a sturdy gluten-free pie dough that rolls well and chills cleanly.
Common Mistakes to Avoid with This Dish:
- Using hot filling: It melts the dough before the pies hit the oven.
- Skipping the cornstarch: Runny fruit escapes through the seams.
- Cutting the pies before they cool: The filling needs time to set or it pours out.
Why Picnic Food Has to Survive Heat, Travel, and a Flat Blanket
Picnic food lives by a different set of rules than dinner at the table. A dish can taste excellent in a bowl on the counter and still fail outside if it turns greasy, limp, or awkward to eat with one hand. The winners here all do the same basic trick: they hold texture, stay flavorful at room temperature, and don’t become miserable the minute condensation shows up inside a container.
Acid matters more than people think. Lemon juice, vinegar, pickles, mustard, and balsamic glaze are not decoration; they’re the parts that keep potato salad, bean salads, and chicken bites from tasting dull once they’ve sat for a while. Salt matters too, and so does fat in the right place. A little mayo, olive oil, pesto, or cheese can make a dish carry flavor farther without turning it heavy.
Texture is the other half of the equation. Crunchy cabbage, crisp cucumber, toasted buns, firm pasta, and chicken with a set crust all survive handling better than soft, delicate foods. If you’ve ever bitten into a soggy sandwich and felt your mood collapse right along with it, you already understand the logic.
I also think picnic food needs to be forgiving. A little extra chill time shouldn’t ruin it. A short walk from the car shouldn’t ruin it. One ingredient being slightly too sharp or slightly too sweet shouldn’t ruin it. That’s why these recipes are built around sturdy methods, not fragile perfection.
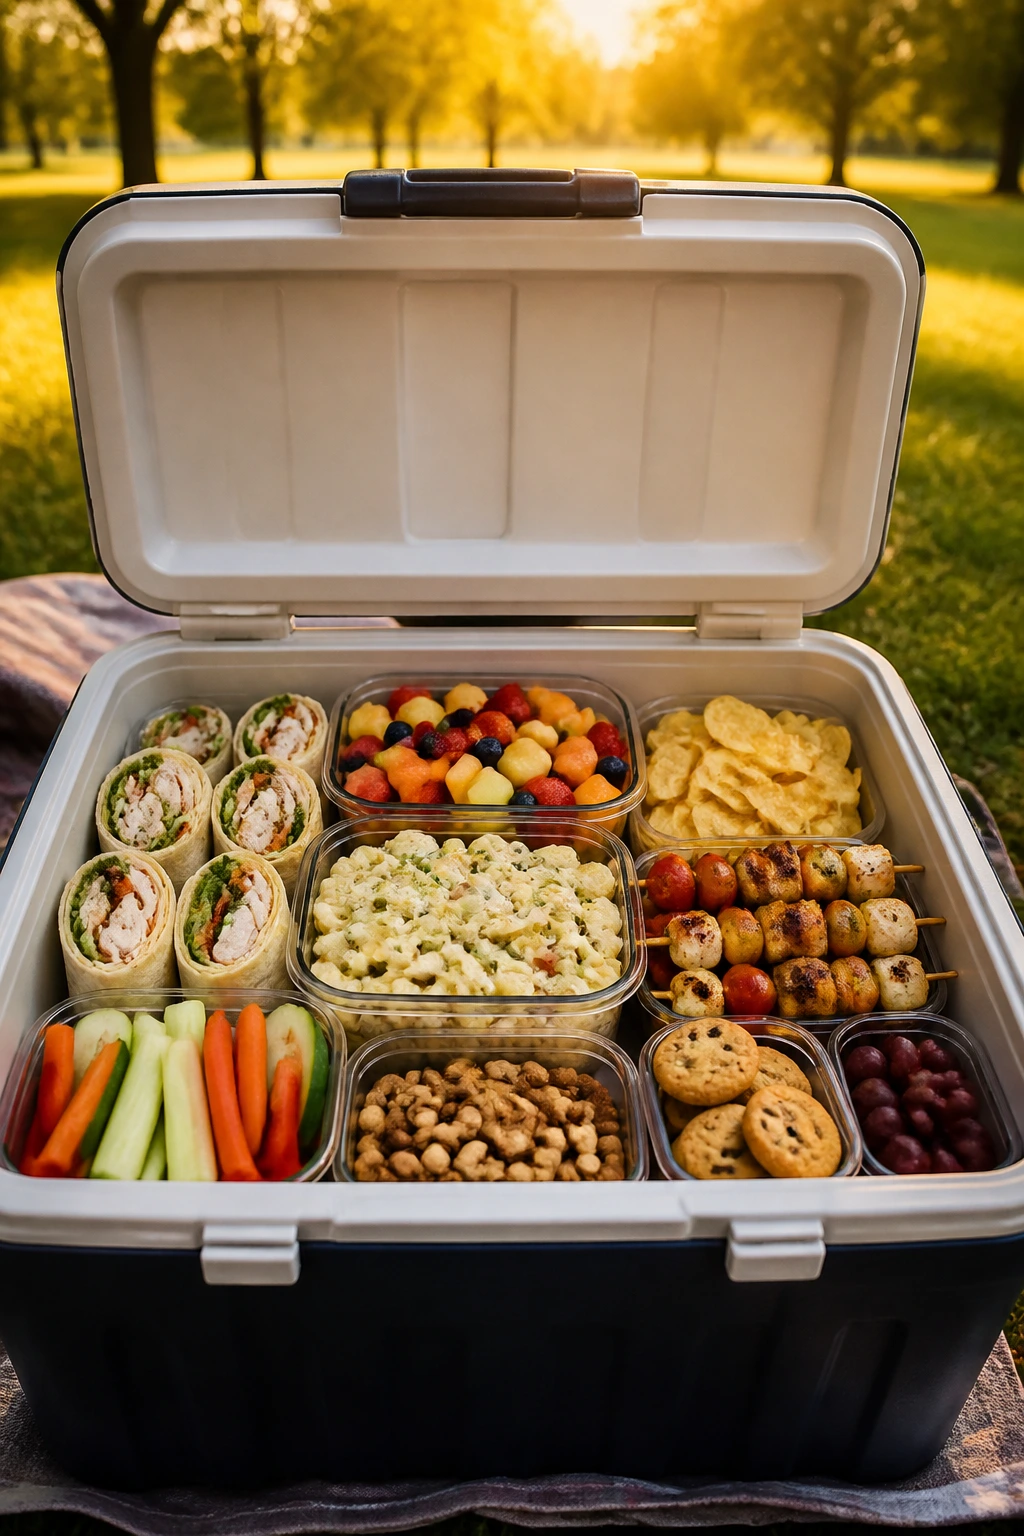
Essential Equipment for These Recipes
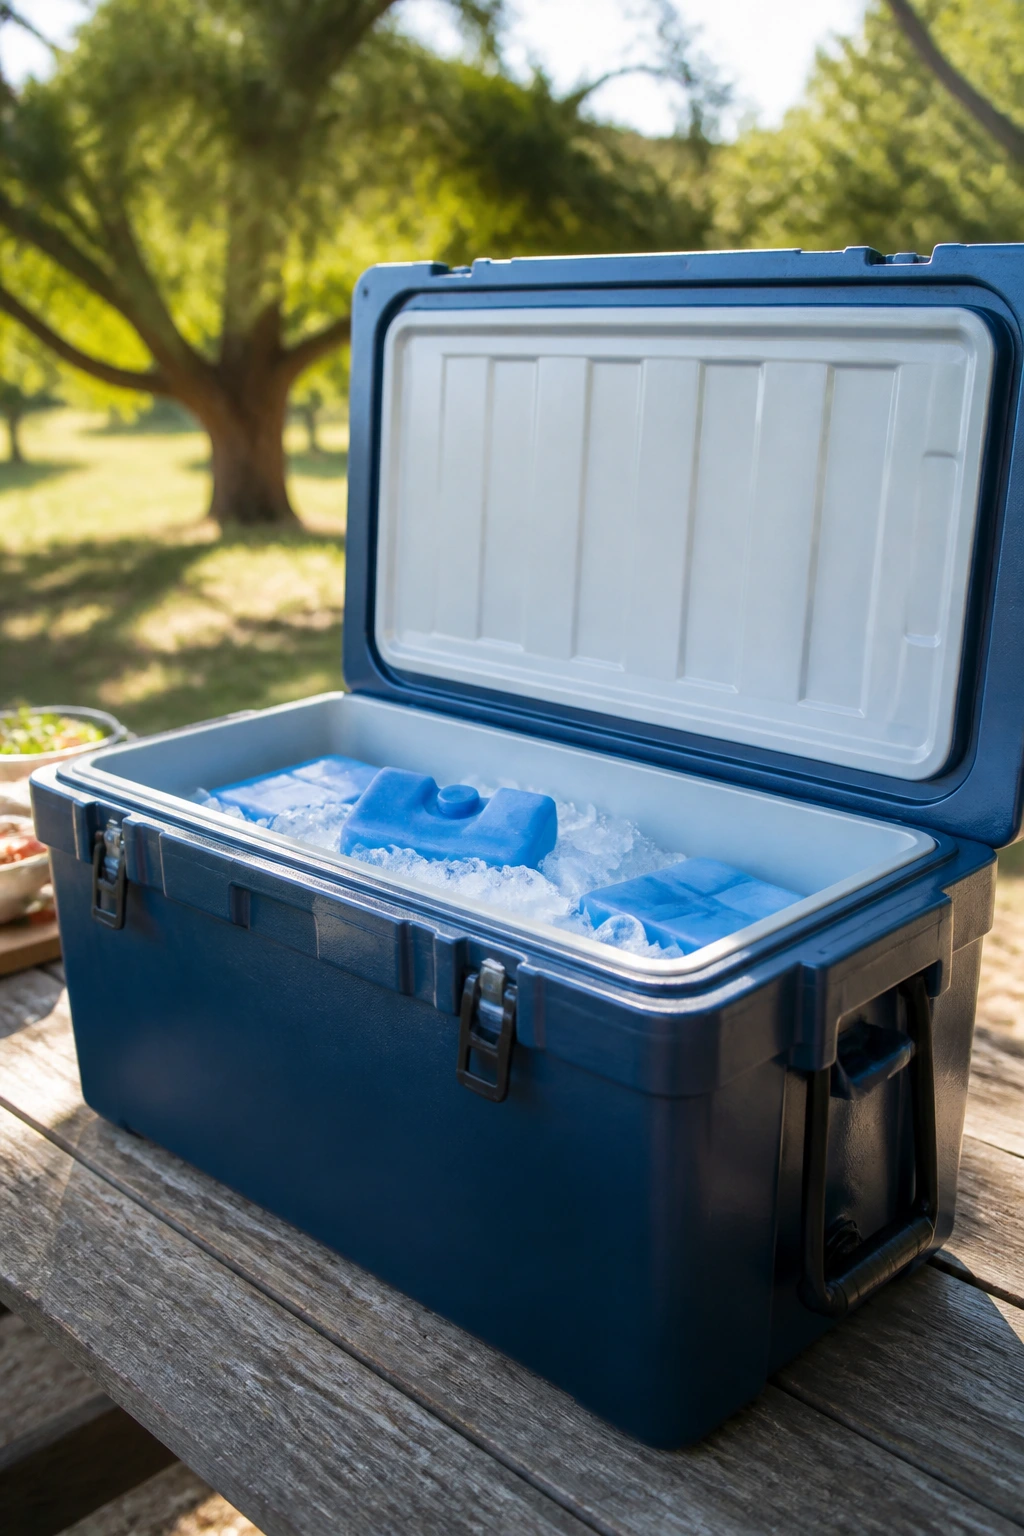
- Large cooler with ice packs: Keep mayo-based salads, eggs, chicken, and dairy-heavy dishes cold until the last minute.
- Airtight containers in a few sizes: Wide containers are better for salads; shallow ones help fried foods cool without steaming.
- Sheet pans with wire racks: Useful for fried chicken, toasted buns, and anything that needs to cool without getting soggy.
- Sharp chef’s knife: Clean cuts matter for skewers, sandwiches, fruit, and cabbage.
- Cutting board with a damp towel underneath: Stops it from sliding when you’re slicing wet vegetables or trimming bread.
- Mixing bowls in medium and large sizes: You’ll use them constantly, and wide bowls make folding easier.
- Whisk and rubber spatula: A whisk smooths dressings; a spatula keeps salads and fillings from getting beaten up.
- Muffin tin: Handy for quiche cups and anything portioned into neat little rounds.
- Parchment paper: Helpful for hand pies, sliders, and anything sticky.
- Small squeeze bottle or lidded jar: Good for balsamic glaze, dressing, or barbecue sauce when you want to pack it separately.
Smart Shopping and Ingredient Tips
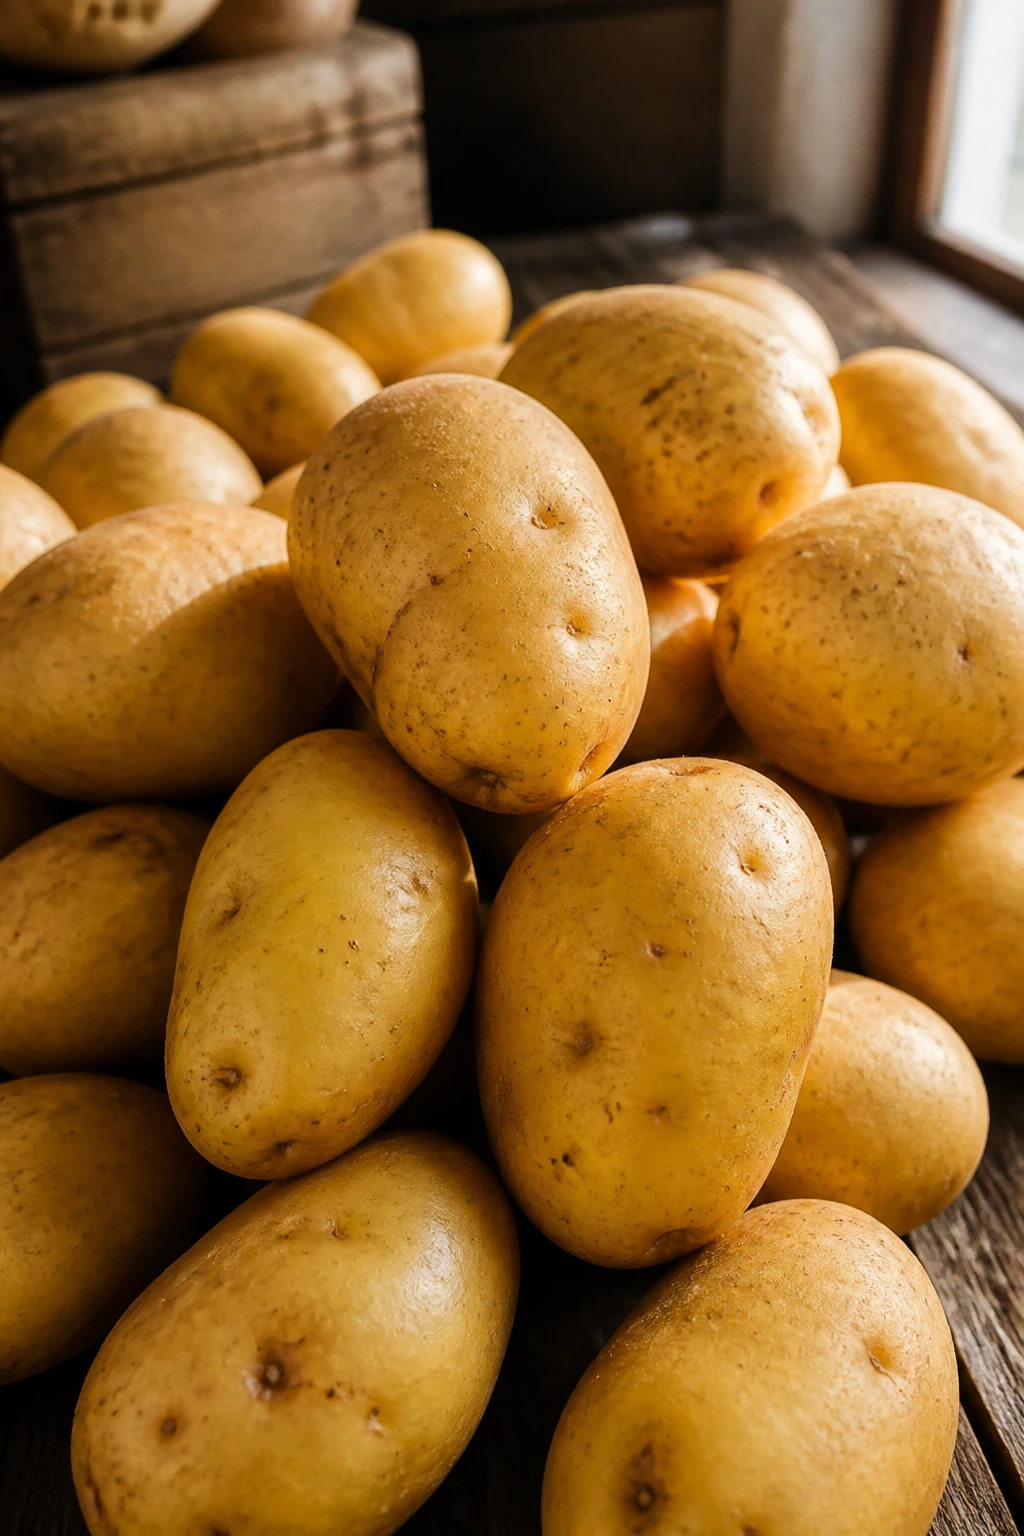
The smartest picnic shopping starts with ingredients that can take a little abuse. Yukon Gold potatoes, short pasta shapes, cabbage, chickpeas, carrots, cucumbers, and sturdy greens all hold up better than fragile leaves or watery produce. When you’re buying tomatoes, look for ones that feel heavy for their size and give just a little at the stem end; hard, flavorless tomatoes make caprese and salads taste hollow.
For dairy, choose block feta instead of pre-crumbled when you can. It’s usually creamier and saltier in a cleaner way. The same logic works for mozzarella pearls and cream cheese: buy the version that feels firm and fresh, not the one sitting in a container of sad liquid. If you’re making deviled eggs or potato salad, full-fat mayo gives a better texture than the lighter kind, which can taste thin once chilled.
Chicken is worth a careful look too. For fried chicken and sliders, thighs carry more flavor and stay juicy after a couple of hours in a cooler. For shredded chicken, rotisserie is the easiest route, but a simple poached batch is cheaper and lets you control the salt. If you’re using deli turkey, ask for it sliced thin; thick deli slices make pinwheels tear and fight you.
Dry ingredients matter more than people think. Fresh tortillas bend better than ones that have been hanging around too long. Pasta should be short and ridged if you want dressing to cling. Bread needs enough structure to hold a filling but enough softness to bite through without pressing everything out the sides. These are small choices, but picnic food is built on small choices.
How to Serve These Recipes
Presentation:
Picnic food looks best when it’s arranged in separate zones instead of dumped together in one giant container. Put salads in shallow bowls, stack pinwheels and tea sandwiches in neat rows, and keep skewers or deviled eggs in single layers so the top stays pretty and the bottom doesn’t get crushed.
Accompaniments:
A good basket usually wants one bread item, one creamy side, one bright salad, one crunchy thing, and one sweet finish. Think crackers, kettle chips, sliced melon, olives, grapes, or a simple green salad with a lemon vinaigrette. A few dill pickles on the side never hurt either.
Portions:
For a small picnic, plan on 1 to 2 salads, 1 protein, 1 handheld item, and 1 dessert for 4 people. If the evening is more snack-like than meal-like, smaller servings of 4 to 6 recipes are enough, especially if you include bread and fruit. For bigger groups, double the salads first — they stretch farther than sandwiches.
Beverage Pairing:
I like sparkling water with lime, iced tea, lemonade, or a dry rosé with this kind of spread. If you want an alcohol-free option that feels a little festive, cucumber water or a tart cherry spritz works well with the salty, creamy parts of the menu.
Additional Tips and Flavor Boosters
Flavor Enhancement:
A little acid changes almost every recipe here for the better. Lemon zest over deviled eggs, extra vinegar in slaw, pickle brine in potato salad, or a squeeze of lime over chickpea salad can make the whole spread taste sharper and more awake.
Customization:
If you’re feeding mixed eaters, build a few dishes in modular form. Keep the glaze separate for caprese skewers, the sauce separate for sliders, and the dressing separate for soba salad until the last possible moment. That way the people who want extra sauce can have it, and the people who hate soggy bread don’t have to suffer for the group.
Serving Suggestions:
Fresh herbs do more work than fancy garnish. Dill on potato salad, basil on caprese, cilantro on corn salad, mint on watermelon, and chives on quiche cups all make the food smell bright the second the lid comes off. Toasted sesame seeds, flaky salt, or crushed kettle chips can also add a last-minute crunch that makes the plate feel finished.
Make-It-Yours:
For dairy-free eaters, swap mayo-based dressings for olive oil and mustard or vinegar-based versions, and use beans, chicken, or vegetables as the main bulk. For gluten-free picnics, lean on potato salad, chickpea salad, deviled eggs, watermelon salad, caprese skewers, and corn salad first; then use certified gluten-free bread, tortillas, pasta, or crusts where needed. For people who want more heat, a few sliced chilies or a spoonful of chili crisp goes a long way without overwhelming the basket.
Make-Ahead, Storage, and Reheating Guidance
Most picnic food is happiest when it has a little time to settle, but not all of it likes the same clock. Mayo-based salads, deviled eggs, and dairy-heavy fillings should stay refrigerated and packed cold until serving. As a rule, keep cold food at or below 40°F and don’t leave it out more than 2 hours; if the air is hot enough to make you sweat just standing still, shorten that to 1 hour.
Potato salad, pasta salad, chickpea salad, coleslaw, and corn salad usually keep 3 to 4 days in the fridge if stored in airtight containers. Pasta salad and chickpea salad often taste better after a few hours because the dressing settles in. Coleslaw is crunchiest on day one and day two; after that, it softens, which isn’t wrong, just different.
Fried chicken holds up for 3 days in the fridge if you cool it on a rack before packing. Reheat it in a 375°F oven or air fryer for 10 to 15 minutes until the skin crisps back up. Skip the microwave unless you’re prepared to lose the crust. That’s not drama. That’s physics.
Pinwheels, tea sandwiches, and sliders are best assembled the same day, though their fillings can be made 1 day ahead. Keep bread, sauces, and wet ingredients separate until shortly before serving. Hand pies keep well for 1 to 2 days at room temperature in a covered container, or up to 4 days refrigerated. They also freeze well for up to 2 months; reheat in a 325°F oven until the crust feels crisp again.
If you’re packing a cooler, put the coldest containers on the bottom and keep the lid shut as much as possible. Shade matters. So does restraint. The fewer times you open the cooler to “check,” the better everything eats later.
Variations and Adaptations to Try
The Cooler-First Menu:
If you need everything to hold up without much babysitting, lean toward chickpea salad, coleslaw, pasta salad, deviled eggs, caprese skewers, and hand pies. These recipes don’t need reheating, and they can be packed in layers with ice packs without losing their shape. It’s the easiest route when the picnic starts early and runs long.
The No-Mayo Basket:
Swap creamy salads for vinaigrette-based ones — chickpeas, soba noodles, corn and black bean salad, and coleslaw all work well without mayo. Add olive oil, citrus, vinegar, mustard, or tahini so the dishes still have body. This version tastes especially good when the weather is hot enough that you don’t want anything rich hanging around.
The Gluten-Free Spread:
Potato salad, deviled eggs, watermelon salad, caprese skewers, chickpea salad, corn salad, and fried chicken already fit the bill. Then use gluten-free pasta, bread, tortillas, and pie crust for the other dishes if needed. The key is choosing sturdy GF versions rather than the flimsy ones that crack the second you roll or slice them.
The Kid-Friendly Tray:
Dial back the onion, cut the cucumber thin, keep the spice low, and use milder cheese. Sliders, hand pies, watermelon salad, quiche cups, and pinwheels usually disappear first with kids because they’re easy to hold and don’t require explanation. A little ketchup or extra barbecue sauce on the side helps, too.
The Bold-Flavor Set:
If your crowd likes stronger flavors, add pickles, jalapeños, capers, chili crisp, smoked paprika, or extra Dijon. That works especially well in potato salad, coleslaw, fried chicken, soba noodles, and chickpea salad. The trick is to push one or two ingredients harder, not everything at once.
The Vegetarian Picnic Lineup:
You can build a full spread without meat by leaning on caprese skewers, chickpea salad, pasta salad, corn salad, tea sandwiches, quiche cups, and hand pies. If you want more protein, add beans, eggs, cheese, and nuts before reaching for heavy substitutes. Vegetarian picnic food is at its best when it still has texture, not when it tries to imitate something else.
Common Mistakes to Avoid
The first mistake is overpacking wet and dry foods together. A tomato-heavy salad sitting against bread, or a sauced slider stacked with no barrier, turns into a soggy mess fast. Keep dressings, sauces, and breads separate until the last minute whenever you can.
Another mistake is not chilling the right foods hard enough. Deviled eggs, mayo salads, and dairy-heavy fillings need to stay cold in transit, not just “cool-ish.” Use ice packs, keep the cooler in shade, and don’t let the lid stay open while you’re deciding who gets the last hand pie.
People also overdo the dressing. Picnic food needs coating, not drowning. If a salad looks wet in the bowl, it will look worse after fifteen minutes in the container. Start with less dressing than you think, toss, then add more if the food needs it.
Soft bread is a common trap. Tea sandwiches, sliders, and pinwheels all need a little structural backbone or they slump under the filling. Toasting buns lightly, buttering bread, or using tighter-crumb bread makes a real difference. So does keeping wet ingredients like tomato slices or cucumbers under control.
A lot of cooks also forget that picnic food tastes different cold. That’s why salt, acid, and herbs matter so much. If something tastes fine hot but flat once chilled, it probably needed another pinch of salt, a squeeze of lemon, or a sharper dressing from the start.
Finally, don’t pack fried food hot. It seems efficient. It isn’t. Steam softens crust faster than almost anything else in a cooler. Let fried chicken and pastry cool on a rack first, or you’ll spend the whole night eating what used to be crisp.
Frequently Asked Questions
What picnic foods can sit out the longest?
The safest bets are foods that don’t rely on dairy-heavy sauces or delicate greens: caprese skewers, hand pies, fried chicken once it’s cooled, and sturdy salads like chickpeas, corn, or pasta with vinaigrette. Even then, keep the two-hour rule in mind and shorten it when the weather is hot.
Can I make these recipes the day before?
Yes, several of them improve overnight. Potato salad, pasta salad, chickpea salad, coleslaw, and the fillings for sliders or pinwheels all benefit from a rest. Just keep bread, crispy toppings, and dressings separate until serving so the texture doesn’t collapse.
How do I keep sandwiches from getting soggy?
Use butter, cream cheese, or another barrier on the bread, then layer dry ingredients against it before adding wetter items. Pack tomatoes, pickles, and dressings separately if possible, and assemble close to eating time. Toasting the bread or buns also helps more than people expect.
Which recipes are best if I don’t have a cooler?
Hand pies, caprese skewers, fried chicken that has cooled fully, and some dry sandwiches travel better than mayo salads or deviled eggs. If you’re skipping the cooler, keep the menu short and pick foods that are naturally stable at room temperature for the short trip.
Can I use rotisserie chicken instead of cooking chicken from scratch?
Absolutely. Rotisserie chicken is one of the easiest shortcuts in the whole list, especially for sliders, pinwheels, or chicken salad-style fillings. Just pull the meat while it’s still warm enough to shred cleanly, and season the final dish well because store-bought chicken can taste a little under-seasoned.
What’s the best way to transport deviled eggs?
Use a single-layer container with a lid, or nest them in a tray lined with lettuce, parchment, or a silicone egg holder. Pack them chilled and keep the filling fairly stiff so it doesn’t smear during the ride. Paprika is best added before serving if you want the tops to stay neat.
Which dishes freeze well?
Hand pies freeze beautifully once baked and cooled. Fried chicken can freeze, too, though the crust is best when reheated in the oven. Mayo salads, cucumber sandwiches, and watermelon salad do not freeze well; the texture goes off in a hurry.
How do I scale this menu up for a bigger group?
Start by doubling the salads first, then add one more handheld item and one dessert. Salads stretch farther than sandwiches, and they’re easier to serve from big bowls. If you’re feeding a crowd outdoors, keep a second bowl of dressing or sauce nearby so the last servings don’t dry out.
Do I have to serve everything cold?
No, and I wouldn’t. Fried chicken, quiche cups, and hand pies are all good warm or at room temperature. The trick is to let hot foods cool enough to pack safely, then serve them without trying to force them into the same temperature zone as the chilled salads.
A Cooler Full of Easy Summer Nights
The best picnic baskets aren’t complicated. They just have balance. A creamy side, something bright, something salty, something hand-held, and one sweet thing at the end usually cover more ground than an overstuffed spread that tries to do everything at once.
If you build from this list, you can mix a few cool salads with one sturdy main, then add a dessert that doesn’t need a fork. That’s the move I trust most when the evening is warm, the light is fading, and everyone wants to eat before the bugs get ideas.