
A slow cooker and a slab of pork belly can do something oddly graceful together. The fat slowly melts, the meat turns tender at the edges, and the whole kitchen picks up that deep, savory-sweet smell that makes people wander in asking when dinner will be ready. That’s the magic of crockpot pork belly: it does not ask for attention every ten minutes, but it still gives you a dish with real character.
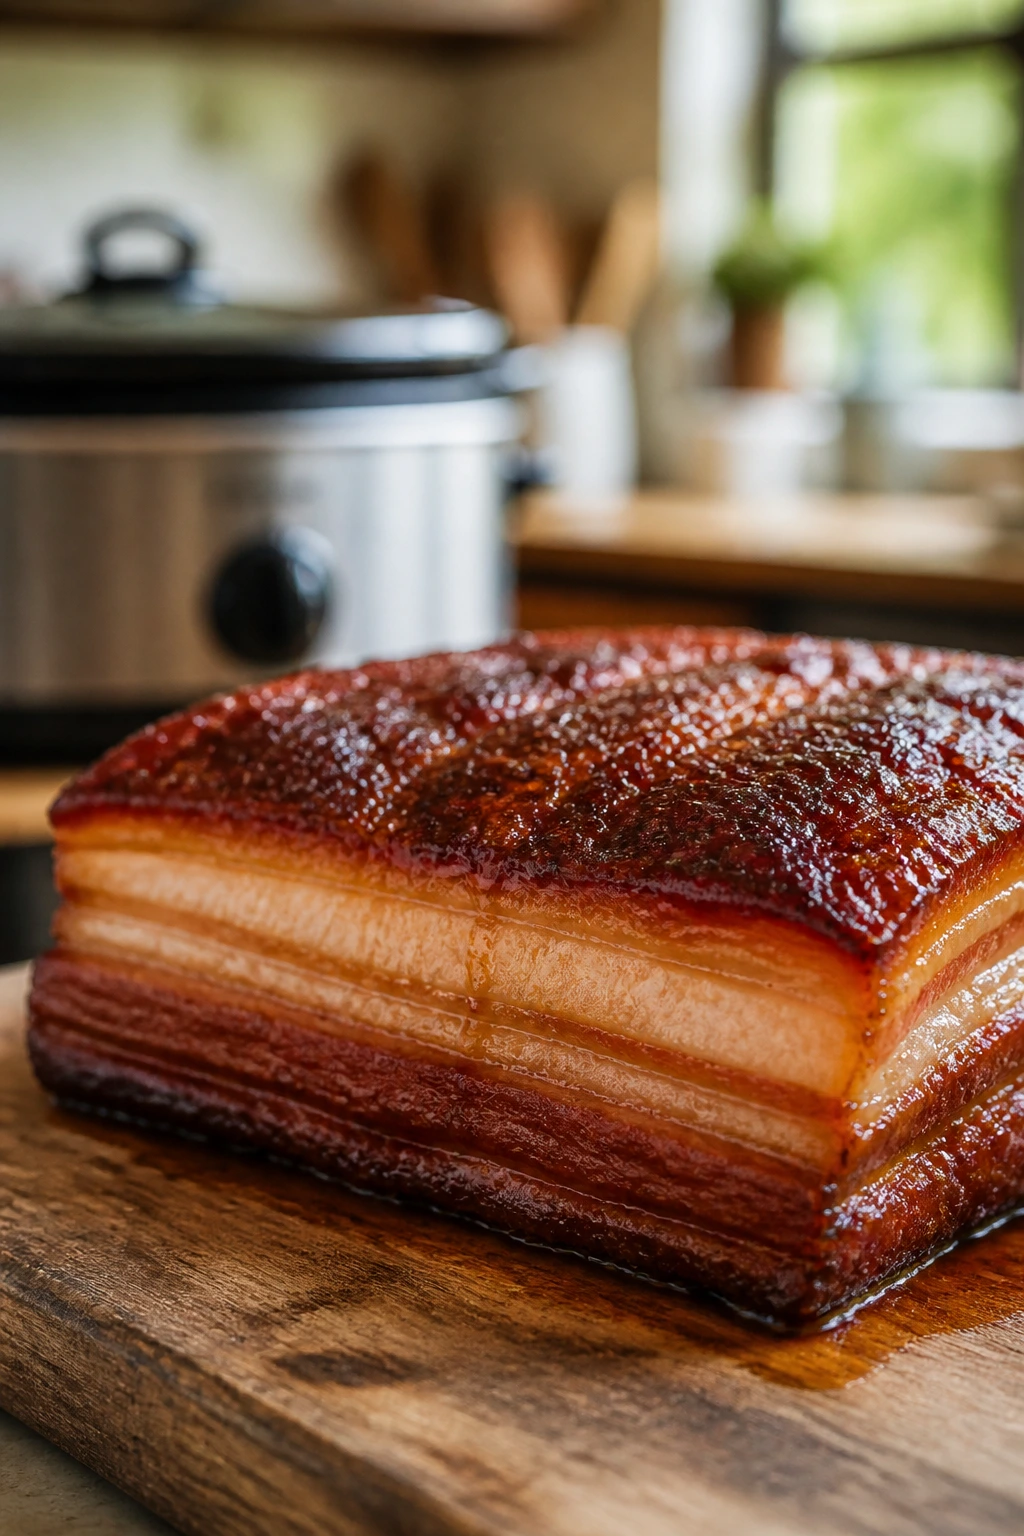
I’m not interested in pork belly that comes out pale, greasy, and oddly apologetic. The cut has enough fat to carry strong flavors, which is exactly why a soy-garlic-ginger braise works so well here. The slow cooker handles the long, gentle part; the broiler handles the part the pot can’t do. Simple. Honest. Much better than pretending the crockpot can crisp skin or brown meat.
If you’ve only had pork belly as a restaurant slice with a crackly top, this version will feel softer and calmer, but not less satisfying. The texture should be spoon-tender without falling apart into mush, and the sauce should cling in a thin, glossy layer that tastes salty, a little sweet, and sharp at the edges from rice vinegar. That balance matters. Pork belly gets heavy fast if you let the sweetness drift too far.
The first useful thing to know is that this is a cut with opinions. Treat it like a roast and it can feel clumsy; braise it low and slow, then finish it properly, and it turns into something you’ll want to slice against the grain and eat over rice with a spoon.
Why This Crockpot Pork Belly Is Worth the Slow Cook
-
It cooks itself after the first 20 minutes. Once the pork, aromatics, and sauce are in the pot, the slow cooker takes over for 6 to 7 hours on low, which means you are not standing over a skillet trying to guess when the fat has rendered.
-
The texture comes from time, not effort. Pork belly needs gentle heat so the fat softens and the meat turns supple; rushing it on high usually gives you tougher edges and a less even finish.
-
The final broiler step earns its keep. Five minutes under a hot broiler gives you bronzed edges and bubbling sauce, which is the difference between “soft pork in liquid” and an actual dish with contrast.
-
It plays well with plain sides. Steamed jasmine rice, rice noodles, smashed cucumbers, and quick-pickled vegetables all make sense here because the sauce is rich and needs something clean underneath it.
-
Leftovers get better manners overnight. Chilled pork belly slices more cleanly the next day, and the sauce tastes tighter after the fat has been skimmed and settled.
Why Pork Belly and the Slow Cooker Work Together
Pork belly has always liked low heat. That’s the part a lot of home cooks miss. It isn’t a lean cut that perks up when you blast it with heat; it’s a layered one, and those alternating bands of fat and meat need time to relax into each other. A slow cooker gives you that time without making you babysit a stovetop braise for half the day.
The flavor profile here borrows from classic soy-based braises: garlic, ginger, brown sugar, rice vinegar, sesame oil, and a little star anise if you want that lacquered, restaurant-style aroma. I like this direction because it gives the pork belly a backbone. The cut is rich enough already. What it needs is sharpness, not more fat. That tiny hit of vinegar keeps the sauce from tasting like sweet soy syrup, and that matters more than most recipes admit.
This is also the rare slow cooker dish that improves when you finish it elsewhere. The crockpot does tenderness. The broiler does drama. And no, you cannot fake that with another hour on high. A slow cooker is a moisture box; it will never give you the blistered edge that makes pork belly worth reaching for in the first place.
If you want a meal that tastes like you paid attention without actually requiring you to hover, this is the lane. The smell of ginger and garlic softening in soy sauce has a way of making the house feel warmer, even before the first spoonful hits a bowl.
What Goes Into the Pot
Yield: Serves 6
Prep Time: 20 minutes
Cook Time: 6 to 7 hours on Low, or 3 to 4 hours on High, plus 5 minutes under the broiler
Total Time: About 6 hours 25 minutes to 7 hours 25 minutes on Low, or 3 hours 25 minutes to 4 hours 25 minutes on High
Difficulty: Intermediate — the cooking itself is easy, but trimming the pork, skimming the fat, and finishing the sauce cleanly take a little care.
Best Served: Warm, right after broiling, when the edges are sticky and the sauce is glossy.
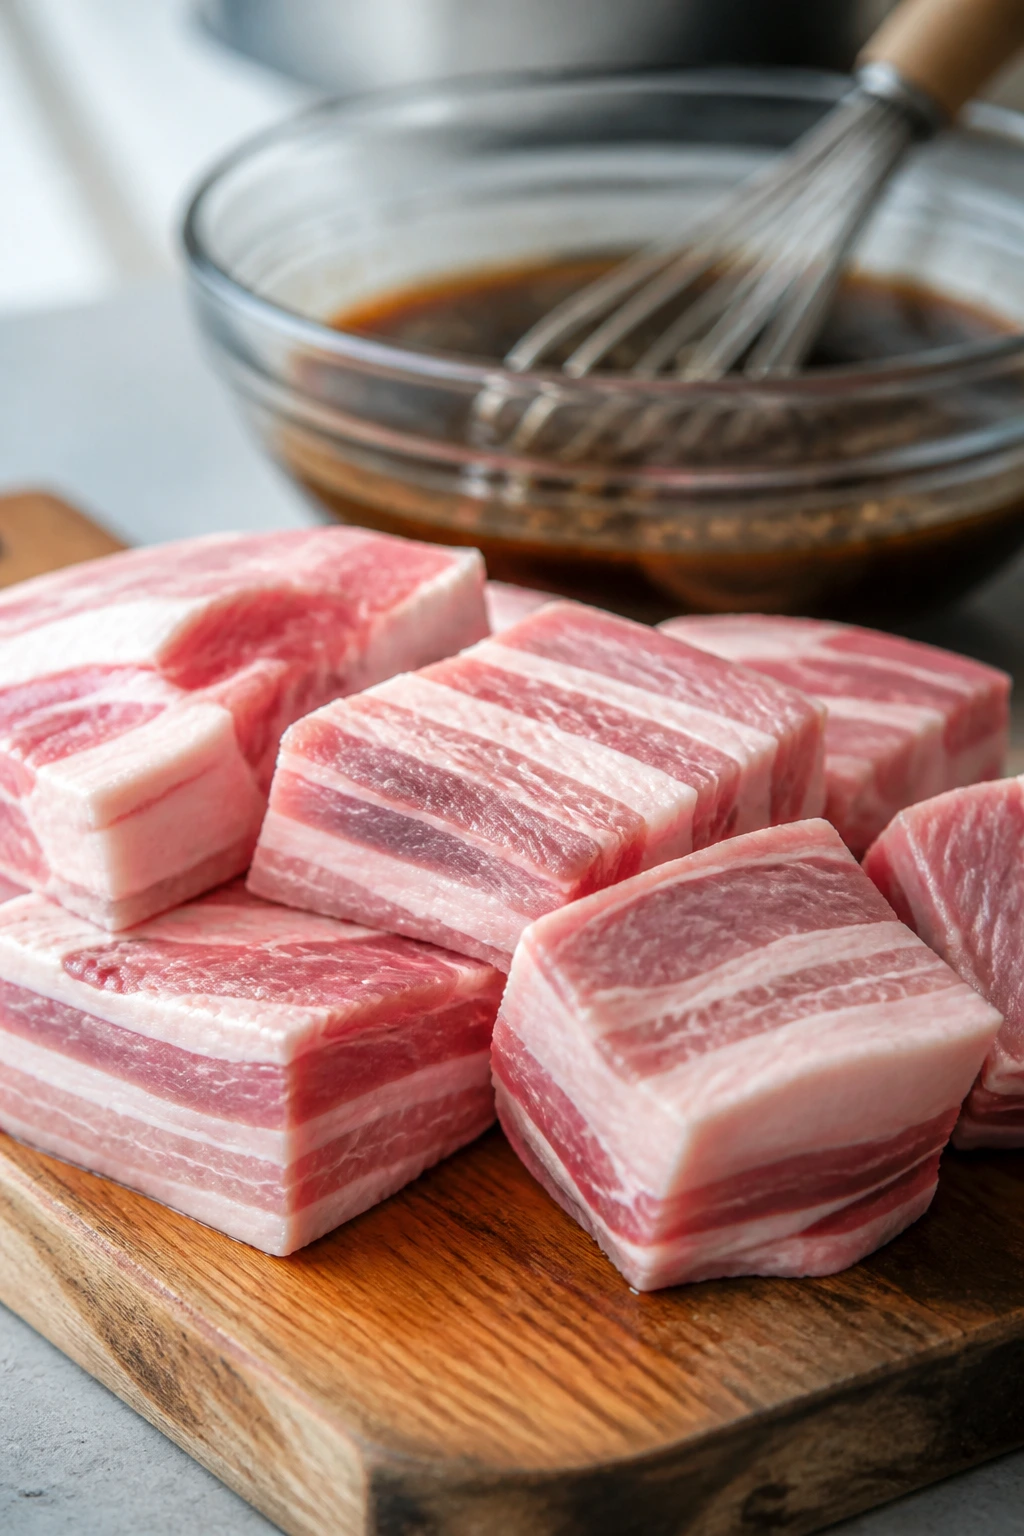
For the Pork Belly:
- 3 pounds skinless pork belly, cut into 2-inch pieces
- 1 teaspoon kosher salt
- 1/2 teaspoon freshly ground black pepper
For the Braising Sauce:
- 1 large yellow onion, sliced into thin half-moons
- 6 garlic cloves, smashed
- 1 2-inch piece fresh ginger, peeled and sliced
- 1 cup low-sodium soy sauce
- 1/2 cup water
- 1/3 cup packed light brown sugar
- 1/4 cup rice vinegar
- 2 tablespoons hoisin sauce
- 1 tablespoon toasted sesame oil
- 2 star anise
- 1 cinnamon stick
- 1/2 teaspoon crushed red pepper flakes, optional
For the Finish:
- 1 tablespoon cornstarch
- 1 tablespoon cold water
- 2 scallions, thinly sliced
- 1 teaspoon toasted sesame seeds
Why each ingredient matters
Pork Belly
- What to use: 3 pounds skinless pork belly, cut into 2-inch pieces.
- Preparation: Pat it dry and trim off any ragged flaps so the pieces cook at the same pace and the sauce can cling later.
- Substitutions: Pork shoulder will give you a leaner, shreddable result; thick-cut pork belly slices work too if they are at least 1 inch thick.
- Tips: Skin-on pork belly is not a great fit for this method unless you’re willing to finish aggressively under a broiler or remove the skin first. A slow cooker will not crisp it for you.
The Braising Liquid
- What to use: 1 cup low-sodium soy sauce, 1/2 cup water, 1/3 cup brown sugar, 1/4 cup rice vinegar, 2 tablespoons hoisin, and 1 tablespoon sesame oil.
- Preparation: Whisk the liquid in a bowl before it goes into the cooker so the sugar dissolves and the sauce tastes even from the start.
- Substitutions: Tamari works for a gluten-free version; coconut aminos can stand in if you want a softer, less salty sauce, though you may need a pinch more salt at the end.
- Tips: Keep the liquid modest. Pork belly renders a lot of its own fat, and drowning it in extra broth just gives you a pale, diluted sauce.
Aromatics and Spice
- What to use: 1 onion, 6 garlic cloves, 1 piece ginger, 2 star anise, 1 cinnamon stick, and red pepper flakes if you want heat.
- Preparation: Slice the onion thinly so it softens into the sauce instead of sitting there like a pile of raw rings.
- Substitutions: If you do not have star anise, use 1/2 teaspoon Chinese five-spice instead; if you hate cinnamon in savory food, skip it and lean harder on ginger.
- Tips: Smash the garlic cloves rather than mincing them. They give up flavor without disappearing into the sauce, and you can fish them out later if you want a cleaner finish.
The Finish
- What to use: 1 tablespoon cornstarch mixed with 1 tablespoon cold water, plus scallions and sesame seeds.
- Preparation: Stir the slurry right before using it so it does not clump.
- Substitutions: Arrowroot works in place of cornstarch; it thickens a touch more cleanly if you avoid a hard boil.
- Tips: Do not skip the scallions. That fresh green bite is what keeps a rich pork dish from feeling flat and heavy on the tongue.
The Tools That Make It Easy
You do not need much here, which is one reason I keep coming back to this recipe.
- 6-quart slow cooker: This size gives the pork belly enough room to sit in a shallow layer without packing the pieces too tightly.
- Large mixing bowl: You need this to whisk the sauce evenly before it goes in the pot.
- Sharp chef’s knife: Pork belly cuts cleaner when the knife isn’t fighting through the fat.
- Cutting board with a damp towel underneath: Pork belly can be slippery, and this keeps the board from skating around.
- Rimmed sheet pan: This is for the broiler finish; the sides catch bubbling sauce and rendered fat.
- Parchment or foil: Foil is easier under the broiler, though parchment is fine if you only need a quick glaze and your pan allows it.
- Tongs: You’ll use these to move the pork belly without tearing it apart.
- Fine-mesh strainer or fat separator: Helpful for skimming the rendered fat from the cooking liquid before you reduce it.
- Small whisk: Good for the cornstarch slurry and for smoothing out the sauce at the end.
How to Build the Sauce and Prep the Belly
The first few minutes matter more than people think. Pork belly is forgiving, but the sauce can still taste messy if you throw everything in without a plan. The goal here is not to be fancy. The goal is to get every flavor working in the same direction.
I do not bother with a sear for this recipe. That surprises some cooks, but I think it’s the right call. A quick browning step is nice when you have a stovetop braise and want that dark crust from the start, but in a true set-and-forget slow cooker dish, I’d rather spend those minutes building a balanced sauce. The broiler will handle the final color later.
-
Pat the pork belly dry and cut it into pieces. Trim the slab into 2-inch chunks or thick strips if it isn’t already cut that way. Dry the surface with paper towels and season it with the kosher salt and black pepper. A dry surface takes the sauce better and keeps the meat from looking washed out when it starts cooking.
-
Whisk the braising liquid in a bowl. Combine the soy sauce, water, brown sugar, rice vinegar, hoisin, sesame oil, star anise, cinnamon stick, and red pepper flakes if you’re using them. Stir until the sugar is mostly dissolved and the sauce smells sharply sweet and savory. It should taste a little too salty on its own; that is normal because it will mellow as the pork renders.
One thing worth saying plainly: do not use a giant flood of liquid. Pork belly gives off plenty of fat, and the sauce needs room to concentrate. You want braising liquid, not soup.
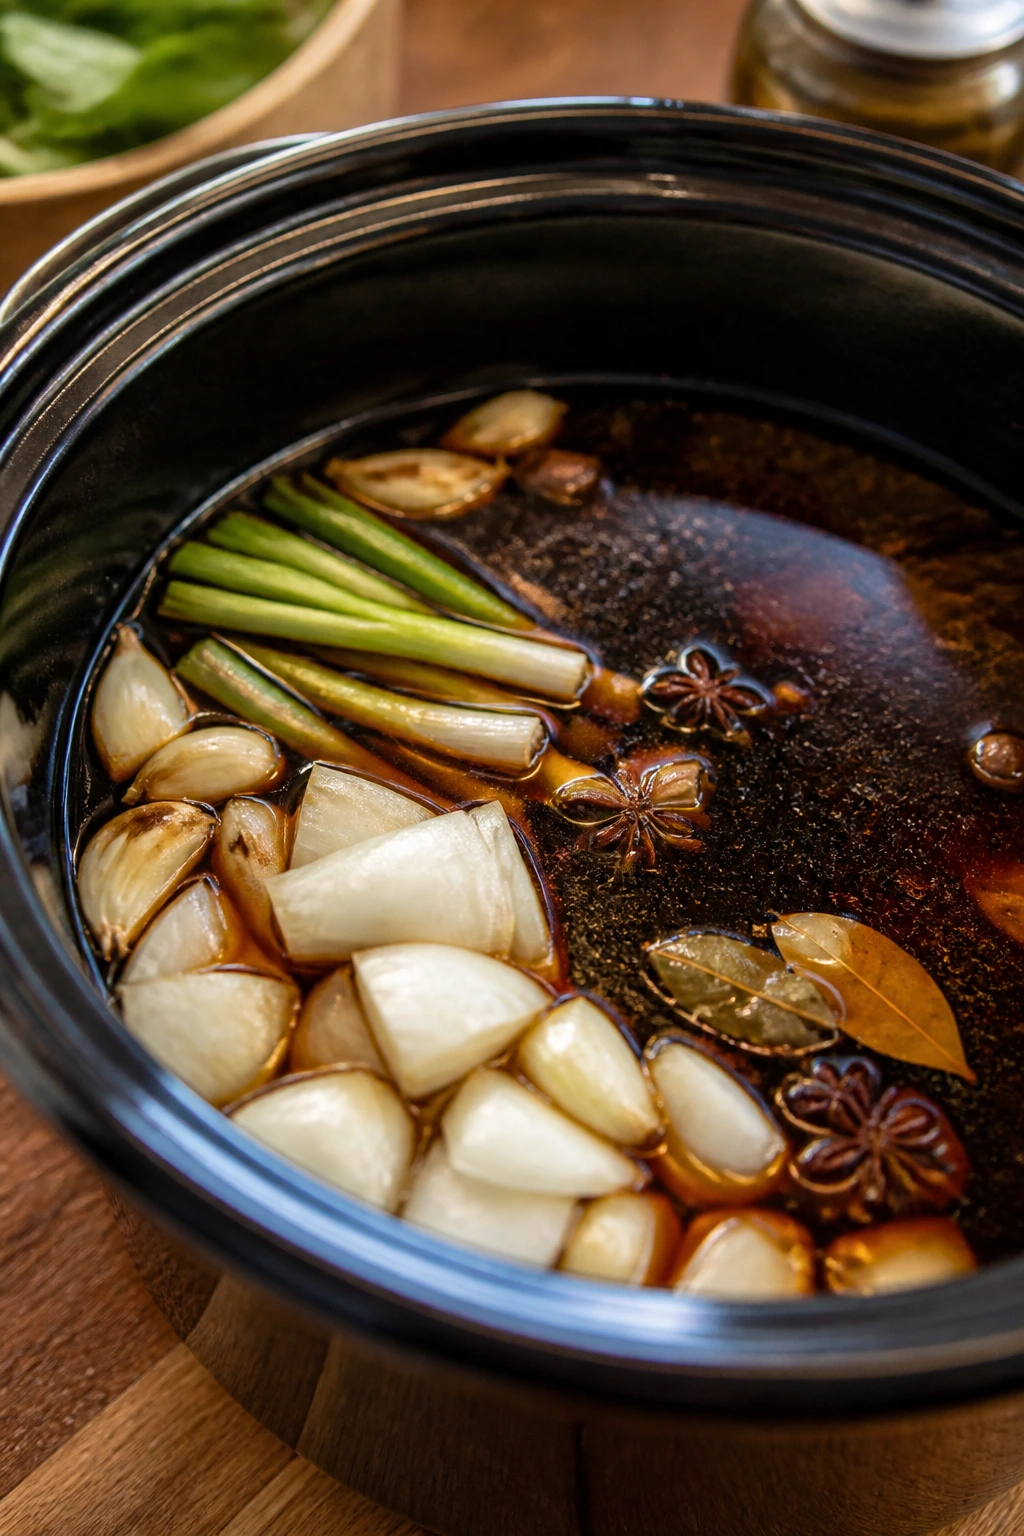
How to Layer the Slow Cooker

This is the part where the recipe becomes easy. Once the pot is loaded, you’re mostly waiting, and waiting is the point.
The onion bed does a small but useful job here. It keeps the pork belly from sitting flat against the bottom, and it softens into the sauce while the meat cooks. Garlic and ginger work best when they are tucked in around the pork instead of left floating on top, where they can dry out and turn sharp.
-
Scatter the onion, garlic, and ginger across the bottom of the slow cooker. They should form a loose bed rather than a tight layer. If your onion pieces are too thick, slice them once more; the thinner they are, the less they will fight the fork later.
-
Nestle the pork belly pieces over the aromatics and pour the sauce on top. Spoon a little sauce over each piece if you can, but do not worry about coating every square inch. The liquid should come partway up the pork, not bury it. Put the lid on, set the cooker to Low, and stop fussing.
A small warning. If the pieces are stacked in two tall layers, the top layer will still cook, but the bottom layer will pick up more sauce and become softer. That isn’t a disaster. It just means you should stir once, halfway through, if your slow cooker runs unevenly.
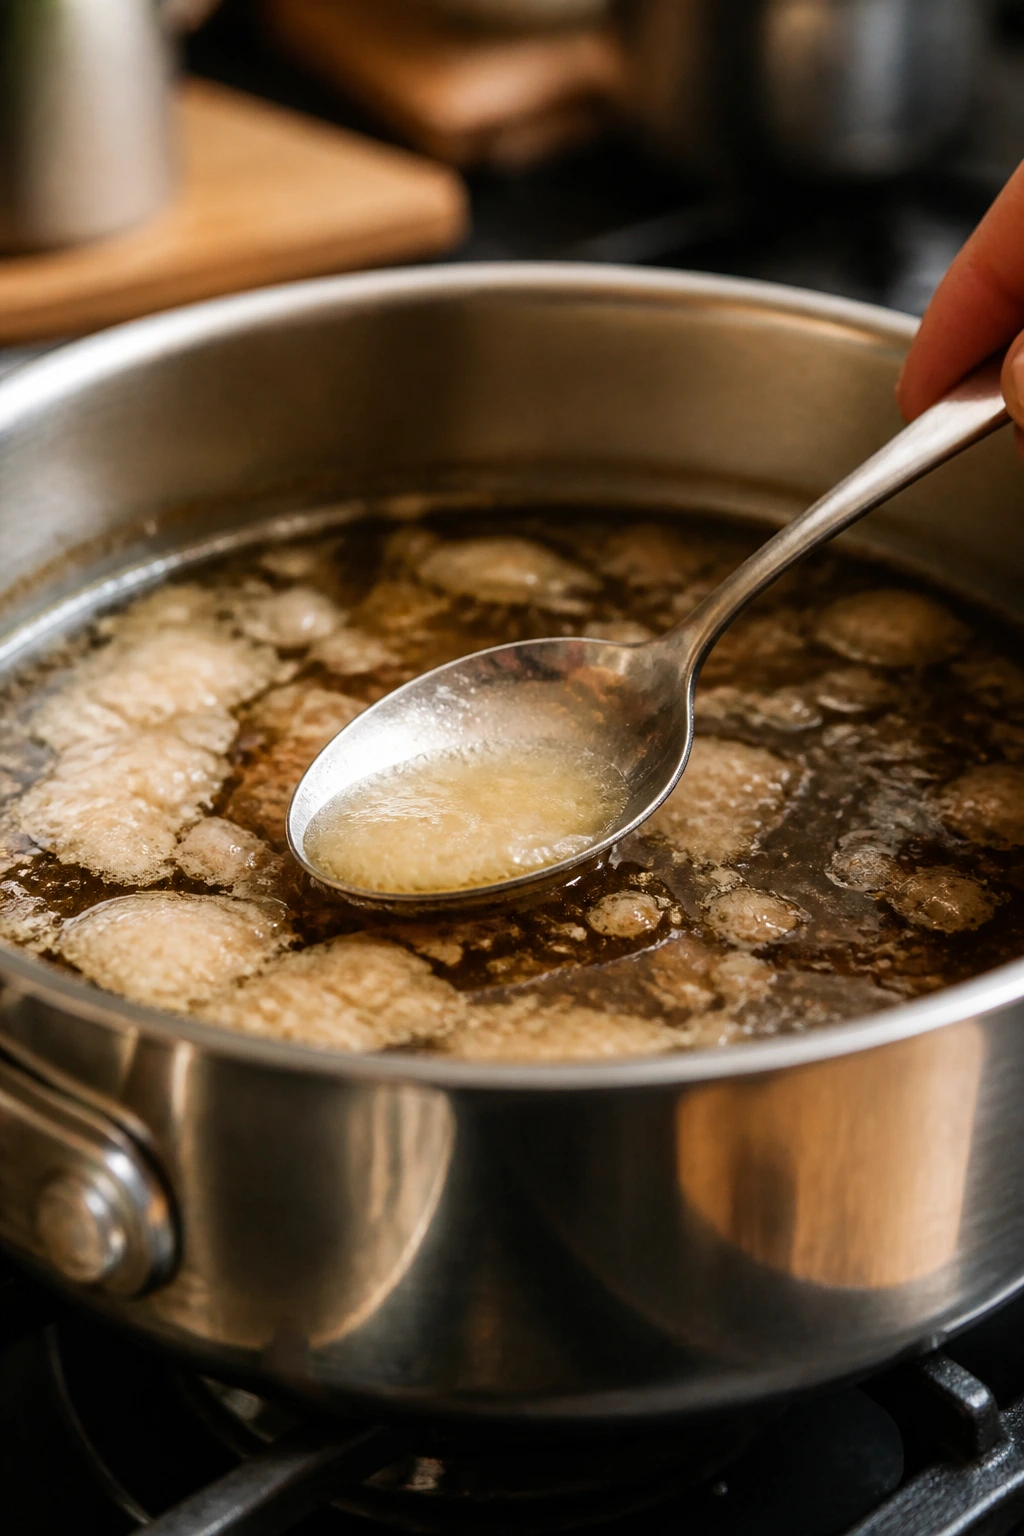
The Slow Cook That Does the Real Work
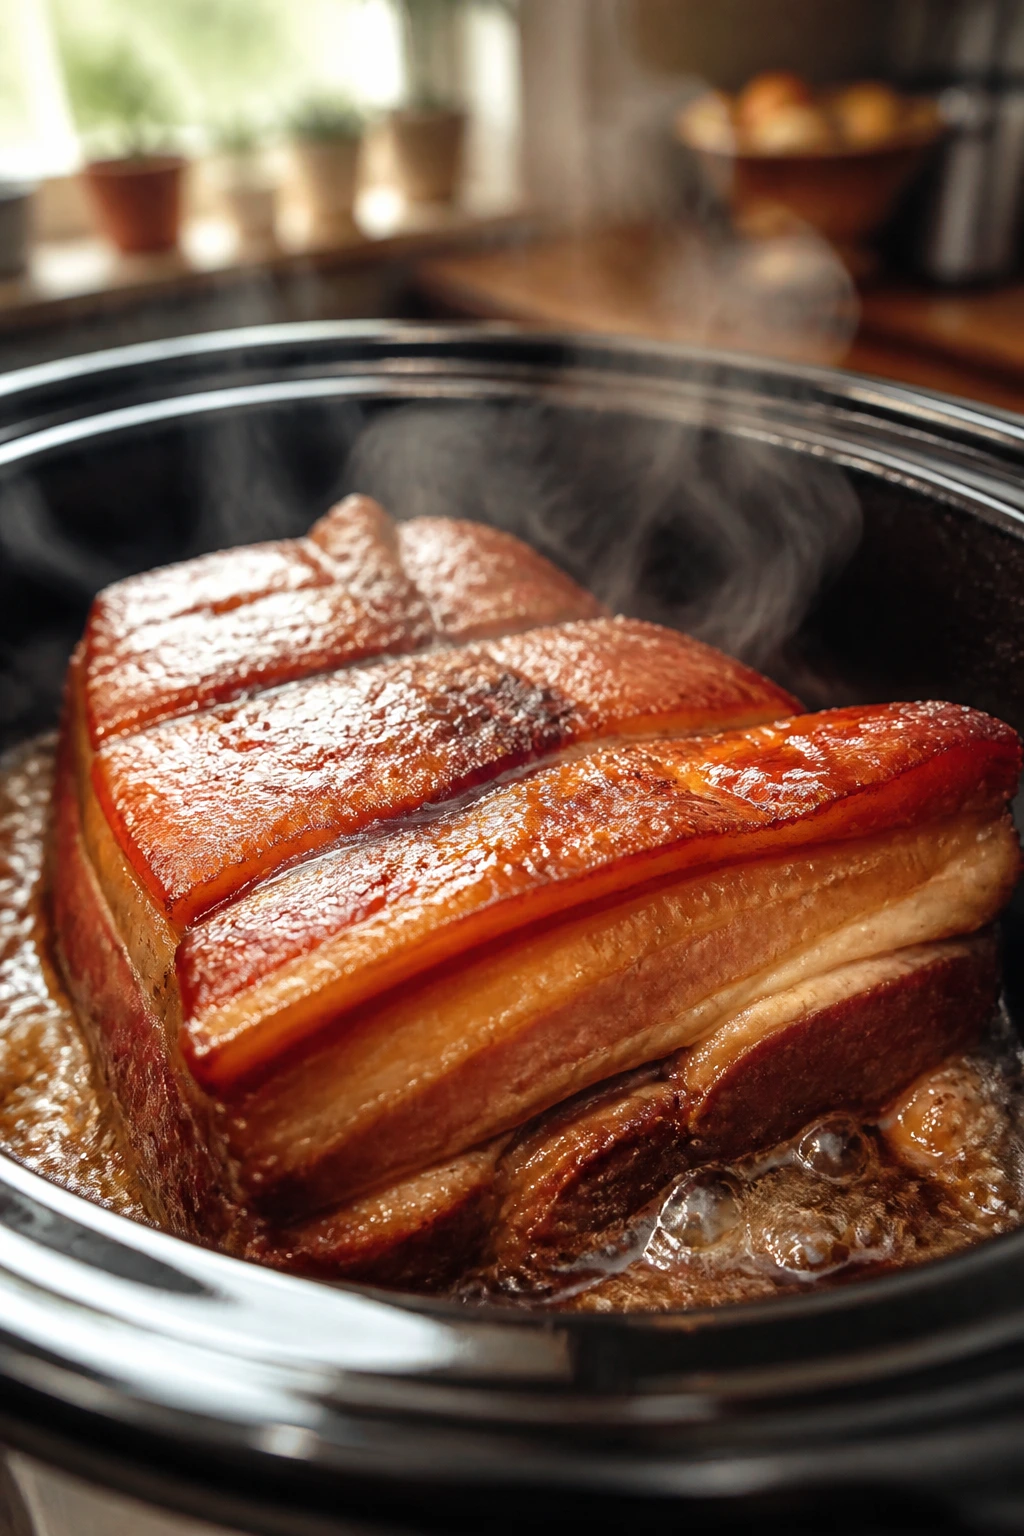
At this stage, the house starts doing the work for you. The fat gradually melts, the ginger softens, and the whole pot shifts from separate parts into one glossy, unified thing. That transformation happens slowly enough that you can miss it if you keep opening the lid, which is why I’m a little strict about leaving the cooker alone.
Pork belly is done when the meat is fork-tender and the fat has turned almost silky. If you want a number, the thickest pieces usually land somewhere around 190°F to 200°F. The texture matters more than the thermometer, though. You want a fork to glide in with little resistance, but you do not want the pieces so fragile that they collapse when you lift them.
-
Cook on Low for 6 to 7 hours, or on High for 3 to 4 hours, until the pork belly is tender. If your slow cooker tends to run hot, start checking at 5 1/2 hours on Low or 3 hours on High. The pork should bend when lifted with tongs and should give way easily when pressed with a fork.
-
Test one piece before you move on. Pull out the largest chunk and tug at it gently. If it still feels springy, give it another 30 minutes and check again. If it starts to separate into ragged strands with no real structure left, it has gone a little farther than ideal. Still usable. Just softer than I like.
There’s a narrow sweet spot here, and it’s worth hitting. The meat should be tender enough to cut with the side of a fork, but not so loose that you lose the shape entirely before the final finish.
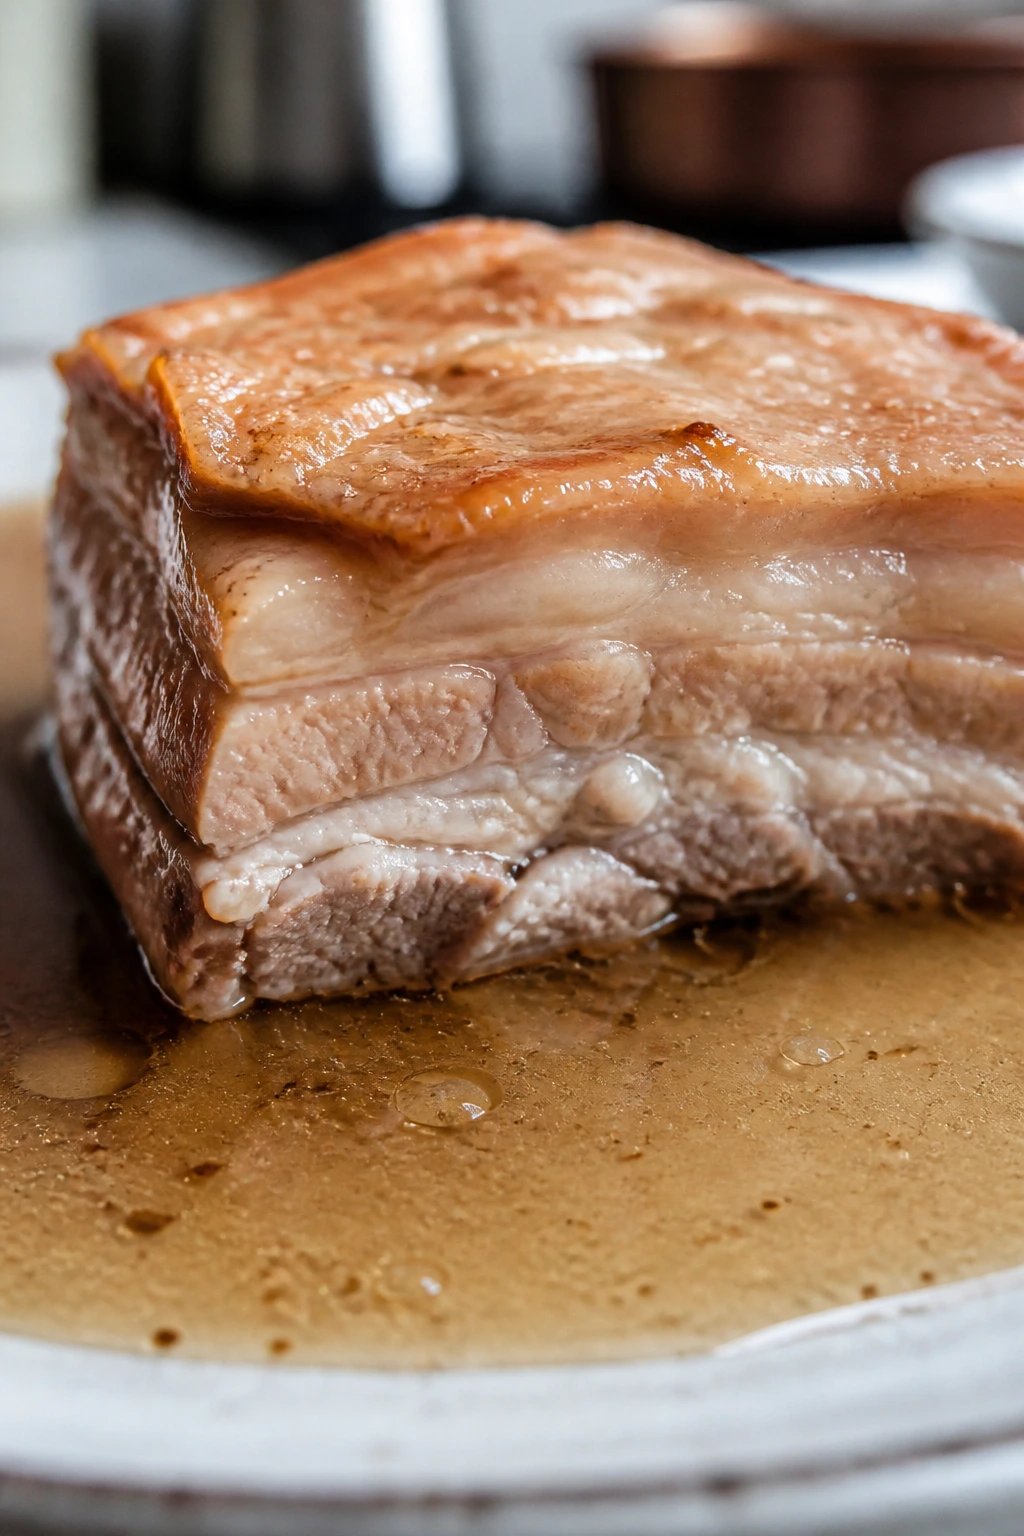
Turning the Cooking Liquid Into a Sticky Sauce
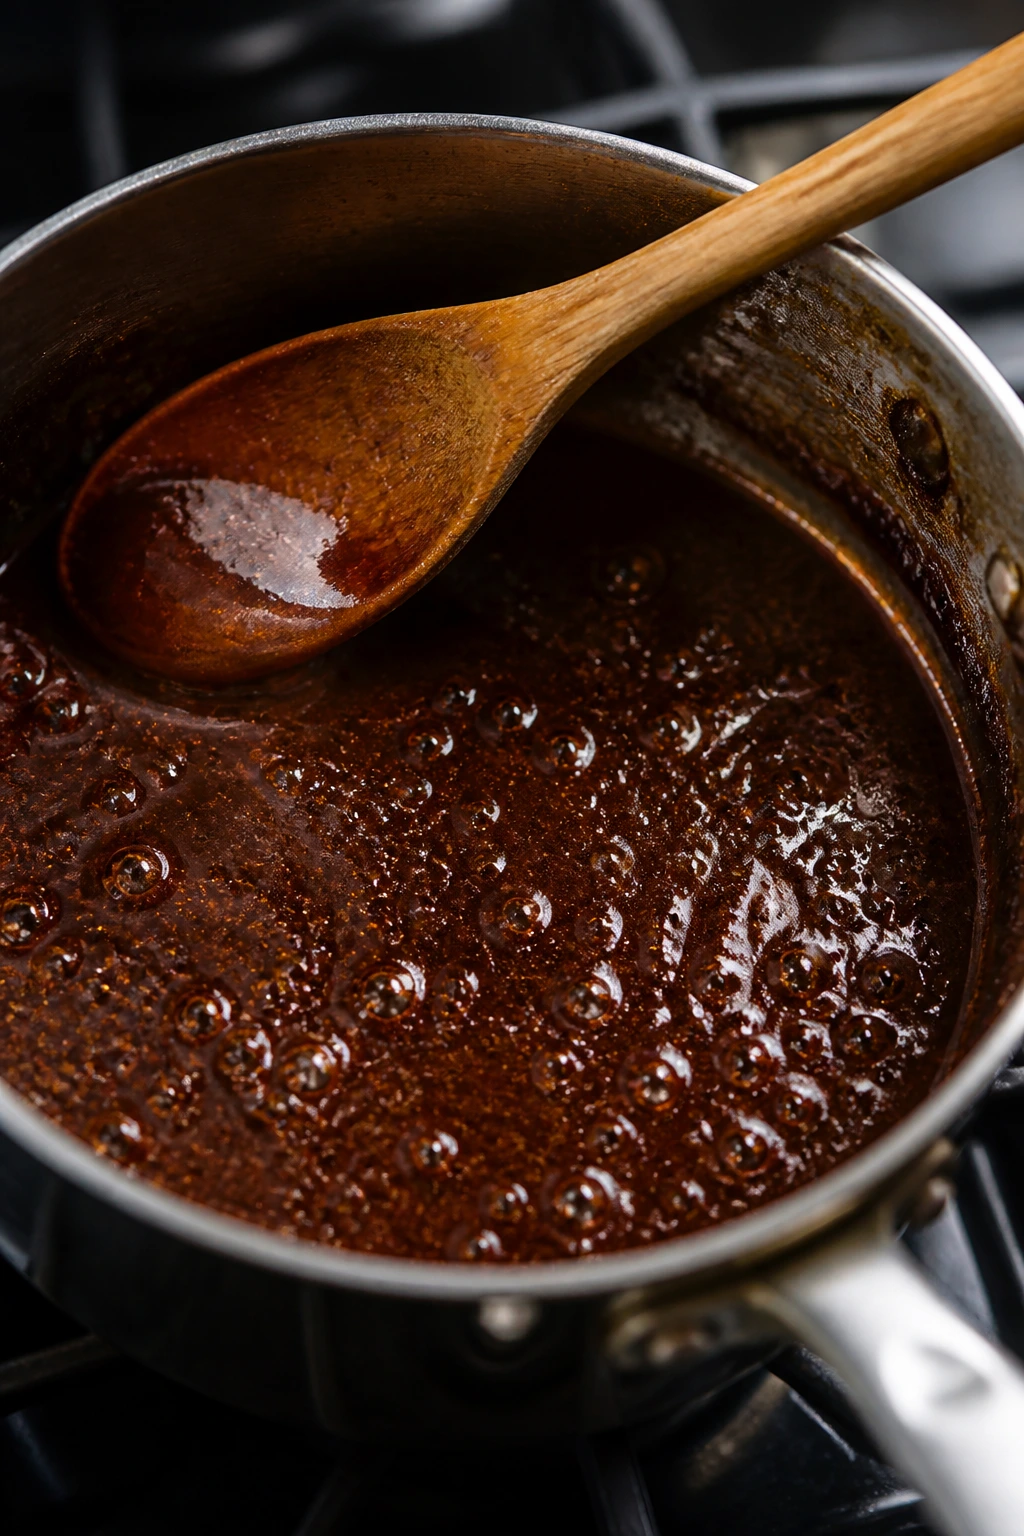
Here’s the part that separates a decent slow cooker pork belly from a memorable one. You have to treat the cooking liquid like a sauce, not a byproduct. That means skimming some fat, tightening the flavor, and giving it a little body before it goes back on the pork.
If you own a fat separator, this is its moment. If you don’t, a large spoon and a bit of patience will do. The fat will rise to the top fast enough that you can spoon off a good portion in a minute or two. Don’t obsess over removing every last drop. Pork belly is still pork belly. But you do want the sauce to coat, not slick.
-
Transfer the pork belly pieces to a rimmed sheet pan. Line the pan with foil if you want easier cleanup. Keep the pork close together but not stacked on top of each other; the broiler needs surface area to work with.
-
Strain the cooking liquid into a saucepan, skim the excess fat, and simmer it with the cornstarch slurry. Discard the cinnamon stick and star anise if you like a cleaner sauce, or leave them in for a minute or two longer if you want a stronger spice note. Bring the liquid to a simmer over medium heat, whisk in the cornstarch slurry, and cook for 2 to 3 minutes until the sauce thickens enough to coat the back of a spoon. If it gets too thick, add a tablespoon or two of water.
The sauce should look glossy, not gummy. If it turns too sticky too fast, you reduced it a little too hard; add a splash of water and whisk until it loosens. That small correction is normal. Sauces are allowed to need adjustment.
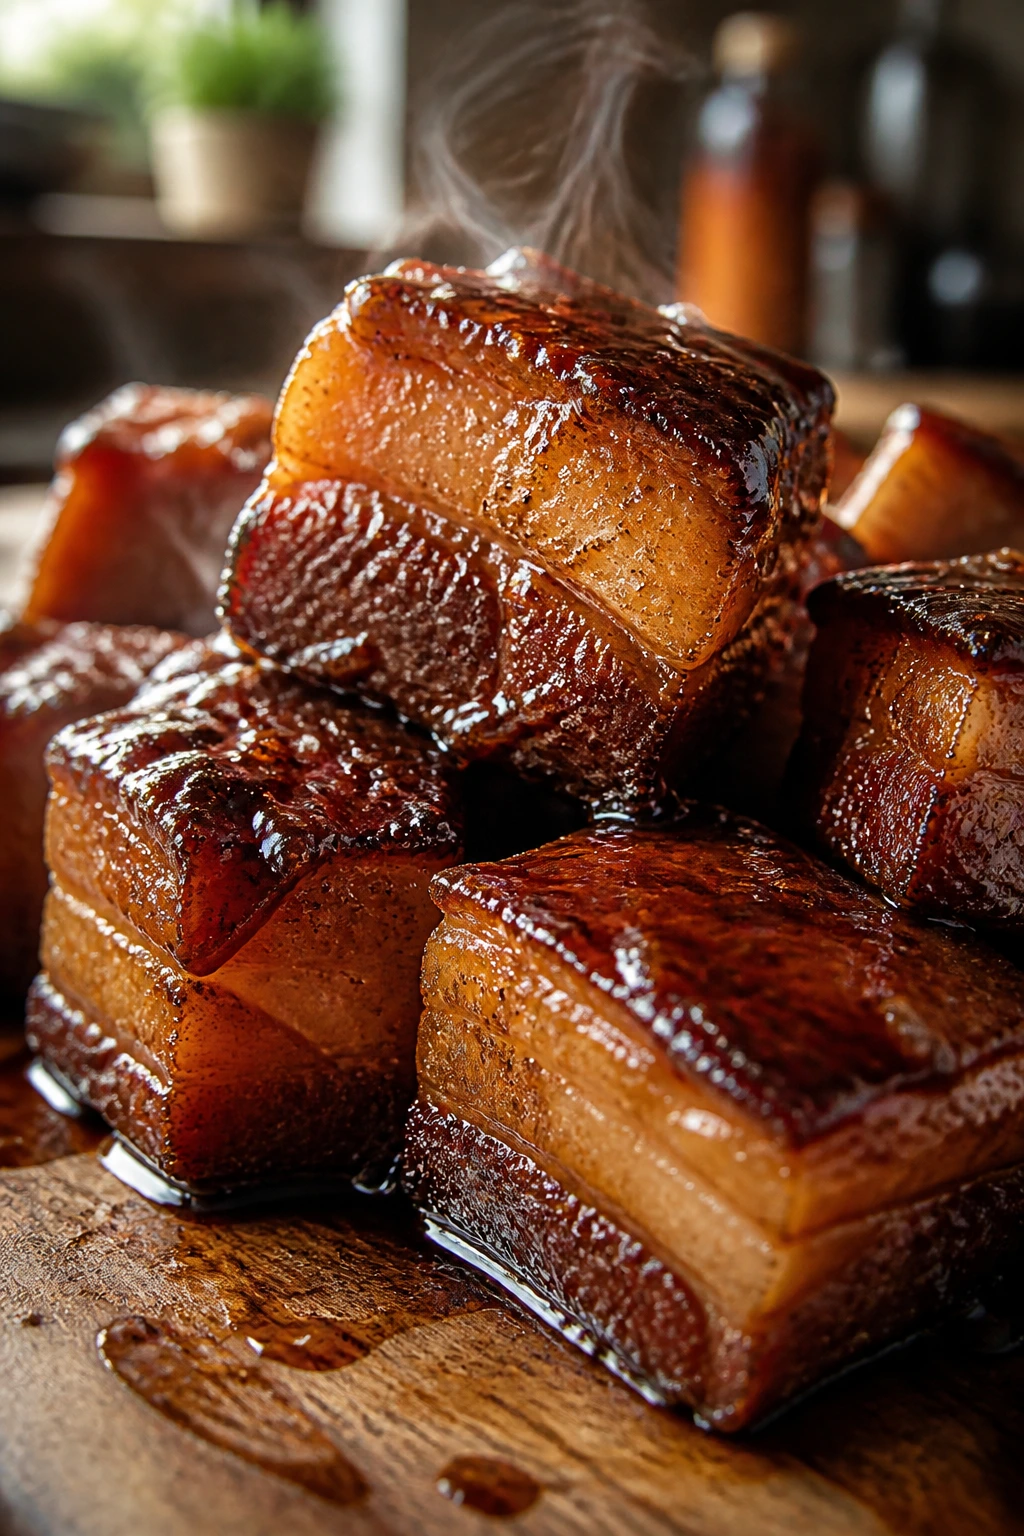
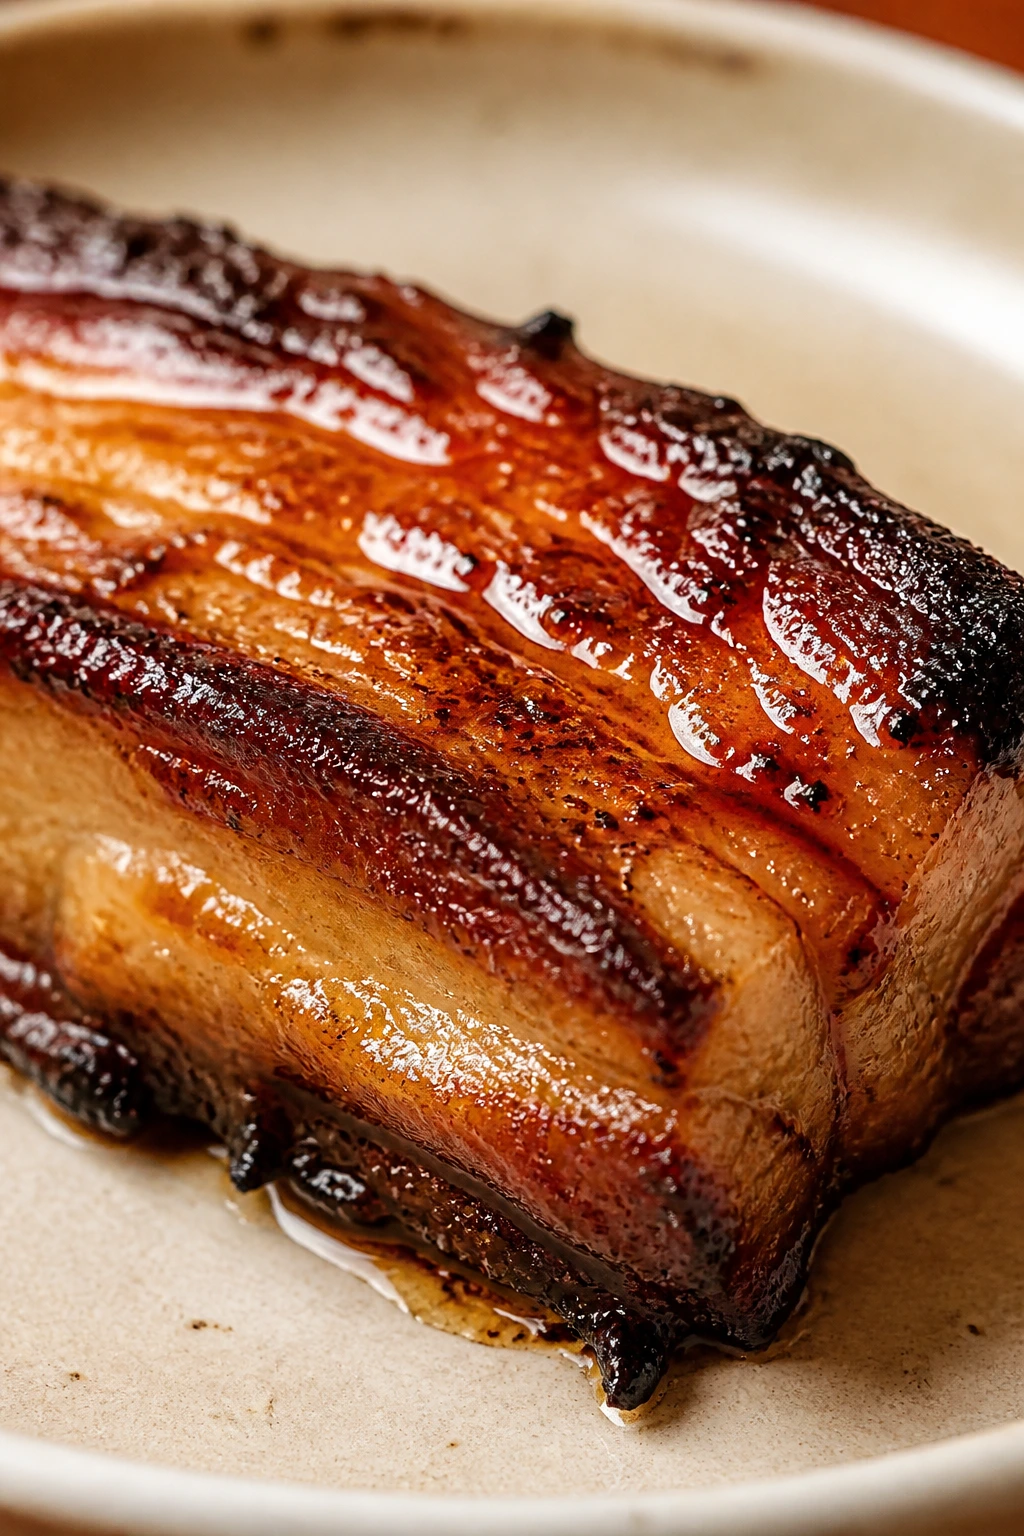
Broiling for Bronze, Not Burnt Edges
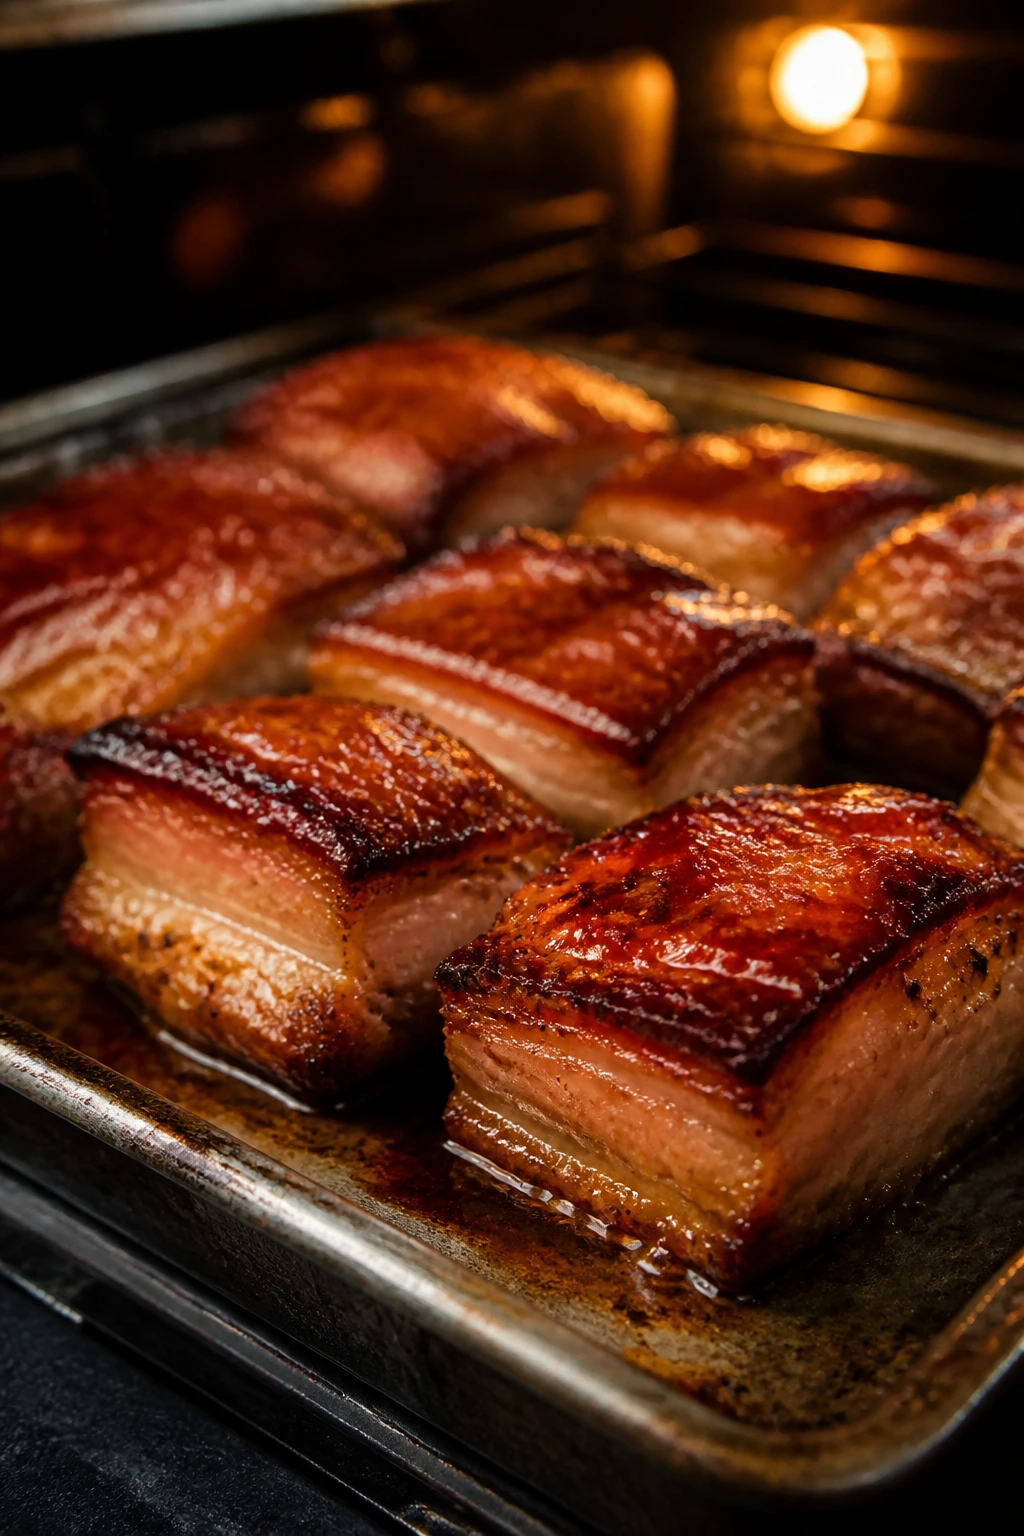
This step is short, and it matters a lot. The slow cooker makes tenderness; the broiler gives the pork belly some attitude. Five minutes can change the whole plate.
The goal is not char. The goal is bronzed edges, bubbling sauce, and a surface that looks lacquered rather than pale. If your broiler runs hot, keep the rack in the middle position rather than the very top slot. I’ve seen too many otherwise good pieces burn because someone treated the broiler like a toaster.
- Brush or spoon the thickened sauce over the pork belly and broil for 4 to 6 minutes, watching closely. If you want deeper color, flip the pieces once and brush the other side after the first few minutes. Pull the pan as soon as the edges darken and the sauce bubbles in small, sticky patches. Finish with scallions and sesame seeds, then let the pork rest for 5 minutes before serving.
That last rest is not optional. It gives the surface a minute to settle so the pieces hold together when you move them to rice or noodles. Skip it and the sauce runs everywhere. Sometimes that’s fine. Here, it’s not the look I want.
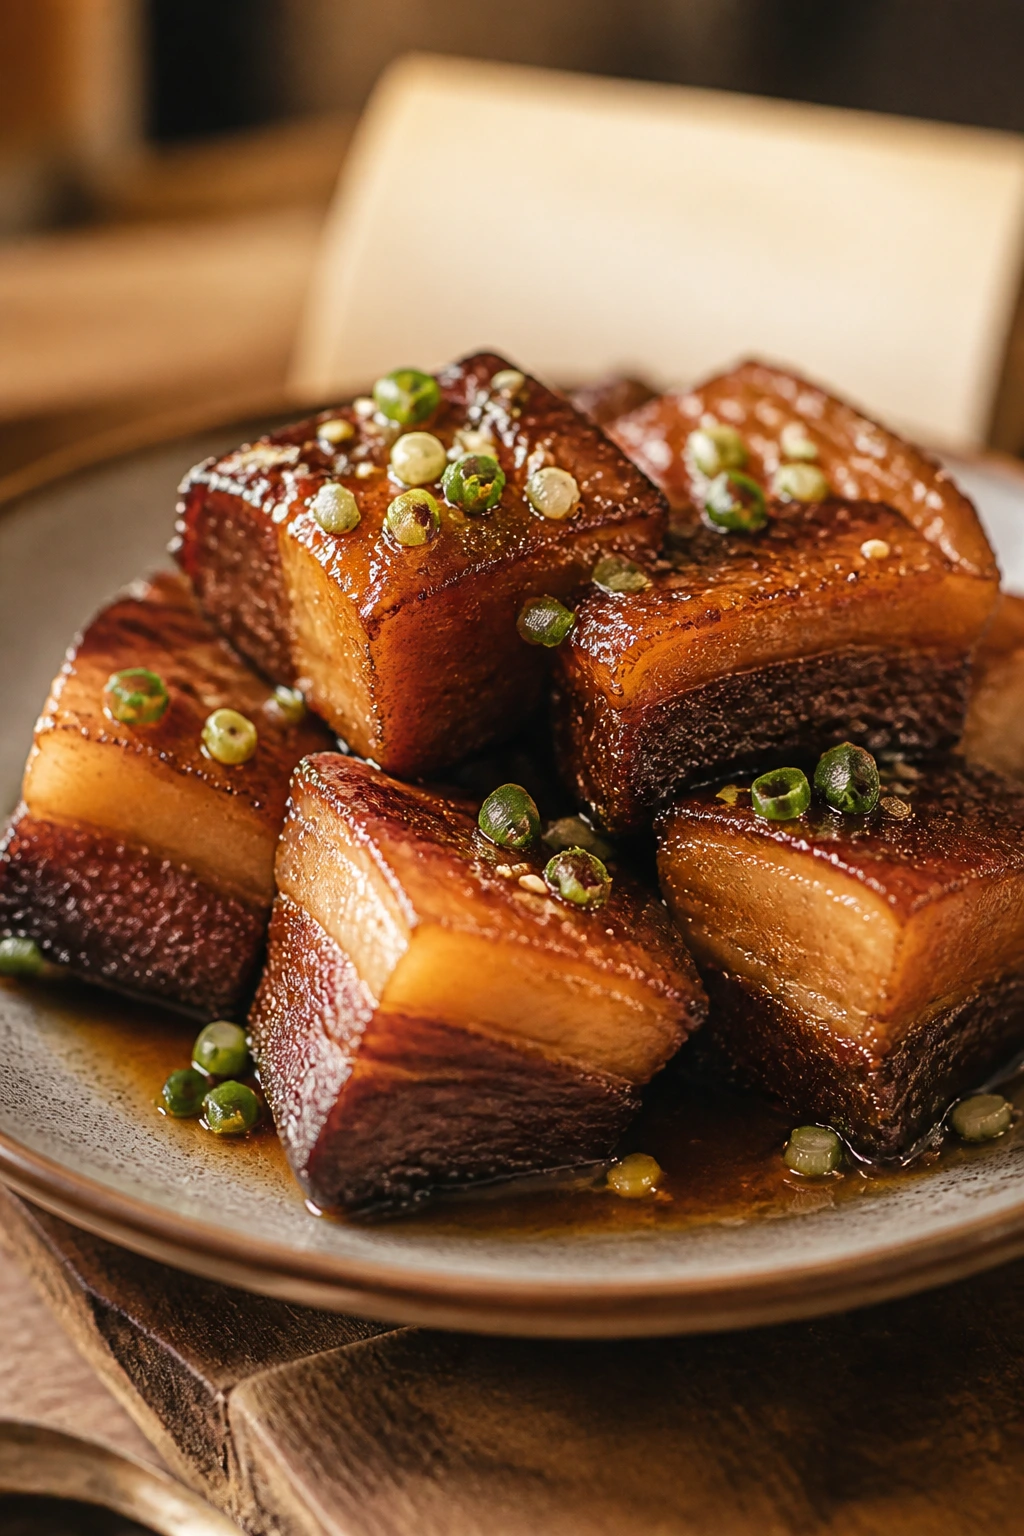
How to Serve It Without Overdoing the Plate
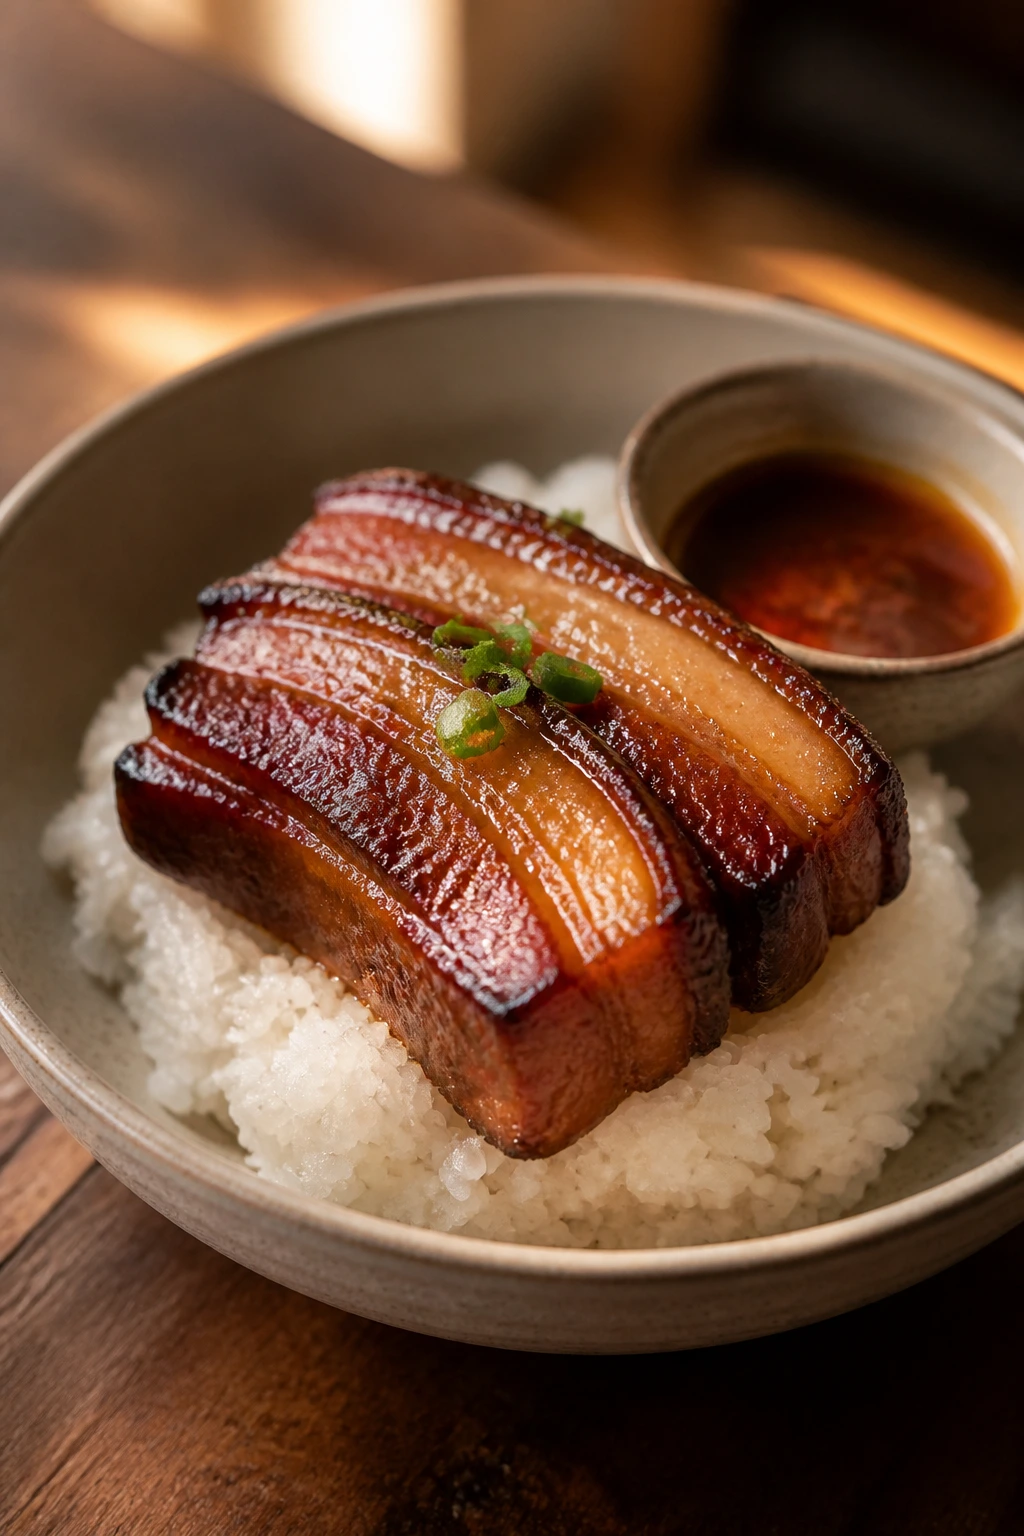
Presentation: I like this piled over a shallow bed of jasmine rice, with the sticky sauce spooned around the sides rather than dumped over the top. A few scallions and sesame seeds are enough garnish; the pork belly should look glossy and bronzed, not buried under herbs.
Accompaniments: Steamed rice is the obvious choice, and honestly the best one. If you want more contrast, add smashed cucumbers with rice vinegar and salt, quick-pickled daikon, or garlicky bok choy. Plain noodles also work, but keep the sauce amount modest so the bowl does not tip into heaviness.
Portions: This recipe serves 6 if you keep the portions sensible — about 4 to 5 ounces of cooked pork belly per person is rich enough for dinner. If you’re feeding bigger eaters, make rice or noodles the bulk of the plate and let the pork act like the star topping instead of the whole meal.
Beverage Pairing: Cold lager cuts through the fat cleanly. So does unsweetened iced tea with lemon, or sparkling water with a squeeze of lime if you want to keep things light. For something nonalcoholic with more body, ginger beer does a nice job next to the soy and ginger in the sauce.
A good plate here needs a little tension. Rich pork belly, plain rice, something crisp and acidic, maybe one green vegetable that still tastes green. That’s the formula I keep returning to because it works without making dinner feel fussy.
Practical Tips That Make a Difference
Flavor Enhancement: If you want a deeper, darker sauce, add 1 extra tablespoon of hoisin at the thickening stage and let it simmer for one more minute. It pushes the glaze toward sticky and slightly smoky without making it sugary.
Time-Saver: Mix the braising sauce the night before and keep it covered in the fridge. In the morning, all you need to do is season the pork, layer the cooker, and press start.
Pro Move: Chill the cooked pork belly for 20 to 30 minutes before slicing it if you want clean edges. The fat firms up enough that the pieces hold their shape better, especially if you plan to reheat and serve later.
Cost-Saver: Ask for a single slab of pork belly from the butcher counter rather than pre-cut, individually packaged pieces. The slab is often cheaper per pound, and you control the cut size yourself.
Texture Fix: If the sauce tastes right but feels too greasy, do not keep reducing it until it turns syrup-thick. Skim more fat first, then reduce gently. That gives you shine without the mouth-coating slickness.
I also like keeping a small bowl of extra vinegar nearby when serving. A few drops on top of the finished pork belly wake up the whole plate if the sauce feels a little heavy. That tiny acid hit can rescue a dish that’s leaning too far toward rich.
Common Pork Belly Mistakes in a Slow Cooker
-
Using too much liquid. The symptom is pork belly that tastes boiled instead of braised, with a thin sauce that never really tightens up. Fix it by keeping the braising liquid modest and letting the pork’s own fat do some of the work.
-
Expecting the slow cooker to crisp the top. It won’t. The skinless pieces may look tender, but they’ll still be soft and pale without a quick broiler finish. Pull them onto a sheet pan and broil for a few minutes if you want bronze edges and actual contrast.
-
Skipping the fat skim. Pork belly gives off a lot of fat, and if you reduce that straight into the sauce, the result can feel slick and flat. Spoon off the top layer first, then reduce what’s left.
-
Cooking on High and walking away for too long. The meat can go from nicely tender to ragged and overly soft faster than you think, especially in an older slow cooker that runs hot. Start checking early if you use High.
-
Slicing or serving immediately after broiling. The pieces are delicate at this point, and moving them too fast causes them to break apart. Let them sit for 5 minutes so the glaze settles onto the meat instead of sliding off the pan.
-
Using skin-on belly and hoping for the best. In a slow cooker, skin turns soft, not crisp. If you cannot find skinless belly, plan on extra broiler time or remove the skin before cooking.
Variations Worth Trying
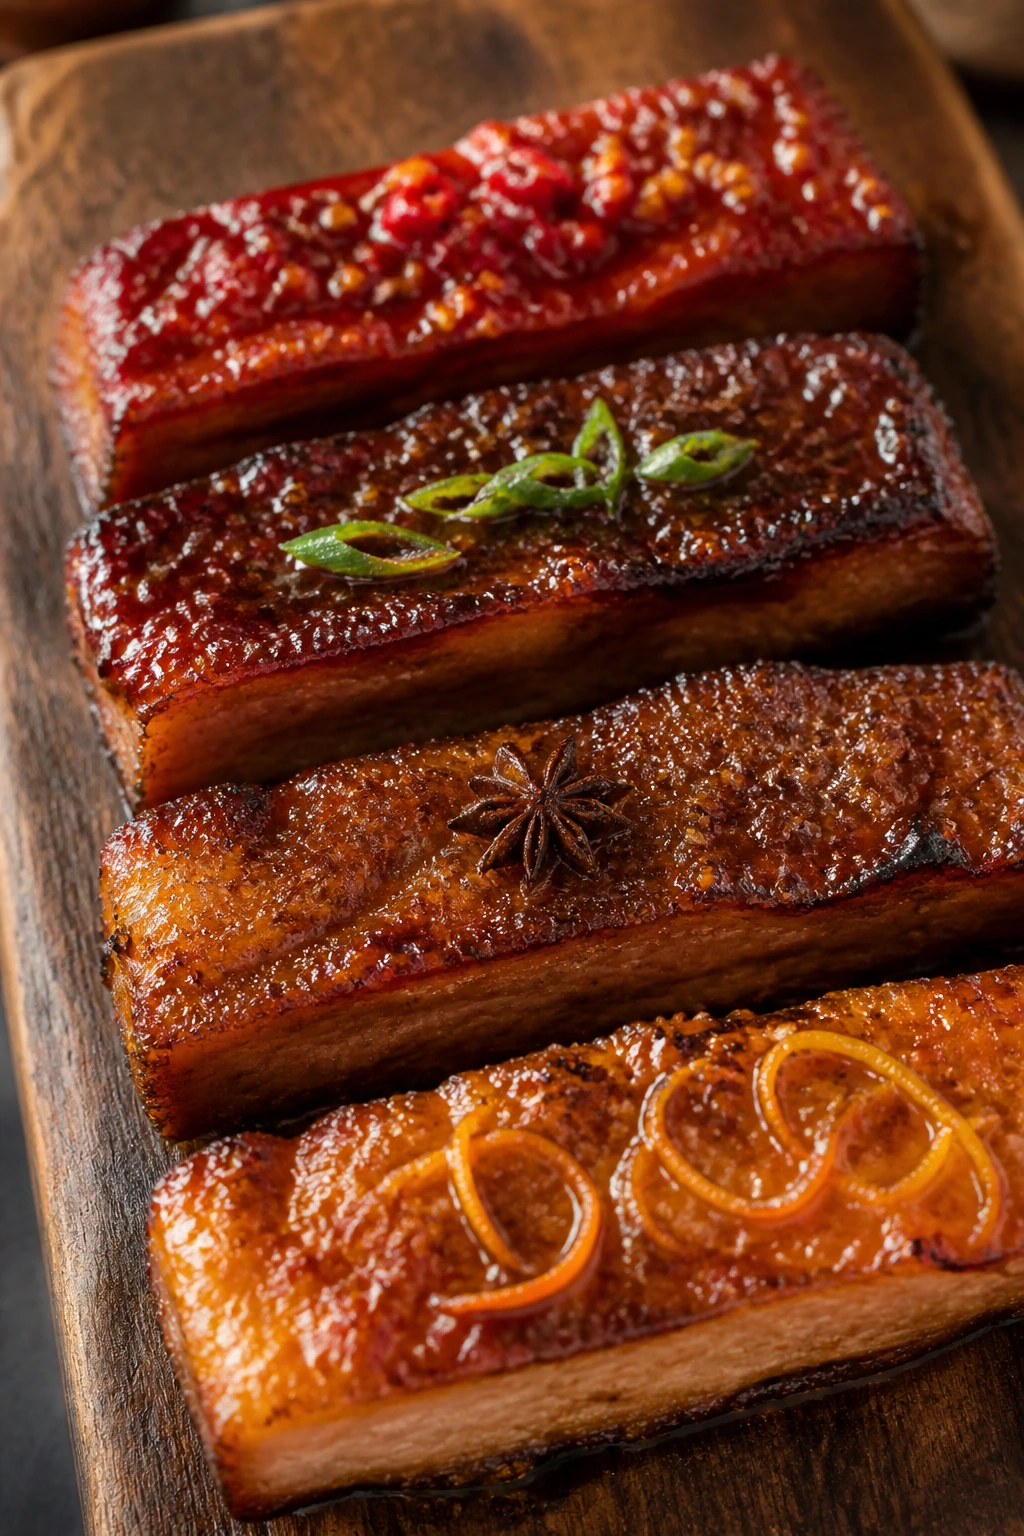
Gochujang Heat Wave
Stir 2 tablespoons of gochujang into the braising sauce and cut the brown sugar back to 2 tablespoons. The result is deeper, hotter, and a little more savory, with enough chili heat to cut through the fat. I like this with cucumber salad and plain rice.
Tamari and Honey Swap
Use tamari instead of soy sauce and add 1 tablespoon honey in place of part of the brown sugar. This keeps the dish gluten-free while giving the glaze a slightly rounder finish. If you go this route, check the sauce near the end; tamari can taste a touch sharper as it reduces.
Five-Spice Pantry Version
Skip the cinnamon stick and star anise, then use 1 1/2 teaspoons Chinese five-spice powder instead. It gives you clove, fennel, and cinnamon in a more compact form, which is handy if your spice drawer is crowded or you want a more direct, aromatic finish.
Orange-Ginger Bright Finish
Add the zest of 1 orange and 1/4 cup orange juice to the braising liquid, then reduce the water to 1/4 cup. The pork belly comes out a little brighter and less deep-brown in flavor, which works well if you plan to serve it with rice noodles or a sharper slaw.
If you like a dish to feel familiar but not static, these swaps give you a little room without changing the structure that makes the recipe work in the first place. The pork stays rich. The sauce stays glossy. You just steer the flavor one direction or another.
Make-Ahead, Storage, and Reheating
Cooked pork belly keeps well, but it needs a little respect because of the fat content. At room temperature, keep it out for no more than 2 hours. After that, into the fridge it goes. Rich meat turns on you faster than a lean roast once it’s been sitting around.
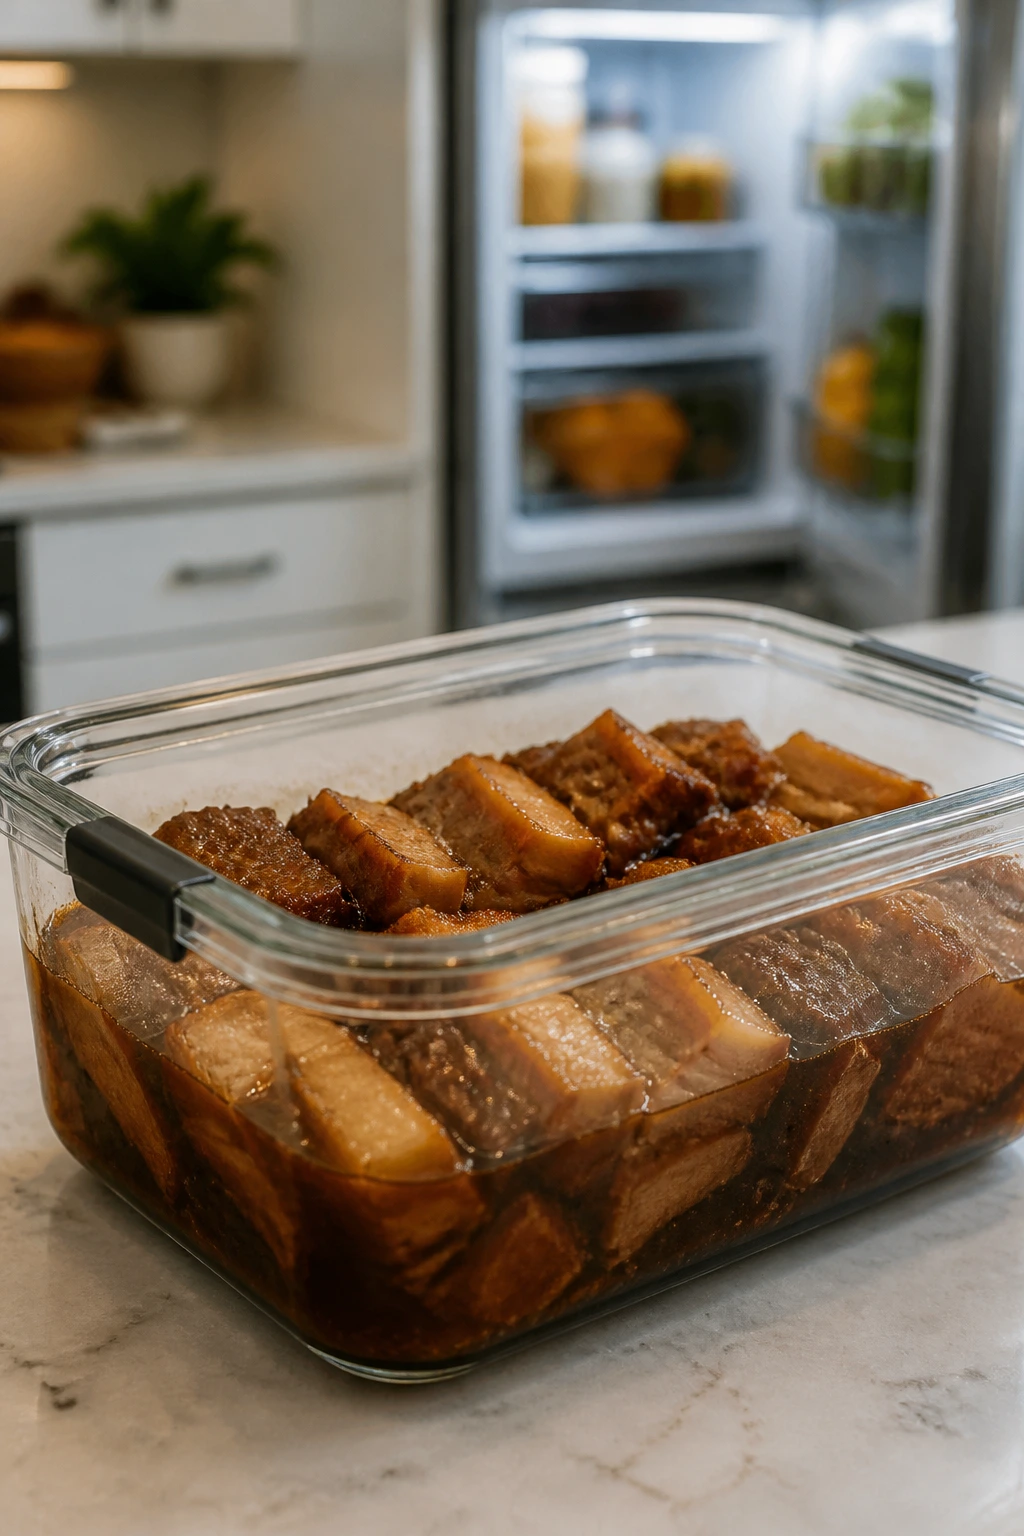
In the refrigerator, store the pork belly and sauce together in an airtight container for 3 to 4 days. I actually prefer it the next day because the fat firms up on top, which makes it easier to lift off and reheat without turning the whole thing greasy. If you want the cleanest texture, chill the meat and sauce separately, skim the fat from the top of the sauce, then recombine them when you reheat.
For the freezer, pack the pork belly with some of the sauce in a freezer-safe container or bag for up to 2 months. Press out as much air as you can so the sauce doesn’t pick up freezer flavor. Thaw overnight in the refrigerator before reheating. I do not recommend freezing the finished scallion garnish, for obvious reasons.
The best reheating method depends on how you plan to serve it. For a tray of pork belly pieces, use a 300°F oven, covered, for about 15 to 20 minutes until hot through. If you want to restore some shine, uncover it for the last 3 to 5 minutes and brush on a little extra sauce. On the stovetop, a skillet over medium-low heat with 1 to 2 tablespoons of water works well, especially if you’re only reheating a few pieces. Microwave reheating is possible, but it softens the glaze and should be the backup plan, not the first choice.
Make-ahead wise, the sauce can be mixed 1 to 2 days ahead, and the pork can be cut and salted the day before. I would not cook and broil it until you’re close to serving if you care about the edges, because the crisp finish is best fresh from the oven.
Questions People Ask Before Making It

Can I use skin-on pork belly instead of skinless?
You can, but the texture changes a lot. The skin will not crisp in the slow cooker, so you either need to remove it first or give the pieces a stronger broiler finish at the end. Skinless belly is simpler and more reliable for this recipe.
Do I need to sear the pork before slow cooking it?
No, not for this version. A sear adds flavor, but it also adds a pan to wash and takes you away from the set-and-forget part of the recipe. The sauce plus broiler finish gives you enough depth without that extra step.
Why does my pork belly look greasy when it’s done?
Because pork belly is fatty, and the slow cooker renders that fat into the liquid. The fix is to skim the top layer before you reduce the sauce, then serve the finished dish with something plain underneath, like rice or noodles, so the richness has somewhere to go.
Can I cook it on High instead of Low?
Yes, though I prefer Low because the texture is steadier. High works in about 3 to 4 hours, but you need to start checking earlier and more often. If your slow cooker runs hot, the edges can go from tender to ragged faster than expected.
What if the pork belly is still tough after the cooking time?
Give it another 30 to 45 minutes and check again. Pork belly needs enough time for the fat and connective tissue to soften, and that final stage can happen a little unevenly depending on the size of the pieces. Tough usually means it needs more time, not more heat.
Can I make this gluten-free?
Yes. Swap the soy sauce for tamari and check your hoisin sauce label, because some versions contain wheat. Everything else in the recipe works fine without changes.
Can I freeze leftovers and still get good texture later?
You can, and the result is better if you freeze the pork in its sauce rather than plain. Thaw it overnight, reheat gently, then brush with fresh sauce or a little extra thickened liquid before serving. That keeps the meat from drying out.
What sides keep the dish from feeling too heavy?
Anything with bite or acid helps. I like cucumber salad with rice vinegar, pickled vegetables, or sautéed greens with garlic. Even plain steamed bok choy does the job because it gives the plate a clean, watery contrast.
A Sticky Finish Worth Repeating
This is the kind of meal that reminds me why slow cookers still matter. Not because they make dinner vanish into a blur, but because they give a tough, fatty cut the time it needs to become tender without turning into an all-day project. Crockpot pork belly is rich by nature. The trick is guiding that richness instead of drowning in it.
The broiler finish is the last bit I’d refuse to skip. Five minutes, maybe six. That’s where the gloss appears, where the edges darken, where the sauce goes from good to something you want to spoon over rice before anyone else gets to the table.
Crockpot Pork Belly — Recipe Card
Recipe Name: Crockpot Pork Belly
Description: Tender pork belly slow-cooked with soy sauce, garlic, ginger, brown sugar, and rice vinegar, then broiled until the edges are sticky and bronzed. Rich, savory, and made for rice.
Prep Time: 20 minutes
Cook Time: 6 to 7 hours on Low, plus 5 minutes under the broiler
Total Time: 6 hours 25 minutes to 7 hours 25 minutes
Course: Dinner, Main Course
Cuisine: Asian-inspired
Servings: 6 servings
Calories: About 730 kcal per serving
Ingredients
For the Pork Belly:
- 3 pounds skinless pork belly, cut into 2-inch pieces
- 1 teaspoon kosher salt
- 1/2 teaspoon freshly ground black pepper
For the Braising Sauce:
- 1 large yellow onion, sliced into thin half-moons
- 6 garlic cloves, smashed
- 1 2-inch piece fresh ginger, peeled and sliced
- 1 cup low-sodium soy sauce
- 1/2 cup water
- 1/3 cup packed light brown sugar
- 1/4 cup rice vinegar
- 2 tablespoons hoisin sauce
- 1 tablespoon toasted sesame oil
- 2 star anise
- 1 cinnamon stick
- 1/2 teaspoon crushed red pepper flakes, optional
For the Finish:
- 1 tablespoon cornstarch
- 1 tablespoon cold water
- 2 scallions, thinly sliced
- 1 teaspoon toasted sesame seeds
Instructions
-
Pat the pork belly dry, season it with the salt and pepper, and cut it into 2-inch pieces if needed.
-
Whisk the onion, garlic, ginger, soy sauce, water, brown sugar, rice vinegar, hoisin, sesame oil, star anise, cinnamon stick, and red pepper flakes in a bowl.
-
Add the onion, garlic, and ginger to the bottom of the slow cooker, then nestle the pork belly pieces on top.
-
Pour the sauce over the pork belly, cover, and cook on Low for 6 to 7 hours, or High for 3 to 4 hours, until fork-tender.
-
Transfer the pork belly to a foil-lined rimmed sheet pan. Strain the cooking liquid into a saucepan and skim off excess fat.
-
Bring the sauce to a simmer over medium heat, whisk in the cornstarch slurry, and cook for 2 to 3 minutes until glossy and slightly thickened.
-
Spoon or brush the sauce over the pork belly and broil for 4 to 6 minutes, watching closely, until the edges are bronzed and sticky.
-
Rest for 5 minutes, then garnish with scallions and sesame seeds and serve warm.
Notes: For a gluten-free version, use tamari instead of soy sauce. Skinless pork belly is easiest here, and the broiler finish is what gives the dish its best texture.