
Boneless chicken breast gets blamed for being dry, but the real problem is usually how fast people push it past the point where the meat still feels supple. The cut is lean, the shape is awkward, and the thin tail end cooks long before the thick center catches up. One minute too long in a hot pan can turn a decent Tuesday-night dinner into something stringy at the edges and chalky in the middle.
That does not mean boneless chicken breast is doomed. It means the cut asks for a little respect. A flat surface, a bit of salt, a hot skillet, and an instant-read thermometer change the whole experience. Suddenly the chicken slices cleanly, stays juicy under a fork, and still gets the browned, savory edges that make dinner feel finished instead of merely cooked.
The trick is not to fuss harder. It is to stop guessing. Once you understand where the moisture leaves, where the heat moves fastest, and where to pull the chicken off the burner, the whole process gets calmer. The fix starts before the pan even heats.
Why This Method Earns Its Keep
-
Even thickness matters: Pounding the thick end of the breast to about ½ to ¾ inch keeps the last bite as tender as the first, instead of serving you one dry edge and one underdone center.
-
Salt ahead of time: A quick dry brine of 15 to 30 minutes gives the meat time to absorb seasoning and hold onto more moisture; if you have an hour, even better.
-
Hot pan, short cook: A medium-high skillet builds browning fast, which means the chicken spends less time drying out while still picking up that savory crust.
-
Thermometer over guesswork: Pulling the chicken around 160 to 162°F and letting it rest to 165°F keeps you out of the danger zone and out of the “why is this so tough?” zone.
-
Works with real life: The same prep works for pan-searing, oven finishing, and air frying, so dinner can bend around the tools you already have.
-
Leftovers stay useful: Properly cooked chicken breast slices neatly for wraps, salads, pasta, and rice bowls instead of turning stringy the next day.
Why Boneless Chicken Breast Gets Dry So Fast
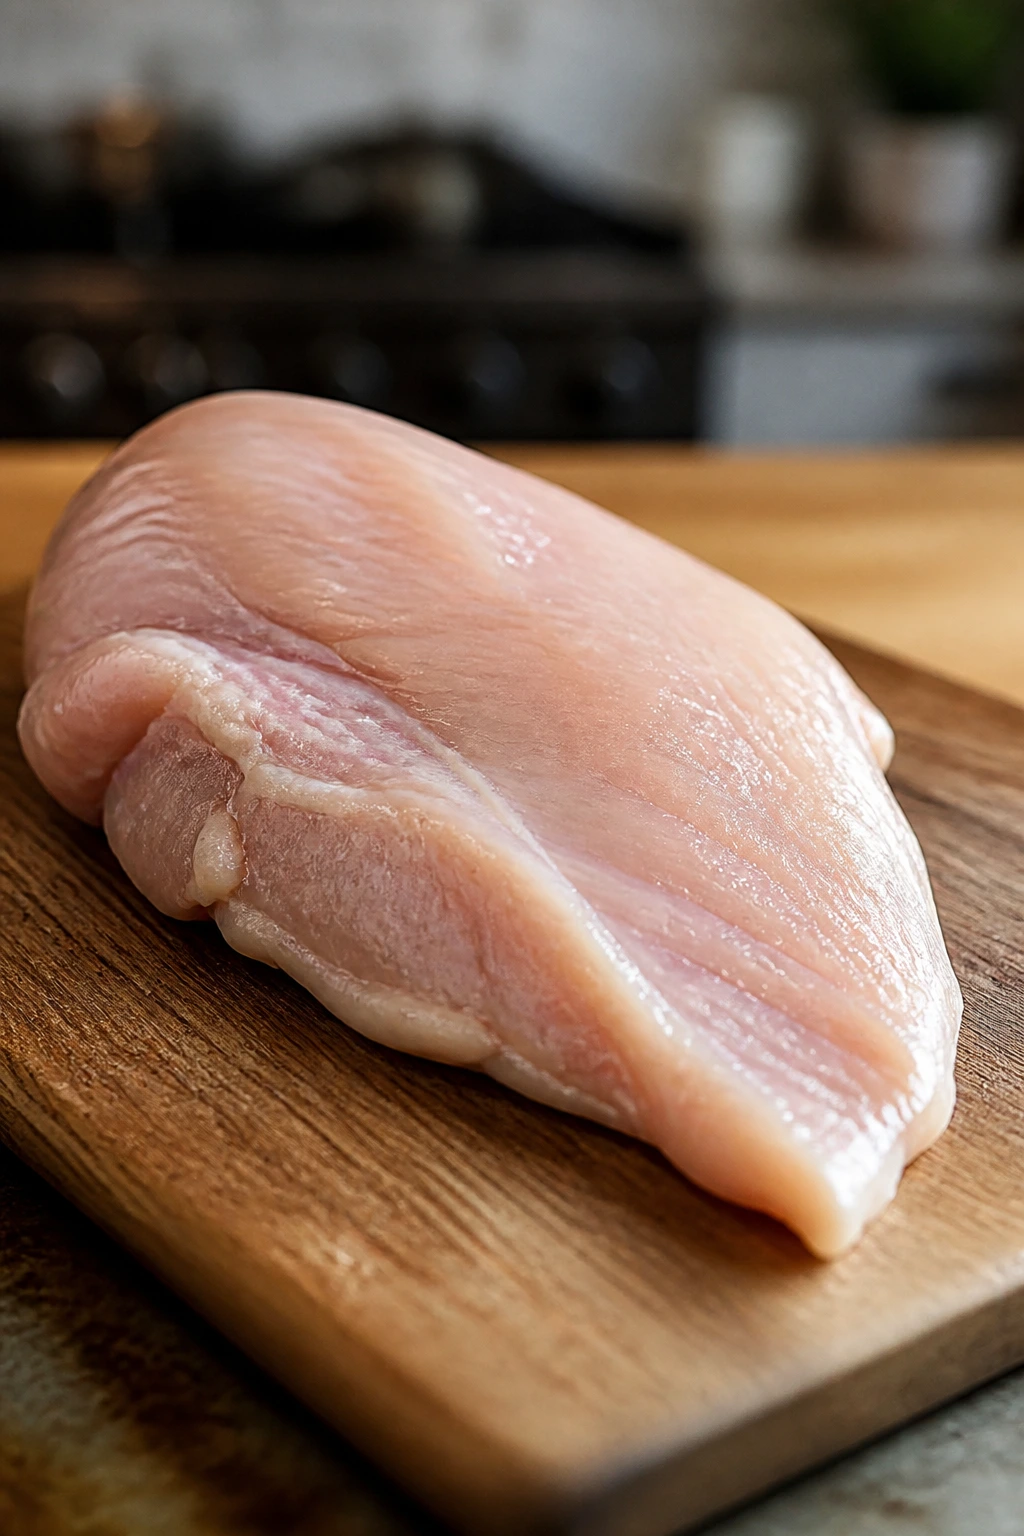
The first thing to understand is that boneless chicken breast is not badly behaved. It is just lean. There is very little fat to cushion the cooking process, and there is almost no connective tissue to melt and forgive a few extra minutes in the heat. That makes timing matter more than it does with thighs, drumsticks, or any cut that comes with more fat and structure.
The shape causes trouble, too. Most supermarket breasts are thick on one end and thin on the other, sometimes with a little flap that cooks in a blink. If you cook the whole piece as one even chunk, the thin edge reaches done first and then keeps going while the center catches up. By the time the thickest part is ready, the outer layers have already tightened.
The Shape Problem
A breast that looks “normal” in the package can still be wildly uneven once it hits the board. That hump on top is usually the part people cut into first, because it looks done from the outside while the underside is still building heat. The narrow tail is even more deceptive. It can feel harmless, but it is the first thing to overcook.
Butterflying or pounding the breast solves most of that. So does simply buying similar-sized pieces and sorting the tiny ones from the giant ones before you cook. Ten seconds of attention here saves you from guessing later.
The Moisture Problem
Chicken breast loses moisture when the proteins tighten too fast. That means high heat is not the enemy by itself; uncontrolled heat is. A hot skillet with a short cook time works because the outside browns quickly while the inside has only a brief path to the finish line.
Moisture on the surface matters, too. Water has to leave before browning can start, and that first burst of steam is useful only for drying the surface. After that, it slows you down. Patting the chicken dry before seasoning is not a fussy chef move. It is one of the few easy things that makes a visible difference in the pan.
The Salt Problem
Salt gets talked about like magic, which is annoying, but there is a plain reason it helps here. A little time with salt on the surface changes how the meat holds water and seasons the inside more evenly. Salt right before cooking still helps, but it does not do quite the same work.
That is why the method in this article leans on a short dry brine when possible. It is not a long project. Fifteen minutes is enough to matter. Thirty is better. Overnight is a nice bonus if the rest of dinner is already mapped out.
The Few Prep Moves That Change the Texture
The best boneless chicken breast for weeknight dinners does not start in the pan. It starts on the board with a knife, a towel, and a small amount of attention. That part is boring. Good. Boring is what makes Tuesday night easier.
Trim the floppy edge
Most breasts have a little thin strip or loose flap on one side. Trim away only the obvious dangling bit if it is very thin, or tuck it under if you are keeping the piece whole. Do not carve the breast into a sad, skinny oval unless you need cutlets. You want to even the shape, not destroy it.
If the breast is huge, weigh it mentally against the pan. Very large pieces often do better if you butterfly them into two thinner cutlets. That sounds like more work, but it is actually less stressful once the heat is on.
Pound the thick end, not the whole thing into submission
Put the chicken between two pieces of parchment or in a zip-top bag with the air pressed out. Use the flat side of a meat mallet, a rolling pin, or even the bottom of a small skillet. Aim for an even thickness, usually around ½ to ¾ inch.
You are not trying to make chicken schnitzel unless you want chicken schnitzel. You are trying to remove the dramatic difference between the thick hill and the thin tail. Tap from the center outward. Gentle is better than violent here. A breast that has been smashed into a jagged sheet cooks unevenly again, which defeats the whole point.
Salt ahead and let the surface dry a little
Season with about 1 teaspoon kosher salt per pound of chicken, plus pepper and any dry spices you like. If you are using table salt, back off a little because it is denser. Then let the chicken sit for 15 to 30 minutes if you can. If you have an hour or more, set it on a rack in the fridge so the surface dries a touch.
That short rest does two jobs. First, the salt gets moving into the meat instead of sitting on the surface in a salty crust. Second, the outside loses a little moisture, which helps the browning happen faster in the pan.
If the chicken starts to look wet again after sitting, blot it lightly before it goes into the skillet. Dry surface, hot pan, short cook. That rhythm matters more than most people think.
My Weeknight Method for Juicy Chicken Breast
This is the method I reach for when dinner needs to be solid, not theatrical. It gives you browned chicken with enough control to avoid the dry, cottony slice that ruins the mood. It also works with whatever side dish is hanging around in the fridge, which is half the point.
For 2 to 3 servings:
- 1 to 1½ pounds boneless skinless chicken breasts, pounded to even thickness
- 1 teaspoon kosher salt
- ½ teaspoon black pepper
- ½ teaspoon garlic powder
- ½ teaspoon smoked paprika
- 1 tablespoon neutral oil, such as avocado, canola, or grapeseed
- 1 tablespoon unsalted butter
- 2 garlic cloves, smashed, optional
- 1 teaspoon lemon juice or chopped parsley for finishing, optional
Prep the chicken
-
Pat the chicken breasts dry with paper towels. If there is a thin flap on one side, trim only the obvious dangling bit or fold it under.
-
Pound each breast to an even thickness of about ½ to ¾ inch. A little taper is fine. A dramatic thick mound is not.
-
Season both sides with the salt, pepper, garlic powder, and smoked paprika. If you have time, let the chicken sit 15 to 30 minutes before cooking.
Cook the chicken
-
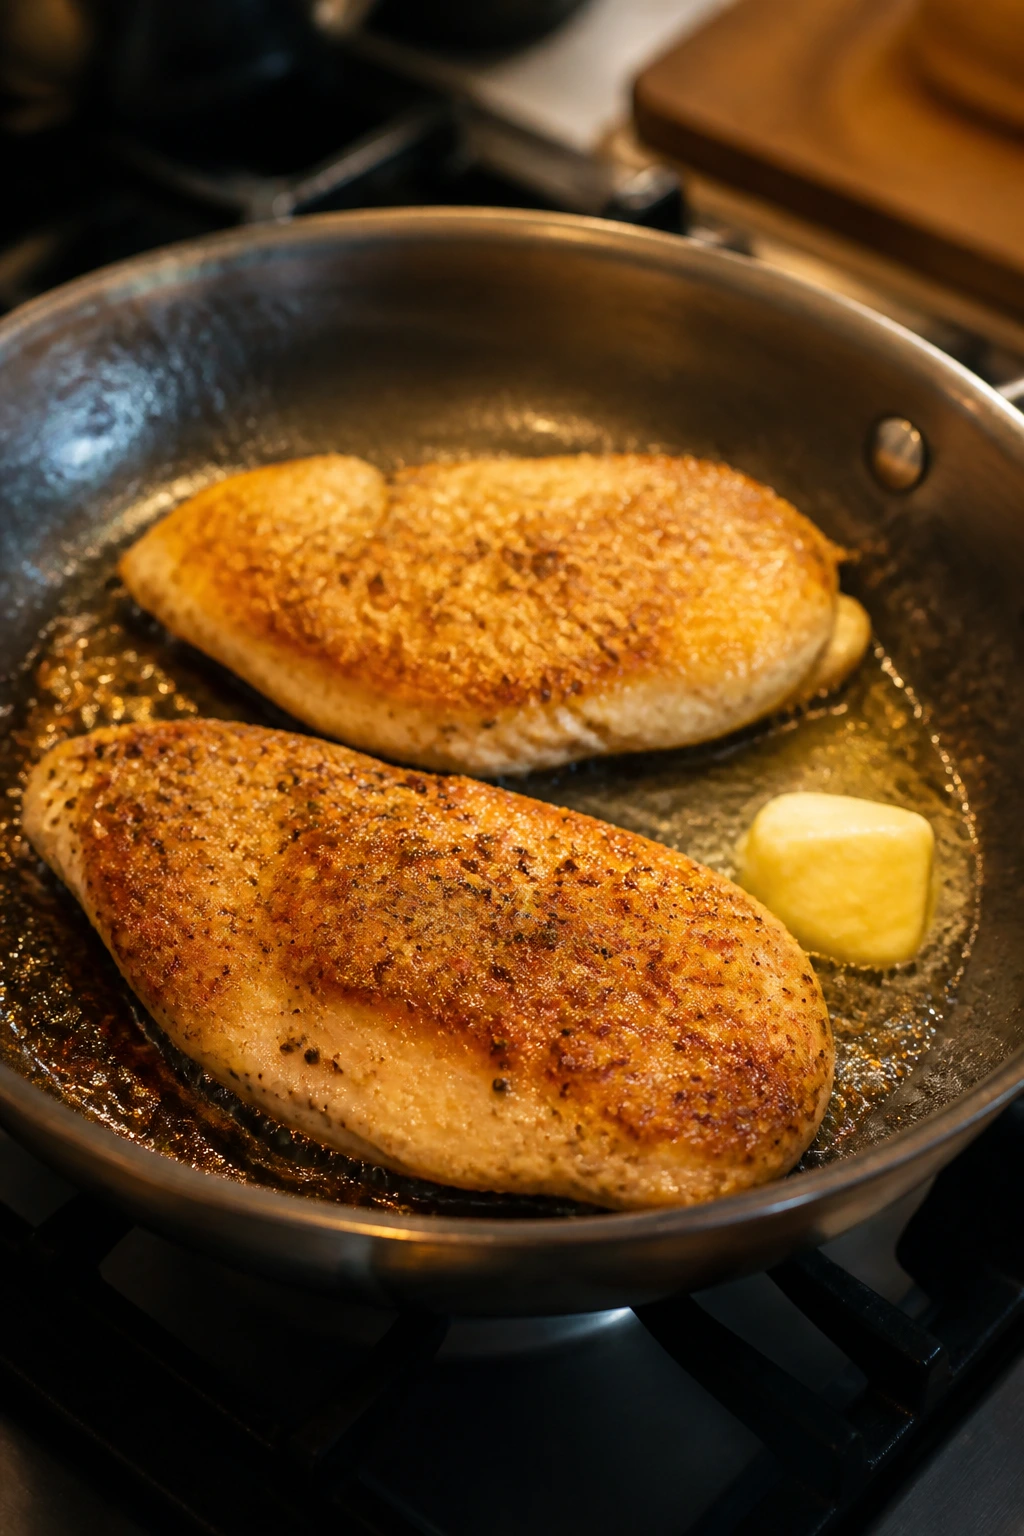
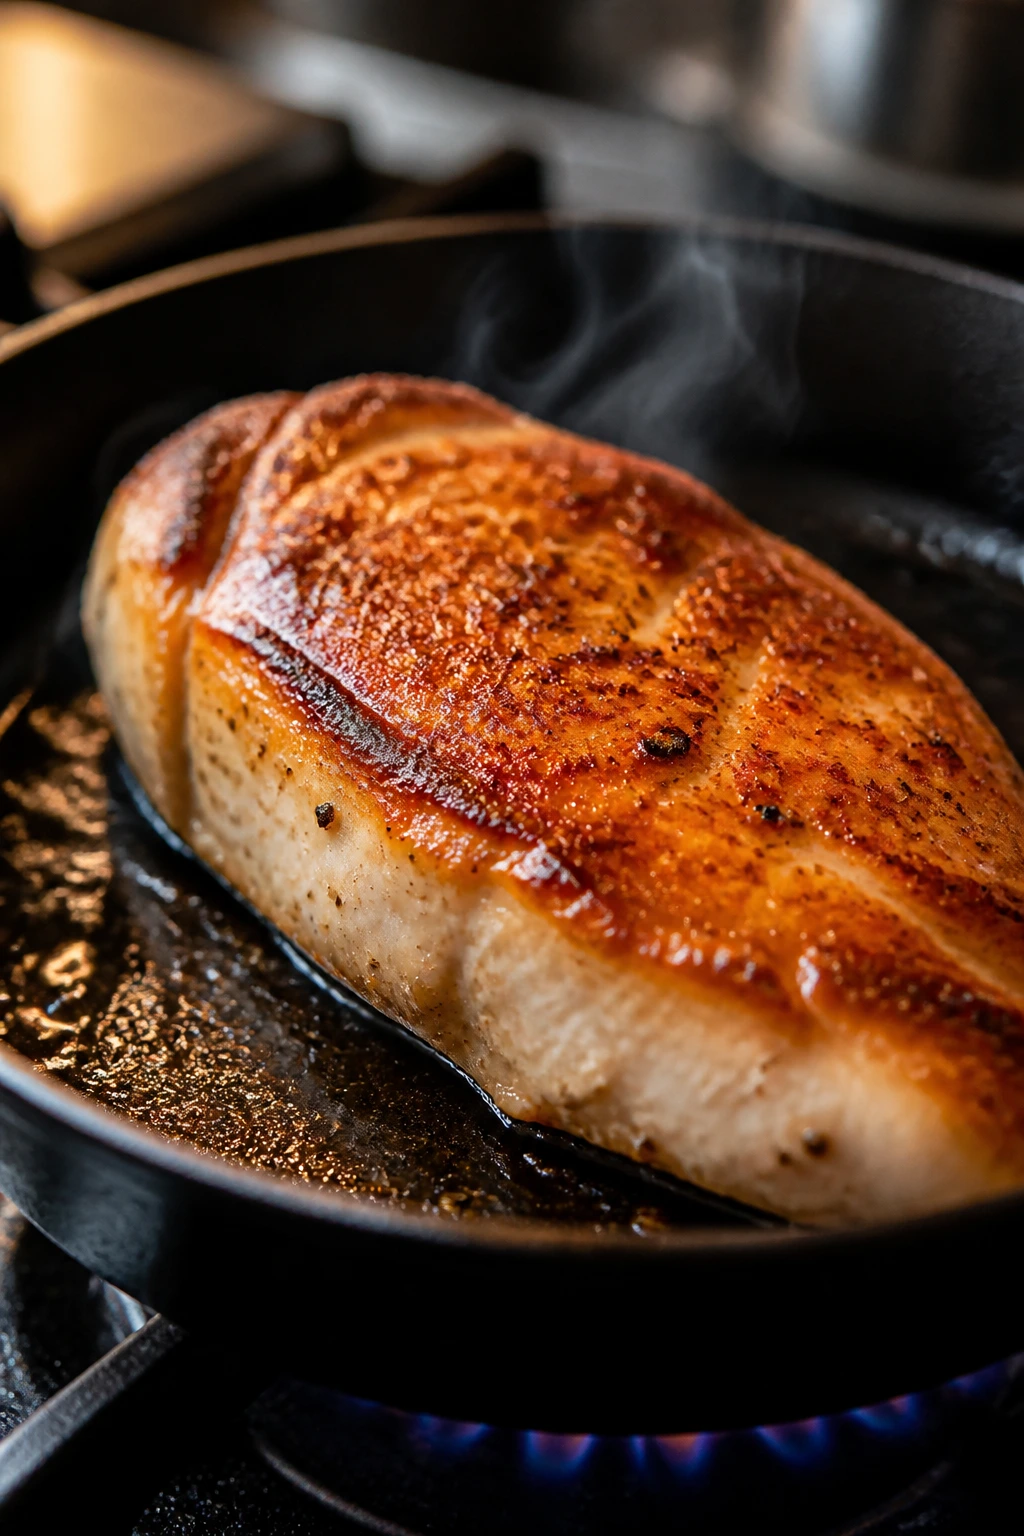
Heat a 12-inch skillet over medium-high heat for about 2 minutes. Add the oil and swirl it around. The oil should shimmer and move easily, but it should not smoke hard.
-
Lay the chicken in the pan away from you so the oil does not spit back. Let it cook without moving for 4 to 5 minutes, until the underside is deep golden brown and releases easily when you lift an edge.
-
Flip the chicken. Add the butter and smashed garlic to the pan if you are using them. Reduce the heat to medium. Spoon the melted butter over the chicken for 30 to 45 seconds.
-
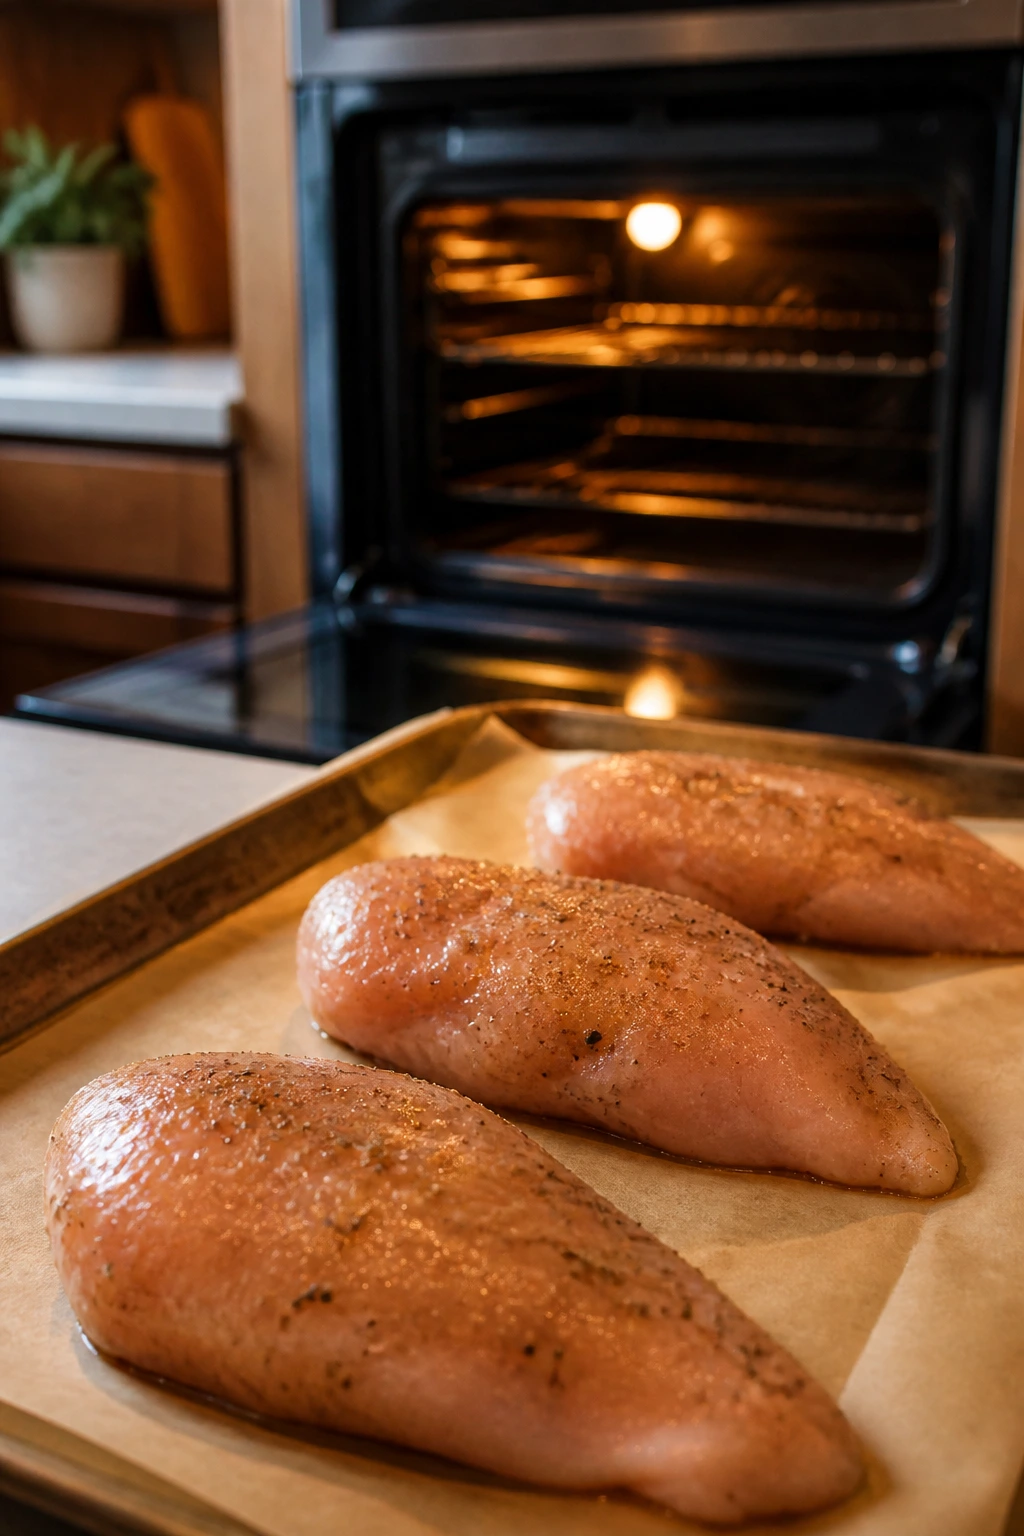
For breasts thicker than 1 inch, cover the pan loosely for 2 to 4 minutes or move the skillet to a 400°F oven for 4 to 6 minutes. Cook until the thickest part reaches 160 to 162°F.
-
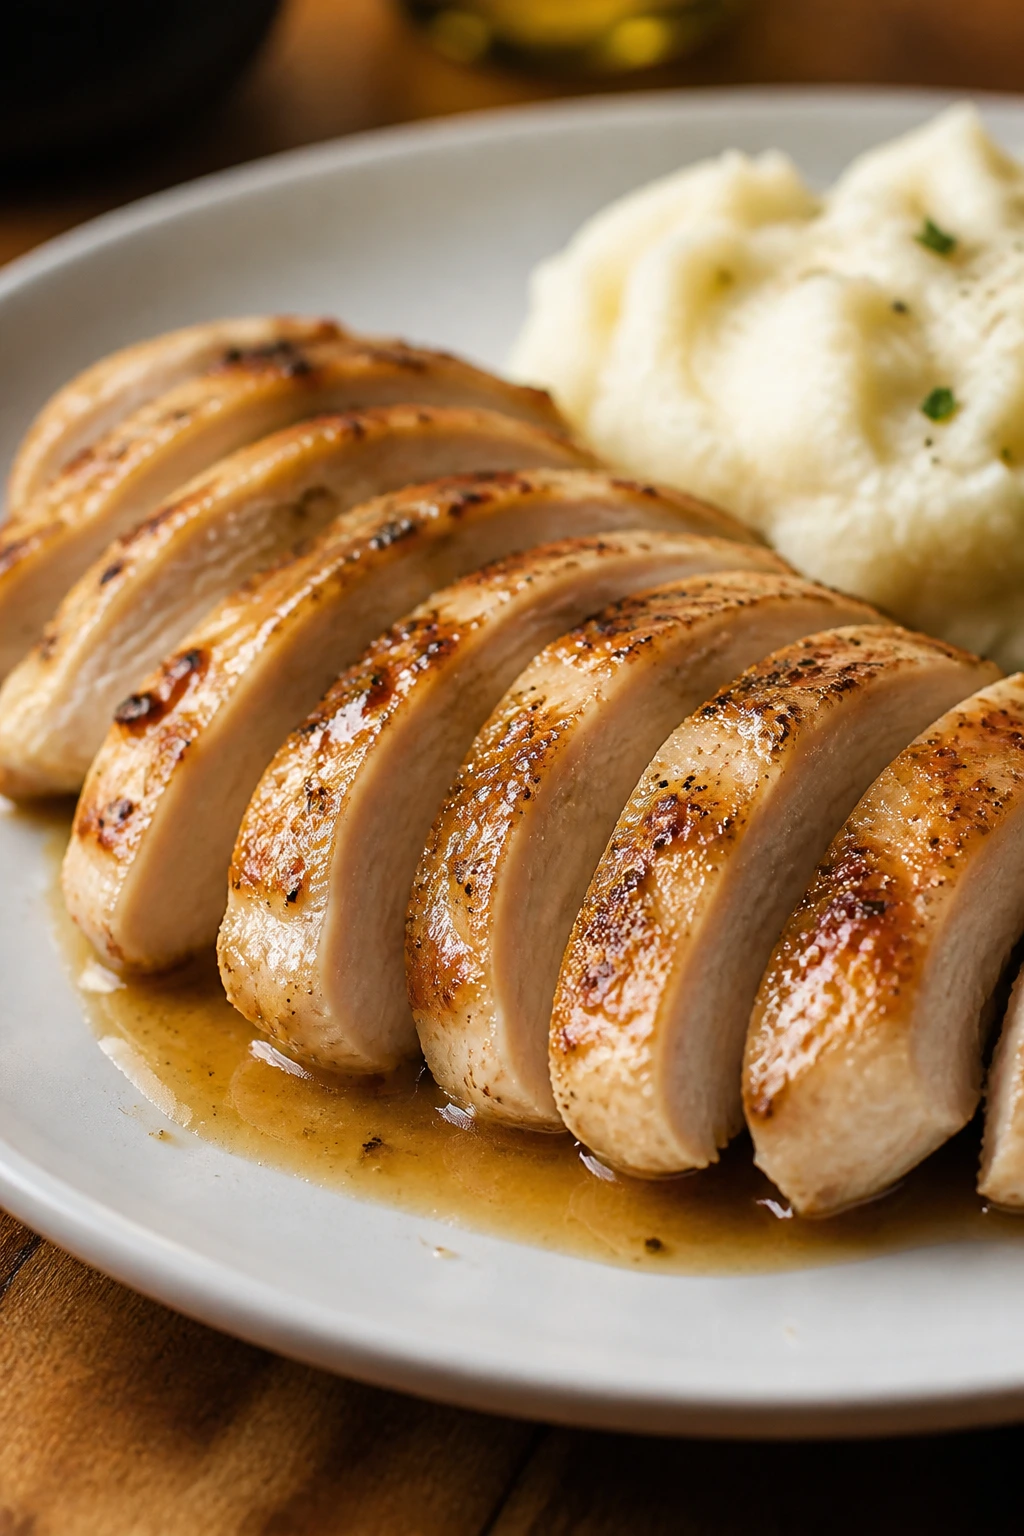
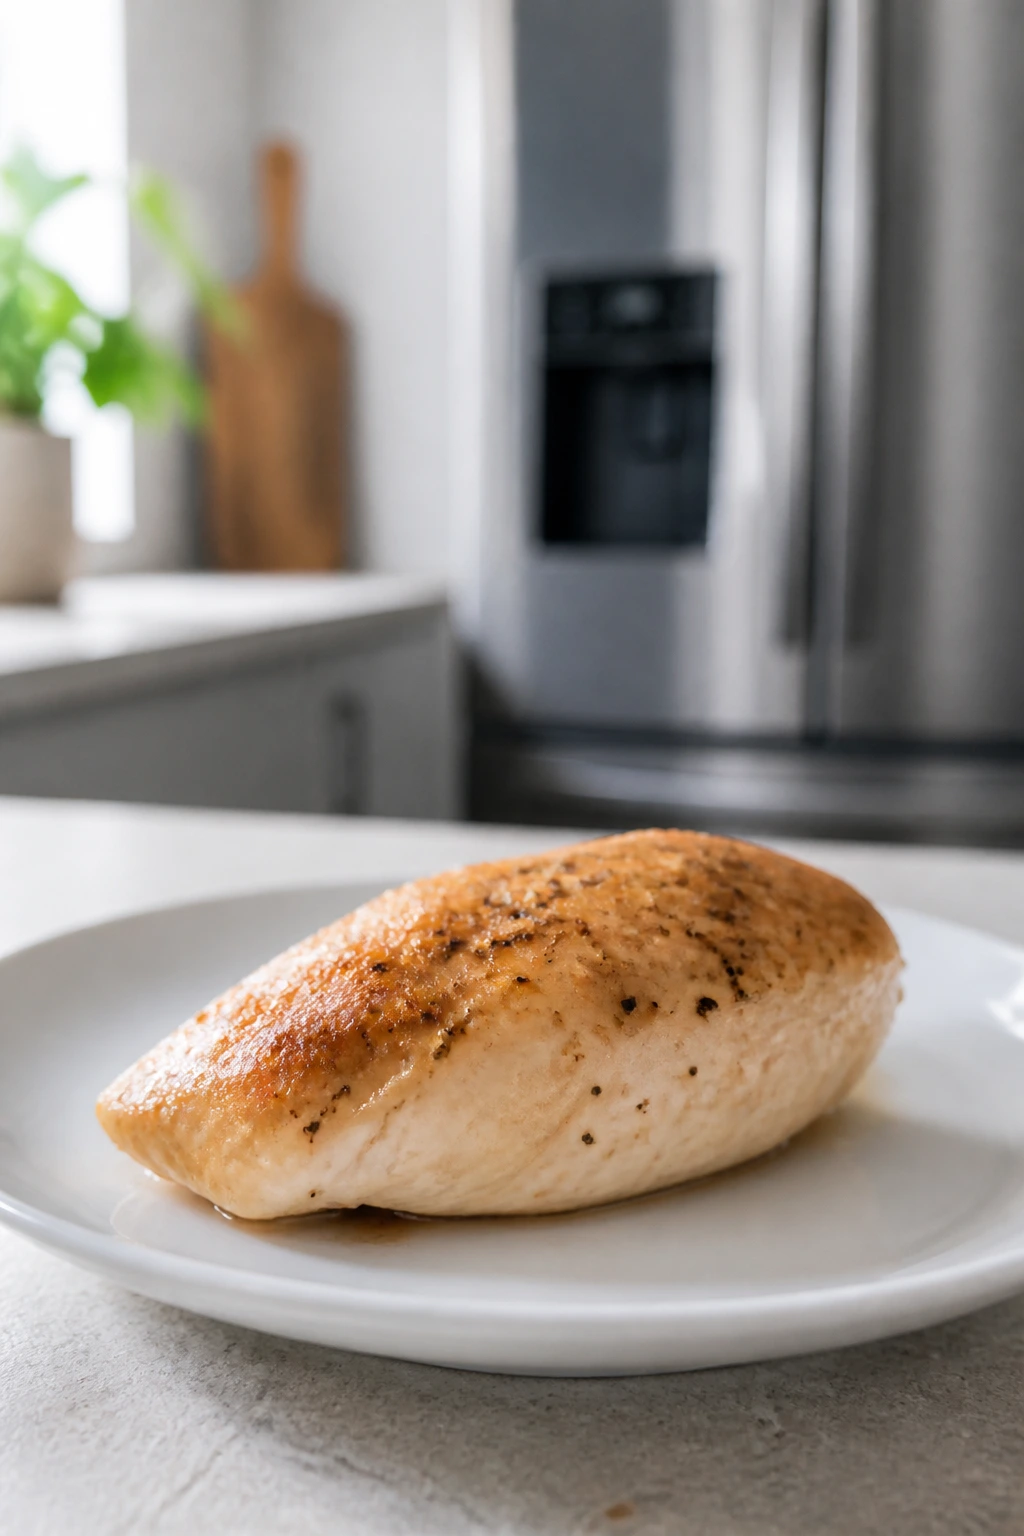
Transfer the chicken to a cutting board and rest for 5 minutes. The temperature will climb a few more degrees while the juices settle. Slice against the grain, finish with a squeeze of lemon if you want brightness, and serve.
The key number is not 165°F in the pan. It is 165°F after the rest. That distinction saves a lot of dinners.
When a Skillet Finish Beats the Oven
A skillet earns its place because it gives you two things at once: browning and control. The direct contact of a hot pan creates those browned edges that taste savory in a way baked chicken often does not. And because you can see the surface changing in real time, it is easier to stop before the meat goes past tender.
Cast iron for the deepest crust
I like cast iron when I want a strong sear and I am not planning to baby the pan sauce. It holds heat well, which helps if the chicken is a little thicker than ideal or if the burner dips when you add cold meat. The downside is obvious: it gets hot fast and stays hot, so you need to pay attention the moment the butter goes in.
Stainless steel for pan sauce lovers
Stainless steel is the better choice if you want browned bits you can turn into a quick sauce. The fond clings to the pan in a way that tastes like dinner already did some of the work for you. A splash of broth, a spoonful of Dijon, and a knob of butter can become a simple sauce in under 2 minutes.
Nonstick when ease matters more than dark brown color
Nonstick is perfectly fine for chicken breast on a chaotic night. It is gentler, easier to clean, and less likely to punish you for walking away to check on rice. The tradeoff is less dramatic browning. You will still get cooked chicken, but you will not get the same crusty edge you find in cast iron or stainless steel.
If you want the skillet method to shine, do not crowd the pan. Leave space around each breast. When chicken sits too close together, it steams in its own released moisture and you end up with pale spots instead of brown ones.
Oven, Air Fryer, and Poaching: Which One Fits the Night
Sometimes the stove is busy, or the idea of standing over a skillet feels like one task too many. Fine. Boneless chicken breast can still come out tender in the oven, the air fryer, or even a gentle poach, as long as you match the method to the result you want.
Oven-roasting for hands-off cooking
The oven is the easiest choice when the chicken is thick or when you are cooking several pieces at once. A 425°F oven gives good color and usually takes about 18 to 22 minutes for average breasts around 6 to 8 ounces each, depending on thickness. If the breasts are especially large, expect a few more minutes and check with a thermometer.
A rimmed sheet pan lined with parchment works well, but a wire rack set over the pan gives the hot air more room to move. That can help if you want more even browning on the underside. I would still pat the chicken dry and brush or rub it lightly with oil before it goes in.
Air fryer for fast, even edges
The air fryer is useful when you want a crisp exterior without heating the whole kitchen. Set it around 375°F and cook boneless chicken breast for 10 to 14 minutes, flipping halfway through if your model cooks unevenly. A light coating of oil helps the surface brown instead of drying into a pale shell.
Air fryers are fussy about size. Huge breasts and tiny cutlets do not want the same timing. If the pieces are wildly different, either pound them to the same thickness first or cook them in separate batches.
Poaching for shredded chicken and soft texture
Poaching is the quiet option. It is not the method I want when I crave browned edges, but it is useful when the chicken will be shredded for tacos, soup, enchiladas, or chicken salad. Keep the liquid at a gentle 180 to 190°F, not a hard boil, and cook until the thickest part reaches 160 to 165°F, usually about 12 to 18 minutes depending on thickness.
A rolling boil is the enemy here. Boiling makes the outside tighten fast and gives you a stringier bite. Gentle heat keeps the texture softer, especially if the chicken will be mixed with sauce afterward.
How to Know the Chicken Is Done Without Cutting It Open
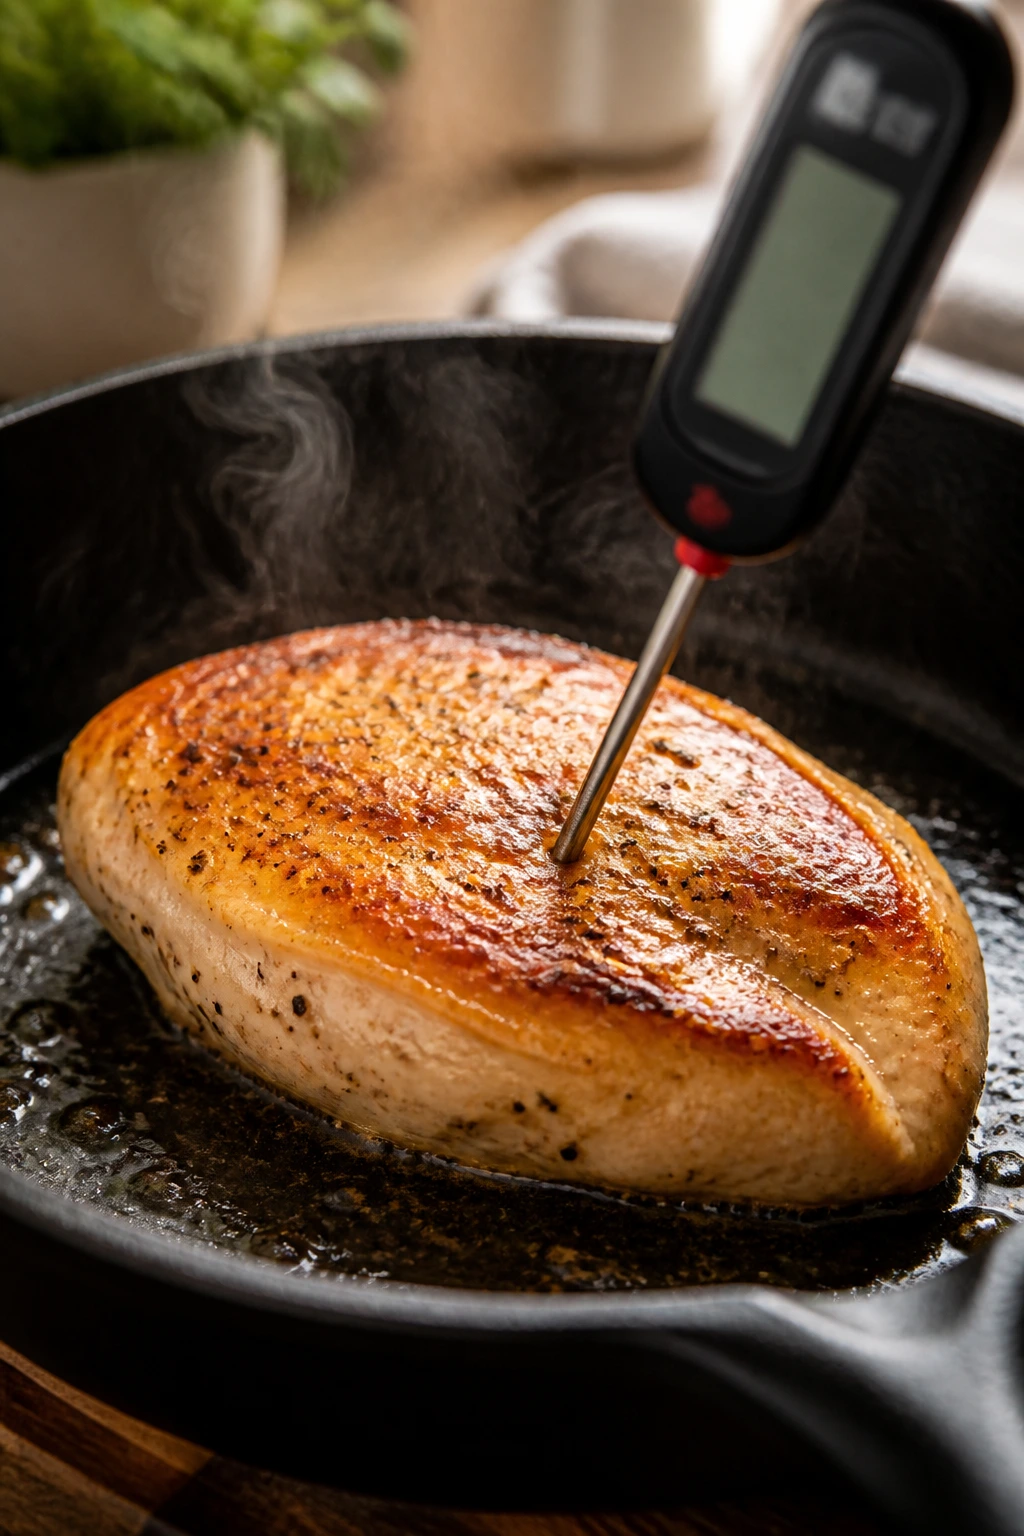
Chicken breast can look done long before it is, and it can also look a little pink even when it has reached a safe temperature. That is why the thermometer matters more than the color. Color is a helpful hint. It is not the final judge.
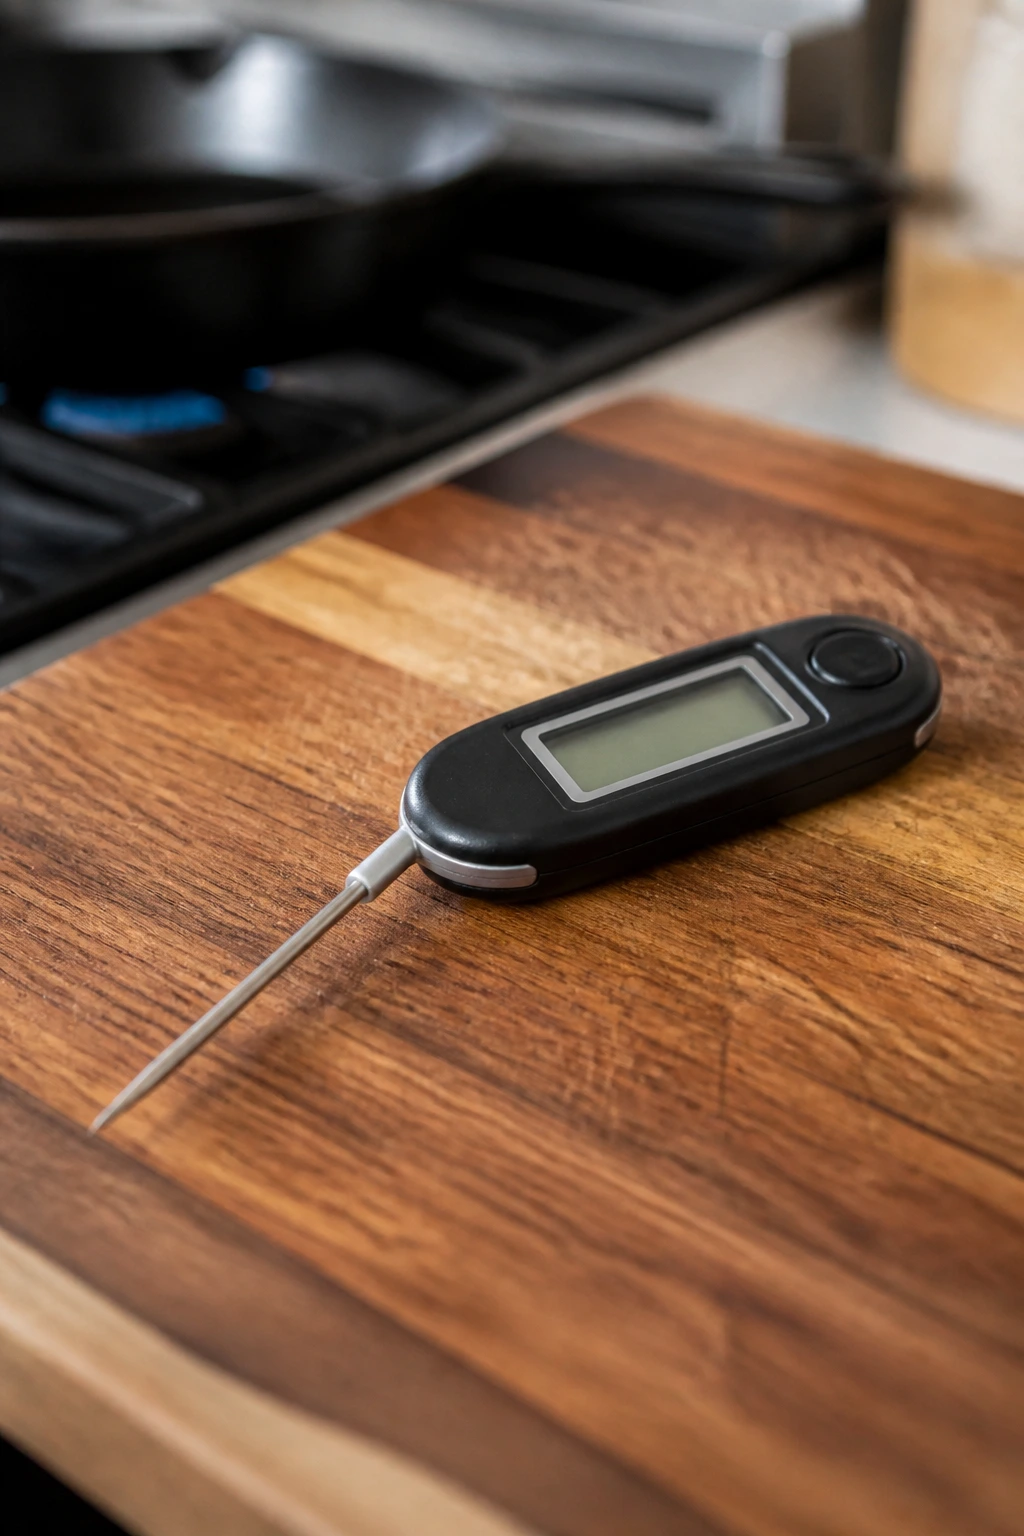
The safest number for poultry is 165°F in the thickest part. For boneless chicken breast, I usually take the meat off the heat at 160 to 162°F if it is about to rest for 5 minutes. That carryover heat is enough to close the gap. If the pieces are very thin, or if the pan is resting on a hot burner and still cooking aggressively, I hold closer to 165°F before pulling them.
Insert the thermometer sideways into the thickest part, not from the top if that puts the tip near the pan or too close to the surface. The tip should sit in the middle of the meat, where the temperature changes slowest. A bad thermometer angle gives you a false reading, and a false reading gives you dry chicken.
A few other cues help, but none of them beats the number on the screen. The meat should feel springy when pressed gently with tongs. Juices may run clear or only faintly tinted. The exterior will have a dry, set look, not a wet sheen. Still, if the thermometer says 160°F and the chicken looks right, trust the thermometer.
One more thing: don’t keep cutting into the thickest breast to “check.” Every slash leaks juice onto the board. That juice is not coming back.
Seasonings and Sauces That Keep the Meat Interesting
Chicken breast does not need to be complicated to taste good, but it does need something that gives the outside personality. Salt and pepper are the floor, not the ceiling. If you want dinner to feel finished, a small amount of seasoning or a quick sauce changes the whole plate.
Dry rubs that brown well
A dry spice rub is the easiest upgrade because it does not add extra moisture. For each pound of chicken, try a mix like 1 teaspoon kosher salt, ½ teaspoon garlic powder, ½ teaspoon paprika, ¼ teaspoon onion powder, and a few grinds of black pepper. Smoked paprika gives the meat a deeper color and a warm, almost woodsy smell in the pan.
Be careful with sugar-heavy rubs on high heat. They can scorch before the chicken is done. If you want a sweeter profile, save the honey or maple for the end or build it into a pan glaze after the chicken comes out.
Fast pan sauce from the browned bits
The browned bits in the skillet are free flavor. After the chicken rests, lower the heat and pour off any excess fat, leaving just a thin slick behind. Add ¼ cup chicken broth, a teaspoon of Dijon mustard, and a little lemon juice if you like. Scrape the pan with a wooden spoon until the browned bits dissolve, then swirl in 1 tablespoon butter.
That sauce is not fancy. It does not need to be. It tastes like the chicken was cooked on purpose instead of merely survived.
Bright finishes that wake up the plate
Acid belongs at the end more often than in the middle. A squeeze of lemon, a spoonful of yogurt sauce, chopped parsley, dill, or scallions—those things sharpen the flavor right before serving. If the chicken tastes flat, the problem is often not more salt. It is contrast.
I also like a tiny bit of heat when the rest of dinner is mild. A pinch of red pepper flakes in the pan sauce or a dab of chili crisp on the side wakes up the whole plate without making the chicken taste like it was dragged through a fire.
How to Turn One Chicken Breast Into Dinner
A good piece of chicken is not the whole meal. It is the anchor. Once you get the texture right, the rest of dinner can be as plain or as busy as the night requires.
Presentation
Slice the breast on a slight bias, not straight down, so the pieces fan out instead of stacking into a sad little pile. If you have pan juices or a quick sauce, spoon a little over the top and leave a few slices exposed so the browned surface still shows. That contrast matters. Brown edges and pale sides on the same plate look unfinished.
Accompaniments
Chicken breast wants something starchy or creamy next to it, and something crisp or bright to cut through the lean bite. Roasted potatoes, buttered rice, couscous, or mashed potatoes all work because they catch juices. On the fresher side, go with green beans, broccoli, a chopped salad, cucumbers, or shredded cabbage dressed with a sharp vinaigrette.
For a faster route, tuck the sliced chicken into tortillas with slaw and avocado, or pile it over rice with a fried egg and scallions. It does not have to be elegant. It just has to eat well.
Portions
A typical serving is 4 to 6 ounces of cooked chicken per adult, a little less if the plate has a heavy side dish and a little more if the chicken is the main event. One pound of boneless chicken breast usually gives you about ¾ pound cooked, depending on moisture loss. That is enough for 2 large servings or 3 modest ones.
Beverage Pairing
Cold sparkling water with lemon cuts through the richness of butter or pan sauce without getting in the way. If you want something with a bit more body, a dry cider or a crisp white wine can handle lemon, herbs, and browned chicken skin flavors, even though there is no skin here. Beer works too, especially something light and clean rather than bitter and heavy.
Tools That Make the Job Easier
-
Instant-read thermometer — The single tool that keeps you from guessing; it tells you exactly when to pull the chicken.
-
12-inch skillet — Big enough to keep the pieces spaced apart so they brown instead of steam.
-
Meat mallet or rolling pin — Useful for evening out the thick end of the breast; a small skillet can stand in if needed.
-
Tongs — Better than a fork, because they let you flip and move the chicken without puncturing it.
-
Rimmed sheet pan — Handy for oven-finished chicken, resting, or keeping multiple cooked pieces organized.
-
Wire rack — Optional, but useful if you want air to circulate under oven-baked chicken or if you are salting it ahead.
-
Sharp chef’s knife — A dull knife tears the meat when you slice it; a sharp one makes clean cuts and prettier serving pieces.
-
Cutting board with a groove — Helps catch resting juices so they do not run across the counter.
-
Small bowl for seasoning — Not glamorous, but useful for mixing a dry rub before you touch the raw chicken.
Practical Tips for Better Results on Busy Nights
Flavor Enhancement: A tiny finish goes a long way. After the chicken rests, brush the slices with a little melted butter, olive oil, or pan sauce, then add lemon zest, chopped parsley, or dill. The point is not to drown the meat. It is to wake up the browned surface right before it hits the plate.
Time-Saver: Pound several breasts at once and stack them between parchment sheets in the fridge for a day or two. That way the meat is already even when dinner time arrives. If your evening is chaotic, you can also salt the chicken in the morning and leave it uncovered on a rack in the fridge; it cooks faster and browns more evenly after that.
Cost-Saver: Buy chicken breasts by weight and sort by size before you cook. The biggest pieces are often the least convenient, so split them into cutlets and freeze the smaller pieces for a faster dinner later. A freezer bag with the air pressed out beats tossing the whole pack back in its tray.
Pro Move: Move the chicken off the hottest part of the burner for a few seconds right after flipping if your stove runs aggressive. That tiny pause keeps the butter from burning and gives you a little more control over the final minutes. Also, keep the thermometer nearby before the skillet goes on. Fumbling for it while the chicken burns is a mistake people make more often than they admit.
Make-It-Yours: If you want a dairy-free finish, skip the butter and use olive oil plus lemon. If you want extra richness, spoon a quick yogurt sauce beside the chicken instead of adding more fat to the pan. If you are keeping sodium lower, lean harder on garlic, paprika, pepper, herbs, and citrus at the end rather than piling on salt in the beginning.
Common Mistakes That Dry Out Chicken Fast
The mistakes are familiar because they are tempting. Most of them happen when dinner is late and the cook starts hoping instead of checking. Chicken breast does not reward hope.
-
Starting with uneven pieces: Symptom: the thin tail is dry while the center is still catching up. Fix: pound, butterfly, or buy similar-sized breasts and cook them in separate batches if needed.
-
Using a pan that is too cool: Symptom: pale chicken with weak browning and a slightly steamed smell. Fix: preheat the skillet for a couple of minutes before adding the oil, and don’t crowd the pan.
-
Moving the chicken too often: Symptom: the surface never gets a real crust and the meat tears when you flip it. Fix: leave it alone for the first few minutes until it releases naturally.
-
Cooking by color alone: Symptom: the outside looks done but the inside feels dry or still oddly soft. Fix: use an instant-read thermometer and trust the number at the thickest point.
-
Cutting immediately after cooking: Symptom: juices flood the board and the slices look dry five minutes later. Fix: rest the chicken for 5 minutes before slicing; the juices settle back into the meat instead of running out.
-
Marinating in acid for too long: Symptom: the surface turns strangely firm or mealy. Fix: use lemon, vinegar, or yogurt in a short marinade, or save the acid for the end as a sauce or finish.
Variations and Alternative Approaches
Lemon-Herb Skillet Cutlets
Pound the chicken a little thinner, season with salt, pepper, garlic powder, and thyme, then finish with lemon juice and parsley after the pan comes off the heat. This version works well with rice, couscous, or boiled potatoes because the bright finish plays nicely with simple sides.
Smoky Paprika and Lime Chicken
Use smoked paprika, cumin, garlic powder, and a pinch of chili powder, then finish with lime instead of lemon. The profile is warmer and a little deeper, which makes it a good fit for black beans, corn, or warm tortillas.
Dijon and Pan-Juice Dinner Chicken
Rub the breasts with a thin layer of Dijon before the dry seasoning goes on. The mustard helps the spices cling and gives the pan sauce a cleaner edge when you deglaze with broth. It is one of the easiest ways to make the chicken taste more finished without adding much work.
Parmesan Crusted Oven Breasts
If you want crunch, coat the chicken in a mix of grated Parmesan and panko after a thin layer of oil or mayo. Bake at 425°F until the crust is golden and the center reaches temperature. This version is less about silky texture and more about contrast, which is why it works well with a green salad.
Lower-Sodium Pantry Version
Cut the salt in half and lean harder on garlic powder, black pepper, onion powder, citrus zest, and herbs. Finish with a small spoonful of unsalted yogurt or a squeeze of lemon to keep the flavor lively. You will not miss the extra salt as much once the seasoning has something bright to lean on.
Storage, Reheating, and Make-Ahead
Cooked boneless chicken breast keeps well if you cool it properly and do not leave it sitting on the counter for half the evening. The general rule is no more than 2 hours at room temperature before it goes into the fridge. After that, tuck it into a shallow airtight container so it chills quickly and evenly.
In the refrigerator, cooked chicken breast stays good for 3 to 4 days. It is best sliced after it cools if you plan to use it in salads or wraps. Whole pieces dry out a little less than sliced ones, but sliced chicken is more convenient for the next meal, so I usually split the difference and store a mix.
For the freezer, wrap the chicken tightly or store it in a freezer bag with as much air pressed out as possible. It keeps best for up to 2 months if you care about texture, though it remains safe longer if kept frozen solid. Thaw it in the refrigerator overnight rather than on the counter.
Reheating matters more than people think. For the skillet, add a teaspoon or two of broth, water, or sauce, cover the pan, and warm the chicken over low heat until it reaches 165°F again. In the oven, cover loosely with foil and warm at 300°F for about 10 to 15 minutes depending on thickness. In the microwave, use 50% power in short bursts and cover the chicken with a damp paper towel so the surface does not turn rubbery.
For make-ahead, the best move is often to season the raw chicken a few hours early, or even the night before, and keep it refrigerated on a rack or plate. That short dry brine helps the meat brown better the next day. Cooked chicken breast can also be made ahead for salads and lunches, but it tastes best when reheated gently and served with something saucy.
Frequently Asked Questions
How thick should boneless chicken breast be for the best texture?
About ½ to ¾ inch is the sweet spot for most weeknight cooking. That thickness lets the outside brown before the inside gets pushed past tender, which is the whole game with this cut.
Do I really need to brine chicken breast?
You do not need a long brine, but a short salt rest makes a noticeable difference. Even 15 to 30 minutes helps the seasoning move inward and gives the surface a better chance to brown.
Can I cook chicken breast straight from the fridge?
Yes, but it cooks a little less evenly. If you have the time, let it sit out just long enough to take the chill off while the pan heats; do not leave it out for hours. The bigger win is even thickness and a thermometer, not room temperature drama.
What if my chicken breasts are huge?
Split them horizontally into two thinner cutlets or pound them down before cooking. Giant breasts take longer on the heat, and that extra time is where dryness creeps in. If you leave them whole, expect to use the oven finish more often.
Is 165°F the only safe temperature for chicken breast?
For poultry, 165°F is the safe endpoint to trust. I often pull boneless chicken breast at 160 to 162°F and let it rest for 5 minutes, because the temperature usually climbs the last few degrees while the meat settles. If you are not resting it, take it to the full safe finish.
How do I keep leftovers from tasting rubbery?
The biggest fix is not overcooking the chicken the first time. After that, reheat gently with a splash of broth or sauce and avoid blasting it in the microwave for too long. Dry chicken gets drier fast.
Can I make this ahead for meal prep?
Yes, and it works well if you plan for gentle reheating. Cook the chicken, cool it fast, and portion it into containers within 2 hours. It holds best for 3 to 4 days in the fridge and is most useful when sliced thin for bowls, wraps, or salads.
Can I use this method for chicken thighs too?
Some parts, yes, but thighs want a different finish. They have more fat and usually taste best cooked beyond the breast’s endpoint, often around 175°F or higher. Thighs are more forgiving, but the timing and doneness rules are not the same.
What if I do not own an instant-read thermometer?
Buy one if you can; it is the cheapest way to stop wasting chicken. If you have to cook without it, cut into the thickest part and look for opaque meat with no translucent center, but that is a fallback, not the best plan. Guessing by color alone is where dry chicken starts.
The Chicken Breast You Can Count On
Tender boneless chicken breast is not a lucky accident, and it is not a special-occasion project. It is the result of a few small habits: even thickness, a short salt rest, a hot pan, and a quick exit before the meat overcooks. Once those pieces are in place, the cut stops feeling like a gamble.
That is the part I like most. You do not need a long marinade, a complicated sauce, or a grocery list that turns weeknight dinner into homework. You need a method you trust. The next time the package lands in the cart, you will know exactly how to turn it into dinner without crossing your fingers.