
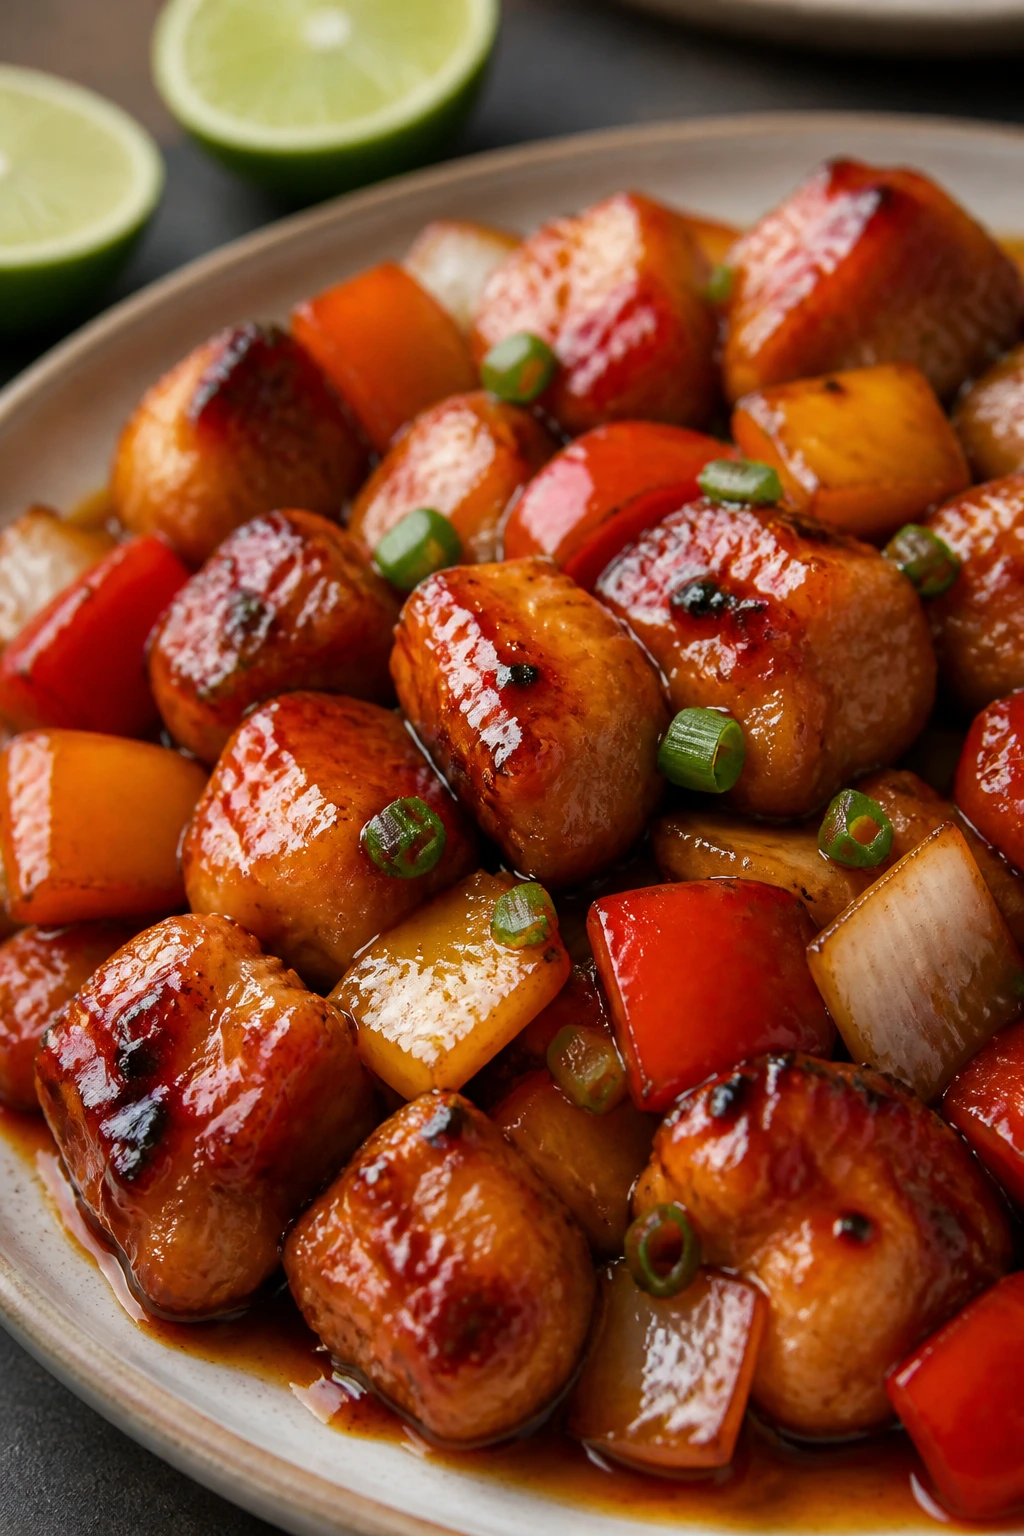
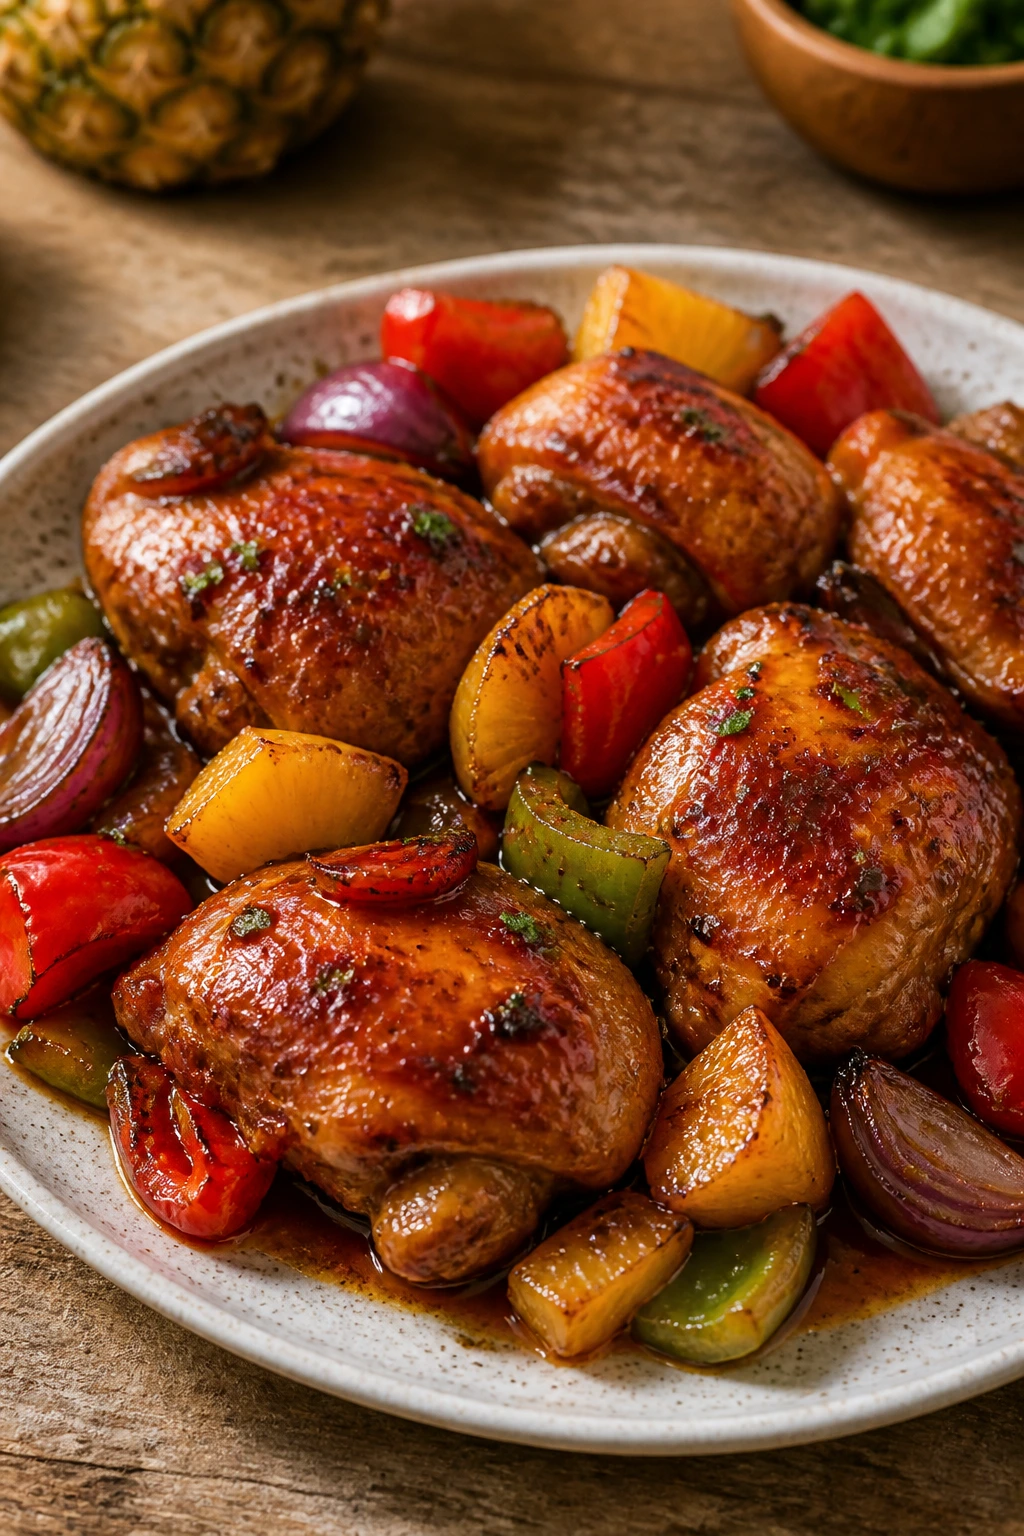
Roasted sweet and sour chicken for weeknight dinners is one of those dishes that sounds like it should take more effort than it does. The name alone suggests takeout-level flavor, sticky glaze, and a kitchen full of pans. What you actually get is a hot oven, one sheet pan, a small saucepan, and chicken that turns browned at the edges while the sauce stays bright instead of cloying.
I like this style of sweet and sour chicken far more than the fried version for home cooking. Frying gives you crunch, sure, but it also gives you splatter, a long cleanup, and breading that softens the second it meets sauce. Roasting does something smarter here: the chicken gets direct heat, the peppers soften just enough to keep their shape, and the pineapple develops those caramelized corners that taste almost jammy. That little bit of char matters.
The other reason this dish earns its place on a real dinner schedule is that it behaves well. Chicken thighs stay juicy at 425°F, the sauce can be made while the oven heats, and the final toss at the end gives you glossy coating without turning the pan into a syrupy mess. If you’ve ever wanted sweet and sour chicken that tastes intentional instead of nostalgic in a greasy way, this version is the one to keep close.
Why Roasted Sweet and Sour Chicken Belongs in a Weeknight Rotation
-
One pan does the heavy lifting: The chicken, peppers, onion, and pineapple roast together, so you’re not babysitting a skillet while rice boils in the next burner over.
-
The sauce stays bright, not muddy: Simmering the sweet-and-sour sauce separately keeps the vinegar sharp and the brown sugar from tasting flat.
-
Chicken thighs forgive small timing mistakes: If you give them two extra minutes in the oven, they’re still juicy. Breasts can work too, but thighs are the safer choice when the evening feels crowded.
-
Roasting makes the pineapple taste better: The edges brown, the juices thicken, and you get little sticky spots on the sheet pan that taste better than any canned-style sauce alone.
-
Cleanup stays manageable: A lined sheet pan, one saucepan, and a bowl for tossing is a very different experience from frying, and that difference shows up after dinner when you are tired.
-
Leftovers reheat in a decent way: The chicken doesn’t collapse, and the sauce clings better after a short reheat than a deep-fried version ever does once it cools.
The Time, the Yield, and the Shape of the Evening
Yield: 4 to 6 servings
Prep Time: 20 minutes
Cook Time: 25 minutes
Total Time: 45 minutes
Difficulty: Beginner — the steps are straightforward, and the sauce comes together in a small saucepan while the chicken roasts.
Chill/Rest Time: None
Best Served: Right after tossing with the glaze, while the peppers still have a little bite and the sauce is glossy.
The timing above assumes you cut the chicken into bite-size pieces and keep the vegetables in fairly broad chunks. If you slice the peppers too thin, they go soft fast. If you crowd the pan, everything steams instead of browning. That’s the real divide here.
I’d call this a “one active half-hour” dinner. The oven needs about 25 minutes, but the hands-on work is concentrated at the beginning, which is the part that matters on a busy night. Once the pan is in the oven, you can cook rice, rinse a salad, or just stand there for a second and breathe.
What Goes Into the Pan
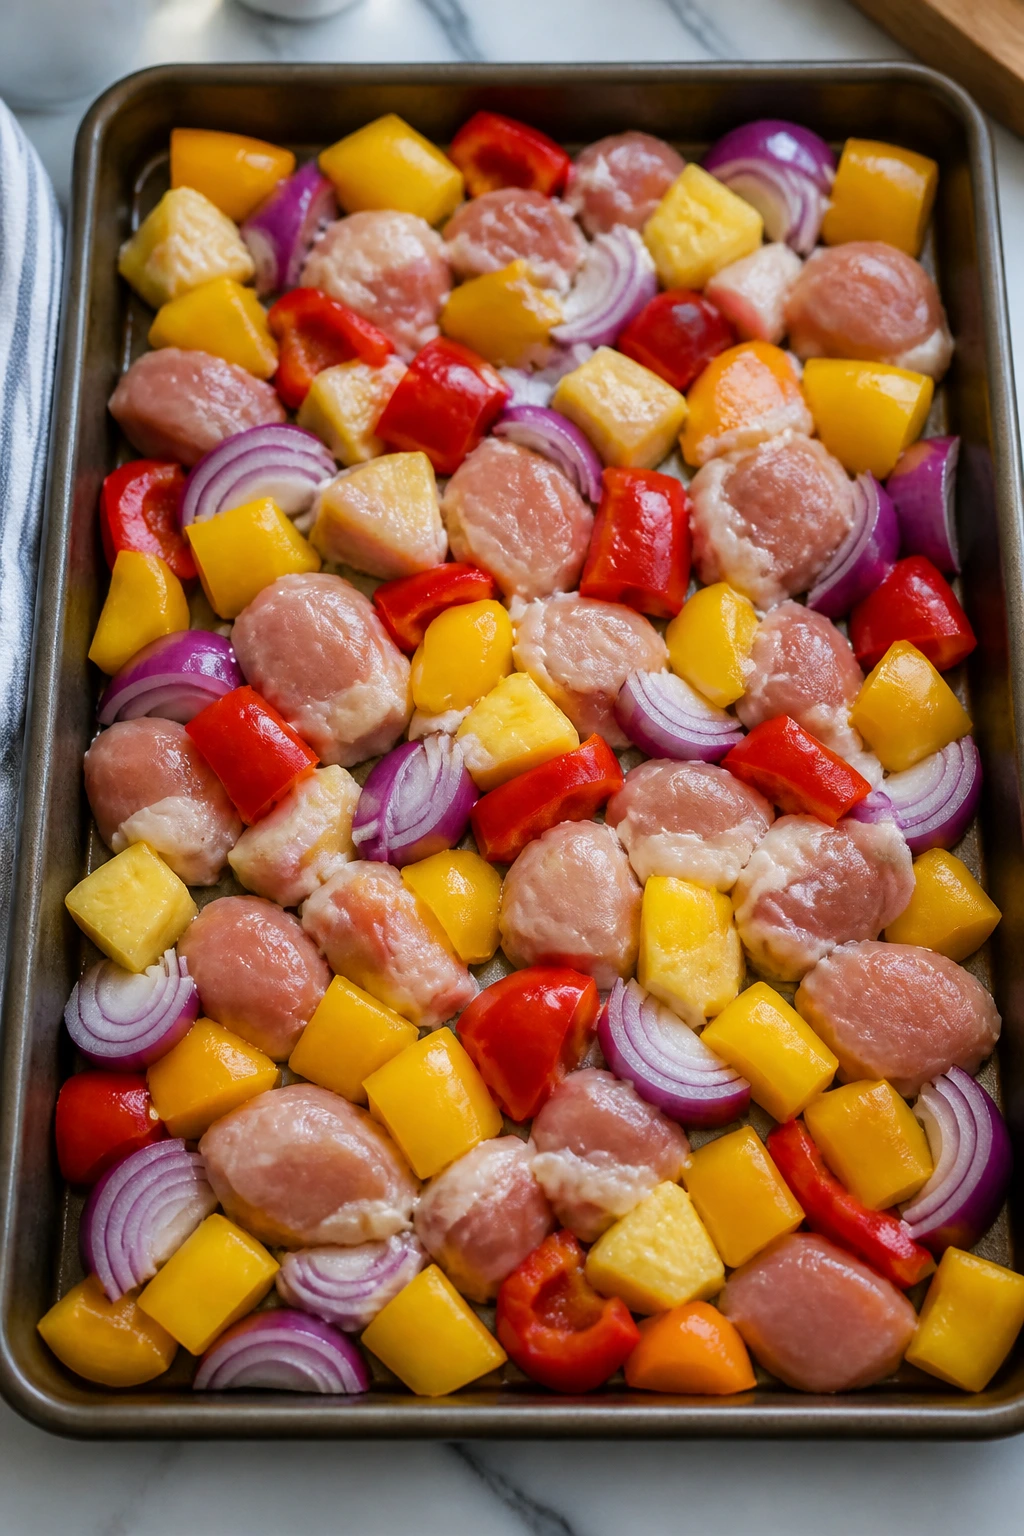
- 1 1/2 pounds boneless, skinless chicken thighs, cut into 1 1/2-inch pieces
- 2 tablespoons neutral oil, such as avocado or canola
- 1 tablespoon soy sauce
- 1 tablespoon cornstarch
- 1 teaspoon fine sea salt
- 1/2 teaspoon black pepper
- 1 red bell pepper, cut into 1-inch pieces
- 1 yellow bell pepper, cut into 1-inch pieces
- 1 medium red onion, cut into wedges
- 1 can (20 ounces) pineapple chunks in juice, drained, with 1/2 cup juice reserved
- 1/2 cup reserved pineapple juice
- 1/4 cup rice vinegar
- 1/4 cup ketchup
- 3 tablespoons packed light brown sugar
- 2 tablespoons soy sauce
- 2 garlic cloves, minced
- 1 tablespoon fresh ginger, grated
- 1 tablespoon cornstarch mixed with 1 tablespoon cold water
- 1/2 teaspoon red pepper flakes, optional
- 1 teaspoon toasted sesame oil, optional
- 2 scallions, thinly sliced, for finishing
- 1 tablespoon sesame seeds, optional
That’s the clean version. There’s nothing fancy hiding in it. The ingredients are familiar pantry pieces, but the balance matters: enough vinegar to keep the sauce awake, enough sugar to make it stick, enough pineapple juice to taste rounded instead of sharp.
Why Each Ingredient Matters in the Pan
Chicken Thighs
What to use: 1 1/2 pounds boneless, skinless chicken thighs, cut into 1 1/2-inch pieces.
Preparation: Pat the chicken dry before cutting it, then season and toss it with cornstarch and oil so the surface picks up color in the oven.
Substitutions: Boneless chicken breasts work if you prefer them, but cut them a little larger and shorten the roast by a few minutes. Firm tofu, pressed and cubed, can also take the sauce well if you want a meatless pan.
Tips: Thighs are the better fit here because the sweet-and-sour glaze has sugar in it, and sugar + lean breast meat can go from juicy to dry in a blink. Thighs stay cooperative even if your oven runs a little hot.
Bell Peppers, Onion, and Pineapple
What to use: 2 bell peppers, 1 medium red onion, and 1 can of pineapple chunks.
Preparation: Cut the peppers into chunky squares and the onion into wide wedges so they hold their shape during roasting. Drain the pineapple, but save the juice; that juice is part of the sauce, not a bonus to pour down the sink.
Substitutions: Green bell pepper gives a sharper edge if you like a less sweet pan. Fresh pineapple works too, though canned pineapple is easier on a weeknight and gives you the exact juice you need for the glaze.
Tips: Keep the vegetable pieces large enough to brown on the edges without disappearing. Tiny dice turn soft fast and make the dish taste more like a sauce than a roast.
Sweet-and-Sour Sauce
What to use: Pineapple juice, rice vinegar, ketchup, brown sugar, soy sauce, garlic, ginger, and a cornstarch slurry.
Preparation: Whisk the sauce in a small saucepan and simmer it before thickening. That step wakes up the vinegar and keeps the sauce from tasting raw or flat.
Substitutions: Apple cider vinegar can stand in for rice vinegar if that’s what you have, though it brings a slightly rougher edge. Honey can replace part of the brown sugar, but I wouldn’t swap out all of it because the caramel note from brown sugar suits the roasted chicken better.
Tips: Taste the sauce before you thicken it. If it needs more punch, add a teaspoon more vinegar. If it tastes too sharp, a pinch more brown sugar will round it out, but go slowly.
Finishers and Garnishes
What to use: Scallions, sesame seeds, and a little toasted sesame oil if you want extra aroma.
Preparation: Slice the scallions thin and add them after the chicken comes out of the oven so they stay bright and crisp.
Substitutions: Chopped cilantro works if you want a greener finish, though it changes the flavor profile in a noticeable way. Crushed peanuts can stand in for sesame seeds if you want more crunch.
Tips: The sesame oil should stay in the background. One teaspoon is enough. More than that and it starts to dominate the sauce, which is not the goal here.
The Few Tools That Make the Job Easier
- Rimmed half-sheet pan — Big enough to hold the chicken and vegetables in a single layer without crowding.
- Small saucepan — Used for the sauce; a 1-quart pan is fine.
- Large mixing bowl — Helpful for tossing the chicken with oil, cornstarch, and seasoning.
- Whisk — Keeps the sauce smooth when the cornstarch slurry goes in.
- Wooden spoon or silicone spatula — Useful for stirring the pan and coating the chicken after roasting.
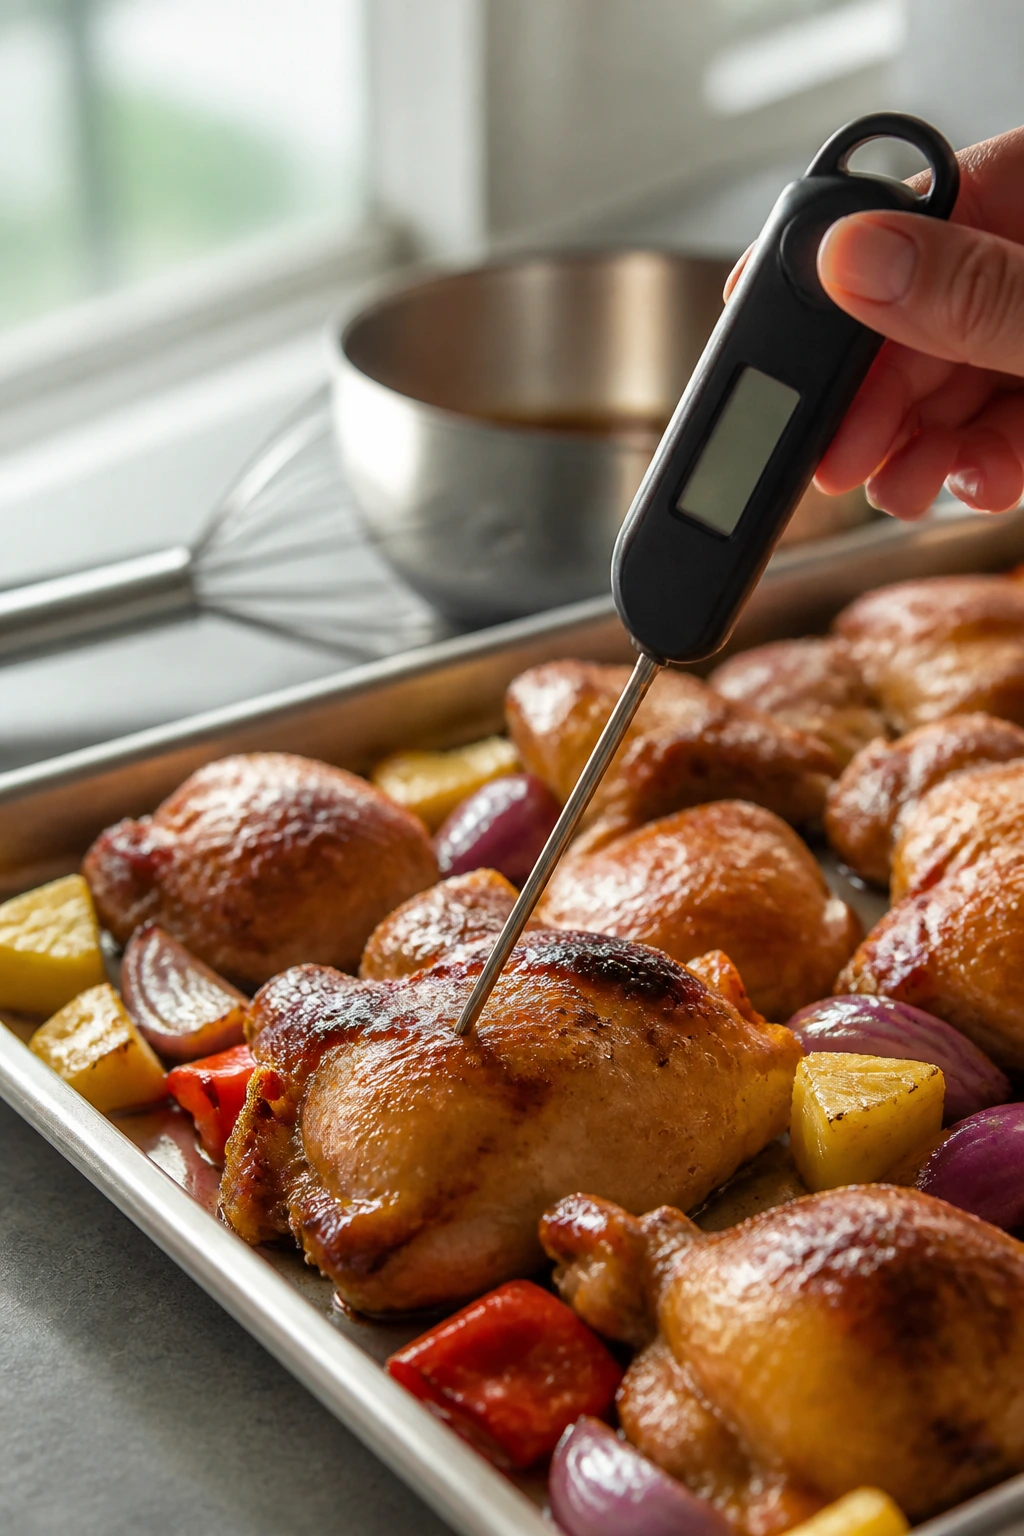
- Instant-read thermometer — The simplest way to confirm the chicken has reached 165°F at the thickest piece.
- Sharp chef’s knife and cutting board — The vegetable cuts matter here; neat chunks roast better than ragged slices.
- Measuring cups and spoons — Sweet and sour sauce needs actual balance, not a generous hand.
I’d also keep a second bowl nearby for the final toss. You can glaze the chicken right on the sheet pan, but I prefer a bowl because it coats more evenly and keeps the pan from turning into a sticky cement situation.
The Step-by-Step Roasted Sweet and Sour Chicken Method

Prep the oven and sauce
-
Preheat the oven to 425°F (220°C) and place a rack in the center position. Line a rimmed half-sheet pan with parchment for easier cleanup, or leave it bare if you want a little more browning on the bottom.
-
Whisk the sauce ingredients in a small saucepan: 1/2 cup reserved pineapple juice, 1/4 cup rice vinegar, 1/4 cup ketchup, 3 tablespoons brown sugar, 2 tablespoons soy sauce, minced garlic, grated ginger, and red pepper flakes if using. Set the pan over medium heat and bring the mixture to a gentle simmer.
-
Stir the cornstarch slurry into the simmering sauce and cook for 30 to 60 seconds, whisking constantly, until the sauce turns glossy and lightly thickened. Do not boil it hard once the cornstarch goes in or the sauce can turn dull and slightly sticky in the wrong way. Remove from the heat and stir in the sesame oil, if using.
Prepare the chicken and vegetables
-
Toss the chicken thighs in a large bowl with the oil, soy sauce, cornstarch, salt, and pepper until every piece is lightly coated. The chicken should look slick, not pastey.
-
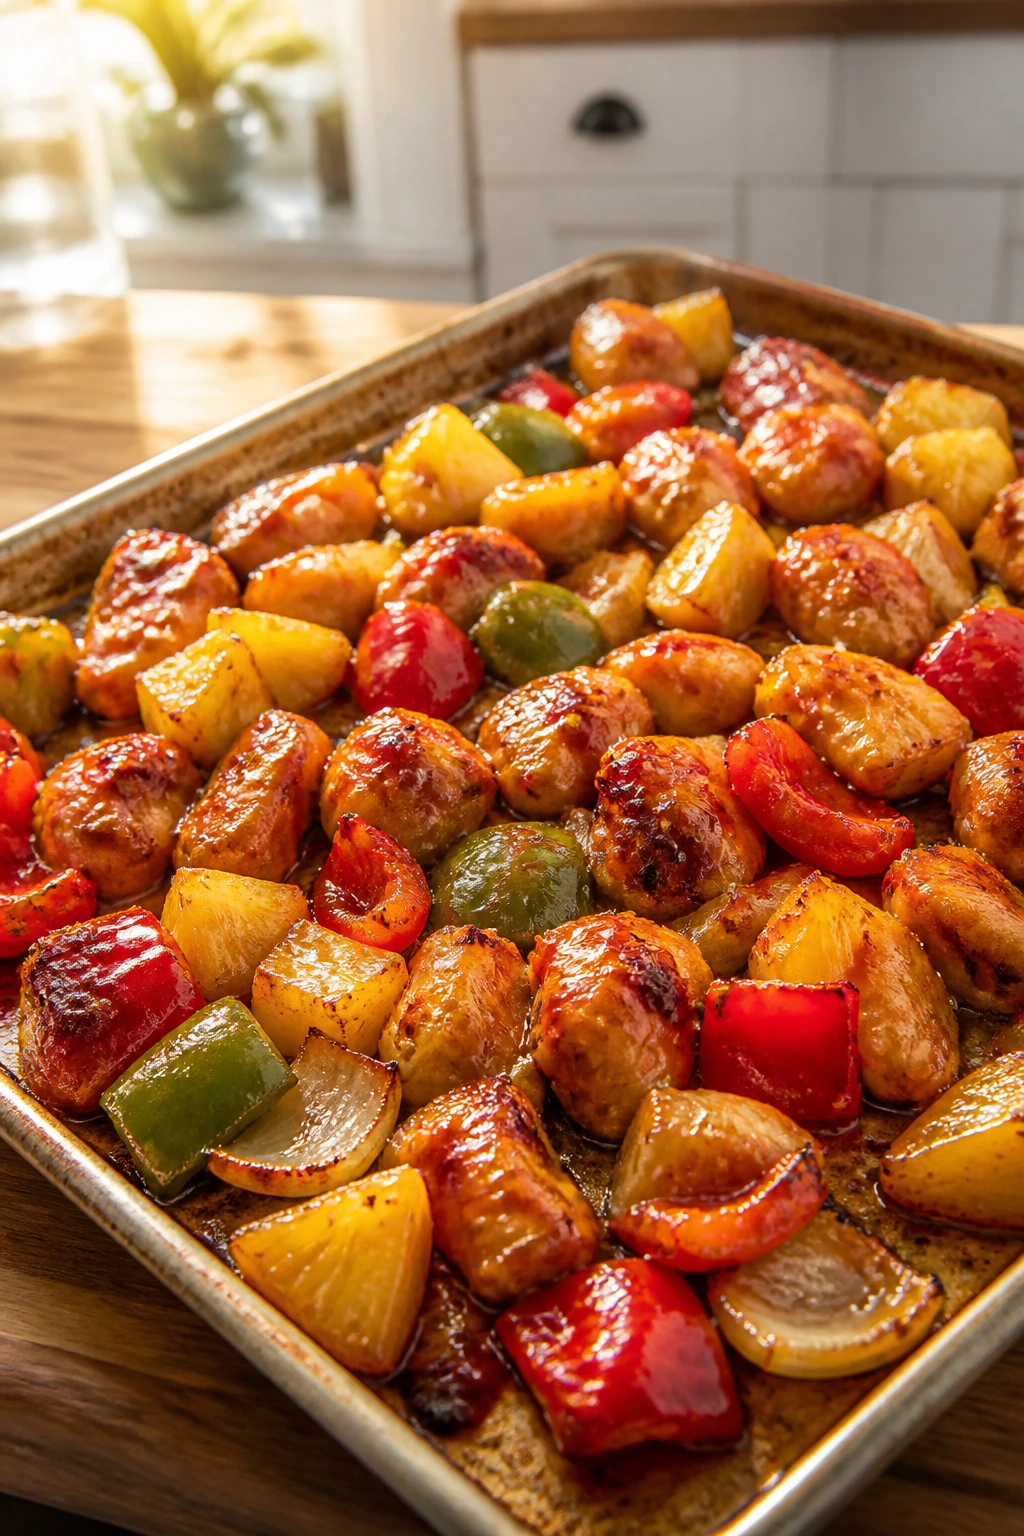
Add the bell peppers and onion to the same bowl and toss again so the vegetables pick up whatever seasoning is left behind. Spread the chicken and vegetables on the sheet pan in a single layer. If the pan looks crowded, split everything between two pans. That matters more than people think.
Roast and finish
-
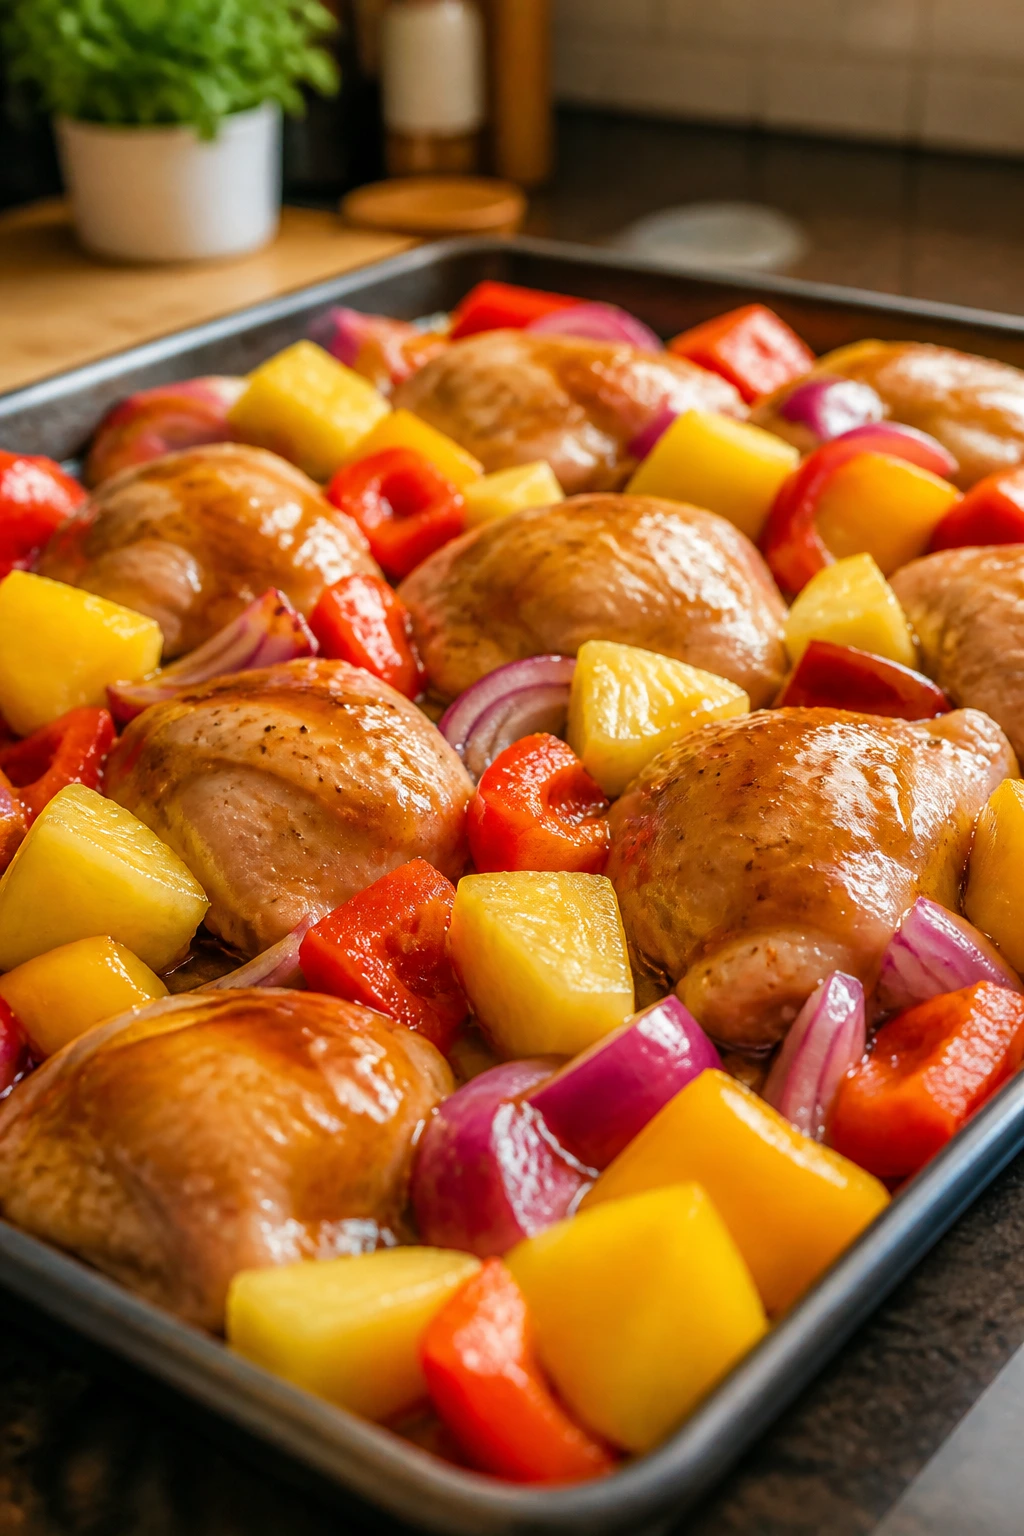
Roast for 15 minutes, then remove the pan and stir the chicken and vegetables with a spatula so the pieces on the edges move toward the center. The peppers should start to blister at the corners, and the chicken should be opaque on the outside but not fully finished yet.
-
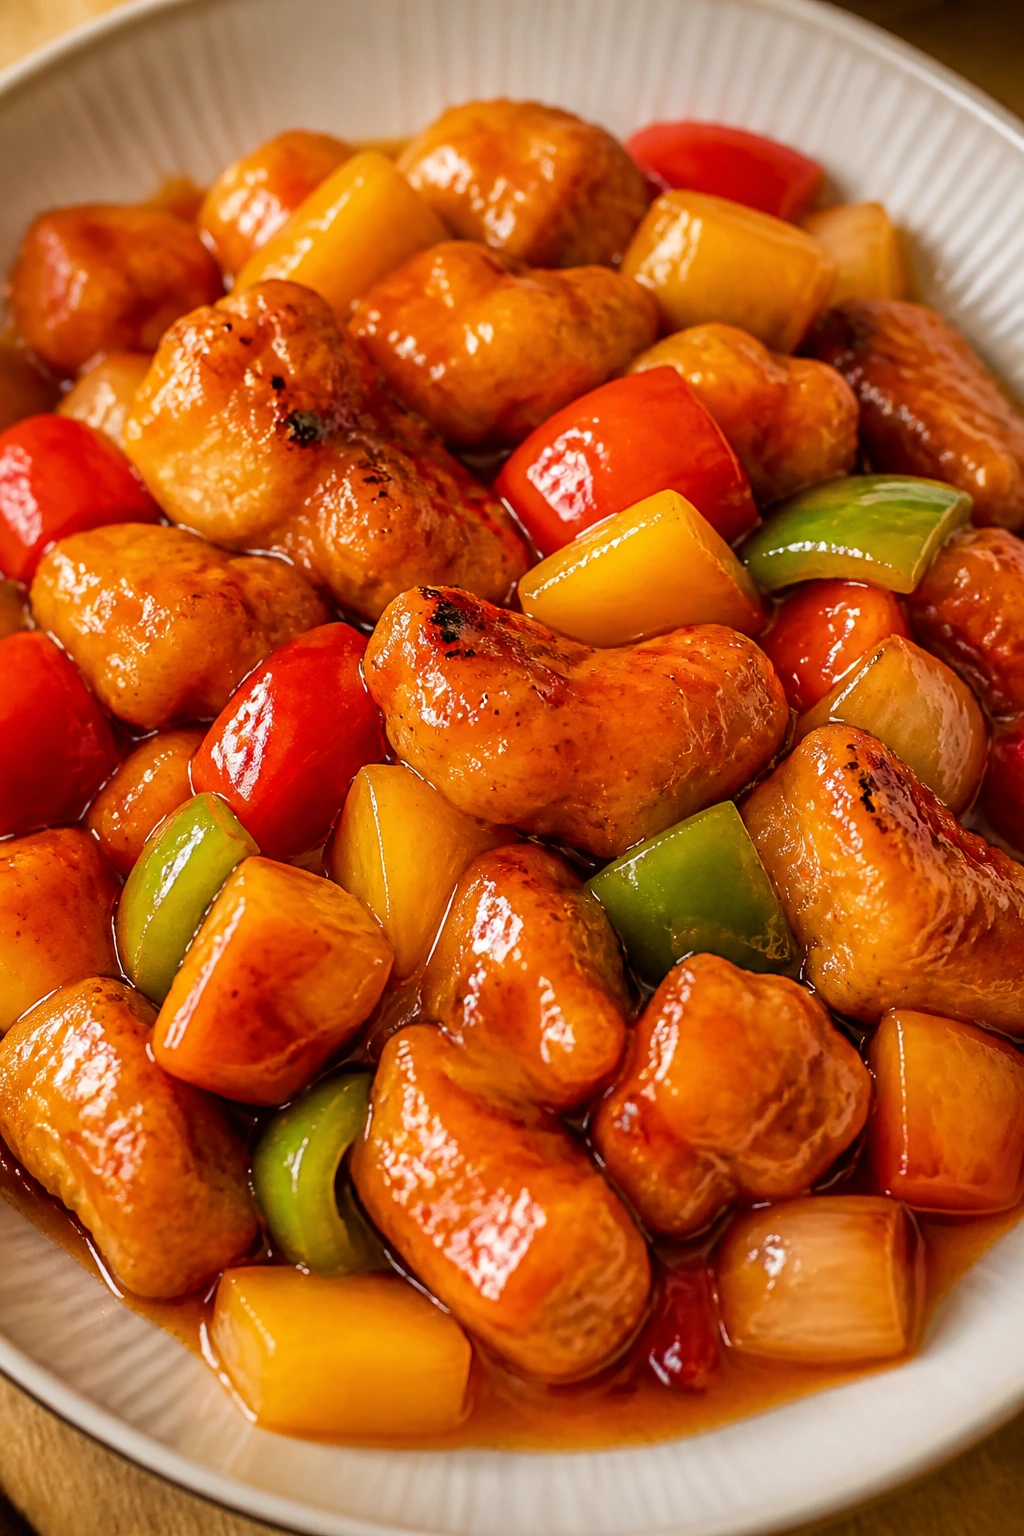
Add the pineapple chunks to the pan and roast for 7 to 10 minutes more, until the chicken reaches 165°F at the thickest piece and the vegetables are tender with browned edges. The pineapple should look a little lacquered around the sides.
-
Transfer the hot chicken, vegetables, and pineapple to a large bowl. Pour in about two-thirds of the sauce and toss until everything is evenly coated. Return the mixture to the sheet pan for 2 to 3 minutes if you want the glaze to cling more tightly, or plate it right away if you like a looser sauce.
-
Scatter the scallions and sesame seeds over the top and serve immediately. If the chicken has gone a little over the edge on browning, that’s fine. The sauce and pineapple will pull it back into balance.
A small note from experience: the sauce should be warm when it meets the roasted chicken. Cold sauce tightens up fast and can make the coating feel clumpy. Warm sauce spreads in a thin layer and gives you that sticky sheen people expect from sweet and sour chicken.
How to Plate It So the Dinner Looks Intentional
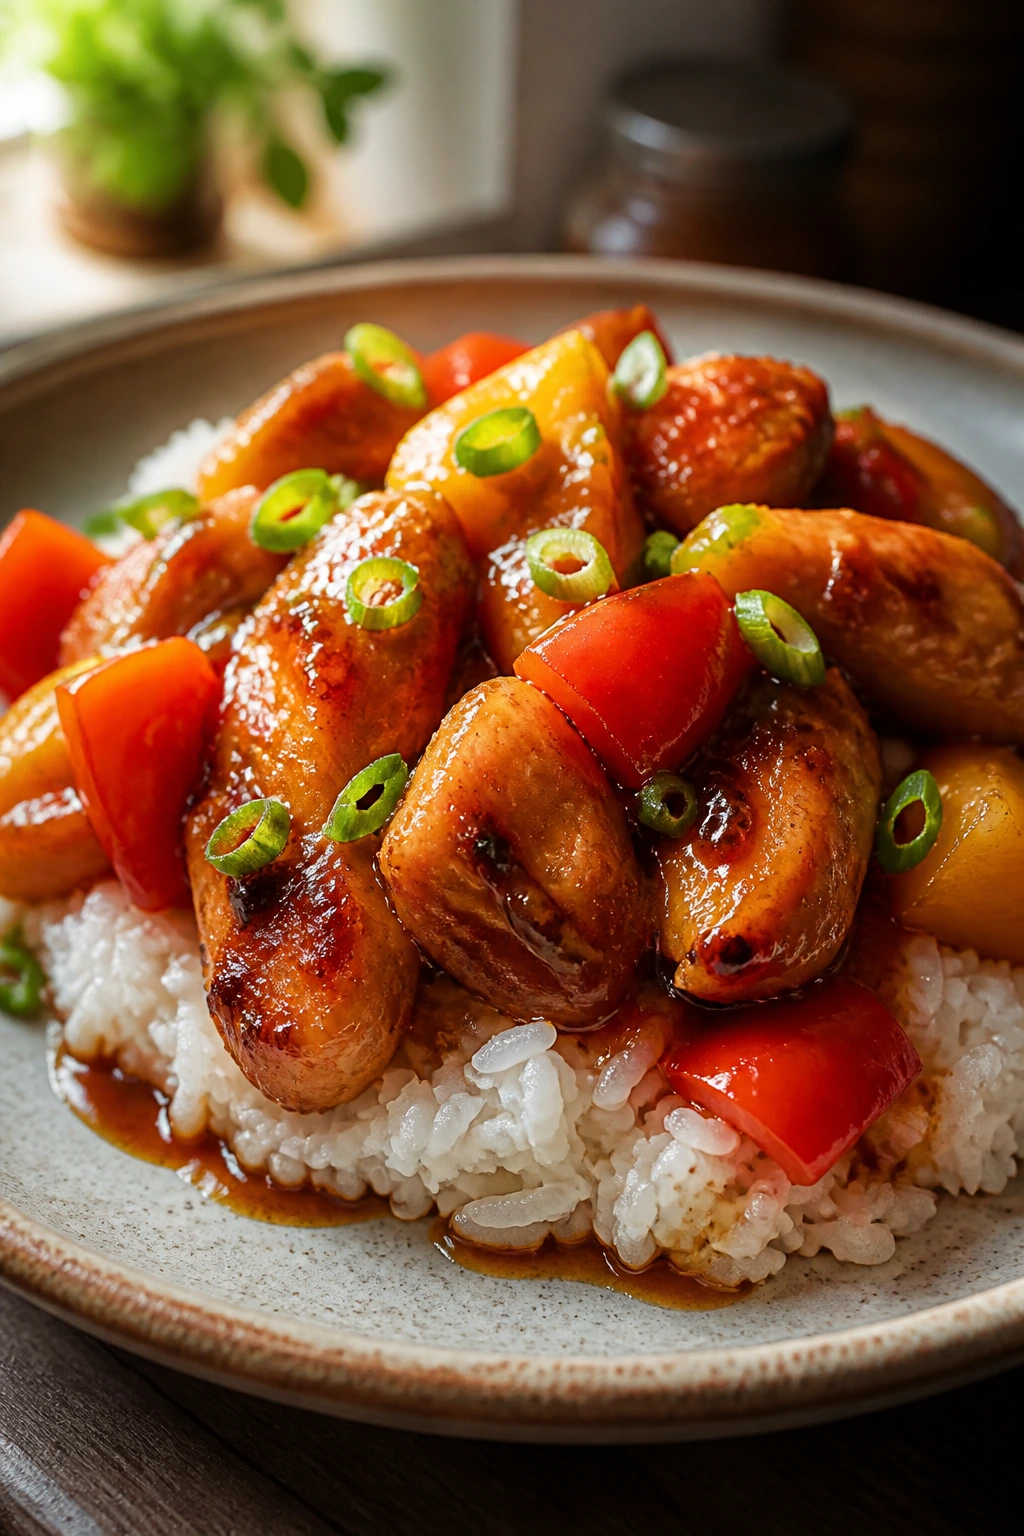
Presentation: Spoon the chicken and vegetables over a mound of steamed jasmine rice, then let the sauce run a little around the edges of the bowl. A few scallion rings on top give the plate a fresh, sharp finish and stop the whole thing from looking brown-on-brown.
Accompaniments: Plain white rice is the easiest choice, but coconut rice works if you want a softer, rounder backdrop. A quick cucumber salad with rice vinegar and a pinch of sugar is the side I reach for when the sauce feels rich enough to need a cold, crisp contrast. Steamed broccoli is fine too, though I like it better if you squeeze a little lemon over it.
Portions: Plan on about 1 to 1 1/4 cups per person if you’re serving rice on the side. For larger appetites, stretch the meal with extra vegetables rather than extra sauce; more peppers and onion keep the dish from feeling heavy.
Beverage Pairing: Cold green tea is the cleanest pairing if you want something simple. A dry riesling works well too, because the slight sweetness plays nicely with the vinegar and pineapple instead of fighting them.
If you’re serving this family-style, put the rice in a wide bowl and mound the chicken on top rather than spreading everything flat. It looks better, and the sauce stays where people can actually scoop it up.
Small Tweaks That Change the Result
Flavor Enhancement: A teaspoon of toasted sesame oil at the very end gives the sauce a deeper, nutty smell, but only if you keep the amount tiny. I also like a squeeze of lime over the finished dish when I want the pineapple to taste a little brighter.
Time-Saver: Mix the sauce up to 3 days ahead and keep it in a jar in the fridge. You can also cut the peppers and onion the night before; just store them in a container lined with a paper towel so they don’t sit in their own moisture.
Pro Move: Roast the chicken and vegetables on the lower-middle rack if your oven browns aggressively. That slows the surface color just enough to keep the sauce from tasting burnt-sugar bitter before the chicken is done. A lot of people blame the recipe when the oven was the real loud one.
Cost-Saver: If bell peppers are expensive, use one red pepper and one green pepper instead of two sweeter peppers. The green pepper brings a sharper note that actually suits sweet and sour sauce, so this isn’t a compromise so much as a different mood.
Make-It-Yours: Add a handful of snap peas during the last 5 minutes if you want a brighter, crisper bite. They stay snappy and give the plate a cleaner texture without changing the core flavor.
I’m also a fan of reserving a few spoonfuls of sauce for the table. Some people want the chicken heavily coated, others want the rice to stay mostly plain. Having extra sauce in a small dish solves both camps without turning dinner into a negotiation.
Mistakes That Turn Sticky Into Soggy

-
Crowding the pan: If the chicken and vegetables overlap, they steam. The symptom is pale chicken and limp peppers. Fix it by using a larger sheet pan or splitting the batch between two pans so the air can move around each piece.
-
Adding the sauce too early: Sweet sauces burn when they sit in the oven for too long. If you pour the glaze on before the chicken has roasted, the edges can darken into bitterness before the center is done. Roast first, glaze at the end.
-
Cutting the chicken too small: Tiny pieces dry out fast once the oven heat and sugar hit them together. Keep the chunks around 1 1/2 inches so they stay juicy and don’t turn tough at the corners.
-
Using watery pineapple straight from the can: If the fruit isn’t drained, the pan floods and the sauce thins out. Reserve the juice for the sauce, drain the fruit well, and let the oven do the rest.
-
Skipping the cornstarch slurry: The sauce still tastes fine without it, but it won’t cling. You’ll end up with a thin glaze that slides off the chicken and pools under the rice. A tablespoon of cornstarch mixed with cold water fixes that in under a minute.
-
Overcooking the chicken because “thighs are forgiving”: They are forgiving, not immortal. Once the thickest pieces hit 165°F, pull the pan. Waiting for a deeper brown color often means the sauce starts to taste sticky in a stale way.
Variations That Still Make Sense
Spicy Chili-Garlic Version: Add 1 to 2 teaspoons chili-garlic paste to the sauce and a pinch more rice vinegar to keep the heat from flattening the sweetness. This version tastes closer to a takeout-style sticky chicken with more bite at the back of the throat.
Orange-Pineapple Brightness: Replace 1/4 cup of the reserved pineapple juice with fresh orange juice and add a little orange zest at the end. The sauce becomes sharper and more perfumed, which works especially well if your pineapple is on the very sweet side.
Gluten-Free Pantry Swap: Use tamari instead of soy sauce and check that your ketchup and vinegar are gluten-free. The texture of the dish does not change much, which is one reason this recipe adapts cleanly.
Extra-Veggie Tray Bake: Add broccoli florets or snap peas during the final 7 minutes of roasting. That turns the dish into a fuller sheet-pan dinner and stretches the chicken a little further without making it feel skimpy.
Chicken Breast Version: Use 1 1/2 pounds boneless chicken breasts, cut into thicker 1 3/4-inch pieces, and start checking for doneness around 20 minutes. Breasts need a closer eye, but they work fine if you prefer them and don’t mind a slightly leaner bite.
Leftovers, Make-Ahead, and Reheating Without a Sad Sauce
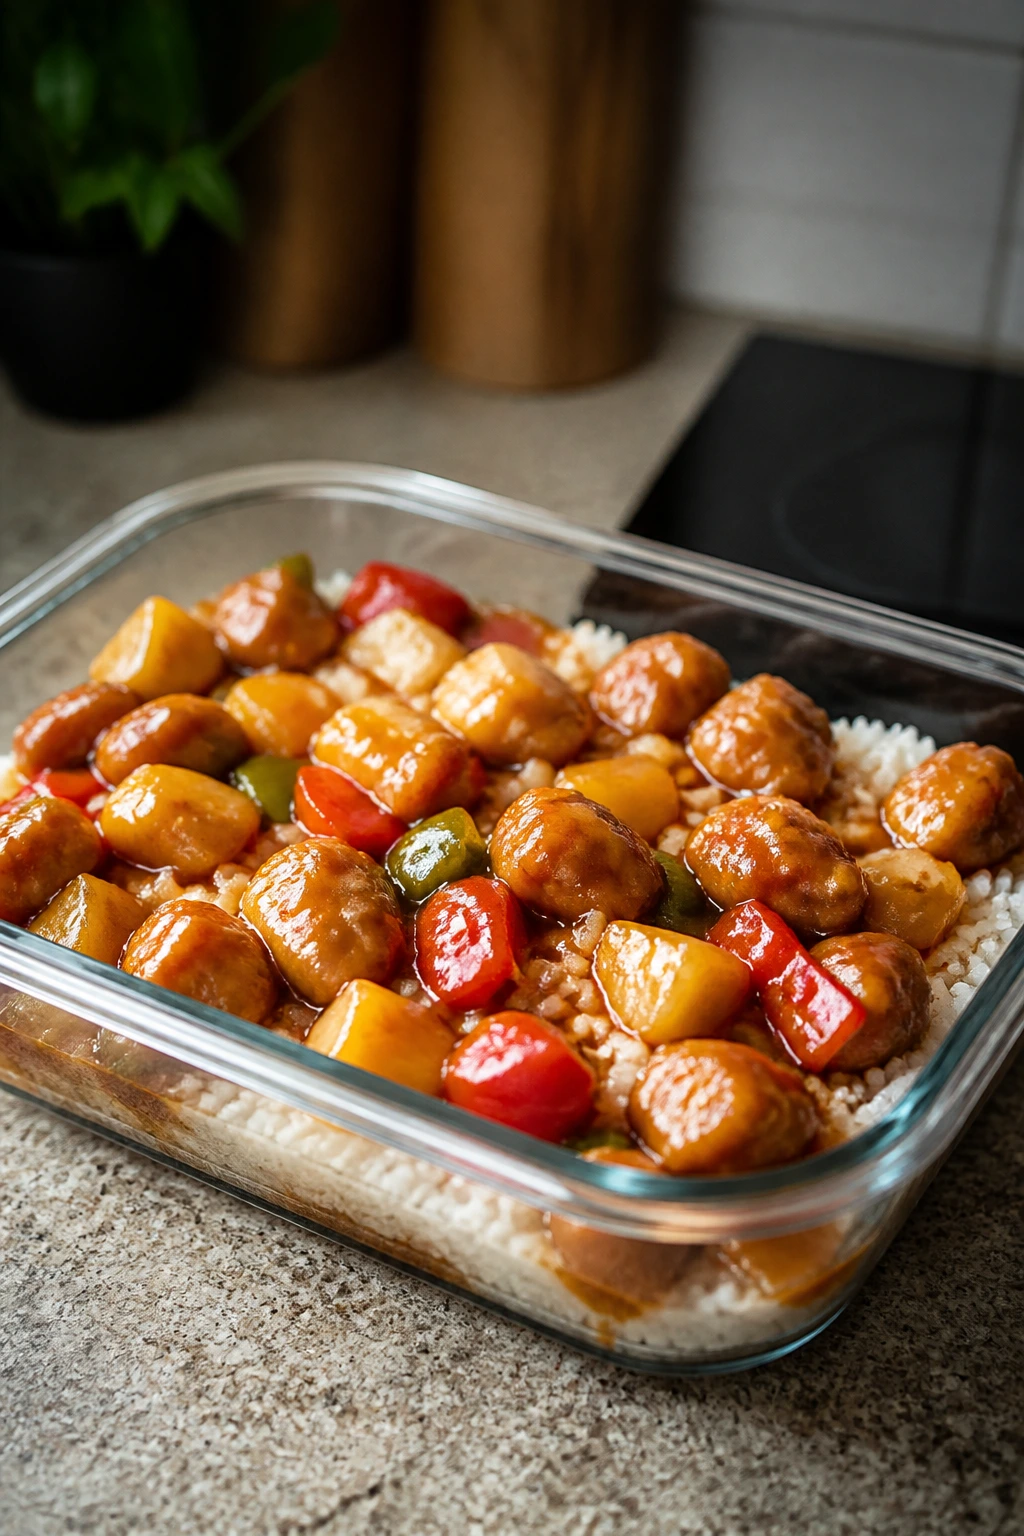
Roasted sweet and sour chicken keeps well in the refrigerator for 3 to 4 days in an airtight container. If you can, store the sauce separately from the rice, because rice soaks up the glaze and turns the whole container heavy. The chicken and vegetables hold texture better when they aren’t sitting in a pool overnight.
Freezing works for up to 2 months, though the bell peppers soften after thawing. I only freeze it if I know I’ll be using the leftovers for something forgiving, like a rice bowl or a quick lunch. Thigh meat handles freezing better than breast meat, which is one more reason I prefer thighs here.
For reheating, the oven is the best option if you want the closest return to the original texture. Put the chicken in a baking dish, cover loosely with foil, and warm at 375°F for 10 to 12 minutes until heated through. If the sauce has tightened up, add 1 to 2 tablespoons of water or pineapple juice before reheating.
A skillet works well for smaller portions. Warm it over medium-low heat with a splash of water, stir once or twice, and stop as soon as the chicken is hot. The microwave is fine in a rush, but use 50 percent power and short bursts so the sauce does not split into sticky spots and dry patches.
For make-ahead planning, the sauce can be cooked up to 3 days ahead and reheated gently before serving. The vegetables can be cut 1 day ahead, and the chicken can be trimmed and seasoned a few hours before dinner. I would not fully roast the dish in advance if you can avoid it; the final toss and brief return to the oven are part of what keeps the sauce lively.
Questions People Ask Before They Make It

Can I use chicken breasts instead of thighs?
Yes, but cut the breasts into slightly larger pieces and start checking them early. Breasts dry out faster once the sauce gets involved, so pull them the moment they hit 165°F and don’t wait for extra browning.
Do I have to use canned pineapple?
No, but canned pineapple is easier here because the juice becomes part of the sauce. If you use fresh pineapple, replace the reserved juice with 1/2 cup apple juice or water plus a little extra sugar so the sauce still has enough body.
Why did my sauce turn thin?
Usually it’s one of two things: either the cornstarch slurry wasn’t simmered long enough to thicken, or the pineapple wasn’t drained and brought extra water into the pan. Whisk the slurry into a gently simmering sauce and let it cook until it looks glossy before you pull it off the heat.
Can I roast the chicken and vegetables together from the start with the sauce on them?
You can, but I don’t recommend it. The sugar in the glaze can scorch before the chicken is finished, which leaves you with bitter spots on the pan and a sauce that tastes darker than you want.
What rice goes best with this?
Jasmine rice is my first pick because it stays fluffy and doesn’t fight the sauce. Brown rice works if you want more chew, and coconut rice is nice when you want the whole meal to lean a little softer and rounder.
How do I keep the peppers from getting mushy?
Cut them in big pieces and roast them just until the corners blister. Thin slices collapse fast, especially once the sauce is tossed in, so keep the cuts generous.
Can I make this with frozen pineapple?
Yes, as long as you thaw and drain it well before roasting. Frozen fruit tends to release more liquid, so the roasting step can get watery if you skip that drainage.
Is there a way to make it a little less sweet?
Trim the brown sugar by 1 tablespoon and bump the vinegar by 1 teaspoon. That small shift keeps the sauce balanced without turning it sharp or thin.
Why This One Earns a Spot on the Repeater List
Roasted sweet and sour chicken works because it respects the shape of a weeknight. You’re not setting up a frying station, you’re not making a sauce that takes half an hour to rescue, and you’re not ending up with a sink full of oily pans. The oven gives you the charred edges and the sauce gives you the familiar sweet-tangy hit, which is really the whole point.
I keep coming back to this version because it tastes complete without asking for much. That matters. The next time you want dinner to feel lively but not chaotic, this is the pan I’d reach for first.
Roasted Sweet and Sour Chicken — Recipe Card
Recipe Name: Roasted Sweet and Sour Chicken for Weeknight Dinners
Description: Chicken thighs, bell peppers, onion, and pineapple roast on one pan, then get tossed in a glossy sweet-and-sour glaze with bright vinegar, ginger, and garlic. The edges caramelize a little, the sauce clings, and dinner lands on the table without a long cleanup.
Prep Time: 20 minutes
Cook Time: 25 minutes
Total Time: 45 minutes
Course: Dinner, Main Course
Cuisine: Chinese-American-inspired
Servings: 4 to 6
Calories: About 410 kcal per serving
Ingredients
For the Chicken and Vegetables:
- 1 1/2 pounds boneless, skinless chicken thighs, cut into 1 1/2-inch pieces
- 2 tablespoons neutral oil
- 1 tablespoon soy sauce
- 1 tablespoon cornstarch
- 1 teaspoon fine sea salt
- 1/2 teaspoon black pepper
- 1 red bell pepper, cut into 1-inch pieces
- 1 yellow bell pepper, cut into 1-inch pieces
- 1 medium red onion, cut into wedges
- 1 can (20 ounces) pineapple chunks in juice, drained, with 1/2 cup juice reserved
For the Sauce:
- 1/2 cup reserved pineapple juice
- 1/4 cup rice vinegar
- 1/4 cup ketchup
- 3 tablespoons packed light brown sugar
- 2 tablespoons soy sauce
- 2 garlic cloves, minced
- 1 tablespoon grated fresh ginger
- 1 tablespoon cornstarch mixed with 1 tablespoon cold water
- 1/2 teaspoon red pepper flakes, optional
- 1 teaspoon toasted sesame oil, optional
For Finishing:
- 2 scallions, thinly sliced
- 1 tablespoon sesame seeds, optional
Instructions
-
Preheat the oven to 425°F (220°C) and line a rimmed sheet pan with parchment.
-
Whisk the pineapple juice, rice vinegar, ketchup, brown sugar, soy sauce, garlic, ginger, and optional red pepper flakes in a small saucepan. Simmer over medium heat, then whisk in the cornstarch slurry and cook until glossy. Stir in the sesame oil, if using.
-
Toss the chicken with oil, soy sauce, cornstarch, salt, and pepper. Add the bell peppers and onion, then spread everything on the sheet pan in a single layer.
-
Roast for 15 minutes, then stir the chicken and vegetables so they cook evenly.
-
Add the pineapple chunks and roast for 7 to 10 minutes more, until the chicken reaches 165°F and the vegetables are browned at the edges.
-
Transfer the roasted chicken and vegetables to a bowl, add about two-thirds of the sauce, and toss to coat. Return to the pan for 2 to 3 minutes if you want the glaze to cling more tightly.
-
Finish with scallions and sesame seeds, then serve hot.
Notes: Thighs stay juicier than breasts here, and the sauce should be warm before it hits the chicken. Leftovers keep 3 to 4 days in the fridge.