
Dry chicken breast usually comes from three things: uneven thickness, too much heat, and no resting time. A tender juicy chicken breast for weeknight dinners does not need a fancy marinade or a long ingredient list. It needs a little structure, a little patience, and a pan that is hot enough to brown the outside before the inside gives up its moisture.
The method I keep coming back to is plain, almost stubbornly plain: a short brine, a simple spice rub, a fast skillet sear, and a lemony pan sauce made from the browned bits left behind. That combination does something useful that a lot of “quick chicken” recipes miss. It gives you meat that slices cleanly, stays moist in the middle, and still tastes like dinner, not diet food.
And yes, a thermometer matters here. Not because this is difficult, but because chicken breast is unforgiving when you guess. Pull it a touch too late and the texture tightens fast; pull it in the right window and the meat stays plump, glossy, and easy to chew. That small difference is the whole game, and it’s easier to hit than people think.
Why This Chicken Breast Method Works on Busy Nights
-
The quick brine does real work: A 15- to 20-minute soak seasons the meat past the surface and gives the outside a little more forgiveness in the pan.
-
Even thickness beats wishful thinking: Pounding the thick end down to about 1/2 to 3/4 inch helps the whole breast finish at the same time instead of leaving you with a dry edge and a raw center.
-
A hot skillet gives you color fast: Browning the chicken in 4 to 5 minutes per side builds flavor without trapping the meat in the pan too long.
-
The thermometer takes the guesswork out: Chicken breast is safest at 165°F, and cooking to that number on purpose is a lot better than slicing it open and hoping.
-
The pan sauce keeps the dinner from feeling plain: A splash of broth, a little garlic, lemon juice, and butter turn the browned bits into something worth spooning over rice, potatoes, or vegetables.
-
It plays nicely with almost anything: This chicken works with buttered noodles, roasted broccoli, salad greens, or leftover grains from the fridge. That flexibility is the whole point.
Timing, Yield, and Difficulty at a Glance
Yield: Serves 4
Prep Time: 15 minutes active
Cook Time: 12 to 15 minutes
Total Time: 35 to 40 minutes, including the 20-minute brine
Difficulty: Beginner — the steps are straightforward, but an instant-read thermometer keeps the chicken from slipping past juicy into dry.
Chill/Rest Time: 20 minutes brining; 5 minutes resting after cooking
Best Served: Right after the rest, while the sauce is still hot and loose
A small note on timing: this is not a recipe that rewards wandering off to fold laundry while the skillet runs. It moves quickly once the pan gets hot. Keep your garlic, broth, and lemon ready before the chicken goes in.
The Ingredient List I Actually Reach For

-
4 boneless, skinless chicken breasts, 6 to 8 ounces each
Choose breasts that are close in size so they finish at the same time. -
4 cups cold water
This is the base of the quick brine; cold water keeps the chicken safe while it sits. -
3 tablespoons kosher salt
The brine seasons the meat and helps the fibers hold onto moisture. If you use fine table salt instead, cut the amount to 2 tablespoons. -
1 tablespoon granulated sugar
Sugar is not for sweetness here. It smooths the edges of the brine and helps the surface brown a little faster. -
1 teaspoon paprika
Sweet paprika gives the chicken a warm color and a subtle roasted note. -
1 teaspoon garlic powder
Garlic powder clings to the dry surface better than fresh garlic would at this stage. -
1/2 teaspoon onion powder
It adds a little roundness without turning the seasoning into a full-on rub. -
3/4 teaspoon black pepper
Pepper gives the crust a sharper edge and keeps the flavor from tasting flat. -
2 tablespoons olive oil
Olive oil helps the chicken sear without smoking too fast. -
2 tablespoons unsalted butter, divided
One tablespoon starts the sear; the other finishes the sauce and gives it a glossy finish. -
2 cloves garlic, minced
Fresh garlic goes into the pan sauce, where it softens fast and smells sweet instead of harsh. -
1/2 cup low-sodium chicken broth
The broth loosens the browned bits and gives the sauce body. -
1 tablespoon lemon juice
Lemon brightens the sauce and keeps the chicken from tasting heavy. -
1 tablespoon chopped parsley
Parsley is the clean green finish that makes the plate look cared for.
Why Each Ingredient Pulls Its Weight
The Chicken Breast
What to use: 4 boneless, skinless chicken breasts, about 6 to 8 ounces each.
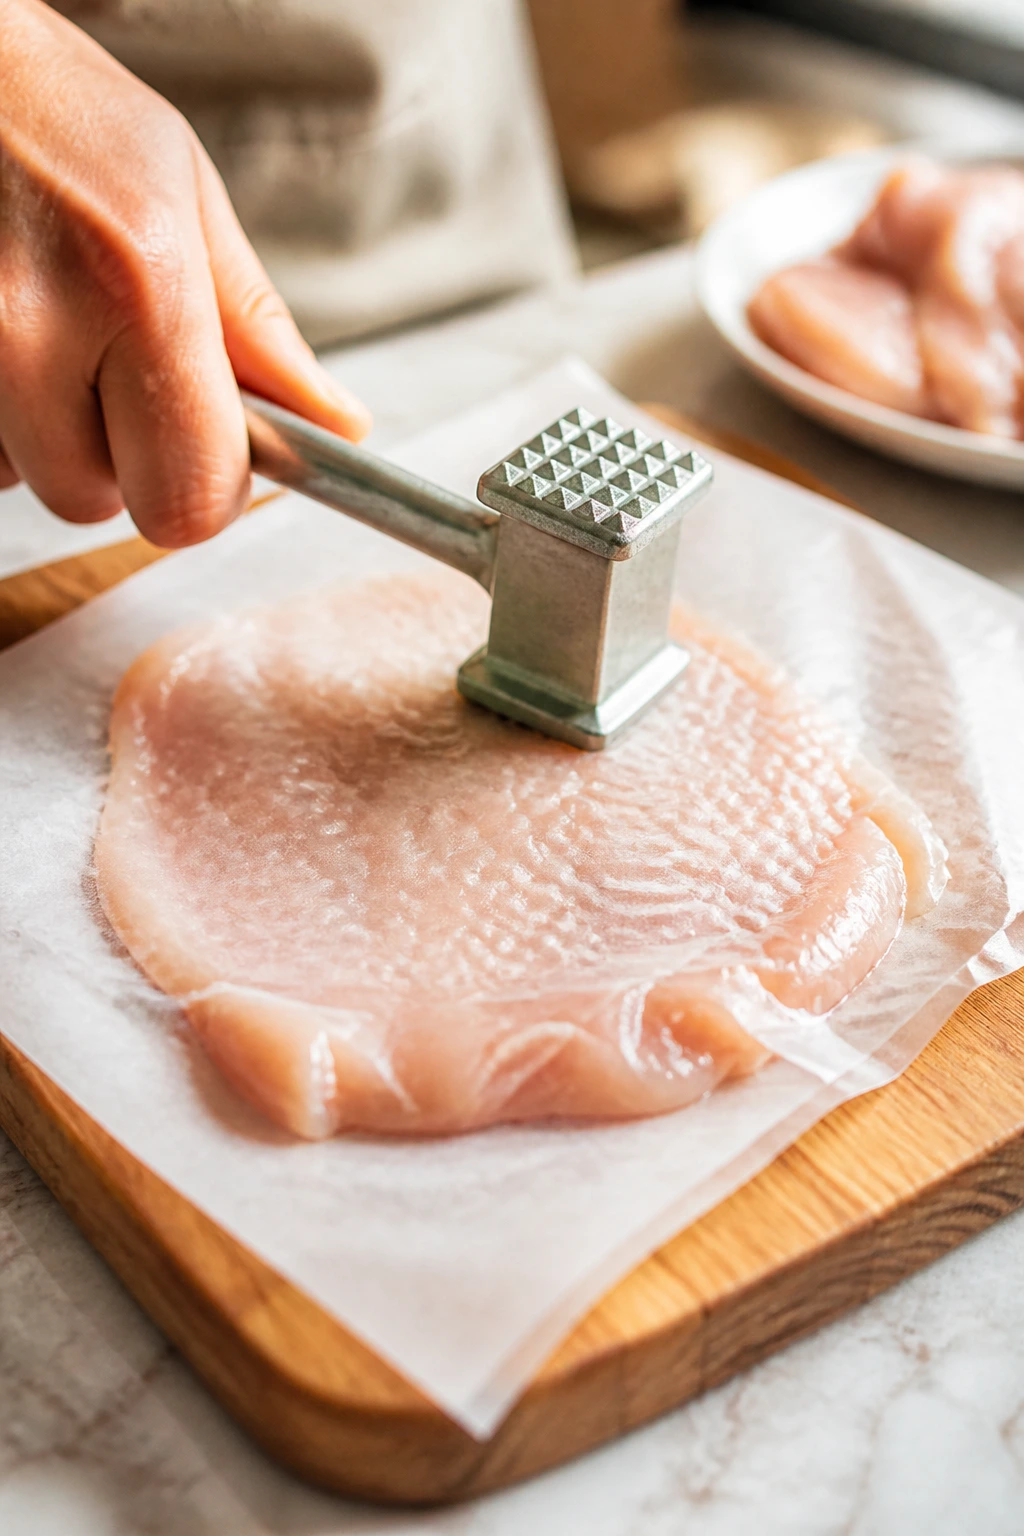
Preparation: Trim any hard white tendon bits if you see them, then pound the thick end until the whole breast is about 1/2 to 3/4 inch thick.
Substitutions: Boneless, skinless chicken thighs work if you want a richer cut; they usually need a few extra minutes in the skillet. Thin-cut chicken cutlets also work, but shorten the cooking time.
Tips: Size matters here. If one breast is twice the size of another, the smaller one will overcook while you wait for the larger one to catch up.
The Quick Brine
What to use: 4 cups cold water, 3 tablespoons kosher salt, and 1 tablespoon granulated sugar.
Preparation: Whisk until the salt and sugar dissolve fully before the chicken goes in. If the crystals sink to the bottom, the brine is uneven and the top layer of the chicken gets more seasoning than the rest.
Substitutions: If you have buttermilk on hand, you can swap in 2 cups buttermilk plus 2 cups water and keep the salt the same. A dry brine also works in a pinch: salt the chicken and let it sit uncovered in the fridge for 30 to 45 minutes.
Tips: Fifteen minutes is enough to help; 20 minutes is the sweet spot for an average breast. Much longer is not better with boneless chicken breast, because the texture can turn a little odd.
The Dry Seasoning
What to use: 1 teaspoon paprika, 1 teaspoon garlic powder, 1/2 teaspoon onion powder, and 3/4 teaspoon black pepper.
Preparation: Mix the spices in a small bowl so they go on evenly instead of landing in patches. Pat the chicken dry first, or the seasoning will slide around on the surface.
Substitutions: Smoked paprika gives the chicken a deeper, campfire-style note. If you want a little heat, add 1/4 teaspoon cayenne or a pinch of red pepper flakes.
Tips: The seasoning should look like a thin, even dusting, not a crusty layer. Too much spice can burn in the pan before the chicken finishes cooking.
The Skillet Finish
What to use: 2 tablespoons olive oil, 2 tablespoons unsalted butter, 2 cloves garlic, 1/2 cup low-sodium chicken broth, 1 tablespoon lemon juice, and 1 tablespoon chopped parsley.
Preparation: Mince the garlic before you start cooking and keep the broth nearby. Once the chicken comes out of the pan, the sauce moves fast.
Substitutions: Avocado oil can replace olive oil if your pan runs hot. Dry white wine can replace half of the broth if you want a sharper sauce; just simmer it for a minute before adding the butter.
Tips: Garlic burns in a blink. If it smells sharp or turns dark brown, the sauce will taste bitter, so keep the heat moderate and move quickly.
The Pans, Thermometer, and Small Tools That Make It Easier
-
12-inch stainless steel or cast-iron skillet
Big enough to give the chicken breathing room; if your pan is smaller, cook in batches. -
Instant-read thermometer
Not optional in my book. It tells you exactly when to stop cooking. -
Tongs
Better than a fork, which lets juice leak out while you flip. -
Small mixing bowl
Handy for the spice mix and for whisking the brine if you don’t use a shallow dish. -
Whisk
Helps dissolve the salt and sugar fast. -
Paper towels
Dry chicken sears better. Wet chicken steams, and steaming is not what we want. -
Meat mallet or rolling pin
Use this between two sheets of parchment or plastic wrap to even out the breasts. -
Wooden spoon or spatula
Needed for scraping up the browned bits when the broth goes in.
The Stovetop Method, Step by Step
Prep and Brine
-
Make the quick brine: In a medium bowl or shallow dish, whisk together 4 cups cold water, 3 tablespoons kosher salt, and 1 tablespoon sugar until the crystals dissolve. Add the chicken breasts and turn them once so the brine touches all sides. Refrigerate for 15 to 20 minutes.
-
Dry and flatten the chicken: Remove the breasts from the brine and pat them very dry with paper towels. Place each one between two sheets of parchment or plastic wrap and pound the thick end until the whole piece is about 1/2 to 3/4 inch thick. Skip the brute force; you want even thickness, not shredded edges.
-
Season the surface: Mix the paprika, garlic powder, onion powder, and black pepper in a small bowl. Sprinkle the seasoning evenly over both sides of the chicken and press it on gently with your fingers so it sticks. If the chicken looks wet, pat it dry again. The surface needs to be dry for browning.
Sear and Build Flavor
-
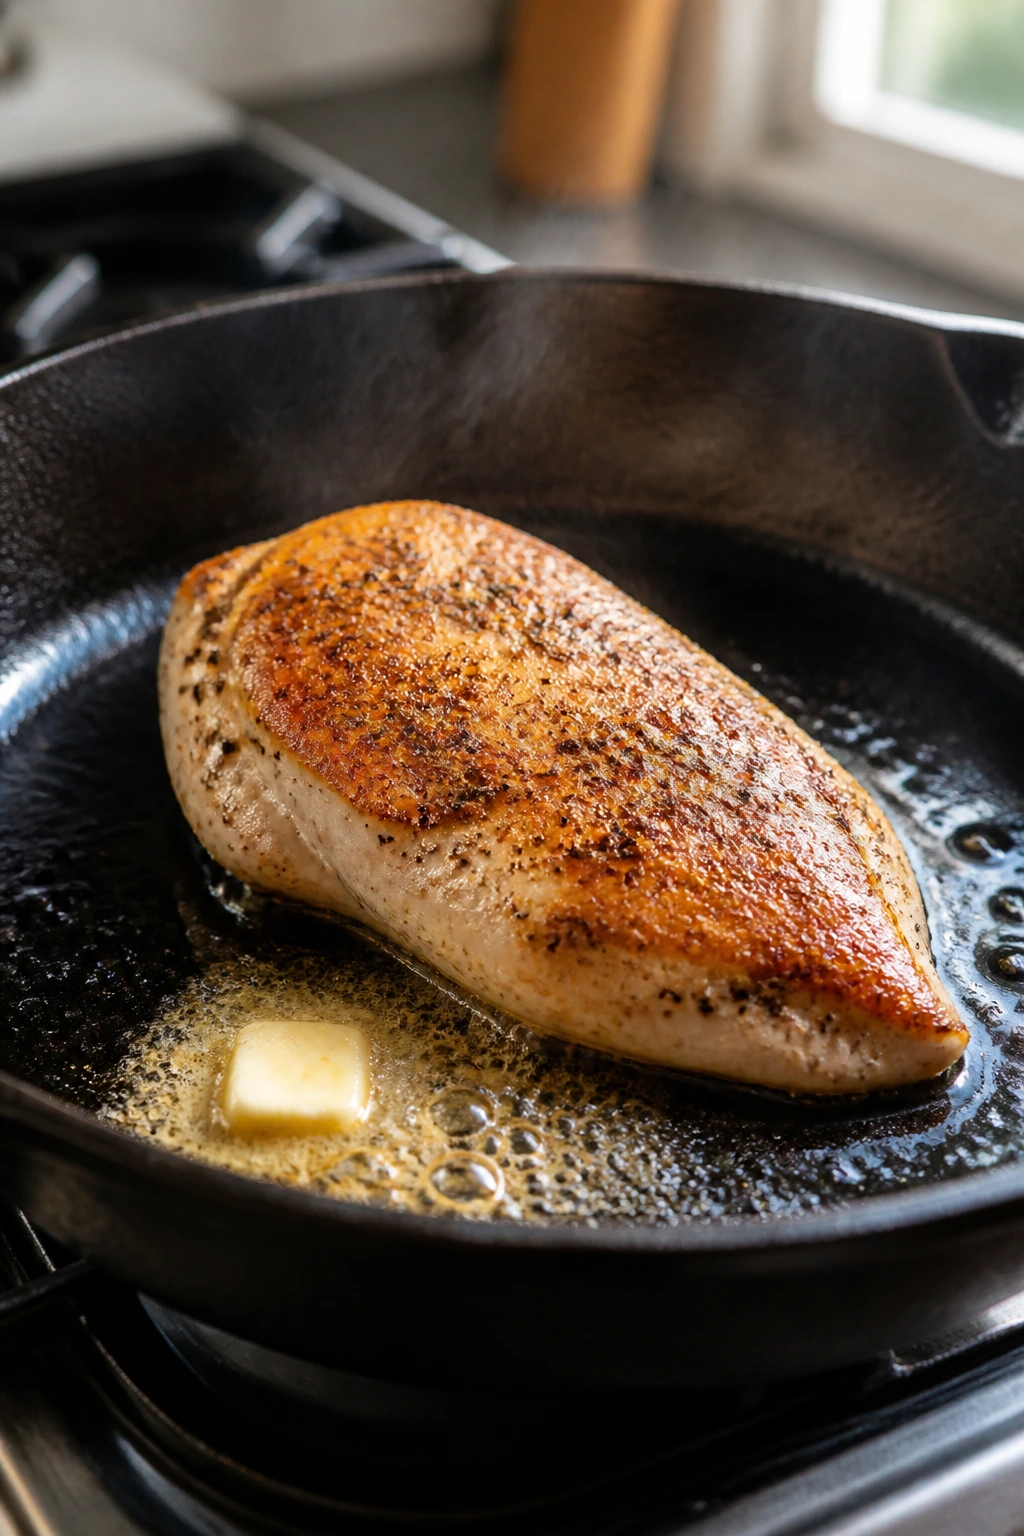
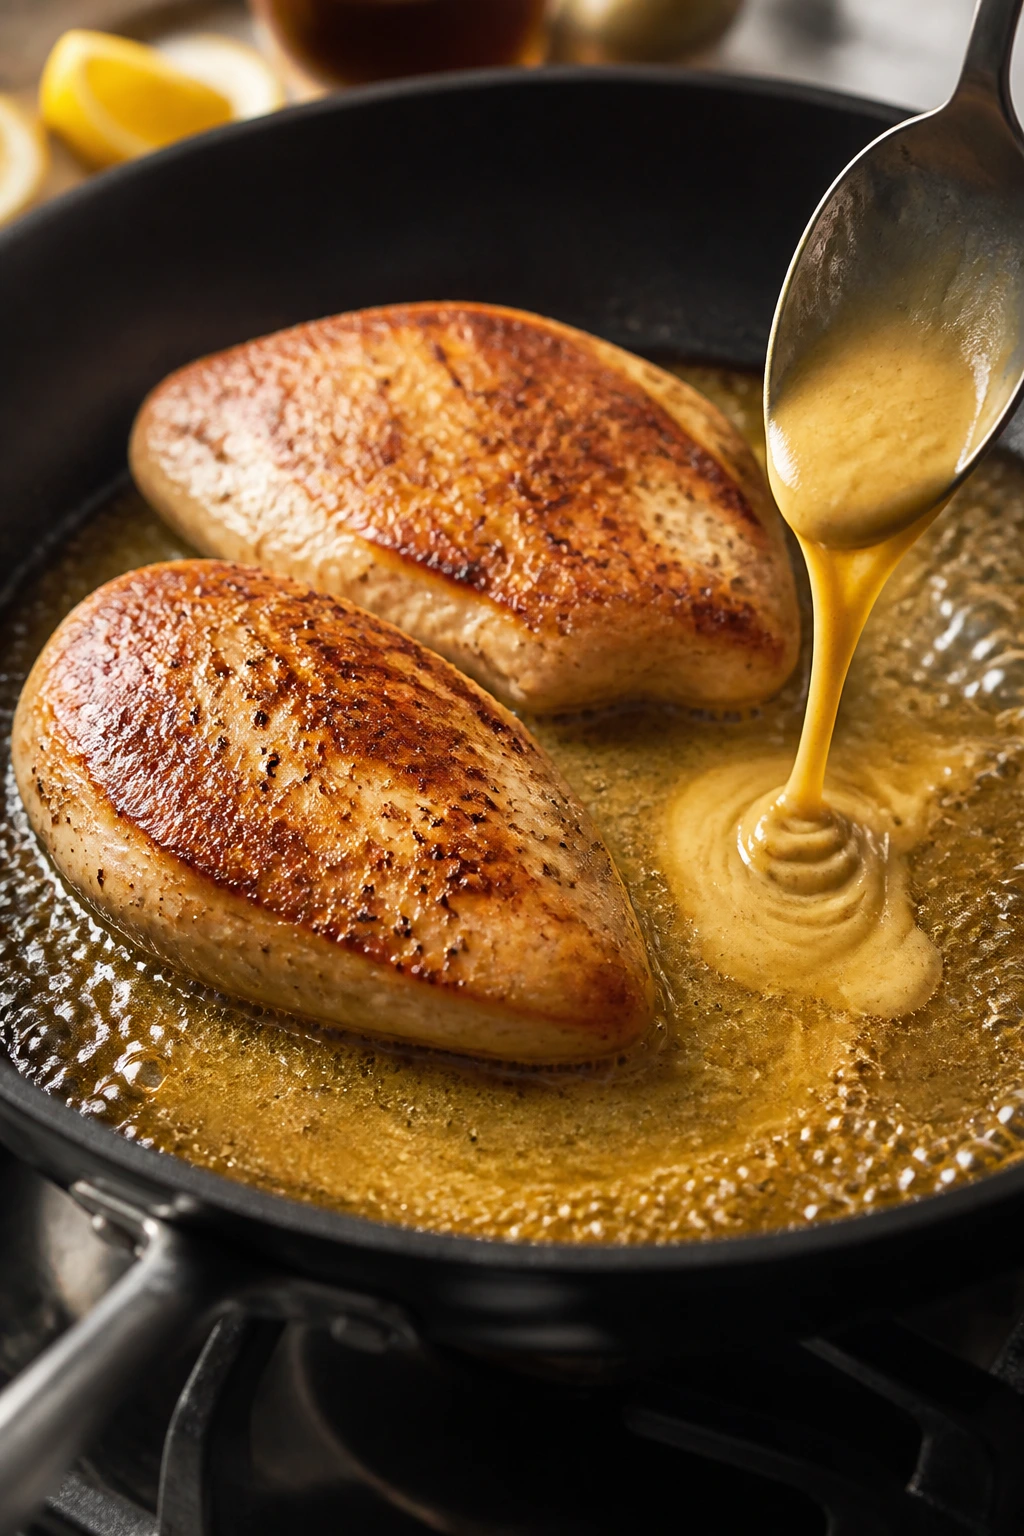
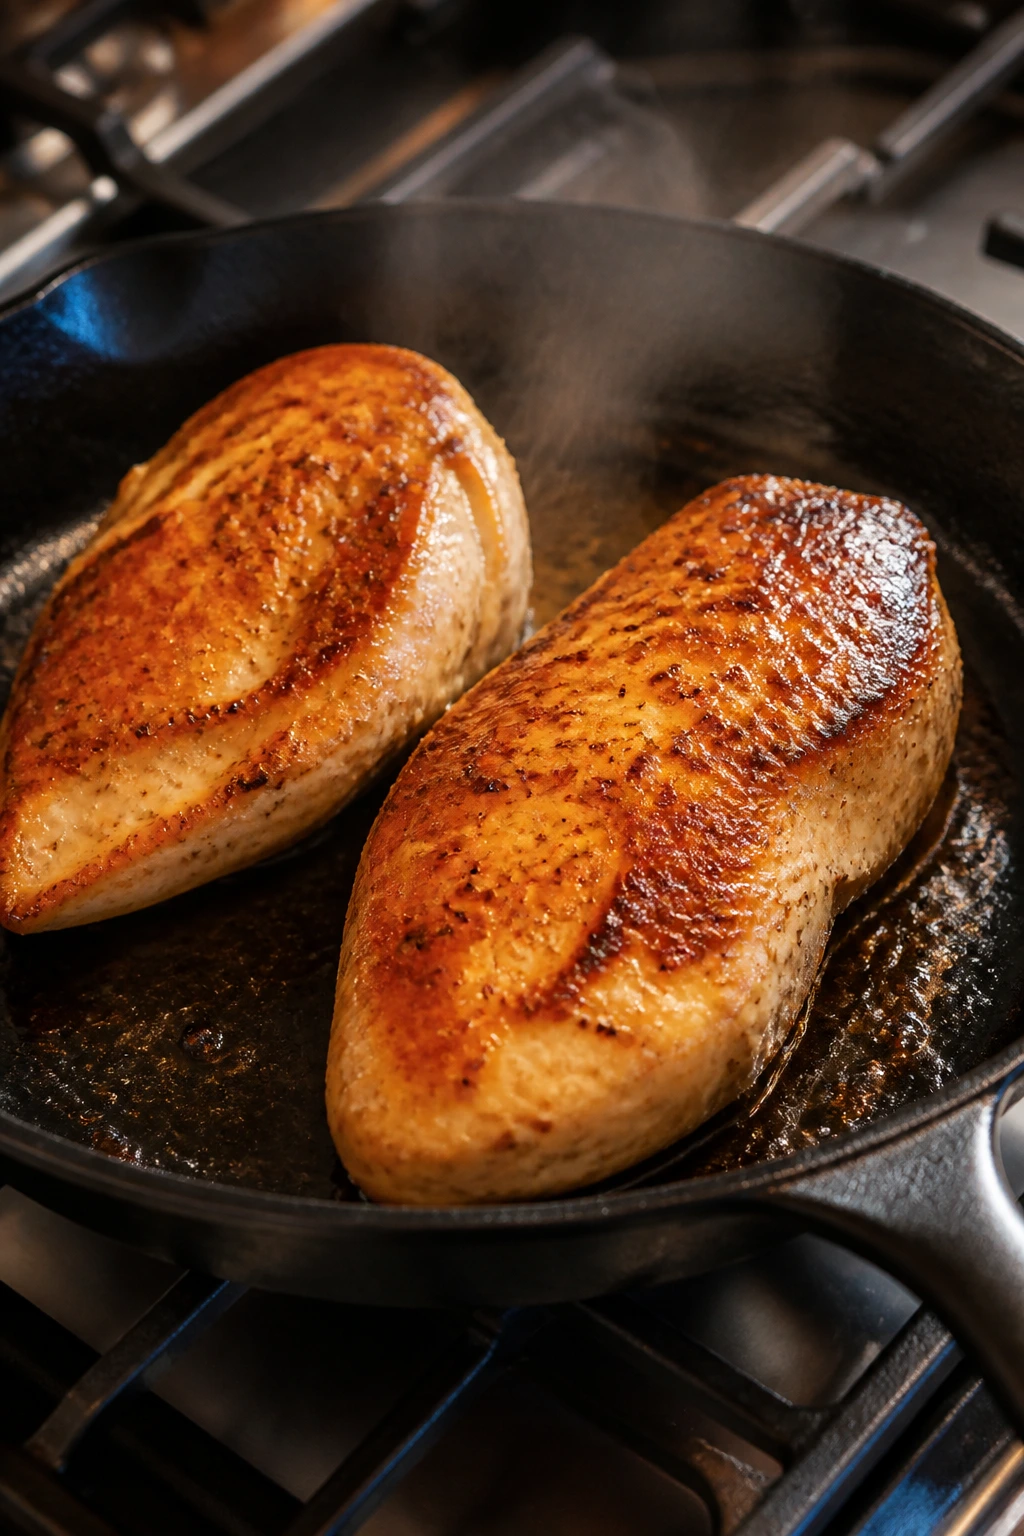
Heat the skillet: Set a 12-inch skillet over medium-high heat. Add the olive oil and 1 tablespoon of the butter. When the butter foams and then settles, the pan is ready. If the butter starts to brown before the chicken goes in, lower the heat for a minute.
-
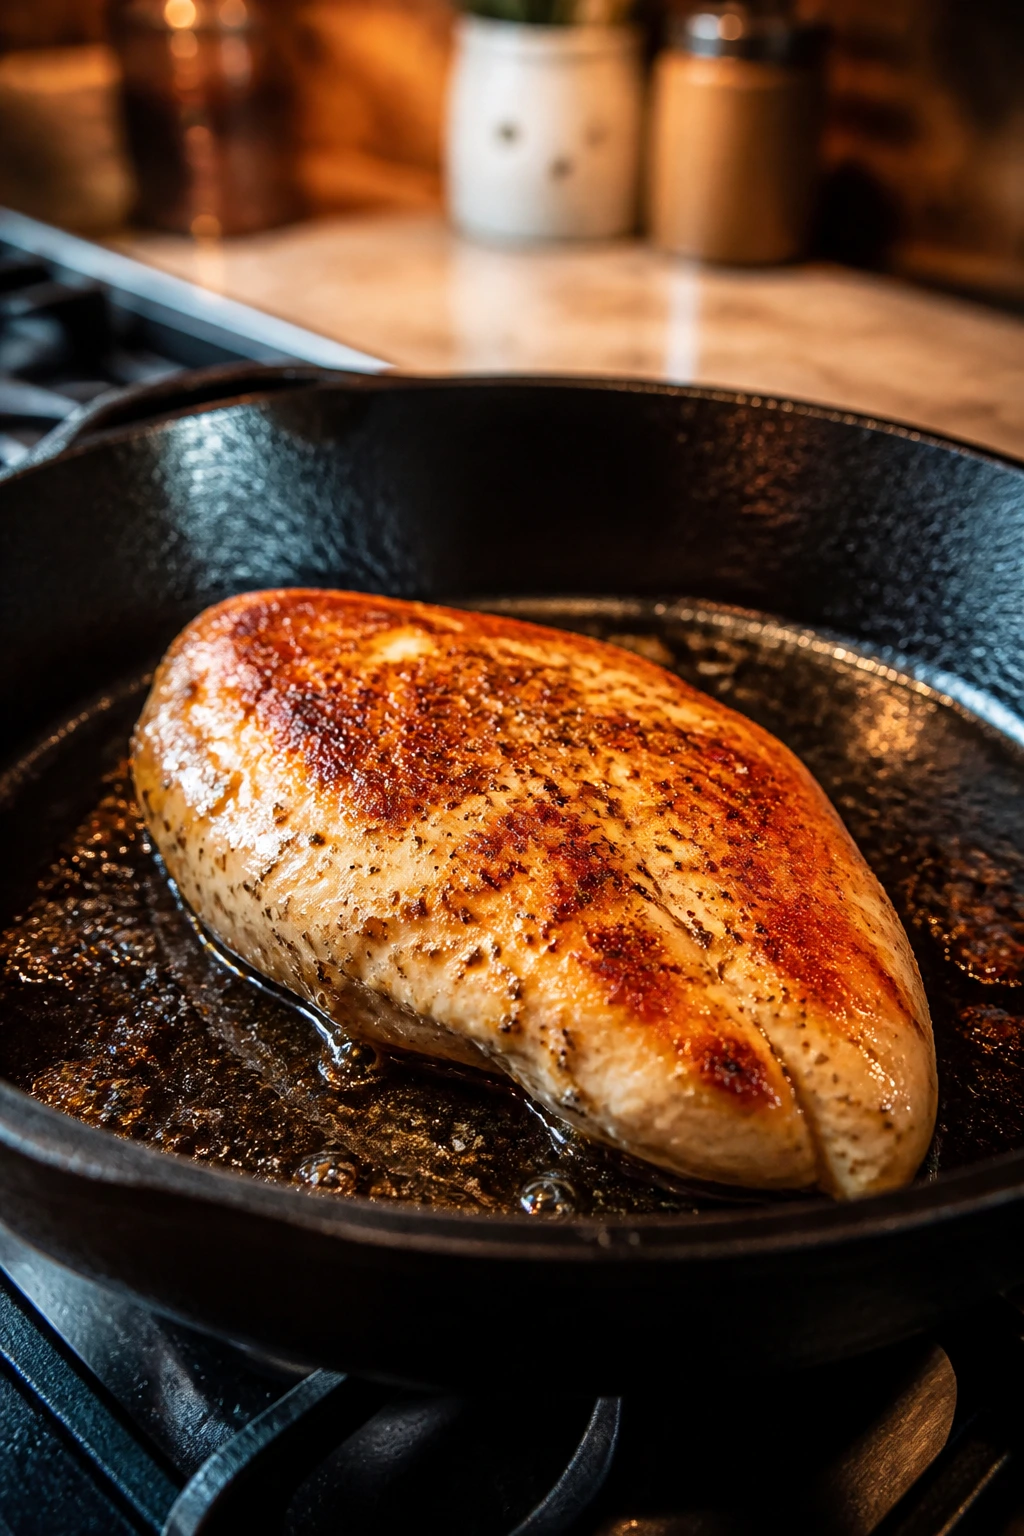
Sear the first side: Lay the chicken breasts in the skillet away from you so the oil doesn’t splatter back. Leave them alone for 4 to 5 minutes. The first side should turn a deep golden brown with a few darker spots before you flip.
-
Flip and finish cooking: Turn the chicken and cook the second side for 3 to 5 minutes, depending on thickness, until the thickest part reads 160°F on an instant-read thermometer. If one breast is larger, move it to the hotter part of the pan for the final minute. Do not keep chasing color if the temperature is there.
Make the Sauce and Rest
-
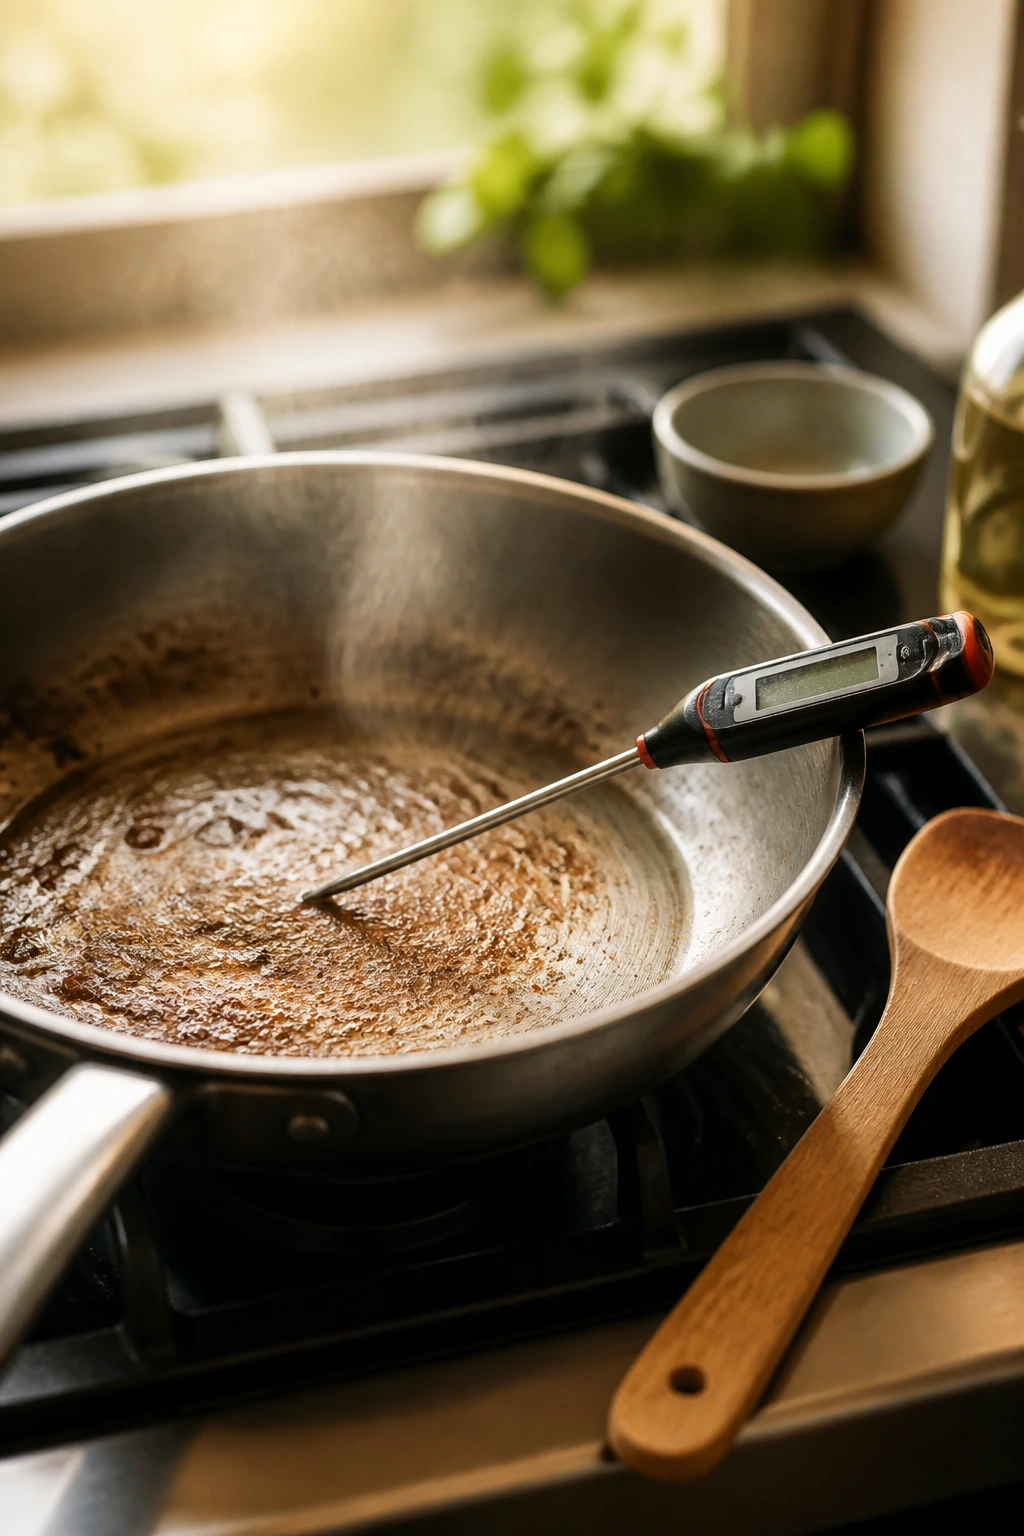
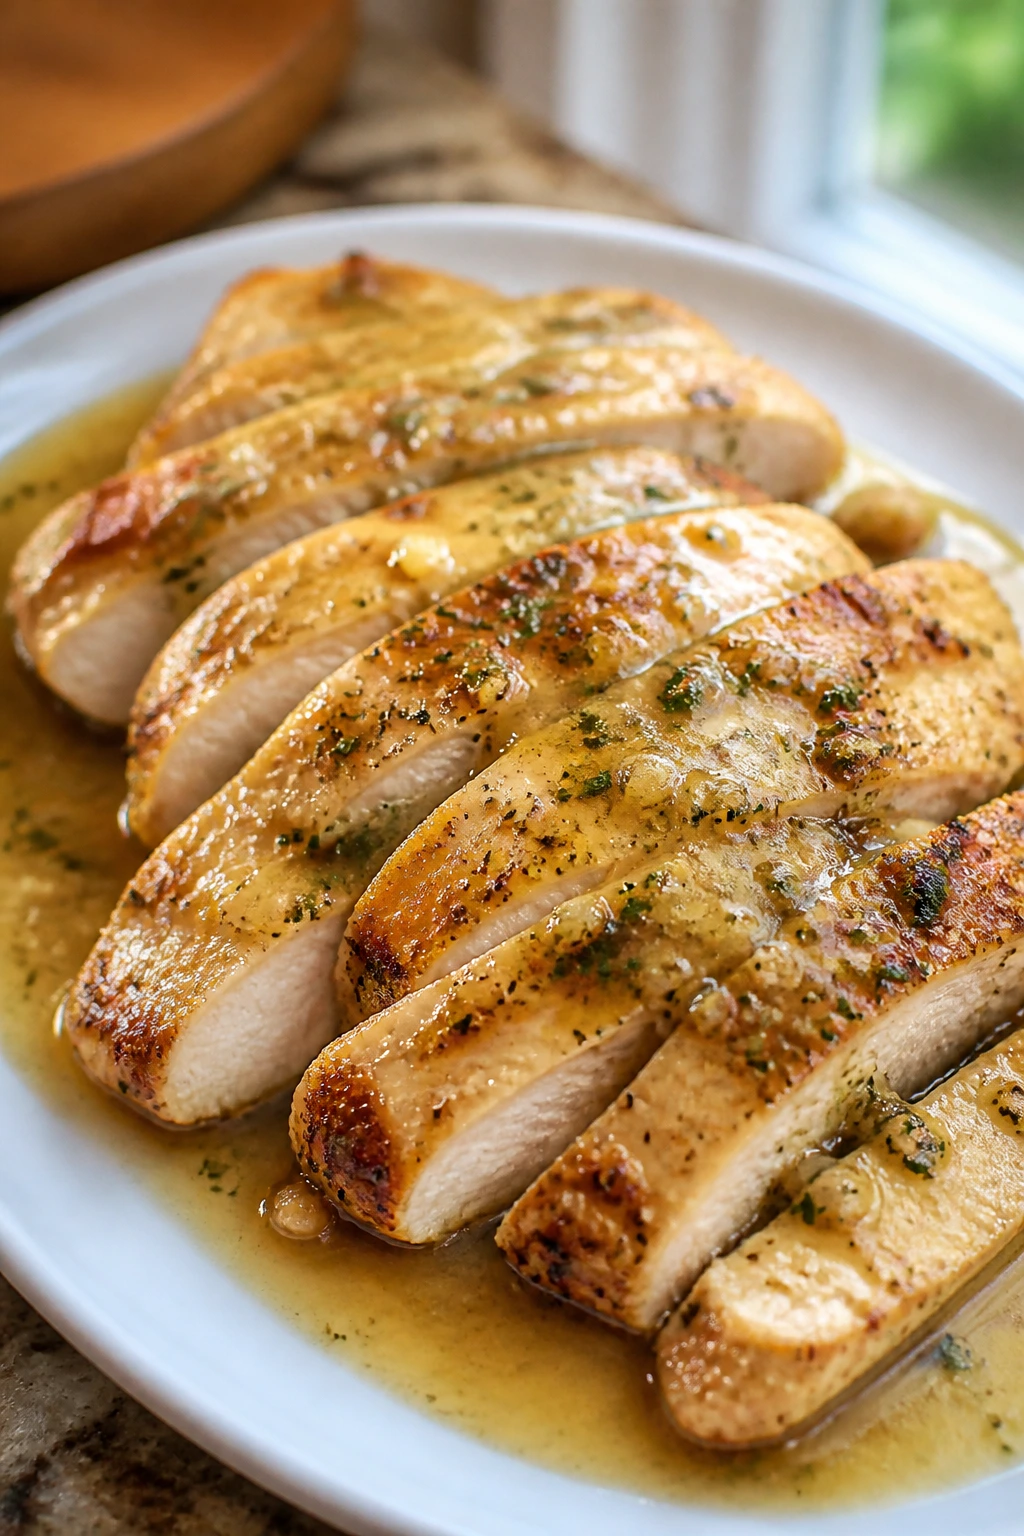
Build the pan sauce: Transfer the chicken to a plate. Lower the heat to medium and add the minced garlic to the skillet. Stir for about 20 seconds, just until fragrant. Pour in the chicken broth and scrape up the browned bits with a wooden spoon. Simmer for 1 to 2 minutes until the liquid reduces slightly, then stir in the lemon juice and remaining tablespoon of butter.
-
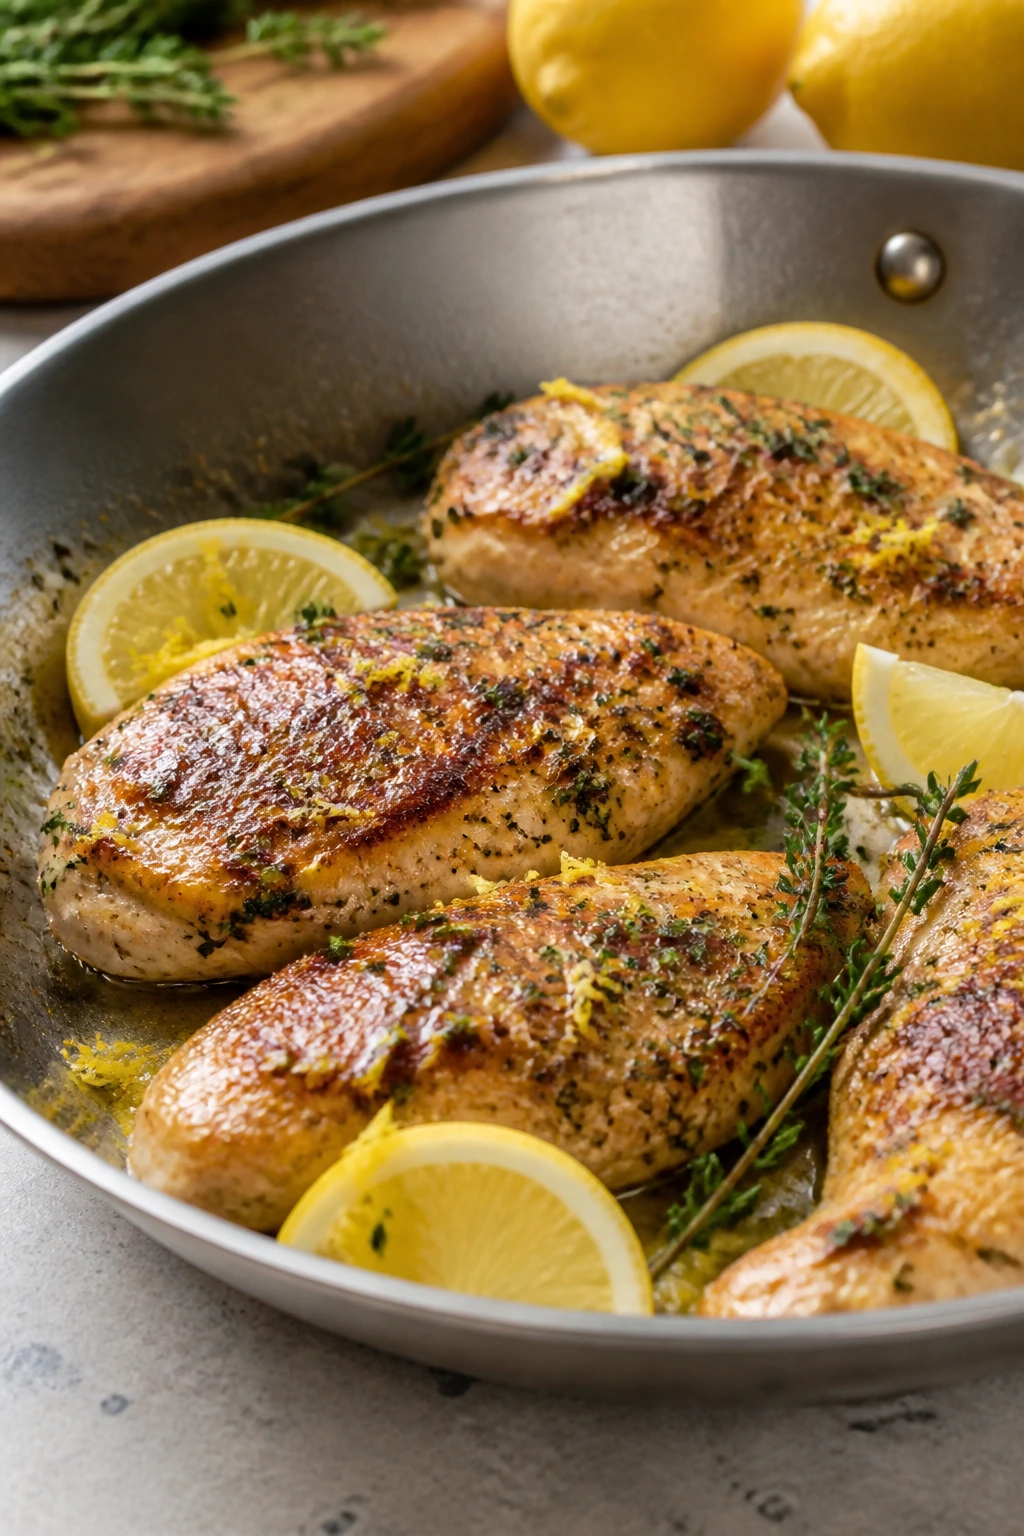
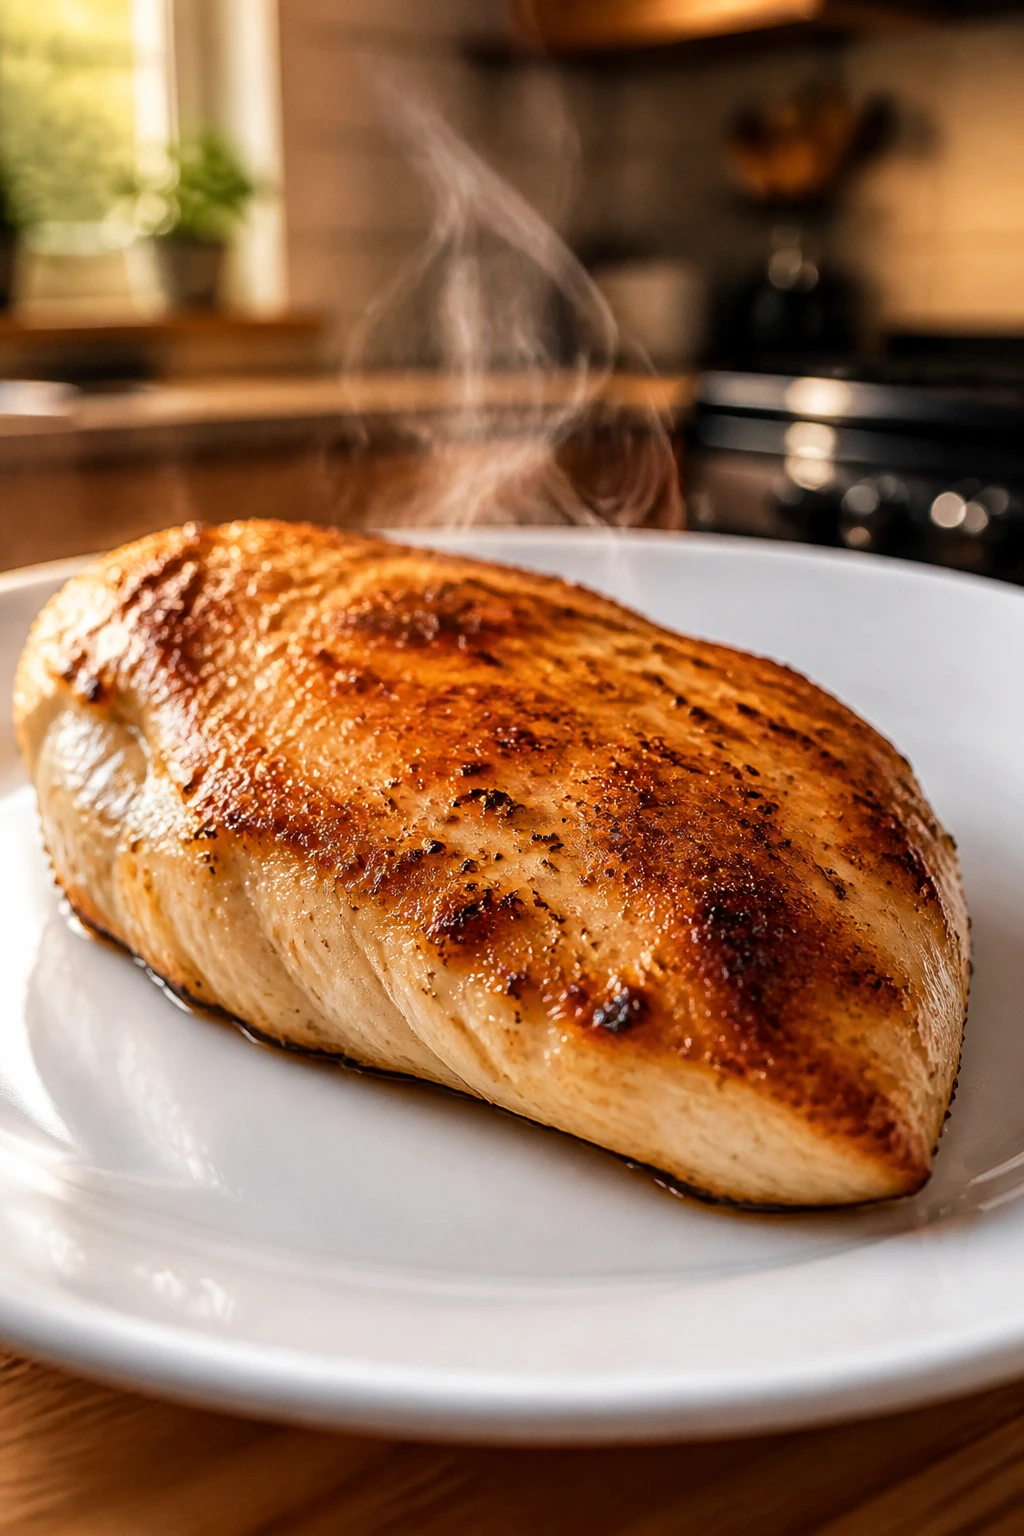
Rest and finish: Return the chicken to the pan or spoon the sauce over the top. Let it rest for 5 minutes, then sprinkle with parsley. The chicken will finish cooking during the rest, the juices will settle, and the slices will hold together instead of spilling onto the board.
How I’d Serve It on a Weeknight Plate
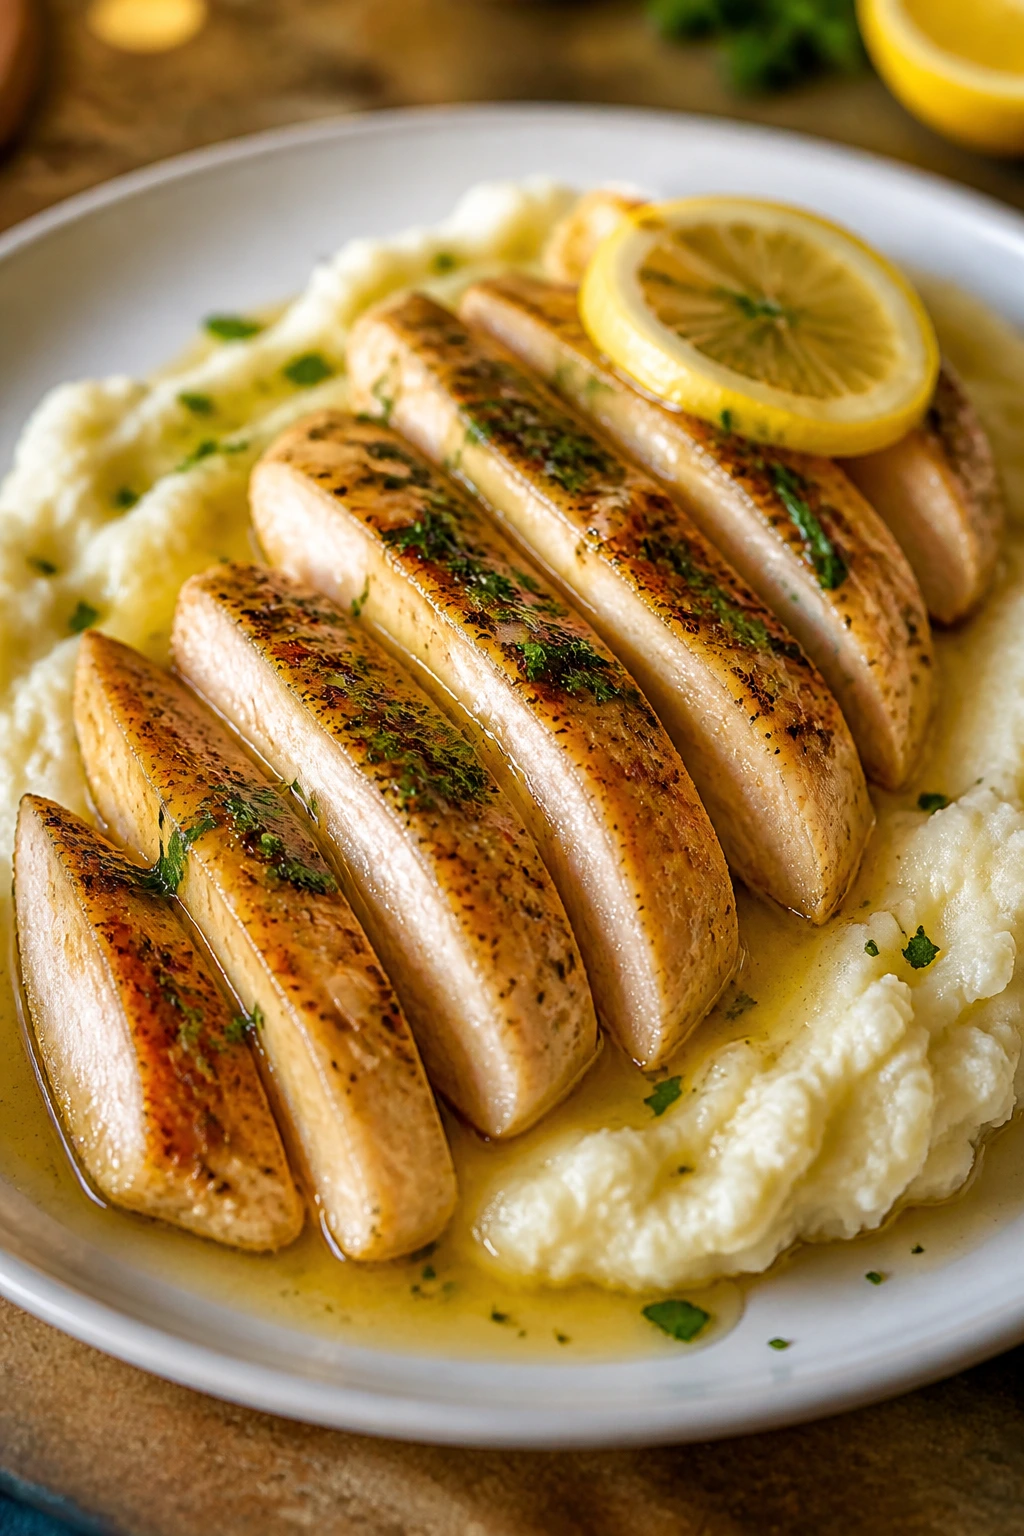
Presentation: Slice the chicken on a slight bias and fan it over the starch or vegetables so the lemon butter sauce can run through the slices. A spoonful of sauce over the top is enough; you don’t need to drown the plate to make it look finished.
Accompaniments: I like this with mashed potatoes when the weather is cool, but rice, buttered egg noodles, or roasted baby potatoes all work. For something lighter, pair it with a simple salad of arugula, cucumber, and shaved parmesan, or a tray of green beans roasted until the tips crisp.
Portions: One breast usually serves one person if the breasts are 6 to 8 ounces raw. If yours are large, one breast can stretch to two smaller portions once sliced. For hungry eaters, add a second side dish rather than piling on more chicken.
Beverage Pairing: Sparkling water with lemon fits well. A crisp white wine, like sauvignon blanc, also works because the acidity keeps the butter sauce from feeling heavy.
A plate of chicken breast can look bare if you leave it alone, which is why I like to give it something starchy or green to lean on. The sauce does the linking. The garnish does the quiet housekeeping.
Small Tweaks That Change the Result
Flavor Enhancement: Stir 1 teaspoon of Dijon mustard into the pan sauce after the broth reduces. It doesn’t make the chicken taste “mustardy” in a loud way; it just sharpens the lemon and gives the sauce a little more grip on the meat.
Time-Saver: If the chicken breasts are already even in thickness, skip the pounding and go straight to brining and seasoning. That saves a step without changing the result much. Thin cutlets can shave off another few minutes, which helps on a night when you’re racing the clock.
Cost-Saver: Buy family packs when they’re priced well, then portion the breasts into freezer bags before they go bad. Chicken breast freezes cleanly if you wrap it tightly, and you’ll be glad to have even-sized pieces on the nights when dinner needs to happen without a store run.
Make-It-Yours: For a dairy-free finish, use all olive oil or avocado oil and skip the butter, then finish the sauce with an extra teaspoon of lemon juice. For a slightly richer version, add a spoonful of chopped fresh thyme or chives at the end.
A small squeeze of lemon at the table helps too. That last hit of acid wakes up the seasoning in a way that bottled sauce never quite manages.
The Mistakes That Usually Dry Out Chicken Breast
-
Uneven thickness:
If one end is thick and the other is thin, the thin end dries out before the center finishes. The fix is simple: pound the breast to an even 1/2 to 3/4 inch thickness before it hits the pan. -
Starting with wet chicken:
Wet chicken steams and slides around in the skillet, which means pale spots instead of a browned crust. Pat it very dry after brining, then season it right away. -
Too much movement in the pan:
If you keep poking, flipping, or pressing the chicken, the crust never gets a chance to form and the juices run out early. Put it down, leave it alone, and trust the timer. -
Guessing instead of checking temperature:
Cutting into the chicken “to see if it’s done” lets all the juice escape onto the plate. Use an instant-read thermometer and pull the chicken at 160°F for a rest that carries it the rest of the way. -
Burning the garlic:
Garlic goes from fragrant to bitter fast, especially after the chicken has browned the pan. Keep the heat at medium for the sauce and stir for only about 20 seconds before adding broth. -
Slicing too soon:
The chicken needs that 5-minute rest so the juices can settle back in. Slice early and they end up on the board, not in the meat.
Variations for Different Cravings
Lemon-Herb Skillet Chicken
Add 1 teaspoon chopped fresh thyme or rosemary to the spice mix and finish the sauce with a little extra lemon zest. This version tastes bright and clean, which makes it a good match for roasted asparagus or a simple salad.
Smoky Paprika Chicken
Swap sweet paprika for smoked paprika and add a pinch of cayenne. The result is deeper and warmer, with a little heat at the edges. I like this one with rice and sautéed peppers because the plate suddenly feels more complete.
Creamy Dijon Chicken
After the broth has reduced, stir in 2 tablespoons of heavy cream and 1 teaspoon Dijon mustard before adding the final butter. The sauce turns velvety and coats the chicken in a way that clings nicely to mashed potatoes.
Garlic-Parmesan Finish
Skip the lemon juice and stir 2 tablespoons of finely grated parmesan into the sauce off the heat. The sauce thickens a little and tastes saltier, so I’d serve it with plain rice or steamed broccoli to keep the meal from getting too rich.
Make-Ahead, Storage, and Reheating
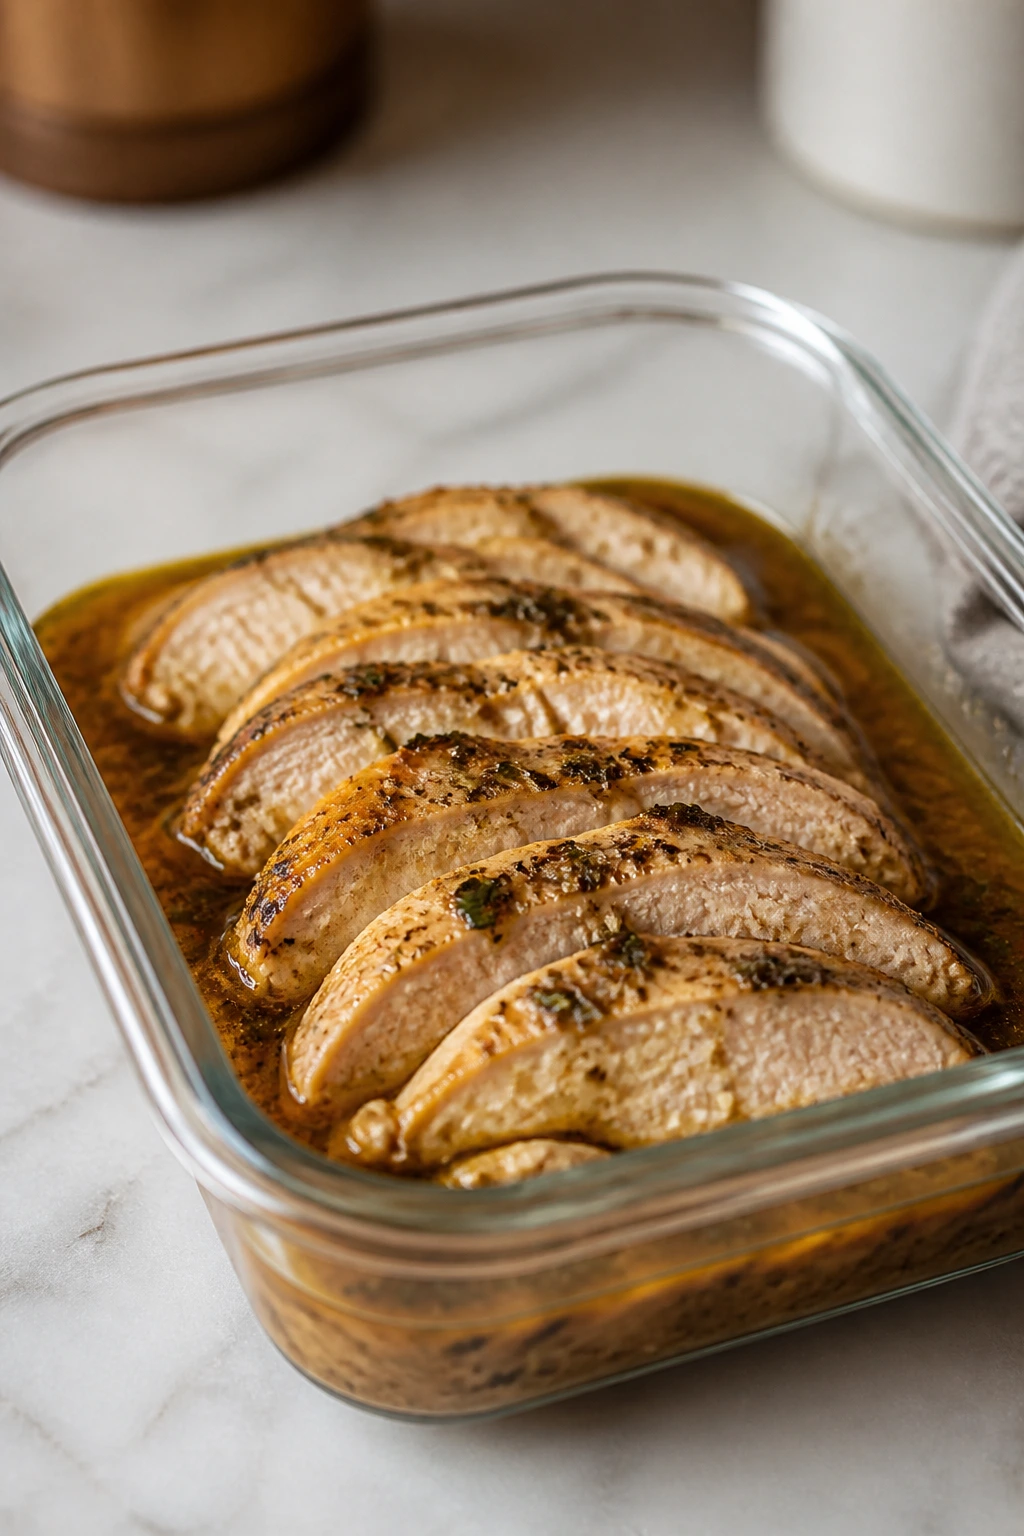
Cooked chicken breast keeps in the refrigerator for 3 to 4 days if you cool it within 2 hours and store it in an airtight container. I prefer to keep the chicken slices in a little of the pan sauce, because the sauce protects the meat from drying out in the fridge. If you’re meal prepping, that small puddle of sauce matters more than people think.
Freezing works too, though the texture is best if you slice the chicken first and freeze it with the sauce in a sealed freezer bag or shallow container. It will keep for up to 2 months. Thawed chicken breast can go a bit stringy if it’s frozen plain and reheated hard, so the sauce is not just decoration here.
For reheating, the gentlest method is a covered skillet over low heat with a tablespoon or two of broth. Warm it slowly until the chicken is hot in the center and the sauce loosens again. The microwave works in a pinch, but use 50% power and short bursts so the meat doesn’t seize up. A splash of broth and a loose cover help more than you’d expect.
If you want to make parts ahead, the brine can be mixed a few hours in advance and kept cold, and the spice blend can sit in a jar for weeks. You can also season the chicken and keep it covered in the fridge for a few hours before cooking. That gives you a little head start without turning dinner into a project.
One small warning: cooked chicken breast reheats better sliced than whole. The slices warm faster, which means less time in the pan or microwave and less chance of drying out around the edges.
Questions Home Cooks Ask About Juicy Chicken Breast
Can I skip the brine if I’m short on time?
You can, but the chicken will need more care in the pan. If you skip it, salt the breasts 20 to 30 minutes ahead and let them sit uncovered in the fridge so the surface dries a bit. The texture won’t be quite as forgiving, but it will still work.
What if my chicken breasts are huge?
Big supermarket breasts usually need pounding even more than smaller ones. If one piece is exceptionally thick, you can also finish it in a 375°F oven for 3 to 5 minutes after the sear instead of pushing the skillet heat too far.
How do I know the chicken is done without cutting it open?
Use an instant-read thermometer in the thickest part of the breast. At 160°F, pull it off the heat and let it rest for 5 minutes; the temperature will climb a bit as it sits, and the meat will stay juicy.
Can I use chicken thighs instead?
Yes. Boneless, skinless thighs are more forgiving and carry more flavor, but they need a few extra minutes in the pan because they’re thicker and fattier. The same sauce works, and honestly, thighs are a nice fallback if you’re nervous about breast meat.
Why did my chicken turn rubbery?
Rubbery chicken usually means it stayed on the heat too long or sat in a pan that was too hot after the first side browned. The fix is to cook by temperature, not by “a little longer just to be safe,” and to rest it instead of carving it the second it leaves the pan.
Can I make this in the oven or air fryer?
Yes, though the sauce part needs a skillet if you want the browned bits. In the oven, bake pounded chicken breasts at 425°F until they hit 160°F in the center, then rest them and make the sauce separately. In an air fryer, cook at 375°F and check early, because thin breasts can overshoot fast.
What if I don’t have low-sodium broth?
Use regular broth, but ease up on the seasoning elsewhere. A salty broth plus a salty brine can stack up fast, and the finished sauce can taste harsh instead of balanced. If you only have regular broth, keep the final lemon bright and don’t add extra salt at the end.
A Reliable Pan of Chicken Breast
There’s a reason I keep this method in the back pocket. It turns one of the most common cuts in the store into something that feels intentional instead of hurried. The chicken comes out browned, moist, and easy to pair with whatever is already in the kitchen.
A meat thermometer, a short brine, and a five-minute rest sound unglamorous. They are. They also solve the problem that makes people sigh when chicken breast shows up for dinner.
Tender Juicy Chicken Breast for Weeknight Dinners — Recipe Card
Recipe Name: Tender Juicy Chicken Breast for Weeknight Dinners
Description: Boneless, skinless chicken breasts are brined briefly, seasoned with a simple spice mix, seared in a skillet, and finished with a lemon-garlic pan sauce. The meat stays moist, slices cleanly, and works with rice, potatoes, pasta, or vegetables.
Prep Time: 15 minutes active
Cook Time: 12 to 15 minutes
Total Time: 35 to 40 minutes, including brining and resting
Course: Dinner, Main Course
Cuisine: American
Servings: 4 servings
Calories: About 300 kcal per serving
Ingredients
- 4 boneless, skinless chicken breasts, 6 to 8 ounces each
- 4 cups cold water
- 3 tablespoons kosher salt
- 1 tablespoon granulated sugar
- 1 teaspoon paprika
- 1 teaspoon garlic powder
- 1/2 teaspoon onion powder
- 3/4 teaspoon black pepper
- 2 tablespoons olive oil
- 2 tablespoons unsalted butter, divided
- 2 cloves garlic, minced
- 1/2 cup low-sodium chicken broth
- 1 tablespoon lemon juice
- 1 tablespoon chopped parsley
Instructions
-
Whisk the water, kosher salt, and sugar together in a bowl until dissolved. Add the chicken breasts and brine for 15 to 20 minutes in the refrigerator.
-
Remove the chicken, pat it very dry, and pound the thicker ends so each breast is about 1/2 to 3/4 inch thick.
-
Mix the paprika, garlic powder, onion powder, and black pepper. Season both sides of the chicken evenly.
-
Heat the olive oil and 1 tablespoon butter in a 12-inch skillet over medium-high heat.
-
Sear the first side for 4 to 5 minutes without moving the chicken.
-
Flip and cook 3 to 5 minutes more, until the thickest part reaches 160°F. Transfer to a plate.
-
Lower the heat to medium. Add the garlic, stir for about 20 seconds, then add the broth and scrape up the browned bits. Simmer 1 to 2 minutes, then stir in the lemon juice and remaining tablespoon butter.
-
Spoon the sauce over the chicken, rest 5 minutes, and finish with parsley.
Notes: Pull the chicken at 160°F and let the rest bring it up to temperature. If the breasts are large, cook in two batches so the skillet stays hot enough to brown properly.