
A chicken breast does not go dry because chicken is doomed to be boring. It goes dry because the pan was too hot, the cut was too thick, or nobody bothered to let it rest for five minutes before slicing. That sounds picky until you cut into a piece that still smells buttery, feels tender under the knife, and tastes like an actual dinner instead of something you had to rescue with ketchup.
For weeknight dinners, that difference matters. You want a meal that gets from fridge to table without turning the kitchen into a project, but you also want the chicken to stay juicy enough that the second bite is as good as the first. I have very little patience for recipes that ask for a dozen ingredients and still leave you with dry meat. On a Tuesday, the real luxury is a skillet, a thermometer, salt, and a method that respects the clock.
Juicy chicken is not a mystery. It’s a stack of small choices: the right cut, even thickness, enough salt, heat that browns before it burns, and a short rest before the knife comes out. Once those pieces are in place, the whole thing gets calmer. Dinner stops feeling like a gamble.
Why This Chicken Routine Works on Busy Nights
-
Fast heat plus even thickness: A chicken breast pounded to about 1/2 inch cooks in roughly 10 to 12 minutes, which is the difference between a tender center and a chalky one.
-
Salt has time to do its job: A 15- to 30-minute dry brine seasons the surface all the way through the first bite, so the meat tastes seasoned instead of salted only on top.
-
The pan earns its keep twice: Browning builds flavor, and the browned bits left behind become the base for a quick sauce, which means one skillet does the work of two.
-
Resting saves the juices: Five minutes under loose foil keeps the cutting board from becoming the place where dinner leaks out.
-
Lean and rich cuts can both work: Breasts need more care, thighs need less, and either one can turn into a solid dinner if you match the method to the meat.
The Chicken Cut That Works Best for Weeknight Dinners
The cut matters more than the sauce. That’s the blunt truth, and it’s the one most rushed chicken dinners ignore.
Boneless, Skinless Breasts
Breasts are the cut people reach for first because they cook fast and take seasoning well. They’re also the easiest to dry out if they’re thick on one end and thin on the other. I like to pound them gently between two sheets of parchment or slice them horizontally into cutlets so the thickest part isn’t trying to catch up with the rest of the piece.
Breasts are best when you want a very short cook time and a clean, lean finish. They love a quick pan sauce, a spoonful of yogurt sauce, or a squeeze of lemon at the table. They do not love being forgotten while you answer a text.
Boneless, Skinless Thighs
Thighs are the cut I trust when the evening is already loud. They have more fat, more flavor, and more forgiveness if you leave them in the pan a minute too long. The texture changes in a good way when they go a little past the bare minimum; the meat turns supple instead of squeaky.
If you want the easiest path to juicy chicken, thighs are it. They’re especially good for skillet dinners, sheet-pan meals, and anything with a sticky glaze. I reach for them when I know I’ll be juggling vegetables, rice, and a distracted conversation at the same time.
Tenderloins
Tenderloins are fast, which is the whole point. They’re thin and soft, and they can go from perfect to dry in a blink if you crowd them or walk away from the stove. They’re great for salad toppers, wraps, rice bowls, and quick sauce-heavy dinners.
They also disappear into a meal fast. That’s useful on nights when the goal is to get food on the table, not to spend twenty minutes admiring the pan.
Bone-In Pieces
Bone-in thighs and drumsticks are the least fussy option if you can spare a little more time. The bone slows the cook a bit and gives you a broader window before the meat dries out. Skin-on pieces also bring a built-in texture payoff, which is hard to argue with.
If you want chicken that tastes like it came from a more deliberate dinner, bone-in is the move. It takes longer than cutlets, sure, but not by much if you know the timing and don’t overcomplicate the rest of the plate.
Salt, Brine, or Marinade?
Should you salt the chicken before it hits the pan, or should you bury it in a marinade and hope for the best? Salt first. Every time.
A little salt reaches into the meat faster than most people expect, especially on boneless pieces. It changes the surface texture, helps the chicken hold onto moisture, and gives you a better crust in the skillet. The whole trick is timing and restraint. You want the meat seasoned, not drowned.
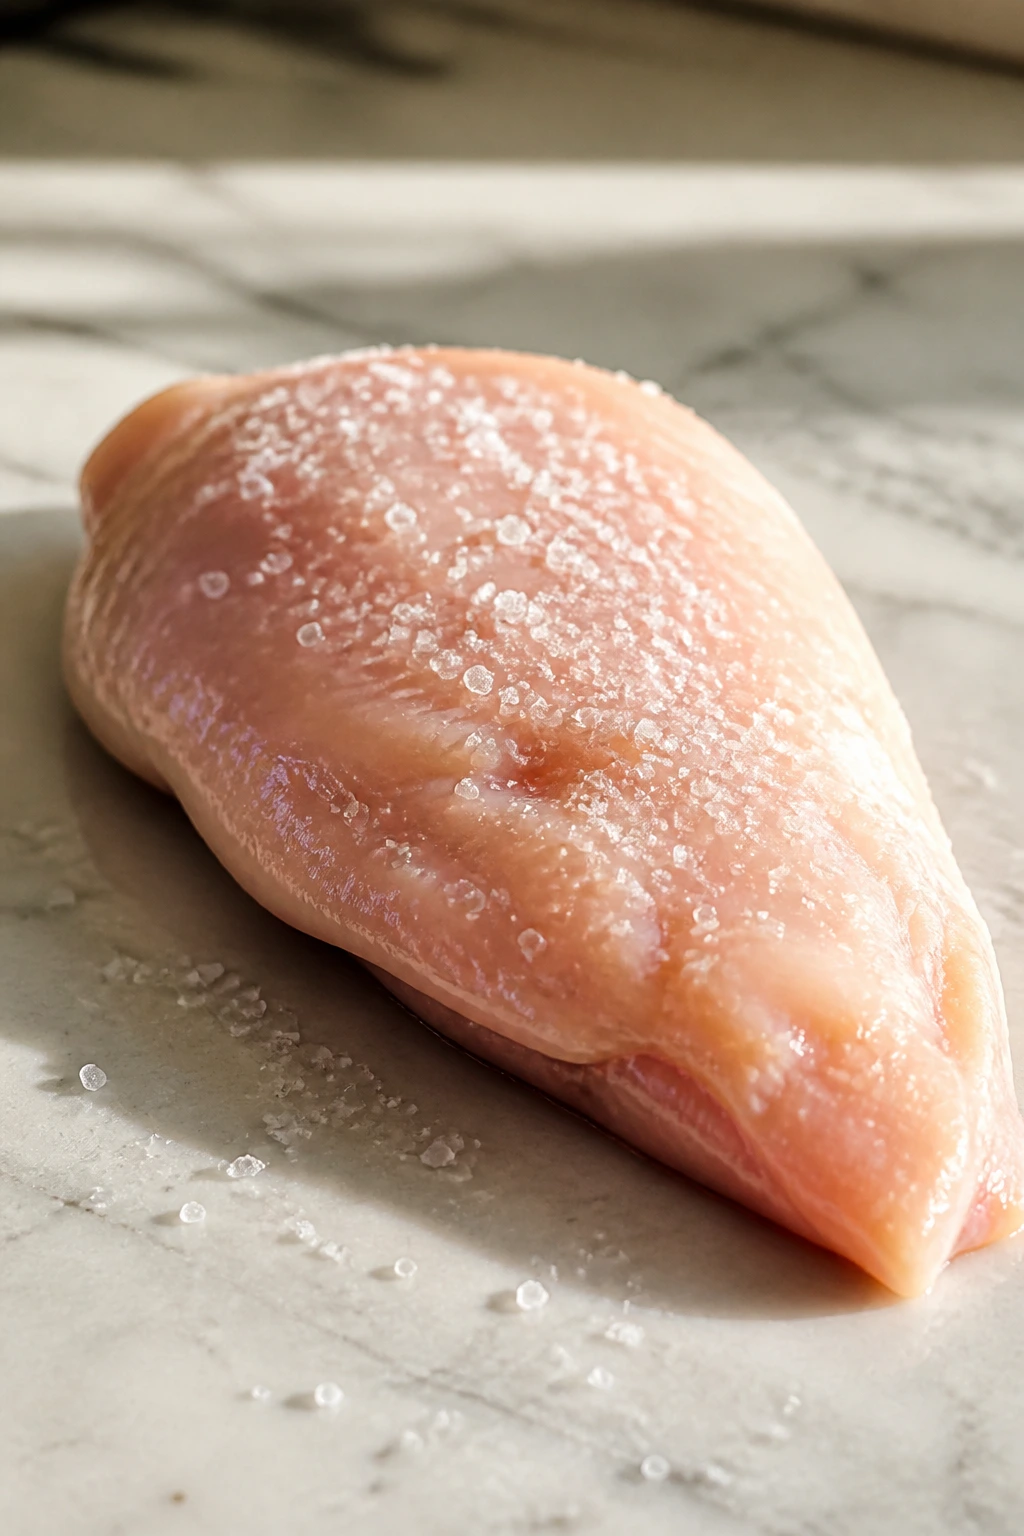
The Dry Brine That Barely Slows You Down
A dry brine is as simple as salting the chicken on both sides and letting it sit. For boneless pieces, 15 to 30 minutes on the counter, or up to overnight uncovered in the fridge, gives you noticeable improvement. I use kosher salt because it’s easier to control by hand than fine table salt.
That dry rest also dries the surface a bit, which helps browning. Wet chicken hits a pan and starts steaming. Dry chicken hits the pan and sears. Tiny difference, big result.
When a Wet Brine Helps
Wet brine is useful for larger pieces, especially bone-in breasts or a whole bird, but it isn’t mandatory for an ordinary Tuesday. If you do use one, keep it modest: enough salt to season the meat, not enough to make it taste like soup water. Once you get into a wet brine, you also have to dry the chicken very well before cooking, or the crust suffers.
For weeknight dinners, I use wet brine less often than most people think I do. It’s helpful, but it’s also one more bowl to wash. Dry brine wins the convenience contest.
Marinades: Good Flavor, Limited Reach
Marinades bring flavor to the surface, and sometimes that’s exactly what you want. Lemon, garlic, soy sauce, herbs, yogurt — all of them have a place. What they do not do is magically penetrate deep into the meat in a short window. The acid can also make the surface a little mushy if you leave it too long.
A 20- to 30-minute marinade is enough for thin pieces. For breasts, I’m careful with acidic marinades and keep the time shorter if there’s a lot of lemon or vinegar in the mix. If I want bold flavor without that risk, I prefer a dry seasoning mix and a sauce at the end.
The Skillet Method for Juicy Chicken Breasts
A skillet on a Tuesday can do a lot. More than most people give it credit for.
The skillet method works because it gives you control. You can brown the chicken, adjust the heat, and keep an eye on the temperature instead of hoping the oven does the right thing on its own. For boneless breasts and cutlets, this is the fastest reliable route to juicy meat.
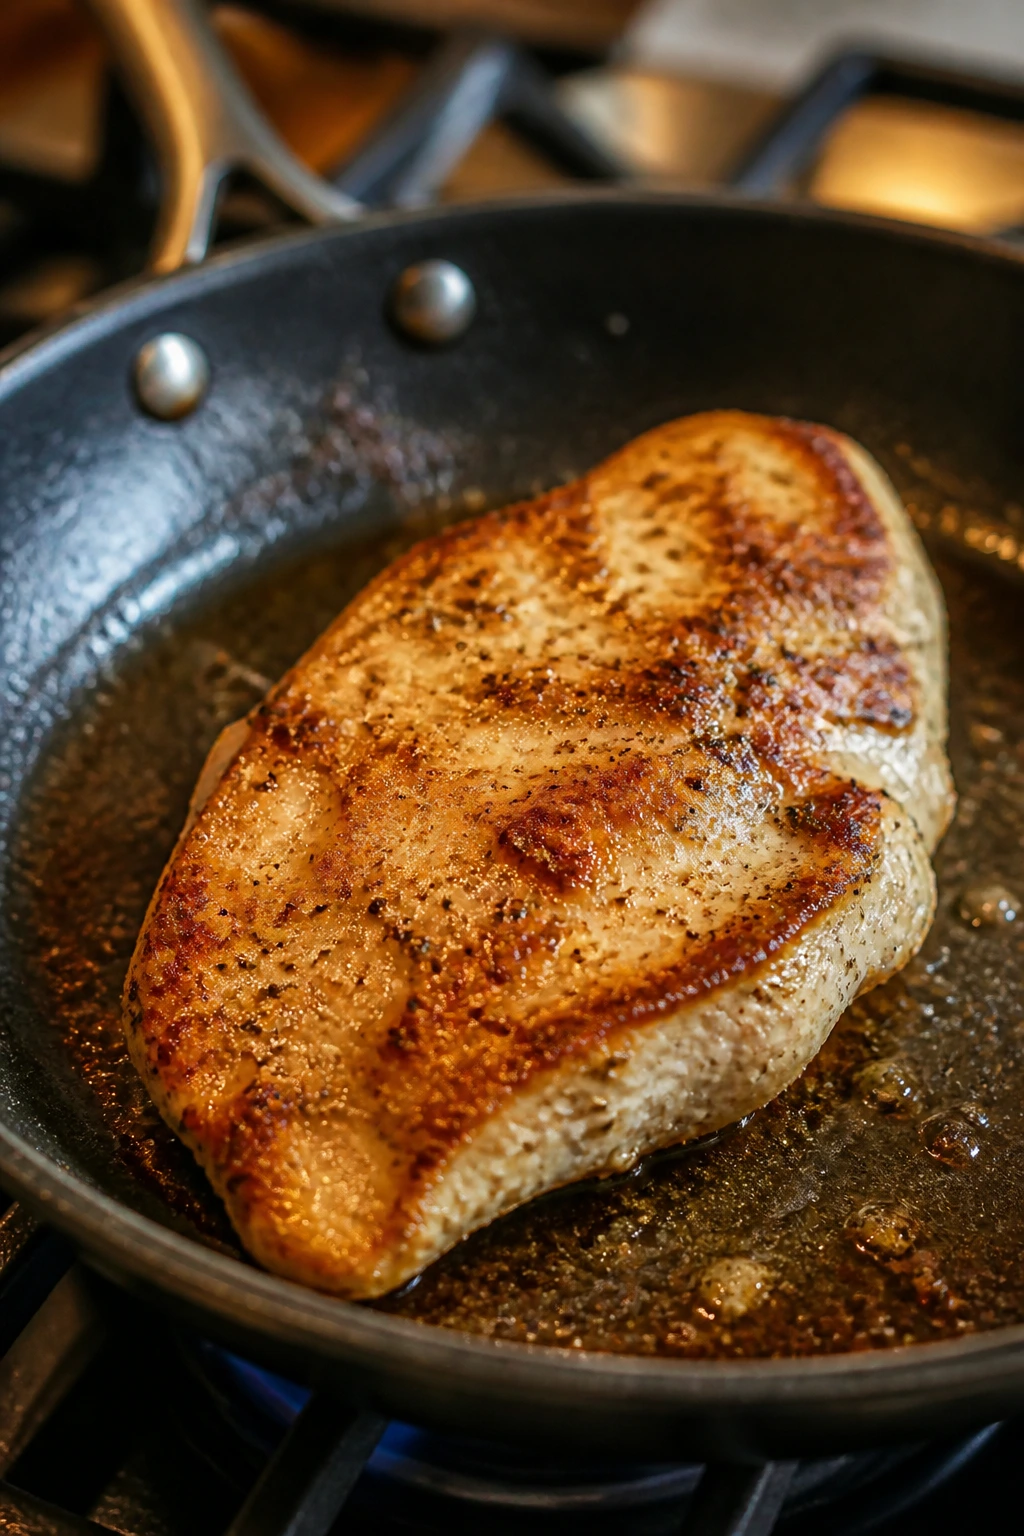
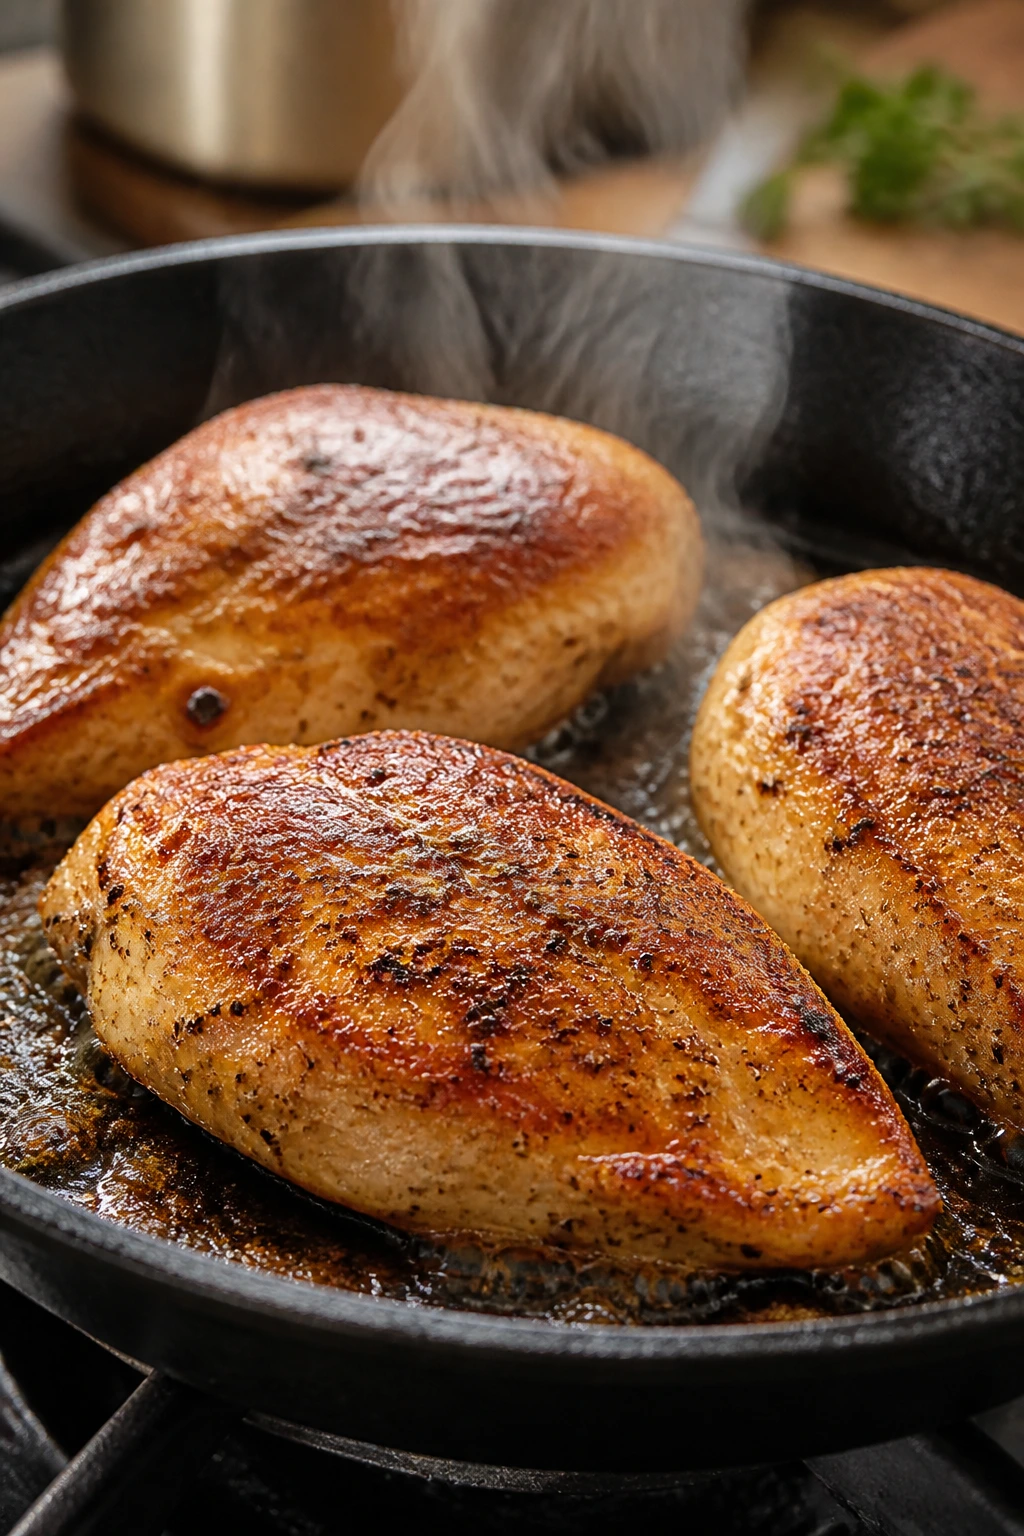
Get the Pan Hot Enough
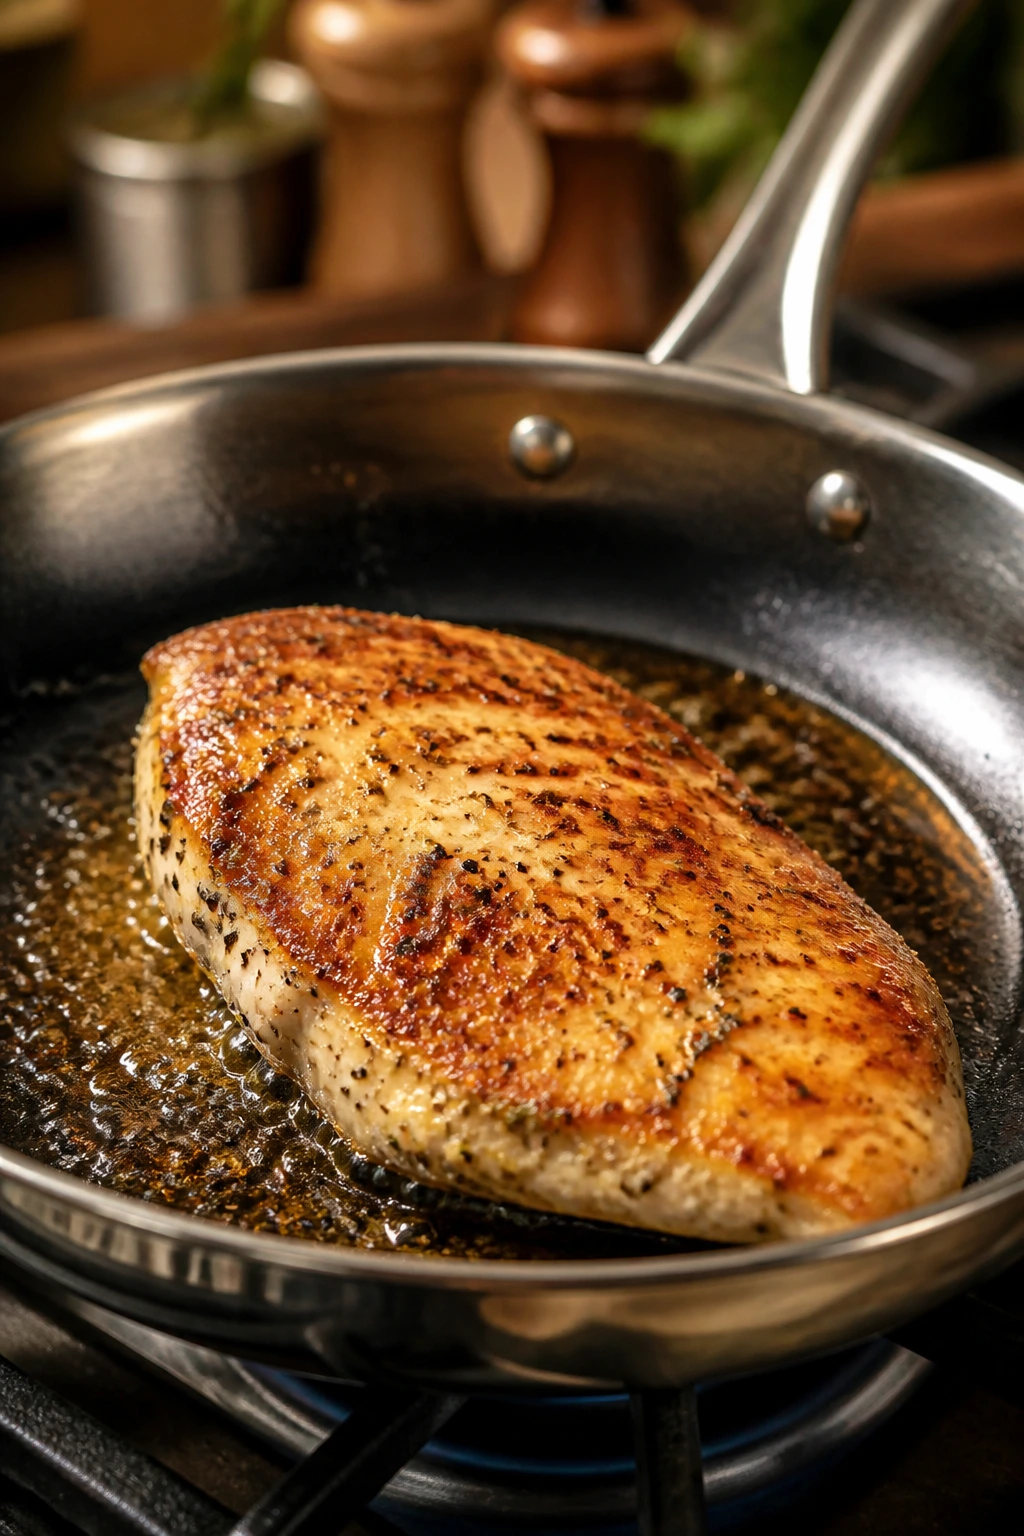
Heat a heavy skillet — cast iron or stainless steel — over medium-high heat until the oil shimmers. Not smokes. Shimmers. The surface should look thin and loose, not aggressively wavy with smoke pouring off the edges. Add a tablespoon or two of oil, then lay in the chicken carefully.
You should hear a steady sizzle the second the meat touches the pan. If the pan is quiet, it isn’t ready. If it smells burnt in the first minute, it’s too hot.
Don’t Keep Fussing With It
Let the chicken sit for a few minutes before you move it. That stillness matters. If you keep poking and lifting, the surface tears and browning slows down. For a 1/2-inch cutlet, 4 to 5 minutes on the first side is common, then 3 to 4 minutes after the flip, depending on thickness.
I use tongs, not a fork. A fork leaks juice. Tongs let you turn the meat without punching holes through the part you want to keep tender.
Finish Gently, Not Ferociously
If the breasts are thick, lower the heat after the first side browns or move the pan to a 375°F to 400°F oven for a few minutes. That gentle finish keeps the outside from overcooking while the center catches up. Pull the chicken when the thickest part reaches 165°F.
Rest it for 5 minutes before slicing. That waiting period is not dead time. It’s the part that keeps the cutting board from catching the whole dinner’s worth of juice.
Slice the Right Way
Cut across the grain, not with it. You’ll see the muscle fibers running in one direction; cut across them so each bite feels shorter and easier to chew. Thin slices also help the chicken stay moist on the plate because less surface area is exposed.
If you’re serving cutlets whole, fine. But when I want the prettiest plate, I slice the breast and fan the pieces over rice or potatoes, then spoon the sauce right over the top.
The Sheet-Pan Method When You Want Dinner in One Move
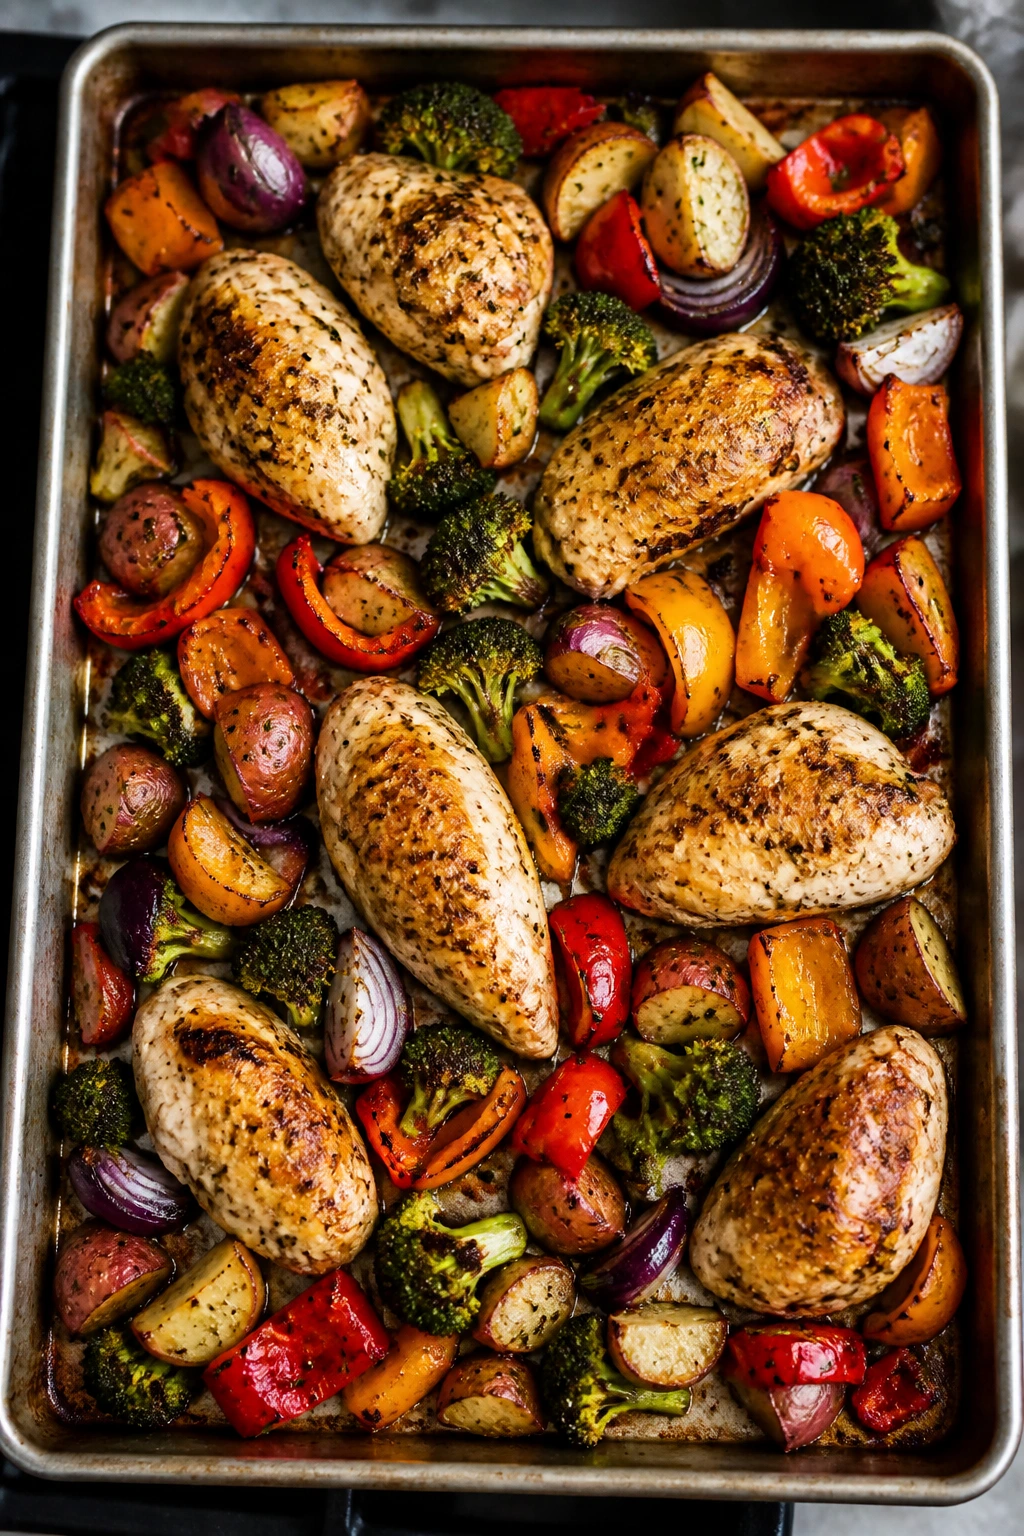
The sheet pan is the boring option only if you let it be boring. Used well, it gives you browned chicken, roasted vegetables, and a tidy cleanup all on the same pan.
This method is best when the chicken and vegetables can finish at roughly the same rate. That means broccoli florets, green beans, zucchini chunks, onion wedges, asparagus, Brussels sprouts, or carrots cut thin enough to cooperate. A full pan of dense vegetables and thick chicken breasts will need some juggling, but the basic idea holds.
Keep the Pan From Crowding
Crowding is the enemy. If the chicken pieces are packed shoulder to shoulder, they steam instead of roast. Use a rimmed sheet pan with enough open space around each piece, and don’t be afraid to split the food onto two pans if needed.
I know that sounds fussy. It isn’t. Space is what gives you browning, and browning is what makes the chicken taste cooked rather than merely heated.
Use High Enough Heat
A 425°F oven is the sweet spot for most sheet-pan chicken dinners. It gives vegetables a little edge and helps chicken pieces get color without turning leathery. For boneless breasts, thinner vegetables, and cutlets, start checking early — around 15 minutes. For thighs or thicker pieces, expect 20 to 30 minutes.
If you’re using bone-in thighs or drumsticks, the timing stretches longer, but the method is still calm. Toss the vegetables with a little oil and salt, nestle the chicken among them, and let the oven do the work.
Add Delicate Ingredients Late
Zucchini, cherry tomatoes, spinach, and fresh herbs should not go in at the same time as thick carrots or potatoes. They’ll collapse. Add tender vegetables near the end so they keep some shape and don’t dissolve into mush.
That tiny bit of timing discipline makes the difference between a sheet pan that looks cooked and one that looks tired.
Bone-In Chicken Pieces That Taste Like You Planned Ahead
Bone-in chicken is the easier weeknight move, not the harder one. The bone and skin buy you time, and time is usually what’s missing after work.
Bone-in thighs and drumsticks give you a wider doneness window than breasts. They’re more forgiving if the oven runs cool, if the pan isn’t perfectly hot, or if the rest of dinner is slower than you wanted. That makes them especially useful when you’re cooking while answering homework questions, opening mail, and checking whether the rice actually came to a simmer.
Why Thighs Forgive Mistakes
The darker meat in thighs contains more fat and connective tissue, so it can handle a little more heat without drying out. I actually prefer thighs a touch past the safe minimum, because the texture relaxes and the meat stops feeling taut. You still need to hit 165°F in the thickest part, but thighs are far less fragile than breasts.
If you’re trying to teach yourself better chicken cooking, start here. Thighs are the training wheels that still taste like the real thing.
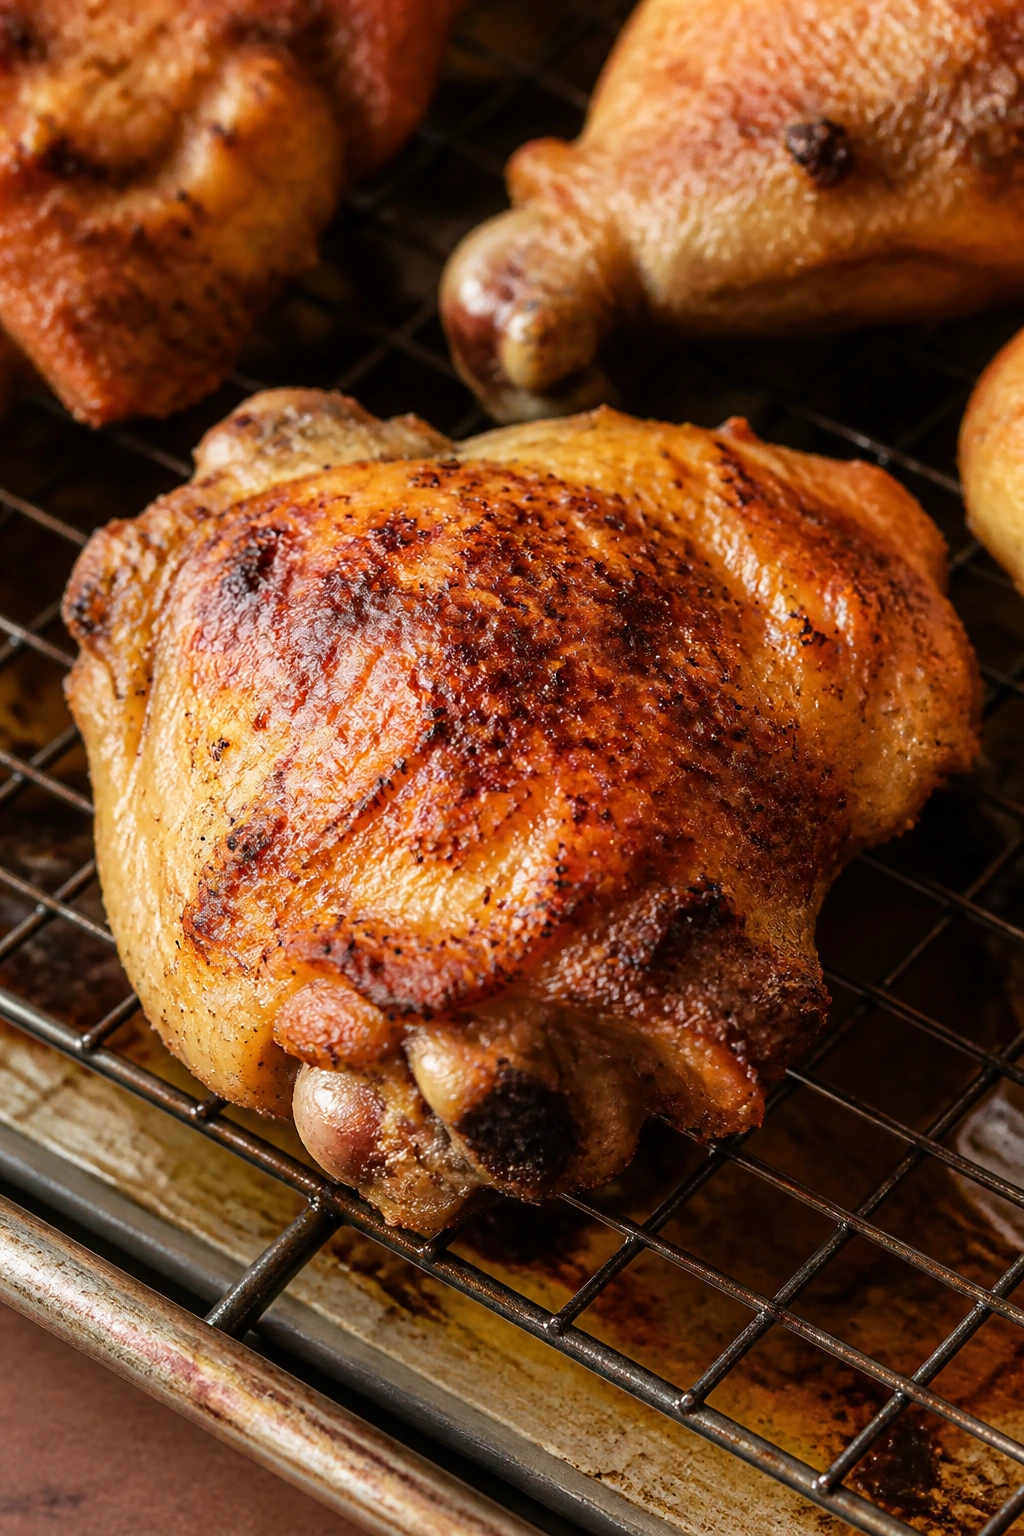
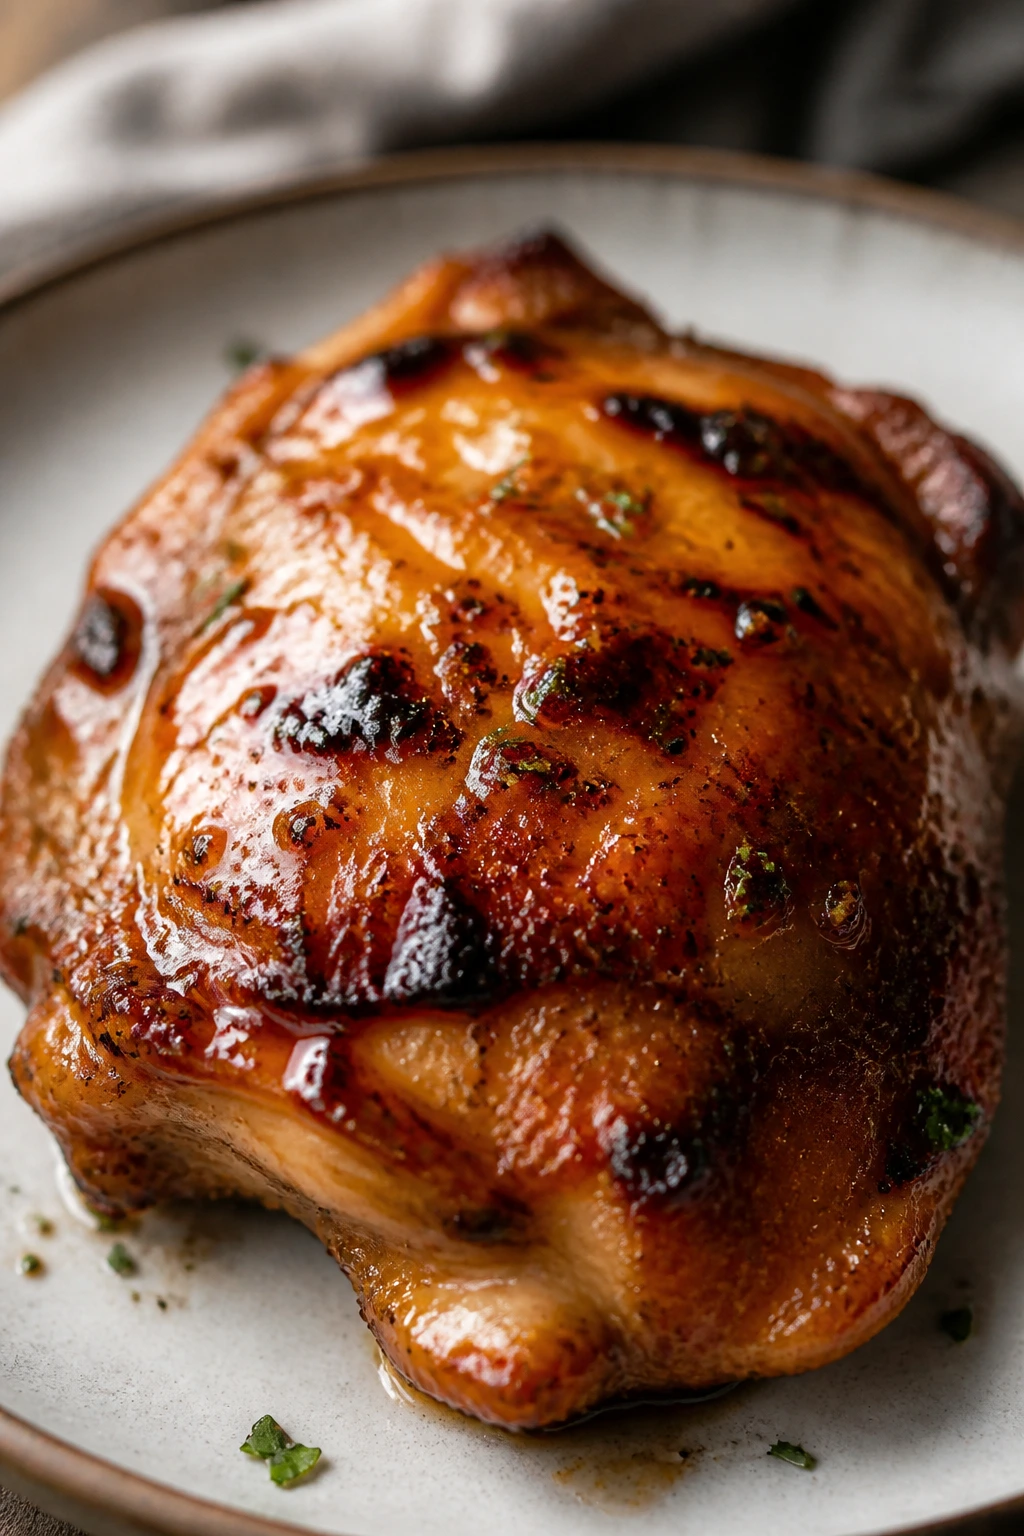
Crisp Skin Without Drama
For skin-on pieces, pat the skin dry until it feels tacky, then season it generously. Put the thighs skin-side up on a rack set over a sheet pan if you’re roasting, or skin-side down in a skillet if you want to render and brown first. The skin should end up bronzed, not pale, and the fat underneath should have melted enough that it doesn’t chew like rubber.
I don’t cover bone-in chicken in the oven unless there’s a sauce involved that absolutely needs it. Covering softens the skin. Sometimes that’s fine. Most of the time, it’s the thing you’ll regret at the table.
Drumsticks Are the Budget Friend That Shows Up
Drumsticks are underrated because they look simple. They’re also cheap, satisfying, and easy to portion. Kids usually handle them well because there’s an obvious grip point and not a lot of knife work involved.
Roast them at 400°F to 425°F until the skin tightens and the juices run clear at the bone. Start checking around 35 minutes. If you want a little glaze, brush it on in the last 10 minutes so the sugars don’t burn.
Sauces That Turn Plain Chicken Into a Real Meal
A bare piece of chicken gets interesting the moment it leaves the pan. Sauce is not decoration here. It’s the part that ties the plate together.
I like sauces that can start in the same skillet after the chicken comes out. That way, the browned bits left behind become flavor instead of scrubbing duty. A quick sauce also gives you a reason to serve the chicken with rice, potatoes, noodles, or bread — anything that wants something to soak into.
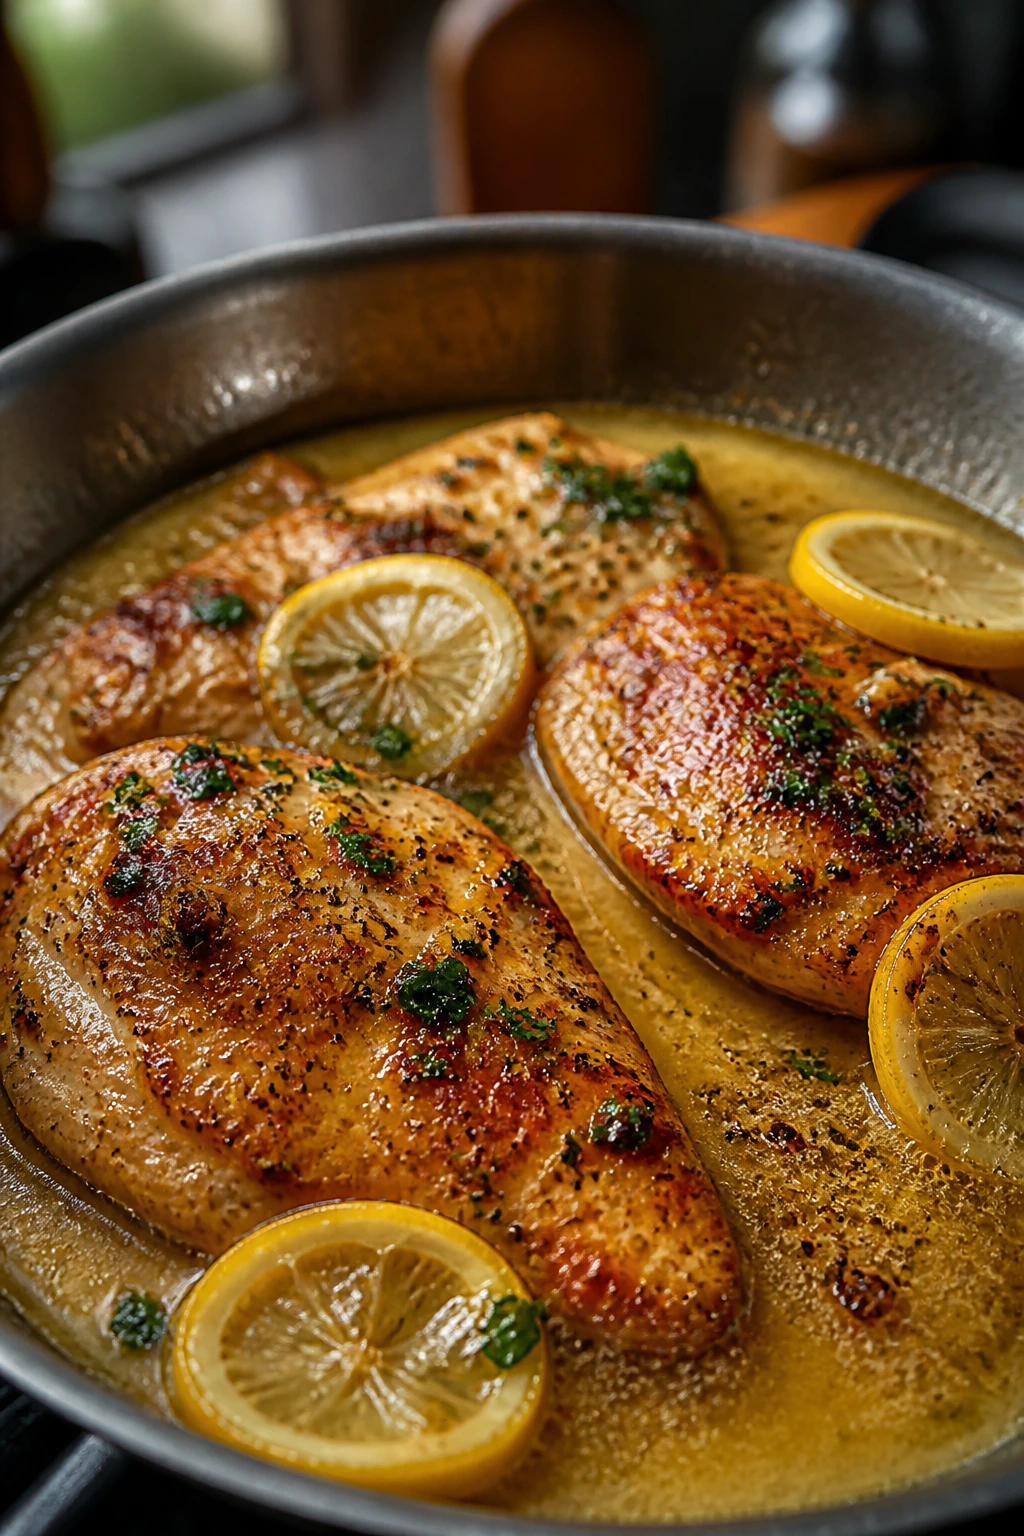
Lemon-Butter Pan Sauce
Add a splash of chicken broth to the hot pan and scrape up the browned bits with a wooden spoon. Let it bubble for a minute or two, then finish with lemon juice, a little zest, and a tablespoon of butter. The sauce should look glossy and loose, not greasy.
This is the sauce I use when the chicken is lean and the rest of dinner needs brightness. Lemon and butter are old-school for a reason. They work.
Dijon Pan Sauce
Dijon is one of the easiest ways to make chicken taste like someone paid attention. Whisk a spoonful into warm pan juices with a little broth and butter, and you get a sauce that tastes sharper than cream but still smooth on the tongue. It’s especially good with boneless breasts and roasted potatoes.
If you want a touch more body, add a teaspoon of flour before the broth or let the sauce reduce a bit longer. I keep Dijon in the fridge for exactly this sort of emergency.
Soy-Ginger Glaze
For a more savory direction, use soy sauce, grated ginger, garlic, a little honey, and a splash of water or broth. Simmer until it turns shiny and lightly sticky, then brush it over sliced chicken or spoon it under rice bowls. The glaze clings best to thighs, cutlets, and tenderloins.
This is the version I make when I’m bored of lemon and don’t want to pretend I’m not. A little sesame oil at the end helps, but use it lightly. It can take over fast.
What to Put on the Plate Beside It
Chicken is the center of the plate, but the sides do a lot of the mood-setting. A dry starch and a bitter vegetable are usually enough to make the dinner feel complete.
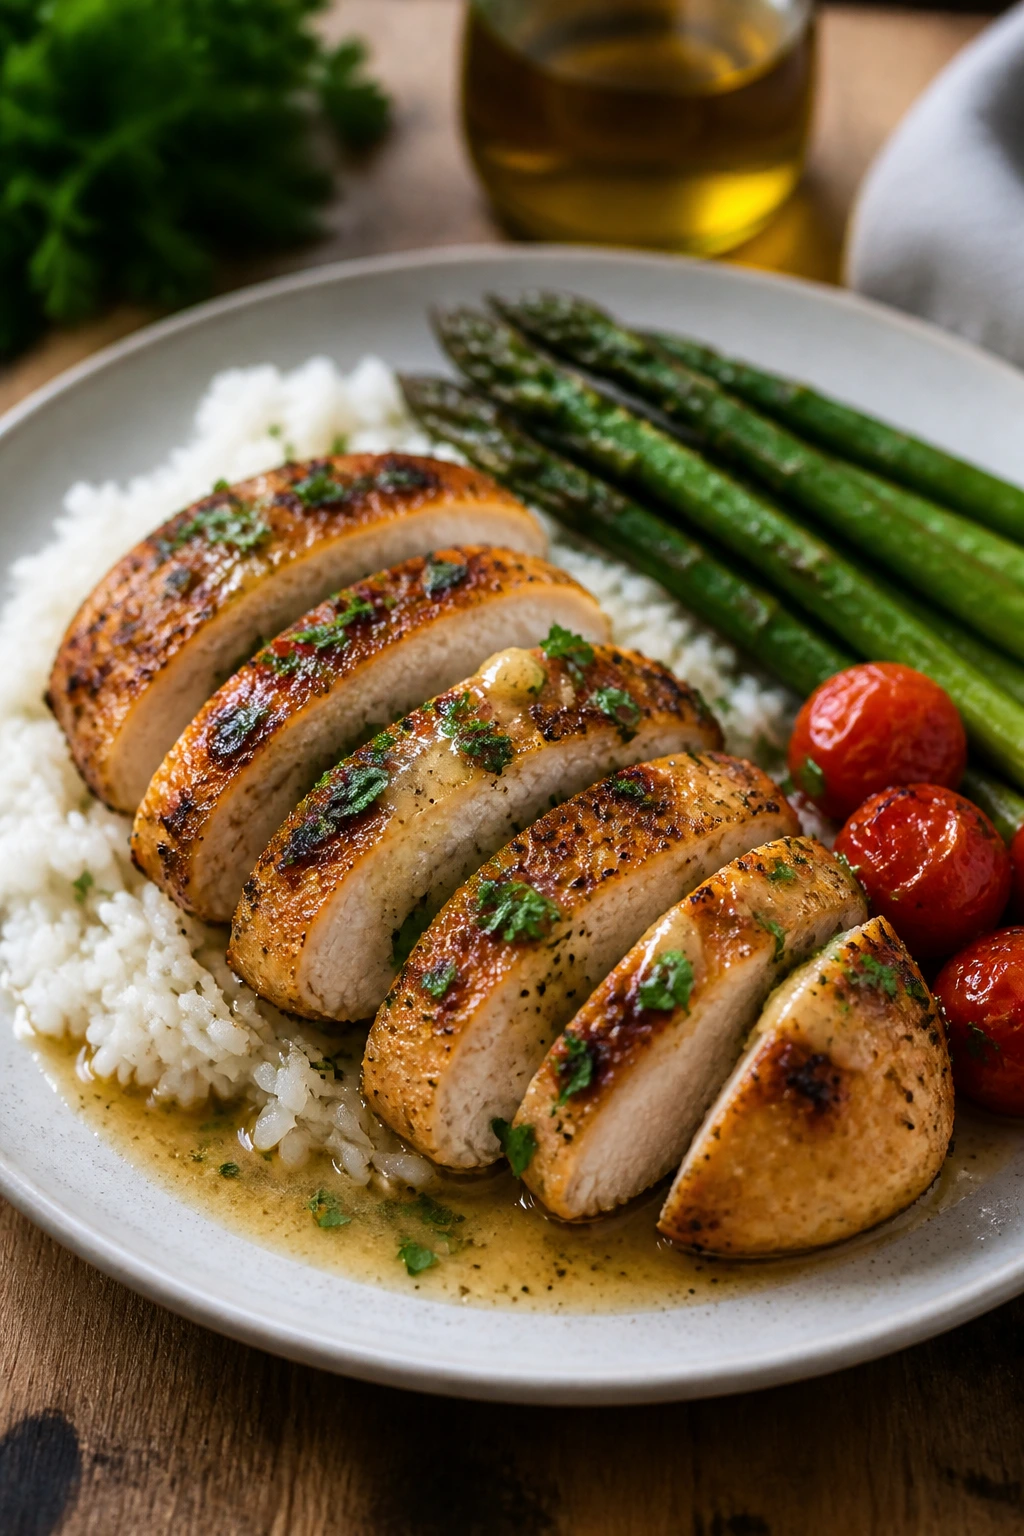
Presentation: Slice boneless chicken on the bias, fan it over rice or mashed potatoes, and spoon the sauce so it pools slightly at the base instead of drowning everything. Bone-in thighs look best served whole on a warm plate with the vegetables pushed close beside them, not scattered all over the place.
Accompaniments: Buttered rice, roasted potatoes, egg noodles, garlic bread, couscous, green beans, broccoli, chopped salad, or a simple cucumber salad all work. I like to pair richer sauces with plain starches and leaner chicken with something crisp and acidic, like a slaw with vinegar and a little sugar.
Portions: Plan on about 6 ounces of raw boneless chicken per adult, which shrinks to a more ordinary serving after cooking. For thighs, two medium pieces usually make a solid dinner. Kids often do fine with 4 ounces, though a saucy plate or shredded chicken in a bowl tends to disappear faster than sliced pieces.
Beverage Pairing: Sparkling water with lemon keeps the plate feeling clean. If you drink wine, a crisp white like Sauvignon Blanc or an un-oaked Chardonnay handles lemon, herbs, and pan sauce without getting heavy. A cold lager works too, especially with paprika or soy-ginger flavors.
The Pantry and Fridge I Keep Ready for Chicken Nights
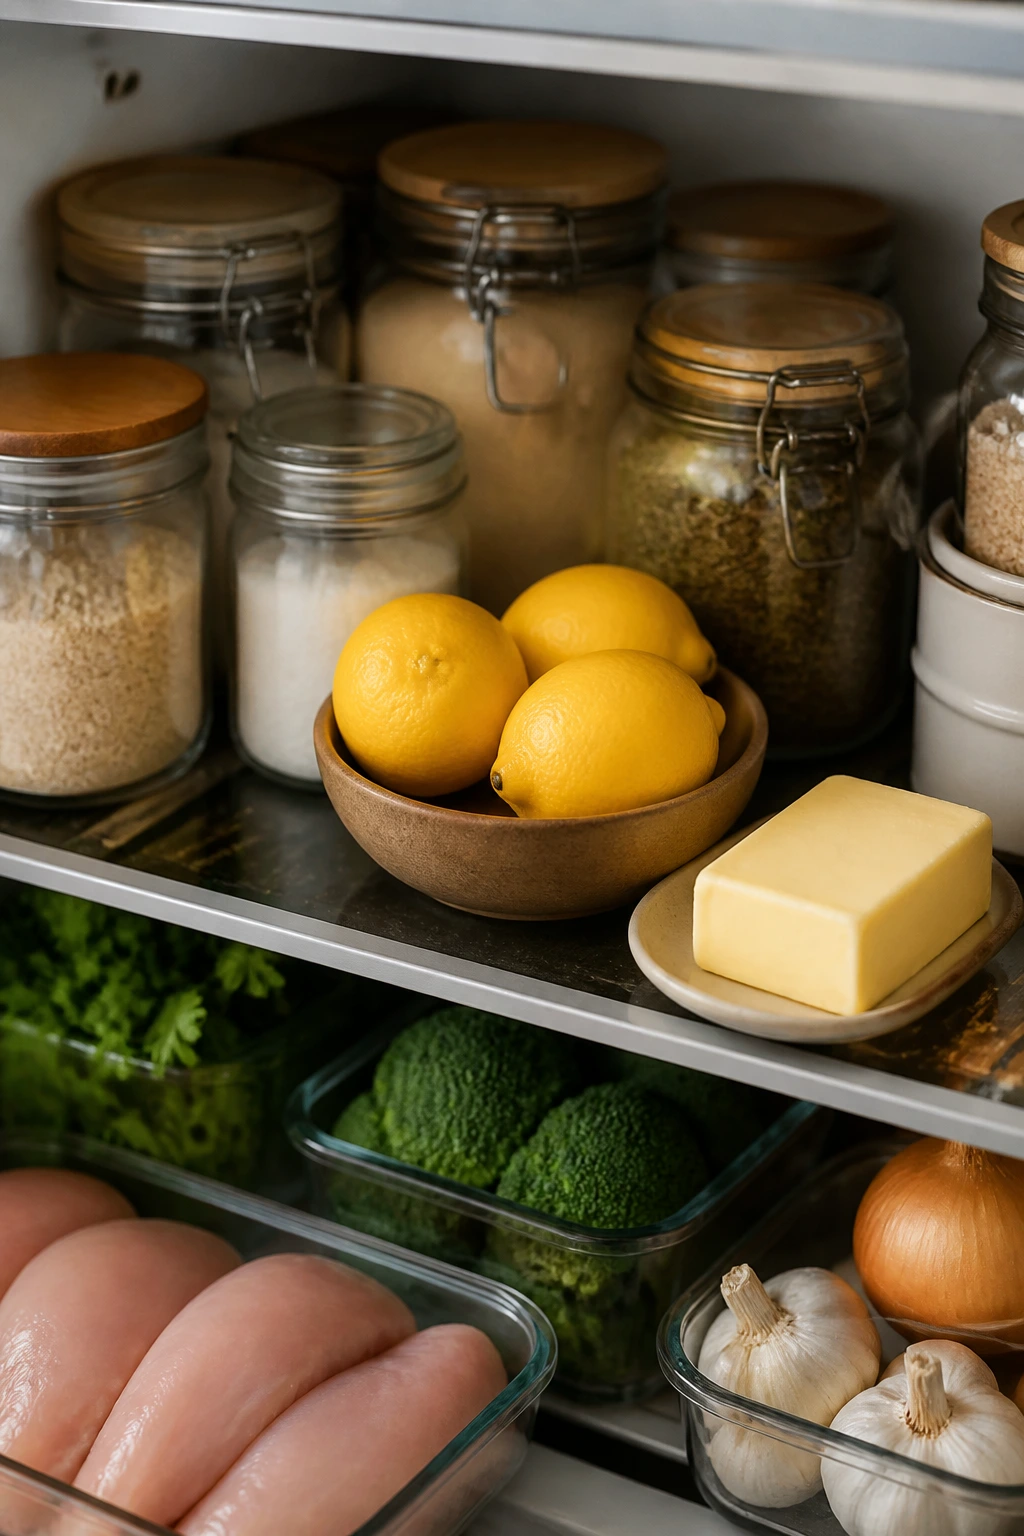
I keep a small chicken-night shelf because a full pantry is overkill. A short, useful list is easier to shop from, easier to remember, and less likely to expire in the back of the cabinet.
The Flavor Base
-
Kosher salt — This is the seasoning that does the quiet heavy lifting. Chicken without enough salt tastes flat, no matter how good the sauce is.
-
Black pepper — Freshly ground pepper adds enough bite to keep the meat from tasting one-note.
-
Garlic powder and onion powder — Handy when you want flavor without chopping another clove or onion.
-
Paprika, smoked paprika, or chili flakes — These give chicken color and a deeper edge without much work.
The Fridge Helpers
-
Dijon mustard — Stir it into pan sauce, whisk it into a marinade, or spread a thin layer under breadcrumbs.
-
Lemons — One lemon can finish a skillet, brighten roasted chicken, or rescue a plate that tastes a little too rich.
-
Butter — A tablespoon at the end of a sauce changes the whole texture.
-
Chicken broth — Keep a carton or a good bouillon source around. It stretches pan drippings into a proper sauce.
-
Plain yogurt or sour cream — Useful for quick marinades and creamy dressings that sit beside the chicken.
The Backup Starches and Vegetables
-
Rice, pasta, or potatoes — These absorb sauce and make the plate feel finished, which is half the job on a busy night.
-
Frozen peas, spinach, broccoli, or corn — Frozen vegetables save dinner when the crisper drawer is empty and your energy is lower than you thought.
-
Onions and garlic — They’re basic, yes, but they’re also the start of almost every pan dinner that tastes intentional.
The Quick Thickener
- Cornstarch or flour — Either one can give a thin sauce a little body. A teaspoon or two is usually enough.
Small Moves That Make Chicken Better
A few habits matter more than fancy recipes. I’ve seen more good chicken ruined by small misses than by big disasters.
Flavor Enhancement: Finish cooked chicken with a little acid — lemon juice, vinegar, or even a splash of pickle brine — and the whole dish wakes up. Acid at the end is sharper and cleaner than cooking it in from the start, especially on breast meat.
Time-Saver: Buy chicken cutlets or slice breasts horizontally yourself so they cook at the same speed. Thick pieces force you to babysit the pan; even pieces let you focus on the sides.
Cost-Saver: Thighs and drumsticks are the smart buy when prices on breasts jump around. They usually need less careful cooking, too, which means fewer dry dinners and fewer last-minute takeout decisions.
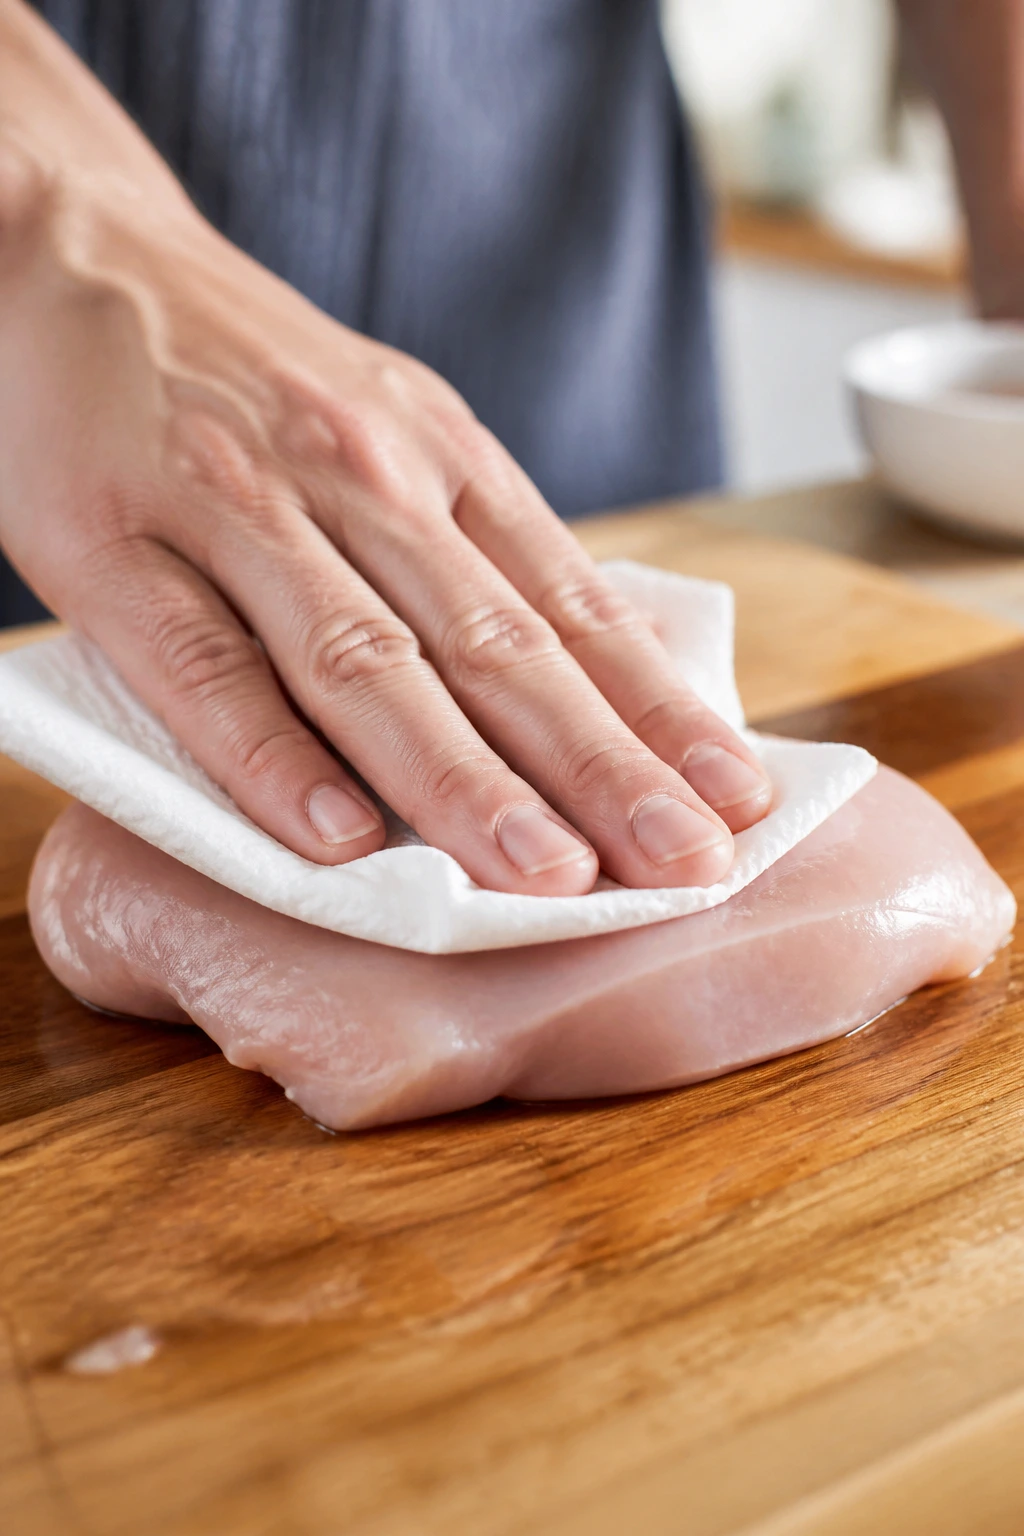
Texture Boost: Pat the chicken dry with paper towels before seasoning. That sounds almost insultingly simple, but it matters because wet surfaces don’t brown the same way. The skin should feel dry to the touch before it hits heat.
Make-It-Yours: Keep the sauce modular. Start with broth and butter, then choose the lane: lemon and herbs, Dijon and cream, soy and ginger, or paprika and garlic. That way the technique stays the same, but the dinner doesn’t feel repetitive.
Mistakes That Dry Out Chicken Fast
Here’s the part people usually learn the hard way. The symptoms are familiar: chicken that looks done but tastes stringy, chicken that leaks all over the board, chicken that somehow has color and no flavor at the same time.
-
Crowding the pan: The chicken steams instead of browns, and the surface goes pale. Give the pieces room or cook in batches; a crowded pan is not a shortcut, it’s a delay.
-
Skipping the thermometer: Guessing by color is how you end up with dry breasts or undercooked centers. Use an instant-read thermometer and aim for 165°F in the thickest part.
-
Overcooking lean cuts to be “safe”: People often leave breasts in the pan well past done because they’re nervous. That just pushes the meat from juicy to chalky. Pull it when it reaches temperature, then rest it.
-
Slicing too soon: The juices run out while the chicken is still settling. A 5-minute rest fixes more bad dinners than fancy seasoning ever will.
-
Using acid too early and too long: A lemon-heavy marinade can turn the surface soft if the chicken sits for hours. For thin cuts, keep acidic marinades short and save extra lemon for the table.
-
Not drying the chicken first: Moisture on the surface blocks browning and gives you a gray, steamy crust. Pat it dry, season it, then cook it.
Flavor Variations to Rotate Through the Month
Not every chicken dinner needs a new personality, but it does help to have a few directions ready.
Lemon-Pepper Skillet Chicken: Use black pepper, garlic, lemon zest, and a finish of butter and lemon juice. This one is sharp, bright, and good with rice or roasted potatoes, especially when you want something that tastes clean rather than rich.
Smoky Paprika Pantry Chicken: Season the meat with smoked paprika, garlic powder, onion powder, salt, and a little olive oil before searing or roasting. It gives the chicken a deeper red-brown color and plays nicely with green beans, corn, or a simple cabbage slaw.
Honey-Mustard Sheet-Pan Chicken: Whisk Dijon, honey, olive oil, and a little salt, then toss it with chicken pieces and carrots or Brussels sprouts. The glaze browns in the oven and sticks to the edges of the vegetables in a way that makes the whole pan feel complete.
Soy-Ginger Sesame Chicken: Mix soy sauce, grated ginger, garlic, a touch of honey, and a little sesame oil for a fast glaze. It works best with thighs or tenderloins and wants rice, scallions, and maybe a handful of cucumber slices for crunch.
Creamy Mushroom Chicken: Sauté sliced mushrooms first, then deglaze with broth and finish with a small splash of cream or sour cream. This version is heavier, but it’s the right answer when the weather is cooler or you want the sauce to do more of the talking.
Tools That Make Chicken Night Easier
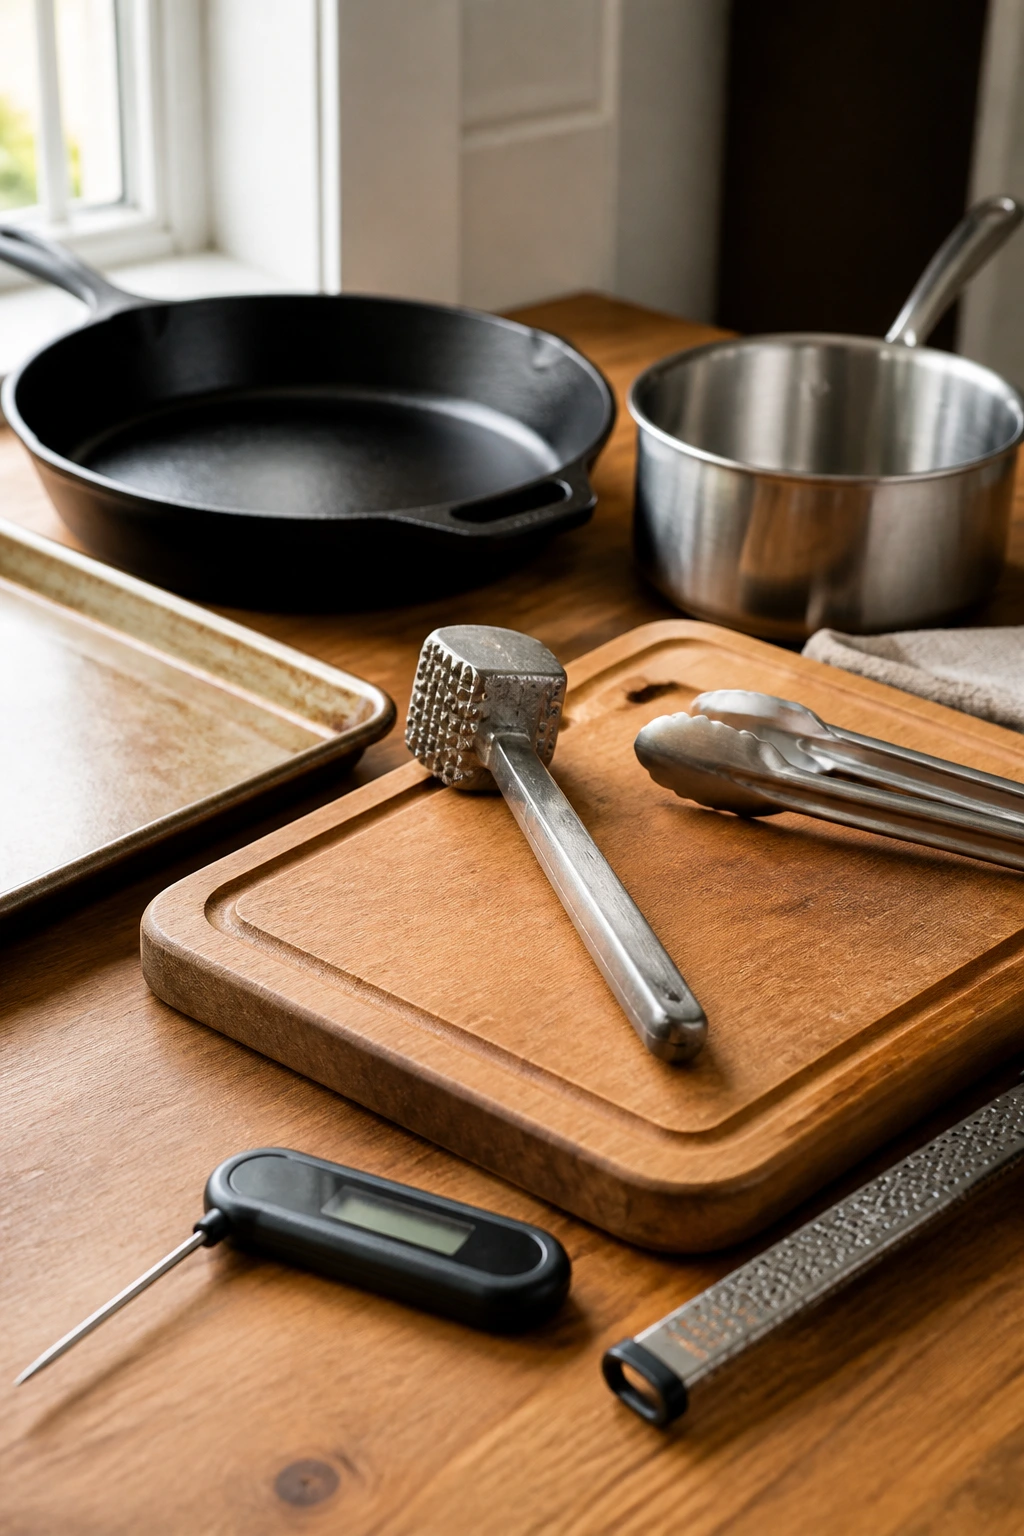
You do not need a drawer full of gadgets. You need a few things that actually earn their space.
-
Instant-read thermometer — This is the one tool I would not skip. It takes the guesswork out of chicken, which is where most dry dinners are born.
-
12-inch cast-iron or stainless steel skillet — Big enough for browning without crowding and sturdy enough to handle high heat.
-
Rimmed sheet pan — Necessary for roasting chicken and vegetables together without sending oil across the oven floor.
-
Tongs — Easier and cleaner than a fork for turning cutlets or thighs without piercing them.
-
Meat mallet or rolling pin — Useful for pounding breasts to even thickness. A wine bottle wrapped in a towel works in a pinch.
-
Cutting board with a juice groove — Chicken leaks; a groove keeps the cutting board from becoming a tiny pond.
-
Small saucepan — Handy for pan sauces when you want to keep the chicken in its resting place and finish the sauce without stress.
-
Microplane or fine grater — Good for lemon zest, garlic, or ginger when you want a finishing note without chunky bits.
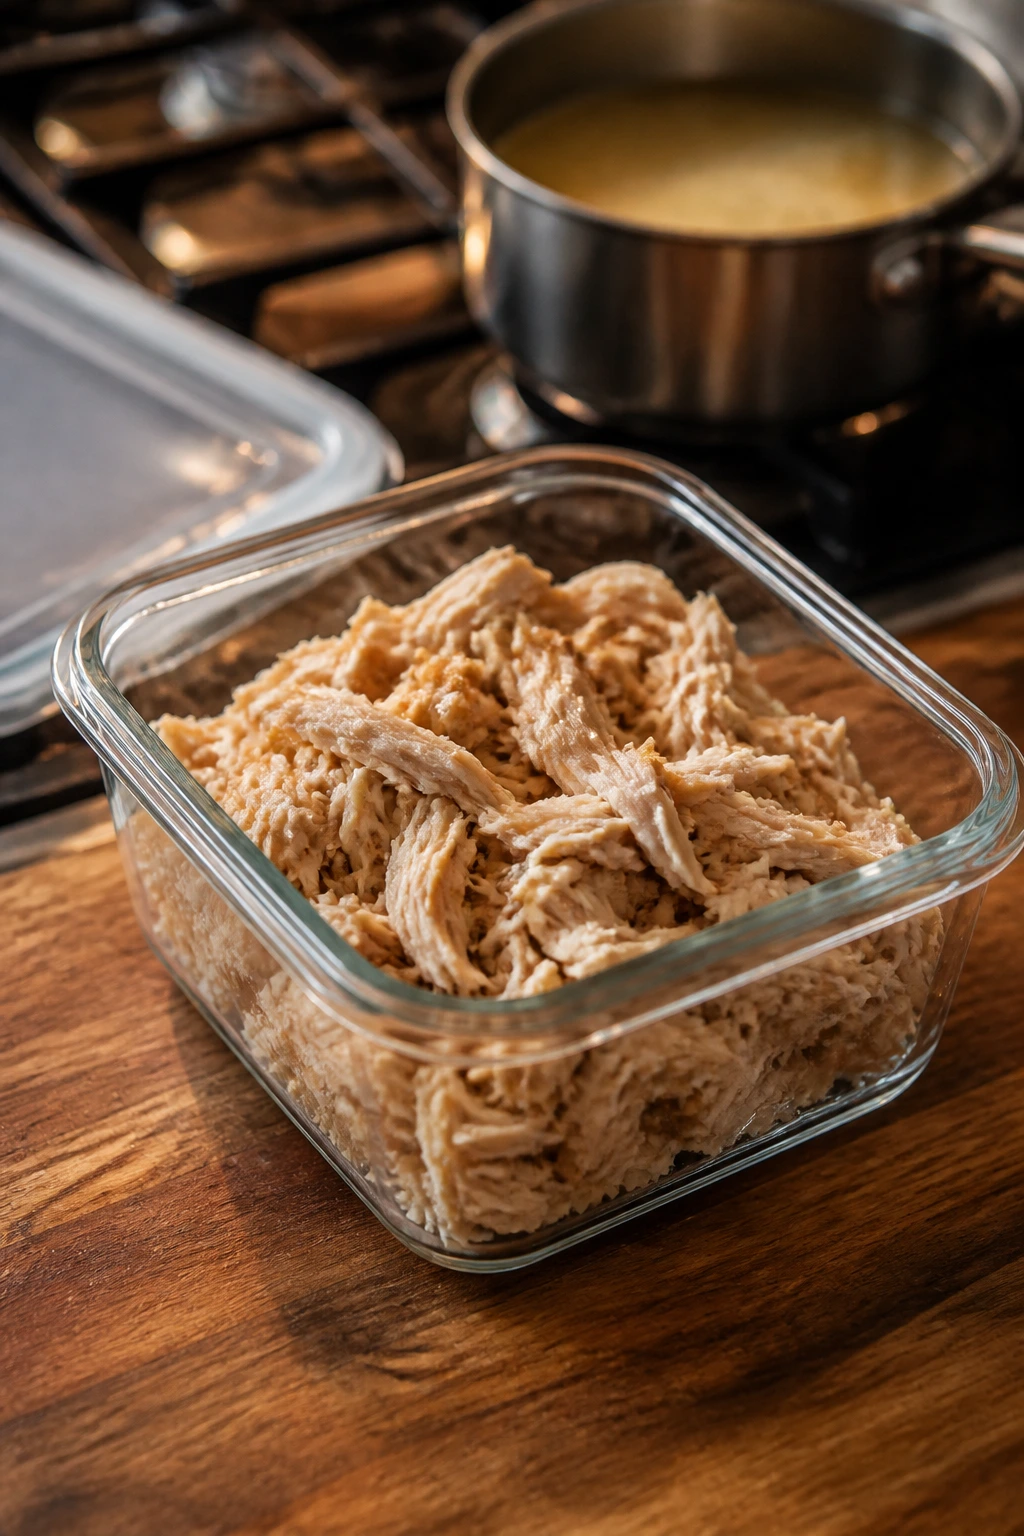
Make-Ahead, Storage, and Reheating Without Wrecking the Texture
Cooked chicken keeps better than people give it credit for, as long as you don’t trap steam under a hot lid and call it good.
In the Fridge
Store cooked chicken in an airtight container for 3 to 4 days in the refrigerator. Let it cool a bit before packing it away, but do not leave it out for hours. If you made a sauce, keep it separate when you can; chicken stored in sauce stays moist, but breaded pieces or crisp-skinned pieces get soft faster.
In the Freezer
Cooked chicken freezes for up to 2 to 3 months. Slice or shred it before freezing if you know you’ll use it for soups, wraps, or rice bowls. Wrap tightly and press out excess air, because freezer burn is usually the result of lazy packaging, not bad luck.
Reheating
For sliced boneless chicken, the skillet is my favorite route. Add a splash of broth or water, cover the pan, and warm it over low heat until the meat reaches 165°F again. The moisture from the steam keeps the slices from drying out.
For bone-in pieces, use a 325°F oven and cover loosely with foil until warmed through. That takes longer, but it preserves the skin better than a microwave. If you do use the microwave, go in short bursts with a damp paper towel over the top and stop the second the meat is hot; aggressive microwaving turns good chicken into chewing practice.
Make-Ahead Moves
You can season chicken the night before, dry brine it uncovered in the fridge, and even chop the vegetables ahead of time. A pan sauce base — broth, mustard, lemon, garlic — can also be mixed earlier in the day and finished in the skillet when the chicken comes out. That little bit of prep turns dinner into assembly instead of performance.
Frequently Asked Questions About Juicy Weeknight Chicken

What chicken cut is best for quick dinners?
Boneless skinless breasts are the fastest, but thighs are the safest bet if you want more forgiveness. If I had to pick one cut for a busy home cook, I’d choose thighs because they stay moist longer and tolerate a little more heat.
Do I really need to brine chicken before cooking?
No, but a short dry brine helps more than people expect. Even 15 to 30 minutes with salt on the surface improves seasoning and gives you better browning, especially on breasts.
What temperature should chicken reach before I take it off the heat?
The safe internal temperature for chicken is 165°F in the thickest part. A thermometer removes the guesswork, and that matters because color alone can fool you.
Can I cook chicken from frozen on a weeknight?
You can cook some frozen chicken methods safely, but it’s not the route I’d choose for the skillet. Thawing in the fridge gives you better browning and more control, which is what you want when dinner has a deadline.
How do I keep chicken breasts from drying out?
Pound them to even thickness, cook over medium-high heat rather than blasting them, and stop at 165°F. Then let them rest for 5 minutes before slicing. Those three moves do more than any complicated marinade.
Is it better to use thighs or breasts for meal prep?
Thighs hold up better after reheating, especially if you’ll eat the chicken over rice or in bowls. Breasts can work too, but slice them thin and store them with a little sauce so they don’t dry out in the fridge.
Can I make weeknight chicken in the oven instead of a skillet?
Yes. The oven is especially good for sheet-pan dinners and bone-in pieces. Just watch the timing and start checking early so the meat doesn’t run past juicy into dry.
What if the chicken is done but the sauce tastes thin?
Keep the chicken resting while you reduce the sauce for another minute or two. If needed, whisk in a small knob of butter or a teaspoon of mustard to give it body. Thin sauce usually needs heat, not panic.
A Chicken Routine That Sticks
Good weeknight chicken is less about a perfect recipe and more about a routine you trust. Once you know which cuts forgive mistakes, how to salt them, and when to stop cooking, dinner gets calmer. The pan doesn’t feel like a test anymore.
That’s the part I keep coming back to: not the exact flavor profile, but the repeatable method. A dry brine here, an instant-read thermometer there, a quick pan sauce when the skillet has something worth scraping up — those are small habits, but they change the whole plate.
Pick one method and use it twice before chasing the next new idea. By the third dinner, you’ll stop guessing, and that is when juicy chicken starts showing up on ordinary weeknights without much drama at all.