
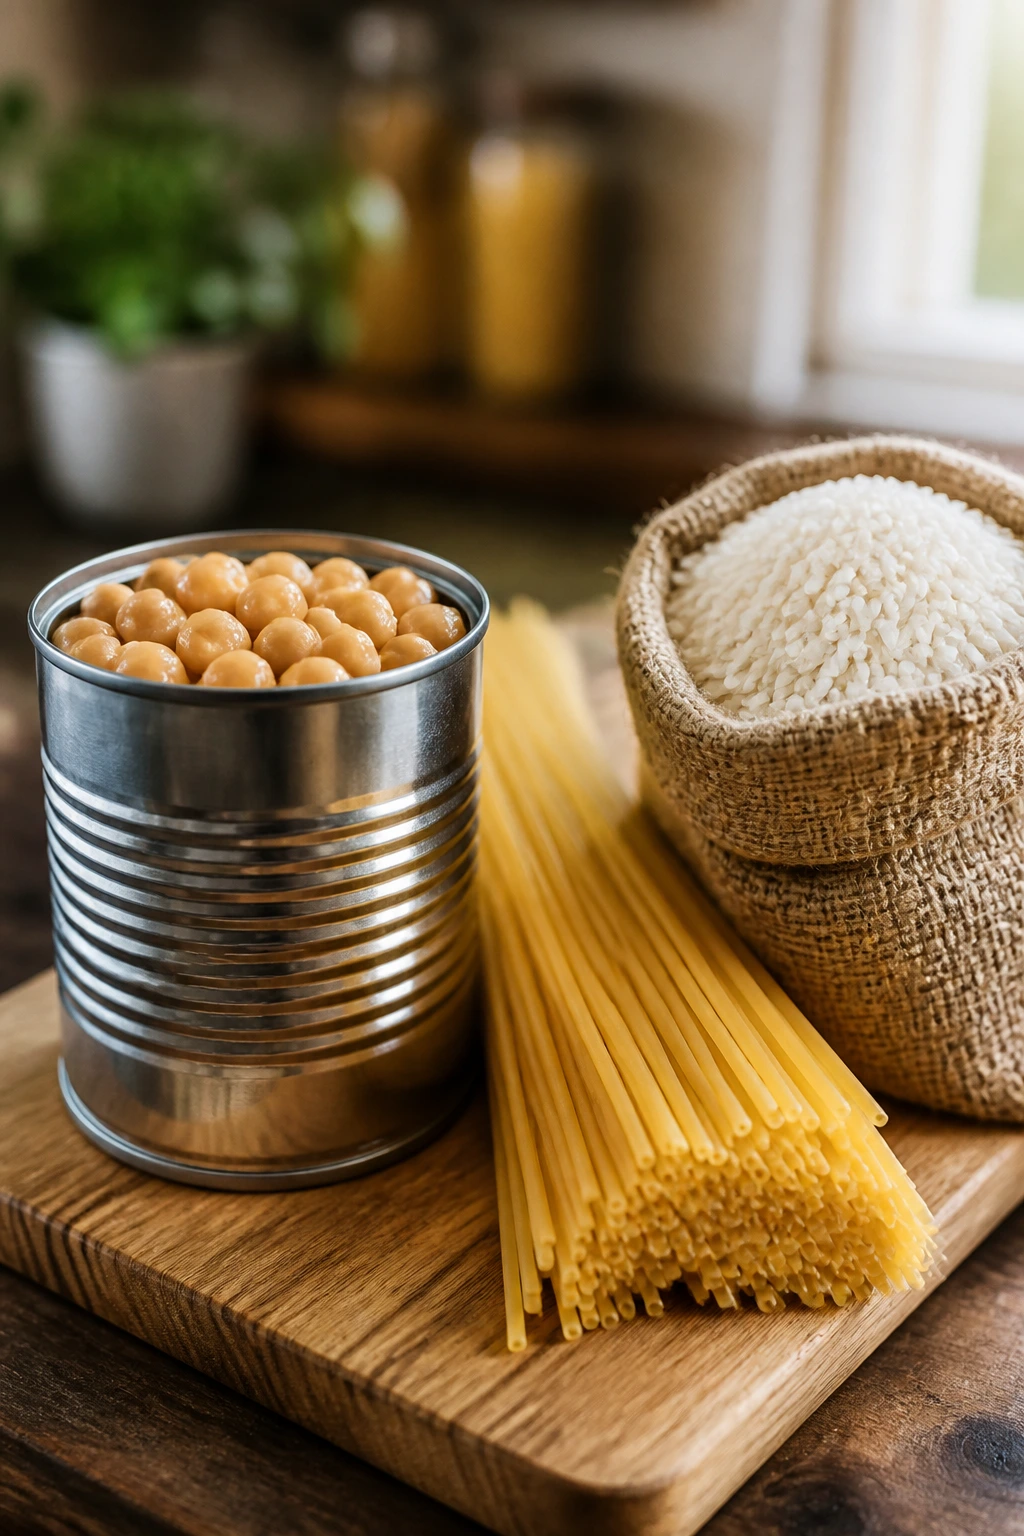
The best last minute dinners from pantry staples start looking humble and end up tasting like you planned ahead. A can of chickpeas, a box of pasta, a tin of tuna, a bag of rice — those aren’t emergency foods in my kitchen. They’re dinner insurance. With the right salt, a little fat, and one sharp hit of acid, they stop feeling like backup and start behaving like a real meal.
I’ve always liked pantry cooking because it rewards good habits instead of perfect timing. Toast the garlic instead of scorching it. Bloom the spices in oil. Save a little pasta water. Rinse the beans. These are tiny moves, but they matter more than a long ingredient list ever will. A pantry meal that tastes flat usually needed more thought, not more groceries.
What makes these dinners work is balance. Starch gives you body. Tomatoes bring brightness. Beans and canned fish bring protein. Peanut butter, olive oil, coconut milk, and cheese carry the richness. Once you see that pattern, the whole cupboard starts to look more useful. One shelf can feed you a lot better than people give it credit for.
Start with the recipe that fits what your shelves already hold, because the best pantry dinner is the one you can make without a grocery run.
1. Spaghetti Aglio e Olio with Toasted Breadcrumbs
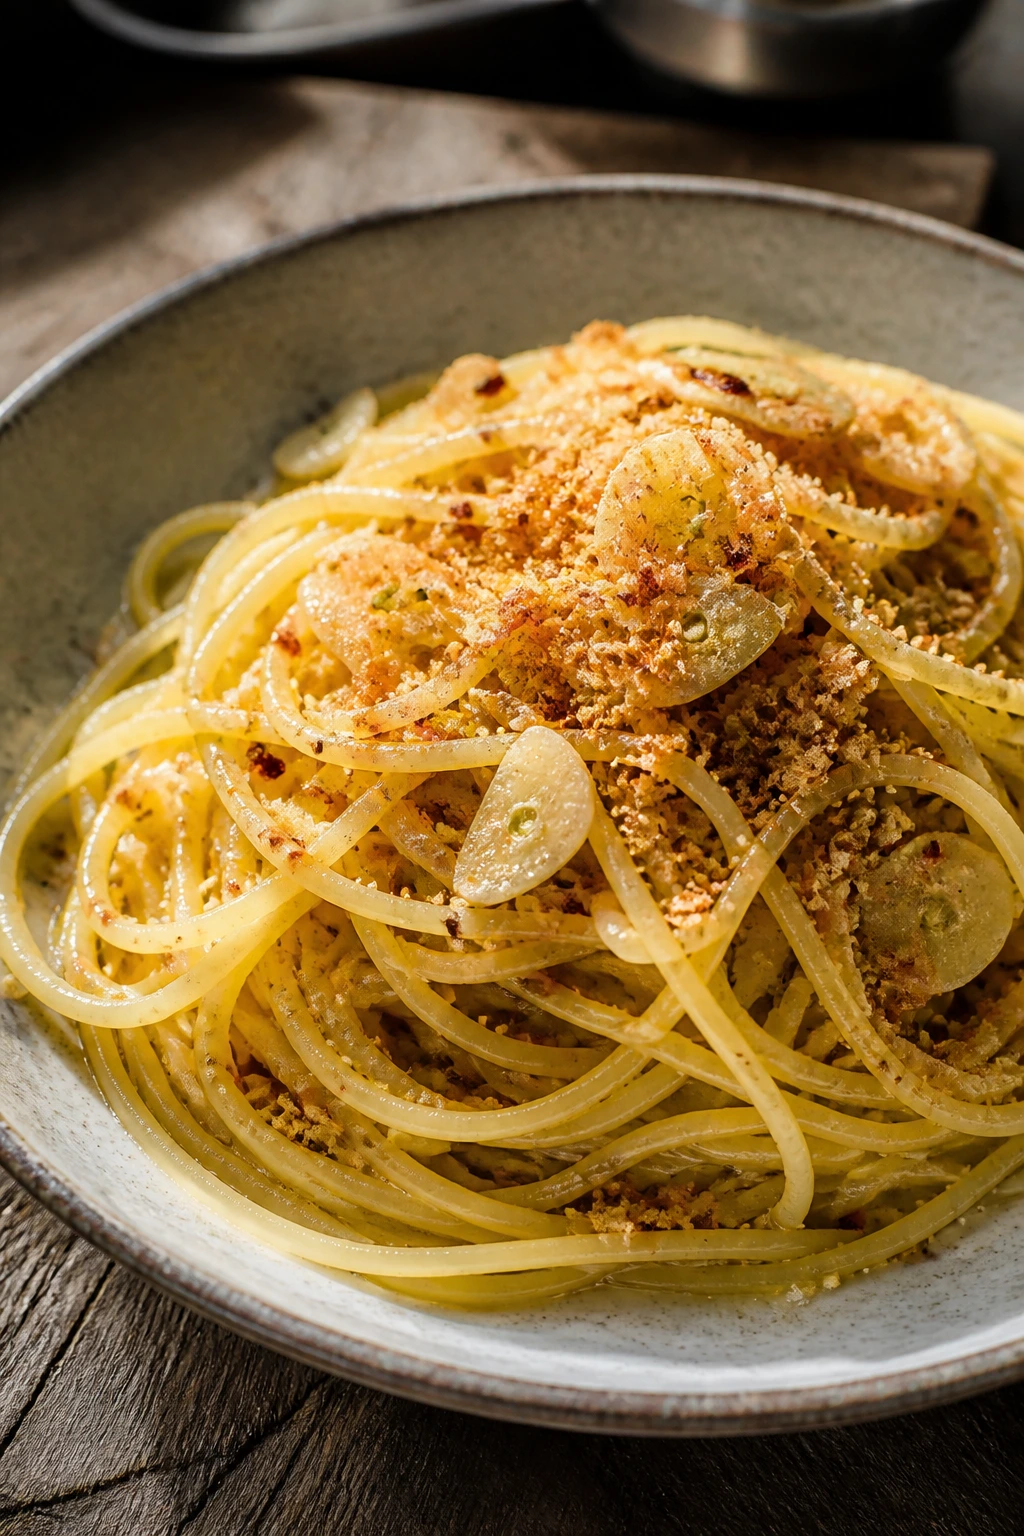
A good garlic-oil pasta can rescue a rough evening in about 20 minutes, and this version has one extra trick that makes it feel finished: crunchy toasted breadcrumbs on top. The sauce stays simple — olive oil, garlic, pepper flakes, a little pasta water — but the texture is what keeps it from feeling bare. When the crumbs hit the hot pasta, you get salt, crunch, and a little toasted nuttiness in every bite.
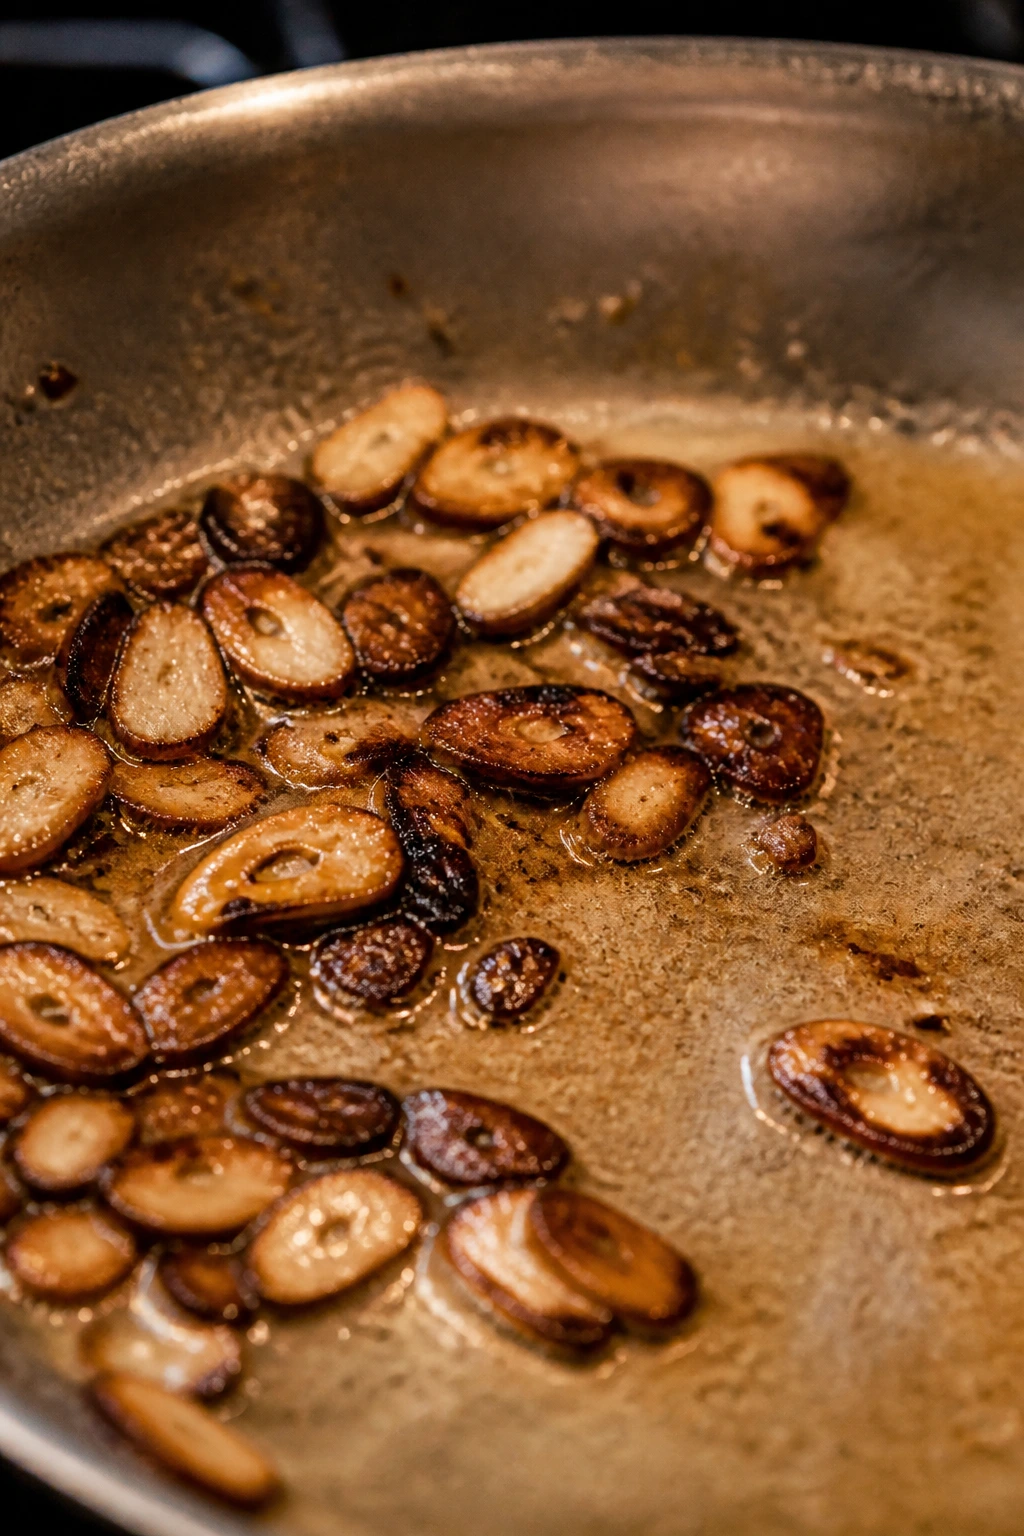
Why it works: this dish is built on a very old pantry truth: pasta wants fat, salt, and starch. The garlic perfumes the oil, the pasta water ties everything together, and the breadcrumbs give you the part a plain oil sauce usually lacks. Keep the garlic pale gold, not brown. That one detail is the difference between sweet and bitter.
Key Ingredients:
- 12 ounces spaghetti
- 1/2 cup extra-virgin olive oil
- 6 garlic cloves, thinly sliced
- 1 teaspoon red pepper flakes
- 1/2 cup fine breadcrumbs
- 1 teaspoon kosher salt, plus more for the pasta water
- 1/2 cup finely grated Parmesan, optional
- 2 tablespoons chopped parsley
- 1 teaspoon lemon zest or 1 tablespoon lemon juice
- Fresh black pepper, for serving
Quick Steps:
- Bring a large pot of salted water to a boil, then cook the spaghetti until al dente, usually 8 to 10 minutes. Reserve 1 cup of the pasta water before draining.
- Warm 2 tablespoons of the olive oil in a skillet over medium heat. Add the breadcrumbs and stir for 2 to 3 minutes, until they turn deep golden and smell toasty. Transfer to a bowl.
- Pour the remaining oil into the same skillet. Add the garlic and red pepper flakes over medium-low heat and cook for 1 to 2 minutes, just until the garlic looks pale gold at the edges. Do not let it brown.
- Add 1/2 cup of the reserved pasta water and stir for 30 seconds. The oil should turn glossy and slightly creamy.
- Add the drained spaghetti and toss for 1 to 2 minutes, adding more pasta water a splash at a time until the strands look slick and coated.
- Turn off the heat. Stir in the parsley, lemon zest or juice, and Parmesan if using. Finish with the toasted breadcrumbs and black pepper.
Tips and Variations:
- Add a drained can of tuna or white beans if you want the dish to lean more filling without losing its speed.
- If your garlic starts to darken, pull the pan off the heat and add a tablespoon of pasta water right away.
- Panko works if that’s what you have, though fine breadcrumbs give a tighter, sandier crunch.
2. Chickpea Tomato Skillet with Cumin and Rice
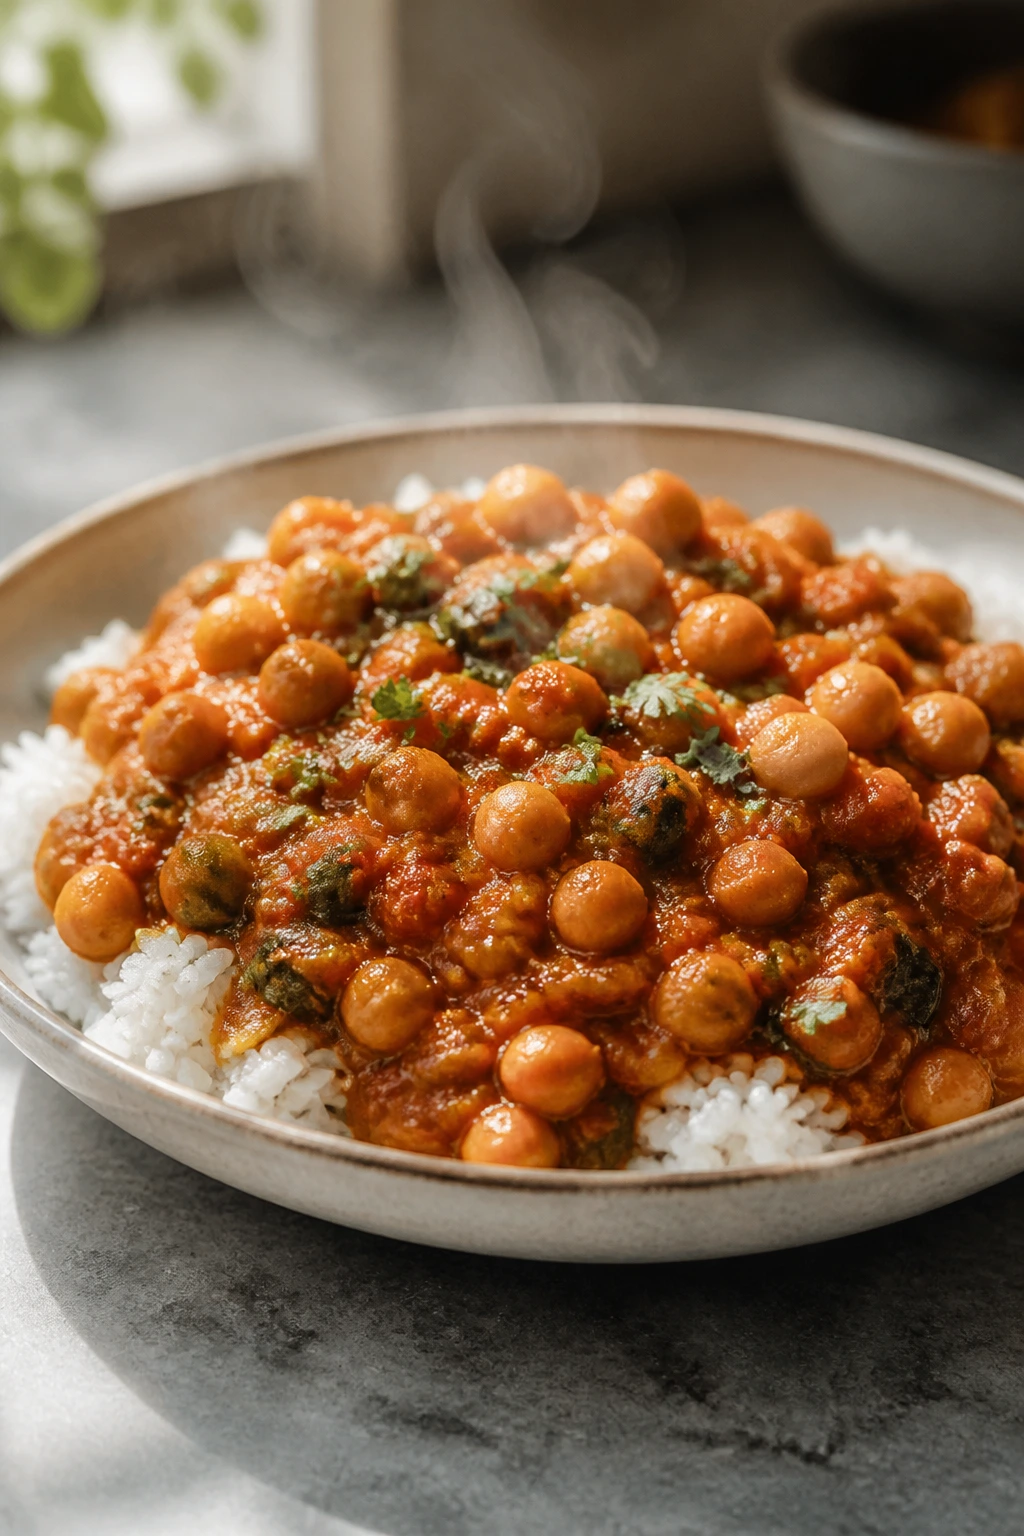
This one tastes like a pantry meal that got dressed up a little. Chickpeas simmer in crushed tomatoes with cumin, paprika, and garlic until the sauce turns thick and brick-red, then you spoon the whole thing over rice or mop it up with bread. It’s warm, a little smoky, and built from ingredients that keep their shape and flavor even when the fridge is nearly empty.
Why it works: canned chickpeas already have a firm, creamy texture, so they don’t need much to become dinner. Tomato paste deepens the sauce fast, and the spices bloom in oil before the liquid goes in, which gives the whole skillet a rounder flavor. If you rush this one, it still works. If you give it 15 steady minutes, it tastes like you tried harder than you did.
Key Ingredients:
- 2 tablespoons olive oil
- 1 medium onion, diced
- 3 garlic cloves, minced
- 1 teaspoon ground cumin
- 1 teaspoon smoked paprika
- 2 tablespoons tomato paste
- 1 (28-ounce) can crushed tomatoes
- 2 (15-ounce) cans chickpeas, drained and rinsed
- 1/2 cup water or broth
- 1 teaspoon kosher salt, plus more to taste
- Fresh black pepper
- 2 tablespoons chopped parsley
- 3 to 4 cups cooked rice, or crusty bread for serving
Quick Steps:
- Warm the olive oil in a wide skillet over medium heat. Add the onion and cook for 5 to 6 minutes, until soft and translucent.
- Stir in the garlic, cumin, and smoked paprika. Cook for 30 seconds, just until fragrant.
- Add the tomato paste and cook for 1 minute, pressing it into the pan so it darkens slightly.
- Pour in the crushed tomatoes, chickpeas, and water or broth. Stir well and bring to a gentle simmer.
- Cook for 12 to 15 minutes, uncovered, until the sauce thickens and the chickpeas taste seasoned all the way through.
- Taste and adjust with salt and black pepper. Spoon over rice and finish with parsley.
Tips and Variations:
- Whole peeled tomatoes work too; crush them with a spoon while they simmer.
- Add a handful of olives or a pinch of chili flakes if you want more edge.
- A small splash of lemon juice at the end wakes up the tomato flavor fast.
3. Tuna Pasta with Capers and Lemon
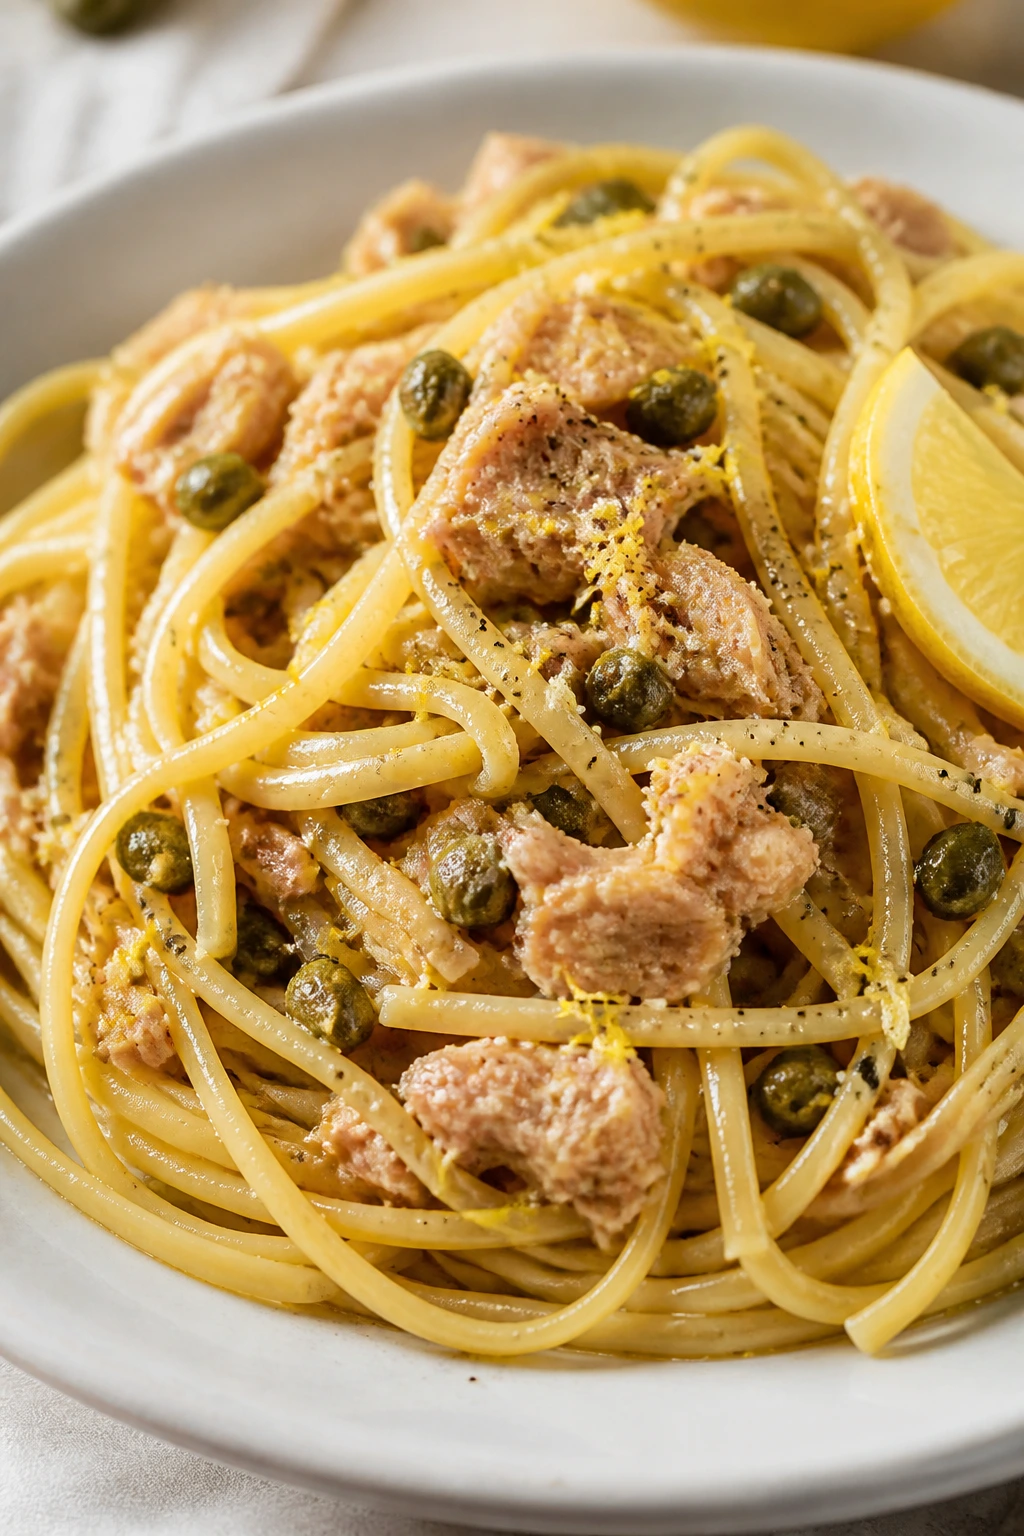
Tuna pasta gets a bad reputation from boring cafeteria versions, which is unfair. Good tuna pasta is briny, bright, and deeply satisfying, especially when capers and lemon are doing the heavy lifting. The sauce is olive oil-based, not heavy, so the fish stays tender and the pasta tastes clean instead of dull.
Why it works: canned tuna brings protein and a savory base, but it needs a few sharp edges to come alive. Capers, lemon, and a little chili turn the whole pot from flat to lively. If you use tuna packed in olive oil, the sauce gets richer; if you use water-packed tuna, just lean harder on the olive oil and lemon zest.
Key Ingredients:
- 12 ounces short pasta, such as penne or rotini
- 2 tablespoons olive oil
- 3 garlic cloves, minced
- 2 tablespoons capers, drained
- 2 cans tuna, about 5 ounces each, drained
- 1/2 cup reserved pasta water
- 1 lemon, zested and juiced
- 1/4 teaspoon red pepper flakes
- 1/4 cup chopped parsley
- Fresh black pepper
- 1/4 cup grated Parmesan, optional
- 1 tablespoon butter, optional for a silkier finish
Quick Steps:
- Boil the pasta in salted water until just al dente. Reserve 1/2 cup of the cooking water, then drain.
- Warm the olive oil in a skillet over medium heat. Add the garlic and capers and cook for 1 minute, until the garlic smells sweet and the capers look a little crisp.
- Add the tuna and break it into large flakes with a spoon. Keep the pieces rough so the texture stays appealing.
- Pour in the pasta water, lemon juice, lemon zest, and red pepper flakes. Stir for 30 seconds, until the sauce looks glossy.
- Add the pasta and toss for 1 to 2 minutes, until every piece is lightly coated. If the pan looks dry, add another splash of water.
- Finish with parsley, black pepper, and Parmesan if you want a salty edge.
Tips and Variations:
- Chopped olives can stand in for capers if that’s what you have.
- Don’t mash the tuna into paste. Big flakes make the dish feel intentional.
- A small knob of butter at the end smooths out the lemon and makes the sauce cling better.
4. Black Bean Quesadillas with Salsa and Cheese

When dinner needs to happen fast, quesadillas do the job with almost rude efficiency. These are filled with mashed black beans, cumin, and enough cheese to glue everything together, then crisped in a skillet until the tortillas turn speckled brown. They’re cheap, filling, and surprisingly good at cleaning out a jar of salsa that’s been sitting around too long.
Why it works: mashing part of the beans gives you a spread instead of loose filling, which means the quesadilla stays together when you flip it. The beans bring body, the cheese melts into the gaps, and the salsa adds moisture plus acid on the side. Keep the skillet at medium heat. Too hot, and the tortillas scorch before the cheese melts.
Key Ingredients:
- 2 tablespoons neutral oil
- 1 small onion, finely minced, or 1 teaspoon onion powder
- 2 (15-ounce) cans black beans, drained and rinsed
- 1 teaspoon ground cumin
- 1/2 teaspoon chili powder
- 1/2 teaspoon kosher salt
- 8 flour tortillas
- 2 cups shredded cheese, such as cheddar or Monterey Jack
- 1 cup salsa, for serving
- 1/2 cup canned corn, optional
- Pickled jalapeños, optional
Quick Steps:
- Heat the oil in a skillet over medium heat. Add the onion and cook for 3 to 4 minutes, until softened, or skip straight to the beans if using onion powder.
- Add the black beans, cumin, chili powder, and salt. Mash about half the beans with a spoon until the mixture looks thick and spreadable.
- Stir in the corn or jalapeños if you’re using them. Cook for 1 minute, then pull the pan off the heat.
- Lay out 4 tortillas. Divide the bean filling among them, then top with cheese and close with the remaining tortillas.
- Cook each quesadilla in a dry skillet or a lightly oiled one over medium heat for 2 to 3 minutes per side, until the outside is crisp and the cheese has melted.
- Rest for 1 minute, then cut into wedges and serve with salsa.
Tips and Variations:
- Refried beans work even faster and make a smoother filling.
- Keep the heat moderate so the tortilla browns instead of going brittle.
- A spoonful of salsa inside the quesadilla adds moisture, but too much will make it soggy.
5. Coconut Red Lentil Curry with Rice
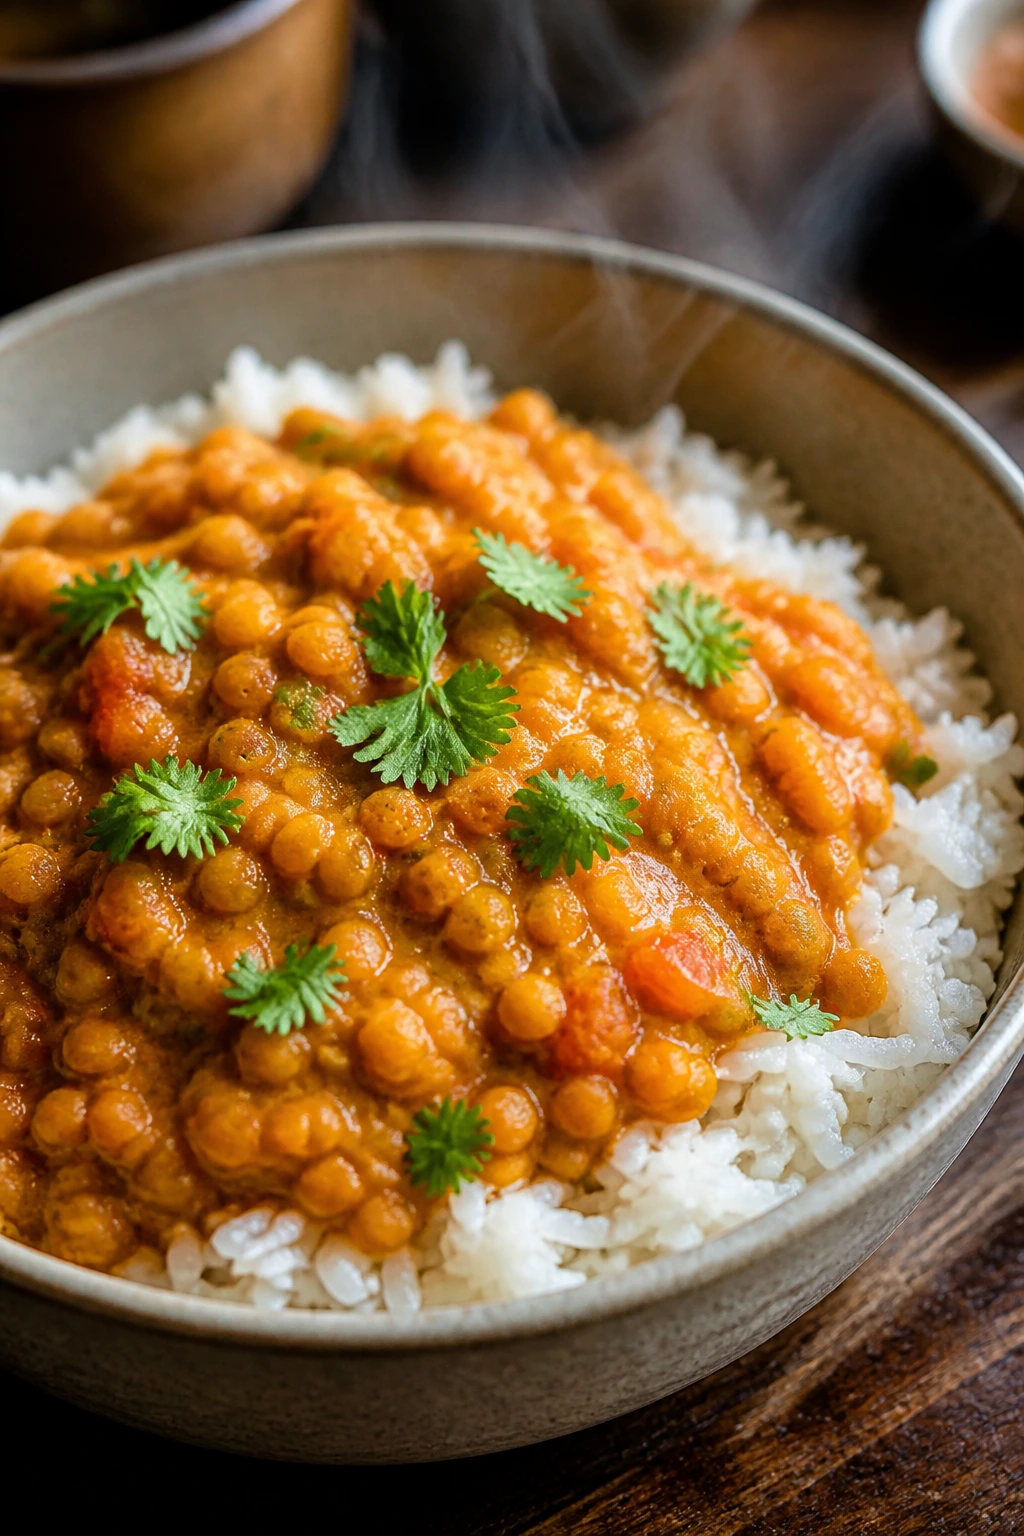
This is the kind of dinner that fills the kitchen with a smell so good it changes the mood in the room. Red lentils melt into coconut milk and tomatoes, turning into a thick, orange curry that feels richer than the ingredient list suggests. It’s soft, spoonable, and the sort of meal I reach for when I want pantry food to taste comforting instead of merely efficient.
Why it works: red lentils break down fast, which means they naturally thicken the sauce without flour or cream. Coconut milk rounds out the spice and gives the curry a silky finish, while tomatoes keep it from tasting one-note. Blooming curry powder and turmeric in oil matters here. It wakes them up.
Key Ingredients:
- 1 tablespoon neutral oil
- 1 medium onion, diced
- 3 garlic cloves, minced
- 1 tablespoon grated fresh ginger or 1 teaspoon ground ginger
- 2 tablespoons curry powder
- 1 teaspoon ground turmeric
- 1 1/2 cups red lentils, rinsed
- 1 (13.5-ounce) can coconut milk
- 1 (14.5-ounce) can diced tomatoes
- 2 cups water or broth
- 1 teaspoon kosher salt
- Lime juice, for finishing
- Cooked rice or flatbread, for serving
Quick Steps:
- Warm the oil in a medium pot over medium heat. Add the onion and cook for 5 minutes, until soft and faintly golden.
- Stir in the garlic and ginger and cook for 30 seconds.
- Add the curry powder and turmeric. Stir for another 30 seconds, letting the spices bloom in the oil.
- Add the lentils, coconut milk, diced tomatoes, water or broth, and salt. Stir well and bring to a gentle simmer.
- Cook uncovered for 18 to 20 minutes, stirring now and then, until the lentils are soft and the curry has thickened.
- Taste and finish with a squeeze of lime juice. Serve over rice.
Tips and Variations:
- If the curry gets too thick, loosen it with a splash of hot water.
- Crushed tomatoes work if that’s what your shelf holds.
- This freezes well in airtight containers, though I’d add the lime after reheating, not before.
6. White Bean Tomato Soup with Rosemary Toast
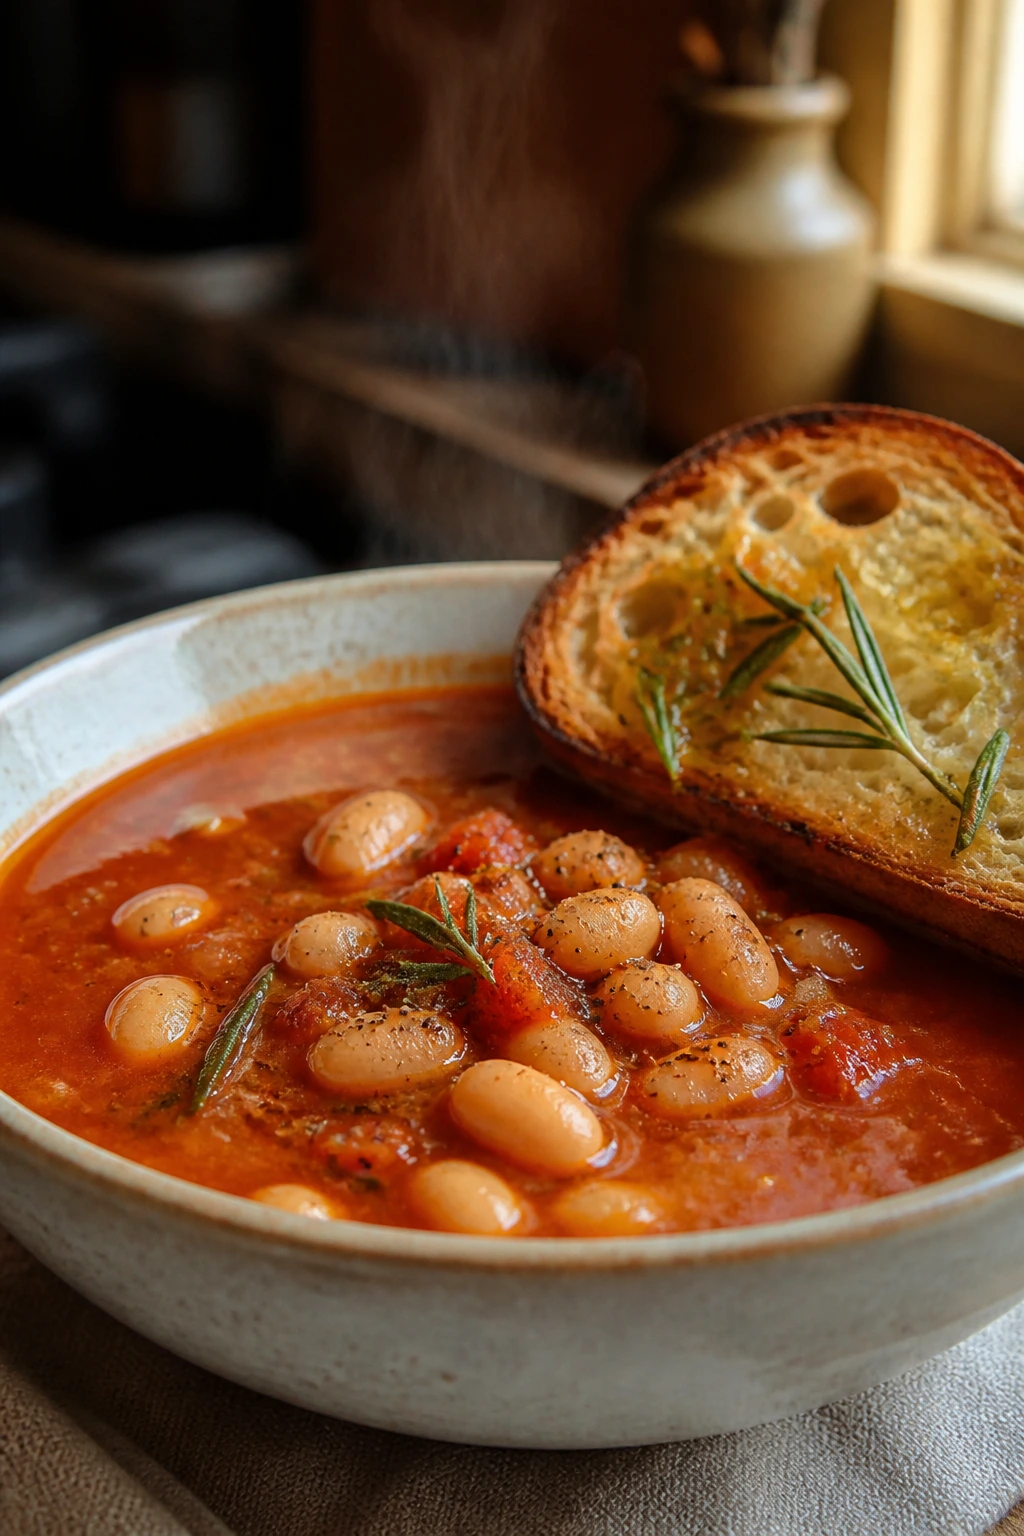
A bowl of tomato soup with white beans in it is one of those quiet pantry meals that looks modest and eats like dinner. The beans make the soup thicker and more substantial, while rosemary toast gives you crunch so the whole thing doesn’t feel soft from top to bottom. It’s rustic in the good way, not the apologetic way.
Why it works: white beans act like a built-in blender. They thicken the broth, add protein, and make the soup feel full without needing cream. A little tomato paste deepens the flavor, and rosemary on the toast gives the meal a sharper, woodsy smell that makes the whole bowl seem bigger.
Key Ingredients:
- 2 tablespoons olive oil
- 1 medium onion, chopped
- 2 garlic cloves, minced
- 1 tablespoon tomato paste
- 1 (28-ounce) can whole peeled or crushed tomatoes
- 2 (15-ounce) cans white beans, drained and rinsed
- 4 cups broth or water plus bouillon
- 1 teaspoon dried rosemary
- 1/2 teaspoon dried thyme
- 1 teaspoon kosher salt, plus more to taste
- Fresh black pepper
- 4 slices bread
- 1 tablespoon olive oil for the toast
- Parmesan, optional
Quick Steps:
- Heat the olive oil in a soup pot over medium heat. Add the onion and cook for 5 to 6 minutes, until soft.
- Stir in the garlic and tomato paste. Cook for 1 minute, until the paste darkens a shade and smells sweet.
- Add the tomatoes, beans, broth, rosemary, thyme, salt, and pepper. Bring to a simmer.
- Cook for 15 minutes. Mash a few beans against the side of the pot, or blend about half the soup if you want a smoother texture.
- Brush the bread with olive oil, sprinkle with a little rosemary and salt, and toast until crisp.
- Ladle the soup into bowls and serve with the toast and Parmesan if using.
Tips and Variations:
- Cannellini beans give the smoothest texture, but navy beans work too.
- A splash of vinegar or lemon at the end sharpens the tomatoes nicely.
- If you want a fuller meal, top each bowl with a fried egg.
7. Egg Fried Rice with Soy and Sesame
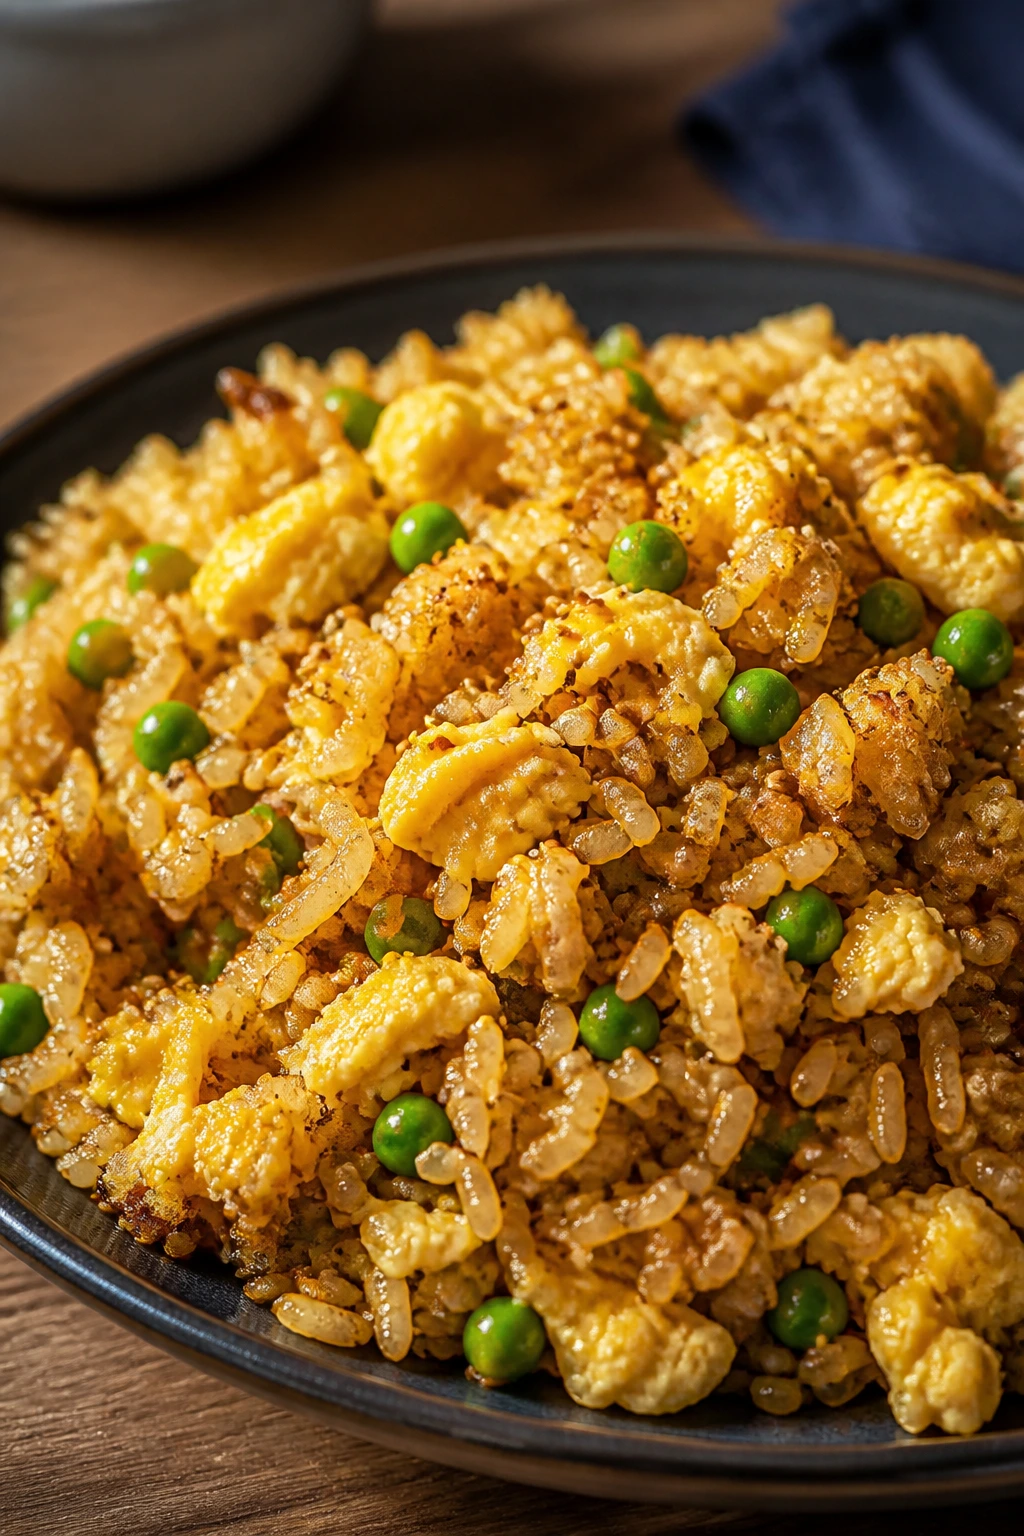
Leftover rice has a job to do, and fried rice is it. This version keeps the ingredient list small: eggs, soy sauce, a little sesame oil, and whatever frozen vegetables you’ve got tucked in the back of the freezer. The rice should taste savory, a little smoky, and separate enough that the grains stay distinct instead of collapsing into mush.
Why it works: cold rice fries instead of steaming. That’s the whole trick, and it matters more than most people think. Eggs add richness and protein, soy sauce brings salt, and sesame oil gives the dish its familiar takeout smell. If the rice is fresh and damp, it will clump. Dry rice behaves.
Key Ingredients:
- 3 cups cold cooked rice
- 3 large eggs
- 2 tablespoons neutral oil
- 1 tablespoon sesame oil
- 2 garlic cloves, minced
- 2 scallions, sliced, or 1/2 small onion, minced
- 3 tablespoons soy sauce
- 1 cup frozen peas and carrots, optional
- 1 teaspoon rice vinegar, optional
- Fresh black pepper
Quick Steps:
- Heat 1 tablespoon of the neutral oil in a large skillet or wok over medium-high heat. Scramble the eggs until just set, then transfer them to a plate.
- Add the remaining neutral oil. Sauté the garlic and scallions or onion for 30 seconds, until fragrant.
- Add the cold rice and break up any clumps with a spatula. Fry for 3 to 4 minutes, pressing the grains against the pan so they dry and heat through.
- Stir in the frozen vegetables if using and cook for 2 minutes, until hot.
- Pour in the soy sauce and toss until the rice turns evenly seasoned. Add the eggs back in and break them into pieces.
- Turn off the heat. Drizzle in the sesame oil and rice vinegar, then finish with black pepper.
Tips and Variations:
- If your rice is fresh, spread it on a plate or tray for 10 minutes so some steam escapes.
- Tamari works if you need a gluten-free version.
- A spoonful of chili crisp on top turns a plain bowl into something with bite.
8. Shakshuka with Canned Tomatoes and Eggs
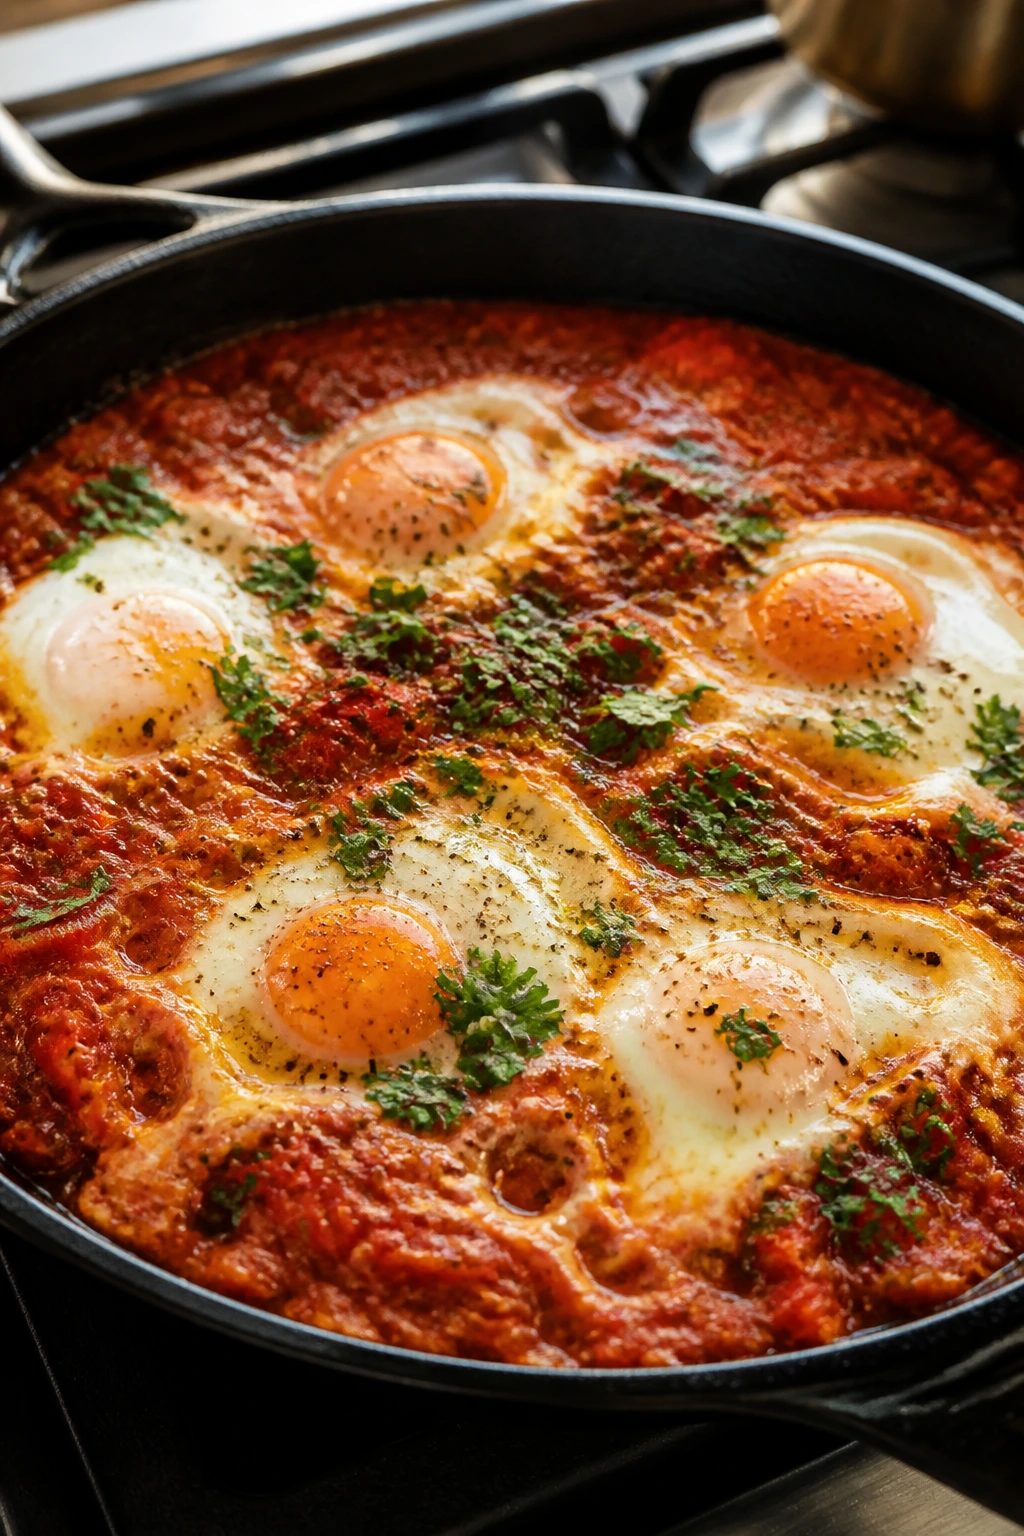
Shakshuka is one of the best uses for canned tomatoes I know. You cook them down with onion, garlic, cumin, and paprika until the sauce turns thick and fragrant, then nestle eggs into the surface and cover the pan until the whites set. The yolks stay soft and bright, which is exactly what you want for swiping bread through the sauce.
Why it works: the tomato base does the heavy lifting here. Canned tomatoes already have enough acidity and body to become a proper sauce once they simmer down, and eggs poach directly in that sauce without any extra fuss. The key is thickness. If the sauce is watery when the eggs go in, you end up steaming them in soup.
Key Ingredients:
- 2 tablespoons olive oil
- 1 medium onion, sliced
- 3 garlic cloves, minced
- 1 teaspoon ground cumin
- 1 teaspoon paprika
- 1/4 teaspoon red pepper flakes
- 1 (28-ounce) can tomatoes
- 1/2 cup water
- 1 teaspoon kosher salt
- 4 to 6 large eggs
- Chopped parsley, for serving
- Feta, optional
- Bread, for serving
Quick Steps:
- Heat the olive oil in a wide skillet over medium heat. Add the onion and cook for 6 minutes, until soft and lightly golden.
- Stir in the garlic, cumin, paprika, and red pepper flakes. Cook for 30 seconds.
- Add the tomatoes, water, and salt. Simmer uncovered for 10 to 12 minutes, stirring now and then, until the sauce thickens enough to leave a slow trail when you drag a spoon through it.
- Use the back of a spoon to make shallow wells in the sauce.
- Crack an egg into each well. Cover the pan and cook for 5 to 7 minutes, until the whites are set but the yolks still jiggle slightly.
- Finish with parsley and feta, then serve right away with bread.
Tips and Variations:
- Add a drained can of chickpeas to the sauce if you want more heft.
- A lid matters here. Without it, the eggs cook unevenly.
- If you like firmer yolks, give the pan another minute and check again.
9. Peanut Noodles with Chili and Sesame
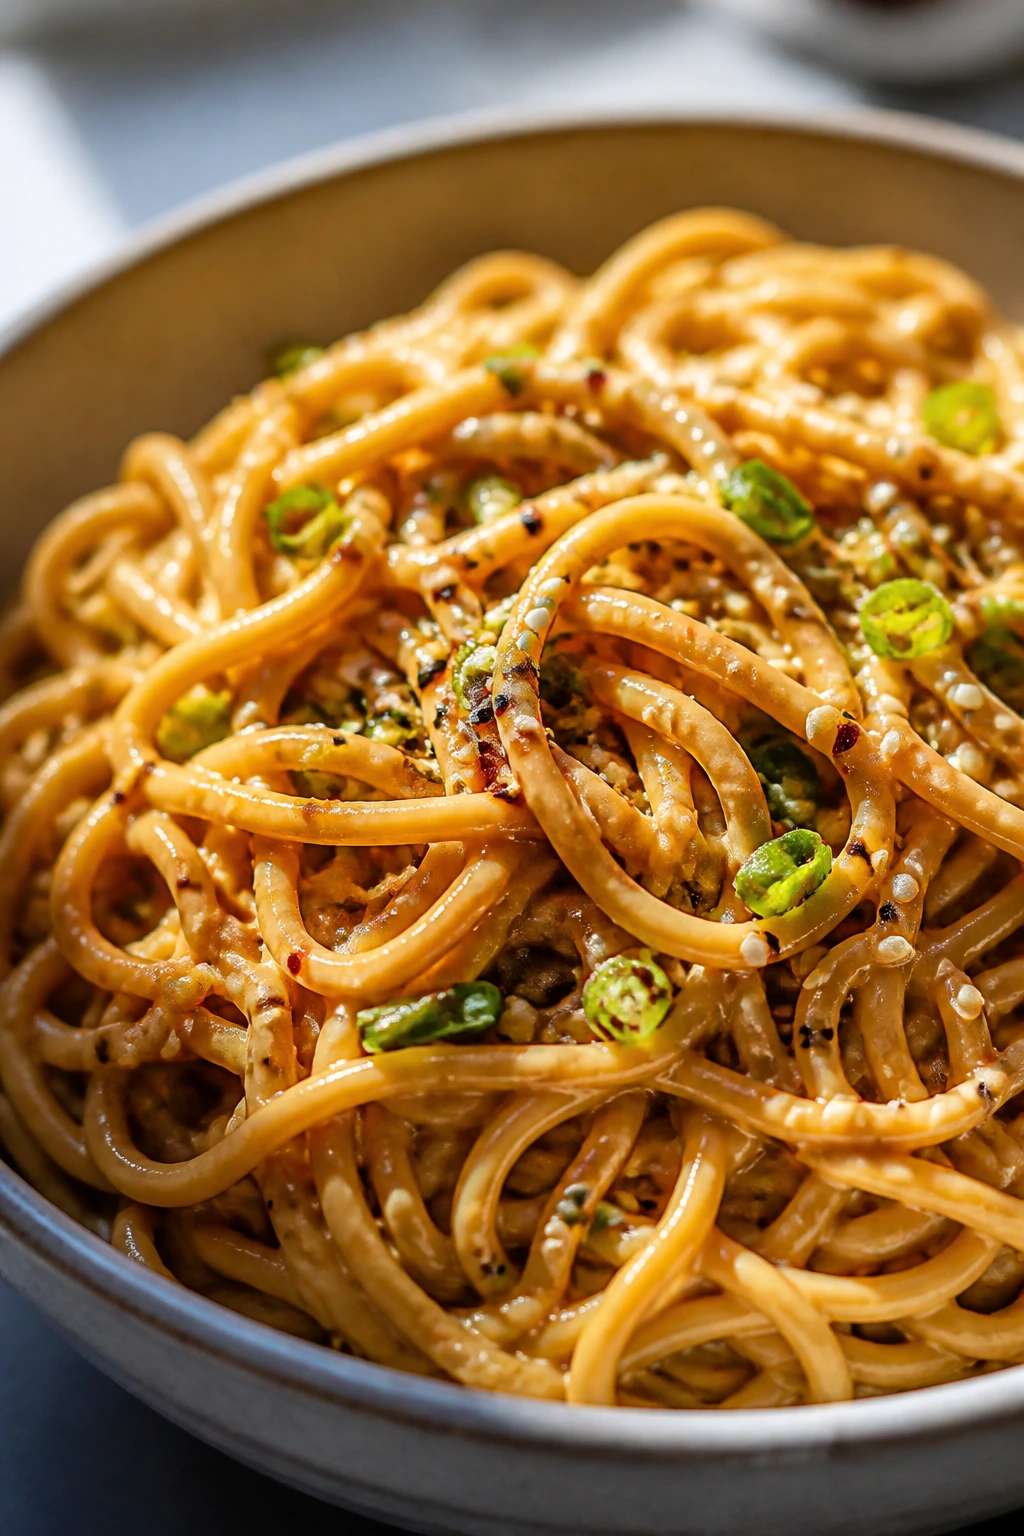
Peanut noodles are the sort of dinner that feels a little indulgent even though the shelf-stable parts are almost embarrassingly basic. Peanut butter, soy sauce, garlic, vinegar, and hot water turn into a glossy sauce that coats the noodles in seconds. It’s salty, nutty, faintly sweet, and easy to stretch with canned chickpeas or a handful of cabbage if you want more crunch.
Why it works: peanut butter already has fat and body, so it emulsifies into a sauce without much help. The hot water loosens it; the soy sauce brings salt; the vinegar cuts through the richness so the bowl doesn’t taste heavy. This is one of those recipes where adding the sauce slowly makes all the difference. Rush it, and you get clumps.
Key Ingredients:
- 12 ounces noodles or spaghetti
- 1/2 cup creamy peanut butter
- 3 tablespoons soy sauce
- 1 tablespoon rice vinegar or lemon juice
- 1 tablespoon brown sugar or honey
- 1 garlic clove, grated
- 1 teaspoon sesame oil
- 1/2 teaspoon red pepper flakes
- 1/3 to 1/2 cup hot water
- 1 cup canned chickpeas, drained, optional
- 1 cup shredded cabbage or carrots, optional
- Sesame seeds, for topping
Quick Steps:
- Cook the noodles in salted water until just tender, then reserve 1/2 cup of the cooking water and drain.
- In a bowl, whisk the peanut butter, soy sauce, vinegar, brown sugar, garlic, sesame oil, red pepper flakes, and 1/3 cup hot water until smooth.
- Taste the sauce. Add more hot water a tablespoon at a time until it pours easily and looks glossy.
- Toss the warm noodles with the sauce until coated. If using chickpeas or shredded vegetables, fold them in now.
- Let the noodles sit for 1 minute so the sauce clings to the pasta instead of pooling.
- Top with sesame seeds and a little extra chili if you want more heat.
Tips and Variations:
- If the sauce tightens up, add a splash of the reserved noodle water and toss again.
- Canned chickpeas make this much more filling without changing the flavor much.
- A spoonful of chili crisp gives the bowl a sharper, more restaurant-style edge.
10. Pasta e Ceci with Garlic and Parmesan
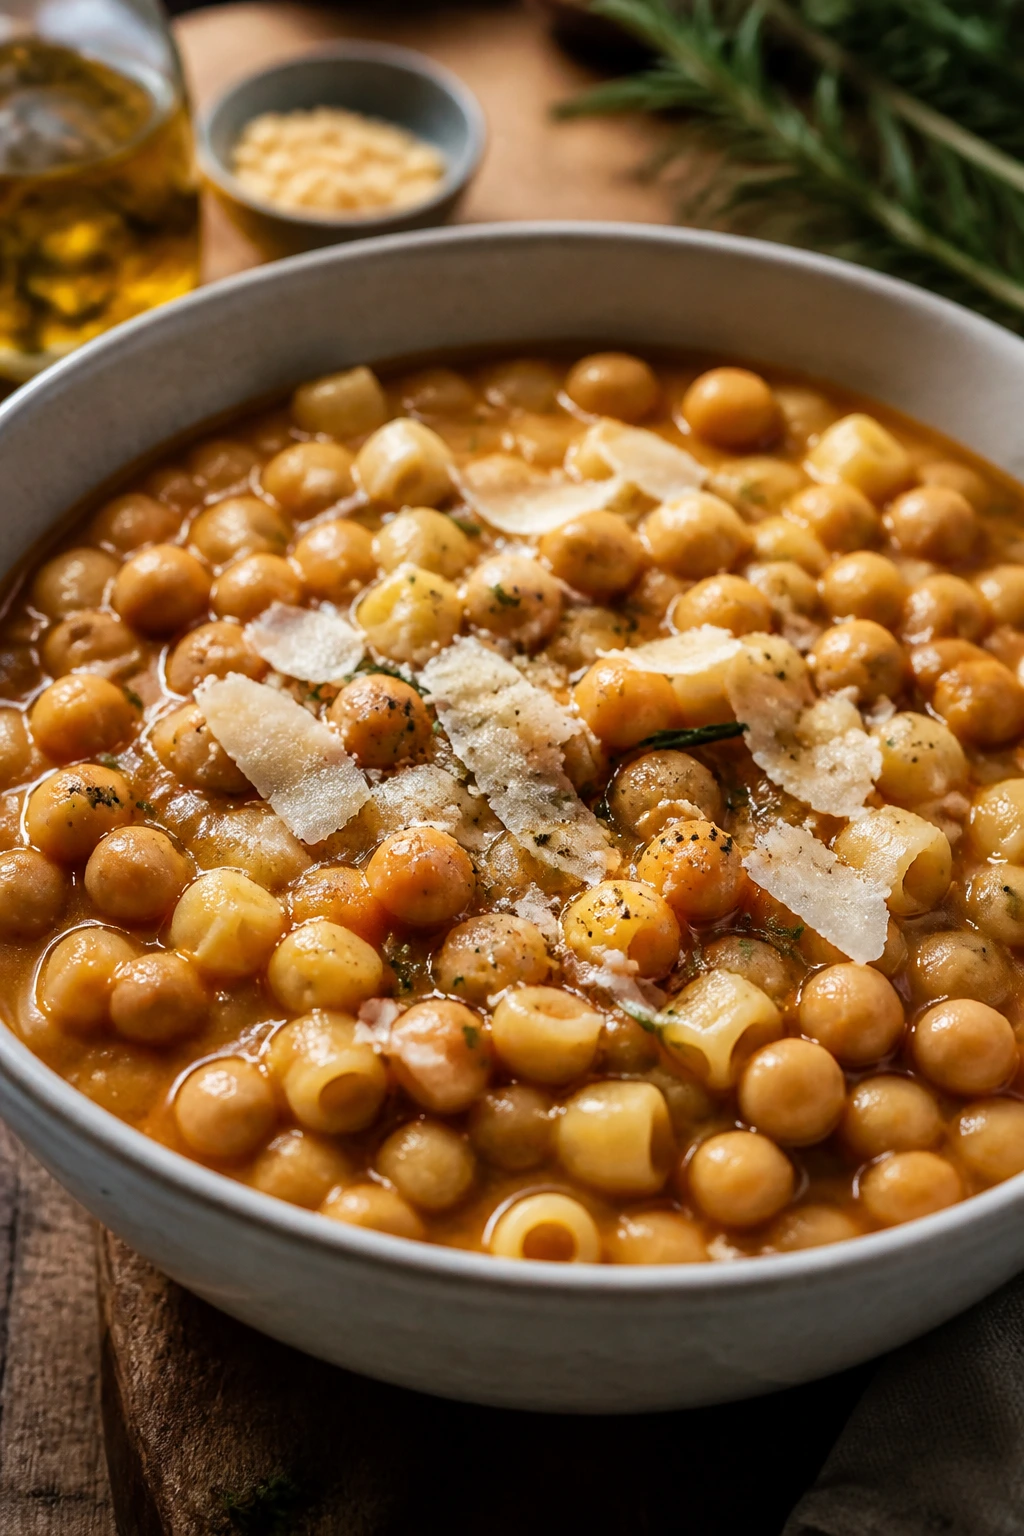
Pasta e ceci is a humble chickpea-and-pasta pot that earns a spot in the dinner rotation because it tastes like more than the sum of its parts. The broth thickens as the pasta cooks, some of the chickpeas break down, and the whole thing lands somewhere between soup and stew. It’s the sort of bowl that feels generous without asking for much back.
Why it works: chickpeas and small pasta both release starch, which naturally thickens the pot as it simmers. Tomato paste and rosemary give it shape, and Parmesan at the end makes the broth taste round instead of thin. The trick is not to overcook the pasta into mush. You want it tender but still holding its own.
Key Ingredients:
- 1/4 cup olive oil
- 1 medium onion, diced
- 3 garlic cloves, minced
- 2 tablespoons tomato paste
- 1 teaspoon dried rosemary
- 1 teaspoon dried oregano
- 2 (15-ounce) cans chickpeas, drained and rinsed
- 4 cups broth
- 8 ounces small pasta, such as ditalini or small shells
- 1 teaspoon kosher salt, plus more to taste
- Fresh black pepper
- Grated Parmesan, for serving
- Red pepper flakes, optional
Quick Steps:
- Heat the olive oil in a soup pot over medium heat. Add the onion and cook for 5 minutes, until soft.
- Stir in the garlic, tomato paste, rosemary, and oregano. Cook for 1 minute, letting the tomato paste darken a little.
- Add the chickpeas and broth. Bring to a gentle simmer and cook for 10 minutes.
- Stir in the pasta and salt. Simmer uncovered for 8 to 10 minutes, stirring often, until the pasta is tender and the broth has thickened.
- Mash a few chickpeas against the side of the pot if you want a creamier texture.
- Ladle into bowls and finish with black pepper, Parmesan, and red pepper flakes if you like heat.
Tips and Variations:
- Small shells, elbows, and ditalini all work well.
- If the pot gets too thick, loosen it with extra broth or hot water.
- A drizzle of olive oil right before serving makes the bowl taste richer.
11. Sardine Spaghetti with Lemon Breadcrumbs
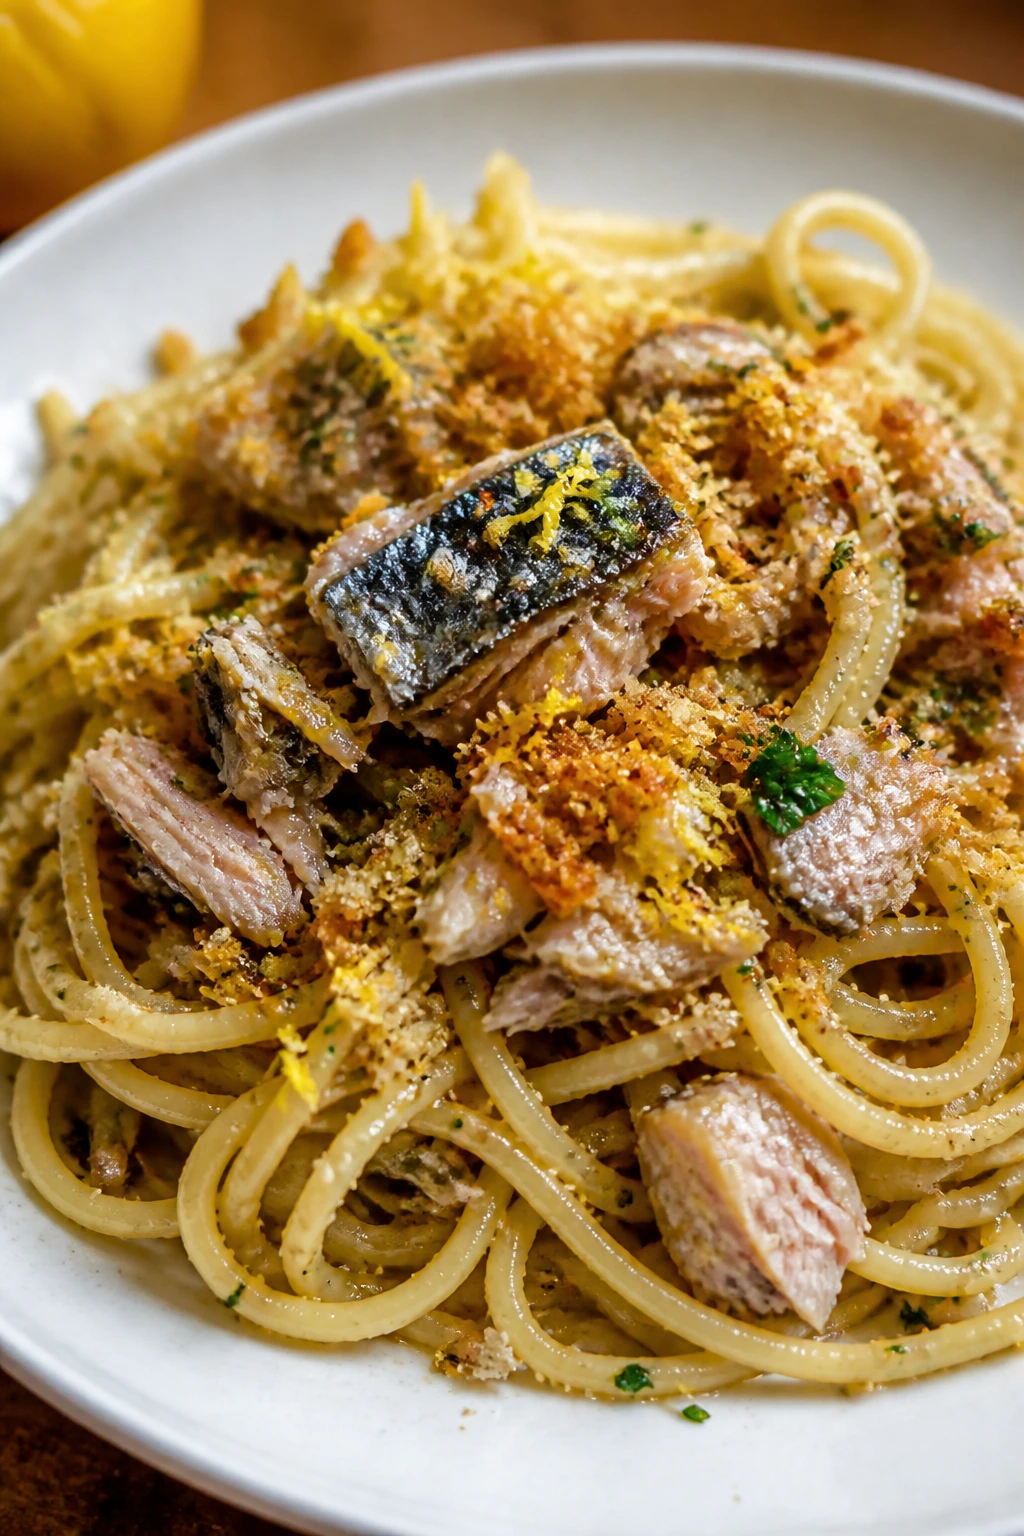
Sardines are one of those pantry ingredients people either already love or need one good recipe to warm up to. Spaghetti is a good place to start. The fish melts into garlic oil, lemon brightens the edges, and toasted breadcrumbs on top give you the crisp texture that sardine dishes often need. It’s salty, rich, and sharper than it sounds on paper.
Why it works: sardines bring built-in seasoning and healthy fat, which means they can carry a pasta dish without much else. The lemon cuts the richness, and the breadcrumbs keep the noodles from feeling too slick. If you’ve only ever had sardines on crackers, this is a better place to meet them.
Key Ingredients:
- 12 ounces spaghetti
- 2 tablespoons olive oil
- 1/2 cup breadcrumbs
- 1 can sardines in olive oil, drained lightly if very oily
- 3 garlic cloves, thinly sliced
- 1/2 teaspoon red pepper flakes
- 1 lemon, zested and juiced
- 2 tablespoons capers, optional
- 2 tablespoons chopped parsley
- Fresh black pepper
Quick Steps:
- Cook the spaghetti in salted water until al dente. Reserve 1 cup of the pasta water, then drain.
- Heat 1 tablespoon of the olive oil in a skillet over medium heat. Add the breadcrumbs and toast for 2 to 3 minutes, stirring often, until golden. Set aside.
- Add the remaining oil to the same skillet. Stir in the garlic and red pepper flakes and cook for 1 minute, until fragrant.
- Add the sardines and break them into large pieces with a spoon. Stir gently so they melt into the oil without disappearing completely.
- Add the lemon juice, lemon zest, capers if using, and 1/2 cup pasta water. Toss in the spaghetti and cook for 1 to 2 minutes, until coated and glossy.
- Serve with parsley, black pepper, and the toasted breadcrumbs.
Tips and Variations:
- Sardines packed in olive oil taste fuller than water-packed tins.
- If the sauce seems too bold, a small extra splash of pasta water softens it.
- White beans can stretch the dish if you want a larger, heavier dinner.
12. Bean and Cheese Burrito Skillet

This is what happens when you want the flavor of a burrito but not the time it takes to roll six separate ones. Beans, salsa, spices, and cheese get tucked into tortillas, then everything finishes together in one skillet so the edges crisp and the filling turns hot and stretchy. It’s messy in the best way, and it eats like a proper dinner.
Why it works: the skillet method lets the tortillas pick up flavor from the bean mixture while the cheese melts into the seams. Refried beans make the filling extra smooth, but mashed pinto beans work too. A little salsa adds moisture and acid, which keeps the whole pan from tasting like mashed starch and cheese.
Key Ingredients:
- 1 tablespoon neutral oil
- 1 small onion, diced
- 2 cups refried beans, or 2 (15-ounce) cans pinto beans, mashed
- 1 teaspoon ground cumin
- 1/2 teaspoon chili powder
- 1 cup salsa
- 1/2 cup water
- 6 flour tortillas
- 2 cups shredded cheese
- 1 cup cooked rice, optional
- Chopped cilantro, optional
Quick Steps:
- Heat the oil in a large skillet over medium heat. Add the onion and cook for 4 to 5 minutes, until softened.
- Stir in the beans, cumin, chili powder, salsa, and water. Cook for 2 to 3 minutes, until the mixture is spreadable and hot.
- Warm the tortillas briefly in a dry skillet or microwave so they bend without cracking.
- Spoon some bean mixture and cheese onto each tortilla. Add rice if using, then roll them up tightly.
- Arrange the burritos seam-side down in the skillet. Spoon any remaining bean mixture and cheese over the top.
- Cover and cook for 4 to 5 minutes over low heat, until the cheese melts and the tortillas are warmed through.
Tips and Variations:
- If you want more color, add canned corn or sliced jalapeños to the bean filling.
- Corn tortillas can work, but they’re more fragile and better folded into a layered skillet bake than rolled.
- This is a good one for cleaning out the last half cup of shredded cheese at the back of the fridge.
Why Pantry Staples Make Better Weeknight Food Than They Get Credit For
A pantry dinner works because it’s built around ingredients that already know how to behave. Pasta thickens sauce. Beans soften into a creamy base. Canned tomatoes bring acid and sweetness in one shot. Rice and tortillas give you something sturdy to carry the rest of the plate. That’s not a compromise. That’s a system.
I like pantry cooking most when it feels slightly improvised but not chaotic. A little oil, a hot pan, a can opener, and a salt shaker can do a surprising amount of work. You don’t need a crowded crisper drawer or a heroic trip to the store. You need a few dependable building blocks and the nerve to let them taste like themselves.
Essential Equipment for These Recipes
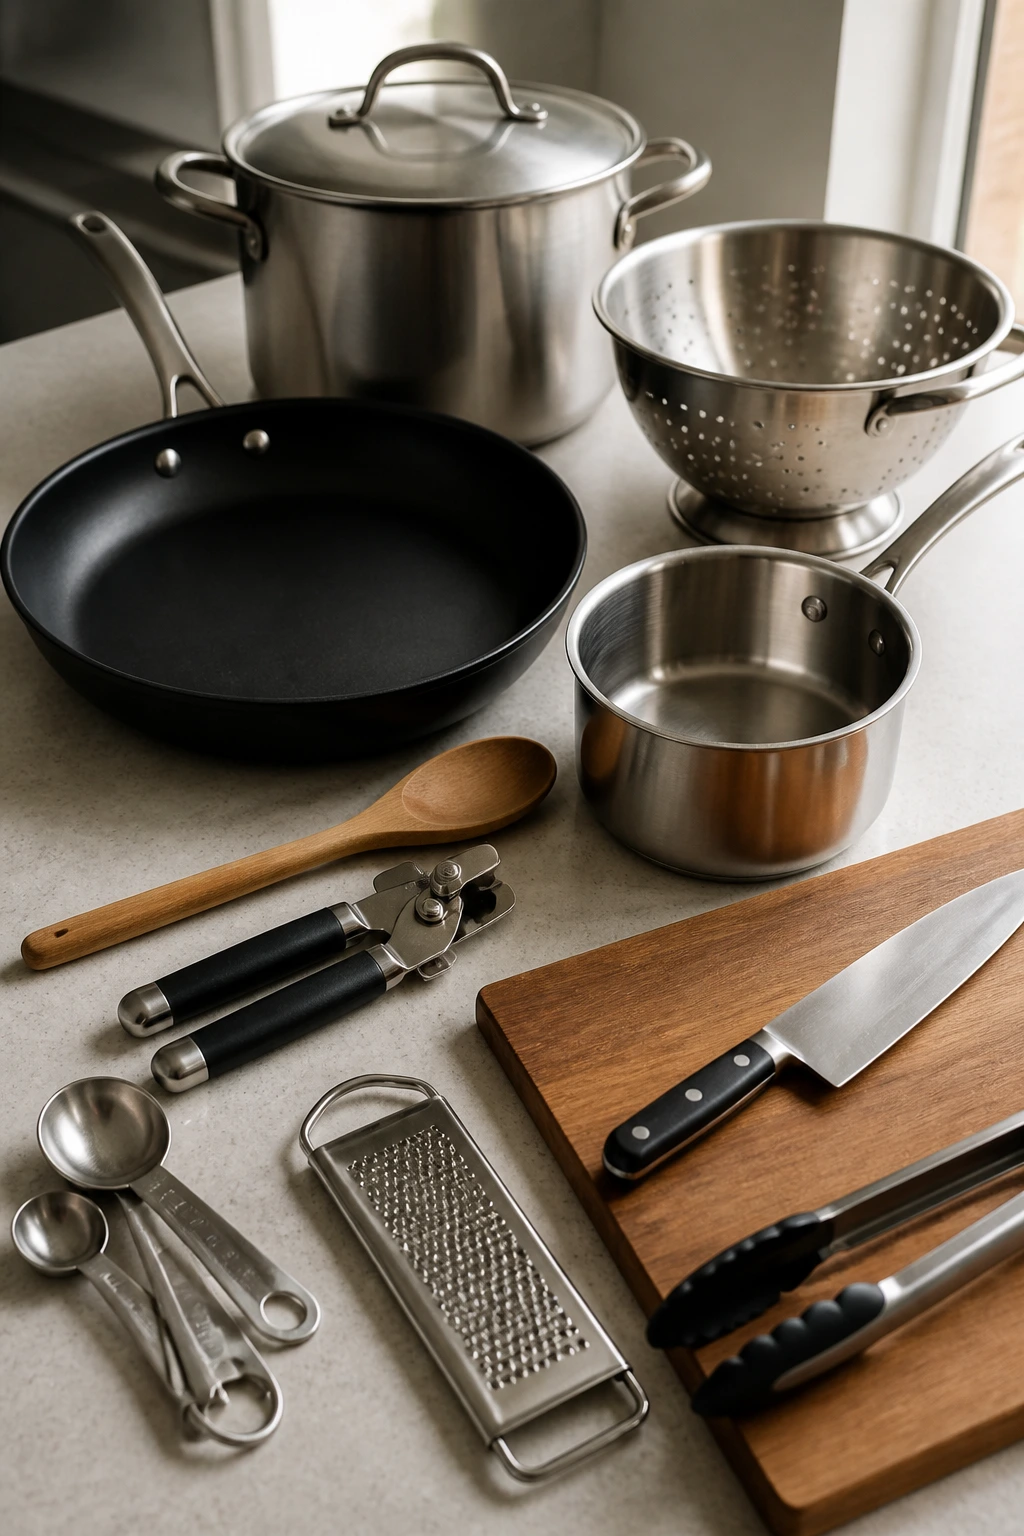
- Large skillet or sauté pan — Best for pasta sauces, shakshuka, quesadillas, fried rice, and any dish that needs quick evaporation.
- Medium saucepan or soup pot — Use this for curry, tomato soup, pasta e ceci, and anything that simmers for more than a few minutes.
- Lid that fits your skillet or pot — Shakshuka, curry, and burrito skillet meals need steam control.
- Colander — Makes pasta and rinsed beans easier to handle.
- Wooden spoon or heatproof spatula — Better than a whisk for breaking up beans, tuna, or rice without crushing everything.
- Can opener — Non-negotiable in pantry cooking.
- Measuring spoons and cups — Especially useful for spices, soy sauce, pasta water, and oil-heavy sauces.
- Chef’s knife and cutting board — Onion and garlic do the heavy lifting in most of these dishes.
- Fine grater or microplane — Handy for lemon zest, garlic, and Parmesan.
- Tongs — Best for tossing hot pasta with sauce without tearing the noodles.
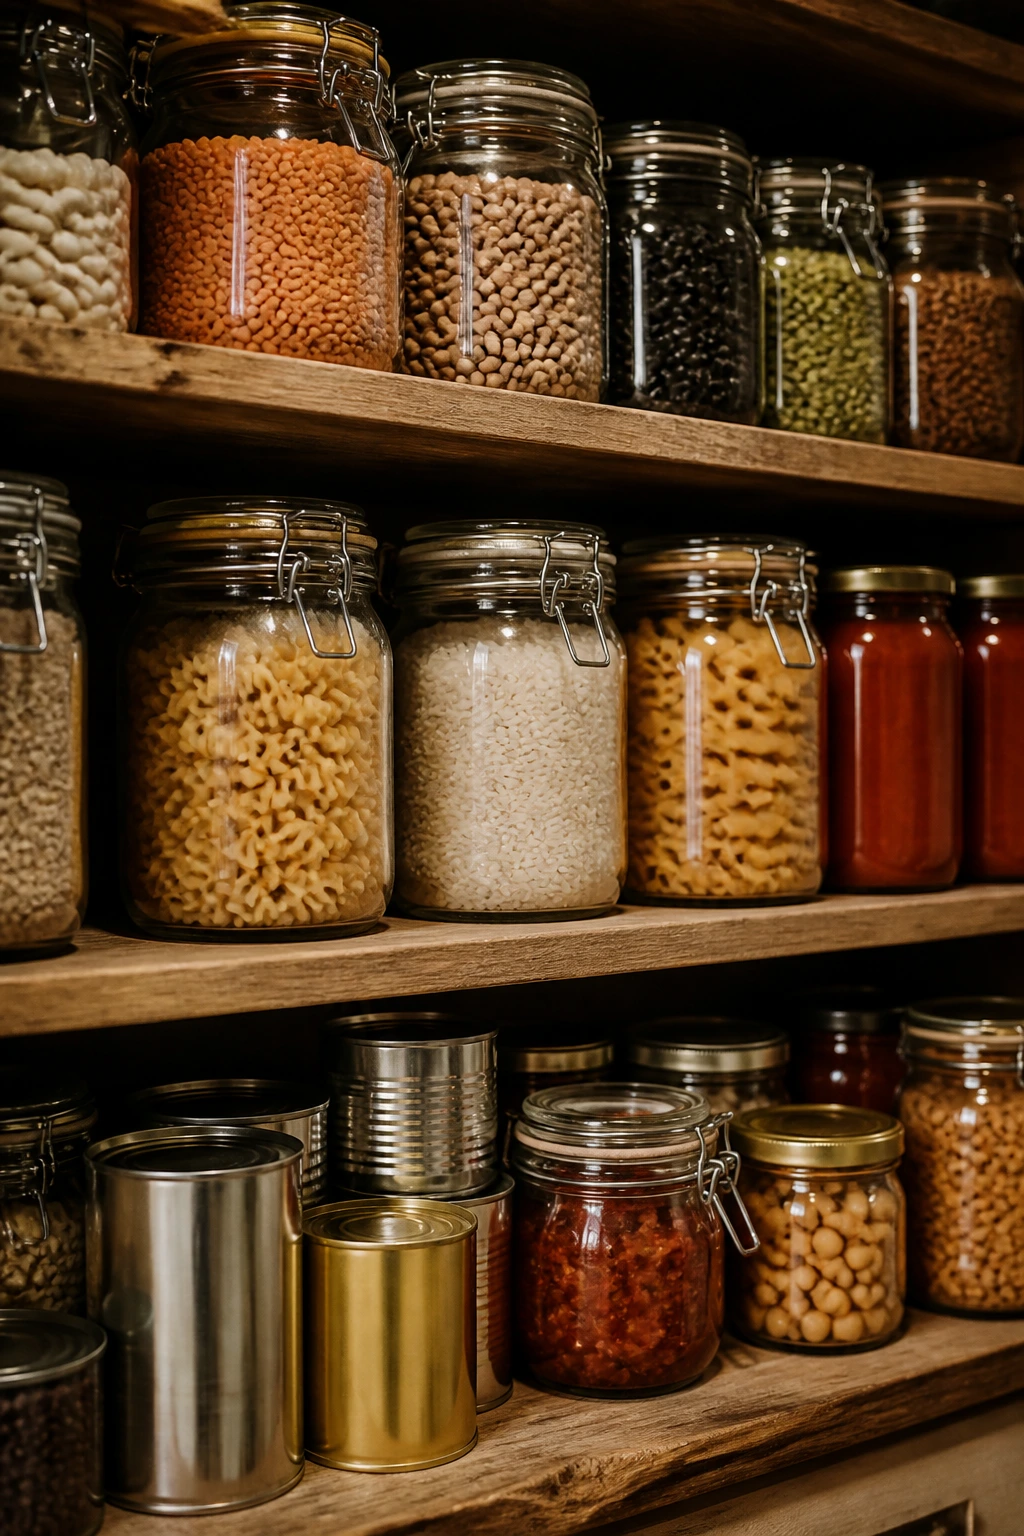
Smart Shopping and Ingredient Tips

A pantry dinner lives or dies on the quality of what’s already sitting on the shelf. Pick canned tomatoes that taste like tomatoes, not sugar water. The ingredient label should be short: tomatoes, maybe salt, maybe citric acid. Whole peeled tomatoes are the most flexible because you can crush them by hand, but crushed tomatoes save time and work beautifully in soups and curries.
Beans deserve a quick inspection too. Low-sodium cans are easier to season from scratch, and rinsing them under cold water removes some of the tinny liquid that can muddy a sauce. Chickpeas hold their shape well in skillet dishes. White beans go soft and creamy. Black beans taste fuller in quesadillas and burritos.
For pasta, shape matters more than people think. Spaghetti likes oil-based sauces. Short pasta grabs tuna, beans, and chunky tomato sauce. Small shapes like ditalini or elbows make soup feel complete. Rice is the same way: long-grain rice stays separate for fried rice, while jasmine gives curry a fragrant base. Brown rice works, but it needs more time and more liquid.
Canned fish is worth buying with intention. Tuna packed in olive oil tastes richer and softer. Sardines in olive oil give you better texture and less of that sharp canned edge. If you keep peanut butter in the pantry, buy one that tastes like peanuts first and sugar second. Coconut milk should be full-fat for curry. Thin coconut beverage won’t do the same job.
And check the cans. Dented on the seam, bulging, rusty, leaking, or puffed? Toss it. Shelf-stable food still needs to be safe shelf-stable food.
Make-Ahead, Storage, and Reheating Guidance
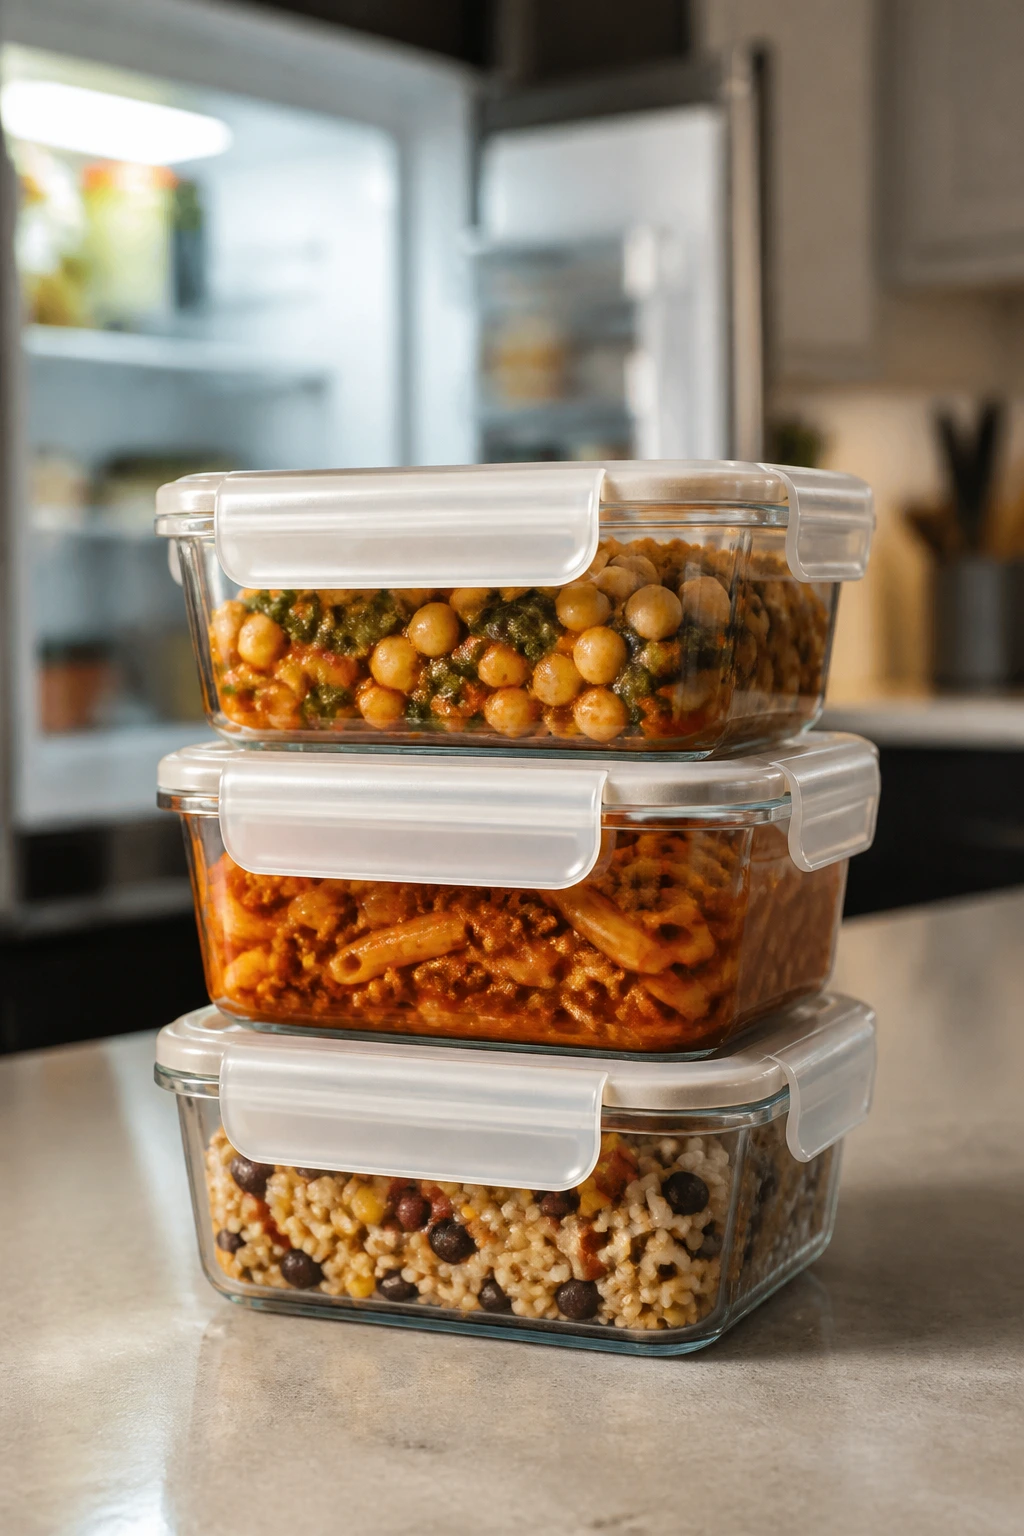
Most of these dinners hold up well for 3 to 4 days in the refrigerator when cooled promptly and stored in shallow containers. Soups, curries, chickpea tomato skillet meals, and pasta e ceci are the best keepers because their sauces protect the starch and beans from drying out. Fried rice also keeps well for 3 to 4 days, though it should be reheated until steaming hot and eaten without a lot of delay.
Pasta dishes with oil-based sauces, like spaghetti aglio e olio, tuna pasta, and sardine spaghetti, are best within 2 days. They’ll still be safe after that if stored properly, but the texture starts to slide. To reheat, add a splash of water to loosen the sauce, cover the pan, and warm gently over low heat. A squeeze of lemon at the end makes the leftovers taste freshly made again.
Rice-based meals should cool quickly, which matters for food safety. Spread rice in a shallow container so steam escapes, then refrigerate within 2 hours. Fried rice reheats well in a skillet with a teaspoon of oil; that keeps the grains from turning sticky. Shakshuka sauce can be made 2 days ahead and reheated before you add the eggs. I wouldn’t freeze the eggs themselves. Make the sauce, freeze that, then poach fresh eggs in it when you want to eat.
Quesadillas and burrito-style dinners are best assembled and crisped fresh. You can make the bean filling up to 3 days ahead, and it freezes well for about 2 months. Tortillas don’t love the freezer nearly as much as fillings do, so freeze the components separately whenever you can. Soup and curry can be frozen for up to 3 months if you leave a little room in the container for expansion.
Variations and Adaptations to Try

Gluten-Free Pantry Night
Use gluten-free pasta in the noodle dishes, rice instead of bread, corn tortillas instead of flour tortillas, and tamari in place of soy sauce. The recipes that lean on beans, tomatoes, eggs, or curry adapt cleanly without losing much personality.
Dairy-Free Without Losing Richness
Skip Parmesan and use a little extra olive oil, lemon, or nutritional yeast where you want a savory finish. Coconut milk, tahini, and mashed beans already bring plenty of body, so you don’t need cream to make the food feel full.
Higher-Protein Pantry Swap
Add an extra can of beans, a couple of eggs, or a tin of fish to almost any of these meals. Tuna pasta, fried rice, shakshuka, and bean skillet dinners take those additions well and don’t get heavy if you keep the seasoning sharp.
Lower-Sodium Version
Choose low-sodium beans, broth, and tomatoes when you can, then rinse canned legumes before cooking. Build flavor with garlic, lemon juice, vinegar, capers, and spices instead of leaning on salt alone. The food ends up brighter anyway.
Spice-Forward Pantry Night
Add chili crisp, harissa, extra red pepper flakes, or a spoonful of canned chipotle in adobo to the tomato-based dishes. A little heat gives pantry food more personality, especially when you’re using mild ingredients like rice, beans, and pasta.
Common Mistakes to Avoid
The biggest mistake is underseasoning canned food and stopping there. Canned beans, tomatoes, tuna, and sardines are convenient, not finished. They need salt, fat, and often a little acid to taste alive. If a dish seems flat at the end, it usually needs lemon, vinegar, chili, or a little more salt, not another random ingredient.
Burning garlic is another classic problem. Garlic goes bitter fast, especially in olive oil. Keep the heat at medium or lower when you’re working with it, and add liquid soon after it smells sweet. If the garlic turns brown before the rest of the dish is ready, pull the pan off the heat and start over if needed. Bitter garlic can drag down the whole meal.
People also rinse away useful starch or skip it entirely. Pasta water helps sauces cling. Rice that’s too wet refuses to fry. Beans that haven’t been drained can make a skillet watery. Every one of these recipes depends on texture, and texture disappears fast when the pan gets flooded.
Then there’s the habit of treating every pantry meal like it needs to be gigantic. It doesn’t. Good pantry cooking is often about choosing 4 or 5 ingredients and letting them be enough. Add what the dish needs, not what the cupboard is daring you to throw in.
Frequently Asked Questions

Can I make these dinners without fresh produce?
Yes. Onion and garlic help, but they’re not mandatory in every recipe. Dried onion, garlic powder, lemon juice, vinegar, capers, salsa, and canned tomatoes can supply a surprising amount of flavor when fresh vegetables aren’t around.
What pantry staples should I keep on hand if I want more dinner options?
I’d keep pasta, rice, canned beans, canned tomatoes, tuna or sardines, broth or bouillon, tortillas, peanut butter, coconut milk, soy sauce, and a few spices like cumin, paprika, curry powder, and chili flakes. That group covers a lot of fast meals.
Which recipes in this roundup freeze best?
The chickpea tomato skillet, coconut red lentil curry, white bean tomato soup, and pasta e ceci all freeze well for up to 3 months. Burrito filling also freezes well. Oil-based pasta dishes and fried rice are better fresh or refrigerated for short stretches.
Can I swap dried beans for canned beans?
You can, but not if you need dinner in a hurry. Dried beans need soaking and a longer cook, while canned beans are ready in minutes. For last-minute cooking, canned is the smarter choice every time.
How do I keep pantry meals from tasting bland?
Season in layers. Salt the onions, bloom the spices in oil, and finish with something sharp like lemon, vinegar, capers, salsa, or chili. That one-two-three pattern gives shelf-stable ingredients a cleaner, brighter taste.
What’s the easiest dinner if I have almost nothing in the kitchen?
Spaghetti aglio e olio is hard to beat if you have pasta, garlic, and olive oil. If you’ve got rice and eggs instead, fried rice is the next best rescue. Both are fast, cheap, and forgiving.
Can I make these in one pot or one skillet only?
Most of them already are one-pot or one-skillet meals. The curry, soup, shakshuka, chickpea skillet, and burrito skillet are especially good if you want to keep cleanup low. For the pasta dishes, one extra pot for boiling water is the only real exception.
The Pantry Has Range
A stocked shelf does not have to mean dull food. Pasta, beans, rice, tomatoes, tuna, lentils, tortillas, peanut butter, and a few spices can turn into dinners with salt, crunch, heat, creaminess, and enough brightness to make them worth repeating. That’s the whole appeal of pantry cooking: the ingredients are ordinary, but the finished plate doesn’t have to be.
Keep a few reliable staples in rotation and the next empty-fridge evening gets much less dramatic. One can, one pan, a little attention, and dinner shows up anyway.