
A nearly empty baking shelf can still turn out something charming. That’s the part people forget about pantry staples: they’re not backup ingredients. They’re the whole story when you want dessert without a grocery run, a special-occasion look without special-occasion effort, and something small enough to feel playful instead of heavy.
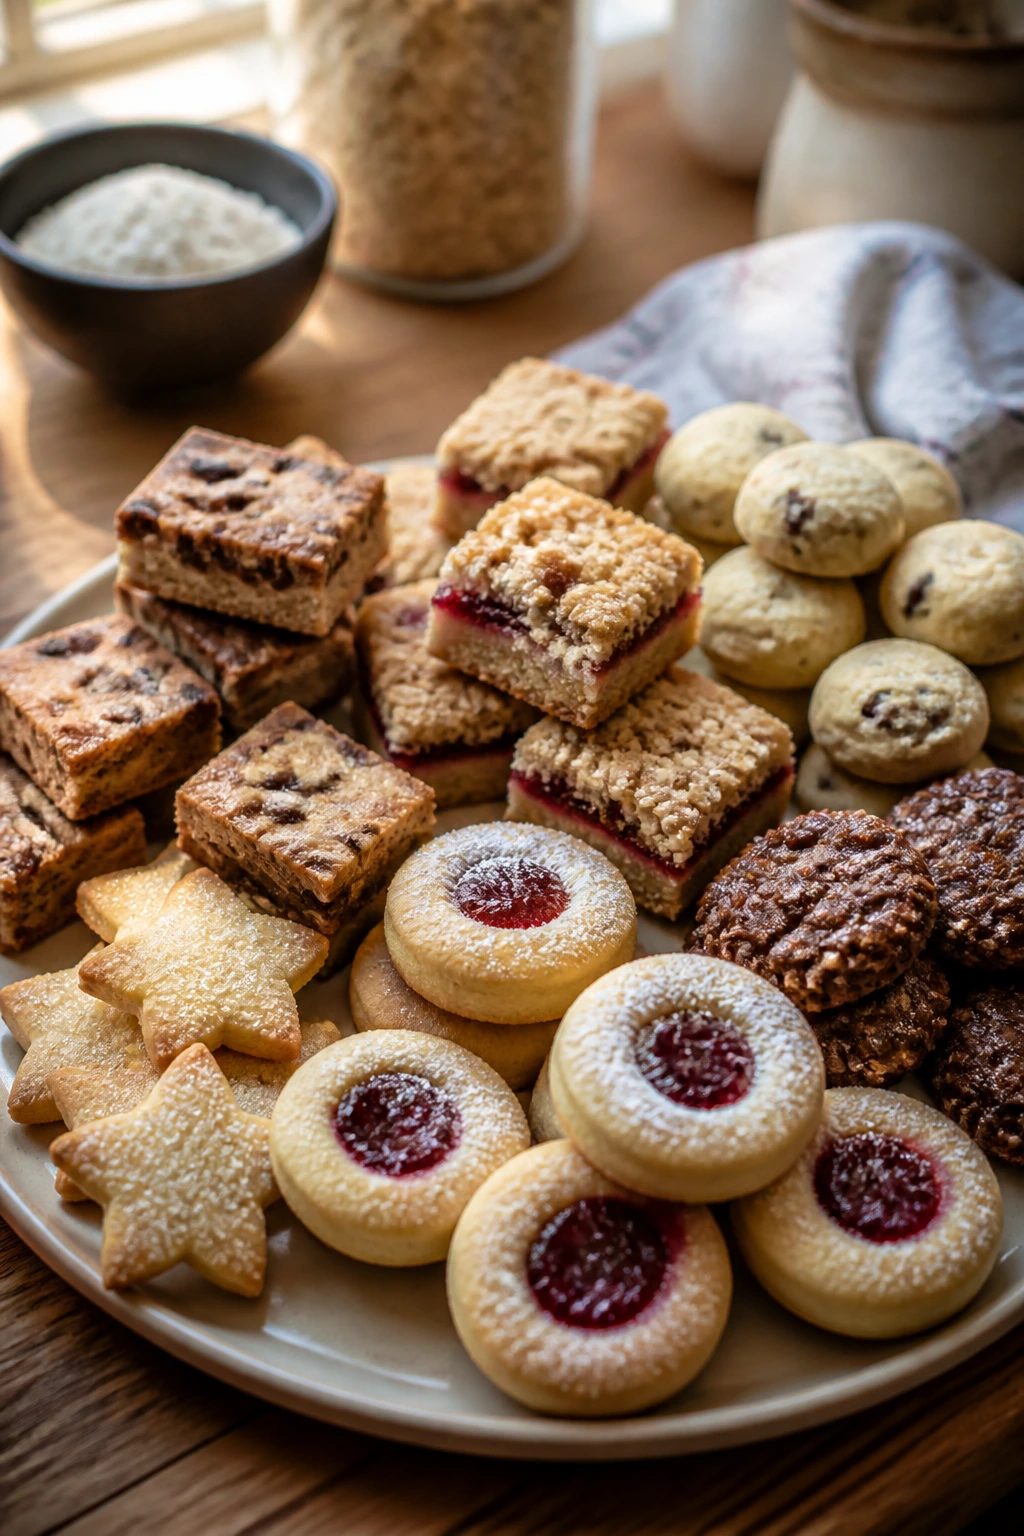
A jar of jam, a bag of cocoa, a box of oats, a can of sweetened condensed milk, a little peanut butter, a handful of sugar — those ordinary things can become cookies with glossy centers, tiny brownies baked in a mini muffin tin, fudgy hearts, pudding cups, and crisp little treats that look like they came from a much more ambitious kitchen. The trick is not fancy shopping. It’s shape, texture, and a few sharp little details that make plain ingredients look deliberate.
I’ve always liked desserts that behave well from the pantry out. They’re the ones that forgive a slightly soft stick of butter, a jam jar with one stubborn spoonful left, or a half-bag of powdered sugar. And when they’re cute, they feel even better: smaller portions, prettier edges, a little drizzle here, a powdered-sugar crackle there. Little things. They matter.
Why You’ll Love This Collection
- Mostly Shelf-Stable: Most of these desserts rely on flour, sugar, cocoa, oats, peanut butter, jam, and canned or boxed staples you can keep on hand for weeks.
- Small and Charming: Mini muffin tin bakes, cookie-cutter shapes, and bite-size bars give you that cute, finished look without extra decorating tools.
- Flexible Flavor: The same pantry basics swing sweet in different directions — chocolate, cinnamon, peanut butter, coconut, butterscotch, and jam all show up here.
- Low-Stress Baking: Several recipes are no-bake or microwave-fast, which means you can get dessert on the table without babysitting the oven.
- Budget-Smart: These recipes lean on ingredients that usually stretch across more than one bake, so you’re not buying a specialty item for a single tray.
- Easy to Dress Up: A dusting of powdered sugar, a chocolate drizzle, or a few sprinkles changes the look fast, which is half the charm of cute desserts.
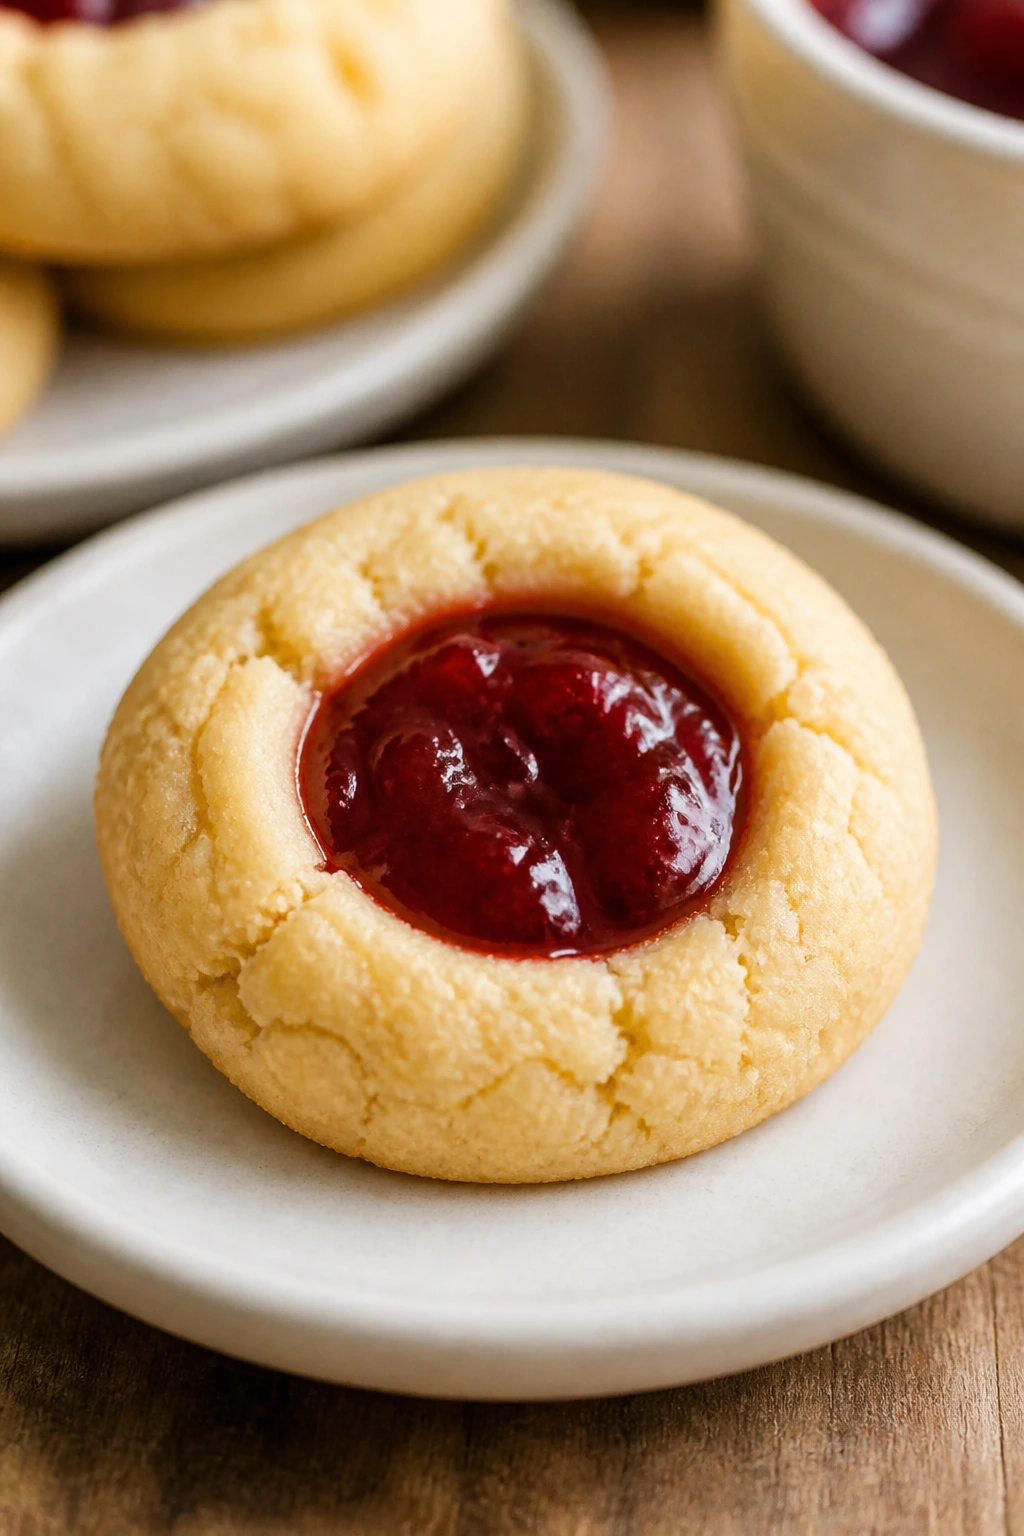
1. Jam Thumbprint Cookies with Glossy Centers
The first batch that comes out of the oven is all edges and jewel-box middles. Thumbprint cookies have that old-fashioned bakery feel, but the version made from pantry staples is the one I trust most: simple butter dough, a spoonful of jam, and a short bake that leaves the centers soft and shiny. Raspberry is classic, apricot is gentler, and blackberry turns the whole tray a little deeper and darker.
Why It Works:
Butter and sugar make a dough that bakes up tender instead of cakey, while the egg yolk keeps the crumb rich without turning it eggy. The jam goes in before baking, which helps it settle into the cookie instead of sitting on top like an afterthought. A 12- to 14-minute bake is enough; if you push these too far, the edges go dry and the jam loses that fresh, glossy look.
Key Ingredients:
- 1 cup (2 sticks) unsalted butter, softened to room temperature
- 2/3 cup granulated sugar
- 1 large egg yolk
- 2 teaspoons vanilla extract
- 2 cups all-purpose flour
- 1/4 teaspoon fine salt
- 1/2 cup seedless raspberry, apricot, or blackberry jam, stirred smooth
- 2 tablespoons finely chopped toasted almonds or pecans, optional for a little crunch
Quick Steps:
- Preheat and prep: Heat the oven to 350°F (175°C) and line two baking sheets with parchment paper.
- Cream the base: Beat the butter and sugar together for 2 to 3 minutes, until pale and fluffy around the edges of the bowl.
- Finish the dough: Mix in the egg yolk and vanilla, then add the flour and salt on low speed just until the dough comes together. Stop as soon as the flour disappears.
- Shape the cookies: Scoop 1 tablespoon of dough at a time, roll into smooth balls, and arrange them 2 inches apart.
- Make the wells: Press your thumb or the back of a teaspoon into the center of each cookie, making a deep, neat indentation.
- Fill and bake: Spoon about 1/2 teaspoon jam into each well, then bake for 12 to 14 minutes, until the edges are set and just barely golden.
- Cool properly: Leave the cookies on the sheet for 10 minutes before moving them to a rack. The jam sets as they cool, and that pause keeps the centers from sliding out.
Equipment for This Recipe:
- Stand mixer or hand mixer
- 2 baking sheets
- Parchment paper
- Small spoon or teaspoon for the jam wells
- Wire rack
How to Serve This Dish:
Pile these on a small plate with the jam side facing up; the shine does most of the work. They sit well next to tea, coffee, or a scoop of vanilla ice cream if you’re turning them into a plated dessert. A dusting of powdered sugar works, but I like them plain — the jam color already does the decorating.
Pro Tips for This Recipe:
- Use a jam that’s thick and smooth. Thin jelly runs and puddles.
- If the dough feels soft, chill it for 20 minutes before shaping. The cookies hold their little thumb wells better.
- Make the wells before baking, not after. Once the cookies puff, pressing them will crack the sides.
- Stir the jam first so it spreads cleanly and doesn’t leave hard fruit lumps in the center.
Variations on This Dish:
- Almond Orchard Thumbprints: Add 1/2 teaspoon almond extract to the dough and use apricot jam for a sharper, nuttier finish.
- Chocolate Center Thumbprints: Swap the jam for 1/2 cup chocolate hazelnut spread and bake 1 minute less.
- Citrus Jam Version: Use orange marmalade for a bright, slightly bitter center that cuts the butter nicely.
Common Mistakes to Avoid with This Dish:
- Don’t overfill the centers. Too much jam bubbles over and glues the cookies to the parchment.
- Don’t skip the cool-down on the sheet. Hot thumbprints are fragile and can collapse if you move them too soon.
- Don’t bake until deeply golden. These should stay pale at the center for the soft, shortbread-like texture that makes them worth eating.
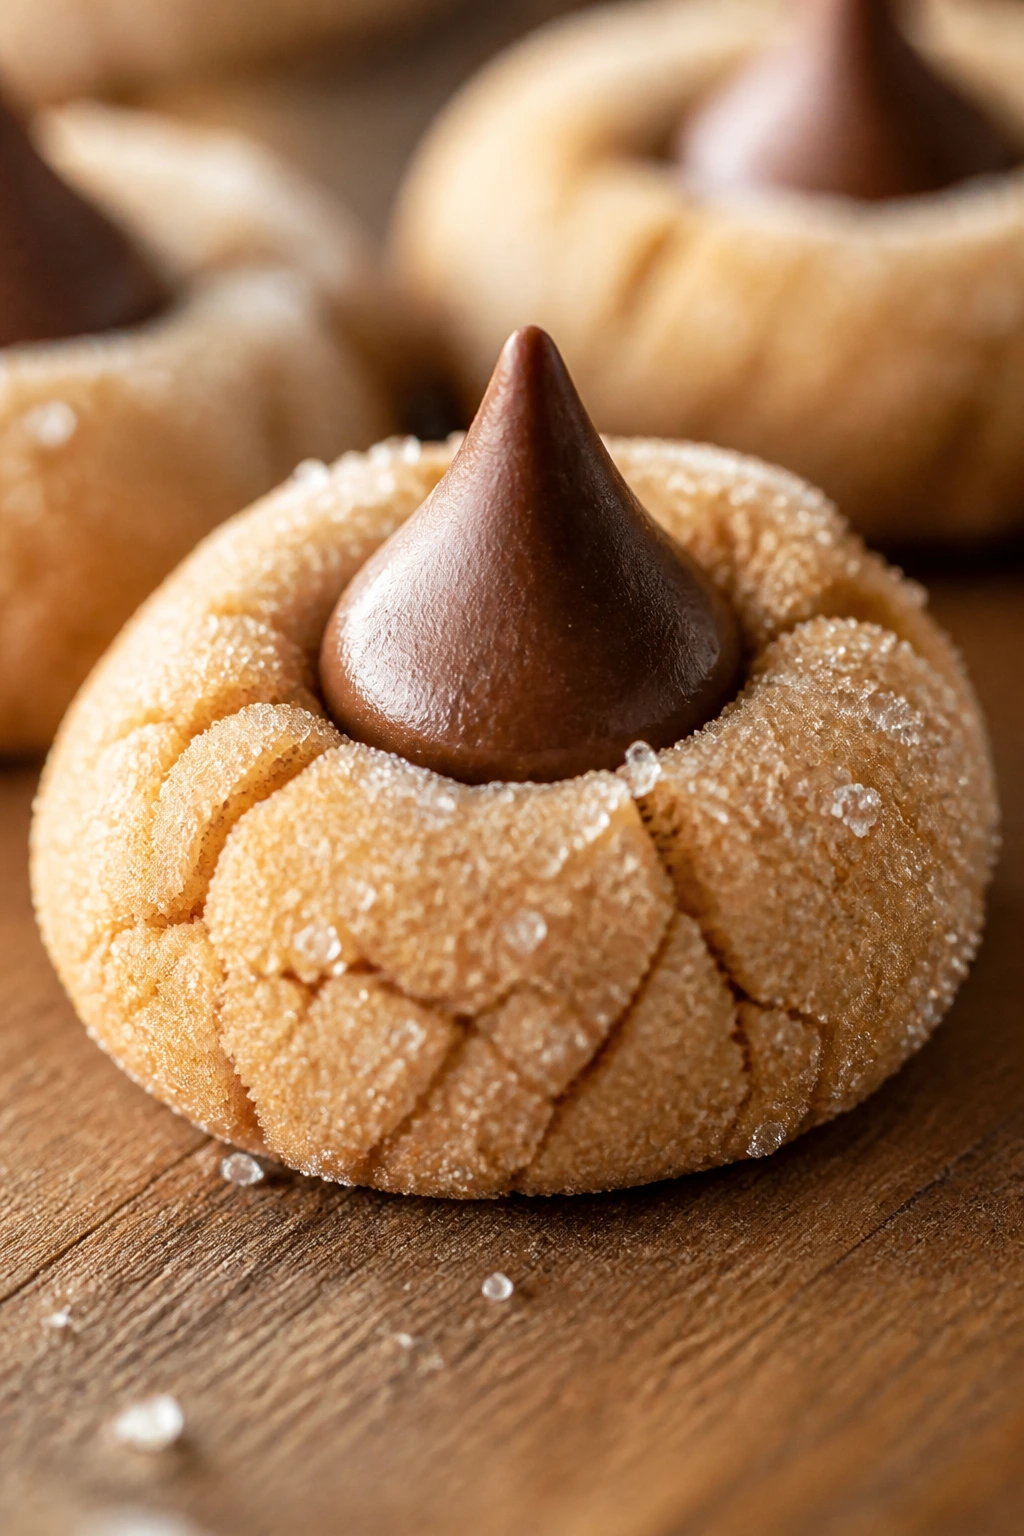
2. Peanut Butter Blossoms with Sugar-Coated Tops
There’s a reason these disappear fastest from a cookie tray. The sugar-coated shell cracks as you bite through it, and the chocolate kiss sinks into the center just enough to look neat without feeling fussy. They’re friendly, familiar, and somehow still a little bit dressed up, which is exactly the kind of thing pantry desserts should be.
Why It Works:
Peanut butter gives the dough structure and a salty, roasted flavor that keeps the cookie from tasting flat. Brown sugar adds moisture, while the white sugar coating gives the outside a delicate crunch. Pressing the chocolate kiss in right after baking matters; if you wait, the cookie firms up and the candy won’t settle cleanly into the center.
Key Ingredients:
- 1/2 cup unsalted butter, softened
- 1/2 cup creamy peanut butter
- 1/2 cup granulated sugar
- 1/2 cup packed light brown sugar
- 1 large egg
- 1 teaspoon vanilla extract
- 1 1/2 cups all-purpose flour
- 1 teaspoon baking soda
- 1/2 teaspoon fine salt
- 1/4 cup granulated sugar, for rolling
- 24 chocolate kisses, unwrapped
Quick Steps:
- Preheat and line: Heat the oven to 375°F (190°C) and line two baking sheets with parchment.
- Build the dough: Beat the butter, peanut butter, granulated sugar, and brown sugar together until smooth and slightly lighter in color.
- Add the wet ingredients: Mix in the egg and vanilla, scraping the bowl so no streaks of butter are left behind.
- Finish with dry ingredients: Add the flour, baking soda, and salt, then mix just until the dough is even. Do not overwork it or the cookies bake up dense.
- Roll and coat: Shape the dough into 1-inch balls, roll each one in the extra granulated sugar, and place them on the sheet 2 inches apart.
- Bake: Bake for 8 to 10 minutes, until the tops look set and the cookies have a matte finish.
- Add the kisses: Press one chocolate kiss into the center of each cookie the second they come out of the oven. Cool on the sheet until the chocolate firms up.
Equipment for This Recipe:
- Hand mixer or stand mixer
- Baking sheets
- Parchment paper
- Small bowl for rolling sugar
- Cooling rack
How to Serve This Dish:
These look best stacked in a shallow bowl or on a cake stand, where the chocolate peaks can catch a little light. They’re the cookie I’d put beside cold milk, but they also work with coffee because the peanut butter softens the bitterness. If you want a cleaner finish, let the chocolate set fully before moving them.
Pro Tips for This Recipe:
- Use creamy peanut butter, not the kind that separates. The dough needs a steady fat content to hold its shape.
- If the dough feels oily, chill it for 15 minutes before rolling.
- Unwrap the chocolate kisses before baking starts. Sounds obvious. Saves the whole rhythm.
- Pull the cookies slightly early; the centers finish firming on the sheet.
Variations on This Dish:
- Dark Chocolate Blossom: Use dark chocolate kisses or a dark chocolate square for a less sweet center.
- Crunchy Peanut Version: Roll the dough balls in finely chopped peanuts instead of plain sugar for extra texture.
- Mini Blossom Bites: Make the dough into 3/4-inch balls and use mini chocolate kisses for a smaller, more snackable cookie.
Common Mistakes to Avoid with This Dish:
- Don’t overbake the dough before adding the chocolate. The cookies should still be soft enough to receive the kiss without cracking.
- Don’t press the candy in too hard. You want it seated, not buried.
- Don’t use natural peanut butter that’s loose and oily unless you’ve mixed it very well. The dough can spread more than you want.
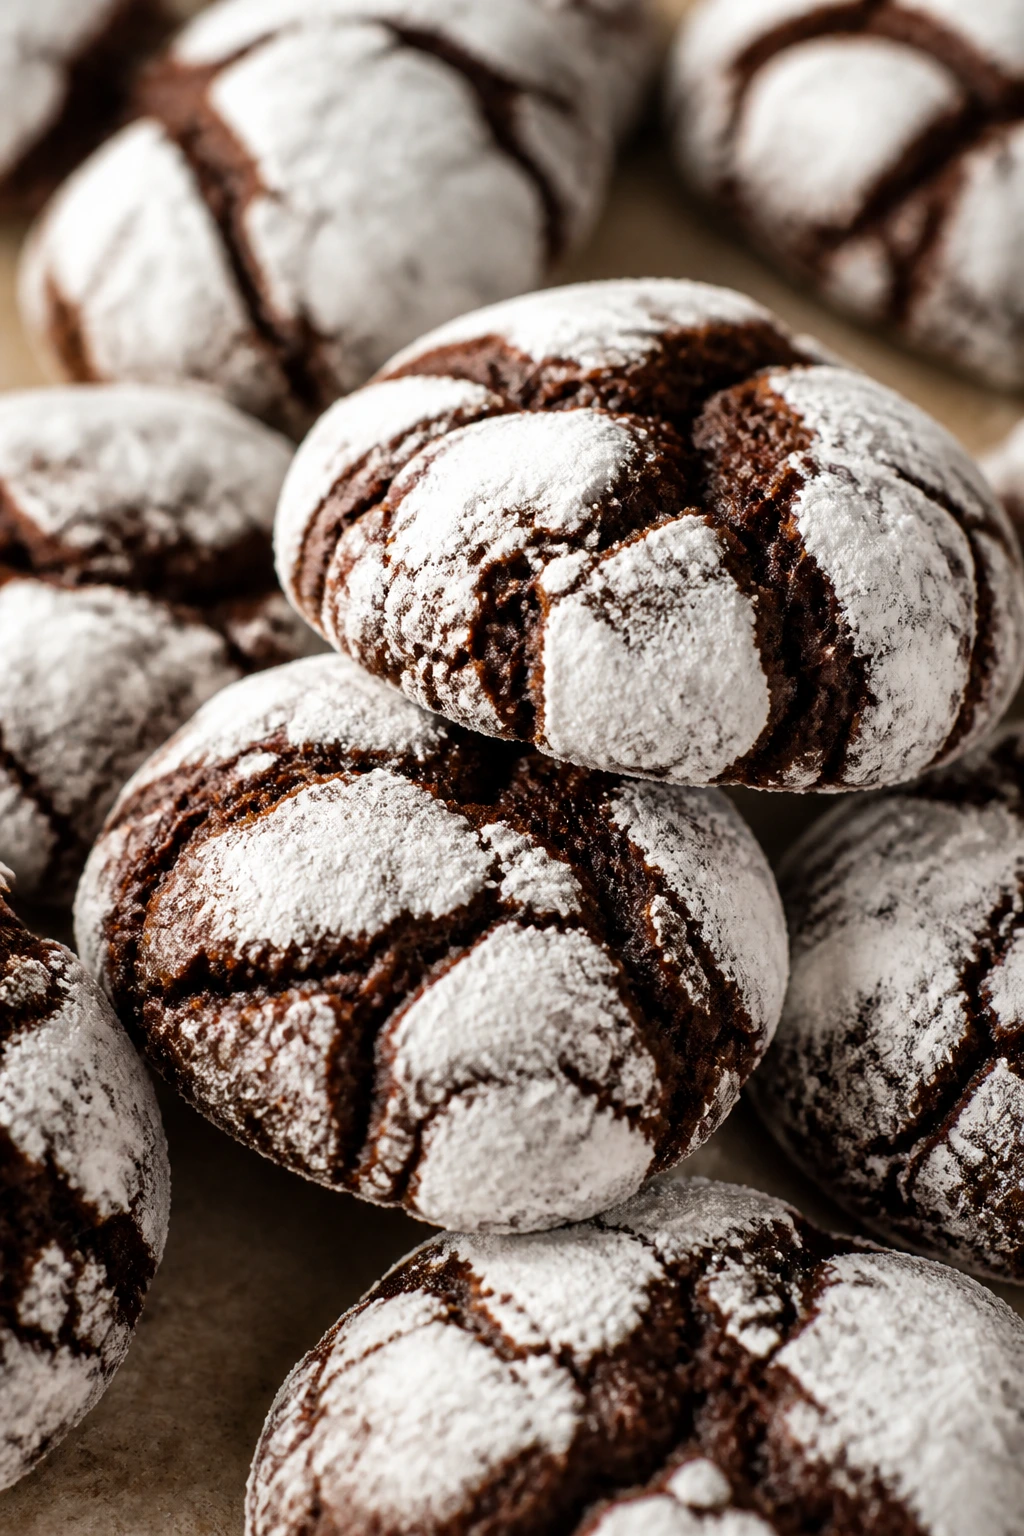
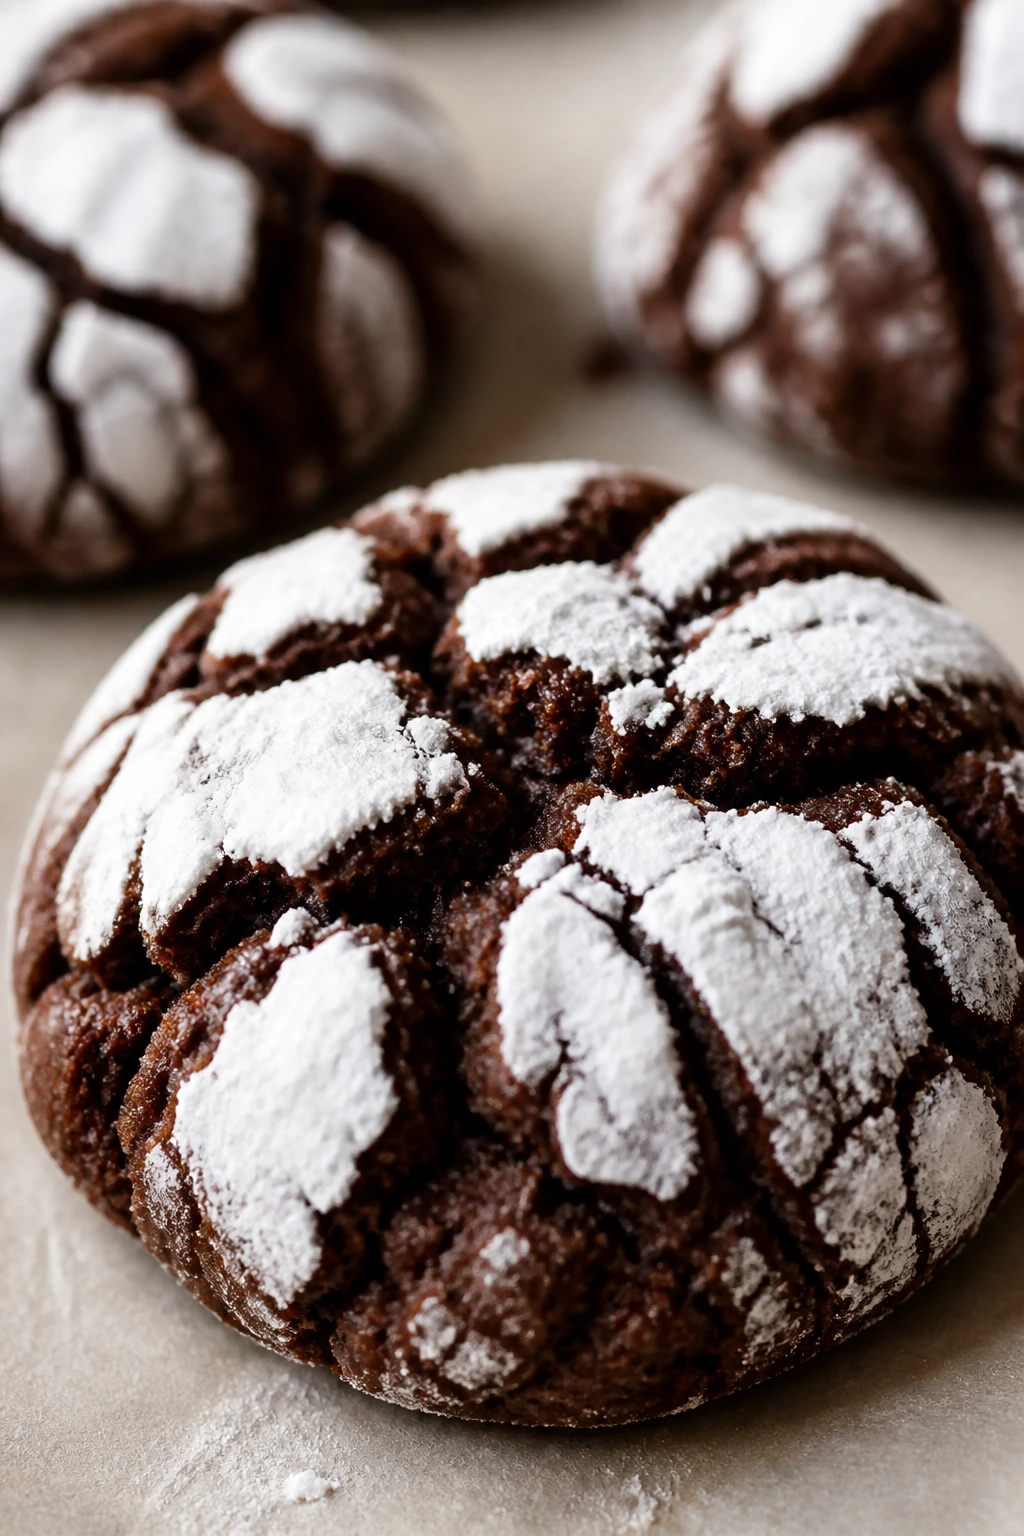
3. Chocolate Crinkle Cookies with Powdered Sugar Cracks
Crinkles are pure theater in cookie form. The dough bakes from a dark, sticky ball into a cracked black-and-white dome, and the powdered sugar dries into the folds like frost on a windowsill. If you want a dessert that looks much more complicated than it is, this is the one.
Why It Works:
Cocoa gives the dough a deep chocolate base, while oil keeps the texture soft even after cooling. Chilling matters here; a chilled dough spreads less, which means the sugar coating stays dramatic instead of melting into the cookie. The contrast between the exterior crackle and the soft, brownie-like middle is the whole point.
Key Ingredients:
- 1 cup granulated sugar
- 1/2 cup vegetable oil
- 2 large eggs
- 1 teaspoon vanilla extract
- 1/2 cup unsweetened cocoa powder
- 1 1/2 cups all-purpose flour
- 1 teaspoon baking powder
- 1/4 teaspoon fine salt
- 1/2 cup powdered sugar, for coating
Quick Steps:
- Mix the wet ingredients: Whisk the sugar, oil, eggs, and vanilla until smooth and glossy.
- Add the chocolate base: Stir in the cocoa powder, then mix until the batter turns deeply brown and no dry cocoa streaks remain.
- Fold in the dry ingredients: Add the flour, baking powder, and salt, stirring just until the dough comes together. It will be thick and sticky.
- Chill the dough: Cover and refrigerate for at least 1 hour, or until it’s firm enough to scoop cleanly.
- Shape and coat: Scoop 1 tablespoon portions, roll into balls, and coat each one generously in powdered sugar.
- Bake: Place on parchment-lined sheets and bake at 350°F (175°C) for 10 to 12 minutes, until the cookies are puffed and cracked but still soft at the center.
- Cool carefully: Let them sit on the baking sheet for 5 minutes before moving to a rack. They’re delicate right out of the oven.
Equipment for This Recipe:
- Mixing bowl
- Whisk or hand mixer
- Baking sheets
- Parchment paper
- Cookie scoop or tablespoon
How to Serve This Dish:
These are the cookies I’d set on a white plate, because the powdered sugar really pops against a plain background. They’re good at room temperature and even better after the chocolate center settles overnight. Pair them with black coffee or a cold glass of milk; both make the cocoa taste deeper.
Pro Tips for This Recipe:
- Coat the dough balls heavily in powdered sugar. A thin dusting disappears as the cookies expand.
- Use a cookie scoop so the balls are even; uneven sizes bake at different speeds and the cracks look messy.
- If your kitchen is warm, chill the shaped balls for 10 minutes before baking.
- Pull them when the centers still look a touch underdone. They finish setting as they cool.
Variations on This Dish:
- Espresso Crinkles: Add 1 teaspoon instant espresso powder to the wet ingredients for a deeper chocolate flavor.
- Peppermint Crinkles: Stir 1/2 teaspoon peppermint extract into the dough and use crushed peppermint candy on top after baking.
- Orange Cocoa Crinkles: Mix in 1 teaspoon orange zest for a brighter, almost truffle-like finish.
Common Mistakes to Avoid with This Dish:
- Don’t skip chilling. Warm dough spreads before the sugar has a chance to crack.
- Don’t undercoat the balls. Bare patches bake into dull, flat spots.
- Don’t expect them to look done by color alone. The tops should crack before the centers feel firm.
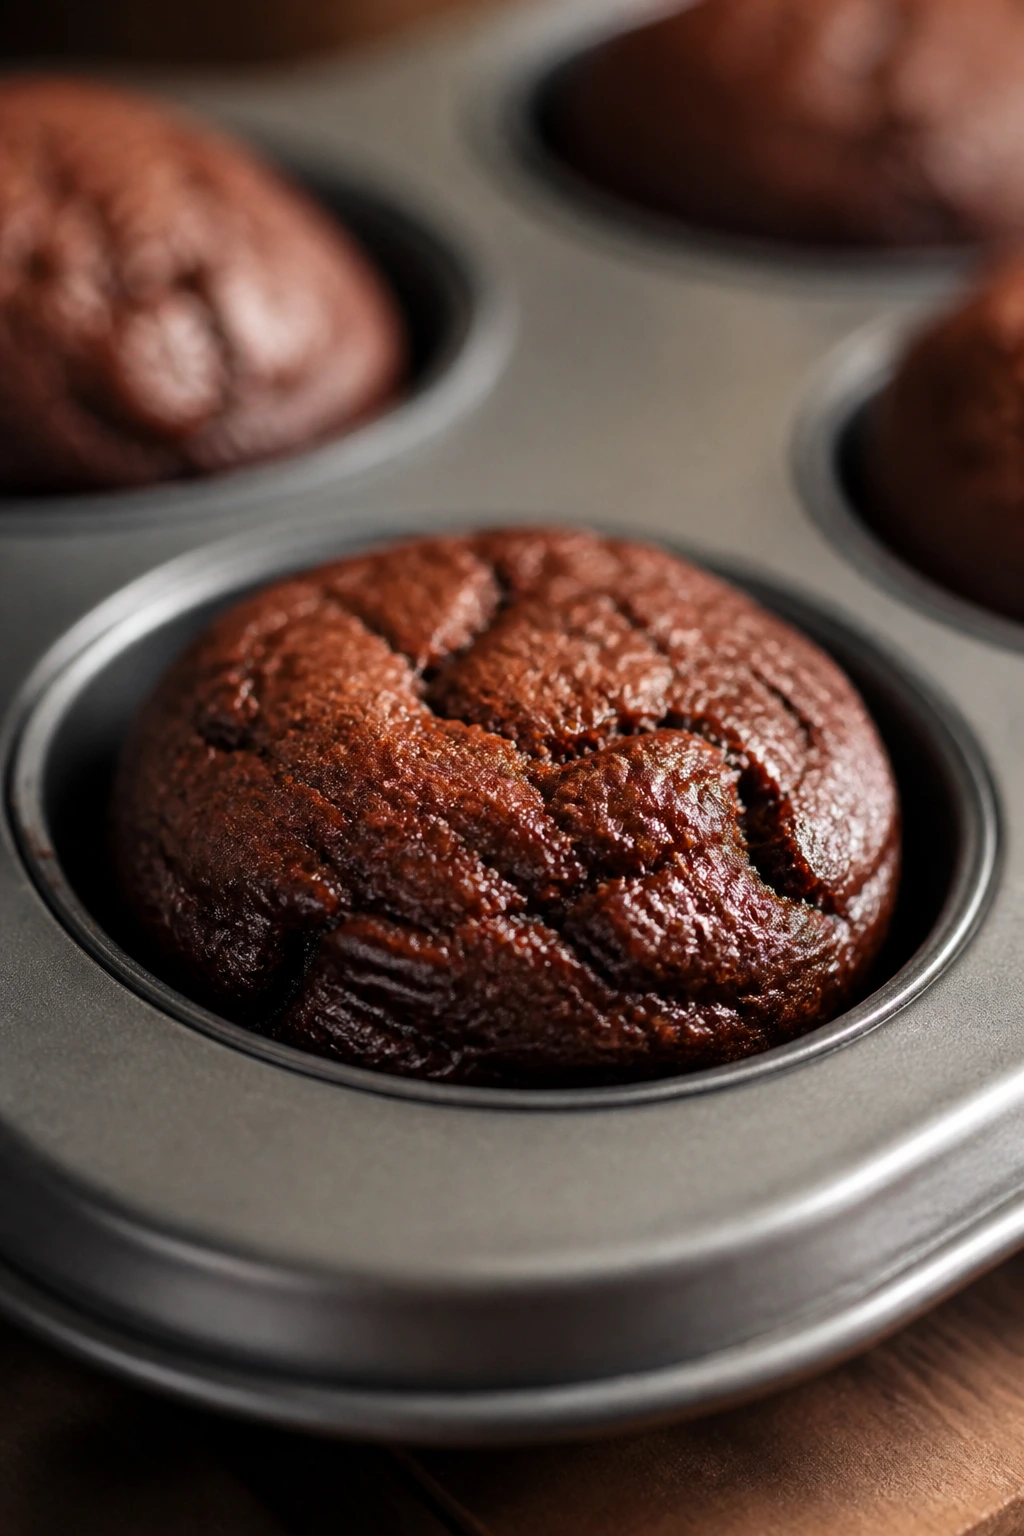
4. Mini Brownie Bites from a Muffin Tin
These are brownies with better manners. Instead of a big slab that needs careful cutting, you get little domed rounds with crisp edges and a fudgy middle, all baked in a mini muffin pan. A powdered sugar dusting makes them look polished with almost no effort, which is about as close to dessert magic as I get.
Why It Works:
Melted butter and cocoa create the dense, glossy batter that gives these bites their fudgy texture. Baking them in a mini muffin tin means the edges caramelize a little faster than a standard brownie pan, so you get more of that chewy perimeter people always fight over. A short bake keeps the centers soft and the tops gently cracked.
Key Ingredients:
- 1/2 cup unsalted butter
- 1 cup granulated sugar
- 2 large eggs
- 1 teaspoon vanilla extract
- 1/3 cup unsweetened cocoa powder
- 1/2 cup all-purpose flour
- 1/4 teaspoon fine salt
- 1/2 cup semisweet chocolate chips
- Powdered sugar or flaky salt, optional for finishing
Quick Steps:
- Prep the pan: Heat the oven to 350°F (175°C). Grease a 24-cup mini muffin tin well, including the edges of each cup.
- Melt the butter: Melt the butter and let it cool for 2 minutes so it doesn’t scramble the eggs.
- Mix the batter: Whisk in the sugar, then the eggs and vanilla until the mixture looks thick and shiny.
- Add the dry ingredients: Stir in the cocoa, flour, and salt until just combined, then fold in the chocolate chips.
- Fill the cups: Spoon the batter into the muffin cups, filling each about 3/4 full.
- Bake: Bake for 12 to 14 minutes, until the tops are set and a toothpick comes out with a few moist crumbs.
- Cool and release: Let the bites cool in the pan for 10 minutes, then loosen them with a small knife and move them to a rack.
Equipment for This Recipe:
- 24-cup mini muffin tin
- Mixing bowl
- Whisk and spatula
- Measuring cups and spoons
- Small offset spatula or butter knife
How to Serve This Dish:
Serve them in a small pile on a plate with powdered sugar sifted over the top like snow. They’re sturdy enough for a dessert tray and small enough to pass around without forks, though I’ll happily eat one with coffee while it’s still warm. A little vanilla ice cream on the side turns them into a plated dessert fast.
Pro Tips for This Recipe:
- Grease the cups well. Brownie bites cling to the sides more than sheet-pan brownies do.
- Don’t overbake for the sake of clean toothpicks. A few moist crumbs are the goal.
- Add the chocolate chips last so they stay visible on top and give the bites a better look.
- If you want a shinier top, whisk the sugar into the melted butter until it looks glossy before adding the eggs.
Variations on This Dish:
- Salted Brownie Bites: Finish each one with a tiny pinch of flaky salt while still warm.
- Walnut Crunch Version: Fold in 1/3 cup chopped walnuts for a firmer bite and a little snap.
- Marble Peanut Butter Bites: Drop 1/2 teaspoon peanut butter onto the batter and swirl lightly with a toothpick before baking.
Common Mistakes to Avoid with This Dish:
- Don’t overfill the cups. Batter that rises too high spills and bakes onto the tin.
- Don’t try to unmold them while hot. The centers need a few minutes to firm up.
- Don’t stir the batter after the flour goes in too much. That’s how brownie bites turn cakey.
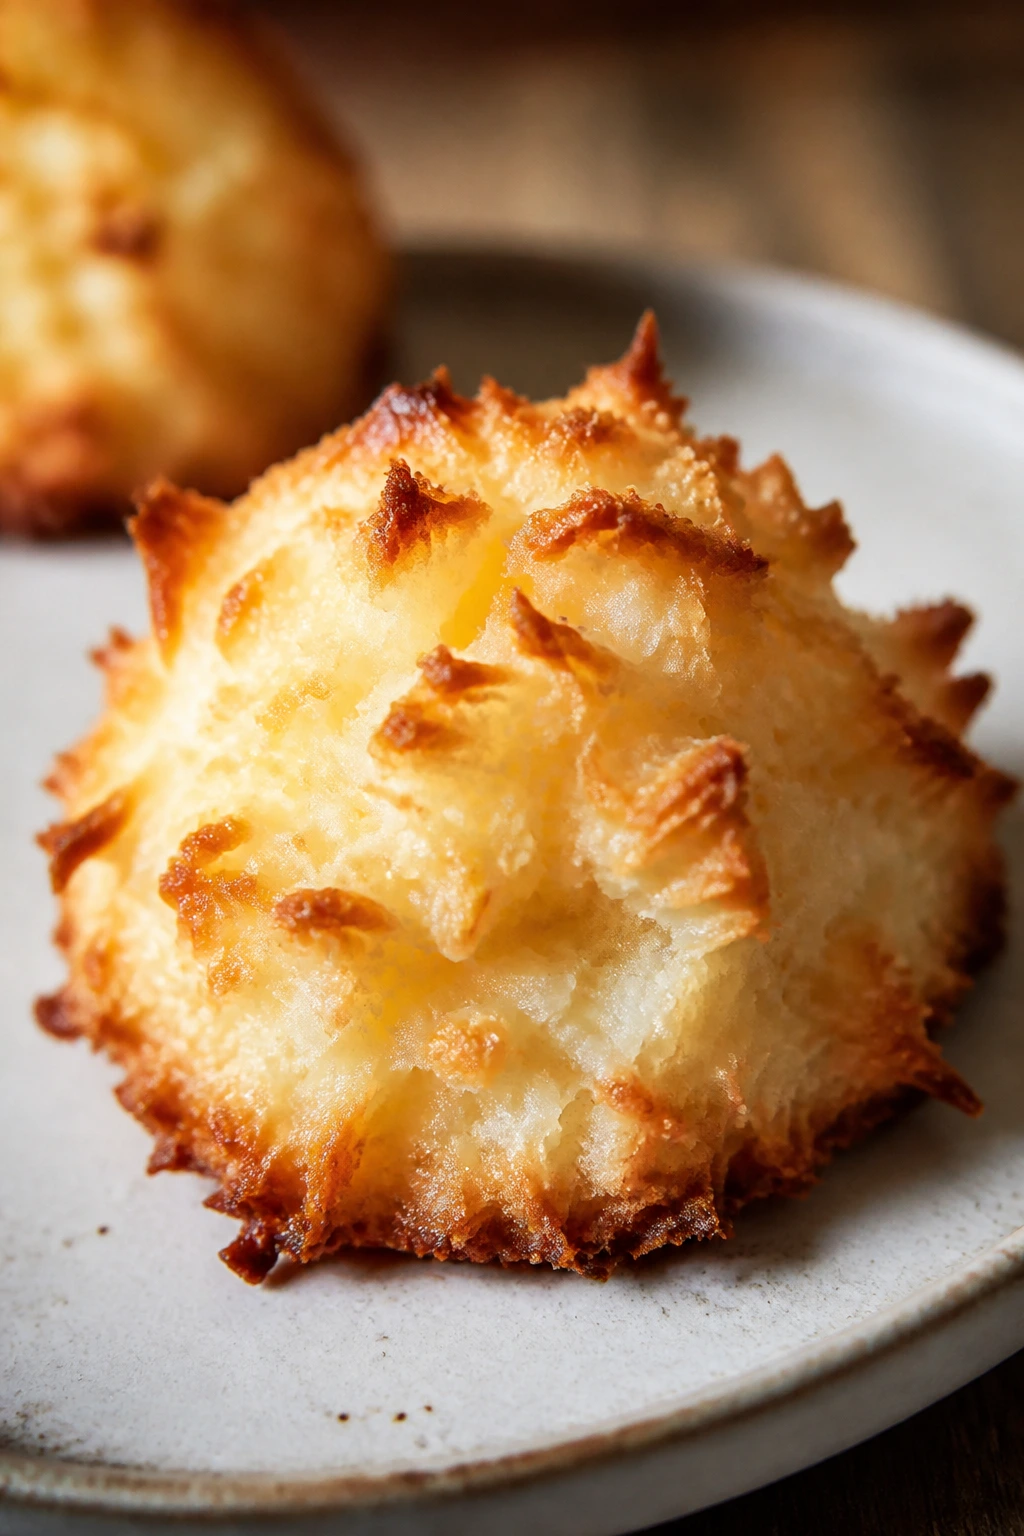
5. Coconut Macaroons with Toasted Edges
Macaroons are the pantry dessert I make when I want something that looks like a bakery case item but behaves like a five-ingredient recipe. They bake into rough little domes with toasted edges, chewy centers, and that clean coconut flavor that tastes both old-fashioned and oddly fancy. A drizzle of chocolate changes the whole mood, but even plain, they look tidy on a plate.
Why It Works:
Sweetened condensed milk binds the coconut and gives the center a dense chew without needing a flour base. Egg whites add lift and help the mounds hold their shape. The oven temp stays modest so the coconut toasts slowly instead of burning on the peaks before the centers set.
Key Ingredients:
- 4 cups sweetened shredded coconut
- 2/3 cup sweetened condensed milk
- 2 large egg whites
- 1 teaspoon vanilla extract
- 1/4 teaspoon fine salt
- 4 ounces semisweet chocolate chips, melted, optional for drizzling or dipping
Quick Steps:
- Preheat and prep: Heat the oven to 325°F (165°C) and line a baking sheet with parchment.
- Whisk the binder: In a bowl, whisk the egg whites, vanilla, and salt until the whites are loose and foamy, not stiff.
- Fold everything together: Stir in the condensed milk, then fold in the coconut until every strand looks coated.
- Shape the macaroons: Scoop heaping tablespoons onto the sheet and mound them lightly. Don’t pack them into tight balls or they bake dense.
- Bake: Bake for 20 to 22 minutes, until the tops are golden and the edges are toasted.
- Cool completely: Let them sit on the tray for 10 minutes, then move to a rack.
- Finish if you like: Drizzle or dip the bottoms in melted chocolate once they’re fully cool.
Equipment for This Recipe:
- Mixing bowl
- Whisk and spatula
- Baking sheet
- Parchment paper
- Small cookie scoop, helpful but not required
How to Serve This Dish:
These look nicest in a small fan or a loose circle on a plate, with the chocolate side hidden or turned up depending on your mood. They’re excellent with strong coffee or tea because the coconut is sweet enough to stand up to bitter drinks. If you’re serving them as part of a dessert tray, mix them with something dark and something pale so the rough texture stands out.
Pro Tips for This Recipe:
- Use sweetened shredded coconut, not unsweetened flakes. The texture and binding are different.
- If the mixture feels too loose, let it sit 5 minutes. The coconut absorbs the milk and firms up.
- Wet your scoop or fingers lightly when shaping sticky mounds.
- Bake until the tops are golden, not pale. Coconut needs color to taste finished.
Variations on This Dish:
- Chocolate-Dipped Macaroons: Dip the cooled bottoms in melted chocolate and set them on parchment until firm.
- Lemon Coconut Macaroons: Add 1 teaspoon lemon zest if you have it; the brightness cuts the sweetness.
- Almond Joy Style: Press one almond into each mound before baking and drizzle with chocolate after cooling.
Common Mistakes to Avoid with This Dish:
- Don’t use egg yolks instead of whites. The texture turns heavy and sticky.
- Don’t underbake. Pale macaroons taste raw and chewy in the wrong way.
- Don’t move them too soon. Fresh macaroons are soft and can tear at the base.
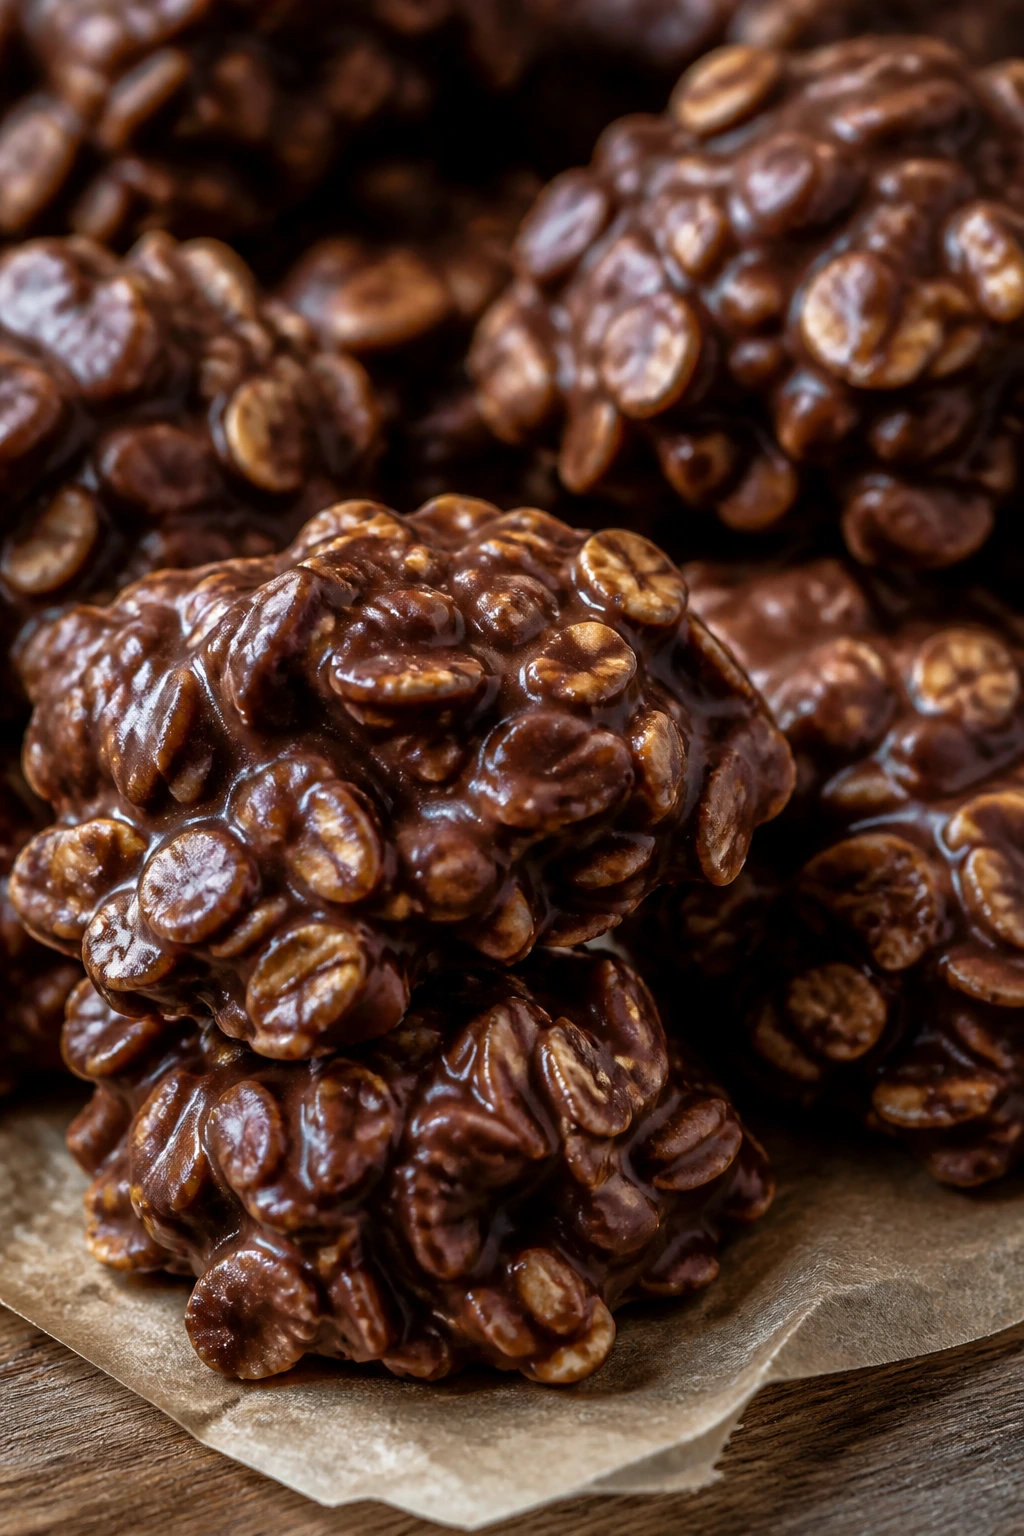
6. Chocolate Peanut Butter No-Bake Oat Clusters
These are the kind of treats that save a humid afternoon. You boil, stir, drop, and wait; no oven, no fuss, no drama. The finished cookies look rustic in the best way — craggy, glossy, and a little lopsided, with oat edges and a dark chocolate smell that fills the kitchen fast.
Why It Works:
Boiling sugar, butter, milk, and cocoa for a full minute gives the mixture enough concentration to set once it cools. Peanut butter smooths the texture and makes the cookie taste more rounded, not just sweet. Quick oats absorb the syrup fast, which is why you need to work quickly once the pan comes off the heat.
Key Ingredients:
- 2 cups granulated sugar
- 1/2 cup unsalted butter
- 1/2 cup milk
- 1/4 cup unsweetened cocoa powder
- 1/2 cup creamy peanut butter
- 3 cups quick oats
- 1 teaspoon vanilla extract
- 1/4 teaspoon fine salt
Quick Steps:
- Prep the surface: Line a countertop or baking sheet with parchment or wax paper.
- Boil the base: In a medium saucepan, combine the sugar, butter, milk, cocoa, and salt. Bring to a full boil over medium heat and boil for exactly 1 minute.
- Add the peanut butter: Remove from the heat, stir in the peanut butter and vanilla until the mixture looks smooth and glossy.
- Fold in the oats: Add the quick oats and stir fast until every oat is coated and the mixture starts to thicken.
- Drop the cookies: Spoon heaping tablespoonfuls onto the paper, shaping them slightly if you want neater mounds.
- Set: Let them cool at room temperature for 20 to 30 minutes, until firm.
- Store or serve: Lift them carefully once set; they firm up more as they sit.
Equipment for This Recipe:
- Medium saucepan
- Wooden spoon or heatproof spatula
- Measuring cups and spoons
- Parchment or wax paper
- Cookie scoop, optional
How to Serve This Dish:
Arrange these in little clusters on a plate rather than in neat rows; they look better that way. They’re good at room temperature and hold up well in lunchboxes or on a snack tray. A cold glass of milk is the obvious pairing, but black tea works too if you like the chocolate a little less sweet.
Pro Tips for This Recipe:
- Start timing the boil when it reaches a full, rolling boil, not before.
- Stir in the oats quickly. Once the mixture starts cooling, it thickens fast.
- If the cookies seem loose, let them sit longer instead of moving them early.
- Use quick oats for the classic chewy set. Old-fashioned oats can work, but the texture is rougher.
Variations on This Dish:
- Coconut Cluster Version: Stir in 1/2 cup shredded coconut with the oats for a snowier look.
- Extra Peanut Version: Add 2 tablespoons more peanut butter if you want the chocolate a little softer.
- Chocolate Almond Clusters: Swap peanut butter for almond butter and add chopped almonds on top.
Common Mistakes to Avoid with This Dish:
- Don’t underboil the syrup. If it doesn’t boil long enough, the cookies stay sticky.
- Don’t stir too long after adding oats. The mixture can turn grainy and stiff.
- Don’t make the mounds too large. Big clusters take longer to set and can spread more than you want.
7. Snickerdoodle Cookie Cups with Cinnamon Sugar Rims
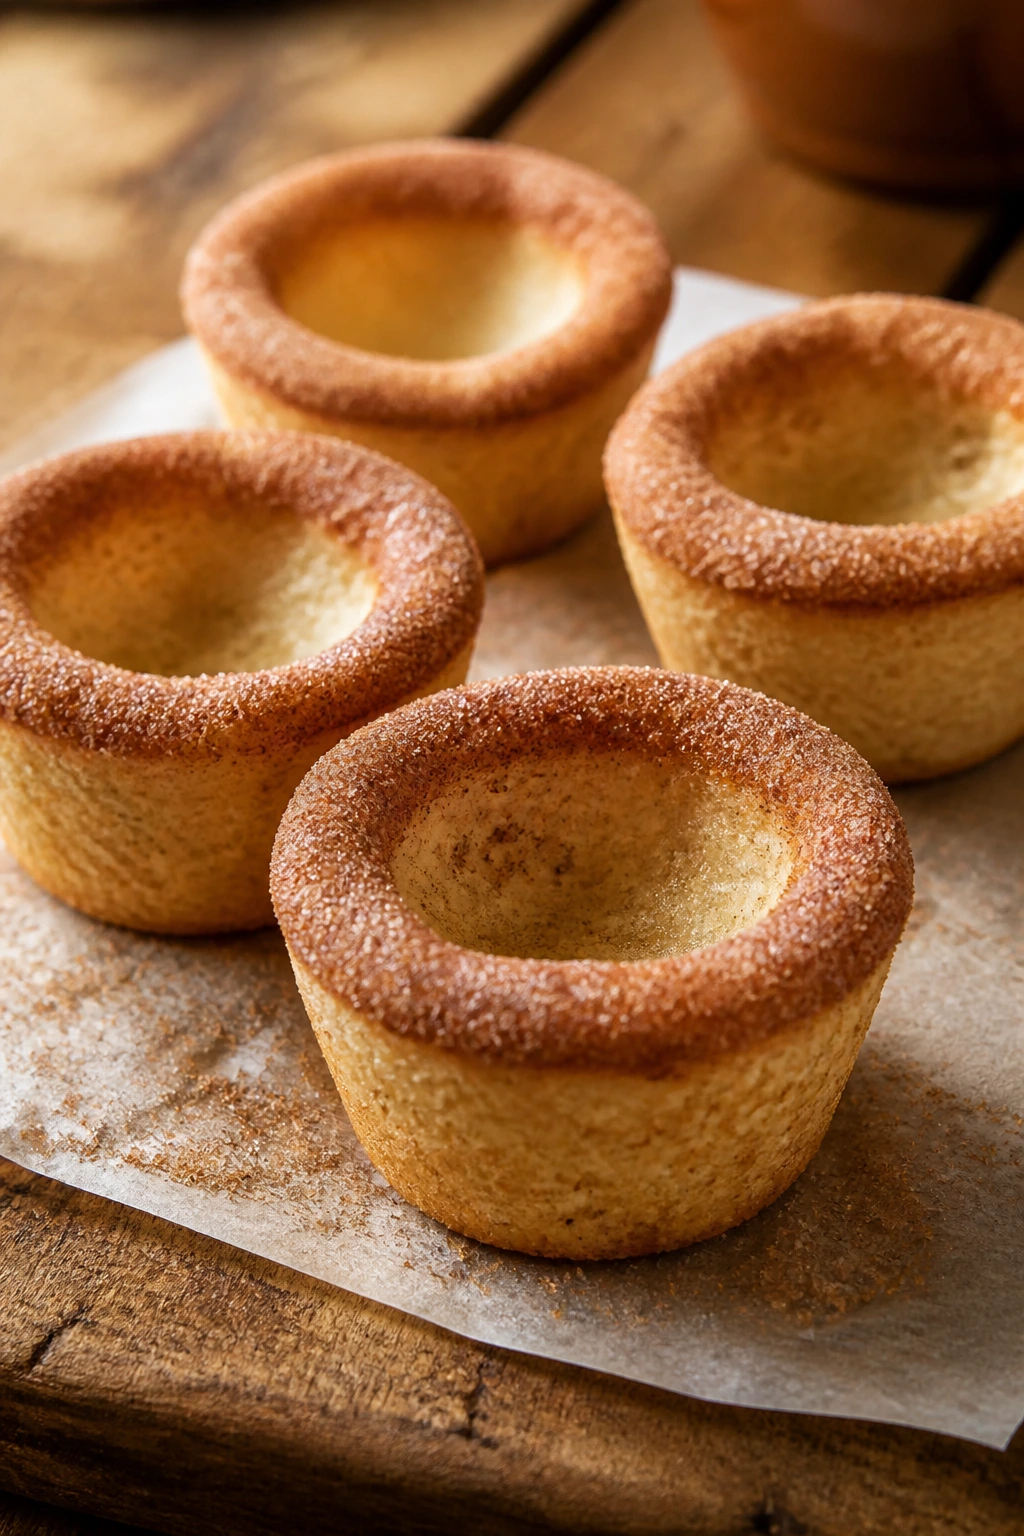
These bake up like little soft-edged cups with a warm cinnamon crust and a pale center waiting to be filled. I like them because they solve the usual snickerdoodle problem: one cookie is never enough, but a cookie cup gives you that same cinnamon-sugar perfume in a more playful shape. A quick glaze or a spoonful of pudding makes them feel dressed for dessert instead of snack time.
Why It Works:
Cream of tartar gives the dough that classic tang and keeps the crumb tender. Baking the dough in a mini muffin tin creates a cup shape, while the cinnamon-sugar coating turns the outside into a slightly crisp shell. Pressing the centers immediately after baking is the key move; do it while they’re still warm and flexible.
Key Ingredients:
- 1/2 cup unsalted butter, softened
- 3/4 cup granulated sugar
- 1 large egg
- 1 teaspoon vanilla extract
- 1 1/2 cups all-purpose flour
- 1/2 teaspoon cream of tartar
- 1/4 teaspoon baking soda
- 1/4 teaspoon fine salt
- 2 tablespoons granulated sugar, for coating
- 1 teaspoon ground cinnamon, for coating
- 1 cup powdered sugar
- 1 to 2 tablespoons milk
- 1/2 teaspoon vanilla, for a simple glaze
Quick Steps:
- Preheat and prep: Heat the oven to 350°F (175°C) and grease a mini muffin tin well.
- Mix the dough: Beat the butter and sugar until fluffy, then add the egg and vanilla.
- Add the dry ingredients: Stir in the flour, cream of tartar, baking soda, and salt until a soft dough forms.
- Coat the balls: Mix the cinnamon and sugar in a small bowl. Roll the dough into 1-inch balls, then coat them thoroughly.
- Bake: Place one ball in each mini muffin cup and bake for 10 to 12 minutes, until the tops are set and lightly puffed.
- Press the centers: While still hot, press the center of each cookie with the back of a teaspoon to make a shallow cup.
- Glaze or fill: Whisk the powdered sugar, milk, and vanilla into a thick glaze, then spoon or drizzle it into the cups after cooling.
Equipment for This Recipe:
- Mini muffin tin
- Hand mixer or stand mixer
- Small mixing bowls
- Teaspoon for pressing centers
- Piping bag or spoon for glaze, optional
How to Serve This Dish:
Serve these on a plate with the glaze pooled in the centers so the shape stays visible. They work well beside apple cider, coffee, or hot chocolate because the cinnamon is the loudest flavor in the room. If you’re making a dessert tray, set them next to something dark and chewy so the pale tops stand out.
Pro Tips for This Recipe:
- Grease the muffin tin well. The sugar coating can glue the cookies to the sides if you’re stingy with the butter.
- Press the centers while the cookies are still hot. Wait even 2 minutes and they start to harden.
- Keep the glaze thick if you want it to sit in the cups instead of running off.
- If you don’t want glaze, a spoonful of chocolate pudding works just as well for a softer fill.
Variations on This Dish:
- Pumpkin Spice Cup: Add 1/2 teaspoon pumpkin pie spice to the dough for a warmer, deeper flavor.
- Brown Sugar Cup: Swap half the granulated sugar for brown sugar and use a plain vanilla glaze.
- Chocolate Drizzle Version: Skip the glaze and drizzle the cooled cups with melted chocolate and a pinch of salt.
Common Mistakes to Avoid with This Dish:
- Don’t skip the cream of tartar if you want the true snickerdoodle flavor.
- Don’t overbake until deeply brown. The cups should stay soft enough to bite cleanly.
- Don’t press the centers too hard. A shallow hollow is enough; punched-through bottoms are not.
8. Chocolate-Dipped Shortbread Coins
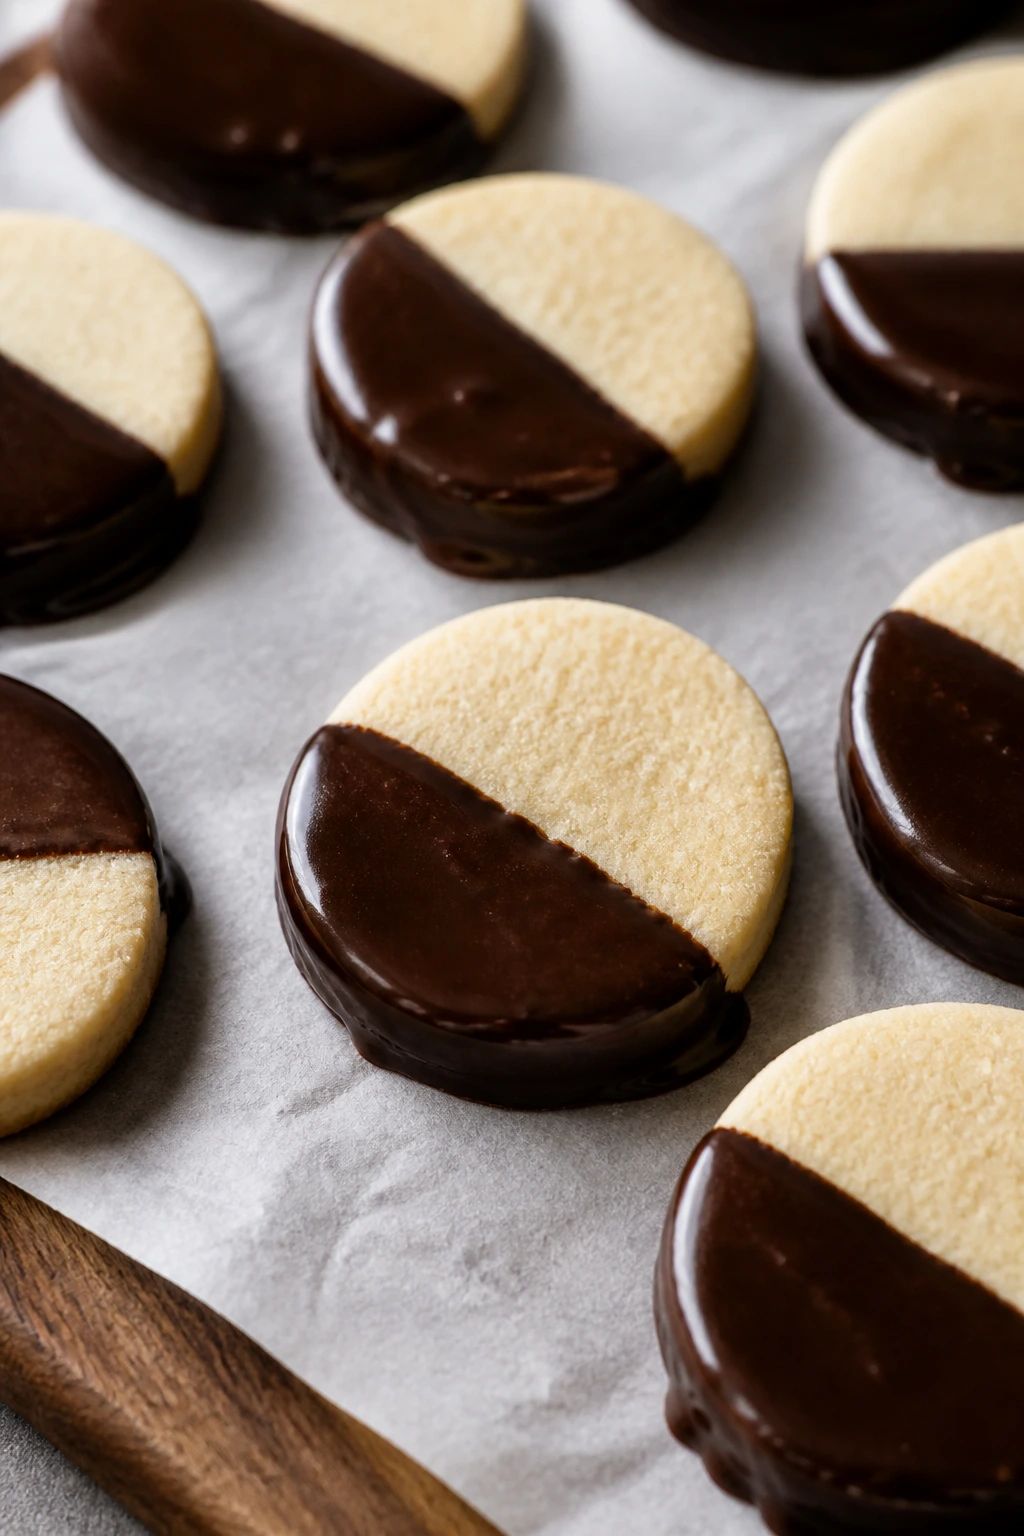
Shortbread is the quiet one on the tray, and that’s exactly why I like it. It’s buttery, crisp at the edges, and clean in flavor, which makes it the perfect canvas for a half-dip in chocolate or a scatter of sprinkles. Cut into little coins, it looks neat without needing decoration gymnastics.
Why It Works:
Shortbread depends on a simple ratio: butter for richness, powdered sugar for fine texture, flour for structure. Since there’s no leavening, the cookies bake into a flat, tender crumb rather than puffing. Rolling the dough to a consistent thickness is what keeps the coins even and gives you that clean bakery finish.
Key Ingredients:
- 1 cup (2 sticks) unsalted butter, softened
- 1/2 cup powdered sugar
- 1 teaspoon vanilla extract
- 2 cups all-purpose flour
- 1/2 teaspoon fine salt
- 1/2 cup semisweet chocolate chips or chopped chocolate
- Sprinkles or flaky salt, optional for the finish
Quick Steps:
- Make the dough: Beat the butter, powdered sugar, and vanilla until smooth and creamy.
- Add flour and salt: Mix in the flour and salt on low speed until the dough just comes together. It will look crumbly before it forms a soft mass.
- Chill briefly: Flatten the dough into a disk, wrap it, and chill for 20 to 30 minutes.
- Roll and cut: Roll the dough to about 1/4-inch thickness and cut into 2-inch rounds.
- Bake: Place on parchment-lined sheets and bake at 325°F (165°C) for 14 to 16 minutes, until the edges are just beginning to color.
- Cool fully: Shortbread crisps as it cools, so let it sit on a rack before dipping.
- Dip in chocolate: Melt the chocolate chips, dip half of each cookie, and set on parchment. Add sprinkles or salt before the chocolate sets.
Equipment for This Recipe:
- Mixer
- Rolling pin
- Round cookie cutter
- Baking sheets
- Parchment paper
How to Serve This Dish:
Line these up in overlapping rows on a tray so the chocolate-dipped edges show. They’re the kind of cookie that looks polished even without a lot of garnish, and they travel well for gifts. Coffee, black tea, or even a small glass of milk all work because the cookie is buttery without being loud.
Pro Tips for This Recipe:
- Don’t add extra flour while rolling unless the dough is truly sticky. Too much flour makes shortbread dry.
- Chill the dough before cutting if it starts to soften.
- Use chopped chocolate if you want a smoother dip than chips sometimes provide.
- Let the cookies cool fully before dipping or the chocolate will slide off.
Variations on This Dish:
- Cinnamon Shortbread Coins: Add 1 teaspoon cinnamon to the flour and skip the chocolate.
- Orange-Dipped Coins: Stir 1 teaspoon orange zest into the dough and dip in dark chocolate.
- Salted Caramel Look: Drizzle the dipped cookies with melted caramel candy or a tiny pinch of flaky salt.
Common Mistakes to Avoid with This Dish:
- Don’t overmix once the flour goes in. Shortbread likes a gentle hand.
- Don’t bake until golden brown all over. Pale shortbread is the right shortbread.
- Don’t dip while warm. The chocolate needs a cool cookie surface to set cleanly.
9. Peanut Butter Fudge Hearts
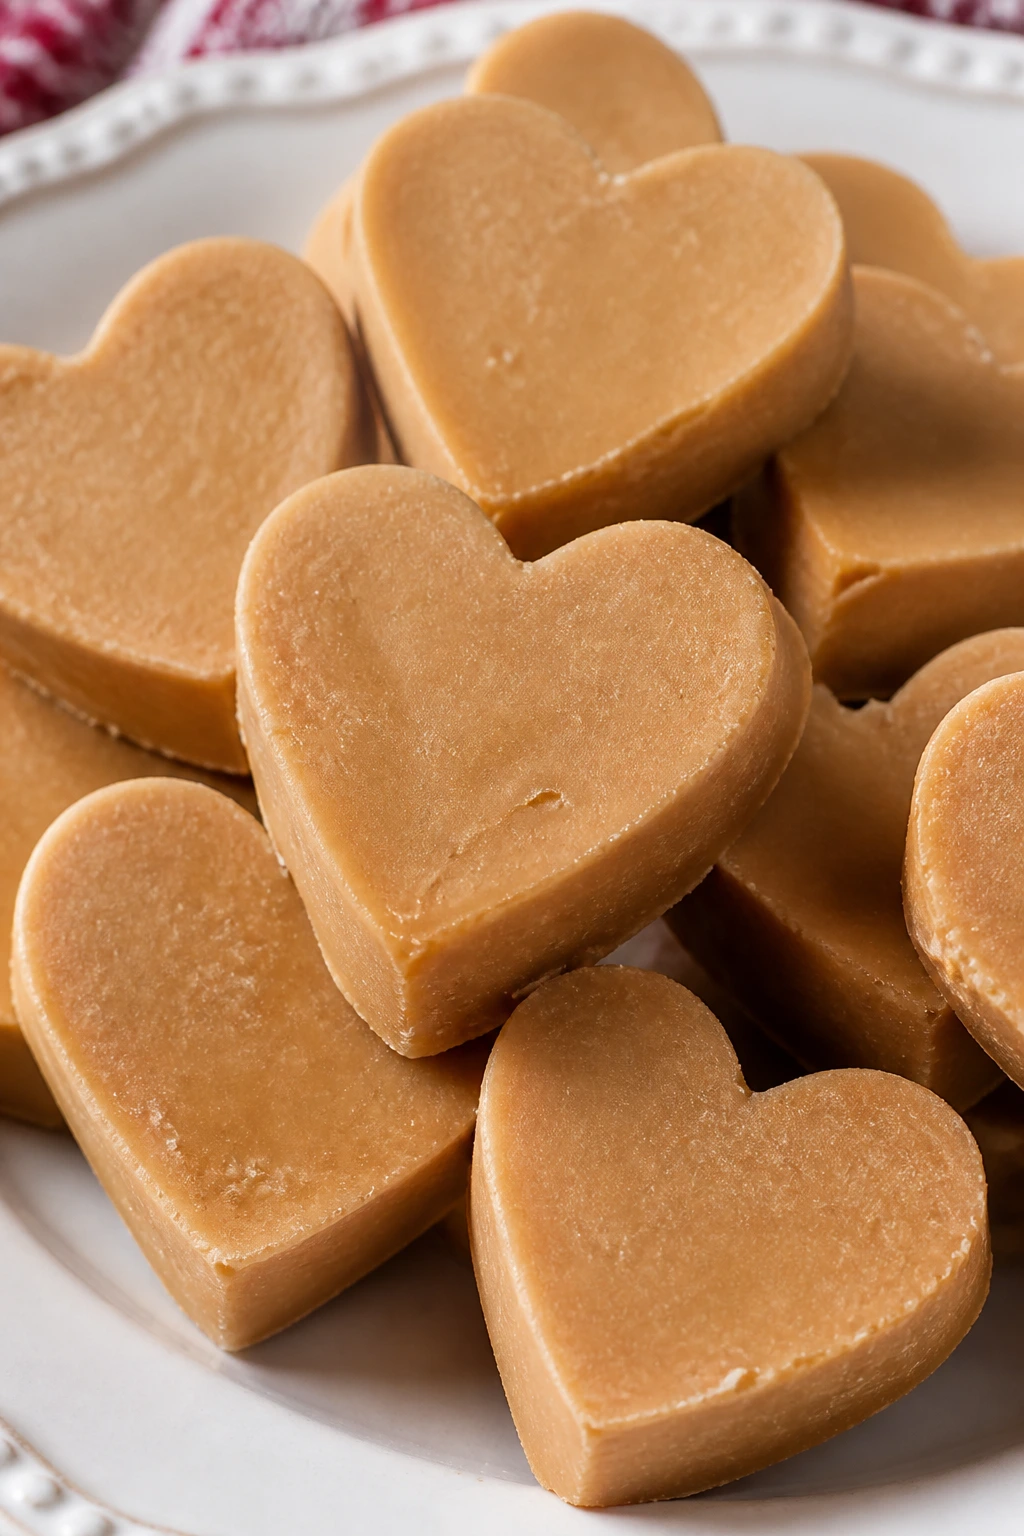
Fudge can look old-fashioned in a good way, and cutting it into hearts changes the whole tone. These are sweet, dense, and faintly salty, with edges that stay clean if you chill the slab properly. They’re also the sort of dessert that makes a tiny plate look intentional, which is more useful than it sounds.
Why It Works:
Butter and peanut butter create the soft, creamy base, while powdered sugar gives the fudge structure without a grainy finish. Chilling the slab before cutting matters more here than almost anywhere else; a warm slab smears, and a cold one gives you neat heart shapes. A little salt keeps the sweetness from turning flat.
Key Ingredients:
- 1/2 cup unsalted butter
- 1 cup creamy peanut butter
- 1 teaspoon vanilla extract
- 3 1/2 cups powdered sugar, sifted
- 1/4 teaspoon fine salt
- 2 tablespoons milk, optional if the mixture feels dry
Quick Steps:
- Line the pan: Line an 8×8-inch square pan with parchment, leaving an overhang.
- Melt and mix: Melt the butter in a saucepan over low heat, then stir in the peanut butter until smooth.
- Add flavor: Remove from the heat and stir in the vanilla and salt.
- Beat in sugar: Add the powdered sugar in two or three additions, stirring until a thick dough forms. If it looks crumbly, add milk 1 teaspoon at a time.
- Press into the pan: Spread the fudge into the pan and press it flat with your hands or a spatula.
- Chill: Refrigerate for at least 1 hour, until fully set.
- Cut hearts: Lift out the slab and cut heart shapes with a small cookie cutter.
Equipment for This Recipe:
- 8×8-inch pan
- Parchment paper
- Medium saucepan
- Spatula
- Small heart cutter
How to Serve This Dish:
These belong on a small plate with three or four pieces arranged in a loose cluster, not a crowded heap. They’re rich, so tiny portions feel right. A few chopped peanuts on the side or a single chocolate square beside them makes the plate look finished without adding more work.
Pro Tips for This Recipe:
- Sift the powdered sugar if it’s lumpy. Fudge shows every grain.
- Press the mixture firmly into the pan so the hearts cut cleanly.
- Chill long enough. If the slab is soft, the cutter drags and tears the edges.
- Warm the cutter slightly under hot water and dry it if the fudge is sticking.
Variations on This Dish:
- Chocolate-Swirled Fudge: Swirl in 2 tablespoons melted chocolate before chilling.
- Crunchy Peanut Fudge: Fold in 1/3 cup chopped peanuts for a firmer bite.
- Maple Peanut Hearts: Swap 1/2 teaspoon of the vanilla for maple extract if you have it.
Common Mistakes to Avoid with This Dish:
- Don’t add all the sugar at once if the mixture is still warm. It can clump.
- Don’t skip the parchment. Fudge is sticky before it chills.
- Don’t rush the cutting step. Warm fudge gives you blobs, not hearts.
10. Rice Krispie Treat Hearts with Marshmallow Pull
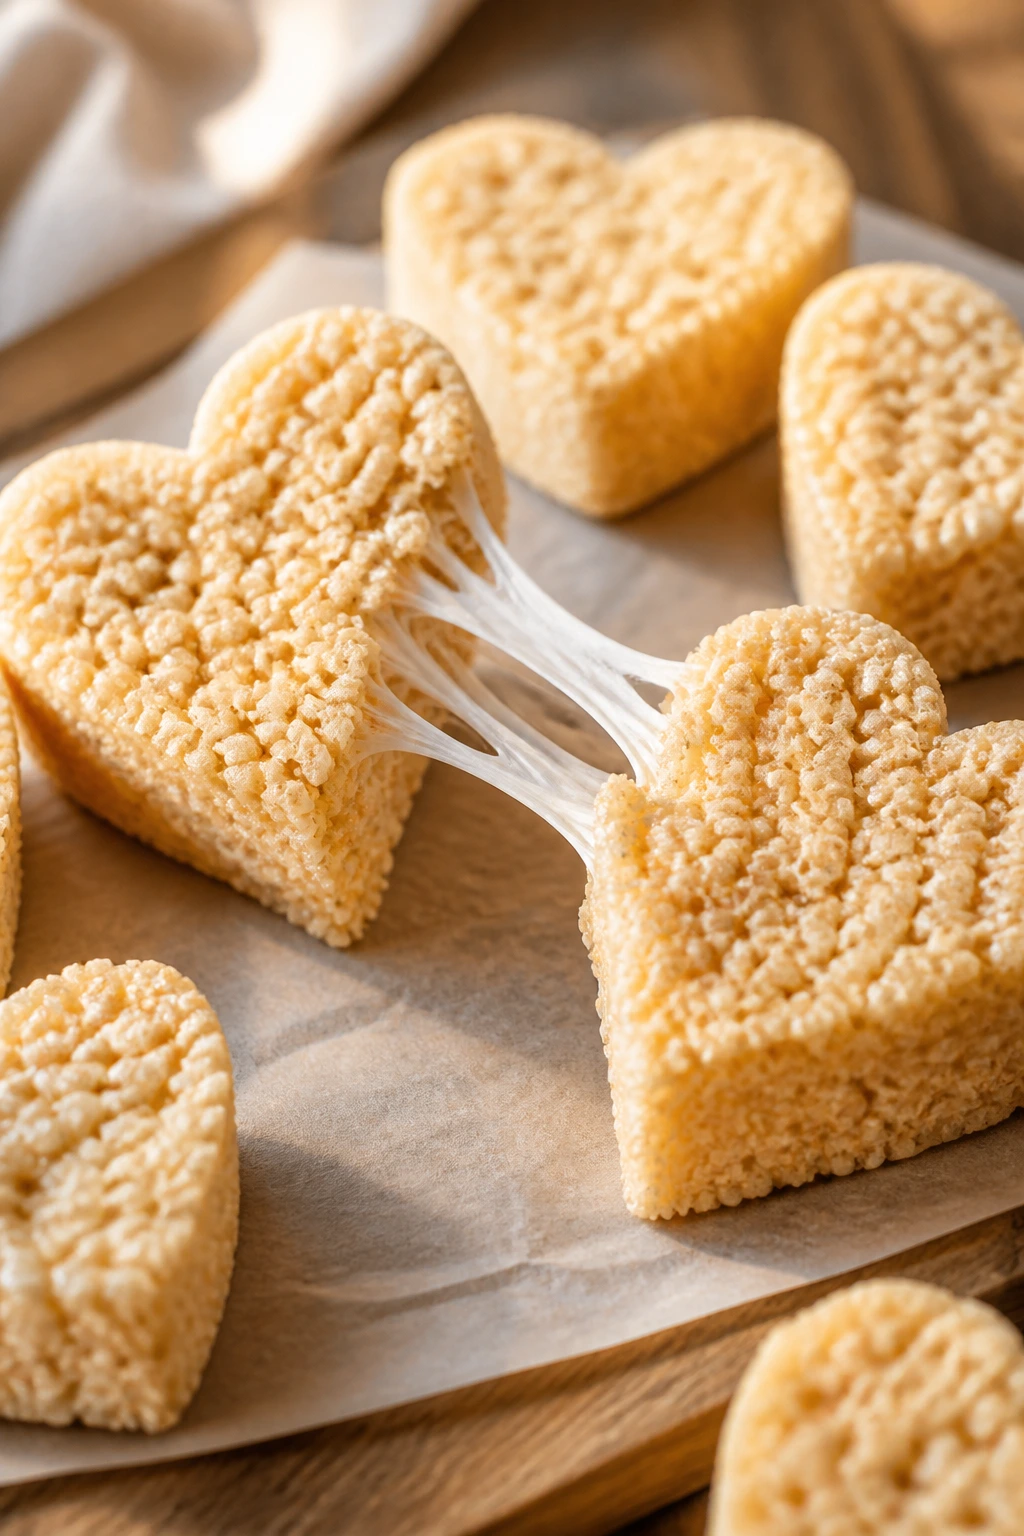
If you’ve ever wanted a dessert that feels playful without requiring actual pastry skills, this is it. Rice krispie treats are already charming in their own awkward, sticky way, and cutting them into hearts gives them a cleaner, giftable look. They’re soft, chewy, and the marshmallow smell alone makes the kitchen feel like a bakery.
Why It Works:
The marshmallow melts into the butter and coats every cereal piece, creating that signature stretchy bite. Vanilla and salt keep the flavor from tasting flat. A lightly greased hand or spatula is the difference between a smooth press and a frustrating sticky mess — which, honestly, is the main technical challenge here.
Key Ingredients:
- 4 tablespoons unsalted butter
- 1 package (10 ounces) mini marshmallows
- 1/4 teaspoon fine salt
- 1 teaspoon vanilla extract
- 6 cups crisp rice cereal
- 1/4 cup melted white chocolate or sprinkles, optional for decorating
Quick Steps:
- Prep the pan: Grease a 9×13-inch pan or line it with parchment.
- Melt the base: Melt the butter in a large pot over low heat, then add the marshmallows and salt. Stir until the marshmallows are fully melted and smooth.
- Add vanilla: Stir in the vanilla off the heat.
- Fold in cereal: Add the cereal and stir gently but quickly until every piece is coated.
- Press into the pan: Scrape the mixture into the prepared pan and press it down lightly with a greased spatula. Do not smash it hard or the treats turn dense.
- Cool and cut: Let the slab cool for about 30 minutes, then cut with a heart-shaped cutter.
- Decorate: Drizzle with melted white chocolate or add sprinkles if you want a more finished look.
Equipment for This Recipe:
- Large pot
- Greased spatula
- 9×13-inch pan
- Heart-shaped cutter
- Parchment paper, optional
How to Serve This Dish:
These are cute on a plate or packed individually in wax paper for gifting. Because they’re sweet and chewy, I like them with something bitter or cold: coffee, black tea, or a scoop of vanilla ice cream. If you’re making a dessert board, they bring the squishy texture that cookie trays usually miss.
Pro Tips for This Recipe:
- Keep the heat low when melting the marshmallows so they stay soft, not scorched.
- Grease your hands or spatula before pressing. Sticky cereal treats punish dry tools.
- Cut the hearts while the slab is still slightly warm if you want cleaner edges.
- Add sprinkles before the surface fully sets so they stick.
Variations on This Dish:
- Chocolate Swirl Hearts: Stir in 1/4 cup mini chocolate chips after the cereal goes in.
- Peanut Butter Treat Hearts: Melt 1/3 cup peanut butter into the marshmallow base for a richer flavor.
- Cinnamon Sugar Version: Add 1/2 teaspoon cinnamon to the melted base and dust the tops lightly with cinnamon sugar.
Common Mistakes to Avoid with This Dish:
- Don’t press too hard into the pan. Compact treats lose the soft pull people expect.
- Don’t wait too long to cut if you want the edges to stay neat.
- Don’t use stale marshmallows. They melt unevenly and leave hard bits behind.
11. Butterscotch Pudding Cups with Graham Crumble
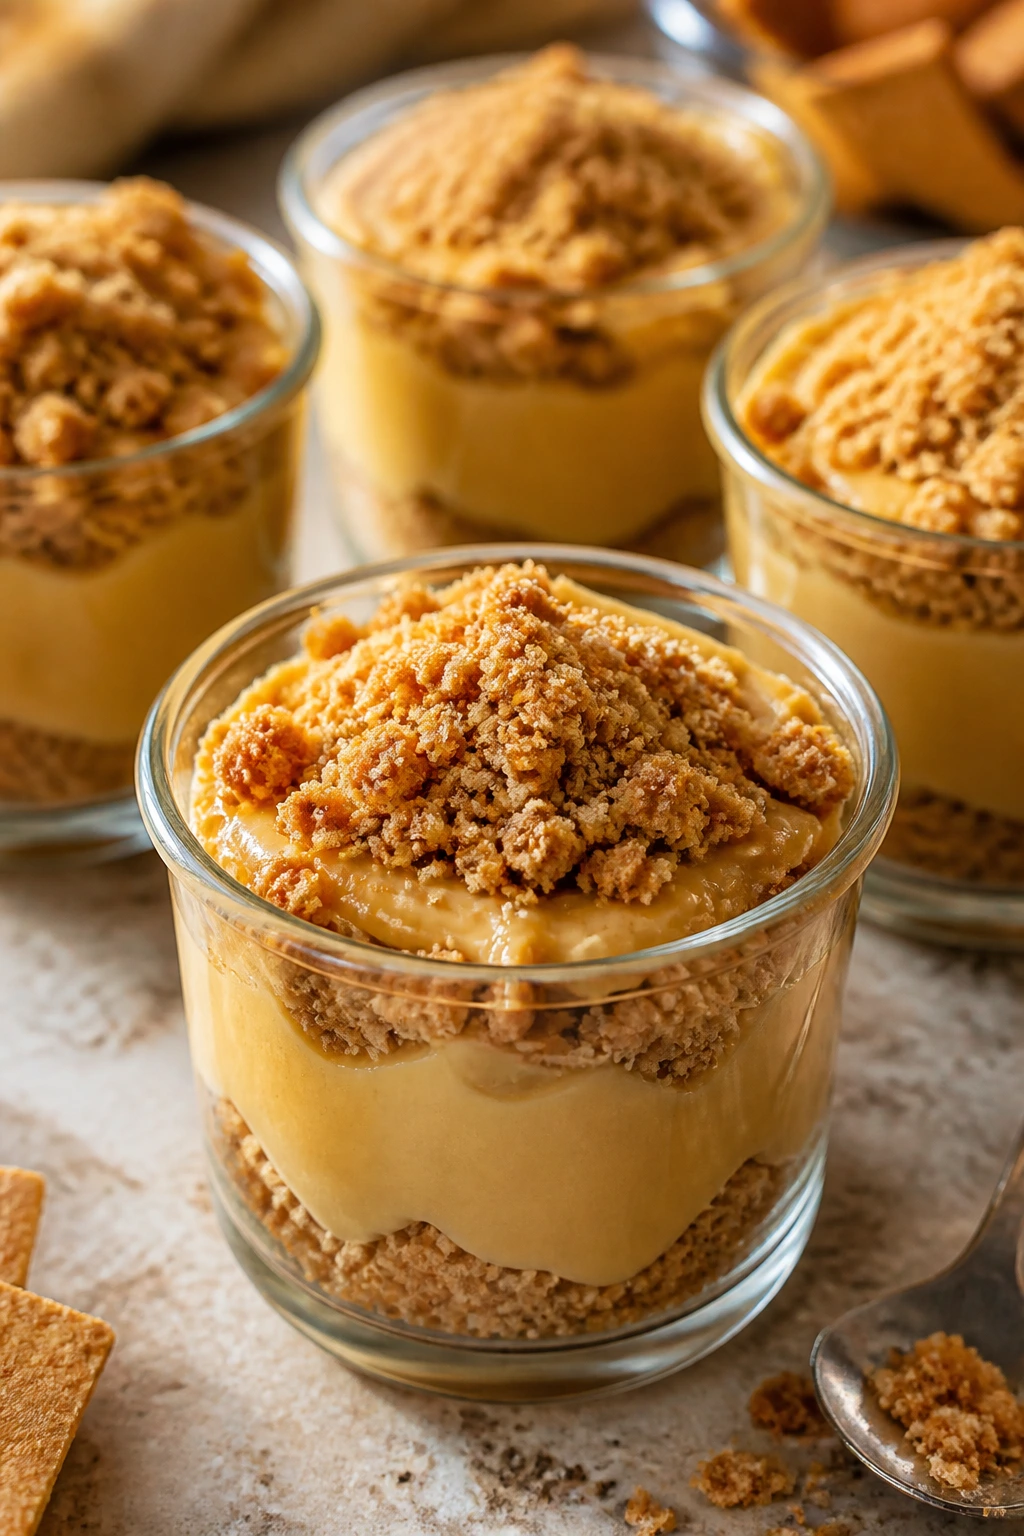
This is the dessert I make when I want something spoonable, calm, and a little nostalgic. The pudding itself tastes like brown sugar and butter toast in a cooler, smoother form, and the crumb layer gives each cup a tiny bit of structure. Serve it in small glasses and it immediately looks more thoughtful than it is.
Why It Works:
Brown sugar gives butterscotch its deeper, almost caramel-like flavor, while cornstarch thickens the pudding into a smooth, glossy fill. Egg yolks add richness and help the texture set without feeling gummy. A graham crumb base keeps the cups from reading as plain pudding bowls, and the layered look makes them feel more finished.
Key Ingredients:
- 3/4 cup packed light brown sugar
- 3 tablespoons cornstarch
- 1/4 teaspoon fine salt
- 2 cups whole milk
- 3 large egg yolks
- 2 tablespoons unsalted butter
- 1 teaspoon vanilla extract
- 1 cup graham cracker crumbs
- 2 tablespoons melted butter
- 1 tablespoon granulated sugar
Quick Steps:
- Make the crumb base: Mix the graham crumbs, melted butter, and granulated sugar in a small bowl, then press a spoonful into the bottom of 4 to 6 small glasses.
- Combine the pudding dry mix: In a saucepan, whisk together the brown sugar, cornstarch, and salt.
- Add milk and yolks: Whisk in the milk and egg yolks until the mixture looks smooth.
- Cook the pudding: Set the pan over medium heat and whisk constantly until the pudding thickens and begins to bubble, about 6 to 8 minutes. Let it bubble for 1 full minute, whisking, so the cornstarch fully cooks.
- Finish the custard: Remove from the heat and stir in the butter and vanilla until glossy.
- Assemble: Spoon the pudding over the crumb base and chill for at least 2 hours.
- Serve cold: Top with a pinch of extra crumbs or a few chocolate chips right before serving.
Equipment for This Recipe:
- Medium saucepan
- Whisk
- Small bowls
- 4 to 6 small glasses or ramekins
- Measuring cups and spoons
How to Serve This Dish:
Serve these cold in clear glasses so the crumb layer and pudding stripe show off. A tiny spoon helps, which sounds fussy until you realize how much nicer small desserts feel when you don’t need a soup spoon. They pair well with coffee, or with nothing at all if you like pudding the old-fashioned way.
Pro Tips for This Recipe:
- Whisk constantly once the pan goes on the heat. Cornstarch can go from thin to lumpy in a hurry.
- Strain the pudding if you spot any cooked egg bits. That one step cleans up the texture fast.
- Chill with plastic wrap pressed against the surface if you don’t want a skin.
- Make the crumb layer thin. Too much and the spoon gets stuck before reaching the pudding.
Variations on This Dish:
- Salted Butterscotch Cups: Sprinkle flaky salt on top right before serving.
- Chocolate Crumb Version: Use crushed chocolate cookies instead of graham crumbs for a deeper base.
- Banana Split Style: Add sliced banana between the crumb and pudding layers if you’re serving immediately.
Common Mistakes to Avoid with This Dish:
- Don’t crank the heat too high. The pudding can scorch on the bottom before it thickens.
- Don’t skip the full minute of bubbling. That’s what removes the chalky cornstarch taste.
- Don’t pour hot pudding into warm glasses and then seal them. Let the cups breathe a little before chilling.
12. Oatmeal Raisin Sandwich Cookies with Vanilla Filling
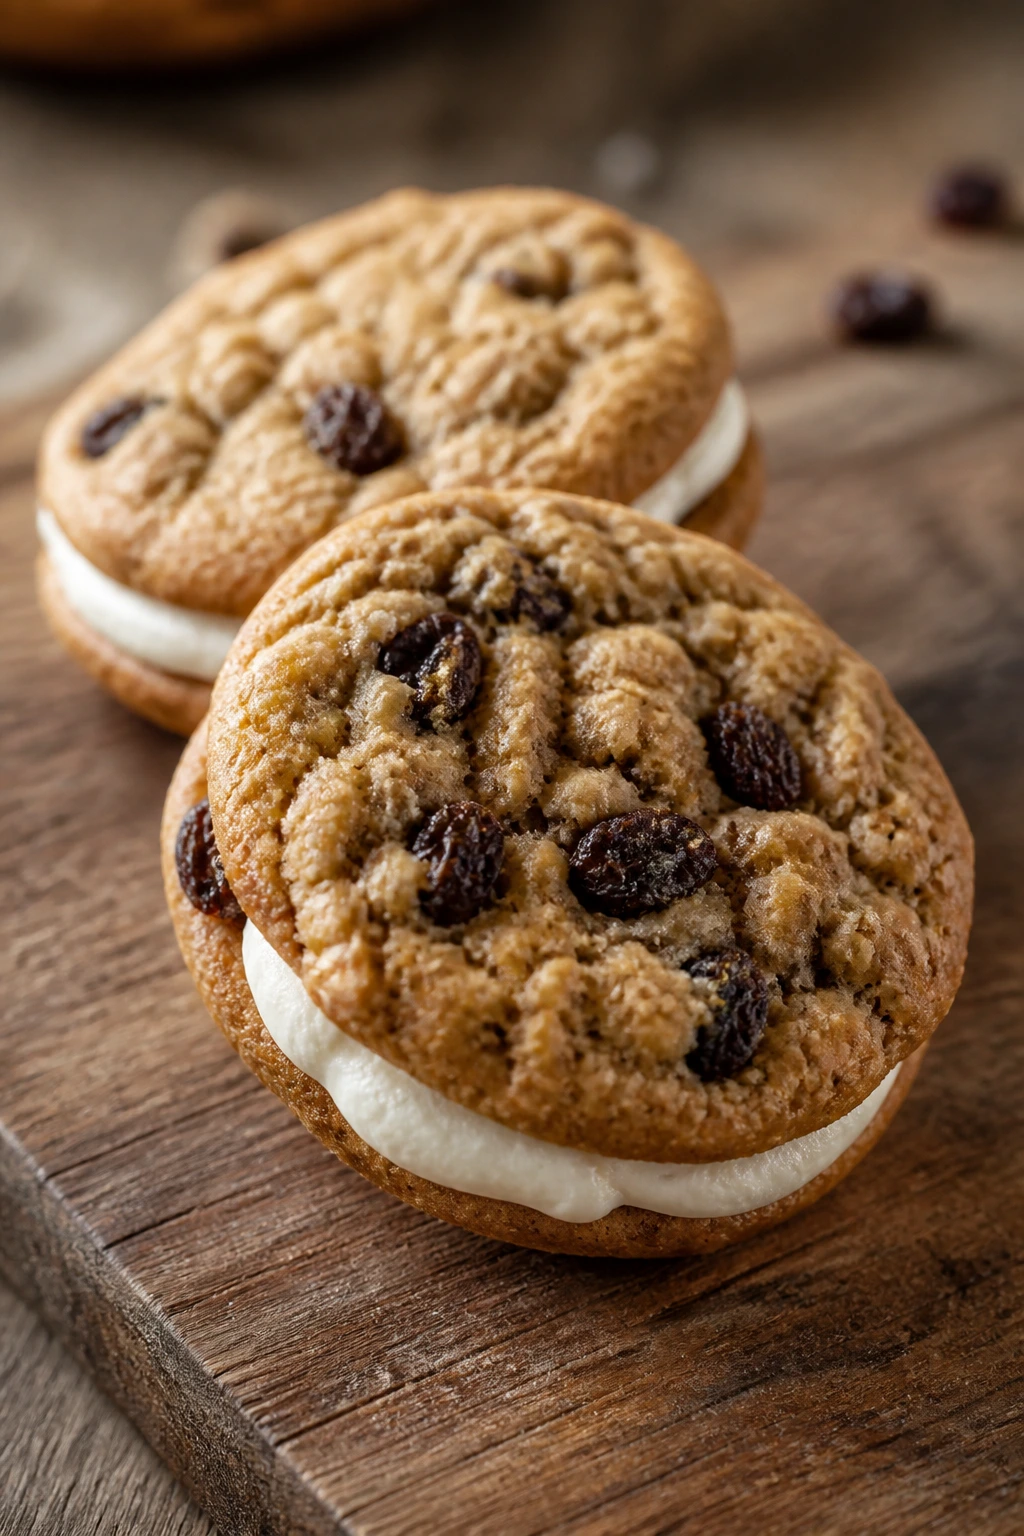
These are the cookies that make oatmeal raisin feel less like the sensible choice and more like the clever one. Two chewy cookies plus a soft vanilla filling create a dessert that eats like a tiny hand pie, only with oats and raisins instead of crust. They’re homespun in the best way and cute enough to stack into a little tower.
Why It Works:
Old-fashioned oats give the cookies chew and rough edges, while brown sugar keeps them soft in the center. The raisins bring little pockets of sweetness that stop the sandwich from tasting one-note. A simple buttercream filling works because it’s sweet, smooth, and firm enough to hold the cookies together without squishing out the sides.
Key Ingredients:
- 1/2 cup unsalted butter, softened
- 1/2 cup packed light brown sugar
- 1/4 cup granulated sugar
- 1 large egg
- 1 teaspoon vanilla extract
- 1 cup all-purpose flour
- 1 1/2 cups old-fashioned oats
- 1/2 teaspoon baking soda
- 1/2 teaspoon ground cinnamon
- 1/2 teaspoon fine salt
- 3/4 cup raisins
- 4 tablespoons unsalted butter, softened, for the filling
- 1 1/2 cups powdered sugar
- 1 teaspoon vanilla extract, for the filling
- 1 to 2 tablespoons milk
Quick Steps:
- Preheat and line: Heat the oven to 350°F (175°C) and line baking sheets with parchment.
- Make the dough: Cream the butter and both sugars until fluffy, then add the egg and vanilla.
- Add the dry ingredients: Mix in the flour, oats, baking soda, cinnamon, and salt until combined, then fold in the raisins.
- Scoop and bake: Drop tablespoon-sized mounds onto the sheet and bake for 10 to 12 minutes, until the edges are set and the centers still look soft.
- Cool completely: Let the cookies cool on a rack before filling them.
- Whip the filling: Beat the filling butter, powdered sugar, vanilla, and enough milk to make a spreadable cream.
- Sandwich: Spread or pipe a tablespoon of filling onto one cookie and press another on top.
Equipment for This Recipe:
- Mixer
- Mixing bowls
- Baking sheets
- Parchment paper
- Small offset spatula or piping bag, optional
How to Serve This Dish:
These stack nicely on a platter, and they look especially cute when you alternate the tops and bottoms so the filling shows. They’re substantial enough for a lunchbox treat but small enough to feel like dessert instead of a heavy snack. A glass of milk works, though a mug of tea cuts the sweetness better.
Pro Tips for This Recipe:
- Use old-fashioned oats for chew. Quick oats make the cookie softer and less textured.
- Cool the cookies completely before filling or the buttercream melts.
- Keep the filling on the thick side so it doesn’t squeeze out the edges.
- If the raisins seem dry, soak them in hot water for 10 minutes, then dry well before adding.
Variations on This Dish:
- Spiced Oat Sandwiches: Add a pinch of nutmeg to the dough for a warmer flavor.
- Chocolate-Fill Version: Replace the vanilla filling with a cocoa buttercream made from 2 tablespoons cocoa powder and a splash more milk.
- Cran-Raisin Swap: Use dried cranberries instead of raisins for a sharper, tangier middle.
Common Mistakes to Avoid with This Dish:
- Don’t overbake the cookies before sandwiching. Dry oatmeal cookies crumble when pressed.
- Don’t use too much filling. These should be neat little sandwiches, not frost-heavy stacks.
- Don’t skip cooling. Warm cookies make the filling greasy and soft.
13. Magic Cookie Bars Cut into Tiny Squares
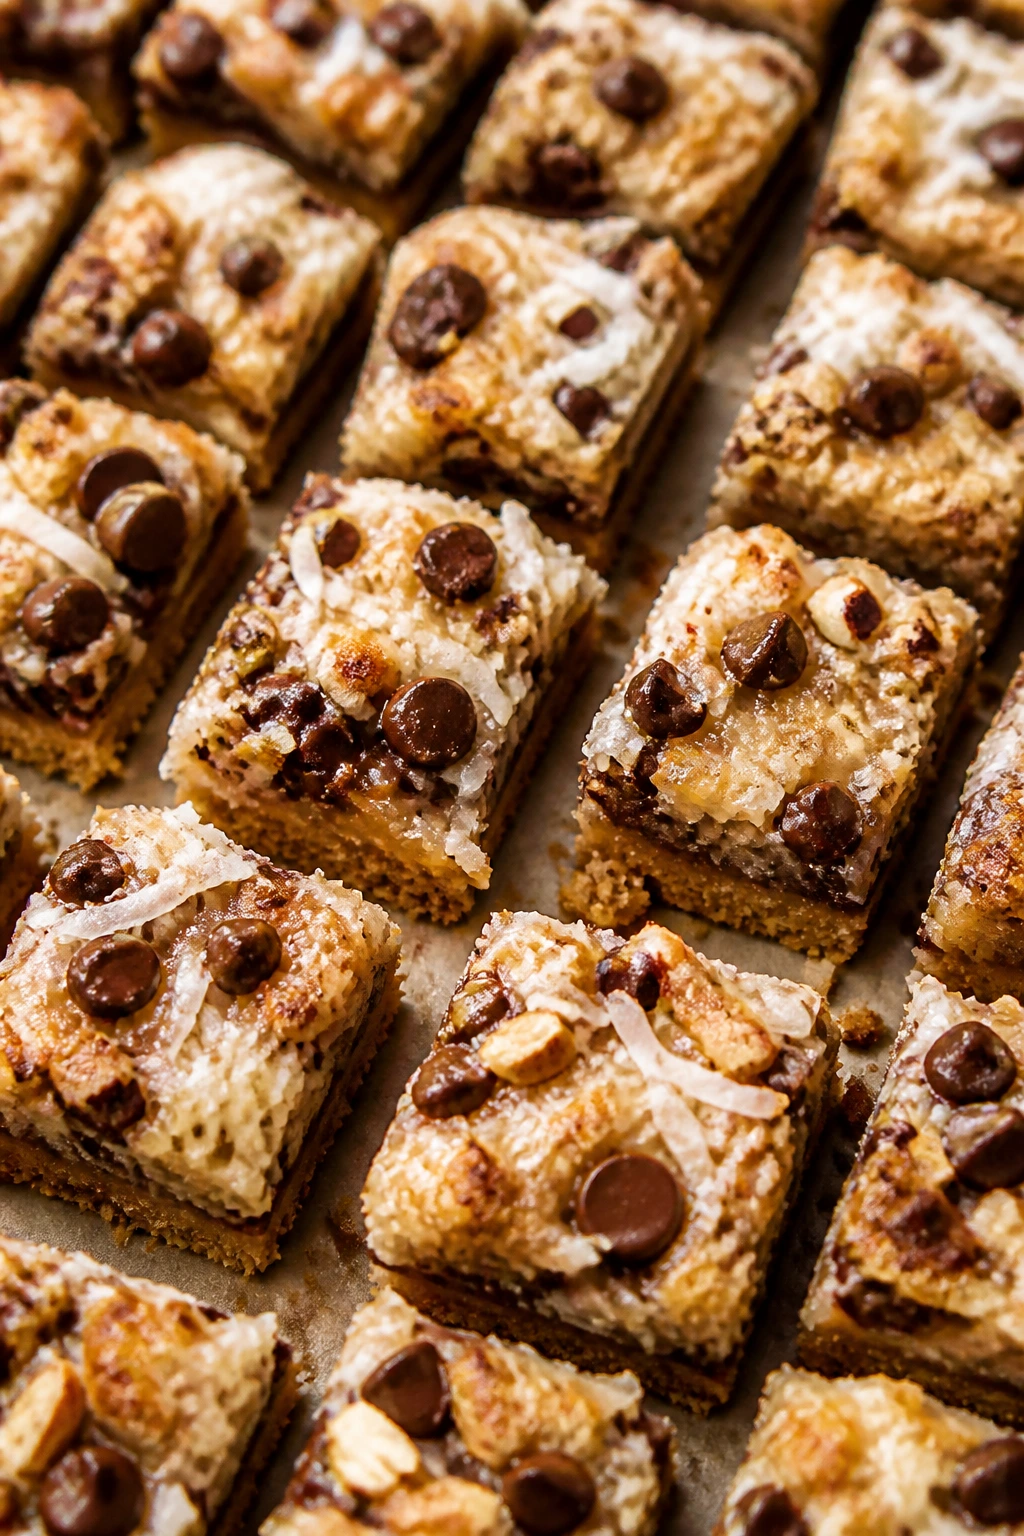
Magic cookie bars look like a pantry clean-out in the best possible sense: graham crust, chocolate chips, coconut, nuts, condensed milk, and a bake that knits the whole thing together into glossy, chewy layers. Cut them small and they become one of the easiest cute desserts on the whole list. They’re rich, so the tiny size actually helps.
Why It Works:
Sweetened condensed milk acts like glue and caramel at the same time, soaking into the crumb base and holding the topping in place. Coconut and nuts toast while the bars bake, which gives you texture against all that soft, sticky sweetness. A smaller cut keeps the bars from feeling too dense, because these are not shy about sugar.
Key Ingredients:
- 1 1/2 cups graham cracker crumbs
- 6 tablespoons unsalted butter, melted
- 1 cup sweetened shredded coconut
- 1 cup semisweet chocolate chips
- 1 cup butterscotch chips
- 1 cup chopped pecans or walnuts
- 1 can (14 ounces) sweetened condensed milk
Quick Steps:
- Prep the pan: Heat the oven to 350°F (175°C) and line an 8×8-inch or 9×9-inch pan with parchment.
- Build the crust: Mix the graham crumbs and melted butter, then press into an even layer.
- Add the toppings: Scatter the coconut, chocolate chips, butterscotch chips, and nuts evenly over the crust.
- Pour the milk: Drizzle the sweetened condensed milk over the whole surface, trying to cover as much as possible.
- Bake: Bake for 25 to 30 minutes, until the top is golden in spots and the edges are bubbling.
- Cool completely: Let the bars cool fully before lifting them out and cutting into small squares.
- Trim small: For a cute finish, cut them into 1-inch squares or skinny diamonds.
Equipment for This Recipe:
- 8×8- or 9×9-inch baking pan
- Parchment paper
- Mixing bowl
- Rubber spatula
- Sharp knife
How to Serve This Dish:
These belong on a dessert tray in small, neat pieces. A little goes a long way, and the layered look makes them feel like something from a bake sale that got promoted to party status. They’re good at room temperature, and they travel better than most frosted desserts.
Pro Tips for This Recipe:
- Press the crumb base firmly so the bars cut cleanly.
- Cover the whole top with condensed milk as evenly as you can; dry patches bake oddly.
- Cool completely before cutting or the coconut layer drags.
- Wipe the knife between cuts for the cleanest little squares.
Variations on This Dish:
- Chocolate-Only Bars: Use only chocolate chips if you want a less sweet, simpler flavor.
- Trail Mix Bars: Swap the nuts for sunflower seeds and add a few raisins.
- Salted Coconut Bars: Finish with a pinch of flaky salt right after baking.
Common Mistakes to Avoid with This Dish:
- Don’t cut while warm. The layers need to set or the whole thing smears.
- Don’t overbake. The condensed milk should caramelize lightly, not turn dark.
- Don’t skip parchment. These bars are sticky and clingy without it.
14. Cake Mix Crinkle Cookies with Powdered Sugar Shells
Cake mix cookies are the shortcut I don’t apologize for. They bake up soft, colorful if you want them to be, and dusted with powdered sugar they look more deliberate than the ingredient list would suggest. If you need a dessert that can be made before the kettle boils, this is the one.
Why It Works:
Cake mix already contains flour, sugar, flavoring, and leavening, so you’re using a pre-balanced base instead of building one from scratch. Eggs and oil transform that dry mix into a dough that spreads a little but still holds a tender center. The powdered sugar coating cracks as the cookies bake, giving you the same dramatic finish as more labor-intensive crinkles.
Key Ingredients:
- 1 box cake mix, 15.25 ounces, chocolate, yellow, or lemon
- 2 large eggs
- 1/3 cup vegetable oil
- 1 teaspoon vanilla extract
- 1/2 cup powdered sugar
Quick Steps:
- Preheat and line: Heat the oven to 350°F (175°C) and line two baking sheets with parchment.
- Mix the dough: Stir the cake mix, eggs, oil, and vanilla together until a thick dough forms.
- Chill briefly: If the dough feels sticky, chill it for 15 minutes.
- Roll and coat: Scoop tablespoon-sized portions and roll them in powdered sugar until heavily coated.
- Bake: Place the dough balls 2 inches apart and bake for 9 to 11 minutes, until the cookies have cracked tops and soft centers.
- Cool on the sheet: Let them sit for 5 minutes before moving them to a rack.
- Serve once set: They firm up as they cool, so don’t judge them too early.
Equipment for This Recipe:
- Mixing bowl
- Baking sheets
- Parchment paper
- Cookie scoop or spoon
- Cooling rack
How to Serve This Dish:
Serve these in a low bowl or on a flat plate where the powdered sugar can dust the surface a little. They pair neatly with milk, coffee, or tea depending on the cake mix flavor. If you make different colors, stack them by shade for a dessert platter that looks more planned than it is.
Pro Tips for This Recipe:
- If the dough is sticky, a short chill helps a lot.
- Roll the dough balls generously in powdered sugar; skimpy coating gives a dull finish.
- Use chocolate cake mix if you want the cracks to stand out more dramatically.
- Pull them early for a soft center. They set as they cool.
Variations on This Dish:
- Lemon Snow Crinkles: Use lemon cake mix and add a little extra powdered sugar coating.
- Chocolate Chip Crinkles: Fold 1/2 cup mini chocolate chips into yellow cake mix dough.
- Red Velvet Style: Use red velvet mix and a vanilla glaze after baking if you want a richer look.
Common Mistakes to Avoid with This Dish:
- Don’t add extra liquid beyond the eggs and oil unless the dough is truly impossible to mix.
- Don’t skip the powdered sugar coating. That’s the crackly top.
- Don’t overbake until firm. These cookies are at their best when the center stays soft.
15. Hot Cocoa Mug Cakes with Marshmallow Tops
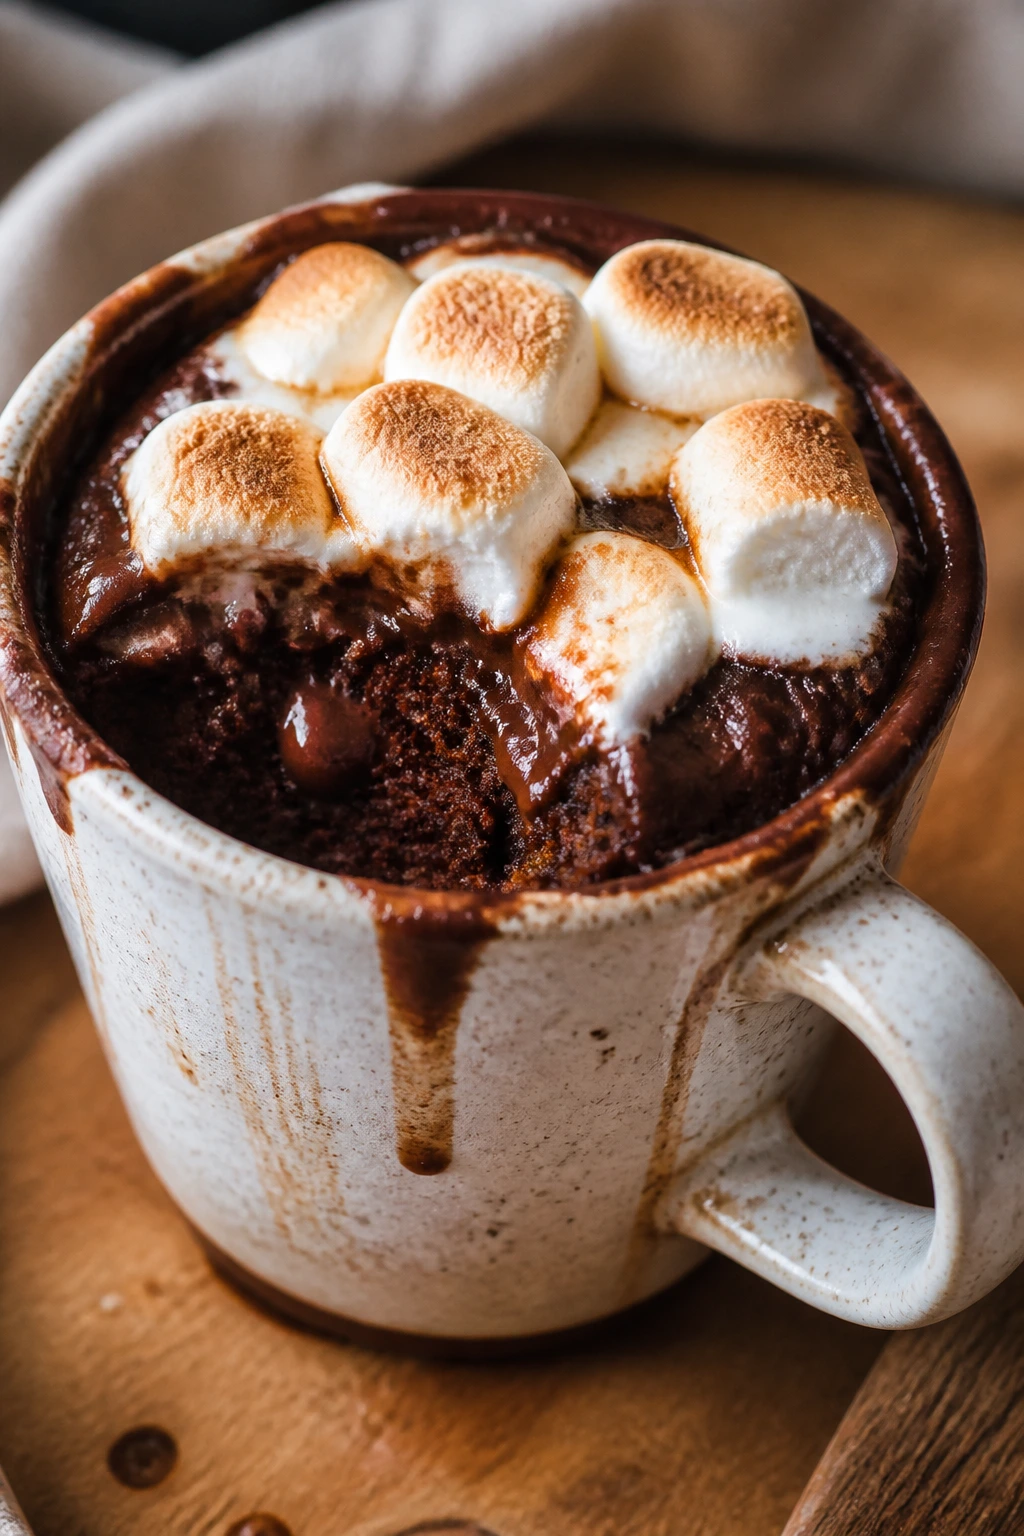
A mug cake is the dessert equivalent of a fast sketch: small, simple, and done before you have time to second-guess it. This hot cocoa version tastes like a cup of chocolate cake and marshmallows had a quiet little meeting in the microwave. It’s cute because it’s contained, and that alone makes it feel a little bit special.
Why It Works:
The batter uses the bare minimum of pantry ingredients to create a single serving that cooks fast and stays tender. Cocoa gives the cake its chocolate base, while a little oil keeps the crumb soft instead of spongey. Marshmallows on top melt and puff just enough to look playful, which is the whole charm here.
Key Ingredients:
- 4 tablespoons all-purpose flour
- 3 tablespoons granulated sugar
- 2 tablespoons unsweetened cocoa powder
- 1/4 teaspoon baking powder
- Pinch of fine salt
- 3 tablespoons milk
- 2 tablespoons vegetable oil or melted butter
- 1/4 teaspoon vanilla extract
- 1 tablespoon chocolate chips
- 2 tablespoons mini marshmallows
Quick Steps:
- Choose the mug: Use a microwave-safe mug that holds at least 10 ounces so the batter has room to rise.
- Mix the dry ingredients: Stir the flour, sugar, cocoa, baking powder, and salt in the mug until the cocoa breaks up fully.
- Add the wet ingredients: Pour in the milk, oil, and vanilla, then stir until the batter looks smooth and no dry flour is hiding at the bottom.
- Add the toppings: Stir in the chocolate chips or leave them on top, then scatter the mini marshmallows over the batter.
- Microwave: Cook on high for 60 to 75 seconds, watching closely near the end. The top should look set but still soft.
- Rest: Let the mug cake sit for 1 minute before eating. It finishes cooking from residual heat.
- Serve warm: Eat straight from the mug or spoon it into a small bowl if you want the marshmallow top to show more clearly.
Equipment for This Recipe:
- Microwave-safe mug or small ramekin
- Spoon
- Measuring spoons
- Small whisk, optional but handy
How to Serve This Dish:
Serve it as soon as it settles so the marshmallows are still a little gooey. A dusting of cocoa powder or a few extra chips on top makes it look more finished. If you want the cute factor to go up, use a clear mug and spoon it onto a saucer.
Pro Tips for This Recipe:
- Start with less microwave time than you think you need. Overcooked mug cakes go dry fast.
- Stir the cocoa well into the dry mix so you don’t get bitter pockets.
- If your microwave runs hot, stop at 60 seconds and check.
- The mug should be only half full before cooking; batter expands quickly.
Variations on This Dish:
- Peppermint Cocoa Mug Cake: Add a drop of peppermint extract and a few crushed mint candies on top.
- Mocha Mug Cake: Stir in a tiny pinch of instant espresso powder for a deeper chocolate note.
- Double Chocolate Version: Swap the marshmallows for extra chocolate chips if you want a denser finish.
Common Mistakes to Avoid with This Dish:
- Don’t use a small mug. Overflow is a mess, not a vibe.
- Don’t overmix into a smooth, airy batter; a few seconds of stirring is enough.
- Don’t leave it in the microwave until the top looks dry. A soft center is part of the texture.
Why Pantry Staples Make Cute Desserts Feel More Doable
Pantry desserts work because the ingredients already know how to behave together. Flour gives structure, sugar controls spread and browning, cocoa brings depth, oats add chew, peanut butter brings fat and salt, and jam gives you instant color without a separate glaze. Once you know which pantry item does what, you stop feeling like you need a special recipe for every small sweet thing.
Cute desserts also benefit from small formats. A cookie cutter, a mini muffin tin, a spoonful of glaze, or a quick drizzle does more visual work than a complicated frosting job ever will. That’s the real secret: not decoration, but proportion. A tiny square looks finished faster than a huge slab, and a heart-shaped fudge piece feels more intentional than an uncut tray.
There’s a practical side too. Shelf-stable ingredients are predictable. You can keep them around, use them in different combinations, and bake on a day when the fridge is nearly empty. That kind of reliability matters more than people admit. It means dessert becomes a thing you can make when you feel like it, not only when you’ve planned three store runs around it.
Essential Equipment for These Recipes
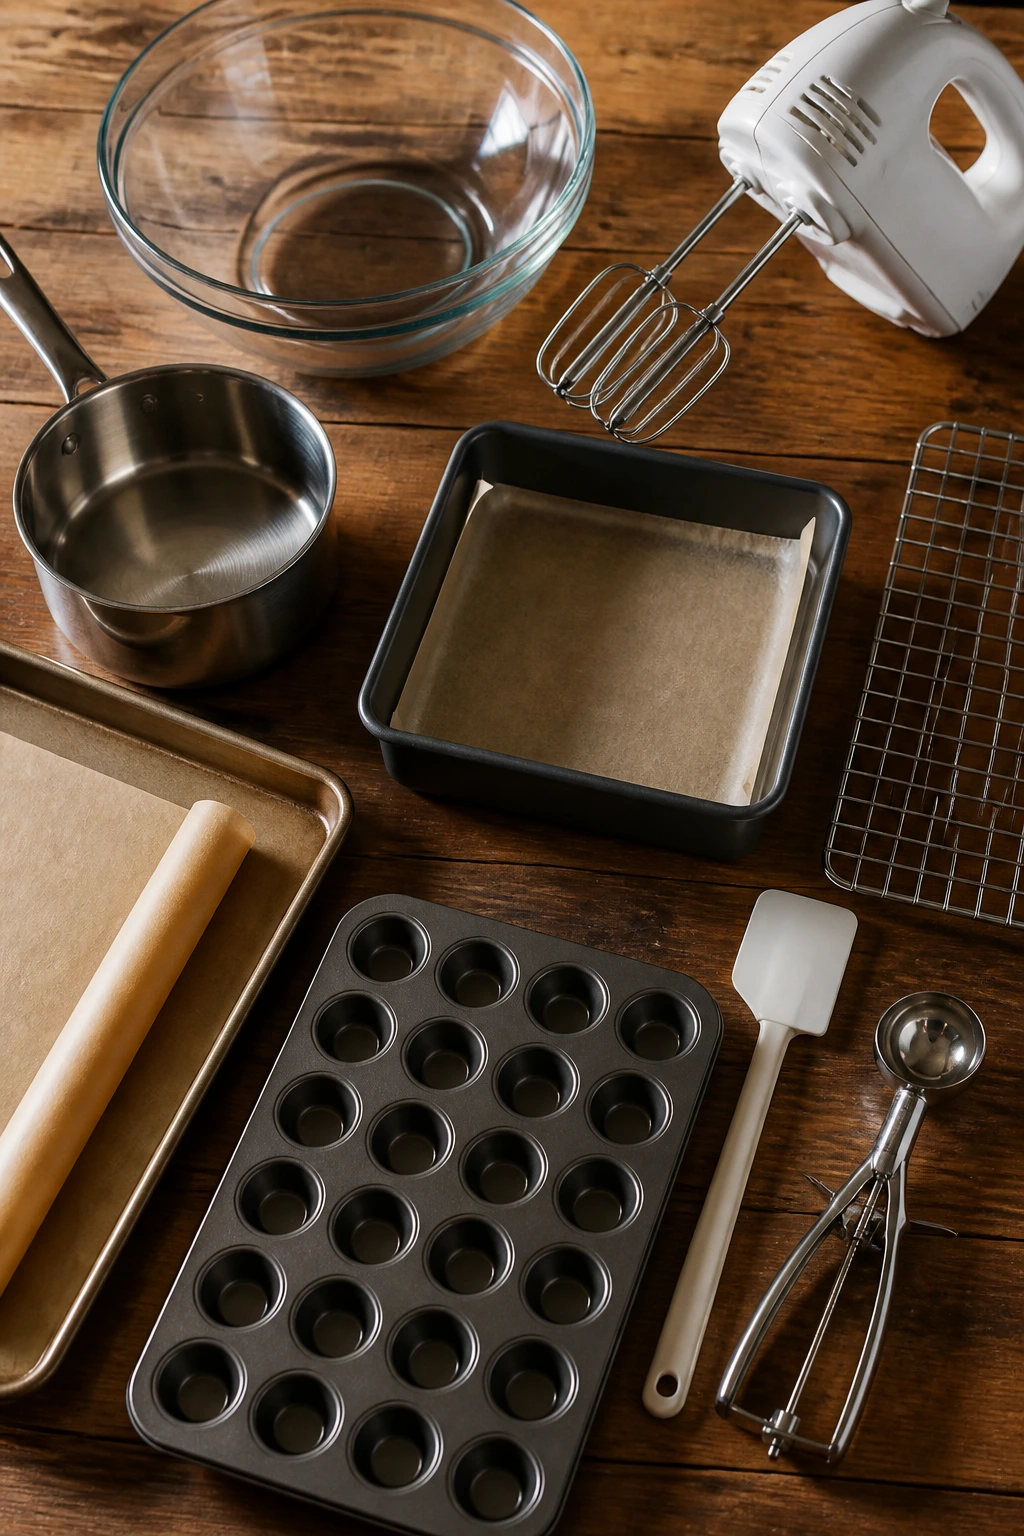
- Mixing bowls in at least two sizes: One for wet ingredients, one for dry, and a spare when a recipe needs a quick crumb or glaze.
- Hand mixer or stand mixer: Helpful for butter-based cookies, thumbprints, and fillings; not required for every recipe, but it saves time.
- Baking sheets with parchment paper: Parchment keeps sticky cookies, crinkles, and shortbread from clinging to the pan.
- Mini muffin tin: Needed for brownie bites and cookie cups, and it turns a plain dough into a more polished-looking dessert.
- 8×8-inch or 9×9-inch baking pan: Best for fudge, magic bars, and any recipe you want to cut into small neat pieces.
- Medium saucepan: Necessary for pudding, no-bake cookies, and any boiled sugar base.
- Rubber spatula or wooden spoon: Good for scraping the bowl clean and folding in oats, coconut, or chocolate chips without tearing the mixture apart.
- Wire cooling rack: Keeps cookies from steaming on the pan and softening underneath.
- Cookie scoop or tablespoon measure: Worth using when you want even size and consistent baking.
- Small cookie cutters or heart cutters: Optional, but they turn bars, fudge, and rice treats into the kind of dessert people notice first.
Smart Shopping and Ingredient Tips
The nicest thing about pantry-dessert shopping is that you don’t need the top shelf version of everything. You do, however, need the right type of pantry item. For cookies, use all-purpose flour unless a recipe says otherwise; bread flour will make them tougher, and self-rising flour changes the leavening in ways that can throw off the texture. For cocoa, plain unsweetened cocoa is the workhorse. Dutch-process cocoa can work in many of these recipes too, but if the recipe depends on baking soda, stick with what’s listed so the rise and flavor stay balanced.
For peanut butter recipes, creamy regular peanut butter behaves more predictably than the natural kind that separates into oil and paste. That’s not a moral judgment. It’s just chemistry. Jam should be thick enough to hold shape in a thumbprint; thin jelly runs, and that glossy center becomes a puddle. Sweetened condensed milk should be the canned, shelf-stable kind, not evaporated milk. They are not interchangeable, and desserts punish that mistake fast.
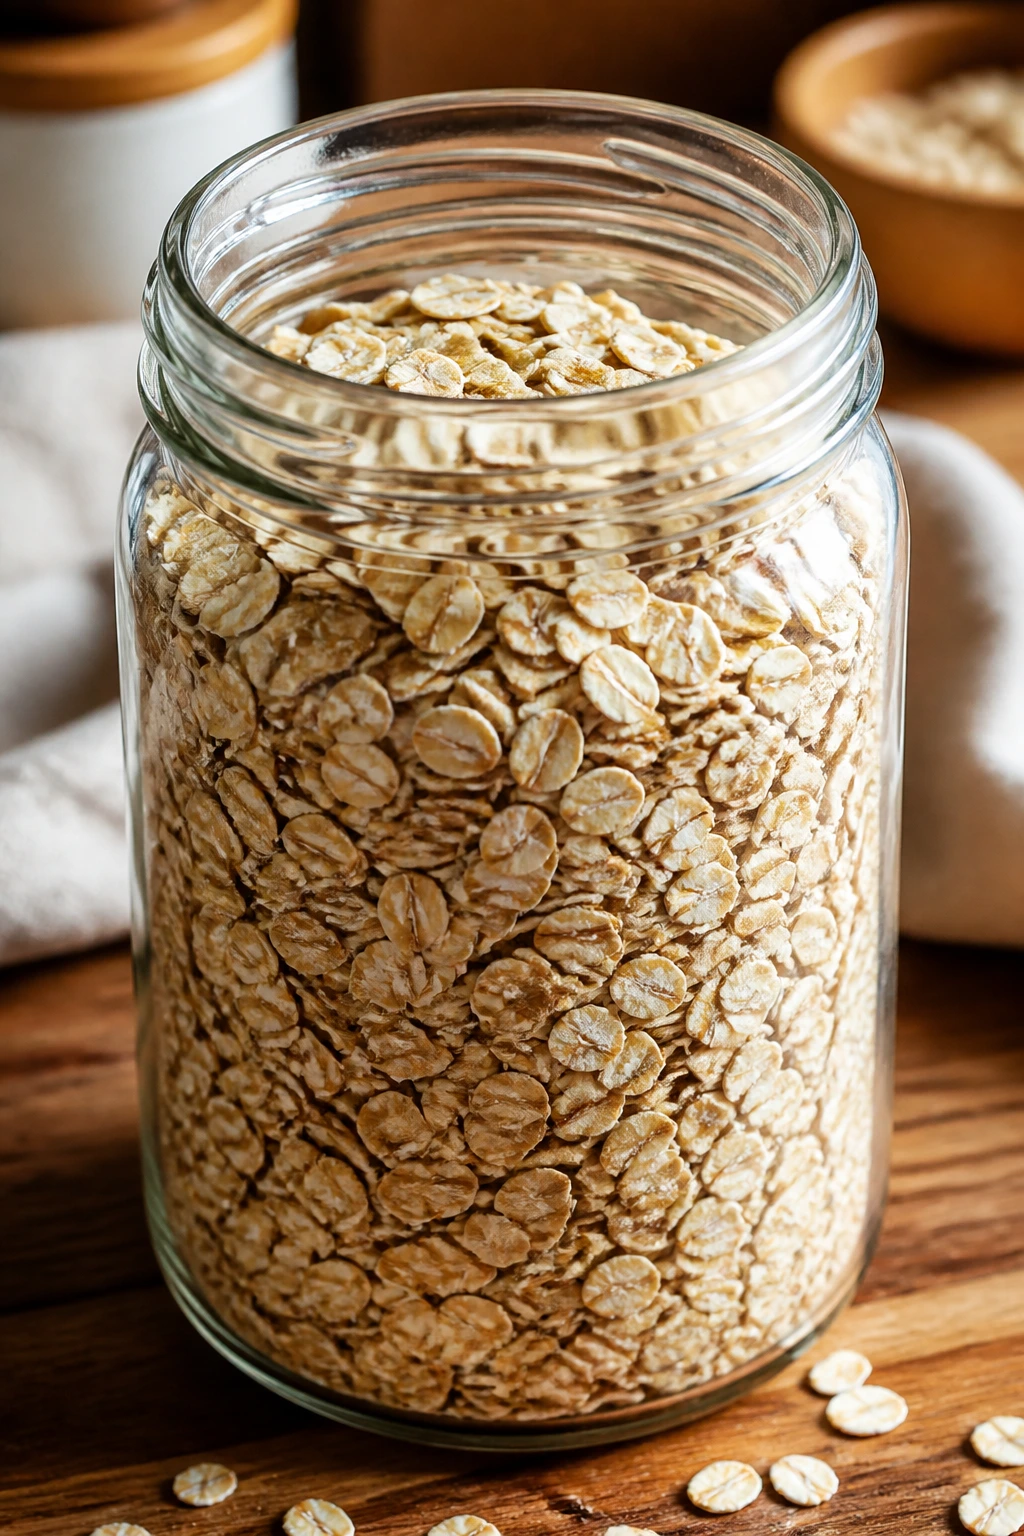
Oats matter more than people think. Old-fashioned oats make cookies chewier and rougher; quick oats absorb liquid fast and work better in no-bakes. For coconut, sweetened shredded coconut is what gives macaroons their shape and chewy bite. For marshmallows, mini marshmallows melt more evenly than giant ones, which is why they’re better for rice treats and mug cakes. Small detail, big difference.
Chocolate chips are one of the few places where quality shows immediately. If you only have standard semi-sweet chips, use them. If you buy a bar and chop it, it melts smoother on shortbread and fudge. I also like keeping powdered sugar in the pantry for dusting and fillings; it turns a plain cookie into something that looks finished in 30 seconds.
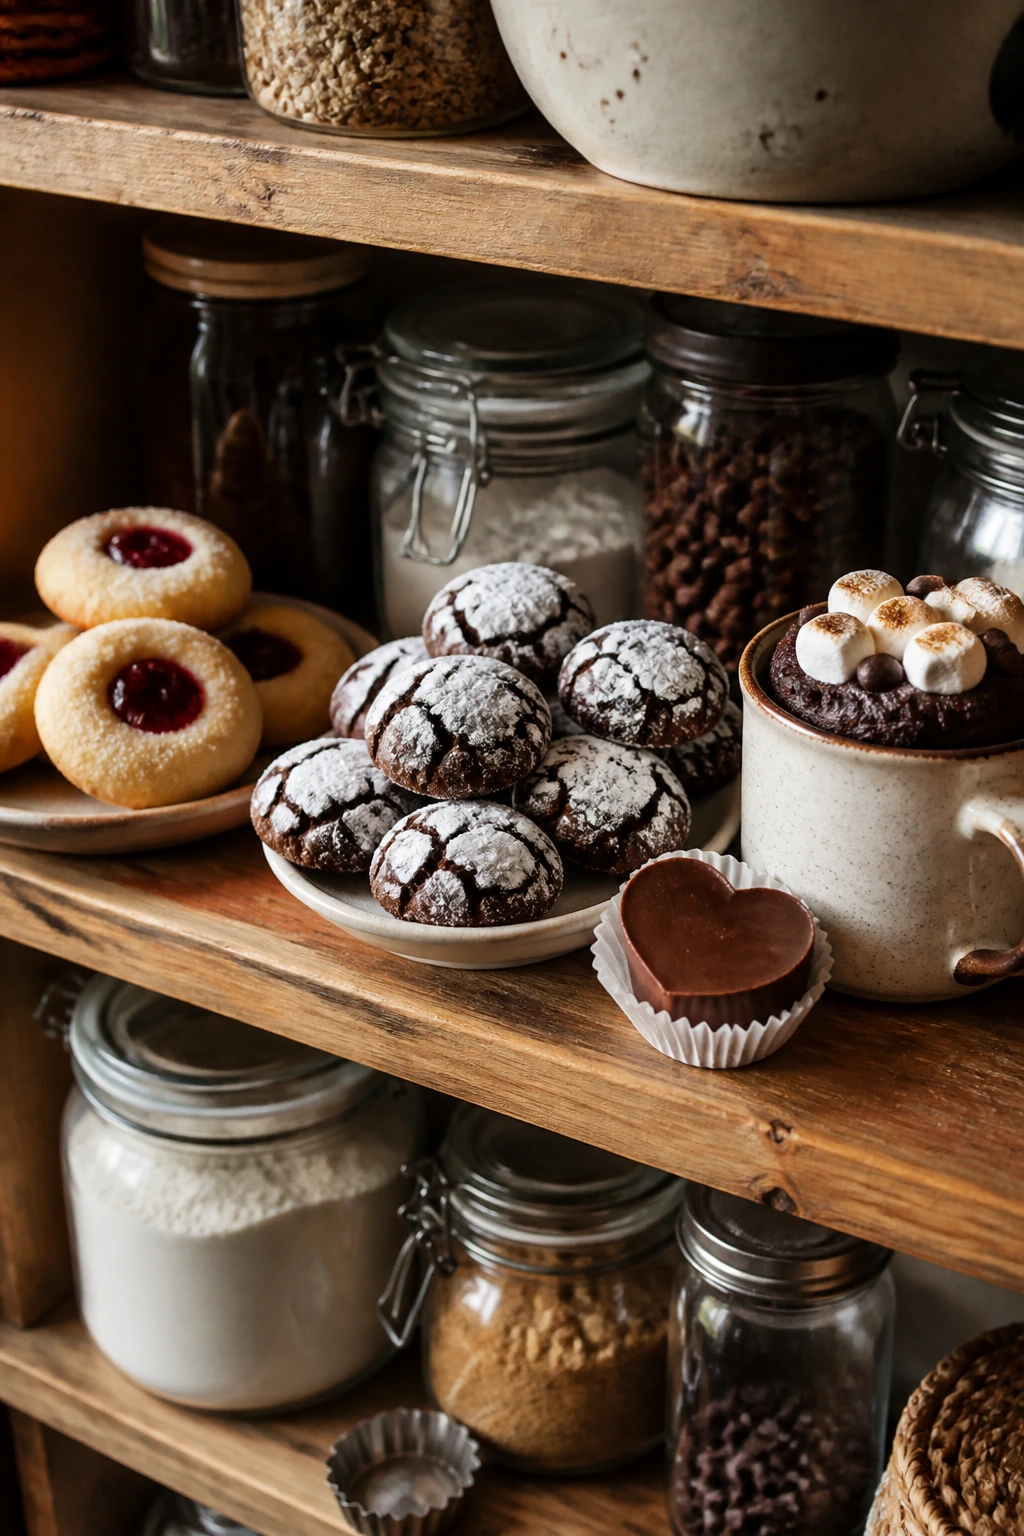
How to Serve These Treats on a Dessert Tray
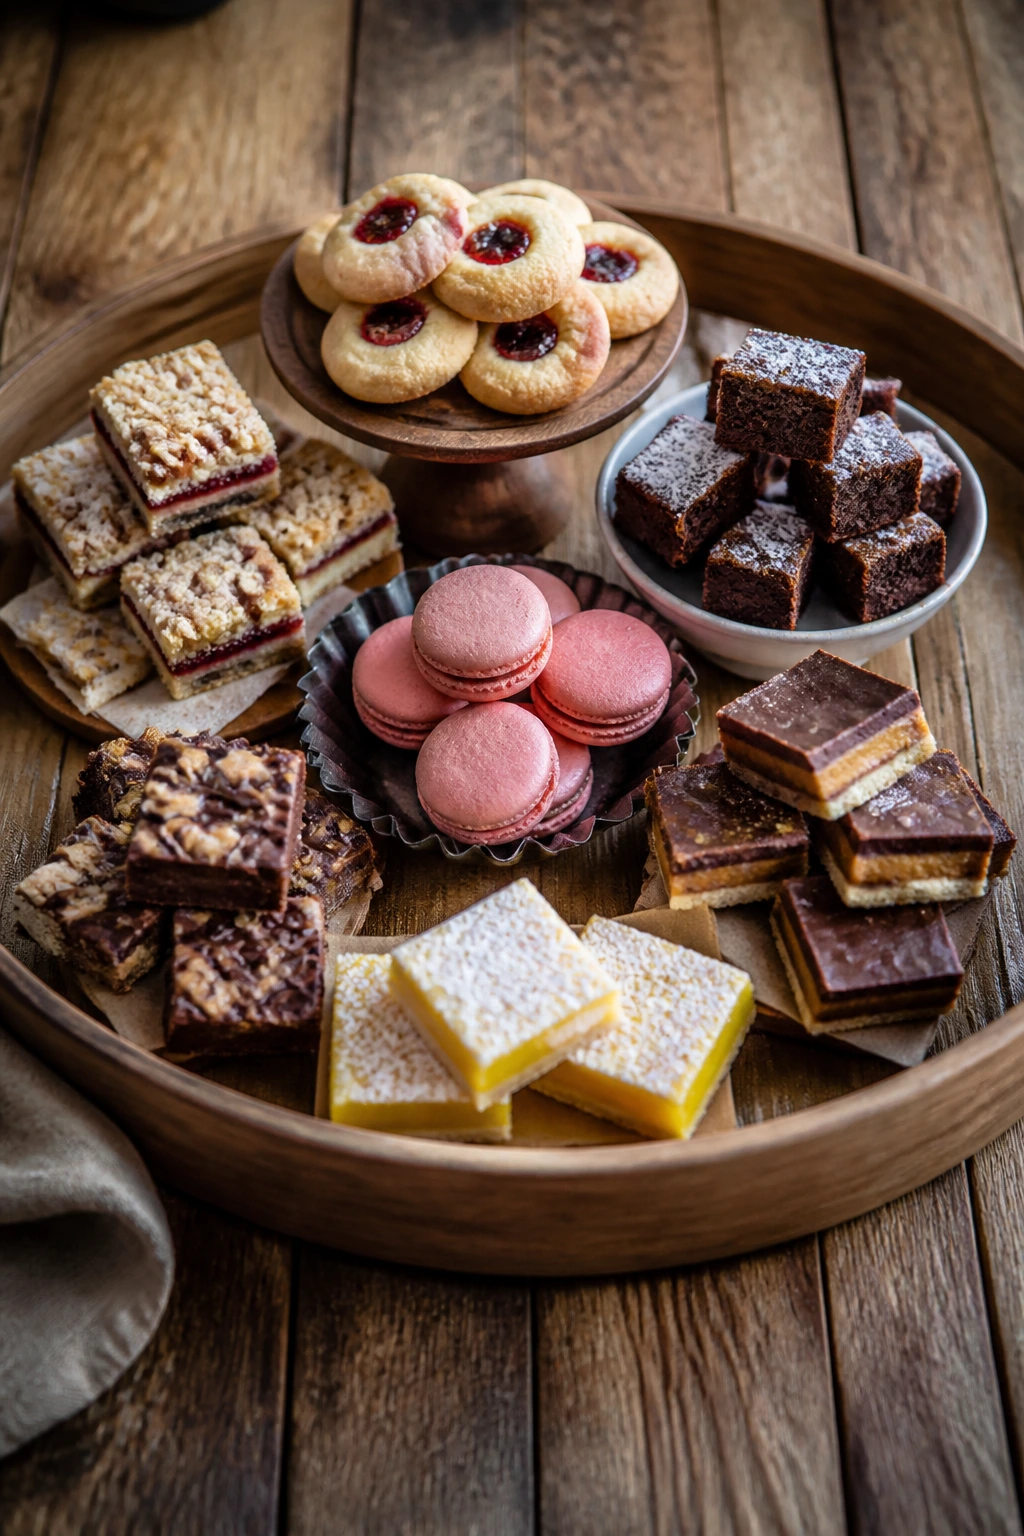
Presentation:
Use a mix of heights and shapes, because that’s what makes a dessert tray look alive. Pile thumbprints and blossoms in shallow stacks, set brownie bites and macaroons in little clusters, and cut bars or fudge into small, tidy pieces so they don’t dominate the plate. A light dusting of powdered sugar or a thin chocolate drizzle can unify the whole spread without making every dessert look the same.
Accompaniments:
Cold milk is the safest all-around choice, but coffee, black tea, and hot cocoa all work depending on how sweet the dessert is. For a more polished plate, pair richer items like fudge and brownie bites with fruit preserves or plain vanilla ice cream. Crisper cookies, like shortbread coins, play nicely beside something soft, such as pudding cups or mug cake.
Portions:
Pantry desserts often feel richer than they look, so small portions make sense. Two cookies, one brownie bite, or a couple of small squares is usually enough when you’re serving a mixed tray. For a party, plan on 2 to 4 pieces per person if the table has several sweets; if these are the only dessert, increase that to 4 to 5 smaller pieces.
Beverage Pairing:
Coffee with a little milk works across the whole collection, especially with chocolate, shortbread, and peanut butter. For cinnamon, coconut, or jam-based treats, black tea or Earl Grey gives a clean contrast. If you want a kid-friendly option, cold milk or vanilla milk makes the sweeter items taste less heavy.
Additional Tips and Flavor Boosters
Flavor Enhancement:
A pinch of salt on chocolate desserts changes everything. Not a lot — a few flakes or a tiny pinch — but enough to keep cocoa, fudge, and brownies from tasting one-note. Espresso powder works the same way in chocolate cookies and mug cakes; it doesn’t make them taste like coffee, it just makes the chocolate louder.
Customization:
If you like texture, add chopped nuts to thumbprints, fudge, no-bake cookies, or magic bars. If you like softer desserts, skip the nuts and add a little extra vanilla or a spoonful of peanut butter where it makes sense. Small swaps like that don’t change the whole recipe; they just tilt it in your direction.
Serving Suggestions:
Powdered sugar is the fastest finishing move in the pantry. So is a chocolate drizzle made from melted chips. If you want a dessert to look more intentional, use a contrast: pale shortbread with dark chocolate, dark brownie bites with white sugar, glossy jam against a matte cookie. That contrast does more than sprinkles ever will.
Make-It-Yours:
For a dairy-free version, choose recipes that already use oil or swap in a plant-based butter that you’ve tested before. For a gluten-free version, look for recipes built around oats, coconut, rice cereal, or a trusted 1:1 baking flour. If you want a less sweet result, reduce the sugar coating on crinkles or use dark chocolate instead of milk chocolate in the dipped cookies.
Make-Ahead, Storage, and Reheating Guidance
Most of these desserts keep well because they’re built from dry pantry ingredients and low-moisture fillings. Plain cookies, shortbread coins, peanut butter blossoms, thumbprints, crinkles, and coconut macaroons usually hold for 3 to 5 days in an airtight container at room temperature, as long as they’re completely cool before packing. Keep soft and crisp cookies separate; a chewy cookie stored with a crisp one steals the texture from both.
Brownie bites, rice krispie treats, fudge, pudding cups, and anything with a creamy filling should go in the refrigerator. The USDA’s basic food-safety rule is plain and useful here: dairy-based desserts need refrigeration within 2 hours, and sooner if the room is warm. Pudding cups are best within 2 to 3 days. Fudge and peanut butter squares can last up to a week chilled, but the texture is nicest in the first few days.
Freezer storage works well for several items. Shortbread coins, thumbprints, blossoms, crinkles, brownie bites, and even baked cookie dough balls freeze for up to 2 to 3 months in airtight containers with parchment between layers. Thaw at room temperature for about 30 minutes. Rice krispie treats can freeze, but they lose some of their spring, so I only do that when I’m making them ahead for a crowd. Magic bars freeze better than you’d expect; just wrap them tightly and thaw in the fridge.
Reheating is mainly for mug cakes and brownie bites. A microwave gives mug cake its intended texture in 10 to 15 seconds of gentle warming, not a full re-bake. Brownie bites can be warmed in a 300°F oven for 4 to 5 minutes if you want the centers soft again. For cookies, I usually skip reheating entirely. Room temperature is where most of them taste best.
Variations and Adaptations to Try
-
Gluten-Free Cupboard Swap
The easiest gluten-free candidates in this collection are macaroons, fudge, rice krispie treats, pudding cups, and mug cake made with a 1:1 gluten-free flour blend. For cookies, the texture changes more than people expect, so chill the dough a little longer and lean on recipes with oats or coconut. -
Dairy-Free Pantry Tray
Peanut butter cookies, crinkles made with oil, many no-bake oat cookies, and mug cakes can all be adapted with plant-based butter or a neutral oil. The main thing is to keep an eye on moisture; dairy-free fats often behave a little differently, so a short chill can save the dough. -
Chocolate-Heavy Version
If you know your crowd wants chocolate first, build the tray around brownie bites, crinkles, chocolate-dipped shortbread, and chocolate mug cakes. Keep one or two lighter items in the mix — thumbprints or macaroons — so the tray doesn’t read like a single flavor repeated five times. -
Fruit-and-Jam Remix
Thumbprints and pudding cups get brighter when you add a second fruit note. Apricot jam, raspberry jam, or a bit of lemon zest in the filling changes the dessert from plain sweet to something sharper and more alive. That’s especially useful after a rich dinner. -
Kid-Friendly Mini Board
Make the smallest versions you can: mini muffin brownie bites, little rice treat hearts, small squares of magic bars, and bite-size cookies. Kids care more about shape and finger-food size than about garnish, and honestly, adults do too once the table fills up. -
Lower-Sugar Version
Choose shortbread, unsweetened coconut macaroons, and peanut butter cookies with a lighter sugar roll if you want a less sweet spread. You can also reduce the finishing sugar on crinkles and skip the drizzle on bars. The trick is to change the topping before you start cutting sugar from the dough, or the texture may suffer.
Common Mistakes to Avoid
The first mistake is using the wrong pantry substitute and pretending it won’t matter. It matters. Evaporated milk is not sweetened condensed milk; quick oats are not the same as old-fashioned oats; thin jelly is not jam. If the recipe asks for a specific pantry item, it usually does so because the texture depends on it.
The second mistake is assuming all cookies should bake until they look done in the center. They shouldn’t. Thumbprints, blossoms, crinkles, and brownie bites all finish setting as they cool, and if you wait until they look fully baked in the oven, you’ll end up with dry edges and a dull crumb. The visual cue is usually the rim, not the middle.
Third, people chill too little or too much without paying attention to the dough. Soft cookie dough spreads; overchilled dough cracks and bakes unevenly. If the dough is sticky, a short rest in the fridge helps. If it’s stiff enough to break, let it sit a few minutes on the counter before scooping. Simple, but it saves a lot of frustration.
Fourth, many home bakers mix no-bake desserts too long after the pot comes off the heat. Oat cookies and marshmallow treats set fast. Once the syrup or marshmallow is ready, you need to move. If you pause to answer a text or wash a spoon, you’ll know because the mixture turns thick before it’s spread or dropped.
Finally, there’s the size problem. Cute desserts depend on proportion. A thumbprint with too much jam, a brownie bite that’s overfilled, or a rice treat cut into giant slabs stops looking charming and starts looking clumsy. Smaller pieces usually taste better too, which is a nice bonus.
Frequently Asked Questions
Can I make these desserts with only basic pantry ingredients and no fresh fruit?
Yes. That’s the whole point of this collection. Jam, cocoa, peanut butter, oats, coconut, condensed milk, marshmallows, and sugar do most of the work, and you can keep the results feeling varied by changing the shape, finishing, or baking method.
Which of these desserts travel best for gifting or potlucks?
Shortbread coins, thumbprint cookies, peanut butter blossoms, crinkles, coconut macaroons, and magic bars travel especially well because they don’t depend on a delicate filling. Pack them in layers with parchment between them, and keep anything creamy or chilled in a separate container.
Do I need a mixer for all of these recipes?
No. A mixer helps with butter-heavy doughs and fillings, but several recipes are fine with a whisk and spatula. No-bake cookies, pudding cups, rice treats, and mug cakes can all be made by hand without much trouble.
Can I use natural peanut butter in the peanut butter recipes?
You can, but the texture changes. Natural peanut butter can make cookies spread more and fudge feel looser, so mix it thoroughly and chill the dough if it seems soft. If you want the most predictable result, regular creamy peanut butter is easier.
How do I keep cookies soft instead of dry?
Pull them when the edges are set and the centers still look slightly underdone. Then cool them on the baking sheet for a few minutes before moving them. Airtight storage matters too; a slice of bread in the container can help keep soft cookies tender for a day or two.
What if my cookies spread too much?
Chill the dough for 15 to 30 minutes, check that your butter wasn’t melted instead of softened, and make sure the flour was measured lightly rather than packed in. Spreading also happens if the baking sheet is warm from a previous batch, so let it cool between rounds.
Can I freeze these desserts?
Many of them freeze well, especially shortbread, crinkles, thumbprints, blossoms, brownie bites, and fudge. Freeze in a single layer first if you can, then move them to a container with parchment between layers. Defrost at room temperature so condensation doesn’t ruin the surface.
Why do my no-bake cookies stay sticky?
Usually the syrup didn’t boil long enough. That full minute at a rolling boil matters because it concentrates the sugar enough for the cookies to set. If they’re already mixed and still sticky, give them extra time at room temperature before blaming the recipe.
Can I make the desserts smaller for a dessert board?
Absolutely, and I think you should. Mini muffin tins, small cutters, and teaspoon-sized drops turn the whole collection into a board that feels elegant without extra effort. Smaller pieces also let people sample more than one flavor, which is half the fun.
A Sweet Pantry Shelf
The best part about these desserts is not that they’re convenient. It’s that they prove ordinary ingredients can still feel thoughtful when you shape them well. A thumbprint with jam, a cocoa crinkle with powdered sugar, a tiny fudge heart, or a mug cake with marshmallows on top doesn’t need a special pantry to feel finished.
I like that kind of baking. It keeps dessert close at hand, and it turns the shelf you already own into something useful instead of decorative. The next time the craving shows up and the fridge looks uninspiring, there’s probably enough in the pantry to fix it before the oven has finished preheating.