
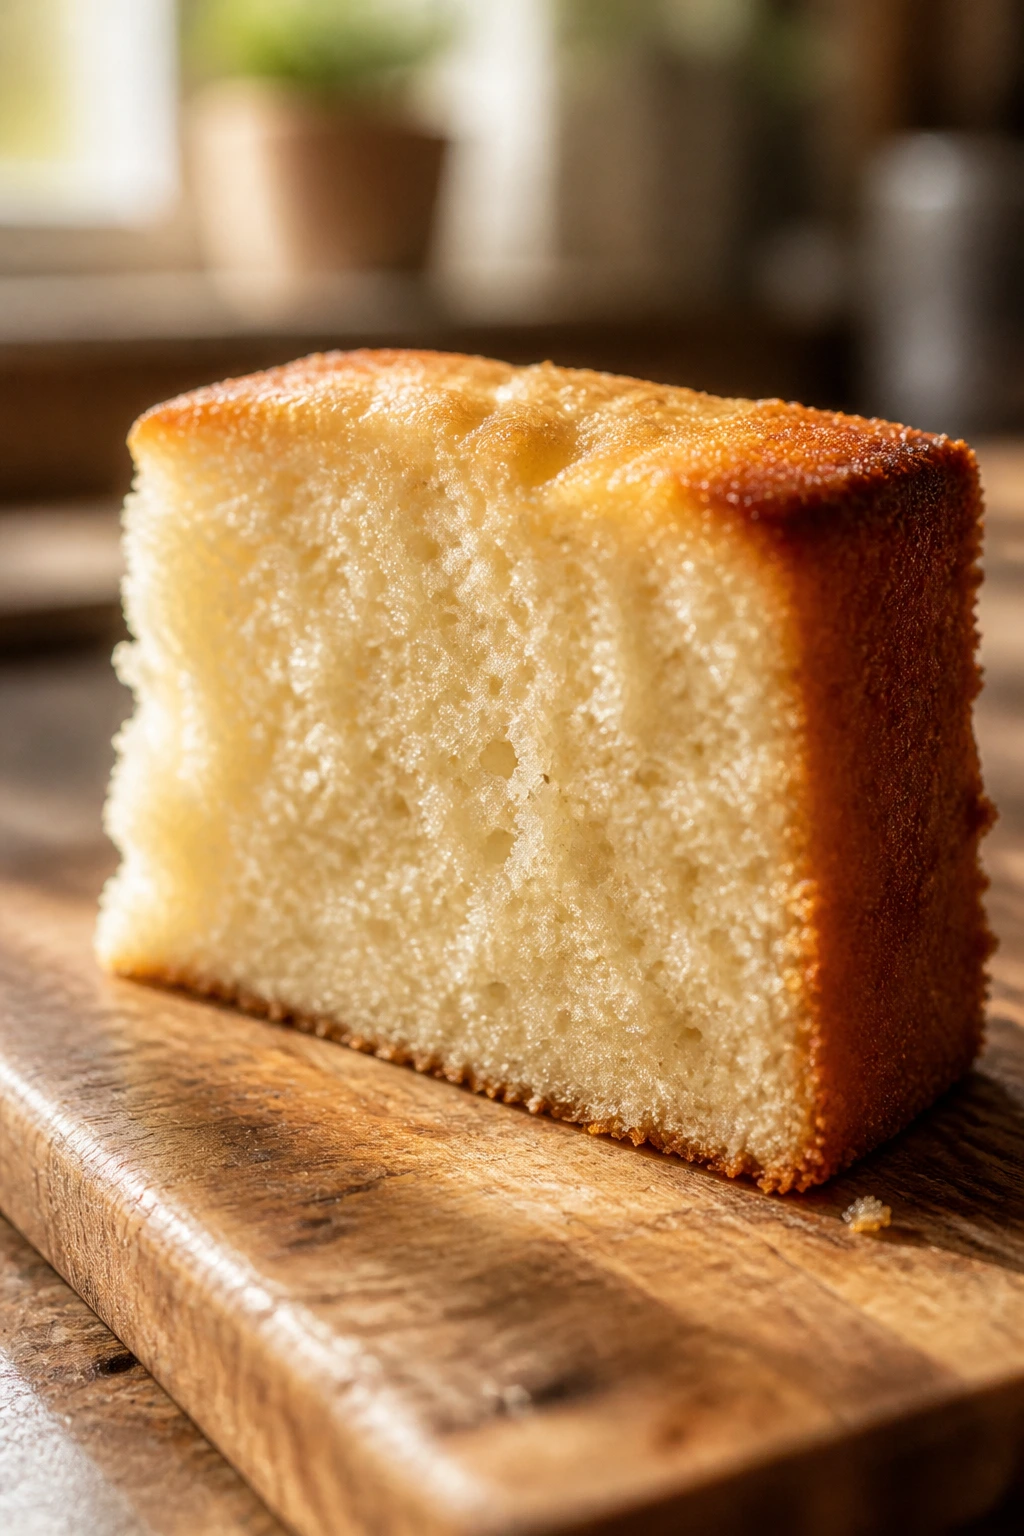
A dessert that stays tender on day three is worth far more than one that looks neat on the first serving and turns dry by the next morning. That matters in July, when a kitchen counter can feel like a heat lamp and anything crisp, flaky, or airy in the wrong way seems to go stale if you blink. The best July desserts that stay soft for days lean on ingredients that hold moisture: brown sugar, sour cream, yogurt, fruit, pudding, oil, and a little bit of restraint in the oven.
That’s the part most baking advice skips. Softness is not luck. It comes from the ingredient list, the mixing method, the pan size, and the exact point where you pull the dessert before it looks “done” in the dramatic, edge-of-burnt sense. I’ve seen perfectly good bars ruined by ten extra minutes and a phone call. I’ve also seen a humble snack cake taste better on day two because the crumb had settled and the fruit had done its quiet work.
A strong July dessert has to do two jobs at once. It needs to feel cool enough for warm weather and sturdy enough to sit in the fridge, travel to a picnic, or linger on the counter without losing its shape. That’s why this collection leans hard into soft cake crumbs, chewy bars, plush cookies, pudding desserts, and fruit-laced bakes that get even better after a little rest. The first batch starts with the one thing every good summer dessert should do: stay worth eating after the first slice.
Why These Soft July Desserts Earn a Spot on the Counter
- Moisture-Heavy Batters: Yogurt, sour cream, oil, and fruit keep the crumb tender long after butter-only cakes go dry.
- Fridge-Friendly Finish: Several of these desserts actually improve after a chill, which makes them easier to slice and serve cleanly.
- Fruit Does the Heavy Lifting: Peaches, berries, cherries, mango, and bananas bring their own juice, and that juice keeps the bake from feeling stale.
- Potluck-Proof Texture: Bars, sheet cakes, and pudding desserts travel better than anything delicate or crisp.
- Low-Fuss Storage: Most of these hold their texture in airtight containers, which means you are not babysitting them all afternoon.
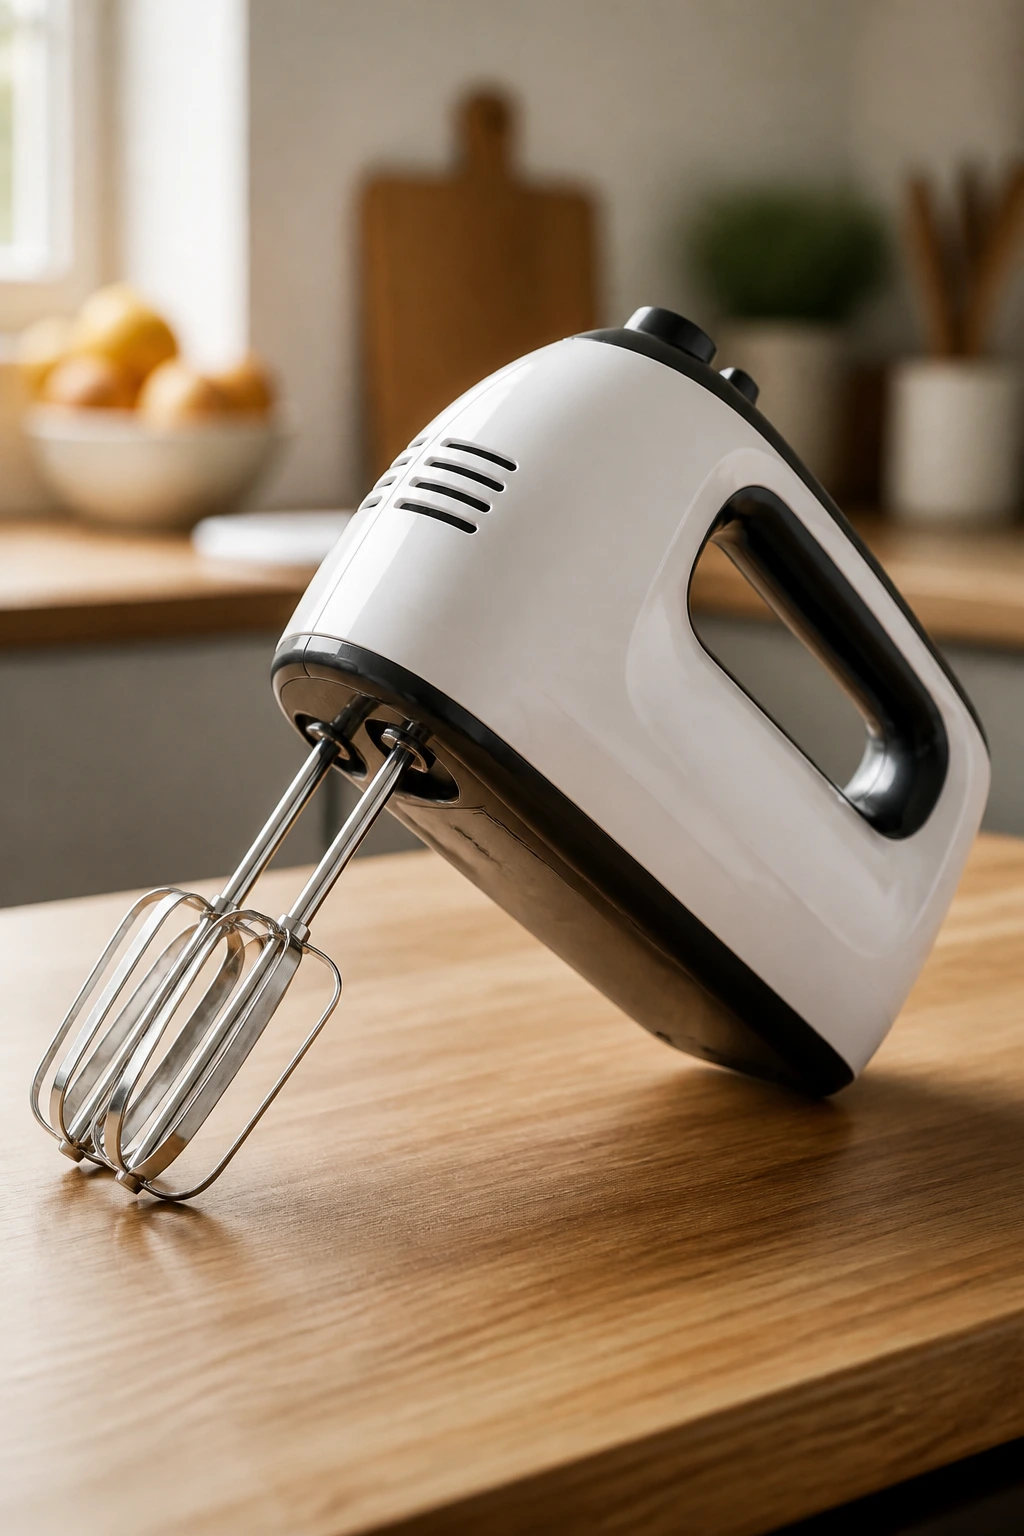
- No Fancy Equipment Spiral: A whisk, a pan, and a good spatula carry more of this list than a stand mixer ever will.
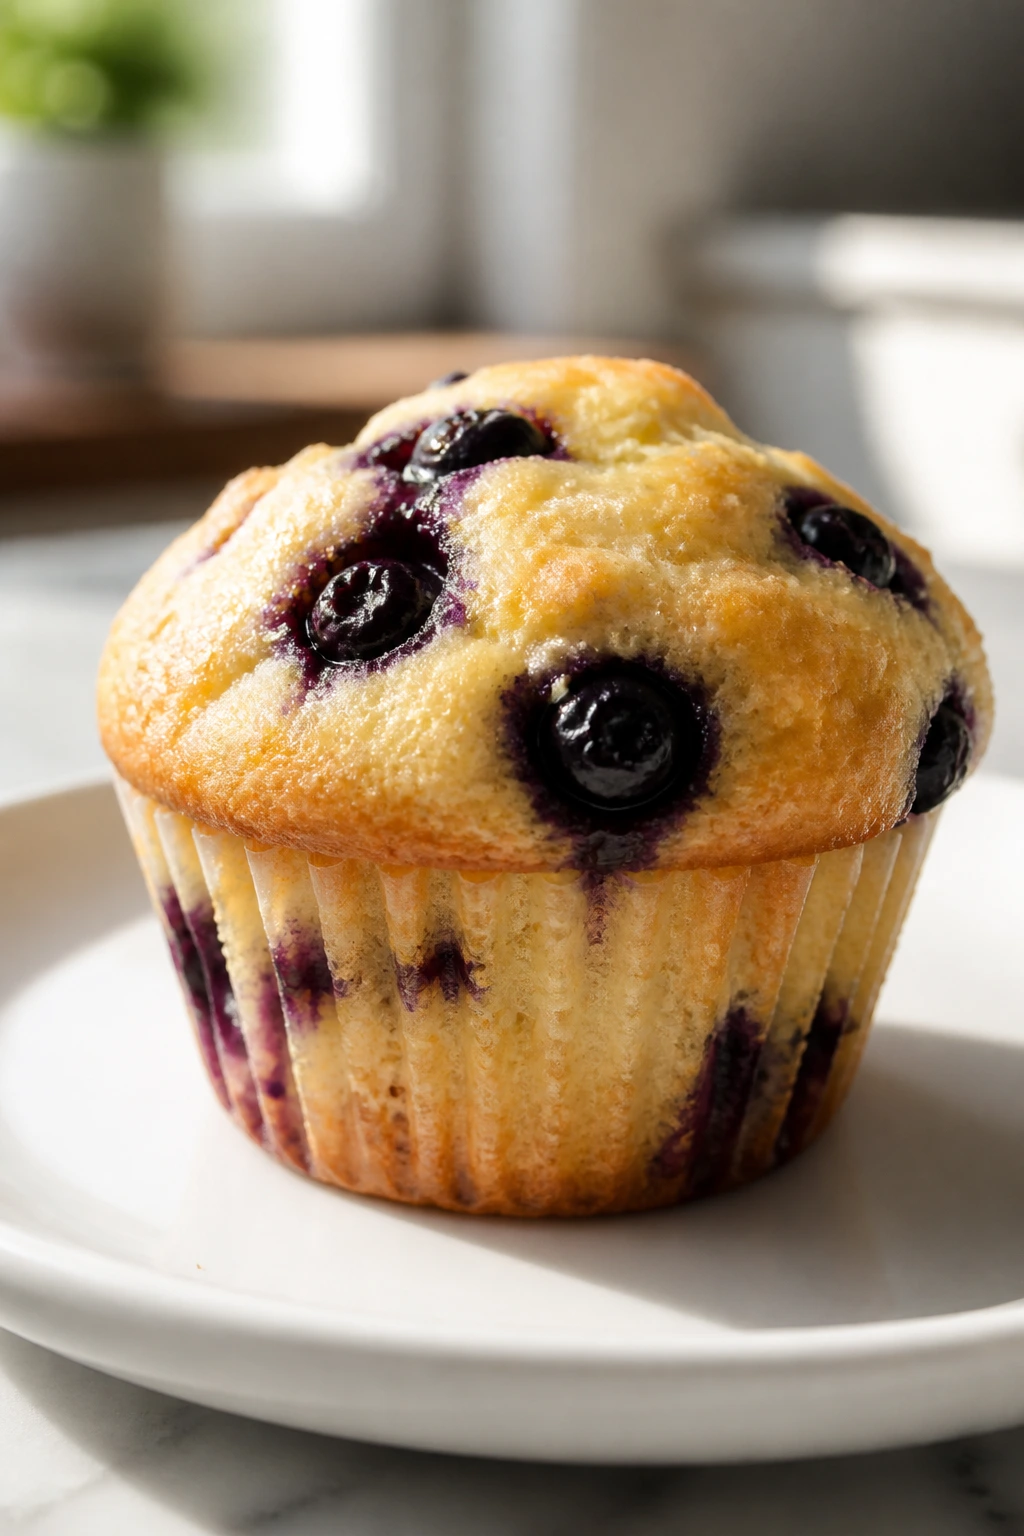
1. Blueberry Buttermilk Muffins
A good blueberry muffin should feel plush when you tear it open, not crumbly in that dry bakery way that leaves your fingertips dusty. Buttermilk gives these muffins a slight tang and a soft, tight crumb, while the blueberries burst into little purple pockets that keep the centers moist for days.
Why It Works:
Buttermilk and melted butter make the batter tender without turning it heavy. The berries release juice as they bake, and that extra moisture hangs around after cooling. A brief rest on the counter lets the crumb settle instead of drying out in the oven’s carryover heat.
Key Ingredients:
- 2 cups all-purpose flour
- 3/4 cup granulated sugar
- 2 teaspoons baking powder
- 1/2 teaspoon baking soda
- 1/2 teaspoon fine salt
- 1 cup buttermilk
- 1/2 cup unsalted butter, melted and cooled slightly
- 2 large eggs
- 1 teaspoon vanilla extract
- 1 1/2 cups blueberries, fresh or frozen
- 1 tablespoon flour, for tossing the berries
- 2 tablespoons coarse sugar, for topping
Quick Steps:
- Preheat the oven to 375°F and line a 12-cup muffin tin with paper liners.
- Whisk the flour, sugar, baking powder, baking soda, and salt in a large bowl.
- In a second bowl, whisk the buttermilk, melted butter, eggs, and vanilla until smooth.
- Fold the wet mixture into the dry mixture until a few streaks of flour remain, then toss the blueberries with 1 tablespoon flour and fold them in gently. Do not overmix.
- Divide the batter among the cups, sprinkle with coarse sugar, and bake for 18 to 22 minutes until the tops spring back and a tester comes out with a few moist crumbs.
- Cool in the pan for 5 minutes, then move to a rack.
Equipment for This Recipe:
- 12-cup muffin tin
- Paper liners
- Two mixing bowls
- Whisk and rubber spatula
- Cooling rack
How to Serve This Dish:
These are best warm with salted butter or cold with a spoonful of plain yogurt. A plate with two muffins and sliced peaches looks like breakfast that wandered into dessert. If you want to stretch them, split them and toast the cut sides lightly the next day.
Pro Tips for This Recipe:
- Use frozen berries straight from the freezer if needed; thawed berries bleed too much.
- Fill the cups nearly to the top for tall domes.
- A 10-minute rest before baking helps the flour hydrate and gives a softer crumb.
- If your oven runs hot, check at 17 minutes.
Variations on This Dish:
- Lemon Blueberry: Add 1 tablespoon lemon zest and a lemon glaze over the cooled tops.
- Peach Swap: Replace half the blueberries with diced peaches, patted dry.
- Mini Muffin Batch: Bake in a mini tin for 10 to 12 minutes for smaller, lunchbox-ready portions.
Common Mistakes to Avoid with This Dish:
- Stirring until the batter is smooth: That gives you tunnels and a tougher crumb. Stop while it still looks a little rough.
- Overfilling the tin with batter spilling over: The muffins fuse together and bake unevenly. Keep the batter just under the rim.
- Skipping the cooling rack: Steam trapped in the tin softens the bottoms in a bad way, not a tender way.
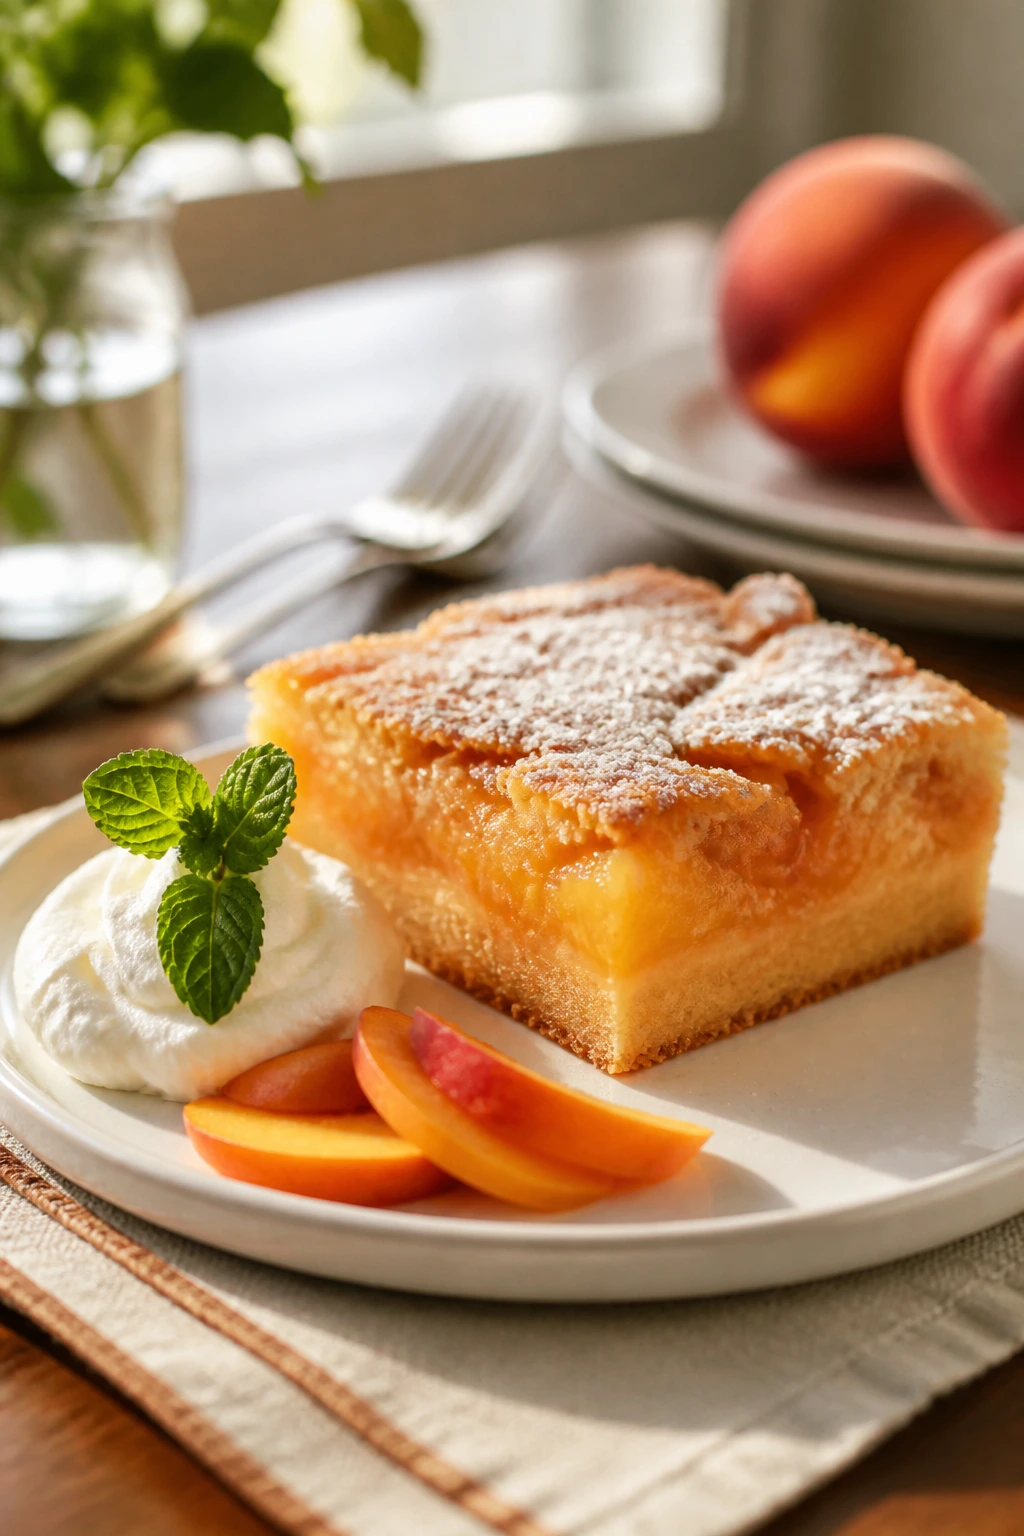
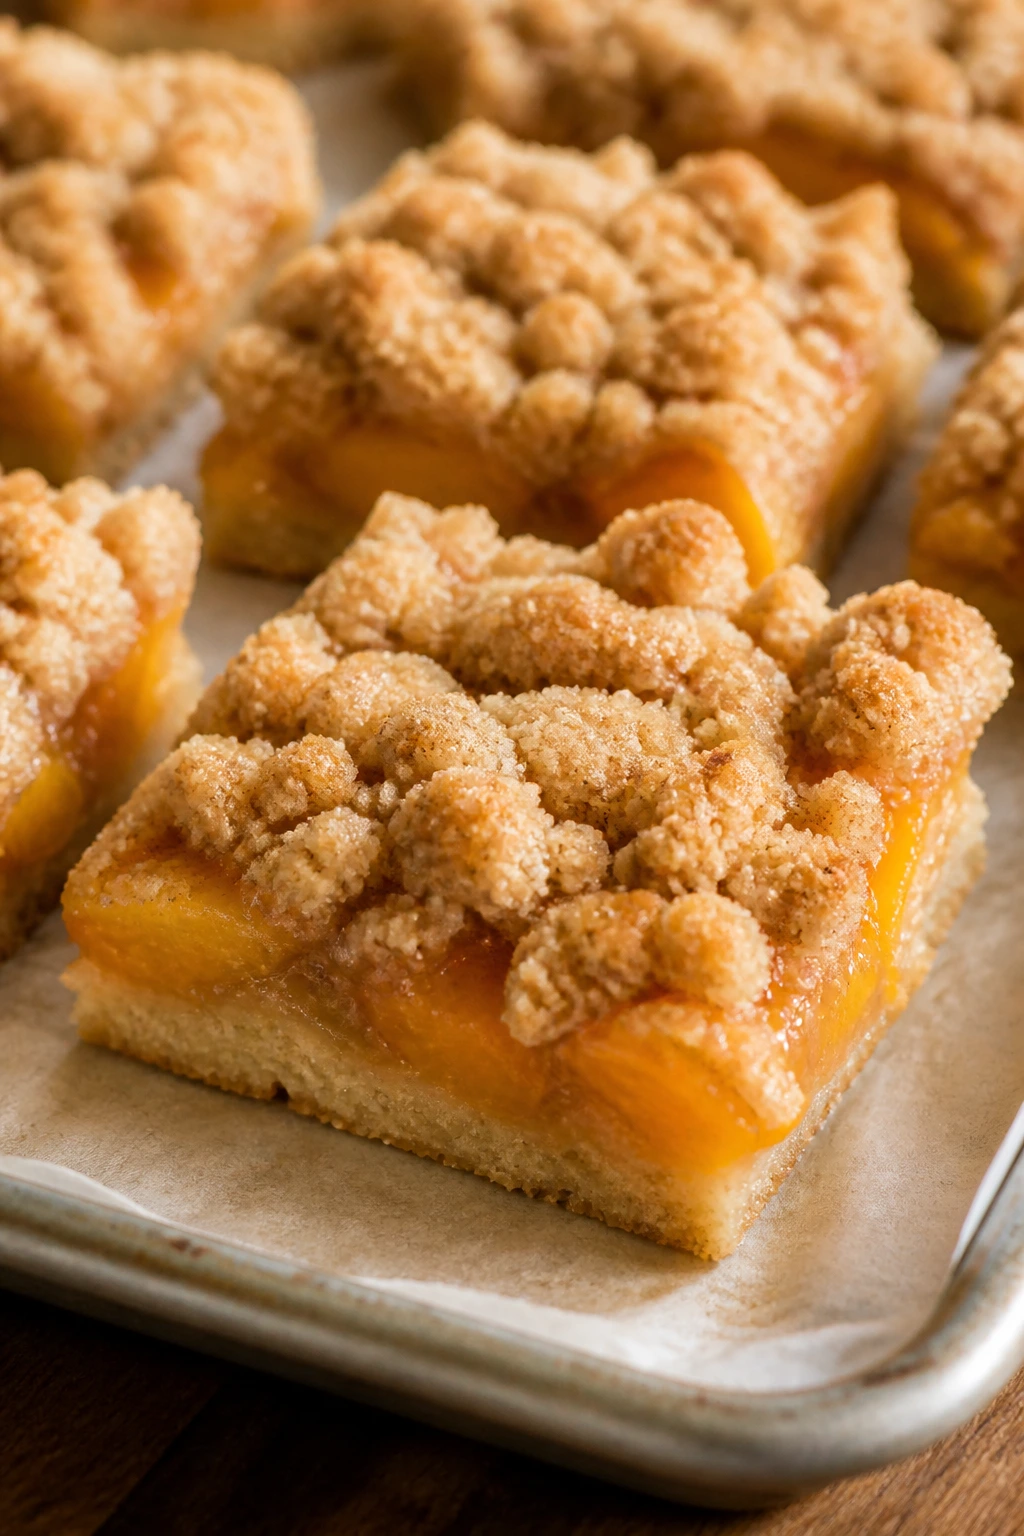
2. Peach Cobbler Bars
These bars taste like peach cobbler got tidier and easier to carry. The base stays soft under a juicy peach layer, and the crumb topping turns sandy at the edges while the center remains tender enough to cut with a butter knife.
Why It Works:
Brown sugar in the crust and topping keeps the bars chewy instead of brittle. Cornstarch thickens the peach juices so the middle sets without turning jammy. A short chill after baking helps the fruit layer settle into the crust instead of sliding apart.
Key Ingredients:
- 2 1/2 cups all-purpose flour
- 1 cup packed light brown sugar
- 1 teaspoon baking powder
- 1/2 teaspoon salt
- 1 cup unsalted butter, softened
- 1 large egg
- 1 teaspoon vanilla extract
- 4 cups peeled, diced peaches
- 1/3 cup granulated sugar
- 2 tablespoons cornstarch
- 1 tablespoon lemon juice
- 1/2 teaspoon cinnamon
Quick Steps:
- Heat the oven to 350°F and line a 9×13-inch pan with parchment.
- Mix 2 1/2 cups flour, brown sugar, baking powder, and salt. Cut in the butter, then mix in the egg and vanilla until a soft dough forms.
- Press about two-thirds of the dough into the pan.
- Toss the peaches with granulated sugar, cornstarch, lemon juice, and cinnamon, then spoon over the base. Crumble the remaining dough over the top.
- Bake for 40 to 45 minutes until the top is golden and the peach filling bubbles at the edges.
- Cool fully, then chill 1 hour before slicing for the cleanest squares.
Equipment for This Recipe:
- 9×13-inch baking pan
- Parchment paper
- Mixing bowls
- Pastry cutter or fork
- Offset spatula
How to Serve This Dish:
Serve the bars at room temperature with vanilla ice cream or lightly sweetened whipped cream. They cut neatly into squares, which makes them easy to stack on a platter without turning into a peach puddle. I like them with a cold glass of milk, though lemonade works too.
Pro Tips for This Recipe:
- Use peaches that are ripe but not collapsing.
- If the fruit is very juicy, add 1 extra teaspoon cornstarch.
- Do not slice while warm unless you like a messy tray.
- A pinch of nutmeg makes the peach flavor taste deeper, not busier.
Variations on This Dish:
- Blackberry Peach Bars: Swap 1 cup of the peaches for blackberries.
- Ginger Peach Bars: Add 1 teaspoon grated fresh ginger to the fruit mixture.
- Oat Crumble Top: Replace 1/2 cup of flour in the topping with quick oats.
Common Mistakes to Avoid with This Dish:
- Using peaches that are too wet: The bars get soupy in the middle. Drain excess juice before assembling.
- Skipping the chill: Warm bars will smear when you cut them. Cold bars behave.
- Baking until the top looks dark brown: The fruit keeps cooking after the pan comes out, so a light golden top is enough.
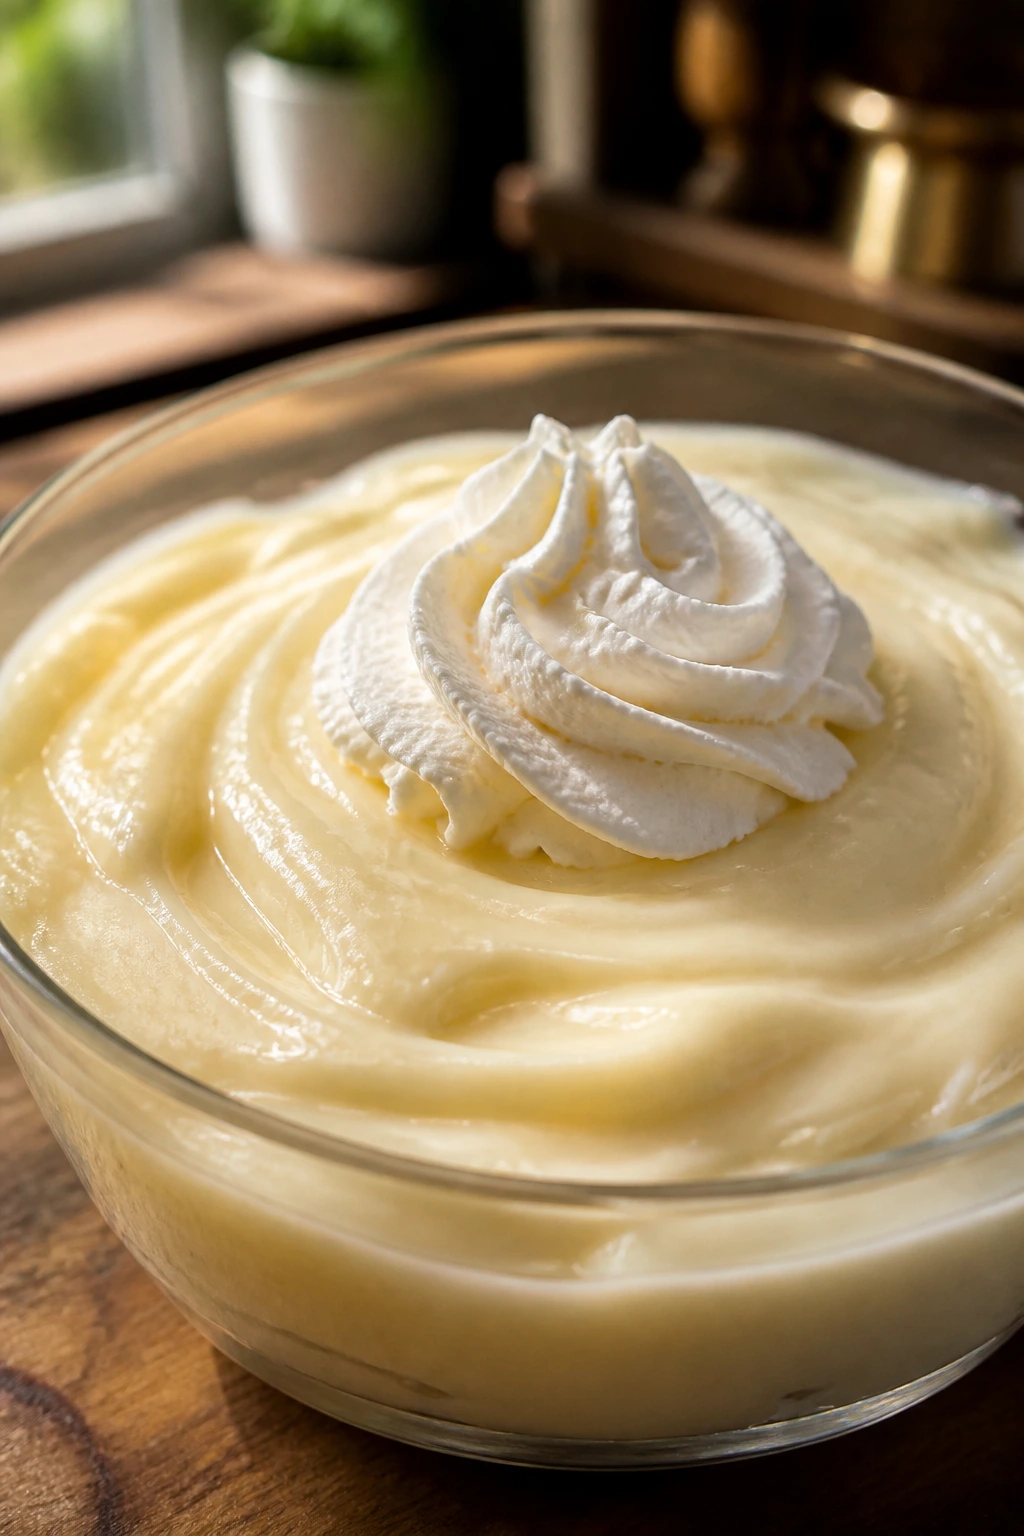
3. Lemon Yogurt Snack Cake
This is the kind of cake that stays soft without asking for frosting gymnastics. It has a fine, almost velvety crumb from yogurt and oil, with lemon zest running through every bite so the whole thing tastes bright even after a day in the fridge.
Why It Works:
Oil keeps the crumb tender longer than butter alone. Yogurt brings acidity and moisture, which softens the structure and keeps the cake from drying out on the edges. The thin glaze, if you use one, seals the top just enough to slow staling.
Key Ingredients:
- 2 cups all-purpose flour
- 1 1/2 teaspoons baking powder
- 1/2 teaspoon baking soda
- 1/2 teaspoon salt
- 1 cup plain whole-milk yogurt
- 3/4 cup granulated sugar
- 1/2 cup neutral oil
- 3 large eggs
- Zest of 2 lemons
- 1/4 cup lemon juice
- 1 teaspoon vanilla extract
- 1 cup powdered sugar, for glaze
Quick Steps:
- Preheat the oven to 350°F and grease an 8×8-inch or 9-inch square pan.
- Whisk flour, baking powder, baking soda, and salt in one bowl.
- In another bowl, whisk yogurt, sugar, oil, eggs, lemon zest, lemon juice, and vanilla until smooth.
- Fold in the dry ingredients just until no flour streaks remain.
- Spread the batter in the pan and bake for 32 to 38 minutes until the center springs back and a tester comes out clean.
- Cool completely, then drizzle with a glaze made from powdered sugar and enough lemon juice to make it pourable.
Equipment for This Recipe:
- 8×8-inch or 9-inch square pan
- Whisk and spatula
- Two mixing bowls
- Microplane or fine grater
- Cooling rack
How to Serve This Dish:
Slice it into tidy squares and add berries on the side. It is good plain, but a spoonful of lightly whipped cream makes it feel more like dessert than coffee cake. The cake also holds up well under a thin layer of sliced strawberries.
Pro Tips for This Recipe:
- Use whole-milk yogurt for the softest crumb.
- Zest the lemons before juicing them.
- Pull it when the center is set but still very pale.
- Wrap the cooled cake well; the flavor deepens overnight.
Variations on This Dish:
- Lime Yogurt Cake: Swap lemon for lime and add a little toasted coconut.
- Blueberry Lemon Cake: Fold in 1 cup blueberries tossed with 1 tablespoon flour.
- Poppy Seed Version: Add 1 tablespoon poppy seeds for crunch in the middle of the crumb.
Common Mistakes to Avoid with This Dish:
- Using low-fat yogurt: The cake can bake up dry and slightly rubbery. Full-fat does the better job.
- Overbaking because the top still looks pale: The cake is done when the center springs back.
- Pouring glaze on a warm cake: It melts into a sticky patch instead of sitting neatly on top.
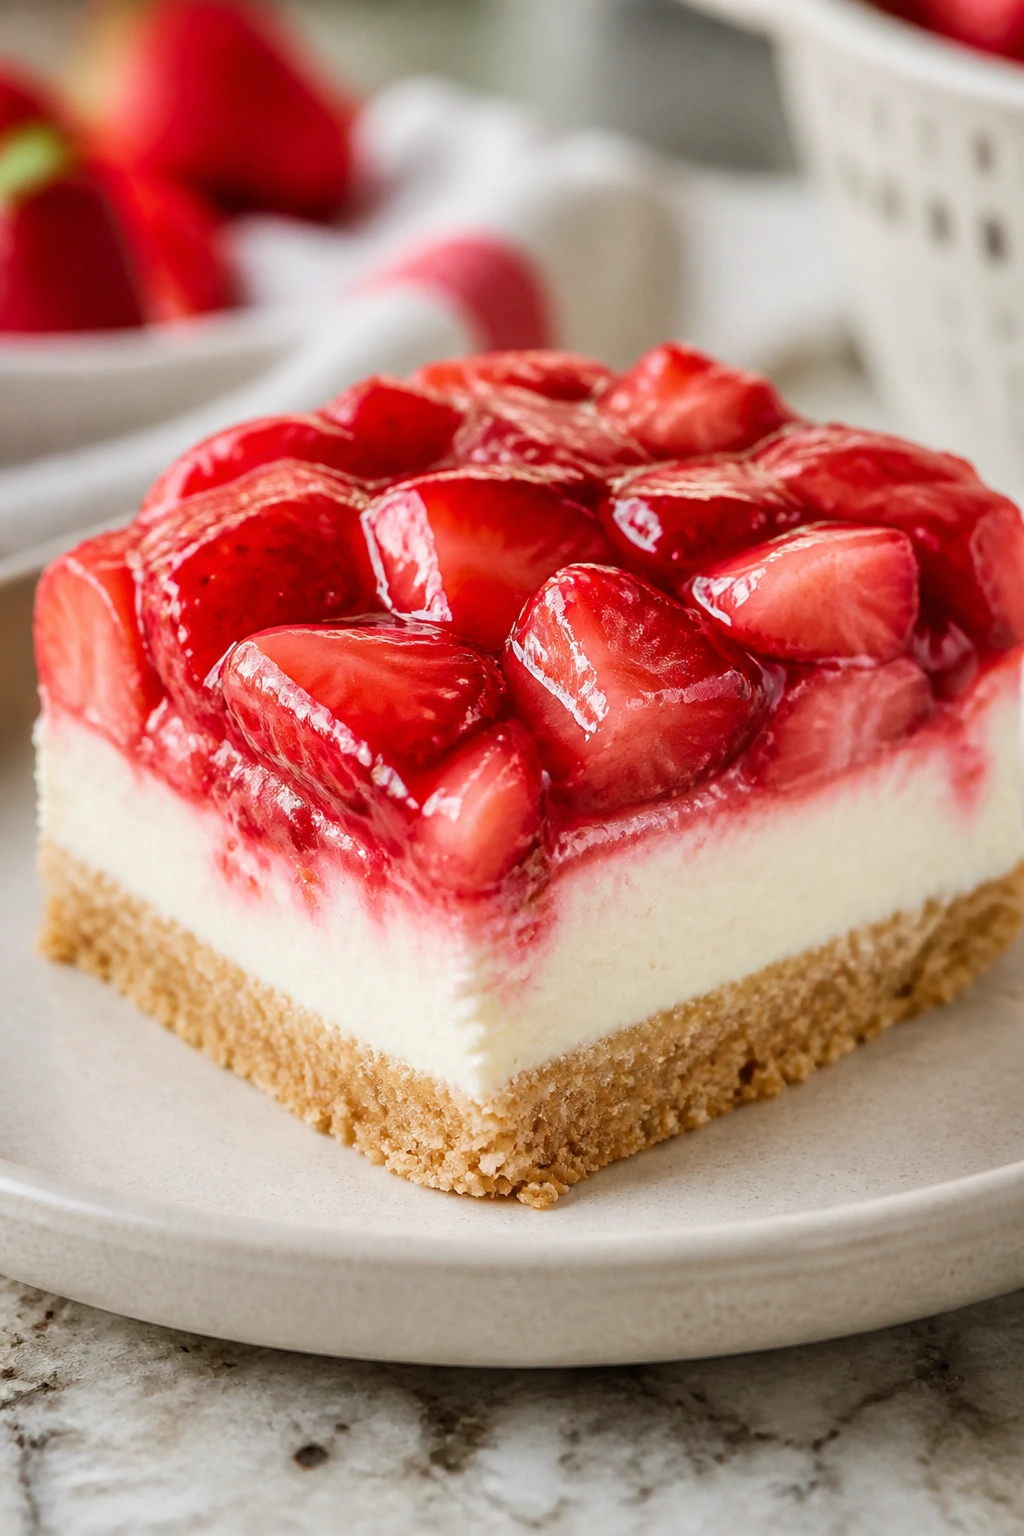
4. Strawberry Cream Cheese Bars
These bars land somewhere between cheesecake and a soft fruit square, which is exactly why they keep so well. The cream cheese layer stays smooth and cool, and the strawberry topping turns jammy without losing its fresh flavor.
Why It Works:
Cream cheese brings fat and moisture, two things that keep a dessert plush in the fridge. The shortbread base gives structure without drying out, and the strawberry layer thickens with a little cornstarch so it stays sliceable. They taste even better after chilling because the filling firms up.
Key Ingredients:
- 2 cups all-purpose flour
- 1/2 cup powdered sugar
- 1 cup unsalted butter, cold and cubed
- 16 ounces cream cheese, softened
- 3/4 cup granulated sugar
- 2 large eggs
- 1 teaspoon vanilla extract
- 2 cups chopped strawberries
- 2 tablespoons sugar
- 1 tablespoon cornstarch
- 1 tablespoon lemon juice
Quick Steps:
- Preheat the oven to 350°F and line a 9×13-inch pan with parchment.
- Mix flour and powdered sugar, then cut in the butter until the mixture looks like damp sand. Press it into the pan and bake for 15 minutes.
- Beat cream cheese, granulated sugar, eggs, and vanilla until smooth, then spread over the crust.
- Cook strawberries, sugar, cornstarch, and lemon juice in a small pan for 3 to 4 minutes until glossy and thick. Spoon over the cream cheese layer and swirl lightly.
- Bake 25 to 30 minutes more, until the center has a gentle wobble.
- Chill at least 3 hours before cutting.
Equipment for This Recipe:
- 9×13-inch baking pan
- Hand mixer
- Saucepan
- Parchment paper
- Sharp knife for slicing
How to Serve This Dish:
Serve them cold for the cleanest texture, with a few extra fresh strawberry slices on top. They make a neat dessert square after a big meal and travel well in a chilled container. A short stack on a white plate does the job without needing anything else.
Pro Tips for This Recipe:
- Softened cream cheese beats cold cream cheese every time.
- Reduce the fruit filling until it coats a spoon.
- Chill fully before cutting or the filling will smear.
- A tiny pinch of salt in the crust makes the butter taste louder.
Variations on This Dish:
- Mixed Berry Bars: Use blueberries and raspberries with the strawberries.
- Lemon Cream Version: Add 2 teaspoons lemon zest to the cream cheese layer.
- Graham Cracker Base: Swap the shortbread crust for crumbs, butter, and a little brown sugar.
Common Mistakes to Avoid with This Dish:
- Using watery strawberries: The filling turns loose. Cook them down until thick.
- Skipping the parchment sling: The bars are harder to lift out cleanly.
- Cutting while warm: The layers slide apart and the squares lose their edges.
5. Brown Sugar Blondies
A good blondie should be chewy in the center, soft at the edges, and a little crackly on top. These use brown sugar for that deep caramel taste, and the melt-in-your-mouth middle holds up for days if you keep the pan covered.
Why It Works:
Brown sugar carries molasses, which keeps the bars moist longer than white sugar alone. Melted butter gives a fudgy texture without needing a mixer. A short bake leaves the center set but still soft, and that’s the whole trick.
Key Ingredients:
- 1 cup unsalted butter, melted
- 1 1/2 cups packed light brown sugar
- 2 large eggs
- 2 teaspoons vanilla extract
- 2 cups all-purpose flour
- 1 teaspoon baking powder
- 1/2 teaspoon salt
- 1 cup chopped chocolate chunks
- 1/2 cup chopped pecans
Quick Steps:
- Heat the oven to 350°F and line a 9×13-inch pan with parchment.
- Whisk melted butter and brown sugar until glossy, then whisk in eggs and vanilla.
- Fold in flour, baking powder, and salt until just combined.
- Stir in chocolate chunks and pecans, then spread the batter in the pan.
- Bake 22 to 26 minutes until the top is set and the center looks slightly underdone.
- Cool completely before cutting.
Equipment for This Recipe:
- 9×13-inch pan
- Parchment paper
- Mixing bowl
- Whisk and spatula
- Sharp knife
How to Serve This Dish:
These are fine plain, but a small scoop of vanilla ice cream makes them feel richer than they have any right to be. Cut them into slim bars for a dessert tray or thicker squares if you want them to read more like a treat than a snack. They stay soft enough to pack for a picnic without crumbling.
Pro Tips for This Recipe:
- Pull them before the center looks fully set.
- Let them cool all the way in the pan.
- Toast the pecans for a deeper flavor.
- Add flaky salt after baking if you like a sharper finish.
Variations on This Dish:
- White Chocolate Macadamia: Swap the chocolate chunks and pecans for white chocolate and macadamias.
- Espresso Blondies: Add 1 teaspoon instant espresso powder to the batter.
- Cherry Chocolate Blondies: Fold in dried cherries and dark chocolate.
Common Mistakes to Avoid with This Dish:
- Overbaking blondies until the middle is firm: That turns them dry by day two. Stop while they still look a touch soft.
- Cutting too soon: Warm blondies collapse and smear.
- Using too much flour: Scoop and level the flour instead of packing it in.
6. Chocolate Sour Cream Cookies
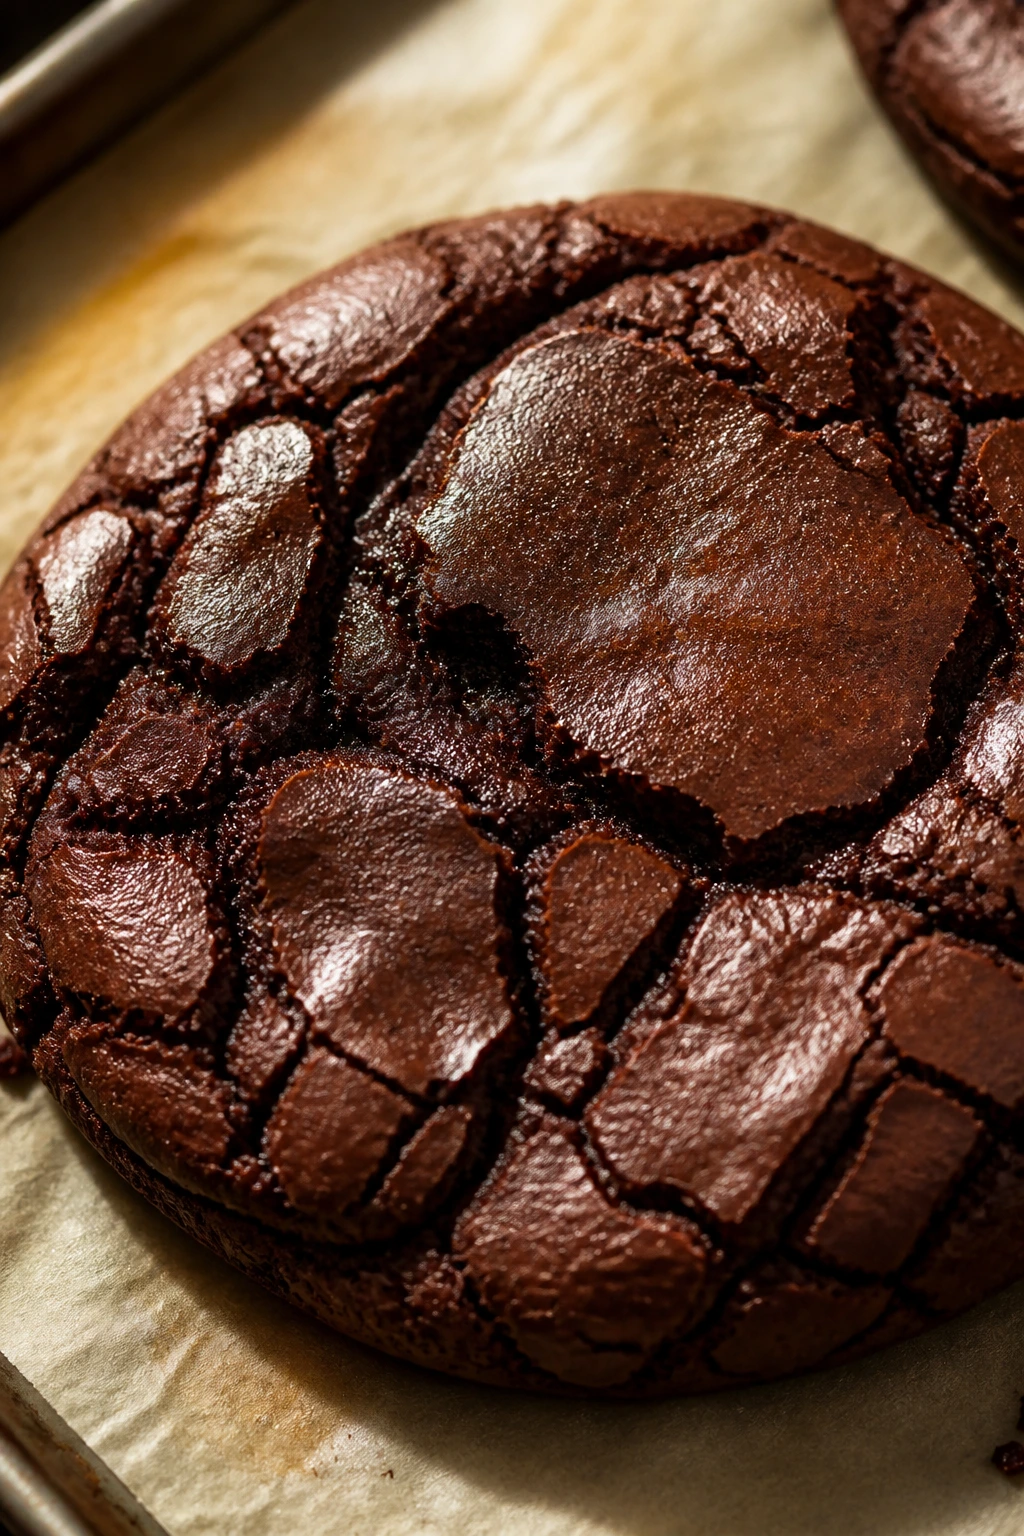
These cookies bake up like small brownie rounds with a softer, cakier center. Sour cream keeps them tender even after a couple of days, and the chocolate flavor gets deeper as they sit in the tin.
Why It Works:
Sour cream adds moisture and fat without making the dough greasy. Cocoa powder gives the cookies that dark, almost truffle-like note, while brown sugar helps the centers stay chewy. Bake them just until the tops crack, and they stay plush instead of dry.
Key Ingredients:
- 1 3/4 cups all-purpose flour
- 1/2 cup unsweetened cocoa powder
- 1 teaspoon baking soda
- 1/2 teaspoon salt
- 1/2 cup unsalted butter, softened
- 3/4 cup granulated sugar
- 1/2 cup packed brown sugar
- 2 large eggs
- 1/2 cup sour cream
- 1 teaspoon vanilla extract
- 1 cup chocolate chips
Quick Steps:
- Preheat the oven to 350°F and line two baking sheets with parchment.
- Whisk flour, cocoa, baking soda, and salt.
- Beat butter with both sugars until fluffy, then beat in eggs, sour cream, and vanilla.
- Mix in the dry ingredients just until combined, then fold in chocolate chips.
- Scoop tablespoons of dough onto the sheets and bake for 10 to 12 minutes until the edges are set and the centers still look soft.
- Cool on the sheet for 5 minutes, then move to a rack.
Equipment for This Recipe:
- Baking sheets
- Parchment paper
- Two mixing bowls
- Cookie scoop
- Cooling rack
How to Serve This Dish:
Serve them at room temperature with cold milk or coffee. They make a good late-afternoon dessert because they are rich without being fussy, and they hold their softness even after a night in a tin. A dusting of powdered sugar gives them a dressed-up look in two seconds.
Pro Tips for This Recipe:
- Use a cookie scoop for even baking.
- Chill the dough 20 minutes if your kitchen is hot.
- Pull them before the centers look dry.
- A pinch of espresso powder deepens the chocolate without tasting like coffee.
Variations on This Dish:
- Peppermint Chocolate: Add a few drops of peppermint extract and crushed mint candies.
- Double Chip Batch: Use half milk chocolate chips and half dark chocolate chunks.
- Nutty Version: Fold in chopped walnuts for a little crunch.
Common Mistakes to Avoid with This Dish:
- Baking until the tops look fully dry: The cookies will lose their soft center. Stop early.
- Using low-fat sour cream: The texture gets thinner and less rich.
- Overcrowding the sheet pan: The cookies spread into each other and bake unevenly.
7. Cherry Almond Coffee Cake
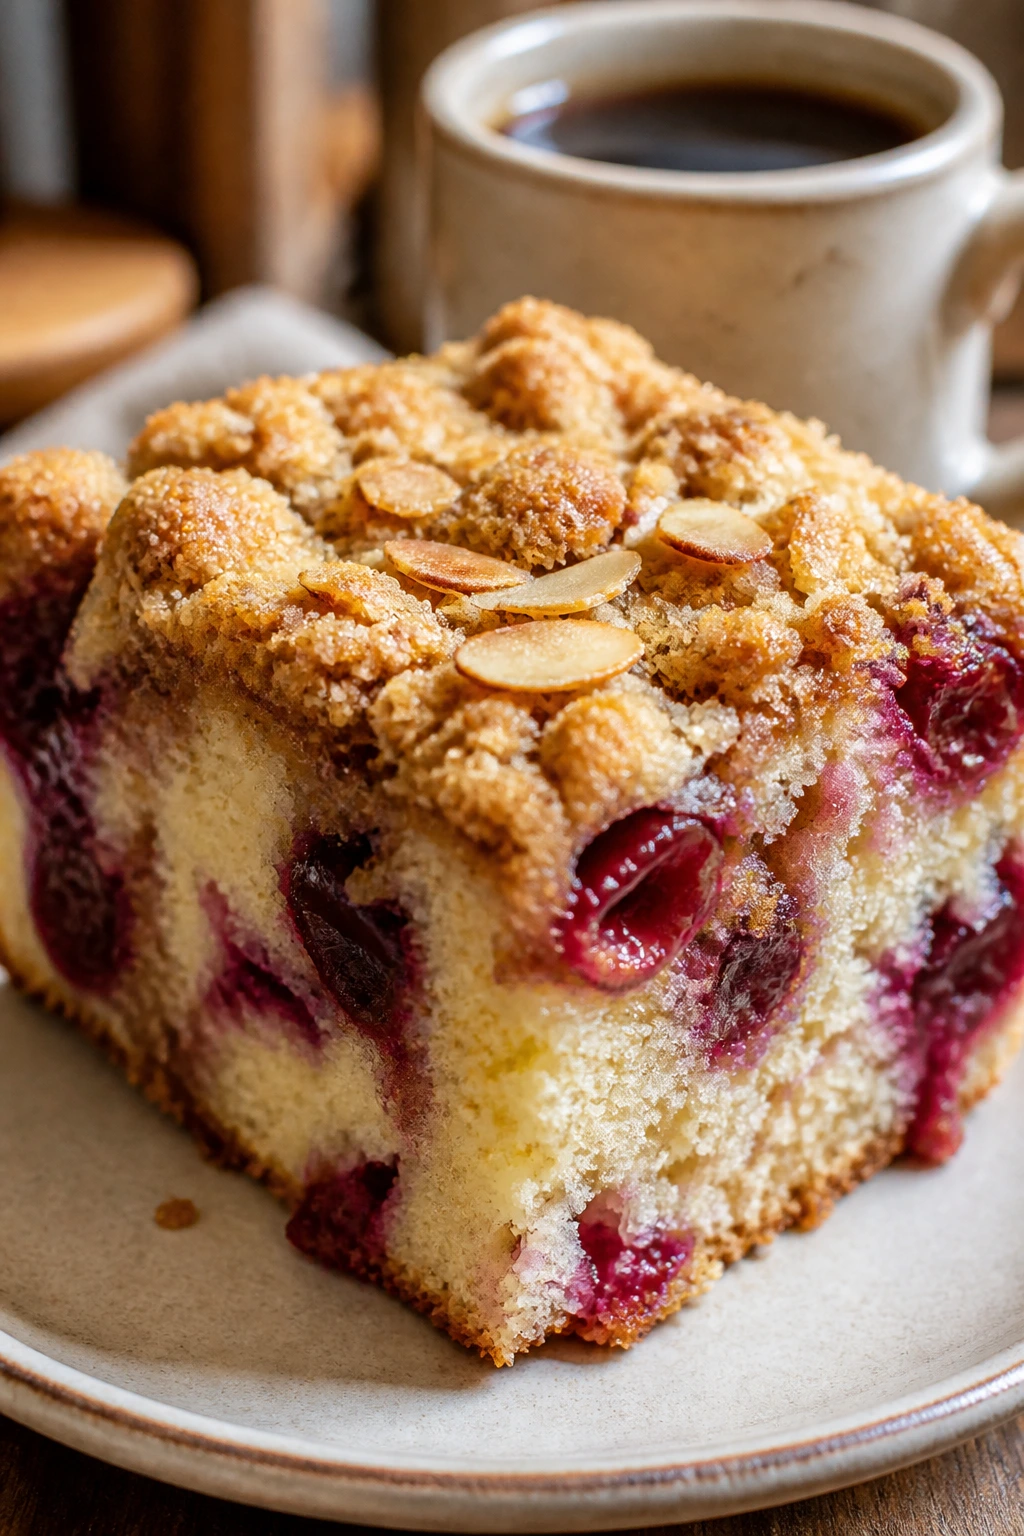
This coffee cake is soft enough to pass for dessert and sturdy enough to sit beside a cup of coffee without breaking apart. Cherries drop little bursts of tart juice through the middle, while almond extract gives the whole pan that bakery smell people notice from the hallway.
Why It Works:
Sour cream keeps the crumb moist for days. Cherries, fresh or frozen, release enough juice to keep the center tender without turning it wet if you toss them with a little flour first. The streusel adds crunch on top, not dryness inside, which is the right trade.
Key Ingredients:
- 2 cups all-purpose flour
- 1 teaspoon baking powder
- 1/2 teaspoon baking soda
- 1/2 teaspoon salt
- 1/2 cup unsalted butter, softened
- 3/4 cup granulated sugar
- 2 large eggs
- 1 cup sour cream
- 1 teaspoon vanilla extract
- 1/2 teaspoon almond extract
- 2 cups pitted cherries
- 1/2 cup brown sugar
- 1/2 cup sliced almonds
Quick Steps:
- Heat the oven to 350°F and grease a 9-inch square pan.
- Whisk flour, baking powder, baking soda, and salt.
- Beat butter and granulated sugar until fluffy, then beat in eggs, sour cream, vanilla, and almond extract.
- Fold in the dry ingredients, spread half the batter in the pan, scatter half the cherries, add the remaining batter, then top with the rest of the cherries, brown sugar, and almonds.
- Bake 40 to 45 minutes until the center springs back and the top is golden.
- Cool for 20 minutes before slicing.
Equipment for This Recipe:
- 9-inch square pan
- Mixer or sturdy whisk
- Mixing bowls
- Rubber spatula
- Cooling rack
How to Serve This Dish:
Cut thick squares and serve warm or at room temperature. A dollop of whipped cream softens the almond edge and makes each slice feel more like a finished dessert. It also travels well if you keep the pan covered and the slices cool before packing.
Pro Tips for This Recipe:
- Toss the cherries with 1 tablespoon flour to stop sinking.
- Use tart cherries if you want a brighter flavor.
- Almond extract is strong; measure it carefully.
- The cake tastes even better the next day.
Variations on This Dish:
- Blackberry Almond Cake: Swap the cherries for blackberries.
- Peach Almond Cake: Use diced peaches and a little cinnamon.
- Glazed Coffee Cake: Drizzle with a simple powdered sugar glaze after cooling.
Common Mistakes to Avoid with This Dish:
- Adding too many cherries: The center turns gummy. Stick to the amount listed.
- Slicing while hot: The crumb tears and the layers lean.
- Using almond extract like vanilla: Too much makes the cake taste sharp. Measure it.
8. Coconut Lime Tres Leches Squares

These squares are cold, soft, and almost spoonable in the best way. Coconut milk and lime make the soak taste bright instead of heavy, and the cake holds onto the liquid without falling apart.
Why It Works:
Tres leches cake is built for softness. The sponge has enough structure to drink in milk, and the coconut milk adds a tropical note that stays pleasant even after a few days in the fridge. Lime zest keeps the sweetness from getting flat.
Key Ingredients:
- 1 1/2 cups all-purpose flour
- 1 1/2 teaspoons baking powder
- 1/4 teaspoon salt
- 5 large eggs, separated
- 1 cup granulated sugar
- 1/3 cup whole milk
- 1 teaspoon vanilla extract
- 1 can evaporated milk
- 1 can sweetened condensed milk
- 1 cup coconut milk
- Zest of 2 limes
- 1 cup heavy cream, whipped
Quick Steps:
- Preheat the oven to 350°F and line a 9×13-inch pan.
- Beat egg yolks with sugar until pale, then mix in milk and vanilla. Fold in flour, baking powder, and salt.
- Whip the egg whites to stiff peaks and fold them into the batter. Bake 22 to 28 minutes until the cake springs back.
- Whisk evaporated milk, condensed milk, coconut milk, and lime zest, then poke holes all over the warm cake and pour the soak over it slowly.
- Chill at least 4 hours, then spread whipped cream on top and cut into squares.
Equipment for This Recipe:
- 9×13-inch baking pan
- Electric mixer
- Mixing bowls
- Whisk
- Offset spatula
How to Serve This Dish:
Serve it cold, straight from the fridge, with extra lime zest on top. The squares hold their shape but still slump just a little on the plate, which is the charm. If you want a sharper finish, add toasted coconut and a few thin lime slices.
Pro Tips for This Recipe:
- Pour the milk soak slowly so the cake can absorb it.
- Chill overnight if you can; the texture improves.
- Whipped cream should be soft, not stiff.
- Use full-fat coconut milk for the cleanest flavor.
Variations on This Dish:
- Mango Coconut Squares: Add diced mango on top of the whipped cream.
- Toasted Coconut Version: Sprinkle toasted coconut over the cream layer.
- Berry Lime Batch: Top with raspberries for a tart hit.
Common Mistakes to Avoid with This Dish:
- Pouring the soak over a hot, broken cake: It falls apart before chilling. Let the cake rest a few minutes first.
- Using whipped topping that is too sweet: It can drown out the lime.
- Skipping the chill: The cake slices like pudding and leaks across the plate.
9. Raspberry Jam Thumbprint Bars
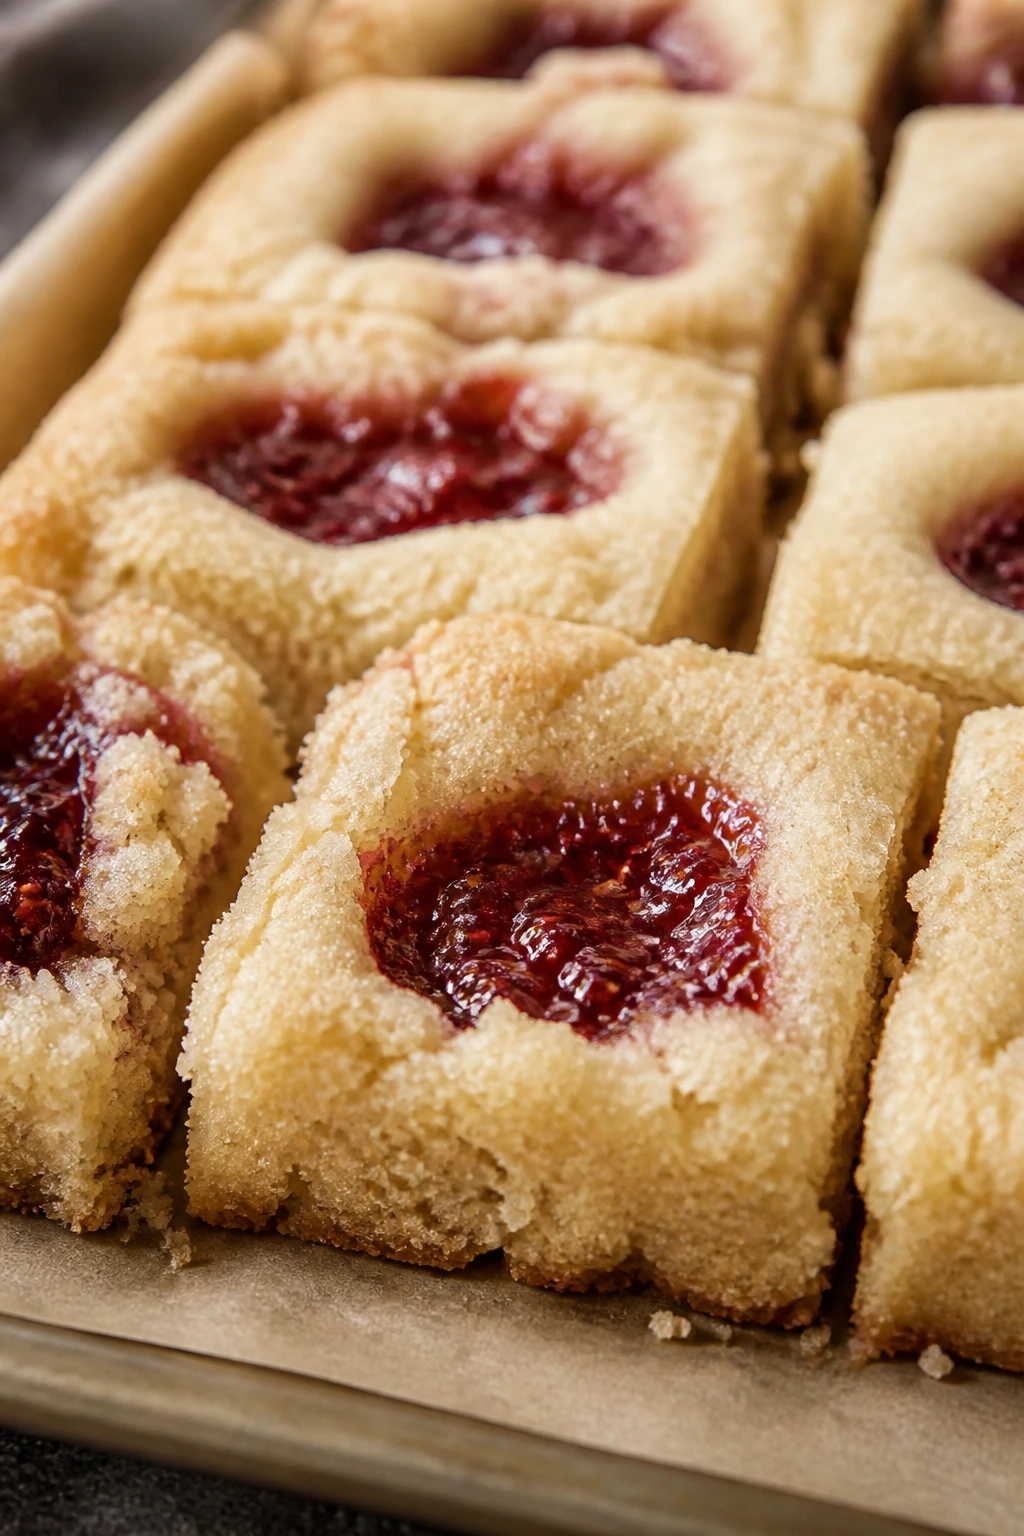
Think of these as the thumbprint cookie’s less fussy cousin. The shortbread base stays soft under the jam layer, and the crumble on top gives enough texture without pushing the bars into dry, sandy territory.
Why It Works:
Jam brings both sweetness and moisture, which keeps the bars soft for days. The buttery base is pressed into the pan instead of rolled, so it stays dense enough to support the filling. A small amount of almond extract makes the raspberry taste sharper.
Key Ingredients:
- 2 cups all-purpose flour
- 1/2 cup powdered sugar
- 1 cup unsalted butter, softened
- 1 large egg yolk
- 1 teaspoon vanilla extract
- 1/4 teaspoon almond extract
- 1 cup raspberry jam
- 1 cup raspberries, optional fresh layer
- 1/2 cup sliced almonds
Quick Steps:
- Heat the oven to 350°F and line an 8×8-inch pan or 9×9-inch pan.
- Mix flour and powdered sugar, then beat in butter, egg yolk, vanilla, and almond extract until crumbly but pressable.
- Press two-thirds into the pan and spread the jam over the top. Scatter raspberries and almonds if using.
- Crumble the remaining dough over the jam and bake 30 to 35 minutes until the top is light golden.
- Cool completely before slicing.
Equipment for This Recipe:
- Square baking pan
- Parchment paper
- Mixer or pastry cutter
- Spatula
- Knife for slicing
How to Serve This Dish:
These bars look especially good cut into narrow rectangles and dusted with powdered sugar. They pair well with tea or coffee, and they also slide neatly into lunchboxes because the jam layer holds the crumb together instead of scattering it.
Pro Tips for This Recipe:
- Warm jam spreads more evenly.
- Do not overbake the edges.
- A little lemon zest in the jam brightens the flavor.
- Chill before cutting if you want neat lines.
Variations on This Dish:
- Apricot Almond Bars: Use apricot preserves instead of raspberry.
- Strawberry Vanilla Bars: Swap in strawberry jam and skip the almond extract.
- Seeded Berry Bars: Use a seedless jam if you want a smoother bite.
Common Mistakes to Avoid with This Dish:
- Pressing the base too thin: It can break under the jam. Keep it firm and even.
- Using too much jam: The bars bake up soft but unstable. Stick close to the measured amount.
- Cutting while warm: The layers need time to set.
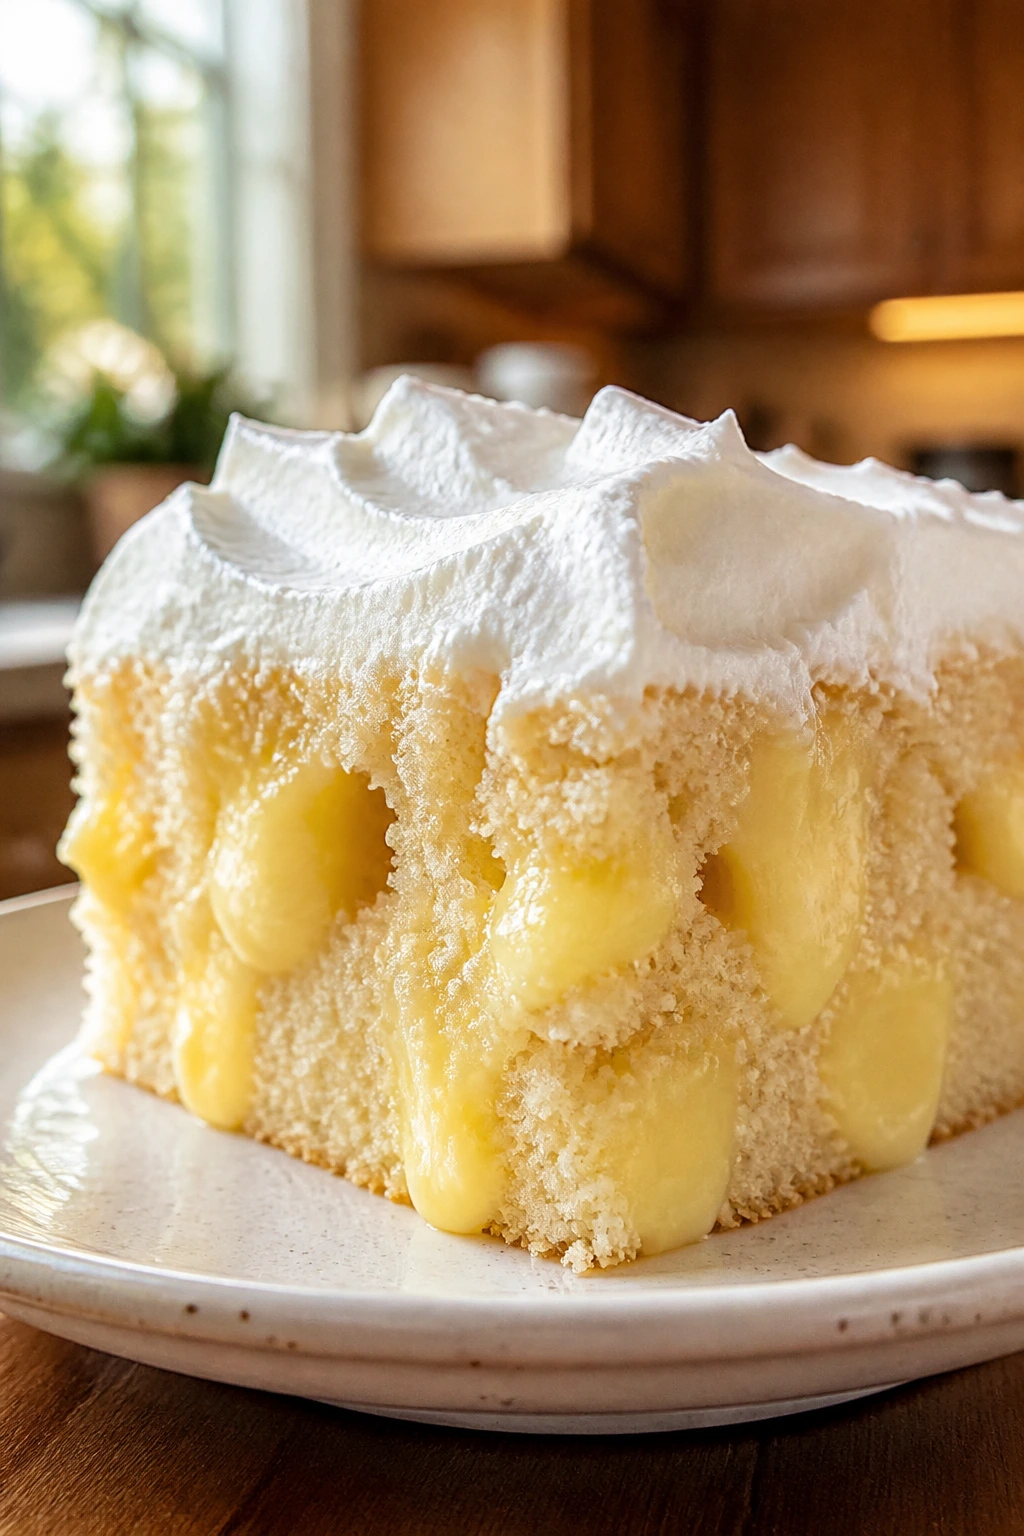
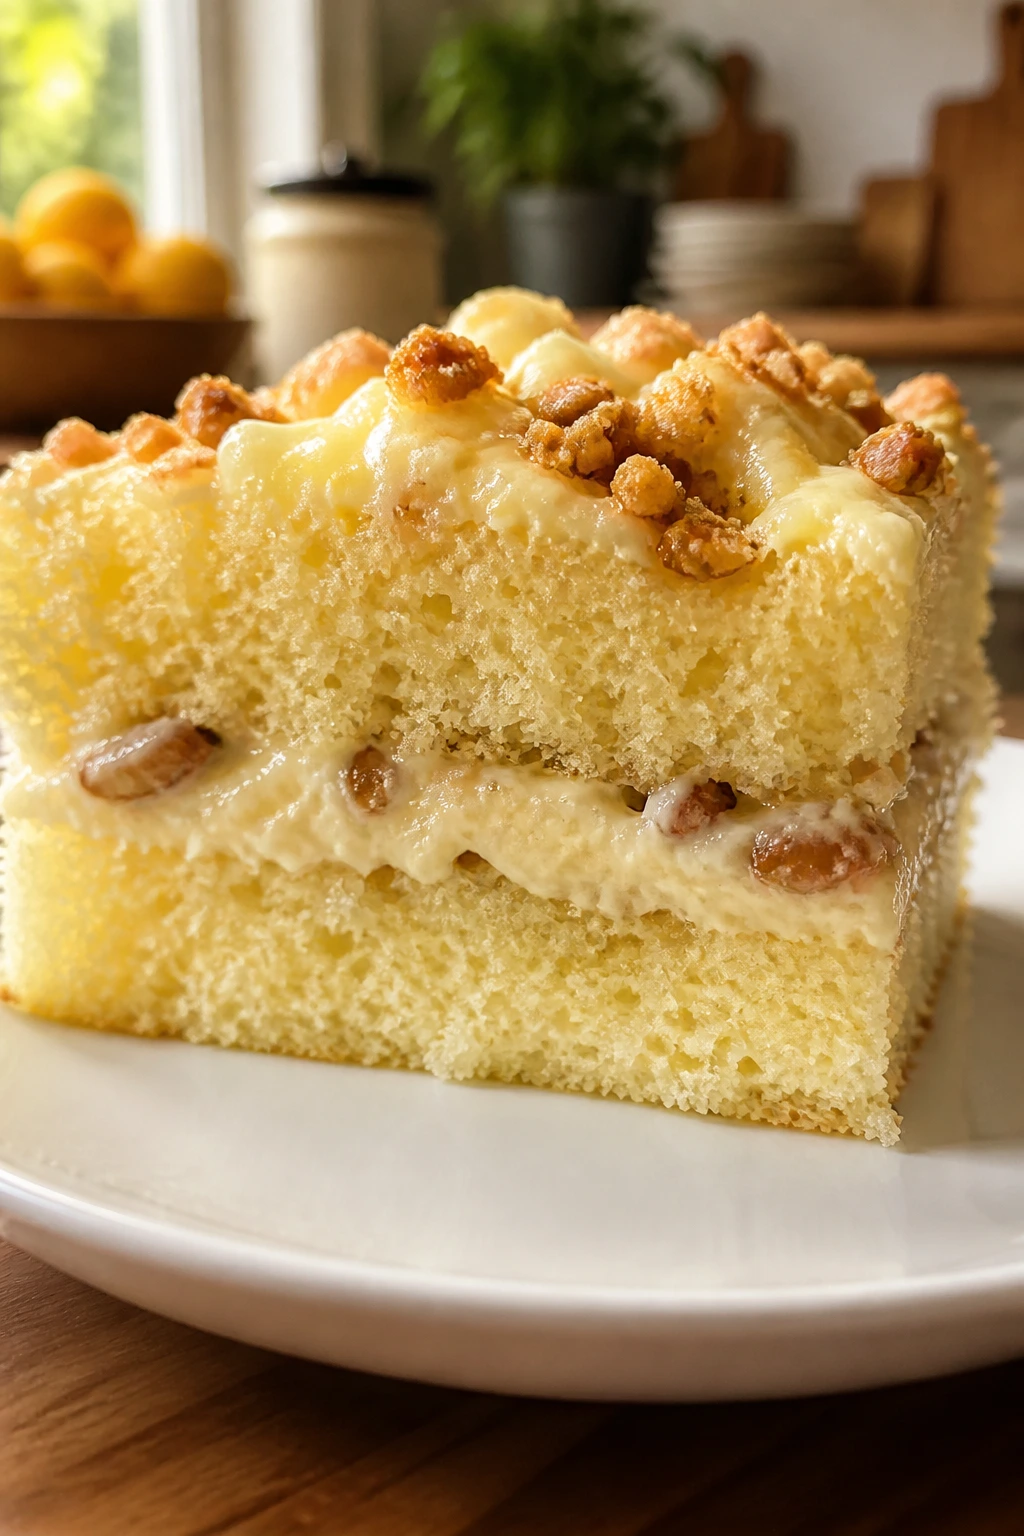
10. Banana Pudding Sheet Cake
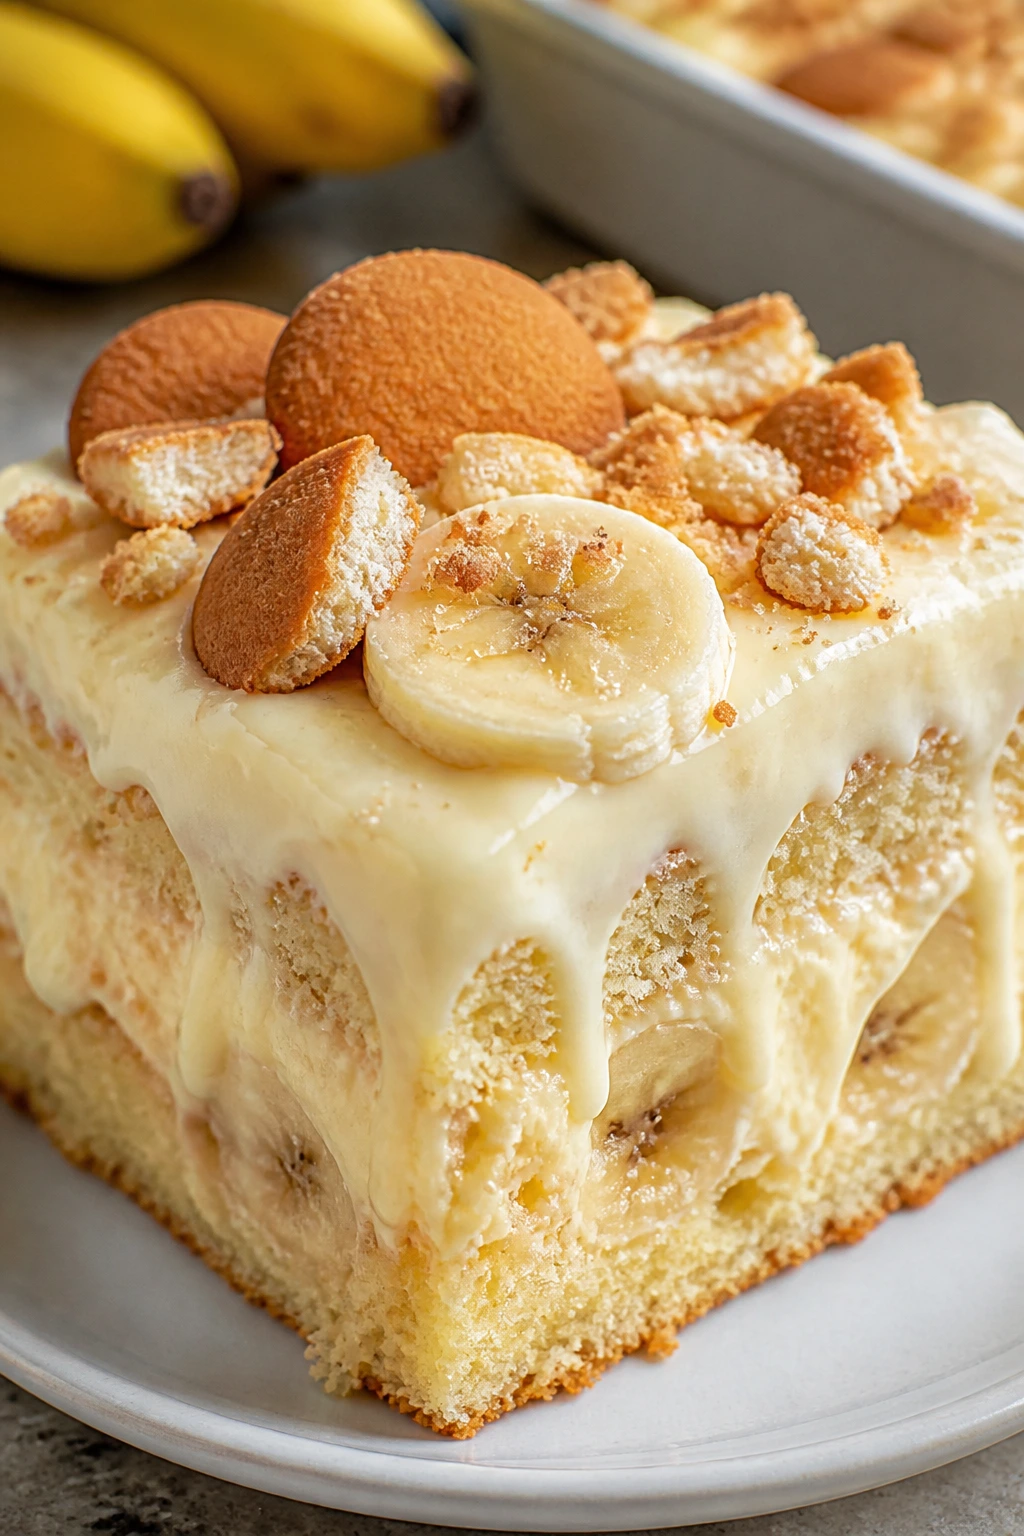
This cake tastes like banana pudding that grew up and got a sturdy pan. The banana crumb stays soft for days, and the vanilla pudding topping seeps just enough into the surface to keep every slice plush.
Why It Works:
Mashed bananas bring moisture and natural sweetness, while oil keeps the crumb from drying out. The pudding layer traps some of that moisture in the top few millimeters of cake, which is exactly where dry cakes usually fail first. Vanilla wafers add a familiar crunch, but only after the cake has softened around them.
Key Ingredients:
- 2 1/2 cups all-purpose flour
- 1 teaspoon baking soda
- 1/2 teaspoon salt
- 1 cup granulated sugar
- 1/2 cup brown sugar
- 3 large eggs
- 3 ripe bananas, mashed
- 3/4 cup neutral oil
- 1 cup sour cream
- 2 teaspoons vanilla extract
- 2 boxes instant vanilla pudding
- 3 cups cold milk
- 1 tub whipped topping
- Vanilla wafers for topping
Quick Steps:
- Preheat the oven to 350°F and grease a 9×13-inch pan.
- Whisk flour, baking soda, and salt.
- Beat sugars, eggs, bananas, oil, sour cream, and vanilla until smooth, then fold in the dry ingredients.
- Bake 28 to 35 minutes until the center springs back and a tester comes out clean. Cool fully.
- Whisk pudding with cold milk, spread over the cake, then top with whipped topping and vanilla wafers.
- Chill at least 2 hours before serving.
Equipment for This Recipe:
- 9×13-inch pan
- Mixer or whisk
- Mixing bowls
- Rubber spatula
- Offset spatula for frosting
How to Serve This Dish:
Serve it cold, in squares, with an extra wafer or two pressed into the top right before serving. The cake is soft enough to spoon a little, but it still cuts well after chilling. It is one of those desserts that vanishes fast from a party tray.
Pro Tips for This Recipe:
- Use bananas with plenty of brown spots.
- Let the cake cool before adding pudding or it will thin out.
- Chill overnight if you want the best texture.
- Crushed wafers on top should be added at the last minute for crunch.
Variations on This Dish:
- Caramel Banana Cake: Drizzle caramel sauce between the pudding and whipped topping.
- Chocolate Banana Version: Add mini chocolate chips to the batter.
- Nutty Pudding Cake: Sprinkle chopped toasted pecans over the whipped topping.
Common Mistakes to Avoid with This Dish:
- Using underripe bananas: The cake tastes flat and less moist. Wait for soft, speckled fruit.
- Adding pudding to a warm cake: The topping slips and turns thin.
- Leaving the wafers on too long before serving: They soften into mush if they sit overnight.
11. Zucchini Chocolate Snack Cake
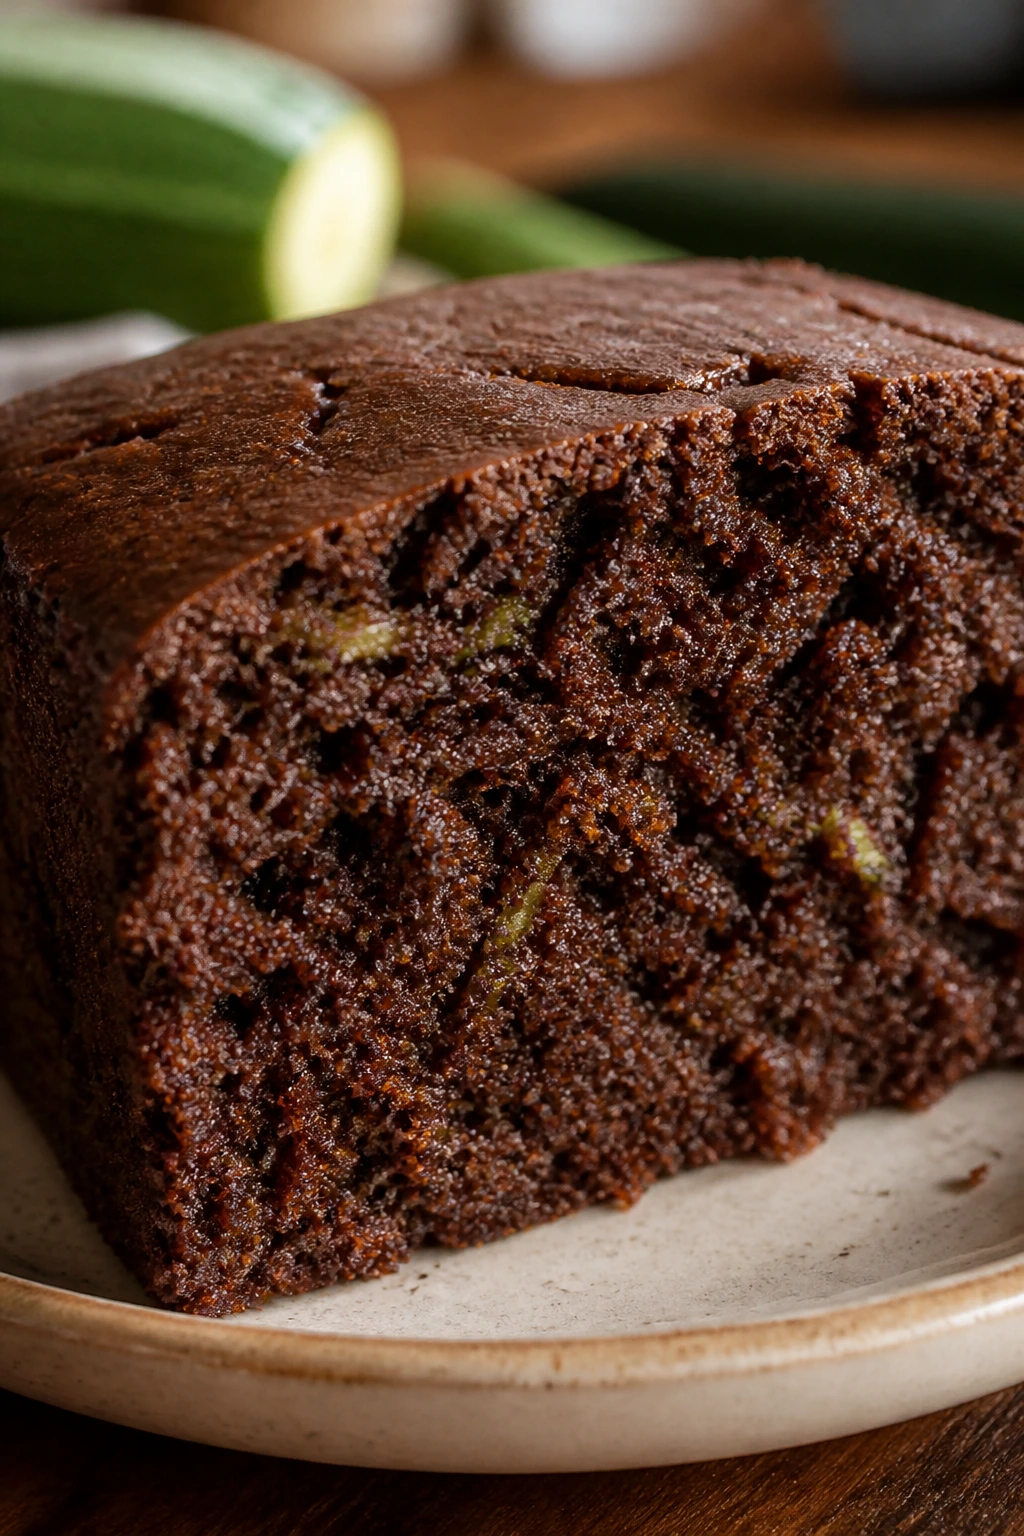
Zucchini in dessert still makes people suspicious until they taste the crumb. Then they stop asking questions. The vegetable melts into the batter and keeps the chocolate cake deeply soft for days, with enough cocoa to taste rich instead of “healthy.”
Why It Works:
Grated zucchini adds moisture without changing the flavor much. Oil and sour cream keep the crumb loose and tender, while cocoa powder gives the cake a deeper color and a softer bake than a lean chocolate sponge. The whole cake stays better on day two than most frosted cakes do on day one.
Key Ingredients:
- 2 cups all-purpose flour
- 3/4 cup unsweetened cocoa powder
- 1 teaspoon baking soda
- 1/2 teaspoon baking powder
- 1/2 teaspoon salt
- 1 cup granulated sugar
- 1/2 cup brown sugar
- 2 large eggs
- 1/2 cup sour cream
- 3/4 cup neutral oil
- 2 cups grated zucchini, lightly squeezed
- 1 cup chocolate chips
Quick Steps:
- Preheat the oven to 350°F and grease a 9×13-inch pan.
- Whisk flour, cocoa, baking soda, baking powder, and salt.
- Beat sugars, eggs, sour cream, and oil until smooth, then fold in the zucchini.
- Stir in the dry ingredients and chocolate chips just until combined.
- Spread into the pan and bake 28 to 33 minutes until the center springs back.
- Cool fully before slicing.
Equipment for This Recipe:
- 9×13-inch pan
- Box grater
- Two mixing bowls
- Whisk and spatula
- Cooling rack
How to Serve This Dish:
Dust it with powdered sugar or spread a thin layer of chocolate frosting if you want it richer. It is easy to serve in squares, and the crumb stays soft enough that people usually go back for a second piece without needing a fork and knife. A glass of cold milk is the obvious partner.
Pro Tips for This Recipe:
- Squeeze the zucchini lightly, not bone dry.
- Do not overmix once the flour goes in.
- Add a handful of chocolate chips on top before baking for a nicer finish.
- The cake tastes better after cooling completely.
Variations on This Dish:
- Orange Chocolate Cake: Add orange zest for a brighter edge.
- Walnut Batch: Fold in 1/2 cup chopped walnuts.
- Frosted Version: Use cream cheese frosting for a tangy finish.
Common Mistakes to Avoid with This Dish:
- Draining the zucchini until it is dry as paper: You lose the moisture that keeps the cake soft.
- Overbaking because the center still looks a touch soft: The cake finishes setting on the rack.
- Using low-quality cocoa: The chocolate flavor gets muddy fast.
12. Pineapple Upside-Down Cupcakes
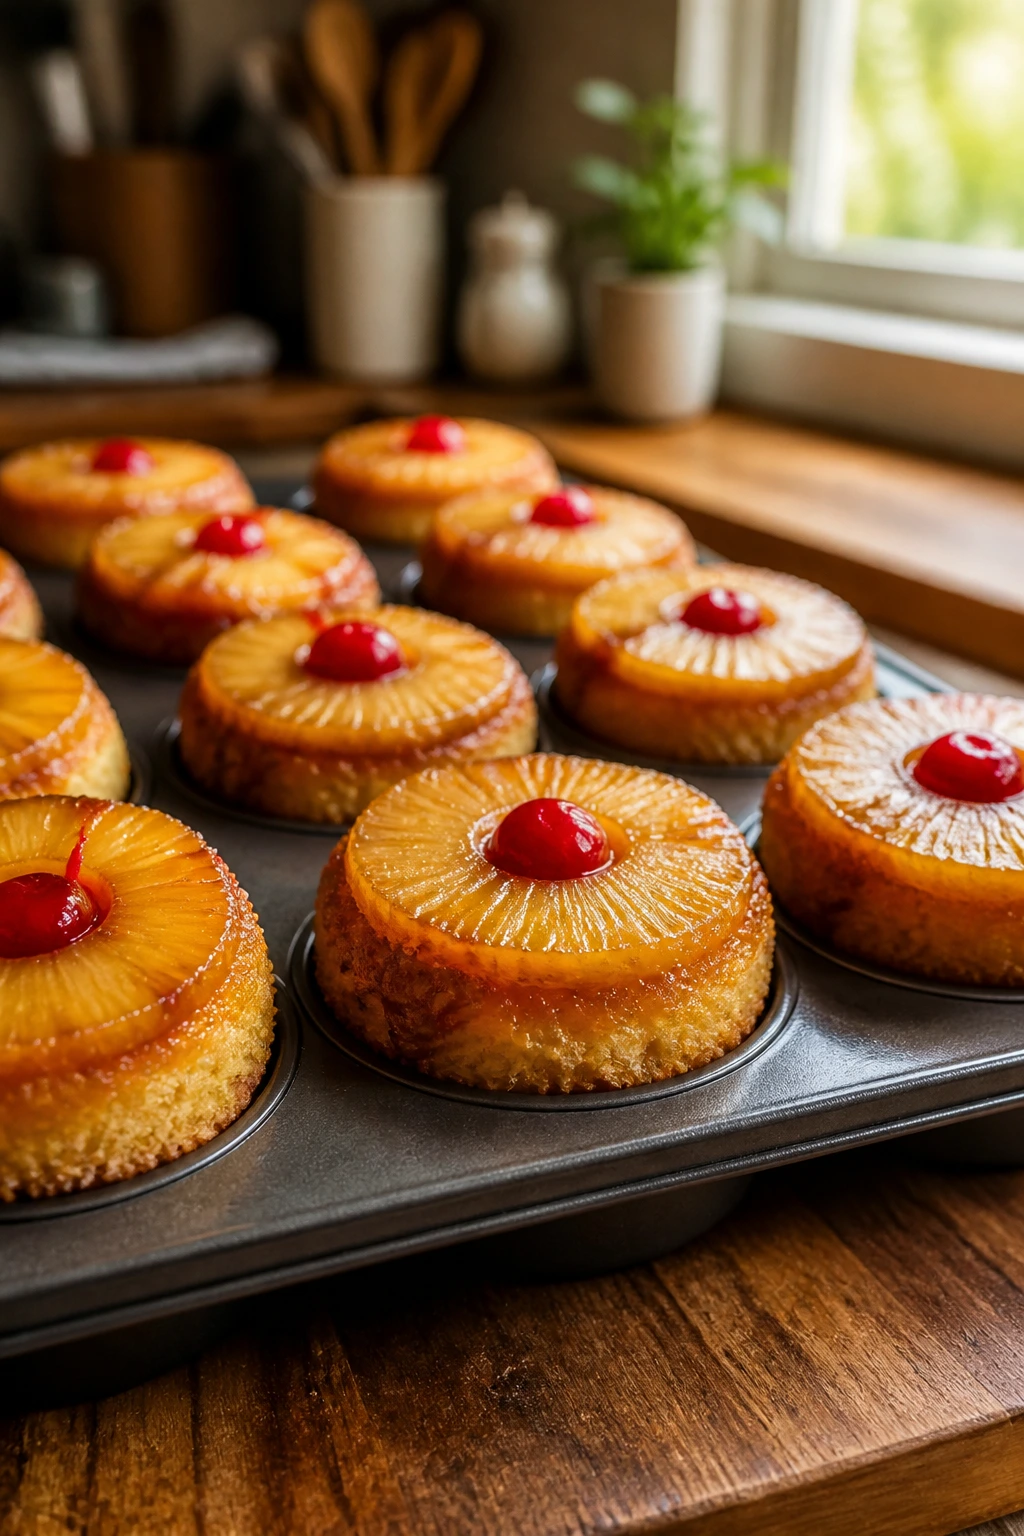
These cupcakes stay moist because the fruit sits right in the pan, soaking into the cake as it bakes. The caramelized pineapple edges keep the tops sticky and soft, and the little maraschino cherry in each one gives them that old-school picnic look.
Why It Works:
Pineapple adds juice and acidity, both of which keep the crumb tender. The brown sugar-butter layer underneath turns into a syrup that feeds the cake instead of drying it out. Cupcake size means the whole thing bakes quickly, so there is less chance of overdoing the edges.
Key Ingredients:
- 1/2 cup unsalted butter, melted
- 1 cup packed brown sugar
- 12 pineapple rings or 1 can pineapple chunks, drained
- 12 maraschino cherries
- 1 3/4 cups all-purpose flour
- 1 1/2 teaspoons baking powder
- 1/2 teaspoon salt
- 1/2 cup granulated sugar
- 2 large eggs
- 1/2 cup milk
- 1/3 cup neutral oil
- 1 teaspoon vanilla extract
Quick Steps:
- Preheat the oven to 350°F and grease a 12-cup muffin tin well.
- Divide melted butter and brown sugar among the cups, then place pineapple and a cherry in each cup.
- Whisk flour, baking powder, salt, and sugar. In another bowl, whisk eggs, milk, oil, and vanilla.
- Fold the wet ingredients into the dry ingredients just until combined.
- Spoon the batter over the fruit and bake 20 to 24 minutes until the tops spring back.
- Rest for 5 minutes, then invert onto a tray.
Equipment for This Recipe:
- 12-cup muffin tin
- Mixing bowls
- Whisk and spatula
- Cooling rack or tray for inverting
- Measuring cups
How to Serve This Dish:
Serve them upside down, warm or room temperature, with a spoon of whipped cream if you want to lean into dessert. They are tidy enough for a tray and soft enough that nobody needs to fight through a dry cupcake top. If you chill them, let them come back to room temperature first.
Pro Tips for This Recipe:
- Drain the pineapple well so the bottoms do not get soggy.
- Invert while still warm or the caramel can stick.
- Use paper towels to blot excess syrup after flipping.
- A touch of cinnamon in the batter works nicely.
Variations on This Dish:
- Rum Pineapple Cups: Add 1 tablespoon dark rum to the batter.
- Coconut Pineapple Cups: Replace part of the milk with coconut milk.
- Peach Upside-Down Cups: Swap pineapple for peach slices.
Common Mistakes to Avoid with This Dish:
- Skipping the greased pan: The fruit layer can cling hard.
- Waiting too long to invert: The sugar layer cools into glue.
- Using batter that is too thick: It will not cover the fruit evenly.
13. Blackberry Buckle
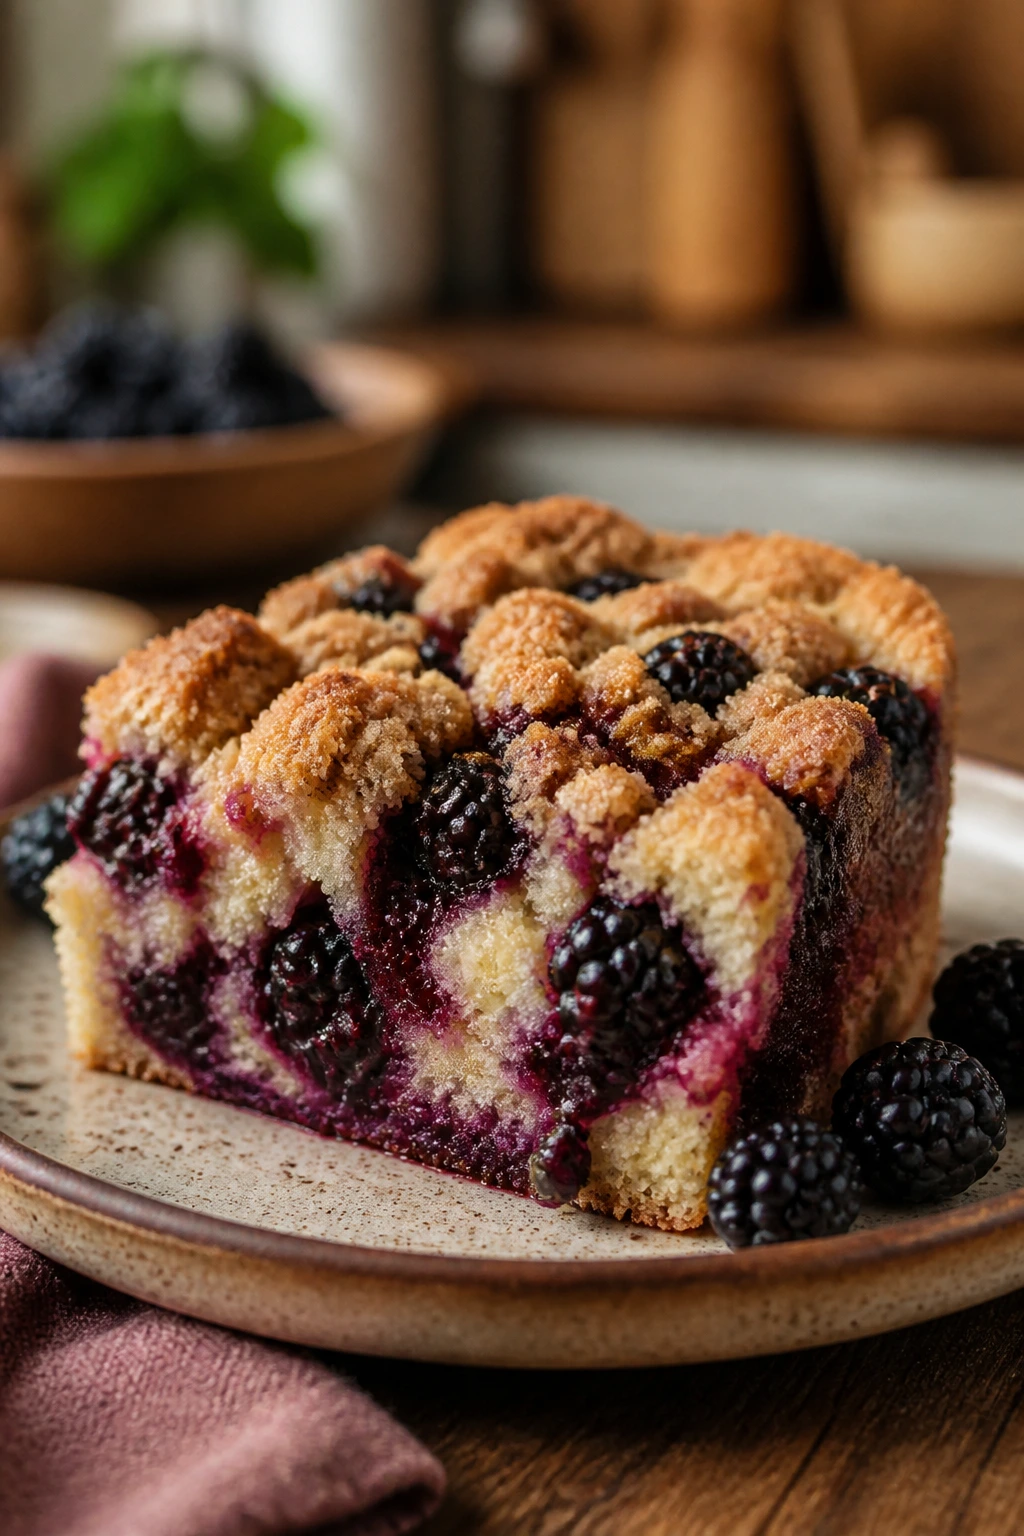
A buckle is a fruit cake that sags in the middle a little under the weight of berries and streusel, and I mean that as praise. This one stays soft because the batter is rich and the blackberries leak juice into the crumb as it bakes.
Why It Works:
Sour cream and butter give the batter enough fat to stay tender. Blackberries are juicy but not overly sweet, so they cut through the crumb and keep every slice moist. The streusel adds a little crunch on top, which makes the softer center feel even softer.
Key Ingredients:
- 1 3/4 cups all-purpose flour
- 1 teaspoon baking powder
- 1/2 teaspoon baking soda
- 1/2 teaspoon salt
- 1/2 cup unsalted butter, softened
- 3/4 cup granulated sugar
- 2 eggs
- 1 cup sour cream
- 1 teaspoon vanilla extract
- 2 cups blackberries
- 1/2 cup flour
- 1/3 cup brown sugar
- 3 tablespoons cold butter, for streusel
Quick Steps:
- Heat the oven to 350°F and grease a 9-inch square pan.
- Whisk the dry cake ingredients. Beat butter and sugar, then beat in eggs, sour cream, and vanilla. Fold in the dry ingredients.
- Spread the batter in the pan and scatter the blackberries on top.
- Mix the streusel ingredients until crumbly and sprinkle over the berries.
- Bake 40 to 45 minutes until the center springs back and the top is golden.
- Cool before cutting.
Equipment for This Recipe:
- 9-inch square pan
- Mixing bowls
- Mixer or hand whisk
- Pastry cutter or fork
- Cooling rack
How to Serve This Dish:
Serve thick wedges with whipped cream or plain yogurt. The buckle tastes especially good the day after baking, when the berry juice has spread into the crumb and the streusel has softened just enough. A little powdered sugar over the top looks nice without hiding the fruit.
Pro Tips for This Recipe:
- Toss berries in a tablespoon of flour if they are very juicy.
- Use cold butter in the streusel for better crumbs.
- Do not overwork the batter.
- Bake until the center barely springs back.
Variations on This Dish:
- Blueberry Buckle: Swap the blackberries for blueberries.
- Mixed Berry Buckle: Use half blackberries and half raspberries.
- Lemon Buckle: Add lemon zest to the batter for a sharper edge.
Common Mistakes to Avoid with This Dish:
- Pressing the fruit into the batter: It sinks too deep and turns wet.
- Pulling it before the center sets: The middle can collapse when sliced.
- Using frozen berries without adjusting bake time: The cake needs a few extra minutes.
14. Soft Sugar Cookies with Cream Cheese Frosting

These are the plush, bakery-style sugar cookies that stay tender because they are thick, frosted, and a little understated in the best way. Cream cheese frosting locks in moisture and gives the cookies a cool, soft finish that holds for days in the fridge.
Why It Works:
Cream cheese in the dough and frosting keeps the texture soft. The cookies bake thick rather than thin, so they never dry out into brittle rounds. If you chill them slightly before baking, they keep their shape and stay puffy.
Key Ingredients:
- 2 3/4 cups all-purpose flour
- 1 teaspoon baking powder
- 1/2 teaspoon salt
- 1/2 cup unsalted butter, softened
- 4 ounces cream cheese, softened
- 1 cup granulated sugar
- 1 large egg
- 2 teaspoons vanilla extract
- 4 ounces cream cheese, for frosting
- 1/4 cup unsalted butter, for frosting
- 2 cups powdered sugar
- 1 teaspoon vanilla extract
Quick Steps:
- Preheat the oven to 350°F and line baking sheets with parchment.
- Whisk flour, baking powder, and salt. Beat butter, cream cheese, and sugar until fluffy, then beat in the egg and vanilla.
- Mix in the dry ingredients just until the dough comes together.
- Scoop dough balls onto the sheets and bake 10 to 12 minutes until the edges are set but the centers still look pale.
- Cool completely, then beat the frosting ingredients and spread or pipe onto the cookies.
Equipment for This Recipe:
- Baking sheets
- Parchment paper
- Mixer
- Cookie scoop
- Offset spatula or piping bag
How to Serve This Dish:
Serve them chilled or at cool room temperature, with frosting piled a little higher than you think is necessary. They make a strong party cookie because they look neat on a tray and stay soft even after sitting out for a short while. A few sprinkles can make them feel more festive without changing the flavor.
Pro Tips for This Recipe:
- Chill the dough if your kitchen is warm.
- Do not brown the bottoms.
- Use full-fat cream cheese for the best frosting texture.
- Frost only when cookies are fully cool.
Variations on This Dish:
- Lemon Sugar Cookies: Add lemon zest to both dough and frosting.
- Almond Frosted Cookies: Swap vanilla for almond extract in the frosting.
- Funfetti Batch: Stir sprinkles into the dough for a birthday-style version.
Common Mistakes to Avoid with This Dish:
- Rolling the dough too thin: Thin cookies go crisp, not soft.
- Baking until golden all over: That dries them out.
- Frosting while warm: The frosting melts and slides.
15. Oreo Dirt Pie Cups
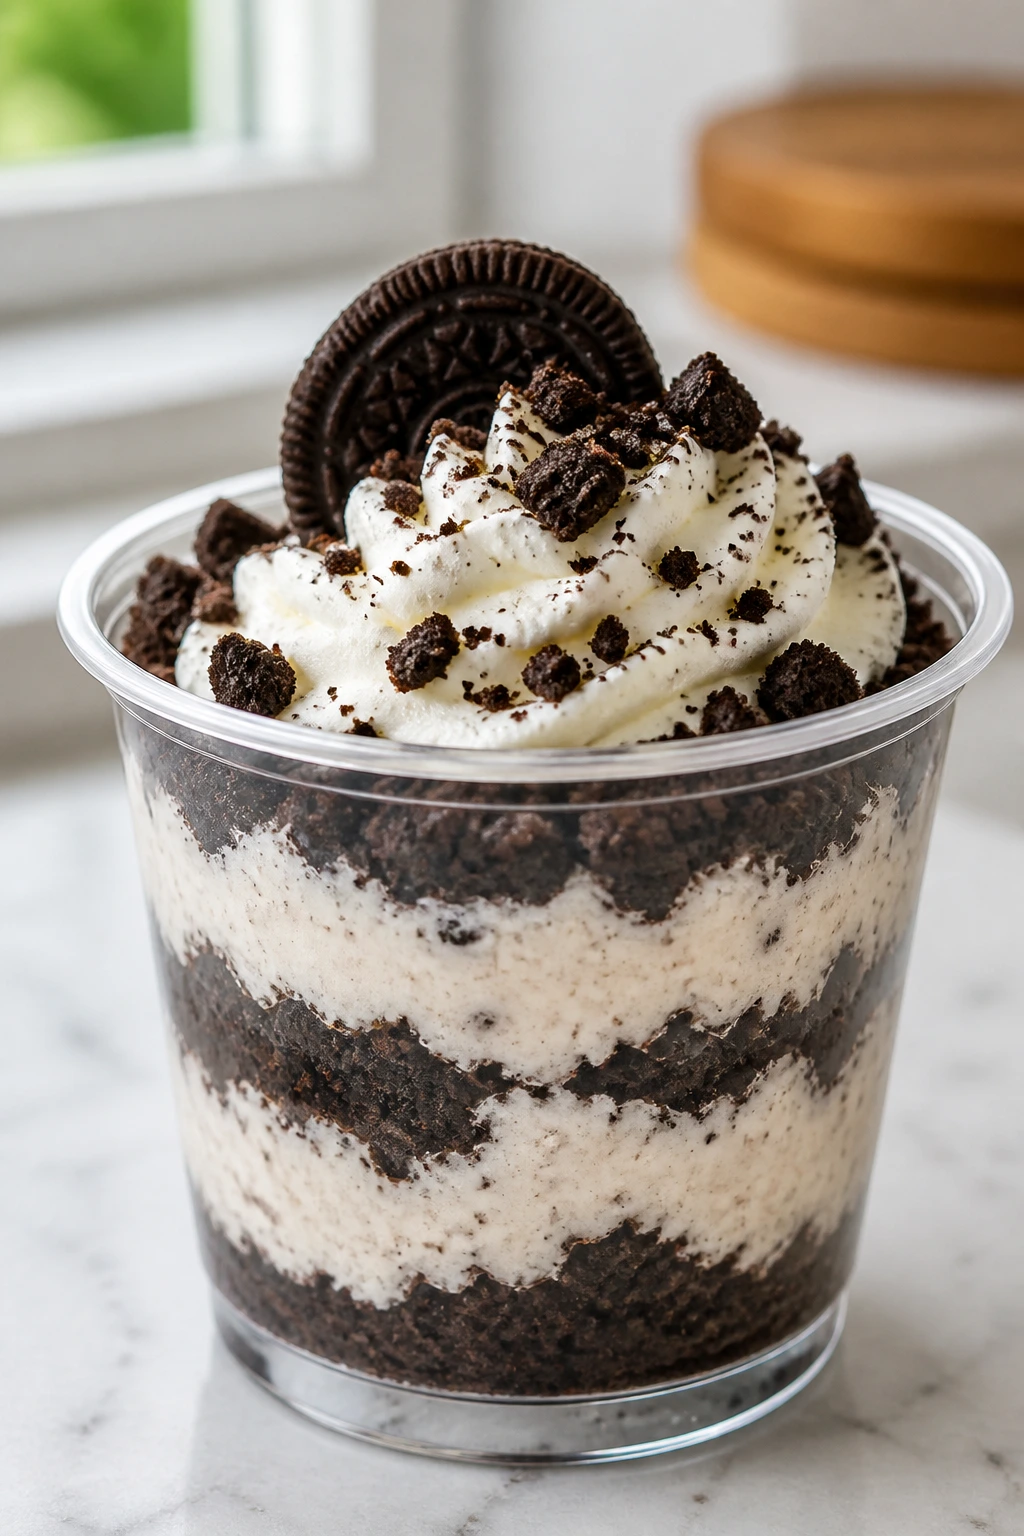
These cups are cold, creamy, and unapologetically soft. Oreo crumbs turn cakey after a day in the fridge, which is part of the charm, and the pudding layer keeps everything lush instead of heavy.
Why It Works:
No-bake desserts depend on chill time instead of oven structure. Cream cheese, whipped topping, and pudding combine into a filling that stays smooth for days. The cookie crumbs soften just enough to taste like a crust rather than loose rubble.
Key Ingredients:
- 24 Oreo cookies, crushed
- 4 tablespoons melted butter
- 8 ounces cream cheese, softened
- 1/2 cup powdered sugar
- 2 cups cold milk
- 1 box instant chocolate pudding
- 1 tub whipped topping, thawed
- Chocolate candies or more cookie crumbs for topping
Quick Steps:
- Mix crushed Oreos with melted butter and press a spoonful into the bottom of each cup.
- Beat cream cheese and powdered sugar until smooth.
- Whisk pudding mix with cold milk until thick, then fold into the cream cheese mixture along with half the whipped topping.
- Spoon the filling into the cups and top with the remaining whipped topping.
- Chill at least 2 hours, then finish with crumbs or candies.
Equipment for This Recipe:
- Small cups or dessert jars
- Mixing bowls
- Hand mixer
- Measuring cups
- Spoon for layering
How to Serve This Dish:
Serve them chilled, right from the fridge. They are good for parties because the individual cups keep the layers neat and the crumb soft, and nobody has to fight a slice onto a plate. A tiny spoon is the right tool here.
Pro Tips for This Recipe:
- Use cold milk so the pudding sets properly.
- Chill the crumbs in the cups before adding filling if you want firmer bottoms.
- Fold the whipped topping gently.
- Add toppings just before serving if you want them to stay crisp.
Variations on This Dish:
- Peanut Butter Dirt Cups: Add peanut butter to the cream cheese layer.
- Mint Cookie Cups: Use mint sandwich cookies instead of Oreos.
- Vanilla Dirt Cups: Swap chocolate pudding for vanilla and add crushed cookies on top.
Common Mistakes to Avoid with This Dish:
- Using warm milk: The pudding turns loose.
- Overmixing the whipped topping: The filling loses its airy feel.
- Assembling too far ahead with crunchy toppings: The texture goes soft fast.
16. Mango Coconut Pudding Parfaits
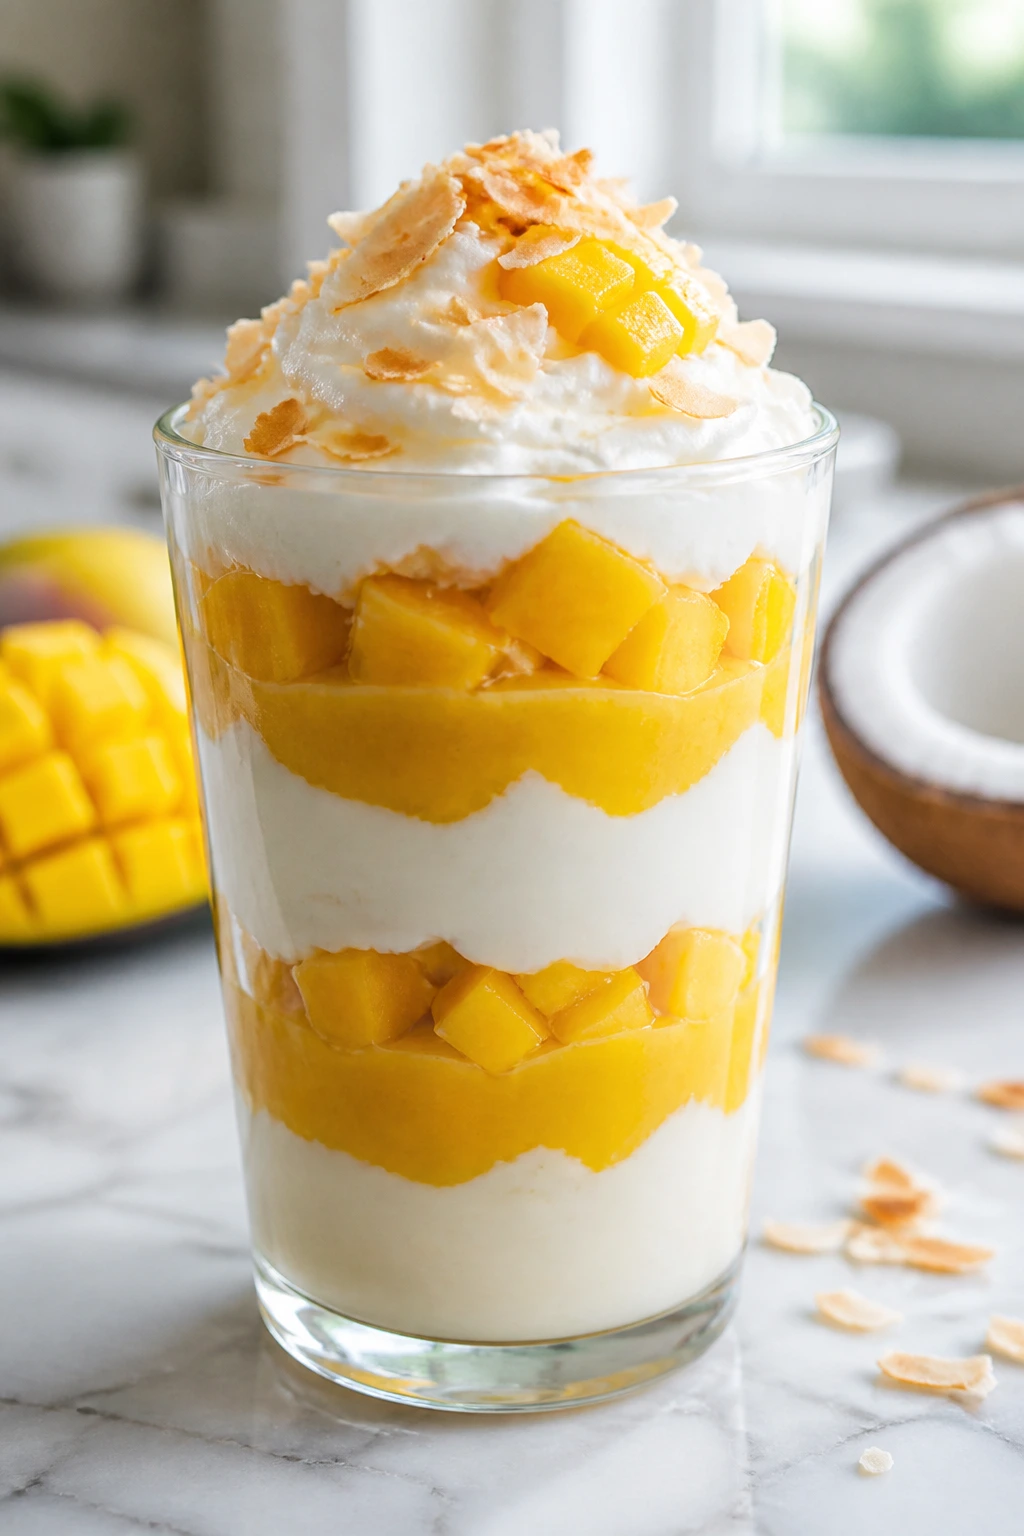
These parfaits are the sort of dessert that looks light but still feels finished. Mango brings a lush, almost custardy sweetness, and coconut pudding keeps the whole thing soft and cool from top to bottom.
Why It Works:
Pudding does the obvious softening work, but mango helps by adding body and fruit puree texture. Graham crumbs or soft cake cubes act like a sponge and soak up the coconut layer without turning mushy. The dessert benefits from at least a few hours in the fridge.
Key Ingredients:
- 2 cups cold milk
- 1 box instant coconut or vanilla pudding
- 1 cup coconut cream or thick coconut milk
- 2 ripe mangoes, diced
- 1 1/2 cups whipped topping or whipped cream
- 1 1/2 cups graham crumbs
- 2 tablespoons melted butter
- Toasted coconut for topping
Quick Steps:
- Mix graham crumbs with melted butter and divide among parfait glasses.
- Whisk pudding with cold milk and coconut cream until thick.
- Spoon pudding over the crumb layer, then add mango pieces.
- Repeat the layers, finish with whipped topping, and chill 2 hours.
- Top with toasted coconut before serving.
Equipment for This Recipe:
- Parfait glasses or jars
- Whisk
- Mixing bowl
- Spoon for layering
- Small skillet or oven tray for toasting coconut
How to Serve This Dish:
Serve cold with a long spoon so each bite gets crumb, pudding, and fruit together. The layers look neat in glass, and the texture stays soft even after a night in the fridge. These are good when you want dessert to feel cool rather than heavy.
Pro Tips for This Recipe:
- Use mangoes that smell fragrant at the stem end.
- Chill the glasses first if the kitchen is hot.
- Add the toasted coconut last so it stays crisp.
- A squeeze of lime over the mango wakes up the flavor.
Variations on This Dish:
- Pineapple Coconut Parfaits: Swap mango for pineapple chunks.
- Berry Coconut Parfaits: Use raspberries or strawberries instead.
- Cake-Cube Parfaits: Replace crumbs with cubes of soft pound cake.
Common Mistakes to Avoid with This Dish:
- Using underripe mango: The dessert tastes flat and a little starchy.
- Layering while the pudding is still loose: It slides into the crumb.
- Overfilling the jars: The top layer smears when you carry them.
17. Apricot Almond Bars

Apricot bars have a sunny, mellow flavor that keeps baking from feeling fussy. The almond crust stays soft under the fruit filling, and the preserve layer gives the bars enough moisture to stay good for days.
Why It Works:
Apricot preserves are thick enough to bake cleanly and moist enough to protect the crust from drying out. Almond flour or sliced almonds add richness, which softens the bite. These bars hold their shape better after a full chill.
Key Ingredients:
- 1 1/2 cups all-purpose flour
- 1/2 cup almond flour
- 1/2 cup powdered sugar
- 1 cup unsalted butter, softened
- 1 teaspoon almond extract
- 1 cup apricot preserves
- 1 cup chopped dried apricots
- 1/2 cup sliced almonds
- 1 tablespoon lemon juice
Quick Steps:
- Heat the oven to 350°F and line an 8×8-inch pan with parchment.
- Mix the flours and powdered sugar, then beat in butter and almond extract until a soft dough forms.
- Press most of the dough into the pan and bake for 12 minutes.
- Stir apricot preserves, dried apricots, and lemon juice together, spread over the base, and crumble the remaining dough plus almonds over the top.
- Bake 25 to 30 minutes until light golden.
- Cool fully before cutting.
Equipment for This Recipe:
- 8×8-inch pan
- Parchment paper
- Mixer or bowl and fork
- Spatula
- Sharp knife
How to Serve This Dish:
Cut them into slim bars and serve with tea, coffee, or a spoon of vanilla yogurt on the side. The bars have enough fruit to stand alone, but the almond notes make them feel more polished than an ordinary jam square. A dusting of powdered sugar is enough decoration.
Pro Tips for This Recipe:
- Warm the preserves before spreading.
- Use good almond extract; a little goes a long way.
- Chill before slicing for cleaner edges.
- A pinch of salt makes the apricot flavor pop.
Variations on This Dish:
- Plum Almond Bars: Replace apricot preserves with plum jam.
- Orange Apricot Bars: Add orange zest to the filling.
- Oat Topping Batch: Add 1/2 cup quick oats to the crumble.
Common Mistakes to Avoid with This Dish:
- Spreading jam too thin: The bars dry out faster. Keep a solid layer.
- Overbaking the crust: The edges get brittle.
- Cutting while warm: The preserve layer needs time to set.
18. Peach Melba Trifle
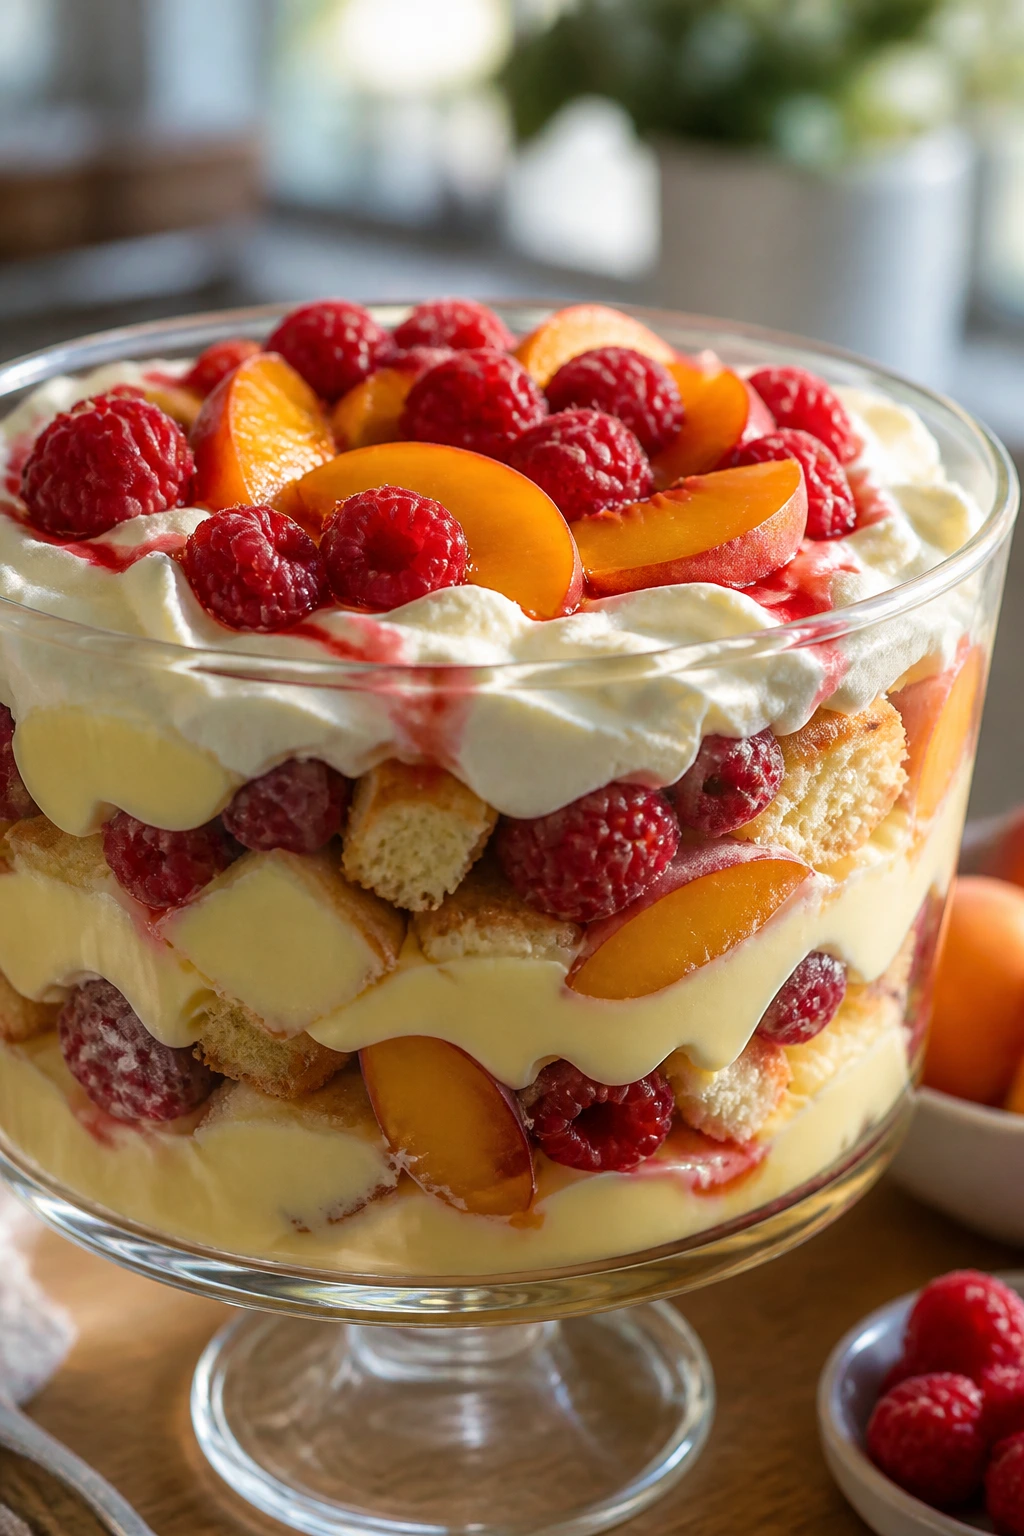
Trifle is a quiet cheat code for soft desserts. Layers of cake, peaches, raspberries, and custard melt into one another in the fridge, so each spoonful tastes plush and cool instead of separate and fussy.
Why It Works:
The cake soaks up peach juice and custard, which keeps the whole bowl soft for days. Raspberries add a bright edge that prevents the dessert from tasting like one long note of sweetness. Since it is built in layers, it actually improves after a night in the refrigerator.
Key Ingredients:
- 1 pound cake or sponge cake, cut into cubes
- 4 ripe peaches, sliced
- 2 cups raspberries
- 2 cups vanilla custard or pudding
- 2 cups whipped cream
- 1 tablespoon sugar
- 1 tablespoon lemon juice
- Sliced almonds for garnish
Quick Steps:
- Toss peaches with sugar and lemon juice and let them sit 10 minutes.
- Layer cake cubes in the bottom of a trifle bowl.
- Spoon over custard, then add peaches and raspberries.
- Repeat the layers, finish with whipped cream, and top with almonds.
- Chill at least 2 hours before serving.
Equipment for This Recipe:
- Large trifle bowl or deep glass bowl
- Mixing bowl
- Sharp knife
- Spoon for layering
- Measuring cups
How to Serve This Dish:
Serve it cold in deep bowls, making sure each scoop gets cake and fruit from the lower layers. The glass bowl shows off the stripes, but the real draw is the soft, almost spoonable texture after chilling. It feeds a crowd without needing neat cuts.
Pro Tips for This Recipe:
- Use slightly stale cake; it absorbs custard better.
- Do not drown the layers or the trifle turns soupy.
- Chill overnight for the best texture.
- Add almonds only right before serving if you want them crisp.
Variations on This Dish:
- Berry Melba Trifle: Use mixed berries instead of peaches.
- Mascarpone Trifle: Fold mascarpone into the whipped cream.
- Ginger Peach Trifle: Add minced candied ginger to the fruit.
Common Mistakes to Avoid with This Dish:
- Using fresh cake that is too soft: It can collapse under the custard.
- Layering too thickly in one go: The bottom gets heavy and muddled.
- Skipping the chill: The flavors stay separate and flat.
19. Cinnamon Roll Blondies
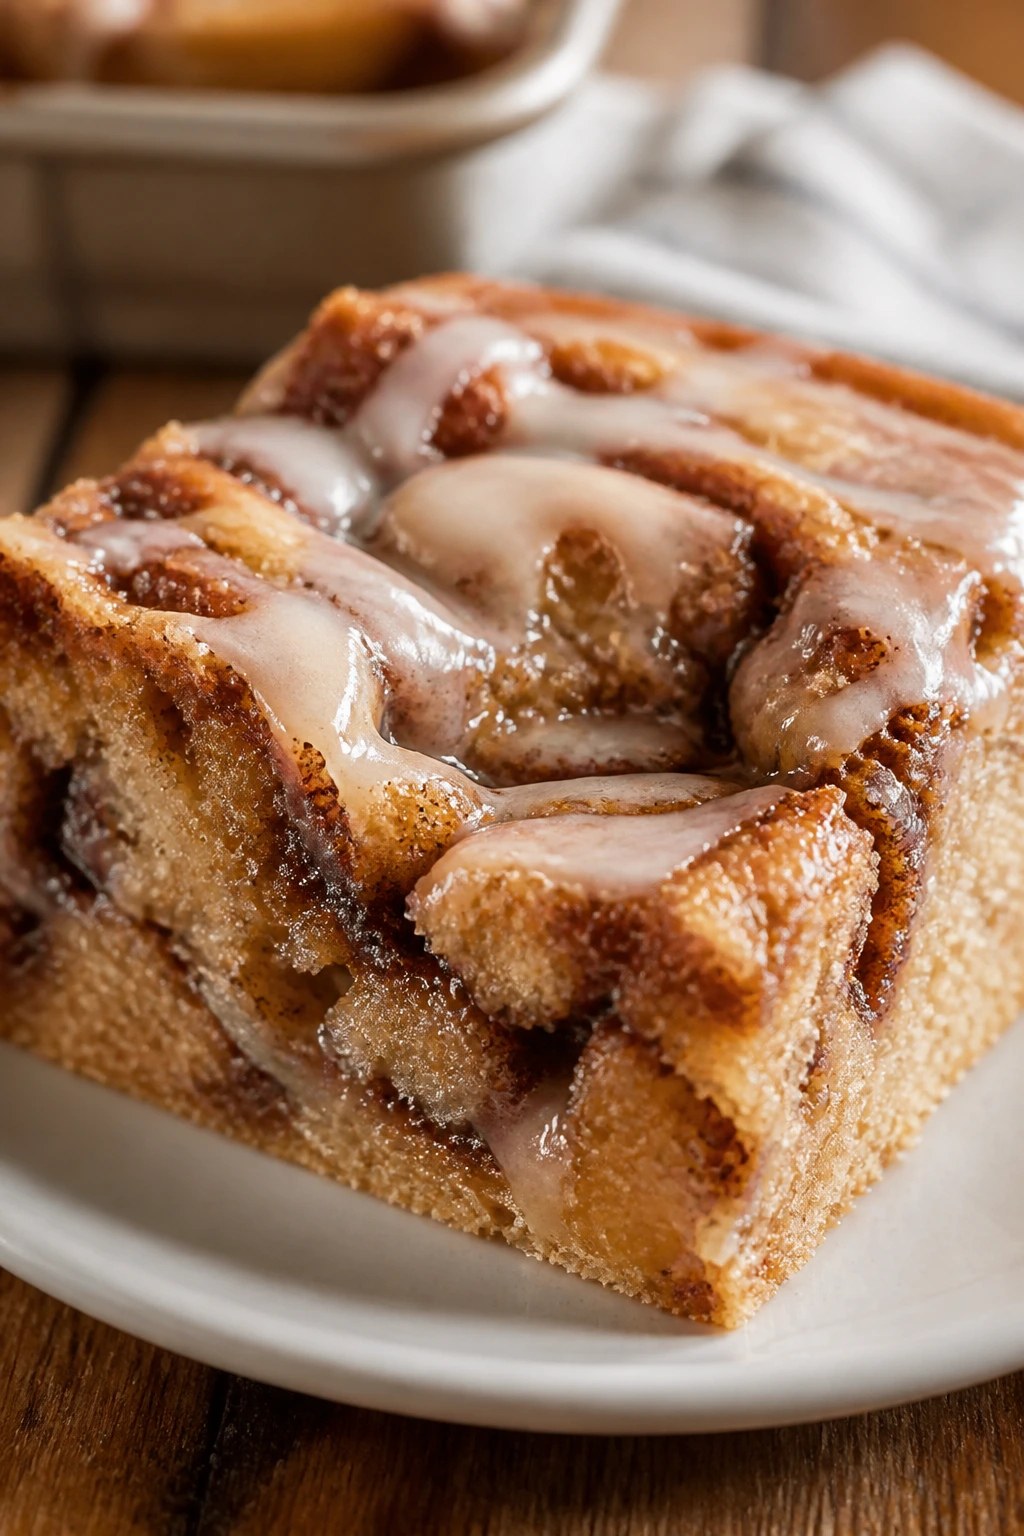
These taste like a cinnamon roll took a shortcut through a blondie pan. The swirl stays soft and buttery, the crumb stays chewy, and the cream cheese glaze sinks into the warm top in the nicest way.
Why It Works:
Brown sugar and melted butter make the base soft for days. The cinnamon swirl brings moisture and spice without turning the bars dry, and the glaze adds a little extra cushion on top. They slice better after cooling, but they never lose that gooey center.
Key Ingredients:
- 1 cup unsalted butter, melted
- 1 1/2 cups brown sugar
- 2 large eggs
- 2 teaspoons vanilla extract
- 2 cups all-purpose flour
- 1 teaspoon baking powder
- 1/2 teaspoon salt
- 1/4 cup melted butter, for swirl
- 1/2 cup brown sugar, for swirl
- 1 tablespoon cinnamon
- 2 ounces cream cheese
- 1 cup powdered sugar
- 2 tablespoons milk
Quick Steps:
- Heat the oven to 350°F and line a 9×13-inch pan with parchment.
- Whisk melted butter and brown sugar, then beat in eggs and vanilla. Fold in flour, baking powder, and salt.
- Spread half the batter in the pan. Mix swirl ingredients and drizzle over the batter, then add the remaining batter and swirl lightly with a knife.
- Bake 25 to 30 minutes until the center is set but still soft.
- Beat cream cheese, powdered sugar, and milk for the glaze, then drizzle over the cooled bars.
Equipment for This Recipe:
- 9×13-inch pan
- Parchment paper
- Mixing bowl
- Whisk and knife
- Small bowl for glaze
How to Serve This Dish:
Serve them at room temperature, where the glaze stays slightly set and the centers remain chewy. They pair well with coffee, but cold milk works just as well. If you are bringing dessert to a casual get-together, these are one of the easiest things to transport.
Pro Tips for This Recipe:
- Swirl gently so the layers stay distinct.
- Pull them when the center looks just barely done.
- Let the glaze thicken a minute before drizzling.
- A pinch of nutmeg in the swirl adds depth.
Variations on This Dish:
- Apple Cinnamon Blondies: Fold in a small amount of finely diced apple.
- Pecan Roll Blondies: Add chopped pecans to the swirl.
- Maple Glaze Version: Swap part of the powdered sugar glaze for maple syrup.
Common Mistakes to Avoid with This Dish:
- Overbaking the middle: The chewy texture disappears fast.
- Swirling too much: The filling disappears into the batter.
- Glazing while the bars are hot: The icing melts away.
20. Vanilla Pudding Poke Cake
This is a cake that gets better after it sits. Vanilla pudding settles into the holes and keeps the crumb soft, while whipped topping on top adds a cool, smooth layer that makes the whole thing taste like a dessert built for warm nights.
Why It Works:
Poke cakes are almost designed for softness. The pudding seeps into the cake and keeps the interior moist for days, which is why slices stay pleasant even when chilled. The top layer stops the surface from drying out and adds a cold, creamy finish.
Key Ingredients:
- 1 box white or yellow cake mix
- Ingredients listed on the box, usually eggs, oil, and water
- 2 boxes instant vanilla pudding
- 4 cups cold milk
- 1 tub whipped topping
- 1 teaspoon vanilla extract
- Sprinkles or berries, optional
Quick Steps:
- Bake the cake in a 9×13-inch pan according to the box directions and cool for 15 minutes.
- Use the handle of a wooden spoon to poke holes all over the warm cake.
- Whisk pudding mix, cold milk, and vanilla until thick, then pour over the cake and spread it into the holes.
- Chill 1 hour, then top with whipped topping and decorations.
- Chill again before slicing.
Equipment for This Recipe:
- 9×13-inch pan
- Wooden spoon handle
- Whisk
- Mixing bowl
- Offset spatula
How to Serve This Dish:
Serve it cold in squares with berries on the side if you want something fresher-looking. The pudding keeps the texture soft enough that the cake almost eats like a chilled custard slab, which is why people keep sneaking back for one more piece. Keep the pan chilled until the moment you cut it.
Pro Tips for This Recipe:
- Poke the holes while the cake is still warm.
- Use instant pudding, not cook-and-serve.
- Pour the pudding slowly so it fills the holes.
- Chill overnight if you want the cleanest texture.
Variations on This Dish:
- Banana Pudding Cake: Use banana pudding and top with sliced bananas.
- Chocolate Pudding Cake: Swap in chocolate pudding and crushed cookies.
- Berry Vanilla Cake: Layer fresh berries under the whipped topping.
Common Mistakes to Avoid with This Dish:
- Waiting until the cake is cold to poke holes: The pudding will not sink in well.
- Using warm milk for the pudding: It stays loose.
- Skipping the chill between layers: The cake gets sloppy instead of soft.
21. Molasses Cookie Icebox Sandwiches
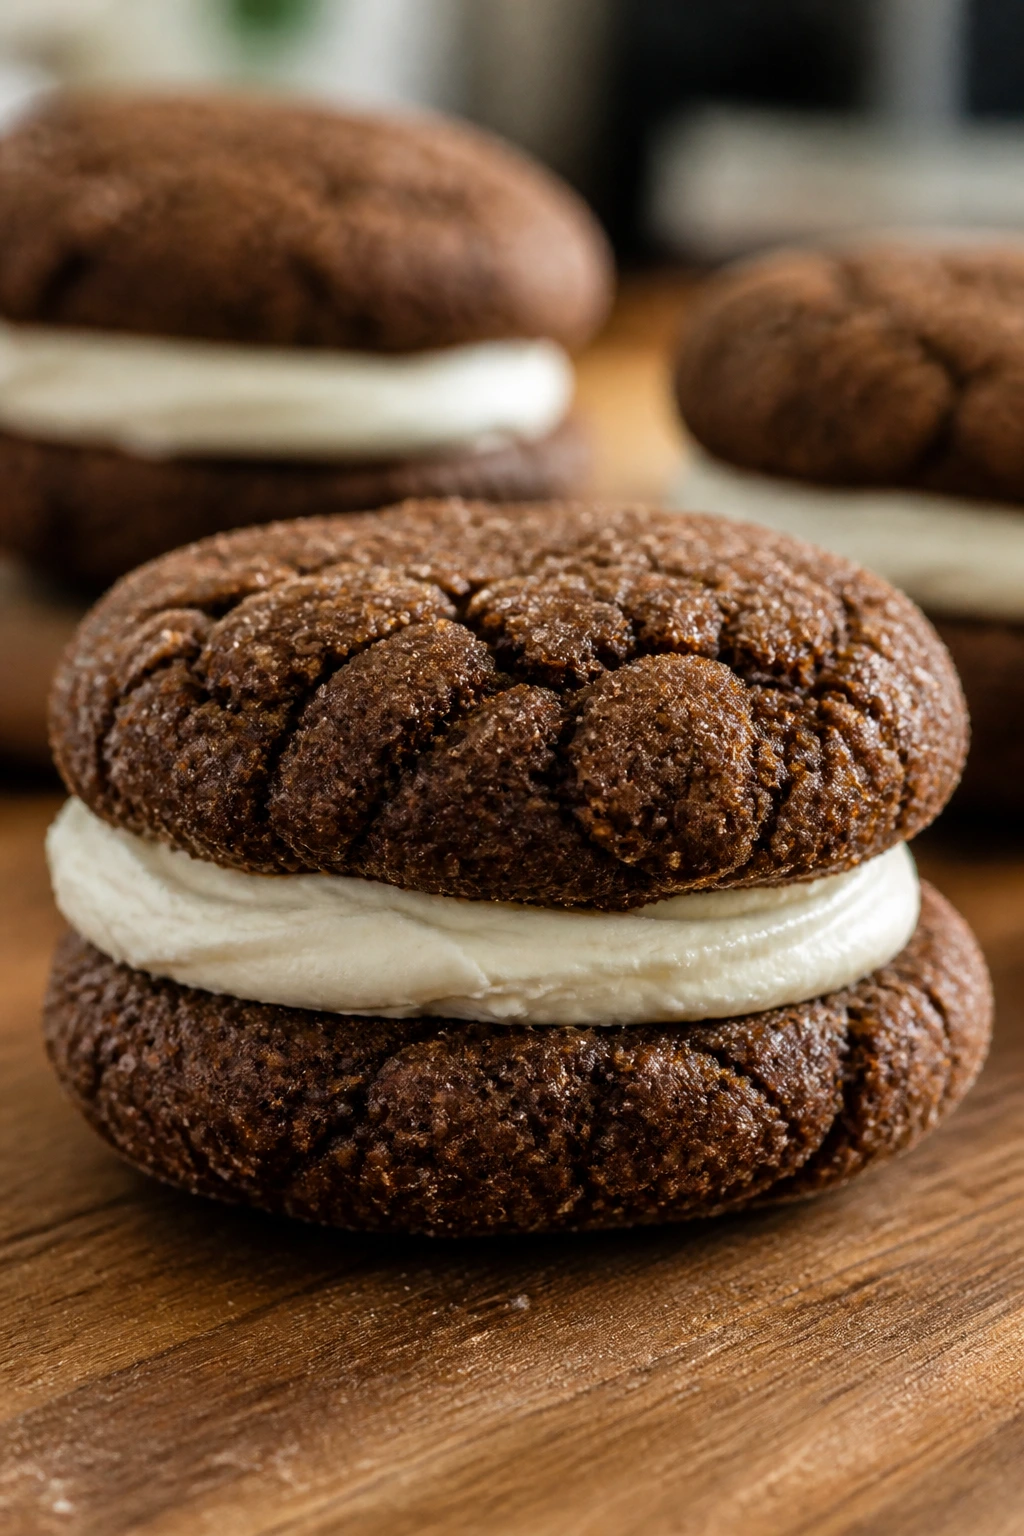
These are the kind of cookies that get softer as they sit, which is a rare and beautiful thing. Molasses gives them a deep, dark sweetness, and the filling turns them into a cold, chewy sandwich that feels made for hot weather.
Why It Works:
Molasses and brown sugar keep the cookies soft from the start. Chilling the dough before baking helps them stay thick, and the cream cheese filling adds another layer of moisture while balancing the spice. Store them cold, and the texture holds up for days.
Key Ingredients:
- 2 1/4 cups all-purpose flour
- 2 teaspoons ground ginger
- 1 teaspoon cinnamon
- 1/2 teaspoon cloves
- 1 teaspoon baking soda
- 1/2 teaspoon salt
- 3/4 cup unsalted butter, softened
- 3/4 cup brown sugar
- 1/2 cup molasses
- 1 large egg
- 4 ounces cream cheese, softened
- 1/4 cup unsalted butter, for filling
- 1 1/2 cups powdered sugar
Quick Steps:
- Whisk flour, spices, baking soda, and salt.
- Beat butter and brown sugar, then beat in molasses and egg. Mix in the dry ingredients and chill the dough 30 minutes.
- Scoop and bake at 350°F for 9 to 11 minutes until the tops look set but soft. Cool fully.
- Beat cream cheese, butter, and powdered sugar into a thick filling.
- Sandwich cookies together and chill before serving.
Equipment for This Recipe:
- Baking sheets
- Parchment paper
- Mixer
- Cookie scoop
- Small offset spatula
How to Serve This Dish:
Serve them cold from the fridge for a firmer bite, or let them sit 10 minutes if you like a softer center. They are tidy enough for a dessert box and rich enough that one sandwich cookie feels like a full finish to a meal. The filling gives each bite a cool, creamy edge.
Pro Tips for This Recipe:
- Chill the dough so the cookies stay thick.
- Do not overbake; soft centers are the point.
- Make the filling thick enough to hold its shape.
- A tiny pinch of black pepper in the dough adds warmth.
Variations on This Dish:
- Maple Sandwich Cookies: Add maple extract to the filling.
- Orange Spice Version: Stir orange zest into the dough.
- Plain Vanilla Filling: Skip the spice in the filling for a cleaner flavor.
Common Mistakes to Avoid with This Dish:
- Baking until the cookies look dry on top: They will harden as they cool.
- Filling them while warm: The cream melts and slides out.
- Making the filling too loose: The sandwiches slip apart in storage.
22. Soft Oatmeal Raisin Cookies
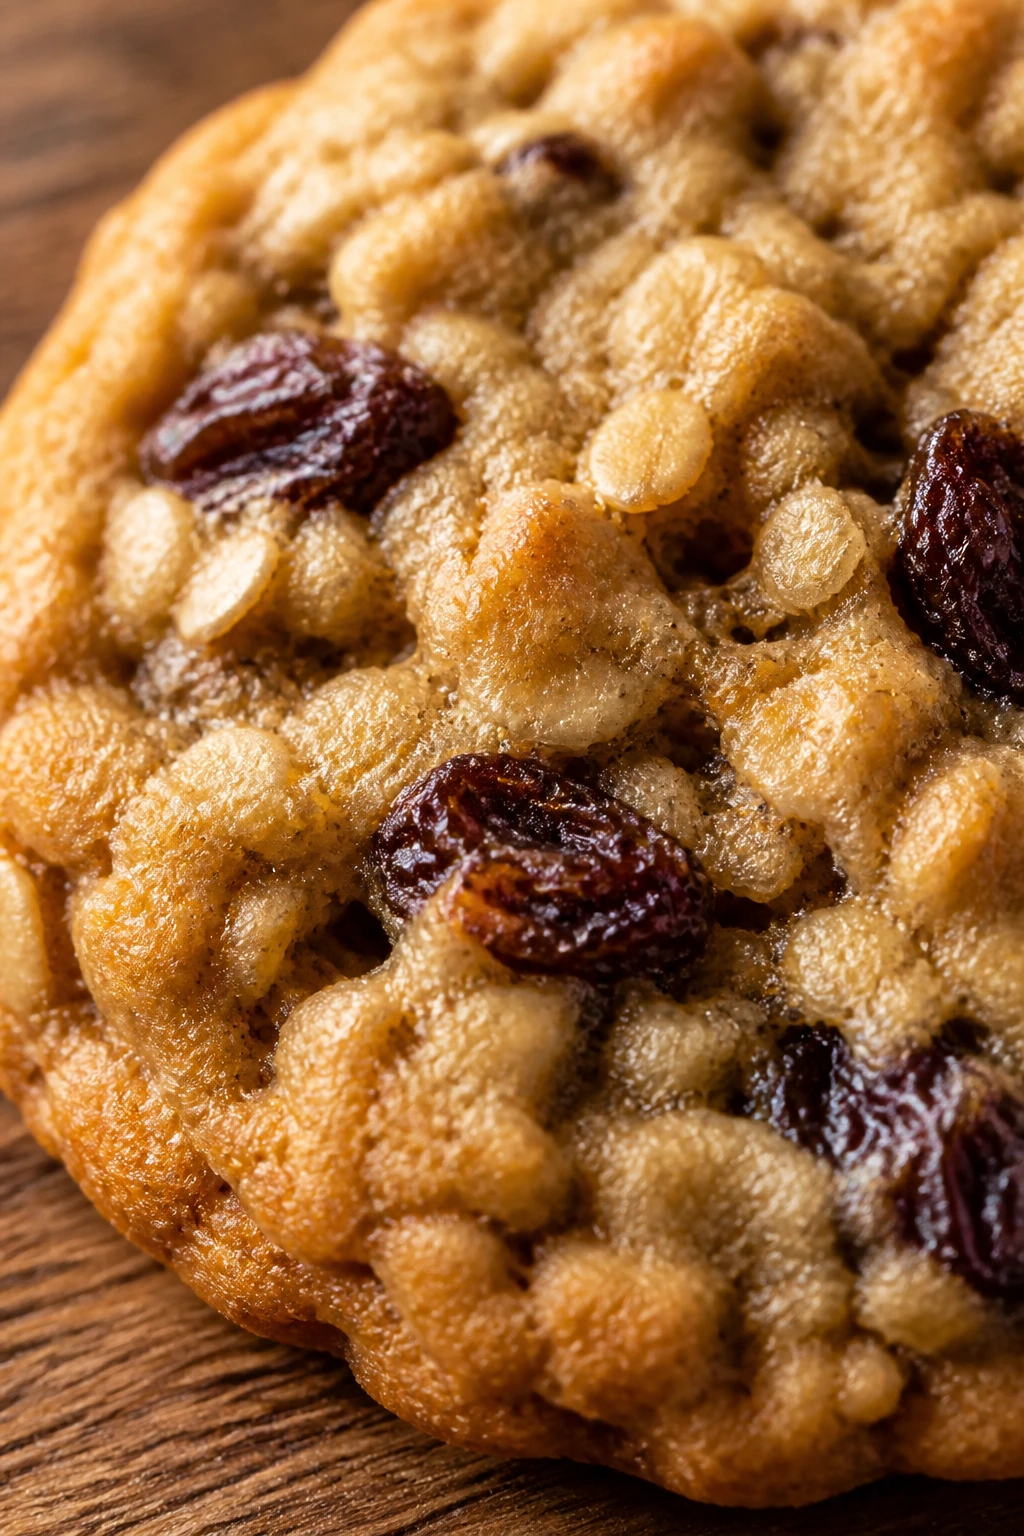
A good oatmeal raisin cookie should bend before it snaps. These stay soft because the oats hold moisture, the brown sugar keeps the crumb chewy, and the raisins plump up while they bake.
Why It Works:
Brown sugar and a little molasses keep the cookie base tender. Oats absorb moisture without drying the cookie out, and raisins bring their own sweetness and softness. Pull them from the oven early, and they remain chewy for days in an airtight tin.
Key Ingredients:
- 1 cup unsalted butter, softened
- 1 cup brown sugar
- 1/2 cup granulated sugar
- 2 large eggs
- 1 teaspoon vanilla extract
- 1 3/4 cups all-purpose flour
- 1 teaspoon baking soda
- 1 teaspoon cinnamon
- 1/2 teaspoon salt
- 3 cups old-fashioned oats
- 1 cup raisins
- 1 tablespoon molasses
Quick Steps:
- Preheat the oven to 350°F and line baking sheets with parchment.
- Beat butter and both sugars until creamy, then beat in eggs, vanilla, and molasses.
- Mix in flour, baking soda, cinnamon, and salt, then stir in oats and raisins.
- Scoop onto the sheets and bake 10 to 12 minutes until the edges are set and the centers still look soft.
- Cool on the sheet for 5 minutes, then move to a rack.
Equipment for This Recipe:
- Baking sheets
- Parchment paper
- Mixing bowls
- Cookie scoop
- Cooling rack
How to Serve This Dish:
Serve them at room temperature with coffee, tea, or cold milk. They pack well, stack neatly, and stay soft enough that even the last cookie from the tin still feels pleasant instead of tired. A small piece of bread in the storage container helps keep them plush.
Pro Tips for This Recipe:
- Soak the raisins in warm water for 10 minutes if they seem dry.
- Use old-fashioned oats, not instant.
- Pull the cookies early.
- Add walnuts if you want a little crunch.
Variations on This Dish:
- Cranberry Oat Cookies: Swap raisins for dried cranberries.
- Chocolate Chip Oat Cookies: Replace half the raisins with chocolate chips.
- Apple Oat Batch: Add finely chopped dried apple and a touch more cinnamon.
Common Mistakes to Avoid with This Dish:
- Overbaking until the tops turn dark: The cookies dry out fast.
- Using instant oats: They make the texture mushy.
- Skipping the cooling rack: Steam softens the bottoms too much.
Why Soft Desserts Hold Up So Well in Warm Weather
Heat is brutal on crisp pastry. A tart shell that seemed sturdy in the oven can go soft in a humid kitchen, and a delicate meringue can sulk the second it leaves the fridge. Soft desserts dodge that problem by starting with a cushion of moisture instead of trying to preserve crunch that was never going to last.
Sugar plays a bigger role than people think. Brown sugar and honey pull in moisture from the air, which helps cakes and bars stay tender a little longer. Fruit does the same job from the inside out. A ripe peach, a spoonful of jam, or mashed banana is not just flavor; it is part of the moisture system.
Dairy matters too. Sour cream, yogurt, cream cheese, pudding, and whipped toppings create richer textures that do not dry into dust after a night in the fridge. If a dessert sounds a little old-fashioned and a little soft in the center, that is often a clue it will keep better than something airier and more fragile.
Essential Equipment for These Recipes
- 9×13-inch baking pan: The workhorse pan for sheet cakes, poke cakes, bars, and anything that needs clean squares.
- 8×8-inch and 9-inch square pans: Better for smaller batches, tighter bars, and recipes that need a thicker cut.
- Muffin tin: Needed for cupcakes, mini cakes, and portioned desserts that keep their softness in single servings.
- Hand mixer or stand mixer: Helpful for cream cheese layers, cookie doughs, and cakes with butter that needs proper aeration.
- Rubber spatula: The tool that saves batters from overmixing and helps get every last bit out of the bowl.
- Parchment paper: Makes lifting bars and cakes out of the pan much easier, and keeps sticky fruit layers from welding themselves to metal.
- Cooling rack: Lets steam escape from the bottom, which matters more than people think for soft cakes.
- Wooden spoon or skewer: Poke cakes need a handle that makes deep, clean holes.
- Sharp chef’s knife: Clean cutting matters for chilled bars and layered desserts.
- Airtight containers: Necessary if you want cookies, bars, or cake slices to stay tender instead of stale.
Smart Shopping and Ingredient Tips
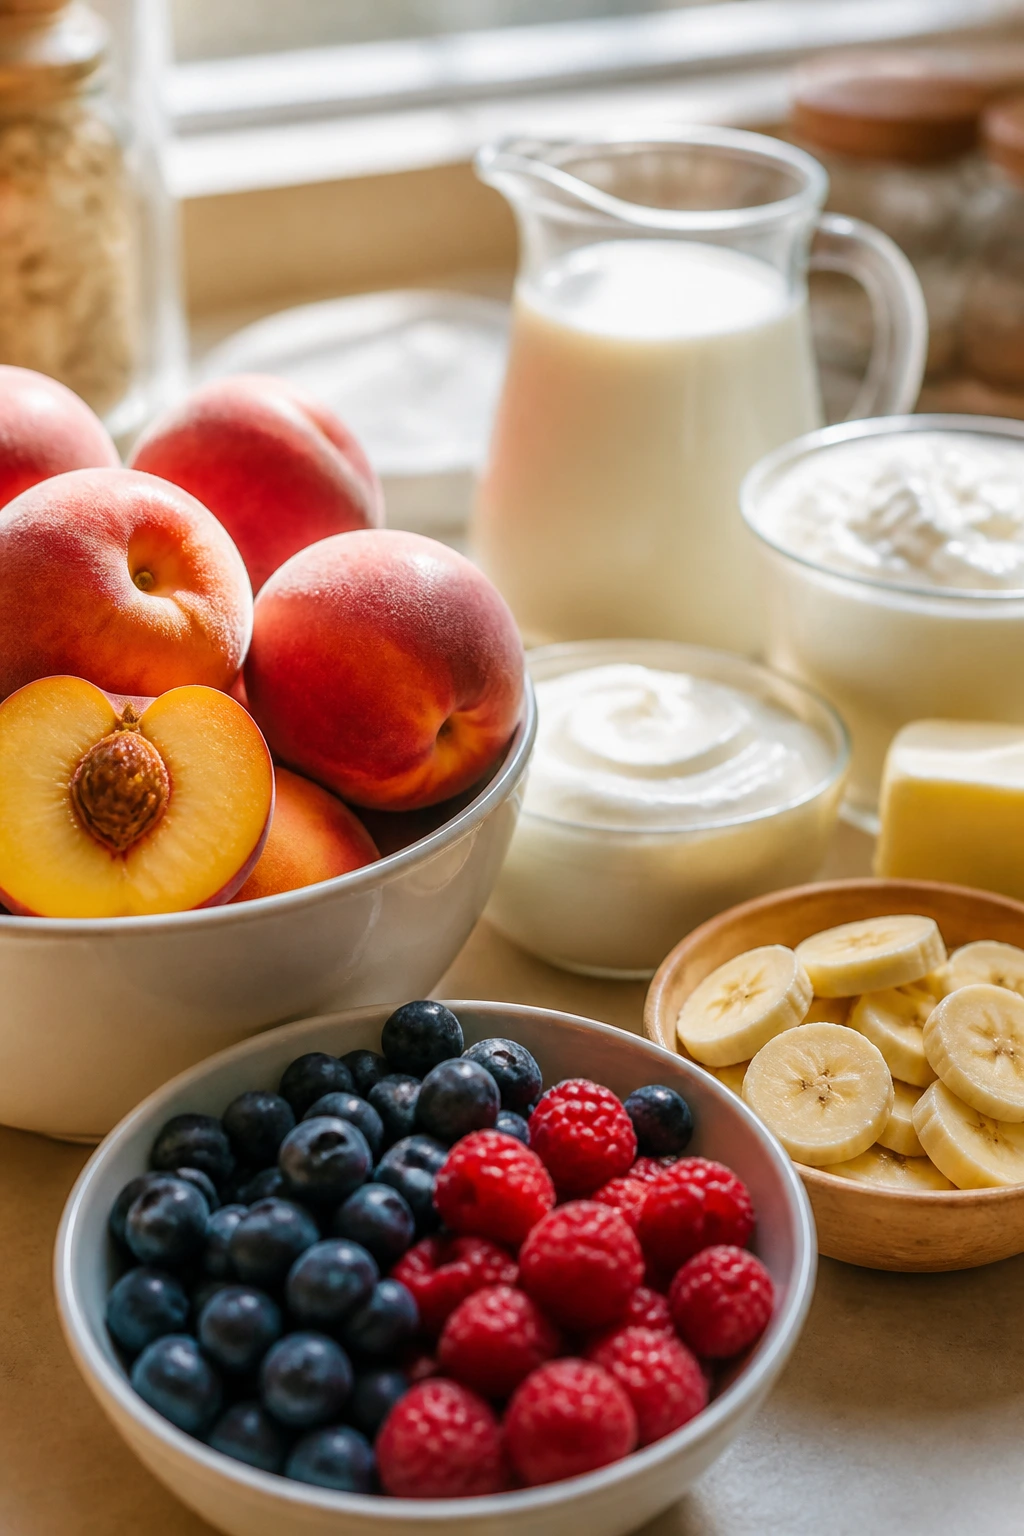
Fruit choices make or break this kind of baking. Pick peaches that give a little at the stem, berries that smell like something, and bananas that have plenty of brown spotting. If the fruit looks perfect and hard, it often bakes into a flatter flavor with less natural moisture. Frozen fruit works well in bars, muffins, and buckles, but keep it frozen until the last minute so the batter does not turn watery.
Dairy deserves a little care. Full-fat yogurt, sour cream, cream cheese, and whole milk behave better than reduced-fat versions because they carry more moisture and fat, which translates to a softer crumb. If a recipe calls for cream cheese, buy the block style rather than the spreadable tub. The texture is steadier, and it sets more predictably in bars and frostings.
For pantry ingredients, brown sugar is the quiet hero. It keeps blondies chewy, cookies soft, and cakes from drying into a dull crumb. If yours has hardened, soften it in a sealed container with a slice of bread or a damp paper towel for a few hours. The same goes for molasses, instant pudding, cornstarch, and vanilla extract: simple ingredients, big texture payoff.
How to Serve These Desserts
Presentation: Soft desserts look best when the cuts are clean and the topping is intentional. Dust cakes with powdered sugar, add a strip of fruit down the center of bars, or finish parfaits with toasted coconut and one bright berry on top. For chilled desserts, serve on cold plates if you want the layers to hold their shape a little longer.
Accompaniments: Vanilla ice cream belongs with peach bars, blackberries, and blondies. Light whipped cream fits buckle, trifle, and poke cake. For muffins and snack cakes, plain yogurt or a spoonful of crème fraîche gives a sharper edge. Fresh sliced peaches, cherries, or berries on the side make the plate feel fuller without adding much work.
Portions: Bars usually cut best at 2×2-inch or 2×3-inch pieces. Snack cakes and sheet cakes can be served in squares the size of a deck of cards. Cookies should be made slightly larger than you think they should be; soft cookies shrink a touch as they cool, and a bigger scoop gives you a more tender center.
Beverage Pairing: Iced coffee works with almost everything here, especially blondies, cookies, and coffee cake. Cold brew with a splash of milk makes a good partner for chocolate desserts. For fruit-heavy bakes, lemonade, black tea, or sparkling water with lime keeps the whole thing from feeling too heavy.
Additional Tips and Flavor Boosters
Flavor Enhancement: A pinch of salt at the finish does more for soft desserts than another spoonful of sugar. It sharpens fruit, wakes up chocolate, and makes brown sugar taste deeper. For cakes and bars, a little citrus zest goes a long way too.
Customization: If you want a dessert to lean richer, add toasted nuts or chocolate chunks. If you want it fresher, use berries, peaches, or a thin fruit glaze. Coconut flakes, crushed cookies, and almond extract are easy ways to push a base recipe in a new direction without messing up the texture.
Serving Suggestions: Soft desserts often look best with a cool topping: whipped cream, vanilla yogurt, cream cheese frosting, or a spoonful of pudding. Fresh mint can work on fruit desserts if you use it sparingly. A single brushed glaze over bars or a dusting of powdered sugar over cake is enough to make them look finished.
Make-It-Yours: For a gluten-free route, use a 1:1 baking blend in bars and cakes, then check the crumb a few minutes early. For dairy-free versions, coconut yogurt and coconut milk help a lot in soft cakes and parfaits. If you want less sugar, lean on ripe fruit and skip extra glaze rather than trimming sugar too hard from the batter, because texture is usually the first thing to suffer.
Make-Ahead, Storage, and Reheating Guidance
Most of these desserts keep best in airtight containers once they are fully cool. Cookie batches usually stay soft for 3 to 4 days at room temperature, and adding a small piece of bread to the container can slow down staling. Bar desserts and snack cakes usually hold 4 to 5 days in the fridge, especially if they contain fruit, cream cheese, or pudding. Trifles, poke cakes, and parfaits should stay refrigerated from the start and are best within 2 to 3 days.
Freezing works well for blondies, muffins, coffee cake, and many sheet cakes. Wrap individual portions tightly in plastic, then place them in a freezer bag or container for up to 2 months. Thaw overnight in the fridge or on the counter for a few hours, depending on how dense the dessert is. Frosted sugar cookies freeze nicely if you freeze them in a single layer first so the frosting sets.
Reheating is gentle work. Muffins and snack cakes come back well in a 300°F oven for 5 to 8 minutes, loosely covered with foil if the top is already browned. Blondies and bars do fine at room temperature, but if you want a warm edge, 10 seconds in the microwave softens them without wrecking the crumb. Pudding desserts and cream-filled items should not be reheated; they are meant to stay cold.
Make-ahead desserts often taste better the next day because the moisture settles. Poke cakes, trifle, cheesecakey bars, and fruit squares all benefit from an overnight rest. Cookies are the exception only in one respect: if you like them extra soft, store them the day they are baked, sealed, and unbothered.
Variations and Adaptations to Try

Gluten-Free Pantry Swap: A 1:1 gluten-free baking blend works best in muffins, cakes, and blondies. Use a blend that includes xanthan gum or the crumb can get sandy, and always check the bake time a few minutes early because gluten-free bakes often dry out fast.
Dairy-Light Version: Coconut yogurt, oat milk, and coconut cream can replace dairy in many of the fruit-heavy cakes and parfaits. The flavor shifts a bit, so pair it with lime, mango, pineapple, or berries rather than trying to force it into a neutral vanilla bake.
Berry-First Batch: If you have more berries than peaches, cherries, or mango, use them where the juice can thicken into the dessert instead of leaking away. Bars, buckles, muffins, and trifle all handle berry swaps well. Toss berries with a little flour or cornstarch if they are especially juicy.
Chocolate-Forward Route: Brownies, chocolate cookies, pudding cake, and blondies can all take extra chocolate chips, cocoa, or a thin ganache. That works best when the base recipe already has a soft crumb; adding chocolate to a dry bake does not fix dryness, it just makes it taste drier.
Lower-Sugar Approach: Use ripe fruit, plain yogurt, and a lighter glaze instead of stripping sugar from the batter. Sugar does more than sweeten; it holds moisture. Cutting it too aggressively often leaves you with a cake that feels stale on day one.
Picnic-Ready Version: Choose bars, muffins, and thick cookies if you need something that can ride in a container without collapse. Keep cream-cheese and pudding desserts chilled in insulated bags with ice packs, and wait to garnish until you reach the table.
Common Mistakes to Avoid
The biggest mistake is baking until the dessert looks fully finished in the pan. Soft desserts usually need to come out while the center is still a little tender, because the heat in the pan keeps cooking them after they leave the oven. If you wait for dark edges and a firm middle, you have already gone too far.
Another problem is choosing fruit that is either too hard or too wet. Hard fruit bakes into a bland, almost crunchy bite, while overly juicy fruit can flood the batter and make bars or cakes collapse in the center. Ripe but still structured fruit tends to behave best. If the fruit is really juicy, cornstarch is not optional.
People also rush the cooling stage. Warm bars smear, cakes tear, and pudding layers slide. I know it is annoying to wait. Still, a full cool-down, and sometimes a chill, is what gives soft desserts their proper texture instead of a messy tray of almost-dessert.
Storage mistakes matter too. Leaving cream cheese bars or pudding desserts uncovered in the fridge dries out the top and makes the edges taste tired. Cookies stored in a loose container lose their chew fast. Airtight storage is not a fussy extra; it is the difference between “soft for days” and “soft yesterday.”
Frequently Asked Questions

Why do some desserts stay soft for days while others dry out fast?
Desserts that keep moisture inside the crumb or filling have a better shot at staying tender. Brown sugar, oil, sour cream, yogurt, fruit puree, pudding, and cream cheese all help in different ways, while lean batters with little fat dry out faster.
Can frozen fruit be used in these recipes?
Yes, in muffins, bars, buckles, and some cakes. Keep frozen fruit frozen until it goes into the batter, and add a small amount of extra bake time if needed. Thawed fruit often leaks too much liquid before it even reaches the oven.
Which desserts in this collection are best for potlucks?
Peach bars, blondies, muffins, coffee cake, and poke cake travel well and stay soft after a few hours. Anything with a creamy layer should ride in a cold bag or cooler. Bars are the safest bet if you want clean slices and easy serving.
How do I keep cookies soft after baking?
Do not overbake them, and store them in an airtight container once they cool. A slice of bread in the container helps hold moisture. Soft cookies also benefit from a day of rest; many of them taste better after the edges relax a little.
What if my cake turns dry by the next day?
It probably baked a little too long or used a lean batter. Next time, pull it earlier and lean on yogurt, sour cream, oil, or fruit. For a dry cake already on the counter, brush slices lightly with simple syrup before serving.
Do cream cheese and pudding desserts need to stay refrigerated?
Yes. Anything with cream cheese, pudding, whipped topping, or custard should go back into the fridge after serving. Keep them covered so the top does not dry out or pick up fridge smells.
Can I make these desserts without a mixer?
Several of them, yes. Muffins, blondies, bars, poke cake, parfaits, and trifle can be done by hand with a whisk and spatula. Cookies and cream cheese frostings are easier with a mixer, but not impossible if the butter and cream cheese are truly soft.
How far ahead can I bake these for a party?
Bars, snack cakes, muffins, and cookies usually handle one to two days ahead without trouble. Pudding cakes, cheesecakey bars, and trifle are good the day before because the chill time helps them settle. Fresh fruit garnishes should wait until the last minute so they stay bright.
What should I avoid if I want soft texture for more than one day?
Avoid extra flour, overmixing, and high baking times. Dry ingredients do not rescue a dessert from overbaking. They only make the crumb tighter, which is the opposite of what you want here.
Soft Slices and Clean Plates
Soft desserts have a quieter kind of appeal. They do not crack when you cut them, they do not shatter on the second day, and they do not need a long list of tricks to stay pleasant. They just need the right mix of moisture, sugar, dairy, and sensible baking time.
That is why these July desserts keep earning their place in real kitchens. They sit well in the fridge, travel without drama, and still taste like someone cared when you open the container on day three. Keep a few of these in rotation, and summer baking gets a lot less delicate.