
The best kids summer desserts do not ask much of you: no long creaming sessions, no fussy layers that slide apart, no oven heat that turns the kitchen into a sauna. On the nights when dinner already used up your patience, the smartest move is a treat that can be built from a few cold ingredients, a little fruit, and maybe one pan that doesn’t stay on the stove for long.
That’s the sweet spot here. Some of these are freezer jobs, some are fruit-and-cream assemblies, and a few need a short bake because a crisp topping or a toasted marshmallow cap is worth the trouble. I like desserts that give you texture without drama — the snap of chocolate, the cool bite of yogurt, the soft give of ripe peaches — because that’s what keeps weeknight dessert from feeling like an extra chore.
A couple of things matter more than people think. Sliced bananas brown fast, berries leak if they sit in sugar too long, and low-fat dairy tends to turn icy in frozen desserts. Those are the little details that separate a tray of happy kids from a tray of disappointing mush, and they show up again and again in the recipes below.
Why These Treats Earn a Spot on Busy Nights
- Fast assembly: Most of these take 10 to 20 minutes of hands-on work, then the fridge or freezer does the rest.
- Kid-friendly jobs: Crumbling cookies, layering parfaits, dipping fruit, and sprinkling toppings are all easy for small hands.
- Heat stays low: Many recipes skip the oven entirely, and the baked ones keep the timing short enough that the kitchen never feels trapped.
- Fruit does the heavy lifting: Strawberries, peaches, mango, blueberries, pineapple, and watermelon bring color and juice without making you build a complicated filling.
- Cleanup stays sane: Sheet pans, muffin tins, jars, and one skillet do a lot of the work here.
- Flexible by design: Most of these desserts can bend toward dairy-free, gluten-free, or nut-free without losing the point of the recipe.
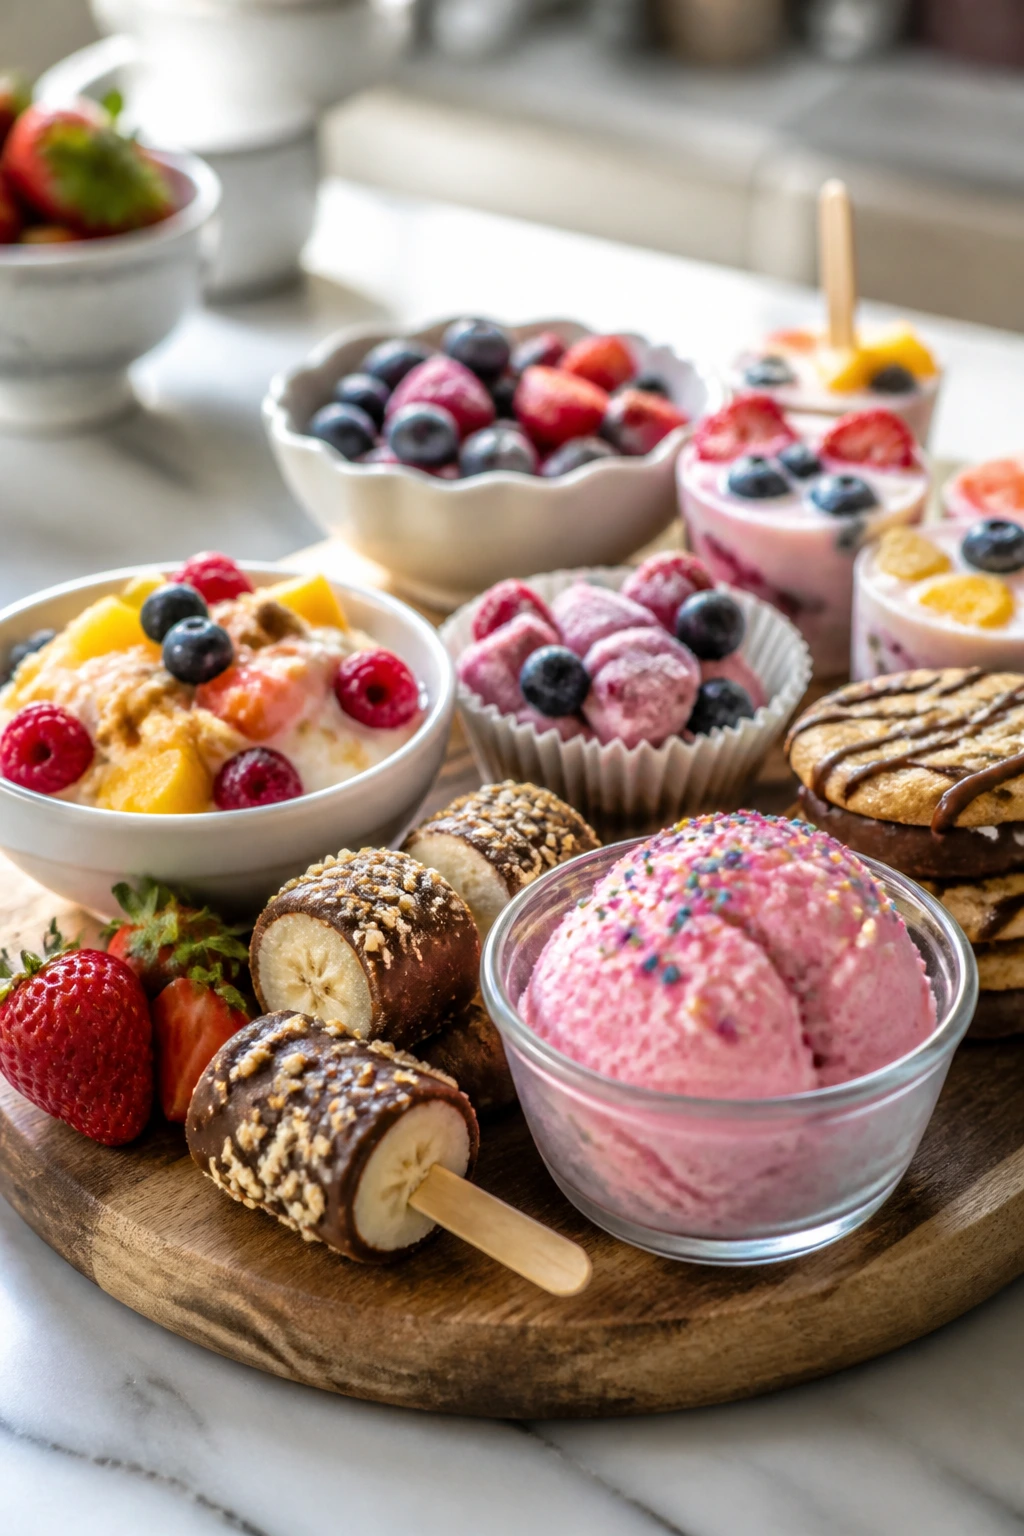
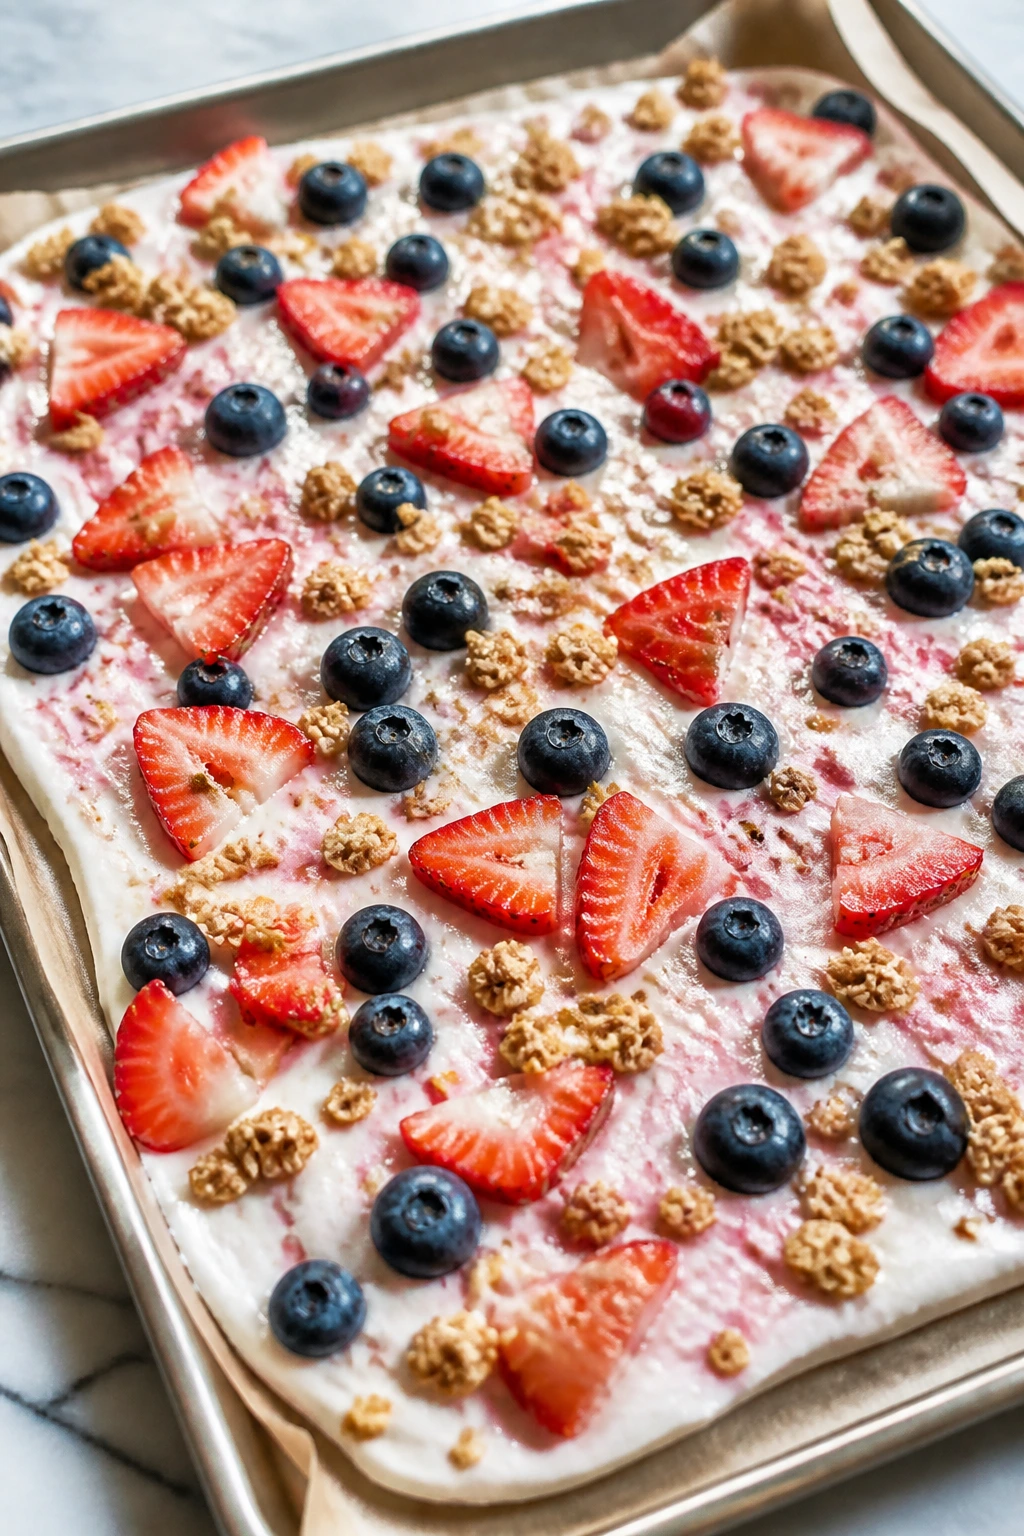
1. Strawberry Yogurt Bark
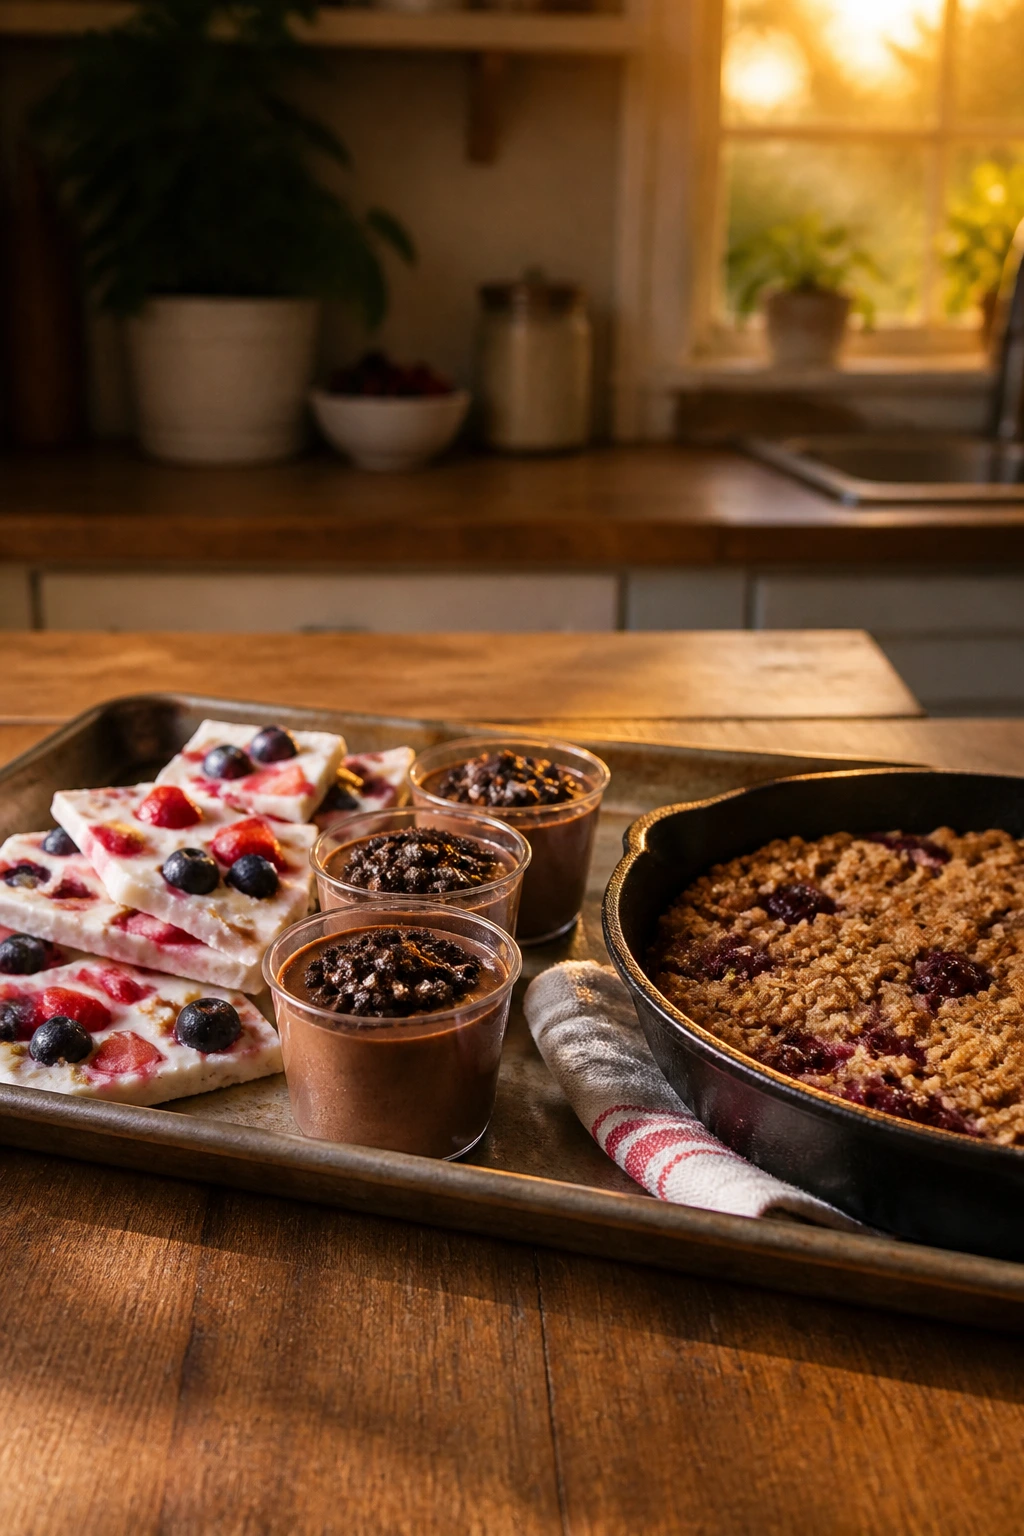
Cold, pink, and a little messy in the best possible way, strawberry yogurt bark is the kind of dessert that vanishes from a freezer tray faster than you expect. The yogurt freezes into a creamy sheet, the berries stay bright, and the granola gives you a little crunch instead of one solid ice cube.
Why It Works:
Greek yogurt has enough body to freeze into something you can actually bite. A thin layer sets faster and cracks cleanly, while honey and vanilla keep the tartness from feeling sharp.
Key Ingredients:
- 3 cups full-fat plain Greek yogurt
- 3 tablespoons honey
- 1 teaspoon vanilla extract
- 1 cup sliced strawberries
- 1/2 cup blueberries
- 1/3 cup granola
- Pinch of fine salt
Quick Steps:
- Line a rimmed baking sheet with parchment paper.
- Stir the yogurt, honey, vanilla, and salt until smooth.
- Spread the mixture into a 1/4-inch-thick layer.
- Scatter the strawberries, blueberries, and granola over the top, pressing them in lightly.
- Freeze for 3 to 4 hours, until firm, then break into shards.
Equipment for This Recipe:
- Rimmed baking sheet
- Parchment paper
- Mixing bowl
- Spatula
How to Serve This Dish:
Serve the bark straight from the freezer on a chilled plate, or pile it into a bowl for kids who like to snack more than they like to sit. A few extra berries on the side make the plate look intentional instead of like a freezer rescue.
Pro Tips for This Recipe:
- Use full-fat yogurt if you want a creamier bite; low-fat yogurt tends to freeze harder.
- Pat the berries dry first so the bark doesn’t grow icy patches.
- Add the granola right before freezing so it stays crisp.
Variations on This Dish:
- Berry Patch Bark: Swap in raspberries and blackberries for a deeper, juicier flavor.
- Chocolate-Dipped Bark: Add a thin drizzle of melted dark chocolate after freezing.
Common Mistakes to Avoid with This Dish:
- Don’t spread the yogurt too thin or it shatters into crumbs before kids can eat it.
- Don’t use wet fruit straight from a rinse; excess water turns into ice crystals.
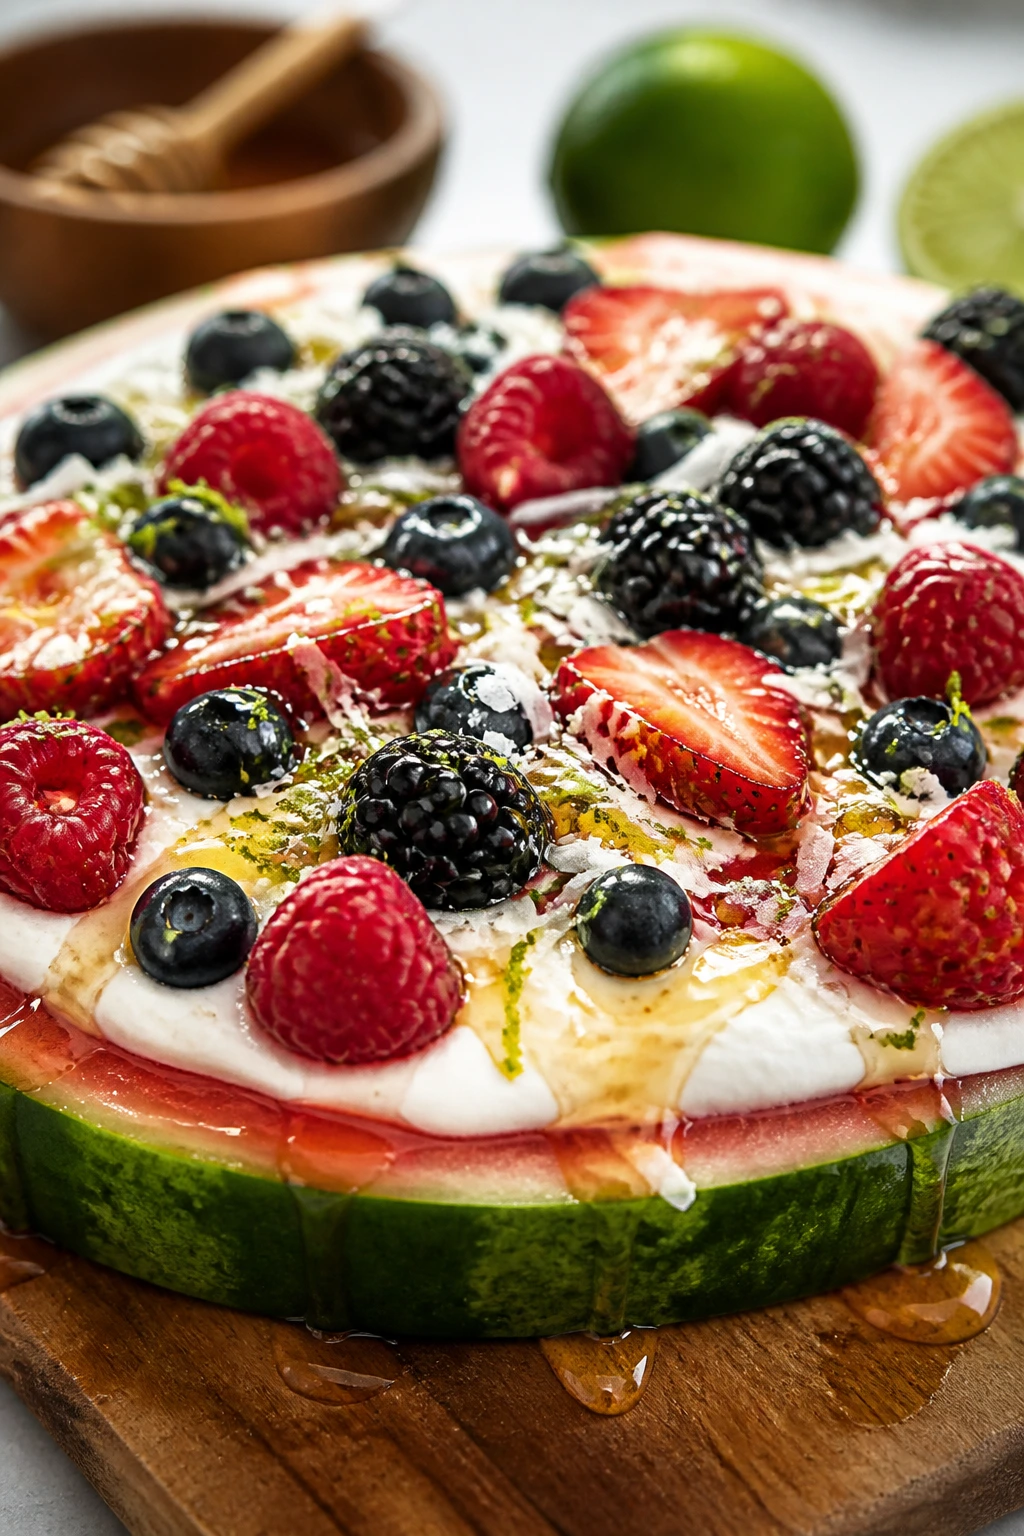
2. Watermelon Pizza with Honey-Lime Drizzle
If you want a dessert that looks fun the second it hits the table, this is the one. Thick watermelon rounds act like a built-in crust, and the topping is cool, creamy, and bright enough to taste like a summer afternoon.
Why It Works:
Watermelon gives you the shape and the chill, so there’s no baking at all. A quick drizzle of yogurt or whipped cream keeps the fruit from feeling lonely, and lime zest wakes up the whole thing.
Key Ingredients:
- 1 large seedless watermelon round, about 8 to 10 inches wide and 1 1/2 inches thick
- 1 cup vanilla Greek yogurt or lightly sweetened whipped cream
- 1 cup mixed berries
- 1/4 cup shredded coconut
- 2 tablespoons honey
- 1 teaspoon lime zest
- 1 tablespoon lime juice
Quick Steps:
- Slice the watermelon into a thick round and pat the surface dry.
- Mix the honey, lime zest, and lime juice in a small bowl.
- Spread the yogurt or whipped cream over the top of the watermelon.
- Scatter the berries and coconut across the surface.
- Drizzle with the honey-lime mixture and slice into wedges.
Equipment for This Recipe:
- Sharp chef’s knife
- Cutting board
- Small mixing bowl
- Spoon or offset spatula
How to Serve This Dish:
Cut it into wedges or little triangles, the way you would a real pizza. It works best on a wide platter, because the fruit will try to slide if you crowd it.
Pro Tips for This Recipe:
- Dry the watermelon surface well, or the topping will slip.
- Keep the fruit cold until the last minute.
- If you want cleaner slices, chill the whole round for 20 minutes before topping it.
Variations on This Dish:
- Tropical Slice: Use mango, kiwi, and toasted coconut.
- Berry Cloud Pizza: Add a layer of whipped cream cheese under the berries.
Common Mistakes to Avoid with This Dish:
- Don’t pile on too much topping; the round will bend and leak.
- Don’t cut it too early if it’s been sitting in the fridge with syrup on top.
3. No-Bake Oreo Pudding Cups
These are the desserts that make children suspiciously quiet. Chocolate pudding, cookie crumbs, and whipped topping layered in little cups do not need much explanation, which is part of the charm.
Why It Works:
Instant pudding sets fast and holds its shape in the fridge. Oreo crumbs soften just enough to taste like a cookie crust, and the whipped layer keeps the dessert from feeling too heavy.
Key Ingredients:
- 24 Oreo cookies, finely crushed
- 2 boxes instant chocolate pudding mix, 3.4 ounces each
- 3 cups cold whole milk
- 2 cups whipped topping
- 1 teaspoon vanilla extract
- Sprinkles or mini chocolate chips for topping
Quick Steps:
- Whisk the pudding mix and cold milk for 2 minutes, until thick.
- Fold in the vanilla and half of the whipped topping.
- Spoon a layer of crushed Oreos into small cups.
- Add pudding, then another thin layer of crumbs, then the remaining whipped topping.
- Chill for at least 1 hour before serving.
Equipment for This Recipe:
- Mixing bowl
- Whisk
- 6 to 8 small cups or jars
- Spoon for layering
How to Serve This Dish:
Use clear cups if you want the layers to show, or small mason jars if you’re sending them to a patio table. A few extra cookie crumbs on top make them look finished instead of rushed.
Pro Tips for This Recipe:
- Use cold milk straight from the fridge so the pudding thickens properly.
- Crush the cookies finely enough that the bottom layer packs down.
- Add toppings just before serving if you want them crisp.
Variations on This Dish:
- Cookies-and-Cream Cups: Swap chocolate pudding for vanilla pudding and add chopped cookies.
- Peanut Butter Cookie Cups: Stir a spoonful of peanut butter into the pudding.
Common Mistakes to Avoid with This Dish:
- Don’t use warm milk; the pudding stays loose and soupy.
- Don’t overmix after the pudding thickens, or it loosens again.
4. Banana Split Skewers
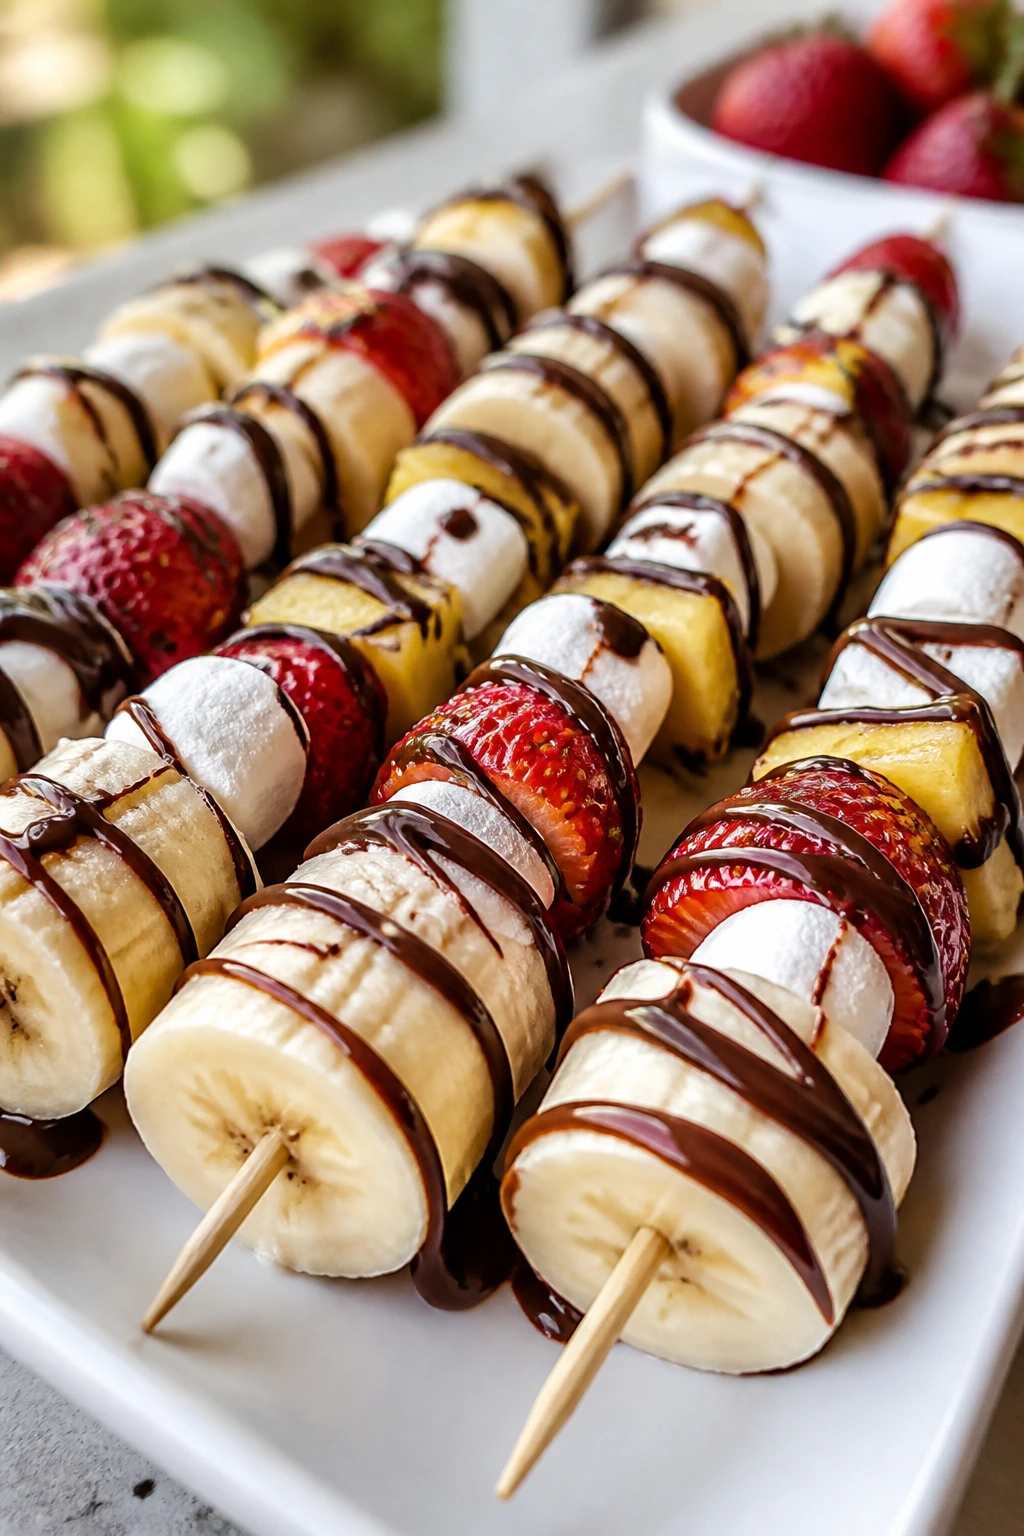
Banana split flavor without the scoop race. That’s the real win here. The skewers give kids something they can hold, and the fruit stays neat enough that you can serve it on a weeknight without setting out bowls and spoons for half the house.
Why It Works:
Skewers turn a classic sundae into a portable snack. Bananas, strawberries, and pineapple give you the same fruit-and-chocolate mix you expect, only with much less melting and mess.
Key Ingredients:
- 3 ripe but firm bananas
- 2 cups hulled strawberries
- 1 cup pineapple chunks
- 1/2 cup mini marshmallows
- 1/3 cup melted chocolate chips
- 2 tablespoons chopped peanuts or sunflower seeds
Quick Steps:
- Slice the bananas into thick coins.
- Thread banana, strawberry, pineapple, and marshmallow pieces onto short skewers.
- Arrange the skewers on a platter.
- Drizzle with melted chocolate.
- Sprinkle with peanuts or seeds and serve right away.
Equipment for This Recipe:
- Short wooden skewers or sturdy toothpicks
- Cutting board
- Small microwave-safe bowl
- Serving platter
How to Serve This Dish:
Set out extra chocolate in a spoonable bowl so each kid can decide how much is enough. These look best lined up on a chilled tray with the fruit facing outward.
Pro Tips for This Recipe:
- Choose bananas that are yellow with a few freckles, not soft and spotted all over.
- Pat the pineapple dry so the chocolate clings instead of sliding off.
- If you want less stickiness, build the skewers just before serving.
Variations on This Dish:
- Frozen Split Skewers: Freeze the finished skewers for 20 minutes before serving.
- Chocolate-Coconut Split: Swap peanuts for toasted coconut.
Common Mistakes to Avoid with This Dish:
- Don’t use overripe bananas; they split when you skewer them.
- Don’t drizzle chocolate too early or it hardens in the bowl before it hits the fruit.
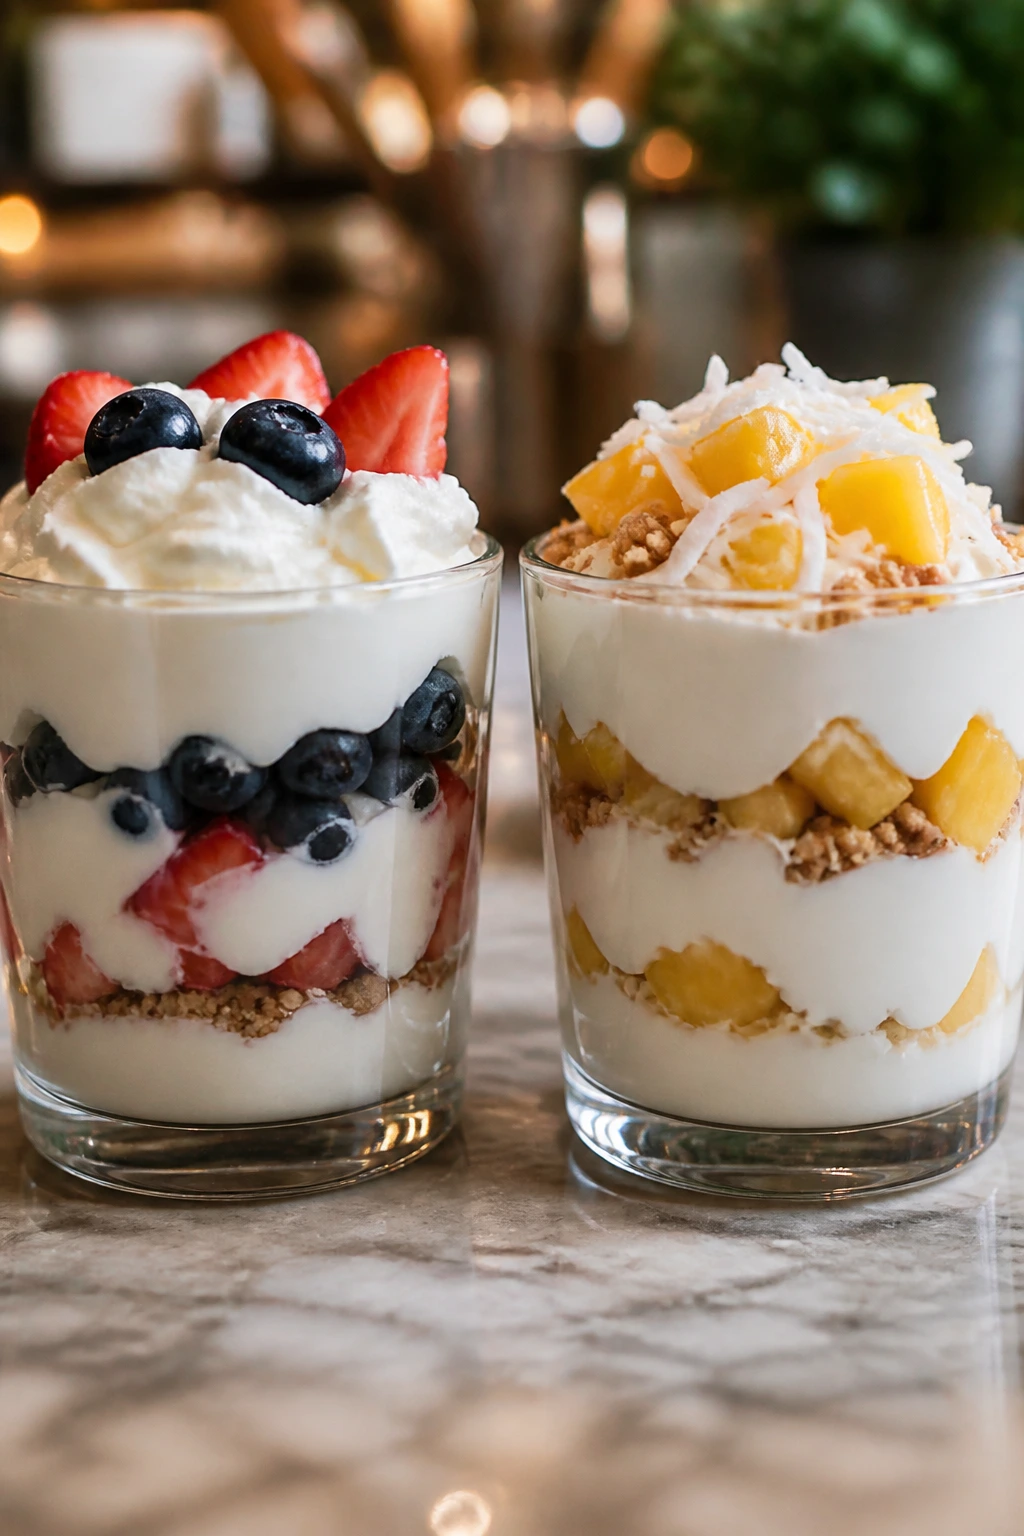
5. Mini Mason Jar Cheesecakes
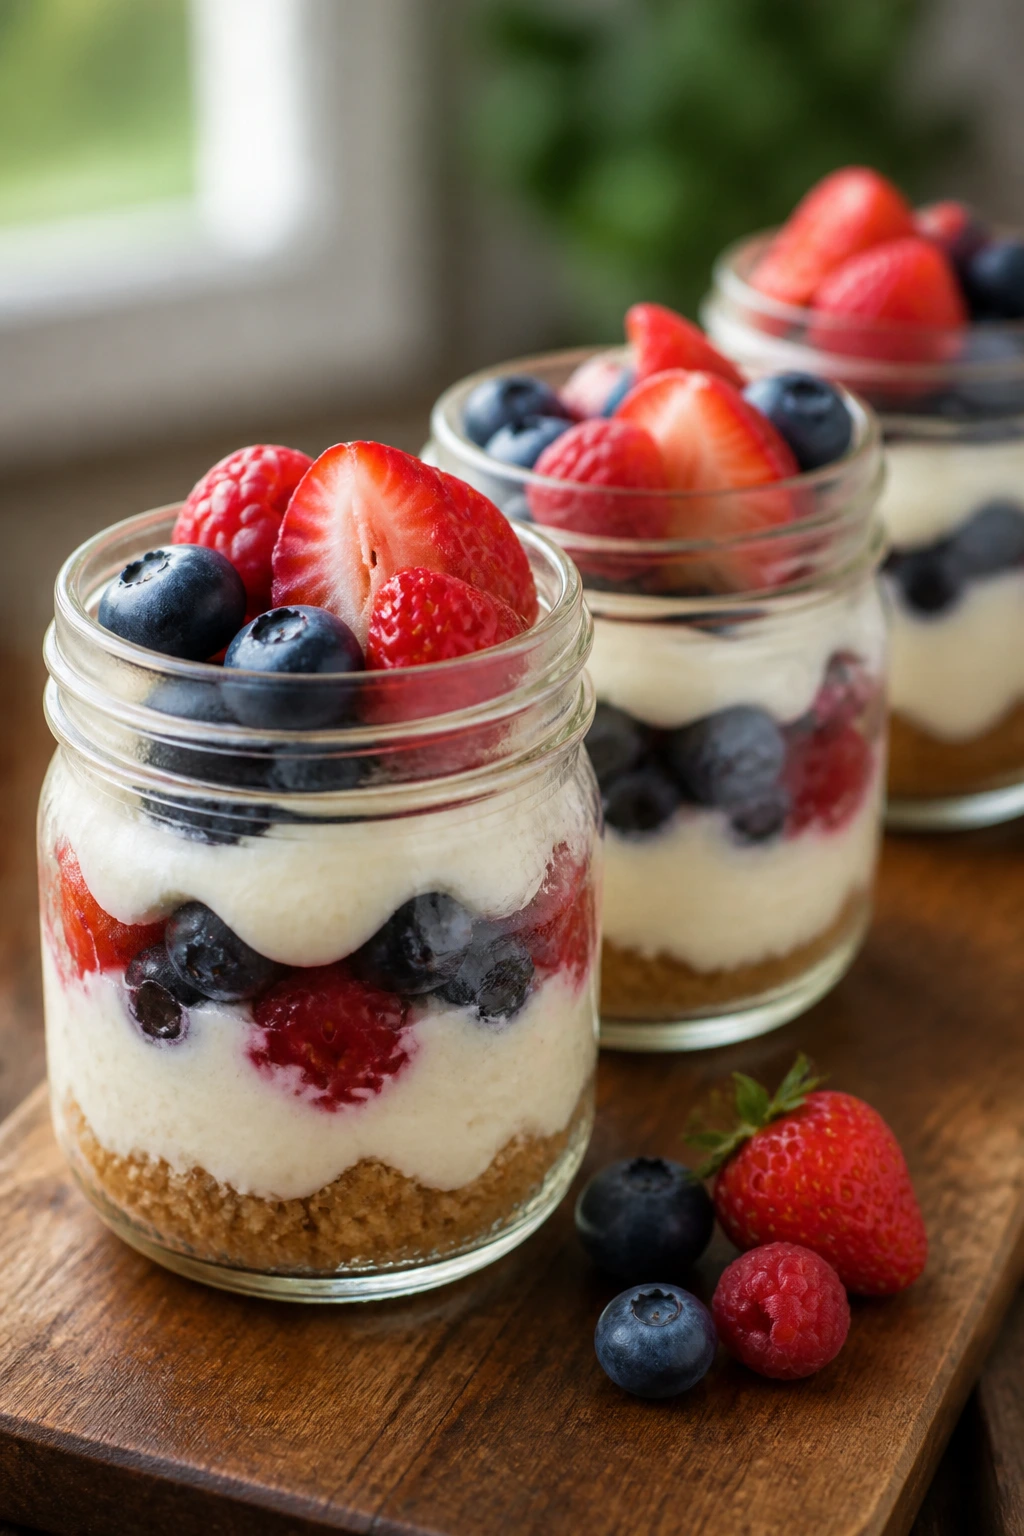
These little jars feel more polished than they are, which is a useful trick on a weeknight. Cream cheese, graham crumbs, and fresh berries do the heavy lifting, and the jar keeps every layer tidy.
Why It Works:
No baking means no crack-prone top and no water bath. The filling sets in the fridge, and the graham base gives you the same salty-sweet contrast you get from a full cheesecake, only faster.
Key Ingredients:
- 1 1/2 cups graham cracker crumbs
- 6 tablespoons melted butter
- 16 ounces cream cheese, softened
- 1/2 cup granulated sugar
- 1 cup whipped cream or whipped topping
- 1 teaspoon vanilla extract
- 1 cup fresh berries
Quick Steps:
- Mix the graham crumbs and melted butter.
- Press 2 tablespoons of the mixture into each small jar.
- Beat the cream cheese and sugar until smooth.
- Fold in the whipped cream and vanilla.
- Spoon into jars, top with berries, and chill for 2 hours.
Equipment for This Recipe:
- Hand mixer
- Mixing bowls
- 6 small mason jars
- Rubber spatula
How to Serve This Dish:
Serve chilled, with a spoon tucked into the jar and berries piled on top. They’re sweet enough for dessert, but small enough that nobody complains about finishing one.
Pro Tips for This Recipe:
- Let the cream cheese soften fully so the filling stays smooth.
- Press the crumb layer down with the back of a spoon so it doesn’t crumble apart.
- Add berries after chilling if you want the colors to stay clean.
Variations on This Dish:
- Lemon Cheesecake Jars: Stir in 2 teaspoons lemon zest and a tablespoon of juice.
- Chocolate Swirl Jars: Fold in 2 tablespoons melted chocolate.
Common Mistakes to Avoid with This Dish:
- Don’t use cold cream cheese unless you enjoy lumps.
- Don’t overfill the jars; leaving space keeps the top neat.
6. Peach Crisp in a Skillet
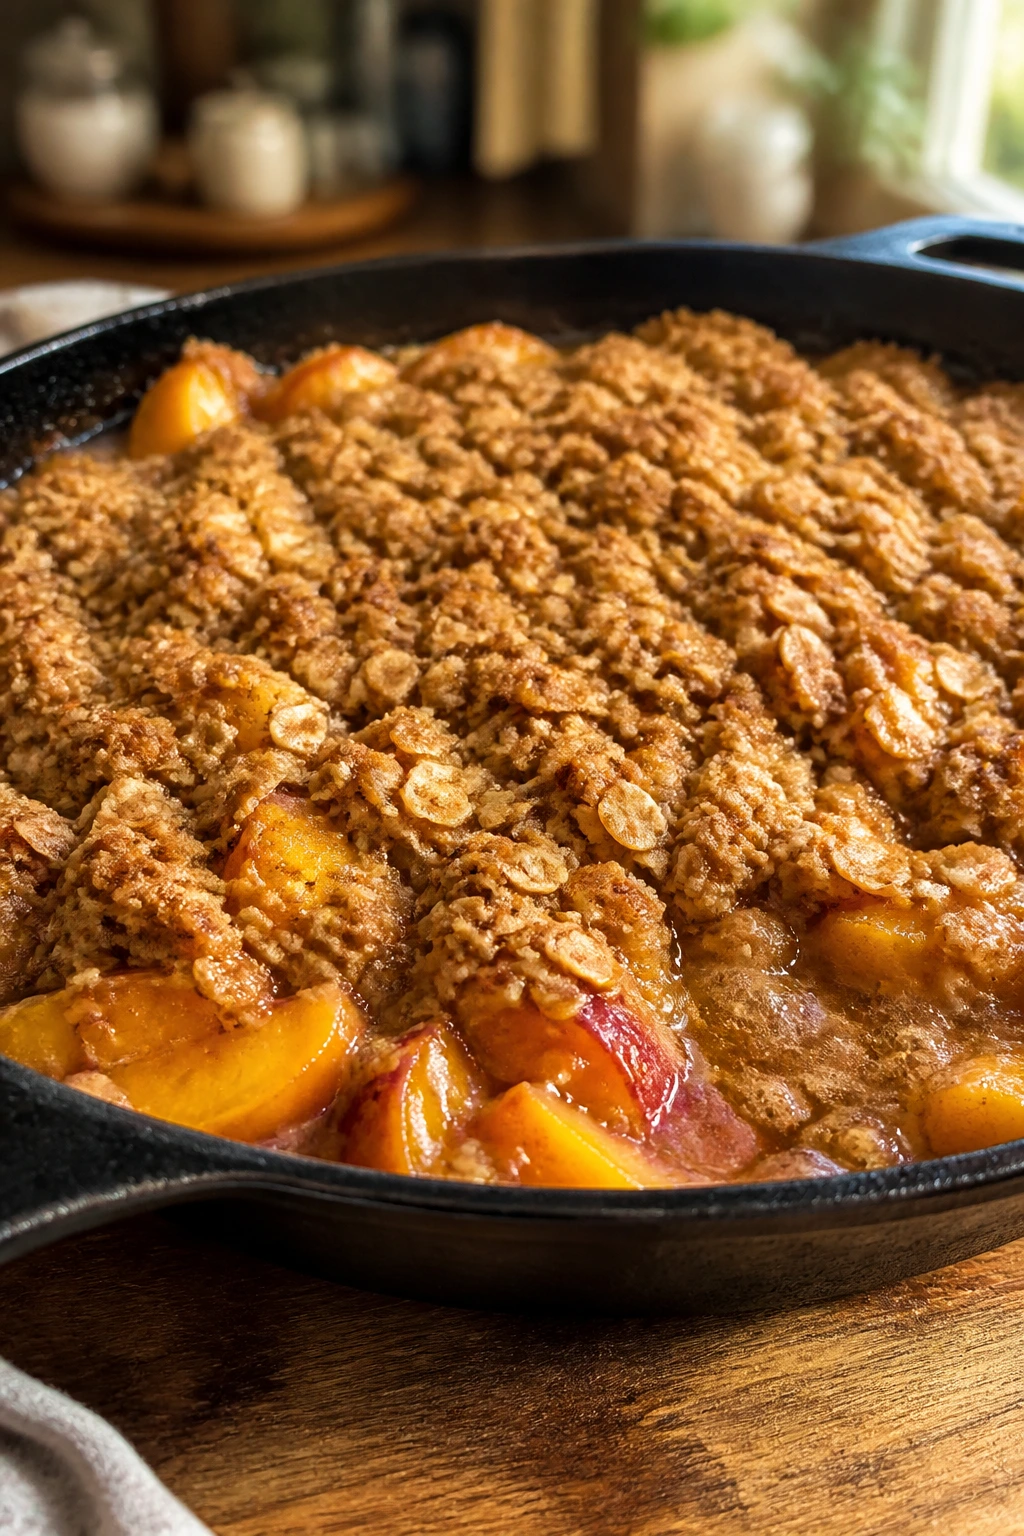
A warm peach crisp is one of the few baked desserts that still feels right when the house is hot, because the fruit does the talking and the topping comes together in a single bowl. The smell alone is enough to make people drift into the kitchen.
Why It Works:
Peaches release enough juice to soften into jammy slices, while oats and butter bake into a crunchy lid. A skillet keeps the fruit hot at the center and helps the topping brown in patches instead of drying out.
Key Ingredients:
- 6 cups sliced ripe peaches
- 2 tablespoons granulated sugar
- 1 tablespoon lemon juice
- 1 cup old-fashioned oats
- 3/4 cup all-purpose flour
- 1/2 cup brown sugar
- 1/2 cup cold unsalted butter, cubed
- 1 teaspoon cinnamon
- Pinch of salt
Quick Steps:
- Preheat the oven to 375°F.
- Toss the peaches with sugar and lemon juice, then spread them in a buttered skillet.
- Mix oats, flour, brown sugar, cinnamon, and salt.
- Cut in the butter until the mixture looks like damp crumbs.
- Sprinkle over the peaches and bake for 30 to 35 minutes, until bubbling at the edges.
Equipment for This Recipe:
- 10-inch oven-safe skillet
- Mixing bowl
- Pastry cutter or fork
- Oven mitts
How to Serve This Dish:
Spoon it into bowls while the fruit is still steaming and top with vanilla ice cream if you have it. The contrast between hot peach juice and cold cream is the reason people keep making crisp in the first place.
Pro Tips for This Recipe:
- Use peaches that smell sweet at the stem end.
- If the fruit is very juicy, add 1 tablespoon of cornstarch.
- Let it sit 10 minutes after baking so the filling settles.
Variations on This Dish:
- Berry-Peach Crisp: Fold in 1 cup blueberries.
- Gluten-Free Crisp: Use certified gluten-free oats and almond flour.
Common Mistakes to Avoid with This Dish:
- Don’t bake it until the top is dark brown; the fruit below will have gone mushy.
- Don’t skip the lemon juice, or the peaches taste flat.
7. Lemon Icebox Pie Cups
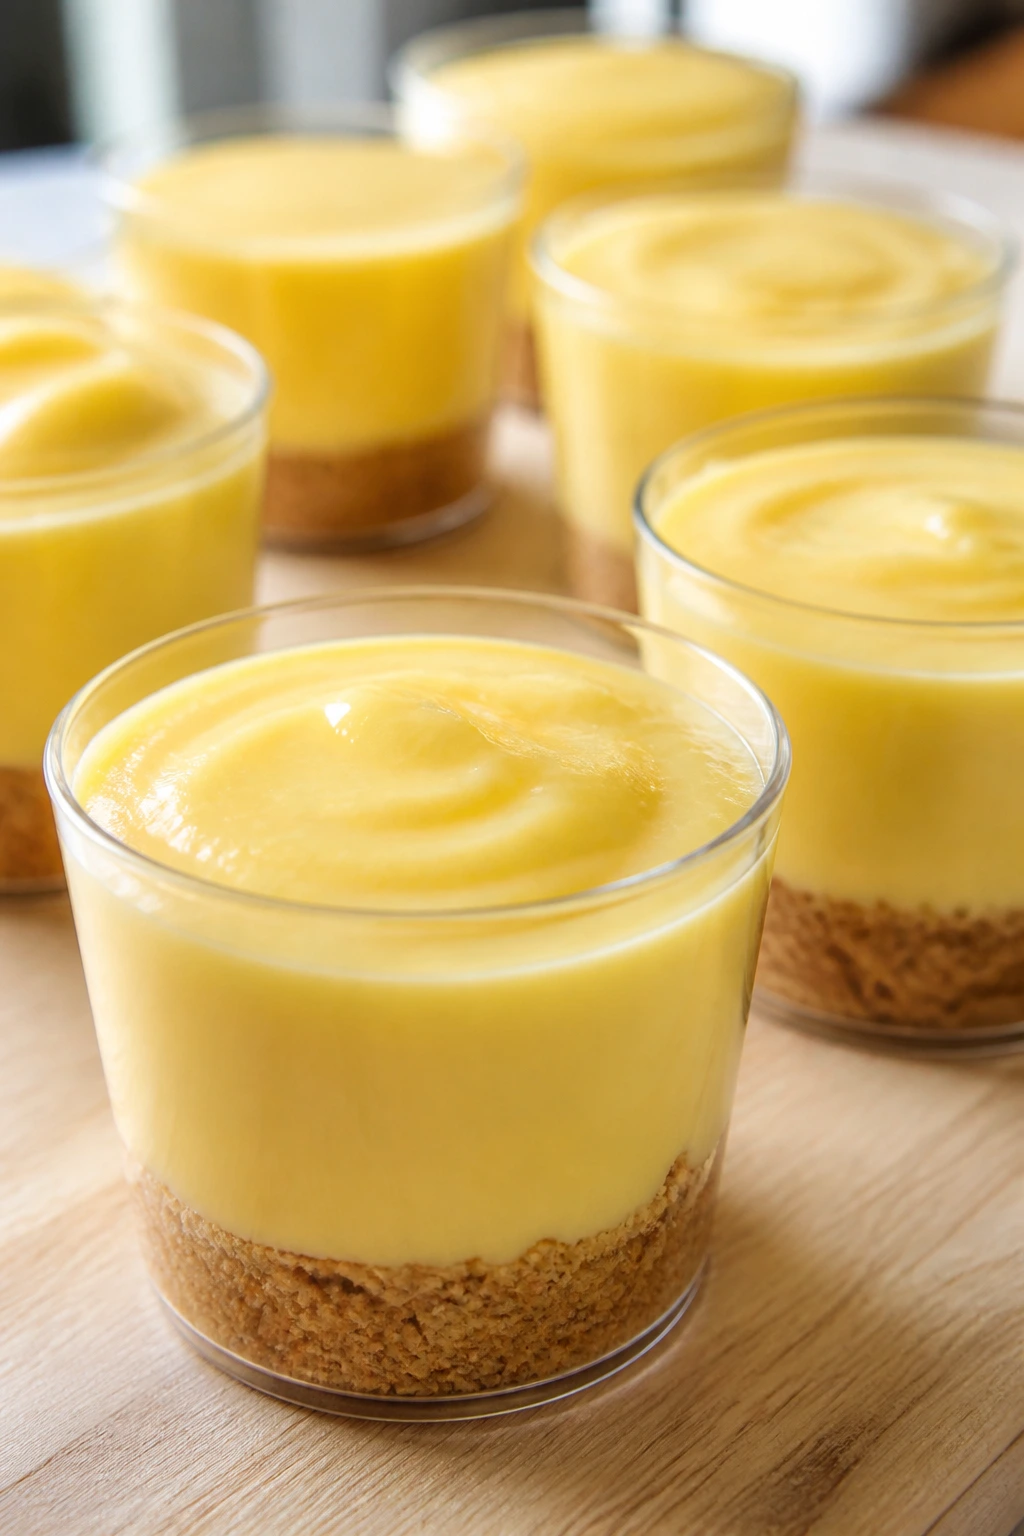
These taste like the cold corner of a lemon pie, which is the best part anyway. The filling is bright, creamy, and firm enough to hold a spoonful, and the small cups make them easy to hand out without cutting anything.
Why It Works:
Cream cheese gives the filling body, while condensed milk and lemon juice set it into a soft, chilled cream. Graham crumbs at the bottom act like a fast crust without requiring any rolling or blind baking.
Key Ingredients:
- 1 cup graham cracker crumbs
- 4 tablespoons melted butter
- 8 ounces cream cheese, softened
- 1/2 cup sweetened condensed milk
- 1/3 cup fresh lemon juice
- 1 teaspoon lemon zest
- 1 cup whipped topping
Quick Steps:
- Mix the crumbs and butter, then spoon into small cups.
- Beat the cream cheese until smooth.
- Add condensed milk, lemon juice, and zest, then beat until thick.
- Fold in whipped topping.
- Spoon into cups and chill for at least 1 hour.
Equipment for This Recipe:
- Mixing bowl
- Hand mixer
- Small cups or jars
- Spoon
How to Serve This Dish:
Top with a pinch of lemon zest or a thin lemon slice. They’re nicest cold, straight from the fridge, and they pair well with a few berries on the side.
Pro Tips for This Recipe:
- Add the lemon juice slowly so the filling stays smooth.
- Chill the cups on a flat tray so they don’t tip.
- Use fresh lemon juice; bottled juice tastes blunt here.
Variations on This Dish:
- Key Lime Cups: Replace lemon with lime juice and zest.
- Berry Lemon Cups: Add a spoonful of blueberry compote on top.
Common Mistakes to Avoid with This Dish:
- Don’t use too much juice or the filling loosens.
- Don’t serve them before chilling; the texture needs time to set.
8. Frozen Chocolate-Dipped Banana Bites
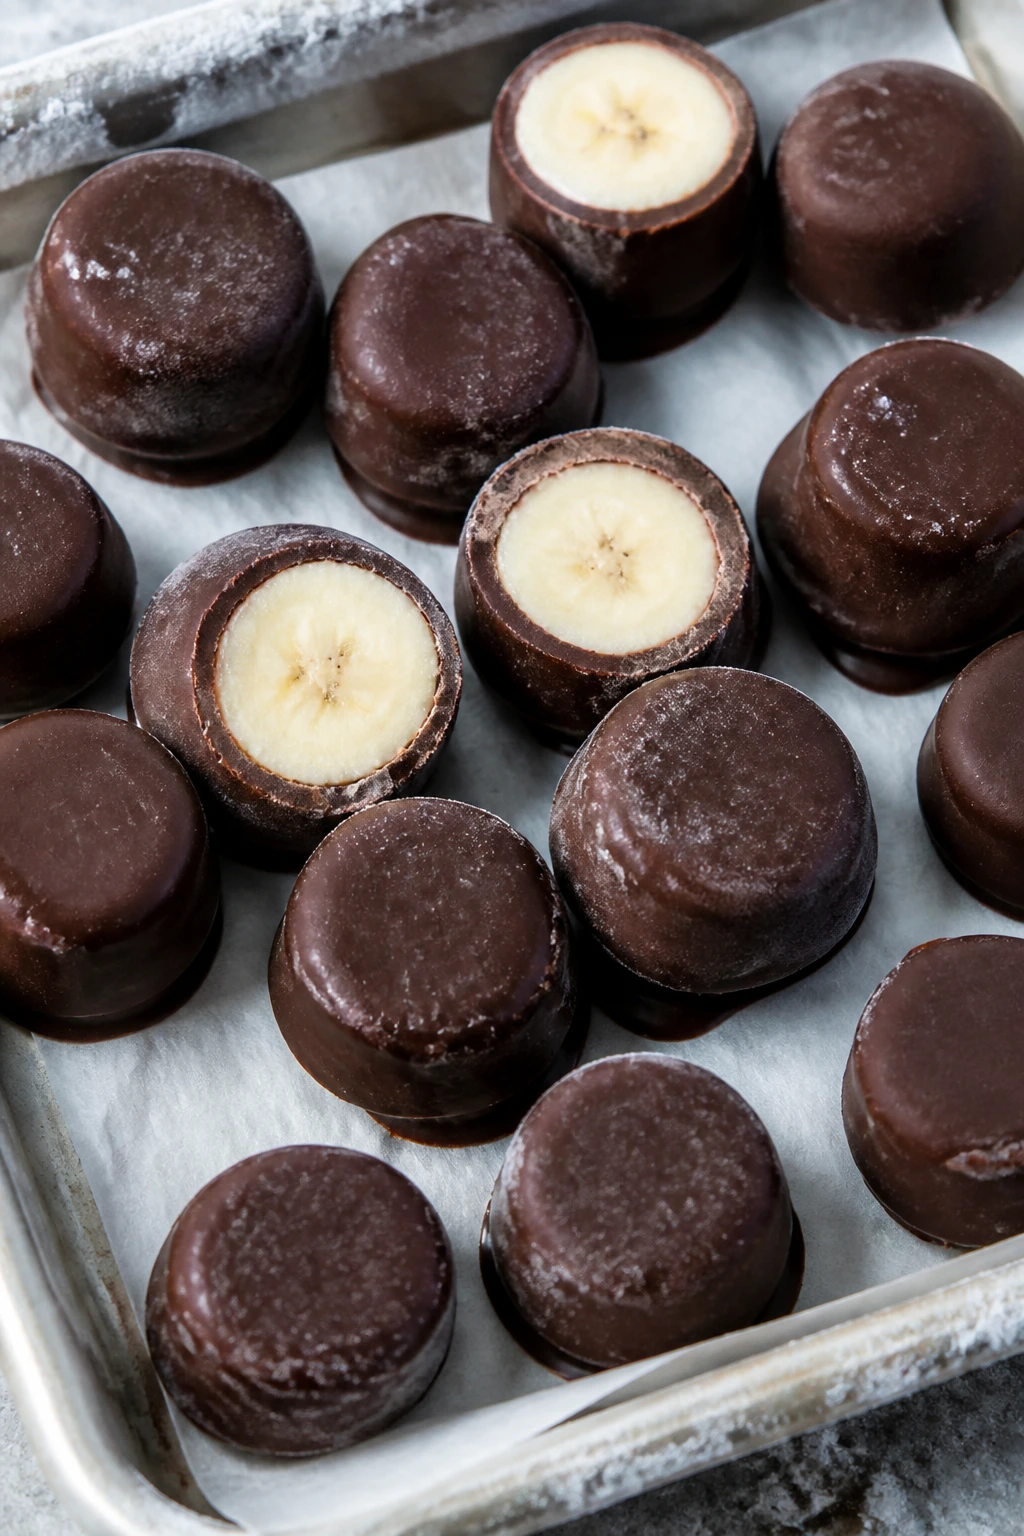
These are barely a recipe and that is part of why they disappear so fast. Banana slices, chocolate, and a sprinkle of crunch turn into tiny frozen candies that feel more special than the ingredient list suggests.
Why It Works:
Freezing the banana slices first keeps the chocolate from sliding right off. Once set, the chocolate shell gives a clean snap while the banana stays soft in the middle.
Key Ingredients:
- 3 bananas
- 8 ounces chocolate chips
- 1 teaspoon coconut oil
- 1/4 cup rainbow sprinkles or chopped nuts
- Pinch of flaky salt, optional
Quick Steps:
- Slice the bananas into 1/2-inch rounds.
- Freeze the slices on a parchment-lined tray for 30 minutes.
- Melt the chocolate chips with coconut oil until smooth.
- Dip each banana round halfway, then set back on the tray.
- Add sprinkles or salt and freeze for 1 hour.
Equipment for This Recipe:
- Rimmed baking sheet
- Parchment paper
- Microwave-safe bowl
- Fork or dipping tool
How to Serve This Dish:
Pile them in a chilled bowl and serve them like frozen candy. If the room is warm, keep the tray in the freezer until the second before you bring it out.
Pro Tips for This Recipe:
- Use bananas that are firm, not soft.
- Melt the chocolate gently so it stays glossy.
- Freeze the tray flat; tilted slices slide.
Variations on This Dish:
- Peanut Butter Bites: Spread a thin layer of peanut butter before dipping.
- Coconut Crunch Bites: Roll the chocolate edge in toasted coconut.
Common Mistakes to Avoid with This Dish:
- Don’t dip warm banana slices or the chocolate melts into a puddle.
- Don’t make the chocolate too hot, or it turns grainy.
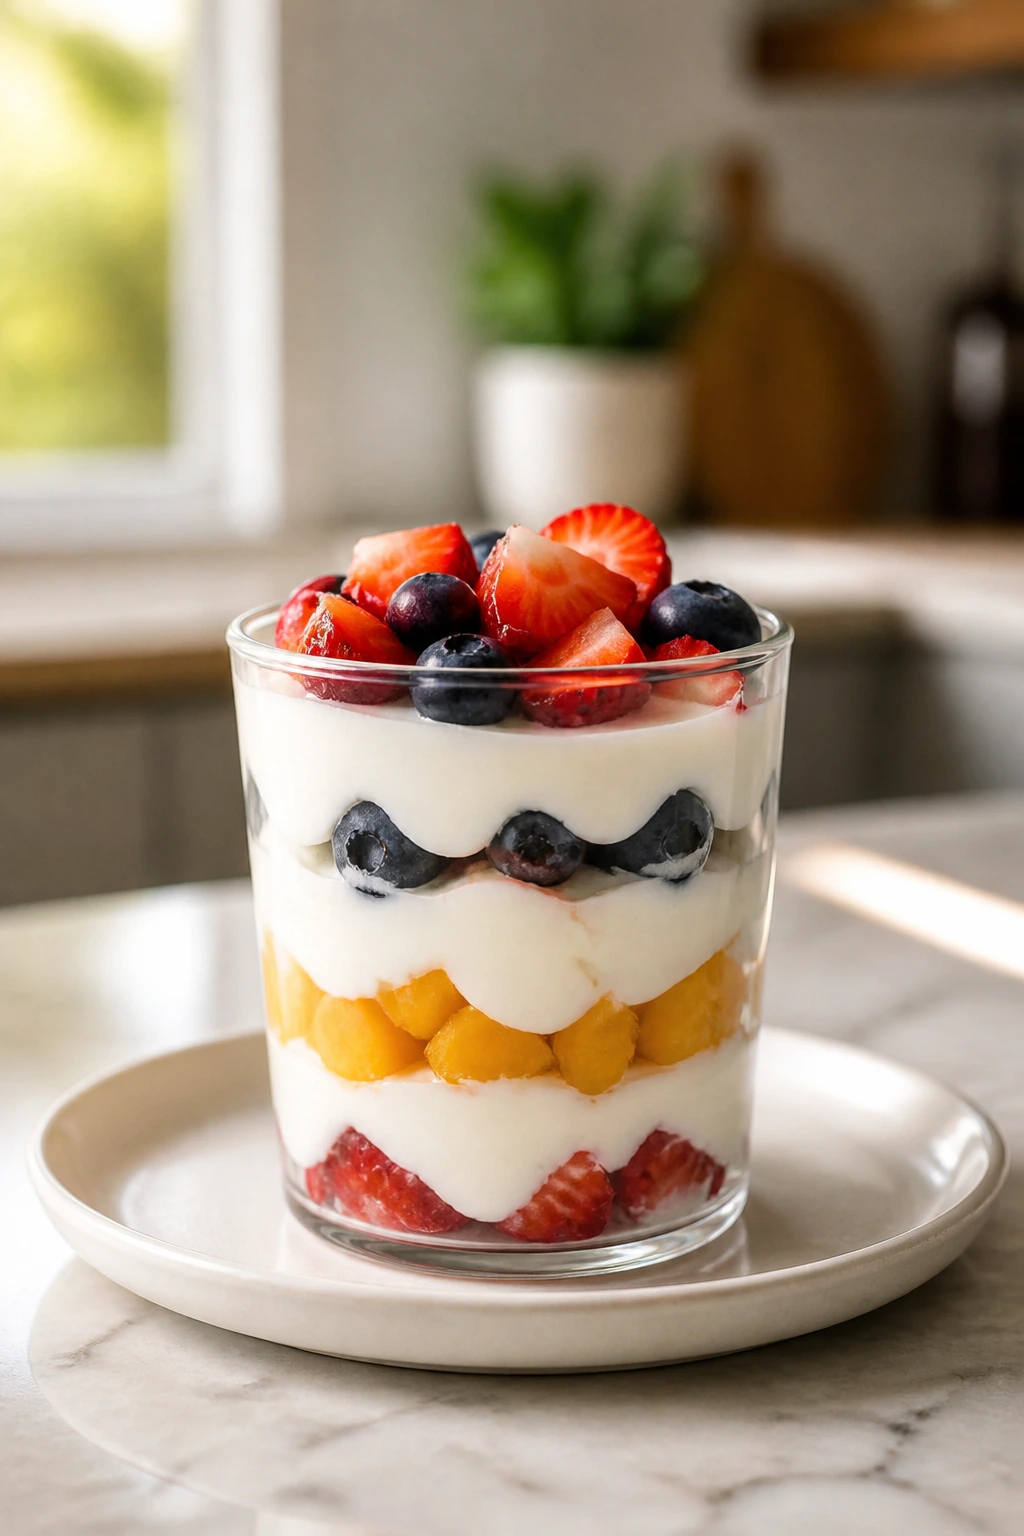
9. Berry Shortcake Parfaits
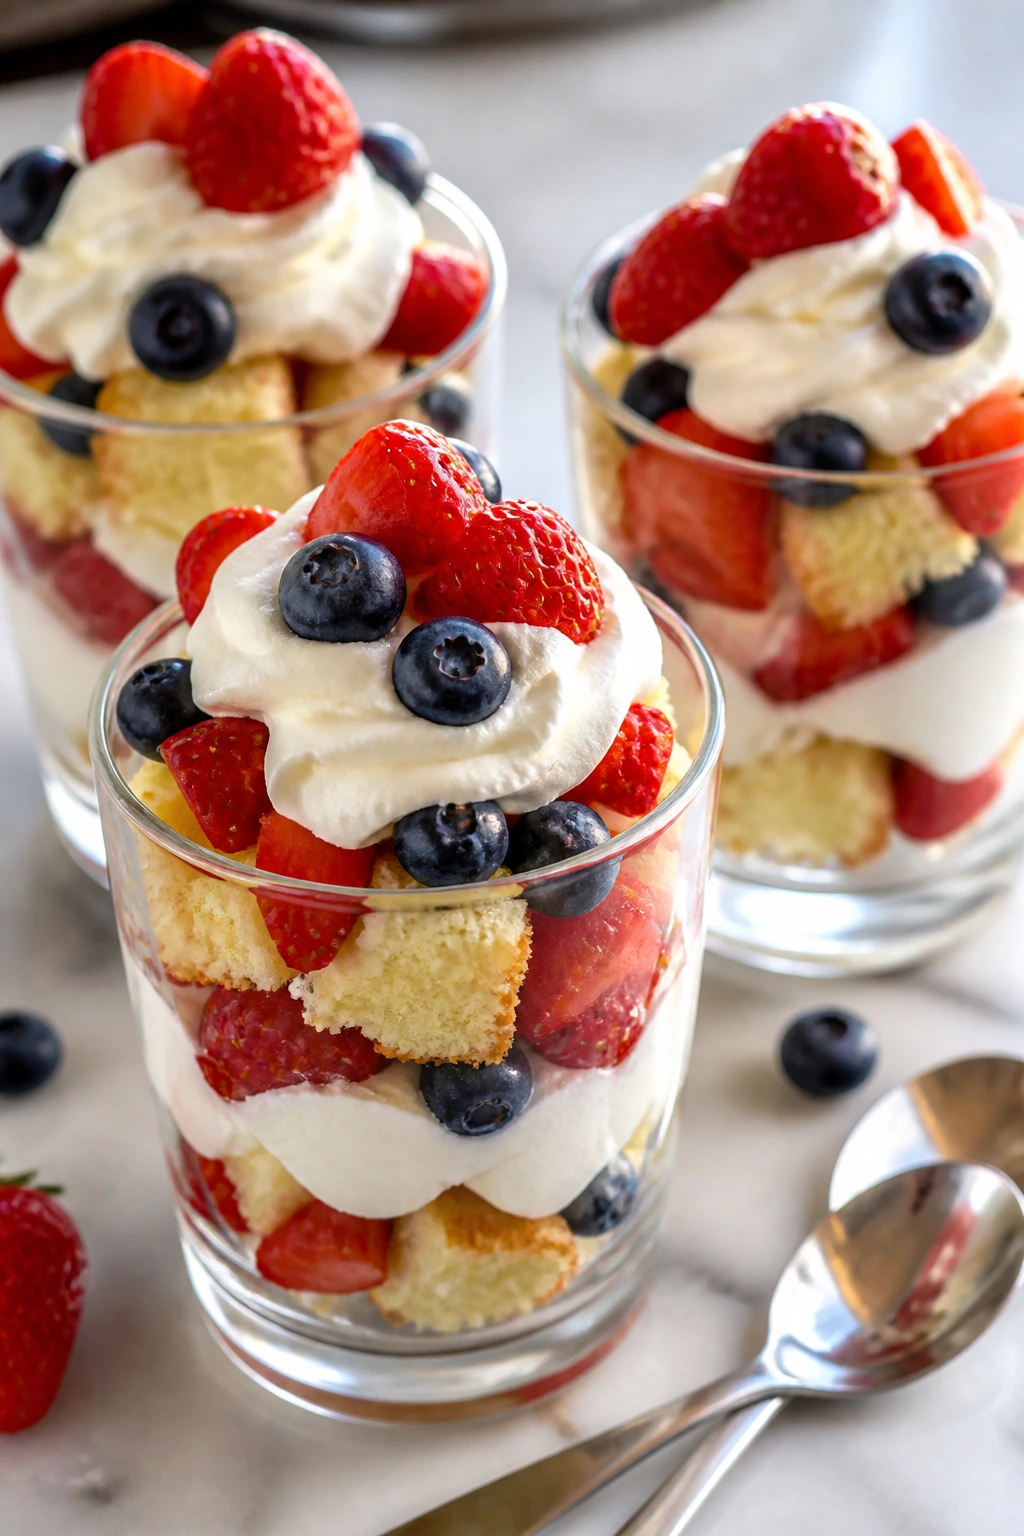
Shortcake in a glass is what happens when dessert needs to be quick but still look like you meant to make it. Soft cake, juicy berries, and whipped cream give you the same classic flavor in about half the effort.
Why It Works:
Macerated berries release syrup in minutes, which means you get saucy fruit without cooking. The cake soaks up the berry juices just enough to taste like shortcake instead of dry cubes.
Key Ingredients:
- 2 cups strawberries, sliced
- 1 cup blueberries or raspberries
- 2 tablespoons sugar
- 1 store-bought pound cake, cut into cubes
- 2 cups whipped cream or vanilla yogurt
- Mint leaves, optional
Quick Steps:
- Toss the berries with sugar and let them sit for 10 minutes.
- Cut the cake into bite-size cubes.
- Layer cake, berries, and whipped cream in glasses.
- Repeat the layers once more.
- Top with mint and serve chilled.
Equipment for This Recipe:
- Parfait glasses or small cups
- Cutting board
- Spoon
- Mixing bowl
How to Serve This Dish:
Use clear glasses if you want the berry streaks to show. A wide spoon helps catch the soft cake and syrup in the same bite, which is the whole point.
Pro Tips for This Recipe:
- Keep the cake cubes fairly large so they don’t disappear.
- If the berries are very ripe, use less sugar.
- Assemble just before serving if you want the cake to stay airy.
Variations on This Dish:
- Angel Food Parfaits: Swap pound cake for angel food cake.
- Chocolate Berry Parfaits: Use chocolate cake cubes and raspberries.
Common Mistakes to Avoid with This Dish:
- Don’t oversweeten the berries or the dessert turns cloying.
- Don’t let the parfait sit for hours assembled; the cake softens too much.
10. Cinnamon Sugar Tortilla Chips with Fruit Salsa
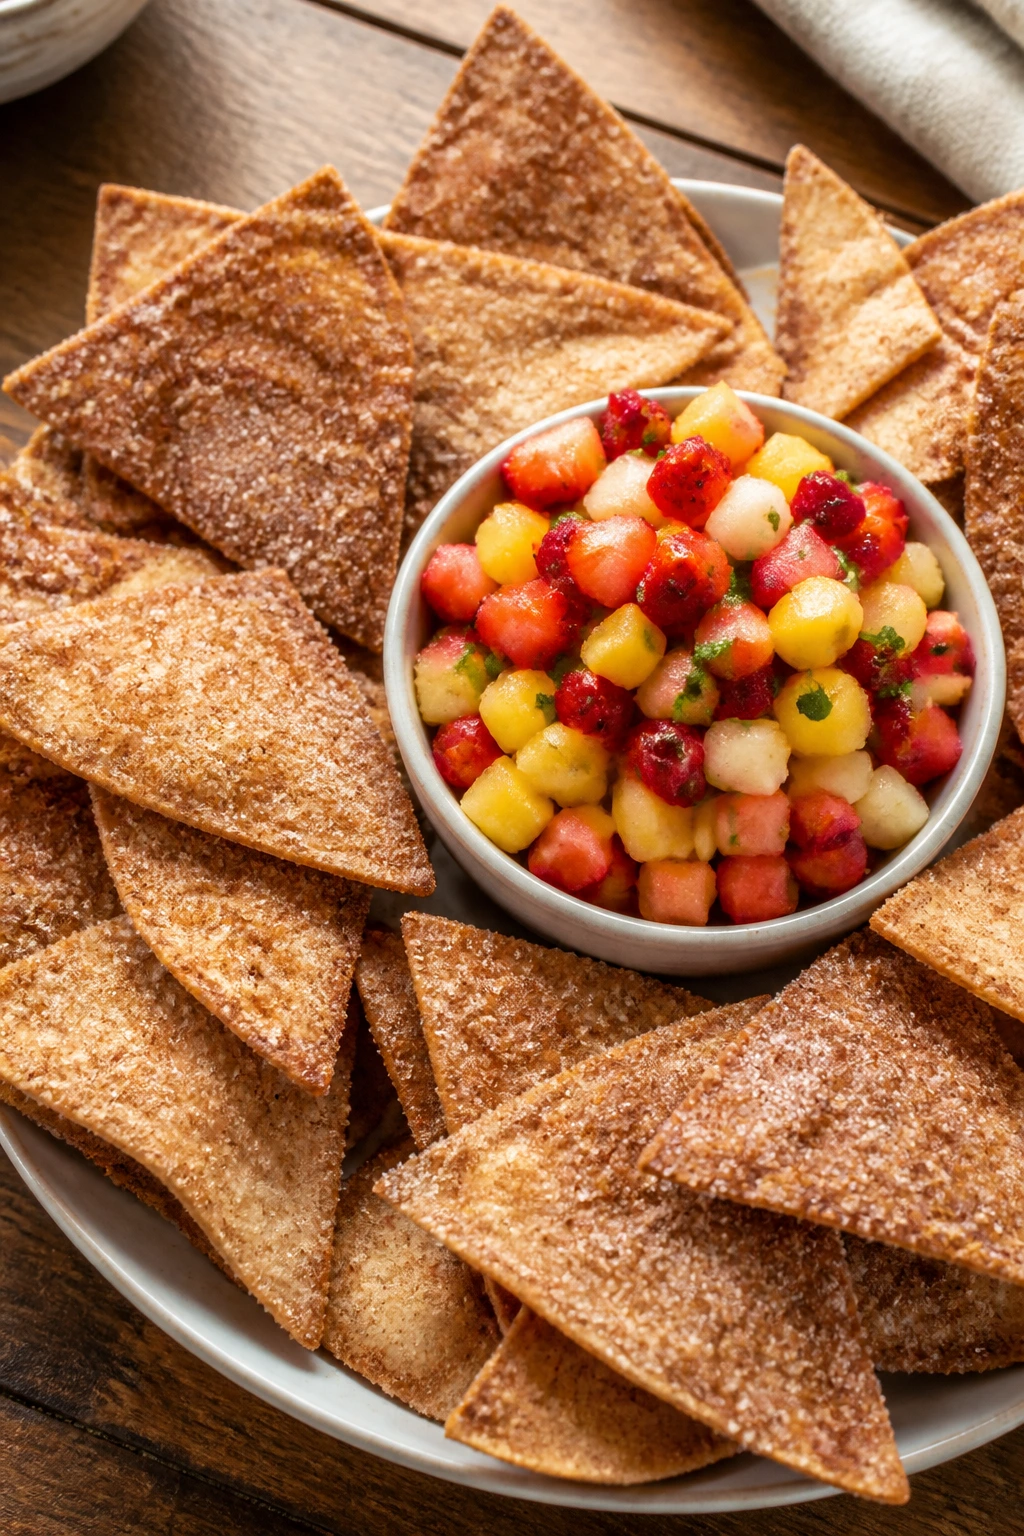
This is the dessert that makes people ask, “Wait, you made that from tortillas?” Yes. And it works because the chips taste like churro-adjacent crackers, while the fruit salsa stays cold and bright.
Why It Works:
A quick bake dries the tortillas into crisp triangles. The fruit salsa gives you the juicy part, so you don’t need a cooked filling or a heavy dip.
Key Ingredients:
- 6 flour tortillas
- 3 tablespoons melted butter
- 1/4 cup granulated sugar
- 1 teaspoon cinnamon
- 2 cups diced strawberries
- 1 kiwi, diced
- 1 peach, diced
- 1 tablespoon lime juice
- 1 tablespoon honey
Quick Steps:
- Preheat the oven to 400°F.
- Brush tortillas with butter and cut into triangles.
- Mix sugar and cinnamon, then sprinkle over the tortillas.
- Bake for 8 to 10 minutes, until crisp and lightly golden.
- Stir the fruit, lime juice, and honey together, then serve with the chips.
Equipment for This Recipe:
- Baking sheet
- Pastry brush
- Sharp knife
- Mixing bowl
How to Serve This Dish:
Set the chips around a bowl of fruit salsa like a snack board. The kids can scoop, pile, and eat with their hands, which is exactly how this dessert should behave.
Pro Tips for This Recipe:
- Keep the fruit dice small so the salsa stays scoopable.
- Let the chips cool fully before serving or they taste soft.
- Use a ripe peach; an underripe one tastes woody here.
Variations on This Dish:
- Mango Salsa Chips: Use mango and pineapple.
- Berry-Lime Chips: Skip the peach and use only berries.
Common Mistakes to Avoid with This Dish:
- Don’t leave the chips in too long; they go from crisp to bitter fast.
- Don’t make the salsa too far ahead or it gets watery.
11. S’mores Dip for the Baking Dish
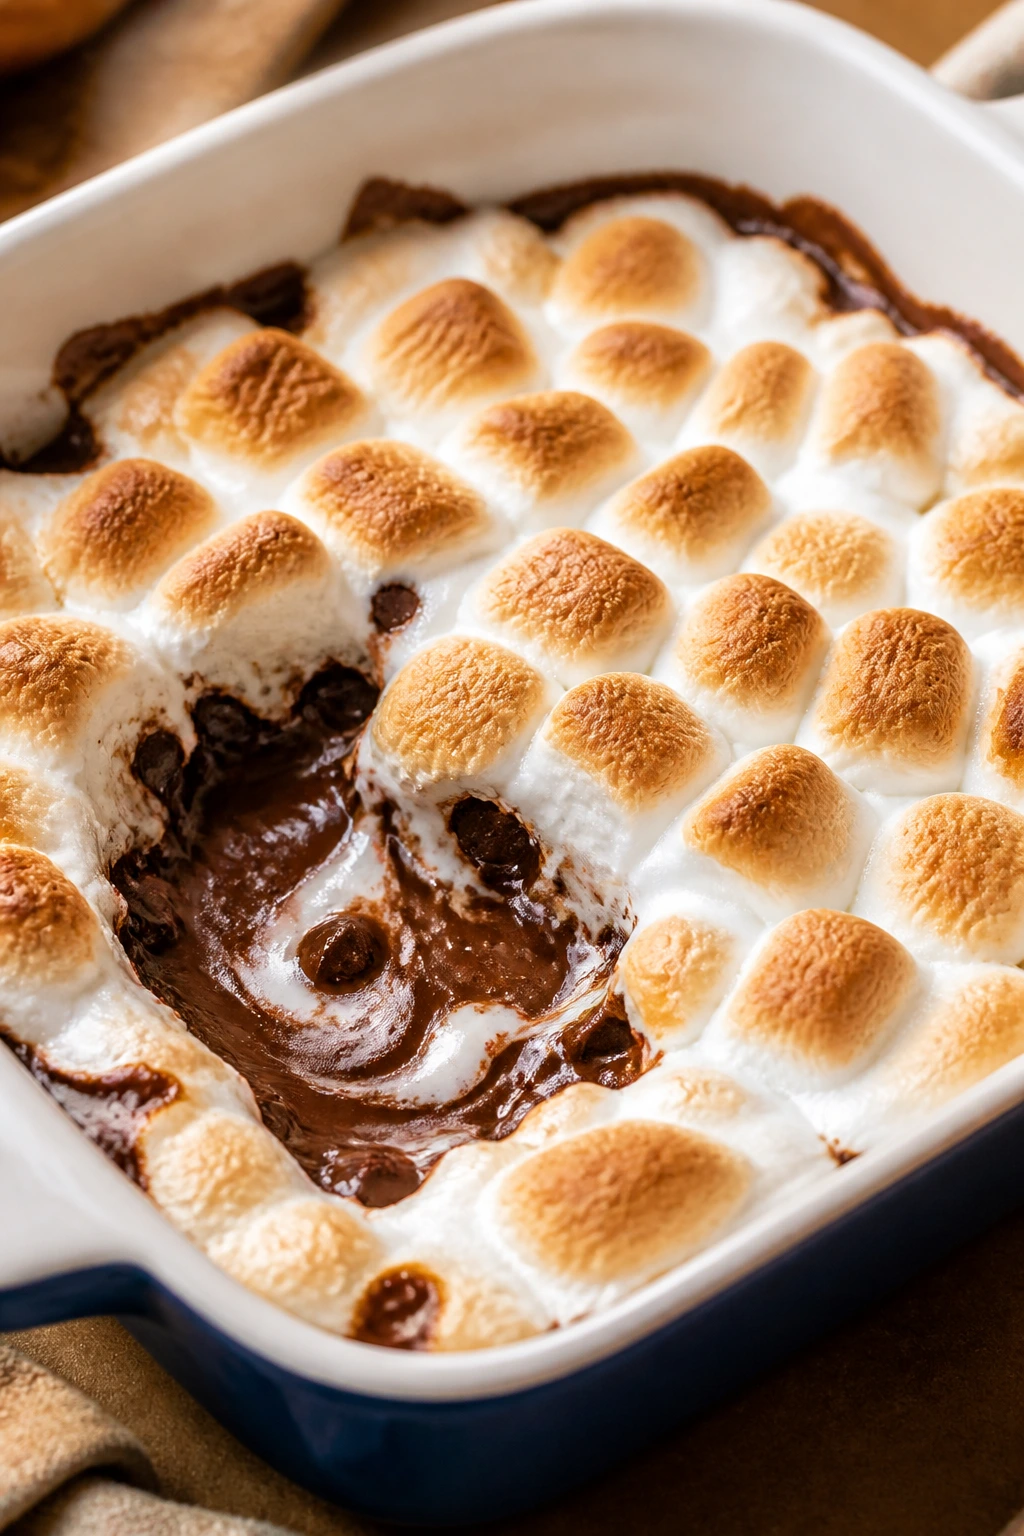
This is the fastest way to get campfire flavor without smoke in your clothes. It is warm, gooey, and a little reckless in the best way, which is exactly why kids love it.
Why It Works:
Chocolate melts into a soft base, marshmallows toast on top, and graham crackers handle the scooping. A shallow dish helps the top brown before the chocolate underneath cools too much.
Key Ingredients:
- 12 ounces milk chocolate chips
- 1/2 cup heavy cream
- 2 cups mini marshmallows
- Graham crackers, for serving
- Pinch of salt
Quick Steps:
- Preheat the broiler or oven to 450°F.
- Warm the chocolate chips and cream in an oven-safe skillet or dish until melted.
- Scatter marshmallows over the top.
- Broil for 1 to 2 minutes, until the tops are golden brown.
- Serve immediately with graham crackers.
Equipment for This Recipe:
- Cast-iron skillet or oven-safe baking dish
- Oven mitts
- Spoon
- Serving plate for crackers
How to Serve This Dish:
Bring it to the table while it’s still bubbling at the edges. Set out extra graham crackers, strawberries, and pretzel sticks so everyone can choose their own dipper.
Pro Tips for This Recipe:
- Stay near the broiler the whole time; marshmallows go from toasted to burnt quickly.
- Use a shallow dish so the topping browns evenly.
- Add a pinch of salt to keep the chocolate from tasting flat.
Variations on This Dish:
- Peanut Butter S’mores: Swirl 2 tablespoons peanut butter into the chocolate.
- Cookies-and-Cream Dip: Replace half the chocolate with white chocolate chips.
Common Mistakes to Avoid with This Dish:
- Don’t use a glass dish under the broiler.
- Don’t walk away for “just a minute”; that’s how marshmallows burn.
12. Coconut Mango Popsicles
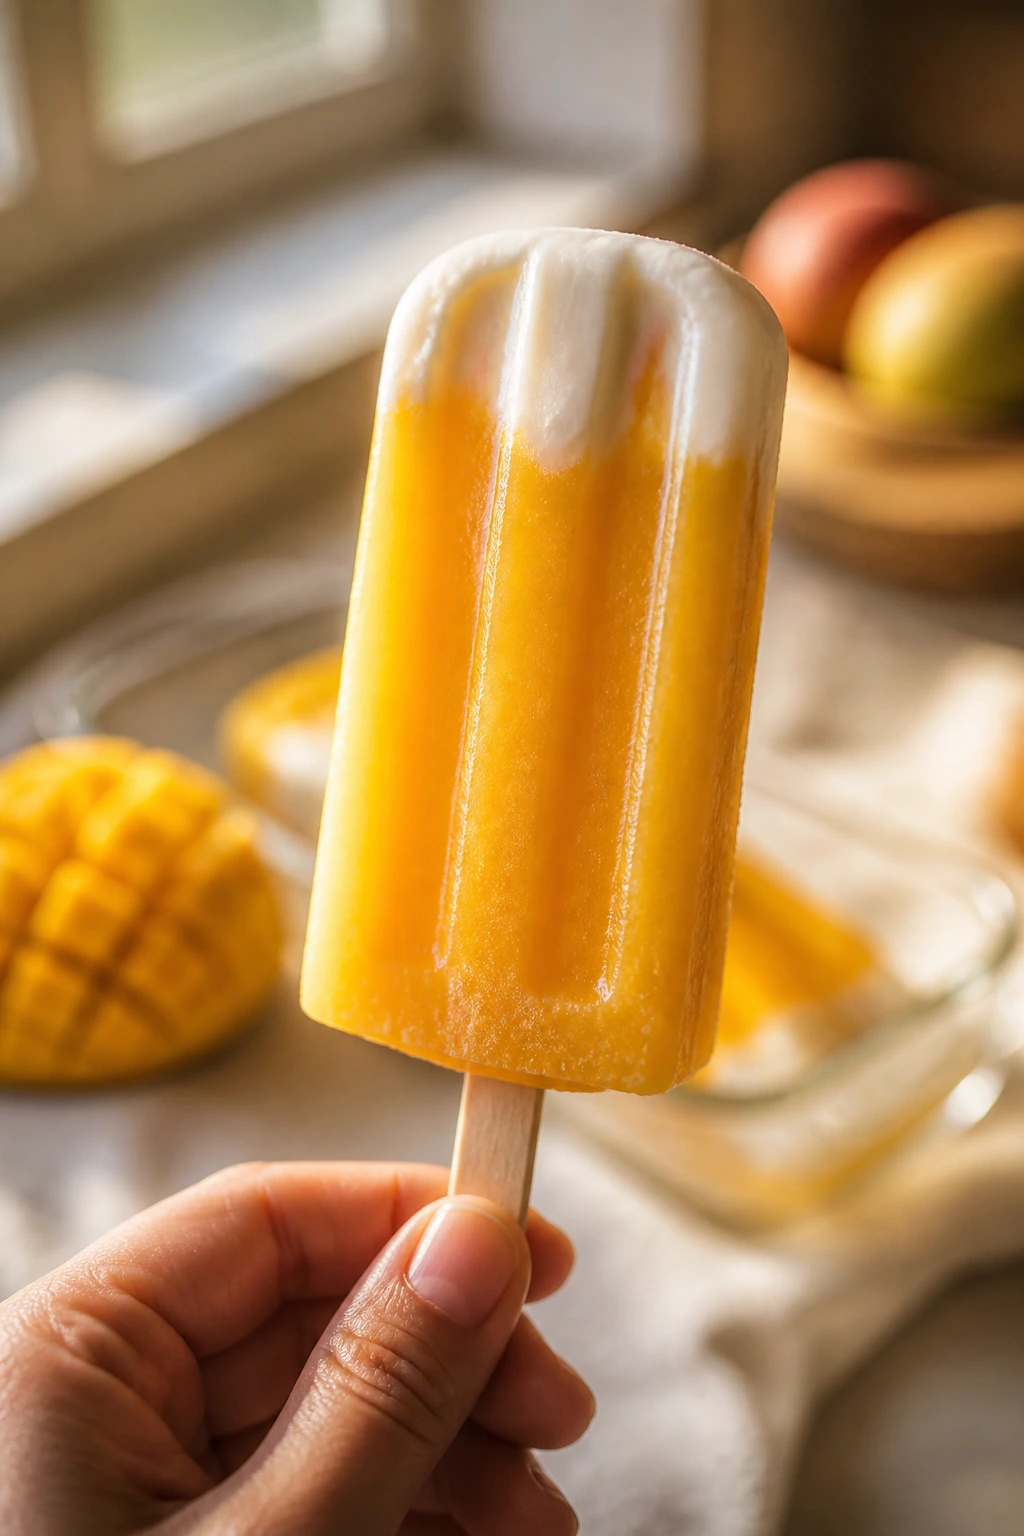
These taste like a beach snack with better manners. Mango gives the popsicles that deep orange sweetness, while coconut milk keeps them creamy instead of icy.
Why It Works:
Mango puree freezes with a smooth texture if you keep enough fat in the base. Coconut milk softens the freeze and lets the fruit taste bright instead of dull.
Key Ingredients:
- 2 cups mango puree
- 1 cup coconut milk
- 2 tablespoons honey
- 1 tablespoon lime juice
- Pinch of salt
- 1/2 cup diced mango, optional
Quick Steps:
- Blend the mango puree, coconut milk, honey, lime juice, and salt.
- Stir in diced mango if using.
- Pour into popsicle molds.
- Insert sticks and freeze for at least 6 hours.
- Run the molds under warm water for 10 seconds to release.
Equipment for This Recipe:
- Popsicle molds
- Blender
- Measuring cups
- Small funnel or spoon
How to Serve This Dish:
Serve them after dinner on a plate lined with parchment so dripping doesn’t become a floor project. A squeeze of lime over the top sharpens the mango if you want them less sweet.
Pro Tips for This Recipe:
- Use ripe mango for the cleanest flavor.
- Shake the coconut milk can before measuring if it separates.
- Don’t overfill the molds; popsicles expand as they freeze.
Variations on This Dish:
- Pineapple Mango Pops: Add 1/2 cup pineapple juice.
- Strawberry Coconut Pops: Swirl in strawberry puree before freezing.
Common Mistakes to Avoid with This Dish:
- Don’t use coconut beverage from a carton if you want a creamy pop.
- Don’t pull them from the molds too early or the sticks loosen.
13. Apple Nachos with Caramel Drizzle
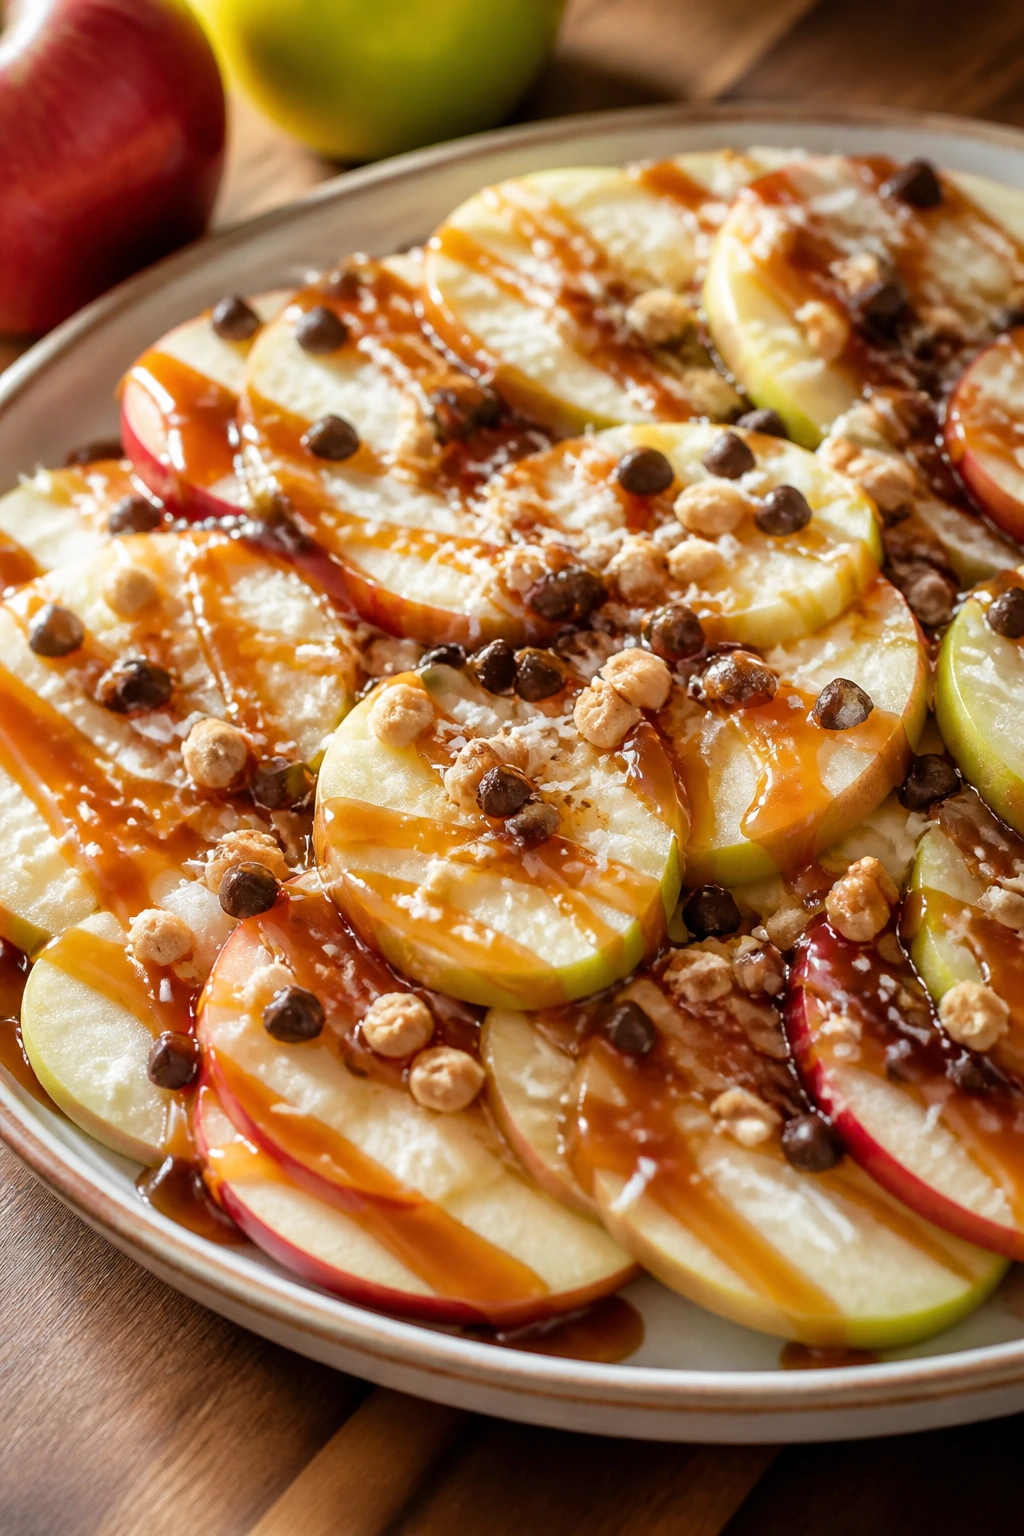
Apple nachos are messy in a controlled way, which is about as close as dessert gets to being practical and fun at the same time. Crisp apple slices, drippy caramel, and a few crunchy toppings do the job fast.
Why It Works:
Apples carry toppings well because they stay firm. The lemon juice keeps the slices from browning too quickly, and the drizzle pattern means every bite gets a little sweet and a little tart.
Key Ingredients:
- 3 crisp apples
- 2 tablespoons lemon juice
- 1/4 cup peanut butter or sunflower seed butter
- 1/4 cup caramel sauce
- 1/3 cup granola
- 2 tablespoons mini chocolate chips
- 2 tablespoons chopped peanuts or sunflower seeds
Quick Steps:
- Slice the apples thinly and toss them with lemon juice.
- Arrange the slices on a platter.
- Warm the peanut butter and caramel slightly so they drizzle.
- Spoon them over the apples.
- Finish with granola, chocolate chips, and chopped nuts or seeds.
Equipment for This Recipe:
- Cutting board
- Sharp knife
- Small microwave-safe bowls
- Serving platter
How to Serve This Dish:
Serve it the second it’s assembled so the apples stay crisp. If you want a more dessert-like spread, add a bowl of vanilla yogurt for dipping on the side.
Pro Tips for This Recipe:
- Slice the apples at the last minute.
- Use two apple varieties if you want more bite and color.
- Warm the drizzles just enough to flow; hot caramel makes the fruit slide.
Variations on This Dish:
- Berry Pie Nachos: Add chopped strawberries and a dusting of cinnamon.
- Tahini Caramel Nachos: Swap peanut butter for tahini.
Common Mistakes to Avoid with This Dish:
- Don’t cut the apples too thick or they’re hard to bite through.
- Don’t overload the platter; too much topping makes everything slip.
14. Rice Krispie Treat Ice Cream Sandwiches
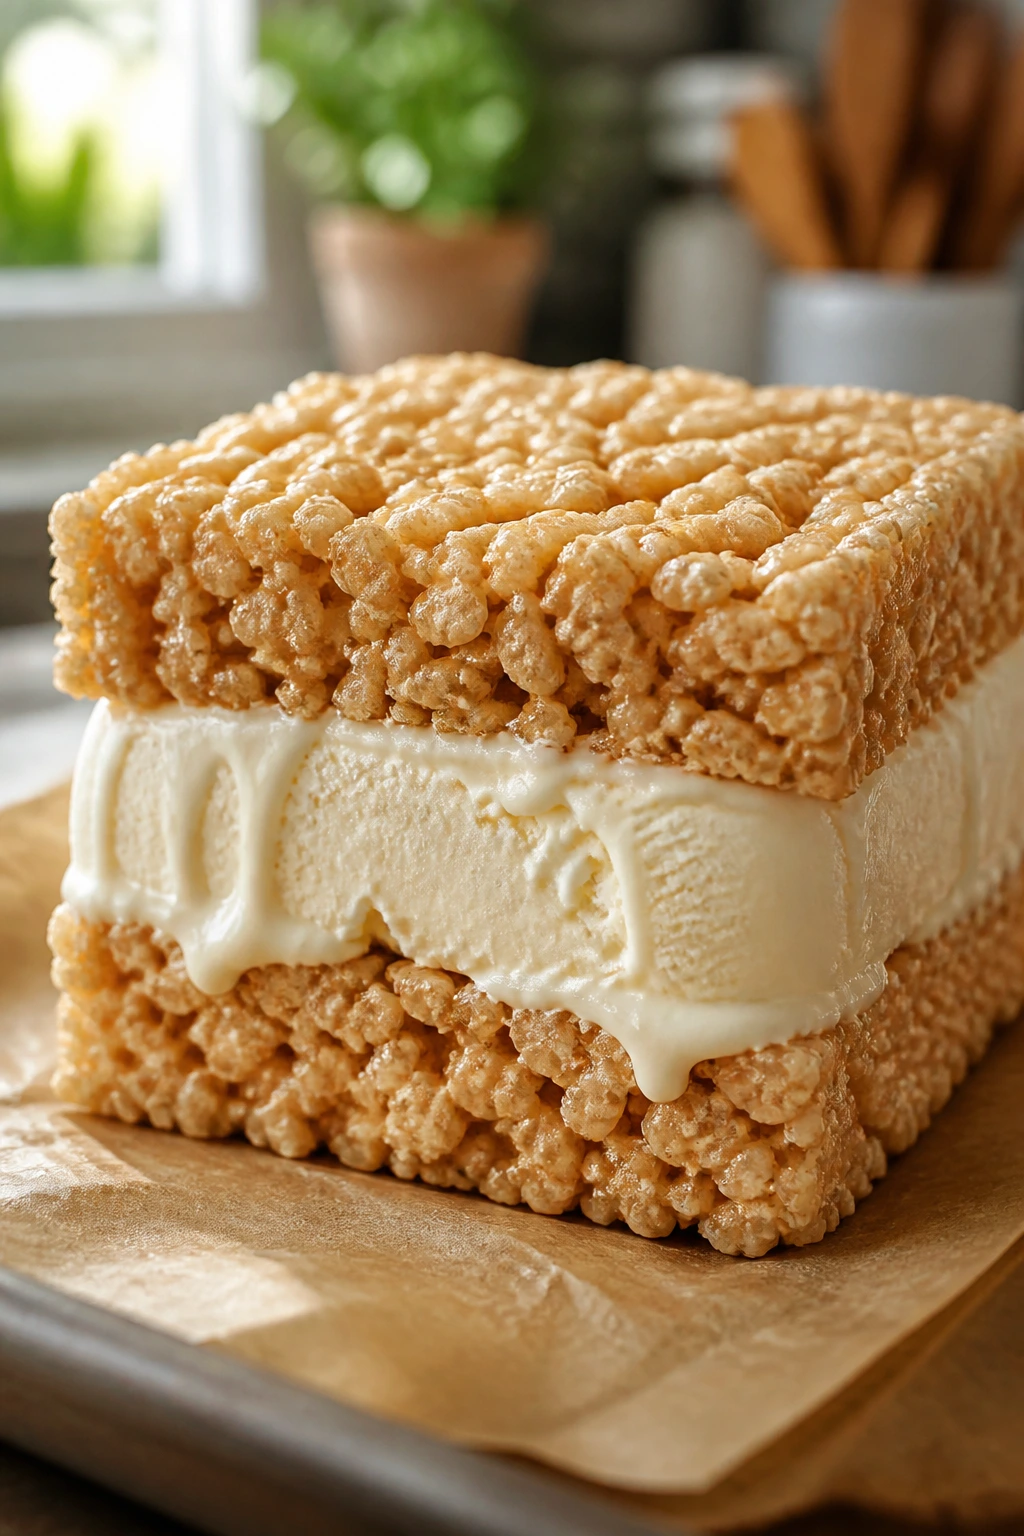
These are a little ridiculous, which is why kids light up when you hand them one. Crisp-chewy cereal squares wrapped around ice cream turn into a dessert that feels halfway between a snack and a celebration.
Why It Works:
Rice Krispie treats stay flexible enough to sandwich, especially if you cut them while they’re fully cool. The ice cream adds the cold center, and the cereal base keeps the whole thing from getting soggy too fast.
Key Ingredients:
- 6 cups crisp rice cereal
- 10 ounces mini marshmallows
- 4 tablespoons unsalted butter
- 1/2 teaspoon salt
- 1 quart vanilla ice cream, slightly softened
- Sprinkles, optional
Quick Steps:
- Melt the butter and marshmallows together over low heat.
- Stir in the cereal and salt.
- Press into a parchment-lined 9×13-inch pan.
- Cool completely, then cut into squares.
- Sandwich softened ice cream between two squares and freeze for 30 minutes.
Equipment for This Recipe:
- Large saucepan
- 9×13-inch pan
- Parchment paper
- Offset spatula or buttered hands
How to Serve This Dish:
Serve on a tray with napkins ready, because this one drips if the weather is warm. A quick roll in sprinkles or mini chips makes them look extra fun without much work.
Pro Tips for This Recipe:
- Press the cereal layer lightly; compact it too much and it gets hard.
- Freeze the ice cream sandwiches before serving so the filling firms up.
- Cut the squares with a lightly buttered knife.
Variations on This Dish:
- Chocolate Chip Sandwiches: Add mini chips to the cereal mix.
- Strawberry Ice Cream Sandwiches: Use strawberry ice cream and top with freeze-dried berries.
Common Mistakes to Avoid with This Dish:
- Don’t wait until the treats are fully stale; they need a bit of spring.
- Don’t use ice cream that has turned watery from thawing and refreezing.
15. Blueberry Muffin Crumble Bars

These taste like the top half of a blueberry muffin got promoted into dessert. You get buttery crumble, jammy berries, and a bar shape that cuts cleanly for weeknight serving.
Why It Works:
Blueberries break down quickly with heat and sugar, so the filling turns glossy without a long bake. Oats and flour on top give you that muffin-streusel feel without needing to make batter and topping separately.
Key Ingredients:
- 1 1/2 cups all-purpose flour
- 1 cup old-fashioned oats
- 3/4 cup brown sugar
- 1/2 cup unsalted butter, melted
- 2 cups blueberries
- 2 tablespoons granulated sugar
- 2 tablespoons cornstarch
- 1 teaspoon lemon zest
- Pinch of salt
Quick Steps:
- Preheat the oven to 350°F.
- Mix flour, oats, brown sugar, butter, and salt into crumbs.
- Press half the crumbs into a parchment-lined 8×8-inch pan.
- Toss blueberries with sugar, cornstarch, and lemon zest, then spread over the base.
- Sprinkle the remaining crumbs on top and bake for 35 minutes.
Equipment for This Recipe:
- 8×8-inch baking pan
- Parchment paper
- Mixing bowls
- Spoon or spatula
How to Serve This Dish:
Let the bars cool before cutting so the blueberry layer sets. They’re good on their own, but a spoon of vanilla yogurt turns them into a proper dessert plate.
Pro Tips for This Recipe:
- Toss the berries with cornstarch or the bars slice too wet.
- Leave a little parchment overhang for easy lifting.
- Cool fully before cutting; warm bars crumble.
Variations on This Dish:
- Peach Crumble Bars: Swap blueberries for diced peaches.
- Lemon-Blueberry Bars: Add extra zest and a light glaze.
Common Mistakes to Avoid with This Dish:
- Don’t underbake the center or the base stays doughy.
- Don’t skip parchment, or the berry layer sticks to the pan.
16. Frozen Yogurt Granola Cups
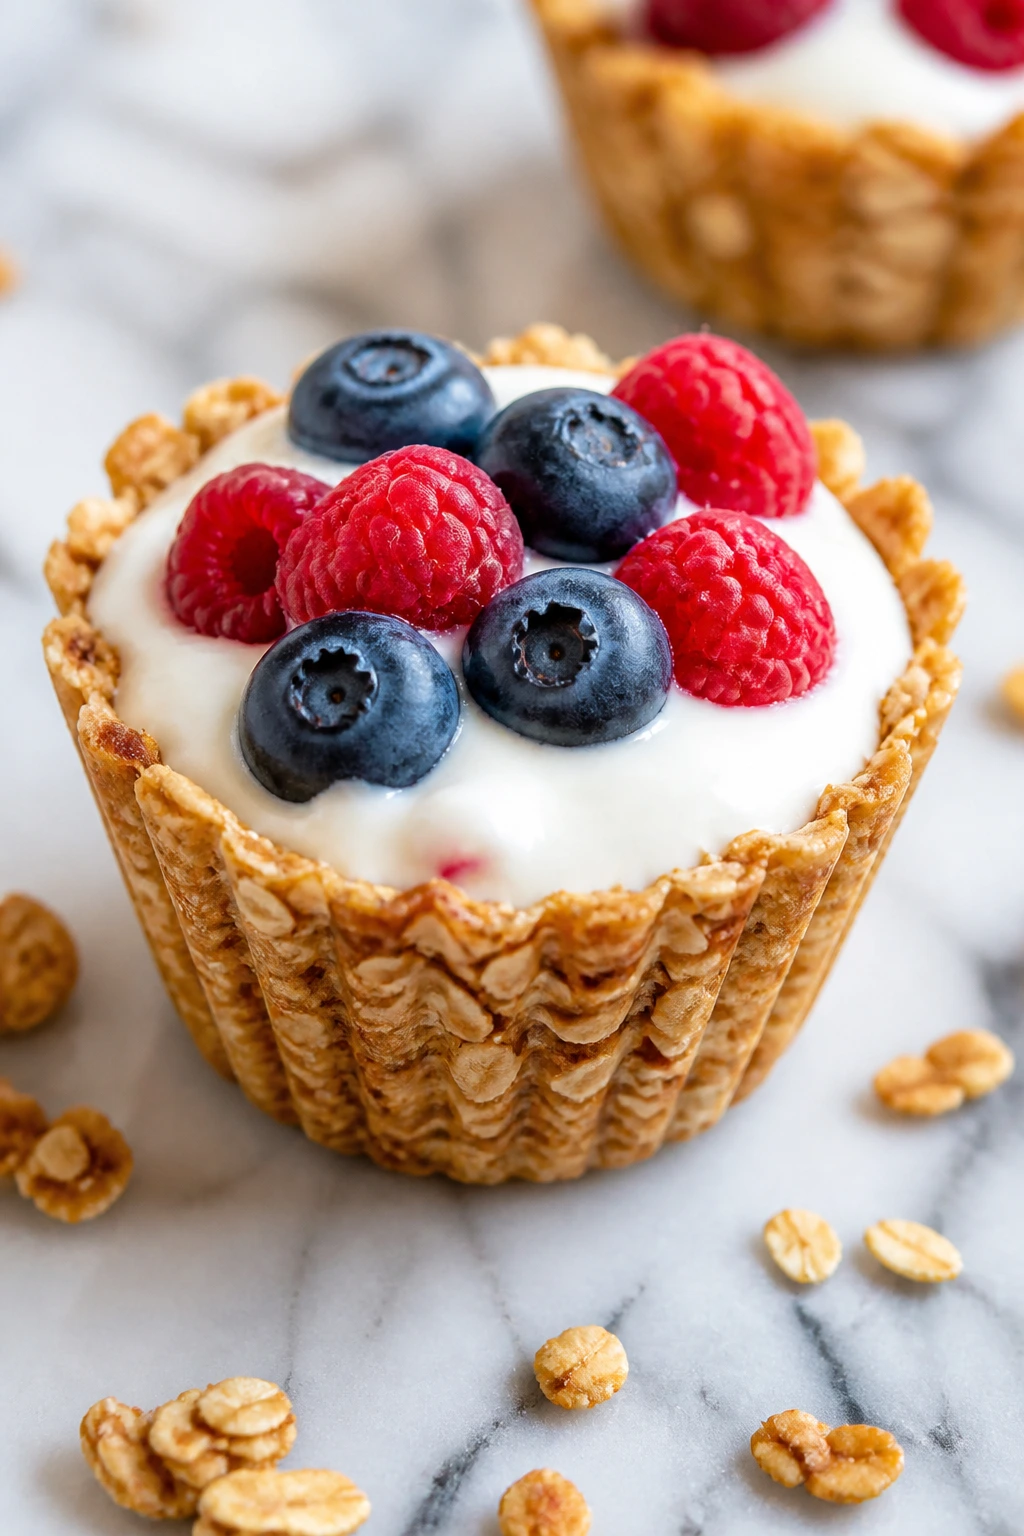
These are part snack, part dessert, part excellent excuse to keep a muffin tin in the freezer. The granola base gives you crunch, and the yogurt cup stays cold and creamy with hardly any effort.
Why It Works:
Pressing granola into muffin cups creates a small edible shell. Yogurt freezes into a soft, spoonable bite instead of a hard block, especially if you stir in a little honey first.
Key Ingredients:
- 2 cups plain Greek yogurt
- 2 tablespoons honey
- 1 teaspoon vanilla extract
- 1 1/2 cups granola
- 1 cup berries
- Silicone muffin liners or paper liners
Quick Steps:
- Mix the yogurt, honey, and vanilla.
- Press granola into lined muffin cups to form a base.
- Spoon yogurt over the granola.
- Top with berries.
- Freeze for 2 to 3 hours, until firm enough to hold.
Equipment for This Recipe:
- Muffin tin
- Liner cups
- Mixing bowl
- Spoon
How to Serve This Dish:
Serve them straight from the freezer for a firmer bite, or let them sit 5 minutes if you want a softer texture. A drizzle of honey right before serving gives the tops a glossy finish.
Pro Tips for This Recipe:
- Press the granola base firmly so it doesn’t crumble apart.
- Use thicker yogurt if you want a neater set.
- Add fruit just before freezing to keep it bright.
Variations on This Dish:
- Chocolate Granola Cups: Add cacao nibs or mini chocolate chips.
- Tropical Cups: Use mango and toasted coconut.
Common Mistakes to Avoid with This Dish:
- Don’t use loose granola without pressing it down.
- Don’t freeze them uncovered, or the tops dry out.
17. Chocolate Peanut Butter Dip and Fruit Plate
This is the dessert version of a snack board, and it is hard to beat when you want something fast that still feels generous. The dip is rich and a little salty, and the fruit keeps it from tipping into candy-bar territory.
Why It Works:
Peanut butter brings body and flavor, while yogurt or cream cheese keeps the dip scoopable. Serving it with fruit and pretzels means every bite can swing sweet, salty, crisp, or soft.
Key Ingredients:
- 1 cup creamy peanut butter
- 1/2 cup plain Greek yogurt or softened cream cheese
- 1/4 cup honey
- 2 tablespoons cocoa powder
- 1 teaspoon vanilla extract
- Pinch of salt
- Apple slices, strawberries, banana chunks, and pretzels for dipping
Quick Steps:
- Whisk the peanut butter, yogurt, honey, cocoa, vanilla, and salt until smooth.
- Spoon into a bowl.
- Arrange the fruit and pretzels around it.
- Serve immediately or chill for 20 minutes if you want it thicker.
Equipment for This Recipe:
- Mixing bowl
- Whisk or spatula
- Serving bowl
- Knife and cutting board
How to Serve This Dish:
Put the dip in the center of a platter and fan the fruit around it. It looks plentiful even when the ingredient list is short, which is useful on a tired night.
Pro Tips for This Recipe:
- Warm the peanut butter for 10 seconds if it’s stiff.
- Slice bananas last so they don’t brown.
- Add a pinch more salt if the peanut butter tastes dull.
Variations on This Dish:
- Sunflower Butter Dip: Swap in sunflower seed butter for a nut-free version.
- Marshmallow Swirl Dip: Fold in a spoonful of marshmallow fluff for a sweeter finish.
Common Mistakes to Avoid with This Dish:
- Don’t make the dip too thick or it becomes hard to scoop.
- Don’t cut all the fruit far ahead; bananas and apples both fade quickly.
18. Pineapple Upside-Down Cake Skillet
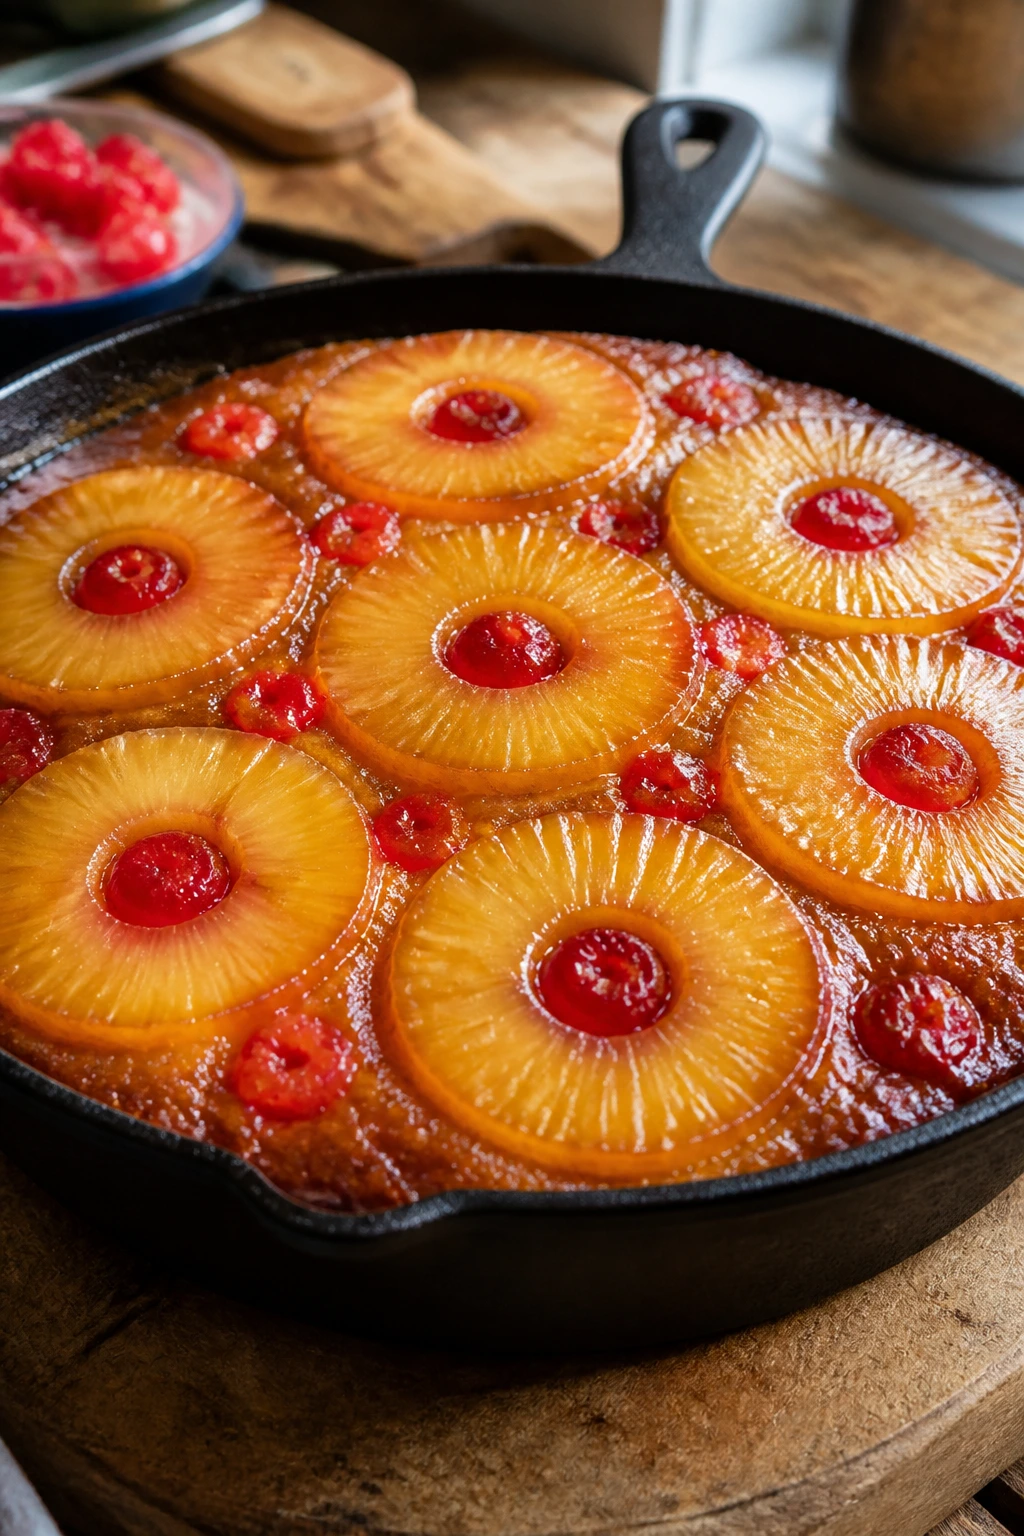
A skillet cake brings a little old-school drama to a weeknight without turning into a project. Pineapple rings caramelize in brown sugar and butter, and the cake batter bakes right over the top before you flip it out.
Why It Works:
The fruit and caramel sit on the bottom of the pan, so the top stays moist and glossy after the flip. A boxed yellow cake mix keeps the prep short while still giving you a tender crumb.
Key Ingredients:
- 1/4 cup unsalted butter
- 1/2 cup brown sugar
- 7 pineapple rings, drained
- 7 maraschino cherries
- 1 box yellow cake mix, plus the eggs, oil, and water listed on the package
Quick Steps:
- Preheat the oven to 350°F.
- Melt the butter in a 10-inch oven-safe skillet and stir in the brown sugar.
- Arrange the pineapple rings and cherries over the caramel.
- Mix the cake batter according to package directions and pour it over the fruit.
- Bake for 30 to 35 minutes, then invert after 5 minutes of cooling.
Equipment for This Recipe:
- 10-inch cast-iron skillet or oven-safe pan
- Mixing bowl
- Spatula
- Oven mitts
How to Serve This Dish:
Serve warm with spoons, not forks. A scoop of vanilla ice cream on the side gives you the melt that makes the whole thing feel complete.
Pro Tips for This Recipe:
- Drain the pineapple well so the caramel doesn’t thin out.
- Let the cake rest a few minutes before flipping or the fruit tears loose.
- Use a pan with enough room for the batter to rise.
Variations on This Dish:
- Peach Upside-Down Cake: Swap pineapple for peach slices.
- Mini Skillet Cakes: Bake in individual skillets for cleaner serving.
Common Mistakes to Avoid with This Dish:
- Don’t overbake or the cake gets dry under the caramel.
- Don’t flip too soon; the topping needs a minute to settle.
19. Cherry Hand Pies
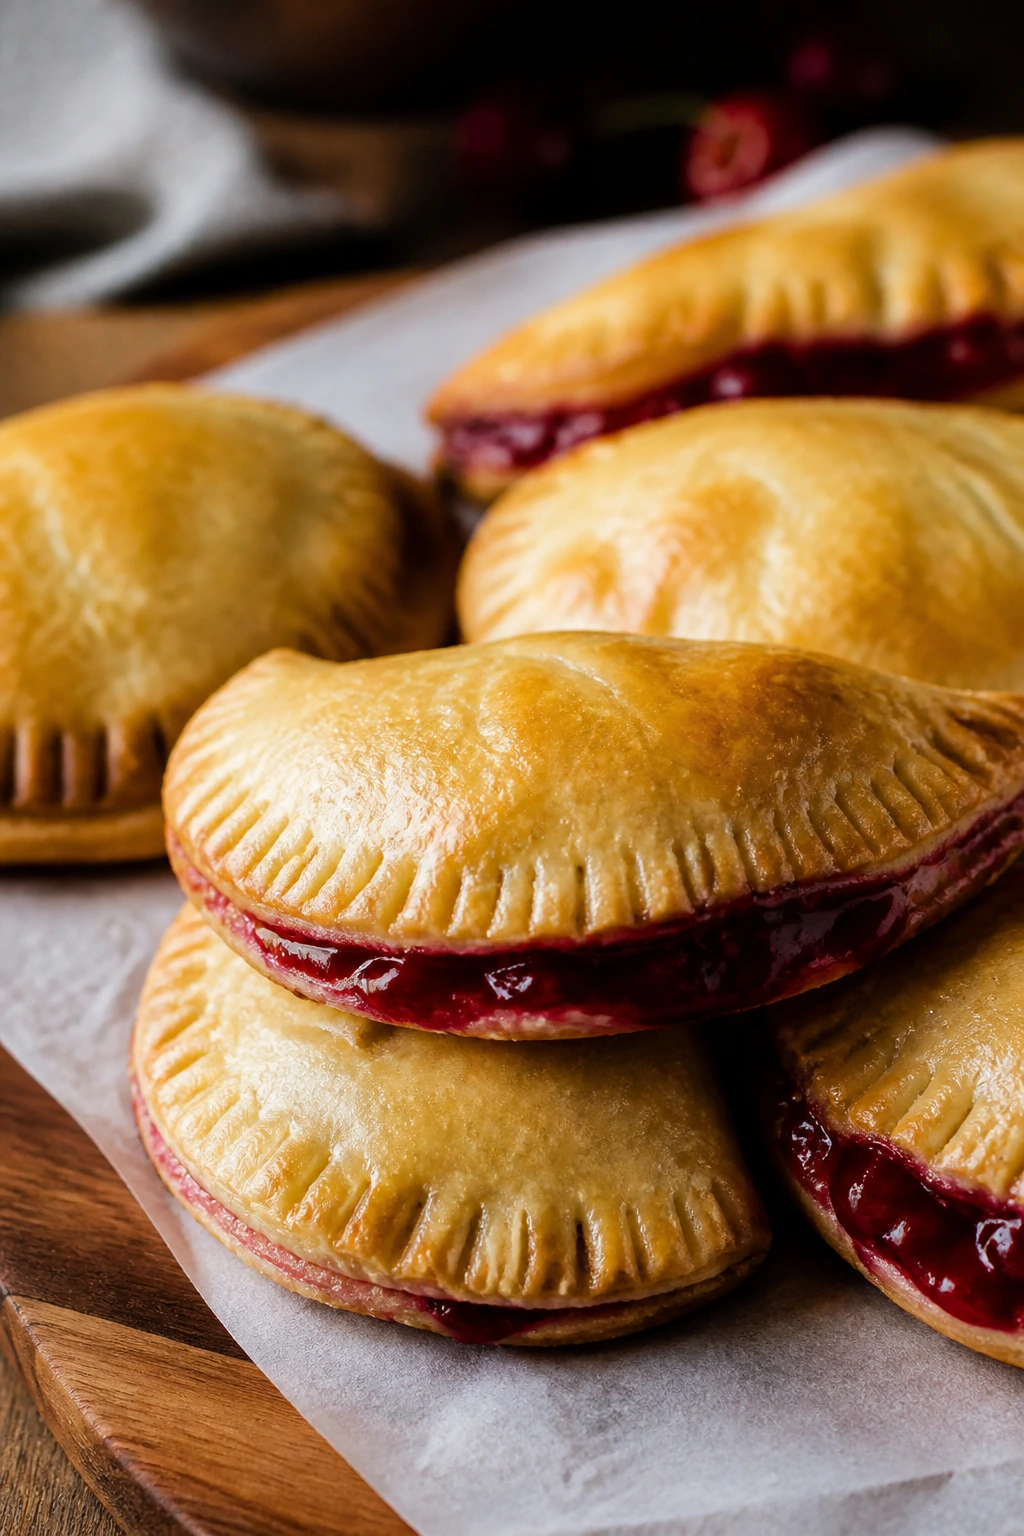
Hand pies feel like dessert with manners: self-contained, portable, and not likely to leave filling everywhere. Cherry is the classic move because it bakes into a thick, bright center that tastes like pie without the need for a pie dish.
Why It Works:
A little cornstarch thickens the cherry filling so it doesn’t explode out the seams. Store-bought pie crust keeps the prep short, and the sealed edge makes these easy to hold while still warm.
Key Ingredients:
- 2 sheets refrigerated pie crust
- 2 cups pitted cherries, fresh or thawed frozen
- 1/3 cup sugar
- 1 tablespoon cornstarch
- 1 teaspoon lemon juice
- 1 egg, beaten with 1 tablespoon water
- Coarse sugar for topping
Quick Steps:
- Preheat the oven to 400°F.
- Cook the cherries, sugar, cornstarch, and lemon juice in a small pan for 3 to 4 minutes, until thick.
- Cut the pie crust into circles or squares.
- Spoon filling onto half, brush edges with egg wash, and seal.
- Brush the tops, sprinkle with sugar, and bake for 18 to 20 minutes.
Equipment for This Recipe:
- Baking sheet
- Parchment paper
- Small saucepan
- Fork for sealing
How to Serve This Dish:
Let them cool until the filling stops bubbling. They’re good plain, but a small scoop of vanilla ice cream beside one makes the whole plate look less hurried.
Pro Tips for This Recipe:
- Chill the filling before assembling so the crust stays crisp.
- Cut vents in the tops if you want extra steam release.
- Crimp the edges firmly with a fork.
Variations on This Dish:
- Blueberry Hand Pies: Use blueberries and a little extra lemon zest.
- Peach Hand Pies: Cook diced peaches with cinnamon.
Common Mistakes to Avoid with This Dish:
- Don’t overfill them; a tablespoon and a half is usually enough.
- Don’t bake with warm filling, or the crust softens before it has a chance to crisp.
20. No-Churn Vanilla Bean Ice Cream
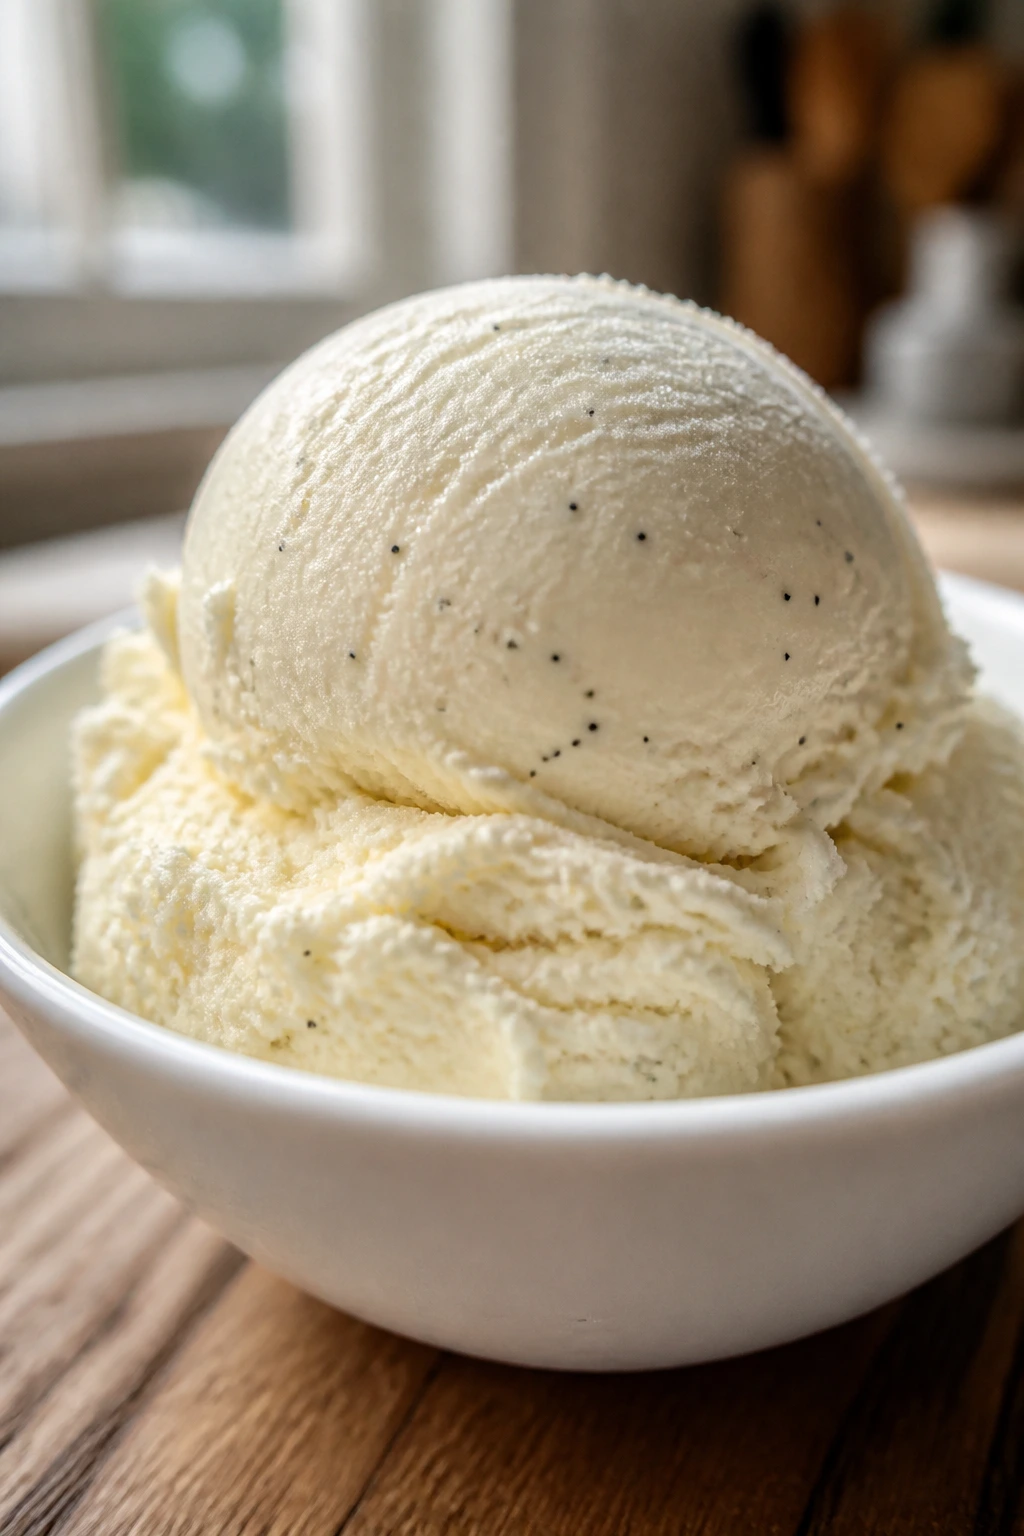
There’s a reason people keep making no-churn ice cream: it tastes like effort without requiring an ice cream maker or a freezer drum. The vanilla bean specks make it feel more special than the ingredient list suggests.
Why It Works:
Whipped cream traps air, and condensed milk keeps the mixture from freezing into a hard brick. Vanilla bean paste gives the ice cream a deeper flavor and those tiny black flecks kids always notice.
Key Ingredients:
- 2 cups heavy cream
- 1 can sweetened condensed milk, 14 ounces
- 1 tablespoon vanilla bean paste or vanilla extract
- Pinch of salt
Quick Steps:
- Whip the heavy cream to soft peaks.
- In another bowl, stir together the condensed milk, vanilla, and salt.
- Fold the whipped cream into the milk mixture.
- Spoon into a loaf pan and smooth the top.
- Freeze for 6 hours, or until scoopable.
Equipment for This Recipe:
- Hand mixer or stand mixer
- Mixing bowls
- Loaf pan
- Spatula
How to Serve This Dish:
Let it sit at room temperature for 5 minutes before scooping. It goes with nearly everything in this list, which is why a batch of it disappears quietly from the freezer.
Pro Tips for This Recipe:
- Stop whipping at soft peaks; stiff cream can turn grainy when folded.
- Fold gently so you keep the air in the mixture.
- Press parchment directly onto the surface if you’re storing it longer.
Variations on This Dish:
- Strawberry Swirl Ice Cream: Fold in a ribbon of berry puree.
- Cookies-and-Cream Ice Cream: Add chopped sandwich cookies near the end.
Common Mistakes to Avoid with This Dish:
- Don’t under-whip the cream, or the texture stays loose.
- Don’t freeze in a warm pan; the surface sets unevenly.
21. Strawberry Lemonade Granita
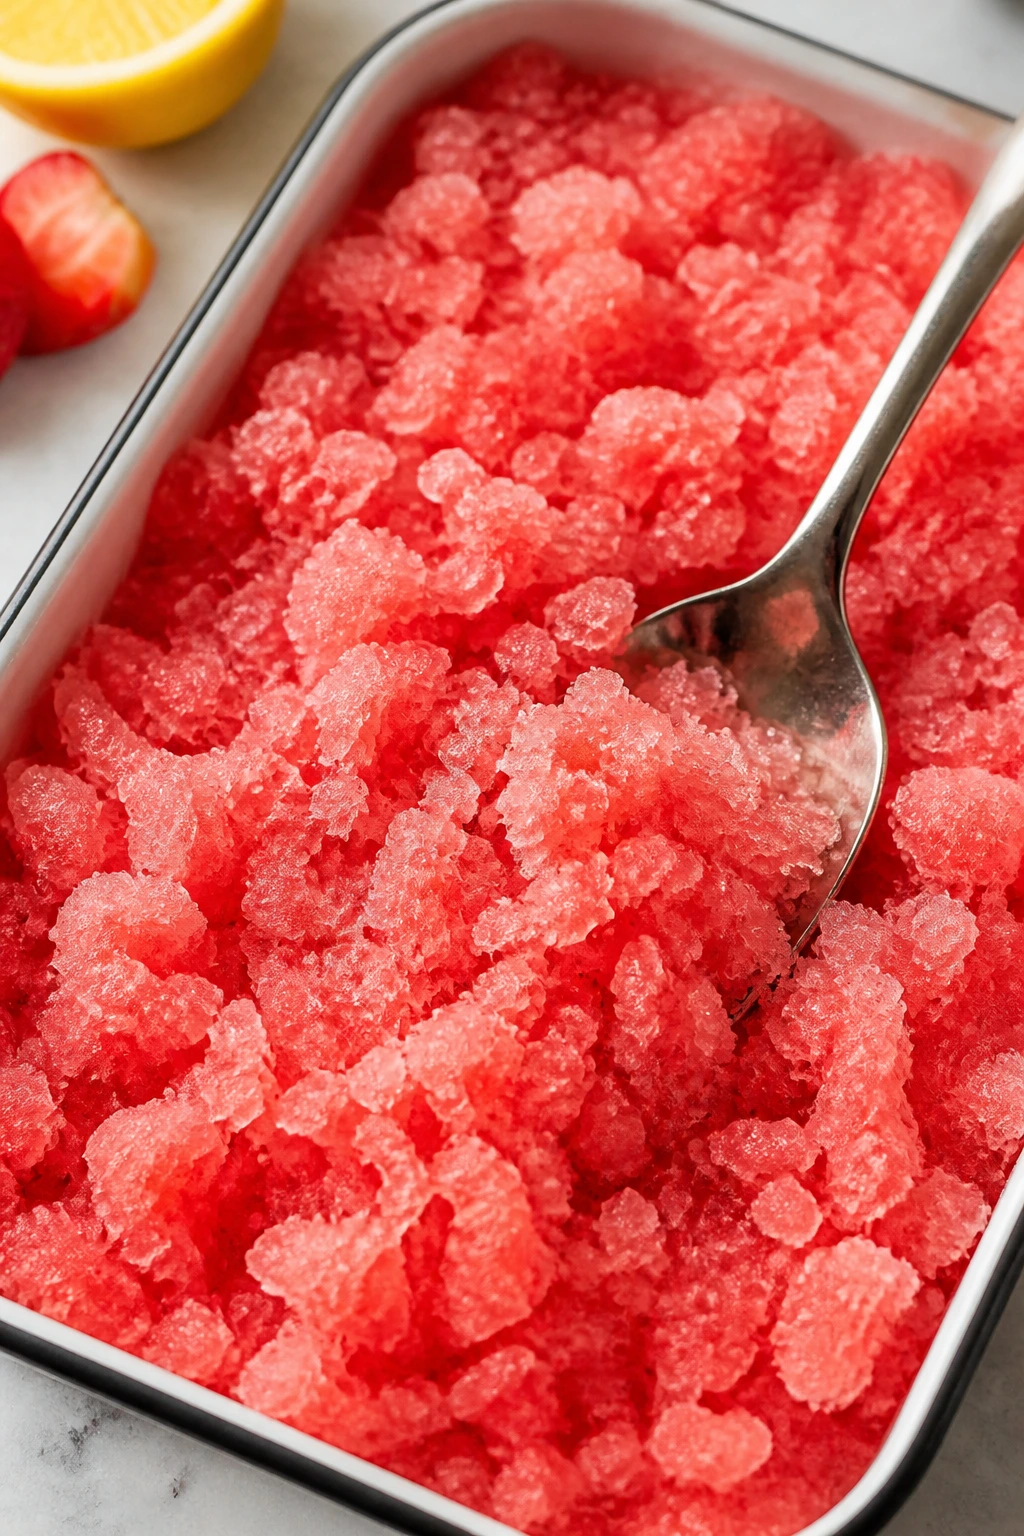
Granita is basically shaved snow with better flavor. It is sharp, cold, and perfect for nights when you want dessert to feel like a reset instead of another heavy finish.
Why It Works:
Sugar keeps the frozen crystals from getting too hard, and scraping during freezing creates that flaky texture. Strawberry and lemon together give you sweet, tart, and cold in the same spoonful.
Key Ingredients:
- 3 cups strawberry puree
- 3/4 cup sugar
- 1 1/2 cups water
- 3/4 cup lemon juice
- 1 teaspoon lemon zest
- Pinch of salt
Quick Steps:
- Stir the sugar and water over low heat until the sugar dissolves.
- Mix the syrup with the strawberry puree, lemon juice, zest, and salt.
- Pour into a shallow metal pan.
- Freeze for 30 minutes, then scrape with a fork.
- Repeat scraping 3 or 4 times, until flaky.
Equipment for This Recipe:
- Shallow metal baking dish
- Fork
- Saucepan
- Blender or food processor
How to Serve This Dish:
Serve in chilled cups with a mint leaf or a thin strawberry slice on top. It melts fast, so bring it out after the rest of dinner is already off the table.
Pro Tips for This Recipe:
- Use a shallow pan so the mixture freezes evenly.
- Scrape from the edges toward the center each time.
- Taste before freezing; some strawberries need less sugar than others.
Variations on This Dish:
- Watermelon Mint Granita: Swap strawberries for watermelon puree.
- Mango Lime Granita: Use mango and lime for a softer sweetness.
Common Mistakes to Avoid with This Dish:
- Don’t freeze it in a deep container or the center stays slushy.
- Don’t skip the scraping; that’s what creates the texture.
22. Mini Fruit Pizzas
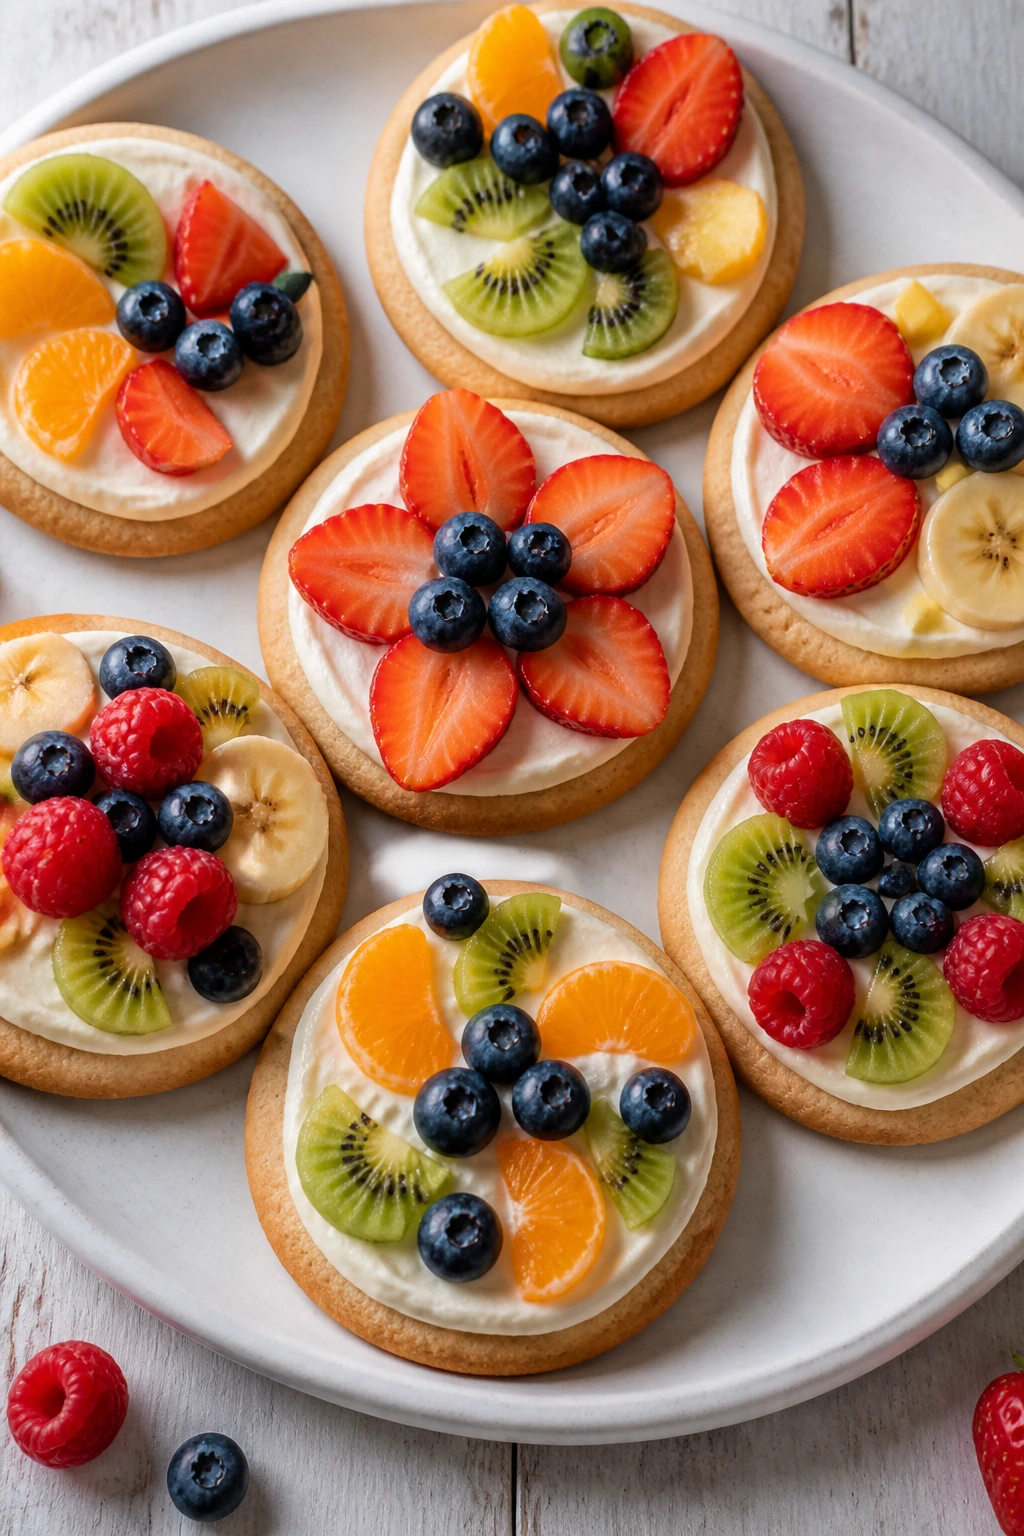
Sugar cookies, cream cheese frosting, and fruit on top. There’s a reason this dessert keeps showing up at potlucks and birthday tables. It’s colorful, simple, and small enough that nobody needs to negotiate for the last slice.
Why It Works:
The cookie base gives you a sturdy platform, the frosting keeps the fruit from sliding, and the fruit itself does the decorating. Kids usually like this one because each pizza can look different.
Key Ingredients:
- 12 small sugar cookies or 1 tube refrigerated sugar cookie dough
- 8 ounces cream cheese, softened
- 1/4 cup powdered sugar
- 1 teaspoon vanilla extract
- 2 cups sliced fruit such as strawberries, kiwi, blueberries, and mandarin segments
Quick Steps:
- Bake the cookies if using dough, then cool completely.
- Beat the cream cheese, powdered sugar, and vanilla until smooth.
- Spread a thin layer over each cookie.
- Top with fruit.
- Chill for 15 minutes if you want the frosting to set a little.
Equipment for This Recipe:
- Baking sheet
- Mixing bowl
- Hand mixer
- Offset spatula or butter knife
How to Serve This Dish:
Line them up on a tray and let everyone pick a favorite color. They’re nicest when the cookies are cool and the fruit is dry, so the frosting stays where you put it.
Pro Tips for This Recipe:
- Dry the fruit on paper towels before topping.
- Spread the frosting thin so the cookies don’t get soggy.
- Use a mix of soft and firm fruit for better texture.
Variations on This Dish:
- Chocolate Cookie Pizzas: Use chocolate cookies and berries.
- Dairy-Free Pizzas: Use a dairy-free cream cheese spread.
Common Mistakes to Avoid with This Dish:
- Don’t frost warm cookies.
- Don’t add juicy fruit too far ahead of serving.
23. Brownie Sundae Cups
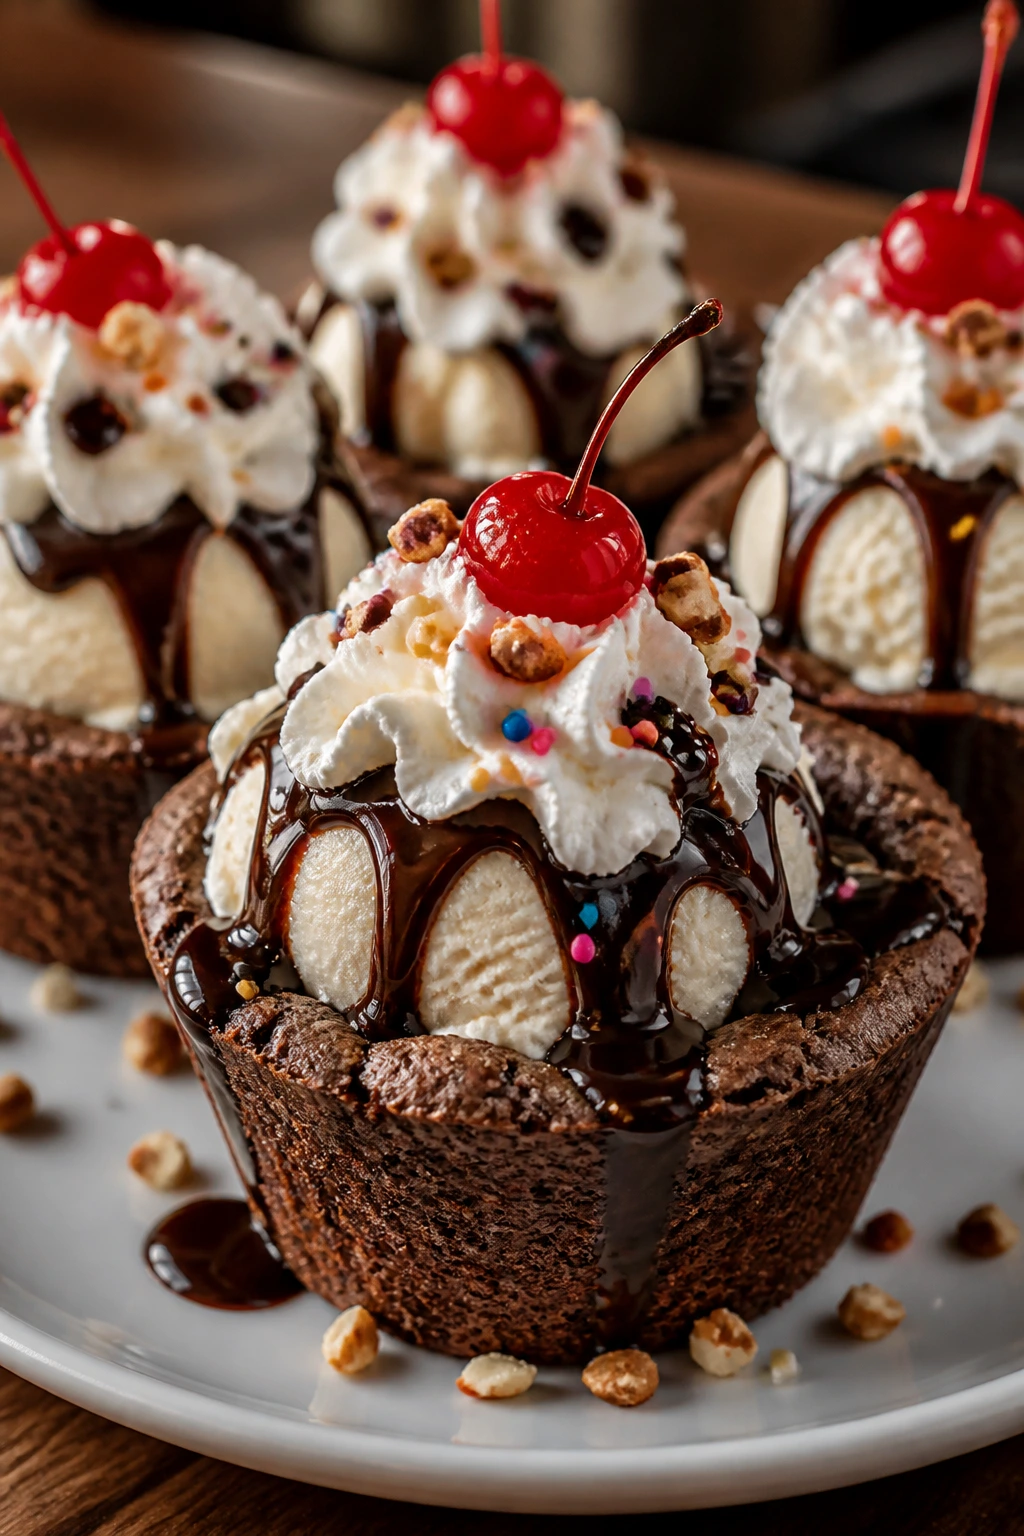
These are for the nights when dessert needs to feel like a real event but you do not want to make a giant pan and a separate bowl of ice cream. The brownie cup holds the scoop, the hot fudge drips down the sides, and nobody misses the silverware.
Why It Works:
Baking brownie batter in muffin cups gives you built-in portions with crisp edges. Once the cups cool, they become sturdy little shells for ice cream, which is a much more practical way to serve a sundae indoors.
Key Ingredients:
- 1 box brownie mix, plus the ingredients listed on the box
- 1 quart vanilla ice cream
- 1/2 cup hot fudge sauce
- Whipped cream
- Maraschino cherries or sprinkles, optional
Quick Steps:
- Preheat the oven to 350°F.
- Prepare the brownie batter according to the box.
- Line a muffin tin and fill each cup about two-thirds full.
- Bake for 18 to 20 minutes, then cool completely.
- Press the centers down slightly, fill with ice cream, and top with fudge and garnish.
Equipment for This Recipe:
- Muffin tin
- Paper liners
- Spoon or small scoop
- Microwave-safe bowl for the fudge
How to Serve This Dish:
Serve them on a tray right after filling, before the ice cream collapses over the edge. A cherry on top still matters here. Some old traditions are worth keeping.
Pro Tips for This Recipe:
- Don’t overbake; the cups should stay fudgy inside.
- Cool them fully before adding ice cream.
- Warm the fudge just enough to pour.
Variations on This Dish:
- Peanut Butter Brownie Cups: Add a spoon of peanut butter before the ice cream.
- Caramel Pretzel Cups: Top with caramel and crushed pretzels.
Common Mistakes to Avoid with This Dish:
- Don’t fill the cups while they’re warm or the ice cream melts immediately.
- Don’t make the brownie cups too shallow; they need room for filling.
24. Peach Melba Scones
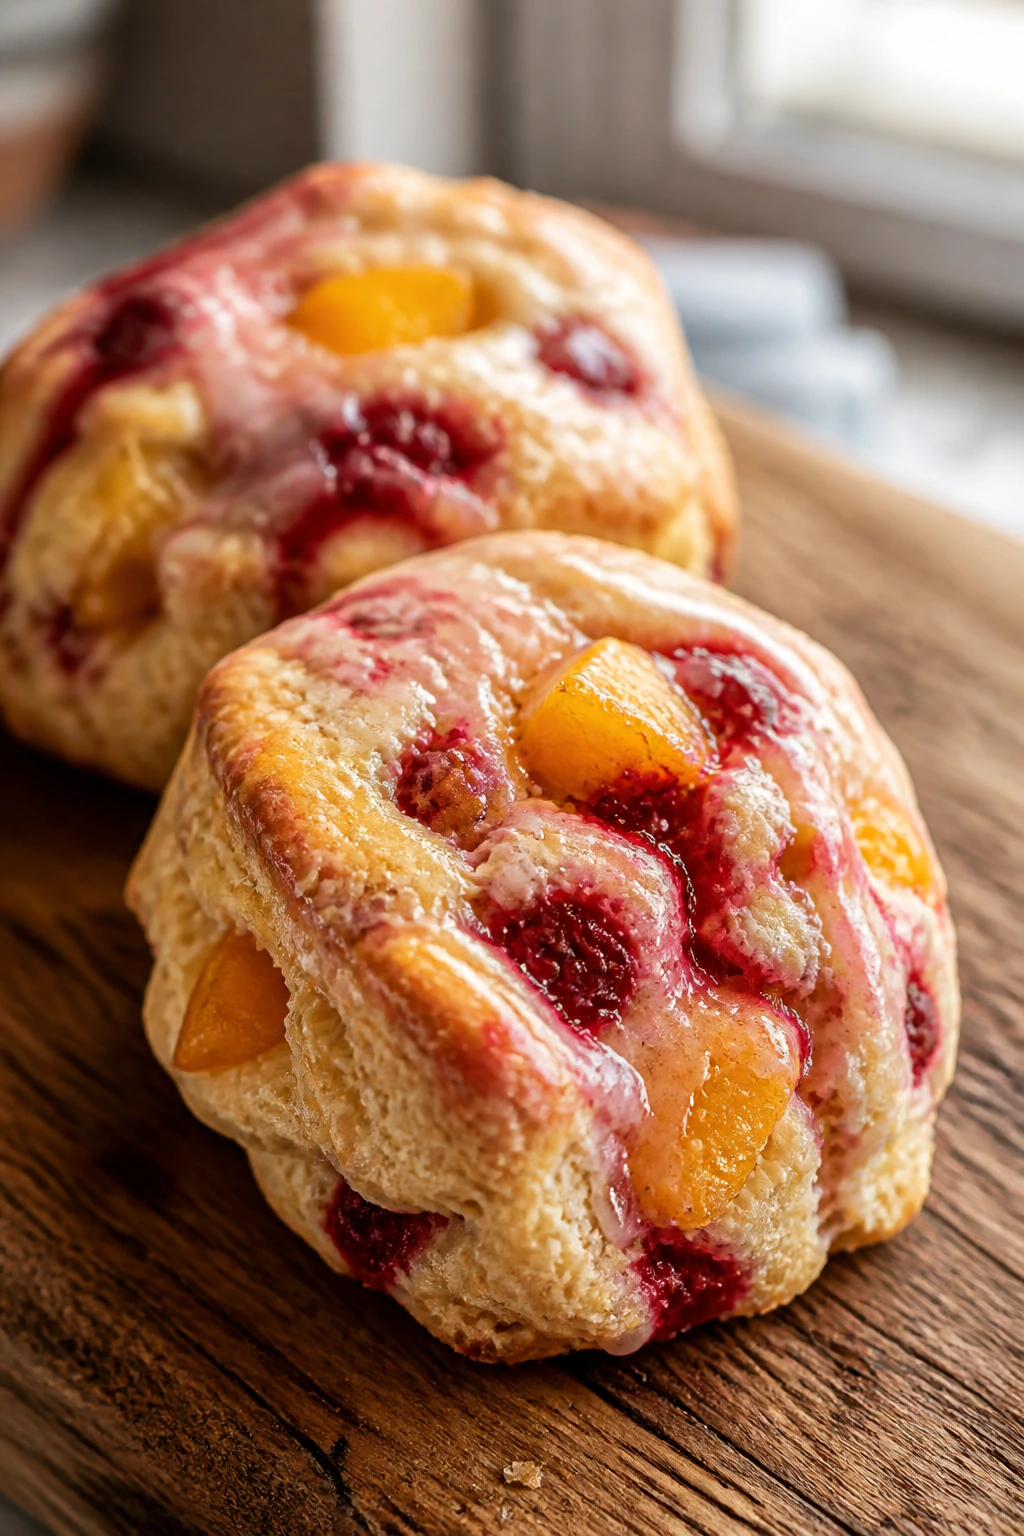
These land somewhere between a breakfast pastry and a dessert, which is why they work so well for late-afternoon snacks that drift into after-dinner territory. Peaches and raspberries bring a bright, jammy flavor that keeps the scone from feeling too heavy.
Why It Works:
Cold butter creates a tender, flaky crumb if you stop mixing before the dough turns smooth. The fruit bakes into pockets of soft sweetness, and a light glaze keeps the top from drying out.
Key Ingredients:
- 2 cups all-purpose flour
- 1/3 cup sugar
- 1 tablespoon baking powder
- 1/2 teaspoon salt
- 1/2 cup cold unsalted butter, cubed
- 1 cup diced peaches
- 1/2 cup raspberries
- 2/3 cup heavy cream
- 1 egg
- Powdered sugar glaze, optional
Quick Steps:
- Preheat the oven to 400°F.
- Whisk the flour, sugar, baking powder, and salt.
- Cut in the cold butter until pea-sized bits remain.
- Fold in the peaches and raspberries, then stir in the cream and egg.
- Shape, cut into wedges, and bake for 16 to 18 minutes.
Equipment for This Recipe:
- Baking sheet
- Mixing bowl
- Pastry cutter or fork
- Bench scraper or knife
How to Serve This Dish:
Serve warm with a spoonful of yogurt or whipped cream if you want to lean dessert. They’re best the day they’re baked, when the fruit is still soft and the edges are crisp.
Pro Tips for This Recipe:
- Keep the fruit cold so the butter doesn’t melt early.
- Handle the dough lightly; too much kneading makes it tough.
- Glaze after cooling if you want the top a little shiny.
Variations on This Dish:
- Blueberry Lemon Scones: Swap in blueberries and lemon zest.
- Gluten-Free Scones: Use a one-to-one gluten-free flour blend.
Common Mistakes to Avoid with This Dish:
- Don’t overmix the dough; that steals the flake.
- Don’t use very juicy fruit without patting it dry first.
25. Cereal Milk Pudding Pops
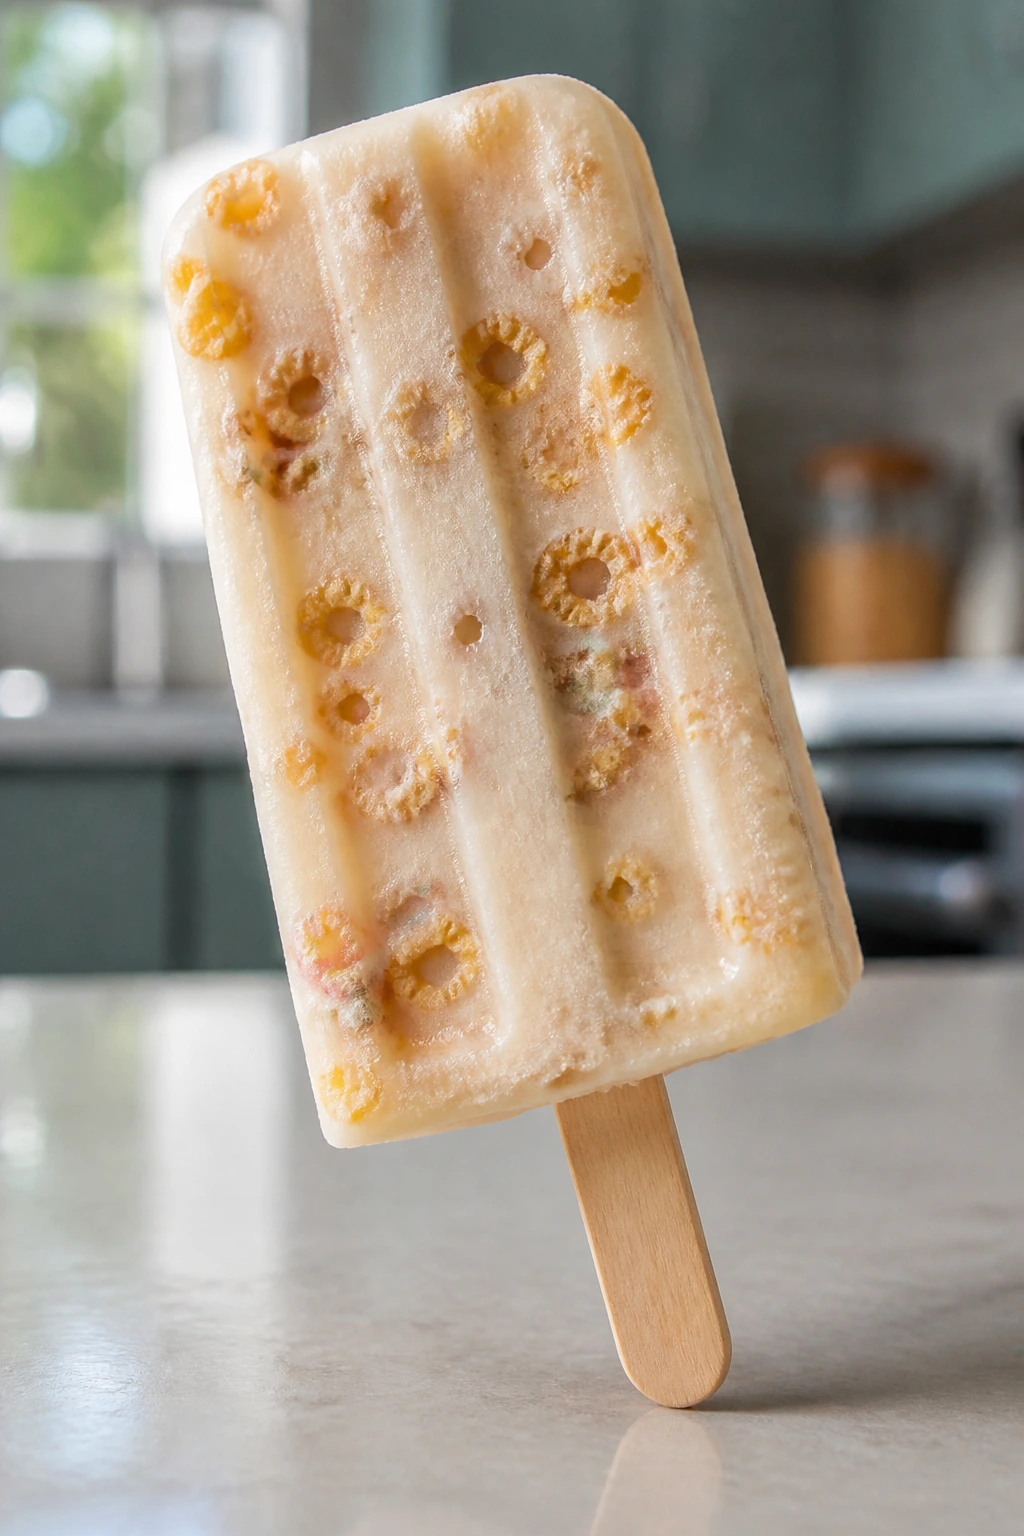
These taste like the last, sweetest spoonful in the cereal bowl, only frozen onto a stick. That makes them a little nostalgic and a lot easier to serve than a full pudding bowl on a hot night.
Why It Works:
Steeping cereal in milk gives the pops a toasted, sweet flavor that feels familiar without needing extra ingredients. Pudding mix thickens the base so it freezes into a smooth pop instead of an icy block.
Key Ingredients:
- 3 cups whole milk
- 2 cups cornflakes or frosted cereal
- 1 box instant vanilla pudding mix, 3.4 ounces
- 1 cup whipped topping
- 1 teaspoon vanilla extract
- Popsicle molds
Quick Steps:
- Soak the cereal in the milk for 15 minutes.
- Strain, pressing lightly to extract the milk.
- Whisk the cereal milk with the pudding mix until thick.
- Fold in the whipped topping and vanilla.
- Pour into molds and freeze for at least 6 hours.
Equipment for This Recipe:
- Saucepan or mixing bowl
- Fine-mesh strainer
- Popsicle molds
- Whisk
How to Serve This Dish:
Run the molds under warm water for a few seconds to release the pops. They’re especially good after dinner when everyone wants something cold but not a giant scoop of ice cream.
Pro Tips for This Recipe:
- Strain well so there are no soggy flakes in the mixture.
- Freeze the molds level or the sticks lean.
- Taste before freezing; some cereals need a little less sugar than others.
Variations on This Dish:
- Chocolate Cereal Pops: Use cocoa cereal and chocolate pudding.
- Strawberry Milk Pops: Blend in a spoonful of strawberry puree.
Common Mistakes to Avoid with This Dish:
- Don’t skip the straining step.
- Don’t use a cereal that turns soggy in a bad way; the flavor should stay pleasant.
26. Salted Pretzel Caramel Bars
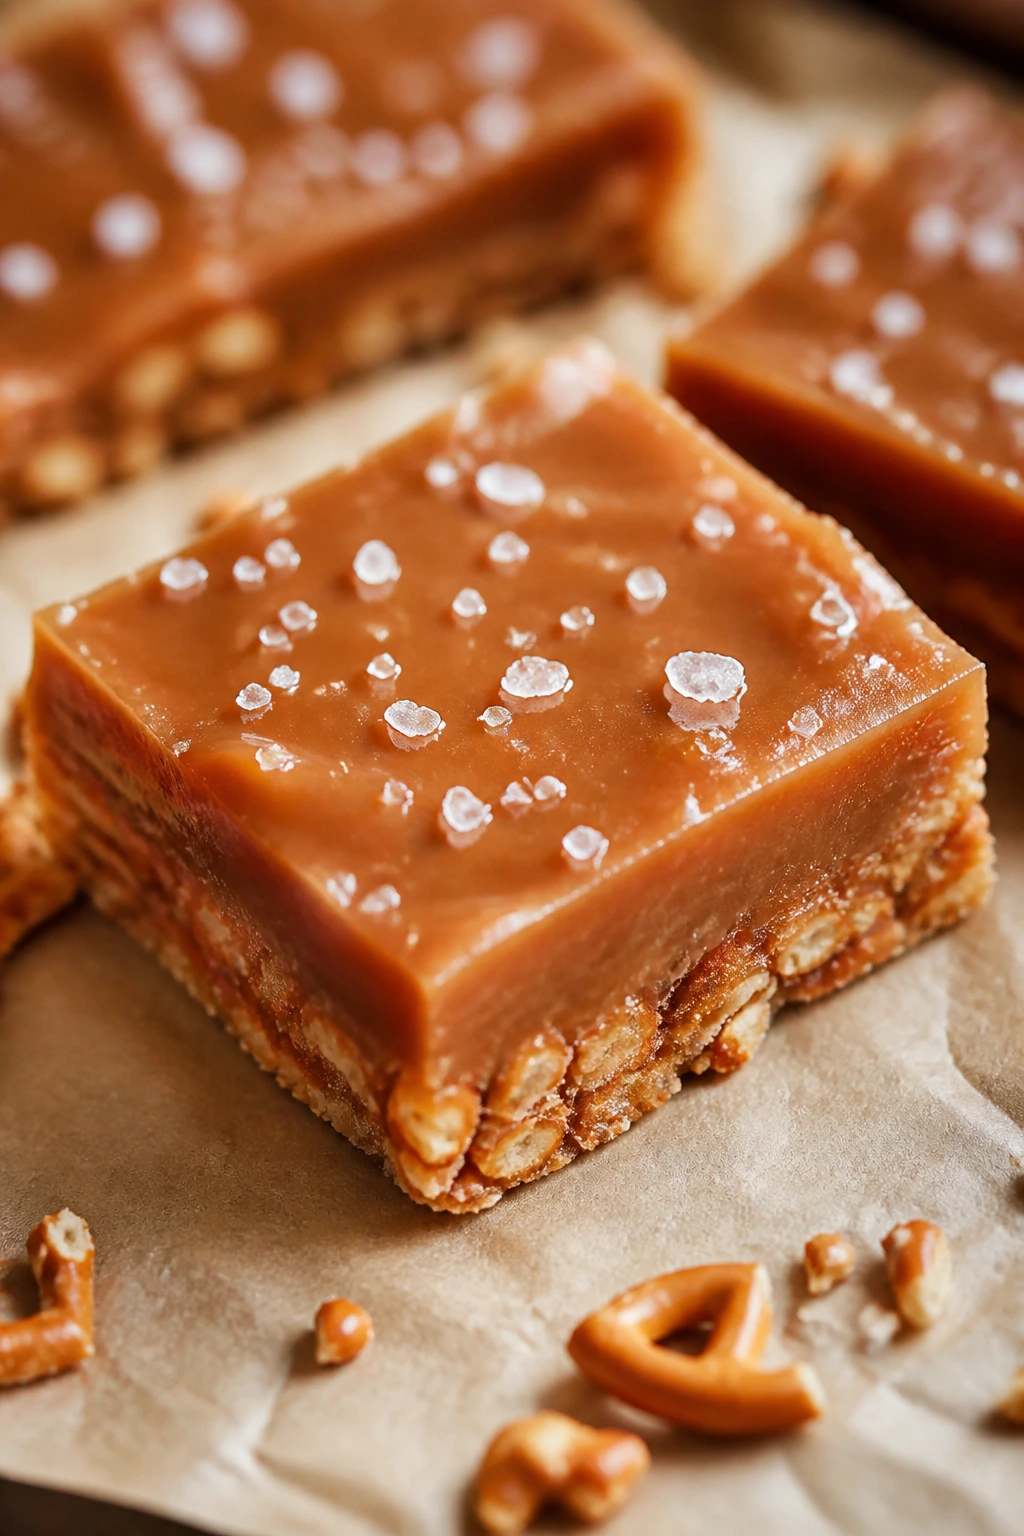
Sweet, salty, chewy, and a little sticky around the edges — these bars are built for people who want dessert to have some crunch. The pretzel base keeps the whole thing from getting too soft, which is useful when the fridge is full and patience is not.
Why It Works:
Pretzels add salt and structure, while caramel and cream cheese create a filling that cuts cleanly after chilling. A quick chocolate drizzle sharpens the sweetness and gives the bars a more finished look.
Key Ingredients:
- 2 cups pretzel crumbs
- 1/2 cup melted butter
- 2 tablespoons sugar
- 8 ounces cream cheese, softened
- 1/2 cup caramel sauce
- 1 cup whipped topping
- 1/2 teaspoon salt
- 1/4 cup melted chocolate, optional
Quick Steps:
- Mix pretzel crumbs, butter, and sugar, then press into a lined 8×8-inch pan.
- Beat the cream cheese until smooth.
- Fold in caramel sauce, whipped topping, and salt.
- Spread over the crust and chill for 2 hours.
- Drizzle with chocolate and cut into bars.
Equipment for This Recipe:
- 8×8-inch pan
- Mixing bowls
- Hand mixer
- Parchment paper
How to Serve This Dish:
Serve cold, cut into small squares because they’re richer than they look. A few extra pretzel crumbs on top help the bars look intentional after slicing.
Pro Tips for This Recipe:
- Crush the pretzels finely so the crust packs well.
- Chill long enough for a clean slice.
- Add the chocolate after the bars are set, not before.
Variations on This Dish:
- Peanut Butter Caramel Bars: Stir peanut butter into the filling.
- Gluten-Free Pretzel Bars: Use gluten-free pretzels.
Common Mistakes to Avoid with This Dish:
- Don’t cut before they’re firm or the filling squishes.
- Don’t use a loose caramel sauce that runs off the sides.
27. Baked Cinnamon Apples with Oat Crumble
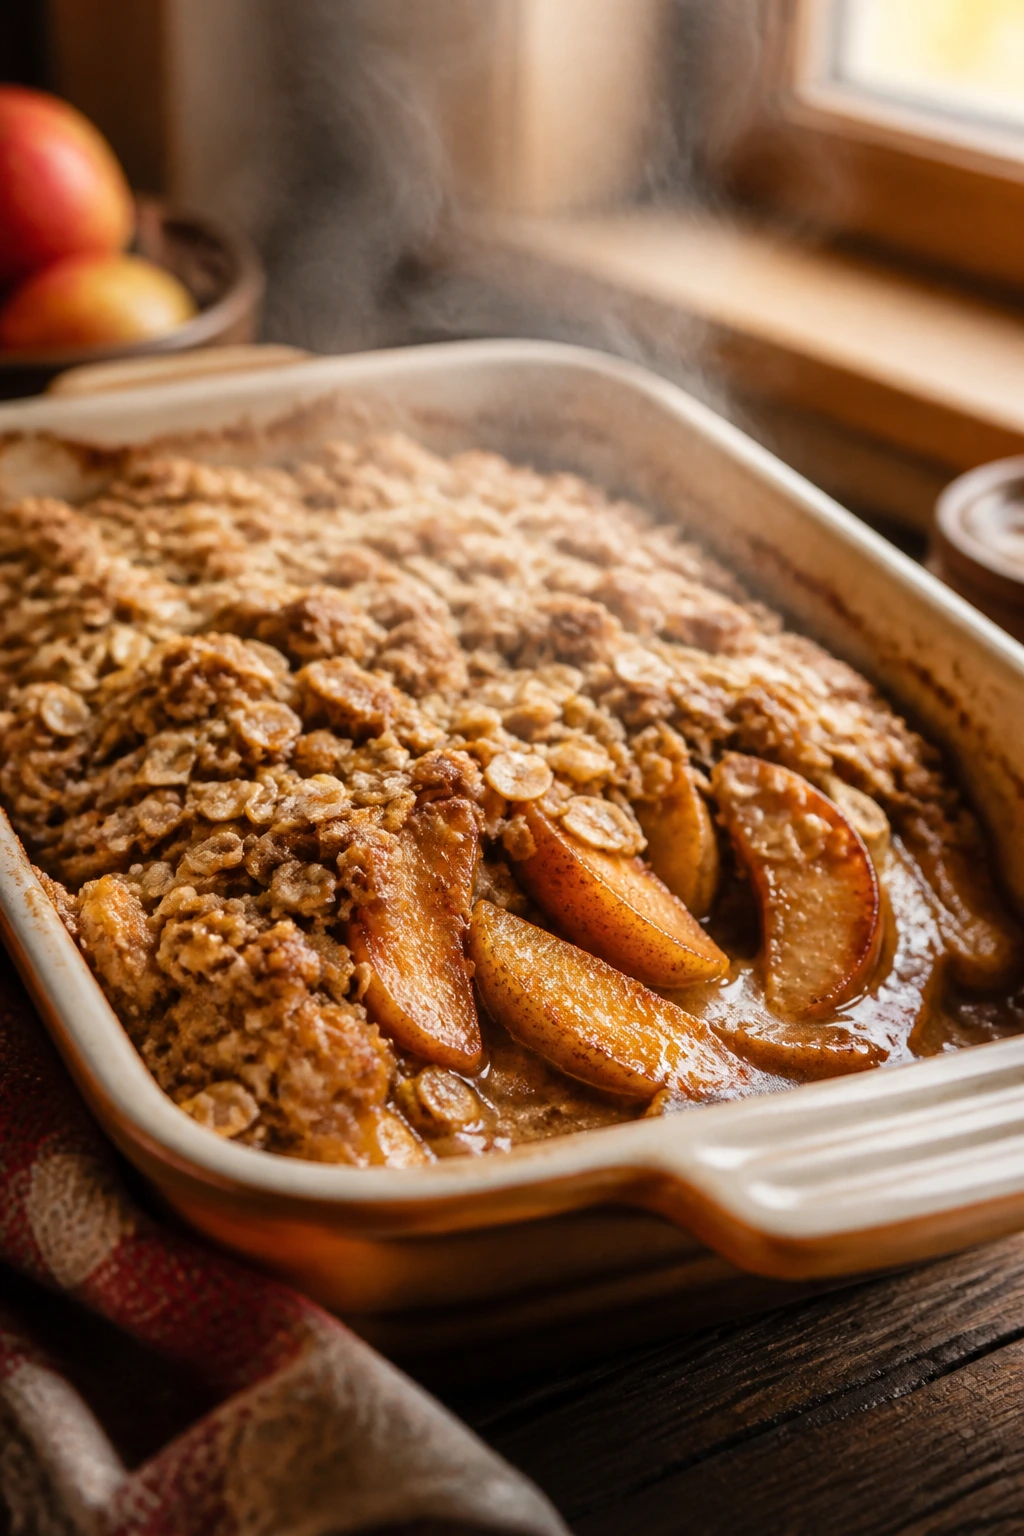
This is the dessert you make when you want the house to smell like you spent more time than you did. Tender apples, cinnamon, butter, and oats give you a warm finish that works when fresh stone fruit starts to fade.
Why It Works:
Baking apples softens them without turning them into applesauce, and the crumb topping protects the fruit from drying out. Cinnamon and brown sugar make the kitchen smell like you meant to do something nice.
Key Ingredients:
- 4 medium apples, cored and sliced or halved
- 2 tablespoons brown sugar
- 1 teaspoon cinnamon
- 1 tablespoon lemon juice
- 1 cup old-fashioned oats
- 1/2 cup all-purpose flour
- 1/3 cup brown sugar
- 1/4 cup cold butter, cubed
- Pinch of salt
Quick Steps:
- Preheat the oven to 375°F.
- Toss the apples with brown sugar, cinnamon, and lemon juice.
- Put them in a baking dish.
- Mix oats, flour, brown sugar, salt, and butter into crumbs.
- Sprinkle over the apples and bake for 30 minutes, until tender.
Equipment for This Recipe:
- Baking dish
- Mixing bowl
- Fork or pastry cutter
- Spoon
How to Serve This Dish:
Serve warm with yogurt or vanilla ice cream. If you want a more breakfast-like version, a spoon of plain yogurt and a few nuts make it feel less like dessert and more like a late snack.
Pro Tips for This Recipe:
- Choose firm apples that hold shape, not mealy ones.
- Cover loosely with foil if the topping browns too quickly.
- Let the apples rest for 5 minutes after baking so the juices settle.
Variations on This Dish:
- Pear Crumble Cups: Swap in pears for a softer filling.
- Maple Pecan Apples: Add chopped pecans and a drizzle of maple syrup.
Common Mistakes to Avoid with This Dish:
- Don’t use soft apples or they collapse into mush.
- Don’t skip lemon juice; it keeps the flavor bright.
28. Mango Coconut Chia Pudding Cups
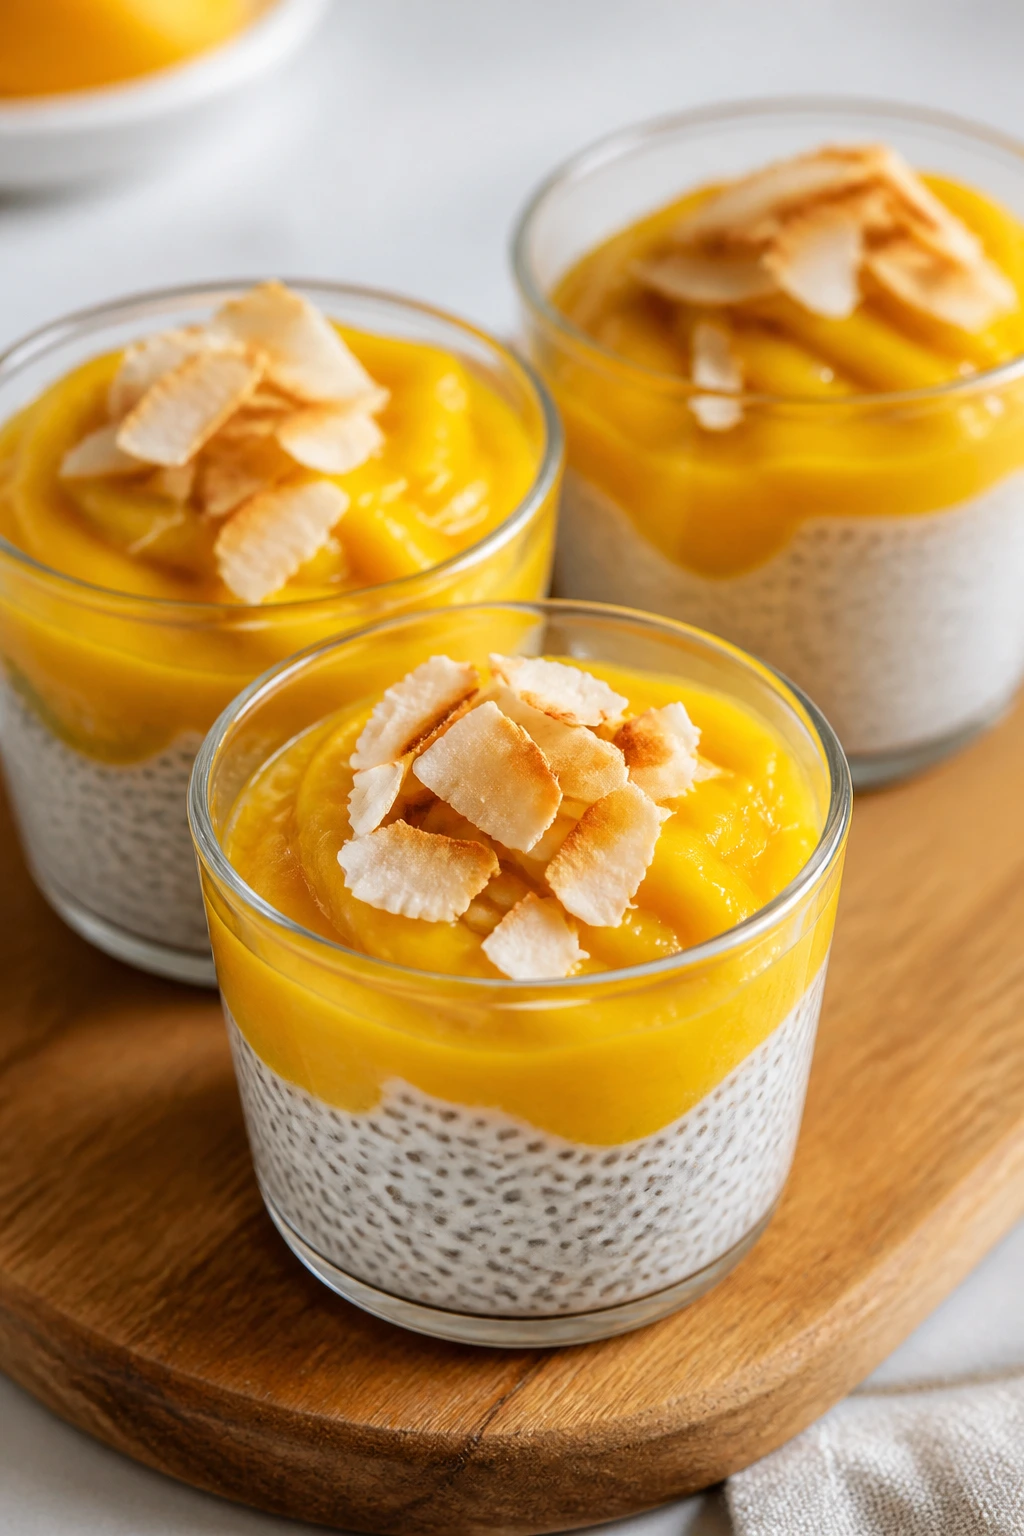
These are cool, creamy, and one of the easiest make-ahead desserts on the list. Chia seeds turn liquid into pudding while mango keeps the flavor sunny and fresh, which is a strong finish for a hot night.
Why It Works:
Chia seeds swell and thicken overnight, so the pudding gets its texture without cooking. Coconut milk adds richness, and mango on top gives a clean, sweet finish that feels lighter than a full custard.
Key Ingredients:
- 1/2 cup chia seeds
- 1 1/2 cups coconut milk
- 1 cup milk or unsweetened almond milk
- 2 tablespoons honey
- 1 teaspoon vanilla extract
- 2 cups mango puree or diced mango
- Toasted coconut, optional
Quick Steps:
- Whisk the chia seeds, coconut milk, milk, honey, and vanilla together.
- Let it sit for 10 minutes, then whisk again to break up clumps.
- Cover and chill for at least 4 hours, or overnight.
- Spoon into cups.
- Top with mango and toasted coconut.
Equipment for This Recipe:
- Mixing bowl
- Whisk
- Jars or small cups
- Spoon
How to Serve This Dish:
Serve them cold from the fridge with a spoonful of mango on top. They’re good for a dessert that has to wait a few hours, which makes them useful on the nights when you know the evening is going to be long.
Pro Tips for This Recipe:
- Whisk twice so the seeds don’t clump at the bottom.
- Use full-fat coconut milk if you want a richer texture.
- Taste after chilling and add a little more honey if the mango is tart.
Variations on This Dish:
- Berry Chia Cups: Swap mango for strawberries and blueberries.
- Chocolate Coconut Cups: Add 1 tablespoon cocoa powder to the base.
Common Mistakes to Avoid with This Dish:
- Don’t skip the second whisk, or the pudding sets unevenly.
- Don’t add too much liquid; chia needs a thick ratio to work well.
Why These Treats Work on a Busy Evening
The strongest recipes in this collection share a useful trait: they finish fast, or they finish themselves. That matters more on a weeknight than any polished dessert technique ever will. A tray of chilled yogurt bark or a bowl of pudding cups takes less active effort than frosting a layer cake, and a skillet crisp gives you a warm finish without asking you to babysit a complicated batter.
Another thing they have in common is a short ingredient list that still feels complete. Fruit, dairy, crumbs, chocolate, oats, and a little honey can do a lot if you use them in the right order. The trick is not chasing novelty. It is knowing when a clean blueberry, a thick peach slice, or a good drizzle of caramel already carries enough flavor to finish the job.
And yes, the texture matters. Kids usually notice crunch, cream, and cold before they notice anything else. That’s why a bark cracks, a parfait layers, a granita flakes, and a hand pie seals shut — each one gives you a clear bite, not just sweetness.
Essential Equipment for the Whole Batch
- Rimmed baking sheets: Best for bark, banana bites, chips, and anything that needs a flat freeze or bake.
- Mixing bowls in 2 sizes: One small bowl and one medium bowl cover most of the no-bake work.
- Hand mixer: Useful for cheesecake cups, pudding-style fillings, whipped cream, and no-churn ice cream.
- Muffin tin: Turns out bars, brownie cups, and frozen yogurt bites with tidy portions.
- 8×8-inch and 9×13-inch pans: Good for bars, crisp layers, and layered chilled desserts.
- Cast-iron or oven-safe skillet: Handy for crisp, s’mores dip, and upside-down cake.
- Parchment paper: Saves you from sticky crusts and frozen slabs that refuse to release.
- Sharp chef’s knife: You’ll use it more than you expect for fruit slicing and clean dessert portions.
- Fine-mesh strainer: Important for granita, fruit puree, and any recipe where you want a smoother finish.
- Freezer-safe jars or small cups: Make the chilled desserts easier to stack, serve, and store.
Smart Shopping and Ingredient Notes
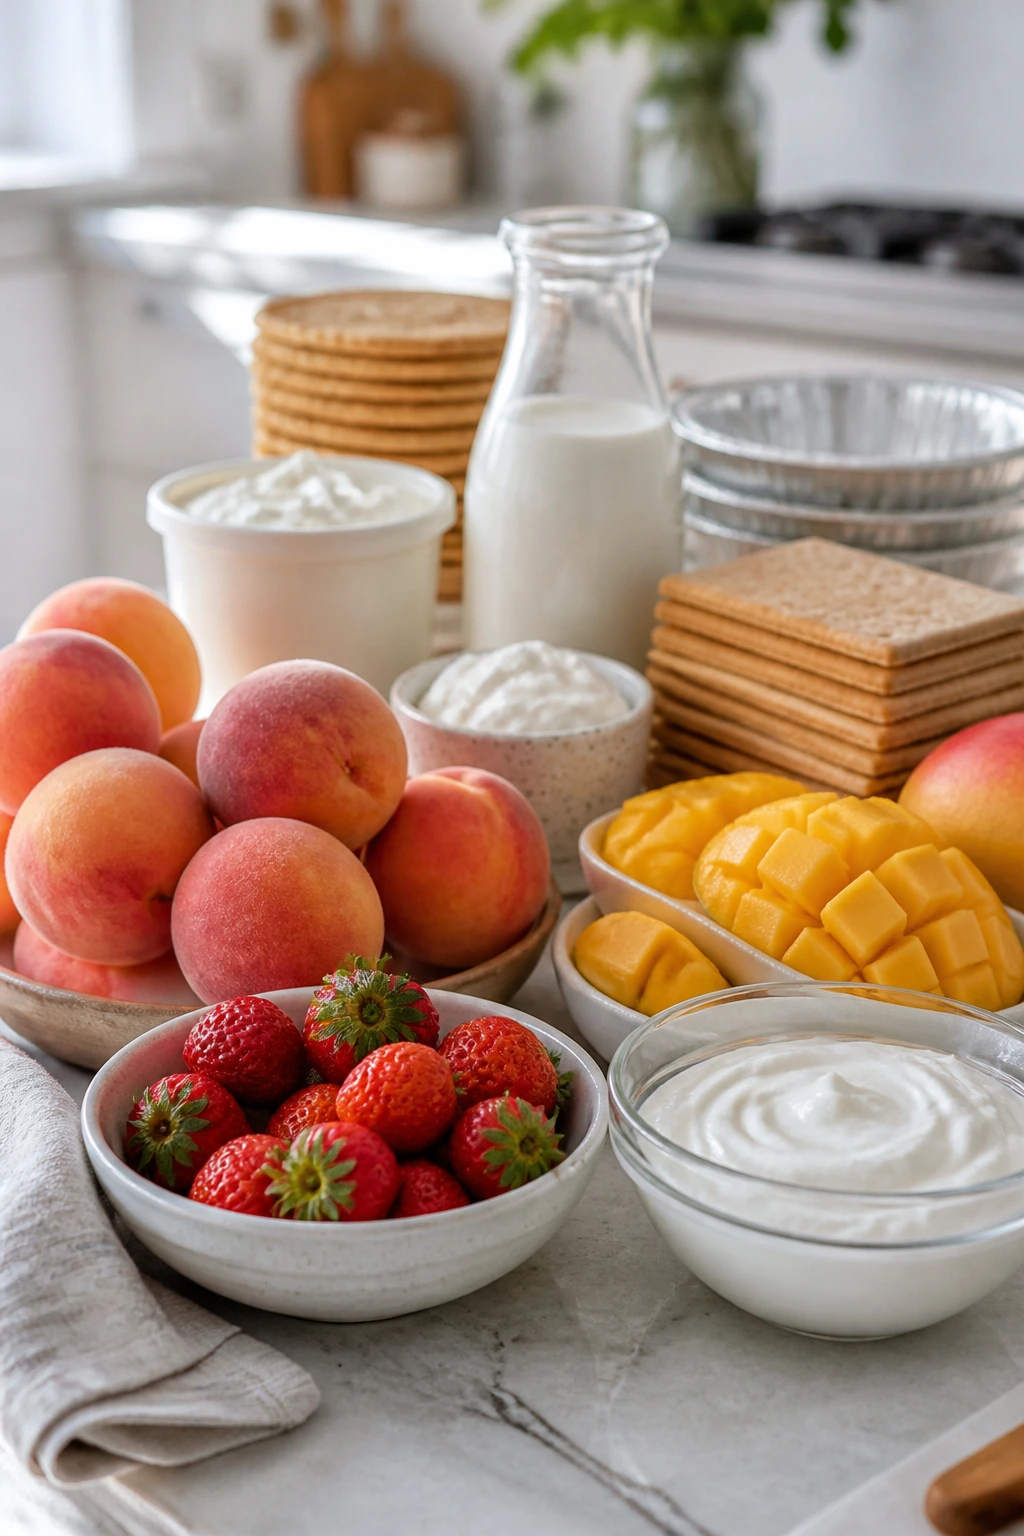
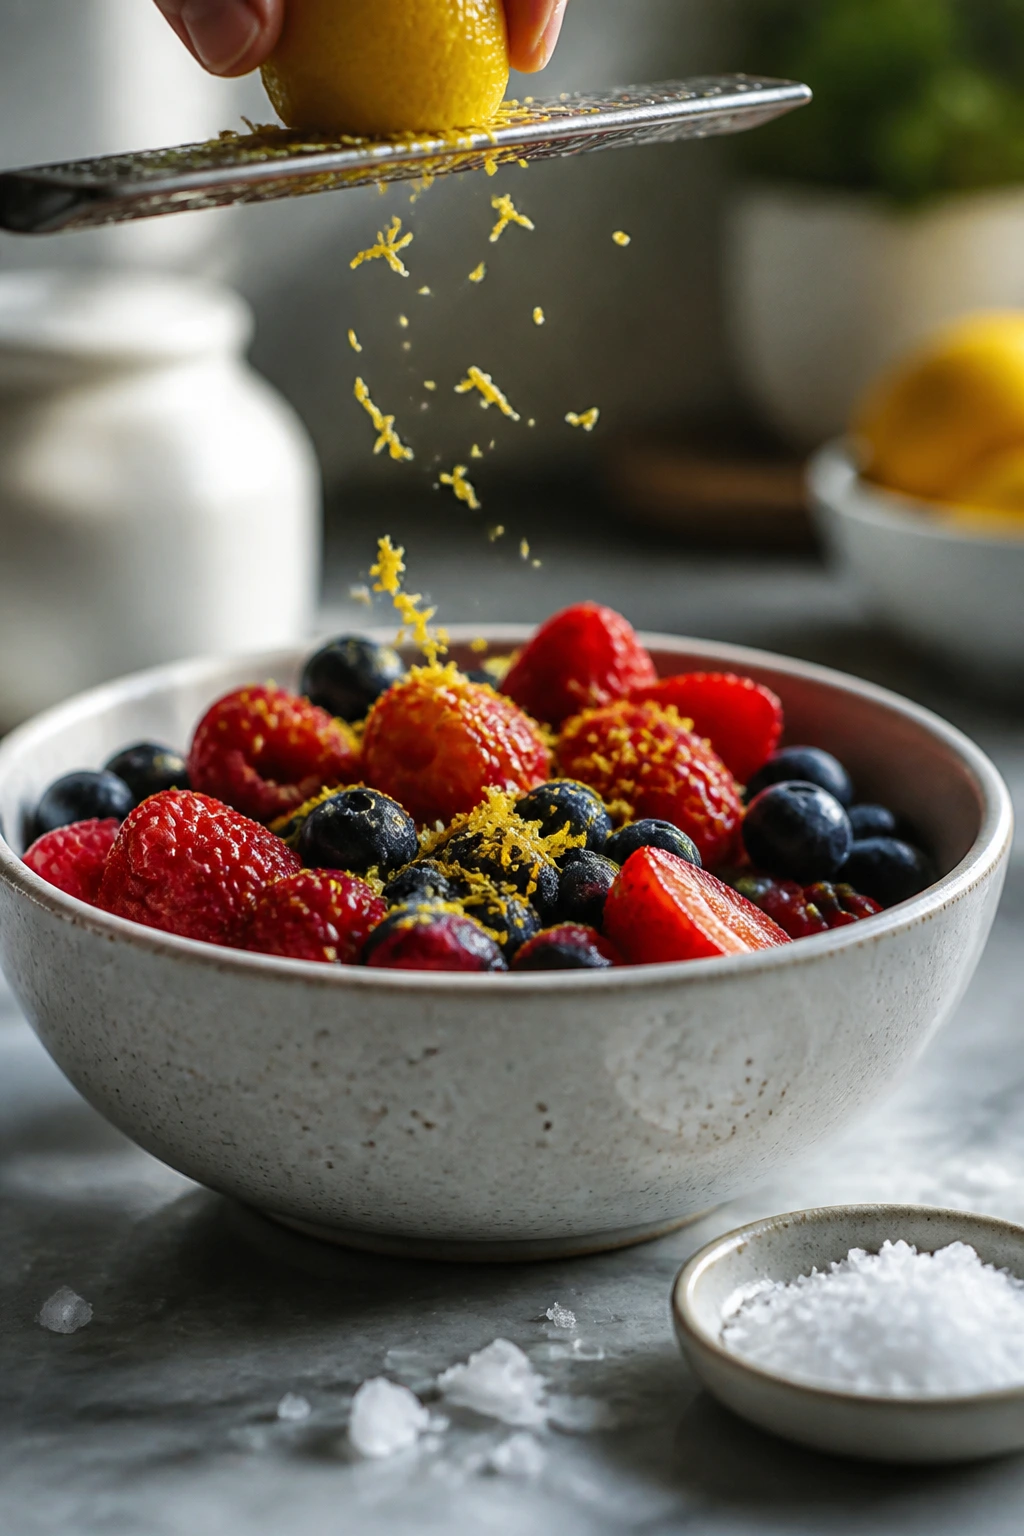
Fruit choices matter more here than in many dessert collections because so many of these recipes lean on fruit for flavor, not just decoration. Pick peaches that smell sweet at the stem, strawberries that look dry and deeply red, and mangoes that give slightly when pressed. If the fruit smells like nothing, it usually tastes like nothing. Watermelon should feel heavy for its size, and pineapple should look bright without having a mushy base.
For dairy, full-fat usually wins. Greek yogurt freezes more smoothly than low-fat yogurt, cream cheese blends better when it softens fully, and heavy cream whips into a stable texture that holds in no-churn ice cream. The lighter versions can work in a pinch, but they often make frozen desserts icy or loose.
Store-bought shortcuts are welcome here, and I would not pretend otherwise. Boxed cake mix, refrigerated pie crust, whipped topping, graham crackers, and instant pudding all earn their keep on busy nights. Use the shortcut that saves time where you actually need it, not the one that creates more steps than it removes. If a recipe already has fruit prep and a topping to manage, a store-bought crust is the sensible move.
For chocolate and caramel, buy what melts smoothly. Chips labeled for melting or baking are safer than bargain chocolate that seizes if you stare at it wrong. And if you’re shopping for granola, cereal, or pretzels, read the label for nut cross-contact if that matters in your house.
How to Serve Them Without Making More Work
Presentation:
Keep serving simple and clean. Clear cups make parfaits, pudding, and chia desserts look layered without extra garnish. Wide platters help with watermelon pizza, fruit nachos, and shortcake cups, while chilled bowls make frozen desserts feel more deliberate than a scoop straight from the container.
Accompaniments:
A small bowl of vanilla ice cream turns crisps, hand pies, and warm skillet cakes into a full dessert without needing another recipe. Fresh berries, mint leaves, and a dusting of powdered sugar go far when you want the plate to look finished. For the colder recipes, a few graham crackers or pretzel sticks on the side make dipping easier.
Portions:
Most of these recipes serve 4 to 6 in modest portions, though bark, pudding cups, and granita can stretch farther if you keep the scoops small. Fruit-based desserts are easiest to scale up, while cream cheese and whipped desserts should be doubled carefully so they still set correctly. If you have mixed ages at the table, cut the richer desserts smaller and let the fruit-based ones carry the rest.
Beverage Pairing:
Cold milk works with the chocolate and cookie desserts, while sparkling lemonade or iced tea fits the fruit-forward recipes better. If you want one drink that can sit beside almost all of these, a lightly sweet lemonade with lots of ice does the job without arguing with the flavors.
Extra Tricks for Better Flavor and Faster Assembly
Flavor Enhancement:
A little citrus zest changes more than people expect. Lemon zest on berry desserts, lime zest on mango, and orange zest on chocolate all keep the sweetness from going flat. A pinch of flaky salt on chocolate bark, caramel bars, or peanut butter dip also sharpens the flavor in a way kids usually like even if they cannot name it.
Customization:
Freeze-dried strawberries are useful when fresh berries are too juicy for topping. Toasted coconut helps anything with mango or pineapple. If you need a nut-free house, sunflower seed butter steps in for peanut butter without ruining the texture. Gluten-free graham crumbs, oats, and pretzels all work here if you choose certified versions.
Serving Suggestions:
Keep a few simple garnishes on hand: mint, sprinkles, extra crumbs, and a handful of sliced fruit. That small finish makes even a five-minute dessert look deliberate. A tiny drizzle of honey or caramel in a zigzag is enough. No need to cover the whole thing.
Make-It-Yours:
For dairy-free versions, coconut yogurt, coconut milk, and dairy-free whipped topping can replace the creamy parts in several recipes. For lower-sugar versions, lean harder on ripe fruit and cut back the drizzle. The desserts still work because the fruit and texture are doing the real job.
Make-Ahead, Storage, and Reheating Guidance
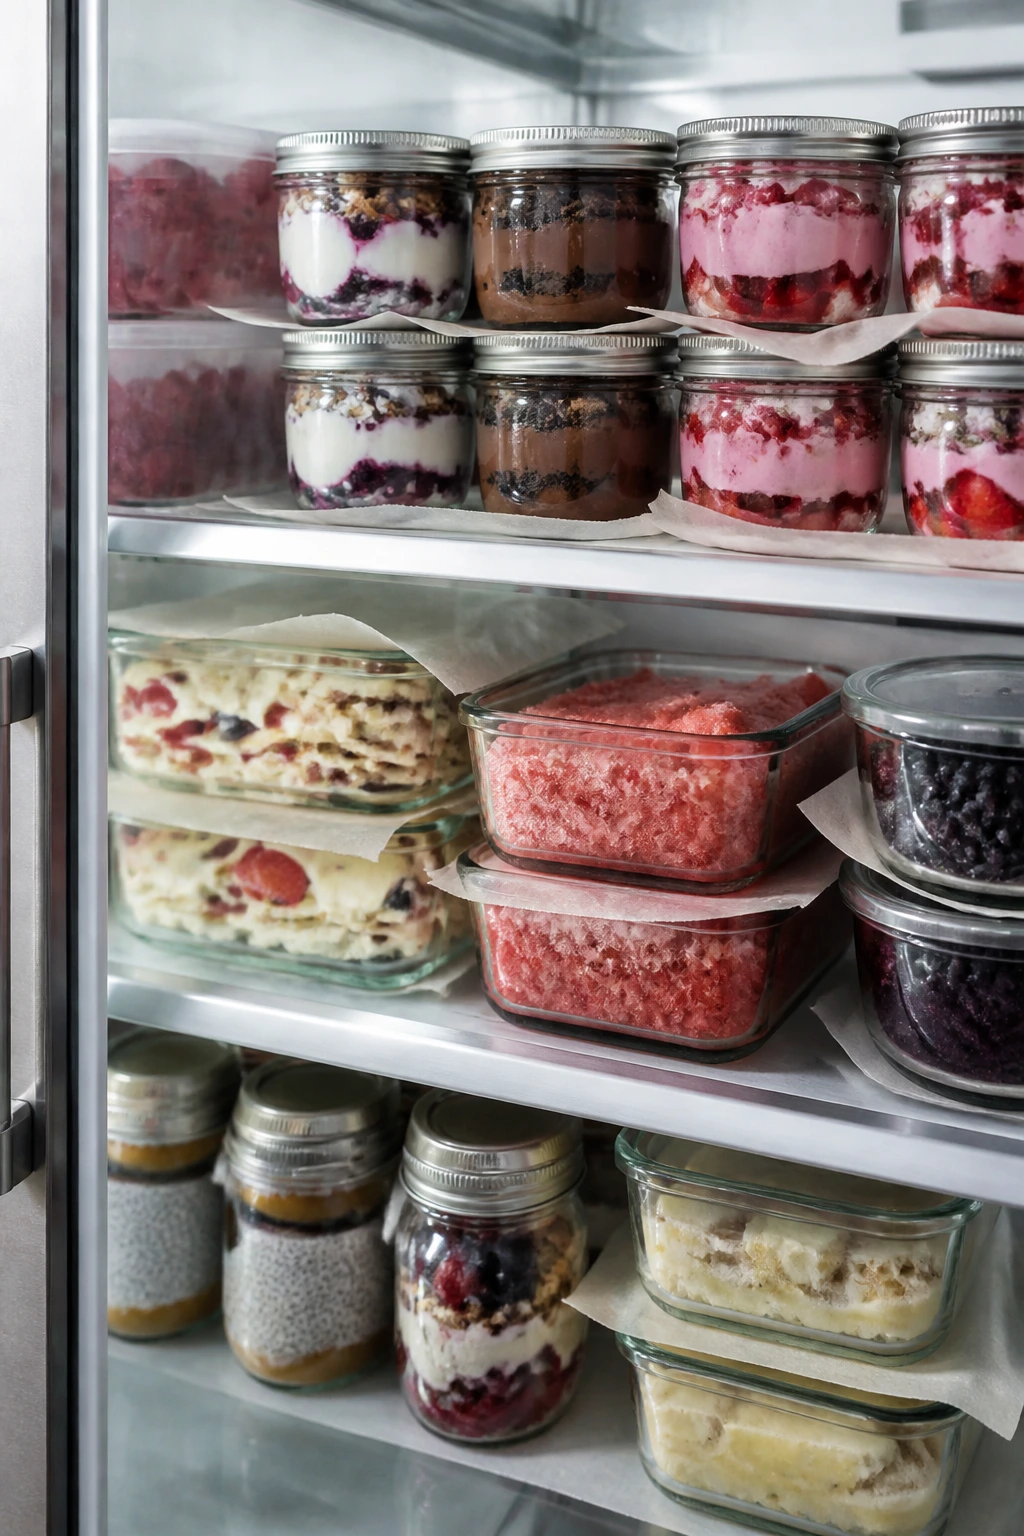
The chilled desserts are the easiest to plan ahead. Yogurt bark, popsicles, frozen banana bites, granita, no-churn ice cream, pudding cups, and chia pudding all benefit from a few hours in the fridge or freezer before serving. Most of them hold well for 1 to 2 weeks in the freezer if you seal them in airtight containers with parchment between layers. Yogurt bark and banana bites are best within 1 week, because freezer air starts to dull the fruit flavor after that.
Bars, hand pies, and crisps keep differently. Fruit bars, pretzel bars, and cheesecake jars stay good for 3 to 4 days in the refrigerator. Peach crisp and baked apples are best within 2 days, though they reheat well in a 325°F oven for about 10 to 12 minutes, loosely covered with foil if the topping is already dark. Hand pies can sit at room temperature for a day, then move to the fridge for another 2 days if you need them to last.
Some desserts should not be reheated at all. Watermelon pizza, fruit nachos, parfaits, and chocolate-dipped banana bites lose their texture if you try to warm them back up. For those, the trick is to assemble late and store the parts separately. Keep fruit dry, toppings sealed, and anything creamy in a chilled container until the last minute.
If you want to save time, make the bases ahead. Bake the crisp topping, cookie shells, brownie cups, or crusts earlier in the day, then finish with fruit, cream, or ice cream later. That way the only thing left after dinner is the fun part.
Easy Swaps and Adaptations to Try
Dairy-Free Summer Swap:
Use coconut yogurt, dairy-free whipped topping, and coconut milk in the frozen desserts, bark, and pudding-style cups. Coconut cream gives a richer result than thin oat milk, so if you want a creamy mouthfeel, choose the thick stuff.
Nut-Free School-Safe Version:
Swap peanut butter for sunflower seed butter, skip chopped nuts, and lean on granola, coconut, or seeds for crunch. Check cereal, pretzels, and chocolate labels if you need the whole batch to stay safe for school or camp.
Gluten-Free Crumb Route:
Use certified gluten-free oats, gluten-free graham crackers, and gluten-free pretzels in the crisp bars, yogurt cups, and pretzel desserts. The texture changes a little, but the desserts still hold together if you keep the crumbs fine and the butter ratio the same.
Lower-Sugar Finish:
Cut the added sugar in fruit desserts by a third and lean on ripe fruit, vanilla, and citrus zest. The easiest place to trim is the drizzle, not the fruit itself. Skip the extra chocolate chips if the dessert already has caramel or whipped topping.
Extra-Fruit Summer Twist:
If you have peaches, blackberries, cherries, apricots, or nectarines, swap them into the bars, crisps, pies, and parfaits without much trouble. Keep an eye on juicy fruit, though. A tablespoon of cornstarch is cheap insurance when the filling needs to slice cleanly.
Common Mistakes to Avoid When Making These Treats
The first mistake is using fruit that is too wet or too ripe for the job. Soggy berries make bark icy, overripe bananas split on the skewer, and watery peaches turn crisps into soup. Pat fruit dry, choose fruit with some structure, and add the juiciest pieces right before serving when you can.
Another problem is not chilling long enough. Cheesecake cups, pudding desserts, granita, chia pudding, and bars all need time to set, and people get impatient right before the dessert is about to work. If a chilled recipe says 1 hour, it usually means 1 hour and 10 minutes in a warm kitchen. Don’t rush the set or you end up with a soft slump that never quite becomes dessert.
Watch the heat on baked desserts. Marshmallows burn fast under a broiler, scones toughen if they get overmixed, and crisp toppings can cross from golden to bitter in one minute if your oven runs hot. Use the timer. Better yet, check early and often.
Low-fat dairy is another weak spot. It can make frozen treats icy and no-churn ice cream less smooth. If you want a creamy result, use full-fat yogurt, heavy cream, or cream cheese where the recipe asks for it. That’s not indulgence for its own sake; it’s texture.
The last mistake is assembling too far ahead. Anything with crisp fruit, toasted topping, or a cookie base can soften faster than expected once it sits under cream or syrup. Build the dessert close to serving time, and it will look and taste like you planned it that way.
Common Questions
Which of these desserts can I make the night before?
The best make-ahead options are pudding cups, cheesecake jars, chia pudding, no-churn ice cream, hand pies, crisp bars, and granita. Anything with a crisp shell or fresh fruit topping is safest when assembled a few hours ahead rather than the night before.
What should I make if I do not want to turn on the oven?
Start with yogurt bark, watermelon pizza, pudding cups, banana bites, fruit nachos, granita, or chia pudding. Those give you plenty of variety without adding heat to the kitchen.
Can I use frozen fruit instead of fresh fruit?
Yes, but thaw it and drain it first for most of these recipes. Frozen berries and mango are excellent in bars, pudding layers, granita, and popsicles, while watery thawed fruit is a bad fit for watermelon pizza, fruit nachos, and shortcake parfaits.
How do I keep bananas and apples from browning?
For bananas, work quickly and chill the dessert as soon as possible. For apples, a little lemon juice goes a long way, and it helps to slice them close to serving time. If you need more time, keep the fruit submerged in lightly salted water for a minute, then pat it dry before using.
Which desserts are easiest for kids to help make?
Fruit skewers, bark, pudding cups, parfaits, fruit pizzas, and apple nachos are all good jobs for small hands. Let kids sprinkle, layer, and drizzle. Anything involving a broiler, hot caramel, or sharp knives should stay in adult hands.
How can I make these desserts dairy-free?
Use coconut yogurt, coconut milk, dairy-free whipped topping, and dairy-free chocolate in the no-bake and frozen recipes. For baked desserts, fruit crisps and hand pies are the easiest to adapt because they don’t depend on cream or cheese.
What if my bark or frozen treats turn out too icy?
That usually means the base was too lean or the fruit added too much water. Next time, use full-fat yogurt, coconut milk, or a richer base, and dry the fruit before topping. A thinner layer also freezes more smoothly than a thick slab.
Can I scale these recipes for a party?
Yes, but double the chilled desserts with care so they still fit in the pan or mold you’re using. Bars, crisps, fruit pizzas, and skewers scale easily. Pudding cups, granita, and popsicles are better made in batches so they freeze evenly.
A Sweet Finish Without the Fuss

The nicest thing about these desserts is that they leave room in the evening. No one needs to stand over a stove for half an hour, and no one needs to remember a frosting technique from a birthday party long ago. A bowl of fruit, a sheet pan, a freezer, and a little timing can cover almost every kind of summer craving that shows up after dinner.
Pick one recipe that matches your energy, not your ambition. If the kitchen is already hot, go cold. If the fruit is gorgeous and the oven is manageable for 20 minutes, bake the crisp or the hand pies and enjoy the smell while it lasts. The point is to end the night with something sweet on the table and the rest of the dishes still looking survivable.