
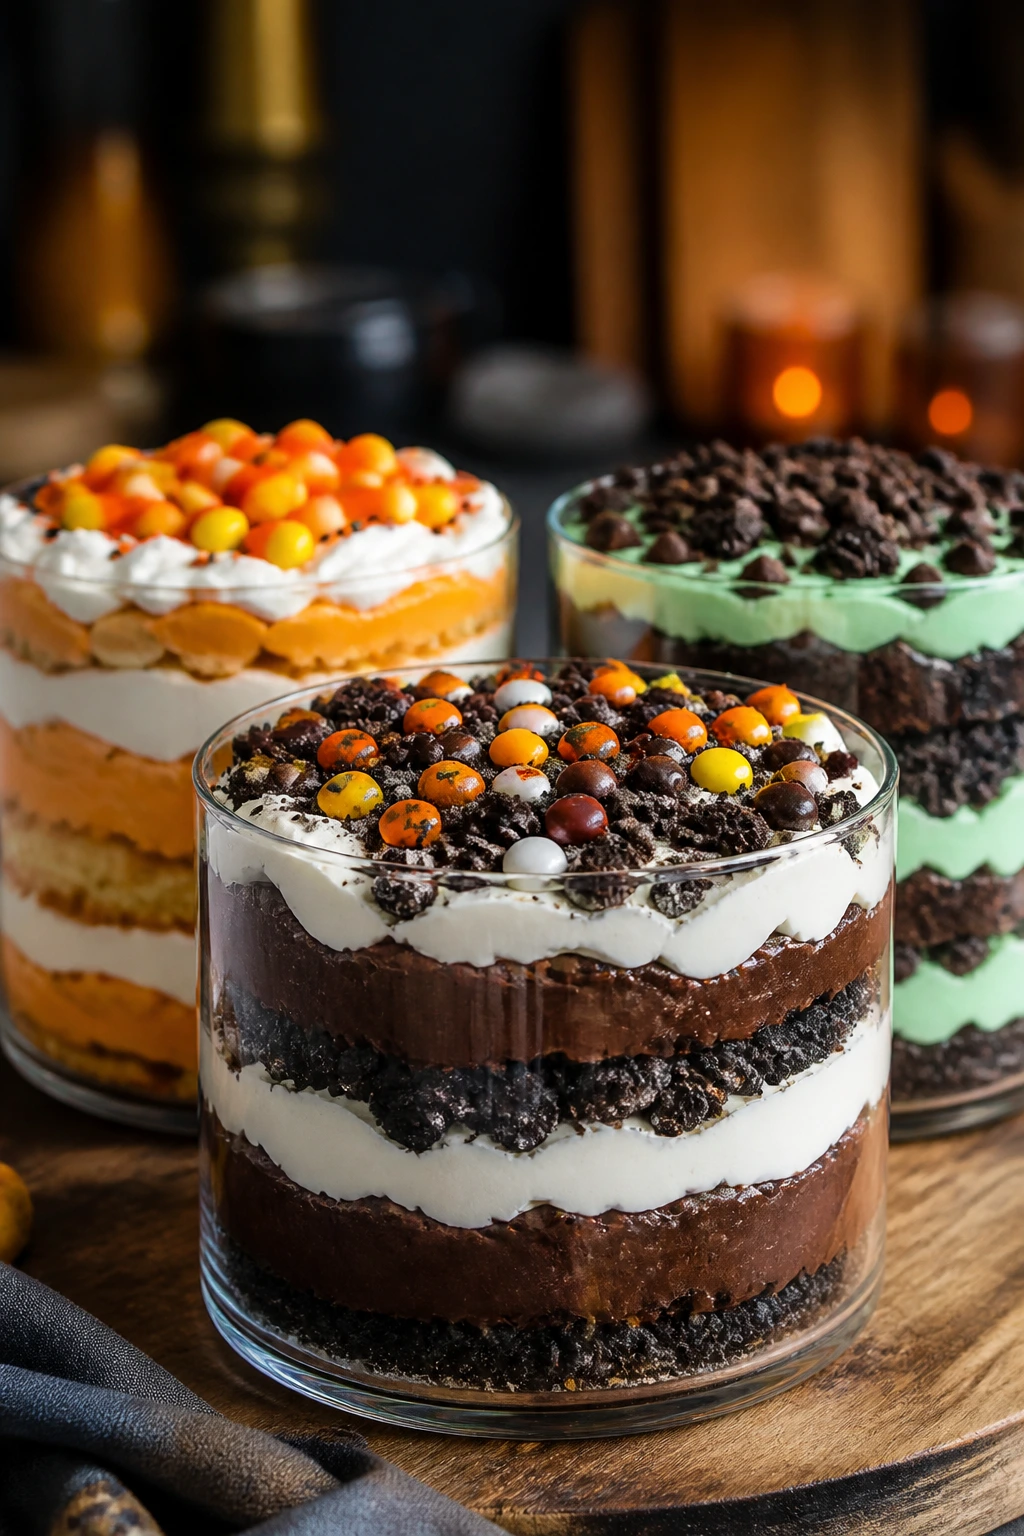
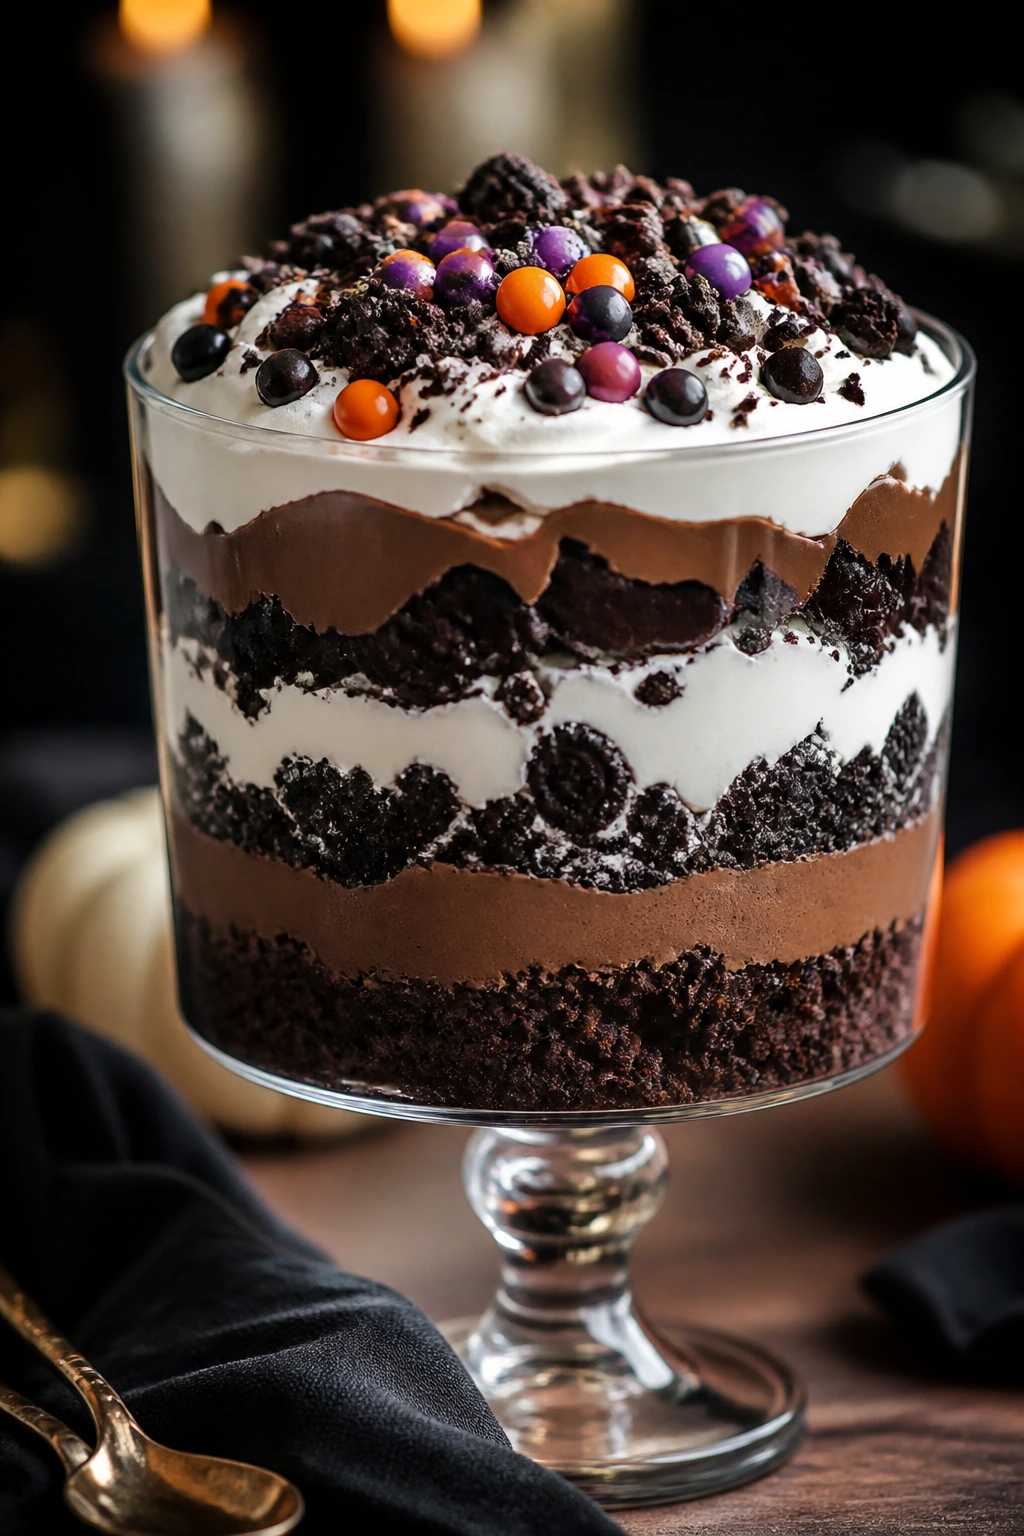
A Halloween trifle is the kind of dessert that looks like you spent an hour fussing over it, when the real work was mostly opening packages and stacking them neatly. That’s exactly why Halloween trifle desserts fit busy nights so well: they bring the layered drama, the creamy spoonfuls, the cookie crunch, and the candy-on-top energy without asking you to bake three separate components from scratch.
There’s a reason trifles keep showing up in my own dessert rotation when the calendar gets crowded and the inbox is rude. A good trifle gives you contrast in every bite — soft cake, cold pudding, a little chew from fruit or candy, and one sharp crunch right at the top. Done right, the spoon sinks through clean layers instead of collapsing into mush. Done wrong, it turns into sweet soup with a few crumbs floating around. We’re avoiding the soup version.
The best part is how forgiving this style is. If the cake is bakery-bought, fine. If the pudding comes from a box, also fine. If your “decorations” are a pile of gummy worms and a handful of cookie tombstones, honestly, that is exactly the point. The trick is choosing combinations that hold their shape, chill well, and taste even better after twenty minutes in the fridge.
Why You’ll Love This Collection
-
Mostly low-effort assembly: A lot of these recipes lean on boxed pudding, bakery cake, or pre-baked brownies, so the heavy lifting is already done before you start layering.
-
Easy to scale up or down: A big trifle bowl feeds a crowd, while small jars or cups make the same idea work for two, four, or one determined person with a spoon.
-
Built for make-ahead: The flavors settle down nicely after a chill, which means you can prep components earlier and finish the dessert when you have a spare ten minutes.
-
Halloween decorations do the job: Candy eyes, cookie “tombstones,” Oreo “dirt,” and orange whipped cream turn basic dessert layers into something that feels festive without needing pastry skills.
-
Flexible with pantry staples: Chocolate cake, vanilla pudding, cookies, whipped topping, canned pie filling, and leftover brownies carry a lot of these recipes without requiring a special shopping trip.
-
Friendly to picky eaters: Each trifle can be adjusted for fruit lovers, chocolate people, peanut butter people, or the person who only eats dessert if there’s enough frosting.
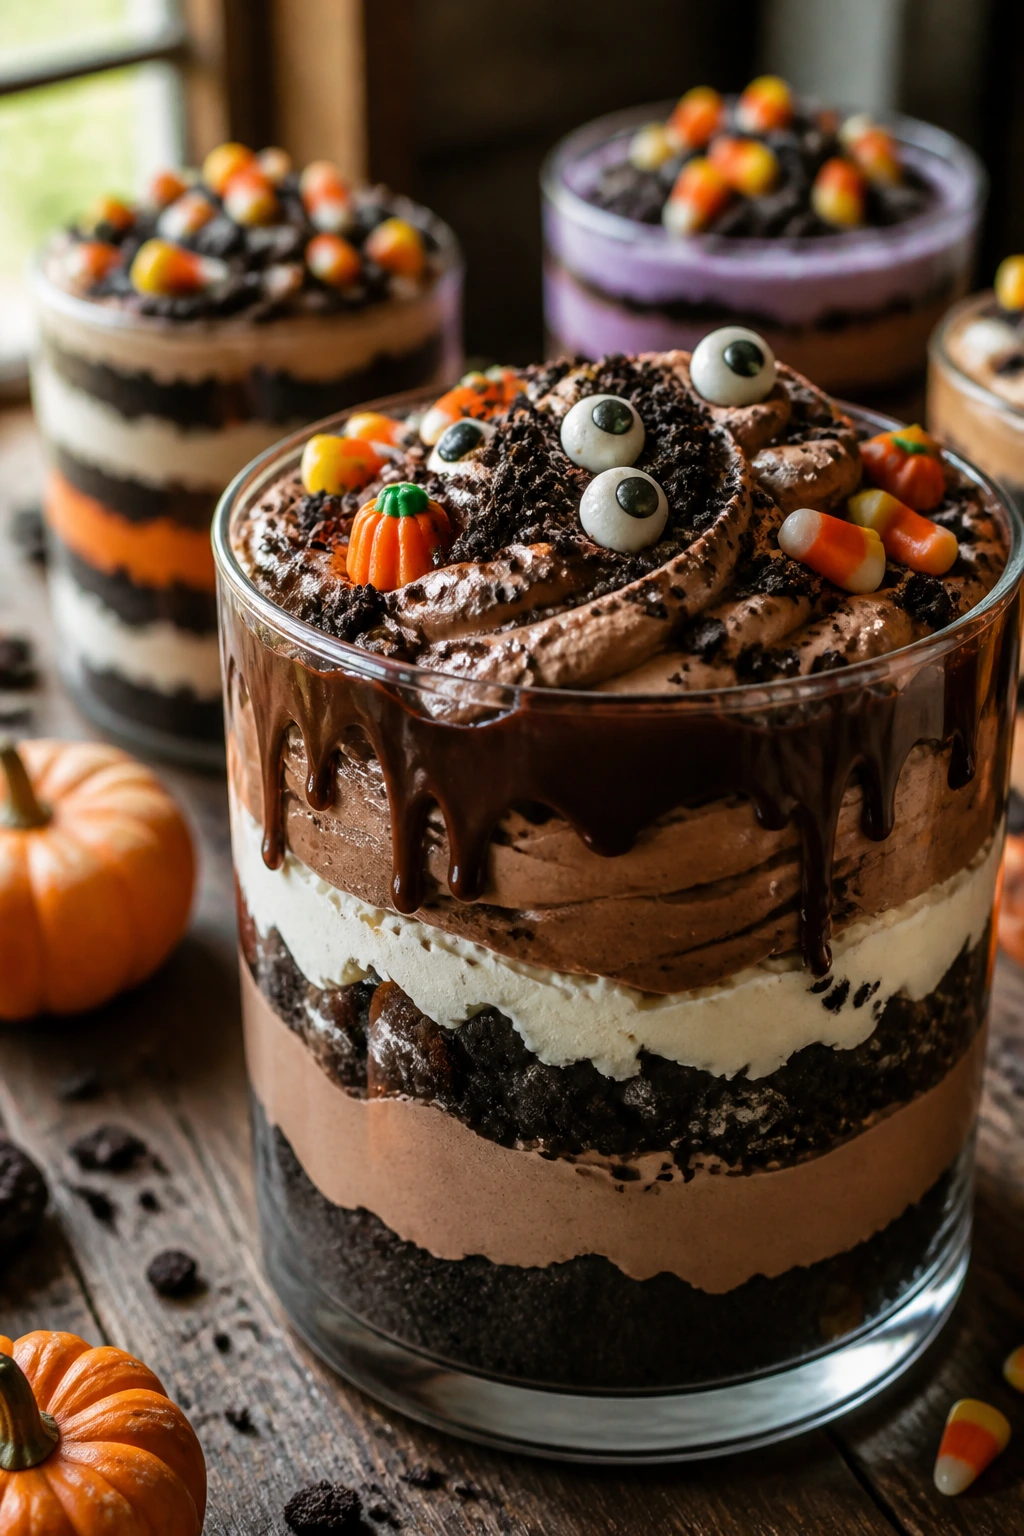
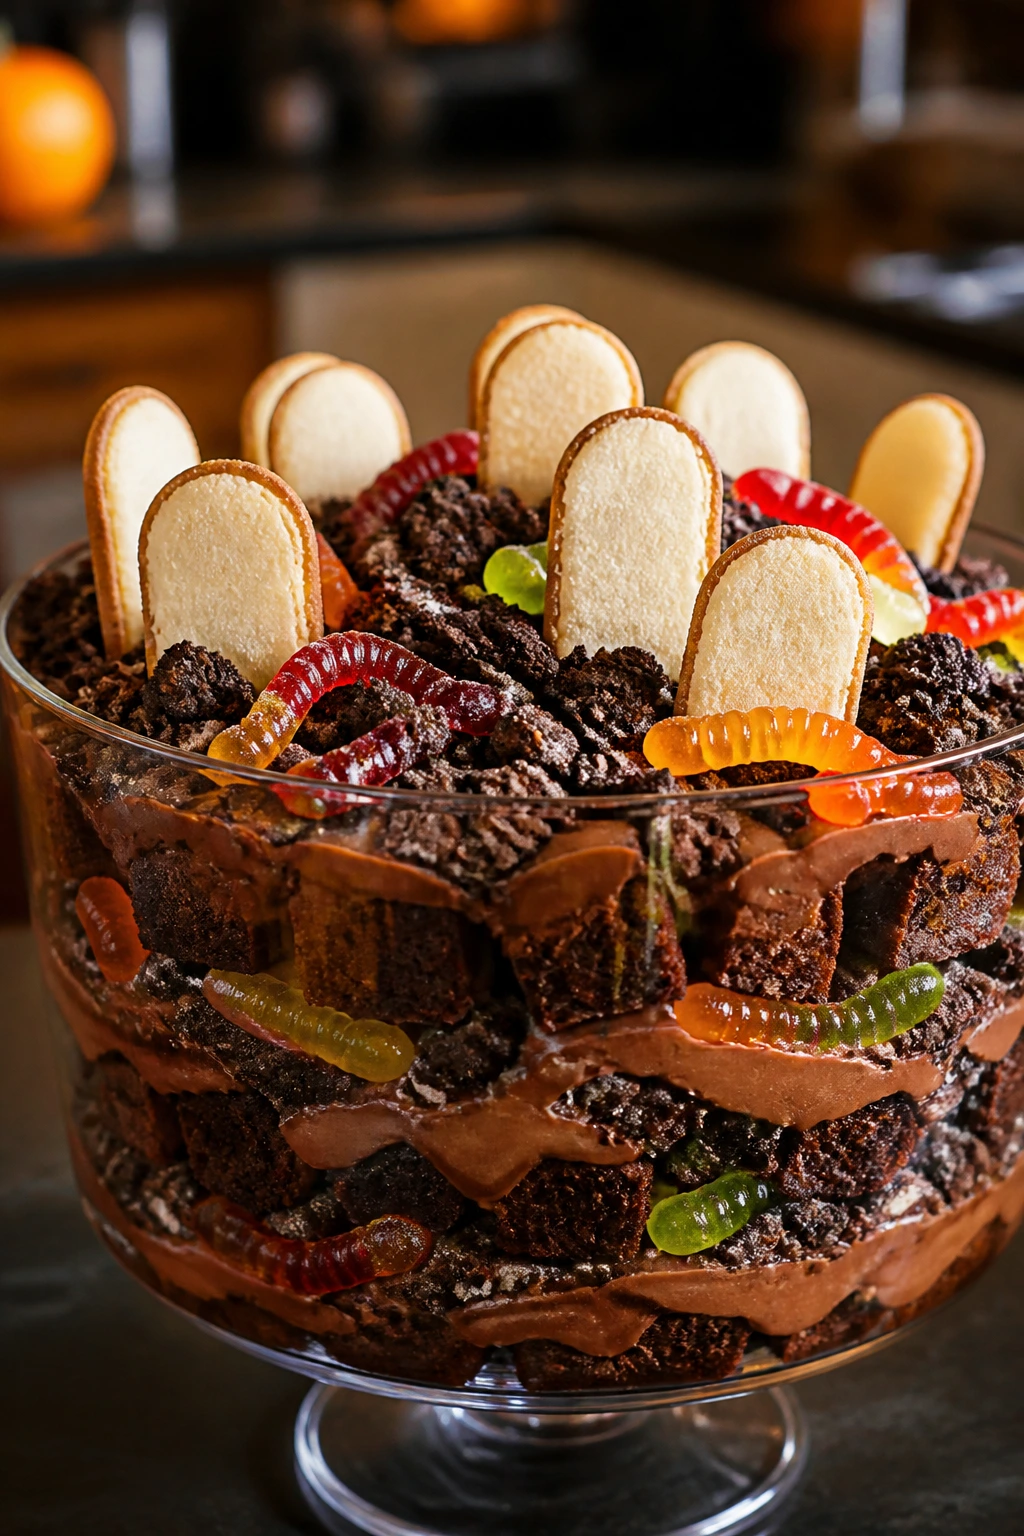
1. Chocolate Graveyard Oreo Trifle
A graveyard trifle should look a little messy. That’s part of the charm. Dark cake, glossy pudding, crushed Oreos, and a few cookie tombstones leaning at odd angles create the right kind of spooky, especially when the top gets a few gummy worms snaking through the “dirt.”
Why It Works: Chocolate-on-chocolate-on-chocolate sounds heavy, but the whipped topping and crushed cookies keep the texture moving. The pudding settles into the cake cubes instead of sliding off them, and the Oreo crumbs give the whole thing that fake-dirt look people love at Halloween. It chills fast and slices into neat spoonfuls if you give it at least 30 minutes in the fridge.
Key Ingredients:
- 1 baked 9×13-inch chocolate cake, cooled and cut into 1-inch cubes
- 2 (3.4-ounce) boxes instant chocolate pudding mix
- 3 cups cold whole milk
- 1 (8-ounce) tub whipped topping, thawed
- 20 Oreo cookies, crushed
- 12 gummy worms
- 6 Milano cookies or shortbread cookies, decorated with black icing as tombstones
Quick Steps:
- Whisk the pudding mix with the cold milk for about 2 minutes, until thick and glossy.
- Fold 1 cup of whipped topping into the pudding for a softer filling.
- Layer half the cake cubes in a trifle bowl, then half the pudding, then half the crushed Oreos.
- Repeat with the remaining cake, pudding, and cookie crumbs.
- Spread the rest of the whipped topping on top, then add the tombstone cookies and gummy worms.
- Chill for at least 30 minutes so the layers stop sliding around.
Equipment for This Recipe:
- Large trifle bowl or deep glass mixing bowl
- Medium mixing bowl
- Whisk
- Offset spatula or spoon
How to Serve This Dish: Spoon it into clear dessert cups or serve straight from the bowl with a wide serving spoon so the layers stay visible. A cold glass of milk is the right drink here, not coffee, unless you want the whole thing to feel more like an after-dinner rescue mission.
Pro Tips for This Recipe:
- Use a fully cooled cake. Warm cake melts the pudding at the edges.
- Crush the Oreos coarsely, not into dust. You want crunch.
- Pipe or dollop the whipped topping in peaks if you want the top to look like a little haunted hill.
Variations on This Dish:
- Mint Graveyard: Swap in mint chocolate cake and add a few crushed mint sandwich cookies for a colder, sharper flavor.
- Peanut Butter Cemetery: Add 1/2 cup peanut butter to the pudding layer and top with chopped peanut butter cups.
Common Mistakes to Avoid with This Dish:
- Don’t assemble it too far ahead if you want crunchy cookies on top. The Oreo crumbs soften after a few hours.
- Don’t skip the chill time. The first spoonful needs a little structure or the whole bowl slumps.
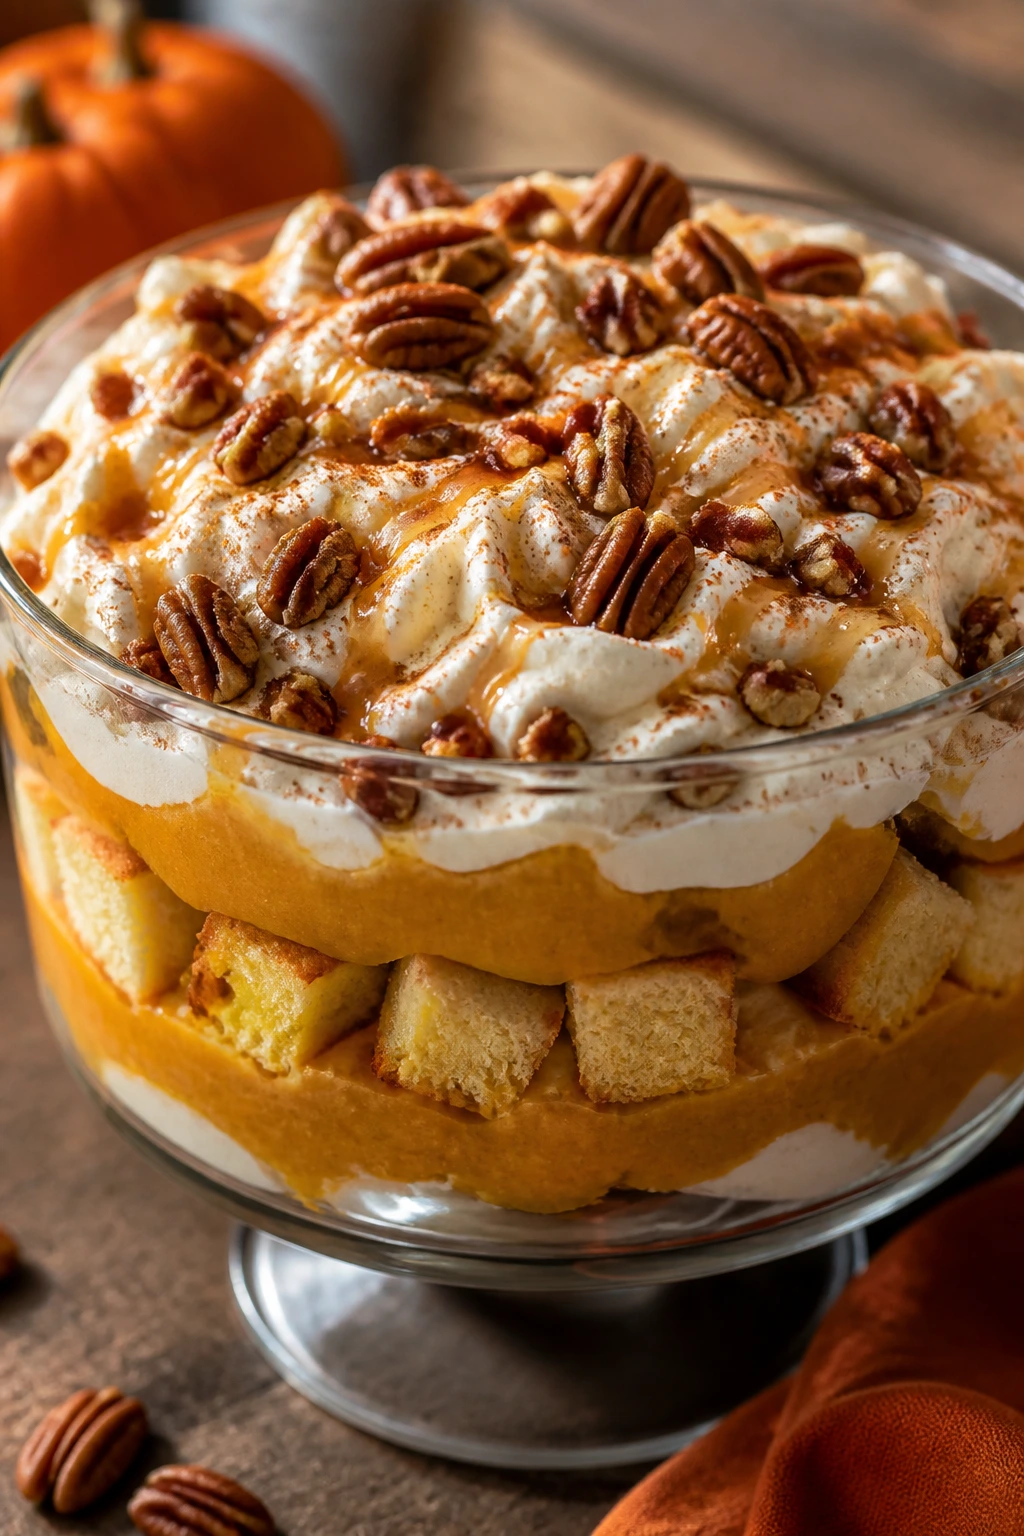
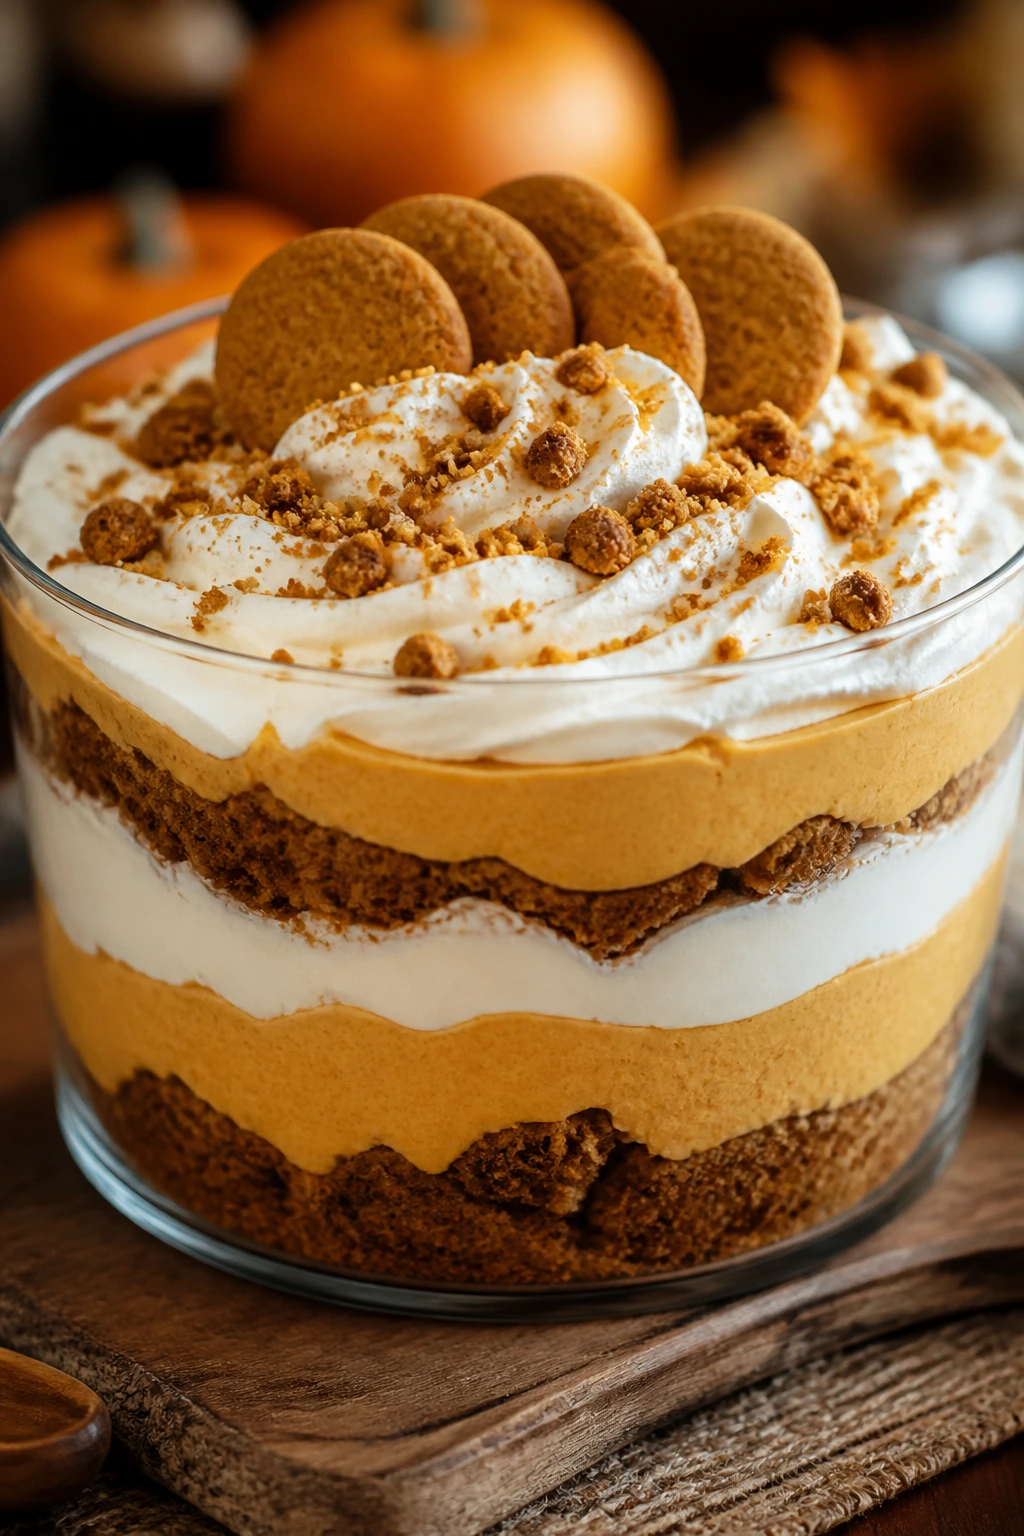
2. Pumpkin Cheesecake Trifle
Pumpkin and cream cheese belong together in a way that never feels fussy. Here, the spice cake and the velvety filling give you the flavor of pumpkin pie without the work of crust crimping or blind baking, which is a trade I’m happy to make on a weeknight.
Why It Works: Pumpkin filling gets heavier if you overdo it, so folding it into cream cheese and whipped topping keeps the texture light enough for layering. Gingersnaps add a dry, snappy contrast, and that little bit of spice at the edges makes the pumpkin taste fuller. It’s the sort of trifle that tastes better after a short chill because the spice softens and the layers settle.
Key Ingredients:
- 1 spice cake mix, baked in a 9×13-inch pan and cooled
- 8 ounces cream cheese, softened
- 1 cup pumpkin purée
- 1/2 cup powdered sugar
- 1 teaspoon pumpkin pie spice
- 2 cups whipped topping
- 18 gingersnap cookies, lightly crushed
- 1/2 cup chopped pecans, toasted
Quick Steps:
- Beat the cream cheese, pumpkin purée, powdered sugar, and pumpkin pie spice until smooth.
- Fold in 1 cup of whipped topping to lighten the filling.
- Layer half the spice cake cubes in a dish, then half the pumpkin mixture, then a handful of gingersnaps.
- Repeat with the remaining cake and filling.
- Top with the rest of the whipped topping, pecans, and the remaining crushed cookies.
- Chill 30 to 45 minutes before serving.
Equipment for This Recipe:
- Mixing bowl
- Hand mixer
- Trifle bowl or 8-cup glass bowl
- Rubber spatula
How to Serve This Dish: Serve chilled with a small spoon so each scoop gets cake, filling, and cookie crumbs. A mug of black tea or spiced cider plays nicely with the pumpkin without making the dessert feel heavier.
Pro Tips for This Recipe:
- Soften the cream cheese fully or you’ll get little white lumps that never quite blend out.
- Toast the pecans in a dry skillet for 4 to 5 minutes; raw pecans taste flat here.
- Keep the gingersnaps off the very bottom if you’re making it ahead, since they soften fastest.
Variations on This Dish:
- Maple Pumpkin Layer: Add 2 tablespoons maple syrup to the filling for a deeper, rounder sweetness.
- No-Cake Version: Swap the spice cake for vanilla wafers and make a lighter, pudding-style trifle.
Common Mistakes to Avoid with This Dish:
- Don’t add extra pumpkin purée just to boost the color. Too much makes the filling loose.
- Don’t use pumpkin pie filling instead of purée unless you cut the sugar back.
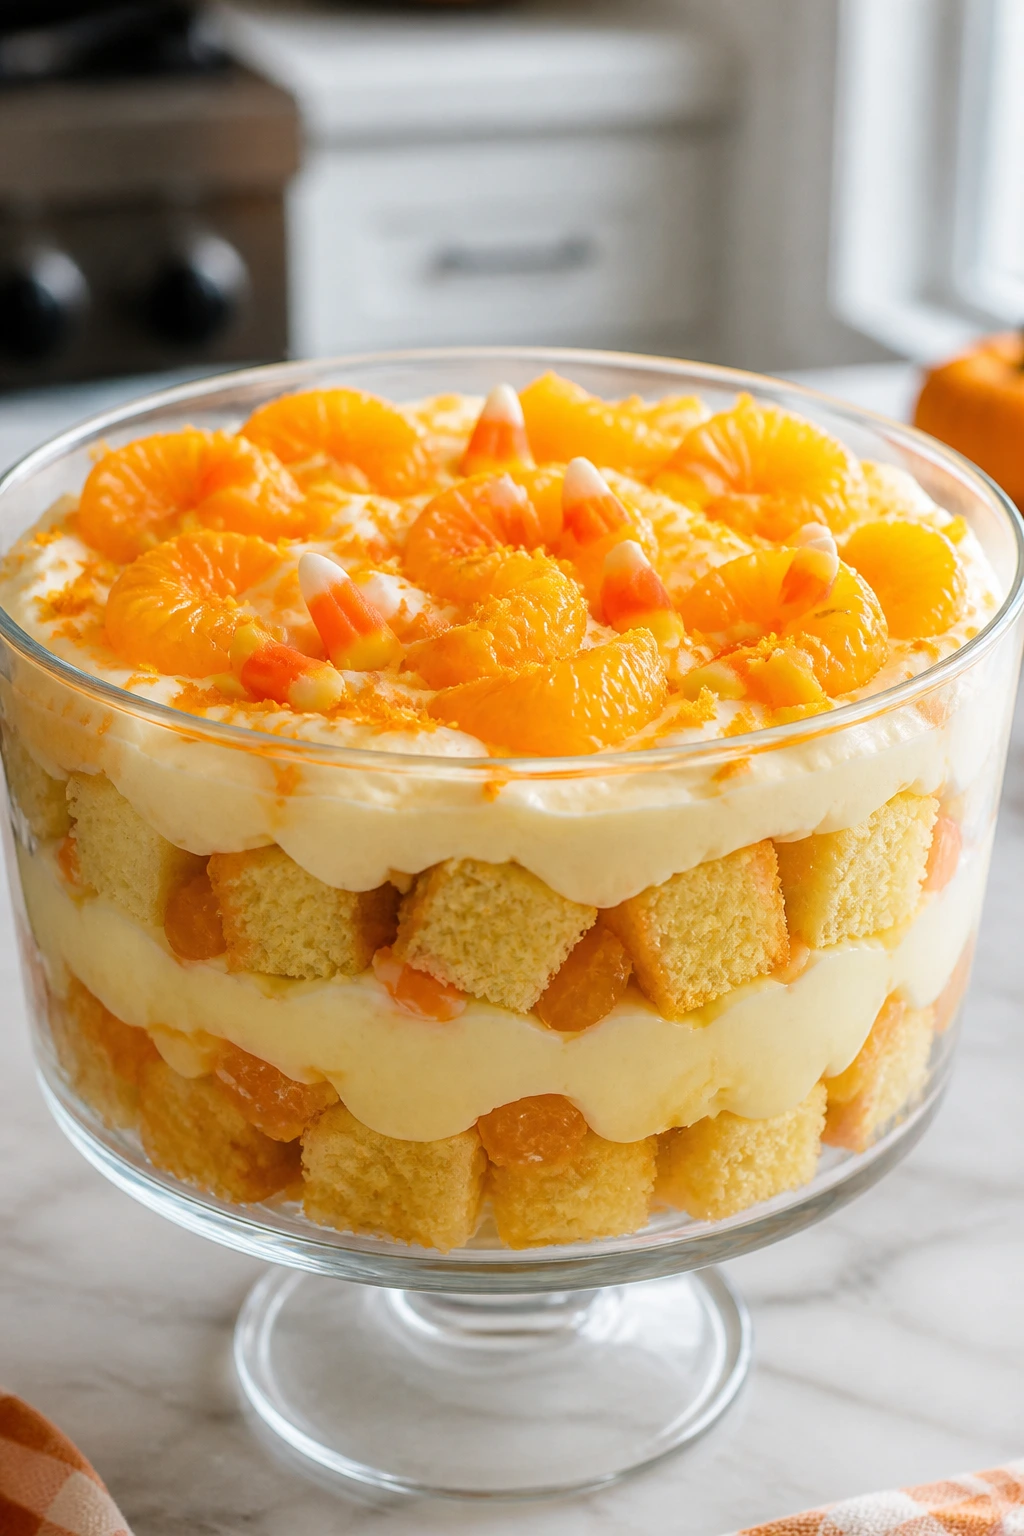
3. Candy Corn Vanilla Trifle
Candy corn is divisive in candy bowls, but layered into a trifle it makes perfect visual sense. The stripes of yellow cake, pale vanilla cream, and orange-tinted topping give you the candy-corn effect without forcing anyone to chew on a whole handful of waxy sweets.
Why It Works: This one depends on color and contrast more than drama in the flavor. Vanilla pudding keeps the layers clean and soft, orange zest gives the top a little lift, and the mandarin oranges bring a bright, juicy bite that cuts through the sweetness. It’s friendly for kids, but the citrus keeps adults from getting bored halfway through.
Key Ingredients:
- 1 vanilla or yellow cake, baked and cut into cubes
- 2 (3.4-ounce) boxes instant vanilla pudding mix
- 3 cups cold milk
- 1 (8-ounce) tub whipped topping
- 1 cup mandarin oranges, drained well
- 1/2 cup orange candy melts, melted for drizzling
- 1 cup candy corn
- 1 teaspoon orange zest
Quick Steps:
- Whisk the pudding mix and milk for 2 minutes until thick.
- Fold half the whipped topping and the orange zest into the pudding.
- Layer cake cubes, pudding, and mandarin oranges in a clear bowl.
- Repeat the layers and smooth the rest of the whipped topping over the top.
- Drizzle with melted candy melts and scatter candy corn around the edge.
- Chill for 20 to 30 minutes.
Equipment for This Recipe:
- Trifle bowl or clear casserole dish
- Whisk
- Measuring cups
- Zester or microplane
How to Serve This Dish: Use clear cups if you want the color layers to show more sharply. I like this with cold milk or sparkling apple cider, which keeps the dessert feeling light instead of sticky.
Pro Tips for This Recipe:
- Drain the mandarins well and pat them dry. Extra juice makes the bottom layer slippery.
- Add the candy corn right before serving if you want it firm.
- A little orange zest goes a long way; too much makes the vanilla taste sharp.
Variations on This Dish:
- Creamsicle Candy Corn: Swap half the vanilla pudding for orange pudding.
- Berry Candy Corn: Add a thin ribbon of strawberry jam between layers for a red, white, and orange look.
Common Mistakes to Avoid with This Dish:
- Don’t pile in wet fruit without draining it. The bowl will look cloudy fast.
- Don’t leave candy corn buried in the filling if you want the decoration to stay obvious.
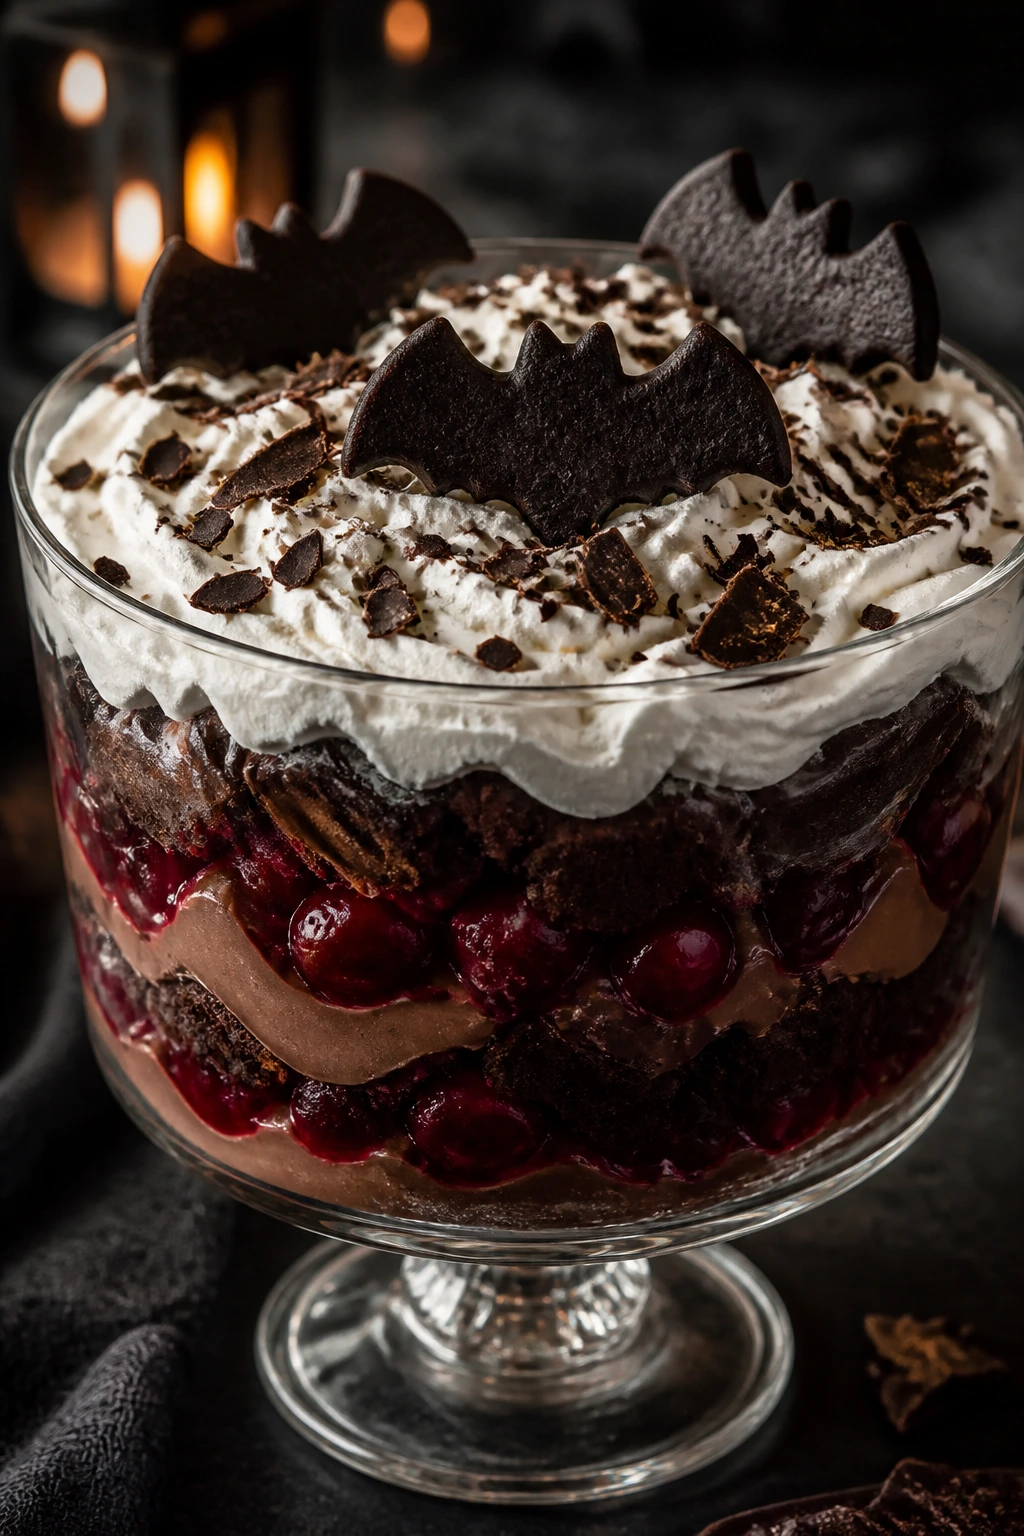
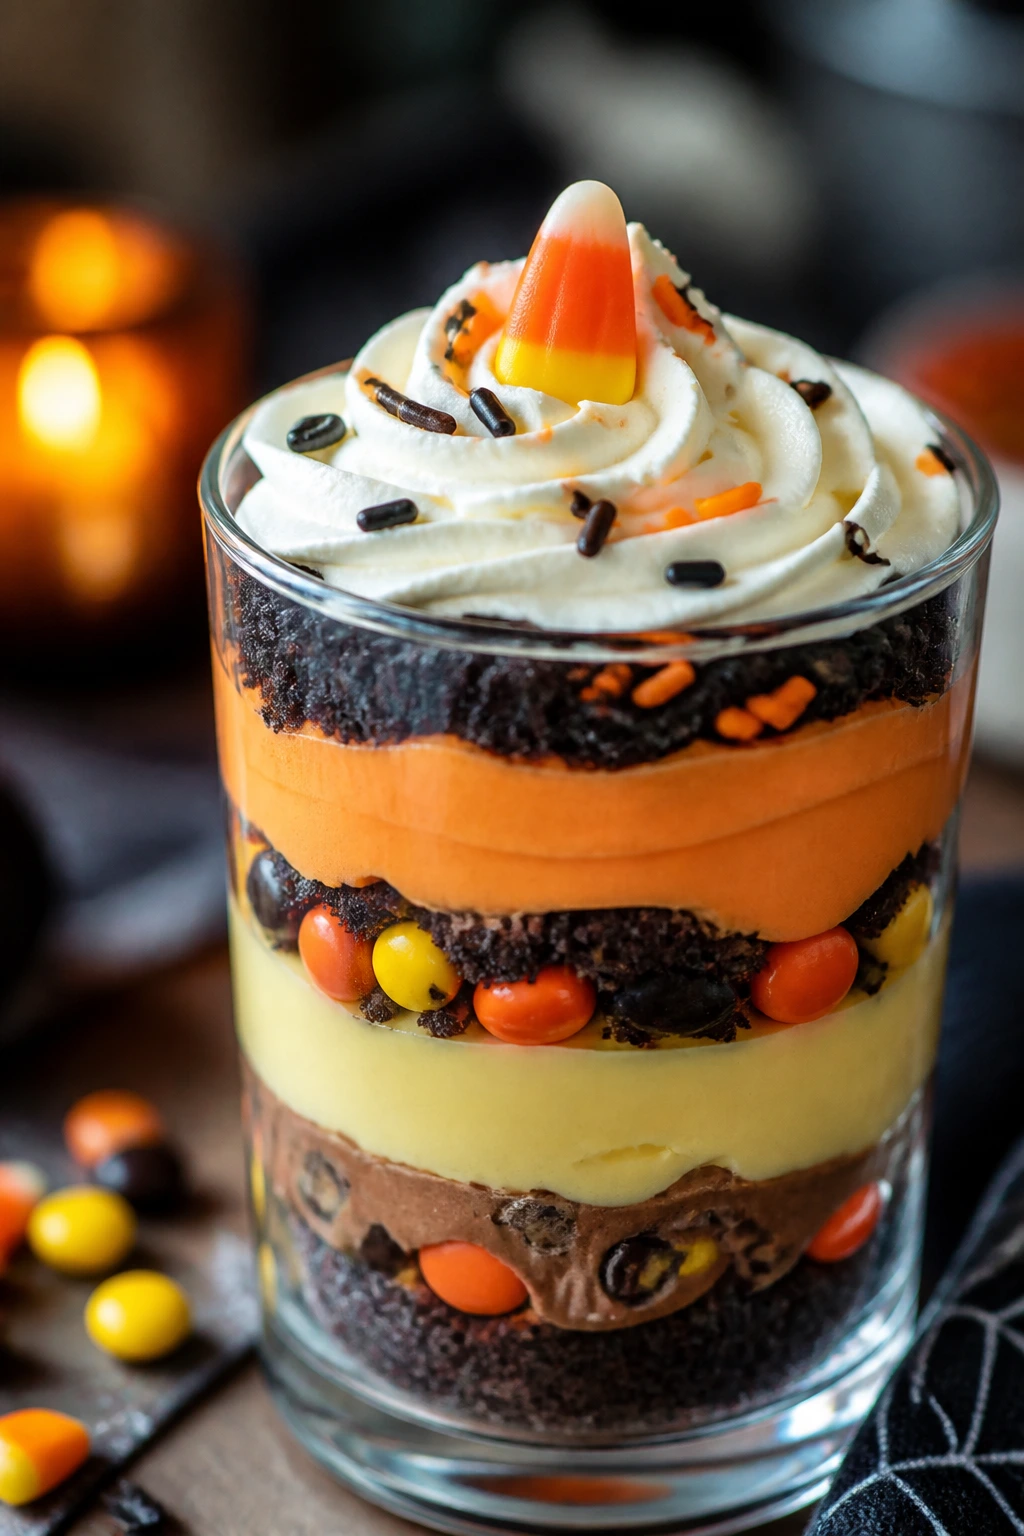
4. Black Forest Bat Trifle
There’s something wonderfully over-the-top about black forest flavors in a Halloween dessert. Chocolate cake, dark cherry filling, and a whipped top with bat-shaped cookies give the bowl a moody look that feels a little theatrical, which is exactly where Halloween likes to live.
Why It Works: Cherry pie filling brings enough syrup to soak into the brownie or cake cubes, so every spoonful tastes richer than the ingredient list suggests. Chocolate pudding fills in the gaps and stops the dessert from feeling too fruity. The cherries also hold their shape better than fresh berries, which matters when the goal is a trifle that still looks tidy after chilling.
Key Ingredients:
- 1 box brownie mix, baked in a 9×13-inch pan and cooled
- 2 cups cherry pie filling
- 2 (3.4-ounce) boxes instant chocolate pudding mix
- 3 cups cold milk
- 2 cups whipped topping
- 1/2 cup shaved dark chocolate
- 8 chocolate sandwich cookies, cut into bat shapes or topped with paper bat picks
Quick Steps:
- Whisk the pudding mix and milk until thick, about 2 minutes.
- Cut the brownies into 1-inch squares.
- Layer half the brownies, half the cherry filling, and half the pudding.
- Repeat the layers, then spread whipped topping over the top.
- Finish with shaved chocolate and the bat cookies.
- Chill 30 minutes before serving.
Equipment for This Recipe:
- 9×13-inch pan
- Sharp knife
- Large serving bowl
- Spoon or spatula
How to Serve This Dish: Serve this in tall glasses if you want each layer to show off its dark red and brown stripes. A strong cup of coffee sits well beside it, but a glass of cold milk works if you want the whole thing to read as an after-school dessert.
Pro Tips for This Recipe:
- Use brownies that are fully cooled and slightly firm. Fudgy, warm brownies collapse under the cherry syrup.
- Spoon the cherry filling in little patches instead of one big dump so the layers stay visible.
- Dark chocolate shavings make the top look sharper than mini chips.
Variations on This Dish:
- Spiked Cherry Version: Stir 1 tablespoon cherry liqueur into the filling for adults.
- White Forest Swap: Use vanilla cake and white chocolate curls for a lighter look.
Common Mistakes to Avoid with This Dish:
- Don’t overmix the pudding and whipped topping. You want a soft cream, not something gluey.
- Don’t skip the chill. The cherry layer needs time to settle or it slides to the bottom.
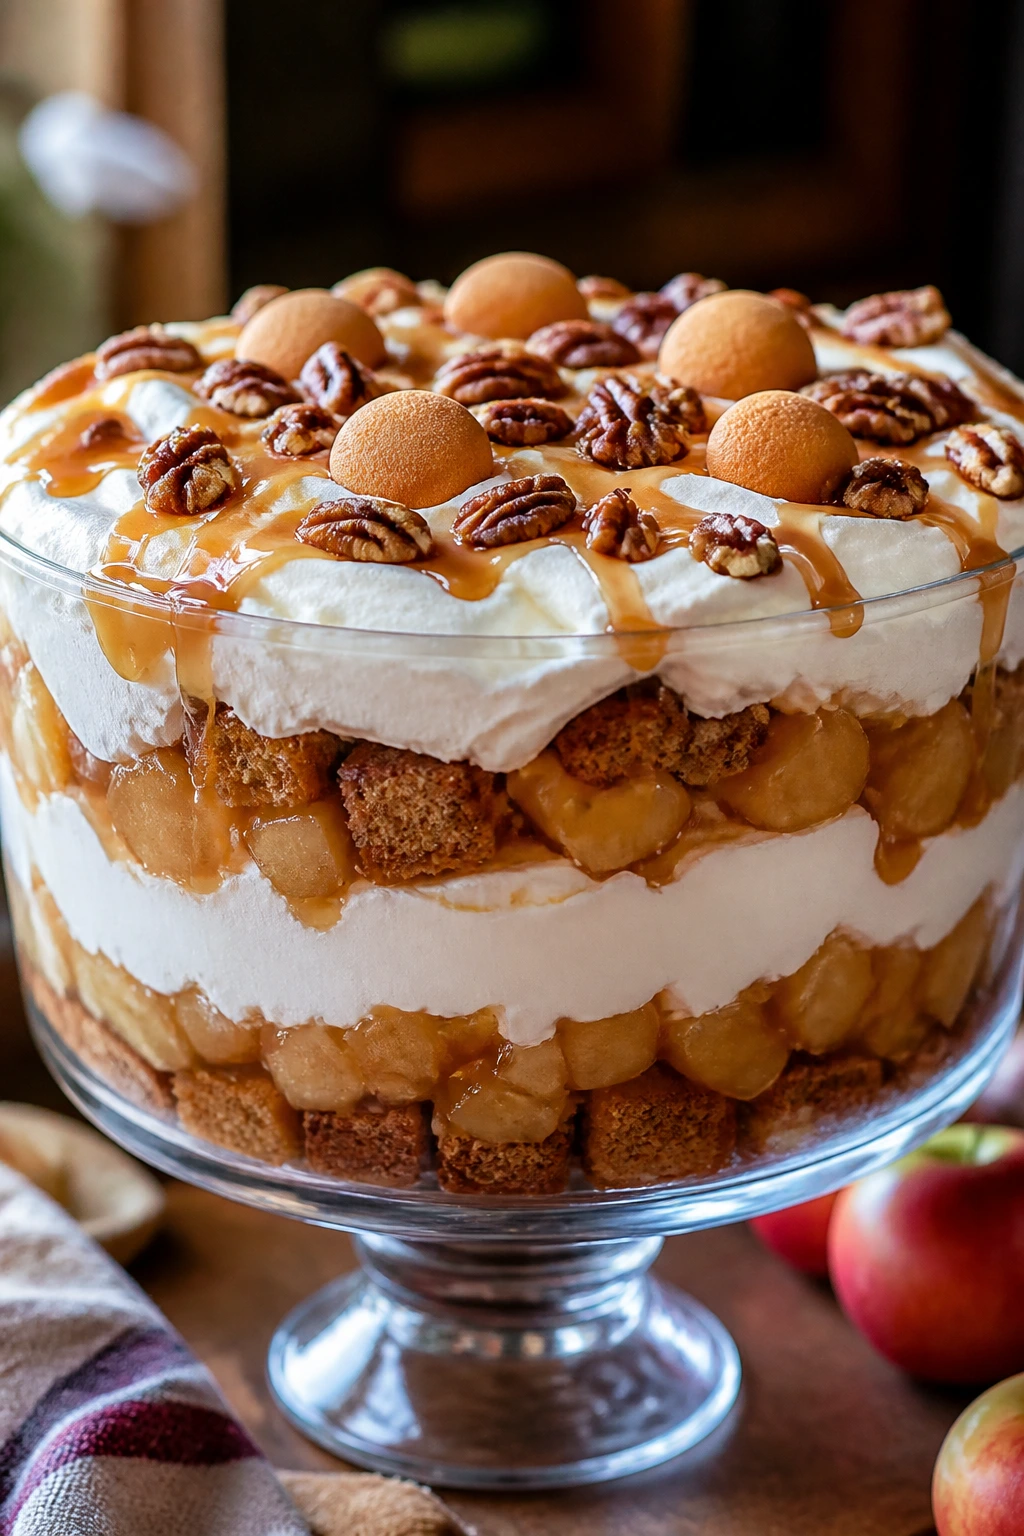
5. Apple Cider Caramel Trifle
This one tastes like a bakery window without demanding a pastry bag. Soft spice cake, apple pie filling, caramel, and whipped cream make a dessert that feels familiar from the first bite, but the trifle bowl gives it a cleaner, more relaxed shape than a pie plate ever could.
Why It Works: Apple pie filling gives you fruit that’s already tender and spiced, so there’s no peeling or sautéing. Caramel sauce threads through the cream and catches in the cake cubes, which keeps every spoonful from tasting the same. A little toasted pecan on top is enough; too many and the bowl starts to feel heavy.
Key Ingredients:
- 1 spice cake, baked and cooled
- 2 cups apple pie filling, chopped into smaller pieces
- 1 cup caramel sauce, divided
- 2 cups whipped topping
- 1 teaspoon cinnamon
- 1/2 cup chopped toasted pecans
- 1/2 cup crushed vanilla wafers
Quick Steps:
- Stir the cinnamon into the apple pie filling.
- Layer half the spice cake cubes in the bowl.
- Spoon on half the apples, drizzle with caramel, and add a little whipped topping.
- Repeat the layers, then finish with the remaining whipped topping.
- Top with pecans, vanilla wafers, and another thin drizzle of caramel.
- Chill at least 20 minutes.
Equipment for This Recipe:
- Mixing bowl
- Trifle bowl
- Spoon
- Small saucepan, optional for warming caramel
How to Serve This Dish: A shallow dessert bowl gives you the best ratio of cake to apples to cream. I like this with hot cider or a plain cup of tea; both keep the caramel from feeling too sticky-sweet.
Pro Tips for This Recipe:
- Chop the pie filling a bit so big apple slices don’t make the layers slide apart.
- Warm the caramel for 10 to 15 seconds if it’s too thick to drizzle.
- Add the wafers at the end if you want them crunchy.
Variations on This Dish:
- Salted Caramel Apple: Finish with flaky salt and a darker caramel sauce.
- Cranberry Apple Twist: Add 1/2 cup cranberry sauce for a sharper, brighter layer.
Common Mistakes to Avoid with This Dish:
- Don’t use warm caramel straight from a saucepan. It melts the whipped topping too fast.
- Don’t overload the bowl with apples or you’ll lose the cake layers.
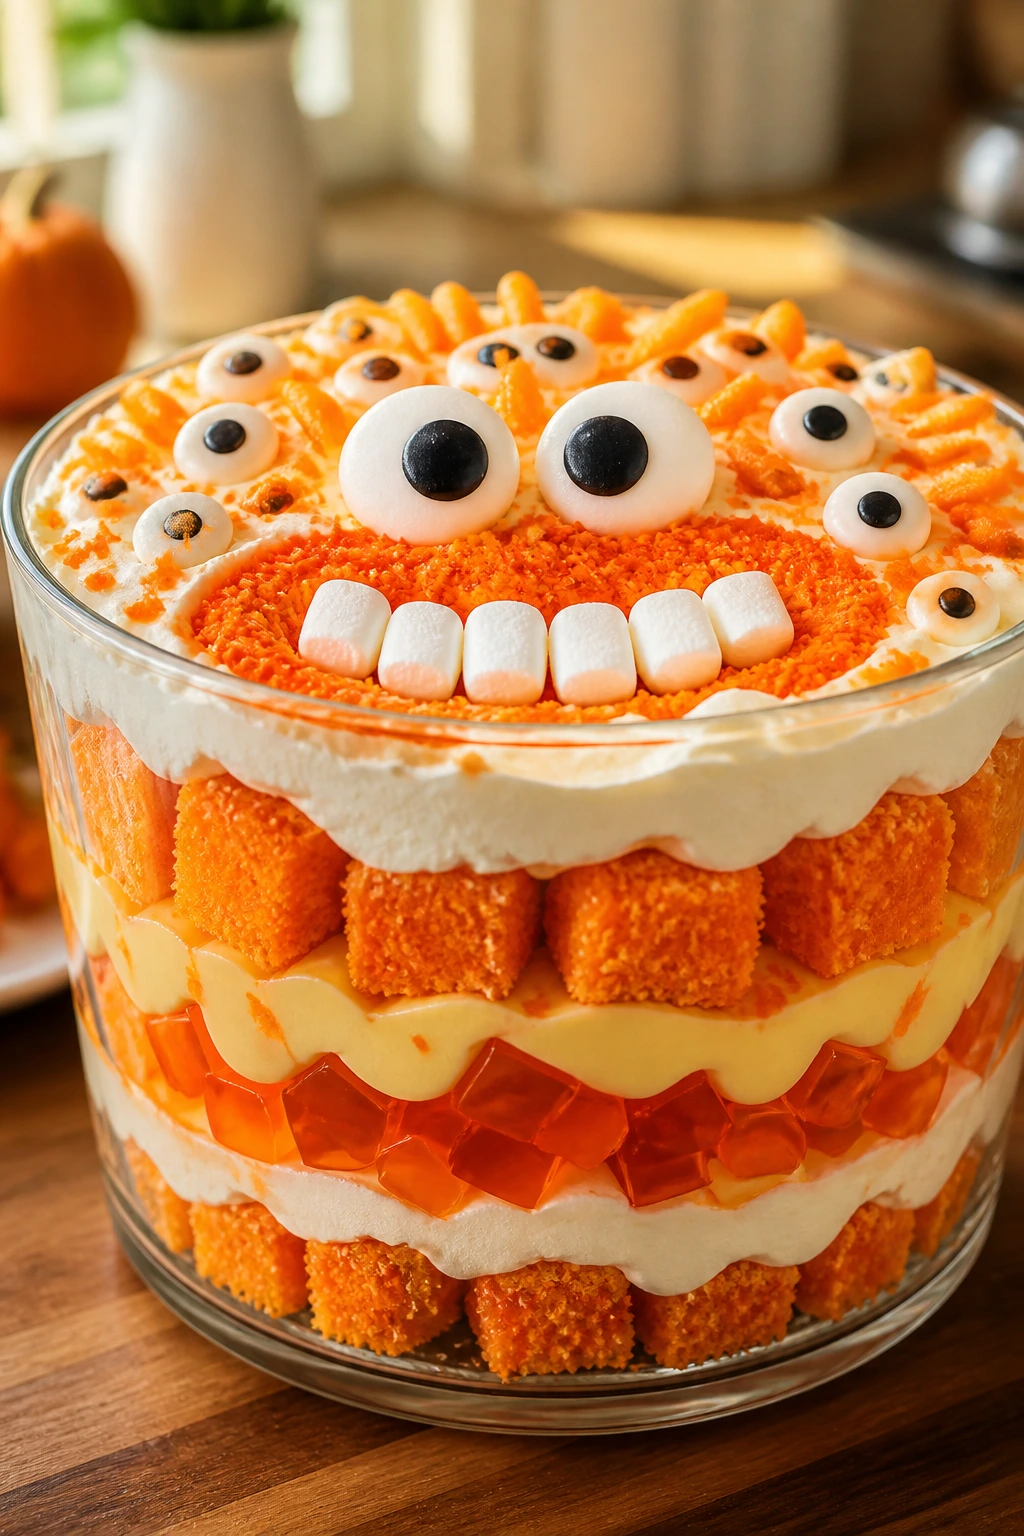
6. Orange Creamsicle Monster Trifle
Orange and vanilla are a natural pair, and when you give them bright candy eyes and a few marshmallow teeth, the bowl suddenly turns into a monster worth smiling at. It’s playful without becoming cloying, which is a small miracle with candy-heavy desserts.
Why It Works: The orange flavor needs something creamy to anchor it, and vanilla pudding does that job better than plain whipped cream. Orange cake or orange gelatin cubes give the trifle its color, while mini marshmallows keep the texture from feeling too smooth. The monster face is decorative, but the flavor pairing is doing real work underneath.
Key Ingredients:
- 1 orange or vanilla cake, baked and cubed
- 2 (3.4-ounce) boxes instant vanilla pudding mix
- 3 cups cold milk
- 1 teaspoon orange extract
- 2 cups whipped topping
- 1 cup mini marshmallows
- 1/2 cup candy eyes
- 1/2 cup orange jelly candies, chopped
Quick Steps:
- Whisk the pudding, milk, and orange extract until thick.
- Fold in 1 cup whipped topping.
- Layer cake, pudding, marshmallows, and jelly candies in a bowl.
- Repeat the layers, then top with the rest of the whipped topping.
- Add candy eyes near the top edge and scatter a few marshmallows for “hair.”
- Chill 20 minutes.
Equipment for This Recipe:
- Mixing bowl
- Whisk
- Trifle bowl or clear punch bowl
- Small spoon for candy placement
How to Serve This Dish: Serve it in clear cups if you want each child to get a neat monster face. A glass of milk or orange soda keeps the orange cream flavor front and center.
Pro Tips for This Recipe:
- Use orange extract sparingly; too much makes the pudding taste fake-fast.
- Place the candy eyes only after the top layer is settled so they don’t sink.
- Keep the jelly candies small. Big chunks interrupt the cream layers.
Variations on This Dish:
- Creamsicle Boo Cups: Turn the whole recipe into individual jars with one big candy eye on each.
- Tangy Citrus Monster: Add a tablespoon of fresh orange zest for a sharper citrus note.
Common Mistakes to Avoid with This Dish:
- Don’t use too many marshmallows in the middle layers. They make the spoonfuls sticky.
- Don’t assemble hours ahead if the candy decorations are delicate; they can bleed color.
7. Peanut Butter Spider Trifle
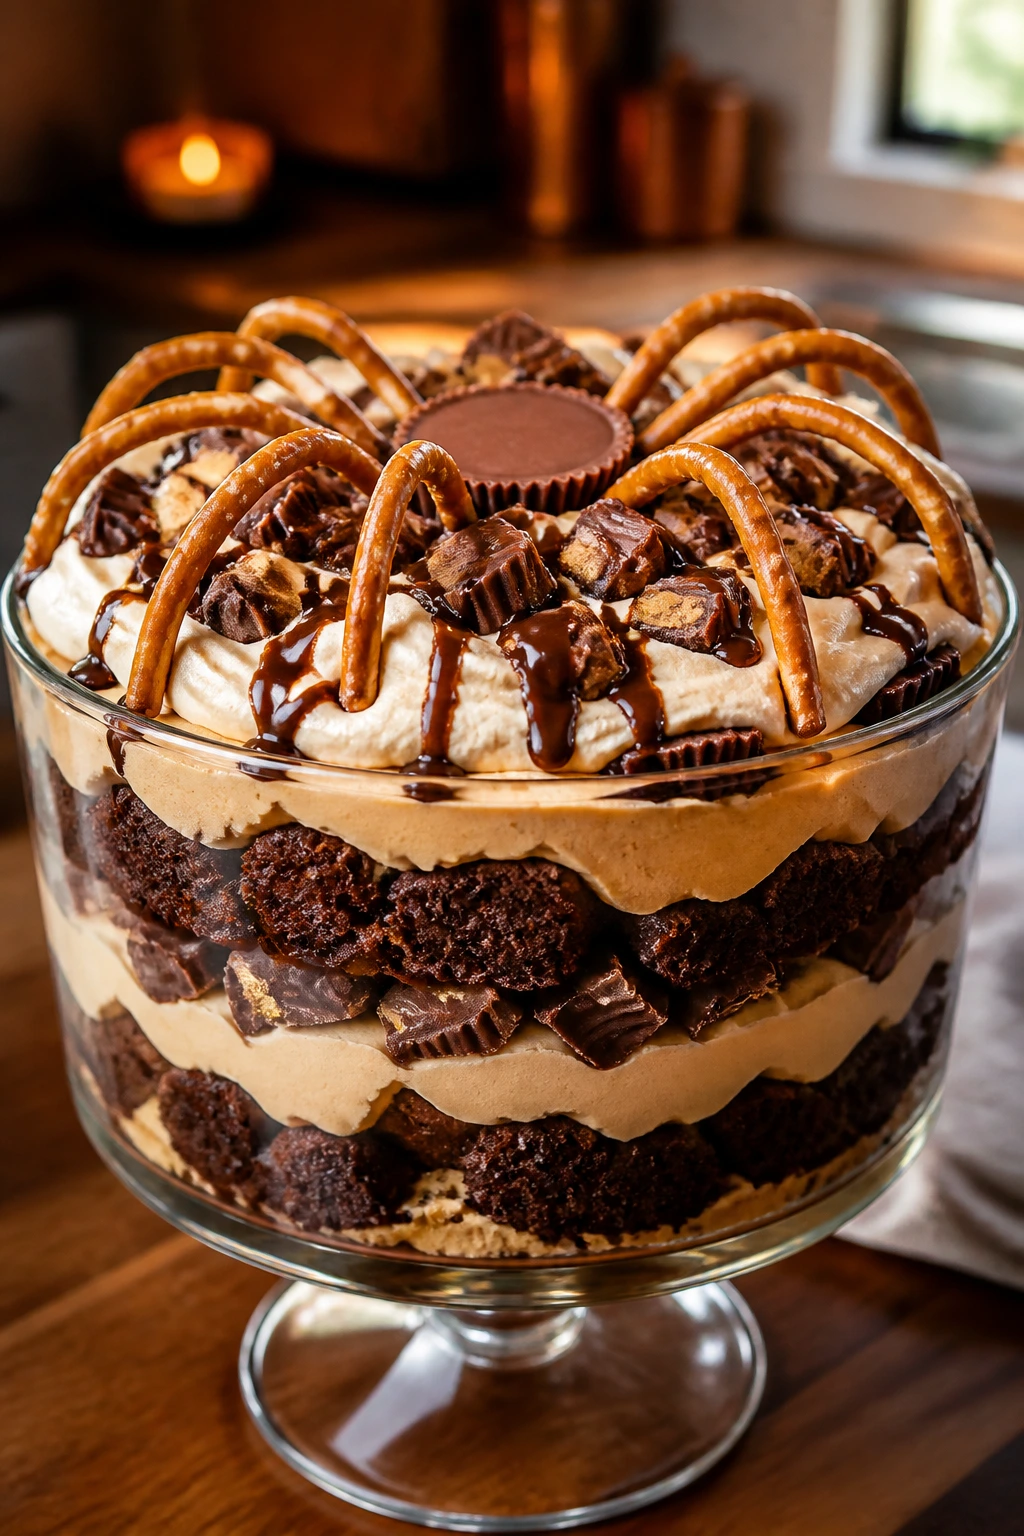
Peanut butter desserts always bring a little salt and a lot of depth, which makes them useful when the rest of the table leans sugary. Here, the chocolate layers and peanut butter pudding create a flavor that feels like a giant candy cup, then the spider legs on top push it into Halloween territory.
Why It Works: Peanut butter thickens pudding in a way that feels rich instead of heavy. Chocolate cake or brownies absorb the filling and stay soft, and chopped peanut butter cups give you the exact texture contrast this trifle needs. A pinch of salt keeps the whole thing from tipping into sugar overload.
Key Ingredients:
- 1 chocolate cake or brownie base, cooled and cubed
- 2 cups peanut butter pudding or vanilla pudding mixed with 1/2 cup peanut butter
- 2 cups whipped topping
- 1 cup chopped peanut butter cups
- 1/2 cup chocolate syrup
- 12 pretzel sticks or black licorice ropes for spider legs
- 1/4 cup mini chocolate chips
Quick Steps:
- Stir peanut butter into the pudding until smooth if you’re using vanilla pudding.
- Fold in 1 cup whipped topping.
- Layer cake, pudding, peanut butter cups, and a drizzle of chocolate syrup.
- Repeat, then spread the remaining whipped topping over the top.
- Add pretzel or licorice spider legs and a few mini chocolate chips for the spider body.
- Chill 30 minutes.
Equipment for This Recipe:
- Mixing bowl
- Rubber spatula
- Trifle bowl
- Spoon or squeeze bottle for syrup
How to Serve This Dish: A small bowl is enough; this one eats rich. A cold glass of milk is the right call, and if you’re serving it after dinner, keep the portions modest or the peanut butter will sit on the tongue like a dare.
Pro Tips for This Recipe:
- Use creamy peanut butter, not a crunchy jar with added bits. The texture gets clumsy fast.
- If the pudding feels too thick after adding peanut butter, loosen it with 1 to 2 tablespoons milk.
- Pretzel legs work better than licorice if you want a firmer spider shape.
Variations on This Dish:
- Reese’s Graveyard: Add crushed peanut butter cups between every layer.
- Salted Spider: Finish with flaky salt and a little more chocolate syrup.
Common Mistakes to Avoid with This Dish:
- Don’t use natural peanut butter that separates unless you stir it thoroughly. Oily streaks make the pudding slippery.
- Don’t drown the layers in syrup. You want ribboning, not a chocolate swamp.
8. Red Velvet Blood Moon Trifle
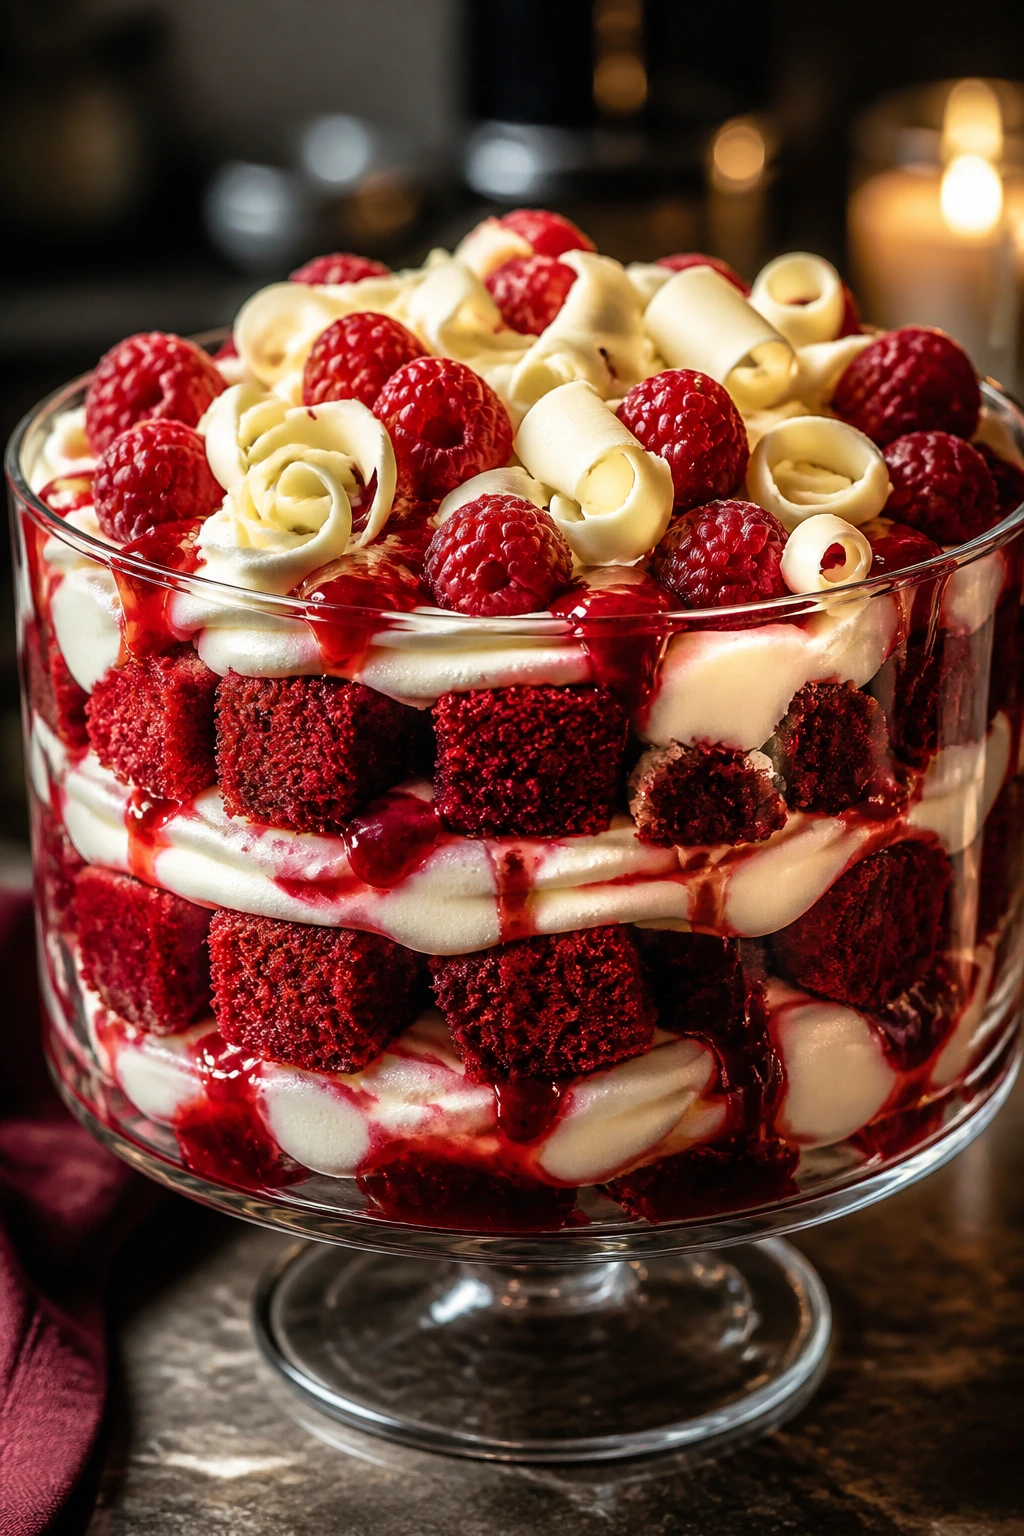
Red velvet already has drama built in. When you layer it with cream cheese filling and a glossy berry ribbon, the bowl starts looking like dessert wearing stage makeup — bold, a little theatrical, and easier to make than it looks.
Why It Works: Red velvet cake is mild enough to carry cream cheese without competing with it, and the berry layer adds the tart edge that keeps the sweetness in check. Raspberry sauce is especially useful because it stains the cream in a way that looks intentional, which is half the Halloween appeal. The result is soft, plush, and a little sharp on the finish.
Key Ingredients:
- 1 red velvet cake, baked and cooled
- 8 ounces cream cheese, softened
- 1/2 cup powdered sugar
- 2 cups whipped topping
- 1 cup raspberry sauce or seedless raspberry jam thinned with 2 tablespoons water
- 1/2 cup fresh raspberries
- 1/4 cup white chocolate curls
Quick Steps:
- Beat cream cheese and powdered sugar until smooth.
- Fold in whipped topping.
- Layer cake cubes, cream cheese filling, and raspberry sauce in a bowl.
- Repeat the layers, then finish with more filling on top.
- Add raspberries and white chocolate curls.
- Chill 20 to 30 minutes.
Equipment for This Recipe:
- Hand mixer
- Mixing bowl
- Trifle bowl
- Spoon
How to Serve This Dish: Serve it cold in clear cups so the red and white layers stay dramatic. A few extra raspberries on the side make the whole thing feel more finished, even if you assembled it in ten minutes flat.
Pro Tips for This Recipe:
- Beat the cream cheese until it’s completely smooth before adding whipped topping.
- Seedless raspberry sauce looks cleaner than jam if you want sharp layers.
- Use a cake that’s fully cooled so the filling doesn’t thin out.
Variations on This Dish:
- Blackberry Moon: Swap the raspberry layer for blackberry sauce.
- Chocolate Velvet: Use chocolate cake and keep the same cream cheese filling.
Common Mistakes to Avoid with This Dish:
- Don’t overdo the sauce. Red velvet gets muddy if the berry layer is too thick.
- Don’t skip the chill. The cream cheese layer firms up and tastes better after a short rest.
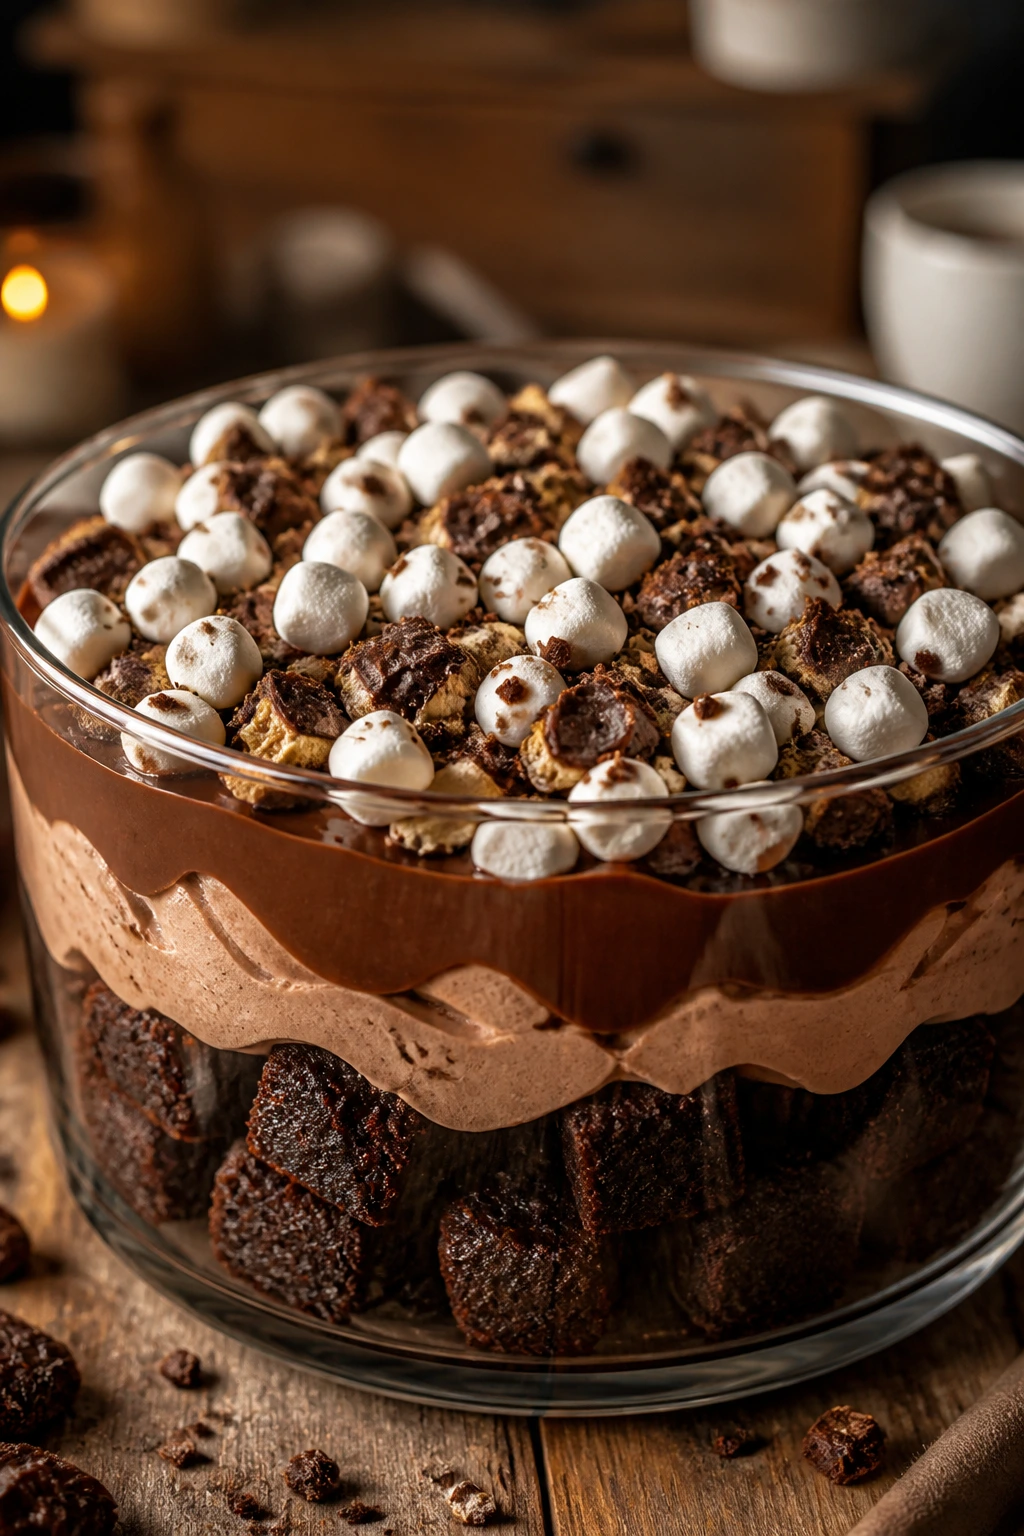
9. S’mores Cauldron Trifle
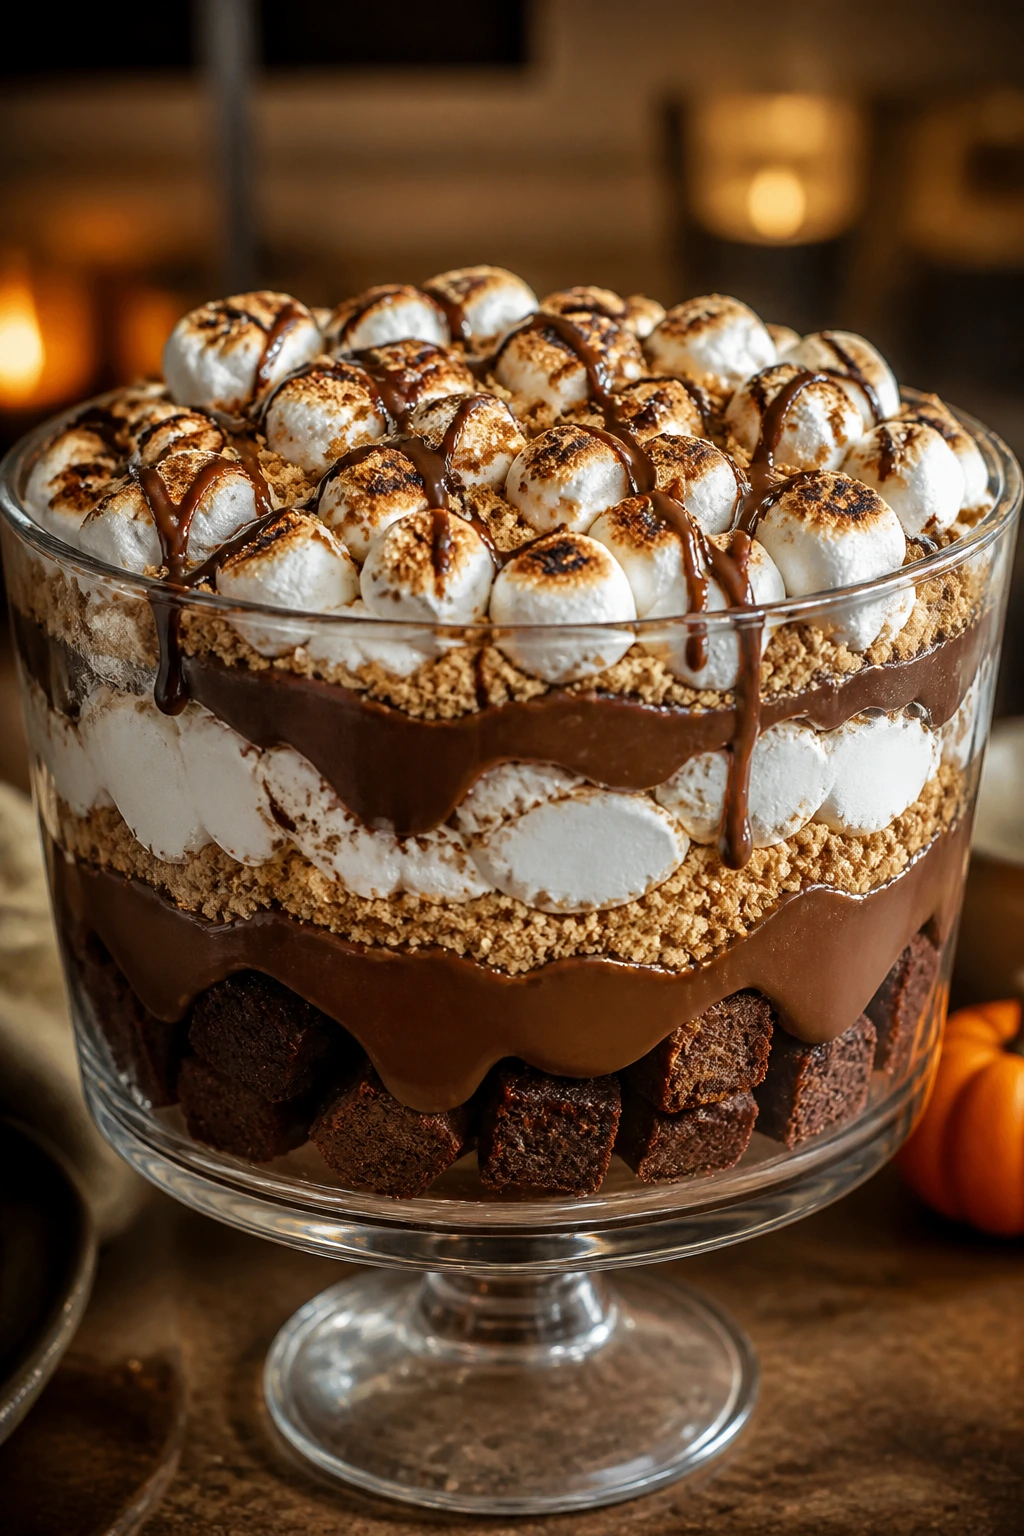
A s’mores trifle has all the campfire cues without the smoke in your hair. Chocolate pudding, graham crumbs, marshmallow fluff, and brownie chunks stack into a dessert that feels casual enough for a Tuesday but still special enough to put in the center of the table.
Why It Works: Graham crackers bring a dry, sandy crunch that keeps the pudding from feeling flat. Marshmallow fluff gives the top that soft, sticky finish you expect from a s’more, and the brownie cubes add the dense chocolate bite that keeps the whole thing from tasting like straight sugar. A quick torch on the marshmallows helps, but it’s optional.
Key Ingredients:
- 1 pan brownies, baked and cooled, cut into cubes
- 2 (3.4-ounce) boxes instant chocolate pudding mix
- 3 cups cold milk
- 1 cup marshmallow fluff
- 2 cups whipped topping
- 1 1/2 cups graham cracker crumbs
- 1 cup mini marshmallows
- 1/2 cup chocolate sauce
Quick Steps:
- Whisk pudding with milk until thick.
- Fold in 1 cup whipped topping.
- Layer brownie cubes, pudding, graham crumbs, and a few spoonfuls of marshmallow fluff.
- Repeat the layers, then spread the remaining whipped topping on top.
- Add mini marshmallows and a drizzle of chocolate sauce.
- If you like, toast the top marshmallows briefly with a kitchen torch.
- Chill 20 minutes.
Equipment for This Recipe:
- Baking pan
- Mixing bowl
- Trifle bowl
- Kitchen torch, optional
How to Serve This Dish: Serve warm brownie pieces only if they’ve cooled to room temperature; otherwise the pudding softens too much. I like this with coffee or cold milk, depending on whether you want the dessert to feel cozy or more kid-friendly.
Pro Tips for This Recipe:
- Use coarse graham crumbs, not flour-like crumbs. They need to act like real texture.
- Torch the marshmallows only right before serving.
- Keep the chocolate sauce thin enough to drizzle, not pour in one blob.
Variations on This Dish:
- Caramel S’mores: Add a caramel ribbon between the layers.
- Peanut Butter Fire Pit: Add chopped peanut butter cups and a spoonful of peanut butter to the pudding.
Common Mistakes to Avoid with This Dish:
- Don’t use hot brownies. They melt the fluff and make the bottom soggy.
- Don’t make the graham layer too thick or it turns pasty after chilling.
10. Tiramisu Tombstone Trifle
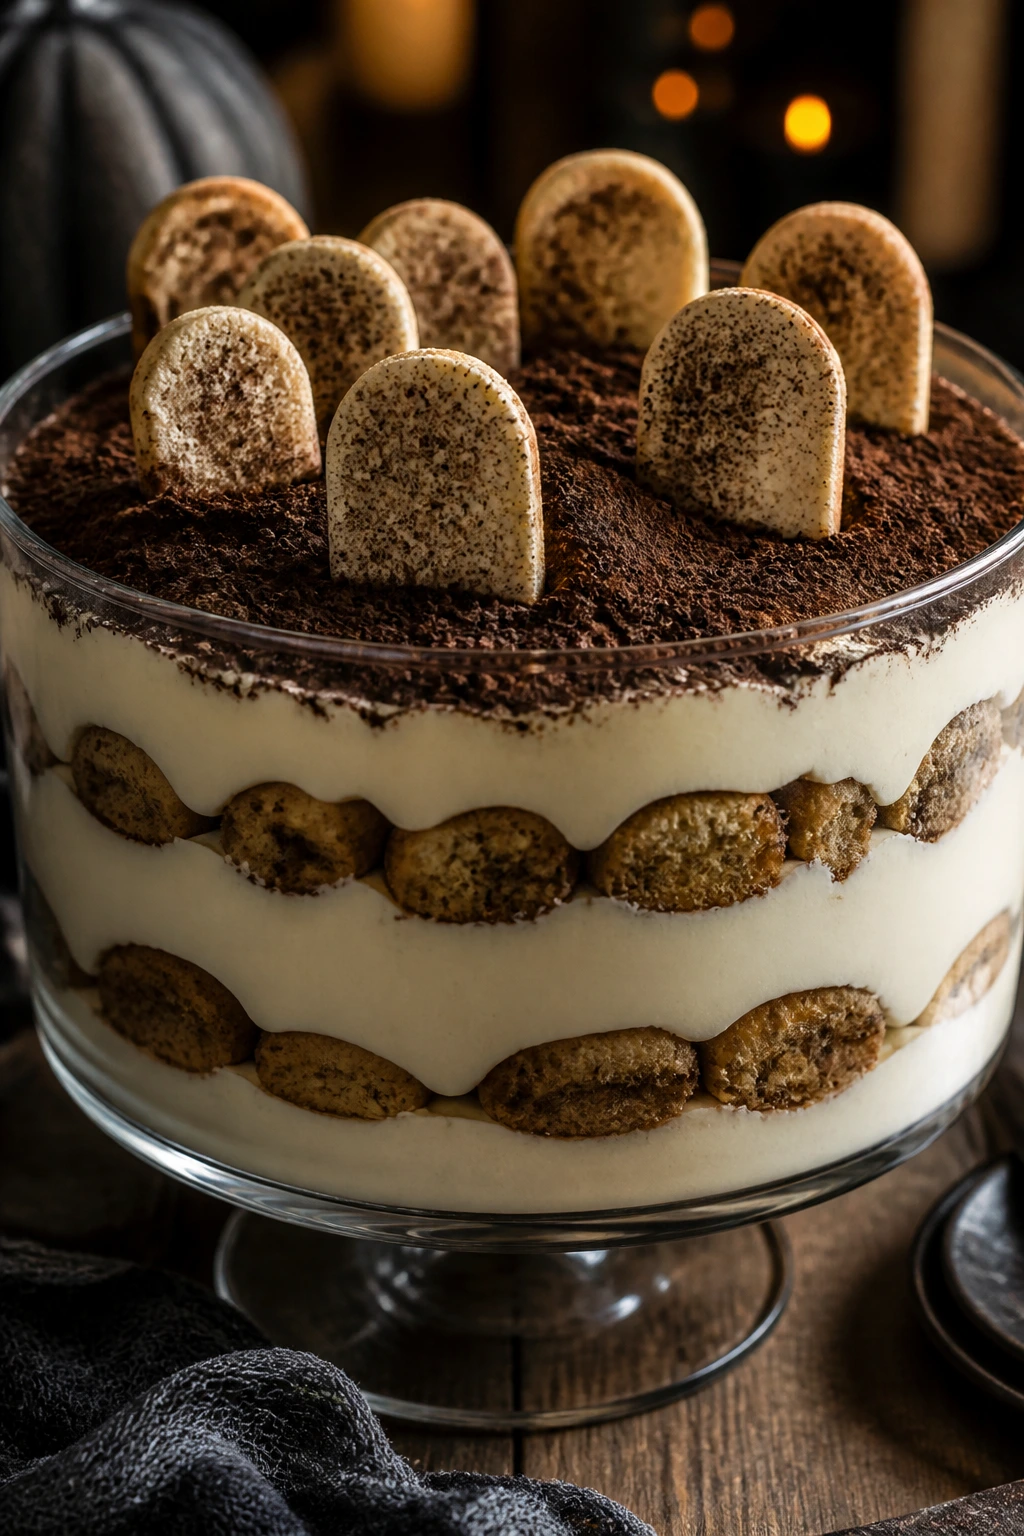
Tiramisu is already a little moody. The espresso, cocoa, and mascarpone cream give it a dark, polished look that takes beautifully to Halloween styling, especially once you add chocolate cookie tombstones and a dusting of cocoa that looks like a fresh graveyard.
Why It Works: Ladyfingers soak up espresso fast, so they need a creamy partner or they go floppy. Mascarpone gives the filling a smooth, slightly tangy finish that keeps the coffee from tasting harsh. The cocoa on top is more than decoration; it brings a dry note that balances the soft cream below.
Key Ingredients:
- 24 ladyfingers
- 1 cup cooled espresso or strong coffee
- 8 ounces mascarpone cheese
- 1 cup heavy cream
- 1/2 cup powdered sugar
- 2 tablespoons cocoa powder, plus more for dusting
- 8 chocolate cookies for tombstones
Quick Steps:
- Whip the heavy cream and powdered sugar until soft peaks form.
- Fold in the mascarpone until smooth.
- Dip ladyfingers quickly in espresso, about 1 second per side.
- Layer ladyfingers and mascarpone cream in a bowl.
- Repeat, then dust with cocoa powder.
- Add tombstone cookies before chilling for 30 minutes.
Equipment for This Recipe:
- Hand mixer
- Shallow dish for espresso
- Trifle bowl
- Fine sieve for cocoa dusting
How to Serve This Dish: Serve in small portions, since tiramisu is richer than it looks. A tiny cup of coffee or espresso keeps the flavor intact, though a glass of milk makes sense if you’re serving kids and skipping the coffee.
Pro Tips for This Recipe:
- Dip the ladyfingers fast. A long soak turns them to paste.
- Use cold mascarpone so the filling stays smooth and slightly firm.
- Dust cocoa right before serving if you want the top to look crisp and dark.
Variations on This Dish:
- Pumpkin Tiramisu Tombstone: Fold 1/2 cup pumpkin purée into the mascarpone cream.
- Chocolate Espresso Crypt: Add shaved dark chocolate between the layers.
Common Mistakes to Avoid with This Dish:
- Don’t overwhip the cream. It should hold peaks, not turn grainy.
- Don’t flood the ladyfingers. Espresso is a soak, not a bath.
11. Chai Pear Trifle
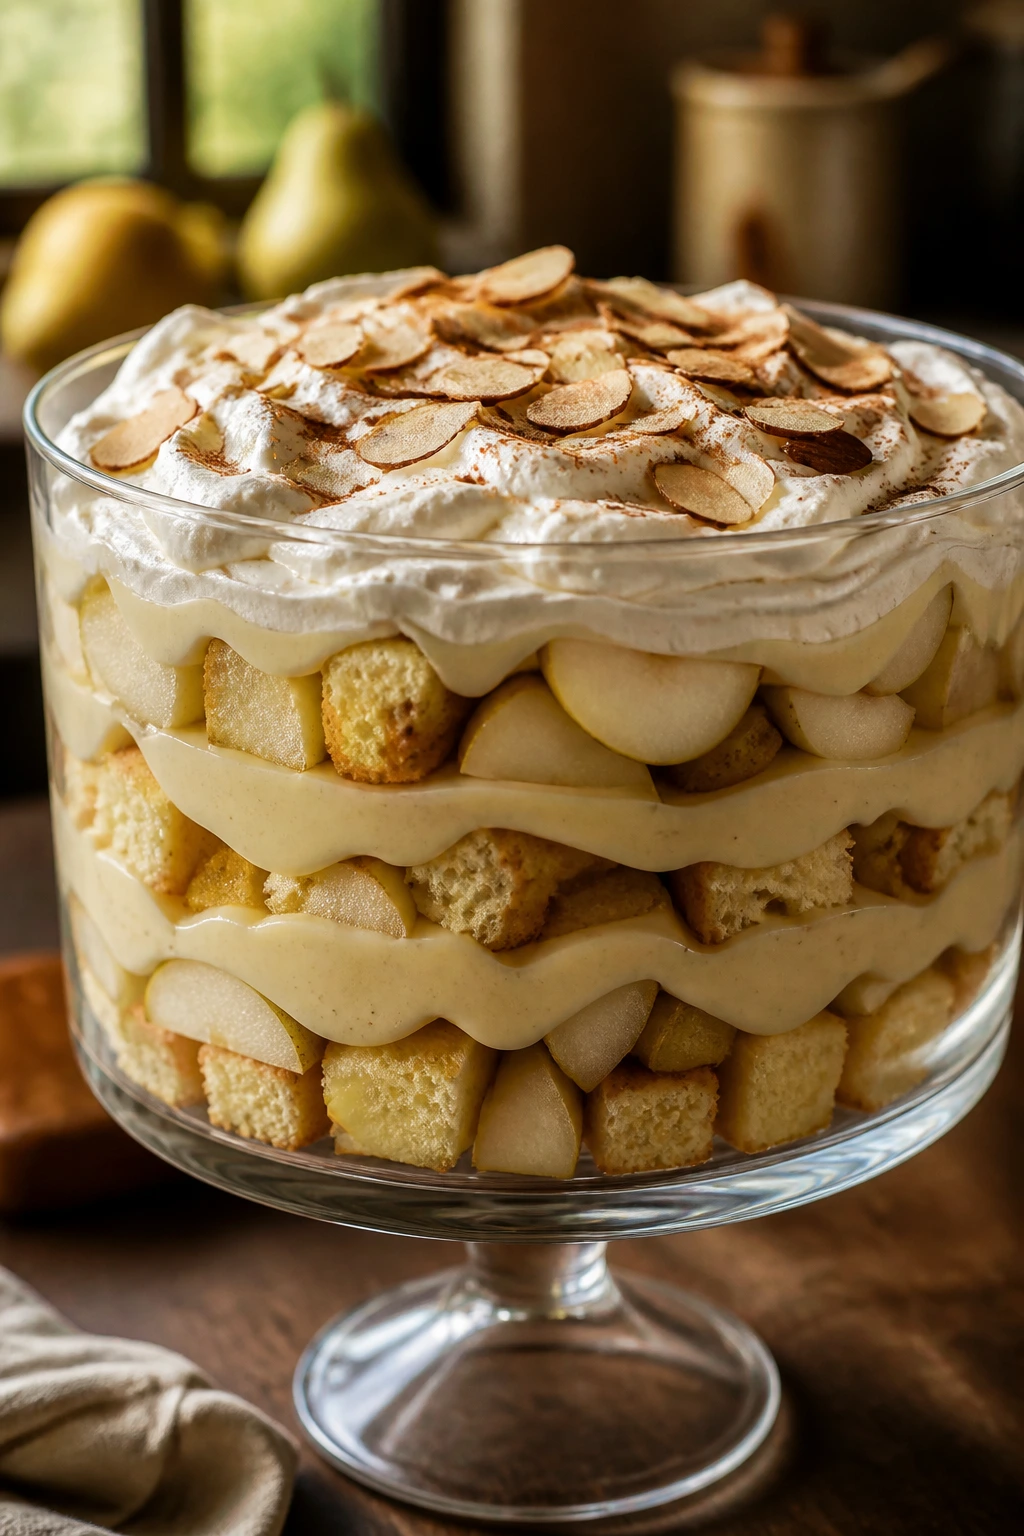
This trifle is quieter than the candy-heavy ones, and that’s part of its appeal. Chai spice, soft pears, and vanilla cream make a dessert that feels a little autumnal without shouting about it, which I appreciate when the candy bowl is already doing enough talking.
Why It Works: Pears bring a soft, almost buttery sweetness that pairs well with chai spices like cinnamon, cardamom, and ginger. Vanilla pudding smooths the edges, and a thin layer of crushed cookies adds the crunch the fruit alone can’t provide. It’s a useful option when you want a dessert that doesn’t taste like a candy aisle.
Key Ingredients:
- 1 vanilla pound cake, cubed
- 2 cups sliced pears, drained if canned
- 2 cups vanilla pudding
- 1 teaspoon chai spice blend
- 2 cups whipped topping
- 1/2 cup toasted sliced almonds
- 12 vanilla wafers, crushed
Quick Steps:
- Stir chai spice into the vanilla pudding.
- Fold in 1 cup whipped topping.
- Layer cake cubes, pears, pudding, and crushed wafers.
- Repeat the layers.
- Top with the remaining whipped topping and toasted almonds.
- Chill 20 to 30 minutes.
Equipment for This Recipe:
- Mixing bowl
- Trifle bowl
- Spoon
- Small skillet for toasting almonds
How to Serve This Dish: Serve this in smaller glass cups with a spoon that can reach the bottom of the layers. Hot tea, especially plain black tea or chai, fits the flavor better than a heavy drink.
Pro Tips for This Recipe:
- If using canned pears, drain them very well.
- A pinch of cardamom in the pudding makes the chai taste more distinct.
- Toast the almonds until they smell nutty, not brown and bitter.
Variations on This Dish:
- Apple Chai Swap: Replace the pears with diced spiced apples.
- Honey Chai Cream: Add 1 tablespoon honey to the pudding for a rounder sweetness.
Common Mistakes to Avoid with This Dish:
- Don’t use pears that are too ripe. They collapse and make the dessert watery.
- Don’t skip the cookie layer; the fruit and cream need a dry base.
12. Brownie Boo Trifle
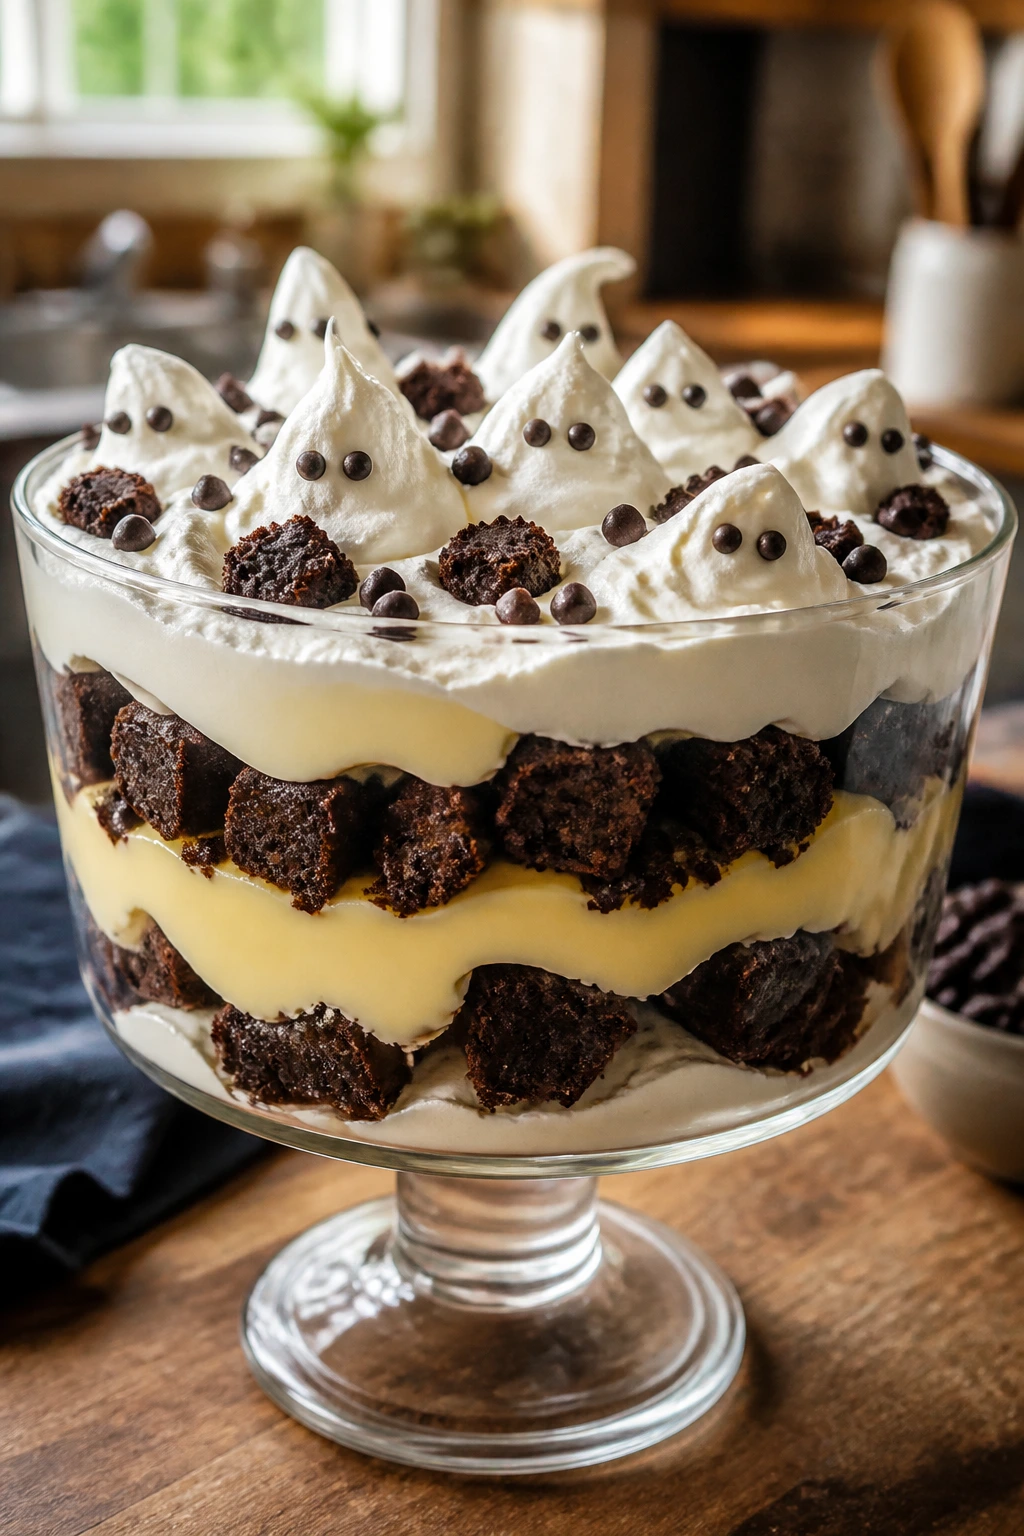
A brownie trifle is one of those desserts that never needs convincing. The only Halloween part here is the decorating, which is enough when the brownie cubes, pudding, and marshmallow topping already taste like a good idea.
Why It Works: Brownies hold their shape better than cake under thick fillings, so this one stays clean even after a chill. Vanilla pudding gives the chocolate base a softer edge, and marshmallow cream on top makes the whole bowl feel like a giant ghostly sundae. It’s a smart move for cooks who want maximum payoff with almost no fiddly work.
Key Ingredients:
- 1 pan brownies, cooled and cubed
- 2 cups vanilla pudding
- 2 cups whipped topping
- 1 cup marshmallow cream
- 1/2 cup chocolate cookie crumbs
- 1/2 cup mini marshmallows
- 12 candy eyes or white chocolate chips for ghost faces
Quick Steps:
- Fold 1 cup whipped topping into the vanilla pudding.
- Layer brownies, pudding, and cookie crumbs.
- Repeat the layers.
- Spread marshmallow cream over the top.
- Add mini marshmallows and candy eyes to make little ghosts.
- Chill 20 minutes before serving.
Equipment for This Recipe:
- Mixing bowl
- Spoon
- Trifle bowl
- Offset spatula
How to Serve This Dish: Serve in narrow dessert cups if you want a strong brownie-to-cream ratio. A cold glass of milk keeps the sweetness grounded, and it’s the kind of dessert that disappears quickly from a party table.
Pro Tips for This Recipe:
- Use fudgy brownies, not cakey ones. They stay chewy after chilling.
- If the marshmallow cream sticks to your spoon, warm it for 5 to 10 seconds.
- Put the eyes on after the top layer is smoothed, or they sink.
Variations on This Dish:
- Cookies-and-Cream Boo Bowl: Add crushed sandwich cookies into the pudding.
- Salted Boo Brownie: Finish with a tiny pinch of flaky salt.
Common Mistakes to Avoid with This Dish:
- Don’t overfill the bowl with brownie chunks. The cream layers need room to spread.
- Don’t let the pudding sit too long before layering or it firms up too much.
13. Salted Caramel Pretzel Trifle

Sweet desserts get more interesting when something salty shows up. This trifle leans into that idea hard: caramel pudding, pretzels, chocolate cake, and a little flaky salt on top create a bowl that’s crunchy, creamy, and a little mischievous.
Why It Works: Pretzels stay crisp longer than cookies, so they bring useful texture to a chilled dessert. Salted caramel keeps the sweetness from flattening out, and chocolate cake gives the bowl a dark base that feels right for Halloween. If you’ve ever wished a candy bar had a spoon, this is close.
Key Ingredients:
- 1 chocolate cake, cubed and cooled
- 2 cups caramel pudding
- 2 cups whipped topping
- 2 cups mini pretzels, crushed lightly
- 1 cup chocolate chips
- 1/3 cup salted caramel sauce
- 1 teaspoon flaky sea salt
Quick Steps:
- Fold half the whipped topping into the caramel pudding.
- Layer cake cubes, caramel pudding, pretzels, and chocolate chips.
- Repeat the layers.
- Spread the remaining whipped topping on top.
- Drizzle with caramel sauce and sprinkle with flaky salt.
- Chill 20 minutes.
Equipment for This Recipe:
- Mixing bowl
- Spoon
- Trifle bowl
- Measuring cups
How to Serve This Dish: Serve this in short, wide glasses so every bite gets some pretzel crunch. Coffee or cold milk both work; the coffee pulls out the caramel, while milk softens the salt.
Pro Tips for This Recipe:
- Crush the pretzels by hand so you keep some bigger pieces.
- Use a light hand with the salt. A pinch is enough.
- Add a few pretzels on top just before serving if you want a fresh crunch.
Variations on This Dish:
- Chocolate-Covered Pretzel Version: Add chopped chocolate pretzels for more crunch.
- Peanut Caramel Twist: Mix chopped roasted peanuts into the layers.
Common Mistakes to Avoid with This Dish:
- Don’t crush the pretzels into powder. They need to stay snappy.
- Don’t over-salt the top; the caramel already does a lot of work.
14. Cookies and Cream Ghost Trifle
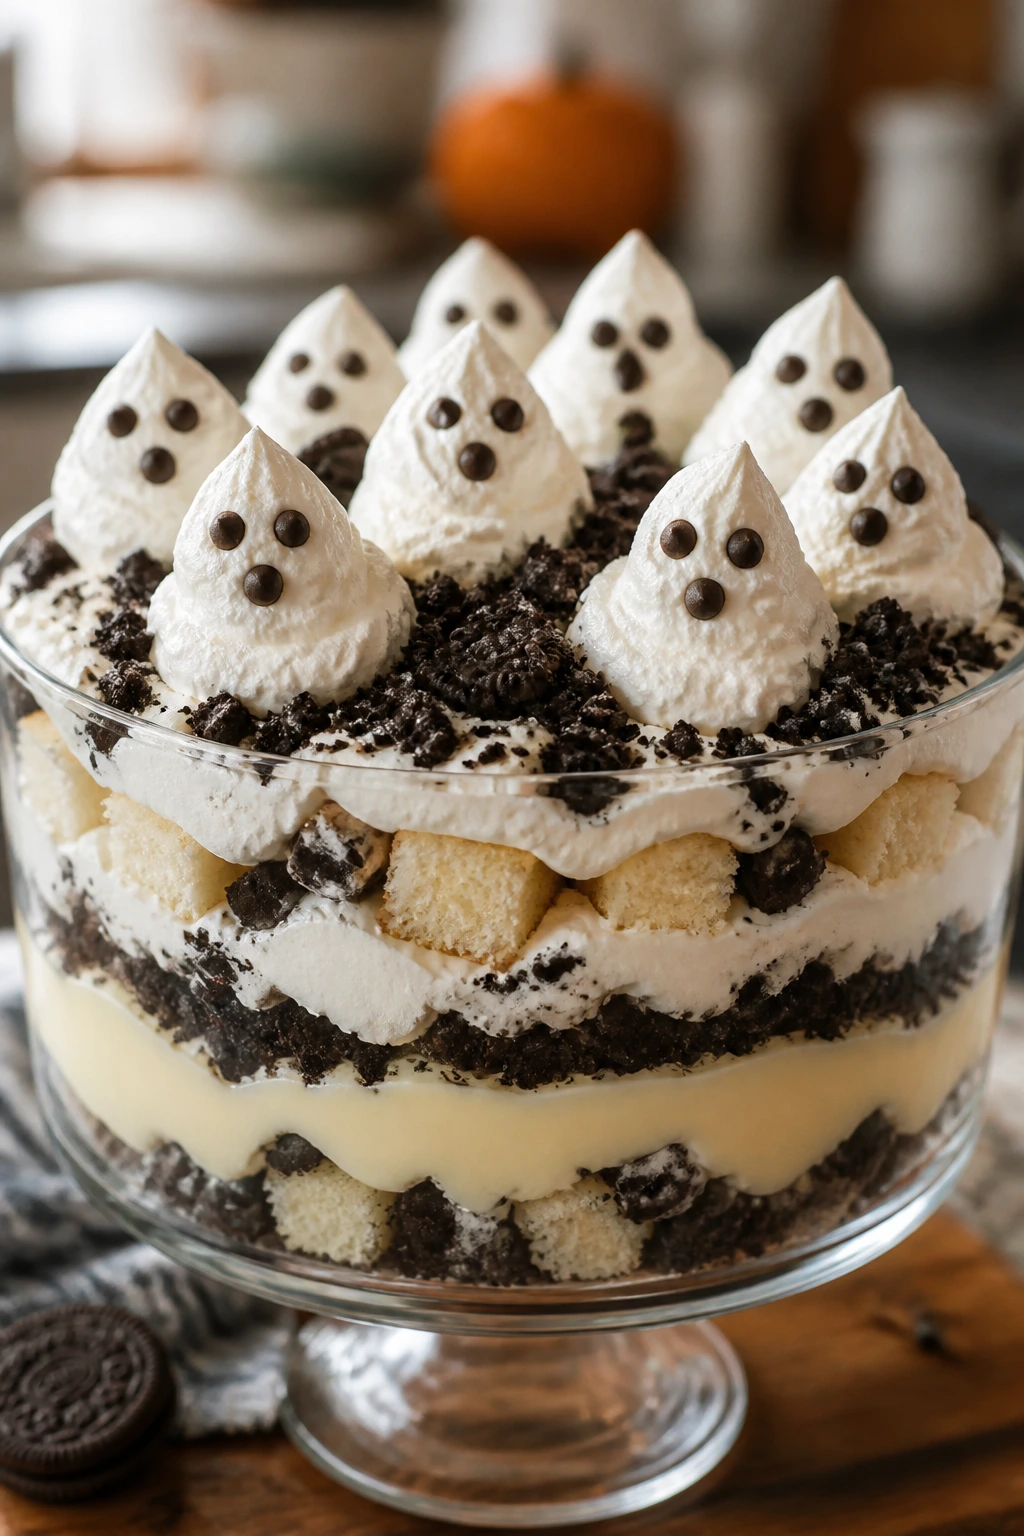
If a dessert can be stuffed with Oreos and still look neat in a bowl, I’m paying attention. This trifle is all soft vanilla cream, dark cookie crumbs, and a ghostly top of whipped swirls that looks festive without asking you to pipe anything perfect.
Why It Works: Cookies and cream desserts live or die by the cookie texture, and this version keeps enough chunks to remind you what you’re eating. Vanilla pudding softens the cookie pieces just enough, while the whipped topping makes the whole thing feel lighter. The ghost faces on top are silly, yes, but they also give kids a target and keep the dessert from looking plain.
Key Ingredients:
- 1 vanilla cake or pound cake, cubed
- 2 (3.4-ounce) boxes instant vanilla pudding mix
- 3 cups cold milk
- 24 Oreo cookies, roughly chopped
- 2 cups whipped topping
- 1/2 cup mini chocolate chips for faces
- 1 tablespoon black decorating gel, optional
Quick Steps:
- Whisk the pudding with milk until thick.
- Fold 1 cup whipped topping into the pudding.
- Layer cake cubes, pudding, and chopped Oreos.
- Repeat the layers.
- Pipe or spoon the remaining whipped topping into ghost shapes on top.
- Add chocolate chip eyes and a little gel mouth.
- Chill 20 minutes.
Equipment for This Recipe:
- Mixing bowl
- Trifle bowl
- Spoon or piping bag
- Knife for chopping cookies
How to Serve This Dish: Serve in jars if you want the ghost faces to sit upright. A cold glass of milk is the obvious pairing, and honestly, it’s the right one.
Pro Tips for This Recipe:
- Keep some cookie pieces large so the trifle doesn’t turn into black mud.
- Chill the bowl before assembling if your kitchen runs warm.
- Use bakery pound cake if you want the neatest layers.
Variations on This Dish:
- Mint Ghost Trifle: Use mint Oreos for a colder flavor.
- Chocolate Ghost Trifle: Swap vanilla cake for chocolate cake.
Common Mistakes to Avoid with This Dish:
- Don’t chop the cookies too finely. You need texture, not dust.
- Don’t pipe ghost tops too early or they soften before serving.
15. Maple Pecan Pumpkin Trifle
Maple and pumpkin are old friends, and when pecans join the party, the bowl gets a deeper, nuttier flavor that feels more grown-up than the candy-heavy options. This is one of the easiest trifles to make look polished without much effort.
Why It Works: Pumpkin pudding carries the maple flavor well, and pecans bring a toasted crunch that stands up to chilling. Pound cake gives the layers enough structure to hold the creamy filling, which matters more here than in some of the softer desserts. A small pinch of cinnamon ties the whole thing together without shouting.
Key Ingredients:
- 1 pound cake, cubed
- 2 cups pumpkin pudding or vanilla pudding mixed with 1/2 cup pumpkin purée
- 2 tablespoons maple syrup
- 2 cups whipped topping
- 1 cup toasted pecans, chopped
- 1 teaspoon cinnamon
- 1/4 teaspoon salt
Quick Steps:
- Stir maple syrup, cinnamon, and salt into the pudding.
- Fold in 1 cup whipped topping.
- Layer pound cake, pumpkin pudding, and pecans.
- Repeat the layers.
- Spread the remaining whipped topping on top and finish with more pecans.
- Chill 20 to 30 minutes.
Equipment for This Recipe:
- Mixing bowl
- Trifle bowl
- Spoon
- Skillet for toasting pecans
How to Serve This Dish: Serve it cold with a spoon that can reach the bottom of the pecans. Hot coffee or black tea keeps the maple from feeling too sticky-sweet.
Pro Tips for This Recipe:
- Toast the pecans until you can smell them from across the kitchen.
- Use real maple syrup, not pancake syrup, if you want the flavor to land cleanly.
- A little salt makes the pumpkin taste fuller, not saltier.
Variations on This Dish:
- Bourbon Maple Pumpkin: Add a teaspoon of bourbon for an adult version.
- Apple Maple Pecan: Fold in 1 cup chopped spiced apples.
Common Mistakes to Avoid with This Dish:
- Don’t use too much maple syrup. It can thin the pudding.
- Don’t skip the salt; the dessert tastes flatter without it.
16. Cherry Almond Witch Hat Trifle
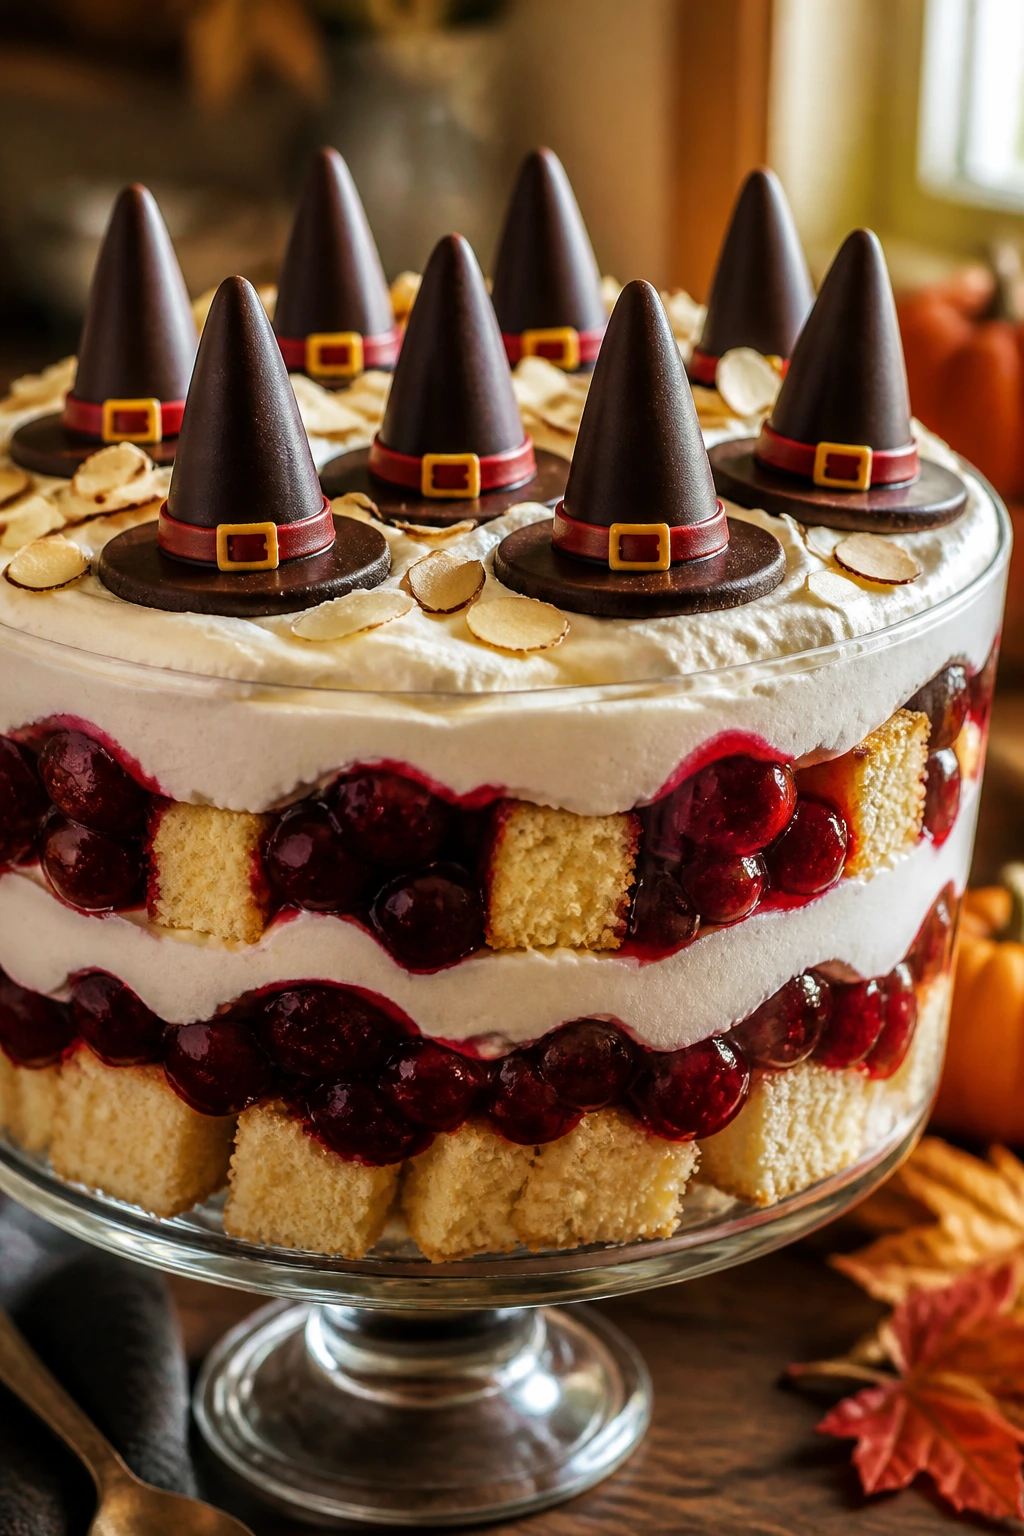
Cherry and almond have that bakery-shop flavor that feels more dressed up than it actually is. Add a few chocolate witch hats on top and the bowl looks like you paid attention to every detail, even if you assembled it between emails.
Why It Works: Almond cake has enough flavor to stand up to sweet cherry filling without turning muddy. A cream layer scented with almond extract makes the cherry taste brighter, and the slight bitterness of sliced almonds cuts the richness at the end. It’s a good example of how one extract can carry a whole dessert.
Key Ingredients:
- 1 almond or vanilla cake, cubed
- 2 cups cherry pie filling
- 2 cups whipped topping
- 1 teaspoon almond extract
- 8 chocolate cookies or chocolate-dipped cookies for witch hats
- 1/2 cup sliced almonds, toasted
- 1/2 cup vanilla pudding, optional for a thicker layer
Quick Steps:
- Stir almond extract into the whipped topping, or fold it into vanilla pudding if you want extra body.
- Layer cake cubes, cherry pie filling, and the almond cream.
- Repeat the layers.
- Top with the remaining cream, toasted almonds, and witch hat cookies.
- Chill 20 minutes.
Equipment for This Recipe:
- Mixing bowl
- Spoon
- Trifle bowl
- Small skillet for almonds
How to Serve This Dish: Serve it in narrow glasses if you want the cherry layer to show through clearly. I like this with tea or a glass of cold milk, since the almond flavor can get lost beside anything too strong.
Pro Tips for This Recipe:
- Use just enough almond extract to perfume the cream; too much turns bitter.
- Toast the almonds lightly so they stay crisp.
- Place the witch hats after chilling so they don’t soften.
Variations on This Dish:
- Black Cherry Witch Hat: Use dark sweet cherries for a deeper color.
- Chocolate Almond Version: Add a thin chocolate pudding layer under the cherries.
Common Mistakes to Avoid with This Dish:
- Don’t pour in the cherry filling without draining excess syrup if it looks loose.
- Don’t overdo the extract; almond gets loud fast.
17. Lemon Berry Eyeball Trifle
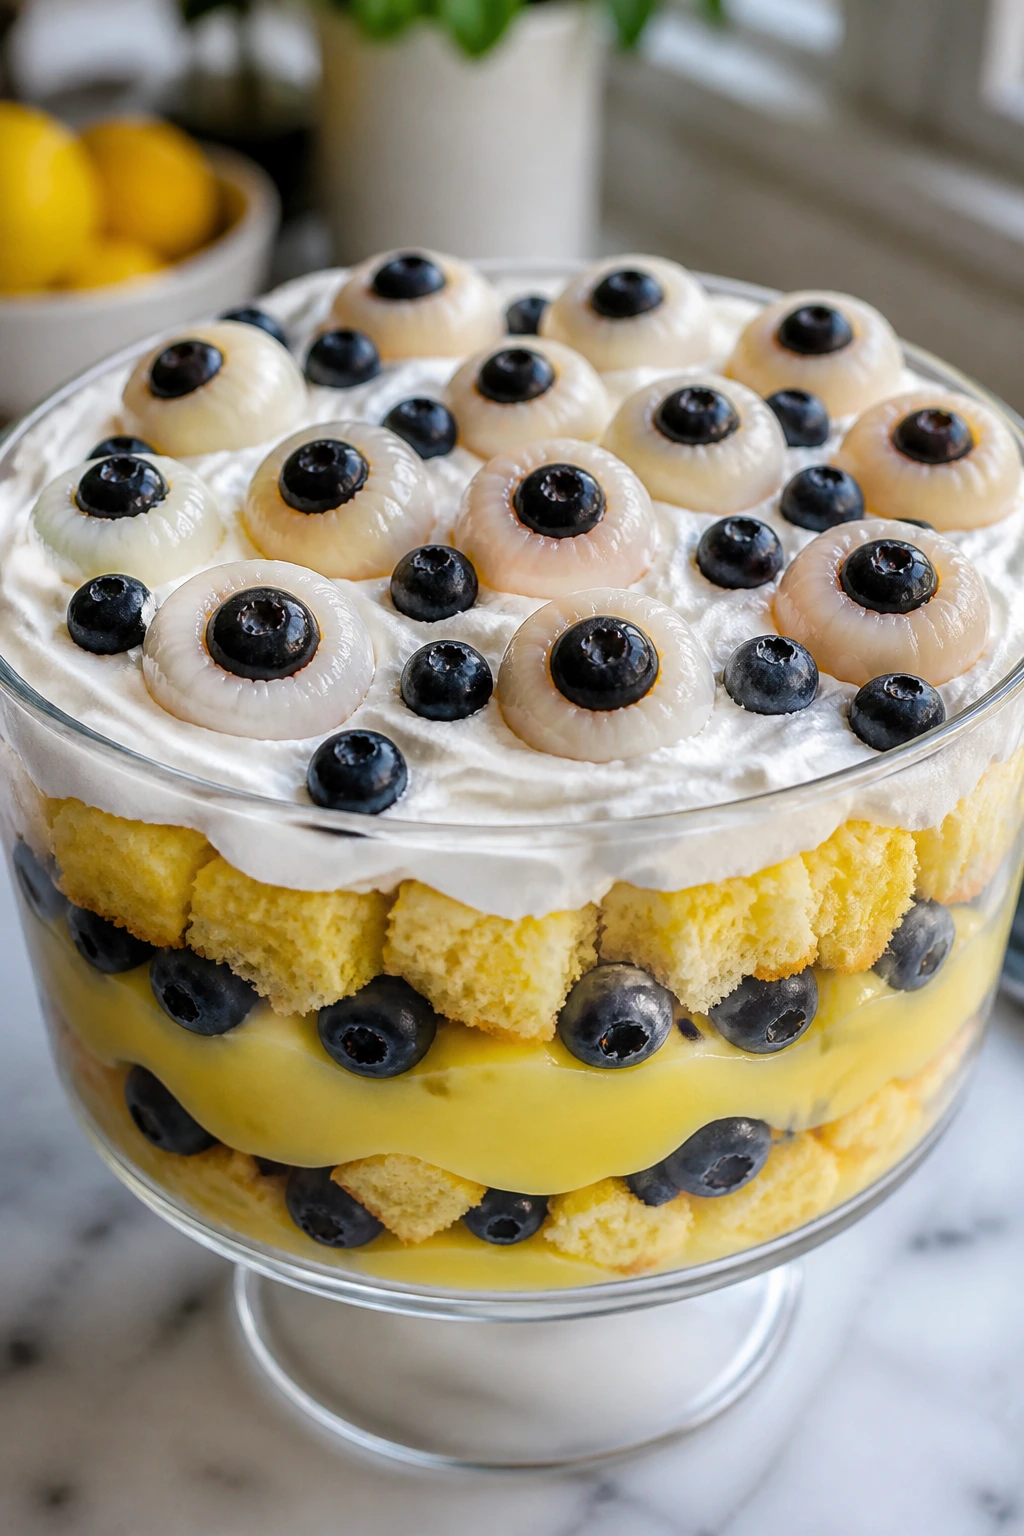
A lemon trifle sounds cheerful until you top it with little blueberry-and-lychee “eyeballs,” and then it turns deliciously weird. The tartness keeps the dessert from going flat, which is handy when you’re working with whipped layers and cake cubes.
Why It Works: Lemon pudding brings brightness that can cut through richer Halloween desserts on the same table. Blueberries tucked into lychee halves give you the eyeball look with a juicy bite that still tastes like fruit instead of novelty candy. The cream layer stays soft, but the citrus keeps it awake.
Key Ingredients:
- 1 lemon or vanilla cake, cubed
- 2 cups lemon pudding
- 2 cups whipped topping
- 1 cup fresh blueberries
- 1 (11-ounce) can lychees, drained
- 1 tablespoon lemon zest
- 1/2 cup crushed vanilla wafers
Quick Steps:
- Stir lemon zest into the pudding.
- Fold in 1 cup whipped topping.
- Layer cake cubes, lemon pudding, and crushed wafers.
- Repeat the layers.
- Top with the remaining whipped topping.
- Place a blueberry inside each lychee half and set them on top like eyeballs.
- Chill 20 minutes.
Equipment for This Recipe:
- Mixing bowl
- Spoon
- Trifle bowl
- Small knife, if you need to halve the lychees carefully
How to Serve This Dish: Serve this cold in clear cups so the eyeballs show up near the top. Sparkling water with lemon or plain iced tea works well because the dessert already has a sharp citrus edge.
Pro Tips for This Recipe:
- Drain the lychees well, or the top gets slippery.
- Keep the blueberries dry so they sit nicely inside the fruit.
- Add the eyeballs just before serving if you want them to look fresh.
Variations on This Dish:
- Raspberry Eyeball Trifle: Swap blueberries for raspberries inside the lychees.
- Lemon Coconut Version: Add toasted coconut to the top for extra texture.
Common Mistakes to Avoid with This Dish:
- Don’t use too much lemon zest or the pudding gets bitter.
- Don’t place the eyeballs too early if you want them to stay glossy.
18. Nutella Marshmallow Night Sky Trifle
This is the dessert version of a late-night sky: dark, creamy, and dotted with little white marshmallows that look like stars. Nutella gives the bowl a hazelnut-chocolate depth that feels richer than standard pudding, which is a welcome shift when the rest of the table leans sugary.
Why It Works: Nutella folds into whipped cream more easily than plain cocoa, so the filling stays silky. Brownie cubes give the trifle a firm base, and chocolate wafer crumbs add a dry crunch that keeps the spoon from sinking straight through. Mini marshmallows are more than decoration here; they soften just enough in the chill to feel a little cloud-like.
Key Ingredients:
- 1 pan brownies, cooled and cubed
- 1 cup Nutella
- 2 cups heavy cream
- 1/2 cup powdered sugar
- 2 cups chocolate pudding
- 1 cup mini marshmallows
- 1/2 cup chocolate wafer crumbs
Quick Steps:
- Whip the cream and powdered sugar to soft peaks.
- Fold 1/2 cup Nutella into the whipped cream.
- Layer brownies, chocolate pudding, and wafer crumbs.
- Repeat the layers, then spread the Nutella cream on top.
- Add mini marshmallows and small drizzles of warm Nutella.
- Chill 20 to 30 minutes.
Equipment for This Recipe:
- Hand mixer
- Mixing bowl
- Trifle bowl
- Spoon or piping bag
How to Serve This Dish: Serve it in dark bowls if you have them, or clear jars if you want the layers to show. Coffee is the best beverage partner here, though cold milk keeps it kid-friendly.
Pro Tips for This Recipe:
- Warm the Nutella for 10 seconds before drizzling so it moves easily.
- Use soft peaks, not stiff peaks, in the cream or the filling turns grainy.
- Keep the wafer crumbs in a middle layer so they stay crunchy longer.
Variations on This Dish:
- Hazelnut Crunch Night Sky: Add chopped toasted hazelnuts on top.
- White Star Version: Swap chocolate pudding for vanilla pudding and keep the Nutella cream.
Common Mistakes to Avoid with This Dish:
- Don’t overwhip the cream; Nutella makes it feel thicker than it is.
- Don’t use stale brownies that crumble into dust. Slightly fudgy is better.
19. Banana Pudding Pumpkin Patch Trifle
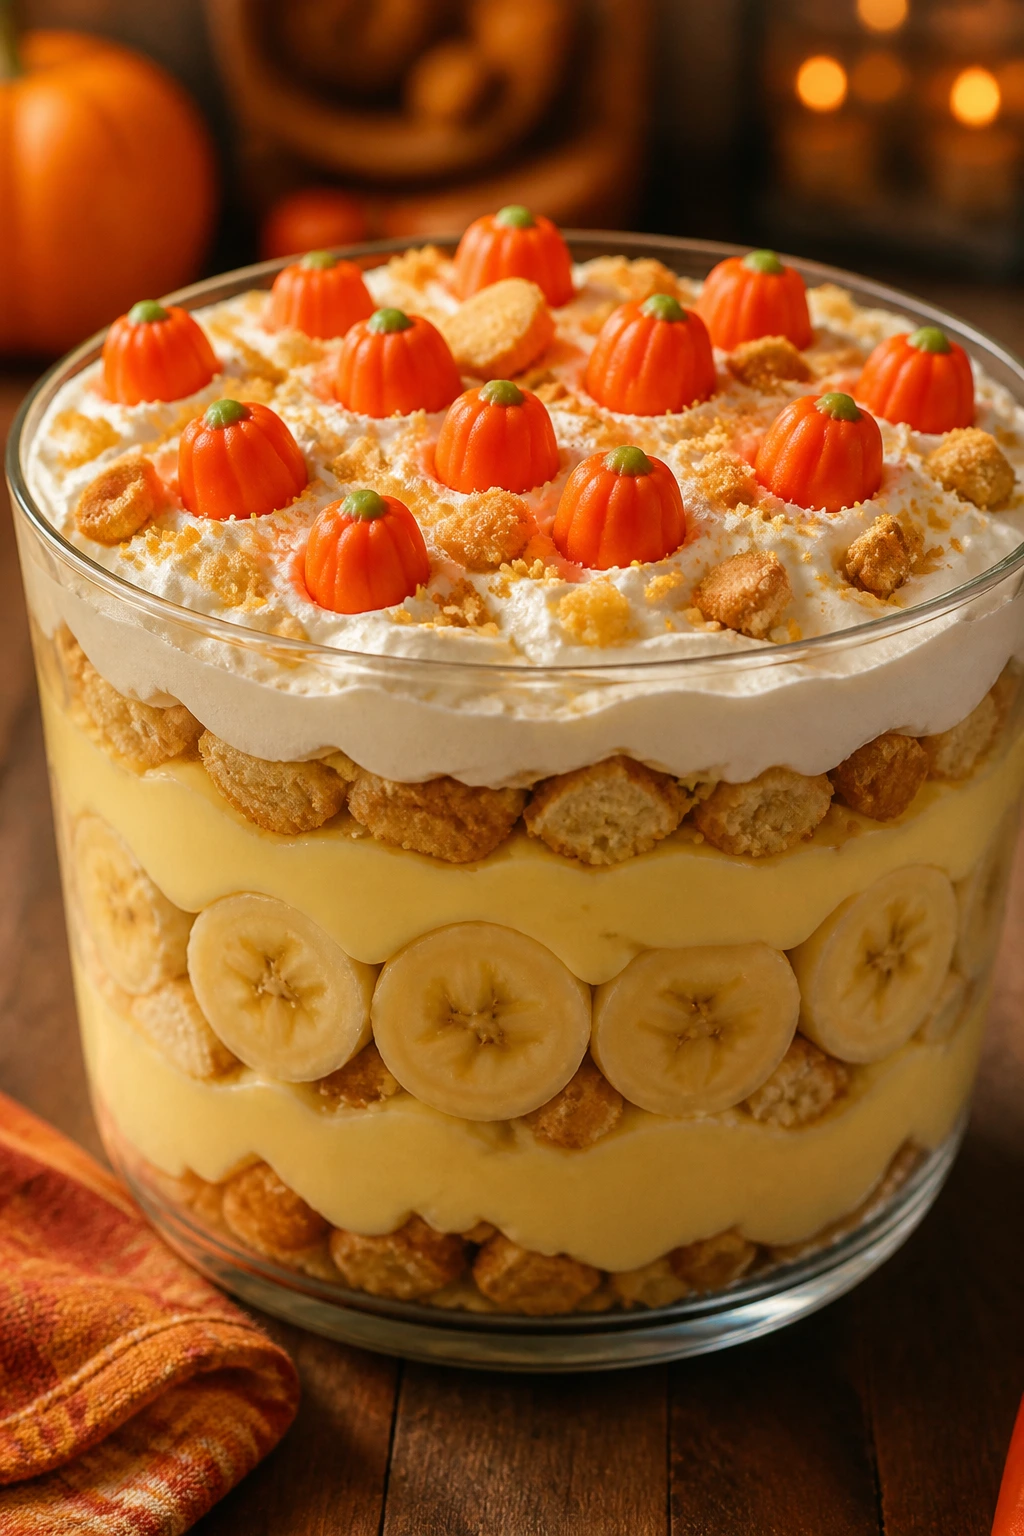
Banana pudding already has a nostalgic pull, and once you add little candy pumpkins to the top, it becomes a Halloween dessert that doesn’t need much explaining. The vanilla wafers and banana slices keep it grounded, which is why it disappears so fast.
Why It Works: Banana pudding is already built for layering because the cookies soften just enough to become part of the structure. Fresh banana adds aroma and sweetness, while whipped topping keeps the whole dessert airy. Candy pumpkins on top do the Halloween job without changing the flavor much, which is a good thing here.
Key Ingredients:
- 4 ripe bananas, sliced
- 2 (3.4-ounce) boxes instant vanilla pudding mix
- 3 cups cold milk
- 1 (8-ounce) tub whipped topping
- 2 cups vanilla wafers
- 1 cup whipped cream or extra whipped topping for the top
- 1 cup candy pumpkins
Quick Steps:
- Whisk the pudding with milk until thick.
- Fold in 1 cup whipped topping.
- Layer wafers, banana slices, and pudding.
- Repeat the layers, ending with pudding.
- Top with whipped cream and candy pumpkins.
- Chill no more than 2 hours if you want the bananas to stay bright.
Equipment for This Recipe:
- Mixing bowl
- Trifle bowl
- Knife
- Spoon
How to Serve This Dish: Serve it as soon as the top is set. Banana pudding turns more relaxed as it sits, so small bowls are the way to go. A glass of milk fits, but so does iced coffee if you want a slightly sharper contrast.
Pro Tips for This Recipe:
- Slice the bananas right before layering so they don’t brown.
- Put a thin pudding layer on top of the bananas to slow discoloration.
- Use the ripest bananas you can find without having them turn mushy.
Variations on This Dish:
- Chocolate Banana Patch: Add a thin layer of chocolate pudding between the banana layers.
- Peanut Butter Banana Patch: Swirl 1/3 cup peanut butter into the pudding.
Common Mistakes to Avoid with This Dish:
- Don’t make this too far ahead or the banana slices dull and soften too much.
- Don’t bury the candy pumpkins; they belong on top where they stay bright.
20. Coconut Lime Witch’s Brew Trifle
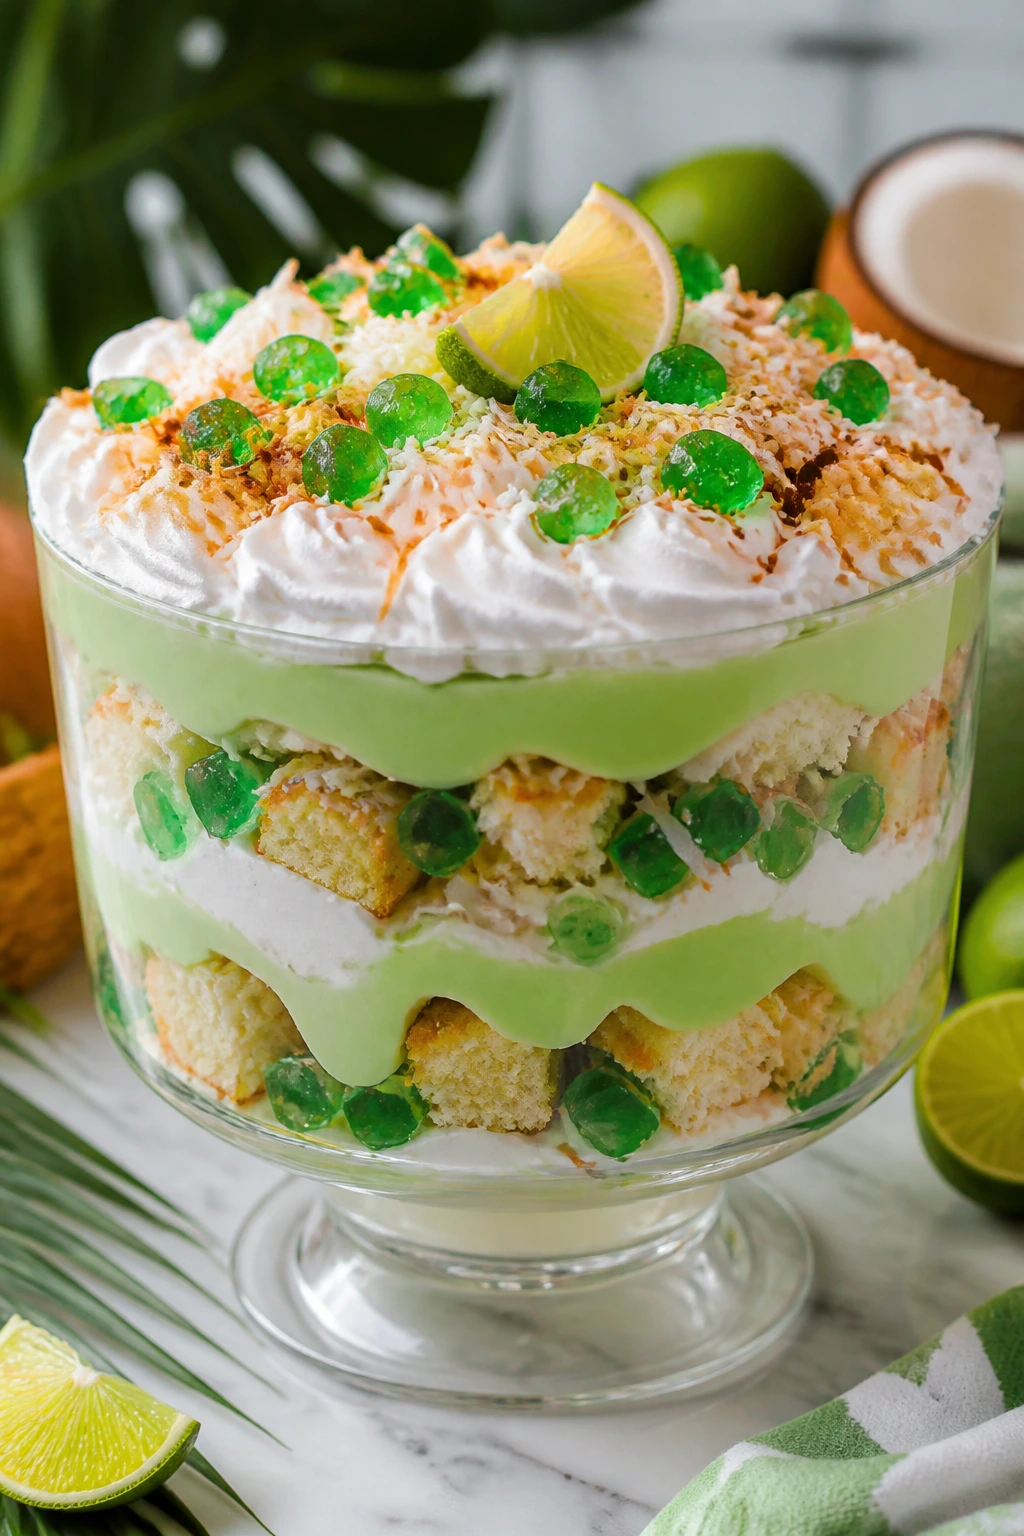
This one tastes like a bright pause in a table full of chocolate. Coconut and lime bring a clean, tropical edge that keeps the dessert from feeling weighed down, and the green color makes the whole thing look mischievous enough for Halloween.
Why It Works: Coconut cake gives the trifle a soft, fragrant base, while lime pudding or lime-curd-style filling adds the sharpness it needs. Toasted coconut brings crunch and scent, and the whipped layer smooths out the citrus so it doesn’t feel puckering. It’s a smart choice when you want one dessert on the table that tastes a little fresher than everything else.
Key Ingredients:
- 1 coconut cake, cubed
- 2 cups lime pudding
- 2 cups whipped topping
- 1 teaspoon lime zest
- 1 cup toasted shredded coconut
- 1/2 cup green jelly candies or kiwi slices
- 1/4 cup crushed vanilla cookies
Quick Steps:
- Stir lime zest into the pudding.
- Fold in 1 cup whipped topping.
- Layer cake cubes, lime pudding, crushed cookies, and a few green candies.
- Repeat the layers.
- Top with the remaining whipped topping and toasted coconut.
- Chill 20 minutes.
Equipment for This Recipe:
- Mixing bowl
- Trifle bowl
- Spoon
- Skillet for toasting coconut
How to Serve This Dish: Serve this in clear bowls to show off the pale green layers. A cold sparkling water with lime or plain iced tea keeps the dessert crisp and bright.
Pro Tips for This Recipe:
- Toast the coconut until just golden; it can go from pale to bitter quickly.
- Add kiwi only right before serving if you use it, since it softens fast.
- Keep the lime zest fine so it disappears into the cream instead of feeling stringy.
Variations on This Dish:
- Pineapple Lime Brew: Add pineapple chunks for extra juiciness.
- Mint Coconut Swap: Add a few chopped mint candies for a colder flavor.
Common Mistakes to Avoid with This Dish:
- Don’t use too much lime juice in the pudding or it thins out.
- Don’t let the toasted coconut sit uncovered for long; it loses crunch fast.
21. Strawberry Shortcake Frankenstein Trifle
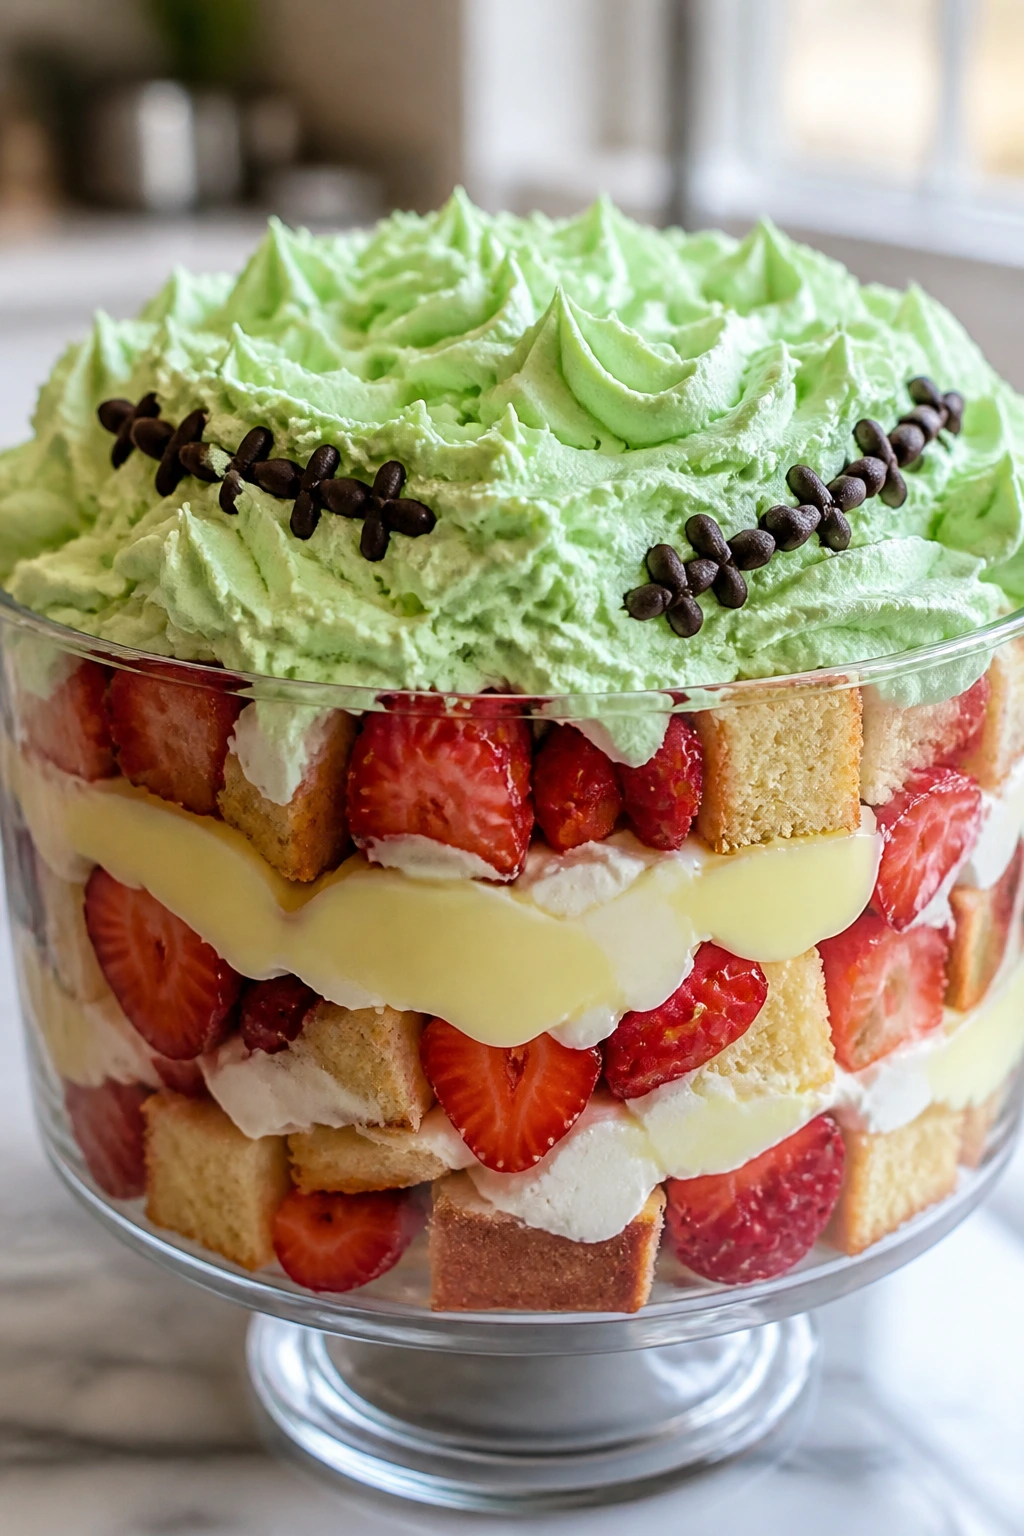
Strawberry shortcake has the kind of cheerful sweetness that turns eerie fast once you give it a green top and a few dark chocolate details. It’s one of the easiest Halloween trifles to make look “decorated” because strawberries already bring that bold red color.
Why It Works: Strawberry cake or shortcake cubes soak up the cream without dissolving, and vanilla pudding keeps the fruit layer from leaking into the bottom. A little green-tinted whipped topping turns the top into Frankenstein hair, which is goofy in the best way. The fruit keeps the dessert from feeling too heavy after a chocolate-laden meal.
Key Ingredients:
- 1 strawberry cake or shortcake, cubed and cooled
- 2 cups sliced strawberries
- 2 cups vanilla pudding
- 2 cups whipped topping
- 2 to 3 drops green food coloring
- 1/2 cup mini chocolate chips
- 1/2 cup crushed vanilla wafers
Quick Steps:
- Tint half the whipped topping green with food coloring.
- Layer cake cubes, strawberries, pudding, and crushed wafers.
- Repeat the layers.
- Spread the green whipped topping on top.
- Add chocolate chips for “hair” or stitches.
- Chill 20 minutes.
Equipment for This Recipe:
- Mixing bowl
- Trifle bowl
- Spoon
- Small spatula
How to Serve This Dish: Spoon it into cups if you want the green top to look like Frankenstein’s hairline. A glass of milk or strawberry lemonade works well, depending on whether you want the drink to echo the fruit or cool it down.
Pro Tips for This Recipe:
- Pat the strawberries dry after slicing so the bowl doesn’t turn pink at the bottom.
- Tint the topping slowly; one extra drop can make it look neon.
- Use cake cubes that are sturdy enough to hold the berry juice.
Variations on This Dish:
- Mixed Berry Monster: Swap in raspberries and blueberries for a darker, more chaotic look.
- Chocolate Frankenstein: Use chocolate cake and keep the green topping for contrast.
Common Mistakes to Avoid with This Dish:
- Don’t pile in wet berries without draining them first.
- Don’t over-color the whipped topping; a pale green looks more like frosting and less like paint.
22. Mini Cheesecake Jar Trifles with Halloween Sprinkles
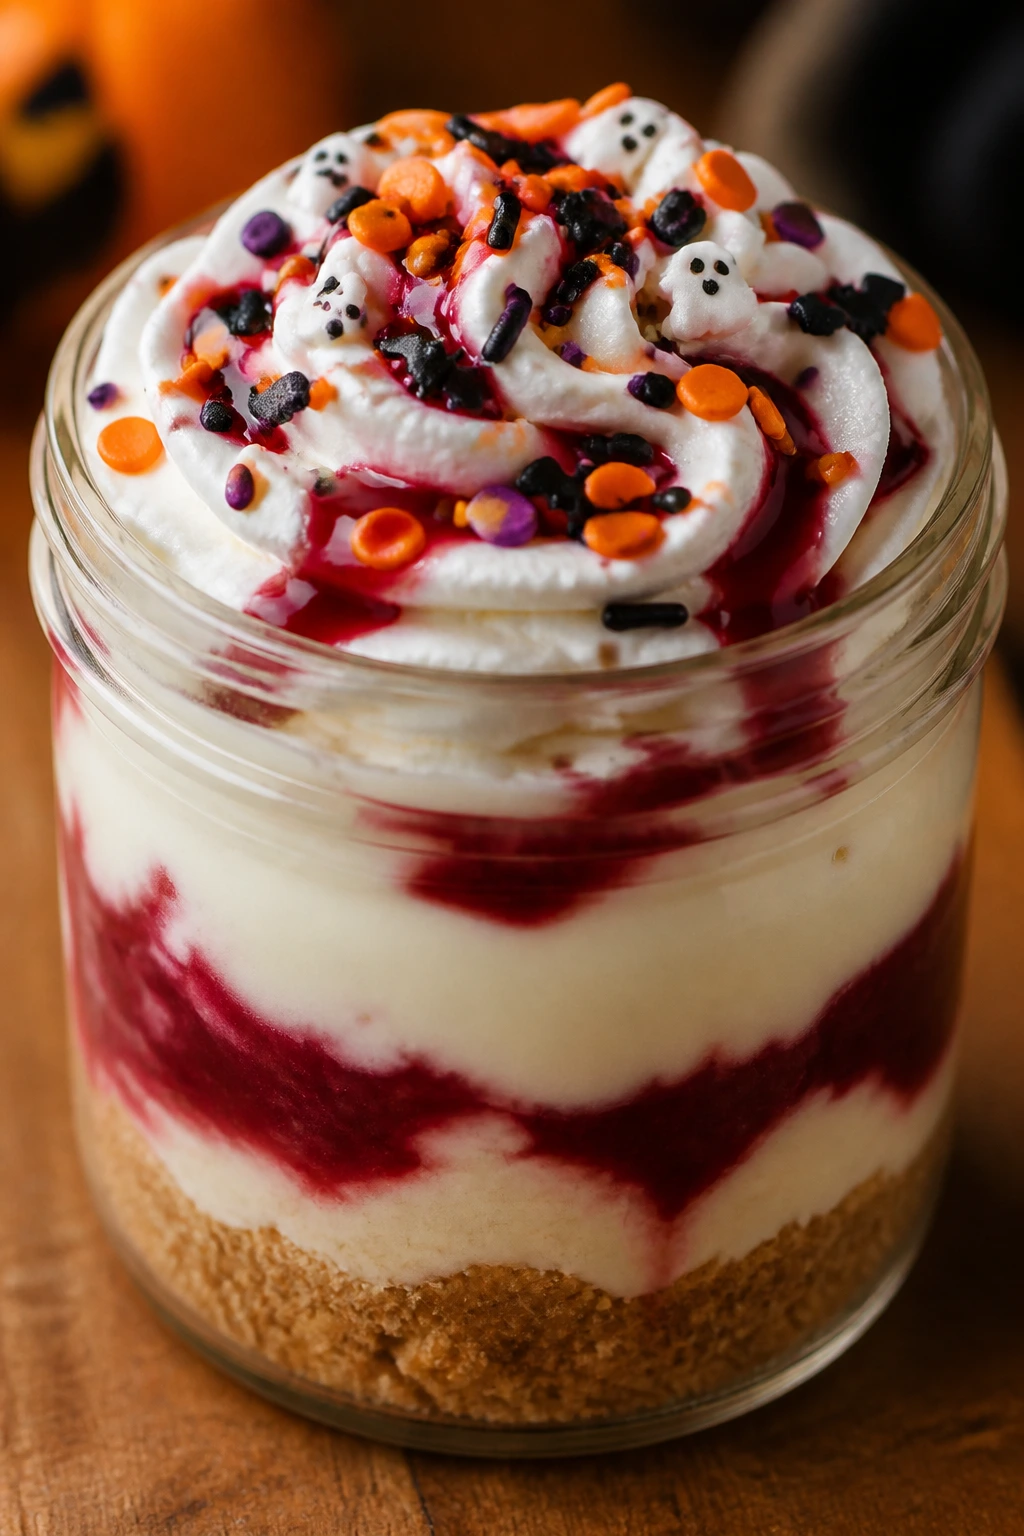
Jar trifles are the answer when you want the flavor of cheesecake without committing to a full springform pan. They travel well, look tidy, and let you decorate each serving differently, which is handy when half the fun is giving every jar its own personality.
Why It Works: Cheesecake filling made with cream cheese and whipped topping is thick enough to hold up in a small jar, and a graham crust gives you the familiar base without any baking beyond crushing crumbs. A berry or chocolate swirl adds color, while Halloween sprinkles make each jar look finished with almost no effort. The portion size is also civilized, which helps.
Key Ingredients:
- 2 cups graham cracker crumbs
- 4 tablespoons melted butter
- 8 ounces cream cheese, softened
- 1/2 cup powdered sugar
- 1 teaspoon vanilla extract
- 2 cups whipped topping
- 1/2 cup raspberry sauce or chocolate sauce
- 1/4 cup Halloween sprinkles
Quick Steps:
- Mix graham crumbs and melted butter until the crumbs look like wet sand.
- Press a spoonful into each jar.
- Beat cream cheese, powdered sugar, and vanilla until smooth.
- Fold in whipped topping.
- Layer cheesecake filling over the crust and add a spoonful of sauce.
- Repeat if the jars are tall enough, then top with sprinkles.
- Chill at least 30 minutes.
Equipment for This Recipe:
- Small jars or cups
- Mixing bowl
- Hand mixer
- Spoon or piping bag
How to Serve This Dish: Serve these cold, straight from the fridge, with tiny spoons. They’re the easiest dessert on this list to hand to guests at the door or pack for a party tray.
Pro Tips for This Recipe:
- Press the crust down firmly so it doesn’t float up into the filling.
- Use a piping bag if you want the layers to look cleaner in small jars.
- Add sprinkles right before serving if you want the colors to stay sharp.
Variations on This Dish:
- Chocolate Cheesecake Jars: Use chocolate cookie crumbs instead of graham crumbs.
- Pumpkin Cheesecake Jars: Fold pumpkin purée and pumpkin spice into the filling.
Common Mistakes to Avoid with This Dish:
- Don’t overfill the jars; you need space for the top garnish.
- Don’t make the filling runny. The jars need a thick cream to stay neat.
Why Trifles Win on Halloween Weeknights
The whole appeal of a Halloween trifle is mechanical as much as it is decorative. You get soft layers, creamy layers, and crunchy layers, and each one does a job the others can’t. Cake carries flavor, pudding holds moisture, cookies or nuts keep the spoon interesting, and the top layer is where you get to play.
That structure matters more than people think. If you put every texture in one bowl and stir it around, the dessert loses its edges. A trifle keeps the contrast alive. The first spoonful can be all cream and crumbs, while the next one lands on a chunk of brownie or a pocket of fruit, and that keeps the whole bowl from tasting flat halfway through.
Weeknight-friendly trifles also forgive shortcuts in a way layered cakes never do. Bakery cake? Fine. Boxed pudding? Fine. Leftover brownies? Honestly, better than fine. The only real rule is to respect the order of the layers and give the filling a little time to settle. That’s why these desserts work when the clock is loud and the kitchen is small.
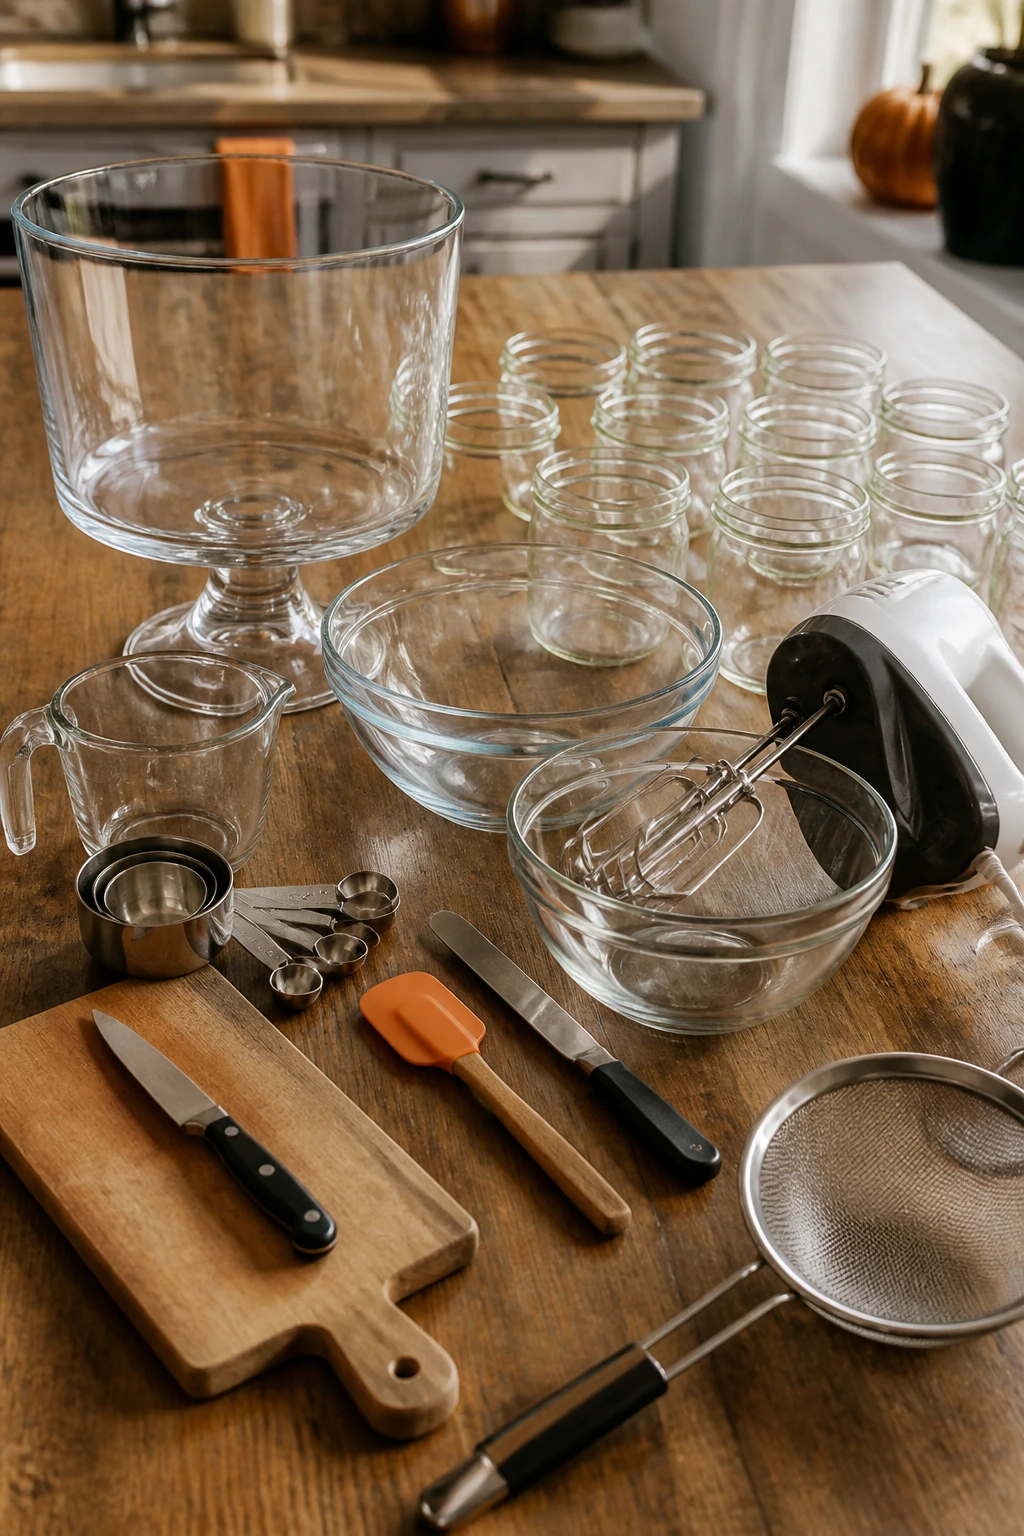
Essential Equipment for These Halloween Trifles
-
Large trifle bowl or deep glass bowl: The clear sides are the point; they show the layers and keep the dessert from looking like a mixed-up scoop.
-
8 to 12 small jars or dessert cups: Useful for parties, lunchbox-style treats, or when you want smaller portions that chill fast.
-
Hand mixer: Beats cream cheese, whipped cream, and pudding mixtures into a smooth base without much effort.
-
Mixing bowls in two sizes: One for the filling, one for crumbs or fruit. You’ll save yourself a sink full of crossed-up ingredients.
-
Rubber spatula: Better than a spoon for folding in whipped topping without knocking all the air out.
-
Offset spatula or spoon: Helps spread the top layer cleanly, especially when you want the bowl to look neat.
-
Measuring cups and spoons: Trifles are forgiving, but the cream-to-cake ratio still matters.
-
Small knife and cutting board: Handy for cubing cakes, slicing fruit, and trimming candy decorations.
-
Fine sieve: Useful for cocoa dusting, powdered sugar, or a cleaner finish on top.
Smart Shopping and Ingredient Tips
Buy the cake with the final texture in mind, not the prettiest label. For trifles, a slightly dense cake or brownie usually wins because it keeps its shape after chilling. Very airy sponge cake can work, but it sinks fast once pudding hits it. Bakery cake is often a better shortcut than a homemade sheet cake because it cools into cleaner cubes and usually tastes better after a night in the fridge.
Pudding is where a lot of people get sloppy, and it shows. Instant pudding is the best fit for these desserts because it sets quickly and holds the layers together. If you use cooked pudding, chill it until it’s fully firm before layering or the whole thing gets loose around the edges. Whole milk gives the cleanest texture; lower-fat milk works, but the filling will be softer.
For fruit, choose pieces that won’t bleed too fast. Canned pie filling is useful because it’s already cooked down and stable, while fresh berries need to be dry and fairly firm. If you’re using bananas or pears, slice them right before assembly. If you’re using citrus or juicy fruit, drain it well. I keep a paper towel under the cutting board for fruit that leaks, because those little puddles are exactly what turn a trifle muddy.
Crush cookies and pretzels a little more coarsely than you think. Powdery crumbs disappear into the cream. Bigger pieces stay interesting after chilling, and they’re the only reason some bites feel different from others. That little texture gap matters. A lot.
How to Serve These Recipes
Presentation: Clear glass matters more than fancy garnish here. Tall bowls, stemmed trifle glasses, or small jars let the layers do the visual work. If you’re serving a bowl centerpiece, keep the top layer neat and add the decorative candies or cookies right before bringing it out so they still look crisp.
Accompaniments: A cold glass of milk is the simplest match for the chocolate-heavy trifles. Coffee works beautifully with the caramel, tiramisu, Nutella, and brownie-based versions. For fruit-forward bowls, try sparkling apple cider, black tea, or plain iced tea with lemon. If the trifle already has a lot of sugar, keep the drink plain.
Portions: A full trifle bowl usually serves 8 to 10 generous scoops, though the richest versions, like peanut butter or tiramisu, feel better at 6 to 8 smaller servings. Jar trifles are easiest to portion because each cup naturally lands in the 1/2- to 3/4-cup range. If you’re scaling up, build more layers rather than making each layer taller; that keeps the bowl stable.
Beverage Pairing: For chocolate trifles, choose milk, cold brew, or black coffee. For pumpkin, apple, and chai versions, go with spiced tea, cider, or a light roast coffee. Citrus and berry trifles like sparkling water, lemonade, or unsweetened iced tea, which keeps the dessert from feeling syrupy.
Additional Tips and Flavor Boosters
Flavor Enhancement: A pinch of salt in chocolate, caramel, pumpkin, or peanut butter layers quietly sharpens the whole bowl. It doesn’t make the dessert salty. It just keeps the sweetness from flattening out after the first few bites.
Customization: Swap cake flavors the way you’d swap socks — chocolate cake can stand in for vanilla in most of these, and pound cake can replace almost anything when you need structure more than personality. If you have leftovers from another bake, cube them and use them before they dry out.
Serving Suggestions: Finish with one high-contrast garnish instead of five. Think a line of shaved chocolate, a handful of toasted nuts, a few candy eyes, or a dusting of cocoa. Too many toppings make the bowl look busy, and then the layers stop reading clearly.
Make-It-Yours: For gluten-free versions, use a gluten-free brownie or sponge and keep the cookies to certified gluten-free brands. For dairy-free versions, coconut whipped topping and dairy-free pudding do the job well enough. If you want a lower-sugar bowl, cut back on candy decorations and lean harder on fruit, citrus zest, or toasted nuts for personality.
Make-Ahead, Storage, and Reheating Guidance
Trifles are best treated like chilled desserts, not baked leftovers. Most of the collection can be assembled 2 to 12 hours ahead if the ingredients are sturdy, and many actually taste better after a short rest in the fridge because the cake softens and the cream settles into the crumbs. That said, the crunchy parts matter. Oreos, pretzels, wafers, and graham crumbs all soften over time, so if you want real texture, hold back some of the crunchy topping and add it right before serving.
For storage, cover the bowl tightly with plastic wrap or a fitted lid and refrigerate for up to 3 days in most cases. Fruit-heavy trifles like banana pudding are the exception; those are better within 24 hours, since bananas brown and soften quickly. Cheesecake jar trifles and chocolate-based trifles keep their shape longer than citrus or berry versions, which tend to bleed color into the cream after a day or two.
Freezing isn’t a good plan for most of these. Whipped topping, pudding, and fresh fruit change texture in the freezer and can turn grainy after thawing. If you absolutely need to freeze something, freeze only the cake cubes or brownies on their own for up to 2 months, then thaw them before layering. The assembled trifle should stay out of the freezer.
There’s no reheating step here, which is part of the charm. If a refrigerated trifle feels too firm, let it sit on the counter for 10 to 15 minutes before serving so the cream loosens a bit. If the top decorations look tired, add a fresh handful of crumbs, a drizzle of sauce, or a few candy pieces right before the bowl hits the table.
Clever Swaps and Seasonal Twists for the Whole Collection
Gluten-Free Graveyard Makeover: Use gluten-free brownies, gluten-free vanilla cake, or a certified gluten-free cookie crumb. The biggest difference is texture, so aim for slightly denser cake rather than airy sponge.
Dairy-Free Cauldron Swap: Coconut whipped topping, dairy-free pudding, and almond milk-based cakes can carry most of these recipes. Coconut and chocolate are the easiest pairings here because they hide the substitution cleanly.
Lower-Sugar Trick-or-Treat Version: Cut the candy decorations in half and let fruit, toasted nuts, cocoa, or citrus zest do more of the flavor work. The trifle still looks festive if you keep the colors bold and the top layer neat.
Fruit-Forward Harvest Twist: Lean on apples, pears, berries, and citrus, then keep the cake or cookie layer thinner. These versions are useful when you want a dessert that feels lighter after a heavy dinner.
Kid-Party Monster Mode: Add candy eyes, gummy worms, bright sprinkles, and neon whipped topping. The trick is to keep the flavors simple underneath so the decorations don’t have to fight the dessert.
Adult Dessert Table Version: Add espresso, spiced liqueur, cherry liqueur, or bourbon in small amounts to the filling or drizzle. A tablespoon is usually enough; you’re seasoning the dessert, not turning it into a cocktail.
Mistakes That Turn a Trifle Soggy
The first mistake is using warm components. Warm cake, hot brownie, or freshly cooked pudding will melt the cream layer before the bowl has a chance to settle. Cool everything to room temperature first, and if you’re in a hurry, spread the cake cubes on a tray so they lose heat faster.
The second mistake is flooding the bowl with too much liquid fruit or sauce. You want ribbons and pockets, not a full puddle at the bottom. Drain canned fruit, thicken thin sauces, and keep the drizzle light. If the ingredient can run, it will run.
The third mistake is crushing every crunchy ingredient into dust. Fine crumbs disappear into pudding and you lose the whole contrast that makes trifles good. Leave cookies, pretzels, or wafers in uneven pieces so some bits stay crisp after chilling.
Then there’s the overwhipped cream problem. It happens fast, especially with heavy cream or mascarpone. Once the cream turns grainy or stiff, it stops folding cleanly and can make the filling feel heavy. Stop at soft peaks unless the recipe asks for something firmer.
Finally, people decorate too early. Candy eyes sink, marshmallows sweat, cookie tombstones lean, and pretzels soften. If the garnish is meant to look sharp, add it just before serving. That one habit fixes more trifle problems than any other trick.
Halloween Trifle Questions People Actually Ask
Can I make these the night before?
Yes, most of them hold well overnight, especially the brownie, chocolate, pumpkin, and cheesecake jar versions. Keep back the crunchy garnish and add it right before serving so the top doesn’t go soft.
What kind of cake works best for a trifle?
A slightly dense cake works better than a very light sponge. Pound cake, boxed cake mix, brownies, and bakery sheet cakes all hold up well because they soak in flavor without falling apart.
How do I keep cookies or pretzels from getting soggy?
Use them as a middle or top layer, not the very bottom, and save some for the final garnish. Bigger pieces also stay crisp longer than fine crumbs, which is why I prefer rough chopping over pulverizing.
Can I use homemade whipped cream instead of whipped topping?
Absolutely, but it softens faster. If you go that route, whip it to soft peaks and serve the trifle the same day. Stabilized whipped cream is a smarter choice for anything you plan to chill longer.
Do I need a trifle bowl?
No. A deep glass mixing bowl, casserole dish, or individual jars all work. The only thing that matters is visibility; if you can see the layers, the dessert still reads as a trifle.
Which recipes travel best?
The jar trifles, cheesecake cups, and brownie-based versions travel the cleanest. Fruit-heavy bowls and anything with candy decorations are better assembled close to serving time.
Can I make these less sweet?
Yes. Cut the candy toppings, use dark chocolate instead of milk chocolate, add a pinch of salt, and lean on fruit or citrus for contrast. That keeps the dessert lively without making it sugary all the way through.
What if my pudding turns out too loose?
Chill it for 10 to 15 minutes before layering, and if it still feels thin, fold in a bit more whipped topping or use less milk next time. Loose pudding is the fastest way to lose clean layers.
Is there a good option for people who don’t like chocolate?
Definitely. The pumpkin cheesecake, candy corn vanilla, chai pear, lemon berry, coconut lime, and banana pudding versions all skip the heavy chocolate route and still feel festive.
A Sweet Way to End the Night
The nicest thing about Halloween trifle desserts is that they don’t demand perfection. They want layers, not precision. A clean spoonful of pudding, a soft cube of cake, a little crunch, and one ridiculous candy garnish on top — that’s enough to make the whole bowl feel finished.
If you keep the textures distinct and the decorations last-minute, these desserts carry the kind of easy, slightly homemade charm that suits a busy weeknight better than a showpiece cake ever could. Pick one that matches the ingredients already in your kitchen, and the dessert table takes care of itself from there.