
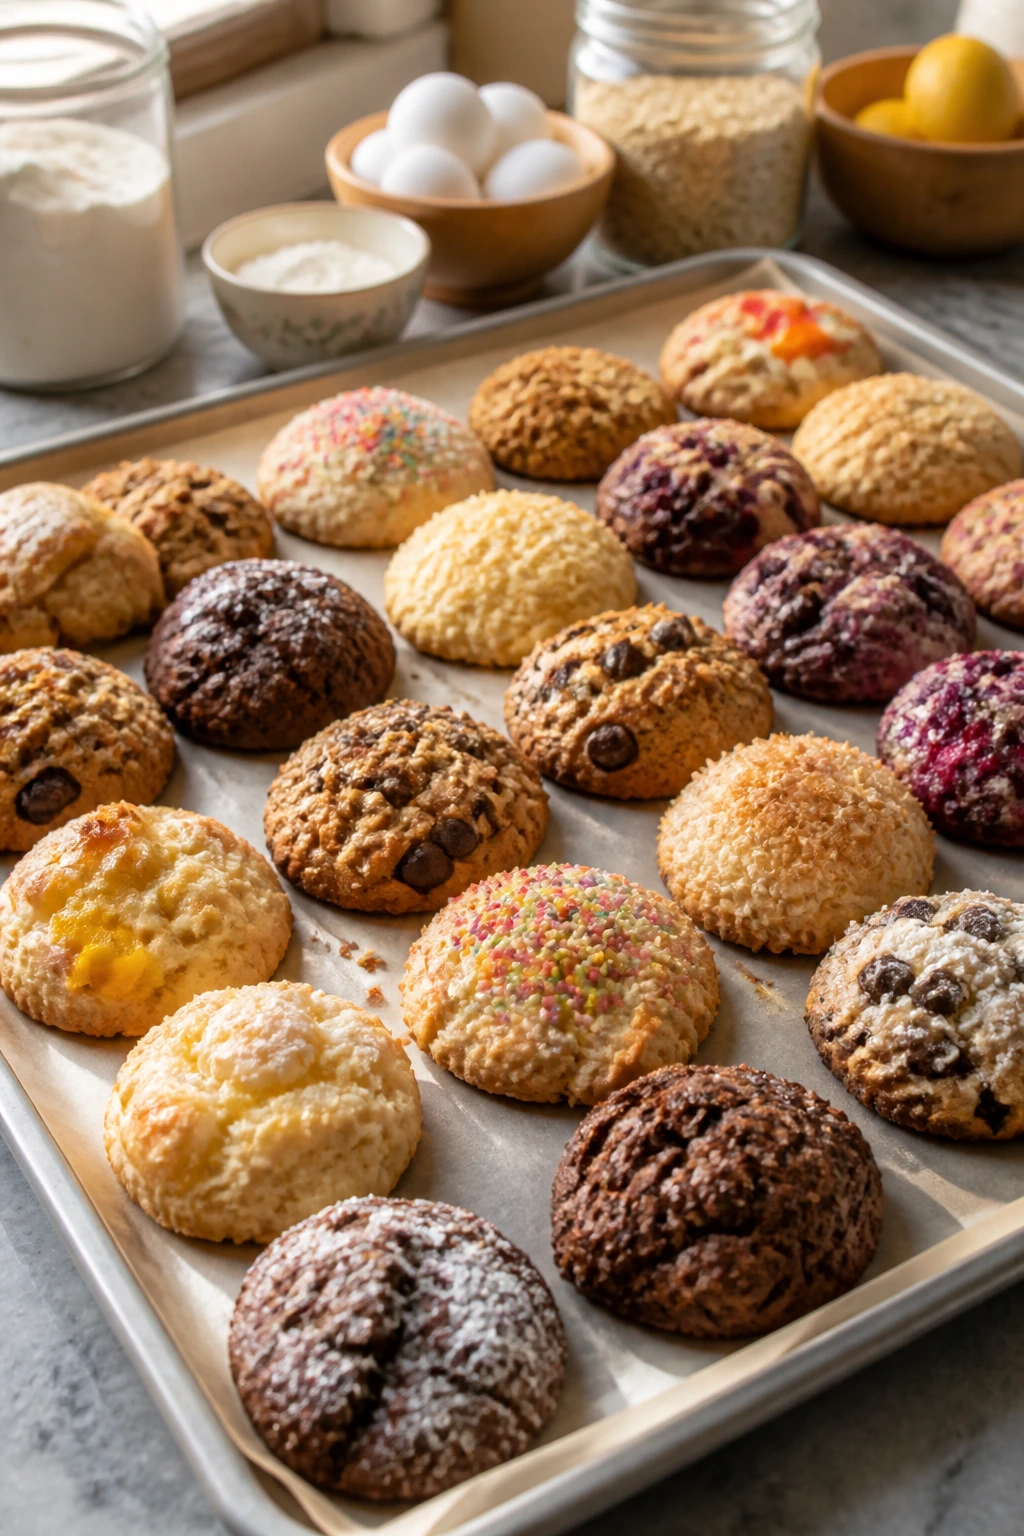
Easter drop cookies have a nice trick: they look festive without asking for a rolling pin, cookie cutters, or a sink full of bowls. A soft scoop of dough, a parchment-lined sheet, and a few pantry extras can do the whole job. Flour, sugar, butter, eggs, cocoa, oats, jam, citrus, and a handful of sprinkles will get you much farther than you’d think.
That’s why I keep coming back to drop cookies for spring dessert trays. They forgive small mistakes, they bake fast, and they let the flavor do the decorating — lemon zest, toasted coconut, jam centers, pastel candies, a little cinnamon, a little cocoa. If the butter is softened properly and the oven is honest about its temperature, these cookies land in that sweet spot between soft centers and clean edges. No piping bags. No fussy chilling unless the dough really needs it.
Some of these lean cheerful and bright. Some are plain-spoken and rich, the kind of cookie that disappears before anyone can decide whether to take a second one. All 25 are built from pantry staples first, with Easter color and spring flavor layered on top, and the trick is knowing which dough wants chocolate eggs, which one wants citrus glaze, and which one is better left alone. That’s where the fun starts.
Why These Pantry-Staple Cookies Earn Their Spot on the Tray
-
No special shopping trip: Most of these start with flour, sugar, butter, eggs, baking powder or soda, and one shelf-stable flavor booster like cocoa, oats, jam, or spices.
-
Fast bake time: Most scoops go into a 350°F oven for 9 to 12 minutes, which means you can rotate trays without babysitting a dozen fussy batches.
-
Festive without the fuss: Pastel sprinkles, mini chocolate eggs, shredded coconut, citrus glaze, and jam centers do the Easter part for you.
-
Easy to mix and match: You can set out a tray with one chocolate cookie, one citrus cookie, one fruit cookie, and one spiced cookie, and the plate looks intentional without extra work.
-
Better texture than decorated cutouts: Drop cookies keep a softer center and a more honest crumb, which is a blessing if you want cookies that taste like cookies and not like sugared cardboard.
-
Good for pantry rescue baking: A half bag of chocolate chips, an open jar of jam, or the last cup of oats can become the base of a finished cookie instead of sitting there in silence.
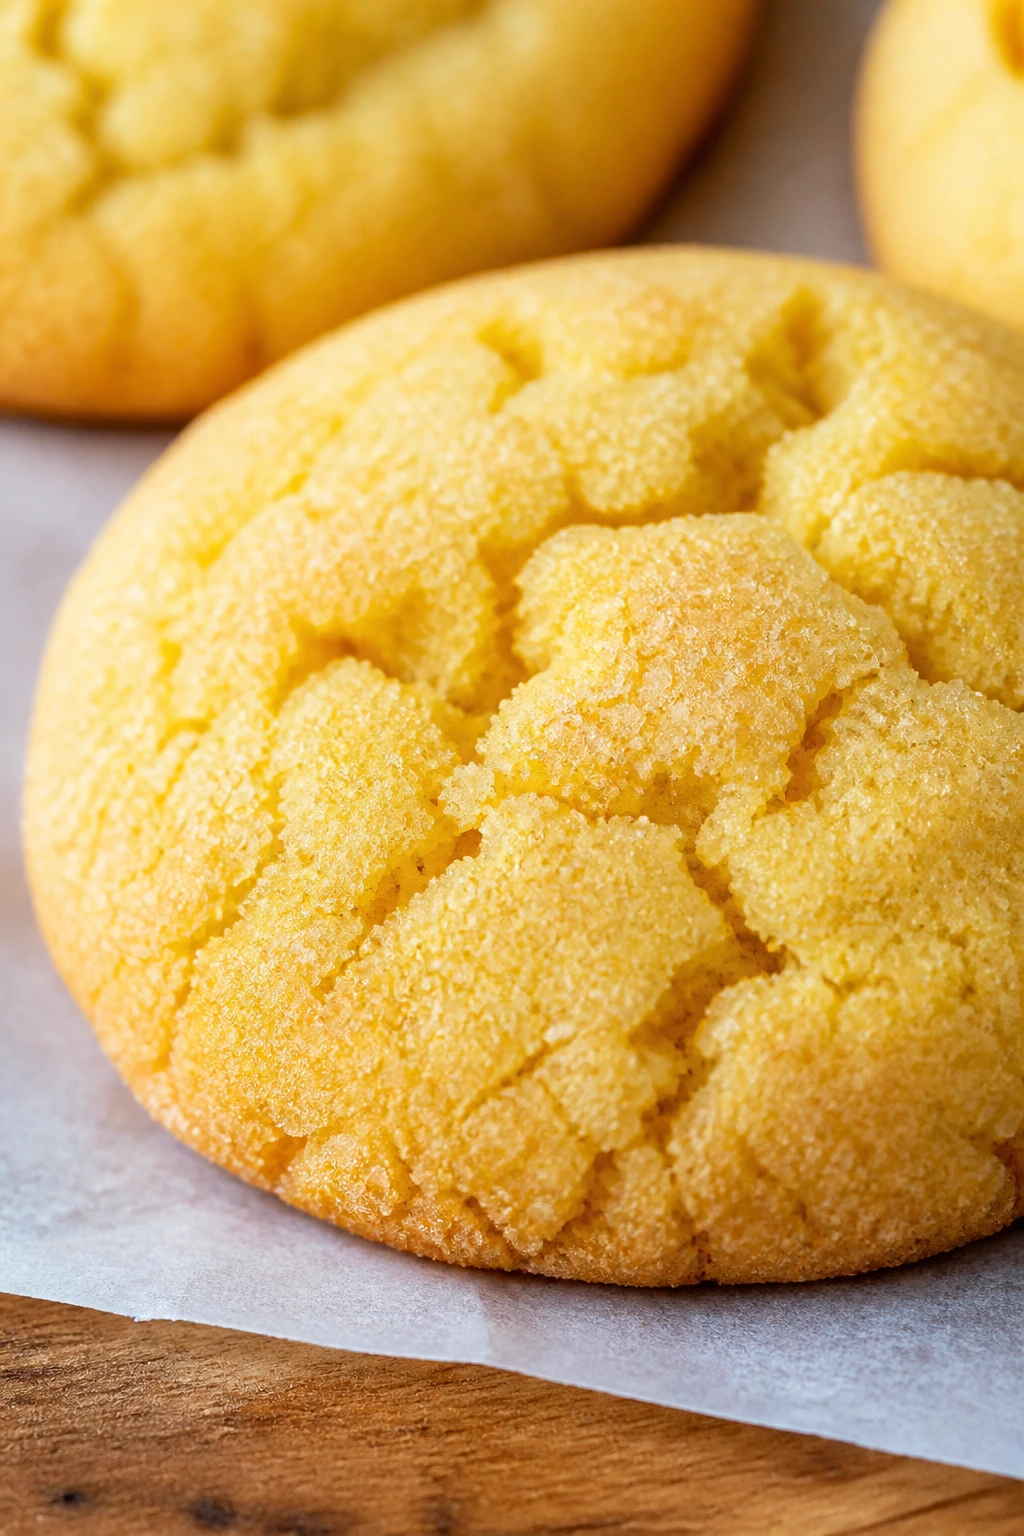
1. Pastel Sprinkle Vanilla Drop Cookies
Intro: These are the easiest kind of Easter cookie to love: soft, buttery, and dotted with little bursts of color. The dough bakes up pale and tender, while the sprinkles give that bright, confetti-like look that belongs on a spring tray. I prefer jimmies here, not tiny nonpareils; they hold their shape instead of bleeding into the dough.
Why It Works: The softened butter gives the cookie spread and a plush crumb, while a small splash of milk keeps the center from drying out before the edges set. Because the vanilla is the main flavor, you taste the butter first and the sweetness second. Bake them until the tops still look light; that’s where the soft middle lives.
Key Ingredients:
- 1/2 cup unsalted butter, softened — this is the cookie’s structure and flavor base.
- 3/4 cup granulated sugar — gives the edges a faint crunch.
- 1 large egg — binds the dough and adds lift.
- 2 teaspoons vanilla extract — the main flavor note, so don’t skimp.
- 2 cups all-purpose flour — keeps the cookie soft, not cakey.
- 1 teaspoon baking powder — helps the tops puff a little.
- 1/2 teaspoon fine salt — keeps the sweetness from flattening.
- 2 tablespoons milk — loosens the dough just enough.
- 1/3 cup pastel jimmies — fold in at the end so the color stays clean.
Quick Steps:
- Preheat the oven to 350°F (175°C) and line two baking sheets with parchment paper.
- Cream the butter and sugar for 2 to 3 minutes, until the mixture looks lighter and a little fluffy.
- Beat in the egg and vanilla, then stir in the flour, baking powder, salt, and milk just until combined.
- Fold in the sprinkles gently, then scoop 1 1/2-tablespoon mounds about 2 inches apart.
- Bake for 9 to 11 minutes, until the edges are set and the centers still look pale. Cool on the sheet for 5 minutes before moving to a rack.
Equipment for This Recipe:
- Hand mixer or sturdy wooden spoon — either one works, but the mixer saves time.
- Two rimmed baking sheets — keeps the cookies from sliding.
- Parchment paper — prevents sticking and keeps the bottoms even.
- 1 1/2-tablespoon cookie scoop — gives you consistent size and bake time.
How to Serve This Dish: Stack them in a shallow bowl with a few extra pastel candies tucked around the edges. They work best with cold milk, but a small cup of coffee gives the vanilla a deeper finish.
For a brunch table, set them beside fruit and let their color do the work.
Pro Tips for This Recipe:
- Use jimmies, not nonpareils, if you want crisp color lines.
- If the dough feels greasy, chill it for 15 minutes before scooping.
- Pull them early; pale tops mean softer cookies.
- Add 1/4 teaspoon almond extract if you want a bakery-style note.
Variations on This Dish:
- Lemon Vanillins: Add 1 tablespoon lemon zest for a brighter, springier finish.
- Confetti Almonds: Swap half the vanilla for almond extract and press a few sliced almonds on top before baking.
Common Mistakes to Avoid with This Dish:
- Overmixing after the flour goes in: The dough turns tight and the cookies bake up dry. Stop as soon as the last streaks disappear.
- Using melted butter: The cookies spread too thin. Softened butter should dent under your finger, not puddle.
- Baking until deeply golden: These should stay pale in the middle if you want that soft crumb.
2. Brown Sugar Toasted Coconut Cookies
Intro: Toasted coconut changes everything here. Raw coconut tastes sweet and flat; toasted coconut smells nutty and gives the cookies a warm, almost caramel edge. These are chewy in the middle, a little crisp at the rim, and exactly the kind of cookie that disappears fast once the tray hits the table.
Why It Works: Brown sugar brings moisture, and the coconut adds chew without making the dough heavy. A quick toasting step wakes the flavor up before the dough even goes into the bowl. Bake them until the edges darken by one shade; that’s the sweet spot.
Key Ingredients:
- 1/2 cup unsalted butter, softened — for a soft, chewy base.
- 1 cup packed light brown sugar — adds molasses depth and keeps the crumb moist.
- 1 large egg — holds the cookie together.
- 1 teaspoon vanilla extract — rounds out the coconut.
- 1 3/4 cups all-purpose flour — keeps the cookie from spreading too much.
- 1/2 teaspoon baking soda — helps the cookies spread and brown.
- 1/2 teaspoon fine salt — balances the sweetness.
- 1 cup sweetened shredded coconut, divided — some in the dough, some toasted for the top.
- 2 tablespoons milk — just enough to loosen the dough.
Quick Steps:
- Toast 1/2 cup of the coconut in a dry skillet over medium heat for 3 to 4 minutes, stirring often, until it smells nutty and turns light gold.
- Preheat the oven to 350°F (175°C) and line baking sheets with parchment.
- Cream the butter and brown sugar for 2 minutes, then beat in the egg and vanilla.
- Stir in the flour, baking soda, salt, milk, and the untoasted coconut until just combined.
- Scoop onto the sheet, sprinkle the tops with the toasted coconut, and bake for 10 to 12 minutes.
Equipment for This Recipe:
- Dry skillet — for toasting the coconut.
- Mixing bowl and spoon or mixer — either works.
- Baking sheets lined with parchment — helps the bottoms stay even.
- Cookie scoop — keeps the mounds the same size.
How to Serve This Dish: These look good piled loosely on a cake stand, with the toasted coconut catching the light on top. Serve them with tea or coffee, and put them near chocolate cookies if you want contrast on the tray.
They are the cookie version of a clean white shirt with good texture.
Pro Tips for This Recipe:
- Toast more coconut than you think you need; the extra is useful for garnish.
- Let the skillet cool a minute before you toast if you’re doing a second batch.
- If you like a deeper note, add 1/4 teaspoon coconut extract.
- Chill the dough 20 minutes if your kitchen is warm.
Variations on This Dish:
- Chocolate-Coconut Spillover: Fold in 3/4 cup dark chocolate chips for a richer, less sweet cookie.
- Pecan Coconut Crunch: Add 1/2 cup chopped pecans and cut the coconut topping in half.
Common Mistakes to Avoid with This Dish:
- Skipping the toast: Untoasted coconut tastes dull and chewy in the wrong way. A few minutes in a skillet fixes that.
- Overpacking the coconut: Too much shredded coconut can make the dough crumbly. Measure it loosely.
- Pulling them too late: Once the edges go dark brown, the centers dry out fast.
3. Peanut Butter Egg-Nest Cookies
Intro: These are the cookies that make people grin before they even take a bite. The peanut butter gives you a salty-sweet base, and the mini chocolate eggs tucked into the top do the Easter part with almost no effort. They bake into soft domes with a little crackle on the edges.
Why It Works: Peanut butter carries flavor all by itself, so the ingredient list stays short and the result still tastes complete. The combination of butter and peanut butter gives enough fat for tenderness without turning the dough greasy. Press the candies in while the cookies are warm, not hot; that keeps them sitting on top instead of sliding off.
Key Ingredients:
- 1/2 cup unsalted butter, softened — lightens the peanut butter.
- 1/2 cup creamy peanut butter — the main flavor and texture driver.
- 1/2 cup granulated sugar — helps the outside crisp a little.
- 1/2 cup packed light brown sugar — keeps the center soft.
- 1 large egg — binds the dough.
- 1 teaspoon vanilla extract — smooths the peanut flavor.
- 1 1/2 cups all-purpose flour — enough structure to hold the candies.
- 1/2 teaspoon baking soda — gives the cookies a little lift.
- 1/2 teaspoon fine salt — sharpens the sweet-salty balance.
- 30 mini chocolate eggs — press them in after baking.
Quick Steps:
- Preheat the oven to 350°F (175°C) and line two baking sheets with parchment.
- Cream the butter, peanut butter, granulated sugar, and brown sugar until the mixture looks smooth and fluffy.
- Beat in the egg and vanilla, then stir in the flour, baking soda, and salt just until the dough comes together.
- Scoop 1 1/2-tablespoon portions and bake for 9 to 10 minutes, until the edges are set and the tops have a slight crackle.
- Press 2 or 3 mini chocolate eggs into each cookie while it is still warm, then let them cool fully.
Equipment for This Recipe:
- Mixing bowl and mixer — the easiest way to blend the thick dough.
- Baking sheets — one batch at a time if needed.
- Parchment paper — helps the soft cookies release cleanly.
- Spoon or small scoop — peanut butter dough sticks a little.
How to Serve This Dish: Set these near the center of the cookie tray so the chocolate eggs are visible. They pair well with milk, obviously, but a dark roast coffee pulls the peanut butter into sharper focus.
If you want a true Easter feel, scatter a few extra candy eggs around the platter.
Pro Tips for This Recipe:
- Stir natural peanut butter well before measuring if that’s what you’re using.
- Press the candies in gently; don’t shove them all the way to the sheet.
- Add 2 tablespoons of chopped peanuts if you want extra crunch.
- Chill the dough 15 minutes if it feels sticky or soft.
Variations on This Dish:
- Sunflower Nest Cookies: Swap in sunflower seed butter for a nut-free version with the same texture.
- Chocolate Peanut Pile-Ups: Fold 1/2 cup chocolate chips into the dough and skip the candy eggs.
Common Mistakes to Avoid with This Dish:
- Adding the candies too late: Once the cookies cool, the eggs won’t stick. Press them in while the tops are still warm.
- Using oily peanut butter without stirring: The dough can turn loose and the cookies spread. Mix the jar well first.
- Overbaking for color: Peanut butter cookies go from pale to dry fast. Pull them when the tops are set, not browned.
4. Lemon Poppy Seed Glaze Cookies
Intro: These taste like a bright morning in cookie form. Lemon gives the dough its sharp edge, poppy seed adds a tiny crunch, and the glaze on top dries into a thin, shiny shell. I like these when a tray needs something yellow and fresh-looking without going full cake.
Why It Works: Lemon zest carries more flavor than extra juice, so the dough stays sturdy while still tasting citrusy. Poppy seed gives the crumb a speckled look that feels right at home on a spring dessert spread. The glaze is thin on purpose; you want a sheen, not a frosting blanket.
Key Ingredients:
- 1/2 cup unsalted butter, softened — creates a soft, rich base.
- 3/4 cup granulated sugar — keeps the cookies light.
- 1 large egg — provides structure.
- Zest of 2 lemons — the strongest lemon flavor in the recipe.
- 2 tablespoons lemon juice — adds brightness.
- 2 cups all-purpose flour — keeps the dough scoopable.
- 1 teaspoon baking powder — helps the cookies puff.
- 1/2 teaspoon fine salt — prevents the lemon from tasting flat.
- 1 tablespoon poppy seeds — adds a tiny crunch.
- 3/4 cup powdered sugar plus 1 to 2 tablespoons milk or lemon juice — for the glaze.
Quick Steps:
- Preheat the oven to 350°F (175°C) and line baking sheets with parchment.
- Cream the butter and sugar until pale, then beat in the egg, lemon zest, and lemon juice.
- Stir in the flour, baking powder, salt, and poppy seeds just until the dough holds together.
- Scoop the dough onto the sheet and bake for 9 to 10 minutes, until the tops look set but not browned.
- Cool completely, whisk the glaze until smooth, then drizzle or spoon it over the cookies.
Equipment for This Recipe:
- Microplane or fine grater — for the lemon zest.
- Mixing bowl and mixer — makes the batter smooth.
- Baking sheet and parchment — keeps the bottoms tidy.
- Small whisk — useful for the glaze.
How to Serve This Dish: Put them on a pale plate or a wooden board so the glaze and poppy seeds show clearly. They’re excellent with tea, especially anything floral or black and brisk.
If you’re serving a brunch crowd, place them near fresh berries.
Pro Tips for This Recipe:
- Zest the lemons before juicing them; it’s easier and less messy.
- Let the cookies cool all the way before glazing or the icing will soak in.
- Add 1/4 teaspoon almond extract if you want a bakery-style citrus note.
- If your lemons are small, use three instead of two and keep the juice measured.
Variations on This Dish:
- Orange Poppy Cookies: Swap in orange zest and juice for a softer citrus flavor.
- Lemon Sesame Twist: Replace half the poppy seeds with toasted sesame seeds for extra crunch.
Common Mistakes to Avoid with This Dish:
- Using too much juice: The dough turns loose and the cookies spread. Zest does the heavy lifting here.
- Glazing warm cookies: The icing slides off or disappears. Wait until they’re cool.
- Browning them heavily: Lemon cookies should stay pale for the cleanest flavor.
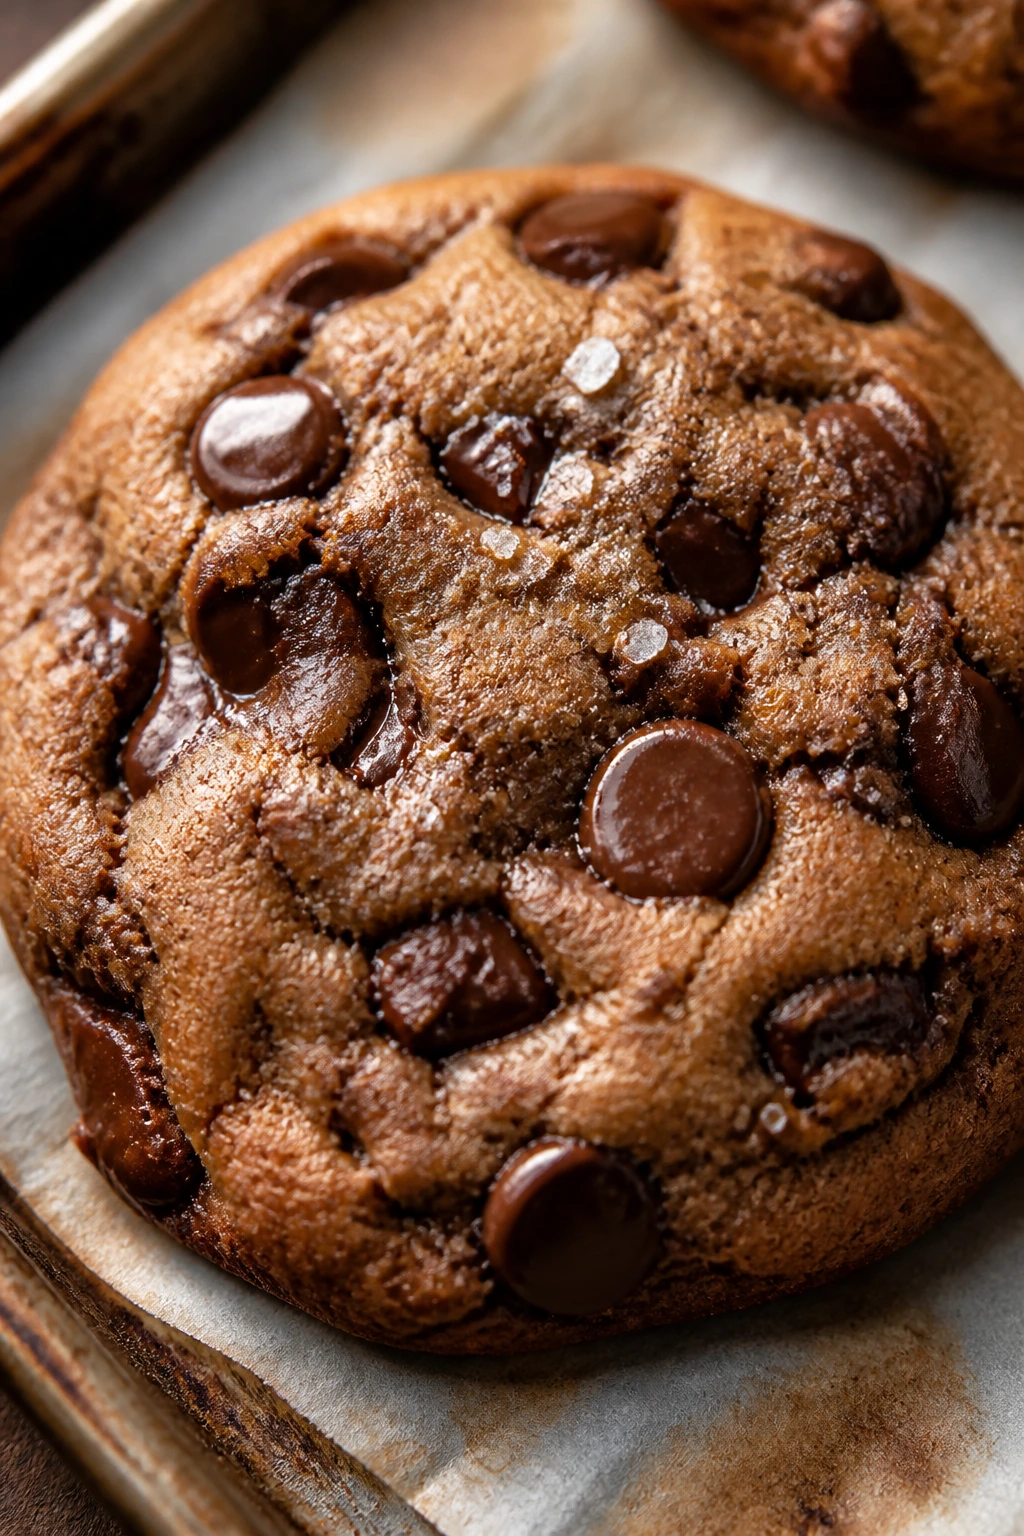
5. Cocoa Chip Chocolate Drop Cookies
Intro: These are the richer, darker cousin on the tray. Cocoa gives the dough a deep chocolate base, and the chocolate chips melt into pockets that stay soft after the cookies cool. If you want one cookie that feels a little more serious than the candy-colored ones, this is the one.
Why It Works: Cocoa powder brings flavor without making the dough wet, which helps the cookies hold their shape. The mix of granulated and brown sugar keeps the edges a little crisp while the center stays chewy. A pinch of salt makes the chocolate taste fuller, not sweeter.
Key Ingredients:
- 1/2 cup unsalted butter, softened — gives the cookie body.
- 1/2 cup granulated sugar — helps the edges crisp.
- 1/2 cup packed light brown sugar — adds chew and moisture.
- 1 large egg — binds the dough.
- 2 teaspoons vanilla extract — rounds out the cocoa.
- 1 1/2 cups all-purpose flour — keeps the dough stable.
- 1/2 cup unsweetened cocoa powder — the main flavor.
- 1/2 teaspoon baking soda — gives the cookies lift.
- 1/2 teaspoon fine salt — balances the sweetness.
- 1 cup chocolate chips — for melty pockets.
Quick Steps:
- Preheat the oven to 350°F (175°C) and line baking sheets with parchment.
- Cream the butter and both sugars for 2 minutes, then beat in the egg and vanilla.
- Whisk the flour, cocoa, baking soda, and salt in a separate bowl, then stir into the wet mixture.
- Fold in the chocolate chips and scoop 1 1/2-tablespoon mounds onto the sheet.
- Bake for 9 to 11 minutes, until the centers look just set. Cool on the sheet for 5 minutes.
Equipment for This Recipe:
- Mixer or strong wooden spoon — cocoa dough gets thick.
- Medium bowl — for the dry ingredients.
- Baking sheet lined with parchment — prevents sticking.
- Cookie scoop — helps the cookies bake evenly.
How to Serve This Dish: These belong near the front of the tray because they give a strong chocolate contrast to the lemon and fruit cookies. They go well with black coffee, cold milk, or even a small glass of cold oat milk if that’s your thing.
A tiny pinch of flaky salt on top right after baking is never wasted here.
Pro Tips for This Recipe:
- Spoon and level the cocoa if you’re measuring by cups; packed cocoa can make the dough dry.
- If you want a darker flavor, add 1 teaspoon instant espresso powder.
- Save a few chips to press into the tops before baking.
- Let the cookies rest on the sheet before moving them; they firm up as they cool.
Variations on This Dish:
- Mocha Chip Cookies: Add 1 tablespoon instant espresso powder for a coffee-chocolate edge.
- Triple Chocolate Piles: Use white and dark chips together for a more varied bite.
Common Mistakes to Avoid with This Dish:
- Too much cocoa from a heavy scoop: The dough turns chalky. Measure lightly.
- Baking until the tops look dry: That usually means overdone. Pull them while they still look a little soft.
- Skipping the salt: Chocolate tastes flatter without it.
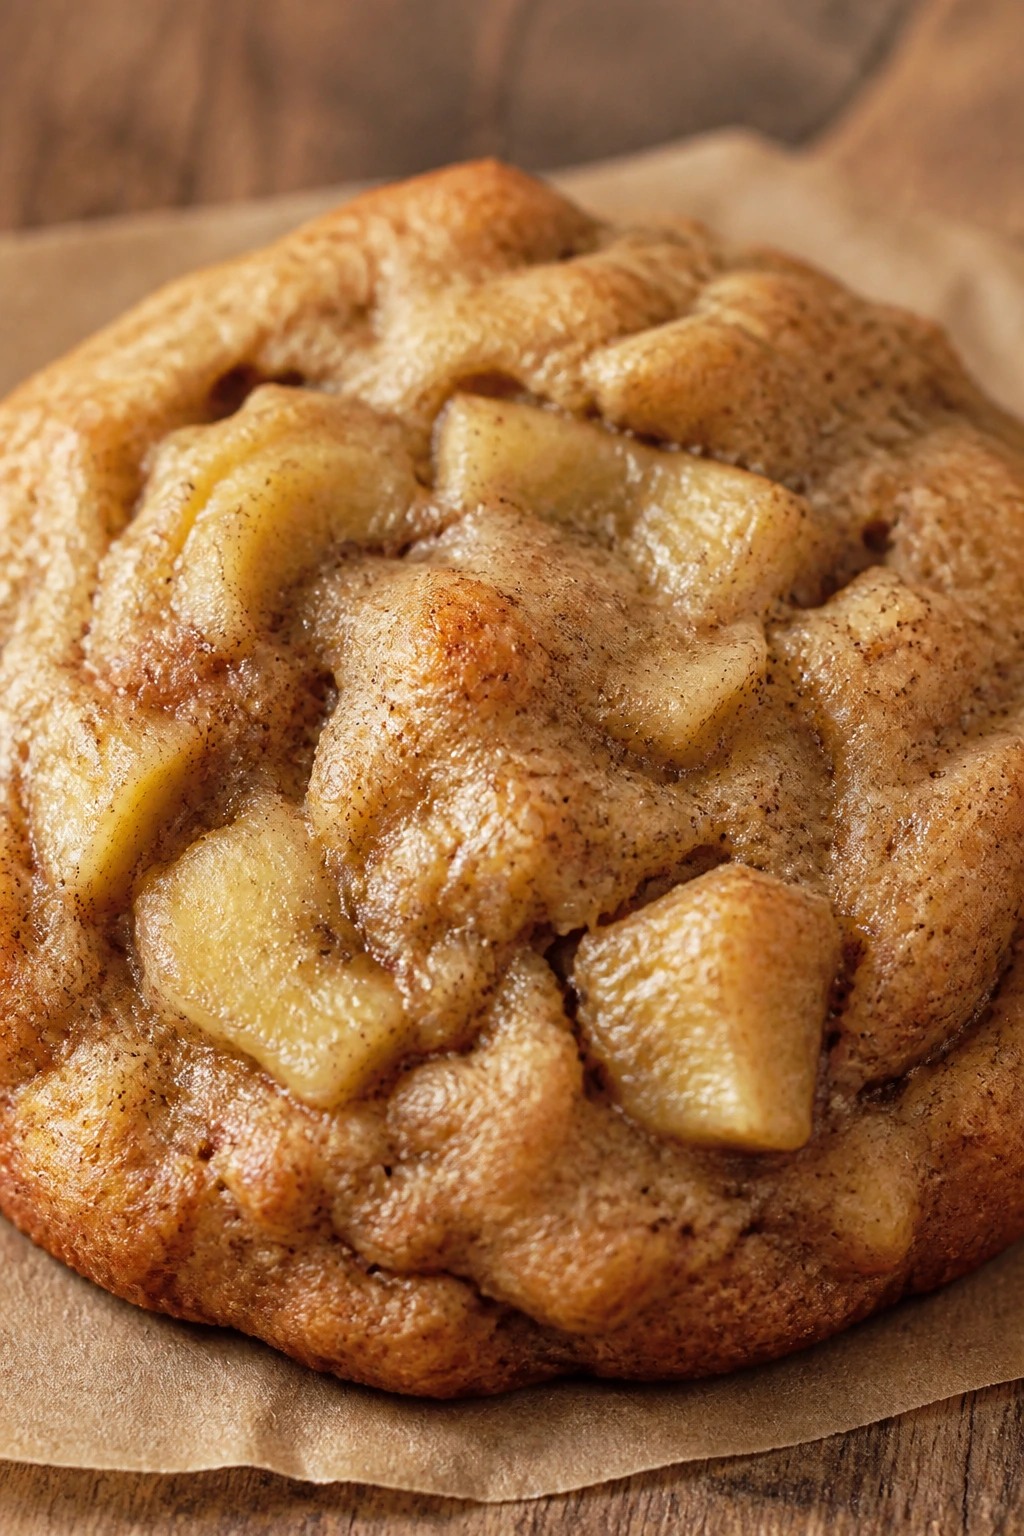
6. Oatmeal Raisin Carrot Spice Cookies
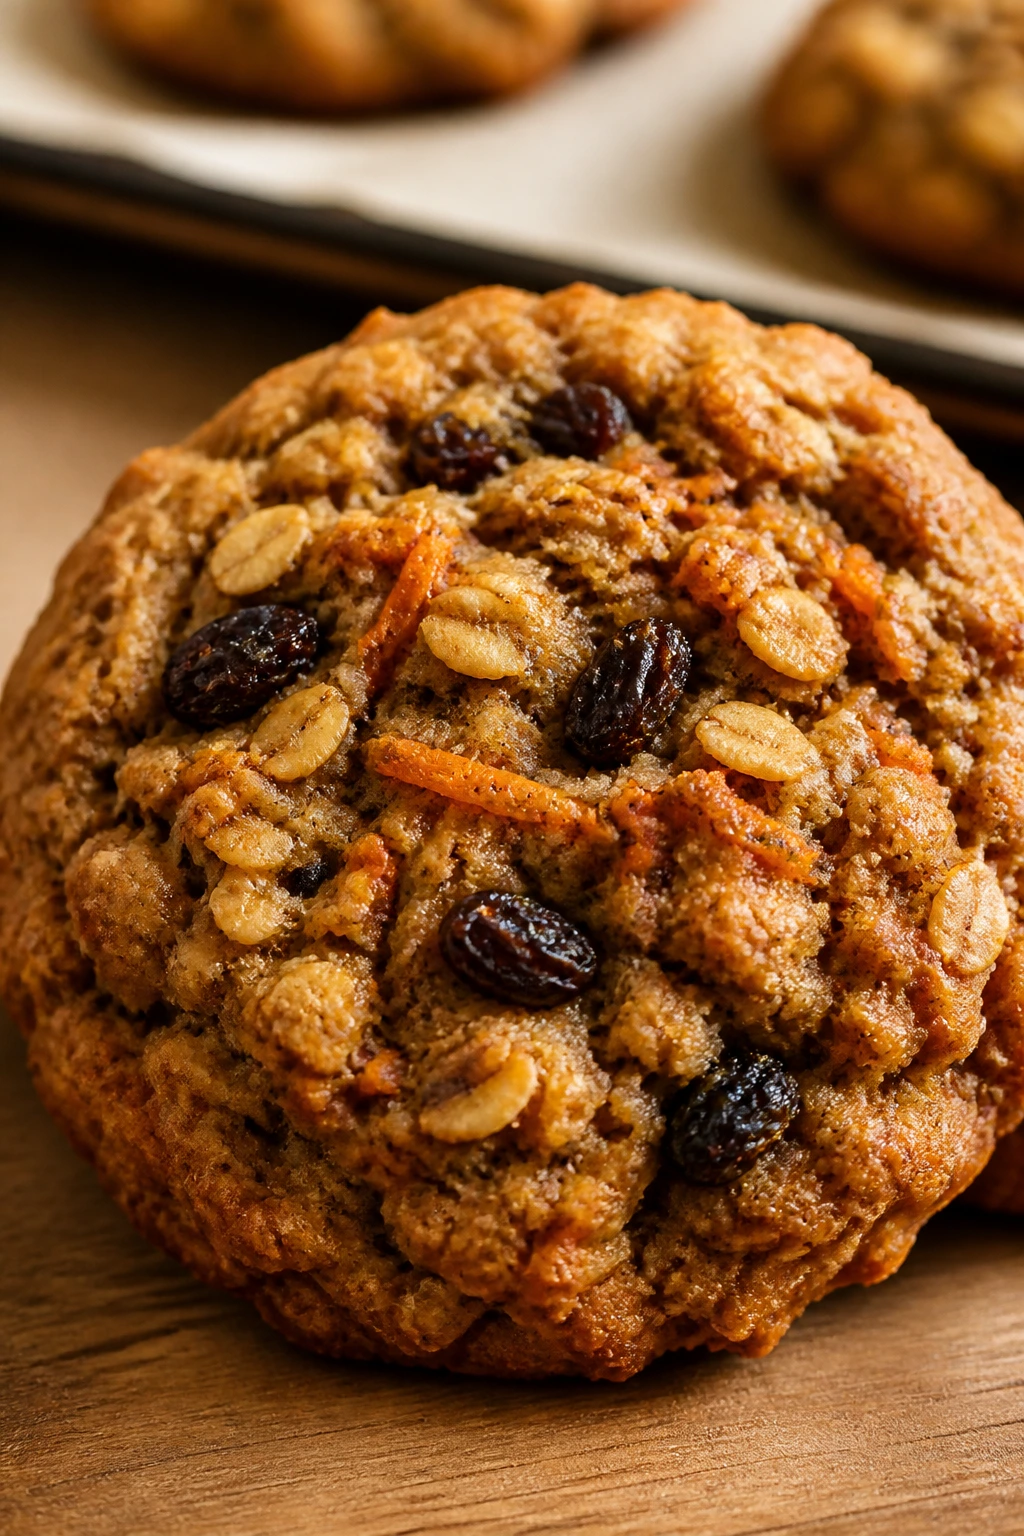
Intro: These sit in the middle of the tray with a quieter kind of charm. They’re chewy from the oats, tender from the carrot, and warm with cinnamon and nutmeg. If you like carrot cake but want something that eats more like a cookie, this is the move.
Why It Works: Oats give body, and grated carrot adds moisture without making the dough soupy if you squeeze out the excess first. Raisins bring little pockets of sweetness that keep the spices from feeling dry. These cookies are better when they’re slightly underbaked in the center.
Key Ingredients:
- 1/2 cup unsalted butter, softened — the fat that keeps the cookies tender.
- 3/4 cup packed light brown sugar — adds chew and a hint of molasses.
- 1 large egg — binds the dough.
- 1 teaspoon vanilla extract — softens the spice.
- 1 cup finely grated carrot, squeezed dry — keeps the crumb moist.
- 1 1/4 cups all-purpose flour — enough structure for the carrot.
- 1 cup old-fashioned oats — gives chew and texture.
- 1 teaspoon cinnamon — the main spice note.
- 1/4 teaspoon nutmeg — a little goes a long way.
- 1/2 teaspoon baking soda, 1/2 teaspoon salt — lift and balance.
- 3/4 cup raisins — sweet little bursts in each bite.
Quick Steps:
- Preheat the oven to 350°F (175°C) and line a baking sheet with parchment.
- Cream the butter and brown sugar until smooth, then beat in the egg and vanilla.
- Stir in the carrot, flour, oats, cinnamon, nutmeg, baking soda, and salt.
- Fold in the raisins, then scoop the dough into mounds and lightly flatten them.
- Bake for 11 to 12 minutes, until the edges are set and the centers still look soft.
Equipment for This Recipe:
- Box grater or food processor — for the carrot.
- Clean kitchen towel — to squeeze the carrot dry.
- Mixing bowl and spoon — the dough is thick but manageable.
- Baking sheet and parchment — keeps the bottoms from sticking.
How to Serve This Dish: These are nice beside tea or cold milk, and they hold up well on a buffet because they’re sturdy without being hard. Put them next to the chocolate cookies so people can choose between spice and cocoa.
They also pair well with sliced strawberries if you want the plate to lean springy.
Pro Tips for This Recipe:
- Squeeze the grated carrot until it stops dripping; extra moisture makes flat cookies.
- Use old-fashioned oats, not instant, for the best chew.
- If the dough feels too loose, let it sit 10 minutes before scooping.
- Add 1/4 cup chopped walnuts if you want more crunch.
Variations on This Dish:
- Carrot Cake Glaze Cookies: Drizzle with a thin powdered sugar glaze after cooling.
- Cran-Carrot Chews: Swap half the raisins for chopped dried cranberries.
Common Mistakes to Avoid with This Dish:
- Leaving the carrot wet: The cookies spread and bake up gummy. Squeeze it dry.
- Using too much nutmeg: It takes over fast. Measure it carefully.
- Pulling them only when browned: The center should still look a little soft.
7. Snickerdoodle Cookies
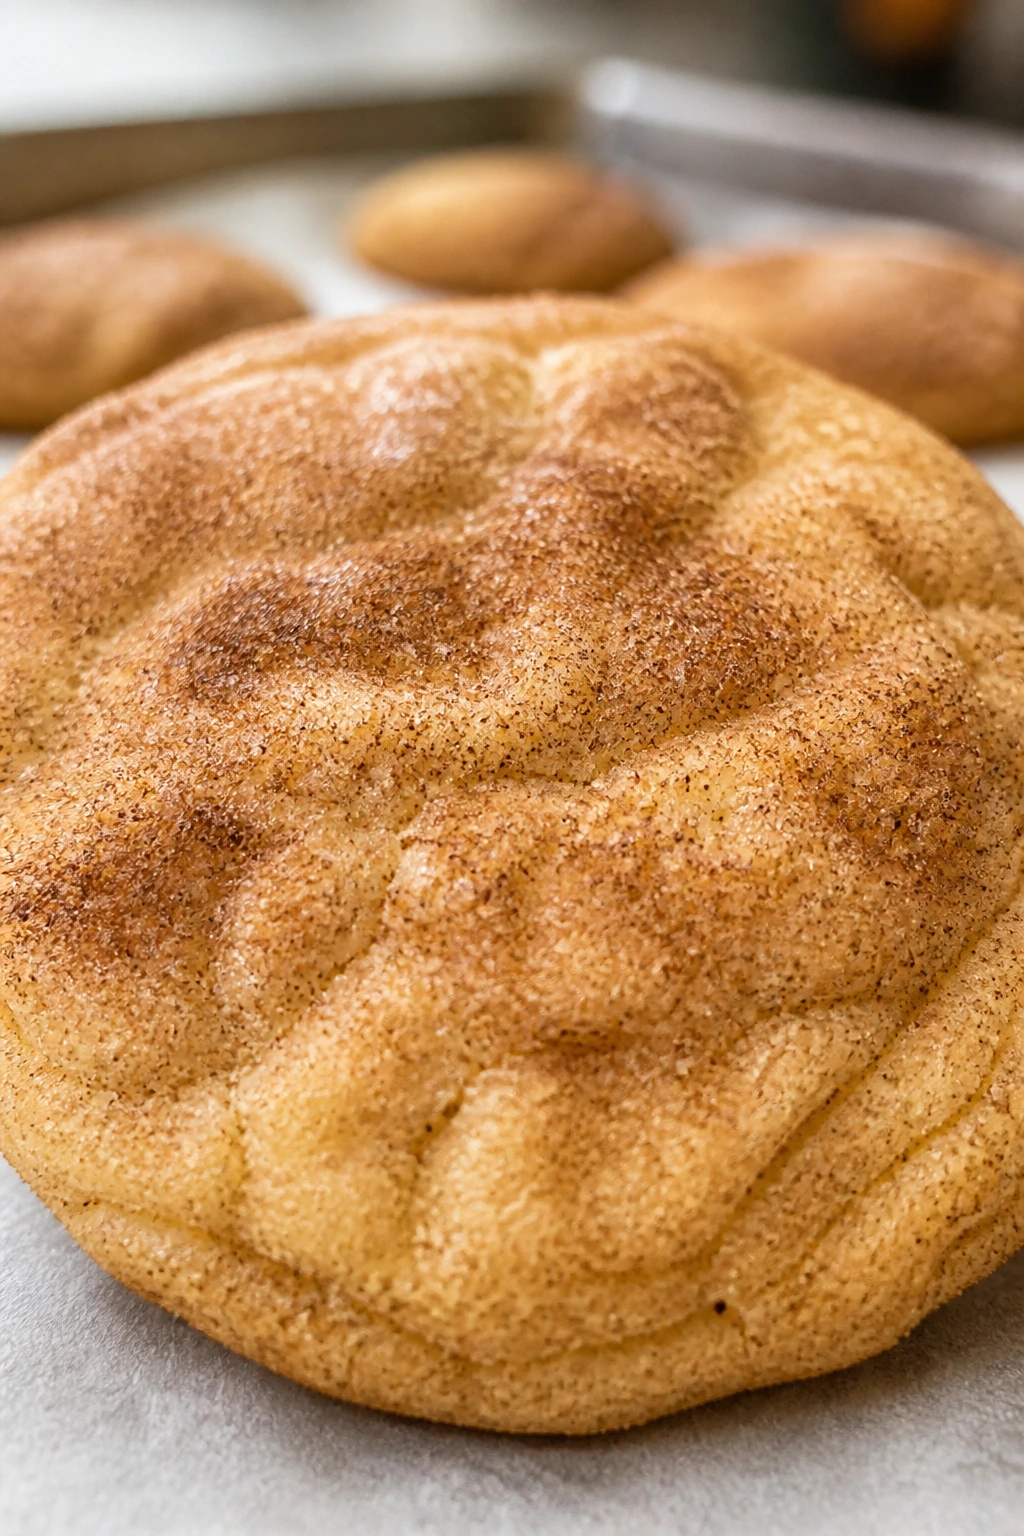
Intro: Snickerdoodles don’t need Easter decorations to earn a spot. Their cinnamon-sugar coating gives them a warm, speckled top, and the tang from cream of tartar keeps the flavor sharp. They’re the reliable, always-gone-first cookie in this whole batch.
Why It Works: Cream of tartar changes the texture in a way regular sugar cookies can’t match; it gives the cookie a gentle lift and that signature slightly tangy finish. The cinnamon-sugar coating crusts up in the oven and leaves the tops sandy and fragrant. Bake them just until the edges set and the centers puff.
Key Ingredients:
- 1/2 cup unsalted butter, softened — gives a soft, rich crumb.
- 1 cup granulated sugar — for sweetness and surface crunch.
- 1 large egg — binds the dough.
- 1 teaspoon vanilla extract — rounds the sharp edges.
- 2 cups all-purpose flour — the structural base.
- 2 teaspoons cream of tartar — the flavor marker.
- 1 teaspoon baking soda — helps with spread and lift.
- 1/2 teaspoon fine salt — keeps the sugar in line.
- 1/4 cup sugar mixed with 1 tablespoon cinnamon — for rolling.
Quick Steps:
- Preheat the oven to 375°F (190°C) and line baking sheets with parchment.
- Cream the butter and sugar, then beat in the egg and vanilla.
- Stir in the flour, cream of tartar, baking soda, and salt until the dough comes together.
- Scoop the dough, roll each portion in the cinnamon-sugar mixture, and space them 2 inches apart.
- Bake for 9 to 10 minutes, until the tops are set and lightly cracked.
Equipment for This Recipe:
- Mixing bowl and mixer — useful for the creaming step.
- Small bowl — for the cinnamon-sugar coating.
- Parchment-lined baking sheets — keeps the coating from sticking.
- Cookie scoop — gives a neat, even batch.
How to Serve This Dish: These can sit anywhere on the tray because the flavor is familiar and the smell does half the selling. I like them next to coffee or hot tea, where the cinnamon comes through harder.
They’re also a good bridge cookie between the citrus pieces and the chocolate ones.
Pro Tips for This Recipe:
- Don’t skip cream of tartar unless you’re fine with a different cookie.
- Roll the dough generously in cinnamon sugar; a thin coat disappears in the oven.
- Remove them while the centers are still puffy.
- Let the tray cool between batches so the sugar coating doesn’t melt too fast.
Variations on This Dish:
- Orange Snickerdoodles: Add 1 tablespoon orange zest for a spring lift.
- Molasses Snickers: Swap 2 tablespoons of sugar for molasses and add an extra 1/2 teaspoon cinnamon.
Common Mistakes to Avoid with This Dish:
- Flattening the dough before baking: Snickerdoodles need their shape to puff properly.
- Using too little cinnamon sugar: The coating is half the experience.
- Overbaking until the tops brown: That kills the soft, pillowy center.
8. Almond Butter Blossom Cookies
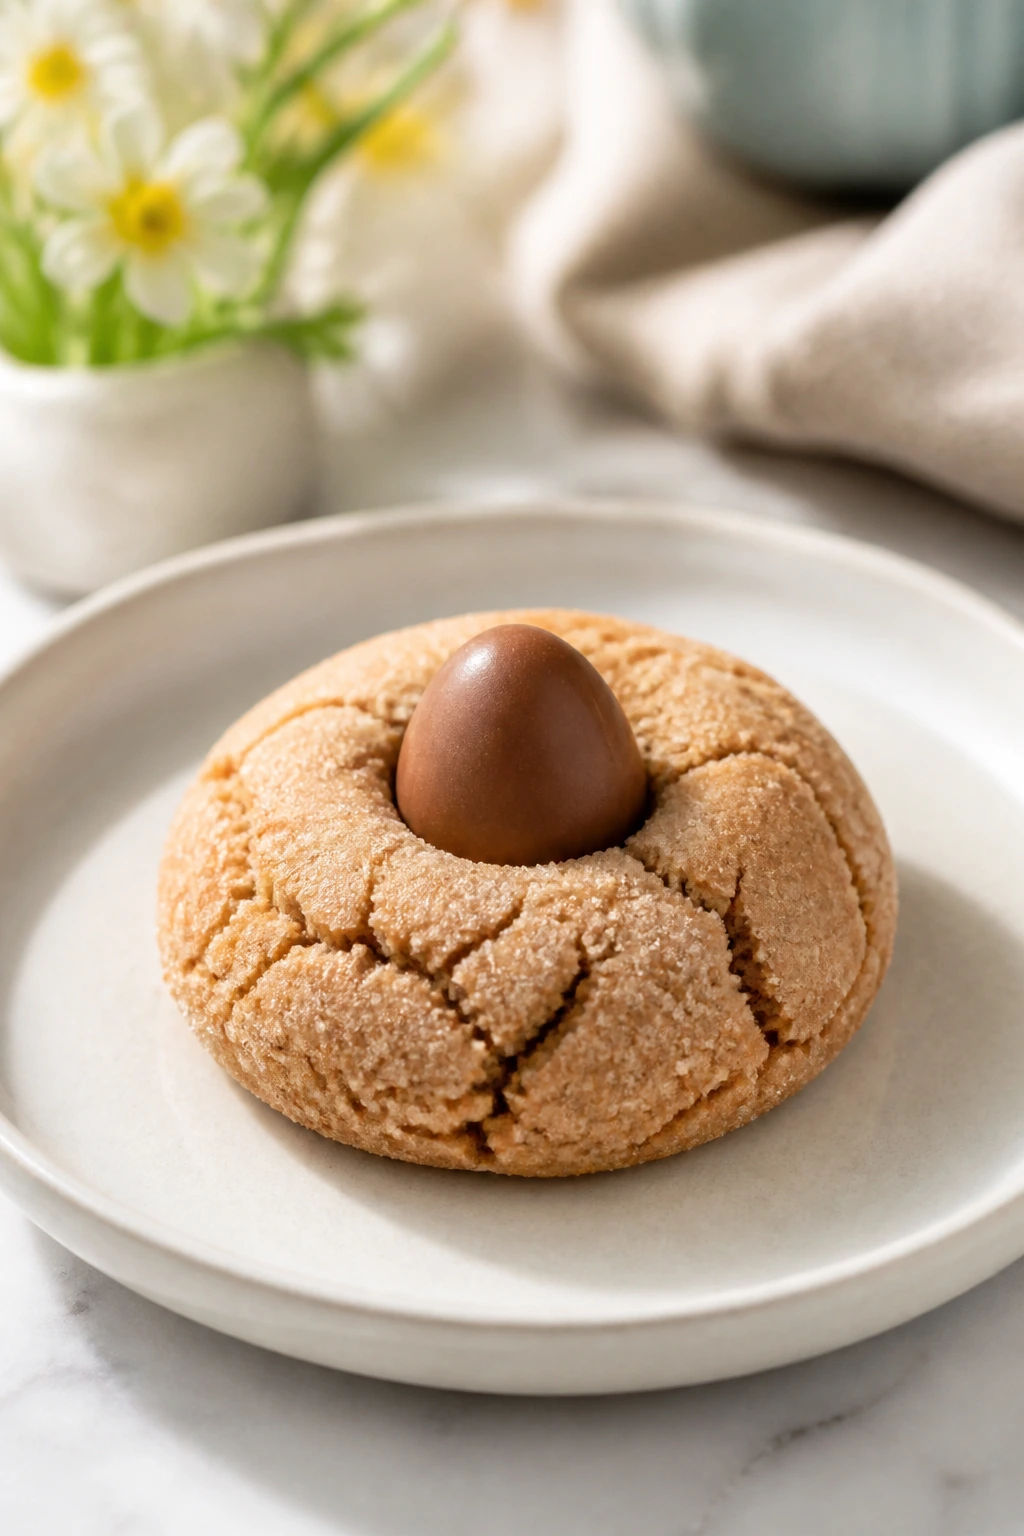
Intro: These are a spring cousin of the classic peanut butter blossom, and they have a slightly softer, more elegant nut flavor. Almond butter gives the cookie a cleaner finish, and the little chocolate egg on top makes the Easter theme obvious without loud decoration. They look neat on a plate. No piping required.
Why It Works: Almond butter brings richness and a mild toasted flavor, while the butter keeps the dough from getting dense. A quick bake followed by a candy press gives you a center that stays visible and doesn’t sink into the cookie. The result is sturdy enough for a tray, but still tender when you bite into it.
Key Ingredients:
- 1/2 cup unsalted butter, softened — keeps the cookie light.
- 1/2 cup creamy almond butter — the main flavor.
- 3/4 cup granulated sugar — helps with spread and surface texture.
- 1 large egg — gives the dough structure.
- 1 teaspoon vanilla extract — balances the nuttiness.
- 1 1/2 cups all-purpose flour — enough body to hold the candies.
- 1/2 teaspoon baking soda — gives a little lift.
- 1/2 teaspoon fine salt — sharpens the sweet nut flavor.
- About 24 mini chocolate eggs — press into the centers after baking.
Quick Steps:
- Preheat the oven to 350°F (175°C) and line two baking sheets with parchment.
- Cream the butter, almond butter, and sugar until smooth, then beat in the egg and vanilla.
- Stir in the flour, baking soda, and salt just until the dough comes together.
- Scoop the dough into balls, bake for 9 to 10 minutes, and pull them when the edges are set.
- Press one mini chocolate egg into the center of each warm cookie and let them cool completely.
Equipment for This Recipe:
- Mixing bowl and mixer — helpful for the thicker nut butter dough.
- Baking sheets — one or two, depending on oven space.
- Parchment paper — keeps the bottoms clean.
- Spoon or scoop — the dough is sticky enough to fuss with.
How to Serve This Dish: These look best in a tight cluster so the candy tops read clearly. Put them near the front of the tray, because the little eggs catch the eye and the almond flavor works well after a meal.
They go nicely with coffee or a simple cup of tea.
Pro Tips for This Recipe:
- Stir almond butter well if oil has separated in the jar.
- Press the candy eggs in while the cookies are warm, not hot.
- Add 1/4 teaspoon almond extract if you want a stronger nut flavor.
- Chill sticky dough for 15 minutes before scooping.
Variations on This Dish:
- Peanut Blossom Swap: Use peanut butter if that’s what’s already in the pantry.
- Cocoa Almond Centers: Add 2 tablespoons cocoa powder to the dough for a deeper flavor.
Common Mistakes to Avoid with This Dish:
- Waiting too long to add the candies: The centers won’t stick once the cookies cool.
- Overbaking for color: The eggs look prettier on a lighter cookie.
- Using runny almond butter without adjusting: The dough can spread too much. Chill it first if needed.
9. Strawberry Jam Thumbprint Cookies
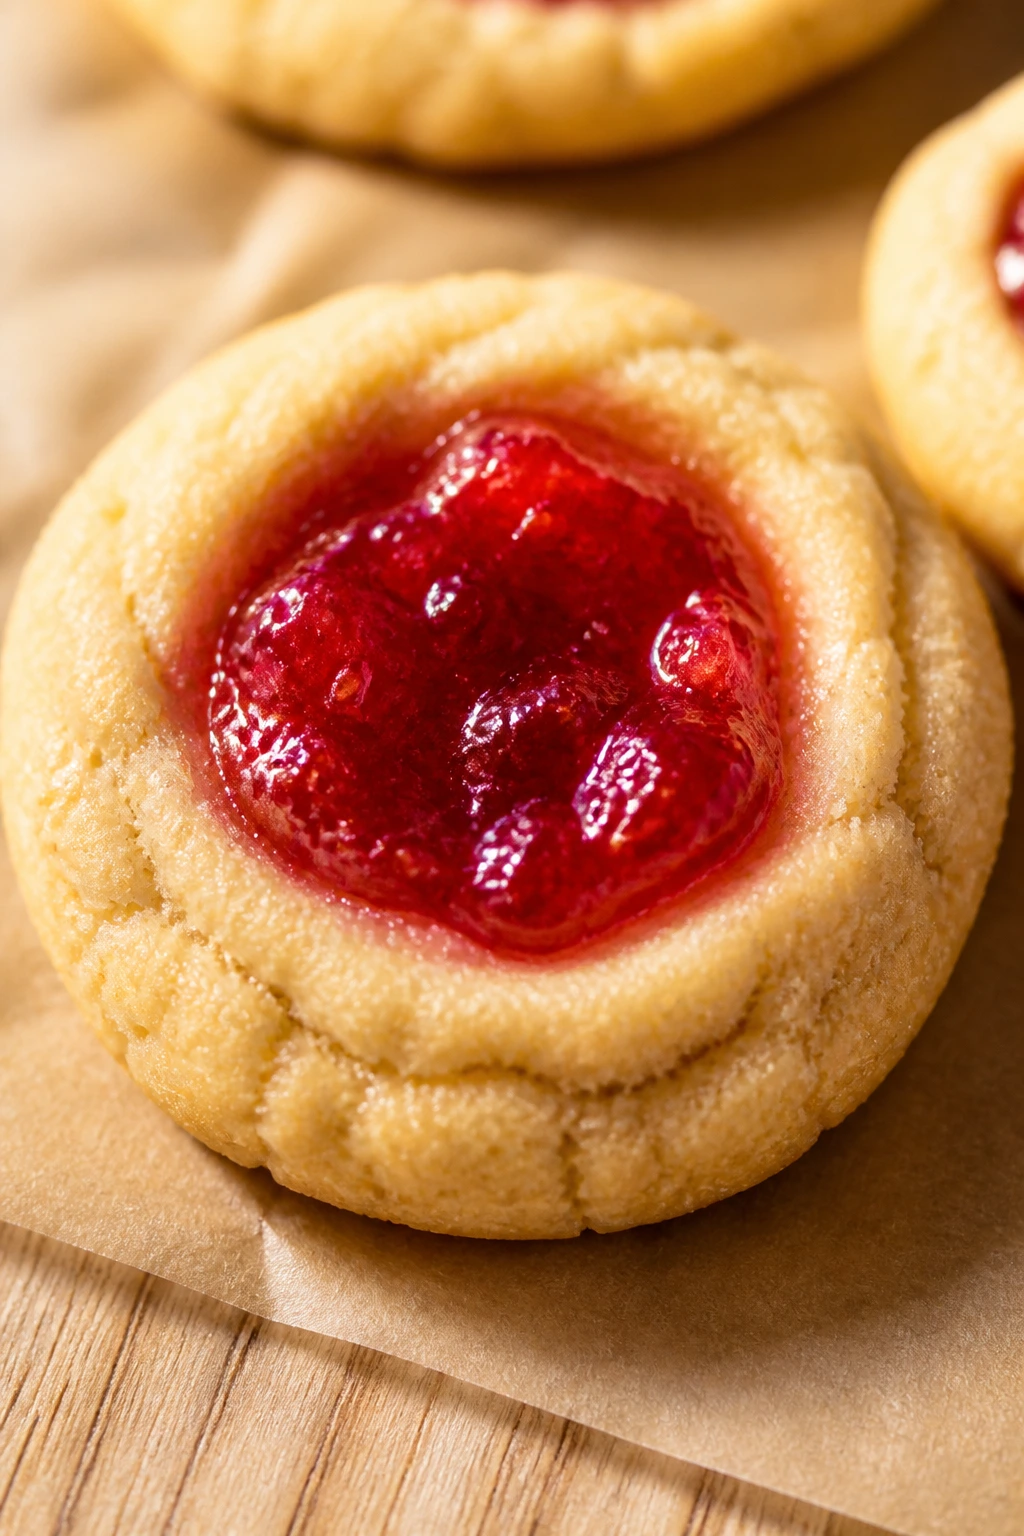
Intro: If spring had a cookie drawer, this would be in it. The tender dough and bright jam center give you color, fruit, and a little shine all at once. I like strawberry jam best here, but apricot or raspberry works when the pantry says that’s what you’ve got.
Why It Works: The egg yolk makes the dough tender and rich, while the jam bakes into a glossy center that stays soft instead of hardening. Making the indent halfway through baking keeps the wells from collapsing. You get a cookie that tastes like a small tart, only simpler.
Key Ingredients:
- 1/2 cup unsalted butter, softened — creates the buttery base.
- 2/3 cup granulated sugar — for sweetness and light spread.
- 1 large egg yolk — keeps the dough tender.
- 1 teaspoon vanilla extract — adds warmth.
- 1 3/4 cups all-purpose flour — enough structure for the thumbprint.
- 1/4 teaspoon fine salt — balances the jam.
- 1/2 teaspoon baking powder — gives a slight lift.
- 1/2 to 3/4 cup thick strawberry jam — the center filling.
Quick Steps:
- Preheat the oven to 350°F (175°C) and line a baking sheet with parchment.
- Cream the butter and sugar, then beat in the egg yolk and vanilla.
- Stir in the flour, salt, and baking powder until a soft dough forms.
- Scoop the dough into rounds, bake for 6 minutes, press a small indent into each center, fill with jam, and bake for 4 to 5 minutes more.
- Cool on the sheet so the jam sets a little before moving them.
Equipment for This Recipe:
- Baking sheet and parchment — the jam can stick without them.
- Teaspoon or thumb-sized tool — for making the indent.
- Small spoon — for filling the centers.
- Mixing bowl and spoon — nothing fancy needed.
How to Serve This Dish: Line these up where the jam can be seen; they do half the work visually. They’re good with tea, and they give a nice sweet pause between the chocolate and spice cookies.
If the jam is bright red or orange, they look especially good on a pale platter.
Pro Tips for This Recipe:
- Use thick jam, not runny preserves, or the centers may overflow.
- If the indent puffs up during baking, press it again while the cookies are hot.
- Chill the shaped dough for 10 minutes if it feels soft.
- Warm jam stirs more easily, but don’t make it hot.
Variations on This Dish:
- Apricot Glow: Swap in apricot jam for a softer, sunnier color.
- Raspberry Spark: Use raspberry jam for a sharper fruit note.
Common Mistakes to Avoid with This Dish:
- Filling too early: Jam can bubble and run off the cookie. Add it after the first bake.
- Using too much jam: The centers leak and the bottoms get sticky.
- Pressing the indent too deep before baking: The dough can crack around the edges. A shallow well is enough.
10. Orange Cardamom Sugar Drop Cookies
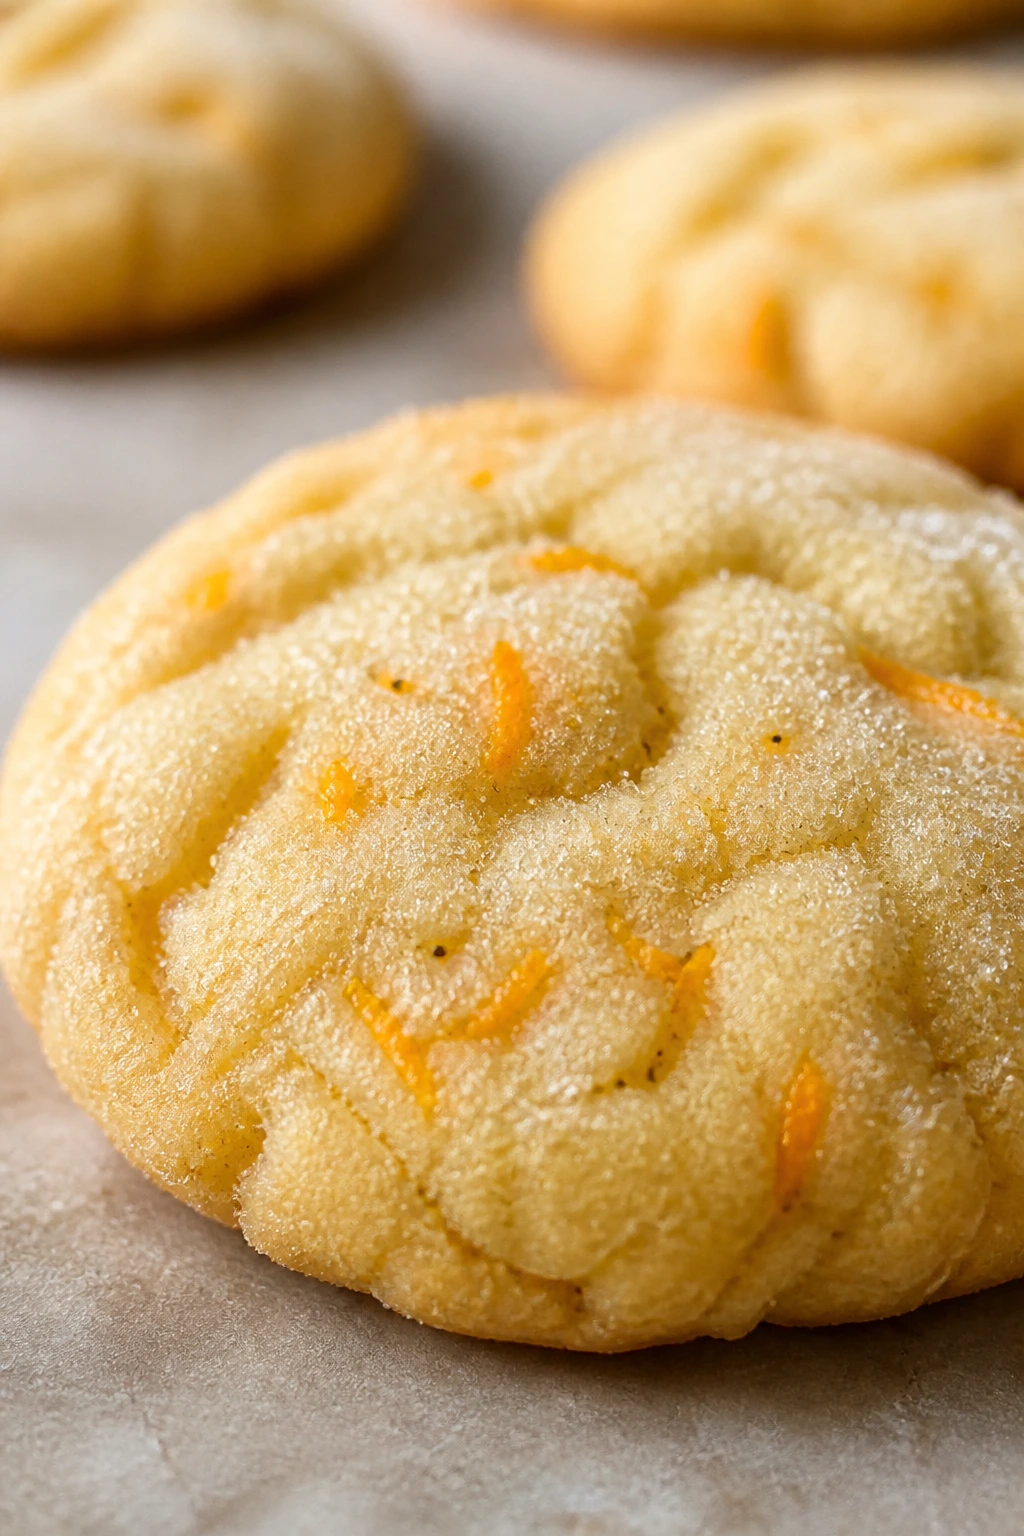
Intro: These smell expensive in the best way, even though the ingredients are plain old pantry regulars. Orange zest gives the dough lift, cardamom brings a little floral spice, and the finished cookie tastes clean and bright with a soft, sandy crumb. I’d put these on the tray when I want one cookie that feels a little more grown-up.
Why It Works: Citrus oils in the zest do more than juice alone ever could. Cardamom works in the background, not as a loud spice but as a cool, aromatic note that keeps the orange from tasting flat. The dough is simple enough to mix by hand, which is handy if you don’t want a mixer out for one batch.
Key Ingredients:
- 1/2 cup unsalted butter, softened — the fat that carries the spice.
- 3/4 cup granulated sugar — keeps the cookie light.
- 1 large egg — gives the dough structure.
- Zest of 1 large orange — the main orange flavor.
- 2 tablespoons orange juice — adds a little brightness.
- 1 3/4 cups all-purpose flour — keeps the dough scoopable.
- 1 teaspoon baking powder — helps the cookies puff slightly.
- 1/2 teaspoon ground cardamom — the aromatic note.
- 1/2 teaspoon fine salt — balances the citrus.
- Optional glaze: 1/2 cup powdered sugar with 1 tablespoon orange juice.
Quick Steps:
- Preheat the oven to 350°F (175°C) and line baking sheets with parchment.
- Cream the butter and sugar, then beat in the egg, orange zest, and orange juice.
- Stir in the flour, baking powder, cardamom, and salt until a soft dough forms.
- Scoop the dough onto the sheet and bake for 9 to 11 minutes, until the tops are set and the edges are barely golden.
- Cool, then drizzle with the glaze if you want a shinier finish.
Equipment for This Recipe:
- Microplane or fine grater — for the orange zest.
- Mixing bowl and spoon — the dough stays soft.
- Baking sheet lined with parchment — keeps the bottoms neat.
- Small whisk — for the glaze.
How to Serve This Dish: These work well at the edge of the tray, where their pale tops and bright scent can stand out. Pair them with tea or a sparkling citrus drink.
They also sit nicely beside coconut or jam cookies.
Pro Tips for This Recipe:
- Zest the orange before juicing it.
- If your cardamom is old, add a pinch more; stale spice goes quiet fast.
- Don’t overbake; these should stay soft and pale.
- Add 1 teaspoon of orange zest to the glaze for extra color and smell.
Variations on This Dish:
- Lemon-Cardamom Drops: Swap the orange for lemon and keep the cardamom.
- Orange Almond Glaze Cookies: Add 1/4 teaspoon almond extract to the dough.
Common Mistakes to Avoid with This Dish:
- Using too much juice instead of zest: The dough gets loose and the orange flavor gets weaker.
- Heavy cardamom hand: It can turn soapy if you pour it in by instinct. Measure it.
- Glazing before cooling: The glaze slides off or goes patchy.
11. Molasses Ginger Cookies
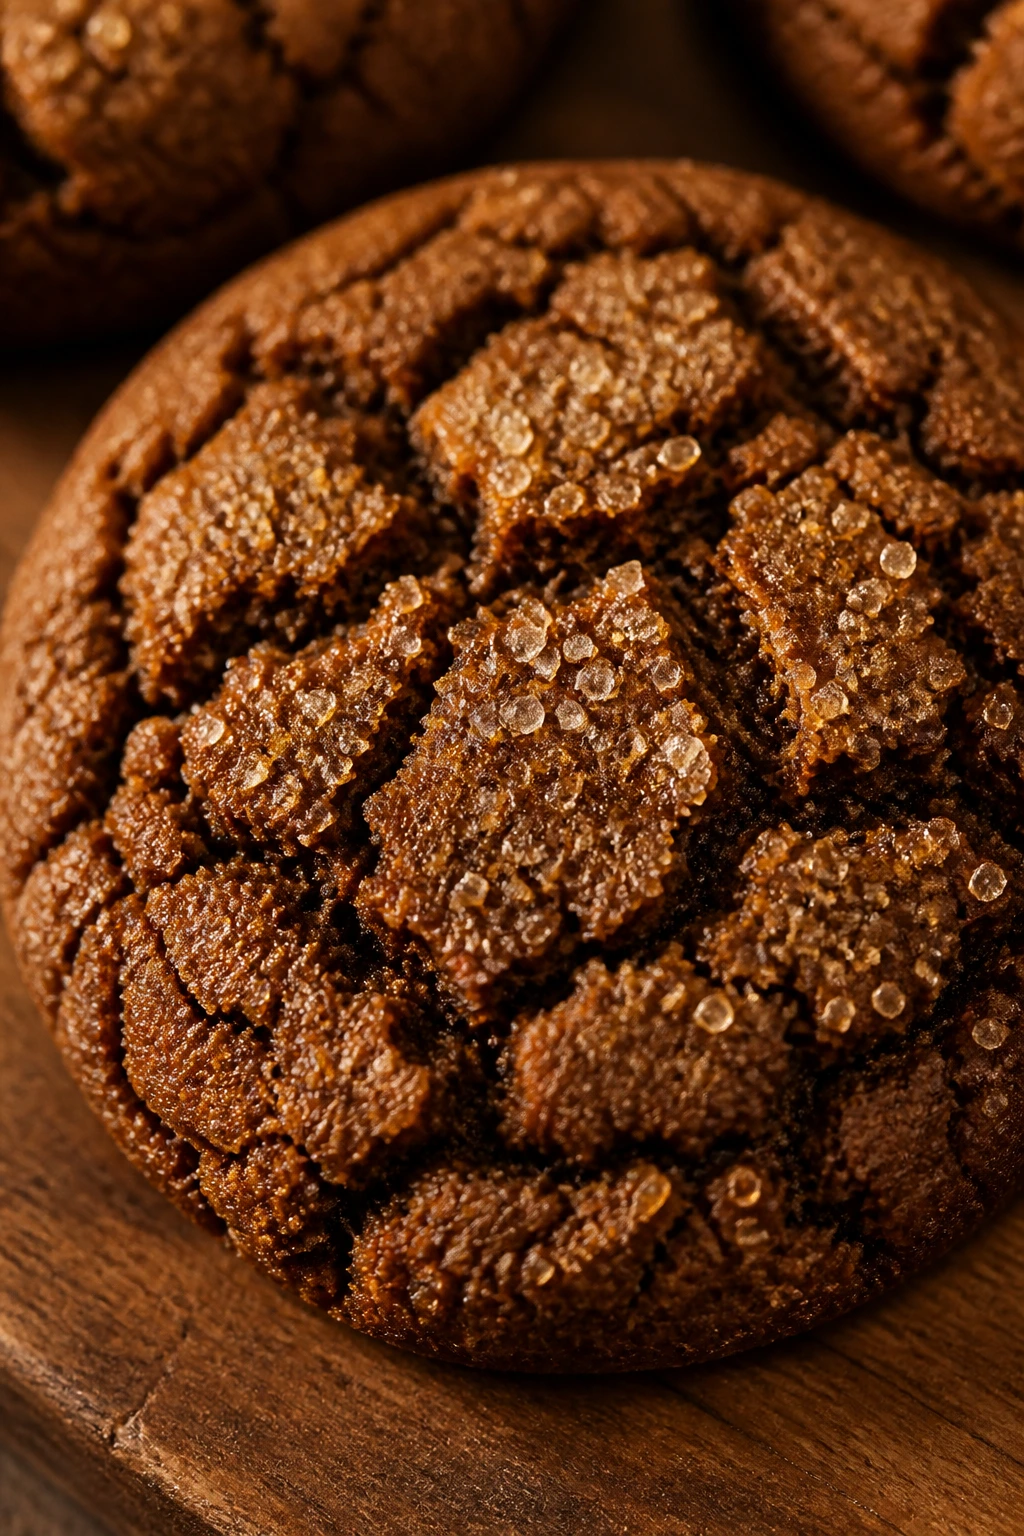
Intro: These are the dark, crackled cookies that smell like spice the second they start baking. Molasses gives them color and chew, ginger gives them heat, and a dusting of sugar before baking helps the tops crack in a pretty way. They’re not shy. Good.
Why It Works: Molasses holds moisture and gives the dough that deep, almost smoky sweetness. Ginger, cinnamon, and cloves make the flavor feel layered instead of flat, which matters when you’re working with pantry spices. Rolling the dough in sugar keeps the exterior a little crisp while the center stays soft.
Key Ingredients:
- 1/2 cup unsalted butter, softened — keeps the cookie tender.
- 3/4 cup packed light brown sugar — adds chew and depth.
- 1/4 cup molasses — the signature flavor.
- 1 large egg — helps bind the heavy dough.
- 2 cups all-purpose flour — gives the cookies enough structure.
- 1 teaspoon baking soda — helps them spread and crack.
- 2 teaspoons ground ginger — the main spice.
- 1 teaspoon cinnamon — adds warmth.
- 1/4 teaspoon ground cloves — a small amount is enough.
- 1/2 teaspoon fine salt — keeps the sweetness in check.
- Extra sugar for rolling — creates the crackly crust.
Quick Steps:
- Preheat the oven to 350°F (175°C) and line baking sheets with parchment.
- Cream the butter and brown sugar, then beat in the molasses and egg.
- Stir in the flour, baking soda, ginger, cinnamon, cloves, and salt until the dough is smooth and sticky.
- Scoop the dough, roll each mound in sugar, and place them 2 inches apart.
- Bake for 10 to 11 minutes, until the tops crack and the centers still look a little soft.
Equipment for This Recipe:
- Mixing bowl and mixer — the sticky dough mixes best this way.
- Small bowl for the sugar coating — keeps the process tidy.
- Baking sheets — don’t crowd them.
- Parchment paper — helps the sugary bottoms release.
How to Serve This Dish: Put these near the chocolate cookies or coffee-flavored ones so their spice has room to breathe. They are excellent with black tea, coffee, or cold milk.
If you like a little contrast, serve them with sliced oranges.
Pro Tips for This Recipe:
- Use mild molasses, not blackstrap, unless you want a sharper, bitter note.
- Chill the dough 20 minutes if it’s too sticky to scoop cleanly.
- Pull them while the centers still look soft; they firm on the tray.
- Roll the dough generously in sugar for the best crackle.
Variations on This Dish:
- Orange Molasses Cookies: Add 1 tablespoon orange zest for a brighter edge.
- Gingerbread Crinkles: Add 1/2 teaspoon extra ginger and a dusting of powdered sugar after cooling.
Common Mistakes to Avoid with This Dish:
- Using blackstrap molasses by accident: The flavor gets harsh fast. Mild molasses is the safer choice.
- Baking until firm: These should stay soft in the middle.
- Skipping the sugar coating: The crackled top and crisp outside depend on it.
12. Cherry Chocolate Chip Cookies
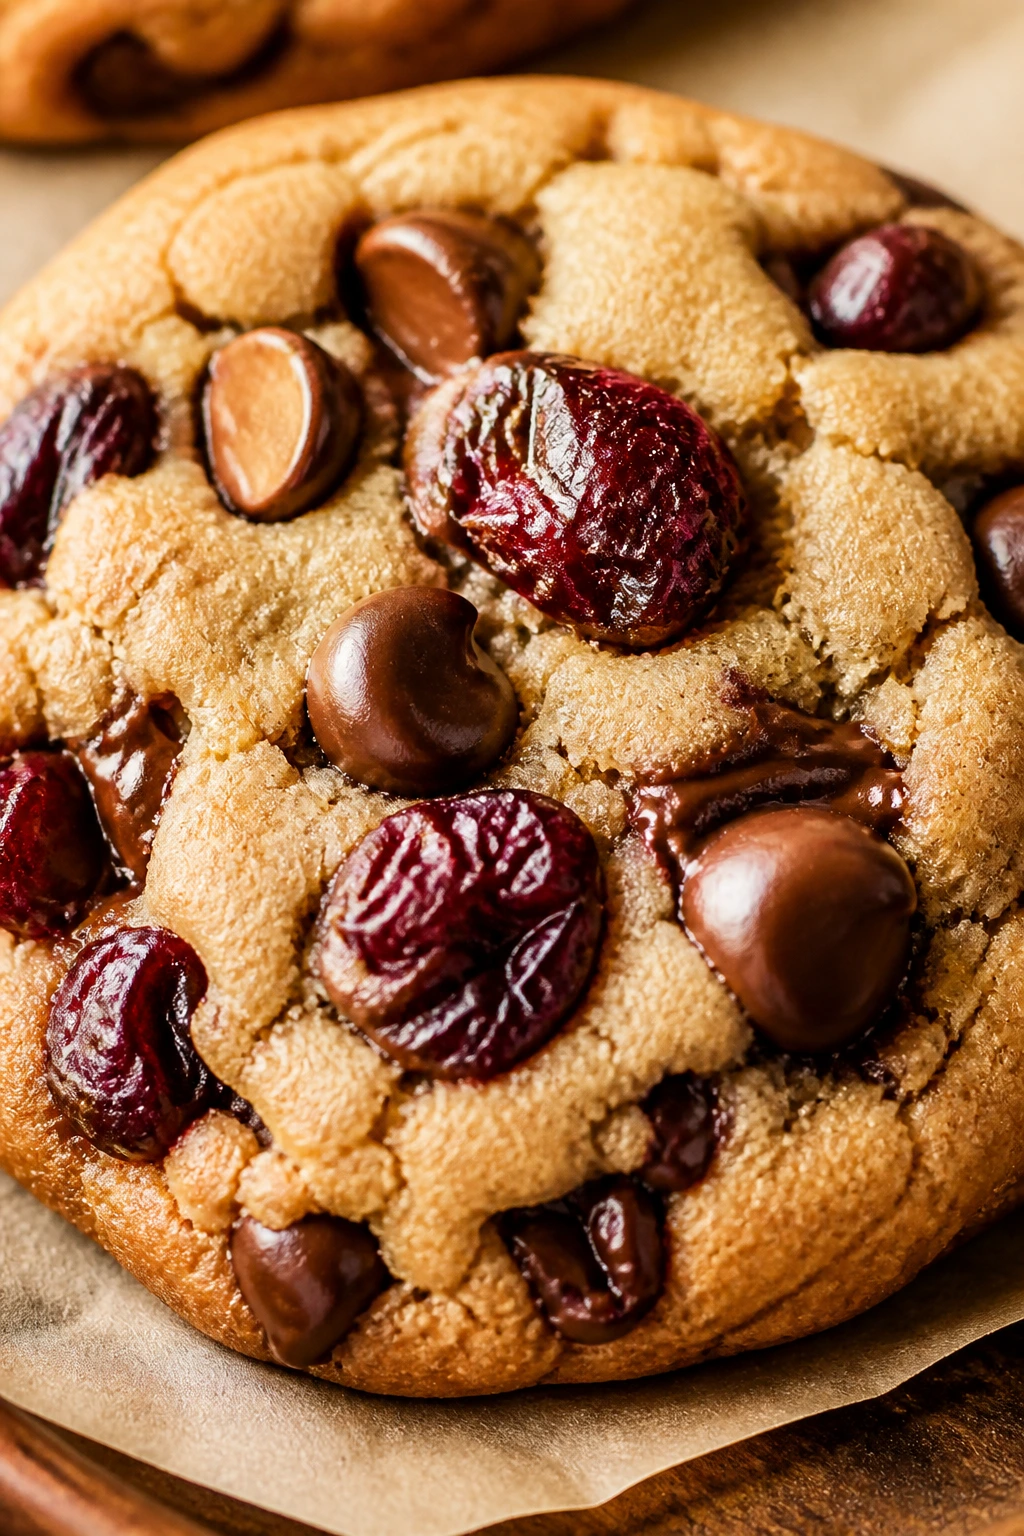
Intro: Dried cherries and chocolate chips make a tidy pair here. The cherries are tart and chewy, the chocolate melts in little pockets, and the dough stays soft enough to feel bakery-made. These are a nice change of pace when you want fruit without going full citrus.
Why It Works: Dried cherries bring chew and a tart edge that keeps the cookie from reading too sweet. Chocolate chips soften in the oven and create a richer bite around the fruit. A touch of almond extract makes the cherry flavor read sharper without turning the cookie into marzipan.
Key Ingredients:
- 1/2 cup unsalted butter, softened — gives the cookie body.
- 1/2 cup granulated sugar — lightens the crumb.
- 1/2 cup packed light brown sugar — adds moisture.
- 1 large egg — binds the dough.
- 1 teaspoon vanilla extract — rounds everything out.
- 1 3/4 cups all-purpose flour — keeps the dough stable.
- 1/2 teaspoon baking soda — helps with spread.
- 1/2 teaspoon fine salt — balances sweetness.
- 3/4 cup dried cherries — chewy fruit pieces.
- 3/4 cup chocolate chips — for melty pockets.
- 1/4 teaspoon almond extract — optional, but useful.
Quick Steps:
- Preheat the oven to 350°F (175°C) and line baking sheets with parchment.
- Cream the butter and both sugars, then beat in the egg, vanilla, and almond extract.
- Stir in the flour, baking soda, and salt, then fold in the cherries and chocolate chips.
- Scoop the dough into even mounds and bake for 9 to 11 minutes.
- Cool the cookies on the sheet for a few minutes before moving them to a rack.
Equipment for This Recipe:
- Mixing bowl and mixer — helps with the sugar base.
- Baking sheets with parchment — keeps the bottoms tidy.
- Cookie scoop — useful because the fruit makes the dough uneven.
- Rubber spatula — good for folding in the mix-ins.
How to Serve This Dish: These do a nice job of filling out the tray with a fruit-and-chocolate flavor that isn’t citrus-heavy. They pair well with coffee or a deeper black tea.
If you’re making cookie boxes, tuck these in next to the lemon cookies for contrast.
Pro Tips for This Recipe:
- Chop oversized cherries so the dough scoops cleanly.
- If the fruit feels dry, soak it in hot water for 5 minutes and pat it dry.
- Save a few chips and cherries to press on top before baking.
- Add 1/4 cup chopped pecans if you want more texture.
Variations on This Dish:
- White Cherry Drifts: Swap the chocolate chips for white chocolate.
- Cherry Oat Cookies: Add 1/2 cup oats and reduce flour by 1/4 cup.
Common Mistakes to Avoid with This Dish:
- Using cherries that are too dry and hard: They turn chewy in the wrong way. Soak and dry them first.
- Overloading with chips and fruit: The dough can’t hold its shape. Stay near the listed amount.
- Baking too long: The chocolate firms up and the cookies lose their soft middle.
13. White Chocolate Cranberry Cookies
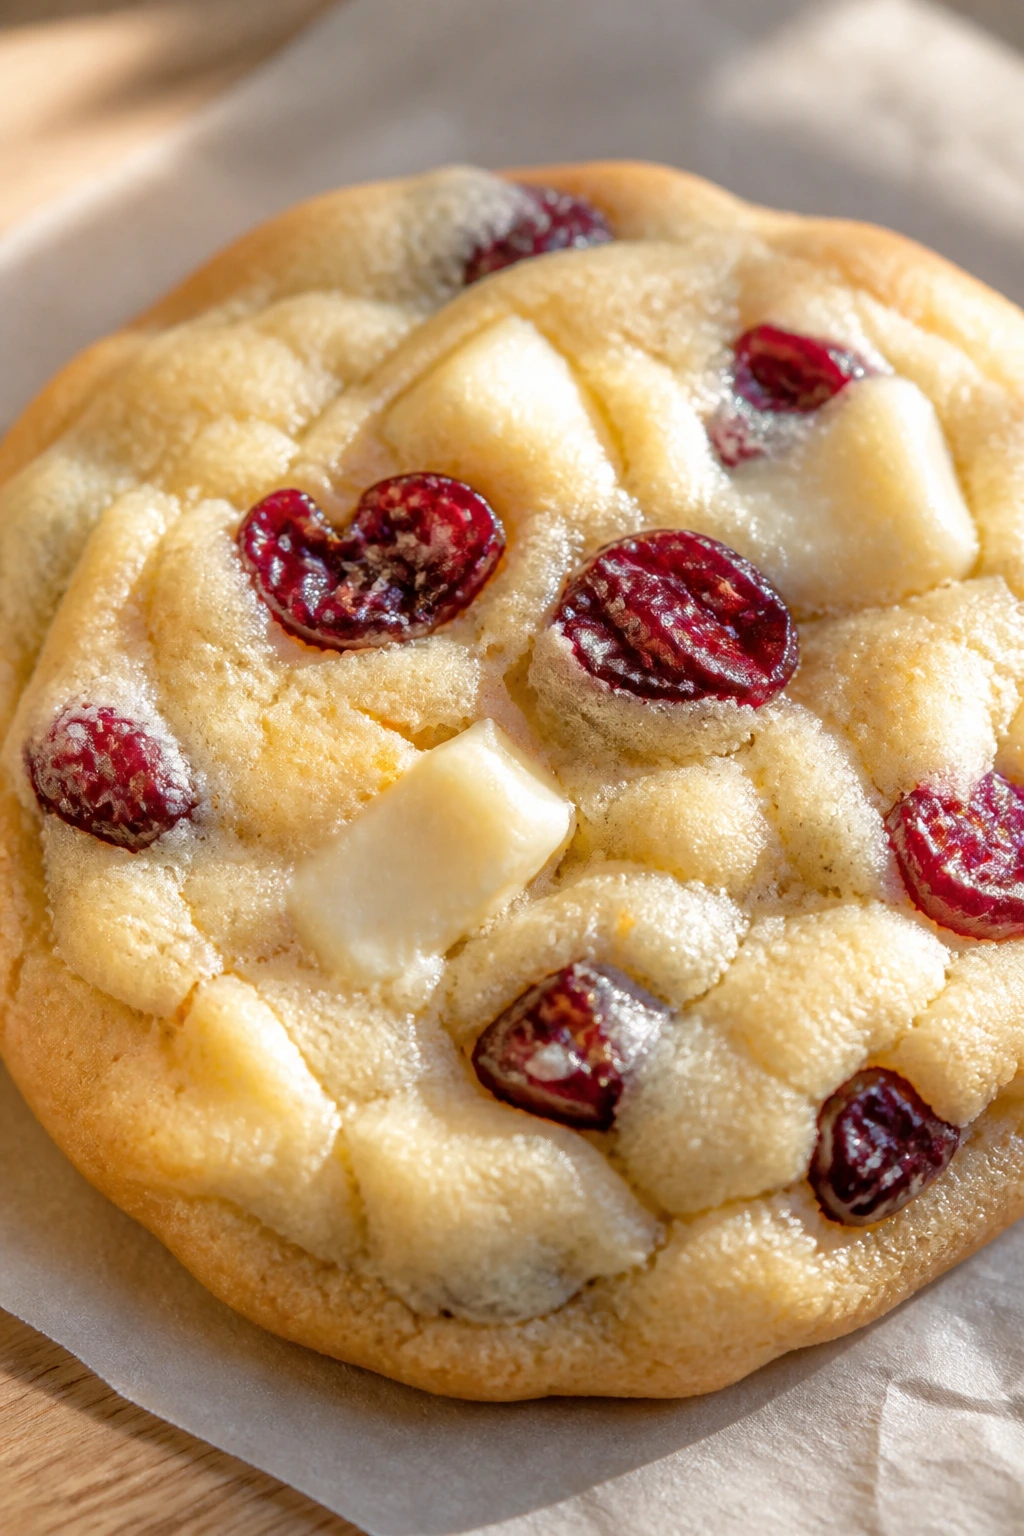
Intro: These are the bright, sweet-tart cookies that somehow make a cookie tray look more polished than it is. White chocolate gives creamy pockets, cranberries bring sharpness, and the pale dough reads as springy even though the ingredients are as ordinary as they come. A little orange zest helps, too.
Why It Works: White chocolate is sweet and soft, so dried cranberries and citrus zest keep the flavor from going flat. The brown sugar helps the cookie stay chewy, and the mix of chips and fruit gives each bite a little variation. This is the kind of cookie that tastes better the second day.
Key Ingredients:
- 1/2 cup unsalted butter, softened — keeps the dough tender.
- 1/2 cup granulated sugar — for light spread.
- 1/2 cup packed light brown sugar — adds chew.
- 1 large egg — binds the dough.
- 1 teaspoon vanilla extract — rounds the flavor.
- 1 3/4 cups all-purpose flour — enough body to hold the mix-ins.
- 1/2 teaspoon baking soda — helps the cookies rise a little.
- 1/2 teaspoon fine salt — sharpens the sweetness.
- 3/4 cup dried cranberries — tart fruit pieces.
- 3/4 cup white chocolate chips — creamy sweet pockets.
- 1 teaspoon orange zest — optional, but it wakes the whole batch up.
Quick Steps:
- Preheat the oven to 350°F (175°C) and line baking sheets with parchment.
- Cream the butter and both sugars, then beat in the egg, vanilla, and orange zest.
- Stir in the flour, baking soda, and salt, then fold in the cranberries and white chocolate chips.
- Scoop the dough and bake for 9 to 11 minutes, until the edges are set and the centers still look soft.
- Cool briefly on the sheet, then move to a rack.
Equipment for This Recipe:
- Mixing bowl and mixer — useful for the sugar stage.
- Baking sheets — lined with parchment.
- Spatula — folds in the chips without crushing them.
- Zester — if you’re using orange zest.
How to Serve This Dish: These bring a light color to the tray, especially next to the darker chocolate cookies. They go well with tea or a light coffee, and they’re easy to tuck into paper liners for gifting.
A few dried cranberries sprinkled around the platter help sell the flavor before anyone bites in.
Pro Tips for This Recipe:
- Chop very large cranberries so the cookies scoop evenly.
- Use good white chocolate chips; the cheap ones can taste waxy.
- Add 1/4 teaspoon almond extract if you want a softer, bakery-style finish.
- Keep the cookies pale so the white chocolate stays visible.
Variations on This Dish:
- Apricot White Chocolate: Swap the cranberries for chopped dried apricots.
- Cranberry Oat Drops: Add 1/2 cup oats for a firmer chew.
Common Mistakes to Avoid with This Dish:
- Using too many chips: The dough stops holding together. Keep the add-ins measured.
- Baking until browned: White chocolate looks best on a light cookie.
- Skipping the orange zest if the fruit is very tart: The flavor can taste one-note without it.
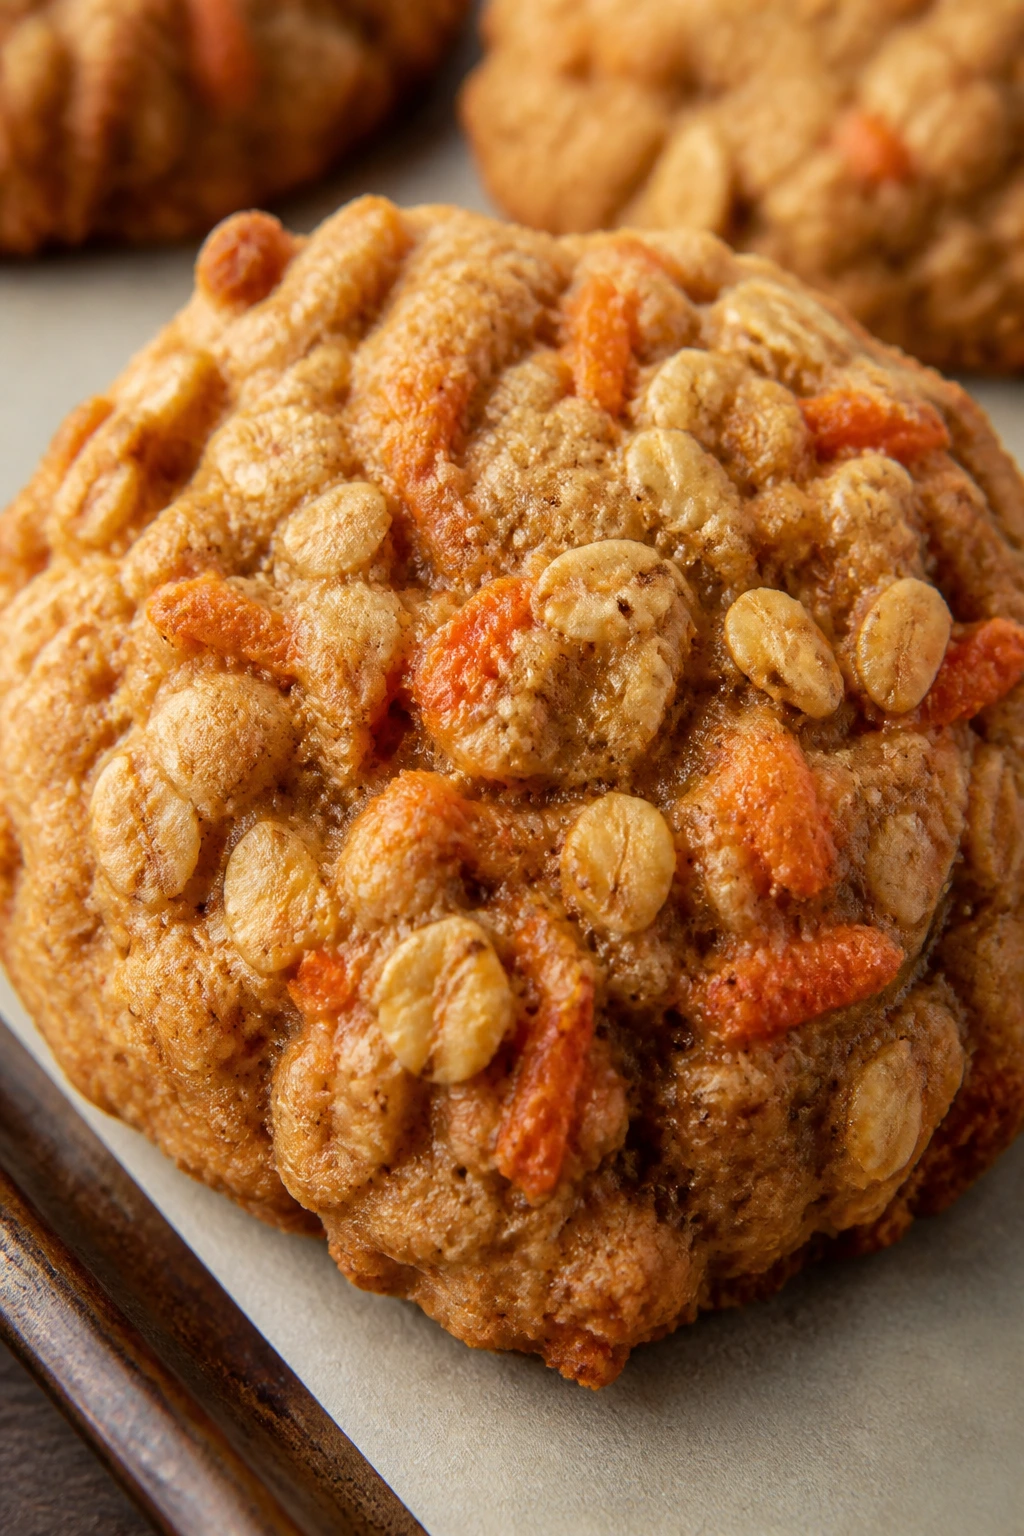
14. Peanut Butter Oat Cookies
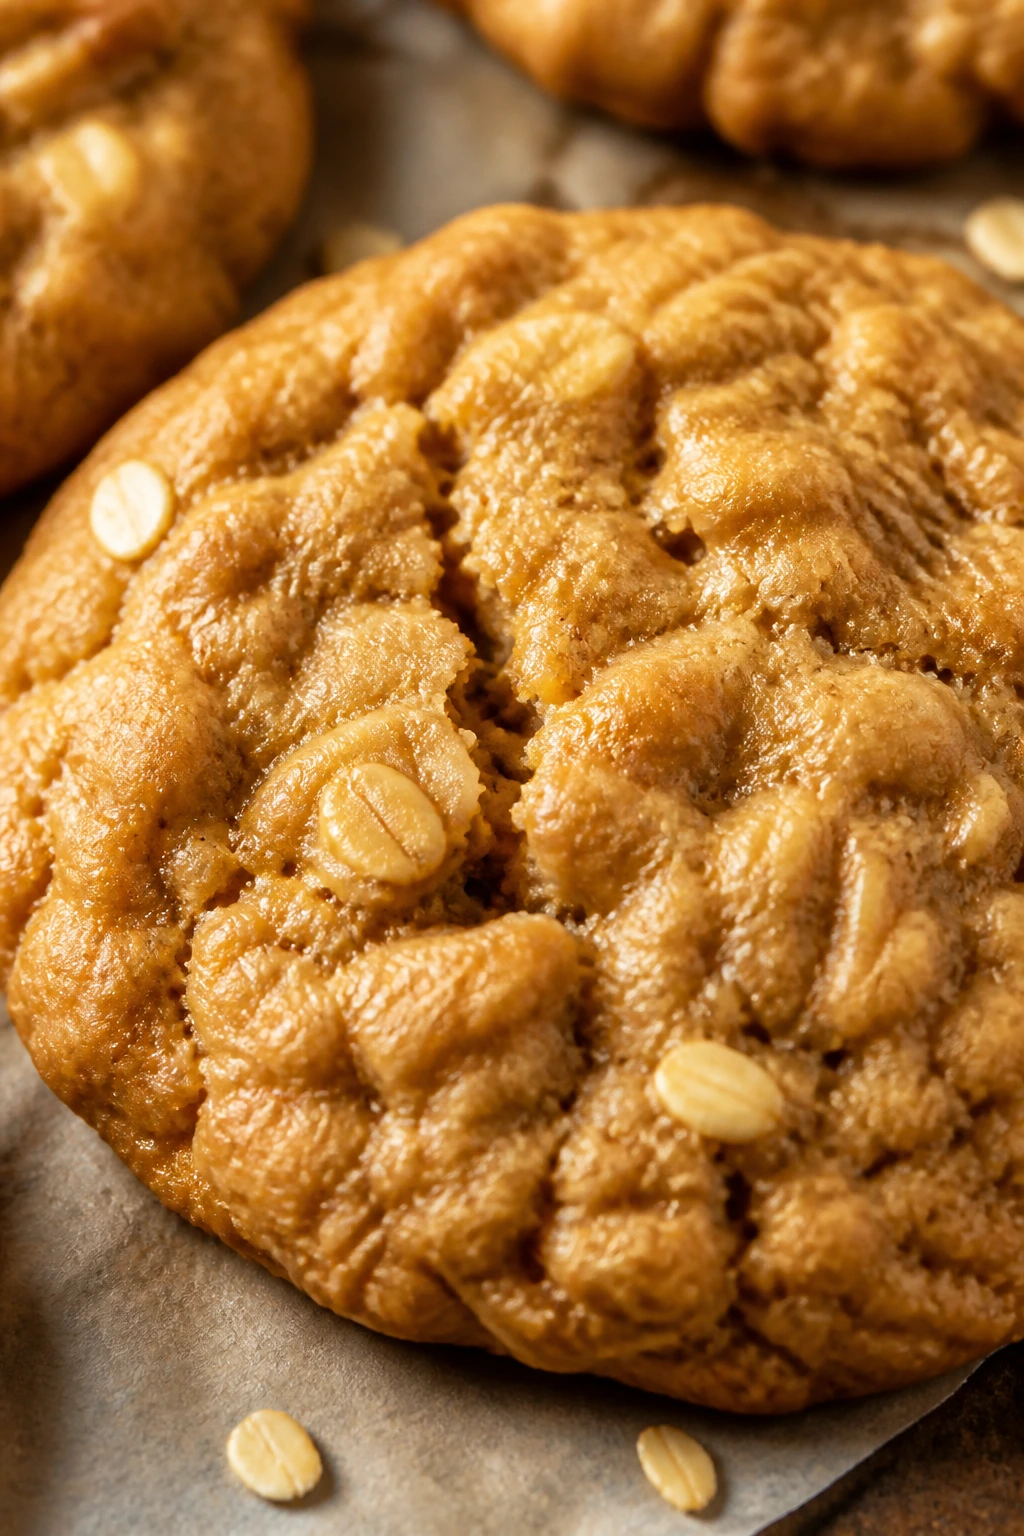
Intro: These are plain-spoken in the best way. Peanut butter and oats make a chewy, sturdy cookie that feels homey without being heavy, and they’re the kind of thing you can make from a nearly empty pantry. If you need a backup cookie for the tray, this is it.
Why It Works: Oats soak up the moisture from the peanut butter and butter, which gives the cookie chew and keeps it from crumbling. Brown sugar adds depth, and a short bake leaves the centers soft enough to stay pleasant for days. The dough is forgiving, which I appreciate.
Key Ingredients:
- 1/2 cup unsalted butter, softened — gives the dough structure.
- 1/2 cup creamy peanut butter — the main flavor.
- 3/4 cup packed light brown sugar — keeps the cookies chewy.
- 1 large egg — binds the dough.
- 1 teaspoon vanilla extract — smooths the flavor.
- 1 cup old-fashioned oats — adds texture and body.
- 1 cup all-purpose flour — gives enough structure.
- 1/2 teaspoon baking soda — helps with spread.
- 1/2 teaspoon fine salt — balances the sweet-salty note.
- 1/2 cup chocolate chips or raisins — optional mix-in.
Quick Steps:
- Preheat the oven to 350°F (175°C) and line baking sheets with parchment.
- Cream the butter, peanut butter, and brown sugar until smooth, then beat in the egg and vanilla.
- Stir in the oats, flour, baking soda, and salt, then fold in any chips or raisins.
- Scoop the dough into mounds and gently flatten them with your palm.
- Bake for 10 to 11 minutes, until the edges are set and the centers look a bit underdone.
Equipment for This Recipe:
- Mixing bowl and spoon or mixer — either works.
- Baking sheet — lined with parchment.
- Cookie scoop — makes the dough easier to portion.
- Cooling rack — helps them set up after baking.
How to Serve This Dish: These are the sturdy ones you can set out near coffee, milk, or even a bowl of fruit and forget about. They’re good for people who want a less sugary cookie among the pastel options.
If you’re packing a tin, put them at the bottom; they handle stacking well.
Pro Tips for This Recipe:
- If the dough seems dry, let it sit 5 minutes before adding anything else. The oats will soften a bit.
- Add 1/4 cup chopped peanuts if you want more crunch.
- Don’t flatten them too much or they turn thin.
- Chill for 15 minutes if your kitchen is warm.
Variations on This Dish:
- Raisin Peanut Oats: Use raisins instead of chocolate chips for a more breakfast-like cookie.
- Chocolate Peanut Oat Piles: Add cocoa powder and skip the raisins for a richer batch.
Common Mistakes to Avoid with This Dish:
- Packing the oats too tightly: The dough gets dry and stiff. Measure loosely.
- Baking until fully browned: That makes them hard instead of chewy.
- Using natural peanut butter without adjusting: Stir it well or the dough can spread unevenly.
15. Maple Pecan Cookies
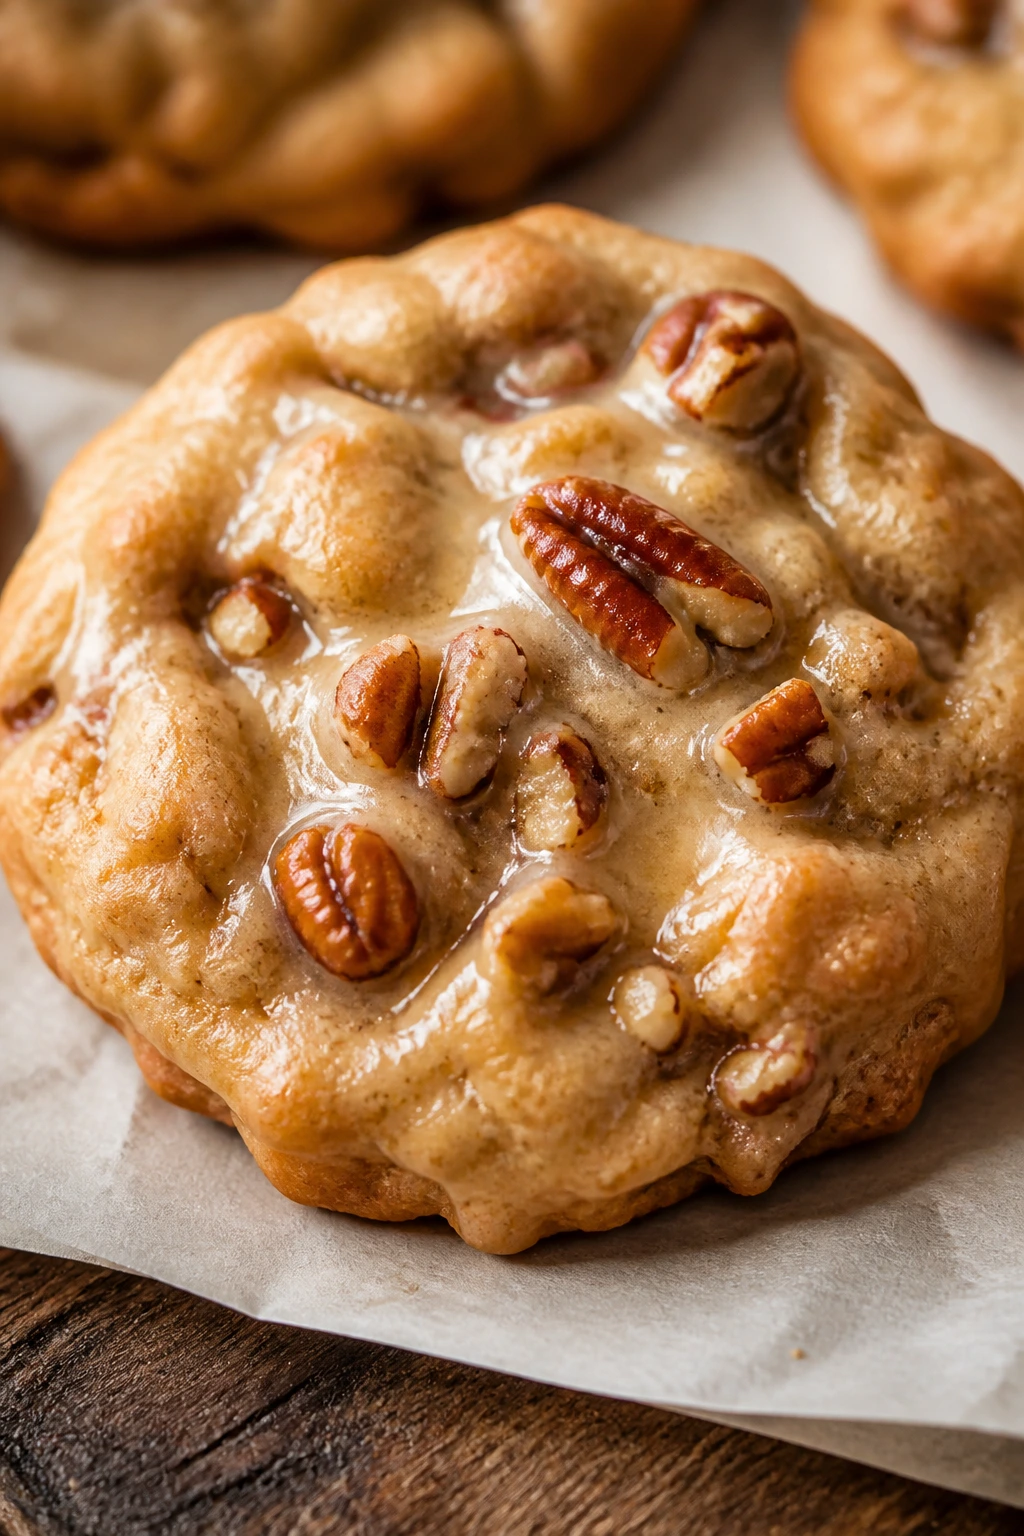
Intro: Maple and pecans make a cookie that smells like warm syrup the second it hits the oven. These are softer than a crunchy bakery cookie, with a mellow sweetness and nutty bits that stay noticeable even after baking. They feel like something you’d put beside a pot of coffee and leave alone for five minutes.
Why It Works: Maple syrup adds flavor and moisture, but you still need brown sugar to keep the dough from going flat. Pecans toast a little in the oven and bring a buttery crunch that works especially well with soft cookie dough. A small amount of cinnamon pushes the maple flavor forward without turning it into spice cake.
Key Ingredients:
- 1/2 cup unsalted butter, softened — gives richness.
- 3/4 cup packed light brown sugar — adds chew.
- 1/4 cup pure maple syrup — the maple flavor.
- 1 large egg — binds the dough.
- 1 teaspoon vanilla extract — rounds the syrup.
- 1 3/4 cups all-purpose flour — gives structure.
- 1 teaspoon baking powder — helps lift.
- 1/2 teaspoon cinnamon — brings warmth.
- 1/2 teaspoon fine salt — balances the sugar.
- 3/4 cup chopped pecans — for crunch.
Quick Steps:
- Preheat the oven to 350°F (175°C) and line baking sheets with parchment.
- Cream the butter and brown sugar, then beat in the maple syrup, egg, and vanilla.
- Stir in the flour, baking powder, cinnamon, and salt until just combined.
- Fold in the pecans and scoop the dough into rounds.
- Bake for 10 to 11 minutes, until the tops are set and the edges are just starting to color.
Equipment for This Recipe:
- Mixing bowl and mixer — useful for blending syrup into the butter.
- Baking sheets — lined with parchment.
- Rubber spatula — to fold in the pecans.
- Cooling rack — helps the cookies finish setting.
How to Serve This Dish: These are a nice bridge between the spice cookies and the citrus cookies. Serve them with coffee or strong tea, and if you’re setting out a dessert board, put them near a little bowl of extra pecans.
They also hold up well beside fresh berries.
Pro Tips for This Recipe:
- Use real maple syrup, not pancake syrup, or the flavor gets muddy.
- Chop the pecans fairly small so the dough scoops cleanly.
- Add a pinch of flaky salt on top right after baking.
- Cool the baking sheet between batches to keep the cookies from spreading too fast.
Variations on This Dish:
- Maple Walnut Drops: Swap the pecans for walnuts if that’s what’s in the pantry.
- Maple Pecan Glaze Cookies: Drizzle with a thin maple glaze once cooled.
Common Mistakes to Avoid with This Dish:
- Too much syrup: The dough gets loose and the cookies spread. Measure it carefully.
- Using stale pecans: The flavor goes flat or bitter. Smell them before baking.
- Overbaking to brown them heavily: Maple cookies taste best when they stay soft.
16. Chocolate Coconut Macaroons
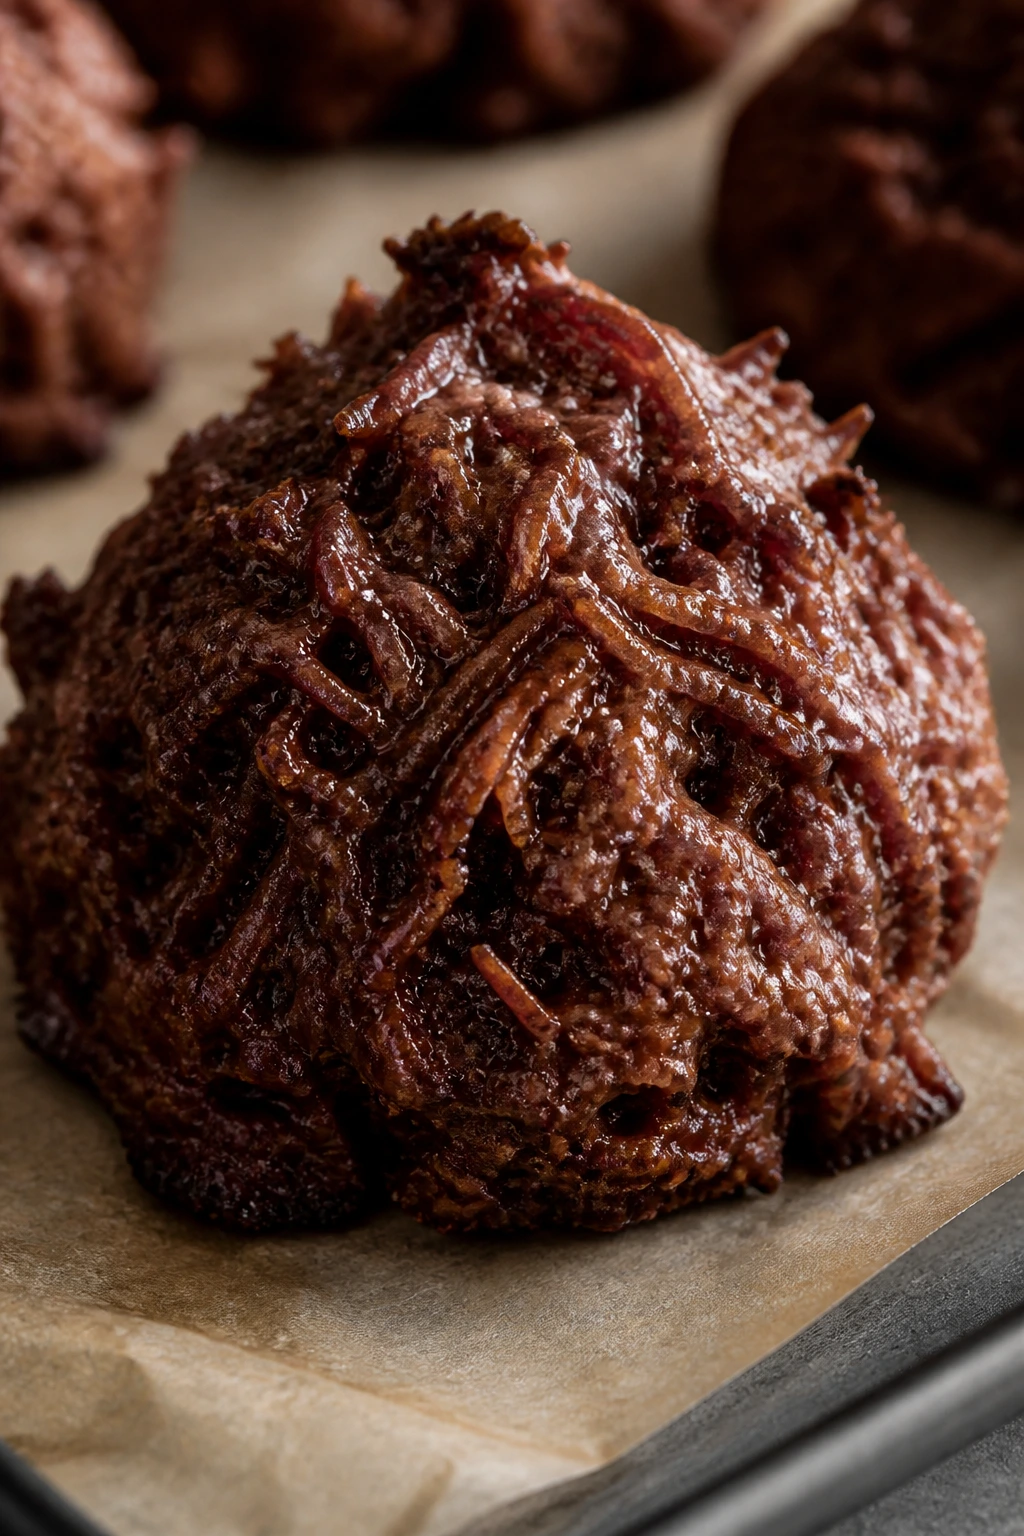
Intro: These are the mounds on the tray that look dramatic with almost no effort. Coconut gives you chew, cocoa gives you depth, and the egg whites hold everything together into glossy little domes. They’re crisp at the edges, tender in the middle, and deeply chocolatey without needing flour.
Why It Works: Egg whites tighten as they bake, so the macaroon keeps its shape even without a full cookie dough structure. Coconut is the star, and cocoa simply darkens the flavor enough to keep things interesting. A small amount of chocolate chips gives you little pockets of melt.
Key Ingredients:
- 2 large egg whites — the binder.
- 1/2 cup granulated sugar — helps the tops set.
- 1 teaspoon vanilla extract — adds warmth.
- 1/4 teaspoon fine salt — balances the sweetness.
- 3 cups sweetened shredded coconut — the body of the cookie.
- 1/4 cup unsweetened cocoa powder — deepens the flavor.
- 1/2 cup mini chocolate chips — optional, but useful.
Quick Steps:
- Preheat the oven to 325°F (165°C) and line a baking sheet with parchment.
- Whisk the egg whites, sugar, vanilla, and salt until foamy and combined.
- Fold in the coconut, cocoa powder, and chocolate chips until the mixture is evenly coated.
- Scoop heaping spoonfuls onto the sheet and pack them lightly so they hold together.
- Bake for 12 to 14 minutes, until the edges are set and the tops look dry.
Equipment for This Recipe:
- Mixing bowl and whisk — enough for the foamy base.
- Spoon or cookie scoop — these are shaped by scooping, not rolling.
- Baking sheet lined with parchment — crucial for easy release.
- Cooling rack — lets the bottoms dry a little.
How to Serve This Dish: These add height and texture to a cookie tray, so I like them in the center or slightly off to one side. They’re good with coffee, but they also work with a cold glass of milk or a little espresso after brunch.
A few extra coconut flakes on the platter make them look intentional.
Pro Tips for This Recipe:
- Use sweetened shredded coconut, not the dry unsweetened kind, unless you adjust the sugar.
- Pack the scoops lightly so the mounds don’t fall apart.
- Let them cool fully before moving them; they firm as they rest.
- Add a tablespoon of finely chopped candied ginger if you want a brighter finish.
Variations on This Dish:
- Lemon Coconut Macaroons: Add 1 tablespoon lemon zest for a sharper top note.
- Almond Coco-Macaroons: Stir in 1/4 teaspoon almond extract for a softer flavor.
Common Mistakes to Avoid with This Dish:
- Underbaking: The bottoms stay sticky and the centers collapse. Give them enough time to dry.
- Using too much cocoa: The mixture can get crumbly. Measure carefully.
- Trying to shape them like standard dough: These are scoop-and-bake cookies; fussing with them usually makes them worse.
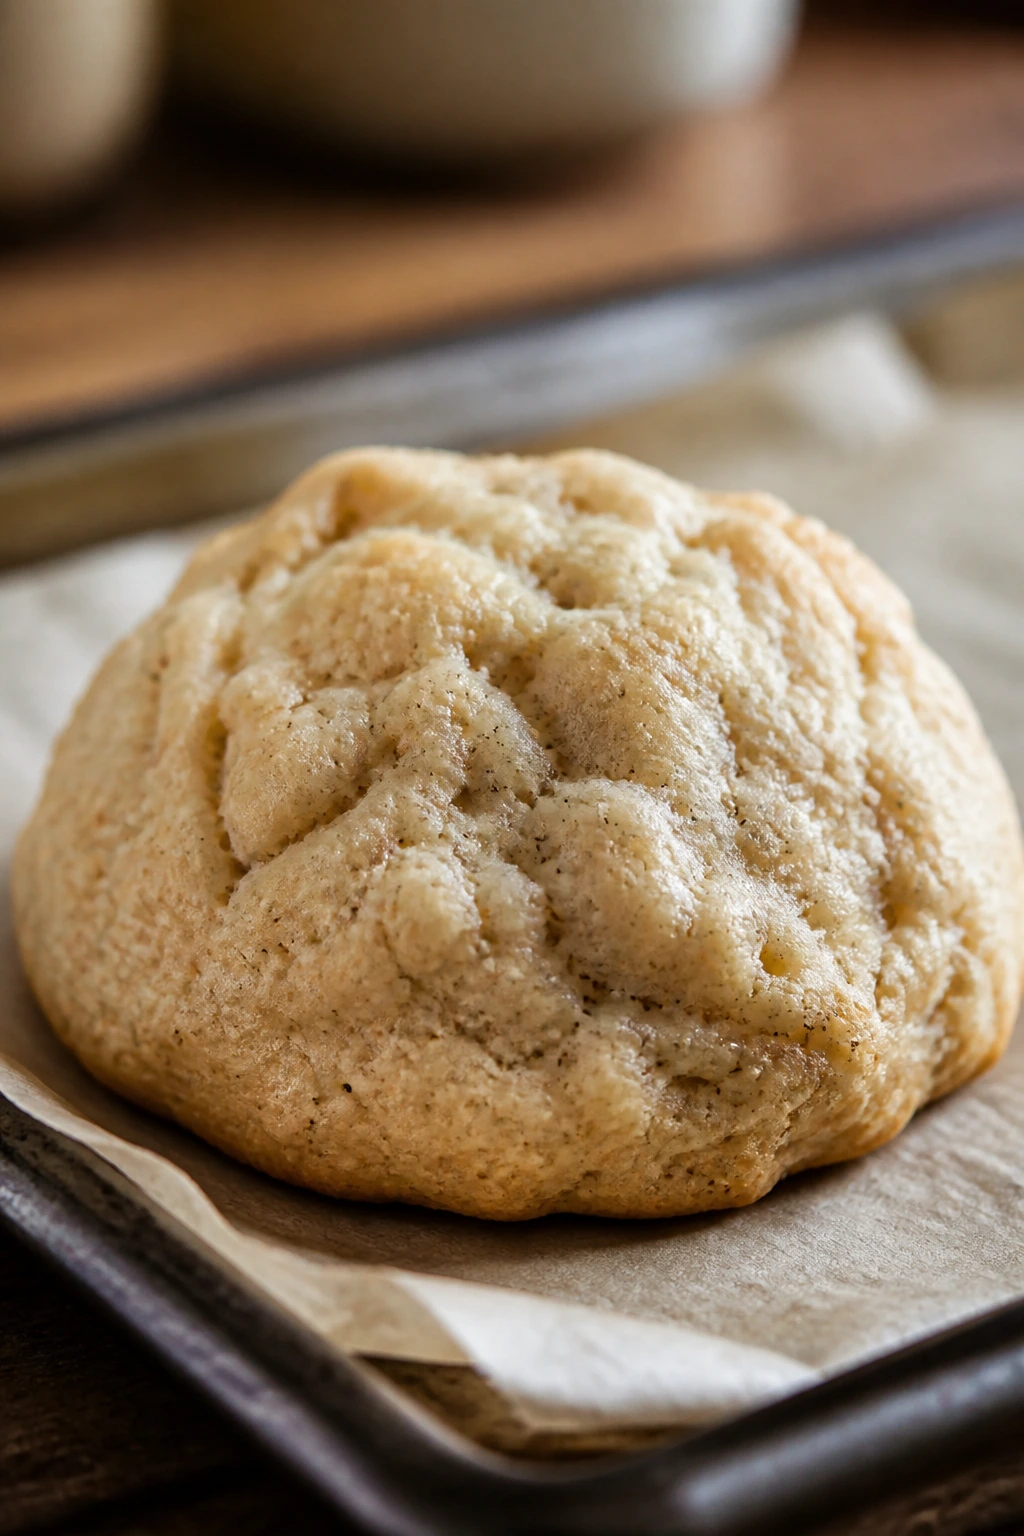
17. Banana Cinnamon Cookies
Intro: These taste like a softer version of banana bread, only in cookie form. They’re tender, a little cakey, and warm with cinnamon, which makes them useful when you have one ripe banana to spend and not much else. They aren’t flashy. They are useful. That counts.
Why It Works: Banana adds moisture and natural sweetness, which means the cookie can stay soft without a lot of extra sugar. Oats give the dough structure and keep it from turning into a pancake. A short chill helps the banana settle in, which is worth the extra 15 minutes.
Key Ingredients:
- 1/2 cup unsalted butter, softened — gives richness.
- 3/4 cup packed light brown sugar — adds chew and depth.
- 1 large ripe banana, mashed to about 1/2 cup — the moisture and flavor.
- 1 large egg — binds the dough.
- 1 teaspoon vanilla extract — rounds the banana.
- 1 1/2 cups all-purpose flour — keeps the dough steady.
- 1 cup old-fashioned oats — adds texture.
- 1 teaspoon baking soda — helps the cookies rise.
- 1 teaspoon cinnamon — the main spice.
- 1/2 teaspoon fine salt — keeps the sweetness in check.
- 1/2 cup chopped walnuts or chocolate chips — optional.
Quick Steps:
- Preheat the oven to 350°F (175°C) and line baking sheets with parchment.
- Cream the butter and brown sugar, then beat in the banana, egg, and vanilla.
- Stir in the flour, oats, baking soda, cinnamon, and salt until just mixed.
- Fold in the walnuts or chips if using, then chill the dough for 15 minutes.
- Scoop the dough and bake for 10 to 12 minutes, until the edges are set and the centers still look soft.
Equipment for This Recipe:
- Mixing bowl and spoon — the dough is soft and easy to stir by hand.
- Baking sheet — lined with parchment.
- Cookie scoop — helps because the dough is sticky.
- Fork — useful if you want to flatten the tops lightly.
How to Serve This Dish: These work well as an afternoon cookie, not just a dessert-table cookie. Put them near coffee or tea, or send them out with the fruit if you want the tray to feel a little less sugary.
They’re the sort that taste even better after sitting for a few hours.
Pro Tips for This Recipe:
- Use a banana that’s ripe enough to mash easily but not soupy.
- Chill the dough so it doesn’t spread too much.
- Add 2 tablespoons of shredded coconut for a spring twist.
- If the dough seems too loose, stir in 2 tablespoons more flour.
Variations on This Dish:
- Chocolate Banana Oats: Fold in 1/2 cup chocolate chips.
- Banana Nut Crunch: Use pecans instead of walnuts for a softer bite.
Common Mistakes to Avoid with This Dish:
- Using a huge banana: The dough gets too wet and spready. Keep it near 1/2 cup mashed.
- Skipping the chill: The cookies can bake flat. Fifteen minutes helps.
- Overbaking into brown edges: They should stay soft and tender.
18. Espresso Chocolate Chip Cookies
Intro: These taste like dessert after lunch, which is usually a good thing. Espresso powder deepens the chocolate and gives the cookies a slightly grown-up edge, while the chips stay soft in the center. They’re strong enough to stand beside the sweeter Easter cookies without getting lost.
Why It Works: Instant espresso powder dissolves into the dough and boosts the cocoa flavor without making the cookies taste like coffee drinks. Brown sugar helps them stay chewy, and the mix of soft dough plus melty chips keeps each bite from going flat. A pinch of extra salt sharpens the whole thing.
Key Ingredients:
- 1/2 cup unsalted butter, softened — the fat that carries the flavor.
- 1/2 cup packed light brown sugar — keeps the cookie chewy.
- 1/4 cup granulated sugar — helps with spread.
- 1 large egg — binds the dough.
- 1 teaspoon vanilla extract — rounds the flavor.
- 1 1/2 cups all-purpose flour — the structure.
- 1 tablespoon instant espresso powder — the coffee note.
- 1/2 teaspoon baking soda — gives lift.
- 1/2 teaspoon fine salt — balances the sweet and bitter.
- 1 cup chocolate chips — the melt pockets.
Quick Steps:
- Preheat the oven to 350°F (175°C) and line baking sheets with parchment.
- Cream the butter and sugars, then beat in the egg and vanilla.
- Stir in the flour, espresso powder, baking soda, and salt until a soft dough forms.
- Fold in the chocolate chips, scoop onto the sheet, and bake for 9 to 11 minutes.
- Cool for 5 minutes before moving the cookies to a rack.
Equipment for This Recipe:
- Mixing bowl and mixer — useful for the creaming stage.
- Small spoon — helpful if your espresso powder clumps.
- Baking sheets lined with parchment — keeps the bottoms smooth.
- Cooling rack — helps them finish setting.
How to Serve This Dish: These should sit near the darker cookies on the platter, where their coffee flavor makes sense. They pair best with black coffee, milk, or a tiny shot of espresso if you really want to commit.
A sprinkle of flaky salt on top makes the chocolate taste bigger.
Pro Tips for This Recipe:
- Use instant espresso powder, not brewed coffee, or the dough gets wet.
- Save a few chips for the tops.
- If the dough feels loose, chill it 20 minutes.
- Add 1/4 teaspoon cinnamon if you want a mocha direction.
Variations on This Dish:
- Mocha Chip Cookies: Add 2 tablespoons cocoa powder.
- Double Espresso Bites: Increase the espresso powder to 2 teaspoons for a sharper coffee note.
Common Mistakes to Avoid with This Dish:
- Using brewed coffee instead of powder: The dough thins out and spreads. Powder keeps the texture right.
- Overbaking the cookies dry: The chips should stay soft, not stiff.
- Adding too much espresso: The bitterness can take over the chocolate.
19. Carrot Cake Oat Cookies
Intro: These are softer and more cake-like than the oatmeal carrot cookies earlier in the list. The oats give chew, the carrot keeps the middle moist, and the spice mix leans a little closer to actual carrot cake. If you want a cookie that feels a bit more dessert-y than breakfast-y, this is the one.
Why It Works: More baking powder and a slightly softer dough make these puff rather than spread, which gives them a gentle cake crumb. Oats keep the texture interesting, and grated carrot brings moisture plus a little sweetness. A light glaze can finish them, but they hold their own without one.
Key Ingredients:
- 1/2 cup unsalted butter, softened — the base fat.
- 3/4 cup packed light brown sugar — keeps the cookie soft.
- 1 large egg — binds everything.
- 1 teaspoon vanilla extract — rounds the spice.
- 1 cup finely grated carrot, squeezed dry — moisture and color.
- 1 1/4 cups all-purpose flour — enough to hold the dough.
- 1 cup old-fashioned oats — adds chew.
- 1 teaspoon baking powder — gives a lighter crumb.
- 1/2 teaspoon baking soda — supports browning.
- 1 teaspoon cinnamon and 1/4 teaspoon ginger — the spice mix.
- 1/2 teaspoon salt — balances the sweetness.
- 1/2 cup raisins or chopped walnuts — optional.
Quick Steps:
- Preheat the oven to 350°F (175°C) and line a baking sheet with parchment.
- Cream the butter and brown sugar, then beat in the egg and vanilla.
- Stir in the carrot, flour, oats, baking powder, baking soda, cinnamon, ginger, and salt.
- Fold in raisins or walnuts if using, then scoop the dough and gently mound it.
- Bake for 11 to 12 minutes, until the tops look set but still soft.
Equipment for This Recipe:
- Grater and clean towel — for the carrot.
- Mixing bowl and spoon — enough for the dough.
- Baking sheet lined with parchment — essential.
- Cooling rack — helps the texture settle.
How to Serve This Dish: These look nice on a tray with lemon cookies or coconut cookies because they lean into the spring idea without shouting. They’re good with tea and even better if you let them rest for a few hours before serving.
A light dusting of powdered sugar makes them read more like carrot cake.
Pro Tips for This Recipe:
- Squeeze the grated carrot dry or you’ll get flat cookies.
- If you want more cake-like texture, don’t overmix the oats.
- Add 1/4 cup shredded coconut for extra spring flavor.
- Chilling the dough 10 minutes helps the scoops hold their shape.
Variations on This Dish:
- Carrot Raisin Tea Cookies: Skip the walnuts and keep the dough soft.
- Carrot Cake Glaze Drops: Finish with a thin lemon or vanilla glaze.
Common Mistakes to Avoid with This Dish:
- Leaving the carrot wet: The cookies turn heavy and sticky.
- Using too much spice: Ginger and cinnamon should support the carrot, not bury it.
- Baking until brown all over: These should stay tender in the center.
20. Sesame Honey Cookies
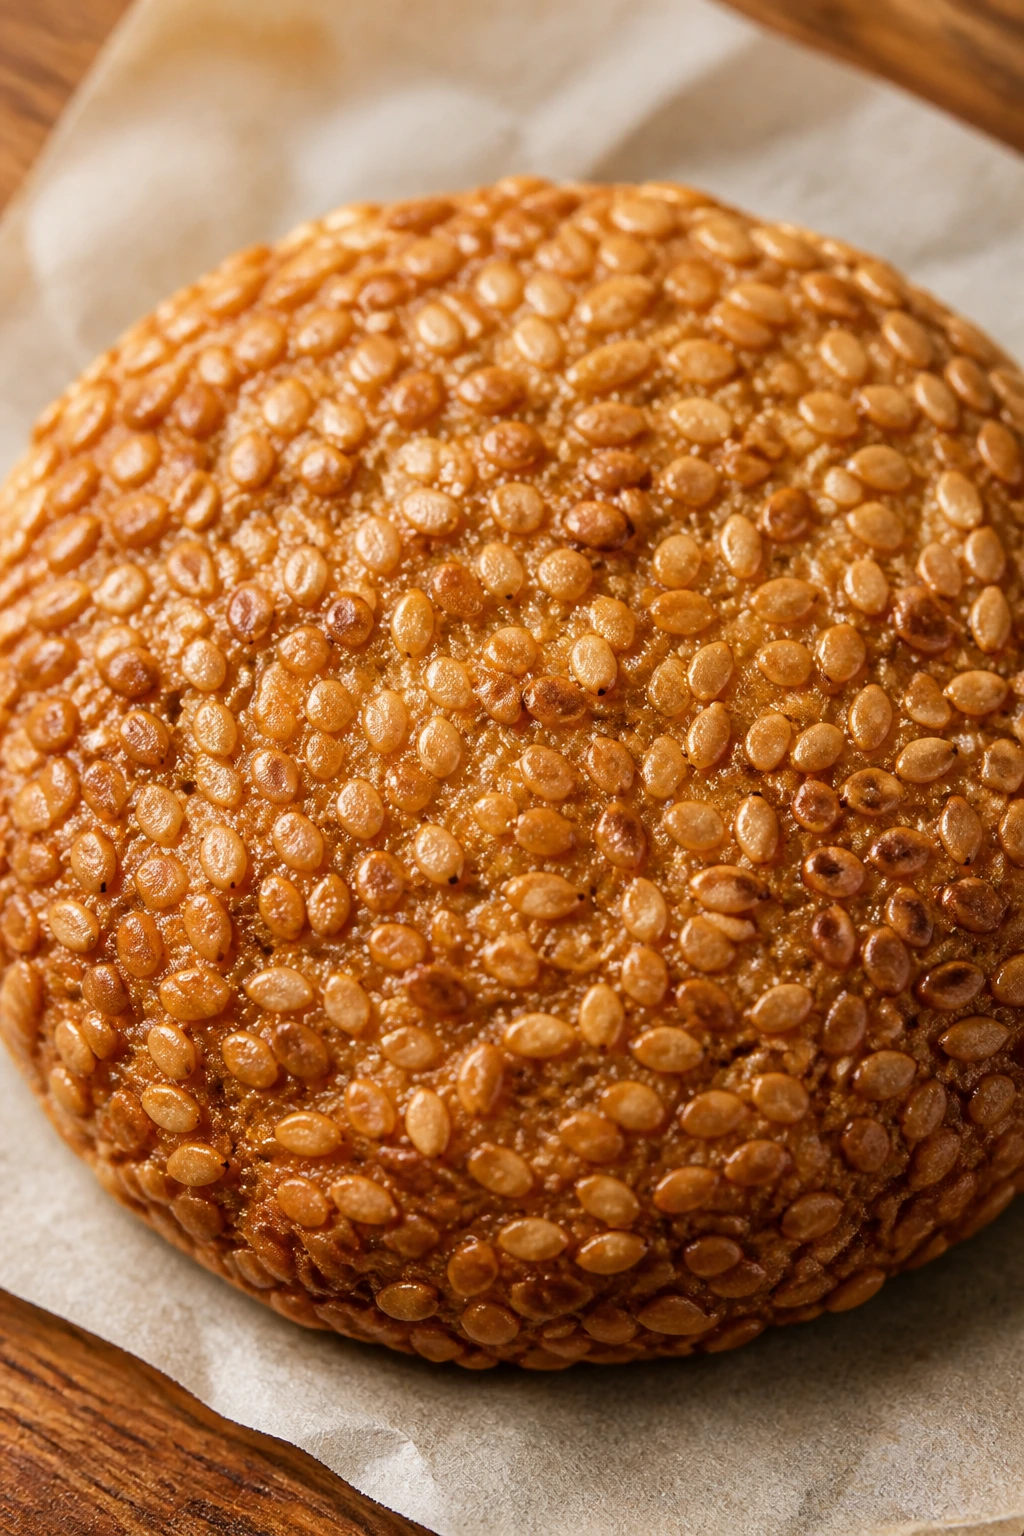
Intro: Sesame and honey are a quiet, elegant pair. The sesame seeds toast in the oven and give a nutty crunch, while the honey keeps the cookie soft and lightly floral. These are not the loudest cookies on the tray, but they bring texture that the sweeter ones don’t have.
Why It Works: Honey adds moisture and a round sweetness that granulated sugar alone can’t give you. Sesame seeds bring a toasted, almost savory edge, especially if you give them a quick toast first. The dough can be rolled in extra seeds for a cleaner look and more crunch.
Key Ingredients:
- 1/2 cup unsalted butter, softened — keeps the cookie tender.
- 1/3 cup honey — the main sweetener.
- 1/3 cup granulated sugar — helps with spread.
- 1 large egg — binds the dough.
- 1 teaspoon vanilla extract — softens the honey flavor.
- 1 3/4 cups all-purpose flour — enough structure.
- 1/2 teaspoon baking soda — gives lift.
- 1/2 teaspoon fine salt — balances the sweetness.
- 1/2 cup toasted sesame seeds — folded into the dough.
- 2 tablespoons extra sesame seeds — for rolling or topping.
Quick Steps:
- Preheat the oven to 350°F (175°C) and line baking sheets with parchment.
- Cream the butter, honey, and sugar, then beat in the egg and vanilla.
- Stir in the flour, baking soda, salt, and sesame seeds until the dough comes together.
- Scoop the dough and press the tops gently into extra sesame seeds.
- Bake for 9 to 11 minutes, until the edges are lightly golden.
Equipment for This Recipe:
- Mixing bowl and spoon or mixer — the dough is simple.
- Small bowl of sesame seeds — for topping.
- Baking sheet lined with parchment — keeps the bottoms clean.
- Cooling rack — useful because honey cookies soften as they cool.
How to Serve This Dish: Put these near the edge of the tray, where their sesame topping can be seen and touched. They’re good with tea, especially black tea, and they give the platter a different texture from the fruit cookies.
A little drizzle of honey on the plate is enough if you want extra shine.
Pro Tips for This Recipe:
- Toast the sesame seeds first if they’re raw; the flavor is deeper.
- Chill the dough briefly if honey makes it sticky.
- Add 1/2 teaspoon orange zest if you want the honey to feel brighter.
- Keep the cookies small; sesame topping can get messy on oversized mounds.
Variations on This Dish:
- Tahini Sesame Drops: Swap 2 tablespoons of the butter for tahini.
- Orange Sesame Cookies: Add orange zest and a light citrus glaze.
Common Mistakes to Avoid with This Dish:
- Using raw sesame seeds only: The flavor stays flat. Toasting wakes them up.
- Baking too dark: Honey can go bitter if the cookies get too brown.
- Making the dough too wet: It spreads quickly if the honey is overmeasured.
21. Cornmeal Lemon Cookies
Intro: Cornmeal gives these cookies a sandy, delicate crunch that feels a little old-fashioned in the best way. Lemon brightens the crumb, and the combination tastes cleaner and less sugary than a lot of the other cookies here. They’re the tray’s texture cookie.
Why It Works: Fine cornmeal adds grit in a pleasant way, not a gritty way, and it gives the dough a distinct bite. Lemon zest and juice cut through the butter so the cookie never feels heavy. If you want a cookie that survives a long brunch table without going soft, this one has the build for it.
Key Ingredients:
- 1/2 cup unsalted butter, softened — the rich base.
- 3/4 cup granulated sugar — keeps the cookies light.
- 1 large egg — binds the dough.
- Zest of 1 lemon — the strongest flavor note.
- 1 tablespoon lemon juice — adds brightness.
- 1 1/2 cups all-purpose flour — the main structure.
- 1/2 cup fine cornmeal — gives the sandy texture.
- 1 teaspoon baking powder — helps the cookies puff.
- 1/2 teaspoon fine salt — sharpens the lemon.
- Optional glaze: 1/2 cup powdered sugar plus 1 tablespoon lemon juice.
Quick Steps:
- Preheat the oven to 350°F (175°C) and line baking sheets with parchment.
- Cream the butter and sugar, then beat in the egg, lemon zest, and lemon juice.
- Stir in the flour, cornmeal, baking powder, and salt until a soft dough forms.
- Scoop the dough onto the sheet and bake for 10 to 11 minutes, until the edges are just turning gold.
- Cool, then glaze lightly if you want a brighter finish.
Equipment for This Recipe:
- Microplane or zester — for the lemon.
- Mixing bowl and spoon — enough for the dough.
- Baking sheet lined with parchment — helps the delicate bottoms.
- Small whisk — for the glaze.
How to Serve This Dish: These do well near the lighter fruit cookies, where their pale color and lemon scent make sense. Serve them with tea or sparkling lemonade if you want the lemon to read louder.
A plate of fresh berries beside them is not a bad idea.
Pro Tips for This Recipe:
- Use fine cornmeal, not coarse, or the texture gets too rough.
- Let the dough rest 10 minutes so the cornmeal hydrates a little.
- Don’t overbake; they should stay pale and sandy.
- A tiny pinch of salt on the glaze works well.
Variations on This Dish:
- Lime Corn Cookies: Swap the lemon for lime.
- Lavender Lemon Corn Cookies: Add a pinch of dried culinary lavender, not more.
Common Mistakes to Avoid with This Dish:
- Using coarse cornmeal: It makes the cookies feel scratchy. Fine cornmeal is the right choice.
- Baking until deeply golden: The texture turns hard instead of delicate.
- Skipping the rest: The dough benefits from a short sit before scooping.
22. Coconut Lime Cookies
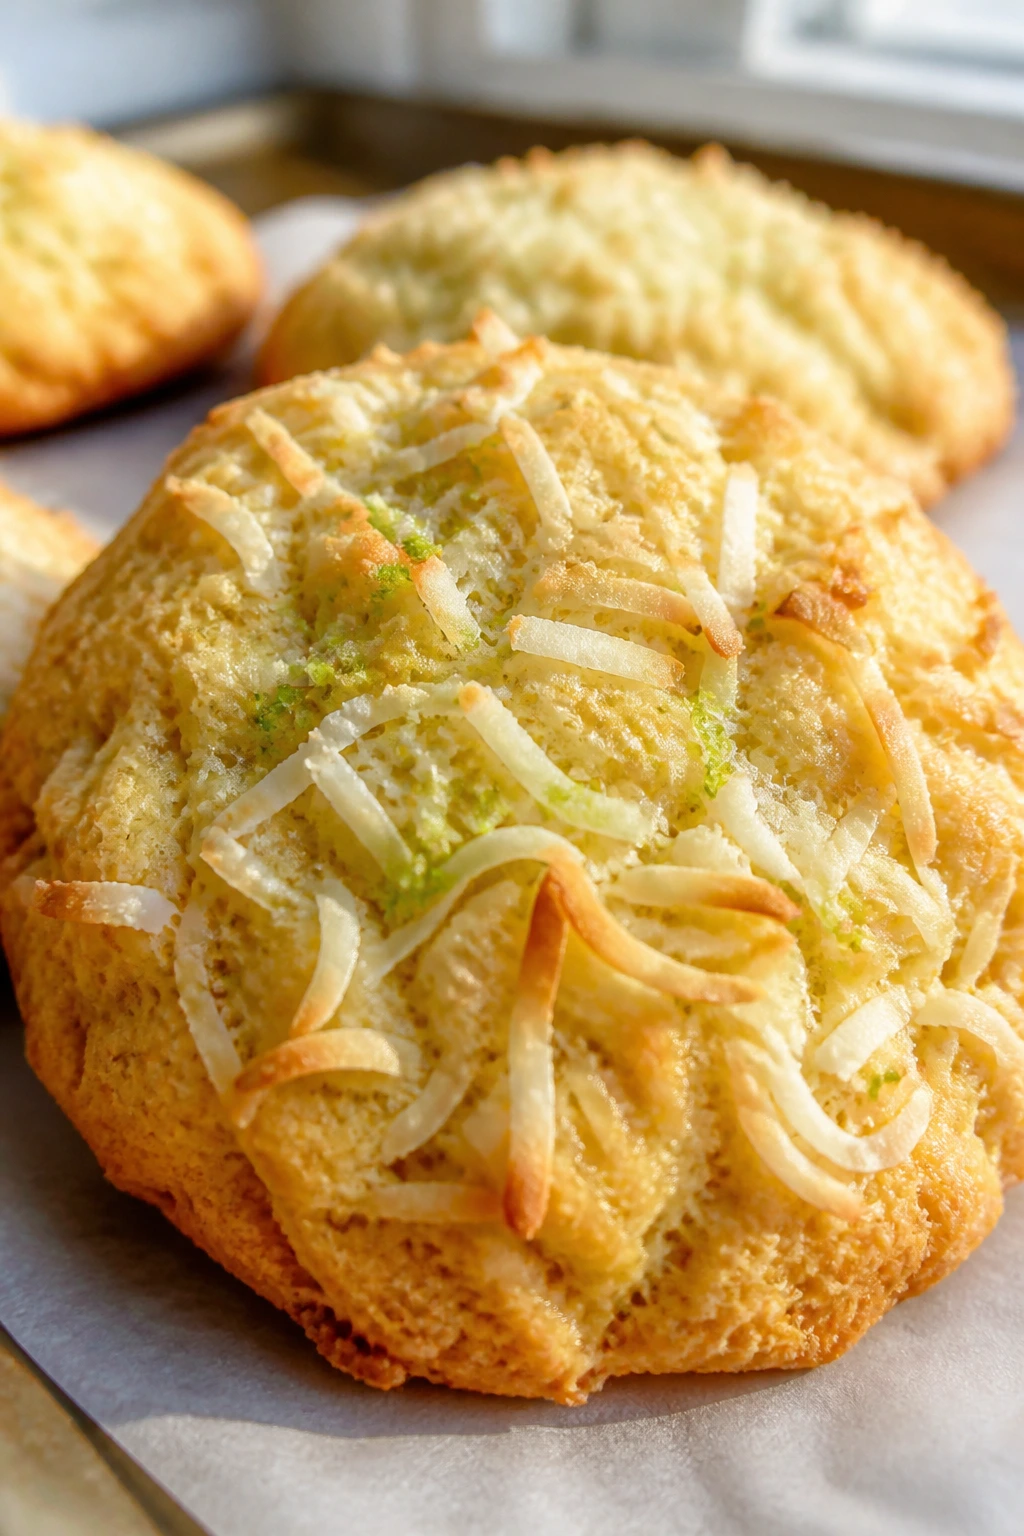
Intro: Coconut and lime should be on more cookie trays than they are. The coconut gives chew, the lime gives a bright, clean finish, and the whole thing tastes like a spring dessert that woke up early. These are especially good if your tray needs a green-white-yellow kind of color story without actual food dye.
Why It Works: Coconut soaks up moisture and gives the cookie a soft bite, while lime zest keeps the sweetness from getting heavy. A little juice in the dough adds brightness, but the zest is where the flavor lives. If you glaze them, keep the drizzle thin so the lime stays sharp.
Key Ingredients:
- 1/2 cup unsalted butter, softened — gives the cookie richness.
- 3/4 cup granulated sugar — keeps the crumb light.
- 1 large egg — binds the dough.
- Zest of 2 limes — the main flavor.
- 1 tablespoon lime juice — a little brightness.
- 1 3/4 cups all-purpose flour — the structure.
- 1 teaspoon baking powder — helps the cookies puff.
- 1/2 teaspoon fine salt — balances the sweetness.
- 1 cup sweetened shredded coconut — the chewy texture.
- Optional glaze: 3/4 cup powdered sugar plus 1 to 2 tablespoons lime juice.
Quick Steps:
- Preheat the oven to 350°F (175°C) and line baking sheets with parchment.
- Cream the butter and sugar, then beat in the egg, lime zest, and lime juice.
- Stir in the flour, baking powder, salt, and coconut until the dough forms.
- Scoop the dough onto the sheet and bake for 9 to 11 minutes.
- Cool fully, then drizzle with the lime glaze if desired.
Equipment for This Recipe:
- Zester — for the lime peel.
- Mixing bowl and spoon — the dough is easy by hand.
- Parchment-lined baking sheet — keeps the coconut from sticking.
- Small whisk — for the glaze.
How to Serve This Dish: These are nice beside the coconut macaroons or lemon cookies, since they lean into the same bright lane from a different angle. Pair them with tea or sparkling water with citrus.
They look best on a light plate where the coconut can be seen.
Pro Tips for This Recipe:
- Zest the limes before juicing them.
- If your limes are dry, use a little extra zest rather than extra juice.
- Toast 1/4 cup of the coconut for a deeper topping.
- Cool the cookies before glazing or the icing slides.
Variations on This Dish:
- Lemon Coconut Cookies: Swap lime for lemon.
- Coconut Chip Lime Cookies: Fold in 1/2 cup white chocolate chips.
Common Mistakes to Avoid with This Dish:
- Too much lime juice: The dough gets loose and sticky. Keep the juice measured.
- Using unsweetened dry coconut without adjusting: The cookies can feel brittle.
- Glazing warm cookies: The topping will disappear into the crumb.
23. Lemon Blueberry Drop Cookies
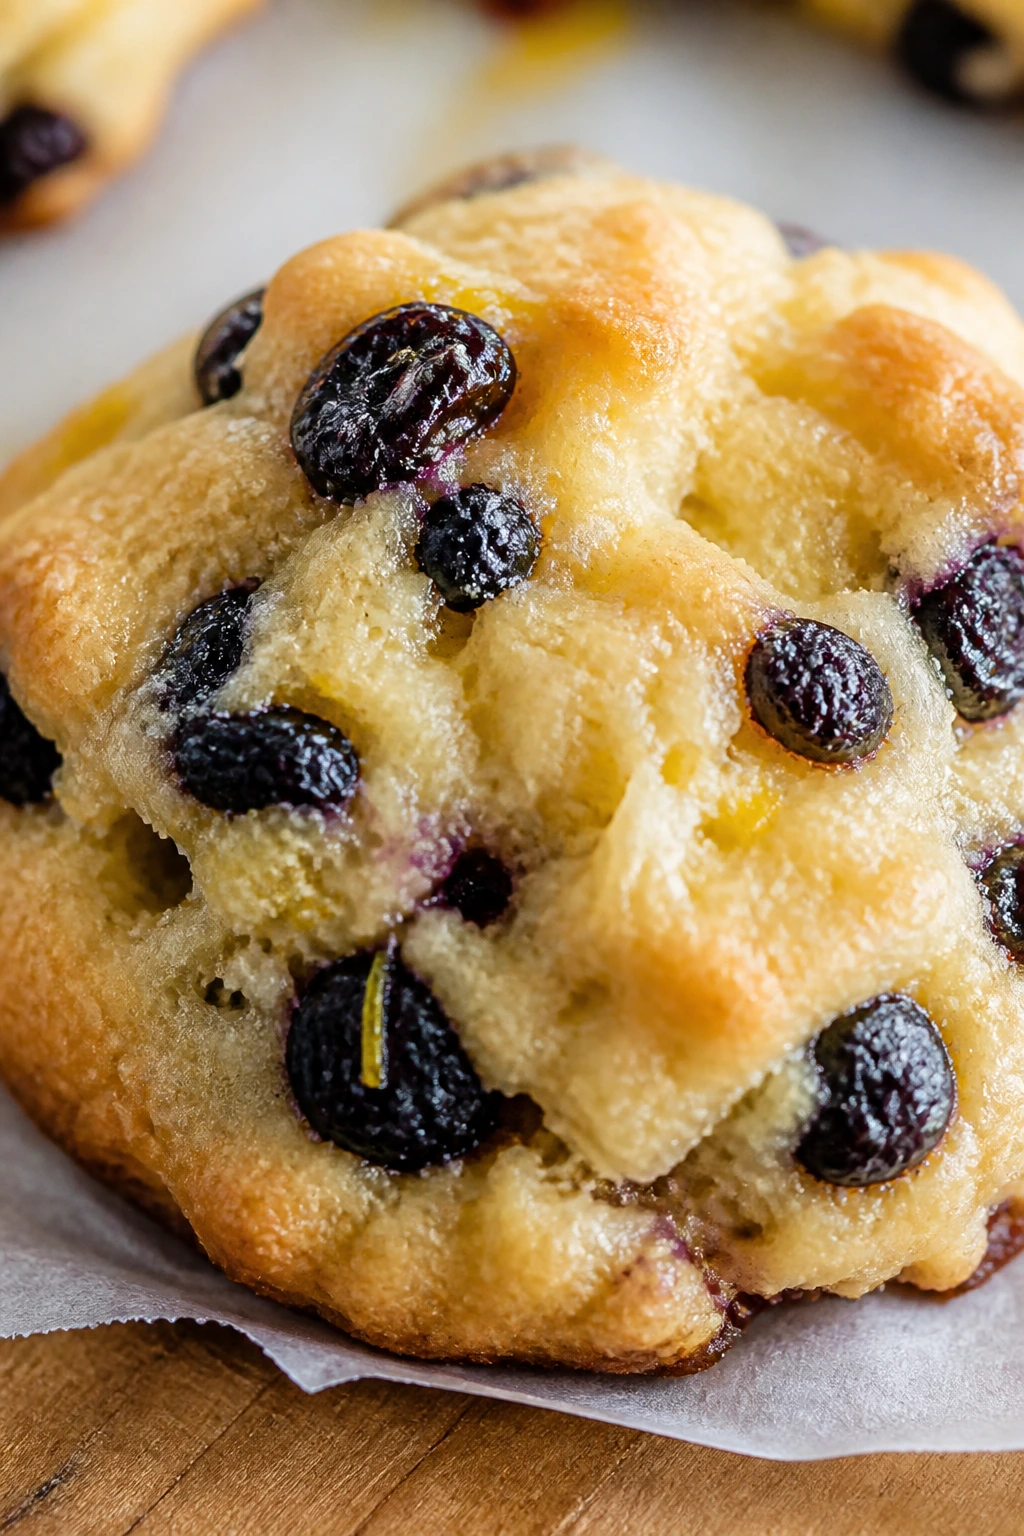
Intro: Blueberry and lemon give you that classic spring pairing without asking you to make pie. Dried blueberries work especially well in drop cookies because they don’t bleed the way fresh berries can. The finished cookie is soft, gently fruity, and just a little tart at the edges.
Why It Works: Lemon zest sharpens the dough and keeps the berry flavor from tasting one-note. Dried blueberries add chew without watering down the batter, which is the main reason I reach for them in cookie dough. If you want a glaze, keep it thin and lemony, not thick and sugary.
Key Ingredients:
- 1/2 cup unsalted butter, softened — the fat base.
- 3/4 cup granulated sugar — keeps the cookies light.
- 1 large egg — binds the dough.
- Zest of 1 lemon — the strongest lemon flavor.
- 1 3/4 cups all-purpose flour — enough to hold the fruit.
- 1 teaspoon baking powder — helps the cookies puff a little.
- 1/2 teaspoon fine salt — balances the sweetness.
- 3/4 cup dried blueberries — chewy fruit pieces.
- 1 tablespoon milk — helps the dough come together.
- Optional glaze: 1/2 cup powdered sugar plus 1 tablespoon lemon juice.
Quick Steps:
- Preheat the oven to 350°F (175°C) and line baking sheets with parchment.
- Cream the butter and sugar, then beat in the egg and lemon zest.
- Stir in the flour, baking powder, salt, and milk until a soft dough forms.
- Fold in the dried blueberries, scoop the dough, and bake for 10 to 11 minutes.
- Cool, then glaze lightly if you want a brighter finish.
Equipment for This Recipe:
- Mixing bowl and spoon — simple dough, simple tools.
- Lemon zester — for the zest.
- Baking sheets — lined with parchment.
- Cookie scoop — useful because dried fruit can snag.
How to Serve This Dish: These belong near the citrus cookies and the fruit jam cookies, where the colors read as coordinated rather than random. They pair well with tea, lemonade, or even plain milk.
A little extra lemon zest on the plate makes them feel fresher.
Pro Tips for This Recipe:
- Chop large dried blueberries if they are especially big.
- If the fruit seems dry, soak it in hot water for 5 minutes and dry it well.
- Add a pinch of cardamom if you want more floral spice.
- Keep the glaze thin so the cookie texture stays visible.
Variations on This Dish:
- Blueberry Oat Drops: Add 1/2 cup oats for more chew.
- Lemon Cranberry Cookies: Swap dried cranberries for the blueberries.
Common Mistakes to Avoid with This Dish:
- Using fresh blueberries in this dough: They add too much moisture. Dried berries behave better.
- Overloading the fruit: The dough can’t hold together. Measure it.
- Baking too long: The lemon flavor gets muted and the cookie dries out.
24. Vanilla Chai Drop Cookies
Intro: These taste like the spice cabinet decided to behave. Cinnamon, ginger, cardamom, and cloves give the cookie depth, but vanilla keeps it soft and friendly. They’re a smart way to use pantry spices when you want something that feels a little warmer than the citrus cookies.
Why It Works: Chai spices are strong, so the vanilla base matters; it keeps the dough from tasting like a jar of mixed spice. Brown sugar gives the cookies chew and helps the spice cling to the crumb. These are especially good if you like a cookie that smells as good as it tastes.
Key Ingredients:
- 1/2 cup unsalted butter, softened — gives richness.
- 3/4 cup granulated sugar — helps the edges set.
- 1/4 cup packed light brown sugar — adds moisture.
- 1 large egg — binds the dough.
- 2 teaspoons vanilla extract — the soft base note.
- 2 cups all-purpose flour — the structure.
- 1/2 teaspoon baking soda — gives lift.
- 1 teaspoon cinnamon — the biggest spice.
- 1/2 teaspoon ground ginger — adds warmth.
- 1/2 teaspoon ground cardamom — the floral edge.
- 1/4 teaspoon ground cloves — keep this small.
- 1/2 teaspoon fine salt — balances the sweetness.
Quick Steps:
- Preheat the oven to 350°F (175°C) and line baking sheets with parchment.
- Cream the butter and sugars, then beat in the egg and vanilla.
- Stir in the flour, baking soda, cinnamon, ginger, cardamom, cloves, and salt until the dough forms.
- Scoop the dough onto the sheet and bake for 9 to 11 minutes.
- Cool on the sheet for a few minutes before moving to a rack.
Equipment for This Recipe:
- Mixing bowl and mixer — the dough is easy to blend.
- Measuring spoons — the spices need to stay balanced.
- Baking sheet lined with parchment — keeps the cookies even.
- Cooling rack — helps the spice aroma settle.
How to Serve This Dish: These work best beside the chocolate and maple cookies, where the spice can sit in contrast to richer flavors. Serve with tea or coffee, and if you want a little extra polish, dust them with a whisper of powdered sugar.
They’re the tray cookie people notice when they’re standing still.
Pro Tips for This Recipe:
- Measure cloves carefully; too much turns the cookies harsh.
- Add 1 teaspoon orange zest if you want a brighter chai profile.
- Chill the dough 10 to 15 minutes for cleaner scoops.
- Pull them before the edges get dark brown.
Variations on This Dish:
- Dirty Chai Cookies: Add 1 teaspoon instant espresso powder.
- Cardamom-Heavy Chai Drops: Increase cardamom to 3/4 teaspoon for a more floral finish.
Common Mistakes to Avoid with This Dish:
- Using too much clove: It takes over the whole cookie. Keep it measured.
- Baking until hard: These should stay soft and scented.
- Skipping vanilla: Without it, the spices feel harsh rather than warm.
25. Apricot Almond Drop Cookies
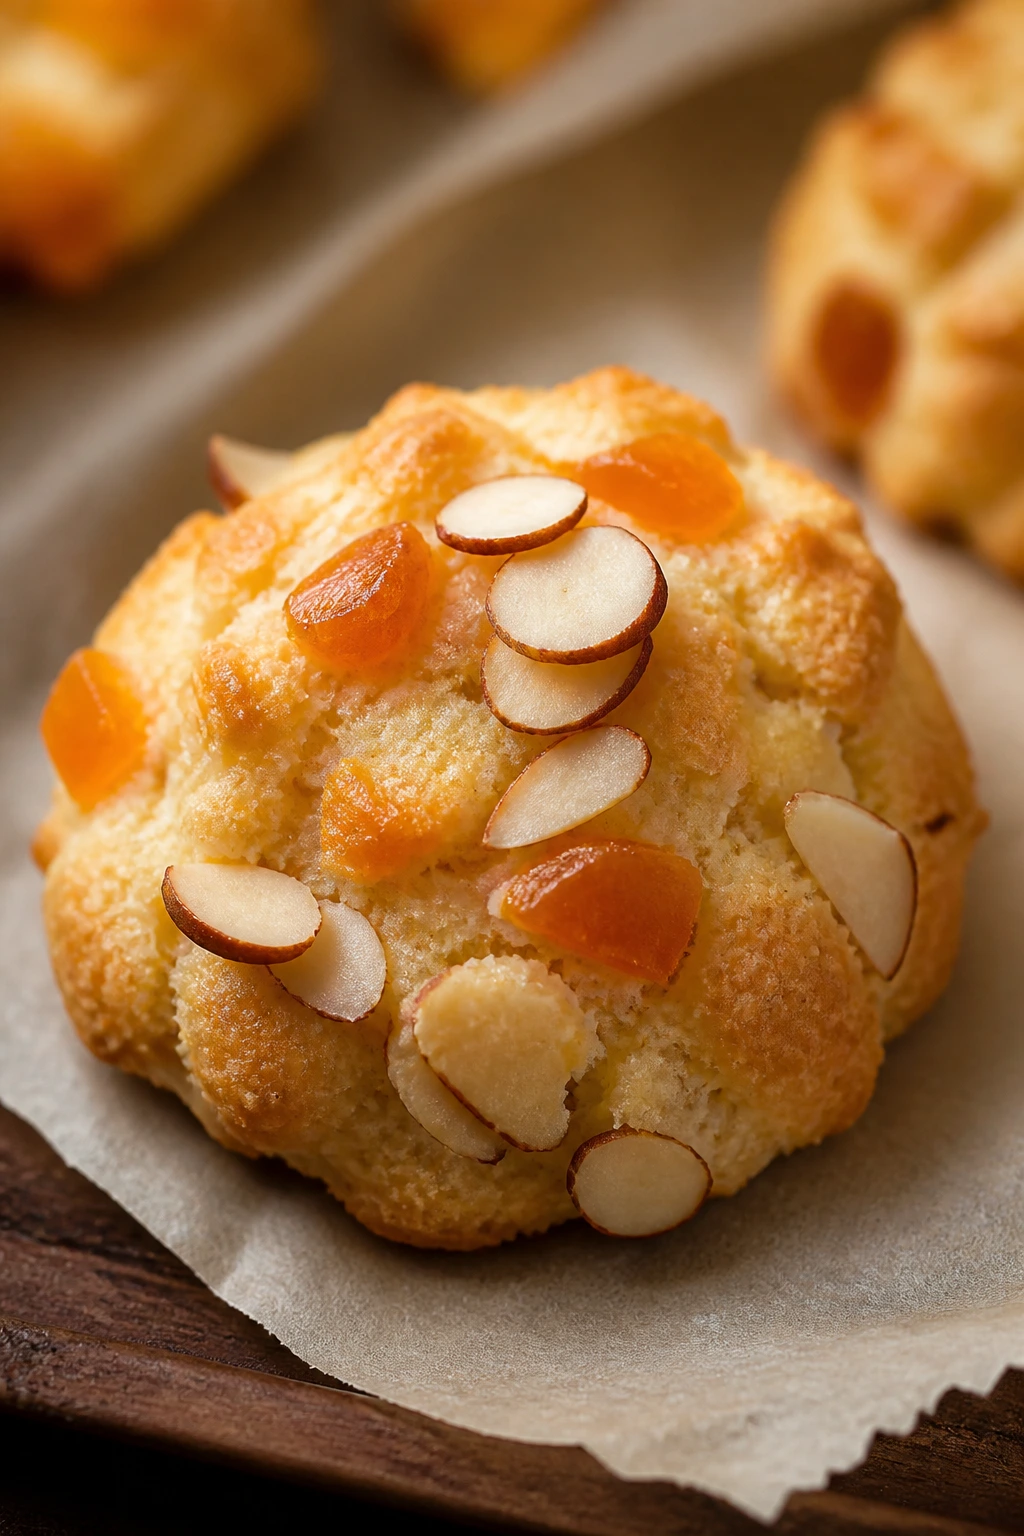
Intro: These cookies taste like a fruit-and-nut pantry rescue that turned out better than planned. Apricot gives a sunny, sticky sweetness, almond extract sharpens the flavor, and the sliced almonds on top add a clean little crunch. They’re a nice final cookie for the tray because they feel bright without being sugary.
Why It Works: Dried apricots bring chew and color, while almond extract gives the cookie a bakery-style finish with very little effort. The dough stays tender because the fruit softens as it bakes. A few sliced almonds on top are enough; you don’t need a heavy hand.
Key Ingredients:
- 1/2 cup unsalted butter, softened — the rich base.
- 3/4 cup granulated sugar — gives the cookies lightness.
- 1 large egg — binds the dough.
- 1 teaspoon vanilla extract — rounds the fruit.
- 1/2 teaspoon almond extract — the key flavor note.
- 1 3/4 cups all-purpose flour — enough structure to hold the fruit.
- 1 teaspoon baking powder — gives a gentle lift.
- 1/2 teaspoon fine salt — keeps the sweetness in check.
- 3/4 cup chopped dried apricots — chewy fruit pieces.
- 1/2 cup sliced almonds — for topping or folding in.
Quick Steps:
- Preheat the oven to 350°F (175°C) and line baking sheets with parchment.
- Cream the butter and sugar, then beat in the egg, vanilla, and almond extract.
- Stir in the flour, baking powder, and salt, then fold in the apricots and half the almonds.
- Scoop the dough onto the sheet and press a few extra almonds onto the tops.
- Bake for 10 to 11 minutes, until the edges are lightly golden and the centers are set.
Equipment for This Recipe:
- Mixing bowl and spoon — the dough mixes easily.
- Baking sheet lined with parchment — keeps the bottoms clean.
- Knife or kitchen scissors — handy for chopping apricots.
- Cooling rack — helps them finish setting.
How to Serve This Dish: These are a clean finish to the tray because they bring fruit, nut, and a pale golden color all at once. They go well with tea, coffee, or a simple glass of milk.
If you want the tray to look fuller, tuck a few extra sliced almonds around them.
Pro Tips for This Recipe:
- Chop the apricots small enough that they don’t drag the dough apart.
- If the fruit feels tough, soak it briefly in hot water and dry it well.
- Add a teaspoon of orange zest if you want the fruit to taste brighter.
- Don’t overbake; almond cookies dry out quickly.
Variations on This Dish:
- Apricot Coconut Drops: Add 1/2 cup shredded coconut for more chew.
- Almond Jam Cookies: Replace half the apricots with chopped dried peaches or a spoonful of thick jam.
Common Mistakes to Avoid with This Dish:
- Using apricot pieces that are too big: The dough won’t scoop evenly. Chop them down.
- Baking until deeply browned: The almond flavor gets harsh and the cookies dry out.
- Forgetting the almond extract: That small amount is what gives the cookie its finish.
Why Drop Cookies Make Easter Baking Easier
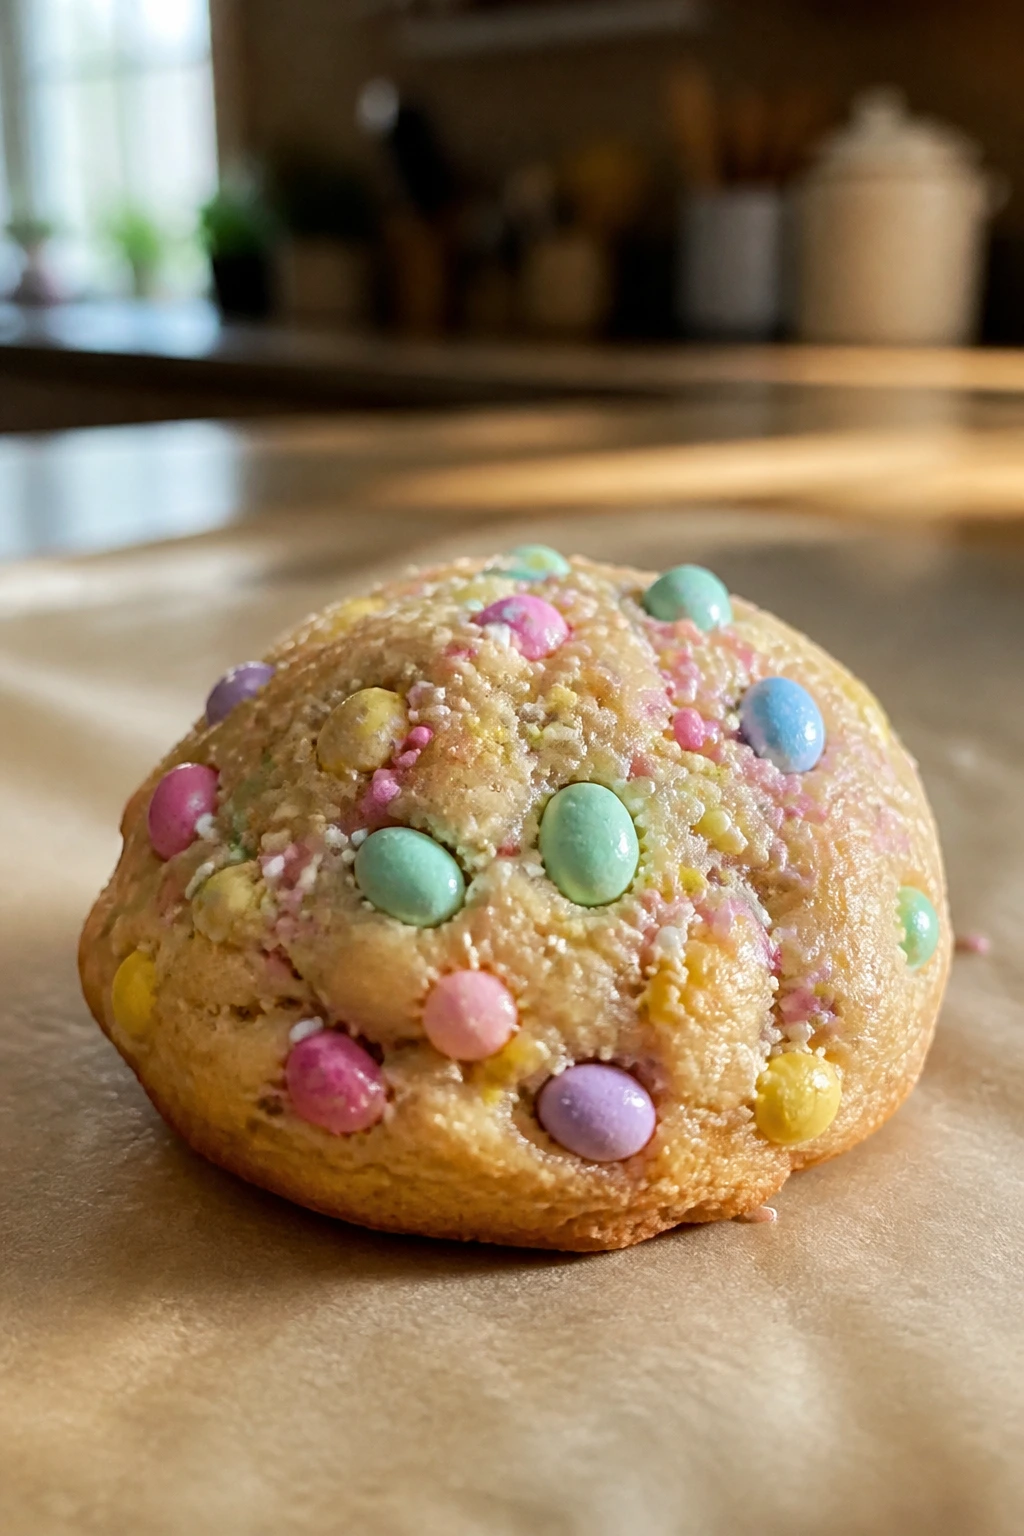
Drop cookies work for Easter because they solve three problems at once: they look festive, they bake quickly, and they don’t demand perfect shaping. That matters when the rest of the menu already asks enough of you. A tray of cookies that comes together from pantry shelves and a couple of fresh add-ins feels practical, and practical is underrated at a holiday table.
The other advantage is texture. Cutout cookies can be lovely, but they also invite rolling, cutting, rerolling, chilling, and the occasional brittle edge that tastes more like decoration than dessert. Drop cookies give you the soft middle, the chewy edge, the crackled top, the jam center, the coconut shard, the candy egg. They let the ingredients speak without a lot of stage direction.
I also like how forgiving they are. If one batch spreads a touch more than you expected, you still have cookies. If the sprinkles bleed a little, nobody panics. If the lemon glaze lands unevenly, it still tastes like lemon glaze.
Essential Equipment for These Cookies
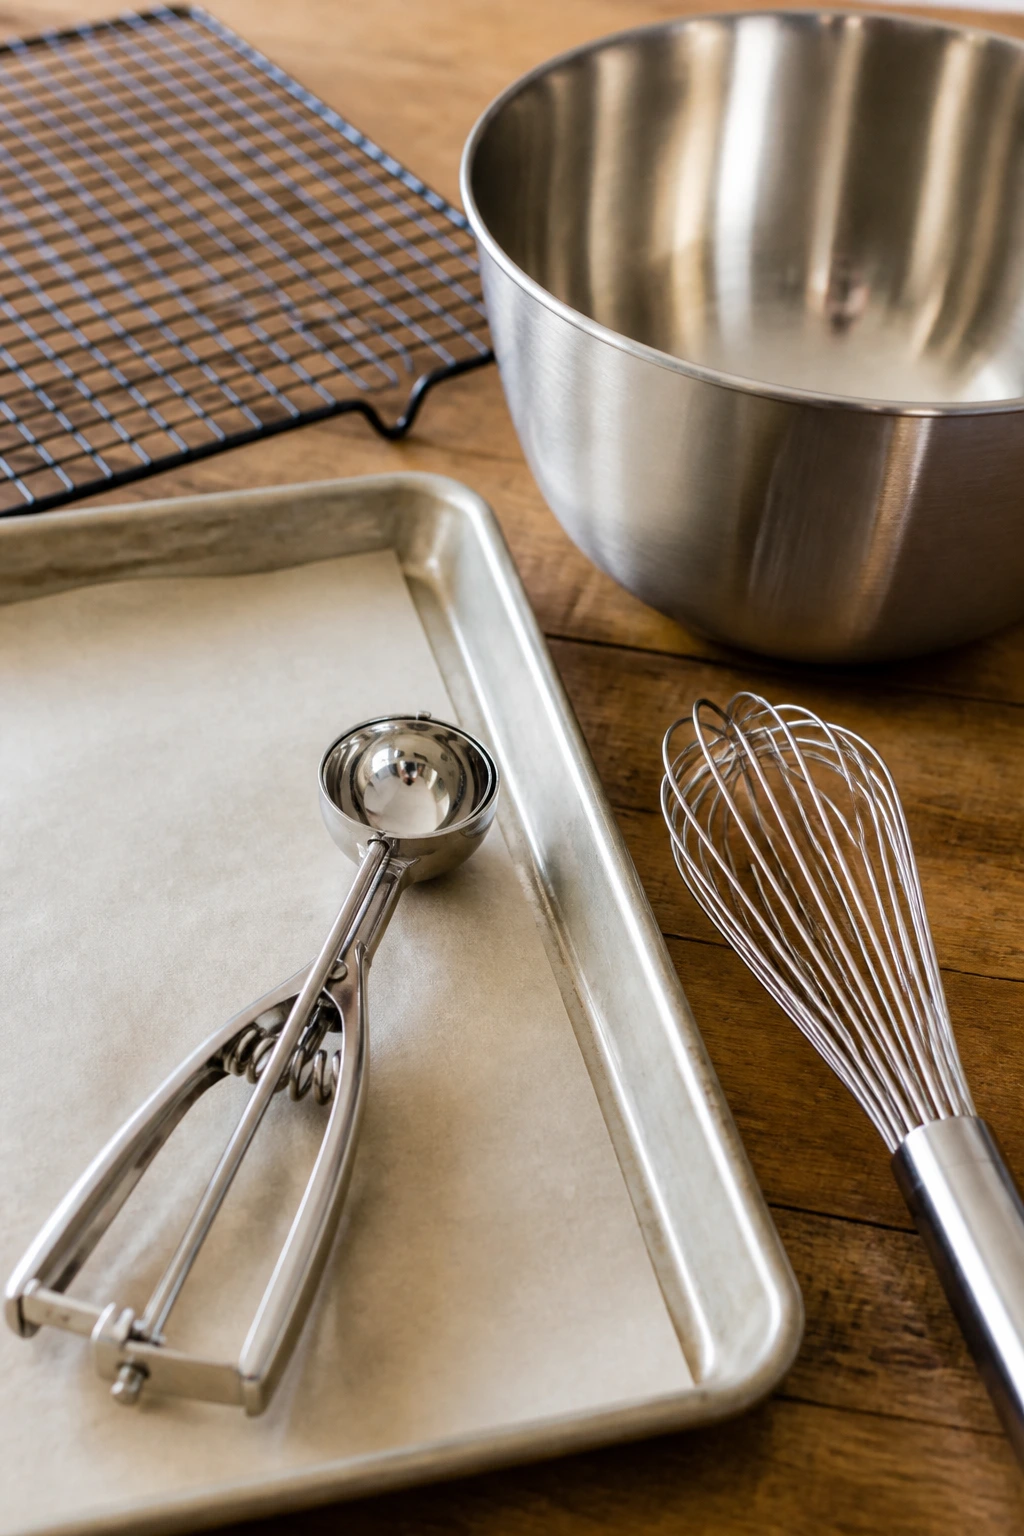
- Rimmed baking sheets: The raised edge helps stop soft doughs and candy-filled cookies from sliding.
- Parchment paper: Keeps the bottoms from over-browning and makes cleanup painless.
- Cookie scoop in the 1 1/2- to 2-tablespoon range: Makes the batches bake at the same pace.
- Mixing bowls in two sizes: One for the dough, one for the dry ingredients or coatings.
- Hand mixer or sturdy wooden spoon: A mixer helps with butter-heavy doughs, but a spoon works for smaller batches.
- Microplane or fine grater: Handy for lemon, lime, and orange zest.
- Cooling rack: Helps cookies set without trapping steam underneath.
- Small whisk: Useful for glazes and for breaking up powdered sugar lumps.
- Airtight tins or containers: Good for keeping soft cookies soft and crisp ones crisp.
- Offset spatula or butter knife: Useful for thumbprints and for nudging cookies off the sheet if they stick.
Smart Shopping and Ingredient Tips
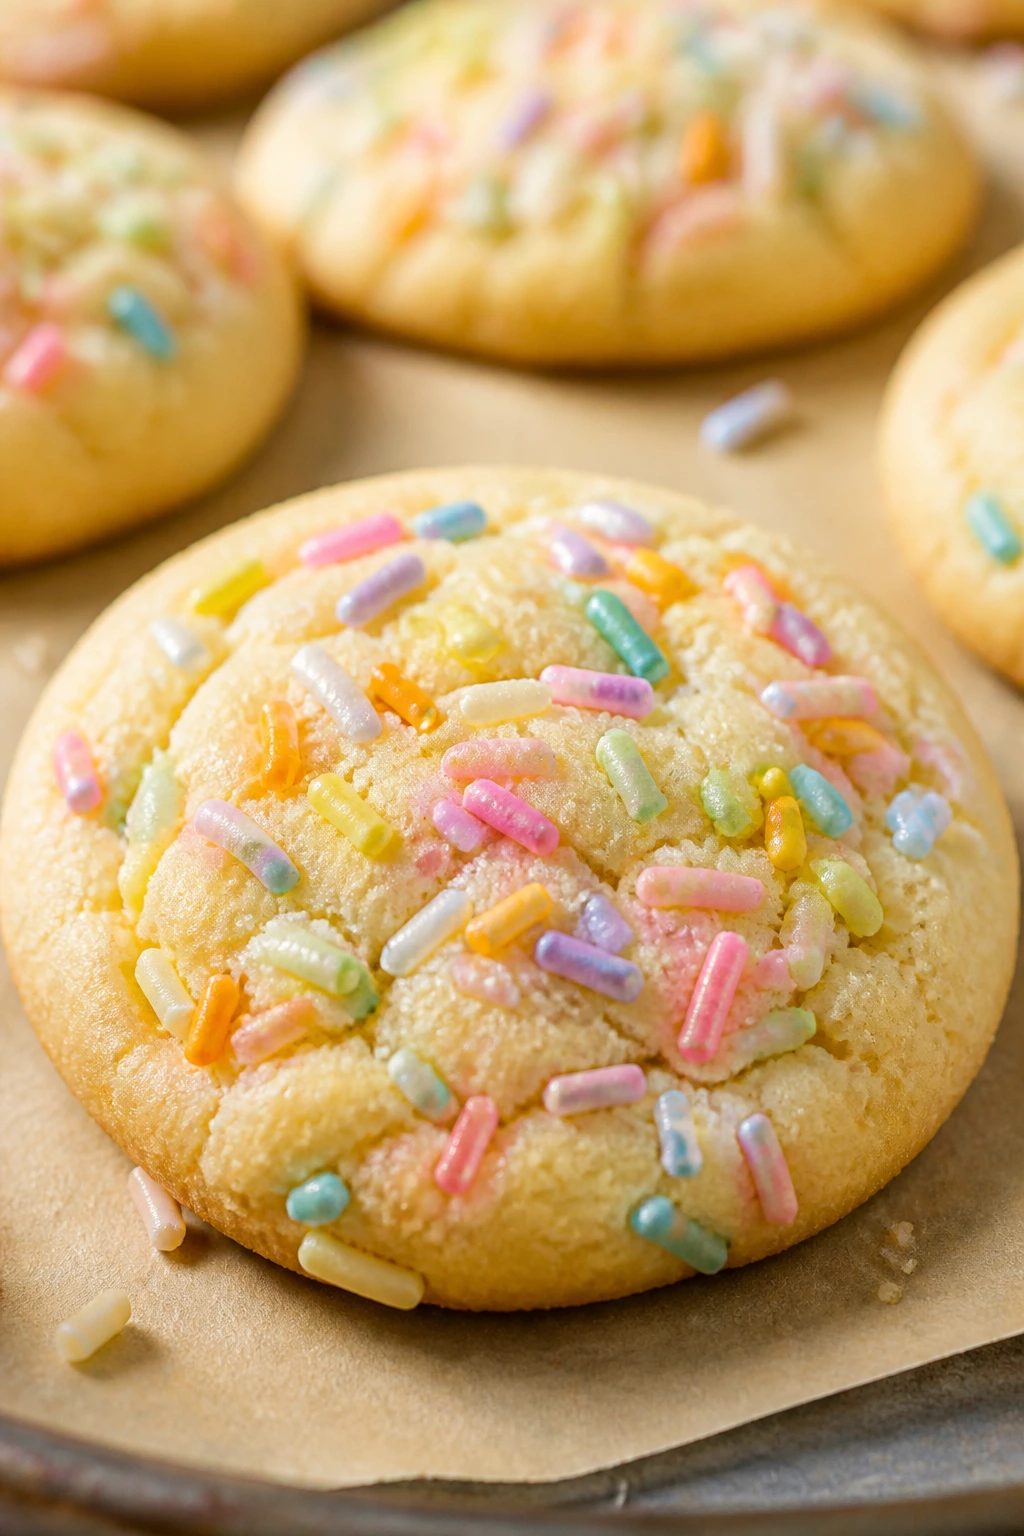
Butter matters more than people think. If a cookie starts with creamed butter and sugar, use butter that is softened, not melted, and not cold enough to fight the mixer. You want it to dent when pressed, not smear into oil. Unsalted butter gives you better control, because salt levels vary enough from brand to brand that one extra pinch can change the finish.
Flour and leaveners are worth checking before you bake a holiday tray. All-purpose flour is the safest choice for almost everything here, while baking soda and baking powder should smell neutral and behave normally when they hit liquid. If a box has been sitting open for ages, it may still work, but weak leavening is one of the quiet reasons cookies come out dense.
For the Easter-specific add-ins, choose the versions that behave well in dough. Jimmies hold color better than nonpareils. Dried fruit should feel pliable, not leathery; if it’s dry, a quick soak in hot water for 5 minutes and a good pat-dry bring it back. Thick jams stay put in thumbprints better than loose preserves. And if you’re buying mini candy eggs, make sure they’re sturdy enough to press into warm cookies without cracking in half.
Citrus is worth buying fresh. Bottled juice can work in a glaze, but zest is where the real flavor lives, and one lemon or lime can do more work than a whole plastic bottle. Same with spices: cinnamon, ginger, cardamom, cloves, and nutmeg all fade quietly over time, so give them a smell before you trust them in a whole batch.
How to Serve These Recipes
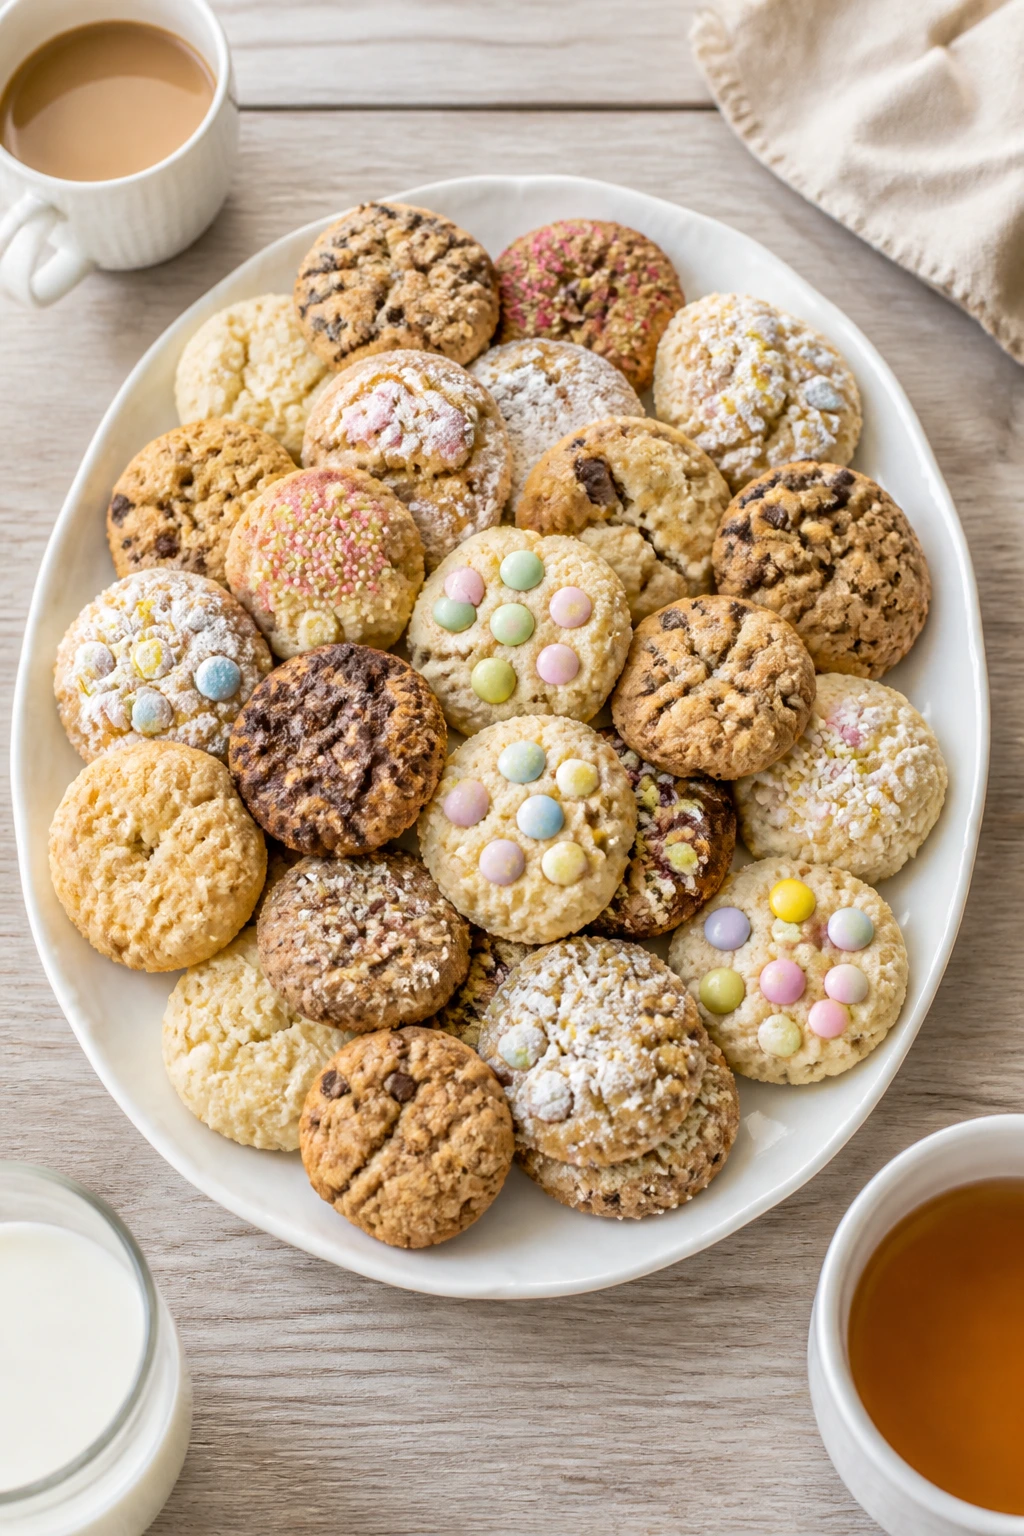
Presentation: Build the tray by flavor family, not by random pile. Put chocolate, spice, citrus, fruit, and coconut cookies into small clusters so the colors and textures tell a story. A white platter makes the sprinkles, jam, and chocolate eggs stand out; a wooden board makes the toasted coconut and nuts look warmer.
Accompaniments: Cookies like these sit well beside fresh berries, sliced citrus, or a small bowl of candy eggs for the table. Coffee is the obvious match for the chocolate, maple, and espresso cookies. Tea works better than people expect with lemon, orange, and chai cookies, especially if the tea has a little body to it. Cold milk still earns its place, because some cookies really do want it.
Portions: For a dessert table, plan on 2 cookies per person if there are other sweets around, or 3 if cookies are the main dessert. If you are packing boxes or plates, mix one rich cookie, one bright cookie, and one chewy cookie into each portion. That keeps the box from feeling monotone.
Beverage Pairing: Black coffee and chocolate cookies are a clean match. Lemon, coconut, and orange cookies lean nicely into Earl Grey, mint tea, or sparkling lemonade. If you’re serving brunch, a plain latte or cappuccino covers a lot of ground without overpowering the tray.
Additional Tips and Flavor Boosters
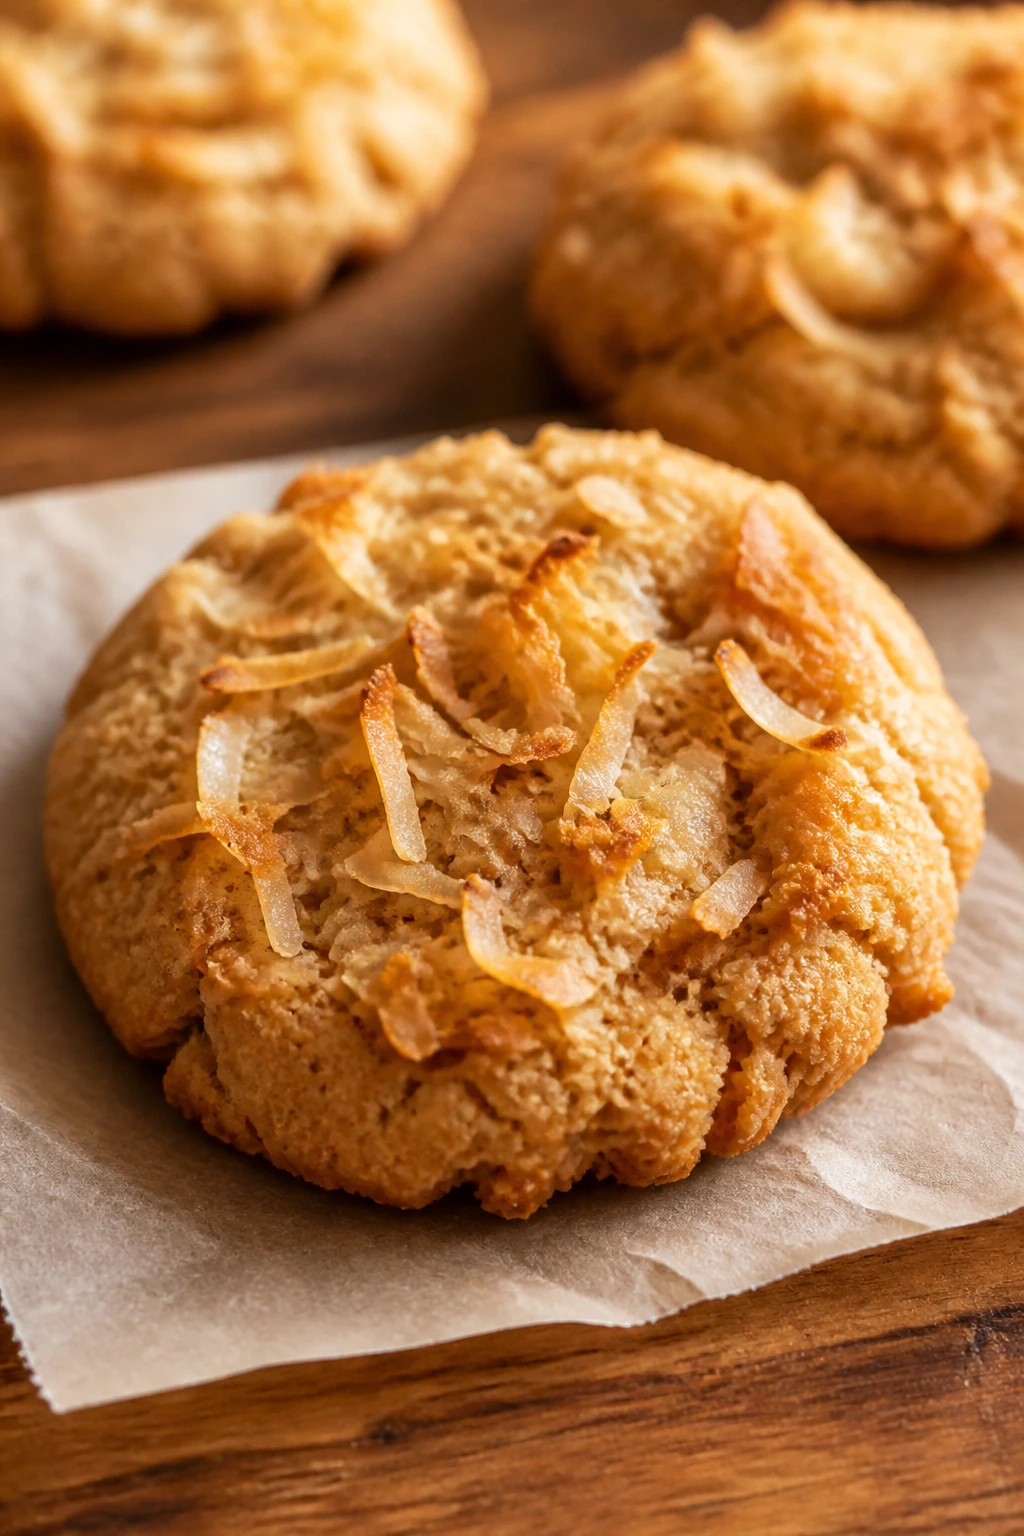
Flavor Enhancement: Toast coconut, pecans, sesame seeds, or even oats in a dry skillet before folding them into a dough. Three or four minutes is enough to wake them up, and the smell tells you when to stop. That tiny step gives the whole cookie a deeper, less one-note taste.
Customization: If you want one base dough to do more work, start with the vanilla or brown sugar cookie and split it into batches with different add-ins. One portion can take sprinkles, another can take citrus zest, and a third can take chocolate chips or chopped fruit. Keep the add-ins around 1/2 to 3/4 cup so the dough still holds together.
Serving Suggestions: Finish chocolate cookies with a pinch of flaky salt, lemon cookies with a thin glaze, and spice cookies with a dusting of powdered sugar. Put a few extra sprinkles, toasted coconut flakes, or chopped nuts around the platter. It makes the whole tray look deliberate instead of assembled at the last minute.
Make-It-Yours: For dairy-free baking, use a firm vegan butter stick rather than a soft tub spread. For nut-free trays, sunflower seed butter stands in well for peanut butter or almond butter, though the dough may need a short chill. For lower-sugar batches, shave 2 to 4 tablespoons from the granulated sugar and let the spices or citrus do more of the talking.
Make-Ahead, Storage, and Reheating Guidance
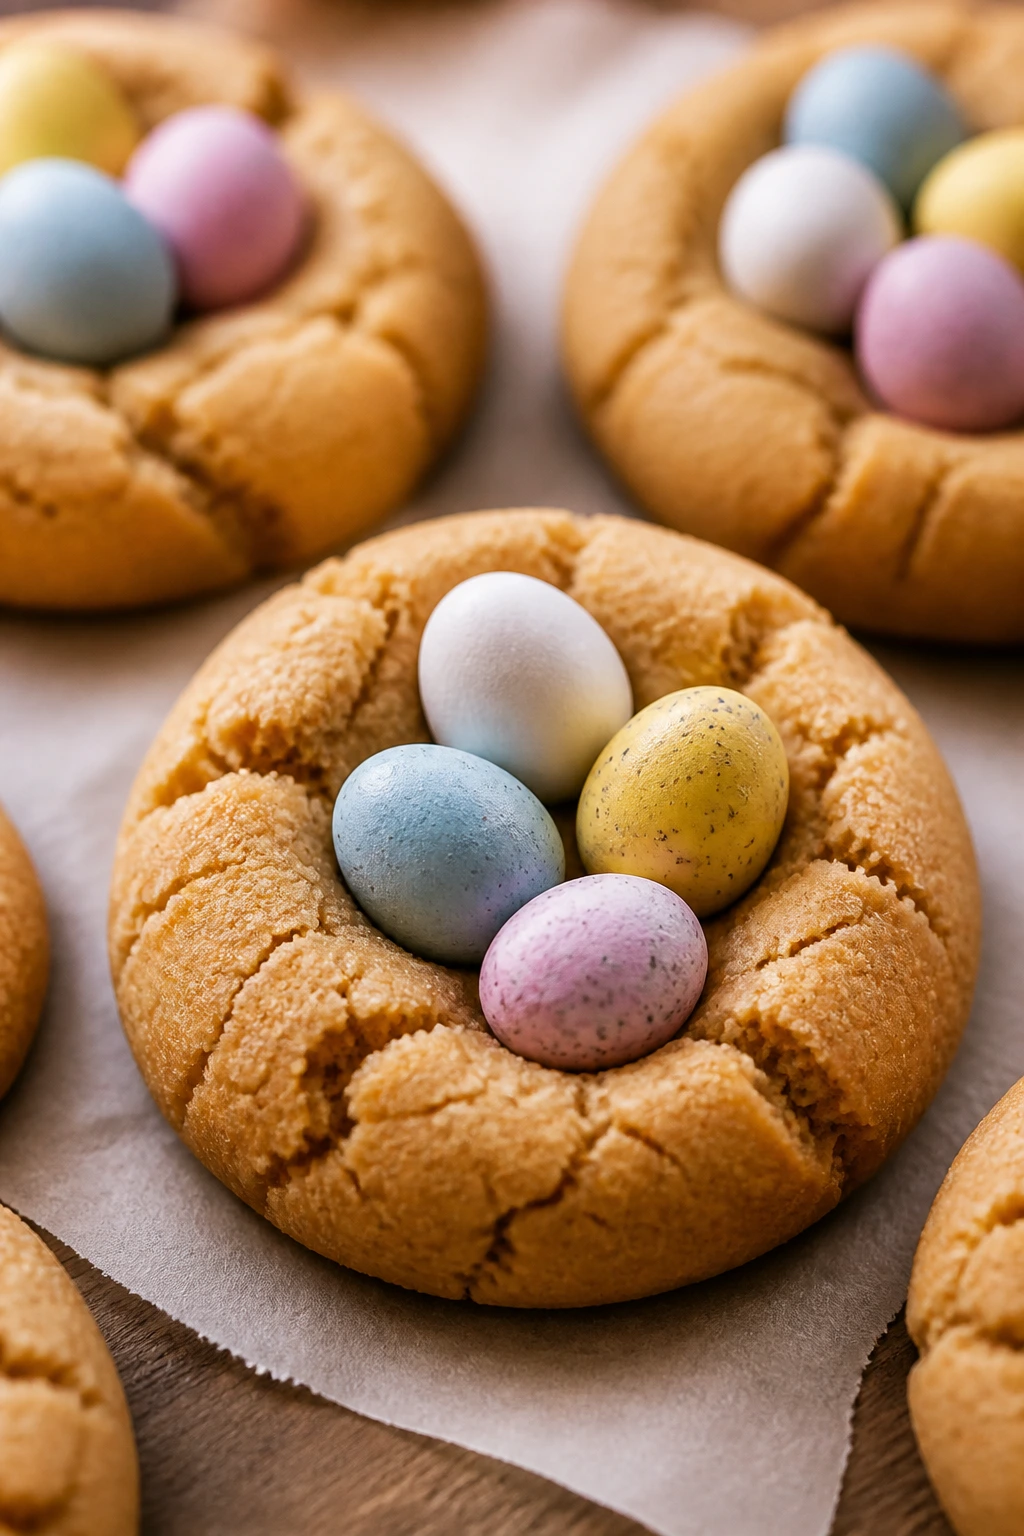
Most baked cookies in this collection keep well at room temperature for 3 to 4 days in an airtight container. The soft ones — vanilla, peanut butter, oatmeal, banana, and maple — like a slice of sandwich bread in the tin to help them stay tender. The crispier ones, like cornmeal lemon or snickerdoodles, do better layered between sheets of parchment so they don’t pick up moisture.
Dough balls freeze well for up to 2 months. Scoop them first, freeze them on a tray until firm, then move them to a freezer bag so they don’t fuse into one brick. Bake from frozen by adding 1 to 2 extra minutes. That works especially well for chocolate chip, peanut butter, oatmeal, and spice doughs.
Finished cookies also freeze well for about 2 months, though glazed cookies and jam thumbprints are better frozen unglazed if you can help it. Let them thaw in the container so condensation doesn’t form on the surface. If you need to refresh a soft cookie, warm it in a 275°F oven for 3 to 5 minutes. That’s usually enough to bring back the aroma without drying out the crumb. For a single cookie, 8 to 10 seconds in the microwave can do the trick, though it’s not ideal for anything with glaze or candy on top.
A few doughs improve after a short rest. Banana, honey, and oatmeal doughs often bake a little cleaner after 10 to 15 minutes in the fridge. Jam cookies and glazed citrus cookies are better assembled close to serving time if you want the tops to stay neat.
Variations and Adaptations to Try
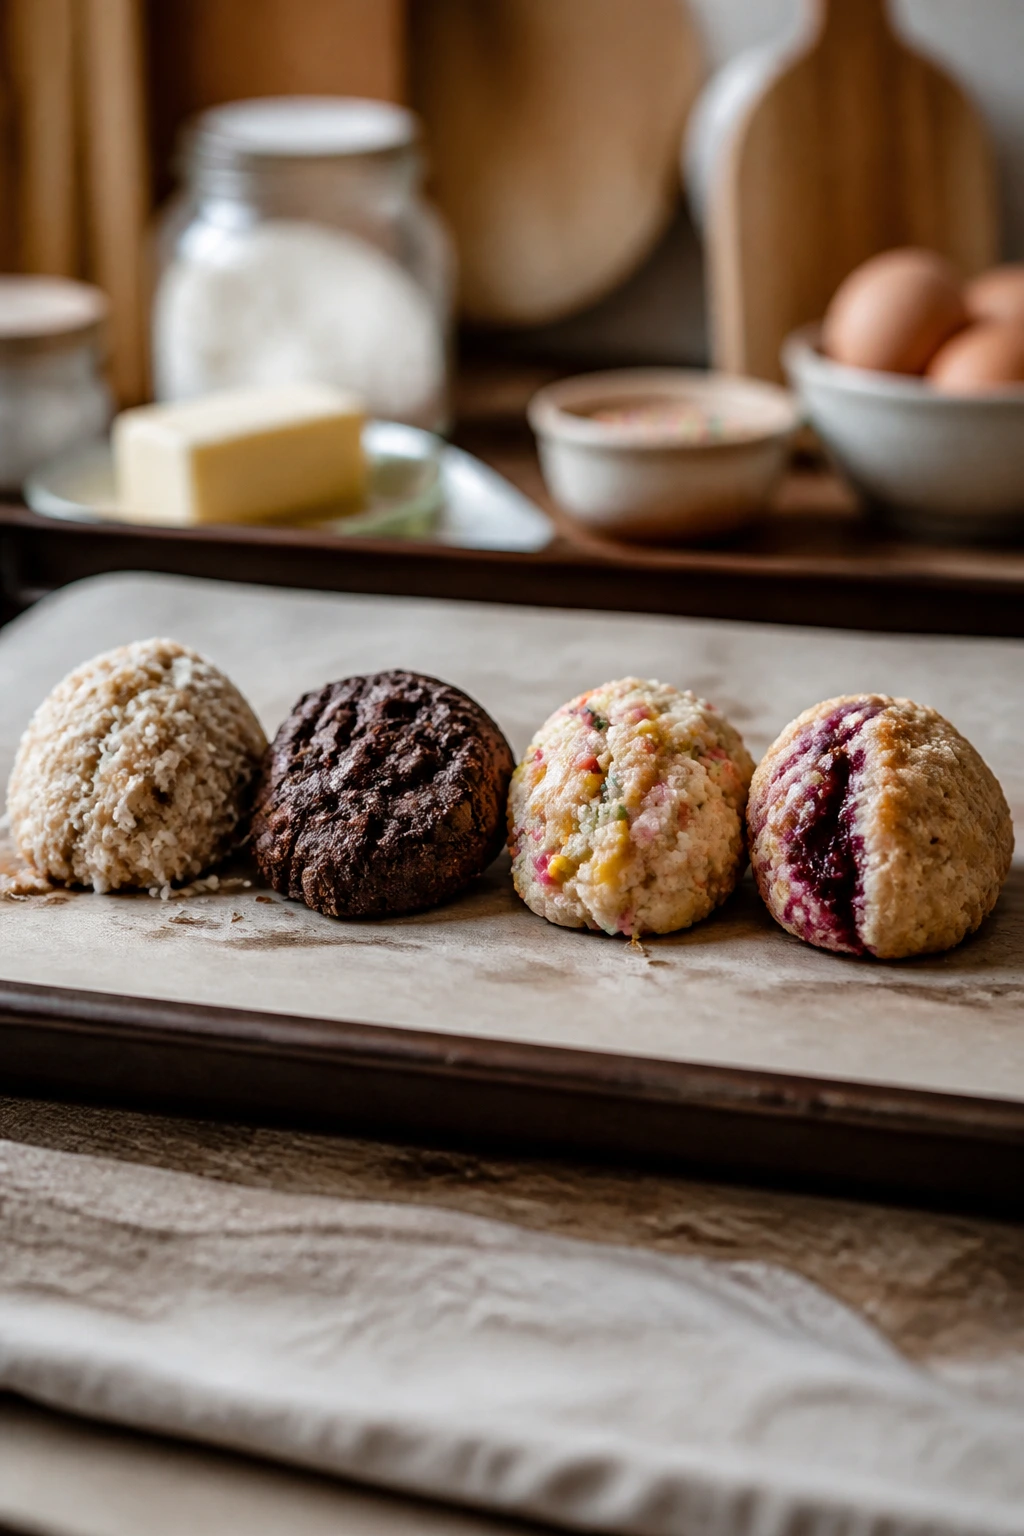
Gluten-Free Pantry Tray: Use a good 1:1 gluten-free baking flour in place of all-purpose flour, and choose certified gluten-free oats if oats are in the recipe. The texture usually stays close, though a few doughs may need 1 tablespoon more milk if they feel dry.
Dairy-Free Swap-Outs: Replace butter with a firm plant-based butter stick in most of the cookie doughs here. Coconut oil can work in some batches, but it spreads more and gives a stronger flavor, so I’d keep it for coconut or lime cookies rather than the vanilla ones.
Nut-Free Easter Tin: Swap sunflower seed butter for peanut or almond butter, and skip nut toppings. Sesame cookies can stay on the menu if sesame is allowed, but if you need a tighter nut-free version, lean on vanilla, citrus, chocolate, and jam instead.
Lower-Sugar Cookie Mix: Drop the granulated sugar by 2 tablespoons in most doughs and keep the brown sugar where possible so the texture doesn’t dry out. Fruit, citrus zest, spice, and toasted coconut can carry a surprising amount of flavor without needing a bigger sugar hit.
Pastel Candy Upgrade: Press mini chocolate eggs or pastel-coated chocolates onto warm cookies after baking, not before. If you’re mixing candies into dough, use chopped pieces rather than full candy shells so the dough doesn’t tear while scooping.
Extra-Spring Citrus Set: Add lemon, orange, or lime zest to vanilla, coconut, maple, or almond doughs. A thin citrus glaze can carry the same idea across several cookies without making them taste identical.
Common Mistakes to Avoid
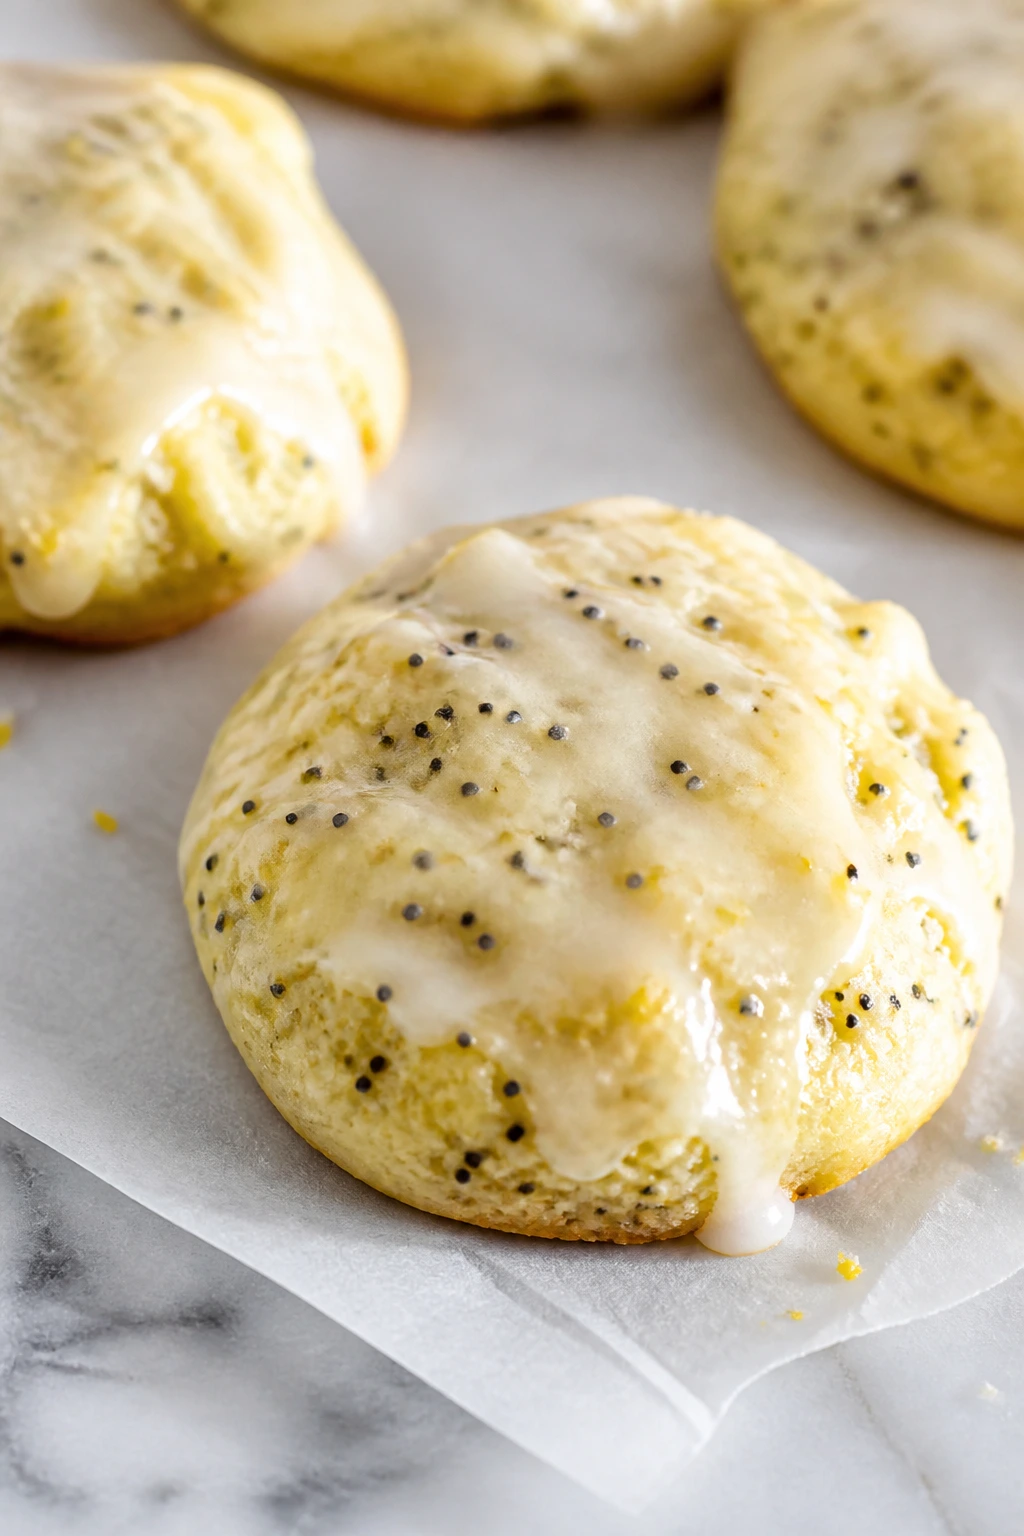
-
Using butter that is too warm: If the butter is shiny or oily, the cookies spread before the structure sets. Softened butter should hold a thumbprint, not run across the bowl. If it’s too warm, chill the dough for 15 minutes before scooping.
-
Measuring flour by scooping straight from the bag: That packs in more flour than you think, which makes the cookies dry and dense. Spoon the flour into the cup and level it off, or weigh it if that’s how you bake. The difference shows up fast in a cookie tray.
-
Baking everything until deeply browned: Most of these cookies should come out when the centers still look a little soft. They finish setting on the hot tray, and that extra minute in the oven is often the line between chewy and dry. Watch the edges, not just the timer.
-
Adding mix-ins at the wrong time: Sprinkles can bleed if they’re overmixed, jam can run if it goes in too early, and candy eggs can crack if they bake the whole time. Fold delicate add-ins in at the end, and press top decorations on after baking when the recipe calls for it.
-
Ignoring tray temperature between batches: A hot baking sheet makes the next round spread faster. Let the sheet cool for a few minutes or switch to a fresh one if your cookies are coming out too thin.
-
Using stale baking soda or baking powder: Flat cookies often start with weak leavening. If the box has lost its punch, the dough can’t rise the way it should, and you end up with dull, heavy cookies no matter how careful you were elsewhere.
Frequently Asked Questions
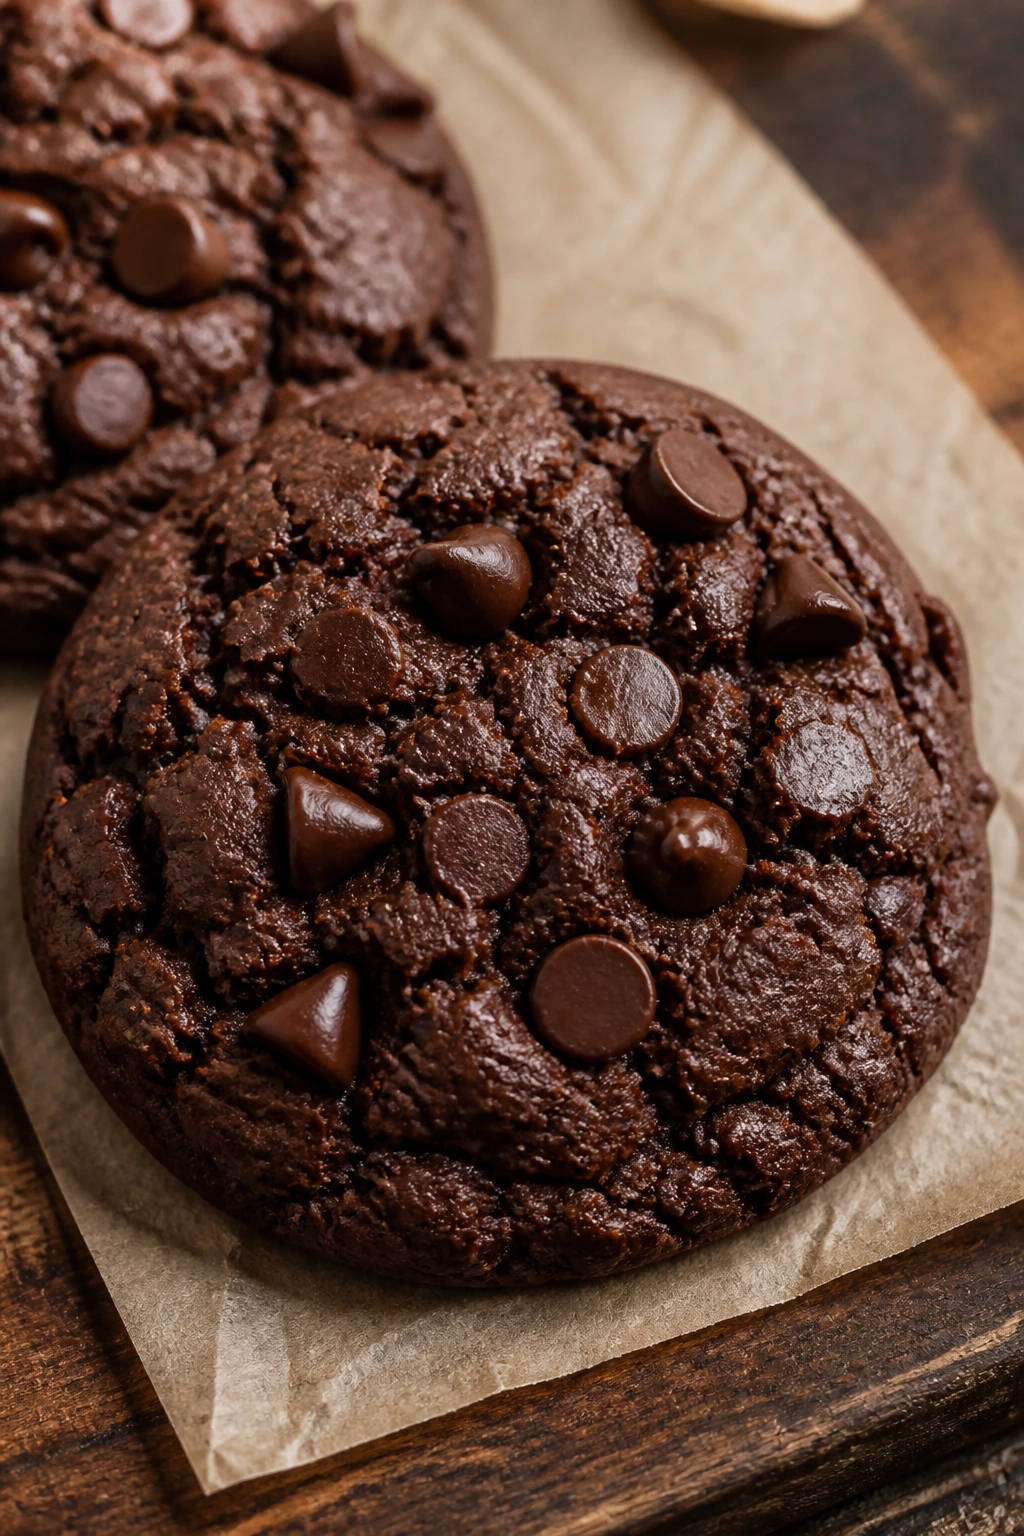
Can I use salted butter instead of unsalted butter?
Yes, but cut the added salt by about 1/4 teaspoon for most single-batch cookie doughs. Salted butter varies from brand to brand, so the flavor can get a little uneven if you don’t adjust.
Which cookies in this collection freeze best?
Peanut butter, chocolate chip, oatmeal, snickerdoodle, maple, and spice doughs freeze especially well as dough balls. Baked cookies freeze fine too, but cookies with glaze or jam centers are better frozen plain and finished later.
Can I make these without a mixer?
You can, especially the simpler doughs like vanilla, citrus, and spice cookies. Peanut butter and butter-heavy doughs take more elbow grease by hand, but a sturdy spoon and a little patience get the job done.
How do I keep the cookies from spreading too much?
Start with softened, not melted, butter and measure the flour correctly. If the dough still feels loose, chill it for 15 to 20 minutes, and don’t put cookie dough on a hot baking sheet from the last batch.
Can I swap all-purpose flour for self-rising flour?
I wouldn’t do it without adjusting the leaveners. Self-rising flour already contains baking powder and salt, so the ratios shift fast and the texture changes in ways that are hard to predict.
What if my dough feels crumbly or dry?
Add milk 1 teaspoon at a time until the dough just comes together. For oat or nut-heavy doughs, give it a minute after mixing too, because oats and nut butters often absorb moisture more slowly than plain flour doughs.
Can I make one cookie base and split it into different flavors?
Yes. A plain vanilla or brown sugar dough works well as a starting point, then you can divide it and add cocoa, sprinkles, citrus zest, chopped fruit, or chocolate chips to each bowl. That’s a smart way to make a mixed tray without making 25 separate doughs from scratch.
Are these good for cookie boxes or shipping?
The sturdier ones — peanut butter, oatmeal, maple pecan, snickerdoodle, sesame, and chocolate chip — hold up best in boxes. Layer them with parchment, and keep jam-thumbprint or glazed cookies on top so they don’t get crushed.
A Tray Built From the Pantry
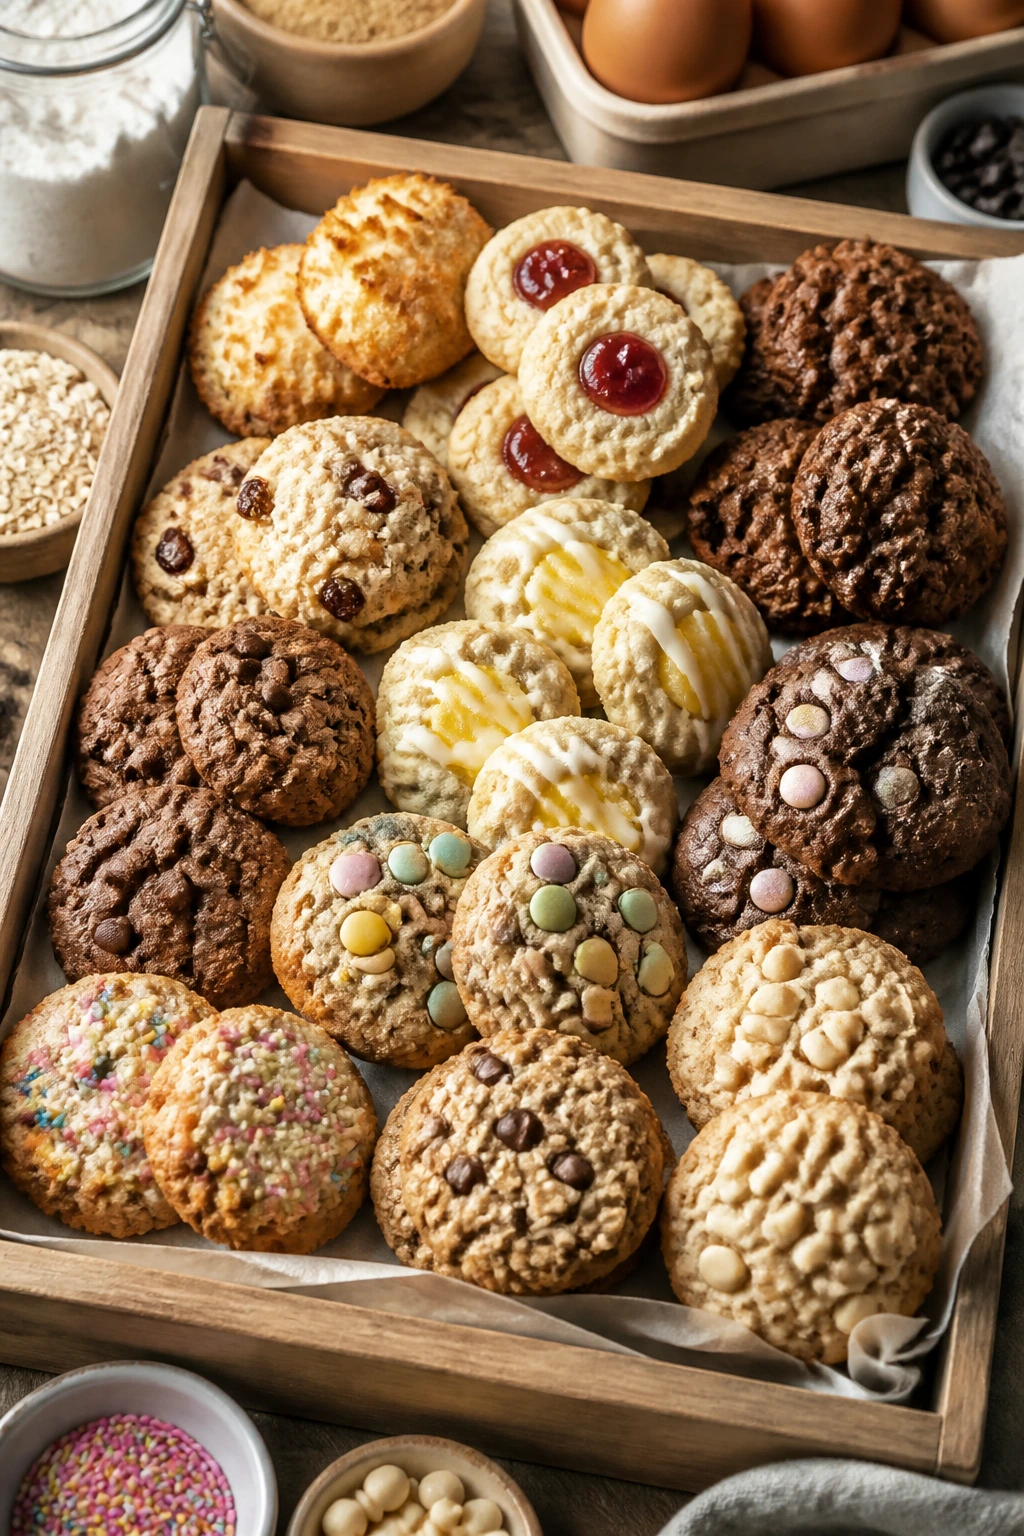
There’s something satisfying about making a holiday tray from the shelves you already have. A bag of flour, a few sticks of butter, some sugar, a jar of jam, and a couple of citrus fruits can turn into a spread that looks planned even when it wasn’t. That’s the quiet charm of Easter drop cookies: they give you color, variety, and enough texture to keep people reaching for one more.
I like the balance in this collection. Some cookies are bright and sharp, some are soft and old-fashioned, and some bring in chocolate or spice when the plate needs weight. Put them together, and the tray feels full in a way that matters more than decoration. It tastes like you thought ahead, even if you mostly just worked with what was on hand.
Keep the butter soft, the scoops even, and the tray varied. That’s enough to make the whole spread feel finished, and it leaves you with a stack of cookies that won’t sit politely for long.