
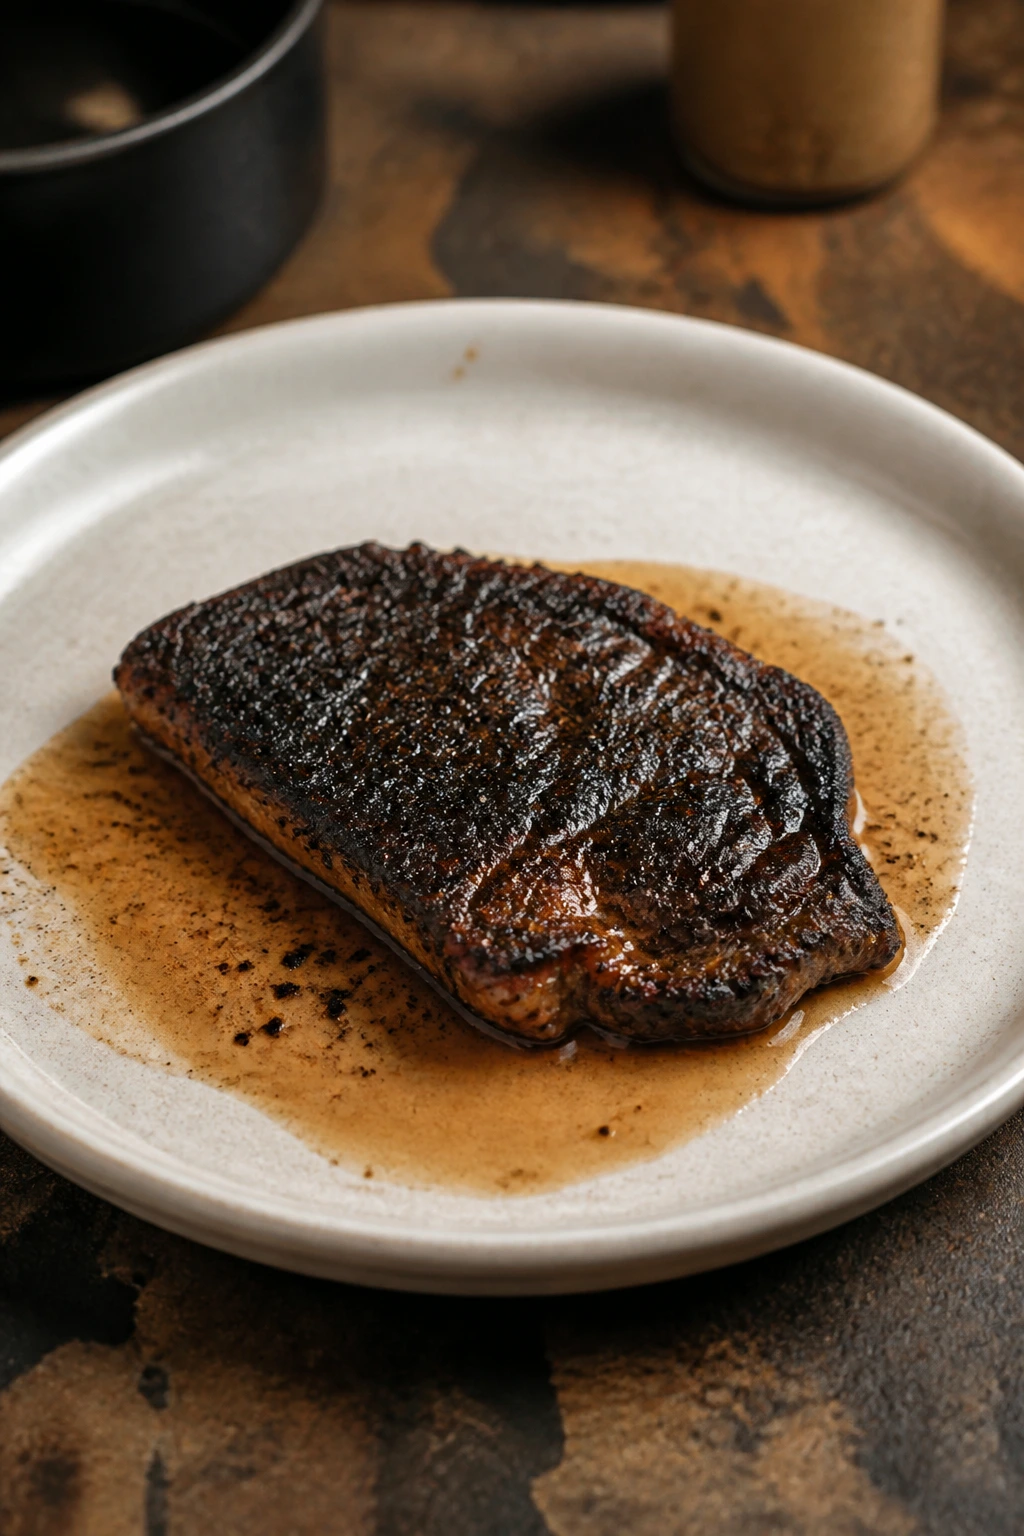
An anniversary dinner at home works best when the food feels deliberate, not complicated. The best anniversary dinner ideas at home usually come down to one excellent protein, one sauce that leaves a sheen on the plate, and one side that knows when to stay in the background. That formula beats a crowded menu almost every time.
Some nights call for a 30-minute skillet and a good bottle of wine. Other nights want short ribs braised until the meat gives way with a fork and the whole kitchen smells like thyme and red wine. Both can feel like a celebration. Neither needs a reservation.
The dishes below lean on the details that matter: a hard sear, a glossy finish, bright lemon at the end, warm potatoes, pasta that stays slippery instead of clumping. Small things. Big payoff. Pick the one that fits your evening, your stove, and your appetite.
Why These Dinners Feel Special Without Turning the Night Into Work
-
Low-Stress Timing: Several of these recipes land on the table in under 45 minutes, which keeps the evening calm instead of turning it into a kitchen marathon.
-
Built-In Occasion Feel: Each dish has a sauce, a crisp edge, or a bright finishing note, so the plate looks considered even when the ingredient list stays short.
-
Flexible for Two or Four: Some recipes are made for a couple; others scale cleanly if you’re cooking for guests or want leftovers the next day.
-
Pantry Staples Do the Heavy Lifting: Butter, garlic, stock, wine, potatoes, pasta, and herbs show up again and again because they carry flavor without making shopping messy.
-
Worth the Effort, Not Fussy: The recipes ask for attention in the right places—searing, resting, reducing, tasting—not a dozen unnecessary steps.
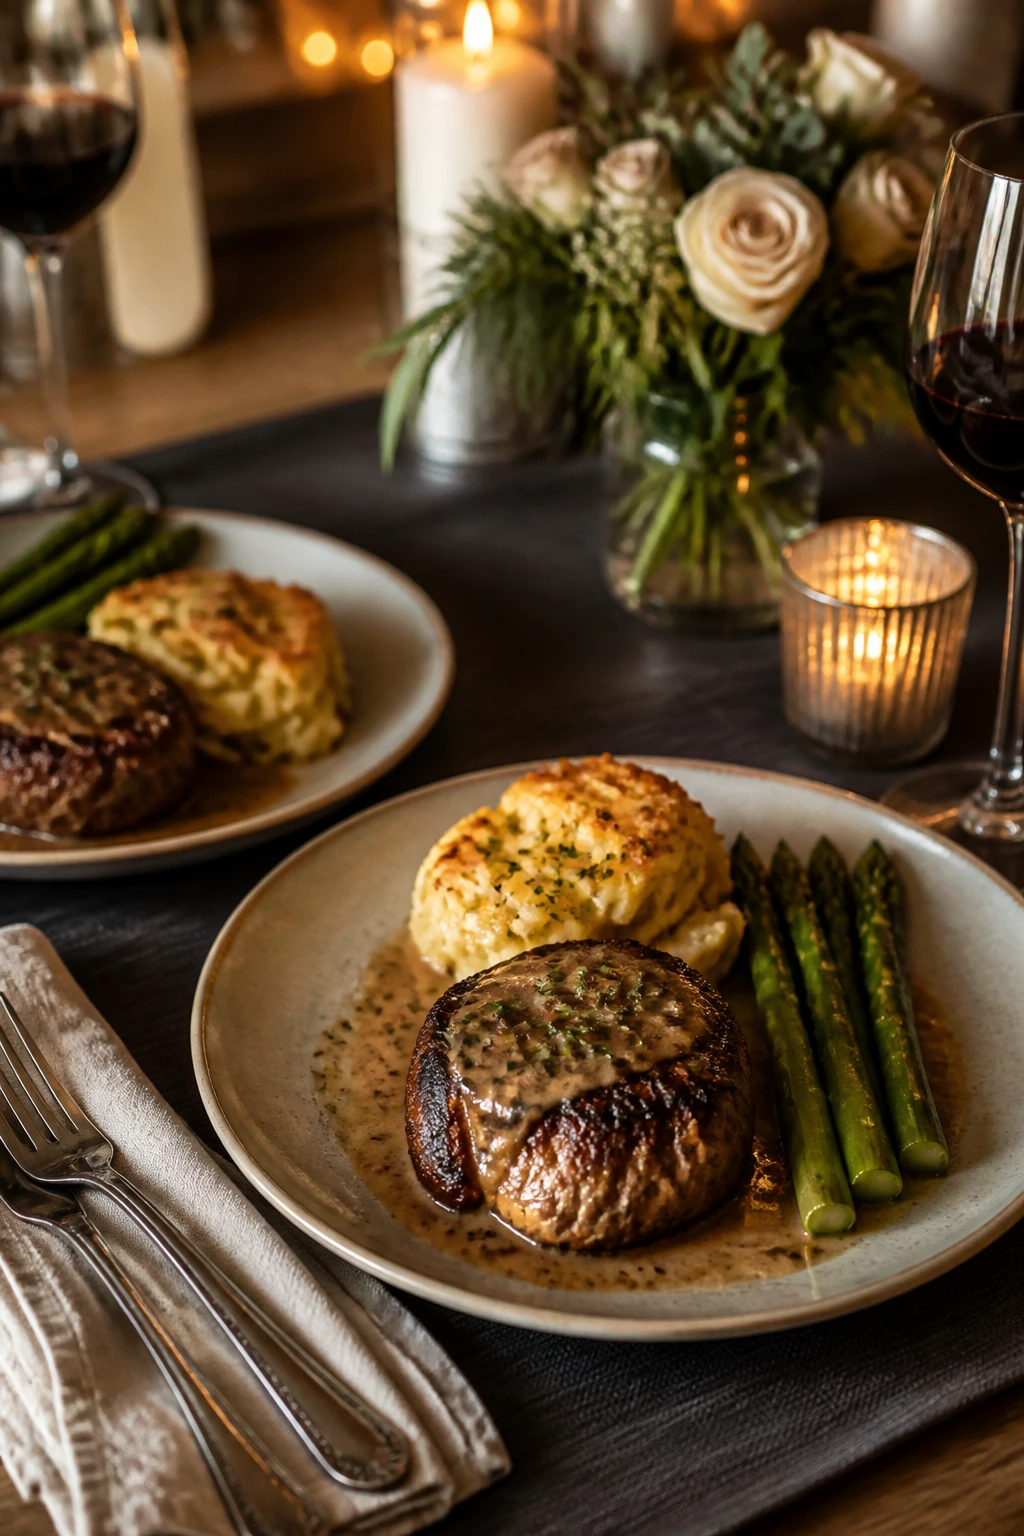
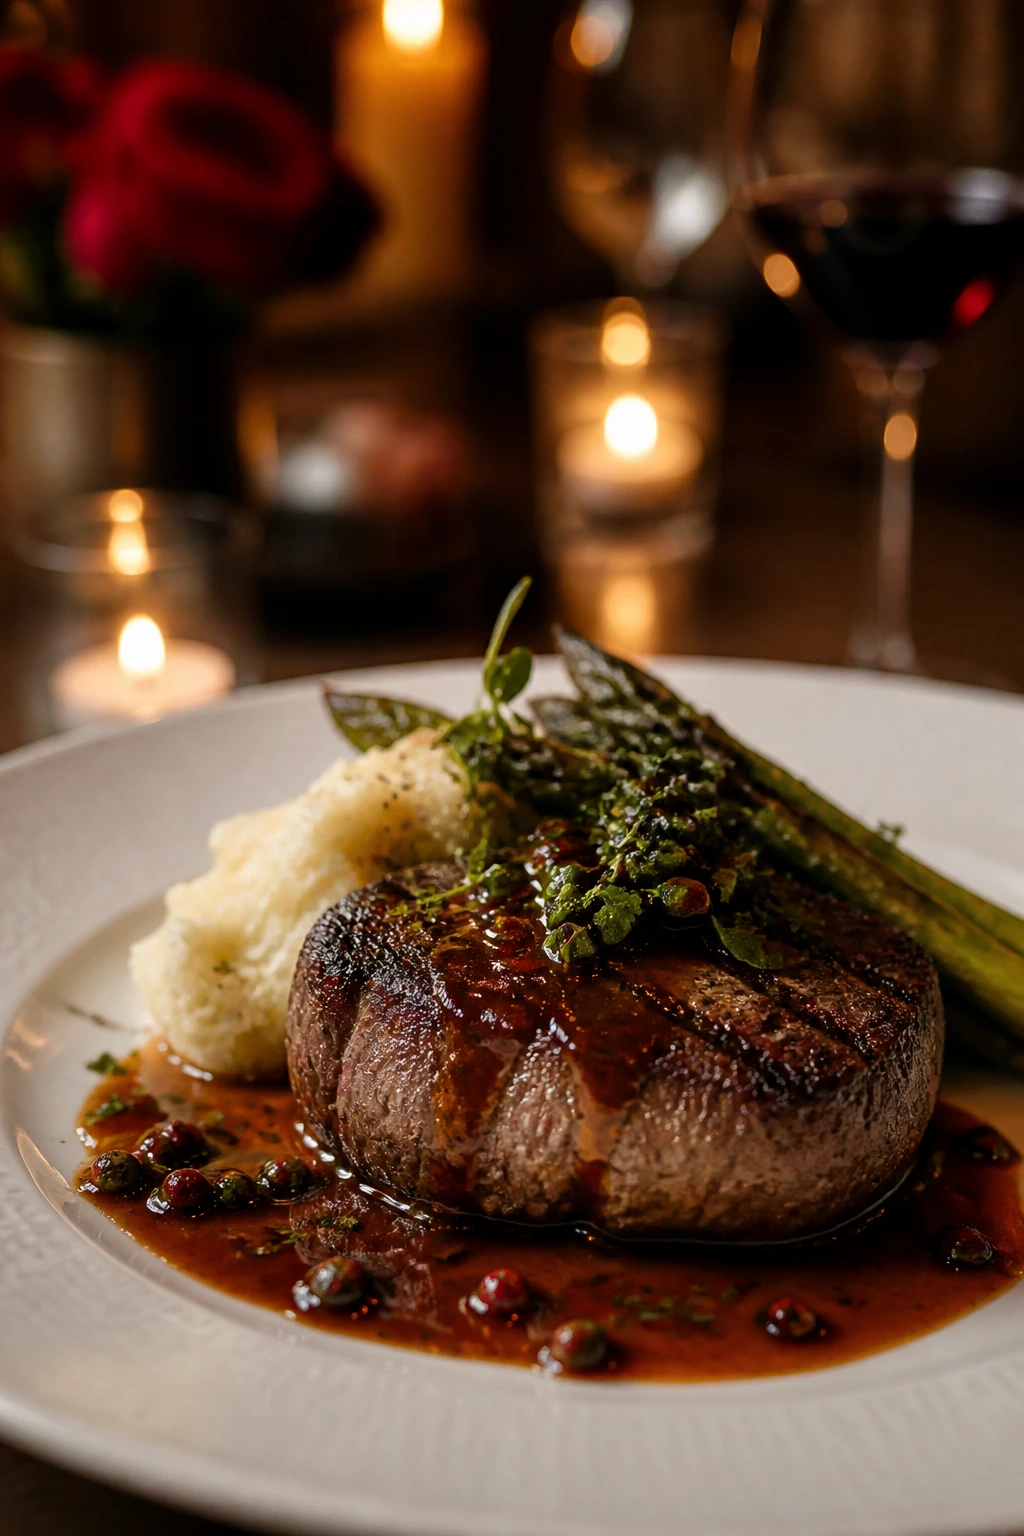
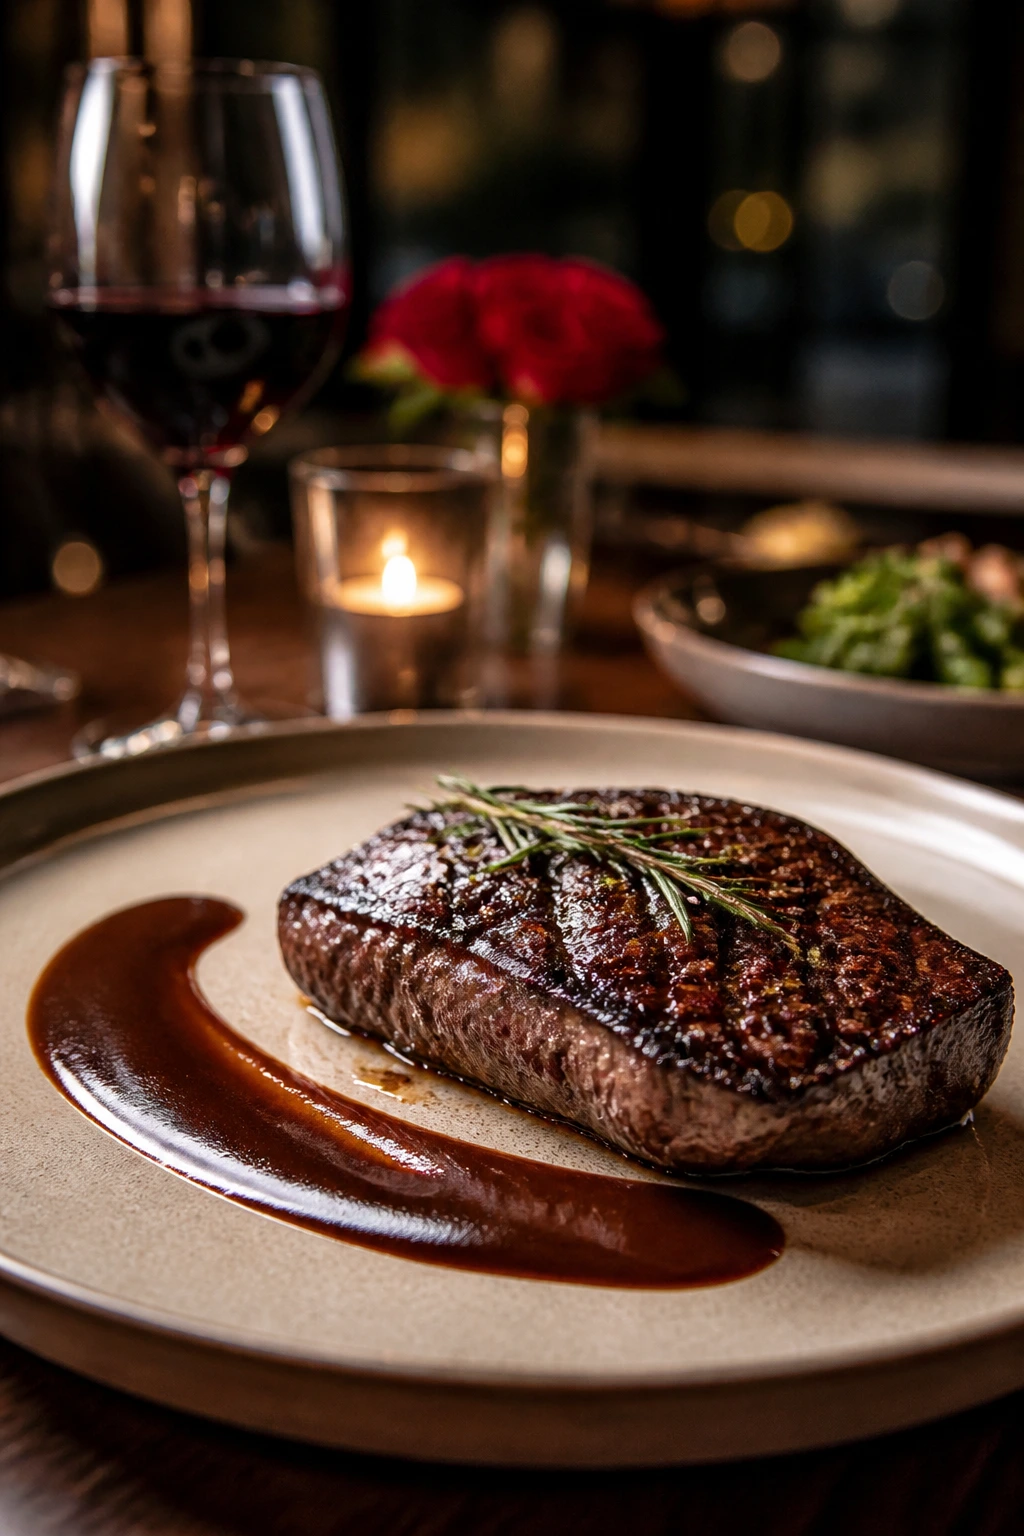
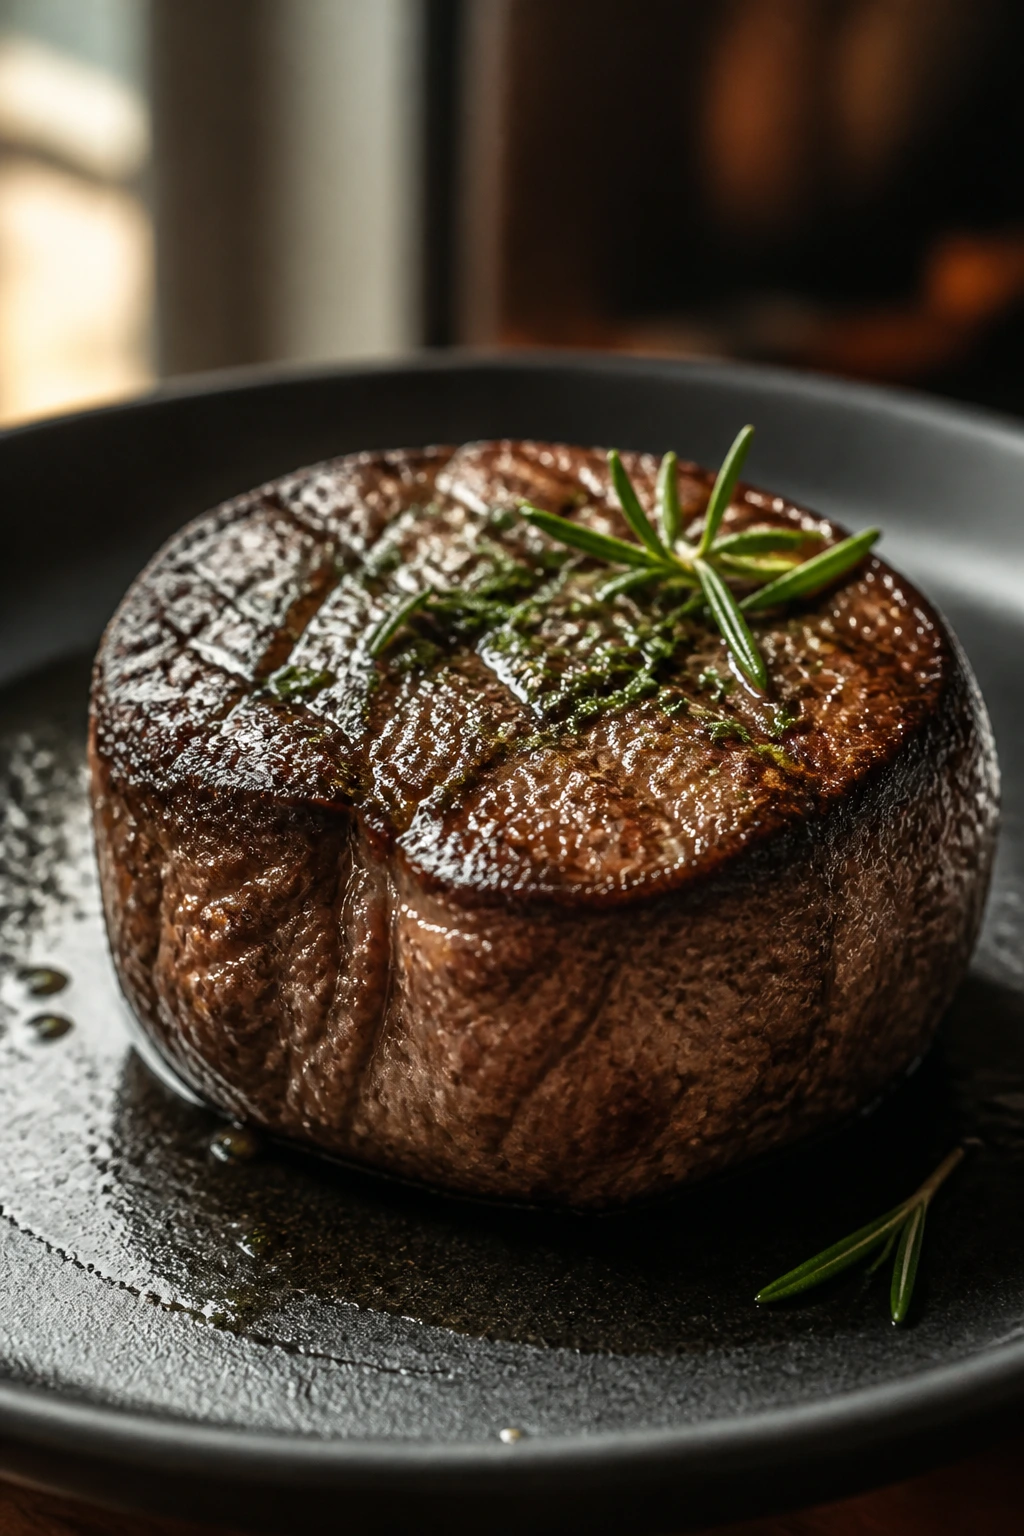
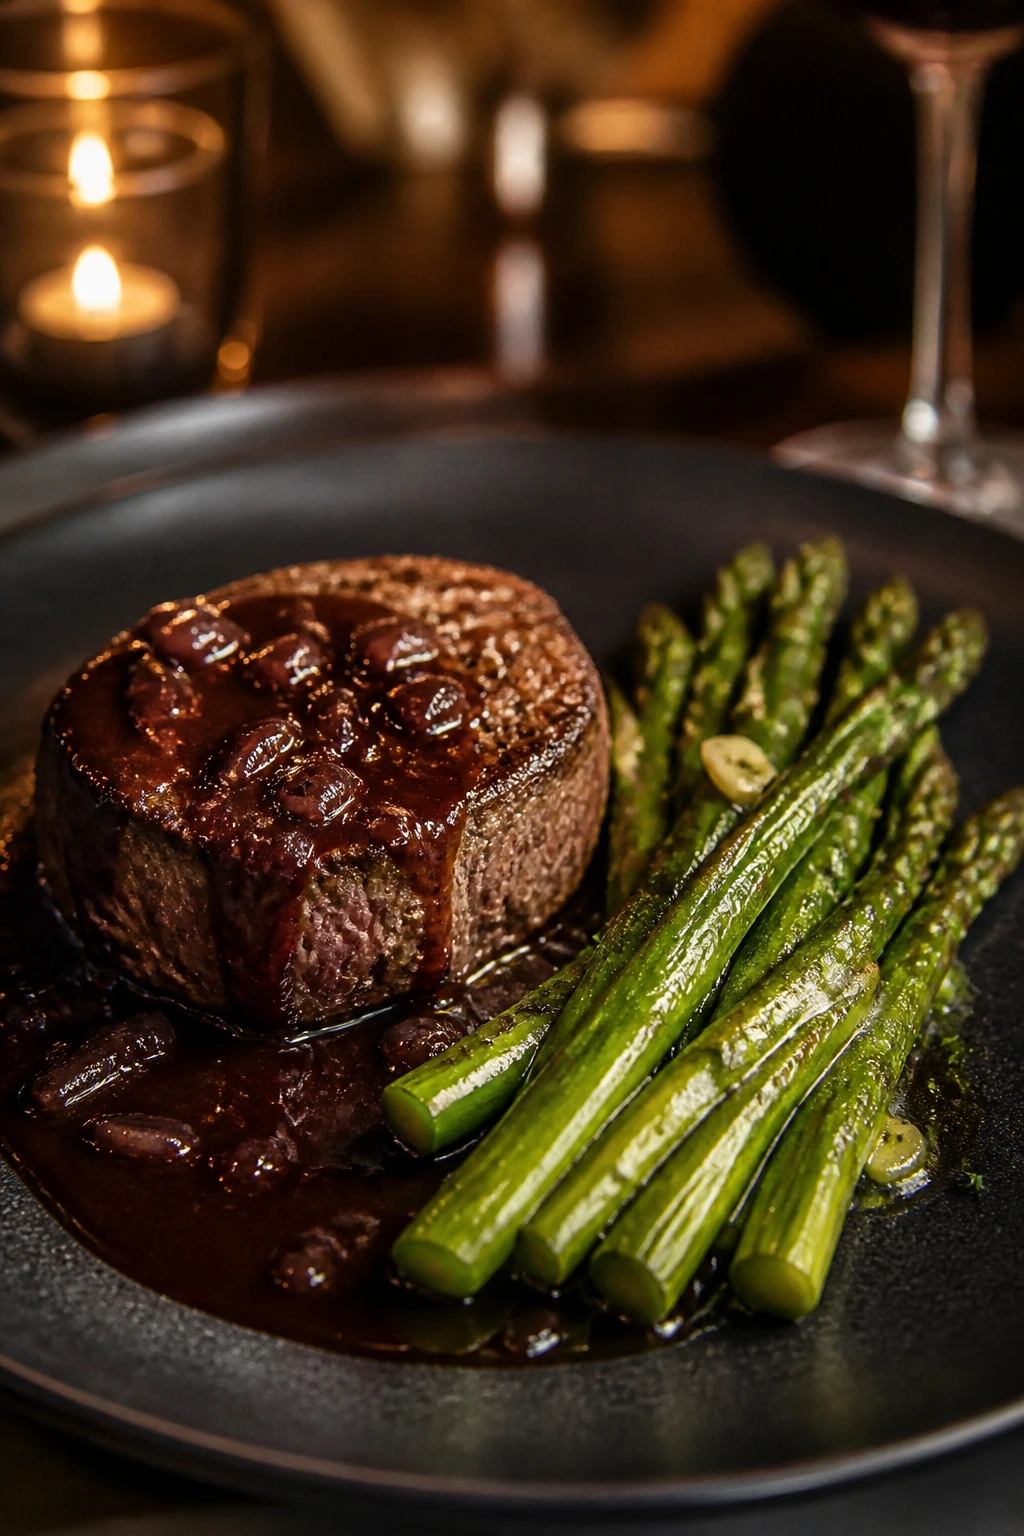
1. Filet Mignon with Red Wine Pan Sauce and Garlic Butter Asparagus
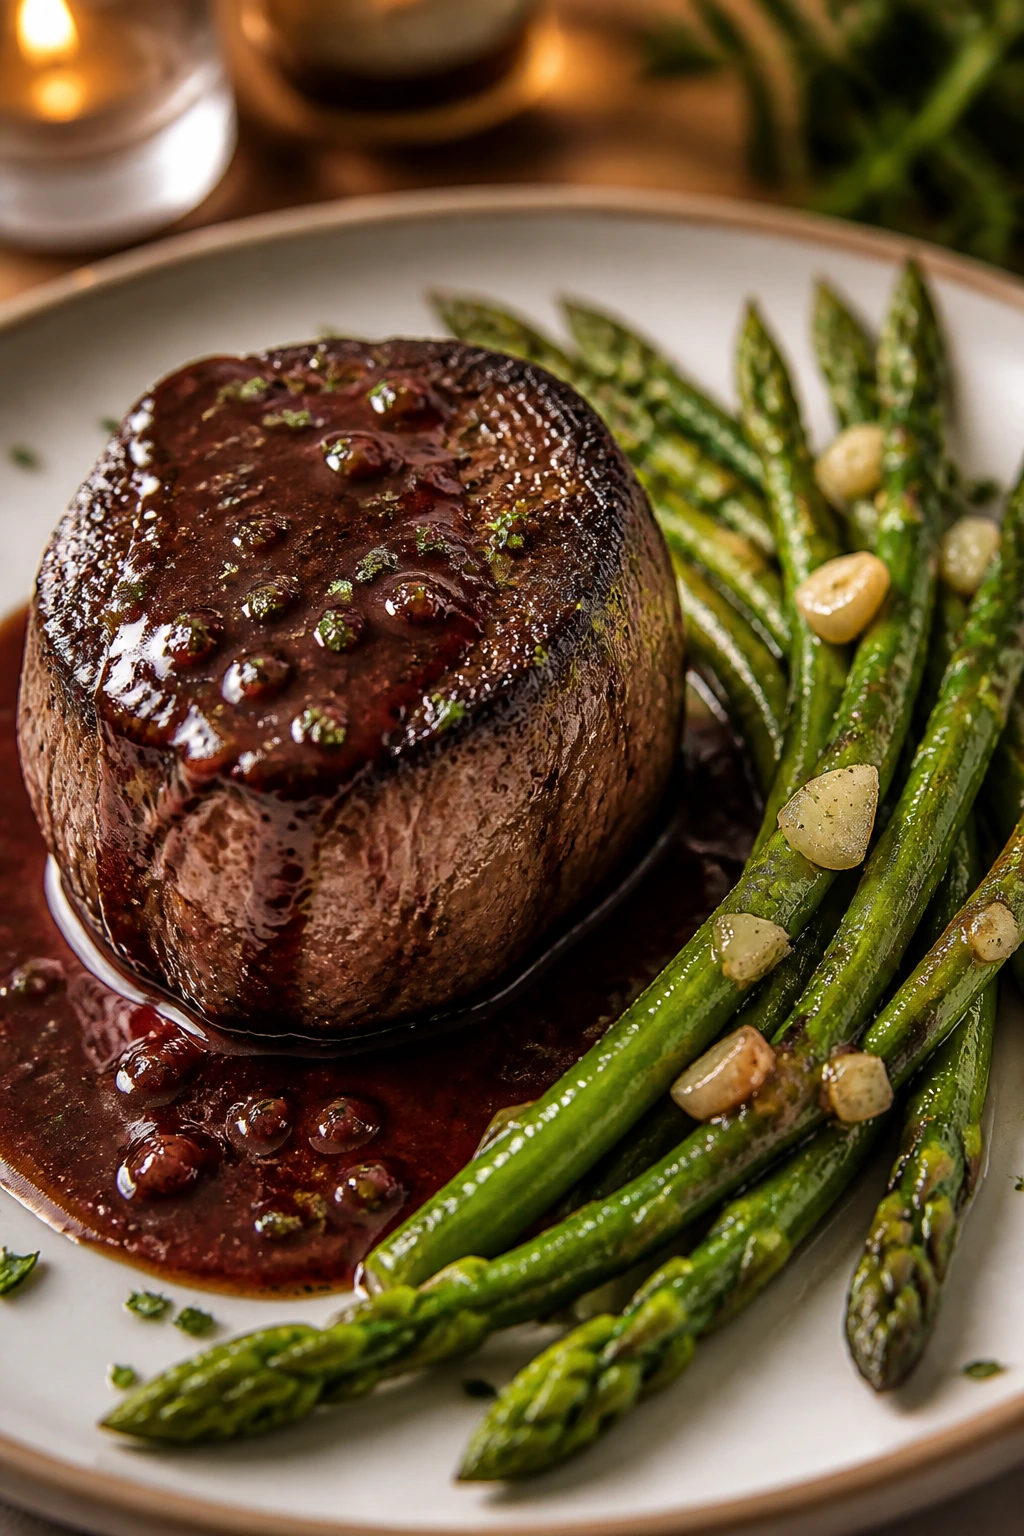
A filet mignon does not need a lot of help. It needs heat, salt, a fast sear, and something glossy on top when it lands on the plate. That’s why this feels like a smart anniversary dinner at home rather than a stunt.
Timing: Prep 15 minutes, Cook 20 minutes, Total 35 minutes. Serves: 2.
Why It Works:
Filet cooks quickly, which means you can keep the evening relaxed and still serve something that feels polished. The red wine pan sauce picks up every browned bit from the skillet, so the whole dish tastes deeper than the ingredient list suggests. Asparagus cooks fast, too, which keeps the plate fresh instead of heavy. A 1 1/2-inch filet gives you enough thickness to sear well without drying out while it finishes in the oven.
Key Ingredients:
For the Steak
- 2 filet mignon steaks, 6 to 8 ounces each, about 1 1/2 inches thick
- 1 1/2 teaspoons kosher salt
- 1 teaspoon freshly ground black pepper
- 1 tablespoon olive oil
For the Pan Sauce
- 1 small shallot, finely minced
- 1/2 cup dry red wine
- 1/2 cup beef stock
- 1 teaspoon Dijon mustard
- 1 teaspoon fresh thyme leaves
- 1 tablespoon cold unsalted butter
For the Asparagus
- 1 pound asparagus, trimmed
- 1 tablespoon olive oil
- 1 clove garlic, minced
- 1 tablespoon unsalted butter
Quick Steps:
-
Preheat and season: Heat the oven to 425°F and let the steaks sit at room temperature for 15 to 20 minutes while you season both sides with salt and pepper.
-
Roast the asparagus: Toss the asparagus with olive oil, garlic, and a pinch of salt on a rimmed sheet pan. Roast for 10 to 12 minutes until the tips are lightly browned and the stalks are crisp-tender.
-
Sear the steaks: Heat a cast-iron skillet over medium-high heat until very hot. Add the oil, then sear the steaks for 2 to 3 minutes per side until a deep brown crust forms.
-
Finish in the oven: Transfer the skillet to the oven and cook for 4 to 6 minutes, until the thickest part of the steak reads 125°F for medium-rare. Pull it early; the temperature rises while it rests.
-
Make the sauce: Move the steaks to a plate to rest. In the same skillet, add the shallot and cook for 30 seconds, then pour in the red wine and stock. Simmer until reduced by about half, whisk in Dijon and thyme, then finish with cold butter.
-
Plate and serve: Spoon the sauce over the steaks and arrange the asparagus alongside. Let the steak rest for 5 to 10 minutes before slicing.
Equipment for This Recipe:
- 12-inch cast-iron skillet — the fast heat helps the crust form.
- Rimmed sheet pan — for the asparagus.
- Instant-read thermometer — the easiest way to avoid overcooking.
- Tongs — for turning the steaks cleanly.
How to Serve This Dish:
Serve the steak whole or sliced on a slight angle, with the asparagus tucked beside it and the sauce pooled underneath instead of flooding the plate. A small mound of mashed potatoes works if you want a fuller meal. Warm plates matter here. Cold plates dull a good steak in a hurry.
Pro Tips for This Recipe:
- Dry the steaks well before seasoning. Moisture blocks browning.
- Use cold butter to finish the sauce so it turns shiny instead of oily.
- Salt the asparagus lightly; the sauce already carries plenty of flavor.
- If you want a stronger wine note, reduce the wine by a few extra tablespoons before adding stock.
Variations on This Dish:
- Peppercorn Finish: Add an extra teaspoon of cracked black pepper to the skillet sauce and finish with a spoonful of cream.
- Blue Cheese Steak: Crumble a small amount of blue cheese over the rested steak right before serving. It turns the dish richer and more assertive.
- Herb Butter Swap: Skip the pan sauce and top the steak with a tablespoon of compound butter made with parsley, chives, and lemon zest.
Common Mistakes to Avoid with This Dish:
- Using steaks that are too thin: Thin filets cook through before a crust develops. Stick with 1 1/2-inch steaks if you can.
- Skipping the rest time: Slice too soon and the juices run everywhere. Five minutes is the bare minimum.
- Crowding the pan with asparagus and steak at the same time: The vegetables steam and the steak loses heat. Keep them separate.
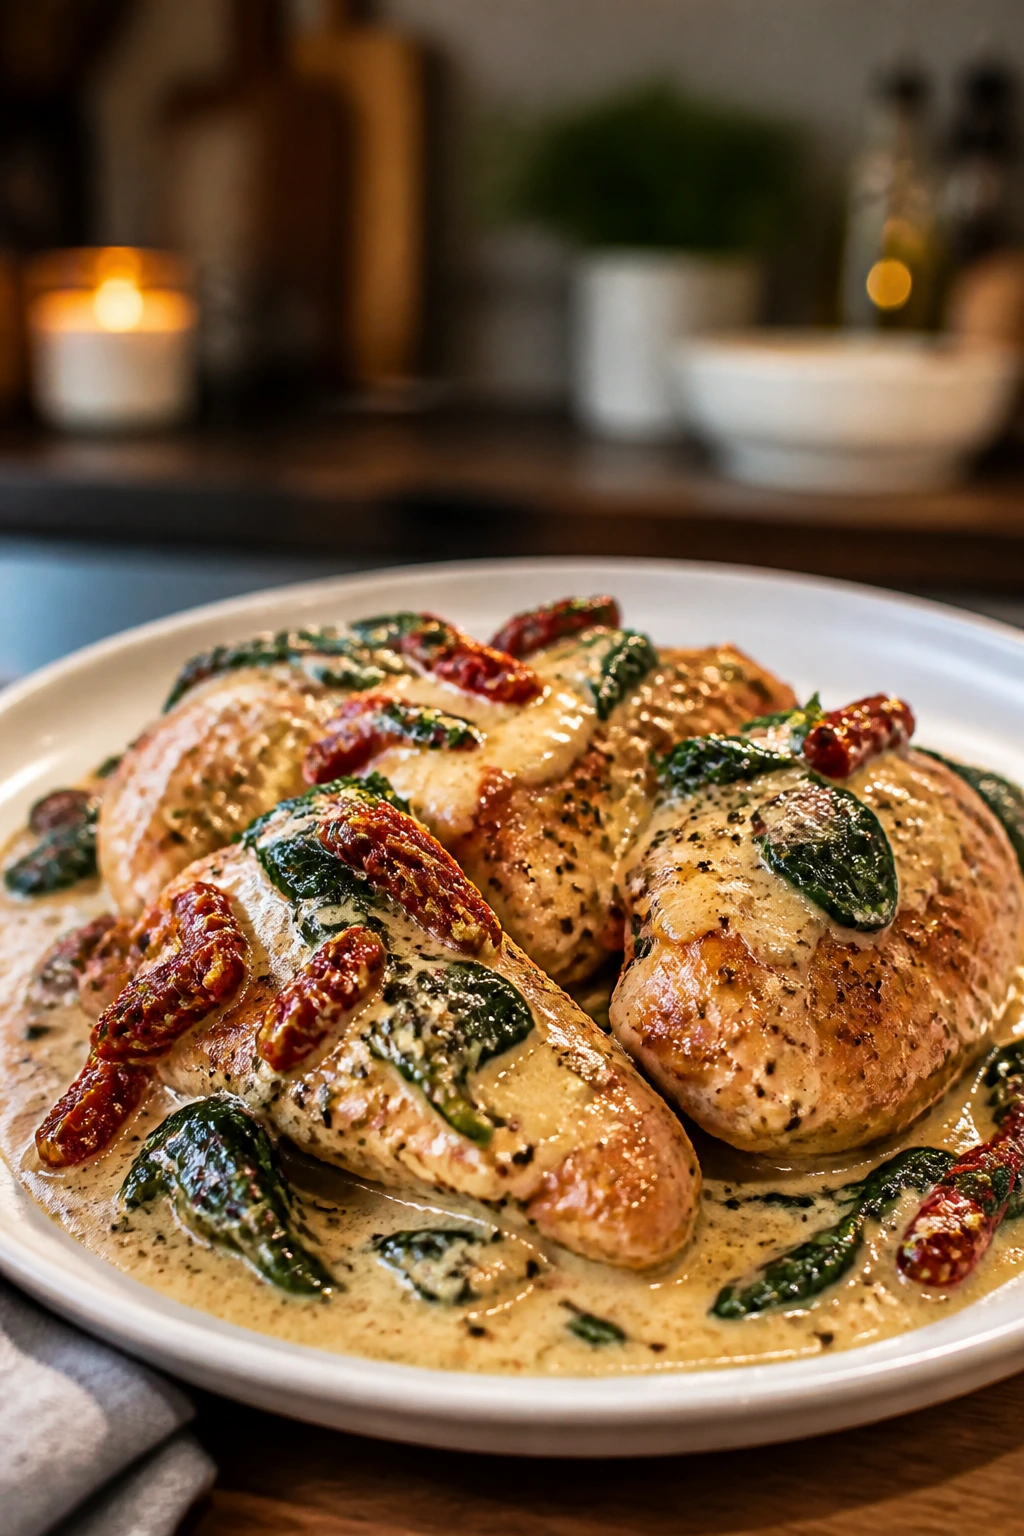
2. Creamy Tuscan Chicken with Sun-Dried Tomatoes and Spinach
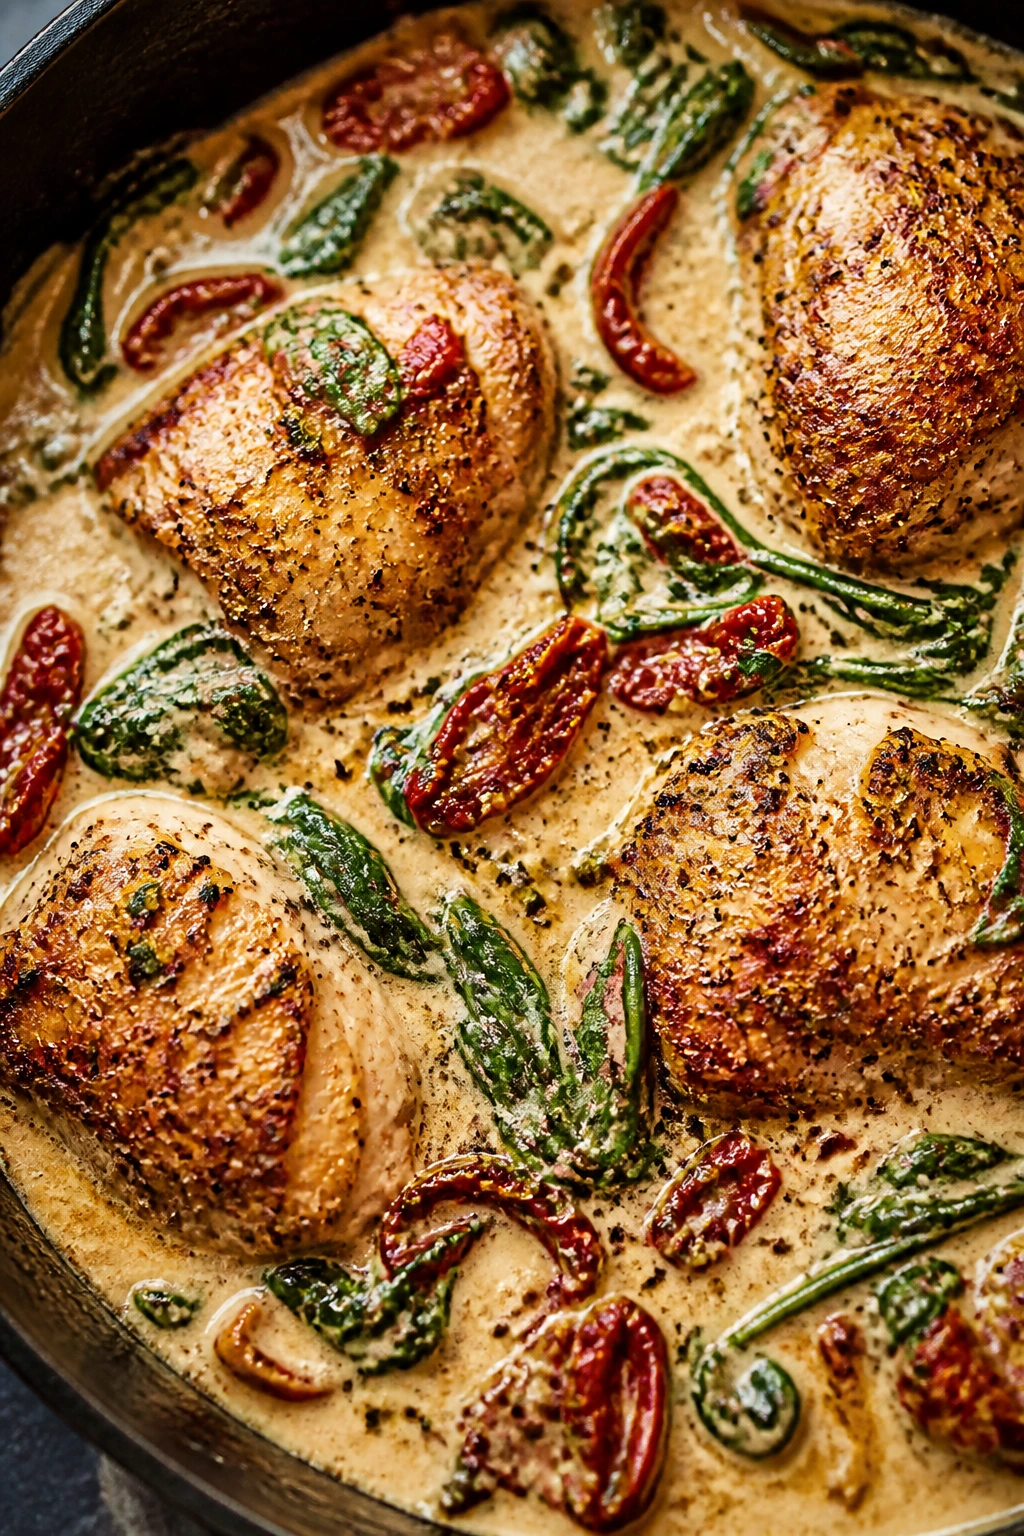
When garlic hits butter and sun-dried tomatoes, the whole kitchen changes. This one smells like something that took more effort than it did, which is exactly the sort of trick a good anniversary dinner should pull.
Timing: Prep 15 minutes, Cook 25 minutes, Total 40 minutes. Serves: 4.
Why It Works:
Chicken thighs stay juicy even if you don’t baby them, and that matters when you’re cooking for a special night and also trying to pour a drink and answer the door. Sun-dried tomatoes bring concentrated sweetness and a little chew, while cream and Parmesan turn the skillet into a sauce that clings to everything. Spinach folds in at the end and keeps the dish from feeling too heavy. The whole thing stays in one pan, which is a gift when you’d rather spend time at the table.
Key Ingredients:
For the Chicken
- 1 1/2 pounds boneless, skinless chicken thighs, trimmed of excess fat
- 1 teaspoon kosher salt
- 1/2 teaspoon black pepper
- 2 tablespoons all-purpose flour
- 2 tablespoons olive oil
For the Sauce
- 2 tablespoons unsalted butter
- 3 cloves garlic, minced
- 1/2 cup sun-dried tomatoes in oil, drained and chopped
- 1 cup low-sodium chicken broth
- 3/4 cup heavy cream
- 1/2 cup grated Parmesan
- 1 teaspoon Italian seasoning
- Pinch of red pepper flakes
- 1 tablespoon lemon juice
For the Finish
- 2 cups baby spinach
- 1 tablespoon chopped basil or parsley
Quick Steps:
-
Season and dredge: Pat the chicken dry, season with salt and pepper, then dust lightly with flour so the surface browns instead of slipping around in the pan.
-
Sear the chicken: Heat the olive oil in a large skillet over medium-high heat. Cook the thighs for 4 to 5 minutes per side until deeply golden, then move them to a plate.
-
Build the sauce base: Lower the heat to medium, melt the butter, and cook the garlic and sun-dried tomatoes for 30 seconds until fragrant.
-
Add the creamy layer: Pour in the broth, cream, Parmesan, Italian seasoning, and red pepper flakes. Simmer for 3 to 4 minutes until the sauce thickens enough to coat a spoon.
-
Finish the chicken: Return the chicken to the skillet and simmer for 6 to 8 minutes, until the thighs reach 165°F and the sauce looks silky around the edges.
-
Wilt the spinach: Stir in the spinach and lemon juice just until the leaves collapse. Finish with basil or parsley and serve immediately.
Equipment for This Recipe:
- Large 12-inch skillet — one with straight sides is best.
- Tongs — for moving the chicken without tearing the crust.
- Wooden spoon — for scraping the browned bits into the sauce.
- Measuring cups and spoons — the cream sauce rewards accuracy.
How to Serve This Dish:
Pile the chicken over mashed potatoes, buttered noodles, or a shallow bowl of soft polenta. Spoon plenty of sauce over the top so the tomatoes and spinach show at the edges. This is one of those dishes that likes a simple green salad on the side and not much else.
Pro Tips for This Recipe:
- Use Parmesan from a block. The pre-shredded stuff tends to stay grainy.
- Let the sauce simmer gently. A hard boil can make the cream split.
- Lemon juice at the end wakes up the sauce; don’t skip it.
- Chicken thighs forgive a little timing drift, which makes them ideal for a dinner that includes candles, music, and conversation.
Variations on This Dish:
- Lighter Tuscan Skillet: Replace half the cream with extra broth and add an extra squeeze of lemon.
- Pasta Bowl Version: Slice the chicken and toss it with fettuccine or penne so the sauce coats the noodles.
- Mushroom-Heavy Version: Add 8 ounces of sliced cremini mushrooms when you cook the garlic for a deeper, earthier flavor.
Common Mistakes to Avoid with This Dish:
- Turning the heat too high once the cream goes in: The sauce can break or reduce too fast. Keep it at a gentle simmer.
- Using too much flour on the chicken: A heavy coating turns gummy. Dust lightly and shake off the extra.
- Adding spinach too early: It overcooks and disappears. Stir it in at the end.
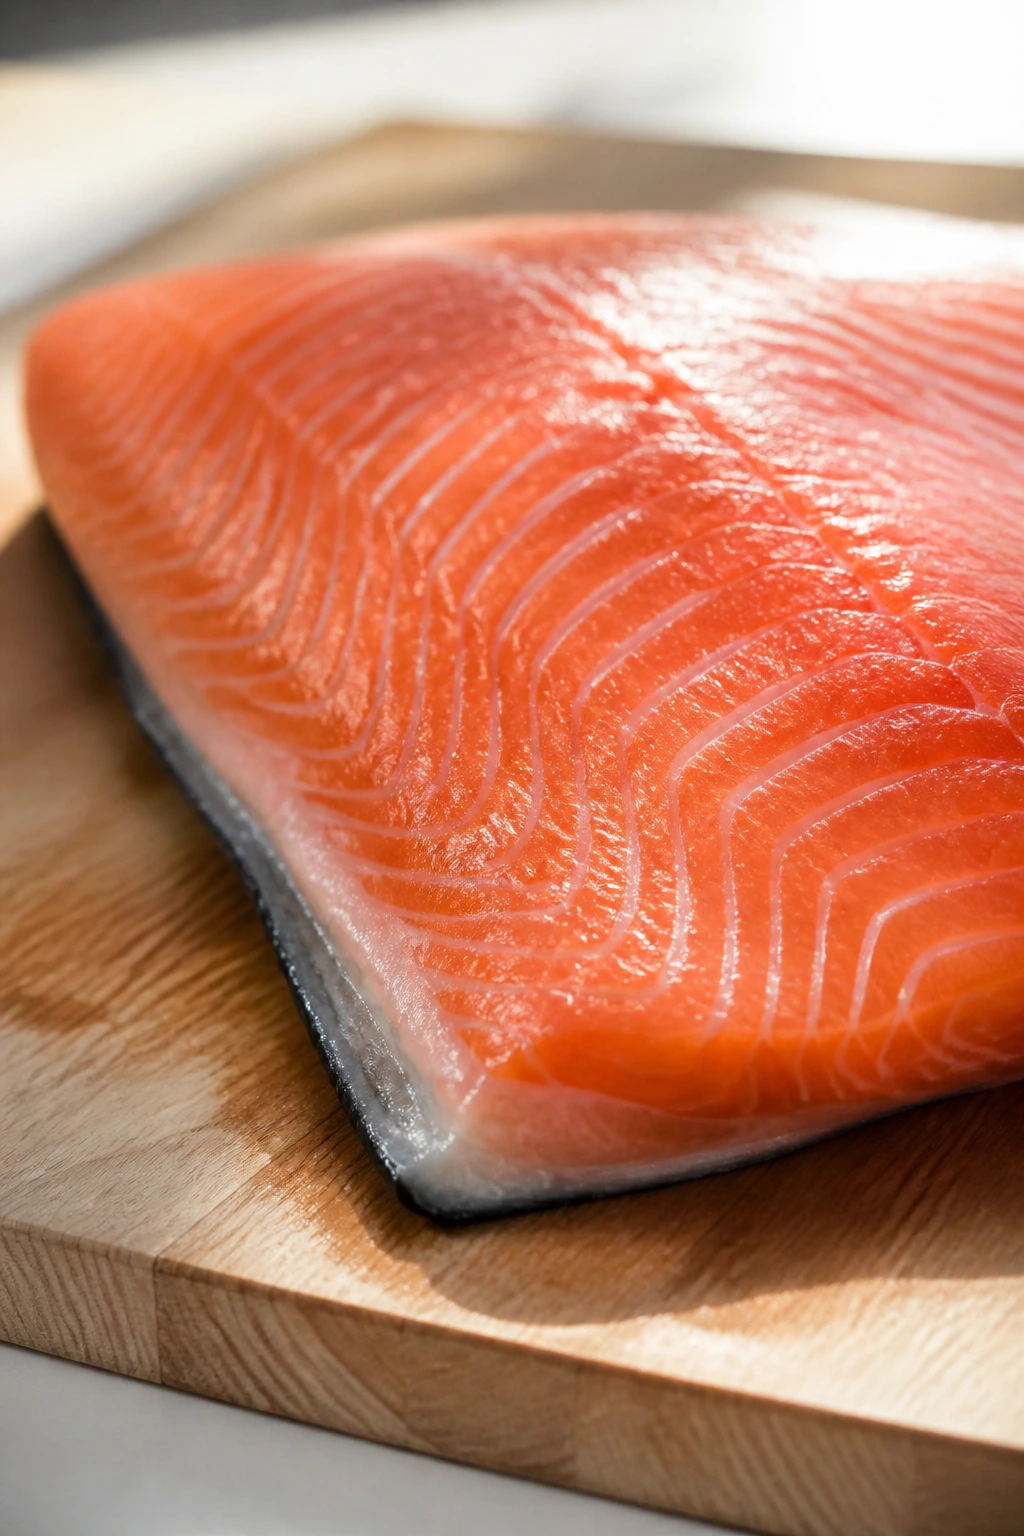
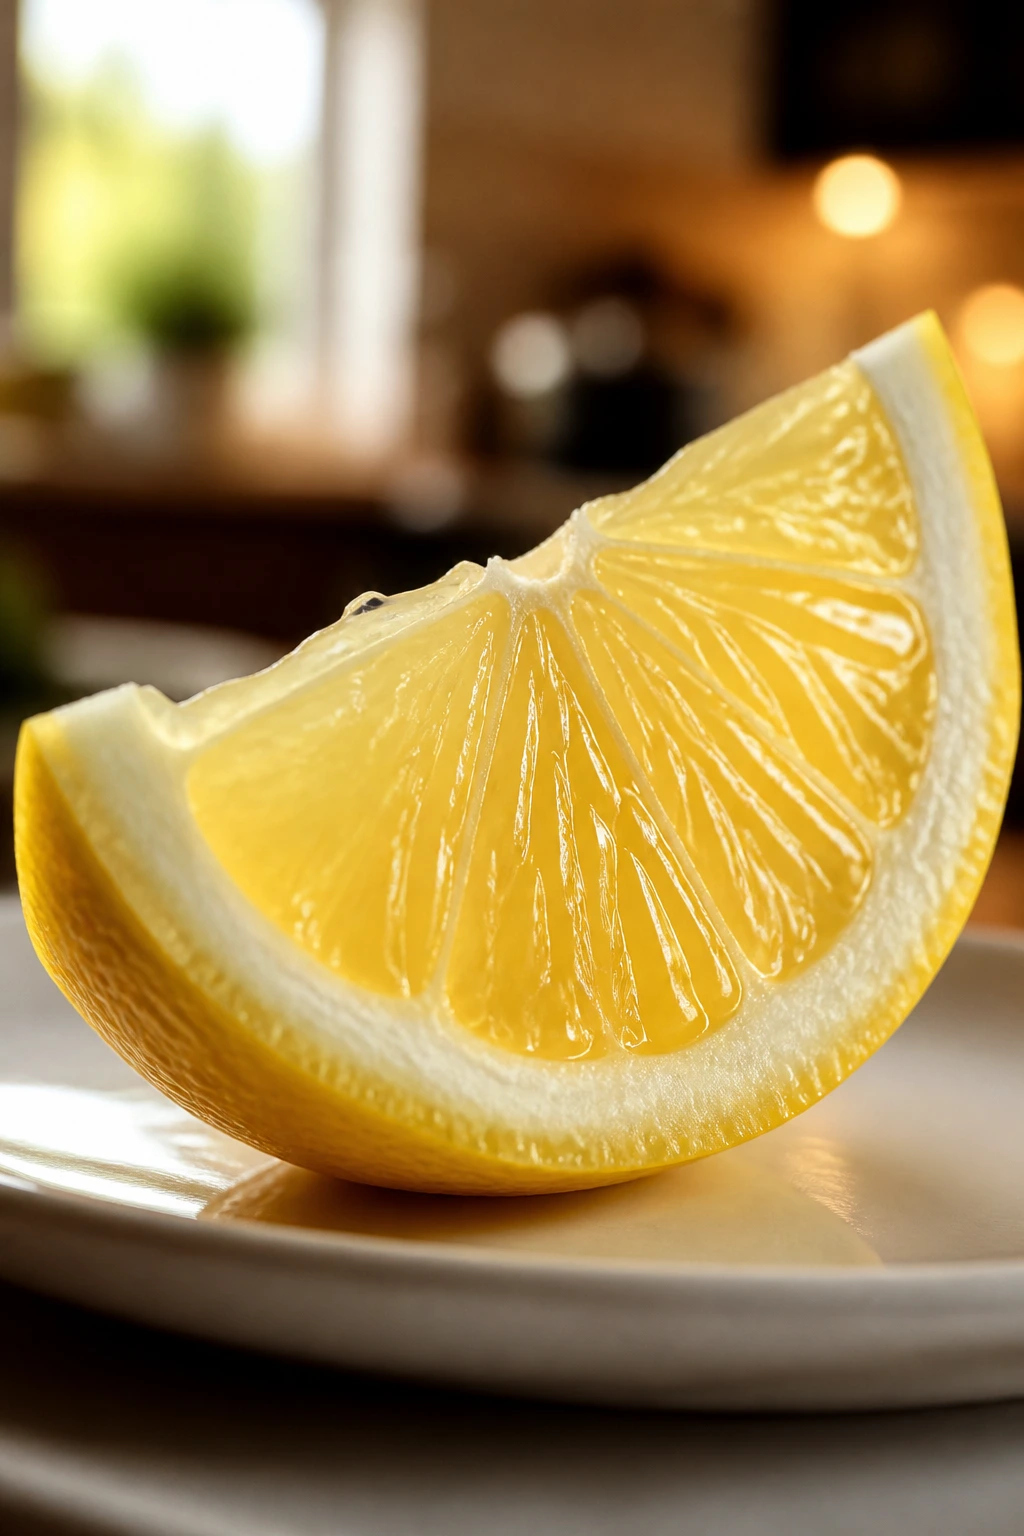
3. Lemon Herb Salmon with Crispy Potatoes
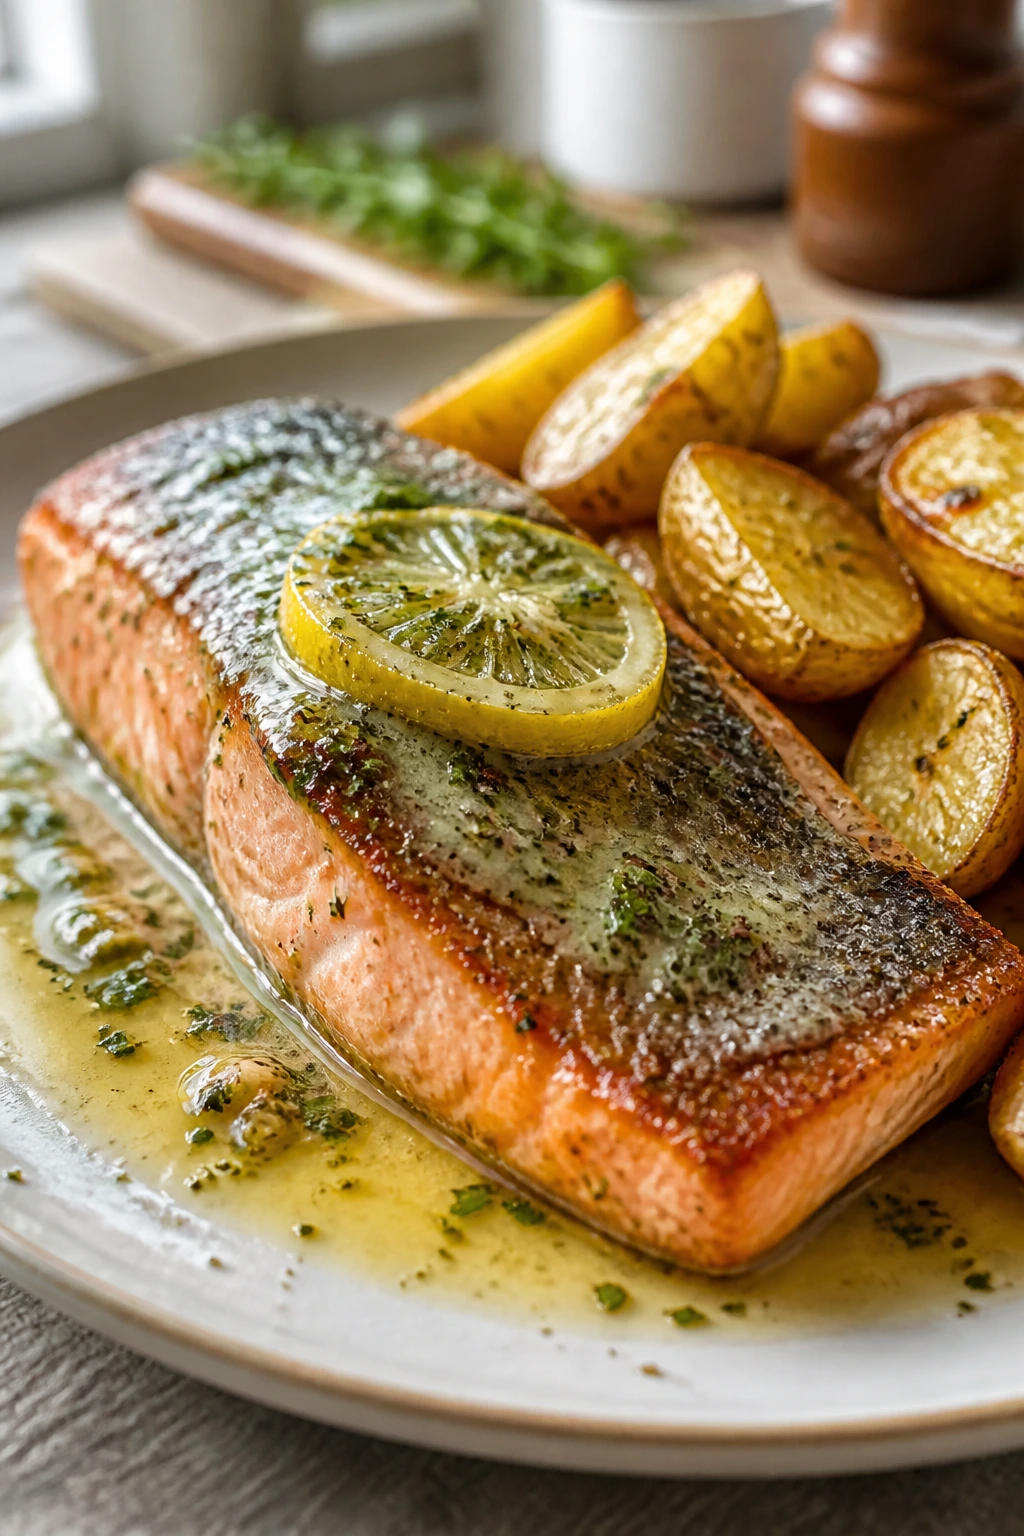
Salmon gets romantic fast when the skin crisps and lemon hits the butter. Add potatoes with browned edges and you’ve got a dinner that looks calm, bright, and more expensive than it needs to be.
Timing: Prep 15 minutes, Cook 30 minutes, Total 45 minutes. Serves: 2.
Why It Works:
This recipe relies on contrast, and that’s why it lands so well. The potatoes roast first so they get deeply golden instead of pale and soft, while the salmon goes in later so it stays tender at the center. A lemon herb butter at the end ties the whole plate together and gives the fish a clean finish. The method is simple enough for a weeknight, but the result feels like a proper occasion.
Key Ingredients:
For the Salmon and Potatoes
- 1 pound baby Yukon gold potatoes, halved
- 2 tablespoons olive oil
- 1 teaspoon kosher salt
- 1/2 teaspoon black pepper
- 2 salmon fillets, 6 ounces each, skin on if possible
- 1/2 teaspoon paprika, optional
For the Lemon Herb Butter
- 3 tablespoons unsalted butter
- 1 clove garlic, finely grated or minced
- Zest and juice of 1 lemon
- 1 tablespoon chopped dill
- 1 tablespoon chopped parsley
- 1 teaspoon Dijon mustard
- 1 tablespoon capers, drained, optional
Quick Steps:
-
Start the potatoes first: Heat the oven to 425°F. Toss the potatoes with olive oil, salt, and pepper on a sheet pan and roast for 15 minutes.
-
Prep the salmon: Pat the fillets dry and season the tops with salt, pepper, and paprika. Dry fish sears and roasts better than damp fish.
-
Add the salmon: Push the potatoes to the edges of the pan and place the salmon in the center, skin-side down if you’re using skin on. Roast for 10 to 12 minutes more, until the salmon flakes at the edges and reads about 125°F in the center.
-
Make the butter: While the fish cooks, melt the butter gently with the garlic, lemon zest, lemon juice, dill, parsley, Dijon, and capers.
-
Finish the plate: Toss the potatoes with a spoonful of the lemon herb butter, then spoon the rest over the salmon.
-
Serve hot: Let the salmon rest for 2 minutes before plating so the juices settle.
Equipment for This Recipe:
- Rimmed sheet pan — a single pan keeps the potatoes crisp.
- Small saucepan — for the lemon herb butter.
- Fish spatula — helpful, though a regular spatula works too.
- Instant-read thermometer — useful for salmon doneness.
How to Serve This Dish:
Serve the salmon on a warmed plate with the potatoes alongside and a few extra dill leaves scattered over the top. A simple cucumber salad or a pile of roasted green beans fits nicely. The plate should look bright and clean, not crowded.
Pro Tips for This Recipe:
- Choose salmon fillets that are the same thickness so they finish together.
- If the potatoes are small enough, leave them cut-side down for the first roast. That’s where the crispness happens.
- Pull the salmon before it looks “done” in the pan. It keeps cooking for a minute or two after it comes out.
- Capers are optional, but they give the butter a salty edge that works well with salmon.
Variations on This Dish:
- Dill-Caper Salmon: Double the dill and capers and skip the Dijon for a sharper, cleaner flavor.
- Mustard Herb Salmon: Brush the fillets with Dijon before roasting for a little more punch.
- Asparagus Swap: Replace the potatoes with asparagus spears during the last 10 minutes if you want a lighter plate.
Common Mistakes to Avoid with This Dish:
- Adding the salmon too early: It overcooks before the potatoes finish. Roast the potatoes first.
- Leaving the fish wet: Pat it dry or the surface steams.
- Using overloaded butter: A small amount is enough; too much hides the salmon instead of helping it.
4. Garlic Butter Shrimp Scampi with Linguine
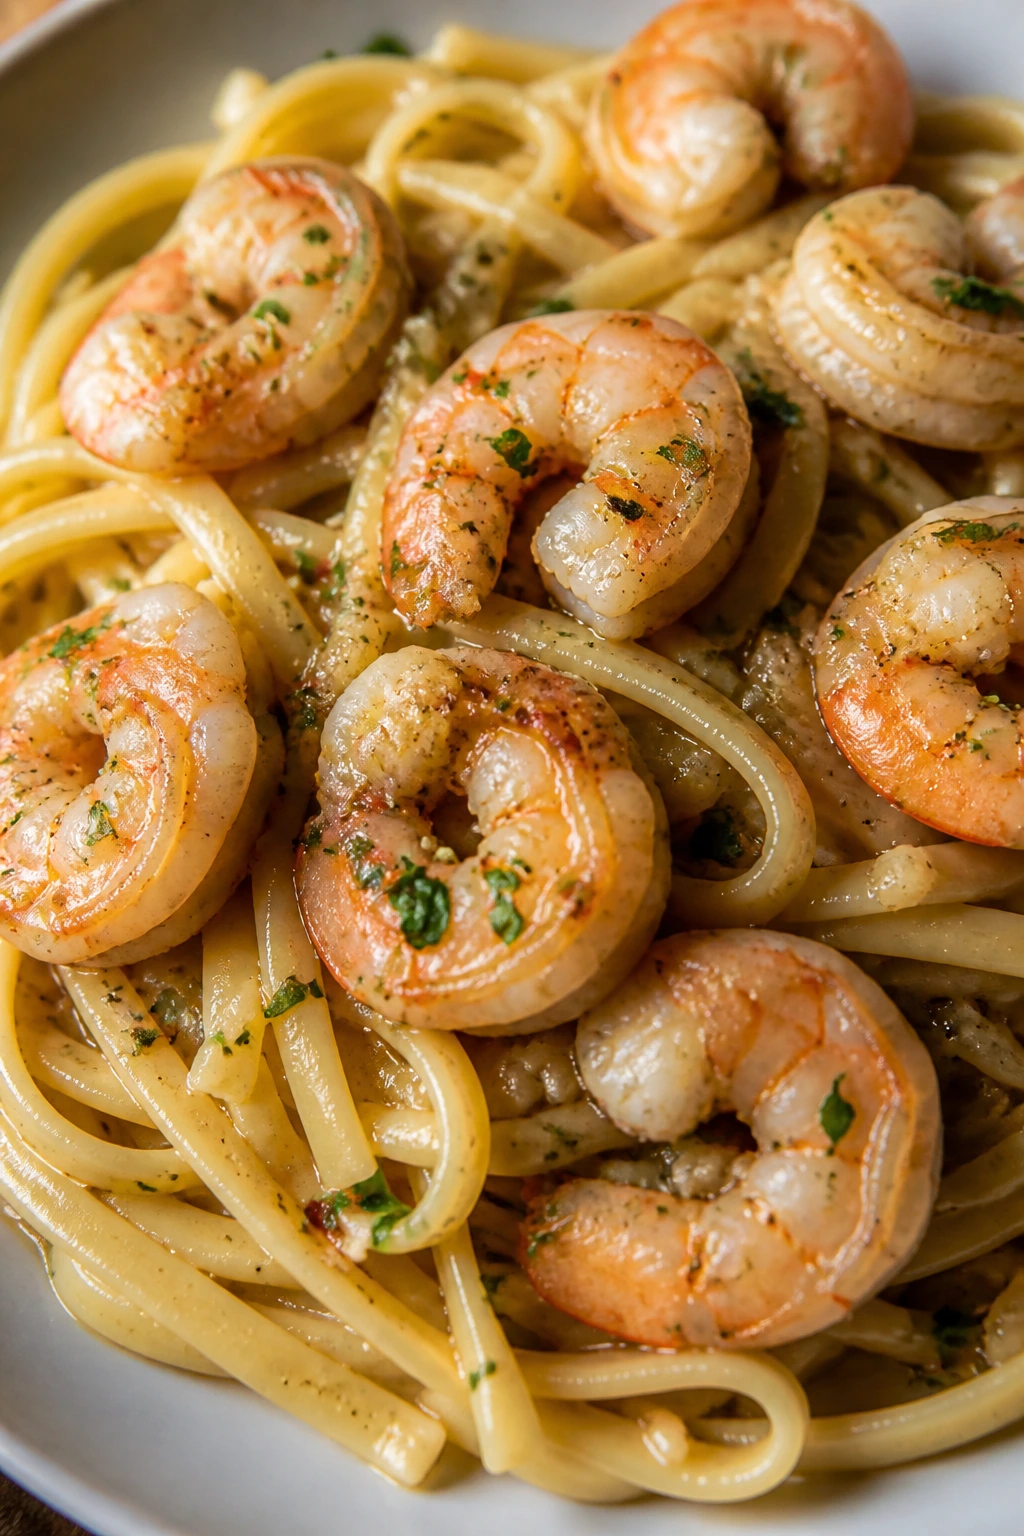
Shrimp scampi is the rare dinner that looks fancy and cooks in the time it takes to boil water. The garlic-butter-wine thing works because it’s fast, bright, and a little messy in the best way.
Timing: Prep 15 minutes, Cook 15 minutes, Total 30 minutes. Serves: 4.
Why It Works:
Shrimp needs just a few minutes of heat, which makes this one of the easiest date-night dinners to pull off without stress. The sauce is built from the pasta water, butter, wine, garlic, and lemon, so it turns glossy instead of greasy. Linguine gives the sauce enough surface to cling to, and parsley cuts through the richness at the end. If you want a fast meal that still feels like an event, this is a strong place to start.
Key Ingredients:
For the Pasta and Shrimp
- 12 ounces linguine
- 1 pound large shrimp, peeled and deveined
- 1 teaspoon kosher salt
- 1/2 teaspoon black pepper
- 2 tablespoons olive oil
For the Scampi Sauce
- 3 tablespoons unsalted butter
- 4 cloves garlic, minced
- 1/2 teaspoon red pepper flakes
- 1/2 cup dry white wine or low-sodium chicken broth
- 1/2 cup reserved pasta water
- Juice and zest of 1 lemon
- 2 tablespoons chopped parsley
- 1/4 cup grated Parmesan, optional
Quick Steps:
-
Boil the pasta: Bring a large pot of salted water to a boil and cook the linguine until al dente. Reserve 1/2 cup of pasta water before draining.
-
Dry and season the shrimp: Pat the shrimp dry, then season with salt and pepper. Dry shrimp sear better and release less water.
-
Cook the shrimp fast: Heat olive oil and 1 tablespoon of butter in a large skillet over medium-high heat. Cook the shrimp for 1 to 2 minutes per side until pink and just curled, then remove them.
-
Build the sauce: Add the garlic and red pepper flakes to the skillet and cook for 20 to 30 seconds. Pour in the wine and simmer for 1 to 2 minutes until the sharp alcohol smell fades.
-
Finish the pasta: Add the remaining butter, lemon juice, lemon zest, pasta, and reserved pasta water. Toss until the sauce looks silky and clings to the noodles, then return the shrimp and parsley.
-
Serve immediately: Taste for salt, add Parmesan if you want it, and plate while everything is hot.
Equipment for This Recipe:
- Large pot — for the linguine.
- Wide skillet — gives the shrimp room to sear.
- Tongs — for tossing pasta and shrimp.
- Microplane or fine grater — for lemon zest.
How to Serve This Dish:
Twirl the linguine into shallow bowls and nestle the shrimp on top so the pink color shows. A few lemon wedges on the side never hurt. Garlic bread is optional, though I’d keep it simple and let the pasta do the talking.
Pro Tips for This Recipe:
- Use shrimp that smell clean and faintly briny, not fishy.
- Don’t walk away from the pan once the shrimp go in. They go from perfect to rubbery quickly.
- Reserve more pasta water than you think you need; a splash can rescue a sauce that looks dry.
- Lemon zest matters here. The juice brings brightness, but the zest gives the dish its perfume.
Variations on This Dish:
- Tomato Scampi: Add a handful of cherry tomatoes with the garlic for color and a sweet burst.
- Gluten-Free Bowl: Swap in a sturdy gluten-free pasta and keep the pasta water trick the same.
- Extra-Garlic Finish: Roast a few garlic cloves ahead of time and mash them into the sauce for a softer, sweeter garlic note.
Common Mistakes to Avoid with This Dish:
- Overcooking the shrimp: The moment they curl into tight little C’s, they’re done.
- Skipping the pasta water: Butter and wine alone can feel thin. The starch in the water pulls it together.
- Using wet shrimp: Frozen shrimp that haven’t been thawed and dried properly will steam instead of sear.
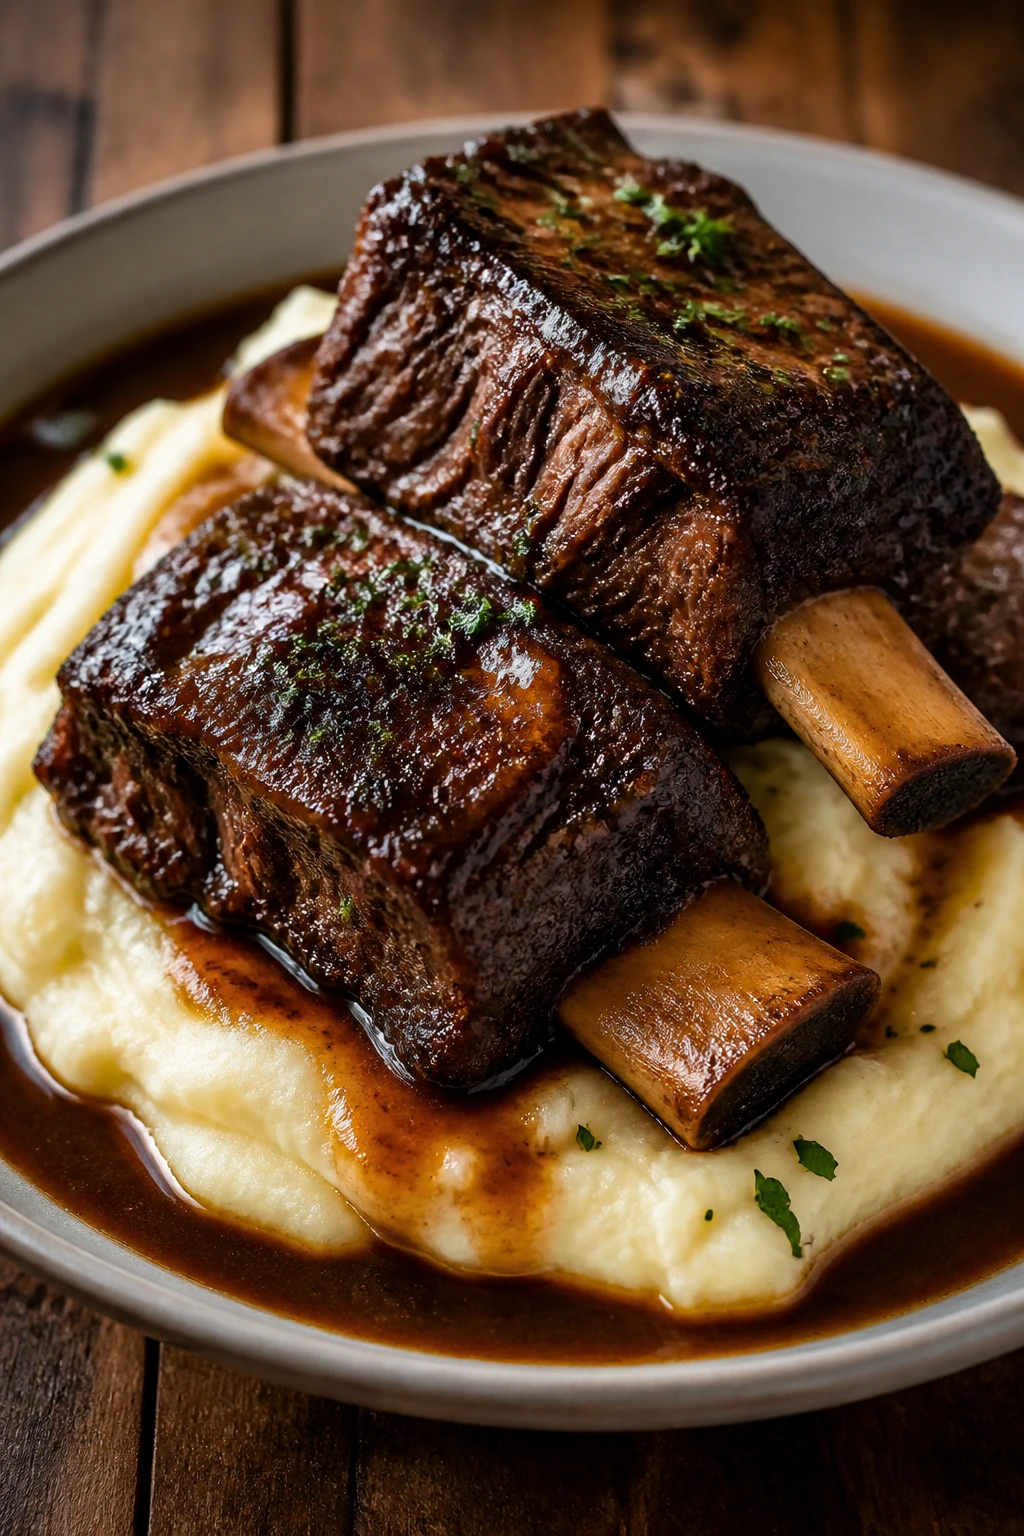
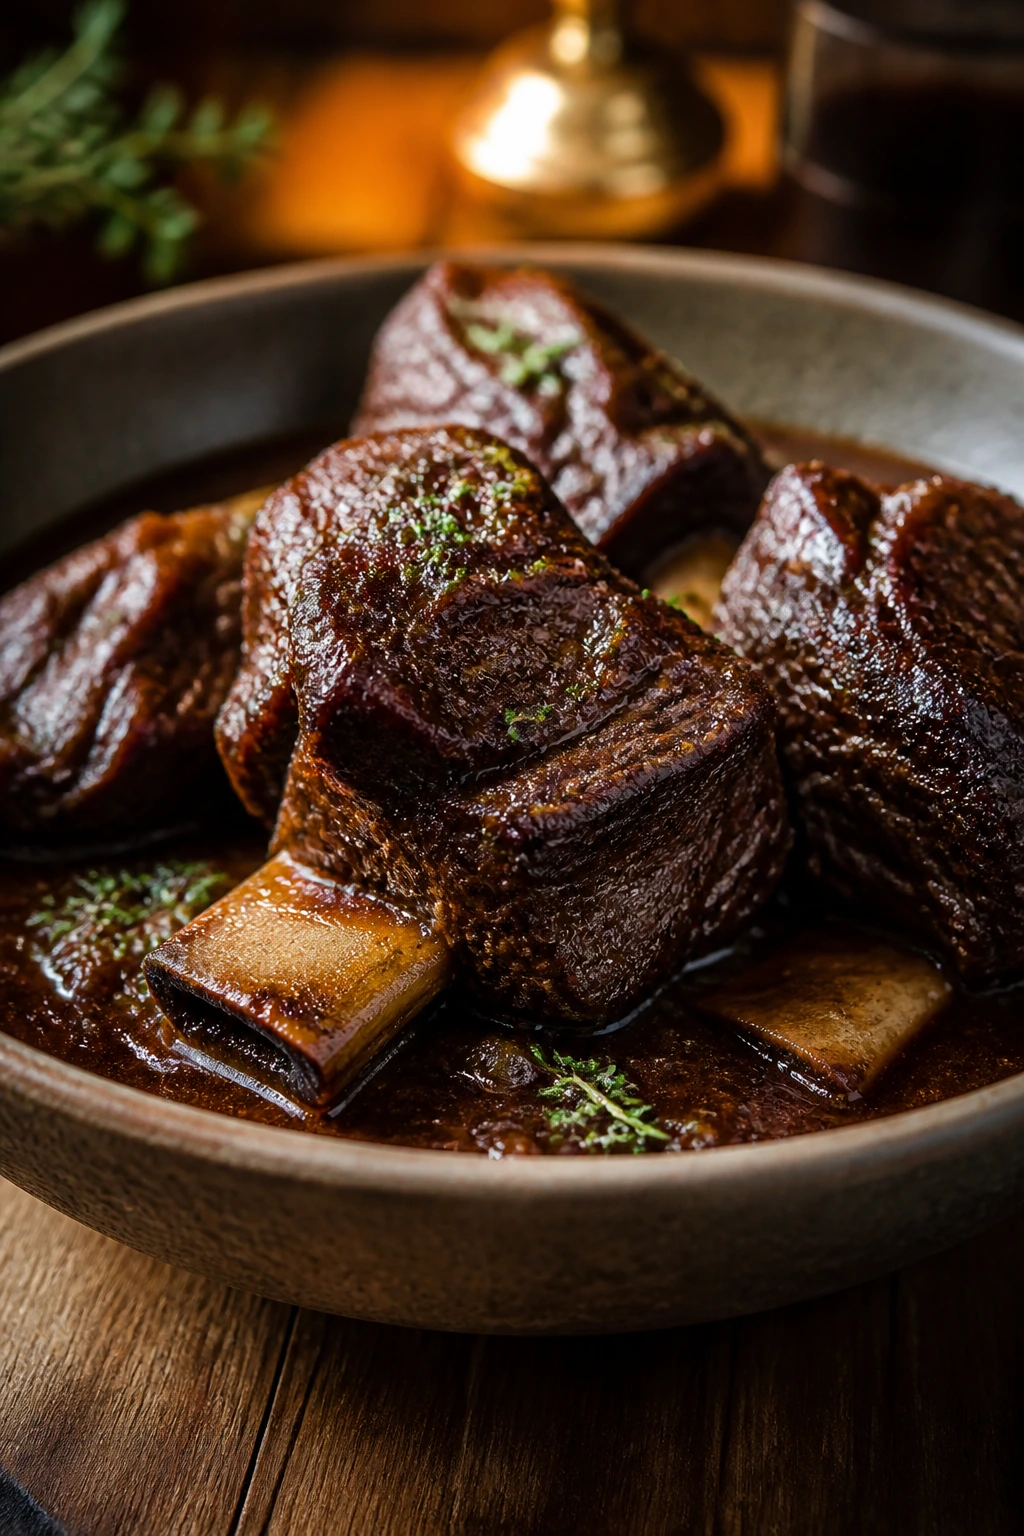
5. Braised Short Ribs with Parmesan Mashed Potatoes
Short ribs are not fast. That’s the point. They’re the slow lane, and they belong on an anniversary table because the cooking time feels like part of the gift.
Timing: Prep 25 minutes, Cook 3 hours, Total 3 hours 25 minutes. Serves: 4.
Why It Works:
The collagen in short ribs breaks down into something rich and spoonable when the heat stays low and steady long enough. Red wine, stock, and herbs build a braising liquid that turns into a dark, glossy sauce by the time the meat is ready. Parmesan mashed potatoes catch that sauce without fighting it. This is the kind of dinner that smells as good as it tastes, which matters when the evening itself is the whole point.
Key Ingredients:
For the Short Ribs
- 3 pounds bone-in beef short ribs
- 2 teaspoons kosher salt
- 1 teaspoon black pepper
- 2 tablespoons neutral oil
- 1 yellow onion, chopped
- 2 carrots, chopped
- 2 celery ribs, chopped
- 4 garlic cloves, smashed
- 2 tablespoons tomato paste
- 2 cups dry red wine
- 2 cups low-sodium beef stock
- 2 sprigs rosemary
- 4 sprigs thyme
- 1 bay leaf
For the Mashed Potatoes
- 2 pounds Yukon gold potatoes, peeled and cut into chunks
- 4 tablespoons unsalted butter
- 1/2 cup heavy cream, warmed
- 1/2 cup grated Parmesan
- Salt to taste
Quick Steps:
-
Heat the oven and season the ribs: Preheat the oven to 300°F. Pat the short ribs dry and season them all over with salt and pepper.
-
Sear in batches: Heat the oil in a Dutch oven over medium-high heat. Brown the ribs on all sides, working in batches so the pot doesn’t crowd.
-
Cook the vegetables: Add the onion, carrots, and celery to the pot and cook for 5 minutes until softened. Stir in the garlic and tomato paste and cook for another minute.
-
Build the braise: Pour in the wine and simmer for 3 to 4 minutes, scraping the bottom of the pot, then add the stock, rosemary, thyme, and bay leaf. Return the short ribs to the pot, cover, and bring the liquid halfway up the meat.
-
Braise until tender: Move the pot to the oven and cook for 2 1/2 to 3 hours, until the meat pulls away from the bone with little resistance.
-
Make the potatoes: While the ribs braise, simmer the potatoes in salted water for 15 to 18 minutes until fork-tender. Drain well, then mash with butter, warm cream, and Parmesan.
-
Finish and serve: Skim excess fat from the braising liquid if needed. Spoon the sauce and vegetables over the potatoes and top with the ribs.
Equipment for This Recipe:
- Heavy Dutch oven or braiser — the best vessel for a slow braise.
- Potato masher or ricer — either gives a good texture.
- Fine spoon or ladle — for skimming fat from the sauce.
- Tongs — for turning the ribs while searing.
How to Serve This Dish:
Build each plate with a bed of mashed potatoes first, then lay a rib on top and spoon the sauce over the meat. A few extra thyme leaves make it look finished without trying too hard. Serve with a simple green salad if you want something crisp beside it.
Pro Tips for This Recipe:
- Brown the ribs well. Color equals flavor here, and pale ribs make a flat sauce.
- Use a wine you’d drink. The flavor stays in the pot.
- If you have time, chill the braising liquid for a few minutes and lift off the fat before reheating.
- Short ribs taste even better the next day, which makes them a good choice if you want one thing off your plate before the big night.
Variations on This Dish:
- Bourbon Braise: Replace 1/2 cup of the wine with bourbon for a deeper, slightly sweeter sauce.
- Creamy Polenta Base: Swap the mashed potatoes for soft polenta if you want a silkier plate.
- Root Vegetable Version: Add parsnips or turnips to the braise during the last hour for a more rustic finish.
Common Mistakes to Avoid with This Dish:
- Skipping the sear: Braised meat still needs browning first. Without it, the sauce tastes flat.
- Braising at too high a temperature: A hard boil toughens the meat. Keep the oven low and steady.
- Not seasoning enough: Short ribs need more salt than you might expect, especially with potatoes underneath.
6. Mushroom Risotto with White Wine and Thyme

Risotto gets treated like a diva, but the move is actually simple: keep the stock warm, stir with some patience, and stop trying to rush rice that wants a little attention.
Timing: Prep 15 minutes, Cook 35 minutes, Total 50 minutes. Serves: 4.
Why It Works:
Arborio rice releases starch as it cooks, which gives risotto its soft, creamy body without needing a mountain of cream. Mushrooms add an earthy note that makes the dish feel deep and satisfying even though the ingredient list stays modest. White wine gives the rice a sharp first layer of flavor, and thyme keeps the whole bowl from leaning too heavy. It’s a vegetarian main that doesn’t feel like a compromise.
Key Ingredients:
- 6 cups low-sodium chicken or vegetable stock, kept warm
- 1 1/2 cups Arborio rice
- 1 pound mushrooms, sliced
- 1 shallot, finely chopped
- 3 cloves garlic, minced
- 1/2 cup dry white wine
- 3 tablespoons olive oil
- 4 tablespoons unsalted butter
- 1/2 cup grated Parmesan
- 1 tablespoon fresh thyme leaves
- 2 tablespoons chopped parsley
- Salt and black pepper
- Lemon zest, optional
Quick Steps:
-
Warm the stock: Keep the stock in a saucepan over low heat so it stays hot but not boiling. Cold stock slows the rice and makes the texture uneven.
-
Brown the mushrooms: Heat 1 tablespoon of olive oil in a wide pan over medium-high heat and cook the mushrooms until they lose their moisture and turn deeply golden. Move half to a plate for topping later.
-
Toast the rice: Lower the heat to medium, add the remaining olive oil, and cook the shallot and garlic for 1 minute. Stir in the rice and cook for another minute until the grains look slightly translucent around the edges.
-
Add wine and stock gradually: Pour in the wine and stir until absorbed. Add the warm stock one ladle at a time, stirring often, and wait until each addition is mostly absorbed before adding the next. This takes about 18 to 22 minutes.
-
Finish the risotto: When the rice is tender but still has a faint bite in the center, remove the pan from the heat. Stir in the butter, Parmesan, thyme, and the remaining mushrooms. Season with salt, pepper, and lemon zest if you want a brighter finish.
-
Rest and serve: Let the risotto sit for 2 minutes so it settles into a creamy mound, not a soup.
Equipment for This Recipe:
- Wide sauté pan or straight-sided skillet — gives the rice room to move.
- Small saucepan — for keeping stock warm.
- Ladle — easier than pouring from a measuring cup.
- Wooden spoon — gentle enough for steady stirring.
How to Serve This Dish:
Ladle the risotto into shallow bowls and finish with the reserved mushrooms, parsley, and a little extra Parmesan. A simple bitter greens salad is a good companion because it cuts the creaminess. Keep the portion moderate; risotto is rich and wants to be the center of the plate.
Pro Tips for This Recipe:
- Stir often, not frantically. The rice wants movement, not punishment.
- Taste early and often near the end. Risotto goes from underdone to soft fast.
- Use a wide pan instead of a deep pot so the liquid evaporates evenly.
- If the risotto sits too long, loosen it with a splash of hot stock before serving.
Variations on This Dish:
- Asparagus and Pea Risotto: Stir in blanched asparagus tips and peas at the end for a brighter, spring-like version.
- Porcini Upgrade: Soak a small handful of dried porcini and use the soaking liquid in place of part of the stock for a deeper mushroom flavor.
- Lemon-Parmesan Version: Add extra lemon zest and a touch more Parmesan for a sharper finish.
Common Mistakes to Avoid with This Dish:
- Adding all the stock at once: The rice will steam instead of turning creamy.
- Using cold stock: It slows the cooking and makes the texture uneven.
- Overcooking until mushy: Risotto should flow slowly on the plate, not sit like paste.
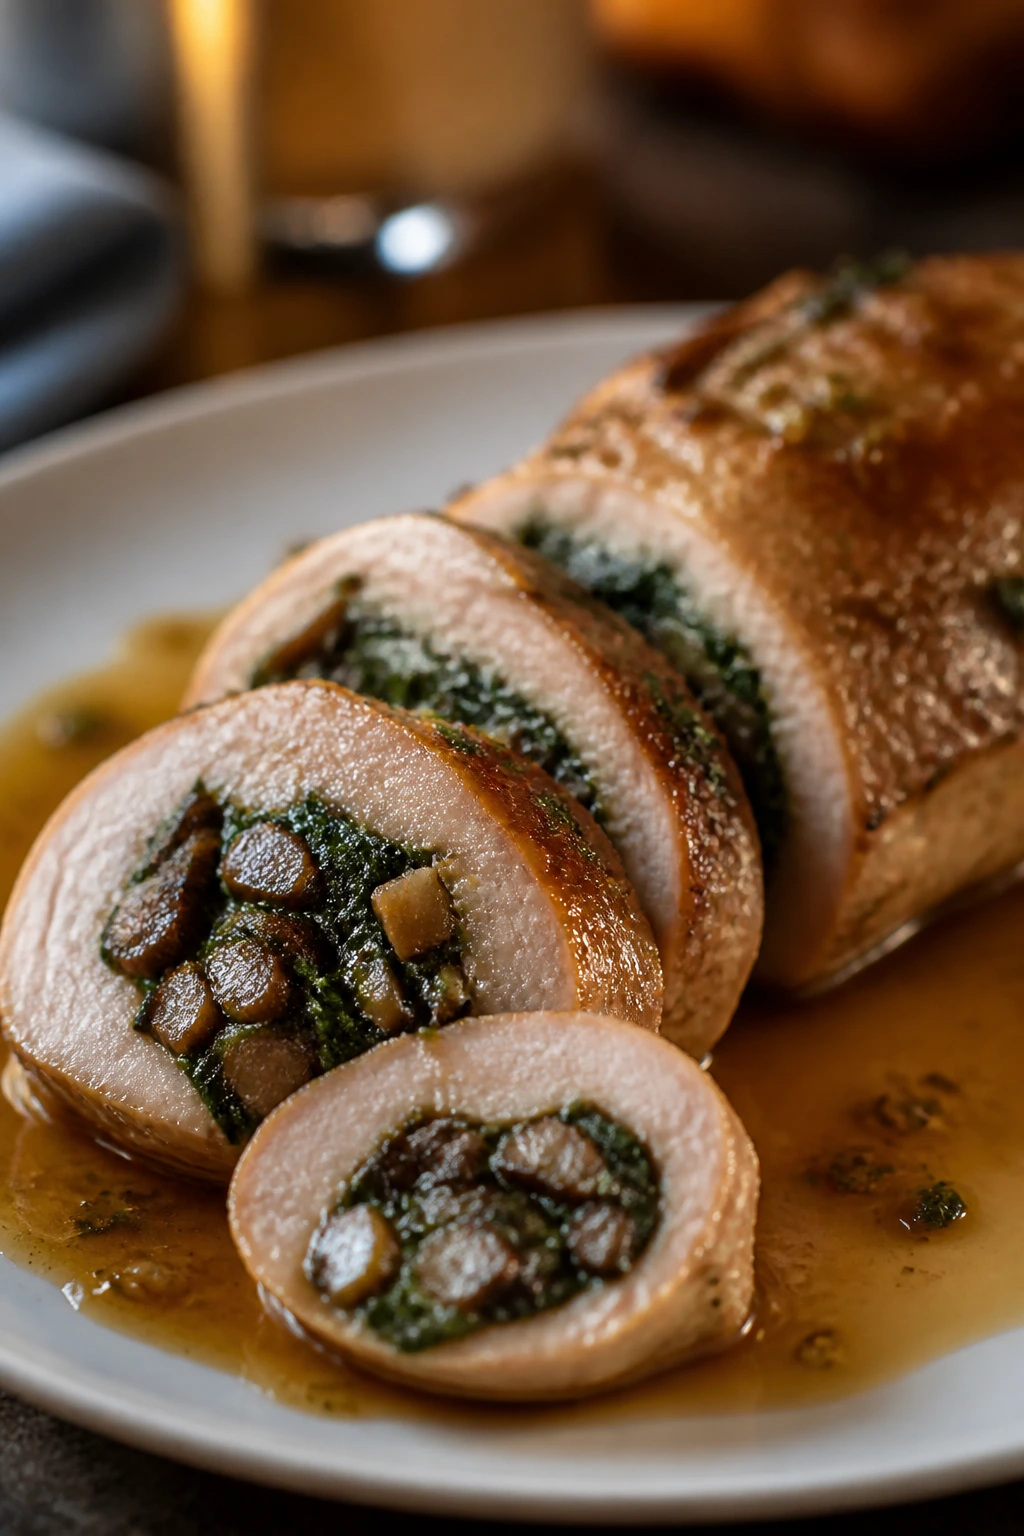
7. Stuffed Pork Tenderloin with Apple Cider Pan Sauce
Stuffed pork tenderloin looks like it took a caterer. It slices into neat spirals, carries its own filling, and gives you a sweet-savory sauce that feels right for a dinner where you want the plate to have a little drama.
Timing: Prep 20 minutes, Cook 35 minutes, Total 55 minutes. Serves: 4.
Why It Works:
Pork tenderloin cooks quickly, which keeps the meat tender, and the stuffing adds flavor without making the dish heavy. Mushrooms and spinach bring moisture and a little earthiness inside the roll, while the apple cider pan sauce picks up the browned bits left behind in the skillet. The result is balanced: savory, slightly sweet, and easy to slice cleanly. It’s one of those dishes that looks far more involved than it is.
Key Ingredients:
For the Pork and Filling
- 2 pork tenderloins, 1 to 1 1/4 pounds each
- 1 1/2 teaspoons kosher salt
- 1 teaspoon black pepper
- 1 tablespoon olive oil
- 8 ounces mushrooms, finely chopped
- 2 tablespoons unsalted butter
- 2 cups baby spinach
- 2 cloves garlic, minced
- 1 teaspoon chopped fresh sage or thyme
- 1/2 cup grated Parmesan
- 1/4 cup breadcrumbs
For the Apple Cider Pan Sauce
- 1 cup apple cider
- 1/2 cup low-sodium chicken stock
- 1 teaspoon Dijon mustard
- 1 tablespoon unsalted butter
- 1 teaspoon apple cider vinegar or lemon juice
Quick Steps:
-
Preheat and cook the filling: Heat the oven to 400°F. In a skillet, melt the butter and cook the mushrooms until their moisture is gone and they begin to brown, then add garlic, spinach, sage, Parmesan, and breadcrumbs. Stir until the filling looks dry enough to hold together.
-
Butterfly the tenderloins: Slice each tenderloin lengthwise almost all the way through, open it like a book, and pound lightly so the thickness evens out.
-
Fill and roll: Spread the mushroom mixture along the center of each tenderloin, leaving a border at the edges. Roll tightly and tie with kitchen twine at 1 1/2-inch intervals.
-
Sear the outside: Season the outside with salt and pepper, then sear the tenderloins in olive oil over medium-high heat for 2 minutes per side until browned.
-
Roast to temperature: Move the skillet to the oven and roast for 18 to 22 minutes, until the center reads 145°F. Do not overcook pork tenderloin; it dries out fast.
-
Rest and make the sauce: Transfer the pork to a cutting board and let it rest for 10 minutes. Put the skillet back on the stove, add the cider, stock, and Dijon, and simmer for 4 to 5 minutes until slightly reduced. Whisk in the butter and vinegar.
-
Slice and serve: Cut the pork into thick spirals and spoon the sauce over the top.
Equipment for This Recipe:
- Oven-safe skillet — for searing and roasting in one pan.
- Kitchen twine — necessary for keeping the roll tight.
- Meat mallet or rolling pin — useful for flattening the tenderloin evenly.
- Sharp knife — makes cleaner slices when serving.
How to Serve This Dish:
Serve the pork in thick slices over mashed potatoes, roasted carrots, or creamy polenta. Spoon the sauce over the top so the spiral of filling stays visible around the edges. A few sautéed green beans or broccolini will keep the plate from feeling too soft.
Pro Tips for This Recipe:
- Keep the filling fairly dry so it doesn’t leak out during roasting.
- Tie the tenderloin snugly, but not so tight that the filling squeezes out.
- Resting matters here. Slice too early and the filling shifts.
- The cider sauce should taste bright, not sugary. The vinegar or lemon at the end keeps it in line.
Variations on This Dish:
- Apple and Sage Version: Add chopped sautéed apple to the filling for a sweeter fall-style center.
- Spinach and Feta Swap: Replace Parmesan with feta for a saltier, more tangy profile.
- Herb Crumb Crust: Mix a little extra breadcrumb with chopped parsley and press it onto the outside before roasting.
Common Mistakes to Avoid with This Dish:
- Overstuffing the tenderloin: Too much filling causes the roll to split open. Use a thin layer.
- Cutting before the rest period: The juices need time to settle or the slices dry out.
- Skipping the thermometer: Pork tenderloin is too lean to guess at.
8. Chicken Marsala with Creamy Polenta
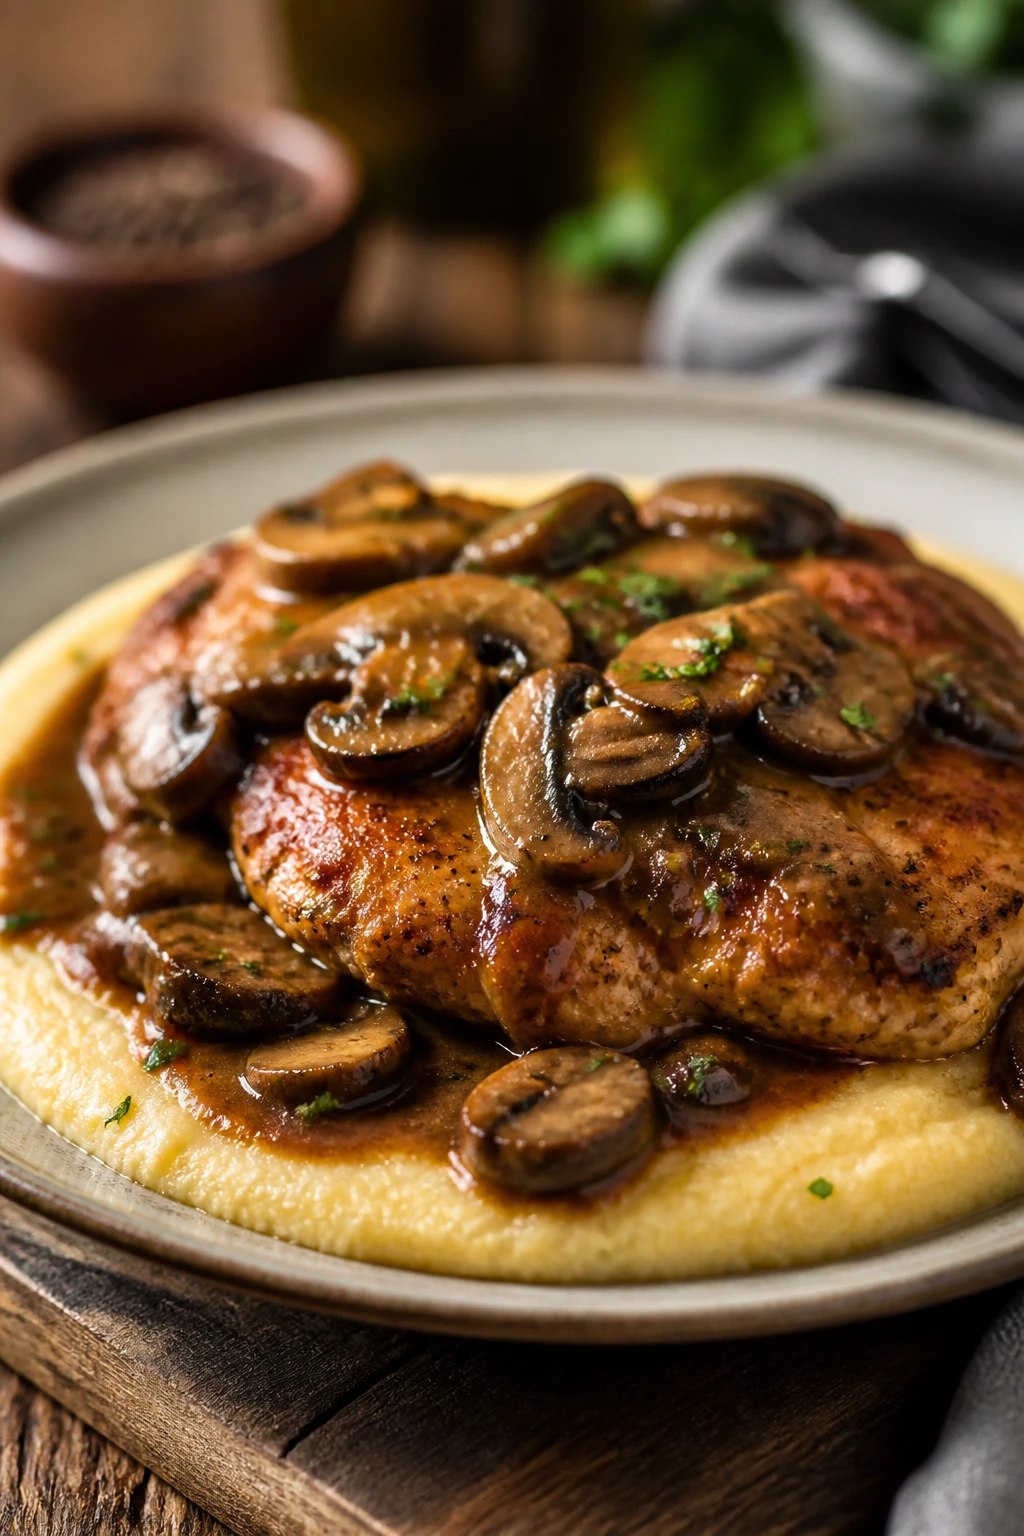
Chicken Marsala sits right on the border between comfort food and date-night food, which is probably why it works so well here. The mushroom sauce is deep and a little sweet, and the polenta underneath gives you something soft enough to catch every drop.
Timing: Prep 15 minutes, Cook 30 minutes, Total 45 minutes. Serves: 4.
Why It Works:
Marsala wine brings a nutty, slightly caramel edge that plain stock can’t give you. Thin chicken cutlets cook quickly and stay tender, which matters because the sauce needs only a few minutes to come together. Polenta turns the plate into a cushion instead of a pile, and that makes the meal feel warmer and more deliberate. It’s not flashy, but it knows exactly what it’s doing.
Key Ingredients:
For the Chicken
- 1 1/2 pounds boneless, skinless chicken cutlets or breasts, pounded thin
- 1/3 cup all-purpose flour
- 1 teaspoon kosher salt
- 1/2 teaspoon black pepper
- 2 tablespoons olive oil
- 2 tablespoons unsalted butter
For the Marsala Sauce
- 8 ounces cremini mushrooms, sliced
- 1 shallot, minced
- 3/4 cup dry Marsala wine
- 1 cup low-sodium chicken stock
- 1/3 cup heavy cream
- 1 tablespoon chopped parsley
For the Polenta
- 1 cup quick-cooking polenta
- 4 cups water or broth
- 2 tablespoons unsalted butter
- 1/2 cup grated Parmesan
- Salt to taste
Quick Steps:
-
Start the polenta: Bring the water or broth to a boil in a saucepan. Whisk in the polenta slowly, then reduce the heat and cook for 5 to 8 minutes, stirring often, until creamy. Stir in butter and Parmesan, then cover.
-
Prepare the chicken: Season the cutlets with salt and pepper, then dust them lightly with flour and shake off the excess.
-
Sear the chicken: Heat the oil and butter in a skillet over medium-high heat. Cook the chicken for about 3 minutes per side until golden and cooked through, then move it to a plate.
-
Cook the mushrooms: Add the mushrooms and shallot to the skillet and cook until the mushrooms release their liquid and then brown, about 5 minutes.
-
Build the sauce: Pour in the Marsala and stock, scraping up the browned bits. Simmer for 3 to 4 minutes, then stir in the cream and cook until the sauce lightly coats a spoon.
-
Return the chicken: Put the chicken back in the skillet for 2 minutes so it warms through and picks up the sauce.
-
Plate with polenta: Spoon the polenta onto plates, top with chicken and sauce, and finish with parsley.
Equipment for This Recipe:
- Large skillet — for chicken and sauce.
- Medium saucepan — for the polenta.
- Whisk — makes the polenta smooth.
- Tongs — for flipping the chicken.
How to Serve This Dish:
Put the polenta down first, then nestle the chicken on top and spoon the sauce over the center so the mushrooms stay visible. A bitter green salad or roasted broccoli gives the plate some lift. This is not a dish that needs bread on the side unless you want it.
Pro Tips for This Recipe:
- Pound the chicken evenly so it cooks at the same speed.
- Use dry Marsala if you want a savory sauce; sweet Marsala changes the whole profile.
- Keep extra broth nearby in case the polenta thickens too much while you finish the chicken.
- The mushrooms should be browned, not just softened. That’s where the flavor lives.
Variations on This Dish:
- Extra-Mushroom Marsala: Double the mushrooms and let them take over the sauce.
- Lighter Sauce Version: Use half cream, half stock for a thinner, sharper pan sauce.
- Mascarpone Polenta: Stir in a spoonful of mascarpone at the end if you want the base even softer and richer.
Common Mistakes to Avoid with This Dish:
- Slicing the chicken too thick: Thick pieces take longer and can dry out before the sauce is done.
- Letting the Marsala boil hard: It can turn harsh. A steady simmer is enough.
- Waiting too long to serve the polenta: It thickens fast, so keep a little warm broth nearby.
9. Lobster Tails with Herb Butter and Orzo
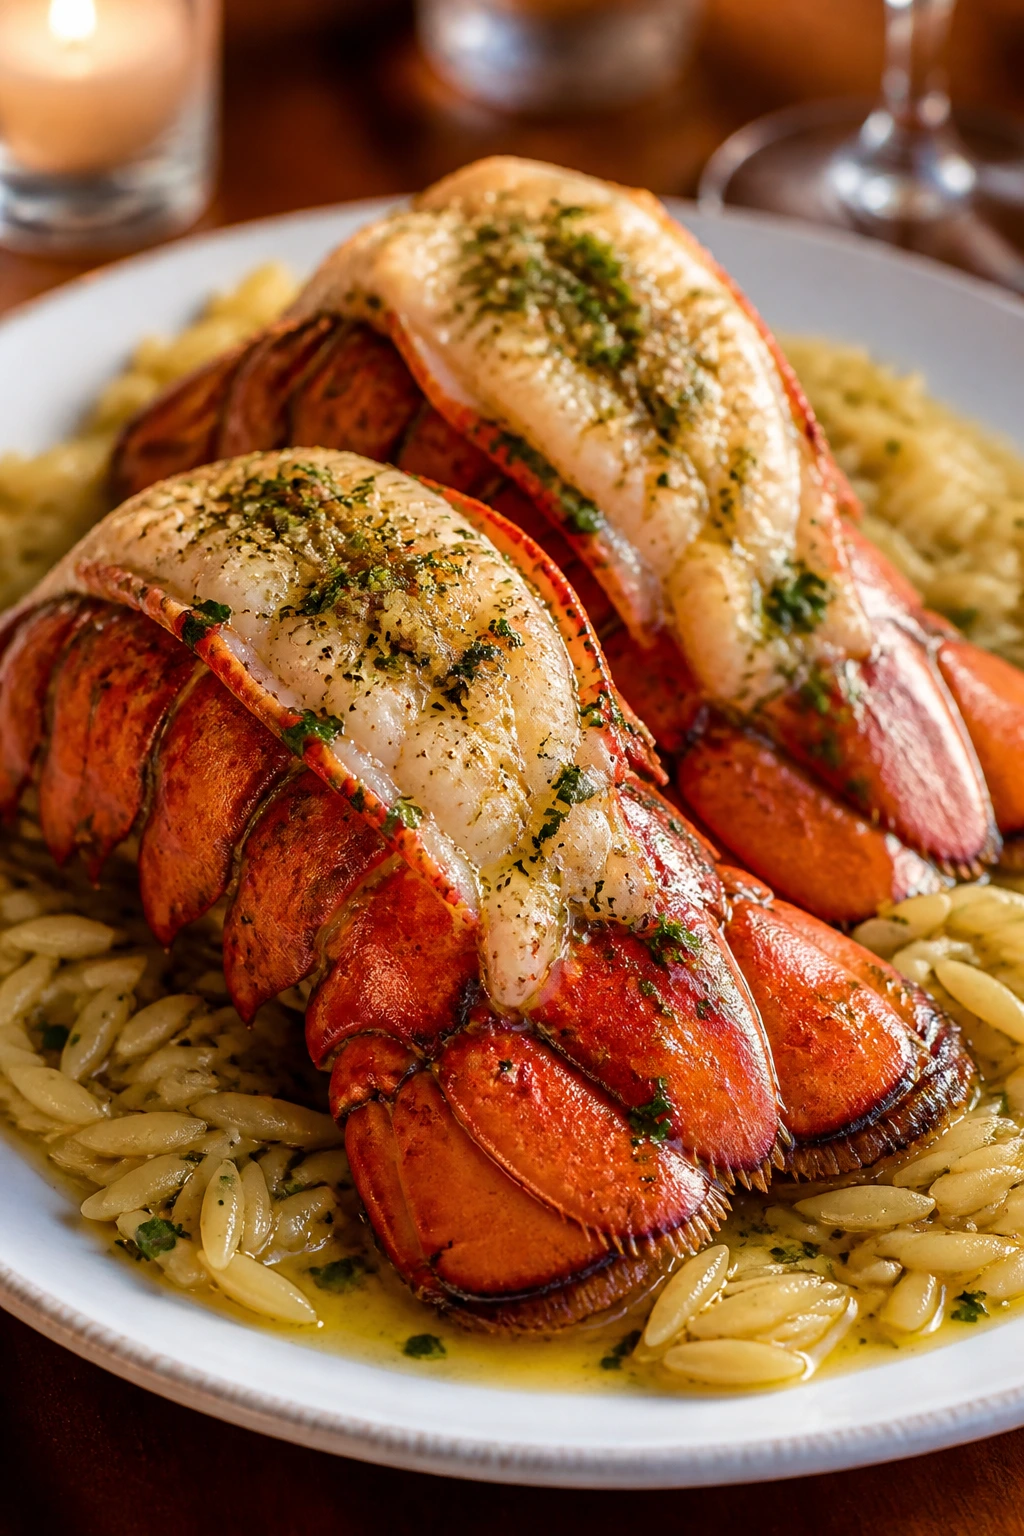
Lobster tails feel like a marker of occasion before they even hit the broiler. The trick is to keep the cooking time short, the butter fragrant, and the side simple enough to let the lobster stay in charge.
Timing: Prep 20 minutes, Cook 15 minutes, Total 35 minutes. Serves: 2.
Why It Works:
Lobster is delicate, so a fast broil gives it a slight kiss of color without making it tough. Herb butter keeps the meat juicy and adds enough flavor that you don’t need a complicated sauce. Orzo gives you a soft, rice-like base that catches the butter and lemon without stealing attention from the lobster. It’s elegant, but not fussy, which is a useful combination for a home anniversary dinner.
Key Ingredients:
For the Lobster
- 2 lobster tails, 5 to 6 ounces each, thawed if frozen
- 4 tablespoons unsalted butter
- 2 cloves garlic, minced
- 1 tablespoon lemon juice
- 1 teaspoon paprika
- 1 tablespoon chopped parsley
- Salt and black pepper
For the Orzo
- 1 cup orzo
- 1 tablespoon olive oil
- 1 shallot, minced
- 2 cups low-sodium chicken or vegetable broth
- 1/2 cup peas
- 1 teaspoon lemon zest
- 2 tablespoons grated Parmesan, optional
Quick Steps:
-
Preheat the broiler and start the orzo: Set an oven rack 6 inches from the broiler and bring the broth to a simmer in a saucepan. In another pan, heat the olive oil and cook the shallot for 1 minute, then add the orzo and broth and simmer until the liquid is absorbed, about 10 to 12 minutes.
-
Finish the orzo: Stir in the peas, lemon zest, and Parmesan if using. Keep it covered and warm.
-
Prep the lobster tails: Use kitchen shears to cut the top shell lengthwise, then gently loosen the meat and lift it partly out of the shell so it sits on top.
-
Make the herb butter: Melt the butter with garlic, lemon juice, paprika, parsley, salt, and black pepper.
-
Broil the lobster: Brush the tails generously with herb butter and broil for 6 to 8 minutes, basting once halfway through, until the meat is opaque and reaches about 140°F to 145°F.
-
Plate and finish: Spoon the orzo onto plates, lay the lobster tails on top, and drizzle with any remaining butter.
Equipment for This Recipe:
- Kitchen shears — the cleanest way to split the shells.
- Small saucepan — for the herb butter.
- Broiler-safe baking sheet — for the lobster tails.
- Medium saucepan — for the orzo.
How to Serve This Dish:
Serve the lobster meat still resting in its shell, perched over the orzo so the plate feels generous and tidy at the same time. A lemon wedge and a few parsley leaves are enough garnish. If you want a second side, keep it to a sharp salad with vinaigrette.
Pro Tips for This Recipe:
- Thaw frozen lobster tails in the fridge, not on the counter.
- Don’t overbroil. Lobster goes from tender to chewy faster than most people expect.
- Lift the meat onto the shell so it cooks evenly and looks clean on the plate.
- Keep the butter warm but not bubbling; a scorching pan can turn the garlic bitter.
Variations on This Dish:
- Old Bay Butter: Swap the paprika for Old Bay seasoning if you want a more classic seafood-shop flavor.
- Garlic Chive Version: Replace parsley with chives for a softer onion note.
- Lemon-Orzo Upgrade: Stir in a small handful of arugula right before serving for a peppery finish.
Common Mistakes to Avoid with This Dish:
- Leaving the shell too intact: The meat cooks unevenly and doesn’t get that lifted presentation.
- Broiling too far from the heat: The lobster cooks slowly and the texture suffers.
- Using overcooked or dried-out orzo: Keep a small splash of broth nearby in case it needs loosening before serving.
10. Seared Scallops with Pea Purée and Crispy Pancetta
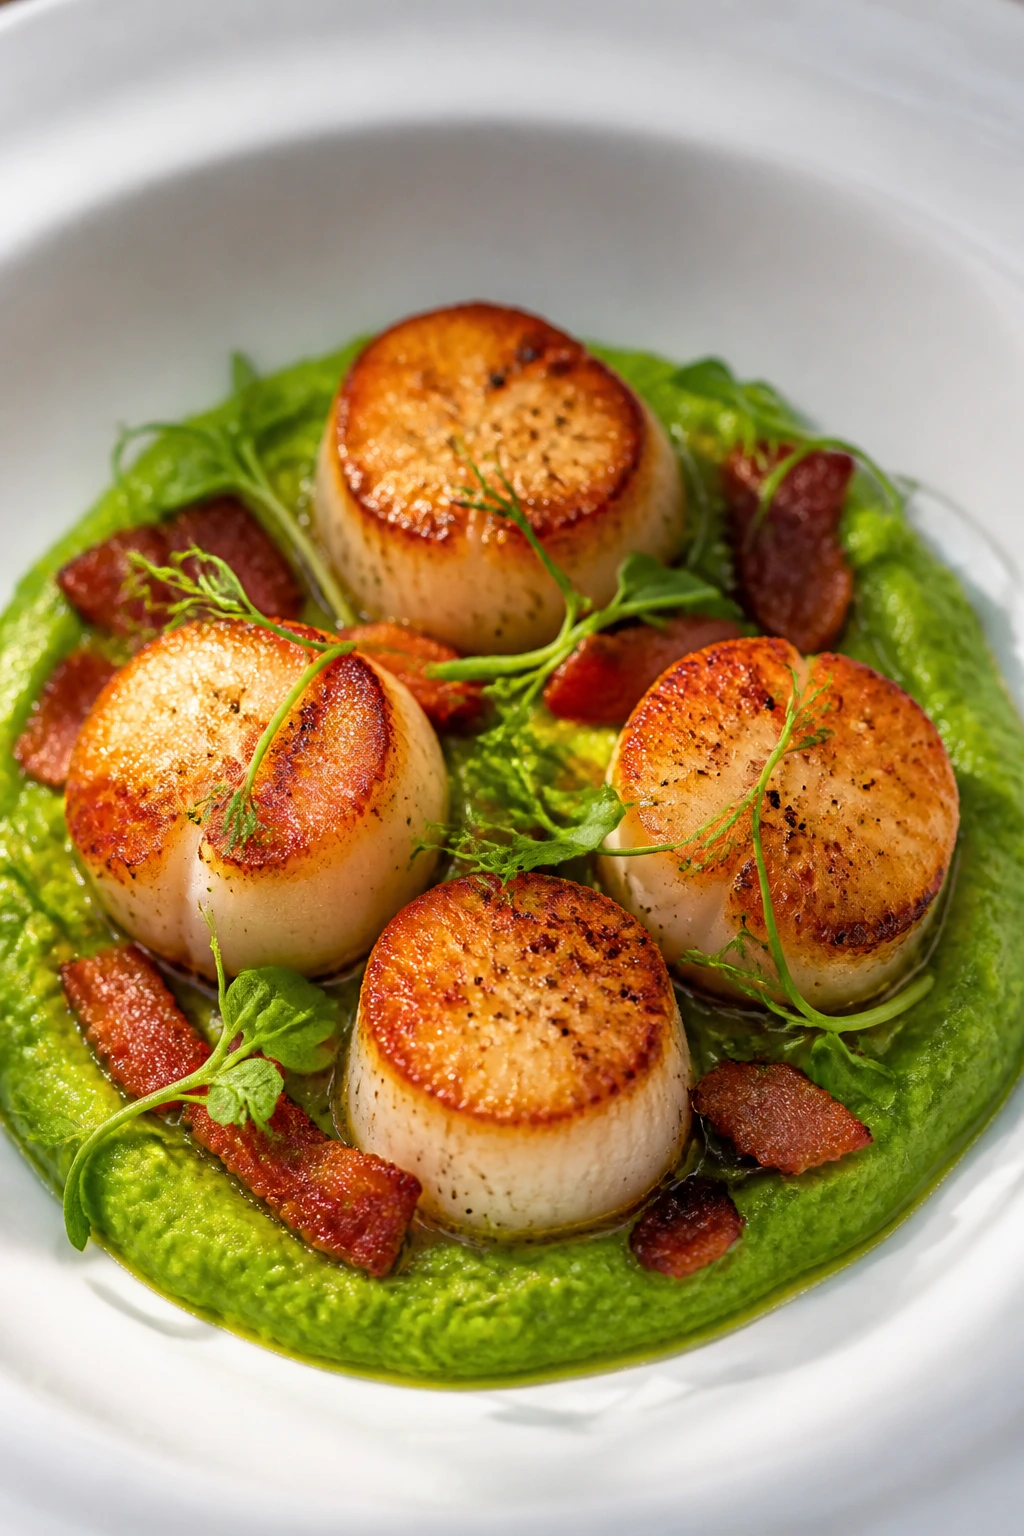
Scallops scare people for no good reason. Dry them well, heat the pan until it’s truly hot, and don’t touch them too soon. That’s most of the battle.
Timing: Prep 20 minutes, Cook 15 minutes, Total 35 minutes. Serves: 2.
Why It Works:
Scallops cook in minutes, which makes them perfect for a dinner that needs to feel special without dragging on. The pea purée gives the plate a sweet, soft base, and pancetta adds a salty crunch that keeps the dish from going flat. A quick sear creates that caramelized crust people love, and the center stays tender if you stop in time. It’s elegant in the quiet way, not the showy way.
Key Ingredients:
For the Scallops
- 1 pound dry sea scallops
- 1 teaspoon kosher salt
- 1/2 teaspoon black pepper
- 2 tablespoons neutral oil
- 4 ounces pancetta, diced
For the Pea Purée
- 2 cups frozen peas
- 1 shallot, sliced
- 2 tablespoons unsalted butter
- 1/4 cup low-sodium chicken stock or cream
- 1 tablespoon lemon juice
- 1 tablespoon chopped mint or parsley
Quick Steps:
-
Start the pancetta and purée: Cook the pancetta in a skillet over medium heat until crisp, then move it to a paper towel-lined plate. In the same pan, sauté the shallot for 1 minute, add the peas and stock or cream, and cook until the peas are tender.
-
Blend the purée: Transfer the pea mixture to a blender or food processor with butter, lemon juice, and mint or parsley. Blend until smooth, then season with salt and keep warm.
-
Dry the scallops well: Remove the small side muscle if it’s still attached, then pat the scallops dry with paper towels. Salt and pepper them right before cooking.
-
Sear the scallops: Heat the oil in a clean skillet over medium-high heat until it shimmers. Place the scallops in the pan without crowding and cook for 1 1/2 to 2 minutes per side, until a deep golden crust forms and the centers are just opaque.
-
Plate the dish: Spoon the pea purée onto plates, set the scallops on top, and scatter the pancetta around them.
-
Serve immediately: Scallops wait for no one. Get them to the table the second they come off the heat.
Equipment for This Recipe:
- Heavy skillet — for the sear.
- Blender or food processor — for the purée.
- Paper towels — drying is half the battle.
- Tongs or a thin spatula — for turning the scallops gently.
How to Serve This Dish:
Use a wide, shallow plate so the pea purée can spread out in a neat arc under the scallops. The pancetta should stay crisp, so sprinkle it on at the last second. A glass of something crisp and dry suits this plate better than anything heavy.
Pro Tips for This Recipe:
- Buy dry scallops rather than wet-packed ones. Wet scallops release too much liquid and refuse to brown properly.
- Don’t salt them until right before they hit the pan.
- If the pan is crowded, scallops steam. Cook in batches if needed.
- The purée should taste bright, not bland. Lemon at the end matters.
Variations on This Dish:
- Minted Pea Purée: Use mint instead of parsley for a fresher, more spring-like flavor.
- Cauliflower Swap: Replace half the peas with cauliflower florets for a softer, less sweet purée.
- Bacon Finish: Use bacon instead of pancetta if that’s what you have; just keep the pieces small and crisp.
Common Mistakes to Avoid with This Dish:
- Cooking wet scallops: They leak liquid and never brown.
- Moving them too soon: Let the crust form before you flip.
- Overcooking: Scallops should feel springy, not rubbery, when you press them lightly.
What Makes a Home Anniversary Dinner Feel Special
A good anniversary plate usually has three things going on at once: heat, contrast, and one finish that wakes everything up. That can mean a crisp crust on steak, creamy potatoes under braised meat, or a squeeze of lemon over seafood. It does not mean piling on more food. In fact, too many components make the night feel busy instead of thoughtful.
Heat and contrast do the real work
Food that reaches the table hot, with a sauce that still shines, always feels more memorable than food that sat around while you finished one last side. I’d rather serve one polished plate than three rushed dishes. That’s not laziness. That’s restraint.
A good dinner for two also needs texture. Soft and crisp. Rich and bright. Tender and crunchy. If everything on the plate tastes the same, the meal fades fast.
Keep the menu small on purpose
Pick one main, one starch, and one green thing or sauce. That’s enough. More than that usually means you’re trying to impress the table instead of feeding it well. The dishes above already give you drama where it counts: a pan sauce, a braise, a silky purée, a crust, a broil.
One strong finish matters more than fancy extras
A squeeze of lemon. A spoon of herb butter. A crack of black pepper at the end. Those little finishes do more than a stack of garnish ever will. They sharpen the flavors and make the plate taste alive.
Essential Equipment for These Recipes
- 12-inch cast-iron skillet — ideal for steak, scallops, and fast pan sauces because it holds heat well.
- Large nonstick or stainless skillet — useful for chicken, shrimp, and Marsala when you want quick cleanup.
- Heavy Dutch oven or braiser — the right choice for short ribs and anything that needs a slow oven braise.
- Rimmed sheet pans — perfect for potatoes, salmon, asparagus, and lobster tails under the broiler.
- Medium saucepan with a heavy bottom — helpful for polenta, stock warming, and simple sauces.
- Large pot for pasta — choose one roomy enough so the linguine can move.
- Instant-read thermometer — this removes the guesswork from steak, chicken, pork, salmon, and lobster.
- Kitchen twine — needed for the stuffed pork tenderloin.
- Sharp chef’s knife — worth using for clean vegetable cuts and neat slices at the end.
- Cutting board with a groove — keeps juices from running off the board when you rest meat.
- Tongs — good for steak, chicken, shrimp, and pork.
- Fish spatula — optional, but it helps with salmon and scallops.
- Blender or food processor — useful for the pea purée; an immersion blender works too.
Smart Shopping and Ingredient Tips
Pick proteins by shape and thickness
The easiest mistake to make is buying the right protein in the wrong size. A filet mignon that’s too thin cooks before it browns. Salmon fillets that vary wildly in thickness finish at different times. Pork tenderloin should feel firm and even. Short ribs should have visible marbling and a little fat cap, not look dry and stringy.
Buy dairy that can handle heat
Heavy cream holds up better than half-and-half in skillet sauces and risotto finishing. Parmesan should come from a block if possible; it melts smoother and tastes cleaner. Butter should be unsalted so you control the seasoning. These are small choices, but they change the final plate more than people expect.
Choose produce that finishes bright
Look for asparagus with tight tips, spinach with firm leaves, and mushrooms that feel dry rather than slippery. Lemons should feel heavy for their size, which usually means they’re juicy. For potatoes, Yukon golds are the workhorses here because they roast well and mash without becoming gluey. Frozen peas are fine for the purée and often taste fresher than tired refrigerated ones.
Buy wine you’d actually drink
Dry red wine for the steak sauce and short ribs. Dry white wine for scampi, risotto, and some fish dishes. Marsala for the chicken. If you would not sip it, do not pour it into the pan. The flavor stays.
Keep seafood selection strict
Lobster tails should be cold, firm, and smell clean. Scallops should be labeled dry or untreated. Shrimp should be peeled and deveined if you want the evening to stay easy. Seafood punishes shortcuts more than meat does, so it pays to start with the right package.
How to Plate an Anniversary Dinner That Feels Like an Occasion
Presentation:
Use warm plates if you can. A hot steak on a cold plate loses its edge too fast, and creamy dishes like risotto or polenta tighten up the moment they hit a chilled surface. Aim for a little negative space on the plate instead of filling every inch. A neat sauce swipe or a spooned pool reads cleaner than a flood.
Accompaniments:
Keep the sides focused. Steak and short ribs want potatoes. Salmon is happy with green beans, asparagus, or a lemony salad. Shrimp scampi and chicken Marsala like pasta or polenta, while lobster and scallops do best with something soft and simple under them. Bread is fine, but only if the sauce deserves it.
Portions:
For a more intimate dinner, serve one protein, one starch, and one vegetable or sauce. Filet mignon and lobster tails are naturally sized for two. Chicken, pork tenderloin, and short ribs stretch well for four. If you want the meal to feel special rather than heavy, keep servings a touch smaller than you would on an ordinary night.
Beverage Pairing:
Dry red wine suits steak and short ribs. Crisp white wine or sparkling water with lemon works beautifully with salmon, shrimp, lobster, and scallops. Marsala chicken and risotto can go either way depending on how rich you made them. If you’re skipping alcohol, sparkling water with citrus slices and a small bowl of olives does the job nicely.
Additional Tips and Flavor Boosters
Flavor Enhancement:
A finishing acid is the easiest upgrade in the whole collection. Lemon juice wakes up salmon, shrimp, scallops, and creamy chicken. A splash of vinegar sharpens short rib sauce and pork cider sauce. If a dish tastes heavy at the end, it probably needs acid, not more salt.
Customization:
If you want more vegetables on the plate, add them where they’ll matter most. Toss peas into the orzo, stir spinach into the chicken, or roast broccoli with the potatoes. If you want the meal to feel richer, add an extra spoon of butter at the end. If you want it lighter, cut the butter back and lean on herbs and citrus instead.
Serving Suggestions:
Fresh parsley, dill, chives, and thyme can make a plate look finished without turning it fussy. A few lemon wedges, cracked black pepper, or a sprinkle of flaky salt right before serving is enough. I’m not a fan of over-garnishing. Food should still look like food.
Make-It-Yours:
For gluten-free diners, lean on potatoes, polenta, rice, and naturally gluten-free sauces; swap the flour in the chicken and Marsala recipes for cornstarch or a gluten-free blend. For dairy-free meals, use olive oil, broth, and a little extra herb finish instead of cream and Parmesan. For a more decadent version, keep the butter where it counts and stop trying to make the plate do too much.
Make-Ahead, Storage, and Reheating Guidance
Dishes to cook the same night
Steak, salmon, scallops, shrimp scampi, and lobster tails are best cooked close to serving time. Seafood especially can turn rubbery or dry when reheated. If you need to move ahead, prep the sauce components, chop the herbs, trim the vegetables, and chill everything until you’re ready.
Dishes that improve overnight
Braised short ribs are the standout here. The flavors settle and deepen after a night in the fridge, and the sauce is easier to skim once the fat firms up. The chicken Marsala sauce also holds well for a day or two, though the chicken itself is best reheated gently. Stuffed pork tenderloin can be sliced and stored for up to 3 days in the fridge, but keep the sauce separate if you can.
What freezes well and what does not
Short ribs freeze well for up to 3 months in their sauce. Chicken Marsala and creamy Tuscan chicken can be frozen for up to 2 months, though the cream sauces may need a brisk whisk when reheated. Risotto does not freeze well; it turns grainy. Seafood is not a good freezer-leftover candidate once cooked, so plan to enjoy it fresh.
Reheating without wrecking texture
Reheat braises covered at 325°F until hot through, or warm them slowly on the stovetop with a splash of stock. Chicken dishes do best in a covered skillet over low heat with a spoonful of broth to keep the sauce loose. Pasta dishes should be reheated gently in a pan with a splash of water or broth. For risotto, add hot stock a little at a time while stirring until it loosens. Seafood is the exception: if it’s overcooked once, reheating only makes it worse. Eat it fresh whenever possible.
Variations and Adaptations to Try
-
The Two-Person Version: Pick one fast protein, one starch, and one green side, then stop there. Filet mignon, salmon, shrimp scampi, or scallops all work well when you want a dinner for two that feels focused instead of oversized. Keep the plate clean and the portions modest.
-
The Gluten-Free Table: Use potatoes, polenta, rice, or risotto as your base. Swap the flour in chicken Marsala and stuffed pork with cornstarch or a gluten-free blend, and use gluten-free pasta for the scampi. Most of these dishes adapt cleanly because the sauce and protein carry the flavor.
-
The Dairy-Lighter Night: Lean on olive oil, stock, lemon, and herbs instead of cream-heavy finishes. Salmon, lobster, shrimp, and scallops already suit this style well. You can still use a small amount of butter at the end if you want shine without a heavy sauce.
-
The Seafood Evening: Build the menu around salmon, shrimp, lobster, and scallops, but keep the cooking windows tight. Prep the sides first, then cook the seafood last and serve immediately. This is the cleanest route if you want the meal to feel light and a little luxurious.
-
The Slow-Supper Choice: If you want the kitchen to smell like dinner for hours, choose the short ribs. They give you the most dramatic payoff and leave room for a simple salad or roasted vegetable on the side. It’s the most hands-off choice in the group, and it suits a long evening well.
Common Mistakes to Avoid
-
Trying to cook too many fancy pieces at once: One great main and one good side beat three half-finished dishes. Pick a menu that fits your stove space and your attention span.
-
Ignoring doneness temperatures: Guessing is how steak gets overcooked and chicken dries out. Use an instant-read thermometer and take the food off the heat a little early where needed.
-
Serving cold food on cold plates: The texture of steak, pasta, and braised dishes changes fast once they leave the pan. Warm plates make the whole meal feel more intentional.
-
Underseasoning the sauce: Salt matters, but so does acid. Lemon juice, wine, or vinegar often makes the difference between “fine” and “memorable.”
-
Reheating seafood like it’s a braise: Lobster, scallops, and shrimp don’t forgive rough reheating. Cook them close to serving or enjoy them cold the next day if the dish allows it.
-
Buying ingredients that fight the recipe: Wet scallops, thin steaks, tough herbs, and watery tomatoes all create extra work. Start with ingredients that already want to behave.
Questions That Come Up Before the Candles Are Lit

Which of these anniversary dinner ideas at home is the easiest?
Garlic butter shrimp scampi and lemon herb salmon are the simplest if you want a fast, tidy dinner. Both cook quickly and rely on a short ingredient list. If you want the least pressure overall, the scampi is probably the safest bet.
What should I make if I want the meal to feel fancy but not stressful?
Filet mignon with red wine sauce, lobster tails, and stuffed pork tenderloin all look polished without requiring a long list of moving parts. If you prefer a forgiving recipe, the chicken Marsala and Tuscan chicken are easier than they look.
Can I make any of these dishes ahead of time?
Short ribs can be braised a day ahead and reheated gently. Chicken Marsala, Tuscan chicken, and stuffed pork tenderloin also hold well for a short time in the fridge. Seafood is the opposite; it’s best cooked close to serving.
What if I only have one skillet and one saucepan?
That’s enough for most of these recipes. Choose a skillet dinner like scampi or Tuscan chicken, or prep the sides in the saucepan and cook the main in the skillet. Short ribs do need a Dutch oven, but the rest stay fairly manageable.
Can I swap chicken breasts for thighs in the Tuscan chicken recipe?
Yes, though you should pound the breasts to even thickness so they cook at the same rate. Breasts dry out more easily than thighs, so keep the simmer gentle and check the temperature early. If you like a richer sauce, thighs are the better fit.
How do I keep scallops and shrimp from turning rubbery?
Dry them well, cook them in a very hot pan, and stop as soon as they turn opaque. Shrimp and scallops need less heat than most people think. If you wait for them to look “extra done,” they’re already past their best texture.
What’s the best option if I need to feed four people without making the kitchen chaotic?
Chicken Marsala, Tuscan chicken, stuffed pork tenderloin, and short ribs are the easiest to scale. They all pair nicely with a simple starch and a green vegetable, and they don’t require last-second precision the way seafood does.
Can I make these recipes more affordable without losing the special feel?
Yes. Use chicken Marsala, Tuscan chicken, shrimp scampi, or mushroom risotto and lean on sauce, herbs, and good plating instead of pricier proteins. A candlelit table and a well-cooked skillet dinner do more for the mood than an expensive cut of meat ever will.
The Kind of Dinner That Stays With You
The meal that sticks in memory usually isn’t the one with the biggest grocery bill. It’s the one where the steak had a proper crust, the sauce tasted like someone cared, and the plate reached the table hot enough to matter. That’s the quiet magic of a good anniversary dinner at home.
Pick the recipe that matches your energy, not the one that looks hardest on paper. A calm kitchen makes a better evening than a showy one. And if the food is seasoned well and served at the right moment, the rest tends to take care of itself.
Every Recipe at a Glance
-
1. Filet Mignon with Red Wine Pan Sauce and Garlic Butter Asparagus — Prep 15 min, Cook 20 min, Total 35 min. Serves 2. Standout: the fastest plate that still feels dressed up.
-
2. Creamy Tuscan Chicken with Sun-Dried Tomatoes and Spinach — Prep 15 min, Cook 25 min, Total 40 min. Serves 4. Standout: a one-skillet sauce that clings to every bite.
-
3. Lemon Herb Salmon with Crispy Potatoes — Prep 15 min, Cook 30 min, Total 45 min. Serves 2. Standout: bright, crisp, and clean on the plate.
-
4. Garlic Butter Shrimp Scampi with Linguine — Prep 15 min, Cook 15 min, Total 30 min. Serves 4. Standout: the quickest dinner in the group with the biggest payoff.
-
5. Braised Short Ribs with Parmesan Mashed Potatoes — Prep 25 min, Cook 3 hr, Total 3 hr 25 min. Serves 4. Standout: deep, slow-cooked flavor that improves overnight.
-
6. Mushroom Risotto with White Wine and Thyme — Prep 15 min, Cook 35 min, Total 50 min. Serves 4. Standout: creamy without feeling heavy.
-
7. Stuffed Pork Tenderloin with Apple Cider Pan Sauce — Prep 20 min, Cook 35 min, Total 55 min. Serves 4. Standout: the most centerpiece-looking dinner on the list.
-
8. Chicken Marsala with Creamy Polenta — Prep 15 min, Cook 30 min, Total 45 min. Serves 4. Standout: mushroom sauce and soft polenta in one calm plate.
-
9. Lobster Tails with Herb Butter and Orzo — Prep 20 min, Cook 15 min, Total 35 min. Serves 2. Standout: a classic special-occasion feel without a long prep list.
-
10. Seared Scallops with Pea Purée and Crispy Pancetta — Prep 20 min, Cook 15 min, Total 35 min. Serves 2. Standout: the cleanest, most elegant plate of the bunch.