
A good casserole buys you time. That is the whole point. When dinner is already tucked into a baking dish — layered, covered, waiting — you get a rare thing on a busy family night: a meal that feels calm before you even turn on the oven.
Make ahead casseroles for busy families work because they solve the ugly middle hour between school pickup and bedtime. They let you cook once, clean once, and eat without that frantic stove-side juggling act where one pan burns while somebody asks for a missing shoe. I love casseroles that hold their shape, reheat cleanly, and still taste like dinner instead of leftovers disguised with extra cheese.
The best versions are sturdy, not fussy. They use ingredients families already know — pasta, rice, chicken, beans, potatoes, cheese — and they do not collapse if they wait in the fridge overnight. A few lean creamy, a few lean tomato-sauced, a few bring crunch on top, and that range matters because a house full of hungry people gets bored fast. These 15 casseroles are the ones I’d trust when the calendar is crowded and the sink is already full.
Why These Make-Ahead Casseroles Earn a Permanent Spot in Busy Family Dinners
-
Less 5 p.m. chaos: You can assemble most of these dishes earlier in the day, then bake them when everyone starts drifting toward the kitchen with that very specific hungry look.
-
Built for leftovers: These casseroles reheat in neat squares or generous scoops, which means lunch the next day is already handled.
-
Family-friendly flavors: Every recipe leans familiar enough for picky eaters, but none of them taste bland or tired.
-
Budget-smart ingredients: Beans, rice, pasta, potatoes, canned tomatoes, and shredded chicken stretch a shopping list without making the meal feel skimpy.
-
Easy to scale: Most of these dishes double cleanly for guests or halve without drama if you’re feeding a smaller crew.
-
Fridge and freezer friendly: Several of them can be assembled ahead, chilled, or frozen, which is the kind of backup plan that saves a week.
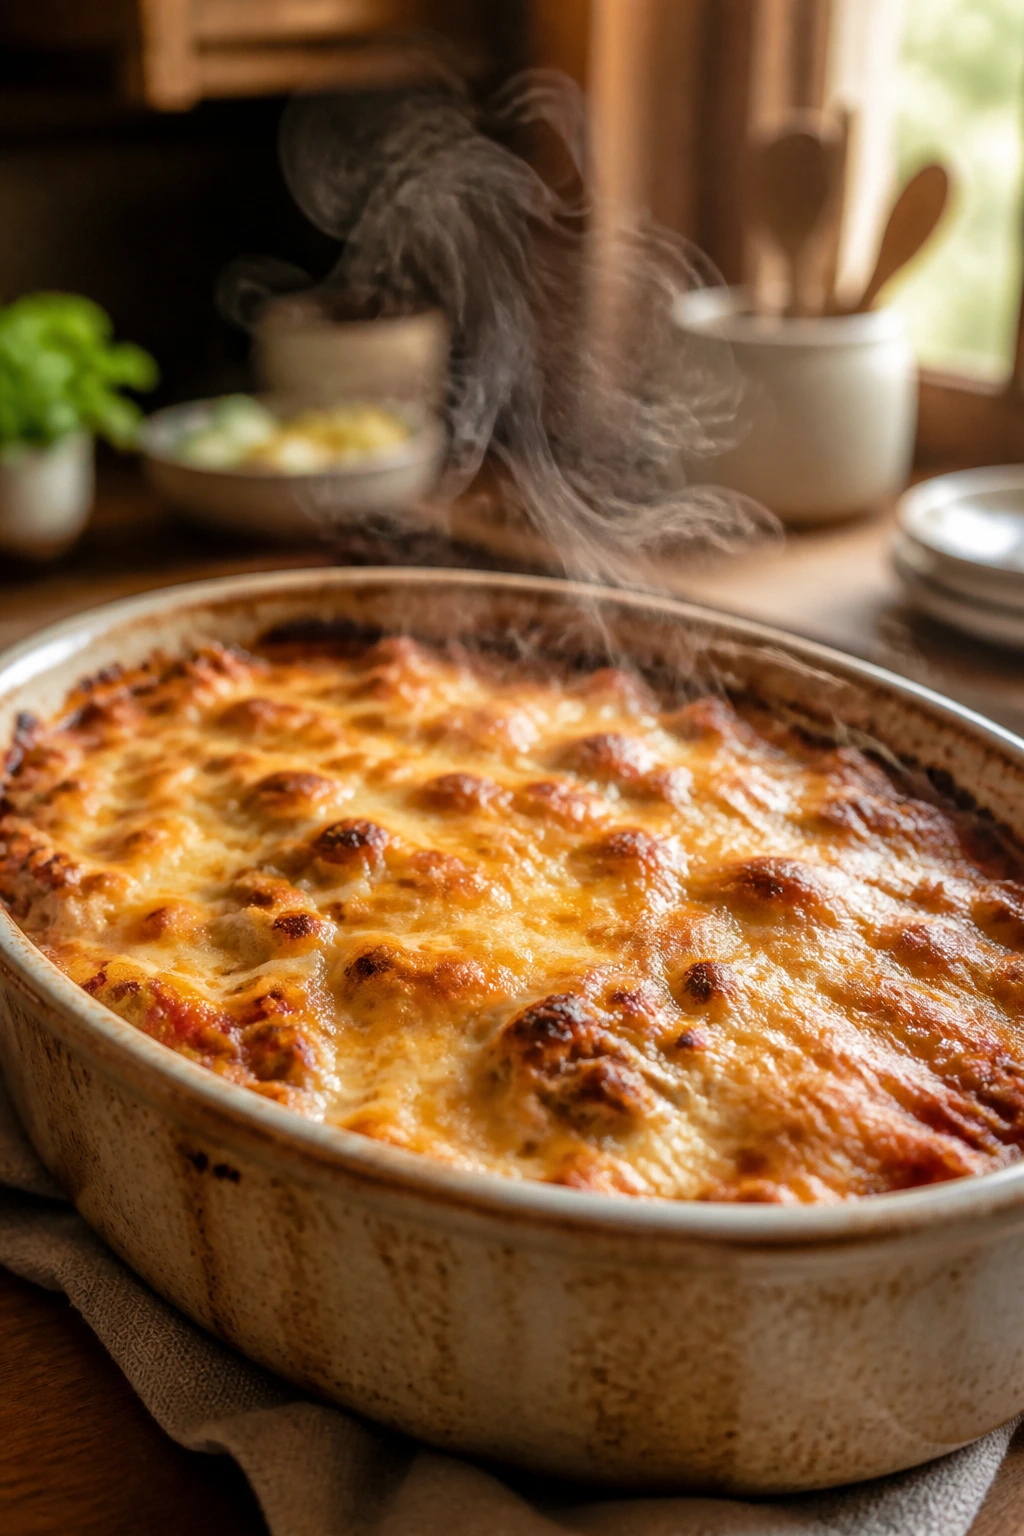
1. Overnight Sausage Hash Brown Breakfast Casserole
Eggs, sausage, and hash browns do a lot of work here, and they do it in a very pleasant, old-school way. The top turns golden and a little crisp, the middle stays soft and savory, and the whole thing smells like a diner breakfast that somehow learned how to fit into a 9×13-inch pan.
This is one of those make ahead casseroles for busy families that feels almost unfair in the best way. You can build it the night before, slide it into the oven the next morning, and serve it with fruit or toast while everyone is still half-awake. It also cuts into tidy squares, which matters more than people admit.
Why It Works
Frozen hash browns absorb the egg custard without turning mushy, and the sausage brings enough fat and seasoning that the casserole tastes complete even before the cheese melts. The overnight rest lets the potatoes soften evenly, so the center bakes through without the edges drying out. If you’ve ever had a breakfast bake that looked done on top but tasted loose underneath, this method fixes that problem.
Key Ingredients
- 1 pound breakfast sausage — Choose a well-seasoned bulk sausage so the casserole tastes finished without extra fuss.
- 1 medium yellow onion, diced — It softens in the skillet and adds a little sweetness behind the sausage.
- 1 red bell pepper, diced — This gives the casserole color and a fresh note that keeps the eggs from feeling heavy.
- 1 (30-ounce) bag frozen shredded hash browns, thawed and patted dry — Dry potatoes keep the bake from getting watery.
- 8 large eggs — They form the custard that holds everything together.
- 2 cups whole milk — Whole milk gives the filling a richer, smoother texture than skim.
- 2 cups shredded sharp cheddar, divided — Sharp cheddar cuts through the potatoes and sausage better than mild cheese.
- 1 teaspoon kosher salt, 1/2 teaspoon black pepper, 1/2 teaspoon garlic powder — Enough seasoning to wake up the eggs.
- 2 tablespoons chopped chives or parsley — Use this at the end for a bright finish.
Quick Steps
-
Brown the sausage: Cook the sausage in a large skillet over medium heat for 6 to 8 minutes, breaking it into crumbles, until no pink remains. Add the onion and bell pepper during the last 3 minutes and cook until softened.
-
Build the base: Grease a 9×13-inch baking dish, spread in the thawed hash browns, and top with the sausage mixture. Sprinkle on 1 1/2 cups of the cheddar.
-
Whisk the custard: In a large bowl, whisk the eggs, milk, salt, pepper, and garlic powder until the mixture looks smooth and pale yellow.
-
Assemble and chill: Pour the egg mixture evenly over the casserole. Cover tightly and refrigerate for 8 to 24 hours, or bake right away if you’re short on time.
-
Bake until set: Heat the oven to 375°F (190°C). Bake covered with foil for 30 minutes, then uncover, add the remaining cheese, and bake 15 to 20 minutes more until the center reaches 160°F and the top is lightly browned.
-
Rest before slicing: Let the casserole sit for 10 minutes so the squares hold together instead of sliding apart.
Tips and Variations
- Make-ahead note: Assemble it the night before and bake it straight from the fridge, adding about 5 extra minutes if the dish is very cold.
- Swap idea: Breakfast sausage can become turkey sausage or crumbled bacon without changing the method.
- Flavor boost: A spoonful of hot sauce in the egg mixture adds warmth without making the casserole spicy.
2. Creamy Chicken Alfredo Broccoli Bake
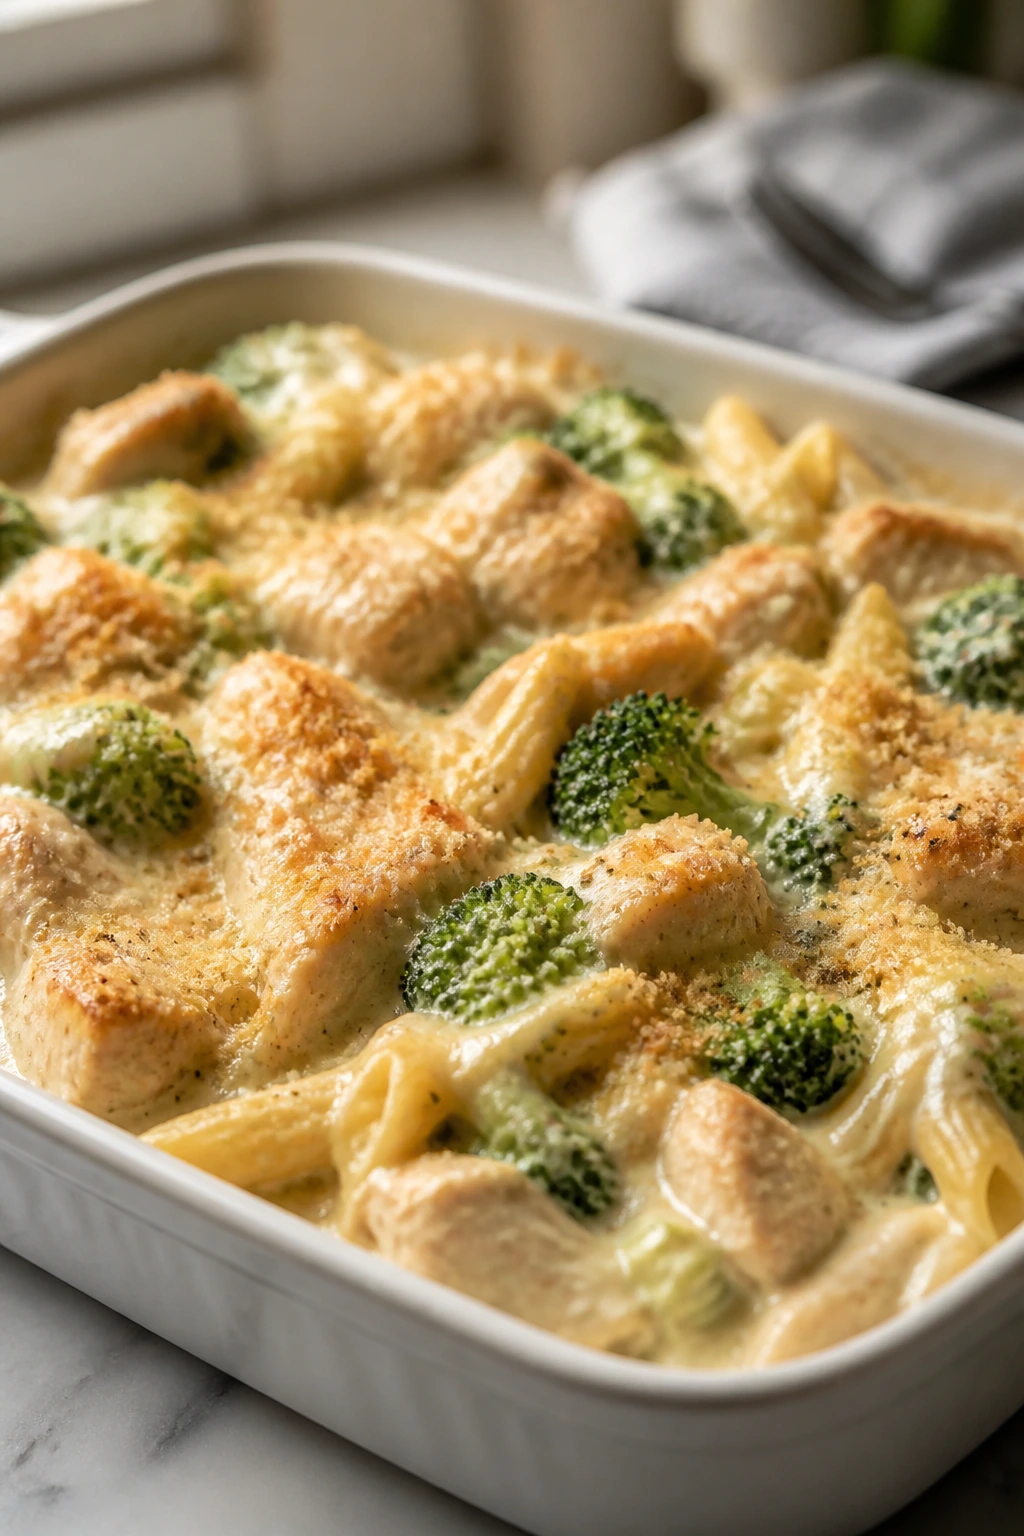
This one is pure comfort with a cleaner, fresher edge than a lot of cream-heavy pasta bakes. The broccoli stays bright, the chicken keeps it filling, and the Alfredo-style sauce coats the pasta instead of drowning it. You get that stretchy-cheese pull on top, which never hurts.
If your crew likes chicken Alfredo but you do not want to stand over a skillet making sauce at dinner time, this casserole is the answer. The pasta and broccoli get par-cooked, the sauce is made once, and the whole thing can wait in the fridge until you need it. I like it because it tastes generous without being fussy.
Why It Works
Broccoli and short pasta both hold up well after chilling, which makes them good candidates for a bake-later dinner. A quick white sauce made with butter, flour, milk, and broth stays smooth enough to cling to every bite, and the Parmesan gives it a salty backbone that keeps the flavor from going flat. Undercooking the pasta by a couple of minutes is the trick here — it finishes in the oven instead of turning soft.
Key Ingredients
- 12 ounces short pasta, such as penne or rigatoni — A sturdy shape catches the sauce and keeps its texture.
- 4 cups broccoli florets — Fresh or frozen both work; just keep the pieces bite-sized.
- 3 cups cooked chicken, chopped or shredded — Rotisserie chicken is an easy shortcut.
- 3 tablespoons butter — The base for the sauce.
- 3 tablespoons all-purpose flour — This thickens the sauce into a coating, not a soup.
- 2 cups whole milk and 1 cup low-sodium chicken broth — The milk brings richness, the broth keeps it from tasting heavy.
- 1 cup grated Parmesan and 1 1/2 cups shredded mozzarella — Parmesan for flavor, mozzarella for the melt.
- 3 cloves garlic, minced; 1/2 teaspoon salt; 1/4 teaspoon black pepper; pinch of nutmeg — Small details, big payoff.
Quick Steps
-
Cook the pasta and broccoli: Boil the pasta until it is 2 minutes shy of al dente. Add the broccoli for the last 2 minutes, then drain both well.
-
Make the sauce: Melt the butter in a saucepan over medium heat. Add the garlic for 30 seconds, whisk in the flour, then slowly add the milk and broth, whisking until the sauce is smooth and thick enough to coat a spoon.
-
Finish the sauce: Stir in the Parmesan, salt, pepper, and nutmeg until melted and glossy.
-
Combine everything: Fold the pasta, broccoli, and chicken into the sauce. Transfer to a greased 9×13-inch dish and top with the mozzarella.
-
Bake: Cover and refrigerate up to 24 hours, or bake immediately at 375°F (190°C) for 25 to 30 minutes until bubbling and lightly browned.
-
Rest and serve: Let it stand 10 minutes before scooping so the sauce settles back into the pasta.
Tips and Variations
- Freezer note: Freeze the baked casserole in portions, not the sauce alone, for the best texture later.
- Vegetable swap: Cauliflower florets can replace some or all of the broccoli.
- Serving idea: A squeeze of lemon over the top wakes up the creaminess.
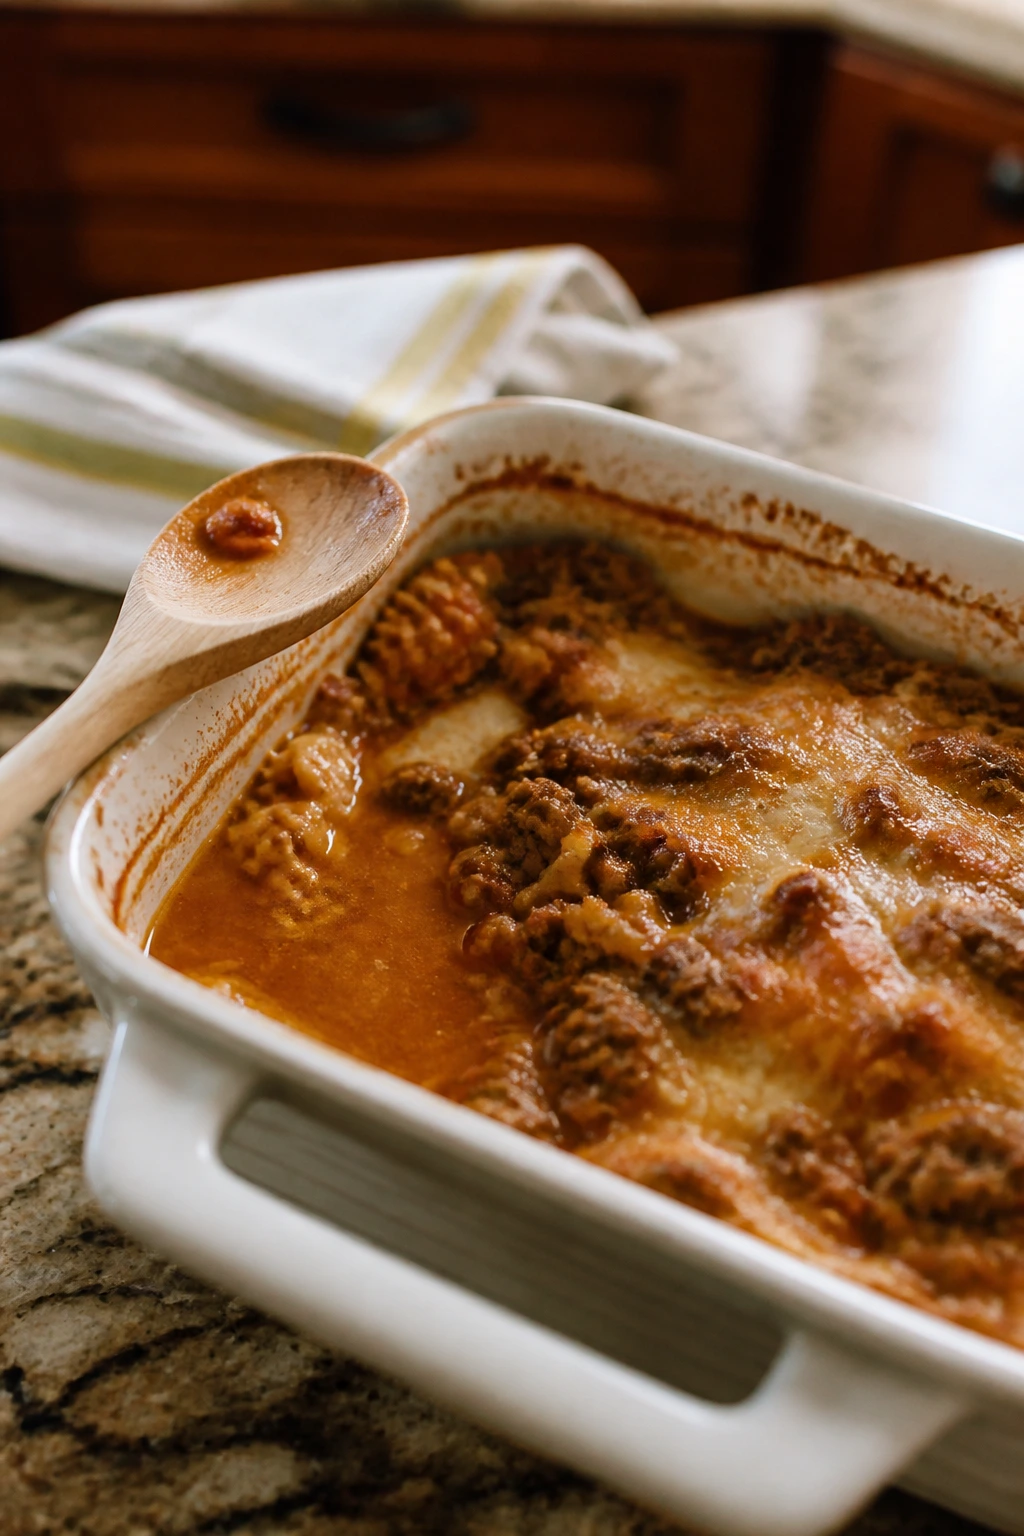
3. Tex-Mex Beef and Rice Casserole
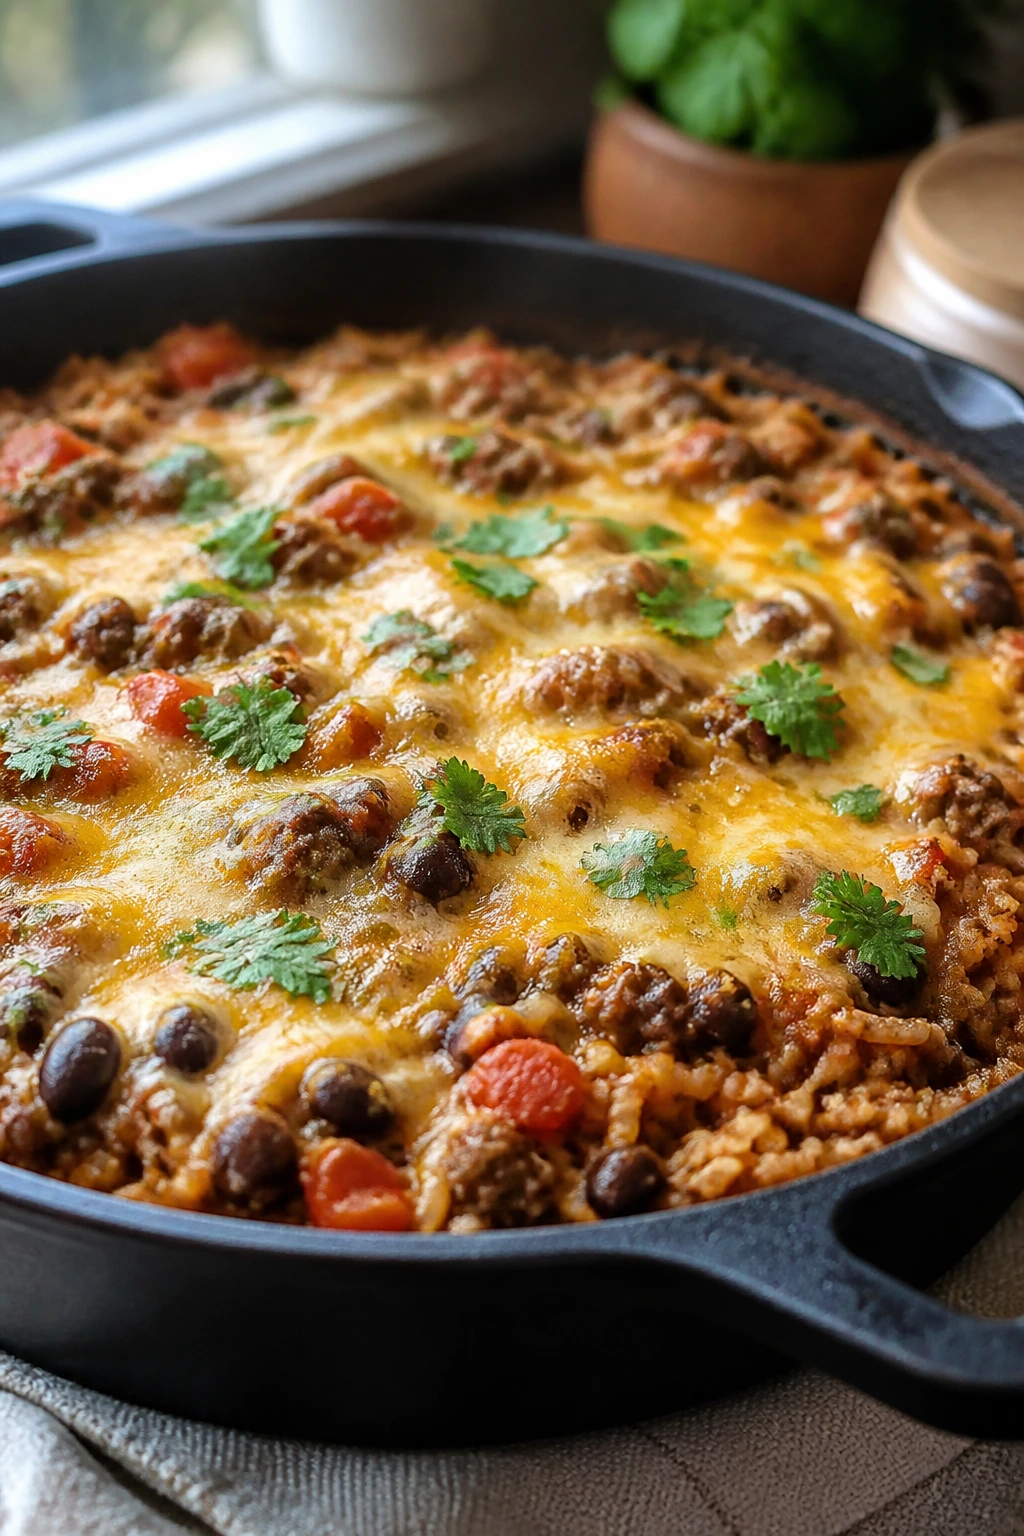
This is the casserole I reach for when I want dinner to feel loud in a good way. Beef, beans, rice, salsa, and melted cheese make a pan that smells smoky and a little tangy while it bakes. It’s filling enough for a hungry crowd and easy enough that nobody has to ask what’s for dinner twice.
A make ahead casserole for busy families needs to survive a fridge wait without turning dull, and this one does exactly that. The salsa and tomatoes keep the rice moist, the beans stretch the meat, and the cheese on top seals everything in. Serve it with tortilla chips if you want crunch, or leave it as-is and call it done.
Why It Works
Cooked rice is the secret here. It keeps the texture steady after chilling, while the beef mixture carries all the seasoning. Black beans add bulk and a bit of creaminess, and salsa does the job of both sauce and seasoning, which is one less thing to juggle at the stove. The casserole reheats with almost no loss of flavor because the filling is already heavily seasoned before it even goes into the dish.
Key Ingredients
- 1 1/2 pounds lean ground beef — Enough meat for a hearty casserole without making it greasy.
- 1 medium onion, diced — It gives the filling a sweet base note.
- 2 cloves garlic, minced — Small but important.
- 4 cups cooked rice — Day-old rice works especially well.
- 1 can (15 ounces) black beans, drained and rinsed — They stretch the meat and keep the casserole from feeling one-note.
- 1 cup frozen corn — Adds sweetness and a little pop.
- 1 can (10 ounces) diced tomatoes with green chiles — This keeps the dish bright and saucy.
- 1 cup salsa, 2 cups shredded cheddar or Monterey Jack, divided — Salsa seasons the whole pan; cheese finishes it.
- 2 teaspoons chili powder, 1 teaspoon cumin, 1/2 teaspoon smoked paprika, salt, and pepper — The warm spice mix is what makes it taste like dinner and not just leftovers.
Quick Steps
-
Brown the beef: Cook the ground beef and onion in a large skillet over medium heat for 7 to 8 minutes. Drain off excess fat, then stir in the garlic and spices for 30 seconds.
-
Mix the filling: Fold in the rice, beans, corn, tomatoes, and salsa. Stir until everything is evenly coated and the mixture looks moist but not soupy.
-
Assemble: Spread half the cheese in the bottom of a greased 9×13-inch dish, add the beef mixture, and top with the remaining cheese.
-
Chill or bake: Cover and refrigerate up to 24 hours, or bake right away at 350°F (175°C) for 25 to 30 minutes.
-
Finish: Bake until the cheese is melted and the edges bubble. If you like a darker top, broil for 1 to 2 minutes at the end.
-
Serve: Let it rest for 5 to 10 minutes, then top with scallions or cilantro.
Tips and Variations
- Crunch move: Add crushed tortilla chips right before serving so they stay crisp.
- Protein swap: Ground turkey works fine, but add a splash of oil so it doesn’t dry out.
- Heat control: Use mild salsa for kids and keep hot sauce on the table for everyone else.
4. Tuna Noodle Casserole with Peas and Crispy Panko
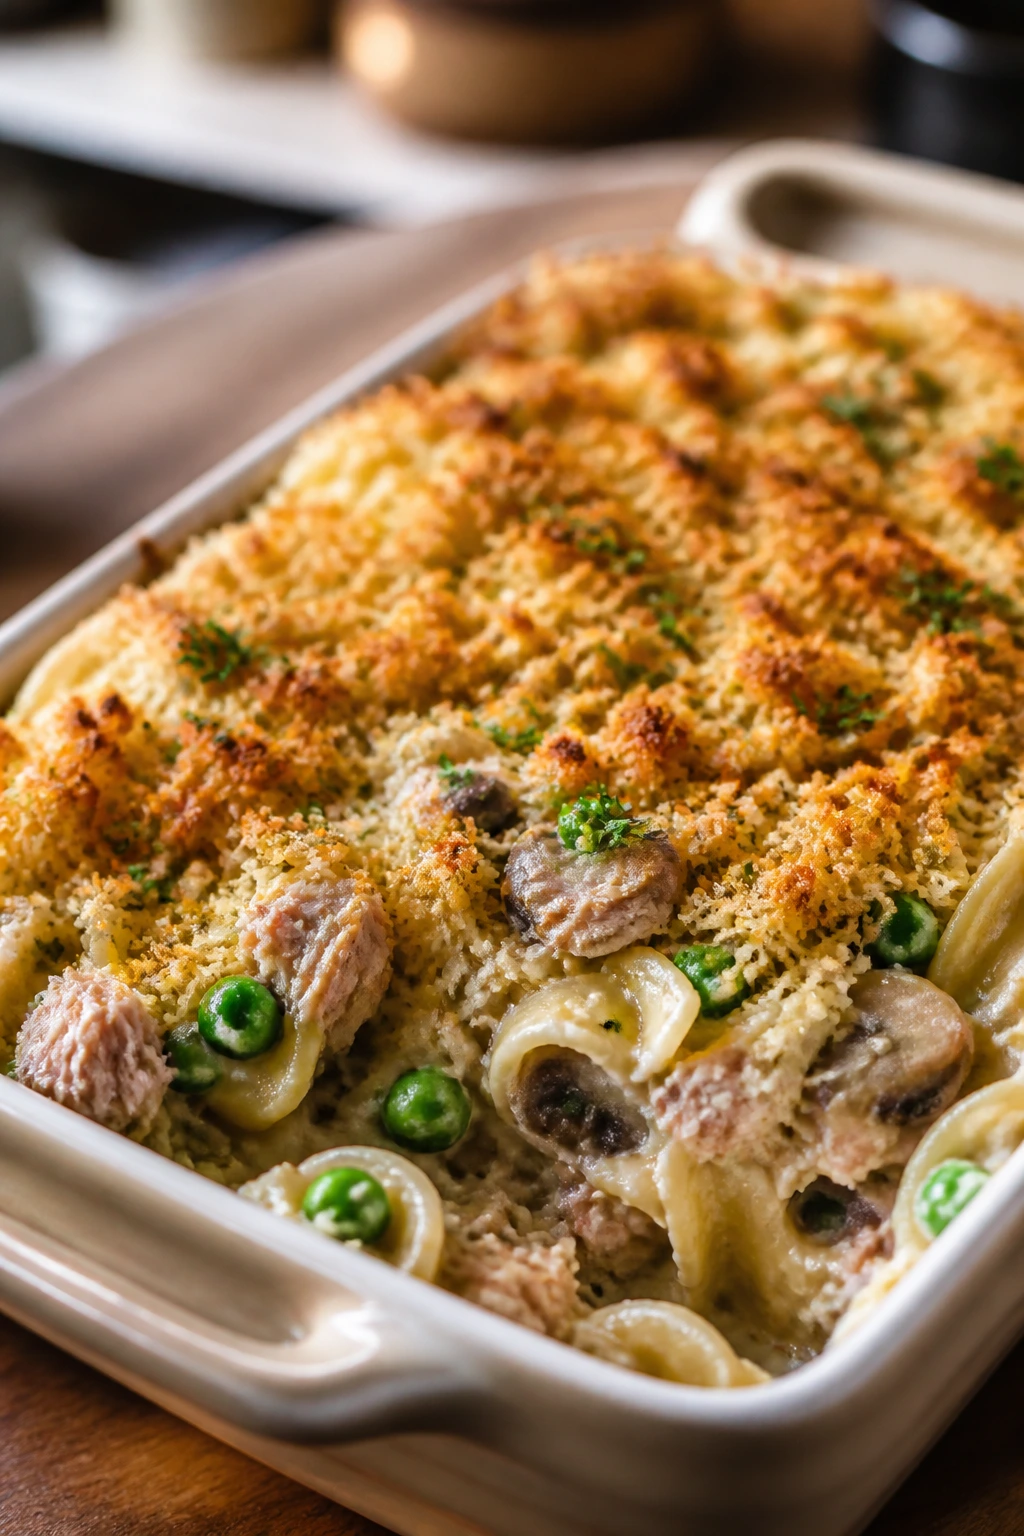
There’s something deeply practical about tuna noodle casserole, and I mean that as a compliment. It is gentle, creamy, and a little nostalgic, but the version I actually like has mushrooms, peas, and a crisp panko topping that keeps the whole thing from going flat. It smells buttery when it comes out of the oven, which is half the battle on a weeknight.
This is one of those make ahead casseroles for busy families that saves real money without feeling like a compromise. It uses pantry staples, cooks fast, and gets better if you let the sauce settle into the noodles for a while before baking. The panko topping is not optional in my book. It gives the dish some life.
Why It Works
The sauce is thick enough to coat the noodles but not so thick that the casserole turns stodgy after chilling. Mushrooms add a savory depth that canned cream soups rarely deliver on their own, and peas bring color and a little sweetness. A good crunch on top matters because the filling is soft; without that contrast, the casserole can feel heavy.
Key Ingredients
- 12 ounces egg noodles — Their soft texture is classic here, and they cook quickly.
- 2 tablespoons butter, 1 small onion diced, 8 ounces mushrooms sliced — This trio builds the savory base.
- 3 tablespoons all-purpose flour, 2 cups milk, 1 cup low-sodium chicken broth — The sauce ingredients.
- 2 cans tuna in water, drained well — Drain it hard so the casserole does not get watery.
- 1 cup frozen peas — Add them straight from the freezer.
- 1 cup shredded cheddar — A little sharpness keeps the flavor from feeling flat.
- 1 cup panko, 2 tablespoons melted butter, 1 teaspoon lemon zest — The topping and a bright finish.
Quick Steps
-
Cook the noodles: Boil the egg noodles until just shy of al dente, then drain and set aside.
-
Build the sauce: Melt the butter in a skillet over medium heat. Cook the onion and mushrooms for 6 to 7 minutes, then whisk in the flour and cook for 1 minute.
-
Finish the filling: Slowly whisk in the milk and broth until the sauce thickens. Stir in the tuna, peas, cheddar, salt, and pepper.
-
Combine and top: Fold in the noodles, transfer to a greased casserole dish, and scatter the panko mixed with melted butter and lemon zest over the top.
-
Bake: Bake at 375°F (190°C) for 20 to 25 minutes until the edges bubble and the topping turns golden.
-
Rest briefly: Give it 5 to 10 minutes before serving so the sauce settles.
Tips and Variations
- Make-ahead note: Assemble it a day ahead, but add the panko topping just before baking so it stays crisp.
- Shortcut: Rotisserie chicken can replace the tuna if your crowd is not into fish.
- Flavor bump: A little Dijon in the sauce gives the casserole more backbone.
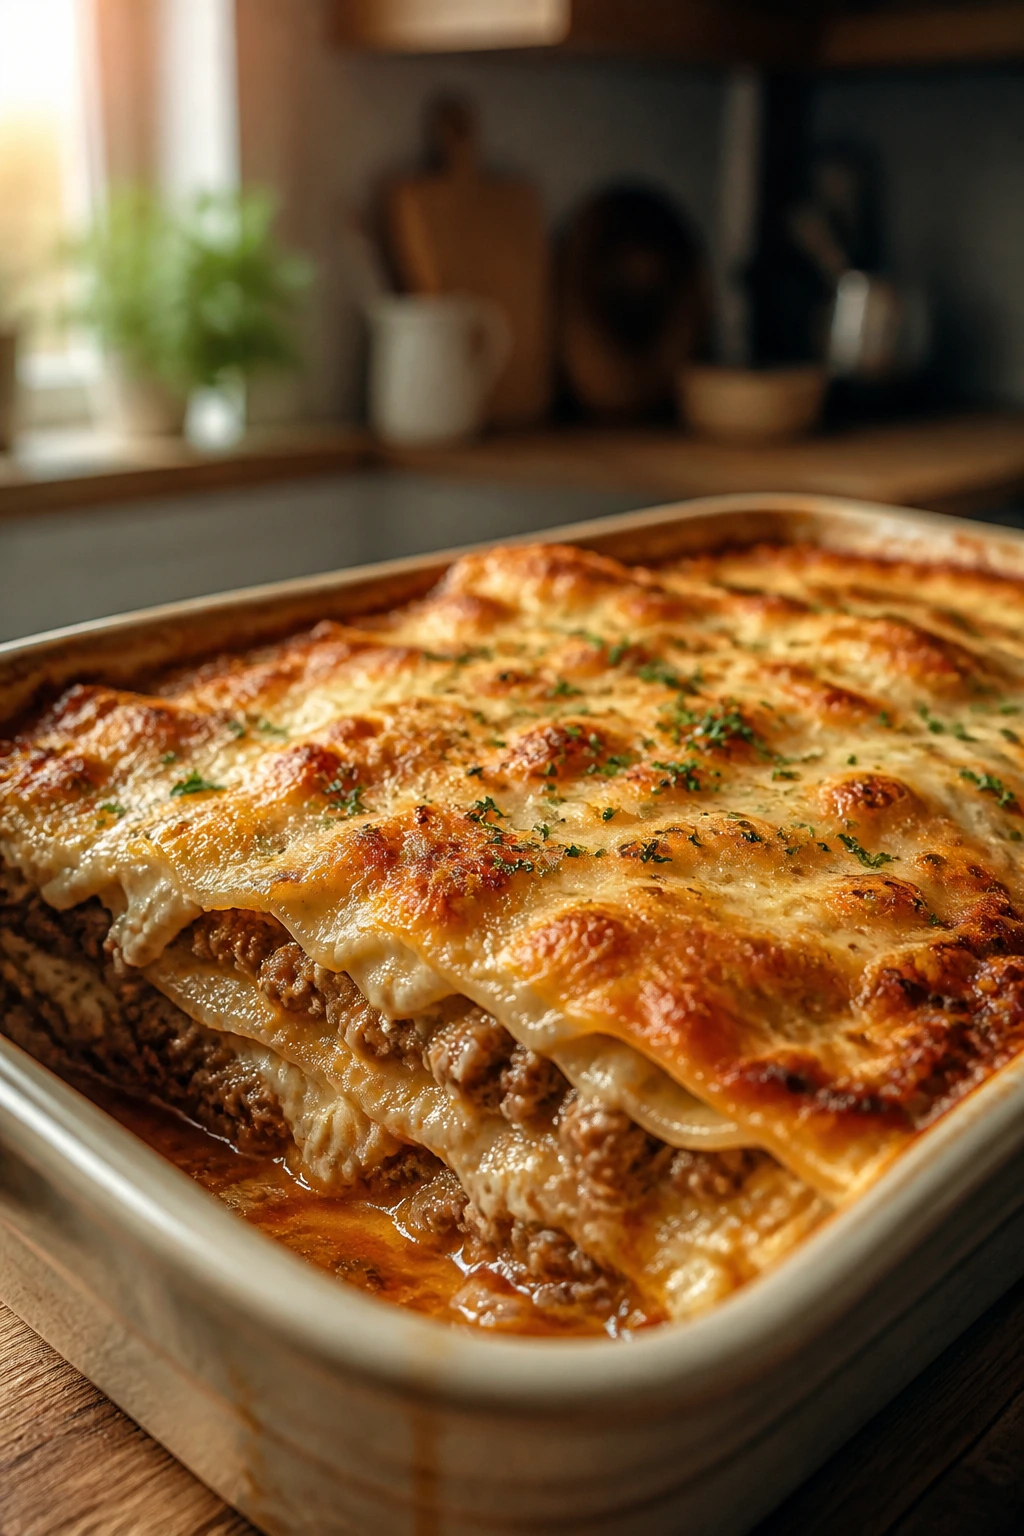
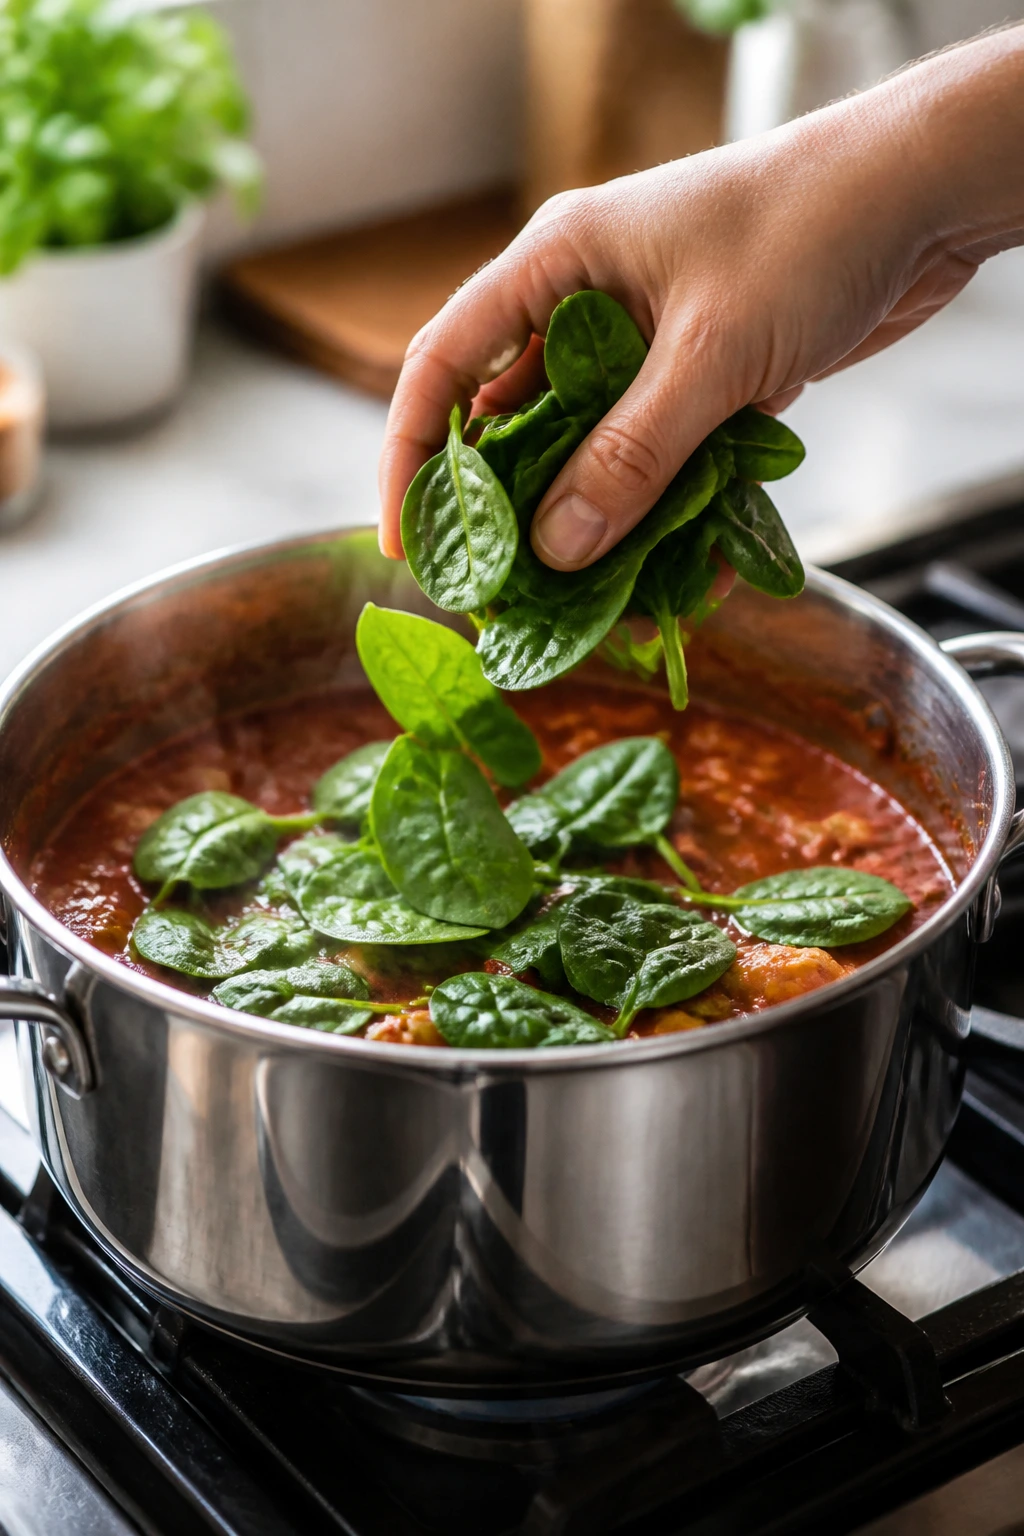
5. Baked Ziti with Spinach and Ricotta
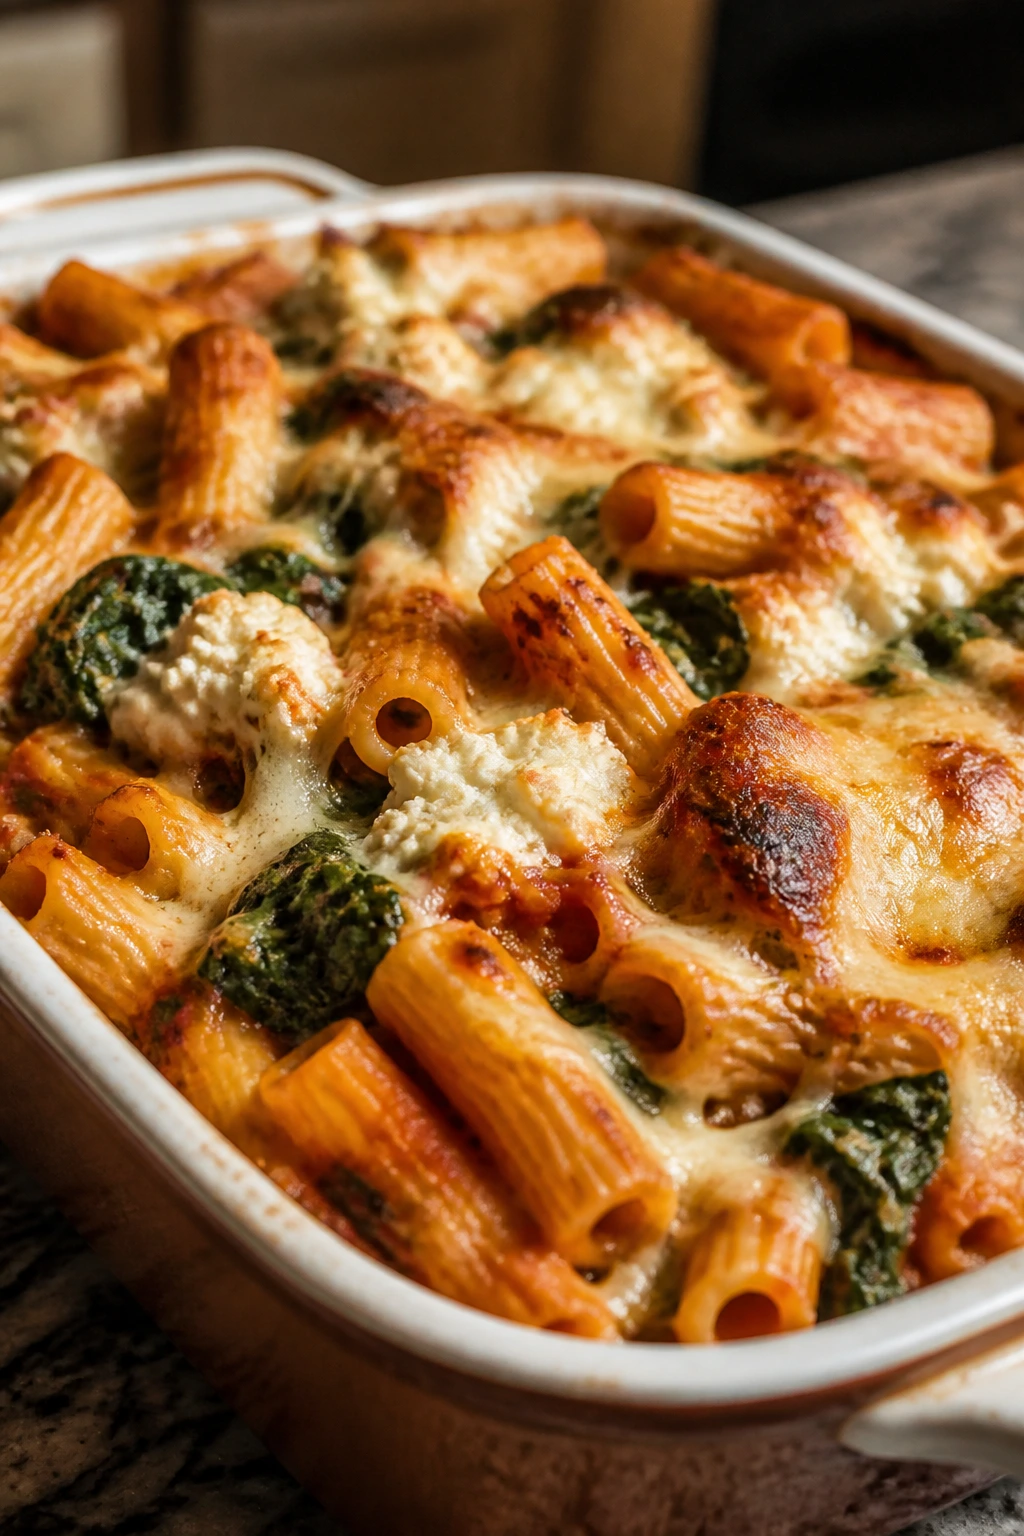
Baked ziti is one of those dishes that looks humble and eats like a crowd-pleaser. The edges get saucy and caramelized, the ricotta softens into creamy pockets, and the spinach disappears into the pasta without turning the whole pan green. It’s red, white, and gold in a baking dish, which is a fine thing to bring to a busy table.
This casserole earns its place because it is easy to assemble ahead and still tastes generous after a fridge rest. The pasta shape catches the sauce, the ricotta keeps things plush, and the mozzarella on top stretches in all the right ways. If you want a vegetarian bake that doesn’t feel like a side dish wearing a costume, this is it.
Why It Works
Ziti is built for baked pasta dishes because its hollow shape holds sauce inside and out. Ricotta mixed with an egg gives the filling a light set instead of a grainy one, and spinach adds body without demanding extra work. The casserole also reheats nicely because the sauce protects the noodles from drying out.
Key Ingredients
- 1 pound ziti — A sturdy pasta that stays satisfying after baking.
- 24 ounces marinara sauce — Use one with good tomato flavor; it carries the whole dish.
- 15 ounces ricotta — This gives you creamy pockets throughout the casserole.
- 2 cups shredded mozzarella, divided — One portion inside, one on top.
- 1/2 cup grated Parmesan — For salt and depth.
- 5 ounces baby spinach — It wilts down fast and blends right in.
- 1 large egg — Helps the ricotta hold together.
- 2 cloves garlic, 1 teaspoon Italian seasoning, salt, and pepper — The flavor base.
Quick Steps
-
Cook the pasta: Boil the ziti until 2 minutes shy of al dente. Drain well.
-
Wilt the spinach: Warm a little oil in a skillet, cook the garlic for 30 seconds, then add the spinach and stir just until wilted.
-
Mix the filling: Stir together the ricotta, egg, Italian seasoning, salt, pepper, half the mozzarella, and the spinach.
-
Combine: Toss the pasta with the marinara, then fold in the ricotta mixture. Transfer to a greased casserole dish and top with the remaining mozzarella and Parmesan.
-
Bake: Cover and refrigerate up to 24 hours, or bake at 375°F (190°C) for 30 to 35 minutes until the sauce bubbles and the top is golden.
-
Rest: Let it sit for 10 minutes before scooping.
Tips and Variations
- Sauce note: If your marinara is thick, stir in 1/4 cup water so the pasta stays moist.
- Vegetable swap: Chopped zucchini or mushrooms can join the spinach.
- Finish: Fresh basil or extra Parmesan makes the top taste brighter.
6. Chicken Enchilada Casserole
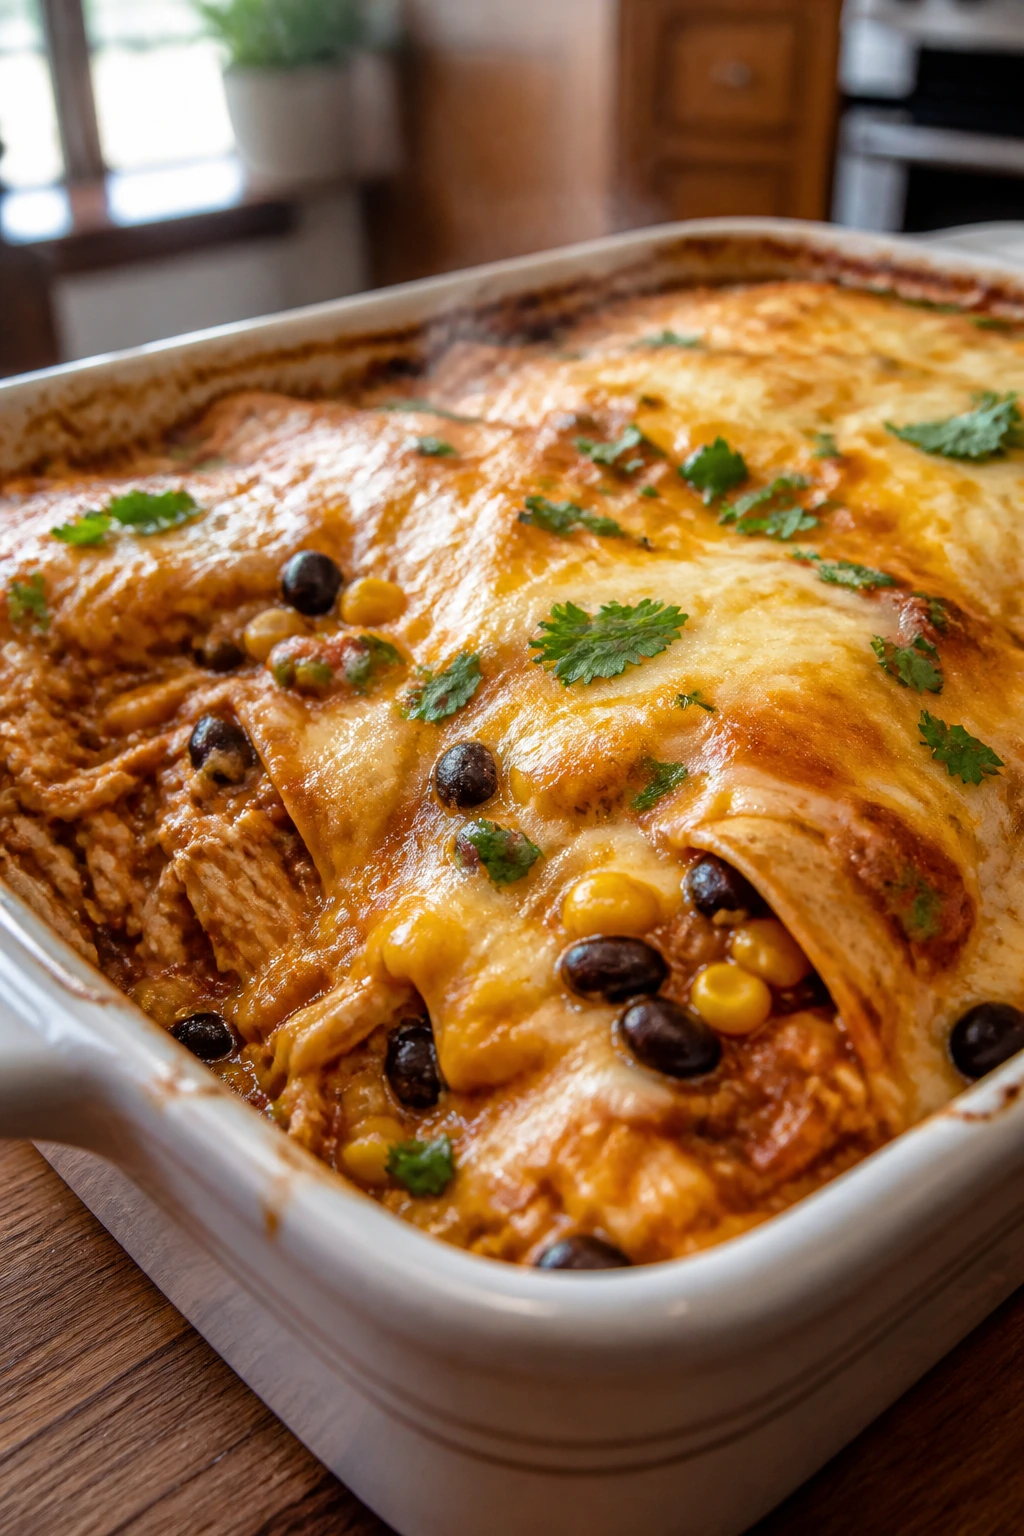
This is basically enchiladas without the rolling ceremony, and that alone makes it worth making on a busy night. Tortillas soften into the sauce, chicken gets tucked through the layers, and the top turns molten and a little browned around the edges. It tastes smoky, tangy, and comforting in the same bite.
A make ahead casserole for busy families should survive being stacked, chilled, and baked later, and this one was born for that job. The tortillas act like noodles, the sauce keeps everything tender, and the black beans add enough heft that you do not need a giant portion to feel fed. I like it with a spoonful of sour cream and a handful of cilantro if I have it.
Why It Works
Corn tortillas hold up better than flour tortillas in a saucy casserole because they stay tender without turning gummy. Enchilada sauce gives the whole pan flavor before it even hits the oven, so you’re not relying on toppings alone to carry the dish. The layers also make slicing easier after a short rest, which matters when dinner has to happen fast.
Key Ingredients
- 3 cups shredded cooked chicken — Rotisserie chicken makes this easy.
- 12 corn tortillas, cut into strips — They form the layers and soften into the sauce.
- 2 cups red enchilada sauce — Use a sauce you actually like to eat.
- 1 can black beans, drained and rinsed — They make the casserole more filling.
- 1 cup corn — Frozen or canned both work.
- 1 small onion, diced — It gives the filling a little bite.
- 2 cups shredded Monterey Jack and cheddar blend, divided — Melt and flavor together.
- 1 teaspoon cumin, 1/2 teaspoon garlic powder, salt, and pepper — Simple seasoning that fits the sauce.
Quick Steps
-
Mix the filling: Combine the chicken, black beans, corn, onion, half the enchilada sauce, cumin, garlic powder, salt, and pepper in a bowl.
-
Layer the casserole: Spread a thin layer of enchilada sauce in the bottom of a greased 9×13-inch dish. Add tortilla strips, then half the chicken mixture, then cheese. Repeat once more.
-
Top it off: Finish with the remaining sauce and cheese.
-
Chill or bake: Cover and refrigerate up to 24 hours, or bake at 375°F (190°C) for 25 to 30 minutes.
-
Watch for doneness: Bake until the cheese is bubbling and the center is hot all the way through.
-
Rest and garnish: Let it stand 10 minutes, then top with cilantro or sliced green onions.
Tips and Variations
- Texture tip: If you like a firmer top, reserve a few tortilla strips for the very last layer under the cheese.
- Swap idea: Shredded turkey works just as well as chicken.
- Serving idea: Serve with avocado slices or a simple cabbage salad.
7. Shepherd’s Pie Casserole
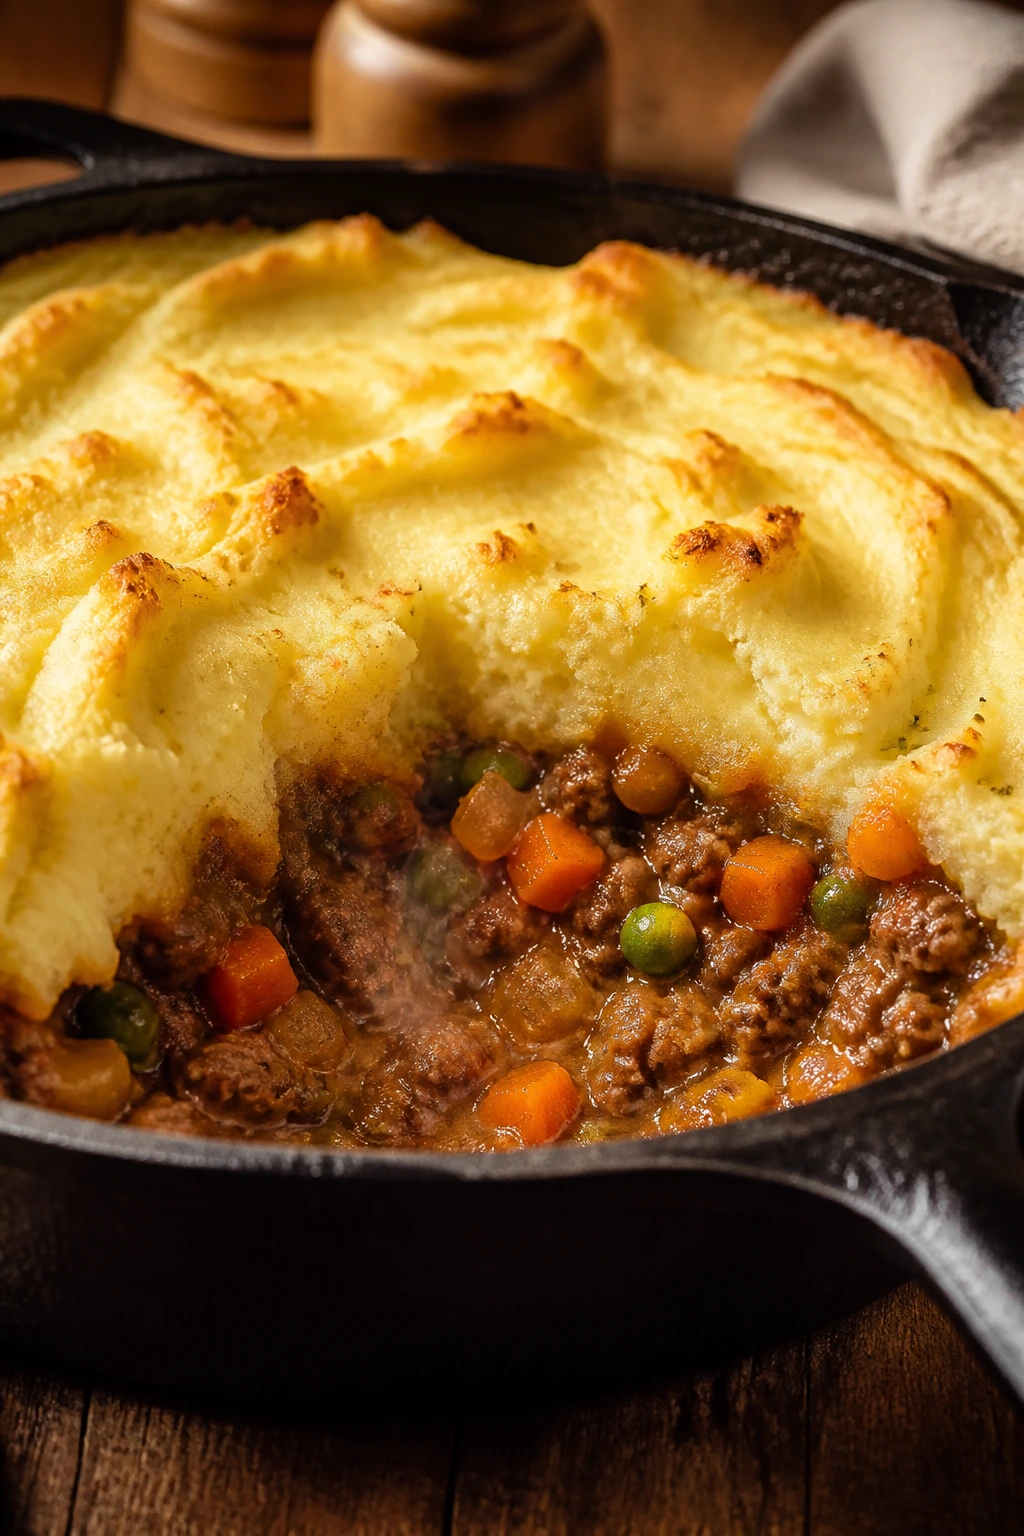
Some dinners feel like a hug, and shepherd’s pie is one of them. Savory meat filling, soft vegetables, mashed potatoes browned on top — it’s honest food, not showy food, which is exactly why families keep coming back to it. The best part is the crustless, all-filling spoonful that comes out of the pan hot and tidy.
This casserole handles a make-ahead schedule beautifully because the components hold up on their own. The filling can cool in the dish before the potatoes go on top, and the whole thing can sit in the fridge until you need it. If you make the mashed potatoes a little stiffer than usual, the finished casserole slices better.
Why It Works
The meat layer is cooked down until thick, so it does not flood the mashed potatoes with liquid. A little flour thickens the broth into gravy, which keeps the filling rich after reheating. Potatoes on top create a protective layer that prevents the bottom from drying out and gives the casserole its classic finish.
Key Ingredients
- 2 pounds ground beef or lamb — Beef is milder; lamb gives the traditional flavor.
- 1 onion, 2 carrots, 2 celery stalks, all diced — The classic vegetable base.
- 2 tablespoons flour — Thickens the gravy.
- 1 cup beef broth, 1 tablespoon Worcestershire sauce — The savory liquid layer.
- 1 cup frozen peas — Stir in at the end so they stay bright.
- 4 cups mashed potatoes — Use leftovers or make a fresh batch.
- 1 cup shredded cheddar or Parmesan — Optional, but good if you like a browned top.
- 2 tablespoons butter, salt, pepper, and 1 teaspoon thyme — For finishing and seasoning.
Quick Steps
-
Cook the filling: Brown the meat in a large skillet over medium-high heat. Add the onion, carrots, and celery, and cook until softened.
-
Thicken it: Sprinkle in the flour, stir for 1 minute, then add the broth and Worcestershire. Simmer until the mixture looks thick and glossy.
-
Add peas: Stir in the peas, thyme, salt, and pepper.
-
Assemble: Spread the filling in a greased casserole dish. Top with mashed potatoes, smoothing them all the way to the edges.
-
Bake: Refrigerate up to 24 hours, or bake at 400°F (205°C) for 20 to 25 minutes until bubbling. If you want extra color, broil briefly at the end.
-
Rest before serving: Give it 10 minutes so the layers settle.
Tips and Variations
- Potato tip: A stiffer mash holds up better than one made very loose with cream.
- Cheese move: A light dusting of cheddar on top adds a salty crust.
- Vegetable swap: Corn can replace the peas if that’s what your family likes better.
8. Stuffed Pepper Casserole
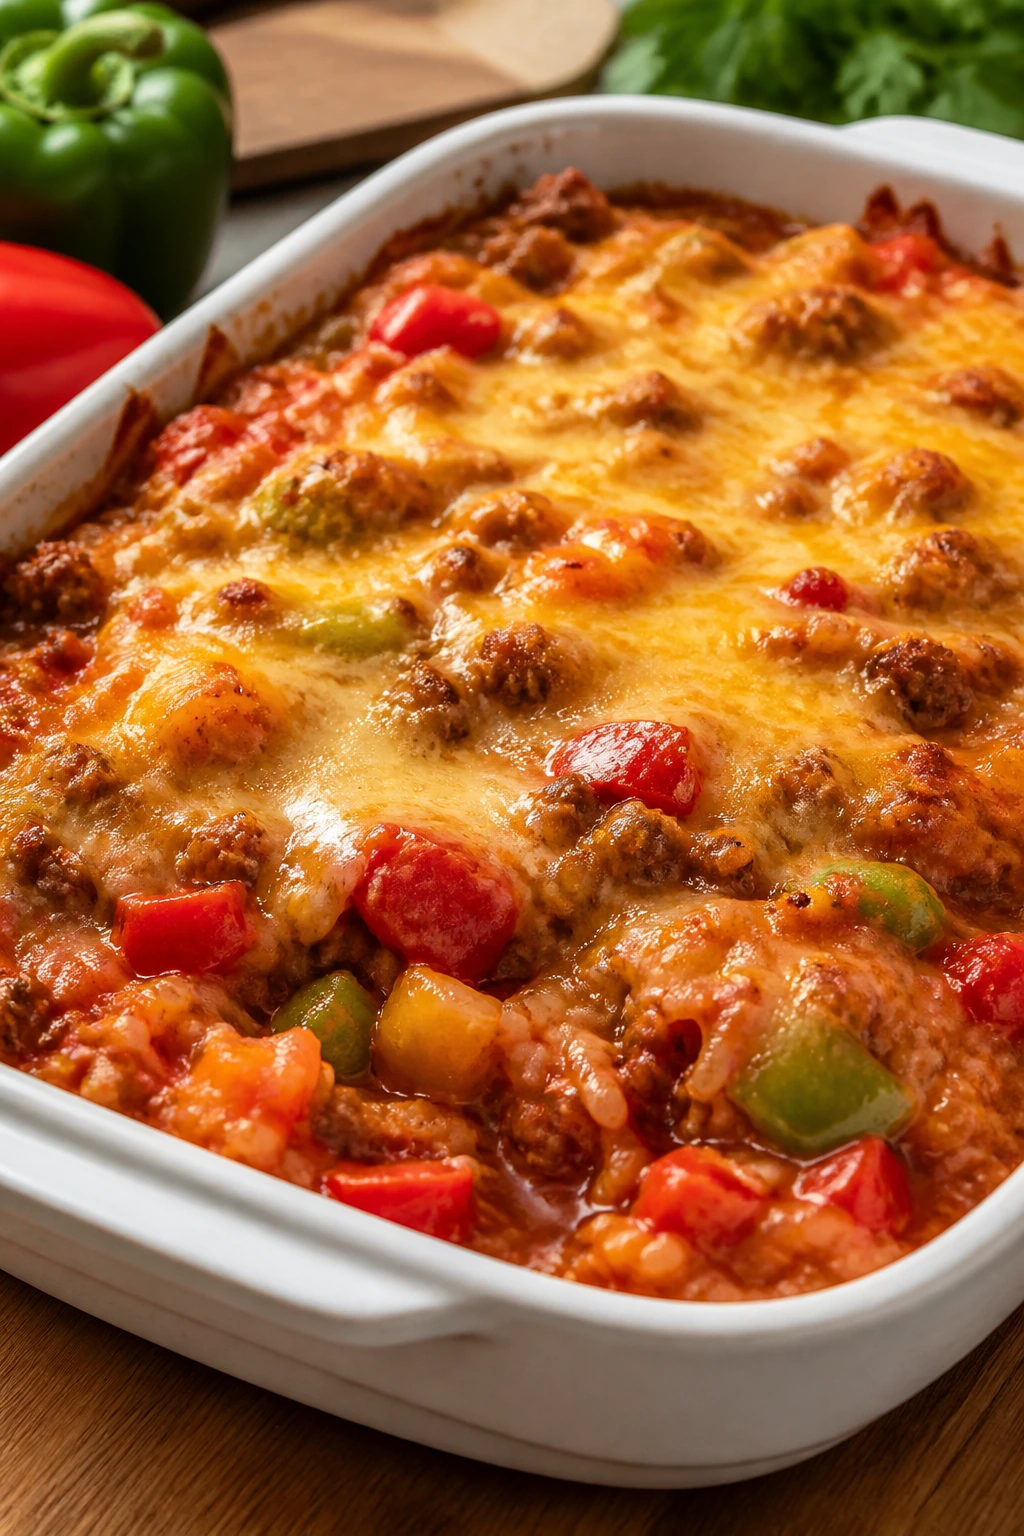
If you like the flavor of stuffed peppers but not the fiddly work of hollowing them out, this casserole is the better deal. The peppers soften into the rice and meat, the tomato sauce pulls everything together, and the top gets a blanket of melted cheese that makes the whole dish feel complete. It’s colorful, simple, and solidly family-proof.
This is a strong candidate for make ahead casseroles for busy families because the filling gets even better after it sits. The rice drinks in the sauce, the peppers turn tender, and the seasoning spreads through the whole pan instead of staying stuck in one bite. It’s the sort of meal that looks like you tried harder than you did.
Why It Works
Stuffed pepper flavor needs three things: sweet peppers, seasoned meat, and enough sauce to keep the rice from drying out. A pre-cooked rice base makes the casserole reliable because it does not need to absorb liquid in the oven. The peppers keep their shape just enough to taste like peppers, not mush.
Key Ingredients
- 1 1/2 pounds ground turkey or beef — Turkey is lighter; beef is richer.
- 1 onion, 3 bell peppers, and 3 cloves garlic, all diced — The main flavor and color.
- 3 cups cooked rice — White, brown, or even a rice blend all work.
- 1 can diced tomatoes, 1 cup tomato sauce, 1 cup broth — This is the saucy backbone.
- 1 teaspoon Italian seasoning — Keeps the flavor familiar.
- 1 teaspoon salt, 1/2 teaspoon black pepper — Basic seasoning.
- 1 1/2 cups shredded mozzarella or cheddar — For the top.
- Optional red pepper flakes — Use if you want a little heat.
Quick Steps
-
Brown the meat: Cook the ground turkey or beef in a large skillet over medium heat with the onion until browned.
-
Add peppers and garlic: Stir in the diced peppers and garlic and cook for 3 to 4 minutes until they start to soften.
-
Build the sauce: Add the tomatoes, tomato sauce, broth, rice, Italian seasoning, salt, and pepper. Stir until evenly mixed.
-
Assemble: Transfer to a greased casserole dish and sprinkle the cheese over the top.
-
Bake: Cover and refrigerate up to 24 hours, or bake at 375°F (190°C) for 30 to 35 minutes until hot and bubbling.
-
Rest and serve: Let it sit for 5 to 10 minutes before scooping.
Tips and Variations
- Rice note: Day-old rice is excellent here because it stays separate and does not clump.
- Flavor bump: A few spoonfuls of salsa can replace part of the tomato sauce if you want a little more zip.
- Serving idea: A dollop of sour cream cools the tomato flavor nicely.
9. Green Bean Chicken and Wild Rice Casserole

This is the casserole I’d make when I want the table to look organized before anyone has even sat down. Wild rice gives it a nutty chew, chicken makes it filling, and green beans keep the whole pan from feeling too soft. The fried onion topping is a little old-fashioned, but it earns its keep.
Busy families need casseroles that reheat without turning into paste, and this one is better than most at holding texture. Wild rice stays pleasantly firm, green beans keep some snap, and the creamy sauce ties everything together without flooding the pan. If you like green bean casserole but want a full meal, this is the move.
Why It Works
Wild rice has more structure than white rice, so it keeps a casserole from going mushy after a fridge rest. A simple milk-and-broth sauce coats the chicken and grains without needing canned soup, and the fried onion topping adds crunch at the very end. That contrast is what makes the dish feel finished.
Key Ingredients
- 3 cups cooked wild rice blend — Cook it ahead and cool it before assembling.
- 3 cups chopped cooked chicken — Rotisserie chicken saves time.
- 1 pound green beans, trimmed — Fresh or frozen both work.
- 8 ounces mushrooms, sliced — They deepen the flavor.
- 3 tablespoons butter, 3 tablespoons flour — For the sauce.
- 2 cups milk, 1 cup chicken broth — Creamy, but not heavy.
- 1 teaspoon Dijon mustard, 1 cup grated Parmesan — These two ingredients sharpen the sauce.
- 1 cup crispy fried onions — The crunchy top.
Quick Steps
-
Prep the vegetables: If using fresh green beans, blanch them in salted boiling water for 3 minutes, then drain. Sauté the mushrooms in butter until browned.
-
Make the sauce: Sprinkle flour over the mushrooms, stir for 1 minute, then whisk in the milk and broth. Cook until thickened.
-
Finish the filling: Stir in the Dijon, Parmesan, chicken, rice, green beans, salt, and pepper.
-
Assemble: Spread the mixture in a greased casserole dish and top with the fried onions.
-
Bake: Refrigerate up to 24 hours, then bake at 350°F (175°C) for 25 to 30 minutes until hot.
-
Serve: Let it rest for 10 minutes so the sauce settles.
Tips and Variations
- Crunch tip: Add the fried onions only in the last 10 minutes if you want them extra crisp.
- Swap idea: Turkey works in place of chicken.
- Flavor option: A pinch of thyme fits the rice and mushrooms nicely.
10. Ham and Pea Mac and Cheese Bake
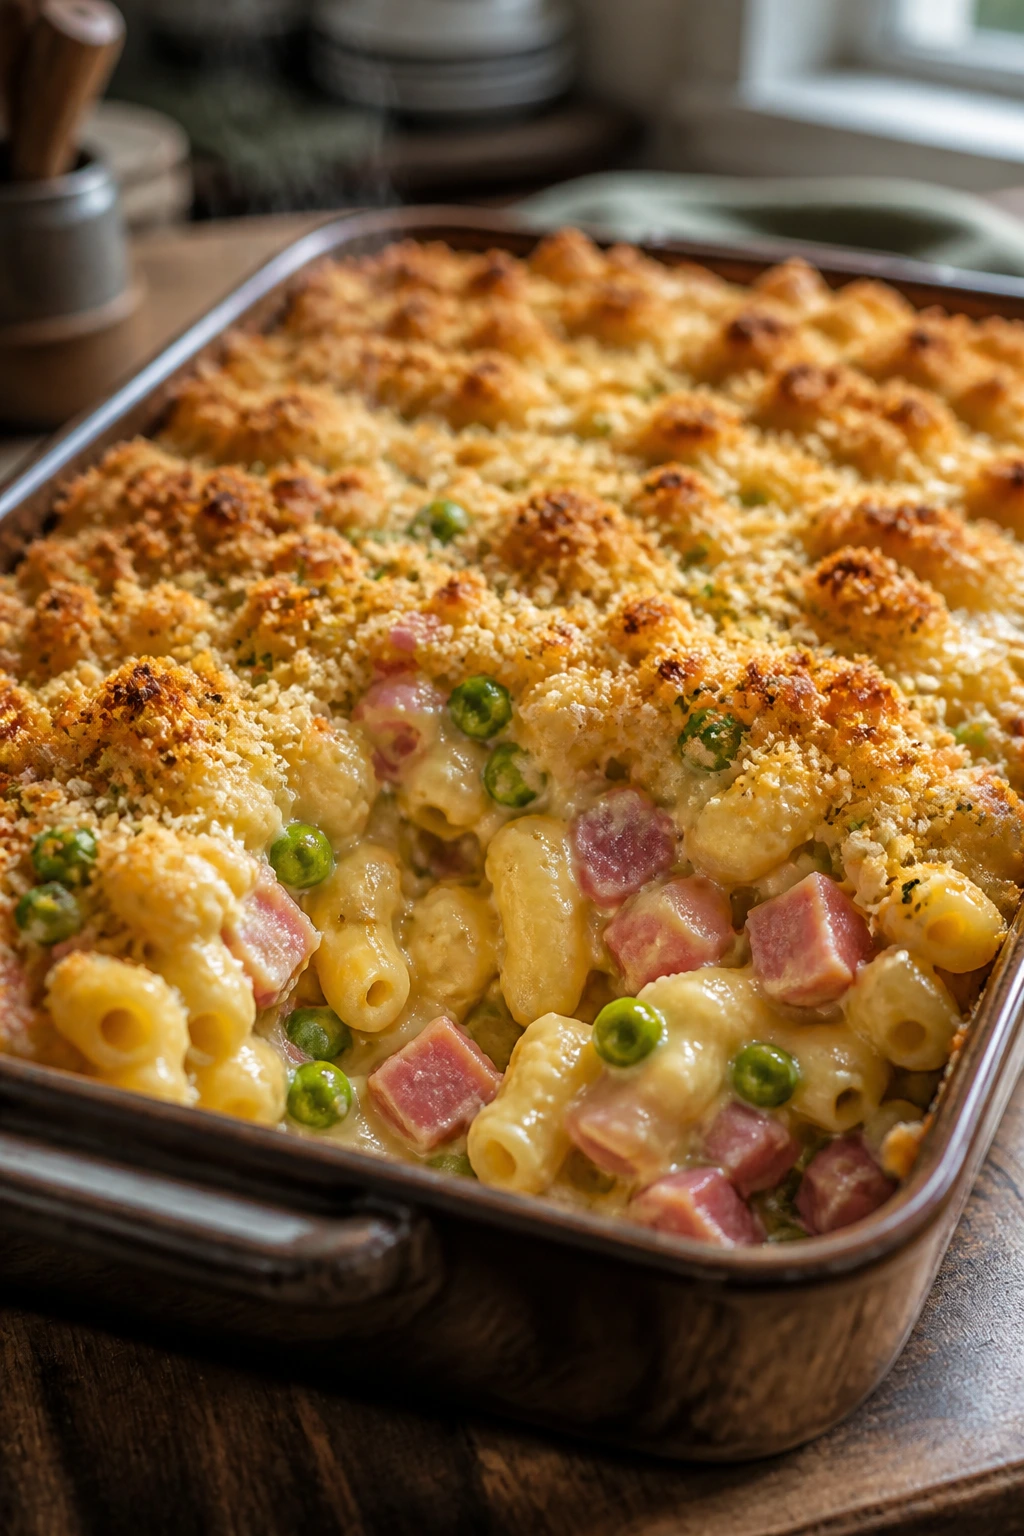
Mac and cheese with ham and peas is one of those dishes that gets everybody moving toward the table a little faster. The sauce is rich and stretchy, the ham gives it a smoky bite, and the peas keep the texture from feeling too soft. It’s cozy without being sleepy.
This casserole is one of the best make ahead casseroles for busy families because it is almost always a hit and it reheats cleanly. You can make the cheese sauce, fold it into the pasta, and hold the whole dish in the fridge until dinner. The panko topping is the piece I refuse to skip. It saves the top from going all mush.
Why It Works
A two-cheese sauce gives you both flavor and melt. Sharp cheddar brings the tang, while Gruyère or more cheddar keeps the texture smooth. Ham adds salt and substance, peas add a little brightness, and the baked breadcrumb top gives each scoop a crunchy first bite before the creamy center shows up.
Key Ingredients
- 12 ounces elbow macaroni — Small shapes hold the sauce well.
- 3 tablespoons butter, 3 tablespoons flour — The roux for the sauce.
- 2 cups whole milk, 1 cup half-and-half — Rich enough to taste special.
- 2 cups shredded sharp cheddar, 1 cup shredded Gruyère — A strong cheese blend.
- 2 cups diced ham — Leftover ham works well.
- 1 cup frozen peas — Stir them in straight from the freezer.
- 1 cup panko, 2 tablespoons melted butter — The crunchy top.
- 1 teaspoon mustard powder, salt, and pepper — Helps the cheese taste sharper.
Quick Steps
-
Cook the pasta: Boil the macaroni until just shy of al dente, then drain.
-
Make the sauce: Melt butter in a saucepan, whisk in the flour, then slowly add the milk and half-and-half. Cook until thick, then stir in the mustard powder and cheeses.
-
Mix the filling: Fold in the ham, peas, pasta, salt, and pepper. Transfer to a greased casserole dish.
-
Add the topping: Mix the panko with melted butter and scatter it over the top.
-
Bake: Refrigerate up to 24 hours or bake immediately at 375°F (190°C) for 20 to 25 minutes until bubbly and browned.
-
Rest briefly: Let it sit for 5 minutes before serving.
Tips and Variations
- Make-ahead note: Hold the panko aside until baking day.
- Swap idea: Smoked turkey or cooked bacon can replace the ham.
- Serving tip: A tiny shake of hot sauce at the table is very good here.
11. Pizza Pasta Casserole
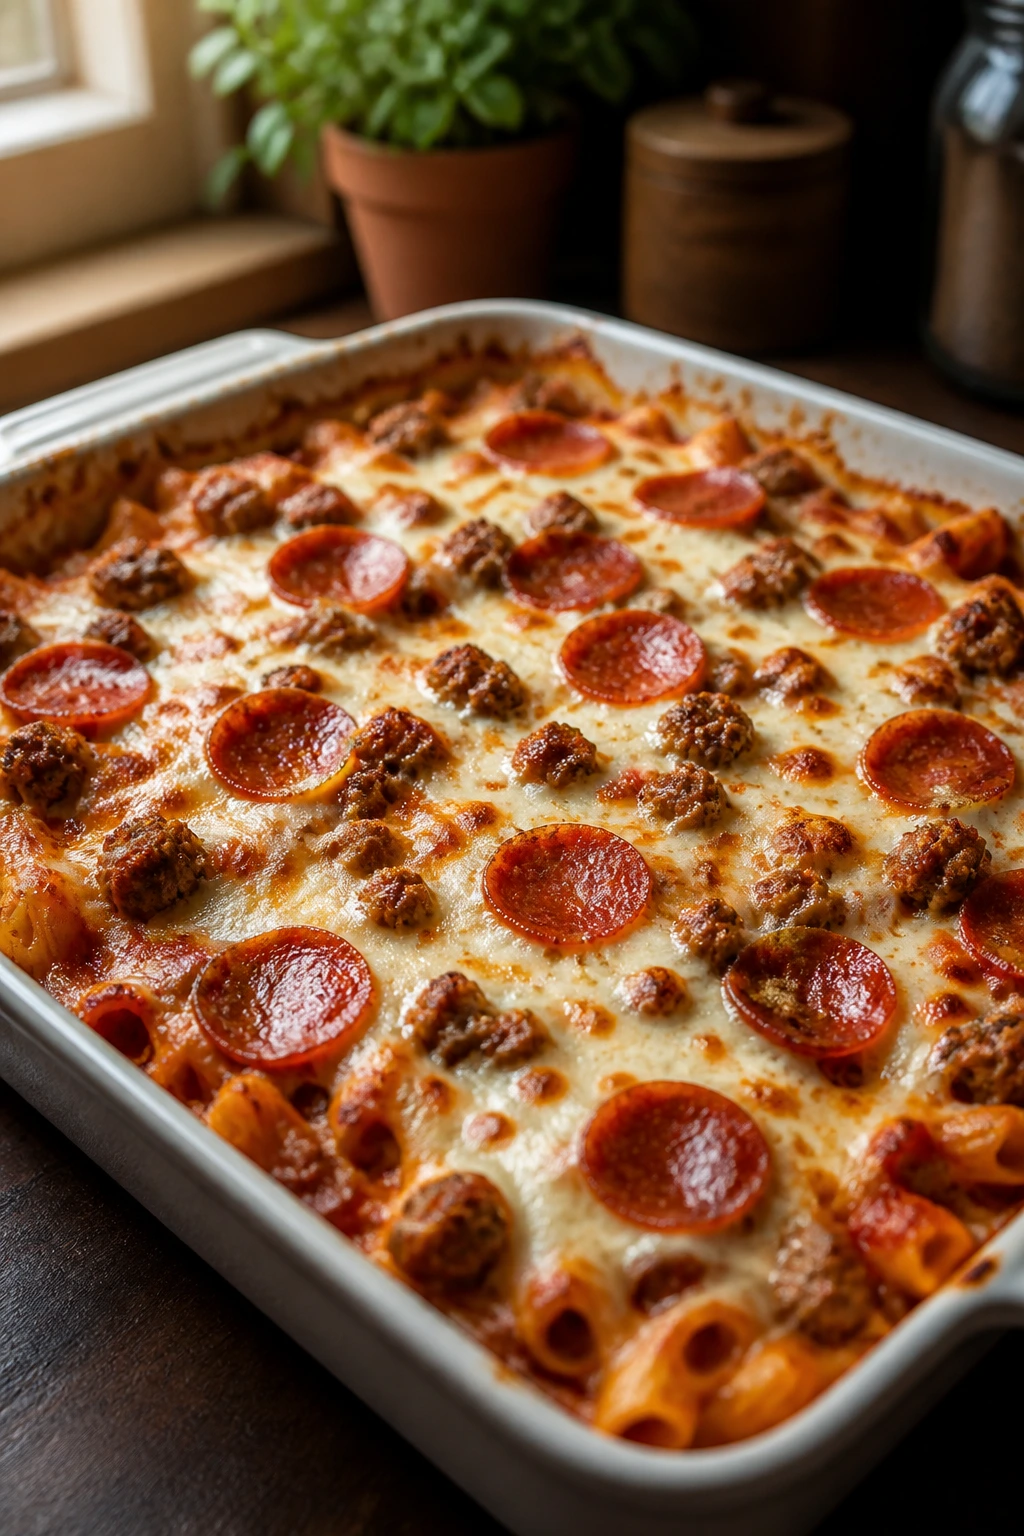
This one tastes like the dinner version of a pizza night that got smarter. You still get the sausage, tomato sauce, mozzarella, and pepperoni, but everything comes together in a way that fills more plates and less time. It’s the kind of pan that disappears fast because nobody has to negotiate toppings.
Families like this casserole because it feels familiar on the first bite. Busy cooks like it because it assembles quickly, can wait in the fridge, and reheats without making a mess. If you have kids who treat pizza like a food group, this one earns its place.
Why It Works
Pasta is a better base than pizza dough when you need a make-ahead dinner. It holds sauce, stretches servings, and does not get soggy as quickly once it cools. Italian sausage and pepperoni bring built-in seasoning, so you do not need to load the pan with extra herbs to make it taste like something.
Key Ingredients
- 12 ounces rotini or penne — Spirals and tubes catch the sauce.
- 1 pound Italian sausage — Mild or hot, depending on your crowd.
- 1 small onion, diced — Adds sweetness to the sausage.
- 3 cloves garlic, minced — A must for the sauce.
- 24 ounces marinara sauce — Use one with decent tomato flavor.
- 1 1/2 cups shredded mozzarella, 1/2 cup Parmesan — The cheese layer.
- 1 cup sliced pepperoni — That classic pizza flavor.
- 1 cup chopped bell pepper or mushrooms — Optional, but good if your family likes vegetables.
- 1 teaspoon oregano, salt, and pepper — Just enough seasoning.
Quick Steps
-
Cook the pasta: Boil the pasta until just shy of al dente and drain.
-
Brown the sausage: Cook the sausage and onion over medium heat until browned, then stir in the garlic for 30 seconds.
-
Add sauce and pasta: Stir in the marinara, oregano, salt, and pepper, then toss with the pasta.
-
Assemble: Transfer to a greased casserole dish, sprinkle on mozzarella and Parmesan, and top with pepperoni.
-
Bake: Cover and refrigerate up to 24 hours, or bake at 375°F (190°C) for 25 to 30 minutes until hot and bubbly.
-
Rest: Let it sit for 5 minutes so the cheese settles.
Tips and Variations
- Kid move: Leave the vegetables on the side if your crew picks them out.
- Flavor option: A few sliced olives give it a more pizza-shop feel.
- Shortcut: Use jarred pizza sauce if that is what you already have.
12. Sloppy Joe Biscuit Casserole
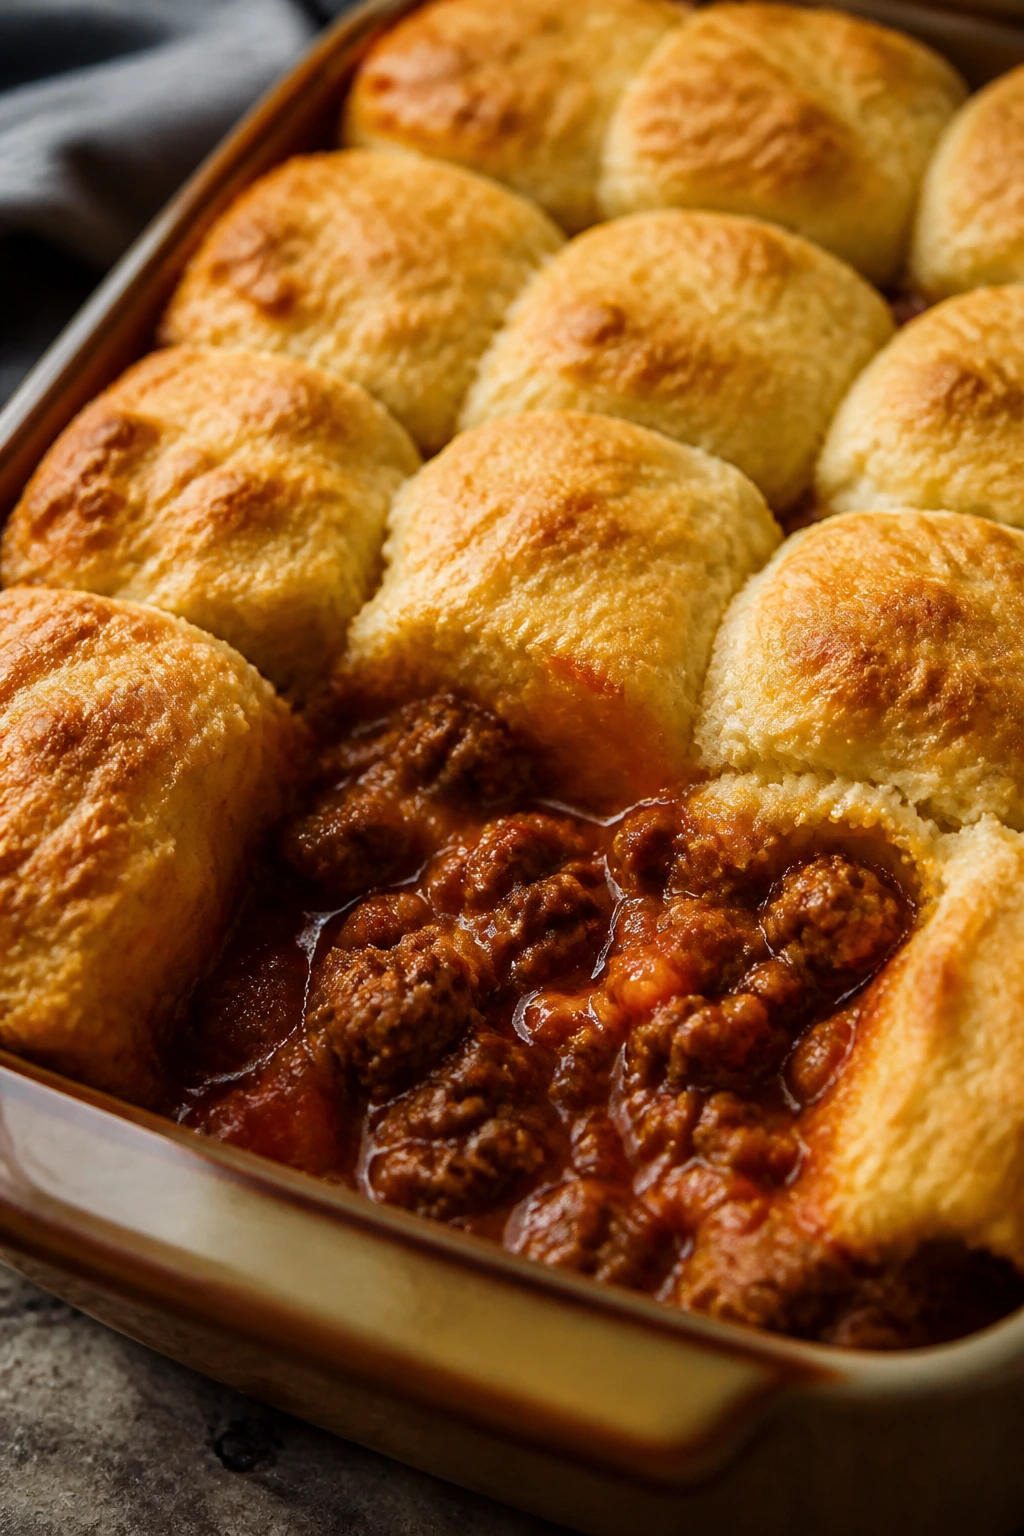
This casserole has the loud, sweet-savory flavor of sloppy joes and the comfort of biscuits baking on top. The filling bubbles underneath, the biscuit pieces brown above it, and the whole thing tastes like the dinner table got a little more relaxed on purpose. It is messy in the best possible way.
A dish like this works for busy families because it feels like fun food but still counts as a real meal. You can make the filling ahead, keep the biscuit dough separate, and bake the top fresh when it’s time to eat. That keeps the biscuits from getting soggy, which is the one thing that can ruin the whole point.
Why It Works
The filling needs to be thick and a little glossy so it does not soak the biscuits too much. Tomato paste deepens the sauce, brown sugar softens the acidity, and Worcestershire adds the savory note that makes sloppy joe flavor taste complete. The biscuit topping bakes into a soft, golden crust that grabs the sauce underneath.
Key Ingredients
- 1 1/2 pounds ground beef or turkey — Beef is richer; turkey is lighter.
- 1 onion, 2 cloves garlic — The savory base.
- 1 cup ketchup, 2 tablespoons tomato paste — Sweet and concentrated tomato flavor.
- 2 tablespoons brown sugar, 1 tablespoon Worcestershire, 1 teaspoon yellow mustard — The classic sloppy joe balance.
- 1 cup beef broth — Keeps the filling saucy.
- 2 cups shredded cheddar — Melts into the filling.
- 1 tube refrigerated biscuit dough, about 8 biscuits — The top layer.
- Salt, pepper, and 1/2 teaspoon paprika — Helps the sauce taste rounded.
Quick Steps
-
Make the filling: Brown the meat and onion in a large skillet. Drain if needed, then add the garlic for 30 seconds.
-
Season and simmer: Stir in ketchup, tomato paste, brown sugar, Worcestershire, mustard, broth, paprika, salt, and pepper. Simmer 5 to 7 minutes until thick.
-
Assemble: Spread the filling in a greased casserole dish and sprinkle on the cheddar.
-
Add biscuits: Cut the biscuit dough into halves or quarters and place the pieces over the top.
-
Bake: Bake at 400°F (205°C) for 20 to 25 minutes until the biscuits are browned and the filling bubbles.
-
Rest slightly: Let it sit 5 minutes before serving.
Tips and Variations
- Make-ahead note: Build the filling ahead, but add biscuits right before baking.
- Swap idea: A little chopped bell pepper fits nicely in the filling.
- Serving idea: Pickles on the side are not mandatory, but they work.
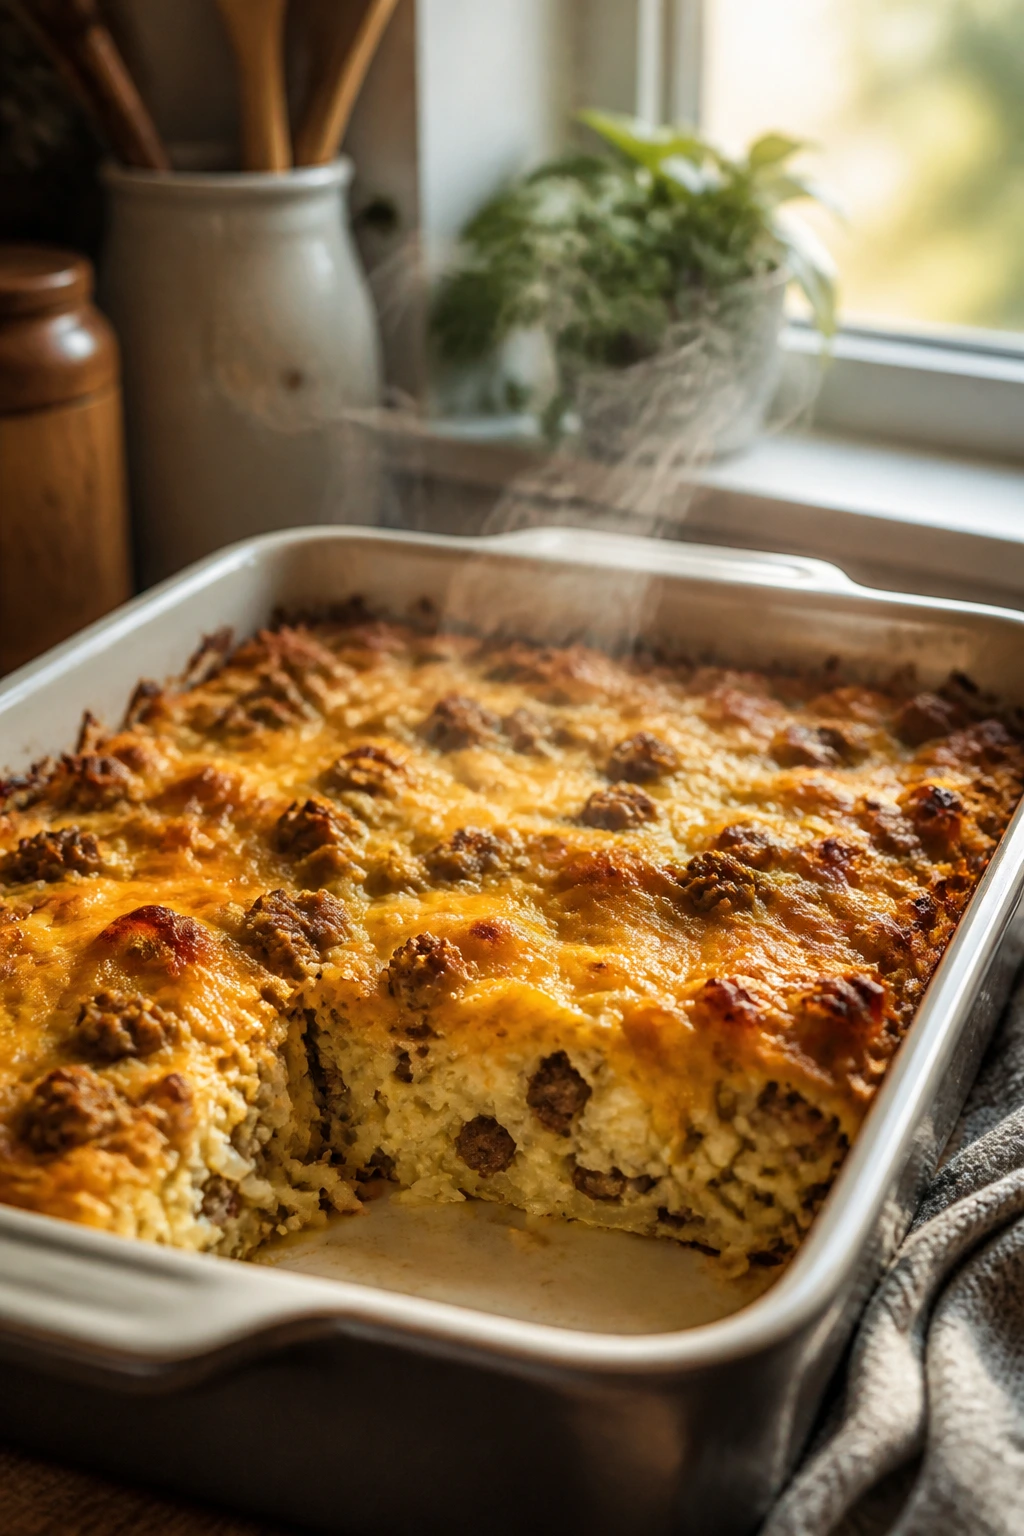
13. Turkey Tater Tot Casserole
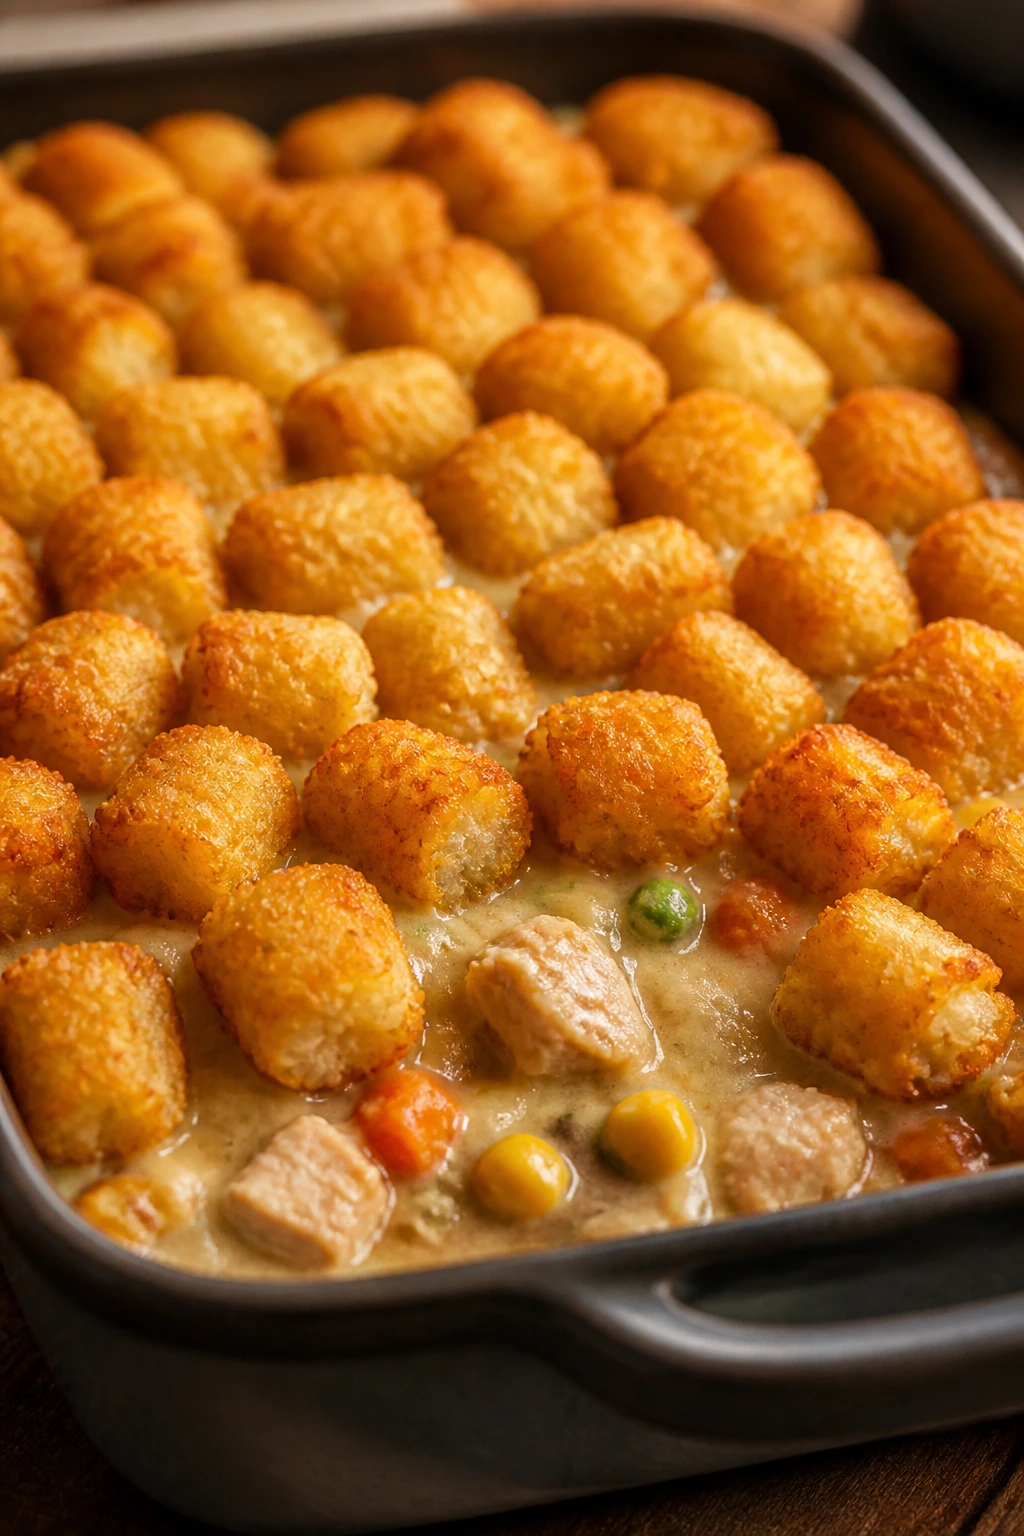
Tater tot casserole is not trying to be elegant, and that is part of its charm. Crispy potatoes on top, a creamy turkey filling underneath, and a layer of cheese in the middle make it feel like something kids will actually eat without a speech. It bakes up golden and practical.
This is one of the strongest make ahead casseroles for busy families because the whole pan can be assembled, chilled, and baked without much fuss. Ground turkey keeps it lighter than the beef version, but the casserole still feels substantial thanks to the potatoes and vegetables. It also freezes well, which makes it a good backup dinner.
Why It Works
The filling stays creamy because it uses a simple sauce base rather than a loose gravy. Frozen mixed vegetables are already chopped and ready, which saves time and adds color without extra prep. Tater tots on top give you a crisp layer that helps the casserole feel finished instead of soft all the way through.
Key Ingredients
- 1 1/2 pounds ground turkey — A lean protein that still works in a rich casserole.
- 1 onion, diced — Adds flavor to the turkey.
- 2 cups frozen mixed vegetables — Peas, carrots, corn, and green beans all fit.
- 1 can (10.5 ounces) condensed cream of mushroom soup — The quick creamy binder.
- 1/2 cup milk, 1 teaspoon Worcestershire sauce — Loosens and seasons the filling.
- 2 cups shredded cheddar — Melts into the middle.
- 1 bag (32 ounces) frozen tater tots — The top.
- Salt, pepper, and 1/2 teaspoon paprika — Simple seasoning.
Quick Steps
-
Cook the turkey: Brown the turkey and onion in a skillet over medium heat until no pink remains.
-
Mix the filling: Stir in the vegetables, soup, milk, Worcestershire, paprika, salt, and pepper. Cook for 2 minutes until combined.
-
Assemble: Spread the filling in a greased casserole dish, top with the cheese, and then arrange the tater tots in a single layer.
-
Chill or bake: Cover and refrigerate up to 24 hours, or bake at 400°F (205°C) for 35 to 40 minutes.
-
Watch the top: Bake until the tater tots are browned and crisp and the filling bubbles around the edges.
-
Rest and serve: Let it stand 5 to 10 minutes before scooping.
Tips and Variations
- Crunch tip: A light spray of oil on the tater tots helps them brown better.
- Swap idea: Ground beef gives a more traditional flavor.
- Finish: Chopped parsley or green onions keep the pan from looking too beige.
14. Creamy Mushroom Spinach Orzo Bake
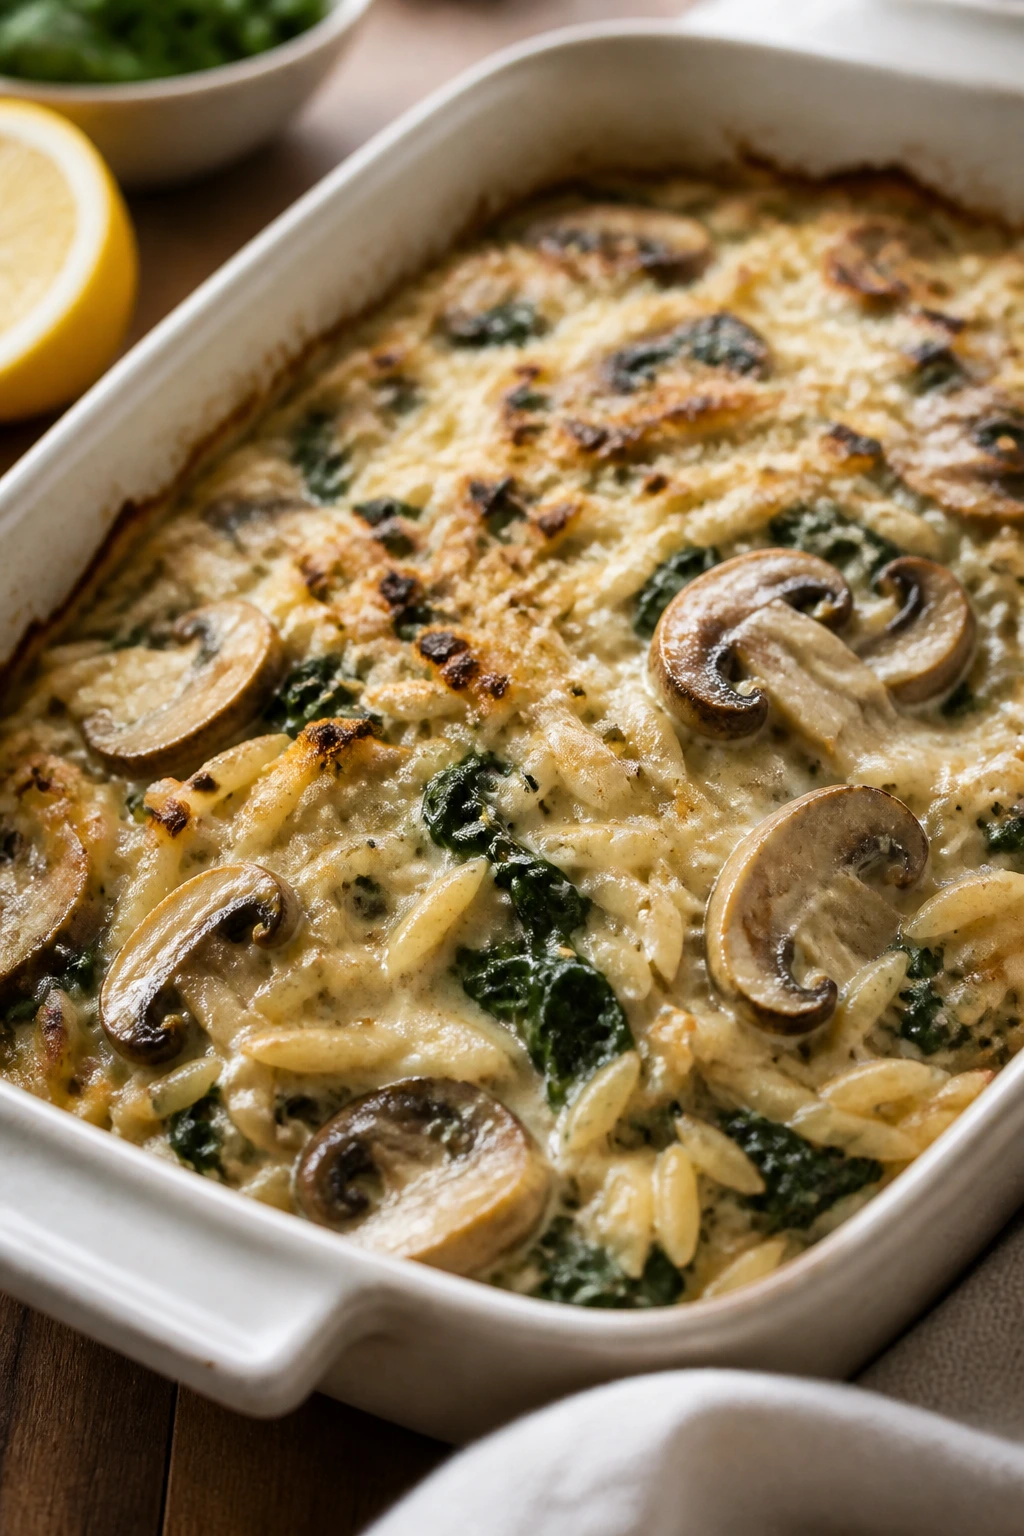
Orzo makes a casserole feel a little more polished without making it fussy. The mushrooms bring deep, earthy flavor, the spinach melts into the sauce, and the top browns into a soft crust that feels more elegant than the work it asks from you. It’s creamy, soothing, and quietly useful.
This is a good choice when you want a meatless make-ahead dinner that still feels like dinner. The grains are small enough to soak up sauce well, and the whole pan reheats without turning gluey if you keep the liquid balanced. I like serving it with chicken or roasted vegetables on the side, but it stands alone just fine.
Why It Works
Orzo behaves a bit like pasta and a bit like rice, which makes it ideal for a baked casserole. The mushrooms cook down into the sauce and give it body, while spinach adds color and a softer texture so the dish does not feel too dense. A little lemon zest at the end keeps the creaminess from feeling heavy.
Key Ingredients
- 12 ounces orzo — Small pasta that bakes well in sauce.
- 16 ounces mushrooms, sliced — Use cremini for deeper flavor.
- 3 tablespoons butter, 3 cloves garlic — The flavor base.
- 3 tablespoons flour, 2 cups milk, 1 cup vegetable broth — The sauce.
- 5 ounces baby spinach — It wilts down quickly.
- 1 cup grated Parmesan, 1 cup shredded mozzarella — Salt, melt, and finish.
- 1 teaspoon lemon zest, salt, pepper, and thyme — The bright finish.
Quick Steps
-
Cook the orzo: Boil the orzo until 2 minutes shy of al dente, then drain.
-
Cook the mushrooms: Melt butter in a skillet over medium heat. Add the mushrooms and cook until browned and their liquid has mostly evaporated, about 8 minutes.
-
Make the sauce: Add the garlic for 30 seconds, stir in the flour, then whisk in the milk and broth until thick.
-
Combine: Stir in the spinach, cheeses, lemon zest, salt, pepper, thyme, and orzo. Transfer to a greased casserole dish.
-
Bake: Refrigerate up to 24 hours or bake at 375°F (190°C) for 20 to 25 minutes until bubbling and lightly golden.
-
Rest: Let it stand 5 minutes before serving.
Tips and Variations
- Texture tip: If the mixture looks too thick before baking, splash in 1/4 cup broth.
- Protein add-on: Shredded chicken folds in easily if you want it heartier.
- Flavor finish: Extra Parmesan right before serving makes the top taste sharper.
15. BBQ Chicken Cornbread Casserole
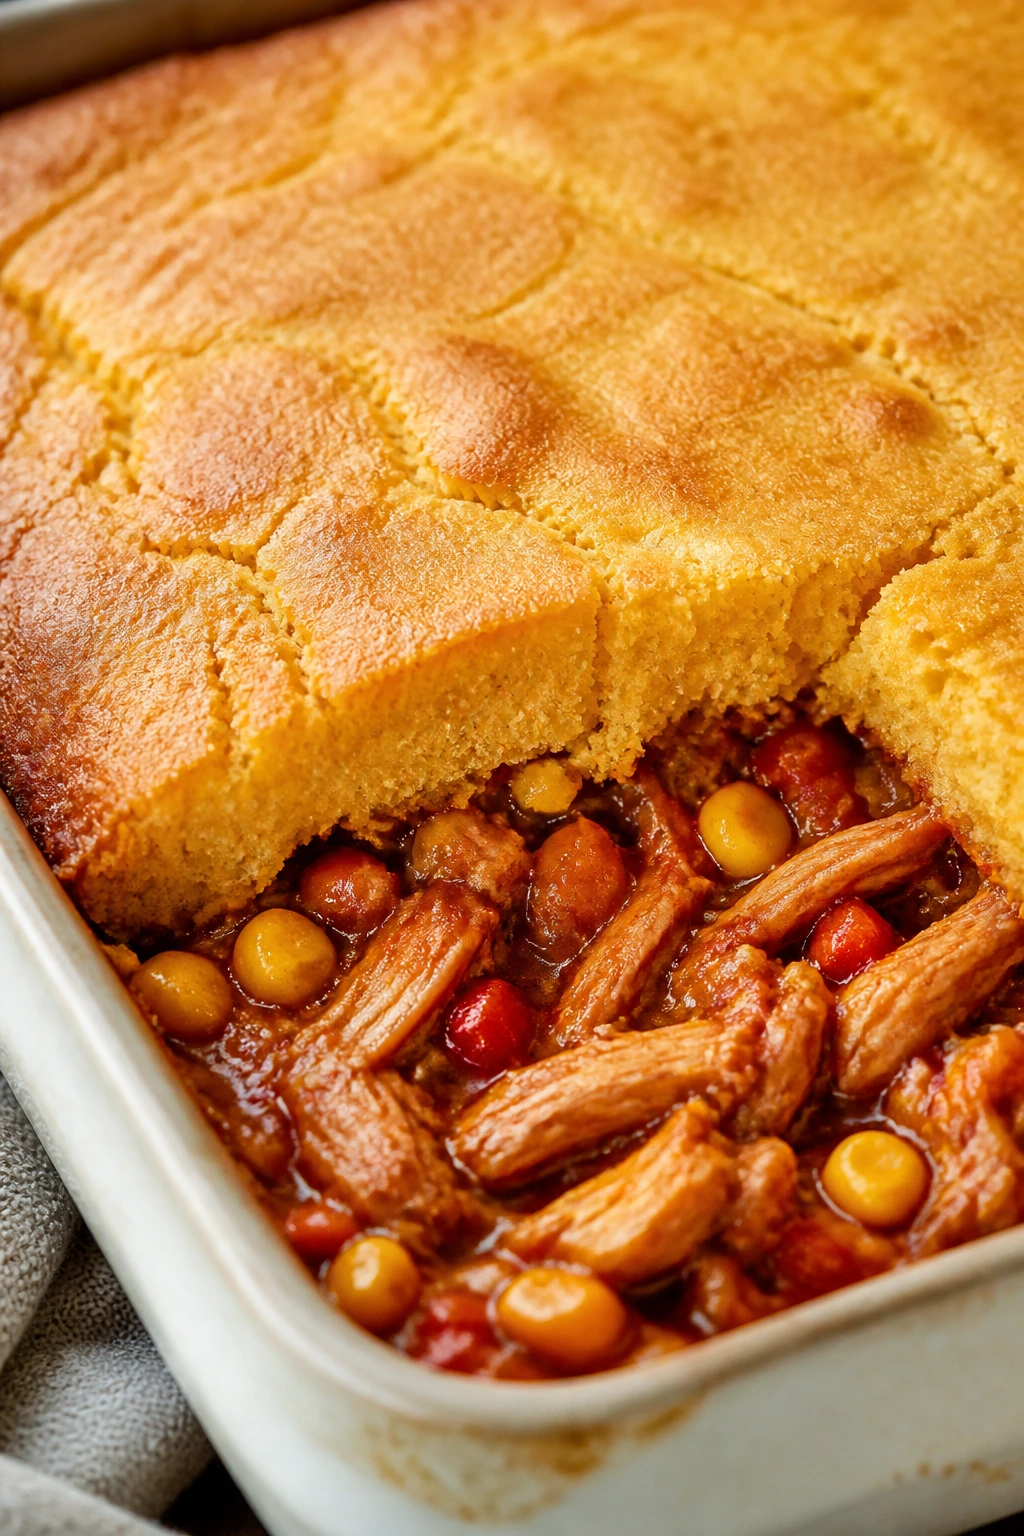
This is the casserole I make when I want dinner to feel friendly and a little smoky. Barbecue sauce gives the chicken its personality, corn adds sweetness, and the cornbread top bakes into a golden lid that soaks up just enough sauce to stay tender. It tastes like a cookout moved indoors.
A make-ahead casserole for busy families should be practical and forgiving, and this one is both. You can mix the filling earlier, keep the cornbread batter separate, and bake it when you’re ready. The contrast between the saucy bottom and the soft, crumbly top is the whole point.
Why It Works
BBQ sauce brings both flavor and moisture, which means the chicken stays juicy after a fridge rest. Corn and bell pepper add sweetness and a little texture, and the cornbread top acts like a built-in side dish. The trick is to keep the batter separate until baking day so the topping stays light instead of soggy.
Key Ingredients
- 3 cups shredded cooked chicken — Rotisserie chicken is perfect here.
- 1 1/2 cups barbecue sauce — Choose one with a flavor your family already likes.
- 1 can (15 ounces) corn, drained — Sweetness and texture.
- 1 bell pepper, diced, and 1/2 cup red onion, diced — Fresh crunch in the filling.
- 2 cups shredded cheddar — Melts into the filling and on top.
- 1 box cornbread mix — Or use your favorite homemade batter.
- 1 egg and 1/3 cup milk, or the amount your mix calls for — To make the topping.
- 1/2 teaspoon smoked paprika, green onions for garnish — Optional, but useful.
Quick Steps
-
Mix the filling: Combine the chicken, barbecue sauce, corn, bell pepper, red onion, smoked paprika, and half the cheddar.
-
Assemble the base: Spread the mixture in a greased casserole dish.
-
Make the cornbread batter: Stir together the cornbread mix, egg, and milk according to the package or your recipe.
-
Add the topping: Pour the batter over the chicken mixture and sprinkle on the remaining cheddar.
-
Bake: Bake at 375°F (190°C) for 30 to 35 minutes until the cornbread is golden and a toothpick comes out clean.
-
Rest and finish: Let it sit for 10 minutes, then top with green onions.
Tips and Variations
- Make-ahead note: Keep the cornbread batter separate until baking time.
- Swap idea: Pulled pork works if that’s what you have.
- Serving idea: Coleslaw on the side gives the casserole a crisp edge.
Why the Casserole Method Works So Well for Busy Nights
Casseroles earn their keep by doing the dull part of dinner work in one pan. You get a starch, a protein, vegetables, sauce, and often cheese, all locked together so the oven can finish the job while you do something else. That alone is useful. The part people forget is that the resting time matters too — a casserole thickens and settles after baking, which makes it easier to serve cleanly than a skillet dinner that has to be eaten the second it is done.
Make-ahead casseroles also fit the rhythm of real family life. You can assemble them before pickup, before a practice run, before a long commute home, or before the kitchen turns into a traffic jam. Some of them bake better from cold; others are happier when the topping is added at the last minute. Once you learn that difference, you stop fighting dinner and start using it to your advantage.
There is also a texture reason these dishes hold up. Pasta, rice, potatoes, tortillas, and hash browns all behave differently in the oven, but they share one useful trait: they absorb flavor without falling apart if you season them well and give them enough moisture. That is why so many casseroles taste even better after a night in the fridge. The flavors settle in. The pan gets friendlier.
Essential Equipment for These Recipes
- 9×13-inch baking dish — The workhorse pan for most of these casseroles.
- Large skillet — Needed for browning meat, softening onions, and building flavor before baking.
- Medium saucepan — Useful for white sauces, cheese sauces, and quick gravies.
- Large mixing bowls — You’ll want at least two for tossing fillings and whisking sauces.
- Whisk — Helps keep milk-based sauces smooth instead of lumpy.
- Wooden spoon or heatproof spatula — Good for breaking up meat and folding fillings together.
- Measuring cups and spoons — These casseroles depend on the right balance of liquid and starch.
- Colander — Handy for draining pasta, rice, and vegetables.
- Aluminum foil — Essential for covering casseroles during chill time and the first part of baking.
- Instant-read thermometer — Helpful for confirming that chicken and egg-based casseroles reach a safe temperature.
- Box grater — Freshly grated cheese melts better than pre-shredded cheese.
- Sharp chef’s knife and cutting board — For onions, peppers, mushrooms, and herbs.
- Airtight storage containers — Make leftovers easier to portion and reheat.
Smart Shopping and Ingredient Tips
The easiest way to make a better casserole is to shop like the ingredients matter. They do. Pick sturdy shapes for pasta bakes — penne, rotini, ziti, elbow macaroni — because they hold sauce better than thin noodles. For rice casseroles, cooked rice from the day before is often better than freshly steamed rice because it’s a little drier and less likely to clump.
Cheese deserves a little care too. Buy blocks and grate them yourself when you can. Pre-shredded cheese has coatings that slow down melting, and in a casserole that difference shows up as a grainier sauce or a less stretchy top. Sharp cheddar, Monterey Jack, mozzarella, Parmesan, and Gruyère all do different jobs, and mixing two cheeses usually gives a better result than using one alone.
Frozen vegetables are a smart buy here, not a compromise. Corn, peas, green beans, and chopped mixed vegetables often taste cleaner than tired produce that has spent too long in the crisper drawer. If you use frozen vegetables, thaw and drain them when moisture matters, especially in pasta and rice casseroles. Mushrooms, onions, peppers, and broccoli do better fresh because they contribute more texture.
For meat, look for something with enough flavor to carry the pan. Ground beef around 85 to 90 percent lean gives you flavor without too much grease. Chicken thighs bring more moisture than breast meat, though both work. Rotisserie chicken is one of the best shortcuts in this entire category because it saves time and adds seasoning without extra effort.
Sauce is the place where people sometimes get lazy and regret it later. If you use canned soup, choose one with a flavor that fits the dish and keep the salt in check. If you make a sauce from scratch, let it thicken a little more than you think it needs to before baking. Casseroles loosen in the oven. They do not tighten.
How to Serve These Recipes
Presentation: Serve casseroles in squares or generous spoonfuls with a bright garnish on top — chopped parsley, green onions, cilantro, or a little extra cheese. A clean edge in the pan makes the whole dinner look more intentional, so let the casserole rest before you cut it.
Accompaniments: Keep the sides simple. A green salad, roasted carrots, steamed broccoli, crusty bread, coleslaw, or fruit works across most of these dishes. For heavier bakes like mac and cheese or shepherd’s pie, a crisp salad with vinegar dressing keeps the plate from feeling too rich.
Portions: Most of these casseroles feed 6 to 8 people, with a few stretching to 10 if you serve a side or two. For a lighter meal, plan on a smaller square and an extra salad. For hungry teens or a full house, count on a more generous scoop and a second pan if you want leftovers.
Beverage Pairing: Water with lemon is fine, but dinner feels better with a little more thought. I like iced tea with Tex-Mex or BBQ casseroles, sparkling water with creamy bakes, and simple milk or a mild fruit spritzer for kid-heavy tables. If you want one all-purpose option, unsweetened iced tea is hard to beat.
Additional Tips and Flavor Boosters

Flavor Enhancement: A finishing sprinkle of fresh herbs, a squeeze of lemon, or a few grates of Parmesan can wake up a casserole that tastes a little sleepy after baking. Tiny bright additions do more than people expect, especially in creamy dishes.
Customization: Add spinach to pasta bakes, corn to Tex-Mex casseroles, mushrooms to meat sauces, or extra vegetables to rice casseroles. You do not need to rebuild the recipe to make it suit your house. Small changes are enough.
Serving Suggestions: Crunch matters. Toasted breadcrumbs, fried onions, crushed tortilla chips, or a few crisp biscuit edges make soft casseroles more satisfying. A spoonful of sour cream, salsa, pesto, or hot sauce on the side gives people room to adjust their own plate.
Make-It-Yours: For a lighter version, use turkey, chicken, or more vegetables in place of heavier meats. For dairy-free cooking, choose a plant milk with some body and use a dairy-free shredded cheese you already trust. For gluten-free baking, use rice, corn tortillas, gluten-free pasta, or potatoes as the base and thicken sauces with cornstarch instead of flour.
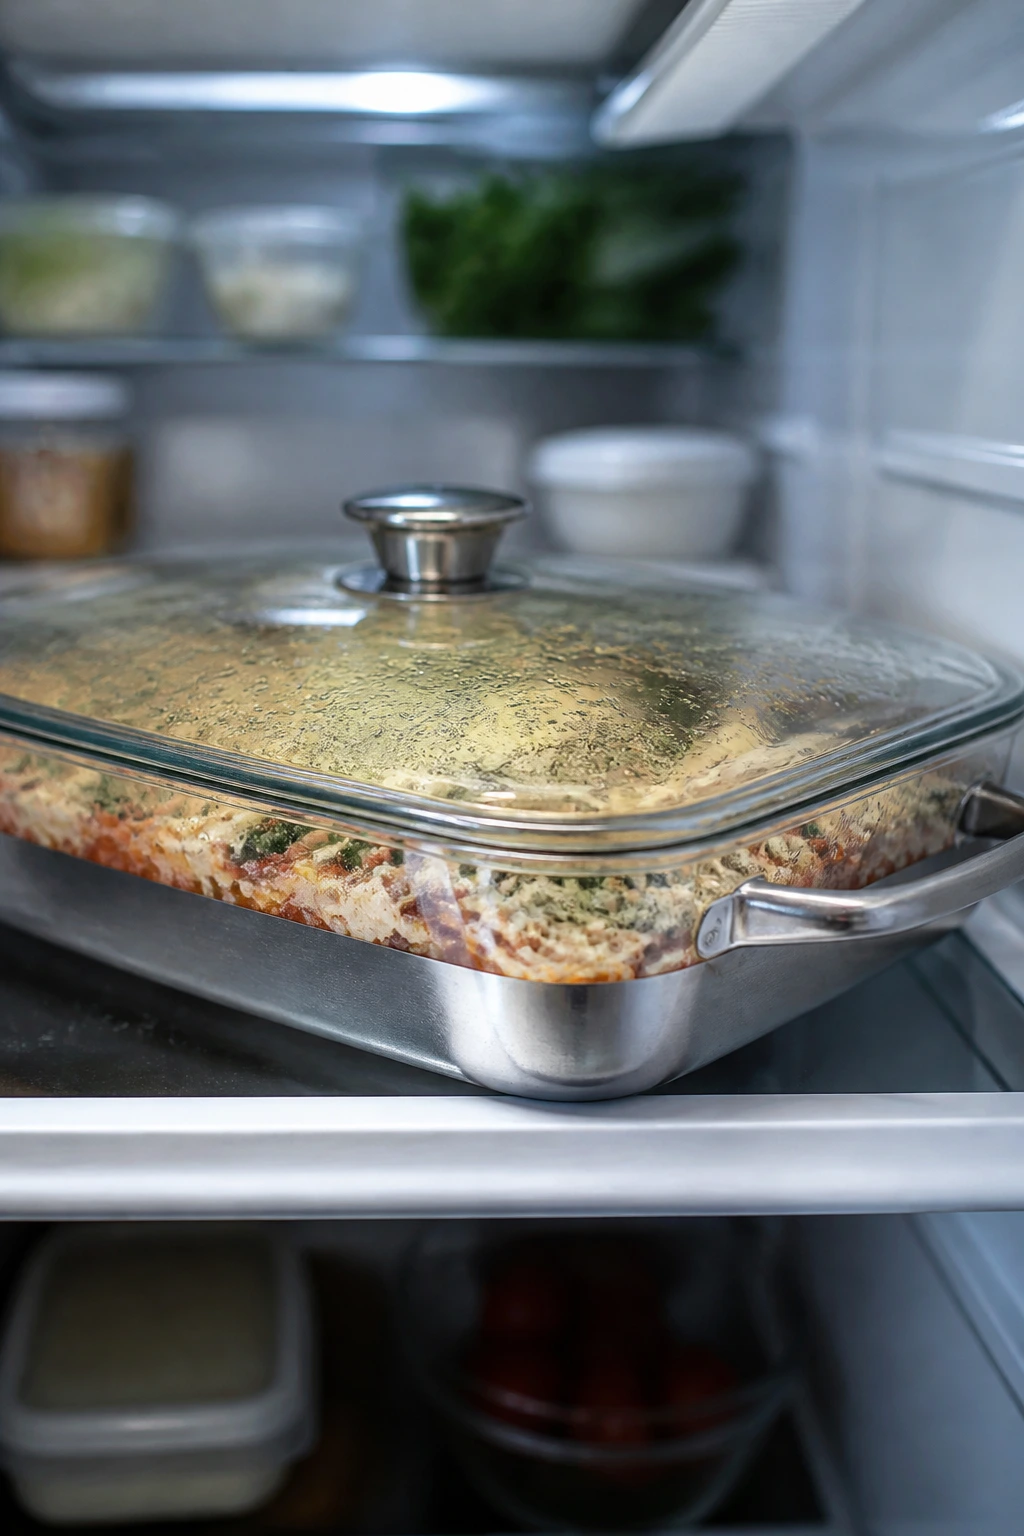
Make-Ahead, Storage, and Reheating Guidance
Most of these casseroles can be assembled up to 24 hours ahead and kept covered in the refrigerator before baking. That said, a few are happier with a split schedule. Biscuit-topped or cornbread-topped casseroles should have the topping added just before baking so it stays light and does not absorb too much liquid. Pasta, rice, and tortilla casseroles usually do fine sitting overnight.
Once baked, casseroles keep well in the refrigerator for 3 to 4 days in airtight containers. Reheat individual portions in the microwave with a loose cover, or warm a larger portion in a 325°F (165°C) oven until hot in the center. If the casserole is pasta- or rice-based, add a spoonful or two of milk, broth, or water before reheating so the starches loosen back up instead of tightening.
Freezing works best for casseroles that are not overloaded with crunchy toppings or delicate dairy sauces. Wrap the unbaked or baked casserole tightly, then freeze for up to 2 months for best flavor and texture. Thaw overnight in the refrigerator before baking or reheating. If you bake from frozen, expect a much longer cook time and cover the dish with foil for most of it so the top does not burn before the center heats through.
Food safety matters here too. Chicken and egg-based casseroles should reach 165°F (74°C) in the center when reheated. Ground beef casseroles are usually fine at that same temperature for leftovers, and eggs should be fully set. A thermometer saves guesswork. So does patience.
Variations and Adaptations to Try
Gluten-Free Pantry Swap
Use gluten-free pasta, rice, corn tortillas, or potatoes as the base, and thicken white sauces with cornstarch instead of flour. Most of the recipes here adapt cleanly without losing their shape.
Dairy-Light Family Bake
Swap in unsweetened oat milk or lactose-free milk for sauces, and use a moderate amount of a cheese you know melts well. You do not need to make the casserole dry to make it lighter.
Vegetable-Heavy Version
Stretch any of the meat casseroles with more mushrooms, peppers, spinach, green beans, broccoli, or corn. If you increase vegetables a lot, add a bit more sauce so the dish stays moist.
Mild Kid Table
Choose mild salsa, mild cheese, and less black pepper or chili powder, then put the heat on the table instead. That keeps the casserole friendly without making it bland for everyone else.
Freezer-First Assembly
Make two pans at once, bake one, and freeze the other unbaked in a disposable pan. Label it with the oven temperature and the add-time so future-you does not have to guess.
Crispier Top Finish
Add breadcrumbs, panko, fried onions, crushed chips, or extra cheese near the end of baking instead of at the beginning. The casserole still gets that crunchy contrast, and the top looks better when it reaches the table.
Common Mistakes to Avoid
Using too much liquid: The casserole looks rich before baking, then comes out loose and soupy. The fix is simple: keep sauces thick before they go in, and drain vegetables well. Pasta and rice should be coated, not swimming.
Overcooking the starch first: Pasta, rice, and potatoes can all go from tender to tired if you cook them fully before baking. Stop short by a minute or two so the oven has something left to do.
Forgetting the rest time: Straight from the oven, a casserole can slump apart and flood the plate. Five to ten minutes makes a real difference. It gives the sauce time to settle and the layers time to hold.
Adding crunchy toppings too early: Fried onions, breadcrumbs, chips, and biscuit tops lose their edge if they sit under sauce for hours. Hold them back when you can, or add them only for the last stretch of baking.
Underseasoning the base: Casseroles hide weak flavor under starch and cheese. Taste the filling before it goes into the dish and season it a little more boldly than you think you need.
Using cheese straight from the bag and calling it done: Pre-shredded cheese works in a pinch, but fresh-grated cheese melts cleaner and tastes fuller. That difference shows up fast in baked pasta and creamy casseroles.
Frequently Asked Questions

Can I assemble these casseroles the night before?
Yes, most of them can be assembled up to 24 hours ahead and kept covered in the fridge. Pasta, rice, meat, and tortilla casseroles usually handle that well, while biscuit and cornbread toppings are better added right before baking.
Which casseroles freeze best?
Bean, meat, rice, and pasta casseroles tend to freeze better than very creamy dishes with delicate toppings. Shepherd’s pie, enchilada casserole, sloppy joe filling, and tater tot casserole are especially dependable freezer meals.
Do I bake casseroles straight from the fridge?
You can, but cold dishes usually need a little extra time. Let the pan sit on the counter while the oven preheats if you can, and expect to add about 5 to 15 minutes depending on how cold it is and how dense the casserole feels.
How do I keep the top from getting soggy?
Keep crunchy toppings off until the end, and don’t flood the casserole with sauce. If the filling looks loose before baking, simmer it a little longer on the stove or reduce the added liquid.
Can I use frozen vegetables instead of fresh?
Yes, and in many casseroles they’re the better choice. Just thaw and drain watery vegetables like broccoli or green beans if they might dump extra moisture into the pan.
What if my casserole is watery after baking?
That usually means the filling started too loose or the vegetables weren’t drained well. Let it rest longer, and if you’re making it again, thicken the sauce a bit more before assembling.
How do I scale these recipes up for a crowd?
Double the filling and use two baking dishes rather than one giant deep pan. Casseroles cook more evenly in a normal 9×13-inch dish than in one extra-deep container.
Can I make these without dairy?
Some of them adapt better than others, but yes. Use a creamy plant milk, a dairy-free cheese you trust, and a little extra seasoning because dairy-free casseroles can taste flatter if you don’t season the base properly.
Keep One Pan in the Fridge
A good casserole is not glamorous. That is part of the appeal. It is dependable, it feeds people, and it buys back a little breathing room on nights when the schedule has already taken enough.
These make ahead casseroles for busy families work because they respect real life. They let you prepare early, bake later, and serve dinner with less scrambling and more actual eating. That feels like a small victory, but small victories are what keep weeknights from sliding off the rails.