
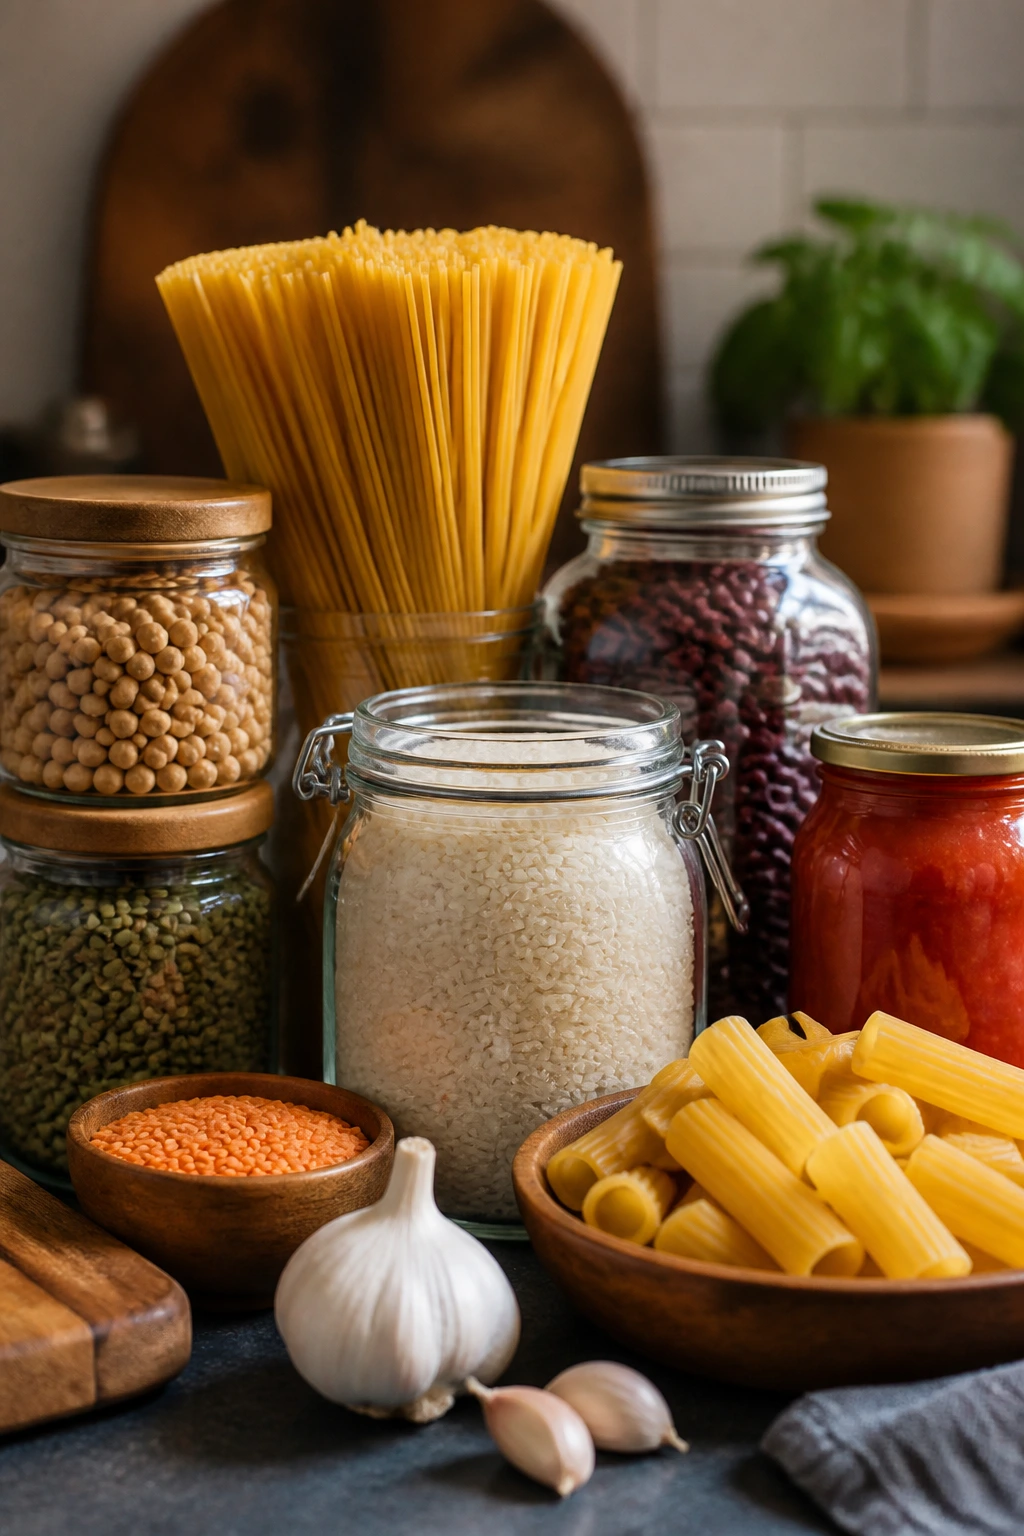
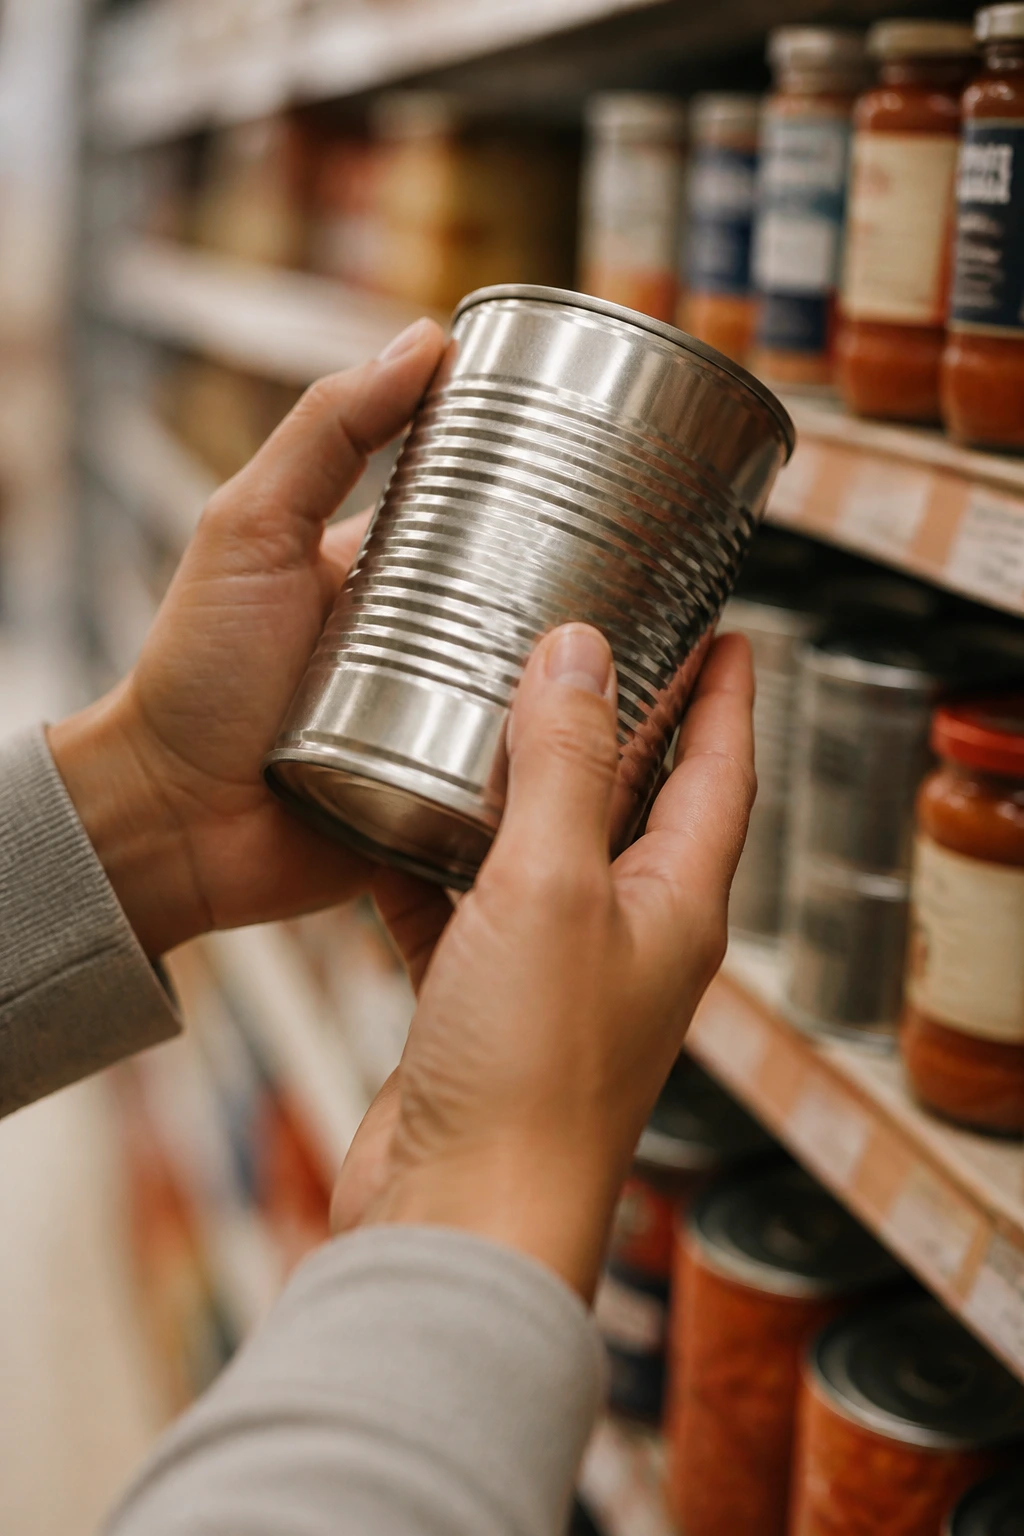
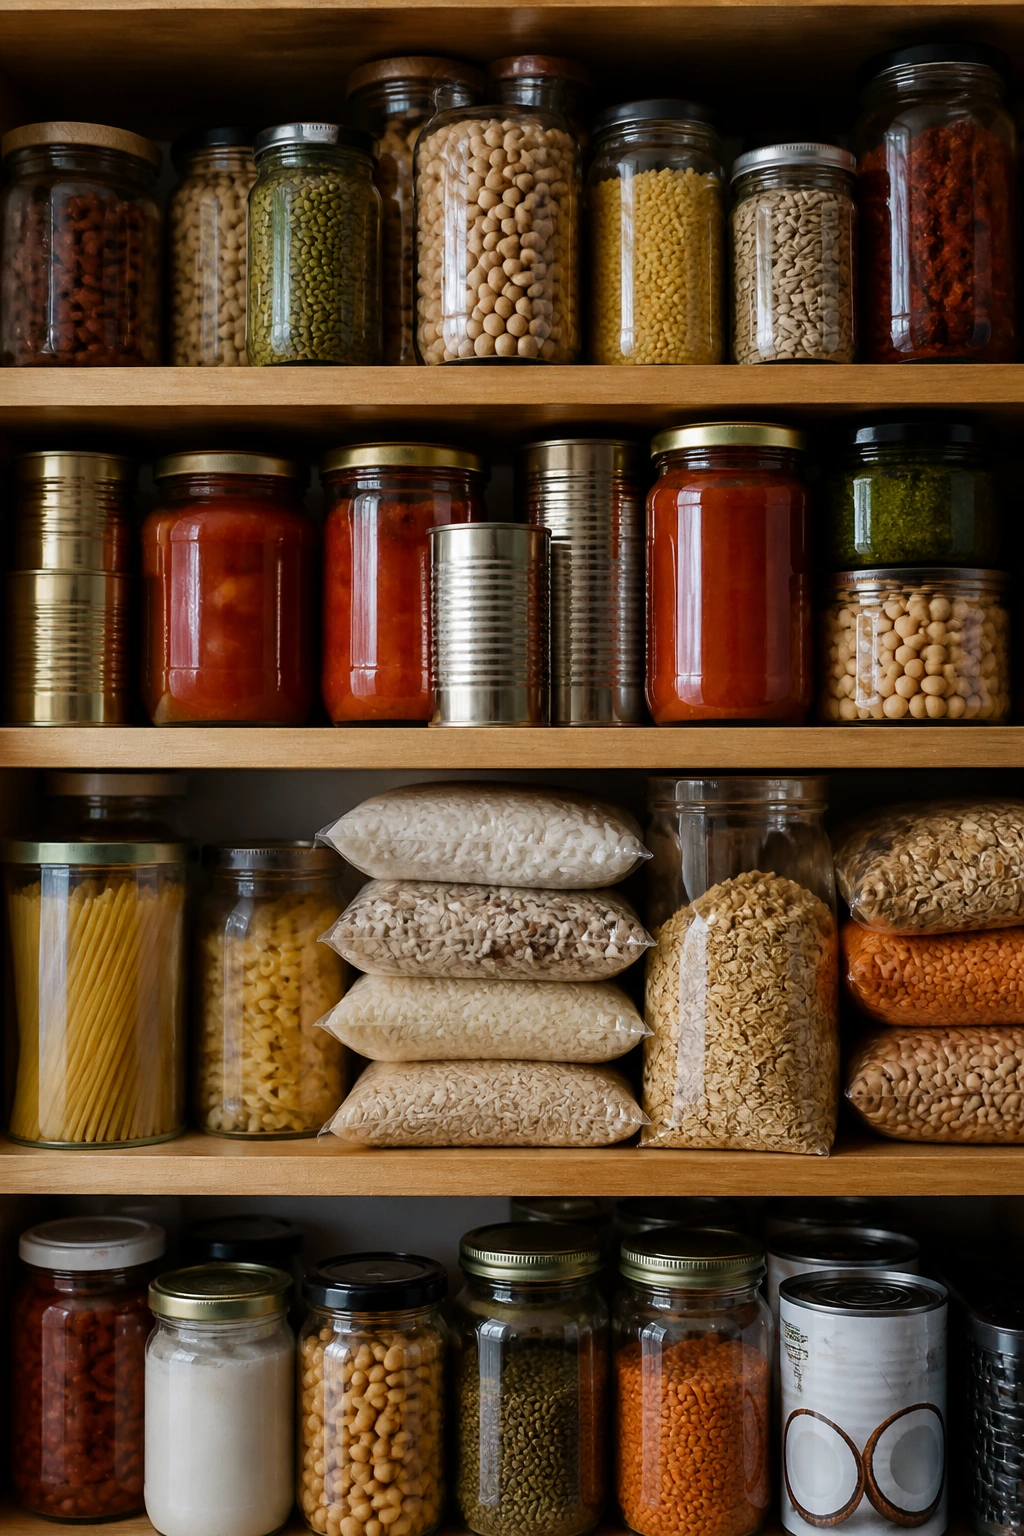
Weeknight meals that use pantry staples have a way of saving dinner when the fridge looks like a shrug. A can of tomatoes, a box of pasta, one onion, and a few garlic cloves can turn into something warm, salty, and far more satisfying than the ingredient list suggests.
The trick is not pretending the pantry can do everything. It can’t. What it can do is handle the heavy lifting: beans for body, rice or noodles for bulk, canned fish or eggs for protein, and tomato, vinegar, lemon, or chili for the sharp edge that keeps the whole thing from tasting flat. That’s why a good cupboard dinner feels bigger than the sum of its labels.
I keep coming back to pantry cooking because it rewards smart habits instead of perfect timing. Toast the spices. Salt the pasta water. Keep a jar of capers, a can of coconut milk, and a box of breadcrumbs around. Small things. Big payoff. The meals below lean on that kind of practical magic.
Why These Pantry Meals Earn a Spot on Busy Nights
-
Shelf-stable cores: Every recipe here starts with ingredients like canned beans, pasta, rice, tuna, sardines, coconut milk, or tomatoes, so a grocery run is optional, not mandatory.
-
Fast sauces: Tomato, soy, curry, lemon, and chili-based sauces come together in 10 to 15 minutes and cling to the starch instead of pooling at the bottom of the bowl.
-
Flexible protein: Beans, eggs, canned fish, and cheese can swap in or out depending on what’s on hand, which keeps these meals useful instead of fussy.
-
Low-waste cooking: These dishes are built to use the end of a jar, the last onion in the bin, or the half-box of pasta nobody has claimed.
-
Real dinner texture: You get crisp crumbs, soft beans, runny yolks, chewy noodles, and toasted edges. Not just “something hot.”
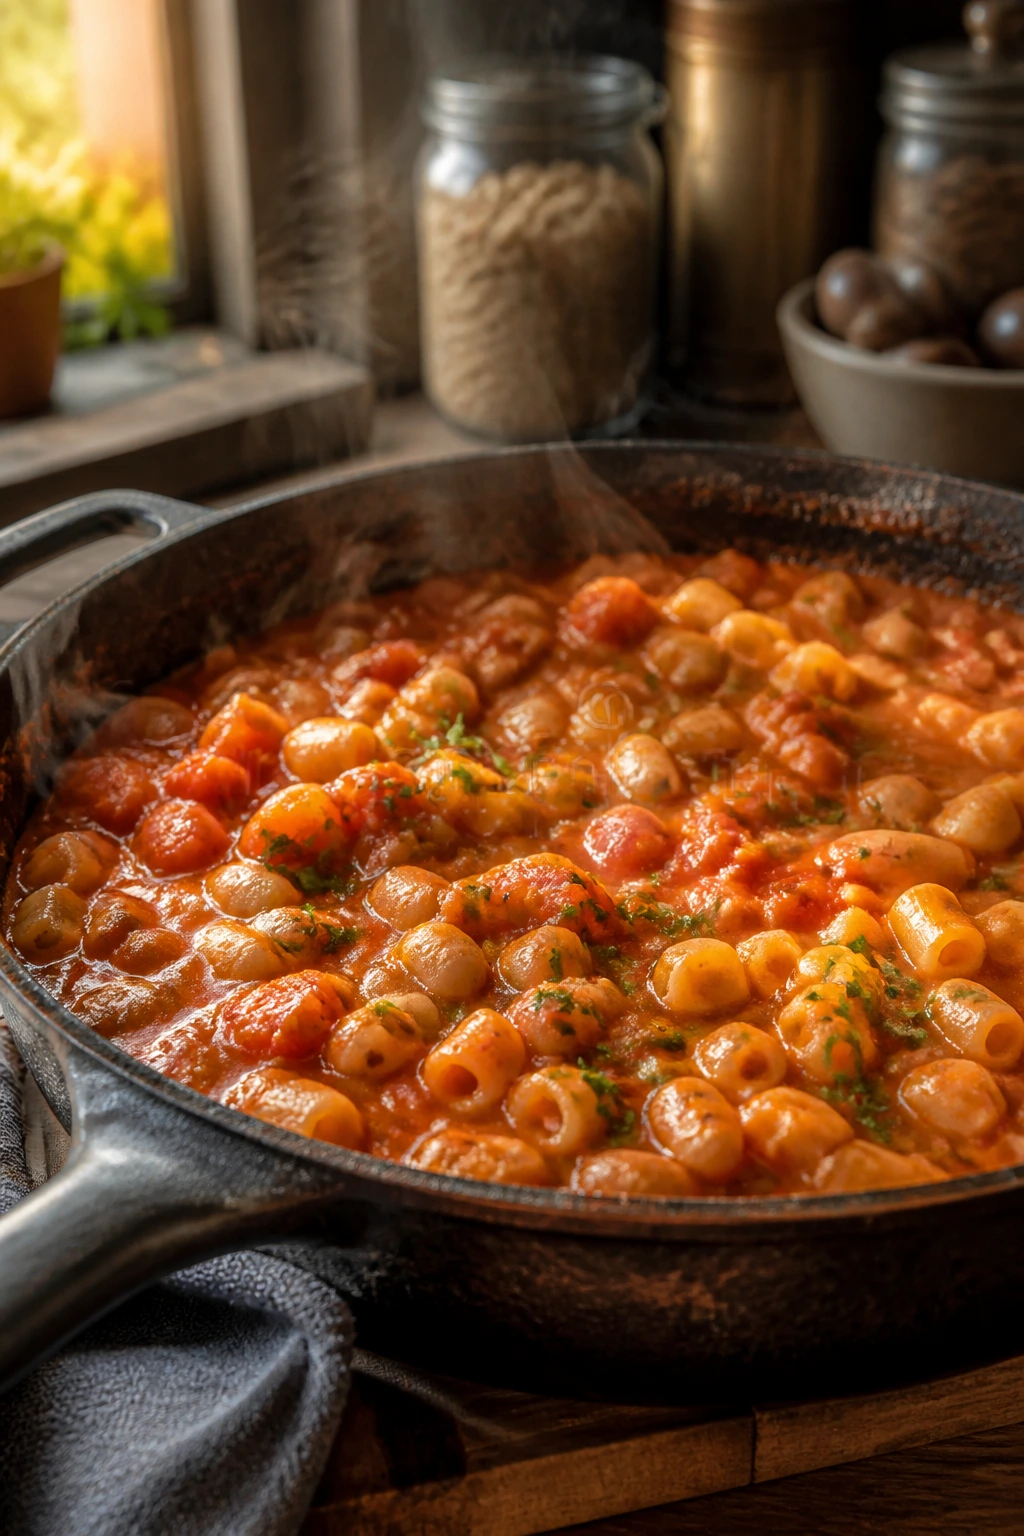
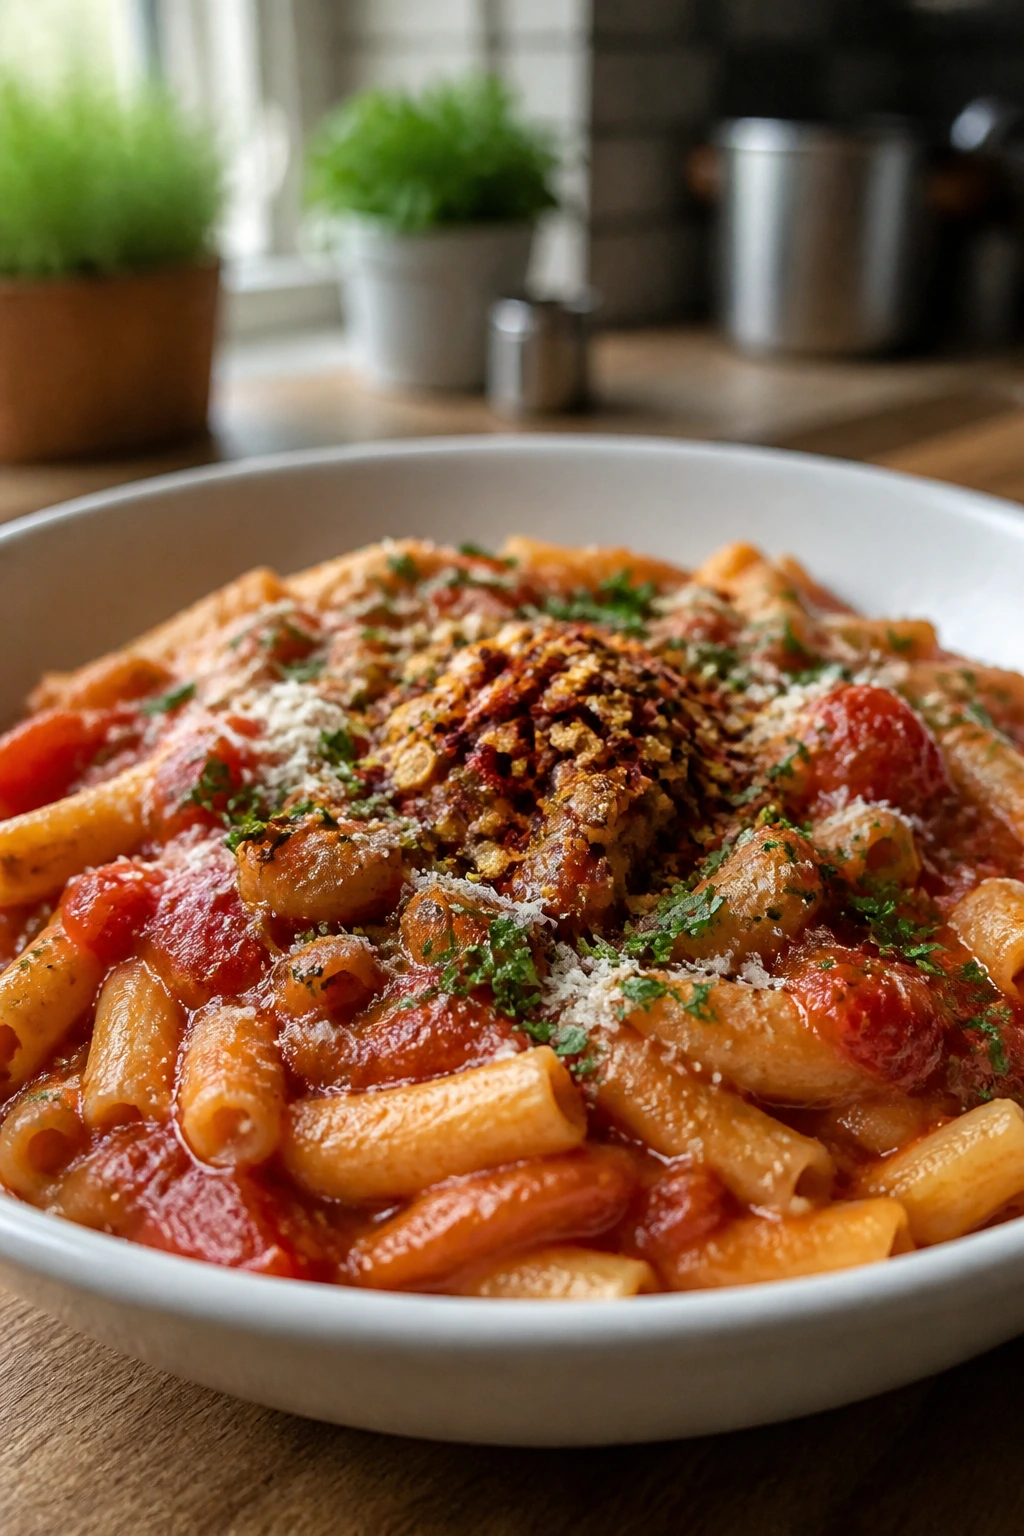
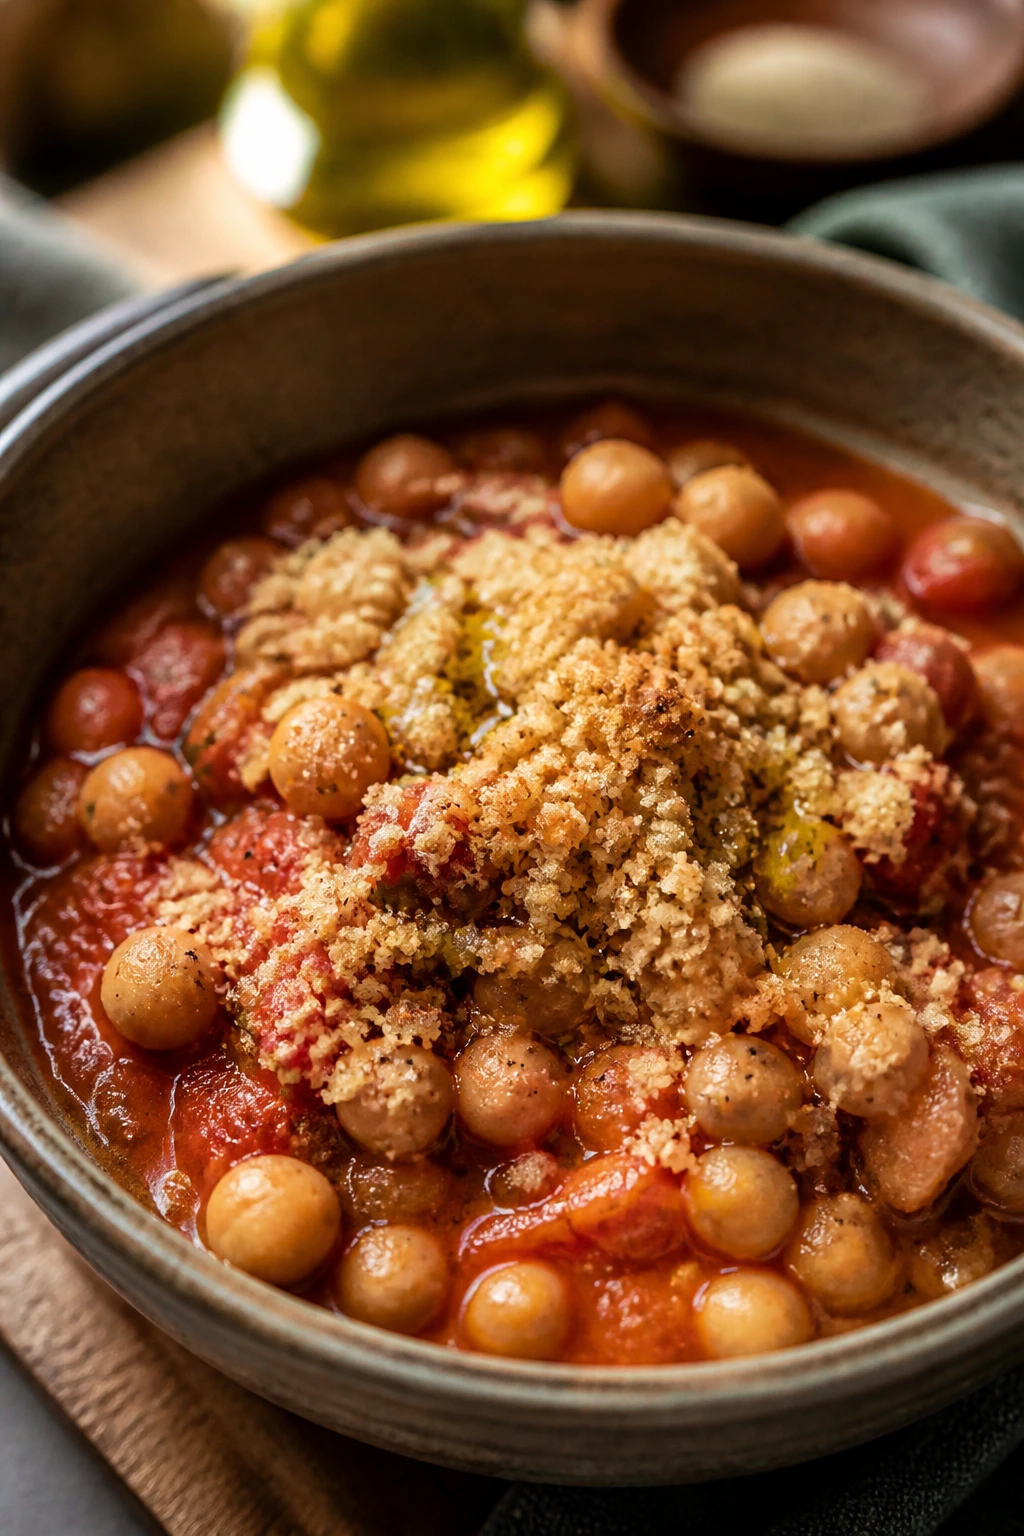
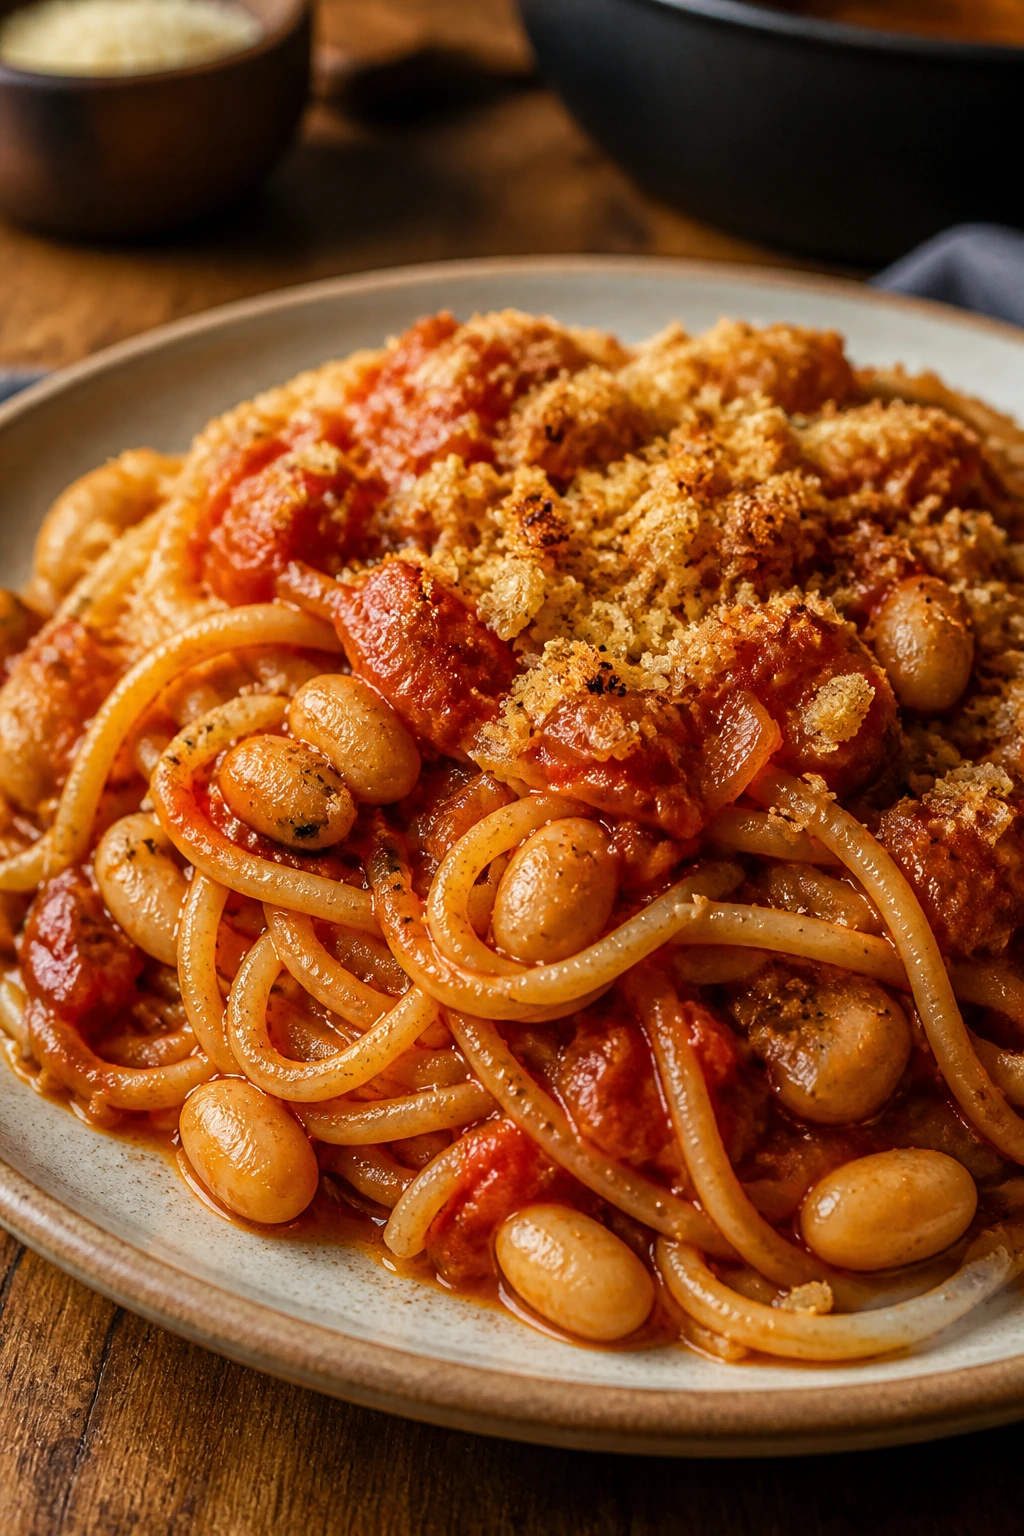
1. Tomato-Garlic Spaghetti with White Beans
This is the kind of spaghetti I make when the pantry is fine and the fridge is rude. The sauce turns glossy and brick-red, the beans soften enough to thicken it a little, and the breadcrumbs on top stay crisp if you toast them in the oil first. It tastes like a longer-cooked dinner than it is.
Why It Works:
Crushed tomatoes cook down fast, cannellini beans bring body without cream, and pasta water ties the oil and tomato together so the sauce actually clings to the noodles. The garlic gets sweet, the red pepper flakes give the sauce a small bite, and the whole pan smells like you tried harder than you did. That matters on a Tuesday.
Key Ingredients:
- 12 oz spaghetti
- 3 tbsp olive oil
- 1 cup panko breadcrumbs
- 4 garlic cloves, thinly sliced
- 1/2 tsp red pepper flakes
- 1 can (28 oz) crushed tomatoes
- 1 can (15 oz) cannellini beans, drained and rinsed
- 1 tsp kosher salt
- 1/2 tsp black pepper
- 1/2 cup reserved pasta water
- 1/2 cup grated Parmesan
- 2 tbsp chopped parsley
Quick Steps:
- Bring a large pot of salted water to a boil and cook the spaghetti until just shy of al dente, about 1 minute less than the package says.
- Meanwhile, heat 1 tablespoon of olive oil in a large skillet over medium heat. Add the breadcrumbs and toast, stirring often, until golden and crisp, about 3 to 4 minutes. Transfer to a bowl.
- Add the remaining olive oil to the skillet. Stir in the garlic and red pepper flakes and cook for 30 to 45 seconds, just until fragrant. Do not let the garlic brown.
- Pour in the crushed tomatoes, beans, salt, and pepper. Simmer for 8 to 10 minutes, until the sauce looks thicker and the beans are slightly broken down.
- Add the drained pasta and 1/2 cup pasta water. Toss over low heat for 1 to 2 minutes, then stir in the Parmesan and parsley. Finish with the toasted breadcrumbs on top.
Equipment for This Recipe:
- Large pot
- Large skillet
- Colander
- Wooden spoon
- Tongs
How to Serve This Dish:
Pile it into shallow bowls so the sauce spreads instead of disappearing. Add another pinch of breadcrumbs and a little extra black pepper on top. A simple green salad or roasted broccoli is enough beside it, though I’ll happily eat the bowl alone with a fork and a wedge of bread.
Pro Tips for This Recipe:
- Toast the breadcrumbs first. If you skip that step, the top turns soggy in minutes.
- Use whole peeled tomatoes if you want a chunkier sauce; crush them with your hands before they go in.
- Save more than 1/2 cup pasta water if your tomatoes are very thick. You may need an extra splash to loosen the sauce.
- Grate the Parmesan finely so it melts instead of clumping.
Variations on This Dish:
- Anchovy Depth: Mash 2 anchovy fillets into the oil with the garlic for a deeper, salty sauce.
- Greens-and-Beans Version: Stir in 2 cups baby spinach at the end and let it wilt for 30 seconds.
- No-Dairy Finish: Skip the Parmesan and finish with lemon zest and an extra drizzle of olive oil.
Common Mistakes to Avoid with This Dish:
- Letting the garlic burn: Burned garlic turns bitter fast. Keep the heat at medium and move quickly.
- Skipping the pasta water: Without that starchy splash, the sauce sits on the noodles instead of coating them.
- Adding too much sauce too early: If the sauce seems thin, let it simmer longer before tossing the pasta.
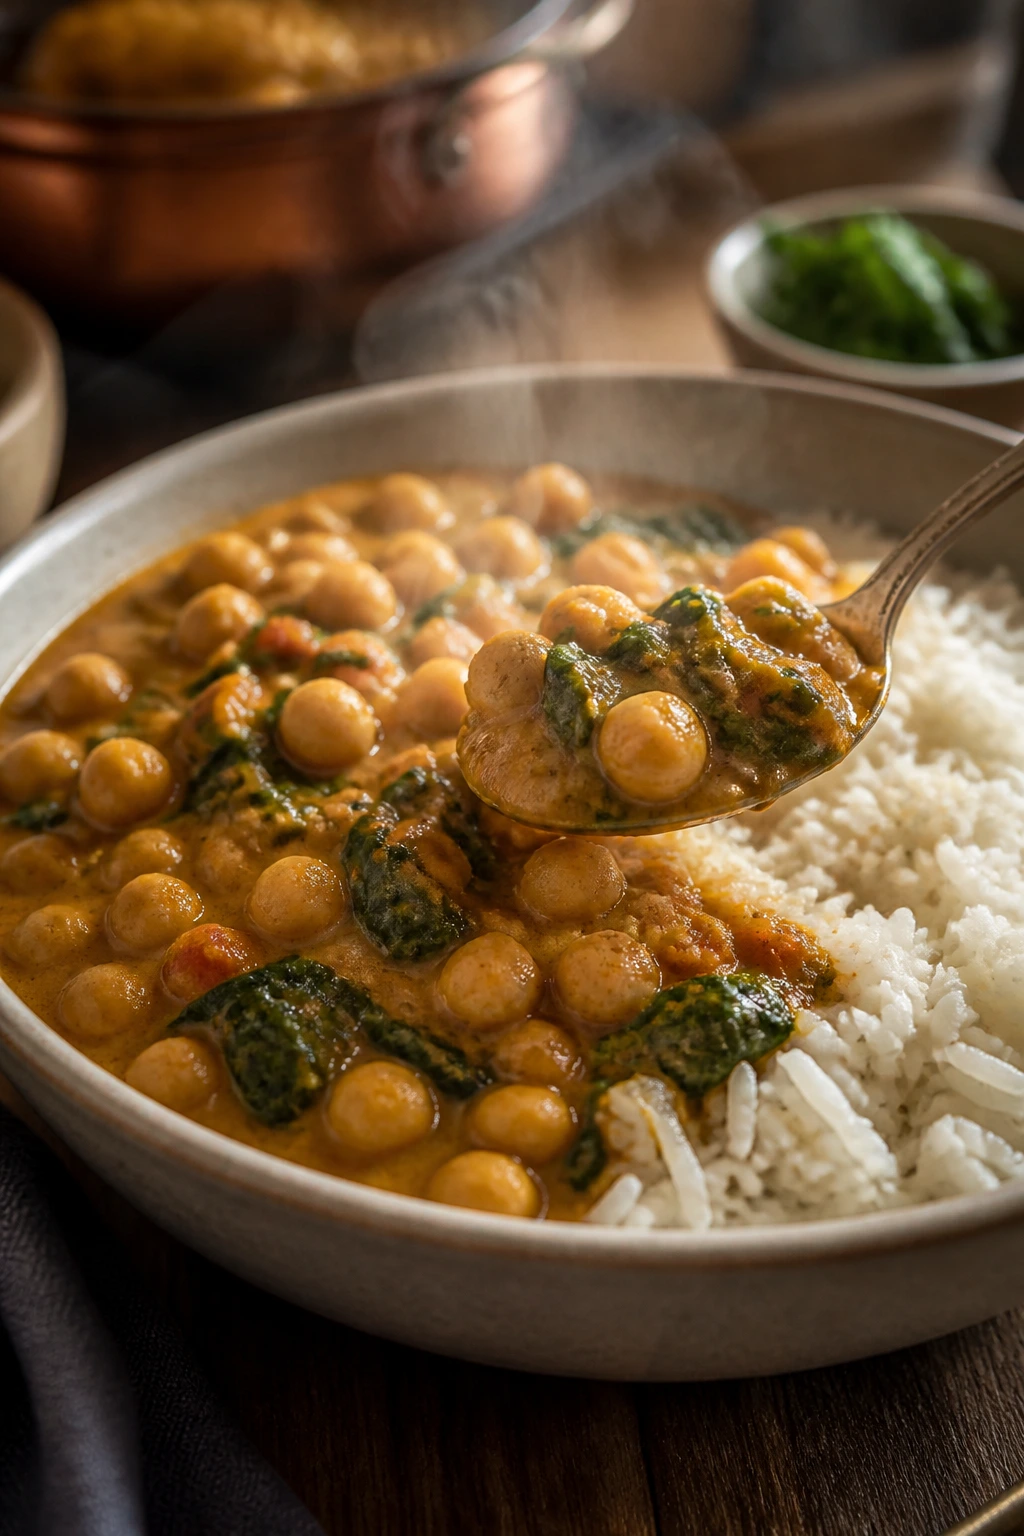
2. Chickpea Coconut Curry with Rice
This one smells rich before it even looks rich. Curry powder blooms in oil, coconut milk softens the edges, and chickpeas hold their shape while the sauce turns silky and spoonable. It’s the sort of dinner that feels like it arrived with a plan, even when the plan was “use what’s here.”
Why It Works:
Coconut milk carries spice in a way water never will, chickpeas bring enough starch to make the curry feel complete, and tomato paste adds the deep, cooked note that keeps the sauce from tasting thin. A handful of spinach at the end melts into the curry without asking for much time. Rice under it soaks up everything.
Key Ingredients:
- 1 cup jasmine rice
- 2 cups water
- 1 tbsp neutral oil
- 1 small onion, finely chopped
- 3 garlic cloves, minced
- 1 tbsp grated ginger
- 2 tbsp curry powder
- 2 tbsp tomato paste
- 1 can (13.5 oz) full-fat coconut milk
- 2 cans (15 oz each) chickpeas, drained and rinsed
- 1 tsp kosher salt
- 2 cups baby spinach
- 1 tbsp lime juice
- Chopped cilantro, for serving
Quick Steps:
- Rinse the rice until the water runs mostly clear. Combine it with 2 cups water in a small saucepan, bring to a boil, cover, reduce to low, and cook for 15 minutes. Rest off the heat for 5 minutes.
- Heat the oil in a skillet over medium heat. Add the onion and cook for 4 to 5 minutes, until soft and translucent.
- Stir in the garlic, ginger, curry powder, and tomato paste. Cook for 30 to 60 seconds, stirring constantly, until the spices smell toasty.
- Add the coconut milk, chickpeas, and salt. Simmer for 10 to 12 minutes, stirring now and then, until the sauce thickens a little.
- Fold in the spinach and lime juice. Cook for 1 minute, just until the spinach wilts. Spoon over the rice and finish with cilantro.
Equipment for This Recipe:
- Medium saucepan
- Large skillet
- Wooden spoon
- Measuring cups and spoons
How to Serve This Dish:
Spoon the curry over a small mound of rice so the sauce stays visible around the edges. A spoonful of yogurt or a squeeze of extra lime is nice if you have it. I like this with cucumber slices or plain crackers on the side for crunch.
Pro Tips for This Recipe:
- Use full-fat coconut milk. Light coconut milk makes the sauce thinner and less satisfying.
- Bloom the curry powder in the oil before adding the liquid. It changes the flavor from dusty to rounded.
- Rinse the chickpeas well or the curry can taste too briny.
- If the sauce gets too thick, add 2 to 3 tablespoons of water and stir.
Variations on This Dish:
- Peanut Curry Twist: Stir in 1 tablespoon peanut butter with the coconut milk for a thicker, nuttier sauce.
- Tomato-Heavy Version: Add 1 extra tablespoon tomato paste and reduce the coconut milk by 1/4 cup for a sharper curry.
- Red Lentil Swap: Replace one can of chickpeas with 3/4 cup red lentils and simmer 5 minutes longer.
Common Mistakes to Avoid with This Dish:
- Boiling the sauce too hard: Coconut milk can separate if you rage at it. Keep the simmer gentle.
- Dumping in the spinach too early: It turns dull and watery if it cooks for long.
- Under-seasoning the rice: Plain rice under a spiced sauce tastes flat, so salt it lightly while it cooks.
3. Black Bean Taco Skillet
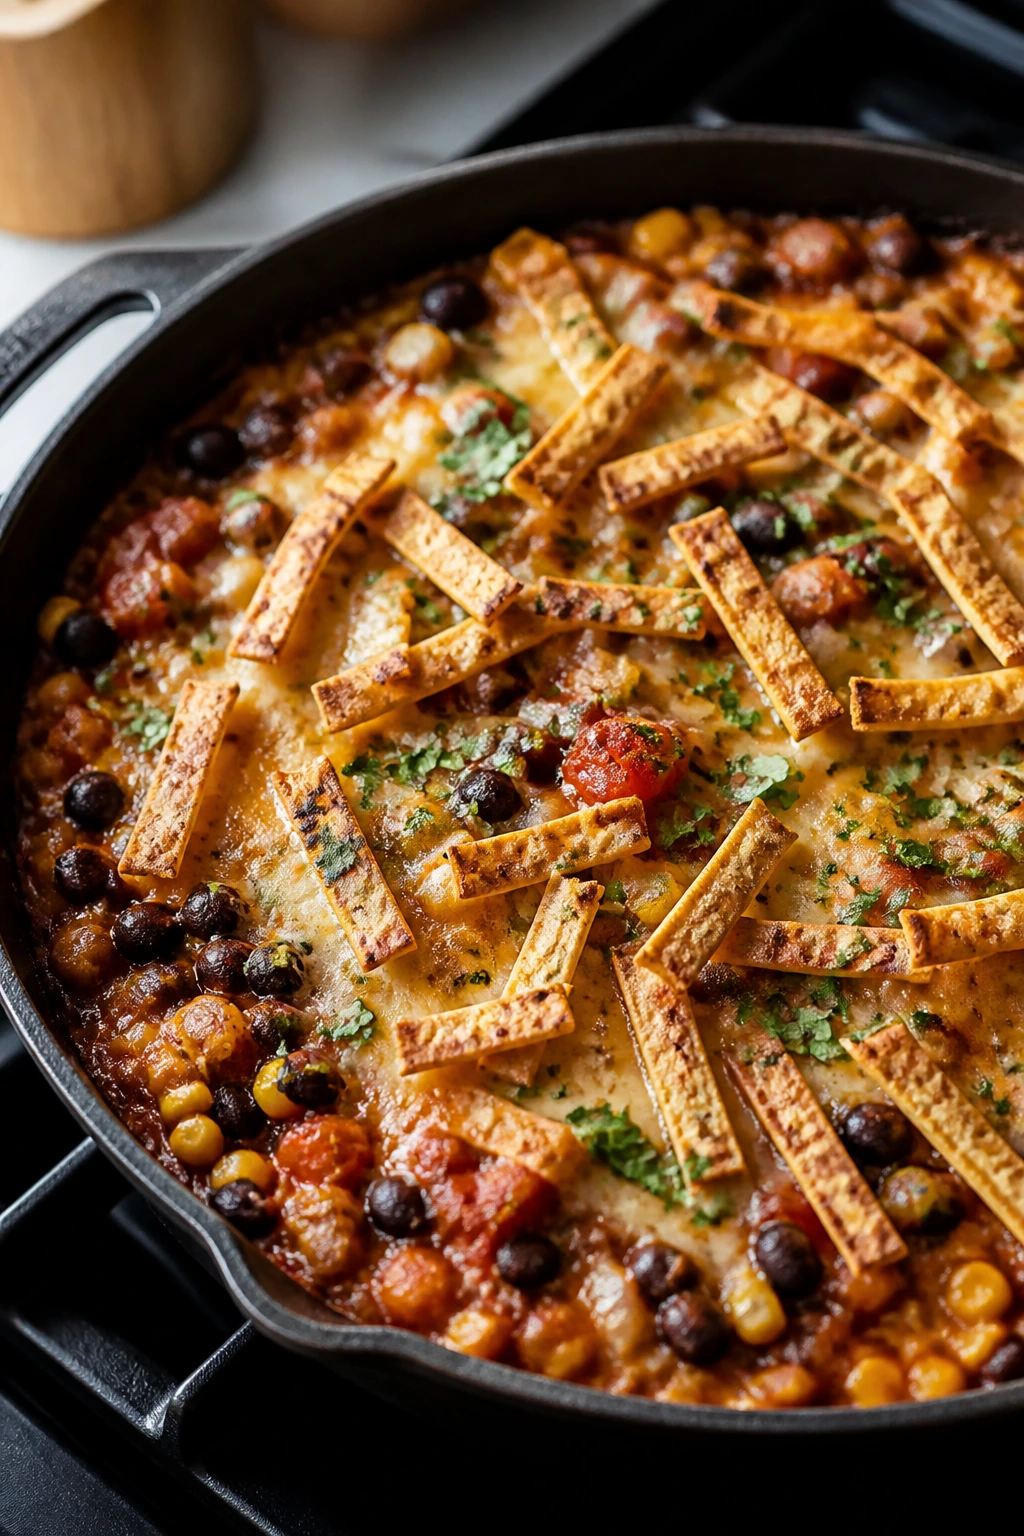
This is the one-pan dinner that smells like a fast-food night but eats like a home-cooked one. The salsa turns into sauce, the beans stay whole enough to chew, and the tortilla strips on top crisp where they touch the heat. It’s messy in the good way.
Why It Works:
Salsa does two jobs here: flavor and liquid. Black beans make the skillet filling enough to stand on its own, while cheese melts over the top and seals everything together. The broiler gives you the browned spots that make a skillet meal worth the extra minute.
Key Ingredients:
- 1 tbsp neutral oil
- 1 small onion, diced
- 2 tbsp taco seasoning
- 1 can (15 oz) black beans, drained and rinsed
- 1 can (14.5 oz) diced tomatoes, lightly drained
- 1 cup salsa
- 1 cup canned or frozen corn, drained if needed
- 4 small tortillas, cut into strips
- 1 1/2 cups shredded cheddar or Monterey Jack
- 2 tbsp chopped cilantro
- 1 lime, cut into wedges
Quick Steps:
- Heat the oil in an oven-safe skillet over medium heat. Add the onion and cook for 4 minutes, until softened.
- Stir in the taco seasoning and cook for 30 seconds so it blooms in the oil.
- Add the black beans, diced tomatoes, salsa, and corn. Simmer for 5 minutes, until the mixture looks thick and stewy.
- Scatter the tortilla strips over the top, then cover with the cheese.
- Broil for 1 to 2 minutes, just until the cheese melts and the edges of the tortillas turn crisp. Finish with cilantro and lime.
Equipment for This Recipe:
- Oven-safe skillet
- Wooden spoon
- Knife
- Cutting board
How to Serve This Dish:
Serve it straight from the skillet with lime wedges and a few more tortilla chips on the side. A spoonful of sour cream or plain yogurt helps if the salsa runs hot. If you want to stretch it, put a scoop over rice and call it done.
Pro Tips for This Recipe:
- Use a thick salsa. Thin salsa makes the skillet watery.
- Drain the beans well so the filling doesn’t steam instead of thicken.
- Watch the broiler like a hawk. The line between crisp tortillas and blackened tortillas is not generous.
- If you want more texture, save a few tortilla strips and add them after broiling.
Variations on This Dish:
- Green Salsa Version: Swap the red salsa for salsa verde and use Monterey Jack instead of cheddar.
- Smoky Bean Skillet: Add 1/2 teaspoon smoked paprika for a deeper, warmer flavor.
- Egg-Topped Dinner: Crack 4 eggs on top before broiling and bake until the whites set.
Common Mistakes to Avoid with This Dish:
- Adding the chips too early: They go soft and lose their crunch. Broil them at the end.
- Using too much liquid: The skillet should be thick enough to mound on a spoon.
- Walking away from the broiler: Cheese can go from melted to scorched in less than a minute.
4. Pantry Tuna Pasta with Lemon and Capers
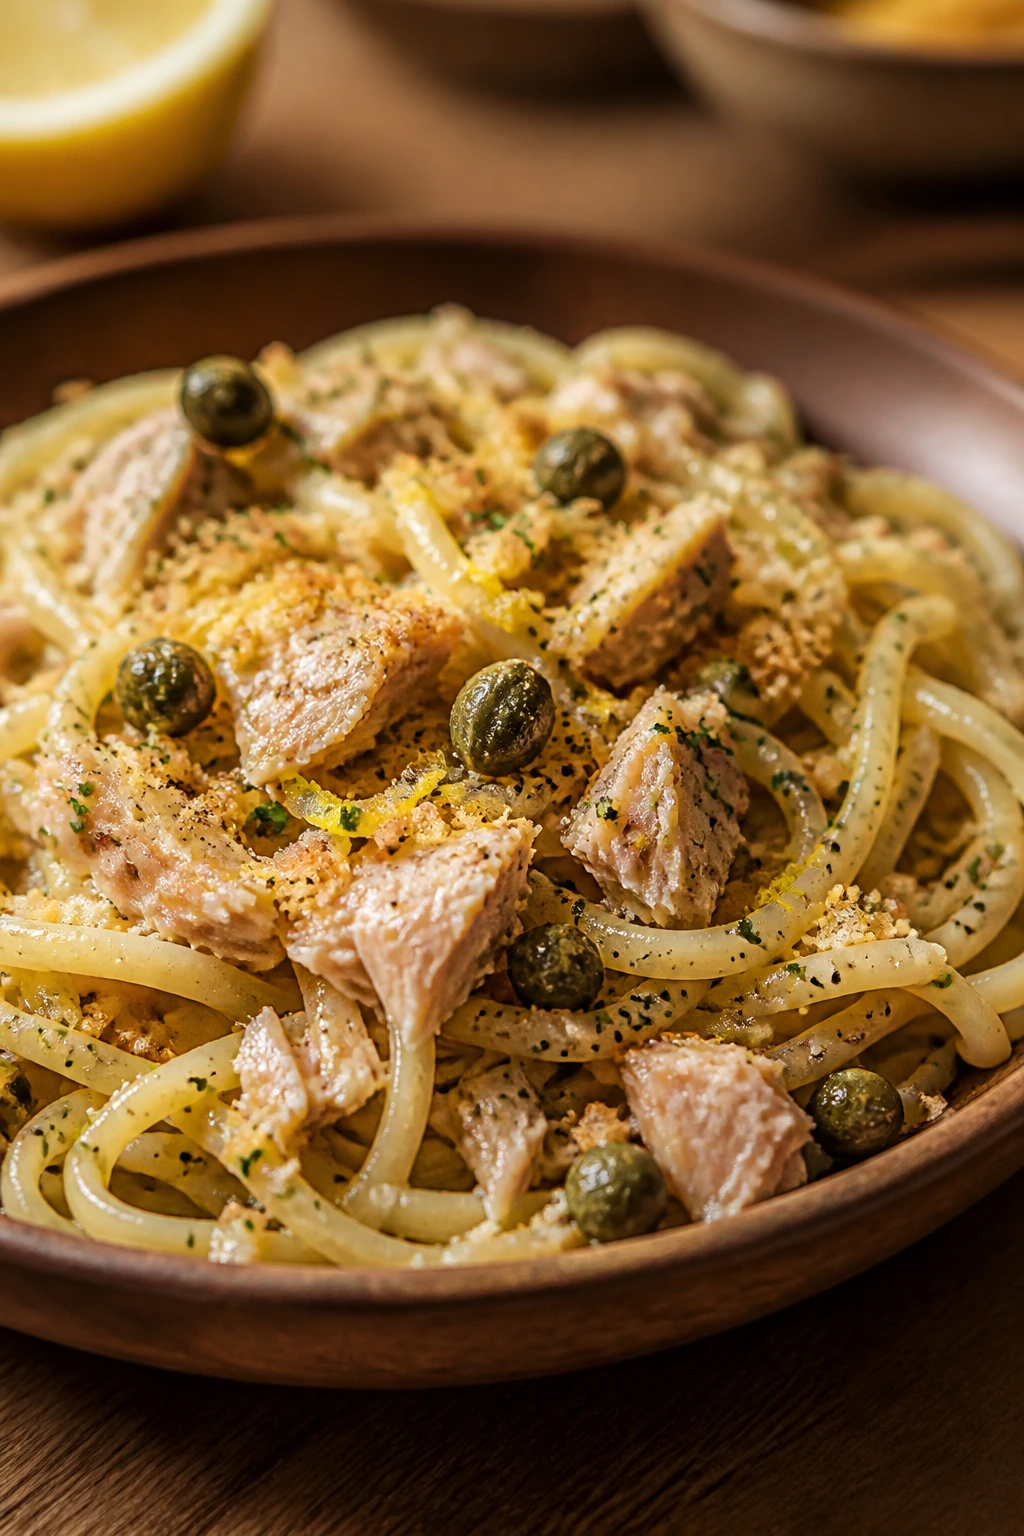
This pasta is salty, bright, and a little briny in the best way. The tuna flakes into the sauce, the capers pop, and the lemon keeps the whole pan from feeling heavy. It tastes like pantry food with its jacket on.
Why It Works:
Tuna in olive oil brings fat and flavor without much work, capers add little hits of salt, and lemon juice cuts through the richness so the sauce stays lively. Breadcrumbs on top give you texture, which matters here because the sauce itself is soft and slick. Short pasta or spaghetti both work.
Key Ingredients:
- 12 oz spaghetti or rigatoni
- 3 tbsp olive oil
- 1 cup breadcrumbs
- 4 garlic cloves, minced
- 1/4 tsp red pepper flakes
- 2 cans (5 oz each) tuna in olive oil, drained lightly
- 2 tbsp capers, drained
- 1 lemon, zested and juiced
- 1/4 cup chopped parsley
- Black pepper, to taste
Quick Steps:
- Cook the pasta in salted water until al dente. Reserve 1 cup of the pasta water before draining.
- Heat 1 tablespoon of olive oil in a skillet and toast the breadcrumbs over medium heat for 3 minutes, stirring often, until golden. Set aside.
- Add the remaining oil to the skillet. Stir in the garlic and red pepper flakes and cook for 30 seconds.
- Add the tuna and capers. Break the tuna into large flakes with a spoon and warm it through for 1 minute.
- Add the lemon zest, 1/2 the lemon juice, and 1/2 cup pasta water. Toss in the pasta and parsley, adding more water if needed. Finish with black pepper and the toasted crumbs.
Equipment for This Recipe:
- Large pot
- Skillet
- Colander
- Tongs or pasta fork
How to Serve This Dish:
I like this in wide bowls with the breadcrumbs piled in the middle like a little salty dune. A plain green salad or a handful of cherry tomatoes works alongside it. If you have extra lemon, serve wedges at the table; the pasta likes a fresh squeeze.
Pro Tips for This Recipe:
- Use tuna packed in olive oil if you can. It gives the sauce more body than water-packed tuna.
- Don’t mash the tuna into paste. Large flakes make the dish better.
- Add lemon in stages. Too much at once can take over the sauce.
- A spoonful of pasta water makes the sauce glossy, not greasy.
Variations on This Dish:
- Tomato Tuna Pasta: Stir in 1/2 cup of crushed tomatoes for a softer, redder sauce.
- Olive Pantry Version: Add 1/4 cup chopped black olives with the capers.
- No-Breadcrumb Finish: Use crushed toasted crackers or skip the topping and add extra parsley.
Common Mistakes to Avoid with This Dish:
- Overheating the tuna: It dries out fast. Warm it, don’t cook it hard.
- Forgetting to salt the pasta water: Tuna and capers are salty, but the pasta itself still needs seasoning.
- Skipping the crunchy topping: Without it, the dish can feel soft and one-note.
5. Smoky Lentil Soup with Tomatoes
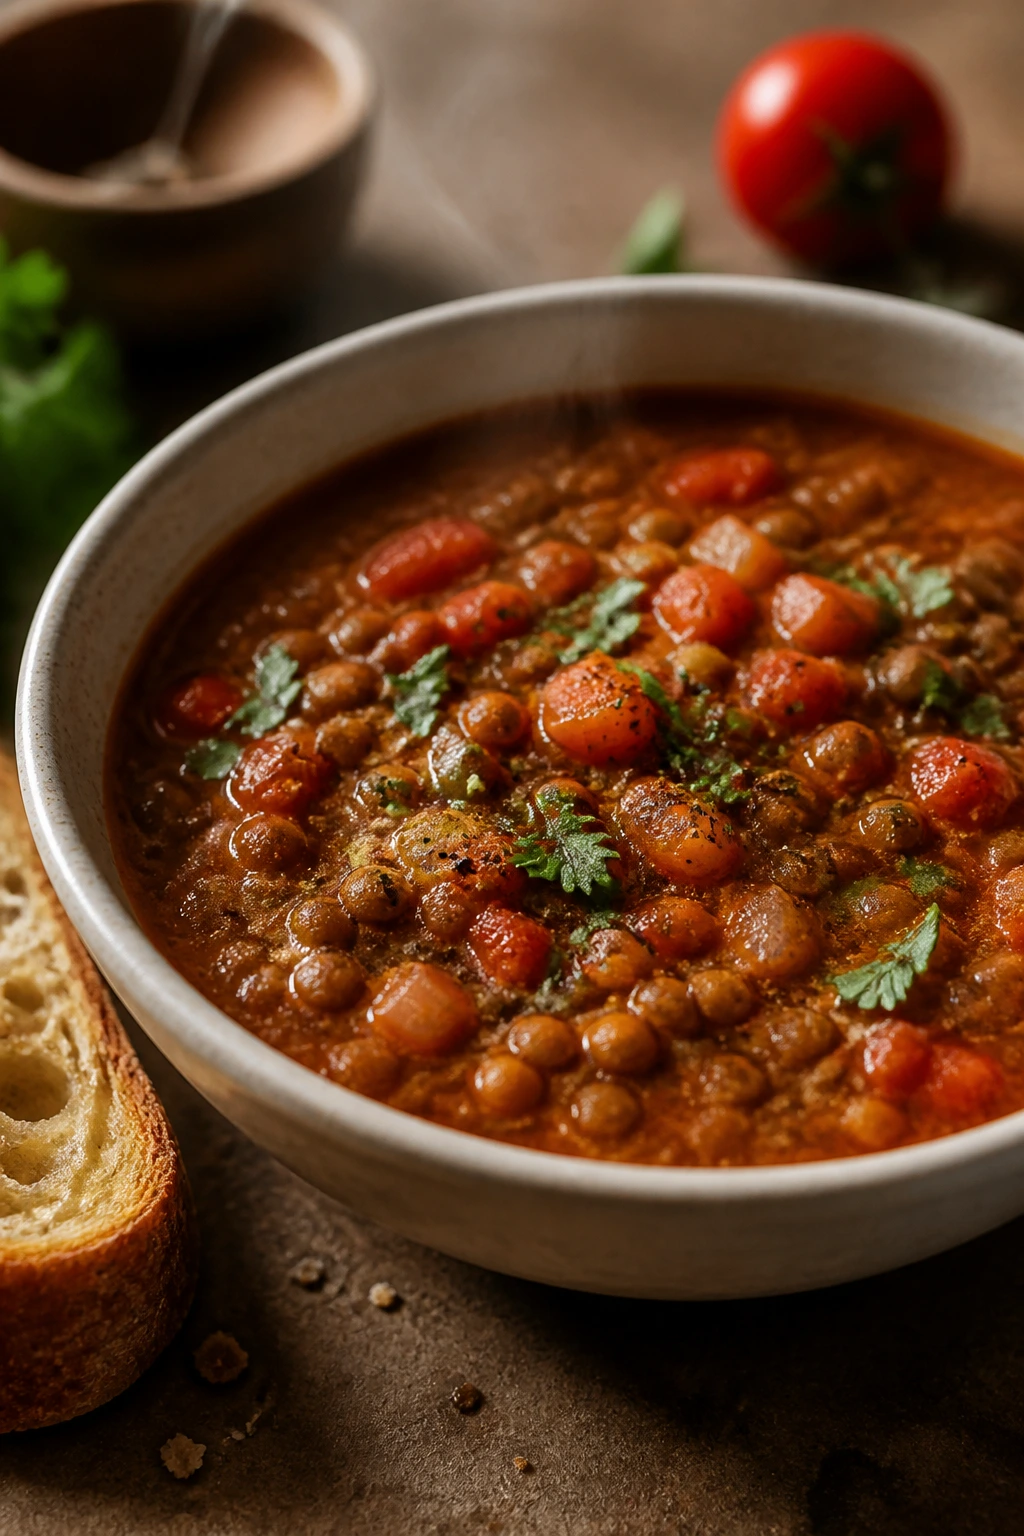
This soup is thick enough to eat with a spoon and a piece of bread at the same time. Lentils stay earthy, the tomatoes bring acidity, and smoked paprika adds a slow, almost meaty note that makes the pot taste deeper than its ingredient list. It’s a pantry soup with real backbone.
Why It Works:
Brown lentils cook in about half an hour and don’t need soaking, which makes them one of the best pantry ingredients around. Onion, carrot, and celery build the base, tomato gives the broth body, and a splash of vinegar at the end keeps the whole thing from turning muddy. This is a soup that likes salt, pepper, and a good ladle.
Key Ingredients:
- 1 tbsp olive oil
- 1 onion, diced
- 2 carrots, diced
- 2 celery stalks, diced
- 3 garlic cloves, minced
- 2 tsp smoked paprika
- 1 1/2 cups brown lentils, rinsed
- 1 can (14.5 oz) diced tomatoes
- 6 cups vegetable broth
- 1 bay leaf
- 1 tsp kosher salt
- 1/2 tsp black pepper
- 1 tbsp red wine vinegar
Quick Steps:
- Heat the oil in a Dutch oven over medium heat. Add the onion, carrots, and celery and cook for 6 to 7 minutes, until softened.
- Stir in the garlic and smoked paprika and cook for 30 seconds, just until fragrant.
- Add the lentils, tomatoes, broth, bay leaf, salt, and pepper. Bring to a boil, then reduce to a steady simmer.
- Cook uncovered for 25 to 30 minutes, stirring now and then, until the lentils are tender but not mushy.
- Remove the bay leaf. Stir in the vinegar and taste for salt. Serve hot.
Equipment for This Recipe:
- Dutch oven or large soup pot
- Cutting board
- Chef’s knife
- Wooden spoon
- Ladle
How to Serve This Dish:
Ladle it into deep bowls and finish with a drizzle of olive oil or a sprinkle of chopped parsley if you have it. Toast or crusty bread is the obvious partner. A sharp pickle on the side is good too; it cuts the earthiness in a useful way.
Pro Tips for This Recipe:
- Rinse the lentils well so you don’t get grit or dust in the broth.
- Add vinegar at the end, not the beginning. The soup tastes brighter that way.
- If the pot gets too thick, add water in 1/2-cup splashes until it loosens.
- Smoked paprika can go bitter if scorched, so keep the heat moderate when you bloom it.
Variations on This Dish:
- Sausage Lentil Soup: Brown sliced sausage with the onions before adding the vegetables.
- Curried Lentil Version: Swap the smoked paprika for curry powder and finish with lemon juice.
- Chunkier Vegetable Bowl: Add a can of drained diced potatoes or extra carrots for more body.
Common Mistakes to Avoid with This Dish:
- Boiling it hard: Lentils can break apart if the heat is too aggressive.
- Under-salting early: Lentils drink salt. Taste near the end and adjust.
- Skipping the acid finish: Without vinegar or lemon, the soup can taste dull and heavy.
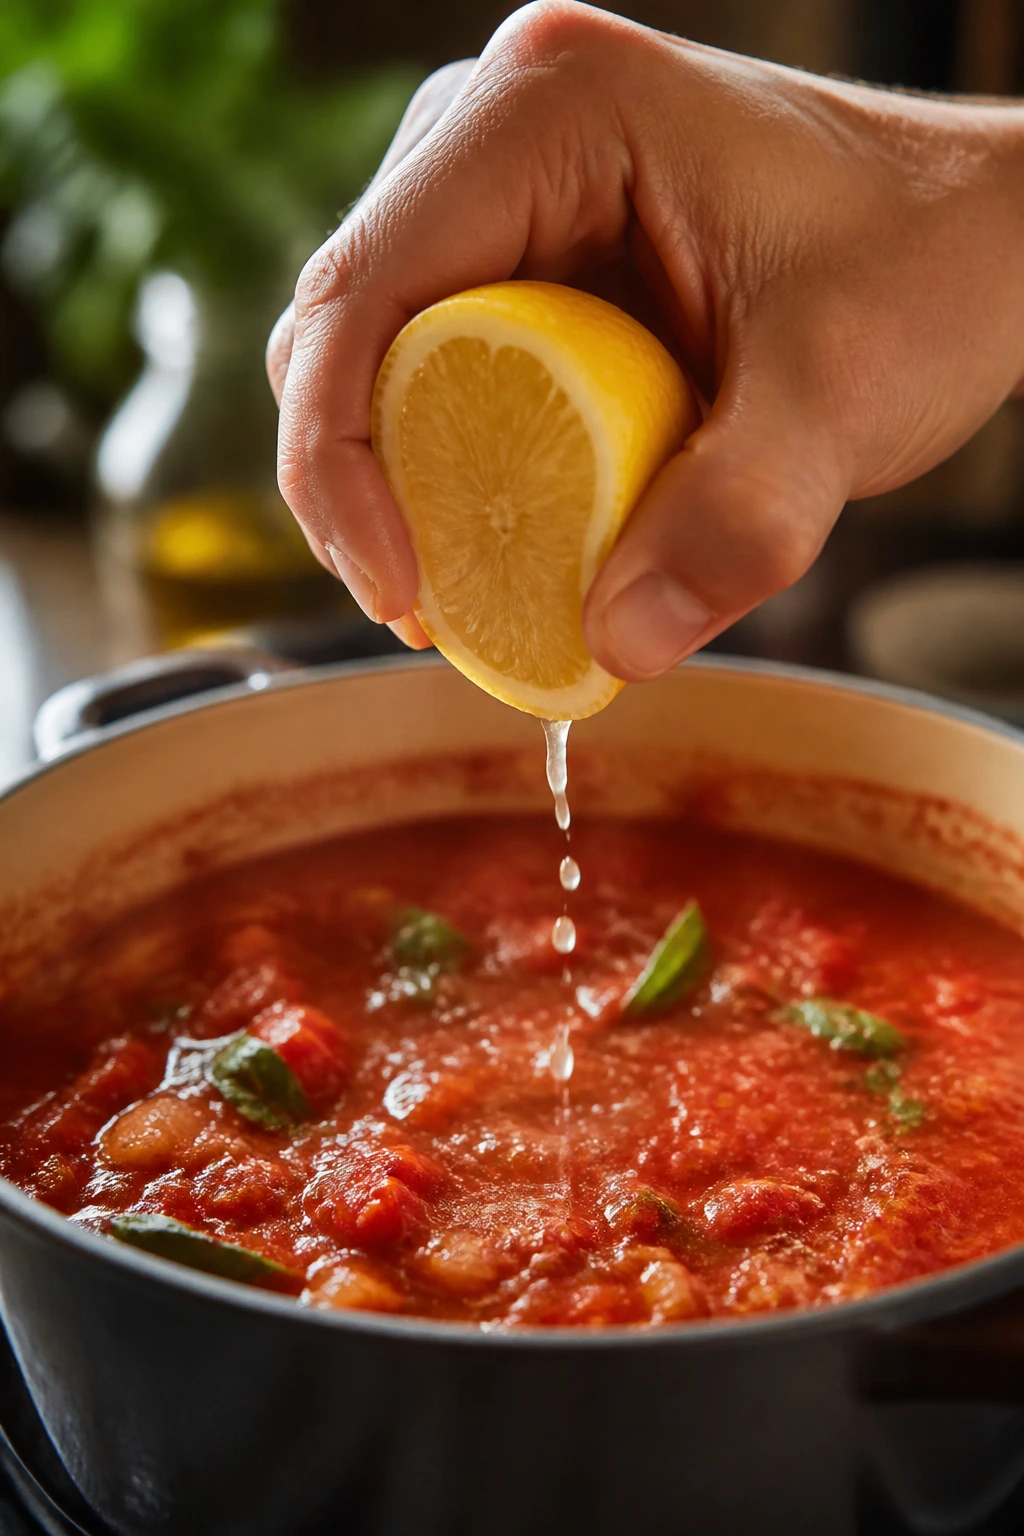
6. Quick Shakshuka with Canned Tomatoes
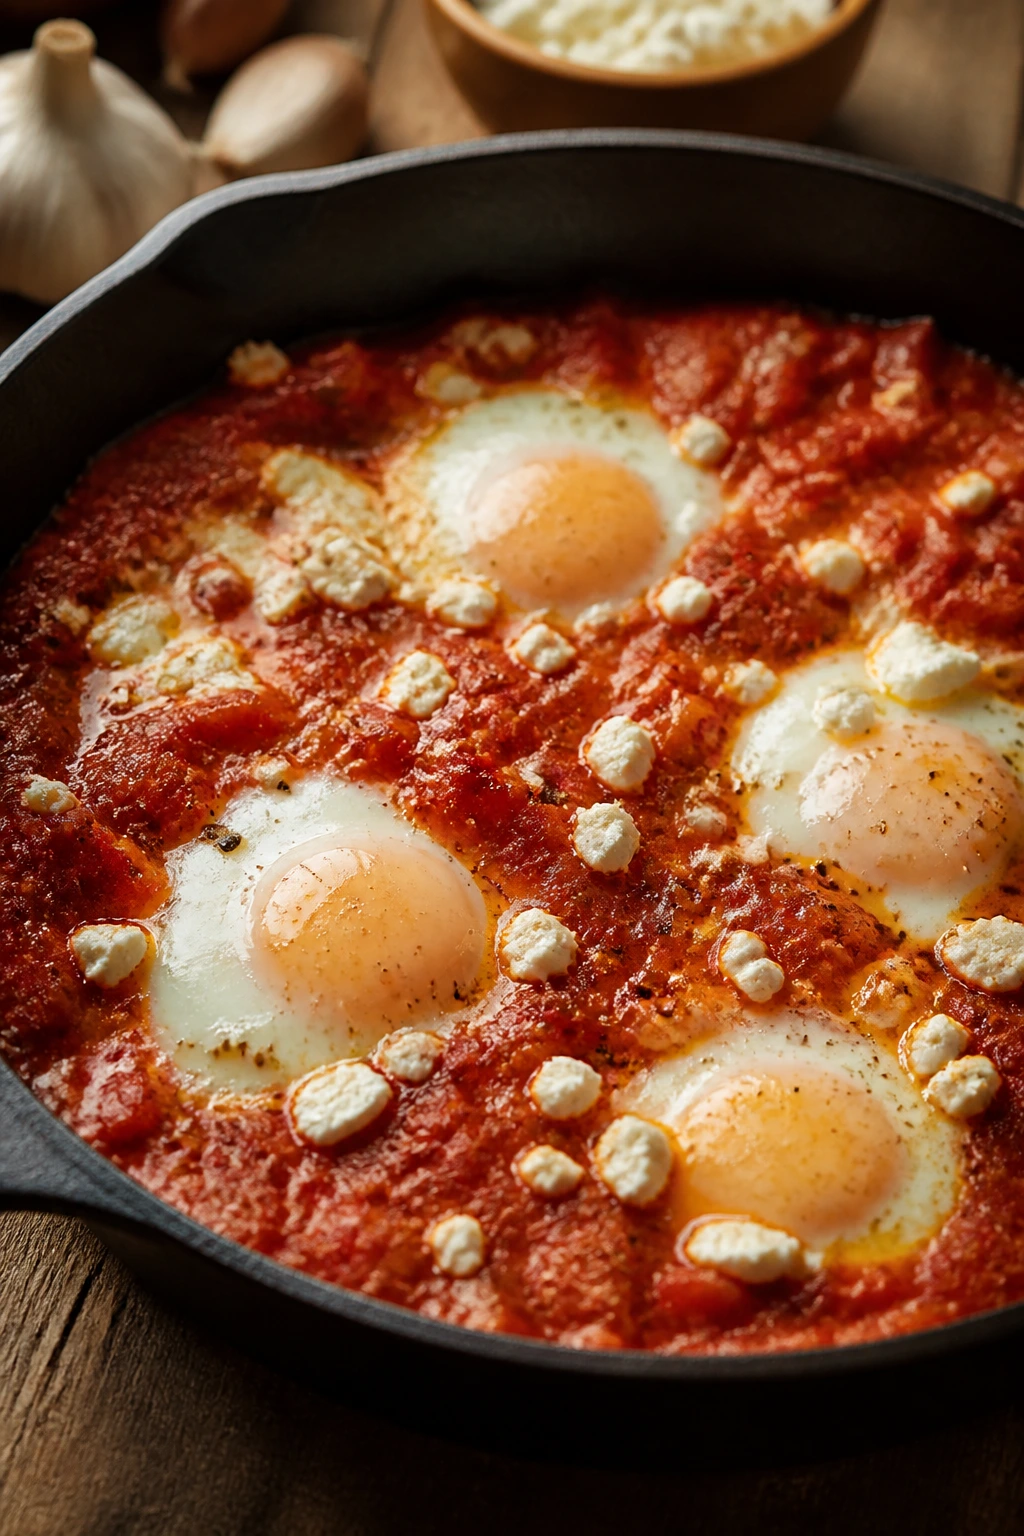
Shakshuka looks fancy because the eggs are sitting in a red, bubbling pan, but the move is straightforward. Onion, garlic, cumin, and paprika cook into canned tomatoes, then the eggs poach right in the sauce. The whites set, the yolks stay soft, and the bread does the rest.
Why It Works:
Tomatoes make a quick simmering sauce, the spices give it warmth, and the eggs turn the skillet into a meal instead of a sauce. A little feta on top adds salt and creaminess. This is one of those dishes that tastes better than it has any right to, partly because the yolks act like a built-in sauce.
Key Ingredients:
- 2 tbsp olive oil
- 1 small onion, sliced
- 1 cup jarred roasted red peppers, drained and sliced
- 3 garlic cloves, minced
- 1 tsp ground cumin
- 1 tsp paprika
- 1/4 tsp red pepper flakes
- 1 can (28 oz) crushed tomatoes
- 1 tsp kosher salt
- 5 large eggs
- 1/4 cup crumbled feta
- 2 tbsp chopped parsley
- Crusty bread, for serving
Quick Steps:
- Heat the olive oil in a large skillet over medium heat. Add the onion and roasted peppers and cook for 5 minutes, until soft.
- Stir in the garlic, cumin, paprika, and red pepper flakes. Cook for 30 seconds.
- Add the crushed tomatoes and salt. Simmer for 8 to 10 minutes, until the sauce thickens enough that a spoon leaves a trail.
- Make 5 little wells in the sauce. Crack an egg into each well.
- Cover the skillet and cook for 5 to 7 minutes, until the whites are set but the yolks still wobble a little. Finish with feta and parsley.
Equipment for This Recipe:
- Large skillet with a lid
- Wooden spoon
- Knife
- Cutting board
How to Serve This Dish:
Bring the skillet to the table and let everyone tear bread into the sauce. A spoonful of plain yogurt on the side can cool the heat if you used a heavy hand with the red pepper flakes. I like this with a crisp salad because the eggs and tomatoes are soft and rich.
Pro Tips for This Recipe:
- Keep the sauce at a gentle simmer before adding the eggs. A hard boil tears the whites.
- Crack each egg into a small bowl first if you’re nervous about broken yolks.
- If the sauce is too loose, uncover and simmer for another 2 minutes before the eggs go in.
- Use a lid that fits well enough to trap steam and set the tops of the whites.
Variations on This Dish:
- Harissa Shakshuka: Stir in 1 tablespoon harissa paste with the spices.
- White Bean Shakshuka: Add 1 can drained white beans to the sauce for a heftier version.
- Cheesy Top Version: Swap the feta for grated mozzarella and let it melt on top during the last minute.
Common Mistakes to Avoid with This Dish:
- Overcooking the eggs: The yolks should still be soft when you turn off the heat.
- Watery sauce: If the tomatoes taste thin, simmer longer before adding the eggs.
- Serving it without bread: The sauce wants something to soak into. Bread is not optional in spirit, even if it looks optional on paper.
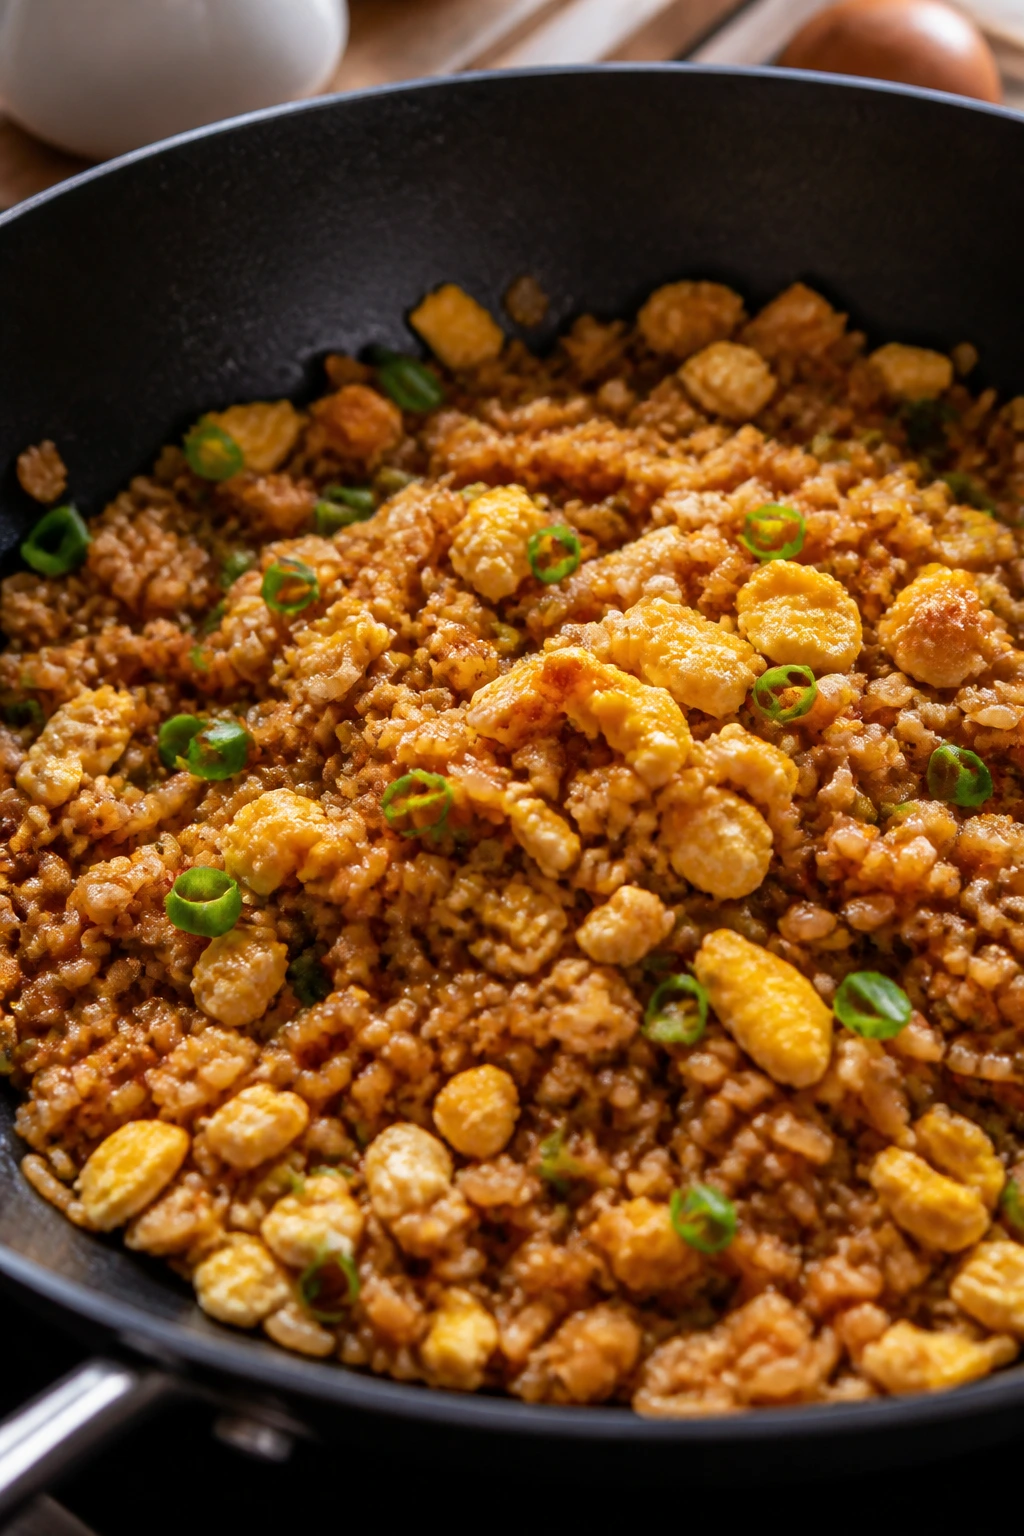
7. Chili Mac with Kidney Beans
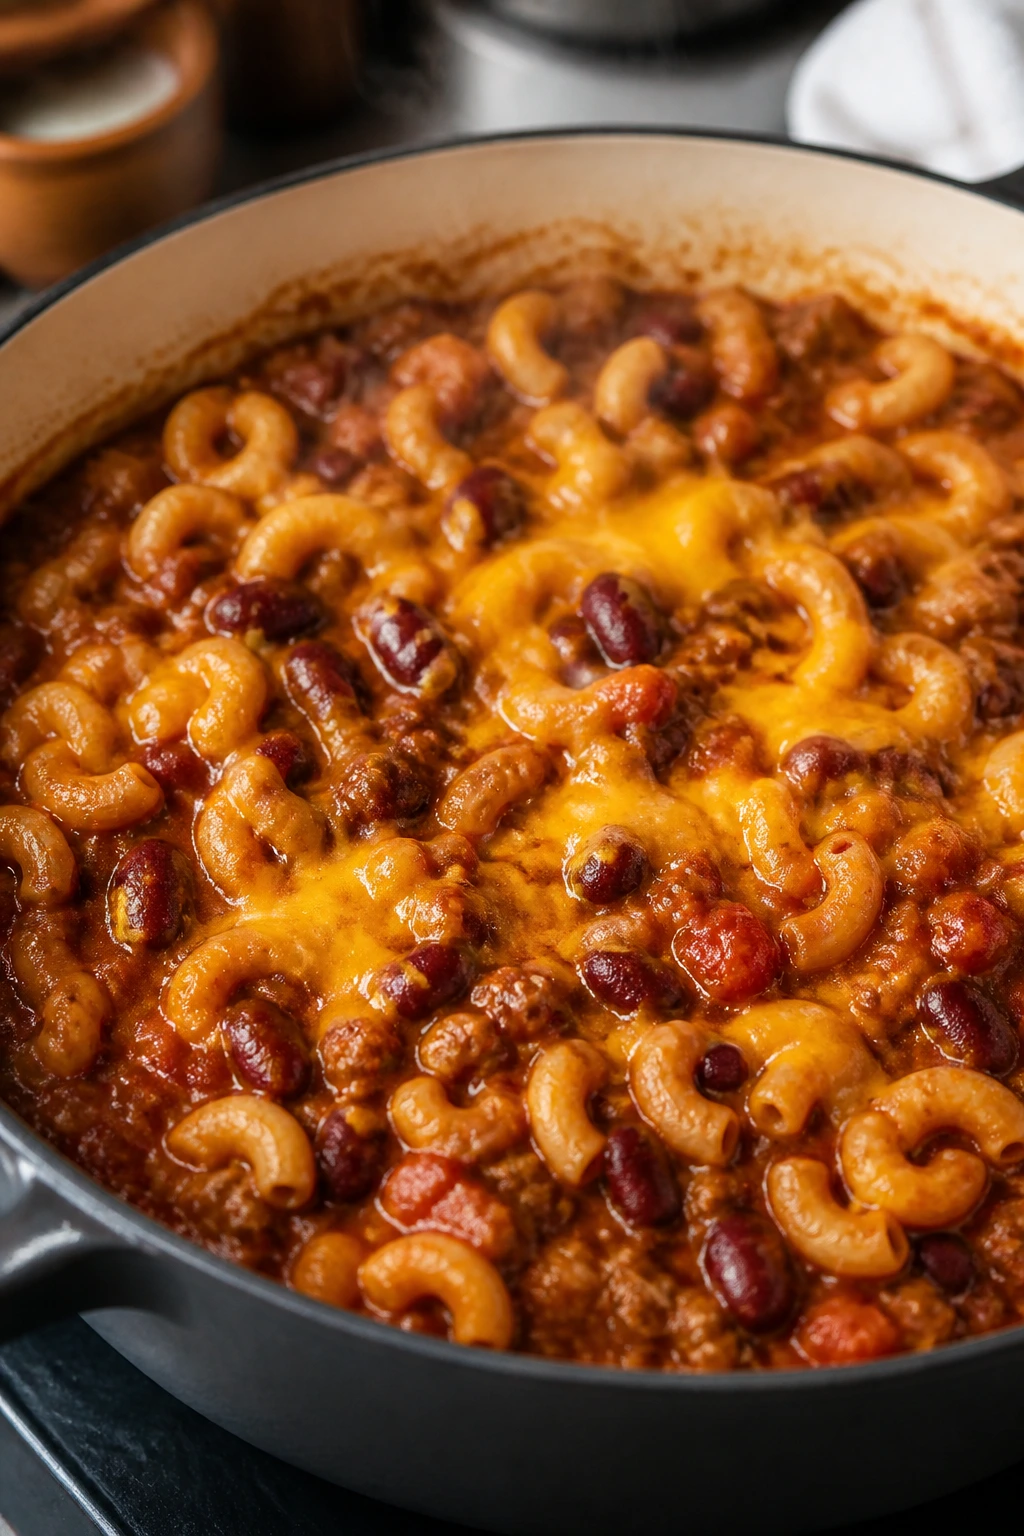
This is the closest thing to a pantry hug that still requires a stove. The macaroni cooks right in a tomato-chili base, the kidney beans give the pot some heft, and the cheddar melts into the sauce instead of sitting on top like a decorative thought. It’s bold, soft, and good with hot sauce.
Why It Works:
Macaroni drinks up the chili broth while it cooks, so you get a one-pot meal instead of a pot of pasta plus a pot of sauce. Tomato paste gives the base a slow-cooked taste, kidney beans make it filling, and cheddar adds the fatty edge that keeps chili mac from tasting one-note. Stir often and it behaves.
Key Ingredients:
- 1 tbsp neutral oil
- 1 onion, diced
- 2 garlic cloves, minced
- 2 tbsp chili powder
- 1 tsp ground cumin
- 2 tbsp tomato paste
- 1 can (14.5 oz) diced tomatoes
- 2 cups broth
- 1 cup water
- 8 oz elbow macaroni
- 1 can (15 oz) kidney beans, drained and rinsed
- 1 1/2 cups shredded cheddar
- Salt and hot sauce, to taste
Quick Steps:
- Heat the oil in a deep skillet or Dutch oven over medium heat. Add the onion and cook for 4 to 5 minutes.
- Stir in the garlic, chili powder, cumin, and tomato paste. Cook for 1 minute, until the paste darkens a shade.
- Add the diced tomatoes, broth, water, and macaroni. Bring to a boil, then reduce to a steady simmer.
- Cook for 10 to 12 minutes, stirring often, until the pasta is tender and the liquid has thickened into a saucy coating.
- Stir in the beans and cheddar off the heat. Taste, salt if needed, and add hot sauce if you want more heat.
Equipment for This Recipe:
- Deep skillet or Dutch oven
- Wooden spoon
- Measuring cups and spoons
- Grater, if the cheese isn’t pre-shredded
How to Serve This Dish:
Spoon it into bowls before the cheese fully settles. A few sliced scallions or a handful of crushed tortilla chips on top give it a little lift. I like this with something cold and crisp on the side because the mac is rich and dense.
Pro Tips for This Recipe:
- Stir often while the pasta cooks. Macaroni likes to glue itself to the bottom.
- Add cheese off the heat so it melts smoothly instead of turning grainy.
- Use a heavy pot if you have one. Thin pots scorch the tomato paste faster than you’d expect.
- If the sauce tightens too much, add 1/4 cup water and stir.
Variations on This Dish:
- Smoky Chipotle Version: Add 1 teaspoon chipotle powder or a spoon of adobo sauce.
- Three-Bean Version: Swap in black beans or pinto beans for part of the kidney beans.
- Baked Top Version: Transfer to a baking dish, add more cheese, and bake at 400°F for 8 minutes.
Common Mistakes to Avoid with This Dish:
- Using too little liquid: The pasta needs enough broth to cook without drying out.
- Stirring in the cheese too early: It can seize if the pot is boiling hard.
- Walking away while the pasta cooks: It goes from tender to sticky fast.
8. Sardine Pasta with Lemon and Capers
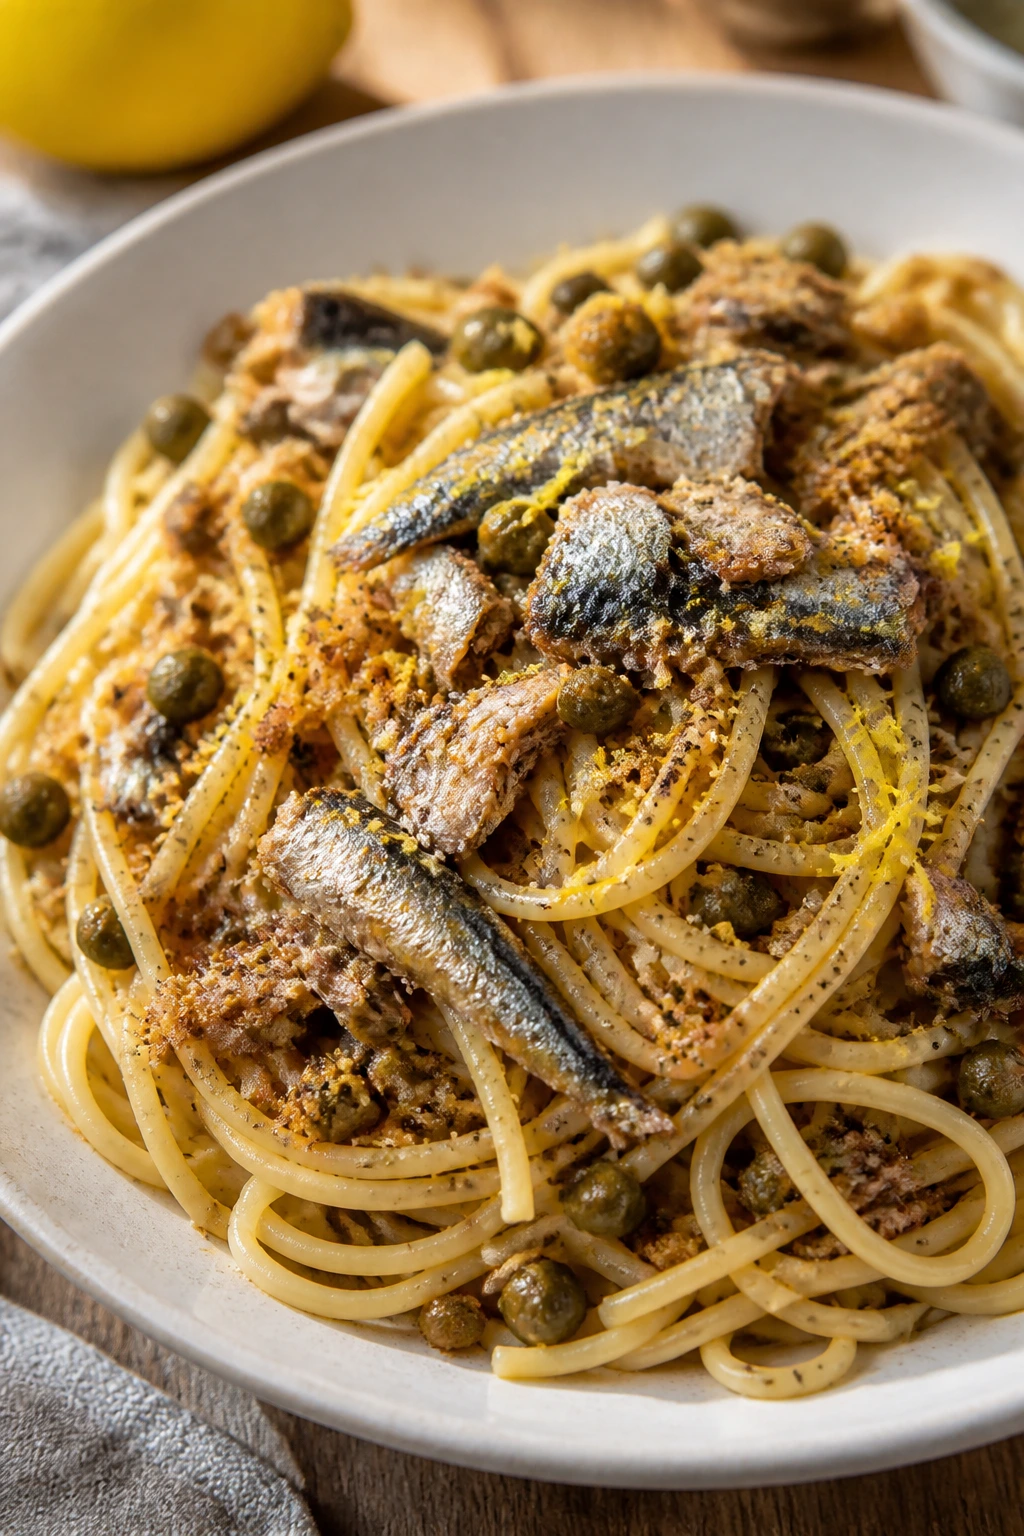
Sardines get a bad reputation from people who haven’t had them tossed with garlic, lemon, and pasta. In this dish they melt into the oil, the capers bring sharp little bursts of salt, and the breadcrumbs add crunch so the whole thing doesn’t feel soft from end to end. It’s briny in a clean, useful way.
Why It Works:
Sardines in olive oil come with fat built in, which means they can perfume the whole pan without any extra effort. Lemon cuts through the richness, capers add bite, and breadcrumbs keep the texture lively. This is pantry food that tastes awake.
Key Ingredients:
- 12 oz spaghetti or linguine
- 3 tbsp olive oil
- 1 cup breadcrumbs
- 3 garlic cloves, sliced
- 1/2 tsp red pepper flakes
- 2 cans sardines in olive oil, lightly drained
- 2 tbsp capers, drained
- 1 lemon, zested and juiced
- 2 tbsp chopped parsley
- Black pepper, to taste
Quick Steps:
- Cook the pasta in well-salted water until al dente. Reserve 1 cup of the pasta water.
- Heat 1 tablespoon of olive oil in a skillet and toast the breadcrumbs for 3 minutes, stirring often, until golden. Set aside.
- Add the remaining oil to the skillet. Stir in the garlic and red pepper flakes and cook for 30 seconds.
- Add the sardines and capers. Break the sardines into large chunks with a spoon and warm them through for 1 minute.
- Add the lemon zest, lemon juice, and 1/2 cup pasta water. Toss with the pasta and parsley. Finish with black pepper and breadcrumbs.
Equipment for This Recipe:
- Large pot
- Skillet
- Colander
- Wooden spoon
- Tongs
How to Serve This Dish:
Use shallow bowls and pile the breadcrumbs in the center so they stay crisp until the fork gets there. A salad with a sharp vinaigrette or a few sliced cucumbers works well beside it. If you like a little heat, a few drops of hot sauce are not out of place.
Pro Tips for This Recipe:
- Buy sardines packed in olive oil if possible. They tend to taste rounder and less dry.
- Use the lemon zest. The juice alone won’t give the same lift.
- Don’t mash the sardines into a paste. A few visible pieces make the texture better.
- Toast the breadcrumbs in advance if you want one less thing to juggle during dinner.
Variations on This Dish:
- Tomato Sardine Pasta: Add 1/2 cup crushed tomatoes and simmer for 3 minutes before tossing.
- Spanish-Style Version: Stir in 1/2 teaspoon smoked paprika with the garlic.
- Mackerel Swap: Canned mackerel works here if sardines aren’t in the cupboard.
Common Mistakes to Avoid with This Dish:
- Overcooking the fish: Sardines only need to warm through.
- Skipping the acid: Without lemon, the dish can taste heavy and oily.
- Leaving out the crunchy topping: The breadcrumbs make the pasta feel finished.
9. Coconut Chickpea Stew with Spinach
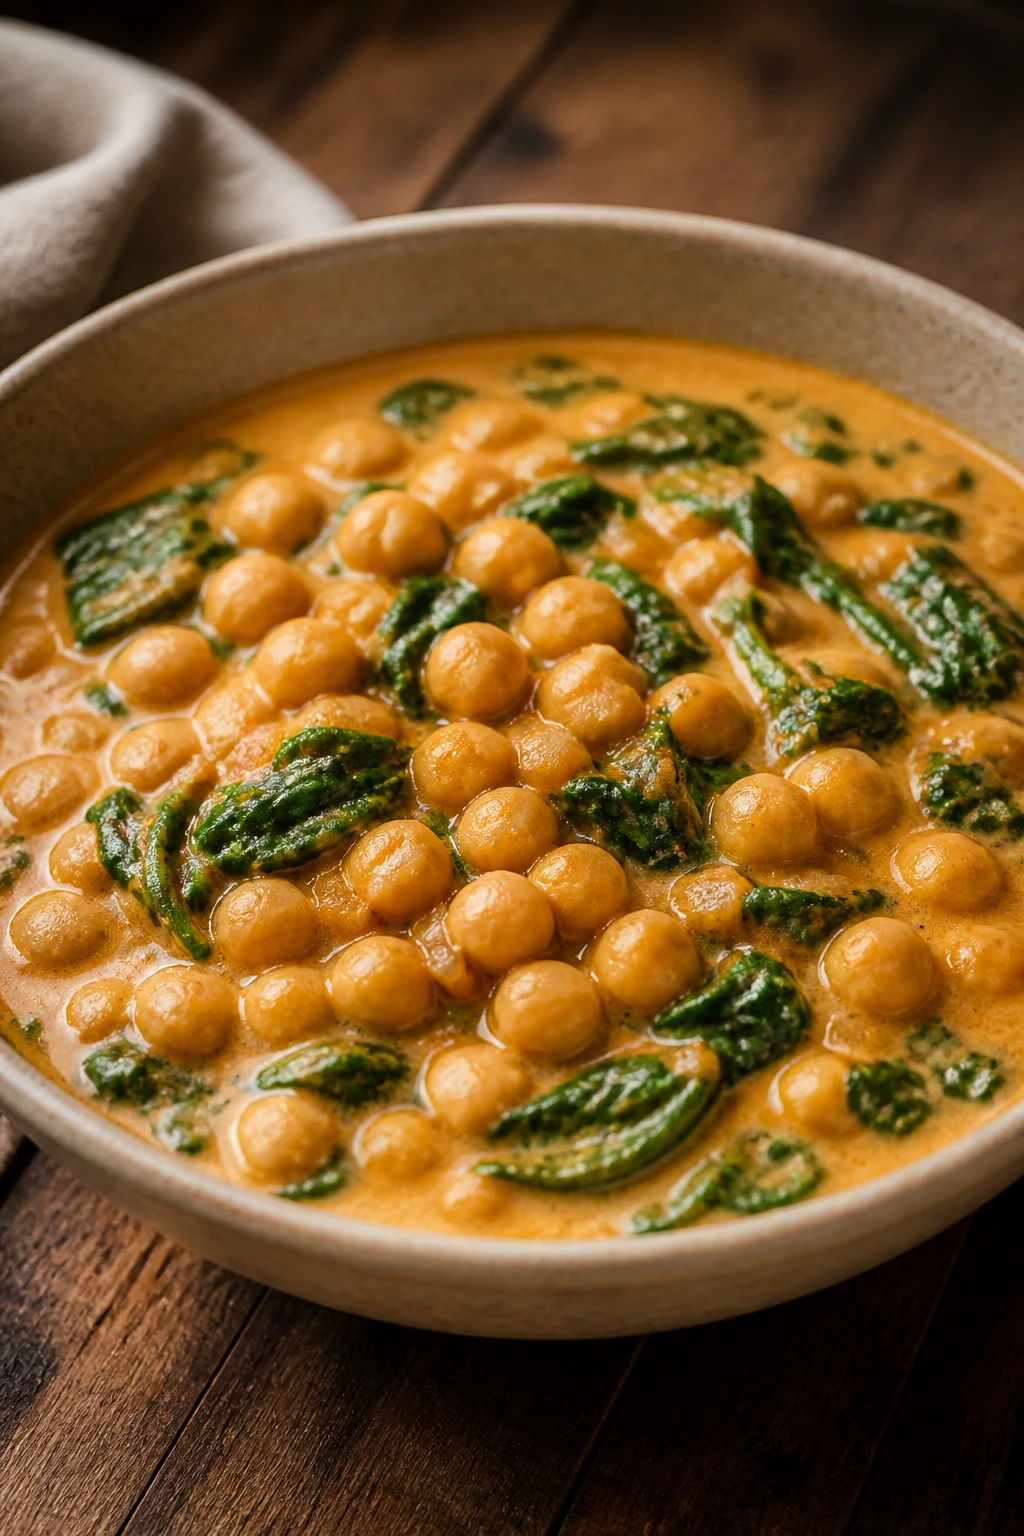
This stew sits in that nice middle ground between soup and curry. The coconut milk makes it silky, the chickpeas stay firm enough to chew, and the spinach disappears into the broth without stealing the show. It’s the sort of meal that tastes like you remembered how to cook for yourself.
Why It Works:
Coconut milk softens the spice and gives the stew a glossy finish. Tomatoes bring acidity, chickpeas add body, and spinach wilts in the last minute so it doesn’t overcook into sludge. Serve it with rice and you’ve got a full dinner with almost no ceremony.
Key Ingredients:
- 1 tbsp neutral oil
- 1 onion, diced
- 3 garlic cloves, minced
- 1 tbsp grated ginger
- 2 tsp curry powder
- 1 can (14.5 oz) crushed tomatoes
- 2 cans (15 oz each) chickpeas, drained and rinsed
- 1 can (13.5 oz) coconut milk
- 1 tsp kosher salt
- 4 cups baby spinach
- 1 tbsp lime juice
Quick Steps:
- Heat the oil in a large pot over medium heat. Add the onion and cook for 5 minutes, until soft.
- Stir in the garlic, ginger, and curry powder. Cook for 30 seconds, just until fragrant.
- Add the crushed tomatoes, chickpeas, coconut milk, and salt. Bring to a gentle simmer.
- Cook for 12 to 15 minutes, stirring now and then, until the stew thickens slightly.
- Fold in the spinach and lime juice. Stir until the spinach wilts and the stew turns bright at the edges.
Equipment for This Recipe:
- Large pot or Dutch oven
- Wooden spoon
- Measuring cups and spoons
- Ladle
How to Serve This Dish:
Ladle it over rice or scoop it up with flatbread. A spoonful of yogurt or a pinch of flaky salt on top gives the stew a little extra finish. If you have cilantro, use it. If you don’t, it still holds together.
Pro Tips for This Recipe:
- Use full-fat coconut milk for the best texture.
- Keep the simmer gentle so the coconut stays smooth.
- Lime juice goes in at the end. If you add it too soon, the stew tastes flatter.
- If you want it thicker, mash a few chickpeas against the side of the pot before serving.
Variations on This Dish:
- Tomato-Forward Version: Add 1 extra tablespoon curry powder and reduce the coconut milk by 1/4 cup.
- Peanut Stew Swap: Stir in 2 tablespoons peanut butter for a thicker, nuttier pot.
- Bean Mix Version: Replace one can of chickpeas with cannellini beans for a softer texture.
Common Mistakes to Avoid with This Dish:
- Boiling it hard: Coconut milk behaves better at a gentle simmer.
- Adding the spinach too early: It should wilt, not dissolve.
- Forgetting the lime: The stew needs that final sharp note.
10. Soy-Garlic Egg Fried Rice
Cold rice is the whole story here. Fresh rice is too steamy and soft; cold rice separates in the pan and picks up that little toasted edge fried rice needs. Eggs coat the grains, soy sauce seasons everything, and sesame oil gives the finish a smell that feels like the kitchen opened a door.
Why It Works:
Fried rice depends on dry grains and hot heat. The egg acts like a loose binder, soy sauce adds salt and color, and garlic gives the rice a sharp little backbone. Canned corn or peas add sweetness and color if you want them, but the rice itself does most of the work.
Key Ingredients:
- 4 cups cold cooked rice
- 3 large eggs, beaten
- 2 tbsp neutral oil
- 1 small onion, diced
- 3 garlic cloves, minced
- 1 cup canned corn, drained
- 3 tbsp soy sauce
- 1 tsp sesame oil
- 2 tbsp sliced scallions
- White pepper or black pepper, to taste
Quick Steps:
- Heat 1 tablespoon of oil in a large skillet or wok over medium-high heat. Add the eggs and scramble until just set, then transfer to a plate.
- Add the remaining oil, onion, and garlic. Cook for 2 minutes, until the onion softens and the garlic smells sweet.
- Add the cold rice and break up any clumps with your spoon. Stir-fry for 3 to 4 minutes, until the grains look hot and a little dry.
- Stir in the corn and soy sauce. Cook for 1 minute, tossing well so the rice turns evenly seasoned.
- Return the eggs to the pan, add the sesame oil and scallions, and toss once more. Taste and season with pepper.
Equipment for This Recipe:
- Large skillet or wok
- Spatula or wooden spoon
- Mixing bowl
- Measuring spoons
How to Serve This Dish:
Serve it right away while the edges still have a little bite. A spoonful of chili crisp or hot sauce wakes it up fast. It can stand alone, though I like it with sliced cucumbers or any crunchy pickle that’s hanging around.
Pro Tips for This Recipe:
- Use rice that was cooked and chilled ahead of time. Warm rice clumps.
- Keep the pan hot enough to sizzle, not so hot that the garlic burns.
- Don’t drown the rice in soy sauce. You want seasoning, not a brown puddle.
- If you only have fresh rice, spread it on a tray and chill it for 20 to 30 minutes before cooking.
Variations on This Dish:
- Spam Fried Rice: Add diced Spam with the onion and let it crisp a little.
- Curry Fried Rice: Stir in 1 teaspoon curry powder with the rice.
- Vegetable Pantry Version: Add drained canned peas, carrots, or mixed vegetables for more color.
Common Mistakes to Avoid with This Dish:
- Using hot rice: It turns sticky and heavy.
- Adding too much sauce at once: The rice gets wet instead of fried.
- Stirring nonstop: Letting it sit for a minute in the pan creates the toasted bits people actually want.
11. White Bean and Rosemary Toasts with Soft Eggs
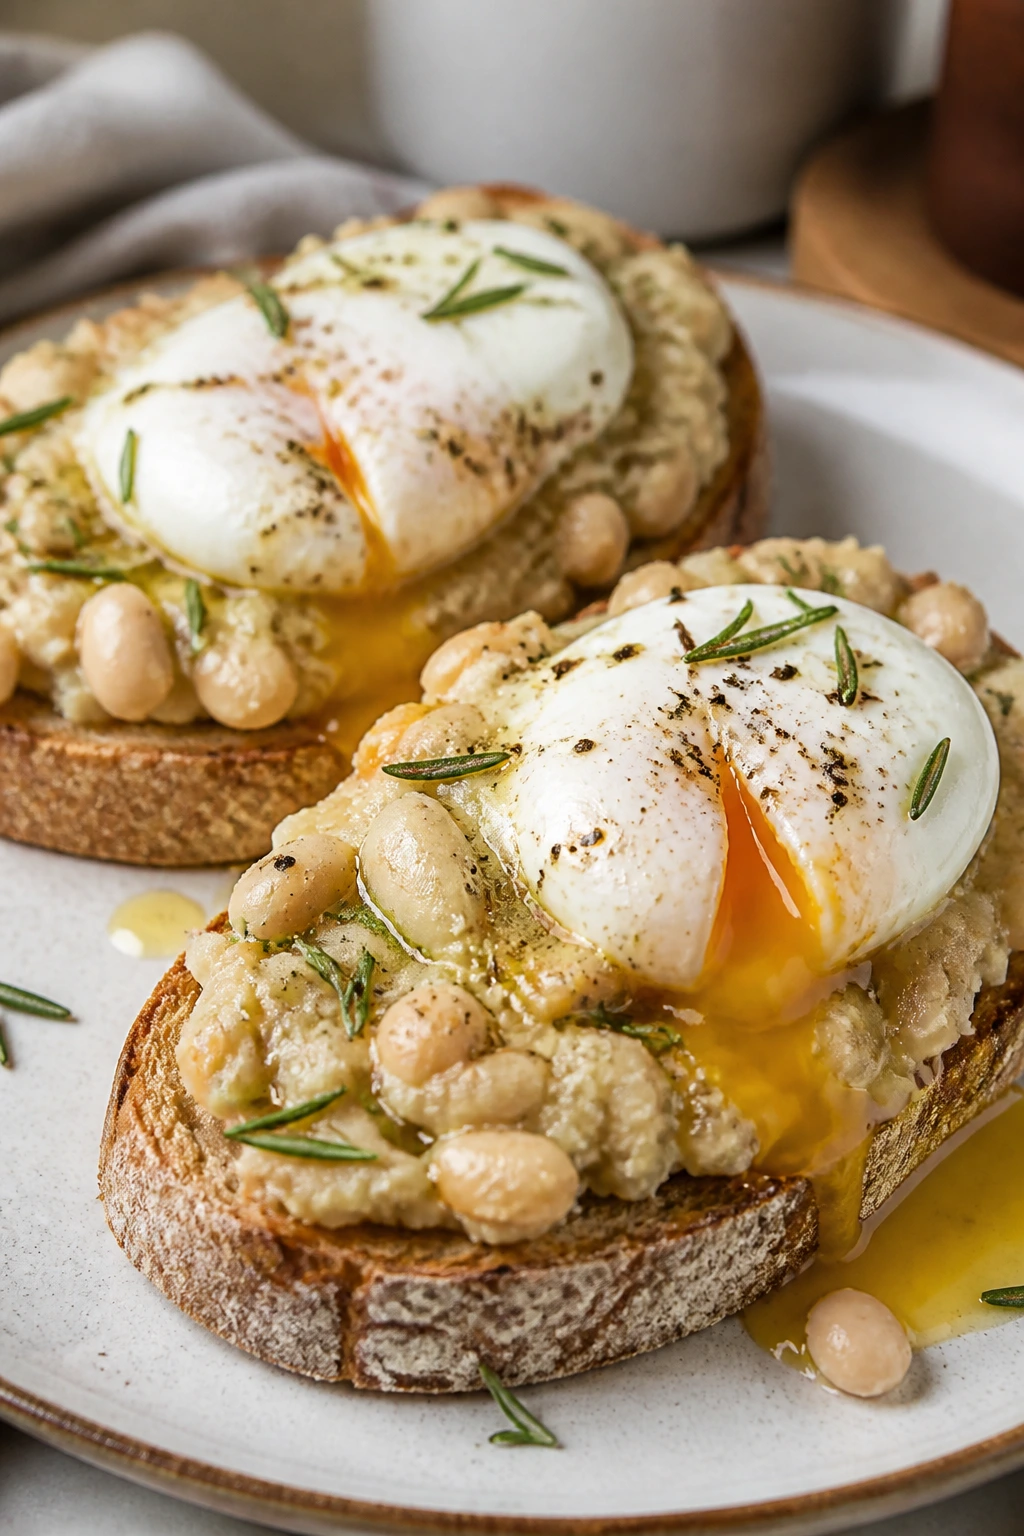
This is dinner on toast, but in the satisfying, grown-up sense of the phrase. The beans mash into a garlicky spread, rosemary perfumes the oil, and the eggs give you a yolk that runs into the toast like a built-in sauce. Fast. Cheap. Not boring.
Why It Works:
White beans are mild enough to take on garlic, rosemary, lemon, and Parmesan without fighting back. Soft eggs add richness and make the toast feel complete, not like a snack stretched too far. The bread matters here; use something sturdy enough to hold the mash.
Key Ingredients:
- 1 can (15 oz) cannellini beans, drained and rinsed
- 2 tbsp olive oil
- 1 garlic clove, minced
- 1 tsp chopped rosemary
- 1/2 tsp kosher salt
- 1/4 tsp black pepper
- 1 tbsp water or broth
- 4 thick slices crusty bread
- 4 large eggs
- 1 tbsp lemon juice
- 1/4 cup grated Parmesan
- Red pepper flakes, for serving
Quick Steps:
- Toast the bread until the edges are deeply golden.
- Heat the olive oil in a skillet over medium heat. Add the garlic and rosemary and cook for 30 seconds.
- Add the beans, salt, pepper, and water or broth. Mash about half the beans with the back of a spoon and heat for 2 to 3 minutes, until thick.
- Cook the eggs in a separate skillet to your liking; fried eggs with runny yolks are the easiest fit here.
- Spoon the bean mixture over the toast. Top with eggs, lemon juice, Parmesan, and red pepper flakes.
Equipment for This Recipe:
- Skillet
- Toaster or broiler
- Spoon or potato masher
- Frying pan for the eggs
How to Serve This Dish:
Put two toasts on a plate and let the yolks spill where they want. A handful of arugula or a sliced tomato on the side keeps the plate from feeling too soft. This is one of those meals that looks humble and eats bigger than it looks.
Pro Tips for This Recipe:
- Leave some beans whole for texture. Full mash turns the toast into paste.
- Use thick bread so the toast doesn’t collapse under the beans and egg.
- Lemon at the end brightens the beans without making them sharp.
- If the rosemary is strong, chop it very fine so it doesn’t feel woody.
Variations on This Dish:
- Tomato Toast Version: Add a spoonful of drained crushed tomatoes to the beans.
- Anchovy Bean Toast: Mash 1 anchovy fillet into the oil before the garlic.
- Vegan Version: Skip the egg and add a drizzle of tahini plus extra Parmesan-style crumbs.
Common Mistakes to Avoid with This Dish:
- Using flimsy bread: It turns limp before you get halfway through.
- Overcooking the eggs: The runny yolk is the sauce.
- Making the bean mash too wet: It should mound on the toast, not slide off.
12. Peanut Sesame Noodles
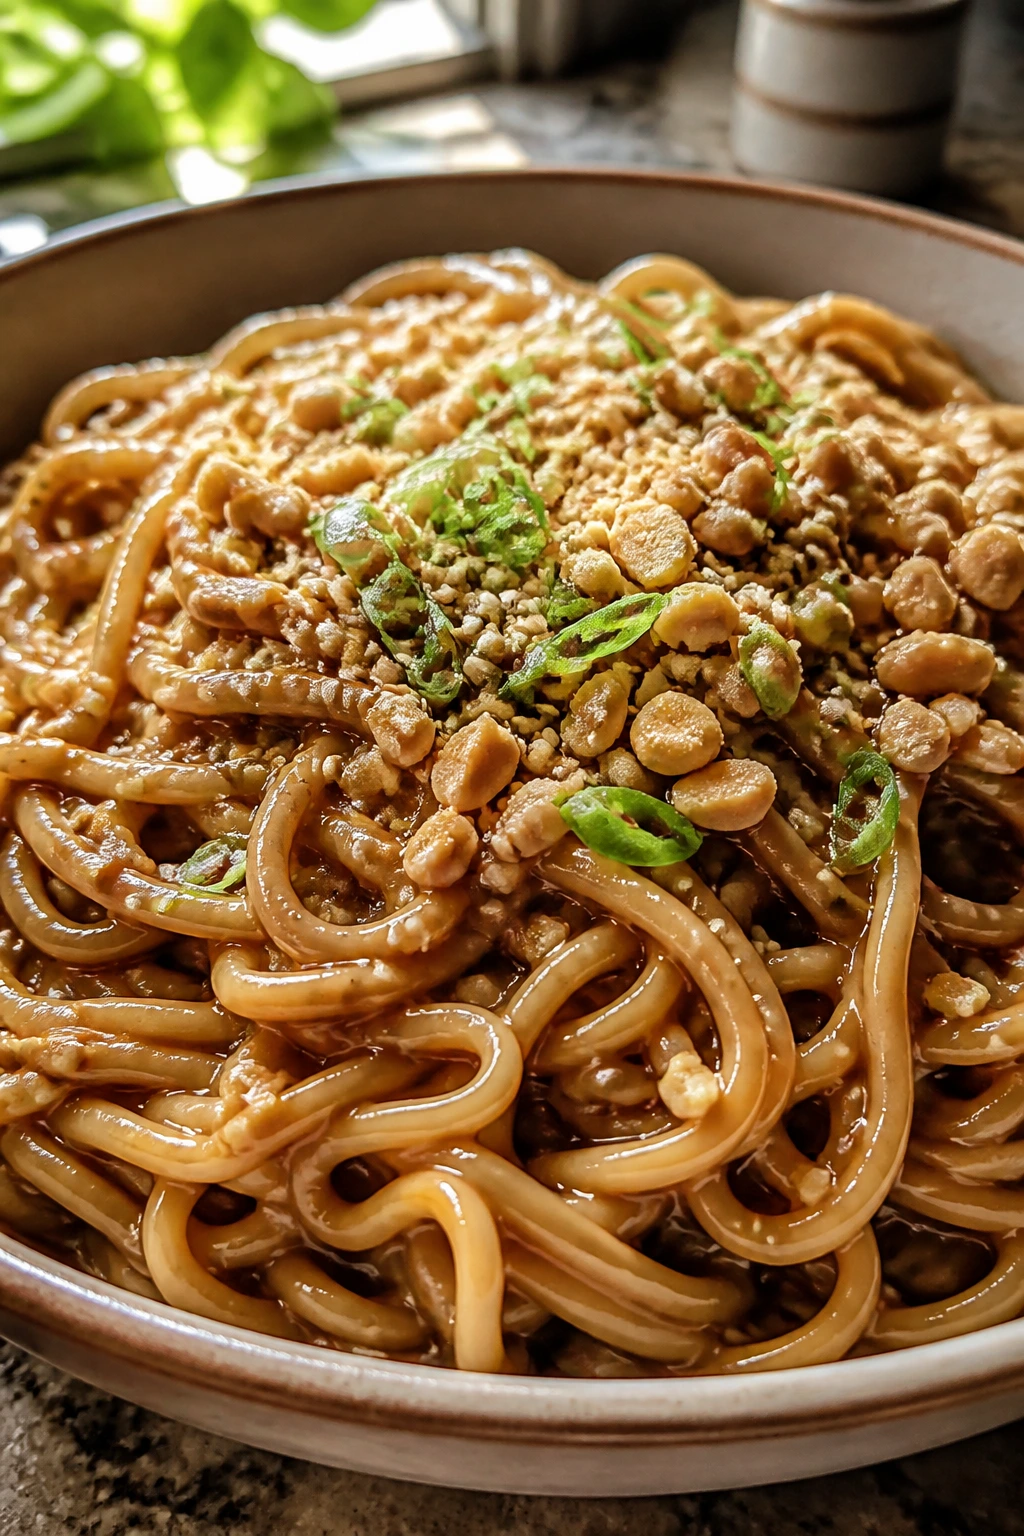
Peanut noodles are the pantry meal I make when I want dinner to feel cold, warm, salty, sweet, and a little sticky all at once. The sauce comes together in a bowl, the noodles drink it up, and the whole thing tastes like it took more planning than it did. It’s one of the best uses for a half-empty jar of peanut butter.
Why It Works:
Peanut butter emulsifies with hot water into a sauce that clings to noodles without needing cream. Soy sauce gives the salt, rice vinegar keeps it from tasting heavy, and sesame oil gives the finish a roasted edge. If you want crunch, peanuts or scallions on top take care of it.
Key Ingredients:
- 12 oz spaghetti, ramen, or other noodles
- 1/3 cup peanut butter
- 2 tbsp soy sauce
- 1 tbsp rice vinegar
- 1 tbsp honey or brown sugar
- 1 tbsp sesame oil
- 2 garlic cloves, grated
- 1/2 tsp chili crisp or red pepper flakes
- 1/4 cup hot water, plus more if needed
- 2 tbsp chopped peanuts or sesame seeds
- Sliced scallions, for serving
Quick Steps:
- Cook the noodles according to the package directions. Reserve 1/2 cup of the cooking water, then drain.
- In a large bowl, whisk together the peanut butter, soy sauce, vinegar, honey, sesame oil, garlic, chili crisp, and 1/4 cup hot water until smooth.
- Toss the hot noodles into the sauce. Add a splash of reserved noodle water if the sauce looks too thick.
- Mix until every strand is coated and glossy.
- Top with peanuts and scallions. Serve warm or at room temperature.
Equipment for This Recipe:
- Medium pot
- Large mixing bowl
- Whisk
- Colander
How to Serve This Dish:
Serve the noodles in a broad bowl with the toppings scattered over the middle. They’re good warm, but they’re also good after they sit for a bit and absorb more sauce. If you have cucumbers or shredded cabbage, add them for crunch.
Pro Tips for This Recipe:
- Use hot noodle water to loosen the sauce. Cold water makes peanut butter seize up.
- Add vinegar after the sauce comes together so the flavor stays bright.
- If your peanut butter is very stiff, microwave it for 10 seconds first.
- Taste before salting. Soy sauce may already carry enough.
Variations on This Dish:
- Cold Sesame Noodles: Chill the finished noodles for 20 minutes and serve with sliced cucumber.
- Nut-Free Version: Use sunflower seed butter instead of peanut butter.
- Extra-Spicy Bowl: Stir in more chili crisp and a spoonful of soy sauce at the end.
Common Mistakes to Avoid with This Dish:
- Making the sauce too thick: It should coat the noodles, not glue them together.
- Overdoing the soy sauce: Peanut butter already brings a lot of richness.
- Skipping the noodle water: That starchy splash is what makes the sauce smooth.
13. Pasta e Fagioli
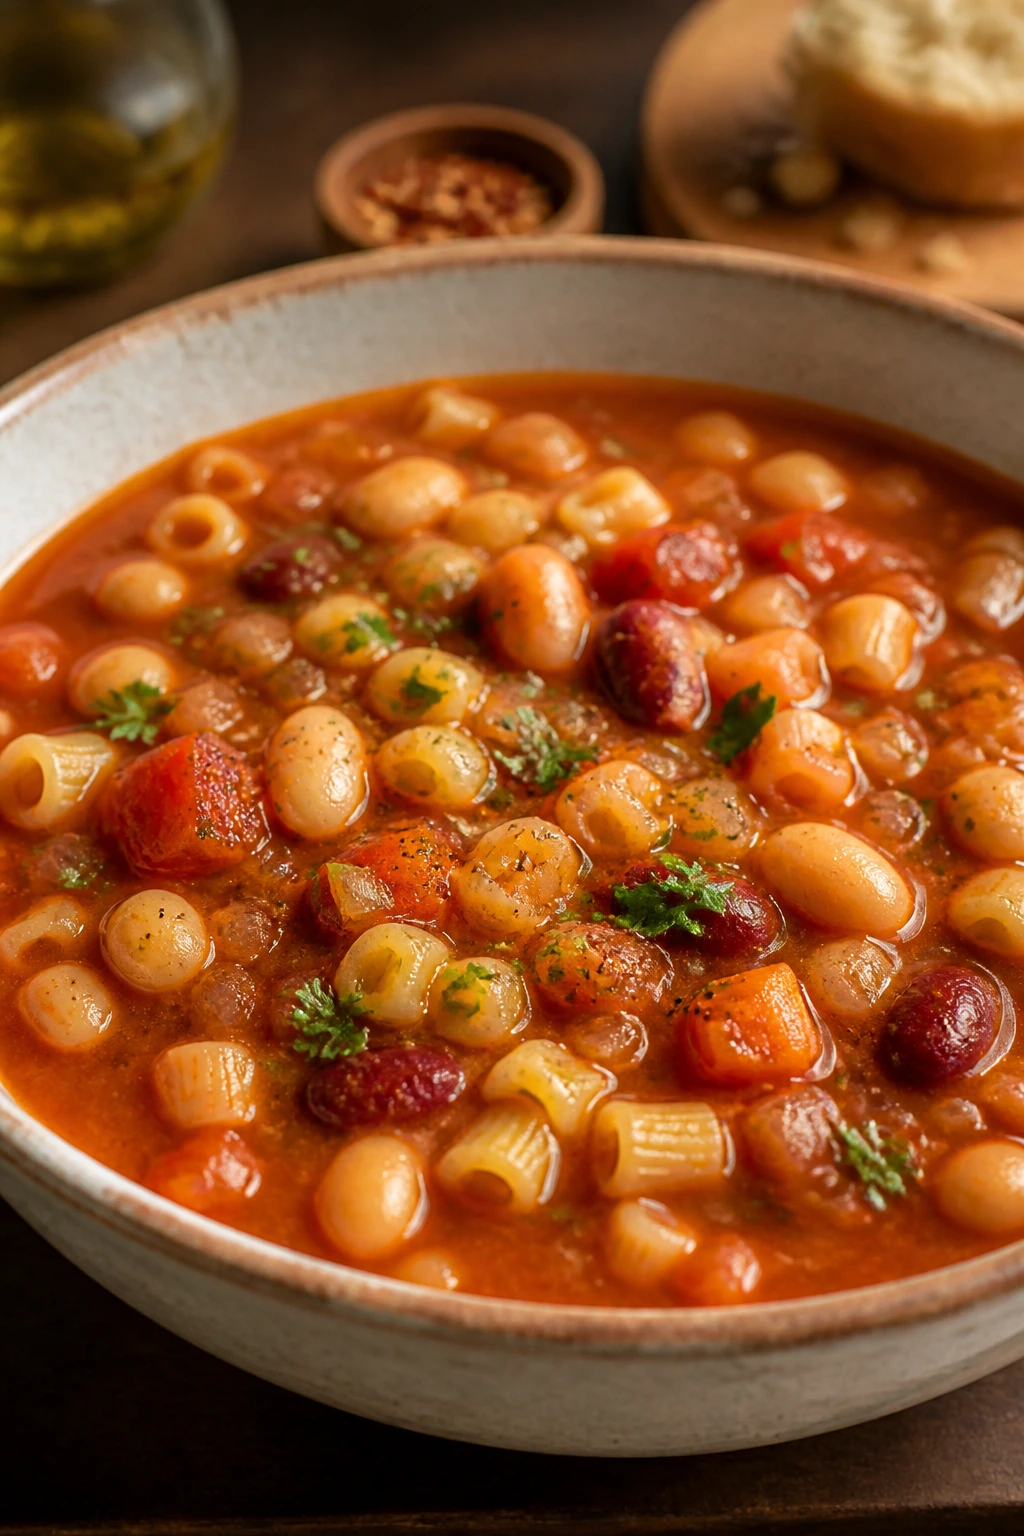
Pasta e fagioli is what happens when beans and pasta stop pretending they’re side dishes and become the meal. The broth turns tomato-rich and savory, the beans make it thick, and the tiny pasta gives you that nice spoon-and-fork rhythm in the bowl. It is humble in the best possible way.
Why It Works:
Beans and pasta both thicken the pot as they cook, so the broth gets body without flour or cream. Onion, carrot, celery, and garlic build the base, while a parmesan rind — if you have one — adds a salty depth that feels almost unfair. This soup tastes like the shelves were paying attention.
Key Ingredients:
- 1 tbsp olive oil
- 1 onion, diced
- 2 carrots, diced
- 2 celery stalks, diced
- 3 garlic cloves, minced
- 1 tsp Italian seasoning
- 1 can (14.5 oz) diced tomatoes
- 1 can (15 oz) cannellini beans, drained and rinsed
- 1 can (15 oz) kidney beans, drained and rinsed
- 5 cups broth
- 1 bay leaf
- 1 cup ditalini or other small pasta
- 1/2 cup grated Parmesan
- Chopped parsley, for serving
Quick Steps:
- Heat the olive oil in a large pot over medium heat. Add the onion, carrots, and celery and cook for 6 minutes, until softened.
- Stir in the garlic and Italian seasoning and cook for 30 seconds.
- Add the tomatoes, beans, broth, and bay leaf. Bring to a simmer and cook for 10 minutes.
- Stir in the pasta and cook for 8 to 10 minutes, until tender. Stir often so the pasta doesn’t stick.
- Remove the bay leaf. Stir in the Parmesan and parsley. Serve hot.
Equipment for This Recipe:
- Large soup pot
- Wooden spoon
- Ladle
- Measuring cups and spoons
How to Serve This Dish:
Serve it with a little extra Parmesan on top and some cracked black pepper. I like a piece of toast or a crusty roll on the side, but the soup can carry the night on its own. If you want it thicker, let it sit for 5 minutes before ladling.
Pro Tips for This Recipe:
- If you expect leftovers, cook the pasta separately and add it to each bowl. Otherwise it keeps drinking broth.
- A parmesan rind simmered in the pot adds a lot of flavor if you have one.
- Taste the broth before serving. Beans and pasta both pull salt out of the pot.
- Don’t rush the vegetable base. Those 6 minutes build the flavor.
Variations on This Dish:
- Tomato-Free Bean Soup: Skip the diced tomatoes and add extra broth for a lighter pot.
- Sausage Version: Brown sliced sausage with the vegetables.
- Thicker Stew Style: Mash a cup of the beans against the side of the pot before adding the pasta.
Common Mistakes to Avoid with This Dish:
- Cooking the pasta too long: It turns soft fast in the hot broth.
- Not seasoning enough: Beans need a confident hand with salt.
- Skipping the vegetables: Onion, carrot, and celery are the backbone of the soup.
14. Rice and Bean Burrito Bowls
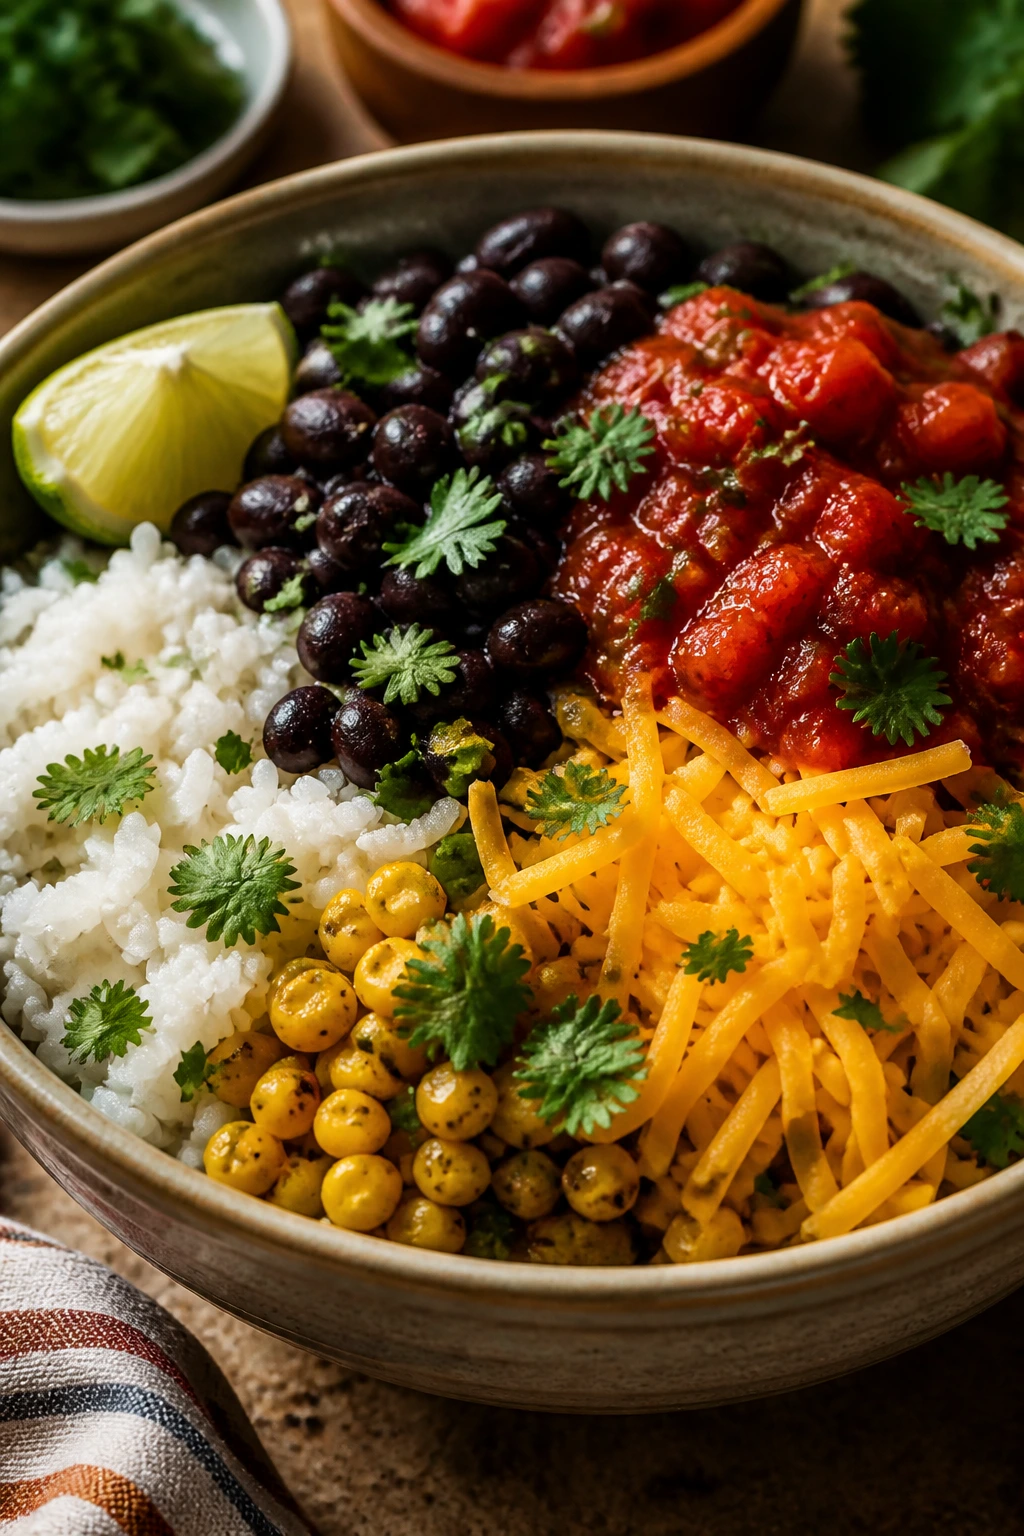
This is the bowl you make when the pantry looks dull but you still want a meal with color and crunch. Warm rice, seasoned beans, sharp salsa, and a little cheese are enough to make dinner feel assembled, not improvised. Add tortilla chips and it has the kind of texture people quietly go back for.
Why It Works:
Rice gives you a neutral base, beans bring protein and body, and salsa acts like both dressing and sauce. Corn adds sweetness, lime wakes everything up, and tortilla chips keep the bowl from becoming one soft note after another. It’s cheap, fast, and annoyingly dependable.
Key Ingredients:
- 1 cup long-grain rice
- 2 cups water
- 1 tbsp neutral oil
- 1 can (15 oz) black beans, drained and rinsed
- 1 tsp ground cumin
- 1/2 tsp chili powder
- 1 cup salsa
- 1 cup canned corn, drained
- 1 tbsp lime juice
- 1/2 cup shredded cheddar
- Tortilla chips, for topping
- Chopped cilantro, for serving
Quick Steps:
- Cook the rice in the water according to the package directions. Finish with a pinch of salt and the lime juice.
- Warm the oil in a small skillet. Add the beans, cumin, chili powder, and 2 tablespoons of water. Cook for 3 to 4 minutes, until hot and lightly saucy.
- Warm the corn if needed, either in the skillet or in the microwave.
- Build bowls with rice first, then beans, corn, salsa, and cheese.
- Finish with tortilla chips and cilantro.
Equipment for This Recipe:
- Small saucepan with lid
- Small skillet
- Serving bowls
- Spoon
How to Serve This Dish:
Make the rice the base and keep the toppings in separate piles so the bowl feels bright instead of muddy. A dollop of sour cream or plain yogurt helps, though it isn’t required. These bowls also work well with hot sauce on the table for whoever wants more bite.
Pro Tips for This Recipe:
- Season the rice a little. Plain rice under beans and salsa can taste dull.
- Warm the beans separately so they don’t cool the whole bowl.
- Add tortilla chips at the very end so they stay crunchy.
- If you have pickled onions, they fit here with almost no effort.
Variations on This Dish:
- Breakfast Bowl: Top with a fried egg and skip the cheese if you want.
- Brown Rice Version: Use brown rice, but cook it ahead because it takes longer.
- Pinto Bean Swap: Replace black beans with pinto beans for a softer, sweeter bowl.
Common Mistakes to Avoid with This Dish:
- Skipping the acid: Lime or salsa is what keeps the rice from tasting plain.
- Putting wet salsa under the chips: The chips soften too fast.
- Serving it cold: Warm beans and rice make this dish work.
15. Crispy Salmon Cakes with Pantry Slaw
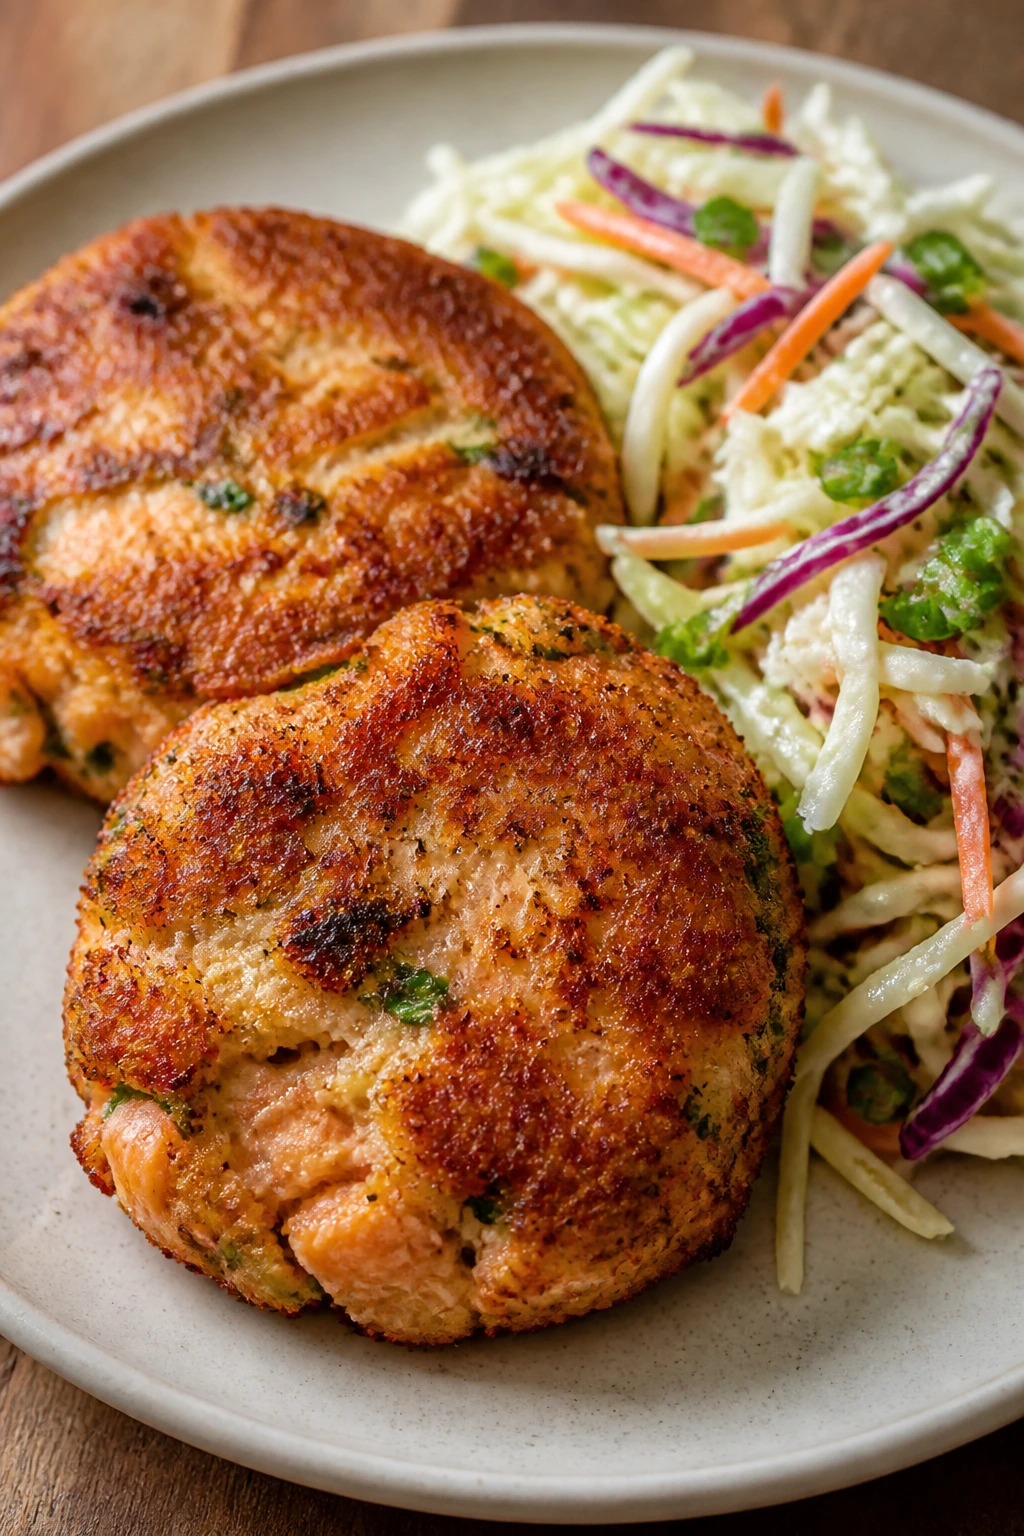
Canned salmon is one of the most underused pantry ingredients around. Mix it with breadcrumbs, egg, mustard, and lemon, and it turns into crisp cakes with a soft center. The slaw on the side keeps the plate sharp and crunchy, which the salmon really needs.
Why It Works:
Canned salmon is already cooked, so the job is not to transform it into something else. It just needs binder, seasoning, and enough heat to brown the outside. Mayo and mustard keep the cakes moist, while a quick cabbage slaw gives you contrast and a little vinegar bite.
Key Ingredients:
- 2 cans salmon (about 14.75 oz each), drained
- 1/2 cup breadcrumbs
- 1 large egg
- 2 tbsp mayonnaise
- 1 tbsp Dijon mustard
- 1 tbsp lemon juice
- 2 tbsp minced onion or scallion
- 1 tbsp chopped parsley
- 1/2 tsp kosher salt
- 1/4 tsp black pepper
- 2 tbsp neutral oil, for frying
- 3 cups shredded cabbage
- 1 tbsp vinegar
- 1 tbsp olive oil
- 1 tsp sugar
Quick Steps:
- In a bowl, mix the salmon, breadcrumbs, egg, mayonnaise, Dijon, lemon juice, onion, parsley, salt, and pepper until just combined.
- Form the mixture into 6 small patties and let them sit for 5 minutes so the breadcrumbs absorb some moisture.
- Heat the oil in a skillet over medium heat. Cook the salmon cakes for 3 to 4 minutes per side, until deep golden and crisp.
- Toss the cabbage with vinegar, olive oil, and sugar for a quick slaw.
- Serve the cakes hot with the slaw on the side.
Equipment for This Recipe:
- Mixing bowl
- Skillet
- Spatula
- Measuring spoons
How to Serve This Dish:
Serve the cakes with the slaw tucked beside them, not buried underneath. A wedge of lemon and a spoonful of mustard or tartar sauce works well if you want more zip. They’re also good on buns, which makes them stretch farther.
Pro Tips for This Recipe:
- Drain the salmon well so the cakes hold together.
- If the mixture feels loose, add 1 to 2 tablespoons more breadcrumbs.
- Don’t flip the cakes too soon. Let the first side brown fully.
- If your salmon has bones or skin, pick out what you don’t want before mixing.
Variations on This Dish:
- Dill Pickle Version: Add 2 tablespoons chopped pickle and reduce the lemon slightly.
- Cajun Salmon Cakes: Swap the parsley for Cajun seasoning and add a pinch of cayenne.
- Air Fryer Version: Brush the patties with oil and air-fry at 400°F for 8 to 10 minutes, flipping once.
Common Mistakes to Avoid with This Dish:
- Making the mixture too wet: The cakes will fall apart in the skillet.
- Using heat that’s too high: The outside burns before the center firms.
- Serving them without acid: The lemon or slaw keeps the fish from feeling heavy.
Why Pantry Staples Pull Their Weight on Busy Nights
The shelf is not the meal. Heat is. That’s the part people forget when they stare into the pantry and assume dinner will be bland by default. A can of beans becomes dinner because you give it oil, garlic, salt, and a little time in a hot pan. A box of pasta becomes dinner because you salt the water, use the starch, and finish the sauce with enough fat to make it cling.
Canned tomatoes are the most useful starting point in the whole cupboard, and I’ll die on that hill. They give you acid, color, and a base that can handle garlic, spices, chili, coconut milk, or cheese without getting lost. Rice does a different job. It quiets strong sauces and makes a bowl feel complete. Beans do both jobs at once: protein and bulk. That is why they show up so often here.
The best pantry dinners don’t try to hide what they are. They lean into the texture of what’s available. Slightly chewy pasta. Soft beans. Crisp crumbs. Runny egg yolks. A little lemon or vinegar at the end. If the cupboard tastes like dinner, it’s usually because someone respected the ingredients enough to cook them with a little heat and a little salt.
Essential Equipment for These Recipes
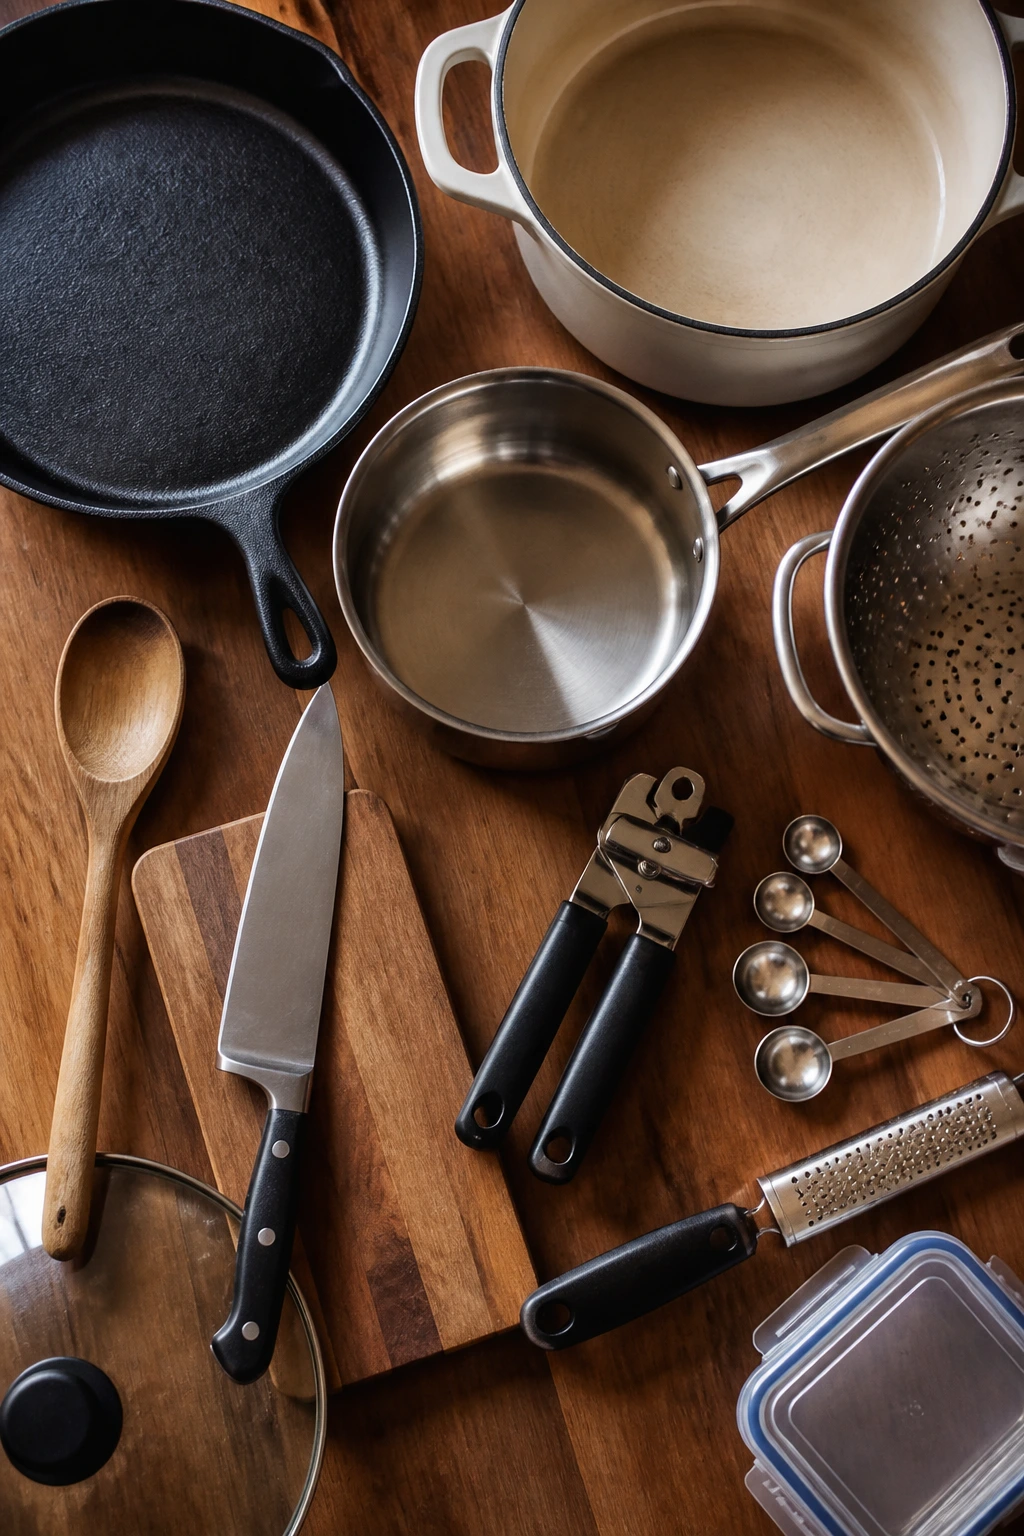
- Large skillet: The workhorse for pasta sauces, fried rice, shakshuka, and quick skillet dinners.
- Dutch oven or heavy soup pot: Best for lentil soup, pasta e fagioli, and anything that needs steady heat.
- Medium saucepan: Handy for rice, small batches of sauce, and quick simmer jobs.
- Colander: Necessary for pasta and useful for rinsing beans fast.
- Wooden spoon or sturdy spatula: Better than a whisk for stirring beans, rice, and thick sauces.
- Chef’s knife: A sharp one makes onion, garlic, and herbs much faster.
- Cutting board: Use one with enough space that you’re not juggling a can opener beside it.
- Can opener: Non-negotiable for this kind of cooking.
- Measuring spoons and cups: Spices and liquid ratios matter more than people think here.
- Microplane or fine grater: Great for lemon zest, garlic, and Parmesan if you keep it around.
- Lid for a skillet or pot: Especially useful for shakshuka, rice, and stews.
- Airtight containers: Good for leftovers, cooked rice, and bean mixtures.
Smart Shopping and Ingredient Tips
Canned tomatoes deserve more respect than they usually get. Whole peeled tomatoes are the most versatile because you can crush them by hand for a rough sauce or break them down more fully in the pot. Crushed tomatoes are easier when you want dinner to move fast. If the label says no salt added, that’s useful for control, but it also means you’ll need to season more confidently.
Beans are where a lot of cupboard dinners either win or lose. Rinse canned beans unless the recipe leans on their liquid for body, because the canning liquid can taste flat or overly salty. Cannellini beans are soft and mild, black beans are sturdier and earthier, and chickpeas hold shape in simmered sauces better than most people expect. Dried beans work too, but they belong to the make-ahead camp, not the emergency-dinner camp.
For pasta, the shape matters more than people like to admit. Long noodles are good for slick sauces like tuna or sardine pasta. Short shapes like elbows, rigatoni, or ditalini are better when the pot is chunky or thick. For rice, long-grain types stay a little separate, which helps fried rice and bowls. Sticky rice has its place, but not here.
Canned fish is worth buying if you choose it well. Sardines packed in olive oil tend to be more supple than the water-packed kind. Tuna in olive oil brings more flavor to the pan. Canned salmon can include bones, which are soft and edible, but if that bothers you, pick them out before mixing. Keep an eye on the sodium levels on the label; a low-salt can gives you more room to season the dish yourself.
How to Serve These Recipes
Presentation: Spoon saucy dishes into shallow bowls so the sauce spreads instead of hiding. Pile crunchy toppings in the center, not at the edges. For toast meals, keep the toppings thick enough that the bread still shows around the sides.
Accompaniments: A chopped salad, a bag of arugula, crusty bread, tortilla chips, lemon wedges, or quick pickles cover most of the meals here. Rice and beans like lime and cilantro. Fish pastas like a plain green salad or cucumbers with vinegar.
Portions: Most of these recipes serve 4 in a useful, normal way. Heavier bowls like chili mac or pasta e fagioli can stretch to 5 if you add a salad or bread. On the other side, fried rice and toast meals can shrink to 2 generous servings if you want a bigger plate.
Beverage Pairing: Sparkling water with lemon goes with nearly everything here. Iced tea is a clean match for the bean and rice dishes. A dry white wine fits tuna, sardine, and salmon meals if that’s your lane.
Additional Tips and Flavor Boosters
Flavor Enhancement: Keep one sharp thing handy: lemon, vinegar, capers, pickled onions, or hot sauce. Pantry food wakes up when the last step has a little bite, and a teaspoon of acid at the end can matter more than another pinch of dried herbs.
Customization: If you want more body, add beans to pasta and soup dishes or rice to stews. If you want more crunch, keep breadcrumbs, tortilla chips, sesame seeds, or chopped peanuts on the table. Those little textures turn a soft meal into one that feels deliberate.
Serving Suggestions: Finish tomato-based dishes with Parmesan or parsley. Finish coconut or curry dishes with lime and cilantro. Finish fish dishes with lemon zest, black pepper, and a drizzle of olive oil. The garnish is not decoration here; it is the last seasoning.
Make-It-Yours: For dairy-free plates, use olive oil, tahini, or toasted crumbs instead of cheese. For vegetarian versions, beans and eggs do a lot of the work. For a little more protein without changing the recipe much, add a second can of beans or a can of fish to the pot.
Make-Ahead, Storage, and Reheating Guidance
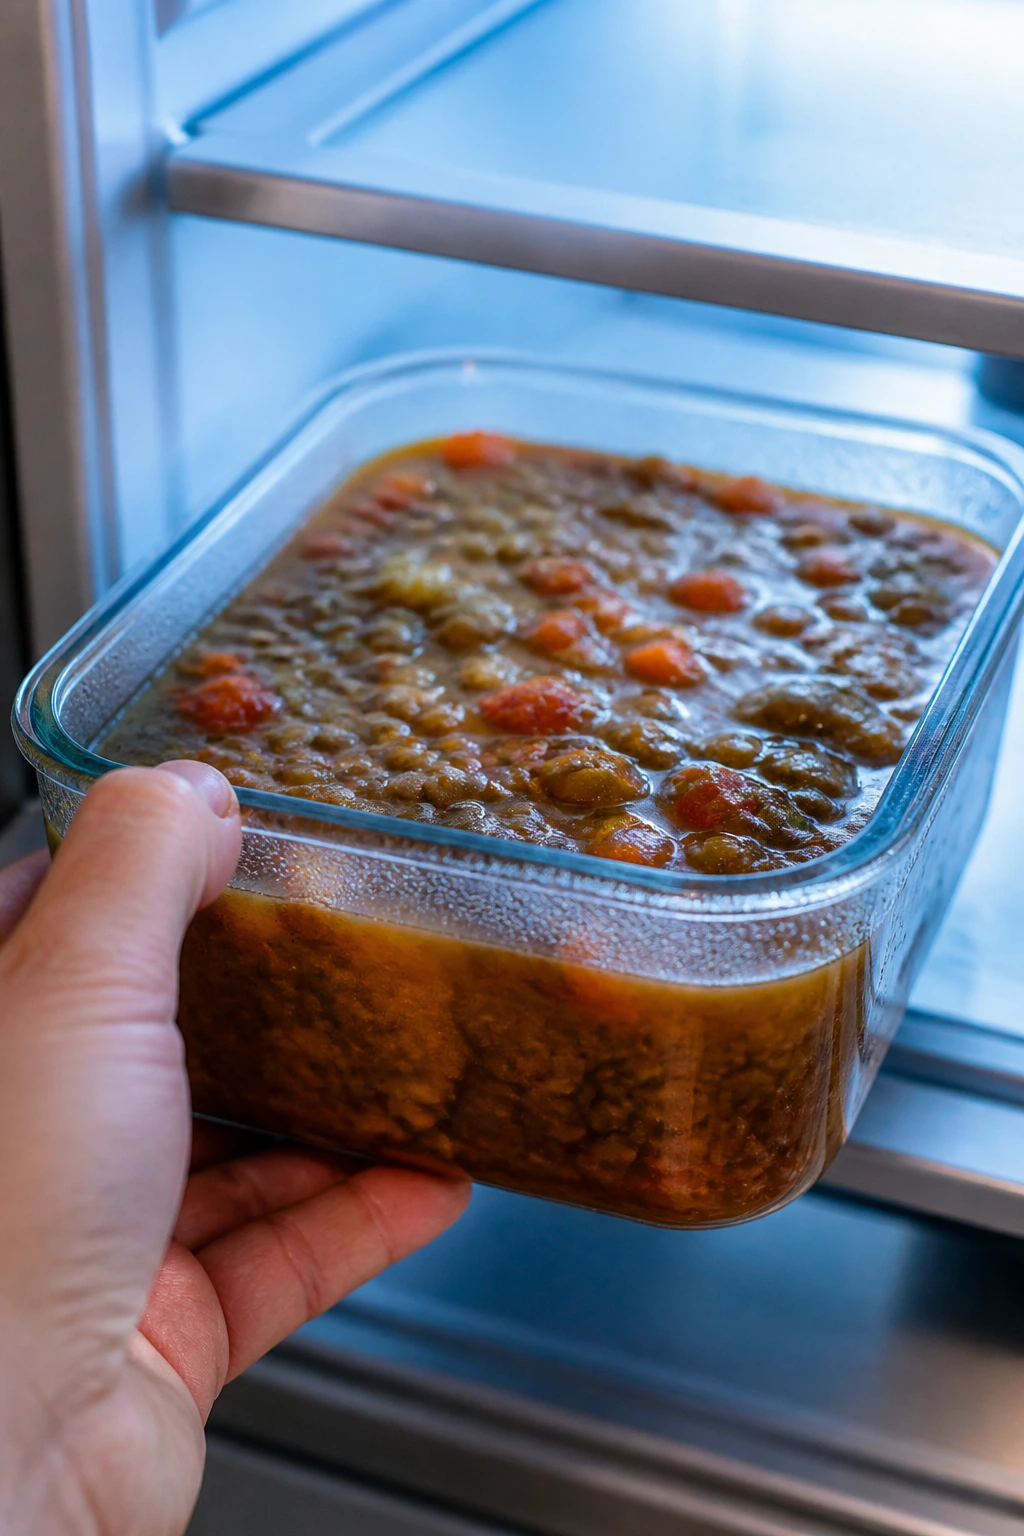
Soups and stews are the easiest winners here. Lentil soup, pasta e fagioli, and chickpea stew keep well in the fridge for 3 to 4 days and freeze for up to 3 months. Reheat them in a pot over medium-low heat with a splash of water or broth if they’ve thickened too much.
Pasta dishes hold for 3 days refrigerated, but the texture gets softer each day, so I usually stop there. Reheat pasta in a skillet with a few tablespoons of water over low heat and stir until the sauce loosens. The microwave works in a pinch, but add liquid first or the pasta dries out around the edges.
Rice dishes like fried rice or burrito bowls keep for 3 to 4 days if they’re cooled fast and sealed well. Reheat rice with a damp paper towel over the container in the microwave, or toss it in a skillet with a teaspoon of oil and a splash of water. Do not leave cooked rice sitting out for hours; cool it and refrigerate it within 2 hours.
Fish-based dishes like tuna pasta and salmon cakes are best within 2 days. Salmon cakes can be chilled after forming and fried later the same day, or cooked and reheated in a 350°F oven for about 8 minutes. Tuna pasta is safest and best reheated gently, with a little oil or water to bring it back to life.
Egg dishes are the outliers. Shakshuka sauce can be made ahead and kept for 4 days refrigerated or 2 months frozen, but the eggs should be cracked in right before serving. Fried eggs and soft yolks do not store well. That’s the price of the good texture.
Variations and Adaptations to Try
-
Gluten-Free Shelf Cooking: Swap in gluten-free pasta, serve curry over rice, use corn tortillas in the taco skillet, and reach for certified gluten-free breadcrumbs when you need crunch. The recipes hold up fine with those changes, and most of the flavor lives in the sauce anyway.
-
Dairy-Free Dinner Path: Skip Parmesan, cheddar, and feta, then finish with olive oil, lemon, or a spoonful of tahini. The meals still work because the beans, tomatoes, coconut milk, and fish already provide enough richness to carry them.
-
Lower-Sodium Cupboard Cooking: Buy no-salt-added tomatoes and beans when you can, rinse canned beans well, and lean on vinegar, lemon, garlic, and herbs to do more of the seasoning work. You’ll taste the ingredients more clearly, which is often a better deal than extra salt.
-
Mild Version for Smaller Palates: Hold back the red pepper flakes, chili powder, and hot sauce, then set them on the table instead of stirring them in. That keeps the base flavor honest and lets everyone build their own heat level.
-
Protein-Heavy Add-On: Add a second can of beans to soups and curries, crack eggs over skillet meals, or stir canned fish into tomato sauces. It’s the easiest way to make a pantry dinner hold steady without turning it into a project.
-
Crunch-First Upgrade: Keep toasted breadcrumbs, crushed tortilla chips, chopped peanuts, or sesame seeds ready for the finish. Pantry meals love texture, and one crunchy topping can make a soft bowl feel complete.
Common Mistakes to Avoid
-
Skipping the aromatics: A can of beans and a jar of sauce will taste flat if they never meet onion, garlic, or spice in a hot pan. Those few minutes of sautéing are where the real flavor starts.
-
Treating everything like it can simmer forever: Pasta, rice, eggs, and canned fish each have a point where they stop improving. Once they’re done, move on. Overcooking turns quick dinners into tired ones.
-
Forgetting to rinse beans or balance salt: Canned ingredients can be briny enough on their own. If you don’t taste as you go, the final dish can end up salty and dull at the same time.
-
Using too much liquid too soon: Saucy meals should look loose at the start and thick by the finish. If the pot is watery, keep simmering before you add more ingredients.
-
Leaving out acid at the end: Lemon, vinegar, lime, or even capers give pantry meals a clean finish. Without that last sharp note, the dish can taste heavy and muddy.
-
Ignoring texture: Soft beans, tender pasta, and creamy sauce all need something crisp beside them. Breadcrumbs, chips, toasted nuts, or crisp greens keep the meal from flattening out.
Frequently Asked Questions
What counts as a pantry staple for these meals?
Anything shelf-stable that can carry part of dinner: canned tomatoes, beans, tuna, sardines, coconut milk, pasta, rice, breadcrumbs, capers, soy sauce, and dried spices all fit. Onion, garlic, lemons, and eggs are common helpers here too, even though they live outside the cupboard for many kitchens.
Can I use dried beans instead of canned beans?
Yes, but only if they’re cooked ahead of time. Dried beans need soaking and simmering, which is great for planned cooking and not so great when everyone is hungry right now. One pound of dried beans usually gives you about 3 cups cooked, which is enough for several of these recipes.
How do I make pantry meals taste less like pantry meals?
Cook the onion and garlic properly, bloom dried spices in oil, and finish with something sharp like lemon or vinegar. Crunch helps too. A toasted breadcrumb topping or a handful of tortilla chips makes a soft dish feel finished.
What’s the best canned tomato to buy?
Whole peeled tomatoes are the most flexible, crushed tomatoes are the fastest, and diced tomatoes are fine when the recipe is chunky or soupy. I reach for whole peeled when I want control and crushed when I want dinner to move quickly. Either way, season them well.
Can I make these meals vegetarian or vegan?
Most of them already lean that way or can be nudged there easily. Skip cheese, use olive oil instead of butter, and let beans, chickpeas, tofu, or extra vegetables carry the plate. Coconut milk, tahini, breadcrumbs, and spices do a lot of the work when dairy is out.
What if I only have rice but not pasta, or pasta but not rice?
That’s fine. Rice dishes can stand in for pasta bowls, and pasta can take the place of rice in saucy or stew-like meals. The important part is matching the sauce to the starch: thinner sauces like tuna or sardine work better with pasta, while thicker curries and beans love rice.
How long can I keep cooked rice in the fridge?
Cooked rice is best within 3 to 4 days if it’s cooled quickly and stored well. Spread it out briefly before chilling if you need to get the heat out fast, then reheat it until steaming hot. Rice that sat out too long should not be kept.
What canned fish works best besides tuna?
Sardines and salmon are both excellent here. Sardines are good for pasta with lemon, capers, and breadcrumbs, while canned salmon shines in cakes or patties. Mackerel also works if you like a stronger fish flavor and a softer texture.
Can I freeze these meals?
Soups and stews freeze well. Pasta dishes, egg dishes, and fried rice are more mixed — some freeze fine, some turn soft or dry — so I usually keep those refrigerated and eat them within a few days. Salmon cakes freeze better if you freeze the uncooked patties on a tray first, then bag them.
When the Shelf Does the Heavy Lifting
A stocked pantry doesn’t mean you have to cook elaborate food. It means dinner stops depending on a perfect store run, a precise plan, or a long list of fresh ingredients that may or may not still be in the crisper drawer. That’s a real kind of relief.
The best shelf meals are not apologetic. They know what they are: beans that need heat, tomatoes that want garlic, rice that wants sauce, pasta that wants salt, and fish that wants lemon. Give those things a little attention and they stop tasting like backup food.
Keep a few good staples on hand and the whole evening gets easier. A can of tomatoes, a bag of rice, pasta, beans, broth, coconut milk, and something crunchy for the finish can carry you farther than a lot of people expect.