
The fridge door opens and the same scene starts again: a backpack dropped by the stairs, one shoe missing, and somebody asking for food before the zipper is even closed. That’s where air fryer after-school snacks earn their keep. They turn a handful of pantry pieces, a little cheese, or leftover dough into something hot, crisp, and worth sitting down for instead of eating over the sink.
The best part is not the machine itself. It’s the timing. Most of these snacks cook in 5 to 12 minutes, which means you can move from “I’m starving” to a plate with steam rising from it before the complaint spiral gets going. And because the air fryer handles browning so well, you get that fresh-from-the-oven crunch without heating the whole kitchen or dragging out a baking sheet the size of a canoe.
I also like that this kind of snack mix keeps everyone happy without making a separate meal for each person. Some recipes lean cheesy and mild, some are a little more savory, and a few land in that sweet spot where fruit, dough, or potatoes feel like a treat instead of a compromise. That balance matters after school, when energy is uneven and patience is thin. A snack that can be grabbed, dipped, and eaten in a few bites changes the whole rhythm of the afternoon.
Why These Air Fryer After-School Snacks Work So Well
-
Fast turnaround: Most of these recipes use short cook times and simple prep, so the air fryer can start earning its place the second backpacks hit the floor.
-
Crisp without deep frying: Hot circulating air gives you browned edges on chicken, tortillas, potatoes, and dough with only a light spray of oil.
-
Flexible ingredients: A lot of these snacks use things you probably already keep around — tortillas, cheese, potatoes, bananas, chickpeas, crescent dough, or frozen ravioli.
-
Easy to scale: A single basket makes two or three snacks for one child, or you can batch-cook in rounds and keep them warm on a sheet pan in a low oven.
-
Dipping-friendly: Marinara, ranch, salsa, honey mustard, peanut butter drizzle, and yogurt dip all fit here, which keeps snack time from feeling repetitive.
-
Kid-tested comfort: These recipes lean on familiar shapes and flavors. That matters more than fancy seasoning when someone is hungry and tired.
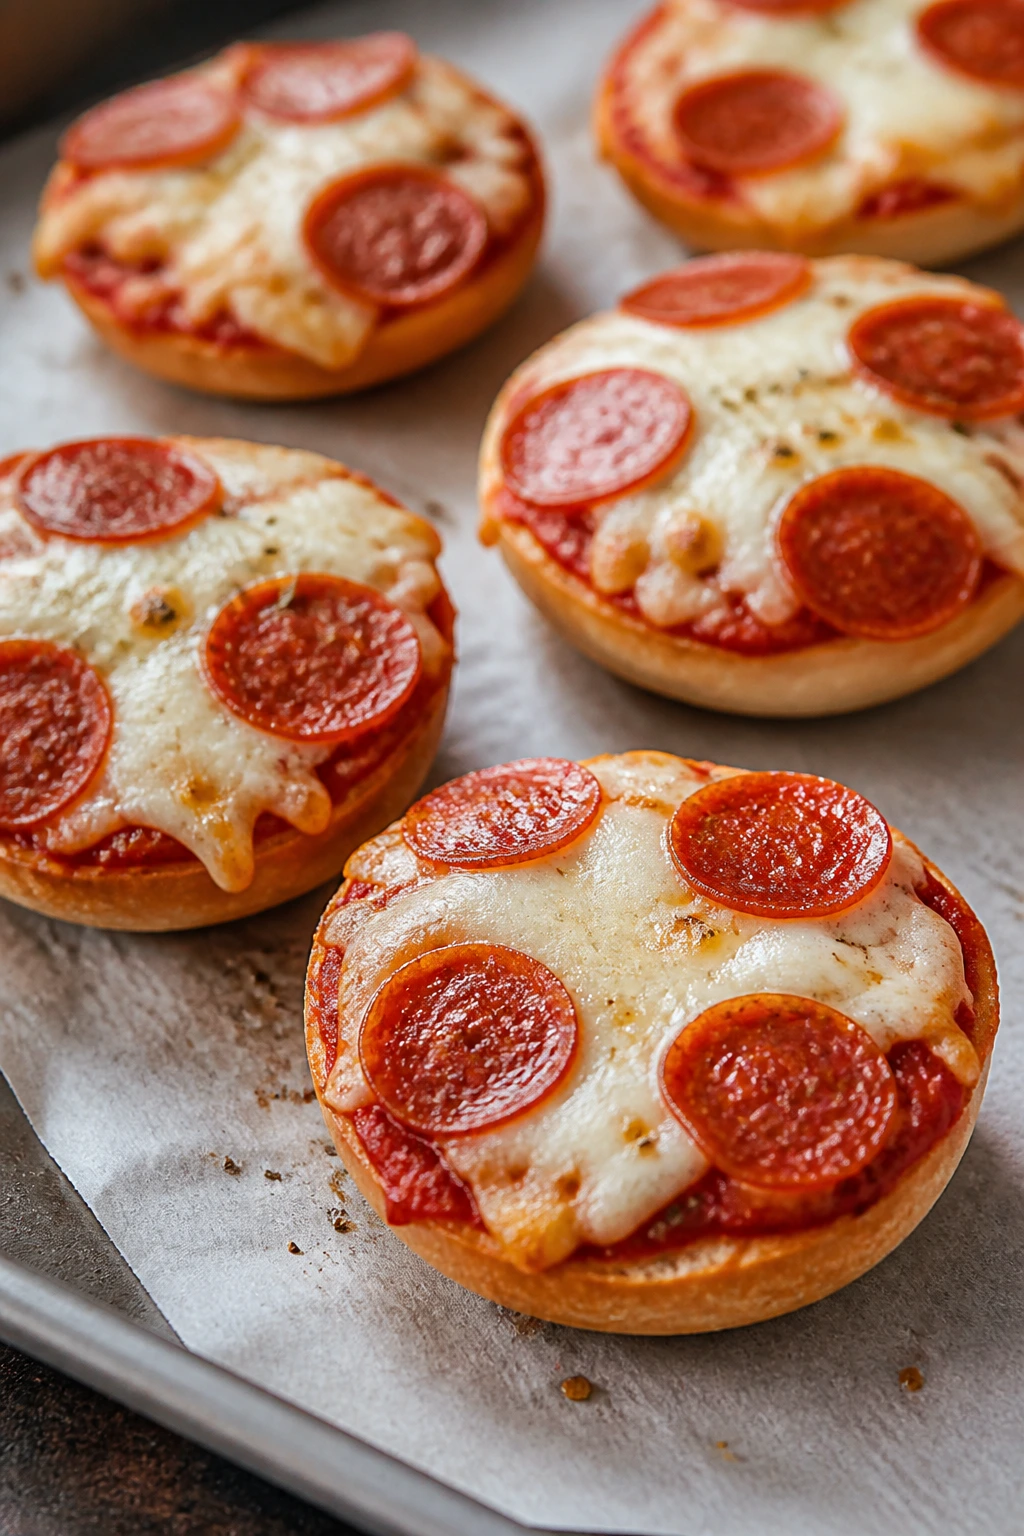
1. Mini Pizza Bagels
Tiny, salty, and a little messy in the best way, mini pizza bagels are the snack that disappears first when I set out a tray. The bagels toast around the edges, the sauce gets hot and glossy, and the mozzarella melts into those soft, stretchy patches kids pick at before the plate even lands.
Why It Works: The air fryer crisps the cut side of the bagel in just a few minutes, so you do not end up with a soft, soggy base. Keeping the toppings light — a thin swipe of sauce, a modest layer of cheese — helps the bagel heat through before the topping dries out. They also reheat better than most pizza leftovers, which makes them worth making in a small batch.
Key Ingredients:
- 6 mini bagels, split in half
- 1/2 cup pizza sauce
- 1 cup shredded mozzarella
- 24 mini pepperoni slices
- 1 tablespoon olive oil
- 1/2 teaspoon Italian seasoning
Quick Steps:
- Preheat the air fryer to 375°F for 3 minutes.
- Brush the cut sides of the bagels with olive oil.
- Air fry the bagel halves for 2 minutes to lightly toast them.
- Add about 1 teaspoon of sauce to each half, then top with mozzarella, pepperoni, and Italian seasoning.
- Air fry for 3 to 4 minutes, until the cheese is melted and bubbling at the edges.
Equipment for This Recipe:
- Air fryer basket or tray
- Small spoon for sauce
- Pastry brush or clean fingers for oil
- Tongs for lifting hot bagels
How to Serve This Dish: Serve them straight from the basket with a bowl of warm marinara on the side. I like putting out carrot sticks and apple slices so the plate feels like a snack board instead of a pizza accident.
Pro Tips for This Recipe:
- Keep the sauce thin. Heavy sauce makes the bagels soft in the center.
- Use pre-shredded mozzarella if you want faster melting; it spreads more evenly here.
- If your bagels are large, add 1 extra minute after topping and check for bubbling cheese.
Variations on This Dish:
- Supreme Lunchbox Style: Add finely chopped olives and bell pepper for an older-kid version.
- White Pizza Twist: Skip the red sauce and use a thin layer of ricotta mixed with garlic powder.
- Breakfast Bagel Bites: Swap pepperoni for cooked breakfast sausage and a few diced scrambled eggs.
Common Mistakes to Avoid with This Dish:
- Overloading the toppings. The bagel turns limp fast. Keep the layer thin.
- Skipping the pre-toast. If you add toppings to raw bagels, the center stays doughy while the cheese finishes.
- Using too much oil. A light brush is enough; extra oil makes the bottom greasy.
2. Parmesan-Crusted Chicken Tenders
These are the kind of chicken tenders that make a kid forget about the frozen box in the freezer. The coating turns bronzed and crisp, the parmesan gets nutty, and the chicken stays juicy if you stop cooking at the right moment — which is easier than it sounds when you use tender-sized pieces.
Why It Works: A flour-egg-panko coating gives the tenders a dry surface that the air fryer can brown fast. Parmesan adds salt and a deeper crust flavor, while panko keeps the texture lighter than standard breadcrumbs. Chicken tenders cook quickly and evenly, so they’re one of the least stressful proteins to make after school.
Key Ingredients:
- 1 1/2 pounds chicken tenders
- 1/2 cup all-purpose flour
- 2 large eggs
- 1 tablespoon milk
- 1 cup panko breadcrumbs
- 1/2 cup finely grated parmesan
- 1 teaspoon paprika
- 1 teaspoon garlic powder
- 1 teaspoon kosher salt
- 1/2 teaspoon black pepper
- Cooking spray
Quick Steps:
- Preheat the air fryer to 400°F for 3 minutes.
- Set up three shallow bowls: flour in one, beaten eggs mixed with milk in the second, panko, parmesan, paprika, garlic powder, salt, and pepper in the third.
- Dredge each tender in flour, then egg, then the panko mixture, pressing gently so the coating sticks.
- Arrange the tenders in a single layer and mist the tops with cooking spray.
- Air fry for 10 to 12 minutes, flipping once halfway, until the coating is deep golden and the chicken reaches 165°F in the thickest part.
Equipment for This Recipe:
- Air fryer basket
- 3 shallow bowls
- Tongs
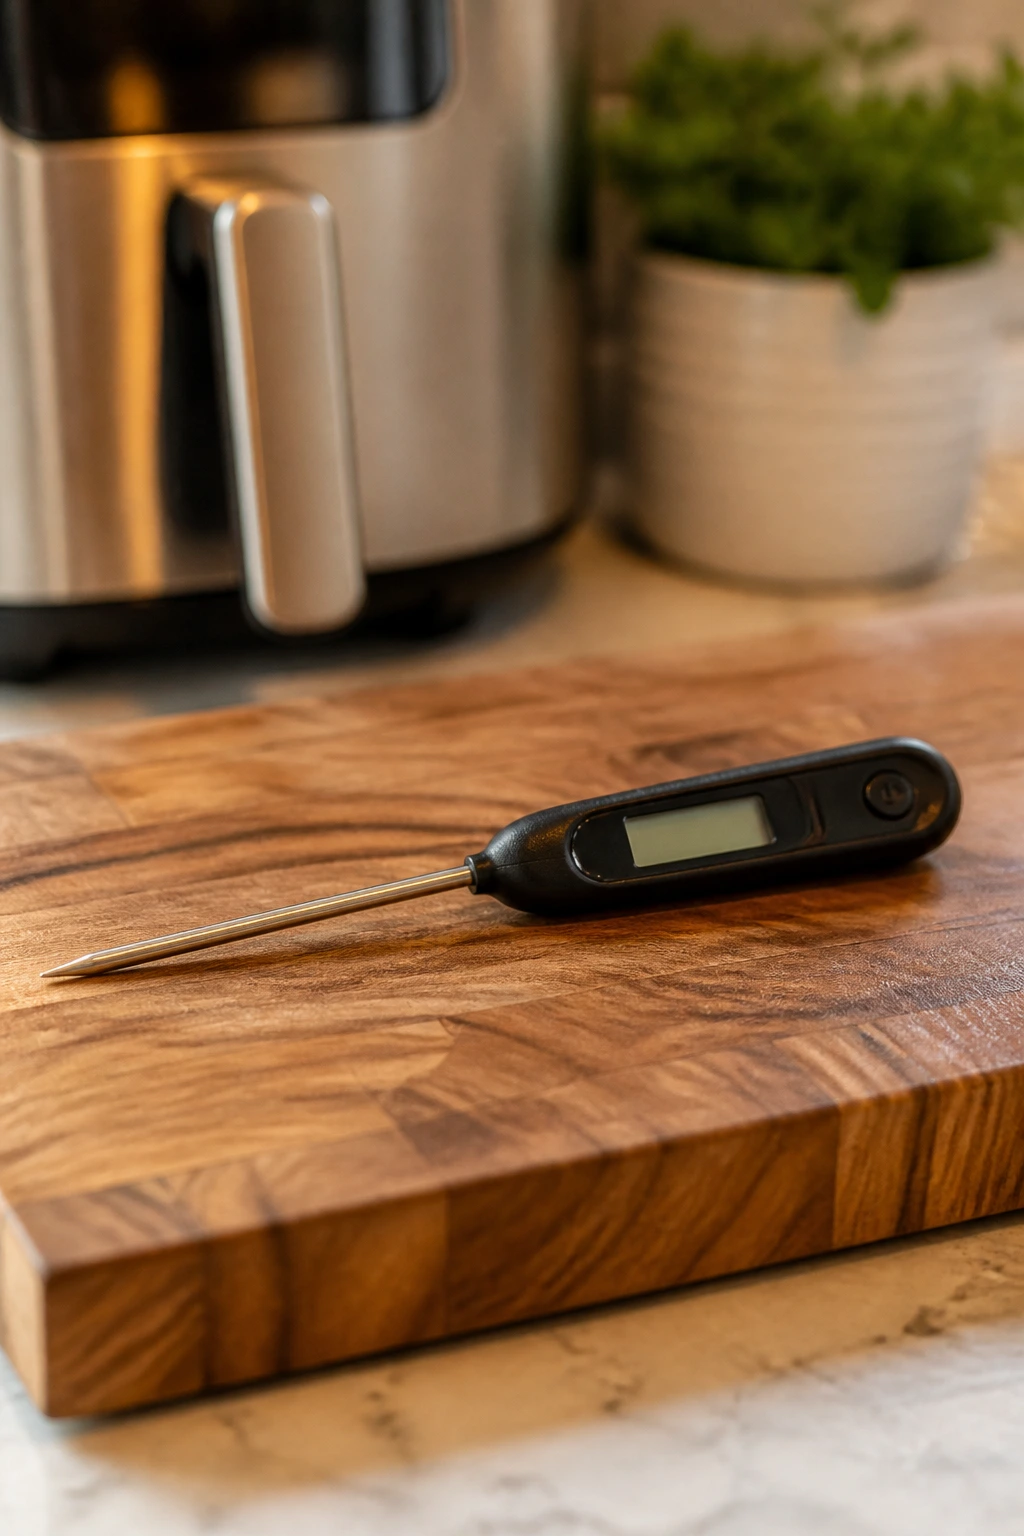
- Instant-read thermometer
How to Serve This Dish: Serve with honey mustard, ketchup, or ranch and a handful of cucumber spears. If you want it to feel more like a real plate, add potato wedges or a piece of buttered toast on the side.
Pro Tips for This Recipe:
- Press the coating onto the chicken. Loose crumbs fall off in the basket.
- Use a thermometer. Dry chicken tenders are usually just overcooked by a minute or two.
- Let them rest for 2 minutes before serving so the crust stays put.
Variations on This Dish:
- Spicy School-Afternoon Version: Add 1/2 teaspoon cayenne to the breadcrumb mix.
- Lemon Parm Cut: Add 1 teaspoon lemon zest to the coating for a brighter finish.
- Gluten-Free Swap: Use gluten-free flour and gluten-free panko; the texture still comes out crisp.
Common Mistakes to Avoid with This Dish:
- Crowding the basket. The coating steams instead of browning.
- Forgetting the spray. Dry crumbs stay dusty and pale.
- Cooking by guesswork. Chicken tenders look done before the center is safe.
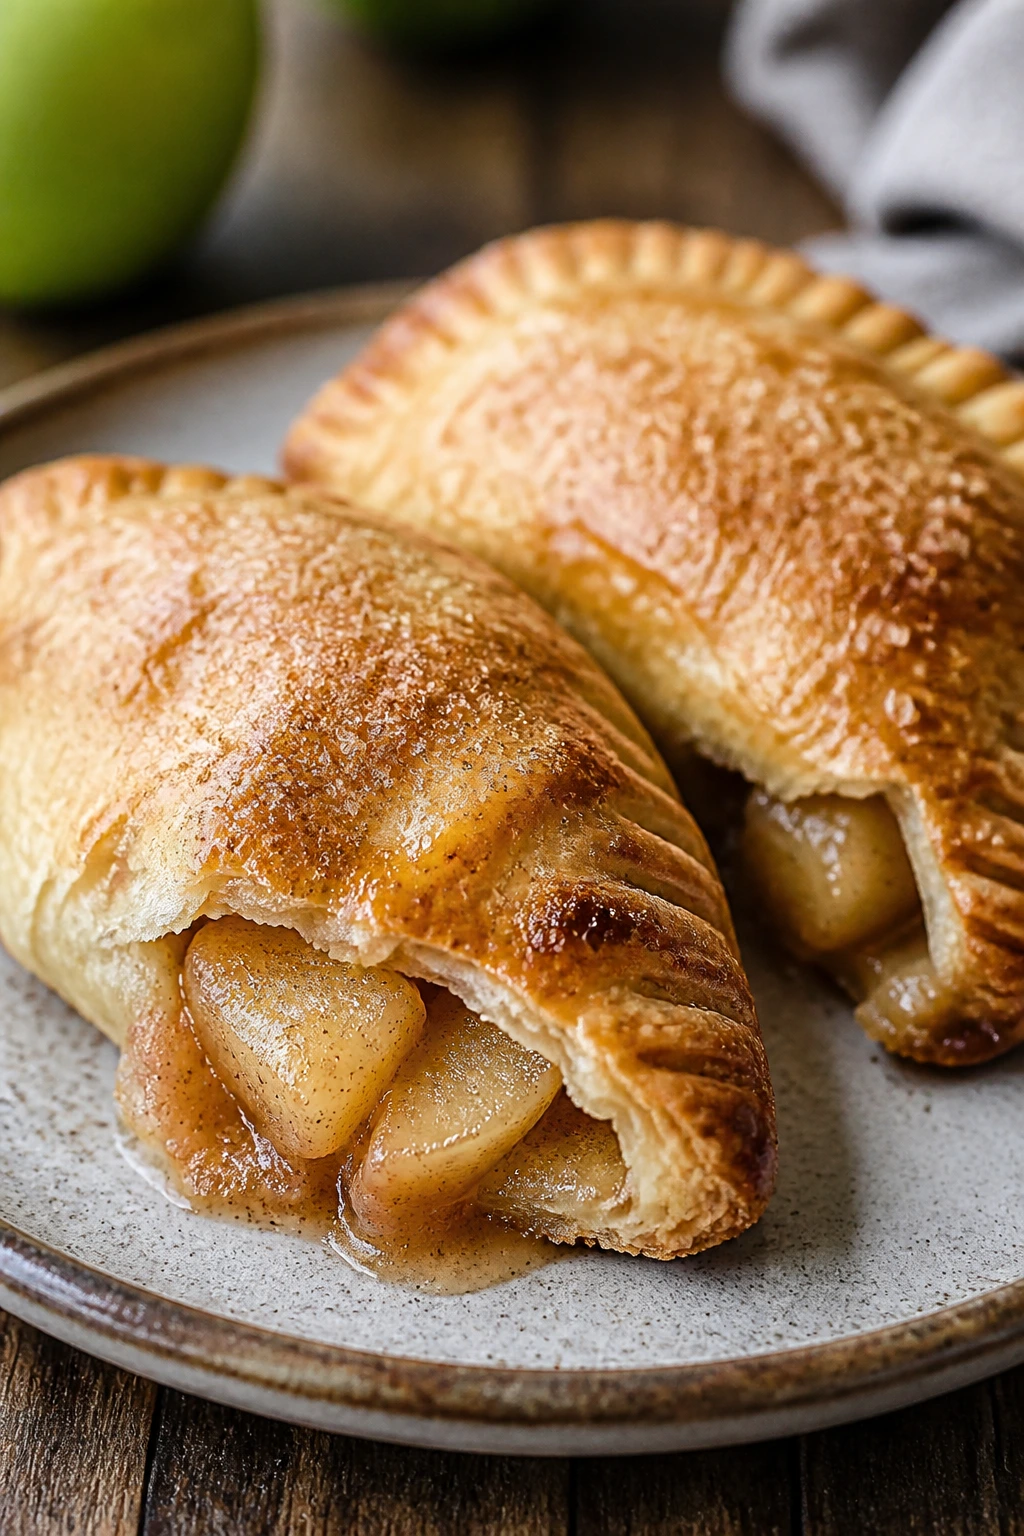
3. Cinnamon Apple Hand Pies
A warm apple hand pie has a very specific charm: flaky edges, soft spiced filling, and a few sugar crystals on top that crack when you bite in. These are the snacks I make when there’s one apple rolling around in the crisper drawer and the family needs something that feels homemade without turning into a project.
Why It Works: Refrigerated pie crust gives you a head start and browns beautifully in the air fryer. The filling is small and sealed, so the fruit softens fast without leaking all over the basket. A little flour in the filling helps thicken the juices before they burst the crust open.
Key Ingredients:
- 2 refrigerated pie crusts
- 1 1/2 cups peeled apples, diced small
- 2 tablespoons granulated sugar
- 1 tablespoon brown sugar
- 1 tablespoon flour
- 1/2 teaspoon cinnamon
- Pinch of nutmeg
- 1 tablespoon butter
- 1 egg, beaten with 1 tablespoon water
- 1 tablespoon coarse sugar, optional
Quick Steps:
- Preheat the air fryer to 350°F.
- Toss the apples, sugars, flour, cinnamon, and nutmeg together in a bowl.
- Cut the pie crusts into 4 to 6 circles or squares each, depending on your shape.
- Spoon a small mound of filling onto one side of each piece, top with a dot of butter, fold, and crimp the edges shut with a fork.
- Brush with egg wash, sprinkle with coarse sugar, and air fry for 8 to 10 minutes, until golden and blistered.
Equipment for This Recipe:
- Air fryer basket
- Small bowl
- Rolling pin or a glass, if needed
- Fork for sealing
- Pastry brush
How to Serve This Dish: Let them cool for 5 minutes, then serve with plain yogurt or vanilla ice cream if you want dessert energy. For an after-school snack, I like a paper napkin and a cold glass of milk.
Pro Tips for This Recipe:
- Dice the apples small so they soften in time.
- Don’t overfill. One spoonful is enough or the seams will open.
- Cut a tiny steam slit in the top if your hand pies are large.
Variations on This Dish:
- Maple Orchard Version: Replace 1 tablespoon of sugar with maple syrup in the filling.
- Berry Apple Mix: Add 1/4 cup blueberries for a juicier pie.
- Dairy-Free Finish: Skip butter and brush with egg wash only; the crust still browns well.
Common Mistakes to Avoid with This Dish:
- Leaving the filling too wet. The crust turns soggy before it crisps.
- Sealing with dry edges. Brush a little water around the rim before crimping.
- Pulling them too early. Pale crust means the bottom is still soft.
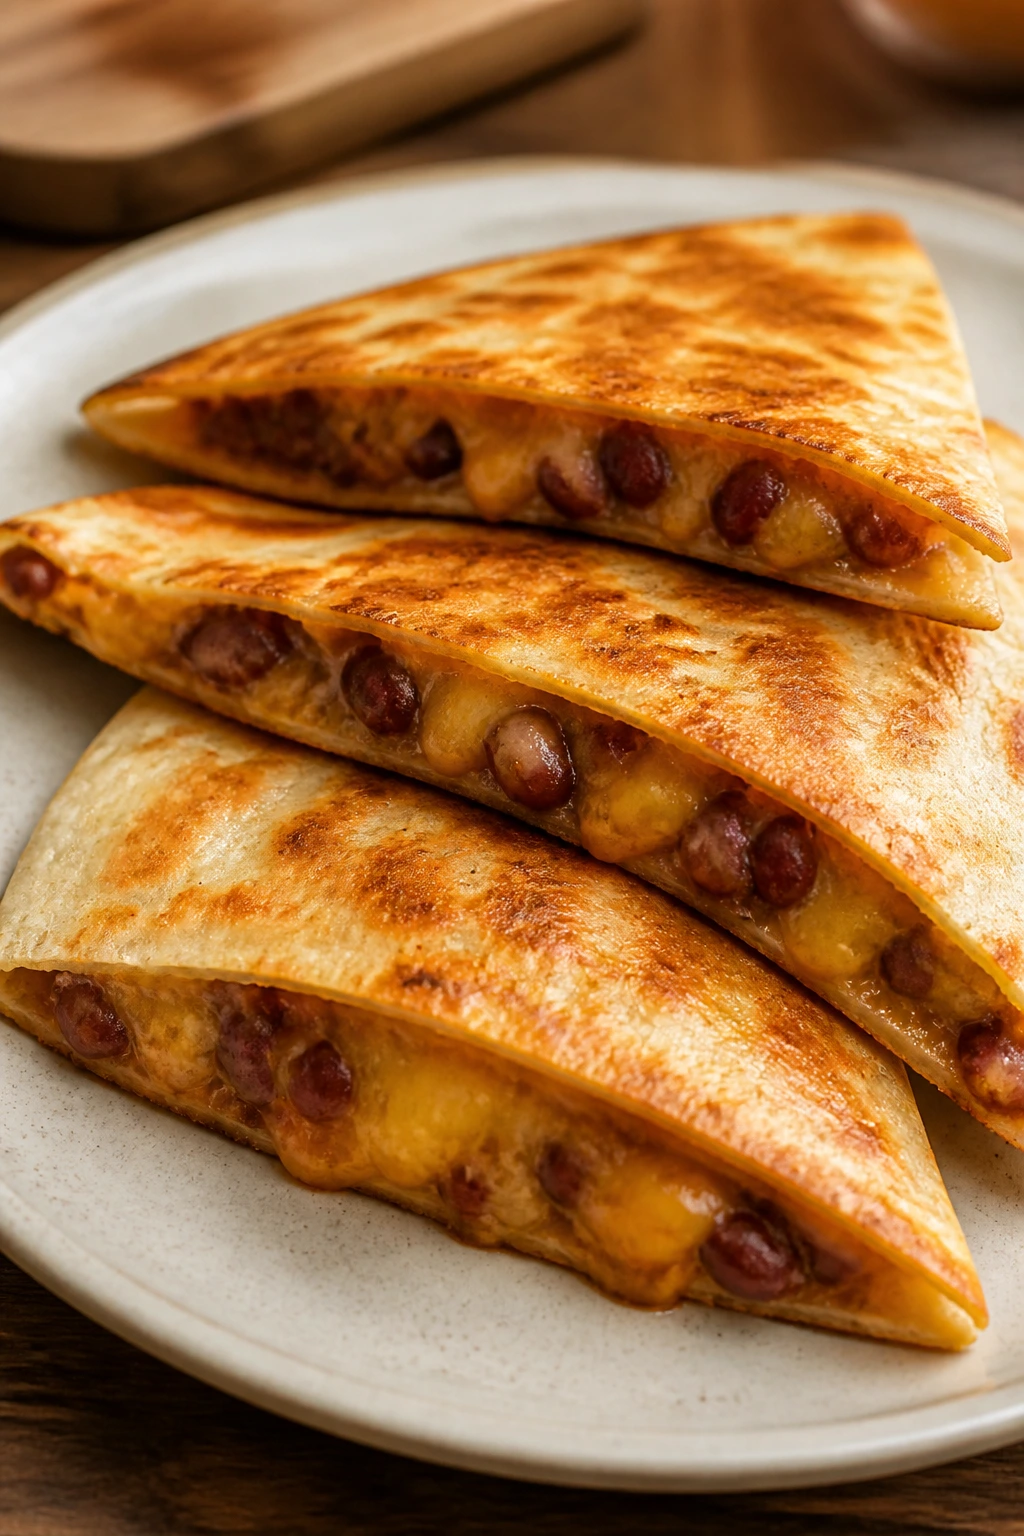
4. Cheesy Bean Quesadilla Triangles
Quesadilla triangles hit that sweet spot between snack and small meal. The tortilla turns crisp and browned, the cheese gets elastic, and the beans keep the center from tasting like empty starch. I like cutting them into smaller wedges because kids grab them faster when they look like finger food.
Why It Works: The air fryer gives the tortilla an even, toasty surface without standing over a skillet. A thin layer of filling melts before the tortilla dries out, and beans make the quesadilla feel more satisfying than cheese alone. If you use a little butter or oil on the outside, the edges go golden instead of leathery.
Key Ingredients:
- 4 medium flour tortillas
- 1 1/2 cups shredded cheddar or Monterey Jack
- 1/2 cup refried beans
- 1/2 cup cooked corn, optional
- 1 tablespoon melted butter or olive oil
- Salsa for serving
Quick Steps:
- Preheat the air fryer to 375°F.
- Spread refried beans over half of each tortilla, then sprinkle with cheese and corn if using.
- Fold each tortilla in half and brush the outside lightly with butter or oil.
- Air fry for 5 to 6 minutes, flipping once, until the tortillas are crisp and the cheese has melted.
- Rest for 1 minute, then cut into wedges with a sharp knife or pizza cutter.
Equipment for This Recipe:
- Air fryer basket
- Pastry brush
- Knife or pizza cutter
- Small spatula
How to Serve This Dish: Serve with salsa, guacamole, or sour cream. If you want to build out the snack, add a bowl of grape tomatoes and a few orange slices — the colors look cheerful, and the plate disappears faster.
Pro Tips for This Recipe:
- Use moderate filling. Too much cheese leaks out and burns on the basket.
- If your tortillas crack at the fold, warm them for 10 seconds in the microwave first.
- A pizza cutter gives you cleaner wedges than a regular knife.
Variations on This Dish:
- Chicken Quesadilla Cut: Add 1/2 cup shredded cooked chicken for a bigger snack.
- Veggie Patch Version: Fold in chopped spinach and a little roasted pepper.
- Pepper Jack Kick: Swap some of the cheese for pepper jack if your crowd likes a mild bite.
Common Mistakes to Avoid with This Dish:
- Overfilling the tortilla. The center turns greasy and the edges won’t seal.
- Skipping the outside fat. Dry tortillas get stiff instead of crisp.
- Cutting too soon. The cheese needs a minute to settle or it smears out.
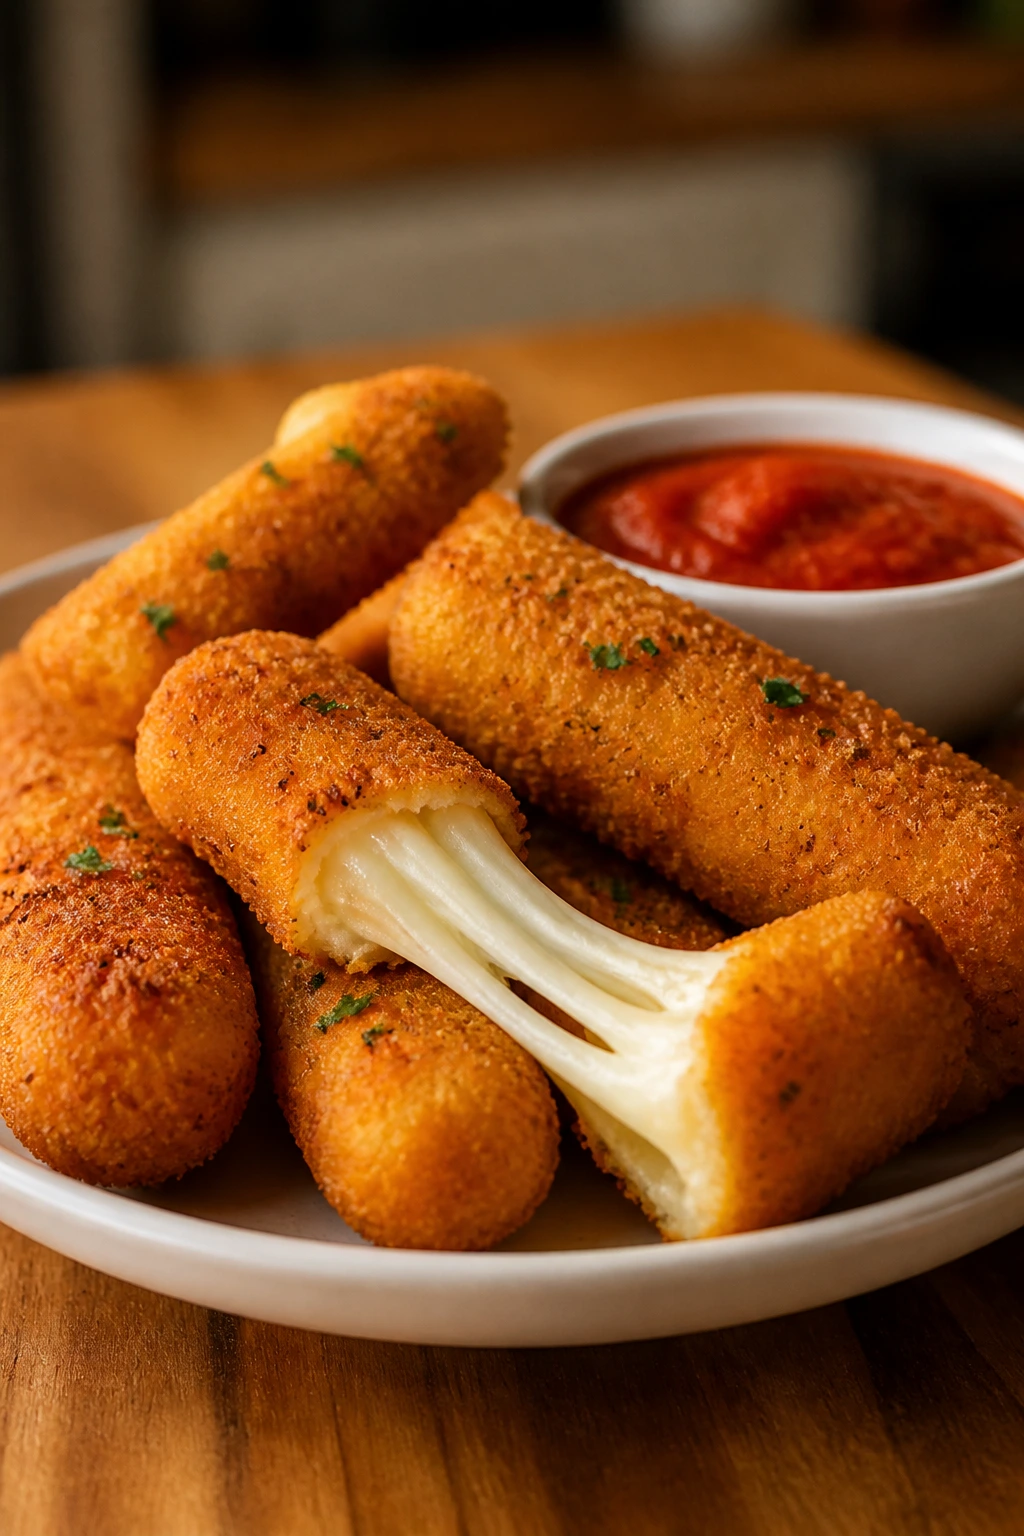
5. Classic Mozzarella Sticks
When you want a snack that vanishes in silence, mozzarella sticks are the answer. The coating should shatter lightly, the cheese should stretch in long strings, and the whole thing needs to be hot enough to feel a little dangerous. That’s part of the appeal.
Why It Works: Freezing the cheese before cooking keeps it from leaking early. The panko-parmesan shell browns faster than a dense breadcrumb crust, and the air fryer gives you a crisp exterior without a pan of hot oil. The key is moving quickly after breading so the cheese stays cold.
Key Ingredients:
- 6 string cheese sticks, cut in half
- 1/2 cup flour
- 2 large eggs
- 1 tablespoon water
- 1 cup panko breadcrumbs
- 1/2 cup finely grated parmesan
- 1 teaspoon Italian seasoning
- 1/2 teaspoon garlic powder
- Cooking spray
- Marinara for serving
Quick Steps:
- Freeze the cheese sticks for at least 1 hour.
- Set out flour, beaten eggs with water, and panko mixed with parmesan, Italian seasoning, and garlic powder.
- Coat each piece in flour, egg, and breadcrumbs, then repeat the egg and breadcrumb layer for a thicker shell.
- Freeze the breaded sticks for another 15 to 20 minutes.
- Air fry at 390°F for 6 to 7 minutes, misting lightly with spray, until the crust is golden. Serve right away.
Equipment for This Recipe:
- Air fryer basket
- 3 shallow bowls
- Baking sheet or plate for freezing
- Tongs
How to Serve This Dish: Put them on a plate with warm marinara and maybe a few celery sticks, if you want balance. They’re best eaten fast, while the cheese is still stretchy and the crust still snaps.
Pro Tips for This Recipe:
- Double-bread them. One coat is usually too thin.
- Freeze between breading and cooking. That step saves the filling.
- Work in small batches so the sticks stay cold.
Variations on This Dish:
- Italian Herb Sticks: Add oregano and basil to the crumb mix.
- Spicy Crumb Version: Stir crushed red pepper into the breadcrumbs.
- Gluten-Free Version: Use GF flour and GF breadcrumbs; freeze them well before cooking.
Common Mistakes to Avoid with This Dish:
- Skipping the freezer time. Melted cheese escapes fast.
- Overcooking by even 1 minute. The filling will burst.
- Crowding the basket. Cheese sticks need space or they soften before crisping.
6. Ham and Cheddar Crescent Roll-Ups
These are the snack equivalent of a clean sweater on a cold day: simple, warm, and reliable. The crescent dough turns flaky and browned, the ham stays savory, and the cheese melts into the folds so every bite tastes like it was planned, even when it wasn’t.
Why It Works: Crescent dough bakes fast in the air fryer, which is exactly what you want when you’re trying to get food on the table before the afternoon crash turns into a full-scale revolt. The ham and cheese stay inside a sealed roll, so kids can hold them without losing half the filling to the counter. A little mustard or seasoned butter gives them a more finished flavor.
Key Ingredients:
- 1 can refrigerated crescent dough, 8-count
- 4 slices deli ham, halved
- 8 slices cheddar or Swiss cheese
- 2 tablespoons melted butter
- 1 teaspoon Dijon mustard, optional
- 1 teaspoon poppy seeds or everything seasoning, optional
Quick Steps:
- Preheat the air fryer to 350°F.
- Separate the crescent dough and lay out the triangles.
- Add half a slice of ham and one slice of cheese to each triangle, then roll from the wide end to the point.
- Brush the tops with melted butter mixed with Dijon, if using, and sprinkle with seeds.
- Air fry for 6 to 8 minutes, until deep golden and puffed.
Equipment for This Recipe:
- Air fryer basket
- Pastry brush
- Small bowl for butter
- Tongs
How to Serve This Dish: Serve with grapes, pickles, or sliced cucumbers. If you want a bigger snack plate, a little mustard or ranch on the side gives the roll-ups a dipping edge they don’t need but kids usually appreciate.
Pro Tips for This Recipe:
- Keep the cheese tucked in. A corner sticking out will burn before the roll finishes.
- Use thin deli slices, not thick-cut ham.
- Let them sit for 2 minutes after cooking so the filling settles.
Variations on This Dish:
- Turkey Club Roll-Up: Swap ham for turkey and add a tiny strip of cooked bacon.
- Pizza Crescent Roll: Use mozzarella and a dab of sauce instead of ham.
- Mild Heat Version: Add a thin smear of pepper jelly inside each roll.
Common Mistakes to Avoid with This Dish:
- Overstuffing the crescents. They split and leak cheese.
- Using cold butter in patches. Brush evenly or some spots brown too fast.
- Letting the dough overlap in the basket. The layers need air around them.
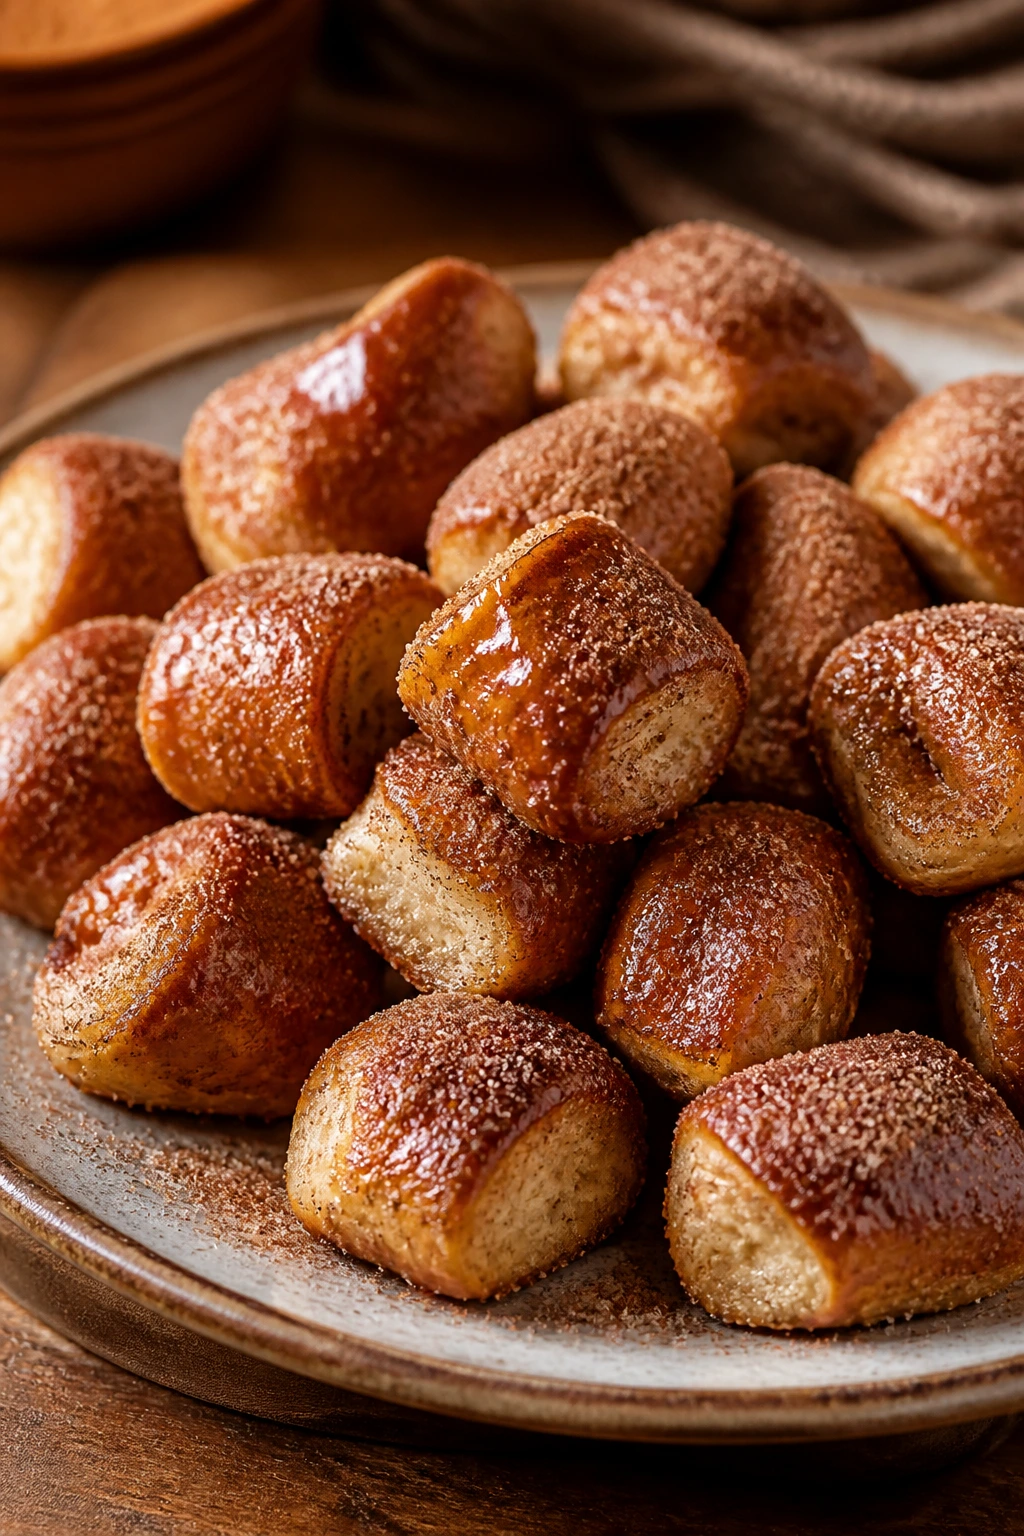
7. Cinnamon Sugar Pretzel Bites
These are the sort of snack that makes the kitchen smell like a mall pretzel stand without leaving flour dust all over the place. The outside gets chewy and bronzed, the cinnamon sugar sticks to the butter, and the bites are small enough that a few vanish before anyone feels guilty about it.
Why It Works: A quick baking soda dip gives the dough that pretzel-style exterior, which the air fryer turns into a chewy shell with a little shine. Smaller pieces cook fast and evenly, so you don’t get raw centers. The cinnamon sugar coating goes on after cooking, when the butter can cling instead of sliding off.
Key Ingredients:
- 1 pound pizza dough, room temperature
- 6 cups water
- 1/3 cup baking soda
- 1 egg yolk mixed with 1 tablespoon water
- 3 tablespoons melted butter
- 3 tablespoons granulated sugar
- 1 tablespoon ground cinnamon
- Pinch of salt
Quick Steps:
- Preheat the air fryer to 380°F.
- Cut the dough into 1-inch pieces and keep them covered so they do not dry out.
- Bring the water and baking soda to a simmer in a pot, then dip the dough pieces for 20 to 30 seconds and drain well.
- Brush with egg wash and air fry for 7 to 8 minutes, until browned and puffed.
- Toss the warm bites with melted butter, cinnamon, sugar, and a pinch of salt.
Equipment for This Recipe:
- Air fryer basket
- Medium pot
- Slotted spoon
- Mixing bowl
- Pastry brush
How to Serve This Dish: Serve warm with cream cheese dip, caramel sauce, or a small bowl of melted chocolate. They’re good on a plate, but they disappear even faster in a paper-lined basket.
Pro Tips for This Recipe:
- Work quickly after cutting the dough so the pieces stay soft.
- Drain the baking soda dip well or the surface gets patchy.
- Toss with sugar while warm so it sticks.
Variations on This Dish:
- Savory Pretzel Twist: Skip the cinnamon sugar and finish with melted butter and coarse salt.
- Pumpkin Spice Version: Replace the cinnamon with pumpkin pie spice.
- Stuffed Center Bite: Press a tiny cube of cream cheese inside each dough piece before boiling.
Common Mistakes to Avoid with This Dish:
- Skipping the baking soda dip. The crust turns bread-like instead of pretzel-like.
- Overcrowding the basket. The bites need space to puff.
- Coating too late. The sugar won’t stick once the surface cools.
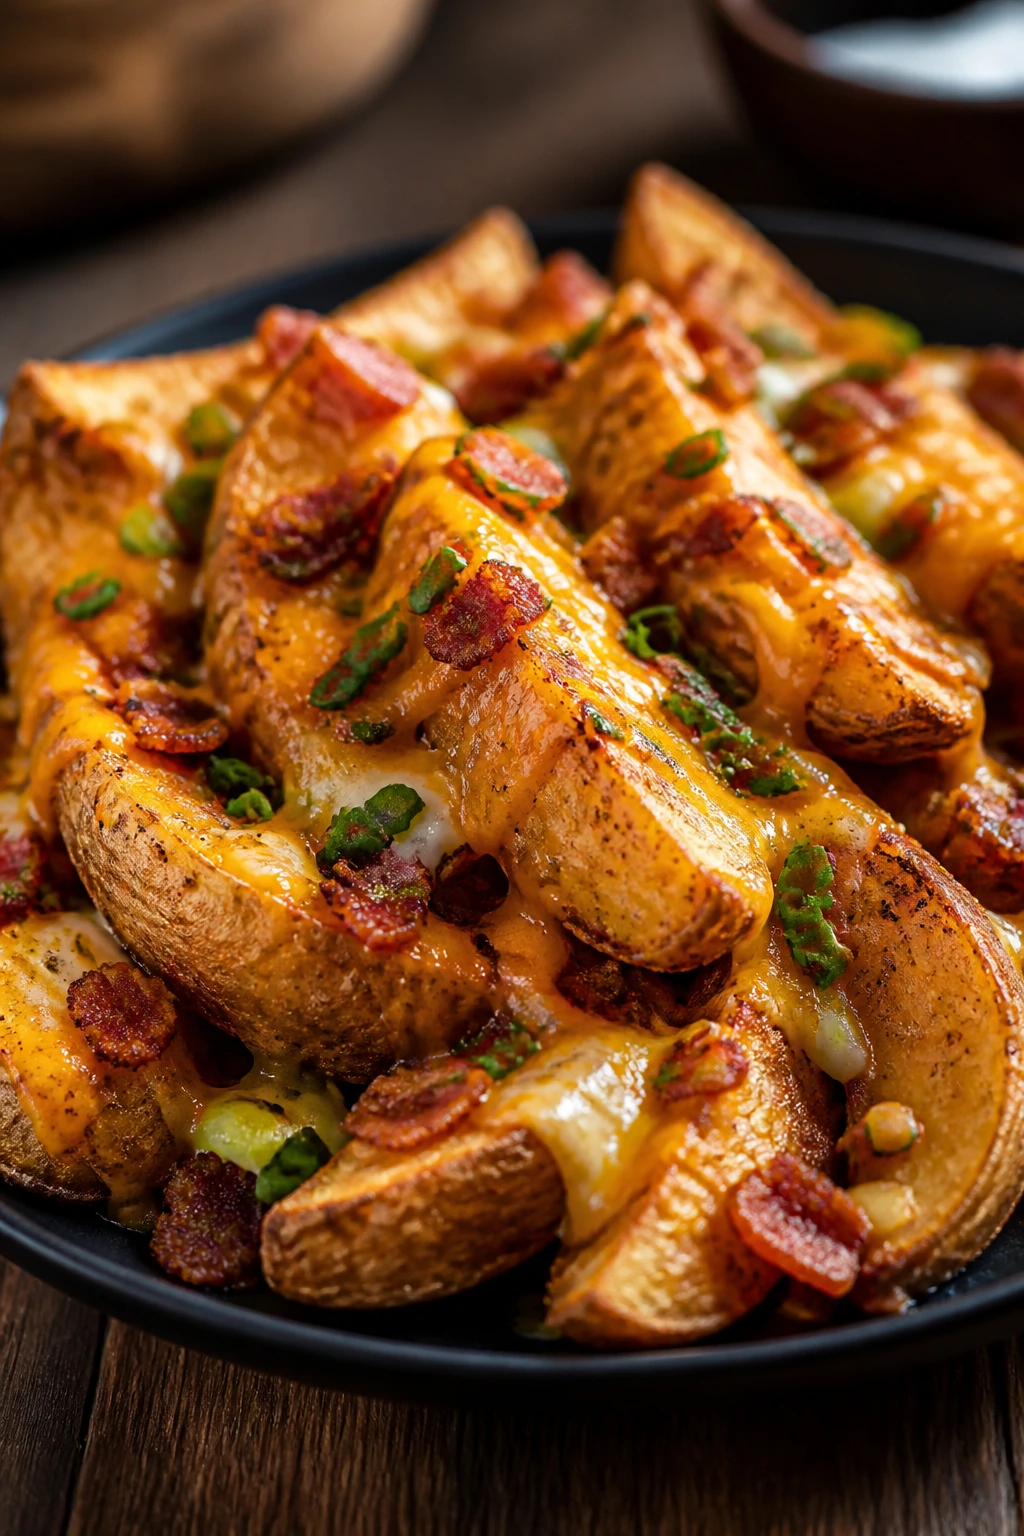
8. Loaded Potato Wedges
There’s a reason potato wedges show up whenever people want comfort without effort. They’re crisp on the outside, fluffy in the middle, and sturdy enough to hold cheddar, bacon, or a swipe of sour cream. They also happen to be one of the easiest snacks to scale up without turning the kitchen into a mess.
Why It Works: Potatoes have enough starch to crisp well in the air fryer, especially when cut into even wedges and dried before seasoning. A light coating of oil helps the spices cling, and the high heat gives you browned edges in a fraction of the time of an oven. Loading them after the first cook keeps the cheese from burning.
Key Ingredients:
- 3 medium russet potatoes
- 2 tablespoons olive oil
- 1 teaspoon kosher salt
- 1 teaspoon garlic powder
- 1 teaspoon paprika
- 1/2 cup shredded cheddar
- 4 slices cooked bacon, crumbled
- 2 tablespoons sliced scallions
- Sour cream, for serving
Quick Steps:
- Preheat the air fryer to 400°F.
- Scrub the potatoes and cut each into 6 to 8 wedges.
- Toss with olive oil, salt, garlic powder, and paprika.
- Air fry for 18 to 22 minutes, shaking halfway, until the wedges are browned and the centers are soft.
- Add cheddar and bacon in the last 2 minutes so the cheese melts without scorching.
Equipment for This Recipe:
- Air fryer basket
- Large bowl
- Sharp knife
- Cutting board
- Tongs
How to Serve This Dish: Serve with sour cream or ranch and a pile of raw vegetables if you want the plate to feel complete. These work as a snack or a small dinner side, which is handy when the afternoon eats up the whole evening.
Pro Tips for This Recipe:
- Dry the potatoes after cutting. Wet potatoes steam.
- Don’t cut the wedges too thick or the centers stay dense.
- Shake the basket well; the edges need new hot air to crisp.
Variations on This Dish:
- Garlic Herb Wedges: Add rosemary and thyme to the seasoning mix.
- Buffalo Wedge Plate: Toss finished wedges with a little buffalo sauce and blue cheese crumbles.
- No-Bacon Version: Use shredded cheddar and chives only; it still feels loaded.
Common Mistakes to Avoid with This Dish:
- Uneven cutting. Some wedges burn while others stay hard.
- Adding cheese too early. It scorches before the potatoes finish.
- Using too much oil. The wedges soften instead of crisping.
9. Ranch Chickpeas
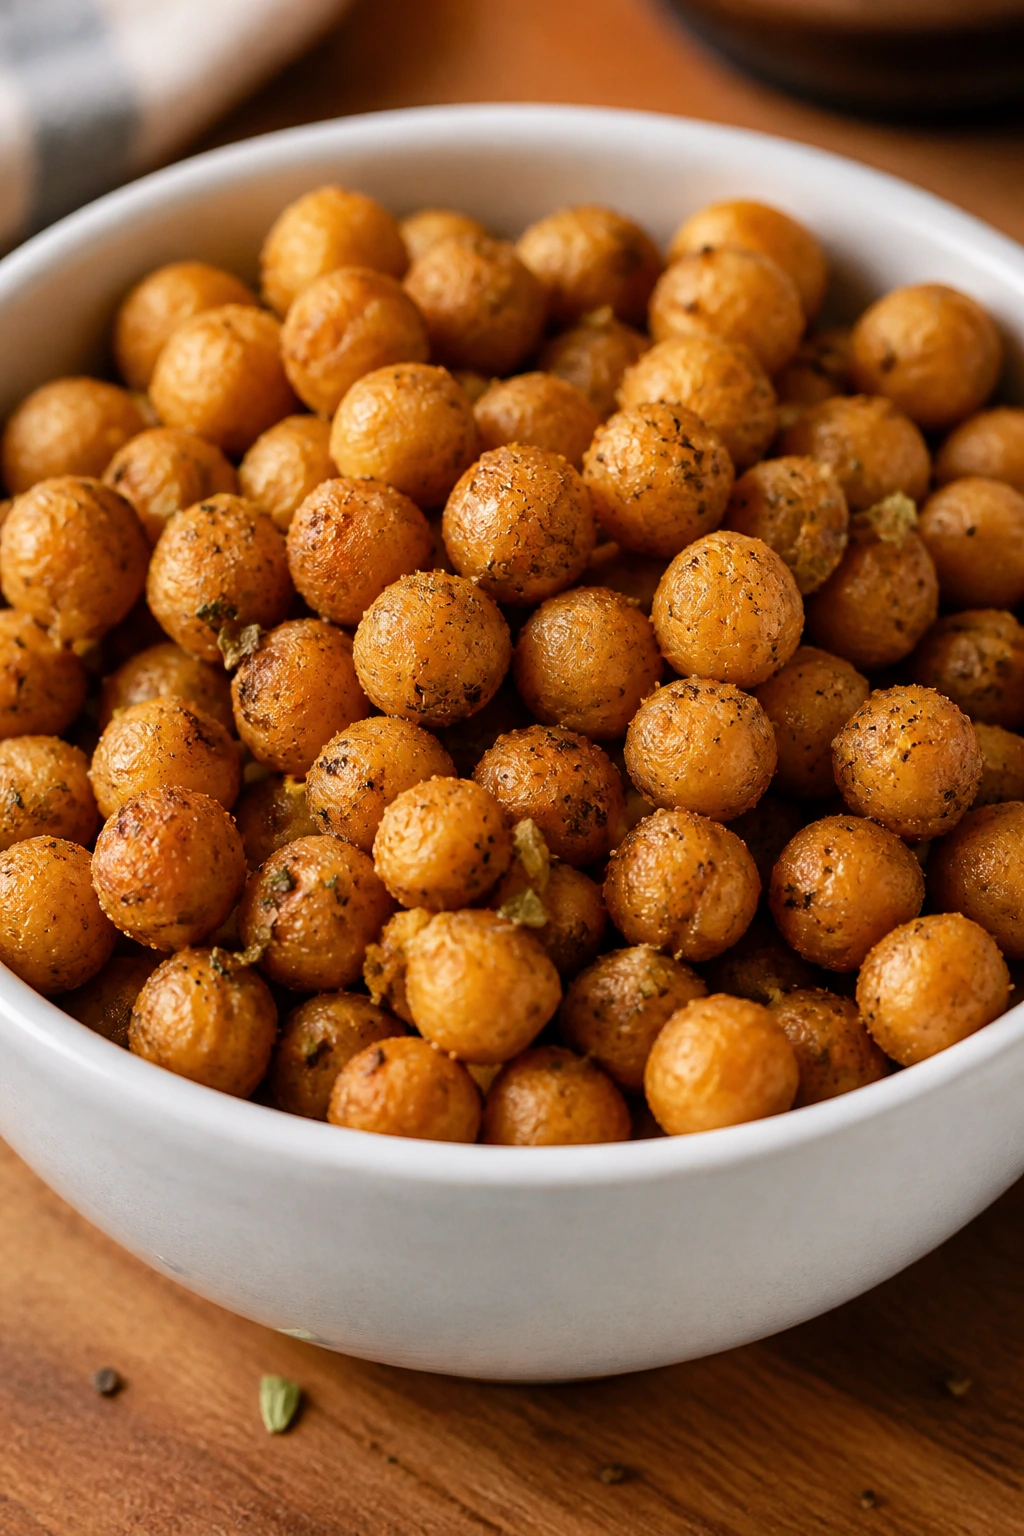
Crunchy chickpeas are one of those snacks that sound humble until you eat a handful and realize they’re gone faster than chips. The ranch seasoning gives them a salty, herby edge, and the air fryer turns the outsides crisp while the centers stay just a little creamy if you stop at the right time.
Why It Works: Chickpeas need to be dry before they can crisp, which is where most people go wrong. Once the surface moisture is gone, the air fryer turns them into tiny crunchy bites in about 12 minutes. They’re a strong backup snack because the ingredients are cheap, shelf-stable, and easy to season two or three different ways.
Key Ingredients:
- 2 cans chickpeas, drained and rinsed
- 1 tablespoon olive oil
- 1 tablespoon ranch seasoning
- 1/2 teaspoon garlic powder
- 1/2 teaspoon smoked paprika
- 1/4 teaspoon salt, optional
Quick Steps:
- Preheat the air fryer to 390°F.
- Pat the chickpeas very dry with a clean towel and remove any loose skins.
- Toss with olive oil, ranch seasoning, garlic powder, paprika, and salt if needed.
- Air fry for 12 to 15 minutes, shaking every 5 minutes, until crisp and lightly browned.
- Cool for 5 minutes before serving; they crisp a little more as they sit.
Equipment for This Recipe:
- Air fryer basket
- Clean kitchen towel
- Mixing bowl
- Spoon or spatula
How to Serve This Dish: Serve them in a small bowl beside sliced peppers, cheese cubes, or grapes. They’re good for snacking by the handful, but they also make a nice crunchy topper for simple salads if a few are left over.
Pro Tips for This Recipe:
- The drier the chickpeas, the better the crunch.
- Open the basket once or twice to let steam escape.
- Season immediately after tossing with oil so the spices stick.
Variations on This Dish:
- Taco Chickpeas: Use taco seasoning and a squeeze of lime after cooking.
- Garlic Parmesan Chickpeas: Toss with parmesan the second they come out.
- Sweet Cinnamon Snack Chickpeas: Use cinnamon sugar instead of ranch for a sweeter version.
Common Mistakes to Avoid with This Dish:
- Leaving too much moisture on the chickpeas. They soften instead of crisp.
- Overcooking until hard as pebbles. Pull them when the outside is crisp, not stone-like.
- Skipping the shake. The bottom layer burns while the top stays soft.
10. Peanut Butter Banana Oat Bites
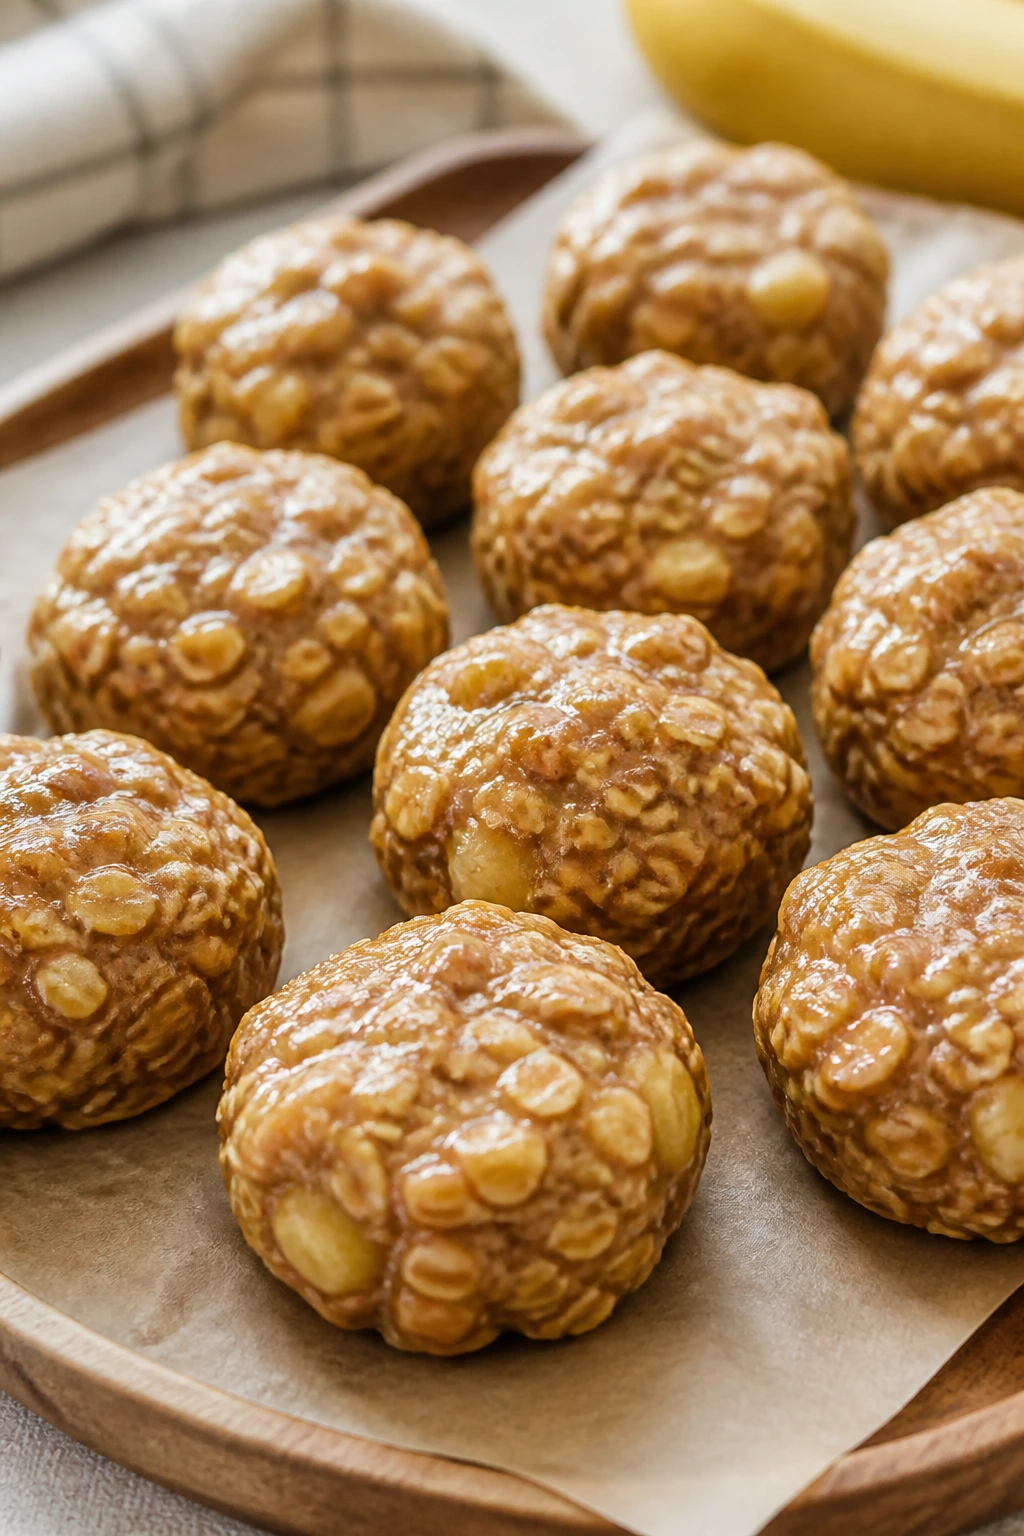
These little bites land somewhere between cookie and snack, and that’s part of their charm. They smell like warm banana and peanut butter, they hold together with a soft chew, and they’re small enough that nobody needs a fork or napkin strategy to get through them.
Why It Works: Bananas and oats do the heavy lifting here. The banana keeps the mixture moist, the oats give body, and peanut butter adds enough richness that the bites taste finished instead of like leftover cereal. Air frying them in small mounds helps the outsides set before the centers dry out.
Key Ingredients:
- 2 ripe bananas
- 2 cups rolled oats
- 1/4 cup creamy peanut butter
- 1/4 cup mini chocolate chips
- 1/2 teaspoon cinnamon
- Pinch of salt
Quick Steps:
- Preheat the air fryer to 350°F.
- Mash the bananas until mostly smooth, then stir in oats, peanut butter, chocolate chips, cinnamon, and salt.
- Scoop the mixture into 12 small mounds on a parchment-lined air fryer insert or a piece of air fryer-safe parchment.
- Air fry for 8 to 9 minutes, until the edges are set and lightly browned.
- Cool for 5 minutes so they firm up before lifting.
Equipment for This Recipe:
- Air fryer basket
- Mixing bowl
- Spoon or small cookie scoop
- Parchment liner, if your basket needs it
How to Serve This Dish: Serve them warm with a little extra peanut butter for dipping, or pack them with apple slices for a snack that feels more complete. They’re also good cold, which is handy when somebody wanders back for seconds an hour later.
Pro Tips for This Recipe:
- Use very ripe bananas with brown spots. They mash smoother and taste sweeter.
- Keep the mounds small or the centers stay gummy.
- Let them rest before moving them; they’re soft when hot.
Variations on This Dish:
- Raisin Oat Version: Swap chocolate chips for raisins and add a pinch more cinnamon.
- Sunflower Seed Swap: Use sunflower seed butter for a peanut-free snack.
- Fudgy Banana Bite: Add 1 tablespoon cocoa powder for a chocolate note.
Common Mistakes to Avoid with This Dish:
- Using under-ripe bananas. The bites come out bland and dry.
- Making them too thick. They set on the edges before the middle is done.
- Handling too soon. They need a few minutes to firm up.
11. Zucchini Parmesan Fries
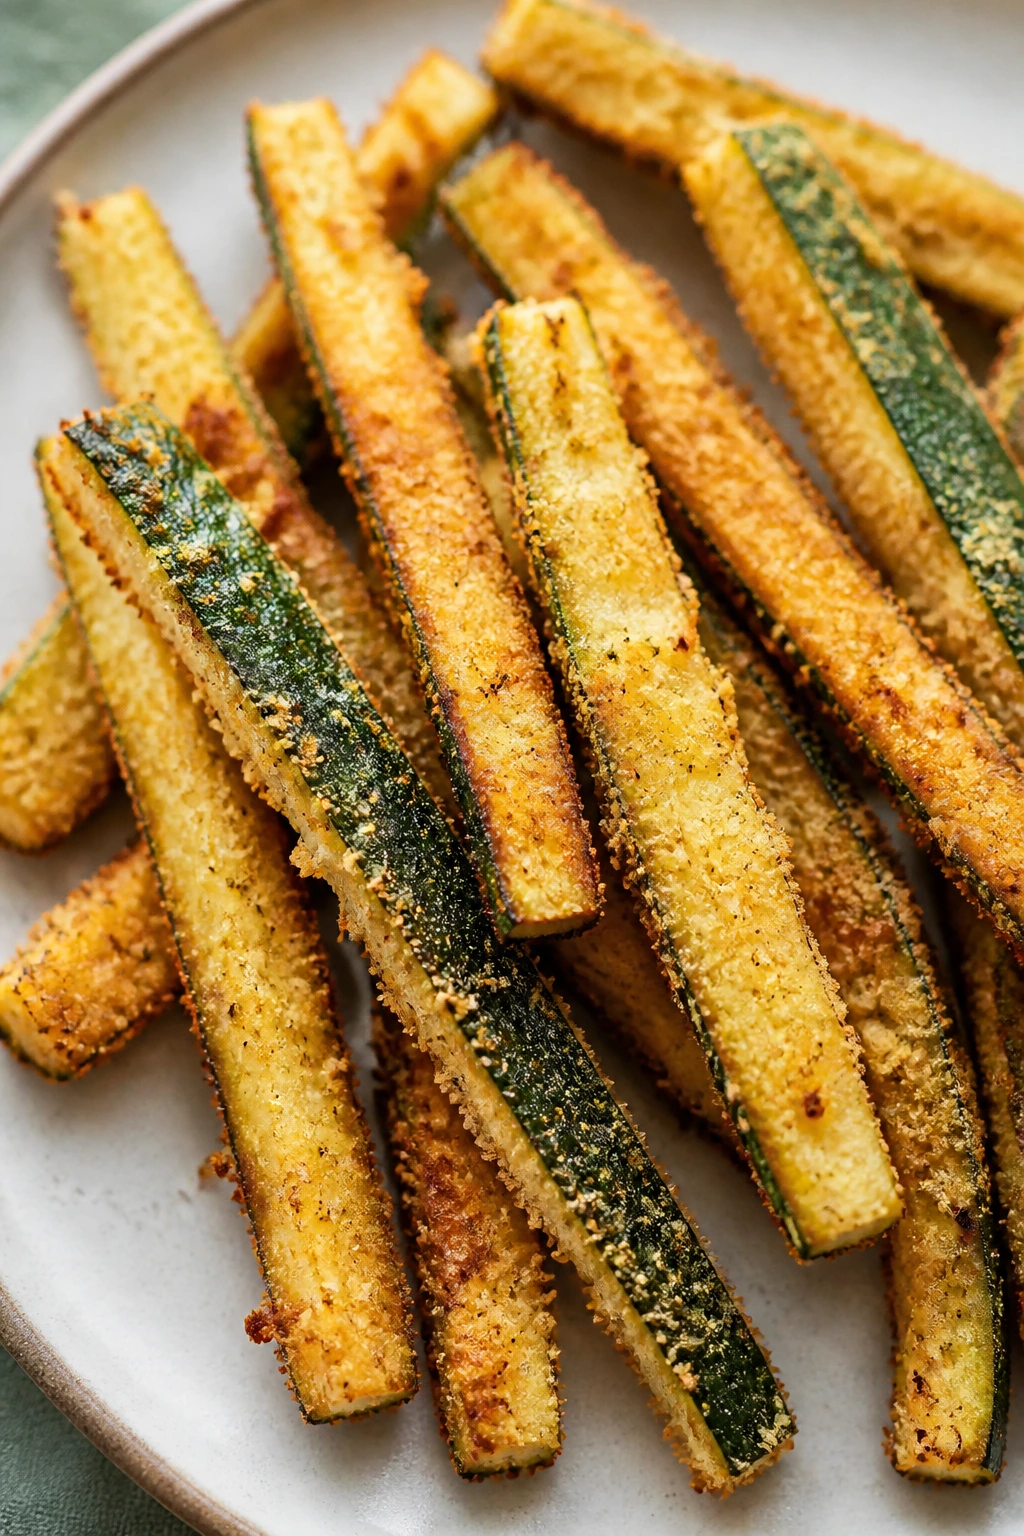
Zucchini fries are the snack that wins over skeptical eaters when the coating is crisp enough and the slices are thin enough. The vegetable softens inside, the parmesan browns in spots, and the outside gives you that crackly bite that makes the tray empty faster than expected.
Why It Works: Zucchini carries a lot of water, so the trick is cutting it into sticks, salting lightly, and drying the surface before breading. A panko-parmesan crust gives structure, and the air fryer drives off moisture while browning the edges. If you cut the pieces too thick, they steam. That’s the whole battle right there.
Key Ingredients:
- 2 medium zucchini
- 1/2 cup flour
- 2 large eggs, beaten
- 1 cup panko breadcrumbs
- 1/2 cup grated parmesan
- 1 teaspoon garlic powder
- 1/2 teaspoon salt
- Cooking spray
- Marinara, for serving
Quick Steps:
- Preheat the air fryer to 400°F.
- Cut the zucchini into fry-shaped sticks and pat them dry.
- Dredge in flour, dip in egg, then coat with panko mixed with parmesan, garlic powder, and salt.
- Place in a single layer, mist lightly with spray, and air fry for 8 to 10 minutes, flipping halfway.
- Serve right away while the crust is crisp.
Equipment for This Recipe:
- Air fryer basket
- Cutting board and knife
- 3 shallow bowls
- Tongs
- Clean towel or paper towels
How to Serve This Dish: Serve with marinara, ranch, or a yogurt dip. I like putting the fries next to a few cheese cubes and fruit pieces so the tray feels generous even when the zucchini disappears first.
Pro Tips for This Recipe:
- Salt the zucchini lightly and let it sit for 5 minutes if your squash is especially watery.
- Use skinny sticks rather than fat wedges.
- Don’t skip the spray; the crust needs a little oil to brown.
Variations on This Dish:
- Herby Garden Fries: Add dried basil and oregano to the crumb mix.
- Cheddar Crust Version: Replace part of the parmesan with shredded cheddar.
- Spicy Crumb Fries: Add a pinch of cayenne for older kids and adults.
Common Mistakes to Avoid with This Dish:
- Cutting them too thick. They turn soft before crisping.
- Crowding the basket. Steam ruins the crunch.
- Waiting too long to serve. Zucchini fries are best within minutes of cooking.
12. Crispy Frozen Ravioli Bites
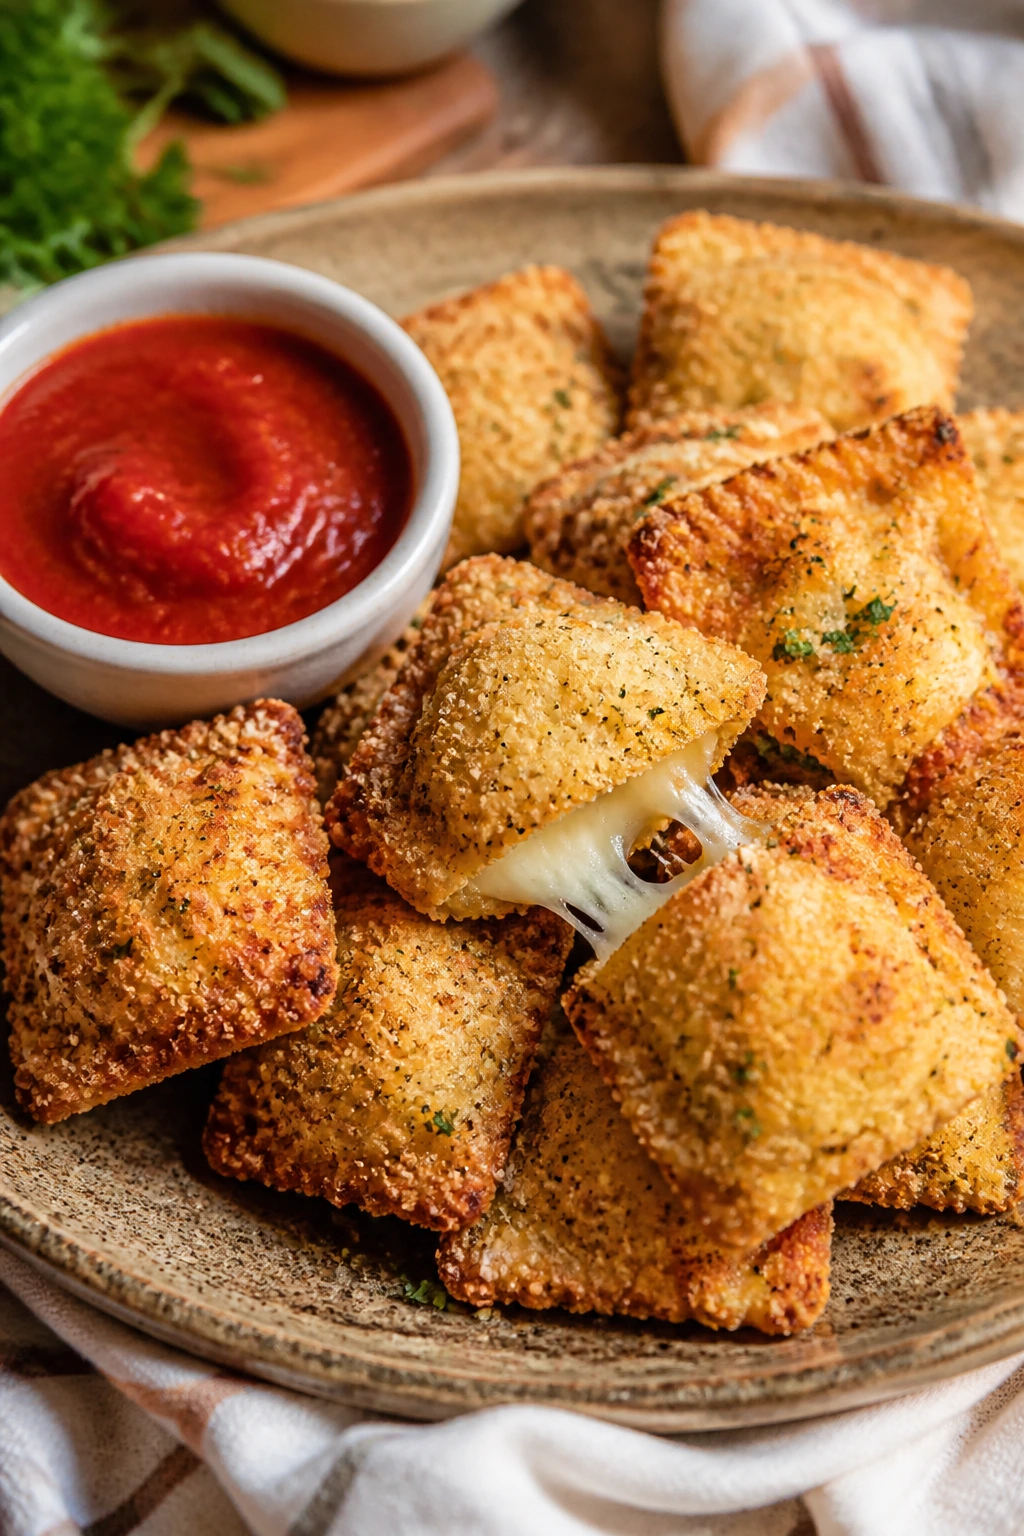
Frozen breaded ravioli is one of my favorite shortcuts because it feels like cheating in the good way. The outside gets toasted and shattery, the cheese inside turns molten, and a little marinara on the side makes the whole thing feel like a tiny restaurant snack.
Why It Works: Breaded frozen ravioli is built for high heat, so the air fryer can crisp the coating without soaking the pasta. Cooking it from frozen preserves the shape and keeps the filling from leaking. This is the snack you make when you want something hot with almost no prep.
Key Ingredients:
- 1 20-ounce bag frozen breaded cheese ravioli
- 1 tablespoon olive oil spray
- 1 cup warm marinara
- 2 tablespoons grated parmesan
- Fresh basil, optional
Quick Steps:
- Preheat the air fryer to 380°F.
- Arrange the frozen ravioli in a single layer and mist lightly with oil spray.
- Air fry for 8 to 10 minutes, shaking once halfway, until the coating is deep golden and crisp.
- Sprinkle with parmesan and let them cool for 1 minute.
- Serve with warm marinara.
Equipment for This Recipe:
- Air fryer basket
- Tongs
- Small saucepan or microwave-safe bowl for marinara
How to Serve This Dish: Serve them in a basket lined with parchment so they feel snacky rather than plated. A simple green salad or cucumber sticks on the side helps if you want to keep the table from turning into a pure carb parade.
Pro Tips for This Recipe:
- Keep the ravioli in one layer or they won’t crisp evenly.
- Shake gently so the coating stays on.
- Warm the marinara before serving; cold sauce dulls the whole bite.
Variations on This Dish:
- Four-Cheese Version: Use frozen ravioli filled with ricotta or mixed cheese if you can find it.
- Pesto Dip Twist: Swap marinara for pesto mixed with a little olive oil.
- Extra Crunch Finish: Dust with more parmesan right after cooking.
Common Mistakes to Avoid with This Dish:
- Thawing first. They get soft and soggy.
- Skipping the shake. One side browns and the other stays pale.
- Serving too late. The crust softens as steam sits in the basket.
13. Air Fryer Mac and Cheese Balls
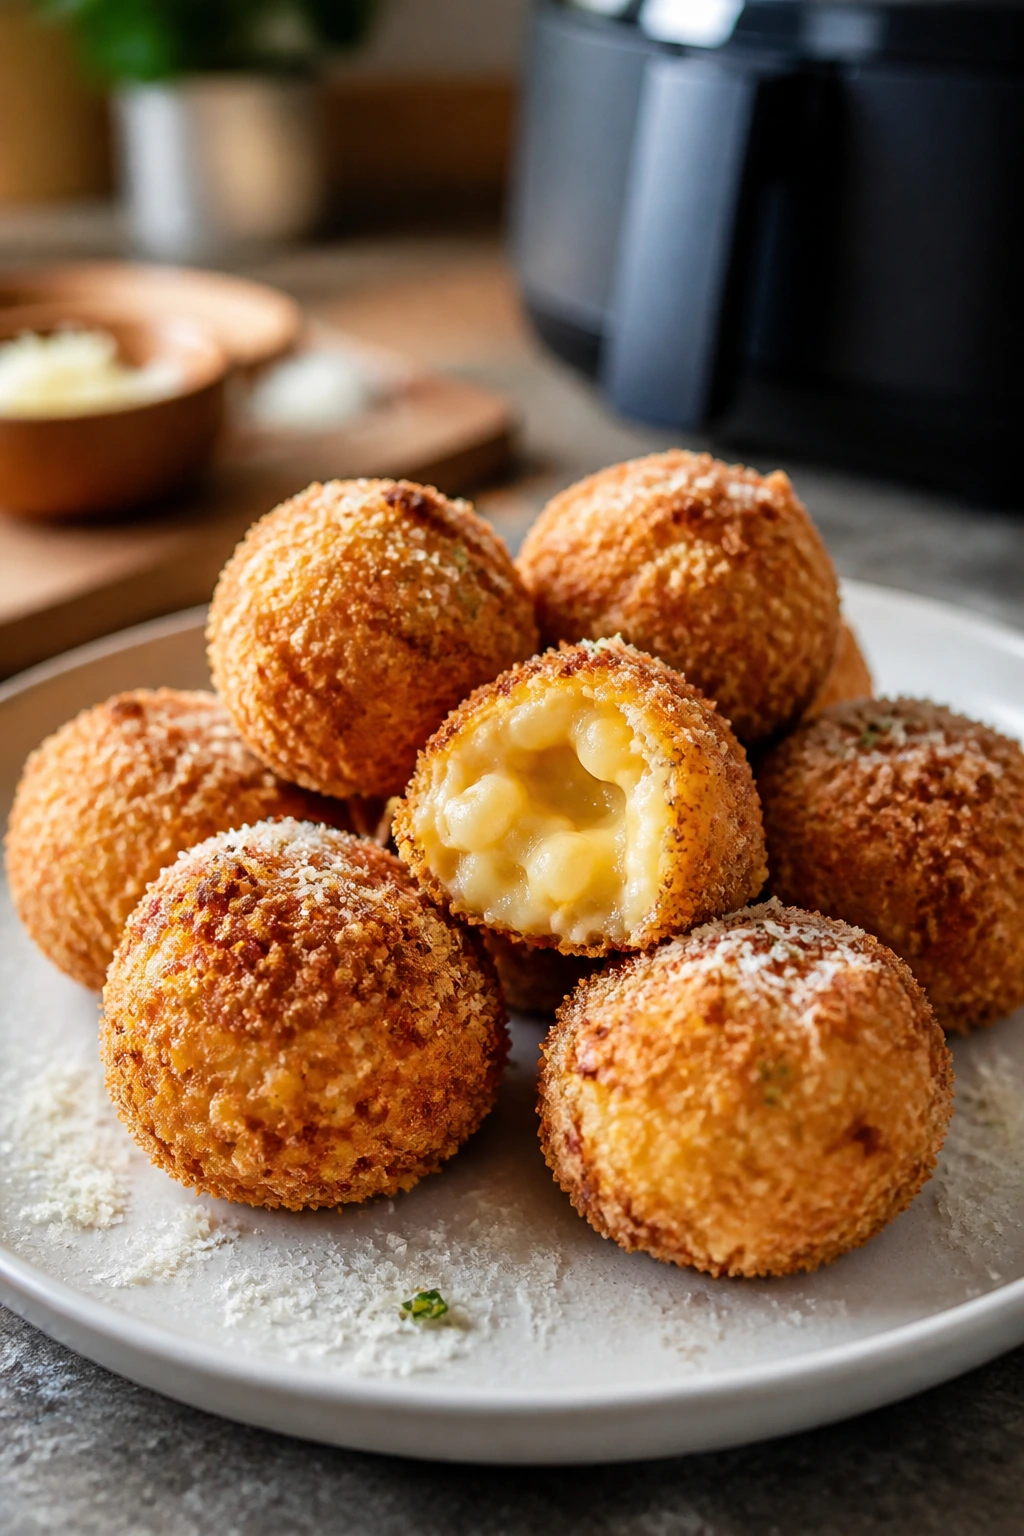
Mac and cheese balls are what happens when leftovers get a second life and somehow become better looking than the original dish. The outside turns crackly, the center stays creamy, and they feel more like a treat than reheated pasta, which is probably why people hover near the tray.
Why It Works: Cold, thick mac and cheese holds its shape once it’s chilled, and that chill is what lets you bread and fry the balls without them slumping apart. The air fryer crisps the coating while warming the center through. If the mac is too loose, the balls will collapse before the crust sets.
Key Ingredients:
- 3 cups chilled thick mac and cheese
- 1/2 cup shredded cheddar, optional
- 1/2 cup flour
- 2 large eggs
- 2 cups panko breadcrumbs
- 1/2 teaspoon garlic powder
- Cooking spray
- Ranch or marinara, for serving
Quick Steps:
- Chill the mac and cheese for at least 2 hours, or overnight if it’s soft.
- Scoop and roll the mac into 1 1/2-inch balls, then freeze for 20 minutes.
- Coat each ball in flour, egg, and panko.
- Mist with spray and air fry at 390°F for 8 to 10 minutes, turning once.
- Let cool for 2 minutes before serving.
Equipment for This Recipe:
- Air fryer basket
- Baking sheet or plate for freezing
- 3 shallow bowls
- Small scoop
How to Serve This Dish: Serve with warm marinara or ranch and a few cut vegetables on the side. They work best as a shared snack because one or two disappear fast, and then somebody asks where the rest went.
Pro Tips for This Recipe:
- Use thick, cold mac and cheese. Thin sauce won’t hold.
- Freeze the shaped balls before breading if the mixture feels soft.
- Seal the coating well so the cheese doesn’t break through.
Variations on This Dish:
- Bacon Mac Balls: Add crumbled bacon to the mac before shaping.
- Jalapeño Popper Style: Stir in chopped pickled jalapeños and a little cream cheese.
- Three-Cheese Swap: Mix cheddar, mozzarella, and parmesan into the base for a richer center.
Common Mistakes to Avoid with This Dish:
- Using fresh, warm mac. It falls apart immediately.
- Packing the basket too tightly. The coating needs hot air on all sides.
- Serving straight from the fryer. The centers can burn tongues before they set.
14. Chicken Taquitos
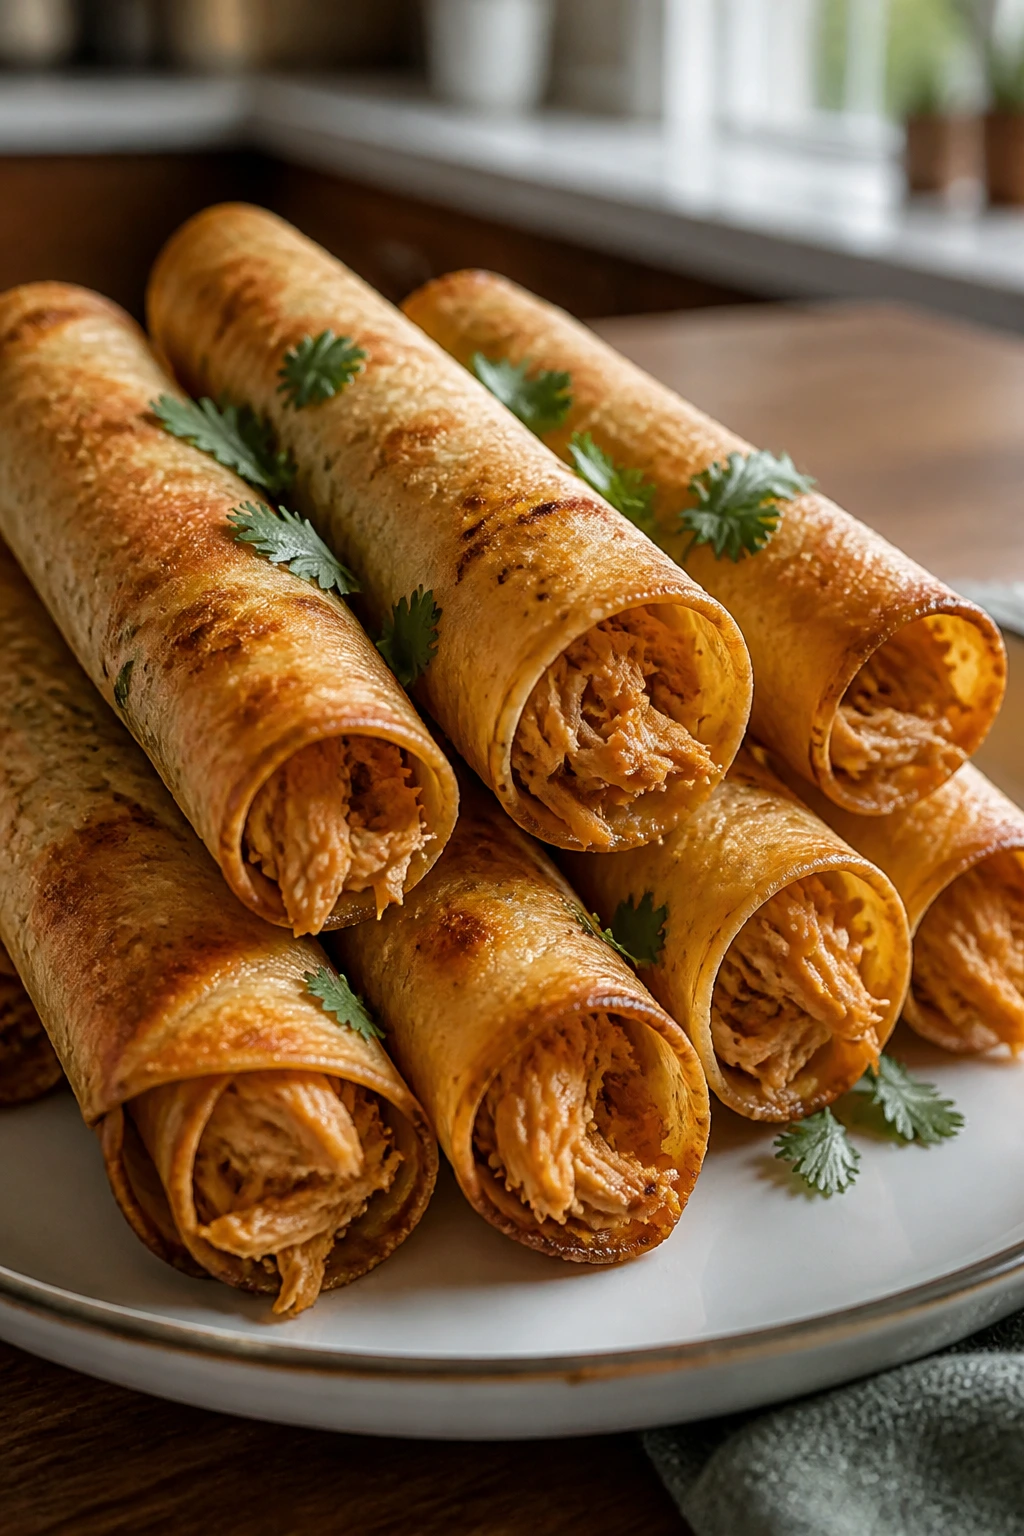
Chicken taquitos bring the crunch of a fried snack with a much simpler method. The tortillas crisp into tight cylinders, the chicken and cheese melt into the middle, and the whole thing feels sturdy enough for little hands. I like these because they can be assembled ahead, then cooked when the snack request actually happens.
Why It Works: Small tortillas roll tightly and crisp fast in the air fryer. The filling stays compact, so the taquitos cook through without opening up. A little oil on the outside gives the tortilla color and keeps the edges from drying into brittle chips.
Key Ingredients:
- 2 cups shredded cooked chicken
- 1 cup shredded Monterey Jack or cheddar
- 1/3 cup salsa
- 2 tablespoons sour cream
- 8 small flour tortillas
- 1 tablespoon olive oil or cooking spray
- Guacamole or salsa, for serving
Quick Steps:
- Preheat the air fryer to 375°F.
- Mix the chicken, cheese, salsa, and sour cream in a bowl.
- Spoon the filling onto each tortilla, roll tightly, and place seam-side down.
- Brush or spray the tops lightly with oil.
- Air fry for 8 to 10 minutes, turning once, until crisp and golden.
Equipment for This Recipe:
- Air fryer basket
- Mixing bowl
- Spoon
- Tongs
How to Serve This Dish: Serve with guacamole, salsa, or a cool sour cream dip. If you’re making them for a mixed-age crowd, slice the taquitos in half so the filling shows a little and the portion size feels manageable.
Pro Tips for This Recipe:
- Warm the tortillas for 10 seconds if they crack while rolling.
- Don’t overfill. Tight rolling matters more than stuffing.
- Place seam-side down first so they stay closed.
Variations on This Dish:
- Bean and Cheese Taquitos: Swap the chicken for refried beans and extra cheese.
- Buffalo Taquitos: Toss the chicken with a little buffalo sauce before rolling.
- Veggie Taquitos: Use sautéed peppers, onions, and black beans.
Common Mistakes to Avoid with This Dish:
- Loose rolling. They unspool in the basket.
- Too much wet filling. The tortillas soften and split.
- Forgetting to turn them. One side gets pale while the other burns.
15. Peanut Butter Banana Wontons
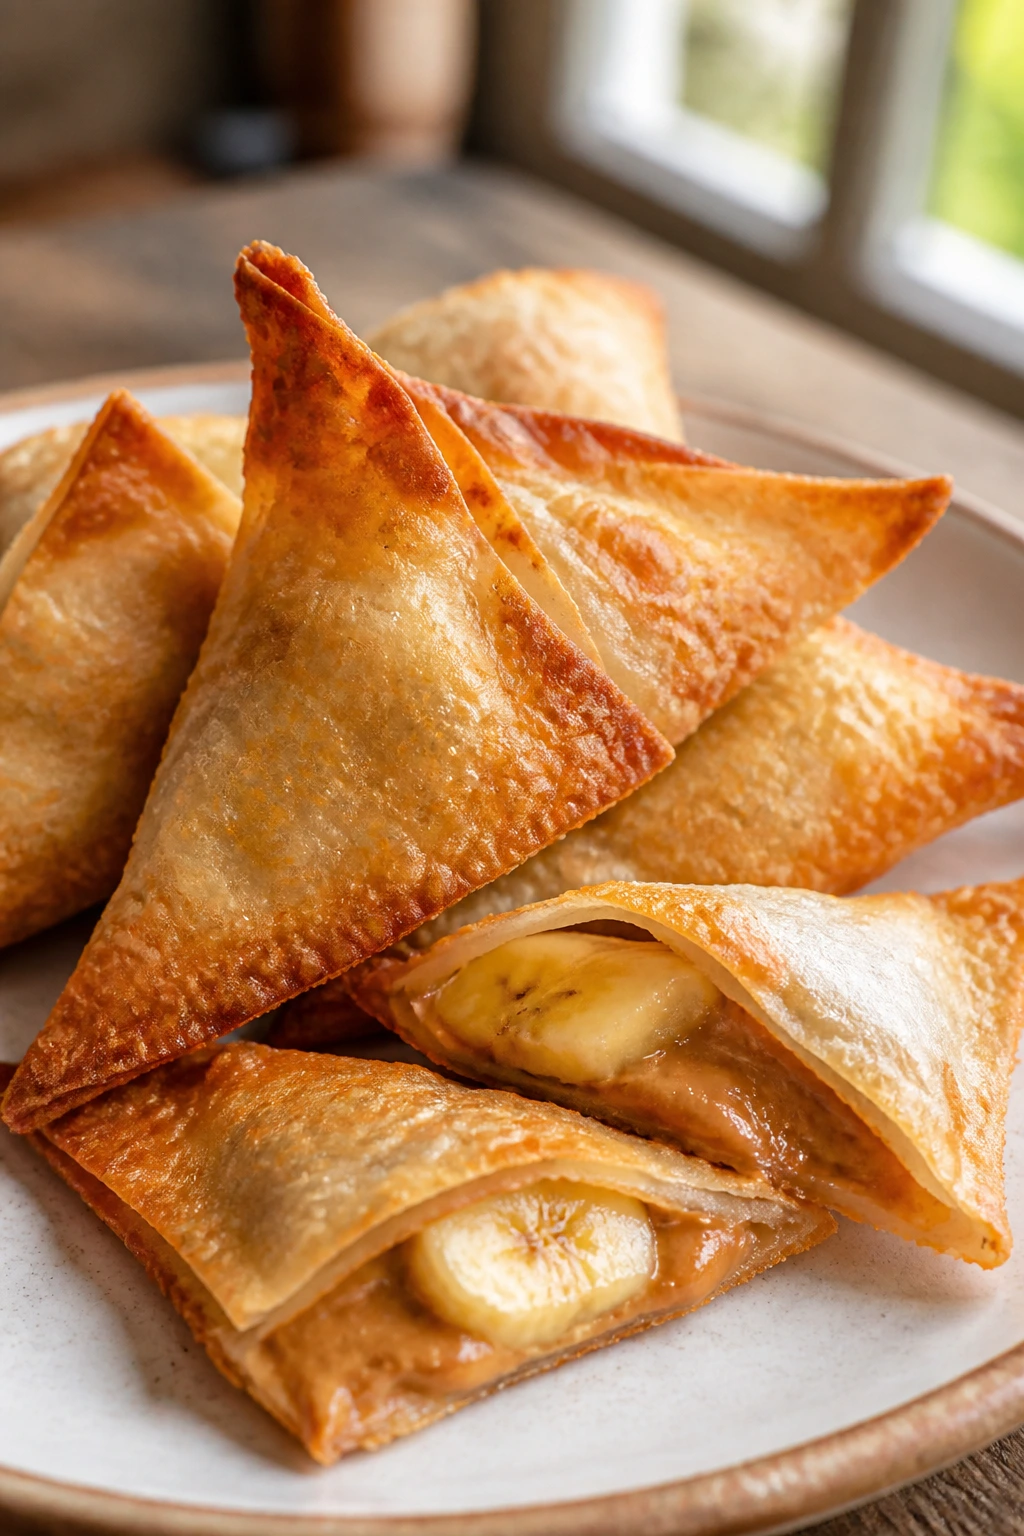
These taste like a shortcut dessert with snack energy, which is exactly why they disappear so fast. The wrapper turns crisp and shattery, the banana gets soft and sweet inside, and the peanut butter adds a nutty middle that keeps the whole thing from tasting like fried sugar alone.
Why It Works: Wonton wrappers crisp quickly, so you get a crunchy shell without deep frying. The filling is small and sealed, which keeps the banana from leaking too much moisture. A light spray of oil gives the wontons their golden color and helps the wrapper blister.
Key Ingredients:
- 12 wonton wrappers
- 2 bananas, sliced thin
- 1/3 cup creamy peanut butter
- 2 tablespoons honey
- 1/2 teaspoon cinnamon
- 1 tablespoon water, for sealing
- Chocolate sauce or powdered sugar, optional
Quick Steps:
- Preheat the air fryer to 370°F.
- Place a small smear of peanut butter, 1 to 2 banana slices, a drizzle of honey, and a pinch of cinnamon in the center of each wrapper.
- Wet the edges with water, fold into triangles, and press the seams shut.
- Lightly spray the tops with oil.
- Air fry for 6 to 7 minutes, turning once, until crisp and golden.
Equipment for This Recipe:
- Air fryer basket
- Small bowl of water
- Pastry brush or spray oil
- Fork for sealing, optional
How to Serve This Dish: Serve warm with chocolate sauce, a dusting of powdered sugar, or just plain if you want the banana to do the talking. They’re good with milk and even better when eaten within a few minutes of cooking.
Pro Tips for This Recipe:
- Slice the banana thin so the wrapper seals cleanly.
- Don’t overfill. Wontons split if you get greedy.
- Press out air pockets before sealing so they fry evenly.
Variations on This Dish:
- Nutella Banana Wontons: Swap peanut butter for chocolate-hazelnut spread.
- Coconut Banana Version: Add shredded coconut to the filling.
- Seed Butter Swap: Use sunflower seed butter for a nut-free option.
Common Mistakes to Avoid with This Dish:
- Using wrappers that dry out. Work with a few at a time and keep the rest covered.
- Sealing poorly. The filling leaks and the wrapper opens.
- Cooking too long. Wonton wrappers go from crisp to too dark fast.
16. Vegetable Egg Rolls
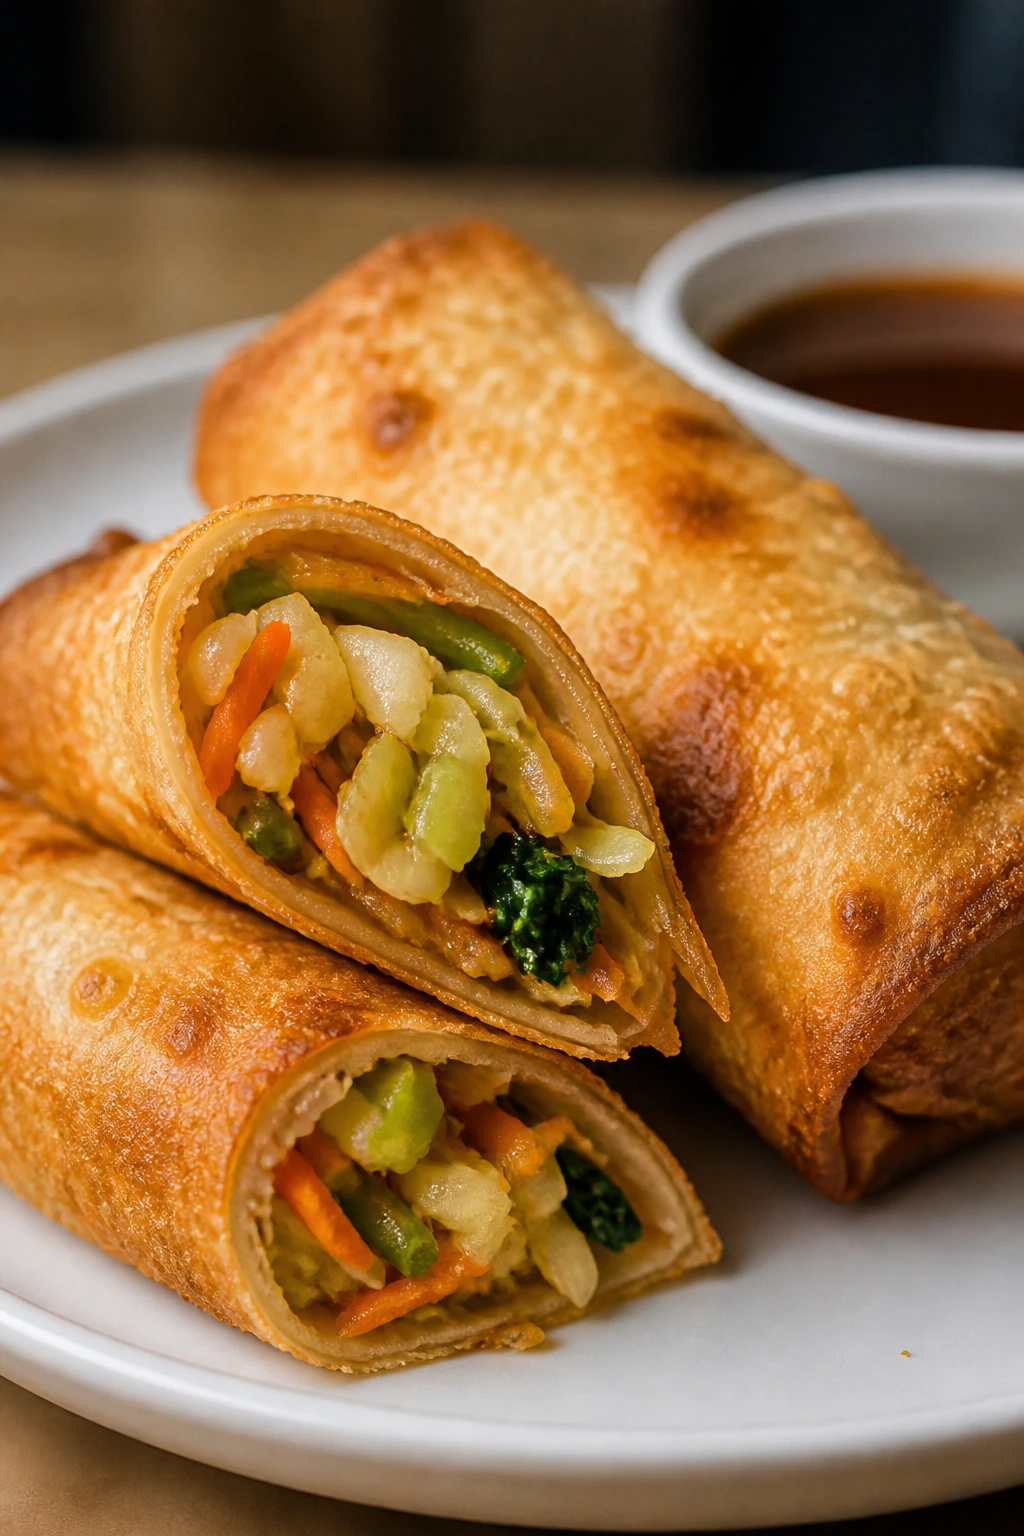
A good egg roll has a crackly shell and a filling that still tastes like vegetables, not just cabbage by way of steam. These hit that mark when the filling is cooked long enough to lose excess water before it gets wrapped. The air fryer takes care of the crunch without a pot of oil on the stove.
Why It Works: Pre-cooking the vegetables drives off moisture, which is the difference between a crisp egg roll and a soggy one. A little sesame oil and soy sauce give the filling a savory backbone, while the wrapper seals in the mix so the air fryer can brown the outside. It’s one of the best ways to make vegetables feel snack-worthy.
Key Ingredients:
- 1 tablespoon oil
- 2 cups coleslaw mix
- 1 cup chopped mushrooms
- 1/2 cup shredded carrots
- 2 green onions, sliced
- 1 tablespoon soy sauce
- 1 teaspoon sesame oil
- 1 teaspoon grated ginger
- 12 egg roll wrappers
- Cooking spray
- Sweet chili sauce, for serving
Quick Steps:
- Heat the oil in a skillet and cook the vegetables, soy sauce, sesame oil, and ginger for 4 to 5 minutes until softened and most liquid cooks off.
- Cool the filling for 5 minutes.
- Place filling in the center of each wrapper, fold, and roll tightly, sealing the edge with water.
- Spray lightly with oil.
- Air fry at 390°F for 8 to 10 minutes, turning once, until crisp and browned.
Equipment for This Recipe:
- Air fryer basket
- Skillet
- Mixing spoon
- Pastry brush or spray oil
- Tongs
How to Serve This Dish: Serve with sweet chili sauce or soy sauce and a few cucumber sticks. These are strong enough to anchor a snack plate, especially if you’re pairing them with something sweeter like fruit.
Pro Tips for This Recipe:
- Let the filling cool before wrapping or the wrappers turn gummy.
- Roll tightly so the egg rolls do not puff open.
- Place them seam-side down first.
Variations on This Dish:
- Chicken Veggie Egg Rolls: Add 1 cup shredded cooked chicken to the filling.
- Mild Kid Version: Use only carrots and cabbage for a simpler filling.
- Sesame Mushroom Roll: Increase the mushrooms and add a pinch of garlic powder.
Common Mistakes to Avoid with This Dish:
- Wet filling. That is the fastest path to limp wrappers.
- Loose rolls. They split in the basket.
- Overbrowning. The wrappers darken quickly, so watch the last 2 minutes.
17. Grilled Cheese Dippers
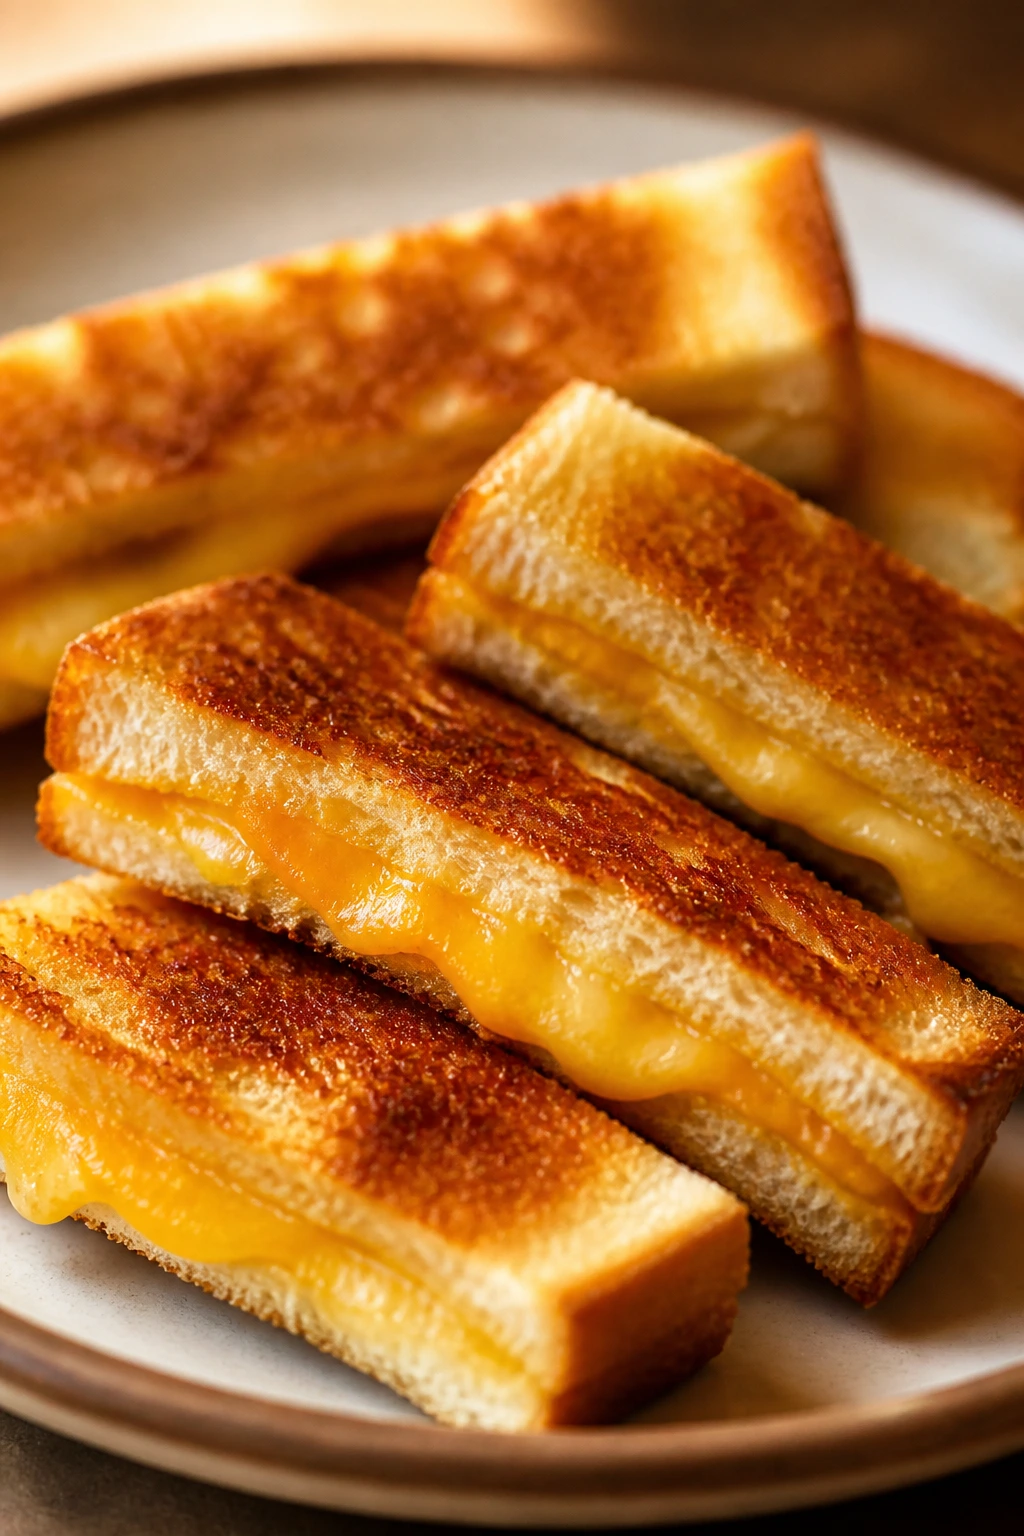
There’s a reason grilled cheese never gets old: melted cheese and toasted bread are still a solid deal. Cutting the sandwich into strips makes it snack-sized, and the air fryer gives you even browning without babysitting a skillet. It feels familiar, which is useful when the afternoon has already been noisy.
Why It Works: The air fryer crisps both sides of the bread at once, so you get a sandwich that holds together when sliced into strips. A mix of cheeses gives you better melt and stretch than a single slice alone. Butter on the outside, plus a little parmesan if you want extra color, helps the bread brown instead of drying out.
Key Ingredients:
- 8 slices sandwich bread
- 4 slices cheddar
- 4 slices mozzarella
- 3 tablespoons softened butter
- 2 tablespoons grated parmesan, optional
- Tomato soup or marinara, for serving
Quick Steps:
- Preheat the air fryer to 370°F.
- Butter one side of each bread slice.
- Layer cheddar and mozzarella between 4 slices, then close the sandwiches with the buttered sides facing out.
- Air fry for 5 to 6 minutes, flipping once, until the bread is golden and the cheese melts.
- Rest for 1 minute, then cut into strips.
Equipment for This Recipe:
- Air fryer basket
- Butter knife
- Sharp knife or pizza cutter
- Spatula
How to Serve This Dish: Serve the strips with tomato soup, warm marinara, or plain ketchup if that’s the household rule. They’re especially good with apple slices on the side because the sweet crunch breaks up all that cheese.
Pro Tips for This Recipe:
- Use medium-thick bread; very soft bread squashes.
- Butter the outside edge to edge.
- Cut after resting so the cheese doesn’t pour out immediately.
Variations on This Dish:
- Garlic Bread Grilled Cheese: Mix a little garlic powder into the butter.
- Pesto Cheese Dippers: Add pesto under the cheese for a green, savory note.
- Ham Melt Version: Slip in a thin layer of ham for a heartier snack.
Common Mistakes to Avoid with This Dish:
- Using too much cheese. It leaks before the bread browns.
- Cooking too hot. The outside burns before the middle melts.
- Skipping the rest. Cutting too soon makes a mess.
18. Mini Corn Dog Bites

Mini corn dog bites are pure playground nostalgia in a snack-sized form. The cornmeal coating bakes up tender and lightly crisp, the hot dog pieces stay juicy, and the whole tray feels playful without being complicated. Put out ketchup and mustard, and the plate goes fast.
Why It Works: Corn muffin batter is sturdy enough to hold hot dog pieces without running, and the air fryer gives the batter enough lift to puff around the meat. Baking in mini muffin cups helps the bites keep their shape. That’s the trick here — shape first, crunch second.
Key Ingredients:
- 1 box corn muffin mix
- 1 large egg
- 1/3 cup milk
- 8 hot dogs, cut into 1-inch pieces
- Cooking spray
- Ketchup and mustard, for serving
Quick Steps:
- Preheat the air fryer to 350°F.
- Grease mini muffin cups or a silicone mini muffin tray and place it in the air fryer basket.
- Mix the corn muffin batter with the egg and milk according to the box directions.
- Fill each cup halfway with batter, press one hot dog piece into each, and spoon a little batter over the top.
- Air fry for 10 to 12 minutes, until puffed and golden, then cool for 2 minutes before removing.
Equipment for This Recipe:
- Air fryer
- Silicone mini muffin tray or air fryer-safe mini muffin cups
- Mixing bowl
- Spoon
- Tongs or small spatula
How to Serve This Dish: Serve with ketchup, mustard, or both, and add pickle spears if you want that classic diner feel. These are happiest when eaten warm, but they also hold up well enough to sit on a plate while everyone finds the napkins.
Pro Tips for This Recipe:
- Use a muffin tray or the batter will spread too much.
- Cut the hot dogs evenly so every bite cooks at the same speed.
- Do not overfill the cups; the batter needs room to puff.
Variations on This Dish:
- Cheddar Corn Dog Bites: Stir shredded cheddar into the batter.
- Turkey Dog Version: Use turkey hot dogs for a lighter flavor.
- Jalapeño Corn Bite: Add a small spoon of diced jalapeño to the batter for grown-up heat.
Common Mistakes to Avoid with This Dish:
- Using too much batter. It spills and cooks unevenly.
- Skipping the tray. The batter spreads and loses the bite shape.
- Pulling them while pale. They need that golden top for the best texture.
Why the Air Fryer Makes Snack Time Less Chaotic
The air fryer works so well for after-school food because it handles browning fast. That matters more than people think. A skillet asks for attention, an oven asks for time, and a microwave asks for forgiveness. The air fryer sits in a narrow lane between those three: enough heat to make things crisp, not so much that the whole kitchen turns into a project.
It also likes small, evenly shaped food, which is exactly what snack food should be. Bagels, wedges, tenders, roll-ups, bites, sticks, and triangles all fit the basket logic. Once you start thinking that way, the machine stops being a novelty and starts acting like a fast little finishing station. That’s where it shines.
Another quiet advantage: the basket gives you a visual cue. You can see when cheese has melted, when breading has browned, and when potatoes need another shake. No guessing from across the room. No poking with a fork every 20 seconds. Just short bursts of heat and a few checks in the middle.
Essential Equipment for These Recipes
-
Air fryer basket or tray: A basket-style model gives the strongest air movement, while a tray works well for flatter snacks like quesadillas or hand pies.
-
Parchment liners or silicone inserts: Useful for wet fillings, mac and cheese bites, and mini muffin-style recipes. Make sure they’re weighted down by food so they do not fly around.
-
Tongs: Handy for flipping tenders, taquitos, wedges, and egg rolls without tearing the coating.
-
Instant-read thermometer: Best for chicken tenders and any recipe where you want a clear safety check instead of guessing.
-
Mixing bowls in two or three sizes: Breading station jobs go much faster when flour, egg, and crumbs each have their own bowl.
-
Pastry brush or oil mister: Both help you apply a thin coat of oil without drowning the food.
-
Sharp knife or pizza cutter: Needed for wedges, quesadilla triangles, hand pies, and sandwich strips.
-
Mini muffin tray or silicone cups: The difference between “corn dog bites” and “corn dog blobs.”
-
Cooling rack: Helps keep breaded snacks crisp instead of trapping steam under the bottom.
Smart Shopping and Ingredient Tips for Kid-Friendly Snacks

A good snack collection starts in the store, not the air fryer basket. For cheese-heavy recipes, buy low-moisture mozzarella, cheddar, or string cheese instead of soft fresh cheeses. Fresh mozzarella tastes lovely on a plate, but it leaks water and makes breading slip off. For mozzarella sticks and grilled cheese dippers, the drier block-style cheese holds together better and melts in a cleaner way.
For tortillas and dough, size matters. Small flour tortillas are easier to roll into taquitos and quesadilla triangles, while standard sandwich bread makes better grilled cheese strips than thick artisan loaves. Crescent dough should be chilled but pliable; if it’s too warm, it stretches and tears, and if it’s too cold, it cracks. That one detail saves a lot of frustration.
Chicken tenders are worth buying as tenders, not slicing breast meat into random strips. Tenders are already shaped for even cooking, which matters in the air fryer because thin ends and thick middles cook at different rates. If you use breast pieces, keep them close to the same thickness. Same rule for potatoes: cut wedges evenly, or the skinny ones turn dark before the thick ones soften.
Frozen shortcuts are useful here, but choose ones that already understand the air fryer’s rhythm. Breaded ravioli, mini corn dogs, and some store-bought chicken bites are built for quick crisping. The cheaper the shortcut, the more you want to check the breadcrumb texture and salt level. Some products are already salty enough to skip extra seasoning; some need a little help.
For the fruit-based snacks, shop by ripeness, not perfection. Bananas should have brown speckles for the oat bites and wontons. Apples should be firm for hand pies so they soften without disappearing. And for chickpeas, canned is fine — just rinse them well and dry them well. The drying matters more than the brand.
How to Serve These Recipes
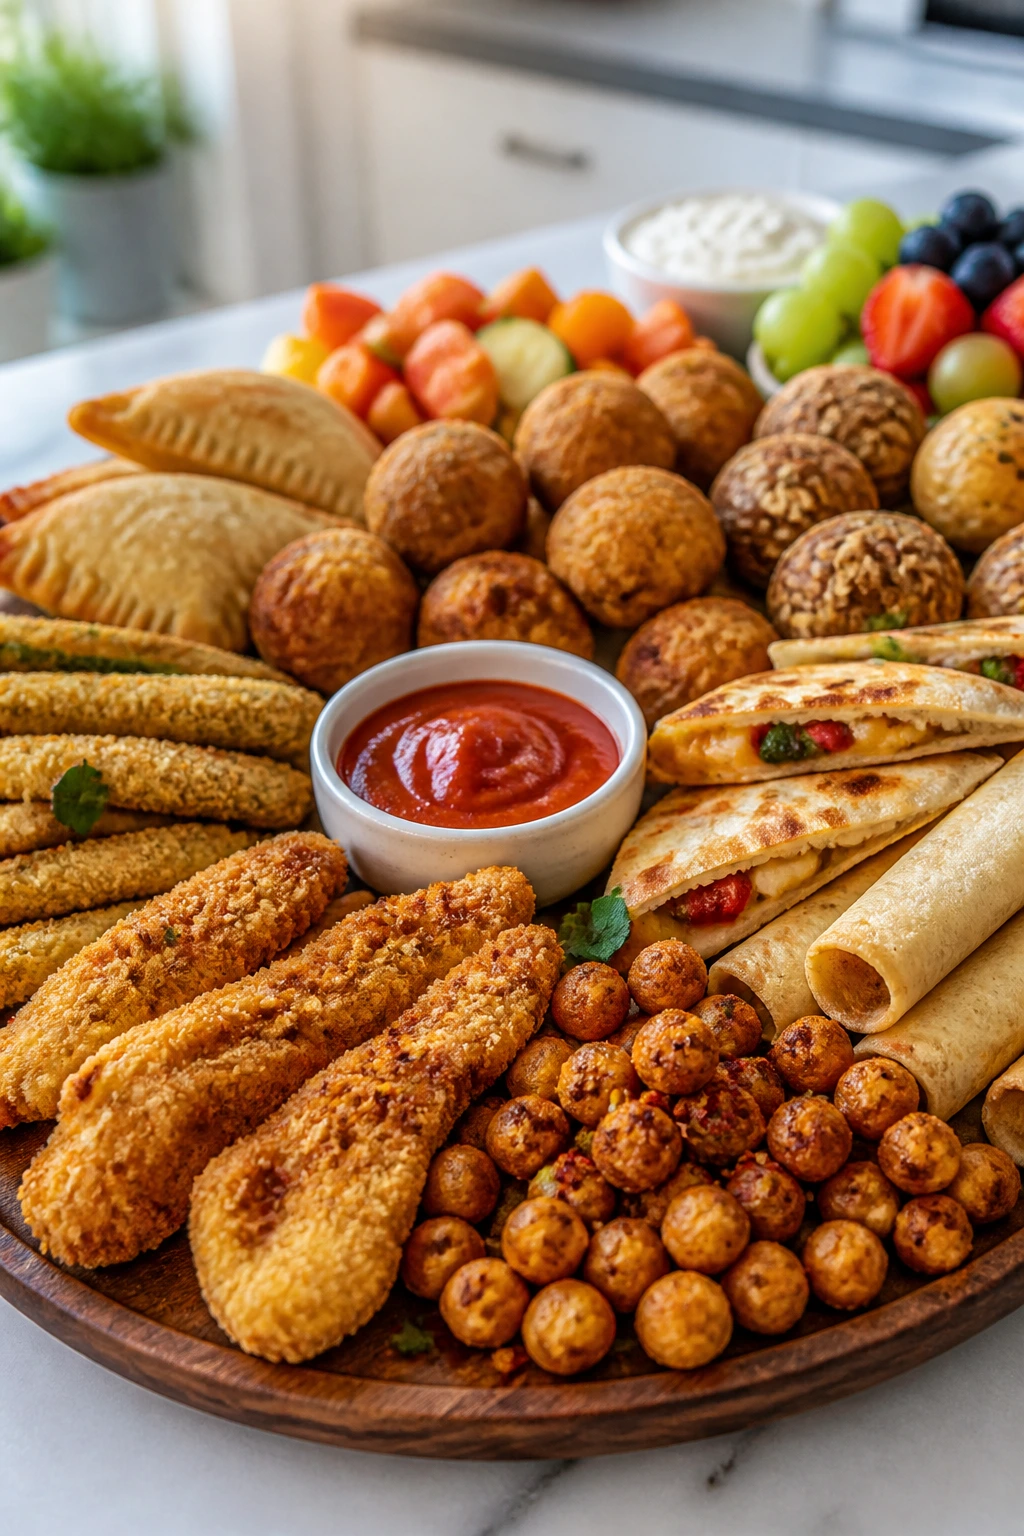
Presentation: Snack food looks better when it has a little structure. Use a small platter, a parchment-lined basket, or a divided tray so the crisp items stay separate from the dips. A ramekin of sauce in the middle makes even a fast snack feel intentional, and it keeps the plate from turning into one wet pile.
Accompaniments: Pair one hot snack with one cold thing. Pizza bagels go with apple slices. Chicken tenders work with cucumber sticks. Hand pies like yogurt or milk. Potato wedges ask for sour cream and something green on the side, even if it’s only celery. The balance keeps the snack from feeling heavy, and it buys you a little more peace before dinner.
Portions: For younger kids, plan on 2 to 4 bites or pieces per snack recipe, then add fruit or vegetables alongside. Older kids and adults will usually want 4 to 6 pieces of something like wedges, taquitos, or chicken tenders. If you’re serving a mixed group, batch the snack once and plate it in small rounds so the first tray doesn’t get picked clean before the rest is done.
Beverage Pairing: Cold milk still makes the strongest case for cheesy and breaded snacks. Sparkling water with lime works well with fried-style bites and keeps the plate from feeling too rich. For sweeter items, unsweetened iced tea or diluted apple juice does the job without making the snack feel like dessert.
Additional Tips and Flavor Boosters
Flavor Enhancement: A tiny finishing sprinkle goes farther than a heavier hand in the filling. Flaky salt on potato wedges, parmesan on ravioli, and cinnamon sugar on hand pies give the last bite some lift. If a snack tastes flat, the fix is usually at the end, not inside the dough.
Customization: Keep one or two sauces in the fridge and let people choose. Marinara, ranch, honey mustard, sweet chili sauce, and sour cream cover most of the snacks here without asking you to cook anything extra. A snack bar of three dips sounds fussy until you realize it saves arguments.
Serving Suggestions: Cut strips, triangles, or bite-size pieces whenever you can. Kids eat faster when the food is already sized for their hands. A snack board with one hot item, one fruit, one crunchy vegetable, and one dip looks fuller than it costs, which is a nice little trick on hard afternoons.
Make-It-Yours: If you need dairy-free versions, choose plant-based cheese that melts rather than the waxy kind that stays rubbery. For gluten-free swaps, use GF tortillas, GF breadcrumbs, or chickpea flour coatings where the recipe can handle it. For lower-salt versions, lean harder on garlic, paprika, cinnamon, lemon zest, or ranch seasoning without the added salt.
Make-Ahead, Storage, and Reheating Guidance
A few of these snacks are best cooked and eaten right away. Mozzarella sticks, grilled cheese dippers, and pretzel bites all lose some of their charm as they sit, because the steam softens the crust. Still, they can be made ahead if needed. Store most cooked snacks in an airtight container in the refrigerator for 3 to 4 days. Breaded items, taquitos, chicken tenders, and potato wedges also freeze well for up to 2 months when wrapped tightly and layered with parchment.
Reheating is where the air fryer earns its second paycheck. For breaded or crisp snacks, reheat at 350°F to 375°F for 3 to 6 minutes, depending on thickness, until the outside crisps again. Taquitos and chicken tenders need the full 5 or 6 minutes if they were refrigerated. Hand pies and roll-ups usually need only 3 to 4 minutes. Skip the microwave unless you want a soft crust; it warms the filling but flattens the texture.
Some snacks are better as components. You can bread mozzarella sticks, shape mac and cheese balls, or mix chicken taquito filling ahead and chill them for the next day. Potato wedges can be cut and soaked in cold water for a few hours, then dried before cooking. For banana or apple-based snacks, prep the filling early but assemble close to cooking time so the fruit does not brown or leak.
If you’re freezing, freeze the shaped items on a tray first, then transfer them to a bag. That keeps them from sticking together in one ugly block. It takes an extra 20 minutes up front and saves a lot of swearing later.
Variations and Adaptations to Try
-
Gluten-Free Basket: Use GF panko, GF tortillas, and a 1:1 gluten-free flour blend for breading. The crisp texture stays close to the original if you avoid very wet fillings.
-
Dairy-Lighter Swap: Choose a dairy-free shredded cheese that melts for bagels, quesadillas, and taquitos, then lean on herbs and sauce for flavor. It won’t behave exactly like dairy cheese, but it gets close enough for snack time.
-
Vegetable-Forward Tray: Double up on zucchini fries, ranch chickpeas, and veggie egg rolls, then serve them with fruit and dip. That gives you a tray with enough crunch to satisfy kids who want snacks that feel fun.
-
Lower-Salt Version: Use unsalted potatoes, low-sodium cheese where possible, and season with paprika, garlic, cinnamon, lemon zest, and herbs instead of leaning on salt. This works especially well for hand pies, banana oat bites, and pretzel bites.
-
Heat-Seeking Version: Add pepper jack to quesadillas, red pepper flakes to chickpeas, and hot honey to chicken tenders. Keep the base snack the same, then let the spicy people doctor their own plate.
-
Lunchbox-Friendly Version: Choose snacks that reheat well at room temperature — hand pies, oat bites, chickpeas, roll-ups, and corn dog bites hold up better than gooey cheese sticks. Pack dips separately in small containers so the crisp texture survives.
Common Mistakes to Avoid

-
Overcrowding the basket: The food starts steaming instead of browning, which is how you end up with pale bagels and soft taquitos. Cook in batches. It’s tedious for 10 minutes, and then you get the texture you wanted in the first place.
-
Ignoring moisture: Wet potatoes, damp chickpeas, soggy zucchini, and warm fillings all sabotage crisping. Dry the food well before it goes in. Sometimes the paper towel matters more than the seasoning.
-
Using too much oil: A little spray helps with color, but a heavy pour makes the coating greasy and soft. You want a film, not a bath.
-
Pulling snacks too early: Cheese melts fast, but breading and dough need the full window to brown. Pale edges usually mean the center has not finished its job yet.
-
Skipping the flip or shake: The bottom side of the basket gets less direct airflow, so one-sided cooking gives you patchy browning. A halfway turn fixes more than people think.
-
Not chilling breaded items: Mozzarella sticks and mac and cheese balls hold together better after a quick freeze. Warm fillings leak. Cold fillings behave.
Frequently Asked Questions
Can I make these snacks ahead of time and cook them later?
Yes, and some actually improve when prepped ahead. You can bread mozzarella sticks, shape mac and cheese balls, roll taquitos, or mix chickpea seasoning earlier in the day. Keep anything with breading or cheese cold until it goes into the air fryer.
Do I need to preheat the air fryer every time?
For most of these snacks, yes. A 3-minute preheat gives you more even browning, especially on breaded items, dough, and potatoes. If you skip it, the first few minutes are spent warming the basket instead of crisping the food.
What if my air fryer runs hot?
Lower the temperature by 25°F and check the food a minute or two early. This matters most for cheese-heavy snacks like mozzarella sticks, grilled cheese dippers, and hand pies, where a hot basket can brown the outside before the center is ready.
Can I use parchment liners?
Yes, but use liners made for air fryers and keep them under food so they do not float. They’re useful for sticky snacks, but they can block airflow if you use too much of them. For crispest results, use them sparingly.
Which snacks reheat the best?
Chicken tenders, taquitos, potato wedges, hand pies, and quesadilla triangles reheat cleanly in the air fryer. Mozzarella sticks and grilled cheese are still good, but they’re better when eaten fresh because the cheese softens the crust over time.
How do I keep cheese from leaking out?
Use less filling than you think, seal the edges well, and chill or freeze the shaped snack before cooking when possible. Leakage usually means the seam was weak or the basket was too hot for too long.
Can I double these recipes?
You can, but cook them in separate batches. The air fryer basket needs space around each piece, and doubling the food without doubling the cook time gives you soft, uneven results. If you’re feeding a crowd, keep the first batch warm on a wire rack in a low oven.
What’s the best snack for picky eaters?
Mini pizza bagels, grilled cheese dippers, chicken tenders, and corn dog bites are usually the safest bets. They rely on familiar flavors and simple shapes, which tends to matter more than fancy seasoning when the day has already been long.
Can I use an oven instead of an air fryer?
Yes, but you’ll usually need a hotter oven and a few extra minutes. A convection setting helps, since it moves air the way the air fryer does. The food will still work; it just won’t get the same tight, fast crisp.
Keeping the After-School Window Easy
The nicest thing about these snacks is not that they’re clever. It’s that they take a chaotic hour and make it feel manageable. A warm basket, one good dip, and a few pieces of fruit on the side are often enough to reset the whole afternoon.
Once you know which recipes your family reaches for first, the after-school scramble gets shorter. That’s the real win here: not novelty, not perfection, just a stocked basket and a few snacks that show up hot when everybody needs them.