
At 3:14 p.m., kids do not ask for a snack — they ask for a second dinner, only smaller and faster.
That’s the whole trick with after-school snacks. They have to arrive quickly, taste familiar on the first bite, and feel substantial enough that nobody starts rummaging again ten minutes later with that hollow, panicked look kids get when they’re still hungry. A bowl of plain crackers disappears fast and leaves almost nothing behind. A good snack gives you crunch, salt, a little sweetness, and enough protein or fat to buy you peace until dinner.
I’m a fan of snacks that look casual but act like tiny meals. Tortillas, cheese, fruit, oats, yogurt, beans, leftover chicken, canned pasta, and a few smart shortcuts can turn the after-school scramble into something calmer. No elaborate prep. No special grocery run. Just food that can survive a backpack drop, a burst of hunger, and the general chaos of the hour when homework, sports gear, and sibling arguments all hit at once.
Why These After-School Snacks Work
- They use familiar food shapes. Kids who reject “something healthy” will often eat the same ingredients tucked into a roll-up, muffin tin cup, or little skewer without blinking.
- They balance fast carbs with staying power. Fruit, bread, tortillas, pasta, and oats give quick energy; cheese, yogurt, nut butter, beans, chicken, or cottage cheese keep the snack from vanishing too fast.
- They’re built for messy hands. These recipes favor tidy slices, cups, and bites that can be eaten while dropping a backpack or sitting at the counter for five minutes.
- They flex around what’s in the fridge. A half tub of yogurt, a lonely tortilla, a few apples, or leftover chicken can all become something useful instead of getting tossed.
- They work at different temperatures. Some are best cold, some are better warm, and some keep well in lunch containers, which matters when the after-school window is a moving target.
- They don’t pretend to be dinner. That sounds small, but it matters. A snack that acts like a snack is easier to sell than a “light meal” that arrives with too many rules.
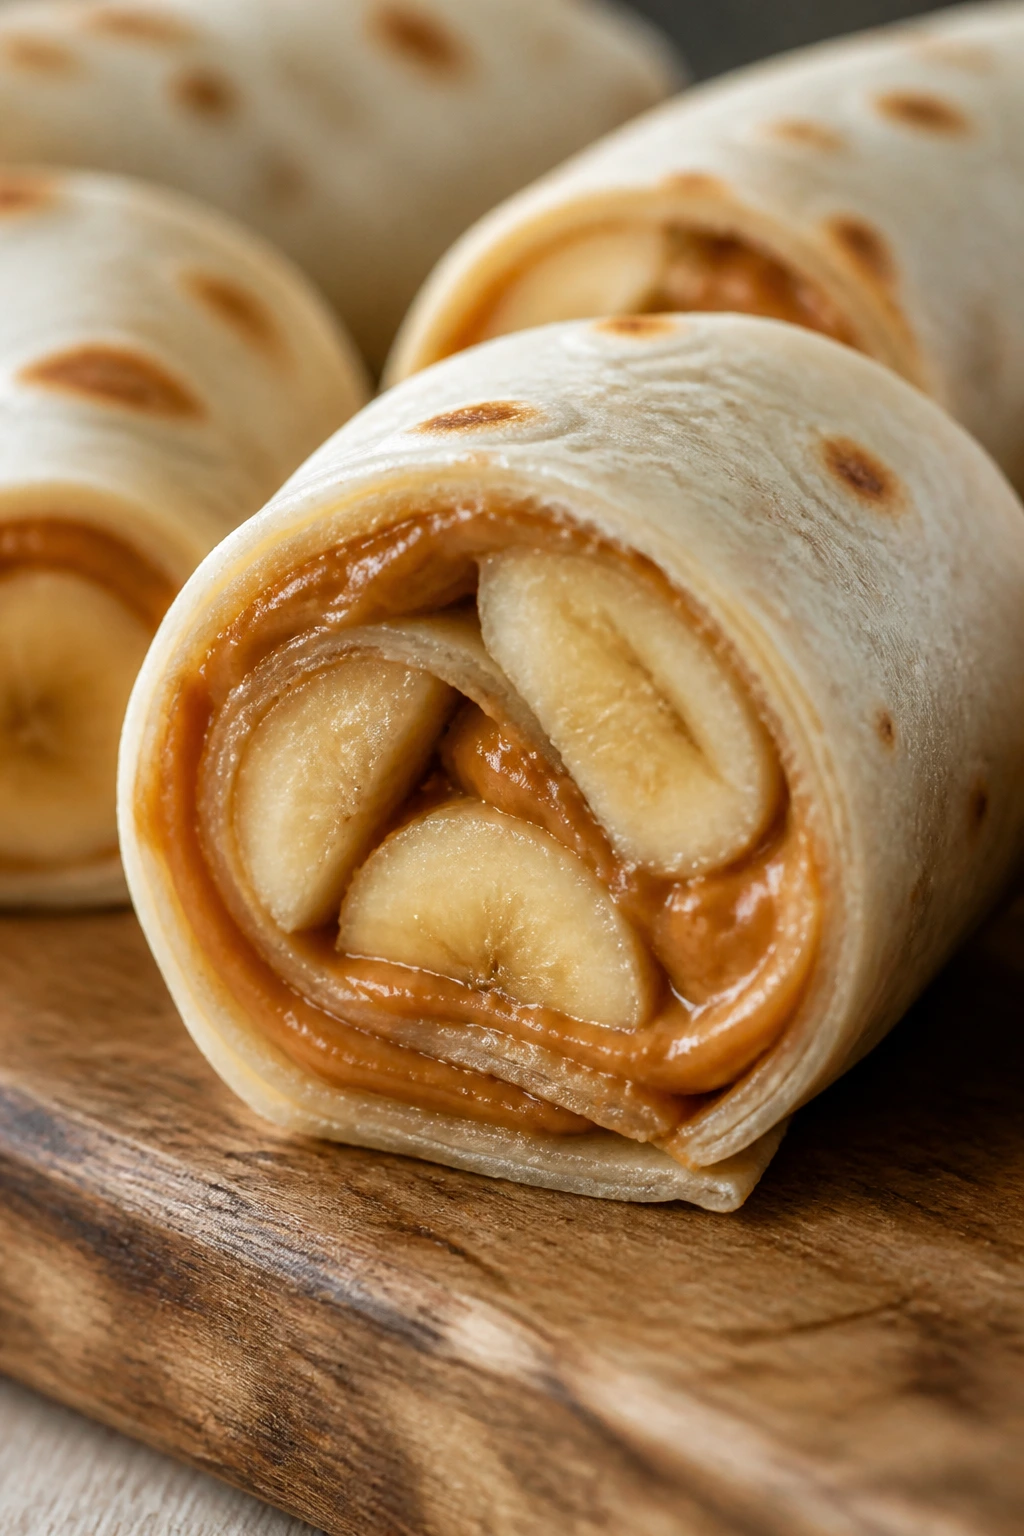
1. Peanut Butter Banana Roll-Ups
A peanut butter banana roll-up is what happens when a sandwich stops trying to be formal and turns into a tidy little spiral. The tortilla stays soft, the peanut butter gives that salty cling, and the banana melts into a creamy center that tastes sweeter with every bite. A dusting of cinnamon makes it smell like toast and warm cereal at the same time.
Why It Works:
It uses ingredients that behave well at room temperature, which means you’re not racing the clock the second it’s assembled. The tortilla wraps the whole thing into something easy to hold, and the peanut butter slows down the banana’s soft edge so it doesn’t feel like baby food. If you let the roll rest for a minute before slicing, the spiral holds together better and looks neat instead of squashed.
Key Ingredients:
- 2 large flour tortillas, 8-inch
- 4 tablespoons peanut butter
- 2 ripe bananas
- 1 tablespoon honey
- 1/2 teaspoon ground cinnamon
- 2 tablespoons mini chocolate chips
- Pinch fine salt
Quick Steps:
- Warm the tortillas in the microwave for 10 seconds so they bend without cracking.
- Spread 2 tablespoons peanut butter over each tortilla, leaving a 1-inch border at the edges.
- Place one banana near the lower third of each tortilla, drizzle with honey, and sprinkle with cinnamon, chocolate chips, and a pinch of salt.
- Roll each tortilla tightly around the banana, seam-side down, and let it sit for 1 minute.
- Slice each roll-up into 1-inch pieces or serve whole for a bigger snack.
Equipment for This Recipe:
- Cutting board for rolling and slicing
- Butter knife or small spatula for spreading
- Sharp knife for clean slices
- Microwave-safe plate for softening tortillas
How to Serve This Dish:
I like these on a small plate with apple slices or a handful of grapes, because the cold fruit makes the creamy filling feel even better. For a hungrier kid, serve one whole roll-up and skip the slicing. If the bananas are long, trim them a little so they don’t poke through the ends.
Pro Tips for This Recipe:
- Use bananas that are yellow with a few freckles, not brown and mushy.
- If your peanut butter is stiff, warm it for 10 seconds so it spreads without tearing the tortilla.
- Roll tightly but don’t squeeze; if you crush the banana, the filling slides out.
- A thin layer of peanut butter is enough. Too much turns this into a messy squish.
Variations on This Dish:
- Sunflower-Seed Swap: Use sunflower seed butter instead of peanut butter for a nut-free school version.
- Berry-Cinnamon Roll-Up: Add a few sliced strawberries along with the banana for a brighter, fresher bite.
- Crunchy Pantry Version: Sprinkle in crushed pretzels or granola for a little snap.
Common Mistakes to Avoid with This Dish:
- Don’t overfill the tortilla. If the banana is buried under too much spread, the roll splits and the filling escapes.
- Don’t slice too soon after rolling. The shape loosens and you get a sloppy spiral.
- Don’t use an overripe banana unless you want a soft, almost pudding-like center.
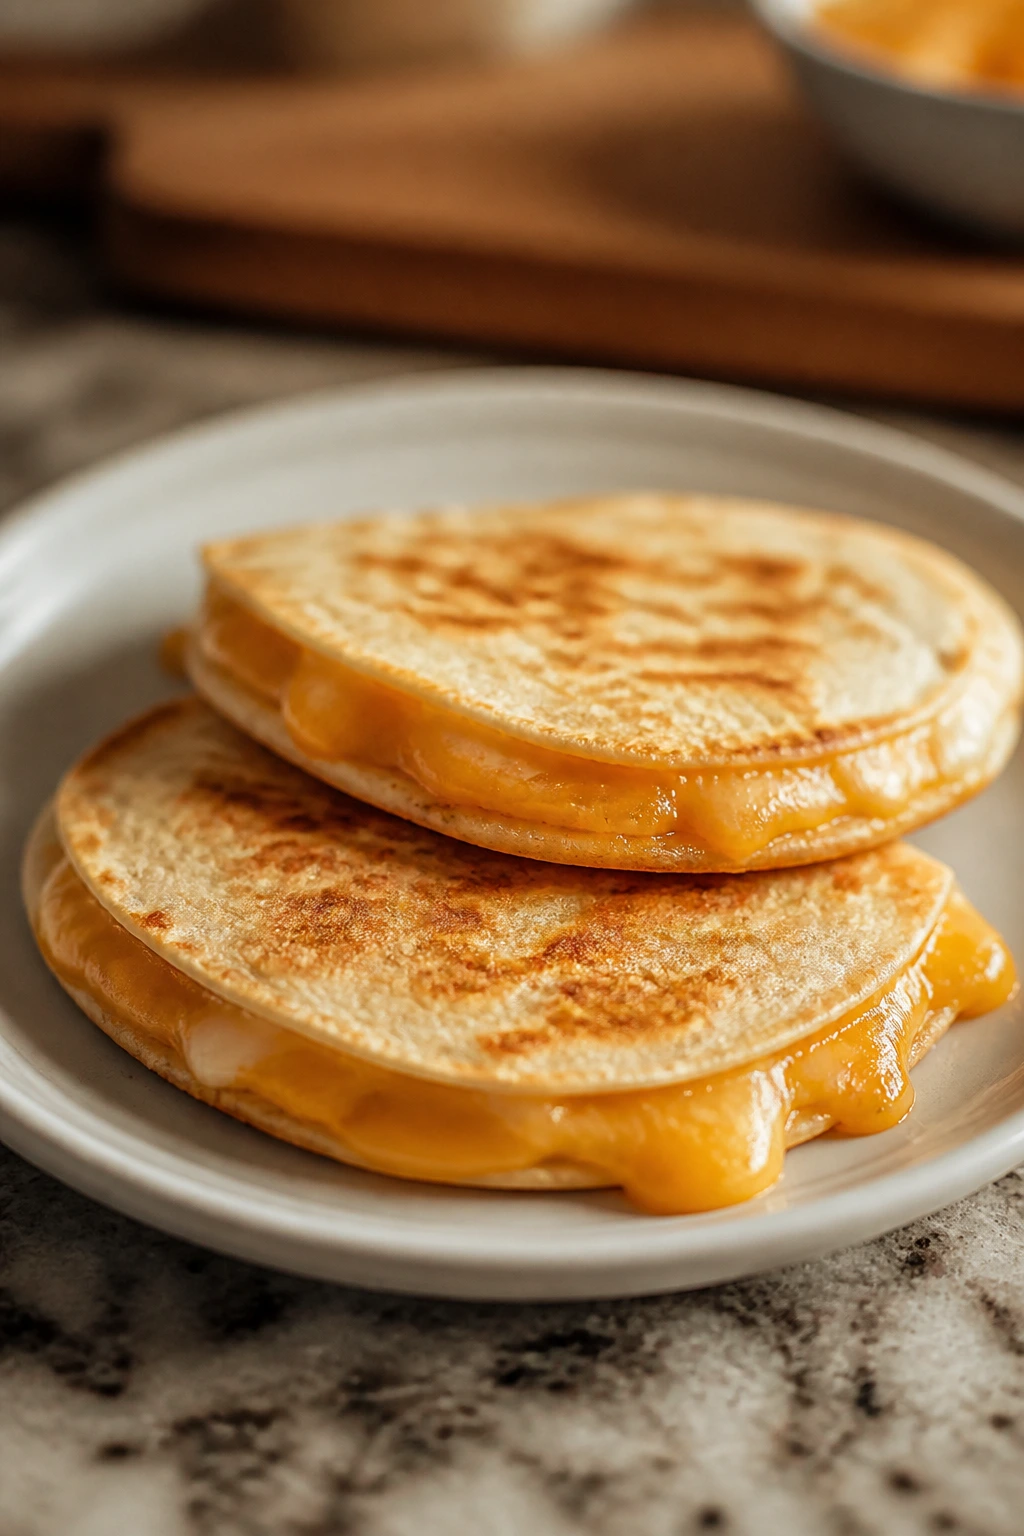
2. Mini Cheese Quesadillas
Two tortillas, a skillet, and five minutes later the kitchen smells like toasted flour and melting cheddar. Mini cheese quesadillas are one of those after-school snacks that disappear fast because the edges get crisp while the middle stays stretchy and warm. They feel like actual food, not a token nibble, which is half the battle.
Why It Works:
Mild cheese melts quickly, so the filling turns gooey before the tortilla burns. The small size makes the snack easy to portion, and you can cut each quesadilla into triangles that kids can grab with one hand. If you tuck in a few black beans or a spoonful of corn, you add enough texture and fiber to keep it from tasting flat.
Key Ingredients:
- 4 small flour tortillas, 6- to 8-inch
- 1 1/2 cups shredded cheddar or Mexican blend cheese
- 1/2 cup canned black beans, rinsed and drained
- 1 tablespoon butter or neutral oil
- 1/4 teaspoon fine salt
- 1/4 teaspoon garlic powder
- Salsa or guacamole, for serving
Quick Steps:
- Heat a large skillet over medium heat and brush it lightly with butter or oil.
- Lay one tortilla in the skillet and sprinkle 1/4 cup cheese over half of it.
- Add 2 tablespoons black beans if using, then sprinkle with a pinch of salt and garlic powder.
- Fold the tortilla over and cook for 2 to 3 minutes per side, until the outside is golden and the cheese is fully melted.
- Repeat with the remaining tortillas, then cut each quesadilla into 3 wedges.
Equipment for This Recipe:
- 10- or 12-inch skillet
- Spatula for flipping
- Cheese grater if you’re shredding a block
- Knife or pizza cutter for slicing
How to Serve This Dish:
Serve the wedges with salsa or guacamole in a little bowl for dipping. A few cucumber sticks or orange slices on the side make the plate look fuller without much extra work. If you’re feeding younger kids, cut the triangles again into smaller strips.
Pro Tips for This Recipe:
- Shred your own cheese if you want the smoothest melt, though pre-shredded works fine here.
- Keep the heat at medium. High heat burns the tortilla before the cheese has time to melt.
- Press the quesadilla lightly with the spatula while it cooks so the filling settles into an even layer.
- If you use beans, blot them with a paper towel first so they don’t steam the tortilla.
Variations on This Dish:
- Bean-and-Corn Quesadilla: Add 2 tablespoons of thawed corn for a sweeter, crunchier filling.
- Pepper Jack Kick: Swap in pepper jack if your kids like a little heat.
- Breakfast-Style Fold: Add a spoonful of scrambled egg and a few shreds of ham for a more filling snack.
Common Mistakes to Avoid with This Dish:
- Don’t stuff the tortilla to the point where cheese spills out and burns in the pan.
- Don’t cook on high heat. The outside will go brown before the center gets soft.
- Don’t cut immediately after cooking if you want clean wedges. Give it a minute so the cheese settles.
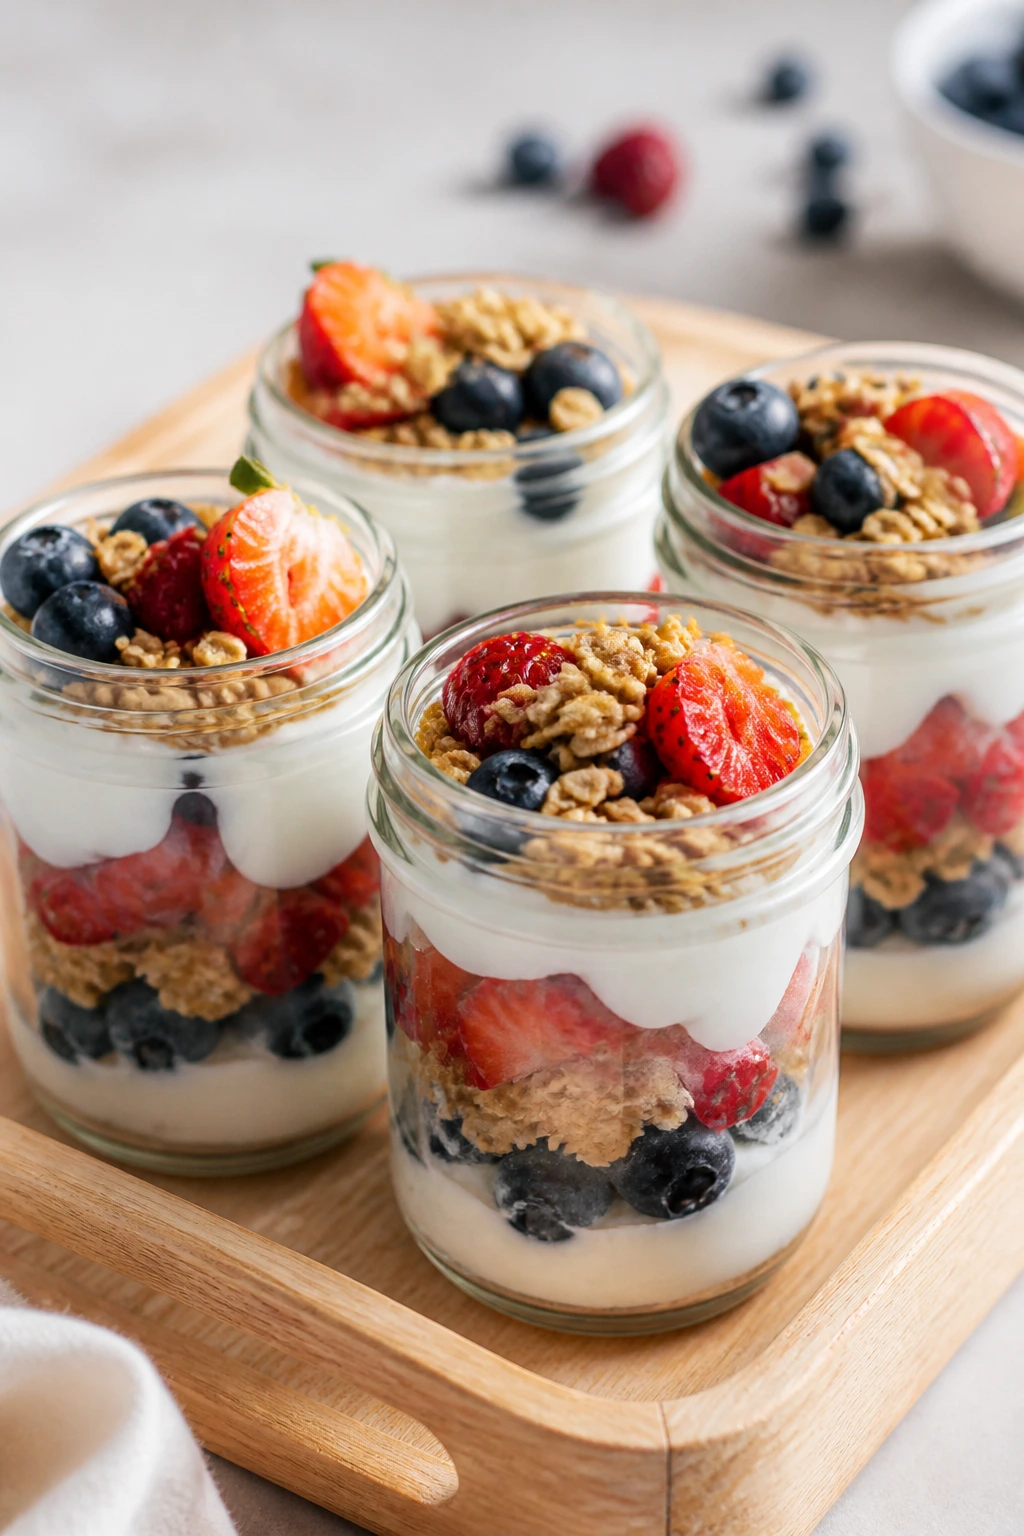
3. Yogurt Parfait Snack Cups
A good yogurt parfait looks like a little striped jar of calm, which is funny because the kid eating it may be anything but calm. Cold yogurt, berries, and crunchy granola give you three textures in one spoonful, and that mix is exactly why kids keep going back for another bite. The best version tastes bright, creamy, and a little honey-sweet without tipping into dessert territory.
Why It Works:
Greek yogurt brings protein, which matters when the after-school hunger is more like a pothole than a breeze. Berries add juicy contrast, and granola gives you crunch, but only if you keep it separate until serving or it turns into mush. A small spoonful of honey is enough; too much sweetener hides the tang that makes yogurt taste fresh.
Key Ingredients:
- 2 cups plain Greek yogurt
- 2 tablespoons honey or maple syrup
- 1 teaspoon vanilla extract
- 1 cup berries, washed and dried
- 1 cup granola
- 2 tablespoons chia seeds
- 2 tablespoons sliced almonds or pumpkin seeds, optional
Quick Steps:
- Stir the yogurt, honey, and vanilla together in a bowl until smooth.
- Spoon a layer of yogurt into 4 small cups or jars.
- Add berries, then a layer of granola, then repeat if the containers are tall enough.
- Sprinkle chia seeds and nuts or seeds on top if using.
- Serve right away, or keep the granola separate until the moment you eat.
Equipment for This Recipe:
- Mixing bowl
- Spoon or small spatula
- 4 jars or snack cups
- Measuring cups
How to Serve This Dish:
These look best in clear cups, where the layers show through. Pair them with pretzel sticks or a piece of toast if you want the snack to feel more like a mini meal. For younger kids, use a wide bowl instead of a tall cup so they can reach the bottom without digging.
Pro Tips for This Recipe:
- Dry the berries well after washing so they don’t leak into the yogurt.
- If you’re packing these ahead, keep the granola in a separate bag and add it at the last second.
- Plain yogurt gives you more control over sweetness than flavored yogurt.
- A tiny pinch of salt in the yogurt makes the honey taste rounder, not bland.
Variations on This Dish:
- Chocolate-Berry Cup: Stir 1 tablespoon cocoa powder into the yogurt for a chocolate-milk vibe.
- Tropical Parfait: Use pineapple and mango instead of berries, and add shredded coconut.
- Dairy-Free Cup: Swap in coconut yogurt and skip the nuts if school rules require it.
Common Mistakes to Avoid with This Dish:
- Don’t use wet berries straight from the sink. They turn the yogurt runny fast.
- Don’t pack granola into the bottom layers unless you want a soft, chewy texture.
- Don’t over-sweeten the yogurt. Kids usually prefer the cleaner taste once the fruit is in the bowl.
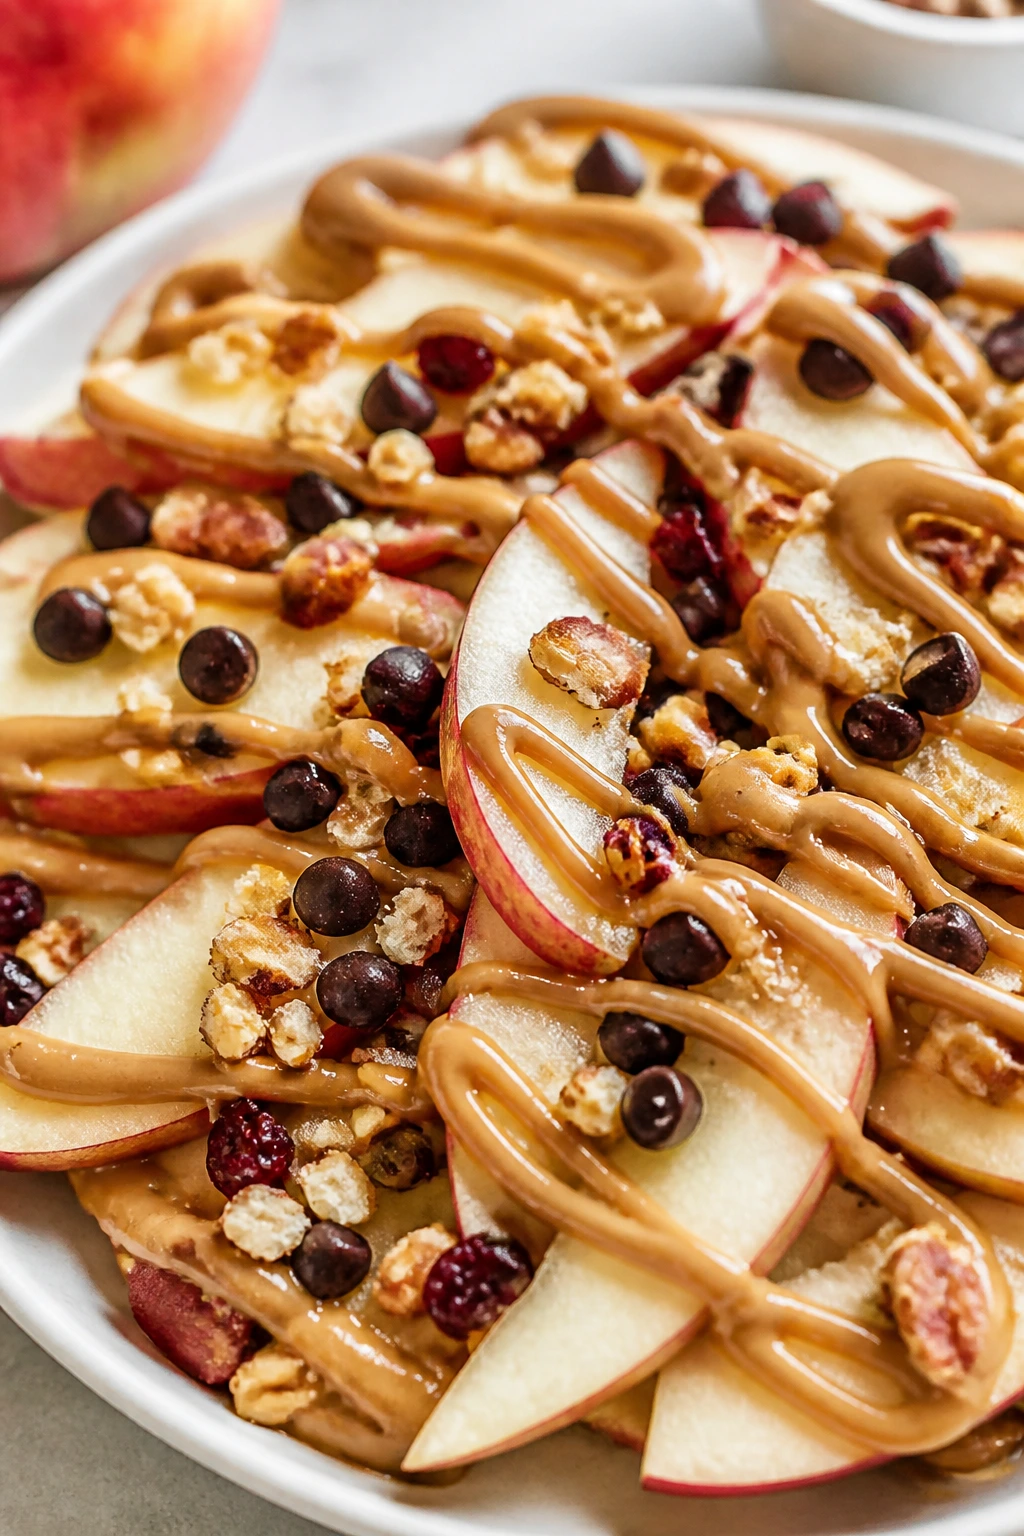
4. Apple Nachos with Peanut Butter Drizzle
If you need something that looks fun on a plate, apple nachos are the move. Crisp apple slices spread out like chips, a warm peanut butter drizzle zigzags over the top, and the whole thing gets scattered with crunchy, sticky, and chocolatey bits. It’s loud food in the best possible way.
Why It Works:
Apples bring the crunch, peanut butter brings the staying power, and the toppings do the work of keeping the snack interesting from the first slice to the last. A quick toss with lemon juice stops browning and keeps the apples looking bright. The drizzle matters more than people think — warm peanut butter tastes smoother and spreads more evenly than cold peanut butter ever will.
Key Ingredients:
- 2 crisp apples, such as Honeycrisp or Fuji
- 1 tablespoon lemon juice
- 1/4 cup peanut butter
- 1 teaspoon coconut oil or water
- 2 tablespoons mini chocolate chips
- 2 tablespoons granola
- 2 tablespoons raisins or dried cranberries
- Pinch fine salt
Quick Steps:
- Slice the apples thinly and toss them with lemon juice in a bowl.
- Arrange the slices on a plate or platter in a single layer.
- Warm the peanut butter with coconut oil or water for 15 to 20 seconds, then stir until smooth.
- Drizzle the peanut butter over the apples, then scatter the chocolate chips, granola, raisins, and salt on top.
- Serve immediately while the apples are still crisp.
Equipment for This Recipe:
- Sharp knife
- Cutting board
- Small bowl
- Spoon or fork for drizzling
How to Serve This Dish:
Pile these onto a large plate and let kids pick them up by hand, or serve with little forks if you’re trying to keep the table cleaner. A few pretzel sticks or cheese cubes on the side turn the plate into a more complete snack. If the apples are especially juicy, blot them lightly before drizzling.
Pro Tips for This Recipe:
- Choose firm apples; soft apples go mealy under the toppings.
- Warm the peanut butter just enough to drizzle, not enough to make it hot.
- Add the toppings right before serving so the granola stays crisp.
- A tiny pinch of salt sharpens the sweetness and keeps the apples from tasting flat.
Variations on This Dish:
- Caramel-Crunch Version: Swap the peanut butter drizzle for warmed caramel sauce and extra chopped pretzels.
- Nut-Free Version: Use sunflower seed butter instead of peanut butter.
- Cinnamon Roll Apple Nachos: Dust the apples with cinnamon and use vanilla yogurt as the drizzle.
Common Mistakes to Avoid with This Dish:
- Don’t slice the apples too far ahead unless you’re willing to lose that bright, crisp look.
- Don’t pour cold peanut butter over the fruit; it clumps and misses half the plate.
- Don’t use apples that are already soft. The snack turns slumpy instead of snappy.
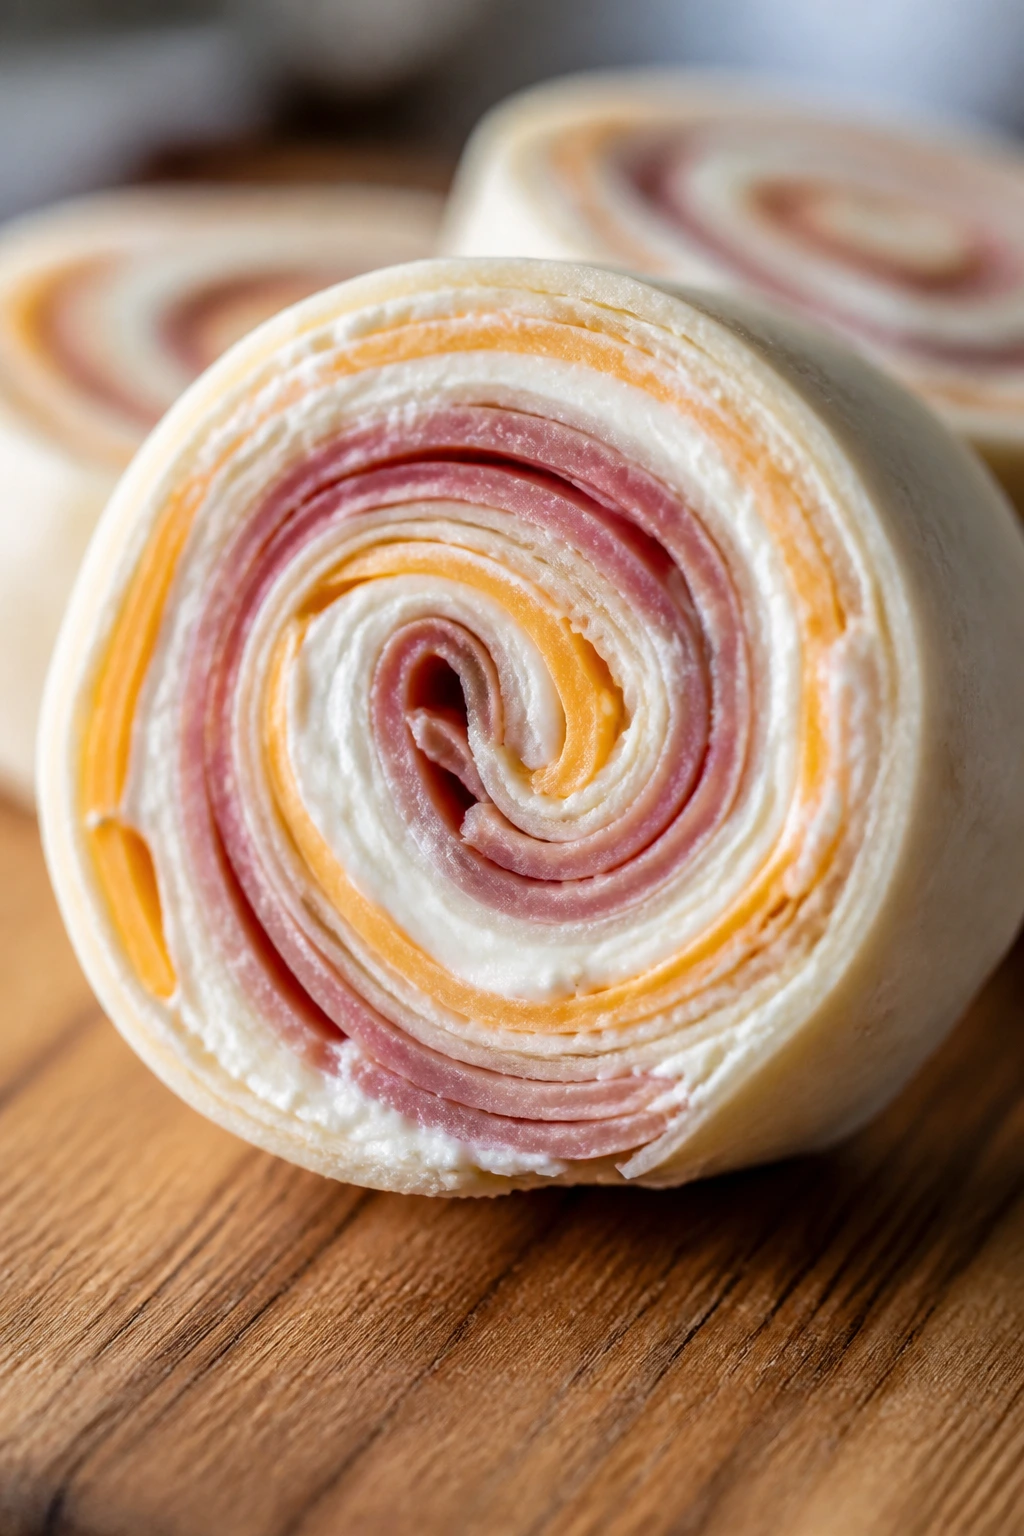
5. Ham and Cheese Pinwheels
Ham and cheese pinwheels have that neat little lunchbox energy kids seem to trust immediately. You spread, layer, roll, chill, and slice, and suddenly you’ve got spirals that look tidy enough to feel special without requiring any real effort. The cream cheese keeps everything together, and the savory ham gives each bite a salty edge.
Why It Works:
Cream cheese acts like edible glue, so the tortilla holds its shape once it’s sliced. Ham and cheddar have enough flavor to carry the whole thing, even cold. Chilling the rolled tortilla for 15 minutes before slicing makes the pinwheels round instead of smashed, which is the difference between “cute” and “why is this falling apart?”
Key Ingredients:
- 4 large flour tortillas, 10-inch
- 4 ounces cream cheese, softened
- 8 ounces sliced ham
- 1 cup shredded cheddar
- 1 teaspoon Dijon mustard, optional
- 1 cup baby spinach leaves, optional
- Pinch black pepper
Quick Steps:
- Spread about 1 ounce cream cheese over each tortilla, going almost to the edges.
- Add a thin layer of ham, then sprinkle with cheddar, mustard if using, spinach, and a pinch of pepper.
- Roll each tortilla tightly into a log.
- Wrap the logs in plastic wrap and chill for 15 minutes.
- Slice into 1-inch pinwheels with a sharp knife.
Equipment for This Recipe:
- Cutting board
- Offset spatula or butter knife
- Sharp knife
- Plastic wrap or parchment for chilling
How to Serve This Dish:
Stack the pinwheels on a plate with a few grapes or carrot sticks, and you’ve got a snack that eats like a small meal. They also fit well in lunchboxes if you tuck a paper towel underneath to catch moisture. For a party-style feel, skewer two or three together with toothpicks.
Pro Tips for This Recipe:
- Soften the cream cheese fully or it will tear the tortilla during spreading.
- Keep the filling layer thin. Thick layers slide out the sides when you roll.
- Chill before slicing. It makes the spirals much cleaner.
- Use a sharp knife and wipe it between cuts if you want the edges neat.
Variations on This Dish:
- Turkey Club Pinwheels: Swap the ham for turkey and add a few bacon bits if you have them.
- Ranch Roll-Ups: Stir a teaspoon of ranch seasoning into the cream cheese.
- Veggie Spiral: Skip the meat and add shredded carrot and cucumber ribbons for a lighter bite.
Common Mistakes to Avoid with This Dish:
- Don’t fill the tortilla so full that the roll bursts open.
- Don’t slice warm pinwheels right away; they flatten and lose their shape.
- Don’t use very wet spinach unless you want the tortilla to soften too fast.
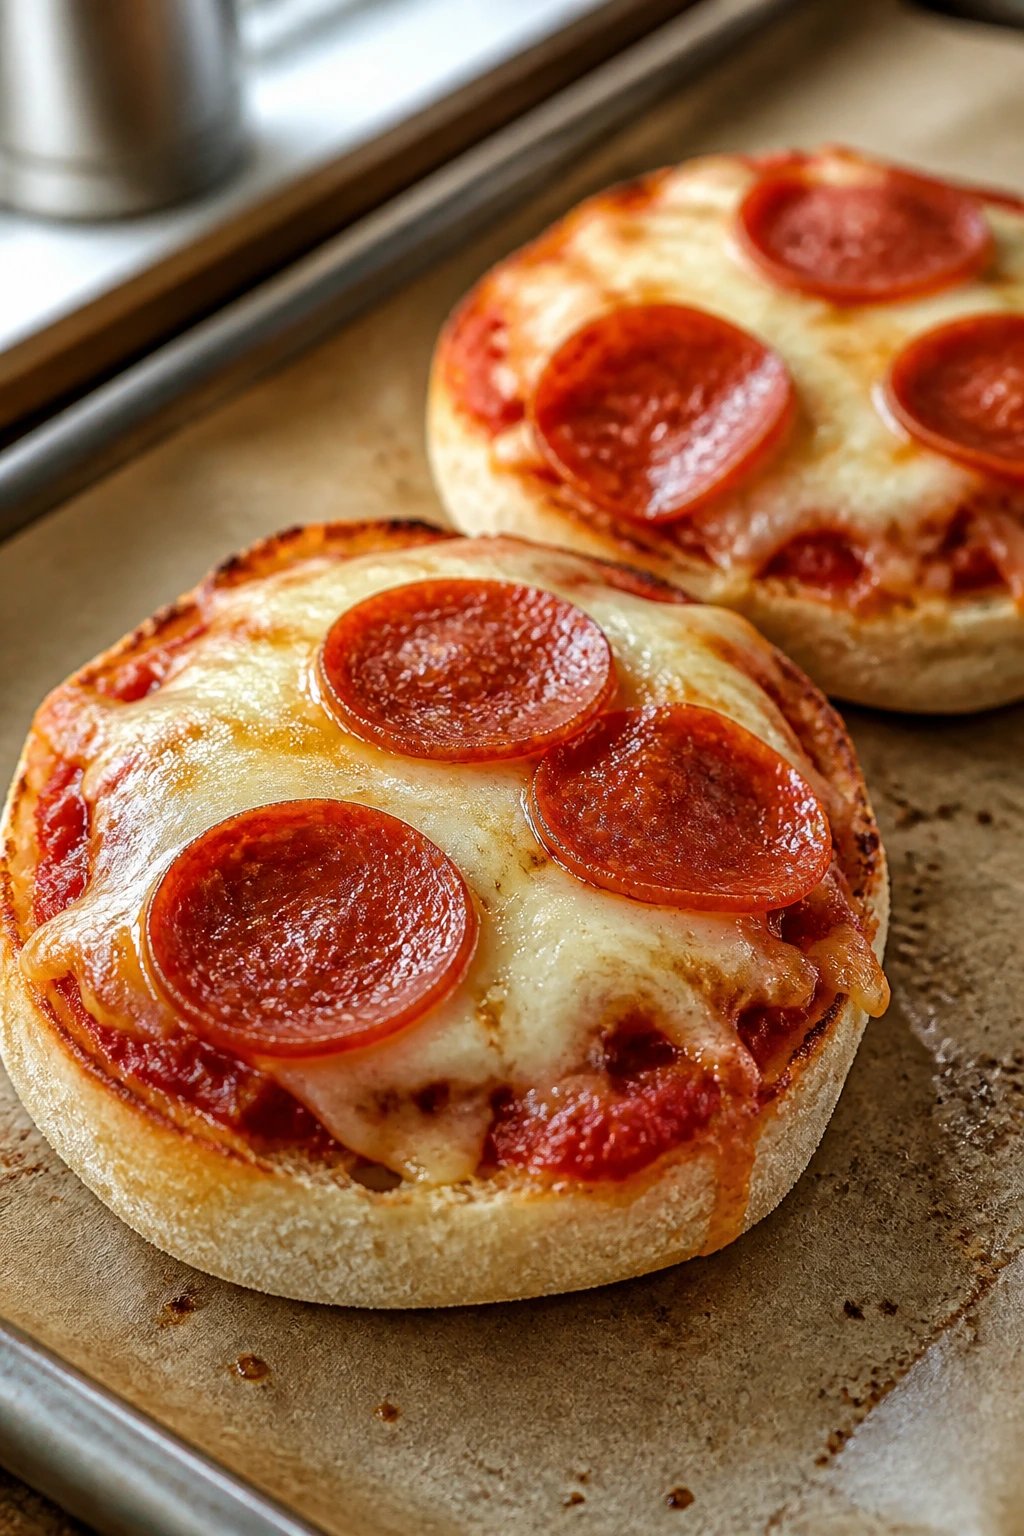
6. Pizza English Muffins
Pizza English muffins smell like a kitchen that has decided to stop taking itself so seriously. Crisp edges, molten mozzarella, and a little tomato sauce make them familiar enough that kids usually go straight for the first bite. They’re also fast, which matters when hunger arrives with the volume turned up.
Why It Works:
English muffins have all those little crags, so the sauce settles in instead of sliding off. A quick toast before topping keeps the bottoms from getting soggy. You get the same cheese-and-tomato comfort as full pizza, but in a smaller shape that cooks in under 10 minutes.
Key Ingredients:
- 4 English muffins, split
- 1/2 cup pizza sauce
- 1 1/2 cups shredded mozzarella
- 12 pepperoni slices or 1/2 cup diced bell pepper
- 1/2 teaspoon dried oregano
- 1 tablespoon olive oil
- Pinch red pepper flakes, optional
Quick Steps:
- Preheat the oven to 425°F and line a sheet pan with parchment.
- Brush the cut sides of the English muffins with olive oil and toast them lightly for 3 minutes.
- Spread 1 tablespoon sauce on each half, then top with mozzarella, pepperoni or bell pepper, oregano, and red pepper flakes if using.
- Bake for 5 to 7 minutes, until the cheese is melted and the edges are lightly browned.
- Let cool for 2 minutes before serving.
Equipment for This Recipe:
- Sheet pan
- Parchment paper
- Small spoon for sauce
- Oven or toaster oven
How to Serve This Dish:
Serve the muffin halves with a few celery sticks, olives, or apple slices so the plate feels complete without a lot of extra work. If you’re feeding younger kids, cut each half into quarters after baking. A small bowl of warm marinara makes these feel even more like pizza without much effort.
Pro Tips for This Recipe:
- Toast the muffins first so the sauce doesn’t soak straight into the bread.
- Use a light hand with sauce; too much makes the muffin slippery.
- Shred mozzarella finely if you want those long melt strings.
- Keep toppings small and thin so they cook at the same pace as the cheese.
Variations on This Dish:
- Veggie Supreme: Add tiny bits of mushroom, bell pepper, and black olive.
- Pepperoni-Mozzarella Classic: Keep it simple when you know the kids prefer the standard version.
- Bagel Bite Swap: Use mini bagels if that’s what you’ve got on hand.
Common Mistakes to Avoid with This Dish:
- Don’t drown the muffin in sauce. It turns the bottom gummy.
- Don’t bake so long that the cheese turns oily and the edges harden.
- Don’t skip the first toast. It’s the difference between crisp and damp.
7. Hummus Veggie Pita Pockets
Hummus in a pita pocket is one of those snacks that looks casual but eats like a proper little lunch. The hummus coats the bread, the vegetables keep it cool and crunchy, and the whole thing has enough salt and lemon to make kids come back for more than one bite. It’s also a welcome break from cheese-heavy snack land.
Why It Works:
Hummus gives you protein and fat, which helps this feel more filling than a raw veggie plate. The pita acts like a soft wrapper, and the trick is warming it just enough to make it flexible without turning it dry. A squeeze of lemon wakes up the vegetables and stops the pocket from tasting muddy.
Key Ingredients:
- 2 pita breads
- 1 cup hummus
- 1 cup shredded carrots
- 1 cup diced cucumber
- 1 cup diced bell pepper
- 1/4 cup crumbled feta, optional
- 2 tablespoons lemon juice
- Pinch salt and pepper
Quick Steps:
- Warm the pita breads for 15 seconds in the microwave or 2 minutes in a dry skillet.
- Stir the lemon juice into the hummus with a pinch of salt and pepper.
- Cut each pita in half to form pockets.
- Spread 1/4 cup hummus inside each pocket, then fill with carrots, cucumber, bell pepper, and feta if using.
- Serve right away so the pita stays soft but not soggy.
Equipment for This Recipe:
- Knife and cutting board
- Small bowl for mixing hummus
- Spoon for filling
- Skillet or microwave for warming pita
How to Serve This Dish:
Cut each pocket into halves or thirds and arrange them with cherry tomatoes or grapes for a bright plate. They work well with a handful of crackers if you want a little extra crunch. For kids who don’t like mixed textures, serve the vegetables on the side and let them build their own pocket.
Pro Tips for This Recipe:
- Warm the pita first or it may tear when you open it.
- Chop the vegetables small so they stay inside the pocket.
- Pat cucumbers dry before filling so the hummus doesn’t slide around.
- Use a thicker hummus if you want the pocket to stay neat longer.
Variations on This Dish:
- Greek Pita Pocket: Add chopped olives and extra feta.
- Roasted Veg Version: Use cooled roasted peppers or zucchini for a softer filling.
- Avocado Hummus Pocket: Mash a little avocado into the hummus for a creamier spread.
Common Mistakes to Avoid with This Dish:
- Don’t overfill the pita. It splits and dumps the filling onto the plate.
- Don’t use watery vegetables without drying them first.
- Don’t let the pita sit too long after filling or the inside turns damp.
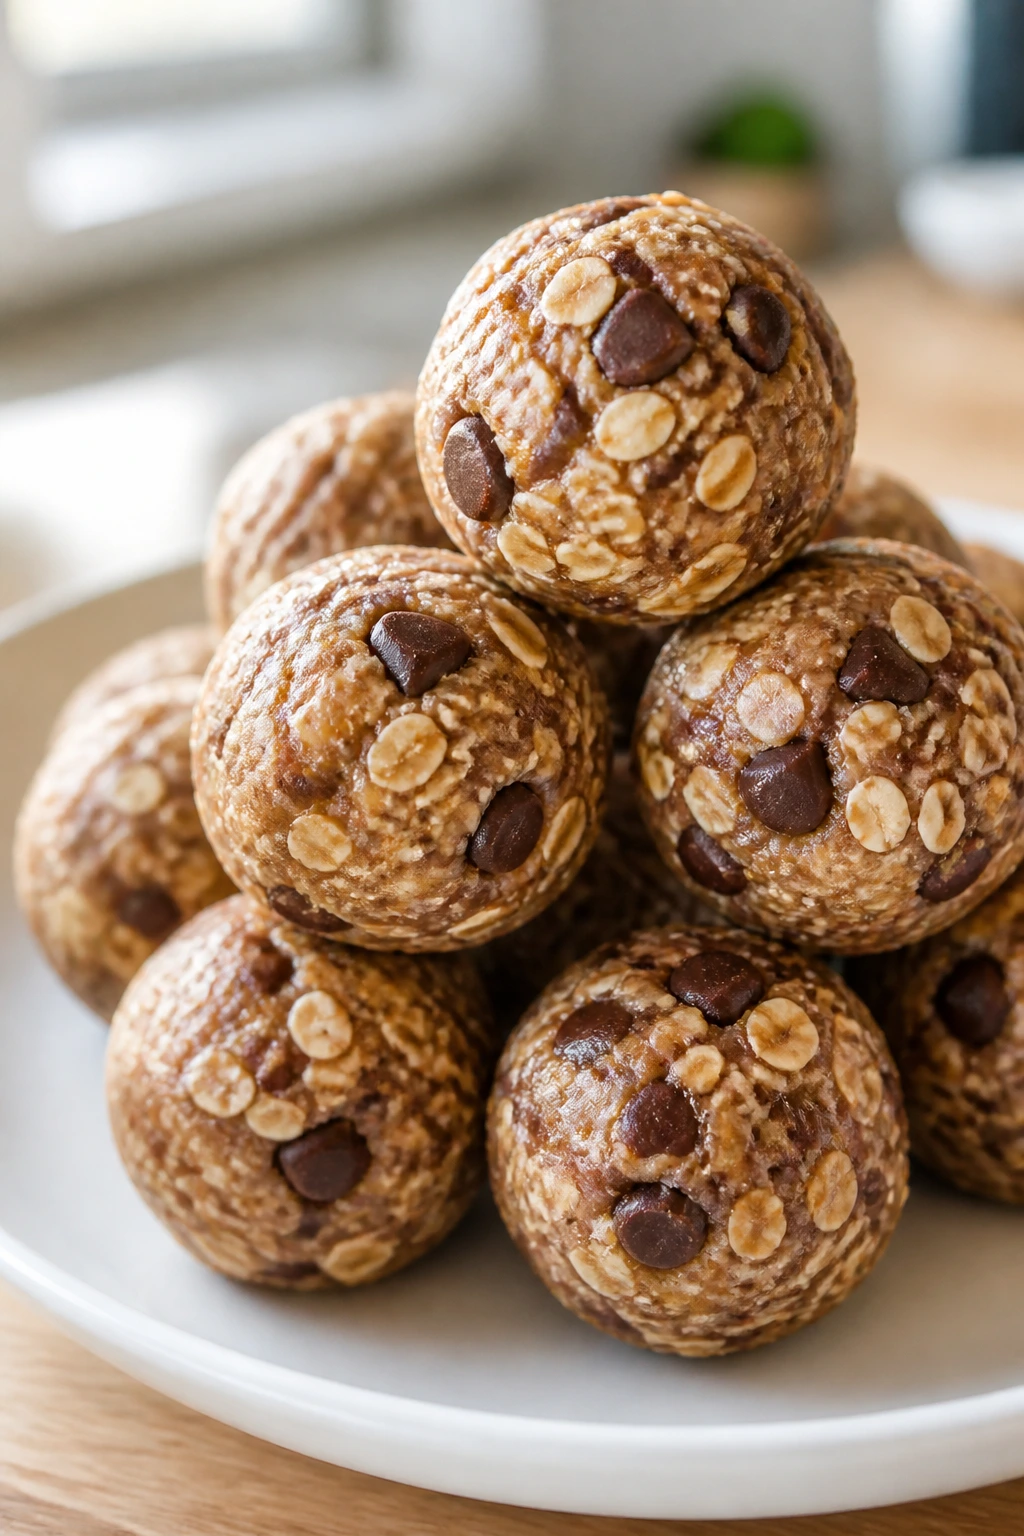
8. Oatmeal Energy Bites
Oatmeal energy bites are the snack drawer version of a spare tire: useful, dependable, and not flashy at all. They’re chewy, sweet, and a little nutty, with chocolate chips or dried fruit running through them like tiny rewards. I like that they can live in the fridge and still feel ready when everybody else in the house is not.
Why It Works:
Oats give the bites their shape, nut butter binds everything together, and honey adds enough stickiness that the balls hold without baking. A quick chill firms them up, which means they don’t flatten into sad little puddles. They’re also easy to portion, which helps when the snack request comes in with no warning and no patience.
Key Ingredients:
- 1 1/2 cups old-fashioned oats
- 1/2 cup peanut butter or almond butter
- 1/3 cup honey
- 1/4 cup ground flaxseed
- 1/4 cup mini chocolate chips
- 1 teaspoon vanilla extract
- Pinch fine salt
Quick Steps:
- Stir all the ingredients together in a medium bowl until the oats are evenly coated.
- If the mixture feels too sticky, add 1 tablespoon more oats at a time.
- Cover and chill for 20 minutes.
- Roll into 1-inch balls with damp hands.
- Store in the fridge until ready to eat.
Equipment for This Recipe:
- Medium mixing bowl
- Spoon or spatula
- Baking sheet or plate for chilling
- Airtight container for storage
How to Serve This Dish:
Set out three or four bites in a small bowl with apple slices or milk. They’re also easy to pack into snack bags for after practice or the ride home. If you want them to feel a little more special, roll the balls in shredded coconut or crushed cereal.
Pro Tips for This Recipe:
- If the mixture is crumbly, add 1 teaspoon of water or a touch more honey.
- If it’s too sticky to roll, chill it a little longer before shaping.
- Use old-fashioned oats, not instant oats, or the texture gets pasty.
- Wet your hands lightly before rolling to keep the mixture from sticking.
Variations on This Dish:
- Chocolate-Coconut Bites: Add 2 tablespoons shredded coconut and use cocoa nibs instead of chips.
- Trail Mix Bites: Stir in chopped raisins and sunflower seeds.
- Sunbutter Version: Use sunflower seed butter for a nut-free school option.
Common Mistakes to Avoid with This Dish:
- Don’t add too much honey or the bites turn sticky and soft.
- Don’t skip the chill time. Warm mix is hard to shape and won’t hold as well.
- Don’t use instant oats unless you want a gummy texture.
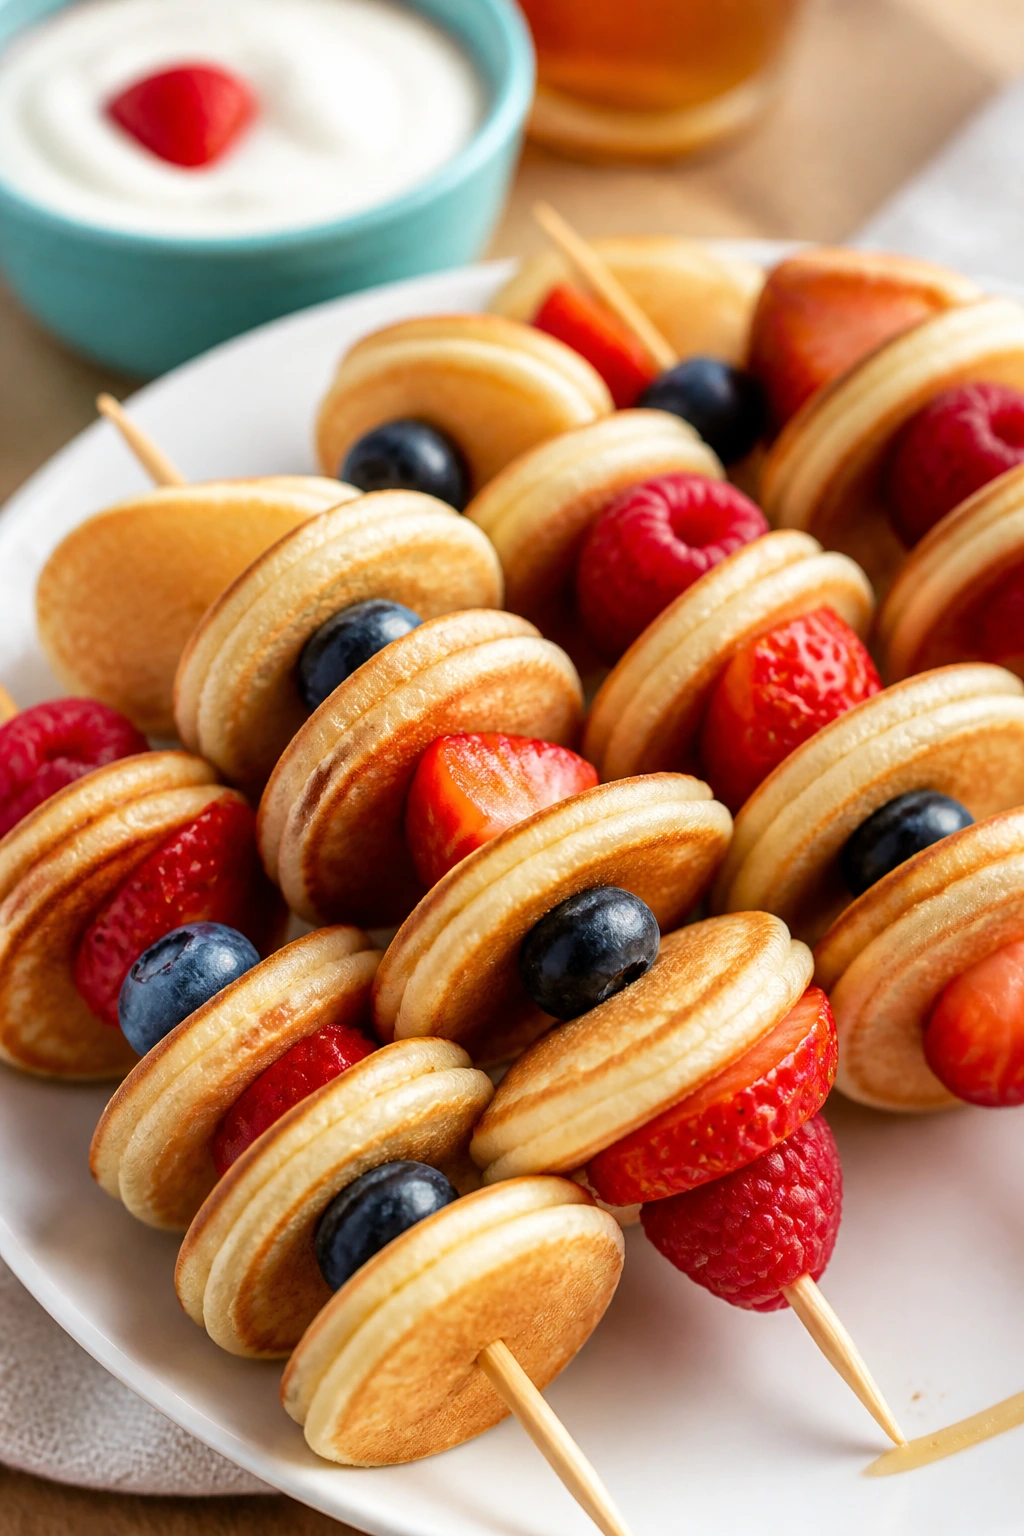
9. Mini Pancake Skewers
Mini pancake skewers feel playful enough to win over kids who act tired of everything before they even take off their shoes. Soft pancakes, juicy fruit, and a little dip on the side make this snack feel like breakfast got invited to after-school duty. It’s one of the few snacks that can lean sweet without feeling like dessert in disguise.
Why It Works:
Mini pancakes are easy to thread and easy to portion. Fruit adds freshness, and the yogurt dip brings a cool, creamy finish that keeps the snack from being all soft sweetness. Using frozen or leftover pancakes makes this fast, which is the whole point when the school pickup clock has already turned rude.
Key Ingredients:
- 18 mini pancakes, frozen or leftover, thawed
- 1 banana, sliced
- 1 cup strawberries, hulled and halved
- 1/2 cup blueberries
- 1/2 cup vanilla Greek yogurt
- 1 tablespoon maple syrup
- 1/4 teaspoon cinnamon
Quick Steps:
- Warm the pancakes according to package directions or until they’re soft and heated through.
- Stir the yogurt, maple syrup, and cinnamon together for a simple dip.
- Thread pancakes and fruit onto short skewers, alternating colors and shapes.
- Arrange on a plate with the dip in a small bowl.
- Serve right away or chill briefly if you want a colder snack.
Equipment for This Recipe:
- Short skewers or reusable snack sticks
- Microwave or toaster oven
- Small mixing bowl
- Knife for fruit prep
How to Serve This Dish:
If your kids are little, slide the fruit and pancakes off the skewer and serve them as a pile with dip. That keeps the fun shape but removes the sharp end, which I prefer for smaller hands. A few bacon strips or a hard-boiled egg on the side turns this into a bigger snack.
Pro Tips for This Recipe:
- Use firm fruit so it holds on the skewer without breaking.
- If you’re using frozen pancakes, warm them first or they’ll crack.
- Keep banana slices fairly thick so they don’t tear as you thread them.
- For younger kids, skip the skewers entirely and make a pancake fruit board instead.
Variations on This Dish:
- Chocolate Chip Stackers: Use mini chocolate chip pancakes for a sweeter version.
- Berry-Only Skewers: Skip the banana and use strawberries and blueberries only.
- Nutty Dip Version: Stir a spoonful of peanut butter into the yogurt dip.
Common Mistakes to Avoid with This Dish:
- Don’t use overripe bananas if you’re making these ahead. They get mushy and slide off.
- Don’t overpack the skewer or it becomes hard to eat.
- Don’t serve the pancakes cold straight from the freezer; the texture goes stiff.
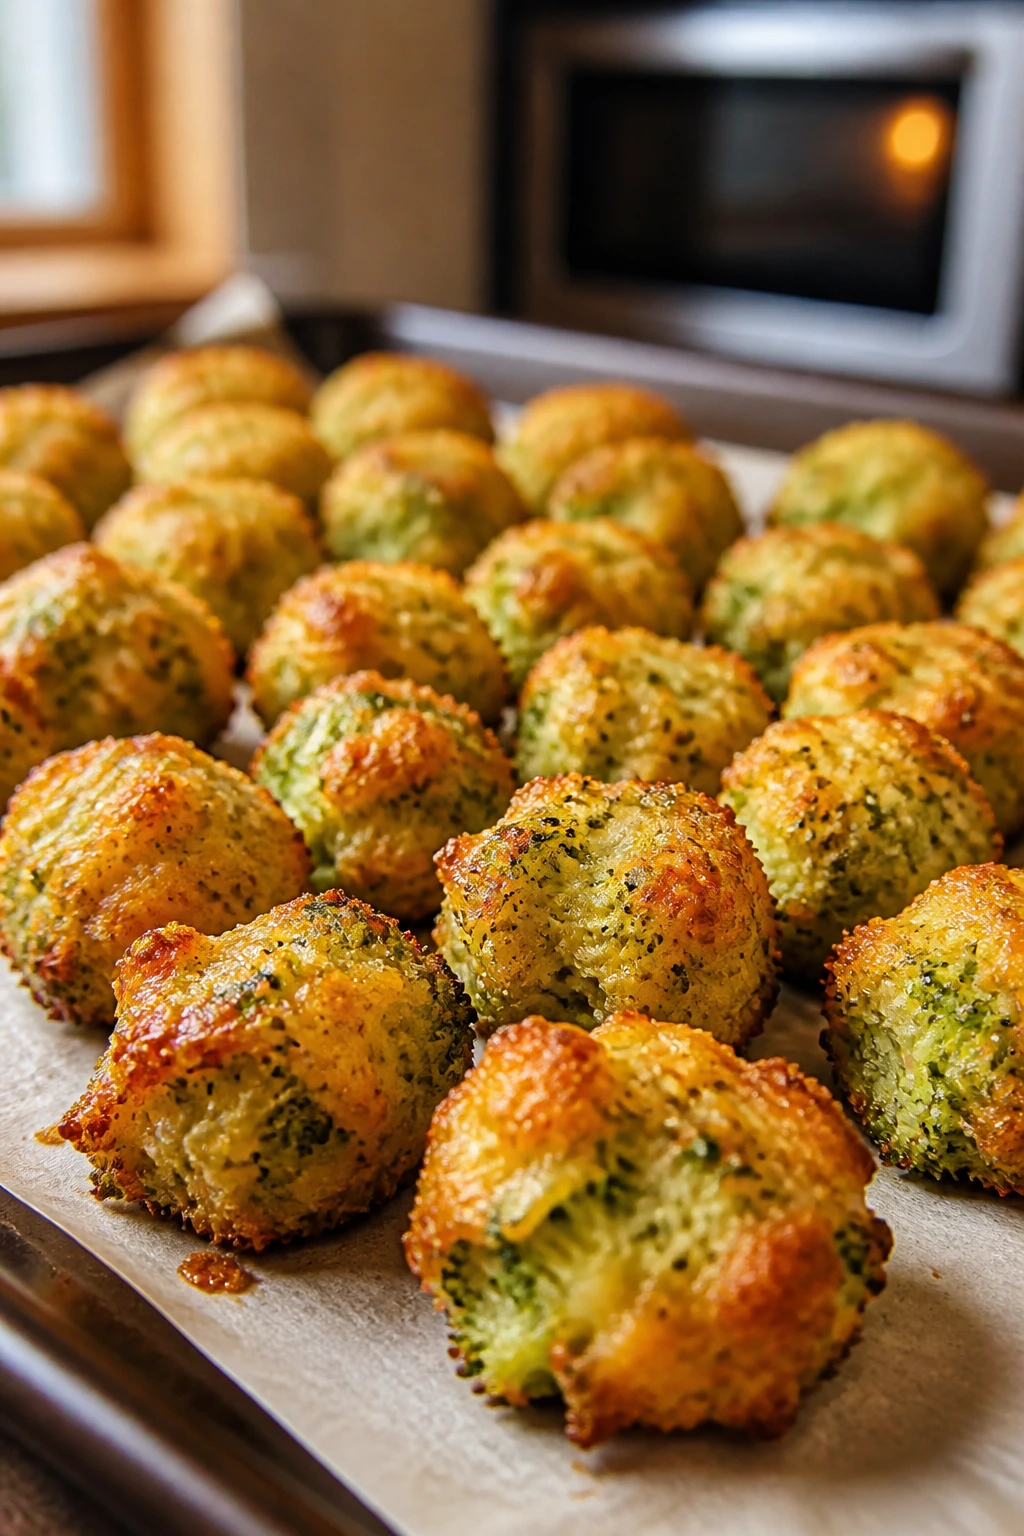
10. Cheesy Broccoli Tots
Cheesy broccoli tots are the kind of snack that gets eaten because the shape is familiar before anyone starts asking what’s inside. They come out crisp on the outside, soft in the middle, and much more comforting than a pile of steamed broccoli ever will. The cheese does its job, but the broccoli still gives the bites a real vegetable backbone.
Why It Works:
Finely chopped broccoli disappears into the mixture instead of announcing itself in big chewy chunks, which helps with picky eaters. The egg and breadcrumbs bind the tots so they hold their shape during baking. Squeezing the broccoli dry is the detail that matters most here; leave in too much water and the tots steam instead of browning.
Key Ingredients:
- 2 cups broccoli florets, steamed and finely chopped
- 1 cup shredded cheddar
- 1 large egg
- 1/2 cup panko breadcrumbs
- 2 tablespoons grated Parmesan
- 1/2 teaspoon garlic powder
- 1/4 teaspoon salt
- 1/4 teaspoon black pepper
Quick Steps:
- Preheat the oven to 400°F and line a baking sheet with parchment.
- Steam the broccoli until just tender, then chop it very fine and squeeze out excess moisture in a clean towel.
- Mix the broccoli, cheddar, egg, panko, Parmesan, garlic powder, salt, and pepper in a bowl.
- Shape into small tot-like cylinders and place them on the sheet pan.
- Bake for 18 to 20 minutes, flipping once halfway through, until browned at the edges.
Equipment for This Recipe:
- Baking sheet
- Parchment paper
- Mixing bowl
- Clean kitchen towel for squeezing broccoli
How to Serve This Dish:
Serve the tots with ketchup, ranch, or warm marinara for dipping. A few apple slices or cucumber sticks keep the plate from feeling too heavy. They’re nicest hot from the oven, but kids will still eat them warm.
Pro Tips for This Recipe:
- Chop the broccoli as fine as you can; big florets make the tots fall apart.
- If the mixture feels wet, add 1 tablespoon more panko.
- Flip gently so the bottoms don’t tear before they’ve set.
- Let the tots rest for 3 minutes after baking so they firm up.
Variations on This Dish:
- Cauliflower Tot Version: Swap in steamed cauliflower for a milder flavor.
- Bacon Cheddar Tots: Add 2 tablespoons cooked bacon bits.
- Gluten-Free Tots: Use gluten-free breadcrumbs or crushed rice cereal.
Common Mistakes to Avoid with This Dish:
- Don’t skip squeezing out the broccoli water. That’s the difference between crisp and soggy.
- Don’t make the tots too large or the centers stay soft.
- Don’t overcrowd the pan; they need a little space to brown.
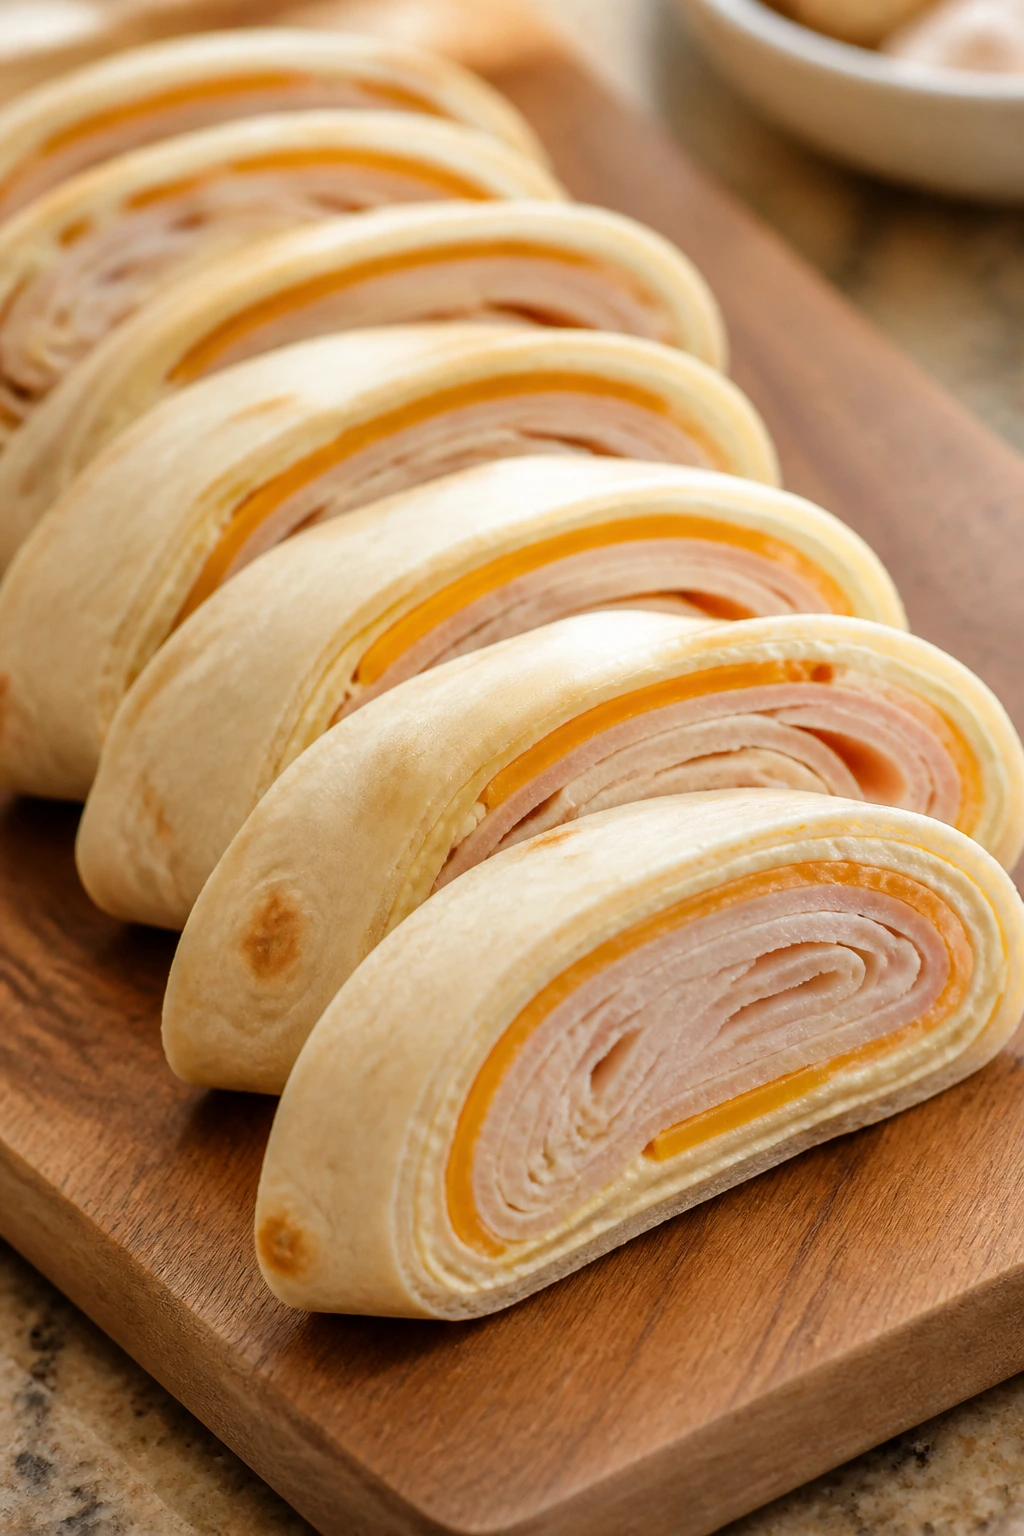
11. Turkey and Cheese Roll-Ups
Turkey and cheese roll-ups are the kind of snack that looks like a lunchbox trick and tastes like one too. The tortilla keeps the slices neat, the turkey brings a salty chew, and the cheese gives you that soft, melty center if you warm it briefly or a cool, tidy bite if you don’t. Either way, kids usually recognize the shape and go in without a debate.
Why It Works:
The filling is familiar enough to feel safe, but the roll-up format keeps it from reading like a sandwich they’ve already rejected three times this week. Cream cheese or mustard acts as a thin glue layer and keeps the slices together. If you add lettuce, keep it dry and crisp so the tortilla doesn’t soften before snack time.
Key Ingredients:
- 4 large flour tortillas
- 8 ounces sliced turkey
- 4 string cheese sticks, halved lengthwise or 1 cup shredded cheddar
- 4 tablespoons cream cheese or mustard
- 1 cup shredded lettuce, optional
- 1 small apple, sliced, for serving
- Pinch black pepper
Quick Steps:
- Spread cream cheese or mustard over each tortilla in a thin layer.
- Arrange turkey and cheese down the center, then add lettuce if using and a pinch of pepper.
- Roll each tortilla tightly into a log.
- Chill for 10 minutes if you want cleaner slices, then cut into 1-inch rounds or serve whole.
- Pair with apple slices or crackers.
Equipment for This Recipe:
- Cutting board
- Butter knife or spoon
- Sharp knife
- Parchment or plastic wrap for chilling
How to Serve This Dish:
These do well on a plate with pretzels, grapes, or baby carrots. If you’re feeding a child who hates mixed textures, serve the turkey, cheese, and tortilla separately and let them build the roll-up themselves. That one small change can save a whole snack.
Pro Tips for This Recipe:
- Use thin deli turkey; thick slices crack and make the roll bumpy.
- Pat lettuce dry or the tortilla gets damp fast.
- Chill before slicing if you care about neat spirals.
- If the tortilla is stiff, warm it for 8 to 10 seconds first.
Variations on This Dish:
- Ranch Turkey Roll-Ups: Mix a little ranch seasoning into the cream cheese.
- Lettuce-Wrapped Version: Skip the tortilla and use large lettuce leaves for a lighter snack.
- Ham Swap: Use ham and Swiss if that’s what your family buys most often.
Common Mistakes to Avoid with This Dish:
- Don’t use too much spread or the tortilla slips around.
- Don’t leave the lettuce wet; it softens the wrap quickly.
- Don’t cut the roll-up before it rests if you want the spirals to hold.
12. Cottage Cheese Fruit Bowls
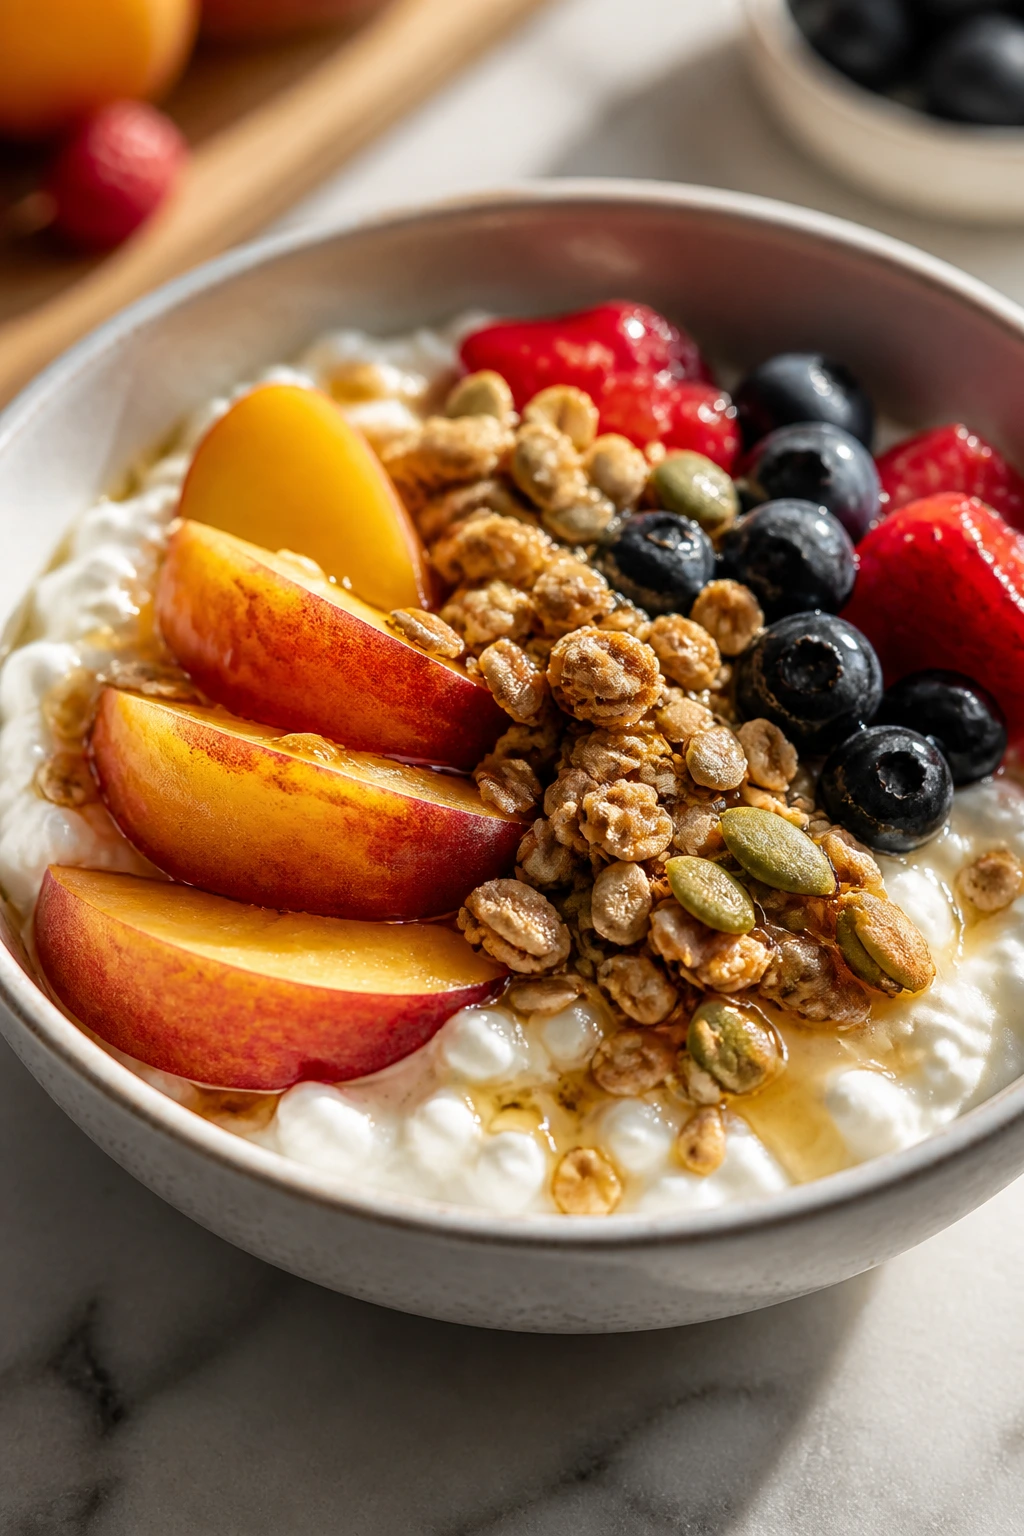
A cottage cheese fruit bowl is not trying to be cute. It just works. Cold, creamy cottage cheese, ripe fruit, a little crunch on top, and a drizzle of honey make a snack that tastes fresh without needing a stovetop or an oven. I like this one because it goes from fridge to spoon in about a minute.
Why It Works:
Cottage cheese brings protein and a gentle saltiness that keeps fruit from tasting too sugary. The fruit adds brightness, and the granola or seeds give you the crunchy finish that keeps each spoonful interesting. If you choose fruit that isn’t watery, the bowl stays textured instead of turning into a soupy mess.
Key Ingredients:
- 2 cups cottage cheese
- 1 cup sliced peaches, pineapple, or mango
- 1 cup berries
- 1/4 cup granola
- 2 tablespoons pumpkin seeds or chopped nuts
- 1 tablespoon honey
- Pinch cinnamon, optional
Quick Steps:
- Spoon the cottage cheese into 2 bowls.
- Top with fruit, granola, and seeds.
- Drizzle with honey and add cinnamon if using.
- Serve right away while the granola is still crisp.
Equipment for This Recipe:
- Small bowls
- Spoon
- Knife and cutting board
- Measuring cups
How to Serve This Dish:
This works best in a shallow bowl so the toppings don’t sink into the cottage cheese. If you want the snack to feel more substantial, add toast points or a few crackers on the side. For younger children, use smaller spoonfuls and keep the fruit pieces bite-size.
Pro Tips for This Recipe:
- Drain juicy fruit well so the bowl doesn’t get watery.
- If the cottage cheese is very salty, balance it with sweeter fruit like peaches or berries.
- A little cinnamon changes the whole bowl without making it taste spiced.
- Use small-curd cottage cheese if you want a softer texture.
Variations on This Dish:
- Savory Cottage Cheese Bowl: Skip the fruit and add cucumber, tomato, and a pinch of salt.
- Tropical Bowl: Use pineapple and toasted coconut.
- Chia Jam Bowl: Swirl in a spoonful of chia jam for a sweeter, thicker topping.
Common Mistakes to Avoid with This Dish:
- Don’t use watery fruit without draining it first.
- Don’t pile on so much honey that the bowl tastes flat and sugary.
- Don’t let granola sit too long in the bowl before serving or it softens.
13. Mini Grilled Cheese Dippers
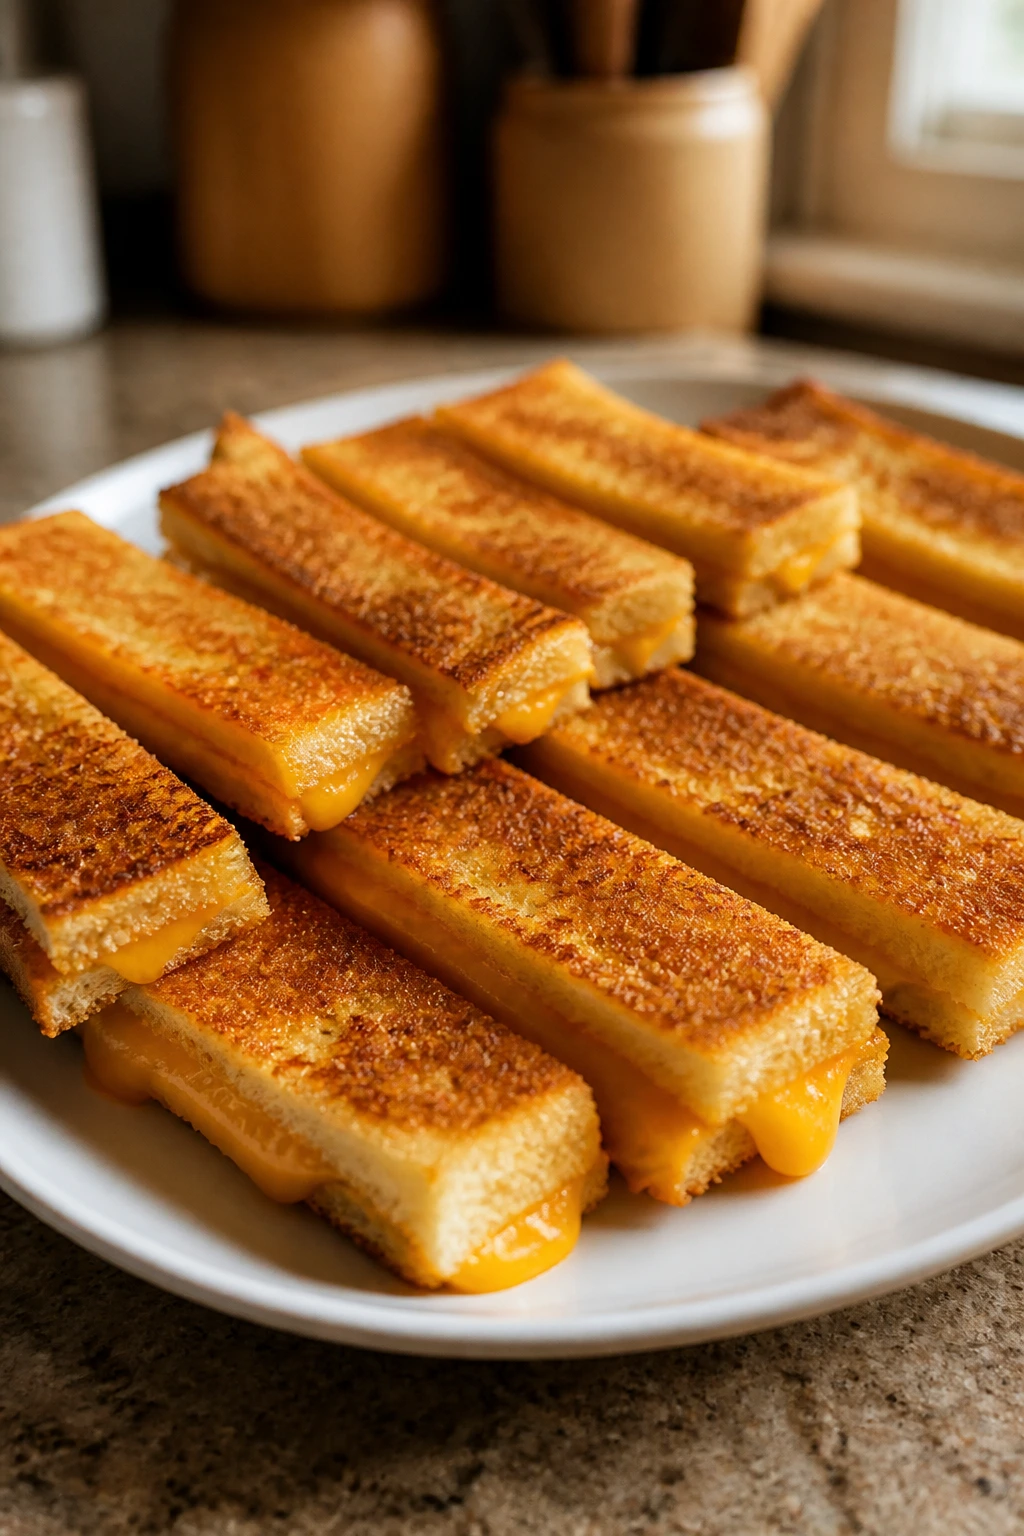
Mini grilled cheese dippers are what happens when a grilled cheese sandwich decides to become finger food. The bread goes golden and buttery, the cheese melts into that stretchy middle kids always seem to chase, and cutting it into strips makes it feel new enough to earn interest again. The warm marinara dip is optional, but I like it because it gives the snack a little tomato bite.
Why It Works:
Small sandwiches cook faster and more evenly than a full grilled cheese, which means you get crisp bread without waiting around for the center to catch up. Cutting the sandwich into sticks makes it easier for kids to dip and less likely to fall apart under a bite. If you use a skillet instead of the oven, you can control the browning better and stop before the bread gets too dark.
Key Ingredients:
- 8 slices sandwich bread
- 2 cups shredded sharp cheddar
- 2 tablespoons softened butter
- 1 cup marinara sauce, warmed
- 1/4 teaspoon garlic powder
- Pinch salt
- 1 teaspoon olive oil, optional
Quick Steps:
- Spread butter on one side of each bread slice.
- Place 4 slices butter-side down and top with cheddar, garlic powder, and a pinch of salt.
- Close with the remaining slices, butter-side up.
- Cook in a skillet over medium heat for 2 to 3 minutes per side until golden and the cheese is melted.
- Cut each sandwich into 3 strips and serve with warm marinara.
Equipment for This Recipe:
- Nonstick skillet or cast-iron pan
- Spatula
- Knife for slicing
- Small saucepan or microwave-safe bowl for warming marinara
How to Serve This Dish:
Serve the strips standing up in a cup or lined across a plate with the dip in a small bowl. A few cherry tomatoes or pickle spears make the plate feel more complete. If your kids are small, cut the strips into shorter pieces so they’re easier to dip.
Pro Tips for This Recipe:
- Use medium heat so the bread browns at the same pace the cheese melts.
- Shred the cheese fine if you want a smoother melt.
- Don’t overfill the sandwich or the filling will ooze out and burn.
- Let the sandwich rest for 1 minute before cutting so the cheese settles.
Variations on This Dish:
- Mozzarella Basil Dipper: Swap cheddar for mozzarella and add a little dried basil.
- Apple Cheddar Version: Add thin apple slices inside for a sweet-savory hit.
- Air Fryer Route: Cook the sandwiches in an air fryer at 375°F for 6 to 8 minutes, flipping once.
Common Mistakes to Avoid with This Dish:
- Don’t use high heat. The bread burns before the cheese melts.
- Don’t cut the sandwich too soon or the cheese runs out.
- Don’t use bread that’s too flimsy; it collapses under the filling.
14. Taco Cups
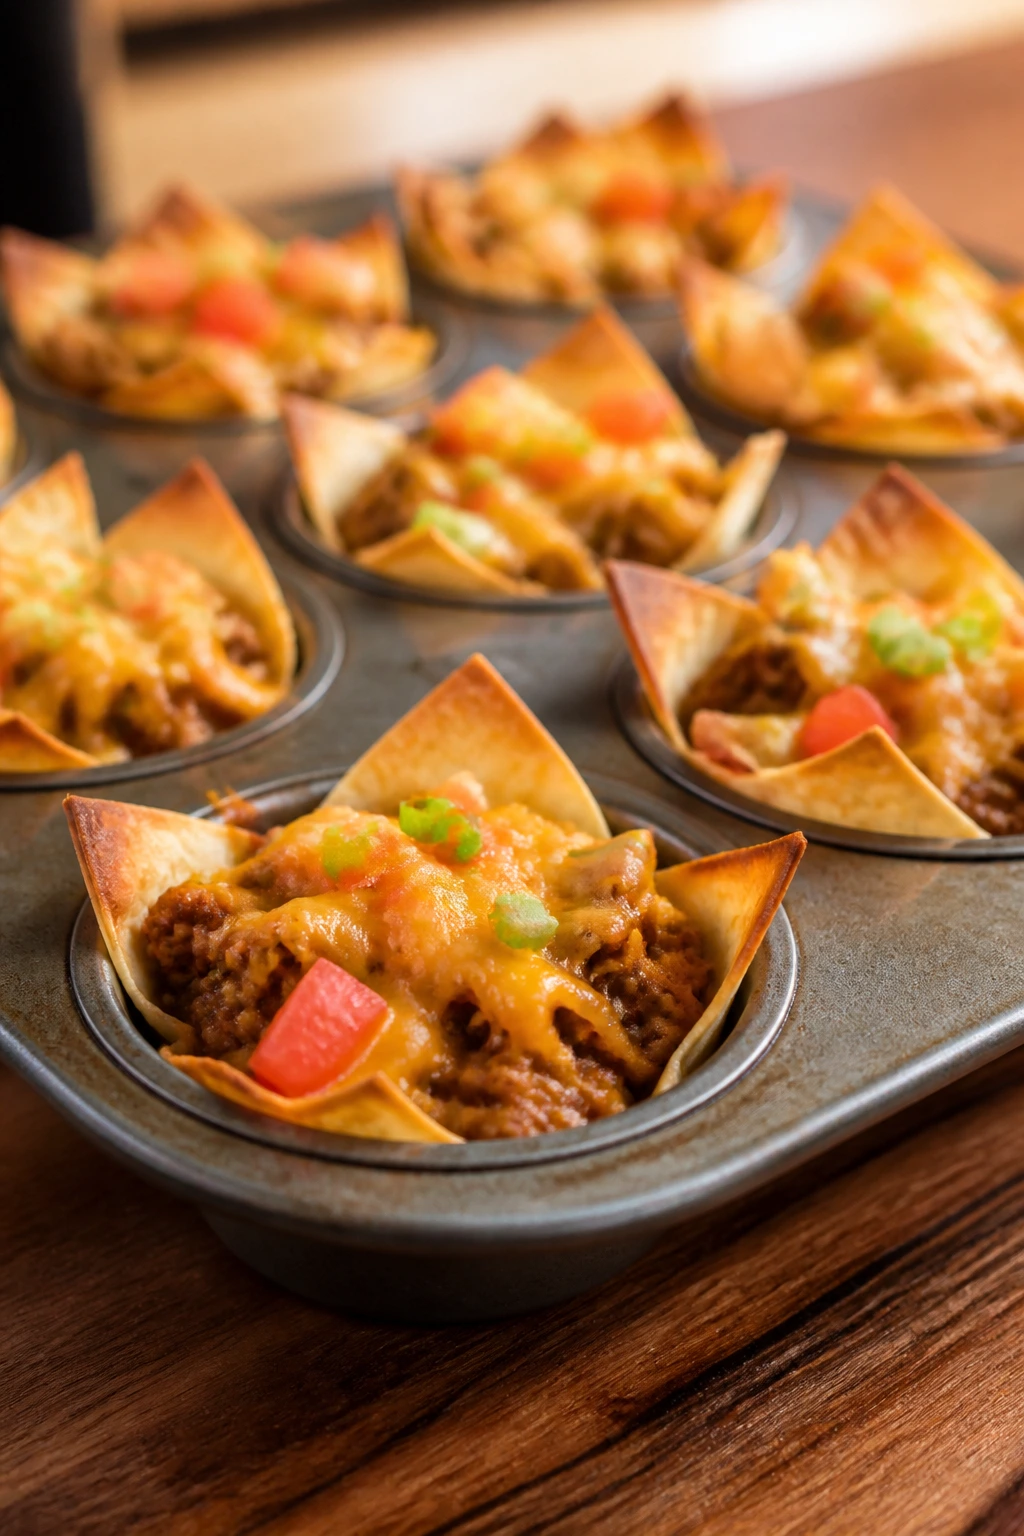
Taco cups are what you make when taco night and snack time shake hands. Wonton wrappers turn crisp in the oven, seasoned meat or beans fill the middle, and melted cheese tops everything with that familiar taco smell that can pull kids into the kitchen by itself. They’re tidy, bite-size, and just messy enough to feel fun.
Why It Works:
The muffin tin gives you shape, the wonton wrappers give you crunch, and the filling stays compact instead of sliding around the plate. Because the cups are small, they cool fast enough for kids to eat without waiting forever. They also let you control portions in a way regular tacos don’t, which is useful when the goal is a snack, not a pile of broken shells.
Key Ingredients:
- 12 wonton wrappers
- 1/2 pound ground beef or turkey
- 1 tablespoon taco seasoning
- 1/3 cup water
- 1 cup shredded cheddar
- 1/2 cup salsa
- 1/4 cup sour cream
- 1/4 cup diced tomato
- 2 tablespoons sliced scallions
Quick Steps:
- Preheat the oven to 375°F and lightly grease a 12-cup muffin tin.
- Brown the meat in a skillet over medium heat, stir in taco seasoning and water, and cook until the mixture looks saucy but not wet.
- Press one wonton wrapper into each muffin cup, add 1 tablespoon meat and a little cheese, then top with a second wrapper if you want taller cups.
- Bake for 8 to 10 minutes, until the wrappers are crisp and the cheese is melted.
- Top with salsa, sour cream, tomato, and scallions before serving.
Equipment for This Recipe:
- Muffin tin
- Skillet
- Wooden spoon
- Measuring spoons
How to Serve This Dish:
Set out the cups with extra salsa and sour cream so kids can dip the tops if they want. A small side of corn, cucumber sticks, or grapes rounds out the plate. These work especially well on a platter if siblings are hovering and waiting for the next batch.
Pro Tips for This Recipe:
- Cook the meat until most of the moisture is gone so the bottoms stay crisp.
- Press the wrappers into the tin firmly or they’ll spring back.
- Don’t overfill the cups or the filling spills over and burns on the pan.
- Let them cool for 2 minutes so the cheese doesn’t scorch little mouths.
Variations on This Dish:
- Bean-and-Corn Cups: Use mashed black beans and corn instead of meat.
- Chicken Taco Cups: Swap in leftover shredded chicken with the same seasoning.
- Mild Queso Cups: Skip salsa on top and finish with a spoonful of warm queso.
Common Mistakes to Avoid with This Dish:
- Don’t leave too much liquid in the filling or the wrappers get soggy.
- Don’t skip the grease on the muffin tin unless you want to pry them out.
- Don’t serve right from the oven; the centers stay hot longer than they look.
15. Mac and Cheese Muffins
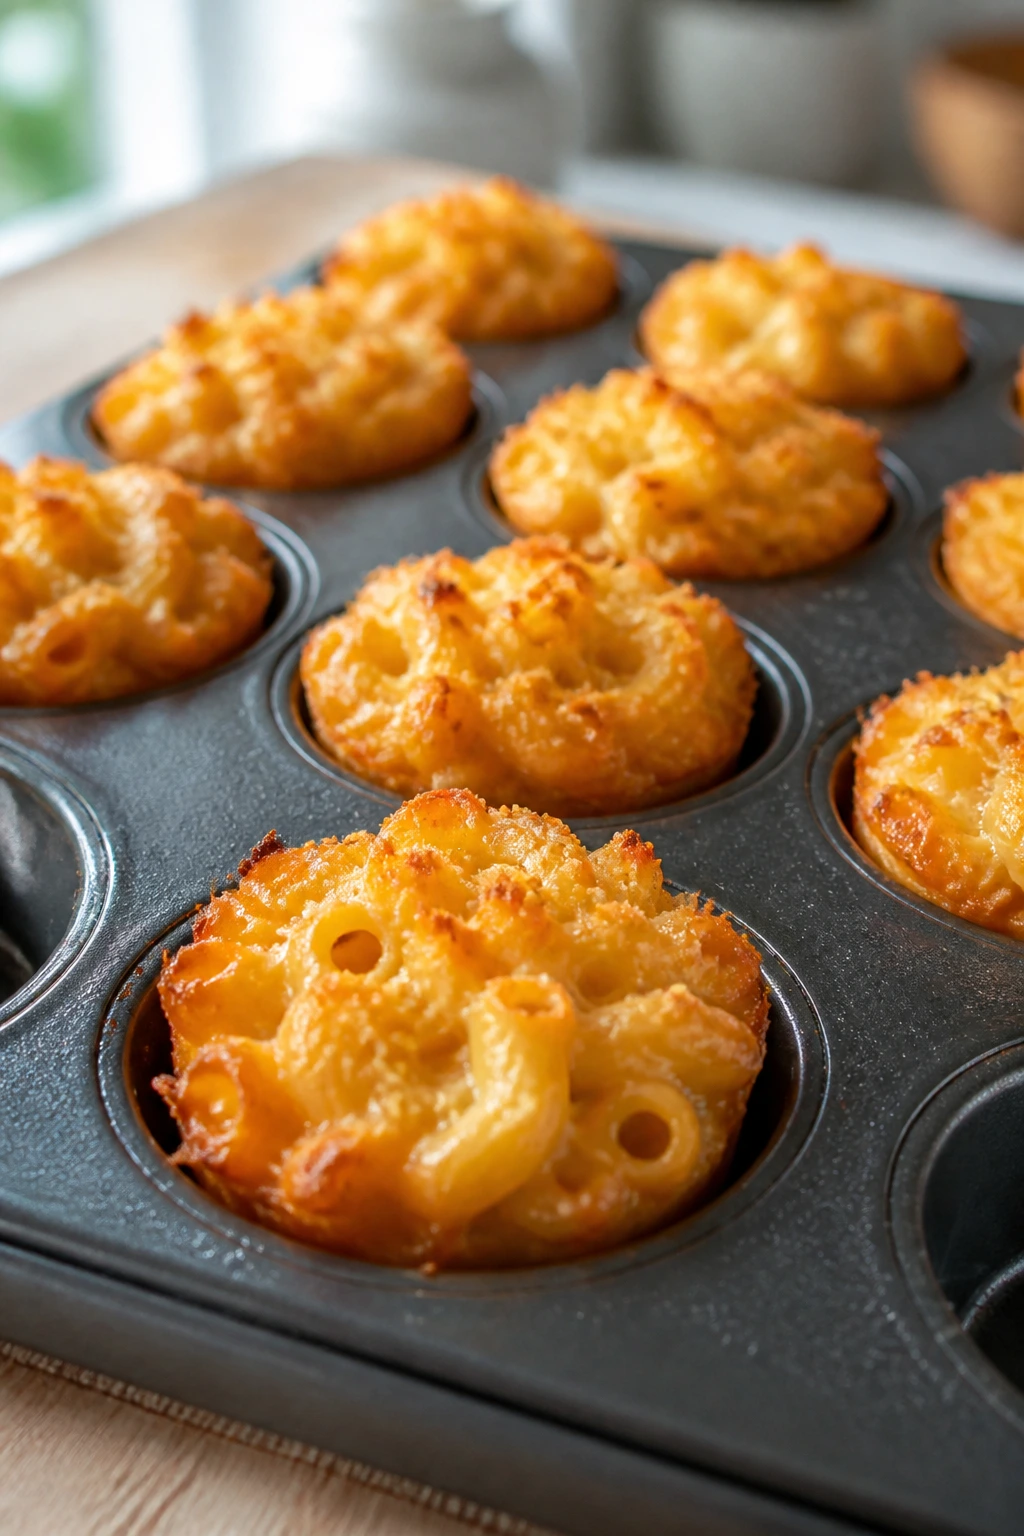
Mac and cheese muffins are what happen when comfort food stops being a spoon-only situation. They bake into neat little rounds with crisp edges, a soft center, and enough cheese to keep everyone happy without needing an entire casserole dish. I like them because they travel well and reheat without collapsing into soup.
Why It Works:
Cooked pasta gives the muffins structure, while the egg and quick cheese sauce hold everything together as it bakes. Baking in muffin tins creates more browned surface area, which means more of those chewy edges people always steal first. The trick is to keep the pasta coated but not swimming; too much sauce makes the muffins break apart when you try to lift them out.
Key Ingredients:
- 2 cups cooked elbow macaroni
- 1 1/2 cups shredded cheddar
- 1 cup milk
- 2 large eggs
- 2 tablespoons butter
- 2 tablespoons all-purpose flour
- 1/2 teaspoon salt
- 1/4 teaspoon dry mustard, optional
Quick Steps:
- Preheat the oven to 375°F and grease a 12-cup muffin tin.
- Melt the butter in a saucepan over medium heat, whisk in the flour, and cook for 1 minute.
- Slowly whisk in the milk and cook until the sauce thickens enough to coat the back of a spoon.
- Stir in the cheddar, salt, and mustard if using, then mix in the macaroni and eggs.
- Spoon into the muffin tin and bake for 18 to 22 minutes, until set and lightly golden.
- Cool for 5 minutes before lifting out.
Equipment for This Recipe:
- Muffin tin
- Saucepan
- Whisk
- Mixing bowl
- Measuring cups
How to Serve This Dish:
Serve two muffins with apple slices or steamed peas on the side if you want something a little more meal-like. They’re also excellent with ketchup or a tiny spoon of marinara for dipping. For younger kids, halve the muffins so they cool faster and look less intimidating.
Pro Tips for This Recipe:
- Grease the muffin tin well; melted cheese likes to cling to metal.
- Don’t overbake or the edges get dry and crumbly.
- Let the muffins cool before removing them or they may break apart.
- A handful of finely chopped broccoli or peas can go right into the batter.
Variations on This Dish:
- Broccoli Mac Muffins: Fold in 1/2 cup finely chopped cooked broccoli.
- Bacon Cheddar Muffins: Add 1/4 cup crumbled cooked bacon.
- Gluten-Free Version: Use gluten-free pasta and a 1:1 gluten-free flour blend in the sauce.
Common Mistakes to Avoid with This Dish:
- Don’t fill the cups to the brim or they puff over and stick.
- Don’t skip the cooling time; hot muffins fall apart easily.
- Don’t use too much sauce or the muffins won’t hold their shape.
16. Frozen Banana Yogurt Pops
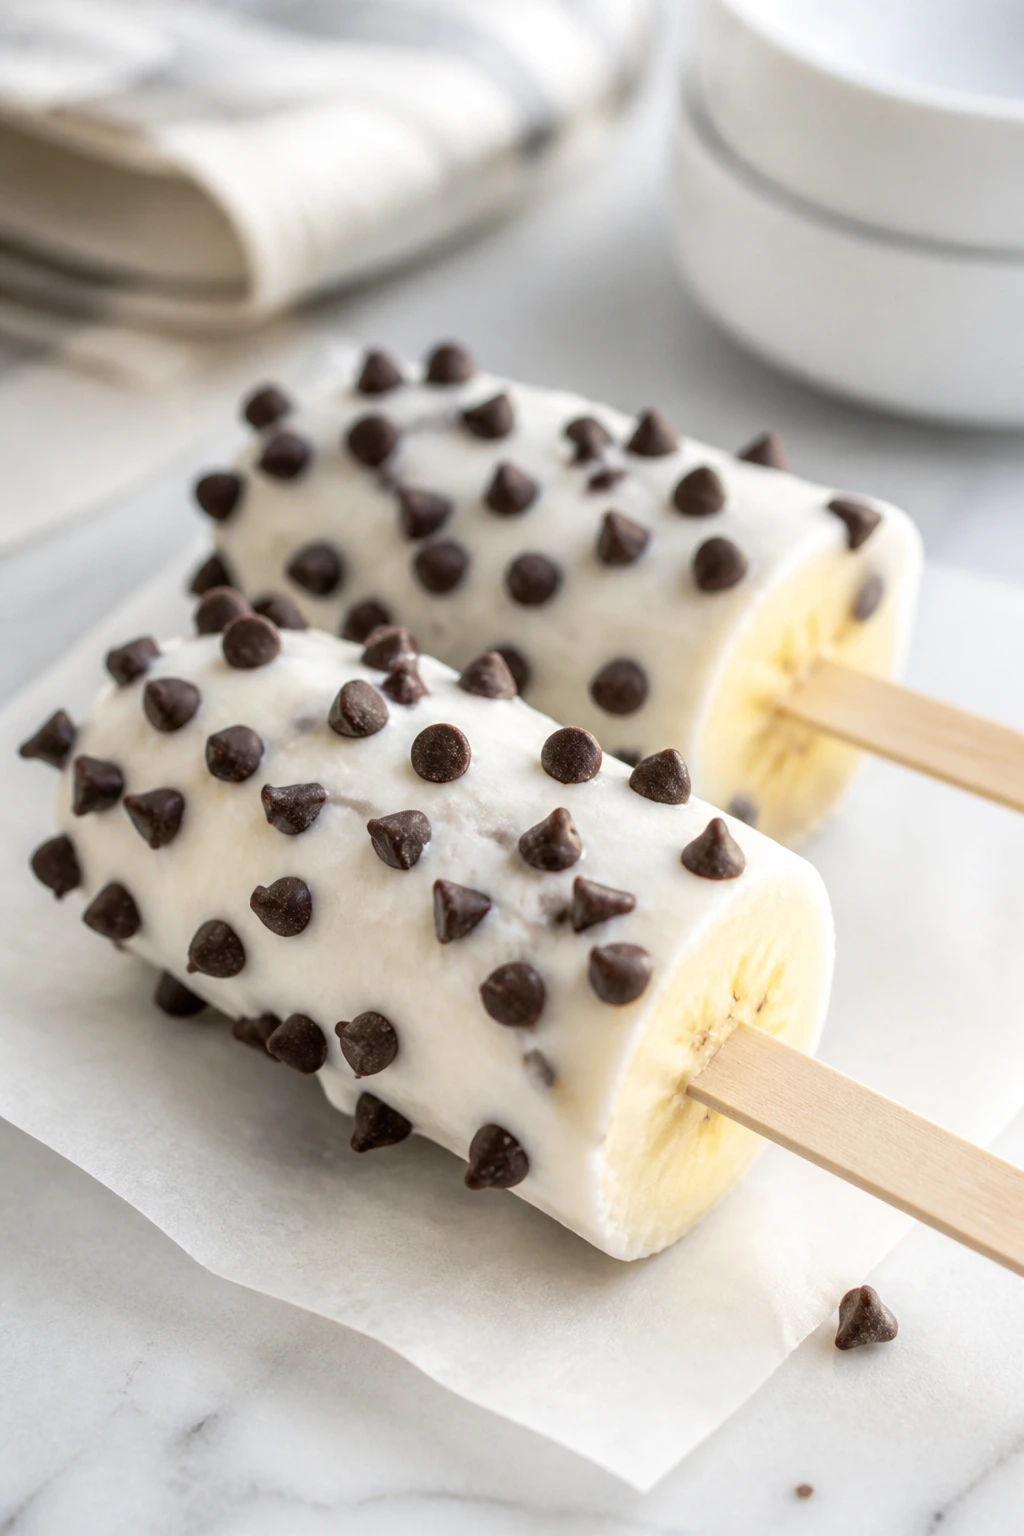
Frozen banana yogurt pops are the kind of snack that feels like a treat without sending the kitchen into full dessert mode. Cold yogurt turns into a creamy shell, the banana softens just enough in the freezer to stay sweet, and the little chocolate chips give you the occasional crunch. They’re especially good when the afternoon is warm and everyone wants something straight from the freezer.
Why It Works:
Bananas freeze smoothly, yogurt adds tang and body, and a touch of peanut butter makes the coating taste richer. The pops need a solid freeze so the yogurt shell sets before they go anywhere near little hands. Once frozen, they’re easy to pull out one by one, which matters when you need a snack you can pace instead of serving all at once.
Key Ingredients:
- 2 bananas, peeled and halved crosswise
- 1 1/2 cups vanilla Greek yogurt
- 2 tablespoons peanut butter
- 2 tablespoons mini chocolate chips
- 8 popsicle sticks or sturdy skewers
- Parchment paper
Quick Steps:
- Insert a popsicle stick into each banana half from the cut end.
- Stir the peanut butter into the yogurt until mostly smooth.
- Coat each banana half in the yogurt mixture, then roll in mini chocolate chips.
- Place on a parchment-lined tray and freeze for at least 3 hours, until firm.
- Eat straight from the freezer.
Equipment for This Recipe:
- Baking sheet
- Parchment paper
- Small bowl
- Popsicle sticks or skewers
How to Serve This Dish:
Serve these on a cold plate or tray so they don’t start melting too fast. A few berries on the side keep the snack bright and help round out the plate. For smaller kids, cut the frozen banana halves into chunks after a brief thaw, though the stick version is more fun.
Pro Tips for This Recipe:
- Use bananas that are ripe but still firm.
- Freeze the tray flat so the coating doesn’t slide off.
- If the yogurt is too thick, stir in 1 teaspoon milk to loosen it.
- Line the tray with parchment or the pops will stick hard.
Variations on This Dish:
- Sprinkle Pops: Roll the coated bananas in rainbow sprinkles instead of chocolate chips.
- Dairy-Free Version: Use coconut yogurt.
- Peanut Butter Banana Pop: Add a thin smear of peanut butter under the yogurt coating.
Common Mistakes to Avoid with This Dish:
- Don’t make the yogurt layer too thin or the banana shows through in patches.
- Don’t skip the freeze time; soft pops get messy fast.
- Don’t use overripe bananas or the pops turn mushy once thawed.
17. Chicken Crescent Roll-Ups
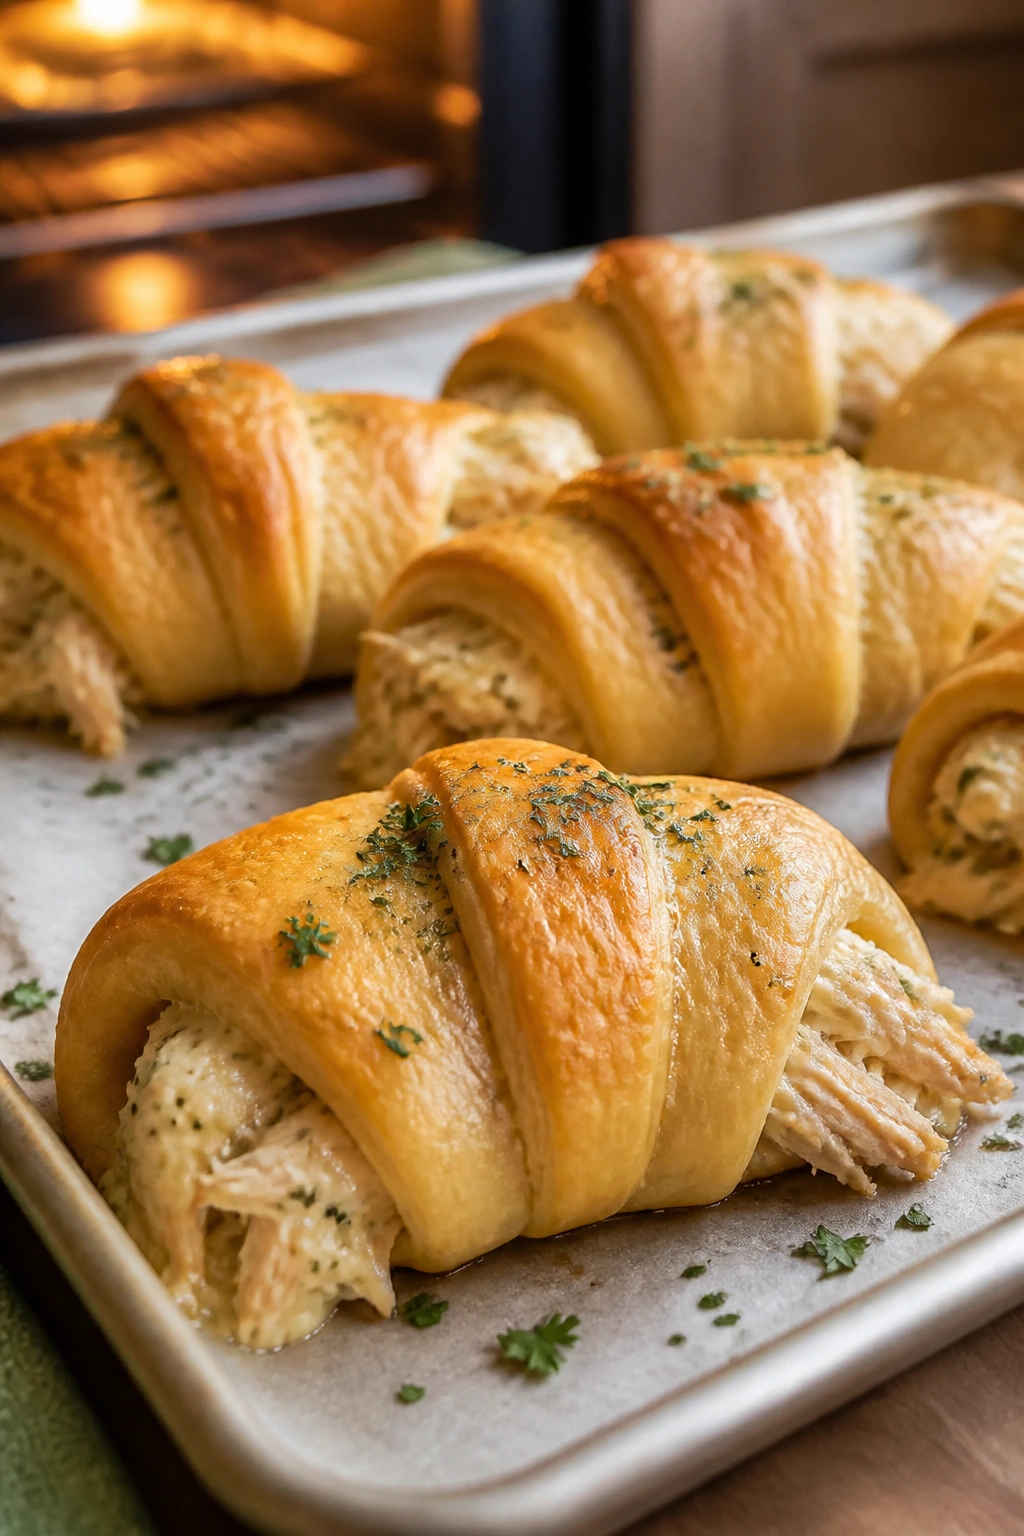
Chicken crescent roll-ups are one of those snacks that tastes like somebody did more work than they actually did. Flaky dough wraps around a creamy chicken filling, and the whole thing bakes into warm, golden little pockets that smell like dinner wandered in on the wrong clock. They’re a little richer than most snacks, which is exactly why kids get interested.
Why It Works:
Crescent dough browns quickly and brings that soft, buttery finish kids usually go for. Shredded chicken gives the filling some substance, and cream cheese keeps the inside moist instead of dry and stringy. Ranch seasoning or a small hit of herbs makes the flavor familiar without making it loud.
Key Ingredients:
- 1 can crescent roll dough, 8 count
- 1 cup cooked shredded chicken
- 3 ounces cream cheese, softened
- 1/2 cup shredded cheddar
- 1 tablespoon ranch seasoning
- 1 tablespoon melted butter
- 1 tablespoon chopped parsley, optional
Quick Steps:
- Preheat the oven to 375°F and line a baking sheet with parchment.
- Mix the chicken, cream cheese, cheddar, and ranch seasoning in a bowl.
- Unroll the crescent dough and spoon a little filling onto the wide end of each triangle.
- Roll the dough around the filling and place seam-side down on the sheet.
- Brush with melted butter and bake for 12 to 15 minutes, until puffed and golden.
Equipment for This Recipe:
- Baking sheet
- Parchment paper
- Mixing bowl
- Spoon for filling
How to Serve This Dish:
Serve these warm with carrot sticks or a few grapes if you want a balanced snack plate. They also make a solid grab-and-go bite when you’re heading back out the door. If you have older kids, a spoonful of ranch or honey mustard on the side works well.
Pro Tips for This Recipe:
- Use finely shredded chicken so the dough rolls neatly.
- Don’t overfill the triangles or the filling bursts out.
- Seal the pointed end underneath so the roll-ups hold during baking.
- Let them cool for a few minutes before serving; the filling stays hot.
Variations on This Dish:
- Buffalo Chicken Version: Stir 1 tablespoon buffalo sauce into the filling.
- BBQ Chicken Roll-Ups: Swap ranch seasoning for a spoonful of barbecue sauce.
- Veggie Crescent Roll-Ups: Use sautéed mushrooms and spinach instead of chicken.
Common Mistakes to Avoid with This Recipe:
- Don’t make the filling too wet. It leaks and softens the dough.
- Don’t bake underdone dough; the inside stays pale and gummy.
- Don’t serve immediately from the oven or the filling can burn little mouths.
18. Pasta Snack Jars
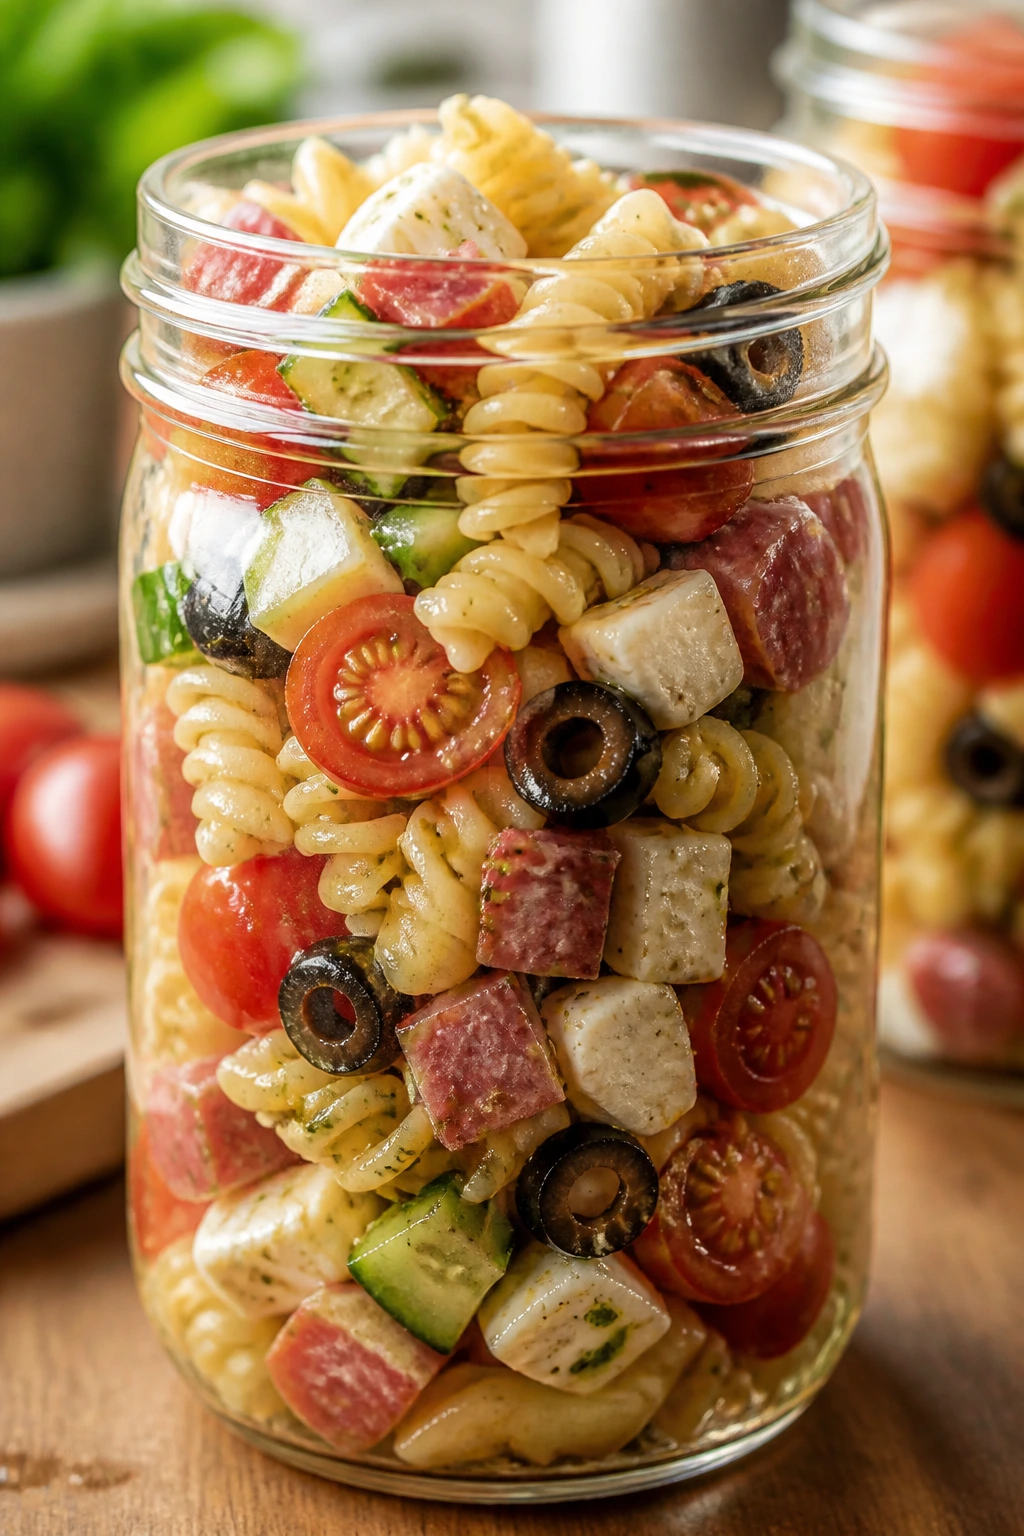
Pasta snack jars are the snack version of a picnic box with better structure. Rotini catches dressing in its spirals, the tomatoes stay bright, the cheese cubes give you something chewy, and the salami adds salt and a little chew that kids tend to trust. It’s the kind of snack that works especially well when everyone is eating at different times.
Why It Works:
Pasta gives the snack real staying power, and the dressing keeps the flavors moving from the first bite to the last. Because the ingredients are chopped small, kids can eat it straight from the jar or tip it into a bowl if they prefer. The key is cooling the pasta completely before packing so the jar doesn’t fog up and turn the vegetables limp.
Key Ingredients:
- 8 ounces rotini or bowtie pasta
- 1 cup cherry tomatoes, halved
- 1 cup cucumber, diced
- 1 cup mozzarella cubes
- 1/2 cup diced salami or pepperoni
- 1/3 cup Italian dressing
- 2 tablespoons grated Parmesan
- 1/4 cup sliced olives, optional
Quick Steps:
- Cook the pasta in salted water until al dente, then drain and rinse under cold water.
- Toss the cooled pasta with Italian dressing and Parmesan.
- Stir in tomatoes, cucumber, mozzarella, salami, and olives if using.
- Pack into jars or containers and chill until snack time.
- Shake or stir before eating.
Equipment for This Recipe:
- Large saucepan
- Colander
- Mixing bowl
- Jars or lidded containers
- Spoon
How to Serve This Dish:
Serve straight from the jar with a fork, or tip it into a bowl if your kids don’t like eating from containers. A few breadsticks or crackers on the side make it feel more complete. This one is especially handy for after-school hours when one child is eating in the car and another is at the table.
Pro Tips for This Recipe:
- Cool the pasta completely before adding the vegetables or the cucumbers soften fast.
- Use small pasta shapes that grab the dressing instead of slipping around.
- Keep the dressing modest; too much makes the jar greasy.
- Pack the jar tightly enough that the ingredients don’t tumble into a pile.
Variations on This Dish:
- Greek Pasta Jar: Use feta, olives, and cucumber with a lemony dressing.
- Ranch Pasta Jar: Swap the Italian dressing for ranch and add chopped carrots.
- Vegetarian Jar: Skip the salami and add chickpeas for more staying power.
Common Mistakes to Avoid with This Dish:
- Don’t pack the jar while the pasta is still warm; condensation ruins the texture.
- Don’t over-dress it. The jar should taste coated, not soaked.
- Don’t use giant pasta shapes that make every bite awkward.
Why the 3 P.M. Snack Window Feels So Tight
The hour after school is weirdly demanding. Kids are hungry, but not always hungry enough for dinner. They want something fast, but not so tiny that they keep asking again. And if the snack looks too healthy, too messy, or too much like leftovers, they’ll often reject it before they’ve taken off their shoes.
That’s why these recipes lean hard on texture. Crunch matters. Creamy matters. Familiar shapes matter too — rounds, cups, sticks, spirals, and triangles all seem to lower the resistance. A snack that can be eaten with one hand while the other hand digs out a soccer sock has a real advantage.
There’s also the timing problem. Some snacks need to be ready in five minutes; others need to wait in the fridge and behave later. The best after-school snacks respect both realities. They don’t demand a full kitchen reset, and they don’t assume anybody is calm enough to wait for a three-course situation.
Essential Equipment for These Recipes
- Large skillet, 10- to 12-inch: Best for quesadillas, grilled cheese, and quick reheating without crowding.
- Baking sheet with parchment paper: Useful for pizza muffins, broccoli tots, and banana pops so nothing sticks.
- Muffin tin: Needed for taco cups and mac and cheese muffins; also handy for portioning.
- Mixing bowls, medium and large: One for wet ingredients and one for combining fillings keeps things cleaner.
- Sharp chef’s knife: Crisp slices matter for apples, roll-ups, and snack jars.
- Cutting board: A wide board gives you room to roll and slice without losing bits to the counter.
- Measuring cups and spoons: Especially useful for snack bites, yogurt mixes, and cheese-heavy fillings.
- Small saucepan: Good for mac and cheese sauce, warming marinara, or loosening peanut butter.
- Silicone spatula: Scrapes every last bit of hummus, yogurt, or peanut butter from the bowl.
- Airtight containers and snack jars: Keep roll-ups, pasta jars, and energy bites tidy in the fridge.
- Clean kitchen towel or cheesecloth: Necessary for squeezing moisture out of broccoli before baking tots.
- Short skewers or snack sticks: Optional, but useful for pancake skewers and fruit-on-a-stick snacks.
Smart Shopping and Ingredient Tips
Start with the ingredients that do the heaviest lifting. Tortillas should be flexible, not brittle; 8-inch flour tortillas are the easiest shape for roll-ups and pinwheels. For cheese, pre-shredded works well when you need speed, but a block of cheddar melts a little smoother in grilled snacks and quesadillas. Both are fine. Buy the one you’ll actually use.
Fruit matters more than people think. Apples should be crisp and firm, not soft and floury. Bananas should be yellow with a few freckles for the roll-ups and pops, but still hold their shape when sliced. For berries, choose the ones that look dry and firm in the container, because soggy berries leak juice into yogurt and turn parfaits muddy.
When you’re shopping for protein, think in small portions. Deli turkey, shredded rotisserie chicken, cottage cheese, Greek yogurt, beans, and hummus are all easy wins. They don’t need much dressing up. A little salt, a little acid, and a good container go a long way.
A few pantry items are worth keeping around because they keep appearing in these snacks. Old-fashioned oats hold up better than quick oats in no-bake bites. Panko gives tots a lighter crunch than regular breadcrumbs. Mini chocolate chips, granola, and tortilla wraps can rescue an almost-empty fridge faster than most people admit.
If your family needs nut-free snacks, sunflower seed butter and pumpkin seeds can stand in for peanut butter and almonds without making the snacks feel stripped down. And if you’re buying hummus, look for one that tastes clean and garlicky rather than flat; bad hummus makes good vegetables feel like a chore.
How to Serve These Recipes
Presentation:
Use small plates, snack bowls, or clear cups. Kids eat with their eyes more than adults do, and a neat pile of triangles, spirals, or snack sticks looks more inviting than a blob on a plate. Bright fruit beside a savory snack helps the whole thing feel like a real meal, not a random kitchen raid.
Accompaniments:
Think in pairs: something soft with something crisp, or something salty with something sweet. Cheese quesadillas go well with fruit. Yogurt cups like pretzels. Broccoli tots and taco cups are happier with salsa, ranch, or marinara. If you need to stretch a snack into something bigger, add cucumber slices, carrot sticks, grapes, or toast points.
Portions:
For younger kids, start with one small item and a fruit or veggie side. Older kids or after-sports hunger usually needs two pieces, two muffins, or one larger roll-up plus something crunchy. Don’t overbuild the plate on the first try; it’s easier to add more than to scrape half of it back into the container.
Beverage Pairing:
Cold water is the safest answer. Milk works especially well with peanut butter, chocolate, or grilled cheese snacks. For fruit-heavy snacks, plain sparkling water or a small cup of unsweetened iced tea for older kids keeps the sweetness from piling up.
Additional Tips and Flavor Boosters
Flavor Enhancement:
A tiny pinch of salt does more work than people expect. It sharpens fruit, wakes up yogurt, and keeps peanut butter from tasting one-note. Lemon juice helps apple and banana snacks stay brighter, and a spoonful of Dijon in a turkey roll-up gives the whole thing a cleaner edge.
Customization:
Treat these snacks like building blocks. Swap cheddar for mozzarella, use black beans instead of meat, or change the fruit based on what’s firm and ripe. If one child likes cold snacks and another wants warm ones, keep the base the same and change the temperature at serving time.
Serving Suggestions:
Cut roll-ups on a diagonal. Put dips in tiny bowls so kids can actually manage them. Add a sprinkle of cinnamon over yogurt cups, a few sesame seeds on savory snacks, or crushed pretzels over apple nachos for a more playful crunch.
Make-It-Yours:
For gluten-free snackers, use corn tortillas, gluten-free breadcrumbs, and certified gluten-free oats. For dairy-free versions, coconut yogurt, plant-based cheese, and hummus carry a lot of weight. For nut-free schools, sunflower seed butter and seed mixes cover the gap without making the snack feel like a compromise.
Make-Ahead, Storage, and Reheating Guidance

A few of these snacks are best eaten the same day, especially apple nachos, yogurt parfaits with granola, and anything built around fresh fruit. Once fruit is cut, the clock starts. In general, snacks with dairy, meat, or cut fruit should not sit out longer than 2 hours.
Roll-ups, pinwheels, pasta snack jars, and cottage cheese bowls keep in the fridge for about 3 days if stored in airtight containers. Taco cups, chicken crescent roll-ups, mac and cheese muffins, and broccoli tots hold for 3 to 4 days refrigerated. Energy bites are the longest-lasting of the bunch; they usually stay good for about 1 week in the fridge and up to 2 months in the freezer.
For reheating, baked snacks do best in a 350°F oven or air fryer for 5 to 10 minutes, depending on size. That keeps the outside from going leathery the way a microwave can. Mac and cheese muffins, taco cups, broccoli tots, and chicken crescents all reheat well this way. Grilled cheese dippers can go back on a skillet for a minute or two if you want the bread crisp again.
Cold snacks need a little planning. Keep granola separate from yogurt. Pack apple slices with a little lemon juice if you’re making them ahead. For banana pops, freeze them on a flat tray first, then move them to a container once they’re firm so they don’t stick together. If you’re packing snack jars, put the dressing in first and the vegetables on top so the pasta stays coated but not soggy.
Variations and Adaptations to Try
- Nut-Free Backpack Swap: Replace peanut butter with sunflower seed butter in roll-ups, energy bites, and banana pops. The flavor is a little earthier, but it plays well with banana, honey, and cinnamon.
- Higher-Protein Rescue: Add shredded chicken, beans, Greek yogurt, cottage cheese, or extra cheese to the snacks that already lean savory. This works best in quesadillas, pinwheels, taco cups, and pasta jars.
- Gluten-Free Snack Shelf: Use certified gluten-free oats, corn tortillas, gluten-free pasta, and gluten-free breadcrumbs. Broccoli tots and energy bites are the easiest places to start, and they don’t need much alteration.
- Lower-Sugar Plate: Skip the honey drizzle on fruit snacks, use plain yogurt, and keep chocolate chips in the background instead of the foreground. Apples, hummus pockets, and savory roll-ups become the backbone here.
- Warm-and-Crispy Plan: Lean on the baked and skillet snacks — quesadillas, pizza muffins, taco cups, broccoli tots, grilled cheese dippers, and mac and cheese muffins — when the kids want something hot right away.
- Soft-Texture Version: Use yogurt cups, cottage cheese bowls, roll-ups, and snack jars if a child hates crunchy food. A soft snack usually lands better when a kid is tired or coming off a loud day.
Common Mistakes to Avoid
- Making every snack sweet. If all you serve is fruit, yogurt, or honey-based food, the snack can feel like a sugar swing instead of a reset. Add cheese, beans, chicken, hummus, or cottage cheese somewhere in the rotation.
- Putting wet ingredients on dry ones too early. Granola, crackers, toasted muffins, and tortillas all lose their edge if they sit under wet fruit or sauce. Keep crunchy pieces separate when you can.
- Building snacks too large for little hands. A giant roll-up or overstuffed quesadilla falls apart faster than kids can eat it. Smaller shapes tend to survive better and feel less intimidating.
- Skipping the cooling or resting time. Broccoli tots, mac muffins, taco cups, and pinwheels all improve after a brief rest. If you cut or pack them too hot, they steam themselves into softness.
- Ignoring texture. Kids are picky about texture long before they’re picky about flavor. A snack can taste fine and still get rejected if it’s soggy, rubbery, or too slippery to hold.
- Leaving dairy and meat out too long. Even the best snack gets risky if it sits on the counter while everyone wanders around. Pack it back into the fridge if it isn’t eaten within a reasonable window.
Frequently Asked Questions
Which of these snacks works best when kids come home absolutely starving?
Chicken crescent roll-ups, taco cups, mac and cheese muffins, mini quesadillas, and pasta snack jars are the strongest choices because they bring more protein and starch together. Fruit-only snacks are fine for a bridge, but they usually don’t quiet that deep-after-school hunger for long.
What can I make ahead the night before?
Pinwheels, snack jars, energy bites, mac and cheese muffins, broccoli tots, and taco cups all handle advance prep well. Keep anything crunchy separate from anything wet, and wait to add toppings like granola or salsa until serving time.
How do I keep apples and bananas from browning?
A little lemon juice on apple slices helps a lot, and bananas do best when they’re kept inside something like peanut butter or yogurt rather than exposed to air. If you’re making a fruit snack ahead, assemble it close to snack time instead of in the morning.
What are the best nut-free swaps?
Sunflower seed butter works cleanly in roll-ups, energy bites, and banana pops. Pumpkin seeds, hummus, cheese, cottage cheese, and yogurt all give you that same “has substance” feeling without relying on nuts.
Can these snacks also work as lunchbox food?
Yes, especially pinwheels, pasta snack jars, energy bites, turkey roll-ups, cottage cheese bowls, and snack cups. Just keep anything crisp separate from anything moist, and use cold packs for dairy or meat-based options.
How do I keep grilled cheese dippers or quesadillas from getting soggy?
Toast or cook them over medium heat until the outside is already crisp before they go into a container. If you’re packing them later, let them cool completely on a rack so trapped steam doesn’t soften the bread.
What if my child only eats one texture, either soft or crunchy?
Lean into it instead of arguing with it. For soft-food kids, parfaits, cottage cheese bowls, roll-ups, and mac muffins are easier to accept; for crunchy-food kids, apple nachos, broccoli tots, taco cups, and crisped quesadilla wedges usually win faster.
Can I freeze any of these and reheat them quickly?
Yes. Energy bites freeze well without reheating, and broccoli tots, mac and cheese muffins, taco cups, and chicken crescent roll-ups can all be frozen and reheated in the oven or air fryer. If you want the texture to hold, use the oven instead of the microwave.
A Better After-School Snack Routine
A good after-school snack should do more than fill five minutes. It should take the edge off hunger, give kids something they actually want to eat, and keep you from improvising with a sleeve of crackers and a promise. That’s the real win here: not fancy food, just food with enough shape, flavor, and staying power to make the hour after school feel less chaotic.
Start with one sweet snack and one savory snack, keep a few of the faster options in the fridge, and let the rest live in the freezer or pantry. Once you’ve got tortillas, fruit, cheese, oats, and a couple of reliable protein options on hand, the 3 p.m. scramble gets quieter fast.