
The best lunch is the one that was already worth eating at dinner. That sounds obvious until you open the fridge at noon and find a container full of dry chicken, soggy noodles, or rice that has turned into a pale little brick. The trick is choosing leftover friendly dinners for lunches that keep their sauce, hold their shape, and still taste like a plan rather than a rescue mission.
That usually means food with a little moisture and a little structure: braises, baked pasta, bean-heavy stews, saucy skillet meals, grain bowls with smart toppings. Meals like that settle overnight instead of falling apart. In the morning, they’re not tired. They’re calmer. Better, even. The flavors have had time to mingle, the sauce has moved into every nook, and the lunch version often tastes fuller than the first plate.
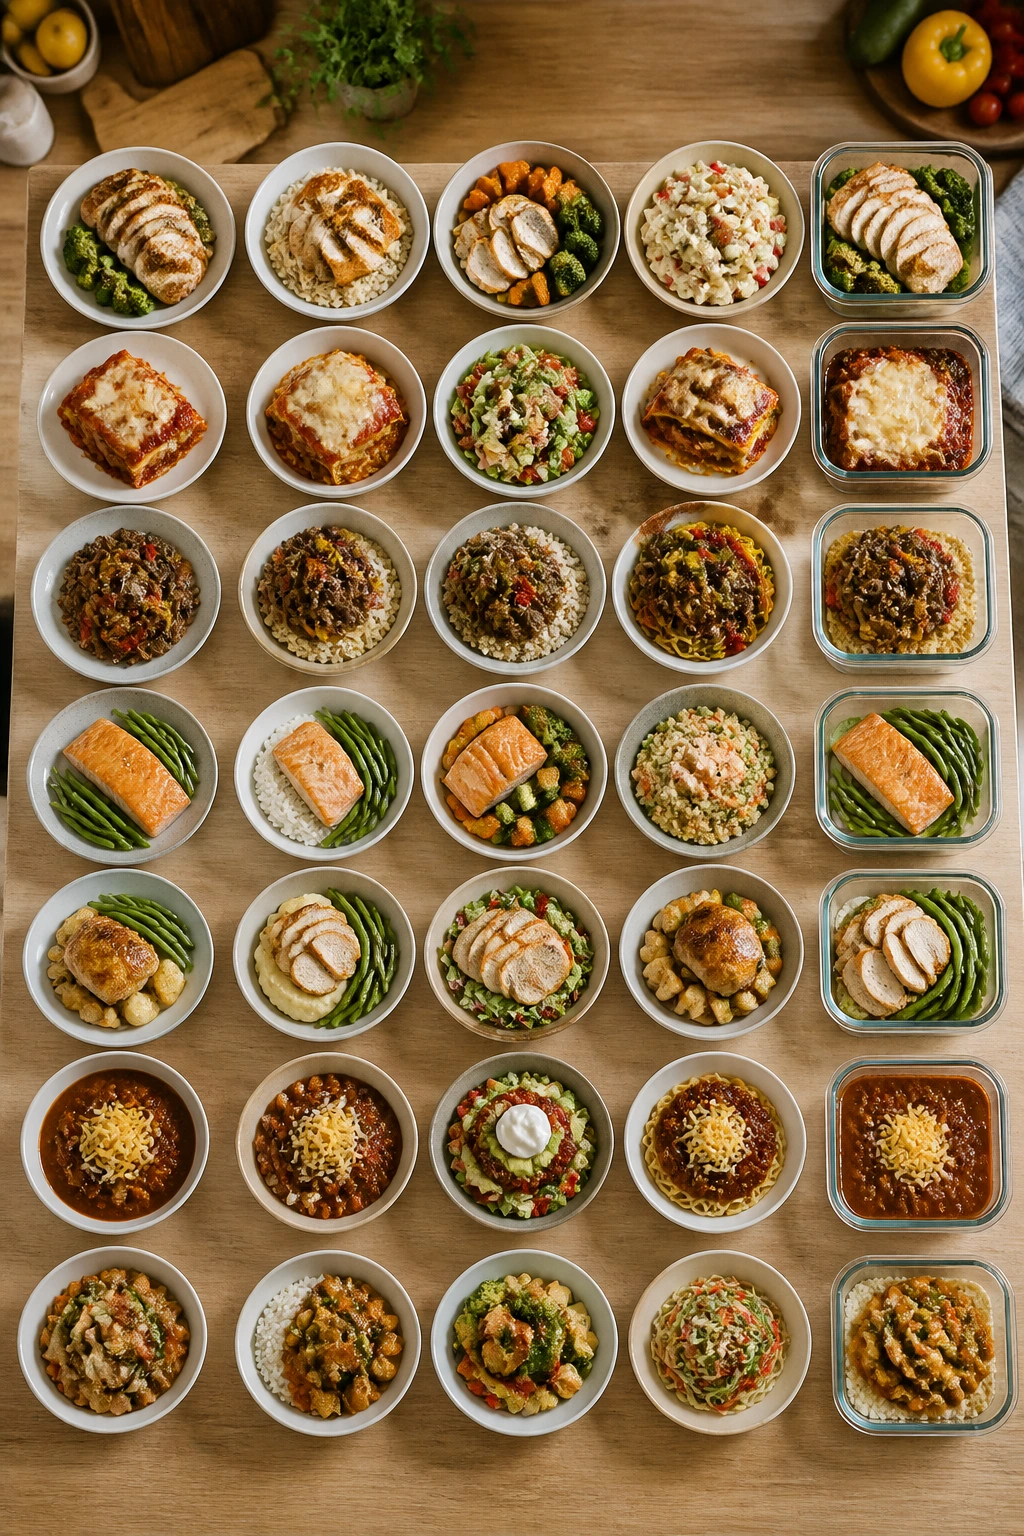
I’ve always had a soft spot for dinners that do double duty. They save money, cut down on weekday scrambling, and make it easier to stop buying sad desk salads just because the lunch hour arrived. More than that, they make your fridge feel useful. The list below sticks to meals that reheat well, pack cleanly, and don’t punish you for making extra on purpose.
Why These Dinners Pull a Second Shift

-
Sauce Is Your Friend: Meals with tomato sauce, curry sauce, broth, or gravy stay moist after reheating, which is why they’re the safest bets for lunch the next day.
-
Sturdy Ingredients Win: Beans, lentils, potatoes, shredded meats, and baked pasta hold up better than delicate greens or flaky fish when they spend a night in the fridge.
-
Portions Pack Cleanly: Casseroles, soups, and grain bowls can be divided into neat containers without turning into a food pile that looks like it lost a fight.
-
Most Reheat Fast: These dinners usually need only a microwave, a skillet, or a low oven, which makes lunch easy instead of fussy.
-
They Stretch the Grocery Budget: A roast, a pot of chili, or a pan of ziti usually creates at least one extra meal, sometimes two, without feeling like leftovers were the point.
-
Lunch Gets Better, Not Sadder: The best part is flavor. Plenty of these dishes taste even more settled and rounded after a night in the fridge.
1. Beef and Bean Chili

This is the kind of dinner that does not mind being packed away. Thick, smoky, and a little glossy around the edges, beef and bean chili tastes like it wants to be in a thermos by noon. The beef gives it backbone, the beans soften the edges, and the tomato base turns slightly deeper after a night of rest.
Why It Works
Chili is one of those rare dishes that improves because it sits. The spices bloom into the broth, the beans soak up the seasoning, and the whole pot thickens into something that scoops well and reheats without complaint. It’s also forgiving; if you add a splash of broth on day two, it comes right back to life. That’s a gift when you want a lunch that feels cooked, not assembled.
Key Ingredients
- 1 tablespoon olive oil — use a neutral one with enough heat tolerance for browning.
- 1 pound ground beef — 85% or 90% lean gives enough flavor without a greasy top.
- 1 medium yellow onion, diced — it melts into the base and rounds out the spice.
- 1 green bell pepper, diced — optional, but it adds a fresh, peppery edge.
- 3 cloves garlic, minced — cook briefly so it smells sweet, not sharp.
- 2 tablespoons chili powder — this is the main seasoning voice.
- 1 teaspoon ground cumin — brings the warm, earthy note chili needs.
- 1 (28-ounce) can crushed tomatoes — the saucy backbone.
- 1 (15-ounce) can kidney beans, drained and rinsed — classic chili texture.
- 1 (15-ounce) can black beans, drained and rinsed — makes the pot heartier.
- 1 cup beef broth — loosens the pot just enough for simmering.
Quick Steps
-
Brown the Beef: Heat the oil in a large pot over medium-high heat. Add the ground beef and cook for 6 to 8 minutes, breaking it up, until it’s deeply browned and no pink remains.
-
Soften the Vegetables: Add the onion and bell pepper, if using, and cook for 5 minutes until the onion turns translucent and the edges start to soften.
-
Bloom the Spices: Stir in the garlic, chili powder, cumin, and a pinch of salt. Cook for 30 to 45 seconds until the spices smell fragrant, then add the tomato paste if you want a thicker pot.
-
Build the Pot: Pour in the crushed tomatoes, beans, and broth. Stir well and bring the chili to a steady simmer.
-
Let It Thicken: Lower the heat and simmer uncovered for 30 to 40 minutes, stirring once or twice, until the chili is thick enough to mound on a spoon instead of running off it.
-
Taste and Pack: Add salt and black pepper to taste. Cool the chili in shallow containers before refrigerating so it chills quickly and stays safe.
Tips and Variations
- Lunch Move: Pack it with cornbread or spoon it over rice to make the lunch box feel bigger.
- Flavor Boost: A teaspoon of cider vinegar at the end sharpens the whole pot.
- Swap It: Ground turkey works well, but add a little extra olive oil so it doesn’t taste lean and flat.
2. Baked Ziti with Sausage and Spinach
A pan of baked ziti comes out bubbling at the corners, with browned cheese on top and sauce peeking through the cracks. It smells like the sort of dinner people hover around the oven for. For leftovers, it’s one of my favorites because the pasta keeps its shape and the sauce stops the whole thing from drying out.
Why It Works
Baked pasta is built for lunch. The noodles soak up sauce without turning mushy if you undercook them slightly, and sausage brings enough fat and seasoning to keep the flavor from fading in the fridge. Ricotta adds a creamy middle that stays pleasant after reheating. Use low-moisture mozzarella, though. Fresh mozzarella can weep too much and leave the dish watery the next day.
Key Ingredients
- 12 ounces ziti or penne — short pasta holds up better than long noodles.
- 1 pound Italian sausage, casings removed — mild or hot both work.
- 1 tablespoon olive oil — only if the sausage is very lean.
- 3 cups marinara sauce — choose one with a simple tomato flavor.
- 1 cup ricotta cheese — gives the filling a soft, creamy layer.
- 1 large egg — helps the ricotta hold together.
- 3 cups baby spinach — it disappears into the sauce and adds color.
- 2 cups shredded low-moisture mozzarella — melts cleanly.
- 1/2 cup grated Parmesan — sharpens the flavor on top.
- 1/2 teaspoon red pepper flakes — optional, but useful if you like a little heat.
Quick Steps
-
Cook the Pasta: Boil the ziti in salted water until it is just shy of al dente, usually 2 minutes less than the package says. Drain it well.
-
Cook the Sausage: Brown the sausage in a large skillet over medium heat for 6 to 8 minutes, breaking it into crumbles. Spoon off excess fat if the pan looks greasy.
-
Stir in the Sauce and Spinach: Add the marinara and spinach. Cook for 2 minutes, just until the spinach wilts and the sauce loosens.
-
Mix the Ricotta Layer: In a bowl, stir together ricotta, egg, Parmesan, and a pinch of salt until smooth.
-
Assemble the Pan: Toss the pasta with half the sauce mixture. Spread it in a 9-by-13-inch baking dish, dollop the ricotta mixture over it, then spoon the remaining sauce on top. Finish with mozzarella.
-
Bake and Rest: Bake at 400°F for 25 minutes, until the cheese is browned in spots and the sauce bubbles at the edges. Rest for 15 minutes before slicing so the layers settle.
Tips and Variations
- Make-Ahead Note: Assemble it a day ahead, chill it, then bake straight from the fridge with 10 extra minutes.
- Best Lunch Trick: Save a spoonful of sauce for reheating so the pasta doesn’t dry out.
- Swap It: Mushrooms can replace part of the sausage if you want a meat-light version that still feels hearty.
3. Chicken Enchilada Casserole
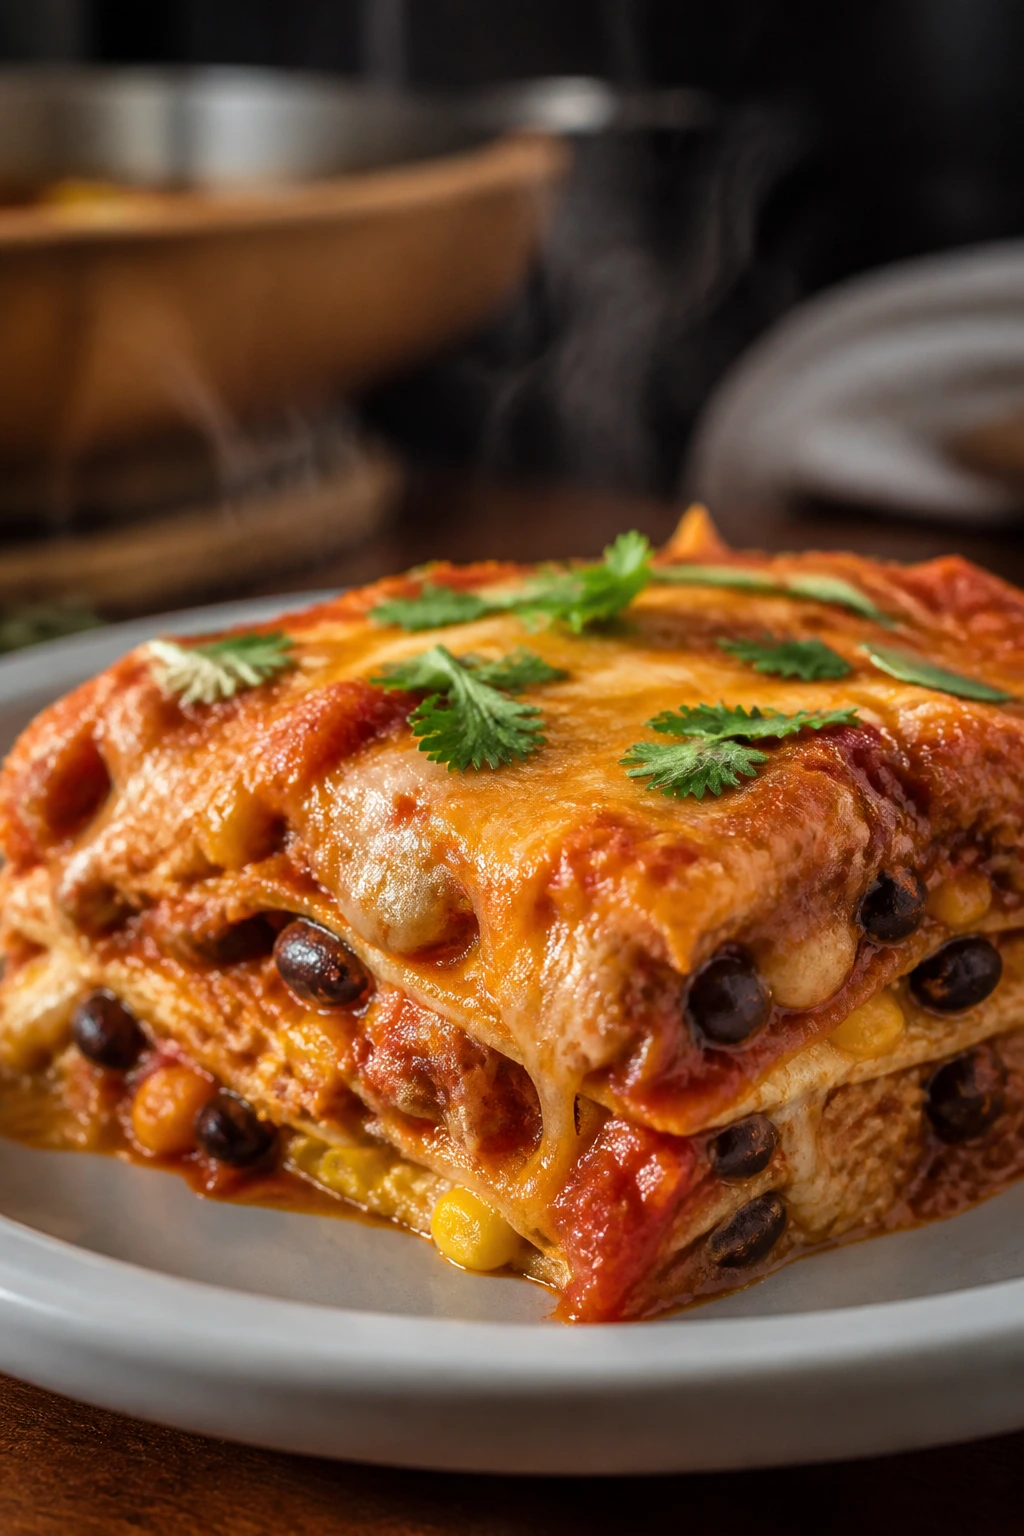
What happens when tortillas, red sauce, and shredded chicken spend a night together? They stop behaving like separate things and become a proper meal. This casserole is saucy, a little messy in the best way, and exactly the sort of dinner that turns into a good lunch without effort.
Why It Works
The tortillas absorb flavor instead of going brittle, which is why enchilada casserole beats a lot of “assembled” lunches. Black beans and corn make it sturdier, and the sauce keeps the chicken from drying out. You can cut it into squares or scoop it into a bowl, and either way it still tastes intentional.
Key Ingredients
- 2 tablespoons olive oil — for softening the onions.
- 1 medium onion, diced — adds sweetness under the sauce.
- 2 cups shredded cooked chicken — rotisserie chicken saves time here.
- 2 cups red enchilada sauce — enough to saturate the layers.
- 1 cup black beans, drained and rinsed — makes the casserole more filling.
- 1 cup corn kernels — fresh, frozen, or thawed all work.
- 8 corn tortillas, cut into strips — they layer better than whole tortillas.
- 2 cups shredded cheddar or Monterey Jack — choose a cheese that melts smoothly.
- 1/2 cup sour cream — optional, but good for serving.
- 1/4 cup chopped cilantro — for a fresh finish.
Quick Steps
-
Soften the Onion: Warm the oil in a skillet over medium heat and cook the onion for 4 to 5 minutes until translucent and lightly golden.
-
Mix the Filling: In a large bowl, combine the chicken, half the enchilada sauce, beans, corn, and cooked onion.
-
Layer the Casserole: Spread a thin layer of sauce in a 9-by-13-inch baking dish. Add tortilla strips, then the chicken filling, then cheese. Repeat once more.
-
Top It Well: Finish with the remaining sauce and the rest of the cheese so the top stays moist.
-
Bake: Bake at 375°F for 20 to 25 minutes until the cheese is melted and the edges are bubbling.
-
Rest Before Cutting: Let it sit for 10 to 15 minutes. If you cut too early, the layers slide around and the whole thing gets sloppy.
Tips and Variations
- Lunch Move: Pack it with avocado slices added after reheating.
- Flavor Boost: A few pickled jalapeños on top wake up the whole tray.
- Swap It: Use shredded turkey or cooked pinto beans if you want a different protein without changing the structure.
4. Coconut Chickpea Curry
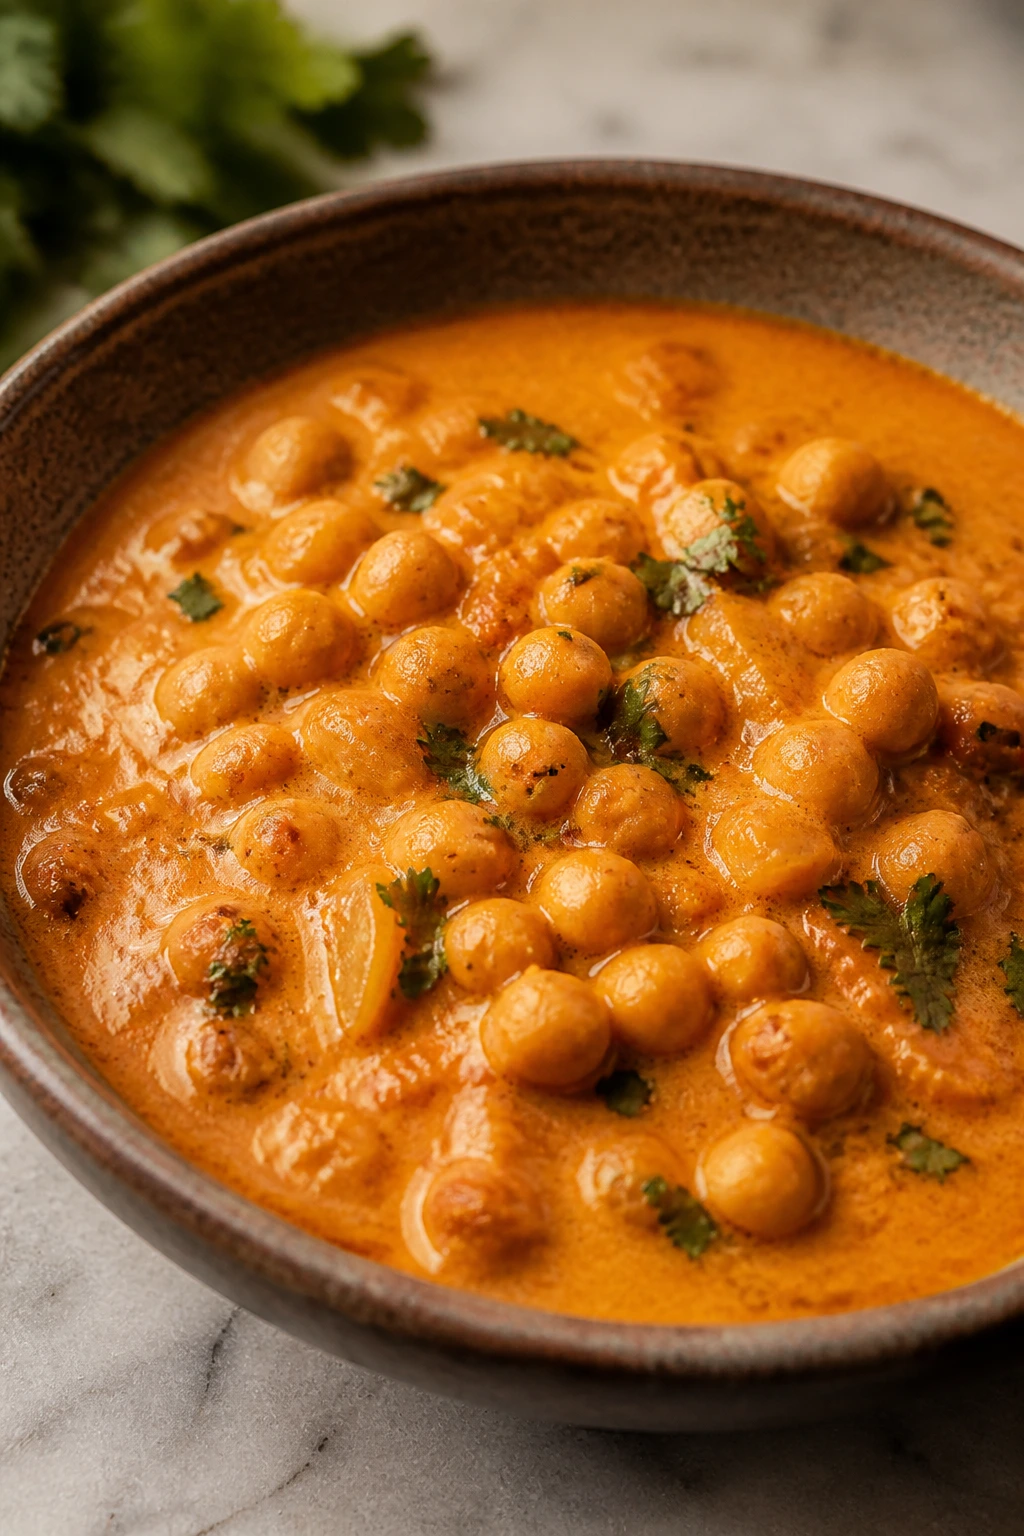
Some dinners taste even better when the sauce has had a night to settle into itself. Coconut chickpea curry is one of those. The sauce turns silky, the chickpeas taste fuller, and a scoop over rice the next day feels almost more complete than the first bowl.
Why It Works
This curry keeps its texture because chickpeas stay firm, even after reheating, and coconut milk gives the sauce enough fat to taste rich without breaking. Tomatoes add brightness, spinach adds color at the end, and the whole dish holds up well in a lunch container. It’s also one of the easiest dinners here to make meatless without feeling like a compromise.
Key Ingredients
- 1 tablespoon coconut oil or olive oil — either works for the base.
- 1 medium yellow onion, diced — gives the sauce sweetness.
- 3 cloves garlic, minced — cook until fragrant.
- 1 tablespoon grated fresh ginger — adds warmth and lift.
- 2 tablespoons curry powder or 1 tablespoon curry paste — choose one strong flavor path.
- 2 (15-ounce) cans chickpeas, drained and rinsed — the protein and body of the dish.
- 1 (14-ounce) can diced tomatoes — keeps the curry bright.
- 1 (14-ounce) can coconut milk — full-fat gives the best texture.
- 2 cups baby spinach — stirred in at the end so it stays green.
- 1 lime, cut into wedges — the finish matters here.
- Cooked rice, for serving — jasmine or basmati are both good.
Quick Steps
-
Start the Aromatics: Heat the oil in a deep skillet or saucepan over medium heat. Cook the onion for 5 minutes until soft and lightly golden.
-
Add Ginger and Spices: Stir in the garlic, ginger, and curry powder. Cook for 30 seconds, just until the pan smells rich and warm.
-
Build the Sauce: Add the chickpeas, tomatoes, coconut milk, and a pinch of salt. Stir well and bring the mixture to a gentle simmer.
-
Simmer Gently: Cook for 15 to 20 minutes, uncovered, until the sauce thickens slightly and the chickpeas absorb some of the spice.
-
Finish with Greens: Stir in the spinach and cook for 1 minute, just until wilted. Add lime juice to brighten the sauce.
-
Serve or Store: Spoon over rice, or cool and portion it for lunch containers. The curry should look glossy, not watery.
Tips and Variations
- Flavor Boost: A spoonful of peanut butter makes the sauce deeper and richer.
- Swap It: Add cubed sweet potato if you want a sweeter, more filling curry.
- Lunch Move: Keep the rice and curry separate until reheating if you hate soft grains.
5. Turkey Meatballs in Marinara
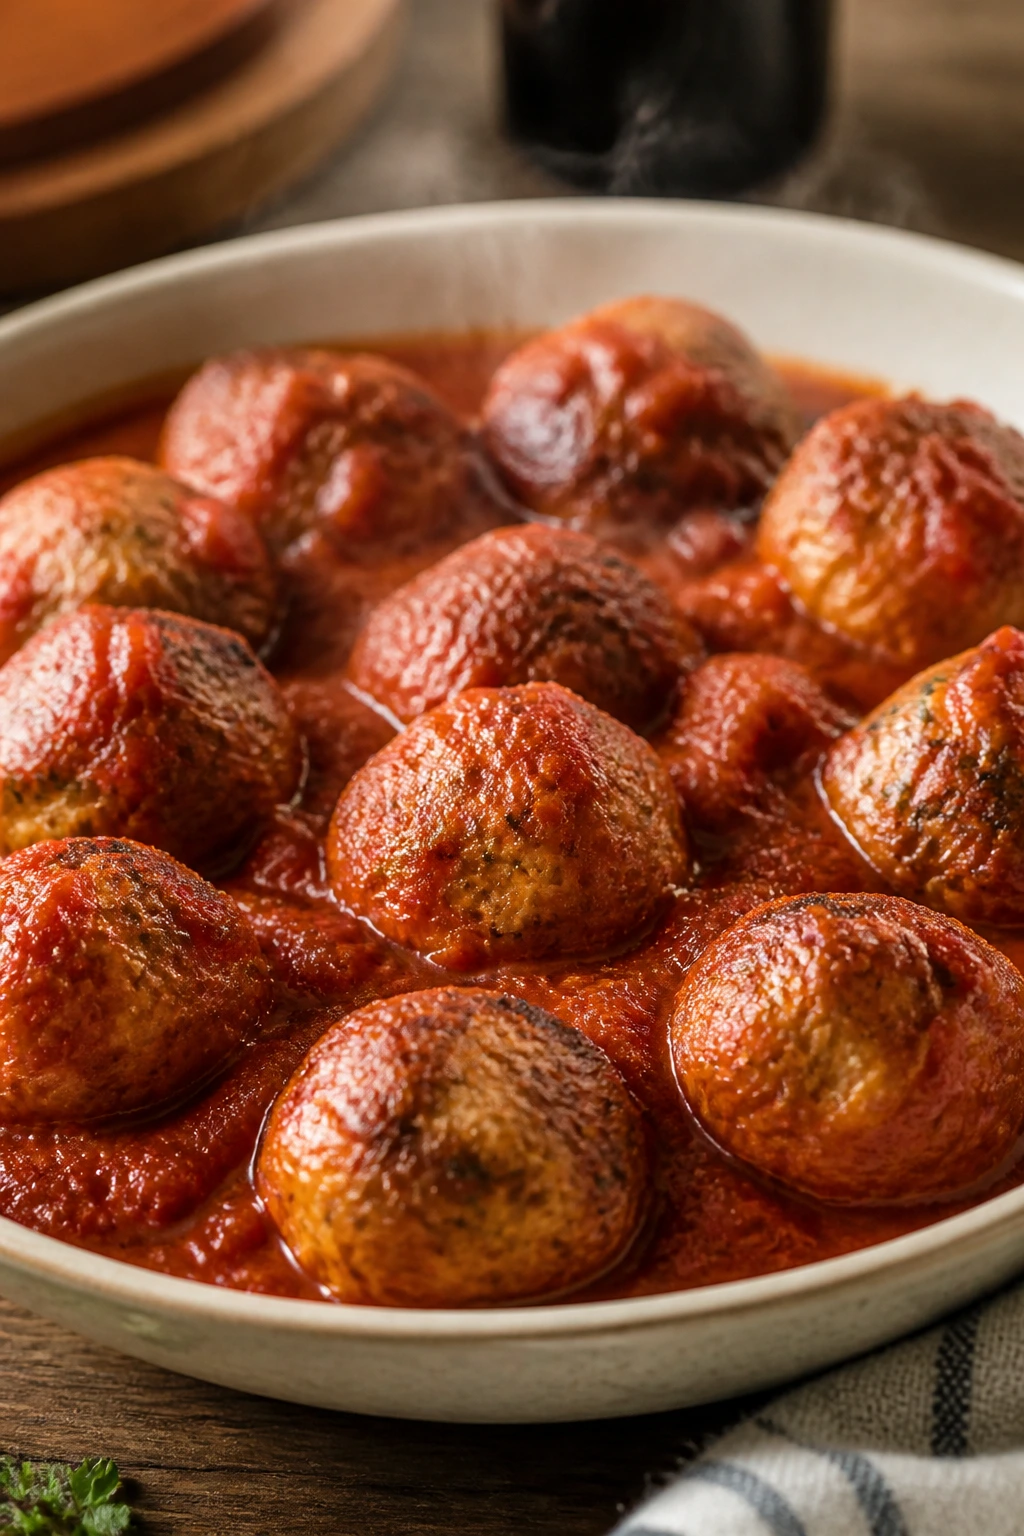
Turkey meatballs are the quiet overachievers of the dinner world. They’re simple, they store well, and they somehow manage to work as pasta topping, sandwich filling, or bowl food without acting precious about it. With enough sauce, they stay tender all the way through lunch.
Why It Works
Meatballs are made for batch cooking because they reheat evenly and keep their shape better than loose ground meat. The marinara acts like a jacket, which keeps the turkey from drying out. This matters more than people think. Lean meat can go from fine to dusty in the fridge if you leave it on its own.
Key Ingredients
- 1 pound ground turkey — 93% lean is a good balance.
- 1/2 cup breadcrumbs — helps the meatballs stay tender.
- 1 large egg — binds the mixture.
- 1/4 cup grated Parmesan — adds salty depth.
- 2 tablespoons chopped parsley — freshens the meatballs.
- 2 garlic cloves, minced — keep it small and even.
- 1 teaspoon kosher salt — enough to season the full batch.
- 1/2 teaspoon black pepper — for a little edge.
- 2 cups marinara sauce — use enough to coat the meatballs well.
- 1 tablespoon olive oil — only if baking in a skillet or finishing in a pan.
Quick Steps
-
Mix Gently: Combine the turkey, breadcrumbs, egg, Parmesan, parsley, garlic, salt, and pepper in a bowl. Mix just until blended. Overmixing makes the meatballs dense.
-
Shape Evenly: Form 1 1/2-inch meatballs so they cook at the same rate. A small scoop helps here.
-
Bake the Meatballs: Place them on a parchment-lined sheet pan and bake at 400°F for 15 minutes, until the outsides are lightly browned and the centers are no longer pink.
-
Warm the Sauce: Heat the marinara in a wide skillet or saucepan over low heat.
-
Simmer Together: Add the baked meatballs to the sauce and simmer for 10 minutes so they absorb some flavor.
-
Pack for Lunch: Serve over pasta, polenta, or in a roll. For lunch, a lidded container with extra sauce keeps them moist.
Tips and Variations
- Better Texture: Mix in 2 tablespoons of ricotta if you want a softer, more tender meatball.
- Lunch Move: They’re excellent in a sub roll with melted mozzarella.
- Swap It: Ground chicken works too, but it needs the sauce even more than turkey does.
6. Pulled Pork with Tangy Slaw
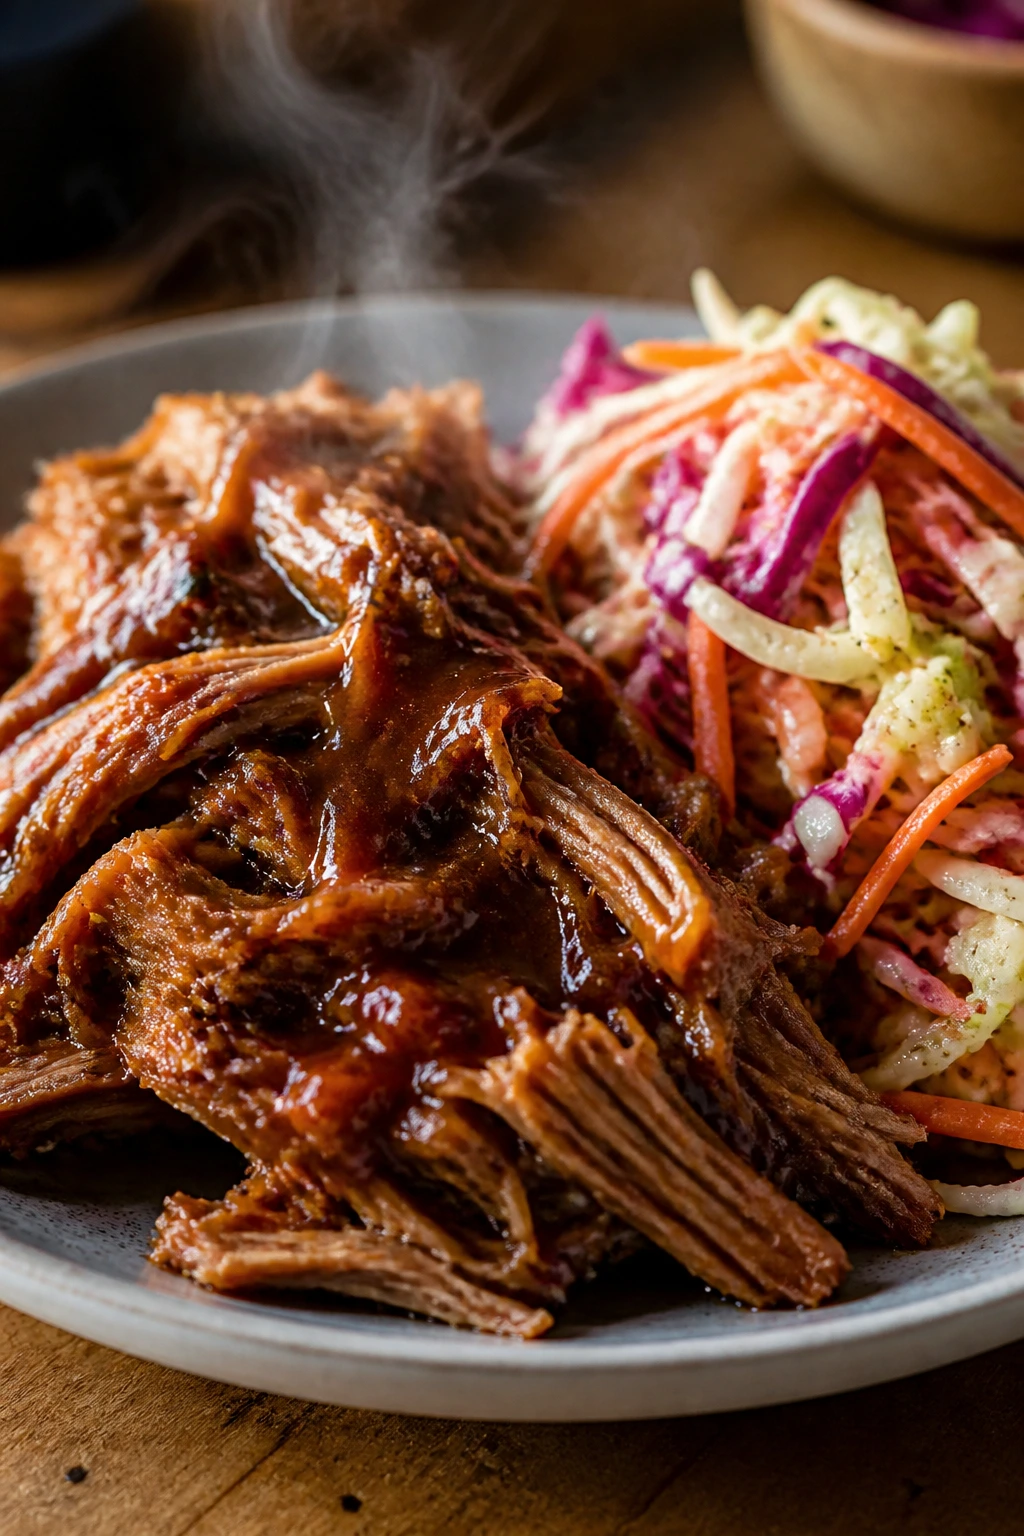
Pulled pork is the dinner that keeps on giving. First it goes on a plate with potatoes or buns. Then it becomes lunch tacos, grain bowls, or a sandwich that tastes like you planned ahead. Slow-cooked pork shoulder shreds into soft strands that stay juicy even after reheating, which is why it earns a spot here without argument.
Why It Works
The shoulder cut has enough fat and connective tissue to stay tender through a long cook and a second round in the microwave. A little sauce mixed back into the shredded pork keeps it from drying out. The slaw gives you crunch on day one, but it also has a job on day two: fresh, acidic slaw cuts through the richness and keeps the lunch from feeling heavy.
Key Ingredients
- 3 pounds pork shoulder — also called pork butt.
- 2 teaspoons kosher salt — season the roast all the way around.
- 1 tablespoon brown sugar — helps the crust darken.
- 1 tablespoon paprika — brings color and a mild smoky note.
- 2 teaspoons garlic powder — easier than fresh garlic for a dry rub.
- 1 teaspoon black pepper — keeps the flavor sharp.
- 1 cup chicken broth or apple cider — keeps the pot from drying out.
- 1/2 cup barbecue sauce — stir in at the end, not the start.
- 4 cups shredded cabbage — the base of the slaw.
- 2 carrots, grated — for sweetness and crunch.
- 1/4 cup mayonnaise and 2 tablespoons apple cider vinegar — the slaw dressing.
Quick Steps
-
Season the Pork: Pat the pork dry, then rub it all over with salt, brown sugar, paprika, garlic powder, and pepper.
-
Cook Low and Slow: Place it in a slow cooker with broth or cider. Cook on low for 8 hours or on high for 4 to 5 hours, until the meat pulls apart easily with two forks.
-
Shred and Sauce: Remove the pork, shred it, and mix in barbecue sauce plus a little of the cooking liquid. Keep the meat juicy, not soupy.
-
Mix the Slaw: Toss the cabbage, carrots, mayo, vinegar, and a pinch of salt. It should taste bright and a little punchy.
-
Build the Meal: Pile the pork onto buns, tortillas, or rice bowls and top with slaw.
-
Store Smart: Keep pork and slaw separate in the fridge so the slaw stays crisp.
Tips and Variations
- Lunch Move: Pulled pork makes a strong next-day sandwich with pickles and mustard.
- Flavor Boost: A splash of hot sauce in the shredded pork keeps it from tasting flat.
- Swap It: Use the same method with boneless chicken thighs if pork shoulder is out of reach.
7. Classic Shepherd’s Pie
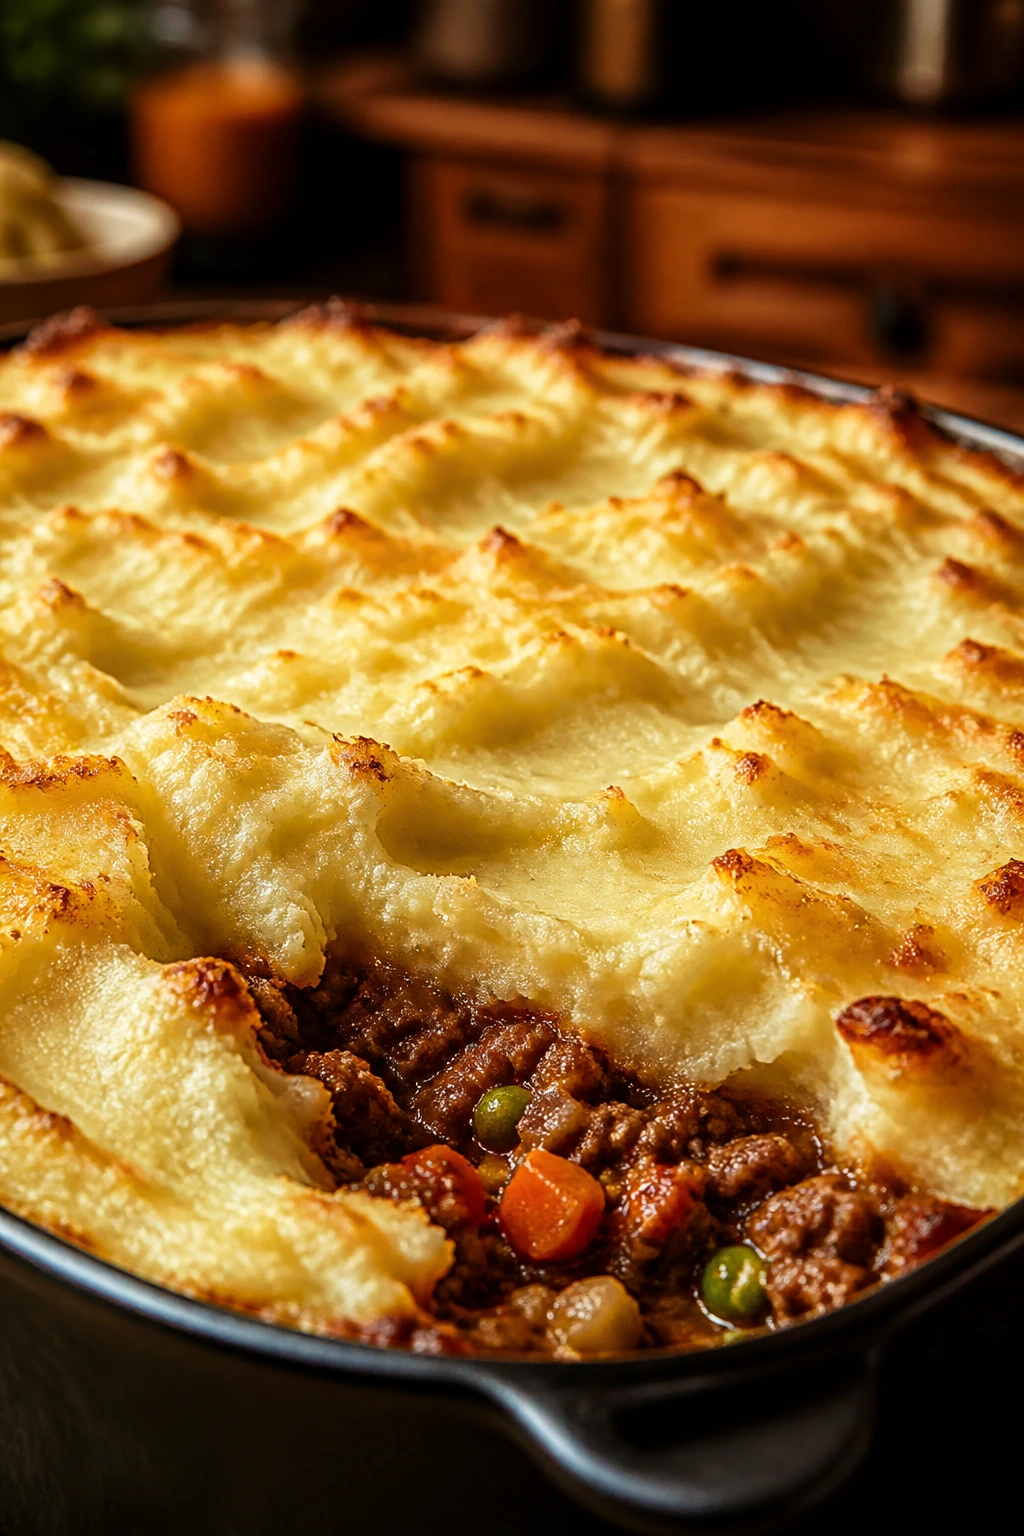
Shepherd’s pie has a way of looking humble and tasting like a full-on answer to a long day. The mashed potato top turns golden in the oven, the savory filling stays tucked beneath it, and the whole thing slices into neat squares that reheat without drama. That matters for lunch. Nobody wants a casserole that collapses into a puddle.
Why It Works
The mashed potato layer acts like a lid, trapping moisture in the meat filling so the bottom stays rich. The filling itself is sturdy, built on carrots, onion, and peas, so it doesn’t go grainy or dry after a night in the fridge. I also like that it’s easy to portion. One square, a little salad, done.
Key Ingredients
- 1 1/2 pounds ground beef or lamb — lamb is traditional, beef is easier to find.
- 1 tablespoon olive oil — only if the meat is lean.
- 1 medium onion, diced — the base flavor.
- 2 carrots, diced small — soften into the filling.
- 1 tablespoon tomato paste — gives the gravy depth.
- 1 tablespoon Worcestershire sauce — sharpens the meaty flavor.
- 1 tablespoon flour — thickens the filling slightly.
- 1 cup beef broth — enough to make a loose gravy.
- 1 cup frozen peas — stir in near the end.
- 4 cups mashed potatoes — made with butter and milk.
- 1/2 cup shredded cheddar — optional, but nice on top.
Quick Steps
-
Cook the Filling: Brown the beef or lamb in a skillet over medium-high heat. Drain excess fat if needed.
-
Add Vegetables: Stir in the onion and carrots and cook for 5 minutes until the onion softens.
-
Make It Saucy: Add tomato paste, Worcestershire, and flour. Cook for 1 minute, then pour in the broth and simmer until the filling thickens.
-
Finish the Filling: Stir in the peas and season with salt and pepper. The mixture should be thick, not soupy.
-
Top with Potatoes: Spread the meat filling in a baking dish and cover it with mashed potatoes, making little ridges with a fork so the top browns.
-
Bake and Rest: Bake at 400°F for 25 minutes until the top is golden and the edges are bubbling. Rest for 10 minutes before serving.
Tips and Variations
- Lunch Move: Warm it in a skillet if you want a crisp bottom.
- Flavor Boost: A little grated cheese on the potatoes gives you a browned top.
- Swap It: Sweet potato mash makes a sweeter version that still packs well.
8. Sheet-Pan Chicken Thighs with Potatoes and Green Beans
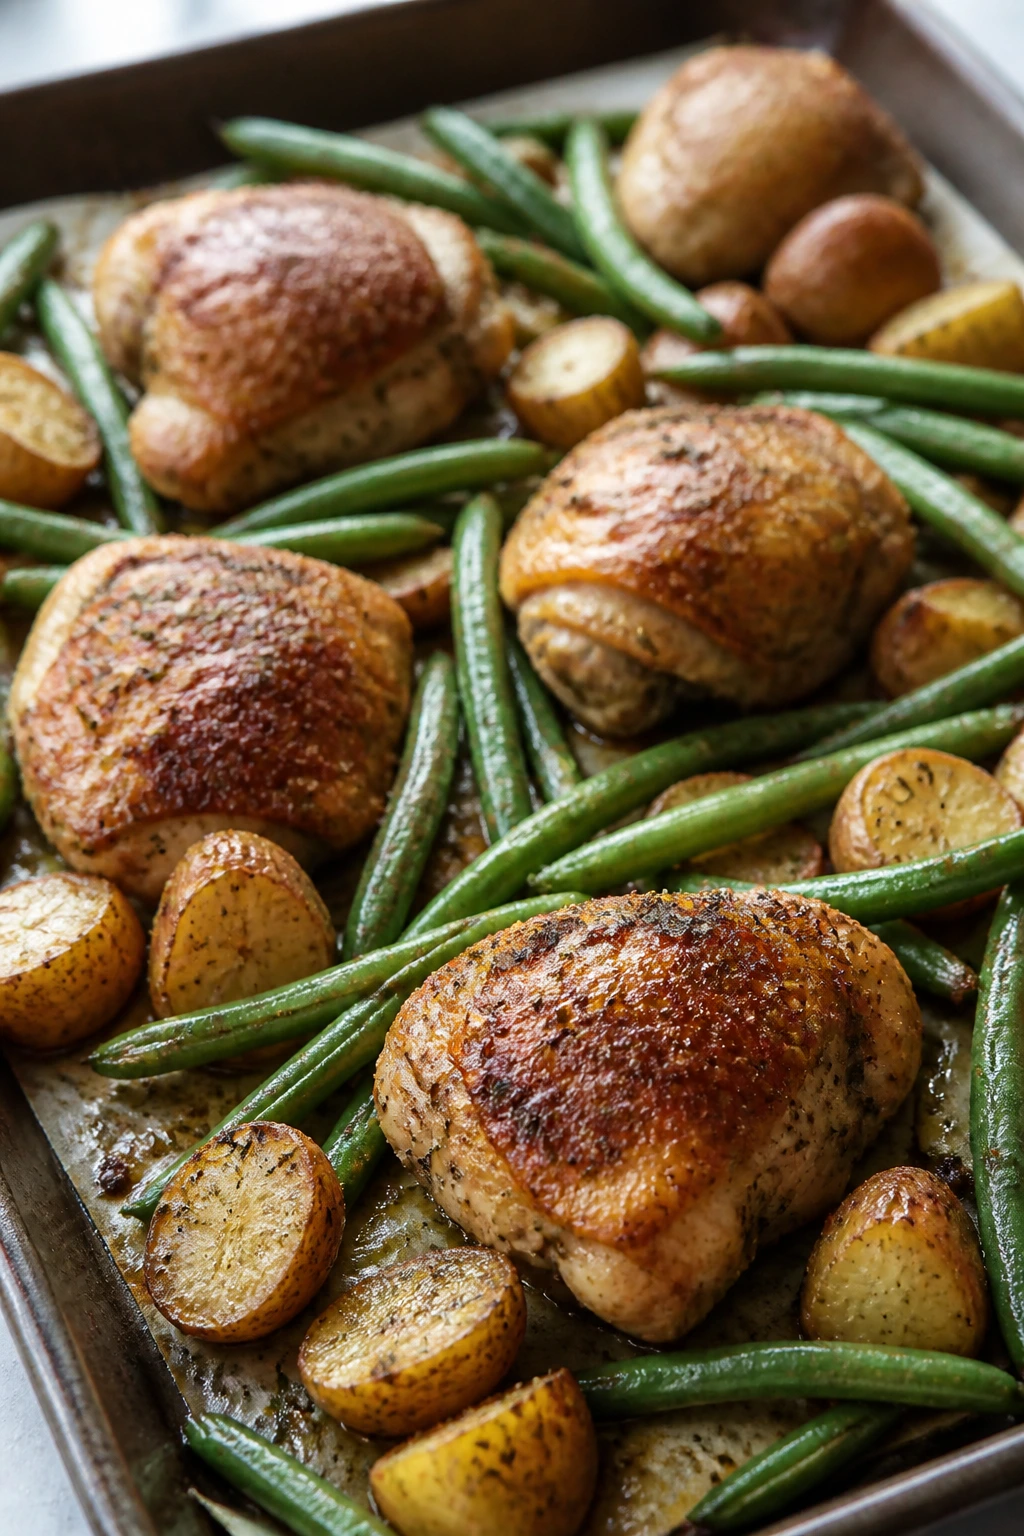
This is the cleanest kind of dinner: one pan, crisp edges, and enough leftovers to build lunch around. Chicken thighs stay juicy where breasts often dry out, and roasted potatoes hold their shape much better than mashed ones in a container. Green beans round out the tray without turning everything mushy.
Why It Works
The bones and skin on chicken thighs protect the meat from drying during reheating. Potatoes catch the pan juices, which is exactly what you want the next day. The trick is roasting in stages so the vegetables brown instead of steaming. It’s not fancy. It just works.
Key Ingredients
- 2 pounds bone-in, skin-on chicken thighs — best for flavor and moisture.
- 1 1/2 pounds baby potatoes, halved — small potatoes roast evenly.
- 12 ounces green beans, trimmed — add them later so they stay bright.
- 3 tablespoons olive oil — enough to coat the tray.
- 2 teaspoons garlic powder — easy seasoning that sticks.
- 1 teaspoon smoked paprika — gives the chicken color.
- 1 teaspoon kosher salt — more if your potatoes are large.
- 1/2 teaspoon black pepper — basic, but necessary.
- 1 lemon, cut into wedges — squeeze at the end.
- 1 tablespoon chopped parsley or thyme — fresh finish.
Quick Steps
-
Heat the Oven: Preheat to 425°F and line a sheet pan with parchment for easier cleanup.
-
Start the Potatoes: Toss the potatoes with half the oil, half the seasoning, and spread them cut side down. Roast for 15 minutes.
-
Season the Chicken: Rub the thighs with the remaining oil, garlic powder, paprika, salt, and pepper.
-
Add the Chicken: Nestle the thighs among the potatoes and roast for 20 minutes.
-
Add the Green Beans: Toss the green beans with a little oil and scatter them on the pan. Roast for 10 to 12 minutes more until the chicken skin is crisp and the thighs read 165°F in the thickest part.
-
Finish and Pack: Squeeze lemon over the tray. For lunch, slice the chicken off the bone and pack it with potatoes and beans, or serve over rice.
Tips and Variations
- Lunch Move: It’s good cold over greens with a mustard vinaigrette.
- Flavor Boost: A spoonful of pesto on the chicken after reheating gives it a fresher feel.
- Swap It: Use broccoli florets instead of green beans if that’s what’s in the fridge.
9. Beef and Broccoli Stir-Fry
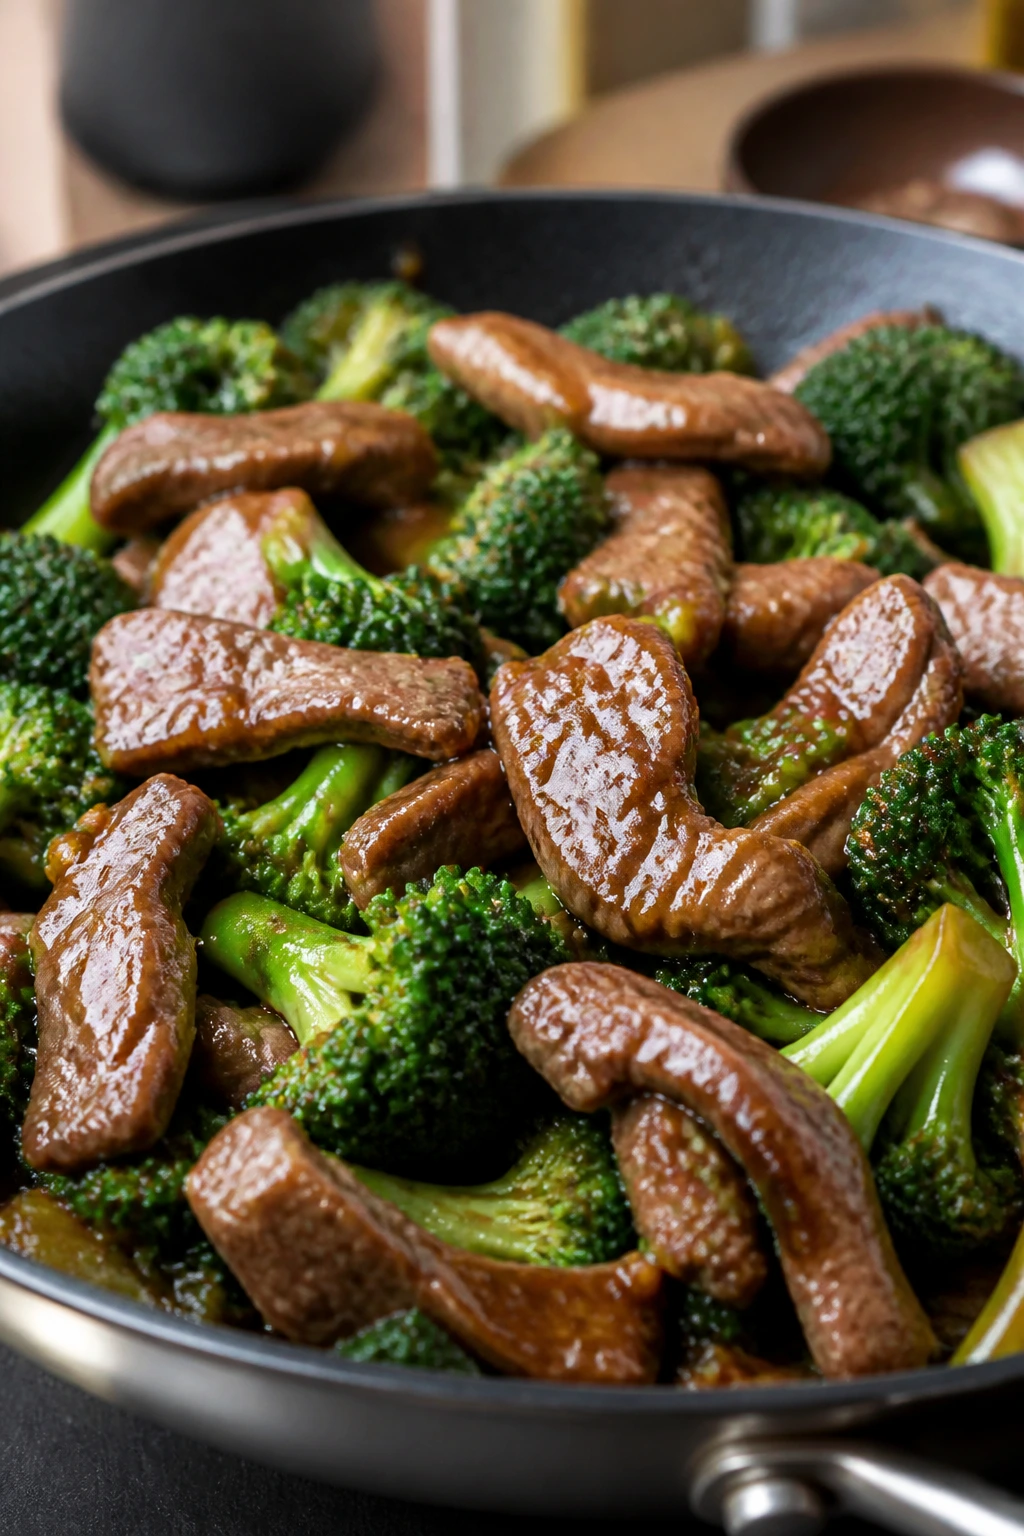
Beef and broccoli can taste like takeout, but only if you keep the sauce balanced and the meat sliced thin. The good version is glossy, a little garlicky, and just thick enough to cling to rice. It reheats well because the sauce keeps the steak from turning leathery.
Why It Works
Stir-fry leftovers live or die by the cut of meat and the sauce. Flank steak or sirloin sliced against the grain stays tender, and the cornstarch in the sauce helps everything gloss over the rice instead of pooling at the bottom. Broccoli is sturdy enough for lunch, especially if you keep it crisp-tender instead of cooking it into mush.
Key Ingredients
- 1 pound flank steak or sirloin, thinly sliced — slice against the grain.
- 1 tablespoon soy sauce — for a quick marinade.
- 1 tablespoon cornstarch — helps the sauce cling.
- 1 tablespoon sesame oil — use a little; it’s strong.
- 4 cups broccoli florets — bite-size pieces cook evenly.
- 3 cloves garlic, minced — the stir-fry should smell like garlic early on.
- 1 tablespoon grated ginger — gives the sauce bite.
- 1/4 cup soy sauce — for the main sauce.
- 1/2 cup beef broth or water — loosens the sauce.
- 2 tablespoons brown sugar — balances the salt.
- 2 cups cooked rice — long-grain rice works best here.
Quick Steps
-
Mix the Sauce: Stir together soy sauce, beef broth, and brown sugar in a small bowl. Set it aside.
-
Marinate the Beef: Toss the sliced steak with soy sauce and cornstarch. Let it sit for 10 minutes while you prep the broccoli.
-
Blanch the Broccoli: Cook the broccoli in boiling water for 1 minute, then drain. This keeps it green and crisp.
-
Sear the Beef: Heat a large skillet or wok until very hot. Add a little oil and cook the beef in a single layer for 1 to 2 minutes per side, just until browned. Pull it out before it overcooks.
-
Build the Sauce: Add the garlic and ginger, cook for 30 seconds, then pour in the sauce. Simmer until it turns glossy and slightly thick.
-
Finish the Pan: Return the beef and broccoli to the skillet and toss to coat. Serve over rice and cool leftovers quickly in shallow containers.
Tips and Variations
- Lunch Move: Keep the rice separate if you want firmer grains.
- Flavor Boost: A few drops of chili oil at serving time sharpen the dish.
- Swap It: Thinly sliced chicken thighs can replace the beef without changing the method much.
10. Sausage, Peppers, and Onions Pasta
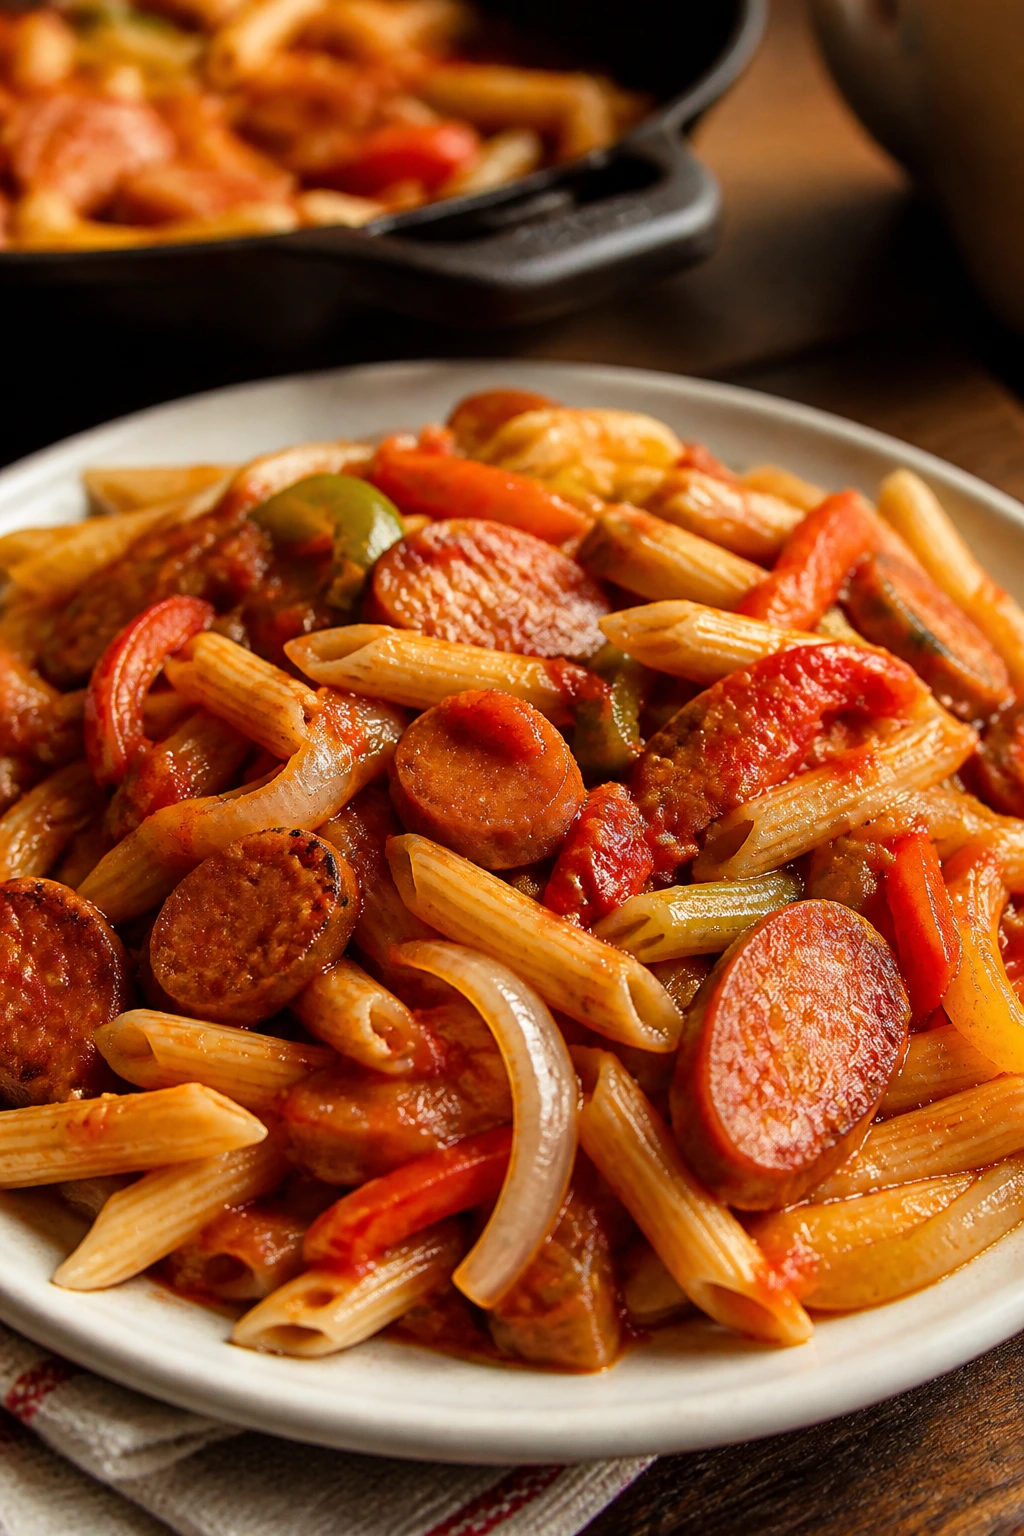
This is one of those meals that looks like it came together by accident and tastes like you knew exactly what you were doing. Sausage, peppers, and onions make a sweet-savory mix that settles beautifully into pasta. The next day, the sauce thickens and clings even better.
Why It Works
Tomato-based sausage sauces are built for leftovers because the fat from the sausage and the sweetness of the peppers create a sauce that doesn’t dry out easily. Penne or rigatoni catches the sauce in the ridges and tubes, which is why this lunch feels more satisfying than a plain pasta bowl. It’s also a good way to use whatever peppers are hanging around the crisper.
Key Ingredients
- 1 pound Italian sausage, sliced or crumbled — mild or hot.
- 2 bell peppers, sliced — use different colors if you like.
- 1 large onion, sliced — the sweeter, the better.
- 3 cloves garlic, minced — adds depth at the end.
- 2 tablespoons tomato paste — thickens the sauce fast.
- 1 (28-ounce) can crushed tomatoes — forms the base.
- 12 ounces penne or rigatoni — ridged pasta holds sauce best.
- 1 teaspoon Italian seasoning — dried oregano and basil both work.
- Pinch of red pepper flakes — optional.
- 1/2 cup grated Parmesan — for serving.
Quick Steps
-
Brown the Sausage: Cook the sausage in a large skillet over medium heat until browned, then transfer it to a plate.
-
Soften the Vegetables: Add the peppers and onions to the skillet and cook for 8 minutes until soft and lightly caramelized.
-
Add Garlic and Paste: Stir in the garlic and tomato paste, cooking for 1 minute until the paste darkens slightly.
-
Make the Sauce: Add the crushed tomatoes, Italian seasoning, and red pepper flakes. Return the sausage to the pan and simmer for 15 to 20 minutes.
-
Cook the Pasta: Boil the pasta until just al dente. Drain and save a little pasta water.
-
Toss and Finish: Mix the pasta with the sauce and a splash of pasta water if needed. Serve with Parmesan and cool the extras before refrigerating.
Tips and Variations
- Lunch Move: It’s good in a bowl, but it’s even better in a toasted roll.
- Flavor Boost: A spoonful of basil pesto stirred in at the end adds freshness.
- Swap It: Use plant-based sausage if you want the same shape and seasoning without the meat.
11. White Bean, Ham, and Kale Soup
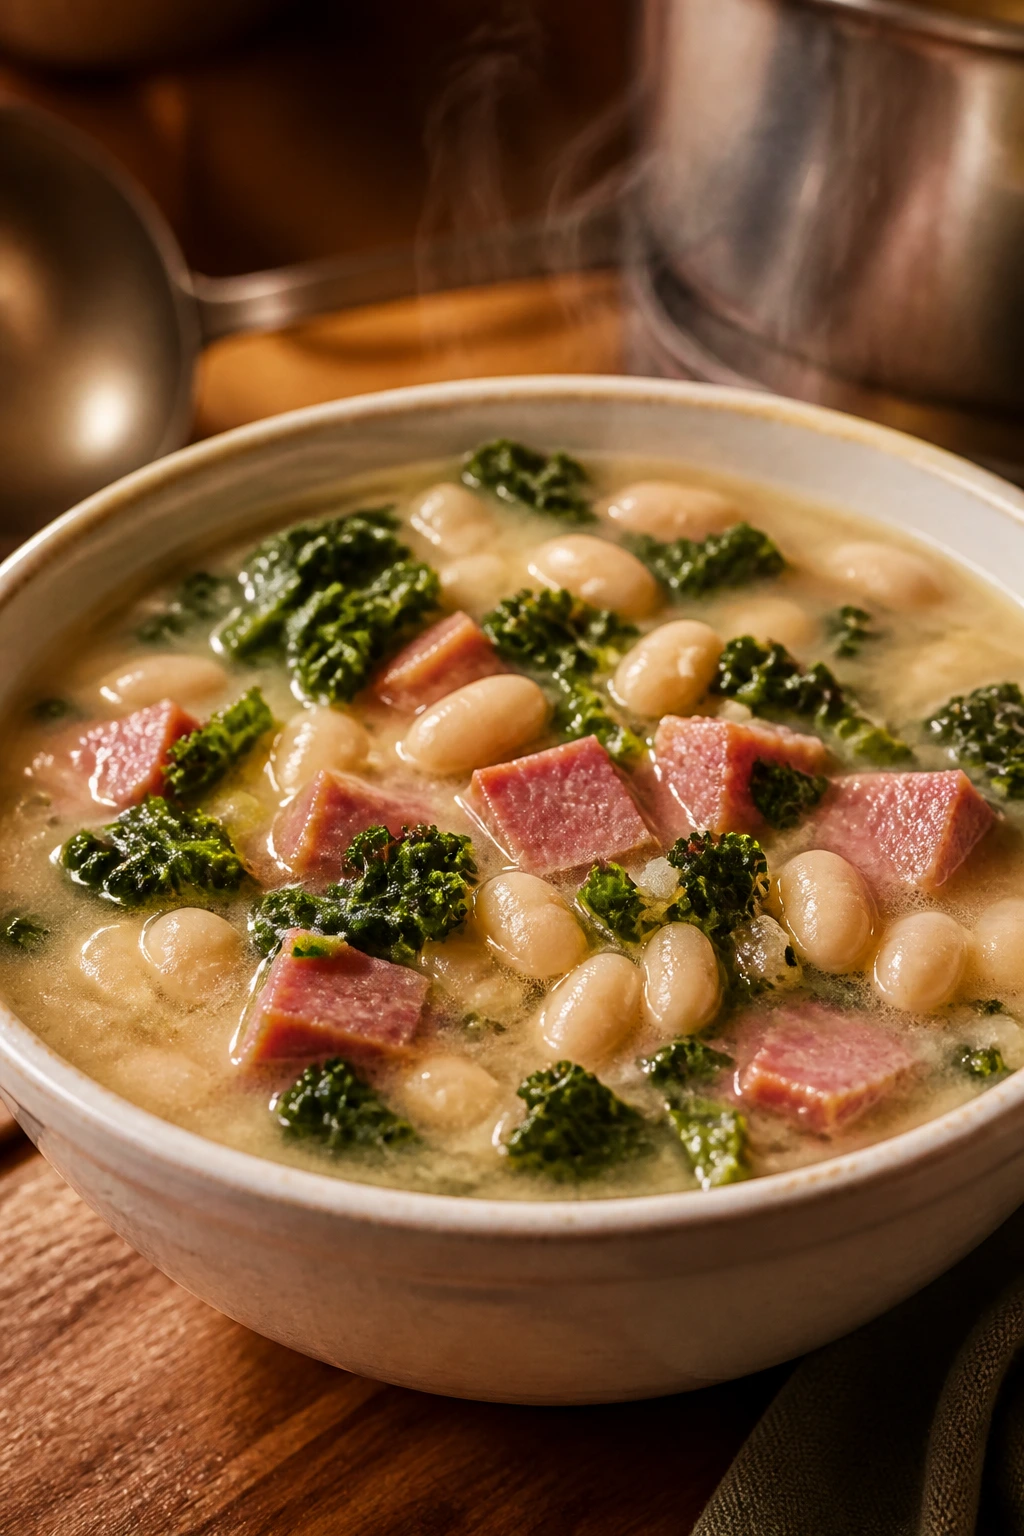
Soup may be the easiest leftover of all, and this one does not need much convincing. White beans make the broth creamy, ham adds salty depth, and kale keeps the bowl from feeling too soft. It’s the sort of lunch that warms you before you’ve even found a spoon.
Why It Works
Beans break down a little in the pot, which naturally thickens the soup without flour or cream. Ham brings enough salt and smoke to keep the flavor interesting after refrigeration, and the broth develops a fuller taste by the next day. If you want a soup that reheats cleanly in a microwave or a saucepan, this is a good place to start.
Key Ingredients
- 2 tablespoons olive oil — for the vegetable base.
- 1 large onion, diced — the first layer of flavor.
- 2 carrots, diced — soften into the broth.
- 2 celery stalks, diced — classic soup backbone.
- 3 cloves garlic, minced — added after the vegetables soften.
- 2 cups diced ham or 1 ham hock — ham hock gives more broth flavor.
- 2 (15-ounce) cans white beans, drained and rinsed — cannellini or great northern.
- 6 cups chicken broth — enough liquid to simmer well.
- 1 bay leaf — subtle but worth it.
- 2 cups chopped kale — stir in near the end.
- Black pepper — ham brings most of the salt.
Quick Steps
-
Cook the Vegetables: Warm the oil in a soup pot and cook the onion, carrots, and celery for 6 to 8 minutes until softened.
-
Add Garlic and Ham: Stir in the garlic and ham and cook for 1 minute until fragrant.
-
Build the Broth: Add the beans, broth, bay leaf, and a few grinds of black pepper. Bring the pot to a simmer.
-
Simmer: Cook for 25 to 30 minutes so the beans soften further and the broth turns creamier.
-
Thicken a Little: Mash some of the beans against the side of the pot with a spoon if you want a thicker soup.
-
Finish with Kale: Stir in the kale and cook for 3 to 4 minutes until just tender. Remove the bay leaf before serving.
Tips and Variations
- Lunch Move: Pack it in a thermos; it holds heat well.
- Flavor Boost: A splash of sherry vinegar brightens the soup at the end.
- Swap It: Leave out the ham and add extra beans plus a little smoked paprika for a vegetarian version.
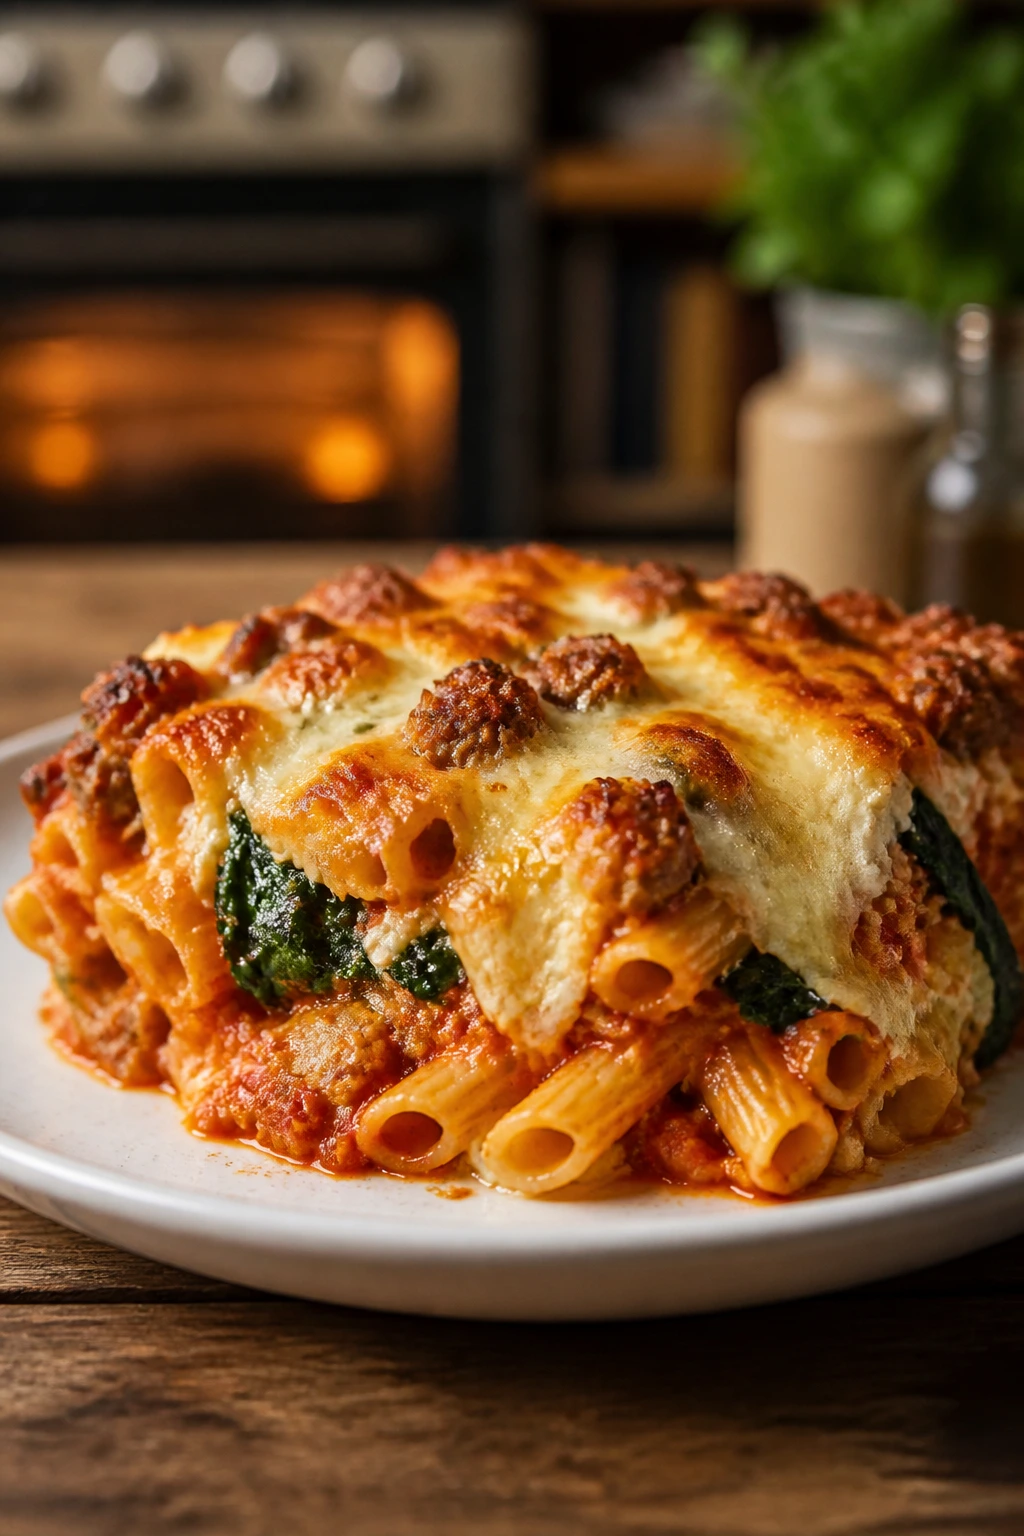
12. Lasagna Roll-Ups
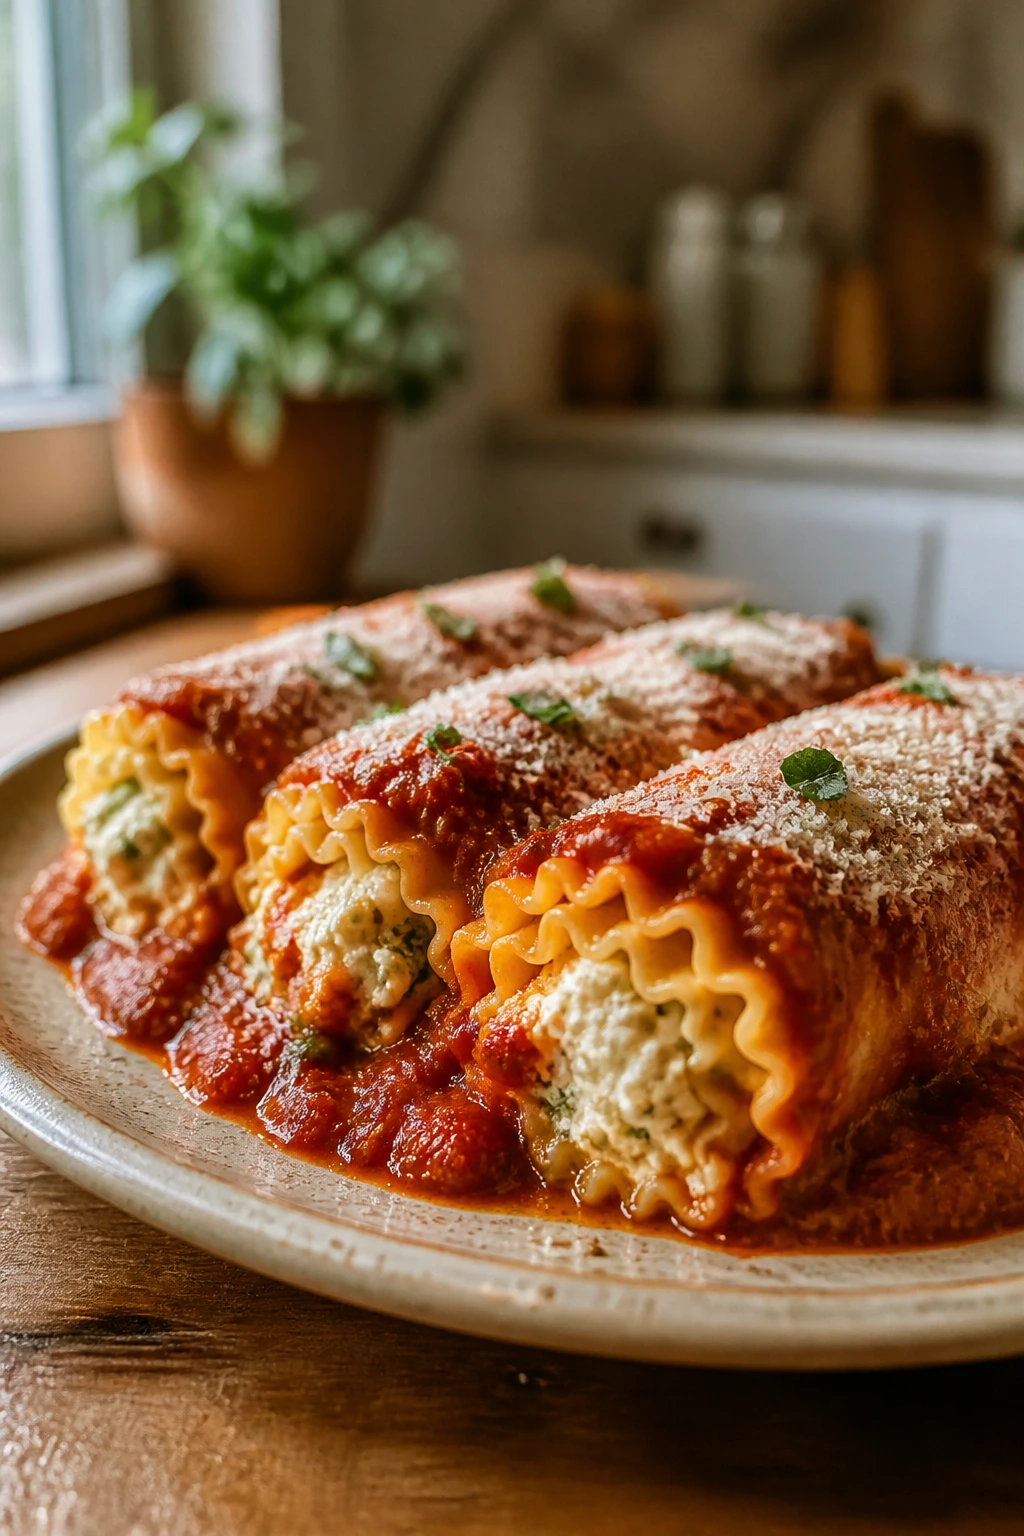
Roll-ups are lasagna without the heavy lifting. Each noodle gets its own filling, which makes portioning easier and leftovers cleaner. The sauce keeps the edges from drying out, and the individual rolls reheat faster than a full slab of lasagna.
Why It Works
This format gives you all the things people love about lasagna—ricotta, spinach, mozzarella, tomato sauce—without the risk of a center that falls apart when cut. Because each roll is separate, lunch portions are neat and predictable. That sounds small, but it matters when you want a meal that feels packed with care instead of hacked apart.
Key Ingredients
- 12 lasagna noodles — cooked just until flexible.
- 2 cups ricotta cheese — the creamy filling.
- 1 large egg — helps the filling hold shape.
- 2 cups shredded mozzarella — for melting and stretch.
- 1/2 cup grated Parmesan — sharp and salty.
- 2 cups chopped spinach — squeezed dry if thawed from frozen.
- 2 cups marinara sauce — enough for the pan and the tops.
- 1 clove garlic, minced — optional, but it wakes up the filling.
- 1 tablespoon chopped basil — fresh flavor on top.
- Olive oil — to keep the noodles from sticking.
Quick Steps
-
Cook the Noodles: Boil the lasagna noodles until pliable but not fully soft. Drain and lay them flat on a lightly oiled tray.
-
Mix the Filling: Stir together ricotta, egg, mozzarella, Parmesan, spinach, garlic, basil, and a pinch of salt.
-
Fill and Roll: Spread a layer of filling along each noodle, then roll it up from one end.
-
Add Sauce: Spoon a little marinara into the bottom of a baking dish, arrange the rolls seam-side down, then spoon the remaining sauce on top.
-
Bake: Cover and bake at 375°F for 25 minutes. Uncover for the last 10 minutes so the tops get a little color.
-
Rest and Pack: Let the roll-ups sit for 10 minutes before serving or storing so the filling firms up.
Tips and Variations
- Lunch Move: Two rolls make a solid lunch without feeling too heavy.
- Flavor Boost: A few dots of pesto over the top after reheating add freshness.
- Swap It: Substitute cottage cheese for part of the ricotta if that’s what’s in the fridge.
13. Stuffed Bell Peppers
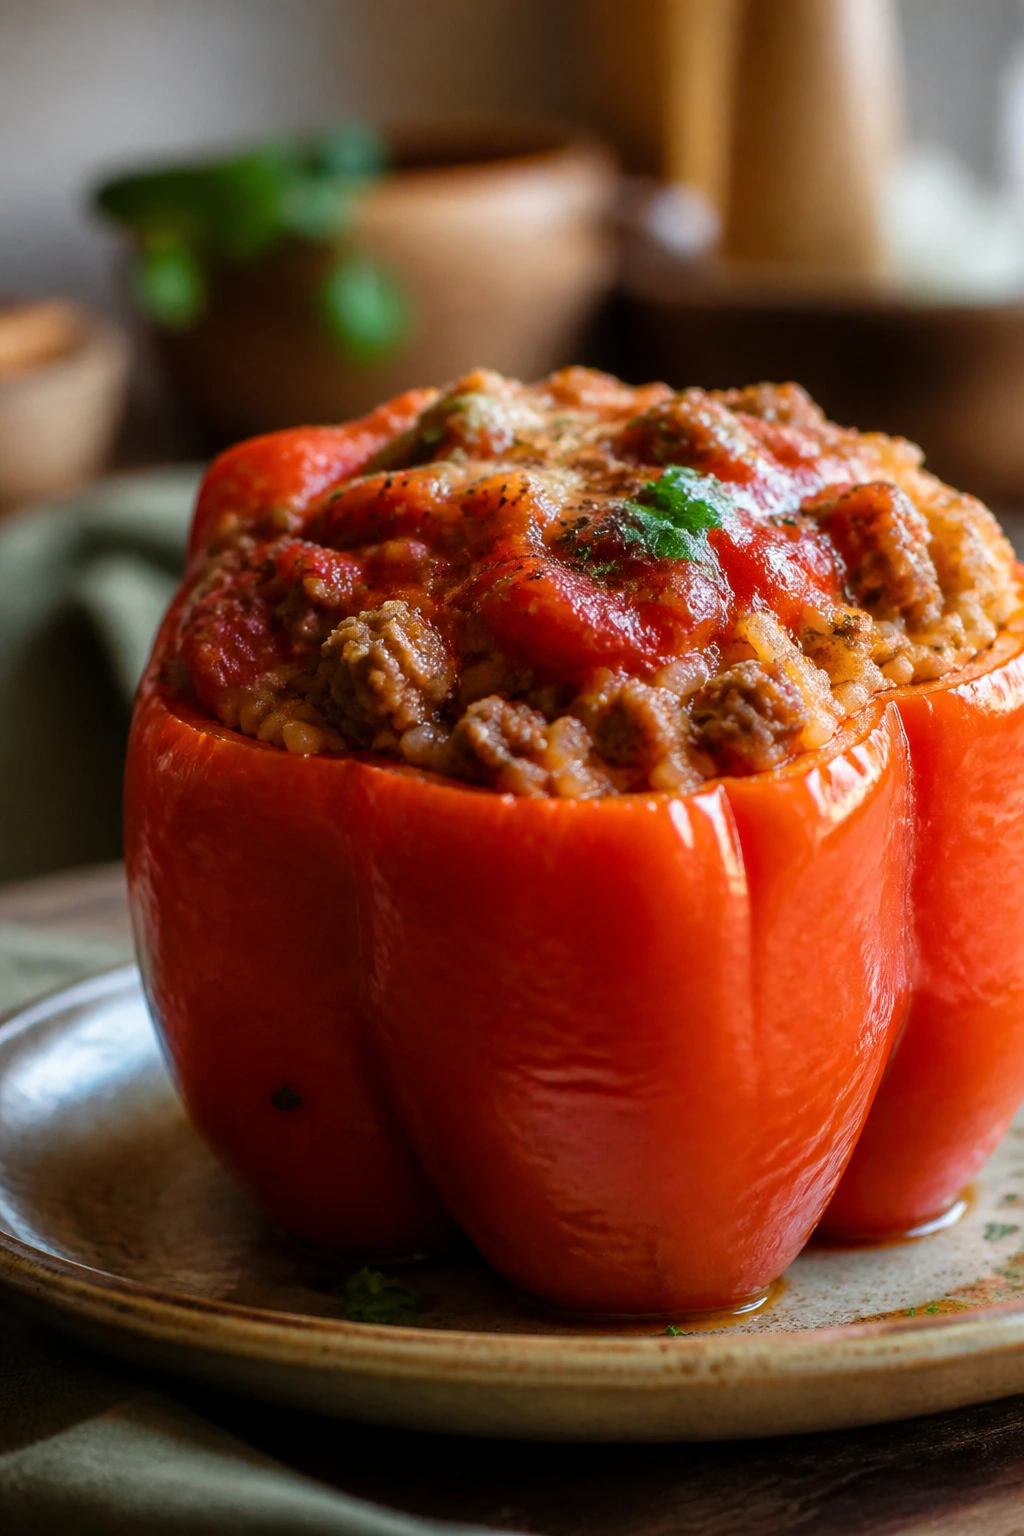
Stuffed peppers solve two problems at once: they use up cooked grain or rice, and they package neatly into their own edible containers. The peppers soften in the oven, the filling gets savory and rich, and the next-day lunch still looks like an actual meal instead of a plateful of leftovers.
Why It Works
Bell peppers hold together better than a lot of lunch vegetables, which means they can be reheated without collapsing. The rice and meat filling soaks up tomato juices as it sits, making the flavor deeper after a night in the fridge. I also like that each pepper is its own portion. No guesswork.
Key Ingredients
- 6 large bell peppers — choose ones with flat bottoms if you can.
- 1 pound ground turkey or beef — turkey is leaner, beef is richer.
- 1 tablespoon olive oil — for the filling.
- 1 medium onion, diced — adds sweetness and structure.
- 2 cloves garlic, minced — keep it brief in the pan.
- 1 cup cooked rice — white or brown both work.
- 1 (14.5-ounce) can diced tomatoes, drained slightly — keeps the filling moist.
- 1 teaspoon dried oregano — gives the mix a Mediterranean edge.
- 1 cup shredded cheese — cheddar, mozzarella, or Monterey Jack.
- Salt and black pepper — season the filling well.
Quick Steps
-
Prep the Peppers: Slice the tops off the peppers and remove the seeds. If the peppers wobble, trim a thin slice from the bottom so they sit flat.
-
Cook the Filling: Brown the meat in a skillet with the onion and garlic. Stir in the rice, tomatoes, oregano, salt, and pepper.
-
Pre-Bake the Peppers: Set the peppers in a baking dish, add a splash of water to the bottom, and bake at 375°F for 10 minutes so they soften a little first.
-
Stuff Them: Fill each pepper with the meat mixture and top with cheese.
-
Bake Again: Cover and bake for 25 minutes, then uncover for 10 more until the cheese melts and the peppers are tender.
-
Cool Before Packing: Let them rest for 10 minutes so the filling settles and doesn’t spill everywhere.
Tips and Variations
- Lunch Move: Slice them in half lengthwise for an easier lunch container fit.
- Flavor Boost: Stir a spoonful of salsa into the filling for extra tang.
- Swap It: Use quinoa instead of rice if you want a slightly firmer, nutty filling.
14. Chicken Tikka Masala
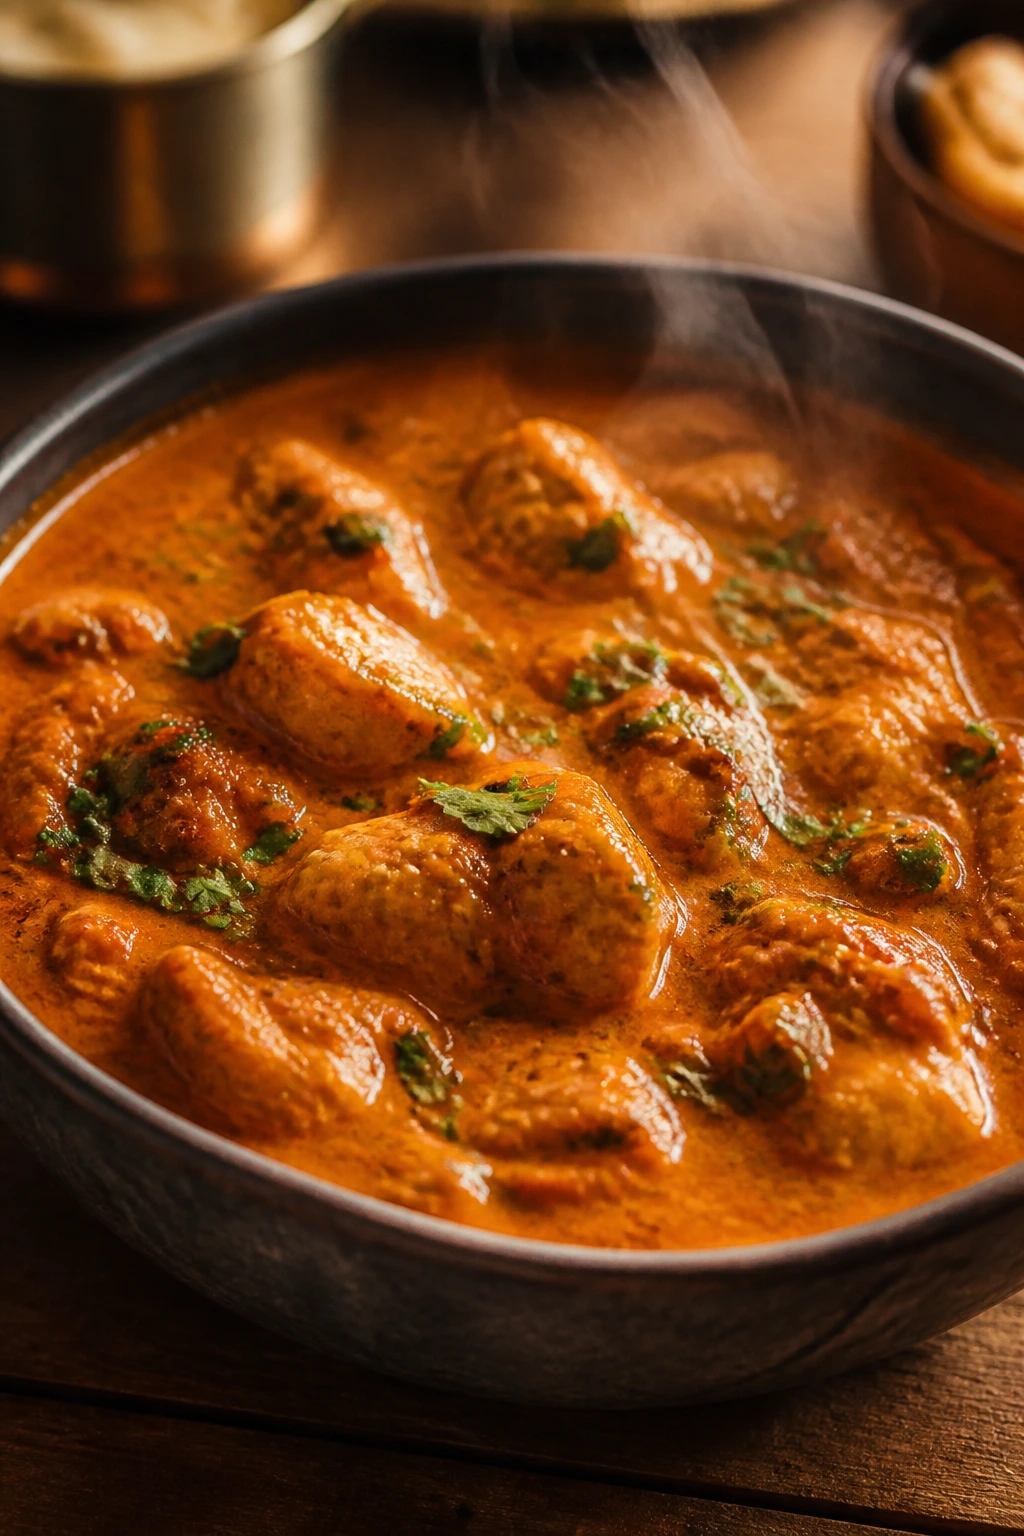
This is the richest dinner on the list, and it still deserves a place because the sauce gets better after a night in the fridge. The tomatoes, spices, and cream settle into something deeper and smoother, while the chicken stays tender enough to reheat well if you use thighs. It’s a lunch that feels like an upgrade, not leftovers.
Why It Works
Tikka masala is built around sauce, and sauce is what keeps lunch from drying out. A yogurt marinade helps the chicken stay soft, the spice blend holds onto flavor, and the finished dish reheats gently without falling apart. Serve it with rice, and the grains catch the sauce so nothing goes to waste.
Key Ingredients
- 1 1/2 pounds boneless, skinless chicken thighs — best for reheating.
- 1/2 cup plain yogurt — tenderizes the chicken.
- 2 tablespoons lemon juice — brightens the marinade.
- 2 teaspoons garam masala — the main spice note.
- 1 teaspoon turmeric — for color and warmth.
- 1 teaspoon ground cumin — grounds the sauce.
- 1 large onion, diced — builds the base.
- 3 cloves garlic, minced — don’t let it burn.
- 1 tablespoon grated ginger — gives the sauce lift.
- 1 (14-ounce) can crushed tomatoes — the tomato base.
- 1 cup cream or full-fat coconut milk — makes the sauce silky.
- Cooked basmati rice — for serving.
Quick Steps
-
Marinate the Chicken: Stir yogurt, lemon juice, garam masala, turmeric, cumin, and a little salt together. Coat the chicken and let it sit for at least 20 minutes.
-
Sear the Chicken: Cook the chicken in a hot skillet until browned on both sides, then set it aside. It does not need to cook through yet.
-
Make the Sauce: In the same pan, cook the onion for 5 minutes, then add garlic and ginger for 30 seconds.
-
Simmer the Tomatoes: Pour in the crushed tomatoes and cook for 10 minutes until the sauce darkens slightly and loses its sharp edge.
-
Finish the Dish: Stir in cream or coconut milk, return the chicken, and simmer until the chicken is cooked through and the sauce turns glossy.
-
Pack for Lunch: Cool the curry in shallow containers and serve it with rice. The sauce should be spoonable, not watery.
Tips and Variations
- Lunch Move: Reheat gently so the sauce doesn’t split.
- Flavor Boost: A pinch of sugar can smooth out sharp tomatoes if needed.
- Swap It: Paneer makes a solid vegetarian version if you want the same sauce with less work.
15. Braised Pot Roast with Root Vegetables
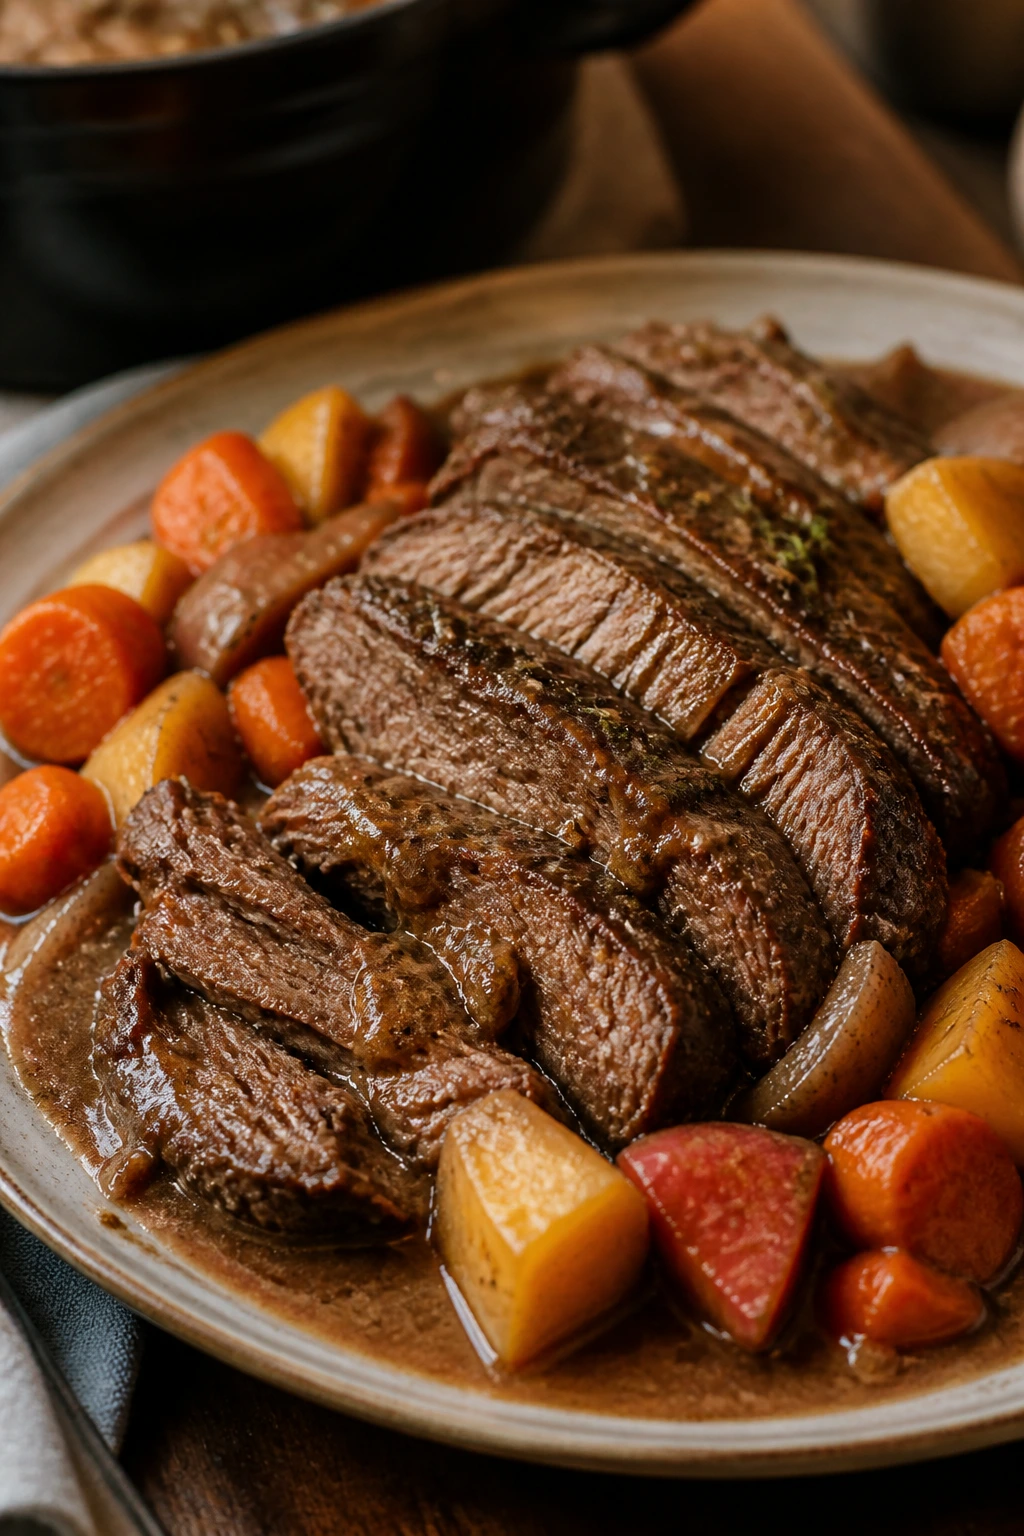
Pot roast is the oldest trick in the leftover playbook, and for good reason. Chuck roast turns tender with time, carrots and potatoes pick up the pan juices, and the gravy keeps everything respectable in a lunch box. It’s one of the rare dinners that feels even more settled the next day.
Why It Works
Chuck roast has connective tissue that melts during a long braise, which is why it stays juicy instead of stringy. Root vegetables can handle that same long cook without falling apart completely. The result is a meal that slices cleanly, reheats well, and tastes like it spent the night getting smarter.
Key Ingredients
- 3 to 4 pounds chuck roast — look for good marbling.
- 2 tablespoons oil — for browning the meat.
- 1 large onion, sliced — it softens into the braising liquid.
- 4 carrots, cut into chunks — sturdy enough for a long cook.
- 3 celery stalks, cut into chunks — classic pot roast flavor.
- 4 cloves garlic, smashed — they melt into the gravy.
- 2 tablespoons tomato paste — deepens the sauce.
- 3 cups beef broth — the braising liquid.
- 1 cup red wine or extra broth — wine adds depth, broth keeps it simple.
- 2 sprigs rosemary and 2 bay leaves — the herb backbone.
- 1 1/2 pounds potatoes, halved — they hold their shape better than mashed potatoes here.
Quick Steps
-
Sear the Roast: Pat the roast dry, season it heavily with salt and pepper, and brown it in oil in a Dutch oven over medium-high heat.
-
Cook the Aromatics: Remove the roast and add the onion, carrots, celery, and garlic. Cook for 5 minutes until the vegetables start to soften.
-
Add the Paste and Liquid: Stir in tomato paste, then pour in the broth and wine. Scrape up the browned bits from the pot.
-
Braise: Return the roast, add rosemary and bay leaves, cover, and bake at 300°F for about 3 hours. Add the potatoes for the last 90 minutes so they do not turn to mush.
-
Check for Tenderness: The roast should pull apart easily with a fork when it is ready.
-
Serve and Store: Slice or shred, spoon over the vegetables, and keep the gravy with the meat for lunch leftovers.
Tips and Variations
- Lunch Move: It’s excellent over buttered noodles or mashed potatoes the next day.
- Flavor Boost: A spoonful of horseradish in the gravy adds a nice bite.
- Swap It: Use parsnips or turnips alongside the carrots for a slightly sweeter, earthier pot.
16. Chicken Fried Rice
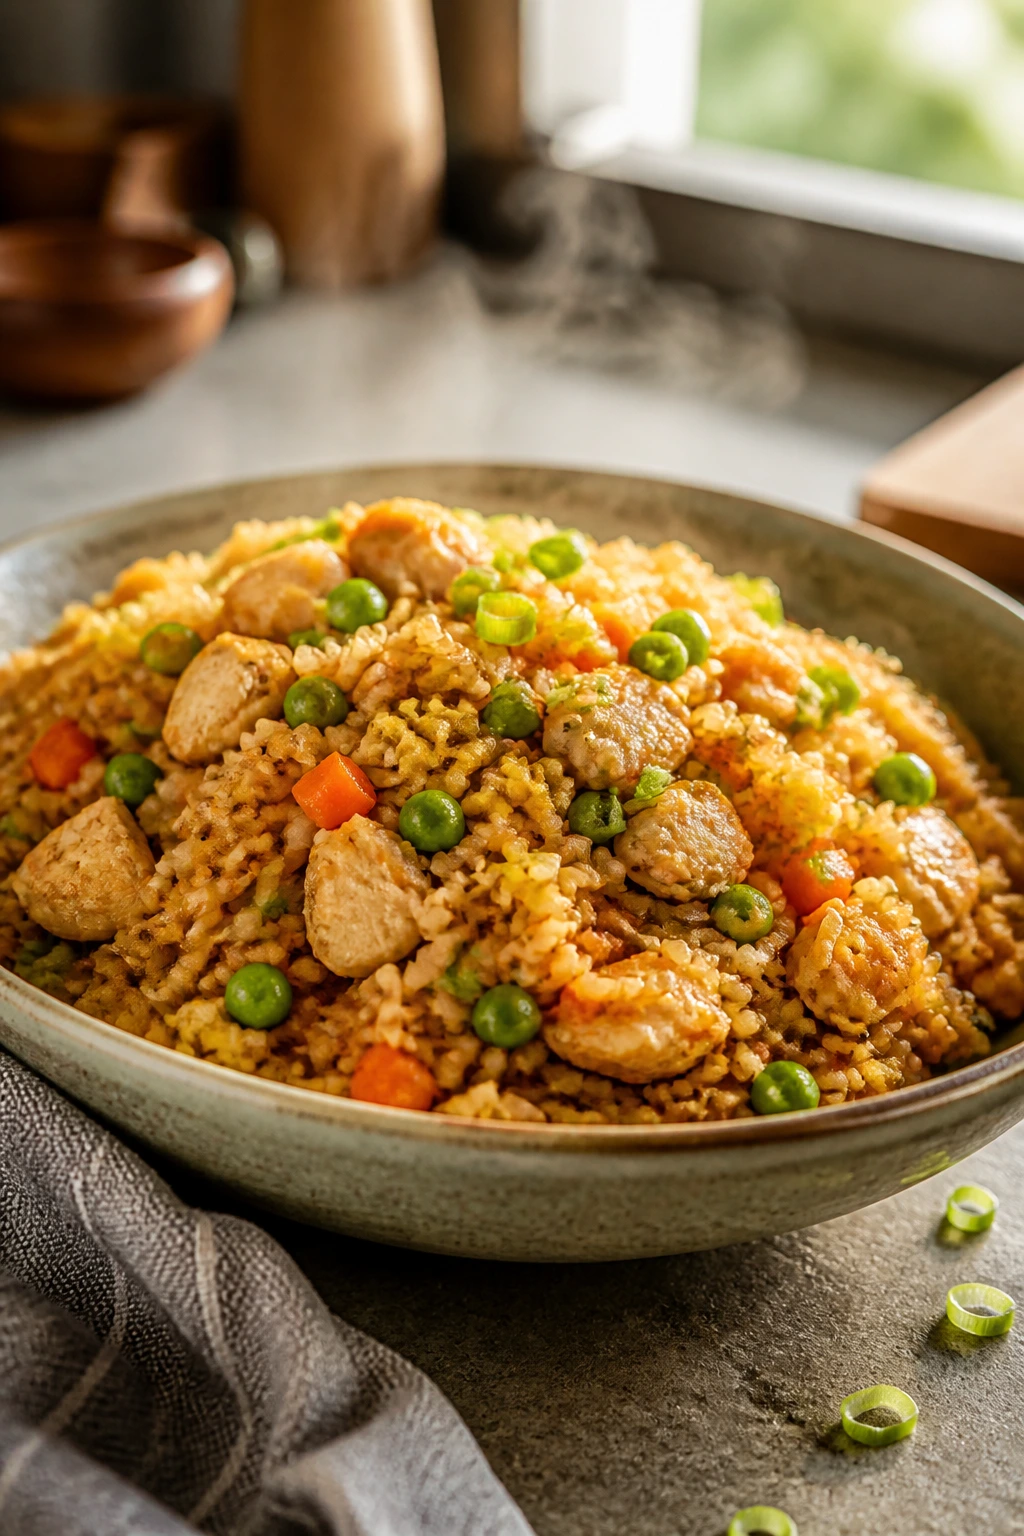
Fried rice is one of the easiest ways to turn leftovers into a dinner that feels intentional. Day-old rice is not a problem here; it’s the whole point. Chicken, eggs, and vegetables get tossed with soy sauce and sesame oil until everything tastes like it belongs together.
Why It Works
Cold rice fries better because the grains have dried out a little, so they separate in the pan instead of turning sticky. That makes this a rare dinner where leftovers are an advantage from the first step. It also reheats beautifully because the rice absorbs sauce without becoming soupy.
Key Ingredients
- 4 cups cold cooked rice — day-old rice is ideal.
- 2 cups cooked diced chicken — rotisserie chicken works well.
- 2 large eggs — scrambled into the rice.
- 1 cup frozen peas and carrots — no need to thaw fully.
- 3 scallions, sliced — fresh finish.
- 2 tablespoons neutral oil — for the pan.
- 2 cloves garlic, minced — a little goes a long way.
- 2 tablespoons soy sauce — start small and add more if needed.
- 1 tablespoon oyster sauce — optional, but adds depth.
- 1 teaspoon sesame oil — finish only; don’t cook it hard.
Quick Steps
-
Scramble the Eggs: Heat 1 tablespoon oil in a large skillet or wok. Scramble the eggs just until set, then move them to a plate.
-
Cook the Vegetables: Add the remaining oil, then the garlic and frozen vegetables. Cook for 2 to 3 minutes until the vegetables are hot and the garlic smells sweet.
-
Add the Rice: Break up any clumps and add the cold rice. Stir and press it into the pan so the grains get a little fried edge.
-
Season It: Pour in soy sauce and oyster sauce, if using. Toss well so the rice turns evenly seasoned.
-
Return the Chicken and Eggs: Add the chicken and eggs back in, then cook for 2 more minutes until everything is hot.
-
Finish and Pack: Add sesame oil and scallions at the end. Reheat leftovers in a skillet if you want to revive the texture.
Tips and Variations
- Lunch Move: Fried rice is one of the best desk lunches because it reheats fast.
- Flavor Boost: A spoonful of chili crisp makes the whole pan brighter.
- Swap It: Shrimp works, but only if you’re okay with a shorter fridge life than chicken.
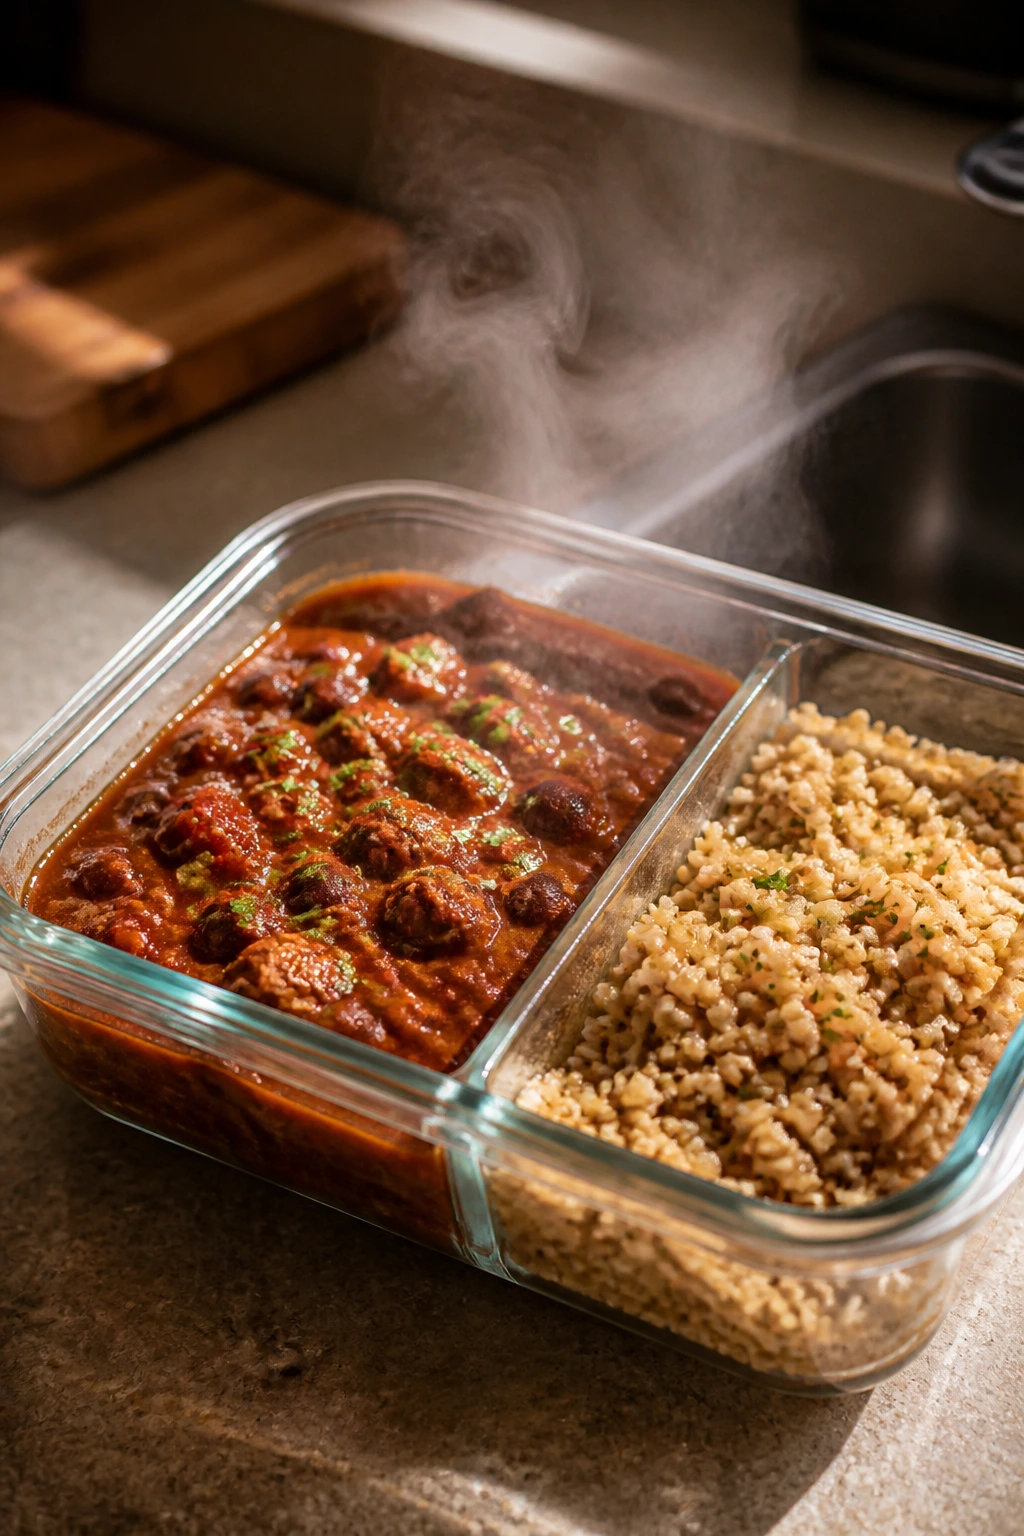
17. Lentil Bolognese
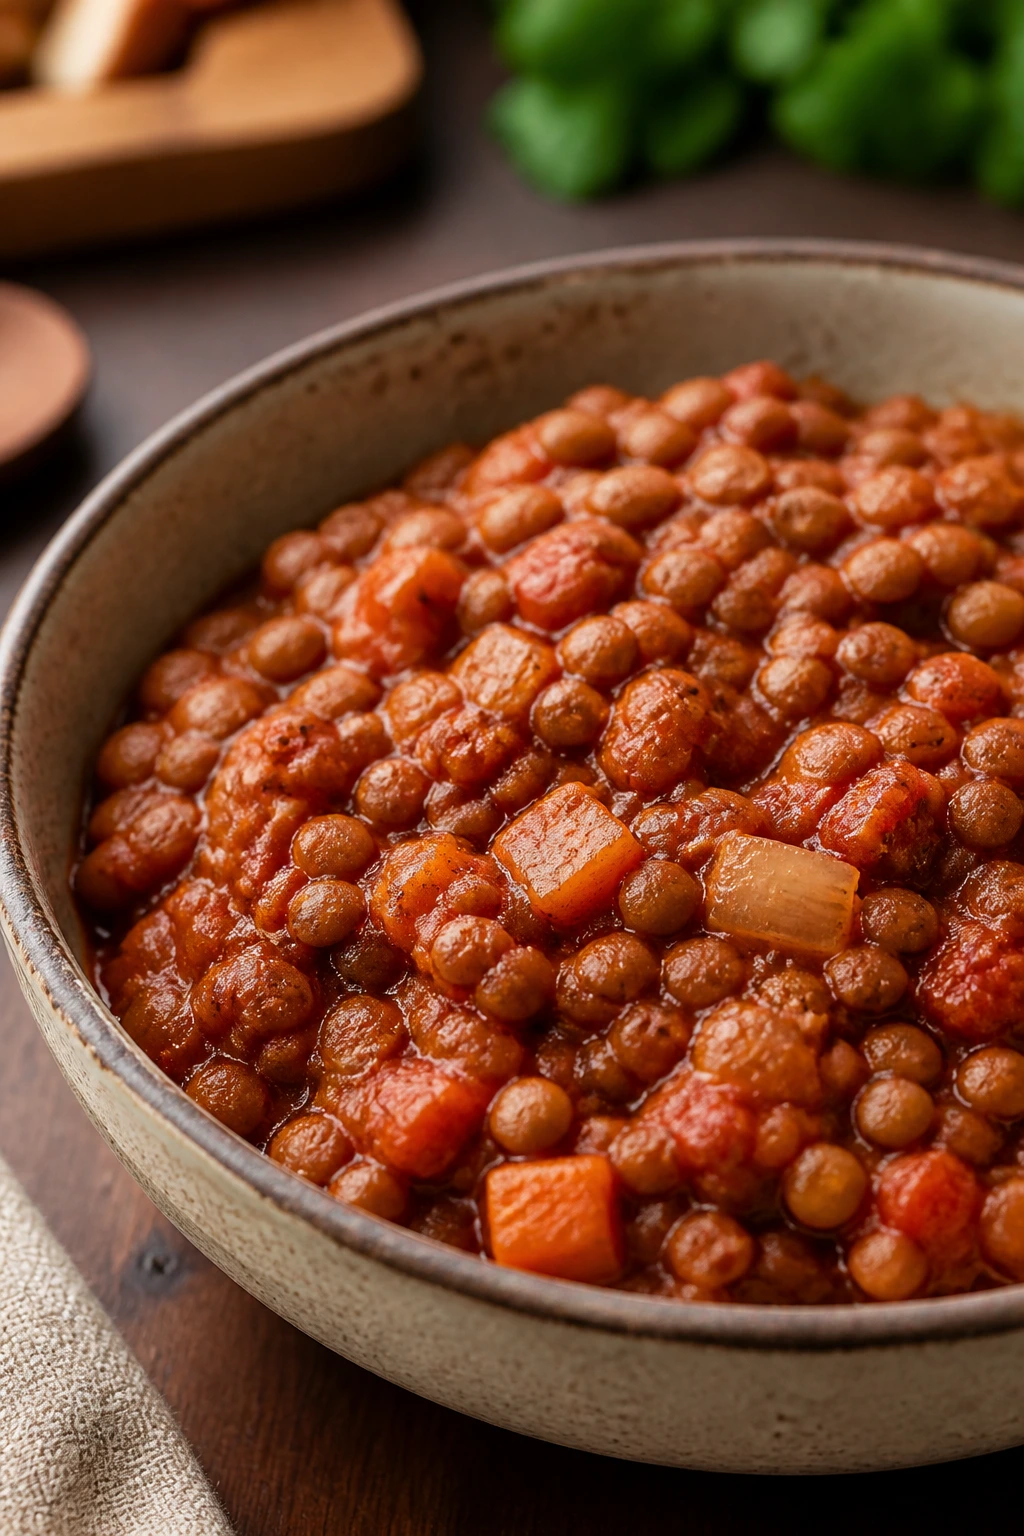
Lentil Bolognese has the same quiet confidence as a meat sauce, just with a different engine. The lentils give it body, the tomato base gives it heft, and the sauce gets thicker and richer after a night in the fridge. Over pasta, it’s comforting. Over baked potatoes, it’s even better than people expect.
Why It Works
Brown or green lentils keep their shape, which is exactly what you want in a sauce that needs to survive reheating. They soak up tomato flavor and mimic the texture of a slow-cooked meat sauce without much fuss. This is one of my favorite leftover dinners because it feels even more substantial the next day, especially with a little cheese on top.
Key Ingredients
- 1 tablespoon olive oil — for the vegetable base.
- 1 medium onion, diced — the first layer of flavor.
- 1 carrot, diced small — adds sweetness.
- 1 celery stalk, diced small — keeps the sauce balanced.
- 3 cloves garlic, minced — cook briefly.
- 1 cup brown or green lentils — rinse and pick through them first.
- 2 tablespoons tomato paste — deepens the sauce fast.
- 1 (28-ounce) can crushed tomatoes — the main tomato body.
- 3 cups vegetable or chicken broth — enough to simmer the lentils.
- 1 teaspoon dried oregano — simple and right.
- 1 bay leaf — remove it before serving.
- Grated Parmesan — for finishing, if you want it.
Quick Steps
-
Cook the Vegetables: Heat the oil in a large pot and cook the onion, carrot, and celery for 6 minutes until softened.
-
Add Garlic and Paste: Stir in the garlic and tomato paste and cook for 1 minute, until the paste darkens slightly.
-
Add Lentils and Liquid: Pour in the lentils, tomatoes, broth, oregano, and bay leaf. Stir and bring to a simmer.
-
Simmer Slowly: Cook uncovered for 35 to 40 minutes, stirring now and then, until the lentils are tender and the sauce is thick.
-
Season: Taste and add salt and pepper. If the sauce seems too thick, add a splash of water.
-
Serve or Store: Toss with pasta, spoon over polenta, or even use it as a baked potato topping.
Tips and Variations
- Lunch Move: It’s excellent in a thermos over pasta.
- Flavor Boost: A little balsamic vinegar at the end gives the sauce more lift.
- Swap It: Add finely chopped mushrooms if you want a meatier texture without adding meat.
18. Greek Chicken Grain Bowls
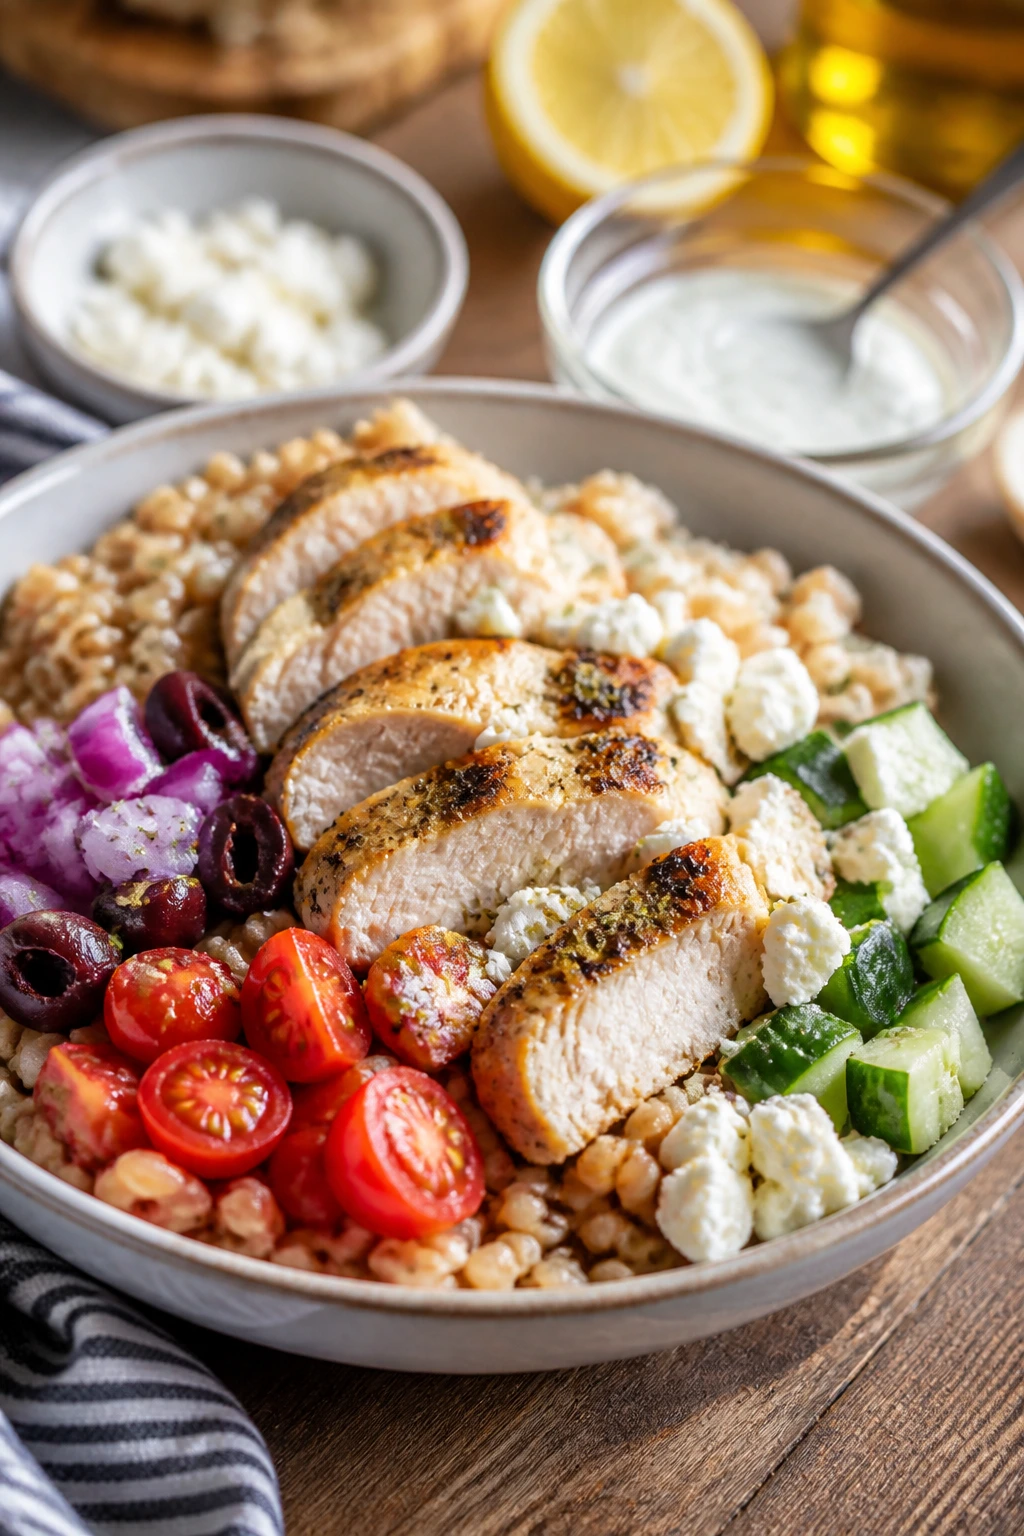
This is the freshest-feeling meal in the bunch, and that’s why it deserves the closing spot. The chicken is lemony, the grain gives it substance, and the toppings stay separate until you want them. That means lunch can be assembled in minutes instead of turning into a soggy bowl with no personality.
Why It Works
Grain bowls are built on separation, which sounds fussy until you’re eating them at lunch. Roast the chicken, cook the grain, chop the vegetables, and keep the sauce on the side. Each part keeps its own texture, so nothing goes limp overnight. I like this format especially when I want leftovers that feel fresh instead of reheated.
Key Ingredients
- 1 1/2 pounds boneless, skinless chicken thighs — juicy enough for reheating.
- 2 tablespoons olive oil — for the marinade.
- 2 teaspoons dried oregano — the Greek flavor note.
- 1 lemon, zested and juiced — brightens the chicken and the sauce.
- 3 cloves garlic, minced — for the marinade.
- 2 cups cooked farro, rice, or quinoa — choose your base.
- 1 cucumber, diced — cool and crunchy.
- 1 pint cherry tomatoes, halved — juicy and bright.
- 1/2 red onion, thinly sliced — sharpens the bowl.
- 1/2 cup crumbled feta — salty finish.
- 1 cup tzatziki or thick yogurt sauce — pack separately.
- Kalamata olives — optional, but very good.
Quick Steps
-
Marinate the Chicken: Toss the chicken thighs with olive oil, oregano, lemon juice, lemon zest, garlic, salt, and pepper. Let it sit while the oven heats, or longer if you have time.
-
Roast: Bake at 425°F for 20 to 25 minutes until the chicken is browned at the edges and reads 165°F in the thickest part.
-
Cook the Grain: Make the farro, rice, or quinoa according to its package directions and fluff it well.
-
Prep the Vegetables: Chop the cucumber, tomatoes, and red onion. Keep the tzatziki separate so the bowl stays crisp.
-
Slice and Assemble: Slice the chicken and layer it over the grain with the vegetables, feta, and olives.
-
Pack Smart: For lunch, store the sauce in a small container and add it right before eating.
Tips and Variations
- Lunch Move: These bowls are best when built from parts, not mixed too early.
- Flavor Boost: A pinch of dill in the yogurt sauce makes the bowl taste fresher.
- Swap It: If you want extra fiber, use chickpeas alongside the chicken or instead of it.
Why These Dinners Reheat Better Than Most
The common thread here is not luck. It’s structure. Saucy food, braised meat, sturdy vegetables, and grains that aren’t delicate all make for lunches that survive the fridge with dignity. If you’re cooking with the next day in mind, you’re really cooking for two meals at once, and the best dinner recipes know how to keep both appointments.
There’s also a storage rule worth respecting. Food safety guidance from the USDA is plain on this point: cool leftovers within about two hours, use shallow containers so the heat drops faster, and reheat food until the center is steaming hot, which usually means 165°F. That matters for stew, rice, chicken, and pasta alike. Good leftovers start with good cooling.
Essential Equipment for These Recipes
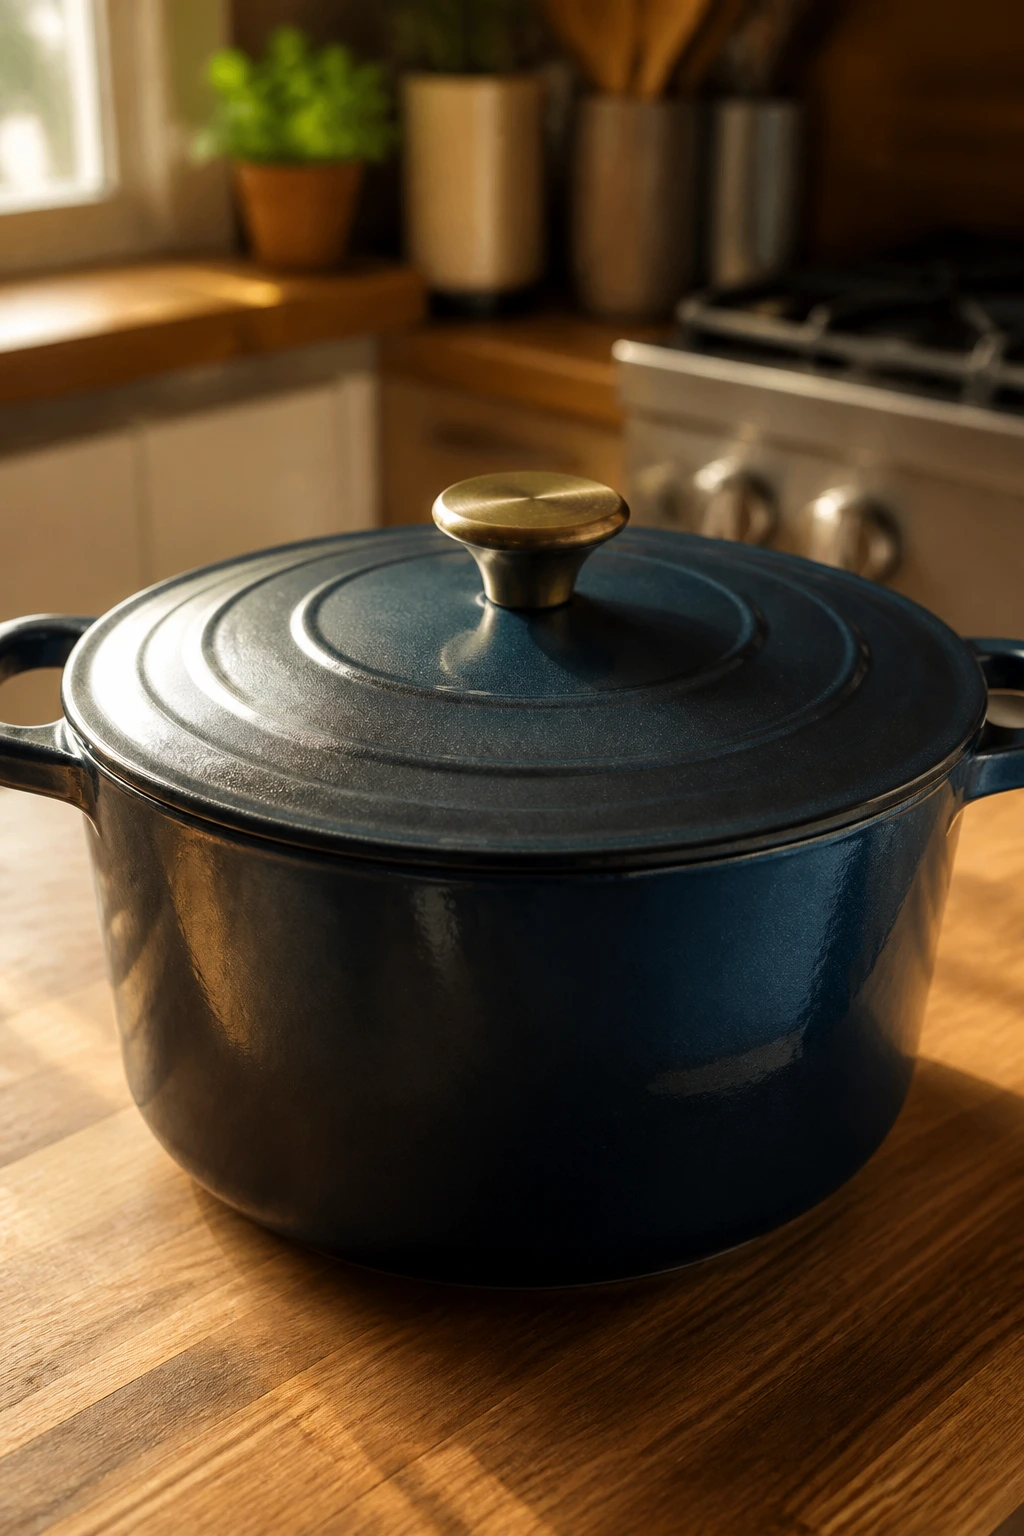
- Large Dutch oven or heavy soup pot: Best for chili, soup, pot roast, and curry because it holds heat evenly.
- Large skillet or sauté pan: Useful for stir-fries, meatballs, and sausage sauces.
- 9-by-13-inch baking dish: Needed for baked ziti, enchilada casserole, shepherd’s pie, and lasagna roll-ups.
- Sheet pans: Handy for chicken thighs, meatballs, and roasted vegetables.
- Large stockpot: Use this for pasta, fried rice prep, and blanching vegetables.
- Colander: Necessary for pasta and for draining beans or blanched broccoli.
- Sharp chef’s knife: Good cutting makes every recipe easier, and it matters most for onions, peppers, and meat slices.
- Cutting board: A large one keeps prep moving without chaos.
- Wooden spoon or spatula: Better than a fork for stirring thick sauces and scraping browned bits.
- Instant-read thermometer: Especially useful for chicken, pork, and pot roast.
- Measuring cups and spoons: Dried spices and sauces need real amounts, not guesswork.
- Airtight glass containers or freezer-safe meal prep boxes: The real star of the leftover game.
- Small sauce containers: Very useful for grain bowls, curry, and anything with a sauce you want to add later.
Smart Shopping and Ingredient Tips
Buy the cut that survives reheating, not the one that looks leanest on the shelf. For chicken dishes, thighs usually beat breasts because they stay juicy after a second trip through heat. For beef, chuck roast and flank steak each have their place: chuck for braising, flank for quick slicing. Ground meat sits in the middle—go for enough fat to keep flavor alive, not so much that the container looks slick the next day.
Tomatoes matter more than people admit. Crushed tomatoes make smooth sauces for pasta, curry, and chili; diced tomatoes leave more texture; tomato paste gives a fast depth boost when you need the sauce to taste cooked. I also like low-moisture mozzarella for baked dishes because it melts cleanly and doesn’t leak water into the pan. Fresh mozzarella is lovely, but it’s not the friendliest choice for leftovers.
Beans, lentils, and rice need a little attention. Rinse canned beans to strip off the salty can liquid, and choose long-grain rice or farro when you want the grains to stay separate. For fried rice, start with cold rice. For curry, keep a little extra broth or coconut milk in reserve so you can loosen the sauce after reheating. That one habit saves a dozen lunch containers from tasting dry.
Herbs are worth separating by job. Dried oregano, thyme, cumin, chili powder, and paprika should go into the pot early so they bloom in the oil. Fresh herbs—parsley, cilantro, basil, dill—belong at the end or on the lunch box, where they still taste alive. The difference is not subtle. One tastes cooked. The other tastes awake.
How to Serve These Recipes
Presentation: Use shallow bowls for chili, curry, and soup so the steam escapes and the toppings stay visible. For casseroles and grain bowls, clean edges matter more than fancy garnish; a spoonful of herbs, cheese, or chopped scallions on top is enough to make lunch look like dinner’s smarter sibling.
Accompaniments: A simple green salad with sharp vinaigrette works beside baked pasta, enchiladas, and shepherd’s pie. Crusty bread is ideal with soup and pot roast. Pickles, olives, and slaw cut through rich meals like pulled pork and tikka masala, and a sliced cucumber salad is nice when the main dish is heavy on sauce.
Portions: Most of these recipes feed 4 to 6 people as dinner, then leave enough for 2 to 4 lunch portions depending on how generous you are with the scoops. For office lunches, think in 1 1/2- to 2-cup portions for saucy meals and 1 large grain bowl per container for the lighter ones. If you want to stretch a dish, add rice, bread, or a cheap side salad instead of making the main dish carry every ounce of the meal.
Beverage Pairing: Sparkling water with lemon is the easiest across-the-board answer. Unsweetened iced tea goes especially well with chili, pulled pork, and sausage pasta. For the richer casseroles and braises, a dry lager or a chilled tomato juice can hold up to the meal without fighting it.
Additional Tips and Flavor Boosters
Flavor Enhancement: Keep a few finishing ingredients around—lemon, vinegar, chopped herbs, hot sauce, grated Parmesan, and pickled peppers. A tiny squeeze or sprinkle at the end can make reheated food taste fresh again, which is half the battle with lunch leftovers.
Customization: If you like heat, put it in the pot and again at the table. Chili flakes, cayenne, chipotle powder, harissa, and chili crisp all work in different places on this list. If you prefer mellow food, lean on garlic, onion, and herbs instead. The point is not to force one flavor path; it’s to make a lunch you’ll actually want to eat.
Serving Suggestions: Crisp toppings should stay crisp. Keep toasted breadcrumbs, tortilla strips, crushed nuts, and fresh greens separate until the last second. A lunch container with a hot base and a cold topper often tastes better than one mixed lid-to-lid.
Make-It-Yours: For dairy-free meals, use coconut milk, olive oil, or a cashew-based sauce where the recipe calls for cream or cheese. For gluten-free cooking, use rice, potatoes, polenta, or gluten-free pasta, but undercook the pasta a touch so it survives storage. For lower-sodium versions, season with herbs, acid, and spice first, then salt carefully at the end.
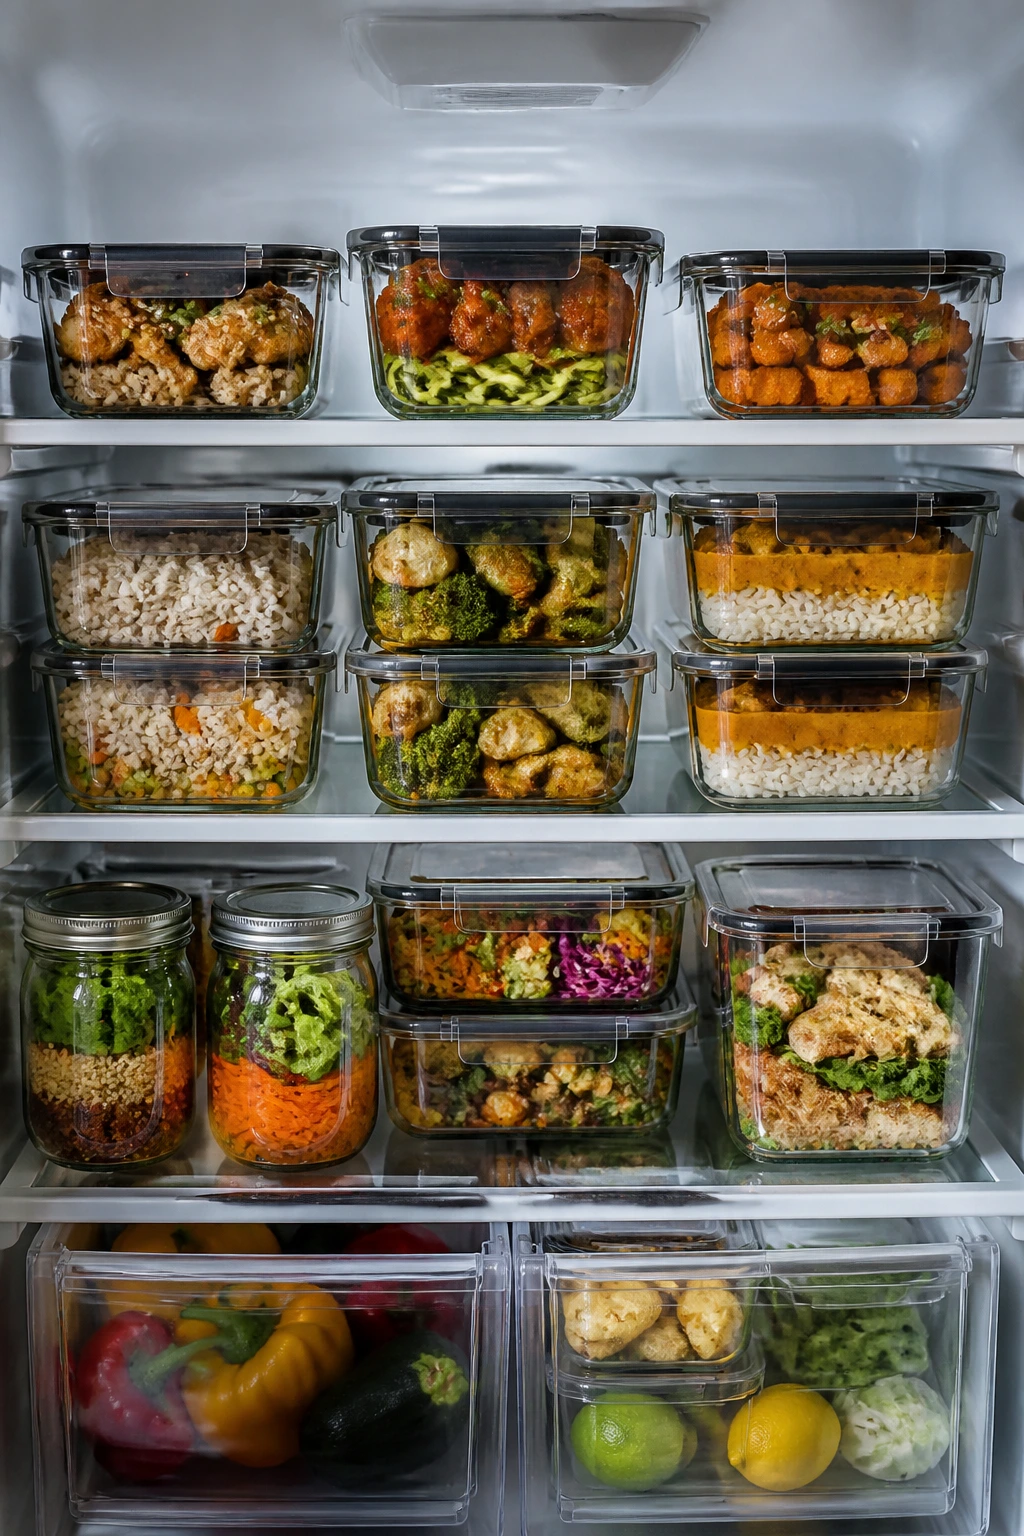
Make-Ahead, Storage, and Reheating Guidance
Most of these dinners keep well for 3 to 4 days in the refrigerator when stored in shallow, airtight containers. Soups, chili, curry, braised meats, and pasta sauces often freeze well for up to 2 to 3 months, though cream-heavy dishes may change texture a bit. Chicken fried rice and grain bowls are best eaten from the fridge rather than frozen, because their texture changes more than the saucy meals do.
Cool food quickly. That’s the part people skip, and it matters. Spread a large batch into several shallow containers instead of leaving it in one deep pot, and get it into the fridge within about two hours. If you’re dealing with rice, pasta, or a dense casserole, portioning it first helps the whole batch chill faster. That’s safer, and it keeps the texture cleaner.
For reheating, match the method to the food. Chili, soup, curry, and lentil bolognese do well on the stovetop over low heat with a splash of broth or water. Baked pasta, shepherd’s pie, and pot roast reheat nicely in a 350°F oven, covered with foil so the surface does not dry out. Fried rice and stir-fries are best in a skillet, where a teaspoon of oil can bring the texture back fast. Microwaves work too—use medium power, stir halfway, and stop when the center is steaming hot rather than boiling from the edges.
If you’re packing lunch without a microwave, lean toward pulled pork sandwiches, grain bowls, stuffed peppers, or chilled pasta salad versions of these meals. If the meal includes a sauce, pack it separately when possible. One small container for sauce can rescue an entire lunch from the dull fate of soaking too long.
Variations and Adaptations to Try
The Freezer-First Batch: Chili, curry, pot roast, soup, and meatballs freeze especially well. Make a full batch, freeze in two-cup portions, and label each container with the name and date so you can grab lunch without guessing.
The Meatless Backup: Lentil bolognese, coconut chickpea curry, and a bean-heavy enchilada casserole all make solid vegetarian dinners that still feel filling. They rely on protein-rich pantry ingredients instead of delicate vegetables, which is why they hold up so well after refrigeration.
The Lower-Dairy Route: Swap cream for coconut milk in curry, skip the ricotta layer in baked pasta by using a thinner béchamel, or finish bowls with olive oil and lemon instead of cheese. The meals still taste finished, which is the main thing.
The Lunch-Box Heat Lovers’ Version: Add chili crisp, pickled jalapeños, hot sauce, or crushed red pepper at the table instead of inside the pot. That keeps the family batch friendly while giving the spice fans something extra in their own container.
The Grain Bowl Shortcut: Use whatever grain you already have—farro, rice, quinoa, couscous, even barley—then build around leftovers from chicken, pork, or roasted vegetables. This is one of the easiest ways to make dinner ingredients stretch without feeling like a repeat.
Common Mistakes to Avoid
Using the wrong cut of meat: Lean chicken breast, extra-lean ground beef, and dry pork loin can taste fine on day one and tired on day two. Choose thighs, chuck, sausage, or shoulder when you want leftovers to stay juicy. If you already bought the lean cut, protect it with sauce.
Overcooking pasta or rice before storing: Soft pasta and mushy rice only get worse in the fridge. Pull pasta out a minute early and cool rice quickly on a tray or sheet pan before packing it away. A little firmness at dinner turns into the right texture at lunch.
Packing crunchy toppings too soon: Tortilla strips, toasted breadcrumbs, nuts, and fresh greens do not belong in the container if you want them crisp later. Keep them separate and add them after reheating. That one habit makes a cheap lunch feel much more deliberate.
Forgetting to season after reheating: Leftovers often need a small second round of salt, lemon, vinegar, or herbs. Heat dulls flavor. A teaspoon of acid or a pinch of flaky salt can wake the whole meal back up.
Cooling a big batch in one deep container: A steaming pot shoved straight into the fridge chills slowly in the center, which is bad for safety and bad for texture. Divide it into smaller containers while it’s still warm enough to portion, and the food cools faster and more evenly.
Reheating too hard: High microwave power or a scorching skillet can dry out the edges before the middle is hot. Use medium heat, stir, cover loosely, and add a splash of broth, water, or sauce if the food looks tight. Slow is boring, but it usually tastes better.
Questions People Usually Ask About These Leftover-Friendly Dinners
Which of these dinners tastes best the next day?
Chili, curry, baked ziti, pot roast, and lentil bolognese are the standouts for day-two flavor. They all have sauce or gravy that settles and deepens overnight, so the lunch version often tastes rounder than the dinner version.
What if I don’t have a microwave at work?
Pulled pork sandwiches, grain bowls, stuffed peppers, and even cold pasta dishes are your best bets. You can also pack soup in a thermos if you heat it fully at home first. A sauce-heavy meal in an insulated container holds up better than something dry.
Can I freeze most of these meals?
Yes, especially chili, soup, curry, meatballs, pot roast, pulled pork, and lentil bolognese. Casseroles and baked pasta freeze reasonably well too, though texture changes a bit. Grain bowls, fried rice, and dishes with fresh toppings are better from the fridge than the freezer.
How do I keep pasta from getting mushy in leftovers?
Cook it a little short of al dente, then cool it fast and store it with enough sauce to keep it moist. If you can, save a little extra sauce for reheating. That’s the easiest fix, and it works more often than people expect.
Can I use rotisserie chicken in these recipes?
Absolutely. It works well in enchilada casserole, curry, fried rice, lasagna roll-ups, and grain bowls. Rotisserie chicken is one of the fastest ways to turn dinner into tomorrow’s lunch without cooking a separate protein.
What’s the best container for lunch leftovers?
Shallow, leakproof containers are the most useful. Glass is nice for reheating, but sturdy plastic works fine if it seals well. For saucy meals, choose a container with a little room at the top so the lid doesn’t get messy.
How far ahead can I make these dinners?
Most of them can be cooked a day or two ahead and still taste excellent. Braises and stews often improve after a night in the fridge, while grain bowls and crisp-topped meals are best when the fresh parts are added just before serving. If you’re making food for the week, freeze half rather than stretching one batch too long.
How do I make these more kid-friendly?
Keep the spice low, serve sauces on the side when possible, and lean on cheese, rice, pasta, or potatoes as the base. Kids usually forgive almost anything if they can identify it quickly and dip it into something familiar. That’s not a flaw. It’s dinner strategy.
A Fridge Full of Good Lunches
The nicest thing about this kind of cooking is how little drama it creates later. A pot of chili, a tray of ziti, a braise, a curry—each one turns into a lunch that feels cared for without asking for much in return. That’s the whole appeal. You cook once, and the next day does not need a rescue mission.
If you build your week around a couple of saucy meals, one grain bowl, and one soup or casserole, lunch starts taking care of itself. No sad sandwich emergency. No scramble at noon. Just food that waited patiently and still tastes like dinner’s better half.
Recipe Collection Quick Reference Table
| Recipe | Prep Time | Cook Time | Total Time | Servings | Standout Detail |
|---|---|---|---|---|---|
| Beef and Bean Chili | 15 minutes | 50 minutes | 1 hour 5 minutes | 6 servings | Thick, thermos-friendly, and better on day two |
| Baked Ziti with Sausage and Spinach | 25 minutes | 35 minutes | 1 hour | 8 servings | Creamy center with sturdy pasta that reheats cleanly |
| Chicken Enchilada Casserole | 20 minutes | 35 minutes | 55 minutes | 6 servings | Tortillas soak up sauce instead of turning soggy |
| Coconut Chickpea Curry | 15 minutes | 25 minutes | 40 minutes | 4 servings | Silky sauce and chickpeas that hold their shape |
| Turkey Meatballs in Marinara | 25 minutes | 25 minutes | 50 minutes | 4 servings | Tender meatballs that work for pasta, subs, or bowls |
| Pulled Pork with Tangy Slaw | 20 minutes | 8 hours | 8 hours 20 minutes | 8 servings | Shredded pork that stays juicy for lunch sandwiches |
| Shepherd’s Pie | 30 minutes | 40 minutes | 1 hour 10 minutes | 6 servings | Clean slices and a potato topping that protects the filling |
| Sheet-Pan Chicken Thighs with Potatoes and Green Beans | 15 minutes | 45 minutes | 1 hour | 4 servings | Juicy thighs and roasted vegetables on one pan |
| Beef and Broccoli Stir-Fry | 20 minutes | 15 minutes | 35 minutes | 4 servings | Glossy sauce that keeps the beef tender after reheating |
| Sausage, Peppers, and Onions Pasta | 20 minutes | 30 minutes | 50 minutes | 6 servings | Saucy pasta that gets even better after resting |
| White Bean, Ham, and Kale Soup | 15 minutes | 45 minutes | 1 hour | 6 servings | Creamy broth and a thermos-ready texture |
| Lasagna Roll-Ups | 30 minutes | 35 minutes | 1 hour 5 minutes | 6 servings | Neat individual portions that reheat fast |
| Stuffed Bell Peppers | 25 minutes | 45 minutes | 1 hour 10 minutes | 6 servings | Built-in containers with tidy lunch portions |
| Chicken Tikka Masala | 20 minutes | 35 minutes | 55 minutes | 4 servings | Rich sauce that deepens overnight |
| Braised Pot Roast with Root Vegetables | 25 minutes | 3 hours 15 minutes | 3 hours 40 minutes | 6 servings | Tender chuck roast with lunch-friendly gravy |
| Chicken Fried Rice | 20 minutes | 15 minutes | 35 minutes | 4 servings | Day-old rice becomes the whole advantage |
| Lentil Bolognese | 15 minutes | 45 minutes | 1 hour | 6 servings | Meatless sauce with real leftover staying power |
| Greek Chicken Grain Bowls | 20 minutes | 25 minutes | 45 minutes | 4 servings | Fresh toppings kept separate for crisp lunch assembly |