
A weeknight dinner can get strange fast. One minute you’re opening the fridge with decent intentions, and the next you’re staring at half a lemon, a tired zucchini, and a package of chicken that needs to become something useful before everyone starts hovering in the kitchen.
Healthy recipes under 500 calories work when they taste like real food, not like a punishment. That means enough protein to keep you full, enough vegetables to give the plate some volume, and just enough fat, acid, or starch to make the whole thing feel finished. The sweet spot is a skillet that sizzles, a sheet pan that browns, or a bowl that still has texture when you hit the last bite.
These 18 recipes stay quick without falling into the usual trap of being skimpy or bland. Some are bright and sharp, some are cozy and spoonable, and a few are the kind of cold lunches that save you from buying a sad sandwich at noon. Calorie counts are estimates, because brands and portions change the math, but each one is built to land comfortably under that 500-calorie line.
Why These Meals Stay in Rotation
-
Fast Cook Times: Most of these recipes hit the plate in 15 to 30 minutes, which matters when the pan is hot and the clock is loud.
-
Real Portion Balance: You get protein, vegetables, and a measured starch or sauce, so the meal feels complete instead of tiny.
-
Ingredient Overlap: Lemon, yogurt, rice, beans, spinach, and chicken show up often, which keeps the shopping list short and the fridge from turning into chaos.
-
Flexible by Design: A few swaps — brown rice for cauliflower rice, cod for salmon, lettuce cups for pita — change the feel without breaking the recipe.
-
Meal Prep Friendly: Several of these hold up well for 3 to 4 days, and a few taste even better after the flavors settle overnight.
-
No Weird Equipment: A skillet, a sheet pan, a pot, and a knife cover most of the list. That’s the part I like.
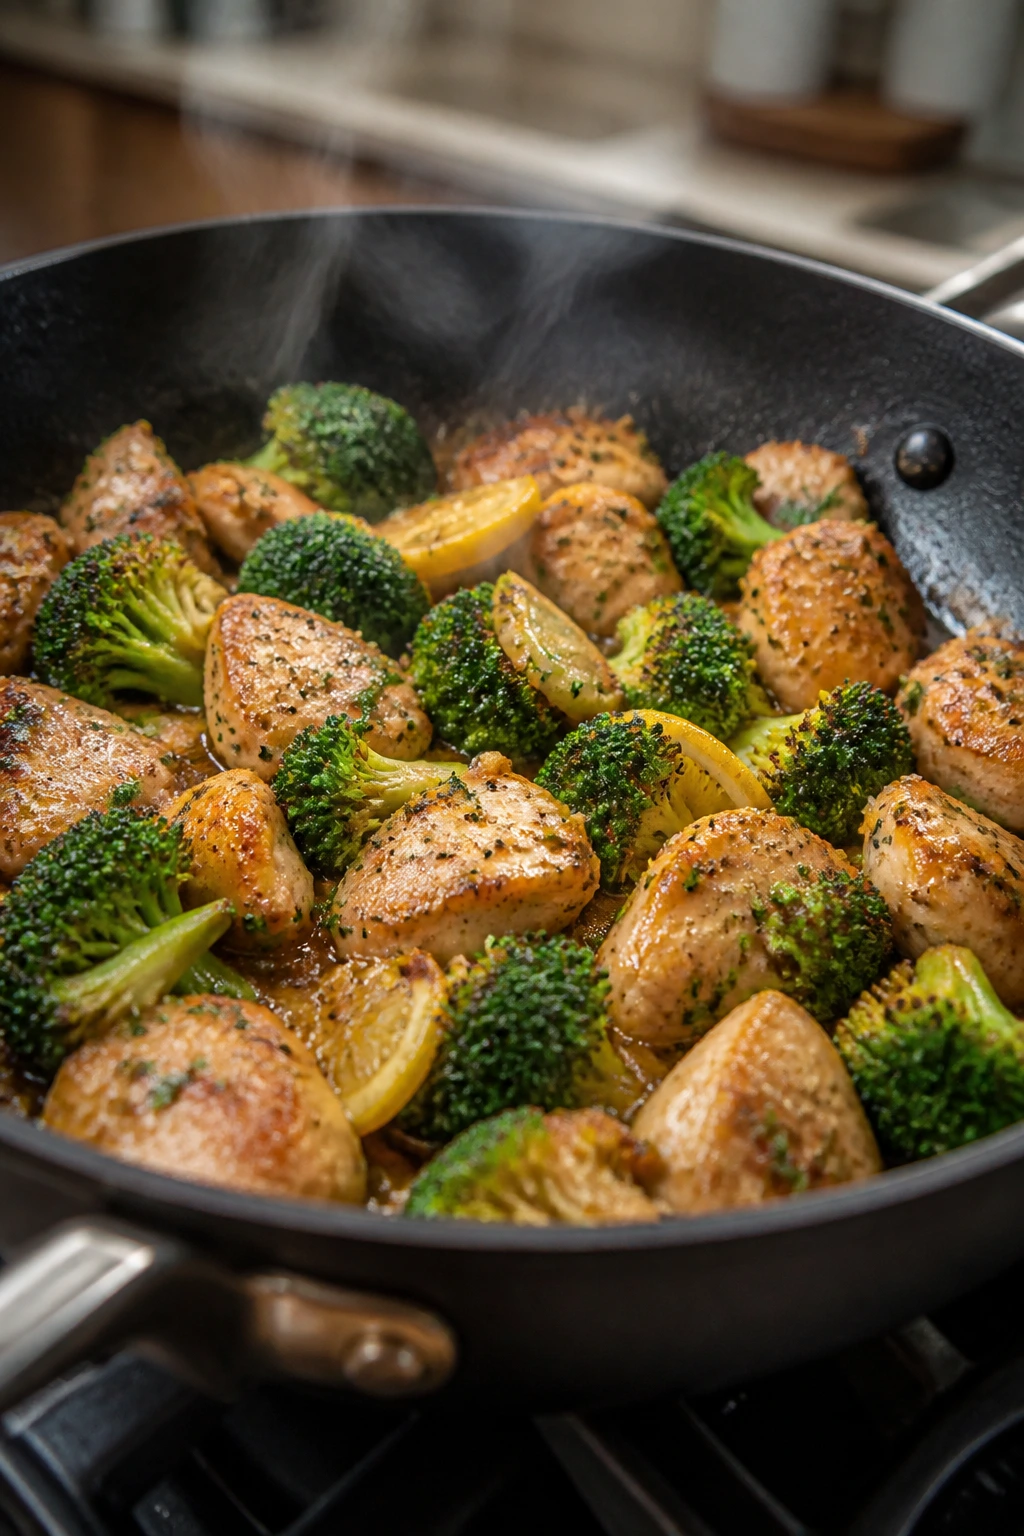
1. Lemon-Garlic Chicken and Broccoli Skillet
Intro:
This one tastes bright and clean, with browned chicken edges, broccoli that still has a little snap, and garlic that goes sweet instead of harsh when you cook it right. At about 300 calories a serving, it scratches the “I want dinner now” itch without turning into a giant pile of noodles or rice. I keep coming back to this style of skillet meal because it behaves.
Why It Works:
Chicken breast stays lean, broccoli brings bulk, and a small amount of olive oil does enough work to carry the garlic and lemon. The whole pan cooks in one stretch, so you get browned bits on the bottom instead of steaming everything into mush. A splash of broth loosens the pan and gives you a light sauce without cream.
Key Ingredients:
- 1 lb boneless, skinless chicken breast, cut into 1-inch pieces
- 3 cups broccoli florets, cut small so they cook fast
- 1 tbsp olive oil
- 4 garlic cloves, minced
- 1/2 cup low-sodium chicken broth
- 1 lemon, zested and juiced
- 1 tsp dried oregano
- 1/2 tsp kosher salt
- 1/4 tsp black pepper
- 1 tbsp grated Parmesan, optional
Quick Steps:
- Season the chicken with salt, pepper, and oregano.
- Heat the olive oil in a large skillet over medium-high heat, then sear the chicken for 4 to 5 minutes, stirring once, until lightly browned.
- Add the broccoli and garlic, and cook for 1 minute until the garlic smells sweet.
- Pour in the broth, cover, and cook for 3 to 4 minutes until the broccoli turns bright green and the chicken is cooked through.
- Uncover, add the lemon zest and juice, and toss until the sauce lightly coats the pan.
- Finish with Parmesan if you want a salty edge, then serve hot.
Equipment for This Recipe:
- 12-inch skillet with a lid
- Cutting board and sharp knife
- Microplane or fine grater for the lemon
- Wooden spoon or spatula
How to Serve This Dish:
Spoon it over 1/2 cup of cooked brown rice, quinoa, or cauliflower rice if you want a little starch. The plate should look glossy, not saucy, with the broccoli still in clear little florets. A lemon wedge on the side never hurts.
Pro Tips for This Recipe:
- Cut the broccoli small; big florets need longer cooking and can throw off the timing.
- Don’t add the lemon at the beginning. It tastes flatter after a long cook.
- If your skillet runs hot, lower the heat once the broth goes in so the garlic doesn’t scorch.
Variations on This Dish:
- Spicy Red Pepper Chicken: Add 1/4 tsp red pepper flakes with the garlic for a little heat.
- Creamy Yogurt Finish: Stir 2 tbsp plain Greek yogurt into the pan off heat for a silkier sauce.
- Mushroom-Broccoli Mix: Swap 1 cup of the broccoli for sliced mushrooms and cook them with the chicken.
Common Mistakes to Avoid with This Dish:
- Don’t crowd the pan. The chicken steams instead of browning, and the flavor gets dull.
- Don’t let the broccoli go soft. It should still have a little bite when you serve it.
- Don’t pour the lemon in while the pan is ripping hot. You’ll lose the fresh edge you wanted in the first place.
2. Turkey Taco Lettuce Wraps
Intro:
These are crisp, savory, and a little messy in the good way. The turkey stays juicy if you season it hard enough, and the butter lettuce gives you the cold crunch that a tortilla can’t. At roughly 280 calories for two generous wraps, this is the kind of dinner that feels lighter but still counts.
Why It Works:
Lean ground turkey takes taco seasoning well, especially when you add salsa for moisture instead of piling on extra oil or cheese. Lettuce cups keep the carb count low without making the filling feel sparse. Avocado gives you just enough richness to round out the flavor.
Key Ingredients:
- 1 lb 93% lean ground turkey
- 1 tsp olive oil
- 1 small yellow onion, finely diced
- 2 garlic cloves, minced
- 1 tbsp chili powder
- 1 tsp ground cumin
- 1/2 tsp smoked paprika
- 1/2 cup salsa
- 8 large butter lettuce leaves, washed and dried
- 1 avocado, diced
- Lime wedges and chopped cilantro, for serving
Quick Steps:
- Warm the olive oil in a skillet over medium heat, then cook the onion for 2 to 3 minutes until soft.
- Add the turkey and garlic, breaking the meat into small crumbles as it browns, about 5 to 6 minutes.
- Stir in the chili powder, cumin, paprika, salt, and salsa, then simmer for 2 minutes until the mixture looks juicy but not wet.
- Spoon the turkey into the lettuce leaves.
- Top with avocado, cilantro, and a squeeze of lime.
- Serve immediately so the lettuce stays crisp.
Equipment for This Recipe:
- Large skillet
- Wooden spoon
- Sharp knife
- Cutting board
How to Serve This Dish:
I like these with a quick tomato-cucumber salad or a scoop of black beans on the side if you want a more filling plate. They’re best arranged on a platter so people can build their own. That keeps the lettuce from collapsing under too much filling.
Pro Tips for This Recipe:
- Choose lettuce leaves with a sturdy bowl shape; floppy leaves leak filling everywhere.
- If the turkey looks dry before it’s done, add 2 tbsp water or broth and let it simmer.
- Mash a little avocado into the meat if you want a softer, richer filling without adding cheese.
Variations on This Dish:
- Bowl Mode: Skip the lettuce and pile the turkey over chopped romaine with tomato and avocado.
- Bean-Stretch Version: Stir in 1/2 cup black beans after the turkey cooks to make the filling go farther.
- Extra-Hot Salsa Build: Use a hot salsa and add pickled jalapeños on top.
Common Mistakes to Avoid with This Dish:
- Don’t use iceberg if you want tidy wraps. It snaps instead of folding.
- Don’t overfill the leaves. Two big spoonfuls is about right.
- Don’t drain off every drop of moisture unless the pan is flooded; a little salsa helps the turkey stay juicy.
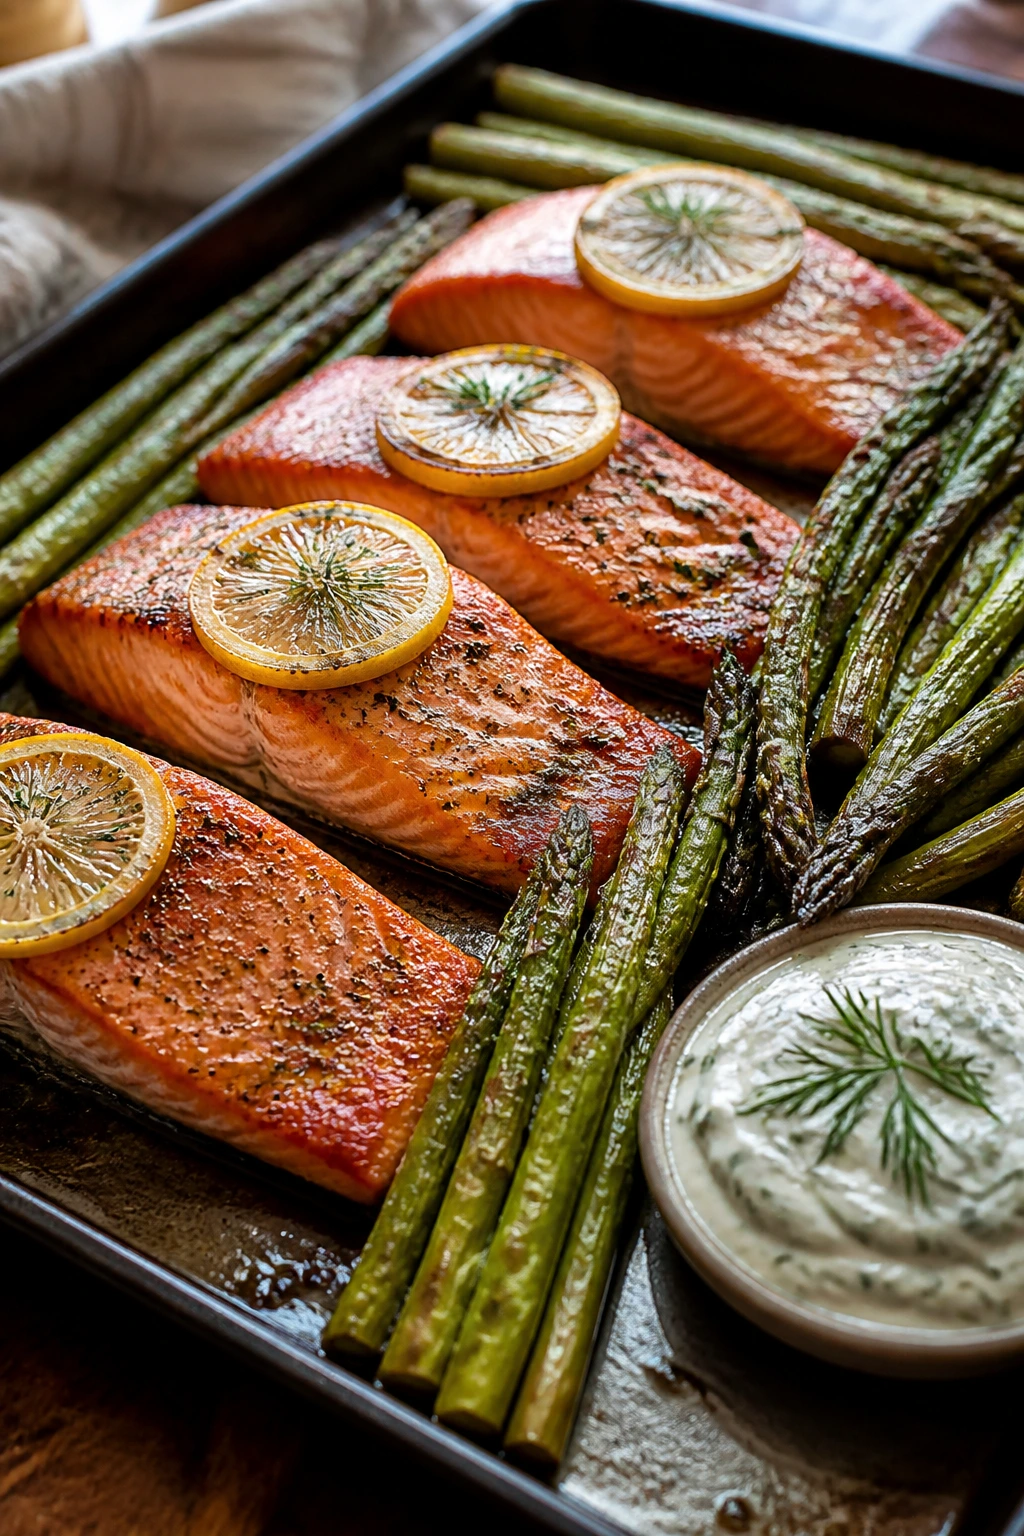
3. Salmon and Asparagus Sheet Pan with Dill Yogurt
Intro:
The salmon turns buttery at the edges, the asparagus picks up a little roast color, and the dill yogurt brings that cool, grassy finish that makes the whole tray feel sharper. This lands around 420 calories per serving and looks fancier than the amount of effort it takes. I’d make this for a quiet dinner when I want the oven to do the work.
Why It Works:
Sheet-pan cooking is efficient because the asparagus and salmon can share the same hot surface without needing separate timing rituals. A short roast at 425°F cooks the fish quickly enough that it stays moist while the asparagus takes on brown tips. The yogurt sauce adds brightness without heavy cream.
Key Ingredients:
- 4 salmon fillets, about 5 oz each
- 1 lb asparagus, trimmed
- 1 tbsp olive oil
- 1/2 tsp kosher salt
- 1/4 tsp black pepper
- 1 lemon, sliced
- 1/2 cup plain Greek yogurt
- 1 tbsp fresh dill, chopped
- 1 tsp Dijon mustard
- 1 tbsp lemon juice
Quick Steps:
- Preheat the oven to 425°F and line a sheet pan with parchment.
- Toss the asparagus with olive oil, salt, and pepper, then spread it out.
- Roast the asparagus for 8 minutes.
- Push the asparagus to the sides, add the salmon fillets, and lay lemon slices on top.
- Roast for 8 to 10 minutes more, until the salmon flakes and looks opaque in the center.
- Stir the yogurt, dill, Dijon, and lemon juice together, then spoon it over the fish.
Equipment for This Recipe:
- Rimmed sheet pan
- Parchment paper
- Small bowl for the sauce
- Spatula
How to Serve This Dish:
Serve it with a small scoop of farro, baby potatoes, or a cucumber salad if you want a little more on the plate. The fish should still glisten when it comes out of the oven. A spoonful of the dill yogurt on the side makes the whole thing look pulled together.
Pro Tips for This Recipe:
- Buy salmon fillets of similar thickness so they finish at the same time.
- Pat the fish dry before roasting; wet salmon steams, and the surface stays pale.
- Put the yogurt sauce on after cooking, not before. Heat dulls the dill and can make the yogurt taste flat.
Variations on This Dish:
- Mustard-Herb Salmon: Add 1 tsp whole-grain mustard to the yogurt for more bite.
- Everything-Style Salmon: Sprinkle the fillets with everything bagel seasoning before roasting.
- Dairy-Free Herb Sauce: Swap the yogurt for tahini thinned with lemon juice and a spoon of water.
Common Mistakes to Avoid with This Dish:
- Don’t keep roasting until the salmon looks dry. Pull it when it flakes with gentle pressure.
- Don’t bury the asparagus under the fish. It needs open space to roast.
- Don’t skip the parchment if your pan is old or sticky. Salmon skin can weld itself to bare metal.
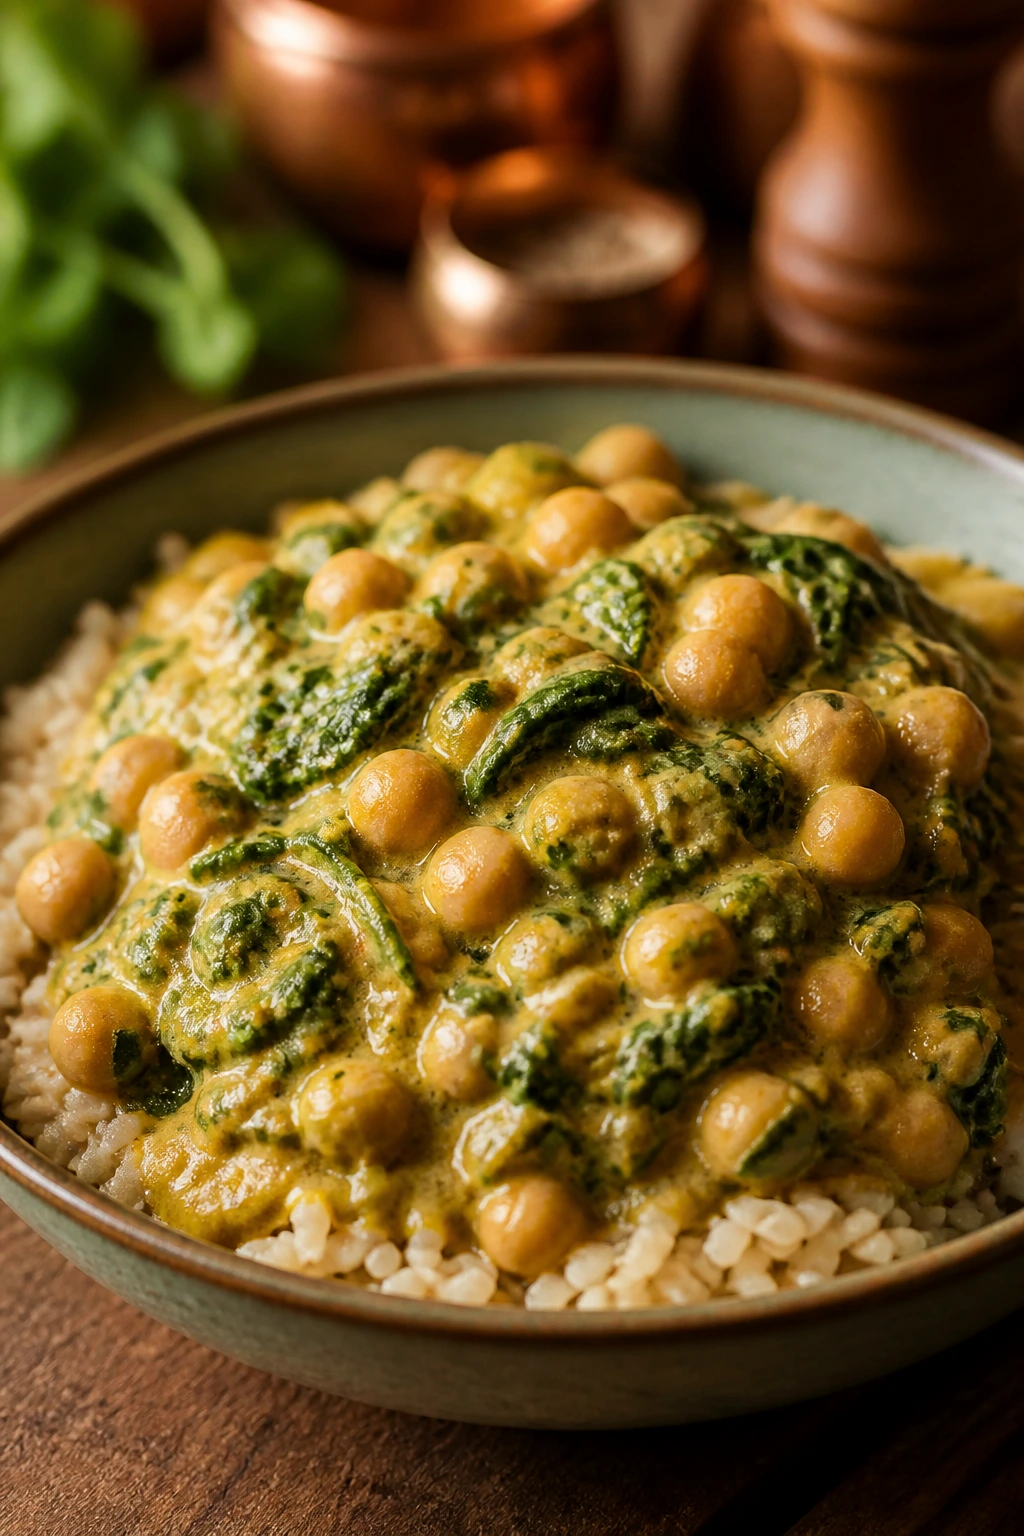
4. Chickpea and Spinach Coconut Curry
Intro:
This curry is warm, creamy, and thick enough to feel like dinner, not soup. Chickpeas bring the protein and the body, spinach collapses into the sauce, and the light coconut milk keeps it rich without tipping the calorie count overboard. A bowl over a small scoop of rice lands around 400 calories and eats like more.
Why It Works:
Curry powder blooms in oil and onion, which gives the sauce a deeper, toasted flavor in less than a minute. Chickpeas hold their shape during simmering, so the pot keeps a pleasant texture instead of turning paste-like. Light coconut milk provides silkiness without the heavy feel of full-fat cans.
Key Ingredients:
- 1 tbsp olive oil
- 1 small yellow onion, diced
- 3 garlic cloves, minced
- 1 tbsp fresh ginger, grated
- 2 tbsp curry powder
- 2 cans chickpeas, drained and rinsed
- 1 can diced tomatoes, 14.5 oz
- 1 can light coconut milk, 13.5 oz
- 4 cups baby spinach
- 1 tbsp lime juice
- Salt, to taste
- 2 cups cooked brown rice, for serving
Quick Steps:
- Heat the olive oil in a large pot over medium heat and cook the onion for 4 minutes until soft.
- Add the garlic and ginger, then stir in the curry powder for 30 seconds until fragrant.
- Pour in the tomatoes, coconut milk, and chickpeas, then simmer for 12 to 15 minutes.
- Stir in the spinach and cook just until it wilts.
- Finish with lime juice and salt.
- Serve over brown rice.
Equipment for This Recipe:
- Large saucepan or Dutch oven
- Wooden spoon
- Measuring cups
- Fine grater for ginger
How to Serve This Dish:
A bowl of curry looks best with a tight mound of rice and a little chopped cilantro on top. I like a squeeze of lime and a spoon of plain yogurt if I’m in the mood for extra coolness. Keep the rice portion modest so the curry stays front and center.
Pro Tips for This Recipe:
- Rinse the chickpeas well; the can liquid can dull the sauce.
- Let the curry simmer long enough to thicken slightly before adding spinach.
- If the curry tastes flat, add salt first, then a little more lime. Acid helps here.
Variations on This Dish:
- Tomato-Forward Curry: Use an extra 1/2 cup diced tomatoes and cut the coconut milk slightly for a brighter sauce.
- Cauliflower Rice Version: Swap the brown rice for cauliflower rice to drop the calories even lower.
- Extra Greens Finish: Stir in chopped kale during the last 5 minutes instead of spinach.
Common Mistakes to Avoid with This Dish:
- Don’t use full-fat coconut milk unless you plan to change the portion size. It adds up fast.
- Don’t boil the pot hard once the coconut milk goes in. A steady simmer keeps the texture smoother.
- Don’t under-salt chickpeas. They need help, or they taste like they were merely invited to dinner.
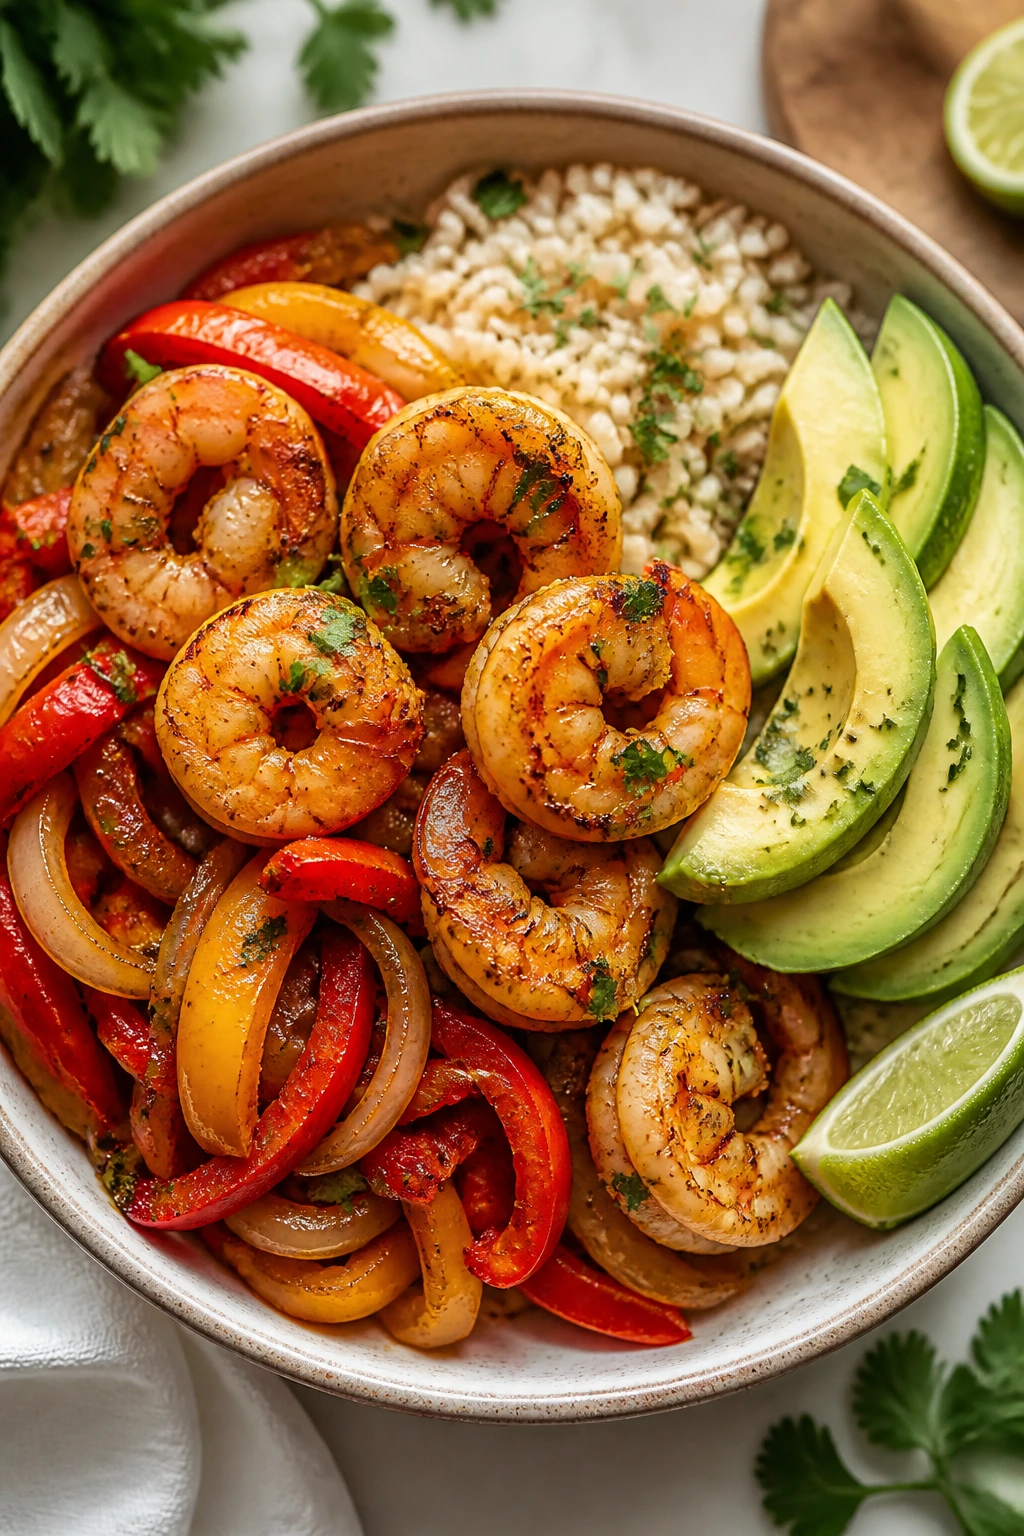
5. Shrimp Fajita Rice Bowls
Intro:
Shrimp cooks fast, which makes it one of the easiest ways to get dinner on the table without a lot of waiting around. Here it sits with charred peppers, onions, and a little salsa over rice, so the bowl lands around 430 calories but still feels full and colorful. The lime at the end matters. A lot.
Why It Works:
Shrimp needs only a few minutes in a hot pan, and the vegetables can cook in the same skillet before the shrimp goes in. That keeps the process quick and gives you browned edges on the peppers instead of limp strips. Rice adds the sturdy base, while salsa and lime keep the bowl from tasting heavy.
Key Ingredients:
- 1 lb raw shrimp, peeled and deveined
- 2 bell peppers, sliced
- 1 small red onion, sliced
- 1 tbsp olive oil
- 1 tsp chili powder
- 1 tsp ground cumin
- 1/2 tsp garlic powder
- Salt and black pepper
- 2 cups cooked brown rice
- 1/2 cup salsa
- 1 avocado, sliced
- Lime wedges and cilantro
Quick Steps:
- Pat the shrimp dry and season with chili powder, cumin, garlic powder, salt, and pepper.
- Heat the oil in a skillet over medium-high heat and cook the peppers and onion for 5 minutes until starting to brown.
- Add the shrimp and cook for 2 minutes per side until pink and curled.
- Divide the rice between bowls.
- Top with the shrimp and vegetables, then add salsa, avocado, cilantro, and lime juice.
- Serve right away while the shrimp is still tender.
Equipment for This Recipe:
- Large skillet
- Tongs or spatula
- Cutting board
- Small serving bowls
How to Serve This Dish:
Build each bowl with rice on the bottom and the shrimp mix on top so the hot juices don’t disappear into the rice too early. A side of shredded cabbage adds crunch if you want more texture. I’d keep the salsa chunky, not watery.
Pro Tips for This Recipe:
- Dry shrimp sear better. Wet shrimp steam, and they lose that tight snap.
- Cook the shrimp only until opaque; they turn rubbery fast.
- If you want more volume without more calories, add extra peppers or shredded cabbage.
Variations on This Dish:
- Cauliflower Rice Bowl: Swap in cauliflower rice and keep the same topping ratio.
- Chipotle Lime Bowl: Add 1 tsp adobo sauce from canned chipotles to the seasoning.
- Black Bean Add-In: Fold in 1/2 cup black beans after the shrimp cooks for a sturdier bowl.
Common Mistakes to Avoid with This Dish:
- Don’t leave the shrimp in the pan too long. Once they curl into a loose C, they’re done.
- Don’t slice the peppers too thick. Thin strips soften faster and taste better here.
- Don’t pour on a watery salsa before serving. It makes the rice soggy in a hurry.
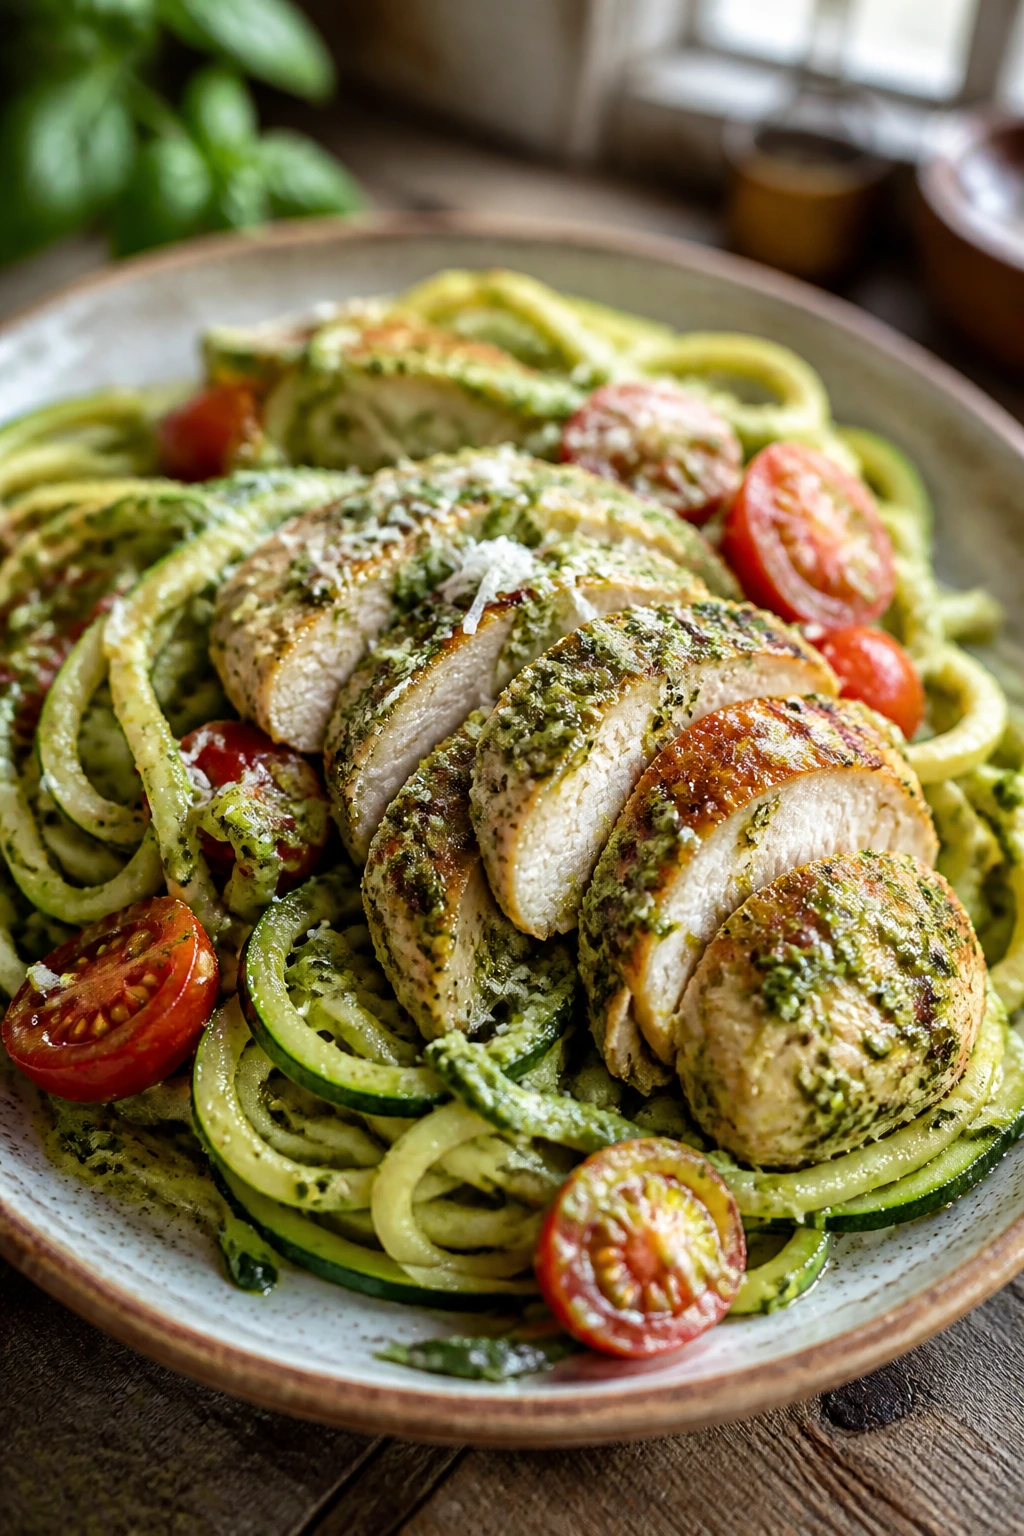
6. Zucchini Noodle Pesto Chicken
Intro:
This is the kind of dinner that sounds light and tastes like you planned harder than you did. Zucchini noodles bring the volume, pesto brings the herb punch, and chicken keeps the bowl steady enough to count as a real meal. It lands around 350 calories a serving, and the cherry tomatoes make it look lively.
Why It Works:
Zucchini noodles cook in a minute or two, so they stay bright and don’t collapse into a wet tangle. Pesto gives you basil, garlic, oil, and cheese in one spoonful, which means you don’t need much of it to carry the dish. Chicken breast adds protein without taking the flavor away from the herbs.
Key Ingredients:
- 1 lb boneless, skinless chicken breast, thinly sliced
- 3 medium zucchini, spiralized
- 3 tbsp basil pesto
- 1 tbsp olive oil
- 1 cup cherry tomatoes, halved
- 2 garlic cloves, minced
- 1/4 cup grated Parmesan
- Salt and black pepper
- Lemon zest, optional
Quick Steps:
- Season the chicken with salt and pepper.
- Heat the olive oil in a skillet over medium-high heat and cook the chicken for 4 to 5 minutes until browned and cooked through.
- Add the garlic and tomatoes, then cook for 1 minute until the tomatoes soften.
- Toss in the zucchini noodles and stir for 1 to 2 minutes, just until they start to wilt.
- Remove the pan from the heat and stir in the pesto.
- Top with Parmesan and lemon zest.
Equipment for This Recipe:
- Large skillet
- Spiralizer or julienne peeler
- Tongs
- Grater for Parmesan
How to Serve This Dish:
Serve it in a shallow bowl so the zoodles don’t bunch up. A simple green salad or a few roasted mushrooms make a good side if you want more on the plate. I prefer this without extra bread; the pesto already handles the richness.
Pro Tips for This Recipe:
- Don’t overcook the zucchini. Two minutes is enough, maybe less.
- Use pesto off the heat so it stays bright and glossy.
- Salt the chicken well before cooking; lean breast meat needs the help.
Variations on This Dish:
- Shrimp Pesto Zoodles: Swap chicken for shrimp and cook them in about half the time.
- Dairy-Free Bowl: Use dairy-free pesto and skip the Parmesan.
- Sun-Dried Tomato Boost: Add 2 tbsp chopped sun-dried tomatoes for a sweeter, deeper flavor.
Common Mistakes to Avoid with This Dish:
- Don’t let the zucchini sit after spiralizing unless you’ve salted and drained it. Water builds up fast.
- Don’t cook the pesto with the heat on. It loses its fresh taste.
- Don’t use thick chicken slices. Thin strips cook evenly and fit the quick format better.
7. Veggie Egg Muffins with Feta
Intro:
These are small, but they earn their keep. The edges set into a soft golden ring, the feta gives little salty pops, and the spinach disappears into the eggs without making them watery if you prep it right. Two muffins land around 200 calories, which makes them a sharp breakfast or a lunch-box backup.
Why It Works:
Eggs set quickly in a muffin tin, so you can bake a batch and move on with your day. A little milk keeps the texture tender, while feta and vegetables add enough flavor that you do not need sauce on top. Since the portions are pre-set, it’s easier to stay in the calorie range.
Key Ingredients:
- 12 large eggs
- 2 tbsp milk
- 1 cup baby spinach, chopped
- 1/2 cup bell pepper, finely diced
- 1/2 cup mushrooms, finely chopped and lightly sautéed
- 3/4 cup feta, crumbled
- 1/2 tsp kosher salt
- 1/4 tsp black pepper
- Cooking spray or butter for the tin
Quick Steps:
- Preheat the oven to 375°F and grease a 12-cup muffin tin well.
- If using mushrooms, sauté them for 2 to 3 minutes to drive off extra moisture.
- Whisk the eggs, milk, salt, and pepper until smooth.
- Stir in the spinach, bell pepper, mushrooms, and feta.
- Divide the mixture between the muffin cups, filling each about 3/4 full.
- Bake for 18 to 20 minutes until set in the center and lightly puffed.
- Cool for 5 minutes before lifting them out.
Equipment for This Recipe:
- 12-cup muffin tin
- Mixing bowl
- Whisk
- Small skillet, if sautéing the mushrooms
How to Serve This Dish:
Serve two muffins with fruit, toast, or a little sliced tomato on the side. They pack neatly into a container, which makes them useful when mornings go sideways. I like them warm, but they’re fine at room temperature too.
Pro Tips for This Recipe:
- Grease the tin well. Egg muffins cling to bare metal like they’re paying rent.
- Pre-cook any watery vegetables; raw mushrooms and spinach can make the muffins soggy.
- Let them rest before removing them so the centers finish setting.
Variations on This Dish:
- Mediterranean Muffins: Add chopped olives and a pinch of oregano.
- Turkey Bacon Version: Mix in 1/4 cup chopped cooked turkey bacon for a smokier bite.
- No-Feta Herb Muffins: Swap the feta for extra chives and parsley if you want a softer flavor.
Common Mistakes to Avoid with This Dish:
- Don’t overfill the cups. They puff, then sink messily if the tin is packed too full.
- Don’t skip the cooling time. Hot egg muffins tear apart when you rush them.
- Don’t add wet vegetables straight from the pan without cooling them first.
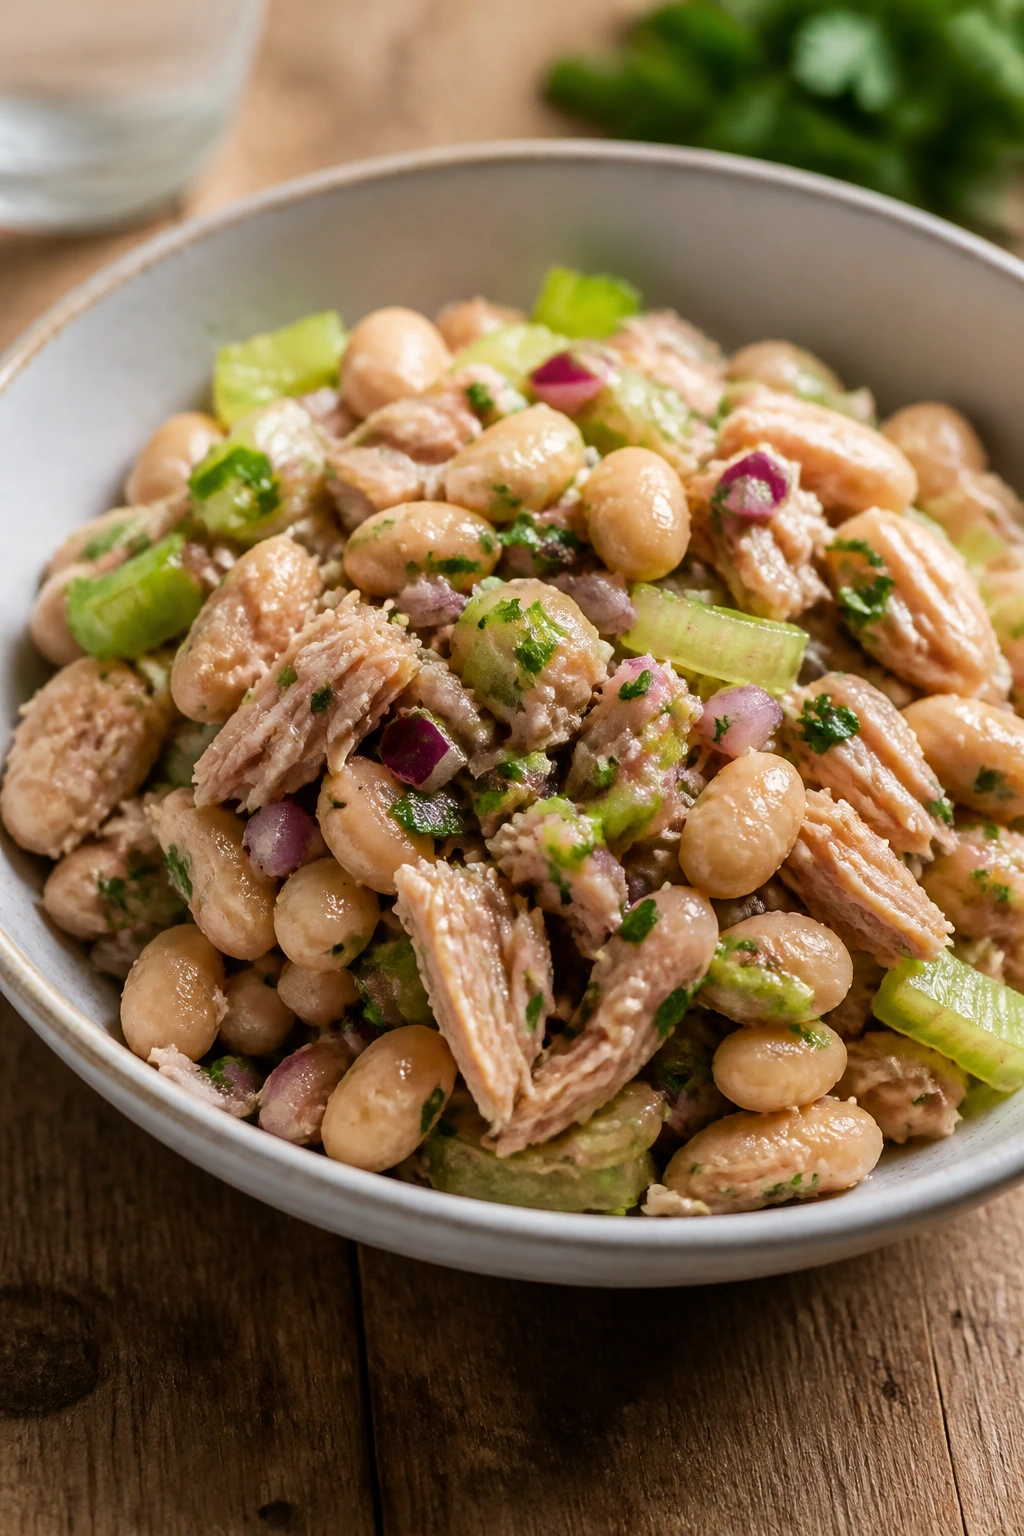
8. Tuna White Bean Salad
Intro:
This is a cold lunch with a little backbone. Tuna brings the protein, white beans give you creaminess without mayo, and the lemon-Dijon dressing keeps everything awake. It takes about 10 minutes, which is the kind of math I trust on a busy day. Around 250 calories a serving, give or take the tuna brand.
Why It Works:
Beans make the salad more filling without adding much prep time, and they hold up better than delicate greens if you pack this for later. Tuna gives clean protein and a savory base, while celery and onion add crunch so the texture doesn’t go soft. A small amount of olive oil keeps the dressing balanced.
Key Ingredients:
- 2 cans tuna in water, drained
- 1 can cannellini beans, rinsed and drained
- 1 celery stalk, diced
- 1/4 red onion, finely minced
- 1/4 cup chopped parsley
- 1 tbsp olive oil
- 1 tbsp lemon juice
- 1 tsp Dijon mustard
- Salt and black pepper
- 4 cups mixed greens, for serving
Quick Steps:
- Whisk the olive oil, lemon juice, Dijon, salt, and pepper in a bowl.
- Add the tuna, beans, celery, onion, and parsley.
- Fold gently until coated, keeping some bean shape.
- Spoon the salad over greens or pack it into containers.
- Taste and add more lemon if it needs a brighter edge.
Equipment for This Recipe:
- Mixing bowl
- Fork
- Cutting board
- Sharp knife
How to Serve This Dish:
Pile it over arugula, spinach, or chopped romaine, or spoon it into a whole-grain wrap if you want a more portable lunch. A few crackers on the side work too, but I’d keep the portion modest. The salad itself should stay chunky.
Pro Tips for This Recipe:
- Dry the beans a bit after rinsing if you want the dressing to cling better.
- Tuna in water keeps the calories lower, but oil-packed tuna works if you reduce the olive oil.
- Add capers if you want a brinier, sharper salad.
Variations on This Dish:
- Mediterranean Version: Add chopped cucumber and a few sliced olives.
- Avocado Bowl: Swap the olive oil for 1/2 avocado mashed into the dressing.
- No-Mayo Lunch Box: Stir in 2 tbsp plain Greek yogurt for a creamier feel.
Common Mistakes to Avoid with This Dish:
- Don’t mash the beans into paste. A little shape makes the salad better.
- Don’t oversalt before tasting the tuna. Some cans bring more salt than others.
- Don’t pack it with wet greens unless you like soggy lunch by noon.
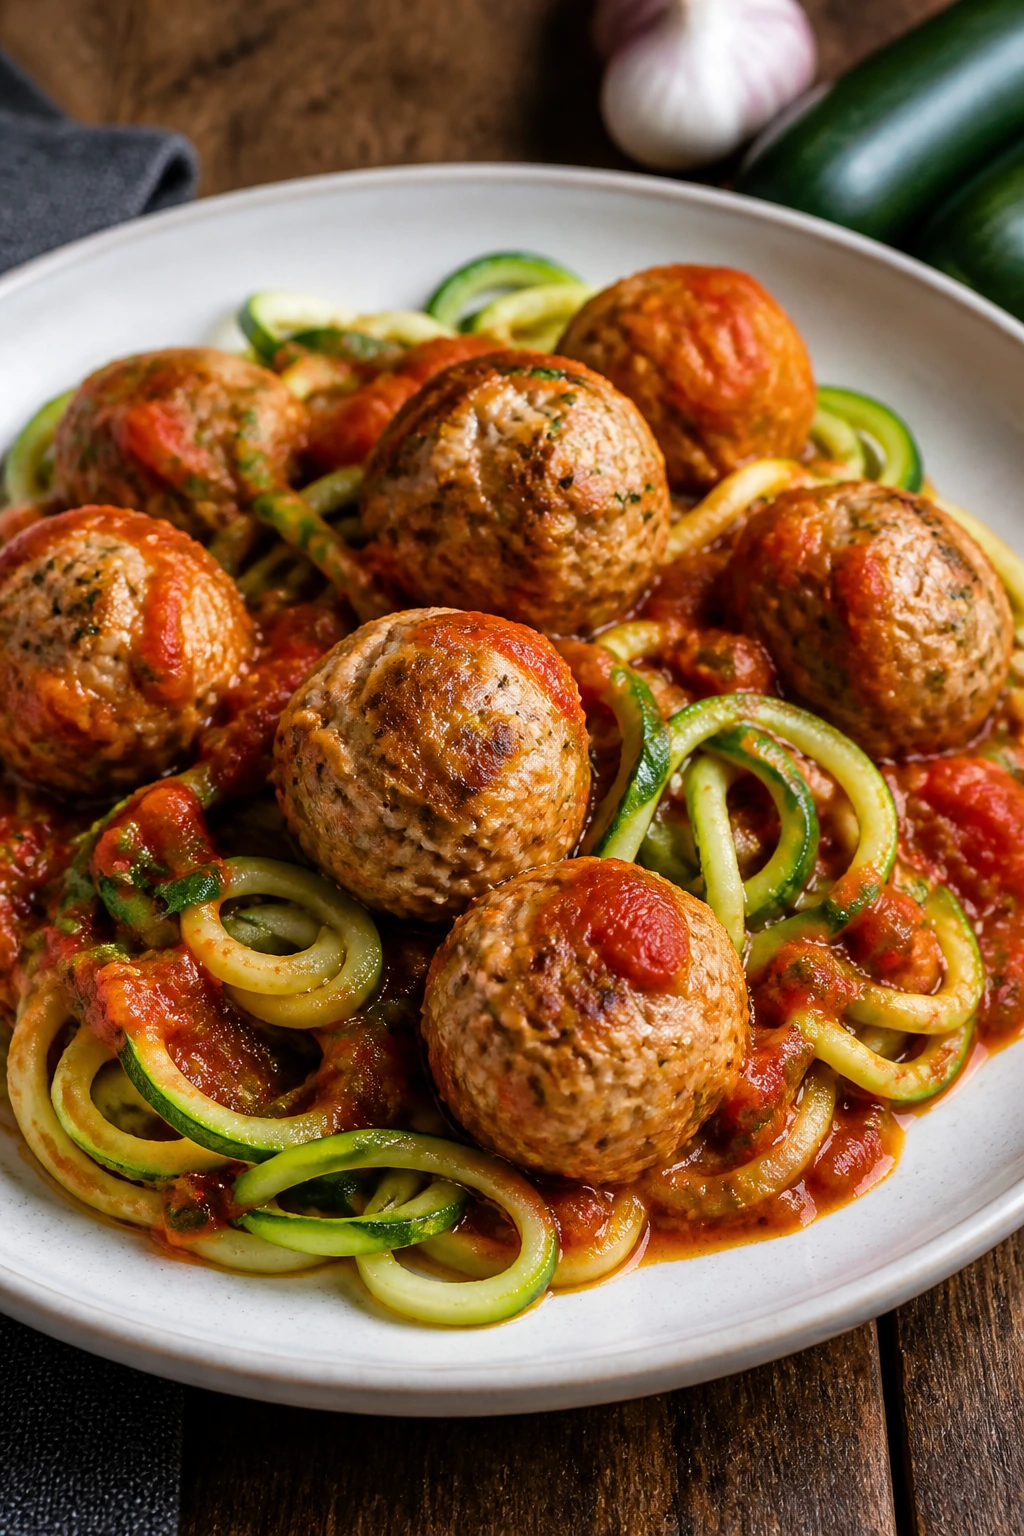
9. Turkey Meatballs with Zucchini and Marinara
Intro:
These meatballs are tender, tomato-sauced, and just hearty enough to feel like real dinner without turning into a pile of pasta. The zucchini noodles keep the plate light, while the turkey and Parmesan do the heavy lifting. It lands around 400 calories a serving and scratches the Italian-food itch fast.
Why It Works:
Lean turkey takes on garlic and Italian seasoning well, and baking the meatballs keeps the cleanup simple. Zucchini noodles soak up sauce without adding many calories, which is why this dish feels bigger than it is. Marinara gives acidity and moisture, so the meatballs don’t need much fat in the mix.
Key Ingredients:
- 1 lb lean ground turkey
- 1 large egg
- 1/3 cup whole-wheat breadcrumbs
- 2 tbsp grated Parmesan
- 2 garlic cloves, minced
- 1 tsp Italian seasoning
- 1/2 tsp salt
- 1 tbsp olive oil
- 2 cups marinara sauce
- 4 medium zucchini, spiralized
Quick Steps:
- Preheat the oven to 425°F and line a sheet pan with parchment.
- Mix the turkey, egg, breadcrumbs, Parmesan, garlic, seasoning, and salt until just combined.
- Roll into 16 small meatballs and place on the sheet pan.
- Bake for 12 to 14 minutes until browned and cooked through.
- Warm the marinara in a skillet, then add the meatballs to coat.
- Sauté the zucchini noodles for 1 to 2 minutes in a separate pan, then top with meatballs and sauce.
Equipment for This Recipe:
- Sheet pan
- Parchment paper
- Large skillet
- Mixing bowl
How to Serve This Dish:
Serve it in shallow bowls so the sauce collects around the noodles instead of sinking straight to the bottom. A simple side salad with lemon dressing fits well here. I’d skip extra cheese unless you’ve left room in the calorie count.
Pro Tips for This Recipe:
- Mix the meatball mixture just until it comes together. Overworking makes them dense.
- Make the meatballs small so they cook quickly and evenly.
- Dry the zucchini noodles before cooking; water is the enemy here.
Variations on This Dish:
- Spicy Turkey Meatballs: Add 1/4 tsp red pepper flakes to the mix.
- Spinach Meatball Version: Fold in 1/2 cup finely chopped spinach for more veg.
- Cauliflower Rice Plate: Serve the meatballs over cauliflower rice if you want less moisture and more heft.
Common Mistakes to Avoid with This Dish:
- Don’t cram the meatballs on a crowded pan. They brown better with space.
- Don’t cook the zucchini until it slumps. A brief toss is enough.
- Don’t pour cold marinara over hot meatballs straight from the oven. Warm the sauce first so the flavor spreads.
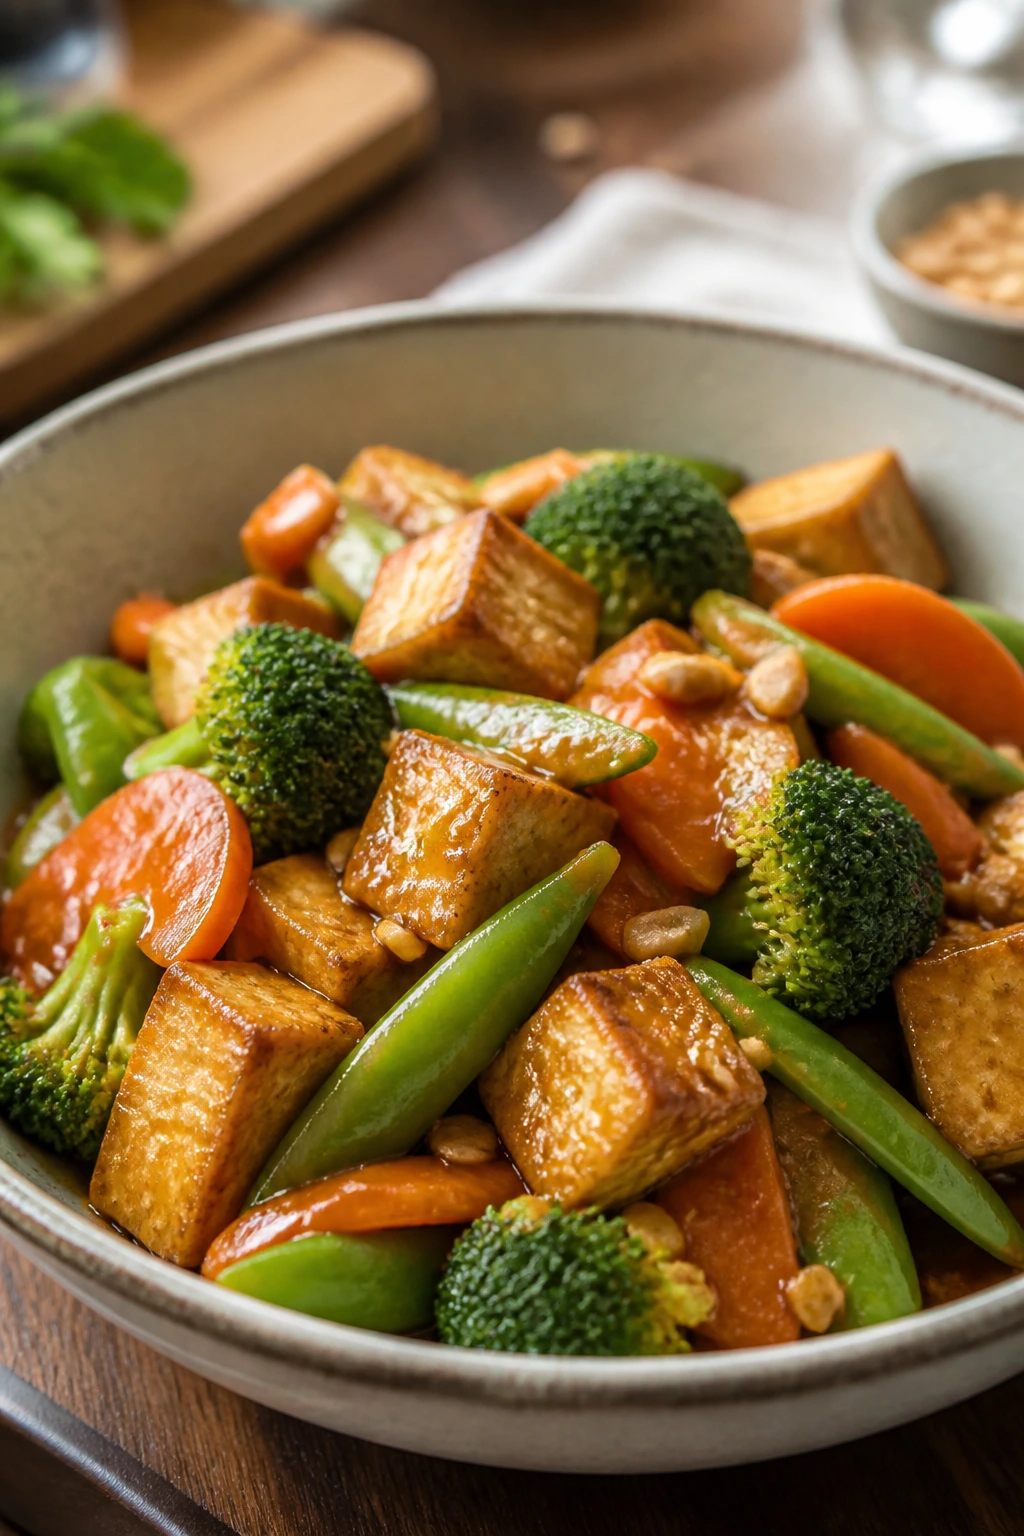
10. Tofu Peanut Stir-Fry
Intro:
This is the stir-fry I make when I want something nutty, savory, and fast enough to feel like a shortcut. The tofu gets crisp on the edges, the vegetables keep their crunch, and the peanut sauce tastes rich without needing a big pour. At about 430 calories a serving, it’s a solid dinner bowl.
Why It Works:
Extra-firm tofu holds up to high heat if you press it first, and a dusting of cornstarch gives the outside a dry, crisp surface. The sauce uses peanut butter, soy sauce, vinegar, and a little honey, so you get salt, acid, and depth in a small amount. Brown rice rounds out the bowl and makes the portion feel complete.
Key Ingredients:
- 14 oz extra-firm tofu, pressed and cubed
- 1 tbsp cornstarch
- 1 tbsp neutral oil
- 2 cups broccoli florets
- 1 cup snap peas
- 1 carrot, thinly sliced
- 2 garlic cloves, minced
- 1 tbsp fresh ginger, grated
- 2 tbsp peanut butter
- 2 tbsp low-sodium soy sauce
- 1 tbsp rice vinegar
- 1 tsp honey or maple syrup
- 1/2 cup water
- 2 cups cooked brown rice
Quick Steps:
- Press the tofu for 10 to 15 minutes, then toss it with cornstarch.
- Heat the oil in a skillet or wok over medium-high heat and sear the tofu on all sides until golden.
- Add the broccoli, snap peas, carrot, garlic, and ginger, and stir-fry for 3 to 4 minutes.
- Whisk the peanut butter, soy sauce, vinegar, honey, and water together.
- Pour the sauce into the pan and toss until everything is glossy.
- Serve over brown rice and finish with sesame seeds if you want crunch.
Equipment for This Recipe:
- Large skillet or wok
- Tofu press or clean kitchen towel
- Whisk
- Spatula
How to Serve This Dish:
Spoon the stir-fry over rice in a wide bowl so the sauce can pool a little. A squeeze of lime or a scatter of scallions sharpens the finish. If you want more crunch, add shredded cabbage on the side.
Pro Tips for This Recipe:
- Press the tofu longer than you think you need to. Extra water keeps it from crisping.
- Keep the vegetables moving, but do not overcook them. Snap peas should still snap.
- Thin the sauce with water until it clings, not clumps.
Variations on This Dish:
- Sesame Chili Tofu: Stir 1 tsp chili crisp into the sauce.
- Cashew Butter Swap: Use cashew butter instead of peanut butter for a softer, sweeter flavor.
- Cauliflower Rice Bowl: Swap the brown rice for cauliflower rice to lighten the bowl.
Common Mistakes to Avoid with This Dish:
- Don’t skip the cornstarch if you want crisp tofu. It matters.
- Don’t let the sauce reduce until it sticks like glue. Peanut butter can go from glossy to pasty fast.
- Don’t cook the carrots so long that they lose all bite. A little crunch is the point.
11. Greek Chicken Pita Pockets
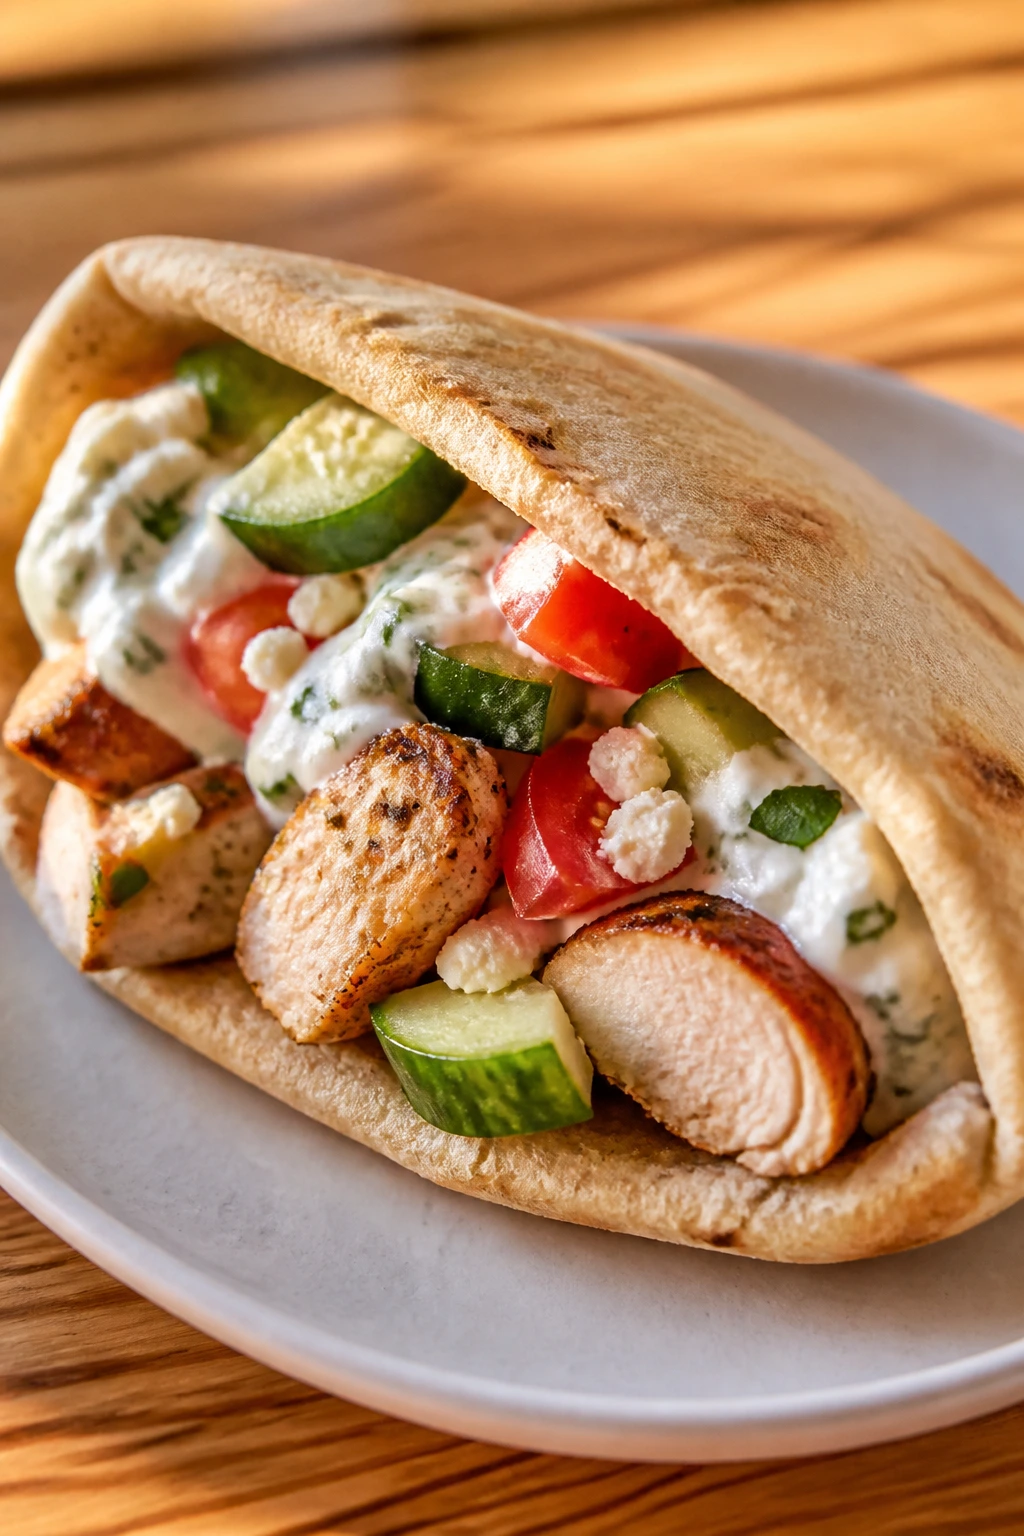
Intro:
This one tastes like a fast lunch shop sandwich, but you control the filling and the salt. The chicken is oregano-heavy and lemony, the cucumber and tomato stay cool, and the pita holds everything together without falling apart if you don’t overstuff it. About 420 calories per pocket, depending on your sauce and feta.
Why It Works:
Thin chicken strips cook quickly and soak up Greek-style seasoning better than thick pieces. Fresh vegetables add crunch and moisture, so you don’t need a lot of oil or heavy dressing. A spoon of tzatziki or yogurt keeps the pocket creamy and sharp at the same time.
Key Ingredients:
- 1 lb boneless, skinless chicken breast, sliced thin
- 1 tsp olive oil
- 1 tsp dried oregano
- 1/2 tsp garlic powder
- 1/2 tsp kosher salt
- 1/4 tsp black pepper
- 4 small whole-wheat pitas
- 1 cup diced cucumber
- 1 cup diced tomato
- 1/4 cup thinly sliced red onion
- 1/2 cup tzatziki or plain Greek yogurt mixed with lemon
- 1/4 cup crumbled feta
- Chopped parsley
Quick Steps:
- Season the chicken with olive oil, oregano, garlic powder, salt, and pepper.
- Cook it in a skillet over medium-high heat for 5 to 6 minutes, until browned and cooked through.
- Warm the pitas in a dry skillet or microwave so they flex instead of crack.
- Toss the cucumber, tomato, onion, and parsley together.
- Split the pitas and fill them with chicken, vegetables, tzatziki, and feta.
Equipment for This Recipe:
- Skillet
- Mixing bowl
- Sharp knife
- Tongs
How to Serve This Dish:
Set the fillings out separately if you want people to assemble their own pockets. A handful of carrot sticks or a lemony side salad fits well without pushing the calories too high. Keep the sauce inside the pocket, not dumped on the plate.
Pro Tips for This Recipe:
- Slice the chicken thin so it cooks before it dries out.
- Warm the pita. Cold pita tears, and you lose the filling.
- Seed the tomatoes if they’re extra juicy; sogginess shows up fast in pocket sandwiches.
Variations on This Dish:
- Chicken Gyro Bowl: Skip the pita and serve everything over chopped romaine.
- Lettuce Wrap Version: Use romaine leaves if you want fewer carbs.
- Dairy-Free Tahini Drizzle: Replace the tzatziki with tahini, lemon, and water whisked smooth.
Common Mistakes to Avoid with This Dish:
- Don’t stuff the pita to the point of splitting it open.
- Don’t use sauce as glue and then wonder why the bread gets soggy. Add it last.
- Don’t let the chicken sit in the pan after it’s done; it keeps cooking and turns dry.
12. Red Lentil Tomato Soup
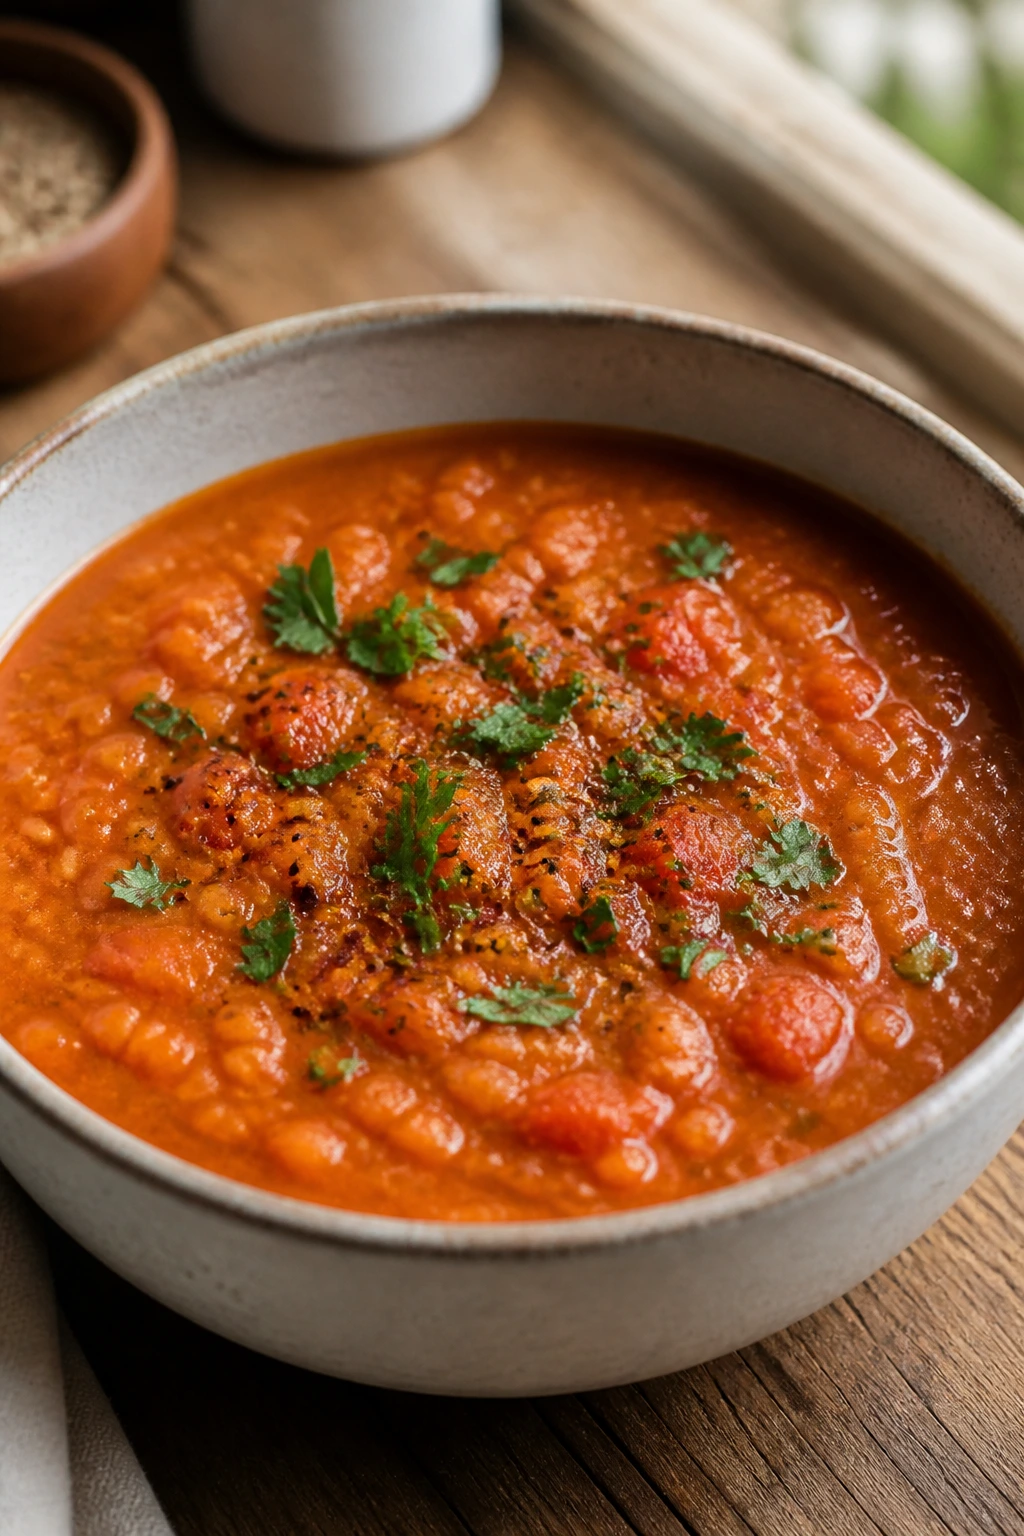
Intro:
This soup is thick, red, and spoonable in a way that feels far more substantial than the ingredient list suggests. Red lentils break down into a creamy base without any dairy, and the tomatoes plus lemon keep the flavor bright. Around 250 calories a bowl, and it reheats like a champ.
Why It Works:
Red lentils cook fast and soften into the broth, which gives the soup body in under half an hour. Onion, carrot, celery, and tomato paste build a deeper base without requiring meat or cream. A handful of spinach at the end gives you a fresh finish and a little color.
Key Ingredients:
- 1 tbsp olive oil
- 1 onion, diced
- 2 carrots, diced
- 2 celery stalks, diced
- 3 garlic cloves, minced
- 1 tbsp tomato paste
- 1 cup red lentils, rinsed
- 5 cups low-sodium vegetable or chicken broth
- 1 can diced tomatoes, 14.5 oz
- 2 cups baby spinach
- 1 tbsp lemon juice
- Salt and black pepper
Quick Steps:
- Heat the oil in a pot over medium heat and cook the onion, carrots, and celery for 5 minutes.
- Stir in the garlic and tomato paste for 30 seconds.
- Add the lentils, broth, and diced tomatoes, then bring to a boil.
- Lower the heat and simmer for 18 to 20 minutes until the lentils are soft and the soup thickens.
- Stir in the spinach and lemon juice.
- Season with salt and pepper, then serve hot.
Equipment for This Recipe:
- Dutch oven or soup pot
- Wooden spoon
- Ladle
- Measuring cups
How to Serve This Dish:
Serve it with whole-grain toast, pita, or a small spoon of yogurt on top if you want a creamy contrast. The soup should be thick enough to mound slightly on the spoon. A few grinds of black pepper finish it well.
Pro Tips for This Recipe:
- Rinse the lentils until the water runs mostly clear.
- Keep the simmer gentle so the vegetables soften evenly.
- If the soup gets too thick, add broth a splash at a time.
Variations on This Dish:
- Curried Lentil Soup: Add 1 tsp curry powder with the tomato paste.
- Blended Version: Purée half the soup for a smoother texture.
- Smoky Paprika Soup: Add 1/2 tsp smoked paprika for a deeper edge.
Common Mistakes to Avoid with This Dish:
- Don’t skip the lemon. Lentils need acid or they taste flat.
- Don’t salt too hard at the start if your broth is already seasoned.
- Don’t walk away during the last few minutes; lentils can go from thick to cementy.
13. Chicken Cauliflower Fried Rice
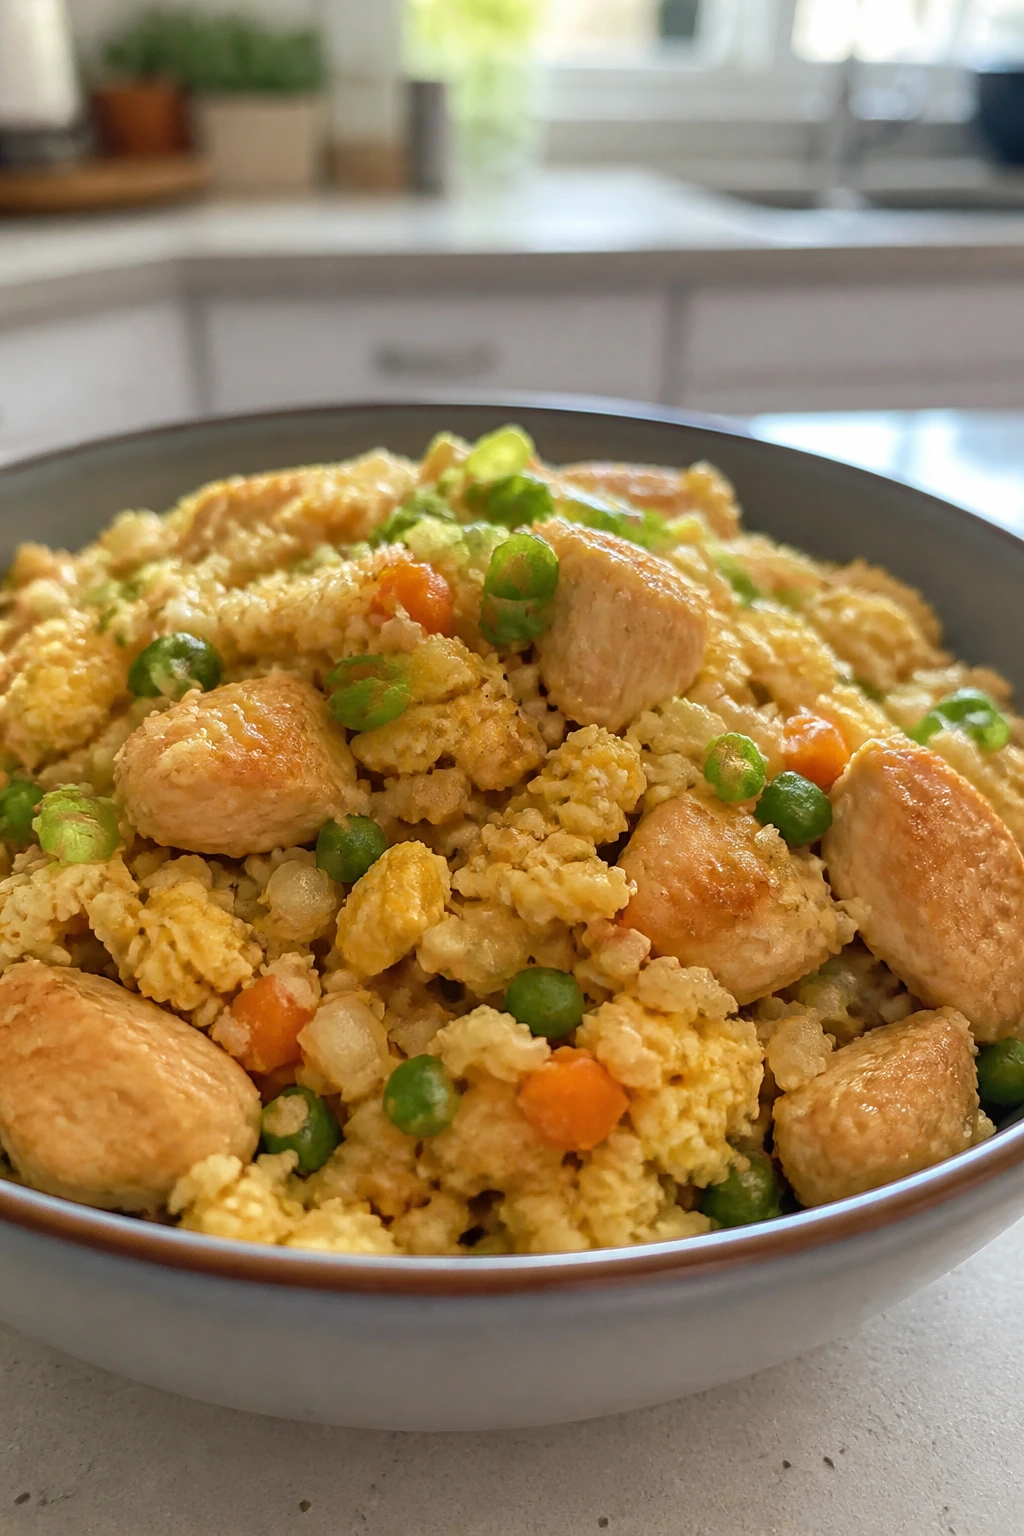
Intro:
This is the takeout-style bowl I lean on when I want something savory and fast but not heavy. The cauliflower rice keeps the carb count down, the eggs add softness, and the chicken gives enough substance that you’re not hungry again in twenty minutes. Roughly 330 calories a serving, and it cooks in one pan.
Why It Works:
Cauliflower rice behaves best when the pan is hot and the moisture can evaporate fast. Scrambled eggs add texture and help the dish feel like fried rice instead of chopped vegetables in soy sauce. Chicken and frozen veg keep the prep short.
Key Ingredients:
- 1 lb boneless, skinless chicken breast, diced
- 1 tbsp neutral oil
- 4 cups cauliflower rice
- 2 large eggs, beaten
- 1 cup frozen peas and carrots
- 3 green onions, sliced
- 2 garlic cloves, minced
- 3 tbsp low-sodium soy sauce
- 1 tsp sesame oil
- Black pepper
Quick Steps:
- Heat the oil in a large skillet or wok over medium-high heat.
- Cook the chicken for 5 to 6 minutes until browned and cooked through.
- Push the chicken to one side, pour in the eggs, and scramble them until just set.
- Add the cauliflower rice, peas and carrots, garlic, soy sauce, and black pepper.
- Stir-fry for 4 to 5 minutes until the cauliflower rice is hot and no longer watery.
- Finish with sesame oil and green onions.
Equipment for This Recipe:
- Large skillet or wok
- Spatula
- Mixing bowl for the eggs
- Cutting board
How to Serve This Dish:
Serve it in deep bowls with a few extra green onions on top. If you want heat, add sriracha at the table rather than in the pan. A cucumber salad works well on the side.
Pro Tips for This Recipe:
- Use cauliflower rice that has been thawed and patted dry if frozen. Water ruins the texture.
- Keep the heat high so the vegetables fry, not steam.
- Add sesame oil at the end; it smells better that way.
Variations on This Dish:
- Shrimp Fried Rice: Swap the chicken for shrimp and cut the cooking time.
- Pineapple Ginger Version: Add 1/2 cup chopped pineapple and 1 tsp extra ginger.
- Egg-Free Tofu Swap: Use crisp tofu cubes instead of eggs for a vegan bowl.
Common Mistakes to Avoid with This Dish:
- Don’t overload the pan. If needed, cook the cauliflower rice in two batches.
- Don’t drown it in soy sauce. It should taste seasoned, not salty.
- Don’t use raw cauliflower rice straight from a wet package without drying it first.
14. Black Bean Sweet Potato Skillet
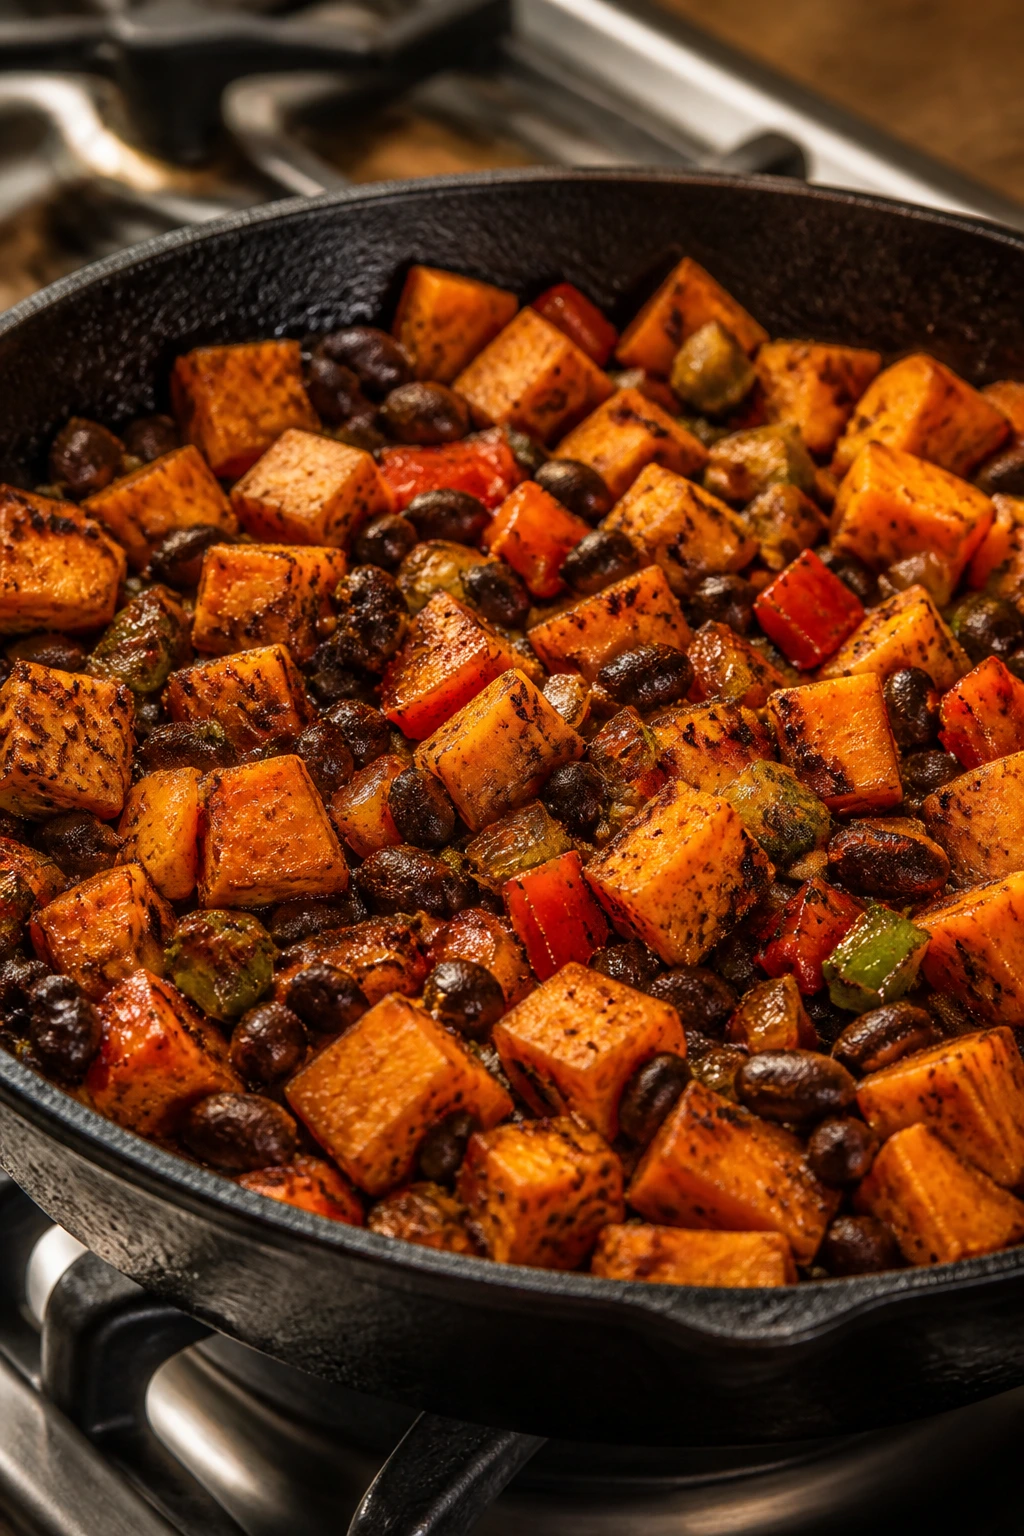
Intro:
This skillet comes out smoky, sweet, and a little saucy from the salsa. Sweet potato gives you the starchy part, black beans bring the protein, and the whole pan stays below 400 calories a serving if you keep the avocado sensible. It’s sturdy enough for dinner and cheap enough to make again next week.
Why It Works:
Sweet potato softens into little golden cubes that hold shape if you cut them small. Black beans make the dish filling, while cumin and chili powder give you the warm, familiar flavor of taco night without much effort. A little salsa ties everything together and saves you from making a separate sauce.
Key Ingredients:
- 1 tbsp olive oil
- 1 medium sweet potato, peeled and diced small
- 1 bell pepper, diced
- 1 small onion, diced
- 2 garlic cloves, minced
- 1 tsp ground cumin
- 1 tsp chili powder
- 1 can black beans, rinsed and drained
- 1/2 cup corn
- 1/2 cup salsa
- 1 avocado, sliced
- Cilantro and lime
Quick Steps:
- Heat the olive oil in a large skillet over medium heat.
- Add the sweet potato and cook for 6 to 8 minutes, stirring often and adding 2 tbsp water if needed to soften it.
- Add the onion, bell pepper, and garlic, and cook for 3 minutes.
- Stir in the cumin, chili powder, beans, corn, and salsa.
- Cook for 2 to 3 minutes until hot and slightly thickened.
- Top with avocado, cilantro, and lime.
Equipment for This Recipe:
- Large skillet with a lid
- Knife and cutting board
- Wooden spoon
- Small bowl for toppings
How to Serve This Dish:
Serve it in bowls, or tuck it into warm tortillas if you have room in your calorie budget. A spoon of plain yogurt works in place of sour cream if you want a cooler finish. The avocado should go on at the end so it stays fresh and green.
Pro Tips for This Recipe:
- Dice the sweet potato small; big chunks take too long and the rest of the pan overcooks.
- Cover the pan for a minute or two if the potato needs help softening.
- Taste before serving. Beans and salsa vary a lot in salt.
Variations on This Dish:
- Breakfast Egg Topping: Add a fried egg on top and call it breakfast-for-dinner.
- Chipotle Version: Stir in 1 tsp minced chipotle in adobo for smoke and heat.
- Quinoa Bowl Build: Serve it over quinoa if you want a sturdier base.
Common Mistakes to Avoid with This Dish:
- Don’t keep the sweet potato pieces too large.
- Don’t forget to add a splash of water if the pan dries out before the potato softens.
- Don’t add avocado too early. It gets soft and odd-looking fast.
15. Baked Cod with Tomato Olive Relish and Couscous
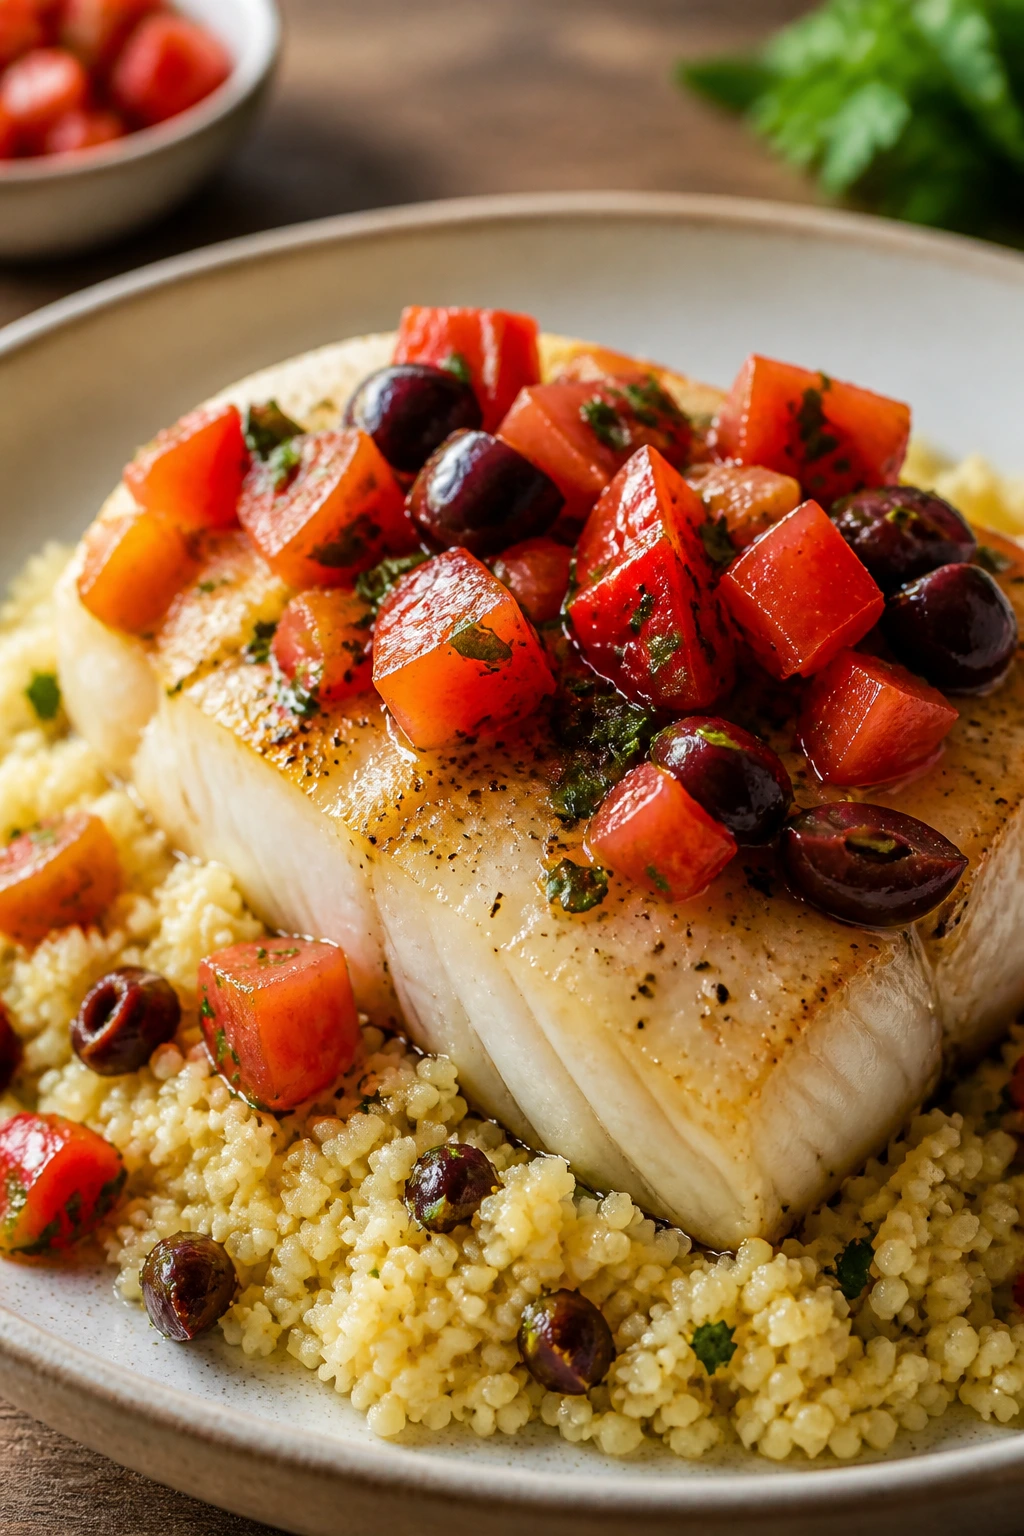
Intro:
Cod is mild, flaky, and a little underrated. It takes on tomato, olive, and caper flavors well, which makes this dinner taste sharper and more interesting than its short ingredient list suggests. With couscous on the side, you’re looking at about 390 calories a serving and a plate that feels tidy, not skimpy.
Why It Works:
Cod cooks quickly and stays delicate when you pull it just as it turns opaque. The relish brings salt, acid, and sweetness from the tomatoes, so the fish doesn’t need a heavy sauce. Couscous is useful here because it cooks in minutes and catches the juices from the fish and relish.
Key Ingredients:
- 1 1/2 lb cod fillets
- 1 tbsp olive oil
- 1/2 tsp kosher salt
- 1/4 tsp black pepper
- 1 cup cherry tomatoes, halved
- 1/4 cup sliced olives
- 1 tbsp capers, drained
- 1 garlic clove, minced
- 1 tbsp chopped parsley
- 1 cup couscous
- 1 1/4 cups boiling water or broth
- 1 lemon
Quick Steps:
- Preheat the oven to 400°F.
- Stir the tomatoes, olives, capers, garlic, parsley, and half the olive oil together.
- Spread the relish in a baking dish and place the cod on top, seasoning it with salt and pepper.
- Bake for 10 to 12 minutes until the fish flakes easily.
- Pour the boiling water or broth over the couscous, cover, and let it sit for 5 minutes before fluffing.
- Serve the cod over the couscous with lemon juice squeezed over the top.
Equipment for This Recipe:
- Baking dish
- Small saucepan or heatproof bowl
- Fork for fluffing couscous
- Knife
How to Serve This Dish:
Put the couscous down first, then lay the cod on top so the tomato juices can run into it a little. A handful of arugula or a cucumber salad gives the plate a fresh edge. I’d use the lemon generously here.
Pro Tips for This Recipe:
- Buy cod fillets that look moist and have a clean smell, not a fishy one.
- Don’t overbake. Cod gets dry in a hurry.
- Let the couscous sit covered for the full 5 minutes before fluffing.
Variations on This Dish:
- Mediterranean Chile Flakes: Add a pinch of red pepper flakes to the relish.
- Herb-and-Lemon Version: Swap parsley for dill or basil.
- Gluten-Free Rice Swap: Serve over rice instead of couscous.
Common Mistakes to Avoid with This Dish:
- Don’t bake the fish until it curls up and looks chalky.
- Don’t skip the capers if you want the relish to have that sharp, briny bite.
- Don’t dump the couscous out too early; the steam is doing the work.
16. Cottage Cheese Berry Power Bowl
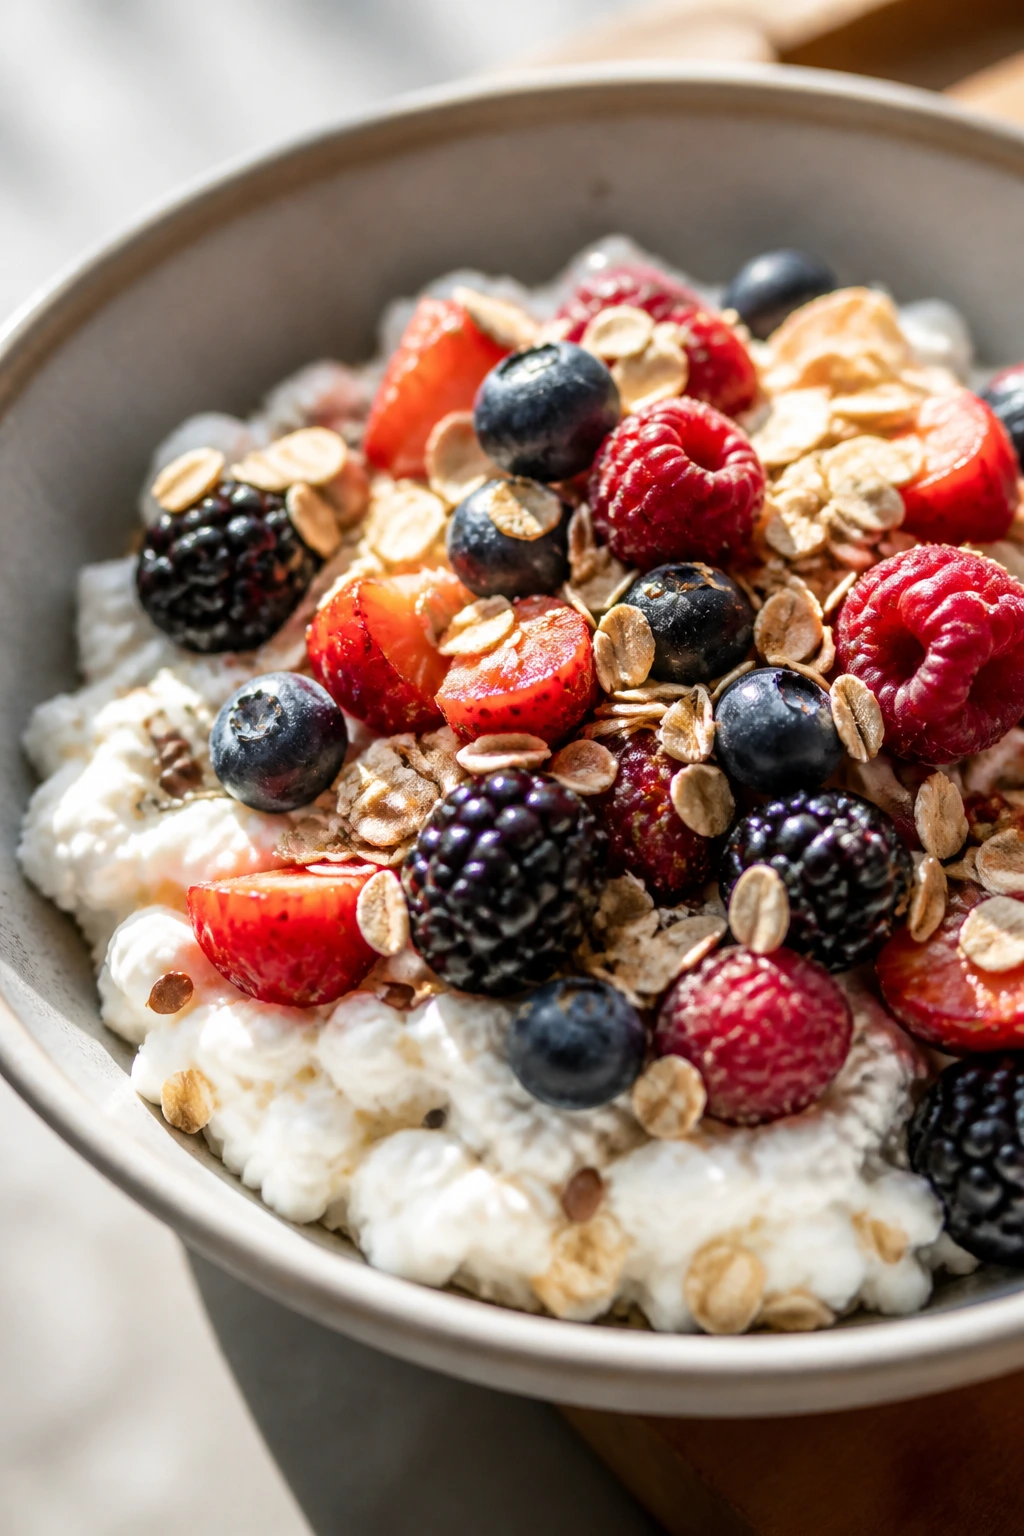
Intro:
This is breakfast that takes almost no time but still eats like you meant it. The cottage cheese is cool and thick, the berries bring juice and acidity, and the oats or granola give you crunch. At about 300 calories, it’s a clean choice when you want something fast and protein-heavy.
Why It Works:
Cottage cheese has enough protein to make a small bowl stick with you longer than a piece of toast alone. Fruit and oats add texture, while chia seeds soak up a bit of moisture and keep the bowl from feeling loose. This is more about assembly than cooking, which is useful on the mornings that arrive too early.
Key Ingredients:
- 2 cups low-fat cottage cheese
- 1 1/2 cups mixed berries
- 1/2 cup rolled oats or low-sugar granola
- 2 tbsp chia seeds
- 2 tbsp chopped almonds
- 1 tsp cinnamon
- 1 tbsp honey
Quick Steps:
- Divide the cottage cheese between 4 bowls.
- Top with berries, oats or granola, chia seeds, and almonds.
- Sprinkle with cinnamon.
- Drizzle with honey right before serving.
- Eat immediately if you want the crunch to stay sharp.
Equipment for This Recipe:
- Mixing bowl, if you want to portion first
- Spoon
- Small knife, if using strawberries
- Airtight containers, for meal prep
How to Serve This Dish:
Serve it cold, straight from the fridge, with the crunchy toppings added at the last minute. If you like a sweeter bowl, use a few extra berries instead of more honey. A small coffee or tea beside it makes the whole thing feel complete.
Pro Tips for This Recipe:
- Use thick cottage cheese, not watery cottage cheese; the texture matters here.
- Keep granola separate if you’re making it ahead.
- A tiny pinch of salt makes the fruit taste brighter.
Variations on This Dish:
- Peach-Pecan Bowl: Swap the berries for sliced peaches and the almonds for pecans.
- Chocolate Cherry Bowl: Add a teaspoon of cocoa nibs and use cherries.
- Savory Cucumber Herb Bowl: Skip the honey and berries, then add cucumber, dill, and black pepper for a lunch-style bowl.
Common Mistakes to Avoid with This Dish:
- Don’t add crunchy toppings too early if you plan to eat it later.
- Don’t bury the bowl in honey. The fruit should still taste like fruit.
- Don’t choose ultra-sweet granola unless you’re accounting for the calories.
17. Turkey and Veggie Stuffed Peppers
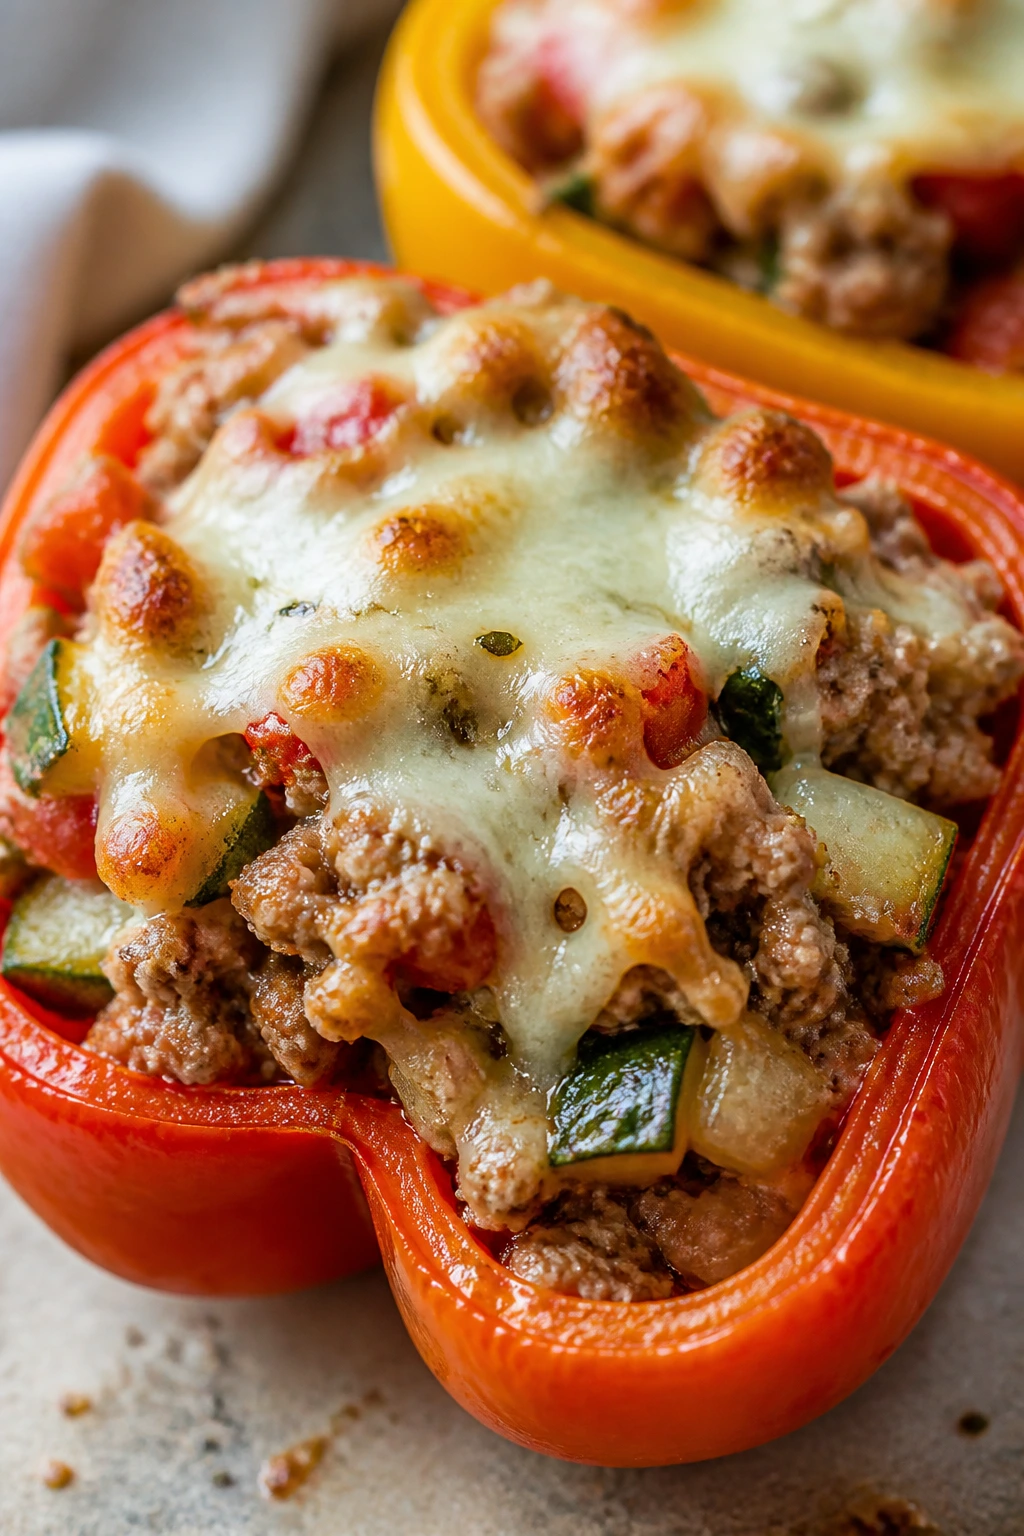
Intro:
Stuffed peppers have a reputation for being fussy, but this version keeps the work under control. The turkey filling is savory and tomato-rich, the peppers soften just enough in the oven, and the melted mozzarella gives a small, useful finish. One stuffed pepper half lands around 430 calories, depending on how you portion the rice.
Why It Works:
Bell peppers are built to hold filling, and a brief pre-cook softens them enough that they don’t stay raw and crunchy in the center. Lean turkey adds protein, while rice or quinoa stretches the mixture so the filling feels substantial. Tomato sauce ties the whole thing together and keeps the inside moist.
Key Ingredients:
- 4 large bell peppers, halved and seeded
- 1 lb lean ground turkey
- 1 small onion, diced
- 2 garlic cloves, minced
- 1 cup cooked quinoa or brown rice
- 1 cup marinara sauce
- 1 cup chopped zucchini or spinach
- 1 tsp Italian seasoning
- 1/2 tsp salt
- 1/4 tsp black pepper
- 1/2 cup shredded mozzarella
Quick Steps:
- Preheat the oven to 400°F.
- If the peppers are thick, microwave or blanch them for 3 to 4 minutes to soften slightly.
- Cook the onion and turkey in a skillet until the turkey is no longer pink.
- Stir in the garlic, cooked grain, marinara, zucchini or spinach, seasoning, salt, and pepper.
- Fill the pepper halves, top with mozzarella, and bake for 20 to 25 minutes until the peppers are tender and the cheese is melted.
- Let them rest for 5 minutes before serving.
Equipment for This Recipe:
- Baking dish
- Skillet
- Spoon
- Knife and cutting board
How to Serve This Dish:
Serve two pepper halves per person with a simple green salad. The filling should stay tucked inside the pepper, not spill out in a flood. A spoon of extra marinara on the plate works if you want more sauce.
Pro Tips for This Recipe:
- Choose peppers that sit flat so they don’t tip in the dish.
- Cook the filling long enough to thicken; watery filling leads to soggy peppers.
- Let the stuffed peppers rest before cutting so the juices settle.
Variations on This Dish:
- Mexican Stuffed Peppers: Use cumin, salsa, and a little cheddar instead of Italian seasoning.
- Dairy-Free Version: Skip the cheese and finish with chopped herbs.
- Cauliflower Rice Stuffing: Swap the grain for cauliflower rice if you want a lighter filling.
Common Mistakes to Avoid with This Dish:
- Don’t leave the peppers raw unless you like a hard bite.
- Don’t use too much sauce in the filling. It leaks and pools.
- Don’t overbake the peppers until they collapse.
18. Miso Ginger Soba with Edamame and Mushrooms
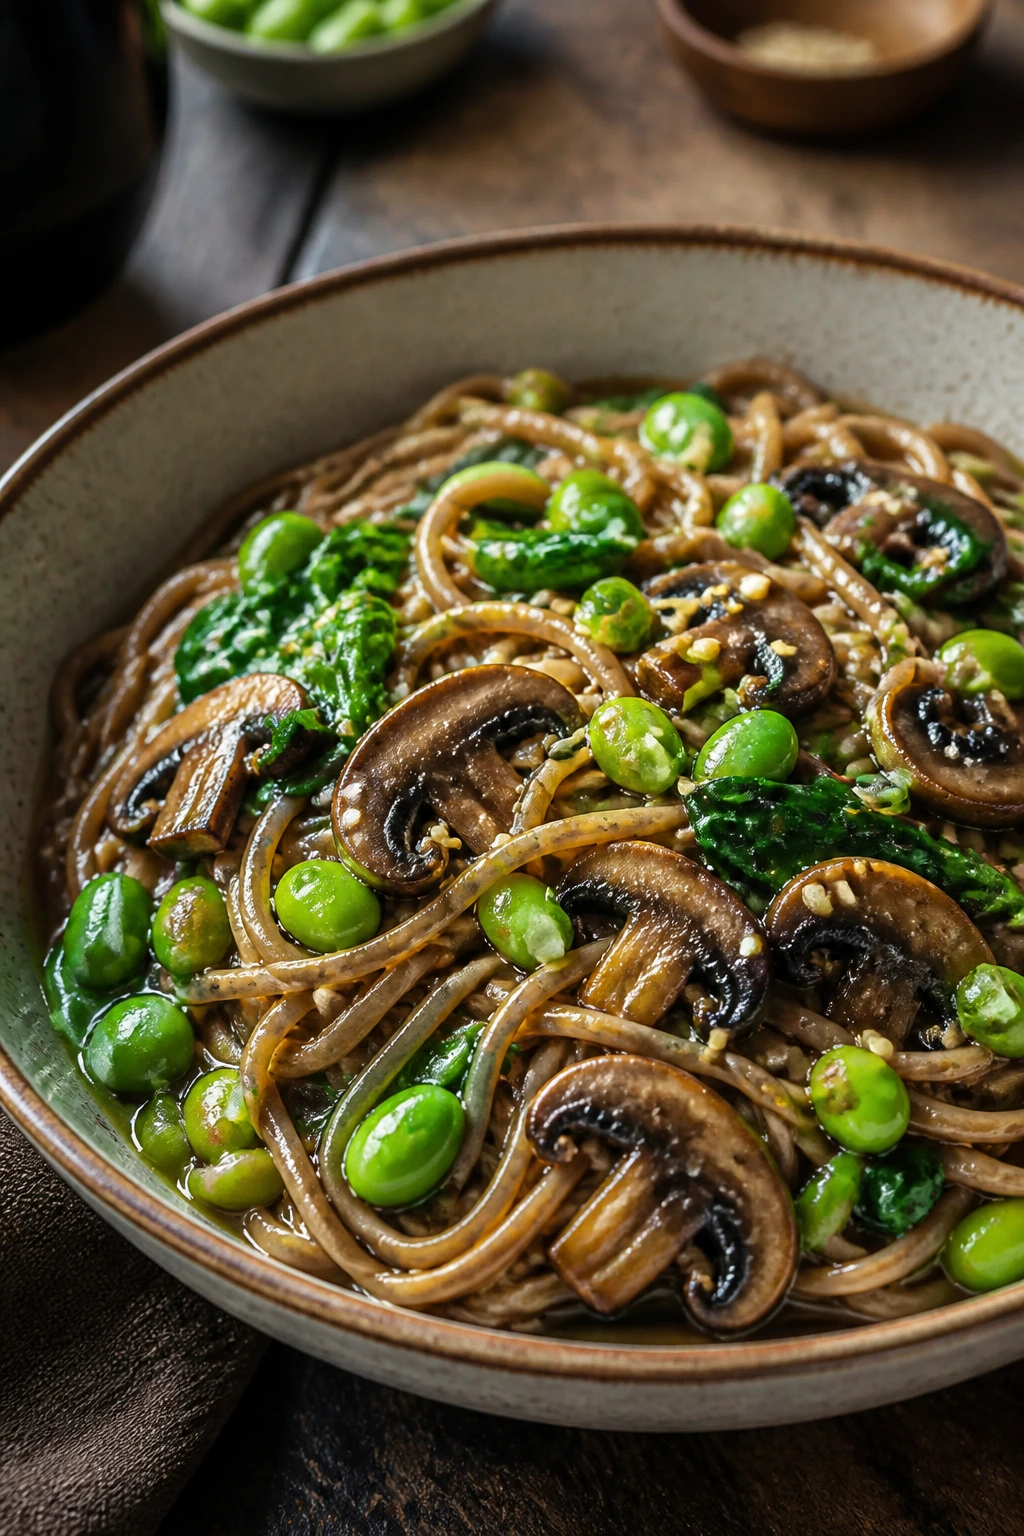
Intro:
This bowl is savory, slippery, and a little earthy in the best way. Miso brings depth, ginger wakes up the noodles, and mushrooms give the dish that full, brothy feel even though it isn’t a soup. Around 430 calories a serving, and it’s quick enough to make on a night when you want something that tastes put together.
Why It Works:
Soba noodles cook quickly and keep a pleasant chew if you rinse them right away. Miso dissolves into hot noodle water and gives the sauce a rounded, salty flavor without needing much oil. Edamame and spinach bring color and protein, while mushrooms add volume and a little meaty chew.
Key Ingredients:
- 8 oz soba noodles
- 1 tbsp neutral oil
- 8 oz mushrooms, sliced
- 2 cups baby spinach
- 1 cup shelled edamame
- 2 garlic cloves, minced
- 1 tbsp fresh ginger, grated
- 2 tbsp white miso paste
- 2 tbsp low-sodium soy sauce
- 1 tbsp rice vinegar
- 1 tsp sesame oil
- Sliced scallions and sesame seeds
Quick Steps:
- Cook the soba noodles according to the package directions, then drain and rinse briefly.
- Heat the oil in a skillet over medium-high heat and cook the mushrooms for 4 to 5 minutes until browned.
- Add the garlic, ginger, edamame, and spinach, and cook for 1 to 2 minutes.
- Whisk the miso, soy sauce, and rice vinegar with 1/4 cup hot water until smooth.
- Toss the noodles and sauce into the skillet and stir until coated.
- Finish with sesame oil, scallions, and sesame seeds.
Equipment for This Recipe:
- Pot for boiling noodles
- Skillet or wok
- Whisk or fork
- Colander
How to Serve This Dish:
Serve it warm in wide bowls so the noodles can stay loose instead of knotted. A little chili crisp on top gives you heat if you want it. I’d keep the scallions fresh and bright at the end, not cooked into nothing.
Pro Tips for This Recipe:
- Dissolve the miso in hot water before adding it to the pan.
- Rinse the soba just enough to stop the cooking, not so much that it turns icy cold unless that’s what you want.
- Add sesame oil last so the smell stays strong.
Variations on This Dish:
- Cold Noodle Salad: Chill the noodles and add cucumber for a lunch version.
- Chicken Add-In: Toss in shredded cooked chicken if you want more protein.
- Rice Noodle Swap: Use rice noodles if soba isn’t in the pantry.
Common Mistakes to Avoid with This Dish:
- Don’t boil the miso hard. It loses some of its round flavor.
- Don’t overcook soba; it turns soft fast.
- Don’t forget to save a little noodle water for loosening the sauce if needed.
How These Healthy Recipes Under 500 Calories Stay Satisfying
The calorie ceiling only works if the plate has structure. A bowl of plain lettuce with a few slices of chicken might technically fit the number, but it won’t feel like dinner for long. These recipes use a better formula: lean protein, vegetables that bring volume, and a measured amount of fat or starch that carries the flavor without taking over the plate.
The quickest route is usually a skillet or sheet pan. A hot pan browns chicken, shrimp, tofu, or salmon in a way that makes a small amount of food taste more substantial. You get caramelized edges, a little sauce from deglazing, and enough aroma to make the meal feel finished. That matters more than people think.
A lot of low-calorie meals fail because they forget texture. Soft needs crunch. Creamy needs acid. Rich needs a sharp herb or a squeeze of lemon. When those pieces are in the right place, a 350-calorie plate can feel more satisfying than a much bigger one that’s all the same texture.
I also like recipes that give you one obvious lever to pull. More rice if you need it. More greens if you don’t. Sauce on the side if you’re packing lunch. That kind of flexibility keeps the meals useful, which is usually the difference between a recipe you save and one you actually cook twice.
Essential Equipment for These Recipes

-
12-inch skillet: The workhorse for chicken, turkey, shrimp, tofu, and fried rice; the wide surface helps food brown instead of steam.
-
Rimmed sheet pan: Best for salmon, cod, and anything that needs high heat without much fuss.
-
Dutch oven or soup pot: Useful for lentil soup, curry, and any recipe that needs a little simmer time.
-
Sharp chef’s knife: Thin slicing matters here, especially for chicken, peppers, onions, zucchini, and herbs.
-
Cutting board with a towel underneath: Keeps the board from sliding when you’re chopping quickly.
-
Mixing bowls in 2 sizes: One for sauces and one for meatballs, salads, or egg mixtures.
-
Measuring spoons and cups: A lot of these recipes rely on small amounts of oil, spices, and acid. Guessing gets you into trouble.
-
Tongs and a sturdy spatula: Better control for flipping chicken, shrimp, and tofu without tearing the food apart.
-
Muffin tin: Needed for the egg muffins, and handy if you want to batch-bake anything small.
-
Airtight storage containers: Important for the salads, grain bowls, and leftovers that need to keep texture overnight.
Smart Shopping and Ingredient Tips
The easiest way to keep healthy cooking sane is to buy ingredients that do more work than they ask for. A bag of broccoli florets, a few lemons, a tub of Greek yogurt, canned beans, and one or two lean proteins can turn into half this article without much extra planning. That’s the kind of shopping that saves a Tuesday night.
Choose lean proteins with the cooking method in mind. Chicken breast is best when it’s sliced or cut small so it cooks fast; chicken thighs bring more fat and flavor, but they bump calories quicker. For salmon and cod, buy fillets that look moist and clean, not dry at the edges. Shrimp should smell like the ocean, not the freezer.
Canned beans and tomatoes are useful here, and the label matters. Look for low-sodium beans and broth if you want more control over seasoning, because those ingredients can quietly push a bowl from balanced to salty. For coconut milk, light coconut milk is the version that keeps curry in range without thinning out the flavor too much.
Frozen vegetables are not the enemy. Frozen peas, carrots, and edamame are often better than limp fresh produce that sat in the crisper too long. The one thing to watch is water. Thaw and pat dry cauliflower rice, zucchini noodles, and spinach if they seem wet. That extra step keeps the texture from going soft in the pan.
For dairy, I prefer plain Greek yogurt, feta, and cottage cheese because they bring a lot of protein for a relatively small calorie hit. Sour cream works in some places, but Greek yogurt gives you more structure and a sharper tang. It behaves better in sauces, too.
How to Serve These Recipes
Presentation: Put the proteins and vegetables where they can be seen. A shallow bowl for curries and noodle dishes, a wide plate for sheet-pan fish, and a bright rimmed bowl for salads all make the food feel intentional.
Accompaniments: Keep the sides simple: lemon wedges, cucumber salad, a small scoop of rice, whole-grain toast, or roasted potatoes depending on the recipe. If the main dish already has starch, skip the extra bread and use greens or a crunchy slaw instead.
Portions: Most of these recipes are built for 4 servings, with the exception of the breakfast bowl and egg muffins, which are easy to scale. A good rule is one palm-sized protein portion, two fists of vegetables, and one cupped hand of starch if you need it.
Beverage Pairing: Sparkling water with citrus fits nearly all of them. For dinner, unsweetened iced tea or a crisp white wine in a modest pour works with the fish, chicken, and Greek flavors.
Additional Tips and Flavor Boosters
Flavor Enhancement: Keep a few acids ready: lemon juice, lime juice, rice vinegar, and Dijon mustard. A teaspoon or two at the end can wake up a whole pan that tasted a little tired.
Customization: Add a vegetable with a different texture whenever a dish feels too soft. Shredded cabbage in bowls, chopped cucumber in wraps, or roasted mushrooms with skillet chicken all make the food more interesting without much effort.
Serving Suggestions: Finish with something fresh and sharp — herbs, scallions, parsley, dill, cilantro, or a little feta. Even a small sprinkle makes low-calorie meals taste more complete.
Make-It-Yours: For higher protein, add extra chicken, tofu, Greek yogurt, or beans and reduce the starch a bit. For lower sodium, lean on garlic, citrus, and herbs instead of pouring on more soy sauce or cheese. For dairy-free meals, tahini and olive oil can carry a surprising amount of flavor.
Make-Ahead, Storage, and Reheating Guidance
The best make-ahead candidates here are the soups, curries, meatballs, stuffed peppers, egg muffins, and tuna salad. They hold up for 3 to 4 days in the refrigerator in airtight containers. The flavor on the lentil soup, curry, and meatballs often improves after a night in the fridge because the seasoning settles in.
For freezing, soups, curry, meatballs, cauliflower fried rice, and stuffed-pepper filling do well for up to 2 months. Fish and shrimp are better eaten fresh, and zucchini noodles never love the freezer. Egg muffins freeze surprisingly well for about 1 month, wrapped tightly and reheated gently.
Reheat skillet meals in a pan over medium heat with a spoonful of water or broth so they don’t dry out. Use the microwave for egg muffins, lentil soup, and stuffed peppers, but cover the container loosely so steam can move. Fish should be reheated low and short, or not at all if you can manage it; leftover salmon is best cold or barely warmed.
Cold salads and bowls need a little separation if you’re meal-prepping. Keep dressings, avocados, crunchy toppings, and greens in separate containers when possible. Assemble right before eating so the lettuce stays crisp and the nuts stay crunchy. That one habit saves more lunches than fancy containers ever will.
Variations and Adaptations to Try

Gluten-Free Swap: Use cauliflower rice, brown rice, quinoa, or rice noodles instead of couscous, pita, breadcrumbs, or regular noodles. The recipes stay balanced; you’re mainly changing the starch and the texture.
Dairy-Light Version: Replace feta, Parmesan, yogurt sauces, and cottage cheese with tahini, avocado, or a lemon-olive oil finish. You lose some tang, so add more herbs and acid to keep the flavor awake.
Plant-Forward Nights: Start with the chickpea curry, lentil soup, tofu stir-fry, black bean skillet, and soba bowl, then add extra vegetables before you touch the starch. These dishes already hold together well without meat.
Kid-Friendly Mild Build: Pull back the chili powder, paprika, and pepper, then serve hot sauce or salsa at the table for the adults. The food stays recognizable, which matters more than trying to “hide” vegetables in everything.
Higher-Protein Adjustment: Add an extra egg, more chicken, or an extra half cup of beans to the bowls and soups, then trim rice or bread a little. The calorie count stays manageable if you watch the starch more than the protein.
Low-Sodium Reset: Use no-salt-added beans and tomatoes, low-sodium broth, and fresh lemon or lime at the end. Citrus gives the meal the lift people often try to fake with more salt.
Common Mistakes to Avoid
The first mistake is making the meal too small to satisfy. If you cut the protein portion down and forget to replace it with vegetables or a small starch, the dish will technically fit under 500 calories and still leave you prowling the kitchen an hour later. Keep the structure.
Another one: overcooking lean proteins. Chicken breast, shrimp, cod, and turkey all punish extra minutes. They go from tender to stringy, and the whole meal feels drier than it should. A hot pan and a timer solve most of that.
Watery vegetables cause trouble all over this list. Zucchini noodles, spinach, cauliflower rice, and mushrooms all release water if you don’t give them enough heat or drainage. Dry them, cook them fast, and do not crowd the pan.
People also reach for too much sauce because they’re afraid the food won’t taste like anything. Then the calories climb and the texture gets sloppy. Use enough sauce to coat, not drown. That’s the line.
Last, don’t ignore acid. A squeeze of lemon, lime, or a splash of vinegar turns a decent bowl into one you actually want to finish. Flat food is often just food that needs a little brightness, not a bigger portion of oil.
Frequently Asked Questions
How do I keep these meals filling under 500 calories?
Focus on protein first, then add high-volume vegetables, then measure the starch or sauce. A bowl with chicken, broccoli, and a little rice stays satisfying longer than a tiny salad with no real protein.
Can I meal prep these recipes for the week?
Yes, but choose the right ones. Soups, curries, stuffed peppers, meatballs, tuna salad, and egg muffins hold up well; shrimp, fish, and zucchini noodles are better cooked fresh or assembled close to serving.
Do frozen vegetables work here?
They do, and they’re often the smarter buy. Frozen peas, edamame, carrots, broccoli, and cauliflower rice are especially useful. Just dry them well if the recipe needs browning.
What if I don’t have time to measure every spice?
Make one or two spice blends ahead of time: taco seasoning, Italian seasoning, or a simple mix of cumin, chili powder, garlic powder, and salt. That keeps the cooking quick without turning the food bland.
How can I lower the calories even more without wrecking the meal?
Reduce the starch portion first, then trim the cheese, oil, or avocado. Don’t cut the protein too much; that’s usually the part that keeps the meal from feeling like a snack.
Can I swap proteins between recipes?
Usually, yes. Shrimp can replace chicken in the pesto zoodles or fried rice, tofu can replace chicken in the stir-fry, and cod can replace salmon in the sheet-pan dinner. Just match the cooking time to the new protein.
What if my sauce turns watery?
Simmer it a little longer, or move the solids out with a slotted spoon and reduce the liquid separately. Zucchini, spinach, and mushrooms are the usual culprits, so dry them before they hit the pan next time.
Are these recipes okay for beginners?
Most of them are. The skillet meals, soups, bowls, and salads are straightforward, and even the fish recipes stay manageable if you watch the time and keep the heat steady. The biggest skill is not overcooking.
Dinner That Works
The nicest thing about these meals is that they don’t ask you to pick between speed and a sensible calorie count. They give you both, and they do it with ingredients that are easy to find and easy to repeat. That matters more than cleverness.
If you keep a few of these in regular rotation — one skillet chicken, one soup, one fish dinner, one no-cook lunch — the whole week gets easier. Not glamorous. Easier. That’s the real win, and it tends to hold up much better than a complicated plan nobody wants to cook twice.