
A summer dinner earns its place on the table when it keeps the kitchen calm and leaves one hand free for a cold drink. That’s the real test, isn’t it? Not whether the dish sounds impressive on paper, but whether you can pull it off with the windows open, the ice tray full, and the stove not roaring like a furnace.
The best warm-weather meals have a certain shape to them. They lean on quick-cooking proteins, bright herbs, juicy produce, and sauces that taste even better after a few minutes of sitting. They don’t ask for a lot of babysitting. They reward a hot grill, a sharp knife, and a little salt at the right moment. A good summer dinner can smell like charred corn, lemon zest, tomato juice, or sesame oil hitting a pan. That kind of food feels made for a cold glass sweating on the table.
I keep coming back to dinners like these because they solve a practical problem with almost no drama. You get a plate that feels complete, but it doesn’t sit heavy. You get enough flavor to make the cold drink matter — whether that drink is iced tea, lemonade, sparkling water, or a very cold beer — and enough freshness that you want to finish the whole thing, not just pick at it. That balance is the whole trick. And it starts with choosing the right dinner in the first place.
Why These Summer Dinners Belong Next to a Cold Drink
-
They stay bright on the plate: Acid, herbs, and a little char keep these dinners from tasting flat once the sun is still high and the air is sticky.
-
They don’t fight the drink: Salt, citrus, chile, cucumber, tomato, and grilled meat all make a cold drink taste colder and cleaner after each bite.
-
Most of them cook fast: Several of these dinners are on the table in 30 minutes or less, which matters when the kitchen already feels warm.
-
The produce actually matters here: Corn, peaches, tomatoes, watermelon, zucchini, herbs, and cabbage are not background players; they do the heavy lifting.
-
Leftovers don’t punish you: A few of these taste even better after the dressing, salsa, or herbs settle in for a few hours.
-
You can mix and match the drinks: Iced tea, lager, lemonade, sparkling water, lime soda, and chilled white wine all fit somewhere in this lineup without feeling forced.
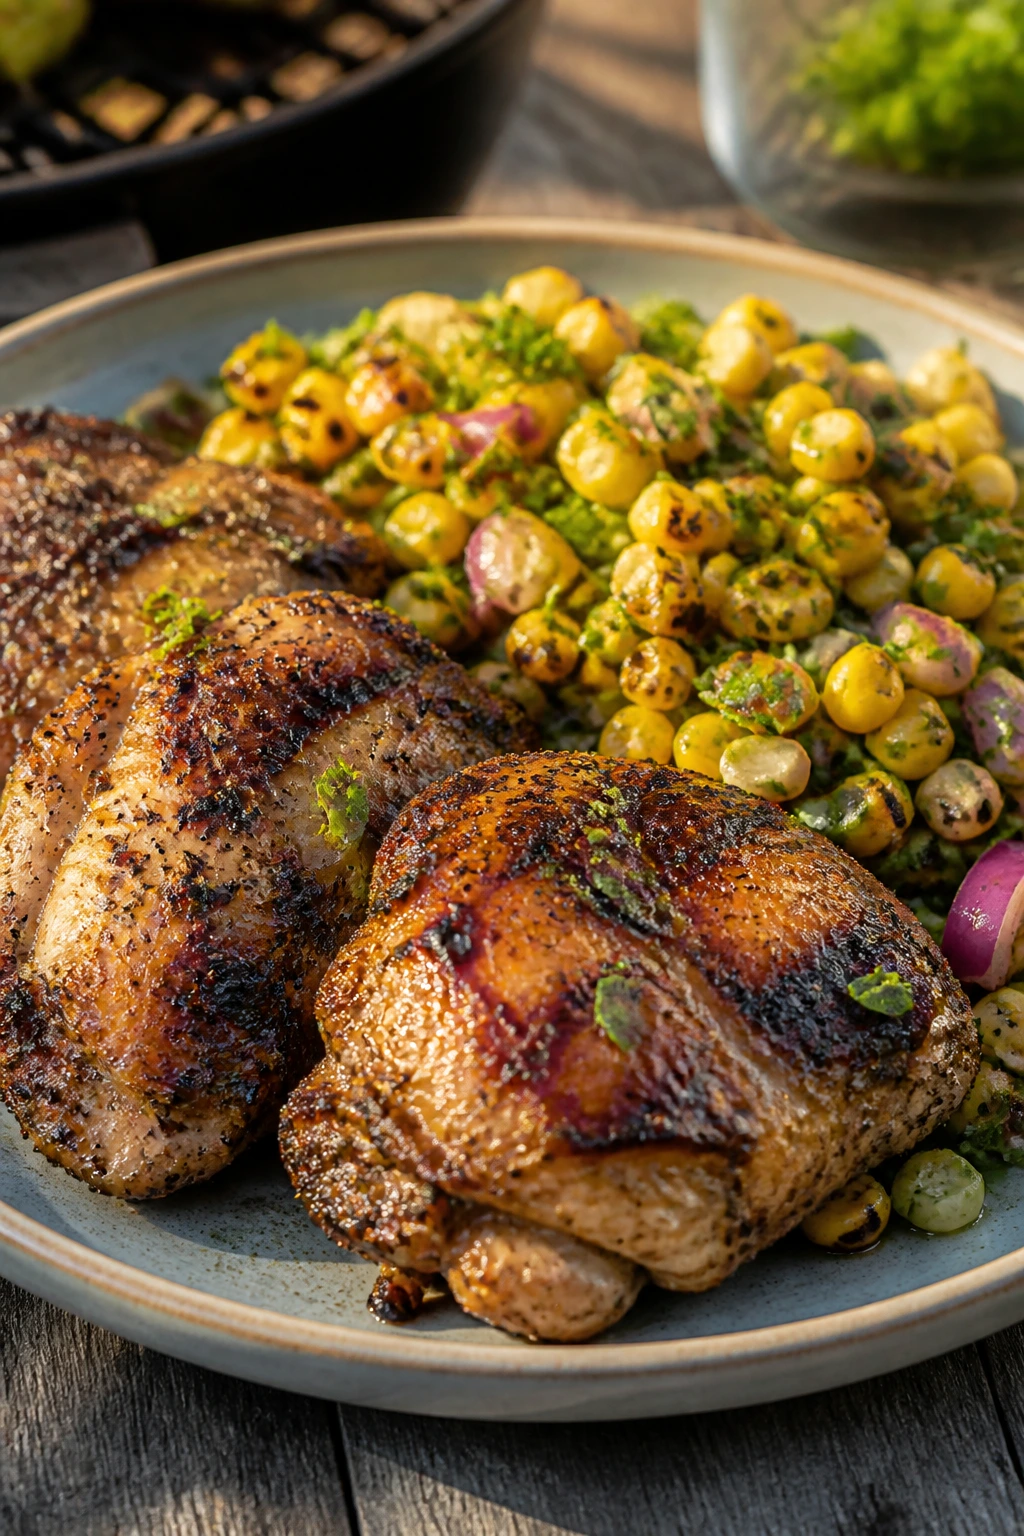
1. Grilled Lemon-Herb Chicken Thighs with Charred Corn Salad
Chicken thighs are one of those cuts that seem to understand summer on their own. They take on grill marks fast, stay juicy even if you give them a minute too long, and pick up lemon and garlic in a way that boneless breasts never quite manage.
Why It Works:
The thighs marinate quickly in olive oil, lemon, garlic, and oregano, which gives you flavor all the way through instead of just on the surface. Grilled corn brings sweetness and a little smoke, and the tomatoes loosen into a light salad once they hit the warm kernels. I like this one because the chicken finishes at 165°F without turning chalky, and the whole plate still feels fresh enough to sit beside an ice-cold pilsner or a tall glass of iced tea.
Key Ingredients:
- 2 pounds boneless, skinless chicken thighs
- 3 tablespoons olive oil
- Zest and juice of 1 lemon
- 3 garlic cloves, minced
- 1 teaspoon dried oregano
- 1½ teaspoons kosher salt
- ½ teaspoon black pepper
- 4 ears corn, husked
- 1 cup cherry tomatoes, halved
- ¼ red onion, finely diced
- ¼ cup chopped basil
Quick Steps:
- Whisk the olive oil, lemon zest and juice, garlic, oregano, salt, and pepper in a bowl. Add the chicken thighs and let them sit for 15 to 30 minutes while you heat the grill.
- Grill the chicken over medium-high heat for 5 to 6 minutes per side, until the thickest part reaches 165°F and the surface has deep brown streaks.
- Grill the corn for 8 to 10 minutes, turning every couple of minutes until the kernels have patches of char.
- Cut the kernels from the cob and toss them with the tomatoes, red onion, basil, and a small pinch of salt.
- Rest the chicken for 5 minutes before slicing so the juices stay put.
- Serve the sliced chicken over the corn salad with a lemon wedge on the side.
Equipment for This Recipe:
- Outdoor grill or grill pan
- Mixing bowl for the marinade
- Tongs for turning the chicken and corn
- Sharp knife and cutting board
- Instant-read thermometer
How to Serve This Dish:
Pile the chicken on a wide platter so the corn salad can spill around it a little. A cold drink with bubbles — beer, sparkling water, or lemon soda — cuts through the lemon and smoke nicely. Serve it with crusty bread if you want something to swipe through the juices.
Pro Tips for This Recipe:
- Pat the chicken dry before marinating so the skinless pieces still brown instead of steaming.
- Don’t move the thighs for the first few minutes on the grill; they release cleanly once they’ve picked up enough color.
- Use corn that feels heavy for its size. That’s where the sweet, plump kernels live.
- Slice the chicken across the grain. It looks nicer and eats softer.
Variations on This Dish:
- Spicy Lemon Chicken: Add ½ teaspoon crushed red pepper and a spoonful of hot sauce to the marinade.
- Herby Yogurt Finish: Drizzle the plate with yogurt mixed with dill and garlic for a cooler, creamier edge.
- No-Grill Version: Sear the thighs in a cast-iron skillet for 6 minutes per side, then finish the corn in the same pan.
Common Mistakes to Avoid with This Dish:
- Marinating too long in lemon: After about 2 hours, the acid starts to make the chicken texture tight. Keep it short.
- Skipping the rest: Slicing too soon sends the juices onto the cutting board instead of the plate.
- Using under-charred corn: Pale corn tastes flat here; the char is part of the point.
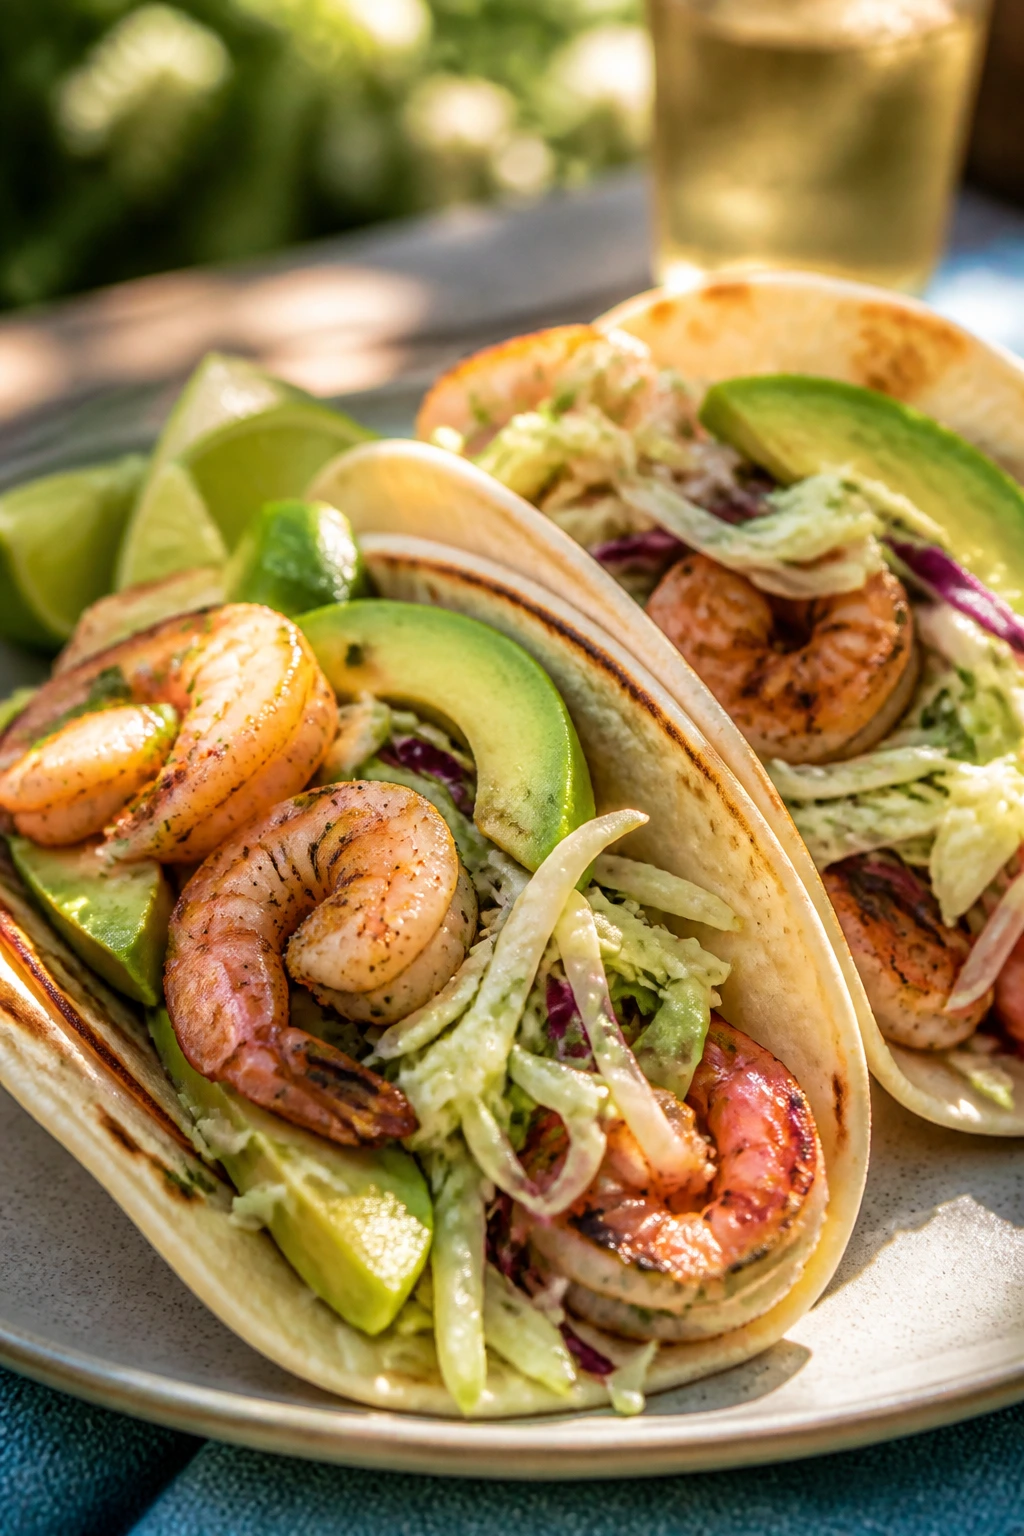
2. Shrimp Tacos with Lime Slaw and Avocado
These are the tacos I make when I want dinner to feel fast, but not lazy. The shrimp hit the pan in minutes, the slaw brings crunch, and the avocado cools the heat without turning the taco into mush.
Why It Works:
Shrimp is all about timing. Once it turns pink and curls into a loose C shape, it’s done. The lime slaw gives you acid and crunch, which matters because shrimp by itself can feel a little too soft against a cold drink. Add a lightly toasted tortilla and a slice of avocado, and you get the kind of taco that actually holds together long enough to eat over a napkin, not a sink.
Key Ingredients:
- 1½ pounds large shrimp, peeled and deveined
- 1 tablespoon olive oil
- 1 teaspoon chili powder
- 1 teaspoon ground cumin
- ½ teaspoon garlic powder
- 1 teaspoon kosher salt
- 8 small corn or flour tortillas
- 4 cups shredded cabbage
- ½ cup plain yogurt or mayo
- Juice of 2 limes
- 1 avocado, sliced
- ¼ cup chopped cilantro
Quick Steps:
- Stir the cabbage, yogurt, lime juice, and cilantro together with a pinch of salt. Let the slaw sit while you cook the shrimp.
- Toss the shrimp with olive oil, chili powder, cumin, garlic powder, and salt.
- Heat a skillet over medium-high heat and cook the shrimp for 1½ to 2 minutes per side, just until opaque and pink.
- Warm the tortillas in a dry skillet or directly over a burner for a few seconds per side.
- Fill each tortilla with slaw, shrimp, avocado slices, and a little extra lime if you want more bite.
- Serve right away so the tortillas stay soft and the shrimp stay juicy.
Equipment for This Recipe:
- Large skillet
- Mixing bowl
- Tongs or a spatula
- Sharp knife
- Small grater or citrus juicer
How to Serve This Dish:
Stack the tacos on a tray and keep the avocado and lime wedges within reach. I like these with a very cold lager, a cucumber-lime agua fresca, or sparkling water with a lot of ice. A simple bowl of tortilla chips on the side never hurts.
Pro Tips for This Recipe:
- Dry the shrimp with paper towels before seasoning. Wet shrimp steam.
- Mix the slaw first so the cabbage softens a little and tastes less raw.
- Warm the tortillas last, not first. Cold tortillas crack, and cracked tacos spill.
- If your shrimp are tiny, shave a minute off the cook time.
Variations on This Dish:
- Blackened Shrimp Tacos: Swap the chili powder mix for blackening seasoning and add a little paprika.
- Grilled Corn Slaw: Fold in 1 cup grilled corn kernels for extra sweetness and texture.
- Lettuce Cup Version: Use butter lettuce leaves when you want the lightest possible dinner.
Common Mistakes to Avoid with This Dish:
- Overcooking the shrimp: Rubber bands in taco form are nobody’s goal. Pull them as soon as they turn opaque.
- Watery slaw: If the cabbage sits in dressing for too long, it gets slack. Dress it lightly.
- Skipping salt on the avocado: A tiny pinch wakes it up and keeps the taco from tasting dull.
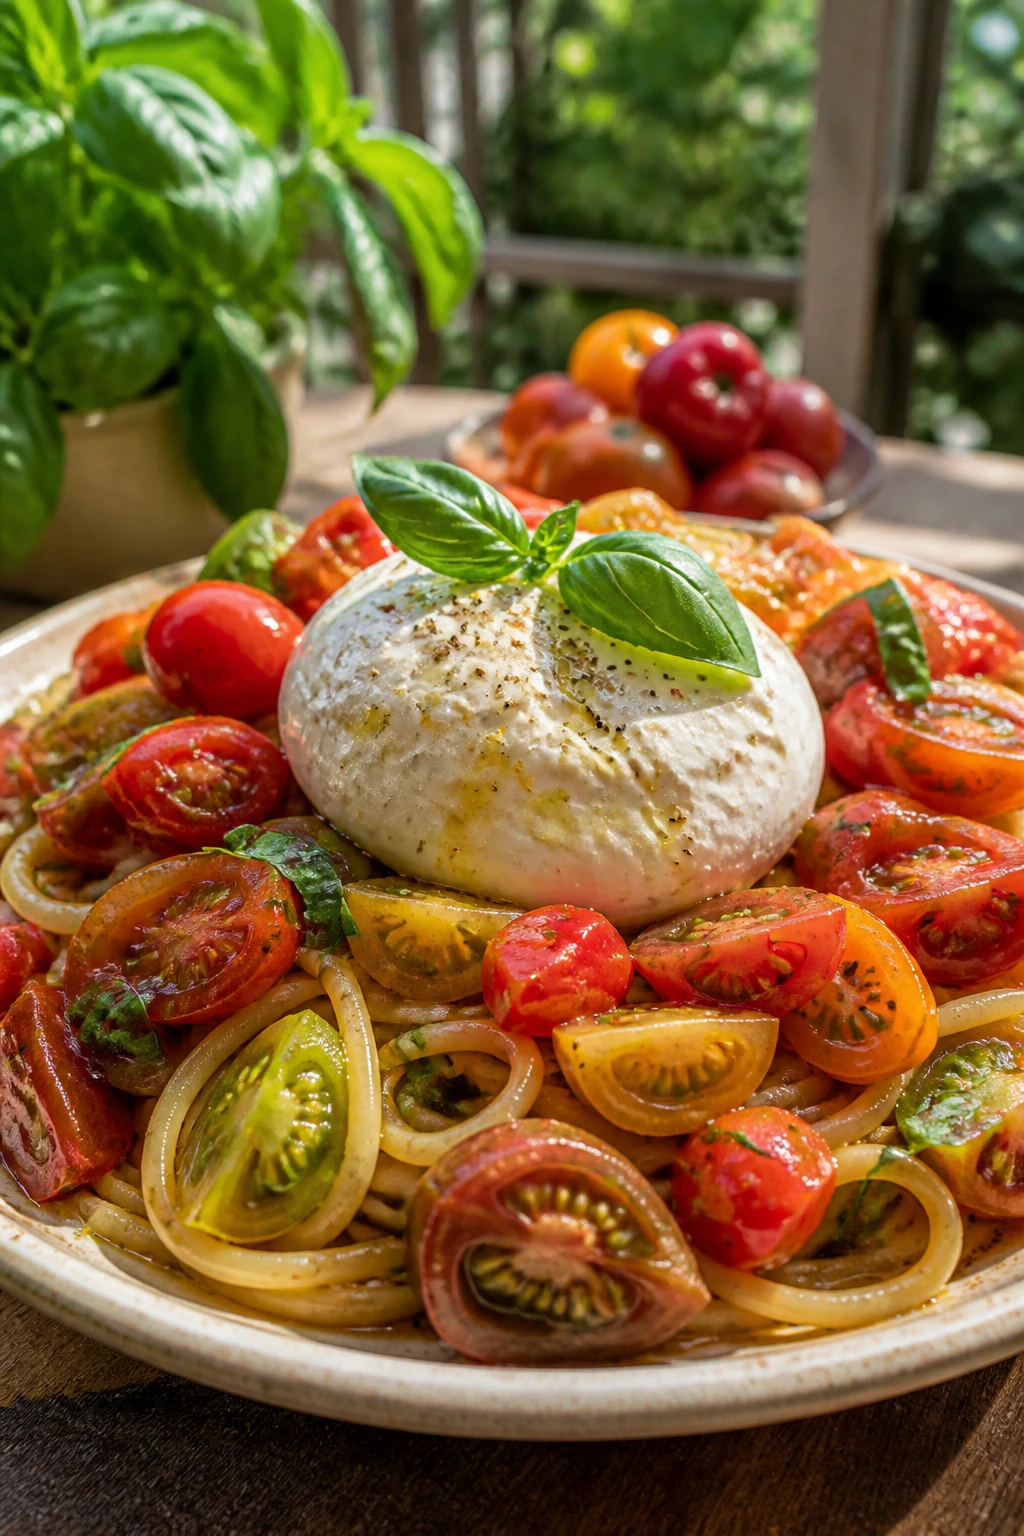
3. Heirloom Tomato Basil Pasta with Burrata
This is what I make when tomatoes are so ripe they stain the cutting board. The sauce is barely a sauce at all, which is exactly why it works — the fruit, olive oil, basil, and warm pasta all do the work together.
Why It Works:
Heirloom tomatoes collapse into their own juices when you warm them with garlic and olive oil, which gives you a glossy, loose coating instead of a heavy tomato sauce. Burrata brings that cool, milky center that softens every forkful. The whole dish lands in that sweet spot between warm and cool, which is a nice place to be with a cold glass of rosé or sparkling water and lemon.
Key Ingredients:
- 12 ounces spaghetti or linguine
- 2 pounds ripe heirloom tomatoes, chopped
- 4 tablespoons olive oil
- 4 garlic cloves, thinly sliced
- 1 teaspoon kosher salt
- ½ teaspoon black pepper
- ½ teaspoon red pepper flakes
- ½ cup torn basil leaves
- 2 balls burrata, about 8 ounces total
- ¼ cup grated Parmesan
Quick Steps:
- Bring a large pot of salted water to a boil and cook the pasta until just shy of al dente.
- Warm the olive oil in a wide skillet over medium heat, then add the garlic and red pepper flakes for about 30 seconds, just until fragrant.
- Add the tomatoes and salt. Cook for 8 to 10 minutes, stirring now and then, until they break down and look jammy around the edges.
- Toss in the drained pasta with a splash of pasta water and stir until the sauce clings to the noodles.
- Turn off the heat and fold in the basil.
- Tear the burrata over the top and finish with Parmesan before serving.
Equipment for This Recipe:
- Large pot
- Wide skillet or sauté pan
- Tongs for tossing pasta
- Colander
- Wooden spoon
How to Serve This Dish:
Serve it in shallow bowls so the burrata can melt into the warm pasta. A cold drink with a little acidity — sparkling water with lemon, chilled white wine, or even a sharp Italian soda — keeps the cheese from feeling too rich. A few extra basil leaves on top make the plate look alive.
Pro Tips for This Recipe:
- Use tomatoes that smell like tomatoes. If they’re bland raw, they’ll stay bland here.
- Save at least ½ cup of pasta water. It helps the sauce coat the noodles.
- Let the burrata sit out for 20 minutes before serving so it softens.
- Salt the pasta water aggressively. The dish needs that seasoning from the start.
Variations on This Dish:
- Caprese Pasta: Add mozzarella pearls and a drizzle of balsamic glaze.
- Anchovy Garlic Version: Melt 2 chopped anchovies with the garlic for a deeper, saltier base.
- Whole-Wheat Spin: Use whole-wheat pasta and add a handful of arugula at the end.
Common Mistakes to Avoid with This Dish:
- Using underripe tomatoes: Pale, mealy tomatoes never turn into a good sauce.
- Overcooking the garlic: Bitter garlic makes the whole pan taste tired.
- Adding burrata too early: Let the heat from the pasta soften it, not the pan.
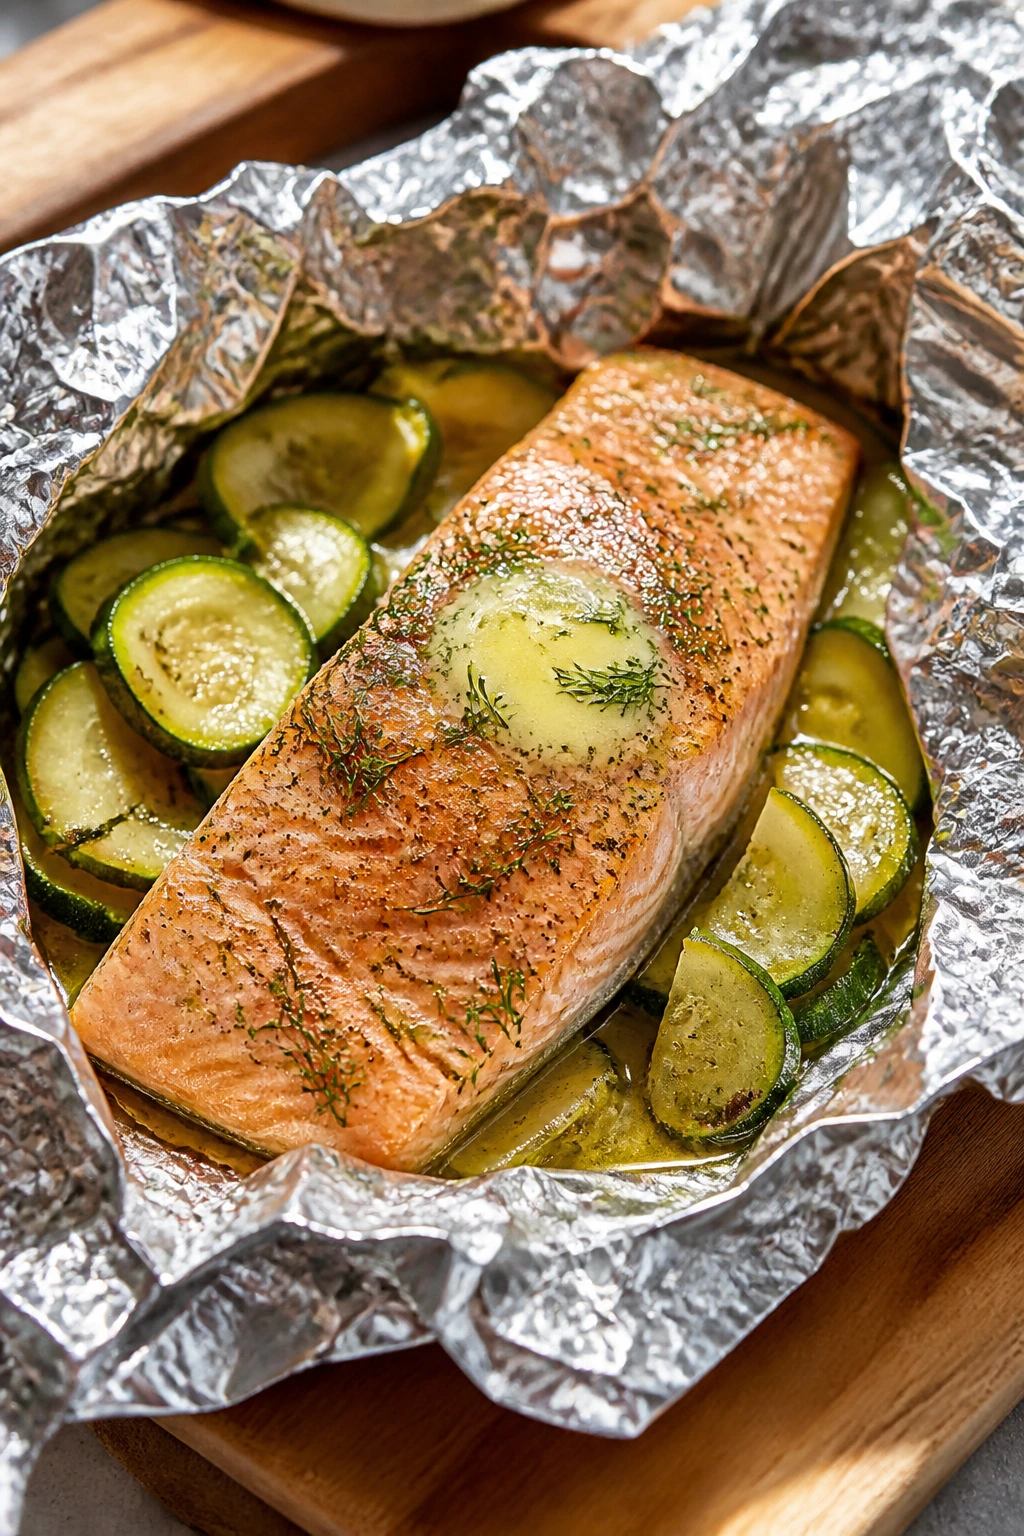
4. Salmon Foil Packs with Zucchini and Dill Butter
Foil packs are one of the few shortcuts I’ll defend without apology. They keep salmon tender, they cut cleanup down to almost nothing, and they let you build dinner with a little steam, a little lemon, and no drama.
Why It Works:
Salmon likes gentle heat, and the foil gives it exactly that. The zucchini softens without going limp, the lemon slices perfume the fish, and the dill butter melts over everything at the end. If you cook the potato slices thin enough — or use pre-cooked ones — the whole pack finishes in the same window, which is the part most people get wrong.
Key Ingredients:
- 4 salmon fillets, about 6 ounces each
- 2 medium zucchini, sliced into half-moons
- 1 pound baby potatoes, thinly sliced or par-cooked
- 2 tablespoons olive oil
- 4 tablespoons unsalted butter, softened
- 2 tablespoons chopped dill
- 1 lemon, thinly sliced
- 1 shallot, thinly sliced
- 1 teaspoon kosher salt
- ½ teaspoon black pepper
Quick Steps:
- Preheat the grill or oven to 400°F.
- Mix the butter with dill, half the salt, and half the pepper.
- Lay four large sheets of foil on the counter and divide the potatoes, zucchini, and shallot among them.
- Drizzle with olive oil, season lightly, then set a salmon fillet on top of each pile.
- Spoon the dill butter over the salmon and finish with lemon slices. Seal the foil packs tightly.
- Cook for 12 to 15 minutes, until the salmon flakes easily and the potatoes are tender when pierced with a fork.
Equipment for This Recipe:
- Heavy-duty aluminum foil
- Grill or oven
- Baking sheet, if baking
- Sharp knife
- Small bowl for the butter
How to Serve This Dish:
Open the packets carefully so the steam doesn’t hit your face. I like to slide the salmon and vegetables onto plates and let the butter become a loose sauce underneath. A dry white wine, a very cold pilsner, or iced green tea all work well here.
Pro Tips for This Recipe:
- Slice the potatoes thin or give them a 5-minute head start in the microwave.
- Seal the foil packs well, but leave a tiny bit of room inside so the steam can move.
- Use a thermometer if you’re nervous; salmon is lovely around 125 to 130°F, then it carries up a bit as it rests.
- Add fresh dill after cooking too if you want a sharper herb note.
Variations on This Dish:
- Mustard-Dill Salmon: Stir 1 teaspoon Dijon into the butter for a little edge.
- Asparagus Packets: Swap the zucchini for asparagus spears when they’re slender and sweet.
- Olive Oil Finish: Replace the butter with more olive oil and chopped parsley for a dairy-free version.
Common Mistakes to Avoid with This Dish:
- Thick potato slices: They stay hard while the fish is already done.
- Leaky foil: Steam escape means uneven cooking.
- Overcooking the salmon: Dry salmon is the one thing this method is trying to protect you from.
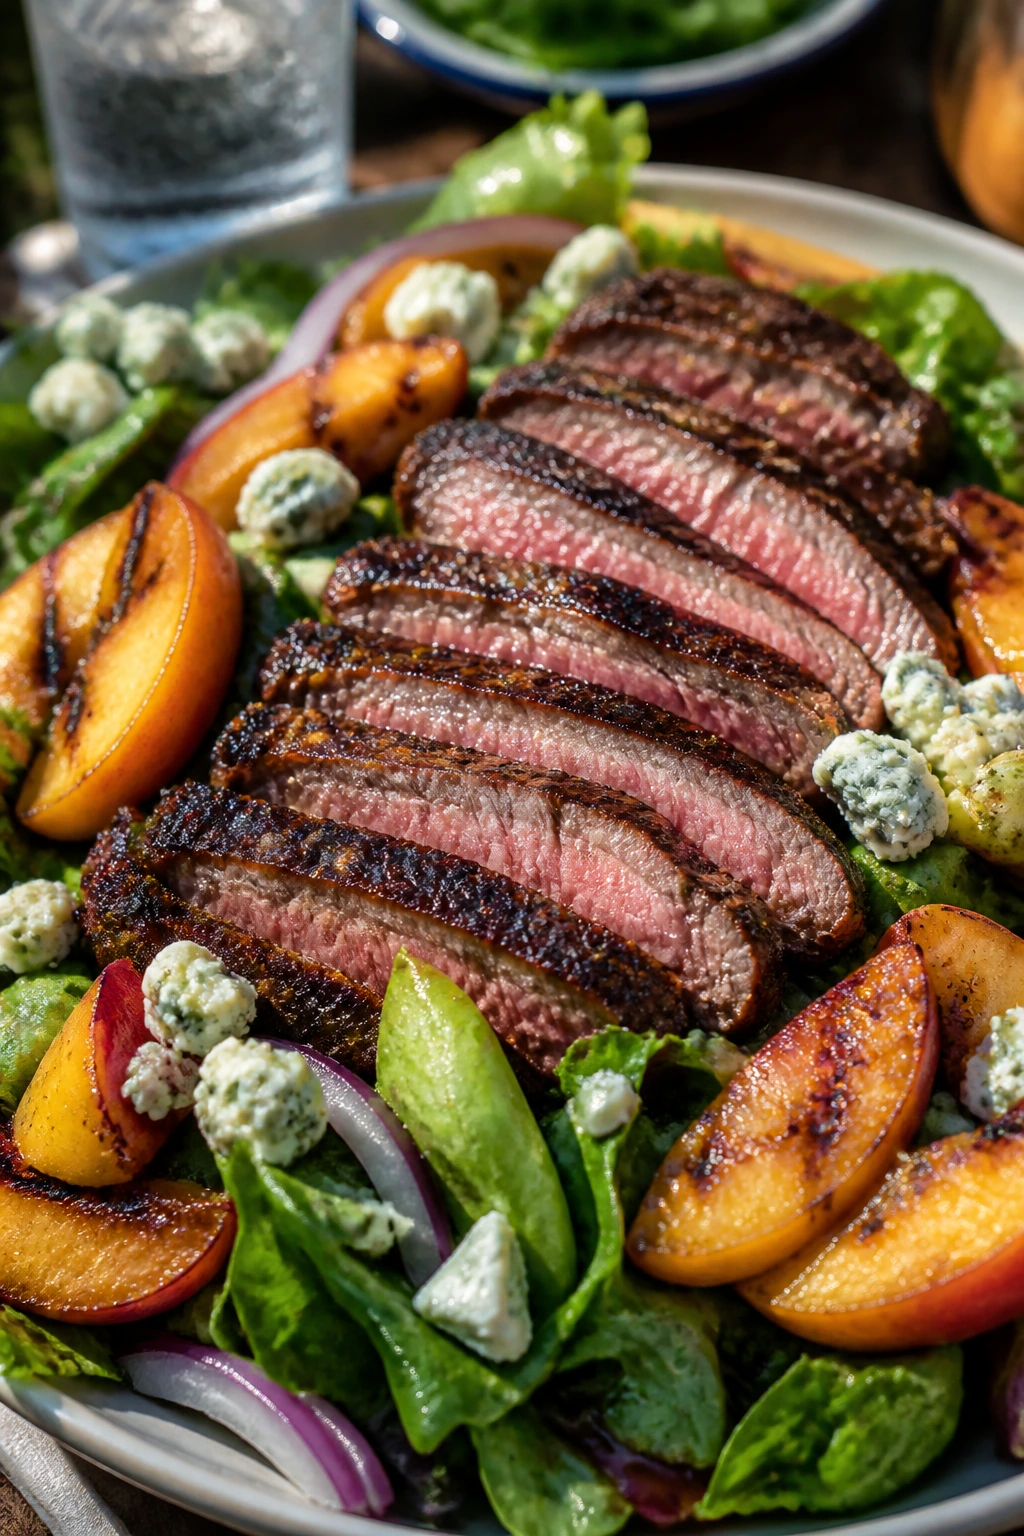
5. Steak Salad with Peaches and Blue Cheese
A steak salad can be a little smug if it’s not handled right. This one earns its keep because the peaches bring sweetness, the blue cheese brings salt, and the steak gives the whole bowl enough heft to count as dinner.
Why It Works:
Flank steak takes a good sear and slices neatly against the grain, which matters when the rest of the salad is all soft fruit and crisp greens. Grilled peaches bring a warm, jammy edge that plays against the blue cheese in a way raw fruit never could. A cold drink with bubbles or a bitter edge — lager, sparkling water, or a dry hard cider — makes the salad feel even more balanced.
Key Ingredients:
- 1½ pounds flank steak
- 2 ripe peaches, halved and sliced
- 6 cups mixed greens
- 1 cucumber, sliced
- 4 ounces blue cheese, crumbled
- ¼ red onion, thinly sliced
- 3 tablespoons olive oil
- 2 tablespoons red wine vinegar
- 1 tablespoon Dijon mustard
- 1 teaspoon kosher salt
- ½ teaspoon black pepper
Quick Steps:
- Whisk the olive oil, vinegar, Dijon, salt, and pepper into a simple dressing.
- Season the steak with salt and pepper and sear it over medium-high heat for 3 to 4 minutes per side, depending on thickness.
- Rest the steak for 8 to 10 minutes before slicing.
- Sear or grill the peach slices for 1 to 2 minutes per side until they show grill marks and soften.
- Toss the greens, cucumber, and onion with half the dressing.
- Arrange the salad, top with steak slices, peaches, and blue cheese, then drizzle the rest of the dressing over everything.
Equipment for This Recipe:
- Grill pan or cast-iron skillet
- Sharp chef’s knife
- Large salad bowl
- Tongs
- Small whisk or fork
How to Serve This Dish:
Serve the steak warm and the greens cold; that temperature contrast is half the charm. I like this with a very cold lager or sparkling water with lime, especially when the peaches are sweet enough to need a little bitterness beside them. Bread is optional, but a hunk of baguette is never a bad idea.
Pro Tips for This Recipe:
- Slice the steak against the grain or it can eat tougher than it is.
- Use peaches that are ripe but still hold their shape. Too soft, and they turn to mush on the grill.
- Dress the greens lightly first, then add more at the table if needed.
- Let the cheese stay in chunks instead of crumbling it into dust.
Variations on This Dish:
- Goat Cheese Version: Swap blue cheese for goat cheese if you want something milder.
- Charred Corn Add-In: Toss in 1 cup grilled corn kernels for more sweetness.
- Herb-Heavy Version: Add mint and basil to the greens for a brighter finish.
Common Mistakes to Avoid with This Dish:
- Slicing the steak too soon: The juices run out and the slices look dry.
- Using watery dressing: Heavy dressing buries the fruit and cheese.
- Overloading on cheese: A little blue cheese goes a long way.
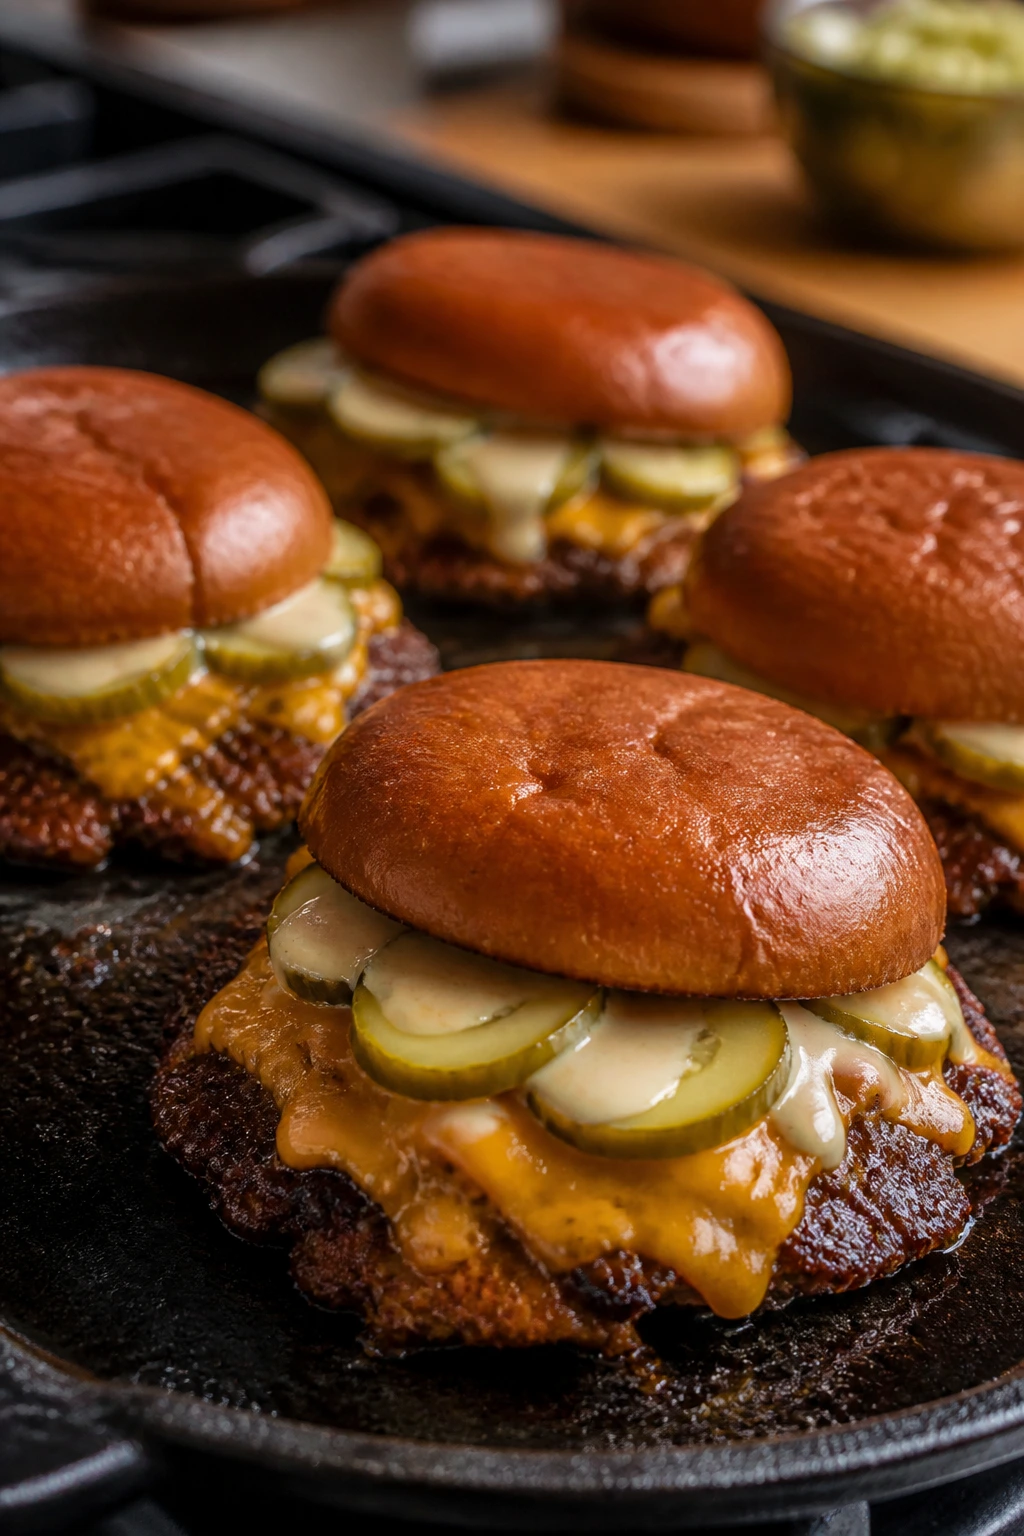
6. Smash Burgers with Quick Pickles and Special Sauce
Some nights want a burger, and they want it with a little attitude. Smash burgers have the crisp, lacy edges that regular burgers never quite get, and the quick pickles keep the whole thing from feeling heavy.
Why It Works:
A thin patty cooked hard and fast gets more crust than a thick burger ever will. That crust is where the flavor lives. The quick pickles add cool crunch, the special sauce brings tang, and the toasted bun keeps the burger from turning soggy before the last bite. Pair it with an ice-cold beer or cola and you’ve got a dinner that feels casual in the best way.
Key Ingredients:
- 2 pounds 80/20 ground beef
- 8 potato buns
- 8 slices cheddar
- ½ cup mayonnaise
- 2 tablespoons ketchup
- 1 tablespoon yellow mustard
- 1 cucumber, thinly sliced
- ½ cup white vinegar
- 1 tablespoon sugar
- 1 teaspoon salt
- 1 small onion, thinly sliced
Quick Steps:
- Stir the vinegar, sugar, and salt together, then pour it over the cucumber slices and let them sit while you cook.
- Mix the mayo, ketchup, and mustard into the special sauce.
- Divide the beef into 8 loose balls and keep them cold until the pan is hot.
- Heat a cast-iron skillet until it’s nearly smoking, then smash each ball flat with a spatula and cook for about 2 minutes.
- Flip, add cheese, and cook 1 minute more until the edges are crisp and the cheese melts.
- Toast the buns, spread on the sauce, and top with pickles and onion.
Equipment for This Recipe:
- Cast-iron skillet or heavy griddle
- Thin metal spatula
- Small bowl for pickling
- Bun toaster or skillet
- Parchment squares, if you want easier smashing
How to Serve This Dish:
Stack the burgers immediately after cooking so the cheese melts into the patty. I like these with cold beer, cola, or a lime seltzer that can cut through the beef and sauce. Serve them with fries or a crunchy slaw if you want a fuller plate.
Pro Tips for This Recipe:
- Keep the beef cold until it hits the pan. Cold meat smashes cleaner.
- Use a very hot surface. Lukewarm heat gives you gray patties.
- Smash only once. Pressing after the flip squeezes out the juices.
- Toast the buns cut-side down until they’re deep golden, not pale.
Variations on This Dish:
- Jalapeño Burger: Add sliced jalapeños to the bun for more heat.
- Mushroom Melt: Sauté mushrooms and pile them over the finished patties.
- Turkey Smash Version: Ground turkey works, but handle it gently and watch the temperature closely.
Common Mistakes to Avoid with This Dish:
- Overcrowding the skillet: The patties need space for crust to form.
- Using lean beef: Dry burgers lose the whole point.
- Skipping the pickle brine: That little acidic bite keeps the burger from feeling too rich.
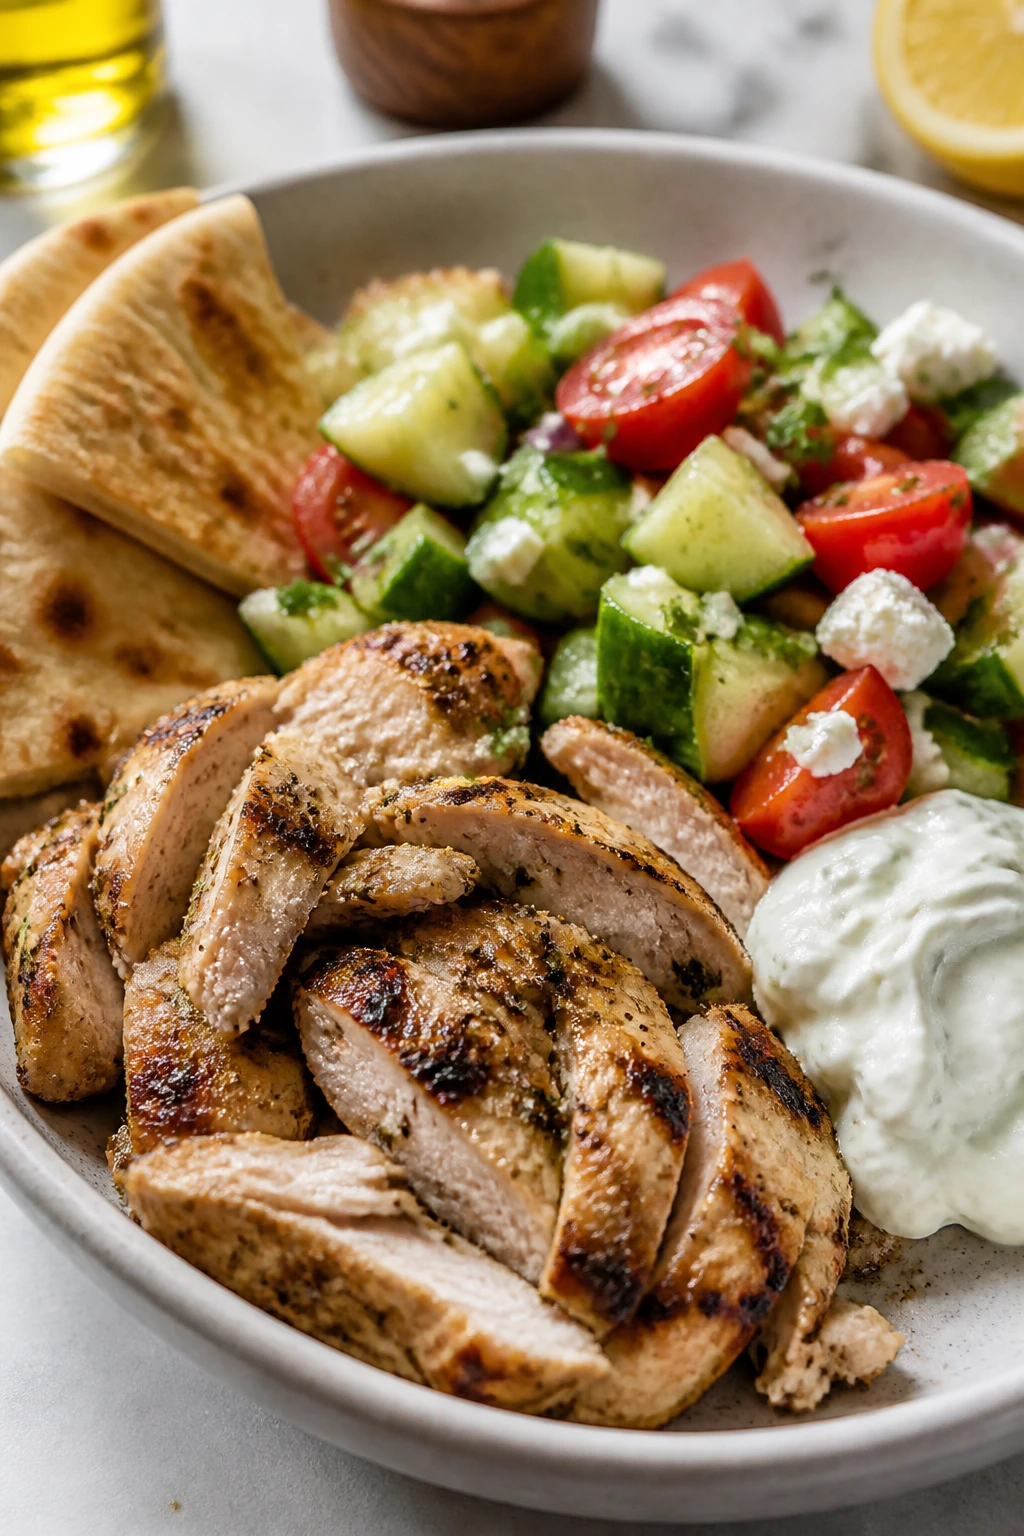
7. Greek Chicken Pita Bowls with Cucumber-Tomato Salad
This is the dinner I make when I want something filling but still clean around the edges. The chicken tastes like lemon and oregano, the vegetables stay crisp, and the yogurt sauce cools everything down in a way that feels almost necessary.
Why It Works:
Greek flavors do a lot of work with very little fuss. Lemon, garlic, oregano, feta, and cucumber are enough to make the bowl taste complete. The chicken can be grilled or seared, and the salad needs only a short toss with olive oil and salt to wake up. A cold sparkling water with mint or a crisp white wine fits right beside it without stealing the show.
Key Ingredients:
- 2 pounds chicken thighs or breasts
- 3 tablespoons olive oil
- 2 teaspoons dried oregano
- Juice of 1 lemon
- 3 garlic cloves, minced
- 2 cups diced cucumber
- 2 cups diced tomatoes
- ½ red onion, thinly sliced
- 1 cup crumbled feta
- 4 pita breads
- 1 cup Greek yogurt
- 1 tablespoon chopped dill
- 1 teaspoon kosher salt
Quick Steps:
- Mix the olive oil, oregano, lemon juice, garlic, and salt. Coat the chicken and let it sit for 20 minutes.
- Cook the chicken over medium-high heat until browned and cooked through, about 5 to 7 minutes per side for thighs or until 165°F for breasts.
- Toss the cucumber, tomatoes, onion, and feta with a little olive oil and salt.
- Stir the yogurt with dill and a squeeze of lemon for a fast sauce.
- Warm the pita bread in a dry skillet or wrapped in foil.
- Slice the chicken and build the bowls with pita, salad, and yogurt sauce.
Equipment for This Recipe:
- Grill or skillet
- Mixing bowl
- Sharp knife
- Small bowl for sauce
- Tongs
How to Serve This Dish:
Serve the bowls family-style and let everyone build their own. A cold drink with herbs — mint lemonade, sparkling water with cucumber, or dry white wine — belongs here. The colors are strong enough that the table looks finished before anyone sits down.
Pro Tips for This Recipe:
- Use thighs if you want the easiest route to juicy chicken.
- Salt the tomatoes lightly before mixing. It draws out their flavor fast.
- Warm the pita just before serving so it stays pliable.
- Keep the yogurt sauce a little loose with lemon juice if you want it to drizzle.
Variations on This Dish:
- Chickpea Bowl: Swap half the chicken for roasted chickpeas.
- Lamb Version: Ground lamb with oregano and garlic gives the bowl a richer edge.
- Rice Bowl Swap: Serve over rice or farro instead of pita when you want a sturdier base.
Common Mistakes to Avoid with This Dish:
- Dry chicken breasts: If you use breasts, pull them at 165°F and rest them.
- Watery salad: Drain the tomatoes a little if they’re very juicy.
- Skipping the yogurt sauce: Without it, the bowl loses its cool contrast.
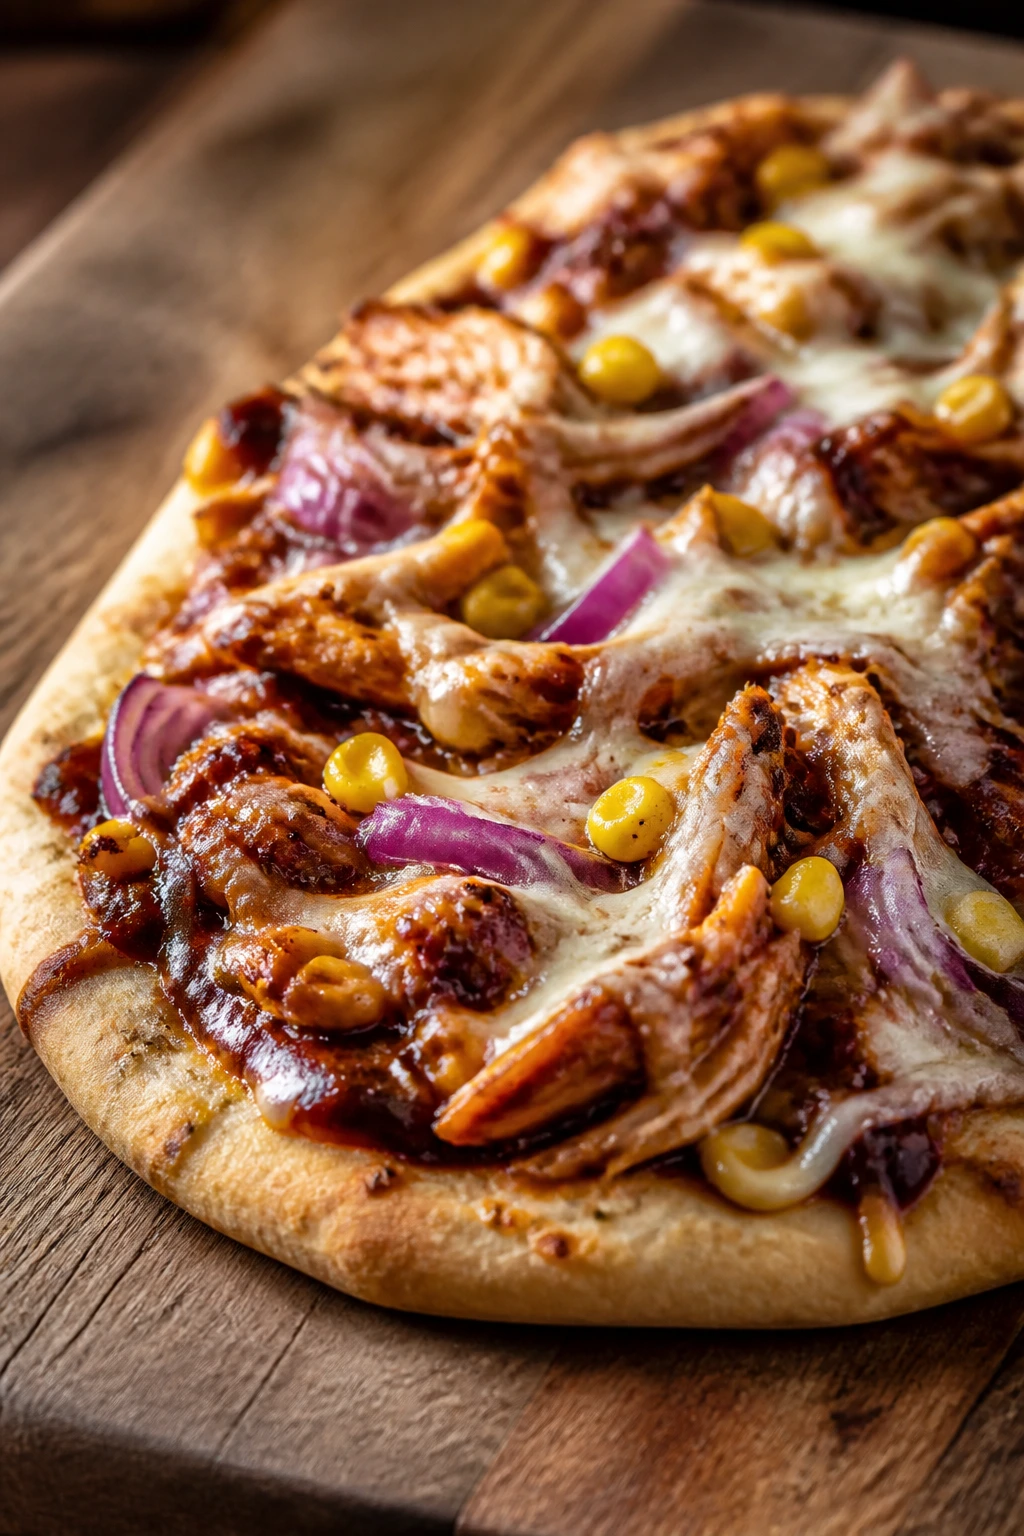
8. BBQ Chicken Flatbread with Red Onion and Corn
Flatbread is the move when you want barbecue flavor without waiting around for a whole pie of dough. It bakes fast, it carries sauce well, and it gives you enough crunch at the edges to feel like you did something.
Why It Works:
This is a smart way to use cooked chicken or leftovers without making them taste recycled. Barbecue sauce, mozzarella, corn, and red onion cover the bread in layers that hit sweet, smoky, salty, and sharp. The flatbread gets crisp in the oven before the toppings can overwhelm it, which is why this one lands so well beside lemonade or a cold pale ale.
Key Ingredients:
- 2 naan or thin flatbreads
- 2 cups cooked shredded chicken
- ½ cup barbecue sauce
- 1 cup shredded mozzarella
- 1 cup corn kernels
- ½ red onion, thinly sliced
- 2 tablespoons chopped cilantro
- 1 tablespoon olive oil
Quick Steps:
- Heat the oven to 425°F and set a sheet pan inside while it preheats.
- Toss the chicken with barbecue sauce.
- Brush the flatbreads lightly with olive oil and top with mozzarella, chicken, corn, and red onion.
- Slide the flatbreads onto the hot pan and bake for 8 to 10 minutes, until the cheese is melted and the edges are crisp.
- Finish with cilantro and a tiny drizzle of extra barbecue sauce if you want more sweetness.
- Slice and serve while the crust still has crunch.
Equipment for This Recipe:
- Sheet pan
- Oven
- Pizza cutter or sharp knife
- Mixing bowl
- Pastry brush or spoon
How to Serve This Dish:
Cut the flatbread into wide strips and serve it on a board, not a plate. A cold drink with a little bitterness — pale ale, lager, or even sparkling water with lemon — keeps the barbecue sauce from feeling sticky. A green salad on the side is enough.
Pro Tips for This Recipe:
- Preheat the sheet pan. A hot surface helps the bottom crisp.
- Don’t drown the bread in sauce. Too much and the center stays soft.
- If the onion tastes too sharp, soak the slices in cold water for 10 minutes first.
- Use pre-cooked chicken from a roast bird or leftovers; this is a good place for it.
Variations on This Dish:
- Buffalo Flatbread: Swap barbecue sauce for buffalo sauce and use blue cheese instead of mozzarella.
- Smoked Gouda Version: Replace part of the mozzarella with smoked gouda for a deeper flavor.
- Jalapeño Corn Flatbread: Add sliced jalapeños if you want the heat to show up.
Common Mistakes to Avoid with This Dish:
- Soggy crust: Too much sauce or topping weighs the bread down.
- Raw onion overload: Thin slices are enough.
- Skipping the hot pan: The crisp bottom is what makes this dinner work.
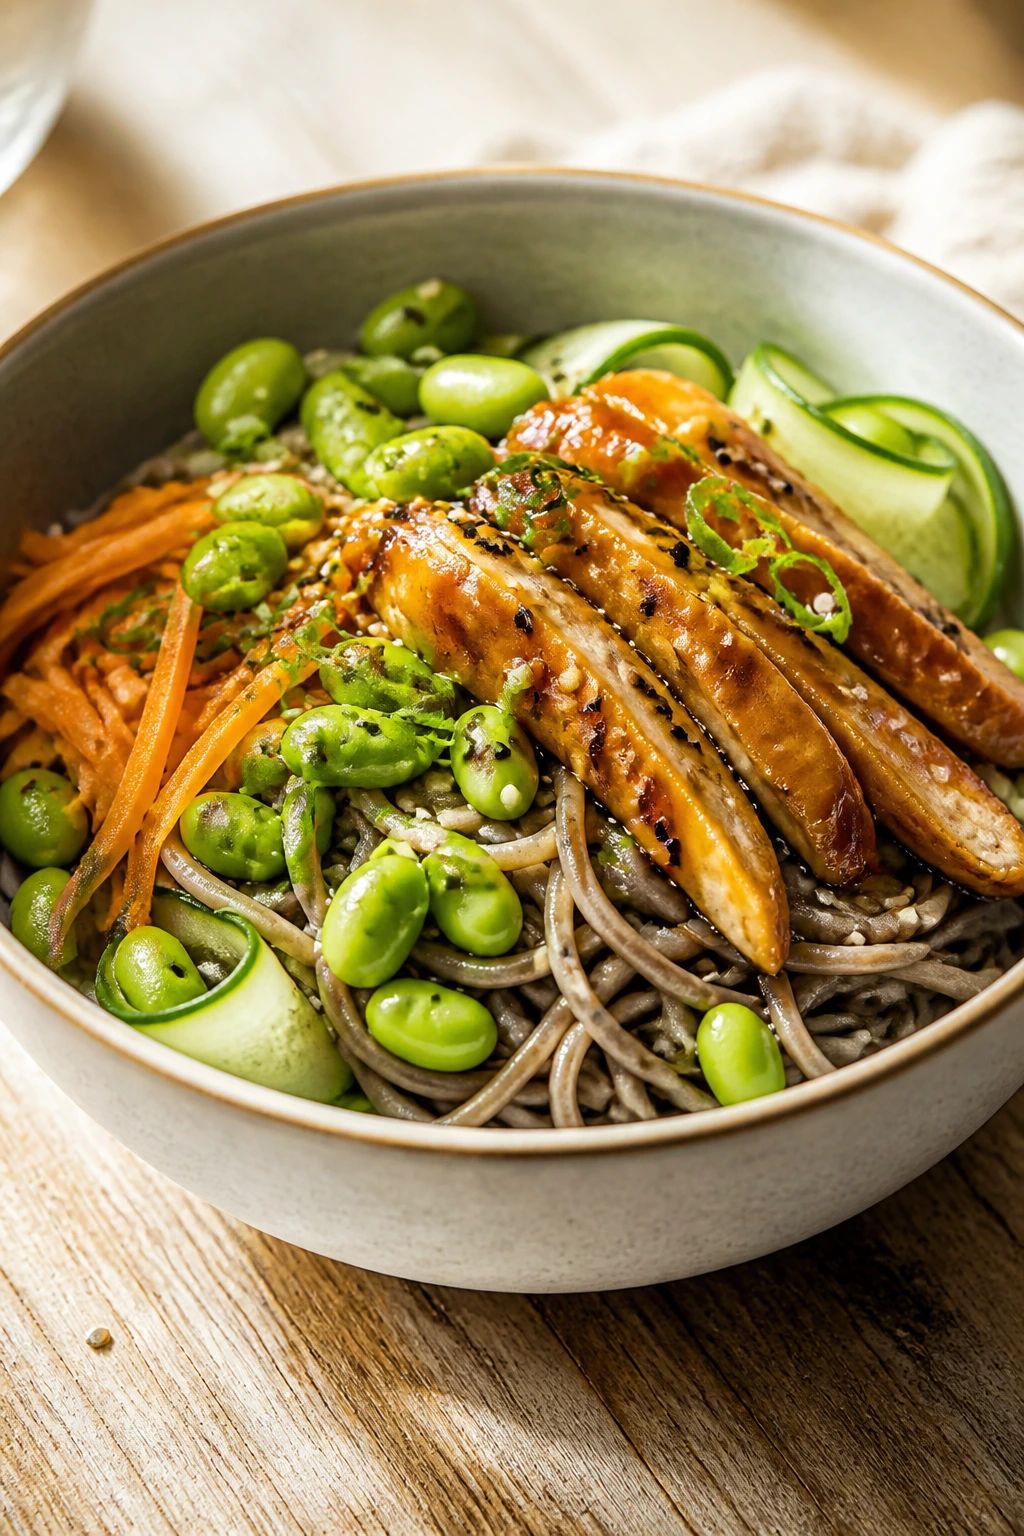
9. Cold Soba Noodle Bowls with Edamame and Sesame Chicken
Cold noodles are underrated on hot nights. They do not ask for much attention, they’re fast, and they carry dressing in a way that turns leftovers into a second meal without protest.
Why It Works:
Soba noodles hold a nutty flavor that tastes good even when chilled. The sesame-soy dressing coats the noodles without drowning them, and the chicken plus edamame give you enough protein to make the bowl feel like dinner, not a side dish. The cucumber and carrot stay crisp, which matters because texture keeps chilled noodle bowls from feeling soft and one-note.
Key Ingredients:
- 8 ounces soba noodles
- 1 pound chicken breast or thighs
- 1 cup shelled edamame
- 1 cucumber, julienned or thinly sliced
- 1 carrot, grated
- 3 tablespoons soy sauce or tamari
- 2 tablespoons rice vinegar
- 1 tablespoon sesame oil
- 1 tablespoon peanut butter
- 1 tablespoon honey
- 2 scallions, sliced
Quick Steps:
- Cook the soba noodles according to the package, then rinse them under cold water until they feel fully cool and not gummy.
- Cook the chicken in a skillet until done, then slice it thin.
- Whisk the soy sauce, rice vinegar, sesame oil, peanut butter, and honey until smooth. Add a splash of warm water if it feels thick.
- Toss the noodles with the dressing, chicken, edamame, cucumber, and carrot.
- Top with scallions and serve chilled or just barely cool.
- Add sesame seeds or chili crisp if you want more crunch or heat.
Equipment for This Recipe:
- Medium pot
- Skillet
- Colander
- Mixing bowl
- Whisk
How to Serve This Dish:
Serve it in deep bowls with chopsticks or forks, whichever feels easier. I like this with iced green tea, ginger beer, or a very cold cucumber soda. It’s one of the few dinners here that can sit on the table for a few minutes and still taste better with each bite.
Pro Tips for This Recipe:
- Rinse the noodles well. The starch is what makes them clump.
- Thin the dressing with 1 to 2 tablespoons hot water if it tightens up.
- Slice the cucumber right before serving if you want maximum crunch.
- Let the chicken cool a little before tossing so it doesn’t wilt the vegetables.
Variations on This Dish:
- Tofu Bowl: Use seared tofu instead of chicken for a vegetarian version.
- Spicy Chili Crisp Version: Add 1 to 2 teaspoons chili crisp to the dressing.
- Gluten-Free Swap: Use 100% buckwheat soba or rice noodles if needed.
Common Mistakes to Avoid with This Dish:
- Gummy noodles: Rinsing them under cold water fixes this.
- Over-thick dressing: It should coat, not glue, the bowl together.
- Warm chicken straight into the bowl: That can soften the vegetables too much.
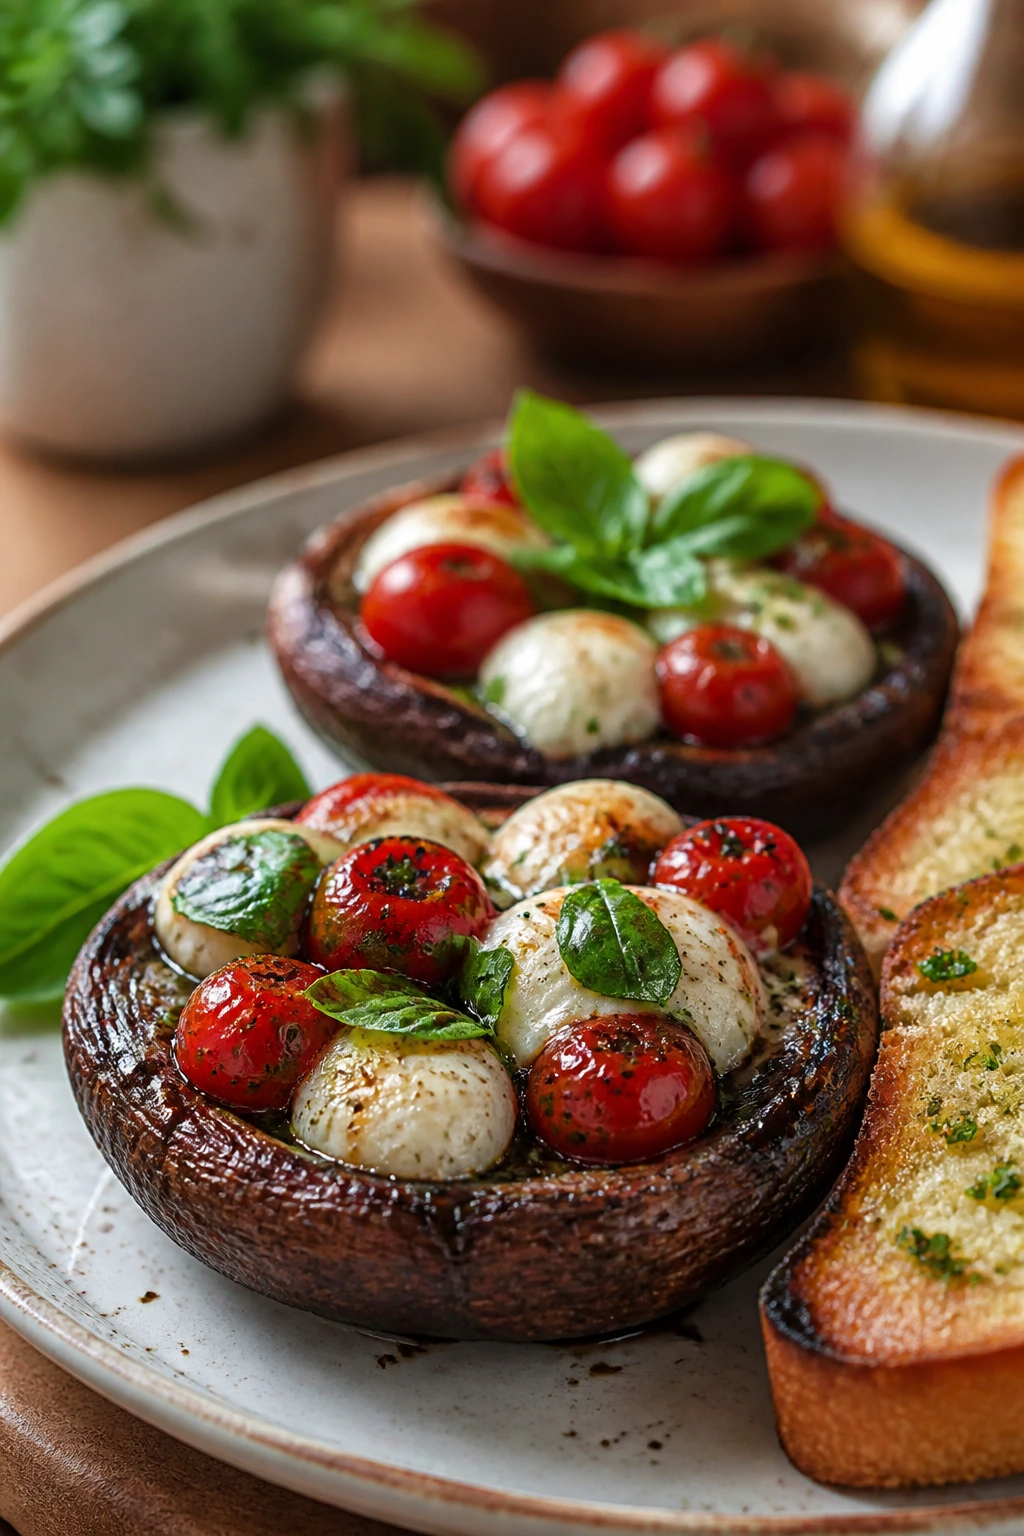
10. Caprese Stuffed Portobellos with Garlic Bread
Portobellos are what you reach for when you want a meatless dinner that still feels like a main event. They have enough heft to carry tomato, mozzarella, and basil without falling apart.
Why It Works:
Roasting the mushrooms first drives off some moisture, which is the difference between a good stuffed portobello and a soggy one. The tomatoes soften into a bright, juicy layer while the mozzarella melts over the top. Garlic bread on the side turns the plate into an actual dinner, not just a mushroom situation. A sparkling drink with citrus or a chilled white wine is a clean match.
Key Ingredients:
- 4 large portobello mushroom caps
- 2 tablespoons olive oil
- 1 teaspoon balsamic vinegar
- 2 cups cherry tomatoes, halved
- 8 ounces fresh mozzarella, sliced
- ¼ cup basil leaves
- 2 garlic cloves, minced
- 4 slices crusty bread
- 2 tablespoons butter, softened
- 1 teaspoon kosher salt
Quick Steps:
- Preheat the oven to 400°F.
- Brush the portobellos with olive oil and a little balsamic, then roast them gill-side down for 10 minutes to release moisture.
- Flip the mushrooms, fill each cap with tomatoes and mozzarella, and roast for another 8 to 10 minutes until the cheese melts.
- Mix the garlic into the butter and spread it on the bread.
- Toast the garlic bread in the oven during the last few minutes.
- Finish the mushrooms with basil and serve immediately.
Equipment for This Recipe:
- Sheet pan
- Pastry brush
- Small bowl
- Sharp knife
- Spatula
How to Serve This Dish:
Serve two portobellos per person if you’re feeding hearty eaters, one if you’re pairing them with a side salad. A cold sparkling water with lemon or a crisp white wine keeps the cheese and mushrooms feeling light enough for warm weather. The plate should look juicy, not crowded.
Pro Tips for This Recipe:
- Scrape the dark gills out if your mushrooms are especially wet.
- Roast them gill-side down first so liquid runs off.
- Add the basil after baking so it stays bright and fragrant.
- Tear the mozzarella instead of slicing it if you want rougher, creamier pockets.
Variations on This Dish:
- Pesto Portobellos: Swap basil leaves for a spoonful of pesto.
- Balsamic Onion Version: Add caramelized onions for sweetness.
- Vegan Swap: Use dairy-free mozzarella and olive oil instead of butter on the bread.
Common Mistakes to Avoid with This Dish:
- Skipping the pre-roast: The mushrooms will leak too much water.
- Adding basil before baking: It turns dark and loses its aroma.
- Overstuffing: Too much filling slides off before the cheese sets.
11. Pork Tenderloin with Peach Salsa and Green Beans
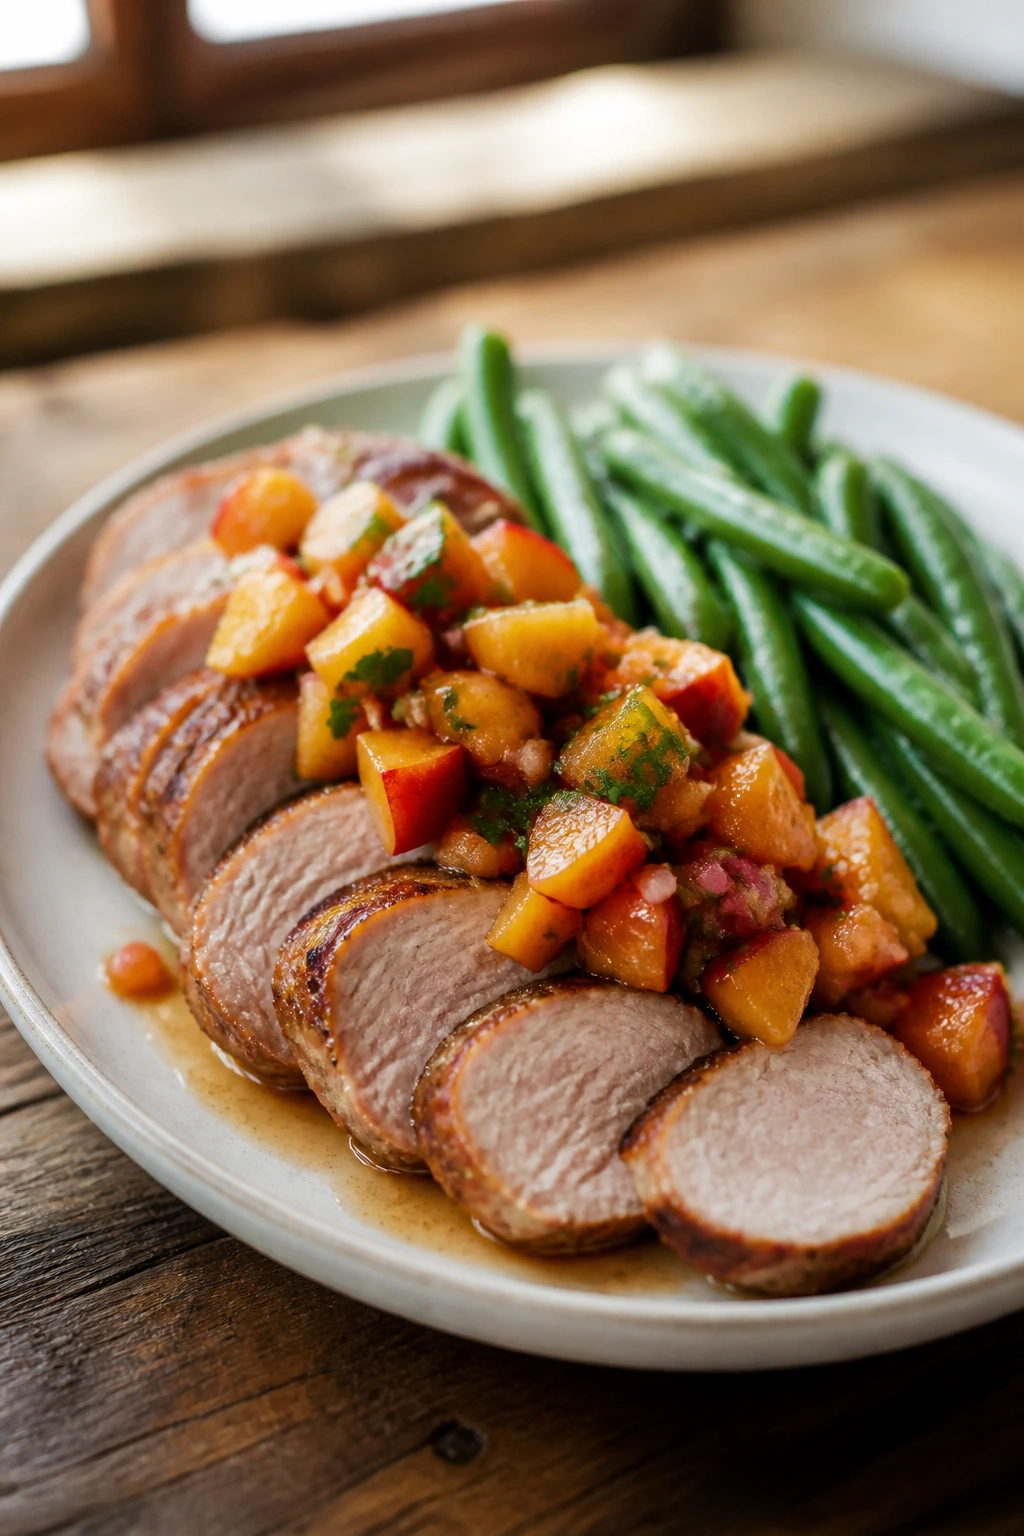
Pork tenderloin is one of the easiest cuts to overcook, which is why I like it with something lively on top. The peach salsa keeps it bright, and the green beans make the plate feel finished without asking for much extra effort.
Why It Works:
Pork tenderloin is lean, so it benefits from a hot sear followed by a short roast. The peach salsa brings sweetness and acid, and a little jalapeño keeps it from tasting like dessert. Green beans stay snappy when you blanch them briefly and dress them with salt and oil while they’re still warm. A cold cider or a tall iced tea fits right in.
Key Ingredients:
- 2 pork tenderloins, about 1¾ pounds total
- 2 peaches, diced
- ¼ red onion, finely diced
- 1 jalapeño, minced
- Juice of 1 lime
- ¼ cup chopped cilantro
- 1 pound green beans, trimmed
- 2 tablespoons olive oil
- 1 teaspoon ground cumin
- 1 teaspoon kosher salt
- ½ teaspoon black pepper
Quick Steps:
- Preheat the oven to 425°F.
- Season the pork with salt, pepper, and cumin, then sear it in an oven-safe skillet over medium-high heat.
- Transfer the skillet to the oven and roast until the pork reaches 145°F, usually about 12 to 15 minutes.
- Stir the peaches, red onion, jalapeño, lime juice, and cilantro together for the salsa.
- Blanch the green beans in salted boiling water for 2 to 3 minutes, then toss them with olive oil and a pinch of salt.
- Rest the pork for 10 minutes, slice it, and spoon the salsa over the top.
Equipment for This Recipe:
- Oven-safe skillet
- Instant-read thermometer
- Saucepan for the beans
- Cutting board
- Sharp knife
How to Serve This Dish:
Slice the pork thin and fan it on the plate so the salsa can run over the edges. Cold cider, iced tea, or sparkling water with a squeeze of lime all work here. The beans can sit right next to the pork and catch some of the peach juice.
Pro Tips for This Recipe:
- Use a thermometer. Tenderloin dries fast once it crosses 145°F and keeps climbing.
- Make the salsa a little ahead so the peach juices mingle.
- Taste the green beans with a pinch of salt before serving; they wake up fast.
- If the peaches are firm, let the salsa sit for 10 minutes longer.
Variations on This Dish:
- Cherry Salsa Version: Use chopped cherries instead of peaches.
- Mustard Herb Pork: Rub the tenderloin with Dijon and chopped rosemary before searing.
- Grilled Version: Grill the tenderloin over medium heat and slice after resting.
Common Mistakes to Avoid with This Dish:
- Overcooking the pork: Dry tenderloin loses all its charm.
- Watery salsa: Very juicy peaches can flood the plate; drain a spoonful if needed.
- Boiling the beans too long: They should stay green and a little crisp.
12. Fish Tacos with Avocado Crema and Cabbage

Fish tacos can be bland if you’re careless. These aren’t. The crema gives you cool richness, the cabbage stays crunchy, and the fish gets enough spice and browning to hold its own.
Why It Works:
White fish cooks fast and likes a hot pan with enough oil to prevent sticking. The avocado crema adds creaminess without burying the fish, and cabbage brings the snap that soft tortillas need. Pickled onions, if you have them, add a sharp little hit that keeps every bite awake. This is one of the easiest dinners in the lineup to pair with a cold lager or lime soda.
Key Ingredients:
- 1½ pounds white fish fillets, such as cod or mahi-mahi
- 1 teaspoon chili powder
- 1 teaspoon paprika
- 1 teaspoon kosher salt
- 8 small tortillas
- 4 cups shredded cabbage
- 1 avocado
- ½ cup plain yogurt or sour cream
- Juice of 1 lime
- ¼ cup chopped cilantro
- ½ cup pickled onions
Quick Steps:
- Mash the avocado with yogurt and lime juice to make a smooth crema.
- Toss the fish with chili powder, paprika, and salt.
- Cook the fish in a hot skillet with a little oil for 2 to 3 minutes per side, until it flakes and the edges are lightly browned.
- Warm the tortillas in a dry skillet.
- Layer cabbage, fish, crema, cilantro, and pickled onions into each tortilla.
- Serve right away with extra lime wedges.
Equipment for This Recipe:
- Nonstick or cast-iron skillet
- Bowl for the crema
- Fork or potato masher
- Tongs
- Citrus juicer
How to Serve This Dish:
Keep the toppings separate until the last minute so the tortillas stay springy. A cold drink with a little zip — lime soda, pale beer, or sparkling water with a salty rim — suits these tacos well. They’re best eaten immediately, preferably standing near the counter with a paper towel in hand.
Pro Tips for This Recipe:
- Dry the fish well before seasoning so it sears instead of steaming.
- Don’t flip it early. If it sticks, it’s not ready yet.
- Shred the cabbage finely; big strips are harder to bite through.
- If the crema seems thick, loosen it with a teaspoon of water.
Variations on This Dish:
- Baja-Style Fish Tacos: Add shredded cabbage slaw with a touch of mayo and hot sauce.
- Blackened Version: Use a blackening spice blend for a darker crust.
- Lettuce Cup Swap: Use romaine leaves for a lighter dinner.
Common Mistakes to Avoid with This Dish:
- Overcooking the fish: Dry fish flakes badly and tastes dull.
- Wet tortillas: Warm them just before serving.
- Too much crema: A spoonful is enough; the fish still needs to show up.
13. Orzo with Grilled Vegetables, Feta, and Herbs
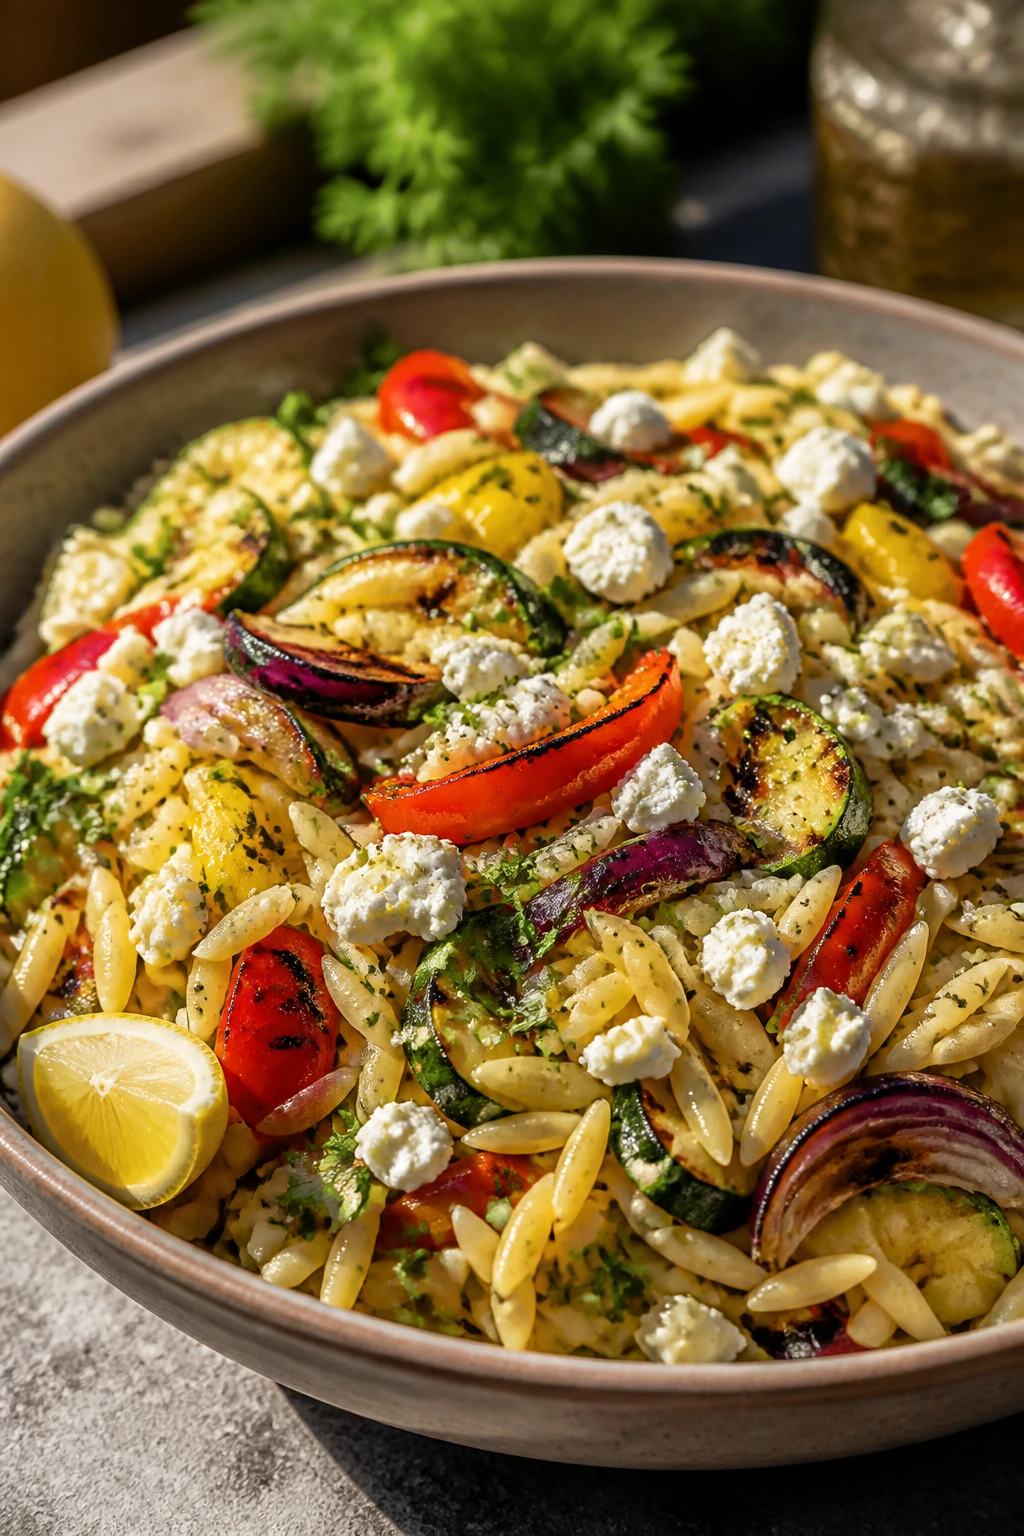
Orzo is one of those pastas that behaves more like a side dish and more like a main depending on what you put with it. Grilled vegetables, lemon, and feta turn it into a dinner that feels roomy but not heavy.
Why It Works:
The grilled zucchini, peppers, and onion give you char and sweetness, while the orzo catches olive oil and lemon in every little curve. Feta brings salt, herbs bring freshness, and the whole thing tastes equally good warm or at room temperature. That makes it especially handy with a cold drink and a late evening meal.
Key Ingredients:
- 12 ounces orzo
- 1 zucchini, sliced lengthwise
- 1 bell pepper, quartered
- 1 red onion, cut into wedges
- 2 cups cherry tomatoes
- 4 ounces feta, crumbled
- Juice of 1 lemon
- 3 tablespoons olive oil
- ¼ cup chopped parsley
- 1 teaspoon kosher salt
- ½ teaspoon black pepper
Quick Steps:
- Grill the zucchini, pepper, and onion until tender with visible char, about 8 to 10 minutes.
- Cook the orzo in salted water until al dente, then drain well.
- Toss the warm orzo with olive oil, lemon juice, salt, and pepper.
- Chop the grilled vegetables into bite-size pieces and fold them into the pasta with the tomatoes.
- Add feta and parsley right before serving.
- Taste for salt and lemon, then adjust.
Equipment for This Recipe:
- Grill or grill pan
- Medium pot
- Colander
- Large bowl
- Sharp knife
How to Serve This Dish:
Serve it in a shallow bowl so the vegetables sit on top instead of disappearing into the pasta. A cold drink with a little sweetness — sparkling lemonade or chilled rosé — works very well here. It’s also one of the easiest dishes to bring to a table already set with other food.
Pro Tips for This Recipe:
- Salt the orzo water well; bland pasta drags the whole bowl down.
- Let the pasta cool for 5 minutes before adding feta so it softens, not melts.
- Use a wide bowl for mixing so the vegetables don’t break apart.
- A small splash of pasta water can help the lemon and oil cling.
Variations on This Dish:
- Chickpea Orzo: Add a can of chickpeas for extra protein.
- Minty Version: Swap half the parsley for mint.
- No-Grill Swap: Roast the vegetables on a sheet pan at 425°F.
Common Mistakes to Avoid with This Dish:
- Overcooked orzo: Mushy pasta turns the bowl heavy.
- Too much lemon: It should brighten, not sharpen everything to a point.
- Adding feta too early: It breaks apart and disappears.
14. Chicken Caesar Wraps with Crisp Romaine
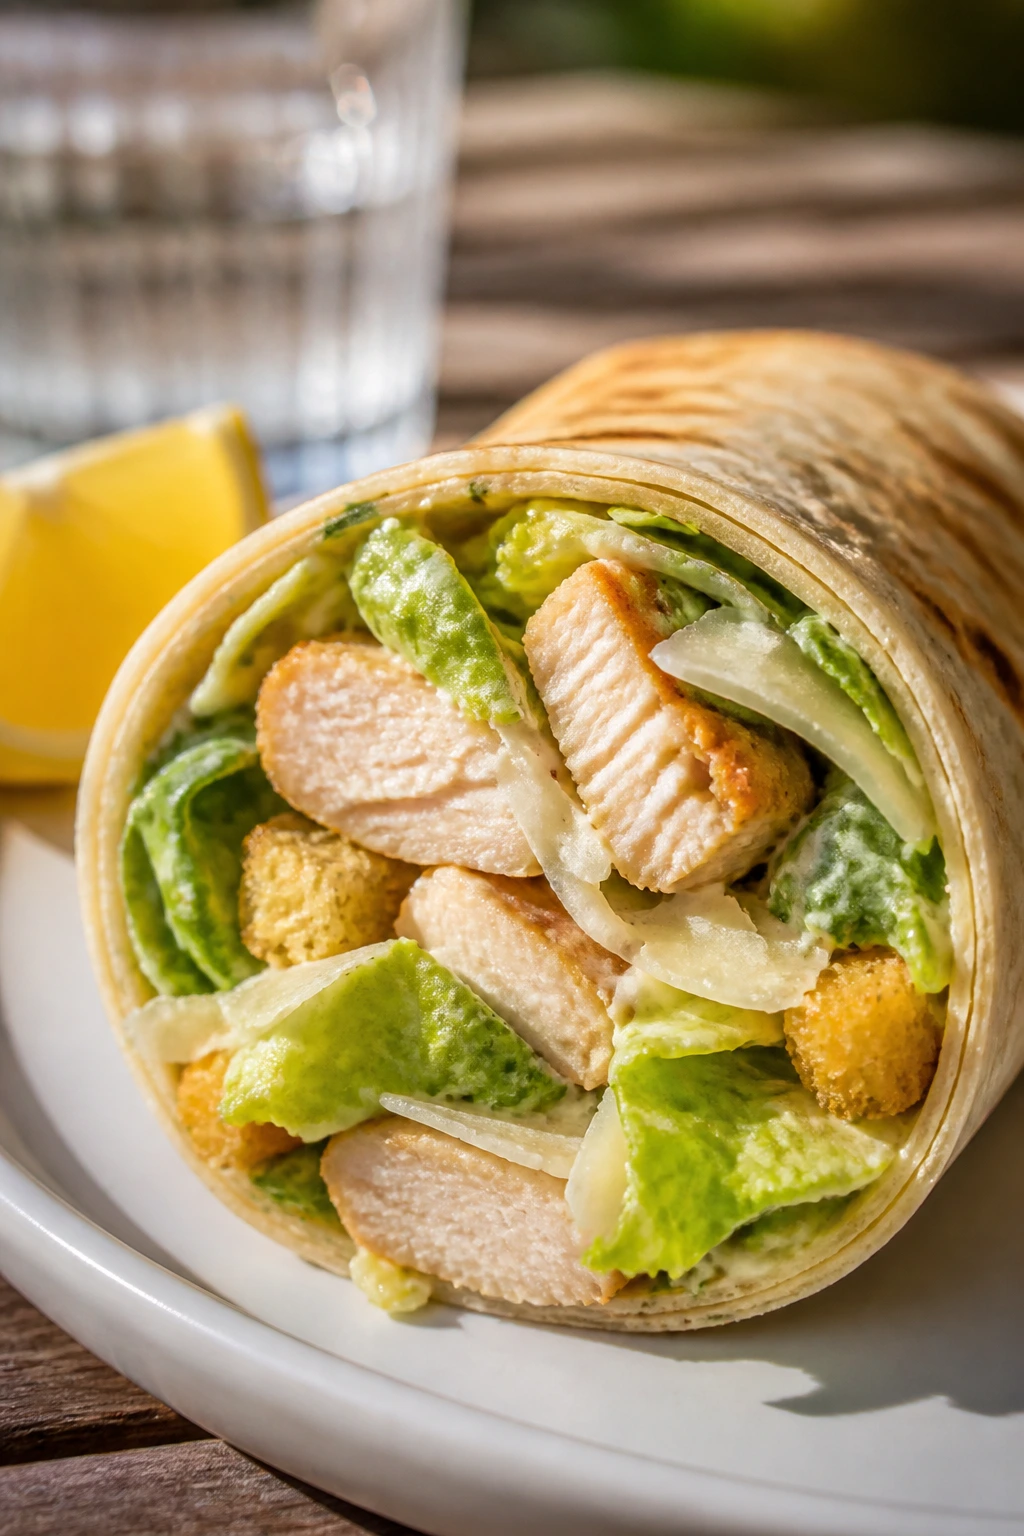
There’s a reason Caesar wraps keep showing up in warm weather: they’re cold, crunchy, and sturdy enough to count as dinner without feeling like a project.
Why It Works:
The chicken gives the wrap body, the romaine gives snap, and the Caesar dressing ties everything together with salt and garlic. Croutons inside the wrap sound small, but they matter because they keep the texture from going flat after the first bite. A cold black tea or club soda with lemon suits the whole thing without getting in the way.
Key Ingredients:
- 3 cups cooked chicken, sliced or shredded
- 6 cups chopped romaine
- ⅓ cup Caesar dressing
- ¼ cup grated Parmesan
- 4 large tortillas
- 1 cup croutons
- 1 lemon, cut into wedges
- Black pepper to taste
Quick Steps:
- Toss the romaine, chicken, Caesar dressing, Parmesan, and black pepper in a bowl.
- Fold in the croutons right before assembling so they stay crisp.
- Spoon the filling down the center of each tortilla.
- Roll the wraps tightly, tucking in the sides as you go.
- If you want a little extra structure, toast the wraps seam-side down in a dry skillet for 1 minute per side.
- Slice in half and serve with lemon wedges.
Equipment for This Recipe:
- Large mixing bowl
- Skillet, optional for toasting
- Sharp knife
- Cutting board
- Spoon or tongs
How to Serve This Dish:
Serve the wraps cut on a diagonal so the filling shows. A cold drink with citrus — iced tea with lemon, seltzer, or even a pale beer — keeps the dressing from feeling too rich. Add fruit or chips on the side if you want the plate to feel more complete.
Pro Tips for This Recipe:
- Dry the romaine well after washing. Water makes the wrap slippery.
- Use chopped chicken, not huge chunks, so the wrap rolls tighter.
- Keep the dressing light; you can always serve extra on the side.
- Toasting is optional, but it helps seal the seam.
Variations on This Dish:
- Grilled Chicken Caesar: Use hot grilled chicken if you want more smoke.
- Bacon Caesar Wrap: Add a few strips of crisp bacon for salt and crunch.
- Anchovy Caesar: Stir a little anchovy paste into the dressing for a deeper Caesar flavor.
Common Mistakes to Avoid with This Dish:
- Overdressing the lettuce: The wrap gets soggy fast.
- Stuffing too much filling inside: It tears before the first bite.
- Skipping the croutons: That crunch is part of the experience.
15. Black Bean and Corn Quesadillas with Salsa Verde
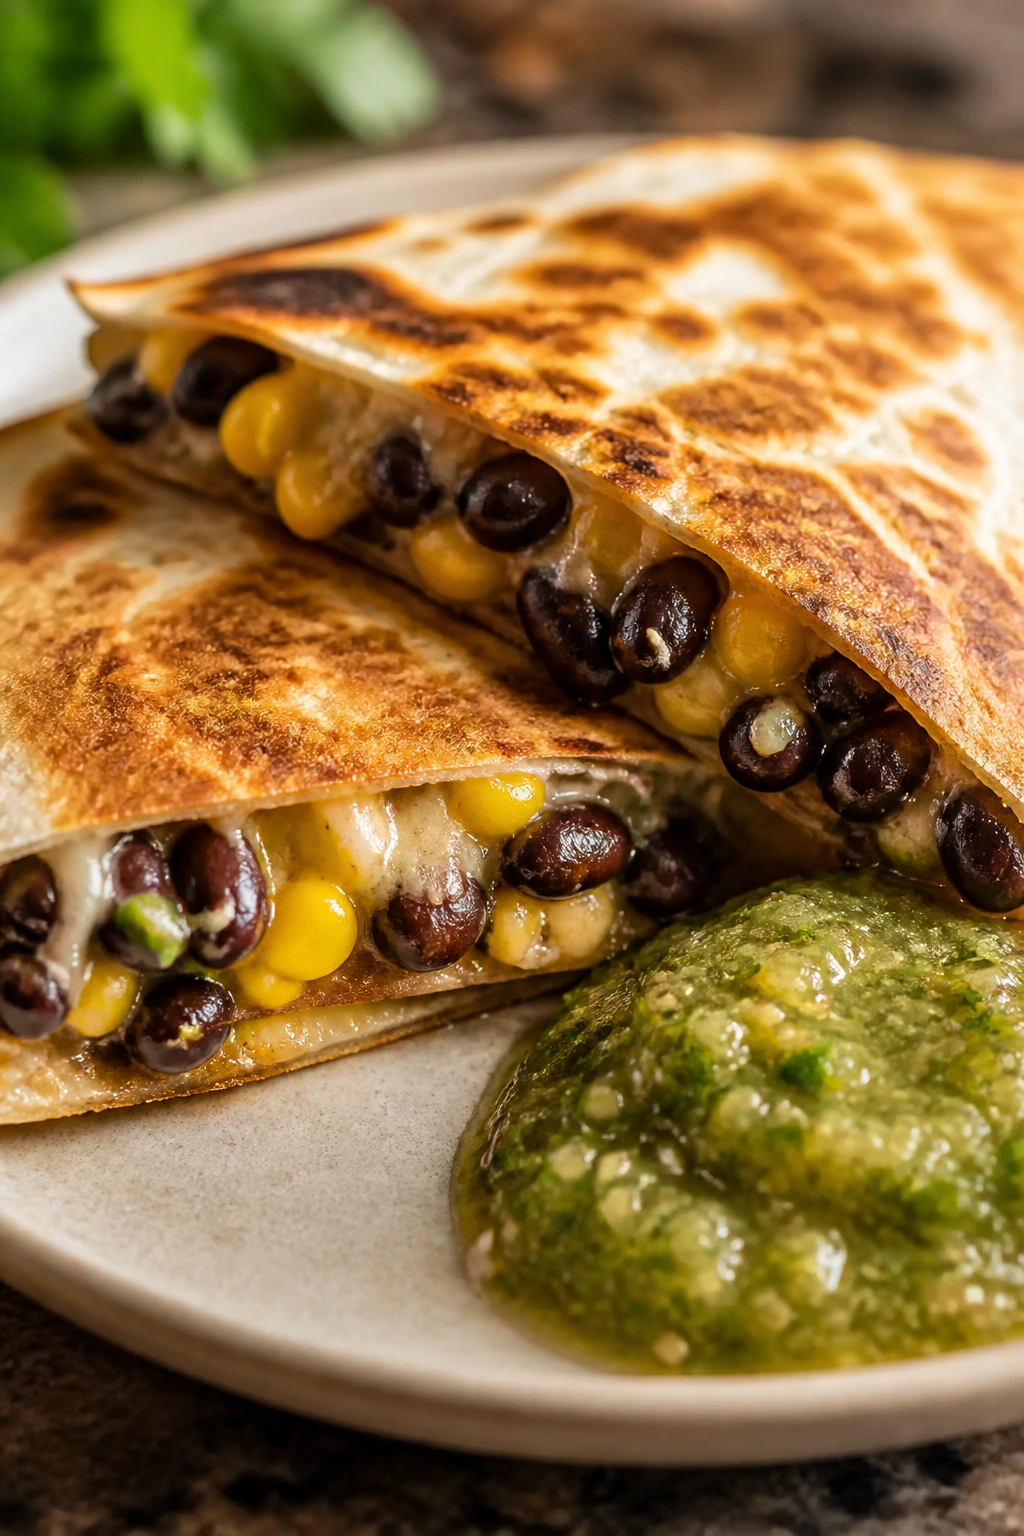
Quesadillas deserve more respect than they get. Done right, they’re crisp at the edges, gooey in the middle, and sturdy enough to eat one-handed while a cold drink sits right beside the plate.
Why It Works:
Black beans bring body, corn adds sweetness, and the cheese melts into the filling so it stays put when you slice the wedge. Salsa verde adds acidity, which is exactly what you need to keep a cheesy dinner from feeling heavy. A lime soda or cold margarita fits the mood, but sparkling water with plenty of lime does the same job.
Key Ingredients:
- 4 large flour tortillas
- 1 can black beans, drained and rinsed
- 1 cup corn kernels
- 2 cups shredded Monterey Jack cheese
- ½ cup salsa verde
- ¼ red onion, finely diced
- 1 teaspoon ground cumin
- 2 tablespoons chopped cilantro
- 1 avocado, sliced
- 1 tablespoon butter or oil for the skillet
Quick Steps:
- Warm the black beans in a pan with cumin and a spoonful of salsa verde, then mash a few of them with the back of a spoon.
- Lay a tortilla in a skillet over medium heat and sprinkle cheese over half.
- Add beans, corn, onion, and cilantro, then fold the tortilla over.
- Cook for 2 to 3 minutes per side, until the tortilla is golden and the cheese has melted.
- Slice into wedges and serve with salsa verde and avocado.
- Repeat with the remaining tortillas.
Equipment for This Recipe:
- Nonstick skillet
- Spatula
- Small pan for the filling
- Knife
- Cutting board
How to Serve This Dish:
Quesadillas look best cut into triangles and stacked in a fan on the plate. A cold drink with lime, whether sparkling or alcoholic, cuts the cheese and keeps each bite lively. I like them with a small salad because the plate benefits from something crisp and green.
Pro Tips for This Recipe:
- Keep the heat at medium. Too hot, and the tortilla browns before the cheese melts.
- Mash some of the beans so the filling stays put.
- Use a light hand with salsa verde inside; serve more on the side.
- Let the quesadilla sit for 30 seconds before cutting so the cheese settles.
Variations on This Dish:
- Chicken Quesadillas: Add shredded rotisserie chicken for extra protein.
- Jalapeño Version: Add sliced jalapeños if you want more heat.
- Cornmeal Tortilla Swap: Use corn tortillas for a more brittle, toasty edge.
Common Mistakes to Avoid with This Dish:
- Too much filling: The tortilla tears and the cheese runs out.
- High heat: Burnt outside, cold middle.
- Cutting immediately: The filling spills before it has a chance to hold together.
16. Thai Beef Lettuce Cups with Cucumber and Mint
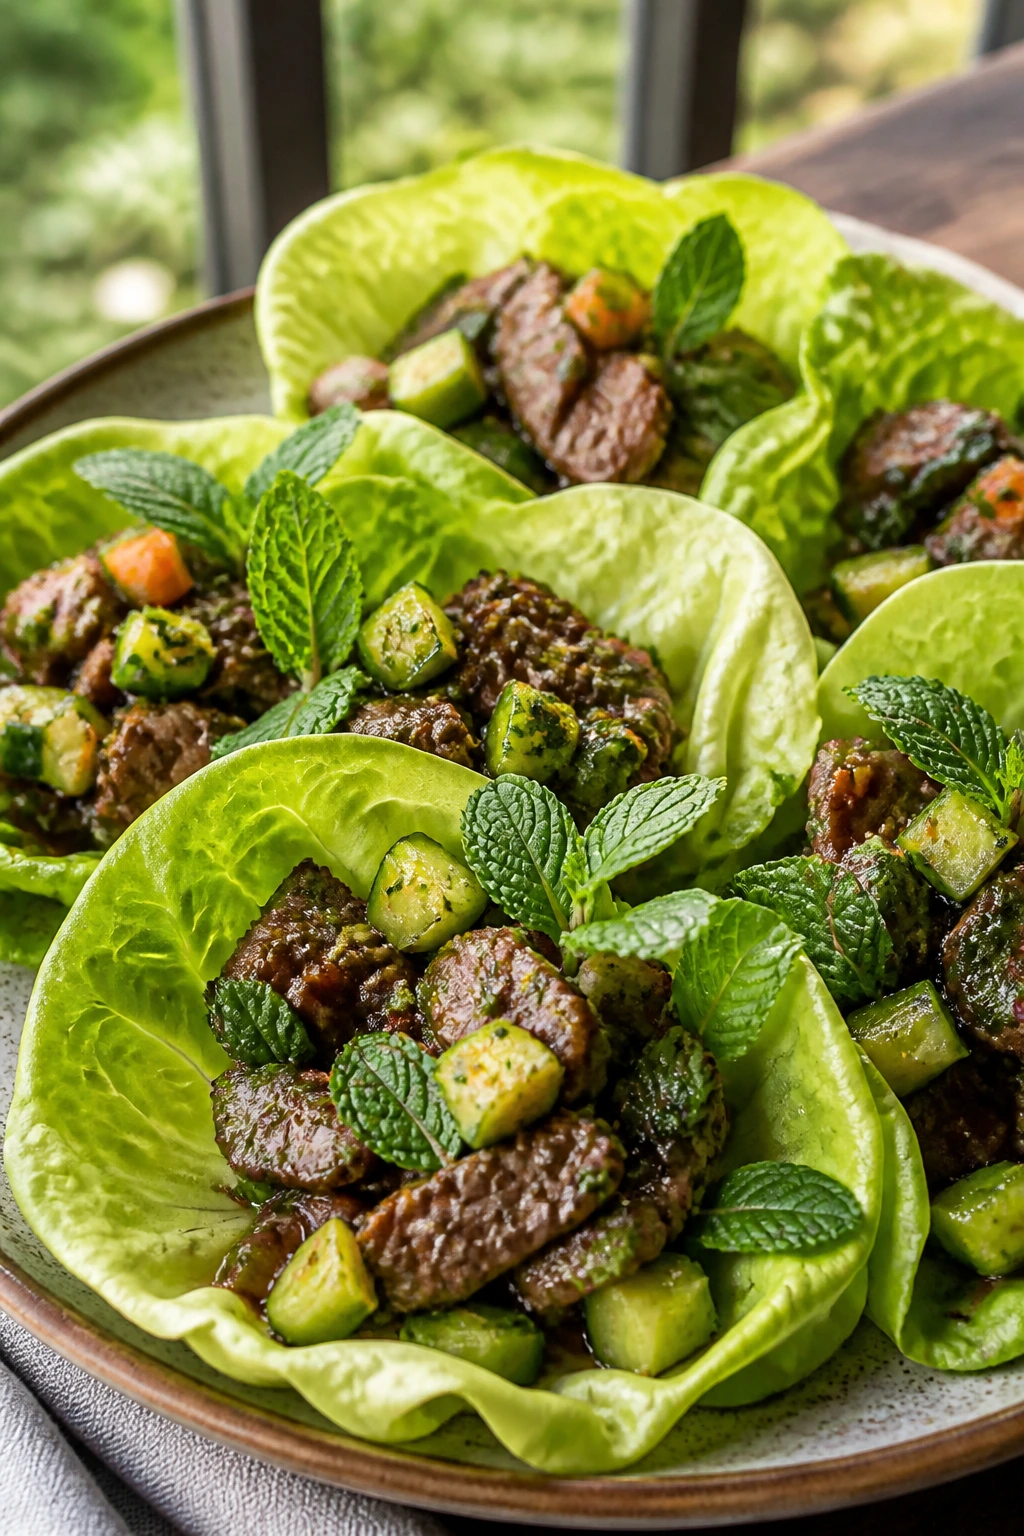
Lettuce cups are a nice trick when the evening feels hot enough to make a big plate seem wrong. They’re fresh, a little spicy, and cold where they should be cold.
Why It Works:
The beef is seasoned with fish sauce, lime, garlic, and a touch of sugar, which gives you the sweet-salty balance Thai-inspired dishes do so well. Butter lettuce acts like an edible bowl without much crunch resistance, and cucumber plus mint cools the heat. A cold cucumber drink or iced jasmine tea feels natural here because the flavor profile is already leaning bright and sharp.
Key Ingredients:
- 1½ pounds ground beef or thin-sliced sirloin
- 2 tablespoons fish sauce
- 1 tablespoon lime juice
- 1 teaspoon brown sugar
- 2 garlic cloves, minced
- 1 cucumber, diced
- 1 head butter lettuce, leaves separated
- ¼ cup chopped mint
- ¼ cup chopped basil
- ¼ cup chopped peanuts
- Crushed red pepper to taste
Quick Steps:
- Stir the fish sauce, lime juice, brown sugar, and garlic together.
- Cook the beef over medium-high heat until browned and no longer pink, then pour in the sauce and let it glaze the meat for 1 minute.
- Spoon the beef into the lettuce leaves.
- Top with cucumber, mint, basil, peanuts, and crushed red pepper.
- Serve with extra lime wedges.
- Eat right away while the lettuce is still crisp.
Equipment for This Recipe:
- Large skillet
- Spoon or spatula
- Knife
- Cutting board
- Small bowl
How to Serve This Dish:
Arrange the lettuce leaves on a chilled platter if you have one. A cold drink with a clean finish — iced jasmine tea, cucumber water, or a cold lager — keeps the herbs and lime tasting sharp. These are best served with a stack of napkins, not a fork.
Pro Tips for This Recipe:
- Drain excess fat from the beef if it pools in the pan.
- Add the lime juice at the end so it stays bright.
- Keep the lettuce leaves dry; water makes them collapse.
- Chop the herbs right before serving so they stay fragrant.
Variations on This Dish:
- Turkey Lettuce Cups: Ground turkey works if you season it a little more aggressively.
- Mushroom Version: Replace half the beef with finely chopped mushrooms.
- Extra Crunch Swap: Add shredded carrots or chopped water chestnuts.
Common Mistakes to Avoid with This Dish:
- Over-salting with fish sauce: It’s potent; measure it.
- Warm, wilted lettuce: Chill the leaves first.
- Skipping fresh herbs: The herbs are what make the cups taste alive.
17. Skillet Sausage and Peppers with Couscous
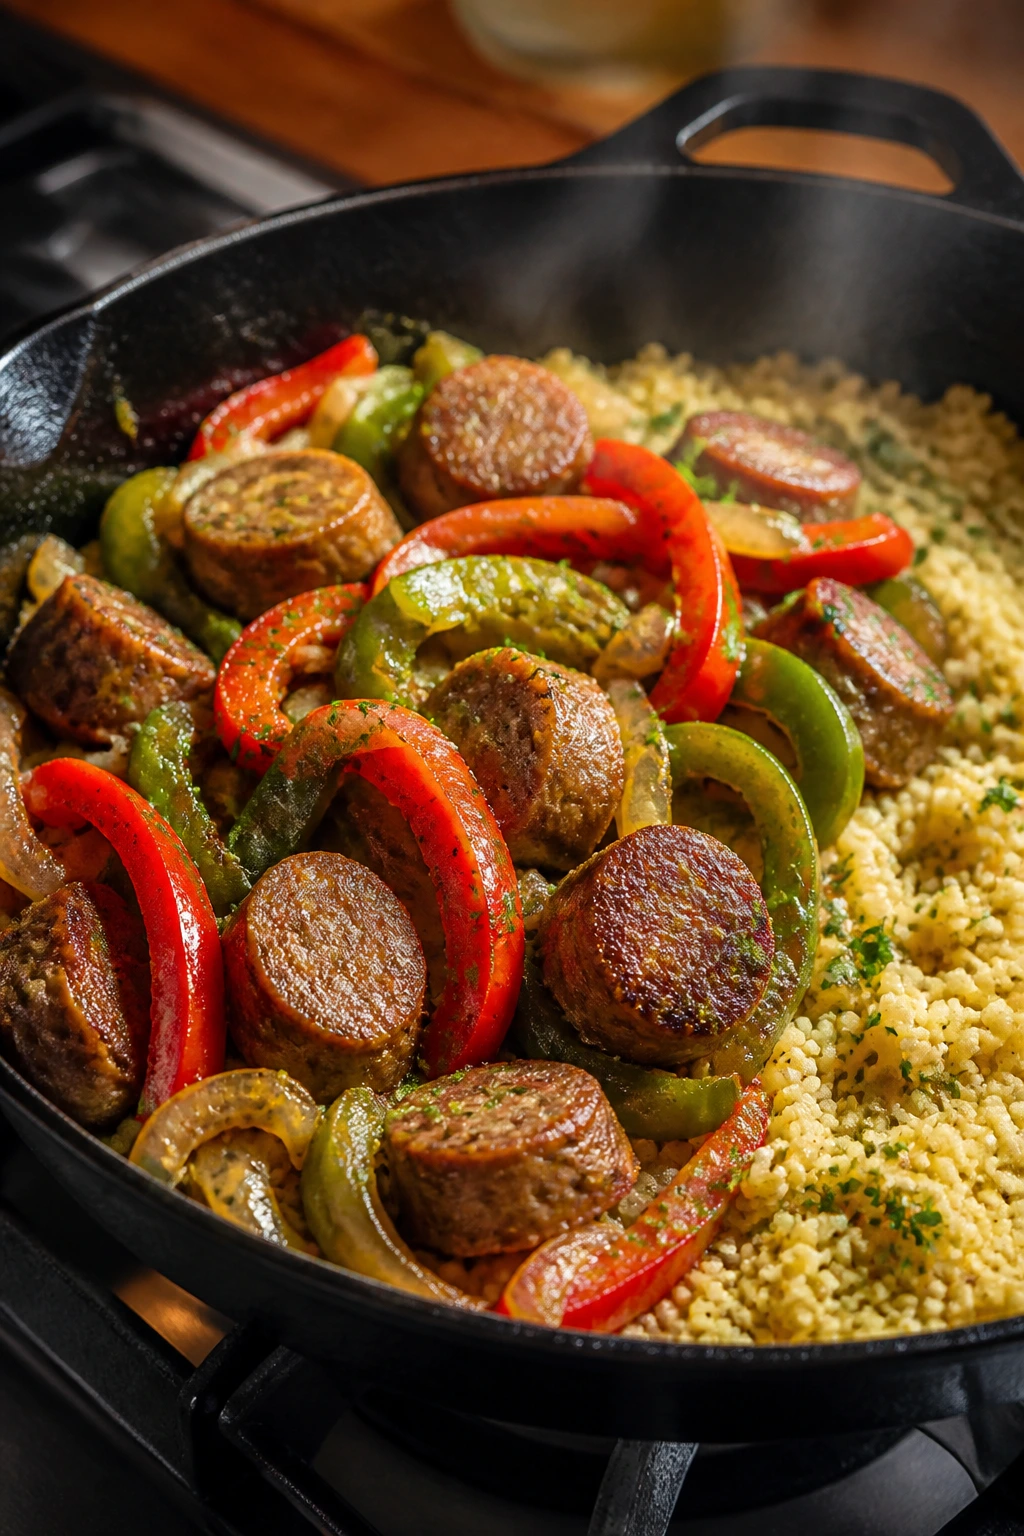
Sausage and peppers can get heavy fast, so the couscous matters here. It lightens the whole plate and catches the juices without turning them into a puddle.
Why It Works:
Sausage brings fat and spice, peppers bring sweetness, and onions round it out with a little softness. Couscous cooks in minutes, which makes the whole dinner move quickly enough for a weeknight. A cold lager or sparkling water with orange slices is a tidy match because it cuts the richness without making the meal feel fussy.
Key Ingredients:
- 1½ pounds Italian sausage links
- 3 bell peppers, sliced
- 1 large onion, sliced
- 1 cup couscous
- 1¾ cups chicken broth
- 2 tablespoons chopped parsley
- 1 tablespoon red wine vinegar
- 1 teaspoon Dijon mustard
- 1 tablespoon olive oil
- 1 teaspoon kosher salt
Quick Steps:
- Brown the sausage in a large skillet over medium heat, then transfer it to a plate.
- Add olive oil, peppers, and onion to the skillet and cook until softened and lightly browned.
- Bring the broth to a boil, stir in the couscous, cover, and let it sit off the heat for 5 minutes.
- Fluff the couscous with a fork, then stir in vinegar, Dijon, and parsley.
- Slice the sausage and return it to the skillet with the peppers and onions for a minute to warm through.
- Serve the sausage and peppers over the couscous.
Equipment for This Recipe:
- Large skillet with a lid
- Small saucepan
- Fork for fluffing
- Sharp knife
- Cutting board
How to Serve This Dish:
Spoon the couscous onto each plate first, then put the sausage and peppers on top so the juices sink in a little. A cold beer or seltzer with citrus makes sense here. If you want a little extra green, a simple cucumber salad fits without effort.
Pro Tips for This Recipe:
- Brown the sausage first so the skillet gets some color before the vegetables go in.
- Use broth instead of water. Couscous needs the seasoning.
- Slice the peppers thick enough to keep some bite.
- Add the vinegar at the end; that sharp note wakes everything up.
Variations on This Dish:
- Chicken Sausage Swap: Use chicken sausage for a lighter version.
- Spicy Version: Choose hot sausage and add red pepper flakes.
- Herbed Couscous: Stir in dill or mint if you want a fresher finish.
Common Mistakes to Avoid with This Dish:
- Steaming the vegetables: The pan should get some browning.
- Dry couscous: If it sits uncovered too long, fluff it and add a spoonful of broth.
- Skipping acid: Vinegar or mustard keeps the dish from tasting flat.
18. Grilled Halloumi and Watermelon Salad with Chickpeas and Mint
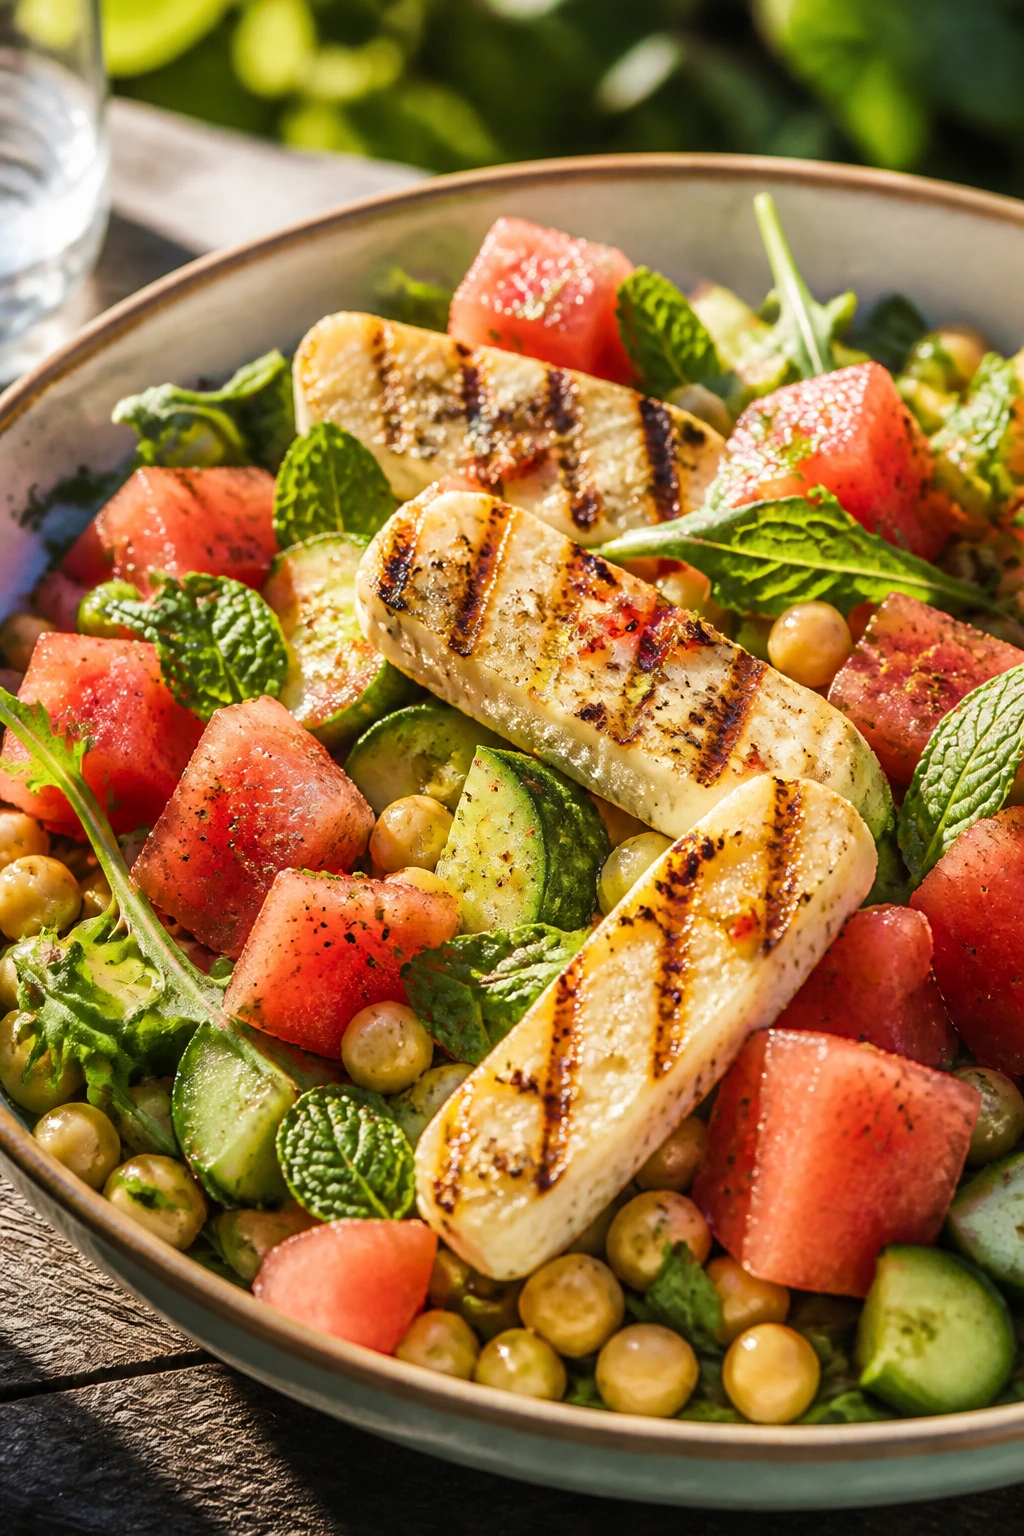
Halloumi and watermelon looks a little unexpected until you eat it. Then it makes complete sense. Salty cheese, cold melon, mint, and chickpeas hit the table like they all planned the same night.
Why It Works:
Halloumi is one of the few cheeses that can stand on a grill without collapsing, which gives you a crisp, browned surface and a chewy middle. Watermelon brings cold sweetness, chickpeas add enough substance to call this dinner, and mint keeps the whole bowl from tasting too sweet. A mint lemonade or cold prosecco is a clean pairing because the salad is already bright and a little salty.
Key Ingredients:
- 8 ounces halloumi, sliced
- 4 cups watermelon cubes
- 1 can chickpeas, drained and rinsed
- 2 cups arugula
- 1 cucumber, sliced
- ¼ cup fresh mint leaves
- Juice of 1 lime
- 2 tablespoons olive oil
- 1 teaspoon kosher salt
- Black pepper to taste
Quick Steps:
- Pat the halloumi dry and grill or sear it for 1 to 2 minutes per side, until browned.
- Toss the watermelon, chickpeas, arugula, cucumber, and mint in a large bowl.
- Whisk the lime juice, olive oil, salt, and black pepper together.
- Drizzle the dressing over the salad and toss gently.
- Top with the grilled halloumi and serve immediately.
- Add more mint or lime if the melon tastes especially sweet.
Equipment for This Recipe:
- Grill pan or skillet
- Large bowl
- Sharp knife
- Tongs
- Small whisk or fork
How to Serve This Dish:
Serve it in a wide bowl so the halloumi can sit on top without sinking into the salad. The best drink here is cold and crisp: mint lemonade, sparkling water, or a chilled glass of something dry and fizzy. A piece of bread on the side turns the bowl into a more complete dinner without crowding it.
Pro Tips for This Recipe:
- Pat the halloumi dry or it won’t brown well.
- Chill the watermelon before cutting if you want a colder bite.
- Dress the salad lightly; watermelon already brings juice.
- Add the halloumi last so it stays warm against the cool fruit.
Variations on This Dish:
- Feta Version: Use feta when you can’t find halloumi, but don’t grill it.
- Herb Salad Add-In: Basil or dill works alongside the mint.
- Spicy Finish: Add a pinch of chili flakes for contrast against the watermelon.
Common Mistakes to Avoid with This Dish:
- Wet cheese: Halloumi needs to be dry before it hits the pan.
- Overdressing the melon: The salad should taste fresh, not diluted.
- Letting it sit too long: The greens and melon both lose their snap.
Why These Summer Dinners Work So Well With a Cold Drink
Warm-weather dinners need a different kind of balance than the heavier meals people lean on in colder months. You want enough salt to make the cold drink taste crisp, enough acid to keep the plate awake, and enough texture that the meal doesn’t collapse into softness halfway through. That’s why grilled chicken thighs, shrimp tacos, noodle bowls, and chilled salads show up so often in summer kitchens. They don’t ask for much heat, but they give back a lot of flavor.
The other thing these dinners share is restraint. They stop before they get fussy. A tomato pasta doesn’t need a long simmer when ripe tomatoes can do the work in ten minutes. A taco doesn’t need six toppings if the shrimp, slaw, and avocado are doing their jobs. That kind of cooking feels right when the table already has ice sweating in a glass and maybe a fan turning in the corner. You don’t want a project. You want a meal with enough shape to feel complete and enough freshness to welcome a cold sip between bites.
I also think these dishes handle leftovers better than people expect. The grilled proteins reheat cleanly, the salads can be rebuilt, and the pasta or couscous settles into itself without turning sad. That matters. A good summer dinner should carry you through one night and still look useful the next day.
Essential Equipment for These Recipes
-
Outdoor grill or grill pan: Useful for chicken, corn, peaches, salmon, steak, and halloumi when you want char without heating the kitchen.
-
Cast-iron or heavy skillet: The best choice for smash burgers, fish, shrimp, sausage, and anything that needs a hard sear.
-
Sheet pans: Flatbread, stuffed mushrooms, foil packs, and roasted vegetables all move cleanly on a rimmed pan.
-
Large mixing bowls: You’ll use these for slaws, dressings, marinades, and the bowls that pull the dinners together.
-
Sharp chef’s knife: Summer produce is only enjoyable when the knife actually cuts cleanly through tomatoes, peaches, herbs, and cucumber.
-
Instant-read thermometer: Especially useful for chicken, pork, salmon, and burgers. Guessing is a bad habit with hot-weather proteins.
-
Tongs and a thin metal spatula: Tongs help on the grill; the thin spatula matters for smash burgers, fish, and anything delicate.
-
Colander: Handy for pasta, soba, or rinsing beans and noodles without making a mess.
-
Foil: Not glamorous, but foil packs and easy cleanup depend on it.
-
Small bowl or jar for dressings: A jar with a lid makes shaking vinaigrettes, salsa, and sauces painless.
-
Salad spinner: Optional, but it saves you from watery greens and damp wraps.
-
Storage containers with tight lids: Important if you want leftovers to keep their texture instead of drying out in the fridge.
Smart Shopping and Ingredient Tips
The shopping list for summer dinners should feel short, but the ingredients need to be chosen carefully. Tomatoes matter more in July-scented recipes than they do in winter pasta. Look for tomatoes that smell sweet at the stem end and feel heavy for their size. If they’re pale and hard, they’ll stay pale and hard in the pan.
For chicken, thighs are the safer bet when you want juicy grilled meat. Breasts can work, but they need a closer eye and a thermometer. Shrimp should smell clean, not briny in a fishy way, and the shells should be firm if you buy them whole. For salmon, aim for fillets that look moist and even in color, not dry around the edges.
Corn, peaches, cucumbers, watermelon, and basil all make or break this kind of meal. Corn should have tight husks and plump kernels. Peaches should give slightly when you press them, but not collapse. Cucumbers are best when they’re crisp and unwrinkled. Basil should be bright and fragrant, not black around the edges. And if you can smell the mint before you even open the bunch, that’s a good sign.
Bread and tortillas matter more than people think. Stale tortillas crack; cheap flatbreads can go leathery if you overbake them. Buy the bread you’d actually want to eat on its own. The same goes for cheese. Halloumi should squeak when you cut it. Burrata should feel soft and a little indulgent. Feta should be salty but not chalky. A few smart choices there save you from needing extra sauce to cover up a weak ingredient.
How to Serve These Recipes
Presentation: Use wide platters, shallow bowls, or boards instead of deep piles. Summer food looks best when you spread it out a little, let the herbs sit on top, and leave some space around the edges for lemon wedges, lime, or a few tomato halves.
Accompaniments: Keep the sides light and crisp: cucumber salad, potato salad with vinegar instead of mayo, crusty bread, grilled corn, simple greens, or a bowl of melon. Most of these dinners already have enough going on, so the sides should help the cold drink do its job, not compete for attention.
Portions: For grilled meat or fish, plan on 5 to 6 ounces per person. For pasta, couscous, or soba, 2 to 2½ cups per person is a solid dinner portion. Wraps, tacos, and lettuce cups usually land at 2 to 4 per person depending on filling, and I’d rather see people take a second round than serve oversized portions that cool too fast.
Beverage Pairing: I’d keep a tray of cold drinks nearby and vary the glassware a little. Iced tea with lemon suits chicken, pork, and wraps. Lager or pale ale sits well beside burgers, tacos, and sausage. Sparkling water with citrus works across almost every plate here, and lemonade or a cucumber cooler belongs wherever herbs, tomatoes, or melon are doing the heavy lifting.
Additional Tips and Flavor Boosters
Flavor Enhancement: A finishing squeeze of lemon or lime changes more dishes here than people expect. Use it right before serving on grilled chicken, fish tacos, or roasted vegetables so the salt and heat have something bright to bounce off.
Customization: Keep one crunchy element in every dinner. Quick pickles, toasted nuts, croutons, cabbage, grilled corn, or cucumber all do the same job in different clothes. That bit of texture is what keeps warm-weather food from feeling soft and sleepy.
Serving Suggestions: Fresh herbs should usually go on at the end, not the beginning. Basil, mint, dill, parsley, and cilantro all taste sharper when they aren’t cooked down to nothing. If the dinner looks a little flat, pile the herbs in the center and scatter them wider than you think you should.
Make-It-Yours: For a lighter plate, swap half the starch for extra greens or cucumbers. For a richer one, add feta, burrata, avocado, or a spoonful of yogurt sauce. For more heat, use chili crisp, jalapeño, or red pepper flakes instead of burying the dish in hot sauce after the fact.
Make-Ahead, Storage, and Reheating Guidance
A lot of these recipes hold up well if you keep the components separate. Grilled chicken, steak, pork, and sausage usually keep 3 to 4 days refrigerated in airtight containers. Salmon and other fish are best within 1 to 2 days, and I’d keep the reheating gentle — low oven heat, about 275°F to 300°F, or a covered skillet with a splash of water.
Pasta, couscous, and orzo can be made ahead and stored for up to 3 days. If they look dry after chilling, stir in a spoonful of olive oil or a little broth before warming. Cold noodle bowls are a little different; soba, dressing, and vegetables can sit together for 2 to 3 days, but the crunchiest vegetables are best added the day you serve them. Lettuce wraps, tacos, and wraps should be assembled at the last minute, because tortillas and lettuce go soft fast.
For freezers, grilled proteins and cooked sausage freeze well for up to 2 months if wrapped tightly and cooled first. I would not freeze the salads, fresh herbs, burrata, watermelon, or avocado crema. Those ingredients lose the exact texture that makes them worth eating. Reheat proteins in a skillet over low heat or in a 300°F oven covered loosely with foil. Microwave only if you accept that the edges will soften.
Make-ahead wins are easy here. Mix dressings a day ahead. Chop onions, cucumber, and herbs a few hours ahead. Marinate chicken for 20 to 30 minutes, not overnight if citrus is involved. Cook grains in advance and chill them. Then, when dinner time shows up, all you need to do is bring the hot part back to life and keep the cool part cold.
Variations and Adaptations to Try
Grill-Free Swap: Use a cast-iron skillet or oven broiler for almost everything in this lineup. Chicken thighs, shrimp, steak, flatbreads, and halloumi all behave well indoors when the grill isn’t an option.
Vegetarian Porch Dinner: Build around halloumi, portobellos, or chickpeas. Those three carry enough salt and texture to replace the meat without making the plate feel like an afterthought.
Gluten-Free Route: Swap in corn tortillas, rice noodles, gluten-free pasta, or bowls over rice and quinoa. The flavor stays the same; only the starch changes shape.
Dairy-Free Version: Skip burrata, feta, sour cream, and Caesar dressing where needed, then replace them with olive oil dressings, avocado, or tahini. The meals still work if you keep the acid and salt in the right place.
Heat-It-Up Variation: Add chili crisp, jalapeño, hot sauce, or red pepper flakes to shrimp, tacos, burgers, noodle bowls, and lettuce cups. A little heat makes the cold drink feel even colder.
Kid-Friendly Tweaks: Pull back on raw onion, reduce the chili, and keep sauces on the side. Burgers, pasta, flatbread, quesadillas, and chicken wraps usually go over best when kids can build their own plate.
Common Mistakes to Avoid
-
Letting the cold drink become an afterthought: These dinners taste better when the drink is chosen with intention. A watery soda or flat iced tea misses the point; the right drink sharpens the meal.
-
Overcooking everything to “be safe”: Summer food is at its best when proteins stay juicy. Use a thermometer for chicken and pork, and pull shrimp or fish the moment they’re done.
-
Burying the produce under heavy sauce: The tomatoes, peaches, corn, herbs, and cucumber are here for a reason. When you flood them with dressing or cheese, the plate turns muddy fast.
-
Serving starches without enough seasoning: Pasta, couscous, noodles, tortillas, and flatbreads need salt somewhere in the process. Bland starch makes even good toppings taste tired.
-
Assembling too early: Wraps, tacos, lettuce cups, and salads all lose texture when they sit loaded for too long. Build them close to serving time and keep the crunchy bits separate until the end.
-
Ignoring temperature contrast: Cold drink, warm protein, cool herbs, crisp vegetables — that push and pull is the whole dinner. If everything lands at the same temperature, the plate feels flatter than it should.
Questions About Summer Dinners and Cold Drinks
Can I make most of these dinners without a grill?
Yes. A cast-iron skillet and a hot oven cover most of the same ground. Chicken thighs, steak, shrimp, flatbread, salmon foil packs, and halloumi all work indoors with a little attention.
What cold drink works if I don’t want alcohol?
Iced tea, cucumber water, mint lemonade, lime soda, and sparkling water with citrus all fit this theme. I’d pick something with acid or bubbles so it cuts through cheese, grilled meat, or avocado.
Which recipes hold up best for leftovers?
Grilled chicken, pork tenderloin, sausage and peppers, orzo, and soba bowls usually keep their shape well. Tacos, lettuce cups, and wraps are better assembled fresh, though the cooked fillings can be stored separately.
Can I prep these in the morning?
Absolutely. Mix sauces, chop vegetables, make dressings, and marinate proteins early in the day. Keep leafy greens dry and store tortillas, herbs, and crunchy toppings separately until dinner.
How do I keep fish and shrimp from turning rubbery?
Watch the clock, but also watch the color and shape. Shrimp should curl into a loose C, not a tight O. Fish should flake and look opaque without drying at the edges.
What’s the easiest dinner in the group for a crowd?
Flatbread, burgers, grilled chicken, quesadillas, or a big pasta bowl are the most practical when people are moving in and out of the kitchen. They can be scaled up without turning the table into a traffic jam.
Can I swap chicken thighs for breasts in these recipes?
Usually, yes, but you need to shorten the cook time and pay closer attention. Thighs give you more forgiveness; breasts need an internal temperature check and a shorter rest.
How do I keep the kitchen cooler while cooking?
Use the grill, a hot skillet for a short time, or recipes that only need boiling water and a quick toss. Prep vegetables early, keep the oven door closed as much as possible, and serve on cold or room-temperature plates when you can.
Porch Light Finish
A good summer dinner does not need to be complicated to feel complete. It needs balance: heat and coolness, salt and acid, something grilled or crisped beside something cold and fresh. That’s why these meals keep working. They give you enough flavor to make the first sip of a cold drink feel earned, which is a nice little luxury on a sticky evening.
Pick one grilled dinner, one chilled bowl, and one fast skillet meal, and you can spend the whole warm stretch of the season cooking without dreading it. Keep the herbs bright, the drinks cold, and the plates simple. That’s the part worth returning to.