
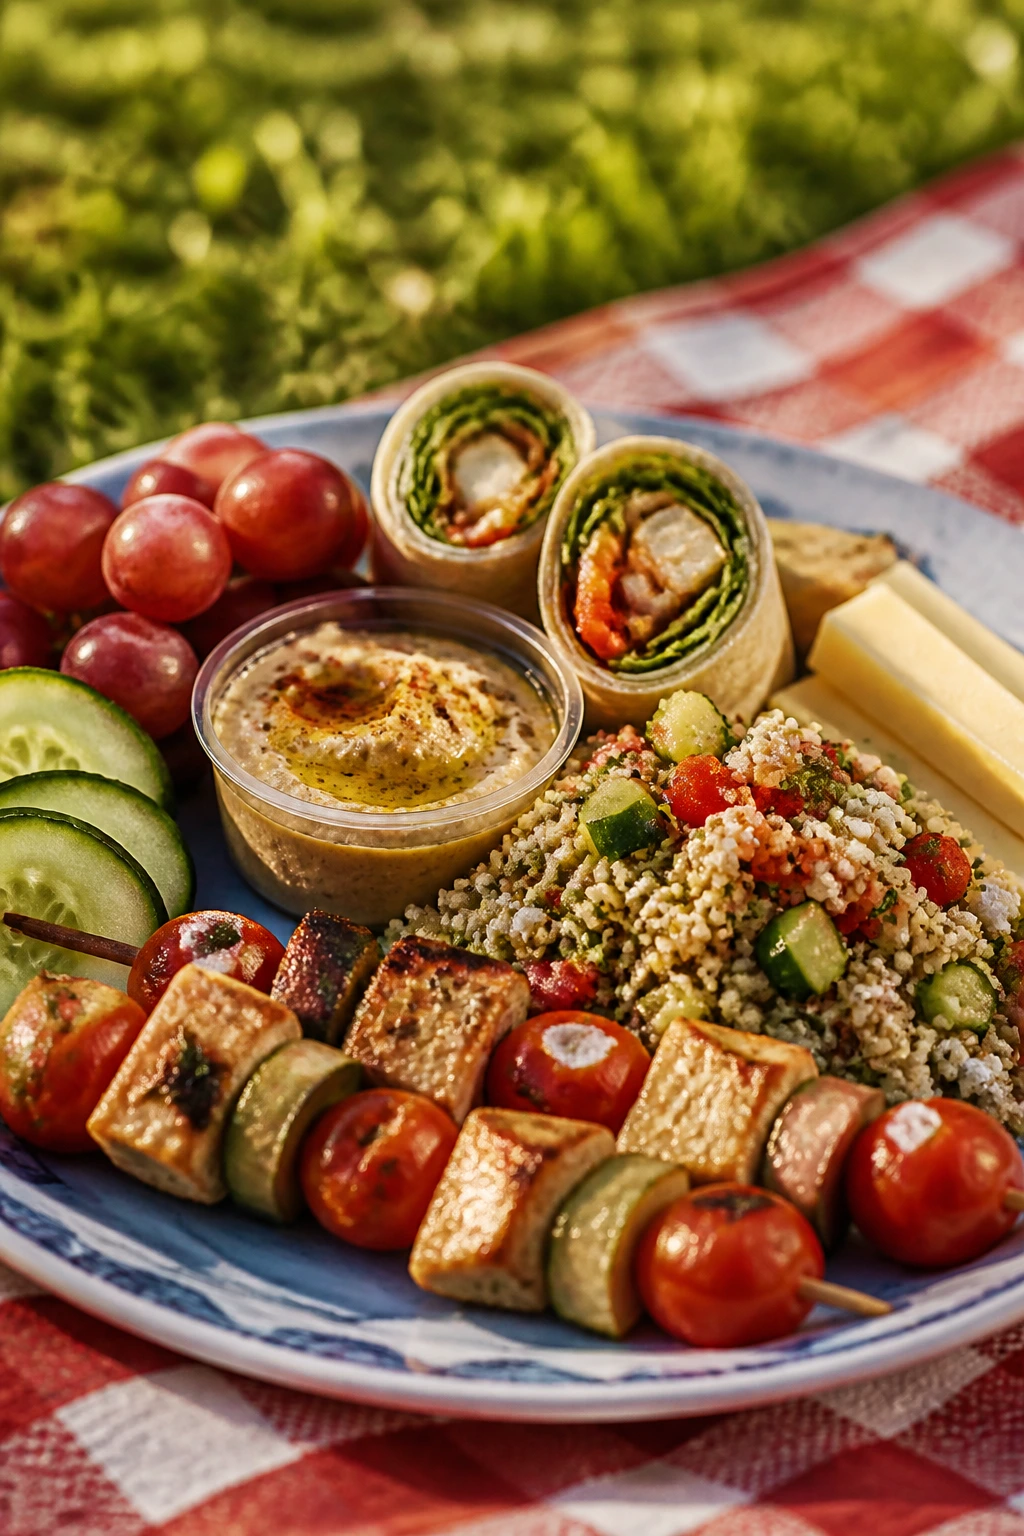
A picnic dinner turns messy fast when the food is heavy, drippy, or too delicate to survive a cooler ride. Light summer dinners for a summer picnic have to do a tricky little dance: stay fresh, hold their texture, and still feel like an actual meal when you’re sitting on a blanket with paper napkins and no sink in sight.
I’ve always had more patience for picnic food that knows its job. Skewers, wraps, grain salads, chilled noodles, sturdy sandwiches, and jars with a bit of structure all earn their place because they keep tasting like themselves after a drive across town or a long stretch in the shade. The aim is not tiny portions and sadness. The aim is food that still has snap, salt, acid, and enough substance to count as dinner.
The recipes below lean on ingredients that behave well outside a kitchen: beans that don’t collapse, herbs that stay fragrant, grains that don’t go gummy, vegetables with enough crunch to stay interesting, and proteins that taste good warm, cool, or somewhere in between. A few are grill-friendly, a few are no-cook, and a few are the sort of thing I’d pack without a second thought when I know the evening will be long and the blanket will be slightly lumpy.
Why This Collection Stays Fresh on a Blanket
- Cooler-Friendly: Every recipe here can handle a chill pack or two and still taste sharp instead of sleepy.
- One-Hand Help: Several of these are built as wraps, skewers, cups, or jars, which matters when one hand is holding a plate and the other is swatting a mosquito.
- Not Too Heavy: The flavors lean on citrus, herbs, yogurt, vinaigrette, tomatoes, cucumber, and beans rather than thick sauces.
- Make-Ahead Ready: Most of the lineup improves after a short rest, which means less last-minute scrambling near the picnic basket.
- Easy to Mix and Match: You can pair almost any of these with fruit, chips, or a simple salad and call it a full dinner.
- Worth the Space: These are the recipes I’d pack when I want something a little more composed than sandwiches, but not fussy enough to make me grumpy.
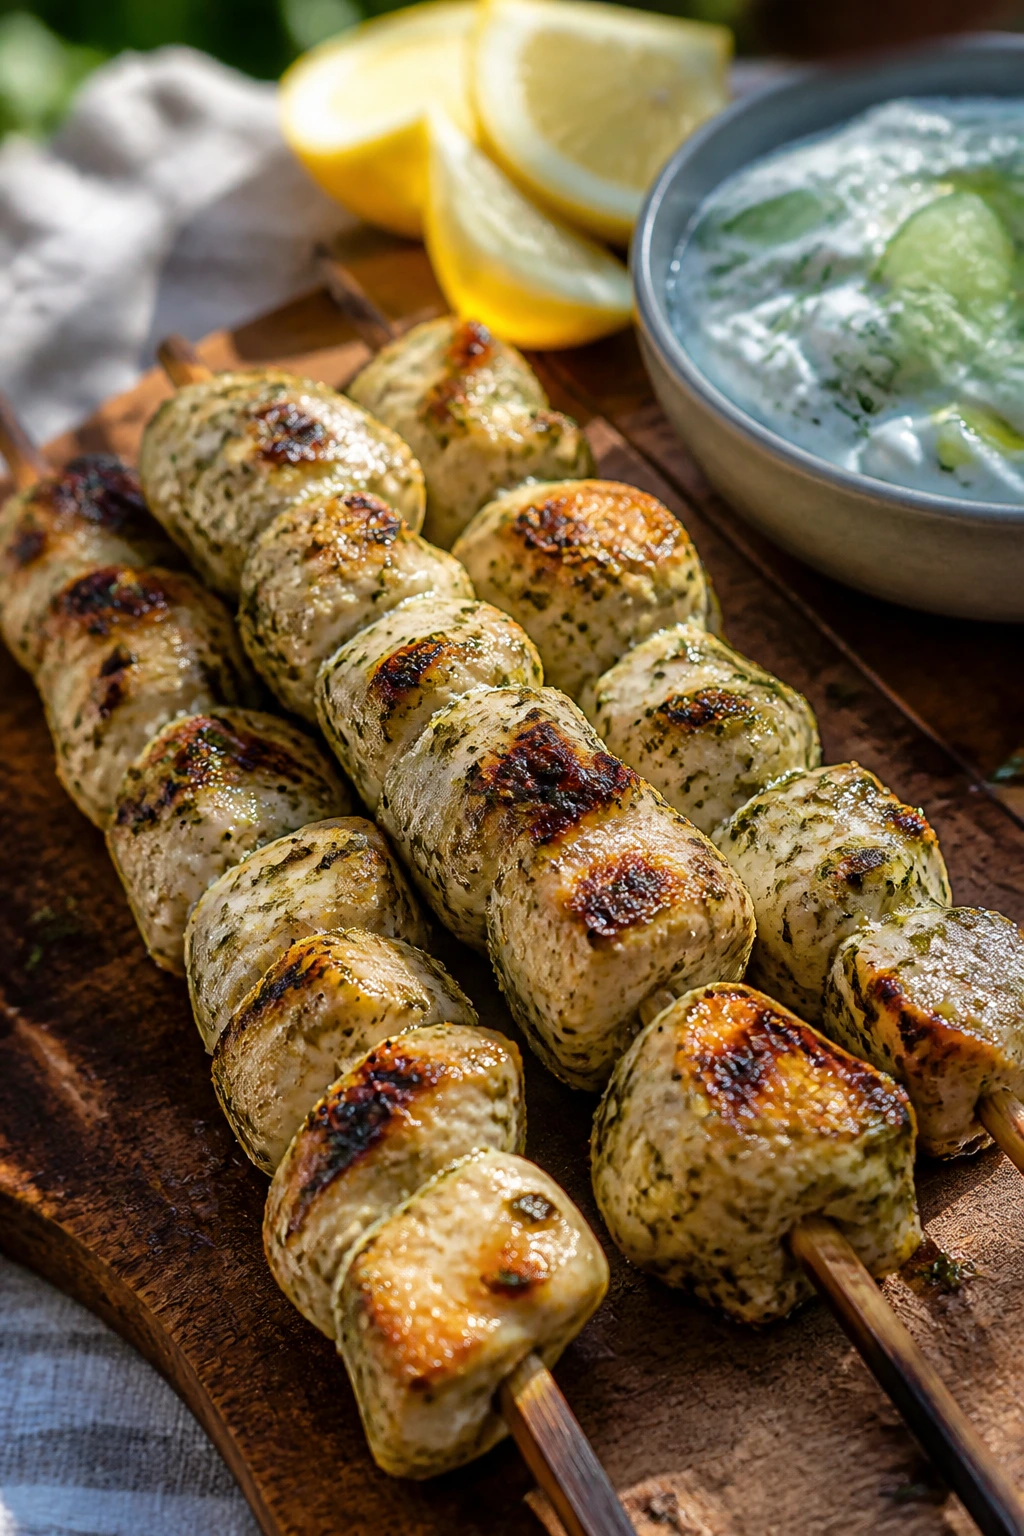
1. Lemon-Herb Chicken Skewers with Cucumber Yogurt Sauce
Why It Works:
These skewers stay juicy because the chicken is cut small and cooked fast over high heat. The yogurt sauce cools the garlic and lemon, and the cucumber adds a crisp, watery snap that feels right on a hot evening.
Key Ingredients:
- 1½ lbs boneless, skinless chicken thighs, cut into 1-inch pieces
- 2 tbsp olive oil
- 2 tbsp lemon juice
- 2 tsp dried oregano
- 1 tsp kosher salt
- 1 cup plain Greek yogurt
- ½ cucumber, grated and squeezed dry
Quick Steps:
- Toss the chicken with oil, lemon juice, oregano, salt, and pepper for 15 to 30 minutes.
- Thread onto soaked skewers or metal skewers.
- Grill over medium-high heat for 10 to 12 minutes, turning until the edges char and the centers reach 165°F.
- Stir yogurt, cucumber, a little garlic, and lemon zest into a sauce.
- Pack the skewers and sauce separately; serve with pita or a grain salad.
Equipment for This Recipe:
- Grill or grill pan
- Metal or soaked wooden skewers
- Mixing bowl
How to Serve This Dish:
Stack 3 to 4 skewers over rice, couscous, or a green salad. The sauce should go in a small lidded cup, not over the chicken before packing. That keeps the whole thing bright instead of soggy.
Pro Tips for This Recipe:
- Cut the chicken evenly so every piece finishes at the same time.
- Add lemon zest to the yogurt sauce; it wakes the whole plate up.
- If the grill runs hot, pull the skewers a minute early and let carryover heat finish the job.
Variations on This Dish:
- Garlic-Parsley Version: Swap oregano for chopped parsley and a heavier hand with garlic.
- Smoky Paprika Version: Add 1 tsp smoked paprika to the marinade for a deeper, campfire note.
Common Mistakes to Avoid with This Dish:
- Don’t crowd the skewers; packed chicken steams and loses those browned edges.
- Don’t pack the sauce on top of the meat or the chicken skin will soften in the cooler.
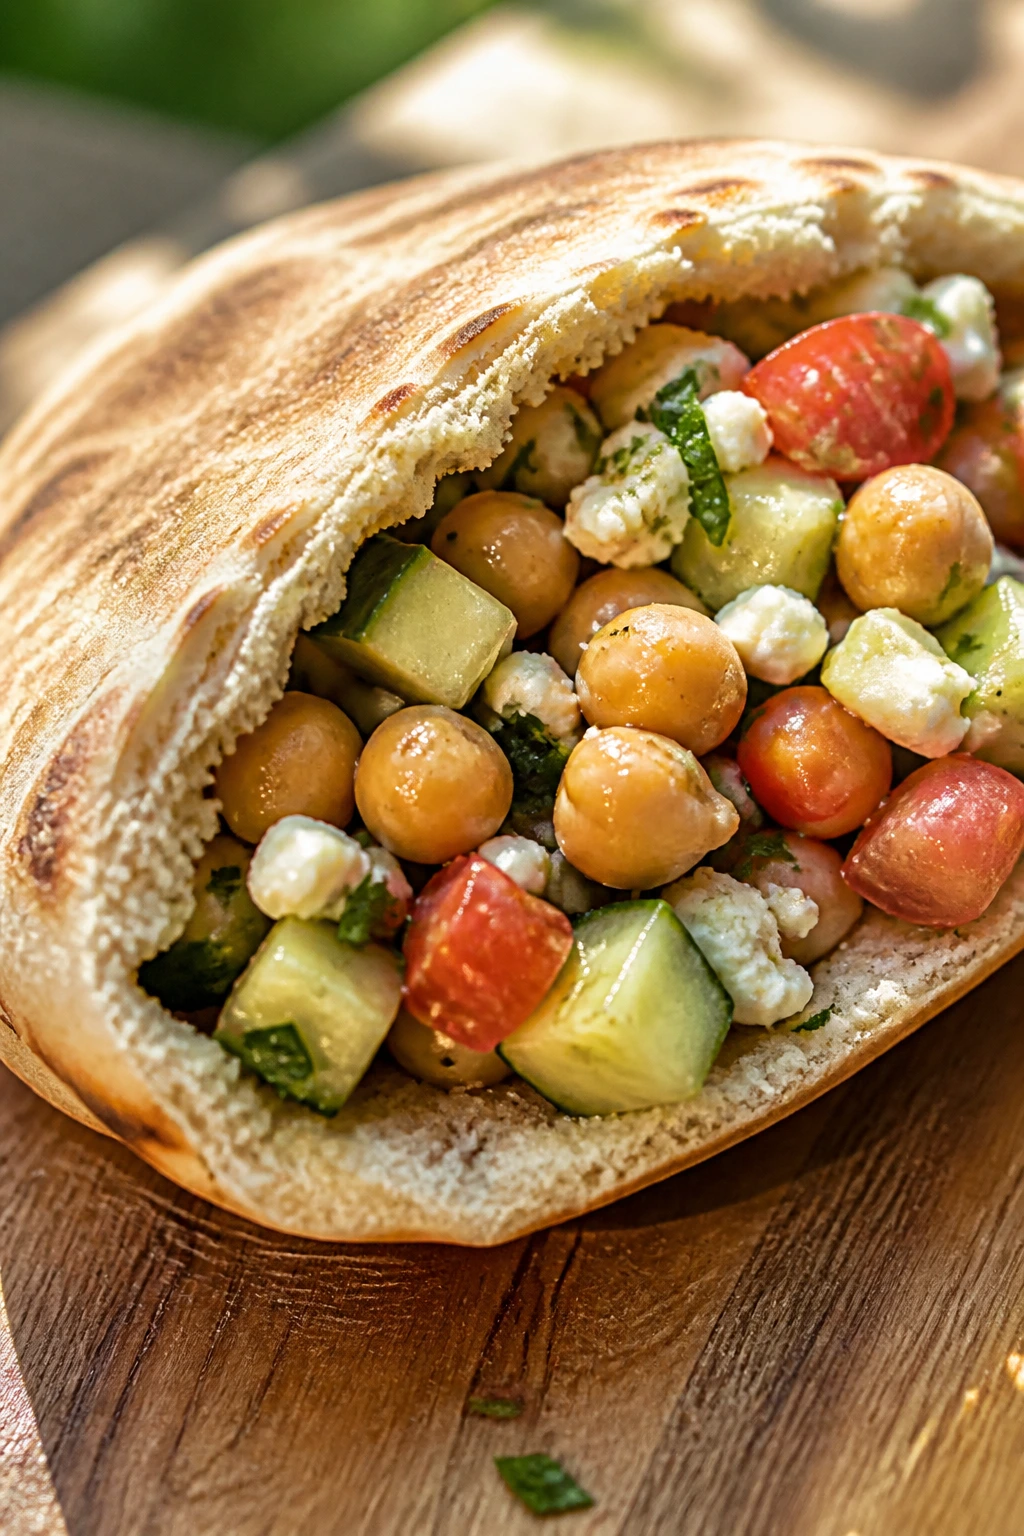
2. Mediterranean Chickpea Pita Pockets
Why It Works:
Chickpeas hold their shape, even after a few hours in the cooler, and they soak up lemon and olive oil without turning mushy. The pita gives you a built-in container, which is always a small picnic victory.
Key Ingredients:
- 2 cans chickpeas, rinsed and drained
- 1 cup diced cucumber
- 1 cup chopped cherry tomatoes
- ½ cup crumbled feta
- 3 tbsp olive oil
- 2 tbsp lemon juice
- 4 whole-wheat pitas
Quick Steps:
- Mix the chickpeas, cucumber, tomatoes, feta, oil, lemon juice, salt, and dill.
- Taste and add more lemon if it feels flat.
- Split the pitas and line each with lettuce if you want extra protection from moisture.
- Spoon in the chickpea mixture right before packing or serving.
- Wrap each pita half in parchment so it holds together.
Equipment for This Recipe:
- Large bowl
- Cutting board and knife
- Paring knife for splitting pitas
How to Serve This Dish:
Serve with olives, grapes, or a handful of kettle chips. One stuffed pita makes a light dinner, two if the day started early and everybody’s hungry.
Pro Tips for This Recipe:
- Salt the tomato-cucumber mix and let it sit 10 minutes, then drain off extra liquid.
- Use sturdy pitas; the thin ones crack at the seam.
- A spoonful of hummus inside each pita helps seal out moisture.
Variations on This Dish:
- Hummus Layer: Add 2 tbsp hummus to each pita for a creamier bite.
- No-Feta Version: Use diced avocado plus extra salt if you want a dairy-free option.
Common Mistakes to Avoid with This Dish:
- Don’t chop the vegetables too small; you want some crunch, not a salad paste.
- Don’t overfill the pita or it splits in your hands.
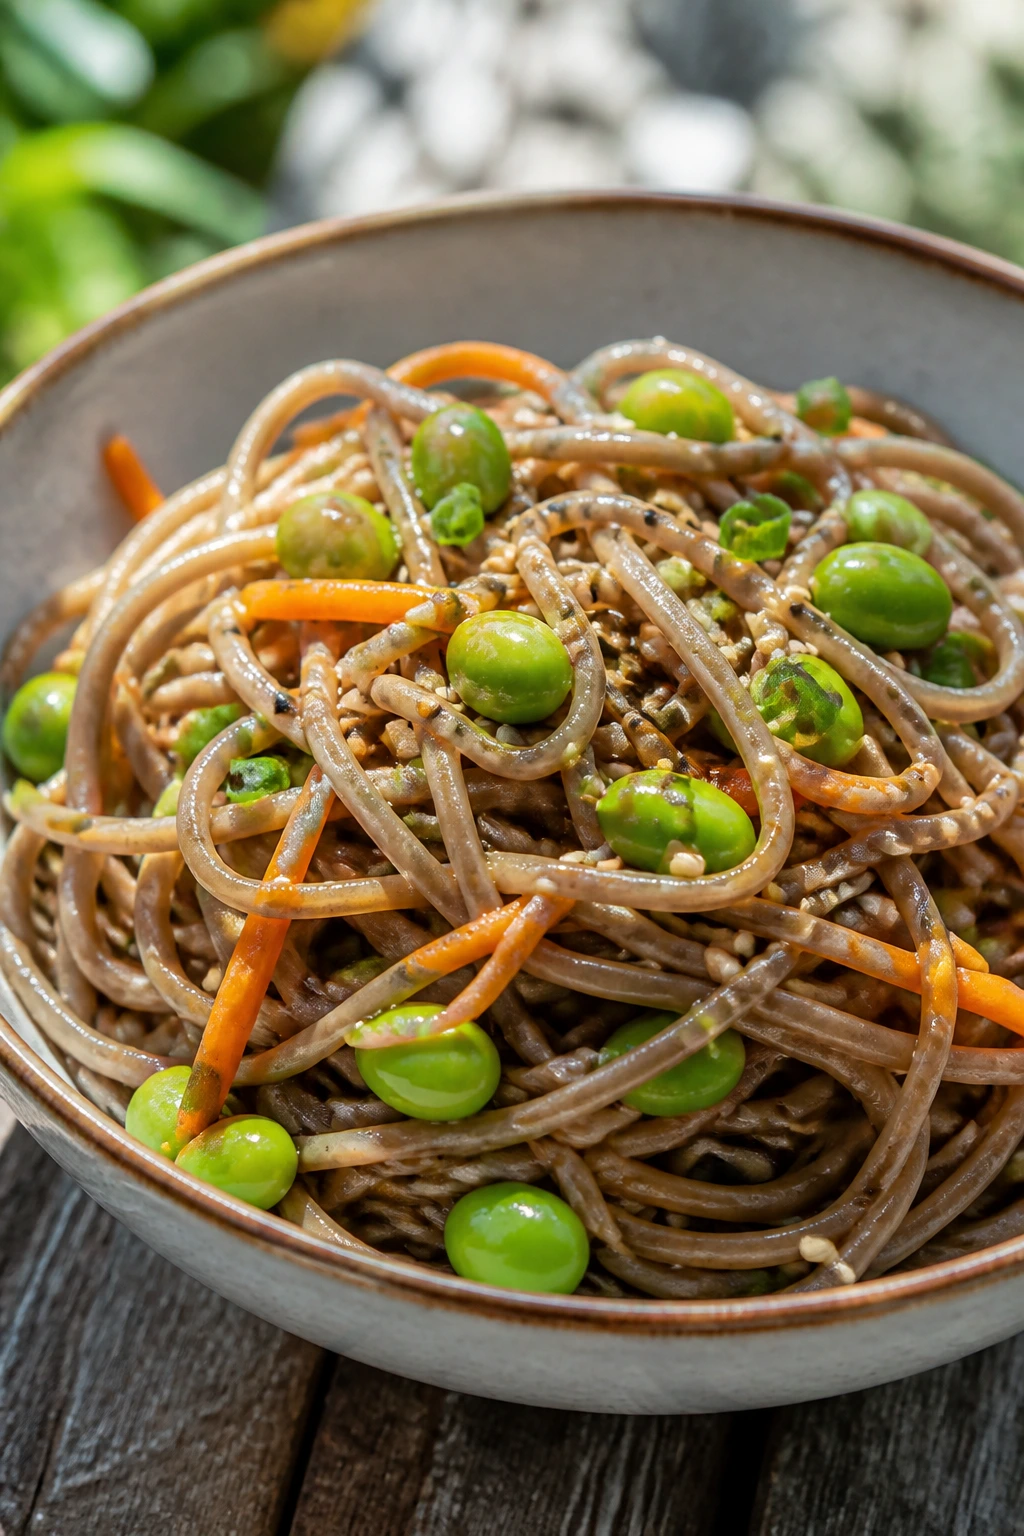
3. Cold Sesame Soba Noodles with Edamame
Why It Works:
Soba noodles taste good cold, which saves you from rewarming anything or fussing at the picnic table. The sesame dressing clings to the noodles and keeps the dish glossy instead of dry.
Key Ingredients:
- 8 oz soba noodles
- 1 cup shelled edamame
- 1 cup shredded carrots
- 3 tbsp soy sauce
- 2 tbsp sesame oil
- 2 tbsp rice vinegar
- 1 tbsp honey
Quick Steps:
- Boil the soba according to package directions, usually 4 to 6 minutes.
- Rinse under cold water until the noodles feel cool and stop steaming.
- Whisk soy sauce, sesame oil, vinegar, honey, and a little grated ginger.
- Toss noodles with edamame, carrots, and dressing.
- Chill for 20 minutes before packing so the flavor settles in.
Equipment for This Recipe:
- Pot
- Colander
- Mixing bowl
How to Serve This Dish:
Pile the noodles into shallow containers and top with sesame seeds and scallions. A hard-boiled egg or grilled tofu makes this an easy full meal.
Pro Tips for This Recipe:
- Toss the noodles with a teaspoon of oil after rinsing if they tend to stick.
- Add the dressing while the noodles are still slightly damp; they absorb flavor better.
- Keep the scallions on top until the last minute so they stay sharp.
Variations on This Dish:
- Spicy Peanut Route: Add peanut butter and chili crisp to the dressing.
- Citrus Lift: Swap half the vinegar for lime juice and add cilantro.
Common Mistakes to Avoid with This Dish:
- Don’t skip the cold rinse or the noodles turn gluey.
- Don’t drown the bowl in dressing; soba should look lightly coated, not soupy.
4. Grilled Shrimp and Corn Salad with Lime Vinaigrette
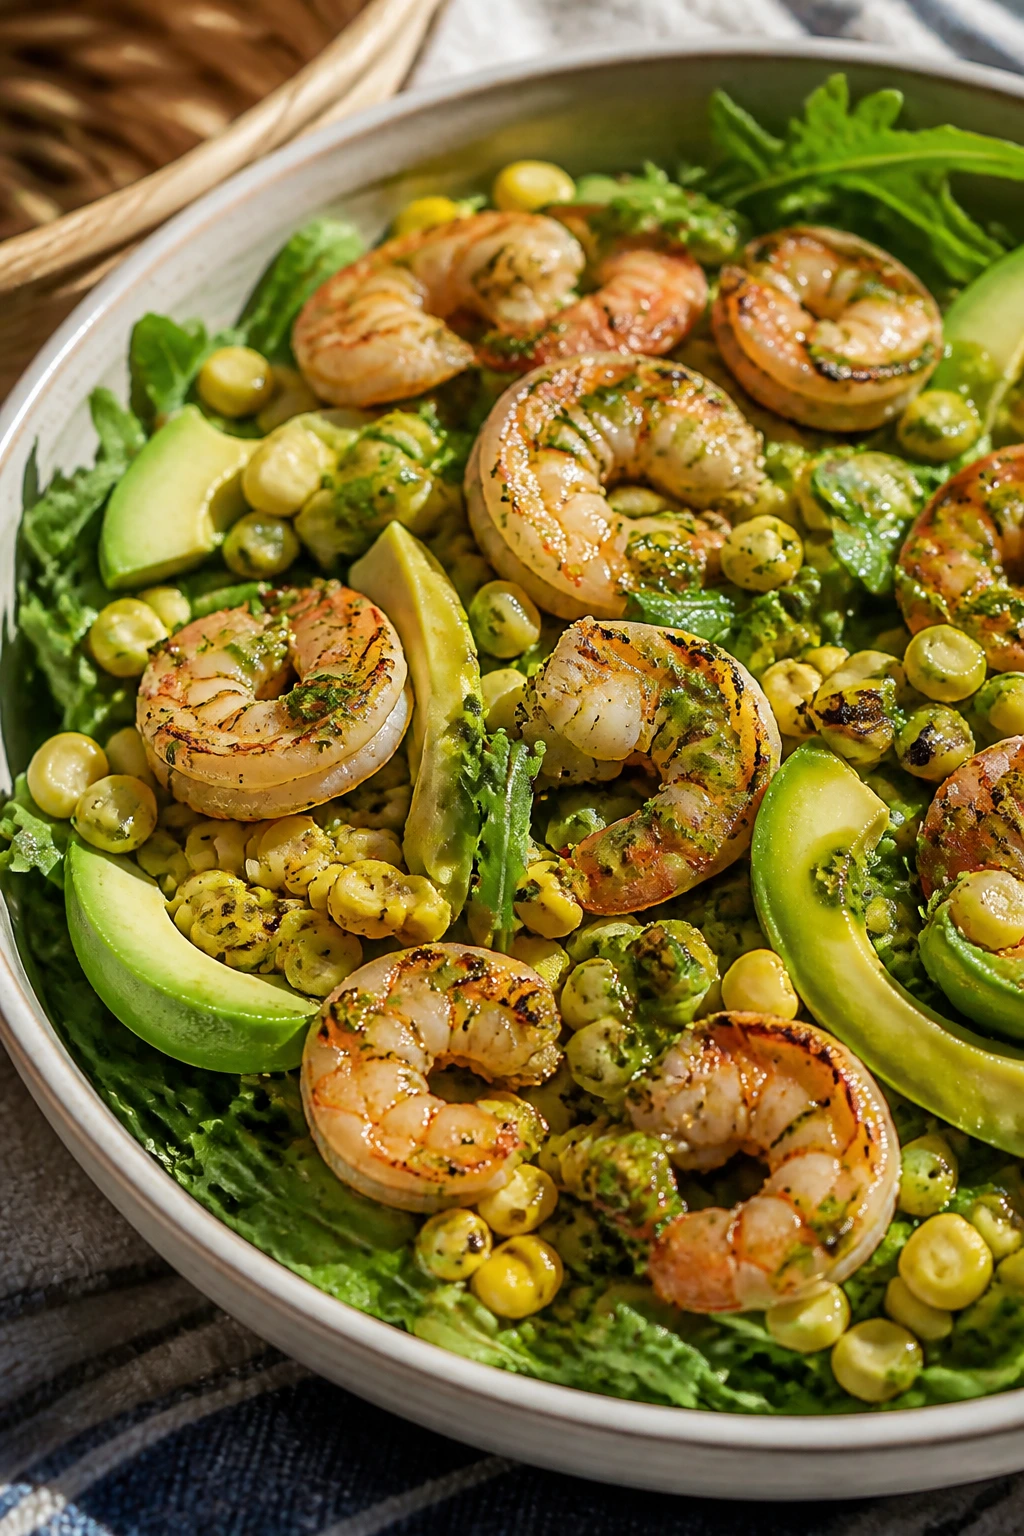
Why It Works:
Shrimp cook fast, corn sweetens on the grill, and the whole salad tastes like it belongs outdoors. Lime cuts through the richness and keeps the plate from feeling heavy.
Key Ingredients:
- 1 lb large shrimp, peeled and deveined
- 2 ears corn, husked
- 4 cups baby arugula
- 1 avocado, sliced
- 3 tbsp olive oil
- 2 tbsp lime juice
- ½ tsp chili powder
Quick Steps:
- Toss shrimp with oil, chili powder, salt, and pepper.
- Grill the corn for 8 to 10 minutes and the shrimp for 2 to 3 minutes per side.
- Slice the kernels off the cobs once cooled enough to handle.
- Whisk lime juice, olive oil, and a pinch of salt for the vinaigrette.
- Toss arugula, corn, shrimp, and avocado gently, then pack with extra dressing on the side.
Equipment for This Recipe:
- Grill
- Tongs
- Large bowl
How to Serve This Dish:
Serve it in a wide bowl so the shrimp stay on top and the avocado doesn’t get crushed. I like this with tortilla chips on the side, which is messier than bread and somehow better.
Pro Tips for This Recipe:
- Pat the shrimp dry before grilling so they sear instead of steam.
- Cool the corn before cutting it; hot kernels jump everywhere.
- Add avocado at the end so it keeps its shape.
Variations on This Dish:
- Mango Swap: Use diced mango instead of avocado for a sweeter, brighter bowl.
- Black Bean Boost: Add 1 cup black beans for more staying power.
Common Mistakes to Avoid with This Dish:
- Don’t overcook the shrimp; rubbery shrimp are a picnic buzzkill.
- Don’t dress the arugula too early or it wilts into a soft heap.
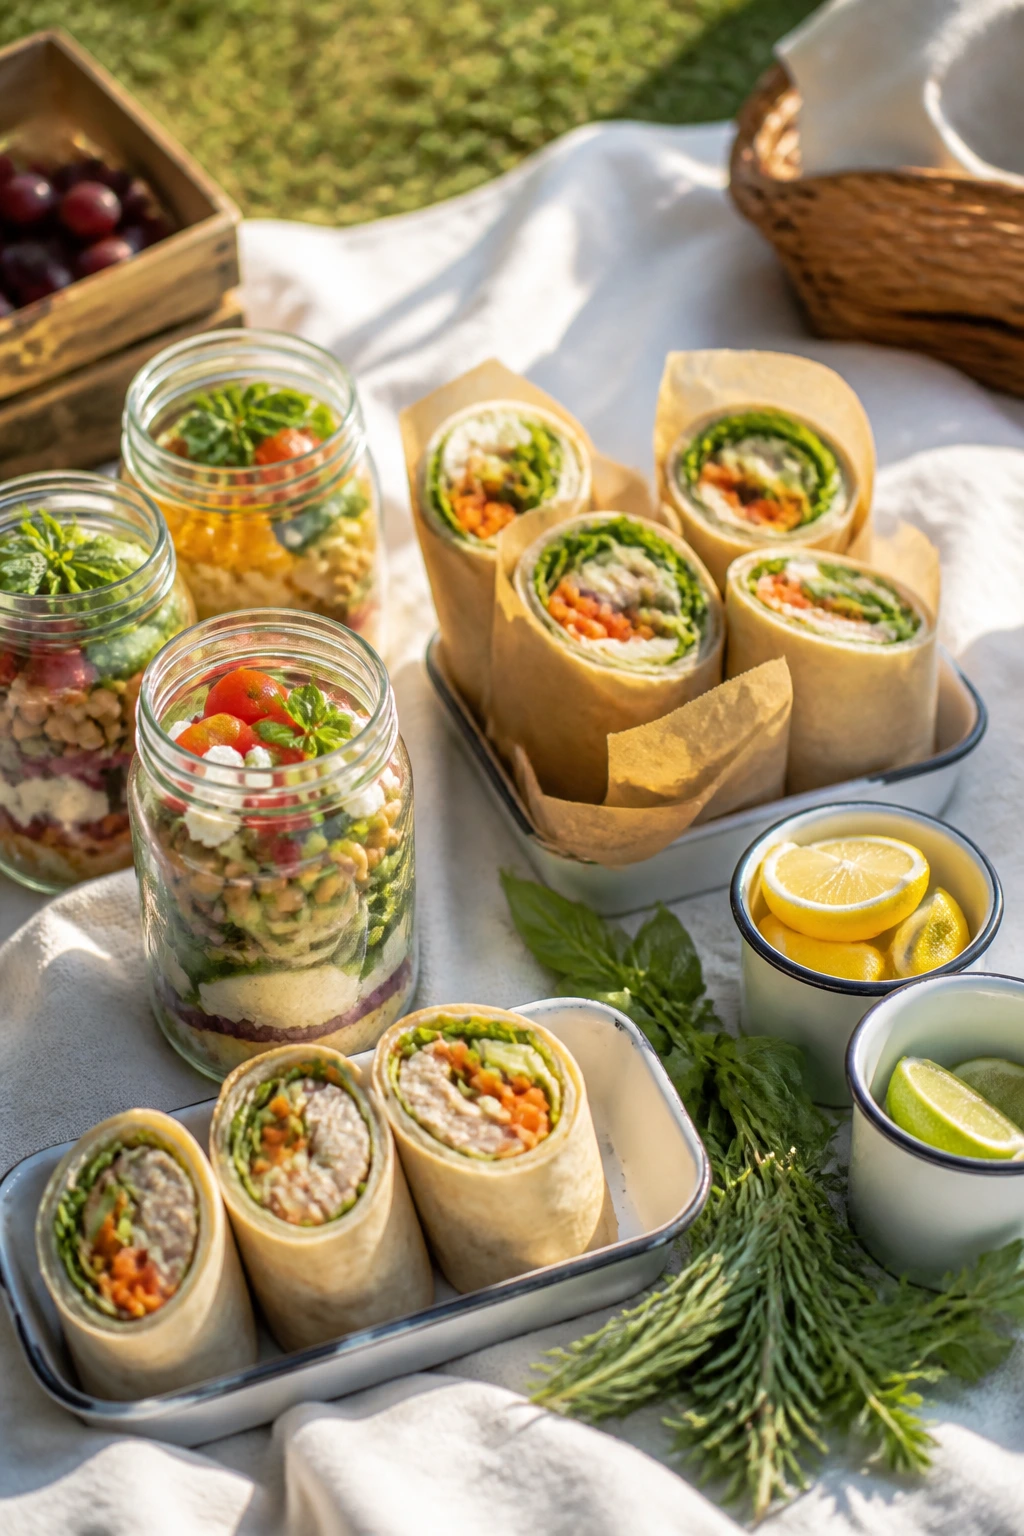
5. Turkey Pesto Pinwheels with Sun-Dried Tomatoes
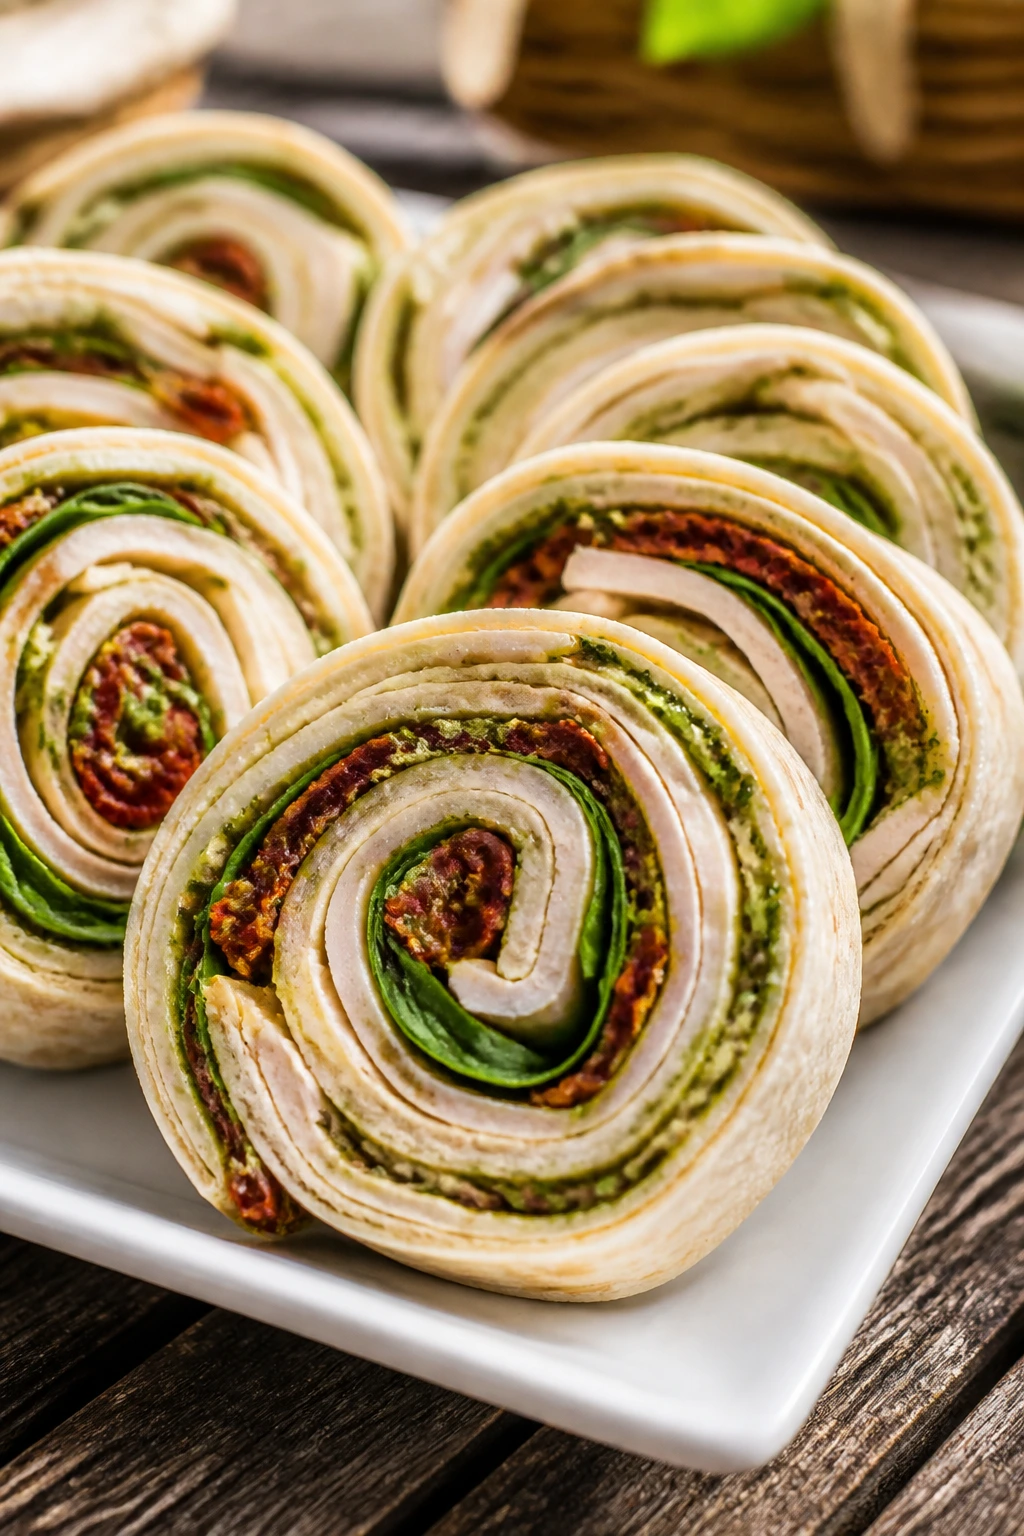
Why It Works:
Pinwheels are one of the few picnic foods that look neat even after travel. The pesto acts like glue, the turkey adds protein, and the sun-dried tomatoes bring a concentrated hit of sweetness.
Key Ingredients:
- 4 large flour tortillas
- 8 oz sliced turkey
- ¼ cup basil pesto
- ½ cup cream cheese, softened
- ⅓ cup chopped sun-dried tomatoes
- 2 cups baby spinach
- 1 cup shredded mozzarella
Quick Steps:
- Stir the cream cheese and pesto together until smooth.
- Spread the mixture over each tortilla, leaving a ½-inch border.
- Layer turkey, spinach, tomatoes, and mozzarella.
- Roll tightly, wrap in parchment, and chill for 20 minutes.
- Slice into 1-inch pinwheels with a sharp knife.
Equipment for This Recipe:
- Cutting board
- Sharp knife
- Parchment paper
How to Serve This Dish:
Arrange the pinwheels in a single layer so the spiral shows. A bowl of grapes or cucumber spears makes the plate feel finished without adding much work.
Pro Tips for This Recipe:
- Chill before slicing or the filling squeezes out.
- Use thinly sliced turkey; thick slices make the roll bulky.
- Pat the sun-dried tomatoes dry so the tortillas don’t get slick.
Variations on This Dish:
- Roasted Pepper Version: Swap sun-dried tomatoes for roasted red peppers.
- Dairy-Light Version: Skip the cream cheese and use hummus as the spread.
Common Mistakes to Avoid with This Dish:
- Don’t overfill the tortilla or the log bursts when you slice it.
- Don’t cut with a dull knife; it mashes the spiral.
6. Watermelon, Feta, and Grilled Chicken Salad
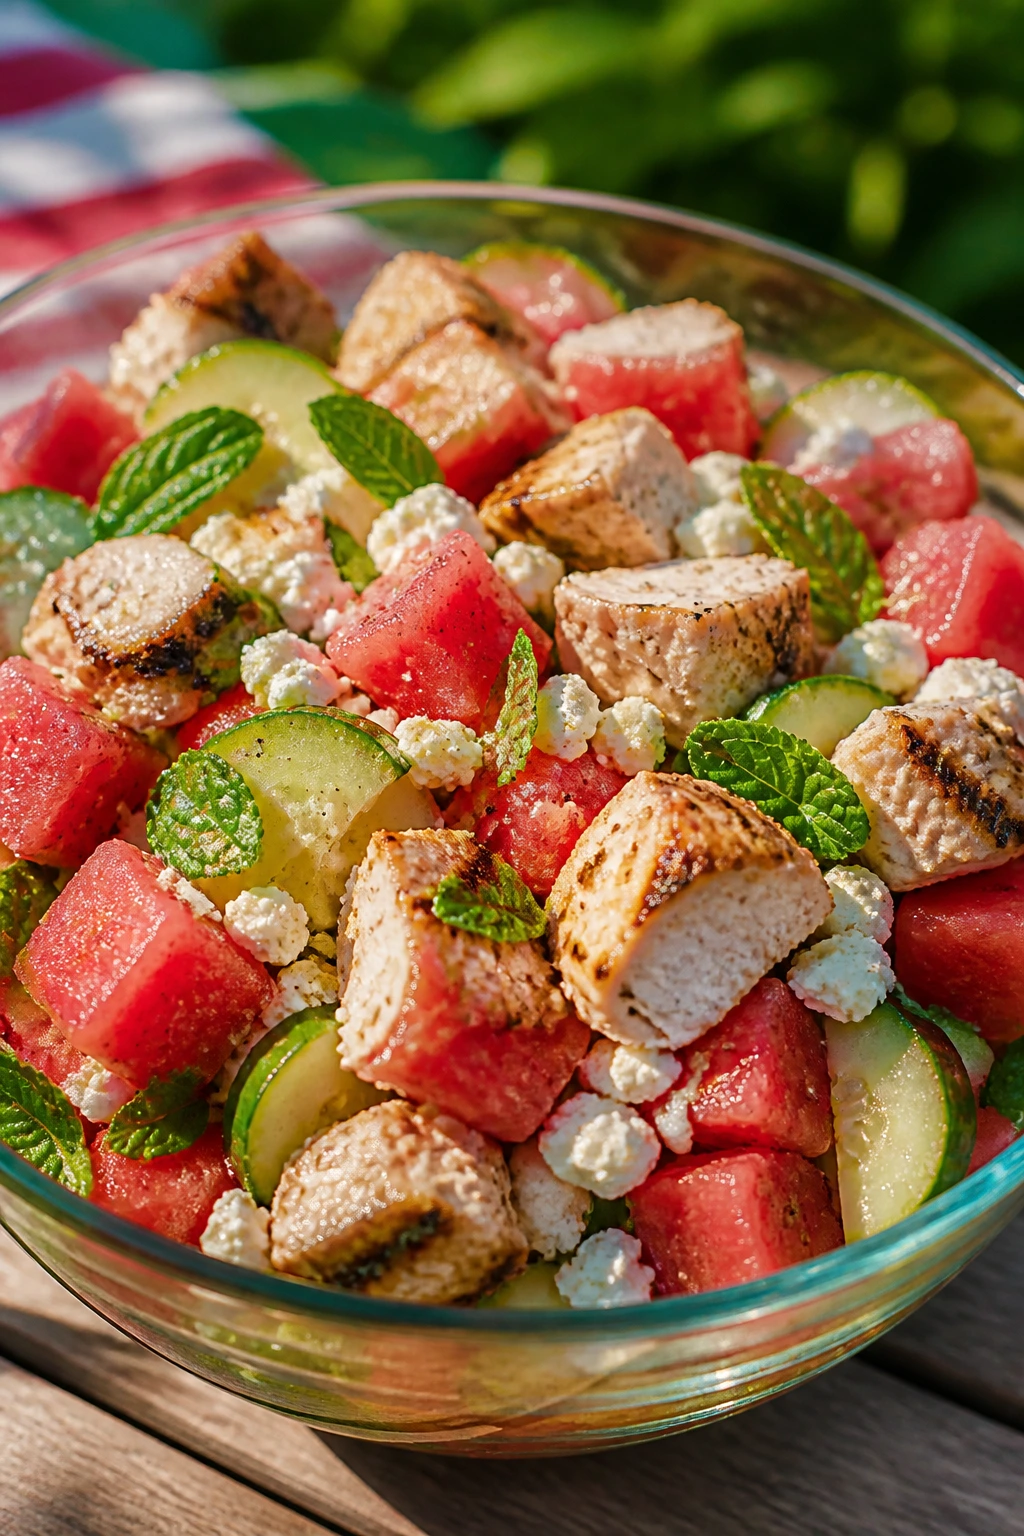
Why It Works:
Sweet watermelon, salty feta, and smoky chicken do the kind of balancing act that makes a dinner feel lighter than it looks. The mint keeps the whole thing from tasting flat.
Key Ingredients:
- 2 cups grilled chicken, chopped
- 4 cups cubed watermelon
- 1 cup cucumber, sliced
- ½ cup crumbled feta
- 2 tbsp olive oil
- 1 tbsp lime juice
- ¼ cup mint leaves
Quick Steps:
- Grill or sear the chicken and let it cool completely.
- Combine watermelon, cucumber, feta, and mint in a large bowl.
- Whisk oil, lime juice, salt, and pepper for the dressing.
- Add the chicken right before packing or serving.
- Keep the dressing in a separate jar until the last minute.
Equipment for This Recipe:
- Grill or skillet
- Large mixing bowl
- Jar with lid
How to Serve This Dish:
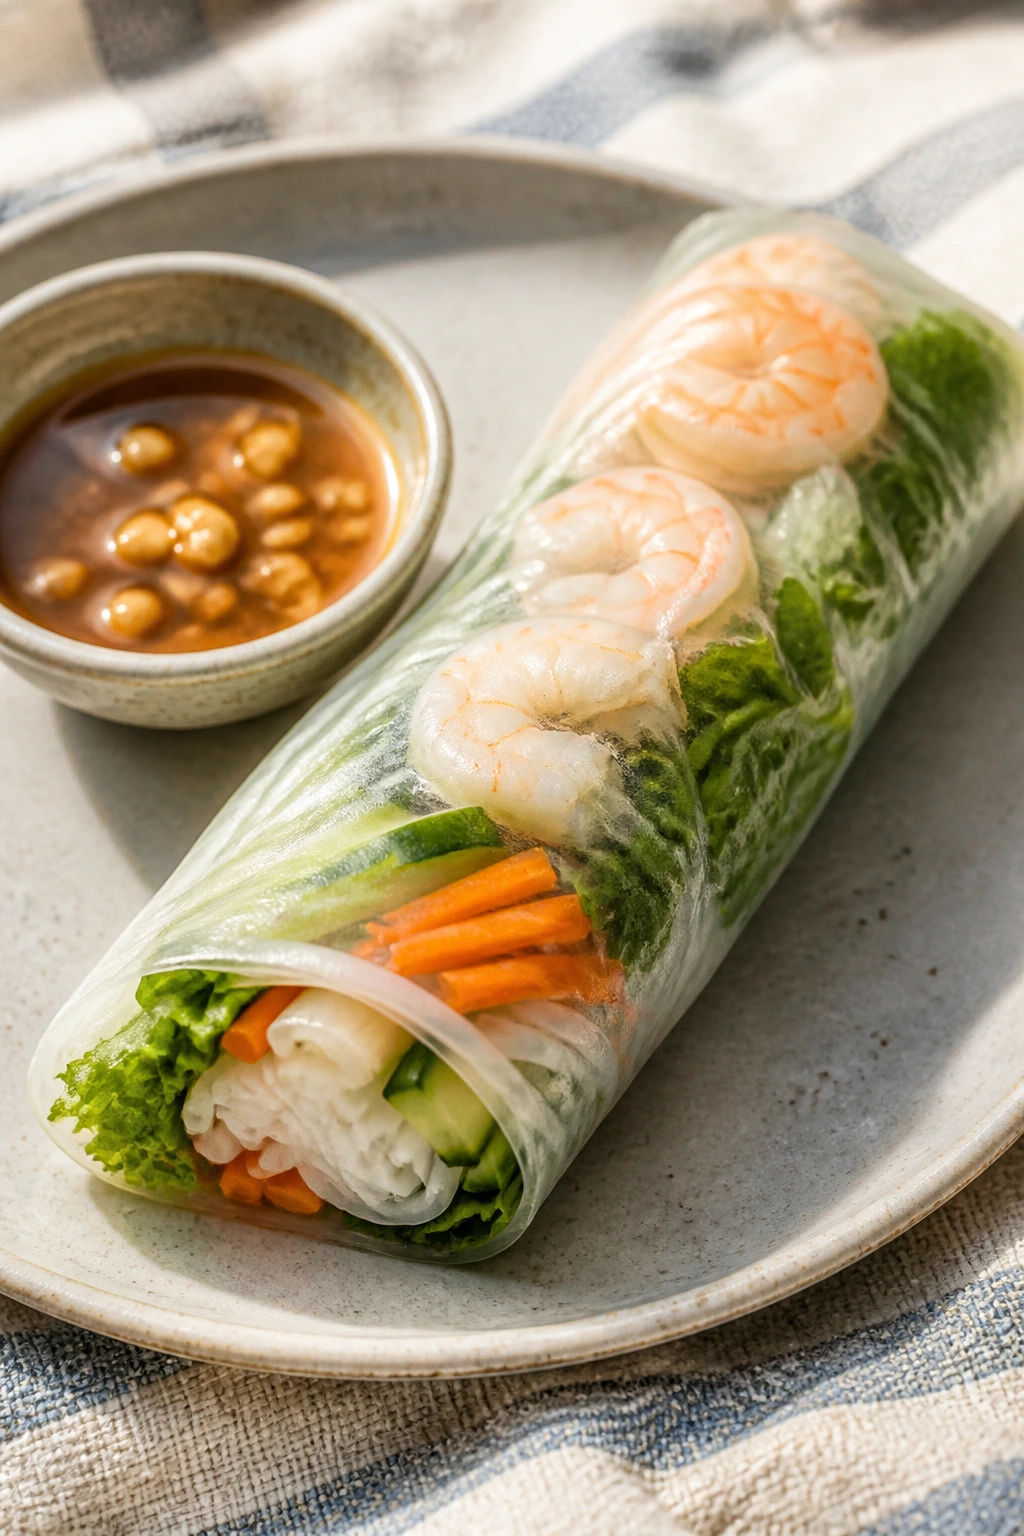
Serve in a wide bowl with a spoon rather than tongs; watermelon slips around. A few toasted pita triangles on the side are enough to round it out.
Pro Tips for This Recipe:
- Choose a watermelon that feels heavy for its size.
- Salt the cucumber lightly and blot it once so the salad doesn’t puddle.
- Add the mint whole or torn, not minced, so it stays fragrant.
Variations on This Dish:
- No-Chicken Version: Add chickpeas instead of chicken.
- Balsamic Version: Use a light balsamic vinaigrette if you want more depth.
Common Mistakes to Avoid with This Dish:
- Don’t cube the watermelon too far ahead or it leaks.
- Don’t toss everything hard; feta smears fast.
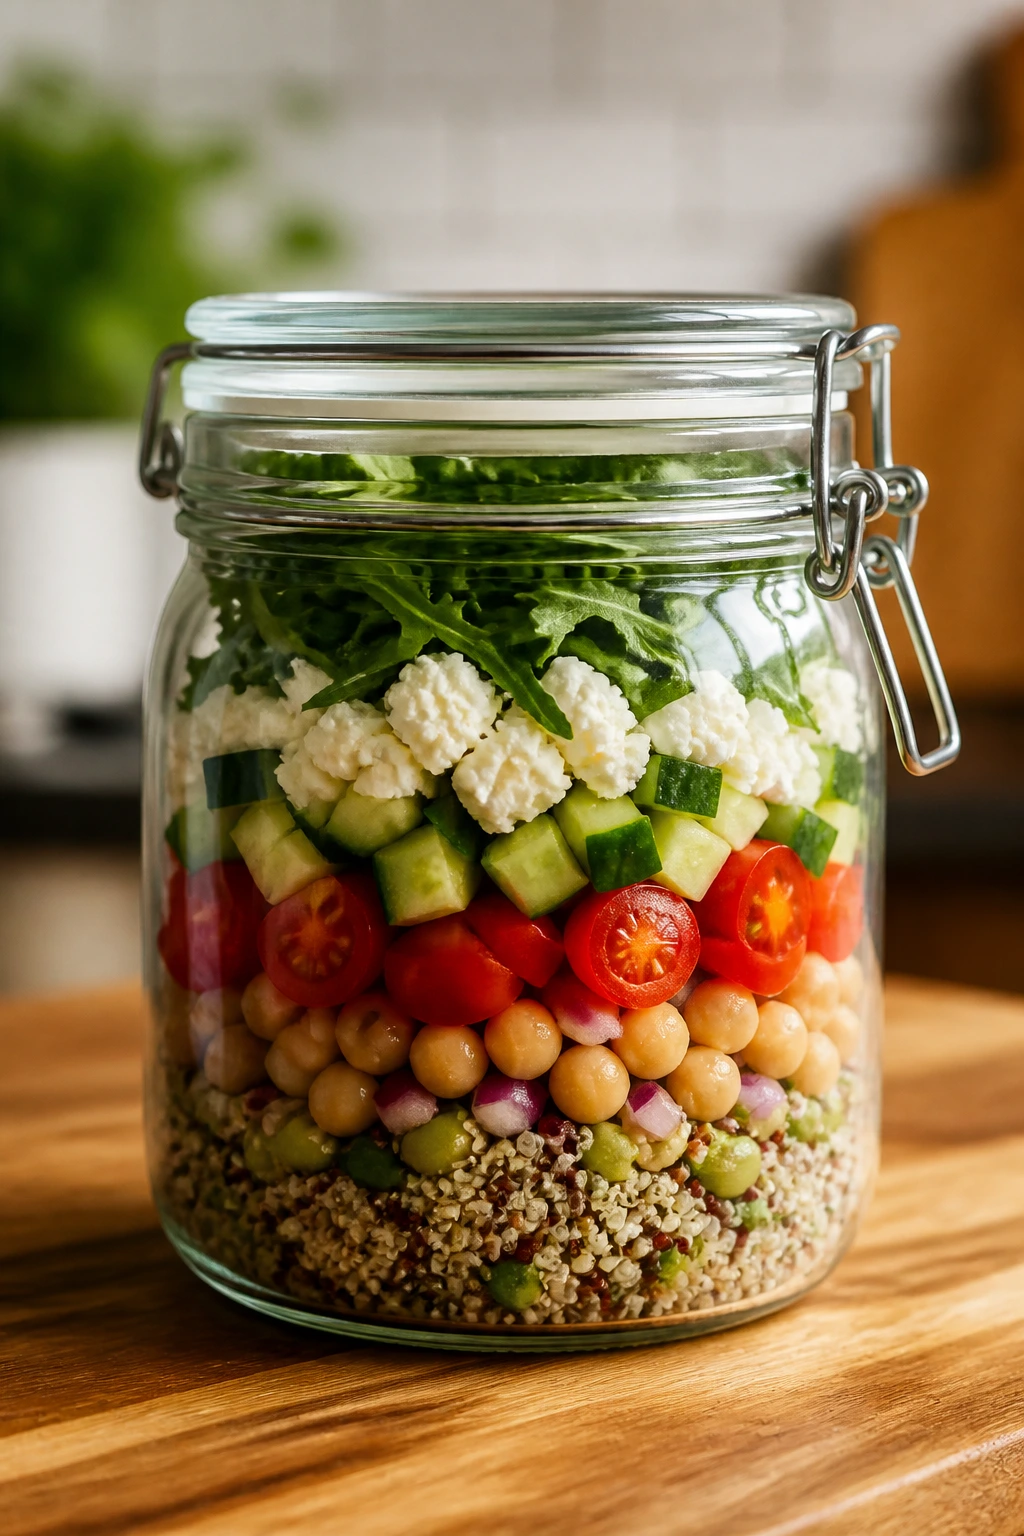
7. Niçoise Picnic Jars with Tuna, Potatoes, and Green Beans
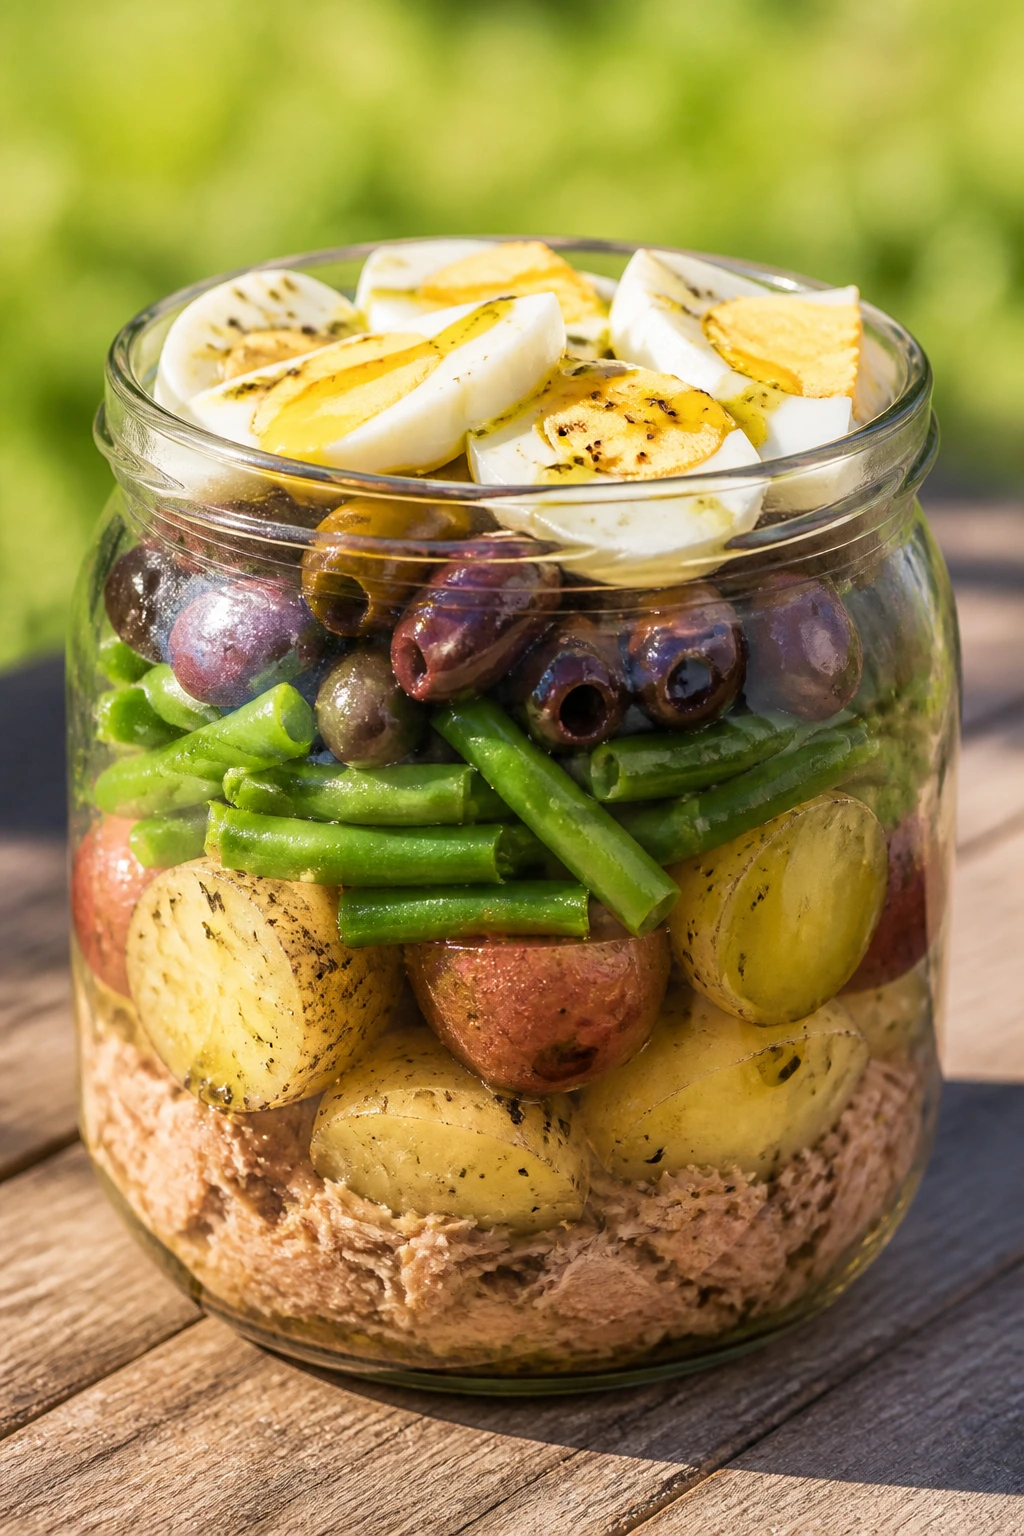
Why It Works:
Jar salads are born for picnics because the layers protect the delicate parts. Potatoes and tuna make this feel like a real dinner, while green beans and olives keep it sharp.
Key Ingredients:
- 2 cups baby potatoes, halved
- 1 cup green beans, trimmed
- 2 cans tuna in olive oil, drained
- 4 hard-boiled eggs, halved
- ½ cup olives
- 2 tbsp Dijon mustard
- 3 tbsp olive oil
Quick Steps:
- Boil the potatoes until tender, about 12 to 15 minutes, then cool.
- Blanch the green beans for 2 to 3 minutes and chill them in ice water.
- Whisk mustard, olive oil, lemon juice, salt, and pepper.
- Layer dressing, potatoes, tuna, beans, eggs, and olives in jars.
- Keep lettuce or greens on top if you want extra crunch.
Equipment for This Recipe:
- Saucepan
- Slotted spoon
- 4 wide-mouth jars
How to Serve This Dish:
Turn the jars into bowls at the picnic site or eat from the jar with a fork. A crusty baguette is the only side I’d bother with here.
Pro Tips for This Recipe:
- Let the potatoes cool before layering or they wilt the greens.
- Use tuna packed in olive oil for better texture.
- Put eggs near the top so the yolk doesn’t smear through the jar.
Variations on This Dish:
- Salmon Swap: Use canned salmon instead of tuna.
- Lemon-Herb Version: Add dill and parsley to the dressing.
Common Mistakes to Avoid with This Dish:
- Don’t pack wet beans without drying them; the jar turns watery.
- Don’t use narrow jars unless you enjoy fighting with a fork.
8. Caprese Pasta Salad with White Beans
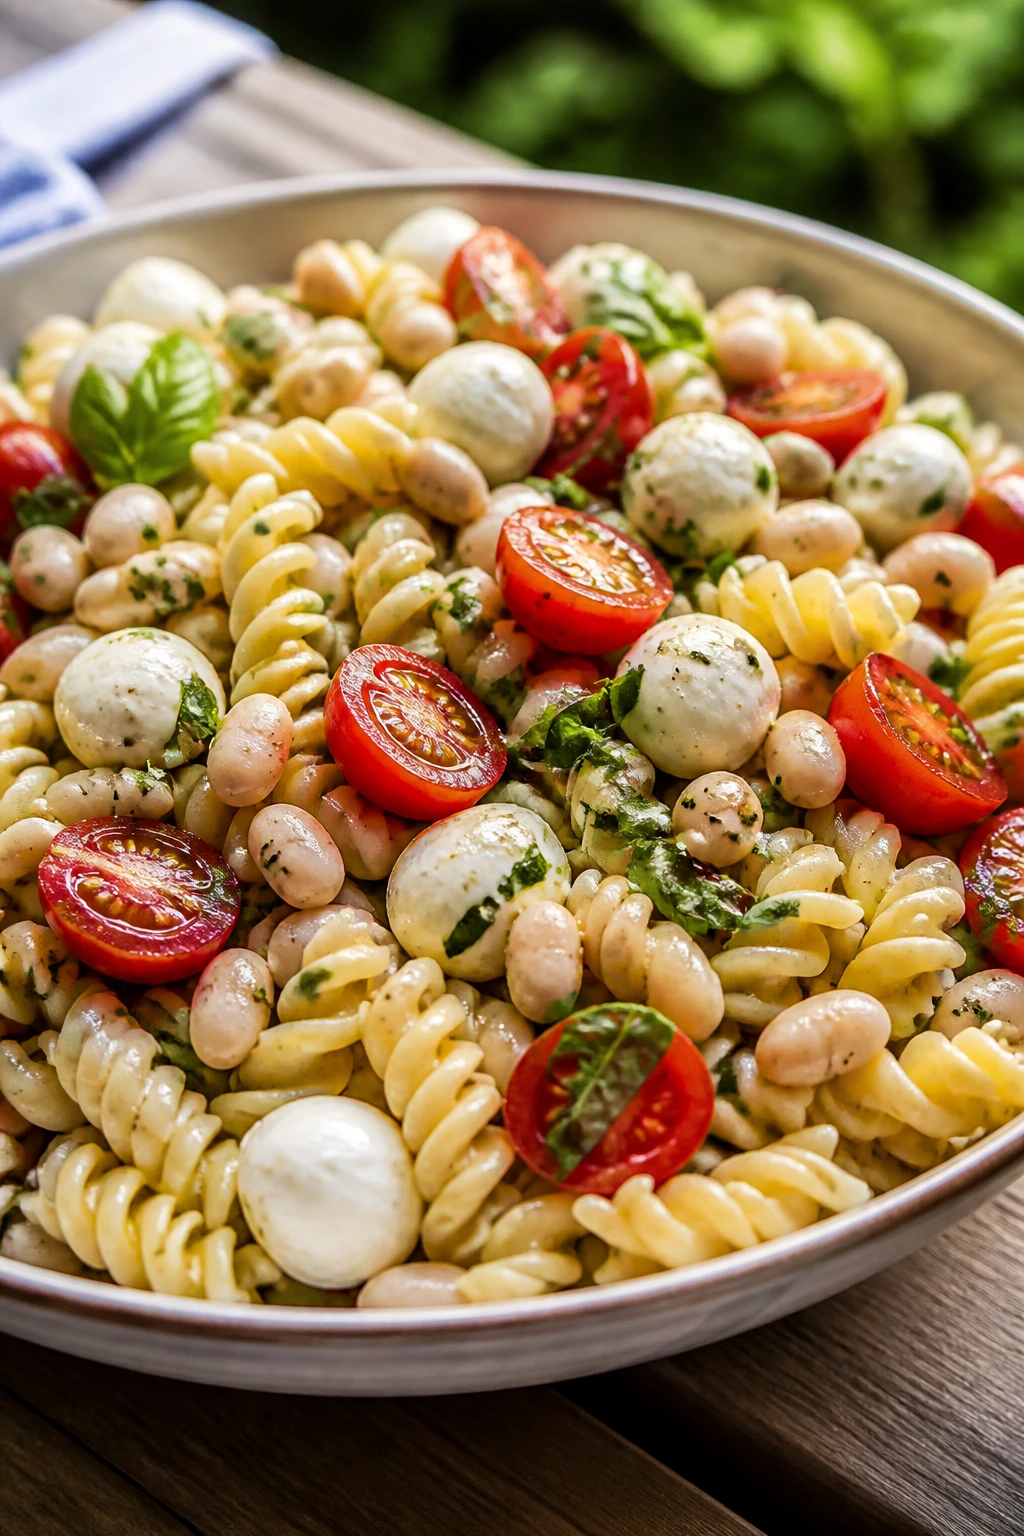
Why It Works:
This pasta salad eats like a side and a main at once, which is exactly what a picnic dinner should do. White beans add protein and keep the bowl from feeling too carb-heavy.
Key Ingredients:
- 12 oz short pasta
- 1 can white beans, rinsed and drained
- 1½ cups cherry tomatoes, halved
- 8 oz mozzarella pearls
- ¼ cup basil leaves
- 3 tbsp olive oil
- 2 tbsp red wine vinegar
Quick Steps:
- Boil the pasta until just al dente, then rinse briefly under cool water.
- Whisk oil, vinegar, salt, pepper, and a little garlic.
- Toss pasta with beans, tomatoes, mozzarella, and basil.
- Chill for 20 minutes so the flavors settle.
- Taste before serving and add another pinch of salt if needed.
Equipment for This Recipe:
- Large pot
- Colander
- Mixing bowl
How to Serve This Dish:
Serve cold or slightly cool in shallow bowls with extra basil on top. If you want a bigger meal, tuck grilled chicken or sliced salami beside it.
Pro Tips for This Recipe:
- Salt the pasta water hard; bland pasta stays bland.
- Drain the mozzarella if it sits in liquid.
- Add basil at the end so it doesn’t darken.
Variations on This Dish:
- Pesto Version: Replace half the vinaigrette with pesto.
- No-Bean Version: Swap beans for diced salami if you want a meatier bowl.
Common Mistakes to Avoid with This Dish:
- Don’t overcook the pasta or it turns soft after chilling.
- Don’t add the dressing to hot pasta; it soaks in oddly and tastes flat.
9. Smoky Black Bean and Mango Tacos
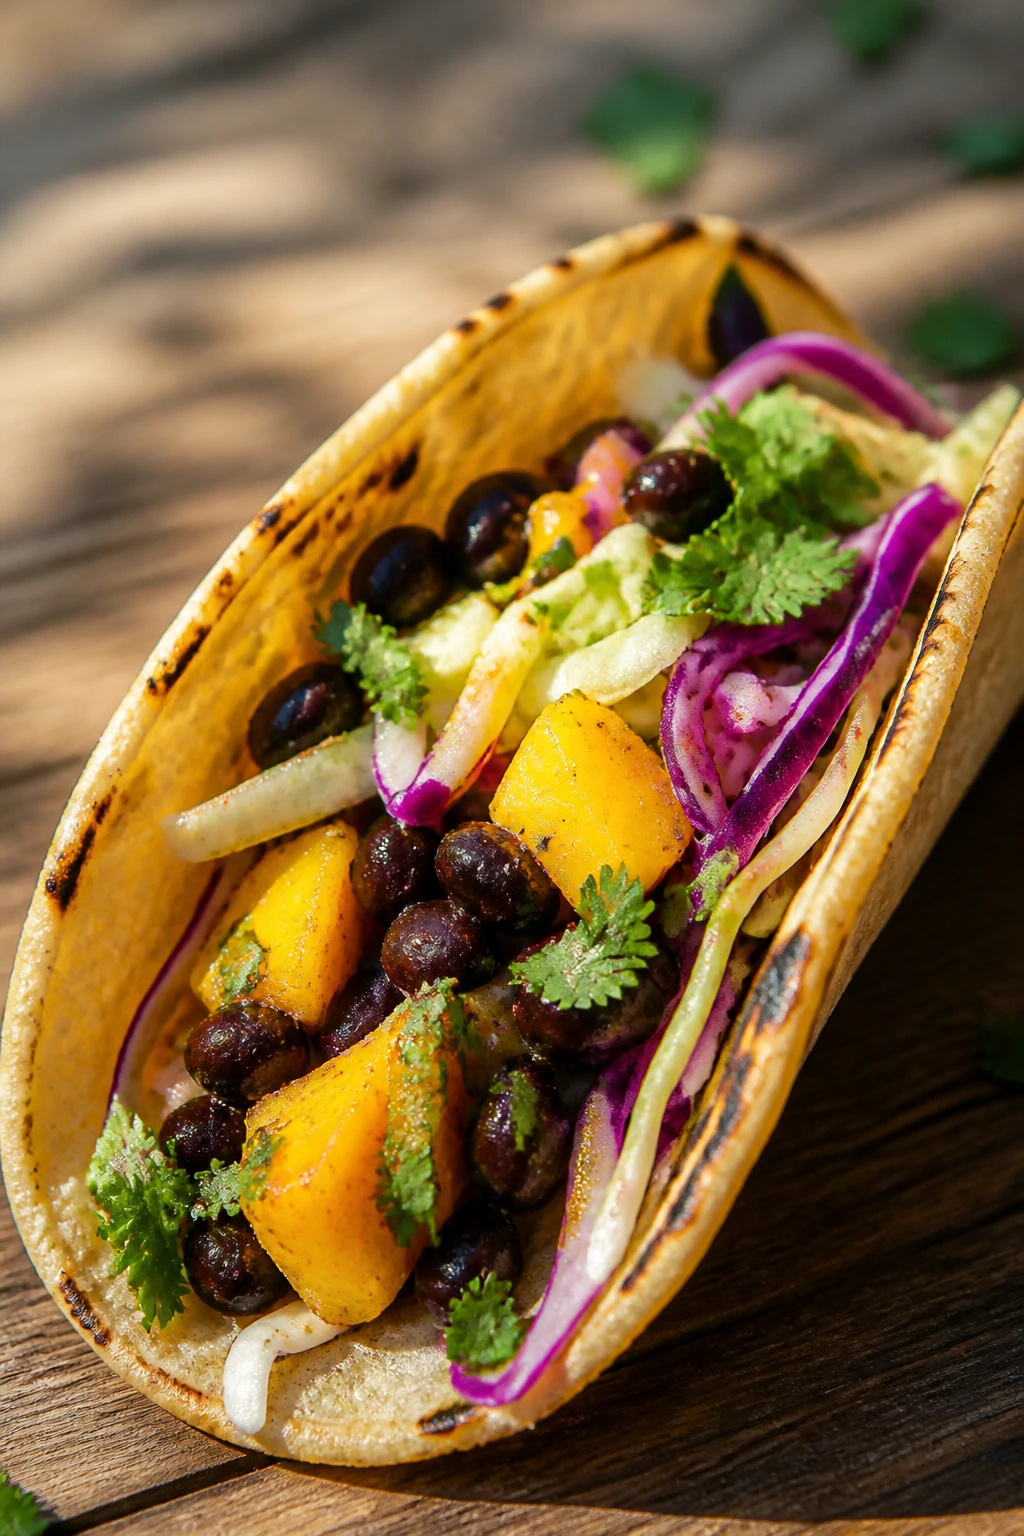
Why It Works:
Black beans give these tacos substance, mango brings the sweet pop, and a smoky spice blend keeps the whole thing from tasting like fruit salad in a tortilla. They’re easy to pack as a taco bar or assembled ahead.
Key Ingredients:
- 2 cans black beans, rinsed and drained
- 1 ripe mango, diced
- 1 cup shredded cabbage
- 8 small corn tortillas
- 1 tbsp olive oil
- 1 tsp smoked paprika
- 1 lime, cut into wedges
Quick Steps:
- Warm the beans in olive oil with smoked paprika, cumin, salt, and a splash of water.
- Dice the mango and toss it with lime juice and a pinch of salt.
- Warm the tortillas in a skillet or over the grill for 20 to 30 seconds per side.
- Fill with beans, cabbage, mango, and cilantro.
- Pack lime wedges separately so the tacos stay crisp.
Equipment for This Recipe:
- Skillet
- Knife and cutting board
- Foil or tortilla warmer
How to Serve This Dish:
Set out the filling and let people build their own. A little hot sauce on the side makes sense, but don’t overdo it or the mango disappears.
Pro Tips for This Recipe:
- Dry the cabbage after shredding so it doesn’t water down the tacos.
- Use ripe but firm mango; mushy fruit slides right out.
- Double-layer the tortillas if they’re delicate.
Variations on This Dish:
- Avocado Version: Add sliced avocado for a creamier bite.
- Chipotle Version: Stir chipotle in adobo into the beans for more heat.
Common Mistakes to Avoid with This Dish:
- Don’t overfill the tacos; they fold better when they stay lean.
- Don’t skip the salt on the mango. It sounds minor. It matters.
10. Grilled Vegetable Quinoa Bowls with Halloumi
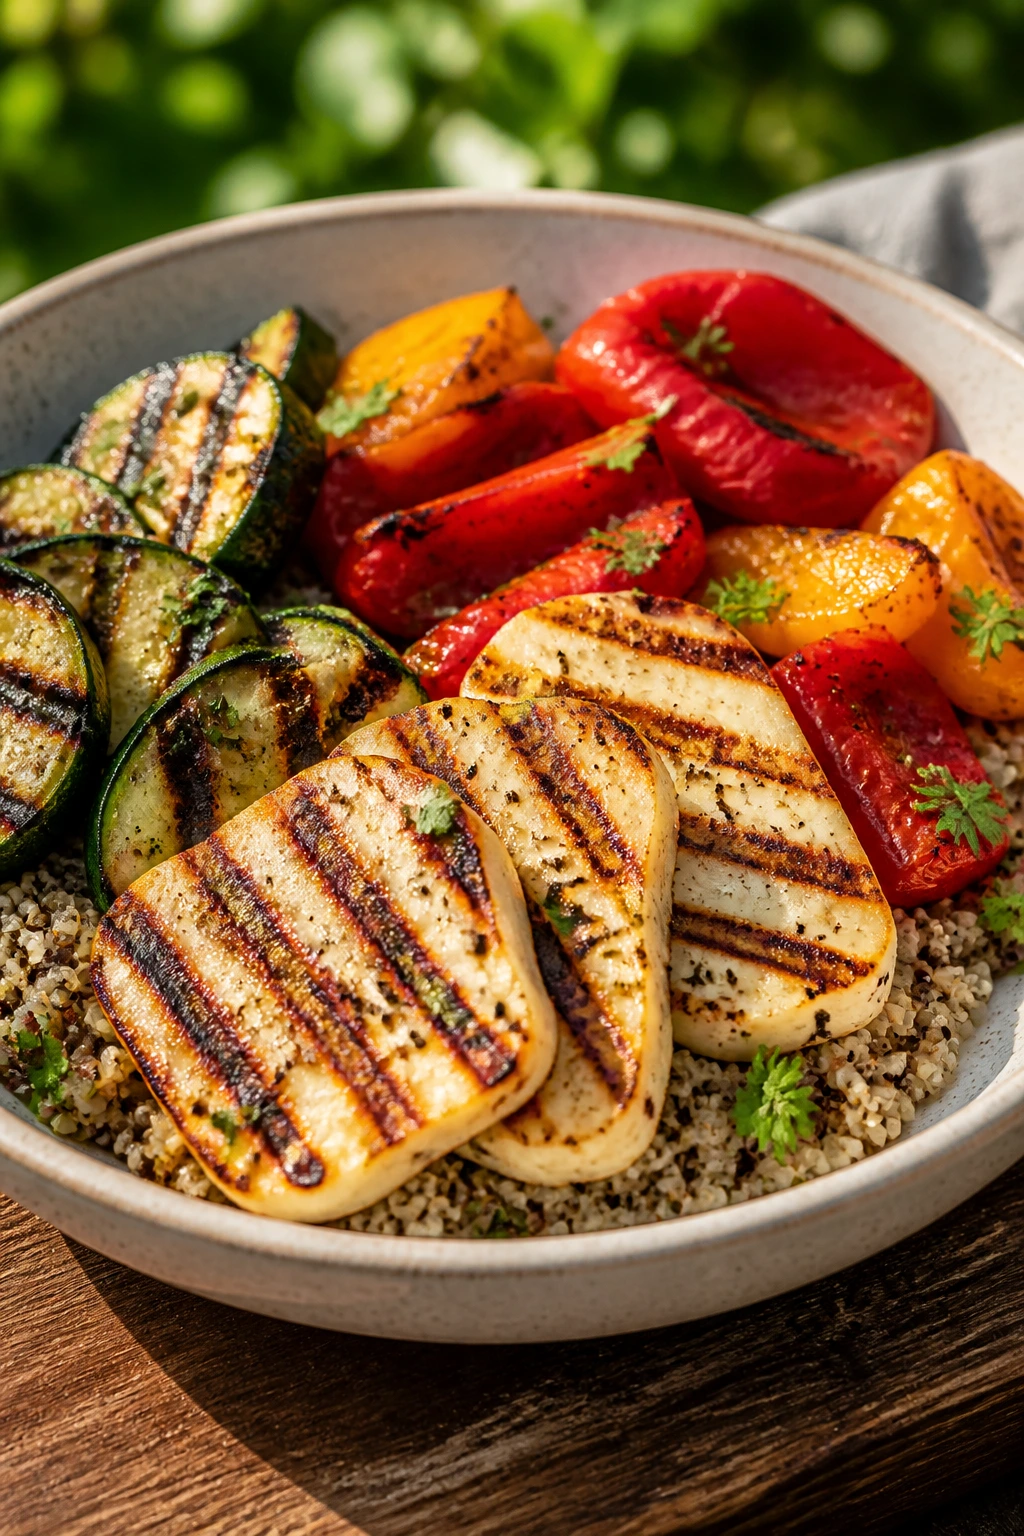
Why It Works:
Quinoa holds up better than lettuce in a warm-weather picnic, and halloumi brings salty chew instead of melt. Grilled vegetables give you char without making the bowl feel heavy.
Key Ingredients:
- 1 cup quinoa, rinsed
- 1 zucchini, sliced lengthwise
- 1 red bell pepper, cut into strips
- 8 oz halloumi, sliced
- 2 tbsp olive oil
- 1 tbsp lemon juice
- 2 tbsp chopped parsley
Quick Steps:
- Cook quinoa in 2 cups water until the grains are fluffy and the little tails show, about 15 minutes.
- Toss vegetables with oil, salt, and pepper.
- Grill the vegetables and halloumi until both have browned edges.
- Fluff quinoa with lemon juice and parsley.
- Pack the bowl with vegetables and cheese on top.
Equipment for This Recipe:
- Saucepan
- Grill or grill pan
- Mixing bowl
How to Serve This Dish:
Serve warm, room temperature, or chilled. A spoonful of yogurt sauce on the side is nice, but not required if the vegetables are well seasoned.
Pro Tips for This Recipe:
- Rinse quinoa well or it can taste bitter.
- Don’t overgrill halloumi; it should get bronzed, not rubbery.
- Season the quinoa while warm so it absorbs the lemon.
Variations on This Dish:
- Herby Version: Add dill and mint with the parsley.
- No-Dairy Version: Swap halloumi for roasted chickpeas.
Common Mistakes to Avoid with This Dish:
- Don’t pack grilled vegetables while they’re hot or they steam the quinoa.
- Don’t leave the quinoa bland; it carries the whole bowl.
11. Tuna Salad Stuffed Avocados
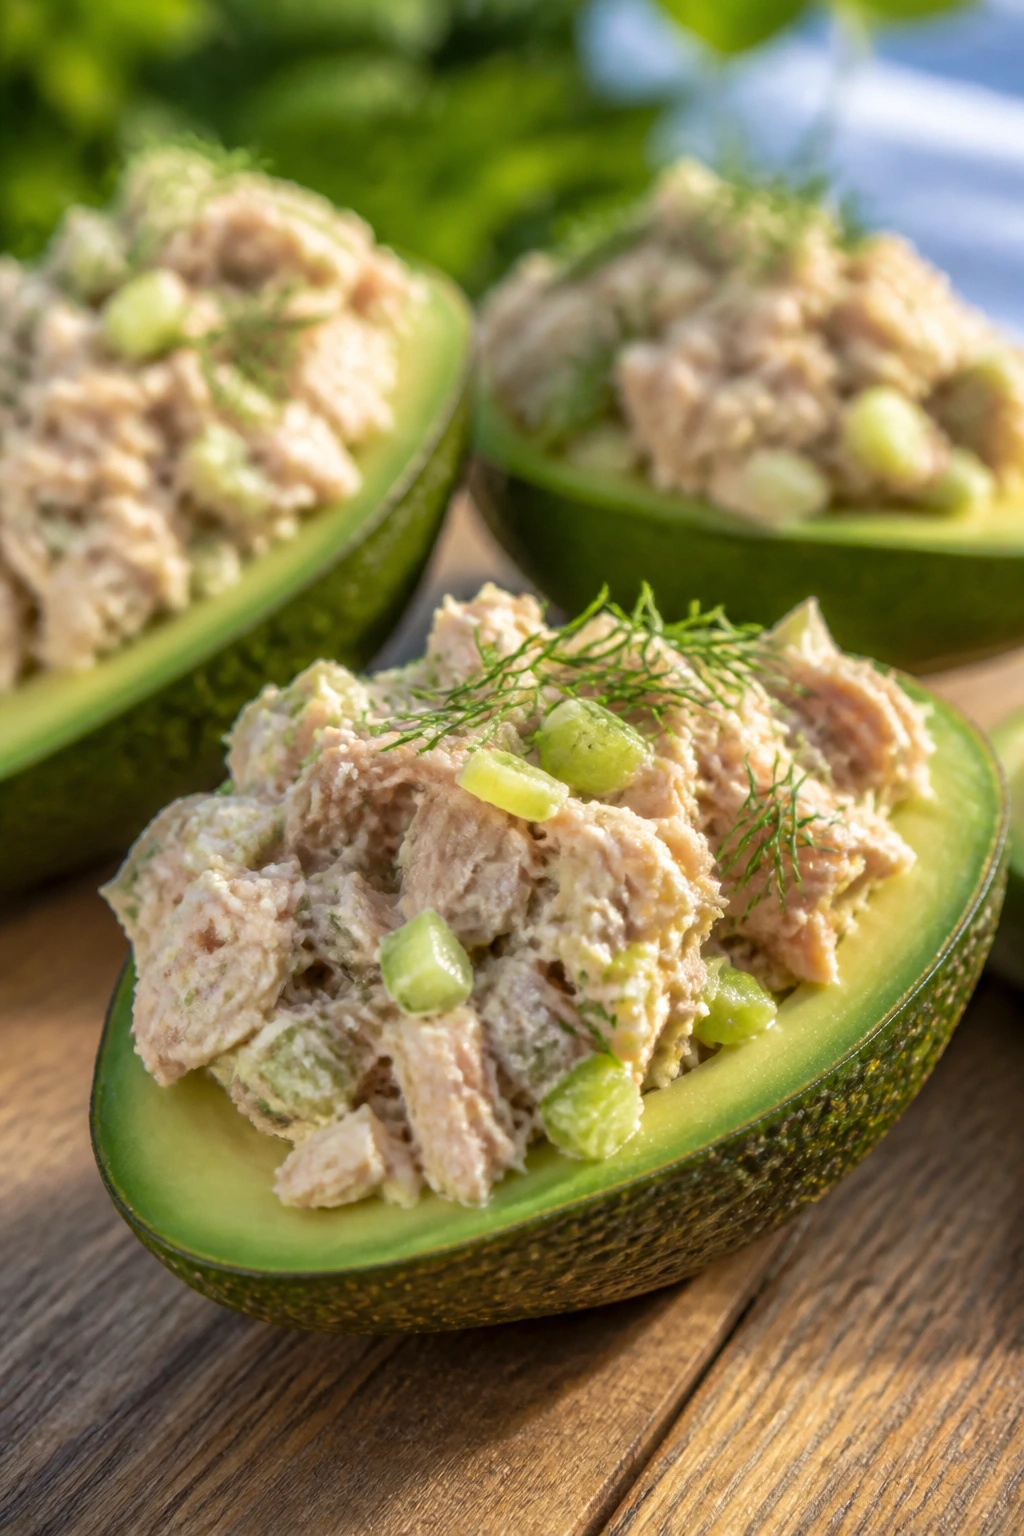
Why It Works:
Avocado cups make tuna salad feel more composed, less cafeteria. The creamy avocado and the salty tuna do the work of bread without making the meal feel dense.
Key Ingredients:
- 2 cans tuna, drained
- 2 ripe avocados, halved and pitted
- ¼ cup diced celery
- 2 tbsp mayonnaise
- 1 tsp Dijon mustard
- 1 tbsp lemon juice
- 1 tbsp chopped dill
Quick Steps:
- Mix tuna, celery, mayo, mustard, lemon juice, dill, salt, and pepper.
- Spoon the tuna salad into the avocado halves.
- Sprinkle with paprika or extra dill.
- Pack the avocados snugly so they don’t slide.
- If making ahead, brush the avocado with lemon and keep the filling separate.
Equipment for This Recipe:
- Bowl
- Spoon
- Paring knife
How to Serve This Dish:
These are best eaten with a fork straight from the shell. A pile of cherry tomatoes or cucumber spears beside them keeps the plate bright.
Pro Tips for This Recipe:
- Choose avocados that give slightly but still hold their shape.
- Use a firm celery dice for crunch.
- Make the tuna salad ahead, then fill the avocados at the picnic.
Variations on This Dish:
- Greek Version: Use yogurt instead of mayo and add chopped olives.
- Spicy Version: Add minced jalapeño and a few drops of hot sauce.
Common Mistakes to Avoid with This Dish:
- Don’t stuff the avocados too early or they brown fast.
- Don’t mash the filling into paste; tuna salad needs texture.
12. Cucumber-Dill Salmon Salad Sandwiches
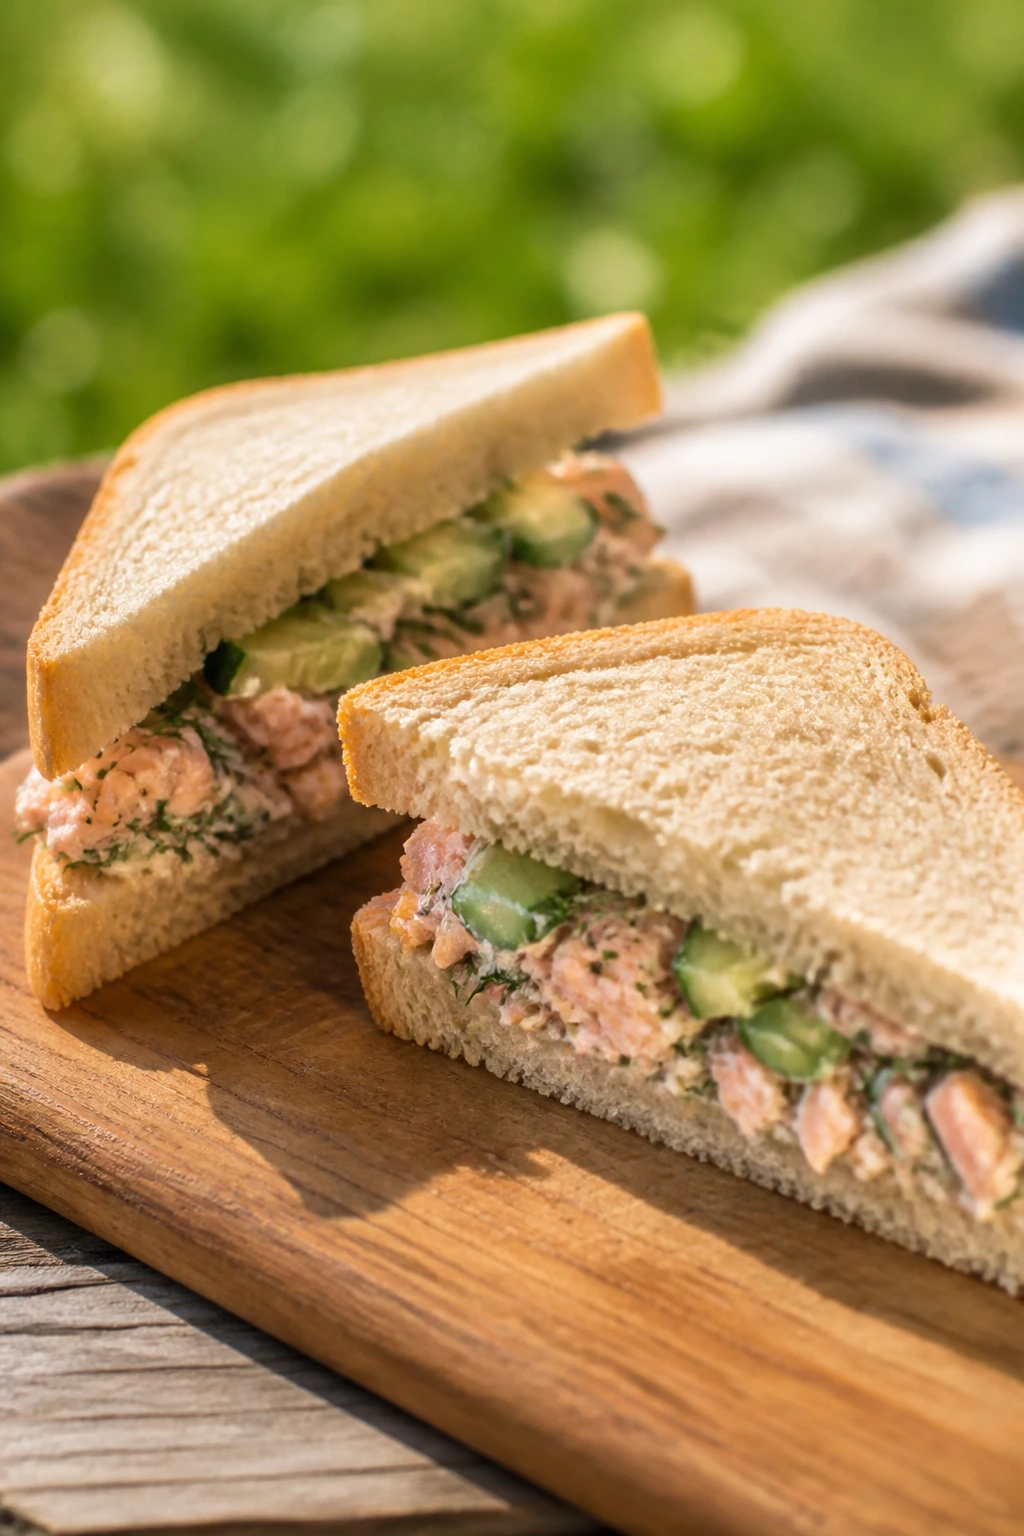
Why It Works:
Cold salmon salad feels elegant without being precious. Dill and cucumber give it a clean edge, and soft bread turns it into a proper picnic sandwich.
Key Ingredients:
- 2 cups cooked salmon, flaked
- ½ cup diced cucumber
- 3 tbsp Greek yogurt
- 1 tbsp mayonnaise
- 1 tbsp lemon juice
- 1 tbsp chopped dill
- 8 slices soft sandwich bread
Quick Steps:
- Flake the salmon and remove any bones.
- Stir together yogurt, mayo, lemon juice, dill, salt, and pepper.
- Fold in the cucumber and salmon.
- Chill the filling for 15 minutes.
- Assemble the sandwiches just before packing.
Equipment for This Recipe:
- Mixing bowl
- Fork
- Knife
How to Serve This Dish:
Trim the crusts if you want them neater, or leave them on for a more casual feel. A handful of chips or a crisp salad rounds it out.
Pro Tips for This Recipe:
- Drain the cucumber so the filling doesn’t go watery.
- Use chilled salmon, not warm, or the mayo loosens.
- Butter the bread lightly if you need a moisture barrier.
Variations on This Dish:
- Rye Version: Serve on thin rye bread with extra dill.
- Open-Face Version: Spoon the salad onto toasted bread for less sogginess.
Common Mistakes to Avoid with This Dish:
- Don’t overmix the salmon or the texture turns mushy.
- Don’t use wet bread; it squashes under the filling.
13. Chicken Caesar Wraps with Romaine Crunch
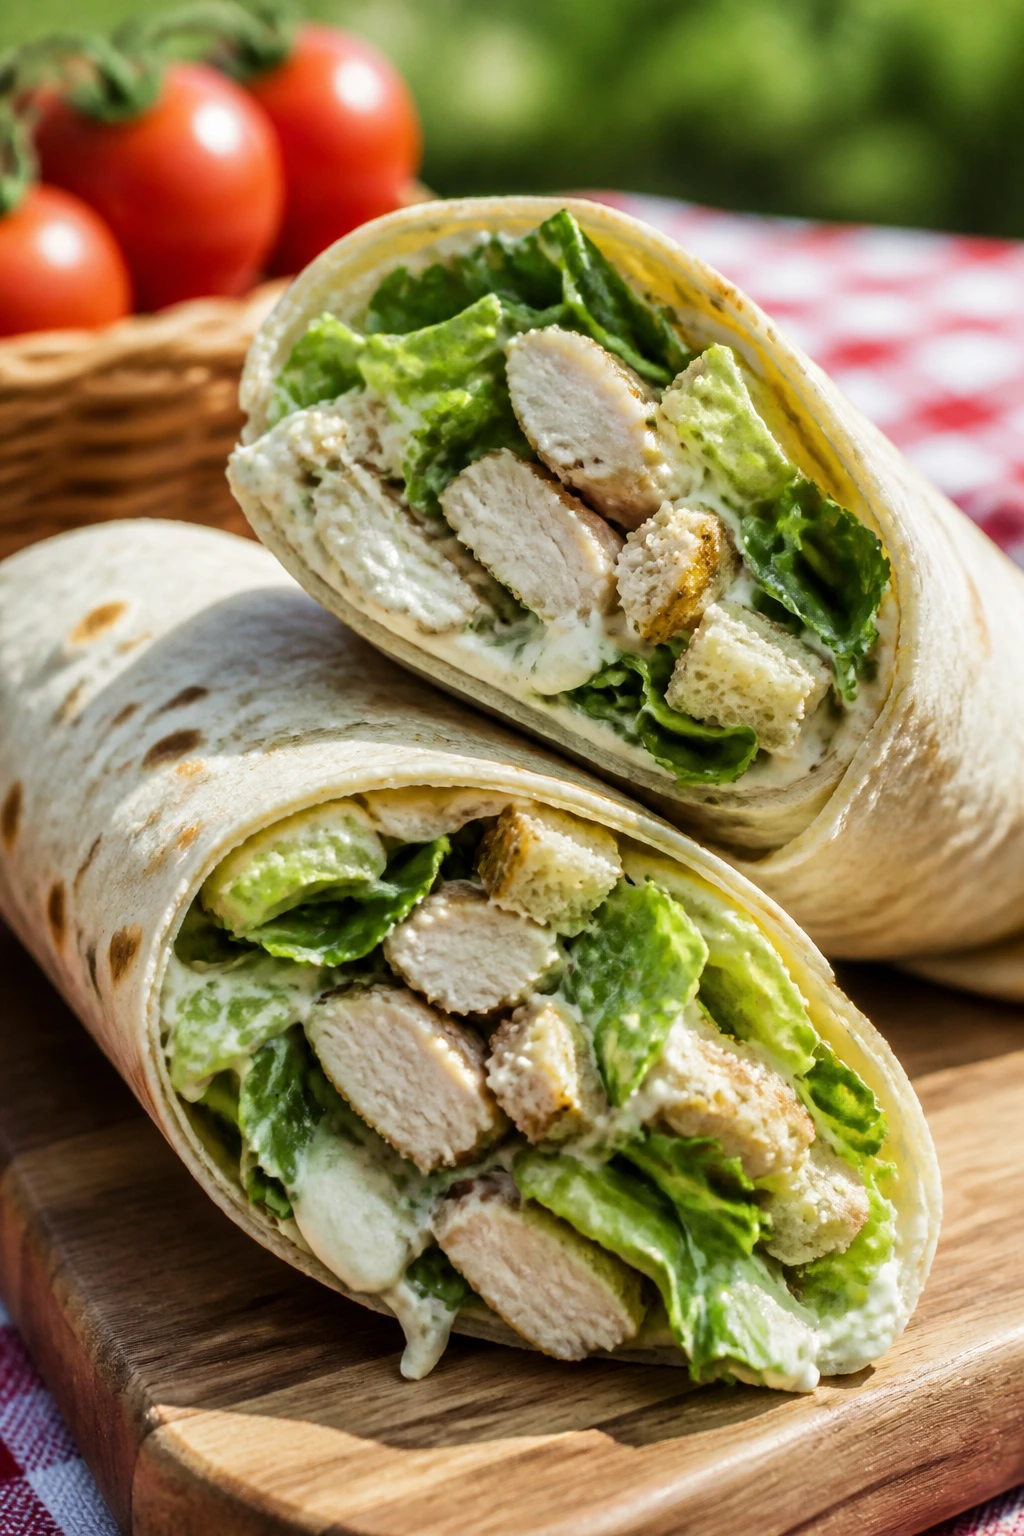
Why It Works:
Caesar flavor travels well when the lettuce stays crisp and the dressing is kept modest. These wraps give you the salty, garlicky taste people want, but with less weight than a big bowl of pasta.
Key Ingredients:
- 2 cups cooked chicken, sliced
- 4 large flour tortillas
- 3 cups chopped romaine
- ¼ cup Caesar dressing
- ¼ cup grated Parmesan
- ½ cup croutons
- 1 tsp lemon juice
Quick Steps:
- Toss romaine with Caesar dressing, lemon juice, Parmesan, and black pepper.
- Lay chicken and a few croutons on each tortilla.
- Add the dressed lettuce right before rolling.
- Roll tightly and wrap in parchment.
- Slice on the bias if you want neat halves.
Equipment for This Recipe:
- Large bowl
- Cutting board
- Parchment paper
How to Serve This Dish:
Serve with a lemon wedge and maybe a cup of cherry tomatoes. If you want them to feel less sandwich-like, cut each wrap into three chunky pieces and stack them on a plate.
Pro Tips for This Recipe:
- Keep the dressing light; heavy dressing makes the wrap slip.
- Add croutons last so they stay crunchy.
- Chill the tortillas for 5 minutes before rolling if they’re cracking.
Variations on This Dish:
- Bacon Version: Add crisp bacon for a smoky bite.
- Grilled Version: Use grilled romaine hearts if you want a little char at home before packing.
Common Mistakes to Avoid with This Dish:
- Don’t dress the lettuce hours ahead or it turns limp.
- Don’t overload the wrap; Caesar fillings spill faster than you think.
14. Farro Salad with Roasted Peppers and Mozzarella
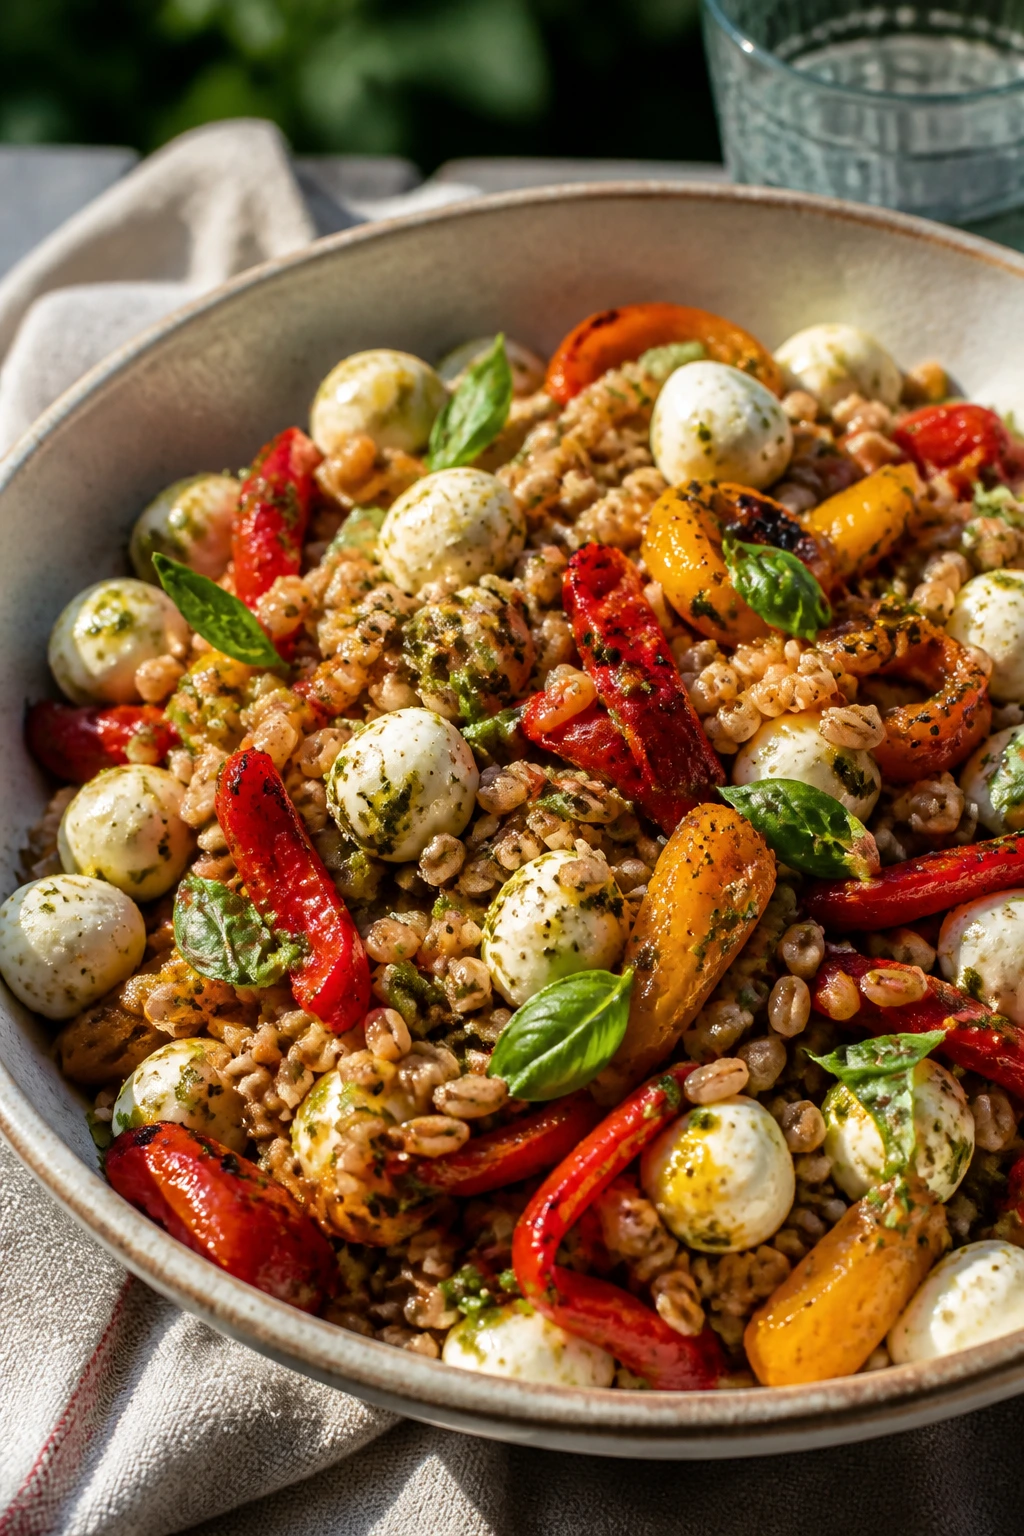
Why It Works:
Farro has enough chew to stay interesting after chilling, and roasted peppers bring sweetness without making a mess. Mozzarella softens the edges, which is a good thing here.
Key Ingredients:
- 1 cup farro
- 1 jar roasted red peppers, drained and chopped
- 8 oz mozzarella pearls
- 2 tbsp olive oil
- 1 tbsp red wine vinegar
- 2 tbsp chopped basil
- 1 cup baby arugula
Quick Steps:
- Simmer the farro in salted water until tender but chewy, about 20 to 25 minutes.
- Drain and cool it slightly.
- Toss with peppers, mozzarella, oil, vinegar, basil, salt, and pepper.
- Fold in arugula just before packing.
- Taste again after chilling and brighten with more vinegar if needed.
Equipment for This Recipe:
- Saucepan
- Strainer
- Mixing bowl
How to Serve This Dish:
Serve in a shallow bowl so the colors show. A grilled vegetable skewer or a piece of focaccia works well beside it.
Pro Tips for This Recipe:
- Cook the farro until tender but not soft.
- Drain the peppers well or the salad loosens up.
- Add arugula last so it stays perky.
Variations on This Dish:
- White Bean Version: Add cannellini beans for more heft.
- Herby Version: Mix in mint and parsley instead of basil.
Common Mistakes to Avoid with This Dish:
- Don’t overcook farro or the bowl turns mushy after chilling.
- Don’t skip salt; grains need more than most people think.
15. Spicy Peanut Tofu Lettuce Cups
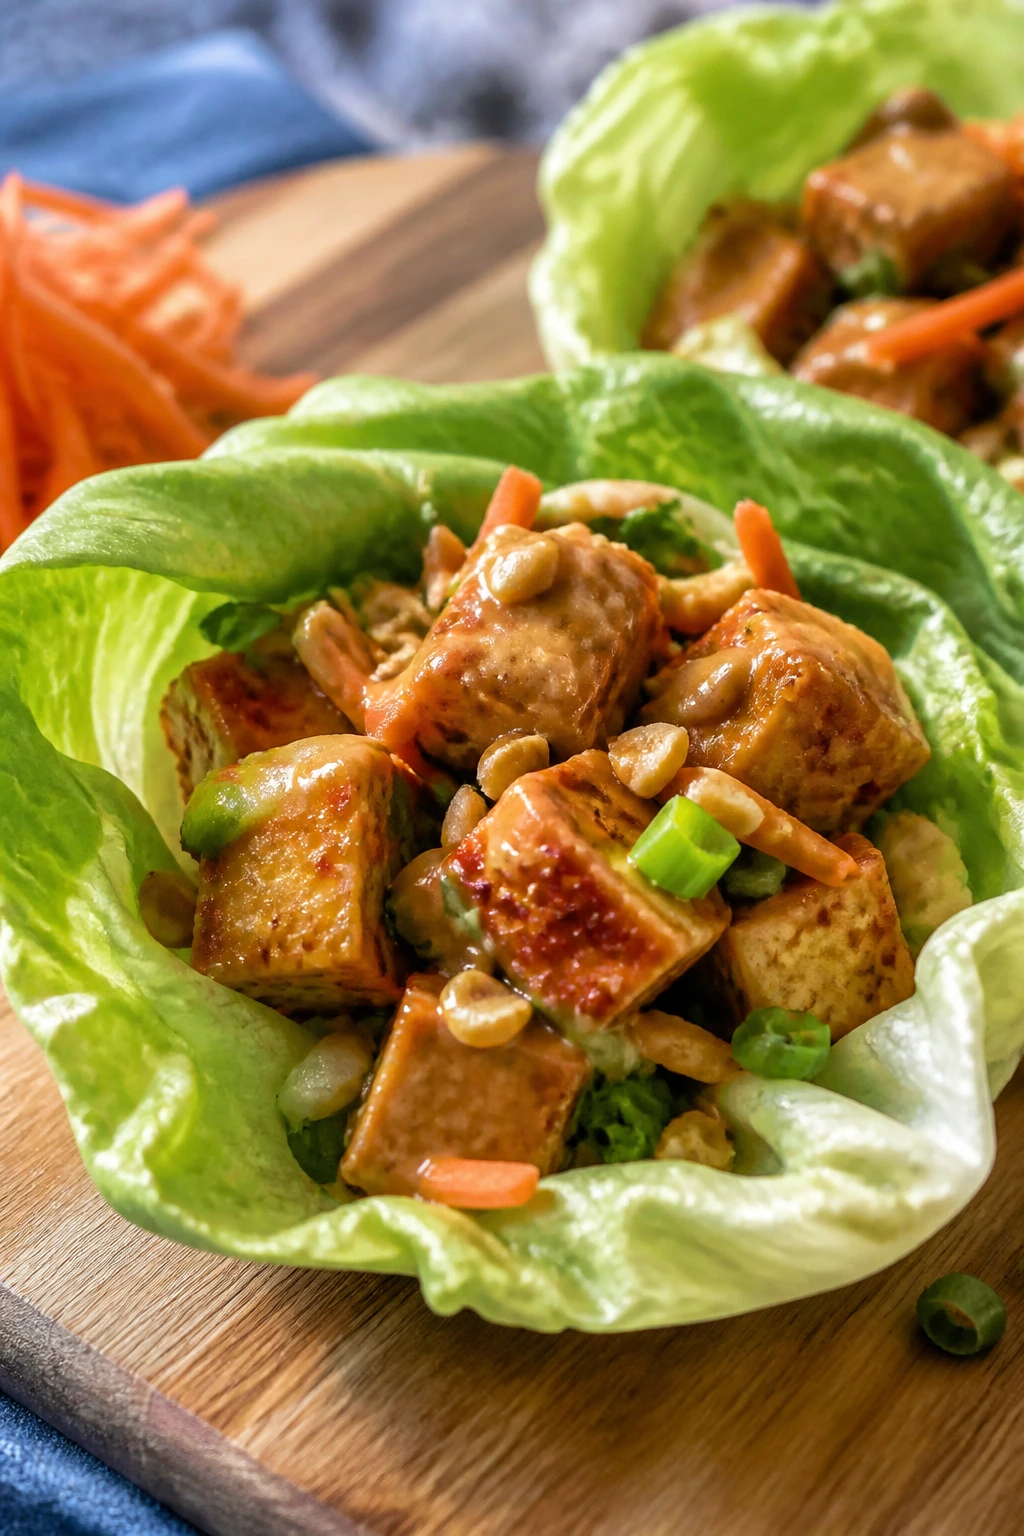
Why It Works:
Lettuce cups keep the filling crisp and portable, and tofu soaks up peanut sauce better than it gets credit for. The result is light, crunchy, and not a bit shy about flavor.
Key Ingredients:
- 1 block extra-firm tofu, pressed and cubed
- 2 tbsp soy sauce
- 2 tbsp peanut butter
- 1 tbsp rice vinegar
- 1 tbsp honey
- 1 head butter lettuce
- 1 cup shredded carrots
Quick Steps:
- Toss tofu with soy sauce and pan-sear until browned on 2 to 3 sides.
- Whisk peanut butter, vinegar, honey, chili paste, and a splash of warm water.
- Toss tofu with half the sauce.
- Spoon into lettuce leaves with carrots and cilantro.
- Pack the sauce separately for drizzling.
Equipment for This Recipe:
- Skillet
- Whisk
- Spoon
How to Serve This Dish:
Set out the cups and sauce together so people can build as they go. A small bowl of rice on the side turns this from snacky to dinner-fast.
Pro Tips for This Recipe:
- Press the tofu well or it won’t brown.
- Use sturdy lettuce leaves; flimsy ones tear under the filling.
- Thin the peanut sauce just enough to drizzle.
Variations on This Dish:
- Chicken Version: Swap tofu for diced chicken thighs.
- Sesame Version: Add sesame oil and crushed peanuts for more crunch.
Common Mistakes to Avoid with This Dish:
- Don’t skip the sear or the tofu tastes soft and dull.
- Don’t overdress the lettuce cups before packing; they collapse.
16. Cobb Salad Skewers with Bacon and Egg
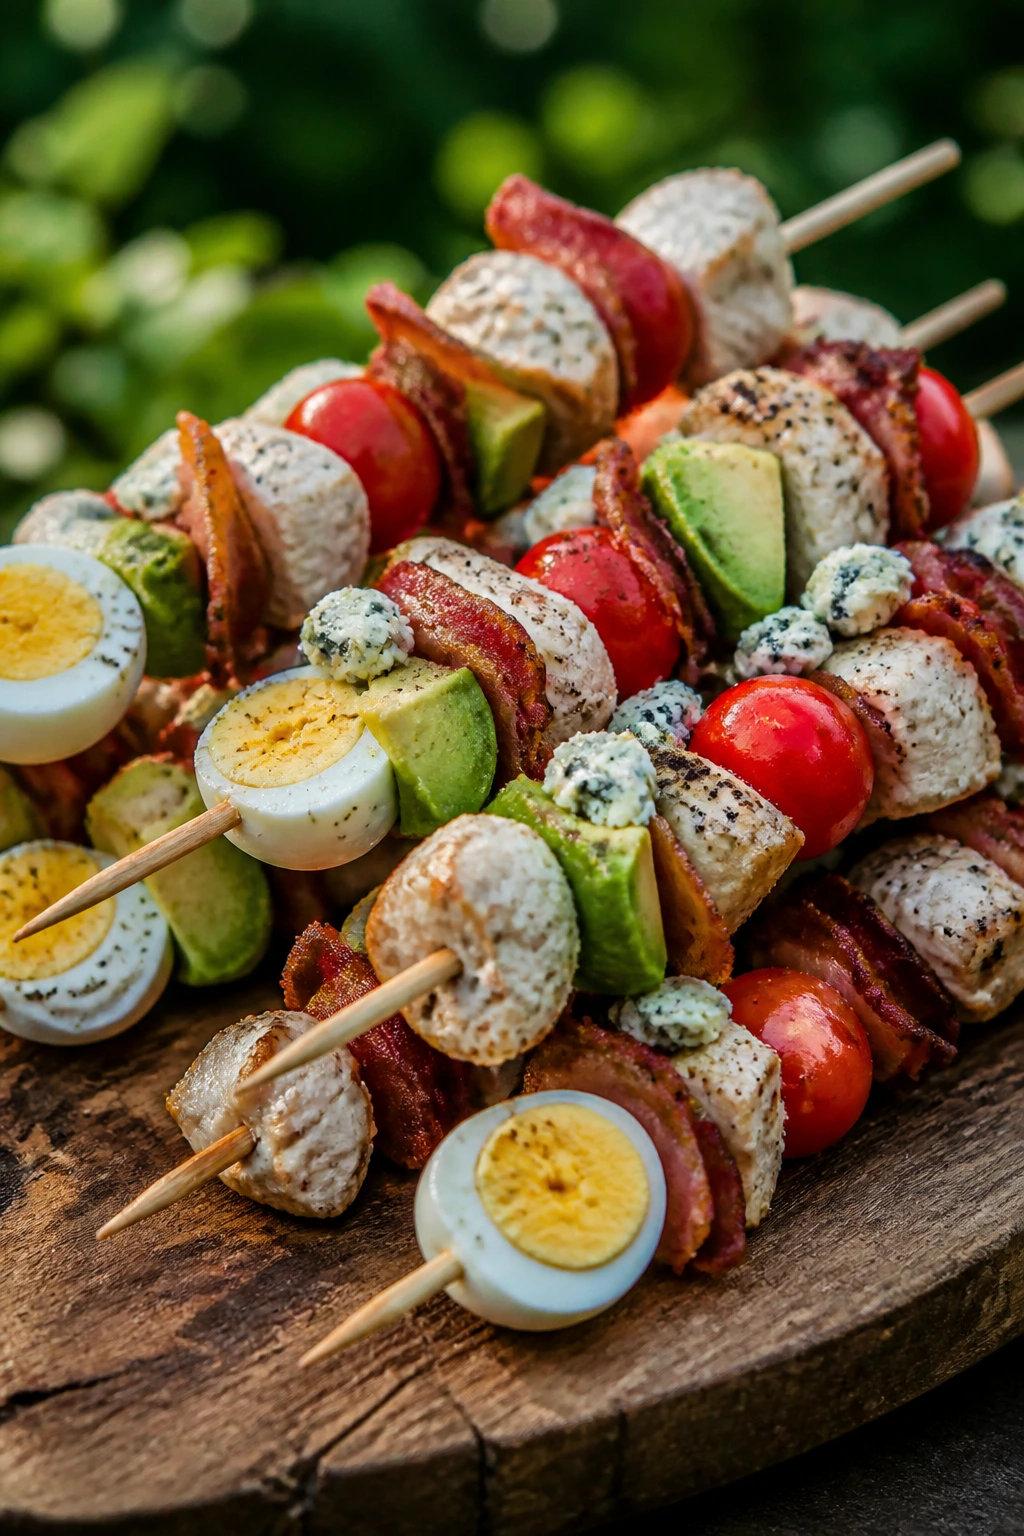
Why It Works:
This is Cobb salad in a form that doesn’t require balancing a forkful of everything at once. Each bite gets bacon, egg, tomato, and avocado, and the skewer does the arranging for you.
Key Ingredients:
- 4 hard-boiled eggs, halved
- 8 cherry tomatoes
- 1 avocado, cubed
- 4 strips cooked bacon, cut into pieces
- 1 cup cooked chicken, cubed
- ¼ cup blue cheese crumbles
- Ranch or vinaigrette for dipping
Quick Steps:
- Cook and cool the eggs, bacon, and chicken.
- Thread egg, tomato, avocado, bacon, and chicken onto short skewers.
- Sprinkle with blue cheese just before packing.
- Keep the dressing in a small container.
- Chill the skewers until the picnic starts.
Equipment for This Recipe:
- Short skewers
- Saucepan
- Small container for dressing
How to Serve This Dish:
Lay the skewers over lettuce or serve them standing up in a tall cup. Dip is optional, but I’d pack it anyway because people always want it.
Pro Tips for This Recipe:
- Use firm avocado so it doesn’t smear.
- Keep the dressing separate until serving.
- If the skewers are short, fewer ingredients per stick makes them easier to eat.
Variations on This Dish:
- No-Bacon Version: Replace bacon with roasted chickpeas.
- Shrimp Version: Use chilled shrimp instead of chicken for a lighter feel.
Common Mistakes to Avoid with This Dish:
- Don’t skewer soft avocado too hard or it falls apart.
- Don’t make the pieces too tiny; they’ll slip around.
17. Chicken Satay Rice Noodle Salad

Why It Works:
Rice noodles are gentle, chicken satay brings peanuty depth, and shredded vegetables keep the bowl bright. It eats cold without getting heavy, which is rare and useful.
Key Ingredients:
- 8 oz rice noodles
- 2 cups cooked chicken, sliced
- 1 cup shredded cabbage
- 1 cup cucumber matchsticks
- ¼ cup peanut butter
- 2 tbsp soy sauce
- 1 tbsp lime juice
Quick Steps:
- Soak or boil the rice noodles until tender, then rinse cold.
- Whisk peanut butter, soy sauce, lime juice, honey, and water until pourable.
- Toss noodles with chicken, cabbage, cucumber, and sauce.
- Top with chopped peanuts and cilantro.
- Chill before packing.
Equipment for This Recipe:
- Bowl
- Pot or heatproof bowl
- Tongs
How to Serve This Dish:
Serve in bowls with extra lime wedges. If you want it to feel more substantial, add edamame or cucumber ribbons.
Pro Tips for This Recipe:
- Rinse rice noodles well so they don’t clump.
- Keep the dressing thin enough to coat, not paste.
- Add peanuts at the end for crunch.
Variations on This Dish:
- Tofu Version: Swap chicken for seared tofu cubes.
- Mild Version: Skip chili and let the lime carry the flavor.
Common Mistakes to Avoid with This Dish:
- Don’t let rice noodles sit undressed too long or they seize up.
- Don’t use too much sauce; it should cling, not pool.
18. Greek Orzo Salad with Artichokes
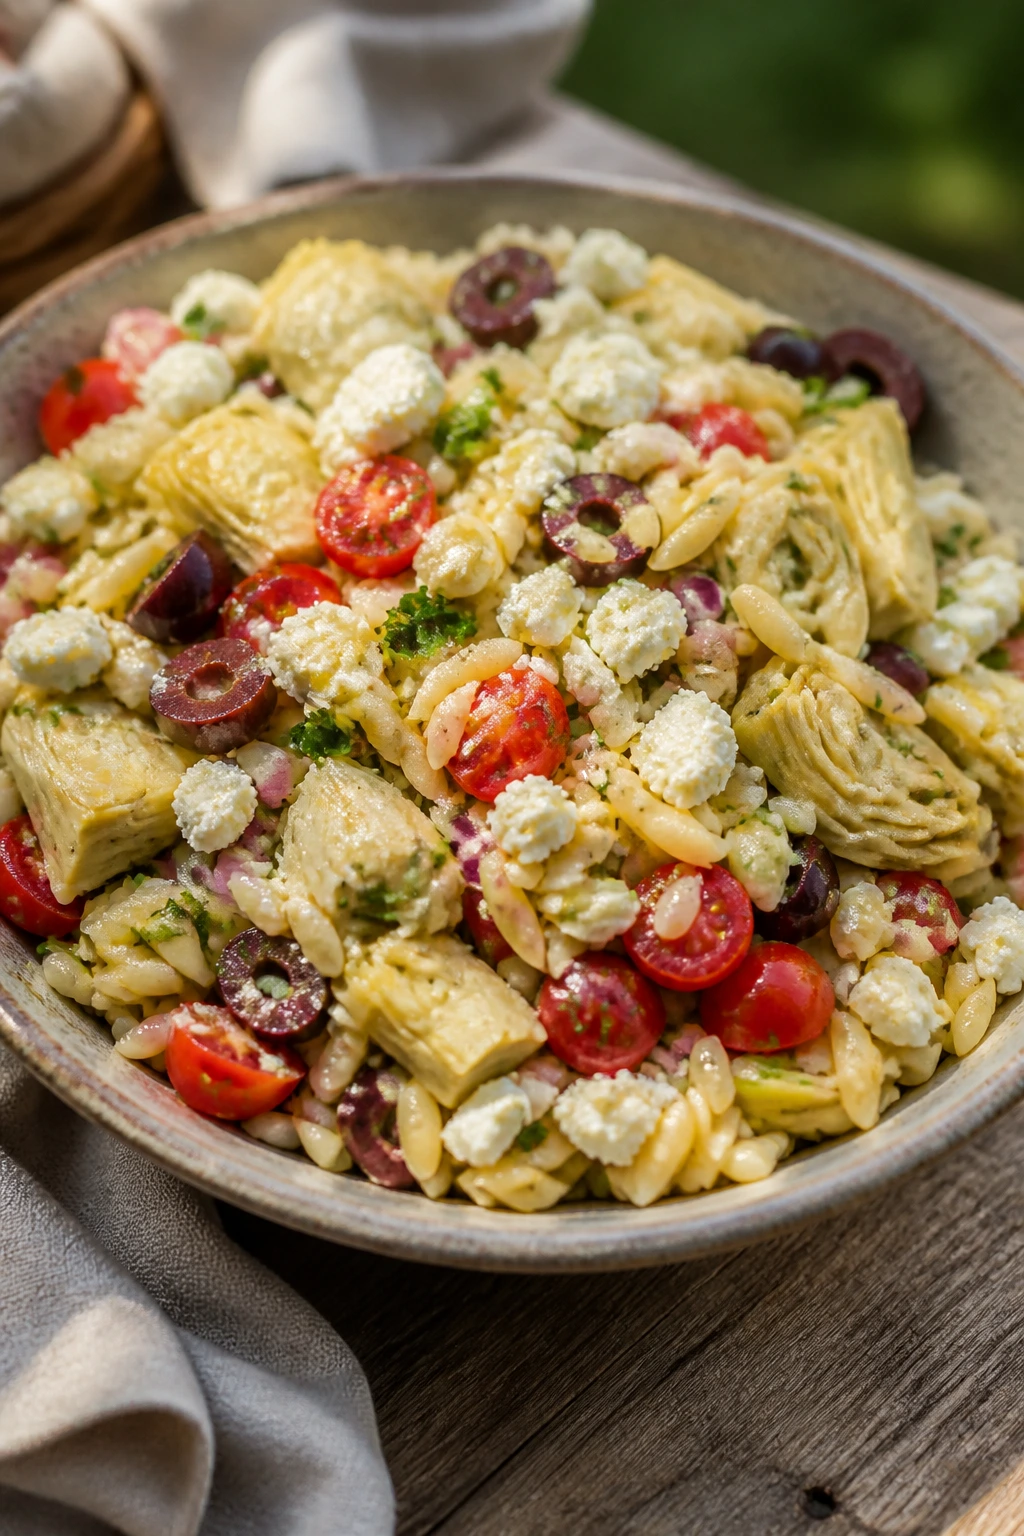
Why It Works:
Orzo gives you pasta comfort in a small shape that’s easy to eat cold. Artichokes and olives keep the salad briny, which makes it taste more finished than a plain pasta bowl.
Key Ingredients:
- 12 oz orzo
- 1 can artichoke hearts, drained and chopped
- ½ cup kalamata olives, sliced
- 1 cup cherry tomatoes, halved
- ½ cup feta
- 3 tbsp olive oil
- 2 tbsp lemon juice
Quick Steps:
- Cook the orzo until just tender, then rinse briefly and drain well.
- Whisk oil, lemon juice, garlic, salt, and pepper.
- Toss with artichokes, olives, tomatoes, feta, and parsley.
- Chill for 20 minutes.
- Stir once before serving so the dressing redistributes.
Equipment for This Recipe:
- Pot
- Strainer
- Mixing bowl
How to Serve This Dish:
Serve as the main bowl or alongside grilled chicken or fish. I like it in a shallow dish because the feta and tomatoes look better spread out than piled up.
Pro Tips for This Recipe:
- Drain the artichokes well or the salad gets slippery.
- Add the feta gently so it doesn’t disappear.
- A little more lemon at serving time sharpens the whole bowl.
Variations on This Dish:
- Pepperoncini Version: Add sliced pepperoncini for heat and tang.
- No-Feta Version: Use toasted pine nuts and extra olive oil.
Common Mistakes to Avoid with This Dish:
- Don’t overcook the orzo or it clumps after chilling.
- Don’t toss the salad while the pasta is steaming hot.
19. BBQ Pulled Chicken Sliders with Slaw
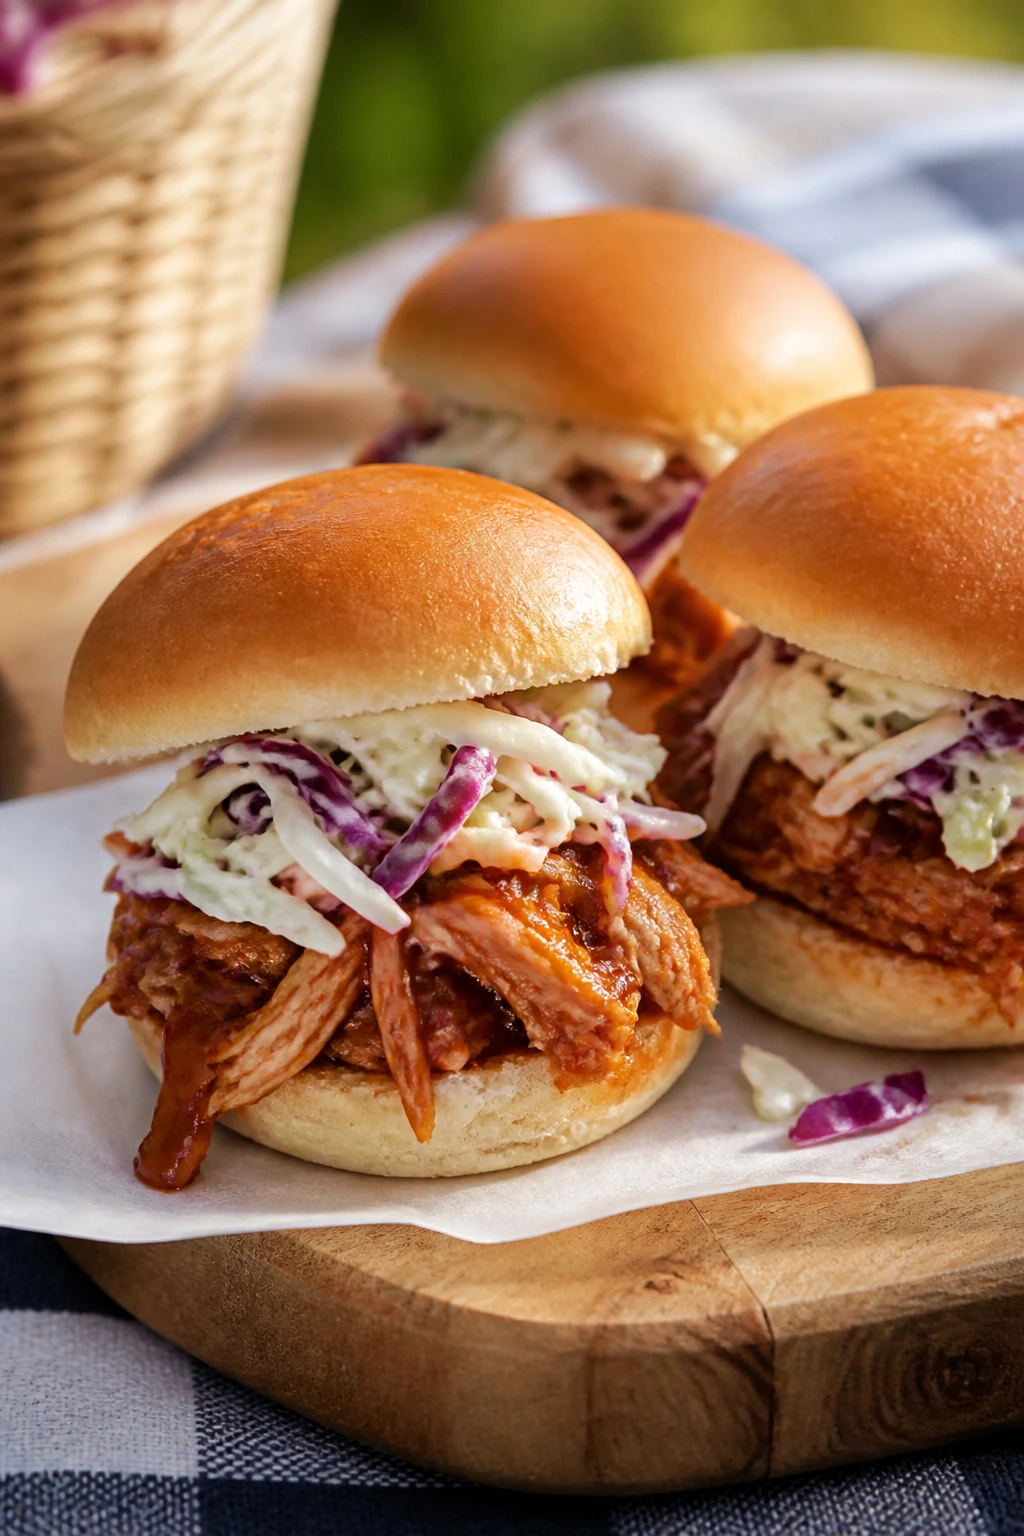
Why It Works:
Pulled chicken is lighter than pulled pork and still gives you that smoky, saucy bite. Slaw cuts through the barbecue sauce so the sliders don’t feel sticky or too rich.
Key Ingredients:
- 2 cups shredded cooked chicken
- ½ cup barbecue sauce
- 2 cups coleslaw mix
- 2 tbsp mayonnaise
- 1 tbsp apple cider vinegar
- 8 slider buns
- Pickles, optional
Quick Steps:
- Warm the chicken with barbecue sauce until just hot.
- Toss slaw mix with mayo, vinegar, salt, and pepper.
- Split the buns and layer in chicken, slaw, and pickles.
- Wrap each slider in parchment.
- Serve warm or room temperature.
Equipment for This Recipe:
- Skillet
- Mixing bowl
- Foil or parchment
How to Serve This Dish:
Three sliders make a generous picnic dinner, especially with fruit or chips on the side. Keep the slaw separate if you want the buns to stay drier.
Pro Tips for This Recipe:
- Use buns that are soft but sturdy; flimsy buns fold in half.
- Don’t drown the chicken in sauce or the sliders get messy.
- Toast the cut sides of the buns if you’re assembling at home.
Variations on This Dish:
- Spicy BBQ Version: Add hot sauce to the chicken.
- Carolina-Style Version: Swap the sauce for a vinegary barbecue style.
Common Mistakes to Avoid with This Dish:
- Don’t assemble too early unless you like soggy buns.
- Don’t skip the slaw; the sandwich needs the crunch.
20. Chilled Avocado Soup with Crab Toasts
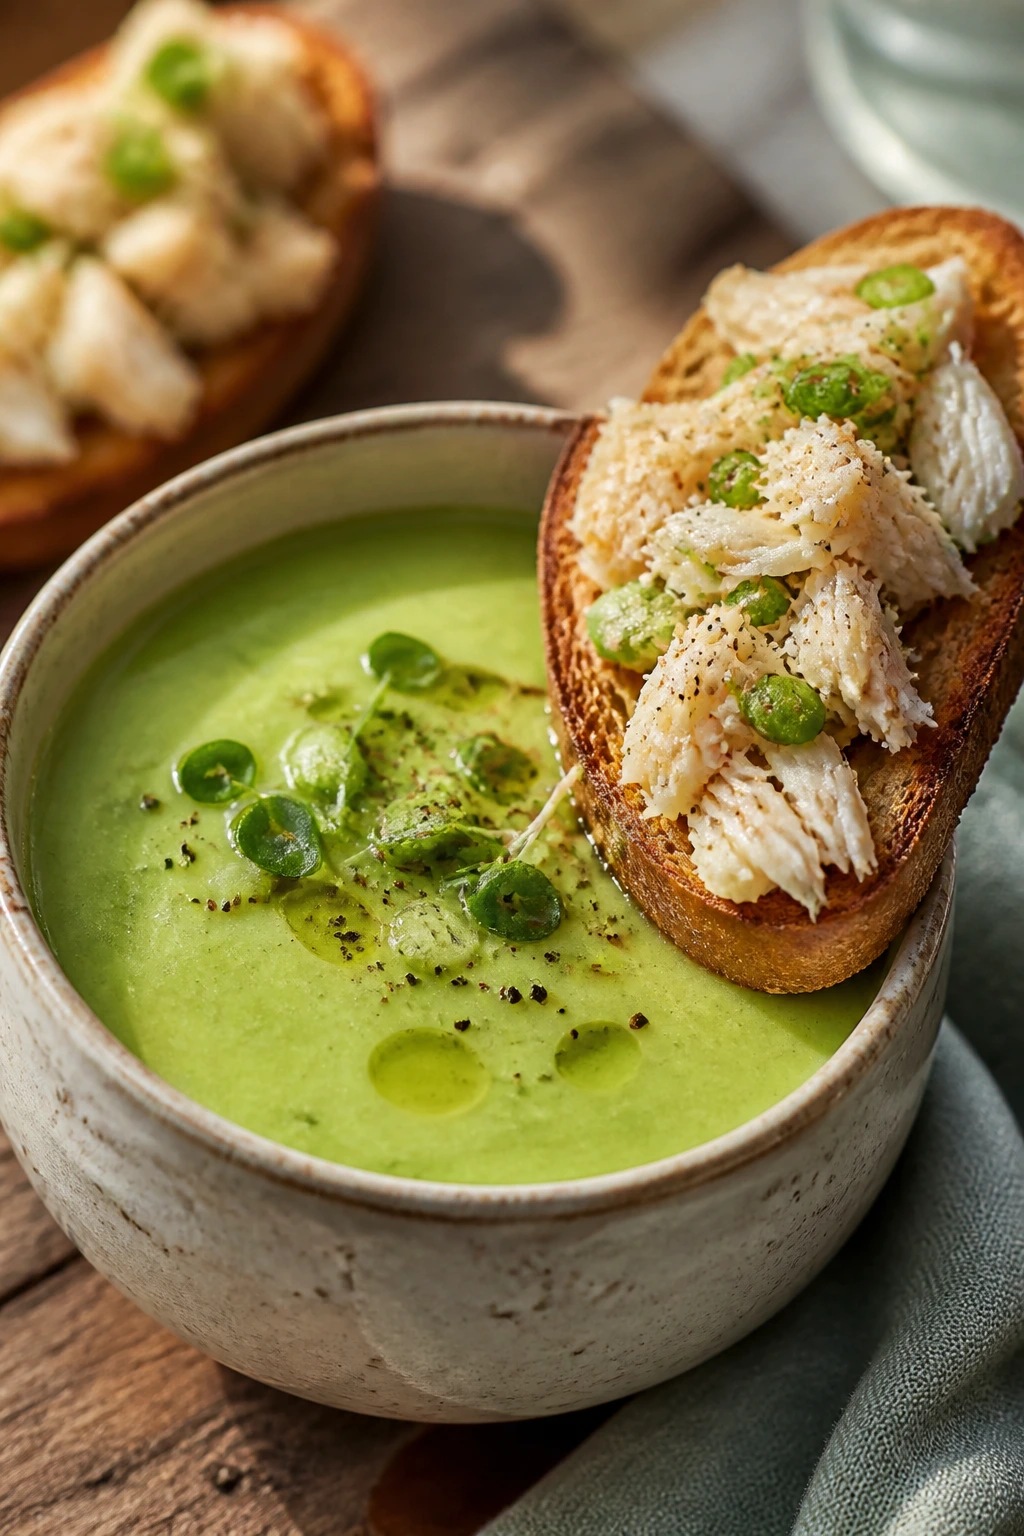
Why It Works:
Cold avocado soup is silky without needing cream, and crab toast gives the meal some texture and a little luxury without making it feel heavy. This one is calm, cool, and surprisingly filling.
Key Ingredients:
- 2 ripe avocados
- 1 cucumber, peeled and chopped
- 1 cup plain yogurt
- 1 tbsp lime juice
- 1 cup lump crab meat
- 4 slices baguette, toasted
- 1 tbsp olive oil
Quick Steps:
- Blend avocado, cucumber, yogurt, lime juice, salt, and water until smooth.
- Chill the soup for at least 30 minutes.
- Mix crab with a little lemon, salt, and pepper.
- Spoon crab onto toasted baguette slices.
- Pack the soup in a cold container and the toasts separately.
Equipment for This Recipe:
- Blender
- Toaster or oven
- Small bowl
How to Serve This Dish:
Pour the soup into cups or shallow bowls and float the crab toast alongside. A few chives on top make it look finished without much effort.
Pro Tips for This Recipe:
- Add water a tablespoon at a time until the soup pours easily.
- Chill the soup well; it tastes flat if it’s merely cool.
- Toast the bread hard enough to resist the crab.
Variations on This Dish:
- Shrimp Version: Swap crab for chopped shrimp.
- Herb Version: Add dill and mint to the soup for a greener flavor.
Common Mistakes to Avoid with This Dish:
- Don’t blend the soup too thin or it becomes watery.
- Don’t assemble the toast too early or the bread softens.
21. Prosciutto, Melon, and Burrata Skewers with Arugula
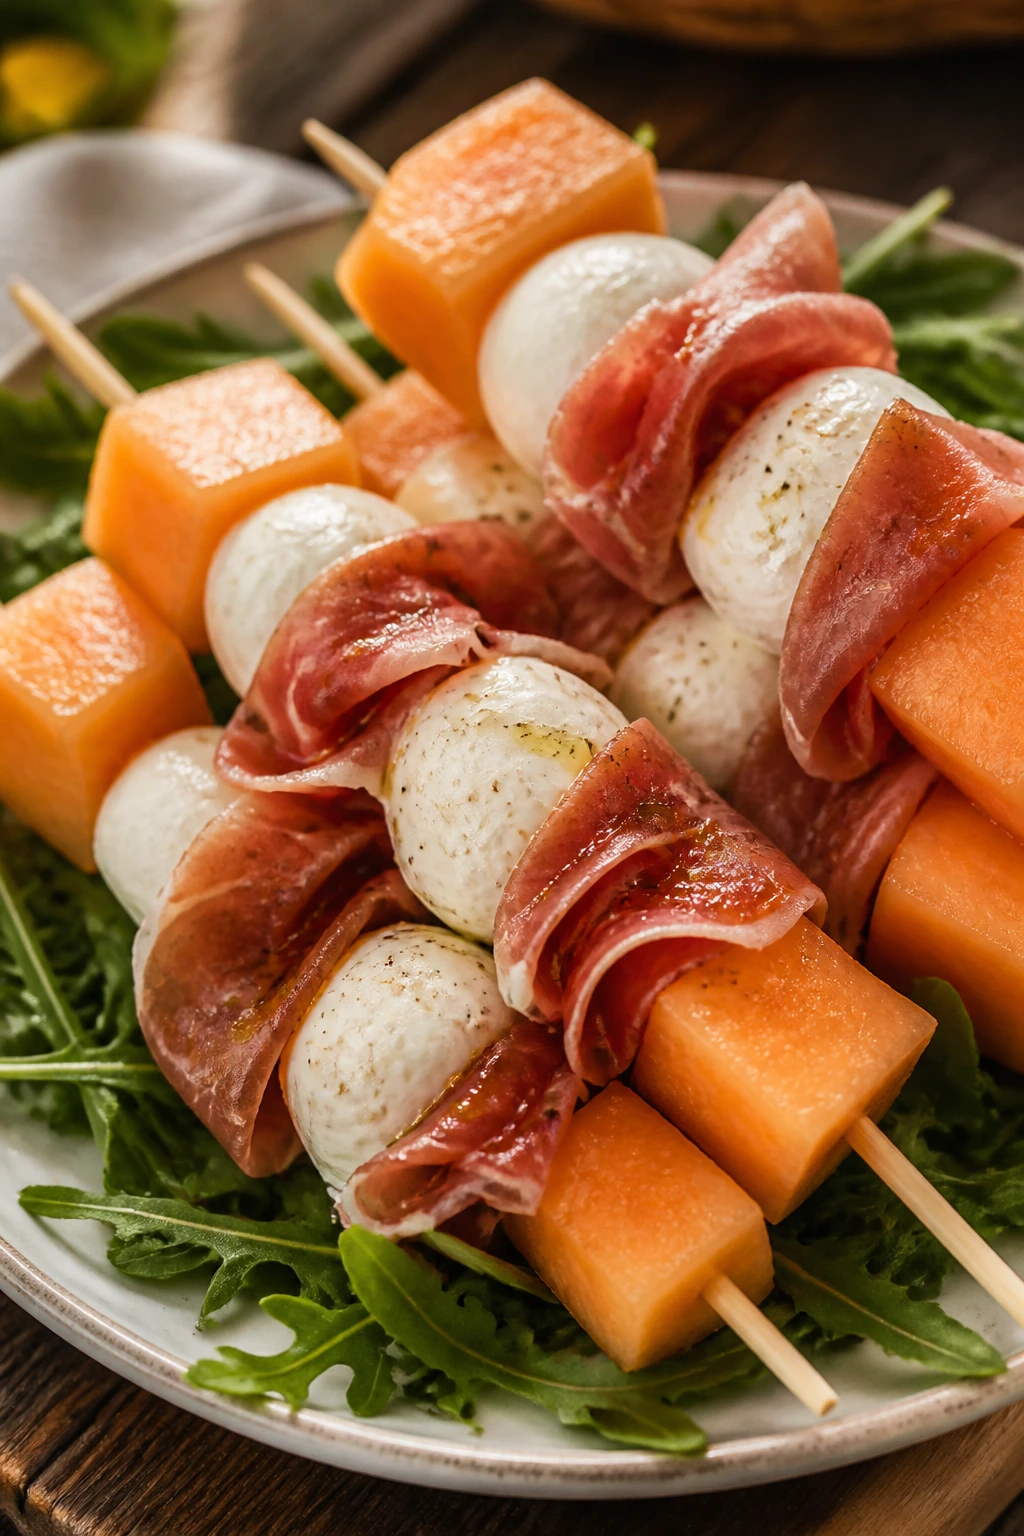
Why It Works:
Sweet melon and salty prosciutto are old friends, and burrata adds a creamy center that feels indulgent without needing a full spread. The skewers keep the whole thing neat, which I appreciate.
Key Ingredients:
- 2 cups cantaloupe cubes
- 8 slices prosciutto, folded
- 8 oz burrata, torn into pieces
- 2 cups arugula
- 2 tbsp olive oil
- 1 tbsp balsamic glaze
- 8 small skewers
Quick Steps:
- Thread melon, prosciutto, and burrata onto skewers.
- Toss arugula with olive oil, salt, and pepper.
- Drizzle the skewers lightly with balsamic glaze.
- Pack the arugula and skewers separately.
- Assemble right before eating.
Equipment for This Recipe:
- Small skewers
- Bowl
- Knife
How to Serve This Dish:
Set the skewers over the arugula so the plate doesn’t look bare. A slice of good bread is enough to make it dinner.
Pro Tips for This Recipe:
- Chill the melon before assembling so the burrata stays fresh.
- Use thick enough prosciutto slices that they don’t tear on the skewer.
- Add the glaze sparingly; too much makes it sticky.
Variations on This Dish:
- Peach Version: Swap cantaloupe for peach wedges.
- Mozzarella Version: Use bocconcini if burrata is too soft for travel.
Common Mistakes to Avoid with This Dish:
- Don’t make the melon pieces too small or they split.
- Don’t drizzle glaze early; it turns the skewers slick.
22. Thai Basil Beef Lettuce Wraps
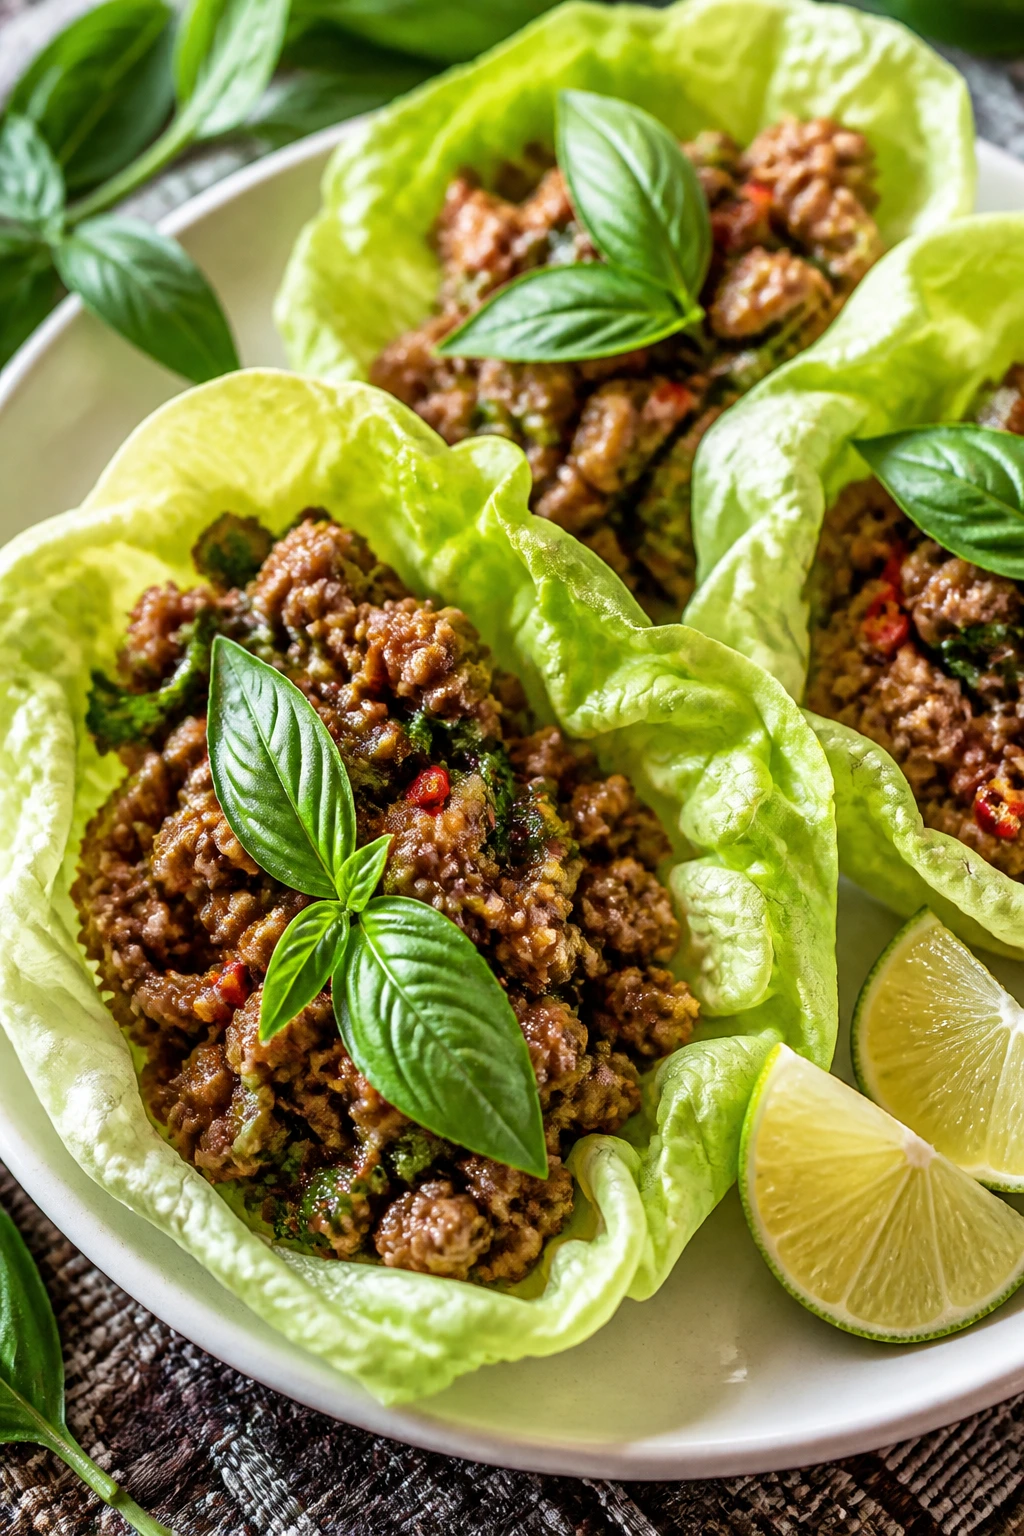
Why It Works:
Thin beef cooks fast and stays tender, while basil and lime keep the flavor bright. Lettuce gives you the crunch, and the filling feels lively instead of weighed down.
Key Ingredients:
- 1 lb ground beef
- 1 tbsp soy sauce
- 1 tbsp fish sauce
- 1 tsp brown sugar
- 1 cup Thai basil or regular basil
- 1 head romaine or butter lettuce
- 1 red chili, sliced
Quick Steps:
- Brown the beef in a skillet over medium-high heat.
- Stir in soy sauce, fish sauce, sugar, garlic, and chili.
- Cook until the liquid glosses the meat, about 2 minutes.
- Fold in basil off the heat.
- Pack with lettuce leaves and lime wedges.
Equipment for This Recipe:
- Skillet
- Wooden spoon
- Serving bowl
How to Serve This Dish:
Put the beef in one container and the lettuce in another. A scoop of jasmine rice on the side works if you want a fuller dinner.
Pro Tips for This Recipe:
- Keep the beef crumbled small so it packs into lettuce leaves cleanly.
- Add basil at the end so it stays fragrant.
- Drain excess fat if the beef is on the rich side.
Variations on This Dish:
- Turkey Version: Ground turkey works if you want it leaner.
- Mild Version: Leave out the chili and add sliced cucumber.
Common Mistakes to Avoid with This Dish:
- Don’t overcook the beef; it should stay juicy.
- Don’t pack the lettuce with hot filling or it wilts.
23. Zucchini Frittata Squares with Tomato Relish
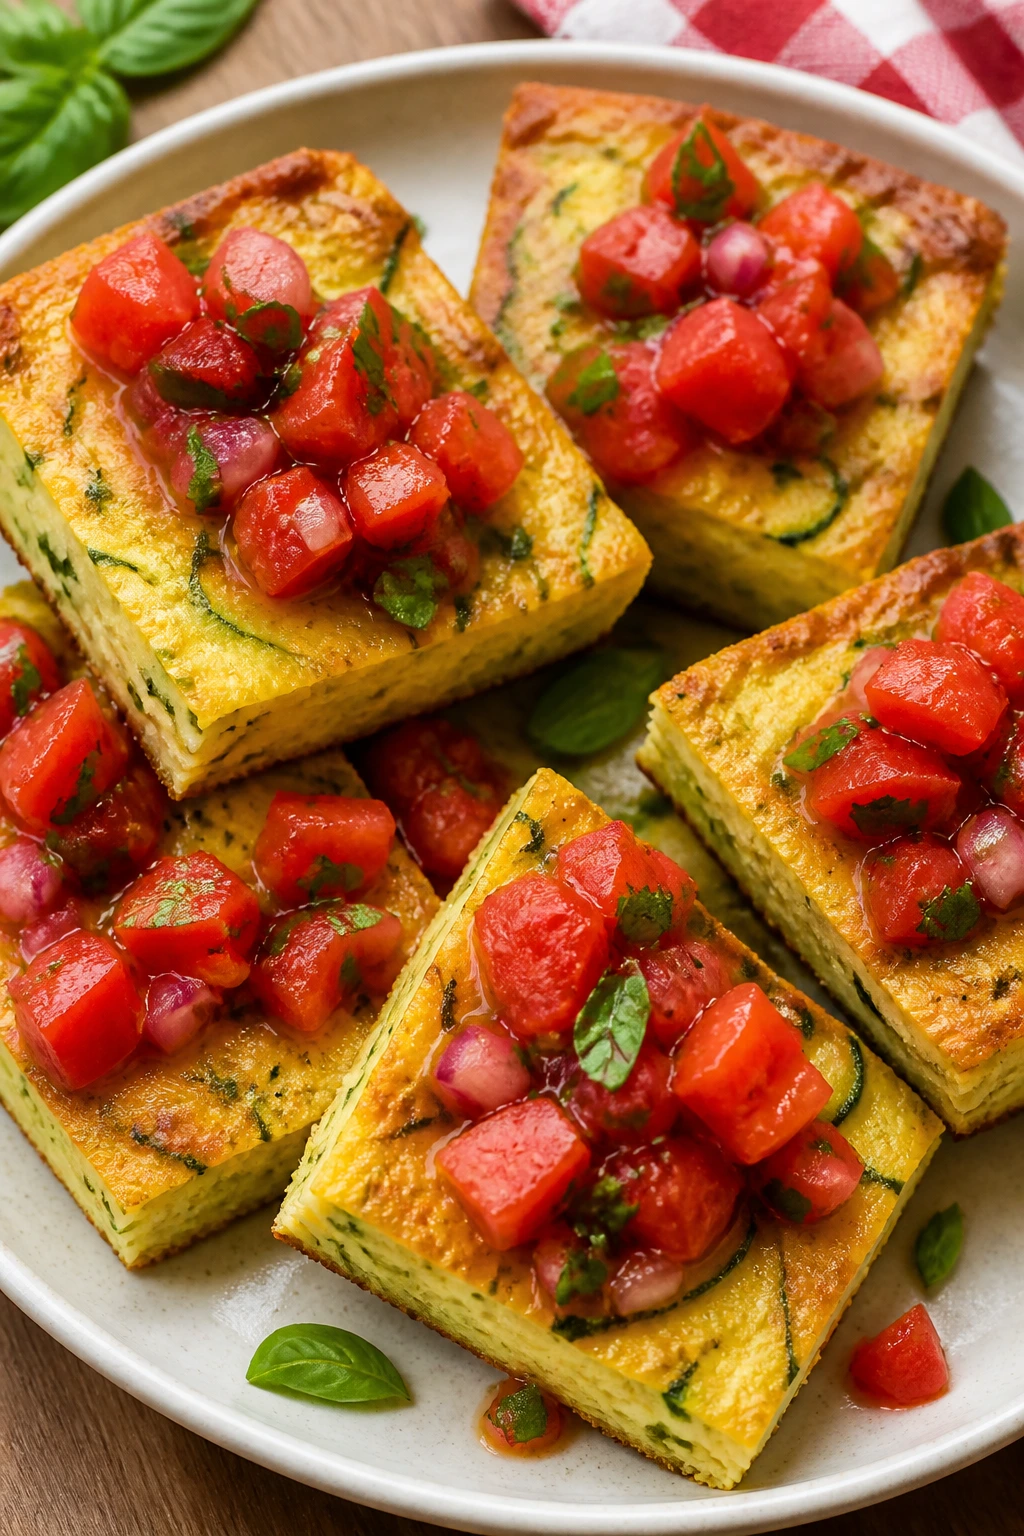
Why It Works:
Frittata cuts cleanly, tastes fine warm or cold, and handles picnic travel better than most egg dishes. Zucchini keeps it light, and tomato relish adds the zip.
Key Ingredients:
- 8 eggs
- 1 zucchini, grated and squeezed dry
- ½ cup shredded Parmesan
- 2 tbsp olive oil
- 1 cup chopped tomatoes
- 1 tbsp red wine vinegar
- 2 tbsp chopped basil
Quick Steps:
- Sauté the zucchini in oil until most moisture cooks off.
- Whisk eggs, Parmesan, salt, and pepper.
- Stir in zucchini and pour into a greased skillet.
- Bake at 375°F for 18 to 22 minutes until set in the center.
- Mix tomatoes, vinegar, basil, and salt for the relish.
Equipment for This Recipe:
- Oven-safe skillet
- Whisk
- Mixing bowl
How to Serve This Dish:
Cut into squares and top with tomato relish right before serving. A green salad or grilled bread makes this feel like a proper dinner.
Pro Tips for This Recipe:
- Squeeze the zucchini dry or the eggs stay loose.
- Let the frittata cool before cutting for cleaner squares.
- The relish can be made a few hours ahead.
Variations on This Dish:
- Goat Cheese Version: Swap Parmesan for goat cheese crumbles.
- Herb Garden Version: Add dill, parsley, and chives.
Common Mistakes to Avoid with This Dish:
- Don’t underbake the center or the squares fall apart.
- Don’t forget to season the eggs; they need salt before baking.
24. Shrimp Avocado Ceviche Cups
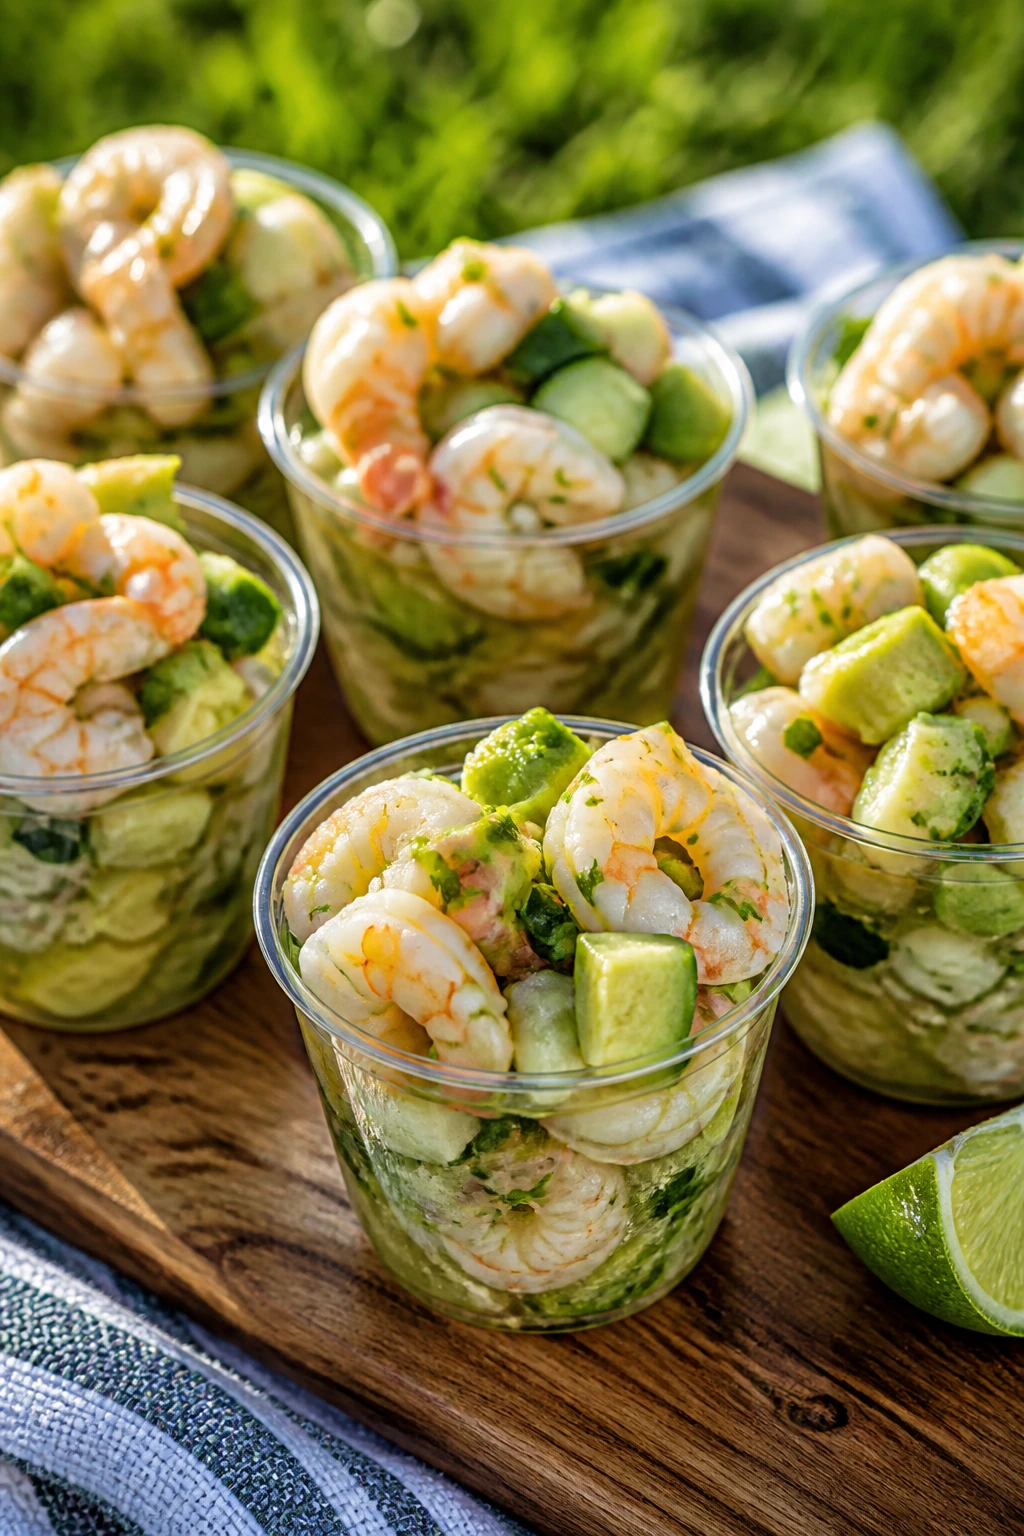
Why It Works:
When the shrimp are cooked and chilled, the citrus and avocado make a cool, clean bite that feels right for hot weather. The cups keep the ceviche tidy and easy to hand around.
Key Ingredients:
- 1 lb cooked shrimp, chopped
- 2 avocados, diced
- 1 cup diced cucumber
- ½ cup tomato, diced
- 3 tbsp lime juice
- 2 tbsp chopped cilantro
- Tortilla chips or endive leaves
Quick Steps:
- Chop the shrimp into bite-size pieces.
- Toss shrimp with lime juice, cucumber, tomato, cilantro, salt, and pepper.
- Fold in avocado just before packing.
- Spoon into cups or small bowls.
- Serve with chips on the side.
Equipment for This Recipe:
- Mixing bowl
- Spoon
- Small cups
How to Serve This Dish:
These are best eaten cold and fast. I like them in clear cups because the layers look tidy and the avocado doesn’t disappear.
Pro Tips for This Recipe:
- Use fully cooked shrimp; this is not the place for guesswork.
- Add avocado last so it stays chunky.
- If the lime is strong, balance it with a pinch of sugar.
Variations on This Dish:
- Mango Version: Add diced mango for sweetness.
- Spicy Version: Fold in minced jalapeño or serrano.
Common Mistakes to Avoid with This Dish:
- Don’t let the avocado sit in lime too long or it softens.
- Don’t serve it warm; ceviche-style fillings need a cold start.
25. Roast Beef and Horseradish Arugula Roll-Ups

Why It Works:
Roast beef gives you a substantial bite without needing bread, and horseradish cuts through the richness. Arugula adds peppery crunch, which keeps the whole thing awake.
Key Ingredients:
- 8 oz sliced roast beef
- 4 large flour tortillas
- 3 tbsp horseradish cream
- 2 cups arugula
- ½ cup sliced roasted peppers
- 1 tsp Dijon mustard
Quick Steps:
- Stir horseradish cream and Dijon together.
- Spread over each tortilla.
- Layer roast beef, arugula, and peppers.
- Roll tightly and chill for 15 minutes.
- Slice into pinwheels or keep whole.
Equipment for This Recipe:
- Knife
- Cutting board
- Parchment
How to Serve This Dish:
These work as a main or as the meatier part of a picnic spread. A few pickles and potato chips make sense here.
Pro Tips for This Recipe:
- Use thin-sliced roast beef so the roll stays compact.
- Dry the peppers well.
- Chill before slicing or the layers slide.
Variations on This Dish:
- Rye Version: Serve the filling on rye bread instead of tortillas.
- Cheddar Version: Add thin cheddar slices for a more filling wrap.
Common Mistakes to Avoid with This Dish:
- Don’t overdo the horseradish unless you want guests blinking.
- Don’t stuff the wrap so full it splits.
26. Sesame Ginger Chicken Salad Jars
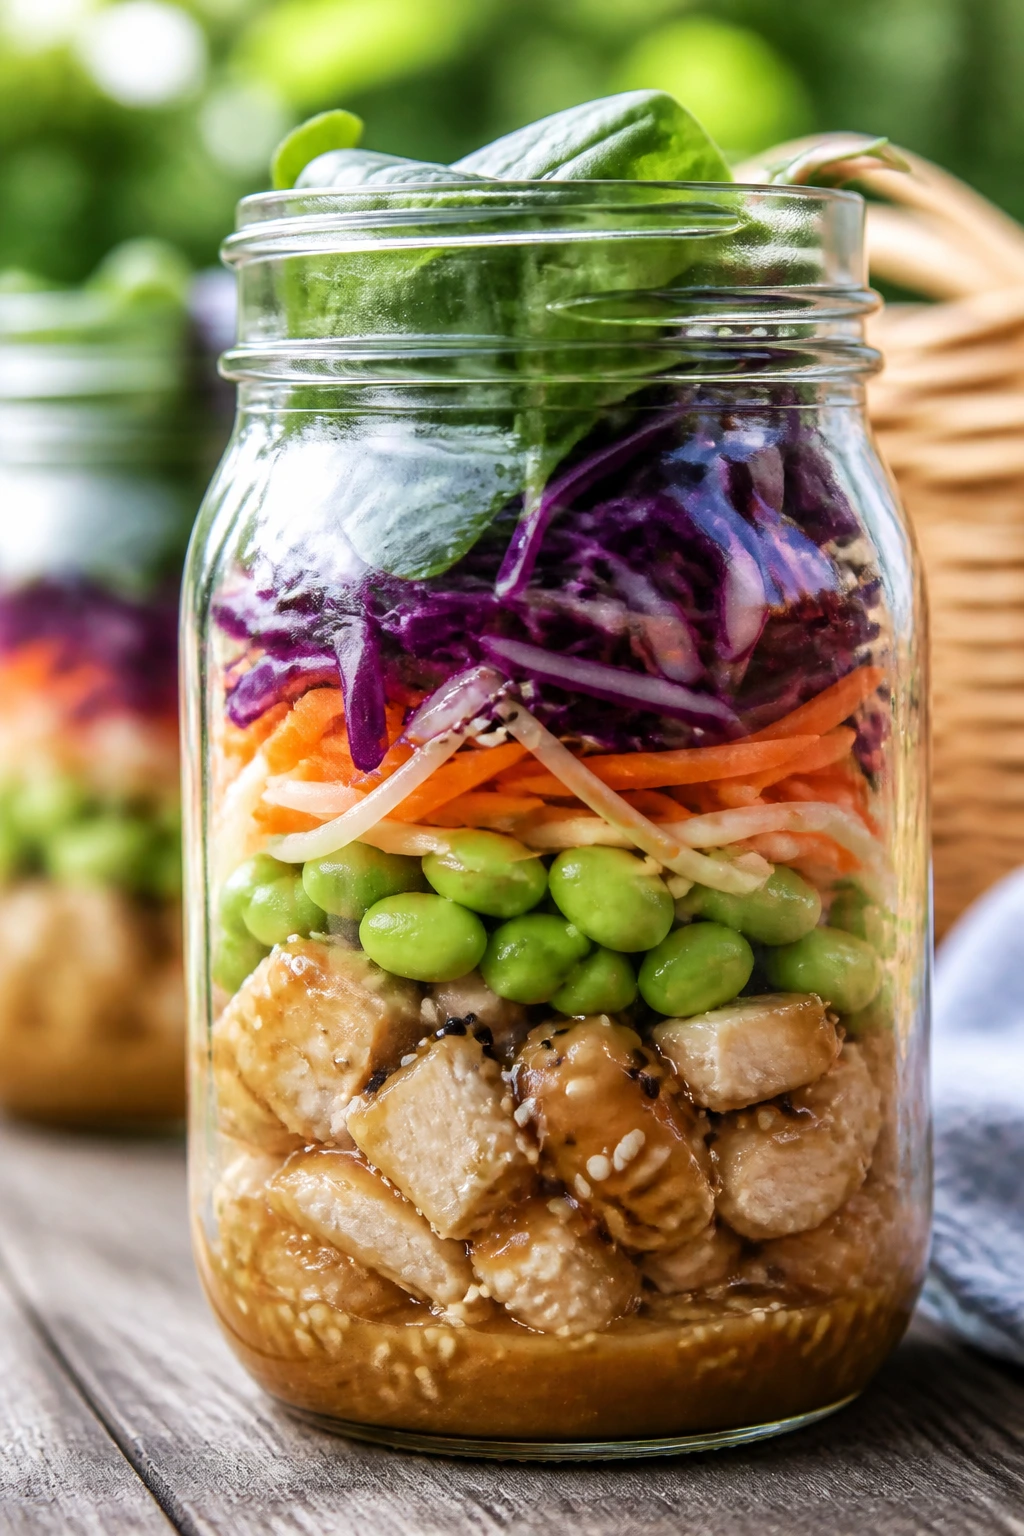
Why It Works:
This salad feels fresh because the dressing is sharp and the cabbage stays crunchy. Packing it in jars means the dressing works at the bottom instead of softening the greens on top.
Key Ingredients:
- 2 cups cooked chicken, shredded
- 2 cups shredded cabbage
- 1 cup shredded carrots
- ½ cup edamame
- 3 tbsp sesame oil
- 2 tbsp rice vinegar
- 1 tbsp grated ginger
Quick Steps:
- Whisk sesame oil, vinegar, soy sauce, ginger, and honey.
- Layer dressing in the jar first.
- Add chicken, edamame, carrots, cabbage, and scallions.
- Top with sesame seeds.
- Shake before eating.
Equipment for This Recipe:
- Jars
- Whisk
- Grater or microplane
How to Serve This Dish:
Pour into a bowl if you want a neater picnic, or eat from the jar if the day is casual. Rice crackers on the side help it feel like a full dinner.
Pro Tips for This Recipe:
- Put the sturdiest ingredients near the dressing.
- Grate ginger finely so it spreads instead of clumping.
- Keep herbs dry before layering.
Variations on This Dish:
- Tofu Version: Use baked tofu instead of chicken.
- Peanut Version: Add peanut butter to the dressing.
Common Mistakes to Avoid with This Dish:
- Don’t put lettuce at the bottom or it wilts fast.
- Don’t skip the acid; sesame alone can taste flat.
27. Loaded Hummus Veggie Pita
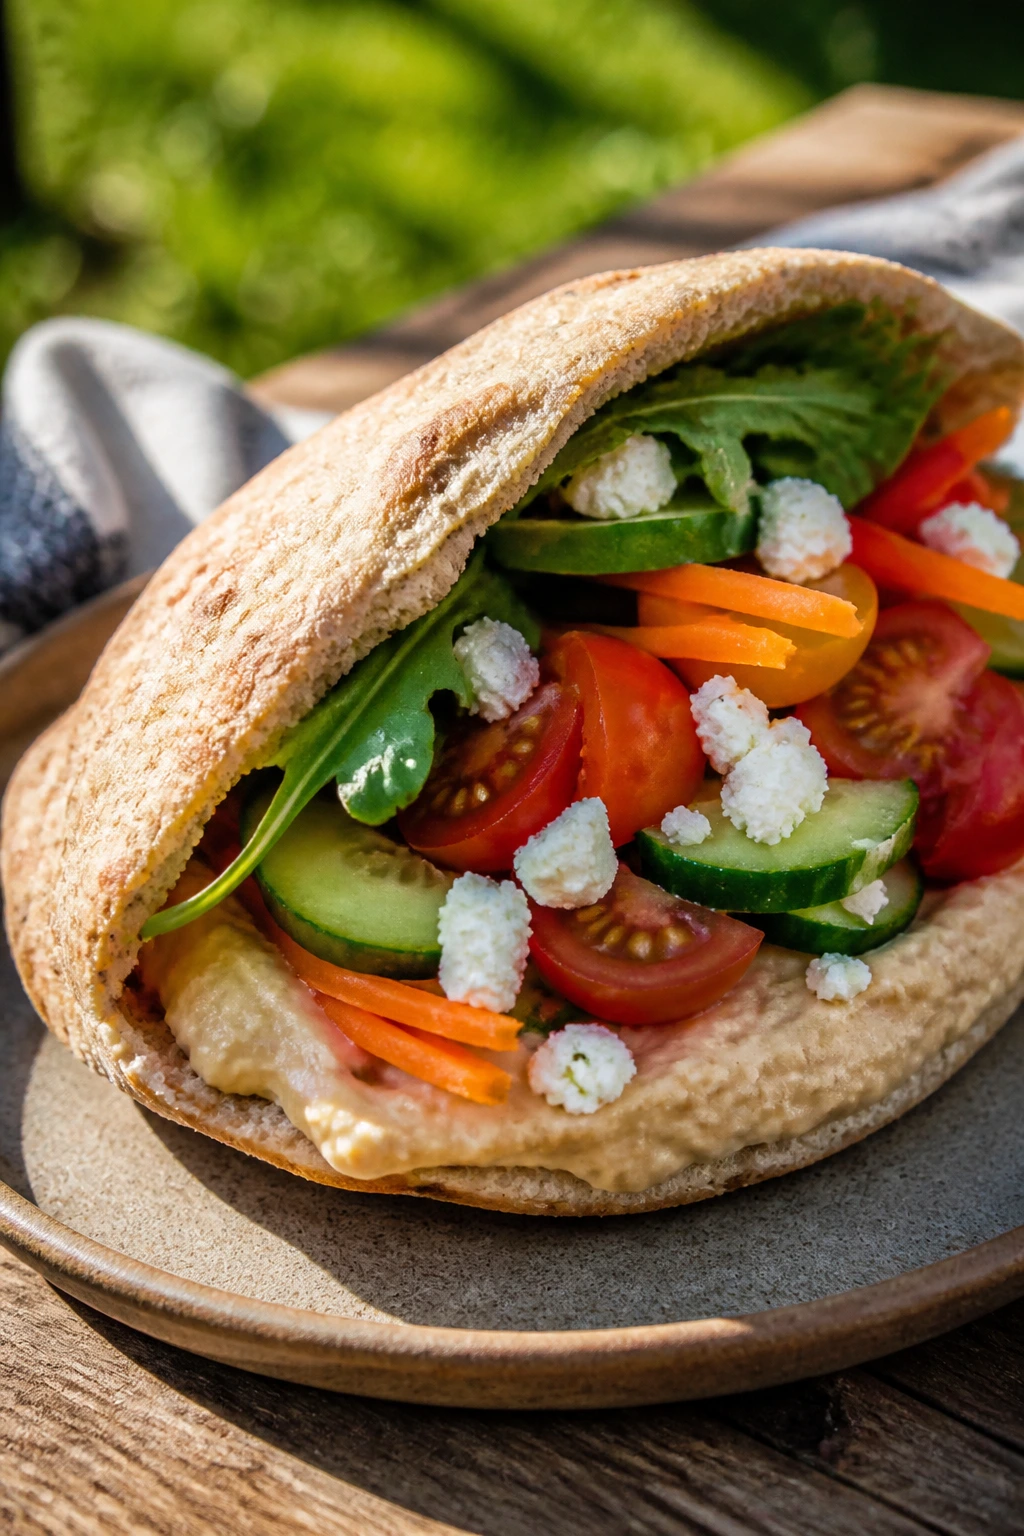
Why It Works:
Hummus acts like both spread and sauce, which makes these pitas easy to assemble and less likely to leak. The vegetables stay crisp, and the whole thing eats like a proper meal rather than a snack tray.
Key Ingredients:
- 1 cup hummus
- 4 whole-wheat pitas
- 1 cup cucumber slices
- 1 cup shredded carrots
- 1 cup chopped tomatoes
- ½ cup crumbled feta
- 1 cup romaine
Quick Steps:
- Warm or split the pitas carefully.
- Spread hummus inside each one.
- Layer romaine, cucumber, carrots, tomatoes, and feta.
- Add a little lemon juice and black pepper.
- Wrap in parchment and pack upright.
Equipment for This Recipe:
- Knife
- Cutting board
- Parchment paper
How to Serve This Dish:
Serve with olives or a handful of roasted chickpeas. If you want more heft, add sliced grilled chicken or falafel.
Pro Tips for This Recipe:
- Line the pita with lettuce first to protect it from the tomatoes.
- Use thick hummus; thin hummus gets messy.
- Cut vegetables into long strips so they fit the pita better.
Variations on This Dish:
- Avocado Version: Add sliced avocado for creaminess.
- Spicy Version: Stir harissa into the hummus.
Common Mistakes to Avoid with This Dish:
- Don’t add too much tomato juice or the pita softens fast.
- Don’t tear the pita while stuffing; open it gently.
28. Spinach Strawberry Salad with Grilled Chicken
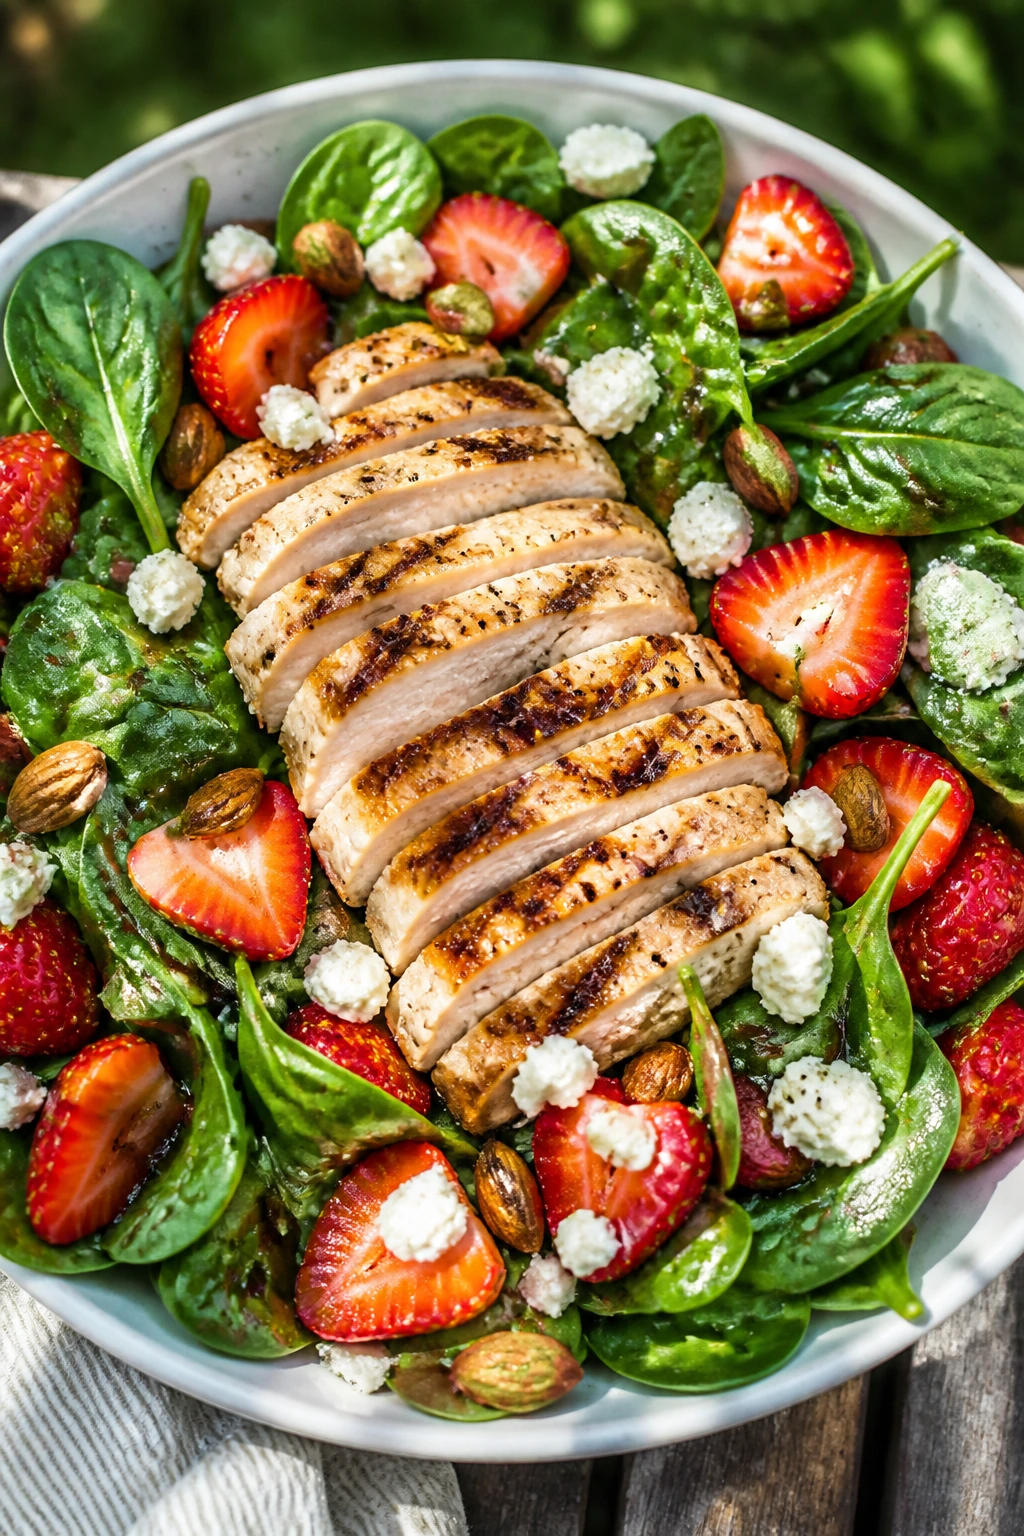
Why It Works:
Sweet strawberries and salty chicken give you contrast, and spinach handles light dressing better than delicate greens. Almonds add crunch, which keeps the salad from feeling soft.
Key Ingredients:
- 2 cups grilled chicken, sliced
- 6 cups baby spinach
- 2 cups strawberries, sliced
- ¼ cup sliced almonds
- ¼ cup feta
- 3 tbsp balsamic vinaigrette
- 1 tbsp olive oil
Quick Steps:
- Grill or sear the chicken and cool it.
- Toss spinach with just enough vinaigrette to gloss the leaves.
- Add strawberries, almonds, feta, and chicken.
- Pack dressing separately if the salad will sit.
- Fold together right before eating.
Equipment for This Recipe:
- Salad bowl
- Knife
- Small jar
How to Serve This Dish:
Serve in a wide bowl so the strawberries stay visible. This works well with toasted bread or a small scoop of grain salad if you need more dinner on the plate.
Pro Tips for This Recipe:
- Slice strawberries just before assembling.
- Toast the almonds for better flavor.
- Keep the chicken plain enough that it doesn’t fight the fruit.
Variations on This Dish:
- Blueberry Version: Swap strawberries for blueberries.
- Goat Cheese Version: Use goat cheese instead of feta.
Common Mistakes to Avoid with This Dish:
- Don’t dress spinach too early or it collapses.
- Don’t use bruised strawberries; they go soft fast.
29. Pasta Salad with Peas, Mint, and Lemon
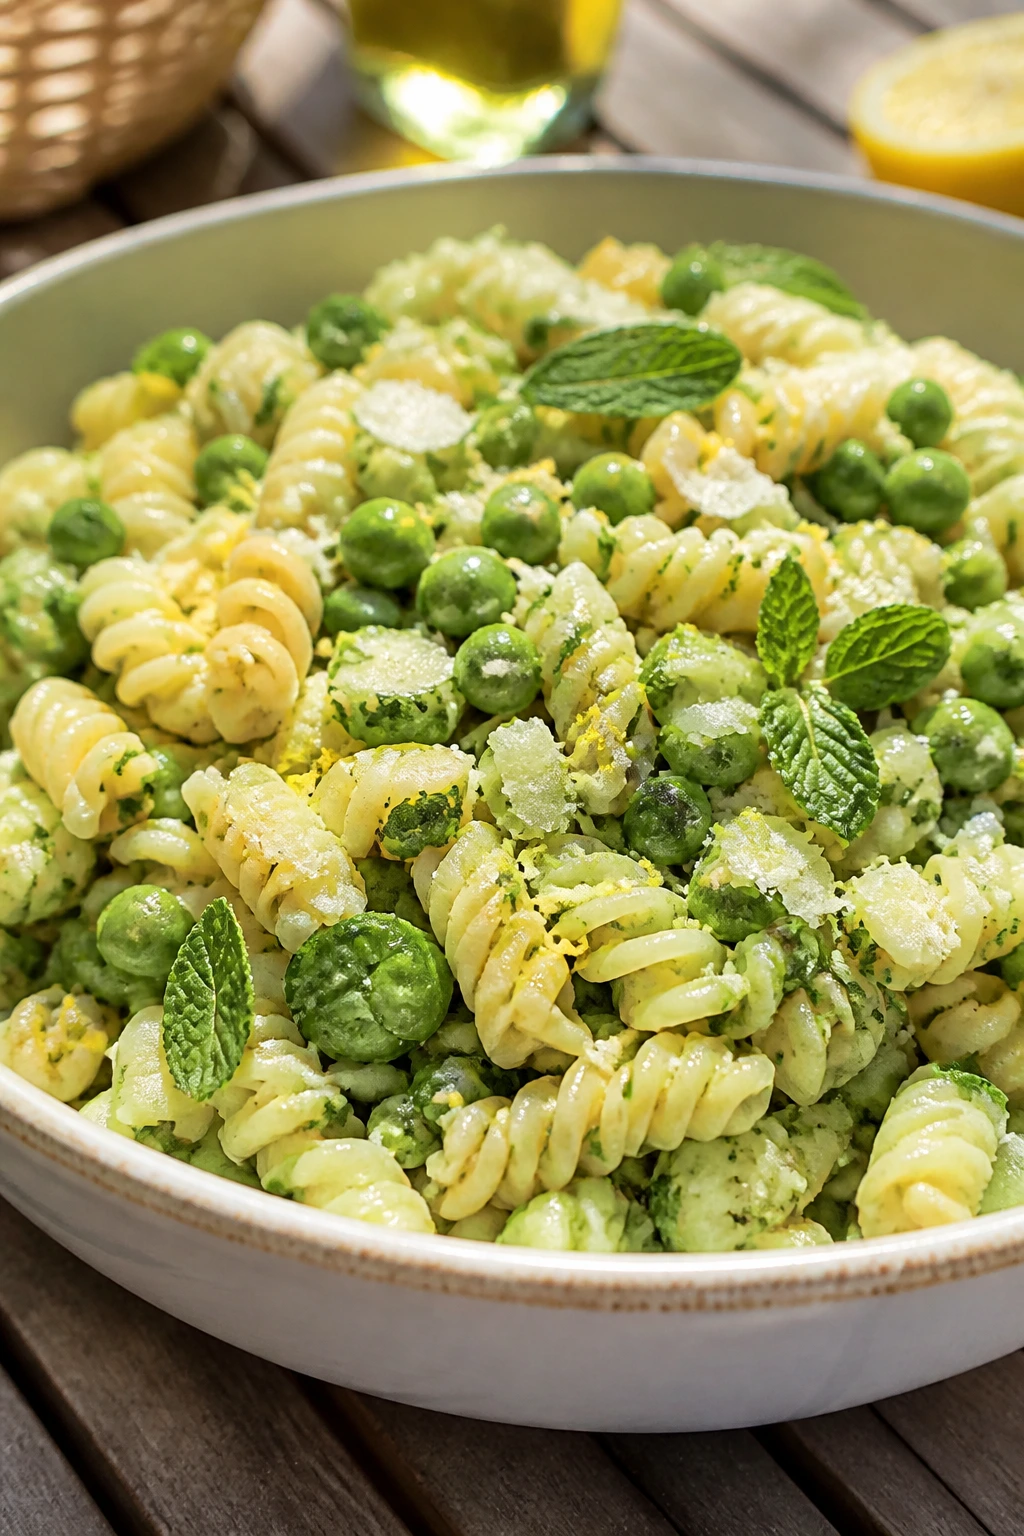
Why It Works:
Peas and mint make pasta taste lighter than it has any right to, and lemon keeps the bowl from getting sleepy. It’s the sort of picnic dinner that disappears because nobody thinks they’ll want a second scoop, then does anyway.
Key Ingredients:
- 12 oz short pasta
- 1½ cups peas, thawed if frozen
- ¼ cup chopped mint
- ¼ cup olive oil
- 2 tbsp lemon juice
- ½ cup Parmesan
- 1 cup diced cucumber
Quick Steps:
- Cook pasta until al dente and rinse briefly cool.
- Whisk oil, lemon juice, salt, pepper, and garlic.
- Toss pasta with peas, mint, cucumber, and Parmesan.
- Chill for 20 minutes.
- Add more lemon before serving if it needs a lift.
Equipment for This Recipe:
- Pot
- Colander
- Bowl
How to Serve This Dish:
Serve as a side or main with grilled chicken or smoked salmon. A few extra mint leaves on top keep it from looking plain.
Pro Tips for This Recipe:
- Salt the pasta water well.
- Use tender peas, not overcooked ones.
- Mint should be chopped just before mixing so it stays bright.
Variations on This Dish:
- Pesto Pea Version: Add a spoonful of pesto.
- Ricotta Version: Fold in small ricotta dollops for a creamier bowl.
Common Mistakes to Avoid with This Dish:
- Don’t overcook the pasta or it turns dense after chilling.
- Don’t forget acid; peas and pasta need lemon to pop.
30. Miso-Ginger Salmon Rice Bowls
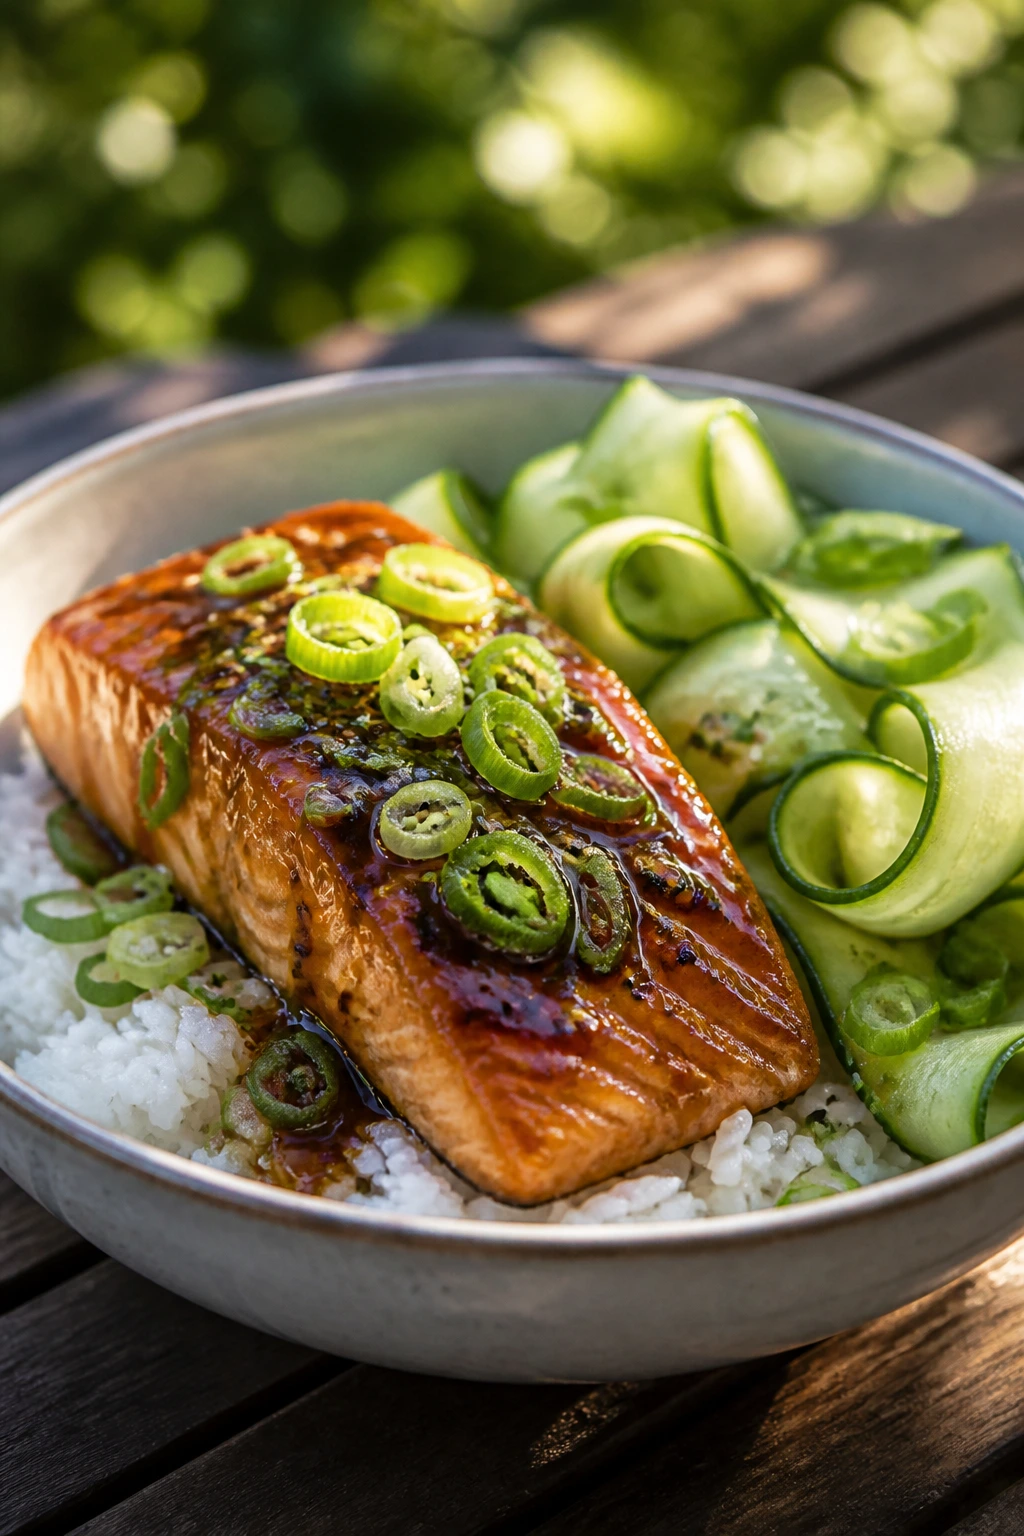
Why It Works:
Salmon tastes rich but not heavy when it’s glazed with miso and ginger, and rice gives the bowl structure for travel. Cucumber and scallions cut through the savory glaze and keep every bite clean.
Key Ingredients:
- 1 lb salmon fillet
- 2 cups cooked rice
- 2 tbsp white miso
- 1 tbsp grated ginger
- 1 tbsp soy sauce
- 1 cucumber, sliced
- 2 scallions, sliced
Quick Steps:
- Mix miso, ginger, soy sauce, and a little honey.
- Brush over salmon and bake at 400°F for 12 to 15 minutes.
- Flake or slice the salmon after cooling.
- Build bowls with rice, cucumber, salmon, and scallions.
- Pack with extra glaze on the side if you want more flavor.
Equipment for This Recipe:
- Baking sheet
- Bowl
- Spoon or brush
How to Serve This Dish:
Serve warm or room temperature. A little sesame seed sprinkle is enough garnish; the bowl already has plenty going on.
Pro Tips for This Recipe:
- Don’t overbake the salmon; it should still flake softly.
- Cool the rice before packing or it traps steam.
- Thin the glaze with a teaspoon of water if it’s too thick to brush.
Variations on This Dish:
- Tuna Version: Use seared tuna if you want a firmer, cooler bowl.
- Tofu Version: Brush the same glaze on pressed tofu.
Common Mistakes to Avoid with This Dish:
- Don’t pack the salmon while it’s hot or the rice gets mushy.
- Don’t skip the cucumber; it balances the glaze.
31. Crunchy Asian Slaw with Grilled Chicken
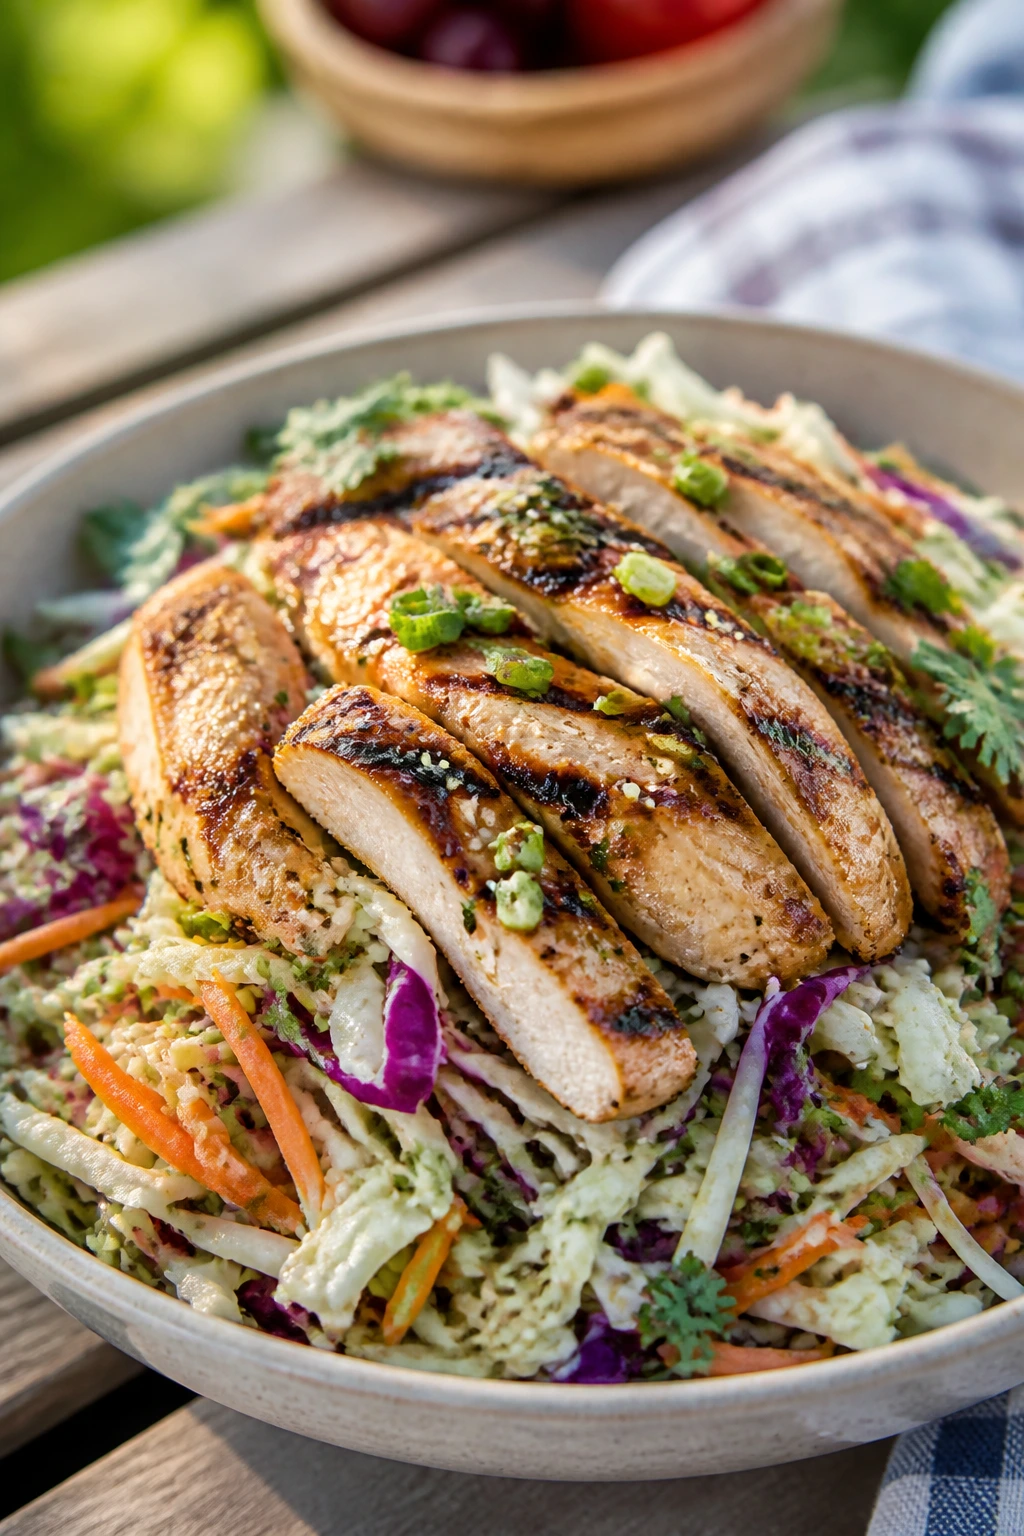
Why It Works:
Cabbage is built for picnics. It stays crunchy, doesn’t mind a little dressing, and gives grilled chicken enough structure to feel like dinner instead of a side dish.
Key Ingredients:
- 2 cups grilled chicken, sliced
- 4 cups shredded cabbage
- 1 carrot, julienned
- 3 tbsp rice vinegar
- 2 tbsp sesame oil
- 1 tbsp soy sauce
- 2 tbsp chopped peanuts
Quick Steps:
- Whisk vinegar, sesame oil, soy sauce, honey, and ginger.
- Toss cabbage and carrot with the dressing.
- Add chicken on top.
- Sprinkle peanuts and cilantro over the bowl.
- Chill briefly before serving.
Equipment for This Recipe:
- Large bowl
- Whisk
- Knife
How to Serve This Dish:
Serve in a big bowl with chopsticks or a fork. If you want more calories, add rice noodles or a scoop of jasmine rice underneath.
Pro Tips for This Recipe:
- Dress the cabbage lightly; it holds dressing better than lettuce.
- Slice the chicken thin so it mixes through the slaw.
- Keep peanuts dry until the end.
Variations on This Dish:
- Sesame Noodle Version: Add chilled rice noodles.
- Spicy Version: Add chili oil or sriracha to the dressing.
Common Mistakes to Avoid with This Dish:
- Don’t shred the cabbage too fine or it turns limp.
- Don’t overdo the dressing; slaw should stay crunchy.
32. Charred Corn Tostadas with Cotija and Lime
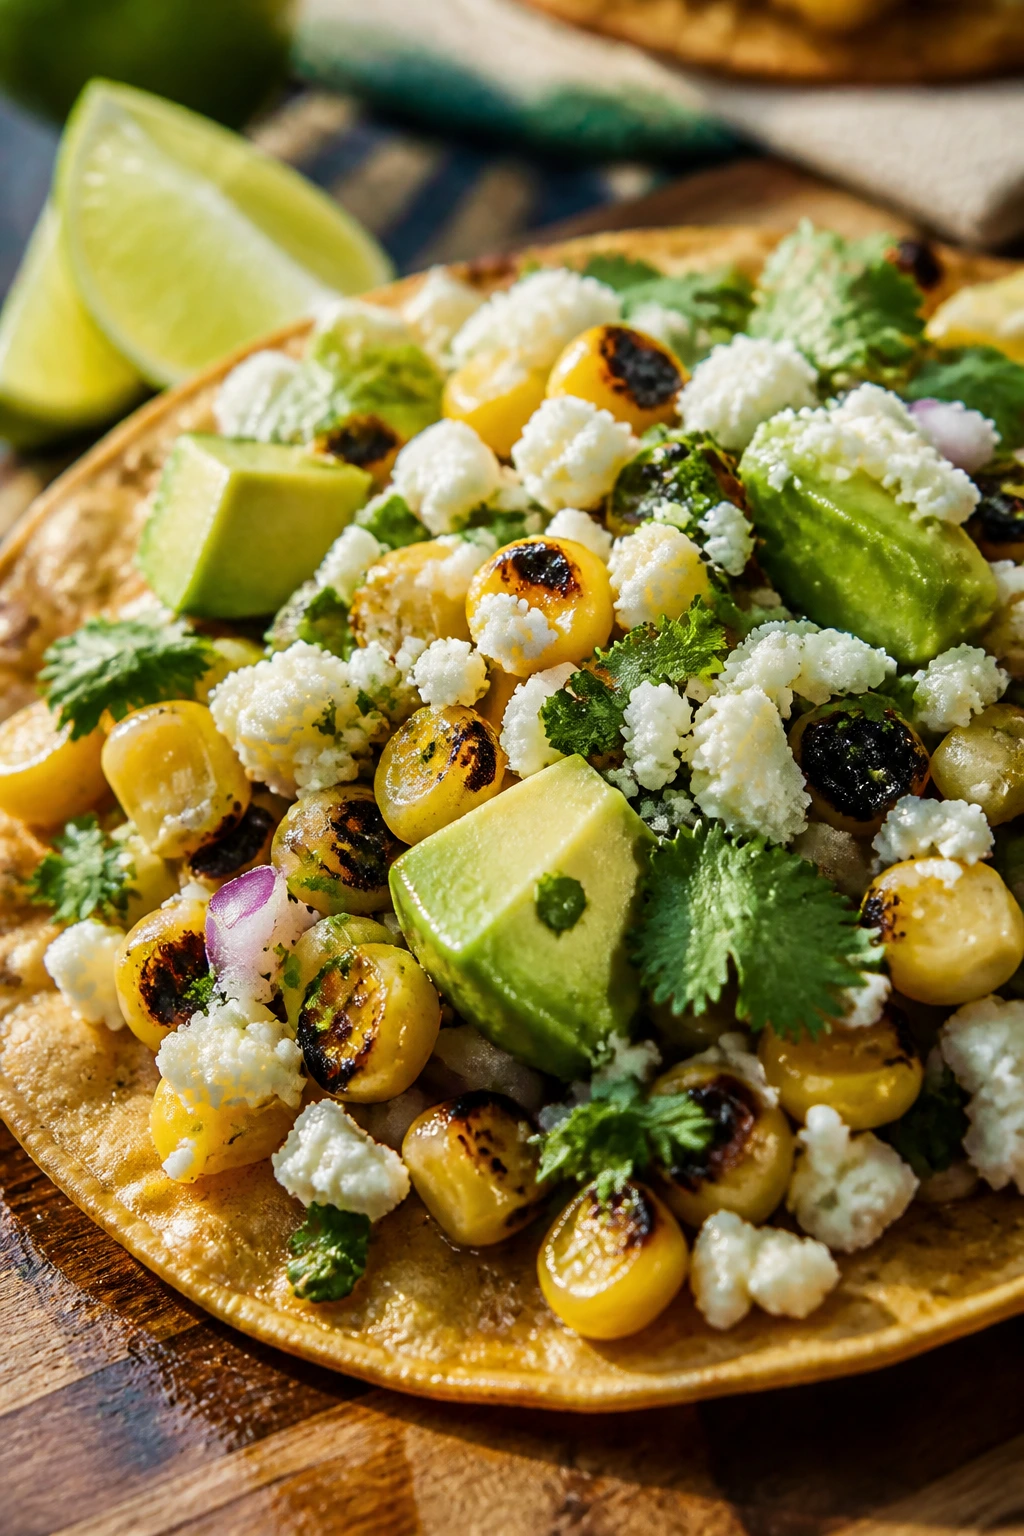
Why It Works:
Tostadas bring crunch the whole time, which is rare in picnic food and worth celebrating. Charred corn, cotija, and lime keep the flavor bright and salty.
Key Ingredients:
- 8 tostada shells
- 2 cups corn kernels
- 1 tbsp olive oil
- ½ cup cotija cheese
- 1 avocado, sliced
- 1 lime, cut into wedges
- ¼ cup chopped cilantro
Quick Steps:
- Sauté or grill the corn until browned in spots.
- Season with salt, pepper, and chili powder.
- Top each tostada shell with corn, cotija, avocado, and cilantro.
- Pack lime wedges separately.
- Assemble just before eating if you want maximum crunch.
Equipment for This Recipe:
- Skillet or grill pan
- Spoon
- Tray or container
How to Serve This Dish:
These are best served open-faced and eaten promptly. A bean salad or grilled chicken can sit beside them if you need to turn them into a bigger dinner.
Pro Tips for This Recipe:
- Keep the shells dry until serving.
- Use slightly under-ripe avocados so they hold shape.
- A little crema or yogurt is nice, but use it lightly.
Variations on This Dish:
- Black Bean Version: Add black beans under the corn.
- Street Corn Version: Mix the corn with a little mayo and chili.
Common Mistakes to Avoid with This Dish:
- Don’t assemble too early or the shells soften.
- Don’t skip the lime; the whole tostada depends on it.
33. Dill Pickle Chicken Salad Sandwiches
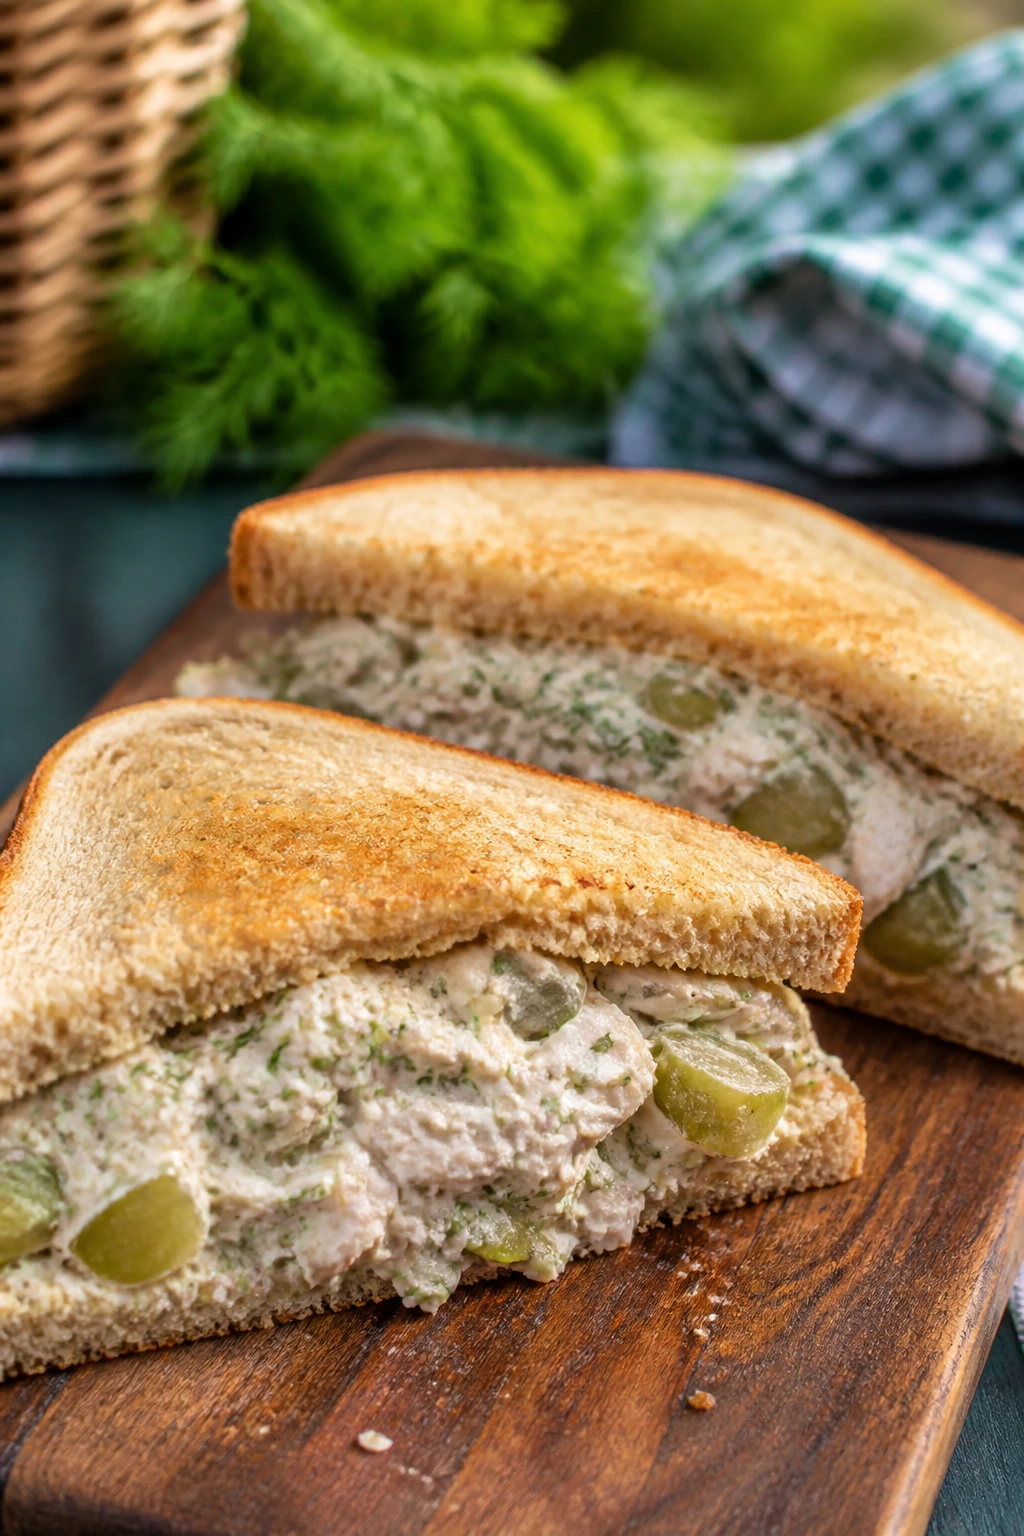
Why It Works:
Pickle juice gives chicken salad a sharp little jolt, and dill keeps it from tasting heavy. If you like picnic food with a little bite, this one lands hard in the right direction.
Key Ingredients:
- 2 cups cooked chicken, chopped
- ¼ cup diced dill pickles
- 3 tbsp mayonnaise
- 1 tsp Dijon mustard
- 1 tbsp pickle juice
- 2 tbsp chopped dill
- 8 slices sandwich bread
Quick Steps:
- Stir chicken, pickles, mayo, mustard, pickle juice, dill, salt, and pepper together.
- Chill the filling for 15 minutes.
- Butter the bread lightly if you want extra moisture protection.
- Assemble sandwiches just before packing.
- Cut into halves or quarters for easier eating.
Equipment for This Recipe:
- Bowl
- Knife
- Spoon
How to Serve This Dish:
Serve with potato chips and crisp lettuce leaves. I like these cold, straight from the cooler, because the pickle flavor gets sharper that way.
Pro Tips for This Recipe:
- Use firm pickles, not floppy ones.
- Add pickle juice slowly; too much makes the salad loose.
- Toast the bread if it’s very soft.
Variations on This Dish:
- Grape Version: Add halved grapes for sweetness.
- Rye Version: Serve on rye or seeded bread for more backbone.
Common Mistakes to Avoid with This Dish:
- Don’t make the salad soupy; it should mound on a spoon.
- Don’t use stale bread unless you enjoy dry corners.
34. Smashed White Bean and Herb Toasts
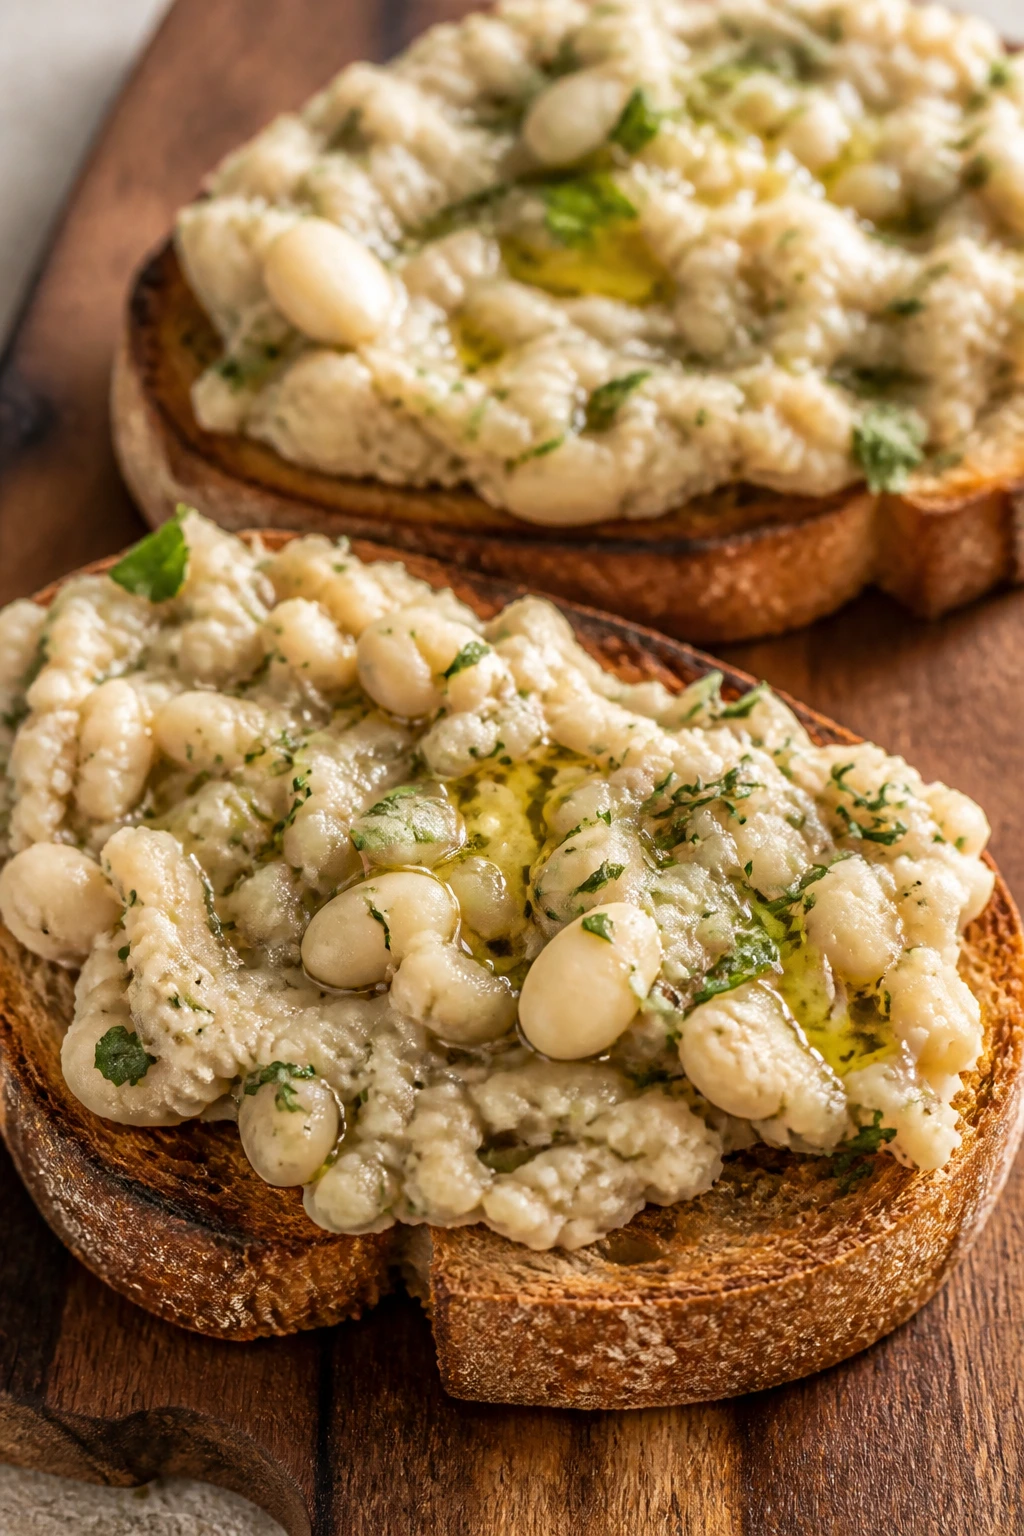
Why It Works:
White beans turn creamy when smashed with olive oil, and herbs give the spread enough freshness to carry a whole meal. Toast keeps the texture honest, which is important here.
Key Ingredients:
- 2 cans white beans, rinsed and drained
- 2 tbsp olive oil
- 1 tbsp lemon juice
- 2 tbsp chopped parsley
- 1 tbsp chopped chives
- 8 slices sturdy bread
- 1 clove garlic, rubbed on toast
Quick Steps:
- Mash beans with olive oil, lemon juice, salt, pepper, and garlic.
- Stir in parsley and chives.
- Toast the bread until deeply golden.
- Rub toast with a cut garlic clove.
- Spread the bean mixture on top and finish with olive oil.
Equipment for This Recipe:
- Fork or potato masher
- Toaster or skillet
- Bowl
How to Serve This Dish:
Serve open-faced so the beans don’t get trapped and soggy. Tomato slices or sliced radishes on top make it feel more dinner-ish.
Pro Tips for This Recipe:
- Leave some beans chunky for texture.
- Use thick bread that won’t buckle.
- Season the beans a little more than you think they need.
Variations on This Dish:
- Lemony Version: Add extra lemon zest.
- Spicy Version: Top with chili flakes or hot oil.
Common Mistakes to Avoid with This Dish:
- Don’t spread on soft bread; it collapses.
- Don’t mash the beans into paste unless you want hummus-adjacent toast.
35. Grilled Portobello and Goat Cheese Sandwiches
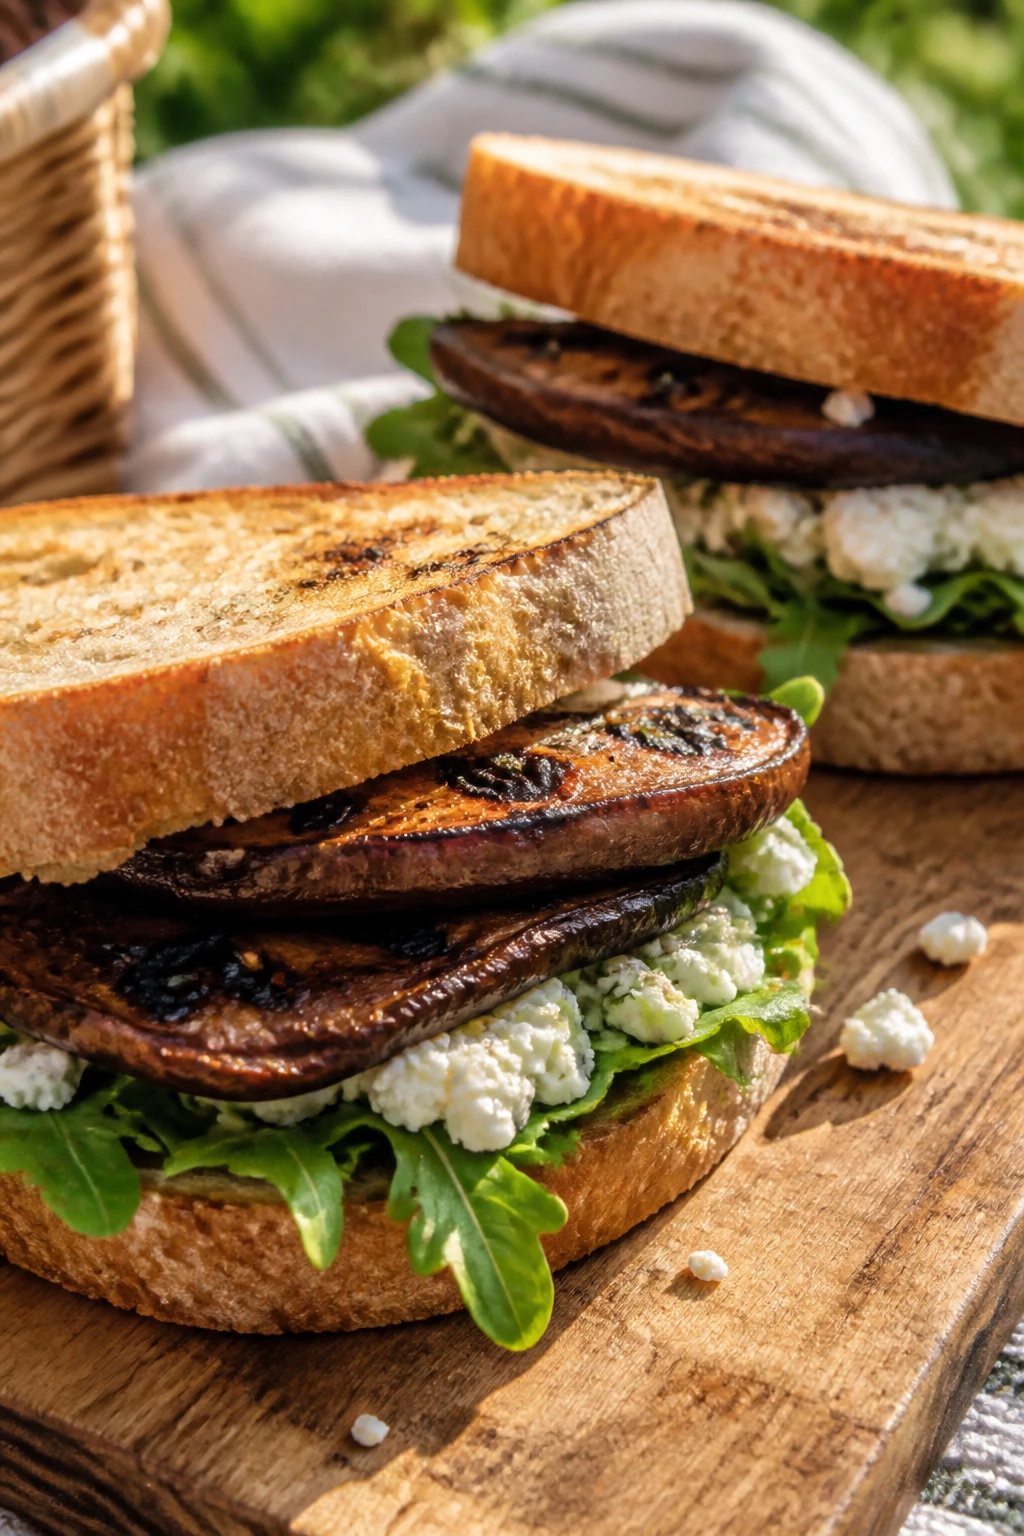
Why It Works:
Portobellos have enough chew to feel hearty without becoming heavy, and goat cheese brings a clean tang. Grilled onions or peppers can join in, but the sandwich doesn’t need much help.
Key Ingredients:
- 4 large portobello caps
- 2 tbsp olive oil
- 4 oz goat cheese
- 4 sandwich rolls
- 1 cup arugula
- 1 tbsp balsamic vinegar
- 1 clove garlic, minced
Quick Steps:
- Wipe the mushrooms clean and remove the stems.
- Brush with oil, garlic, salt, and pepper.
- Grill for 4 to 5 minutes per side until tender and browned.
- Split the rolls, spread goat cheese, and layer arugula and mushrooms.
- Drizzle a little balsamic before packing.
Equipment for This Recipe:
- Grill
- Tongs
- Knife
How to Serve This Dish:
Serve warm or room temperature. A sliced tomato or a handful of chips on the side is enough to finish it off.
Pro Tips for This Recipe:
- Don’t soak the mushrooms; wipe them instead.
- Grill cut-side down first to get a better sear.
- Let them rest before assembling so the bread doesn’t get wet.
Variations on This Dish:
- Pesto Version: Spread pesto instead of goat cheese.
- Mozzarella Version: Use fresh mozzarella if you want a milder sandwich.
Common Mistakes to Avoid with This Dish:
- Don’t underseason the mushrooms; they need salt.
- Don’t pack them piping hot or the rolls steam.
36. Sardine Niçoise Toasts
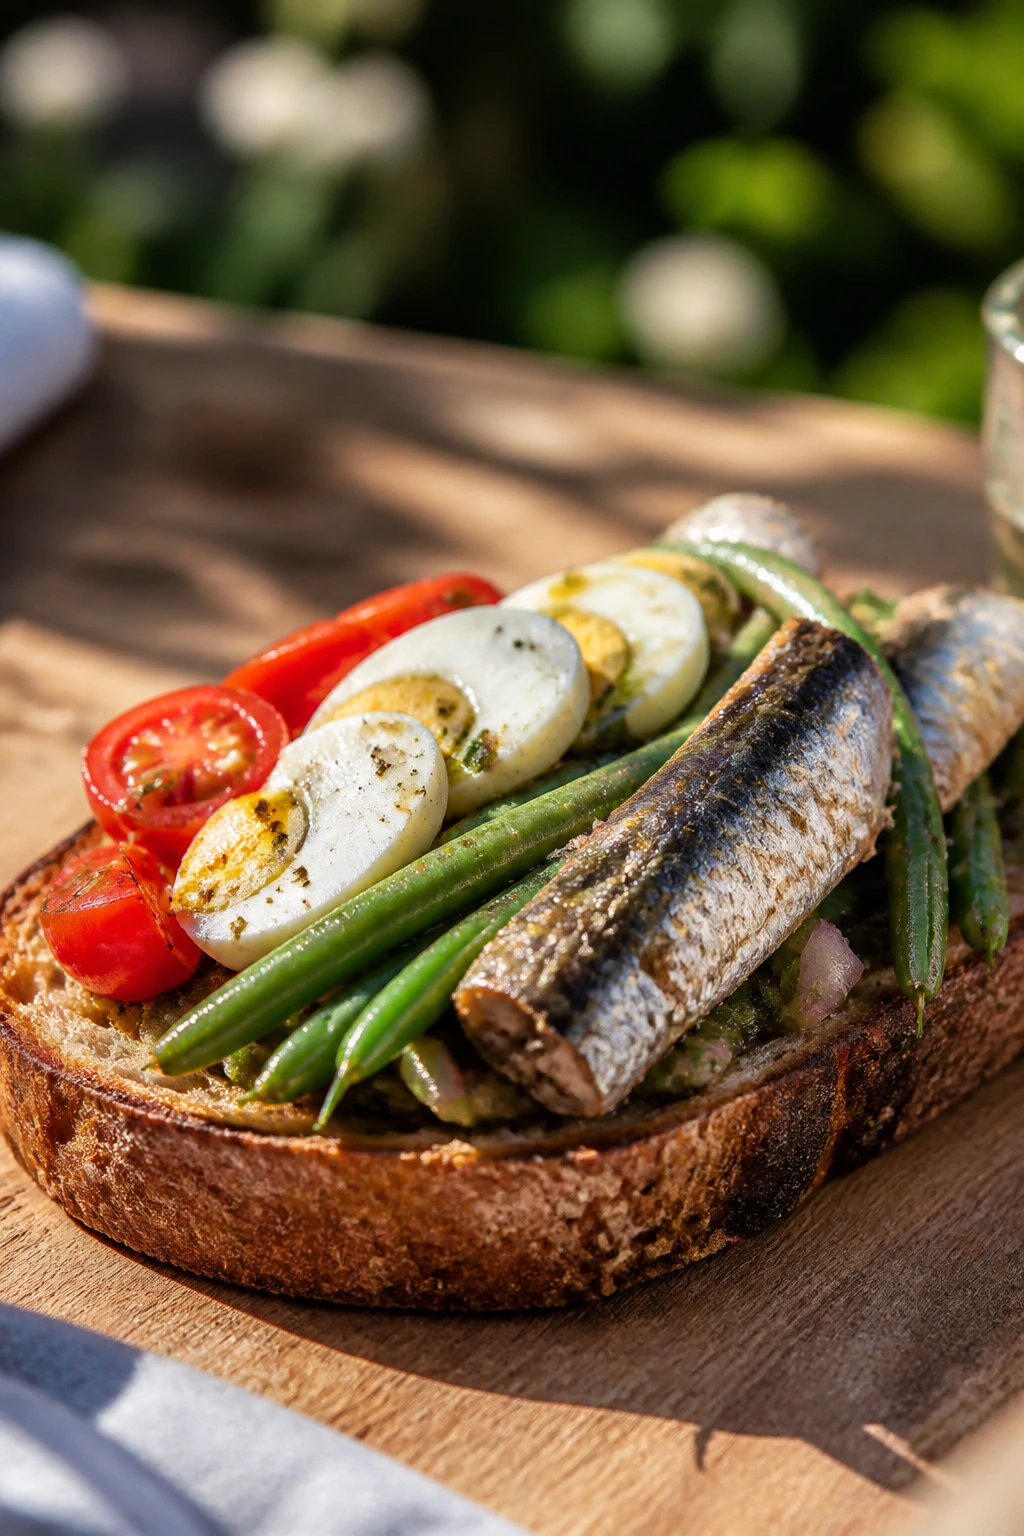
Why It Works:
Sardines bring a salty, savory punch and pack well, while the Niçoise-style toppings keep the toast from feeling one-note. It’s sturdy, fast, and a little old-school in a good way.
Key Ingredients:
- 1 can sardines, drained
- 4 slices toasted sourdough
- 1 hard-boiled egg, sliced
- ½ cup blanched green beans
- ½ cup cherry tomatoes, halved
- 2 tbsp olive oil
- 1 tsp Dijon mustard
Quick Steps:
- Toast the bread until crisp.
- Mix olive oil, Dijon, lemon juice, salt, and pepper.
- Brush the toast lightly with the dressing.
- Layer sardines, egg, beans, and tomatoes.
- Finish with herbs or capers if you like them.
Equipment for This Recipe:
- Toaster or skillet
- Knife
- Small bowl
How to Serve This Dish:
Serve the toppings on the toast right before eating; that bread wants to stay crisp. A green salad or sliced cucumbers keeps the plate balanced.
Pro Tips for This Recipe:
- Choose sardines packed in olive oil for better texture.
- Dry the beans before topping.
- Use thick toast or the weight will sag the center.
Variations on This Dish:
- Tuna Version: Swap sardines for tuna if needed.
- Capers Version: Add capers for a sharper, brinier hit.
Common Mistakes to Avoid with This Dish:
- Don’t assemble ahead or the bread softens.
- Don’t skip the acid; sardines need lemon to stay lively.
37. Summer Roll Rice Paper Wraps with Peanut Sauce
Why It Works:
Rice paper wraps are light, cool, and a little fussy in the best way. Once you get the hang of them, they’re one of the cleanest picnic dinners around.
Key Ingredients:
- 8 rice paper wrappers
- 1 cup cooked shrimp or tofu strips
- 1 cup rice noodles
- 1 cup lettuce
- 1 cup cucumber sticks
- 1 cup carrot sticks
- ¼ cup peanut butter
Quick Steps:
- Soak each rice paper wrapper in warm water until pliable.
- Lay lettuce, noodles, protein, cucumber, and carrot in the center.
- Fold the sides in and roll tightly.
- Mix peanut butter with soy sauce, lime juice, and warm water for dipping sauce.
- Pack wraps in a single layer so they don’t stick.
Equipment for This Recipe:
- Shallow dish
- Cutting board
- Sharp knife
How to Serve This Dish:
Serve whole with the sauce on the side. If you cut them, use a wet knife and move fast, because the rice paper seals in a hurry.
Pro Tips for This Recipe:
- Don’t over-soak the wrappers or they tear.
- Use dry fillings; wet herbs or vegetables make rolling harder.
- Keep each wrap separated with a little parchment.
Variations on This Dish:
- Mango Version: Add thin mango strips.
- Chicken Version: Use shredded chicken instead of shrimp or tofu.
Common Mistakes to Avoid with This Dish:
- Don’t overfill; the wrap should still close cleanly.
- Don’t stack them bare or they stick together.
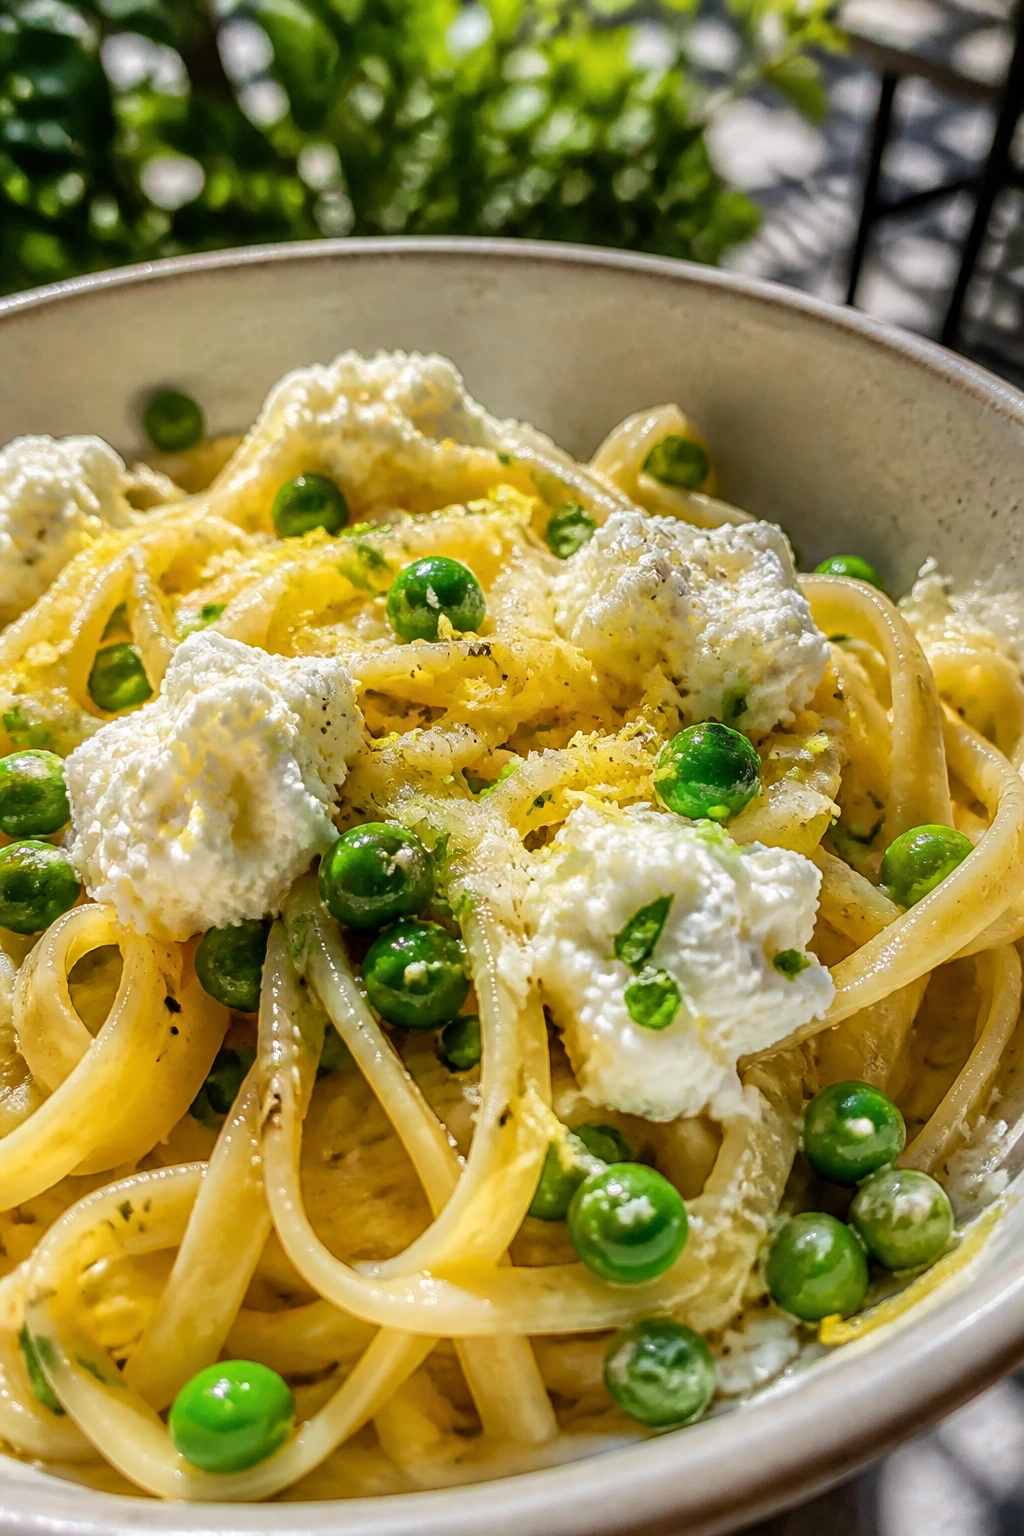
38. Lemon Pasta with Peas and Ricotta
Why It Works:
Ricotta gives the pasta a creamy feel without dragging it down, and lemon keeps the whole bowl bright. Peas add little bursts of sweetness that stay good even after the dish cools.
Key Ingredients:
- 12 oz pasta
- 1 cup peas
- 1 cup ricotta
- 2 tbsp lemon juice
- 1 tbsp lemon zest
- ¼ cup olive oil
- ¼ cup Parmesan
Quick Steps:
- Cook the pasta until al dente.
- Add peas during the last minute if they’re frozen, then drain.
- Stir ricotta, lemon juice, zest, olive oil, salt, and pepper in a bowl.
- Toss pasta and peas with the ricotta mixture.
- Finish with Parmesan and basil.
Equipment for This Recipe:
- Pot
- Strainer
- Mixing bowl
How to Serve This Dish:
Serve room temperature or slightly cool. A little extra olive oil on top makes the pasta glossy and keeps it from drying out during transport.
Pro Tips for This Recipe:
- Thin the ricotta with a spoonful of pasta water if needed.
- Add lemon zest generously; it does a lot here.
- Eat this same day if you want the best texture.
Variations on This Dish:
- Mint Version: Add mint instead of basil.
- Asparagus Version: Swap peas for chopped blanched asparagus.
Common Mistakes to Avoid with This Dish:
- Don’t let the pasta sit without oil or it clumps.
- Don’t make the ricotta mixture too thick to coat.
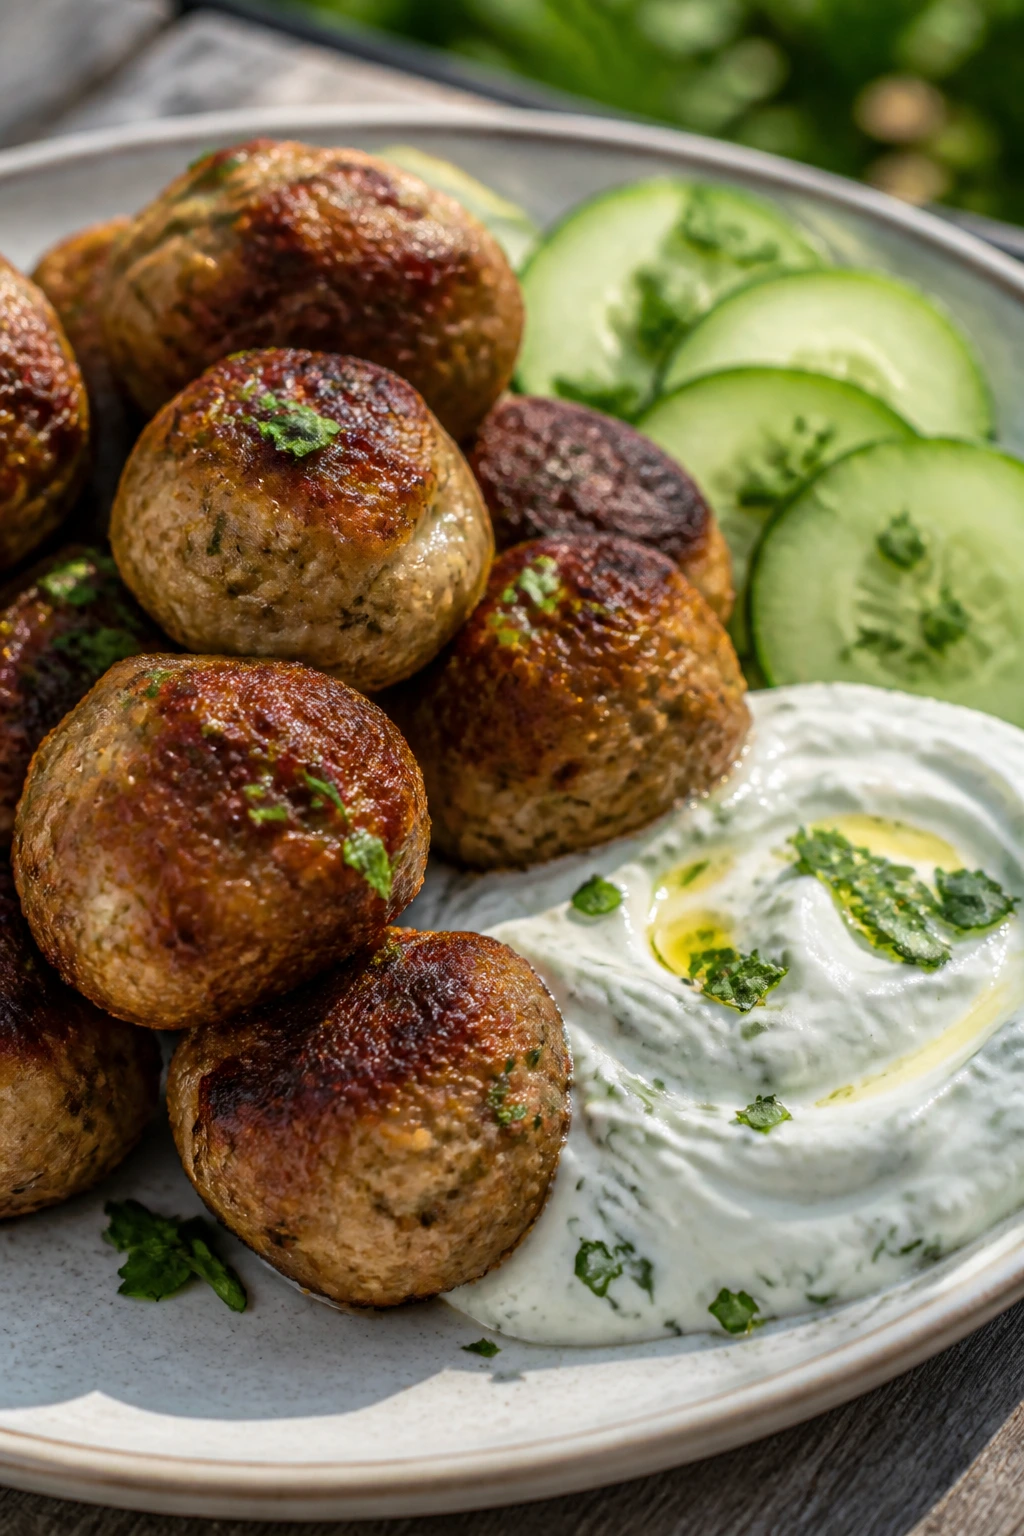
39. Greek Turkey Meatballs with Tzatziki
Why It Works:
Turkey meatballs are lighter than beef but still satisfying, and the Greek seasoning keeps them from tasting plain. Tzatziki cools the edges and gives the platter a picnic-ready dip.
Key Ingredients:
- 1 lb ground turkey
- 1 egg
- ½ cup breadcrumbs
- 2 tbsp chopped parsley
- 1 tsp oregano
- 1 cup tzatziki
- 1 cucumber, sliced
Quick Steps:
- Mix turkey, egg, breadcrumbs, herbs, oregano, garlic, salt, and pepper.
- Form into 1½-inch meatballs.
- Bake at 400°F for 15 to 18 minutes until cooked through.
- Cool slightly before packing.
- Serve with tzatziki and cucumber slices.
Equipment for This Recipe:
- Baking sheet
- Mixing bowl
- Spoon or scoop
How to Serve This Dish:
Serve the meatballs warm or room temperature with pita and cucumber. They also work skewered, which makes them easier to grab from a picnic tray.
Pro Tips for This Recipe:
- Don’t pack the mix too tightly or the meatballs turn dense.
- Cool before dipping so the tzatziki stays thick.
- Add grated onion if you want more moisture.
Variations on This Dish:
- Lamb Version: Use half lamb, half turkey for a richer flavor.
- Dairy-Free Version: Swap tzatziki for tahini sauce.
Common Mistakes to Avoid with This Dish:
- Don’t overbake; turkey dries out fast.
- Don’t skip the herbs or the meatballs taste flat.
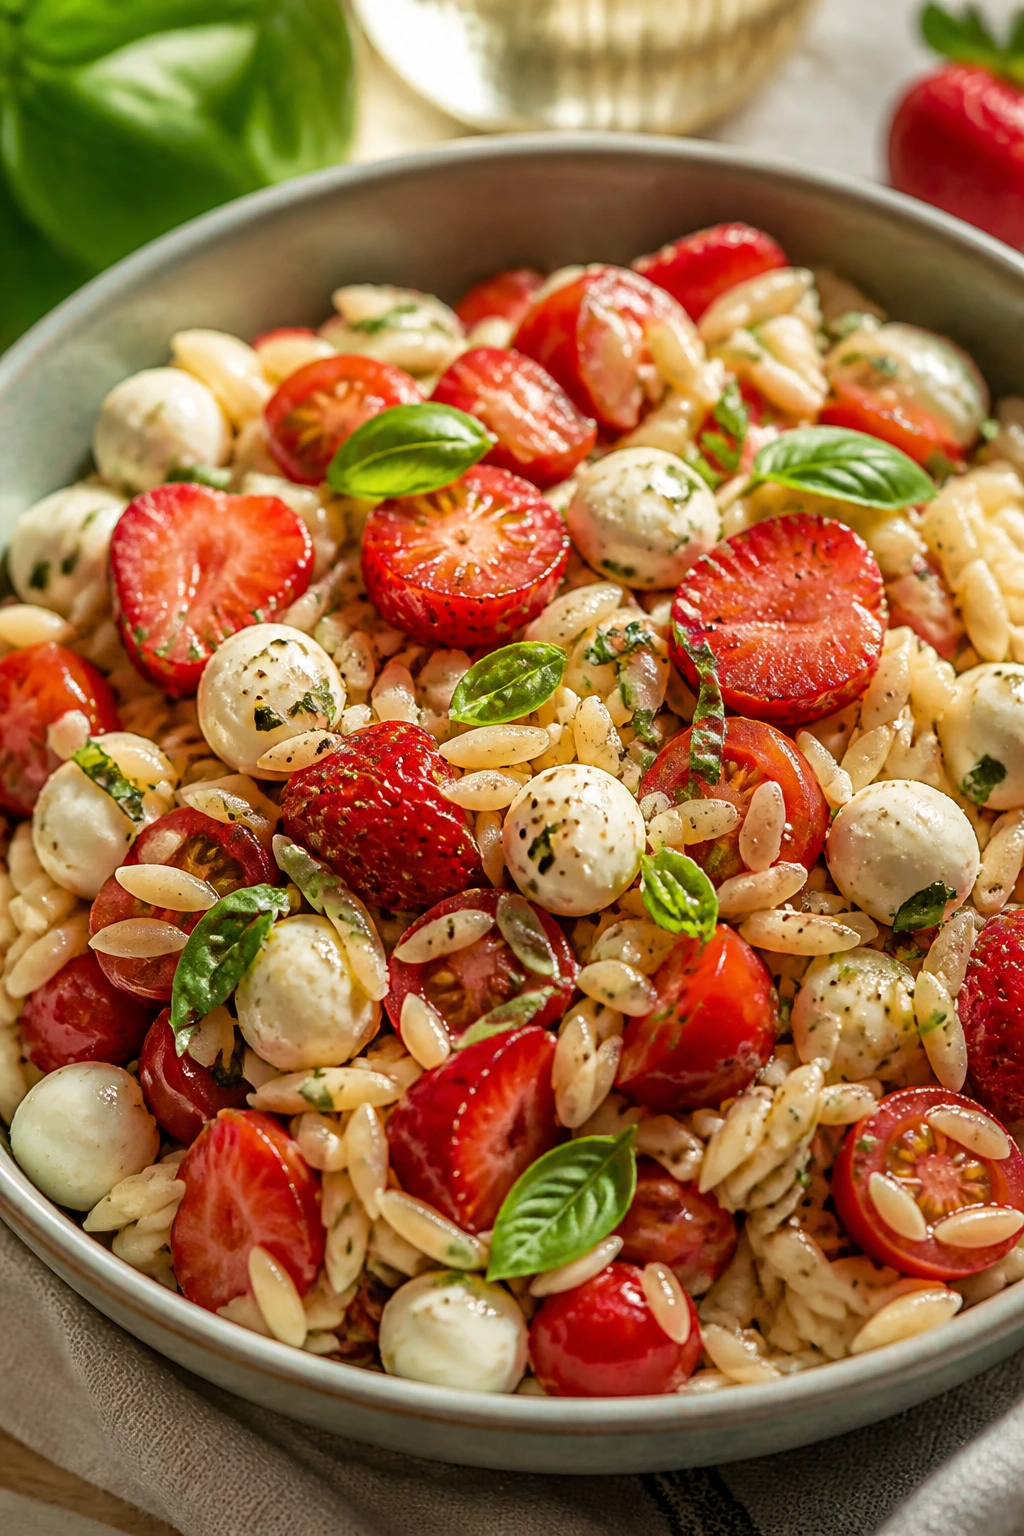
40. Strawberry Caprese Orzo Salad
Why It Works:
Strawberries bring a sweet, bright edge that wakes up classic Caprese flavors, and orzo makes the salad feel like dinner instead of a side. It’s a little unexpected, but not weird.
Key Ingredients:
- 12 oz orzo
- 2 cups strawberries, sliced
- 8 oz mozzarella pearls
- 1 cup cherry tomatoes, halved
- ¼ cup basil leaves
- 3 tbsp olive oil
- 2 tbsp balsamic vinegar
Quick Steps:
- Cook the orzo until just tender, then cool and drain well.
- Whisk oil, balsamic, salt, pepper, and a little honey if the berries are tart.
- Toss orzo with tomatoes, mozzarella, strawberries, and basil.
- Chill for 15 to 20 minutes.
- Taste and add another splash of balsamic before serving.
Equipment for This Recipe:
- Pot
- Strainer
- Mixing bowl
How to Serve This Dish:
Serve in a wide bowl so the strawberries don’t get buried. Grilled chicken, crusty bread, or even a few prosciutto slices make this feel like a complete picnic meal.
Pro Tips for This Recipe:
- Add strawberries at the end so they keep their shape.
- Use ripe but firm berries.
- A pinch of flaky salt at the end makes the fruit taste louder.
Variations on This Dish:
- Peach Version: Swap strawberries for sliced peaches.
- Pesto Version: Use pesto instead of balsamic for a more savory bowl.
Common Mistakes to Avoid with This Dish:
- Don’t mix the strawberries too early or they bleed.
- Don’t overcook the orzo or the salad goes soft after chilling.
Why These Picnic Dinners Work Better Than Heavy Summer Takeout
Picnic food needs a different set of rules than food eaten at the table under a ceiling fan. The best light summer dinners keep their shape, tolerate a little chilling, and still taste alive after the ride. That’s why you keep seeing the same useful building blocks pop up here: grains with a little chew, sturdy greens like cabbage or romaine, proteins that are good warm or cold, and dressings that lean on acid instead of cream.
I’m also a big believer in food that can be packed in layers. A jar salad, a wrap with a dry barrier, a skewer, or a bowl with dressing tucked off to the side is just easier to manage when you’re carrying napkins, plates, maybe a frisbee, and a cooler that somehow gets heavier the farther you walk. Picnic dinner ideas live or die on texture, and texture is the one thing people forget to protect.
The last piece is balance. Heavy meals make you sleepy in the grass. These don’t. They give you enough protein to feel like dinner, enough crunch to stay interesting, and enough acid or herb flavor to taste fresh after the sun has had its way with the afternoon.
Essential Equipment for These Recipes
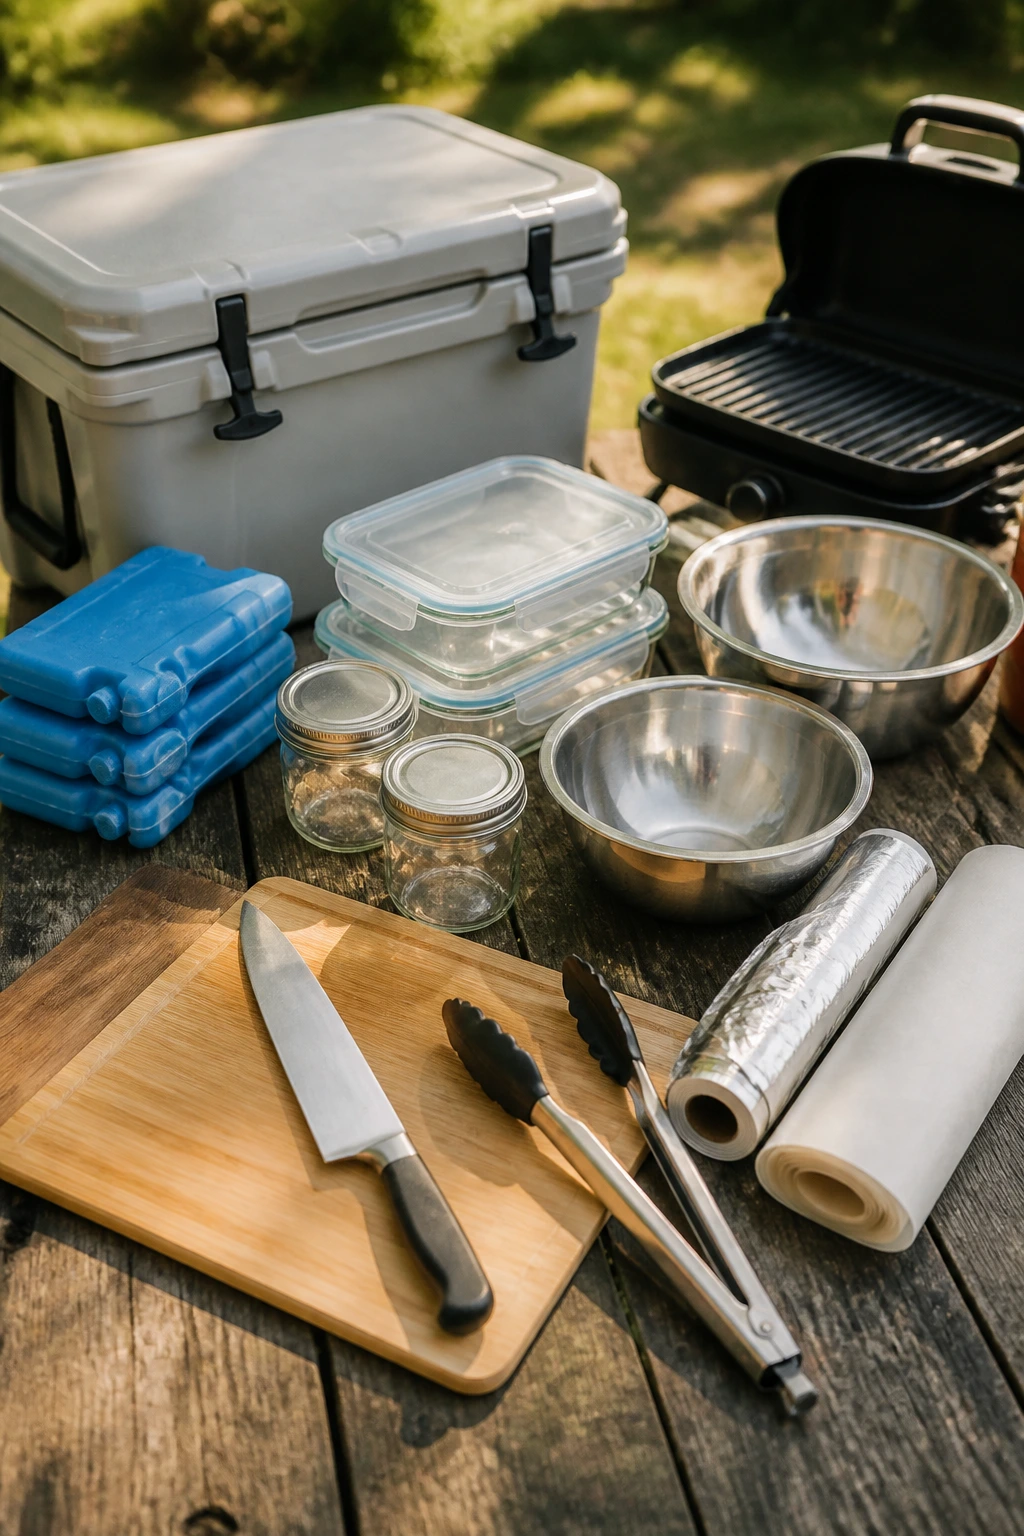
- Insulated cooler: Keep chilled items cold on the way to the picnic and during the meal.
- Ice packs or frozen water bottles: These do the real work of keeping dressings, yogurt, seafood, and chicken safe.
- Shallow food containers with tight lids: They cool faster and pack more neatly than deep bowls.
- Wide-mouth jars: Handy for layered salads, noodle dishes, and anything you want to shake before eating.
- Grill or grill pan: Useful for chicken, shrimp, vegetables, halloumi, and tortillas.
- Mixing bowls in 2 sizes: One for dressing, one for the main filling.
- Chef’s knife and cutting board: Picnic food lives or dies on even slicing.
- Tongs: Better than forks for turning, lifting, and packing grilled food.
- Foil or parchment paper: Keeps wraps, sandwiches, and sliders from sticking together.
- Small lidded cups or jars: Perfect for sauces, dressings, and lime wedges.
Smart Shopping and Ingredient Tips
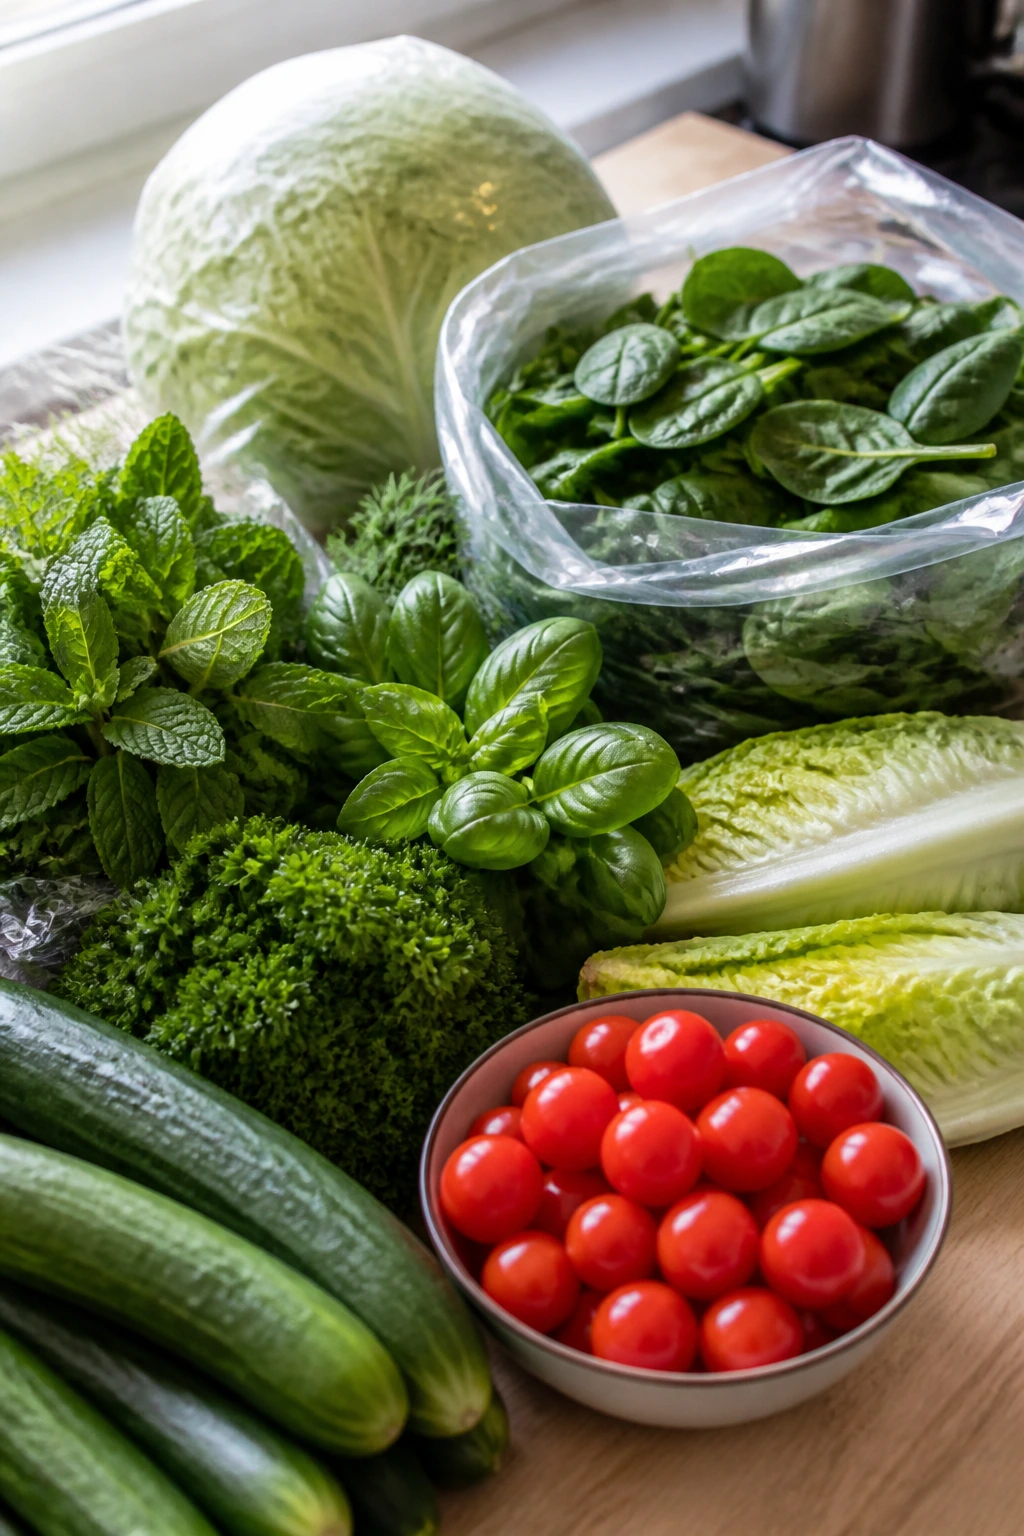
Shop for picnic dinners the way you’d shop for a long drive: buy ingredients that can take a bump. Cherry tomatoes beat large watery tomatoes because they hold their shape. Whole cucumbers are safer than pre-sliced packs. Bagged cabbage, baby spinach, romaine hearts, and herbs like mint, basil, parsley, and dill all work well because they don’t need babying.
For proteins, choose cuts that stay tender as they cool. Chicken thighs are more forgiving than breasts on the grill. Shrimp should be large enough to grill without overcooking. Canned tuna, salmon, beans, tofu, and halloumi all make sense here because they either stay good cold or reheat without going chalky. If you’re buying deli turkey or roast beef, ask for thin slices; thick ones make wraps and roll-ups bulky.
Bread matters more than people think. Soft sandwich bread works for tidy tea-sandwich-style fillings, but sliders and rolls need enough structure to hold sauce and slaw. Pita should be thick enough to split without tearing. Tortillas should be flexible. For cold pasta and grain salads, use short shapes with ridges or nooks so dressing can cling instead of sliding off.
And about dressing: make it a little sharper than you would for an indoor dinner. Lemon, lime, vinegar, mustard, and yogurt lose a bit of punch when food chills. A dressing that tastes almost too zippy at home usually lands right after an hour in the cooler.
How to Serve These Recipes

Presentation:
Pack the food in shallow bowls, jars, or trays so the colors stay visible. Skewers, pinwheels, lettuce cups, and tostadas look best when they’re arranged in one layer instead of piled high, and a few herb leaves or lemon wedges make the spread feel finished without much extra work.
Accompaniments:
Think fruit, chips, olives, quick pickles, or a simple green salad. If you need something more filling, add bread, rice, couscous, or a bean salad rather than another heavy main. The goal is to support the main dish, not bury it.
Portions:
For a light picnic dinner, plan on one substantial item plus a side or two per person: a wrap and fruit, skewers and a grain salad, pasta salad and a handful of vegetables, or two sliders and chips. If the group has been active all afternoon, increase the grain, bread, or potato side rather than doubling the richest part of the meal.
Beverage Pairing:
Cold sparkling water with lime is the safest bet because it doesn’t fight with herbs or citrus. For something with more character, iced tea, lemonade, a dry rosé, or a light lager works with most of these dishes. Keep drinks cold enough that they don’t taste flabby.
Additional Tips and Flavor Boosters
Flavor Enhancement:
A squeeze of lemon or lime right before serving fixes more picnic food than people admit. If a salad tastes sleepy after chilling, that one bright hit usually brings it back.
Customization:
Swap grains, proteins, and herbs based on what you’ve got. Chickpeas can stand in for chicken in several of these, tofu works where grilled meat would feel too heavy, and dill, mint, parsley, or basil can be traded around without wrecking the dish.
Serving Suggestions:
Keep crunchy things crunchy. Add croutons, peanuts, toasted seeds, tortilla chips, or toasted bread at the last second so they don’t turn damp in the cooler.
Make-It-Yours:
If you want lower dairy, lean on vinaigrettes, tahini, or hummus. If you want more heat, add chili crisp, sliced jalapeño, or smoked paprika. If you want a kid-friendlier spread, pull back on raw onion, capers, horseradish, and spicy sauces, then let people add those at the table.
Make-Ahead, Storage, and Reheating Guidance
Most of these picnic dinners can be made ahead, but the trick is knowing which parts want to stay separate. Grain salads, pasta salads, and bean salads usually hold 3 to 4 days in the fridge if they’re tucked into airtight containers. Chicken salad, tuna salad, and tofu fillings are best within 2 to 3 days. Grilled chicken, salmon, and shrimp keep for about 3 days, though shrimp is best in the first 24 to 48 hours if you want the cleanest texture.
Sandwiches and wraps are the most sensitive. You can prep the fillings a day ahead, but assemble them close to serving time, especially if they involve tomatoes, cucumbers, dressing, or juicy fruit. Bread, tortillas, and pitas absorb moisture faster than people expect. If you must assemble ahead, use lettuce, cheese, or a thin smear of hummus or butter as a barrier between bread and wet fillings.
For cold picnic food, reheating is often unnecessary. If you do want to warm chicken, meatballs, or sliders, use low heat so the proteins don’t dry out: 300°F in the oven under loose foil for 10 to 15 minutes, or a covered skillet with a splash of water. Rice and grain bowls reheat well in the microwave with a damp paper towel over the top. Pasta salads are usually better chilled or room temperature, not reheated.
Food safety matters more outdoors. Keep cold foods on ice or in a cooler until serving, and don’t let dairy, seafood, chicken, or egg dishes sit warm for long stretches. If a dish starts with mayo, yogurt, crab, tuna, shrimp, or sliced cooked chicken, it belongs in the cold box until the last possible moment.
Variations and Adaptations to Try
Gluten-Free Picnic Basket:
Use corn tortillas, rice paper, lettuce cups, rice bowls, quinoa salads, or tostadas instead of wheat bread and tortillas. Most of the recipes in this collection already adapt well because the flavor lives in the filling, not the wrapper.
Dairy-Free Cooler:
Swap yogurt sauces for tahini, vinaigrettes, hummus, or avocado-based dressings. Leave out feta, goat cheese, burrata, and ricotta, then add olives, capers, herbs, or toasted nuts for that same salty richness.
Vegetarian Picnic Spread:
Chickpeas, beans, tofu, halloumi, eggs, hummus, and grain salads can carry a dinner just fine. If you remove meat from one of the chicken or beef dishes, increase the protein portion from beans, cheese, or eggs so the meal still feels like dinner.
Low-Sodium Build:
Use lemon, lime, vinegar, herbs, roasted vegetables, and fresh fruit to keep flavor high without leaning on too much salt. Rinse canned beans and tuna, and go easy on olives, pickles, and feta unless the rest of the plate is very mild.
Kid-Friendly Mild Version:
Pull back on garlic, chili, horseradish, and raw onion. Pinwheels, sliders, pasta salads, fruit-forward bowls, and mild wraps tend to go over better when the sauce is on the side and the heat level is low.
Extra-Zippy Summer Version:
Add pickled onions, pepperoncini, capers, or quick-pickled cucumbers to almost any of these. A sharp pickle note gives picnic food more bite and helps it taste lively after chilling.
Common Mistakes to Avoid
The first mistake is packing everything together too early. A sandwich assembled at noon and eaten at six will not thank you for that decision. Wet tomatoes, cucumbers, dressings, and juicy fruit need a barrier or a separate container, and bread should stay dry until the last minute.
Another one: under-chilling. Coolers are only useful if they’re actually cold, which means starting with chilled ingredients and using enough ice packs to hold the temperature. If your cooler feels lukewarm when you open it, the food will taste tired before you even sit down.
People also overdo the sauce. A picnic salad can handle dressing; a picnic puddle cannot. Start with less than you think you need, then add at the table if the dish feels dry after chilling.
And then there’s the texture problem. Soft bread, overcooked shrimp, mushy pasta, and wilting greens all happen when the food is pushed past its limit. Use sturdier vegetables, cook pasta to al dente, pull proteins off the heat a bit early, and keep crunchy toppings separate until serving. Picnic food wants structure.
One more: forgetting salt and acid. Cold food tastes flatter than warm food, so recipes need a little extra help. A pinch of salt, a squeeze of lemon, or a spoon of vinegar often makes the difference between “fine” and “I want another bite.”
Frequently Asked Questions
Which of these light summer dinners can sit out the longest?
The sturdier options are the grain salads, bean salads, skewers, and some wraps if they’re not overloaded with mayo or juicy vegetables. Even then, it’s smarter to keep everything chilled until serving and put perishable dishes back in the cooler between rounds.
Can I make these picnic dinners the night before?
Yes, many of them actually benefit from a short rest. Grain salads, pasta salads, chicken salads, bean salads, and fillings for wraps or pitas can be made ahead, but wait to assemble sandwiches, tostadas, lettuce cups, and anything with avocado until close to serving.
How do I keep sandwiches and wraps from getting soggy?
Use a moisture barrier like lettuce, cheese, hummus, butter, or pesto between the bread and the wet filling. Keep tomatoes, cucumbers, pickles, and dressings separate until the last possible moment, and use sturdy bread or tortillas that can handle the filling.
What if I don’t have a grill?
A hot skillet, grill pan, or oven broiler can stand in for grilled chicken, shrimp, vegetables, and halloumi. You’ll miss some char, but the core idea still works if you get good browning and don’t overcrowd the pan.
Can I use canned beans instead of cooking them from scratch?
Absolutely. Canned chickpeas, white beans, and black beans are part of what makes picnic dinners practical. Rinse them well, drain them thoroughly, and taste before seasoning because canned beans need less salt than many people expect.
Which recipes are best for a full dinner, not just a snacky picnic plate?
The farro salad, quinoa bowls, orzo salads, sliders, frittata squares, and chicken or salmon bowls are the most dinner-like options. If you want a lighter meal that still satisfies, pair one of the wraps or skewers with fruit, chips, or a grain salad.
How do I keep cold food safe on a warm day?
Start with chilled ingredients, keep the cooler closed as much as possible, and use more ice packs than you think you need. Food with chicken, seafood, eggs, yogurt, or mayo should stay cold until serving, and leftovers should go back into the cooler quickly instead of sitting in the open.
Can I swap the proteins around in these recipes?
Usually, yes. Chicken can often become tofu, chickpeas, or shrimp; tuna can become salmon; turkey can become chicken; and halloumi can take the place of meat in grain bowls. Just keep the texture in mind so the final dish still feels balanced.
A Picnic That Eats Like Dinner
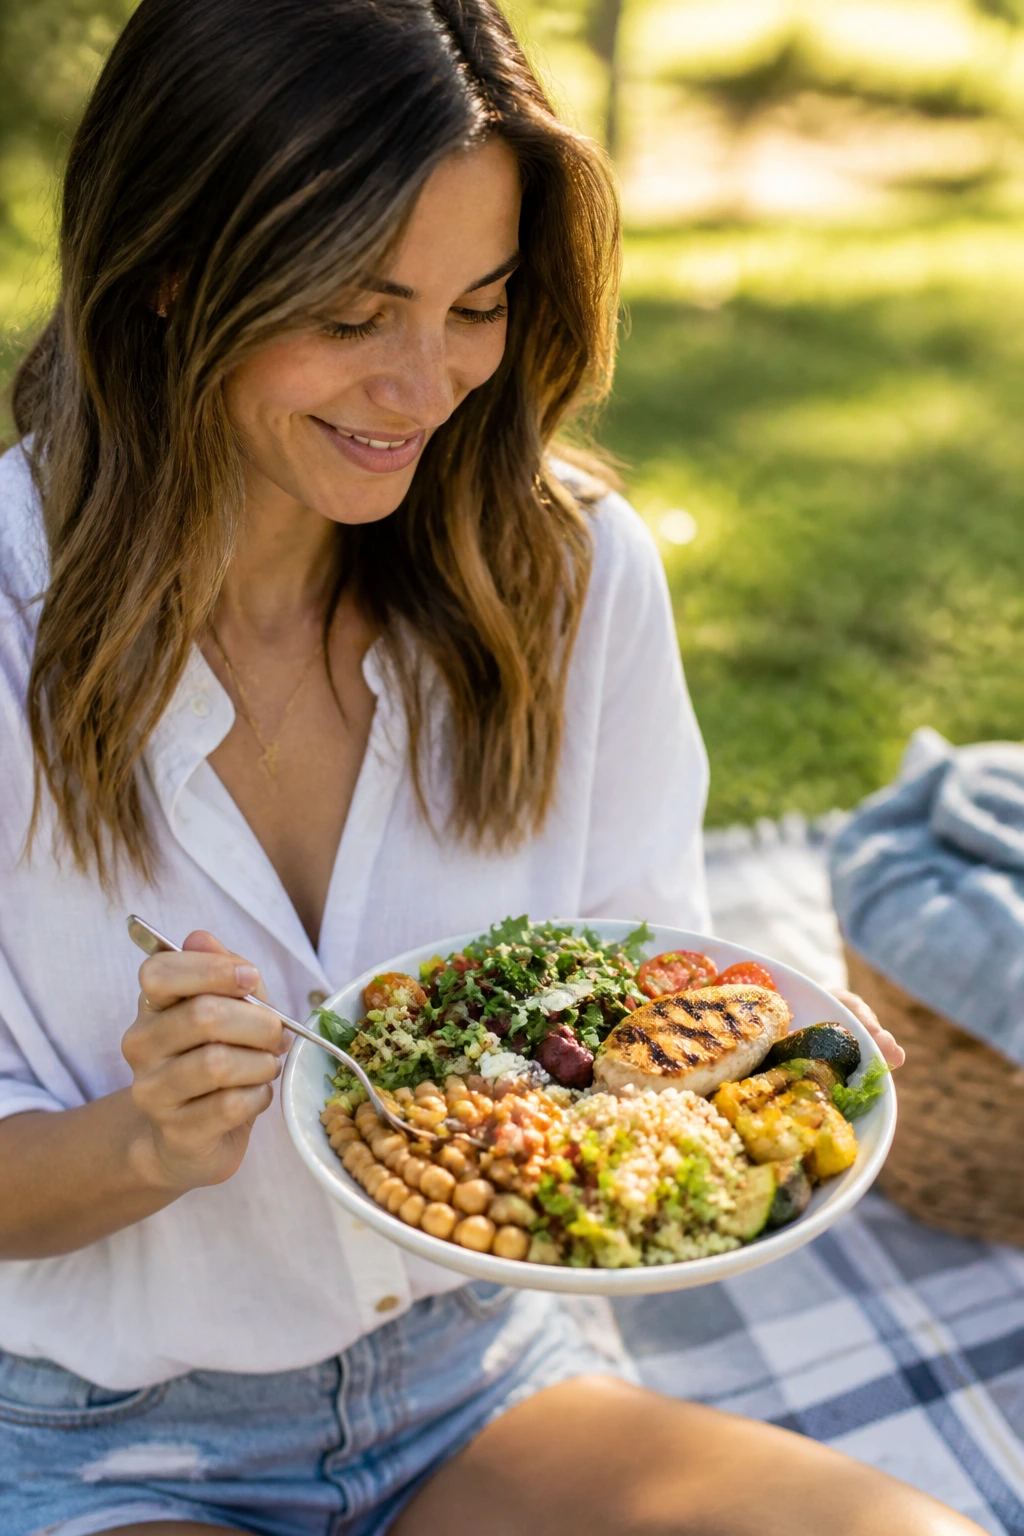
A good picnic dinner doesn’t need to be elaborate. It needs to survive the bag, keep its shape, and still taste like somebody cared when you finally open the lid. That’s why these recipes lean hard on sturdy ingredients, bright dressing, and textures that stay awake after a little travel.
The real win here is flexibility. You can build a spread around one or two of these dishes and fill the rest of the basket with fruit, chips, bread, or a cold drink. Or you can make a few of them ahead and let everybody graze. Either way, the food should feel easy once it’s packed, which is the whole point.
Pick one skewer, one salad, one wrap, and one cold bowl, and the picnic practically builds itself.