
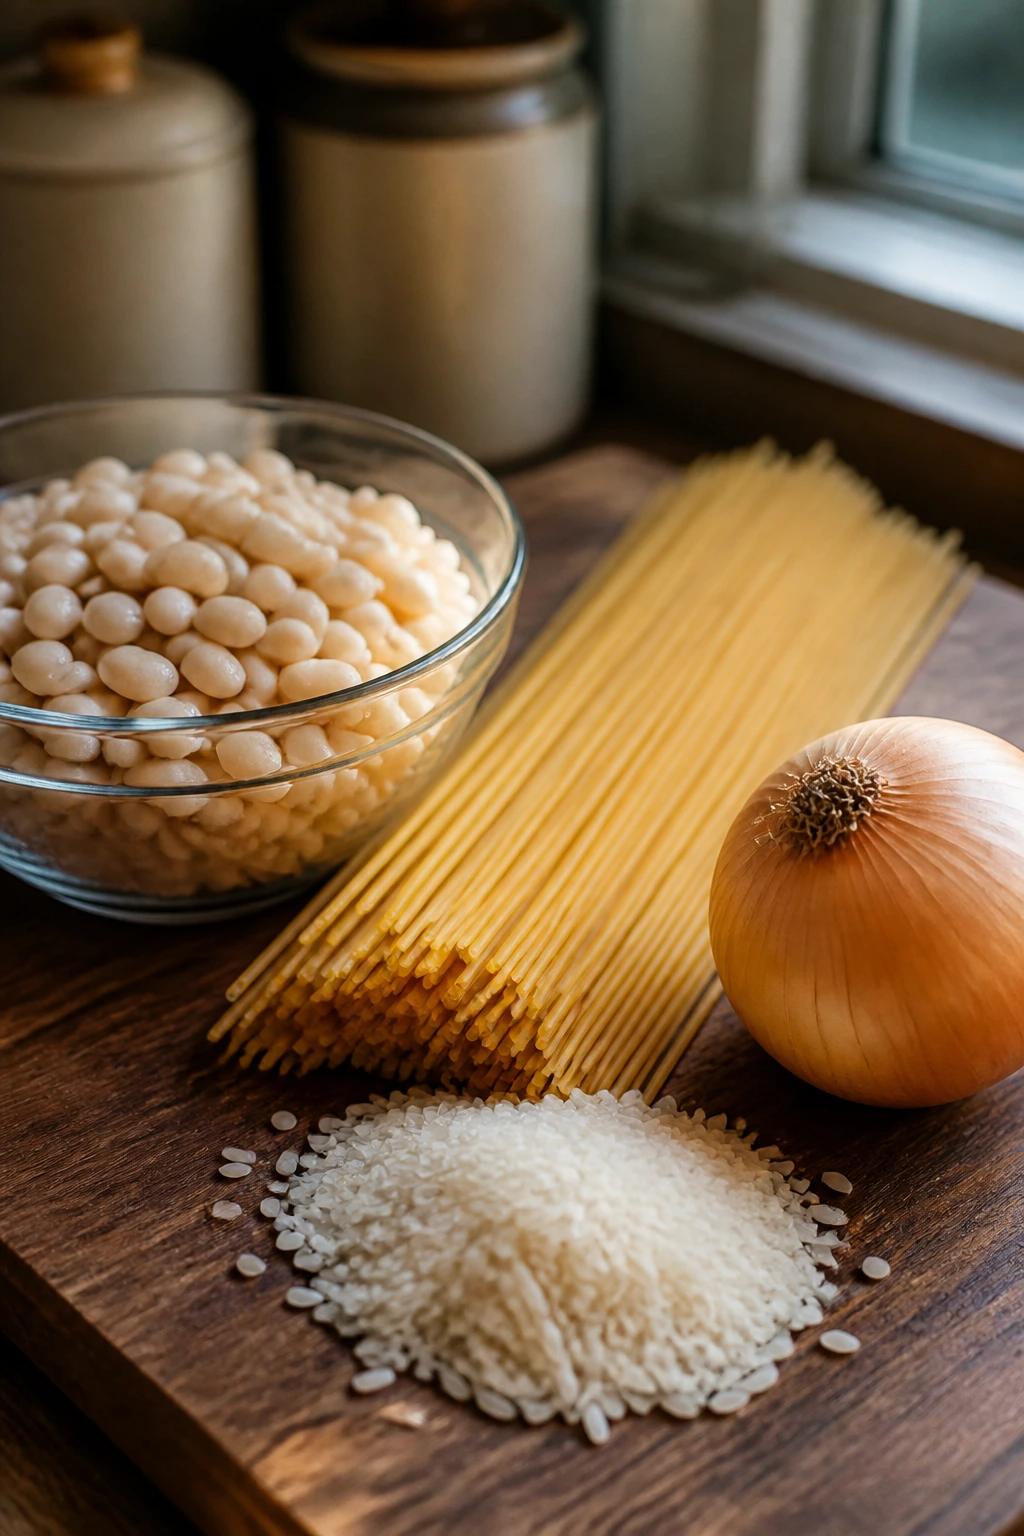
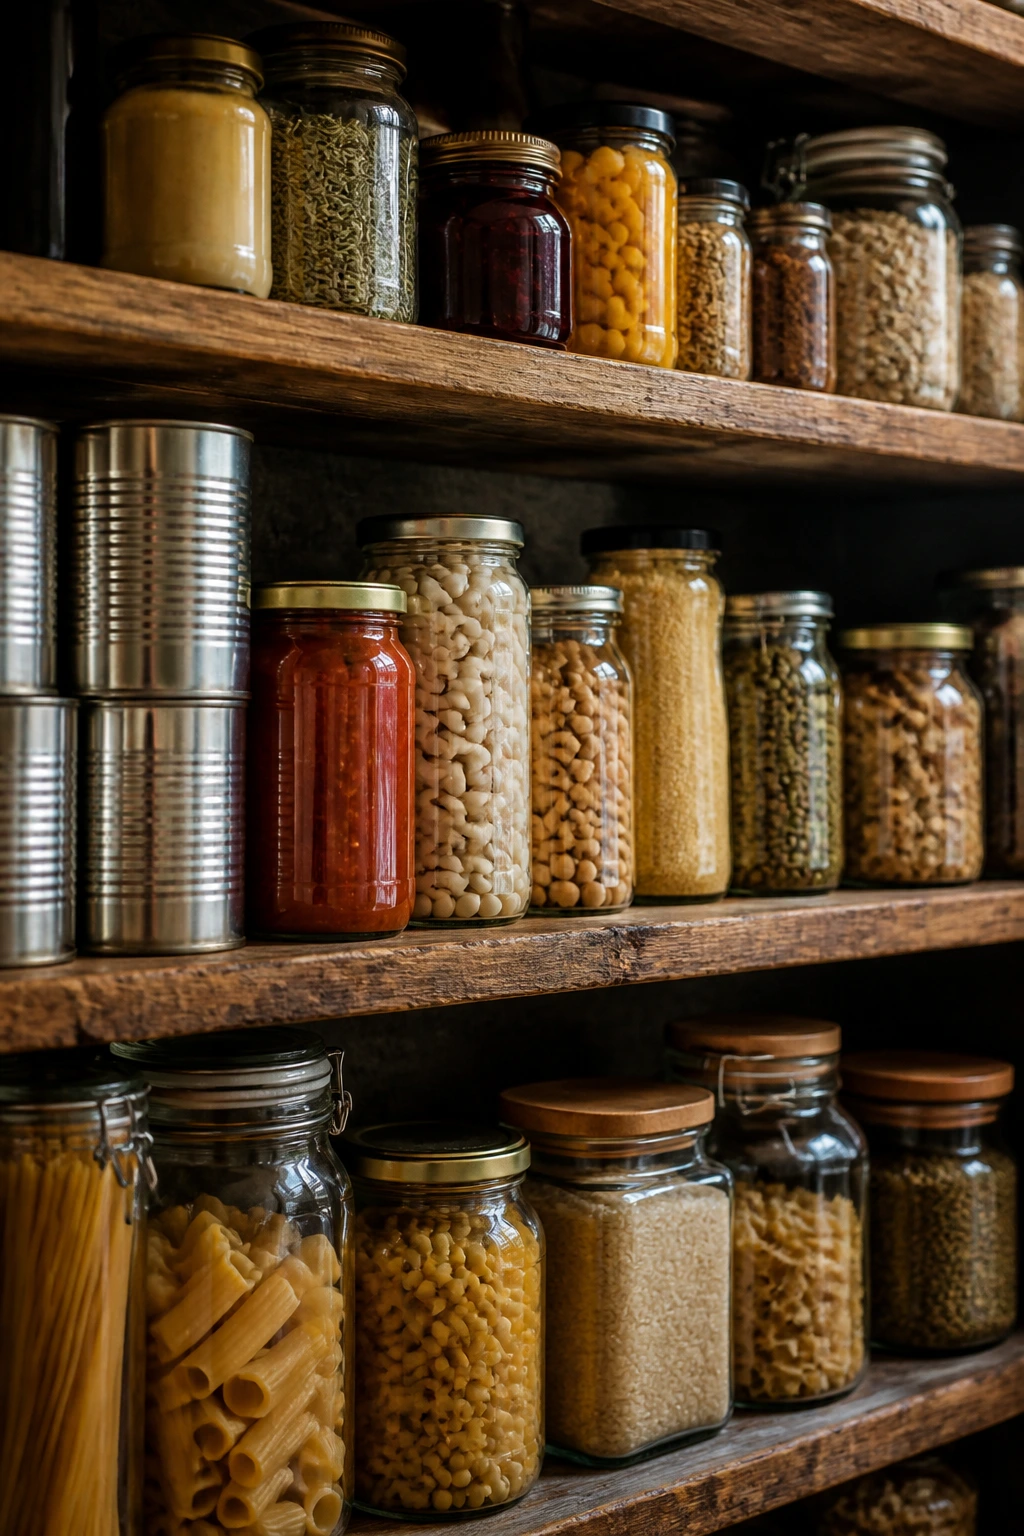
A can of beans, a box of pasta, and a lonely onion can still rescue dinner. Pantry staples do that kind of quiet, useful magic when the clock is sliding past six and nobody wants to stare into the fridge hoping for inspiration.
The real trick is not “making do.” It’s knowing how to turn shelf-stable ingredients into something that tastes intentional: garlic warmed until sweet, tomato paste cooked until brick-red and glossy, pasta water turned into sauce instead of going down the drain. Pantry cooking rewards that sort of attention. It’s cheap in the best way, fast without tasting rushed, and forgiving enough that you can swap a pasta shape or a bean without wrecking the whole pan.
These easy weeknight dinner recipes lean on the things most kitchens already keep around: dried pasta, rice, canned tomatoes, tuna, chickpeas, lentils, coconut milk, broth, tortillas, peanut butter, crackers, and a few seasonings that actually earn their shelf space. A little technique goes a long way here. The smell of garlic in olive oil, the sound of lentils simmering into a thick sauce, the way melted cheese settles into a burrito bake — that’s the part that makes a bare cupboard feel useful again.
Why Pantry Staples Win on Busy Nights
- They cut the shopping list down to size: You can build a full dinner with 6 to 8 ingredients instead of wandering the store for one special sauce or a bundle of herbs.
- They stretch without tasting stretched: Beans, pasta, rice, and couscous take on flavor fast, which means a modest amount of tomato, spice, or cheese can carry the whole dish.
- They handle timing mistakes better: If you leave a chickpea curry on low for 5 extra minutes, it usually improves. A delicate fish fillet would not be so forgiving.
- They save the freezer from becoming a mystery box: Cans, jars, and dry goods keep their shape and flavor long enough that you can plan dinner around what’s already there.
- They make cleanup easier: Most of these recipes live in one pot, one skillet, or a single baking dish, which matters when the day already felt long.
- They still feel like real food: The best pantry dinners have texture — crisp tortillas, silky noodles, brothy beans, browned edges, toasted spices — not just heat and hope.
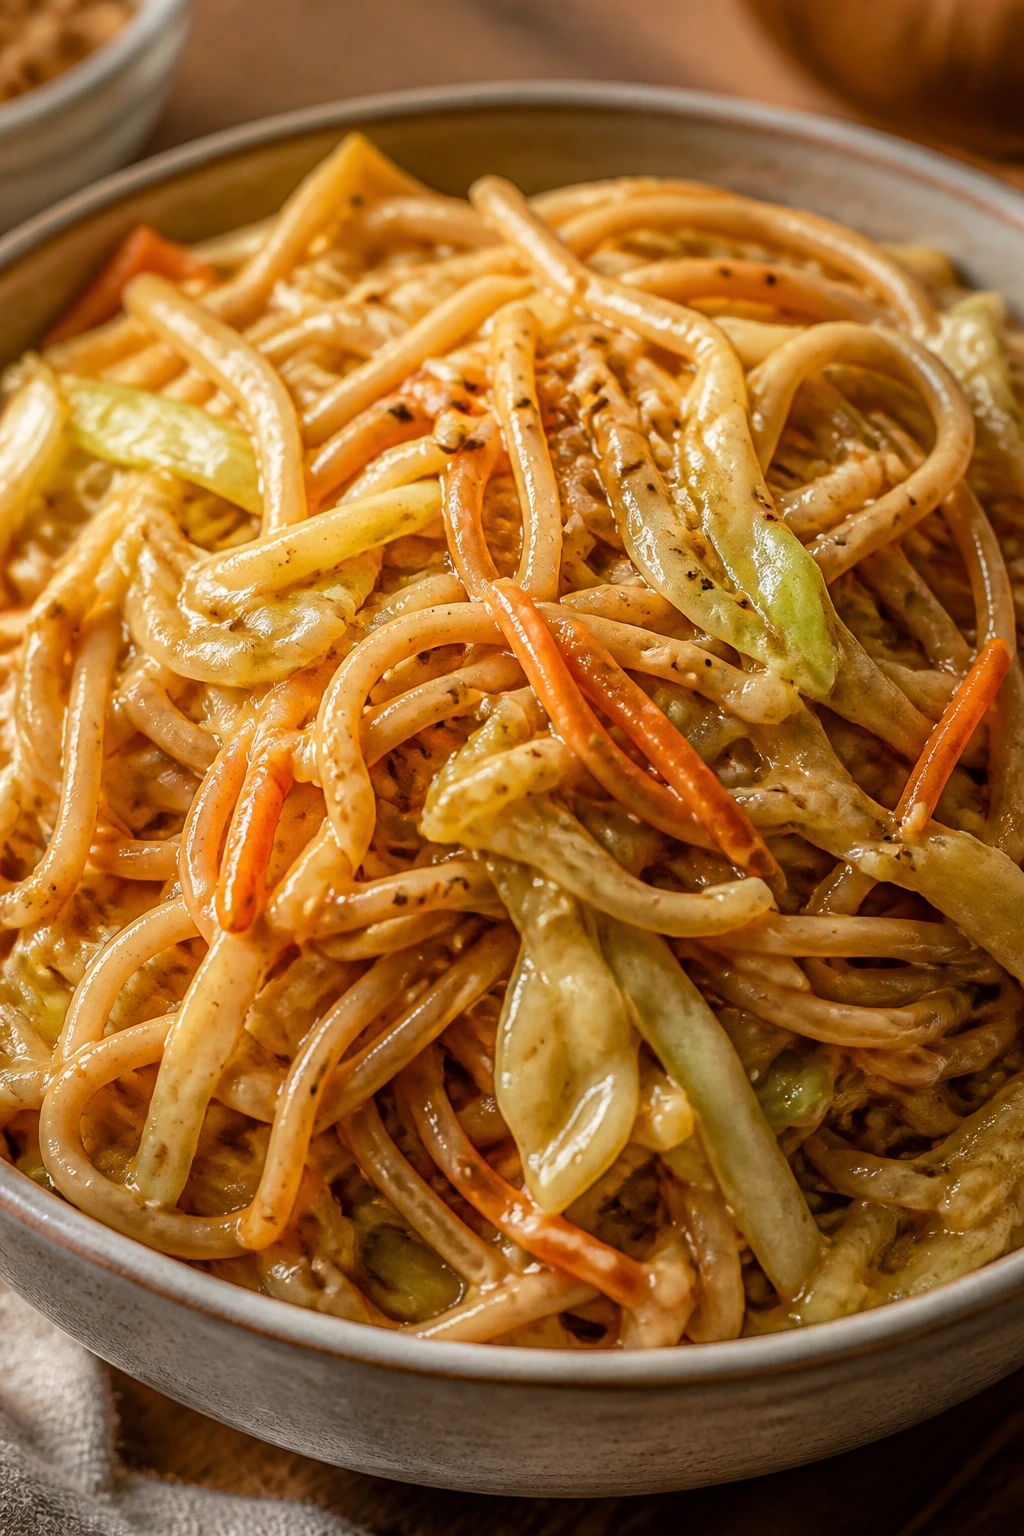
1. Garlic Chili Spaghetti
A pot of spaghetti tossed with garlic, olive oil, and chili flakes has a way of making the kitchen smell like you meant to cook all along. The sauce is spare, but that’s the point: every strand gets coated in a slick, glossy film that clings instead of pooling. Add a little parmesan and the whole bowl snaps into focus.
Why It Works:
This is the pantry dinner I keep coming back to when I want dinner to taste bigger than the ingredient list. The sauce forms in the pan from olive oil, starchy pasta water, and the garlic-infused oil, so you don’t need cream or a jar of sauce. Thinly sliced garlic cooks fast, and that means you get sweet, nutty edges if you pay attention for about 60 seconds. Chili flakes bring heat without turning the dish muddy.
Key Ingredients:
- 12 ounces spaghetti
- 1/3 cup extra-virgin olive oil
- 8 garlic cloves, thinly sliced
- 1/2 teaspoon red pepper flakes, or more if you like heat
- 1 teaspoon kosher salt, plus more for the pasta water
- 1/2 cup reserved pasta water
- 1/2 cup finely grated Parmesan, plus more for serving
- 2 tablespoons chopped parsley, optional
- 1 teaspoon lemon zest, optional but sharp and useful
Quick Steps:
- Boil the Pasta: Bring a large pot of water to a rolling boil, salt it well, and cook the spaghetti until just al dente, usually 8 to 10 minutes.
- Save the Water: Scoop out 1 cup of the pasta water before draining. That cloudy water is part of the sauce.
- Bloom the Garlic: Warm the olive oil in a large skillet over medium-low heat. Add the garlic and red pepper flakes, then cook for 1 to 2 minutes, stirring often, until the garlic is pale gold at the edges. Do not let it brown hard or it turns bitter.
- Emulsify the Sauce: Add 1/2 cup of the pasta water to the skillet, then toss in the drained spaghetti. Stir and lift the pasta until the oil and water turn creamy and clingy.
- Finish and Serve: Add Parmesan, parsley, and lemon zest if using. Toss again, splash in more water if the pan looks dry, and serve right away.
Equipment for This Recipe:
- Large pot
- Colander
- Deep skillet or sauté pan
- Tongs
- Microplane or fine grater for the cheese
How to Serve This Dish:
Pile it into shallow bowls so the strands don’t clump. A green salad with vinegar on it is enough on the side, though I like a chunk of toasted bread for mopping up the last slick of oil. It serves 4 as a main or 6 if you’re building a bigger spread.
Pro Tips for This Recipe:
- Keep the heat modest while the garlic cooks; high heat gives you browned edges before the oil picks up flavor.
- Salt the pasta water until it tastes like the sea. The sauce only has a few ingredients, so the pasta itself needs seasoning.
- If the sauce feels thin, toss for another 30 seconds. The starch in the water needs a moment to tighten.
- Finish with lemon zest if the dish tastes heavy. One small hit of acid wakes up the whole pan.
Variations on This Dish:
- Anchovy-Spiked Version: Melt 2 anchovy fillets into the oil with the garlic for a deeper, savory edge.
- Breadcrumb Crunch: Toast 1/2 cup breadcrumbs in olive oil and scatter them over the top for texture.
- Tomato Kick: Stir in 2 tablespoons tomato paste after the garlic for a faintly sweet, brick-red sauce.
Common Mistakes to Avoid with This Dish:
- Burning the garlic: If the slices turn deep brown, start over. Bitter garlic can take over the entire bowl.
- Draining all the pasta water away: You need some of it to pull the oil into a sauce.
- Skipping the final toss: The pasta should spend at least 30 seconds in the skillet so the sauce clings instead of sliding off.
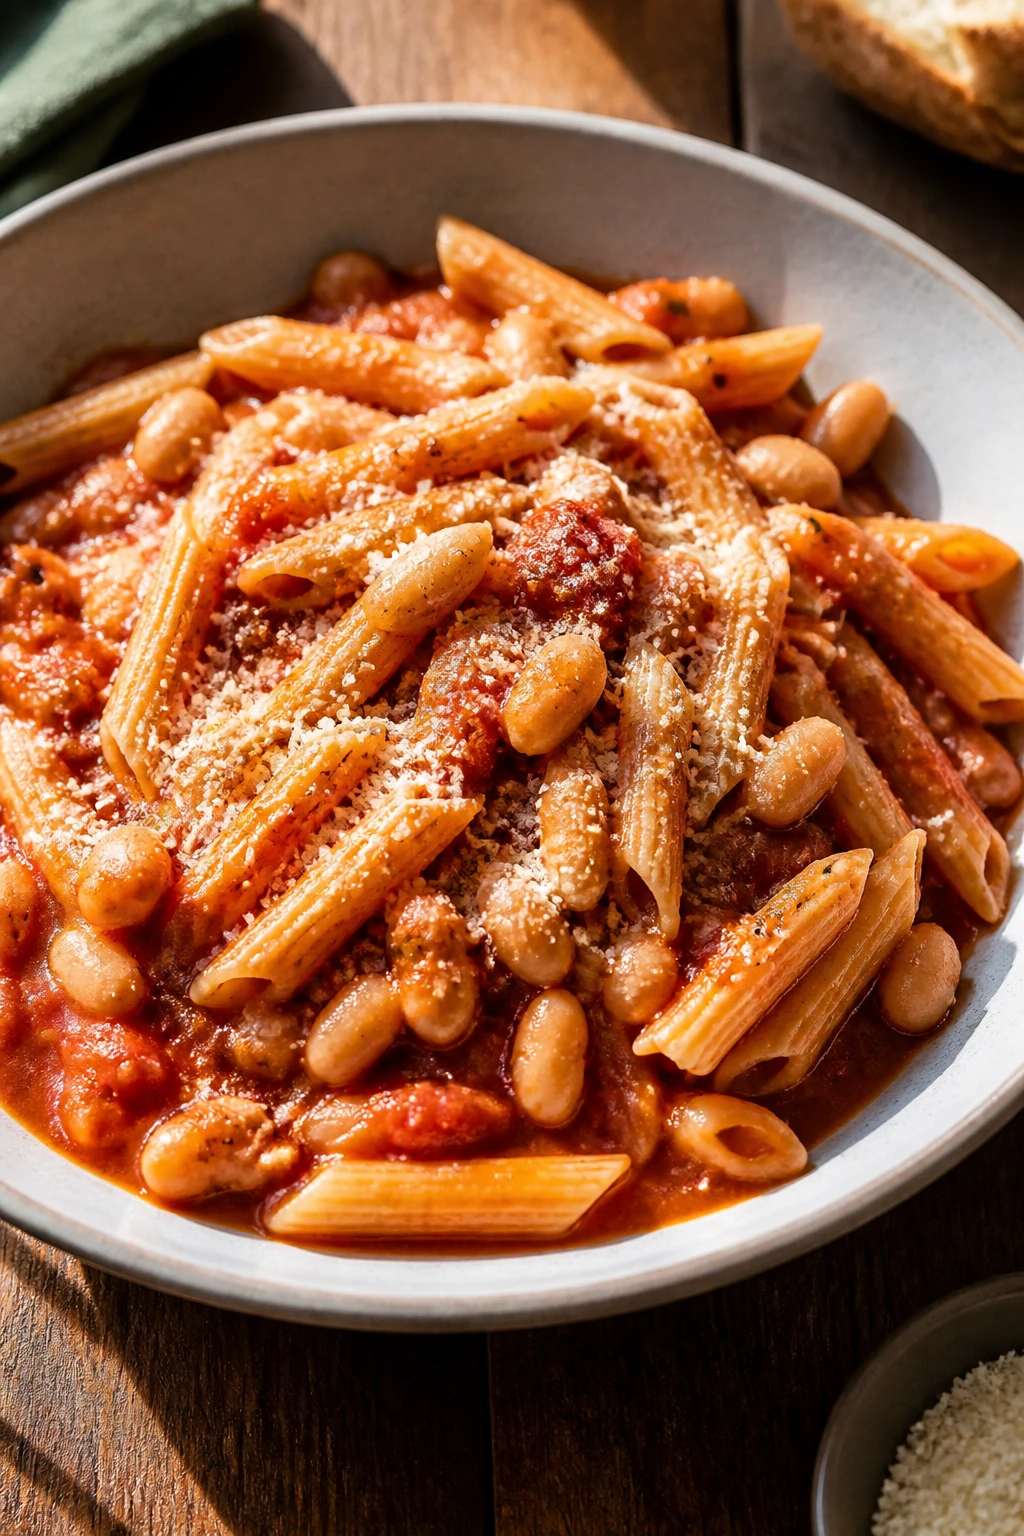
2. Pantry Tomato and Cannellini Bean Penne
This is what happens when canned tomatoes and white beans meet a hot skillet and a little patience. The sauce turns silky and faintly sweet, the beans break down around the edges, and the penne catches little pockets of tomato in every tube. It tastes like something far more elaborate than the five minutes it takes to get the onion sweating.
Why It Works:
Cannellini beans bring body without needing cream. Tomato paste deepens the sauce, and the crushed tomatoes keep it loose enough to coat the pasta without feeling thick or gluey. Penne is the right shape here because the ridges grab the bean-tomato mixture. A short simmer gives the pantry ingredients time to stop tasting separate.
Key Ingredients:
- 12 ounces penne
- 2 tablespoons olive oil
- 1 medium yellow onion, diced
- 3 garlic cloves, minced
- 2 tablespoons tomato paste
- 1 can (28 ounces) crushed tomatoes
- 1 can (15 ounces) cannellini beans, rinsed and drained
- 1 teaspoon dried oregano
- 1/2 teaspoon red pepper flakes
- 1/2 cup heavy cream or 3/4 cup whole milk
- 1/3 cup grated Parmesan, plus more for serving
Quick Steps:
- Cook the Pasta: Boil the penne in well-salted water until al dente, then reserve 1 cup of the cooking water and drain.
- Soften the Onion: Warm the olive oil in a wide skillet over medium heat. Add the onion and cook for 5 to 6 minutes, stirring, until translucent and lightly golden.
- Build the Base: Stir in the garlic, tomato paste, oregano, and red pepper flakes. Cook for 1 minute until the paste darkens slightly and smells sweet.
- Simmer the Sauce: Add the crushed tomatoes and cannellini beans. Simmer uncovered for 10 to 12 minutes, stirring now and then, until the sauce looks thicker and the beans are tender.
- Make It Creamy: Stir in the cream or milk, then add the pasta and a splash of reserved water. Toss until everything looks glossy and the sauce coats the penne.
- Finish: Add Parmesan, taste for salt, and serve hot.
Equipment for This Recipe:
- Large pot
- Colander
- Large skillet or Dutch oven
- Wooden spoon
- Measuring cups and spoons
How to Serve This Dish:
Serve it in warm bowls with a little extra Parmesan and a drizzle of olive oil. Garlic bread is obvious, and I mean that in the best way; a simple romaine salad with lemon dressing keeps the meal from feeling too soft. It makes 4 generous servings.
Pro Tips for This Recipe:
- Rinse the beans well. The can liquid can make the sauce murky and overly salty.
- Let the tomato paste cook for a full minute before adding the tomatoes. That step removes the raw, tinny taste.
- Save more pasta water than you think you need. A few tablespoons can rescue a sauce that looks too tight.
- If you want a deeper flavor, stir in a pinch of sugar only after tasting. Canned tomatoes vary a lot.
Variations on This Dish:
- Pasta e Fagioli Shortcut: Add diced carrots and celery with the onion, then thin the sauce with 1 extra cup broth.
- Baked Penne Finish: Transfer to a baking dish, top with mozzarella, and bake at 400°F for 12 minutes.
- Herby White Bean Version: Stir in chopped basil or parsley at the end for a fresher edge.
Common Mistakes to Avoid with This Dish:
- Adding the cream too early: It can dull the tomato flavor if it cooks for too long.
- Under-simmering the sauce: If it still tastes sharp, give it a few more minutes.
- Using a pot that’s too small: The pasta needs room to get coated instead of packed into a sticky lump.
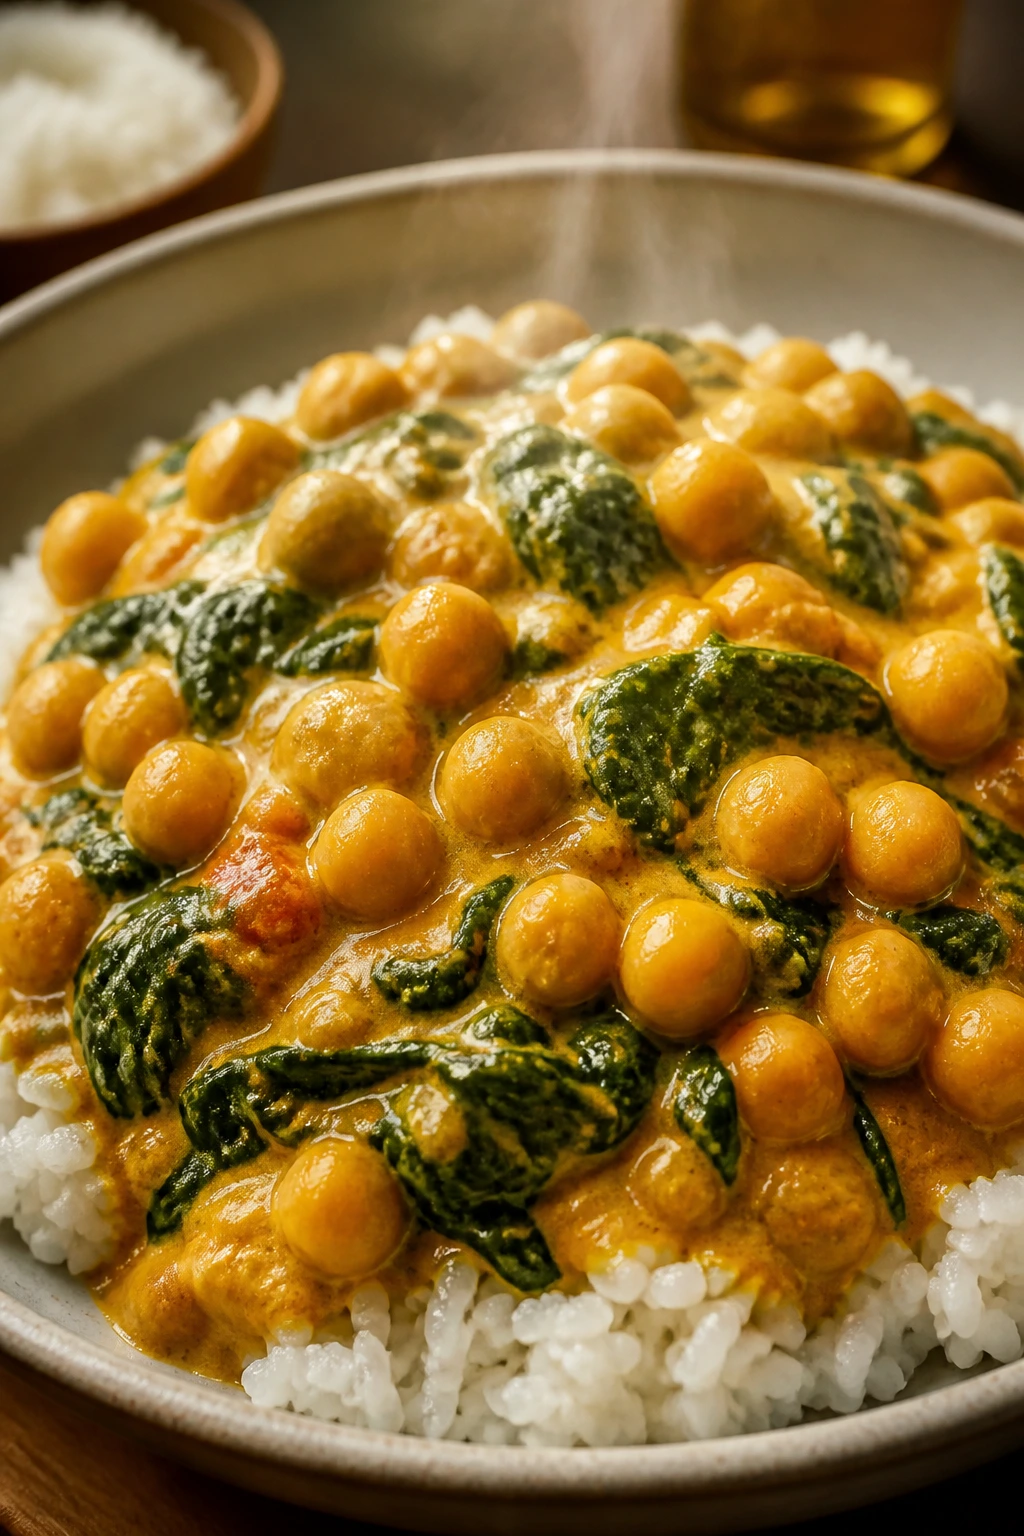
3. Chickpea Coconut Curry
This curry smells rich before it even finishes simmering. The coconut milk smooths out the spices, the chickpeas stay firm enough to bite, and the spinach melts into the sauce without turning the pot swampy. Spoon it over rice and you get one of those dinners that feels calm the second it hits the bowl.
Why It Works:
Curry powder and cumin need a little oil to bloom, or they stay dusty and flat. Coconut milk carries those spices beautifully, while chickpeas add enough heft that you do not need meat to make the dish feel complete. A can of tomatoes brings a little acid, which keeps the coconut from tasting heavy. Frozen spinach folds in at the end and saves you a chopping step.
Key Ingredients:
- 2 tablespoons vegetable oil or olive oil
- 1 medium onion, diced
- 3 garlic cloves, minced
- 1 tablespoon curry powder
- 1 teaspoon ground cumin
- 1 tablespoon tomato paste
- 1 can (15 ounces) chickpeas, rinsed and drained
- 1 can (13.5 ounces) full-fat coconut milk
- 1 can (14.5 ounces) diced tomatoes
- 2 cups frozen spinach
- 1 tablespoon lime juice
- 3 cups cooked rice, for serving
Quick Steps:
- Start the Aromatics: Heat the oil in a deep skillet over medium heat. Cook the onion for 5 minutes, then add the garlic and stir for 30 seconds.
- Bloom the Spices: Stir in the curry powder, cumin, and tomato paste. Cook for 1 minute, until the mixture turns fragrant and slightly darker.
- Build the Curry: Add the chickpeas, coconut milk, and diced tomatoes. Stir well and bring the pot to a gentle simmer.
- Simmer and Thicken: Cook uncovered for 12 to 15 minutes, stirring now and then, until the sauce reduces a little and clings to the chickpeas.
- Add the Greens: Stir in the frozen spinach and cook for 2 to 3 minutes until hot and fully broken up.
- Finish Bright: Add lime juice, taste for salt, and serve over rice.
Equipment for This Recipe:
- Deep skillet or Dutch oven
- Wooden spoon
- Measuring spoons
- Can opener
- Rice cooker or saucepan, if making rice from scratch
How to Serve This Dish:
Ladle the curry over a mound of rice so the sauce pools around the edges. A spoonful of yogurt on top is nice if you keep it around, but it is not required. This makes 4 to 5 servings, and leftovers reheat well the next day.
Pro Tips for This Recipe:
- Use full-fat coconut milk if you want a sauce that looks glossy instead of watery.
- Don’t skip the spice bloom. That one minute in oil matters more than another teaspoon of curry powder.
- If the curry tastes flat, add a pinch of salt before reaching for more spice.
- Frozen spinach should go in frozen. Thawed spinach can go mushy and make the sauce thin.
Variations on This Dish:
- Red Lentil Curry: Swap the chickpeas for 1 cup red lentils and add 1 extra cup water.
- Milder Coconut Stew: Cut the curry powder to 2 teaspoons and add a little more tomato.
- Spicy Pantry Curry: Stir in 1 teaspoon chili garlic sauce or a chopped chile with the onion.
Common Mistakes to Avoid with This Dish:
- Boiling the coconut milk hard: A hard boil can make the sauce split around the edges.
- Adding too much liquid: The curry should be spoonable, not soupy.
- Forgetting acid at the end: Lime juice or even a little vinegar keeps the sauce from tasting heavy.
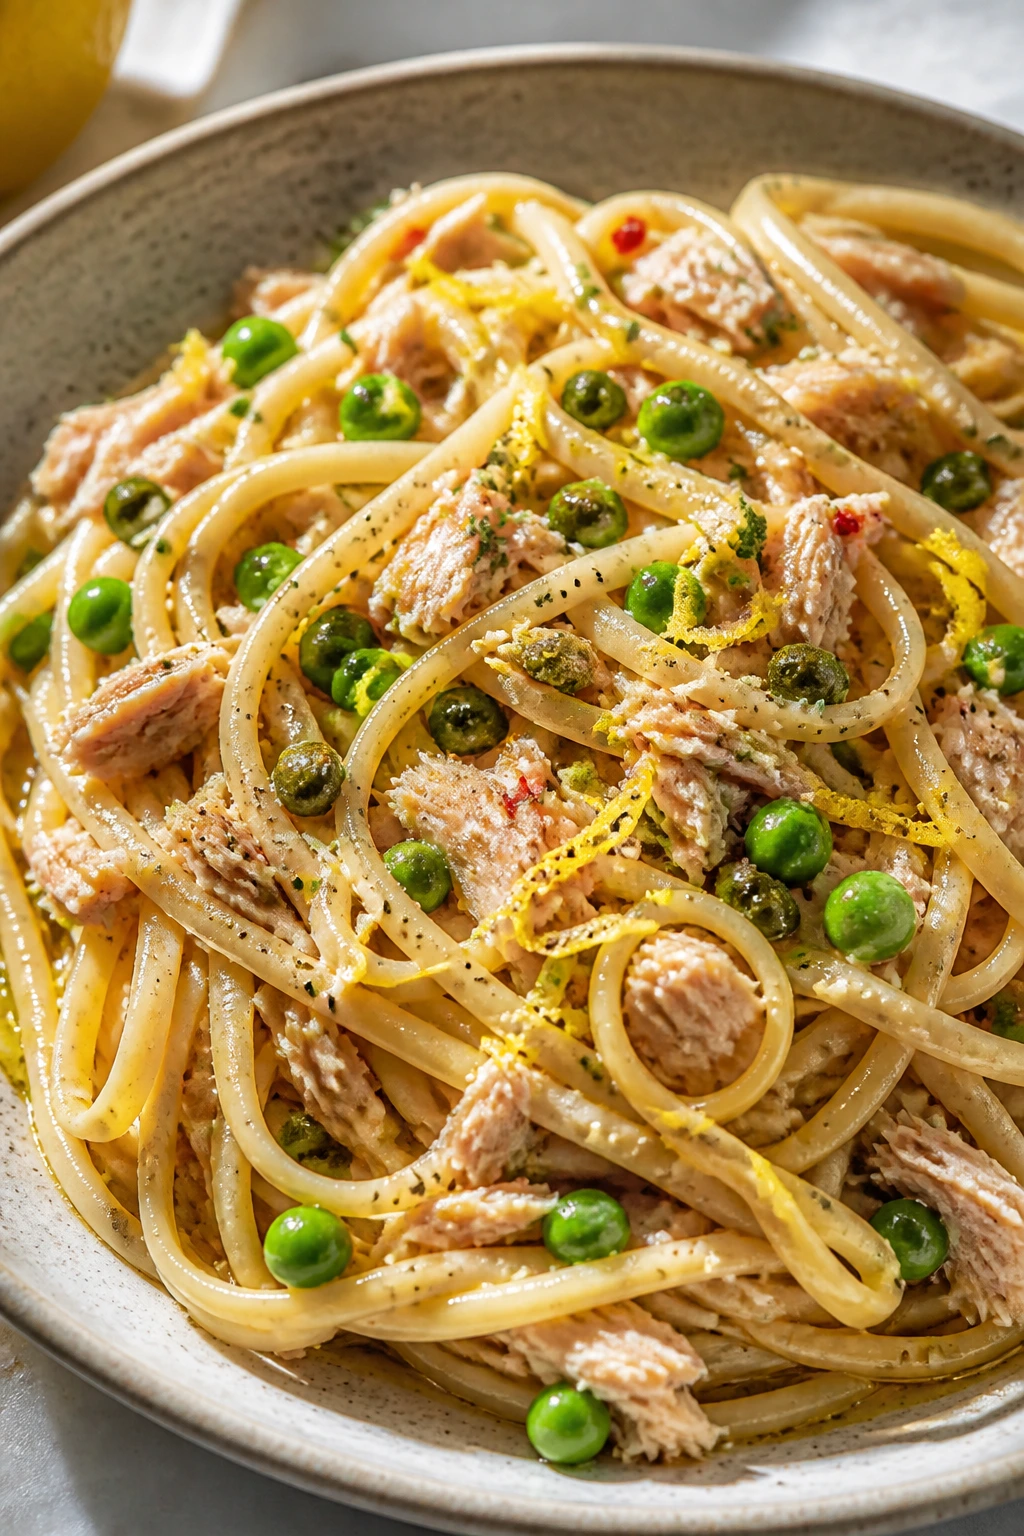
4. Tuna Pasta with Lemon, Capers, and Peas
This is the pantry pasta I make when I want something briny and sharp, not creamy and soft. The capers pop, the tuna stays flaky, and the lemon cuts through the oil so the dish tastes clean instead of canned. A handful of peas gives it some sweetness and texture without asking for a separate vegetable dish.
Why It Works:
Tuna in oil gives the sauce a richer base, but tuna in water works too if you add a little extra olive oil. Capers and lemon do the heavy lifting here; they keep the fish from tasting flat. Peas bring a cold, sweet note that wakes up every forkful. It is fast, but not sloppy if you respect the order of the pan.
Key Ingredients:
- 12 ounces linguine or spaghetti
- 2 cans tuna, drained
- 1 cup frozen peas
- 2 tablespoons capers, drained
- 3 garlic cloves, minced
- 1/4 cup olive oil
- 1 lemon, zested and juiced
- 1/2 teaspoon red pepper flakes
- 1/2 cup grated Parmesan
- 2 tablespoons chopped parsley, optional
Quick Steps:
- Cook the Pasta and Peas: Boil the pasta in salted water. Add the peas for the last 1 minute, then reserve 1 cup pasta water and drain.
- Build the Flavor Base: Warm the olive oil in a skillet over medium heat. Add the garlic, capers, and red pepper flakes, then cook for 30 to 45 seconds.
- Add the Tuna: Stir in the tuna and break it into large flakes. Cook for 1 minute just to warm it through.
- Emulsify: Add the pasta, peas, lemon juice, lemon zest, and 1/2 cup pasta water. Toss until the sauce turns silky and coats the noodles.
- Finish: Add Parmesan and parsley. If the pasta looks dry, splash in another few tablespoons of pasta water.
Equipment for This Recipe:
- Large pot
- Skillet
- Colander
- Tongs
- Microplane or grater
How to Serve This Dish:
Serve it in bowls with an extra squeeze of lemon at the table. I like it with a simple cucumber salad or plain greens, because the pasta already has plenty going on. It feeds 4 people without trying to be precious.
Pro Tips for This Recipe:
- Do not add the tuna too early; it dries out and loses its flaky texture.
- Capers need to be drained, not rinsed. You want their briny punch.
- The lemon zest matters as much as the juice. Skip it and the dish tastes flatter.
- Pasta water is your friend here. The starch helps the oil and lemon come together.
Variations on This Dish:
- Mediterranean Tuna Pasta: Add chopped olives and a spoonful of sun-dried tomatoes.
- Creamy Version: Stir in 2 tablespoons cream cheese with the pasta water.
- Breadcrumb Finish: Toss in toasted breadcrumbs for a crisp top note.
Common Mistakes to Avoid with This Dish:
- Using too little salt in the pasta water: The tuna will not carry the whole dish.
- Skipping the capers’ brine: They are the whole point of the sauce.
- Leaving the skillet dry: Without pasta water, the oil just sits there.
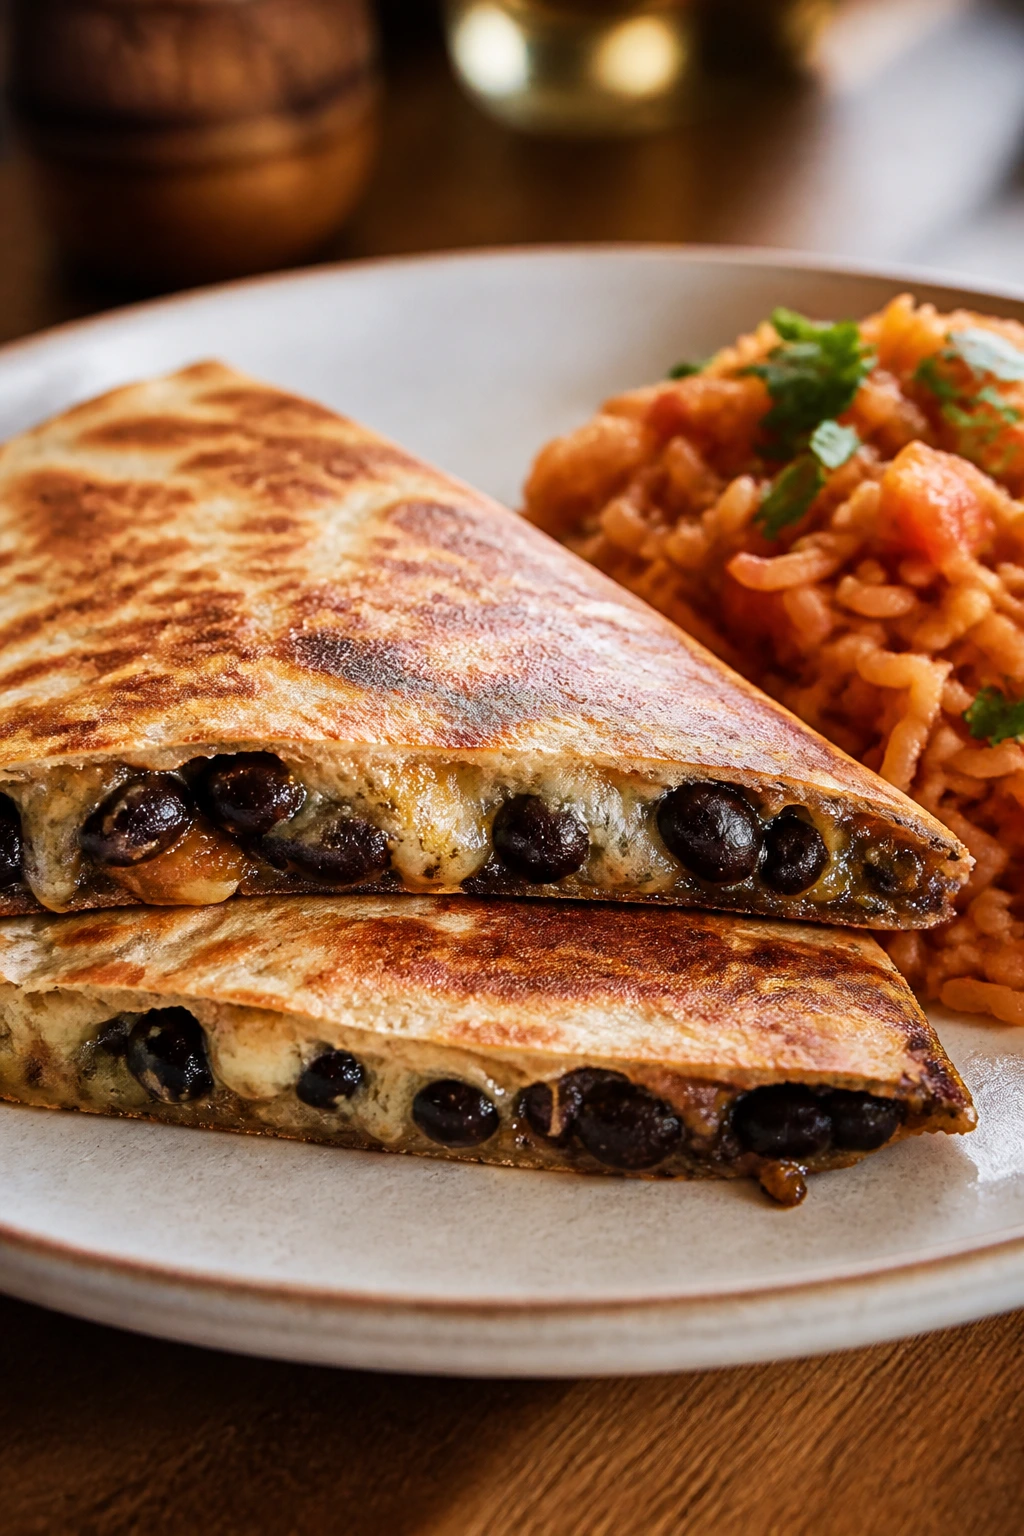
5. Black Bean Quesadillas with Salsa Rice
A quesadilla only looks simple until you cut into it and hit the melted cheese layer. Black beans give it a soft, earthy middle; the rice on the side turns the plate into a real dinner instead of a snack masquerading as one. This is the kind of meal that makes a jar of salsa work a lot harder.
Why It Works:
Black beans and cheese are reliable, but the little upgrades matter. Cumin and a spoonful of salsa keep the filling from tasting one-note, and cooking the quesadilla slowly in a skillet gives the tortillas those deep brown spots that taste faintly nutty. The rice absorbs leftover salsa, so nothing on the plate feels dry.
Key Ingredients:
- 8 flour tortillas
- 2 cans black beans, rinsed and drained
- 2 cups shredded cheddar or Monterey Jack
- 1 cup salsa
- 2 cups cooked rice
- 1 cup frozen corn
- 1 teaspoon ground cumin
- 1 tablespoon vegetable oil or butter
- Sour cream or plain yogurt, optional
Quick Steps:
- Warm the Rice: Heat the cooked rice with the salsa and corn in a saucepan over low heat until hot, about 5 minutes.
- Season the Beans: Mash about half the black beans with cumin and a pinch of salt. Leave the rest whole for texture.
- Fill the Tortillas: Lay out 4 tortillas, sprinkle cheese on one half, add a layer of beans, and top with a little more cheese. Fold over.
- Cook the Quesadillas: Heat the oil or butter in a skillet over medium heat. Cook each quesadilla for 2 to 3 minutes per side until the tortillas are crisp and spotted brown.
- Slice and Serve: Cut into wedges and serve with the salsa rice and a dollop of sour cream if you want it.
Equipment for This Recipe:
- Large skillet or griddle
- Small saucepan
- Spatula
- Knife or pizza cutter
- Mixing bowl
How to Serve This Dish:
Put the quesadilla wedges slightly fanned out beside the rice so the plate looks like dinner and not leftovers. A few pickled jalapeños or a squeeze of lime help a lot. Four hungry people can eat this, or six if there’s a salad on the side.
Pro Tips for This Recipe:
- Use medium heat. High heat browns the tortilla before the cheese melts.
- Don’t overfill the tortillas or the filling spills out and steams the crust.
- Let the quesadilla sit for 1 minute before cutting so the cheese settles.
- If your salsa is thin, stir less of it into the rice so it does not turn mushy.
Variations on This Dish:
- Chicken-Free Taco Melt: Add canned corn and a little chopped onion for more texture.
- Bean-and-Spinach Version: Fold in thawed frozen spinach that you’ve squeezed dry.
- Spicy Chipotle Quesadilla: Stir 1 teaspoon chipotle powder into the beans.
Common Mistakes to Avoid with This Dish:
- Cooking over high heat: You’ll get burnt spots and cold cheese.
- Using too much filling: The tortilla needs room to seal.
- Serving the rice dry: The salsa should be mixed in while the rice is still warm.
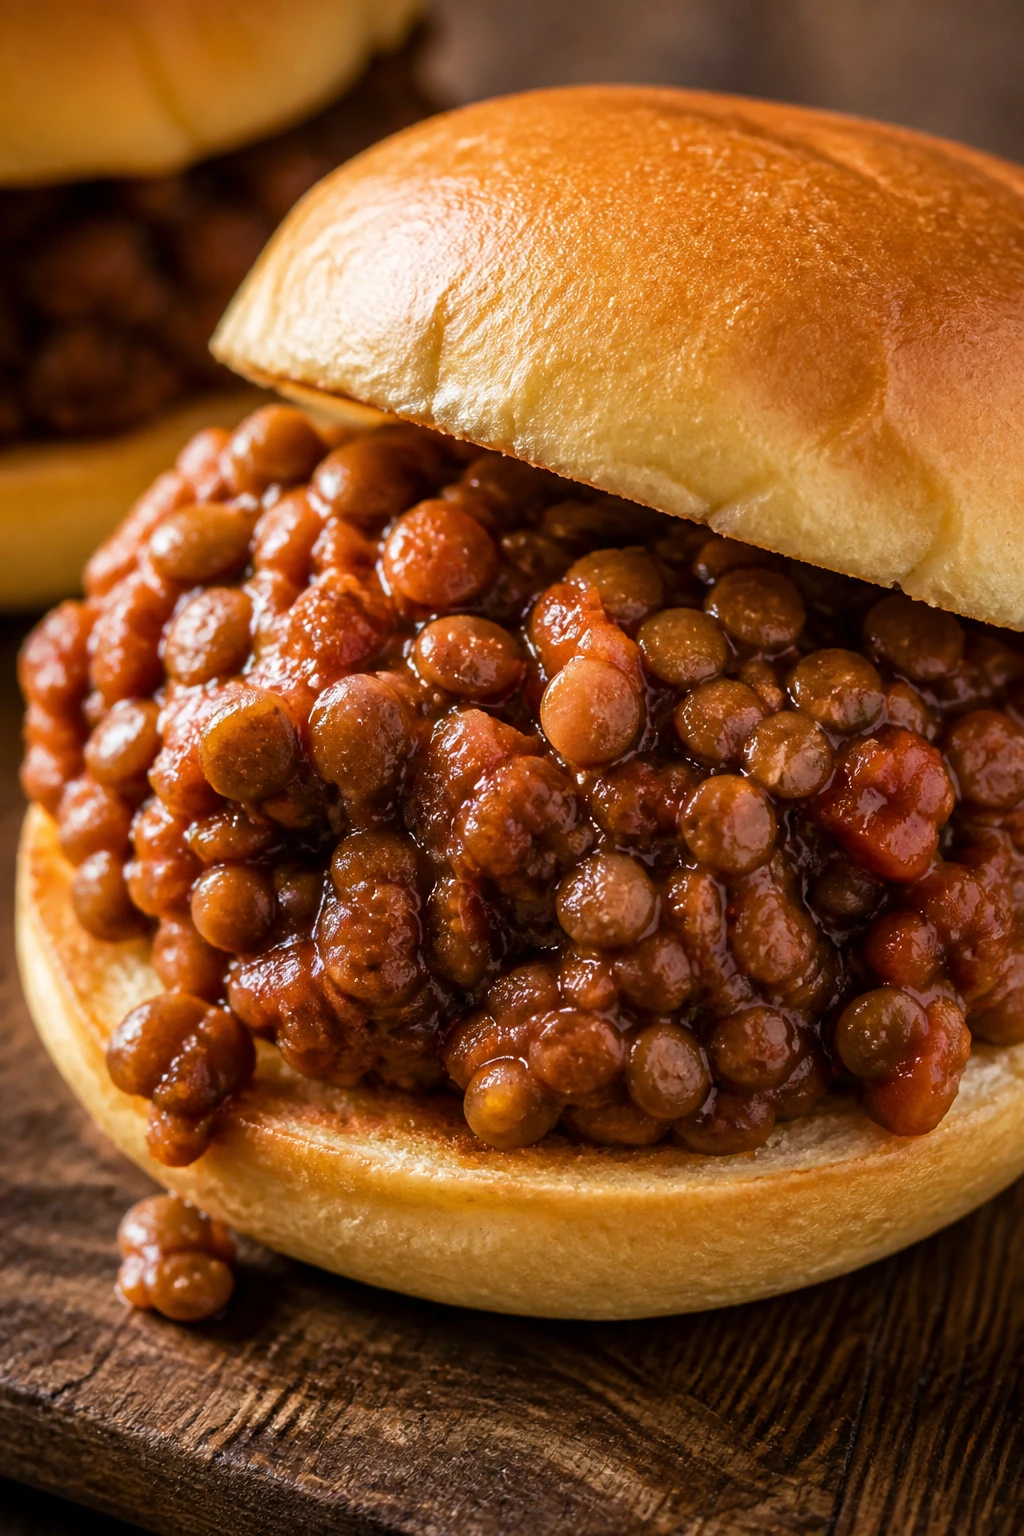
6. Lentil Sloppy Joes
Lentils give sloppy joes a darker, meatier feel than people expect. The filling turns thick and glossy, with just enough sweetness from ketchup to sit right against the onions and mustard. Piled onto toasted buns, it drips in the exact way sloppy joes should.
Why It Works:
Brown or green lentils hold their shape while still softening enough to absorb the sauce. Tomato paste and ketchup bring body; Worcestershire and mustard push the flavor toward savory instead of sugary. If you simmer the mixture until it’s thick enough to mound, the sandwich holds together instead of leaking all over the plate.
Key Ingredients:
- 1 cup brown or green lentils
- 3 cups water
- 1 tablespoon olive oil
- 1 medium onion, diced
- 2 garlic cloves, minced
- 1/2 cup ketchup
- 2 tablespoons tomato paste
- 1 tablespoon Worcestershire sauce
- 1 tablespoon brown sugar
- 1 teaspoon smoked paprika
- 1 teaspoon yellow mustard
- 6 hamburger buns, toasted
Quick Steps:
- Cook the Lentils: Simmer the lentils in 3 cups water for 18 to 22 minutes, until tender but not falling apart. Drain any excess water.
- Soften the Onion: Heat the olive oil in a skillet over medium heat and cook the onion for 5 minutes. Add the garlic and cook for 30 seconds.
- Build the Sauce: Stir in the ketchup, tomato paste, Worcestershire, brown sugar, smoked paprika, and mustard. Cook for 1 minute.
- Add the Lentils: Stir in the cooked lentils and 1/4 cup water. Simmer for 5 to 7 minutes, stirring often, until thick and glossy.
- Assemble: Spoon the lentil mixture onto toasted buns and serve immediately.
Equipment for This Recipe:
- Medium saucepan
- Large skillet
- Wooden spoon
- Colander
- Toaster or oven for the buns
How to Serve This Dish:
Serve them open-faced if you want fewer spills, or close the buns and accept the mess. A pile of potato chips or a crisp slaw makes the plate feel complete. This fills 4 to 6 sandwiches depending on how generous you are.
Pro Tips for This Recipe:
- Do not overcook the lentils. If they collapse, the filling turns paste-like.
- Toast the buns. Soft buns soak through in minutes.
- Taste before you serve. Lentils want more salt than people usually expect.
- If the mixture looks loose, simmer a little longer. It should sit in a bun, not pour out of one.
Variations on This Dish:
- Smoky BBQ Version: Swap half the ketchup for barbecue sauce.
- Spicy Sloppy Joes: Add a pinch of cayenne and a spoonful of pickled jalapeño brine.
- Whole-Grain Bowl: Serve the lentils over rice instead of on buns.
Common Mistakes to Avoid with This Dish:
- Using too much water in the sauce: The filling should be thick, not soupy.
- Skipping the onion step: Raw onion makes the sandwich harsh.
- Underseasoning the lentils: Beans and lentils need salt or they taste dull fast.
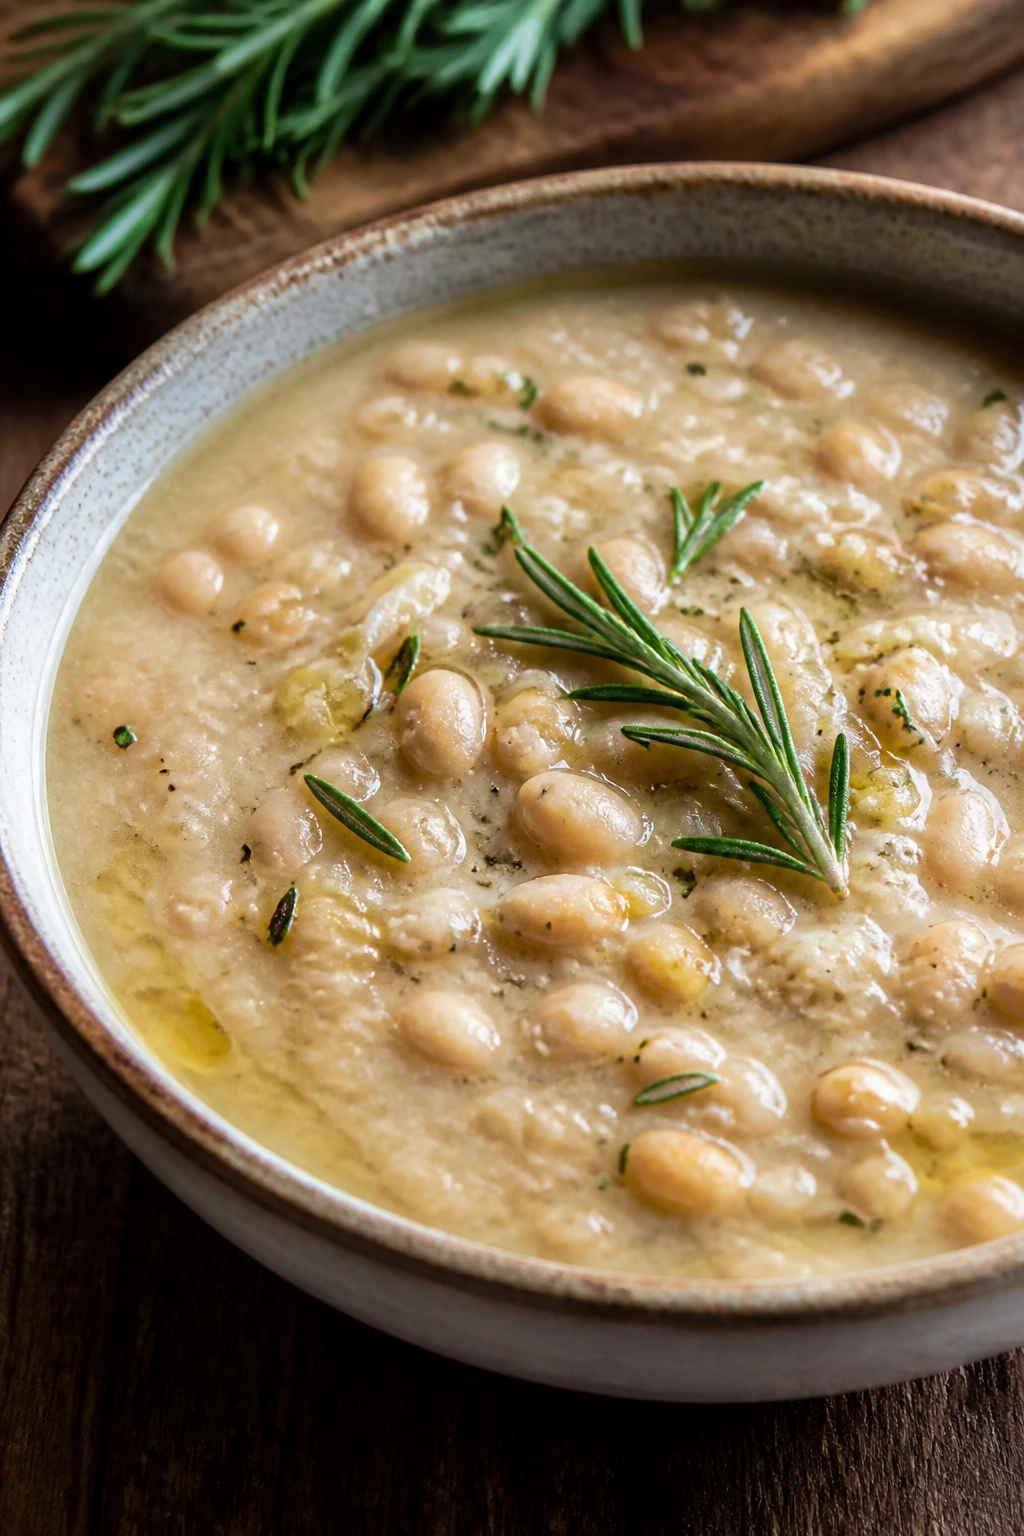
7. White Bean Rosemary Soup
This soup is all about the soft, steady flavor of beans, herbs, and broth. It’s brothy at first glance, but the mashed beans give it a creaminess that feels richer than it looks. Rosemary can go bitter if you overdo it, so a light hand matters.
Why It Works:
Cannellini beans are mild enough to soak up garlic and rosemary without fighting back. A bit of the soup gets mashed at the end, which thickens the pot without flour or cream. The result is a bowl that tastes calm, not bland, and it happens with ingredients most people can keep on hand.
Key Ingredients:
- 2 tablespoons olive oil
- 1 medium onion, diced
- 2 carrots, diced
- 2 celery stalks, diced
- 4 garlic cloves, minced
- 2 cans cannellini beans, rinsed and drained
- 4 cups chicken or vegetable broth
- 1 teaspoon dried rosemary or 1 tablespoon chopped fresh rosemary
- 1 bay leaf
- 1 tablespoon lemon juice
- Salt and black pepper, to taste
- Crusty bread, for serving
Quick Steps:
- Cook the Vegetables: Warm the oil in a Dutch oven over medium heat. Cook the onion, carrots, and celery for 6 to 8 minutes until softened.
- Add Garlic and Herbs: Stir in the garlic, rosemary, and bay leaf. Cook for 1 minute.
- Simmer the Soup: Add the beans and broth. Bring to a simmer, then cook for 15 minutes.
- Thicken It: Mash about 1 cup of the beans with a spoon or use an immersion blender for 3 to 5 quick pulses.
- Finish: Stir in lemon juice, season with salt and pepper, and serve hot.
Equipment for This Recipe:
- Dutch oven or soup pot
- Wooden spoon
- Immersion blender, optional
- Ladle
- Cutting board and knife
How to Serve This Dish:
Serve it with toasted bread rubbed with garlic if you have a spare clove. A little olive oil drizzled on top looks and tastes right. It makes 4 hearty bowls, and a side salad turns it into a full meal.
Pro Tips for This Recipe:
- Keep rosemary light. Too much and the soup tastes piney.
- Mash only part of the soup. You want creaminess, not baby food.
- Add lemon at the end, not while simmering. It stays brighter that way.
- If using canned broth, taste carefully before salting more.
Variations on This Dish:
- Pasta and Bean Soup: Add 1 cup small pasta in the last 10 minutes.
- Tomato-Bean Version: Stir in 1/2 cup crushed tomatoes for a redder, sharper broth.
- Garlic Bread Bowl: Ladle the soup over toasted bread in a bowl if you want a heartier plate.
Common Mistakes to Avoid with This Dish:
- Boiling the soup hard: Beans can break down too fast and the broth gets cloudy.
- Using too much rosemary: It should whisper, not shout.
- Forgetting the acid: Lemon is what keeps the bowl from tasting flat.
8. Peanut Sesame Noodles with Cabbage
These noodles taste like takeout from the best possible pantry run. Peanut butter makes the sauce thick and nutty, soy sauce brings salt, and a little vinegar keeps it from turning heavy. Toss in cabbage and carrot, and you get crunch against all that gloss.
Why It Works:
Peanut butter is one of the best pantry sauce bases around because it turns creamy with hot water and a little whisking. Sesame oil gives it the toasted aroma that makes the whole bowl smell finished. Cabbage is a smart move because it stays crisp even after sitting in the sauce for a few minutes, which is more than can be said for soft greens.
Key Ingredients:
- 12 ounces spaghetti, lo mein noodles, or ramen noodles
- 1/3 cup peanut butter
- 2 tablespoons soy sauce
- 1 tablespoon rice vinegar
- 1 tablespoon honey or brown sugar
- 1 teaspoon sesame oil
- 1 garlic clove, finely grated
- 1/2 cup hot water, plus more as needed
- 2 cups shredded cabbage
- 1 carrot, shredded
- 1 teaspoon sesame seeds
- 1/2 teaspoon chili flakes, optional
Quick Steps:
- Whisk the Sauce: In a large bowl, whisk peanut butter, soy sauce, vinegar, honey, sesame oil, garlic, and hot water until smooth.
- Cook the Noodles: Boil the noodles in salted water until just tender. Drain well.
- Combine: Toss the hot noodles with the sauce, cabbage, carrot, sesame seeds, and chili flakes.
- Loosen If Needed: Add a splash of hot water if the sauce seems too thick or sticky.
- Serve: Eat warm or room temperature.
Equipment for This Recipe:
- Large pot
- Colander
- Big mixing bowl
- Whisk
- Box grater or shredder
How to Serve This Dish:
Serve the noodles in a wide bowl so the sauce spreads evenly. A handful of peanuts on top is excellent if you have them, and sliced cucumber on the side keeps the meal crisp. This recipe feeds 4 comfortably.
Pro Tips for This Recipe:
- Use hot water, not cold, when you make the sauce. Peanut butter loosens faster.
- Salt the noodle water well; the sauce is only part of the seasoning.
- If the noodles sit for a while, toss them again before serving. They drink up sauce quickly.
- Add cabbage after the sauce is mixed so it stays crunchy.
Variations on This Dish:
- Spicy Chili Crisp Noodles: Spoon chili crisp over the top just before serving.
- Sesame Tahini Version: Swap half the peanut butter for tahini for a less sweet sauce.
- Crunchy Edamame Bowl: Stir in thawed edamame for more bite and protein.
Common Mistakes to Avoid with This Dish:
- Using too little water in the sauce: Peanut butter can seize into paste if you rush it.
- Overcooking the noodles: Soft noodles turn gummy fast once the sauce hits them.
- Skipping acid: Vinegar is what keeps the bowl from tasting like straight peanut butter.
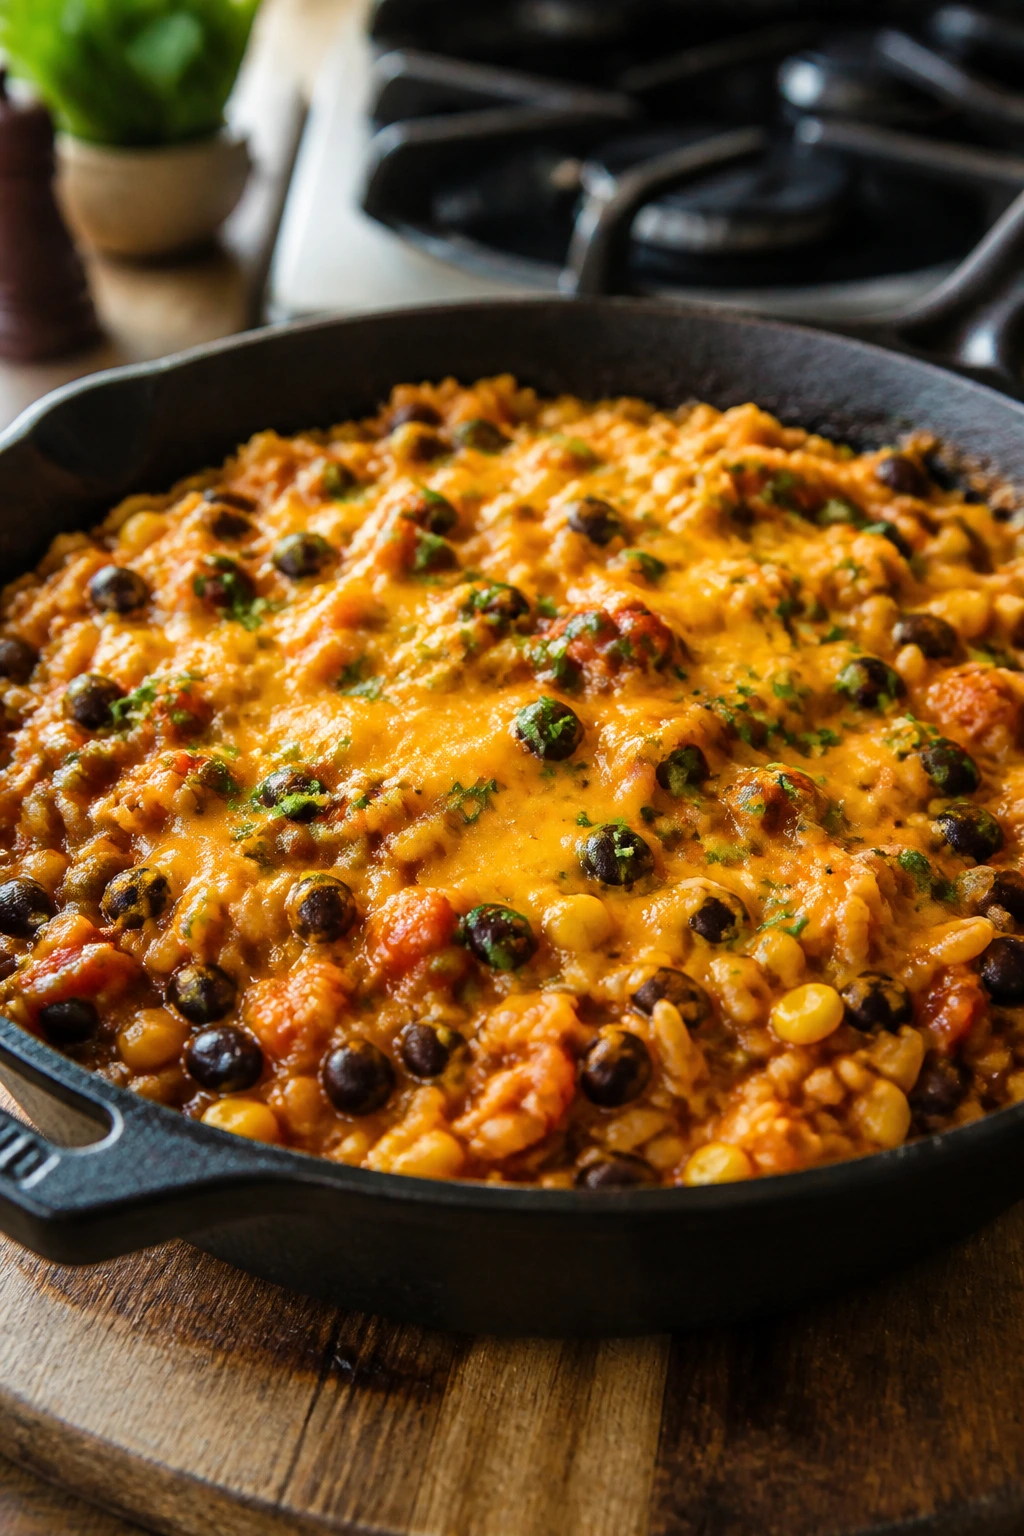
9. Quick Vegetable Chili
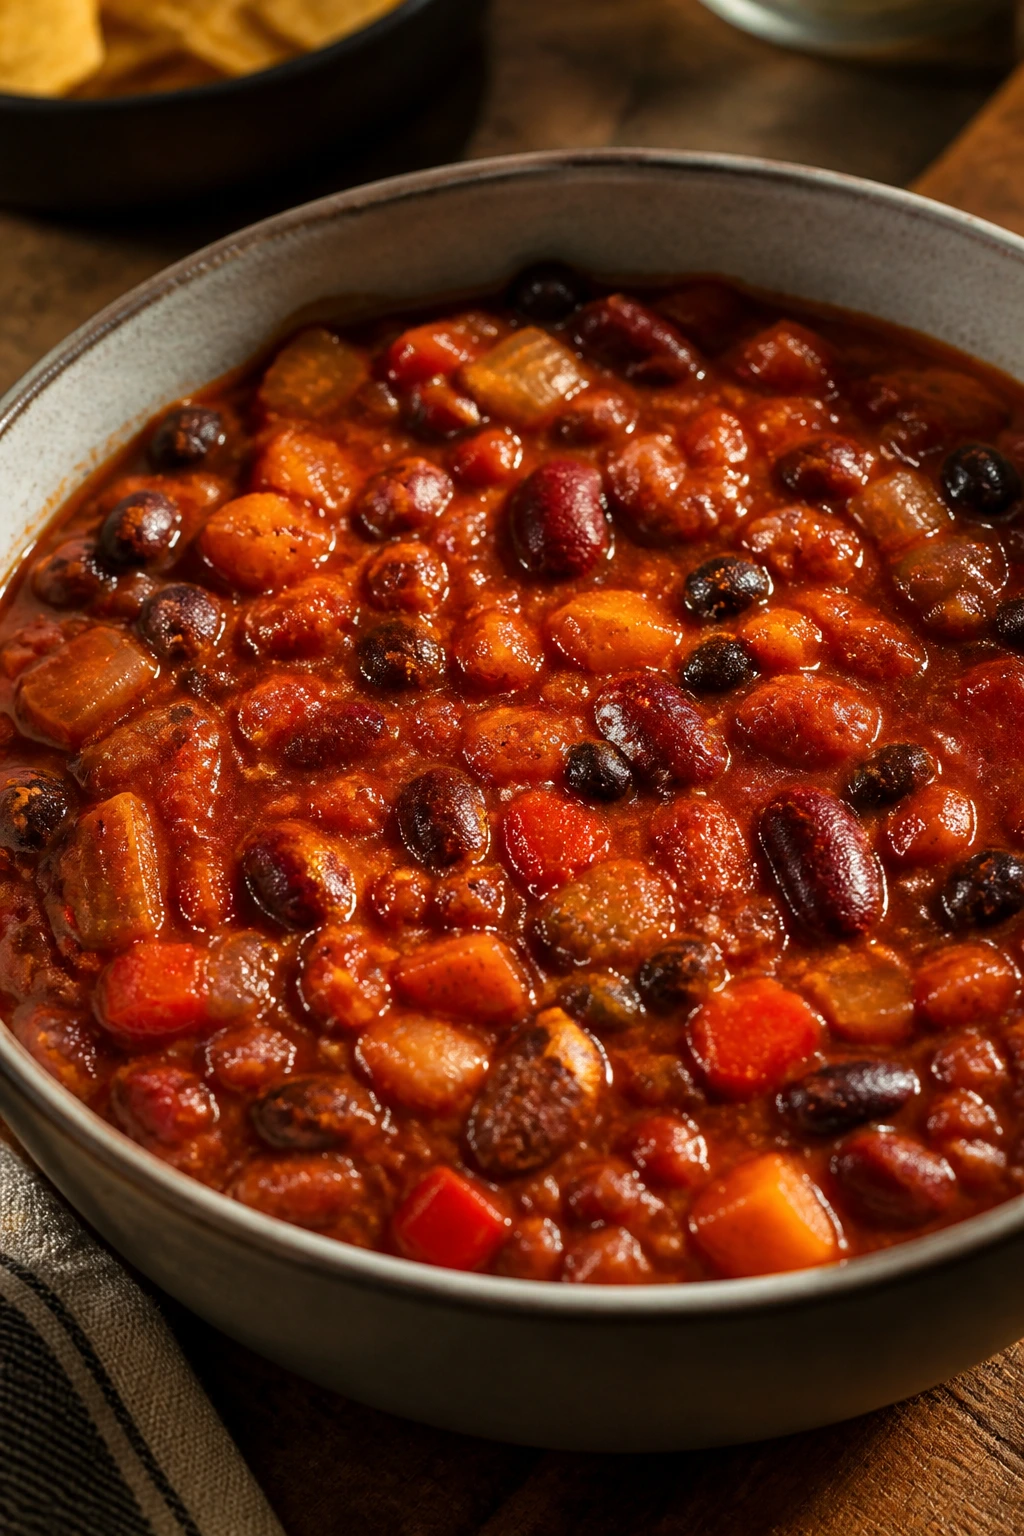
This chili tastes like it had time even when you did not. The beans stay intact, the tomatoes turn brothy and red, and the chili powder blooms into something deeper after a few minutes in oil. It’s the kind of dinner that makes a bowl of crackers feel like a proper side.
Why It Works:
A good pantry chili does not need meat to be hearty. Two kinds of beans give you different textures, and tomato sauce plus diced tomatoes make a base that thickens as it simmers. Chili powder, cumin, and smoked paprika do the flavor work, but only after they’ve had a minute in the pan.
Key Ingredients:
- 2 tablespoons vegetable oil
- 1 medium onion, diced
- 1 bell pepper, diced
- 3 garlic cloves, minced
- 2 tablespoons chili powder
- 1 teaspoon ground cumin
- 1 teaspoon smoked paprika
- 2 cans beans, such as kidney and black beans, rinsed and drained
- 1 can (14.5 ounces) diced tomatoes
- 1 can (8 ounces) tomato sauce
- 1 cup corn, frozen or canned and drained
- 1/2 cup broth, if needed
Quick Steps:
- Start the Base: Heat the oil in a pot over medium heat. Cook the onion and bell pepper for 6 minutes until softened.
- Toast the Spices: Add the garlic, chili powder, cumin, and paprika. Stir for 30 seconds until fragrant.
- Add the Beans and Tomatoes: Stir in the beans, diced tomatoes, tomato sauce, and corn.
- Simmer: Cook uncovered for 20 minutes, stirring occasionally, until the chili thickens.
- Adjust: Add broth if it looks too thick. Taste and add salt before serving.
Equipment for This Recipe:
- Large pot or Dutch oven
- Wooden spoon
- Can opener
- Ladle
- Measuring spoons
How to Serve This Dish:
Ladle it into bowls and top with shredded cheese, sour cream, or chopped onions if they’re around. Saltines, tortilla chips, or rice all work. It makes 4 to 6 servings and freezes nicely.
Pro Tips for This Recipe:
- Let the spices bloom in oil before adding liquid. That short step changes the flavor a lot.
- Rinse canned beans unless you want the pot to taste like bean liquid.
- If the chili tastes sharp, simmer it 5 more minutes instead of dumping in sugar right away.
- Corn adds sweetness and texture; leave it out if you want a darker, denser chili.
Variations on This Dish:
- Smoky Chipotle Chili: Add 1 chopped chipotle in adobo or 1 teaspoon chipotle powder.
- Three-Bean Chili: Use pinto, black, and kidney beans for more texture.
- Rice Bowl Version: Spoon the chili over rice and top with hot sauce.
Common Mistakes to Avoid with This Dish:
- Not simmering long enough: Chili needs time for the flavors to marry.
- Using stale chili powder: If the jar smells dusty, the chili will taste dusty.
- Adding too much broth: A good chili should mound on the spoon, not pour.
10. Pantry Shakshuka
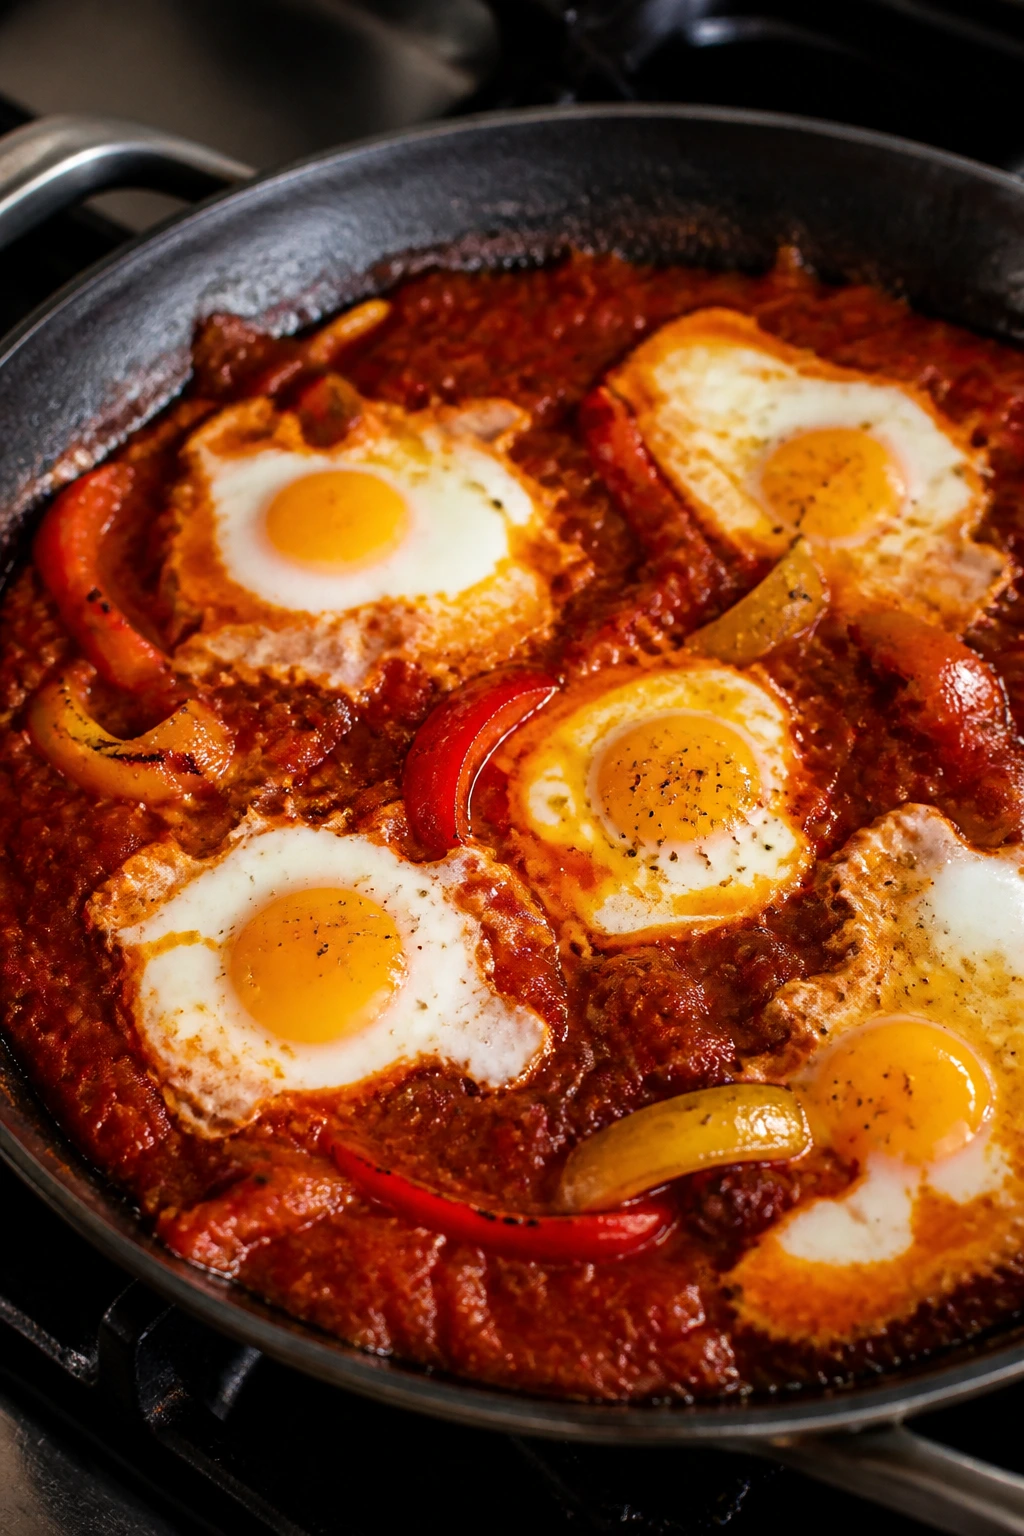
A skillet of shakshuka looks dramatic in the best possible way: red tomato sauce bubbling around bright egg yolks, with pepper and onion tucked underneath. The eggs poach gently in the sauce, so the whites set and the centers stay soft. It’s breakfast energy for dinner, which I mean as a compliment.
Why It Works:
Tomato paste and crushed tomatoes build a sauce with enough body to cradle the eggs. Roasted red peppers add sweetness and a little smoke without any chopping beyond a rough slice. The key is a skillet that’s wide enough for the eggs to sit apart, because crowding makes the whites cook unevenly.
Key Ingredients:
- 2 tablespoons olive oil
- 1 medium onion, sliced
- 1 cup jarred roasted red peppers, sliced
- 3 garlic cloves, minced
- 1 tablespoon tomato paste
- 1 can (28 ounces) crushed tomatoes
- 1 teaspoon ground cumin
- 1 teaspoon smoked paprika
- 1/2 teaspoon sugar
- 6 large eggs
- 1/4 cup feta, optional
- Bread, for serving
Quick Steps:
- Soften the Vegetables: Heat the oil in a wide skillet over medium heat. Cook the onion and roasted peppers for 6 to 7 minutes.
- Build the Sauce: Add the garlic and tomato paste, then cook for 1 minute. Stir in the crushed tomatoes, cumin, paprika, sugar, and a pinch of salt.
- Simmer: Cook uncovered for 10 to 12 minutes until the sauce thickens slightly.
- Add the Eggs: Make 6 small wells in the sauce and crack an egg into each one. Cover the skillet and cook for 5 to 7 minutes, until the whites are set but the yolks still jiggle.
- Finish: Scatter feta on top if using and serve with bread.
Equipment for This Recipe:
- Wide skillet with lid
- Wooden spoon
- Measuring spoons
- Small bowl for cracking eggs, optional
- Bread knife
How to Serve This Dish:
Serve the skillet straight to the table if the pan is presentable. Warm pita, crusty bread, or toast is non-negotiable here; the sauce is too good to leave behind. It feeds 4, maybe 3 if the bread basket is enthusiastic.
Pro Tips for This Recipe:
- Use a wide skillet so the eggs cook in space, not on top of each other.
- Cover the pan once the eggs go in. Steam is what sets the tops.
- If the sauce looks watery, simmer longer before adding the eggs.
- Crack each egg into a small bowl first if you’re nervous about broken yolks.
Variations on This Dish:
- Chickpea Shakshuka: Add 1 can chickpeas to the sauce before the eggs.
- Spicy Harissa Version: Stir in 1 to 2 teaspoons harissa paste.
- Green Herb Finish: Top with parsley or cilantro for brightness.
Common Mistakes to Avoid with This Dish:
- Adding eggs to a thin sauce: The whites spread out and overcook before the yolks are set.
- Lifting the lid too often: You lose steam and slow the cooking.
- Overcooking the yolks: Pull the pan when they still wobble a little.
11. Sardine and White Bean Toasts
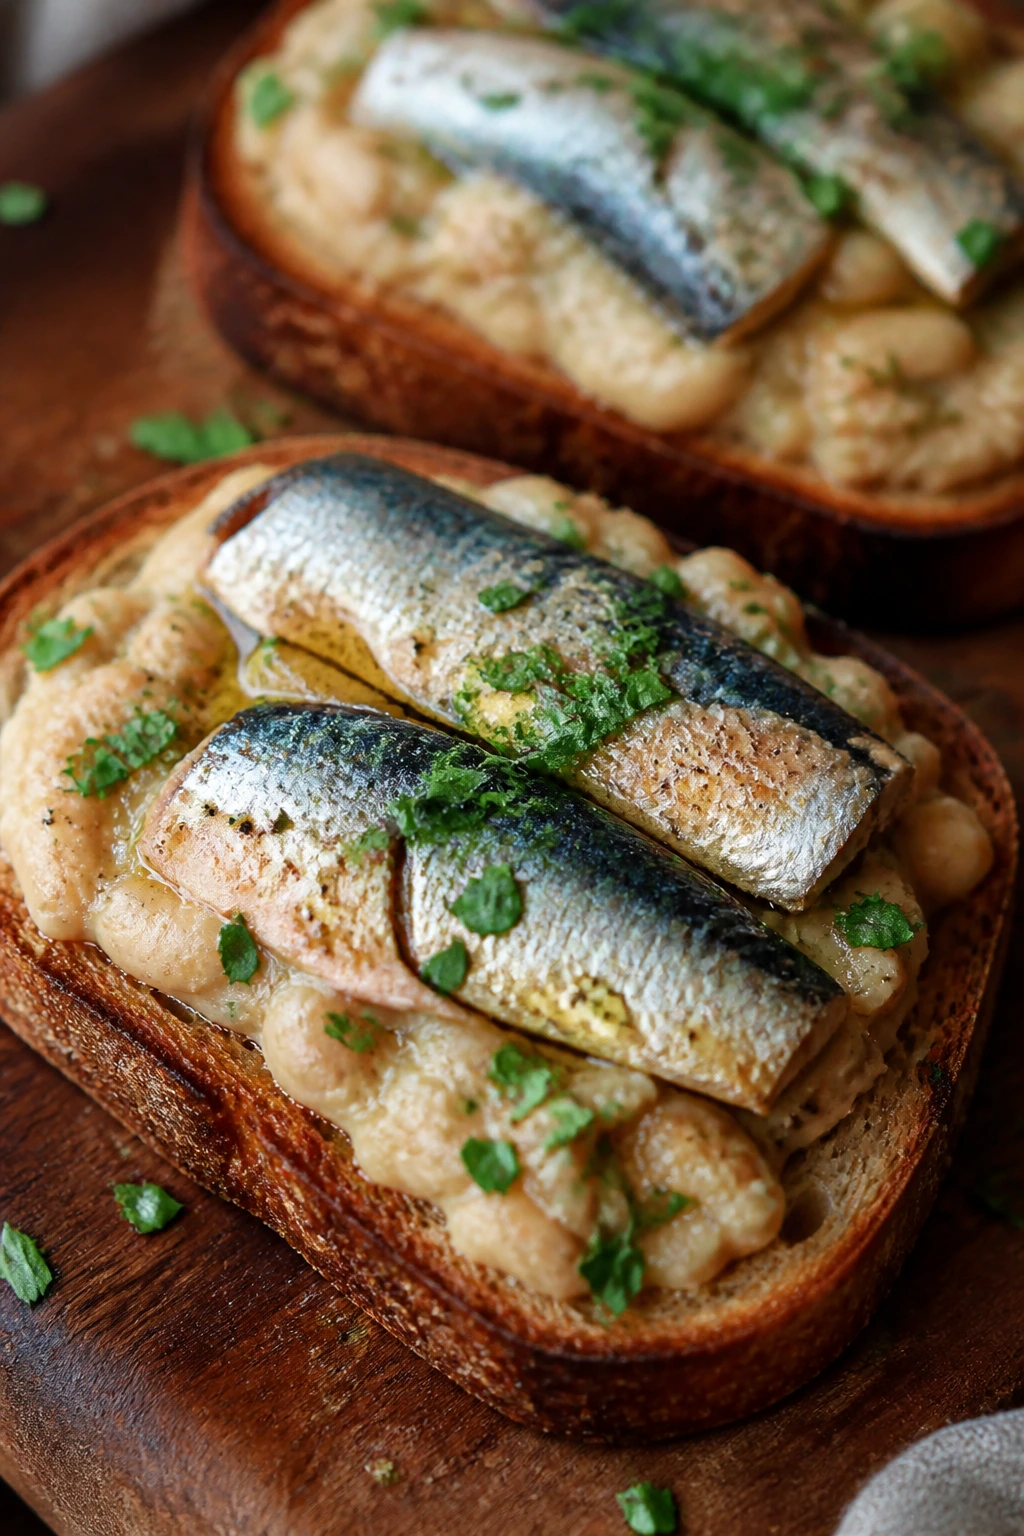
Sardines scare off people who haven’t had them done right. On toast, with white beans mashed into lemony spread, they stop tasting like a dare and start tasting like dinner. The beans soften the edges, the sardines bring salt and richness, and the toast keeps the whole thing from sliding around.
Why It Works:
White beans make a smooth base for the fish, so you get a layered bite instead of a mouthful of straight sardine. Lemon and Dijon lift the beans, while the sardines add built-in seasoning and healthy fat. Thick toast matters here; flimsy bread gets soggy before you finish the first slice.
Key Ingredients:
- 2 cans sardines, drained if packed in water
- 1 can cannellini beans, rinsed and drained
- 2 tablespoons olive oil
- 1 tablespoon lemon juice
- 1 teaspoon Dijon mustard
- 1 small garlic clove, grated, optional
- 6 thick slices crusty bread
- 2 tablespoons chopped parsley
- Red pepper flakes, to taste
Quick Steps:
- Mash the Beans: In a bowl, mash the beans with olive oil, lemon juice, Dijon, garlic, salt, and pepper until mostly smooth.
- Toast the Bread: Toast the slices until deep golden and firm.
- Assemble: Spread the bean mash on the toast, then top with sardines.
- Finish: Add parsley and red pepper flakes. Serve right away.
Equipment for This Recipe:
- Mixing bowl
- Fork or potato masher
- Toaster or skillet
- Knife
- Small grater, if using garlic
How to Serve This Dish:
Serve two toasts per person with a simple salad or tomato slices if you have them. The plate is better if you keep it unfussy. These are sturdy enough for dinner, especially with soup on the side.
Pro Tips for This Recipe:
- Use thick, sturdy bread. Soft sandwich bread falls apart fast.
- Taste the bean mash before topping the sardines; it usually needs more salt or lemon.
- If the sardines are large, break them once with your fork so each bite is easier.
- A little red pepper flakes goes a long way against the richness.
Variations on This Dish:
- Mediterranean Toasts: Add chopped olives and a few capers.
- Tomato Bean Base: Mix 2 tablespoons chopped sun-dried tomatoes into the beans.
- No-Fish Version: Top the bean mash with roasted chickpeas instead.
Common Mistakes to Avoid with This Dish:
- Using thin bread: It cannot support the topping.
- Skipping the acid: Lemon is what keeps the beans bright.
- Overmashing the sardines: Leave some texture so the toasts feel substantial.
12. Salsa Rice and Bean Skillet
This skillet is what happens when rice dinner stops pretending to be a side dish. The grains soak up salsa and broth, the beans warm through without breaking down completely, and the cheese melts into the top like a lid. It is the sort of meal that somehow tastes even better from the pan.
Why It Works:
Toasting the rice briefly in oil builds a nutty base before any liquid goes in. Salsa does double duty here: flavor and moisture. Beans and corn go in near the end so they stay intact, and cheese melts into the hot rice without needing a separate sauce.
Key Ingredients:
- 1 tablespoon oil
- 1 medium onion, diced
- 1 cup long-grain white rice, rinsed
- 1 teaspoon ground cumin
- 2 cups broth or water
- 1 cup salsa
- 1 can black beans, rinsed and drained
- 1 cup corn
- 1 cup shredded cheddar or Monterey Jack
Quick Steps:
- Toast the Rice: Heat the oil in a deep skillet over medium heat. Add the onion and cook for 3 minutes, then stir in the rice and cumin.
- Add Liquid: Pour in the broth, bring to a boil, then lower the heat, cover, and simmer for 15 minutes.
- Finish the Rice: Remove the lid and check that the liquid is absorbed and the rice is tender.
- Stir in the Filling: Fold in the salsa, beans, and corn. Cook for 3 minutes until hot.
- Melt the Cheese: Sprinkle cheese over the top, cover for 2 minutes, then serve.
Equipment for This Recipe:
- Deep skillet with lid
- Wooden spoon
- Measuring cup
- Can opener
- Cheese grater
How to Serve This Dish:
Serve it straight from the skillet with hot sauce at the table. If you want to stretch it further, add shredded lettuce and sliced avocado on the side. It makes 4 to 5 servings and is easy to scale up.
Pro Tips for This Recipe:
- Rinse the rice first so it cooks evenly.
- Keep the lid on while the rice simmers. Peeking lets steam out.
- Use a salsa you like plain. If it tastes flat in the jar, it will taste flat in the skillet.
- Add the beans after the rice is cooked so they stay whole.
Variations on This Dish:
- Taco Skillet: Stir in taco seasoning instead of cumin.
- Cheesy Enchilada Rice: Use enchilada sauce instead of salsa.
- Breakfast-for-Dinner: Top each bowl with a fried egg.
Common Mistakes to Avoid with This Dish:
- Using too much liquid: Rice can go mushy fast.
- Adding cheese too early: It can stick to the bottom instead of melting on top.
- Not seasoning the rice base: Rice needs salt before the salsa goes in.
13. Pasta e Fagioli
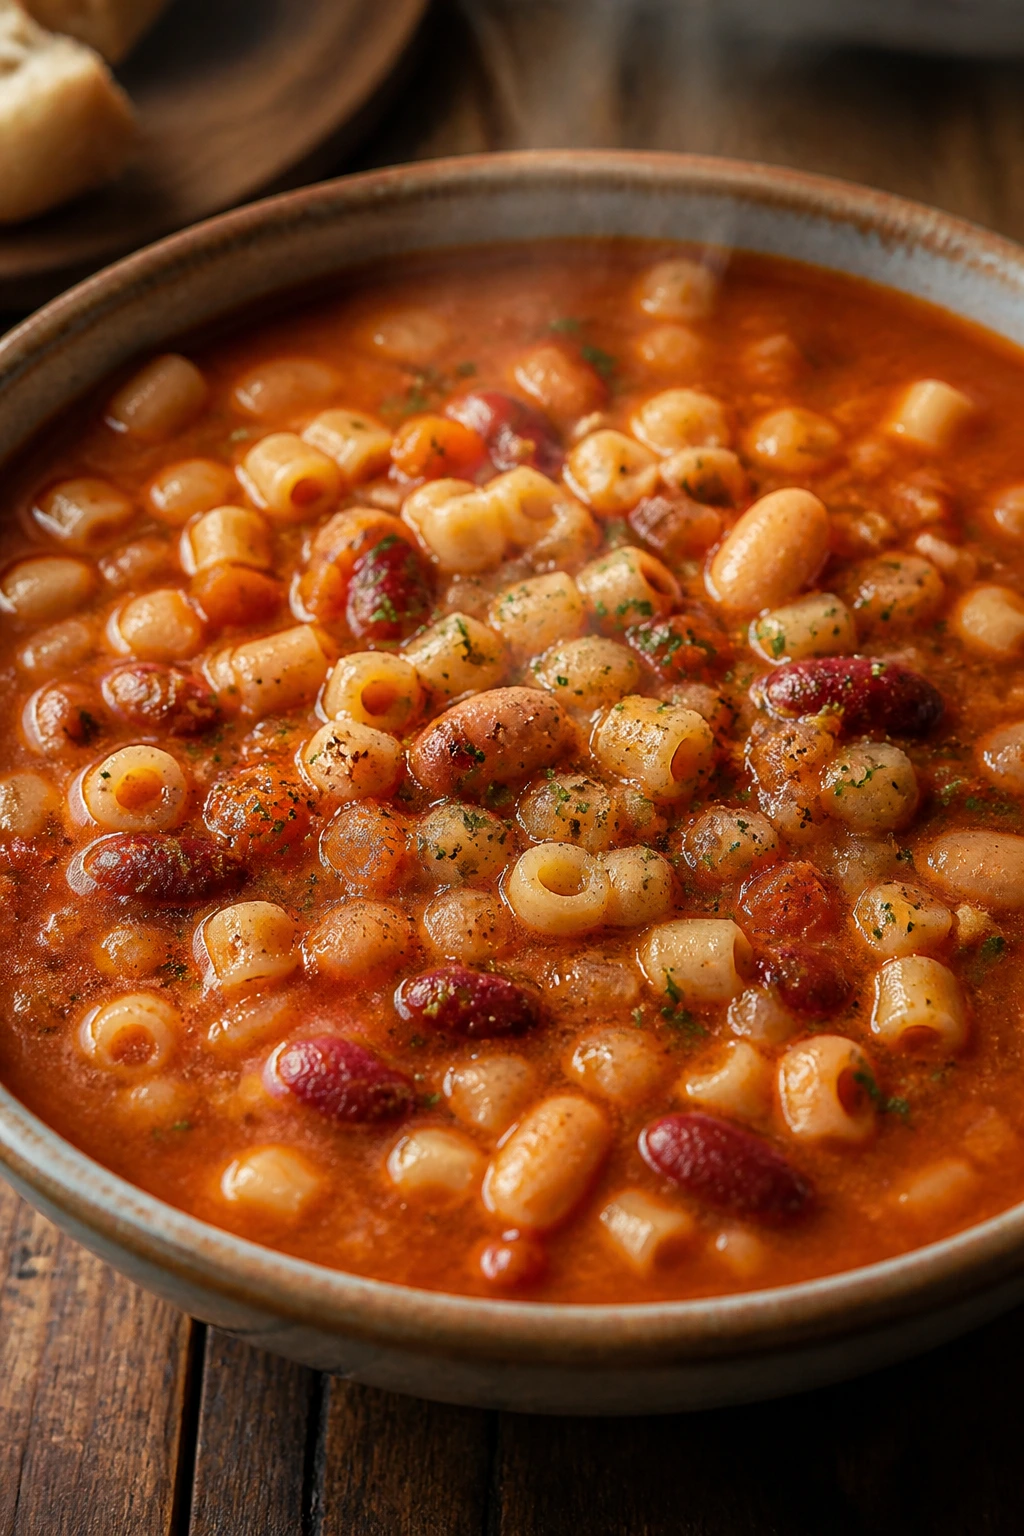
This is the soup that makes a few humble cans and a small handful of vegetables feel like they were waiting for this exact job. The beans thicken the broth, the pasta makes it filling, and the tomato gives the whole pot a little backbone. It’s rustic in a way that feels earned, not fussy.
Why It Works:
Small pasta shapes are ideal because they cook in the broth and help it turn starchy. Two kinds of beans give the soup a better texture than one lonely can. A short simmer pulls the vegetables and tomatoes together, and the final splash of olive oil makes the bowl smell finished.
Key Ingredients:
- 2 tablespoons olive oil
- 1 onion, diced
- 1 carrot, diced
- 1 celery stalk, diced
- 2 garlic cloves, minced
- 1 can crushed tomatoes
- 4 cups broth
- 1 can cannellini beans, rinsed and drained
- 1 can kidney beans, rinsed and drained
- 1 1/2 cups ditalini or small elbow pasta
- 1 teaspoon dried oregano
- 1/2 teaspoon dried thyme
- Parmesan, for serving
Quick Steps:
- Cook the Vegetables: Heat the olive oil in a soup pot over medium heat. Add onion, carrot, and celery, and cook for 6 to 8 minutes.
- Add Garlic and Herbs: Stir in the garlic, oregano, and thyme. Cook for 30 seconds.
- Build the Soup: Add the crushed tomatoes and broth. Bring to a simmer.
- Add Beans and Pasta: Stir in the beans and pasta. Cook uncovered for 10 to 12 minutes, until the pasta is tender.
- Finish: Taste for salt, drizzle with olive oil, and serve with Parmesan.
Equipment for This Recipe:
- Soup pot or Dutch oven
- Wooden spoon
- Ladle
- Can opener
- Grater for Parmesan
How to Serve This Dish:
Serve it in deep bowls with plenty of grated Parmesan on top. A crusty roll is helpful, though not mandatory. It makes 6 modest bowls or 4 large ones.
Pro Tips for This Recipe:
- Cook the pasta right in the soup if you plan to eat it soon; for leftovers, cook it separately and add it to each bowl.
- Let the onion, carrot, and celery soften fully. That base matters.
- If you want a thicker soup, mash a few beans against the pot before serving.
- Add a little olive oil at the end for a rounder flavor.
Variations on This Dish:
- Smoky Version: Add a pinch of smoked paprika with the herbs.
- Greens Version: Stir in chopped kale or spinach during the last 3 minutes.
- Extra-Brothy Version: Add another cup of broth and serve with more bread.
Common Mistakes to Avoid with This Dish:
- Cooking pasta too long in the broth: It can turn soft and absorb too much liquid.
- Skipping the onion base: The soup tastes thin without it.
- Overloading the pot with beans: Too many beans can push the soup into mash territory.
14. Curried Chickpea Couscous
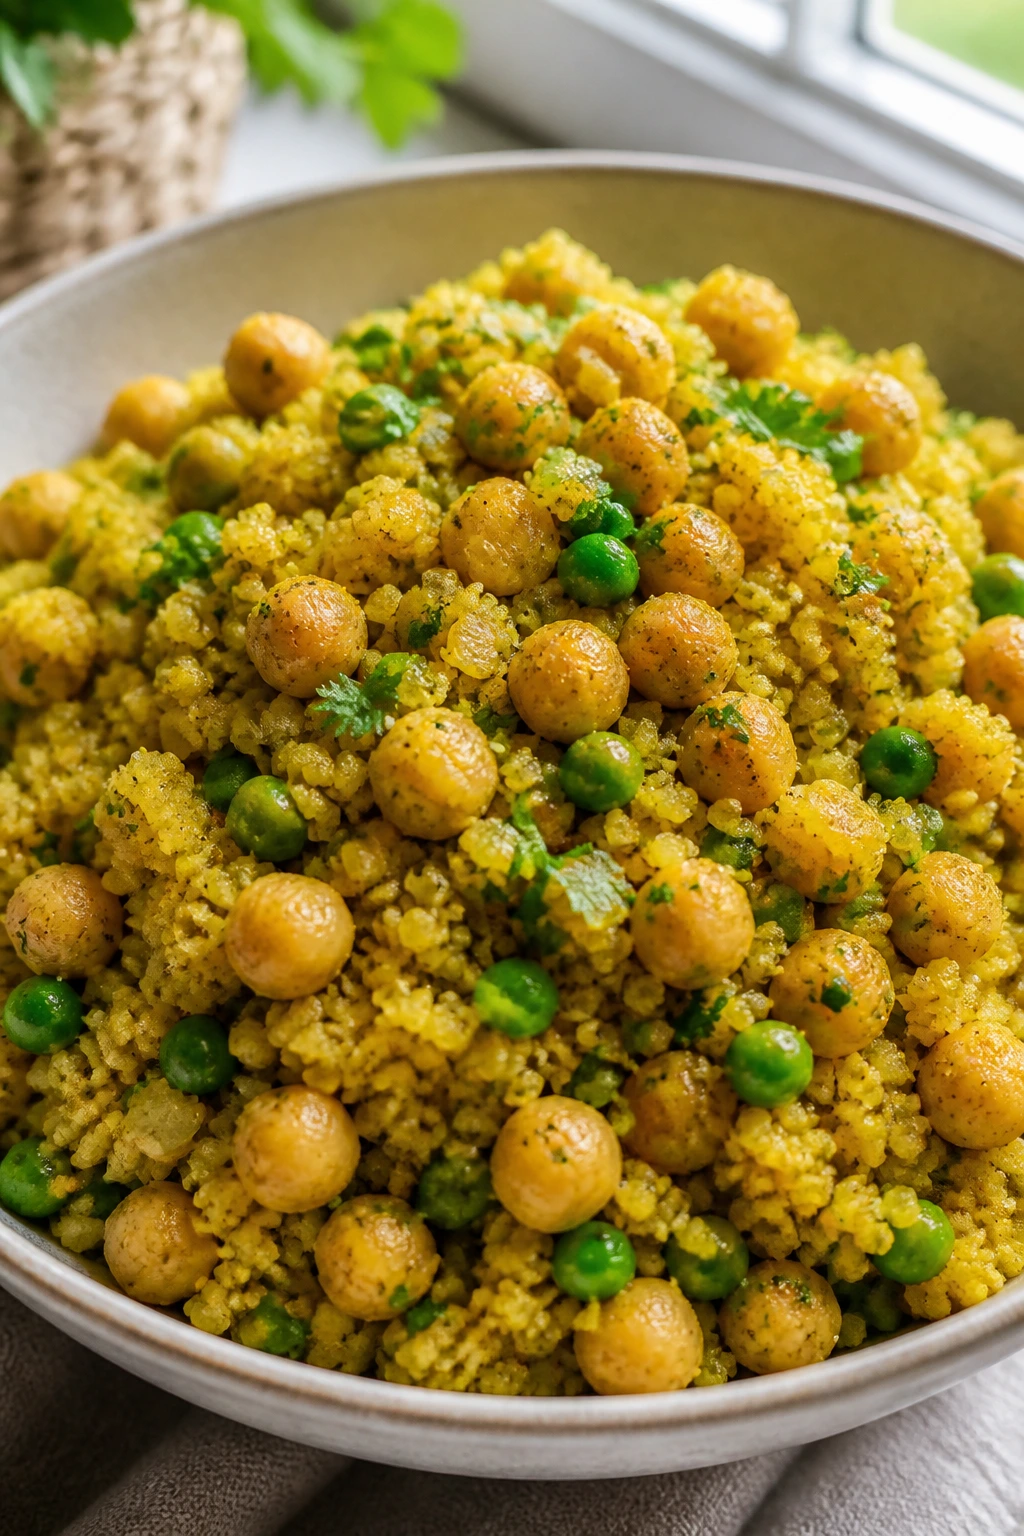
Couscous is the fast road here. It soaks up the curry-spiced broth in minutes, chickpeas give the dish weight, and peas add little bursts of sweetness. The whole bowl has that loose, fluffy texture that makes you feel like you cooked faster than was polite.
Why It Works:
Couscous cooks off the heat, which is why it’s such a handy weeknight tool. You bloom the curry powder in oil with onion first, then let hot broth do the rest. Chickpeas and peas bring the dinner back into solid-food territory, and lemon keeps the bowl from tasting dusty.
Key Ingredients:
- 1 tablespoon olive oil
- 1 small onion, diced
- 2 teaspoons curry powder
- 1 teaspoon ground cumin
- 1 can chickpeas, rinsed and drained
- 1 3/4 cups broth or water
- 1 1/2 cups couscous
- 1 cup frozen peas
- 1 tablespoon lemon juice
- 2 tablespoons raisins, optional
- 2 tablespoons chopped almonds, optional
Quick Steps:
- Cook the Onion: Heat the oil in a saucepan over medium heat. Cook the onion for 4 to 5 minutes.
- Bloom the Spices: Stir in the curry powder and cumin, then add the chickpeas. Cook for 1 minute.
- Add Liquid: Pour in the broth and bring it to a boil.
- Steam the Couscous: Remove the pan from the heat, stir in the couscous and peas, cover, and let sit for 5 minutes.
- Fluff and Finish: Fluff with a fork, add lemon juice, and top with raisins and almonds if using.
Equipment for This Recipe:
- Medium saucepan
- Fork
- Measuring cups and spoons
- Wooden spoon
- Lid
How to Serve This Dish:
Serve it warm in bowls with a spoonful of yogurt on the side if you like a cooler contrast. It’s good as a main on its own, or next to roasted vegetables. This makes 4 servings.
Pro Tips for This Recipe:
- Don’t stir the couscous after it’s covered. Steam needs to do the work.
- Use hot broth so the grain hydrates evenly.
- Raisins are optional, but a little sweetness plays well with curry.
- If the couscous clumps, fluff harder with a fork before adding anything else.
Variations on This Dish:
- Tomato Chickpea Couscous: Stir in 1/2 cup crushed tomatoes with the broth.
- Herb Couscous: Add chopped parsley or cilantro at the end.
- Nuts-and-Seeds Version: Use sunflower seeds if you do not have almonds.
Common Mistakes to Avoid with This Dish:
- Overcooking the couscous: It turns gluey fast.
- Adding too little salt to the broth: The couscous will taste blank.
- Skipping lemon: The curry flavor needs that brightness.
15. Canned Salmon Cakes with Mustard Sauce
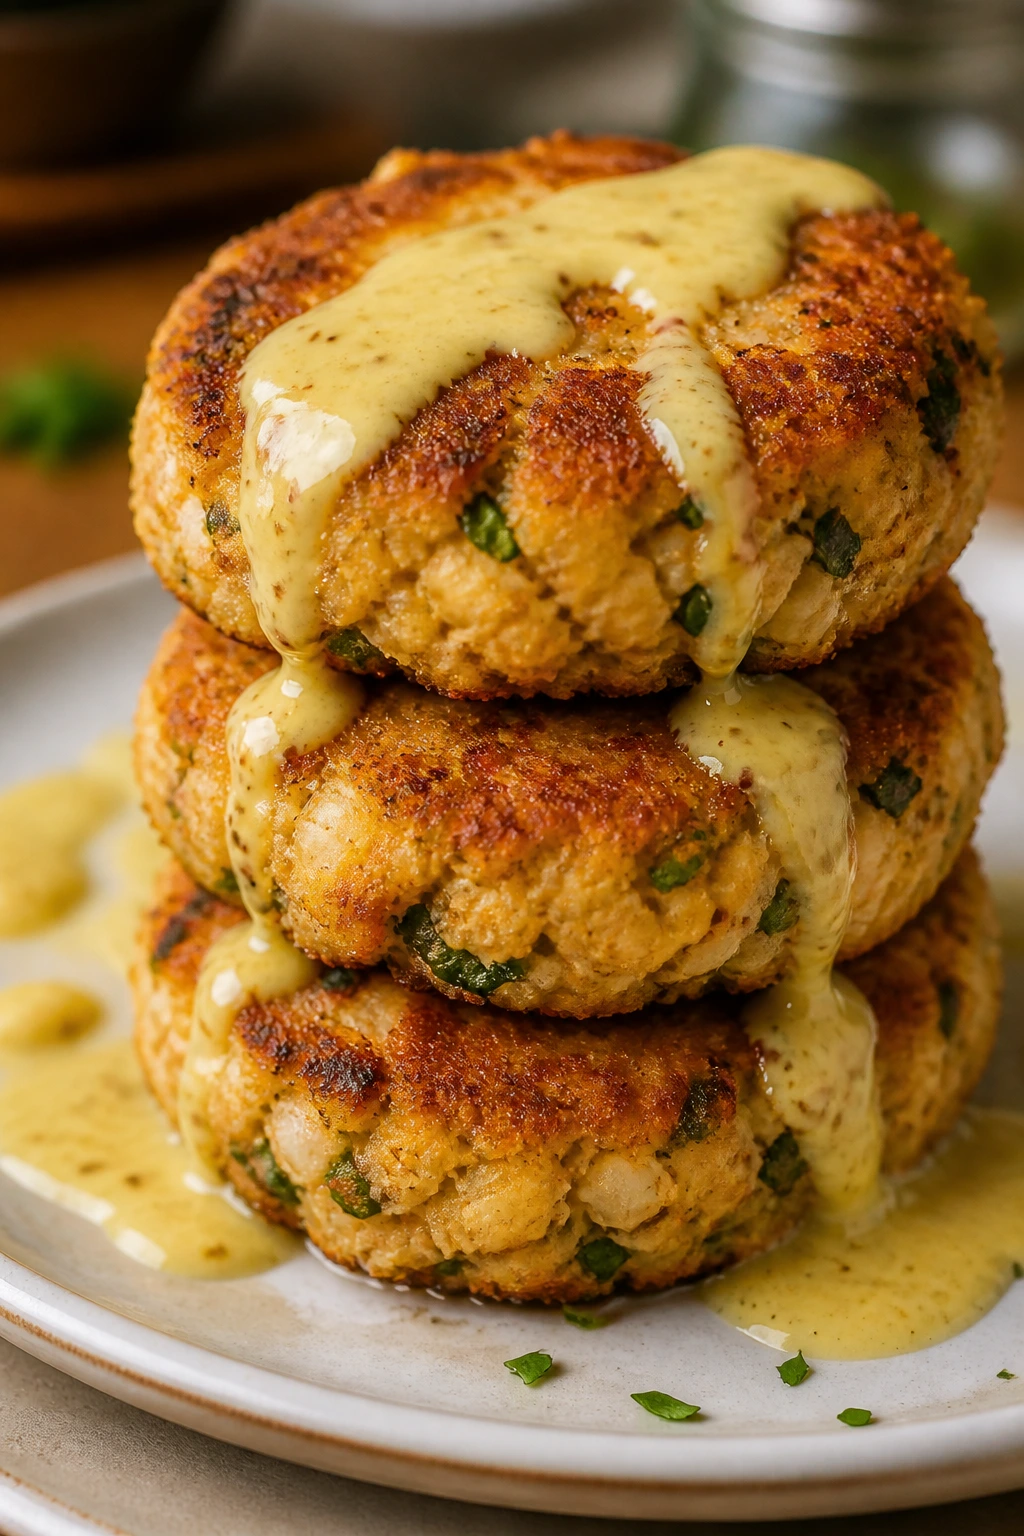
Salmon cakes are one of those recipes that look fancier than the effort they ask for. The outside browns in the pan, the inside stays soft and savory, and the mustard sauce cuts through the richness with a little bite. If your pantry keeps canned salmon, this is a strong reason to use it.
Why It Works:
Canned salmon already brings flavor, so the binder can stay simple: egg, breadcrumbs, a little mayo, and mustard. A brief chill helps the cakes hold shape in the skillet, which is the difference between neat patties and a pan of loose filling. The mustard sauce echoes the fish without burying it.
Key Ingredients:
- 2 cans salmon, drained and flaked
- 1 egg
- 1/2 cup breadcrumbs or crushed saltines
- 2 tablespoons mayonnaise
- 1 tablespoon Dijon mustard
- 2 tablespoons finely minced onion
- 1 tablespoon lemon juice
- 2 tablespoons oil for frying
- Salt and pepper
- For the Sauce: 3 tablespoons mayonnaise, 1 teaspoon Dijon, 1 teaspoon lemon juice
Quick Steps:
- Mix the Cakes: Combine salmon, egg, breadcrumbs, mayo, mustard, onion, lemon juice, salt, and pepper in a bowl.
- Chill Briefly: Form 6 patties and chill for 10 minutes so they firm up.
- Fry: Heat the oil in a skillet over medium heat. Cook the cakes for 3 to 4 minutes per side until deep golden.
- Mix the Sauce: Stir together the sauce ingredients in a small bowl.
- Serve: Spoon the mustard sauce over the cakes or serve it on the side.
Equipment for This Recipe:
- Mixing bowl
- Skillet
- Spatula
- Plate for chilling the cakes
- Small bowl for sauce
How to Serve This Dish:
Serve the cakes with rice, a green salad, or buttered peas. They also work tucked into buns if you want a sandwich night. This recipe makes 6 small cakes or 4 larger ones.
Pro Tips for This Recipe:
- Drain the salmon well so the mixture is not wet.
- Chill the patties before frying. That little pause helps a lot.
- If the mixture feels loose, add 1 to 2 tablespoons more breadcrumbs.
- Flip only when the first side is browned enough to release easily.
Variations on This Dish:
- Dill Version: Add 1 teaspoon dried dill to the mix if you like that flavor.
- Spicy Salmon Cakes: Stir in a pinch of cayenne or hot sauce.
- Cracker-Crusted Cakes: Coat the outside lightly in crushed crackers for extra crunch.
Common Mistakes to Avoid with This Dish:
- Using too much mayo: The cakes will slump in the pan.
- Flipping too soon: They need a crust before you turn them.
- Forgetting the lemon: Salmon and acid are a better pair than salmon and more salt.
16. Tomato Egg Rice
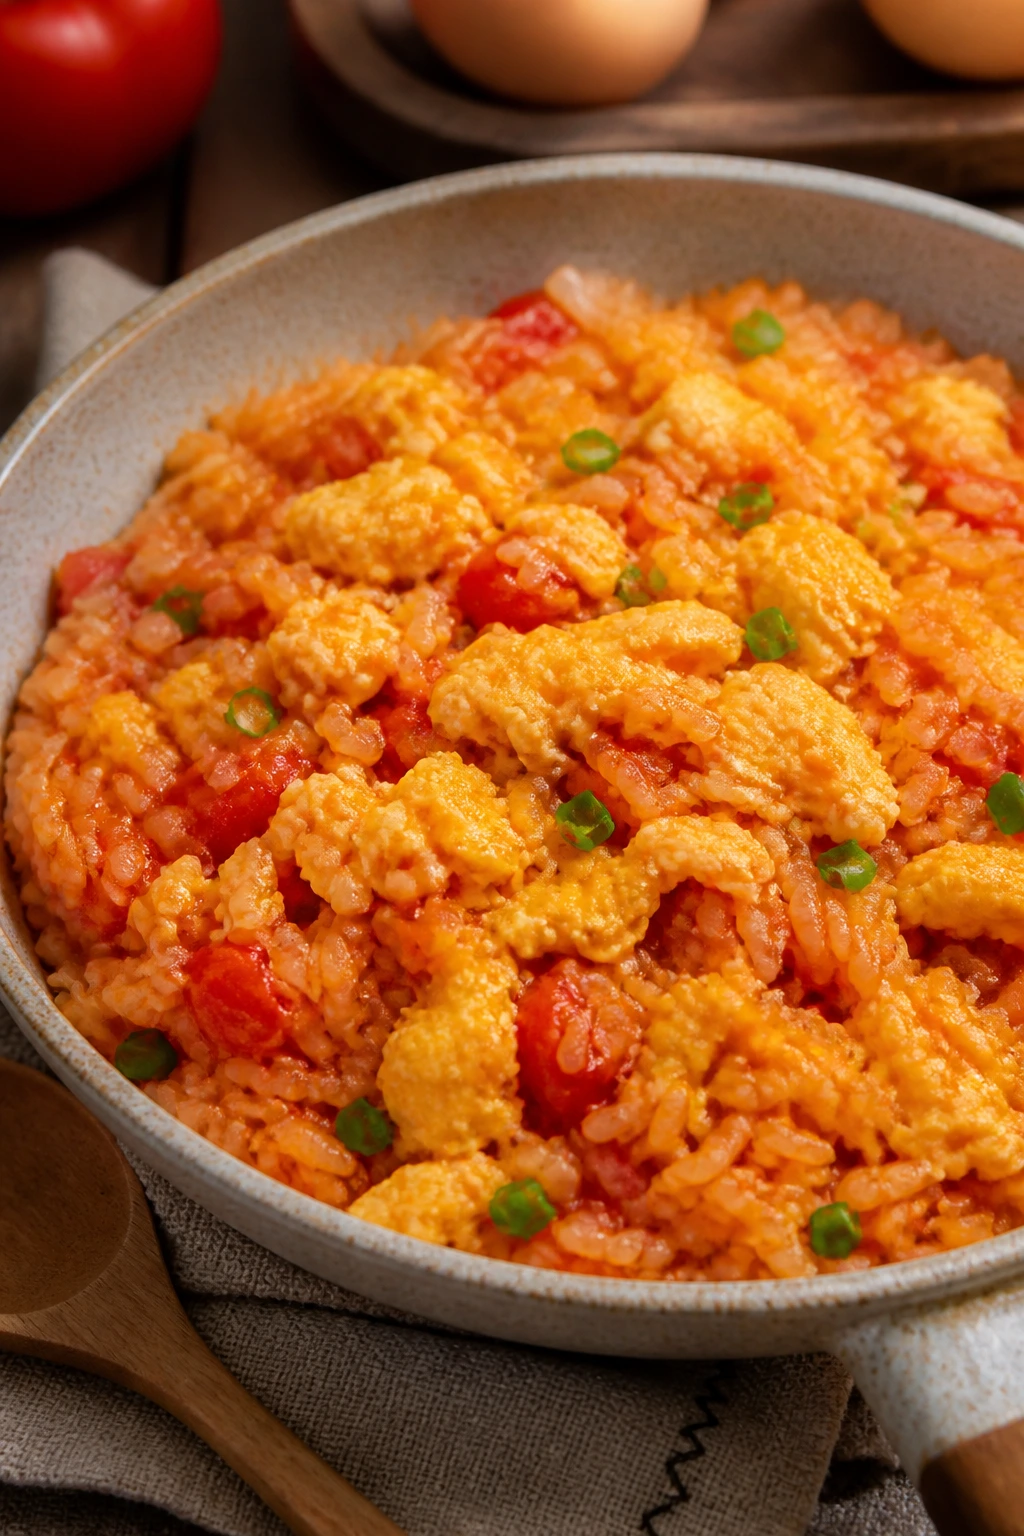
This dish is fast, bright, and slightly messy in the best way. The tomatoes turn saucy, the eggs stay soft, and the rice soaks up the soy-scented juice without getting mushy. It is a pantry dinner with a breakfast heartbeat, and that is part of the charm.
Why It Works:
Eggs and tomatoes give you two different textures in the same skillet: tender curds and slippery sauce. A touch of sugar rounds out the tomato’s acidity, which matters a lot if you use canned tomatoes. Rice turns the whole thing into dinner without needing a separate starch.
Key Ingredients:
- 2 cups cooked rice
- 4 large eggs
- 1 tablespoon oil
- 2 garlic cloves, minced
- 1 can (14.5 ounces) diced tomatoes, drained slightly
- 2 tablespoons soy sauce
- 1 teaspoon sugar
- 1/2 teaspoon black pepper
- 2 scallions, sliced, optional
Quick Steps:
- Scramble the Eggs: Heat 1 teaspoon of oil in a skillet over medium-high heat. Scramble the eggs softly, then remove them to a plate.
- Cook the Tomatoes: Add the remaining oil and the garlic to the skillet. Stir in the tomatoes and cook for 4 to 5 minutes until they look saucy.
- Season: Add soy sauce, sugar, and pepper. Taste.
- Add the Rice: Stir in the rice and cook until heated through and coated in the tomato mixture.
- Return the Eggs: Fold the eggs back in and top with scallions.
Equipment for This Recipe:
- Large skillet
- Spatula
- Small bowl for cracking eggs
- Measuring spoons
- Rice cooker or pot, if needed
How to Serve This Dish:
Serve it in bowls with extra pepper on top. A little hot sauce works if you want more bite. It makes 2 large servings or 3 smaller ones.
Pro Tips for This Recipe:
- Keep the eggs soft. Dry eggs turn the whole dish flat.
- Use day-old rice if you have it. Fresh rice can be too sticky.
- If the tomatoes are very watery, cook them a minute longer before adding the rice.
- A small splash of sesame oil at the end can make the flavor feel bigger.
Variations on This Dish:
- Garlic-Chive Version: Add chopped chives or scallion greens at the end.
- Spicy Chili Version: Stir in chili crisp or a little sambal.
- Veggie-Loaded Bowl: Add frozen peas or corn with the rice.
Common Mistakes to Avoid with This Dish:
- Overcooking the eggs: They should stay tender.
- Using tomatoes straight from the can without reducing them: The rice turns wet.
- Skipping the sugar: A tiny amount balances the acid better than you’d think.
17. Peanut-Soy Ramen

Instant ramen becomes a real dinner fast when you treat the seasoning packet like an option and build a sauce around peanut butter and soy. The broth turns creamy and salty, the noodles stay springy, and the whole pot smells like toasted sesame and garlic. It’s cheap, quick, and not remotely boring if you keep the proportions sane.
Why It Works:
Peanut butter thickens the broth as it simmers, so the noodles pick up more flavor than they would in plain water. Soy sauce and vinegar give the bowl salt and brightness, while sesame oil adds the finish line. Frozen edamame or peas add enough substance to keep the ramen from feeling like a late-night snack.
Key Ingredients:
- 4 packs instant ramen noodles, seasoning packets discarded or saved for another use
- 3 tablespoons peanut butter
- 2 tablespoons soy sauce
- 1 tablespoon rice vinegar
- 1 tablespoon sesame oil
- 2 garlic cloves, minced
- 4 cups water or broth
- 1 cup frozen edamame or peas
- Chili crisp, optional
Quick Steps:
- Build the Broth: Bring the water or broth to a simmer in a medium pot. Whisk in peanut butter, soy sauce, vinegar, and garlic.
- Add the Noodles: Drop in the ramen noodles and cook for 2 minutes.
- Add the Vegetables: Stir in the edamame or peas and cook for 1 more minute until hot.
- Finish: Turn off the heat, stir in sesame oil, and top with chili crisp if using.
- Serve: Ladle into bowls right away.
Equipment for This Recipe:
- Medium pot
- Whisk
- Ladle
- Measuring spoons
- Chopsticks or tongs
How to Serve This Dish:
Serve it immediately while the broth is still creamy and the noodles still have bounce. A soft-boiled egg or a handful of sliced scallions is a nice extra, but not required. This makes 4 modest bowls.
Pro Tips for This Recipe:
- Whisk the peanut butter into the hot liquid before the noodles go in. It blends better that way.
- Do not let the noodles overcook. Ramen turns soft fast.
- Broth makes the flavor fuller, but water works if you season well.
- Add sesame oil at the end so its aroma stays sharp.
Variations on This Dish:
- Miso Peanut Ramen: Stir in 1 tablespoon miso paste with the peanut butter.
- Coconut Ramen: Replace half the water with coconut milk for a richer bowl.
- Crunchy Topper Version: Scatter crushed peanuts over the finished bowl.
Common Mistakes to Avoid with This Dish:
- Adding peanut butter straight to the pot in a lump: It clings and refuses to dissolve.
- Boiling the noodles too long: They keep softening in the hot broth.
- Using too much soy sauce too early: It can crowd out the peanut flavor.
18. Warm Mediterranean Chickpea Pitas
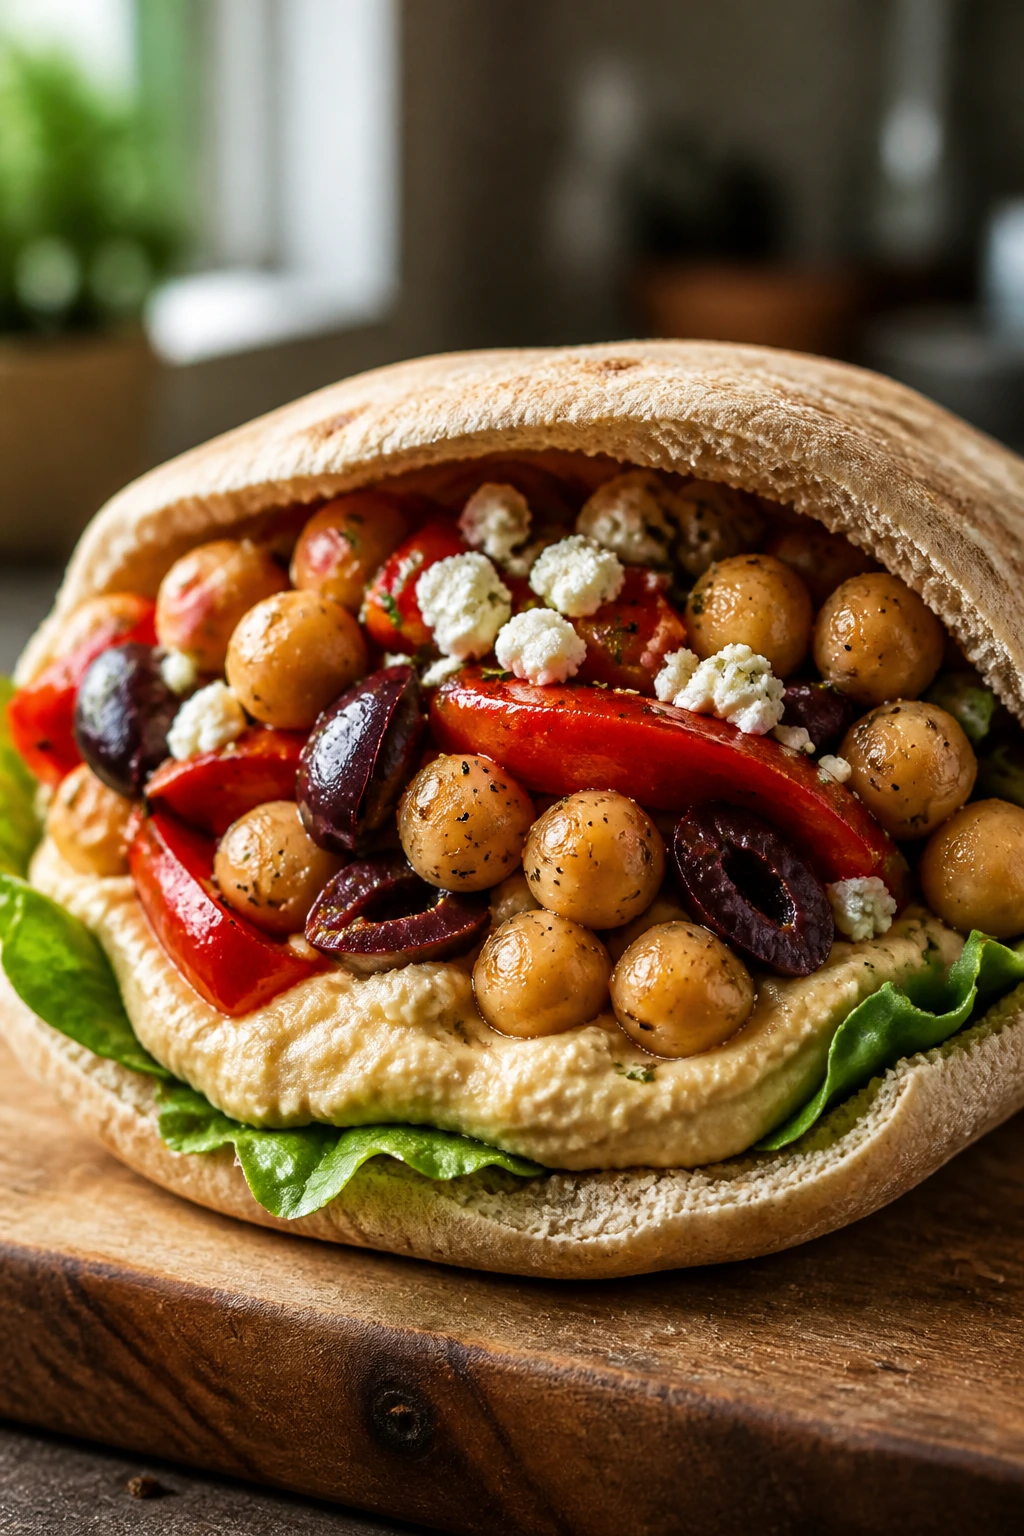
These pitas are the rare pantry dinner that feels fresh without asking for much from the produce drawer. Warm chickpeas, roasted peppers, olives, and feta get tucked into soft bread with hummus, and the whole thing eats like a composed meal instead of a convenience food shortcut. I like the contrast: hot filling, cool hummus, soft pita, briny olives.
Why It Works:
Chickpeas are sturdy enough to warm in a skillet without falling apart. Roasted peppers and olives bring instant flavor, which matters because the rest of the filling is mild. Hummus acts like glue in the pita and keeps the bread from getting dry while the chickpeas do the heavy lifting.
Key Ingredients:
- 2 cans chickpeas, rinsed and drained
- 2 tablespoons olive oil
- 1 teaspoon dried oregano
- 1/2 teaspoon ground cumin
- 1 cup jarred roasted red peppers, sliced
- 1/4 cup sliced olives
- 1 tablespoon lemon juice
- 4 pitas, warmed
- 1/2 cup hummus
- 1/2 cup crumbled feta
- 1 cup shredded lettuce or chopped greens
Quick Steps:
- Warm the Chickpeas: Heat the oil in a skillet over medium heat. Add chickpeas, oregano, cumin, and a pinch of salt. Cook for 4 to 5 minutes.
- Add Flavor: Stir in roasted peppers, olives, and lemon juice. Cook for 1 minute.
- Warm the Pitas: Toast or warm the pita breads so they fold without cracking.
- Assemble: Spread hummus inside each pita, fill with the warm chickpea mixture, and top with lettuce and feta.
- Serve: Eat while the filling is still warm.
Equipment for This Recipe:
- Skillet
- Spatula
- Toaster or dry skillet for the pita
- Knife
- Small bowl for mixing, optional
How to Serve This Dish:
Serve the pitas with extra lemon wedges and a few chips or olives on the side. If you want a larger meal, add a tomato cucumber salad. Four pitas make 4 servings.
Pro Tips for This Recipe:
- Warm the pita. Cold pita tears when you fill it.
- Drain the roasted peppers well so the filling does not get soggy.
- Hummus on both sides inside the pita helps seal the bread.
- Taste the chickpeas before stuffing; they usually need more salt than you think.
Variations on This Dish:
- Falafel-Style Wrap: Add a little tahini and chopped parsley.
- Tomato Olive Version: Stir in chopped sun-dried tomatoes.
- No-Feta Option: Use extra hummus and a few pumpkin seeds for richness.
Common Mistakes to Avoid with This Dish:
- Overfilling the pita: It splits open and becomes a mess.
- Skipping the warm skillet step: The chickpeas taste flat if they never hit the pan.
- Using watery peppers: They make the bread soggy fast.
19. Pantry Mac and Cheese with Peas and Dijon
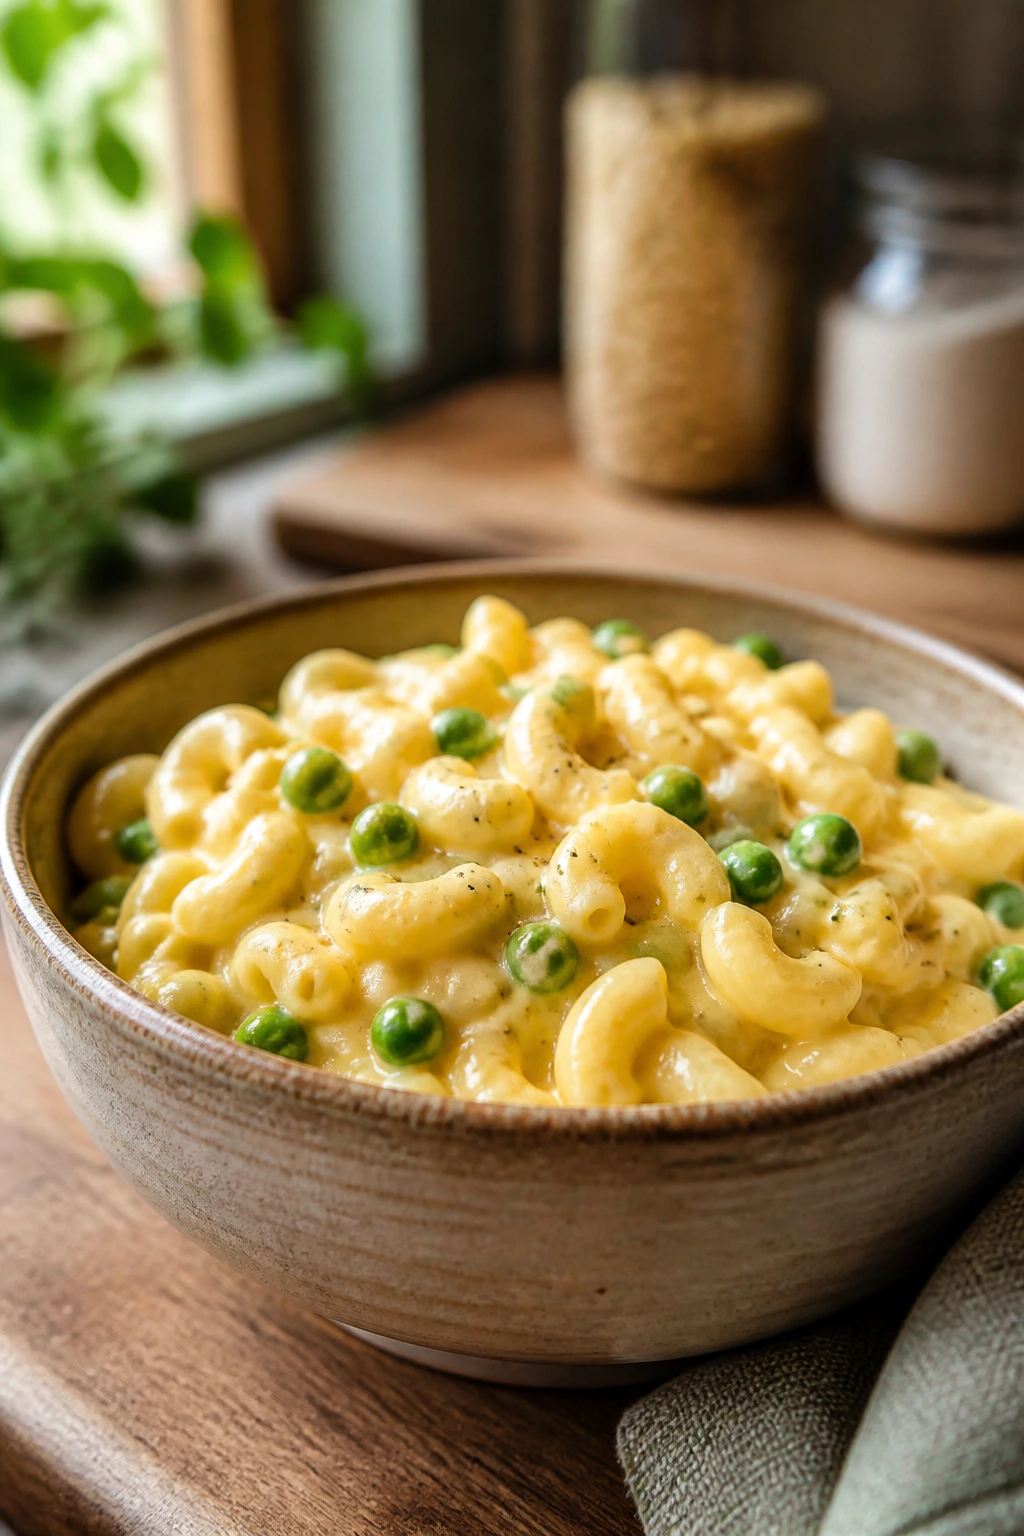
Mac and cheese can absolutely count as a pantry dinner when you keep evaporated milk, pasta, and a block of cheddar around. The sauce turns velvety, the Dijon sharpens the cheese without making it taste mustardy, and the peas break up the richness. It’s straightforward, but there’s a reason people keep making it.
Why It Works:
A roux gives the sauce structure so it clings to the pasta instead of sinking to the bottom of the bowl. Evaporated milk brings a deeper dairy flavor than plain milk alone, and cheddar melts into a thick, spoon-coating sauce if you add it off the heat. Peas are optional, but I like them here because they lighten the whole pan.
Key Ingredients:
- 12 ounces elbow macaroni
- 3 tablespoons butter
- 3 tablespoons all-purpose flour
- 1 can evaporated milk
- 1 cup whole milk
- 2 1/2 cups shredded sharp cheddar
- 1 tablespoon Dijon mustard
- 1 cup frozen peas
- 1/2 teaspoon paprika
- Salt and black pepper
Quick Steps:
- Cook the Pasta: Boil the macaroni in salted water until al dente. Drain and set aside.
- Make the Roux: Melt the butter in a saucepan over medium heat. Whisk in the flour and cook for 1 minute.
- Add the Milk: Slowly whisk in the evaporated milk and whole milk. Cook until the sauce thickens enough to coat a spoon.
- Melt the Cheese: Remove from the heat and stir in cheddar, Dijon, paprika, salt, and pepper until smooth.
- Combine: Fold in the pasta and peas. Warm gently over low heat if needed.
Equipment for This Recipe:
- Medium saucepan
- Whisk
- Large pot
- Colander
- Wooden spoon
How to Serve This Dish:
Serve it hot, with a little extra pepper or paprika on top. It works well with a simple salad or roasted broccoli if you want something green. This makes 4 main-course portions.
Pro Tips for This Recipe:
- Remove the pan from heat before adding the cheese so the sauce stays smooth.
- Shred your own cheddar if possible; pre-shredded cheese has anti-caking agents that can make the sauce grainy.
- If the sauce gets too thick, whisk in a splash of milk.
- Stir the peas in at the end so they stay bright.
Variations on This Dish:
- Tuna Mac: Add 1 drained can of tuna with the pasta.
- Baked Top: Transfer to a dish, add breadcrumbs, and bake at 400°F for 10 minutes.
- Pepper Jack Version: Swap some cheddar for pepper jack if you want heat.
Common Mistakes to Avoid with This Dish:
- Boiling the cheese sauce after it melts: It can separate.
- Using too little salt in the pasta water: The sauce can’t season the pasta from the outside.
- Letting the roux brown too much: This should stay pale for a classic mac texture.
20. Bean and Cheese Burrito Bake
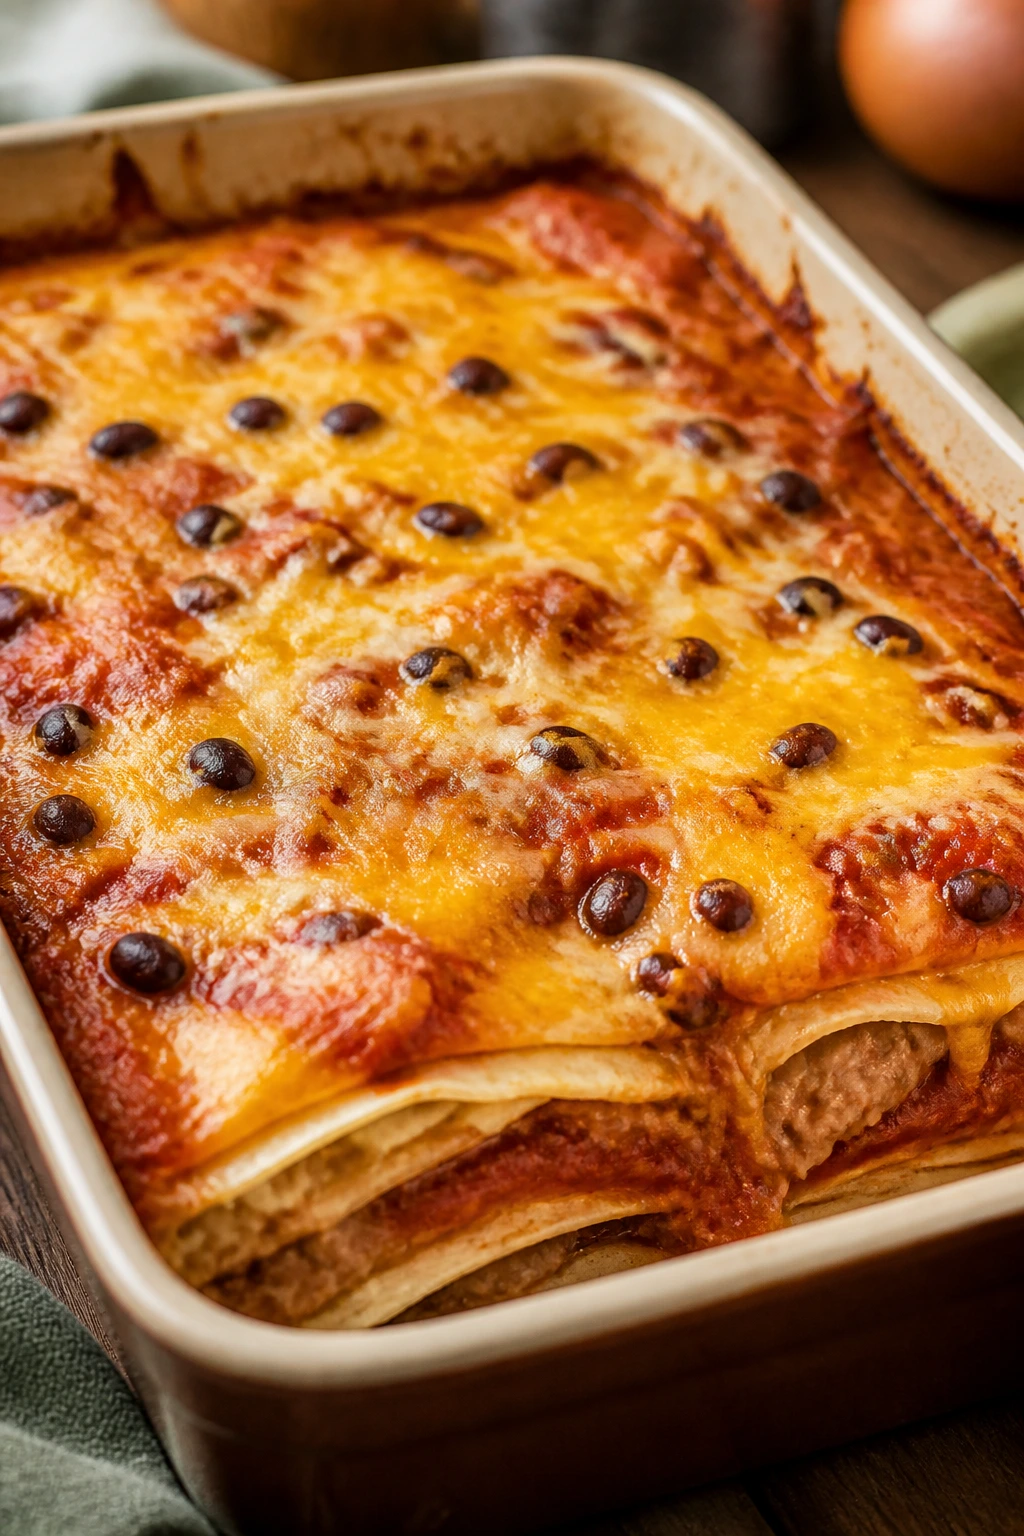
This bake has the cozy, unfussy appeal of a burrito with less rolling and fewer tortilla casualties. The beans get creamy, the salsa and enchilada sauce seep into the tortillas, and the cheese bubbles across the top in a way that makes the whole dish feel more generous than the effort behind it. It’s a strong use for a pack of tortillas that needs a purpose.
Why It Works:
Refried beans or mashed pinto beans spread easily and stay put inside the tortillas. Baking the burritos seam-side down lets the edges crisp while the sauce softens the middle just enough. A quick sauce on top keeps the casserole from drying out, which is where a lot of burrito bakes go wrong.
Key Ingredients:
- 8 flour tortillas
- 2 cans refried beans or 2 cans pinto beans, mashed
- 2 cups shredded cheddar or Mexican blend cheese
- 1 cup salsa
- 1/2 cup enchilada sauce or tomato sauce mixed with 1 teaspoon chili powder
- 1 teaspoon ground cumin
- 1/4 cup chopped onion, optional
- 2 tablespoons chopped green chiles, optional
- Cooking spray or oil for the baking dish
Quick Steps:
- Prep the Dish: Heat the oven to 375°F and lightly grease a 9-by-13-inch baking dish.
- Make the Filling: Stir the beans with cumin, onion, and green chiles if using.
- Roll the Burritos: Spoon filling into the tortillas, add a little cheese, roll them up, and place seam-side down in the dish.
- Add Sauce and Cheese: Spoon salsa and enchilada sauce over the top, then cover with the remaining cheese.
- Bake: Bake for 20 to 25 minutes until bubbling at the edges and browned on top.
Equipment for This Recipe:
- 9-by-13-inch baking dish
- Mixing bowl
- Spoon
- Aluminum foil, optional
- Oven mitts
How to Serve This Dish:
Let the bake sit for 5 minutes before slicing so the filling settles. Serve with sour cream, chopped lettuce, or hot sauce. It makes 4 to 6 servings depending on appetite.
Pro Tips for This Recipe:
- Warm the tortillas for a few seconds before rolling so they do not crack.
- Don’t drown the dish in sauce; enough to moisten, not soak.
- If you want crisp edges, bake uncovered the whole time.
- A little green chile adds lift without making the bake busy.
Variations on This Dish:
- Rice-and-Bean Version: Add 1 cup cooked rice to the filling.
- Spicy Version: Use pepper jack and hotter salsa.
- Breakfast Bake: Add scrambled eggs and skip the enchilada sauce.
Common Mistakes to Avoid with This Dish:
- Overfilling the tortillas: They burst and unroll in the oven.
- Using too little sauce: The top dries out before the cheese browns.
- Cutting immediately: The filling slides out if you don’t let it rest.
Why Pantry Staples Win on Busy Nights
A pantry-driven dinner works because it respects the shape of real life. You do not need a special shopping trip, a long marinating window, or a fridge packed with produce that has to be used by Friday. You need a few building blocks that can turn into different meals depending on what you’re in the mood for: pasta, rice, beans, tomatoes, tuna, coconut milk, tortillas, broth, and a small handful of seasonings that actually earn their keep.
The best part is how these ingredients change under heat. Tomato paste gets sweeter. Beans go creamy when you mash a few. Garlic shifts from sharp to nutty in under a minute if the heat stays low enough. That is the engine behind almost every recipe above. It is not fancy, and I mean that kindly. It’s just solid cooking.
Pantry dinners also give you room to improvise without making a mess of the meal. Swap penne for rigatoni. Use black beans instead of kidney beans. Trade couscous for rice if that’s what’s in the cupboard. The format stays the same, and the flavor still lands because the recipes are built on techniques, not one fragile ingredient.
Essential Equipment for These Recipes
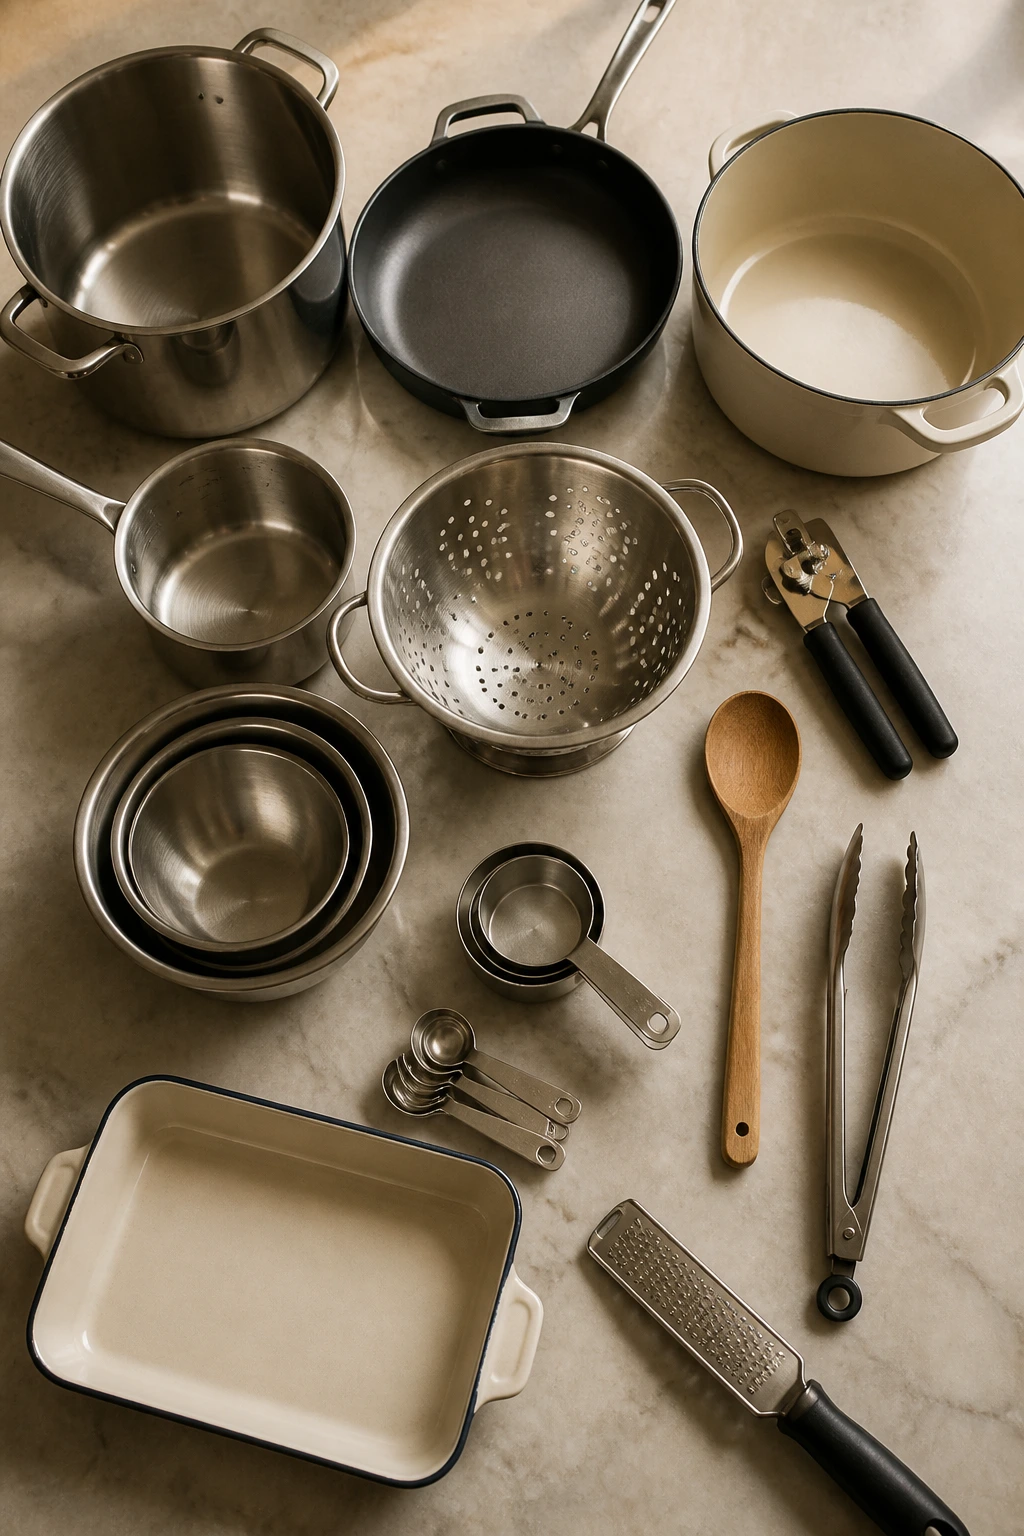
- Large pot: For pasta, soups, chili, ramen, and anything that needs room to move without boiling over.
- Deep skillet or sauté pan: Best for sauces, curry, shakshuka, noodle tosses, and one-pan rice dishes.
- Dutch oven: Handy if you want one vessel that can handle soup, chili, or bean-heavy stews.
- Medium saucepan: Good for mac and cheese, couscous, rice finishes, and quick sauces.
- Colander: You’ll use it more than you think. Pasta and canned beans both benefit from draining well.
- Can opener: Obvious, but worth naming. Pantry cooking dies without it.
- Wooden spoon or heatproof spatula: Better than a whisk for stirring beans, sauce, and rice without shredding everything.
- Tongs: Best for tossing pasta and lifting noodles cleanly from a pot.
- Measuring cups and spoons: Spices and liquids need real amounts, not vibes.
- Mixing bowls: Useful for salmon cakes, sauces, bean mash, and holding ingredients before they hit the pan.
- Baking dish, 9-by-13-inch: Needed for the burrito bake and any pasta bake variation.
- Microplane or fine grater: Great for Parmesan, lemon zest, and garlic when you want a finer texture.
Smart Shopping and Ingredient Tips

If you want pantry dinners to taste better than pantry dinners have any right to taste, shop like someone who cooks from the shelf on purpose. Pick canned beans with no-salt-added labels when you can, then rinse them anyway. That two-second rinse cuts the metallic can taste and gives you more control over seasoning. For tomatoes, crushed tomatoes are the best all-purpose jarless sauce starter, diced tomatoes are better when you want texture, and tomato paste is the tiny tube or can that makes a dish taste cooked instead of merely warmed.
Dry goods matter too. A sturdy pasta shape — penne, spaghetti, rigatoni, ditalini — gives you better texture than tiny shapes that disappear into broth. Long-grain rice stays fluffier than short-grain rice in skillet meals. Couscous cooks fast enough to deserve a place in the cupboard, and instant ramen is worth keeping even if you never use the seasoning packet.
Look at the little bottles and cans with the same care. Tuna in olive oil tastes fuller than tuna in water, though either one works. Full-fat coconut milk makes curry and soups feel finished, while light coconut milk can go thin. Broth cartons keep for a while, but bouillon paste or cubes are easier to store and let you make exactly what you need. And spices? Check them. If cumin or chili powder smells like a cardboard box, the dinner will, too.
How to Serve These Recipes
Presentation:
Serve saucy recipes in shallow bowls so the food looks generous, not buried. Pasta and noodle dishes benefit from a little grated cheese, chopped herbs, or a ribbon of olive oil on top. For skillet meals and burrito bakes, let the browned edges show; that color makes the plate look more finished than a smooth, pale surface ever will.
Accompaniments:
A sharp green salad, garlic toast, roasted broccoli, or simple steamed greens pair well with almost everything here. For bean-heavy dishes, I like something crisp or acidic on the side — pickled onions, vinegar-dressed slaw, lemon wedges, or even a few corn chips. The meal gets better when the side isn’t trying to compete.
Portions:
Most of these recipes feed 4 as a main course, though the soup and chili stretch to 6 if you’re not stacking bowls high. If you’re feeding bigger appetites, add bread, rice, or a salad instead of simply doubling the core recipe. That usually keeps the texture better and the shopping list smaller.
Beverage Pairing:
Sparkling water with lemon is the easy answer, and it works. A dry pilsner or crisp lager suits the tomato, bean, and pasta dishes. If you want wine, go for a bright white with some acid, not anything oaky or heavy.
Additional Tips and Flavor Boosters
Flavor Enhancement:
A spoonful of tomato paste browned in oil is one of the cheapest upgrades in the kitchen. So is finishing a bean dish with lemon juice or a splash of vinegar right before serving. Both make the flavors taste cleaner and more awake.
Customization:
Add olives to tuna pasta, peas to mac and cheese, corn to rice skillets, or spinach to curry. Pantry dinners are not fragile. They can take a few extras without losing their shape, as long as you don’t dump in so much that the pan turns watery.
Serving Suggestions:
Chopped parsley, scallions, grated cheese, hot sauce, and toasted breadcrumbs are the garnish team I reach for most. A small crunchy topper changes a soft dish fast. Even a tablespoon of toasted seeds or crushed crackers can fix a bowl that feels too smooth.
Make-It-Yours:
For vegetarian dinners, lean harder on beans, lentils, eggs, and cheese. For dairy-free meals, use coconut milk, extra olive oil, and a final squeeze of citrus instead of cream or cheese. If you want more protein without changing the recipe style, add eggs, canned fish, or a second can of beans rather than trying to force the dish into a different category.
Make-Ahead, Storage, and Reheating Guidance
Most of these dinners keep well for 3 to 4 days in the refrigerator, with soups, chili, curry, and lentil sauces often improving on day two after the flavors settle. Bean-heavy stews and chili freeze well for up to 2 to 3 months in airtight containers. Pasta dishes with tomato sauce can also be frozen, though the texture softens a bit after thawing. Cream-based sauces and mac and cheese are better refrigerated than frozen unless you don’t mind a slightly grainier result.
Reheat soups, chili, and curry on the stove over medium-low heat with a splash of water or broth to loosen them. Pasta and rice dishes do best in a skillet with a spoonful of water and a lid for a minute or two; that brings the steam back without drying the edges. Microwave works for everything, but go in short bursts and stir between rounds so the center doesn’t overheat while the edges stay cold.
For burrito bake and salmon cakes, the oven is kinder than the microwave. Use 350°F and warm the portions until hot through. If you’re planning ahead, cook the rice or pasta separately when possible, then combine it with sauce at the last minute. That keeps the texture from going soft before you’re ready to eat.
Variations and Adaptations to Try
-
Gluten-Free Pantry Night: Use gluten-free pasta, rice, corn tortillas, or couscous alternatives like quinoa. Check soy sauce labels and swap in tamari when needed; that one change keeps the flavor the same while removing the wheat.
-
Dairy-Free Dinner Swaps: Lean on olive oil, coconut milk, hummus, and lemon instead of cream and cheese. Several of these dishes already work close to dairy-free, and the ones that rely on cheese can usually be finished with a crunchy breadcrumb topping instead.
-
Lower-Sodium Pantry Cooking: Choose no-salt-added tomatoes and beans, rinse canned goods well, and season in stages. A dish that tastes “underseasoned” halfway through can land perfectly once you add acid and herbs at the end.
-
Extra-Protein Builds: Add a second can of beans, an egg on top, or canned tuna or salmon where the recipe can take it. I prefer that route over piling on more cheese, which can make a quick dinner feel heavy fast.
-
Mild Kid-Friendly Versions: Skip the chili flakes, keep the spices to a minimum, and lean on tomato, cheese, and butter. Kids often do better with a simple version that still has salt and texture rather than a dish diluted into nothing.
-
Bold Heat and Spice: Add chili crisp, pickled jalapeños, harissa, chipotle powder, or hot sauce at the table. That way the base dish stays balanced, and everyone can push the heat where they want it.
Common Mistakes to Avoid
-
Skipping the rinse on canned beans: The bean liquid can make sauces salty, murky, and a little tinny. Rinse until the water runs clear, then season the food yourself.
-
Underseasoning the starch: Rice, pasta, and couscous need salt in the water or broth, not just at the end. If the base is bland, the whole dinner follows it.
-
Adding everything at once: Onion, garlic, tomato paste, and spices each need their moment. Dumping them into liquid together makes the dish taste flat instead of layered.
-
Forgetting texture: Pantry dinners get boring when everything is soft. Crisp the tortillas, toast breadcrumbs, keep noodles springy, and leave a few beans whole.
-
Cooking sauces too hard: Cream, coconut milk, and cheese sauces can split or turn grainy if they boil aggressively. Keep the heat gentle and let time do the work.
-
Using stale spices without adjusting: Old spices are not useless, but they often need a little extra. If your cumin has lost its smell, you’ll need more than the recipe calls for.
Frequently Asked Questions
What counts as a pantry staple in these recipes?
I’m using the broad, useful version: dried pasta, rice, beans, tuna, canned tomatoes, broth, peanut butter, tortillas, coconut milk, spices, crackers, and similar shelf-stable ingredients. A few recipes call for onion, garlic, lemon, or frozen vegetables because those are common supporting players, not the stars.
Can I make these dinners with only canned and dry ingredients?
Yes, mostly. If you keep canned beans, canned tomatoes, pasta, rice, tuna, coconut milk, and a few seasonings on hand, you can make most of these without a special shopping trip. Fresh onion, garlic, or herbs improve the flavor, but they are not the thing holding the recipe together.
Which recipes freeze best?
The chili, soups, lentil dishes, and curry freeze well for up to 2 to 3 months. Pasta with tomato sauce also freezes fine, though the noodles soften after thawing. I would skip freezing mac and cheese, tuna pasta, or anything egg-heavy if you want the texture to stay neat.
How do I make pantry dinners taste less flat?
Use three things in balance: salt, acid, and heat. Salt seasonings in layers, add lemon juice or vinegar at the end, and keep some chili flakes, mustard, or hot sauce around for finish. That trio changes pantry food more than buying a fancier canned tomato ever will.
Can I swap dried beans for canned beans?
Absolutely, but dried beans need planning. Cook them fully before they go into these recipes, then use the cooked beans the same way you would canned ones. The tradeoff is time, not flavor; dried beans are great if you already batch-cook them.
What if I don’t have broth?
Water plus salt still works in a pinch, especially in recipes with tomatoes, curry, or cheese. A bouillon cube or paste gives you more depth if you keep one around. I would rather use salted water than skip the recipe entirely.
How do I keep pasta from getting gluey when I reheat it?
Add a splash of water, broth, or tomato sauce and reheat it gently in a skillet or saucepan. The liquid loosens the starch and brings the sauce back to life. Microwaving is fine too, but stir halfway through so the pasta doesn’t dry out in patches.
Can I make these recipes spicier without changing the whole dish?
Yes. Add red pepper flakes, chili crisp, cayenne, chipotle powder, or hot sauce at the end so the base flavor stays intact. That’s cleaner than loading the pan with extra spice early on, which can muddy everything else.
Are these good for picky eaters?
Several are, especially the mac and cheese, burrito bake, tomato egg rice, and plain bean pasta. The trick is to keep the toppings separate and let people add heat or herbs at the table. Picky eaters usually do better when the core plate is simple and the extras are optional.
When the Fridge Looks Bare
The best pantry dinners do one useful thing: they make an ordinary cupboard feel stocked with options. A can of beans becomes soup, a box of pasta becomes dinner with a real sauce, and rice stops being a side dish and starts carrying the meal. That shift saves money, time, and a fair amount of weekday irritation.
I like these recipes because they are practical without being dull. They use ingredients with a long shelf life, but they still ask for real cooking — a little browning, a little simmering, a little care with salt and acid. That is where the good stuff happens.
Keep a few of these in rotation, and the next empty-fridge evening stops feeling like a problem. It turns into a short list of things that already work.