
A can of tomatoes, a box of spaghetti, and half an onion can rescue dinner faster than a delivery app ever will. That is the real appeal of cheap easy meals that use pantry staples: the ingredients are plain on the shelf, then they turn lively the second heat, salt, and a little fat hit the pan.
I like pantry cooking because it’s honest. Beans bring body, pasta catches sauce, rice soaks up whatever you put near it, and eggs or canned fish can turn a bare cupboard into something that feels planned.
The trick is not chasing fancy ingredients. It’s knowing when to use a spoon of tomato paste, when to splash in vinegar, and when to leave a little pasta water in the pot so the sauce goes glossy instead of watery. That’s where the meals below earn their keep.
Why Pantry Staples Make Cheap Easy Meals Work
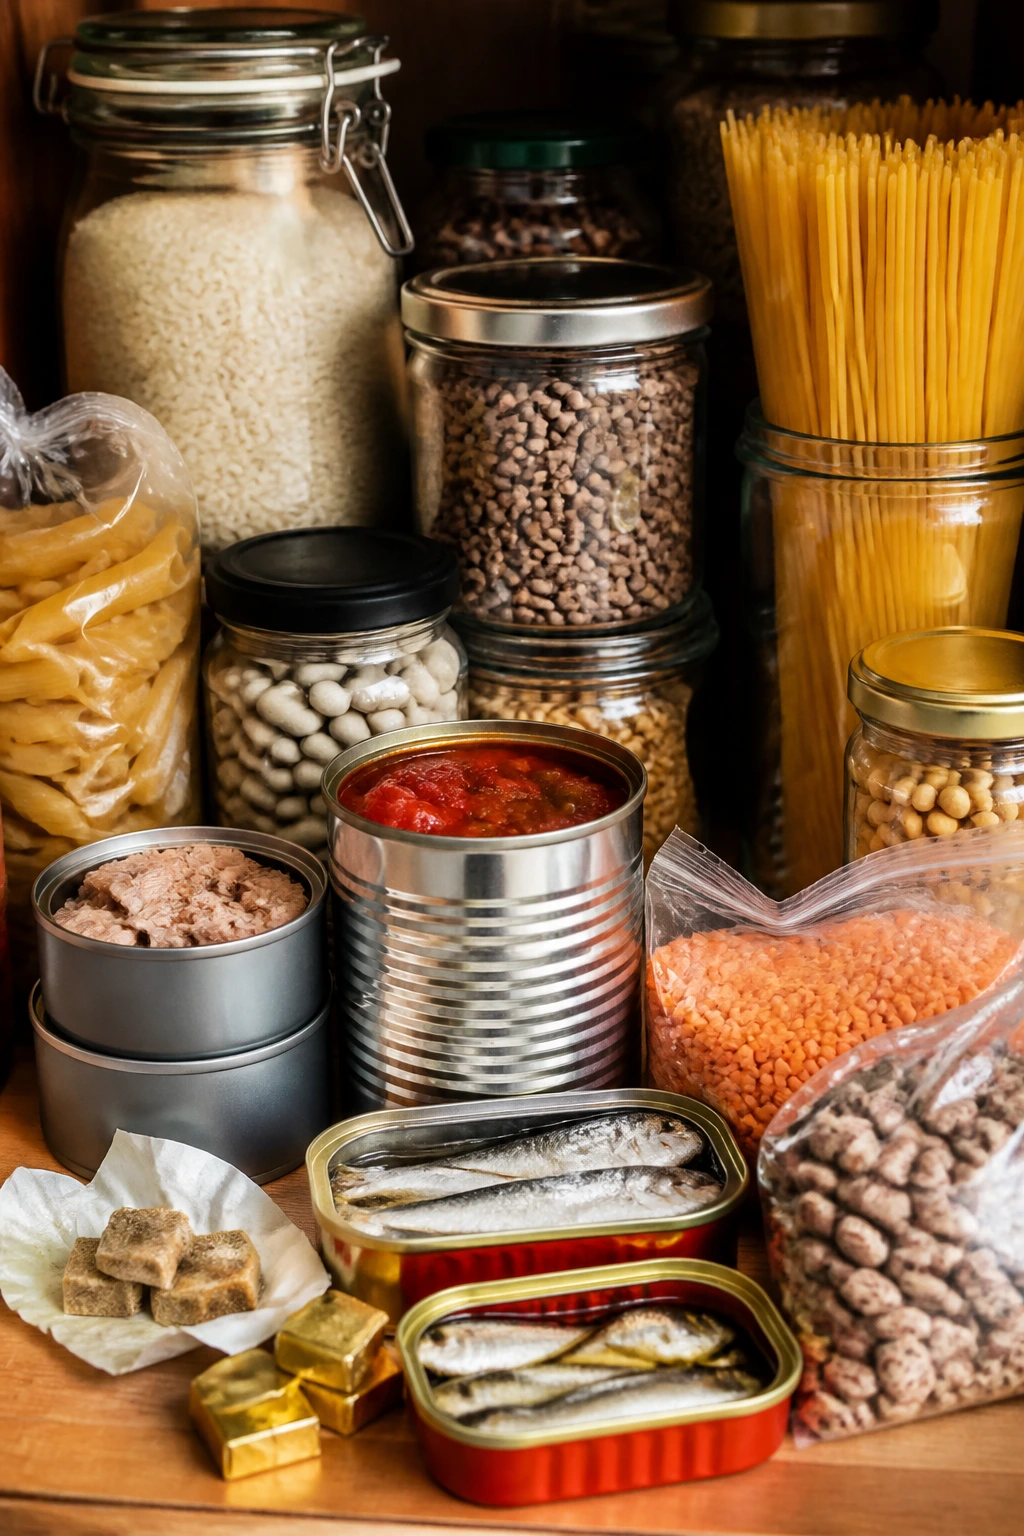
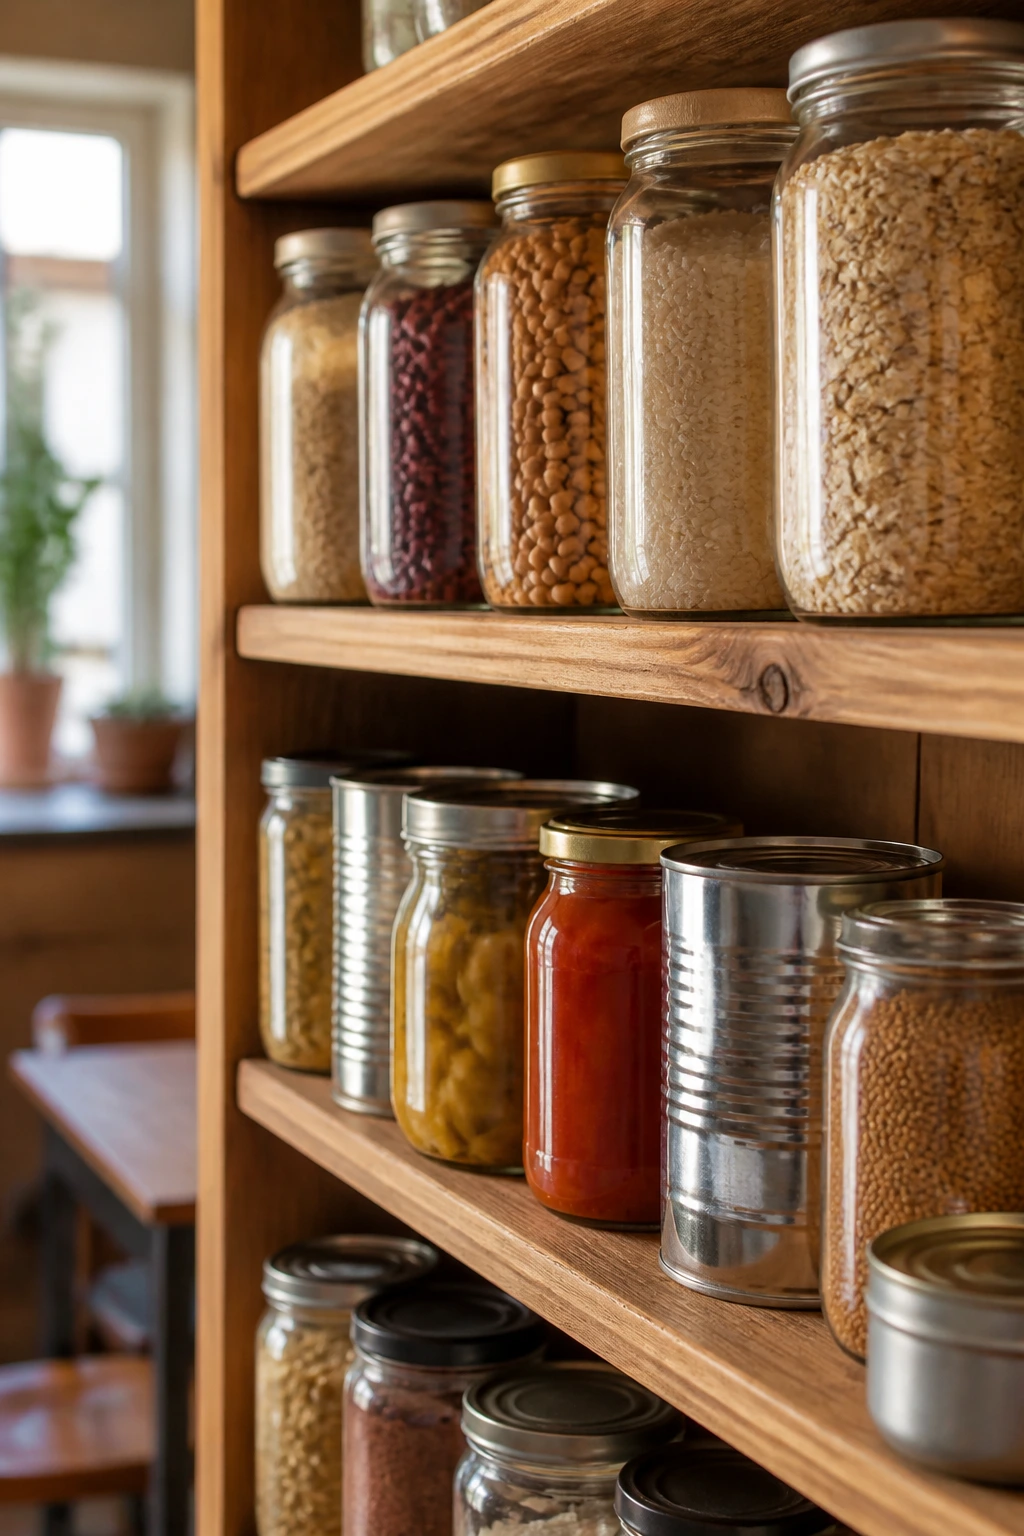
Shelf-stable ingredients do the heavy lifting. Rice, pasta, beans, lentils, canned tomatoes, tuna, sardines, and broth cubes each solve a different problem, and together they build a dinner without a special trip.
They cook fast because they are already halfway there. Canned beans are cooked, pasta only needs boiling, lentils soften quickly, and eggs set in minutes, which is why pantry meals can move from cupboard to table so quickly.
The flavor structure is built in. Tomato products bring acid, beans bring creaminess, oil brings richness, and spices turn a bland pot into something that smells like you meant to cook.
Waste stays low. Pantry food sits quietly until you need it, and that means fewer shriveled vegetables in the crisper drawer and fewer mystery containers in the back of the fridge.
The same core ingredients can play different roles. A can of chickpeas becomes curry, soup, pasta, or a mash for sandwiches. A bag of rice can support fried rice, soup, bowls, or a baked casserole.
Three ingredients. Many endings.
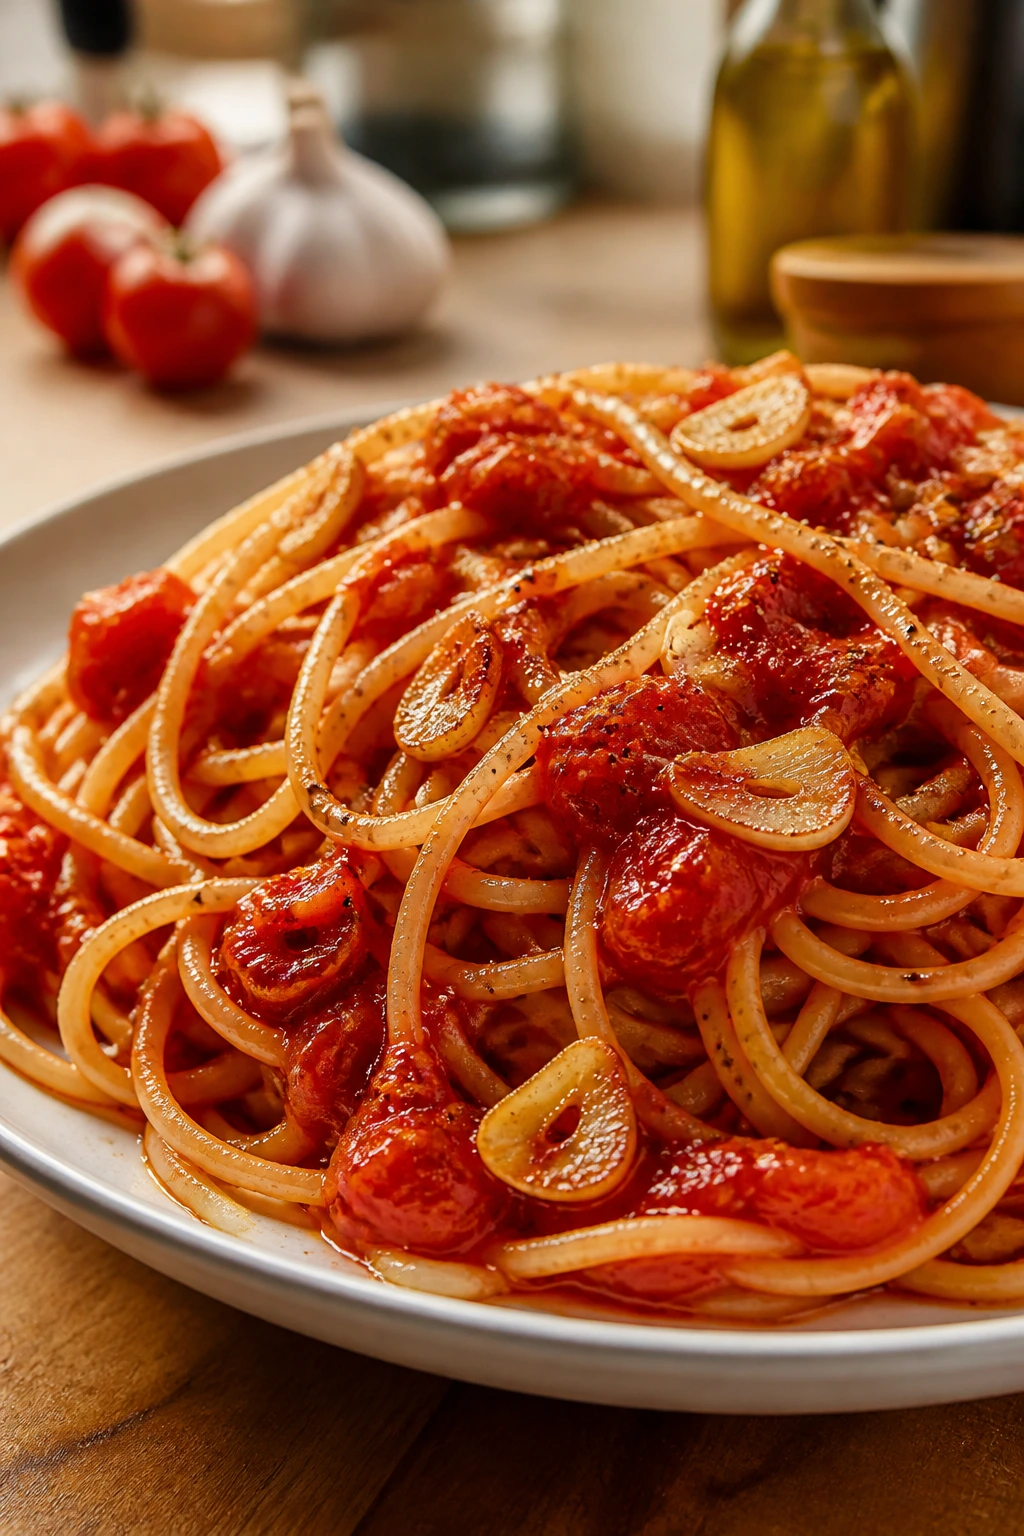
1. Garlic Tomato Spaghetti
A bowl of spaghetti slicked with canned tomatoes, garlic, and olive oil tastes like it had more planning than it did. The sauce should cling to the noodles, not puddle under them, and the garlic needs to smell sweet rather than bitter. This is the kind of dinner that looks simple because it is simple, which is exactly why it works.
Why It Works:
Tomatoes give acidity, olive oil gives body, and pasta water helps the sauce coat every strand. You get a finished pasta dish in about 20 minutes, and the whole thing depends on pantry items that are easy to keep around.
Key Ingredients:
- 12 oz spaghetti — a long shape holds the sauce well.
- 2 tbsp olive oil — the base of the sauce.
- 4 garlic cloves, thinly sliced — sliced garlic tastes gentler than minced.
- 1 can (14.5 oz) diced tomatoes — use crushed if you want a smoother sauce.
- 1 tsp dried oregano — the herb that gives the pot some backbone.
- 1/2 tsp red pepper flakes — enough to wake it up.
- 1/2 tsp kosher salt, plus more for pasta water — season in layers.
- 1/4 cup grated Parmesan — the salty finish.
Quick Steps:
- Boil the spaghetti in well-salted water until just al dente, then save 1/2 cup of the pasta water.
- Warm the olive oil in a skillet over medium heat, then cook the garlic for 30 to 45 seconds until fragrant. Do not let it brown.
- Add the tomatoes, oregano, red pepper flakes, and salt. Simmer for 8 to 10 minutes until the sauce looks thicker and a little glossy.
- Toss in the spaghetti with a splash of pasta water and cook for 1 minute, stirring until the sauce clings to the noodles.
- Finish with Parmesan and another small splash of pasta water if the sauce looks tight.
Equipment for This Recipe:
- Large pot — for boiling the pasta.
- 10- to 12-inch skillet — for the sauce.
- Colander — for draining.
- Wooden spoon — gentle stirring keeps the garlic from sticking.
How to Serve This Dish:
Twirl the pasta into shallow bowls and shower the top with Parmesan and a few grinds of black pepper. A piece of toast or a simple green salad is enough beside it, and the plate looks finished if you add one small handful of parsley.
Pro Tips for This Recipe:
- Save the pasta water before draining. It is the cheapest sauce ingredient you have.
- If the tomatoes taste flat, add 1 teaspoon of vinegar at the end.
- A spoonful of tomato paste cooked with the garlic deepens the sauce fast.
Variations on This Dish:
- Anchovy Depth: Melt 2 anchovy fillets into the oil before the garlic for a deeper, saltier sauce.
- Herb-Roasted Twist: Stir in rosemary or thyme instead of oregano if that’s what’s in the cupboard.
- Pasta Bake Finish: Toss in mozzarella, transfer to a baking dish, and broil until the top browns.
Common Mistakes to Avoid with This Dish:
- Burning the garlic: Bitter garlic takes over the sauce. Keep the heat at medium and move fast.
- Skipping the pasta water: Without it, the sauce slides off the noodles instead of coating them.
- Under-salting the water: Pasta cooked in plain water tastes dull, no matter how good the sauce is.
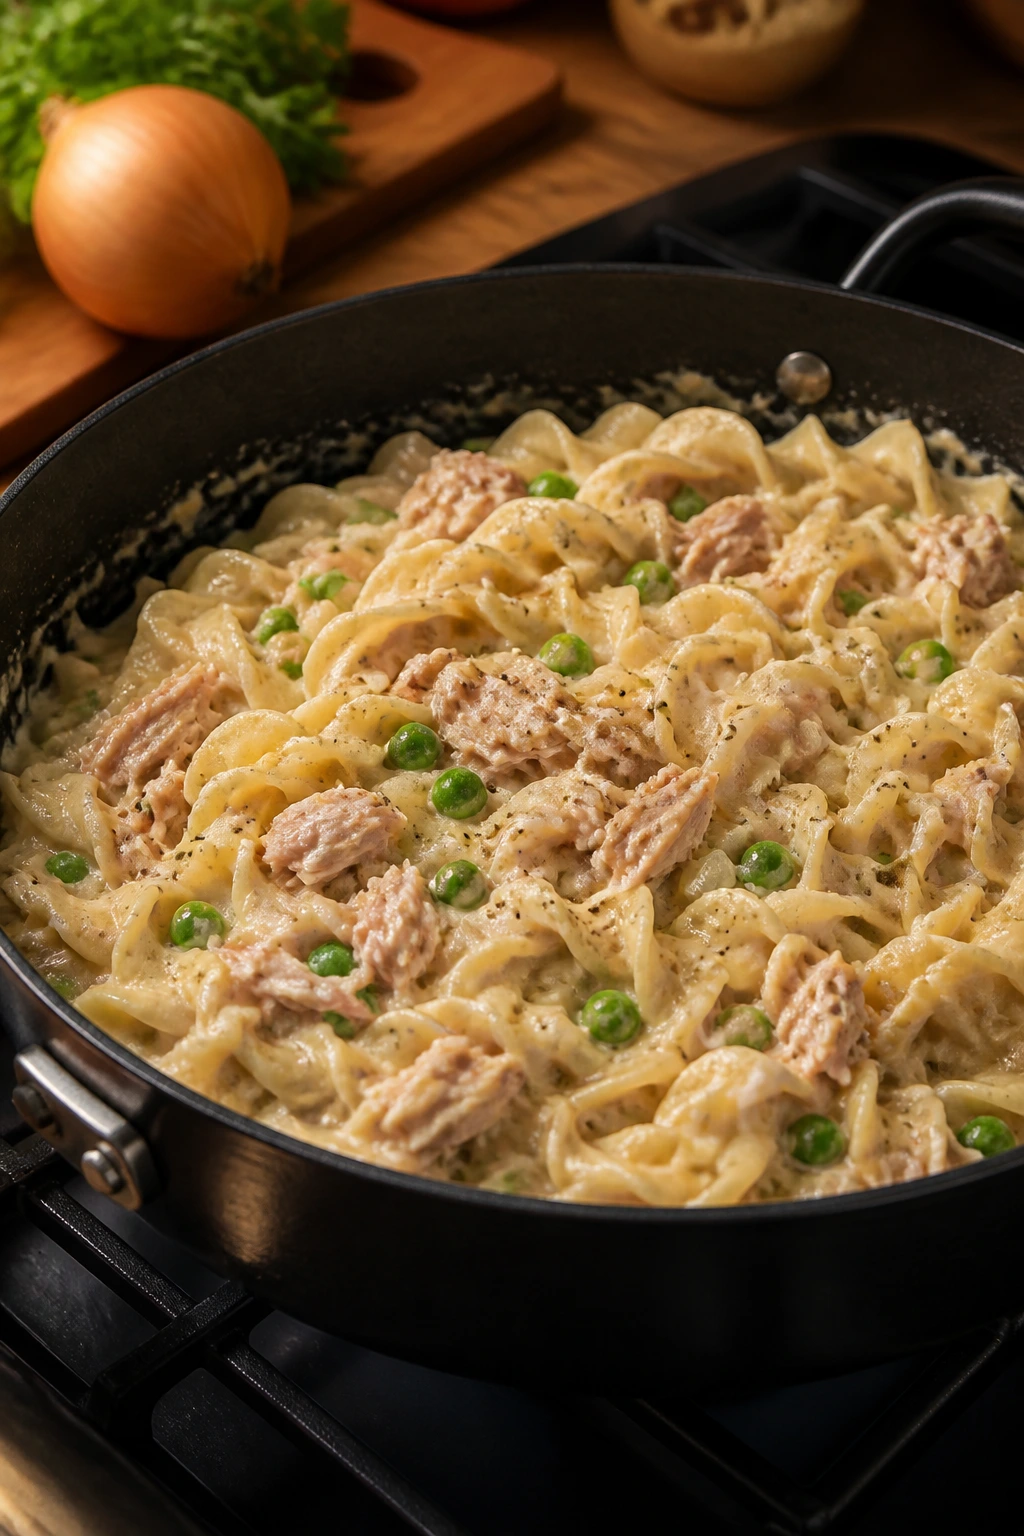
2. Creamy Tuna Noodle Skillet
This is the kind of skillet dinner that smells like a warm kitchen the second the onions hit butter. The noodles are soft, the tuna flakes into the sauce, and the peas add tiny cold pops that keep the whole thing from feeling heavy. It’s budget food, sure, but it has a tidy, old-school comfort to it that still lands.
Why It Works:
Canned tuna brings protein without extra cooking, and evaporated milk makes a quick creamy sauce that does not need a long simmer. The whole skillet comes together in about 25 minutes, which makes it one of the easiest pantry meals to keep on repeat.
Key Ingredients:
- 8 oz egg noodles — they soak up sauce fast.
- 2 cans tuna in water or oil, drained — chunk-light is fine.
- 1 cup frozen peas — add color and sweetness.
- 1 small onion, finely diced — gives the sauce depth.
- 2 tbsp butter — for the roux.
- 2 tbsp all-purpose flour — thickens the sauce.
- 1 can (12 oz) evaporated milk — pantry-friendly creaminess.
- 1 cup chicken broth — loosens the sauce.
- 1 tsp Dijon mustard — cuts the richness.
Quick Steps:
- Cook the egg noodles until al dente, then drain and set aside.
- Melt the butter in a deep skillet over medium heat, then cook the onion for 3 to 4 minutes until soft.
- Stir in the flour and cook for 1 minute. Whisk in the evaporated milk and broth until smooth.
- Add the Dijon, tuna, and peas, then simmer for 3 to 4 minutes until the sauce thickens.
- Fold in the noodles and cook for 1 minute more, just until everything is hot.
Equipment for This Recipe:
- Deep skillet — big enough for sauce and noodles.
- Whisk — keeps the sauce smooth.
- Colander — for draining.
- Measuring cups — especially useful for the milk and broth.
How to Serve This Dish:
Serve it straight from the skillet with cracked pepper on top. Saltines, buttered toast, or a pile of cucumber slices keeps the plate from feeling too soft.
Pro Tips for This Recipe:
- Drain the tuna well so the sauce stays creamy instead of watery.
- If you want a sharper flavor, add 1 teaspoon of lemon juice at the end.
- Cook the noodles only to al dente; they keep softening in the hot sauce.
Variations on This Dish:
- Mushroom Soup Shortcut: Swap the broth and flour sauce for a can of cream of mushroom soup.
- Lemon Pepper Version: Add lemon zest and extra black pepper for a brighter skillet.
- Crispy Top Bake: Transfer to a casserole dish, add breadcrumbs, and broil for 2 minutes.
Common Mistakes to Avoid with This Dish:
- Adding tuna too early: It gets dry and stringy if it cooks too long. Stir it in near the end.
- Making the sauce too thin: Keep simmering until it lightly coats a spoon.
- Using too much salt before tasting: Canned tuna and broth can already bring enough salt.
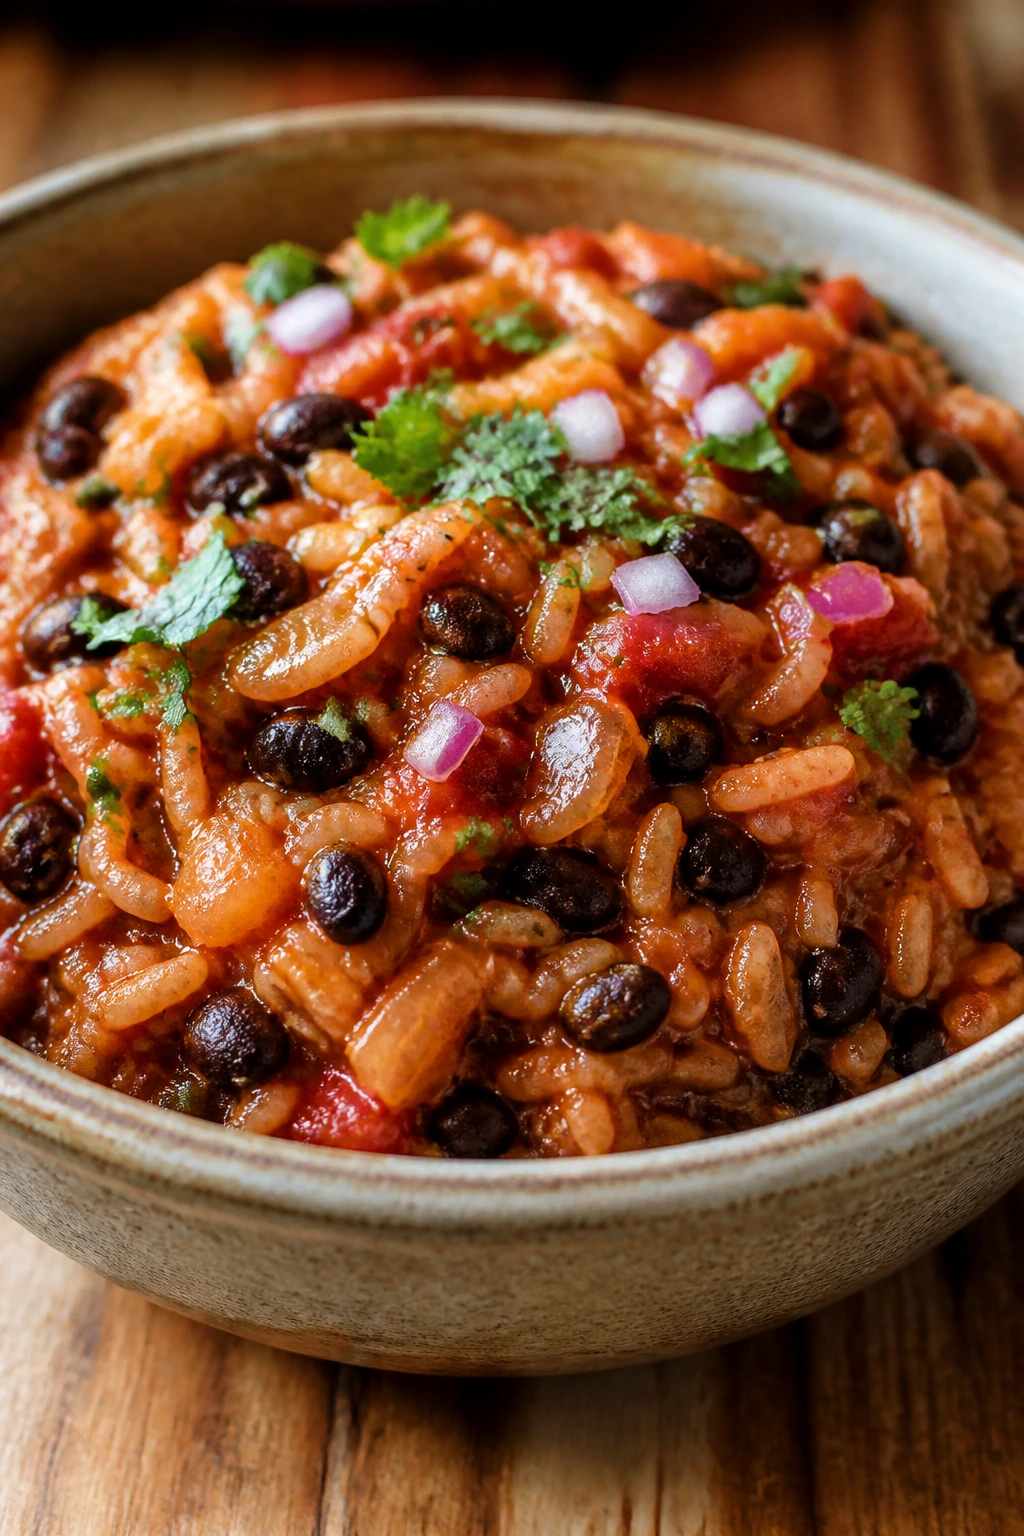
3. Smoky Rice and Beans Bowls
Rice and beans can taste plain if you leave them alone, but they wake up fast when onion, cumin, and salsa get involved. The bowl ends up smoky, saucy, and sturdy, with enough texture from the beans to make it feel like a real meal instead of a side dish pretending to be dinner.
Why It Works:
Rice gives the base, beans supply protein and fiber, and salsa acts like a ready-made sauce. It is cheap because it leans on the same ingredients every time, and it works because the pot does not need much more than heat and seasoning.
Key Ingredients:
- 1 cup long-grain rice — stays separate and fluffy.
- 2 cups water — for cooking the rice.
- 1 tbsp oil — for the onions.
- 1 small onion, sliced — browns into sweetness.
- 1 can black beans, drained and rinsed — the main protein.
- 1 tsp cumin — gives the bowls warmth.
- 1 tsp chili powder — adds smoky depth.
- 1/2 cup salsa — turns the beans into a saucy topping.
- Lime wedges — the finish.
Quick Steps:
- Cook the rice according to the package and keep it warm.
- Heat the oil in a skillet and cook the onion for 6 to 8 minutes until browned at the edges.
- Add the beans, cumin, chili powder, and salsa. Stir and simmer for 5 minutes until the beans look glossy.
- Spoon the beans over the rice and finish with lime juice.
Equipment for This Recipe:
- Medium saucepan — for the rice.
- Skillet — for the bean topping.
- Lid — helps the beans simmer without drying out.
- Spoon — for gentle mashing if you want a creamier texture.
How to Serve This Dish:
Pile the beans over the rice and add hot sauce, cilantro, or a fried egg if you have one. Tortilla chips on the side give it crunch, and the bowl feels fuller if you add a few pickled onions.
Pro Tips for This Recipe:
- Rinse canned beans unless you want the saltier can liquid in the mix.
- Mash a few beans against the skillet to thicken the sauce naturally.
- Hold back a spoonful of salsa for the top so the bowl tastes fresh at the end.
Variations on This Dish:
- Corn and Bean Bowl: Stir in 1 cup of corn for sweetness and more texture.
- Chipotle Heat: Add a spoon of chipotle in adobo for a smoky, hotter version.
- Cheesy Finish: Top with shredded cheddar and cover the bowl for 1 minute so it melts.
Common Mistakes to Avoid with This Dish:
- Skipping the browned onions: Raw onion makes the bowl taste sharp and unfinished.
- Using too much water in the beans: They should be saucy, not soupy.
- Forgetting acid at the end: A squeeze of lime or splash of vinegar pulls everything together.
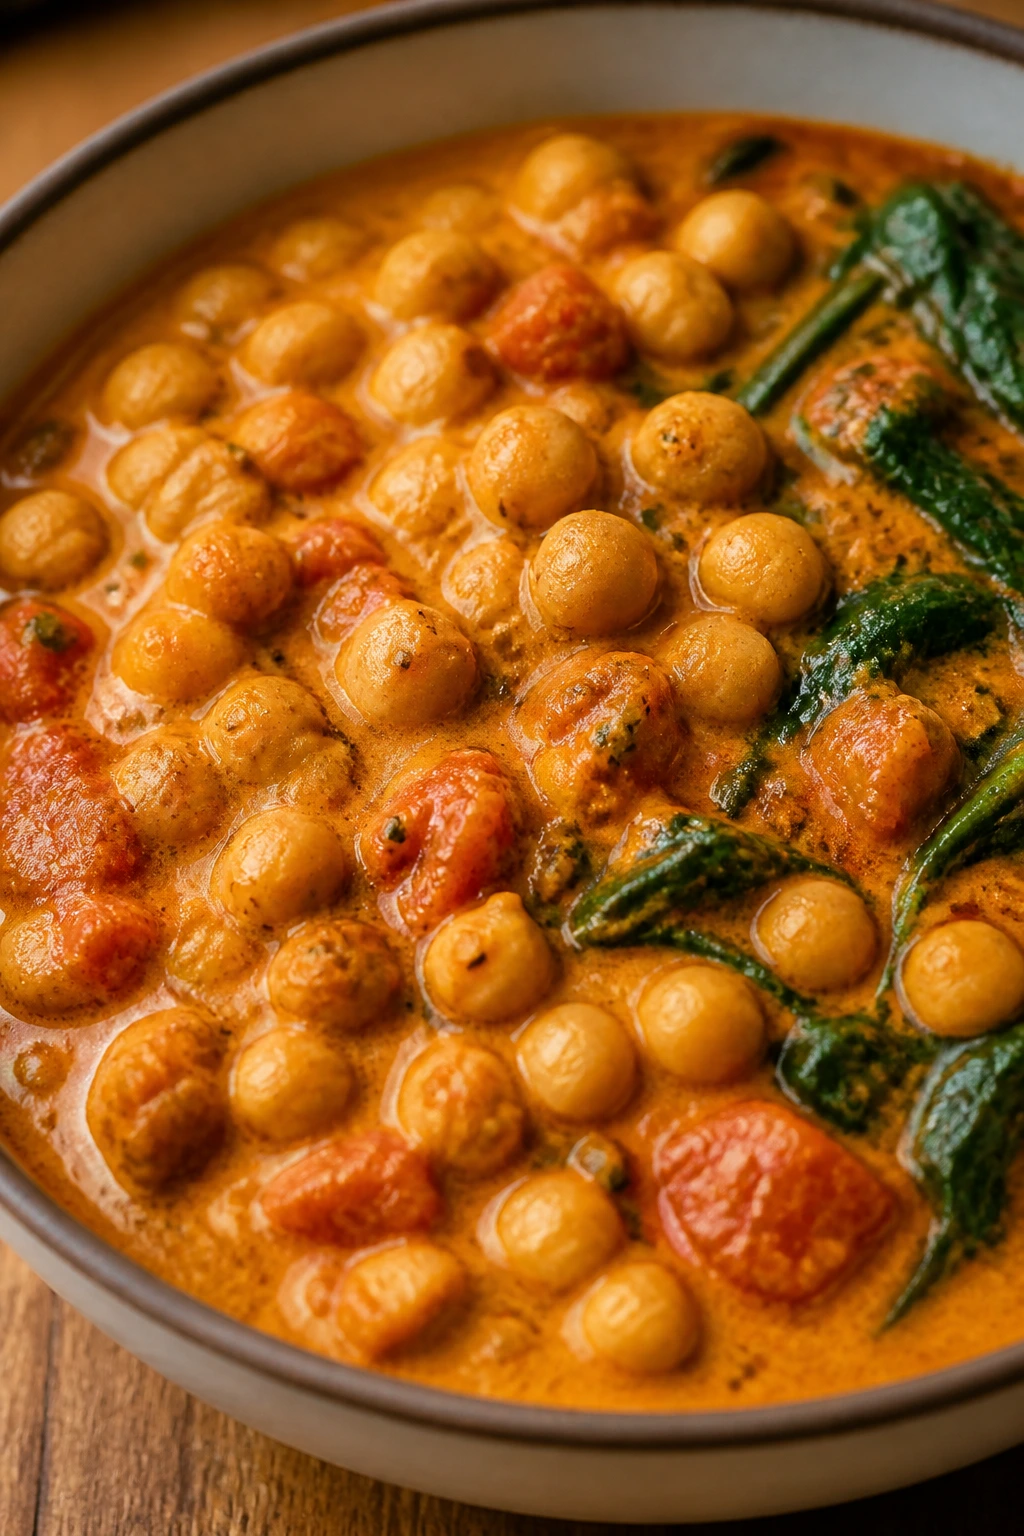
4. Chickpea Coconut Curry
A good chickpea curry smells like toasted spice and warm coconut the second the lid comes off. The sauce should be thick enough to coat the chickpeas, and the tomatoes keep it from tasting heavy. This is the pantry dinner I make when I want a bowl that feels richer than the grocery bill.
Why It Works:
Coconut milk gives the curry body, chickpeas bring the heft, and curry powder does the heavy lifting on flavor. It cooks in one pot, and the leftovers hold up well because the chickpeas absorb the sauce overnight.
Key Ingredients:
- 1 tbsp oil — for the onion and spices.
- 1 medium onion, diced — the base of the curry.
- 3 garlic cloves, minced — for aroma.
- 1 tbsp curry powder — the main seasoning.
- 2 cans chickpeas, drained and rinsed — the protein.
- 1 can (13.5 oz) coconut milk — makes the sauce creamy.
- 1 can diced tomatoes — adds acid and color.
- 1/2 tsp salt — season as the sauce reduces.
- 2 cups cooked rice — for serving.
- 1 cup spinach — optional, but useful.
Quick Steps:
- Heat the oil in a pot over medium heat and cook the onion for 5 minutes until soft.
- Stir in the garlic and curry powder for 30 seconds.
- Add the chickpeas, coconut milk, tomatoes, and salt. Simmer for 15 minutes, stirring now and then.
- Fold in the spinach until it wilts, then serve over rice.
Equipment for This Recipe:
- Medium pot — a wide one keeps the sauce from scorching.
- Wooden spoon — for stirring the thick sauce.
- Measuring spoon — curry powder is strong; eyeballing it is a bad idea.
- Rice cooker or saucepan — for the rice.
How to Serve This Dish:
Serve it over rice with a spoon of plain yogurt if you want a cooler finish. A naan-like flatbread works too, and the bowl looks better with chopped cilantro or sliced scallions on top.
Pro Tips for This Recipe:
- Let the curry powder toast in oil for 30 seconds before the liquids go in.
- If the sauce seems thin, simmer uncovered for a few more minutes.
- Add a small splash of lime juice at the end to keep the coconut from feeling too soft.
Variations on This Dish:
- Tomato-Forward Version: Use extra tomatoes and a little less coconut milk for a brighter sauce.
- Sweet Potato Add-In: Dice and simmer a sweet potato with the sauce until tender.
- Extra Green Curry: Stir in frozen peas or chopped kale near the end.
Common Mistakes to Avoid with This Dish:
- Dumping the curry powder into liquid only: Blooming it in oil gives the sauce a deeper flavor.
- Serving before it thickens: Curry should coat the spoon, not run off it.
- Adding spinach too early: It turns limp and dull if it cooks for too long.
5. Pantry Shakshuka on Toast
What happens when a can of tomatoes, a few eggs, and an onion meet a hot skillet? Dinner with a spoon and a piece of toast. The sauce should be thick and paprika-red, and the eggs need just enough time to set so the yolks stay soft in the center.
Why It Works:
Shakshuka turns cheap ingredients into something that feels deliberate because the eggs cook right in the sauce. It is fast, built from cupboard basics, and one skillet does almost all the work.
Key Ingredients:
- 1 tbsp olive oil — for the onion and garlic.
- 1 medium onion, diced — builds sweetness.
- 3 garlic cloves, minced — sharpens the sauce.
- 1 tbsp tomato paste — deepens the tomato flavor.
- 1 can crushed tomatoes — the body of the sauce.
- 1 tsp paprika — for color and warmth.
- 1/2 tsp cumin — adds earthiness.
- 4 large eggs — the finish.
- 4 slices bread, toasted — for serving.
- Salt and black pepper — to taste.
Quick Steps:
- Heat the oil in a skillet over medium heat and cook the onion for 6 minutes.
- Stir in the garlic and tomato paste, then cook for 1 minute until the paste darkens slightly.
- Add the crushed tomatoes, paprika, cumin, salt, and pepper. Simmer for 10 minutes until thick.
- Make 4 small wells in the sauce, crack in the eggs, cover, and cook for 5 to 7 minutes until the whites are set but the yolks still wobble.
- Serve immediately with toast.
Equipment for This Recipe:
- Large skillet with a lid — the lid traps heat for the eggs.
- Wooden spoon — for the sauce.
- Toaster or oven — for the bread.
- Spoon — for making wells.
How to Serve This Dish:
Bring the skillet straight to the table if you want it to look casual and warm. Toast soldiers, pita, or a thick slice of country bread all work, and a little feta or parsley makes the plate pop.
Pro Tips for This Recipe:
- Keep the sauce thick before adding the eggs, or the whites spread too far.
- Cover the skillet as soon as the eggs go in.
- If the eggs are large, give them another minute so the whites set cleanly.
Variations on This Dish:
- Harissa Heat: Stir 1 teaspoon of harissa into the sauce for more fire.
- Bean-Loaded Shakshuka: Add canned white beans for a heavier version.
- Feta Finish: Crumble feta on top right before serving.
Common Mistakes to Avoid with This Dish:
- Sauce that is too loose: The eggs drift around and overcook. Reduce the tomato base first.
- Cracking eggs from too high: They break and spread. Crack each one into a cup first.
- Walking away from the pan: Shakshuka goes from soft yolk to chalky yolk fast.
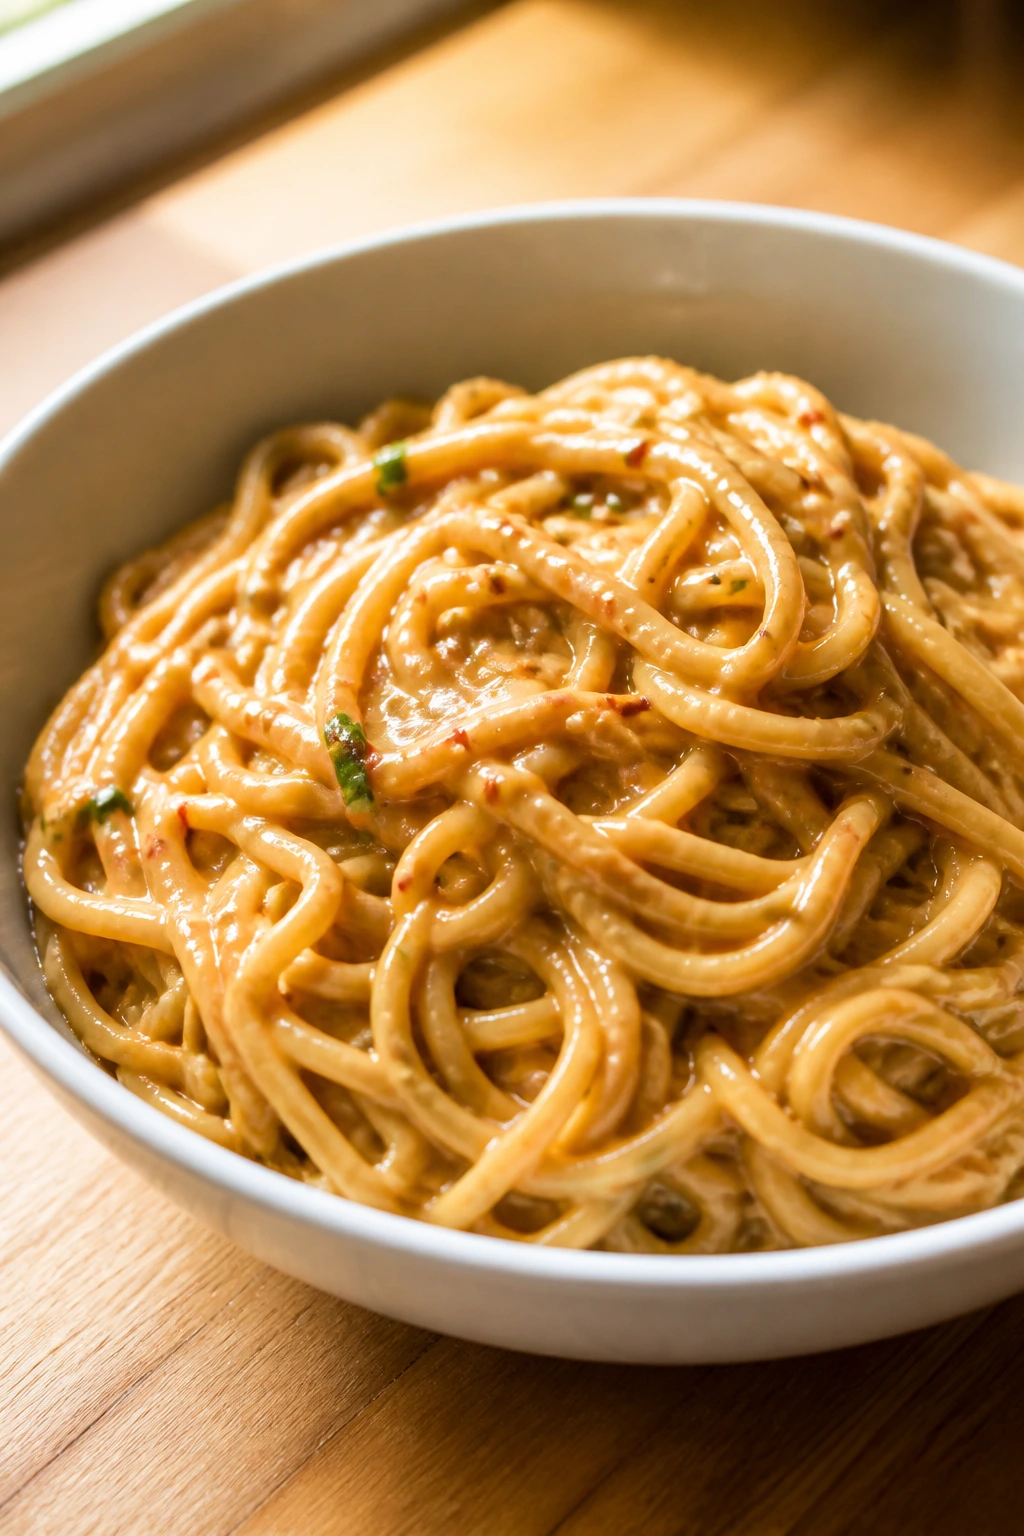
6. Peanut Sauce Noodles
Peanut butter on noodles sounds odd until the sauce hits the bowl and turns silky. The flavor lands somewhere between salty, nutty, and a little sweet, with enough vinegar to keep it from turning into glue. This is one of those pantry dinners that looks like a shortcut and tastes like a plan.
Why It Works:
Peanut butter brings fat and body, soy sauce brings salt, and hot water turns the mixture into a real sauce. It is cheap, fast, and forgiving, which is a rare combination on a tired night.
Key Ingredients:
- 8 oz spaghetti, ramen noodles, or linguine — any long noodle works.
- 1/3 cup creamy peanut butter — smooth sauces are easier here.
- 2 tbsp soy sauce — for salt and depth.
- 1 tbsp rice vinegar or lime juice — keeps the sauce bright.
- 1 tsp sugar or honey — rounds out the flavor.
- 1 garlic clove, finely grated — optional but useful.
- 1/4 tsp chili flakes — for heat.
- 1/2 cup hot water, plus more as needed — to loosen the sauce.
Quick Steps:
- Cook the noodles until al dente and save a little cooking water.
- Whisk peanut butter, soy sauce, vinegar, sugar, garlic, chili flakes, and hot water in a bowl until smooth.
- Toss the noodles with the sauce, adding a splash of noodle water if the sauce looks tight.
- Serve right away.
Equipment for This Recipe:
- Saucepan — for the noodles.
- Mixing bowl — for the sauce.
- Whisk or fork — for breaking up the peanut butter.
- Tongs — useful for tossing.
How to Serve This Dish:
Serve the noodles in a bowl with sliced scallions, sesame seeds, or crushed peanuts if they’re around. A few cucumber slices on the side give the plate a cool crunch that works well against the sauce.
Pro Tips for This Recipe:
- Mix the sauce with hot water before it touches the noodles.
- Keep a little noodle water back; starch makes the sauce cling.
- If the sauce tastes flat, add a few drops more vinegar before reaching for more salt.
Variations on This Dish:
- Sesame Version: Add a teaspoon of sesame oil for a deeper nutty note.
- Spicy Chili Crisp: Stir in chili crisp for crunch and heat.
- Cold Noodle Bowl: Chill the noodles and sauce, then top with shredded cabbage.
Common Mistakes to Avoid with This Dish:
- Using cold peanut butter straight from the jar: It clumps. Warm water fixes that fast.
- Over-thinning the sauce: It should coat the noodles, not run off them.
- Skipping acid: Without vinegar or lime, the sauce tastes heavy and dull.
7. One-Pot Pantry Chili
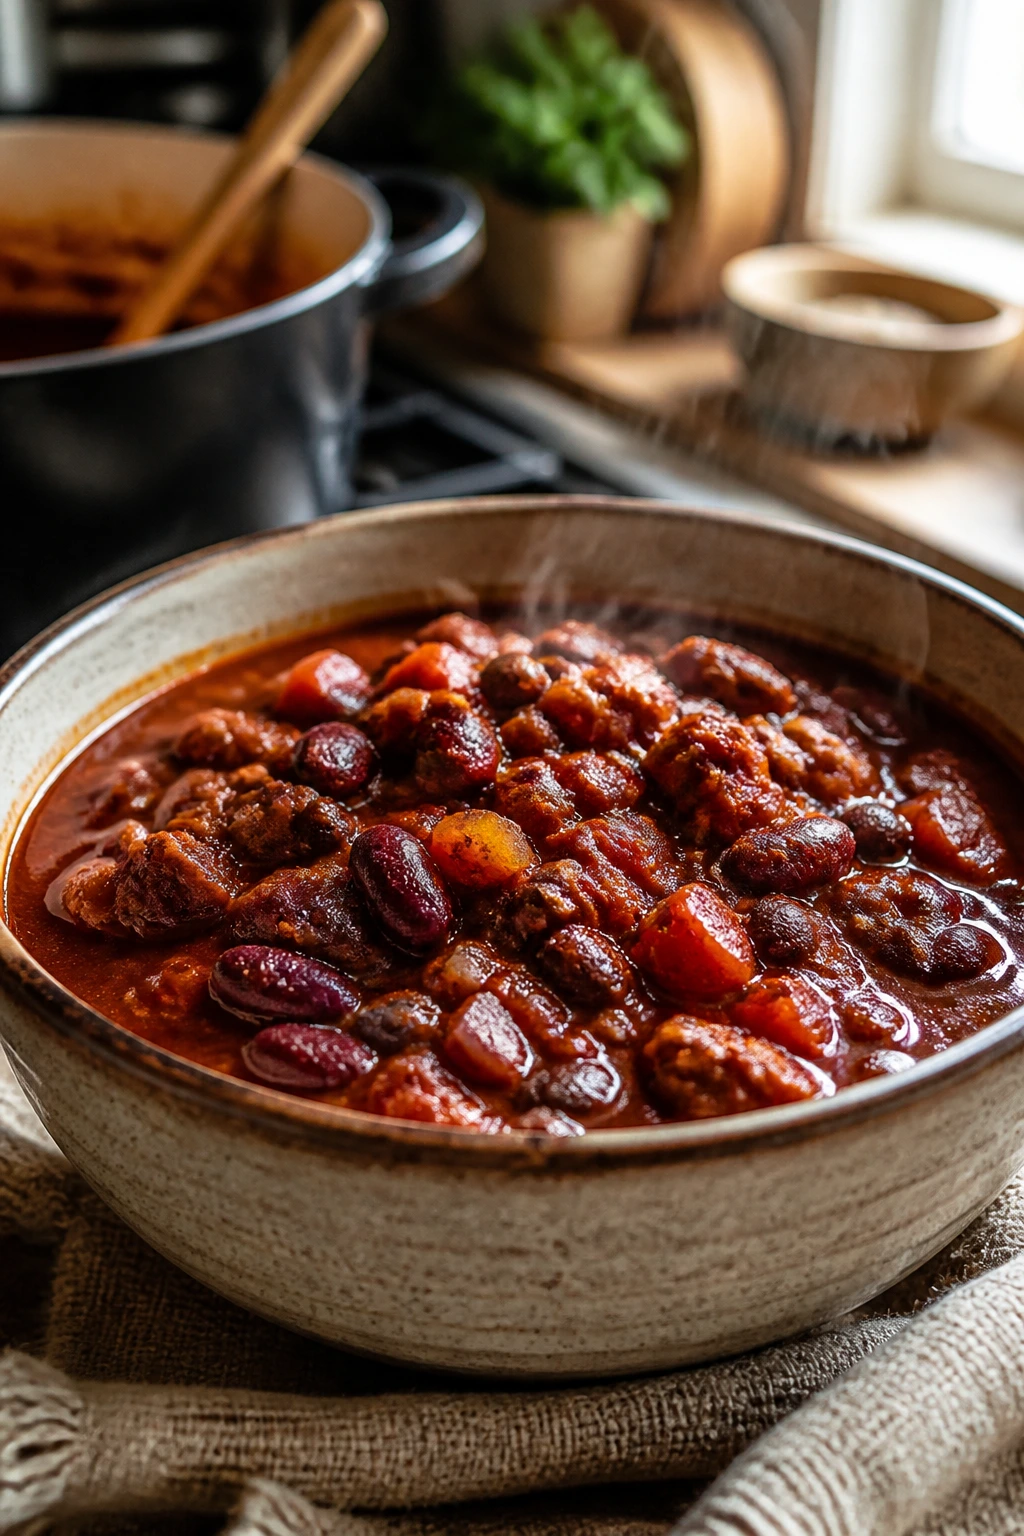
A good pantry chili smells like onions, spice, and tomatoes simmering into one thick pot. The beans should stay intact but tender, and the sauce needs to be rich enough to cling to a spoon. This is the sort of meal that tastes better after it sits for ten minutes, which makes it useful and a little forgiving.
Why It Works:
Beans, tomato paste, and canned tomatoes give you body and depth without a long braise. The spice mix carries the flavor, and the whole pot can be stretched with corn, rice, or bread if needed.
Key Ingredients:
- 1 tbsp oil — for the onion.
- 1 medium onion, diced — the starting point.
- 3 garlic cloves, minced — sharpens the pot.
- 2 tbsp tomato paste — thickens and darkens the flavor.
- 1 can crushed tomatoes — the main liquid.
- 2 cans beans, drained and rinsed — kidney, black, or pinto all work.
- 1 tbsp chili powder — the backbone.
- 1 tsp cumin — adds warmth.
- 1/2 tsp smoked paprika — optional, but useful.
- 1/2 cup water or broth — to loosen the chili.
Quick Steps:
- Cook the onion in oil over medium heat for 5 to 6 minutes.
- Stir in the garlic, tomato paste, chili powder, cumin, and smoked paprika. Cook for 1 minute.
- Add the tomatoes, beans, and water. Bring to a simmer.
- Cook uncovered for 20 minutes, stirring now and then, until thick.
- Taste and adjust salt before serving.
Equipment for This Recipe:
- Dutch oven or soup pot — best for a long simmer.
- Wooden spoon — for stirring and lightly mashing beans.
- Can opener — obvious, but still necessary.
- Ladle — helpful for serving.
How to Serve This Dish:
Ladle the chili into bowls with crackers, shredded cheese, or a spoon of sour cream if you have it. Cornbread is the classic side, but rice or toast works just as well when the pantry is lean.
Pro Tips for This Recipe:
- Cook the tomato paste in oil; that single step keeps the chili from tasting canned.
- Mash a quarter of the beans against the pot to thicken the broth naturally.
- A teaspoon of vinegar at the end wakes the whole pot up.
Variations on This Dish:
- Corn-Bean Chili: Add 1 cup of corn for sweetness and texture.
- Chocolate Shadow: A pinch of cocoa powder makes the chili taste deeper, not sweet.
- Firehouse Version: Stir in chopped chipotle peppers in adobo.
Common Mistakes to Avoid with This Dish:
- Adding too much liquid too early: Chili should be thick enough to hold its shape in a bowl.
- Using raw spice only: Toasting the spice mix in the pot gives it better flavor.
- Serving before tasting salt: Beans soak up seasoning and usually need a final correction.
8. White Bean Soup with Toast
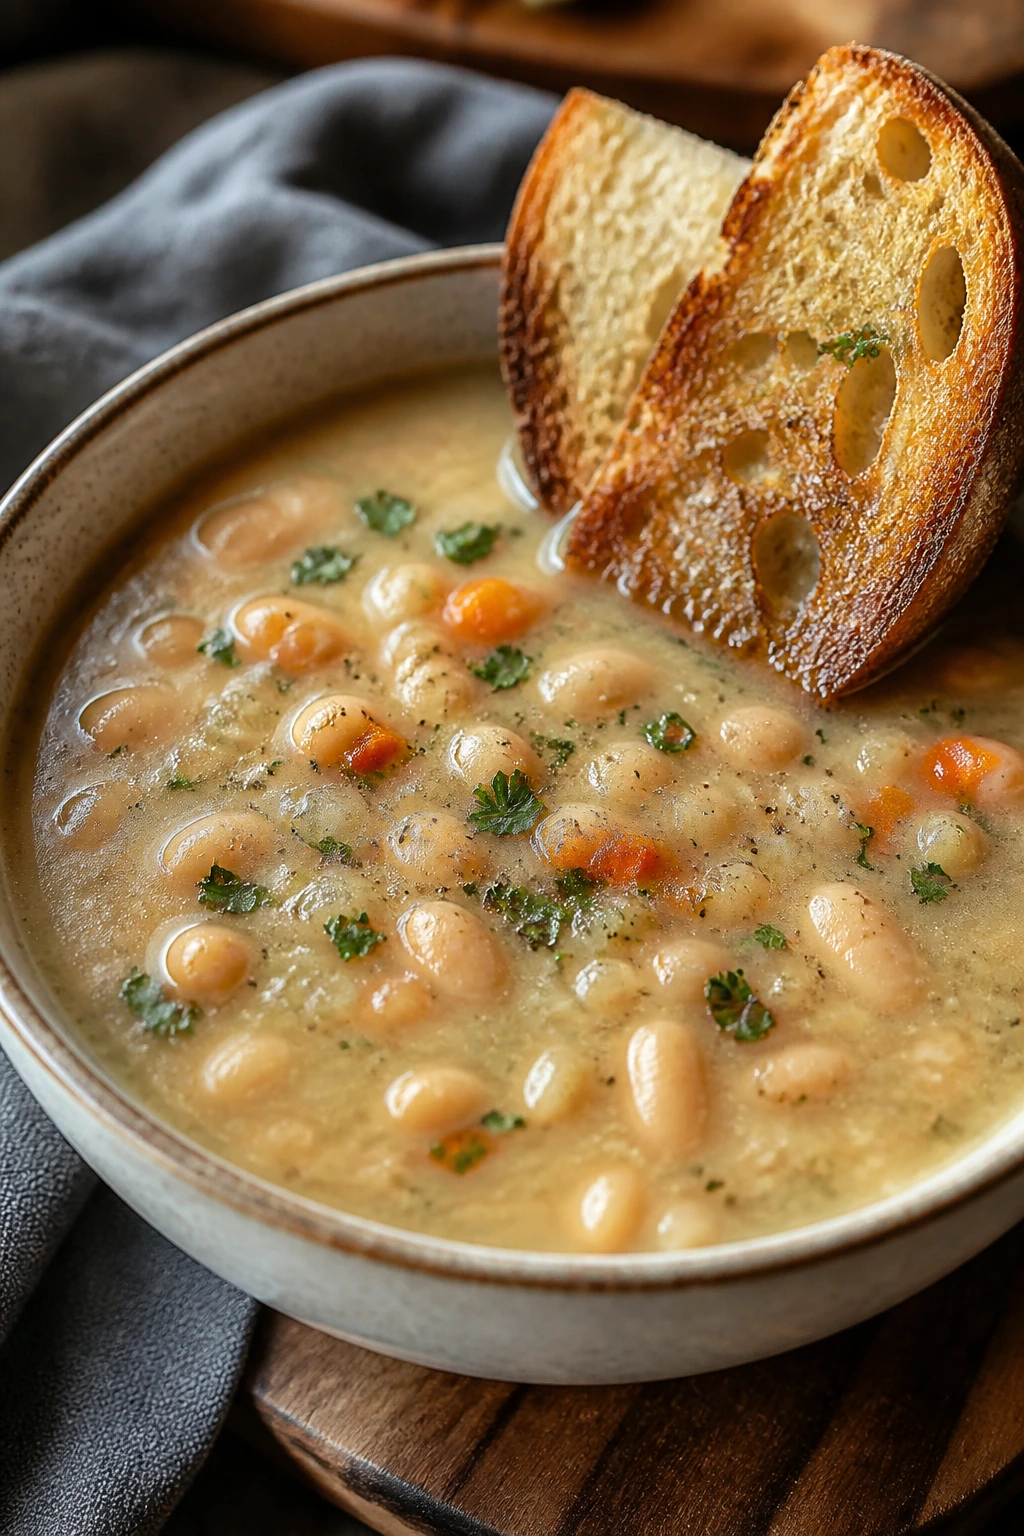
This soup is soft in the best way: gentle onions, creamy beans, and broth that tastes like it had more in it than it did. Blend a little of it, and the texture turns velvety without any cream. It is the kind of dinner that feels calm, not flimsy.
Why It Works:
Cannellini beans bring both protein and a natural thickening effect, while broth and herbs do the rest. The toasted bread is not decoration; it is the thing that makes the bowl feel complete.
Key Ingredients:
- 1 tbsp olive oil — for the vegetables.
- 1 onion, chopped — starts the soup.
- 2 carrots, diced — add sweetness and body.
- 3 garlic cloves, minced — the savory base.
- 2 cans cannellini beans, drained and rinsed — the main body.
- 4 cups chicken or vegetable broth — the soup liquid.
- 1 tsp dried rosemary — sharp and piney.
- 1 bay leaf — adds quiet depth.
- 4 slices bread, toasted — for serving.
Quick Steps:
- Cook the onion and carrots in oil for 6 to 7 minutes until softened.
- Stir in the garlic and rosemary for 30 seconds.
- Add the beans, broth, and bay leaf. Simmer for 15 minutes.
- Blend about 1 cup of the soup in the pot or with an immersion blender, then stir it back in.
- Remove the bay leaf and serve with toast.
Equipment for This Recipe:
- Soup pot — wide enough for easy stirring.
- Immersion blender or regular blender — for texture.
- Ladle — for serving.
- Toaster or skillet — for the bread.
How to Serve This Dish:
Serve the soup in deep bowls with toast leaning on the side like a raft. A drizzle of olive oil, a shake of black pepper, or a spoon of pesto makes the bowl look and taste more finished.
Pro Tips for This Recipe:
- Blend only part of the soup so you keep some bean texture.
- If the broth tastes thin, simmer uncovered for another 5 minutes.
- Add lemon juice at the end if the soup needs a brighter edge.
Variations on This Dish:
- Tomato White Bean Soup: Stir in a cup of crushed tomatoes for a rosier version.
- Sage and Garlic Swap: Use sage if rosemary feels too sharp.
- Greens in the Pot: Add spinach or chopped kale in the last 2 minutes.
Common Mistakes to Avoid with This Dish:
- Boiling the soup hard: Beans can fall apart and turn grainy.
- Forgetting the bread: The texture balance matters here.
- Using too much rosemary: It can dominate fast; keep it measured.
9. Fast Egg Fried Rice
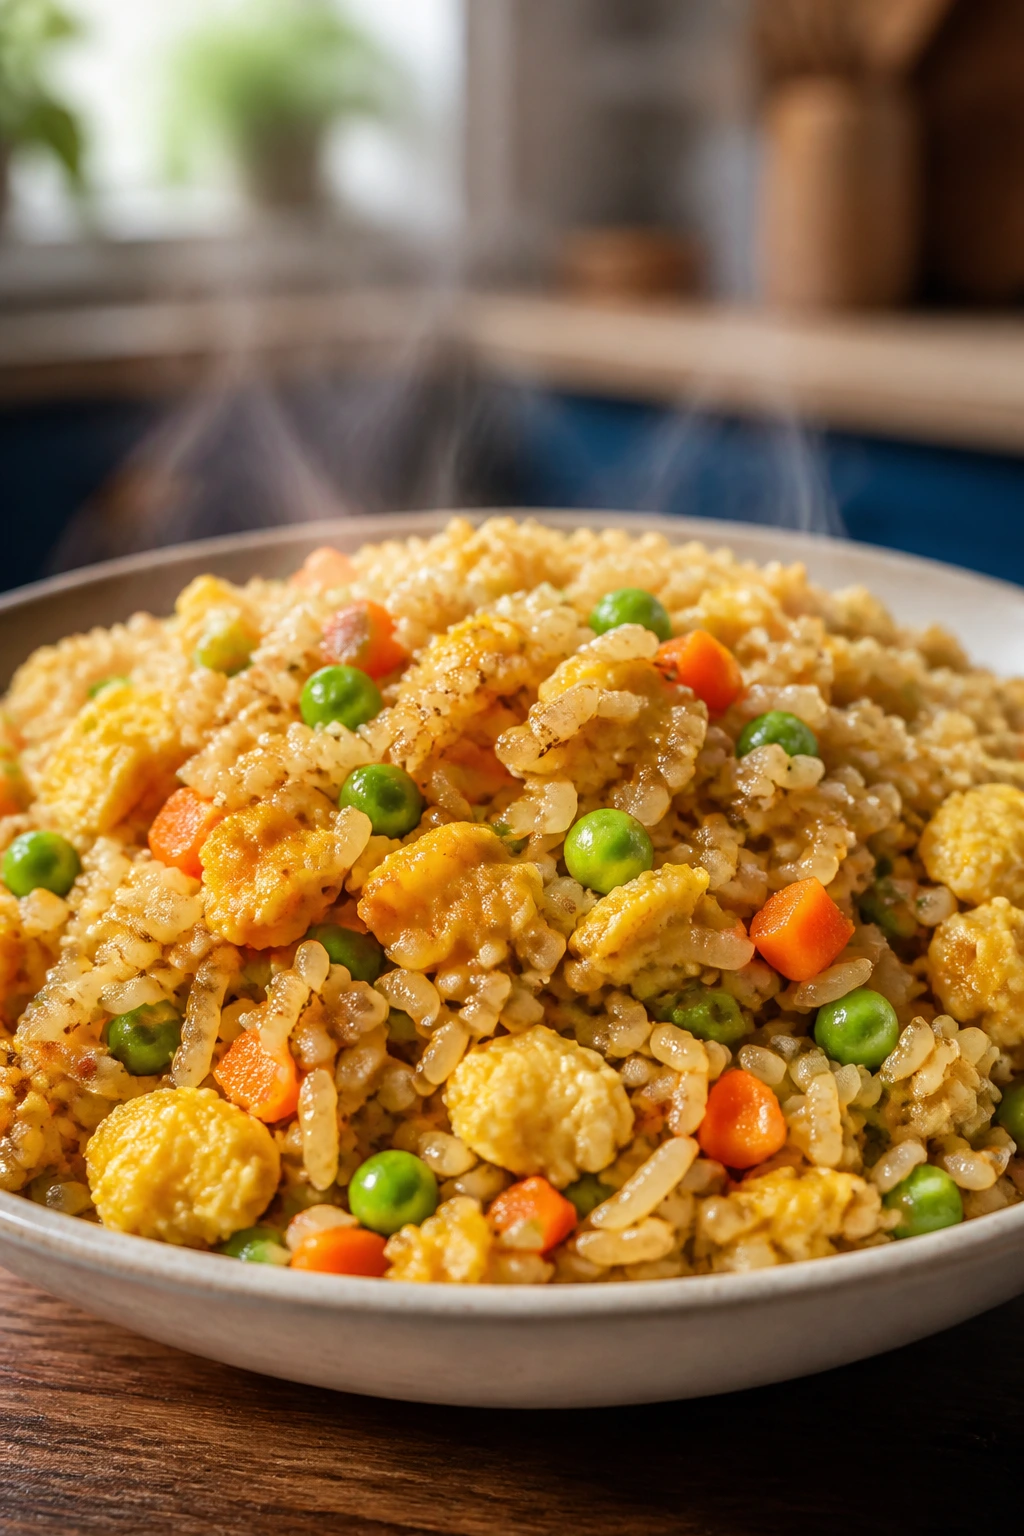
Cold rice is the secret here. Fresh rice turns sticky and clumpy in the skillet, but day-old rice fries into separate grains that soak up soy sauce without turning mushy. Add eggs, peas, and a little sesame oil, and dinner suddenly looks intentional.
Why It Works:
Fried rice is a practical leftover meal because the grains dry out a little in the fridge and fry better the next day. Eggs add protein and richness, and frozen vegetables make it more filling without extra chopping.
Key Ingredients:
- 3 cups cooked, cold rice — day-old rice fries best.
- 2 eggs, beaten — for soft curds.
- 1 cup frozen peas and carrots — straight from the freezer.
- 1 tbsp neutral oil — for the skillet.
- 2 tbsp soy sauce — the main seasoning.
- 1 tsp sesame oil — finish only.
- 2 scallions, sliced — optional but welcome.
- 1 pinch white or black pepper — for balance.
Quick Steps:
- Heat the oil in a large skillet over medium-high heat.
- Scramble the eggs for about 30 seconds, then move them to one side.
- Add the frozen vegetables and cook for 2 minutes.
- Stir in the rice and soy sauce, breaking up clumps as it heats through.
- Finish with sesame oil and scallions.
Equipment for This Recipe:
- Large skillet or wok — gives the rice room to fry.
- Spatula — for breaking up clumps.
- Bowl — for beating the eggs.
- Measuring spoon — soy sauce is easy to overdo.
How to Serve This Dish:
Serve it in a bowl with chili crisp or hot sauce on the side. A fried egg on top turns the rice into a fuller meal, and a few cucumber slices keep the plate from feeling too dry.
Pro Tips for This Recipe:
- Use a wide pan so the rice can fry instead of steam.
- Press the rice into the skillet briefly, then stir; it helps the grains toast a little.
- Add sesame oil at the end so its flavor stays fresh.
Variations on This Dish:
- Spam Style: Dice and crisp pantry ham if you keep it around.
- Garlic Rice Version: Fry 2 cloves of garlic in the oil before the rice goes in.
- Chili Egg Bowl: Top with a runny fried egg and chili oil.
Common Mistakes to Avoid with This Dish:
- Using wet, fresh rice: It turns gummy in the pan.
- Crowding the skillet: The rice steams instead of frying.
- Pouring in too much soy sauce at once: The dish gets salty and dark instead of balanced.
10. Lentil Tomato Stew
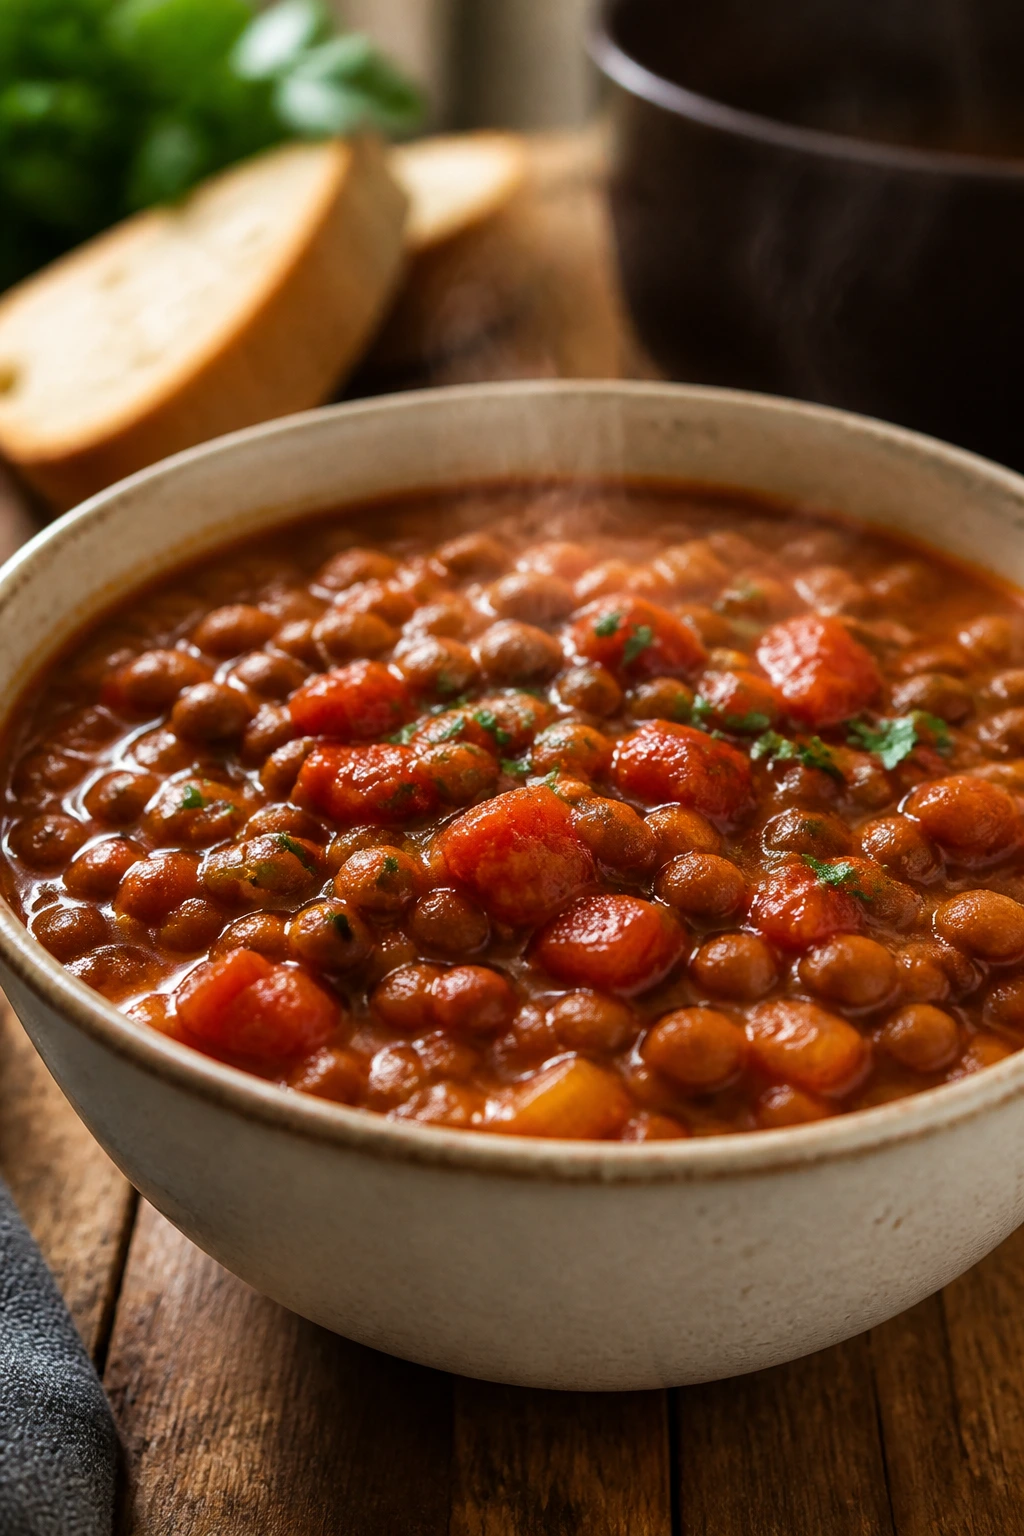
Lentils have a way of making a cheap pot taste thoughtful. They soften into the broth, the tomatoes add brightness, and the whole stew thickens into something spoonable and sturdy. This is the kind of dinner that makes a plain loaf of bread feel necessary.
Why It Works:
Brown lentils cook quickly and do not need soaking, which makes them one of the best budget proteins around. Tomatoes, onion, and herbs build the flavor without much effort, and the pot holds well for leftovers.
Key Ingredients:
- 1 tbsp olive oil — for the vegetables.
- 1 onion, diced — the flavor base.
- 1 carrot, diced — adds sweetness.
- 1 celery stalk, diced — optional but useful.
- 2 garlic cloves, minced — for aroma.
- 1 cup brown lentils, rinsed — the main body.
- 1 can diced tomatoes — acid and color.
- 4 cups broth or water — the cooking liquid.
- 1 bay leaf — quiet depth.
- 1 tsp dried thyme — a good match for lentils.
Quick Steps:
- Cook the onion, carrot, and celery in oil for 6 minutes.
- Stir in the garlic and thyme for 30 seconds.
- Add the lentils, tomatoes, broth, and bay leaf. Bring to a boil, then lower to a simmer.
- Cook for 25 minutes until the lentils are tender but not falling apart.
- Remove the bay leaf and season with salt and pepper.
Equipment for This Recipe:
- Soup pot — gives the stew room to bubble.
- Wooden spoon — for stirring.
- Ladle — for serving.
- Fine-mesh strainer — for rinsing the lentils.
How to Serve This Dish:
Serve the stew with crusty bread or over rice if you want it to go farther. A spoon of yogurt, a drizzle of olive oil, or chopped parsley makes the bowl look finished.
Pro Tips for This Recipe:
- Salt near the end so the lentils stay tender.
- If the stew looks too loose, simmer uncovered for 5 more minutes.
- A splash of vinegar at the end brightens the whole pot.
Variations on This Dish:
- Smoked Paprika Stew: Add smoked paprika for a deeper, campfire flavor.
- Greens and Lentils: Stir in spinach at the end.
- Chunkier Version: Add diced potatoes and simmer them with the lentils.
Common Mistakes to Avoid with This Dish:
- Overcooking the lentils: They should be soft, not chalky or broken into mush.
- Skipping the sauté step: Raw onion and garlic make the stew taste thin.
- Leaving it unseasoned at the end: Lentils need final salt and acid.
11. Crispy Salmon Patties
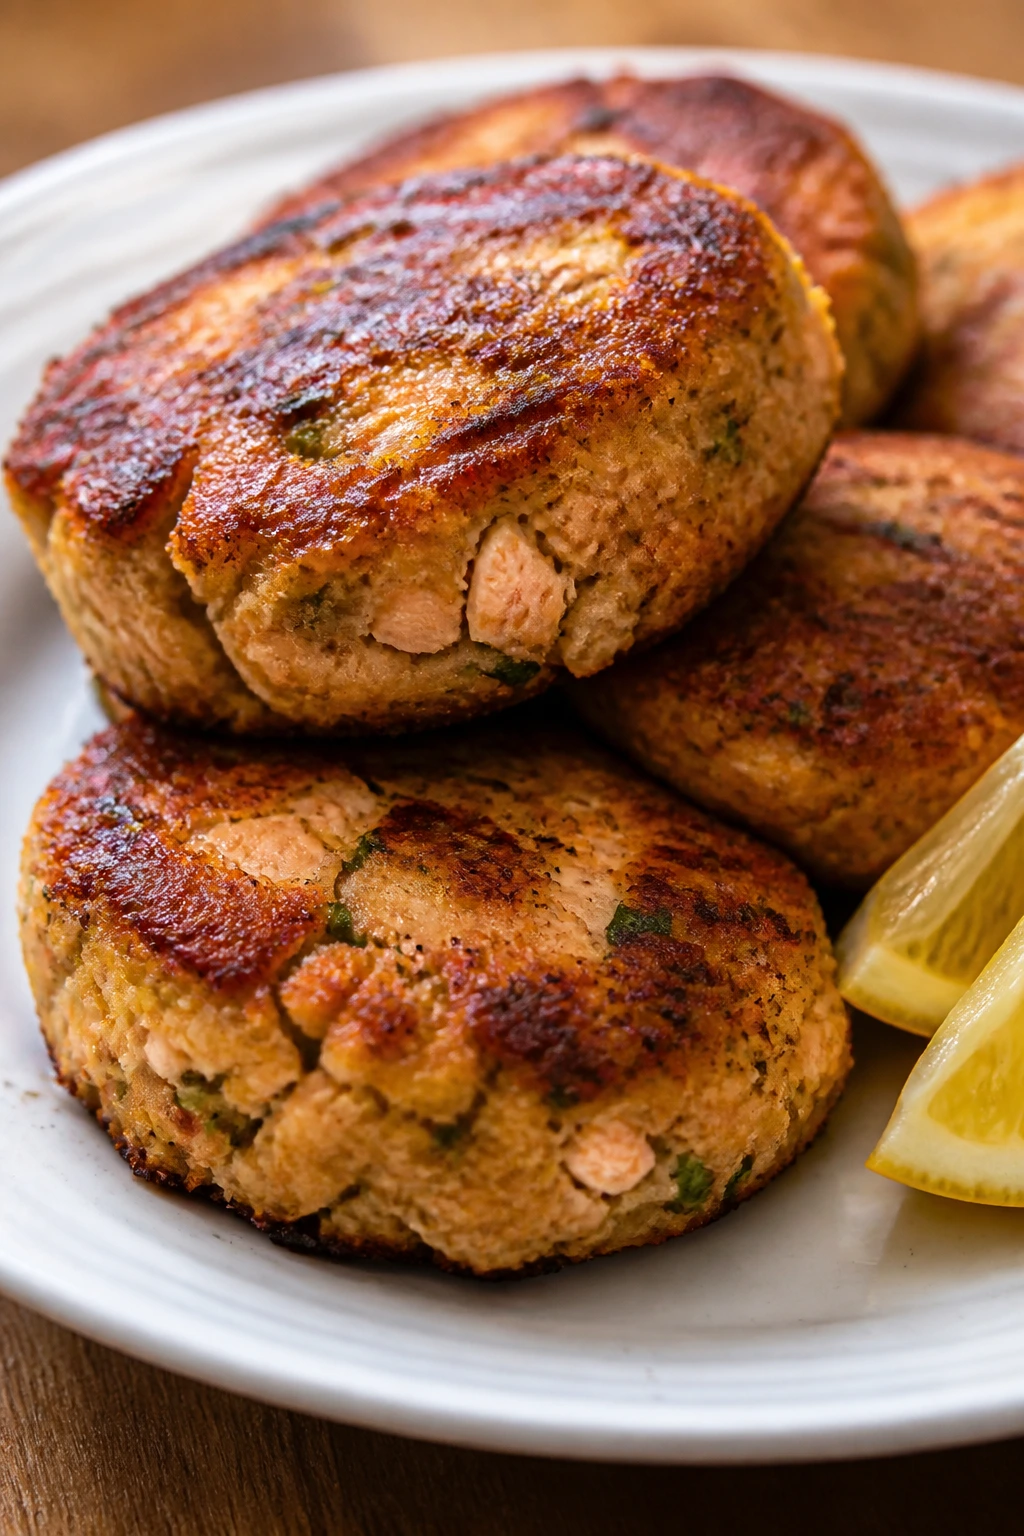
Canned salmon gets ignored because people expect it to taste rough and fishy, but a little mustard, onion, and lemon fix that fast. The outside should brown into a crisp crust while the inside stays tender and flaked. With crackers or salad, this feels much pricier than it is.
Why It Works:
Canned salmon is already cooked, so the patties need only a quick pan-fry. Breadcrumbs and egg hold the mixture together, and the lemon cuts through the richness so the fish does not taste heavy.
Key Ingredients:
- 2 cans salmon, drained — remove any large bones if you prefer.
- 1 egg — the binder.
- 1/2 cup breadcrumbs — helps the patties hold shape.
- 2 tbsp mayonnaise — adds moisture.
- 1 tbsp Dijon mustard — sharpens the flavor.
- 2 tbsp finely minced onion — keeps the mixture lively.
- 1 tbsp lemon juice — brightens the fish.
- 2 tbsp oil — for frying.
Quick Steps:
- Mix the salmon, egg, breadcrumbs, mayonnaise, mustard, onion, and lemon juice in a bowl.
- Shape into 4 patties and let them rest for 5 minutes.
- Heat the oil in a skillet over medium heat.
- Fry the patties for 3 to 4 minutes per side until browned and hot through.
- Drain briefly on paper towels and serve.
Equipment for This Recipe:
- Mixing bowl — for the patty mixture.
- Skillet — for crisping.
- Spatula — for flipping cleanly.
- Plate lined with paper towels — for draining.
How to Serve This Dish:
Serve the patties with tartar sauce, hot sauce, or a squeeze of lemon. A cabbage slaw, potato salad, or crackers on the side makes the plate feel balanced and keeps the fish from being the only texture.
Pro Tips for This Recipe:
- If the mix feels wet, add another spoonful of breadcrumbs.
- Chill the formed patties for 10 minutes if they seem soft.
- Flip only when the bottom is deeply golden.
Variations on This Dish:
- Herb Salmon Cakes: Add dried dill or parsley.
- Spicy Pantry Patties: Stir in hot sauce or cayenne.
- Cracker-Meal Version: Crush saltines instead of using breadcrumbs.
Common Mistakes to Avoid with This Dish:
- Making the patties too thick: They can brown outside before warming through.
- Flipping early: Let the crust form or they will fall apart.
- Overmixing: You want flakes, not a paste.
12. Black Bean Quesadillas

These quesadillas are all about contrast: crisp tortillas, soft beans, and melted cheese that pulls when you cut into them. Mash the beans a little and the filling becomes spreadable, which keeps the tortilla from tearing and gives the whole thing a smoother bite.
Why It Works:
Black beans and cheese are cheap, filling, and fast, and tortillas cook in minutes. The bean mash holds everything together, so you get a clean slice instead of a loose pile.
Key Ingredients:
- 4 flour tortillas — medium size works best.
- 1 can black beans, drained and rinsed — mash them a little.
- 1 cup shredded cheese — cheddar or Monterey Jack.
- 1/2 tsp cumin — warms up the beans.
- 2 tbsp salsa — loosens the filling.
- 1 tbsp oil or butter — for the skillet.
Quick Steps:
- Mash the beans with cumin and salsa until spreadable but not smooth.
- Spread the bean mixture over two tortillas and top with cheese.
- Fold in half and cook in a skillet over medium heat for 2 to 3 minutes per side.
- Slice and serve hot.
Equipment for This Recipe:
- Skillet — for crisping the tortillas.
- Spatula — for flipping.
- Fork or potato masher — for the beans.
- Knife or pizza cutter — for slicing.
How to Serve This Dish:
Cut the quesadillas into wedges and serve with salsa, sour cream, or pickled jalapeños. A bowl of tomato soup or a simple cabbage salad gives the plate more shape.
Pro Tips for This Recipe:
- Keep the heat at medium so the tortilla browns before the cheese burns.
- A thin layer of beans works better than a thick one.
- Cover the skillet for 30 seconds if the cheese needs help melting.
Variations on This Dish:
- Corn Quesadilla: Add corn for sweetness and texture.
- Green Chile Version: Stir chopped green chiles into the beans.
- Protein-Heavy Fold: Add leftover chicken or extra beans.
Common Mistakes to Avoid with This Dish:
- Overstuffing: The tortilla tears and the filling escapes.
- Using high heat: The outside burns before the cheese melts.
- Skipping the bean mash: Whole beans slide around and make the quesadilla awkward to eat.
13. Bean and Cheese Burritos

A burrito from the pantry should feel compact, not sloppy. The beans need enough seasoning to taste like a filling, the rice should stay fluffy, and the tortilla should toast just enough to keep the roll from unraveling. It is a simple formula, but it hits hard when you want real food in a hurry.
Why It Works:
Beans and rice are a classic budget pairing because together they are filling and inexpensive. Add cheese and salsa, and the burrito turns into a complete handheld meal with almost no waste.
Key Ingredients:
- 4 large flour tortillas — warm tortillas roll better.
- 1 can pinto beans, drained and rinsed — mashed slightly.
- 1 cup cooked rice — plain or seasoned.
- 1 cup shredded cheese — melts into the filling.
- 1/2 cup salsa — adds moisture and flavor.
- 1 tsp chili powder — keeps the beans from tasting flat.
Quick Steps:
- Warm the beans in a small pan with chili powder and a splash of water.
- Warm the tortillas in a dry skillet or microwave so they bend easily.
- Layer beans, rice, cheese, and salsa down the center of each tortilla.
- Fold in the sides and roll tightly.
- Toast seam-side down in a skillet for 1 to 2 minutes per side.
Equipment for This Recipe:
- Skillet — for warming and toasting.
- Small saucepan — for the beans.
- Spoon — for spreading the filling.
- Cutting board — for rolling and slicing.
How to Serve This Dish:
Serve the burritos whole or cut in half with extra salsa on the side. A handful of shredded lettuce or a few tortilla chips keeps the plate from feeling too soft.
Pro Tips for This Recipe:
- Do not overfill the tortilla. It should roll cleanly and seal.
- Let the beans cool for a minute before assembling or they will steam the tortilla.
- Toasting seam-side down first helps the burrito stay closed.
Variations on This Dish:
- Breakfast Burrito: Add scrambled eggs if you want it earlier in the day.
- Spicy Bean Version: Stir hot sauce into the beans before rolling.
- Bean and Corn Fold: Add corn for crunch and sweetness.
Common Mistakes to Avoid with This Dish:
- Using cold tortillas: They crack instead of rolling.
- Adding too much salsa: The burrito gets soggy and leaks.
- Skipping the skillet toast: The outside stays limp and the filling slips.
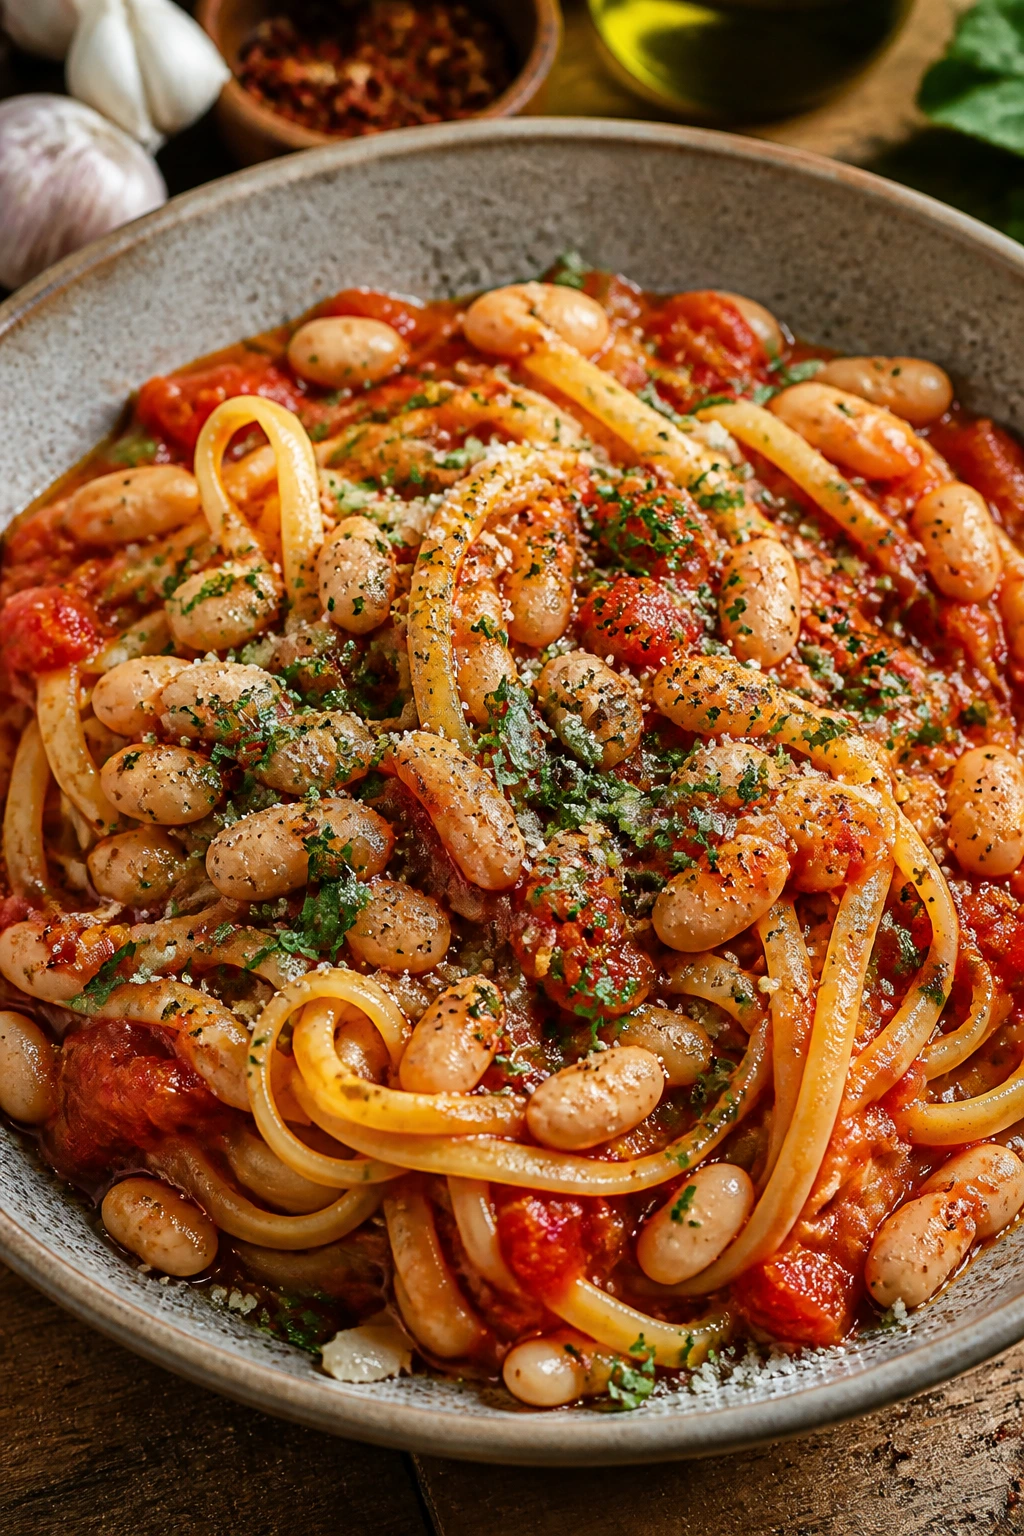
14. Pasta e Ceci
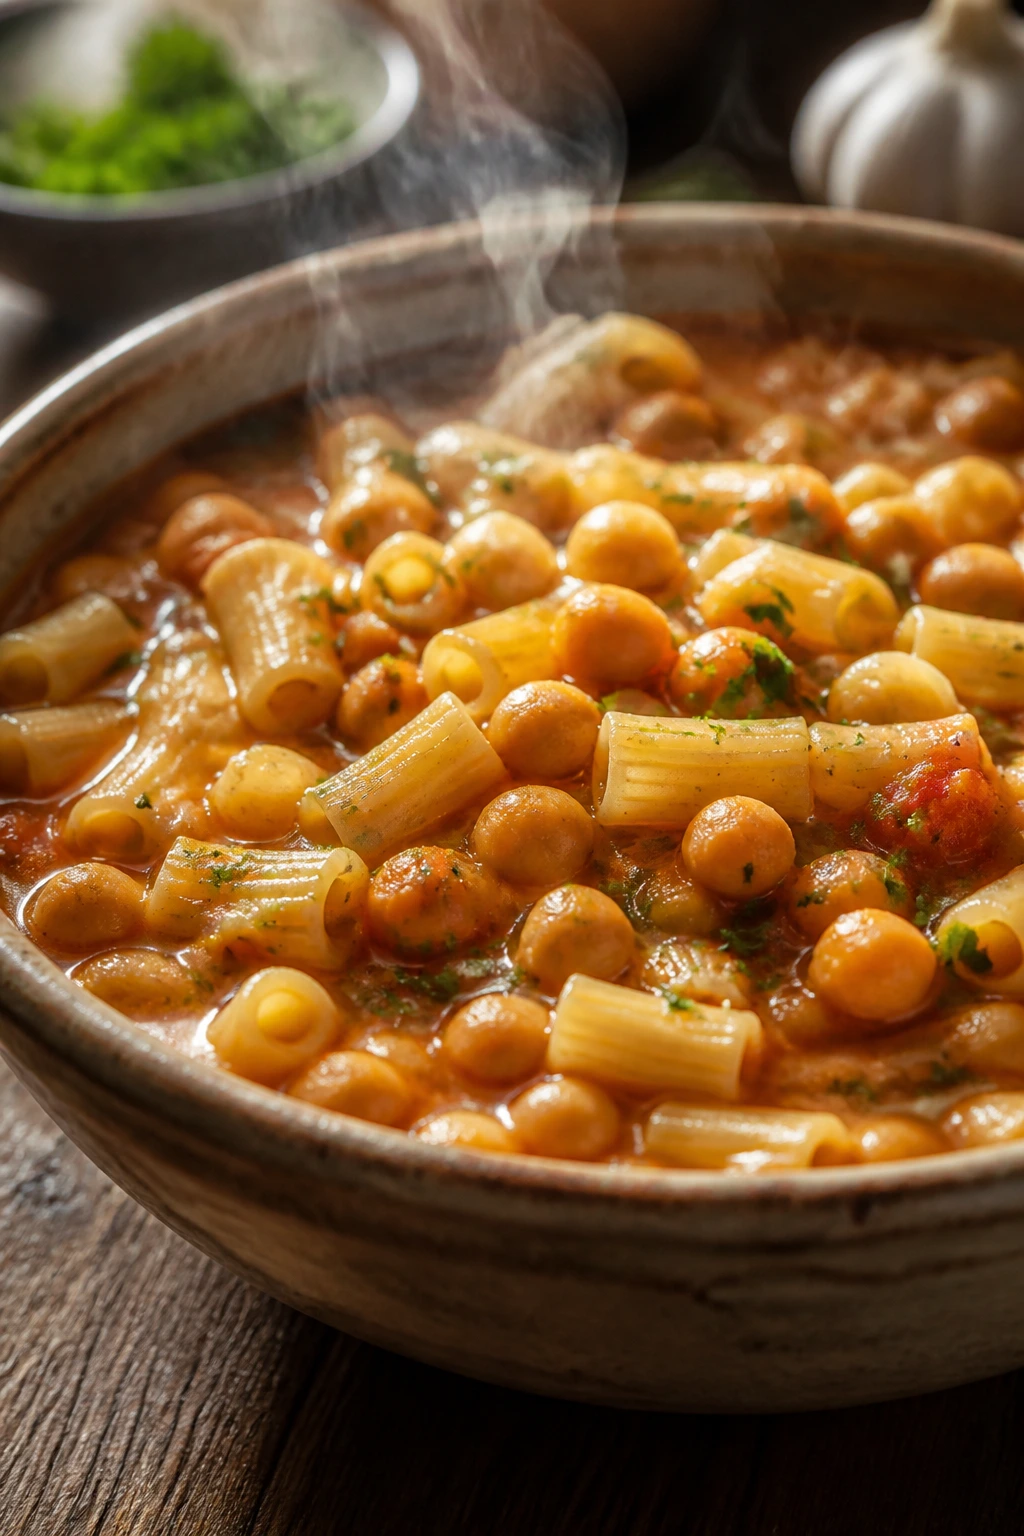
Pasta e ceci is what happens when chickpeas and small pasta decide to act like a full meal. The broth turns starchy and thick, the chickpeas stay soft, and the whole pot tastes richer than the ingredient list suggests. It is humble, but not plain.
Why It Works:
Chickpeas bring protein, pasta gives body, and a little tomato paste plus garlic builds a savory base fast. Because the pasta cooks in the pot, it thickens the broth naturally and keeps the dish from feeling thin.
Key Ingredients:
- 2 tbsp olive oil — for the garlic and tomato paste.
- 3 garlic cloves, minced — the aromatic base.
- 2 tbsp tomato paste — adds depth.
- 1 tsp rosemary, dried or chopped fresh — classic with chickpeas.
- 2 cans chickpeas, drained and rinsed — the main body.
- 4 cups broth or water — the cooking liquid.
- 8 oz small pasta, like ditalini or elbows — cooks right in the pot.
- 1/2 tsp red pepper flakes — optional heat.
Quick Steps:
- Warm the oil in a pot and cook the garlic for 30 seconds.
- Stir in the tomato paste and rosemary, then cook for 1 minute.
- Add the chickpeas and broth, bring to a simmer, and cook for 10 minutes.
- Stir in the pasta and cook until tender, usually 8 to 10 minutes.
- Season and finish with olive oil.
Equipment for This Recipe:
- Soup pot — everything happens here.
- Wooden spoon — for stirring the thickening broth.
- Ladle — for serving.
- Measuring cup — for the broth.
How to Serve This Dish:
Serve it in bowls with black pepper and a little olive oil on top. Garlic toast or a green salad with lemon gives the plate a cleaner edge.
Pro Tips for This Recipe:
- Keep extra broth nearby; the pasta will drink up liquid as it sits.
- Cook the pasta just to tender, not beyond it.
- A squeeze of lemon at the end keeps the chickpeas from tasting heavy.
Variations on This Dish:
- Tomato-Lover’s Version: Add a full can of crushed tomatoes for a redder pot.
- Lemony Finish: Lemon zest and juice sharpen the chickpeas.
- Greens in the Broth: Stir in spinach or chopped kale near the end.
Common Mistakes to Avoid with This Dish:
- Adding all the broth at once and forgetting about evaporation: The pot can go dry.
- Cooking the pasta too long: It turns mushy fast in a soup-like dish.
- Skipping the tomato paste toast: That step is where the flavor starts.
15. Ramen Egg Drop Soup
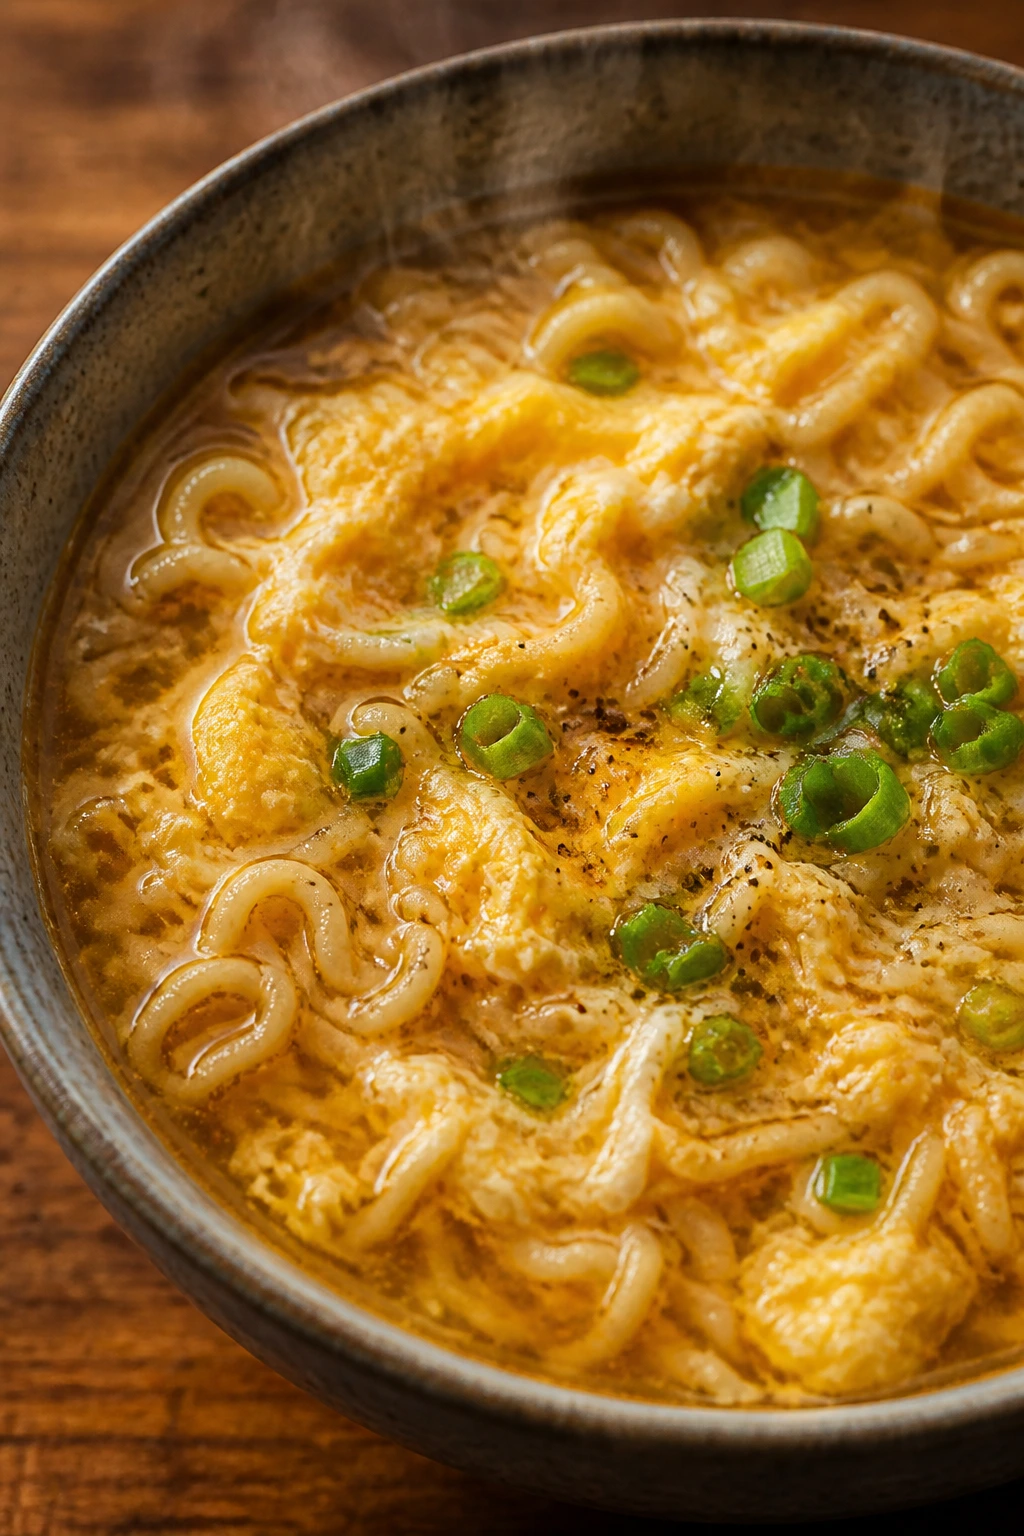
Instant ramen becomes a much better dinner when you stop treating it like emergency food and give it a proper broth. The egg turns into soft ribbons if you pour it slowly, and the sesame oil at the end makes the whole bowl smell fuller. It is fast, warm, and far less sad than the packet suggests.
Why It Works:
Ramen noodles cook in minutes, egg adds protein, and bouillon or broth turns the packet into something worth eating. The key is not overcooking the noodles so they stay springy instead of swollen.
Key Ingredients:
- 2 packs instant ramen noodles — seasoning packets optional.
- 4 cups water or broth — the soup base.
- 1 egg, beaten — for the ribbons.
- 1 to 2 tbsp soy sauce — adjust to taste.
- 1 tsp sesame oil — finish only.
- 2 scallions, sliced — if you have them.
- 1/2 cup frozen peas — optional, but helpful.
Quick Steps:
- Bring the water or broth to a simmer in a saucepan.
- Add the noodles and peas and cook for 2 minutes.
- Stir the soup in one direction and slowly drizzle in the beaten egg.
- Turn off the heat, add soy sauce and sesame oil, and top with scallions.
- Serve immediately.
Equipment for This Recipe:
- Saucepan — for the soup.
- Fork or chopsticks — for stirring the egg.
- Small bowl — for beating the egg.
- Ladle — for serving.
How to Serve This Dish:
Serve it in a deep bowl with chili oil or hot sauce on the side. A slice of toast or a boiled egg makes the bowl feel more substantial without much extra cost.
Pro Tips for This Recipe:
- Discard the seasoning packet if it tastes too salty; soy sauce gives you more control.
- Keep the soup at a gentle simmer so the egg sets in soft threads.
- Add sesame oil after turning off the heat or the flavor fades.
Variations on This Dish:
- Miso Shortcut: Stir in a spoon of miso if you keep it around.
- Garlic Ramen: Add minced garlic to the broth for more bite.
- Soft Veg Version: Toss in frozen corn or spinach.
Common Mistakes to Avoid with This Dish:
- Boiling the noodles too long: They go mushy almost instantly.
- Adding the egg too fast: It turns into clumps instead of ribbons.
- Using too much soy sauce early: Taste first; ramen packets and broth can already be salty.
16. Cornbread and Beans Skillet Bake
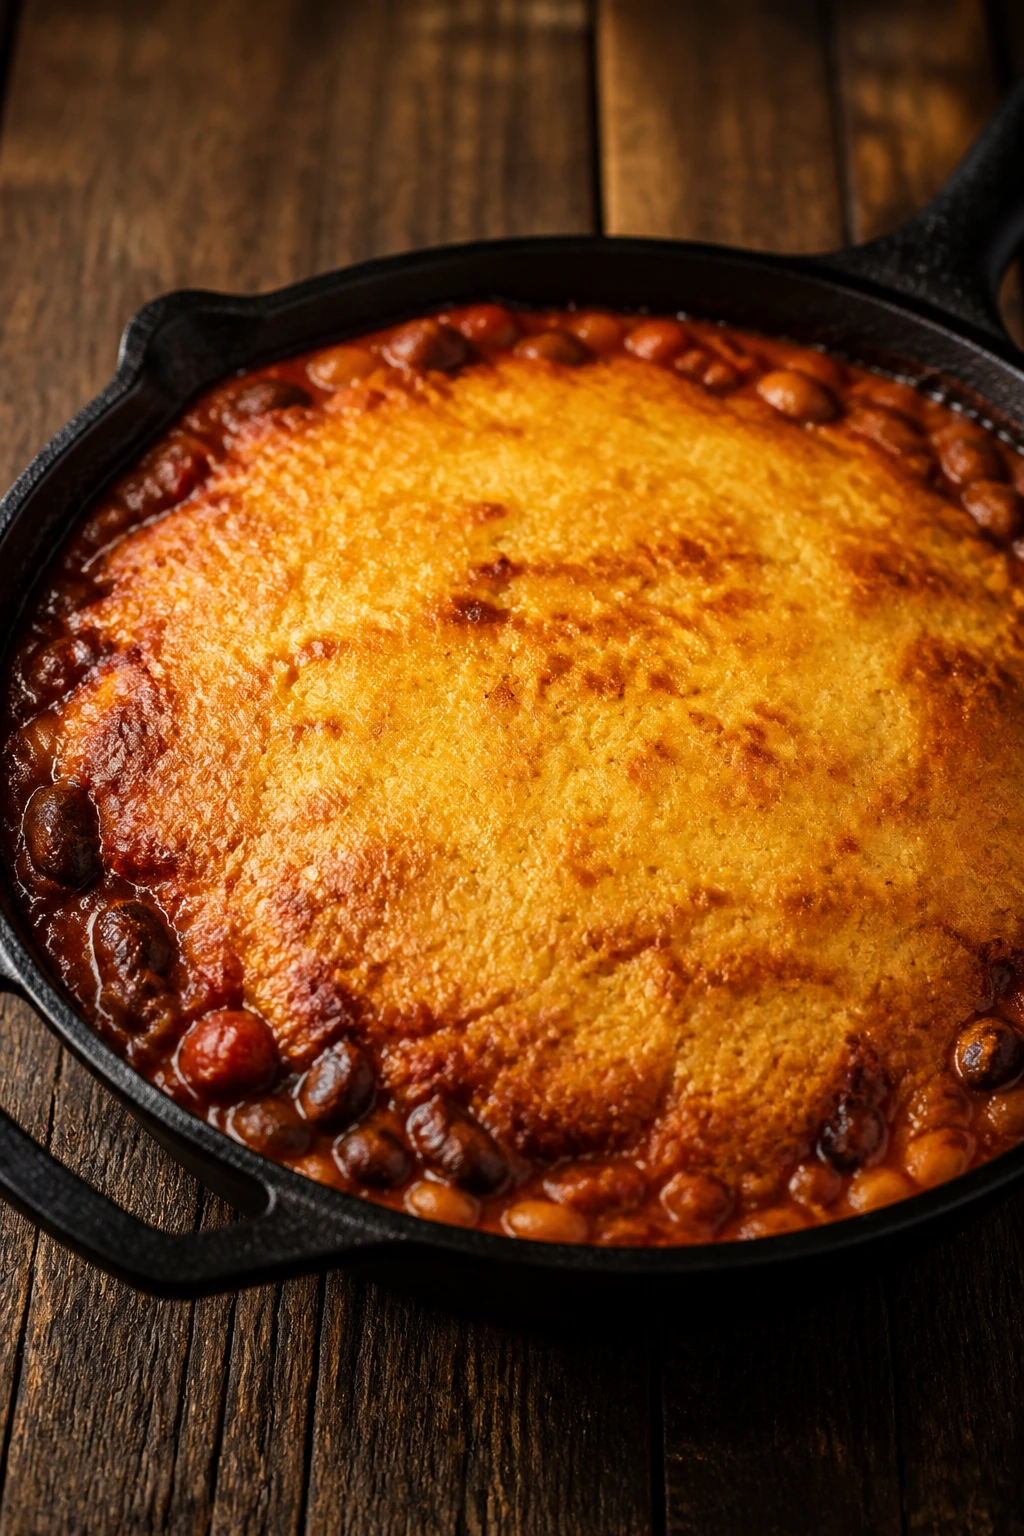
This is a pantry casserole with a crunchy top and a saucy bottom, which is a better combination than it sounds on paper. The beans get seasoned under the batter, and the cornbread rises over the filling with browned edges around the skillet. It is the kind of meal that disappears fast from the center and leaves everyone fighting over the crust.
Why It Works:
Beans and salsa make a quick filling, while cornbread mix creates a baked top that feels more complete than plain beans ever could. It is cheap, oven-friendly, and good for feeding more people without stretching the shopping list.
Key Ingredients:
- 1 tbsp oil — for the onion.
- 1 small onion, diced — the savory base.
- 2 cans pinto beans, drained and rinsed — the filling.
- 1 cup salsa — adds moisture and seasoning.
- 1 cup frozen or canned corn — optional, but nice.
- 1 box cornbread mix — for the topping.
- 1 egg — for the cornbread batter.
- 2/3 cup milk — to mix the batter.
- 1 cup shredded cheese — if you want a richer top.
Quick Steps:
- Preheat the oven to 400°F (205°C).
- Cook the onion in oil for 4 minutes, then stir in the beans, salsa, and corn.
- Pour the filling into a greased skillet or baking dish.
- Mix the cornbread batter with the egg and milk, then spoon it over the beans.
- Bake for 20 to 25 minutes until the top is golden and springs back when touched.
Equipment for This Recipe:
- Oven-safe skillet or baking dish — for the casserole.
- Mixing bowl — for the batter.
- Spoon — for layering.
- Oven mitts — the skillet gets hot.
How to Serve This Dish:
Scoop it into bowls and add extra salsa or chopped onion on top. A crisp salad or a spoon of sour cream keeps the meal from feeling too dense.
Pro Tips for This Recipe:
- Keep the bean layer saucy so the cornbread does not dry out.
- Let the casserole rest for 5 minutes before cutting.
- If the top browns too quickly, cover it loosely with foil.
Variations on This Dish:
- Jalapeño Top: Stir chopped jalapeños into the batter.
- Cheesy Corn Layer: Add extra cheese between the beans and batter.
- Black Bean Version: Swap pinto beans for black beans and add cumin.
Common Mistakes to Avoid with This Dish:
- Dry filling: The cornbread steals moisture, so the bean layer needs salsa or broth.
- Overmixing cornbread batter: That makes the top tough.
- Cutting too soon: The layers need a few minutes to settle.
17. Sardine Tomato Pasta

Sardines are the pantry ingredient people argue about and then quietly admit works. Once they melt into garlic, tomato, and capers, the fishy edge softens and the sauce tastes deeper, brinier, and more expensive than the can suggests. If you like bold food, this pasta has character.
Why It Works:
Sardines are rich, packed with flavor, and already cooked, so they need only a brief warm-through. Tomato and garlic keep the fish from dominating, while capers or chili flakes give the sauce enough bite to feel balanced.
Key Ingredients:
- 8 oz spaghetti or linguine — long noodles work well.
- 2 tins sardines in oil — drain only a little.
- 2 tbsp olive oil — if the sardines need more fat.
- 3 garlic cloves, sliced — keeps the sauce savory.
- 1 can crushed tomatoes — or 2 tbsp tomato paste plus water.
- 1 tbsp capers — optional, but very useful.
- 1/2 tsp red pepper flakes — for heat.
- Parsley or lemon juice — for the finish.
Quick Steps:
- Cook the pasta in salted water and save 1/2 cup of the water.
- Warm the oil in a skillet and cook the garlic for 30 seconds.
- Add the tomatoes, capers, and red pepper flakes. Simmer for 8 minutes.
- Gently break in the sardines and warm for 1 minute.
- Toss with pasta and a little pasta water, then finish with lemon.
Equipment for This Recipe:
- Saucepan — for the pasta.
- Skillet — for the sauce.
- Fork — for breaking the sardines gently.
- Colander — for draining.
How to Serve This Dish:
Serve it with lemon zest, parsley, and black pepper. A salad of bitter greens or a few olives on the side works better than you’d think.
Pro Tips for This Recipe:
- Do not mash the sardines into paste; leave some pieces intact.
- Capers or olives help balance the richness.
- Lemon at the end is non-negotiable if you want the sauce to stay bright.
Variations on This Dish:
- Anchovy-Lite Version: Add anchovy instead of sardines if you want a more subtle fish flavor.
- Bread Crumb Finish: Toast breadcrumbs in oil and scatter them over the top.
- Garlic-Chili Version: Use extra chili flakes and a little more garlic.
Common Mistakes to Avoid with This Dish:
- Cooking the fish too long: It dries out and gets assertive.
- Skipping acid: Lemon or tomato brightness keeps the sauce from feeling heavy.
- Using bland pasta water: Salt the water well so the sauce has help.
18. Potato Onion Hash With Eggs

A good hash is all about the edges. The potatoes should go golden and crisp, the onions should soften into sweetness, and the eggs need to land right on top so the yolks can run into the whole mess. This is cheap, filling, and sturdy enough to work for breakfast or dinner.
Why It Works:
Potatoes are inexpensive and filling, onions add sweetness, and eggs make the skillet feel complete. The only real trick is getting enough browning before the eggs go in.
Key Ingredients:
- 1 1/2 lb potatoes, diced small — russets or Yukon Golds both work.
- 1 medium onion, sliced — sweetens as it cooks.
- 3 tbsp oil — enough for crisping.
- 1/2 tsp paprika — adds color.
- 4 large eggs — the topper.
- Salt and pepper — to taste.
- Hot sauce — for serving.
Quick Steps:
- Parboil the diced potatoes for 5 minutes, then drain well.
- Heat the oil in a large skillet and cook the potatoes for 8 to 10 minutes until they start crisping.
- Add the onion and paprika, then cook for 5 minutes more until the onion softens.
- Make 4 wells and crack in the eggs. Cover and cook until the whites set and the yolks are still soft, about 4 to 5 minutes.
- Season and serve hot.
Equipment for This Recipe:
- Large skillet — preferably cast iron.
- Pot or saucepan — for parboiling.
- Slotted spoon — for draining the potatoes.
- Spatula — for turning the hash.
How to Serve This Dish:
Serve the hash straight from the pan with hot sauce or ketchup. Toast, sliced tomatoes, or a simple cabbage salad round it out without adding much cost.
Pro Tips for This Recipe:
- Dry the potatoes well after boiling so they crisp instead of steaming.
- Do not crowd the skillet; the potatoes need room.
- Cover the pan for the eggs, not the potatoes.
Variations on This Dish:
- Smoky Hash: Add smoked paprika or chopped smoked sausage if you have it.
- Pepper Hash: Toss in chopped bell pepper for sweetness.
- Cheese Melt: Sprinkle shredded cheese over the eggs during the last minute.
Common Mistakes to Avoid with This Dish:
- Skipping the parboil on large potatoes: They brown outside before the centers soften.
- Stirring too often: You need some stillness for the crisp edges.
- Adding the eggs too early: The hash needs to be mostly done first.
19. Tomato Rice Soup
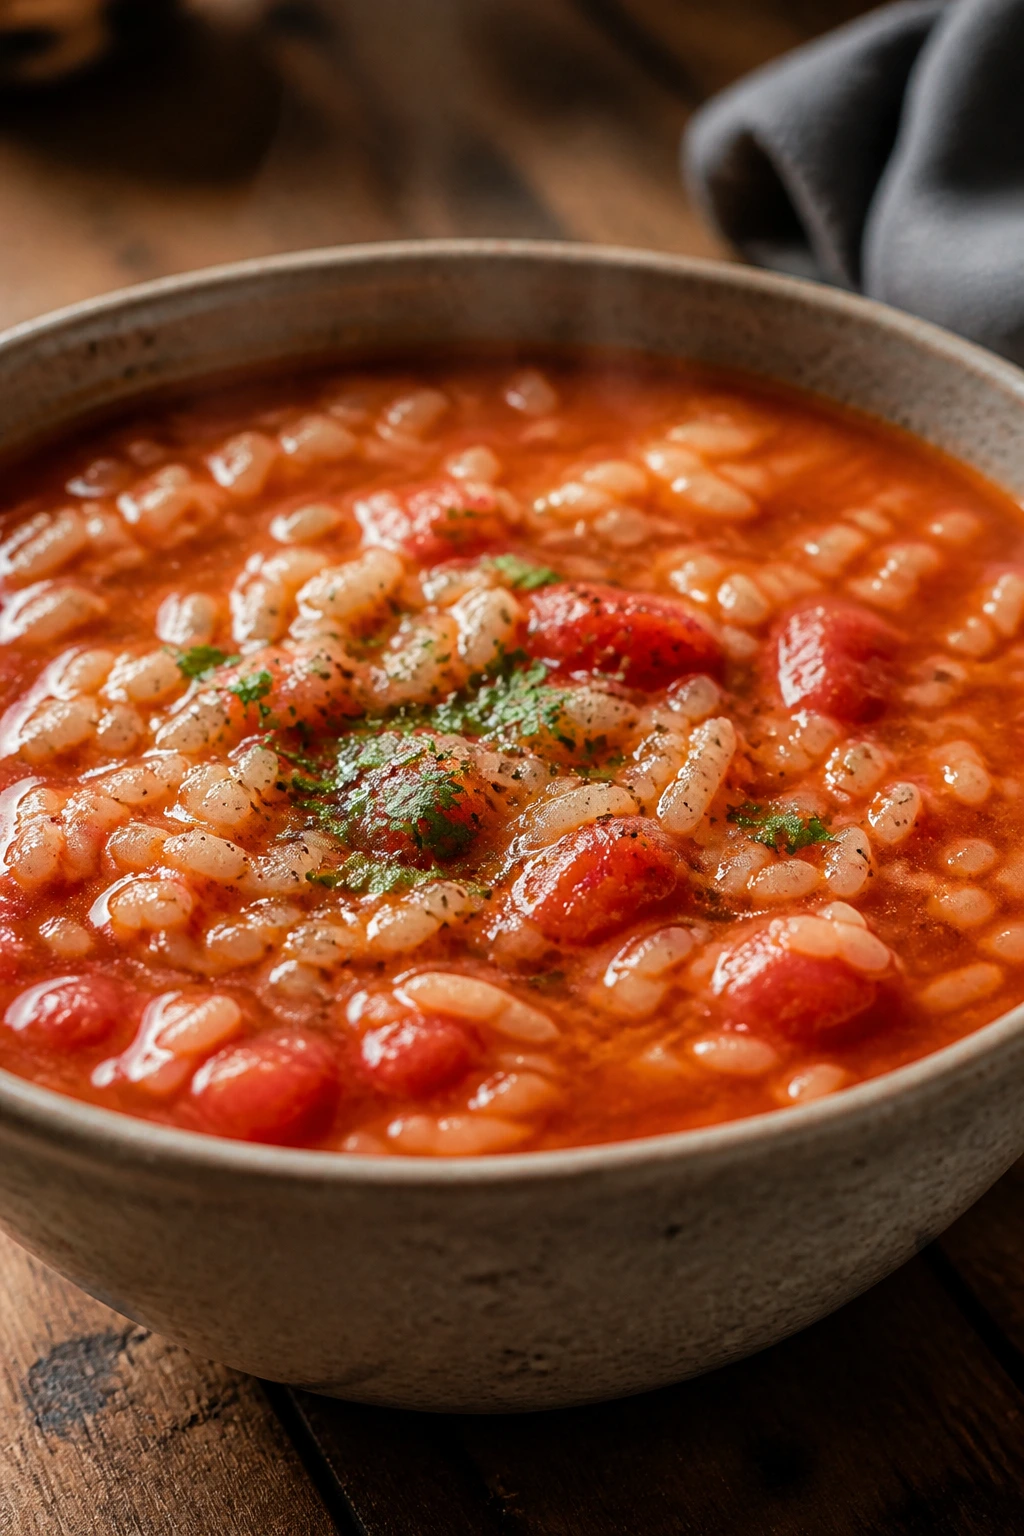
Tomato rice soup is plain in the best way: warm broth, soft rice, and tomato depth that lands between soup and porridge. The rice keeps swelling as it sits, so the texture thickens without effort. It is the kind of meal that feels like it was always supposed to exist in the pantry.
Why It Works:
Rice and tomatoes make a simple soup that gets body from starch rather than cream. A little butter and parmesan make it taste rounder, while the broth keeps the whole thing light enough to sip.
Key Ingredients:
- 1 tbsp butter — for the onion and tomato paste.
- 1 small onion, diced — starts the soup.
- 1 tbsp tomato paste — gives body and color.
- 1 can crushed tomatoes — the tomato base.
- 4 cups broth — the liquid.
- 3/4 cup uncooked rice — long-grain or medium-grain.
- 1 garlic clove, minced — optional, but helpful.
- Parmesan for serving — if you want a salty finish.
Quick Steps:
- Melt the butter in a pot and cook the onion for 5 minutes.
- Stir in the tomato paste and garlic for 1 minute.
- Add the tomatoes, broth, and rice. Bring to a boil, then reduce to a simmer.
- Cook for 18 to 20 minutes until the rice is tender.
- Taste and serve with parmesan.
Equipment for This Recipe:
- Soup pot — for simmering.
- Wooden spoon — for stirring.
- Ladle — for serving.
- Cheese grater — if you want fresh parmesan.
How to Serve This Dish:
Serve it with grilled cheese, toast, or a handful of crackers. A sprinkle of black pepper and parmesan on top gives the bowl some lift.
Pro Tips for This Recipe:
- Stir now and then so the rice does not catch on the bottom.
- Add more broth if the soup thickens too much while sitting.
- A spoon of basil pesto on top changes the whole mood of the bowl.
Variations on This Dish:
- Garlic Tomato Soup: Add extra garlic and a little more butter.
- Herby Version: Stir in oregano or basil near the end.
- Creamier Bowl: Add a splash of milk or evaporated milk.
Common Mistakes to Avoid with This Dish:
- Cooking the rice too long: It keeps softening after heat is off.
- Not watching the bottom of the pot: Tomato-and-rice soups like to stick.
- Serving it too soon after adding broth: Give the rice time to swell and thicken the soup.
20. Pantry Enchilada Skillet
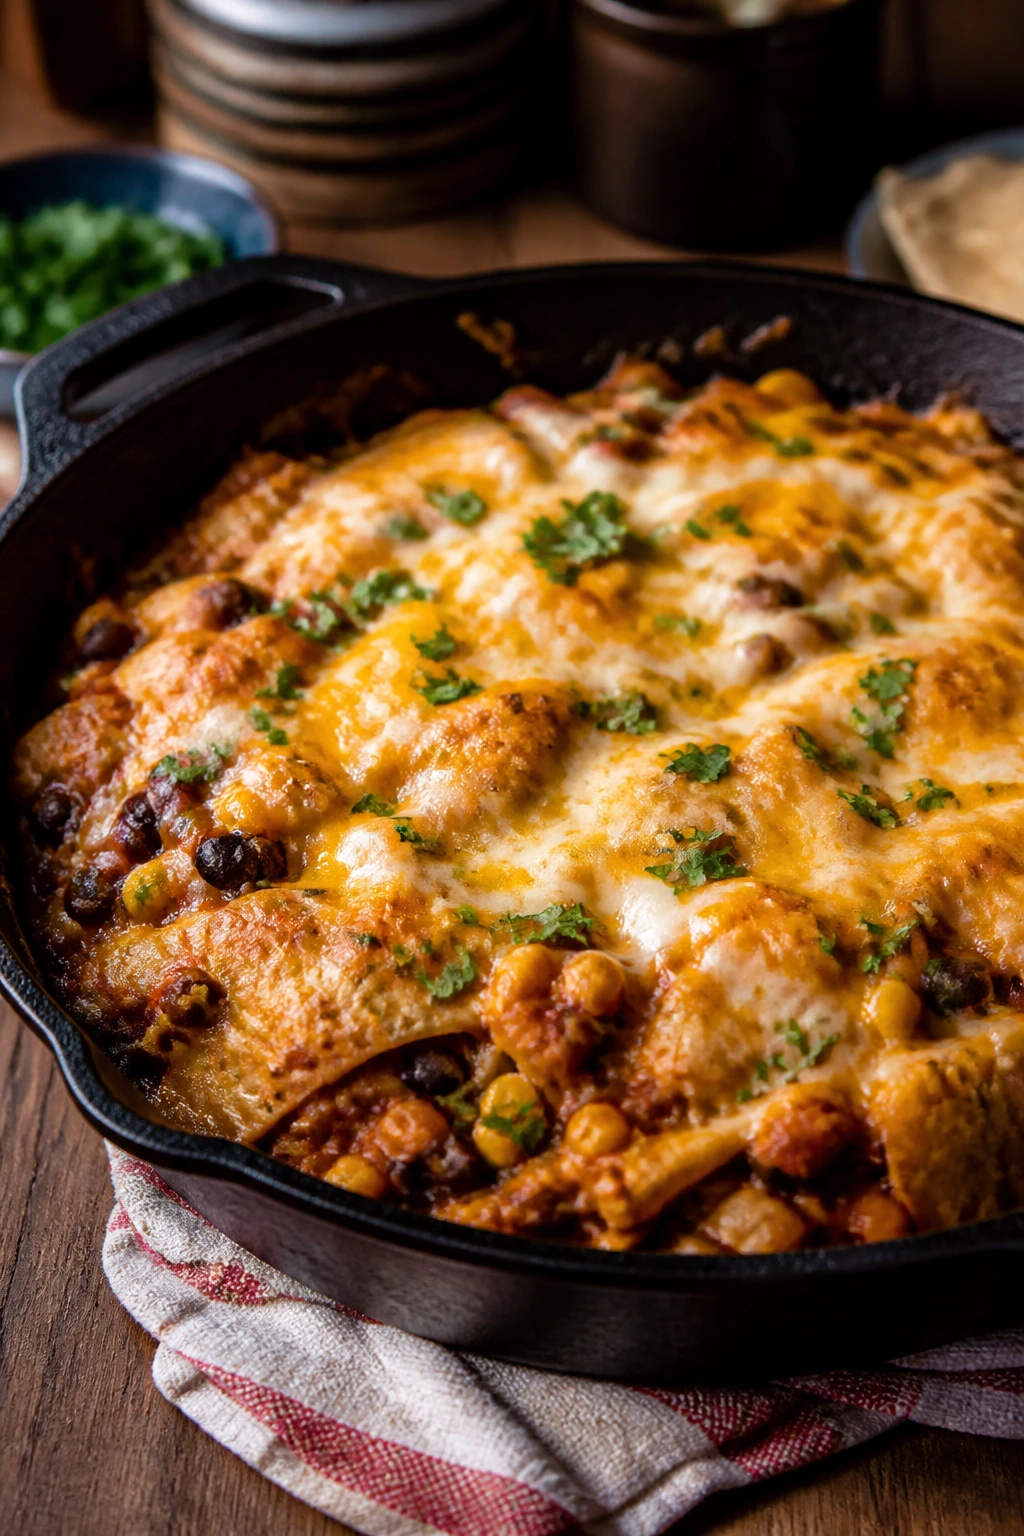
This is the kind of skillet dinner that uses tortillas twice: once inside the layers and again when the cheese melts over the top. The sauce, beans, and corn make a filling that tastes like more than the sum of its parts, and the oven gives the edges a little chew. It is a smart way to feed people without buying much.
Why It Works:
Canned enchilada sauce does the flavor work, beans bring protein, and tortillas help the whole thing become a real meal instead of a bowl. It is cheap because the ingredients repeat on purpose, not by accident.
Key Ingredients:
- 1 tbsp oil — for the onion.
- 1 small onion, diced — adds sweetness.
- 2 cans pinto or black beans, drained and rinsed — the filling.
- 1 cup corn — canned or frozen.
- 1 can enchilada sauce — the flavor base.
- 6 corn tortillas, cut into strips — for layering.
- 1 cup shredded cheese — for the top.
- 1 tsp cumin — optional, but helpful.
Quick Steps:
- Preheat the oven to 400°F (205°C).
- Cook the onion in oil for 4 minutes, then stir in the beans, corn, cumin, and half the enchilada sauce.
- Layer tortilla strips, bean mixture, and more sauce in a skillet or baking dish.
- Top with cheese and bake for 15 to 18 minutes until hot and bubbling.
- Rest for 5 minutes before serving.
Equipment for This Recipe:
- Oven-safe skillet or baking dish — for the layers.
- Knife and cutting board — for the tortillas.
- Spoon — for layering.
- Oven mitts — the dish gets hot fast.
How to Serve This Dish:
Spoon it onto plates with more salsa or sour cream if you have it. A crisp lettuce salad or some sliced avocado makes the skillet feel more like dinner and less like a casserole accident.
Pro Tips for This Recipe:
- Let the beans stay saucy; dry filling makes the bake dense.
- Cut the tortillas into strips so they layer evenly.
- Rest the skillet before cutting so the layers hold together.
Variations on This Dish:
- Red Bean Version: Use kidney beans and a little extra cumin.
- Green Chile Bake: Swap some of the red sauce for green enchilada sauce.
- Chicken Add-In: Stir in leftover chicken if you want a meatier skillet.
Common Mistakes to Avoid with This Dish:
- Using too little sauce: The tortillas need moisture to soften properly.
- Skipping the rest time: The layers need a few minutes to set.
- Overloading the cheese: Too much can make the top greasy instead of melty.
21. Loaded Baked Beans on Toast
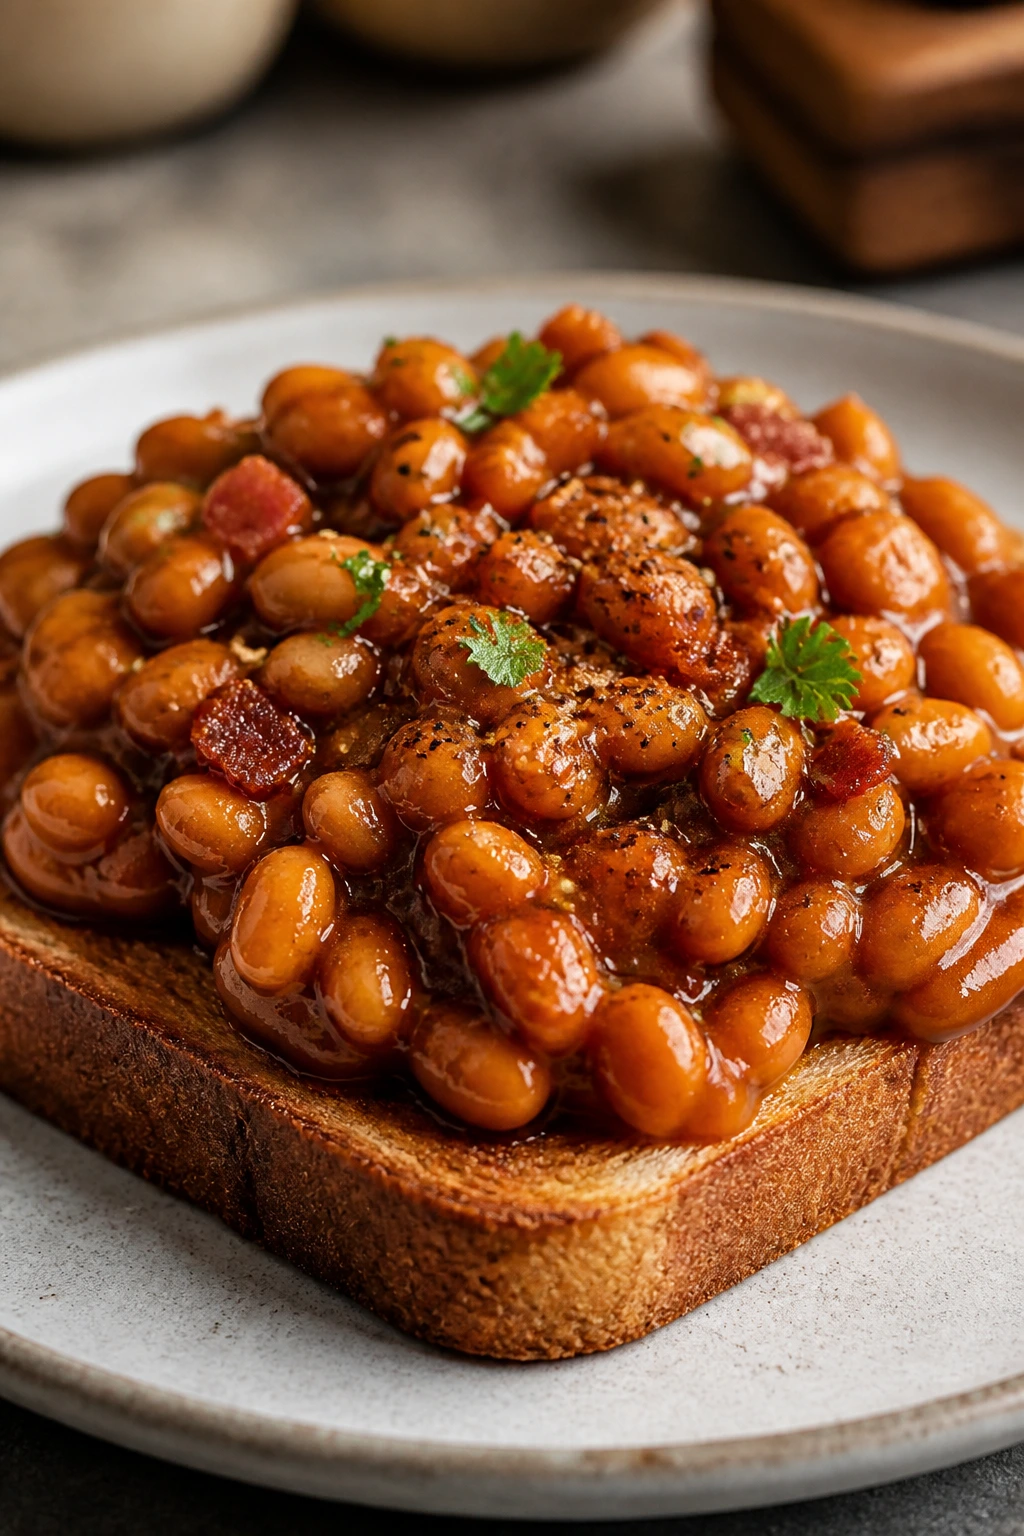
Baked beans on toast sound too plain until you warm the beans with onion, mustard, and Worcestershire. Then the sauce turns deep and savory, and the toast catches the drips at the bottom of the plate. It is cheap, fast, and a little more grown-up than it first appears.
Why It Works:
Canned baked beans already come with a sweet-savory base, so a few sharp add-ins turn them into a better meal. Toast adds crunch, which keeps the soft beans from feeling one-note.
Key Ingredients:
- 2 cans baked beans — the main filling.
- 1 small onion, finely diced — adds bite.
- 1 tbsp mustard — sharpens the sauce.
- 1 tsp Worcestershire sauce — deepens the flavor.
- 4 slices thick bread, toasted — for serving.
- Black pepper — to finish.
Quick Steps:
- Cook the onion in a small pan for 3 minutes until softened.
- Add the baked beans, mustard, and Worcestershire sauce.
- Simmer for 5 to 7 minutes until the sauce thickens a little.
- Spoon over hot toast and finish with black pepper.
Equipment for This Recipe:
- Small saucepan — for the beans.
- Toaster or skillet — for the bread.
- Spoon — for serving.
- Knife — if you want the toast cut into triangles.
How to Serve This Dish:
Serve it open-faced with a little butter under the beans if you want extra richness. Pickles, sliced tomatoes, or a fried egg make it feel less like a snack and more like a meal.
Pro Tips for This Recipe:
- Keep the beans just below a boil so they do not break down too far.
- A little butter on the toast helps it stand up to the sauce.
- Add hot sauce at the end if you want more bite.
Variations on This Dish:
- Cheddar Toast: Melt cheese under the beans.
- Spicy Bean Toast: Stir in chili flakes or hot sauce.
- Egg Topping: Add a fried egg for more protein.
Common Mistakes to Avoid with This Dish:
- Serving the beans straight from the can: They taste flat until you warm and season them.
- Using flimsy bread: It gets soggy fast. Choose thick slices.
- Overcooking the sauce: You want thick, not dry.
22. Lentil Sloppy Joes

Lentils make a better sloppy joe than people expect because they hold shape while soaking up the sweet-tangy sauce. The filling should be thick enough to stay on the bun, with just enough juice to make the sandwich messy in the right way. This is one of the smartest budget dinners on the list.
Why It Works:
Lentils are cheap, cook quickly, and mimic the texture of a ground filling once they simmer in ketchup and tomato paste. The vinegar and mustard stop the sandwich from tasting like sweet tomato paste on bread, which is the trap with cheap versions of this dish.
Key Ingredients:
- 1 tbsp oil — for the onion.
- 1 small onion, diced — builds flavor.
- 2 garlic cloves, minced — optional but useful.
- 1 cup brown lentils, rinsed — the filling.
- 2 cups water or broth — for cooking the lentils.
- 1/2 cup ketchup — the sweet base.
- 2 tbsp tomato paste — deepens the sauce.
- 1 tbsp apple cider vinegar — brings the tang.
- 1 tbsp mustard — sharpens the flavor.
- 4 burger buns — for serving.
Quick Steps:
- Cook the onion in oil for 4 to 5 minutes, then add the garlic.
- Stir in the lentils, water or broth, and bring to a simmer.
- Cook for 20 minutes until the lentils are tender and most of the liquid is gone.
- Stir in ketchup, tomato paste, vinegar, and mustard. Simmer for 5 minutes until thick.
- Spoon onto buns and serve hot.
Equipment for This Recipe:
- Medium saucepan or skillet — for the filling.
- Wooden spoon — for stirring.
- Colander — for rinsing lentils.
- Spoon — for loading the buns.
How to Serve This Dish:
Serve the lentils on toasted buns with pickles or sliced onion on top. A pile of slaw or potato chips on the side gives the plate a sharper edge and keeps the sandwich from being too soft.
Pro Tips for This Recipe:
- Let the lentils cook down until almost dry before adding the sauce.
- Taste before serving; a pinch of salt often makes the whole filling pop.
- Toast the buns so they hold up to the sauce.
Variations on This Dish:
- Smoky Joe: Add smoked paprika or a little chipotle.
- BBQ Swap: Replace part of the ketchup with barbecue sauce.
- Mushroom Version: Add chopped mushrooms with the onion for a fuller texture.
Common Mistakes to Avoid with This Dish:
- Leaving too much liquid in the pan: The sandwich will slide apart.
- Making it too sweet: Vinegar and mustard keep the balance right.
- Using soft buns with no toast: They collapse under the filling.
Why Pantry Staples Deserve a Better Reputation
A lot of people picture pantry food as a fallback meal, the thing you make when the fridge is empty and patience is thin. That misses the point. A pantry gives you structure, and structure is what most quick dinners need: one starch, one protein, one sauce, one sharp finish.
The recipes above prove the same cheap ingredients can land in very different places. Beans become chili, soup, burrito filling, curry, and a baked skillet. Rice turns into fried rice, bowls, and soup. Pasta jumps from tomato sauce to sardine sauce to peanut noodles without feeling repetitive, because the seasonings and textures keep changing.
That is why pantry cooking works in real life. It is not about punishment or scraping by. It is about keeping a few reliable things around so dinner can happen with less friction and less spending.
Essential Equipment for These Recipes

- Large skillet, 10 to 12 inches — useful for pasta sauces, fried rice, hash, and quesadillas.
- Soup pot or Dutch oven — best for chili, stews, soups, and bean-based simmered dishes.
- Medium saucepan — handy for rice, noodles, and quick sauces.
- Oven-safe baking dish or skillet — needed for the cornbread bake and enchilada skillet.
- Can opener — the unsung hero of budget cooking.
- Colander or fine-mesh strainer — for rinsing beans, draining pasta, and washing lentils.
- Wooden spoon and spatula — good for mashing beans, stirring sauces, and flipping patties.
- Whisk or fork — needed for quick sauces and eggs.
- Measuring cups and spoons — pantry food still needs proper seasoning.
- Chef’s knife and cutting board — onions, garlic, and herbs go faster with the right tools.
- Immersion blender — optional, but useful for soups that need a little body.
- Airtight containers — make leftovers easier to store and reheat.
Smart Shopping and Ingredient Tips for Pantry Staples
Buy the ingredients that can change jobs. A can of crushed tomatoes can become pasta sauce, soup, chili, or curry base. A can of chickpeas can slide into stew, pasta e ceci, curry, or a mash for sandwiches. That kind of flexibility matters more than a flashy ingredient you only use once.
Choose low-sodium beans and broth when you can, because pantry cooking gets salty fast once soy sauce, cheese, mustard, or canned fish enters the picture. If the store only has regular beans, that is fine too — just rinse them well and salt at the end. For tomatoes, keep at least two kinds around: crushed for smooth sauces and diced for chunky soups.
Dry goods deserve the same attention. Long-grain rice is the right pick for fried rice and bowls because it stays separate. Small pasta shapes like ditalini, elbows, or shells are better than spaghetti for soups, because they catch more broth in each spoonful. Egg noodles work well when you want something soft and fast, while spaghetti stretches farther when the fridge feels bare.
A few condiments are worth their shelf space. Soy sauce, mustard, vinegar, hot sauce, tomato paste, and bouillon are the quiet engine of cheap cooking. They do not cost much, but they make beans taste seasoned, soup taste round, and noodles taste deliberate. I also keep a tin of sardines and a can of tuna around because they turn pasta or toast into a full meal without asking for much.
One more thing: dried lentils are a bargain because they cook quickly and do not need soaking. If you want the highest return for the least money, lentils, rice, pasta, and canned tomatoes are hard to beat.
How to Serve These Cheap Pantry Dinners

Presentation:
Serve pasta in shallow bowls so the sauce pools just a little, and spoon soups and stews into deeper bowls so the steam stays in. Beans and rice look better when you add one bright finishing touch — scallions, parsley, hot sauce, or a squeeze of lime. Even a pantry dinner benefits from one green or red accent.
Accompaniments:
Toast, tortillas, crackers, slaw, and simple salads all fit this set of meals. Garlic bread works with the tomato dishes, while cabbage or cucumber slaw gives fried or cheesy plates some crunch. If you have pickles, use them. They wake up almost everything here.
Portions:
Most of these recipes feed 2 to 4 people. For bigger appetites, add bread, rice, or tortillas before you start doubling the protein — that keeps the cost down and the plate balanced. Soups and stews stretch especially well, while burritos and quesadillas can be cut in half for lighter portions.
Beverage Pairing:
Sparkling water with lime is an easy match across the board. I also like iced tea with bean dishes and a light beer with chili or enchiladas. For tomato-heavy meals, a cold glass of water with lemon does the job just fine.
Pantry Upgrades That Cost Very Little
Flavor Enhancement:
A spoonful of tomato paste cooked in oil for 30 to 60 seconds changes cheap tomato dishes fast. The same goes for blooming curry powder or chili powder in hot fat before the liquid goes in. That one move makes the spices smell fuller and stops them from tasting dusty.
Customization:
Frozen spinach, corn, carrots, and peas slide into these meals easily. If you have leftover chicken, a few strips can go into soups, rice, or burritos, but the recipes do not need it to work. Beans can also swap places — black beans, pinto beans, chickpeas, and cannellini all bring a different texture.
Serving Suggestions:
Crispy breadcrumbs, crushed crackers, scallions, chopped herbs, lemon zest, and hot sauce make soft food feel finished. A fried egg on top of rice, chili, or hash adds richness without wrecking the budget. The right garnish is not decoration here; it is texture.
Make-It-Yours:
Go gluten-free with rice, corn tortillas, or gluten-free pasta. Go dairy-free by leaning on olive oil, coconut milk, and extra herbs instead of cheese. Go vegetarian or vegan by pushing beans, lentils, chickpeas, and eggs to the front and keeping the sauces bold enough to carry the plate.
Make-Ahead, Storage, and Reheating Guidance
Most of these meals keep 3 to 4 days in the refrigerator in airtight containers. Soups, chili, lentil stew, and bean-heavy sauces usually hold best for 4 to 5 days, while pasta dishes and rice bowls are happiest closer to the front of that window. Casseroles and skillet bakes stay in good shape for about 3 to 4 days.
Freezing depends on the dish. Chili, lentil stew, tomato soup, curry, and bean sauces freeze well for up to 3 months. Rice dishes and baked casseroles usually keep best for 1 to 2 months. Fried rice, egg-heavy skillets, and quesadillas are better fresh or refrigerated, because the texture gets soft after freezing.
Reheat soups and stews on the stovetop over medium-low heat with a splash of water or broth. Pasta and bean dishes reheat well in a skillet with a spoonful of water so the sauce loosens again. Microwave leftovers in covered containers in short bursts, stirring between each one. For casseroles, use a 350°F (175°C) oven until the center is hot and the edges start to bubble.
Cooked rice deserves one careful note. Cool it quickly, spread it in a shallow container if you can, and get it into the fridge promptly. Food safety guidance is blunt here for a reason, and rice is one of the few pantry foods that really benefits from a little extra discipline.
Keep crunchy toppings separate until serving. Toast, breadcrumbs, chips, and tortillas all lose their edge if they sit in the container overnight.
Variations and Adaptations to Try
-
Smoky Shelf-Stable Version: Add smoked paprika, chipotle in adobo, or fire-roasted tomatoes to chili, rice bowls, or bean skillets. The smoke gives cheap food a deeper finish without adding much cost.
-
Gluten-Free Pantry Swap: Use rice, corn tortillas, polenta, or gluten-free pasta in place of wheat noodles and bread. Most of the recipes already lean that way, so the swap is usually straightforward.
-
Lower-Sodium Route: Buy no-salt-added beans and tomatoes when possible, rinse canned beans, and season at the end. Vinegar, citrus, herbs, and garlic carry more flavor than extra salt anyway.
-
Creamier Comfort Version: Stir in evaporated milk, coconut milk, or a little cream cheese where it fits. Soup, curry, tomato rice, and tuna noodles all benefit from one creamy element if you want a softer bowl.
-
Higher-Protein Budget Boost: Add eggs, extra beans, canned salmon, tuna, or lentils instead of reaching for pricier meat. The meals stay cheap, but the plate gets more substantial.
-
Kid-Friendly Mild Mode: Pull back on chili flakes, hot sauce, and sharp mustard, then lean on cheese, butter, and tomato. The food still tastes complete, just less loud.
Common Mistakes to Avoid

Underseasoning the base ingredients:
Beans, rice, pasta, and lentils need salt at different stages, not only at the end. If the onion, garlic, and spice base tastes flat, the finished dish will too.
Making everything too wet:
Cheap pantry meals go sideways when the sauce turns into soup by accident. Simmer uncovered when needed and remember that pasta, rice, and beans keep absorbing liquid after the heat comes off.
Skipping acid and texture:
Tomato, vinegar, lemon, pickles, or hot sauce stop the food from tasting muddy. Crunch from toast, breadcrumbs, chips, or browned edges matters too, especially in soft dishes like soup and beans.
Using the wrong pan for the job:
A crowded skillet steams rice and potatoes instead of frying them. A small pot can boil over on chili or soup. Size matters more than people think.
Overcooking the starch:
Rice gets mushy, pasta goes soft, and lentils turn chalky if you leave them alone too long. Check early, then stop while there is still a little bite.
Treating canned ingredients like they are already finished:
A can of beans is cooked, yes. It is not seasoned to your taste, and it still wants onions, spice, acid, and a little fat before it earns a place on the plate.
Questions People Actually Ask
What pantry staples should I stock first?
Start with rice, pasta, canned tomatoes, canned beans, lentils, tuna or sardines, broth or bouillon, oil, soy sauce, mustard, and vinegar. That set can turn into soups, bowls, pasta, chili, curry, and sandwiches without much else.
Do I have to rinse canned beans?
Not always. Rinsing helps when you want a cleaner flavor, especially for bowls, soups, and burritos, but you can keep some can liquid when you want a thicker, creamier pot. Taste the dish before deciding.
Can I make these meals without fresh vegetables?
Yes, though onion and garlic help a lot if you keep them around. Frozen peas, frozen corn, canned tomatoes, and dried herbs cover a surprising amount of ground.
How do I keep rice from getting mushy?
Use cold rice for fried rice, keep soups and rice bowls from boiling hard for too long, and do not flood the pan with liquid. Rice keeps absorbing moisture after cooking, so stop a little earlier than you think.
Which recipes freeze best?
Chili, lentil stew, tomato soup, curry, and bean sauces are the easiest winners. Egg dishes, fried rice, and quesadillas are much better fresh or just refrigerated.
Can I use dried beans instead of canned?
Yes, but dried beans need soaking and a longer cook, so they are more of a planning ingredient than a quick one. If you already cook beans in batches, they are a smart money-saver.
How do I make a pantry meal taste less flat?
Use salt in layers, then finish with vinegar, lemon, hot sauce, mustard, or pickles. A little browning on onions or tomato paste also adds a lot more than people expect.
What if I only have pasta, rice, or tortillas left?
You can still make dinner. Pasta wants sauce, rice wants beans or eggs, and tortillas can hold beans, cheese, or even a quick egg filling. The pantry wins when you stop waiting for a perfect menu.
Pantry Dinners I Keep Coming Back To
Pantry food only feels like a fallback when nobody gives it enough heat, seasoning, or texture. A can of beans, a box of pasta, and one sharp condiment are already halfway to dinner. Add an onion, a little browning, and something bright at the end, and the cupboard starts looking generous instead of bare.
That is the real pleasure of these meals. They are cheap without tasting tired, fast without feeling rushed, and flexible enough to survive a half-empty shelf. Keep the basics close, and the next good dinner is probably already sitting in the pantry.