
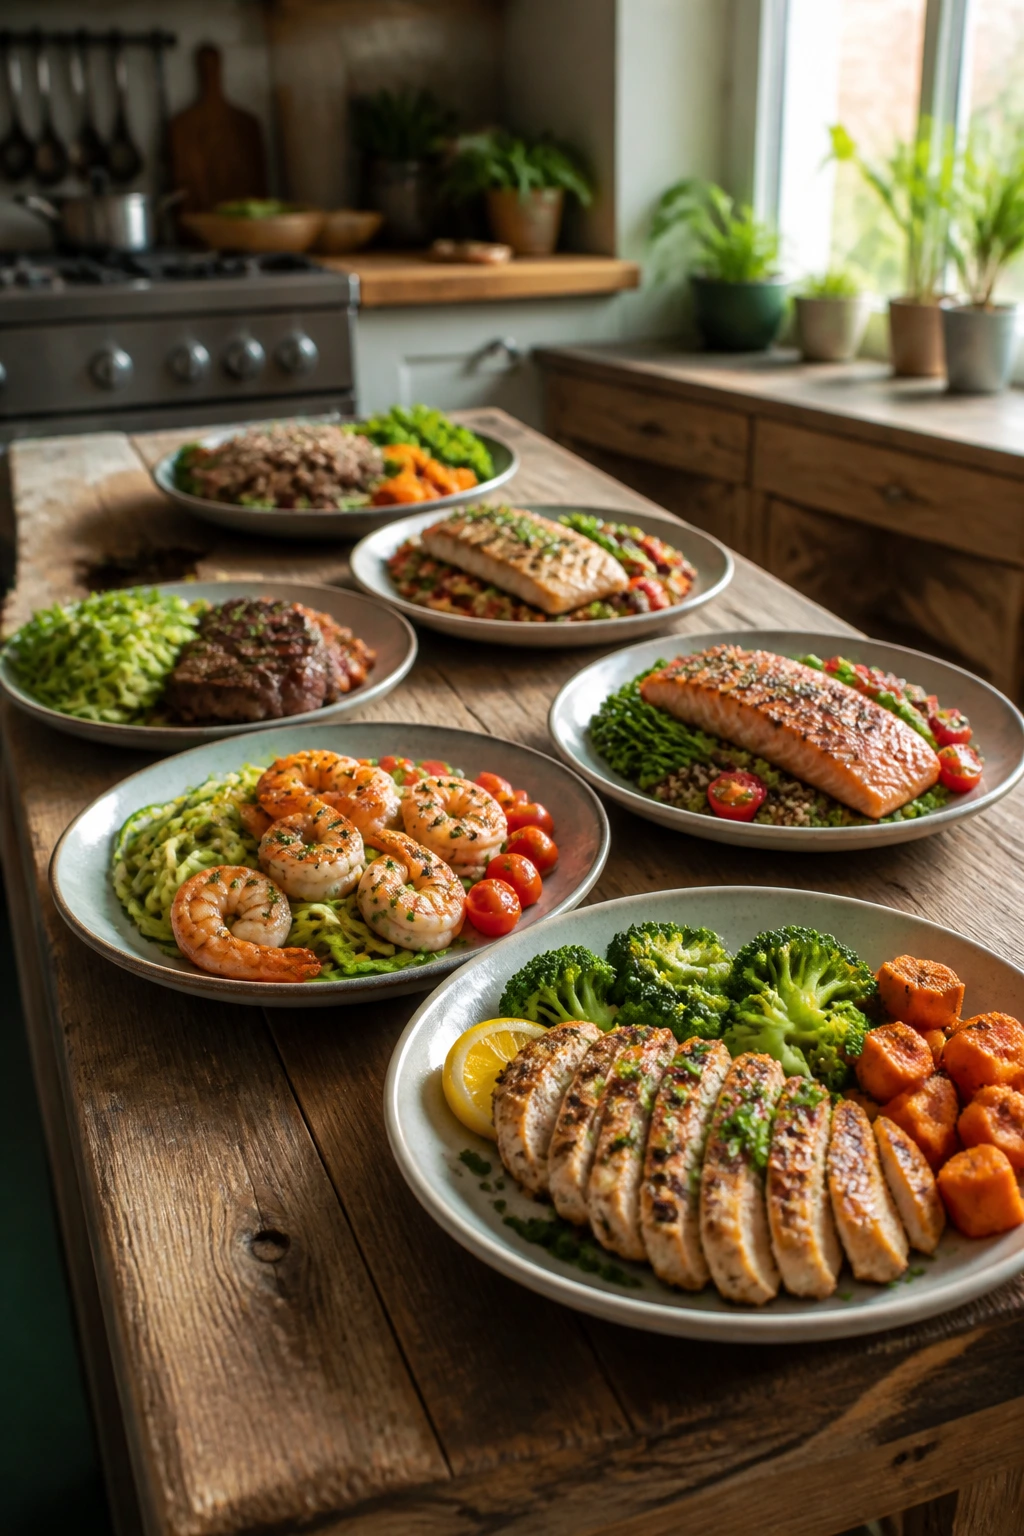
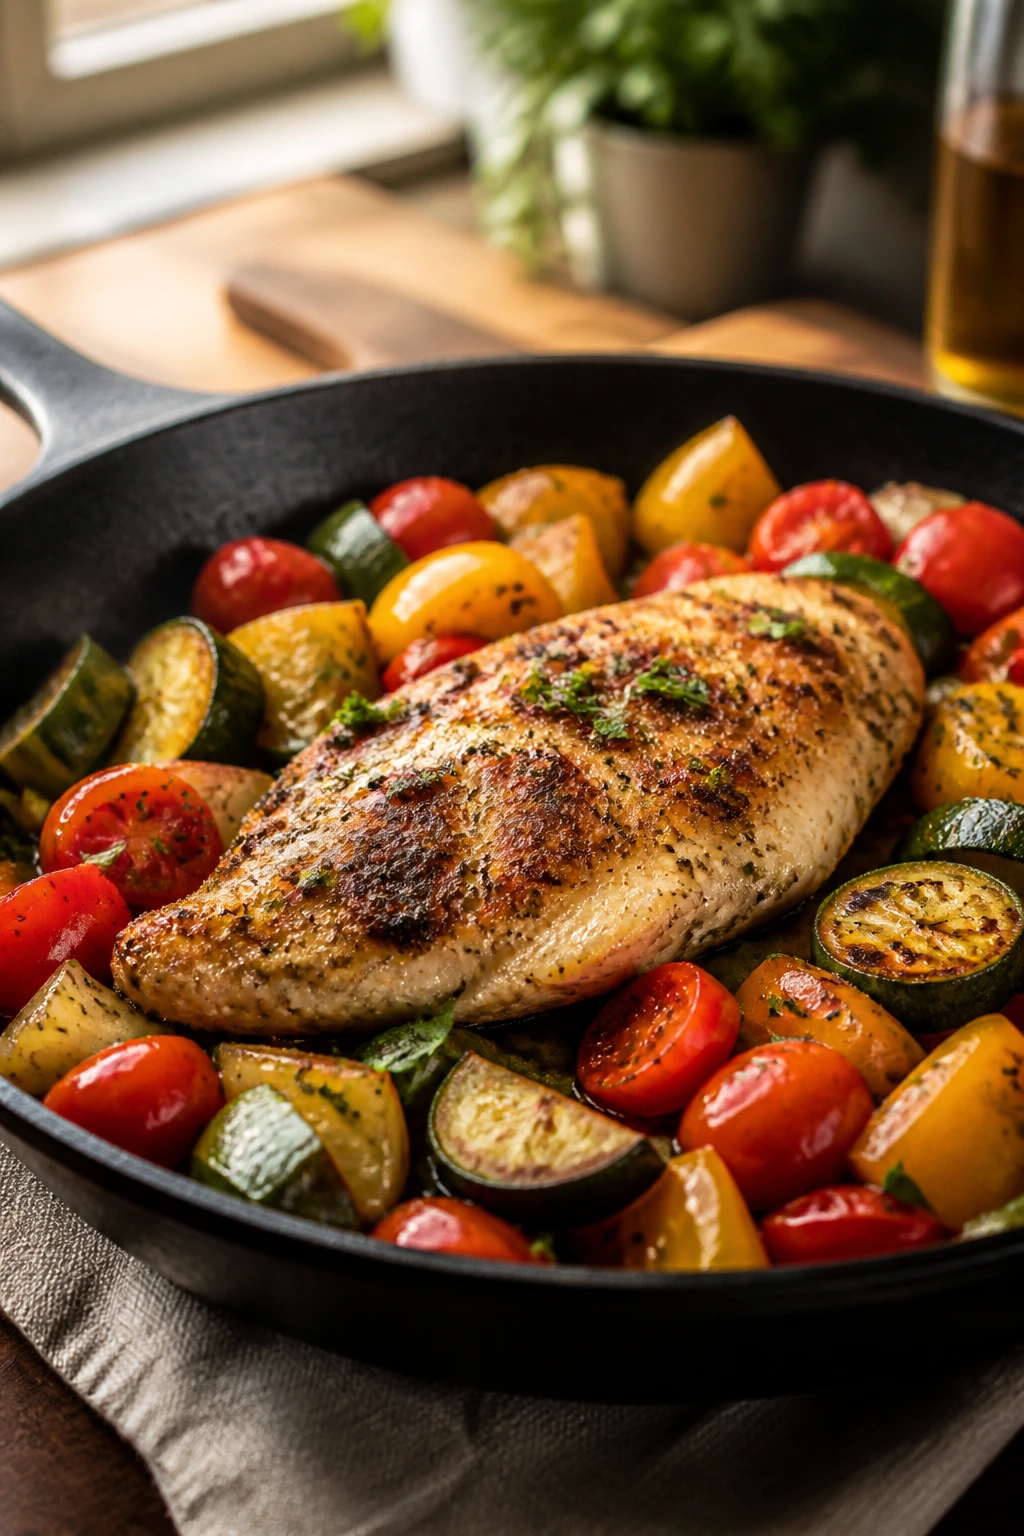
A plate of protein and vegetables can be plain, or it can be the kind of dinner that smells like garlic, lemon, and hot olive oil before you even sit down. That’s the lane I like best. Clean eating does not have to mean bare chicken and a sad pile of steamed greens — it can mean a sharp, bright skillet, a roast tray with browned edges, or a bowl that actually feels like dinner.
What makes protein and vegetable meals worth making is not the idea. It’s the mechanics. Lean chicken stays juicy when you cut it to even thickness. Salmon turns silky when you stop cooking it at the first sign of flaking. Broccoli, Brussels sprouts, cabbage, asparagus, kale, mushrooms, and peppers all behave differently under heat, and once you learn their habits, dinner gets easier in a very practical way.
The collection below leans hard on that rhythm: one-pan meals, sheet-pan dinners, bowls, stir-fries, soups, and a few meatless plates that still land with enough substance to keep you full. There’s no heavy sauce hiding the ingredients. No pointless garnish. Just smart combinations, good timing, and enough seasoning to make the vegetables taste like they were invited on purpose.
Why This Collection Earns a Spot in the Weekly Rotation
- Fast cleanup: Most of these meals use one skillet or one sheet pan, which means you spend your evening eating instead of scraping pans.
- Protein that feels like a meal: Chicken, salmon, turkey, tofu, lentils, beans, and eggs all show up in portions that actually hold the plate together.
- Vegetables with texture: Broccoli stays crisp-tender, Brussels sprouts get those dark edges, and cabbage keeps enough bite to feel lively.
- Sauces that stay clean: Lemon, yogurt, tamari, salsa, herbs, and tomato-based sauces bring flavor without turning the meal sugary or heavy.
- Easy to bend toward your pantry: Swap chicken for turkey, tofu for tempeh, or green beans for asparagus without changing the whole dinner plan.
- Built for real weeknights: A few of these are 20-minute jobs, and even the slower ones are simple enough to pull off when your brain is done for the day.
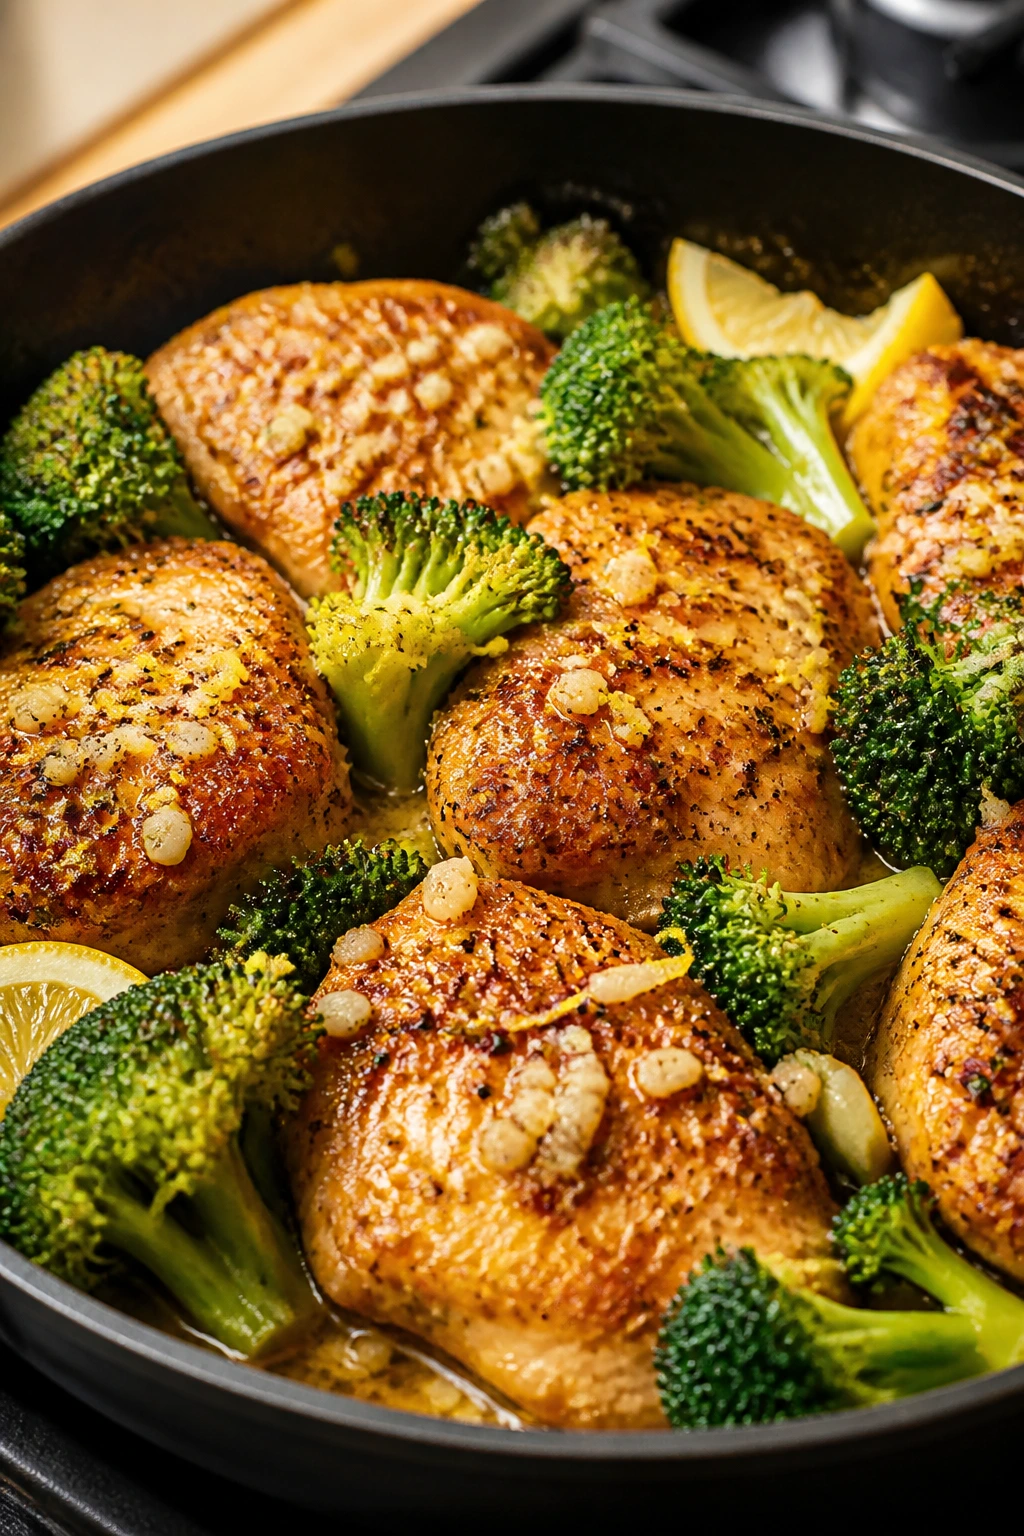
1. Lemon-Garlic Chicken and Broccoli Skillet
The skillet gets hot first, and that matters. Chicken breast can turn dry fast if you baby it, but give it a hard sear, a little lemon, and broccoli that still has some snap, and it comes off the stove smelling clean and sharp instead of tired.
Why It Works: Chicken breast likes quick, even heat, and broccoli can handle the same pan without collapsing. A small splash of broth keeps the garlic from burning, and the lemon cuts through the browned edges so the whole dish tastes brighter than the ingredient list looks.
Key Ingredients:
- 1 1/2 lb boneless, skinless chicken breasts, patted dry and sliced into even cutlets
- 2 tbsp olive oil
- 1 tsp kosher salt
- 1/2 tsp black pepper
- 1 tsp dried oregano
- 4 cups broccoli florets
- 4 garlic cloves, minced
- Zest and juice of 1 lemon
- 1/4 cup low-sodium chicken broth
- 2 tbsp chopped parsley
Quick Steps:
- Season the chicken on both sides with salt, pepper, and oregano.
- Heat 1 tbsp olive oil in a 12-inch skillet over medium-high heat. Sear the chicken for 4 to 5 minutes per side until deeply golden and the internal temperature reaches 165°F (74°C). Transfer to a plate.
- Add the remaining 1 tbsp oil and the broccoli. Pour in the broth, cover, and cook for 3 to 4 minutes until the florets turn bright green and the stems stay a little firm.
- Stir in the garlic and lemon zest, then cook for 30 seconds until fragrant. Add the lemon juice.
- Return the chicken to the skillet and spoon the pan juices over the top. Cook for 1 minute, then finish with parsley.
Equipment for This Recipe:
- 12-inch heavy skillet
- Tongs
- Instant-read thermometer
- Microplane or fine grater
How to Serve This Dish: Pile the chicken and broccoli over cauliflower rice if you want a lower-carb plate, or serve it beside a simple cucumber salad. I like the skillet juices spooned over everything; they turn into the sauce whether you planned one or not.
Pro Tips for This Recipe:
- Slice thick chicken breasts into cutlets so they cook at the same pace as the broccoli.
- Don’t crowd the pan. If the chicken steams, you lose the browning that makes the dish taste finished.
- Zest the lemon before you cut it. That small thing saves a little wrestling.
Variations on This Dish:
- Lime-Cilantro Switch: Use lime juice and chopped cilantro instead of lemon and parsley for a sharper, slightly more Mexican-style profile.
- Thigh-Forward Version: Swap in boneless chicken thighs and cook them a few minutes longer. They stay juicier if you’re nervous about dry breast meat.
- Creamy Finish: Stir 2 tablespoons plain Greek yogurt into the pan off the heat for a softer, more rounded sauce.
Common Mistakes to Avoid with This Dish:
- Wet chicken in the pan: Moisture prevents browning. Pat the cutlets dry before they hit the oil.
- Broccoli cooked to mush: If the florets are left covered too long, they go olive-drab and soft. Pull the lid as soon as they turn bright green.
- Garlic burned in hot oil: Garlic only needs about 30 seconds. Add it late, after the broccoli has started to soften.
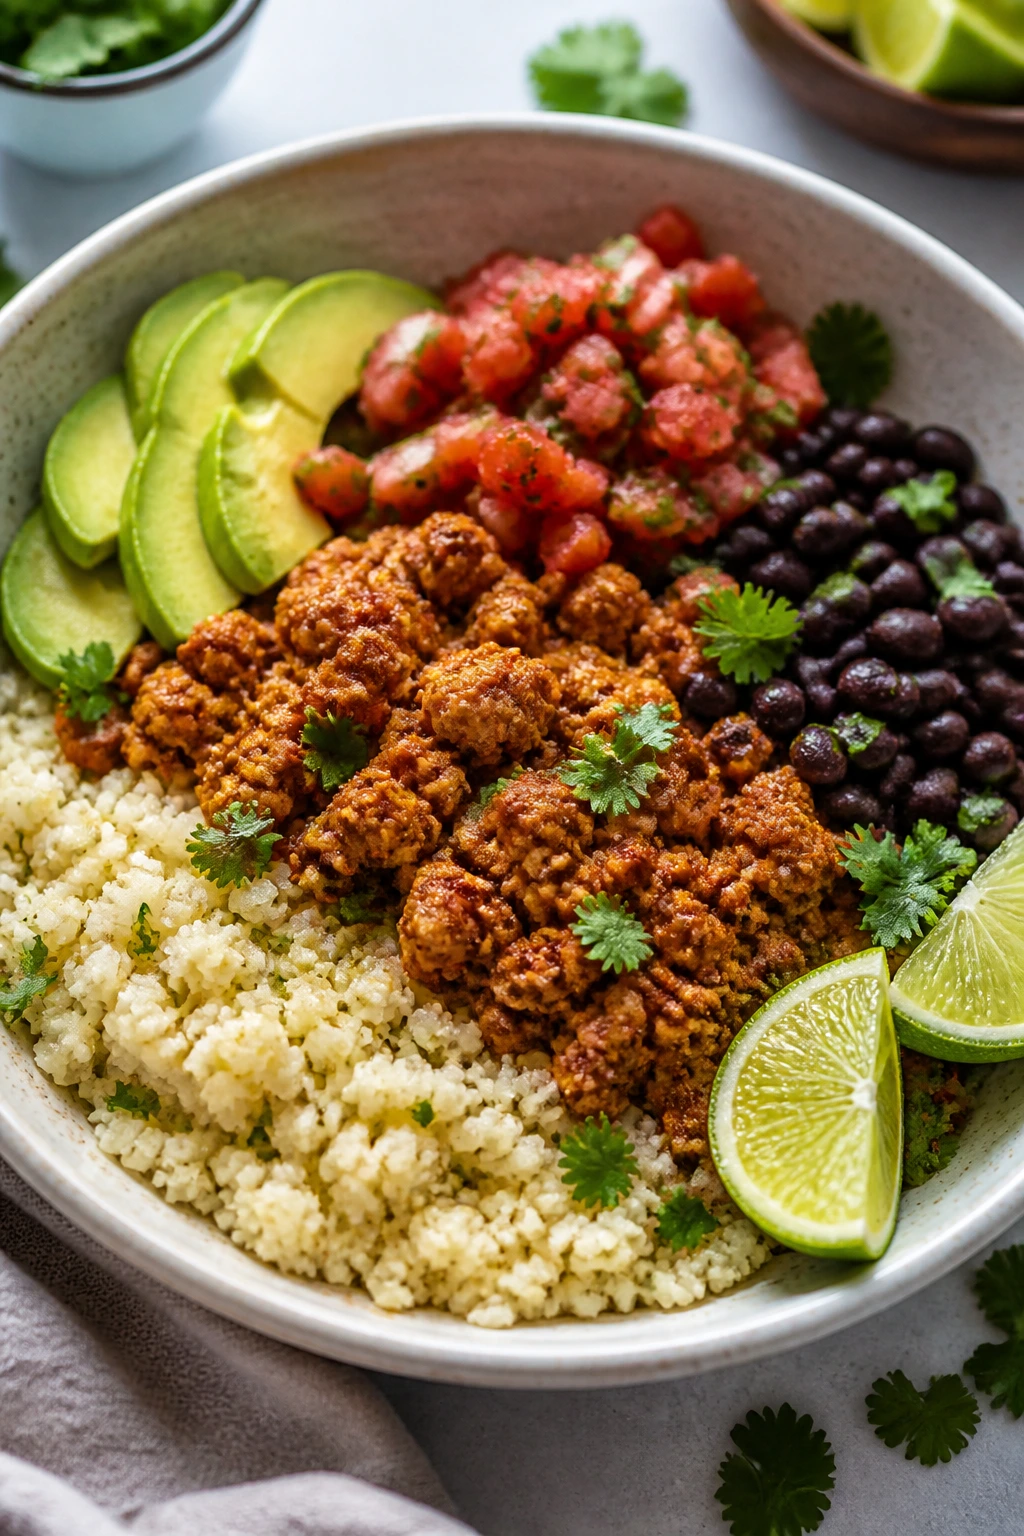
2. Smoky Turkey Taco Cauliflower Rice Bowls
This is the meal I make when I want something fast that still tastes like I cared. The turkey picks up taco seasoning in little browned bits, the cauliflower rice stays light, and the black beans give the bowl enough heft that you do not miss the tortilla.
Why It Works: Lean ground turkey takes seasoning well if you give it enough salt and heat, and cauliflower rice acts like a blank base that soaks up salsa without turning sticky. The avocado and lime at the end keep the bowl from tasting dry or flat.
Key Ingredients:
- 1 lb lean ground turkey, preferably 93% lean
- 1 tbsp olive oil
- 1 small yellow onion, diced
- 2 garlic cloves, minced
- 2 tbsp taco seasoning
- 4 cups cauliflower rice
- 1 cup black beans, rinsed and drained
- 1 cup salsa
- 1 avocado, sliced
- 1/4 cup chopped cilantro
- Lime wedges for serving
Quick Steps:
- Heat the olive oil in a large skillet over medium heat. Add the onion and cook for 3 minutes until softened.
- Add the turkey and cook for 5 to 6 minutes, breaking it into small crumbles, until no pink remains.
- Stir in the garlic and taco seasoning. Cook for 30 seconds until the spices smell warm and toasted.
- Add the cauliflower rice and black beans. Cook for 4 to 5 minutes, stirring often, until the cauliflower softens but still has a little bite.
- Stir in the salsa and cook for 1 minute. Spoon into bowls and finish with avocado, cilantro, and lime.
Equipment for This Recipe:
- Large skillet
- Wooden spoon or spatula
- Cutting board
- Sharp knife
How to Serve This Dish: Serve it warm in shallow bowls so the salsa, avocado, and beans sit in little pockets instead of sliding around. A handful of shredded lettuce under the bowl gives the whole thing a cool, crisp base.
Pro Tips for This Recipe:
- Use 93% lean turkey, not the extra-lean stuff. The very lean packs can go dry and chalky.
- Taste the turkey after the seasoning goes in. If your taco seasoning is salt-light, add a pinch more salt before the cauliflower rice.
- Keep the cauliflower rice on the stove only until it loses its raw smell. That’s the difference between fluffy and watery.
Variations on This Dish:
- Chipotle Heat: Add 1 chopped chipotle pepper in adobo to the turkey for smoke and heat.
- Breakfast Bowl Version: Top the finished bowl with a fried egg and a spoonful of salsa verde.
- Dairy-Free Creaminess: Use mashed avocado instead of sour cream or yogurt.
Common Mistakes to Avoid with This Dish:
- Waterlogged cauliflower rice: Cook it too long and it turns wet. Let the steam escape, then stop.
- Undersalted turkey: Ground turkey needs more seasoning than people think. Taste before serving.
- Avocado added too early: It browns and softens fast. Slice it right before the bowl hits the table.
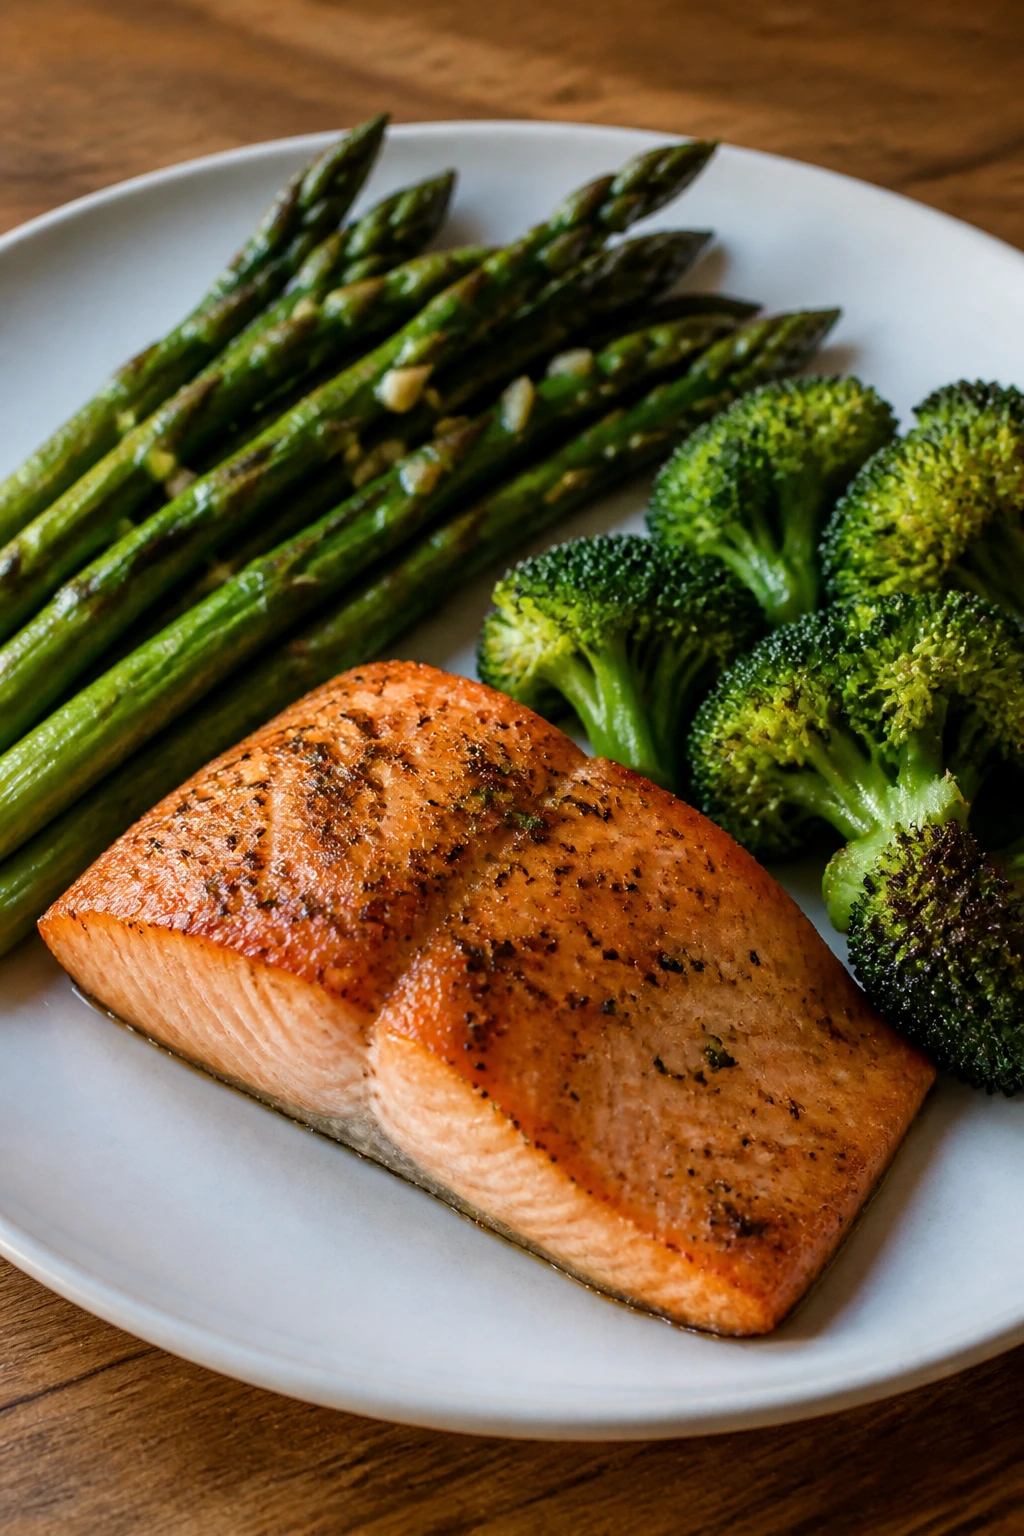
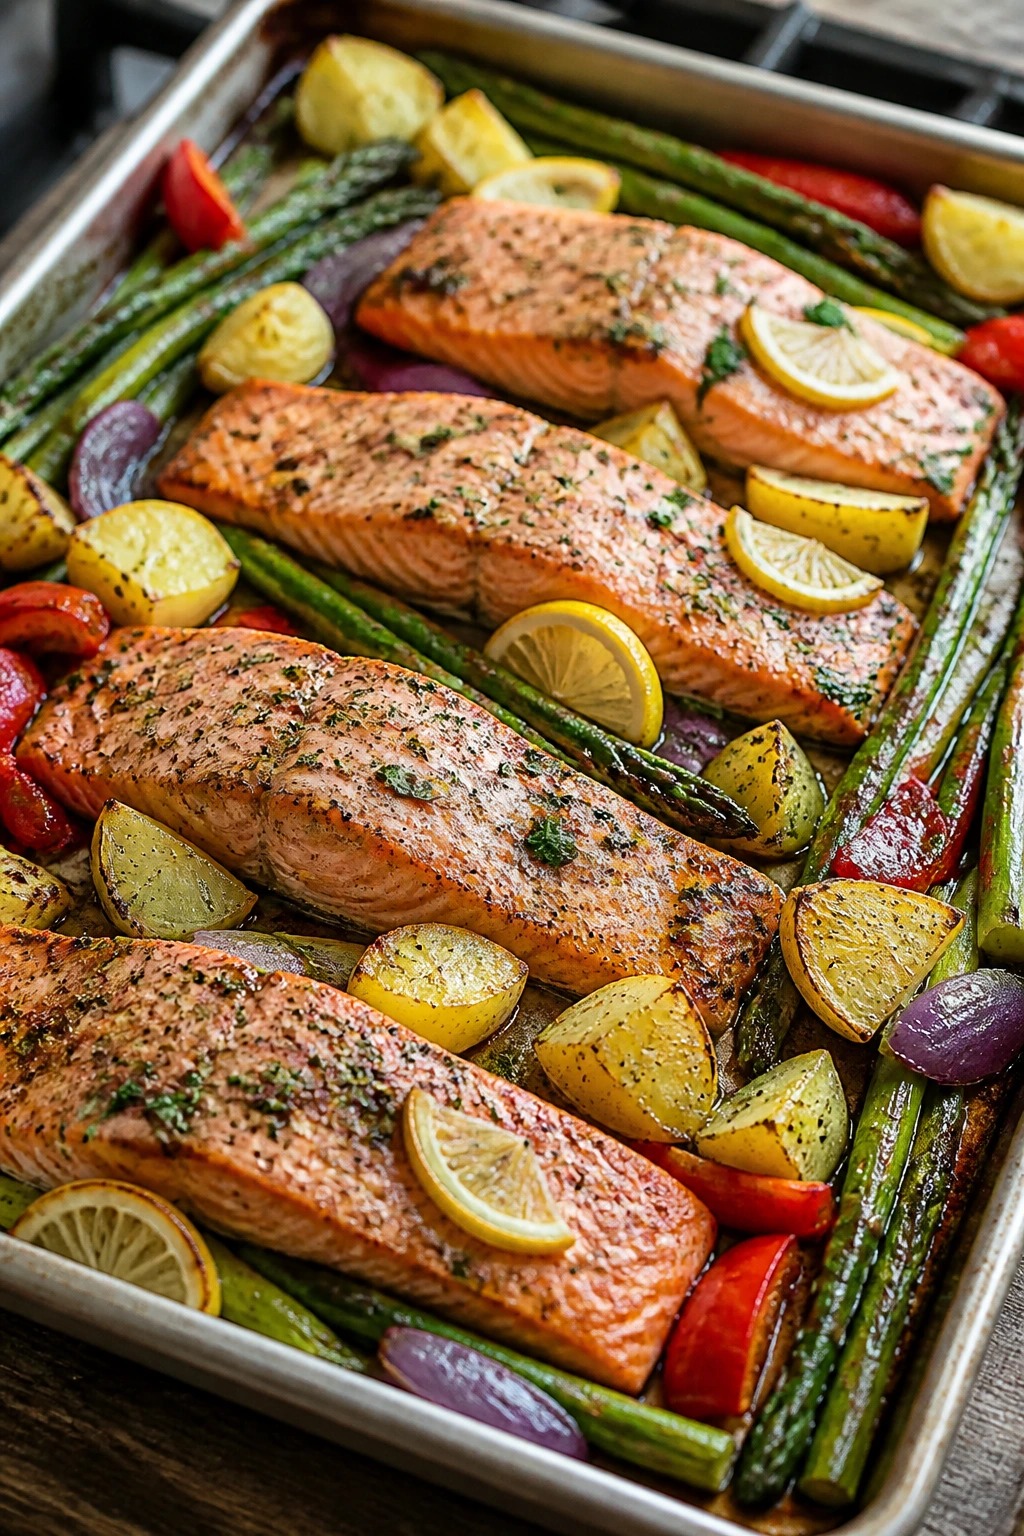
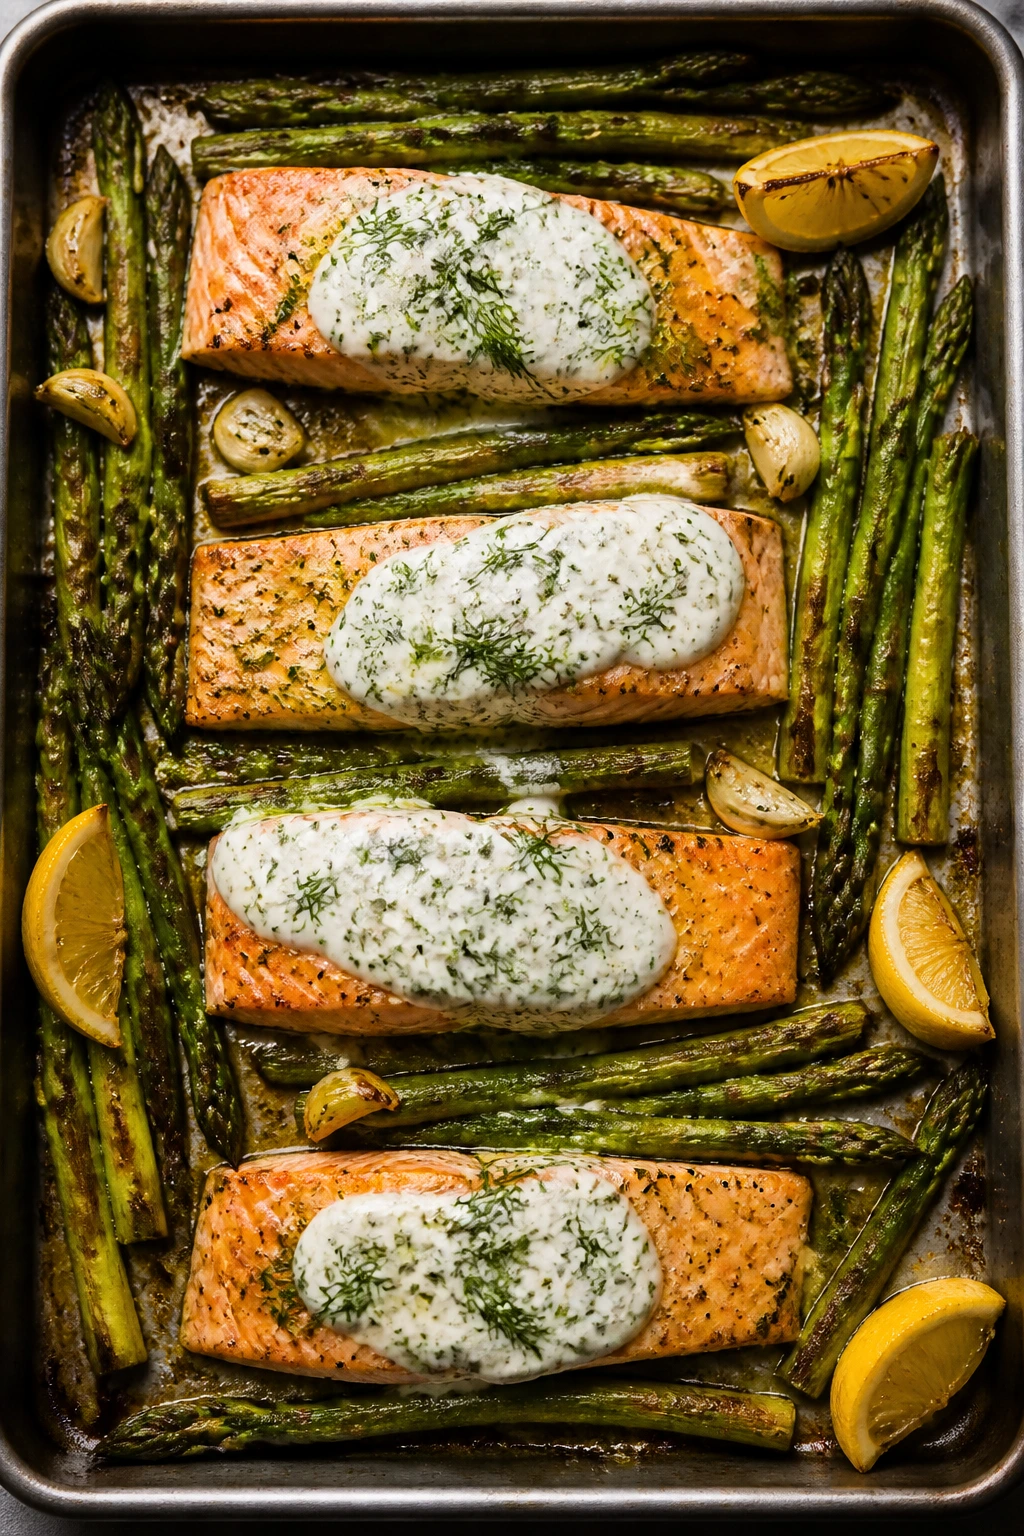
3. Sheet-Pan Salmon with Asparagus and Dill Yogurt
Salmon on a sheet pan has a nice built-in luxury to it. The fish turns buttery at the edges, the asparagus gets browned tips, and the dill yogurt lands cool and grassy on top so the whole tray tastes cleaner than it looks.
Why It Works: Salmon and asparagus both roast fast at high heat, which makes them a natural pair. The yogurt sauce brings acidity and a little creaminess without heavy mayo, and that matters because salmon already gives you richness.
Key Ingredients:
- 4 salmon fillets, 5 to 6 oz each
- 1 bunch asparagus, trimmed
- 2 tbsp olive oil
- 1 tsp kosher salt
- 1/2 tsp black pepper
- 1 tsp garlic powder
- 1/2 cup plain Greek yogurt
- 1 tbsp lemon juice
- 1 tbsp chopped dill
- 1 tsp Dijon mustard
Quick Steps:
- Preheat the oven to 425°F (220°C) and line a rimmed sheet pan with parchment.
- Toss the asparagus with 1 tbsp olive oil, half the salt, and half the pepper. Spread it on the pan.
- Rub the salmon with the remaining oil, salt, pepper, and garlic powder. Set the fillets skin-side down among the asparagus.
- Roast for 10 to 12 minutes, until the salmon flakes easily and reaches 145°F (63°C) in the thickest part.
- Stir the yogurt, lemon juice, dill, and Dijon together. Spoon over the salmon after roasting.
Equipment for This Recipe:
- Rimmed sheet pan
- Parchment paper
- Small bowl for the sauce
- Fish spatula
How to Serve This Dish: Plate each fillet with a tangle of asparagus beside it and a spoonful of dill yogurt right on top. If you want a starch, roasted baby potatoes or a scoop of quinoa sits well under the fish.
Pro Tips for This Recipe:
- Choose salmon fillets that are similar in thickness so they finish at the same time.
- Don’t add the yogurt sauce before roasting. It tastes fresher and looks better after the fish comes out of the oven.
- If the asparagus spears are thick, give them a 2-minute head start in the oven.
Variations on This Dish:
- Lemon-Caper Finish: Add 1 tablespoon capers to the yogurt sauce for a sharper, brinier note.
- Mustard Herb Salmon: Swap dill for chopped parsley and use an extra teaspoon of Dijon.
- Broccolini Swap: Use broccolini instead of asparagus and roast for the same amount of time.
Common Mistakes to Avoid with This Dish:
- Overbaked salmon: Pull it when the center is just opaque and flakes with a fork. It keeps cooking for a minute on the pan.
- Asparagus spread too tightly: Crowding traps steam and leaves the spears soggy.
- Sauce too thin: If your yogurt is watery, stir in a little more Dijon to tighten it up.
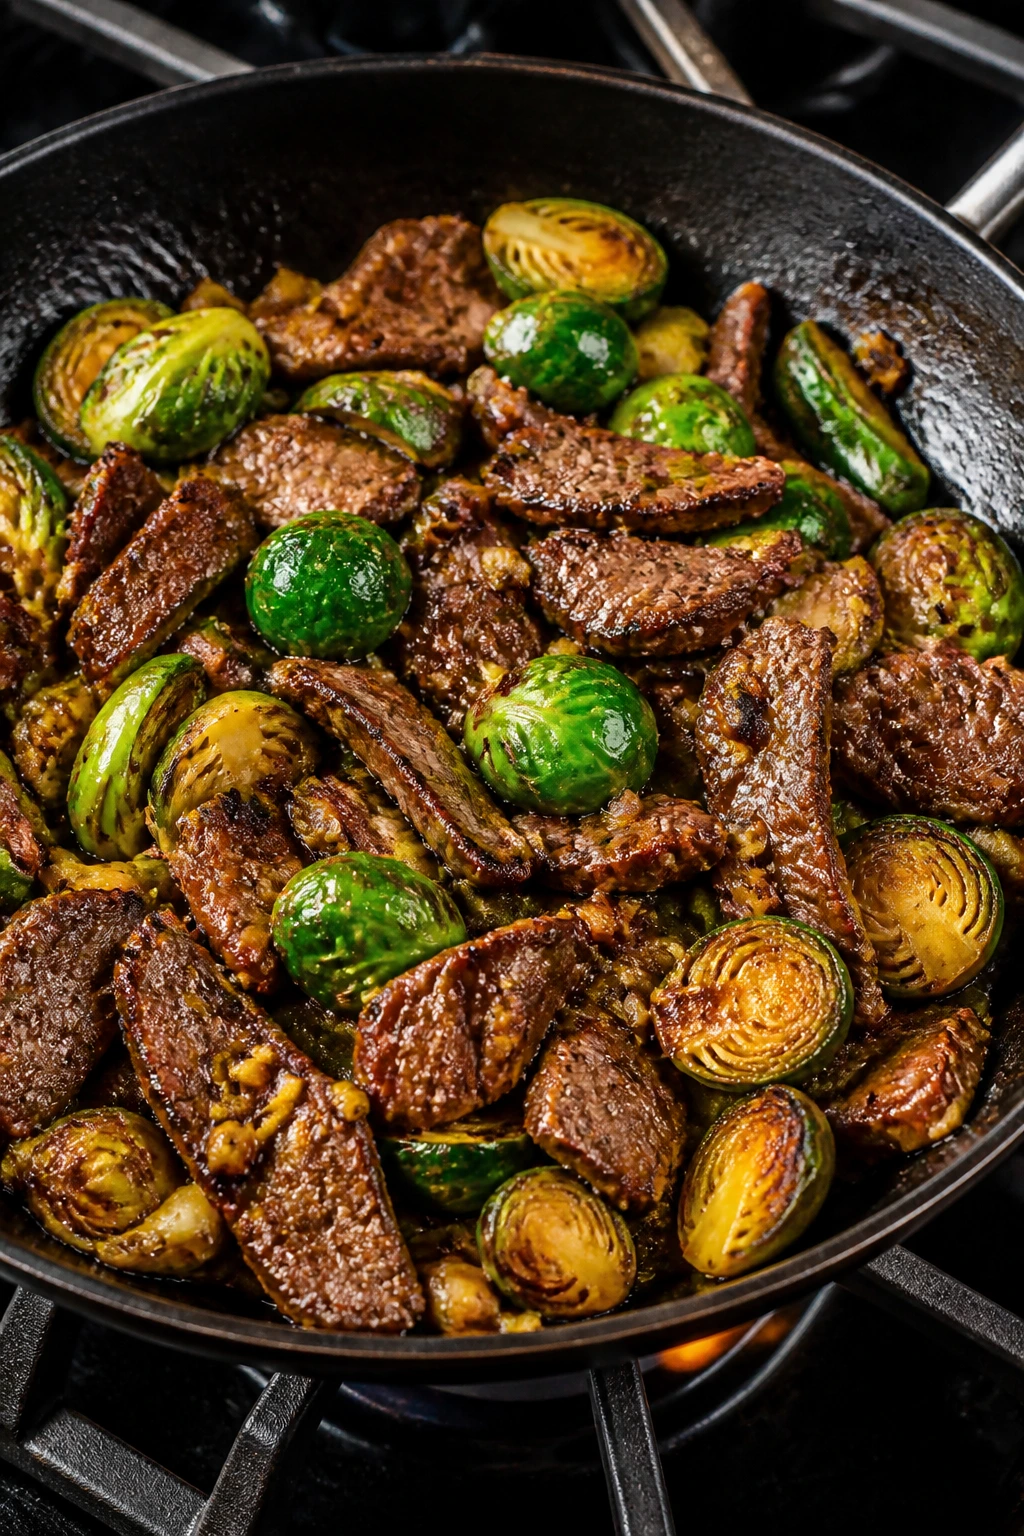
4. Beef and Brussels Sprout Ginger Stir-Fry
This one has bite. The beef gets seared hard, the Brussels sprouts pick up dark edges, and the ginger cuts through the whole pan so nothing feels heavy, even though the dish is filling.
Why It Works: Flank steak likes fast cooking and a hard sear, while halved Brussels sprouts become sweet and nutty when they hit a hot pan cut-side down. A quick soy-vinegar glaze glues the flavors together without burying the vegetables.
Key Ingredients:
- 1 lb flank steak, thinly sliced against the grain
- 3 cups Brussels sprouts, trimmed and halved
- 1 red bell pepper, sliced
- 2 tbsp avocado oil
- 2 garlic cloves, minced
- 1 tsp grated fresh ginger
- 2 tbsp coconut aminos or low-sodium soy sauce
- 1 tbsp rice vinegar
- 1 tsp sesame seeds
- 2 sliced scallions
Quick Steps:
- Heat 1 tbsp oil in a large skillet or wok over medium-high heat. Sear the steak for 1 to 2 minutes per side until browned but still pink in the middle. Remove it.
- Add the remaining oil, Brussels sprouts, and bell pepper. Cook for 5 to 6 minutes until the sprouts blister and the pepper softens at the edges.
- Stir in the garlic and ginger. Cook for 30 seconds.
- Add the soy sauce and rice vinegar. Toss to coat, then return the steak to the pan for 1 minute.
- Finish with sesame seeds and scallions.
Equipment for This Recipe:
- Large skillet or wok
- Sharp knife
- Tongs
- Cutting board
How to Serve This Dish: Spoon the stir-fry over cauliflower rice if you want a lighter bowl, or serve it on its own with a wedge of lime. I like it best straight from the pan, when the Brussels still have some crunch.
Pro Tips for This Recipe:
- Slice the steak thinly and across the grain. That tiny detail makes flank steak tender instead of stringy.
- Let the pan get hot before the Brussels go in. You want browning, not a slow steam.
- Mix the sauce before you start cooking so you can pour it in fast.
Variations on This Dish:
- Mushroom-Heavy Version: Add 8 oz sliced mushrooms and reduce the Brussels sprouts to 2 cups.
- Sesame-Lime Finish: Add lime zest with the scallions for a sharper finish.
- Spicy Pantry Version: Stir in 1 teaspoon chili garlic sauce with the soy sauce.
Common Mistakes to Avoid with This Dish:
- Steak sliced with the grain: It gets chewy fast. Cut across the lines you see in the meat.
- Brussels cooked on low heat: They turn soft and pale instead of browned.
- Sauce added too soon: If you glaze the pan before the vegetables brown, you lose the whole point of the stir-fry.
5. Shrimp Zucchini Noodle Skillet with Tomatoes and Basil
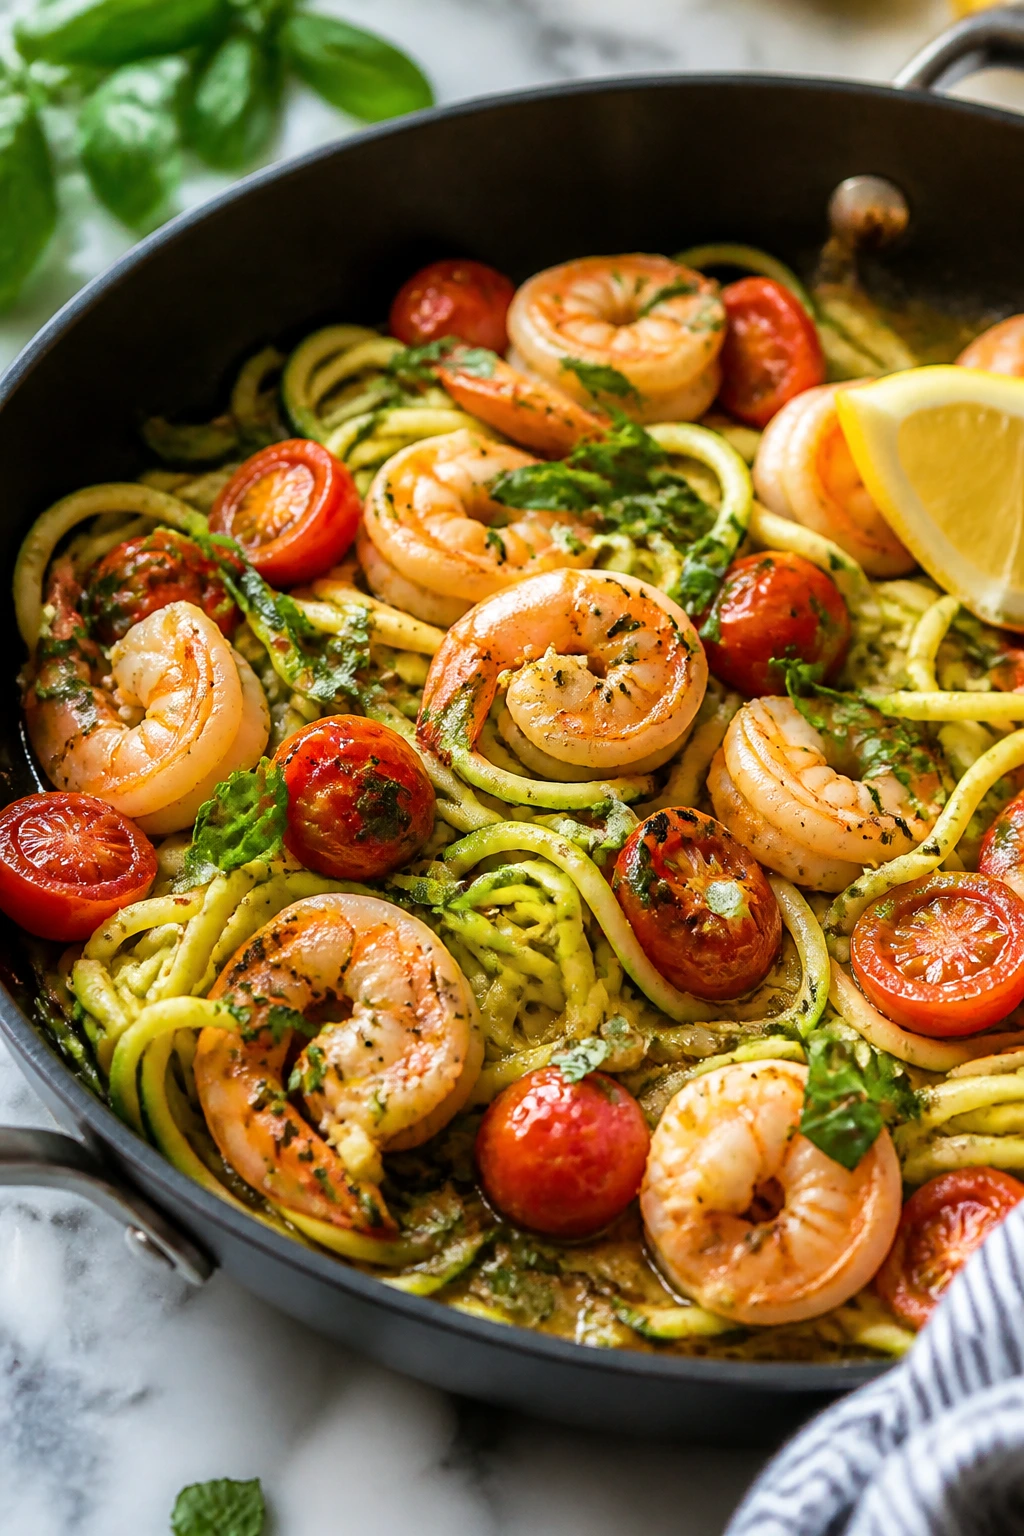
Shrimp and zucchini noodles can go wrong if you’re casual with the clock. Get the timing right, though, and you end up with a bright, glossy skillet where the tomatoes burst, the basil smells like a summer garden, and the shrimp stay tender instead of rubbery.
Why It Works: Shrimp cooks in minutes, which makes it a natural match for zucchini noodles that only need a brief toss in the pan. Cherry tomatoes melt into a light sauce without any cream, and lemon keeps the whole skillet sharp.
Key Ingredients:
- 1 1/2 lb large shrimp, peeled and deveined
- 4 medium zucchini, spiralized
- 1 pint cherry tomatoes, halved
- 2 tbsp olive oil
- 3 garlic cloves, minced
- 1/4 tsp red pepper flakes
- Juice of 1 lemon
- 1/4 cup fresh basil, torn
- 3/4 tsp kosher salt
- 1/2 tsp black pepper
Quick Steps:
- Pat the shrimp dry and season with half the salt and pepper.
- Heat 1 tbsp olive oil in a large skillet over medium-high heat. Cook the shrimp for 1 to 2 minutes per side until pink and opaque. Remove them.
- Add the remaining oil, tomatoes, garlic, and red pepper flakes. Cook for 3 to 4 minutes until the tomatoes blister and start to collapse.
- Add the zucchini noodles and the remaining salt and pepper. Toss for 1 to 2 minutes, just until the noodles soften slightly.
- Return the shrimp to the skillet, squeeze in the lemon juice, and finish with basil.
Equipment for This Recipe:
- Large skillet
- Spiralizer or julienne peeler
- Tongs
- Small knife
How to Serve This Dish: Serve immediately in shallow bowls. Zucchini noodles wait for no one, and that’s fine — their best texture is when they still have a little spring. A few shaved Parmesan curls can go on top if you want a slightly richer finish.
Pro Tips for This Recipe:
- Dry the shrimp well before they hit the pan. Wet shrimp steam instead of sear.
- Salt the zucchini noodles lightly right before serving, not far ahead of time.
- If you want more sauce, add 2 tablespoons of water with the tomatoes and let it reduce.
Variations on This Dish:
- Mediterranean Olive Version: Add 1/4 cup sliced olives and a tablespoon of capers with the tomatoes.
- Garlic Butter Finish: Swap 1 tablespoon of the olive oil for butter and keep the heat medium so it doesn’t brown too fast.
- Spicy Cajun Twist: Use Cajun seasoning on the shrimp and skip the basil.
Common Mistakes to Avoid with This Dish:
- Overcooked shrimp: They curl tightly and get squeaky. Pull them the moment they turn opaque.
- Watery zoodles: If you salt them early, they leak. Salt at the end.
- Pan packed with too much at once: Shrimp need space, or they steam and lose their texture.
6. Ginger Sesame Tofu Stir-Fry with Snap Peas
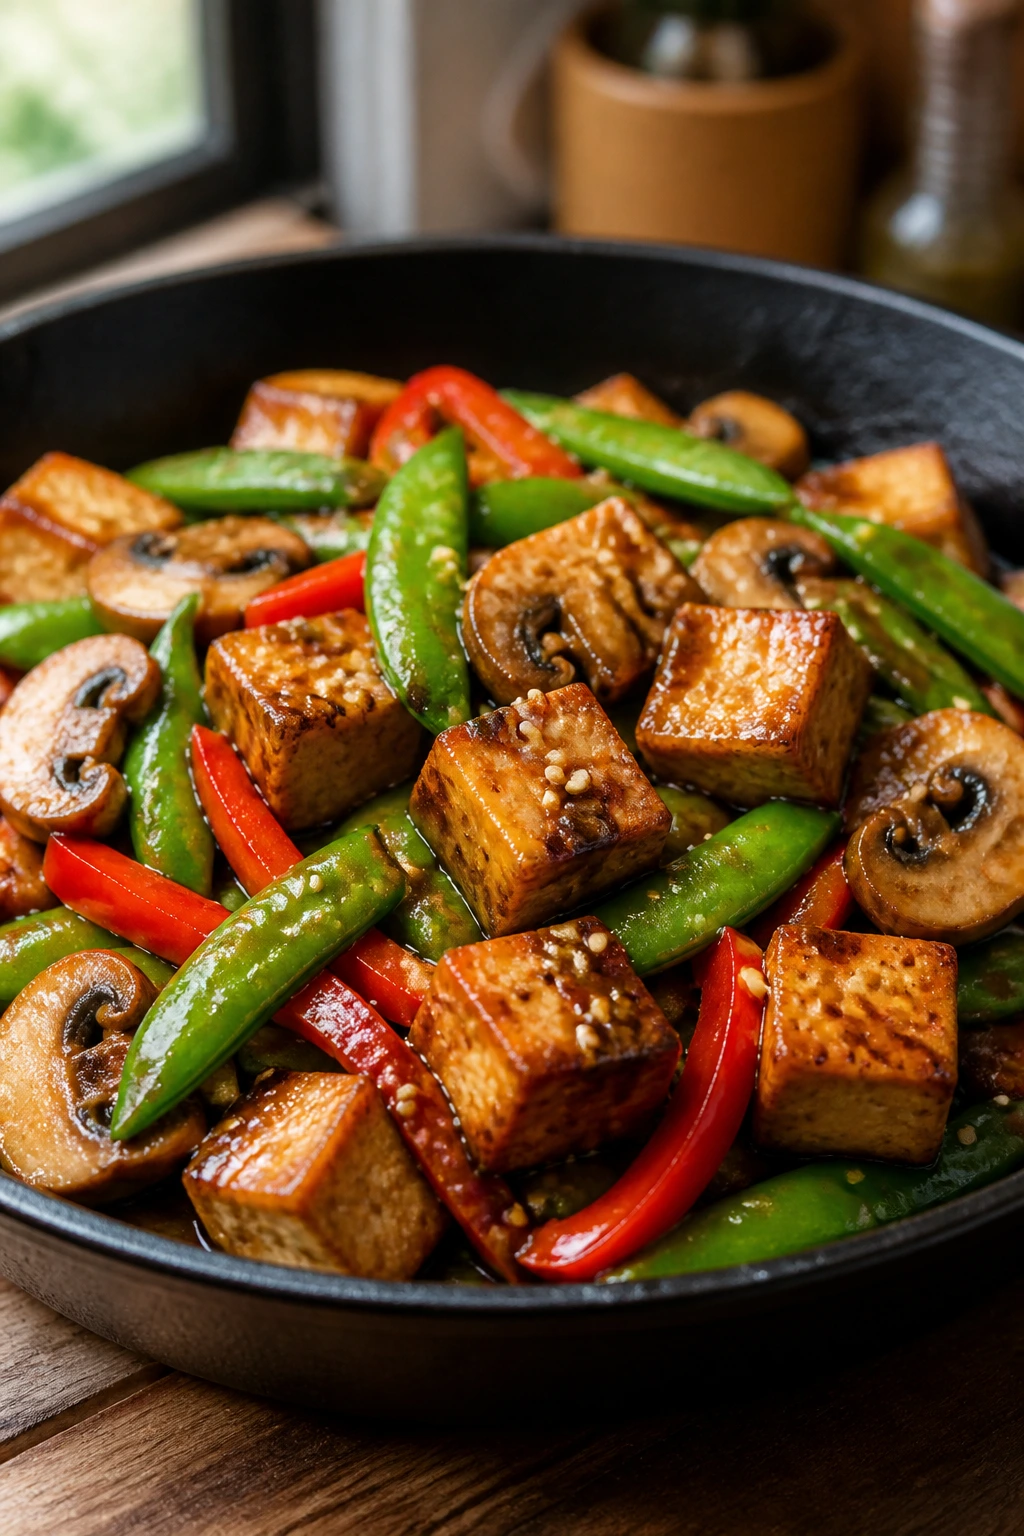
Extra-firm tofu can be dull if you rush it, and that’s the mistake most people make. Press it, brown it, and let snap peas stay bright, and the pan gets a clean, nutty taste that feels much more substantial than the ingredient list suggests.
Why It Works: Tofu needs surface moisture removed so it can sear instead of steam. Snap peas and bell pepper keep the texture lively, while sesame oil, ginger, and tamari create a quick sauce that clings without drowning the vegetables.
Key Ingredients:
- 14 oz extra-firm tofu, pressed and cut into cubes
- 2 cups snap peas, trimmed
- 1 red bell pepper, sliced
- 8 oz mushrooms, sliced
- 1 tbsp sesame oil
- 1 tbsp avocado oil
- 1 tbsp grated fresh ginger
- 2 garlic cloves, minced
- 2 tbsp tamari
- 1 tbsp rice vinegar
- 1 tbsp sesame seeds
- 2 scallions, sliced
Quick Steps:
- Press the tofu for at least 15 minutes, then pat it dry.
- Heat the avocado oil in a large skillet over medium-high heat. Cook the tofu for 8 to 10 minutes, turning the cubes until they’re golden on most sides.
- Add the mushrooms, snap peas, and bell pepper. Cook for 4 to 5 minutes until the mushrooms lose their moisture and the peas turn bright green.
- Stir in the ginger and garlic for 30 seconds, then add the tamari, rice vinegar, and sesame oil.
- Toss until everything is glossy. Finish with sesame seeds and scallions.
Equipment for This Recipe:
- Large nonstick or cast-iron skillet
- Tofu press or a plate with a heavy pan on top
- Spatula
- Cutting board
How to Serve This Dish: Spoon it over cauliflower rice, brown rice, or shredded cabbage. The last one sounds odd until you try it — the cabbage softens just enough under the hot tofu to act like a second vegetable base.
Pro Tips for This Recipe:
- If you skip pressing, the tofu browns unevenly and the pan gets soggy.
- Add the sesame oil at the end, not at the start. It keeps more of its nutty smell that way.
- Don’t overcook the snap peas. They should still snap when you bite them.
Variations on This Dish:
- Miso-Glazed Tofu: Stir 1 teaspoon white miso into the tamari mixture for deeper savory flavor.
- Broccolini Swap: Use broccolini instead of bell pepper and mushrooms for a more uniform green skillet.
- Peanut-Free Bowl: Finish with toasted pumpkin seeds instead of peanuts or cashews.
Common Mistakes to Avoid with This Dish:
- Skipping the press on tofu: The cubes stay pale and soft.
- Burning the garlic: Add it after the vegetables start to soften.
- Too much sauce in the pan: You want a glaze, not soup.
7. Rosemary Pork Tenderloin with Carrots and Green Beans
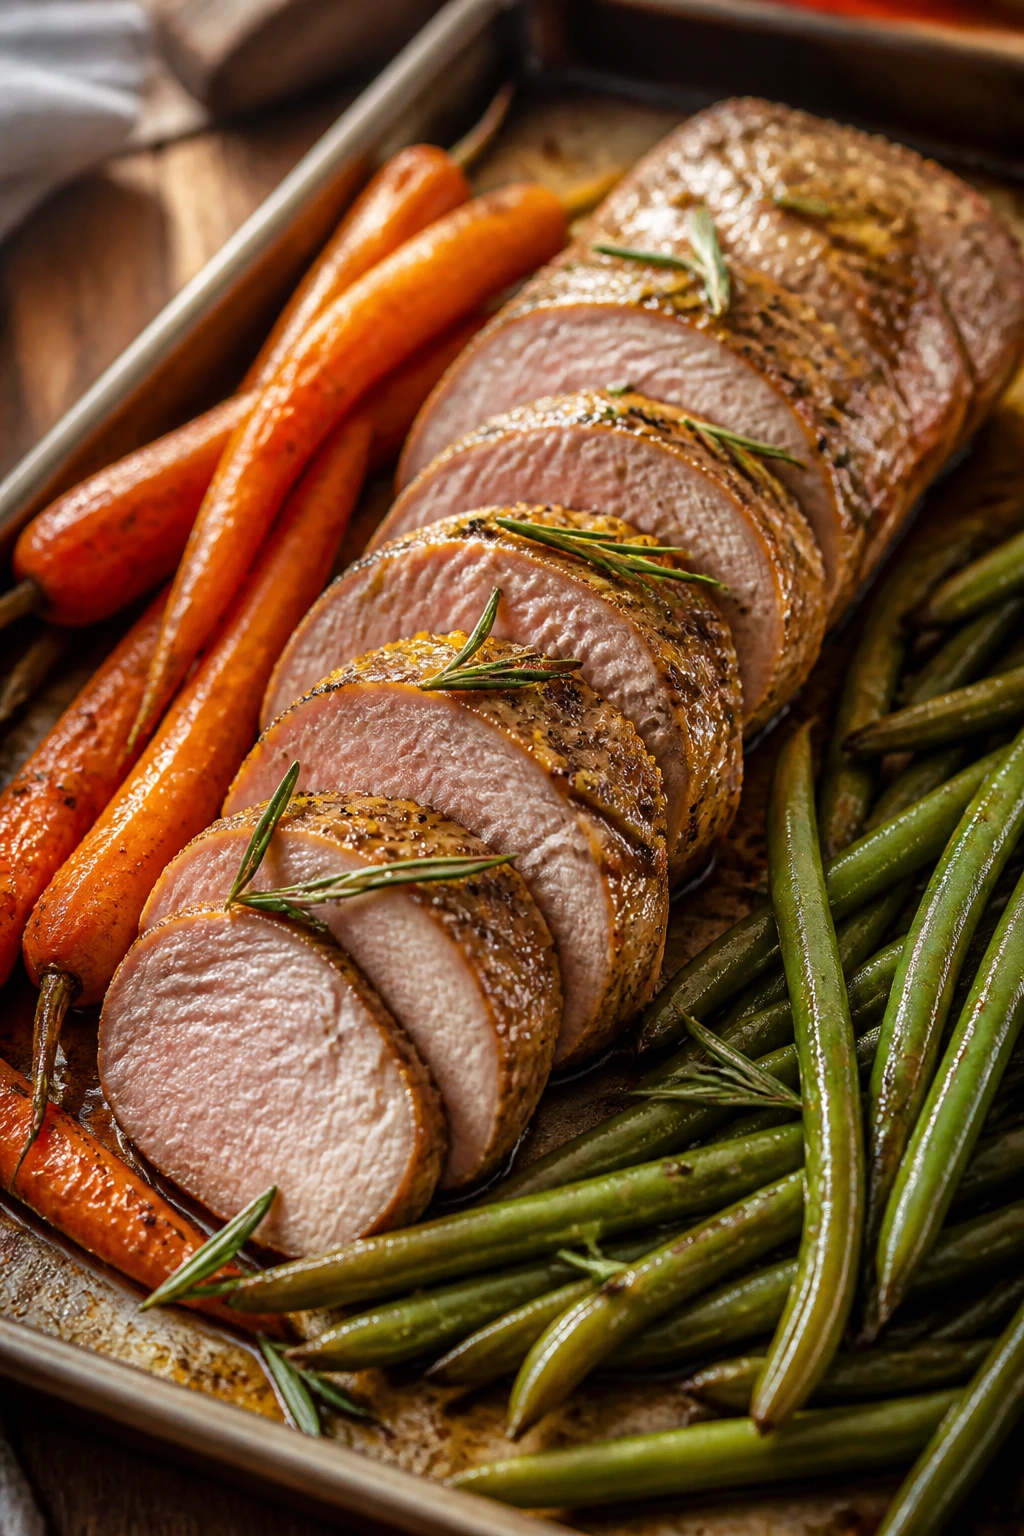
Pork tenderloin deserves more love than it gets. It’s lean, quick, and at its best when you roast it with carrots that turn sweet around the edges and green beans that keep a little bite.
Why It Works: Pork tenderloin cooks quickly and slices cleanly when you stop at 145°F (63°C) and let it rest. Carrots need a head start, green beans need less time, and rosemary plus Dijon makes the whole tray taste like it took longer than it did.
Key Ingredients:
- 1 1/4 lb pork tenderloin
- 1 lb carrots, peeled and cut into sticks
- 12 oz green beans, trimmed
- 2 tbsp olive oil
- 1 tsp kosher salt
- 1/2 tsp black pepper
- 1 tsp smoked paprika
- 1 tsp garlic powder
- 1 tbsp Dijon mustard
- 1 tbsp chopped fresh rosemary
Quick Steps:
- Preheat the oven to 425°F (220°C).
- Toss the carrots with 1 tbsp olive oil, half the salt, half the pepper, and half the smoked paprika. Roast them on a rimmed sheet pan for 10 minutes.
- Rub the pork with the remaining oil, salt, pepper, paprika, garlic powder, Dijon, and rosemary.
- Add the pork and green beans to the sheet pan. Roast for 15 to 18 minutes, until the pork reaches 145°F (63°C) and the carrots are tender.
- Rest the pork for 5 minutes before slicing.
Equipment for This Recipe:
- Rimmed sheet pan
- Instant-read thermometer
- Small bowl
- Sharp carving knife
How to Serve This Dish: Slice the pork into thick coins and fan them next to the carrots and beans. A spoonful of the pan juices over the top keeps the plate from feeling dry.
Pro Tips for This Recipe:
- Let the tenderloin sit at room temperature for 15 to 20 minutes before roasting.
- Pull it a little early if you’re unsure; the rest period finishes the job.
- Spread the carrots out. If they crowd each other, they steam and stay pale.
Variations on This Dish:
- Mustard-Herb Version: Add thyme and swap rosemary for parsley if you want a softer herb note.
- Apple Cider Finish: Brush the pork with 1 tablespoon apple cider vinegar mixed with the Dijon before roasting.
- Garlic-Only Roast: Keep it simple with garlic, salt, pepper, and olive oil if you want the vegetables to lead.
Common Mistakes to Avoid with This Dish:
- Overcooked pork: Tenderloin dries out fast. A thermometer saves it.
- Green beans over-roasted: They should still have color and a little crunch.
- Skipping the rest: Slice too soon and the juices run straight onto the cutting board.
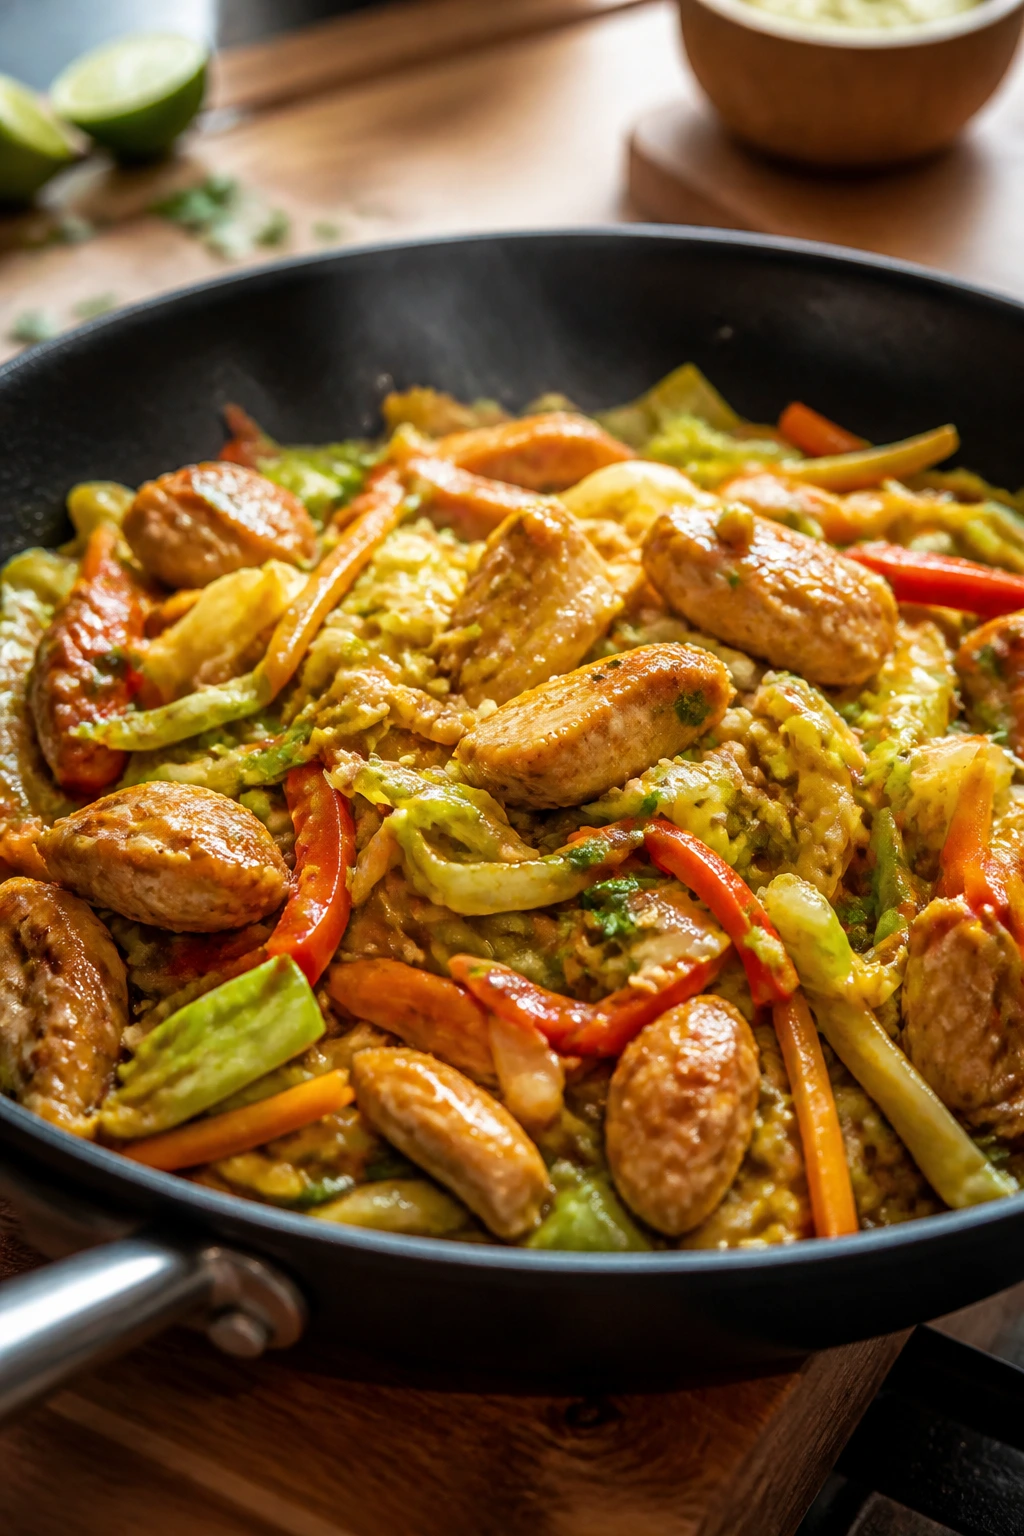
8. Chicken Fajita Sheet Pan with Lime and Cilantro
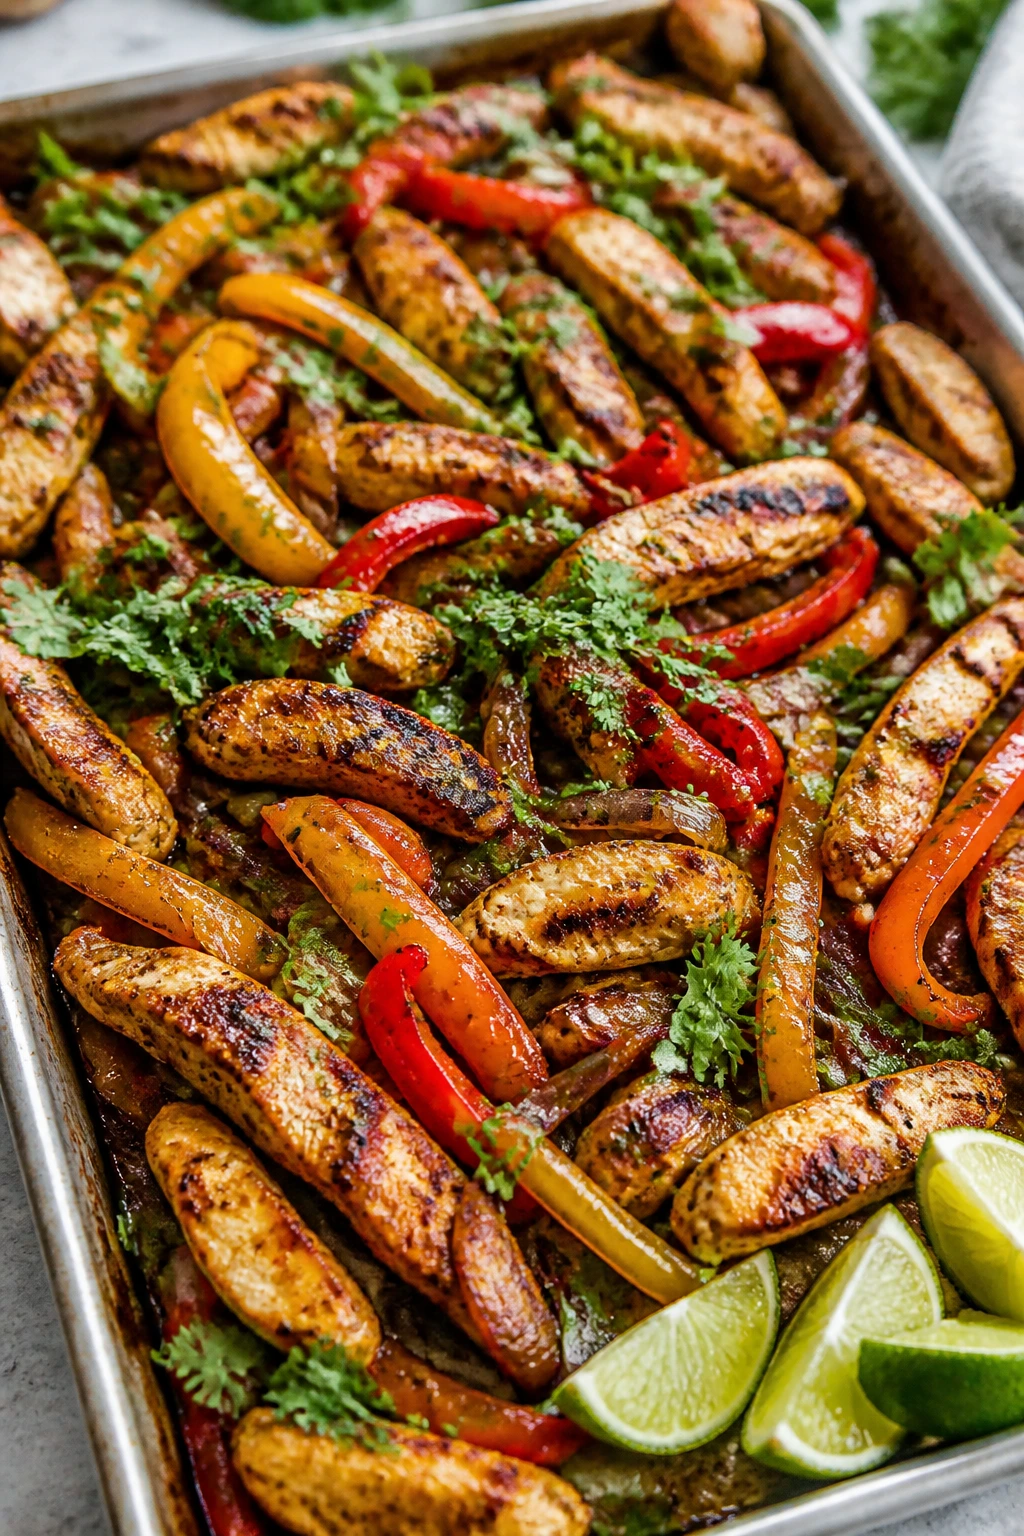
Fajita night gets easier when the oven does the work. The peppers soften, the onions get sweet at the edges, and the chicken picks up a smoky finish that tastes like a restaurant plate without the grease.
Why It Works: Chicken strips cook quickly at high heat, and peppers and onions need the same temperature to caramelize without turning to mush. Lime at the end wakes everything up, which is the difference between “fine” and something you keep making.
Key Ingredients:
- 1 1/2 lb boneless chicken breasts or thighs, sliced into strips
- 2 bell peppers, sliced
- 1 large onion, sliced
- 2 tbsp olive oil
- 2 tsp chili powder
- 1 tsp ground cumin
- 1 tsp paprika
- 1/2 tsp kosher salt
- 1 lime, cut into wedges
- 1/4 cup chopped cilantro
Quick Steps:
- Preheat the oven to 425°F (220°C).
- Toss the chicken, peppers, onion, olive oil, chili powder, cumin, paprika, and salt together in a large bowl.
- Spread everything on a rimmed sheet pan in a single layer.
- Roast for 18 to 20 minutes, stirring once halfway through, until the chicken reaches 165°F (74°C) and the peppers are soft with browned edges.
- Finish with lime juice and cilantro.
Equipment for This Recipe:
- Rimmed sheet pan
- Large mixing bowl
- Tongs
- Meat thermometer
How to Serve This Dish: Serve it straight from the pan, or spoon it into lettuce cups with avocado on top. If you want a fuller dinner, cauliflower rice or shredded cabbage makes a good base.
Pro Tips for This Recipe:
- Cut the peppers and onions thick enough to hold their shape.
- Use thighs if you want more forgiveness and a little more richness.
- Stir halfway through, but don’t keep tossing. The browning matters.
Variations on This Dish:
- Mild Family Pan: Cut the chili powder by half and add extra paprika for color without heat.
- Chipotle Smoke: Swap half the chili powder for chipotle powder.
- Lettuce-Wrap Version: Serve in butter lettuce leaves with diced avocado and a spoon of salsa.
Common Mistakes to Avoid with This Dish:
- Pan overcrowding: If the vegetables pile up, they steam and go limp.
- Uneven slicing: Thin onion slivers burn before the chicken finishes.
- Lime added too early: Acid dulls the roasted flavor if it goes in before cooking.
9. Turkey Meatballs in Spinach Marinara
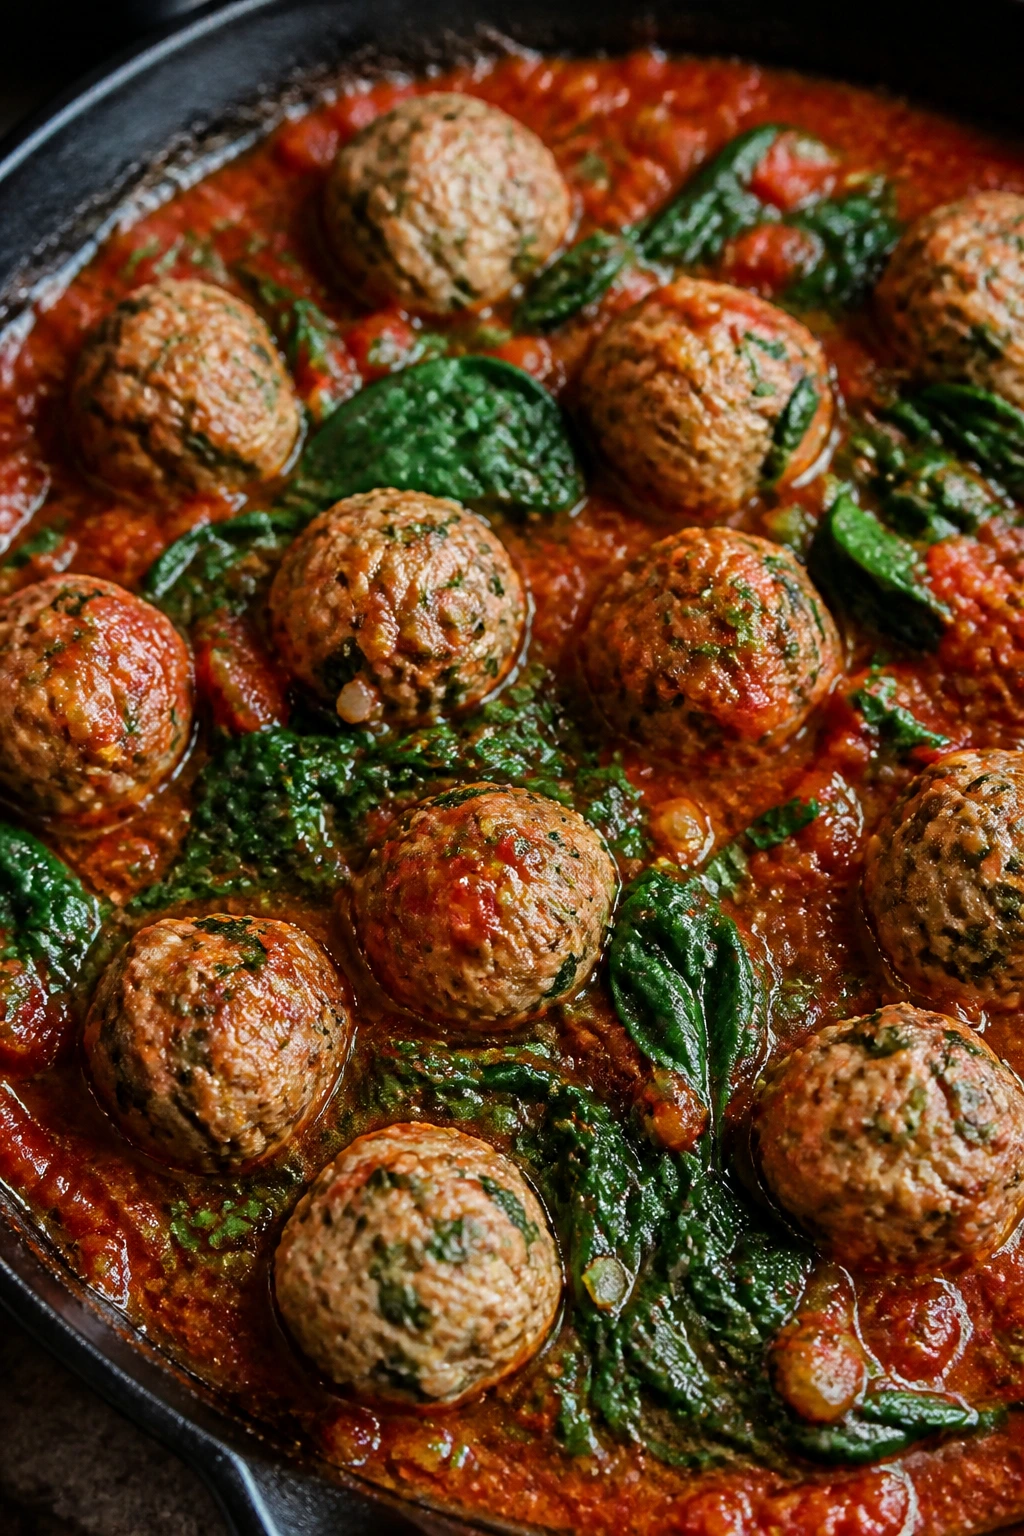
Turkey meatballs can be dry if you treat them like a shortcut. Handle them gently, bake them until just done, and let them sit in warm marinara with spinach and they become the kind of meal you keep around for leftovers.
Why It Works: Ground turkey takes flavor well, but it needs moisture from egg, onion, and a little almond flour or breadcrumbs to stay tender. Spinach wilts directly into the sauce, which means the vegetables are part of the meal instead of a side thought.
Key Ingredients:
- 1 lb ground turkey
- 1/2 cup almond flour or plain breadcrumbs
- 1 large egg
- 2 tbsp grated onion
- 2 garlic cloves, minced
- 1 tsp Italian seasoning
- 3/4 tsp kosher salt
- 1/4 tsp black pepper
- 2 cups marinara sauce
- 4 cups baby spinach
- 1 tbsp olive oil
- 2 tbsp grated Parmesan, optional
Quick Steps:
- Preheat the oven to 400°F (205°C).
- Mix the turkey, almond flour, egg, grated onion, garlic, Italian seasoning, salt, and pepper in a bowl until just combined.
- Shape into 16 meatballs and place them on a parchment-lined sheet pan.
- Bake for 12 to 14 minutes, until the meatballs reach 165°F (74°C).
- Warm the marinara in a skillet, add the spinach, and stir until wilted. Add the meatballs and spoon sauce over them.
Equipment for This Recipe:
- Rimmed sheet pan
- Parchment paper
- Large mixing bowl
- Skillet
How to Serve This Dish: Serve the meatballs over zucchini noodles, roasted spaghetti squash, or a bowl of sautéed greens. A little Parmesan on top is enough; the sauce does the heavy lifting.
Pro Tips for This Recipe:
- Mix the meatball mixture with your hands only until it comes together. Overmixing makes them dense.
- Use a small scoop if you want evenly sized meatballs.
- If your marinara is thick, add 2 tablespoons water so the spinach can wilt without sticking.
Variations on This Dish:
- Pesto Turkey Meatballs: Swap half the marinara for basil pesto stirred into warm tomatoes.
- Beef-Turkey Blend: Use 1/2 lb ground turkey and 1/2 lb lean ground beef for a richer bite.
- Dairy-Free Bowl: Skip the Parmesan and add chopped basil at the end.
Common Mistakes to Avoid with This Dish:
- Dry meatballs: Too much almond flour or overbaking will do it. Pull them as soon as they hit temperature.
- Boiling the sauce hard: Gentle heat keeps the spinach green and the meatballs intact.
- Crowding the pan: Leave space so the meatballs brown instead of steaming.
10. Cod with Tomato-Olive Relish and Wilted Kale

Cod is mild, which is a strength if you give it something bright to sit on. The tomato-olive relish brings salt and acid, and the kale softens into the pan just enough to feel like a second layer, not a bed of sawdust.
Why It Works: Cod flakes fast and stays delicate when you bake it only until opaque. Tomatoes, olives, and lemon carry enough punch to season the fish without masking it, and kale holds up to heat better than softer greens.
Key Ingredients:
- 4 cod fillets, 5 to 6 oz each
- 1 bunch kale, stems removed and leaves chopped
- 1 pint cherry tomatoes, halved
- 1/4 cup pitted olives, sliced
- 2 tbsp olive oil
- 2 garlic cloves, minced
- 1 tsp dried oregano
- 1 lemon, juiced
- 1 tbsp capers, optional
- 1 tsp kosher salt
- 1/2 tsp black pepper
Quick Steps:
- Preheat the oven to 400°F (205°C).
- Toss the tomatoes, olives, capers, 1 tbsp olive oil, and half the lemon juice in a bowl.
- Rub the cod with the remaining oil, salt, pepper, and oregano. Place it on a parchment-lined sheet pan.
- Roast for 10 to 12 minutes, until the cod flakes and reaches 145°F (63°C).
- While the cod roasts, sauté the kale with a splash of water and the garlic for 3 to 4 minutes until wilted. Spoon the tomato-olive mixture over the fish.
Equipment for This Recipe:
- Sheet pan
- Small skillet
- Parchment paper
- Fish spatula
How to Serve This Dish: Serve the cod on top of the kale with the relish scattered over the fillet. It looks simple on the plate, which is part of the appeal — the colors do the talking.
Pro Tips for This Recipe:
- Choose cod fillets that are thick enough to hold together in the oven.
- If your olives are very salty, rinse them lightly before slicing.
- Don’t overwork the kale. A quick sauté keeps it from getting limp and dull.
Variations on This Dish:
- White Fish Swap: Use haddock or halibut if cod isn’t on hand.
- Calabrian Heat: Add 1 teaspoon chopped Calabrian chili to the relish.
- Green Olive Version: Use green olives instead of black for a sharper bite.
Common Mistakes to Avoid with This Dish:
- Fish left in the oven too long: Cod goes from delicate to dry in a narrow window.
- Relish too salty: Olives and capers can stack up fast.
- Kale with tough stems still attached: They stay chewy no matter how long you cook them.
11. Greek Chicken Thighs with Cucumber-Tomato Salad
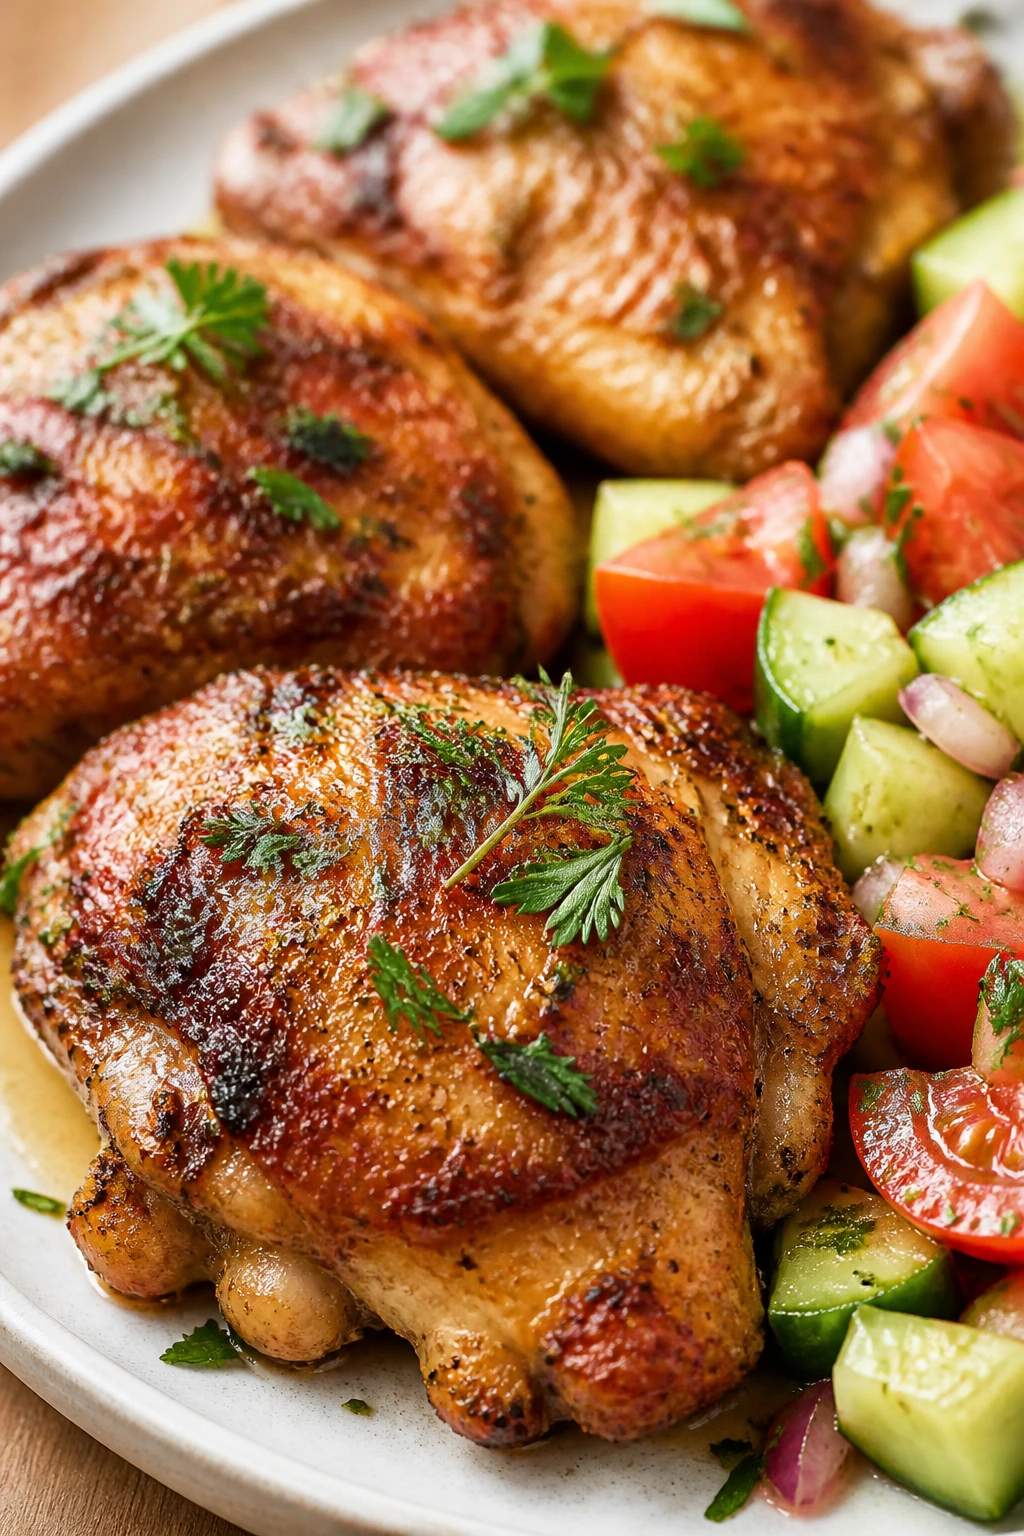
This is the kind of dinner that feels cool even when the chicken is hot. The thighs come off the pan with crisp browned spots, and the salad stays crunchy and juicy beside them so every bite shifts from warm to fresh.
Why It Works: Chicken thighs forgive a little extra heat, which makes them better than breast meat when you want a juicy result without hovering over the pan. The cucumber-tomato salad adds moisture and acid, and that keeps the plate from tasting like it was built in a hurry.
Key Ingredients:
- 1 1/2 lb boneless, skinless chicken thighs
- 1 tbsp olive oil
- 1 lemon, zested and juiced
- 3 garlic cloves, minced
- 2 tsp dried oregano
- 1 tsp kosher salt
- 1/2 tsp black pepper
- 2 cucumbers, diced
- 2 cups cherry tomatoes, halved
- 1/4 red onion, thinly sliced
- 1/4 cup chopped parsley
- 2 tbsp red wine vinegar
Quick Steps:
- Mix the chicken with olive oil, lemon zest, garlic, oregano, salt, and pepper. Let it sit for 15 minutes if you have the time.
- Heat a skillet over medium-high heat and cook the thighs for 5 to 6 minutes per side until browned and the internal temperature reaches 165°F (74°C).
- Toss the cucumbers, tomatoes, onion, parsley, red wine vinegar, and a pinch of salt in a bowl.
- Serve the chicken alongside the salad and spoon any pan juices over the top.
Equipment for This Recipe:
- Large skillet
- Mixing bowl
- Tongs
- Cutting board
How to Serve This Dish: Plate the chicken first, then heap the salad next to it so the juices do not drown the vegetables. A few olives or a crumble of feta can go on top if you want the Greek feel to lean harder.
Pro Tips for This Recipe:
- Salt the cucumber salad only right before serving or it starts to leak water.
- Thighs brown best when the pan is hot enough to sizzle the moment they land.
- If the chicken pieces are thick, press them lightly with a spatula for even contact.
Variations on This Dish:
- Feta Finish: Add 1/4 cup crumbled feta to the salad.
- Oregano-Lime Change: Swap the lemon for lime if you want a brighter edge.
- Oven-Baked Version: Roast the chicken thighs at 425°F for 20 to 25 minutes instead of pan-searing.
Common Mistakes to Avoid with This Dish:
- Salad made too early: Cucumbers release water fast. Mix them at the end.
- Chicken not browned: If the skillet is too cool, the thighs turn gray instead of golden.
- Too much vinegar: The salad should taste bright, not sharp enough to make your eyes water.
12. Stuffed Bell Peppers with Lentils, Mushrooms, and Feta
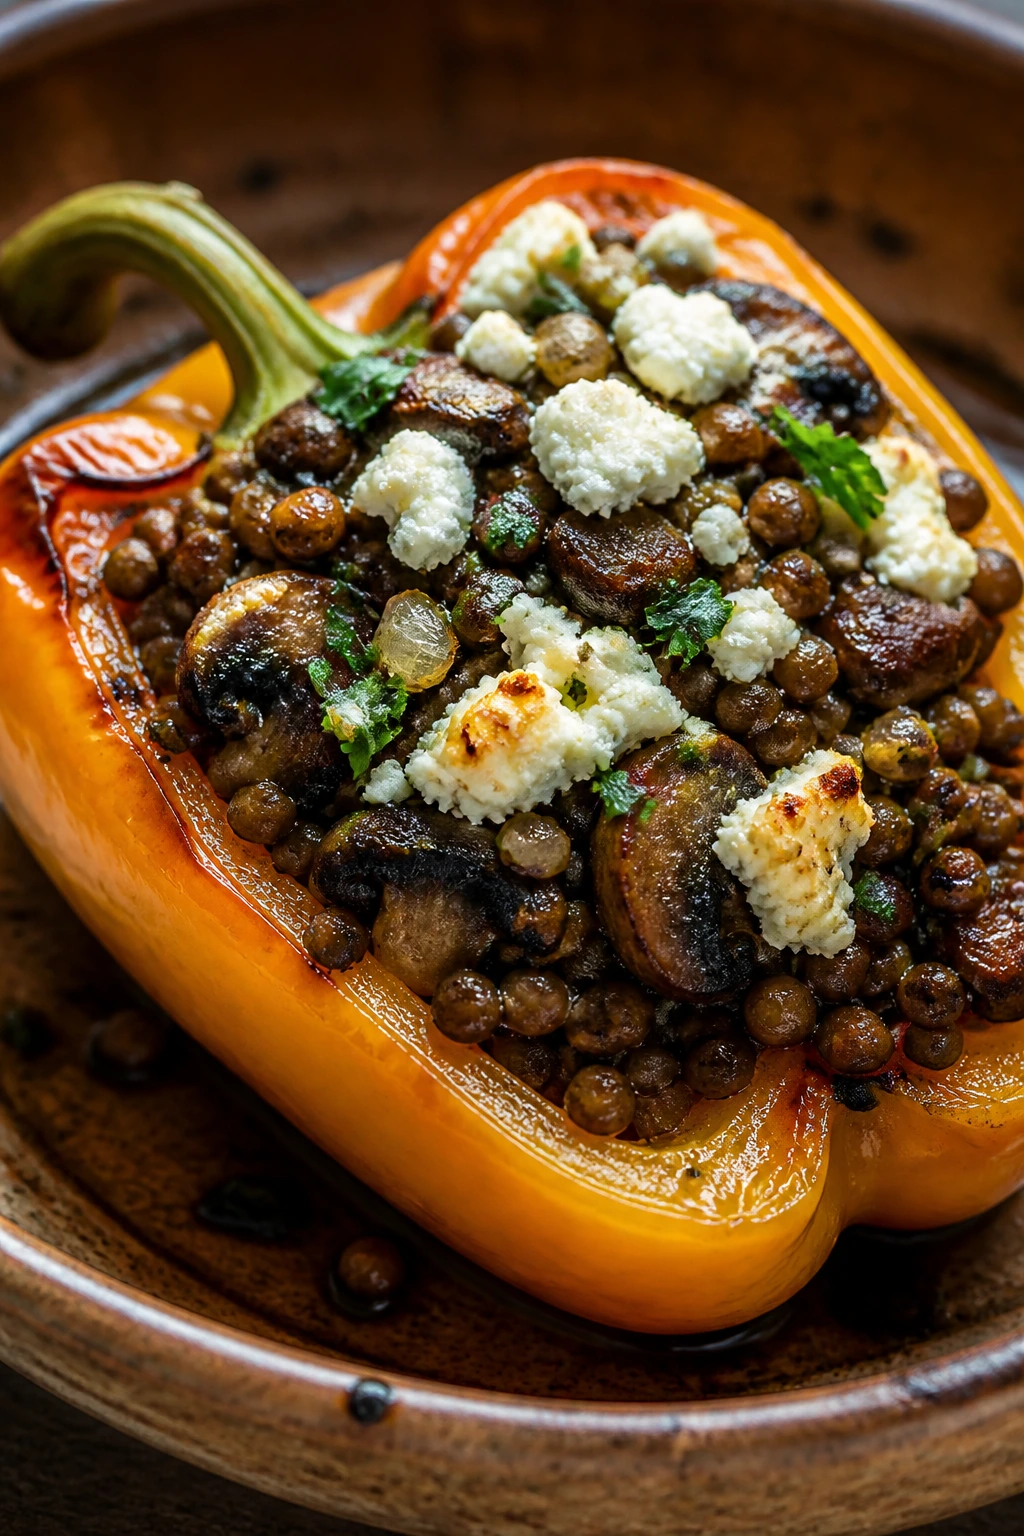
Stuffed peppers get written off because they can be bland or watery. This version fixes both problems with browned mushrooms, earthy lentils, and feta that melts into salty little pockets once the peppers are tender.
Why It Works: Lentils give the filling enough protein and body to stand on its own, and mushrooms bring moisture and depth without making the mixture heavy. Baking the pepper halves before stuffing them keeps the final texture from landing in raw, crunchy territory.
Key Ingredients:
- 4 large bell peppers, halved and seeded
- 1 tbsp olive oil
- 1 small onion, diced
- 8 oz mushrooms, finely chopped
- 2 garlic cloves, minced
- 1 cup cooked brown lentils
- 1 can diced tomatoes, 14.5 oz, drained slightly
- 1 tsp ground cumin
- 1 tsp dried oregano
- 4 cups baby spinach
- 1/2 cup crumbled feta
- 2 tbsp chopped parsley
Quick Steps:
- Preheat the oven to 375°F (190°C).
- Set the pepper halves cut-side up in a baking dish and bake for 10 minutes.
- Heat the olive oil in a skillet. Cook the onion and mushrooms for 6 to 7 minutes until the mushrooms release their water and start to brown.
- Stir in the garlic, lentils, tomatoes, cumin, oregano, and spinach. Cook until the spinach wilts and the filling looks thick, not soupy.
- Spoon the mixture into the peppers, top with feta, and bake for 20 minutes until the peppers are tender.
Equipment for This Recipe:
- Baking dish
- Skillet
- Mixing spoon
- Sharp knife
How to Serve This Dish: Serve two pepper halves per person with a crisp green salad on the side. The pepper itself is the bowl, so keep the extras simple and sharp.
Pro Tips for This Recipe:
- Chop the mushrooms finely so the filling packs tightly into the pepper shells.
- Drain excess liquid from the tomatoes if they look especially wet.
- Add the feta near the end so it softens without disappearing.
Variations on This Dish:
- Southwestern Version: Use cumin, black beans, and a little diced green chile.
- No-Feta Option: Finish with chopped olives and parsley instead.
- Quinoa-Lentil Mix: Replace half the lentils with cooked quinoa for a lighter texture.
Common Mistakes to Avoid with This Dish:
- Watery filling: The mushroom mixture needs to cook down before stuffing.
- Peppers underbaked: If they’re still stiff, they won’t taste finished.
- Overstuffing: Leave a little room at the top so the filling can heat through.
13. White Bean Chicken Soup with Kale and Lemon
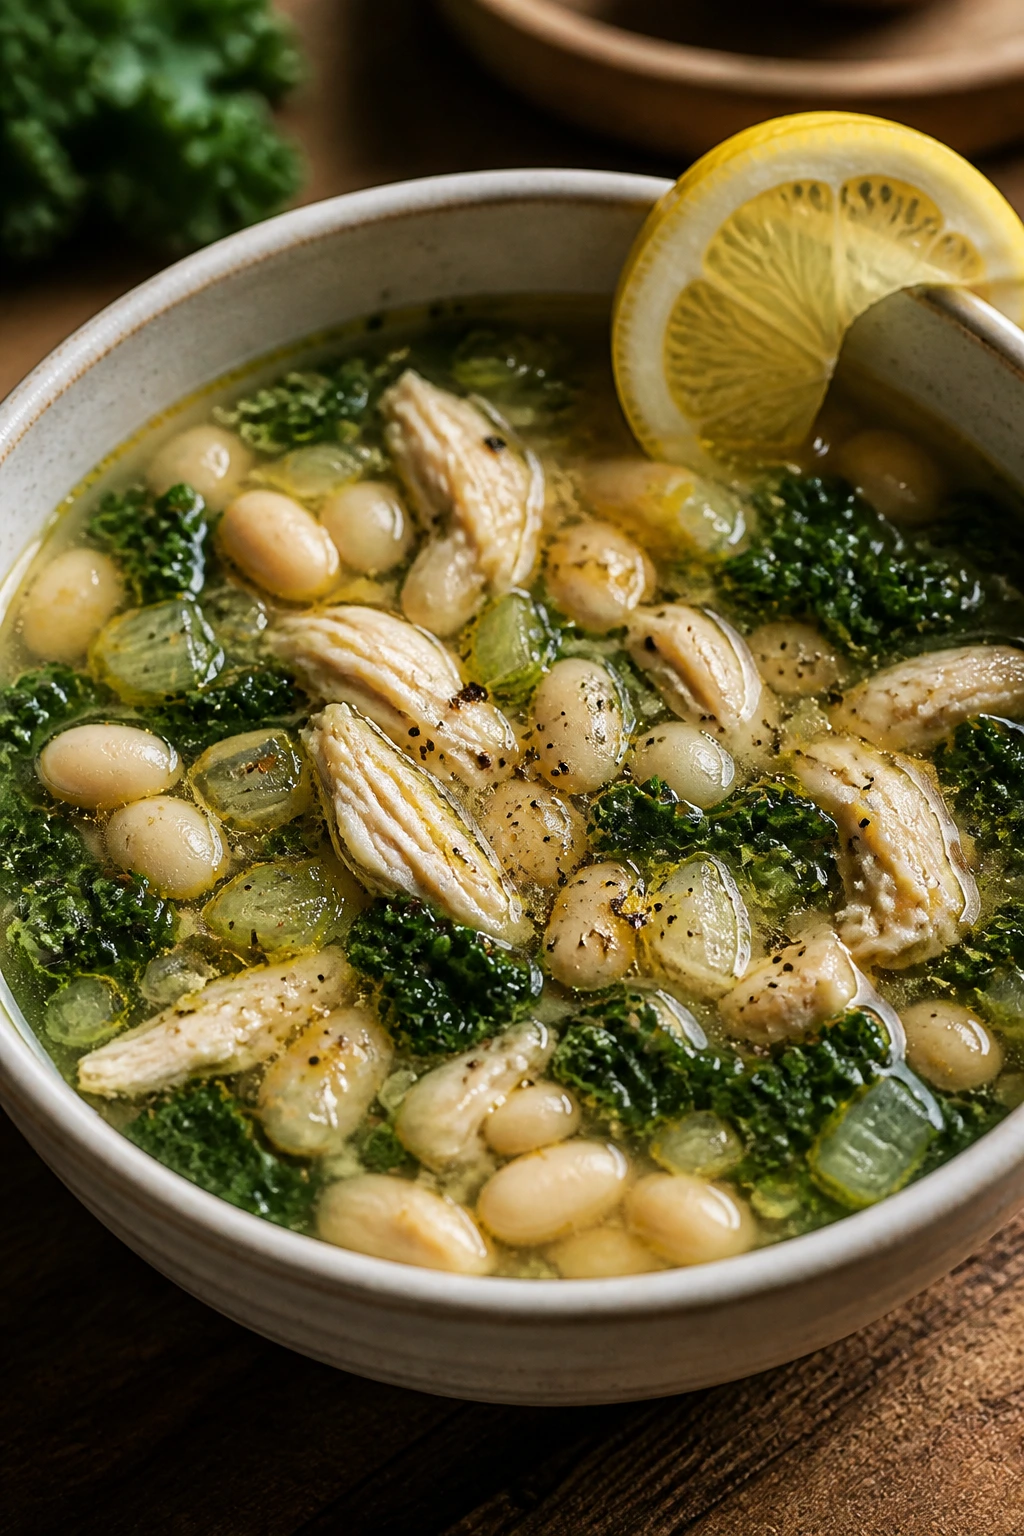
This soup has the clean, quiet kind of comfort I always trust. The broth turns savory from the chicken and beans, the kale keeps some edge, and the lemon at the end stops it from tasting like a heavy winter bowl even when it’s the only thing on the table.
Why It Works: White beans add body and protein without needing cream, and kale holds up better than spinach if the soup sits for a while. A final squeeze of lemon sharpens the broth and makes the carrots and celery taste more like themselves.
Key Ingredients:
- 1 lb boneless chicken breasts or thighs
- 1 tbsp olive oil
- 1 onion, diced
- 2 carrots, diced
- 2 celery stalks, diced
- 3 garlic cloves, minced
- 6 cups low-sodium chicken broth
- 2 cans cannellini beans, drained and rinsed
- 4 cups chopped kale
- 1 bay leaf
- 1 tsp dried thyme
- 1 lemon, juiced
- 1 tsp kosher salt
- 1/2 tsp black pepper
Quick Steps:
- Heat the olive oil in a Dutch oven over medium heat. Cook the onion, carrots, and celery for 6 minutes until the onion turns translucent.
- Stir in the garlic and thyme for 30 seconds.
- Add the broth, chicken, beans, bay leaf, salt, and pepper. Bring to a boil, then lower to a gentle simmer.
- Cook for 15 to 20 minutes, until the chicken reaches 165°F (74°C). Remove the chicken, shred it, and return it to the pot.
- Stir in the kale and lemon juice. Simmer for 2 to 3 minutes until the kale softens.
Equipment for This Recipe:
- Dutch oven or large soup pot
- Ladle
- Sharp knife
- Cutting board
How to Serve This Dish: Ladle it into bowls with a little extra lemon at the table. If you want a side, a slice of toasted whole-grain bread or a plain salad keeps the meal from feeling repetitive.
Pro Tips for This Recipe:
- Add the kale at the end so it stays green and a little chewy.
- If the broth tastes flat, it usually needs more salt before it needs more herbs.
- Thighs make a slightly richer soup, but breasts shred neatly if you want a cleaner texture.
Variations on This Dish:
- Tomato-Free Version: Keep the broth clear and lean into lemon and thyme.
- Turkey Swap: Use diced cooked turkey in place of chicken.
- Parmesan Finish: Add a small Parmesan rind to the simmer if you want deeper savory flavor.
Common Mistakes to Avoid with This Dish:
- Boiling too hard: The chicken dries out and the broth turns cloudy.
- Kale added too soon: It loses color and texture.
- Underseasoned beans: White beans need salt to taste like much of anything.
14. Sirloin with Mushroom Pan Sauce and Cauliflower Mash
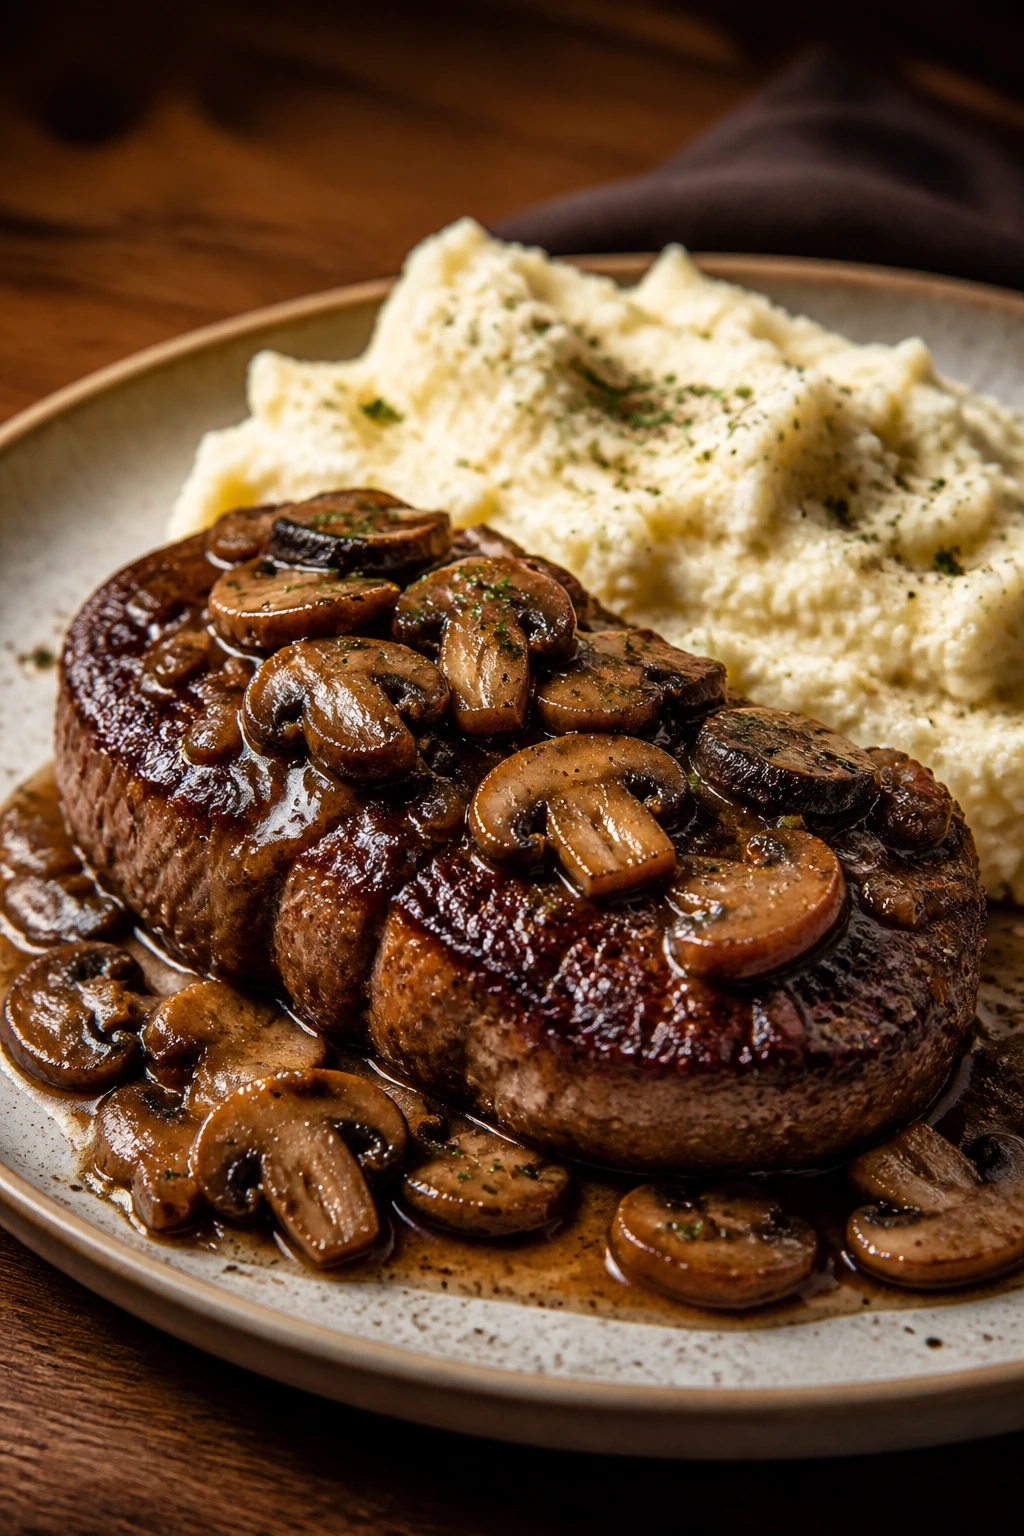
This is the dinner that proves clean eating doesn’t need to mean small or fussy. The steak sears hard, the mushrooms collapse into a glossy pan sauce, and the cauliflower mash gives you a soft landing without the starch overload.
Why It Works: Sirloin cooks fast and slices well if you let it rest, while cauliflower mash scratches the same creamy itch as potatoes with fewer ingredients. Mushrooms and onions build a pan sauce from the browned bits, which is where the real flavor lives.
Key Ingredients:
- 1 1/4 lb sirloin steaks, about 1 inch thick
- 1 head cauliflower, cut into florets
- 8 oz mushrooms, sliced
- 1 small onion, sliced
- 2 tbsp olive oil
- 2 tbsp plain Greek yogurt
- 1 tsp fresh thyme leaves
- 1 tsp kosher salt
- 1/2 tsp black pepper
- 1 tbsp butter or extra olive oil, optional
Quick Steps:
- Steam or boil the cauliflower until very tender, about 10 to 12 minutes.
- Heat 1 tbsp olive oil in a skillet over medium-high heat. Sear the steaks for 3 to 4 minutes per side for medium-rare, or until they reach your preferred doneness. Transfer to a plate and rest.
- Add the remaining oil, mushrooms, and onion to the same pan. Cook for 6 to 8 minutes until browned and soft. Stir in the thyme and 2 tablespoons water to loosen the bits from the pan.
- Mash the cauliflower with the Greek yogurt, salt, pepper, and optional butter.
- Slice the steak against the grain and spoon the mushroom sauce over the top.
Equipment for This Recipe:
- Heavy skillet
- Pot or steamer basket
- Potato masher or food processor
- Sharp slicing knife
How to Serve This Dish: Spoon the cauliflower mash onto plates first, then add sliced steak and mushroom sauce over one side. A handful of roasted green beans or a sharp arugula salad works beside it if you want something green and crisp.
Pro Tips for This Recipe:
- Dry the steak well before searing. Moisture is the enemy of that crust.
- Don’t overblend the cauliflower; it can turn gluey if you beat it too long.
- Let the steak rest for 5 minutes so the juices stay in the meat instead of on the board.
Variations on This Dish:
- Garlic-Chive Mash: Stir chopped chives and roasted garlic into the cauliflower.
- Dairy-Free Finish: Use olive oil instead of yogurt and butter.
- Peppercorn Style: Add cracked pepper and a teaspoon of Dijon to the mushroom pan sauce.
Common Mistakes to Avoid with This Dish:
- Watery mash: Drain the cauliflower very well before mashing.
- Steak sliced too soon: The juices run out and the meat feels dry.
- Mushrooms left pale: They need real browning to taste deep.
15. Miso Ginger Tempeh with Bok Choy and Mushrooms
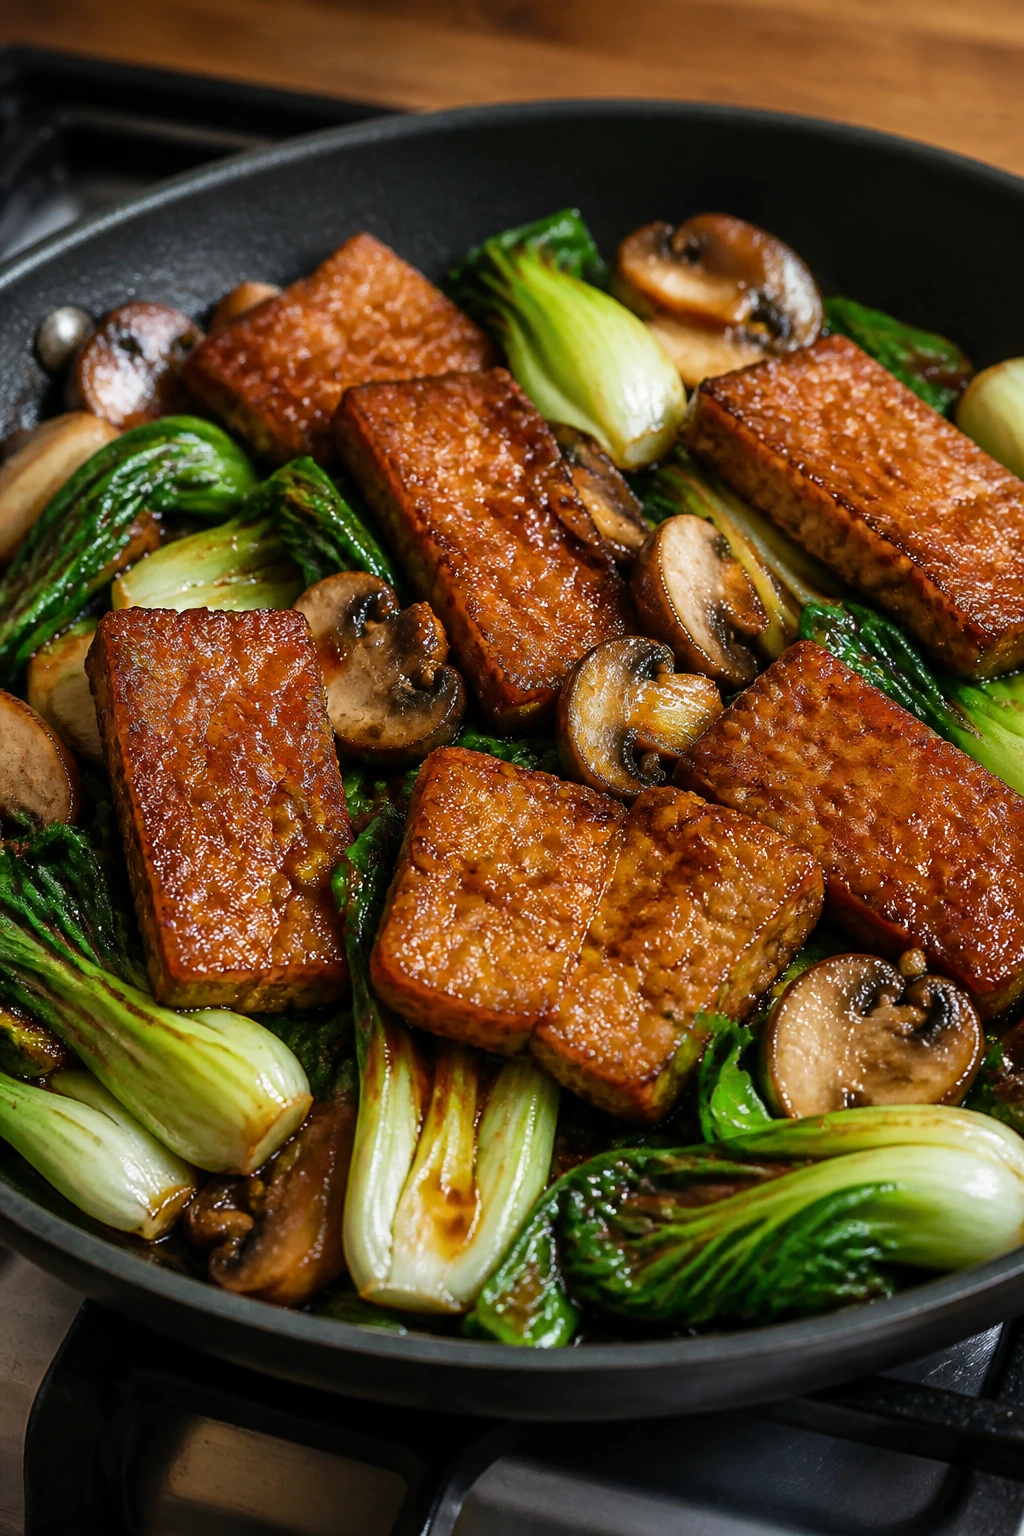
Tempeh gets better once you stop treating it like tofu’s awkward cousin. Steam it, sear it, and put it next to bok choy and mushrooms that soak up the miso-ginger glaze, and the whole skillet turns savory in a clean, steady way.
Why It Works: Tempeh has a denser texture and a slightly nutty flavor, so it needs a little steam before frying to mellow the bitterness. Bok choy cooks fast, mushrooms deepen the sauce, and miso adds a salty backbone without extra heavy ingredients.
Key Ingredients:
- 8 oz tempeh, sliced into strips or cubes
- 4 baby bok choy, halved lengthwise
- 8 oz mushrooms, sliced
- 1 tbsp sesame oil
- 1 tbsp avocado oil
- 1 tbsp white miso
- 1 tbsp tamari
- 1 tbsp rice vinegar
- 1 tbsp grated fresh ginger
- 2 garlic cloves, minced
- 1 tbsp sesame seeds
- 2 scallions, sliced
Quick Steps:
- Steam the tempeh for 5 minutes, then pat it dry.
- Heat the avocado oil in a skillet over medium-high heat and sear the tempeh for 4 to 5 minutes per side until golden.
- Add the mushrooms and bok choy, cut side down. Cook for 4 to 5 minutes until the bok choy edges blister and the mushrooms soften.
- Stir the miso, tamari, rice vinegar, ginger, garlic, and 2 tablespoons warm water together. Pour the sauce into the pan and toss for 1 minute.
- Finish with sesame oil, sesame seeds, and scallions.
Equipment for This Recipe:
- Large skillet
- Steamer basket or pot
- Small bowl for the sauce
- Spatula
How to Serve This Dish: Serve it over rice if you want a fuller bowl, or keep it low-carb with shredded cabbage underneath. The sauce should coat the tempeh lightly, not flood the plate.
Pro Tips for This Recipe:
- Steam tempeh first. That step is not optional if you want a smoother flavor.
- Dissolve the miso in warm water before it hits the pan so it blends instead of clumping.
- Keep the bok choy from overcooking; the stems should still have a little crunch.
Variations on This Dish:
- Tofu Version: Swap tempeh for extra-firm tofu, pressed and cubed.
- Chili Crisp Finish: Add a small spoonful of chili crisp at the table.
- Broccolini Swap: Use broccolini instead of bok choy for a firmer green.
Common Mistakes to Avoid with This Dish:
- Skipping the steam: Tempeh can taste bitter and dry without it.
- Burned miso: Miso should be mixed with water or added off direct heat.
- Soft bok choy: It only needs a few minutes, not a long braise.
16. Mediterranean Tuna and White Bean Skillet
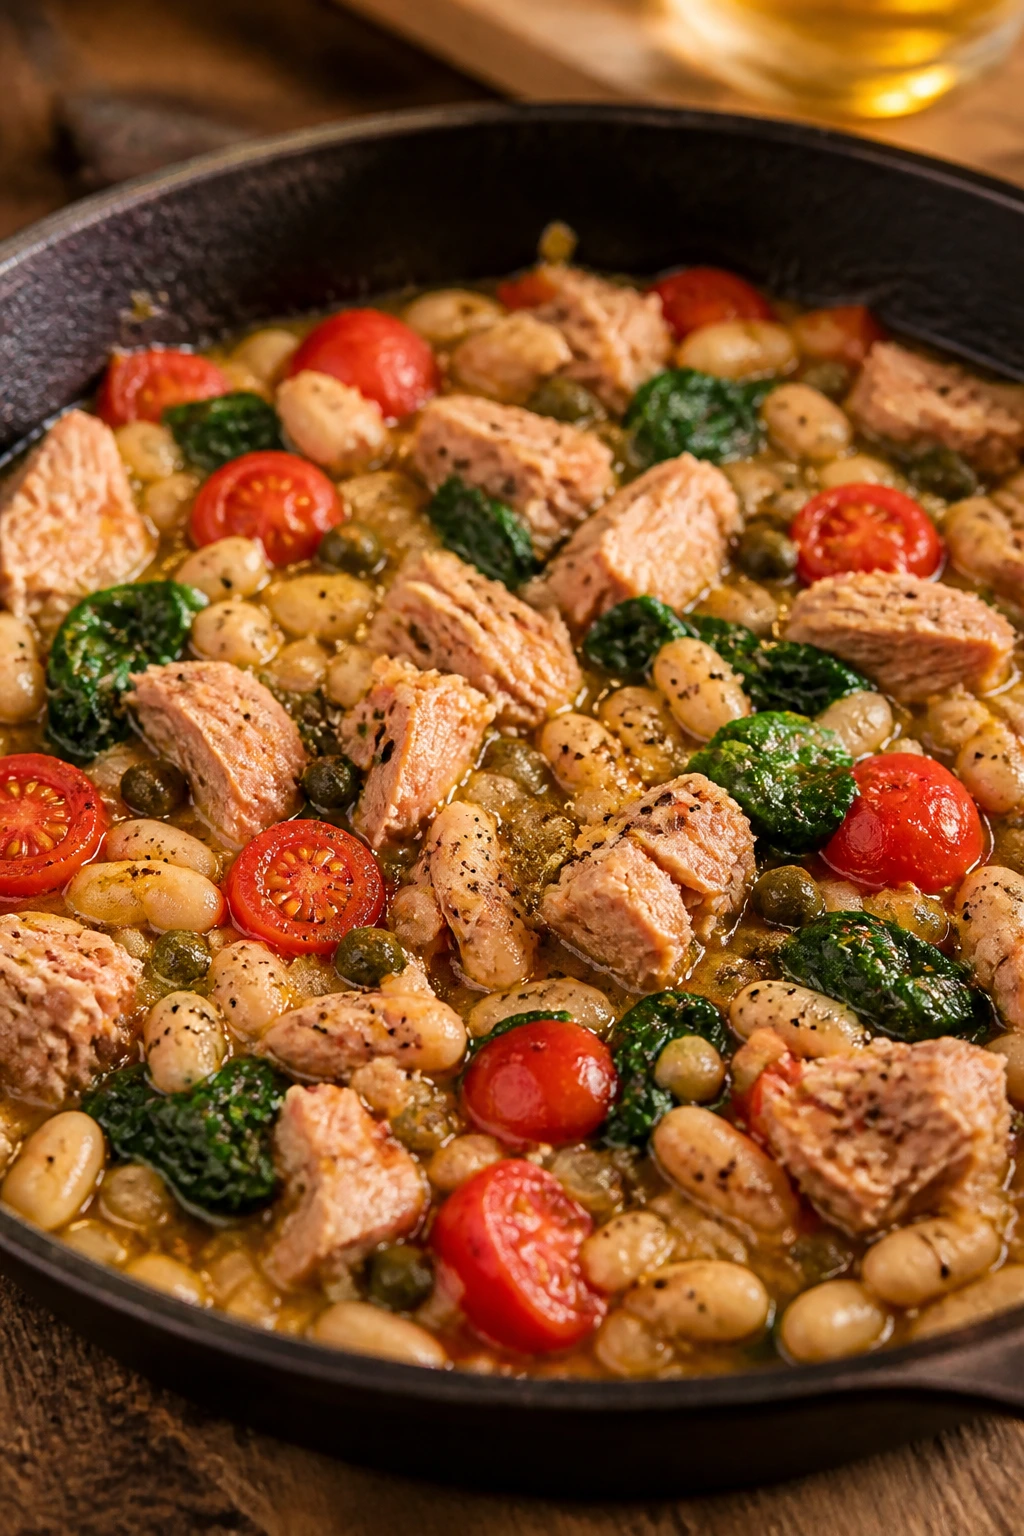
This is pantry food that does not taste like pantry food. The tomatoes burst, the beans warm through, the tuna stays in big tender pieces, and the whole skillet tastes like it had more effort behind it than it did.
Why It Works: Tuna and white beans give the dish enough protein to stand alone, while tomatoes and capers bring the salt and acid that canned fish likes so much. Baby spinach folds in at the end and disappears just enough to make the skillet look fuller.
Key Ingredients:
- 2 cans tuna in water, 5 oz each, drained
- 2 cans cannellini beans, drained and rinsed
- 1 pint cherry tomatoes, halved
- 2 cups baby spinach
- 2 tbsp olive oil
- 2 garlic cloves, minced
- 1 tsp dried oregano
- 1 tbsp capers
- 1 lemon, juiced
- 1/4 cup chopped parsley
- 1/2 tsp black pepper
Quick Steps:
- Warm the olive oil in a skillet over medium heat. Add the garlic and cook for 20 to 30 seconds.
- Add the tomatoes, capers, oregano, and black pepper. Cook for 4 to 5 minutes until the tomatoes blister and release some juices.
- Stir in the beans and cook for 2 minutes until hot.
- Fold in the tuna in large chunks and the spinach. Cook for 1 minute, just until the spinach wilts.
- Finish with lemon juice and parsley.
Equipment for This Recipe:
- Large skillet
- Wooden spoon
- Can opener
- Colander
How to Serve This Dish: Serve it with cucumber slices, roasted zucchini, or a small pile of arugula. If you want bread, go light — the skillet is the main event.
Pro Tips for This Recipe:
- Keep the tuna in chunks instead of stirring it into paste.
- Use oil-packed tuna if you want a richer result, but drain it well.
- If the skillet looks dry, add 2 tablespoons water before the beans go in.
Variations on This Dish:
- Olive Tapenade Version: Add chopped olives with the capers.
- Spicy Harissa Spoon: Stir in 1 teaspoon harissa paste with the tomatoes.
- Pasta Swap: Toss the finished skillet with cooked whole-wheat pasta if you want more carbs.
Common Mistakes to Avoid with This Dish:
- Tuna broken into mush: Stir gently.
- Too much salt from capers and canned tuna: Taste before salting.
- Spinach added too early: It needs only a minute.
17. Chickpea Shakshuka with Spinach

Shakshuka has a way of looking like it took longer than it did. The tomato sauce thickens, the eggs set in little white rings, and the chickpeas make the pan feel grounded enough that you can call it lunch or dinner without apology.
Why It Works: Eggs cook beautifully in a thick tomato base, and chickpeas add protein so the dish eats like a full meal. Spinach wilts in at the end and gives the sauce a softer feel without watering it down.
Key Ingredients:
- 1 tbsp olive oil
- 1 onion, diced
- 1 red bell pepper, diced
- 3 garlic cloves, minced
- 1 tbsp tomato paste
- 1 can crushed tomatoes, 28 oz
- 1 can chickpeas, drained and rinsed
- 4 cups baby spinach
- 6 large eggs
- 1 tsp ground cumin
- 1 tsp smoked paprika
- 3/4 tsp kosher salt
- 1/2 tsp black pepper
- Chopped parsley for serving
Quick Steps:
- Heat the olive oil in a large skillet over medium heat. Cook the onion and red pepper for 6 to 8 minutes until soft.
- Stir in the garlic, tomato paste, cumin, and smoked paprika for 30 seconds.
- Add the crushed tomatoes, chickpeas, salt, and pepper. Simmer for 10 to 12 minutes until the sauce thickens.
- Stir in the spinach until just wilted.
- Make 6 little wells in the sauce, crack in the eggs, cover, and cook for 6 to 8 minutes until the whites set and the yolks stay soft.
Equipment for This Recipe:
- Large skillet with lid
- Wooden spoon
- Can opener
- Spoon for making wells
How to Serve This Dish: Bring the skillet to the table and scatter parsley over the top. It wants something to scoop with — toasted whole-grain bread, flatbread, or crisp cucumber slices all work.
Pro Tips for This Recipe:
- Keep the sauce thick before adding the eggs, or the whites spread too far.
- Crack each egg into a small bowl first if you want more control.
- Cover the skillet only after the eggs are in. Before that, the sauce needs to reduce.
Variations on This Dish:
- Feta Finish: Crumble feta over the top right before serving.
- Harissa Heat: Add 1 teaspoon harissa paste with the spices.
- Green Shakshuka Direction: Use extra spinach and parsley and cut the tomatoes back slightly for a greener pan.
Common Mistakes to Avoid with This Dish:
- Runny tomato base: The eggs won’t sit where you place them.
- Overcooked yolks: Pull the lid as soon as the whites set if you want soft centers.
- Undersalted sauce: Tomatoes need more salt than people expect.
18. Chicken Cabbage Stir-Fry with Peanut-Lime Sauce
Cabbage is underrated in stir-fries because it stays crisp longer than softer greens and costs less than most salad bases. Toss it with chicken, carrots, and a peanut-lime sauce that tastes bright instead of heavy, and the whole pan suddenly feels very useful.
Why It Works: Chicken pieces cook fast in a hot skillet, cabbage gives you volume without a lot of starch, and the peanut-lime sauce brings fat, acid, and salt in a balanced way. It’s the kind of meal that tastes even better once the vegetables are lightly wilted and glossy.
Key Ingredients:
- 1 1/2 lb boneless chicken thighs or breasts, sliced
- 6 cups shredded green cabbage
- 2 carrots, julienned or shredded
- 1 red bell pepper, sliced
- 2 tbsp avocado oil
- 3 tbsp natural peanut butter
- 2 tbsp lime juice
- 2 tbsp tamari
- 1 tbsp water
- 1 tsp grated ginger
- 1 tsp honey, optional
- 1 garlic clove, minced
- 2 scallions, sliced
Quick Steps:
- Whisk the peanut butter, lime juice, tamari, water, ginger, honey if using, and garlic in a small bowl.
- Heat the avocado oil in a large skillet over medium-high heat. Cook the chicken for 5 to 6 minutes until browned and cooked through to 165°F (74°C). Remove it.
- Add the cabbage, carrots, and bell pepper. Stir-fry for 4 to 5 minutes until the cabbage softens but still has crunch.
- Return the chicken to the skillet and pour in the sauce. Toss for 1 minute until coated.
- Finish with scallions.
Equipment for This Recipe:
- Large skillet or wok
- Small bowl for sauce
- Tongs
- Sharp knife
How to Serve This Dish: Serve it in bowls with extra lime wedges. If you want crunch, chopped peanuts or sesame seeds on top make the dish feel finished fast.
Pro Tips for This Recipe:
- Thin the peanut sauce with warm water if it thickens too much before it hits the skillet.
- Shred the cabbage finely so it cooks evenly.
- Add scallions at the very end so they stay sharp.
Variations on This Dish:
- Sunflower Butter Swap: Use sunflower seed butter if peanuts are out.
- Thai Basil Version: Add a handful of basil leaves at the end for a fresher finish.
- No-Honey Savory Bowl: Leave the honey out and lean on extra lime for balance.
Common Mistakes to Avoid with This Dish:
- Sauce too thick: It should coat, not cement the vegetables.
- Cabbage overcooked: It turns limp fast if you forget it on the stove.
- Chicken cut too large: Smaller pieces cook faster and stay juicier.
19. Garlic Rosemary Lamb Chops with Roasted Cauliflower and Broccoli
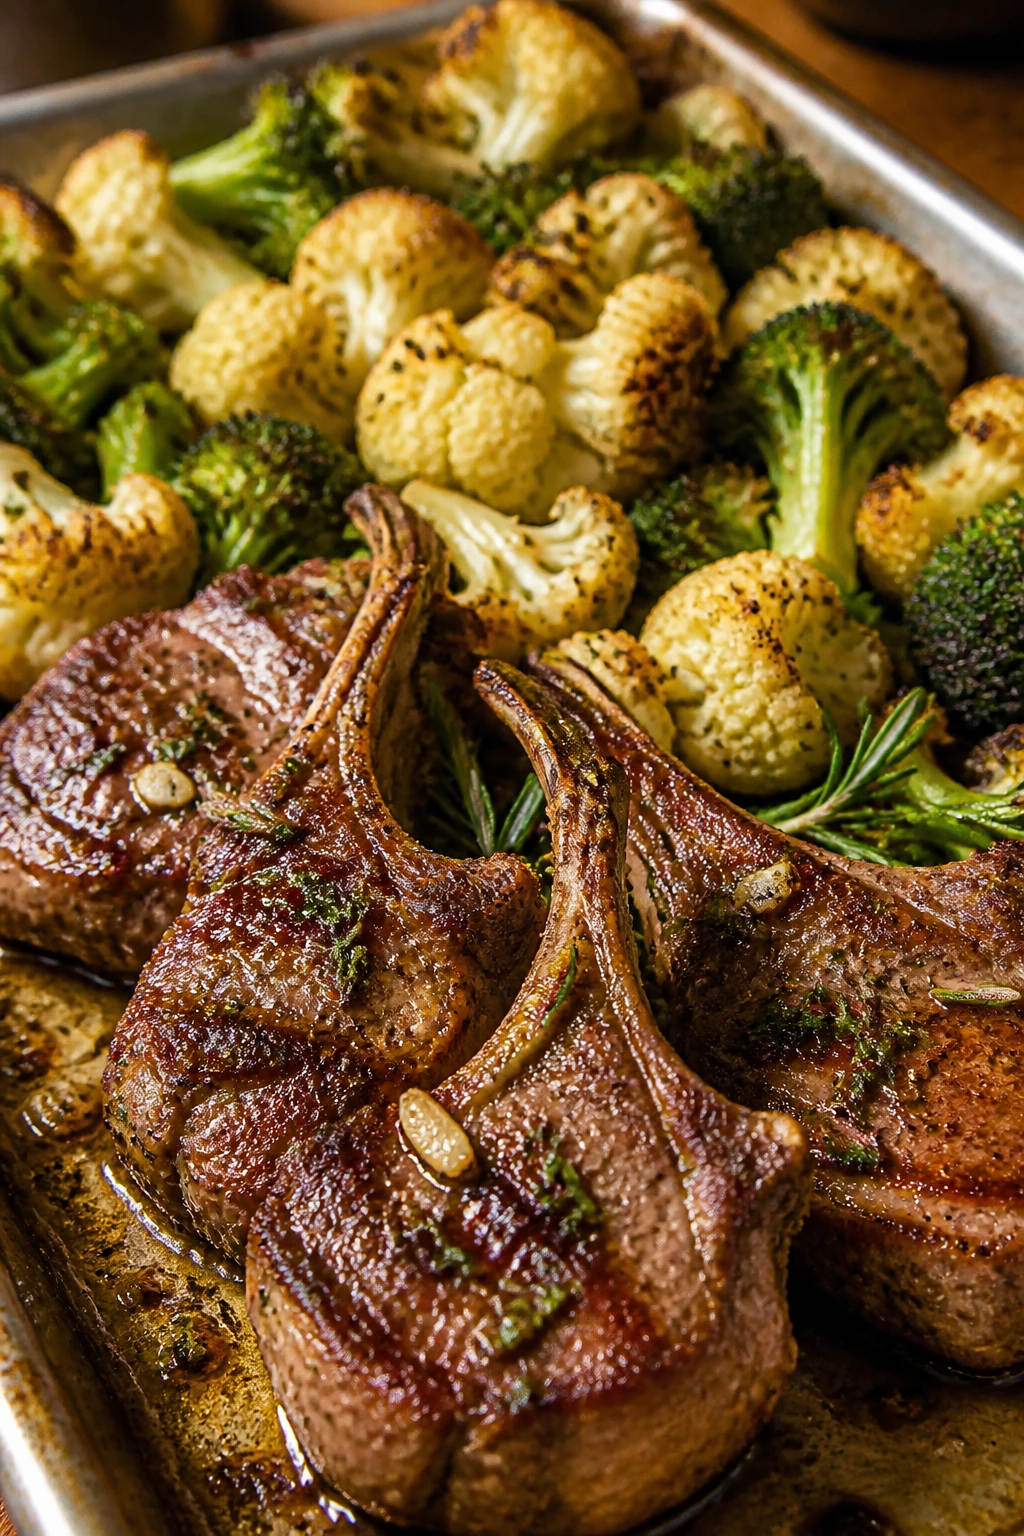
Lamb can feel fancy without actually being complicated. The chops sear quickly, the rosemary and garlic get into the edges, and the cauliflower and broccoli roast on the same tray until they pick up browned spots that make the plate feel complete.
Why It Works: Lamb chops cook fast, which makes them a good match for vegetables that need a strong oven blast. Cauliflower and broccoli both brown well at high heat, and lemon at the end keeps the richer meat from feeling too dense.
Key Ingredients:
- 8 lamb chops, about 2 lb total
- 1 head cauliflower, cut into florets
- 1 large broccoli head, cut into florets
- 3 tbsp olive oil
- 3 garlic cloves, minced
- 2 tsp chopped fresh rosemary
- 1 tsp kosher salt
- 1/2 tsp black pepper
- 1 lemon, cut into wedges
Quick Steps:
- Preheat the oven to 425°F (220°C).
- Toss the cauliflower and broccoli with 2 tbsp olive oil, half the salt, and half the pepper. Roast on a sheet pan for 20 to 25 minutes.
- Meanwhile, rub the lamb chops with the remaining oil, garlic, rosemary, salt, and pepper.
- Sear the chops in a hot skillet for 2 to 3 minutes per side for medium-rare, or until they reach 130°F to 135°F (54°C to 57°C) before resting.
- Serve the lamb with the roasted vegetables and a squeeze of lemon.
Equipment for This Recipe:
- Rimmed sheet pan
- Cast-iron or heavy skillet
- Tongs
- Instant-read thermometer
How to Serve This Dish: Put the vegetables on the plate first, then lay the chops on top or beside them so the meat juices can run into the florets. A simple yogurt-lemon sauce can sit on the side if you want a cool contrast.
Pro Tips for This Recipe:
- Let the lamb sit at room temperature for 15 minutes before cooking.
- Don’t move the chops too soon in the skillet. They need contact time to develop a crust.
- Cut the cauliflower florets into similar sizes so the tray cooks evenly.
Variations on This Dish:
- Minty Lemon Finish: Add chopped mint over the chops right before serving.
- Garlic-Lemon Only: Skip the rosemary if you want a sharper, less herbal flavor.
- Pork Chop Swap: Use thick pork chops and cook them to 145°F (63°C).
Common Mistakes to Avoid with This Dish:
- Lamb overcooked: It gets tough fast. Use a thermometer.
- Vegetables crowded on the tray: They steam instead of roasting.
- No rest after searing: The juices need a few minutes to settle.
20. Spicy Turkey Lettuce Wraps with Water Chestnuts and Carrots
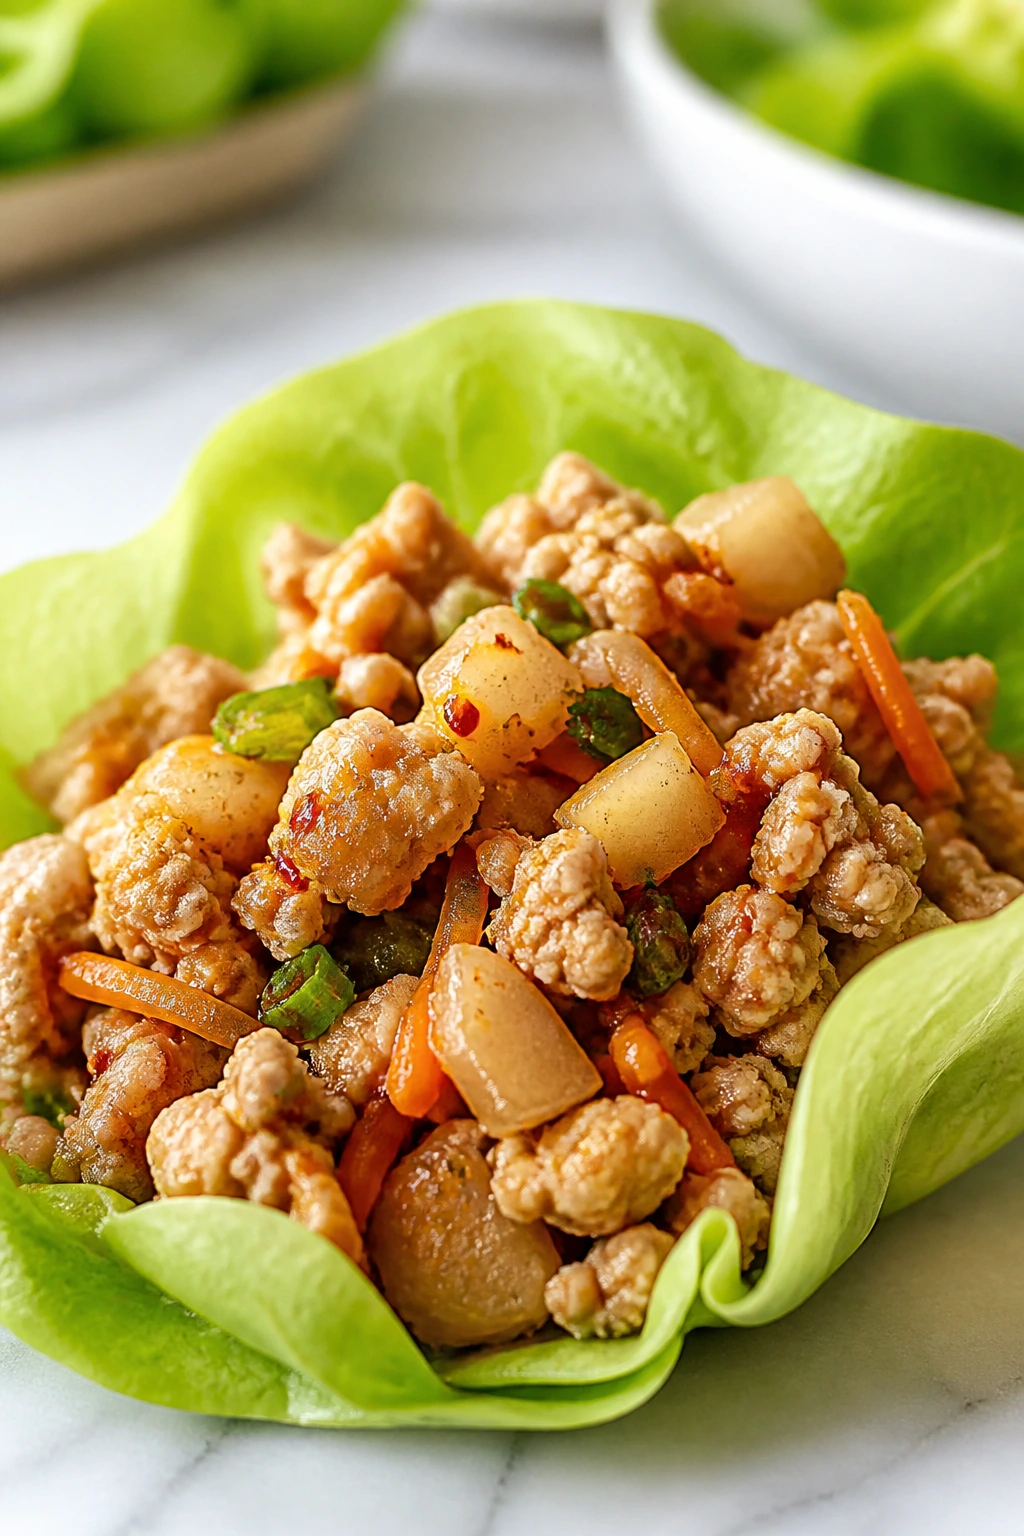
These wraps are the meal I reach for when I want crunch more than comfort. The turkey stays savory, the water chestnuts keep their snap, and the lettuce does the job of a tortilla without stealing any attention.
Why It Works: Ground turkey takes on ginger, garlic, and tamari fast, and the chopped vegetables give the filling texture so it doesn’t collapse into paste. Butter lettuce leaves are sturdy enough to hold the mixture, but still soft enough to fold without tearing.
Key Ingredients:
- 1 lb ground turkey
- 1 tbsp sesame oil
- 1 small onion, diced
- 2 garlic cloves, minced
- 1 tbsp grated fresh ginger
- 1 cup water chestnuts, chopped
- 1 cup shredded carrots
- 1 cup finely chopped mushrooms
- 2 tbsp tamari
- 1 tbsp rice vinegar
- 1 tsp chili garlic sauce
- 1 head butter lettuce, leaves separated and dried
- 2 scallions, sliced
- 1 tbsp chopped cilantro
- 1 tsp sesame seeds
Quick Steps:
- Heat the sesame oil in a large skillet over medium heat. Cook the onion for 2 to 3 minutes until softened.
- Add the turkey and cook for 5 to 6 minutes, breaking it up until no pink remains.
- Stir in the garlic, ginger, water chestnuts, carrots, and mushrooms. Cook for 3 to 4 minutes until the vegetables soften slightly but keep their texture.
- Add the tamari, rice vinegar, and chili garlic sauce. Stir for 1 minute until the filling is glossy and well coated.
- Spoon the mixture into the lettuce leaves and finish with scallions, cilantro, and sesame seeds.
Equipment for This Recipe:
- Large skillet
- Wooden spoon
- Salad spinner or towels for drying lettuce
- Serving platter
How to Serve This Dish: Set the lettuce cups on a platter and put the filling in a bowl at the center. That way everyone can build their own wraps, which keeps the leaves from getting soggy before the second round.
Pro Tips for This Recipe:
- Dry the lettuce leaves well. Water makes the wraps slip apart.
- Chop the vegetables finely so each bite fits neatly inside a leaf.
- If the filling seems wet, cook it for another minute to evaporate the extra liquid.
Variations on This Dish:
- Mild Ginger Version: Skip the chili garlic sauce and add a little extra rice vinegar.
- Cashew Crunch Version: Top with chopped roasted cashews for extra texture.
- Rice Bowl Option: Spoon the filling over cauliflower rice or shredded cabbage if you want a sturdier base.
Common Mistakes to Avoid with This Dish:
- Wet lettuce leaves: They tear and slide. Dry them completely.
- Turkey filling too loose: Cook off the liquid before serving.
- Leaves overfilled: Two spoonfuls is plenty; anything more becomes a collapse waiting to happen.
Why Protein and Vegetable Meals Work So Well on One Plate
Protein and vegetables work because the plate has a job to do, and each part of the meal plays a different one. Protein brings the staying power. Vegetables bring texture, color, and the fresh edge that keeps a dinner from tasting flat after the third bite.
The best clean eating meals are not built around denial. They’re built around contrast. Crisp broccoli next to juicy chicken. Silky salmon beside sharp asparagus. A soft egg set into thick tomato sauce. Those pairings work because one ingredient carries heat while the other brings lift, and the whole plate tastes more complete when the textures are different.
I also like how forgiving this style of cooking can be. A roast tray needs one temperature, then a few timing adjustments for what cooks faster. A skillet lets you pull the protein off the heat and finish the vegetables in the same fat. A soup takes longer, but it rewards you with leftovers that actually improve overnight. Once you understand those patterns, the food stops feeling like a list of rules.
There’s a practical bonus too: when your dinner is built from a protein and two vegetables, it becomes easier to scale, batch, and shop without waste. You don’t need a different system for every meal. You need a hot pan, a sharp knife, and enough attention to stop cooking when the food looks and smells right.
Essential Equipment for These Recipes
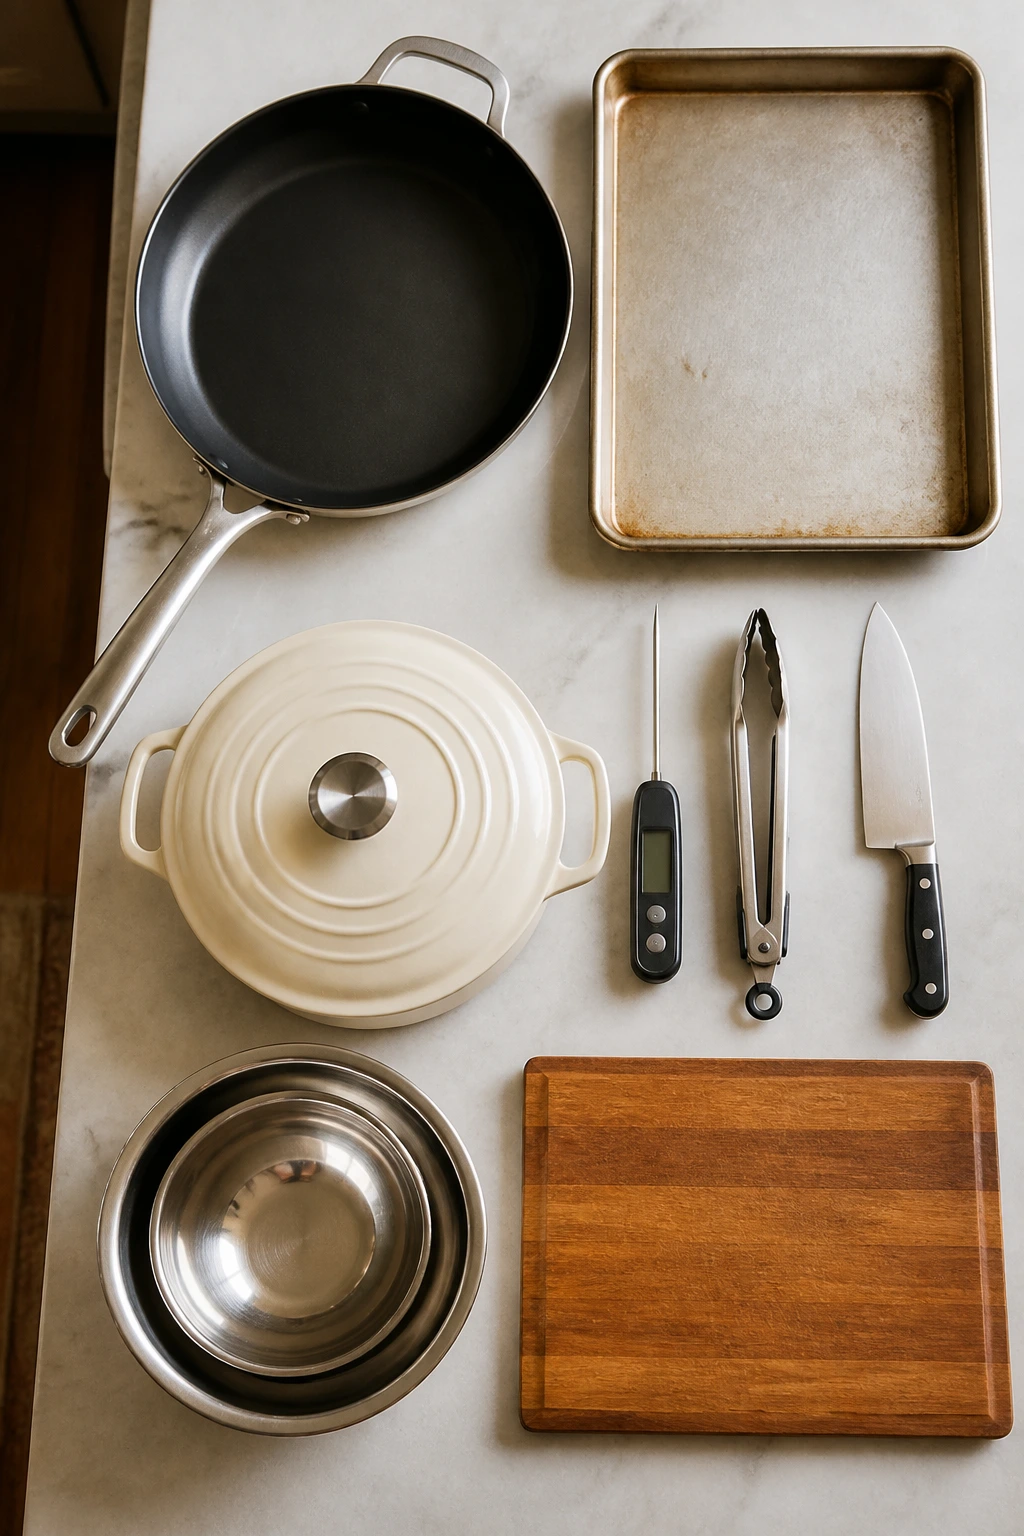
- 12-inch skillet: The workhorse pan for chicken, turkey, tofu, shrimp, and stir-fries. A heavy bottom helps keep the heat steady.
- Rimmed sheet pans: Useful for salmon, pork tenderloin, fajitas, and roasted vegetables. The rim catches juices so they don’t run into the oven.
- Dutch oven or large soup pot: Best for the chicken soup and shakshuka-style tomato dishes. It holds heat well and gives you room to simmer.
- Instant-read thermometer: This is the one tool that saves lean proteins from drying out. Chicken should hit 165°F (74°C), pork 145°F (63°C), and fish should flake cleanly.
- Tongs: Handy for flipping chicken, beef, pork, and tofu without tearing them apart.
- Sharp chef’s knife: Clean slices matter with peppers, onions, cabbage, and beef. Dull knives crush vegetables and slow you down.
- Cutting board: A large one gives you room to work with raw protein and vegetables without making a mess.
- Mixing bowls: You’ll want at least two, one for marinades or sauces and one for the chopped vegetables.
- Microplane or fine grater: Good for lemon zest, garlic, ginger, and hard cheese if you use it.
- Colander or salad spinner: Especially useful for rinsing beans and drying lettuce leaves before wraps.
Smart Shopping and Ingredient Tips for Clean Eating Meals
Choose protein by how it behaves in the pan, not by habit. Chicken breasts should be even in thickness or sliced into cutlets so the edges don’t dry out before the middle cooks. Chicken thighs are more forgiving and a little richer, which makes them a smart pick when you want less fuss. Ground turkey works best at 93% lean; 99% lean can go dry and crumbly without much warning.
Fish needs a different eye. Salmon should look moist and firm, not chalky around the edges. Cod should be thick enough that the flakes hold together when you move it. Shrimp should smell clean, not fishy, and the shells or flesh should look glossy. If seafood is packed in a way that makes you hesitate, skip it.
Vegetables deserve the same attention. Broccoli florets should be tight and deep green. Brussels sprouts should feel dense, not spongy. Zucchini should be firm, with skin that still looks smooth. Kale should have crisp leaves and stout stems. If you’re using frozen cauliflower rice, peas, or green beans, thaw them first and pat them dry so they do not dump extra water into the pan.
Pantry items matter more than people think. Low-sodium broth gives you control. No-sugar-added marinara keeps turkey meatballs from tasting sweet. Salsa should taste like tomatoes, onions, and heat, not corn syrup. Tamari or low-sodium soy sauce helps stir-fries stay savory without turning salty after a short simmer. A good lemon or lime can lift a whole meal; a dull one can flatten it.
How to Serve These Recipes

Presentation: Keep the protein visible. Slice chicken, pork, or steak before plating so the browned edges show, then tuck the vegetables beside or under it instead of burying them. A wedge of lemon, a few herbs, or a spoonful of sauce on top is usually enough.
Accompaniments: Cauliflower rice, simple green salad, roasted potatoes, quinoa, brown rice, butter lettuce, and toasted whole-grain bread all work across this collection. I’d keep the sides plain and let the main dish carry the flavor. Heavy sides tend to crowd out what makes these meals clean and balanced.
Portions: Most of the meat-based dishes here serve 4, with about 5 to 6 oz of protein per person. Soup runs a little farther if you serve it with a small side salad. For lettuce wraps and bowls, think in layers — protein first, then vegetables, then a small amount of sauce or garnish on top.
Beverage Pairing: Sparkling water with lime, unsweet iced tea, and cold water with cucumber all fit the clean, bright feel of these meals. If you want wine with fish or chicken, a dry white like Sauvignon Blanc or Pinot Grigio stays out of the way. For tomato-heavy dishes, a light red can work too, but keep it simple.
Additional Tips and Flavor Boosters
Flavor Enhancement: Finish cooked protein with acid at the table. Lemon, lime, red wine vinegar, or a splash of rice vinegar wakes up meat and vegetables in a way that salt alone can’t. The food tastes newer, which is probably the easiest upgrade in the whole collection.
Customization: Add crunch where the dish needs it. Toasted sesame seeds, chopped peanuts, sliced scallions, cucumber, avocado, or a handful of herbs can change the whole mood of a meal without turning it into something else. I also like pickled onions on bowls and wraps because they give instant sharpness.
Serving Suggestions: Keep a small bowl of finishing elements on the table — herbs, lemon wedges, sliced chili, yogurt, or feta. People use them more than they admit, and the dish feels less monotone when everyone can adjust the last bite.
Make-It-Yours: If you need dairy-free, lean on tahini, olive oil, or yogurt alternatives where a creamy finish helps. If you want lower carb, use lettuce cups, cabbage, cauliflower rice, or extra roasted vegetables instead of grains. If you want a bigger protein hit, add eggs, beans, or a second lean protein like shrimp alongside chicken or tofu.
Make-Ahead, Storage, and Reheating Guidance
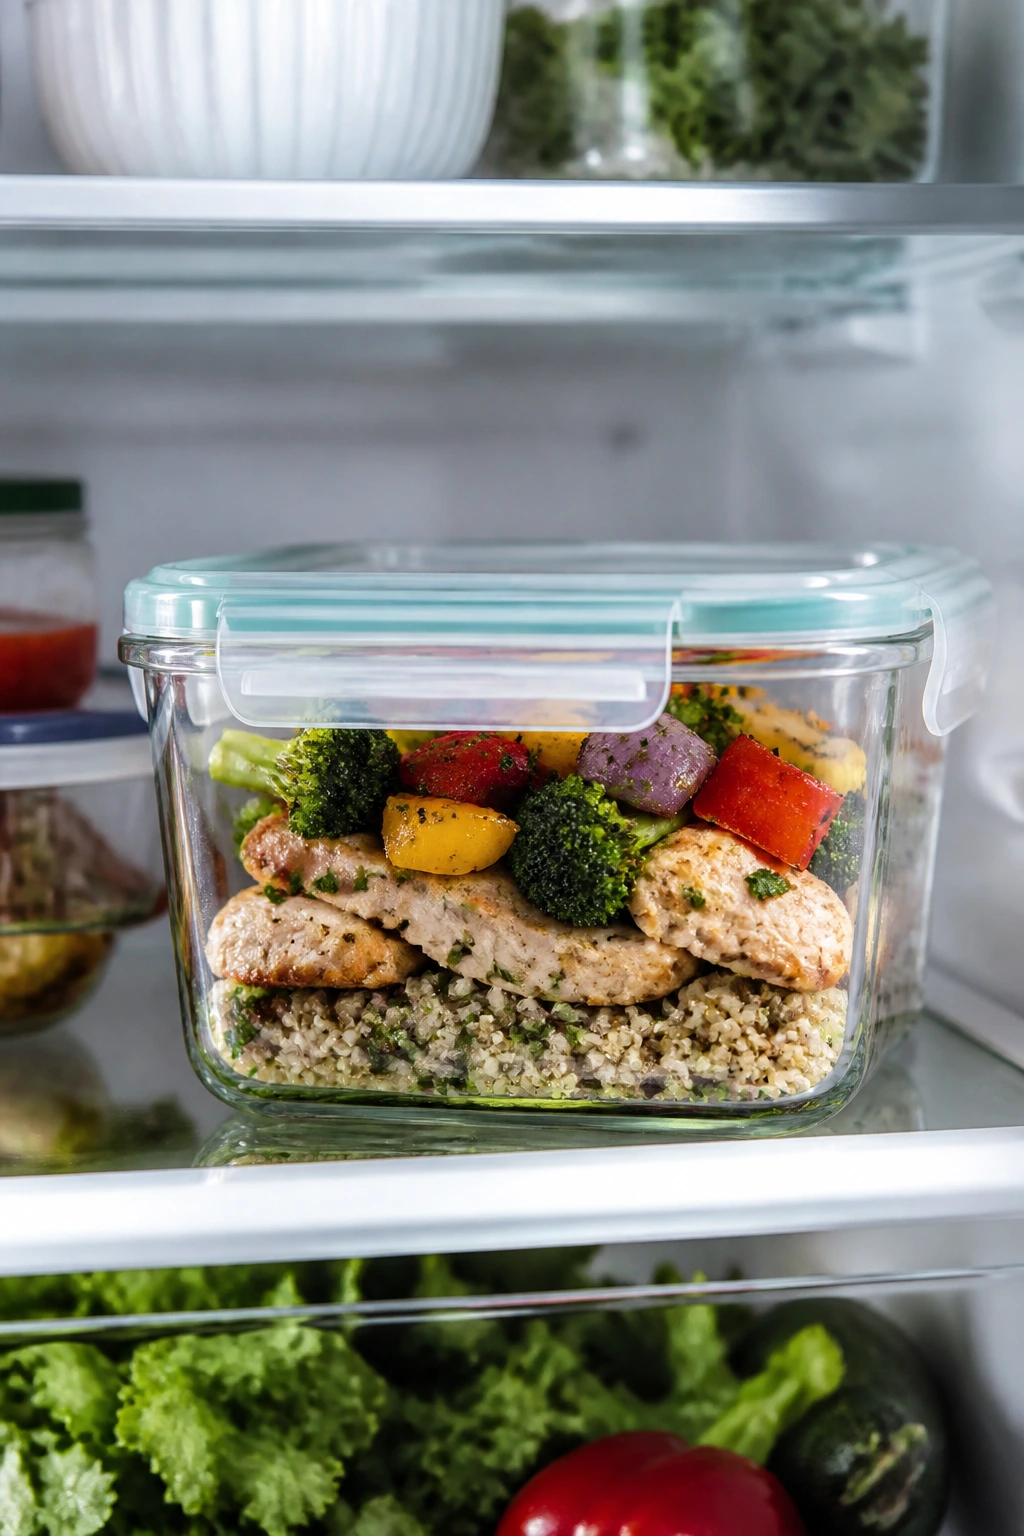
Most of these protein and vegetable meals keep well for 3 to 4 days in the refrigerator if you store them in airtight containers. Soups and stews usually hold the longest and still taste good on day three, especially the white bean chicken soup and the shakshuka base if you store the eggs separately and poach them fresh. Fish is the exception. Salmon, cod, and shrimp are best within 2 days, and I would keep the texture honest rather than try to push them longer.
Freezing works well for the meatballs, soup, turkey taco filling, chicken fajita filling, lentil stuffed pepper mixture, and some of the stir-fry bases. Most of those keep for up to 2 months frozen if you cool them fully first and use freezer-safe containers. Don’t freeze cucumber salad, avocado, lettuce wraps, or zucchini noodles; they turn limp and watery in a way that no reheating can fix.
For reheating, match the method to the dish. Skillet meals do best in a pan over medium heat with a tablespoon or two of water to loosen the sauce. Sheet-pan leftovers can go back into a 375°F (190°C) oven for 8 to 12 minutes. Soup should warm gently on the stove, not boil. If the dish has a sauce, stir now and then so the bottom doesn’t catch.
A few recipes improve overnight. Turkey meatballs in marinara, chicken soup, lentil stuffed peppers, and the tuna-bean skillet all settle into themselves after a rest. Others are meant to be eaten right away. Shrimp zoodles and fish with vegetables lose too much texture if they sit around. Keep the fresh toppings separate, and you can stretch the life of the meal without wrecking the good part.
Variations and Adaptations to Try
The Sheet-Pan Shortcut: When you’re tired, move as many meals as possible onto a single rimmed sheet pan. Chicken fajitas, salmon with asparagus, pork tenderloin with vegetables, and cod with greens all adapt well. The main thing is spacing — give the food room so it roasts instead of steaming.
The Dairy-Free Finish: Swap yogurt sauces for tahini-lemon sauce or a simple herb vinaigrette. That works especially well on salmon, chicken bowls, and roasted vegetable plates where you want creaminess without actual dairy. A spoonful of olive oil and lemon can do more than people think.
The Lower-Carb Bowl Base: Use cauliflower rice, shredded cabbage, spiralized zucchini, or butter lettuce instead of grains and bread. The meals stay balanced because the protein still does the heavy lifting, and the vegetables add enough body that you don’t feel like you’re eating “diet food.” That phrase has caused enough damage already.
The Vegetarian Protein Swap: Tempeh, tofu, lentils, chickpeas, white beans, and eggs all step in nicely when you want to skip meat. Keep the same seasoning logic and the same acid finish; vegetarian protein usually needs the same boldness, just from different ingredients.
The Heat-Lover’s Pass: Add chili garlic sauce, Calabrian chili, crushed red pepper, chipotle powder, or sliced fresh chile to any skillet, bowl, or soup. Heat works best when it sits in the background rather than taking over, so start with a small amount and build.
The Budget Pantry Version: Use canned tuna, beans, eggs, frozen broccoli, and ground turkey when you want the grocery bill to behave. Frozen vegetables are fine in stir-fries and soups if you dry them well first. They will not make the food look fancy, but they do make it practical, and that counts.
Common Mistakes to Avoid
-
Crowding the pan: If too many ingredients pile up at once, they steam instead of browning. That shows up as pale chicken, limp vegetables, and a sauce that tastes thinner than it should. Use two pans or cook in batches when you need to.
-
Treating every vegetable the same: Broccoli, asparagus, cabbage, Brussels sprouts, kale, zucchini, and peppers all want different cooking times. If you dump them all in at once, some turn mushy while others stay raw. Cook the hard vegetables first, then add the quick ones.
-
Overcooking lean protein: Chicken breast, cod, shrimp, and pork tenderloin all dry out if you walk away for too long. Use a thermometer, and stop cooking when the food is done rather than when it looks “a little more done.” That tiny difference matters.
-
Skipping the acid finish: Lemon, lime, vinegar, or a spoon of yogurt makes vegetables and protein taste brighter. Without it, a clean meal can feel flat, even if the seasoning was fine. The last squeeze is not decoration.
-
Making wet toppings too early: Avocado, cucumber salad, yogurt sauces, lettuce, and fresh herbs should wait until the food is ready to eat. If they sit on hot food too long, they go soft, watery, or dull.
-
Using underseasoned sauces: Canned tomatoes, beans, ground turkey, and tofu all need more salt and flavor than people expect. Taste as you go. If the pan tastes sleepy, it probably needs salt, lemon, or both.
Frequently Asked Questions
Which of these meals works best for meal prep?
The turkey meatballs, chicken soup, lentil stuffed peppers, tuna and white bean skillet, and turkey taco filling hold up well for a few days. They reheat cleanly and don’t need fragile toppings to taste finished. Keep any fresh garnishes separate until serving.
Can I use frozen vegetables instead of fresh?
Yes, especially in stir-fries and soups. Frozen broccoli, cauliflower rice, green beans, peas, and spinach work well if you thaw them first and pat them dry so they don’t dump extra water into the pan.
What’s the easiest recipe here for a beginner?
The sheet-pan salmon, chicken fajitas, and turkey taco bowls are probably the least fussy. They use straightforward seasoning, short cooking times, and very little knife work. A thermometer helps, but you can also judge them by color and texture once you’ve made them once.
How do I keep chicken breast from drying out?
Cut it evenly, sear it hot, and pull it the moment it reaches 165°F (74°C). If the breast is thick, slice it into cutlets so the middle and edges cook at the same pace. Thighs are more forgiving if you want a safer margin.
Which meals freeze the best?
Soup, meatballs in marinara, lentil stuffed pepper filling, and turkey taco filling freeze well for up to 2 months. Fish, lettuce wraps, cucumber salads, and zucchini noodles do not freeze well at all. If the texture matters, don’t force it.
Can I make these meals vegetarian or vegan?
Several already are, and others swap cleanly. Tempeh or tofu can replace chicken or pork in the stir-fry-style meals, lentils or chickpeas can replace ground turkey in bowls and peppers, and a tahini sauce can replace yogurt-based finishes.
What if my vegetables are done before the protein?
Pull the vegetables off the heat and keep them loosely covered while the protein finishes. In skillet meals, you can also remove the vegetables first, finish the meat, then toss everything together at the end. That’s often better than leaving the vegetables in the pan until they go soft.
How do I make these dinners feel more filling without adding a lot of extra work?
Add beans, eggs, avocado, or a small portion of cauliflower mash or quinoa, depending on the meal. Those additions give the plate more body without changing the whole structure of dinner. I’d reach for beans first on bowls and soup, and eggs on tomato-based dishes.
A Cleaner Way to Cook Dinner
Protein and vegetables do not need rescuing. They need heat, salt, acid, and a little respect for timing. Once those pieces are in place, the food gets a lot more interesting than the phrase “clean eating” usually suggests.
Pick one skillet meal, one sheet-pan dinner, and one soup or bowl, and you’ve got a dinner rhythm that’s easy to repeat without feeling repetitive. That’s the real payoff here: fewer decisions, fewer dishes, and food that tastes like it was cooked by someone paying attention.