
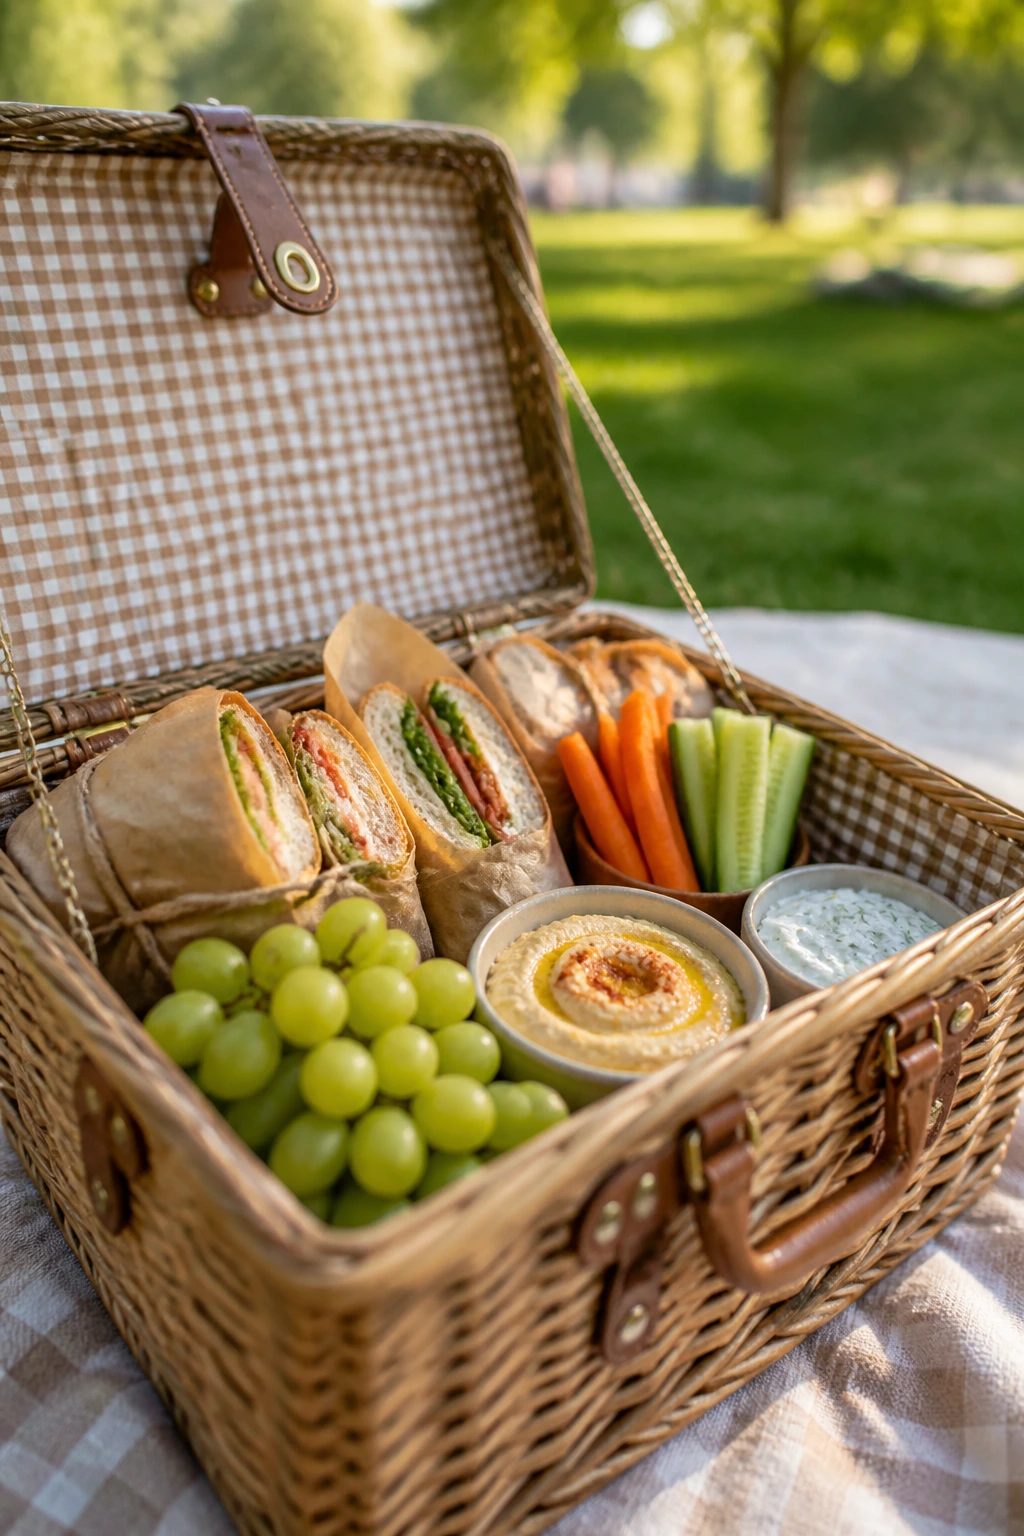
A picnic can turn messy fast, and the food is usually why. These quick summer meals for a summer picnic have one job: stay cool, hold together, and still taste sharp after a drive, a blanket shakeout, and a few too-early hands reaching into the basket before the lid is even fully off.
The difference between a picnic that feels effortless and one that feels like cleanup duty is texture. Crisp lettuce beats floppy greens. A tortilla beats a sandwich loaf that’s been steamed in foil. Pasta salad wins when it’s seasoned enough to taste good cold, not when it’s drowned in dressing and left to sulk in a plastic tub. I care about that part more than I care about cute napkins, and I suspect you do too.
So this collection stays practical. It leans on meals that can be made ahead, packed cold, and eaten without a fork if the blanket situation gets cramped. A few are warm, but even those are built for travel: sturdy rolls, tight fillings, or components that can be held separately until the last minute. That’s the sweet spot for picnic food. Clean enough to carry. Good enough to be fought over.
Why These Picnic Meals Earn a Spot in the Basket
-
Packable: Every recipe here survives a cooler ride or a short sit-out without collapsing into a sad pile of damp bread and loose fillings.
-
Fast Assembly: Most of these meals use cooked chicken, canned fish, quick-boiled pasta, or no-cook fillings, which means the heavy lifting stays under 30 minutes.
-
Cold-Friendly: The flavors are built to stay lively when chilled; lemon, herbs, vinegar, mustard, and pickles keep the food from tasting flat.
-
Low-Mess: Tortillas, pitas, cups, and sturdy rolls keep juices where they belong instead of leaking through the bottom of the container.
-
Easy to Scale: Each recipe can be doubled with almost no extra effort, which matters when one picnic turns into a family reunion with appetite.
-
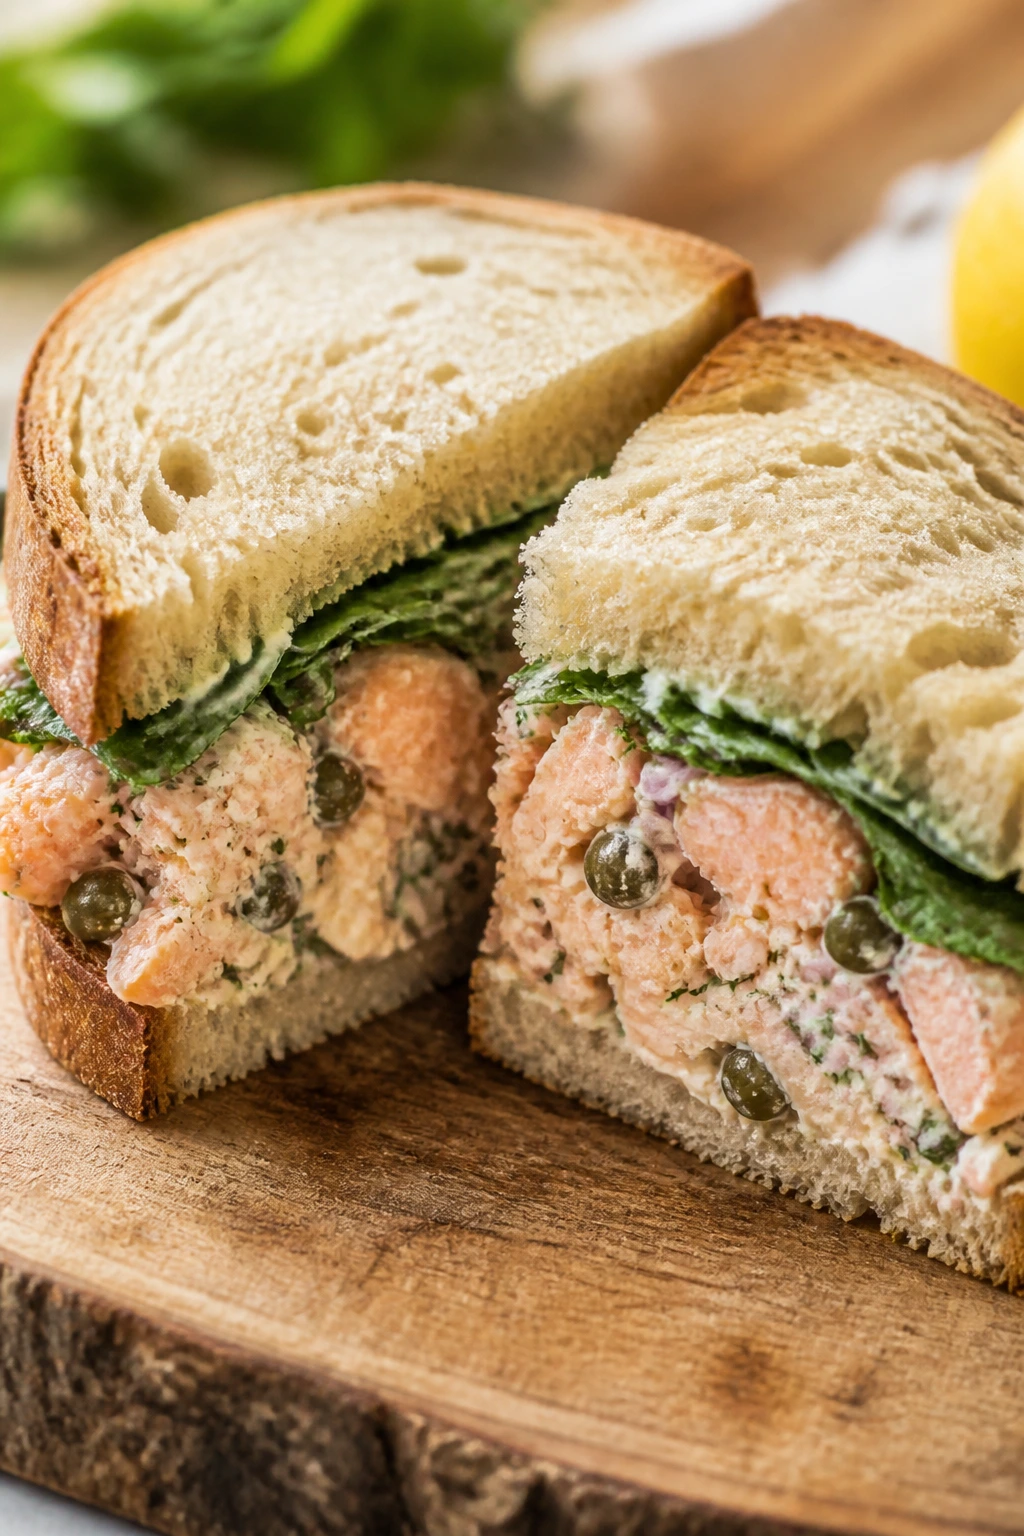
Good at Room Temp: These meals don’t need to be served screaming hot to taste right, and that is a huge win when the nearest outlet is two miles away.
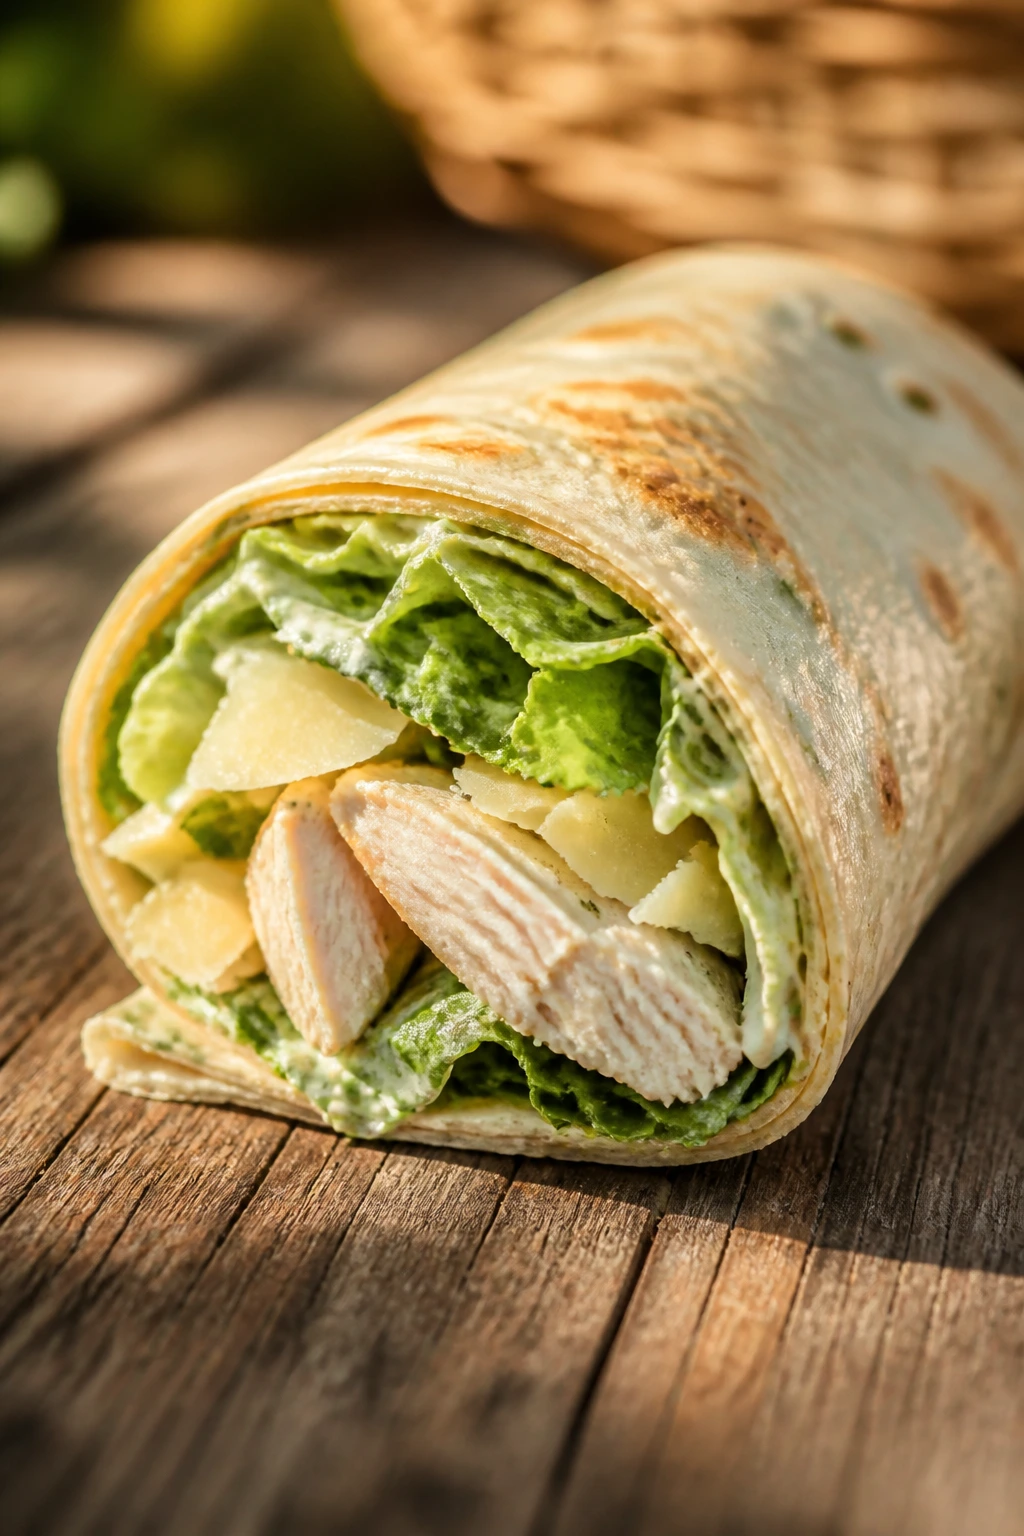
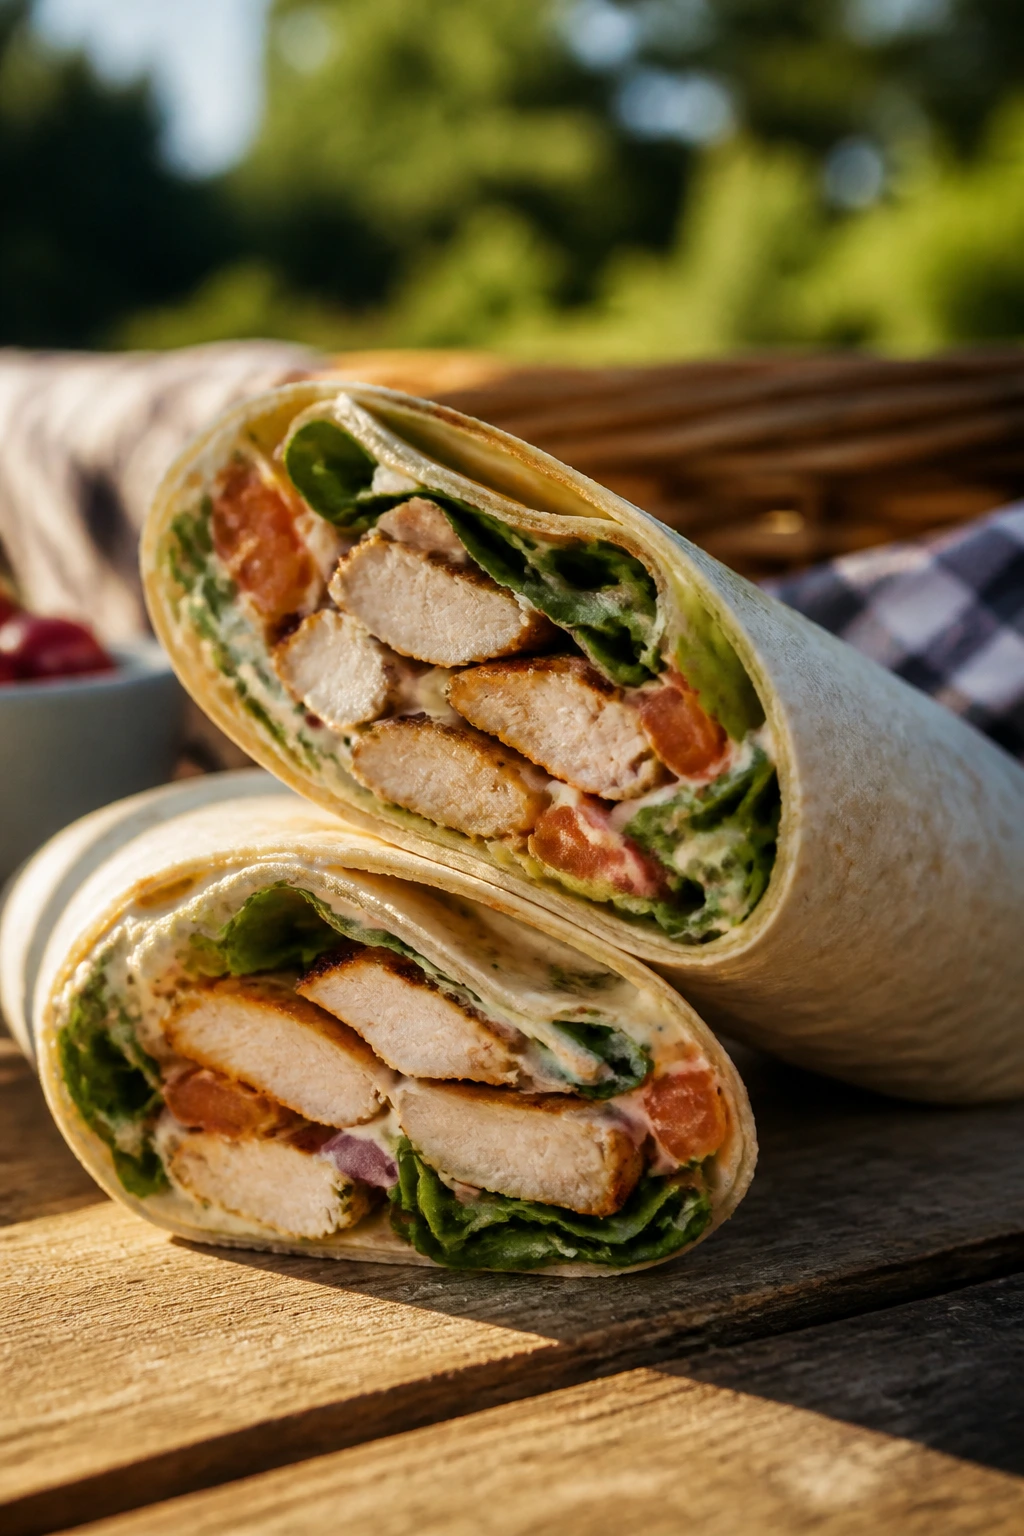
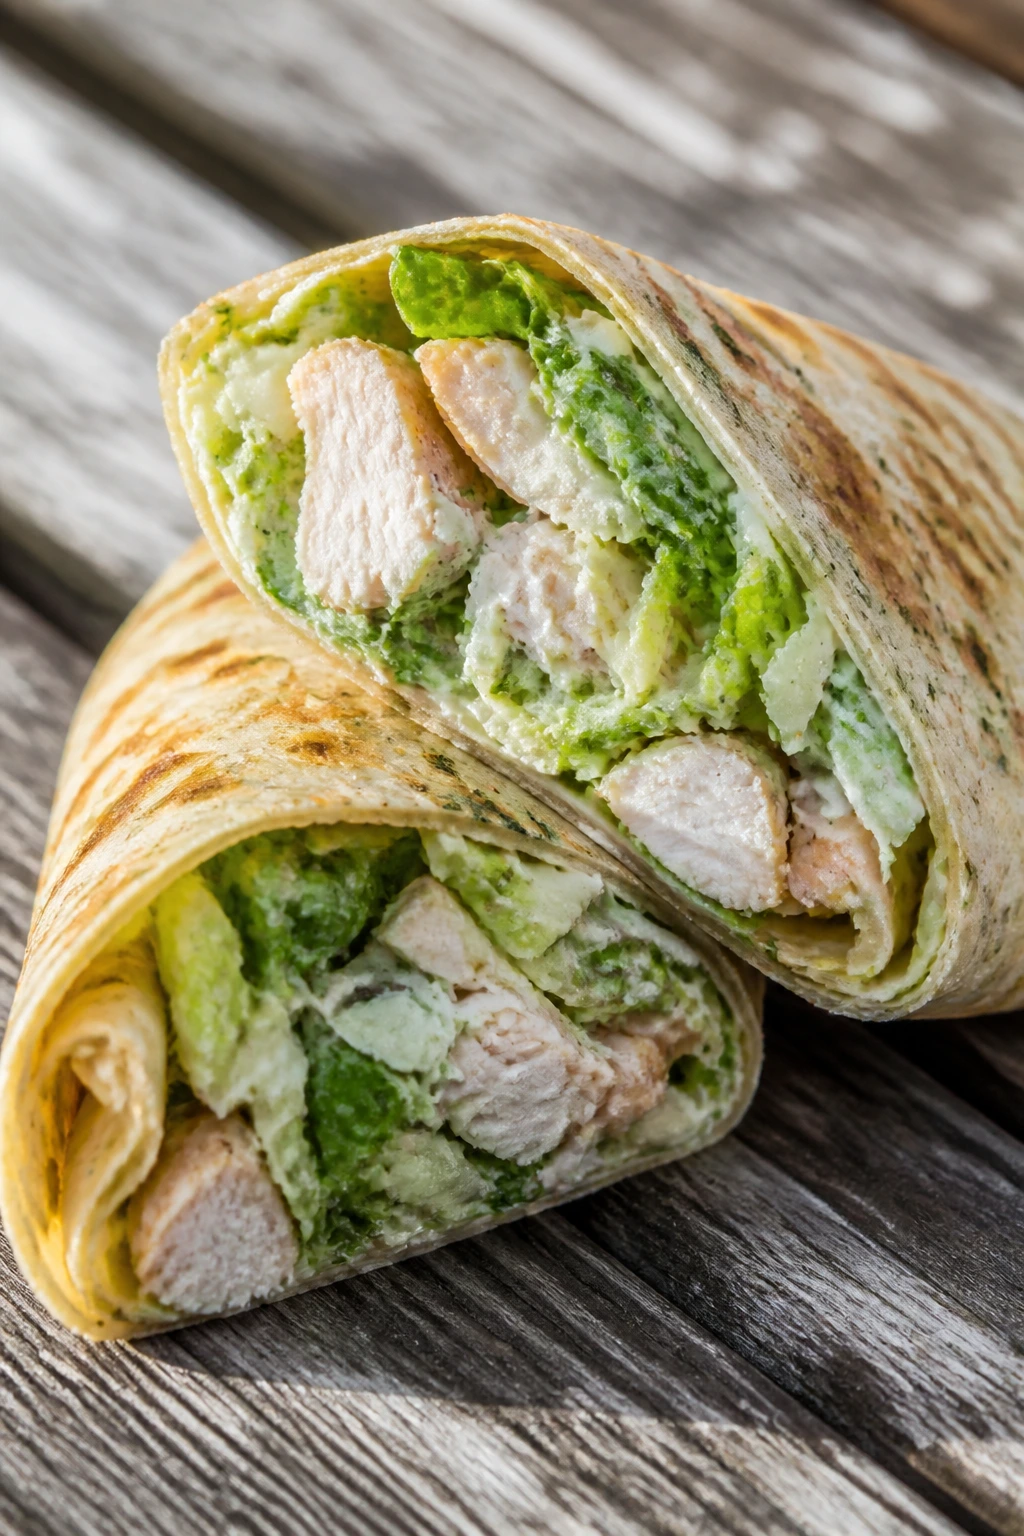
1. Chicken Caesar Wraps
Cold chicken, crunchy romaine, salty Parmesan, and a dressing that clings instead of pooling—this is the kind of wrap that disappears fast at a picnic. The tortilla keeps the mess contained, and the croutons bring a small snap right before they soften.
Why It Works:
Caesar flavor already feels built for a handheld meal because the dressing has enough body to coat the chicken without turning everything soupy. Romaine stays crisp longer than softer greens, and chilled tortillas are easier to roll without tearing. If you wrap these tightly and let them rest seam-side down, they hold together far better than a loose sandwich.
Key Ingredients:
- 3 cups cooked shredded chicken, preferably cooled rotisserie chicken meat
- 1/2 cup Caesar dressing, thick enough to cling to the chicken
- 2 cups chopped romaine lettuce, dried well after washing
- 1/2 cup grated Parmesan cheese
- 1 cup cherry tomatoes, halved
- 4 large flour tortillas, burrito-size
- 1/2 cup croutons, lightly crushed
- 1 teaspoon lemon juice, to sharpen the dressing
- Freshly ground black pepper, to finish
Quick Steps:
- Toss the chicken with Caesar dressing and lemon juice in a large bowl until evenly coated.
- Warm the tortillas in a dry skillet for 10 to 15 seconds per side so they bend without cracking.
- Lay romaine down the center of each tortilla, then top with chicken, tomatoes, Parmesan, and croutons.
- Roll each tortilla tightly, folding in the sides as you go, and place seam-side down for 5 minutes.
- Slice in half on a sharp diagonal and wrap in parchment or foil for transport.
Equipment for This Recipe:
- Large mixing bowl for tossing the filling
- Sharp knife for clean tomato and wrap cuts
- Dry skillet for softening tortillas
- Cutting board with a damp towel underneath so it doesn’t slide
- Parchment or foil for packing
How to Serve This Dish:
Serve the wraps halved, with the cut side facing up so the layers show instead of spill. I like them with dill pickles, grapes, or a handful of kettle chips. A cold wrap plus something salty on the side feels right for picnic food.
Pro Tips for This Recipe:
- Dry the romaine thoroughly; wet leaves are what make the tortilla get slippery.
- Add the croutons last if you want some crunch left at the table.
- Use a thick Caesar dressing, not a thin bottled one that runs to the bottom.
- If you’re making these more than a few hours ahead, pack the chicken filling and tortillas separately.
Variations on This Dish:
- Buffalo Caesar Wraps: Stir 1 to 2 tablespoons of hot sauce into the chicken before wrapping for a sharper, peppery version.
- Romaine Boat Wraps: Skip the tortilla and spoon the filling into large romaine leaves for a lighter, fork-free picnic bite.
- Bacon Caesar Crunch: Add 4 slices of cooked bacon and skip the croutons if you want more smoke and less bread.
Common Mistakes to Avoid with This Dish:
- Overfilling the wrap: The tortilla tears the moment you roll it too tightly around a bulging center. Keep the filling in a thin strip.
- Using wet lettuce: The wrap turns slick and the dressing slides. Dry the romaine well.
- Packing them warm: Warm filling steams the tortilla and softens it. Let everything cool first.
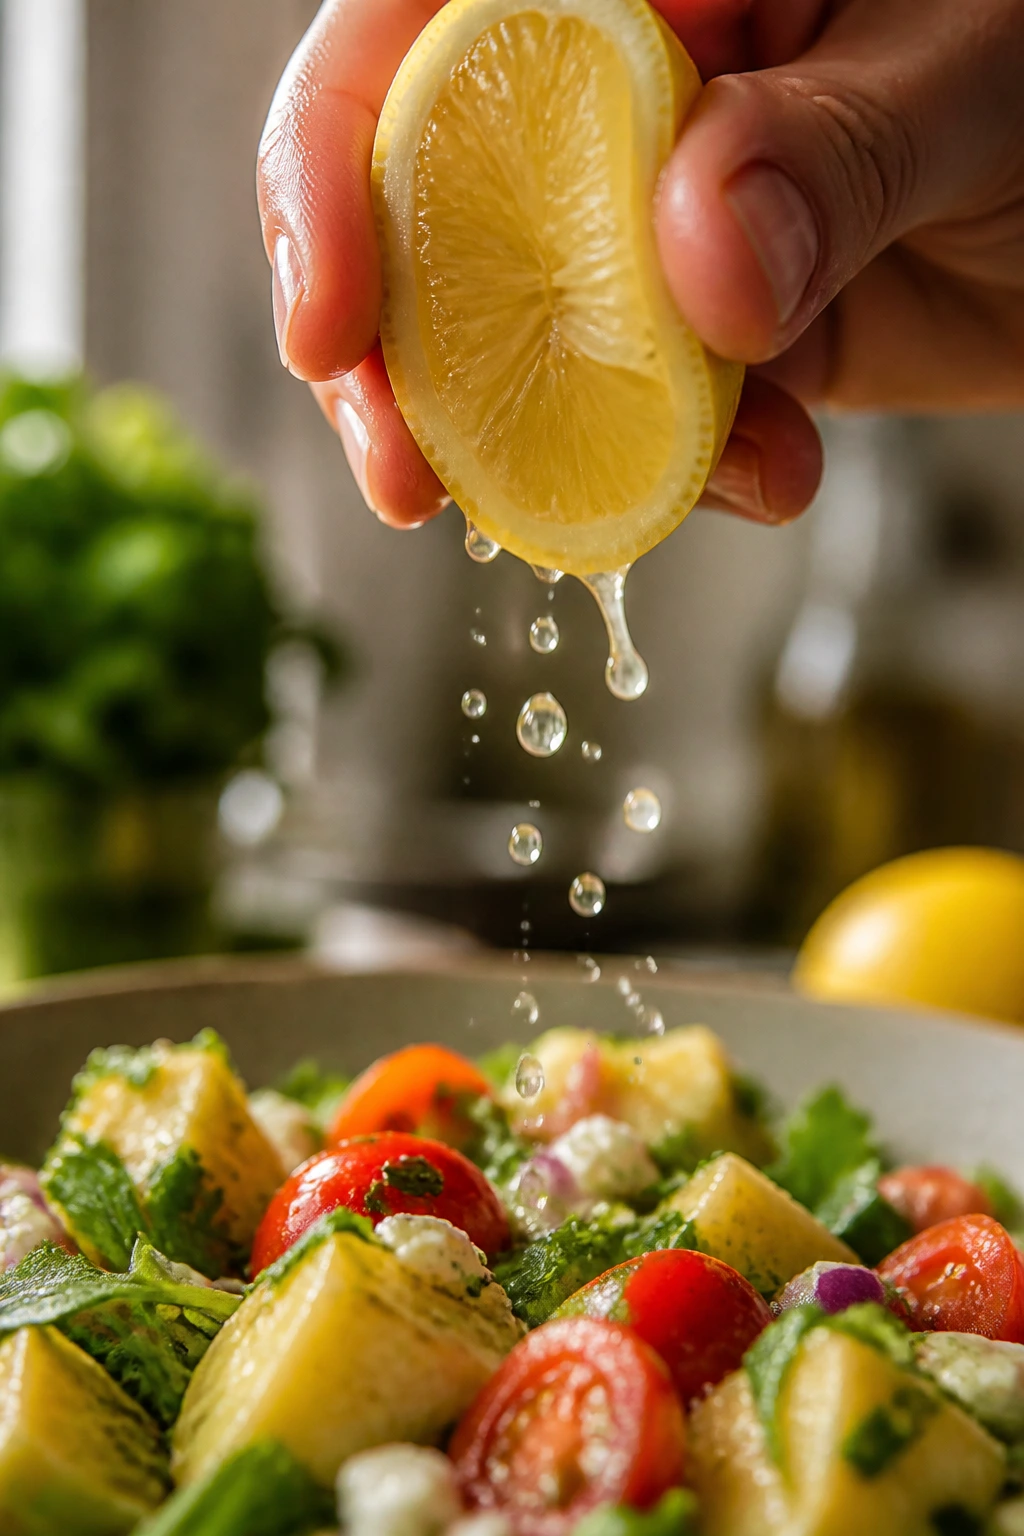
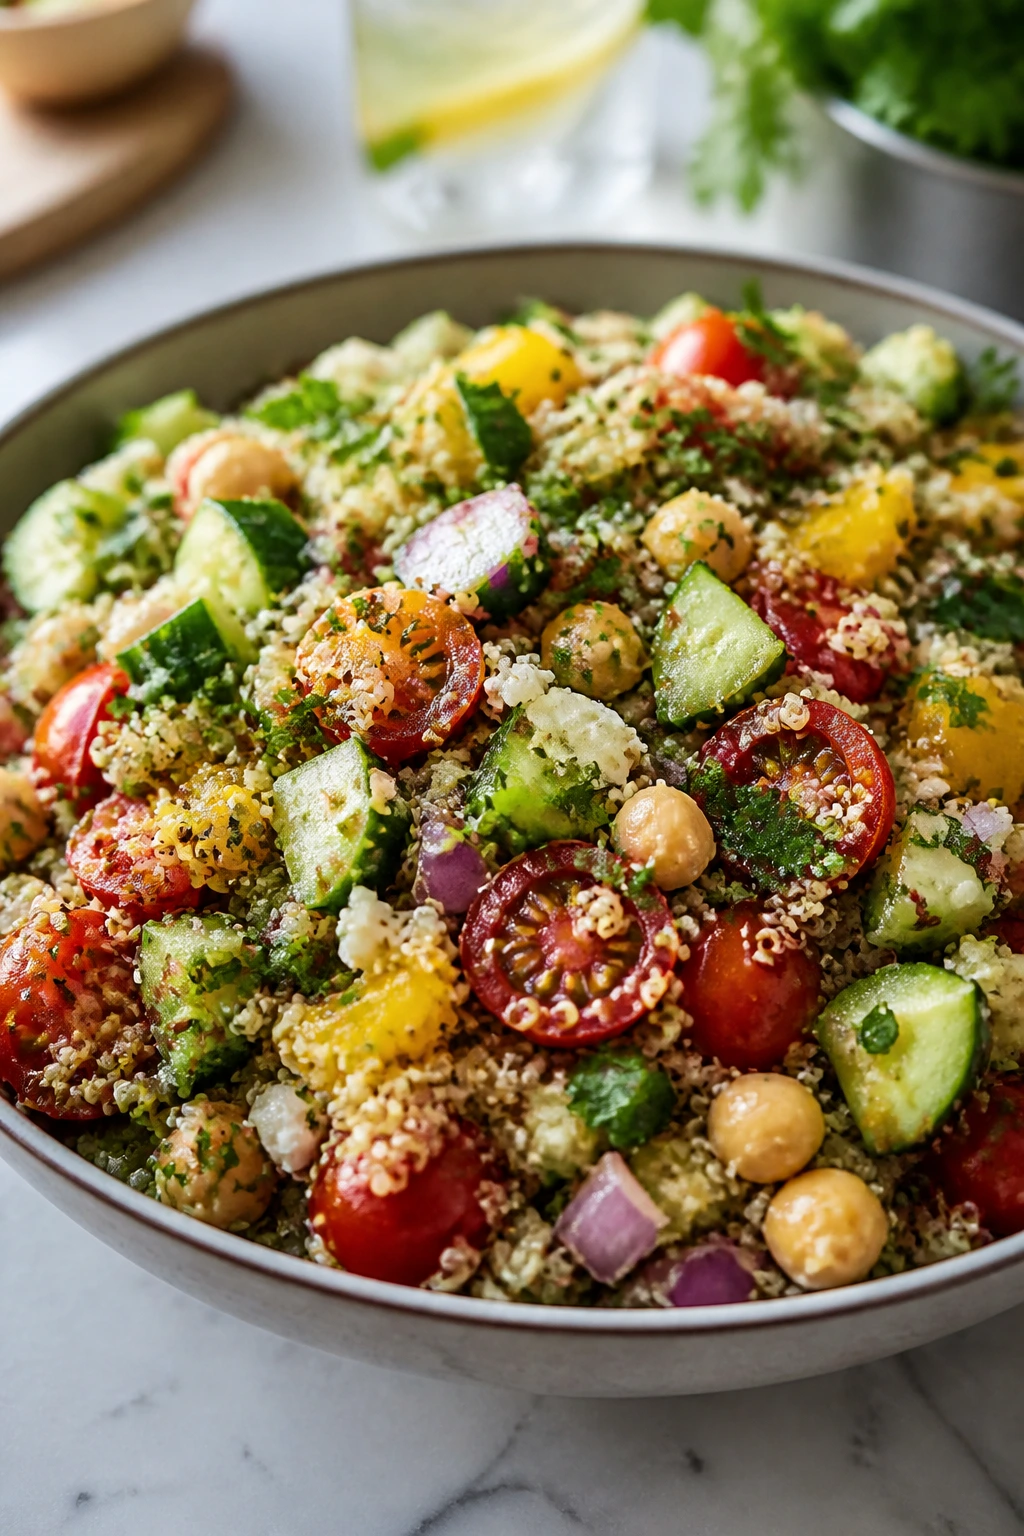
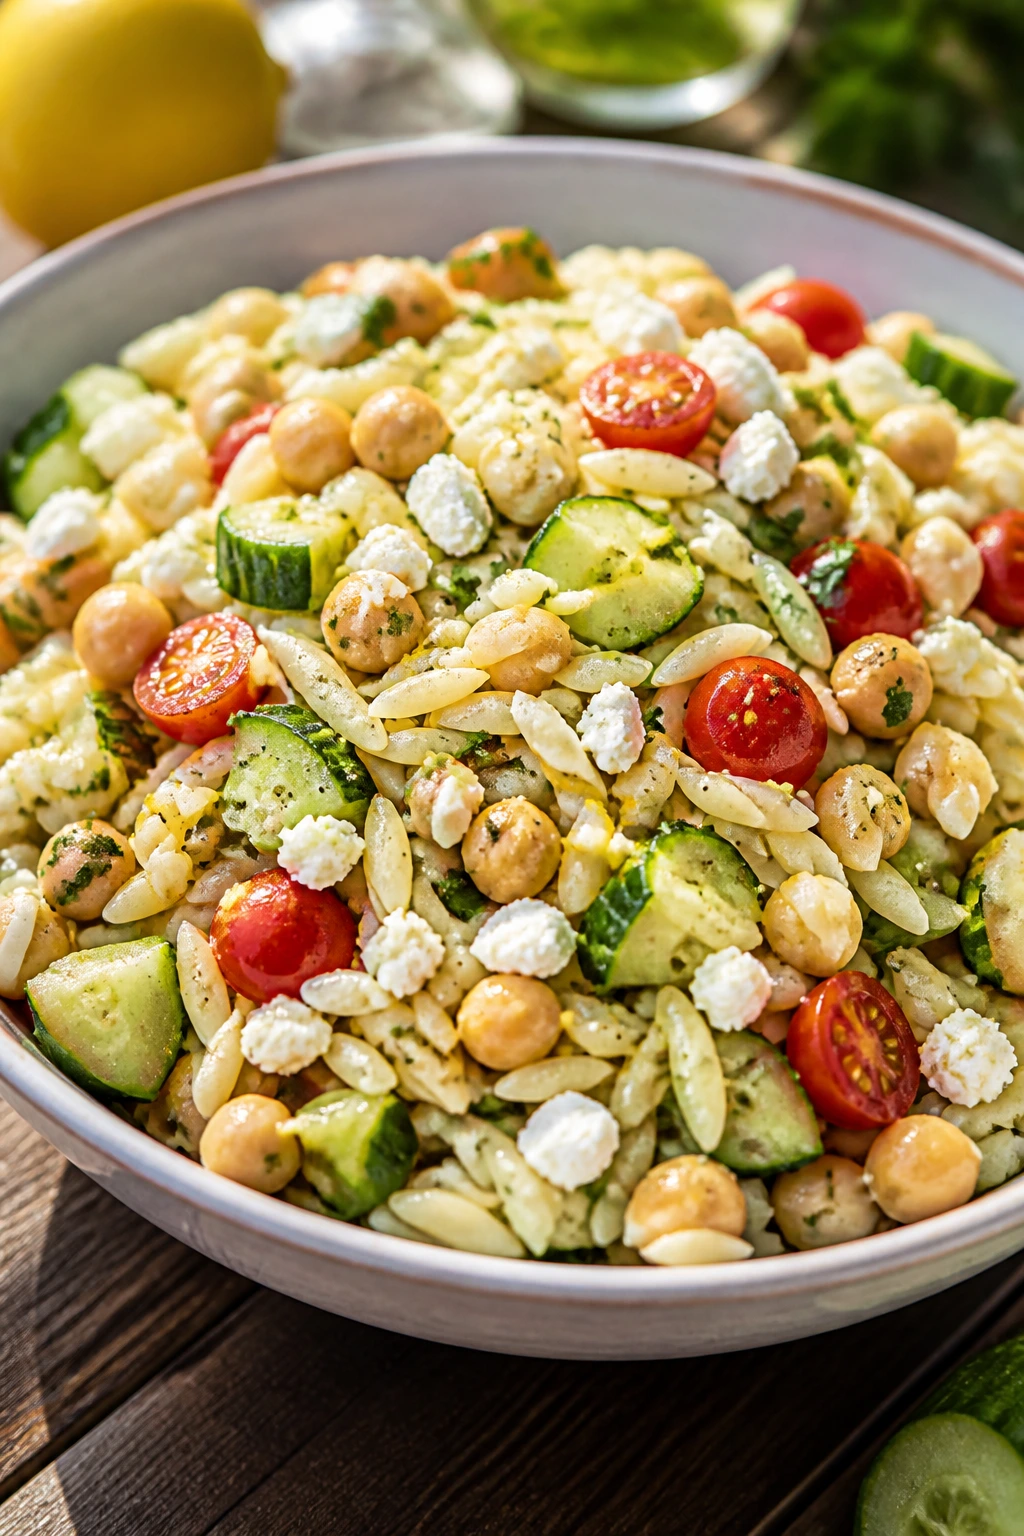
2. Lemon Chickpea Orzo Salad
This is the picnic salad that actually tastes better after a short chill. The orzo gets coated in lemony dressing, the chickpeas bring a firm bite, and the cucumber keeps each forkful from feeling heavy.
Why It Works:
Orzo is small enough to scoop cleanly, but it still behaves like a real pasta salad base. Chickpeas add enough substance that you don’t need meat to make this a meal. The lemon, feta, and parsley keep it bright even after it sits in a cooler for a couple of hours.
Key Ingredients:
- 8 ounces dry orzo
- 1 can chickpeas, drained and rinsed
- 1 cucumber, diced and seeded if especially watery
- 1 pint cherry tomatoes, halved
- 3/4 cup crumbled feta cheese
- 1/4 cup red onion, finely chopped
- 1/4 cup olive oil
- 3 tablespoons lemon juice plus 1 teaspoon zest
- 1 tablespoon Dijon mustard
- 1/4 cup chopped parsley
Quick Steps:
- Boil the orzo in well-salted water until just tender, about 8 to 9 minutes, then drain and cool it on a tray.
- Whisk olive oil, lemon juice, lemon zest, Dijon, salt, and pepper in a large bowl.
- Add chickpeas, cucumber, tomatoes, red onion, feta, and parsley to the bowl.
- Fold in the cooled orzo and toss until everything is lightly coated.
- Chill for at least 20 minutes so the lemon and salt settle into the pasta.
Equipment for This Recipe:
- Medium saucepan
- Colander
- Large mixing bowl
- Fine grater for the lemon zest
- Sheet pan or tray for cooling the pasta quickly
How to Serve This Dish:
Pile it into lidded containers or shallow bowls and finish with a few extra feta crumbles. It works with pita wedges, grilled chicken, or nothing else at all. On a picnic blanket, I’d hand this out with a spoon and let people keep grazing.
Pro Tips for This Recipe:
- Salt the pasta water hard enough that it tastes like the sea; bland orzo stays bland cold.
- Cool the orzo before adding the cheese so the feta doesn’t smear and disappear.
- If you want the salad extra bright, keep 1 tablespoon of dressing back and stir it in right before serving.
- Seed the cucumber if it’s the watery supermarket kind.
Variations on This Dish:
- Herb-Heavy Bowl: Add dill and mint along with the parsley for a fresher, greener finish.
- No-Feta Version: Use diced avocado just before serving if you want a dairy-free, softer texture.
- Lemon-Herb Chicken Orzo: Fold in 2 cups chopped cooked chicken to make the salad more filling.
Common Mistakes to Avoid with This Dish:
- Dumping hot pasta into the bowl: It soaks up dressing too fast and turns pasty. Cool it first.
- Too much onion: Raw onion can dominate cold pasta. Keep it finely chopped and measured.
- Under-seasoning the dressing: Cold food needs more salt and acid than you think. Taste before chilling.
3. Turkey Pesto Pinwheels with Roasted Peppers
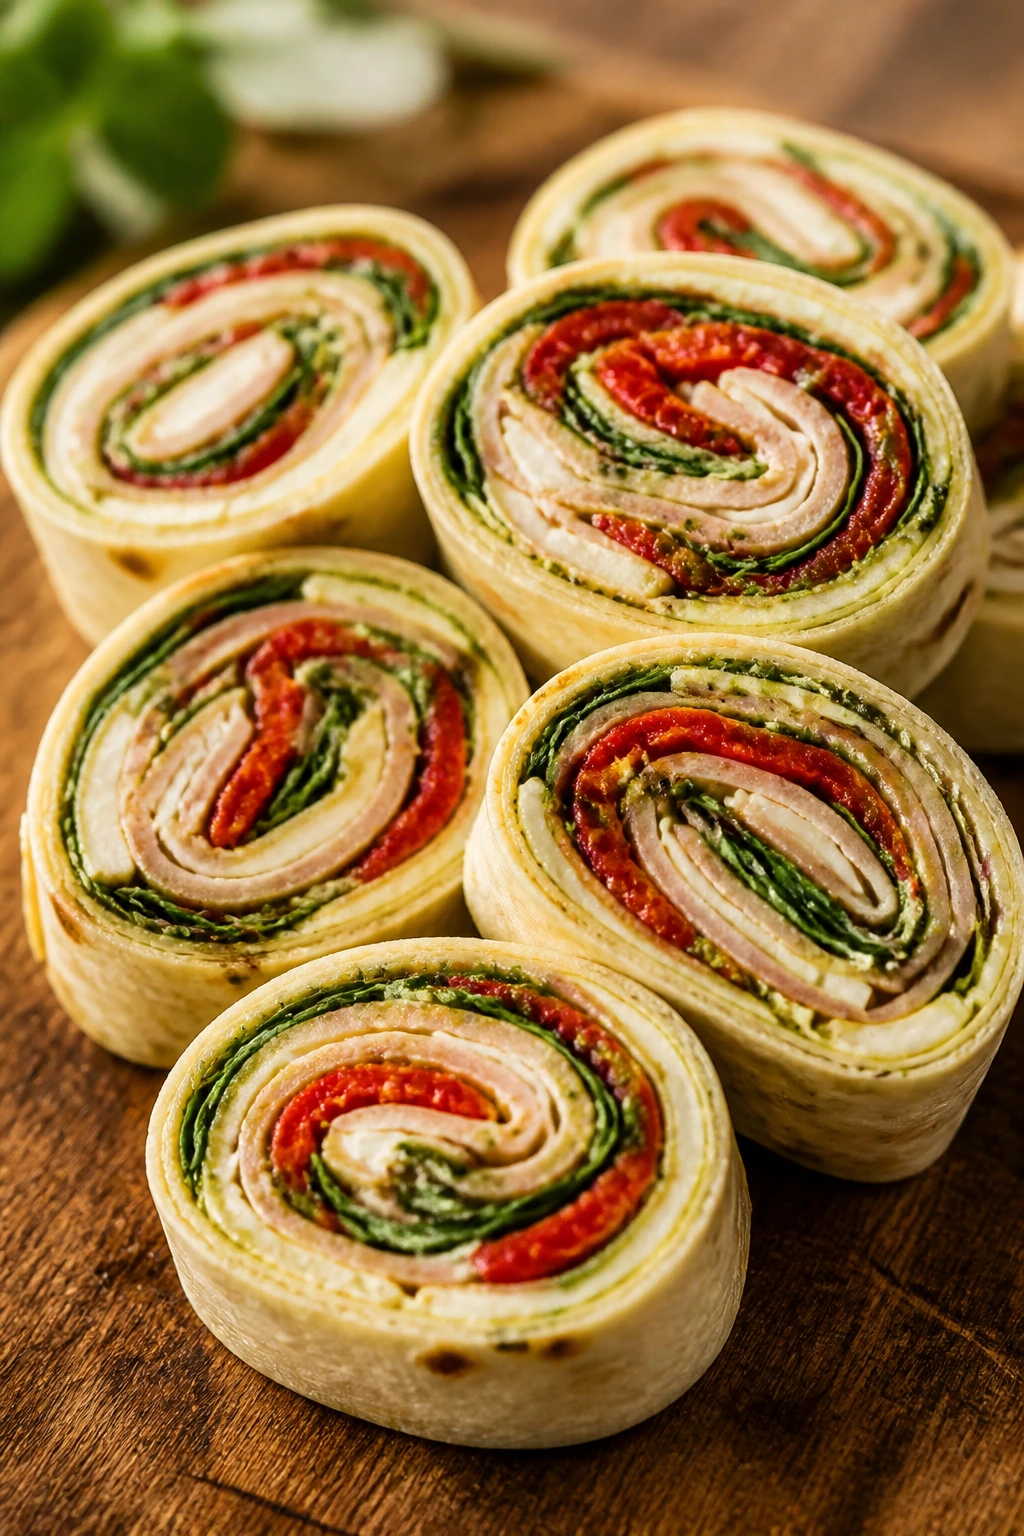
These are the slices that vanish first from a tray. Pesto gives the cream cheese a basil-heavy punch, the roasted peppers add sweetness, and the spiral shape makes them feel a little more deliberate than a regular sandwich.
Why It Works:
Pinwheels travel well because the filling is pressed into a tight layer before slicing. The tortillas act like a soft wrapper, but the cream cheese helps everything glue together so the spirals hold their shape. They’re neat. That matters more than people admit at a picnic.
Key Ingredients:
- 4 large flour tortillas
- 8 ounces cream cheese, softened
- 1/3 cup basil pesto
- 12 ounces sliced deli turkey
- 1 cup roasted red peppers, patted dry and sliced thin
- 2 cups baby spinach
- 1/2 cup shredded mozzarella
- Black pepper, to taste
Quick Steps:
- Mix the softened cream cheese with pesto until smooth and spreadable.
- Spread the mixture across each tortilla in a thin, even layer, leaving a 1-inch border.
- Layer turkey, roasted peppers, spinach, and mozzarella down the center of each tortilla.
- Roll tightly into logs, then wrap each log in parchment and chill for at least 20 minutes.
- Slice into 1-inch pinwheels with a sharp serrated knife.
Equipment for This Recipe:
- Mixing bowl
- Offset spatula or butter knife
- Sharp serrated knife
- Parchment paper
- Cutting board
How to Serve This Dish:
Stand the pinwheels upright in a container or line them in a shallow tray so the spirals stay visible. They go well with cucumber spears and cherry tomatoes. If you’re serving them with other picnic food, these are the neat little bites that keep the plate from feeling all starch.
Pro Tips for This Recipe:
- Pat the roasted peppers dry; wet peppers make the tortilla slip.
- Chill before slicing or the spiral will squish flat.
- Use a thin layer of filling. Too much and the log pops open.
- A serrated knife slices cleaner than a chef’s knife here.
Variations on This Dish:
- Sun-Dried Tomato Swirl: Swap the pesto for sun-dried tomato spread and keep the turkey for a sharper tomato note.
- Chicken Garden Pinwheels: Use shredded chicken instead of turkey and add finely shredded carrot.
- Dairy-Light Roll-Ups: Replace the cream cheese with hummus for a looser, more rustic version.
Common Mistakes to Avoid with This Dish:
- Overstuffing the tortilla: The filling squeezes out when you slice. Keep it thin.
- Skipping the chill time: Warm logs collapse into ragged rounds.
- Cutting with a dull knife: It smears the spiral and crushes the edges.
4. Tuna White Bean Salad with Celery and Dill
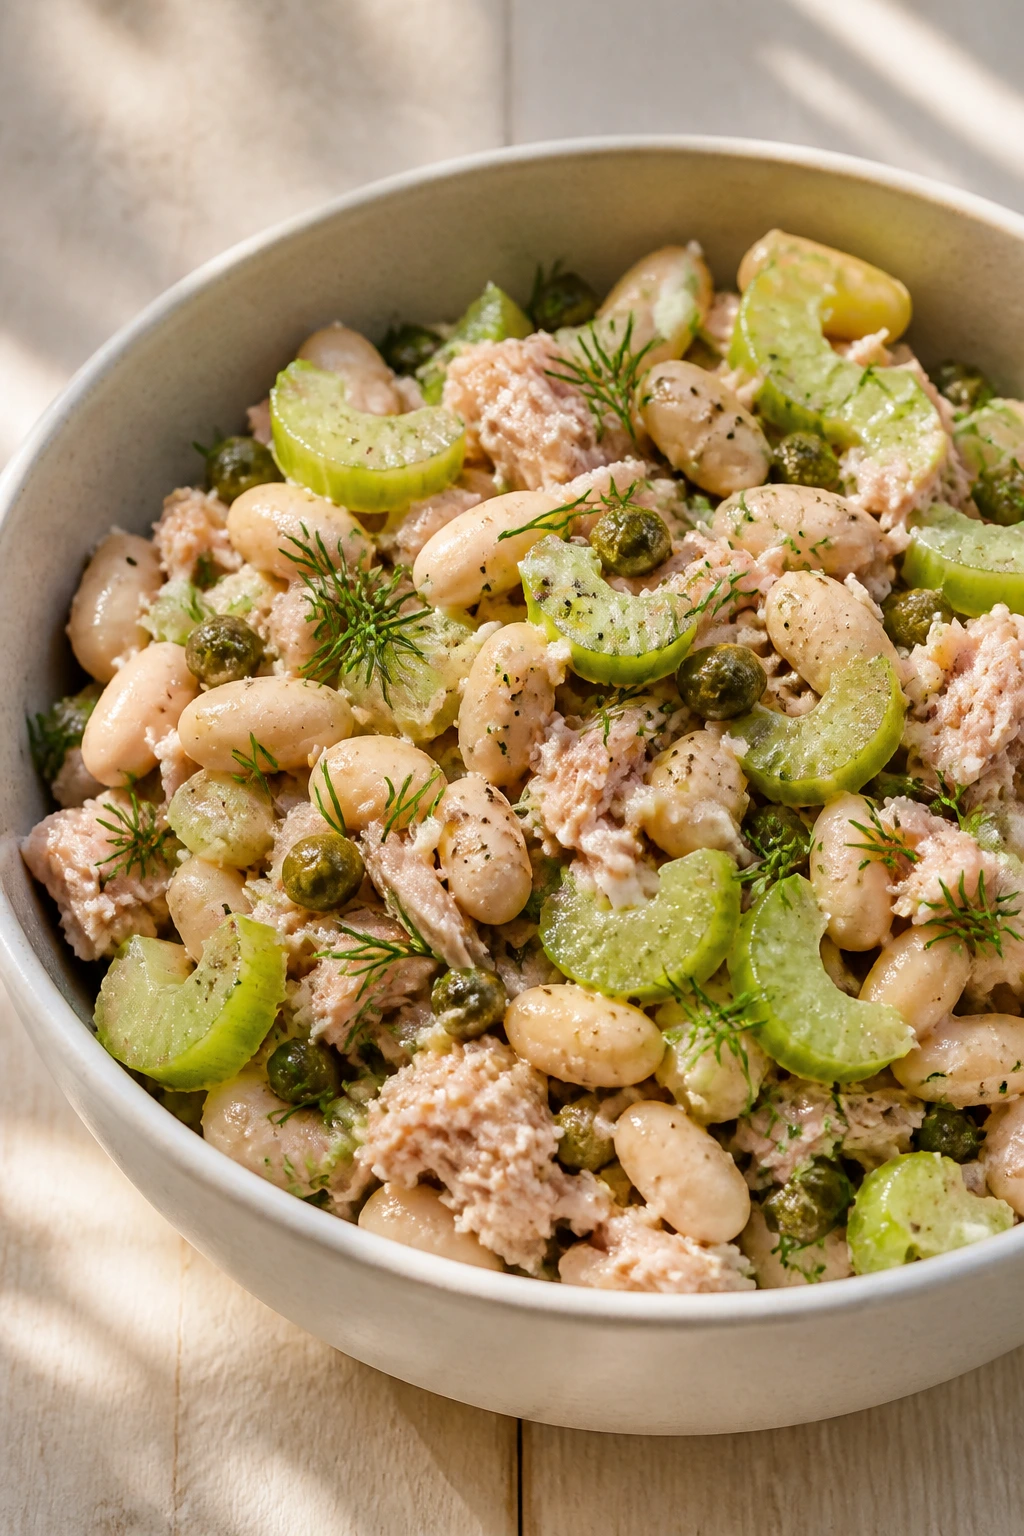
This is the kind of picnic meal that feels old-school in the best way. Tuna, beans, celery, and dill make a cold salad with enough backbone to sit in a cooler without going limp.
Why It Works:
White beans turn a tuna salad into lunch instead of a snack. They’re mild, creamy, and sturdy, which means the salad stays spoonable even after chilling. Celery and capers keep the flavor awake, and a little Dijon helps the mayo taste less heavy.
Key Ingredients:
- 2 cans tuna in water or olive oil, well drained
- 1 can cannellini beans, rinsed and drained
- 2 celery stalks, finely diced
- 1/4 cup red onion, minced
- 1/3 cup mayonnaise or plain Greek yogurt
- 1 teaspoon Dijon mustard
- 1 tablespoon lemon juice
- 1 tablespoon chopped dill
- 1 tablespoon capers, chopped if large
- Black pepper and a pinch of salt
Quick Steps:
- In a bowl, whisk together mayonnaise, Dijon, lemon juice, dill, salt, and pepper.
- Fold in tuna, cannellini beans, celery, onion, and capers until just combined.
- Taste and add more lemon if it needs a sharper edge.
- Chill for 15 to 20 minutes so the celery and dill settle in.
- Serve with crackers, lettuce cups, or thick slices of bread.
Equipment for This Recipe:
- Medium mixing bowl
- Fork for breaking up the tuna
- Sharp knife
- Cutting board
- Airtight container for packing
How to Serve This Dish:
Spoon it into butter lettuce cups if you want a cleaner hand-held bite, or pile it onto seeded crackers. I also like it with sliced cucumber on the side. The salad is rich enough that a crisp, plain side makes sense.
Pro Tips for This Recipe:
- Drain the tuna well, or the salad gets watery fast.
- Chop the celery finely so every bite has crunch without big stringy pieces.
- If using yogurt, add an extra teaspoon of oil or the salad can taste lean.
- This salad improves after 20 minutes in the fridge, not overnight, because the celery can soften.
Variations on This Dish:
- Lemon-Pepper Tuna Salad: Add extra lemon zest and a heavy grind of black pepper for a cleaner, brighter flavor.
- Salmon Bean Salad: Swap the tuna for canned salmon and keep everything else the same.
- Spicy Picnic Tuna: Stir in chopped pepperoncini and a teaspoon of the brine for heat without chili burn.
Common Mistakes to Avoid with This Dish:
- Not draining the beans: Extra liquid turns the salad loose. Drain them well.
- Mashing everything into paste: You want a chunky salad, not a spread. Fold gently.
- Leaving it in the sun: Anything mayo-based needs to stay cold and shaded.
5. Caprese Pasta Salad with Mozzarella and Basil
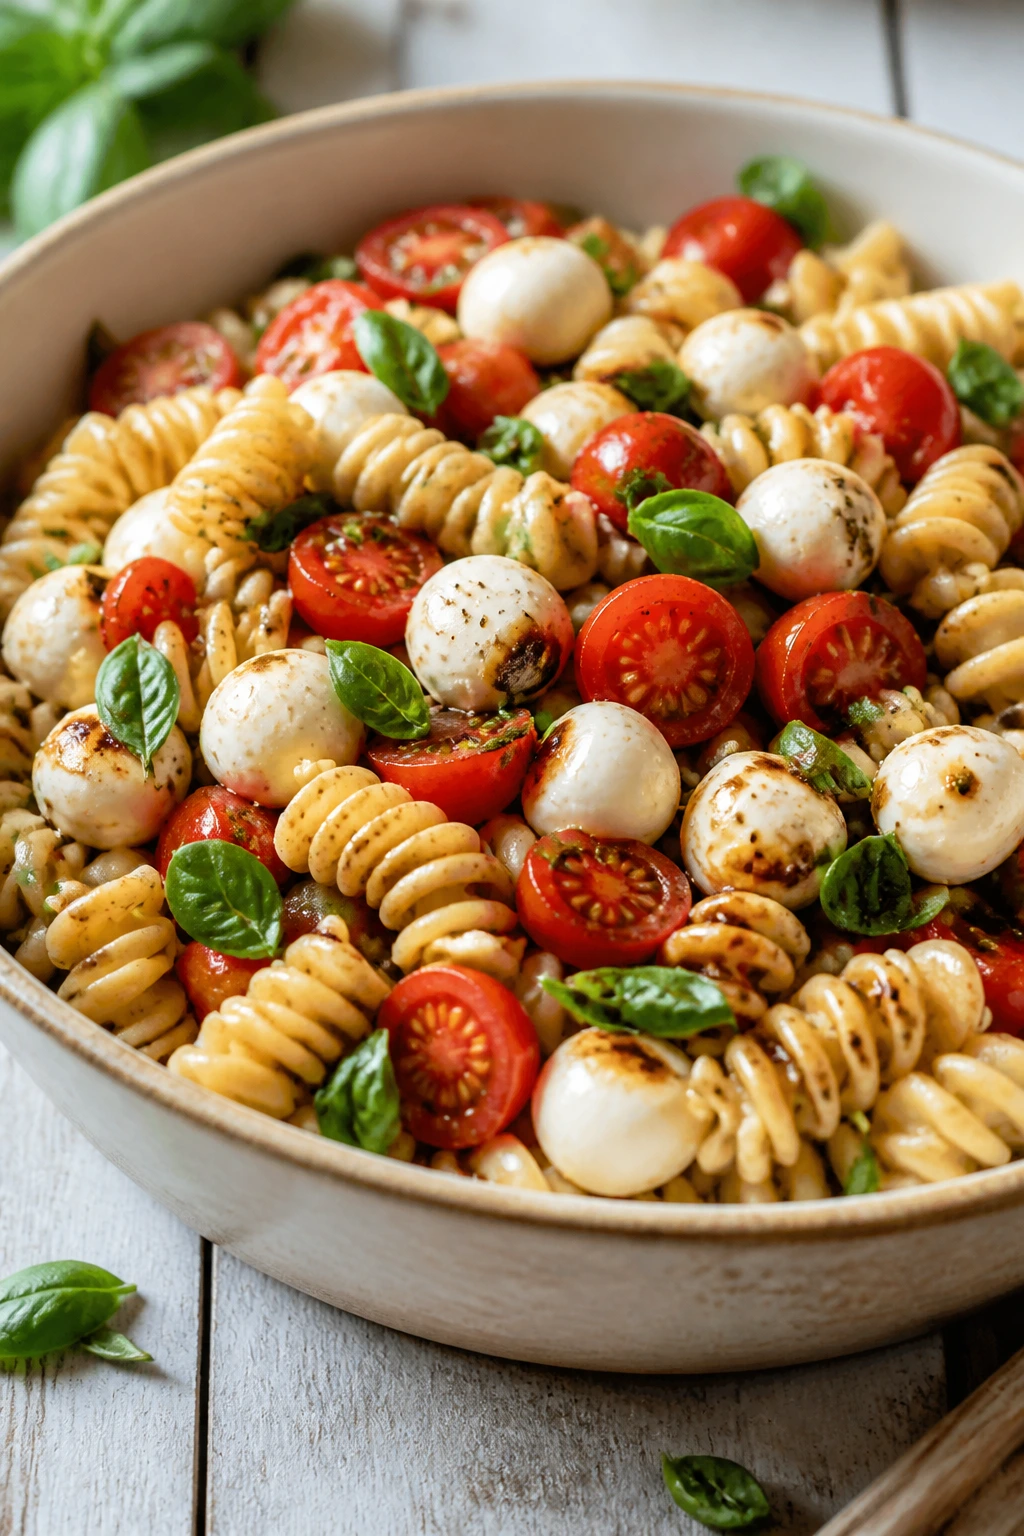
Tomatoes, mozzarella, basil, and pasta are already doing most of the work here. The trick is keeping the dressing light so the salad tastes like summer instead of a jar of oil.
Why It Works:
Caprese flavors stay sharp when they’re cold because basil and tomato both carry their own perfume. Short pasta gives the salad enough bulk to count as a meal, and mozzarella pearls bring little soft bites that don’t require extra chopping. This is one of those dishes that looks simple and still gets scraped clean.
Key Ingredients:
- 12 ounces short pasta, like rotini or fusilli
- 1 pint cherry tomatoes, halved
- 8 ounces mozzarella pearls
- 1 packed cup fresh basil leaves, torn
- 1/4 cup olive oil
- 2 tablespoons balsamic vinegar or a thick balsamic glaze
- 1 small garlic clove, finely grated
- 1 teaspoon kosher salt, plus more for the pasta water
- 1/2 teaspoon black pepper
- 1 cup baby arugula, optional for peppery bite
Quick Steps:
- Cook the pasta in salted water until just tender, then drain and cool it on a tray.
- Whisk olive oil, balsamic, garlic, salt, and pepper in a large bowl.
- Add the cooled pasta, tomatoes, mozzarella, and arugula if using.
- Fold in the basil right at the end so it stays green and fragrant.
- Chill briefly, then finish with a little extra balsamic if the pasta has soaked it up.
Equipment for This Recipe:
- Large pot
- Colander
- Mixing bowl
- Microplane or fine grater
- Tray for cooling pasta
How to Serve This Dish:
Serve it in a wide bowl with a few basil leaves scattered on top. It fits beside grilled chicken, but I’m also fine with it eating alone from a fork. Add crusty bread only if you want people to keep going back for more.
Pro Tips for This Recipe:
- Salt the pasta water generously so the cold salad isn’t bland.
- Tear the basil instead of chopping it into confetti; bruised basil tastes muddy.
- Keep the balsamic light. Too much turns the salad dark and syrupy.
- If packing ahead, tuck the basil in the top layer right before serving.
Variations on This Dish:
- Prosciutto Caprese Pasta: Add thin ribbons of prosciutto for a saltier, more filling version.
- Peach Caprese Pasta: Swap half the tomatoes for sliced peaches if you want sweeter contrast.
- Gluten-Free Version: Use a sturdy chickpea or rice pasta and stop cooking it a minute early.
Common Mistakes to Avoid with This Dish:
- Overcooked pasta: Soft pasta goes mushy after chilling. Stop at tender, not floppy.
- Adding basil too soon: It darkens and loses its perfume. Fold it in at the end.
- Too much dressing: The salad should glisten, not swim.
6. BBQ Pulled Chicken Sliders
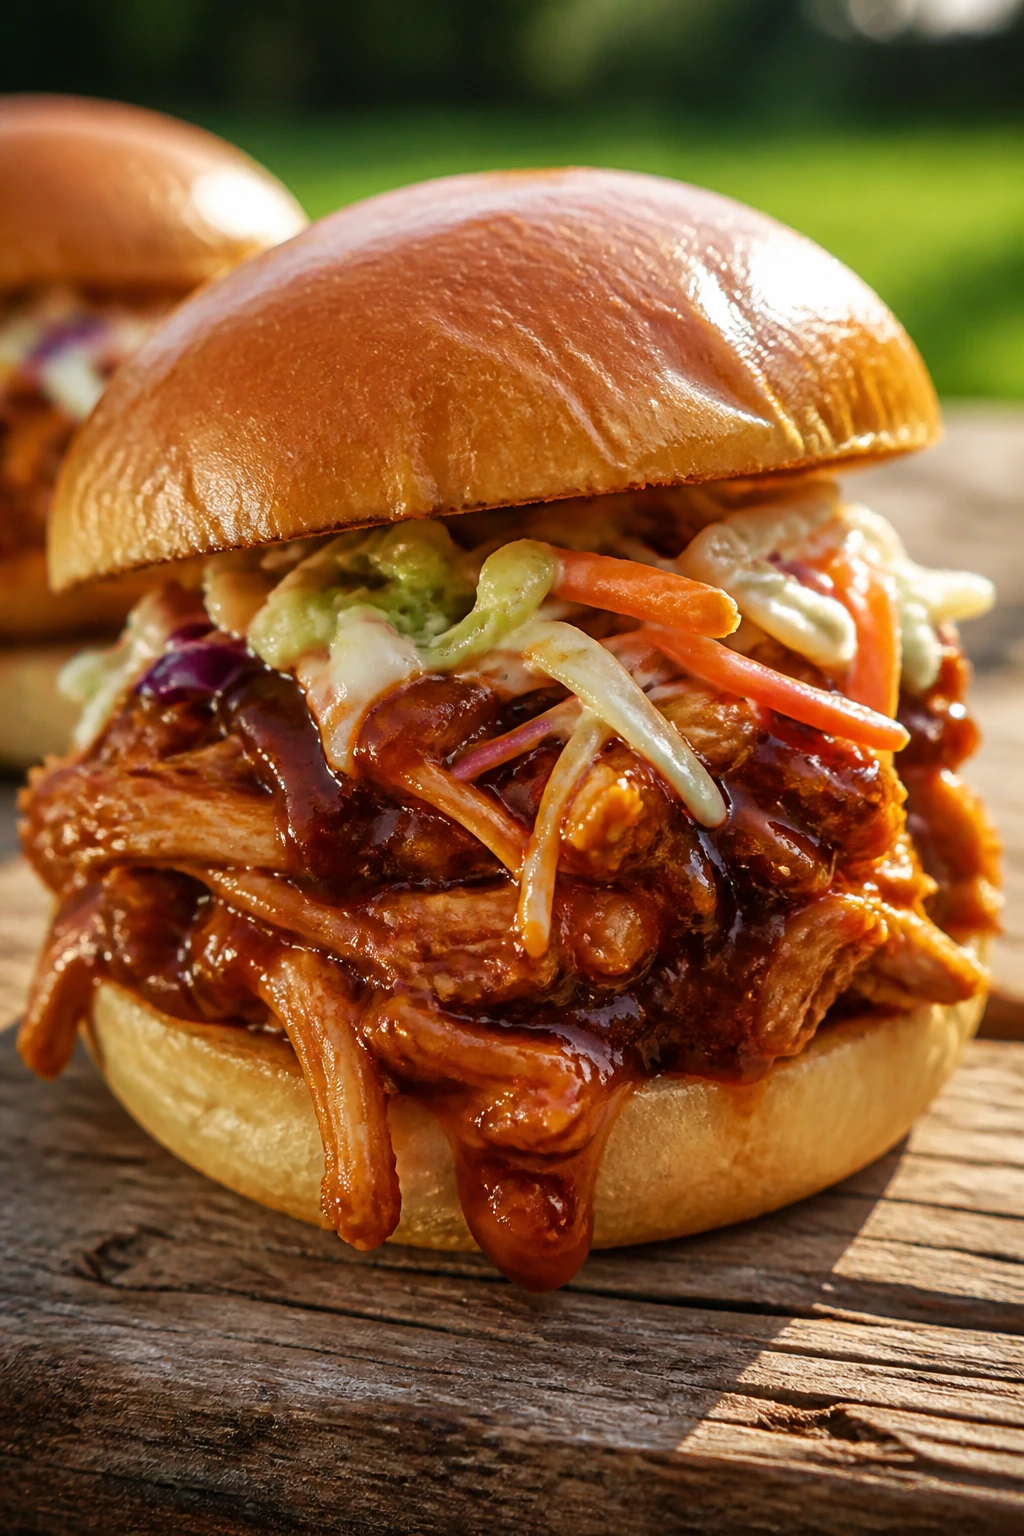
Sweet sauce, soft buns, and a little crunch from slaw make these sliders feel like picnic food with a purpose. They’re the sort of thing people grab with one hand and keep talking with the other.
Why It Works:
Pulled chicken is picnic-friendly because it stays tender even after a short hold. The barbecue sauce clings to the meat, while the slaw cuts through the sweetness so the bun doesn’t feel sticky. Small rolls make portion control easy, which is useful until the last person wants a second one.
Key Ingredients:
- 3 cups cooked shredded chicken
- 1 cup barbecue sauce
- 12 slider buns
- 3 cups coleslaw mix
- 1/4 cup mayonnaise
- 1 tablespoon apple cider vinegar
- 1 teaspoon honey
- 12 dill pickle chips
- Salt and black pepper
Quick Steps:
- Warm the shredded chicken with barbecue sauce in a skillet over medium heat until hot and glossy, about 5 minutes.
- Toss the coleslaw mix with mayonnaise, vinegar, honey, salt, and pepper.
- Split the buns and lightly toast them if you want extra structure.
- Fill each bun with sauced chicken, a small pile of slaw, and a pickle chip.
- Wrap tightly in foil or parchment until ready to serve.
Equipment for This Recipe:
- Skillet
- Mixing bowl
- Tongs or spoon
- Baking sheet for toasting buns
- Foil or parchment
How to Serve This Dish:
Set the sliders on a tray and hold a few extra pickle chips nearby. They go well with potato salad, chips, or sliced melon. If you’re feeding a crowd, stack them in rows and let people grab their own.
Pro Tips for This Recipe:
- Keep the sauce thick; thin sauce runs straight into the bun.
- Toast the cut sides of the buns for a minute so they resist moisture.
- Add slaw right before serving if you want it crisp.
- Use smaller buns than you think you need. These eat bigger than they look.
Variations on This Dish:
- Spicy BBQ Sliders: Stir a tablespoon of hot sauce into the barbecue sauce.
- Pork Slider Swap: Use pulled pork instead of chicken if that’s what you have left over.
- Crunchy Apple Slaw Version: Add thin apple matchsticks to the slaw for a sharper, fresher bite.
Common Mistakes to Avoid with This Dish:
- Soggy buns: Don’t drown them in sauce. Spoon, don’t pour.
- Too much slaw: It slides out and makes the sliders hard to hold.
- Serving them too hot: Steaming buns get soft fast. Let the filling cool a touch.
7. Greek Chicken Pita Pockets
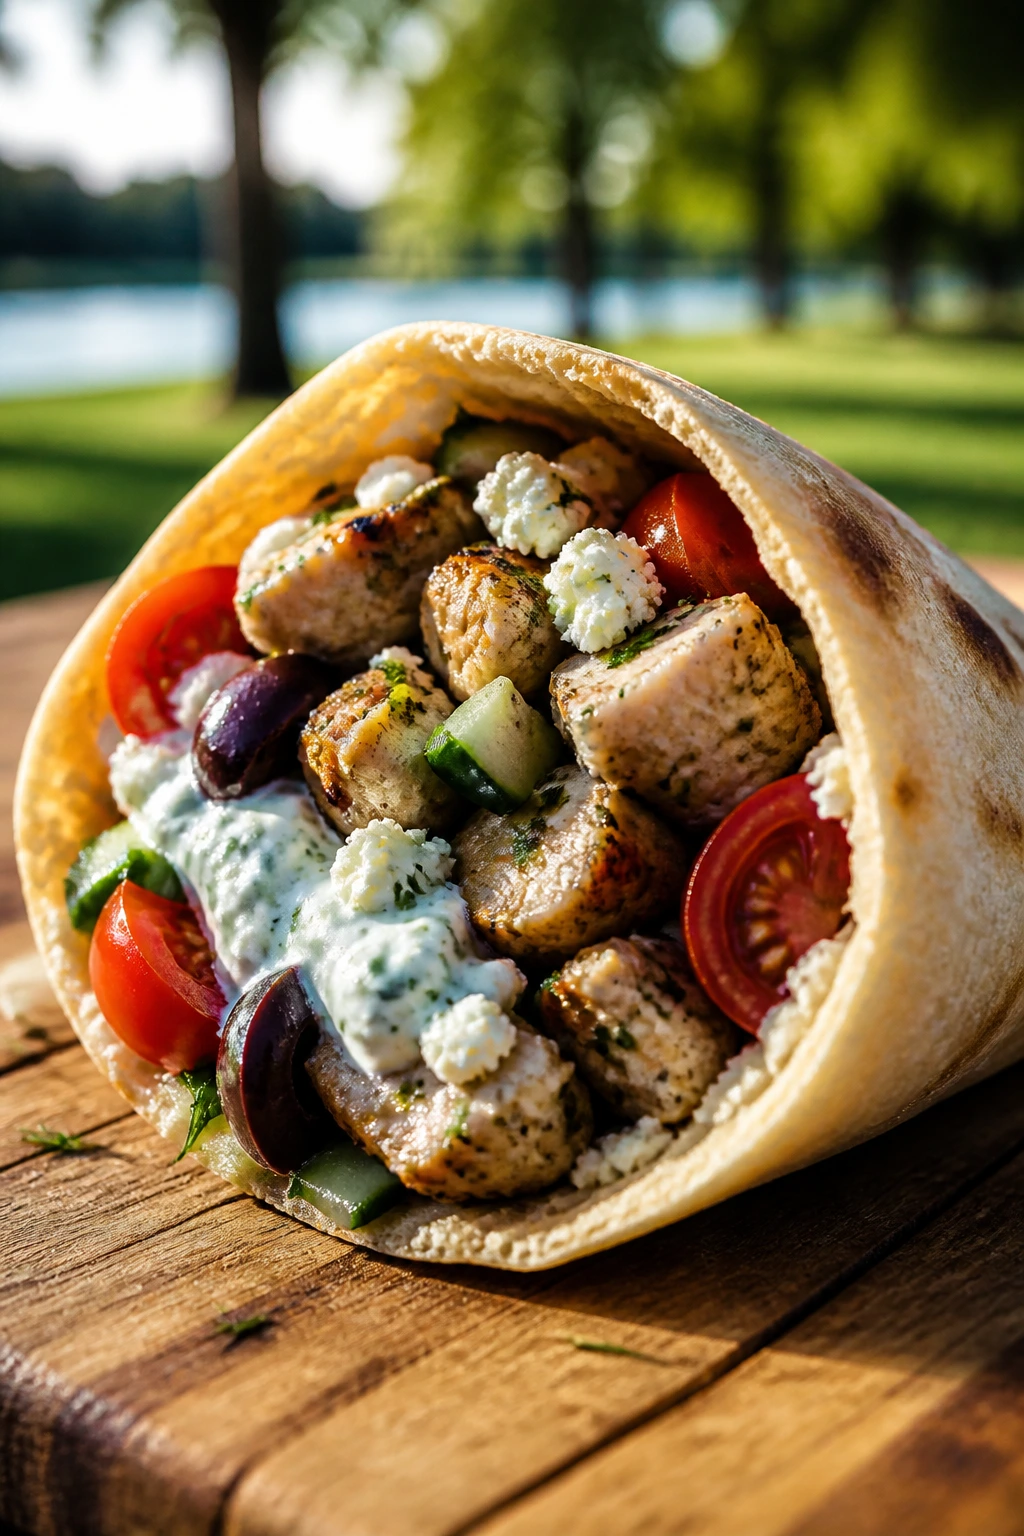
These taste like a proper lunch, not a cobbled-together snack. Cucumber, tomato, feta, olives, and garlicky tzatziki give the chicken enough lift that you don’t miss anything fancy.
Why It Works:
Pita pockets are built to hold chopped fillings without collapsing. Greek flavors are naturally picnic-friendly because they like lemon, herbs, and cold serving temperatures. The key is keeping the vegetables dry so the pita doesn’t turn damp before you reach the grass.
Key Ingredients:
- 4 pita breads
- 3 cups cooked chicken, chopped
- 1 cup cucumber, diced
- 1 cup cherry tomatoes, halved
- 1/2 cup crumbled feta
- 1/3 cup tzatziki
- 1/4 cup red onion, thinly sliced
- 1/4 cup sliced kalamata olives
- 1 cup shredded lettuce
Quick Steps:
- Mix the chicken with half the tzatziki in a bowl.
- Warm the pita breads briefly so they open without cracking.
- Stuff each pita with lettuce, chicken, cucumber, tomatoes, onion, olives, and feta.
- Spoon the remaining tzatziki inside or serve it on the side.
- Wrap each pita in parchment and slice in half if needed.
Equipment for This Recipe:
- Mixing bowl
- Sharp knife
- Cutting board
- Skillet or toaster for warming pitas
- Parchment paper
How to Serve This Dish:
Serve the pita halves with lemon wedges and extra tzatziki in a small container. A handful of grapes or a little tomato-cucumber salad on the side works well. They’re sturdy enough to eat standing up, which picnic food should honestly be able to do.
Pro Tips for This Recipe:
- Seed the cucumber if it’s especially wet.
- Use thick tzatziki so the filling doesn’t run.
- Warm the pita only enough to soften it; too much heat makes it brittle.
- Chop the chicken small so every bite feels balanced.
Variations on This Dish:
- Chickpea Gyro Pocket: Replace the chicken with smashed chickpeas and a pinch of oregano.
- Lamb Pita Version: Use cooked lamb and a little extra mint in the tzatziki.
- Wrap Form: Skip the pocket and roll the filling in a large tortilla for a less fragile lunch.
Common Mistakes to Avoid with This Dish:
- Overstuffing the pita: The pocket splits and dumps the filling.
- Packing watery tomatoes inside too early: They soften the bread.
- Using cold, stiff pita: It cracks before you even get started.
8. Shrimp and Mango Rice Noodle Bowls
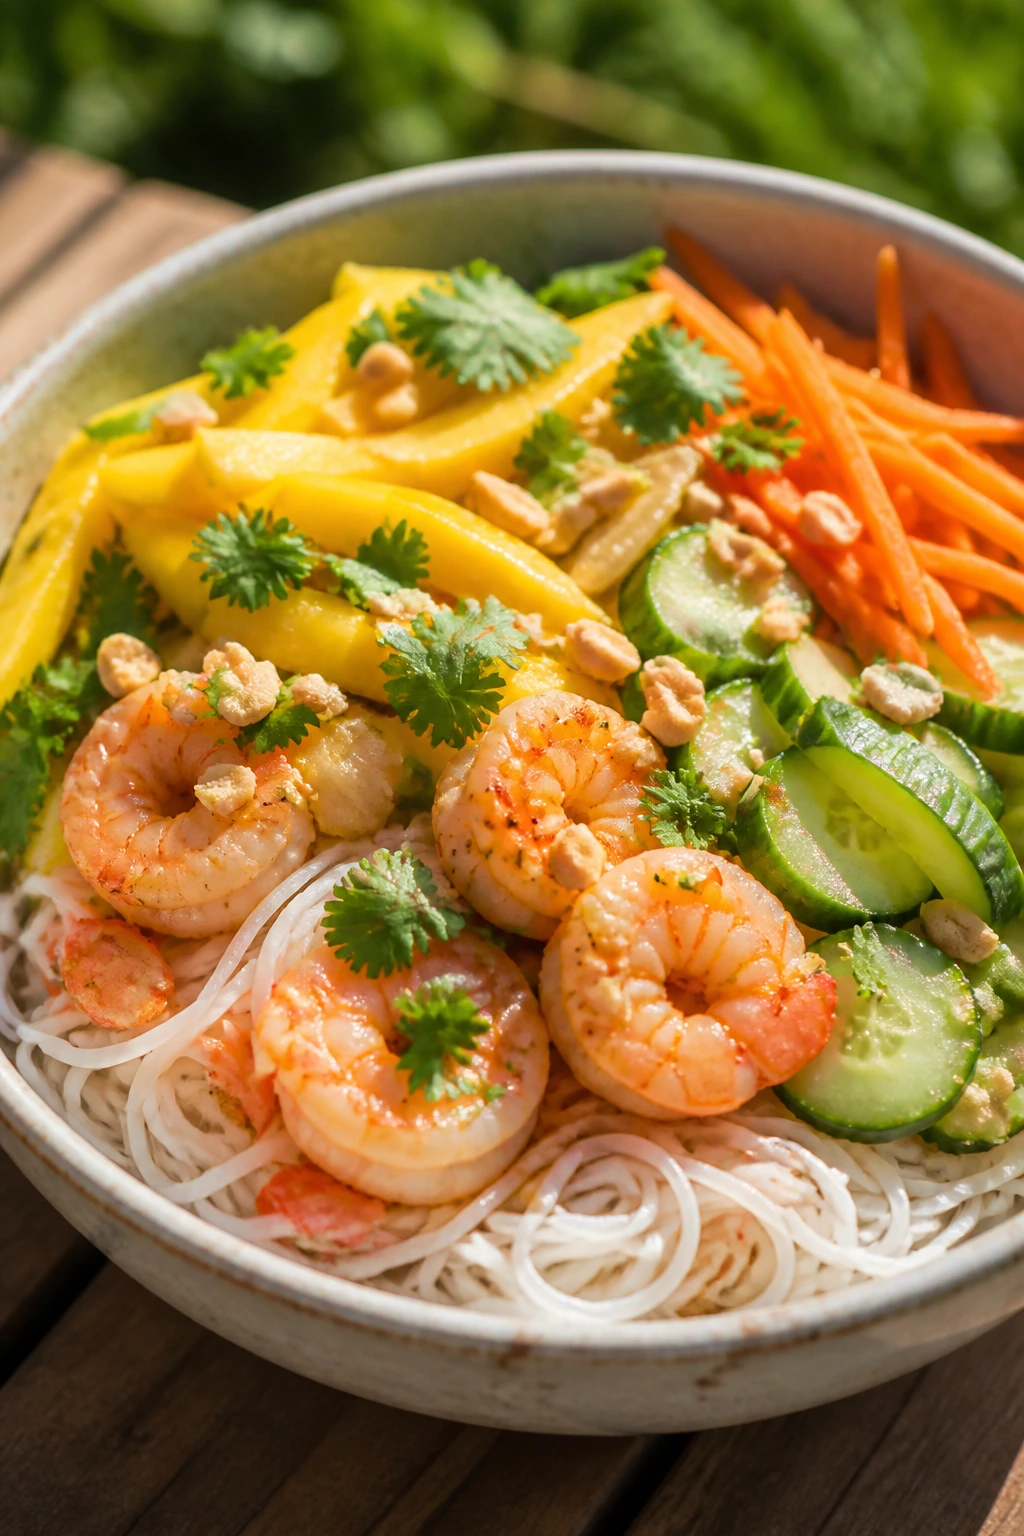
Sweet mango, cool noodles, and shrimp with a little bite make this feel lighter than the sandwich-heavy end of the basket. It still counts as a meal, though. There’s enough protein and starch to keep people from raiding the chips first.
Why It Works:
Rice noodles are nice for picnics because they taste good cold and don’t get gluey the way some pasta does. Mango gives the bowl a juicy pop that plays well against shrimp and lime. The whole thing is held together by a dressing that’s sharp enough to wake up the noodles after chilling.
Key Ingredients:
- 8 ounces rice noodles
- 1 pound cooked shrimp, peeled and deveined
- 1 ripe mango, sliced into strips
- 1 cucumber, julienned or thinly sliced
- 1 cup shredded carrots
- 2 tablespoons chopped cilantro
- 2 tablespoons chopped peanuts
- 3 tablespoons lime juice
- 2 tablespoons soy sauce
- 1 tablespoon sesame oil
- 1 tablespoon honey
Quick Steps:
- Soak or boil the rice noodles according to the package until tender, then rinse them cold.
- Whisk lime juice, soy sauce, sesame oil, honey, and a pinch of salt.
- Toss the noodles with half the dressing, then add shrimp, mango, cucumber, carrots, and cilantro.
- Spoon the rest of the dressing over the top and finish with peanuts.
- Chill until cold and pack in shallow containers.
Equipment for This Recipe:
- Medium pot or heatproof bowl for soaking noodles
- Colander
- Large mixing bowl
- Julienne peeler or sharp knife
- Airtight containers
How to Serve This Dish:
Serve this in bowls or wide containers so the noodles don’t clump. A wedge of lime on the side makes sense. If you want more crunch, bring extra peanuts separately and sprinkle them on at the last minute.
Pro Tips for This Recipe:
- Rinse the noodles well after cooking or they stick in one soft mass.
- Use mango that is ripe but still firm enough to slice cleanly.
- Keep the herbs light; too much cilantro can take over the bowl.
- Add peanuts right before eating if you want them to stay crisp.
Variations on This Dish:
- Peanut-Lime Bowl: Swap the soy dressing for a peanut butter-lime dressing if you want a richer finish.
- Chicken Noodle Bowl: Add shredded rotisserie chicken and a few more spoonfuls of dressing.
- Tofu Picnic Bowl: Use seared tofu instead of shrimp for a vegetarian version that still feels substantial.
Common Mistakes to Avoid with This Dish:
- Overcooking the noodles: They go mushy when chilled. Pull them early.
- Using overripe mango: It smears into the salad. Firm-ripe is the sweet spot.
- Dressing too heavily: Rice noodles need coating, not drowning.
9. Classic Egg Salad Lettuce Cups
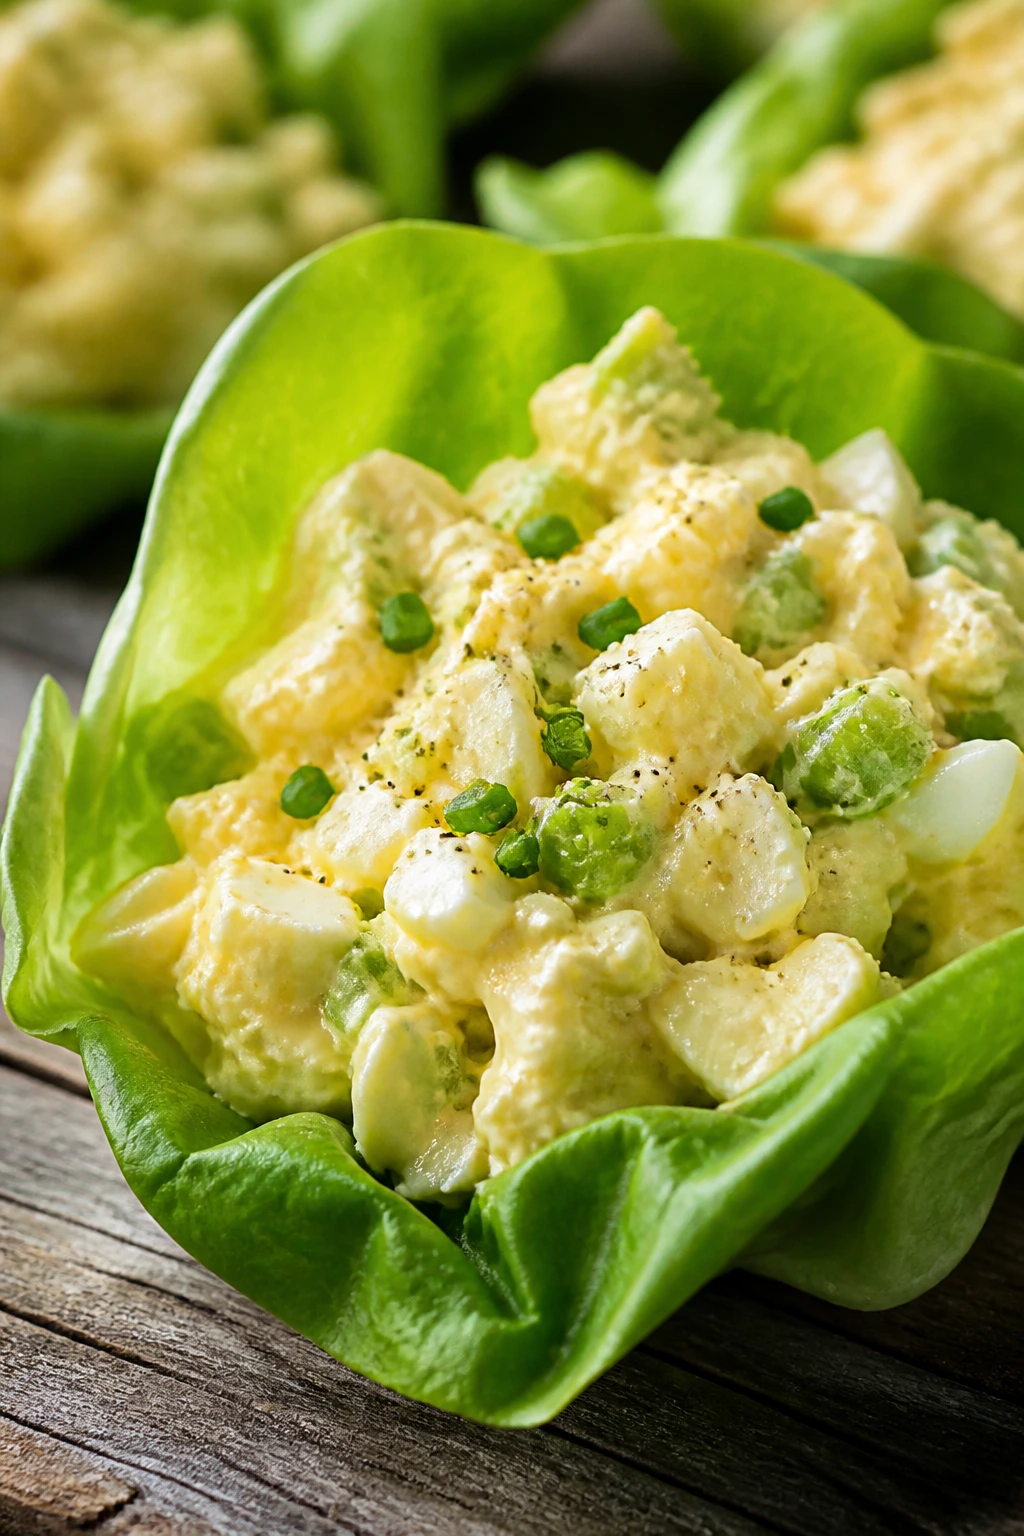
Egg salad gets a bad reputation only when it’s overworked into paste. Kept a little chunky and tucked into crisp lettuce, it turns into one of the cleanest picnic lunches on the blanket.
Why It Works:
Egg salad is rich, so the lettuce cup matters. Butter lettuce or romaine gives you a cold, crisp shell that keeps the filling from feeling heavy. Celery and chives break up the texture, and a little mustard keeps the eggs from tasting flat.
Key Ingredients:
- 8 large eggs
- 1/3 cup mayonnaise
- 1 teaspoon Dijon mustard
- 2 celery stalks, finely diced
- 2 tablespoons chopped chives
- 1 teaspoon lemon juice
- 1/4 teaspoon paprika
- 8 to 10 butter lettuce leaves
- Salt and black pepper
Quick Steps:
- Hard-boil the eggs, then cool them in ice water and peel them once cold.
- Chop the eggs into rough pieces and place them in a bowl.
- Stir in mayonnaise, Dijon, celery, chives, lemon juice, paprika, salt, and pepper.
- Spoon the salad into lettuce leaves right before serving.
- Sprinkle a touch more paprika on top.
Equipment for This Recipe:
- Saucepan
- Slotted spoon
- Mixing bowl
- Sharp knife
- Bowl of ice water
How to Serve This Dish:
Set the lettuce cups on a chilled platter so they stay crisp longer. Crackers or sliced cucumbers make a good side if you want more crunch. This is also the sort of filling that works fine in a sandwich if someone hates lettuce.
Pro Tips for This Recipe:
- Cool the eggs all the way before mixing or the mayo thins out.
- Chop by hand instead of mashing with a fork if you want texture.
- Taste after chilling; cold egg salad often needs a pinch more salt.
- Pack the filling separately from the lettuce leaves until serving time.
Variations on This Dish:
- Dill Pickle Egg Salad: Add chopped pickle and a spoonful of brine for sharper flavor.
- Avocado Egg Salad: Replace half the mayo with mashed avocado for a softer, greener mix.
- Curry Egg Salad: Stir in 1/2 teaspoon curry powder and a few golden raisins if you like a sweeter edge.
Common Mistakes to Avoid with This Dish:
- Overcooking the eggs: Green-gray yolks taste dry and sulfur-heavy.
- Making the filling too wet: It slides right out of the lettuce cup.
- Serving it warm: Egg salad needs to stay chilled and shaded.
10. Hummus Veggie Pita Pockets
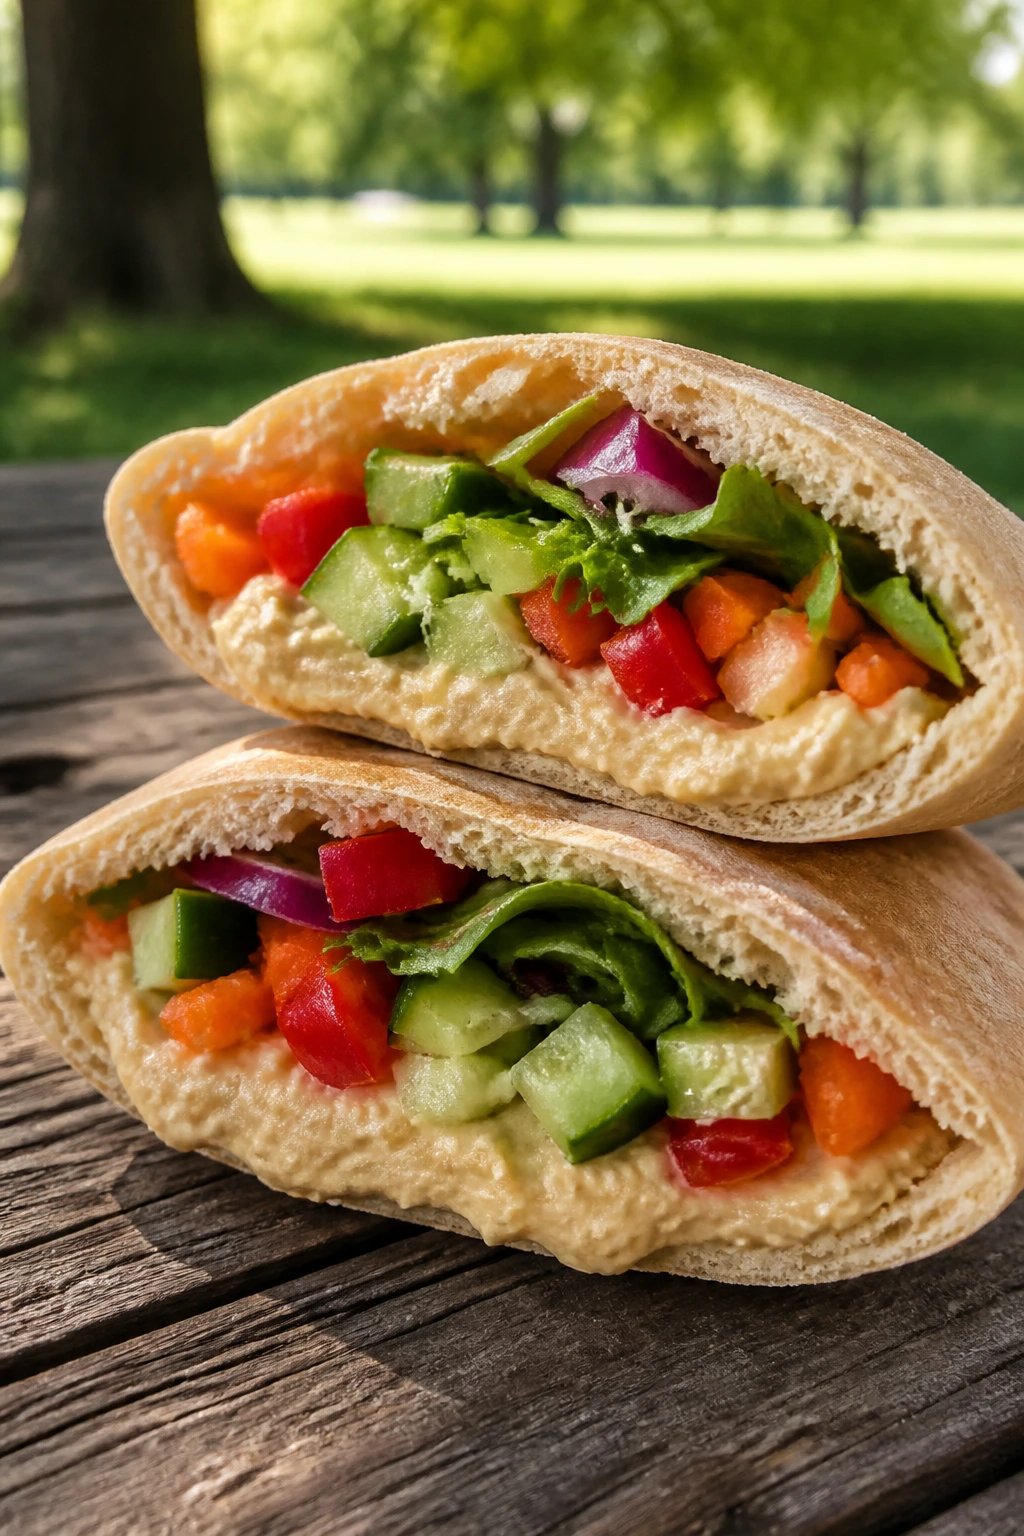
This is the picnic meal that doesn’t need a stove, a grill, or even a second thought. Creamy hummus holds the filling together, and the vegetables keep the whole thing from feeling like a backup plan.
Why It Works:
Hummus acts like glue, which is exactly what a pocket meal needs. The best versions use chopped vegetables that stay crisp and dry, so each bite gets crunch instead of a watery drip. Feta is optional, but I like it because it adds salt without making the pocket messy.
Key Ingredients:
- 1 cup hummus
- 4 pita breads
- 1 cucumber, diced
- 1 bell pepper, thinly sliced
- 1 cup shredded carrots
- 2 cups baby spinach
- 1/2 cup crumbled feta, optional
- 1/4 cup sliced olives
- 1/4 cup sprouts, optional
Quick Steps:
- Warm the pita breads just enough to open them without cracking.
- Spread hummus inside each pocket or on both inner walls.
- Layer spinach, cucumber, bell pepper, carrots, olives, and feta.
- Add sprouts at the very end if using.
- Wrap in parchment and slice in half.
Equipment for This Recipe:
- Knife
- Cutting board
- Spoon or small spatula
- Toaster or dry skillet
- Parchment paper
How to Serve This Dish:
Serve with fruit, chips, or a small cup of olives on the side. A cold drink and a pocket this full is enough. If you’re feeding kids, cut the pitas into smaller wedges so they’re easier to handle.
Pro Tips for This Recipe:
- Use thick hummus; watery hummus won’t hold the filling.
- Pat the vegetables dry after washing so the pita stays firm.
- Layer spinach first to keep the wetter vegetables off the bread.
- Don’t overstuff the pocket unless you enjoy salad falling into your lap.
Variations on This Dish:
- Roasted Pepper Hummus Pocket: Use roasted red pepper hummus and skip the feta for a sweeter profile.
- Protein-Boosted Pocket: Add sliced hard-boiled egg or chickpeas for more staying power.
- Gluten-Free Version: Spoon the filling over crisp romaine leaves and call it lunch.
Common Mistakes to Avoid with This Dish:
- Stuffing it too full: The pita splits and the filling dumps out.
- Using wilted greens: They turn limp before lunch starts.
- Leaving hummus exposed to heat too long: Pack it cold and shaded.
11. BLT Sliders with Basil Mayo

A BLT is already picnic-adjacent, but turning it into sliders makes the whole thing easier to carry. Bacon, tomato, lettuce, and basil mayo are a familiar combination, but the smaller format keeps the mess down.
Why It Works:
Mini rolls handle juicy fillings better than sliced bread. The basil mayo gives the sandwich a fresher, less flat flavor than plain mayo, and the bacon adds the salt that keeps tomatoes from tasting bland. Just don’t overdo the tomato. That’s where things slide off the rails.
Key Ingredients:
- 12 slider buns
- 12 slices bacon
- 2 large tomatoes, sliced and lightly salted
- 2 cups shredded lettuce or tender romaine
- 1/2 cup mayonnaise
- 2 tablespoons chopped basil
- 1 teaspoon lemon juice
- Black pepper
- 1 avocado, sliced, optional
Quick Steps:
- Bake or pan-fry the bacon until crisp, then drain it well.
- Stir basil and lemon juice into the mayonnaise.
- Split the buns and spread a thin layer of basil mayo on each side.
- Layer lettuce, tomato, bacon, and avocado if using.
- Close the sliders, wrap them in parchment, and chill briefly before serving.
Equipment for This Recipe:
- Sheet pan or skillet for the bacon
- Paper towels
- Small bowl for the mayo
- Knife
- Parchment paper
How to Serve This Dish:
Serve the sliders whole or halved, depending on the appetite of the group. They’re good with corn salad, chips, or dill pickles. I’d keep extra basil mayo on the side for anyone who likes a wetter sandwich.
Pro Tips for This Recipe:
- Salt the tomato slices lightly and blot them after 5 minutes to reduce dripping.
- Let the bacon cool before building or it steams the buns.
- Use soft slider buns that still have enough structure to hold up.
- If you’re packing ahead, keep tomato slices separate until serving time.
Variations on This Dish:
- Turkey BLT Sliders: Replace the bacon with thin turkey slices and keep the basil mayo.
- Spicy BLT: Add a little hot sauce to the mayo and a few pickled jalapeños.
- Open-Face BLT Bites: Serve on toasted bread rounds if you want less bread and more topping.
Common Mistakes to Avoid with This Dish:
- Assembling too early: The bun absorbs tomato juice and softens.
- Using floppy bacon: It bends instead of cracking and makes the sandwich messy.
- Tomatoes cut too thick: They slide. Thin slices are easier.
12. Corn, Black Bean, and Avocado Wraps
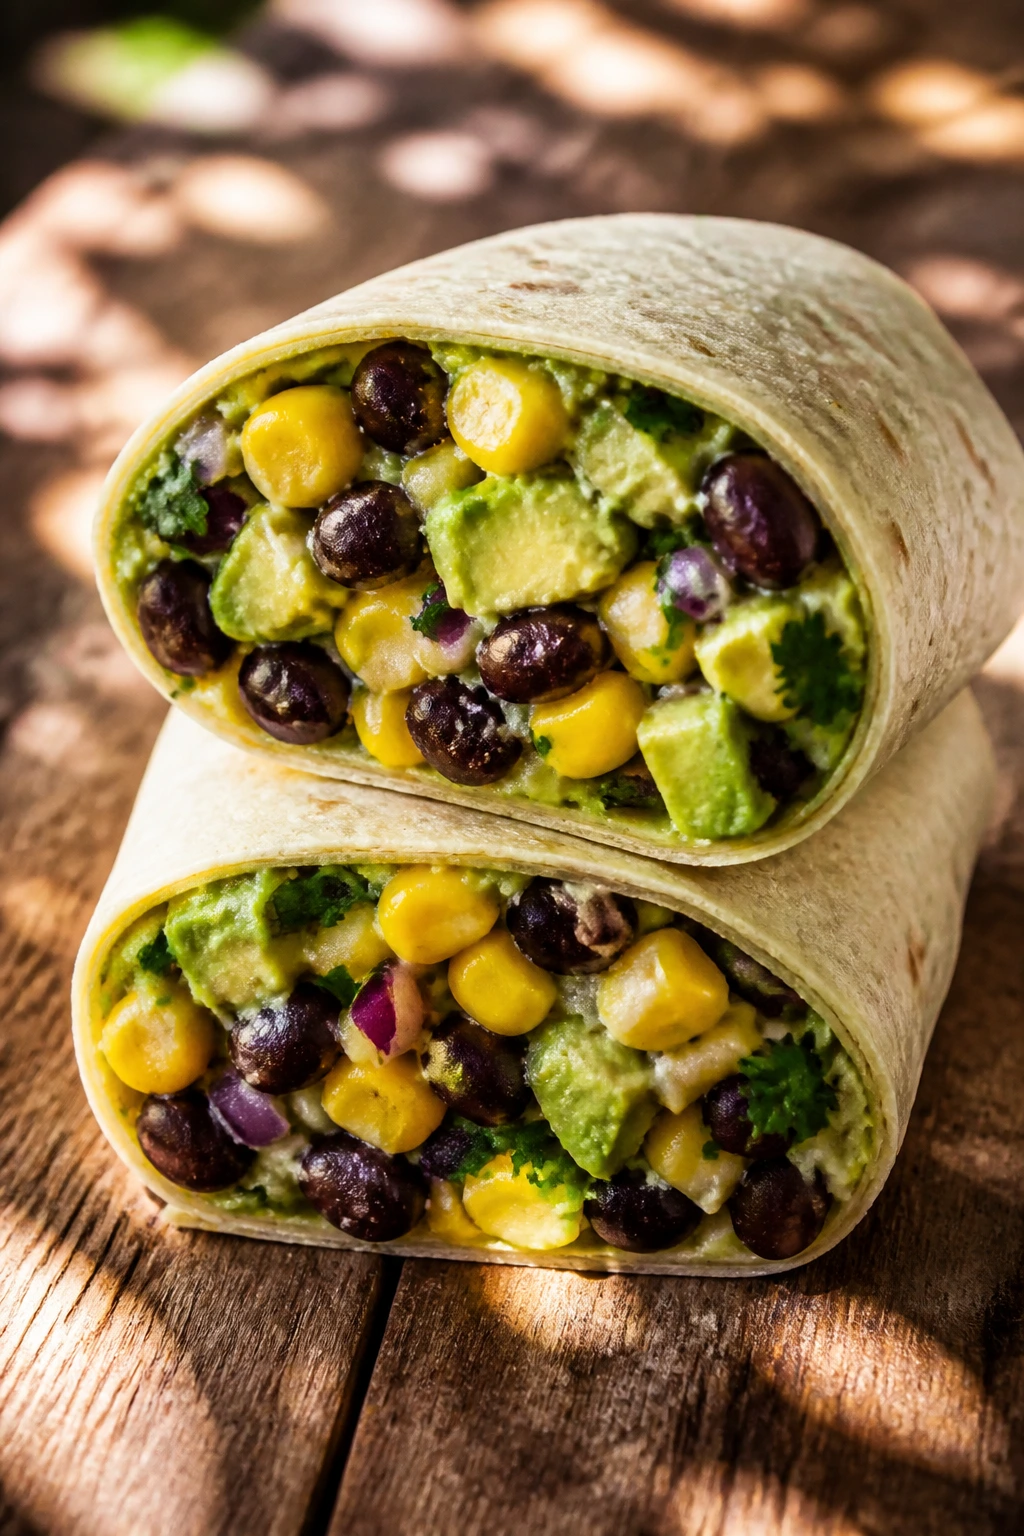
Bright, soft, and a little sweet from the corn, these wraps taste like someone paid attention. Black beans give them bulk, avocado brings the creamy side, and lime keeps the whole thing from tasting dull.
Why It Works:
Corn and black beans are sturdy enough to sit in a wrap without going muddy. Avocado adds richness, but lime keeps it from tasting heavy or turning brown too fast. This is one of the easiest ways to make a meatless picnic meal feel complete.
Key Ingredients:
- 4 large flour tortillas
- 1 can black beans, rinsed and drained
- 2 cups corn kernels, fresh, thawed, or lightly charred
- 2 ripe but firm avocados, diced
- 1/2 cup shredded pepper jack cheese
- 1/4 cup red onion, finely chopped
- 2 tablespoons lime juice
- 2 tablespoons chopped cilantro
- Salt and black pepper
- Hot sauce, optional
Quick Steps:
- Toss black beans, corn, avocado, red onion, lime juice, cilantro, salt, and pepper in a bowl.
- Warm the tortillas for 10 seconds so they roll easily.
- Divide the filling among the tortillas and top with pepper jack.
- Roll tightly and tuck the ends in as you go.
- Wrap each one in parchment and chill until picnic time.
Equipment for This Recipe:
- Mixing bowl
- Knife
- Cutting board
- Dry skillet or microwave for warming tortillas
- Parchment paper
How to Serve This Dish:
Cut the wraps in half and serve with salsa or tortilla chips. They also sit well next to sliced melon or a simple cucumber salad. If someone wants heat, hand over the hot sauce separately instead of putting it into the whole batch.
Pro Tips for This Recipe:
- Use avocado that’s ripe but still firm so it cubes instead of smears.
- Warm the tortillas briefly; cold tortillas crack and split.
- If the corn is very sweet, add a pinch more salt than you think.
- Mash a small spoonful of avocado into the beans if you want the filling to hold together better.
Variations on This Dish:
- Chicken Corn Wraps: Add chopped rotisserie chicken for a fuller lunch.
- Southwest Rice Wraps: Stir in 1/2 cup cooked rice for a denser wrap.
- No-Cheese Version: Skip the pepper jack and add extra lime and cilantro for a fresher finish.
Common Mistakes to Avoid with This Dish:
- Using overripe avocado: It turns to paste and leaks out.
- Too much filling: The tortilla tears as soon as you roll it.
- Forgetting acid: Without lime, the wrap tastes flat and heavy.
13. Soba Noodle Salad with Sesame Edamame
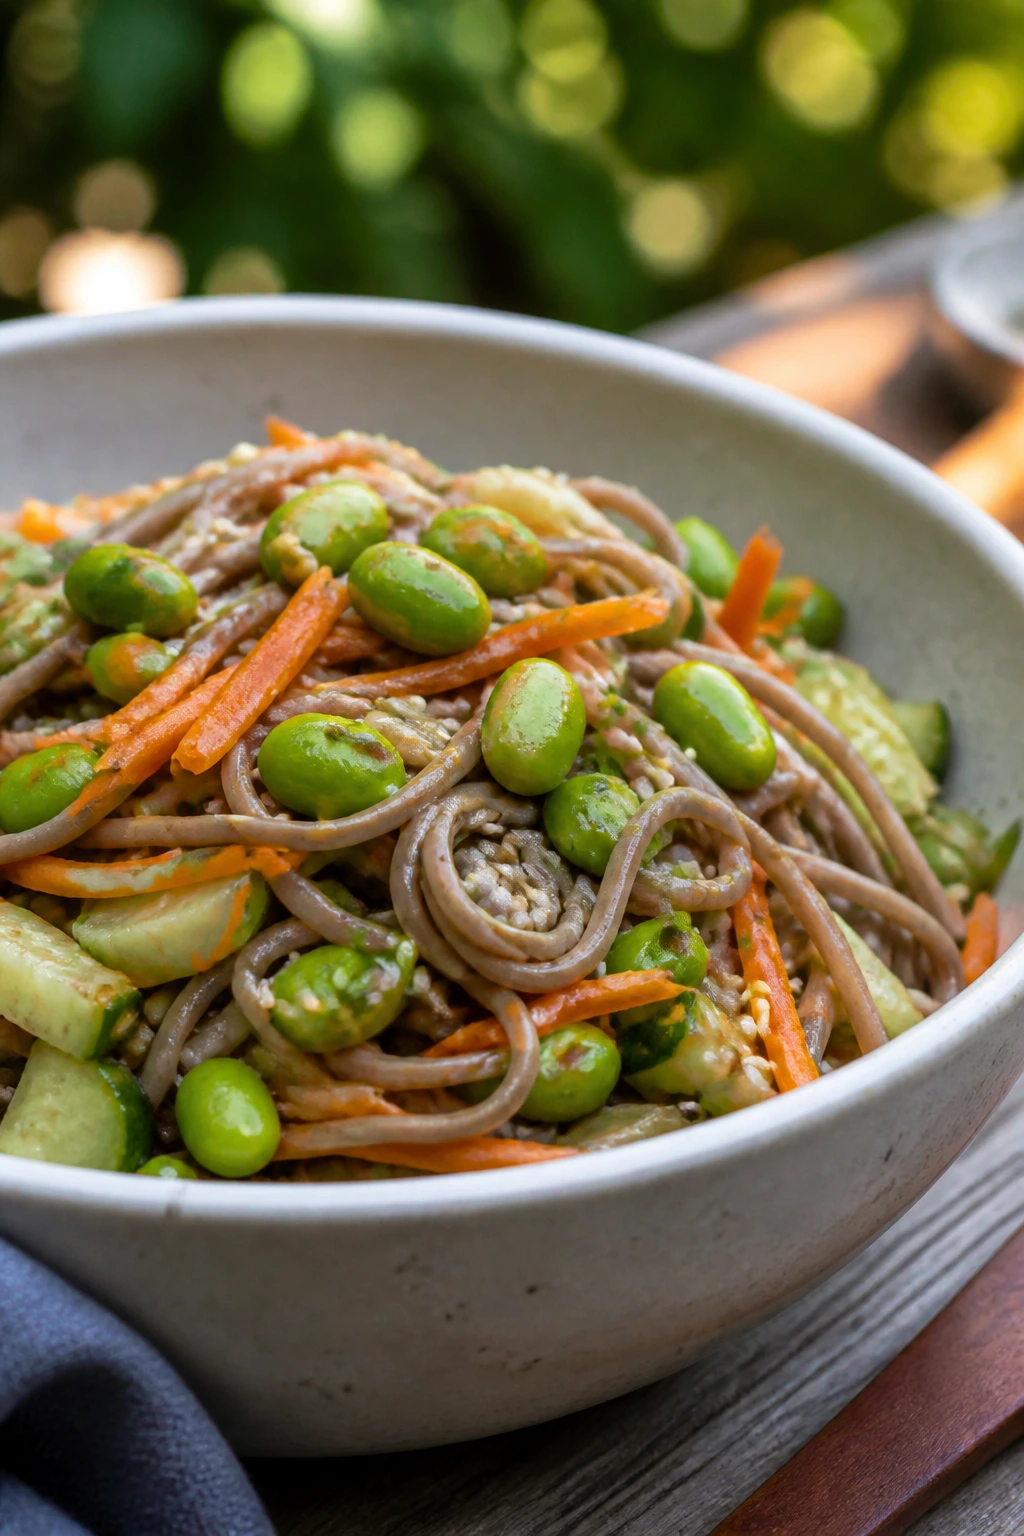
Cold soba noodles have a clean, nutty taste that works especially well at a picnic. Edamame gives the bowl some chew, and sesame dressing ties everything together without making it greasy.
Why It Works:
Soba behaves well when chilled, as long as you rinse it properly. Edamame adds protein and a firm bite, while cucumber and carrots keep the bowl crisp. Sesame dressing tastes strongest after a short rest, which makes this a useful make-ahead meal.
Key Ingredients:
- 8 ounces soba noodles
- 1 cup shelled edamame, cooked and cooled
- 1 cucumber, thinly sliced
- 2 carrots, cut into matchsticks
- 2 scallions, sliced
- 3 tablespoons soy sauce
- 2 tablespoons rice vinegar
- 1 tablespoon sesame oil
- 1 tablespoon honey
- 1 tablespoon toasted sesame seeds
- 1/4 cup chopped peanuts, optional
Quick Steps:
- Cook the soba noodles according to package directions, then rinse them under cold water until the starch is gone.
- Whisk soy sauce, rice vinegar, sesame oil, and honey into a dressing.
- Toss the noodles with the dressing, edamame, cucumber, carrots, and scallions.
- Sprinkle sesame seeds and peanuts on top.
- Chill until cold and pack in shallow containers.
Equipment for This Recipe:
- Pot
- Colander
- Large bowl
- Sharp knife or julienne peeler
- Airtight container
How to Serve This Dish:
Serve in bowls with extra sesame seeds on top and a lime wedge if you want a brighter edge. It works as a main meal on its own or as the cold anchor next to something grilled. I’d bring chopsticks only if you enjoy pretending the picnic table is more formal than it is.
Pro Tips for This Recipe:
- Rinse the soba until it feels cool and no longer slick.
- Cut the vegetables thin so they mix through the noodles instead of sitting on top.
- Add peanuts last if you want them crunchy.
- Taste after chilling; a splash more vinegar often helps cold noodles wake up.
Variations on This Dish:
- Chicken Soba Bowl: Add shredded chicken and a few more tablespoons of dressing.
- Peanut Soba Version: Replace half the dressing with peanut butter whisked smooth with warm water.
- Tofu Soba Salad: Pan-sear tofu cubes and fold them in once cooled.
Common Mistakes to Avoid with This Dish:
- Skipping the rinse: The noodles clump into a sticky block.
- Overdressing the bowl: Soba likes a light coat, not a soak.
- Cutting the carrots too thick: They dominate every bite and fight the noodles.
14. Sausage, Pepper, and Onion Hoagies
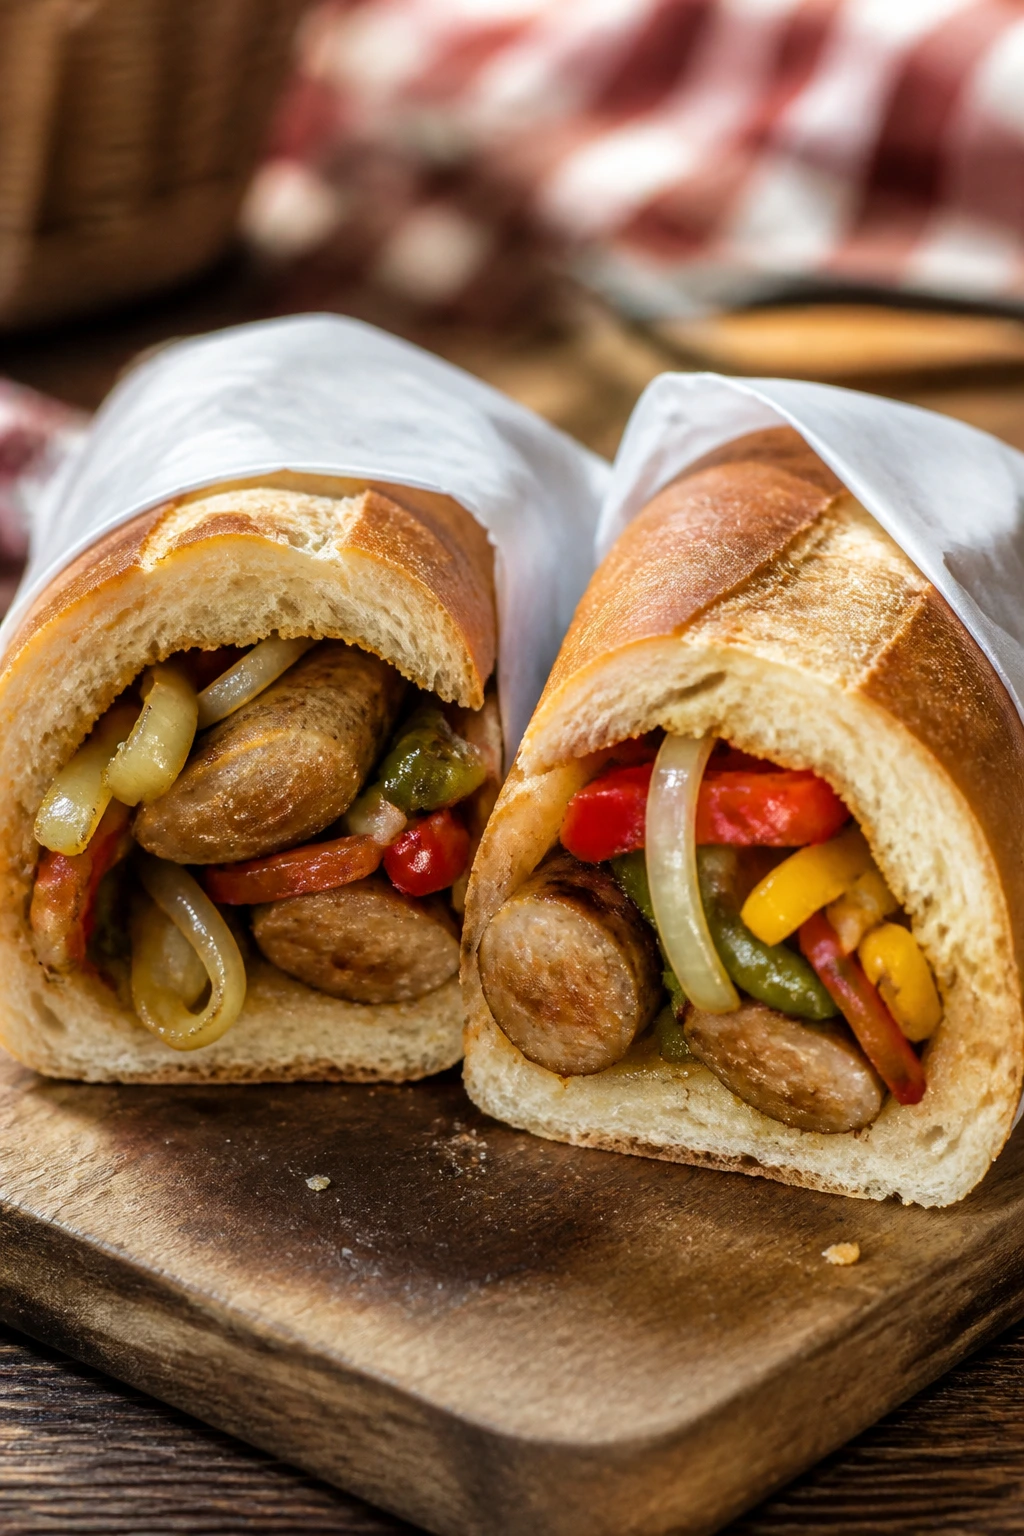
This is the warm picnic meal in the lineup, and it earns its place. Sausage, soft peppers, and onions tucked into a roll are sturdy, filling, and easy to wrap in foil for the trip.
Why It Works:
The hoagie format gives you a built-in container. Sausage brings the fat and salt, peppers bring sweetness, and onions give the whole sandwich that cooked-down savoriness people go back for. Wrap them well and they stay good long enough to eat at the park without chaos.
Key Ingredients:
- 6 Italian sausage links, mild or hot
- 3 bell peppers, sliced
- 1 large onion, sliced
- 2 tablespoons olive oil
- 2 garlic cloves, minced
- 6 hoagie rolls
- 6 slices provolone cheese
- 1 teaspoon dried oregano
- Mustard, optional
- Salt and black pepper
Quick Steps:
- Brown the sausage in a skillet over medium heat until mostly cooked through, about 10 minutes.
- Remove the sausage, then cook peppers and onions in olive oil until soft and lightly browned.
- Add garlic and oregano for the last minute.
- Return the sausage to the skillet and cook until fully done, with no pink inside.
- Pile into hoagie rolls, top with provolone, and wrap in foil.
Equipment for This Recipe:
- Large skillet
- Tongs
- Cutting board
- Sharp knife
- Foil
How to Serve This Dish:
Serve the hoagies warm or room temp, wrapped or unwrapped depending on how messy the group is likely to be. Pickles and potato chips make sense here. If you want to feed hungry people quickly, cut each sandwich in half and line them up.
Pro Tips for This Recipe:
- Slice the peppers thin so they cook at the same speed as the onions.
- Keep the heat at medium; scorching the sausage casing makes the filling tougher.
- Toast the rolls for a minute if you want more structure.
- Wrap the hoagies while they’re still warm so the cheese softens into the filling.
Variations on This Dish:
- Chicken Sausage Hoagies: Swap in chicken sausage for a leaner sandwich.
- Spicy Mustard Version: Add extra mustard and pepperoncini for more bite.
- Veggie Sausage Hoagies: Use plant-based sausage if you want a meatless warm sandwich.
Common Mistakes to Avoid with This Dish:
- Undercooked sausage: Slice one open and check before wrapping the rest.
- Too much oil in the pan: The rolls soak it up and turn heavy.
- Packing them without foil: The filling shifts and the sandwich falls apart.
15. Salmon Salad Sandwiches with Capers
Salmon salad has a richer, cleaner flavor than tuna, and capers keep it from feeling sleepy. Tucked between sturdy bread slices or inside a croissant, it turns into a proper picnic lunch fast.
Why It Works:
Salmon brings a softer texture and a little more richness than tuna, which makes the salad feel special without getting fussy. Capers and lemon cut through the mayo, and celery adds the crunch that keeps each bite from turning velvety. It’s one of the best make-ahead sandwiches if you respect the cold chain.
Key Ingredients:
- 2 cans salmon, drained and flaked, or 2 cups cooked salmon
- 1/3 cup mayonnaise
- 1 teaspoon Dijon mustard
- 1 tablespoon lemon juice
- 2 tablespoons chopped celery
- 1 tablespoon capers, chopped
- 1 tablespoon chopped dill
- 8 slices sturdy bread or 4 croissants
- Lettuce leaves
- Black pepper
Quick Steps:
- Flake the salmon into a bowl and pick out any large bones if using canned salmon.
- Stir in mayonnaise, Dijon, lemon juice, celery, capers, dill, and black pepper.
- Chill the mixture for 10 to 15 minutes.
- Spoon onto bread or croissants lined with lettuce.
- Wrap tightly and keep cold until serving.
Equipment for This Recipe:
- Mixing bowl
- Fork
- Knife
- Cutting board
- Airtight container
How to Serve This Dish:
Serve with cucumber slices, potato chips, or a few salty crackers. I’d cut the sandwiches into triangles if they’re heading into a mixed picnic basket. That shape just feels less heavy for fish salad.
Pro Tips for This Recipe:
- Drain the salmon well or the filling loosens.
- Use bread with enough chew to stand up to the salad.
- Chill the filling before assembling so the mayo stays firm.
- If using croissants, assemble close to serving time so they don’t go soft.
Variations on This Dish:
- Dill-Heavy Salmon Salad: Add extra dill and a spoonful of chopped cucumber.
- Greek Salmon Salad: Fold in chopped olives and a few feta crumbles.
- Open-Face Version: Serve on toasted bread with lettuce on top if you want less bread and more filling.
Common Mistakes to Avoid with This Dish:
- Leaving bones in the salmon: Take a moment and check. Nobody enjoys that surprise.
- Using flimsy bread: It collapses under the filling.
- Assembling too far ahead: Soft bread loses its edge.
16. Mini Spinach Feta Frittata Muffins
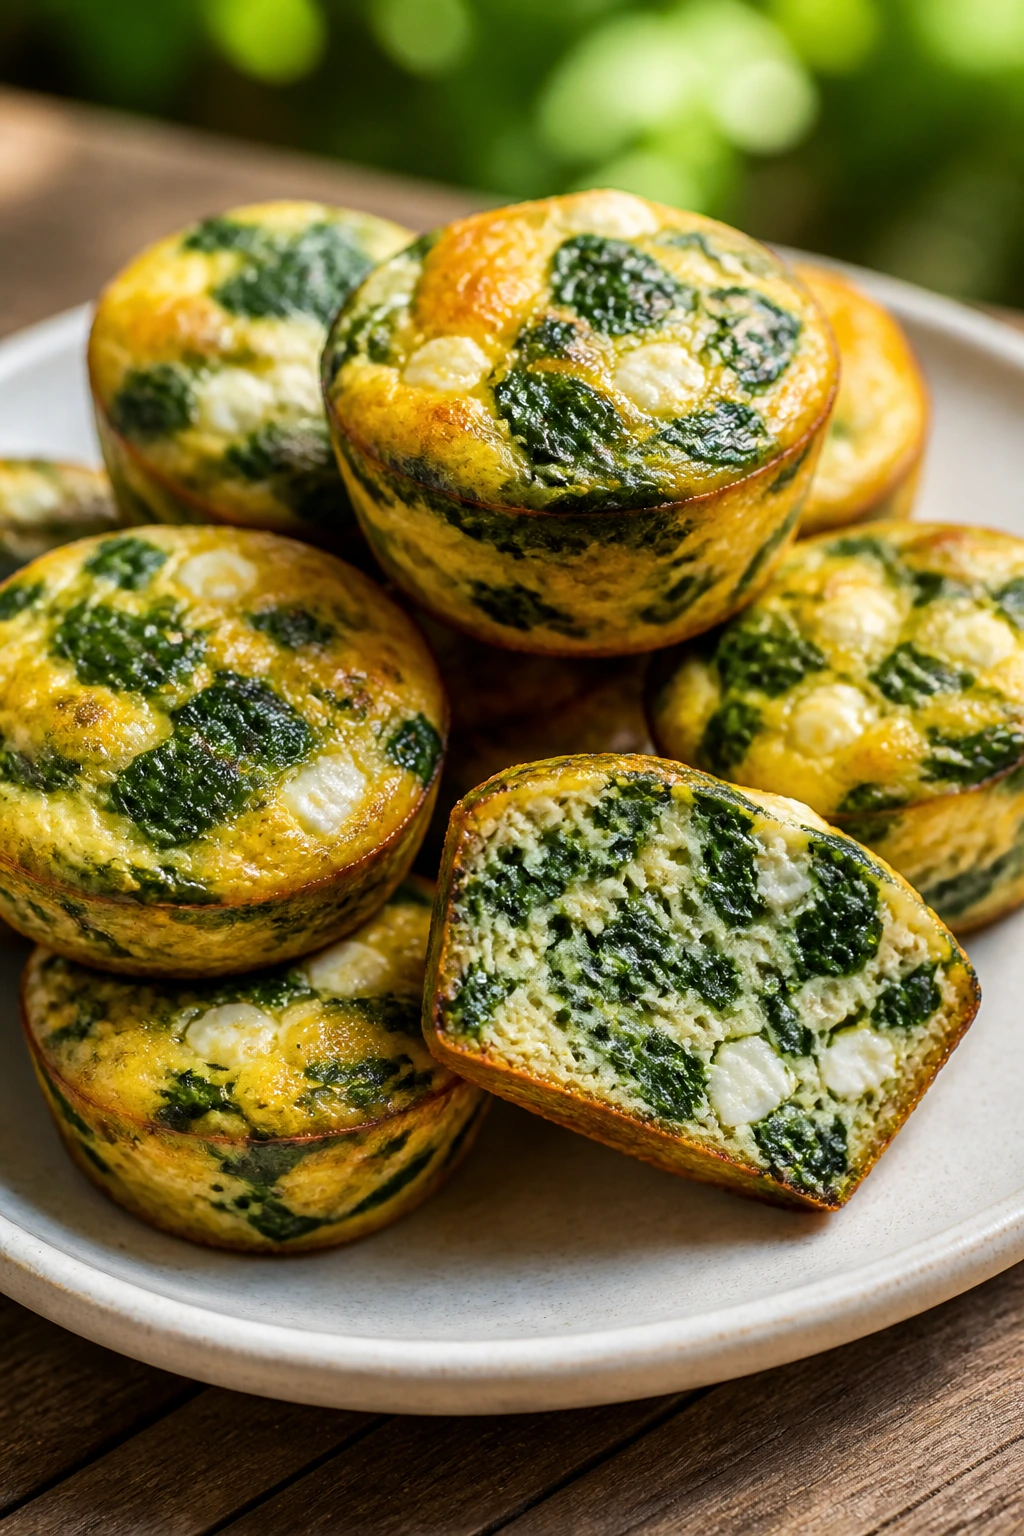
These are the picnic wildcard that people always end up liking more than they expected. They’re neat, bite-sized, and good cold or room temp, which is exactly the kind of flexibility picnic food needs.
Why It Works:
Egg muffins are sturdy because they set into individual portions. Spinach and feta keep the flavor lively, and the muffin shape means no slicing, no serving spoon, no drama. They’re also a nice change from the endless parade of bread and pasta.
Key Ingredients:
- 10 large eggs
- 1/4 cup milk
- 2 cups fresh spinach, chopped
- 3/4 cup crumbled feta
- 2 scallions, thinly sliced
- 1 tablespoon olive oil or butter for the pan
- 1/4 teaspoon salt
- 1/4 teaspoon black pepper
- 1/4 cup chopped sun-dried tomatoes, optional
Quick Steps:
- Preheat the oven to 375°F and grease a 12-cup muffin tin well.
- Whisk eggs, milk, salt, and pepper until blended.
- Stir in spinach, feta, scallions, and sun-dried tomatoes if using.
- Divide the mixture among the muffin cups and bake for 18 to 20 minutes, until set in the center.
- Cool in the pan for 5 minutes before lifting out.
Equipment for This Recipe:
- Muffin tin
- Mixing bowl
- Whisk
- Measuring cup
- Small spatula
How to Serve This Dish:
Serve them at room temp with cherry tomatoes or a little fruit on the side. They also work well tucked into a lunchbox with crackers. If you want to make the picnic feel more organized, put them on a platter instead of letting them rattle around loose.
Pro Tips for This Recipe:
- Squeeze excess water out of the spinach if it’s been washed recently.
- Grease the muffin tin thoroughly or the edges will cling.
- Pull them when the centers are just set; overbaking makes them rubbery.
- Let them cool before packing or steam will soften the tops.
Variations on This Dish:
- Ham and Cheddar Muffins: Swap the feta for cheddar and add chopped ham.
- Herb Garden Muffins: Use parsley and dill instead of scallions.
- Dairy-Free Version: Leave out the feta and add a bit more spinach plus a spoonful of nutritional yeast.
Common Mistakes to Avoid with This Dish:
- Too much liquid in the mix: The muffins turn soggy in the middle.
- Not greasing the pan enough: They stick and break apart.
- Overbaking: The texture gets dry fast.
17. Grilled Halloumi and Peach Sandwiches
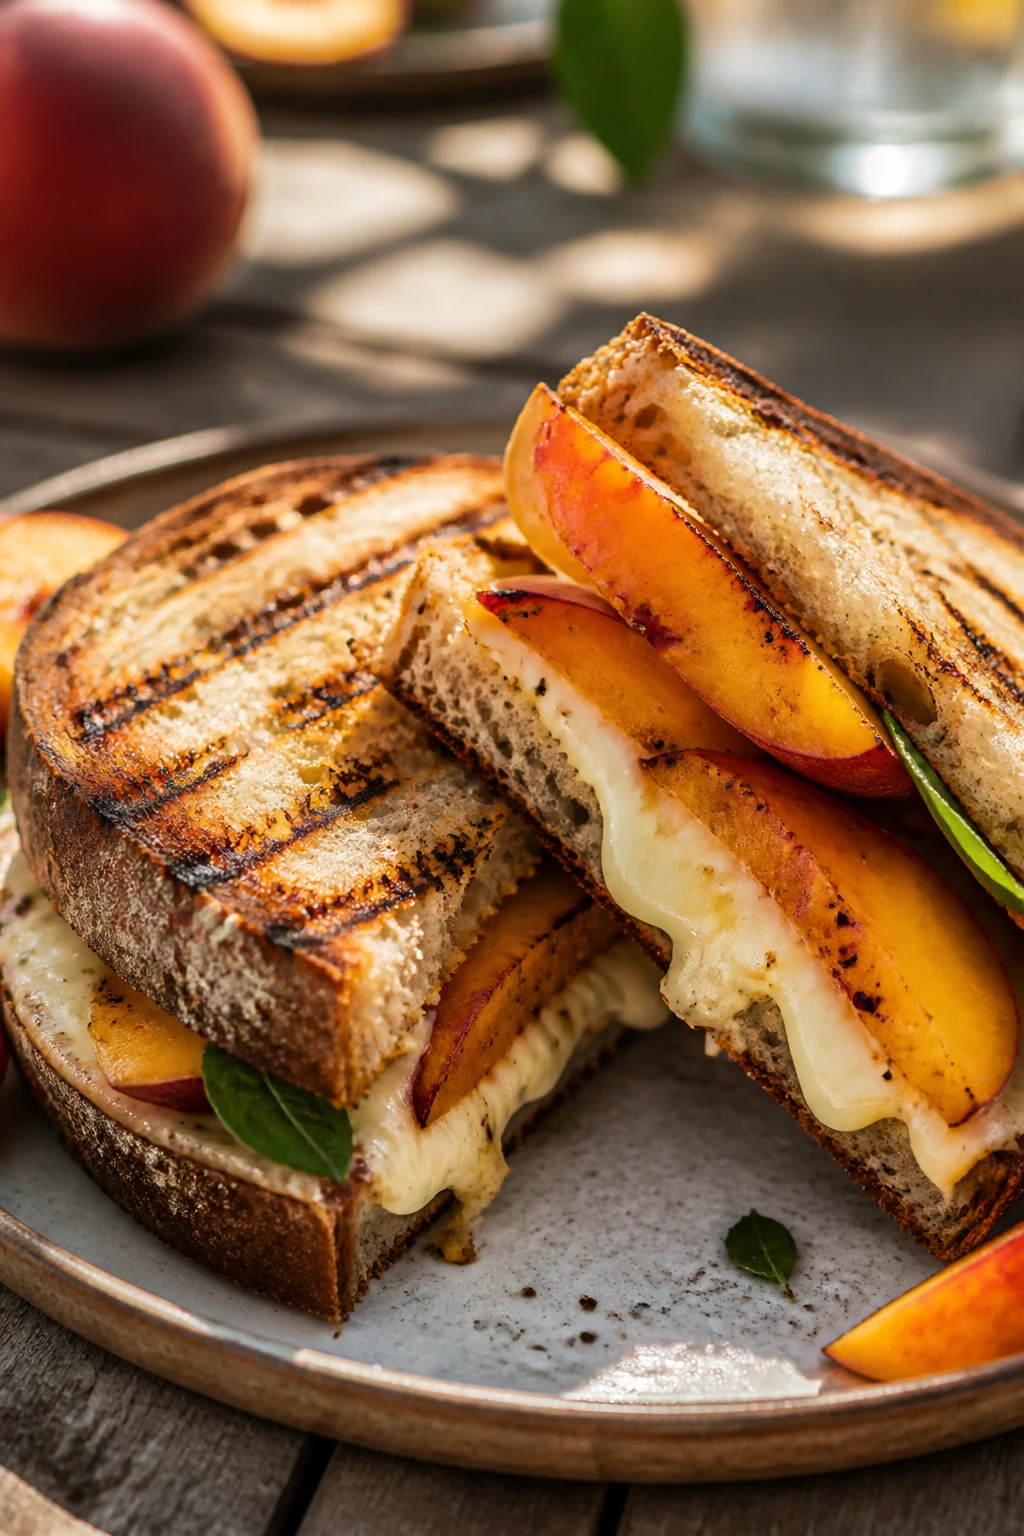
Halloumi brings the salty chew, peaches bring the juicy sweetness, and grilled bread makes the whole thing feel more put together than it has any right to be. This one tastes like late-afternoon heat in a good way.
Why It Works:
Halloumi doesn’t melt into a puddle, which is exactly why it works in a sandwich. Grilled peaches soften and get a little caramel edge, and basil mayo bridges the salty-sweet gap. If you eat this while the bread is still warm, it feels richer than the ingredient list suggests.
Key Ingredients:
- 8 ounces halloumi, sliced
- 2 ripe peaches, sliced
- 4 slices ciabatta or 2 split sandwich rolls
- 2 tablespoons olive oil
- 1/4 cup mayonnaise
- 1 tablespoon chopped basil
- 1 teaspoon lemon juice
- 1 cup arugula
- 1 teaspoon honey
- Black pepper
Quick Steps:
- Mix mayonnaise, basil, lemon juice, and honey for the spread.
- Brush halloumi and peach slices lightly with olive oil.
- Grill both over medium-high heat until the halloumi has browned edges and the peaches show grill marks, about 2 to 3 minutes per side.
- Spread the basil mayo on the bread and layer arugula, halloumi, and peaches.
- Finish with black pepper and close the sandwich.
Equipment for This Recipe:
- Grill pan or outdoor grill
- Small bowl
- Brush or spoon for oil
- Knife
- Tongs
How to Serve This Dish:
Serve these warm or at room temp, sliced into halves so the filling stays visible. I like them with a tomato salad or a handful of salted nuts. They’re a little more polished than some of the other picnic meals, which is not a bad thing.
Pro Tips for This Recipe:
- Use peaches that are ripe but still firm enough to hold a slice.
- Halloumi browns fast, so keep an eye on it.
- Grill the bread for a minute or two if you want it to resist the mayo.
- Assemble close to serving time so the peaches don’t stain the bread.
Variations on This Dish:
- Nectarine Swap: Use nectarines if they’re firmer or easier to slice.
- Burrata-Free Version: If you want softer cheese, add a little ricotta under the arugula, though it’s messier.
- Gluten-Free Build: Serve the halloumi and peaches over grilled gluten-free bread or crackers.
Common Mistakes to Avoid with This Dish:
- Overripe peaches: They collapse on the grill and make the sandwich wet.
- Overcooking halloumi: It gets squeaky and tough.
- Building too early: The bread softens under the warm filling.
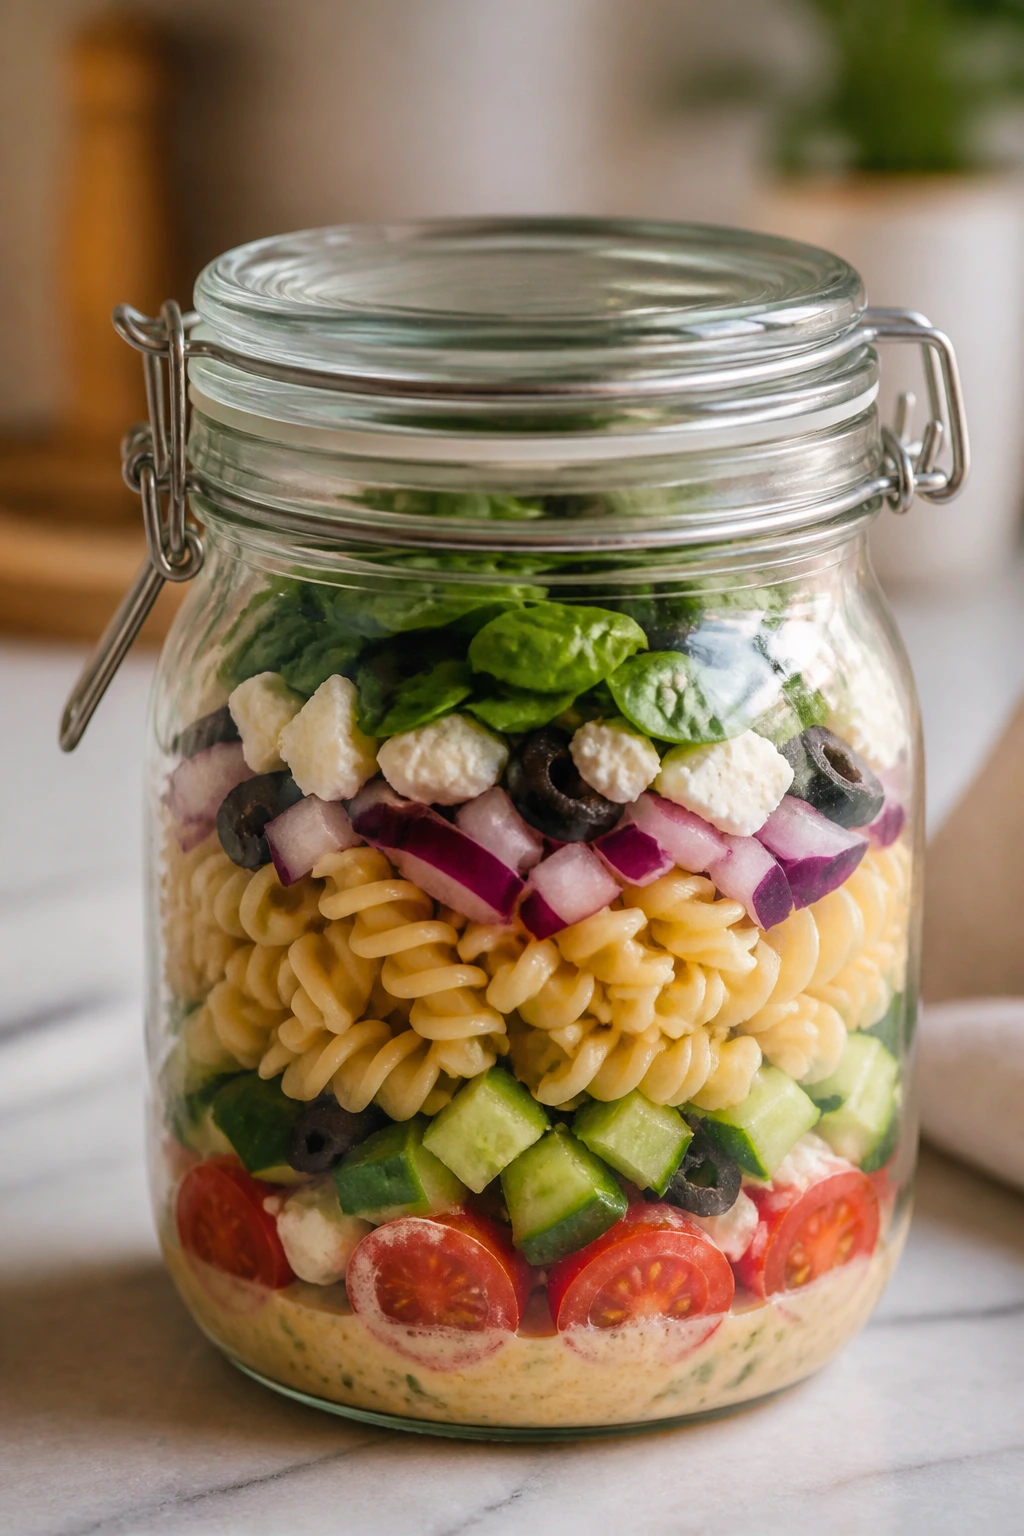
18. Italian Deli Pasta Salad Cups
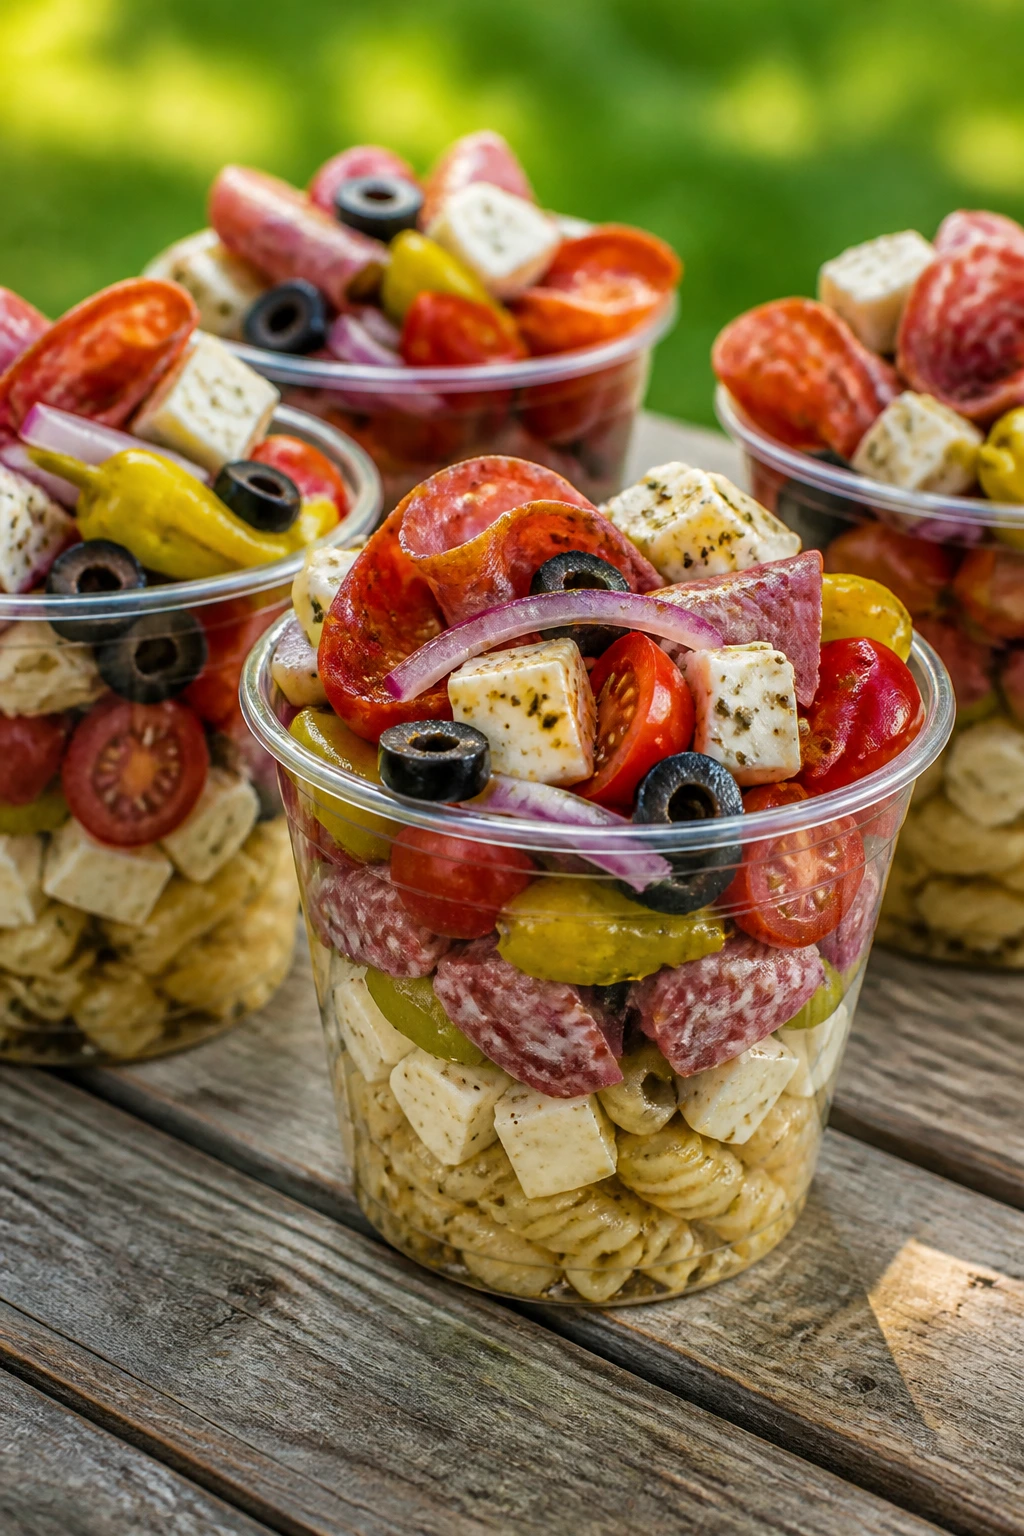
This is what happens when a deli sandwich and a pasta salad decide to stop arguing. Salami, pepperoni, mozzarella, olives, and tangy dressing make a cold meal that feels substantial without requiring any special handling.
Why It Works:
Cold pasta salad benefits from bold ingredients, and deli meats bring salt, chew, and a little fat that keeps the bowl from tasting bland. Small cups make it portable and keep the ingredients from sliding around. This is the one I’d make when the picnic crowd wants something familiar but not boring.
Key Ingredients:
- 12 ounces short pasta
- 4 ounces sliced salami, chopped
- 4 ounces pepperoni, chopped
- 1 cup mozzarella cubes or pearls
- 1/2 cup cherry tomatoes, halved
- 1/3 cup sliced pepperoncini
- 1/4 cup sliced black olives
- 1/3 cup Italian dressing
- 2 tablespoons chopped parsley
- 1/4 cup red onion, very thinly sliced
Quick Steps:
- Cook the pasta until tender, then drain and cool it well.
- Toss the pasta with Italian dressing while it’s still just warm.
- Fold in salami, pepperoni, mozzarella, tomatoes, pepperoncini, olives, parsley, and onion.
- Chill for 20 minutes so the flavors settle.
- Portion into cups or containers for easy grabbing.
Equipment for This Recipe:
- Pot
- Colander
- Mixing bowl
- Measuring cup
- Small containers or cups with lids
How to Serve This Dish:
Spoon it into individual cups so people can eat without fighting over a serving spoon. It also pairs well with sliced melon, chips, or a simple green salad. A picnic spread needs at least one dish that tastes like the deli counter grew up and learned manners.
Pro Tips for This Recipe:
- Cut the meats small so they mix through every bite.
- Dress the pasta while it’s warm; it absorbs more flavor that way.
- Go easy on the onion or it takes over the whole container.
- Hold back a little dressing if you know the pasta will sit for a while.
Variations on This Dish:
- Turkey Deli Salad: Swap the salami and pepperoni for chopped turkey breast.
- Vegetarian Deli Bowl: Replace the meats with chickpeas and extra mozzarella.
- Gluten-Free Version: Use a firm gluten-free pasta and cool it completely before mixing.
Common Mistakes to Avoid with This Dish:
- Using limp pasta: It turns gummy after chilling.
- Too much dressing: The bottom of the cup gets oily.
- Huge chunks of meat: They don’t mix evenly and make the salad awkward to eat.
19. Avocado Chickpea Wraps with Lemon Tahini
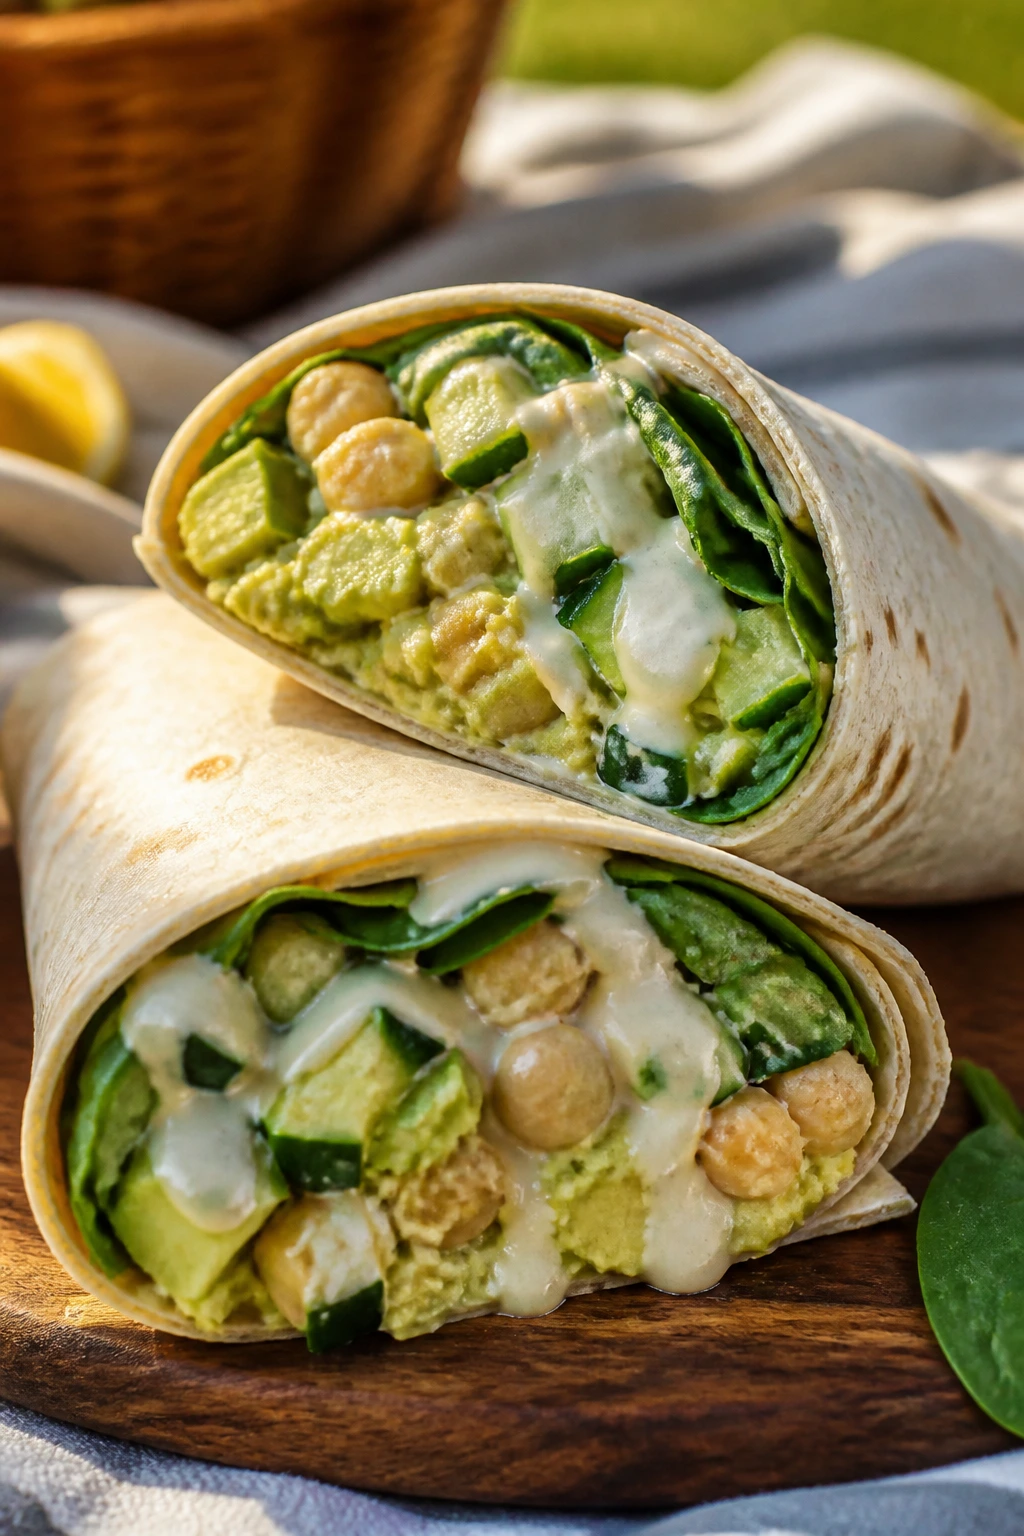
Creamy, lemony, and a little nutty, these wraps are the no-cook answer when you want something filling without heating up the kitchen. Chickpeas and avocado make the filling rich enough to count as lunch, not just a snack between bites of chips.
Why It Works:
Avocado brings smoothness, chickpeas bring body, and tahini gives the filling a roasted, sesame-heavy flavor that works cold. Lemon keeps the avocado from browning too fast and cuts the richness enough that the wrap stays bright. This one is especially useful when you need a vegetarian meal that doesn’t feel thin.
Key Ingredients:
- 1 can chickpeas, drained and lightly mashed
- 2 ripe avocados, diced
- 3 tablespoons tahini
- 2 tablespoons lemon juice
- 1 cucumber, diced
- 2 cups baby spinach
- 4 large tortillas
- 2 tablespoons chopped dill or parsley
- 1/4 red onion, very finely chopped
- Salt and black pepper
Quick Steps:
- Mash the chickpeas roughly in a bowl, leaving some pieces whole.
- Stir in avocado, tahini, lemon juice, dill, onion, salt, and pepper.
- Warm the tortillas for a few seconds so they roll smoothly.
- Layer spinach and cucumber down the center of each tortilla, then add the chickpea-avocado filling.
- Roll tightly, wrap in parchment, and chill until serving.
Equipment for This Recipe:
- Bowl
- Fork or potato masher
- Knife
- Cutting board
- Parchment paper
How to Serve This Dish:
Cut the wraps in half and serve with carrot sticks or a few salty crackers. If you want them to feel a little more picnic-special, sprinkle sesame seeds on the cut edge. These are the wraps I’d choose when the menu needs a meatless anchor that still eats like lunch.
Pro Tips for This Recipe:
- Keep the chickpeas partly chunky so the filling doesn’t smear into paste.
- Use lemon generously; it protects the avocado and brightens the tahini.
- If the mixture seems dry, add a teaspoon of water at a time.
- Pack the wrap tightly so the avocado filling stays centered.
Variations on This Dish:
- Feta Chickpea Wraps: Add crumbled feta for a saltier, firmer bite.
- Curry Chickpea Wraps: Stir in a little curry powder and chopped raisins for a sweeter edge.
- Lettuce Wrap Version: Spoon the filling into romaine leaves if you want a lighter hand-held option.
Common Mistakes to Avoid with This Dish:
- Overmashing the filling: It loses texture and turns heavy.
- Skipping the lemon: The avocado browns fast and the flavor goes flat.
- Packing it too loosely: The filling slides out with the first bite.
20. Chicken Shawarma Couscous Salad
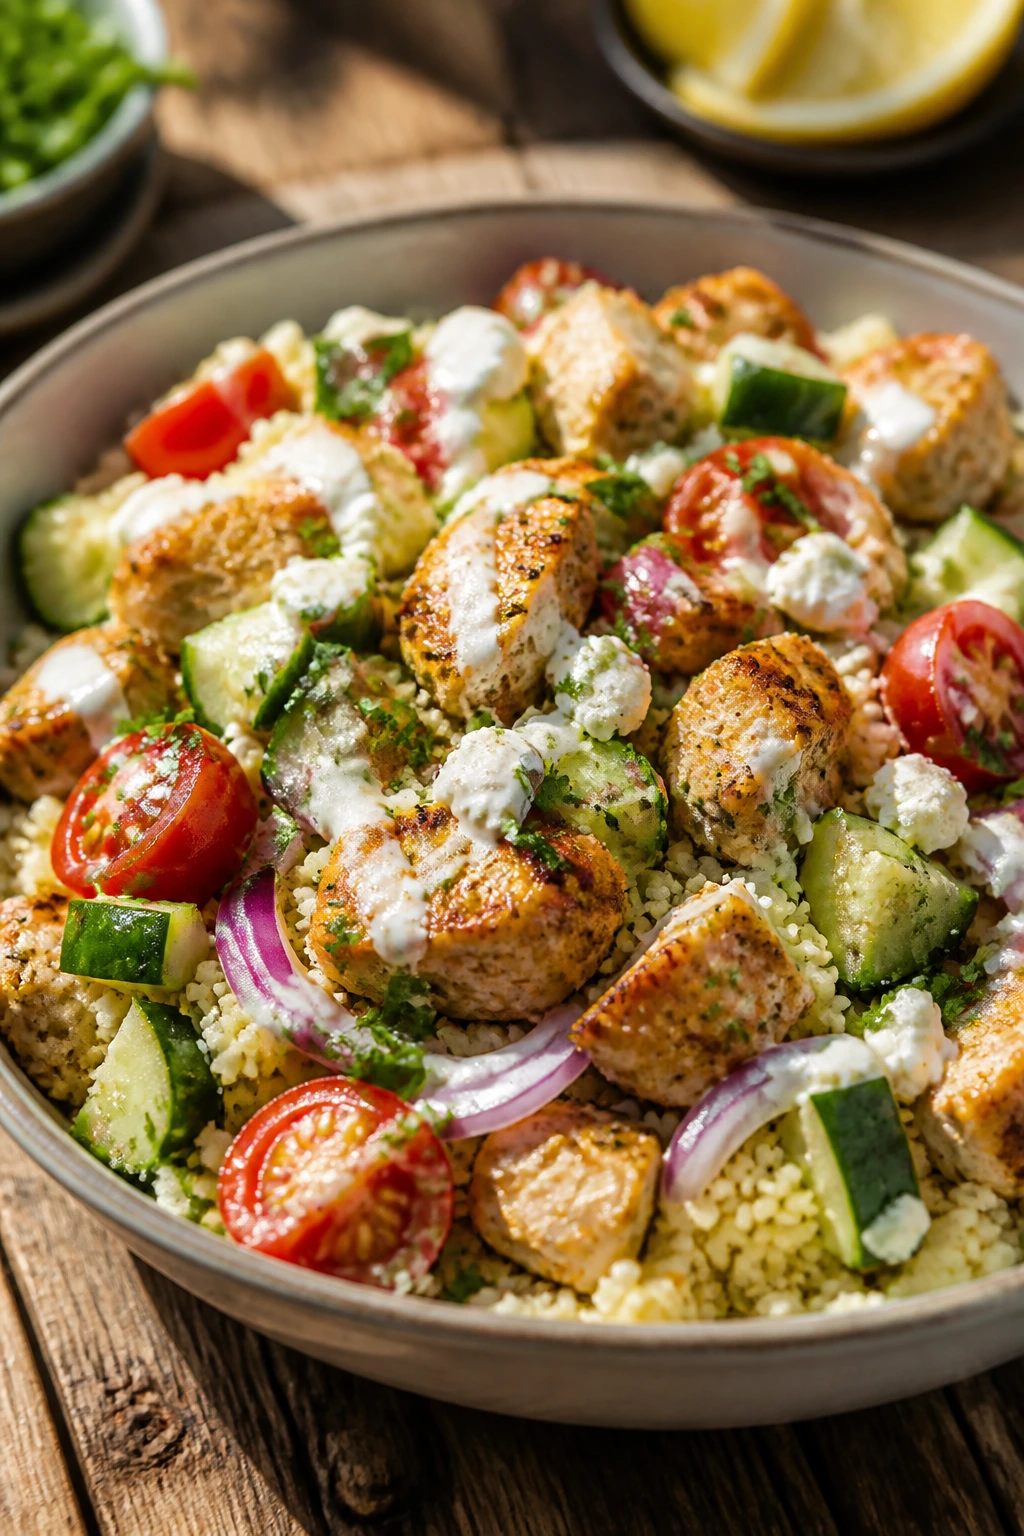
This one brings a little spice to the basket without becoming a project. Couscous soaks up the lemony dressing, chicken carries the shawarma seasoning, and the cucumbers and tomatoes keep the bowl from feeling dusty or dry.
Why It Works:
Couscous is fast and forgiving, which makes it a smart picnic base. The grains are small enough to eat cold but sturdy enough to hold seasoning well. Add chicken, herbs, and a yogurt-lemon dressing, and you get a meal that tastes layered instead of thrown together.
Key Ingredients:
- 1 cup dry couscous
- 3 cups cooked chicken, chopped
- 1 cucumber, diced
- 1 cup cherry tomatoes, halved
- 1/4 cup red onion, thinly sliced
- 1/2 cup crumbled feta
- 1/4 cup chopped parsley
- 1 teaspoon shawarma spice blend
- 1/4 cup Greek yogurt
- 2 tablespoons lemon juice
- 1 tablespoon olive oil
Quick Steps:
- Pour boiling water over the couscous according to the package, cover it, and fluff it after 5 minutes.
- Toss the warm couscous with olive oil and shawarma spice.
- Whisk yogurt and lemon juice into a light dressing with salt and pepper.
- Fold the chicken, cucumber, tomatoes, onion, feta, and parsley into the couscous.
- Spoon the yogurt dressing over the top and chill before packing.
Equipment for This Recipe:
- Heatproof bowl
- Fork
- Mixing bowl
- Knife
- Airtight container
How to Serve This Dish:
Serve with pita wedges or cucumber spears if you want extra crunch. A little extra parsley on top makes it look fresher than it is. This is the kind of salad that can sit in a cooler and still taste like someone thought about it.
Pro Tips for This Recipe:
- Fluff the couscous with a fork so it doesn’t pack into a dense block.
- Season it while warm so the spices bloom a little.
- Keep the cucumbers in medium pieces; too small and they weep into the grains.
- Add the yogurt dressing just before serving if you want the texture a little looser.
Variations on This Dish:
- Chickpea Shawarma Salad: Replace some or all of the chicken with chickpeas.
- Dairy-Free Bowl: Skip the feta and use a little extra olive oil and lemon.
- Spicy Version: Add a pinch of cayenne or harissa to the dressing.
Common Mistakes to Avoid with This Dish:
- Clumpy couscous: Don’t skip the fluffing step.
- Too much yogurt: It can turn the salad heavy and wet.
- Weak seasoning: Couscous needs a firm hand with salt and spices.
Why Picnic Food Needs to Be Built for Travel, Not Just Taste
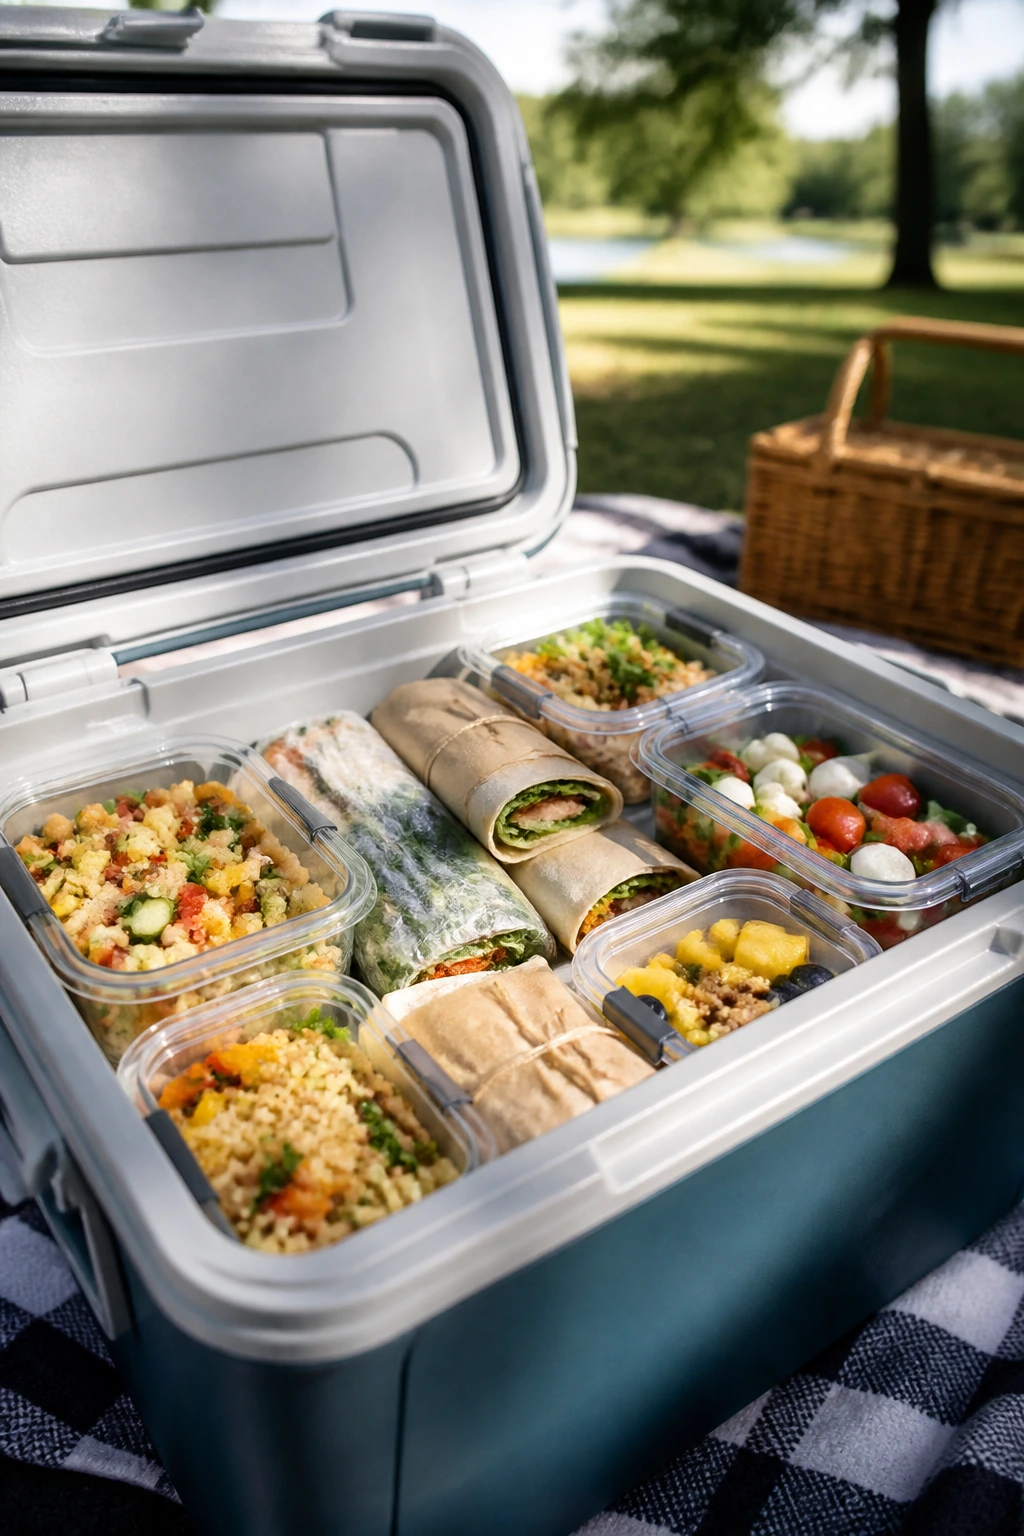
Picnic food has to survive three things most weeknight meals never face: heat, movement, and time. That’s why the best summer picnic meals are usually the ones with a little structure built in. Tortillas, pitas, pasta salad, couscous, sturdy greens, and tight fillings do not just happen to be convenient. They hold moisture where you want it and keep you from eating a sandwich that has turned to wallpaper paste by the second bite.
Cold food also changes in a cooler. Salt softens. Acid sharpens. Herbs can go from bright to bruised if they sit under a heavy layer of dressing, which is why so many of these recipes keep the wet and dry pieces in the same bowl but not mixed into submission. I like that about picnic food. It rewards a little planning without asking for a whole afternoon in the kitchen.
Texture First
A good picnic meal should give you at least two textures in one bite. Crisp with creamy. Soft with crunchy. Juicy with chewy. When you pack food with that in mind, the whole basket feels more intentional and less like a pile of leftovers trying to behave.
Cooler Logic
Cold dishes need to be chilled hard before they leave the house. Put them in shallow containers, not deep tubs, so they cool faster and stay below 40°F longer. That old rule about not letting perishable food sit out for more than 2 hours matters here, and it matters even more when the air is hot and the blanket is sitting in direct sun.
Make-Ahead Is a Feature, Not a Shortcut
The best picnic meals usually taste more settled after a short rest. Pasta absorbs dressing. Chicken picks up lemon and herbs. Slaws lose their raw edge. That does not mean you should make everything the night before and forget it. It means you should pick recipes that improve without turning mushy, and this batch does that.
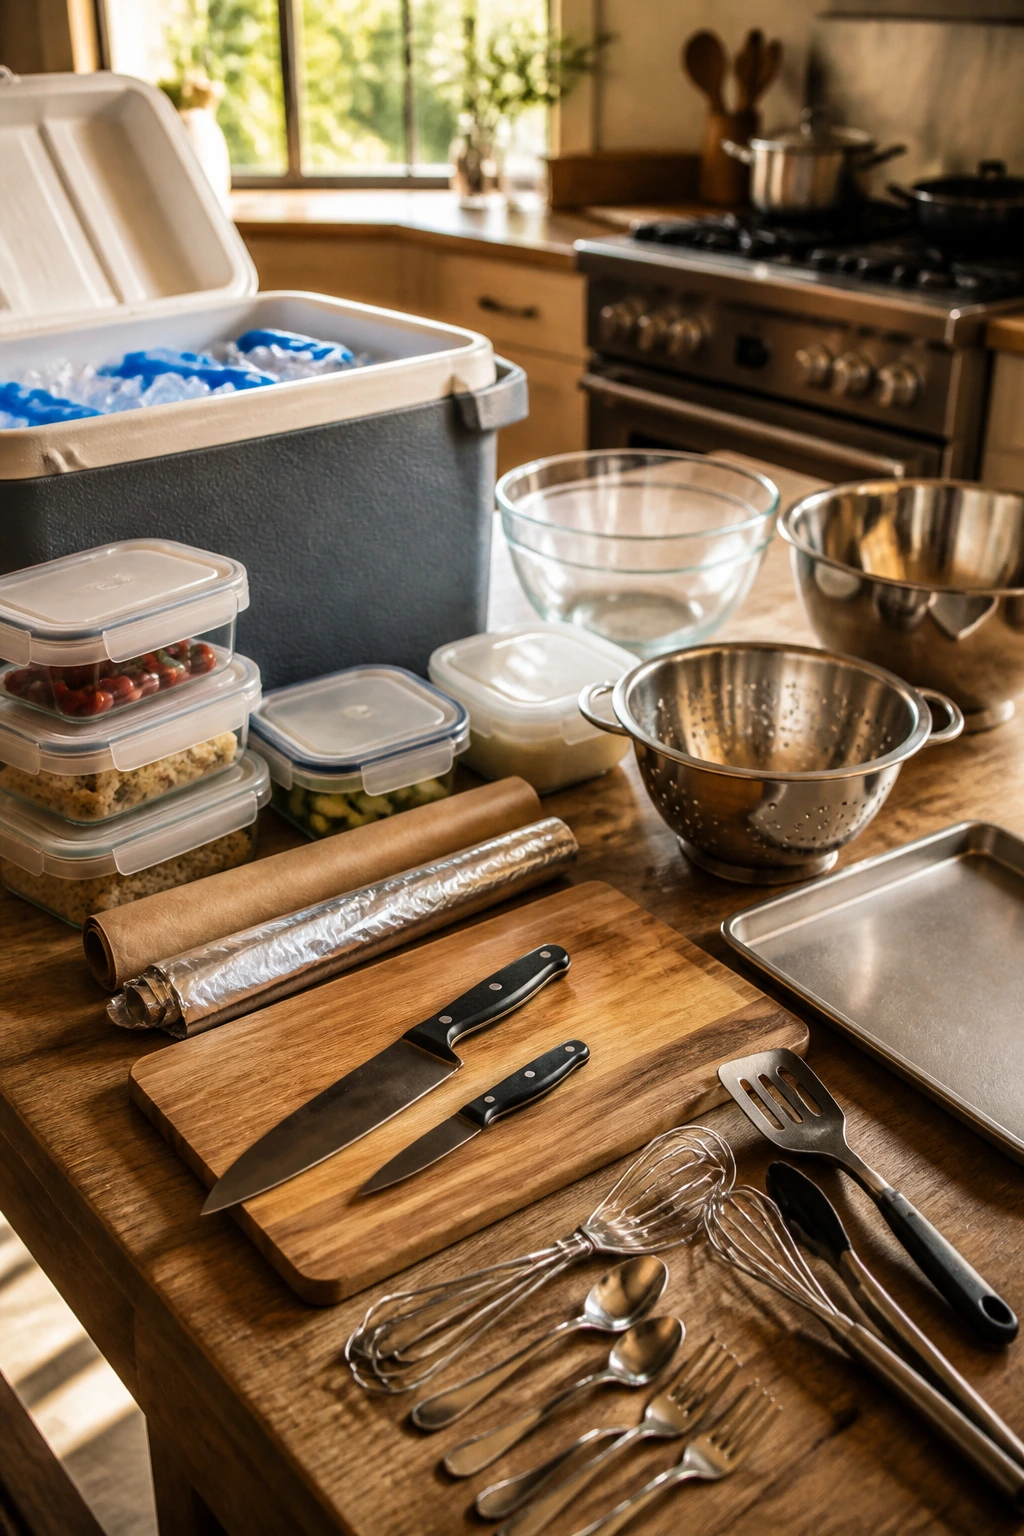
Essential Equipment for These Recipes
-
Insulated cooler with ice packs — This is the one piece of gear that actually protects the food instead of just carrying it.
-
Airtight containers in shallow sizes — Shallow containers chill faster and keep salads from turning into one heavy block.
-
Parchment paper and foil — Both make wraps, sliders, and hoagies easier to pack and less likely to squish.
-
Sharp chef’s knife and small paring knife — Clean cuts matter for tomatoes, wraps, and neat picnic portions.
-
Cutting board — A stable board saves you from chasing cucumbers across the counter.
-
Large mixing bowls — You’ll want at least two for tossing salads and fillings without spills.
-
Medium saucepan and a pot with a lid — For pasta, couscous, noodles, and eggs.
-
Colander — Cool and drain pasta fast so it does not keep steaming itself.
-
Sheet pan — Useful for cooling pasta, toasting bacon, or laying out sandwich components.
-
Tongs and a spatula — Handy for hot fillings, bacon, halloumi, and sausage.
-
Whisk — Helpful for dressing and sauces that need to come together fast.
-
Serving spoons and small forks — Picnic meals get easier when the serving tool is already in the basket.
Smart Shopping and Ingredient Tips
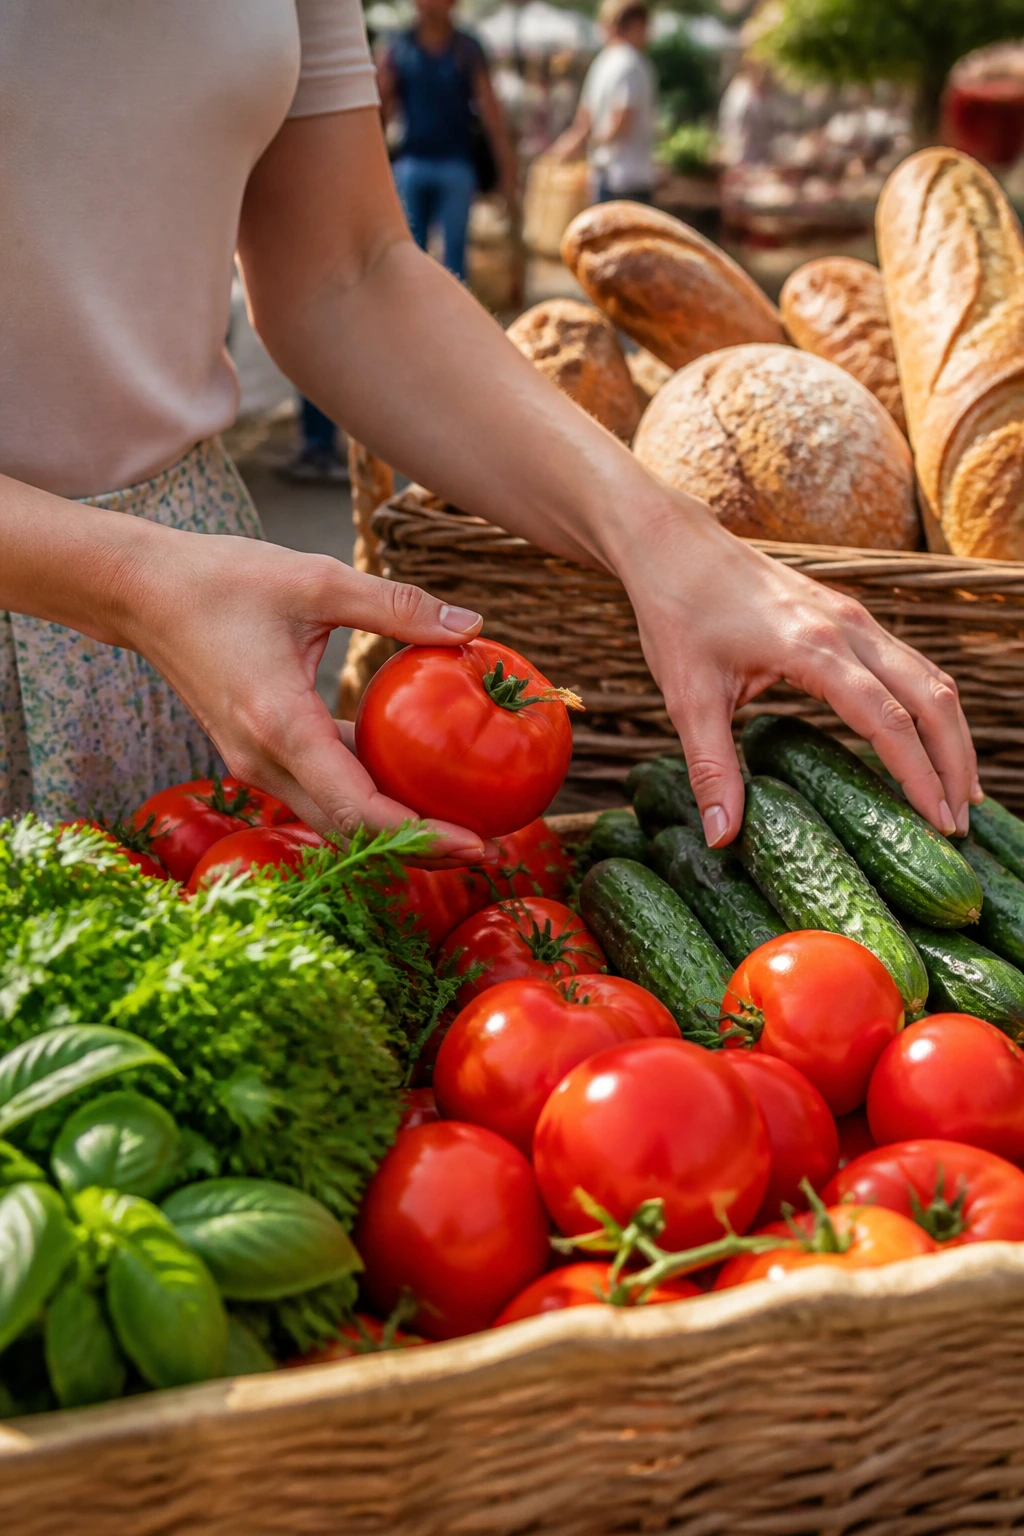
The easiest way to make picnic food taste better is to buy ingredients that already have some structure. Look for firm tomatoes, not the mealy ones that collapse when you slice them. Choose cucumbers that feel heavy for their size and have taut skin. If you’re buying herbs, pick bunches that still look perky rather than damp at the bottom of the bag; basil bruises fast, and sad basil tastes like it knows it’s been ignored.
For bread, wraps, and rolls, sturdier is better. Thin sandwich bread looks nice for a minute and then folds under moisture. Slider buns, pita breads, ciabatta, and large tortillas hold up better because they have some chew. I also like buying bread the day before and leaving it wrapped at room temperature so it dries just enough to resist sogginess. Fresh, soft bread is lovely at the table. On a picnic, it can be a liability.
Protein choices matter too. Rotisserie chicken is one of the smartest shortcuts in the whole category, but let it cool fully before mixing with mayo or dressing. Canned tuna and salmon should be drained thoroughly. If you use shrimp, buy cooked shrimp that smells clean and faintly briny, not fishy. For the vegetarian meals, choose chickpeas that are firm and intact, not broken and mushy at the bottom of the can.
Condiments are not background noise here. Thick Caesar dressing, good Dijon, real mayonnaise, tahini that’s loose enough to stir, and barbecue sauce with a little body make these meals work. Thin, watery condiments disappear into the food and leave you with a bland middle. A picnic basket does not need fancy ingredients. It needs ingredients with enough character to survive the trip.
How to Serve These Recipes
Presentation:
Serve wraps and sandwiches cut on a diagonal so the filling shows through the cross-section. Put pasta salads and grain bowls in shallow bowls or containers, then finish with herbs, cheese, or sesame seeds right before the basket opens. Little touches matter here because picnic food looks better when the top layer is not already dulled by dressing.
Accompaniments:
Kettle chips, salted nuts, grapes, melon wedges, pickles, and simple cucumber salad all fit this group without crowding it. If you want bread on the side, keep it plain and sturdy rather than soft and airy. A picnic plate should not need a knife and fork unless you want it to.
Portions:
A wrap or slider usually counts as one serving, while pasta salad and grain salad run closer to 1 to 1 1/2 cups per person. For a mixed picnic, plan one main meal plus one side or fruit portion per guest. If the group includes kids, cut everything smaller than you think you need; tiny hands do better with smaller pieces.
Beverage Pairing:
Lemonade, iced tea, sparkling water with lime, and light beer all play well with these meals. A citrusy drink works especially well with the richer sandwiches and mayo-based salads because it clears the palate. Keep the drinks as cold as the food. Lukewarm iced tea is a punishment, not a pairing.
Additional Tips and Flavor Boosters
Flavor Enhancement: A squeeze of lemon or lime right before serving wakes up cold salads that have been sitting in the fridge. It sounds too simple to matter. It matters.
Customization: Most of these recipes tolerate one smart add-in: sliced pickles in tuna salad, chopped herbs in pasta salad, or toasted seeds on grain bowls. The trick is to add one thing with crunch or acid, not three things that all shout at once.
Serving Suggestions: Pack a small jar of extra dressing, a wedge of lemon, or a container of flaky salt. Those finishing touches let people adjust their own plate instead of making the whole batch taste one-note from the start.
Make-It-Yours: For dairy-free eaters, swap mayo for hummus or mashed avocado in a couple of the wrap recipes and skip the cheese. For gluten-free guests, use lettuce cups, rice noodles, or a sturdy gluten-free tortilla that bends without cracking. For bigger appetites, add chopped chicken, beans, or hard-boiled eggs to the cold salads instead of just piling on more starch.
Make-Ahead, Storage, and Reheating Guidance
Most of these dishes keep 3 to 4 days in the refrigerator if they’re stored cold in airtight containers. Mayo-based salads are better within 2 to 3 days, especially if they include celery, onion, or herbs that soften quickly. Pasta salads and grain salads often taste even better on day two, as long as you keep a little dressing back and stir it in before serving.
Wraps and sandwiches are best assembled the same day, though the fillings can usually be made a day ahead and held separately. If you’re packing tortillas or pita pockets, keep wet items like tomatoes, cucumbers, and dressings apart until you’re ready to build. That one habit saves a lot of soggy bread and a lot of disappointment.
Hot items such as sausage hoagies or BBQ chicken sliders can be reheated gently in a 325°F oven for 10 to 15 minutes, still wrapped in foil, until warmed through. Frittata muffins reheat well in a low oven or microwave, but they’re also good cold. Shrimp dishes are the exception: don’t reheat them aggressively. They go rubbery fast. Cold shrimp salad is the better move.
For food safety, keep cold picnic dishes below 40°F as long as you can, and do not let them sit out for more than 2 hours total, or 1 hour if the weather is hot enough to make you wish you’d stayed home. Use ice packs, shallow containers, and shade. Picnic food should be relaxed, not reckless.
Variations and Adaptations to Try
Gluten-Free Basket Swap
Use rice noodles, lettuce cups, quinoa salads, or certified gluten-free tortillas for the meals that normally lean on bread. The key is to choose wraps and grains that still have some chew, not dry substitutes that crack when you fold them. Gluten-free bread can work, but it usually needs to be toasted or used for sandwiches that go straight from container to plate.
Dairy-Free Picnic Fix
Skip feta, Parmesan, and cream cheese-heavy fillings, then lean on hummus, tahini, avocado, olive oil, or a punchy vinaigrette. The flavors stay full if you replace the creaminess with another fat, not if you simply remove it. A dairy-free picnic meal should still have body.
Vegetarian Picnic Set
The chickpea, hummus, orzo, couscous, and noodle dishes already do most of the work here. If you want more staying power, add hard-boiled eggs, toasted seeds, or a handful of nuts. Cold vegetarian meals can go flat when they’re under-seasoned, so salt and acid matter more than ever.
Kid-Size Lunch Boxes
Turn the wraps into pinwheels, the salads into little cups, and the sliders into half portions. Kids usually do better with food that looks like a snack but eats like lunch. Keep sauces on the side when possible. That one detail saves a lot of half-eaten, soggy disappointment.
Heat-Friendly Cooler Menu
For picnics in warm weather, favor the most stable recipes: tuna and salmon salads, pasta salads, pinwheels, egg muffins, and couscous bowls. Leave delicate greens, ripe peaches, and warm sandwiches closer to the end of the list unless you have a heavy-duty cooler and plenty of ice. The food should stay cold long enough to enjoy, not just long enough to survive the walk from car to blanket.
Regional Picnic Twist
Give the basket a different accent by swapping flavor profiles: add pesto and mozzarella for Italian notes, lemon and dill for Greek ones, or tahini and shawarma spice for something more Middle Eastern. A picnic menu does not need every dish to match. It just needs the flavors to make sense together.
Common Mistakes to Avoid
Packing wet ingredients together too early
Tomatoes, cucumbers, dressing, and warm fillings all push moisture into bread and greens. Keep the wet parts separate until the last possible moment, especially for wraps and sandwiches. The difference between crisp and soggy is often 20 minutes.
Under-seasoning cold food
Cold food tastes quieter than food served warm. Pasta salad, chicken salad, egg salad, and grain bowls usually need more salt, acid, or herbs than you expect. Taste them after chilling, not while the dressing is still warm and loud.
Choosing bread that is too soft
Fluffy sandwich bread looks nice until it meets tomato juice. Use buns, pitas, tortillas, hoagie rolls, or ciabatta when the filling has any moisture at all. Bread should support the meal, not absorb it like a sponge.
Skipping the chill time
Some recipes, especially pinwheels, chicken salad, and pasta salads, need a short rest for the flavors to settle. That rest also firms up the texture, which helps the food travel. Rush it and you’ll feel the difference at the table.
Forgetting the cooler logic
A blanket in shade is not a refrigerator. Keep perishables cold with ice packs and serve them in small batches instead of exposing everything at once. The food should go from cooler to plate, not sit out waiting for people to finish talking.
Overfilling hand-held meals
This is the classic mistake. A wrap that looks generous in the kitchen becomes impossible to hold outdoors. Keep fillings tight and balanced, and leave room for the tortilla, pita, or bun to do its job.
Picnic Meal Questions People Actually Ask
Can I make these the night before?
Yes, most of them hold up fine if you keep wet ingredients separate until assembly. Pasta salads, grain bowls, egg muffins, tuna salad, and chicken salad all do well overnight. Sandwiches and wraps are better when assembled closer to picnic time.
What picnic meals stay best for a few hours in a cooler?
Tuna salad, salmon salad, pasta salad, couscous bowls, pinwheels, and egg muffins are the strongest hold-ups. They keep their texture and do not depend on being piping hot to taste right. Use shallow containers and ice packs so they stay cold all the way through.
How do I keep sandwiches from getting soggy?
Use sturdier bread, dry the vegetables, and put a barrier like lettuce, cheese, or a thin layer of spread between the bread and the juiciest fillings. Tomato slices are the usual troublemaker, so pack them separately if you can. That small step makes a big difference.
Which recipes are easiest to eat without utensils?
Wraps, pinwheels, sliders, pita pockets, lettuce cups, and frittata muffins are the cleanest choices. Pasta salads and grain bowls usually need a spoon or fork, though they’re still picnic-friendly. If you want zero mess, lean hard into handheld food.
Can I use rotisserie chicken in most of these?
Absolutely. Rotisserie chicken is one of the best shortcuts for picnic meals because it’s already cooked, flavorful, and easy to shred. Just let it cool completely before mixing it with dressing or stuffing it into wraps.
What if my pasta salad dries out in the fridge?
Stir in a spoonful or two of dressing, olive oil, or a little lemon juice before serving. Cold pasta keeps drinking dressing as it sits. That’s normal. The fix is easy.
Are mayonnaise-based salads safe for picnics?
They’re safe if you keep them cold and do not leave them in direct heat for too long. Pack them in a cooler, use ice packs, and put out only what you plan to eat right away. When in doubt, serve smaller batches and refill from the cooler.
Which recipes are best for picky eaters?
Chicken Caesar wraps, BBQ chicken sliders, turkey pinwheels, egg salad cups, and simple pasta salad usually get the least resistance. They rely on familiar flavors and mild textures. If you keep the onions light and the dressing on the side, you’re already ahead.
A Basket That Actually Gets Eaten
A good picnic basket should feel like a small victory, not a logistics test. The meals here do that because they’re built for real outdoor eating: sturdy, cold-friendly, and easy to grab without a whole serving ritual. That’s the part I keep coming back to. Picnic food should survive the trip and still taste like somebody cared.
If you pick two or three of these recipes and one good cooler, you’re already in better shape than the person showing up with a flimsy loaf of bread and a tub of warm potato salad. Pack smart, keep the cold food cold, and do not overfill anything. The grass can take care of the rest.