
A hot grill, a stack of skewers, and twenty minutes of chopping can carry dinner farther than a fussy recipe ever will. There’s something almost stubbornly satisfying about it: meat or vegetables cut into bite-size pieces, brushed with a sharp marinade, then kissed by flame until the edges darken and the centers stay juicy. That’s the whole appeal of a good skewer night. No giant platter of mixed guesses. No half-burned onions hiding under a slab of chicken. Just tidy food with real char.
Skewers also force good habits. Cut things too small and they dry out. Cut them too big and the grill punishes you for it. Get the size right, and the whole process feels calmer than most summer cooking. Chicken thighs can take a little heat, shrimp need almost none, and salmon sits somewhere in the middle with that delicate line between barely cooked and ruined. Learn those differences once, and the grill starts feeling less like a gamble.
What I like most is how forgiving the format can be when the evening gets messy. A bowl of rice, a spoonful of yogurt sauce, a pile of flatbread, a few herbs torn over the top — dinner is done. And because each skewer cooks in plain sight, you can see trouble before it turns into trouble. That matters more than people admit. A skewer lets you watch for the exact moment the zucchini softens, the halloumi blisters, the sausage takes on a dark line, or the scallops turn opaque and springy. That kind of control is worth a lot on a warm night.
Why These Skewers Belong on the Grill
-
Fast Heat, Less Fuss: Bite-size pieces cook in minutes, so you’re not standing over the fire for half an hour while the coals fade and the mood dies with them.
-
Built-In Flavor Balance: Acid, salt, fat, and char all land on the same stick, which is why grilled skewers taste more complete than plain grilled chops or lonely vegetables.
-
Easy to Scale Up: Two or three skewers per person works for a small dinner, and doubling the batch barely changes the grill time if you keep the pieces cut evenly.
-
Friendly to Mixed Eaters: Meat, seafood, cheese, tofu, mushrooms, and vegetables can all share the same menu without forcing everyone into one lane.
-
Cleaner Than Loose Grill Food: Small pieces stay put on a skewer instead of tumbling through the grates or sticking in places you can’t reach with tongs.
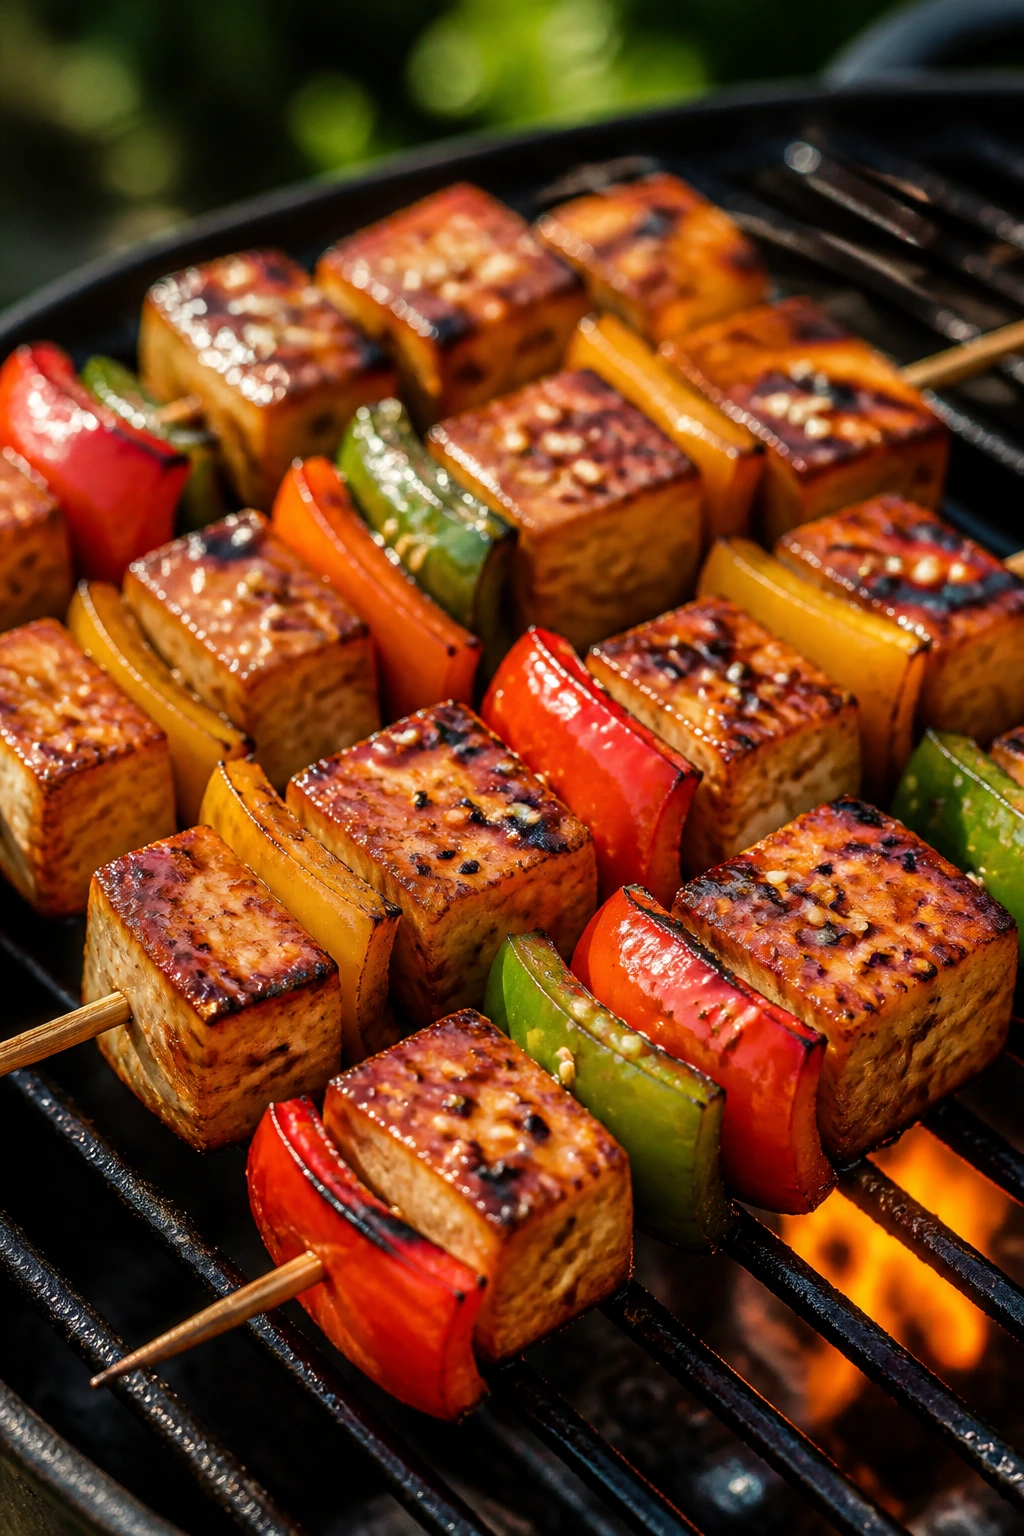
1. Lemon-Garlic Chicken Skewers with Charred Zucchini
Chicken thighs earn their keep on a grill. They stay juicy, take on marinade fast, and forgive a minute of overcooking in a way chicken breast never will. The lemon and garlic here keep things bright, while zucchini and red onion pick up just enough char to make the plate smell like summer the second it leaves the fire.
Why It Works:
Thigh meat has enough fat to handle direct heat, which is why it stays tender instead of drying out by minute seven. Lemon zest gives you perfume without too much sharpness, and the juice helps the garlic and oregano cling to the chicken. Zucchini and onion give you two different textures on one skewer — soft, browned, and a little sweet at the edges. The whole batch cooks in about 10 to 12 minutes over medium-high heat, which means you can go from cutting board to table without wandering off into side-dish chaos.
Key Ingredients:
- 2 lbs boneless, skinless chicken thighs, cut into 1½-inch pieces — thighs stay moist on the grill and don’t seize up the way breast meat can.
- 3 tbsp olive oil — helps the marinade coat evenly and keeps the chicken from sticking.
- 2 lemons, zested and juiced — one for the marinade, one for a finishing squeeze.
- 4 garlic cloves, minced — enough to taste like garlic without burning bitter.
- 2 tsp dried oregano — the dried stuff works well here and stands up to the grill.
- 2 tsp kosher salt — seasons the meat all the way through.
- 1 tsp black pepper — gives the chicken a little edge.
- 2 medium zucchini, cut into 1-inch chunks — cut them thick so they don’t collapse.
- 1 red onion, cut into 1-inch wedges — the wedges hold together better than skinny slices.
Quick Steps:
- Mix the Marinade: Whisk the olive oil, lemon zest, lemon juice, garlic, oregano, salt, and pepper in a large bowl.
- Coat the Chicken: Add the chicken thighs and toss until every piece is slick with marinade. Let it sit for 20 to 30 minutes at room temperature or up to 4 hours in the fridge.
- Thread the Skewers: Alternate chicken, zucchini, and onion pieces on metal or soaked wooden skewers, leaving a little space between each piece so the heat can move.
- Grill Over Medium-High Heat: Cook on a preheated grill at about 425°F, turning every 2 to 3 minutes, until the chicken reaches 165°F and the edges are browned.
- Rest and Finish: Pull the skewers off, rest them for 5 minutes, then hit them with a small squeeze of fresh lemon before serving.
Equipment for This Recipe:
- 8 to 10 metal skewers or soaked wooden skewers — metal is easier, wood works fine if you remember the soak.
- Large mixing bowl — for tossing the marinade without splashing it everywhere.
- Long grill tongs — short tongs make turning awkward.
- Instant-read thermometer — the cleanest way to know the chicken is done.
- Sharp chef’s knife — for trimming the thighs and cutting the vegetables evenly.
How to Serve This Dish:
Serve these skewers over herbed couscous, garlic rice, or warm pita with a bowl of tzatziki on the side. The plate looks best with the chicken stacked slightly off-center and the zucchini left visible, not buried under sauce. Two skewers make a solid dinner for most people; three if the rest of the plate is mostly salad or bread.
Pro Tips for This Recipe:
- Cut evenly: If the chicken pieces vary a lot in size, the small ones dry out before the large ones finish.
- Don’t drown the skewers in lemon: More acid is not better here. Too much time in straight lemon juice can make the surface mushy.
- Use thighs, not breast, if you can: Breast meat works in a pinch, but it needs a shorter grill window and a firmer hand.
- Oil the grates: Chicken skinless pieces like to stick unless the grill is clean and lightly oiled.
Variations on This Dish:
- Greek Pita Version: Add a pinch of cumin and serve the skewers in pita with tomatoes, cucumbers, and crumbled feta.
- Chili-Lemon Heat: Stir 1 teaspoon red pepper flakes or 1 tablespoon harissa into the marinade for a sharper finish.
- Chicken Breast Swap: Use breast meat cut into 1¼-inch pieces and shorten the grill time by a minute or two on each side.
Common Mistakes to Avoid with This Dish:
- Cutting the zucchini too thin: Thin pieces go limp and slide off the skewer. Keep them in sturdy 1-inch chunks.
- Crowding everything tightly: Packed skewers steam more than they grill. Leave a small gap between pieces.
- Pulling the chicken at the first sign of brown: Color can fool you. Check the center with a thermometer and wait for 165°F.
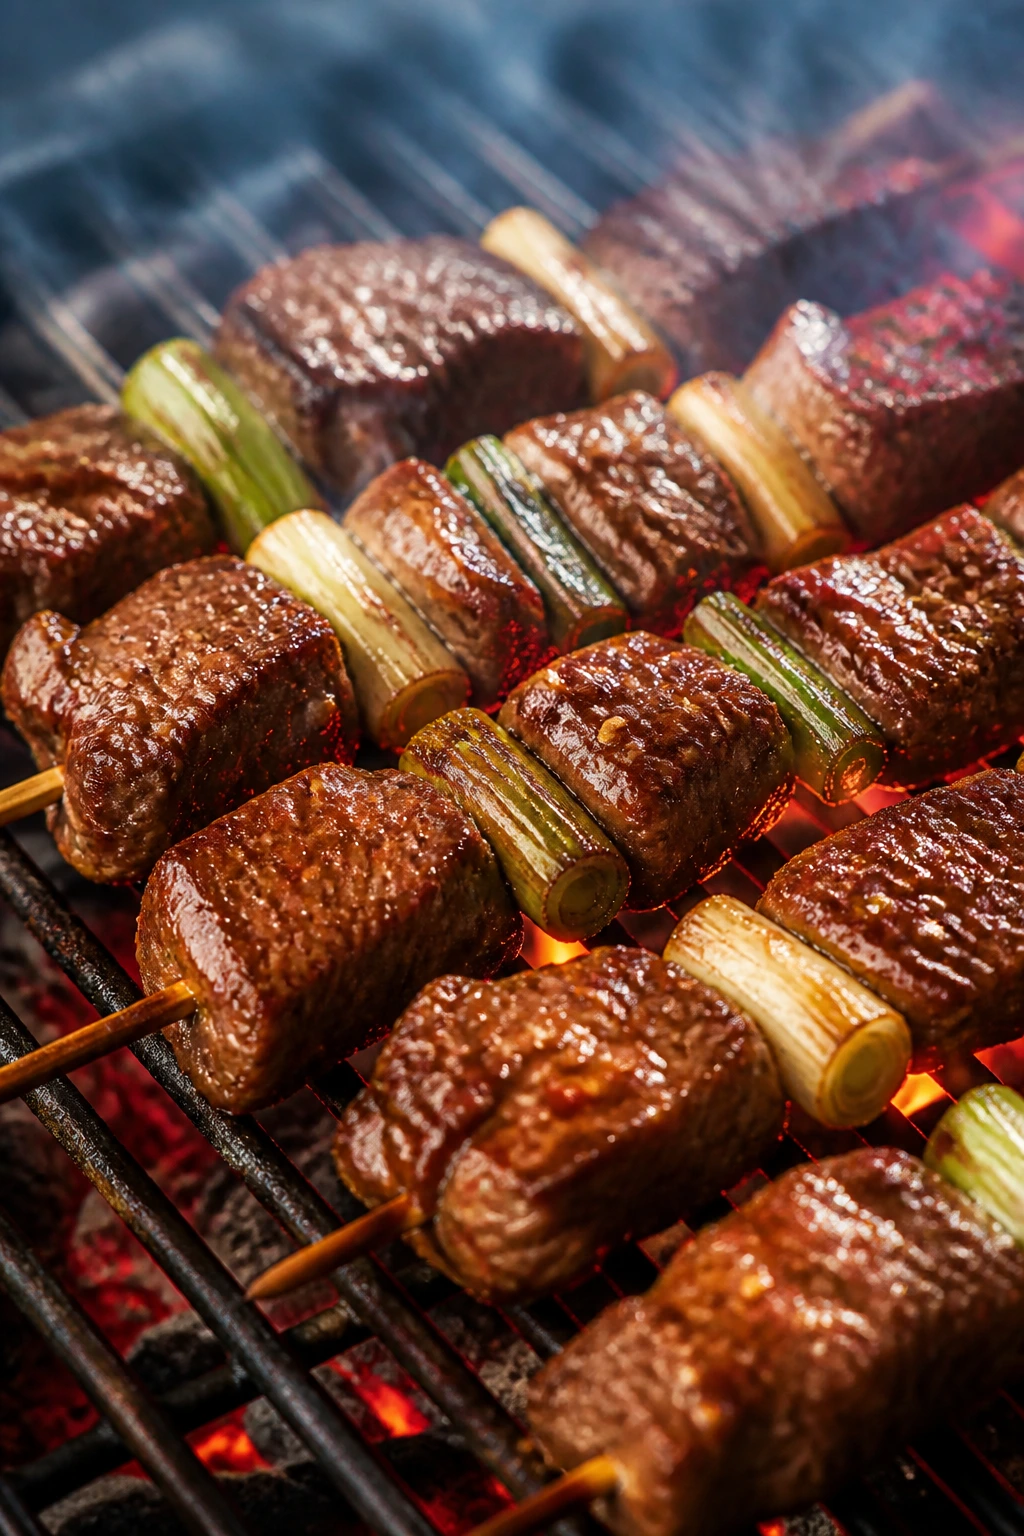
2. Korean-Style Beef and Scallion Skewers
If you slice flank steak the wrong way, you get chewy beef and a bad dinner. Slice it right, and these skewers turn into short, glossy little ribbons of meat with sweet heat from gochujang and sesame. Scallions add a green snap that keeps the whole thing from feeling heavy.
Why It Works:
Flank steak has flavor, but it likes a fast hand and a hot fire. The soy, sesame oil, brown sugar, and gochujang build a marinade that clings instead of sliding off, and the sugar gives the meat a dark edge in under 6 minutes of grill time. Scallions on the same skewer soften just enough to take the raw bite out of them. Use two skewers per strip if you want the meat to stay flat instead of spinning when you turn it.
Key Ingredients:
- 2 lbs flank steak, sliced against the grain into 1-inch strips — slice thin enough to bend, thick enough to stay juicy.
- ¼ cup soy sauce — gives salt and backbone to the marinade.
- 2 tbsp brown sugar — helps the beef caramelize.
- 2 tbsp sesame oil — adds a nutty finish that reads clearly on the grill.
- 2 tbsp gochujang — brings heat and a little funk.
- 3 garlic cloves, minced — makes the marinade smell alive instead of flat.
- 1 tbsp fresh ginger, grated — sharpens the beef.
- 2 bunches scallions, trimmed — use the green parts and the white parts; they both work.
- 1 tbsp toasted sesame seeds — for the finish.
Quick Steps:
- Make the Marinade: Whisk the soy sauce, brown sugar, sesame oil, gochujang, garlic, and ginger until the sugar dissolves.
- Marinate the Beef: Toss the steak strips in the marinade and rest them for 30 minutes at room temperature or up to 8 hours in the fridge.
- Skewer the Meat and Scallions: Fold each strip into loose ribbons and thread them with scallions, keeping the pieces snug but not packed.
- Grill Hot and Fast: Cook over medium-high heat, about 450°F, for 2 to 3 minutes per side until the beef is browned outside and still pink inside.
- Finish and Rest: Sprinkle with sesame seeds and rest for 3 to 5 minutes before serving.
Equipment for This Recipe:
- Metal skewers — better than wood for thin beef strips.
- Sharp knife — a clean slice matters more than most people think.
- Mixing bowl — for the marinade and beef.
- Grill tongs — for quick turns over high heat.
- Instant-read thermometer — helpful if you want 130 to 135°F for medium-rare.
How to Serve This Dish:
Serve with steamed jasmine rice, quick cucumber salad, or lettuce cups if you want a lighter plate. A few spoonfuls of kimchi on the side make the whole thing sharper. I like these with a small bowl of extra scallions and sesame seeds for anyone who wants more crunch.
Pro Tips for This Recipe:
- Freeze the steak for 15 minutes before slicing: It firms up just enough to make thin cuts easier.
- Use short grill windows: Beef strips go from perfect to tough fast.
- Keep the sugar under control: If your grill runs hot, brush off excess marinade before the meat hits the grate.
- Turn with care: The strips are thin; aggressive flipping tears them.
Variations on This Dish:
- Spicier Seoul-Style: Add 1 extra tablespoon gochujang and a pinch of crushed red pepper for more heat.
- Mushroom Swap: Replace half the beef with thick slices of king oyster mushroom for a meat-light version that still grills well.
- Flank-to-Skirt Switch: Skirt steak works too, but slice it into slightly wider strips so it doesn’t shred.
Common Mistakes to Avoid with This Dish:
- Slicing with the grain: That’s the fastest route to chewy beef. Go across the grain, always.
- Leaving too much wet marinade on the meat: Sugar-rich marinade burns. Let excess drip off before grilling.
- Cooking it too long: Thin beef strips need a short, hard blast, not a slow roast.
3. Garlic Butter Shrimp Skewers
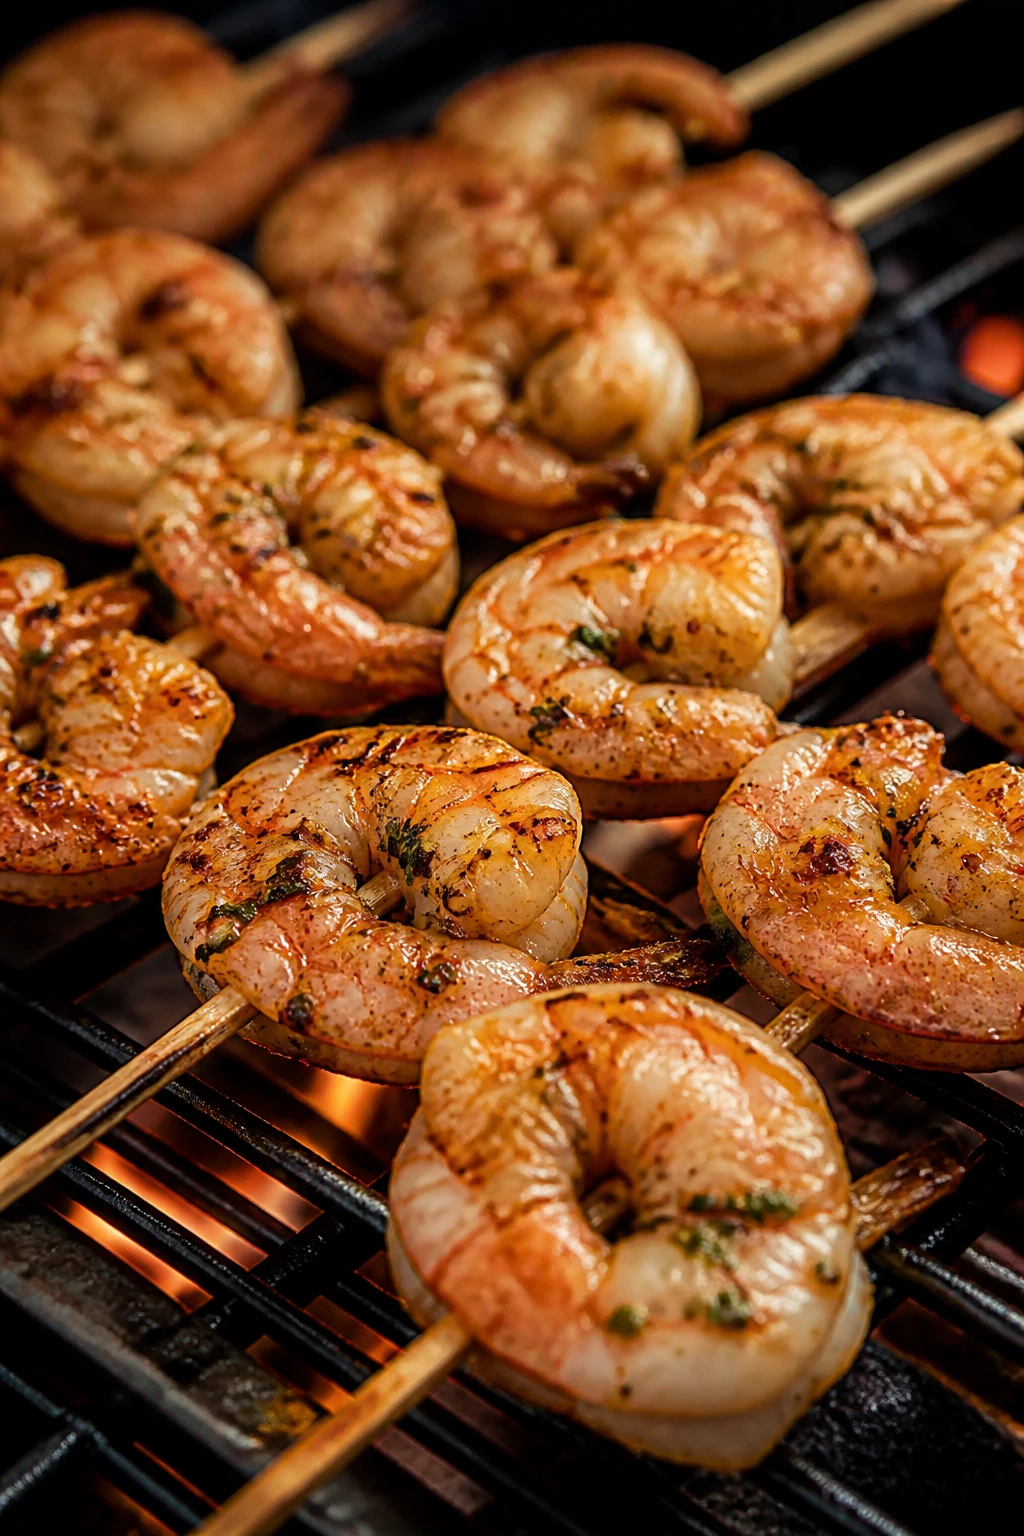
Shrimp are the fastest thing on the grate, and that is precisely the point. These skewers take on garlic butter, lemon, and paprika in a way that feels richer than the ingredient list looks on paper. Done right, the shrimp stay snappy and sweet, not rubbery.
Why It Works:
Shrimp don’t need much time, so this recipe leans into speed instead of fighting it. Butter carries garlic and paprika across the surface, while olive oil keeps the butter from scorching too fast on the grill. The lemon at the end wakes up the richness and keeps the flavor from sitting too heavy. If the shrimp curl into tight little rings, they’ve gone too far. You want a loose C shape. That’s the line.
Key Ingredients:
- 2 lbs large shrimp, 21/25 count, peeled and deveined with tails on — large shrimp are easier to skewer and less likely to overcook before you notice.
- 4 tbsp unsalted butter, melted — gives the shrimp their gloss.
- 2 tbsp olive oil — lowers the risk of the butter burning.
- 4 garlic cloves, minced — enough to taste in every bite.
- 1 tsp smoked paprika — gives a warm, grilled note.
- 1 tsp kosher salt — seasons the shrimp cleanly.
- ½ tsp black pepper — keeps the butter from tasting flat.
- 1 lemon, zested and cut into wedges — for the finish.
- 2 tbsp chopped parsley — brightens the plate.
Quick Steps:
- Mix the Butter Sauce: Stir the melted butter, olive oil, garlic, paprika, salt, and pepper together in a bowl.
- Coat the Shrimp: Toss the shrimp in the sauce for 10 to 15 minutes. Do not leave them soaking for hours; shrimp need a short marinade.
- Thread the Skewers: Put 4 to 6 shrimp on each skewer, keeping the curved sides facing the same direction so they cook evenly.
- Grill Briefly: Cook over medium-high heat, about 425°F, for 2 minutes on the first side and 1 to 2 minutes on the second, until the shrimp are opaque and lightly browned.
- Finish Fast: Move them to a platter, squeeze on lemon, and scatter parsley over the top.
Equipment for This Recipe:
- Skewers — metal is easiest, though soaked wooden skewers work.
- Mixing bowl — for tossing the shrimp in butter.
- Tongs — for a quick flip without tearing the shrimp.
- Grill brush — clean grates help shrimp release cleanly.
- Small spoon or basting brush — for the final butter pass.
How to Serve This Dish:
These are good with grilled corn, rice pilaf, or a loaf of crusty bread to catch the garlic butter. Serve four to six shrimp per person as an appetizer, or eight to ten as dinner with sides. A simple green salad keeps the plate from feeling like all richness.
Pro Tips for This Recipe:
- Dry the shrimp first: Wet shrimp steam instead of browning.
- Stop when they look barely done: Residual heat finishes them after they leave the grill.
- Use large shrimp, not tiny ones: Small shrimp cook so fast that you lose the window.
- Keep garlic from burning: If your grill runs fierce, brush on a little extra butter after grilling instead of before.
Variations on This Dish:
- Cajun Butter Shrimp: Swap smoked paprika for Cajun seasoning and add a pinch of cayenne.
- Honey-Lime Shrimp: Replace lemon with lime and add 1 tablespoon honey for a sweeter glaze.
- Orzo Bowl Version: Pull the shrimp off the skewers and serve them over chilled orzo with cucumbers and herbs.
Common Mistakes to Avoid with This Dish:
- Overcooking the shrimp: Tight coils and a rubbery bite mean you went past the sweet spot.
- Using too much garlic in raw butter: Garlic can burn on a hot grill. Keep some for the finish if your fire is aggressive.
- Crowding them too tightly: Shrimp need a little breathing room or the centers stay pale while the outsides char.
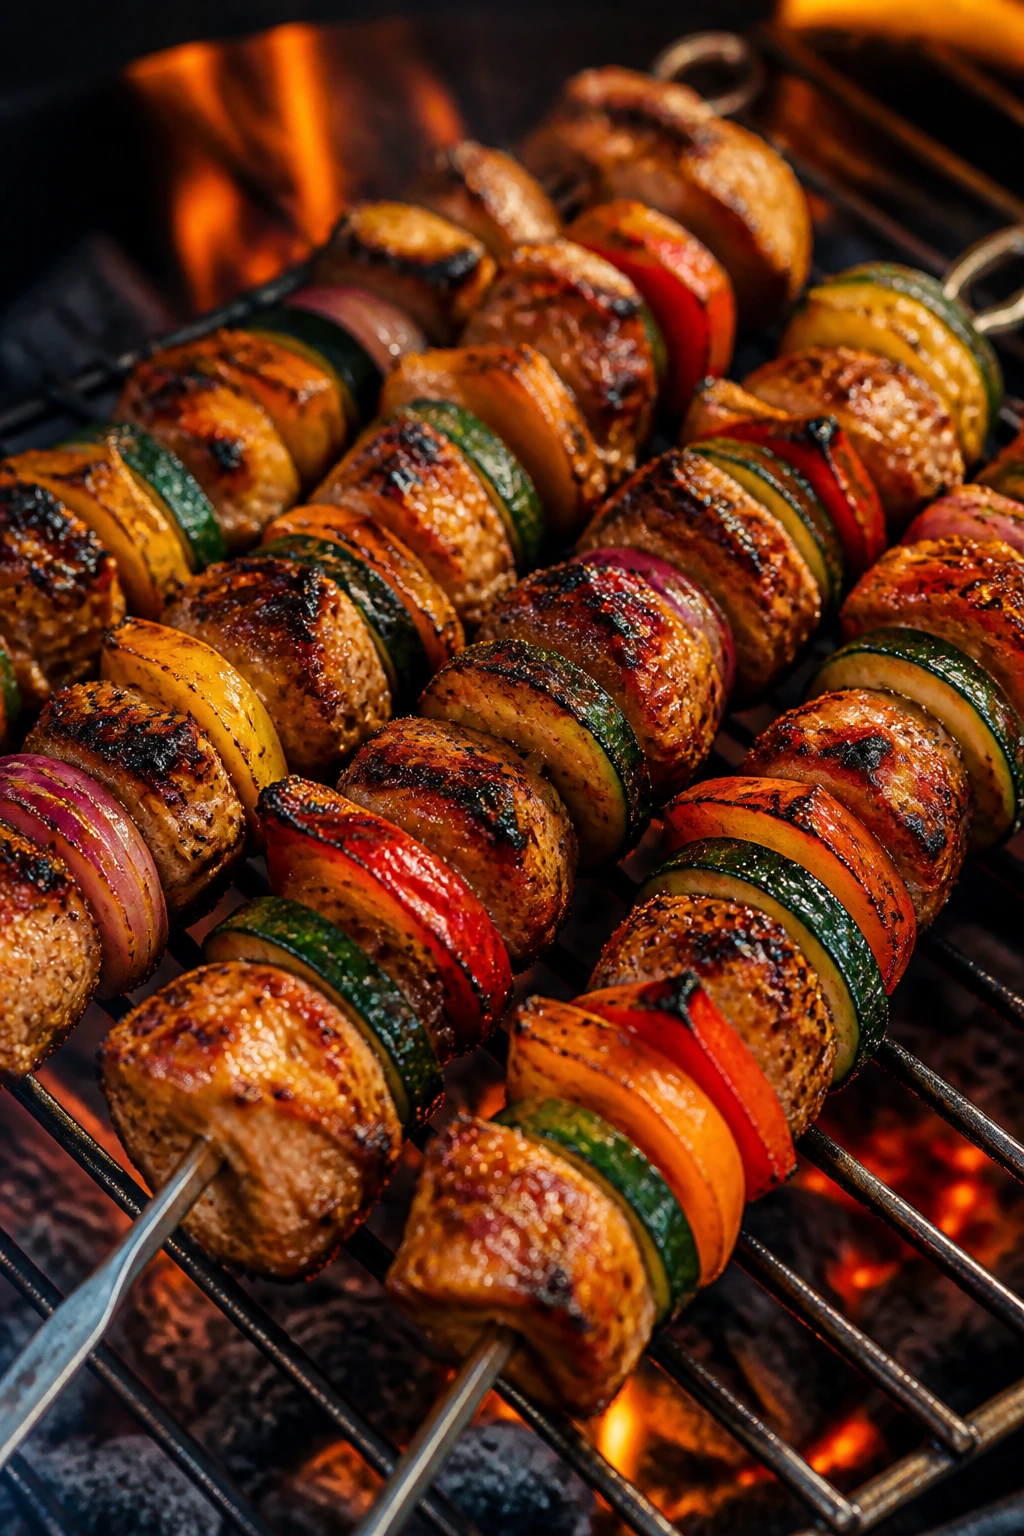
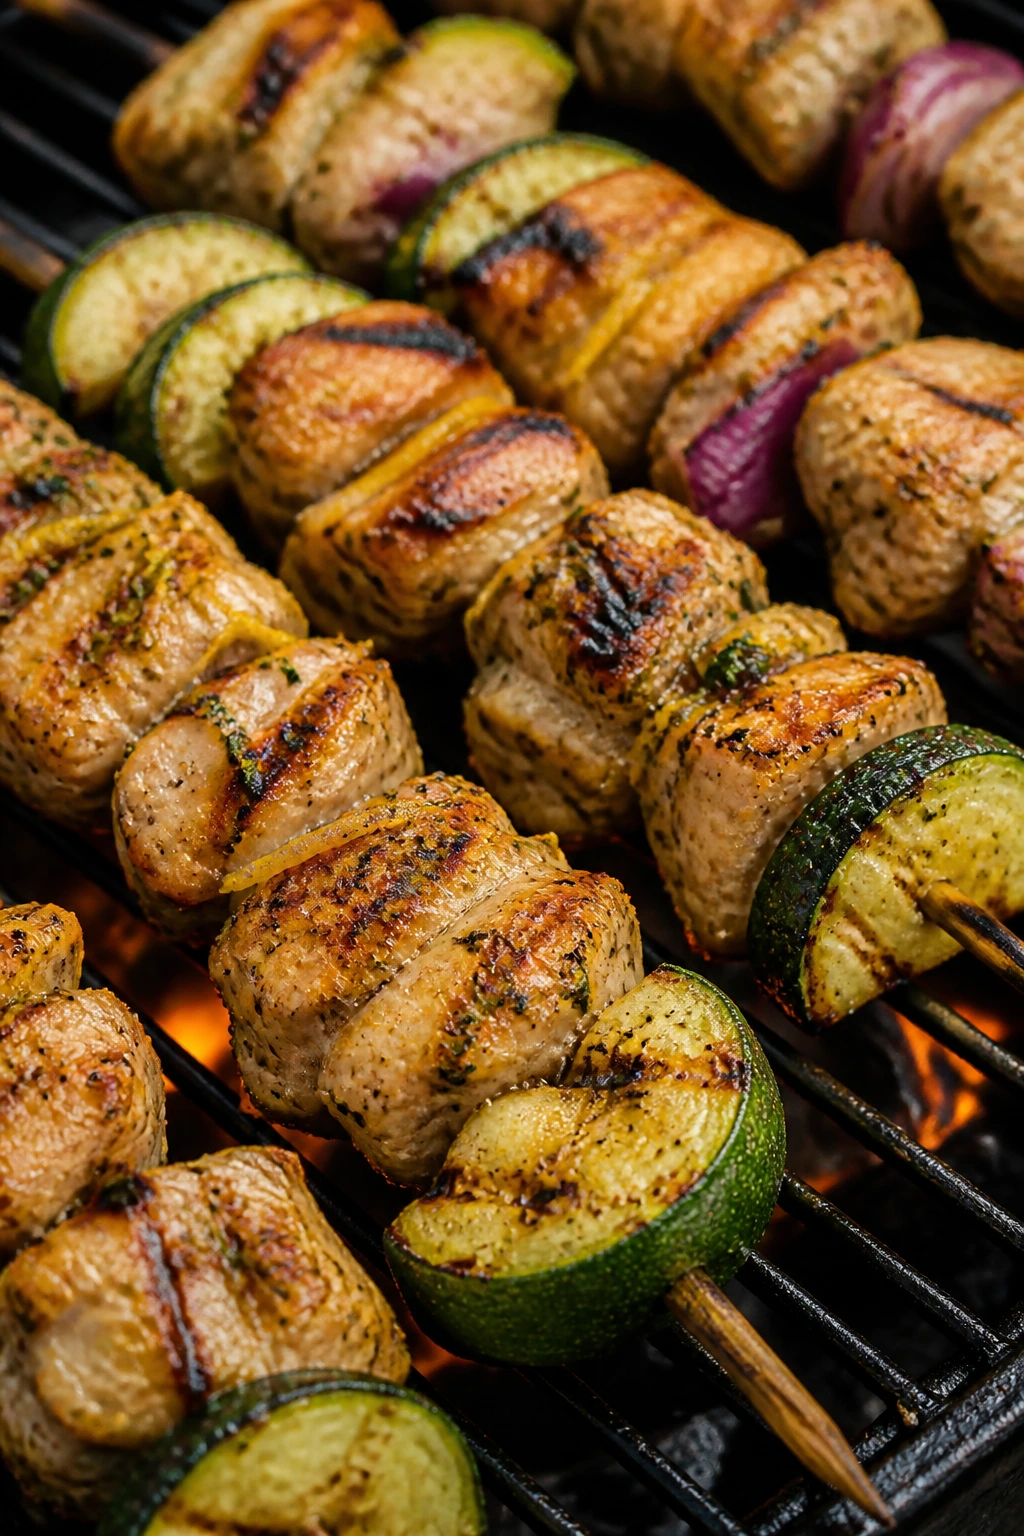
4. Pork Tenderloin and Pineapple Skewers with Chili-Lime Glaze

Pork tenderloin can go dry in a hurry, which is why this skewer format helps. The pineapple gives the grill something sticky to work with, the chili-lime glaze adds edge, and the pork stays tender if you pull it at the right moment. It tastes like someone planned dinner, even if the plan was only ten minutes long.
Why It Works:
Tenderloin is lean, so it benefits from fruit, oil, and a short cooking time. Pineapple brings acid and sugar, which help the pork brown and keep the plate lively. Red onion and bell pepper hold their shape under heat, and they taste better charred than raw. The glaze should be brushed on near the end, not at the start, or the honey will scorch before the pork finishes.
Key Ingredients:
- 2 lbs pork tenderloin, cut into 1½-inch cubes — trim away any silver skin first.
- 2 cups fresh pineapple chunks, cut into 1-inch pieces — fresh browns better than canned.
- 1 red bell pepper, cut into 1-inch squares — adds sweetness and color.
- 1 red onion, cut into thick wedges — holds together on the skewer.
- 3 tbsp olive oil — keeps the pork from sticking.
- 2 tbsp lime juice — brings sharpness to the glaze.
- 2 tbsp honey — helps with caramelization.
- 1 tbsp soy sauce — gives the glaze depth.
- 1 tsp chili flakes or chipotle powder — adds heat without burying the pork.
- 1 tsp kosher salt — seasons the meat.
Quick Steps:
- Make the Glaze: Whisk the olive oil, lime juice, honey, soy sauce, chili flakes, and salt together.
- Toss the Pork: Coat the pork cubes in half the glaze and let them sit for 20 to 30 minutes.
- Build the Skewers: Thread pork, pineapple, pepper, and onion in alternating order so every skewer gets a little sweet and a little savory.
- Grill Until Juicy: Cook over medium-high heat, about 400°F, for 8 to 10 minutes, turning every 2 to 3 minutes, until the pork reaches 145°F.
- Brush and Rest: Brush with the remaining glaze in the last minute, then rest the skewers for 3 to 5 minutes before serving.
Equipment for This Recipe:
- Skewers — metal or soaked wooden.
- Mixing bowl — for the glaze and pork.
- Sharp knife — for trimming the tenderloin cleanly.
- Tongs — for turning without breaking the fruit.
- Instant-read thermometer — the easiest way to keep pork juicy.
How to Serve This Dish:
Rice with chopped cilantro makes the best simple base, but these also work with black beans, grilled tortillas, or a cold cucumber salad. Serve the skewers warm, not piping hot, so the pineapple tastes sweet instead of scorched. One to two skewers per person is plenty when the plate has sides.
Pro Tips for This Recipe:
- Use fresh pineapple if you can: It browns better and keeps the skewers from turning wet.
- Keep the glaze for the end: Honey burns fast.
- Cut pork evenly: Uneven cubes are the reason one end is dry while the other still needs heat.
- Pull at 145°F: Pork tenderloin needs only a short rest to finish safely and stay juicy.
Variations on This Dish:
- Jerk Pork Version: Add 1 tablespoon jerk seasoning to the marinade and use mango instead of pineapple.
- Peach Swap: Use firm peach wedges when pineapple isn’t what you want; they soften and blister in a nice way.
- Chicken Tenderloin Shortcut: Chicken tenderloins work in the same size pieces, but cook them to 165°F.
Common Mistakes to Avoid with This Dish:
- Using canned pineapple without draining it: Excess juice makes the glaze slide off.
- Overcooking the pork: Tenderloin is lean, so even two extra minutes can push it past juicy.
- Brushing sugary glaze too early: It darkens before the meat is done.
5. Lamb, Mint, and Yogurt Skewers
Lamb likes a little swagger. The yogurt softens the surface, mint keeps the flavor bright, and cumin gives the meat the kind of warm depth that makes people reach for the flatbread before the platter is even set down. This one feels a bit more grown-up than the average grill skewer, but not fussy.
Why It Works:
Yogurt clings to lamb in a way straight oil never quite does, and it helps tenderize the cubes without making them mushy. Mint is the right herb here because it cuts through lamb’s richness instead of fighting it. Cumin and coriander bring that dry, warm spice note that tastes natural with char. If you cook lamb cubes to medium, the centers stay rosy and the edges pick up a dark crust that smells far better than it has any right to.
Key Ingredients:
- 2 lbs boneless lamb leg or shoulder, cut into 1½-inch cubes — shoulder has more fat, leg is a touch leaner.
- 1 cup plain Greek yogurt — forms the marinade base and helps browning.
- 2 tbsp lemon juice — brightens the lamb.
- 3 garlic cloves, minced — sharpens the flavor.
- 2 tbsp fresh mint, chopped — keeps the finish clean.
- 1 tbsp ground cumin — lamb’s best friend.
- 1 tsp ground coriander — adds a lighter spice note.
- 2 tsp kosher salt — seasons through the center.
- 1 red onion, cut into wedges — grills alongside the lamb.
Quick Steps:
- Build the Marinade: Stir together the yogurt, lemon juice, garlic, mint, cumin, coriander, and salt.
- Coat the Lamb: Toss the lamb cubes in the marinade and let them sit for 30 minutes at room temperature or up to 8 hours in the fridge.
- Thread the Skewers: Alternate lamb and onion, keeping the pieces snug so they sear instead of flop.
- Grill Over Medium-High Heat: Cook at about 425°F for 8 to 10 minutes, turning every few minutes, until the lamb reaches 135 to 145°F depending on how pink you like it.
- Rest Before Serving: Let the skewers sit for 5 minutes so the juices settle.
Equipment for This Recipe:
- Metal skewers — sturdy and easy to turn.
- Large bowl — for the yogurt marinade.
- Grill tongs — to keep the lamb from tearing.
- Instant-read thermometer — useful if you want precise doneness.
- Paper towels — to blot excess marinade before grilling if needed.
How to Serve This Dish:
Serve these with warm pita, cucumber-tomato salad, and a little extra yogurt sauce on the side. They also sit well on a rice bowl with herbs and sliced radishes. I like them with a squeeze of lemon right at the table, not before.
Pro Tips for This Recipe:
- Don’t let the yogurt drip heavily onto the grill: Shake off excess marinade so the flames stay under control.
- Cut the lamb evenly: Big cubes stay raw in the middle while small ones overcook.
- Use shoulder if you want more richness: Leg is leaner and a little cleaner tasting.
- Give the skewers a short rest: Lamb benefits from 5 minutes off the heat before you eat.
Variations on This Dish:
- Rosemary Lamb: Swap mint for rosemary and add 1 teaspoon lemon zest for a woodier flavor.
- Harissa Lamb: Stir 1 tablespoon harissa into the yogurt for a hotter, redder marinade.
- Beef Swap: Sirloin cubes work with the same marinade and timing, though they may need a minute less.
Common Mistakes to Avoid with This Dish:
- Skipping the yogurt drain if it’s very loose: Watery yogurt won’t cling well.
- Cooking lamb straight from the fridge: Cold meat can seize on the grill and cook unevenly.
- Going too far past medium: Lamb gets dry and loses its charm when it turns gray all the way through.
6. Salmon and Zucchini Skewers with Dill
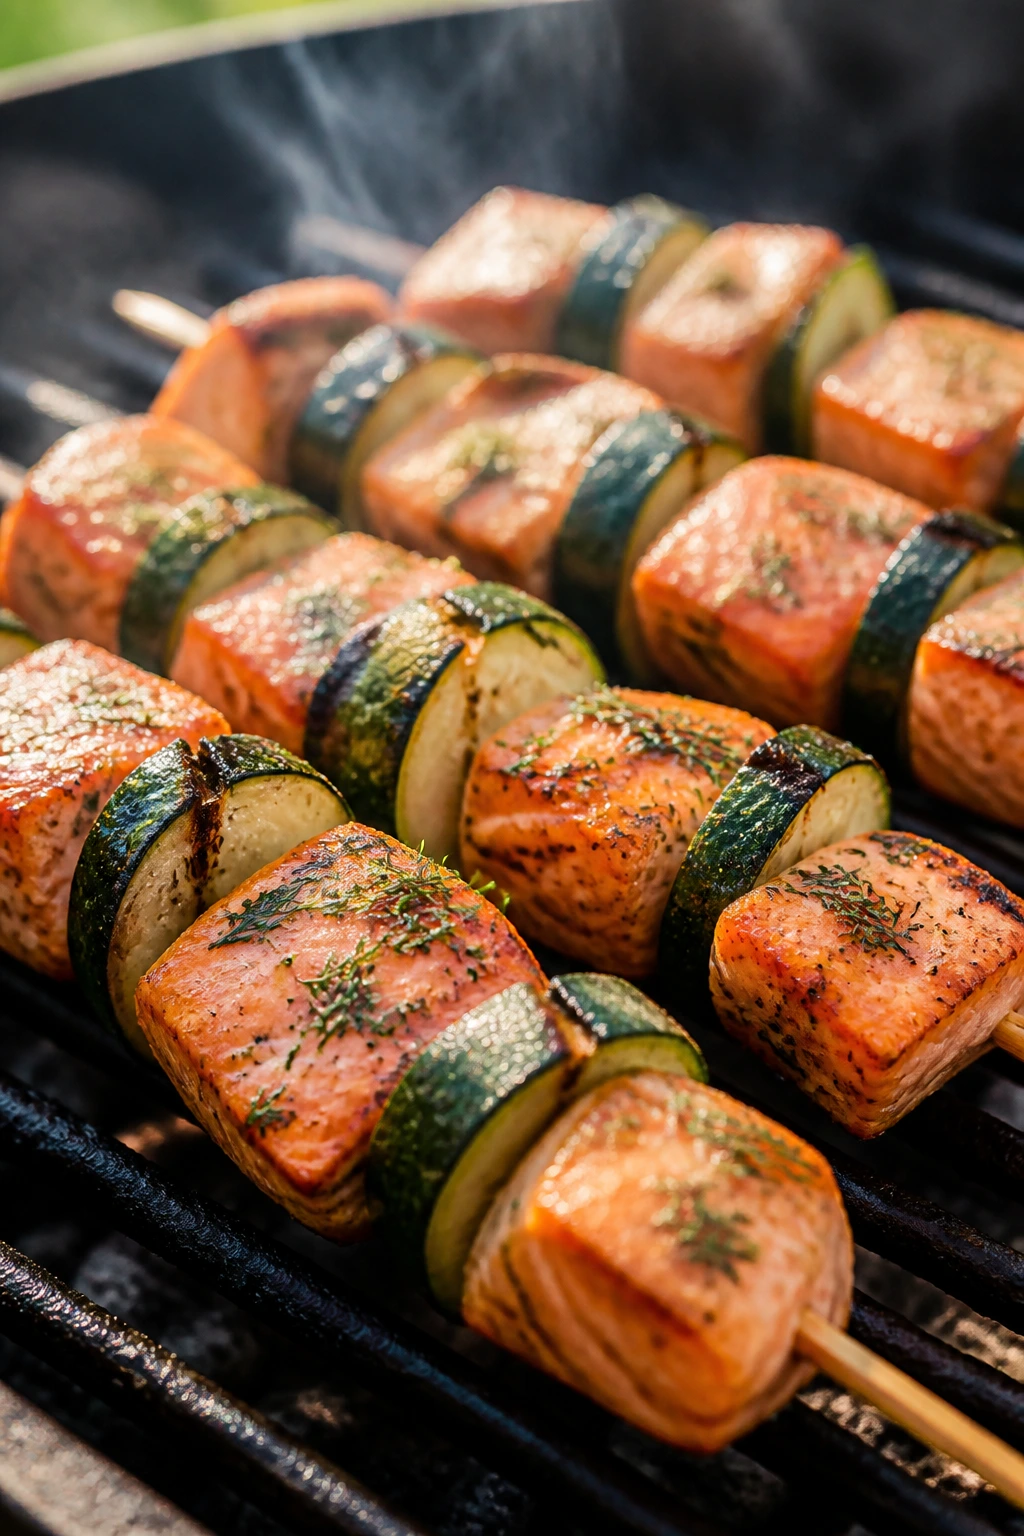
Salmon on skewers sounds fussy until you try it once. The fish picks up smoke in a way that feels almost buttery, and dill gives it a clean edge that keeps the flavor from becoming too rich. Zucchini helps stretch the plate without stealing the show.
Why It Works:
Salmon cubes cook quickly, but not so quickly that you can ignore them. The olive oil and Dijon coat the surface and help the fish hold together on the grill. Dill and lemon belong with salmon the way salt belongs with bread; they keep the fish tasting fresh, not heavy. Zucchini is worth including because it cooks in nearly the same window and turns a little silky at the edges, which is exactly what you want next to fish.
Key Ingredients:
- 2 lbs skinless salmon fillet, cut into 1½-inch cubes — skinless pieces are easier to skewer and turn.
- 2 medium zucchini, cut into thick half-moons or chunks — keep them sturdy.
- 1 red onion, cut into wedges — gives a little sweetness.
- 3 tbsp olive oil — coats the salmon without weighing it down.
- 2 tbsp Dijon mustard — helps the marinade cling.
- 1 lemon, zested and juiced — brings the whole skewer to life.
- 2 tbsp fresh dill, chopped — the right herb for salmon.
- 1 tsp kosher salt — enough to season the fish.
- ½ tsp black pepper — just enough bite.
Quick Steps:
- Make the Marinade: Whisk the olive oil, Dijon, lemon zest, lemon juice, dill, salt, and pepper.
- Coat the Salmon Carefully: Toss the cubes gently so they stay intact, then rest them for 10 to 15 minutes. Salmon does not need long in acid.
- Thread the Skewers: Alternate salmon, zucchini, and onion. Use two skewers per batch if you want the fish to stay flat.
- Grill Over Medium Heat: Cook at about 400°F for 2 to 3 minutes per side until the salmon is opaque on the outside and flakes at the center.
- Finish Gently: Pull the skewers off, let them rest for 2 minutes, then add a tiny extra squeeze of lemon.
Equipment for This Recipe:
- Wide metal skewers — better for fish than narrow round ones.
- Grill tongs — for a careful flip.
- Mixing bowl — for the marinade.
- Sharp knife — to cut salmon into neat cubes.
- Instant-read thermometer — helpful if you want a firmer target.
How to Serve This Dish:
This is good with rice, grilled potatoes, or a crisp cucumber salad. A dill yogurt sauce fits the fish without making the plate feel crowded. If you’re serving it as dinner, two skewers per person is about right.
Pro Tips for This Recipe:
- Keep the salmon cold until skewering: Soft fish is harder to thread cleanly.
- Don’t marinate too long: Acid starts changing the texture fast.
- Oil the grill well: Salmon will stick if the grates are dry or dirty.
- Watch the color: Opaque edges and a slightly translucent center are your cue to pull it.
Variations on This Dish:
- Maple-Dijon Salmon: Add 1 teaspoon maple syrup for a faint sweet edge.
- Asparagus Swap: Use thick asparagus spears instead of zucchini if you want a crisper vegetable.
- Trout Version: Steelhead or trout works with the same marinade and grill time.
Common Mistakes to Avoid with This Dish:
- Cutting the salmon too small: Tiny cubes fall apart on the skewer.
- Using high heat the whole time: Fish skinless pieces can dry fast on screaming hot grates.
- Flipping too soon: Let the fish release on its own before you turn it.
7. Sesame-Soy Tofu and Bell Pepper Skewers
Tofu needs a plan. Left alone, it can taste like not much; pressed, marinated, and charred, it turns into something with a crisp edge and a soft center that actually deserves a place on the grill. The sesame-soy glaze does the heavy lifting here, and bell peppers keep the skewer lively.
Why It Works:
Extra-firm tofu is the only kind I’d put on a grill without hesitation. Pressing it removes enough moisture that it browns instead of steaming, and the soy-maple glaze adds salt, sweetness, and a sticky surface that grips the heat. Bell peppers and onion bring contrast and color. The key is not pretending tofu behaves like meat. It doesn’t. Treat it like something that needs support, and it rewards you.
Key Ingredients:
- 2 blocks extra-firm tofu, 14 oz each, pressed and cubed — press out as much water as you can.
- 2 bell peppers, cut into 1½-inch squares — any color works.
- 1 red onion, cut into wedges — gives sweet char.
- ¼ cup soy sauce — the salty base of the glaze.
- 2 tbsp maple syrup — helps the tofu brown.
- 2 tbsp rice vinegar — adds brightness.
- 1 tbsp sesame oil — gives the glaze its nutty finish.
- 3 garlic cloves, minced — keeps the flavor from going flat.
- 1 tsp grated ginger — sharpens the edges.
- 1 tbsp cornstarch mixed with 2 tbsp water — optional, for a thicker glaze.
Quick Steps:
- Press the Tofu: Wrap the blocks in towels and weigh them down for 20 to 30 minutes.
- Make the Glaze: Whisk the soy sauce, maple syrup, rice vinegar, sesame oil, garlic, and ginger. If you want it thicker, simmer with the cornstarch slurry for 1 to 2 minutes until glossy.
- Marinate Briefly: Toss the tofu in half the glaze for 15 minutes.
- Thread the Skewers: Alternate tofu, peppers, and onion. Keep the cubes snug so they brown evenly.
- Grill Over Medium-High Heat: Cook at about 425°F for 8 to 10 minutes, turning carefully, until the tofu has dark edges and the vegetables are softened.
- Brush and Finish: Spoon on the remaining glaze in the last minute and sprinkle sesame seeds over the top.
Equipment for This Recipe:
- Tofu press or towels and a pan — either works for removing moisture.
- Skewers — metal makes turning easier.
- Small saucepan — only if you thicken the glaze.
- Grill basket or foil-lined tray — optional if your tofu pieces are tiny.
- Tongs — for a careful turn.
How to Serve This Dish:
Serve these over rice, soba noodles, or shredded cabbage with a little extra glaze spooned around the plate. They also work in lettuce cups with cucumber ribbons and scallions. I like them with a sprinkle of toasted sesame seeds right before serving.
Pro Tips for This Recipe:
- Freeze and thaw the tofu for a meatier texture: It changes the surface in a good way.
- Use extra-firm only: Softer tofu falls apart before it hits the grate.
- Oil the skewers lightly: Tofu can stick if you rush the oiling step.
- Don’t drown the tofu in glaze early: Too much sugar before grilling can burn.
Variations on This Dish:
- Spicy Gochujang Tofu: Add 1 tablespoon gochujang to the glaze for heat and color.
- Peanut Version: Stir in 2 tablespoons peanut butter and thin with a splash of water.
- Mushroom Add-In: Add cremini or shiitake caps to the skewer for a deeper grilled flavor.
Common Mistakes to Avoid with This Dish:
- Not pressing the tofu long enough: Wet tofu steams and slides around.
- Using a weak glaze: If the sauce is too thin, it won’t cling.
- Turning the skewers too early: Give the tofu a minute to crust before you move it.
8. Halloumi, Cherry Tomato, and Red Onion Skewers
Halloumi changes the game the minute it meets flame. It gets salty, browned, and a little squeaky in the best possible way, and it holds together where softer cheese would melt into the grates. Cherry tomatoes burst, red onion sweetens, and the whole skewer tastes sharper than it looks.
Why It Works:
Halloumi is one of the few cheeses that actually likes direct heat. It softens without collapsing, so you get browned edges and a creamy middle without a mess. The tomatoes give you little bursts of juice that cut through the salt, and oregano plus lemon keep the whole thing from feeling too rich. This is a short-cook skewer, which is part of the pleasure. If you blink, you miss the window.
Key Ingredients:
- 16 oz halloumi, cut into 1-inch cubes — dry it well before skewering.
- 2 pints cherry tomatoes — choose ones that feel firm, not wrinkled.
- 1 red onion, cut into chunky wedges — sweetens as it grills.
- 2 tbsp olive oil — helps with browning.
- 1 tsp dried oregano — classic with salty cheese.
- 1 lemon, cut into wedges — for serving.
- ½ tsp black pepper — balances the salt.
Quick Steps:
- Pat the Halloumi Dry: Use paper towels so the cheese browns cleanly.
- Assemble the Skewers: Thread halloumi, tomatoes, and onion in a loose pattern.
- Brush with Oil and Oregano: Coat the skewers lightly on all sides.
- Grill Briefly: Cook over medium-high heat, about 425°F, for 1 to 2 minutes per side until the halloumi has dark grill marks and the tomatoes start to wrinkle.
- Finish with Lemon: Squeeze over the top while the skewers are still hot.
Equipment for This Recipe:
- Skewers — metal preferred because halloumi can be sticky.
- Paper towels — for drying the cheese.
- Grill tongs — for a gentle turn.
- Pastry brush — useful for the oil.
- Platter — these look best spread out, not piled up.
How to Serve This Dish:
Serve these with warm flatbread, chopped cucumber salad, or a big handful of herbs dressed with lemon and olive oil. They make a strong starter for four or a light dinner for two with bread on the side. A drizzle of honey at the table is optional, but it works if you like sweet-salty contrast.
Pro Tips for This Recipe:
- Dry the halloumi well: Surface moisture keeps it from browning.
- Use medium heat, not blistering heat: Halloumi needs a little time to brown before it softens too much.
- Keep the tomatoes whole: Halved tomatoes can burst too fast and drip away.
- Serve right away: Halloumi loses its best texture as it cools.
Variations on This Dish:
- Za’atar Halloumi: Swap oregano for za’atar and add a pinch of sesame seeds.
- Zucchini Add-In: Thread thick zucchini half-moons between the cheese and tomatoes for more volume.
- Paneer Version: Paneer behaves similarly, though it tastes milder and likes a little more salt.
Common Mistakes to Avoid with This Dish:
- Leaving the cheese wet: That’s how you get pale halloumi instead of browned halloumi.
- Overcooking the tomatoes: They should wrinkle, not disappear.
- Using high heat for too long: Halloumi can go rubbery if you chase bigger grill marks than the cheese can handle.
9. Mediterranean Chicken Thigh Skewers with Oregano
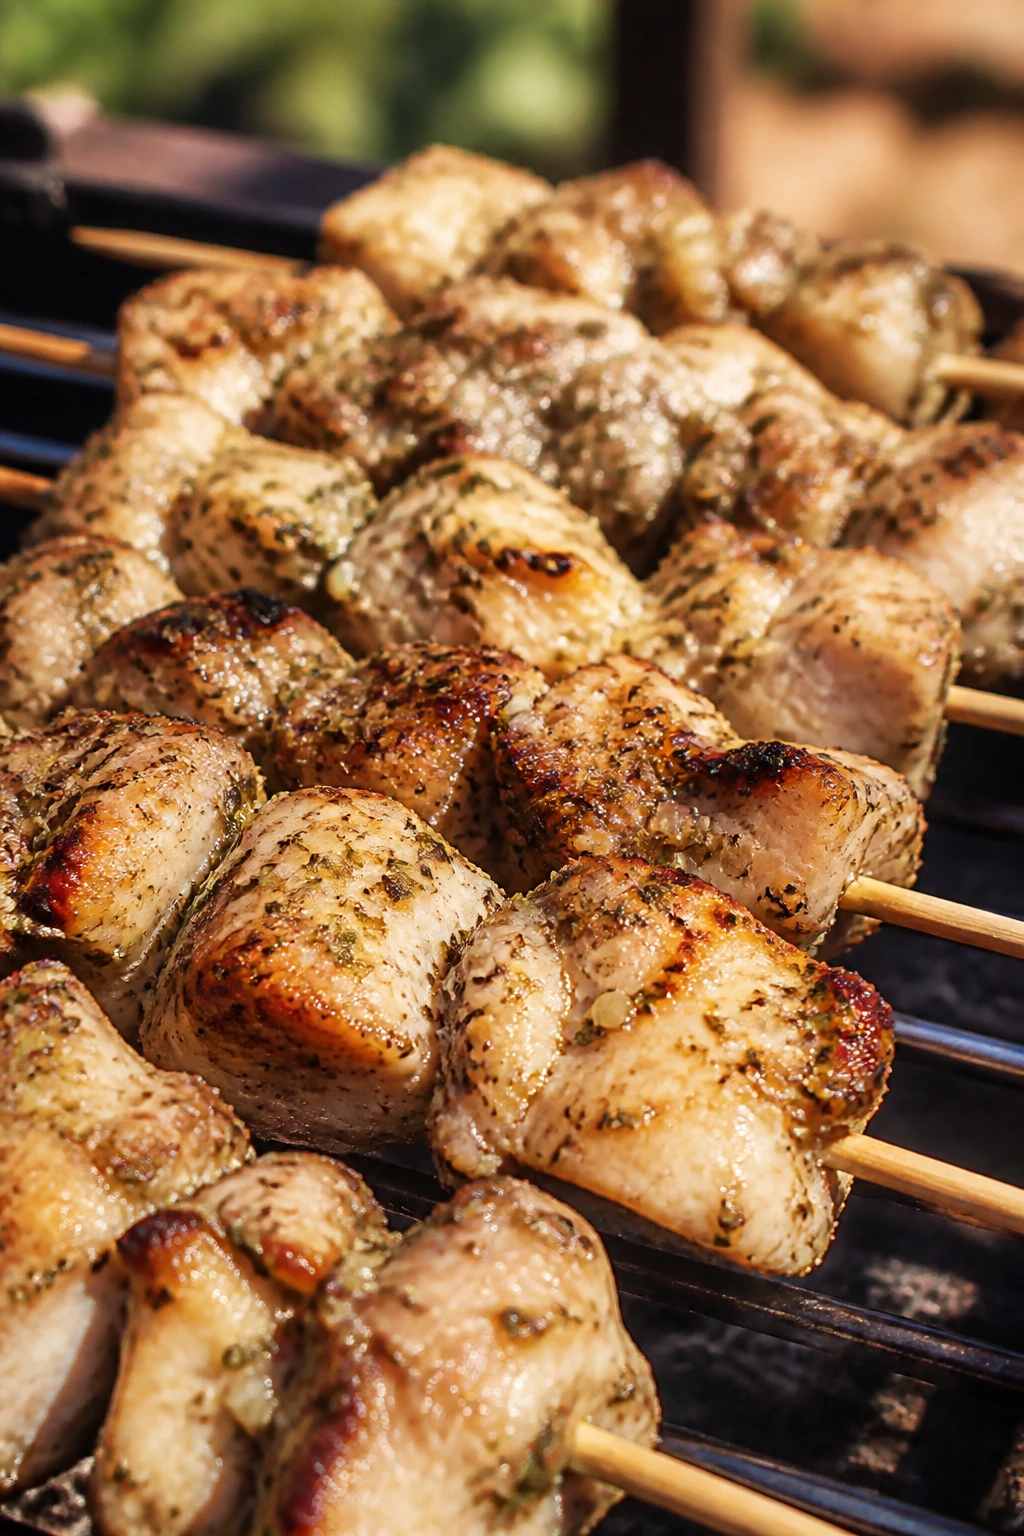
Greek-style chicken needs more than lemon and a prayer. Yogurt, oregano, garlic, and cumin make a marinade that clings to thighs and turns them into the sort of skewer you can serve with rice, pita, or nothing more than a bowl of tomatoes and cucumbers. It’s plain in the best way.
Why It Works:
Greek yogurt gives the chicken a thick coating that helps the meat brown without drying out. Oregano and cumin bring familiar Mediterranean flavor, while lemon keeps the marinade from feeling heavy. Chicken thighs again do the smart thing here: they take the fire, stay juicy, and taste better after a short rest. If you want a dependable skewer for a mixed group, this is one of the safest bets on the list.
Key Ingredients:
- 2 lbs boneless, skinless chicken thighs, cut into 1½-inch pieces — the cut matters.
- ½ cup plain Greek yogurt — tenderizes and clings.
- 2 tbsp olive oil — helps the marinade spread.
- 1 lemon, juiced — sharpens the chicken.
- 4 garlic cloves, minced — gives the marinade backbone.
- 2 tsp dried oregano — classic and strong enough for heat.
- 1 tsp ground cumin — adds warmth.
- 2 tsp kosher salt — seasons deeply.
- 1 bell pepper and 1 red onion, cut into chunks — they grill well beside the chicken.
Quick Steps:
- Make the Marinade: Combine the yogurt, olive oil, lemon juice, garlic, oregano, cumin, and salt.
- Marinate the Chicken: Toss the chicken in the mixture and let it sit for 30 minutes to 4 hours.
- Build the Skewers: Thread chicken with bell pepper and onion chunks, leaving just enough space for heat to move.
- Grill at Medium-High Heat: Cook at about 425°F for 10 to 12 minutes, turning every few minutes, until the chicken reaches 165°F.
- Rest Briefly: Let the skewers sit for 5 minutes before serving.
Equipment for This Recipe:
- Skewers — metal or soaked wooden.
- Mixing bowl — for the yogurt marinade.
- Tongs — to turn the chicken without scraping off all the marinade.
- Instant-read thermometer — chicken should not be guessed at.
- Cutting board and sharp knife — for even pieces.
How to Serve This Dish:
These are excellent with tzatziki, pita, and chopped tomato-cucumber salad. A pile of rice or orzo makes them feel more like a full dinner. I like a few lemon wedges on the side because the chicken can take another hit of acid.
Pro Tips for This Recipe:
- Let the chicken sit in the marinade, not swim in it: Too much leftover yogurt on the outside can scorch.
- Use thighs if you can: Breast meat will work, but it gives you less margin.
- Keep the vegetable pieces large: Tiny bits will cook ahead of the chicken and go soft.
- Oil the grill: Even marinated chicken can grab at dry grates.
Variations on This Dish:
- Harissa Chicken: Stir 1 tablespoon harissa into the marinade for a red, hotter version.
- Lighter Herb Version: Add dill and parsley and reduce the cumin if you want a fresher edge.
- Pita Wrap Night: Slice the cooked chicken off the skewers and tuck it into pita with lettuce and sauce.
Common Mistakes to Avoid with This Dish:
- Using breast meat cut too small: It dries before the vegetables finish.
- Packing the skewers too tightly: Steam replaces char.
- Skipping the rest: Chicken juices need a few minutes to settle or they run all over the cutting board.
10. Smoked Sausage, Peppers, and Onion Skewers
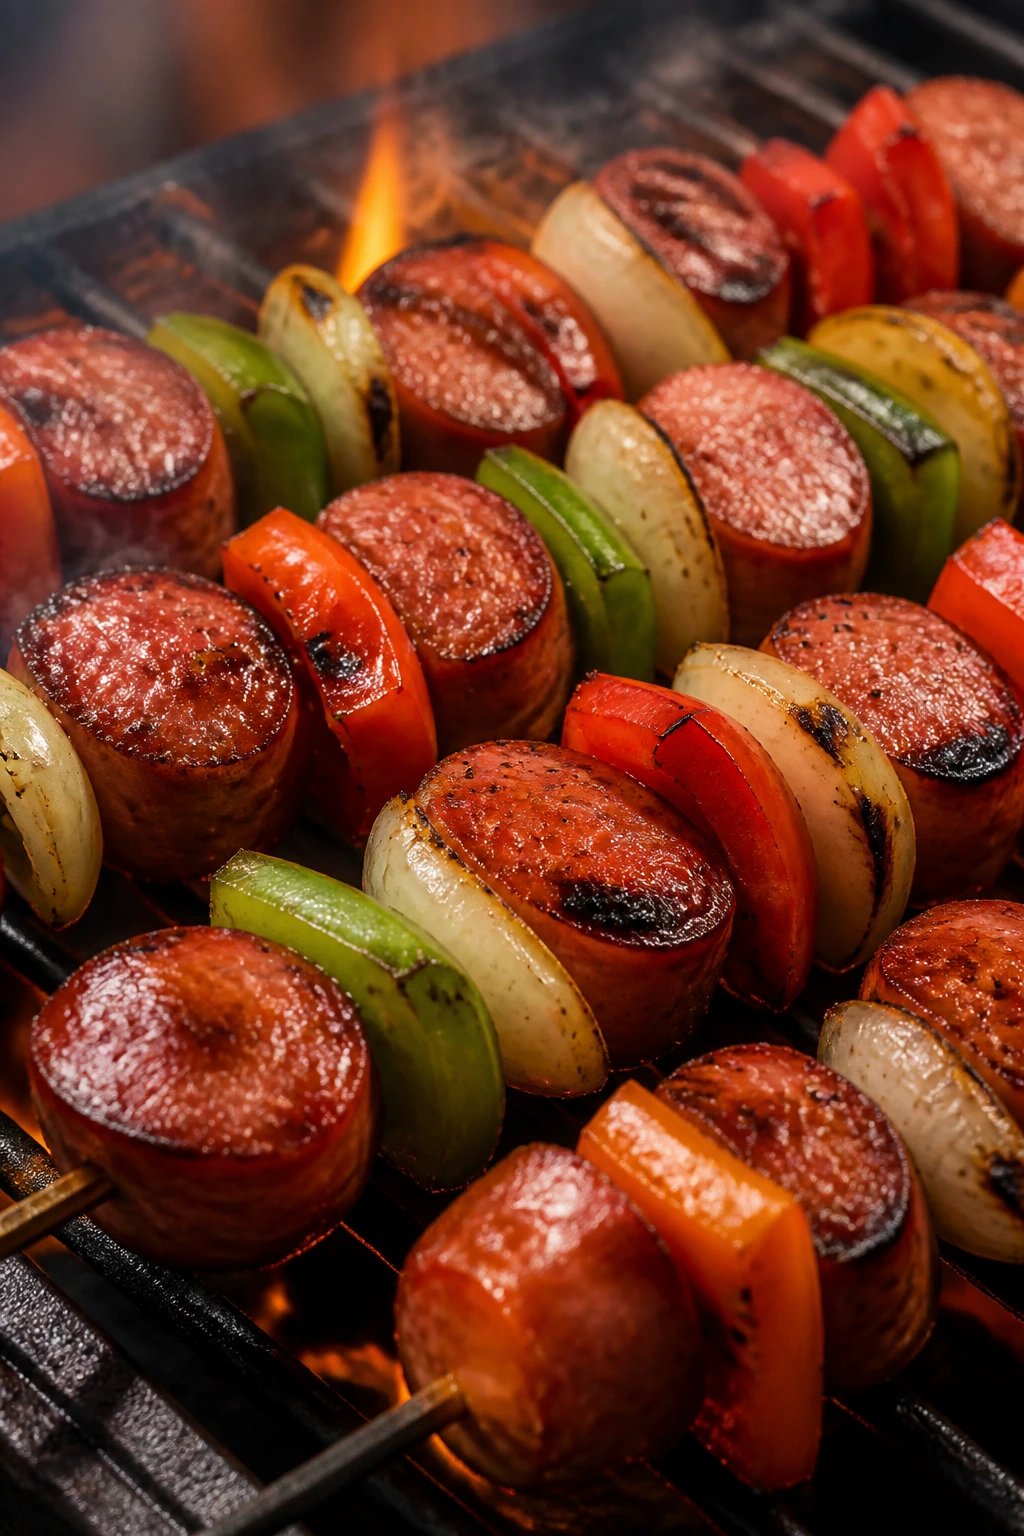
Smoked sausage is the shortcut nobody should apologize for. It already has seasoning, it grills without drama, and it plays nicely with peppers and onions that blister and sweeten beside it. This is the skewer you make when dinner needs to happen without a lecture.
Why It Works:
Because the sausage is already cooked, the grill job is mostly about color and heat. That keeps the cooking window short and the risk low. Bell peppers and zucchini soften into a good texture without going limp if they’re cut thick enough. A little Dijon brushed on after grilling gives the plate a sharp edge that keeps the sausage from tasting one-note.
Key Ingredients:
- 1½ lbs smoked sausage or kielbasa, sliced into 1½-inch coins — pre-cooked sausage keeps this simple.
- 2 bell peppers, cut into 1½-inch squares — use two colors if you want a brighter platter.
- 1 large red onion, cut into wedges — thick wedges hold together.
- 2 zucchini, cut into thick half-moons — they grill fast and soak up the sausage drippings.
- 2 tbsp olive oil — for the vegetables.
- 1 tsp Italian seasoning — works better than a long spice list here.
- ½ tsp black pepper — enough to wake up the sausage.
- 1 tbsp Dijon mustard — for brushing or serving.
Quick Steps:
- Season the Vegetables: Toss the peppers, onion, and zucchini with olive oil, Italian seasoning, and black pepper.
- Thread the Skewers: Alternate sausage and vegetables so every skewer gets some color and some heat.
- Grill Over Medium-High Heat: Cook at about 400 to 425°F for 8 to 10 minutes, turning now and then, until the vegetables are blistered and the sausage is browned.
- Brush with Dijon: In the last minute, lightly brush the sausage with Dijon if you want a sharper finish.
- Serve Hot: Move straight to the table while the sausage still smells smoky.
Equipment for This Recipe:
- Skewers — metal is easiest.
- Large bowl — for tossing the vegetables.
- Grill tongs — to turn bulky pieces cleanly.
- Sharp knife — for even slicing.
- Platter — the colors show best spread out.
How to Serve This Dish:
These sit well with potato salad, grilled corn, or buttered buns if you want something that feels like a cookout plate. They also work over rice with a spoonful of mustard on the side. Two skewers per person is enough if you’ve got sides.
Pro Tips for This Recipe:
- Use smoked sausage, not raw sausage: Raw sausage needs a different cooking plan.
- Cut the vegetables thick: Thin peppers collapse before they get any char.
- Don’t overthink the seasoning: The sausage carries a lot of the flavor already.
- Keep the grill clean: Sausage sugars can smear and stick if the grates are dirty.
Variations on This Dish:
- Andouille Version: Use andouille for more spice and a firmer bite.
- Chicken Sausage Swap: Chicken sausage works fine and keeps the plate lighter.
- Mustard-Herb Finish: Stir chopped parsley into the Dijon for a fresher table sauce.
Common Mistakes to Avoid with This Dish:
- Using vegetables cut too small: They turn soft before the sausage browns.
- Crowding the skewers: Packed pieces steam instead of blister.
- Thinking the sausage needs a long cook: It doesn’t. You’re warming and browning, not curing or baking.
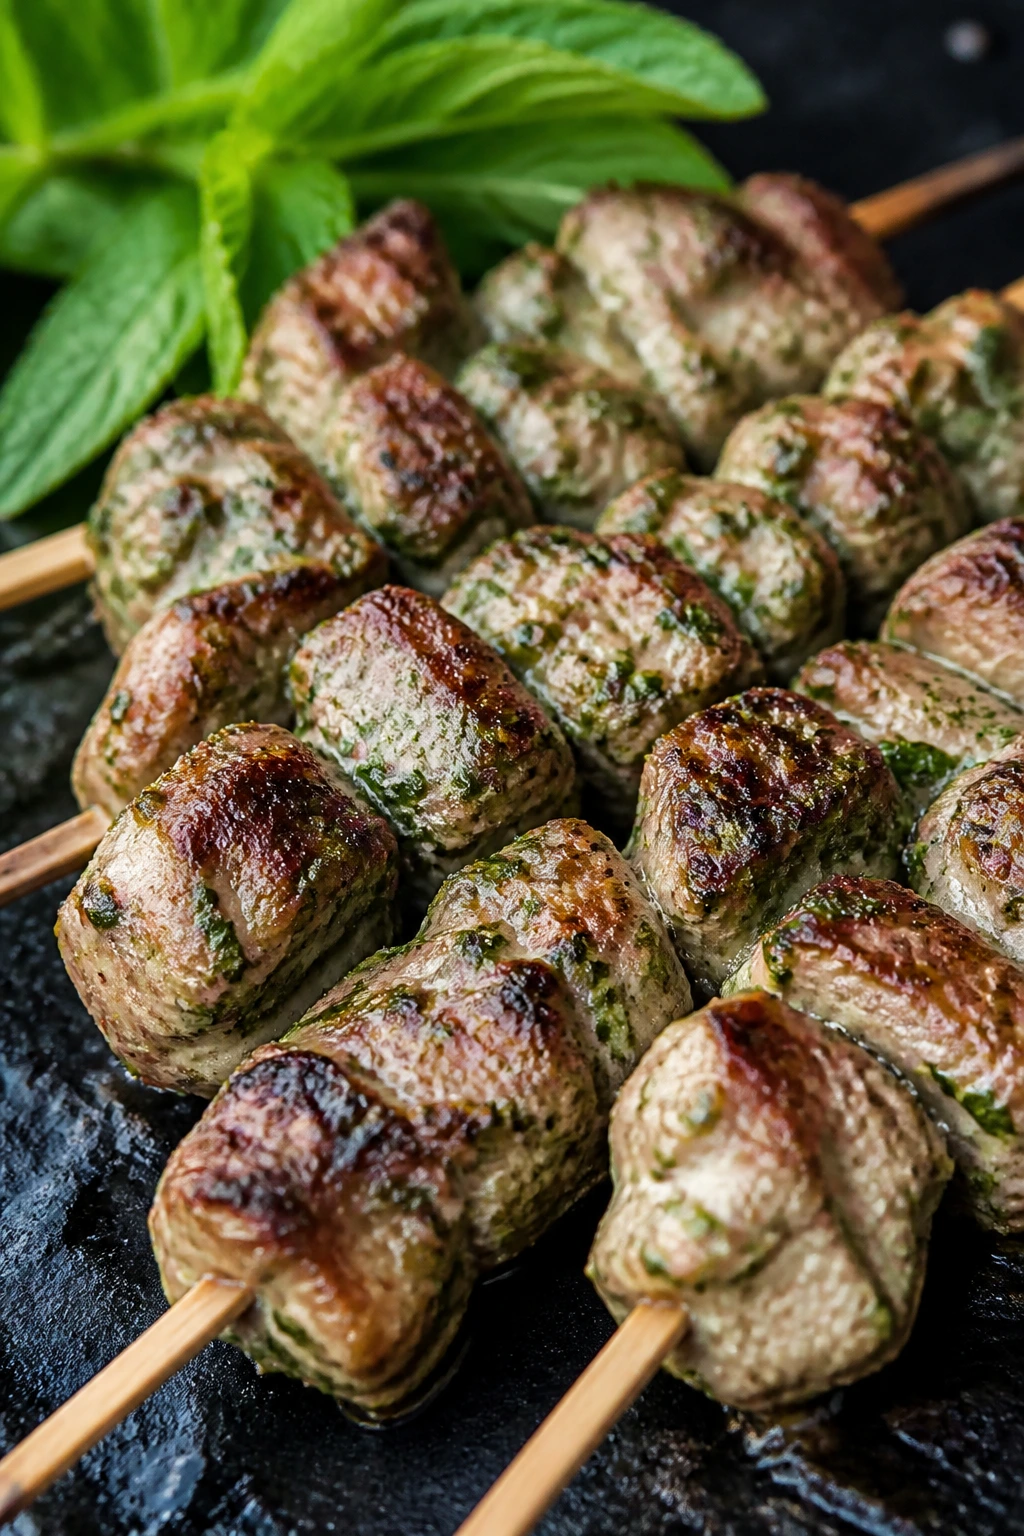
11. Teriyaki Turkey Meatball Skewers
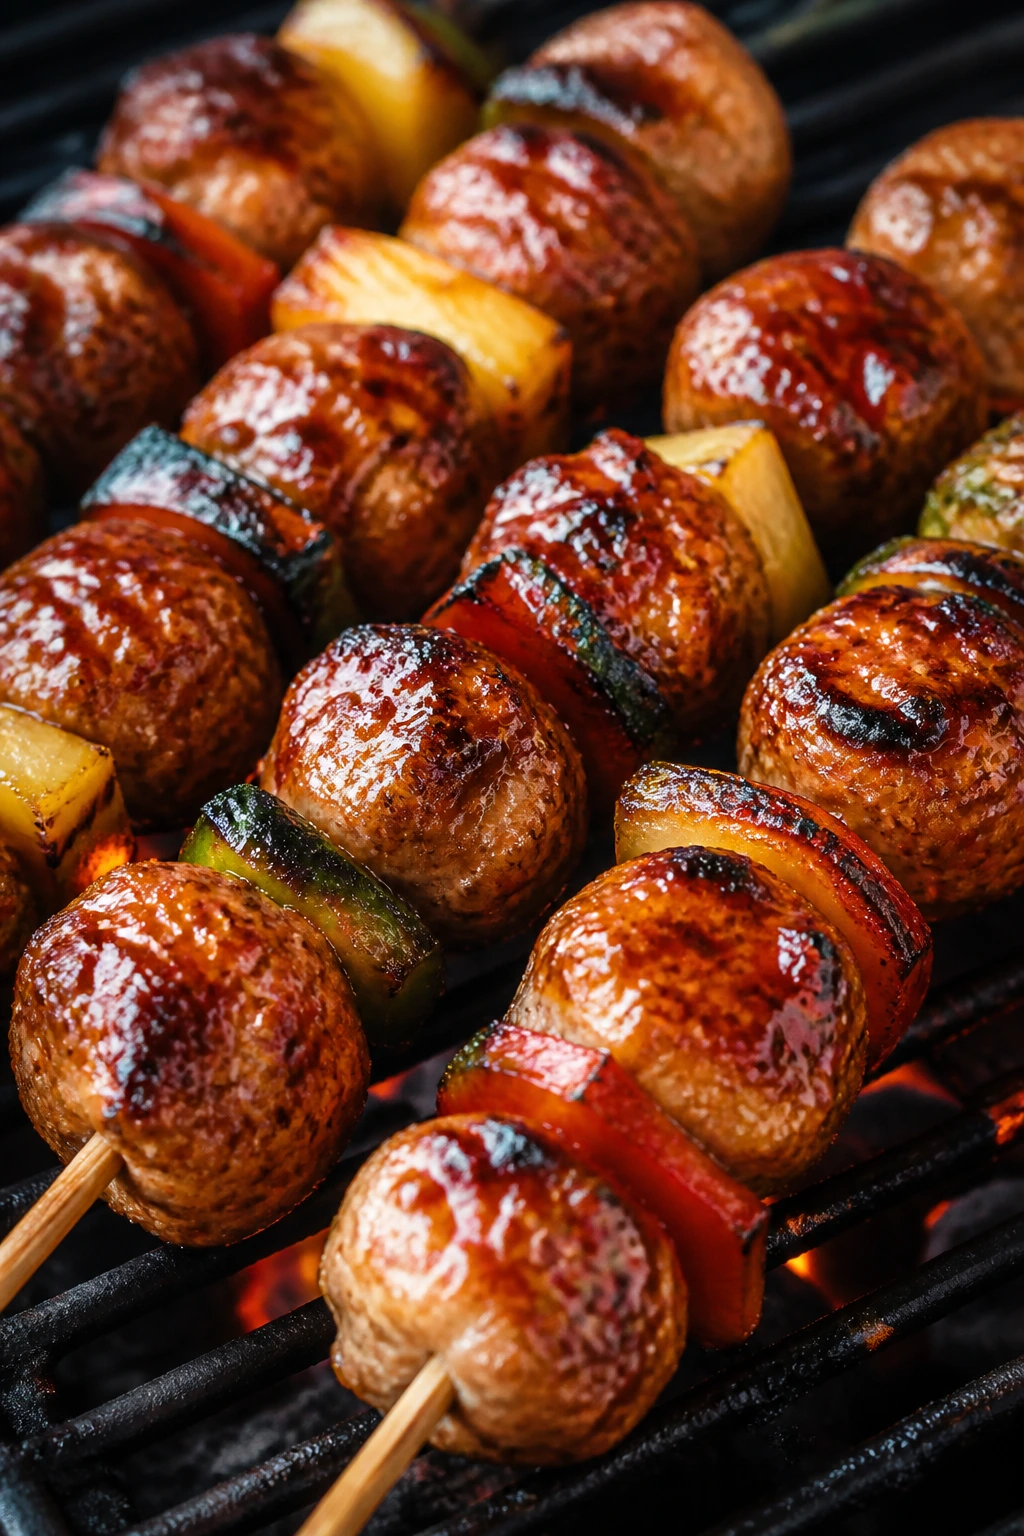
Turkey meatballs are happier on a skewer than in a bowl. They get a little crust, a little glaze, and enough smoke to keep them from tasting lean in a sad way. Pineapple and bell pepper give them sweetness and color without turning the whole thing sugary.
Why It Works:
Ground turkey can dry out if you treat it too rough, so the panko and egg matter here. They keep the meatballs tender while the grill gives the outside a thin crust. Teriyaki is a smart glaze because it reads savory first and sweet second, and that helps the turkey stay balanced. Chill the meatballs before skewering and they hold together much better. Warm, soft turkey balls on a hot grill are a mess. Cold, shaped ones behave.
Key Ingredients:
- 1½ lbs ground turkey — not too lean if you can help it.
- ½ cup panko breadcrumbs — keeps the meatballs tender.
- 1 egg — binds the mixture.
- 3 scallions, finely chopped — add freshness.
- 2 garlic cloves, minced — for depth.
- 1 tbsp fresh ginger, grated — for sharpness.
- 2 tbsp soy sauce — seasons the meat.
- ½ cup teriyaki sauce, plus more for brushing — the glaze.
- 1 bell pepper, cut into squares — for color and texture.
- 2 cups pineapple chunks — optional, but good with the glaze.
Quick Steps:
- Mix the Meatballs: Combine the turkey, panko, egg, scallions, garlic, ginger, and soy sauce until just mixed.
- Shape and Chill: Roll into 1¼-inch meatballs and chill for 15 minutes so they firm up.
- Thread the Skewers: Alternate meatballs with pineapple and pepper, using thick skewers so the balls stay centered.
- Grill at Medium Heat: Cook at about 400°F for 10 to 12 minutes, turning every few minutes, until the turkey reaches 165°F.
- Glaze at the End: Brush with teriyaki in the last 2 minutes so the sugar doesn’t burn.
Equipment for This Recipe:
- Mixing bowl — for the meatball mix.
- Skewers — sturdy ones help with the weight.
- Grill tongs — for careful turning.
- Baking sheet — useful for chilling and transporting.
- Instant-read thermometer — turkey needs a real temp check.
How to Serve This Dish:
These are good over rice with sliced scallions and sesame seeds, or tucked into lettuce cups with cucumber. If you want dinner to feel more casual, serve them with cold noodles and a simple pickled vegetable side. They’re easy to pick up, which matters when the evening is already noisy.
Pro Tips for This Recipe:
- Don’t overmix the turkey: Tight, packed meatballs turn dense.
- Chill before grilling: A short rest makes them hold their shape.
- Brush glaze at the end: Sugar-heavy sauce burns fast on meatballs.
- Use a gentle hand when turning: The skewers hold better if you don’t shove them around.
Variations on This Dish:
- Spicy Sriracha Turkey: Stir 1 tablespoon sriracha into the meatball mix or glaze.
- Chicken Version: Ground chicken behaves the same way, though it may need a minute less.
- Veg-Heavy Skewer: Add mushrooms or zucchini between meatballs if you want more volume.
Common Mistakes to Avoid with This Dish:
- Making the meatballs too large: Big ones brown late and can stay raw in the middle.
- Skipping the chill: Warm turkey is hard to skewer and easier to smear.
- Adding glaze too early: It can go black before the center is done.
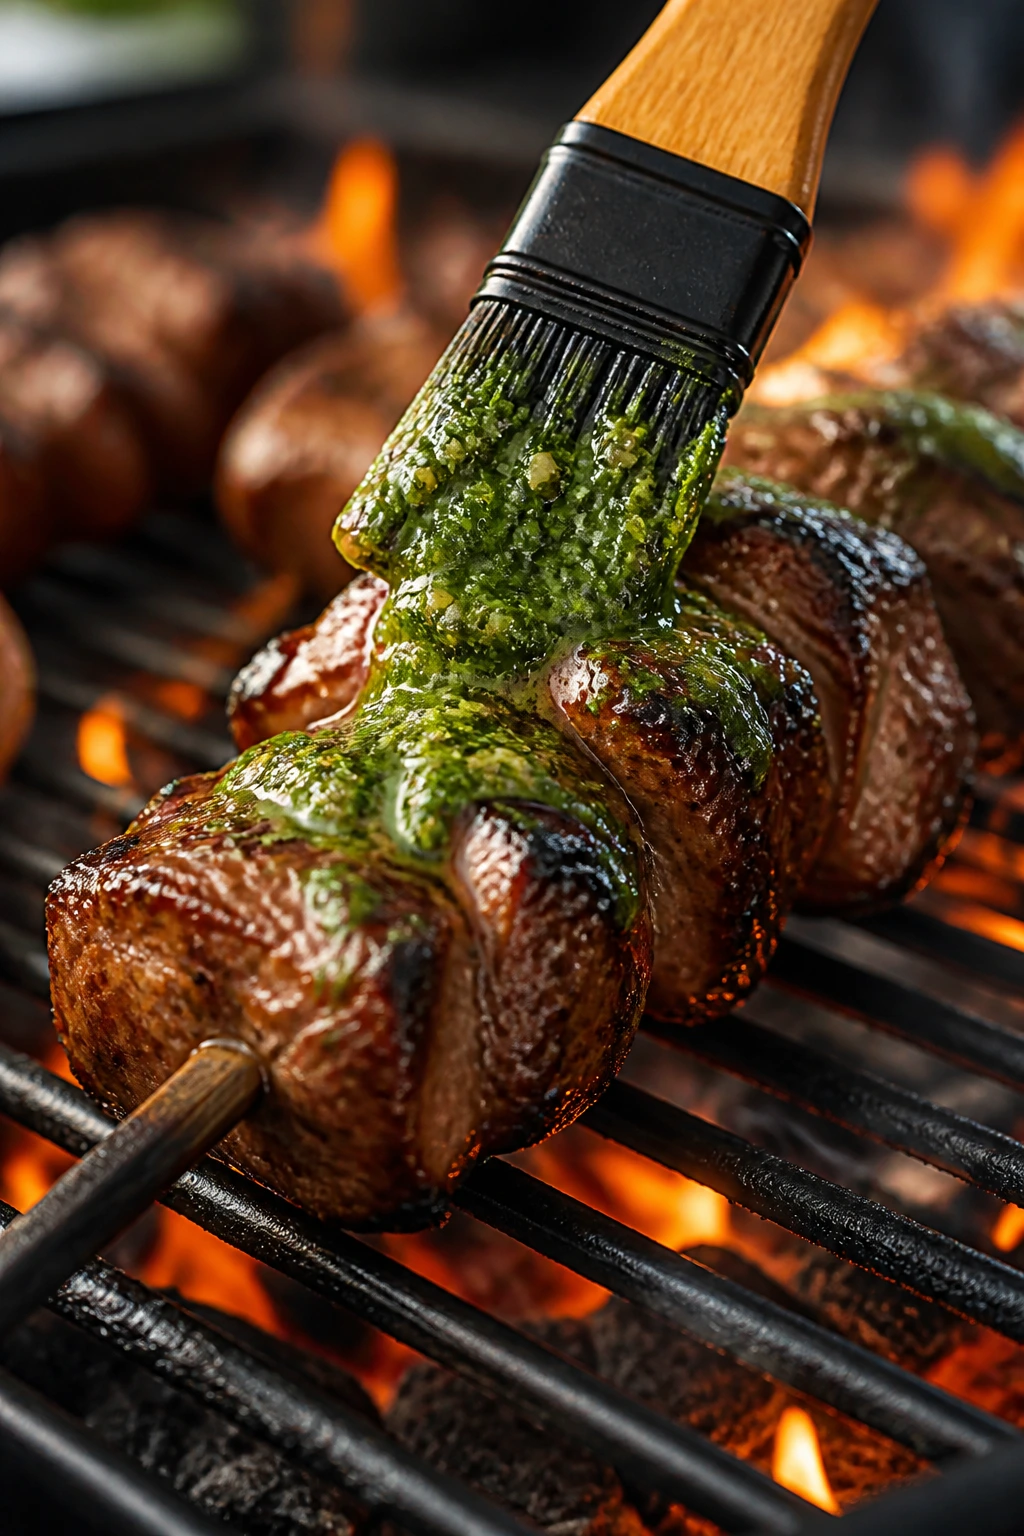
12. Steak and Mushroom Skewers with Chimichurri
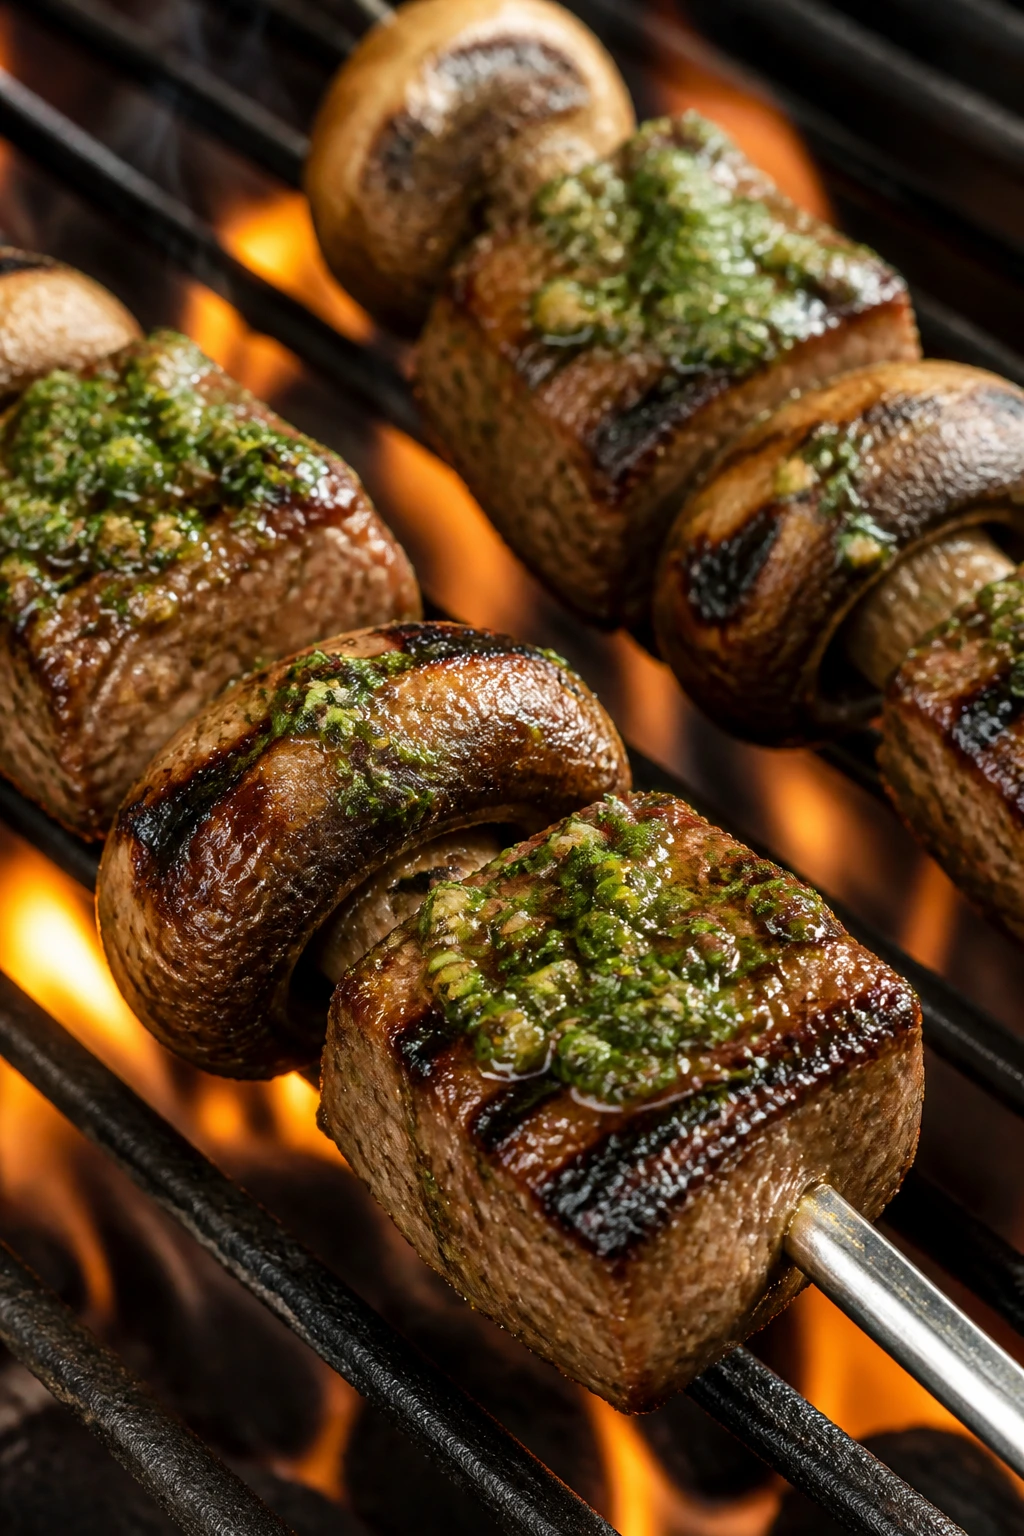
Steak and mushrooms like the same kind of heat. The mushrooms soak up garlicky oil, the beef gets a crust, and chimichurri cuts through the richness with parsley, vinegar, and raw garlic. This is the skewer I’d make when I want something that feels a little more intentional without becoming a project.
Why It Works:
Sirloin or strip steak has enough fat and structure to handle a quick grill without falling apart. Mushrooms do the opposite: they soften, darken, and collect flavor in the creases. Chimichurri is smart here because it brings acid and herb freshness after the meat comes off the fire, not before. That means the beef stays beefy and the sauce stays bright. You get two kinds of heat and one clean finish. That’s the good stuff.
Key Ingredients:
- 2 lbs sirloin or strip steak, cut into 1½-inch cubes — trim off excess fat.
- 1 lb cremini mushrooms, cleaned and left whole if small or halved if large — they hold up best.
- 1 red onion, cut into wedges — brings sweetness.
- 3 tbsp olive oil — for the skewers.
- 2 tsp kosher salt — seasons the steak.
- 1 tsp black pepper — gives the beef a little bite.
- ½ cup chopped parsley — the base of the chimichurri.
- 2 tbsp chopped oregano — a smaller but important note.
- 2 garlic cloves, minced — sharp and raw.
- 2 tbsp red wine vinegar — for the sauce.
- ¼ cup olive oil for chimichurri — makes it spoonable.
- Pinch of red pepper flakes — optional heat.
Quick Steps:
- Make the Chimichurri: Stir the parsley, oregano, garlic, red wine vinegar, olive oil, red pepper flakes, and a pinch of salt. Let it sit while you grill.
- Season the Steak: Toss the steak cubes with olive oil, salt, and pepper.
- Thread the Skewers: Alternate steak, mushrooms, and onion. If the steak pieces are slippery, use two skewers per row.
- Grill Over High Heat: Cook at about 450°F for 8 to 10 minutes, turning every 2 minutes, until the steak hits 130 to 135°F for medium-rare or 145°F for medium.
- Rest and Sauce: Rest the skewers for 5 minutes, then spoon chimichurri over the top.
Equipment for This Recipe:
- Skewers — metal is easiest for heavier ingredients.
- Mixing bowl — for the chimichurri and seasoning.
- Grill tongs — for firm but careful turns.
- Instant-read thermometer — steak is too expensive to guess.
- Cutting board and knife — for clean cubes.
How to Serve This Dish:
Serve with roasted potatoes, grilled bread, or a tomato salad dressed with olive oil and salt. The chimichurri should hit the steak after grilling, not before. One or two skewers per person works well, depending on what else is on the table.
Pro Tips for This Recipe:
- Choose cremini over white mushrooms: They handle the grill with more flavor and less water.
- Pat the steak dry: Dry surfaces brown better.
- Let the chimichurri sit at least 10 minutes: Garlic and vinegar need a minute to wake up.
- Pull steak early and rest it: Carryover heat will finish the middle.
Variations on This Dish:
- Flank Steak Version: Works too, but cut the pieces slightly thinner.
- Garlic Butter Finish: Swap chimichurri for a spoon of compound butter if you want richer steak.
- Pepper Upgrade: Add bell peppers for more sweetness and a lighter plate.
Common Mistakes to Avoid with This Dish:
- Overcrowding the mushrooms: They need room or they steam.
- Overcooking the steak because the mushrooms still look pale: The steak has its own clock.
- Pouring chimichurri on too early: The fresh herbs lose their bite if they sit on hot meat for too long.
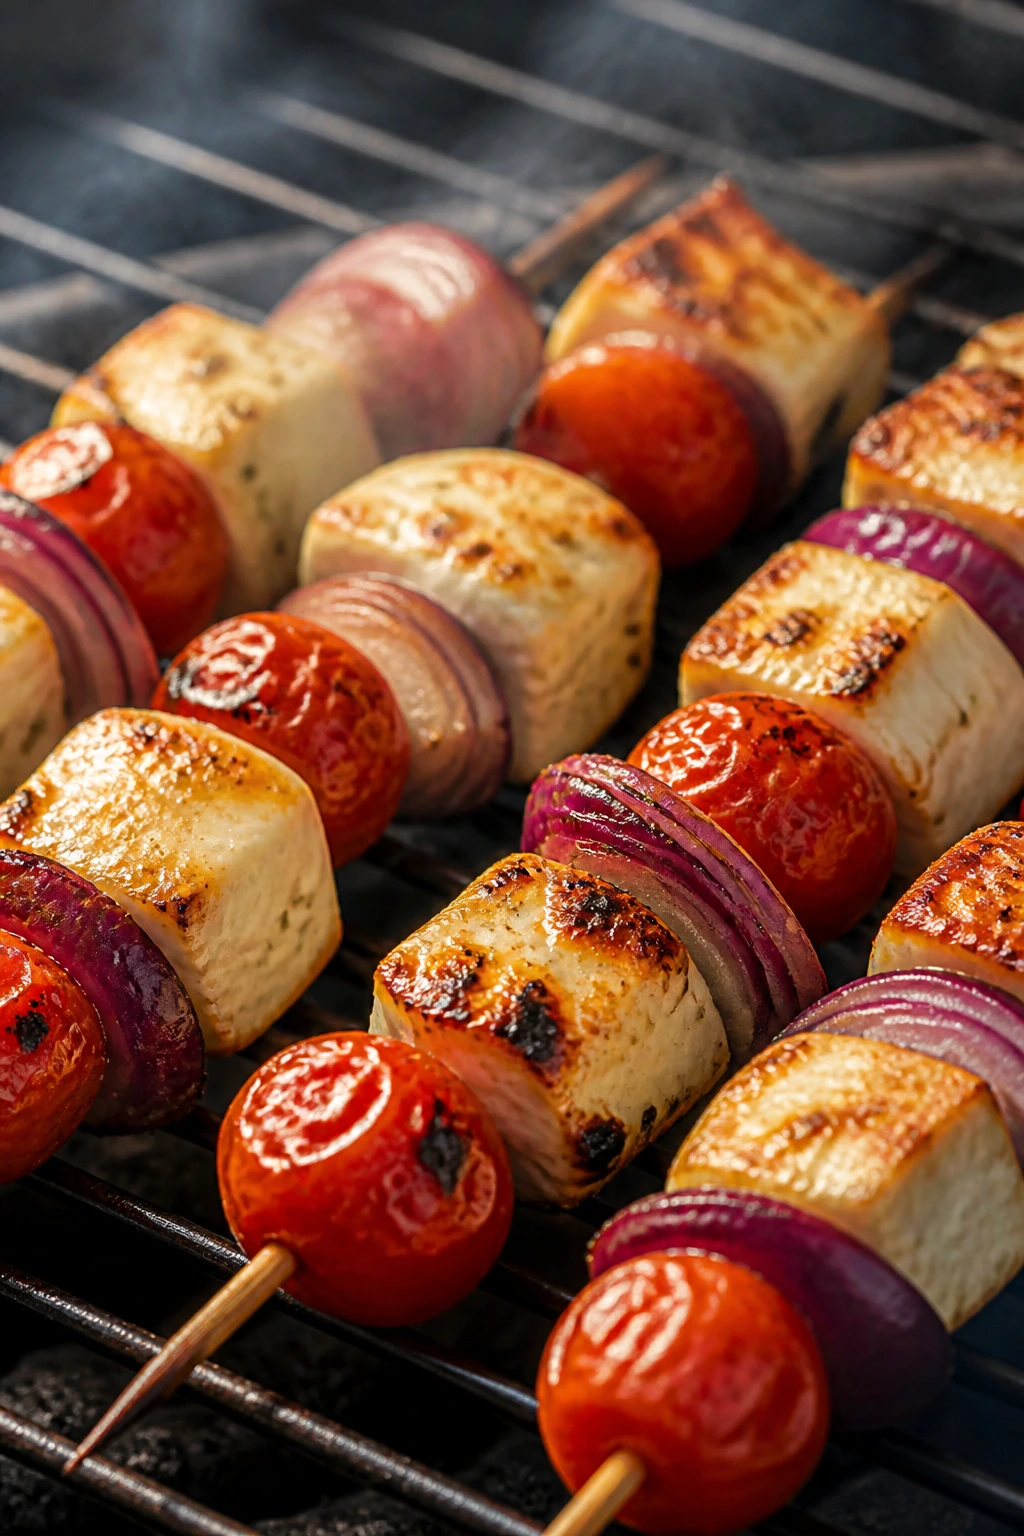
13. Cajun Scallop and Cherry Tomato Skewers
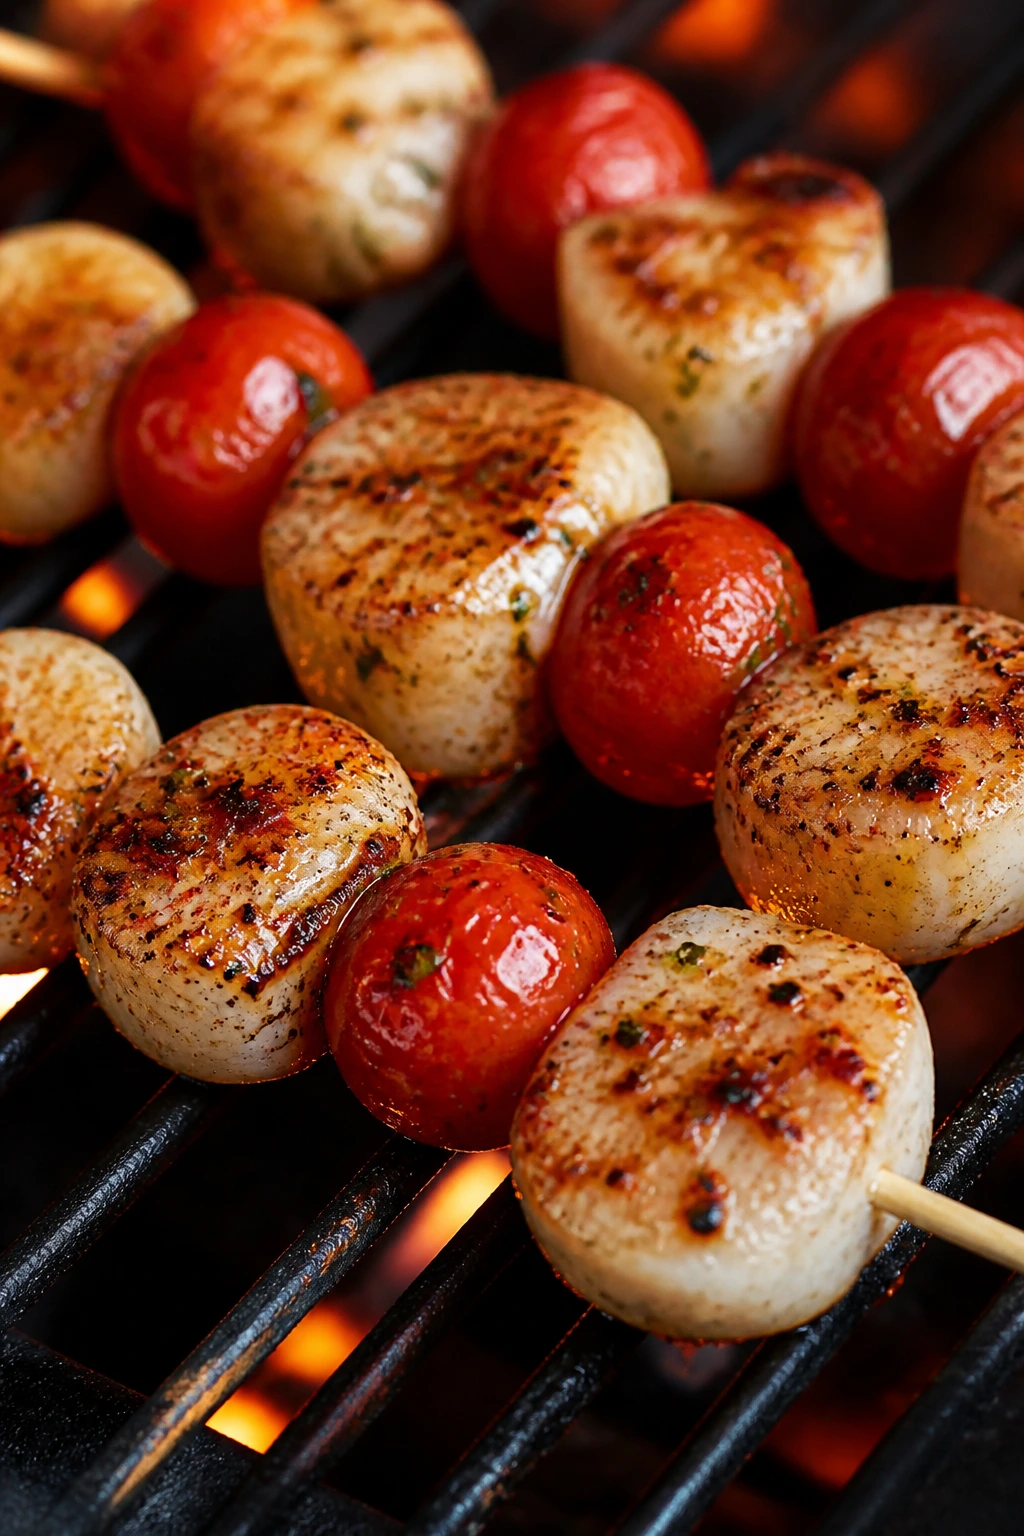
Scallops can be magic on the grill, if you give them a dry surface and a short leash. The Cajun seasoning gives them a smoky edge, the tomatoes burst and sweeten, and the whole skewer tastes like you spent more time on it than you did. That’s a nice trick on a warm night.
Why It Works:
Sea scallops sear fast and reward patience only up to a point. Dry them well, season them lightly, and give them a hot grill for just long enough to build color without pushing the inside past tender. Cherry tomatoes add acid and juice, which keeps each bite from feeling too rich. A little butter at the end helps the spice bloom and gives the scallops a glossy finish.
Key Ingredients:
- 2 lbs large sea scallops, side muscle removed and patted dry — dry scallops are the only kind I’d use here.
- 2 cups cherry tomatoes — keep them whole.
- 1 red bell pepper, cut into 1½-inch squares — sturdy enough for the grill.
- 2 tbsp olive oil — coats the scallops lightly.
- 1 tbsp Cajun seasoning — brings smoke and heat.
- 1 tsp garlic powder — rounds out the spice.
- 1 lemon, cut into wedges — for serving.
- 2 tbsp unsalted butter, melted — brushed on at the end.
- 2 tbsp chopped parsley — fresh finish.
Quick Steps:
- Dry the Scallops Thoroughly: Pat them with paper towels until the surfaces feel dry, not slick.
- Season Lightly: Toss the scallops with olive oil, Cajun seasoning, and garlic powder.
- Thread the Skewers: Alternate scallops with cherry tomatoes and bell pepper. Use two skewers if the scallops want to spin.
- Grill Fast: Cook over medium-high heat, about 425°F, for 2 minutes per side until the scallops are opaque and springy.
- Finish with Butter and Lemon: Brush with melted butter, then squeeze lemon over the top and scatter parsley.
Equipment for This Recipe:
- Skewers — wide ones help hold the scallops steady.
- Paper towels — non-negotiable for drying.
- Tongs — for a gentle flip.
- Grill brush — clean grates help with release.
- Small bowl — for the butter finish.
How to Serve This Dish:
These go well with rice, grilled asparagus, or a green salad with a sharp vinaigrette. I’d serve them right off the grill, because scallops lose their best texture if they sit around. Two to three scallops per skewer is enough for an appetizer; more if it’s the main plate.
Pro Tips for This Recipe:
- Buy dry scallops if you can: Wet scallops carry extra moisture and won’t brown as well.
- Do not over-season: Cajun blend can get salty fast.
- Use sturdy tomatoes: Soft ones burst before the scallops finish.
- Pull them as soon as they turn opaque: Scallops go from sweet to rubbery in a short window.
Variations on This Dish:
- Garlic Herb Scallops: Swap Cajun seasoning for garlic, thyme, and a little paprika.
- Shrimp-Corn Version: If you want a sturdier, more forgiving skewer, shrimp and corn can take the same spice mix.
- Butterless Finish: Use olive oil and lemon only if you want a lighter plate.
Common Mistakes to Avoid with This Dish:
- Starting with damp scallops: Moisture blocks browning.
- Leaving them on too long: Scallops need a short, hot cook.
- Using small skewers that let the scallops spin: Two skewers or wider flat ones solve the problem.
14. Miso Eggplant and Shiitake Skewers
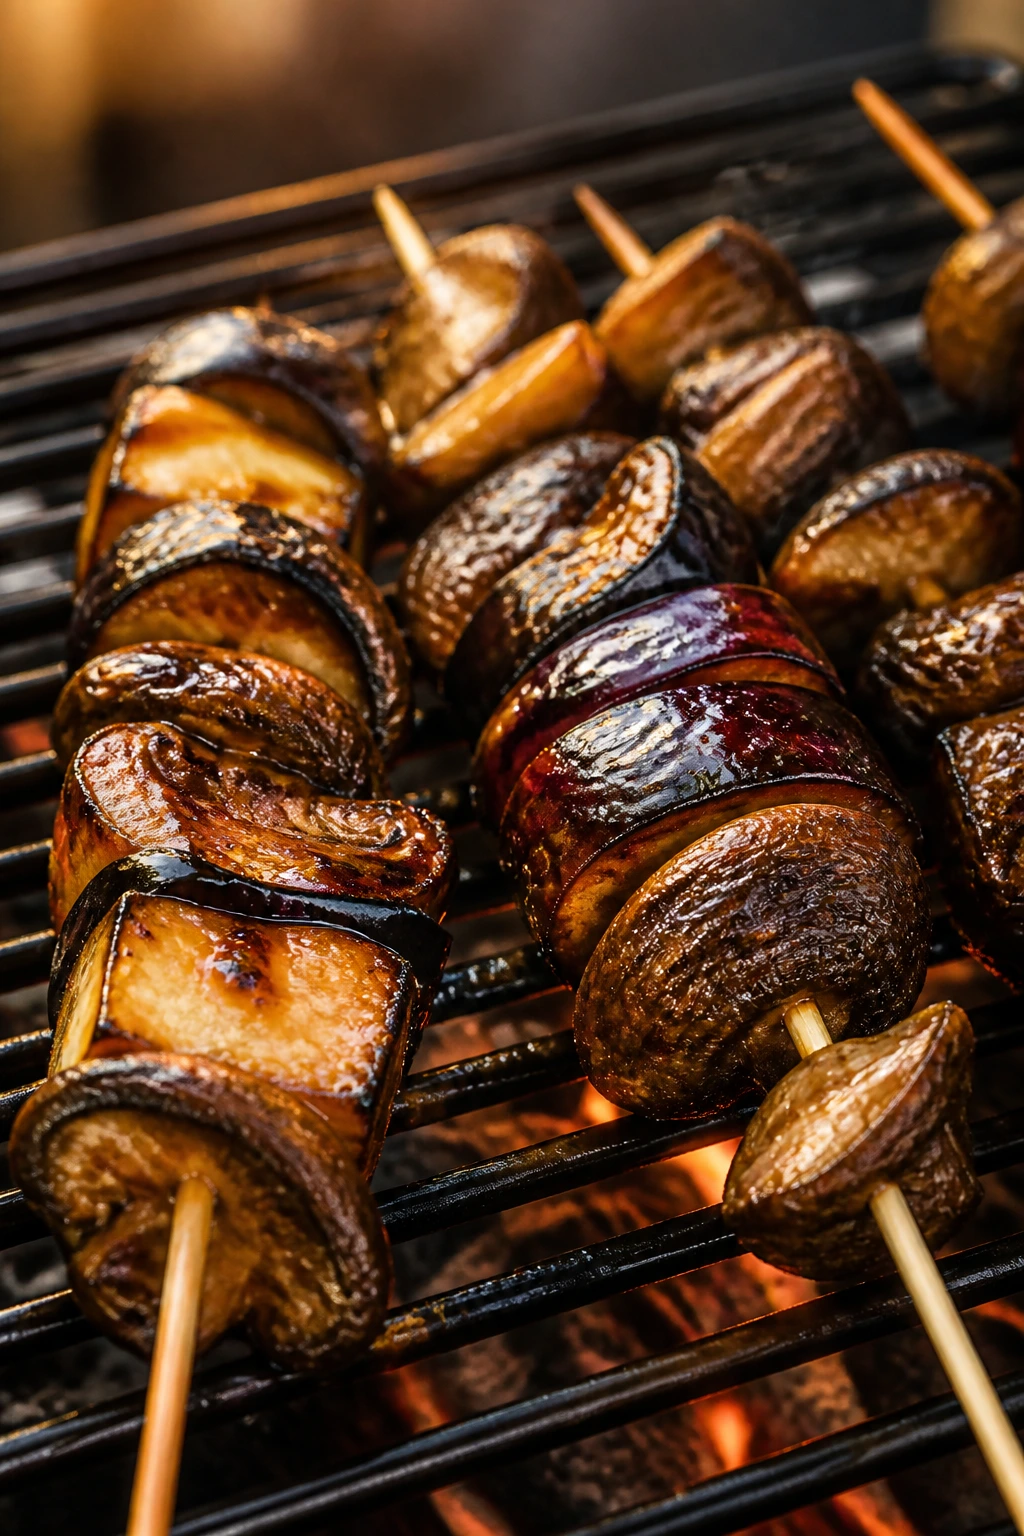
Eggplant turns silky instead of spongy when you respect the heat. The miso glaze here gives it salt, depth, and that sticky-brown finish that makes people stop talking for a second. Shiitakes add a meaty chew that makes the skewer feel like more than a side dish.
Why It Works:
Japanese eggplant is a good choice because it cooks quickly and has fewer big seeds than the large globe kind. Miso, mirin, soy sauce, and sesame oil make a glaze that darkens on the grill without needing much sugar. Shiitake mushrooms hold their shape and add a deep, savory note that gives the skewer a fuller feel. This is one of those recipes that tastes better than the ingredient list suggests, which is always the best kind of surprise.
Key Ingredients:
- 2 medium Japanese eggplants, cut into 1½-inch chunks — smaller and silkier than globe eggplant.
- 12 oz shiitake mushrooms, stems removed — meaty and grill-friendly.
- ¼ cup white miso — the flavor base.
- 2 tbsp soy sauce — deepens the glaze.
- 1 tbsp rice vinegar — keeps the miso from tasting heavy.
- 2 tbsp mirin or honey — helps with browning.
- 1 tbsp sesame oil — brings nuttiness.
- 2 tsp grated ginger — sharpens the finish.
- 1 tbsp water — loosens the glaze just enough.
- Sesame seeds and sliced scallions — for serving.
Quick Steps:
- Whisk the Glaze: Stir together the miso, soy sauce, rice vinegar, mirin, sesame oil, ginger, and water until smooth.
- Coat the Eggplant and Mushrooms: Brush the pieces lightly with the glaze and let them sit for 10 minutes.
- Thread the Skewers: Alternate eggplant and shiitakes, keeping the pieces snug enough to brown.
- Grill Over Medium Heat: Cook at about 400°F for 10 to 12 minutes, turning and brushing with more glaze until the eggplant is soft and browned at the edges.
- Finish with Sesame and Scallions: Sprinkle both over the skewers before serving.
Equipment for This Recipe:
- Skewers — metal or soaked wooden.
- Pastry brush — important for the glaze.
- Mixing bowl — for the miso sauce.
- Grill tongs — to turn the softer vegetables carefully.
- Grill basket — optional, if your eggplant chunks are small.
How to Serve This Dish:
Serve these with rice, soba noodles, or a cabbage slaw dressed with rice vinegar. They make a strong vegetarian main if you add a fried egg on the side. A little chili crisp on top is not a bad idea either.
Pro Tips for This Recipe:
- Use Japanese eggplant if available: It cooks more cleanly than the big round kind.
- Brush the glaze in layers: One coat before grilling, one during, one at the end.
- Keep the grill at medium, not roaring hot: Miso can scorch fast.
- Don’t skip the scallions: They add the bite the vegetables need.
Variations on This Dish:
- Black Bean Version: Swap miso for black bean garlic sauce for a deeper, saltier profile.
- Tofu Add-In: Add cubes of extra-firm tofu if you want more protein.
- Zucchini Swap: Zucchini works, but it softens faster than eggplant, so cut it thick.
Common Mistakes to Avoid with This Dish:
- Trying to cook large globe eggplant chunks the same way: They take too long and can go mushy outside before softening inside.
- Overloading the glaze: Too much sugar or miso can blacken early.
- Forgetting to turn gently: Eggplant softens as it cooks and needs a light hand.
15. Harissa Cauliflower and Chickpea Skewers
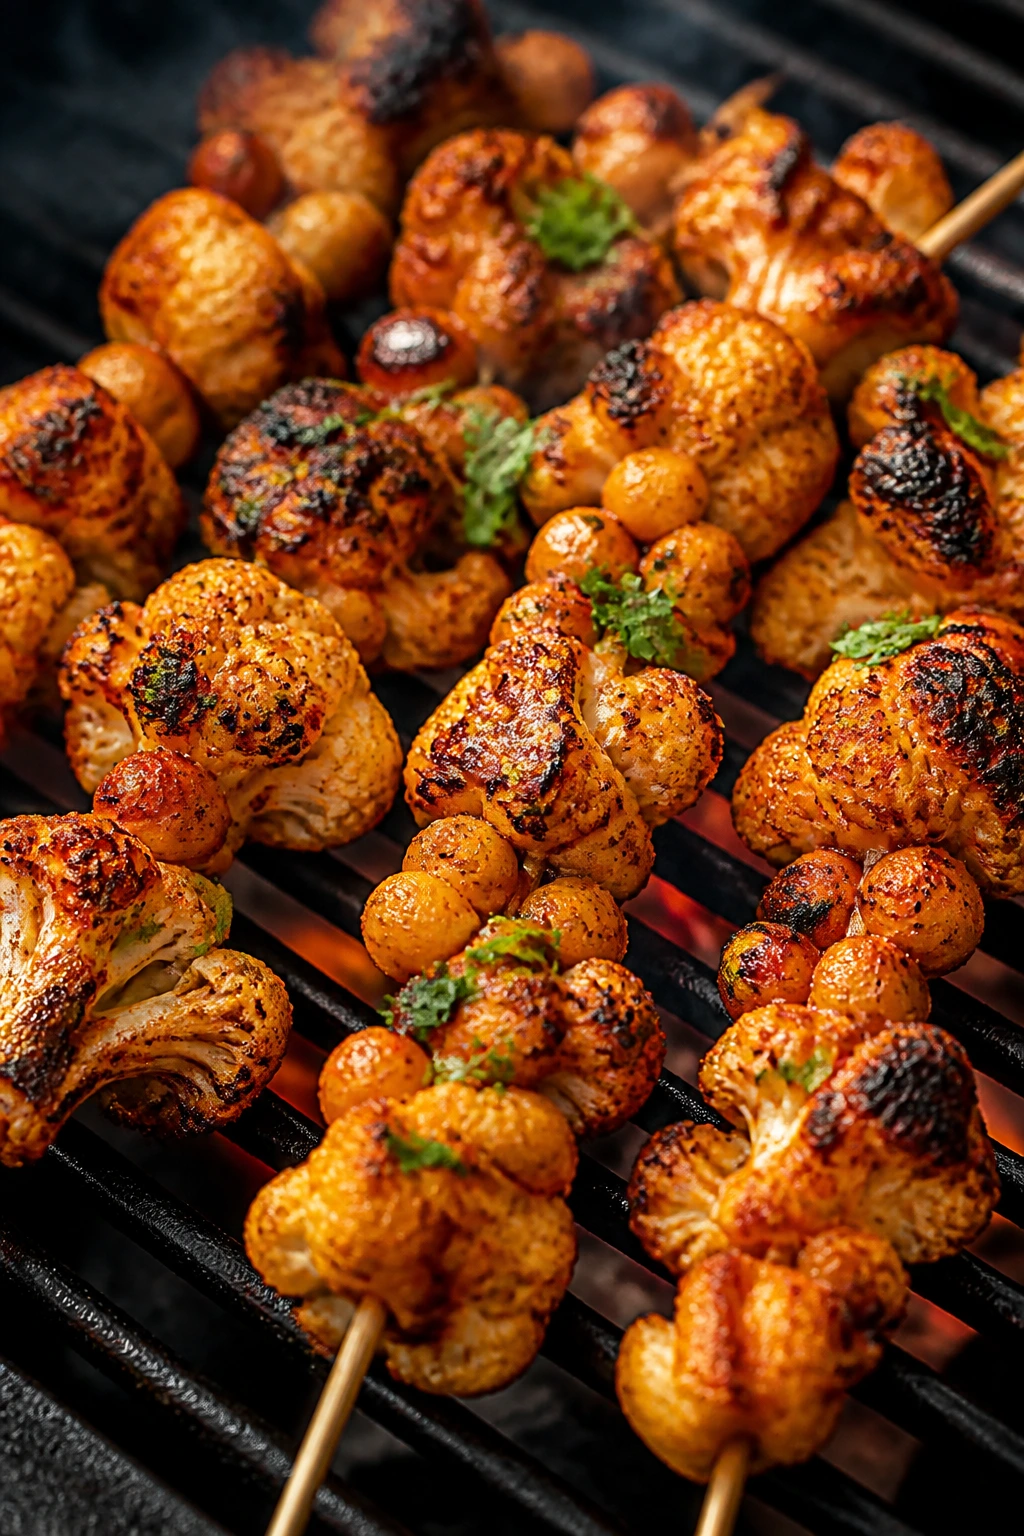
Cauliflower and chickpeas need a head start, not blind faith. Once you give the cauliflower a little steam and the chickpeas a dry surface, the grill does the rest: charred edges, warm spice, and enough texture to make this feel like a proper dinner skewer, not a side project.
Why It Works:
Raw cauliflower can stay stubborn on the grill, so a short blanch or steam-soften changes everything. Harissa brings smoke, heat, and a little tomato depth, while cumin rounds it out. Chickpeas are there for chew and substance, but they need to be dried well so they roast instead of steaming. Add lemon at the end, and the whole skewer gets sharper and brighter.
Key Ingredients:
- 1 large head cauliflower, cut into 1½-inch florets — keep the pieces even.
- 1 can chickpeas, 15 oz, drained and patted dry — dry them well.
- 1 red onion, cut into wedges — adds sweetness.
- 3 tbsp olive oil — for the vegetables and chickpeas.
- 2 tbsp harissa paste — brings smoke and heat.
- 1 tsp ground cumin — warms the flavor.
- 1 tsp kosher salt — seasons the whole batch.
- 1 lemon, cut into wedges — for serving.
- 2 tbsp chopped cilantro or parsley — for a fresh finish.
Quick Steps:
- Soften the Cauliflower Slightly: Steam or blanch the florets for 2 to 3 minutes, then drain and cool.
- Mix the Harissa Coating: Stir the olive oil, harissa, cumin, and salt together.
- Toss the Vegetables and Chickpeas: Coat everything evenly, making sure the chickpeas are dry enough to pick up the sauce.
- Thread the Skewers: Alternate cauliflower, chickpeas, and onion, leaving a little room between pieces.
- Grill Over Medium-High Heat: Cook at about 425°F for 8 to 10 minutes, turning until the edges are charred and the cauliflower is tender.
- Finish with Lemon and Herbs: Squeeze lemon over the top and scatter herbs before serving.
Equipment for This Recipe:
- Skewers — metal or sturdy wooden.
- Large pot or steamer — for the quick cauliflower head start.
- Mixing bowl — for the harissa coating.
- Grill basket — helpful if your florets are small.
- Tongs — for turning without breaking the cauliflower.
How to Serve This Dish:
These work with tahini sauce, yogurt, or a simple garlicky olive oil drizzle. Serve them with couscous, rice, or flatbread if you want the plate to feel like a full meal. They’re also good on a mezze spread with olives and tomatoes.
Pro Tips for This Recipe:
- Dry the chickpeas thoroughly: Wet chickpeas don’t roast well.
- Give the cauliflower a head start: Raw florets can stay too hard in the middle.
- Watch the harissa: Some brands are saltier or hotter than others, so taste before you pile it on.
- Use a grill basket if needed: Small florets can be annoying on round skewers.
Variations on This Dish:
- Dairy-Topped Version: Add a spoonful of yogurt sauce after grilling.
- Smoky Paprika Swap: Replace part of the harissa with smoked paprika for milder heat.
- Paneer Addition: Add cubes of paneer if you want a richer vegetarian skewer.
Common Mistakes to Avoid with This Dish:
- Skipping the cauliflower pre-cook: Raw florets take too long and can burn outside.
- Using wet chickpeas: They steam and slide.
- Setting the grill too hot: Harissa has enough sugar and spice to blacken fast.
Why the Skewer Format Works So Well on a Hot Grill
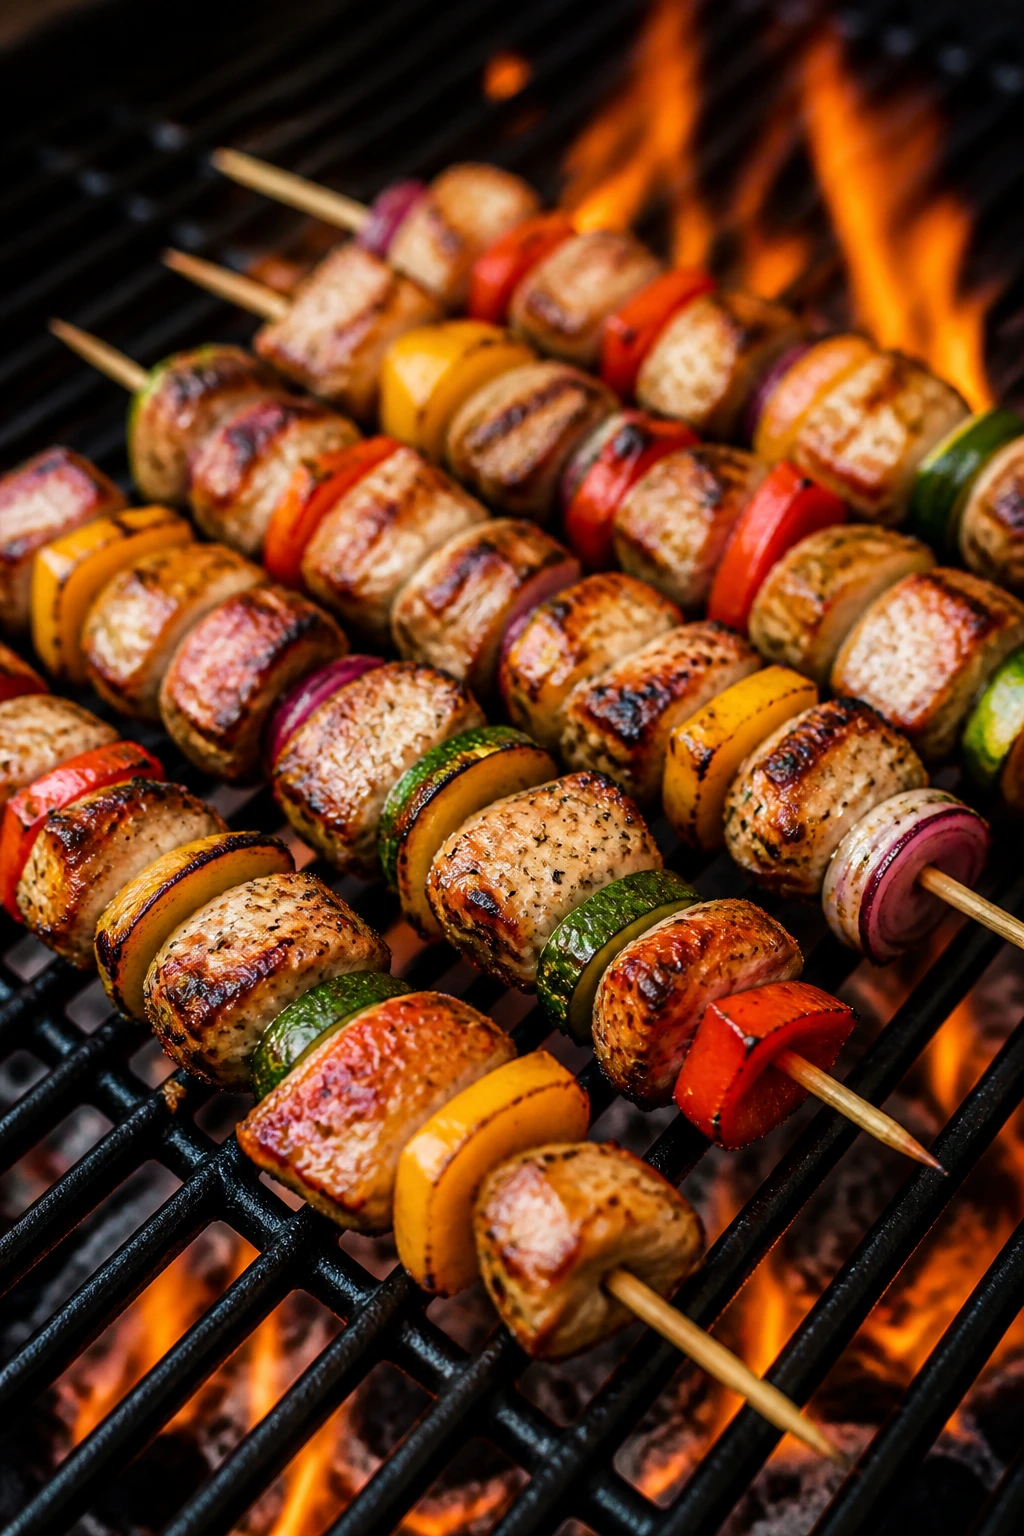
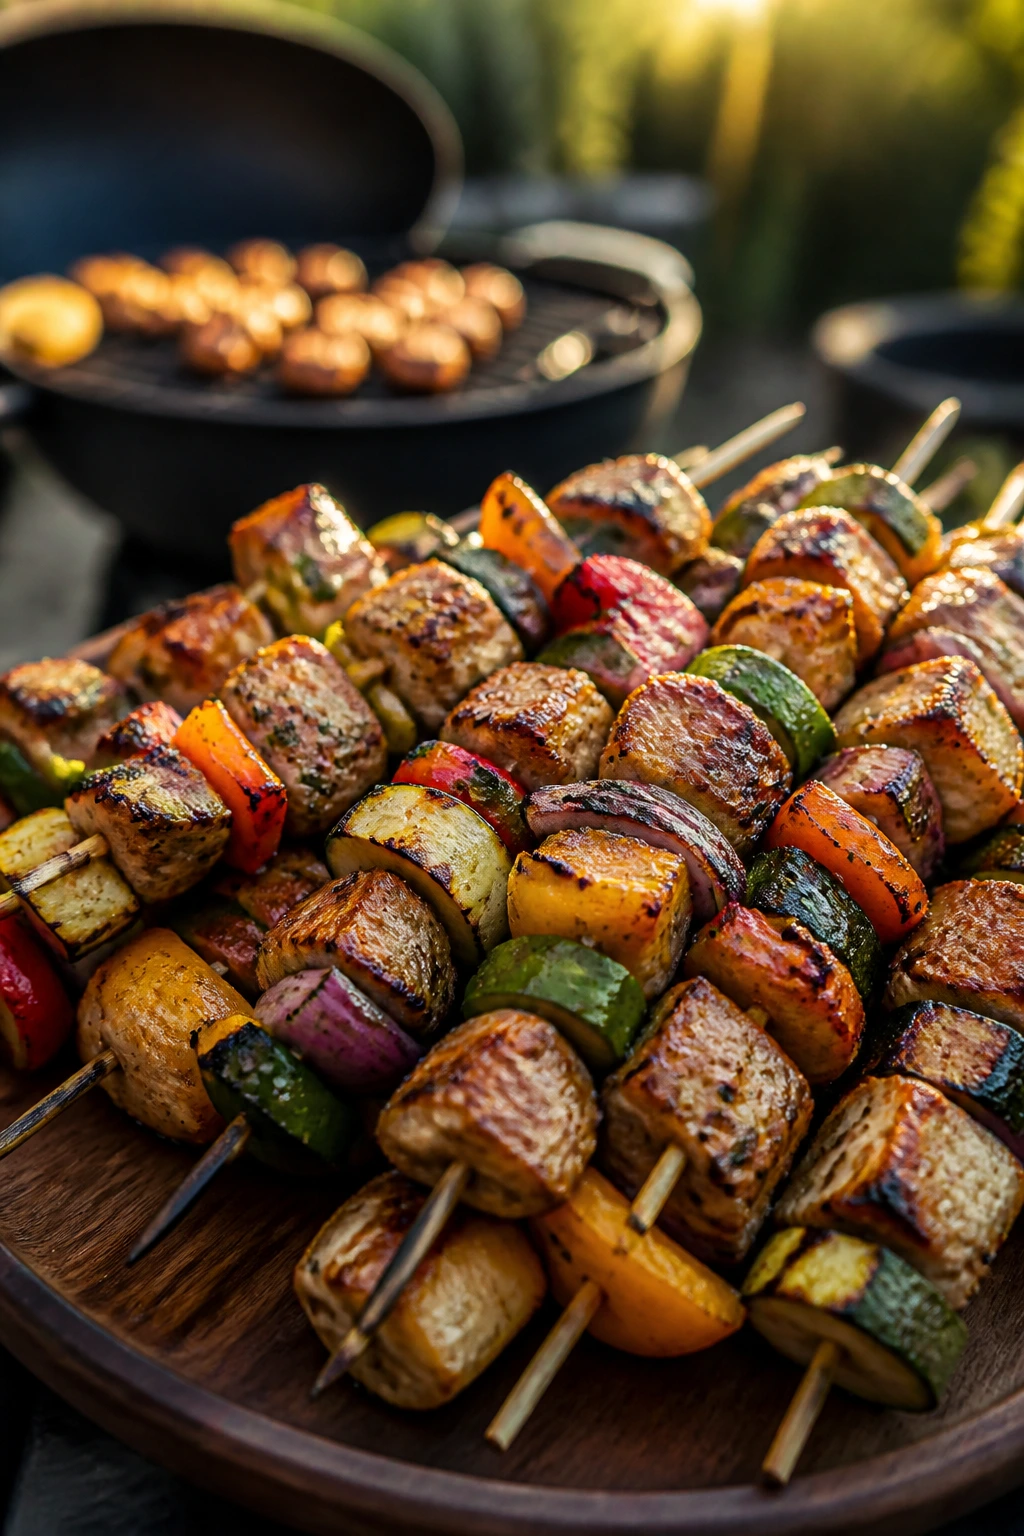
Skewers solve a problem that comes up every time the grill is hot and people are hungry: how do you cook a mix of ingredients without losing half of them to the grates or overcooking the first batch while you wait on the second? The answer is that skewers bundle similar-sized pieces into one even cooking schedule. Chicken thighs, steak, sausage, tofu, mushrooms, and halloumi all become easier to manage once they’re cut to roughly the same bite size and lined up with a little space between each piece.
There’s another benefit that people sometimes miss. A skewer gives every ingredient two jobs at once: it cooks and it carries flavor. A piece of onion next to a cube of beef doesn’t just soften; it picks up fat, smoke, and salt from the beef as the whole thing turns over the fire. That’s why the right skewer can taste more complete than the same ingredients cooked loose in a pan.
The trick is respecting the different cooking speeds. Shrimp and scallops need a short, sharp session. Chicken thighs and pork cubes want a little more time. Halloumi and smoked sausage mostly need color. Once you stop treating all grill food the same way, the whole format gets much easier.
Essential Equipment for These Recipes
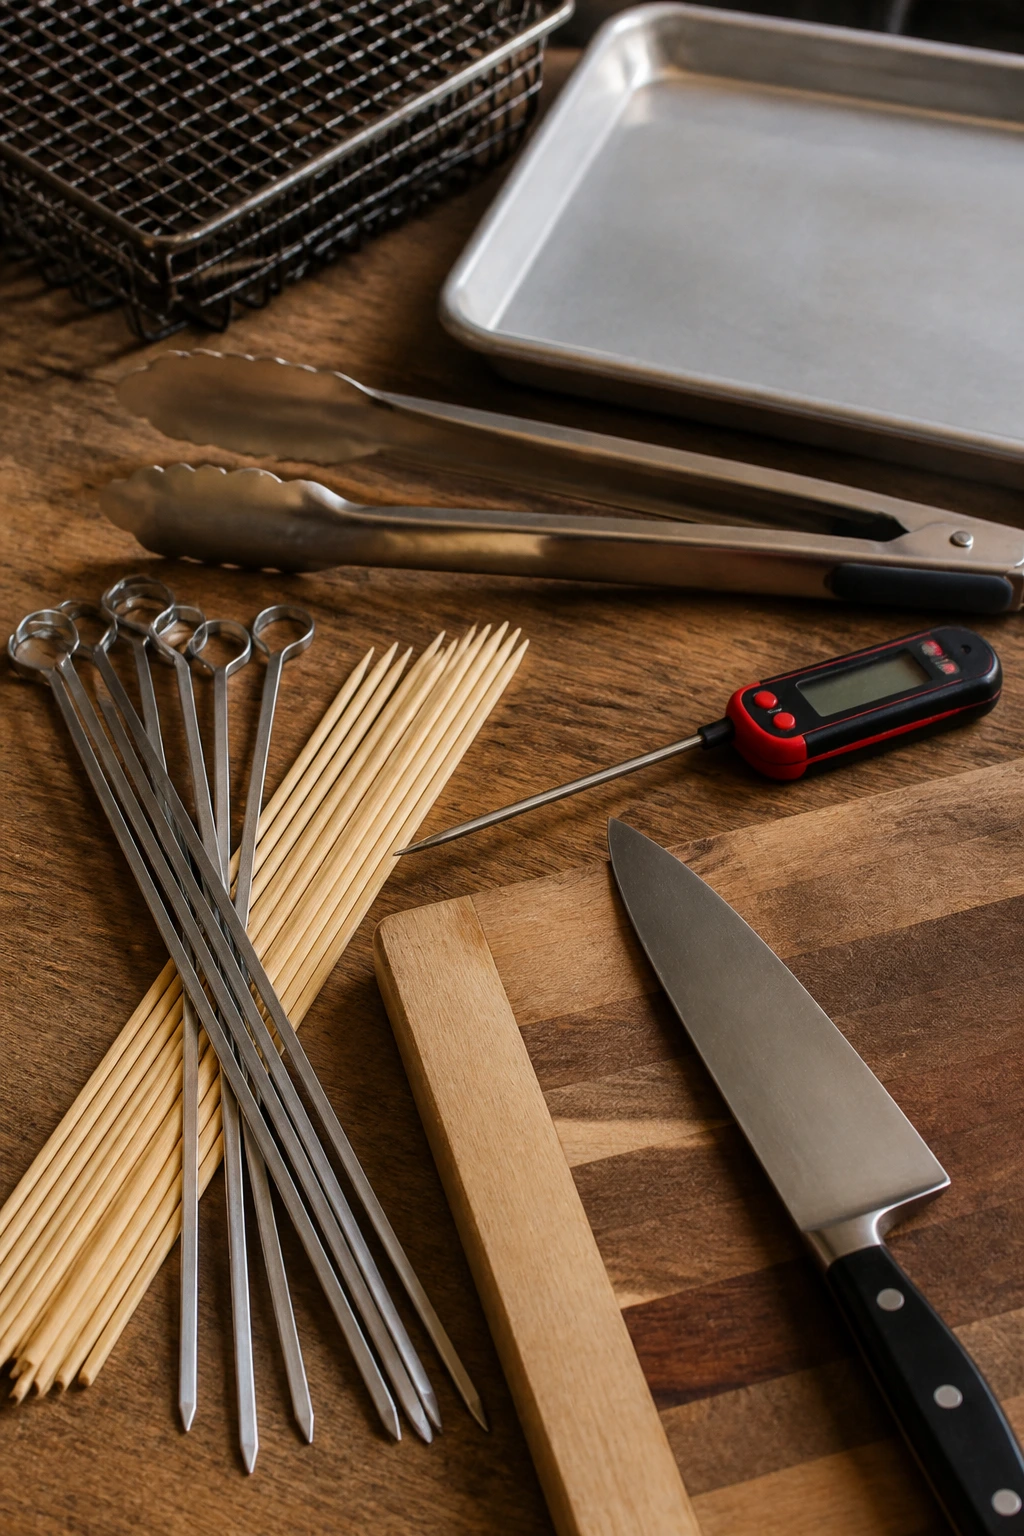
- Metal skewers — my first choice for most of these recipes because they don’t burn and they turn cleanly.
- Wooden skewers — use them when that’s what you have; soak them for at least 30 minutes first.
- Instant-read thermometer — especially useful for chicken, pork, salmon, turkey, and steak.
- Long grill tongs — short tongs make awkward work of hot skewers.
- Mixing bowls — you’ll want at least two for marinades and glazes.
- Sharp chef’s knife — even pieces cook evenly, and uneven pieces are the source of most trouble.
- Cutting board — ideally one for meat and one for vegetables.
- Pastry brush or spoon — for sauces, butter, and late-stage glazing.
- Grill basket — optional, but handy for tofu, small mushrooms, or tiny vegetable pieces.
- Rimmed sheet pan — useful for carrying assembled skewers to the grill without tipping them over.
Smart Shopping and Ingredient Tips for Better Grilled Skewers

The best skewers start in the produce aisle and at the butcher counter, not at the grill. Buy pieces that can be cut into the same shape without a lot of waste. Chicken thighs are easier than breasts for most skewer recipes because they stay juicy and trim into neat cubes without drying out. Pork tenderloin should feel firm, not floppy, and steak for skewers should be a cut you can slice against the grain — flank, sirloin, or strip all work if you cut them correctly.
Seafood needs a different eye. Look for shrimp that smell clean and briny, not fishy, and buy large ones if you plan to skewer them. Scallops should feel dry and springy, not wet and milky; that wet sheen usually means they’ve been treated with extra liquid, which fights browning. Salmon should be cut from a firm fillet, not a piece that wants to fall apart the moment your knife touches it.
For vegetables, choose things that hold their shape: zucchini cut thick, red onion in wedges, peppers in broad squares, cremini mushrooms that are dry and firm, cherry tomatoes that feel plump. Soft or watery vegetables can still work, but they need a shorter cook and a little more attention. And if you’re buying wooden skewers, grab the long ones; short cocktail picks are more trouble than they’re worth on a grill.
One small thing that saves a lot of annoyance: buy more lemons, limes, and herbs than you think you need. A final squeeze of citrus and a handful of chopped parsley or dill often makes the difference between “nice grilled food” and “I should make this again.” That last inch matters.
How to Serve These Recipes
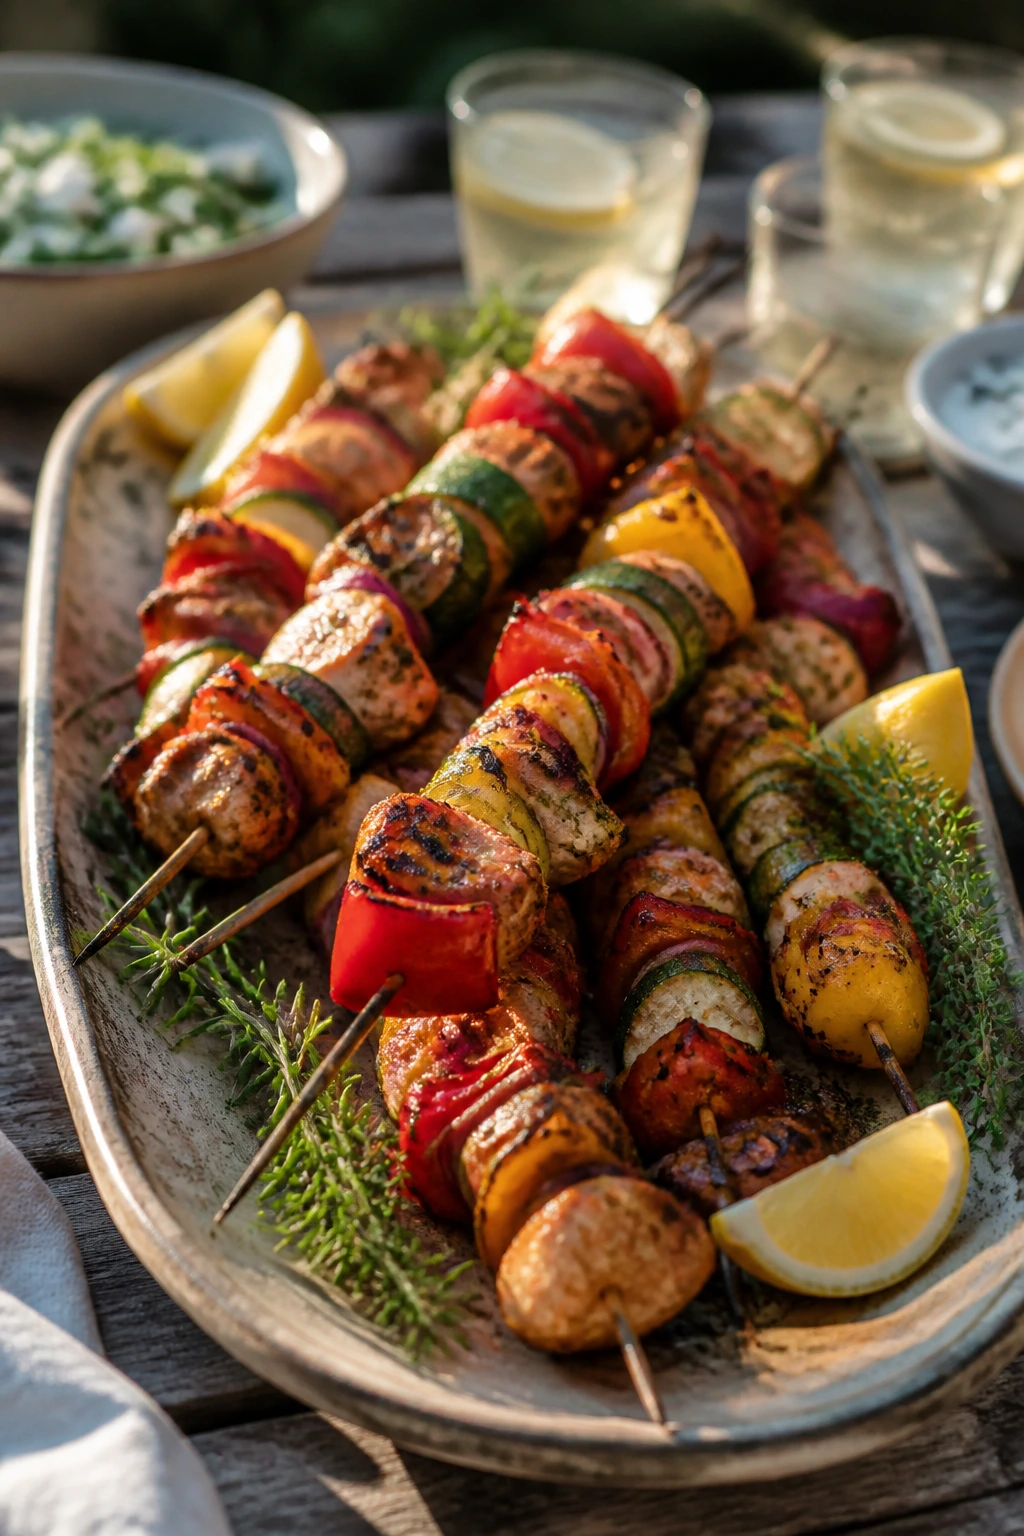
Presentation:
Stack the skewers slightly overlapping on a long platter instead of laying them in a flat row. That gives the plate a looser, more natural look and makes room for herbs, lemon wedges, and sauces at the edges.
Accompaniments:
Most of these recipes like at least one cool side: tzatziki, yogurt sauce, salsa verde, tahini, cucumber salad, or a simple cabbage slaw with vinegar and salt. Rice, couscous, grilled bread, and warm pita are the easiest starches to keep around because they work across chicken, beef, seafood, and vegetables without much thought.
Portions:
For dinner, plan on 2 skewers for lighter recipes like shrimp, halloumi, or scallops, and 2 to 3 skewers for chicken, pork, beef, or sausage if there are only simple sides. If the grill is part of a bigger spread, 1 to 2 skewers per person is enough. For party food, I like smaller pieces so guests can grab and go without needing a knife.
Beverage Pairing:
Crisp beer, sparkling water with lime, dry rosé, or a chilled white like sauvignon blanc all fit this kind of meal. For the spicier skewers, a very cold lager or sparkling lemonade does more work than a fancy drink with too many flavors.
Additional Tips and Flavor Boosters
Flavor Enhancement:
A finishing sauce matters more than people think. Chimichurri for steak, dill yogurt for salmon, sesame seeds and scallions for tofu, and a squeeze of lemon over halloumi or shrimp can pull the whole skewer together in one move.
Customization:
If you want more vegetables, add thick pieces that can survive the same heat as the protein. Zucchini, onion, peppers, mushrooms, and cherry tomatoes are safe bets. If you want more heft, tuck in bread on the side rather than forcing every skewer to do every job.
Serving Suggestions:
Chopped herbs make grilled food look and taste fresher. Parsley, mint, dill, cilantro, and scallions all work well, but use them at the end so they don’t blacken on the grill. A little flaky salt over cheese, fish, or vegetables can also wake things up fast.
Make-It-Yours:
For dairy-free plates, lean on olive oil, citrus, and herb sauces instead of yogurt or butter. For gluten-free cooking, keep an eye on soy sauce and teriyaki and use tamari if needed. For lower-heat dinners, swap harissa, gochujang, or Cajun seasoning for milder herb marinades and serve chili sauces on the side.
Make-Ahead, Storage, and Reheating Guidance
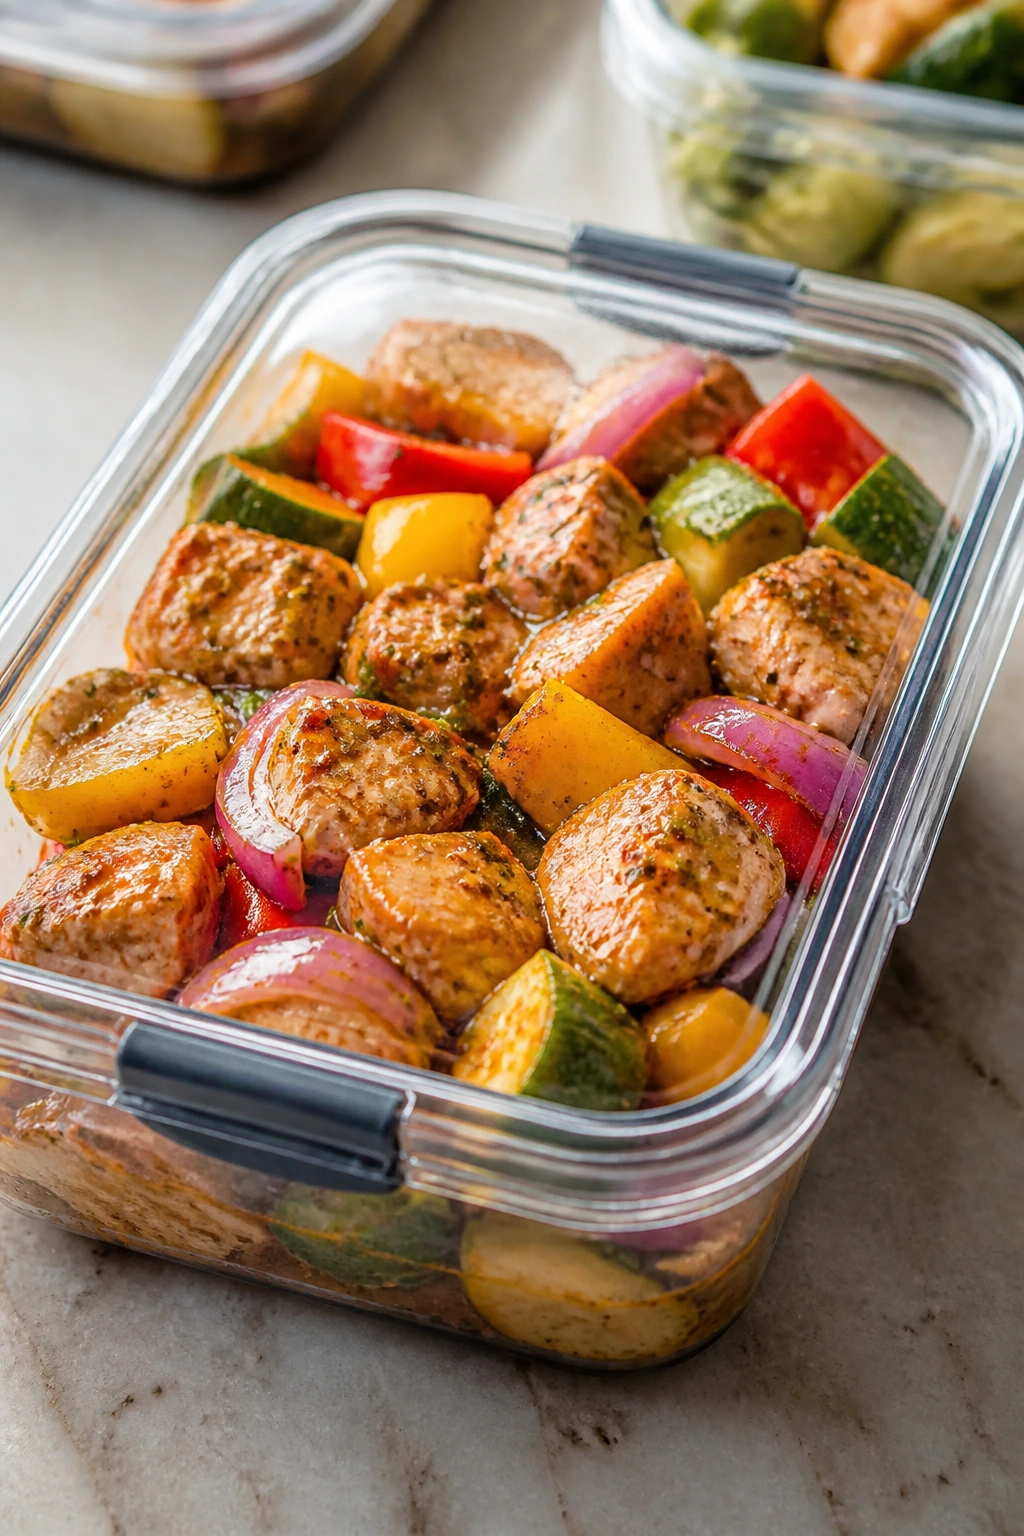
Most skewers can be partially prepped ahead, and that’s the real win on a busy evening. Cut the vegetables and meat in the morning, then keep them separate and cold in sealed containers. Marinades can go together a day ahead, but don’t leave delicate seafood in acid for too long. Shrimp and scallops need the shortest marinating time — usually 10 to 20 minutes is enough. Chicken, pork, beef, and tofu can handle several hours. If you’re freezing raw marinated meat, chicken and beef do best for up to 2 months; pork and tofu can also freeze well, though tofu changes texture in a way some people love and some people don’t.
Cooked leftovers keep in the refrigerator for 3 to 4 days in most cases. Seafood is the exception I’d watch more closely; shrimp, salmon, and scallops are best eaten within 2 days. Pull the food off the skewers before storing if the pieces are likely to get stuck together, then put them in shallow airtight containers. That keeps the texture cleaner.
Reheating depends on what you made. Chicken, pork, beef, sausage, and turkey meatballs reheat well in a 300°F oven for about 8 to 12 minutes, covered loosely with foil so they don’t dry out. Shrimp and scallops are better warmed gently in a skillet over low heat with a teaspoon of water or butter, just until they’re warm through. Tofu and vegetables can go back on a tray in a hot oven or into an air fryer for a few minutes to revive some of the edges. Halloumi is trickier; it’s best fresh, though a short reheat in a skillet can bring back some of the surface browning.
Some skewers are worth eating the next day, and some are not. Chicken, beef, sausage, and tofu hold up decently. Halloumi gets firmer. Shrimp and scallops are the ones that get grumpy if you wait too long. If you know you’ll want leftovers, make a little extra sauce and keep it separate. That helps more than people expect.
Variations and Adaptations to Try
Milder Family Batch:
Skip the hotter marinades and stick with lemon, garlic, oregano, yogurt, or sesame-soy. Set chili paste, harissa, and Cajun seasoning on the table so anyone who wants heat can add it after grilling. This keeps one grill session useful for people with very different tastes.
Gluten-Free Skewer Night:
Most of these recipes are close already, but soy sauce and teriyaki are the places to check first. Use tamari or coconut aminos where needed. Watch bottled marinades, too; some hide wheat in places you don’t expect.
Dairy-Free Swap Set:
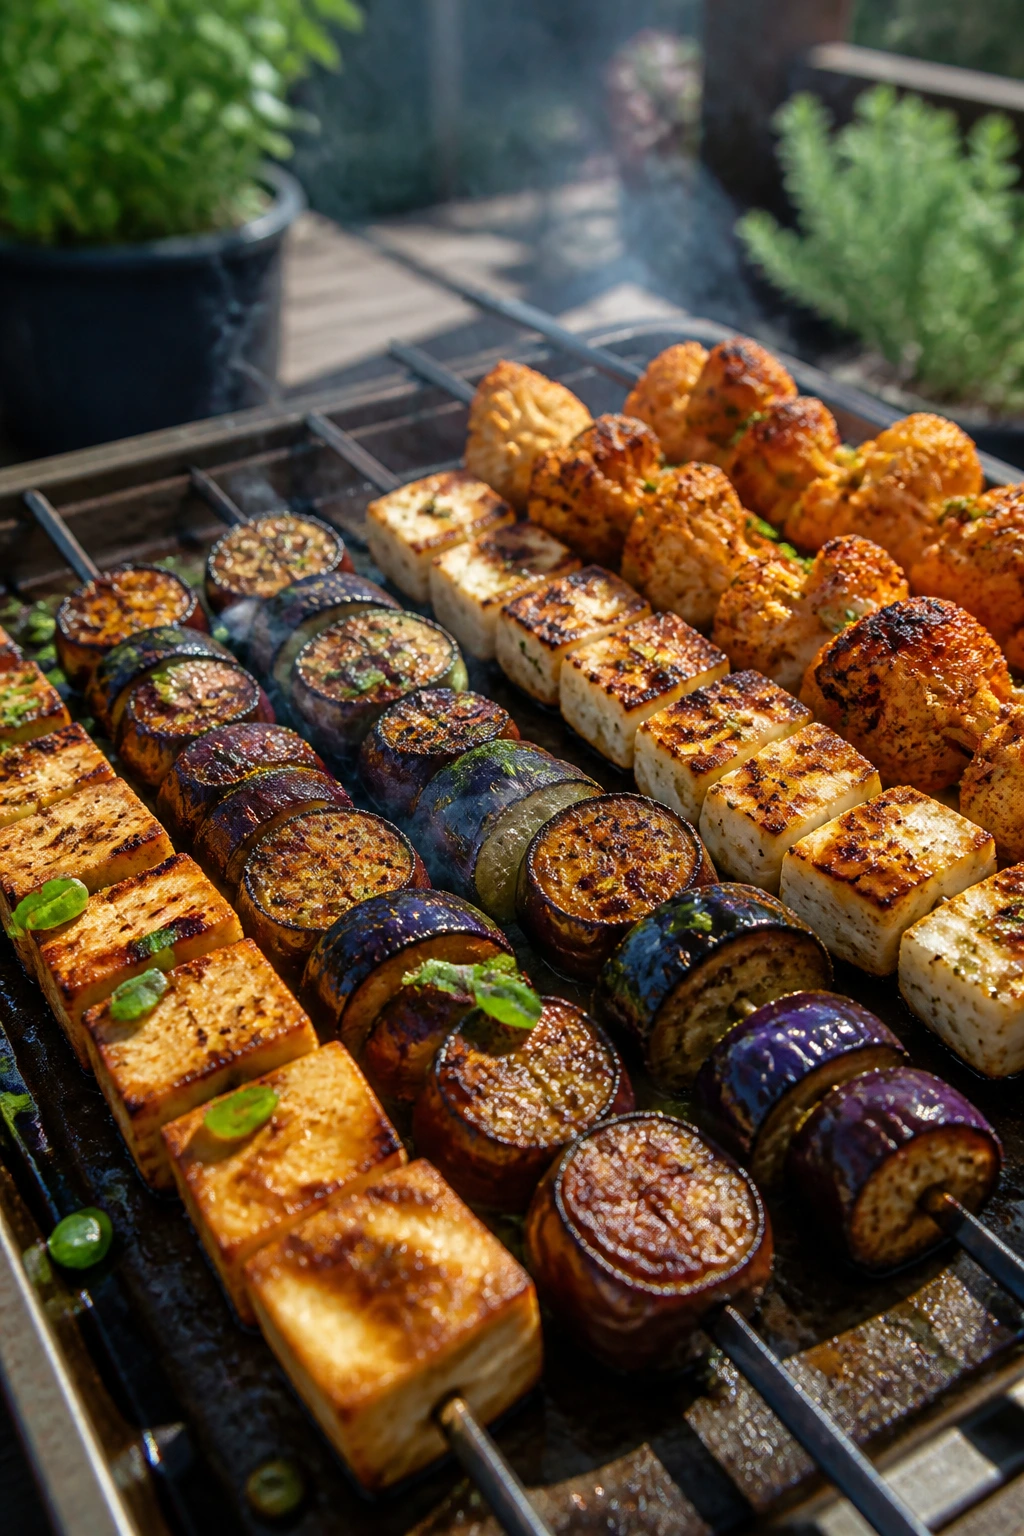
Use olive oil, citrus, and herb pastes instead of yogurt, butter, or halloumi if you need a dairy-free menu. Tofu, salmon, chicken thighs, shrimp, pork, and vegetables all take well to those flavors. A tahini drizzle or herb vinaigrette can replace creamy sauces cleanly.
Vegetarian-Heavy Grill Tray:
Pair tofu, miso eggplant, halloumi, and harissa cauliflower on the same table and let the sauces do the heavy lifting. Add grilled bread, couscous, or rice so the meal feels complete. If you need more protein, chickpeas and paneer both fit the grill better than people think.
Oven or Broiler Backup:
If the weather turns or the grill is already crowded, most of these skewers can move under the broiler or into a hot oven. Use a rimmed sheet pan, turn once halfway through, and keep the pieces spaced out. Seafood and halloumi are especially good under the broiler because they brown fast.
Common Mistakes to Avoid
Cutting everything to different sizes:
This is the biggest reason skewers cook unevenly. A tiny mushroom and a huge chunk of chicken cannot finish at the same second. Keep the pieces in the same size range and the grill stops feeling random.
Forgetting that different foods need different heat windows:
Shrimp and scallops want a short, hot cook. Chicken thighs, pork, and steak need more time. Halloumi and sausage mostly need color. If you ignore that, one ingredient will always be overdone by the time the others are safe.
Loading the skewers too tightly:
People pack them like a sandwich and then wonder why the food steams. Leave a little space so flame and air can reach every piece. You want char at the edges, not a damp interior.
Using sugary glaze too early:
Honey, maple, teriyaki, and some bottled sauces burn before the food is finished if you apply them at the start. Save them for the last few minutes or brush them on after grilling.
Skipping the preheat:
A lukewarm grill sticks, tears fish, and leaves chicken with pale spots. Give the grates time to heat fully, then oil them lightly before the food goes on.
Walking away from seafood:
Shrimp and scallops need attention, not faith. If you’re distracted, they can go from tender to rubbery in less than a minute.
Frequently Asked Questions
Do I need to soak wooden skewers every time?
Yes, if they’re going directly over flame. A 30-minute soak is enough to keep the exposed ends from burning too fast. If the skewers are only touching a grill basket or sitting close to heat rather than in it, the soak matters a little less, but I still do it.
Metal skewers or wooden skewers — which are better?
Metal wins for convenience and heat retention. Wood is cheaper and fine for most home cooks, but you have to remember the soak and you lose a little stability. For seafood, steak, and halloumi, I prefer flat metal skewers because the food turns more cleanly.
How do I keep meat and vegetables from cooking at different speeds?
Use ingredients that need the same cooking window, or give the slower ones a head start. Thick onion wedges and sturdy peppers can match chicken thighs, but tiny tomatoes and soft mushrooms may need to be grouped with quicker items. If in doubt, separate the skewer by cooking speed instead of mixing everything together.
Can I make these in the oven instead of on the grill?
Yes. Put the skewers on a rimmed sheet pan and roast or broil them, turning once halfway through. Broiling works best for halloumi, shrimp, salmon, and sausage because they brown fast, while chicken, pork, and cauliflower usually do better in a hot oven.
How long should I marinate the meat?
Chicken thighs, pork, and beef can usually handle 30 minutes to several hours. Shrimp need only 10 to 20 minutes, and scallops should barely sit in acid at all. Tofu can marinate longer because it’s dense and forgiving, but even there, a few hours is enough.
What internal temperature should I aim for?
Chicken should hit 165°F. Pork tenderloin is best at 145°F with a short rest. Turkey meatballs also need 165°F. Beef can land anywhere from 130 to 145°F depending on how pink you want it. Seafood is better judged by look and texture — opaque, firm, and just springy — though fish is often cooked to 145°F if you want a firmer finish.
Why does my food keep sticking to the grill?
The grill probably wasn’t hot enough, or the grates weren’t clean and lightly oiled. Food releases more easily once it has built a little crust, so give it a minute before turning. If the skewers are wet from marinade, wipe off the extra before they hit the heat.
Can I prep skewers earlier in the day?
Absolutely. Cut the ingredients and make the marinades ahead, then keep everything cold and separate until grilling time. I would not fully assemble seafood skewers too early, but chicken, beef, pork, sausage, and vegetables can be skewered a few hours in advance if you cover and chill them.
A Platter That Knows Summer Nights
A good skewer dinner doesn’t ask for much. Heat the grill. Cut the pieces evenly. Salt the food with a little more care than you think it needs. That’s enough to get from a cutting board to a table full of bright, charred food without much drama, and I’ll take that over a complicated summer menu almost every time.
What makes these recipes worth keeping around is the range. There’s something here for meat eaters, seafood people, vegetarians, and the person who wants dinner with a lemon wedge in one hand and a cold drink in the other. That’s the right kind of flexibility for a season that moves fast.
Once you get used to the rhythm, you may find yourself reaching for skewers before you even think about anything else.