
Picnic food ideas have one job: travel well, taste good after the drive, and still feel worth opening the cooler for. That sounds simple until you’ve watched a sandwich go soggy, a salad collapse into watery sadness, or a piece of fried chicken turn greasy because it was packed while still warm. The best picnic foods are sturdy in the right ways. They hold their shape, keep their seasoning, and don’t need a hot plate or a last-minute rescue.
That’s why I lean toward foods with a little backbone: thick dressings, crisp vegetables, salted cheeses, sturdy breads, cold salads with acid, and handheld bites that don’t drip all over your lap. Summer nights make people lazy in the best way. You want food you can set on a blanket, a porch table, or the hood of a car without building a whole production around it.
Some of these are lunchbox classics with better seasoning. Some are the dishes I reach for when I want dinner to feel loose and easy without turning into takeout. A few are the kinds of picnic foods that get better after a short rest in the fridge, which is really the whole trick. Once you know what survives a few hours in a cooler, the whole spread gets easier.
Why This Picnic Spread Works
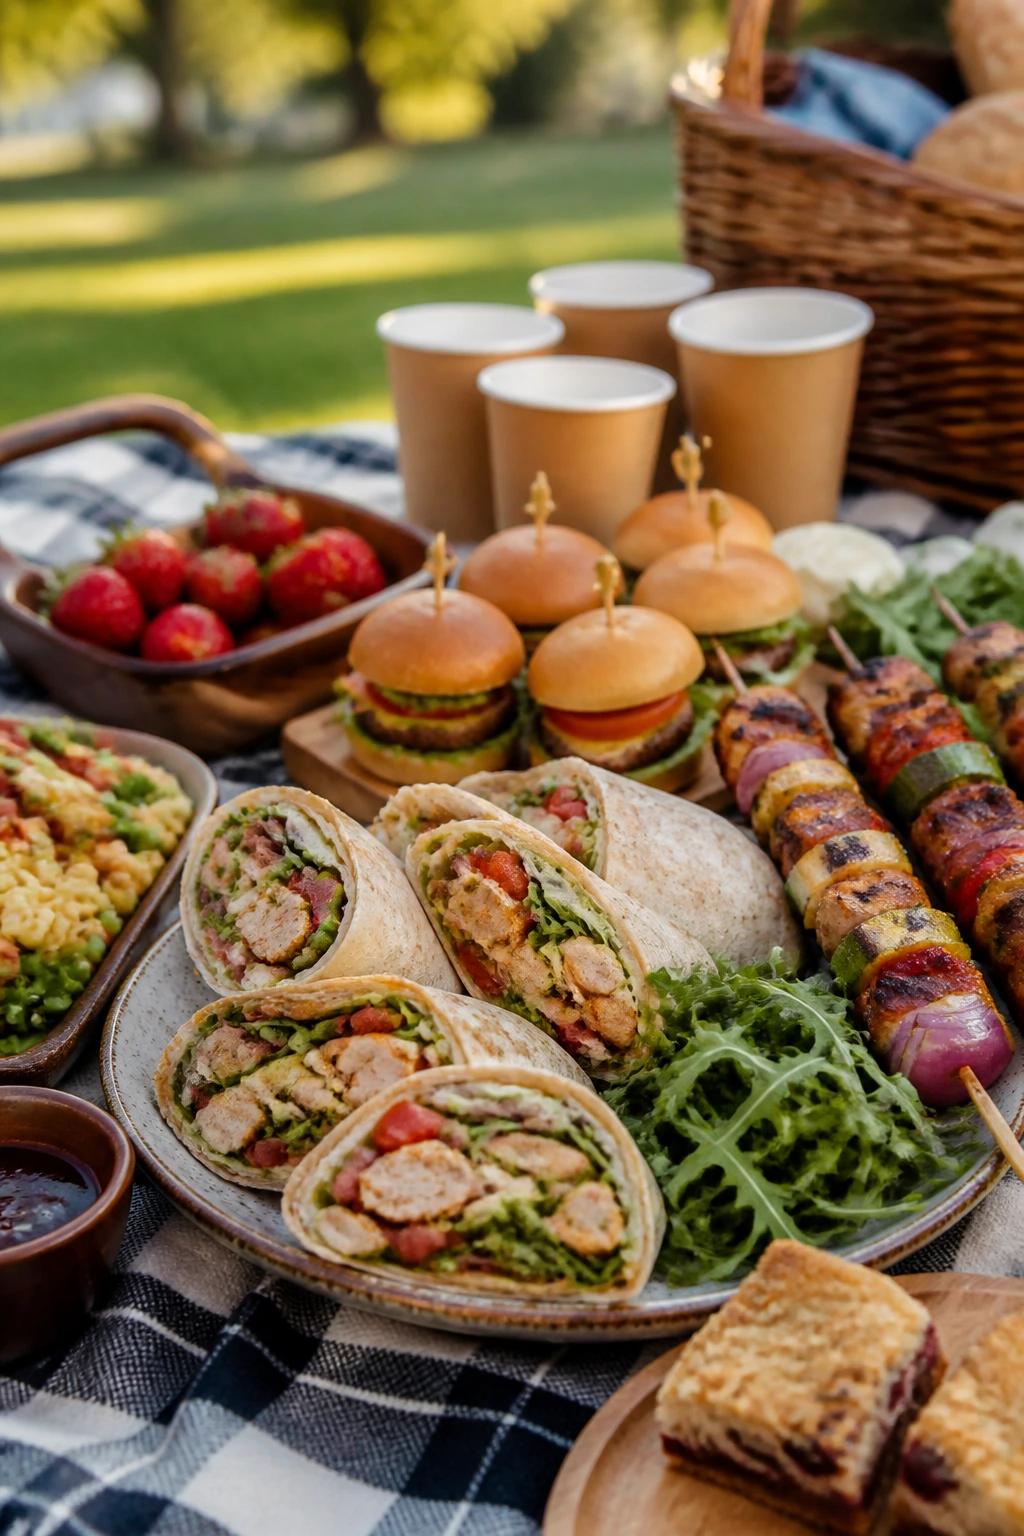
- Built for the cool-down: Every recipe here keeps its shape or flavor after chilling, which matters more than glamour when you’re eating outside.
- Handheld options are included: You’ll find wraps, sliders, skewers, cups, and bars, so nobody is stuck balancing a fork in the grass.
- The lineup covers the whole meal: There are mains, sides, salads, snacks, and sweets, which means you can build an entire picnic without repeating textures.
- Make-ahead friendly by design: Most of these can be cooked or mixed earlier in the day, then packed cold and finished in minutes.
- Not fussy, not bland: These recipes rely on acid, herbs, salt, and crunchy elements instead of heavy sauces that wilt fast.
1. Classic Chicken Salad Lettuce Cups
Chicken salad earns its place at a picnic only when the dressing stays thick enough to cling to the meat. If it turns watery, the lettuce slumps and the whole thing starts tasting like fridge leftovers.
Why It Works:
The mix of mayo and Greek yogurt gives you creaminess with a little tang, and the celery keeps each bite snappy. Served in butter lettuce, it stays light enough for warm weather and doesn’t need bread to hold it together.
Key Ingredients:
- 3 cups cooked shredded chicken
- 1/2 cup mayonnaise
- 2 tablespoons plain Greek yogurt
- 1 celery stalk, finely diced
- 2 tablespoons red onion, minced
- 1 tablespoon lemon juice
- 1 teaspoon Dijon mustard
- 1/4 teaspoon fine salt
- 1/4 teaspoon black pepper
- 8 to 10 butter lettuce leaves
Quick Steps:
- Stir the mayonnaise, yogurt, lemon juice, Dijon, salt, and pepper in a large bowl.
- Fold in the chicken, celery, and red onion until coated.
- Chill for 15 to 20 minutes so the flavors settle.
- Spoon into dry lettuce leaves just before packing or serving.
- Add crackers or sliced cucumbers on the side if you want a little crunch.
Equipment for This Recipe:
- Large mixing bowl
- Rubber spatula
- Sharp knife
- Airtight container
- Spoon for portioning
How to Serve This Dish:
Pile the chicken salad into butter lettuce cups and tuck them onto a chilled platter. I like a few dill pickle chips on the side and a handful of saltines for anyone who wants more structure.
Pro Tips for This Recipe:
- Dry the celery after dicing; extra water thins the dressing.
- Use chicken thighs if you want a richer, softer texture.
- Pack the lettuce separately so it stays crisp.
Variations on This Dish:
- Curry Chicken Salad: Add 1 teaspoon curry powder and 2 tablespoons chopped raisins.
- Apple-Walnut Crunch: Fold in 1/2 cup diced apple and 1/4 cup chopped walnuts.
- Avocado Swap: Replace half the mayo with mashed avocado and eat it the same day.
Common Mistakes to Avoid with This Dish:
- Don’t drown the chicken in dressing; it should look coated, not soupy.
- Don’t assemble the lettuce cups too early or the leaves will sweat.
- Don’t skip the chill time, because the lemon and Dijon need a few minutes to wake up.
2. Pimento Cheese Crackers and Celery
Pimento cheese is one of those spreads that feels casual until you taste a really good batch. The sharp cheddar should hit first, then the cream cheese smooths the edges, and the pimentos bring a sweet little pop.
Why It Works:
This is picnic food that doesn’t ask for heating, slicing, or utensils. The spread firms up after a short chill, which makes it easy to mound onto crackers or stuff into celery ribs without sliding off.
Key Ingredients:
- 8 ounces sharp cheddar, finely shredded
- 4 ounces cream cheese, softened
- 1/4 cup mayonnaise
- 1/3 cup diced pimentos, drained
- 1 teaspoon hot sauce
- 1/4 teaspoon garlic powder
- 1/4 teaspoon black pepper
- Salt to taste
- Crackers and celery ribs for serving
Quick Steps:
- Stir the cheddar, cream cheese, mayonnaise, pimentos, hot sauce, garlic powder, and pepper in a bowl.
- Taste and add salt only if needed.
- Chill for 20 minutes so the spread firms up.
- Spoon onto crackers or celery.
- Pack any leftovers in a tight container with parchment pressed onto the surface.
Equipment for This Recipe:
- Medium bowl
- Fork or sturdy spoon
- Box grater
- Airtight container
- Small serving knife
How to Serve This Dish:
Serve it on sturdy water crackers, celery, or sliced cucumber rounds if you want less crunch from the cracker side. A few paper-thin radishes make the plate look sharper and add a peppery bite.
Pro Tips for This Recipe:
- Use finely shredded cheddar so the spread goes together smoothly.
- Drain the pimentos well, or the mixture loosens.
- Let it sit at room temperature for 10 minutes before serving for easier spreading.
Variations on This Dish:
- Smoky Pimento Cheese: Add 1/2 teaspoon smoked paprika.
- Pickle-Forward Version: Mix in 2 tablespoons finely chopped dill pickles.
- Extra Sharp Batch: Swap half the cheddar for aged white cheddar.
Common Mistakes to Avoid with This Dish:
- Don’t use wet pimentos straight from the jar.
- Don’t overblend it into a paste; some texture is part of the charm.
- Don’t serve it ice-cold or the flavor stays flat.
3. Ham, Cheddar, and Pickle Pinwheels

Ham pinwheels are pure picnic geometry. You lay the fillings out in a thin layer, roll them tight, chill them, and slice into spirals that hold together better than most sandwiches.
Why It Works:
Cream cheese acts like edible glue, so the tortilla stays sealed and the fillings don’t tumble out. Pickles cut through the richness and keep every bite from tasting too heavy.
Key Ingredients:
- 4 large flour tortillas
- 8 ounces cream cheese, softened
- 1 tablespoon Dijon mustard
- 8 ounces sliced ham
- 8 ounces sliced cheddar
- 1/2 cup chopped dill pickles, patted dry
- 2 tablespoons chopped chives
- Black pepper to taste
Quick Steps:
- Mix the cream cheese and Dijon until smooth.
- Spread it over each tortilla almost to the edges.
- Layer ham, cheddar, pickles, chives, and pepper in a thin even layer.
- Roll each tortilla tightly, then wrap in plastic and chill for 30 minutes.
- Slice into 1-inch pinwheels with a sharp knife.
Equipment for This Recipe:
- Cutting board
- Sharp knife
- Mixing bowl
- Plastic wrap or parchment
- Spoon or offset spatula
How to Serve This Dish:
Arrange the pinwheels cut-side up on a platter with toothpicks nearby if you’re serving them outdoors. They’re good with cherry tomatoes and a handful of kettle chips.
Pro Tips for This Recipe:
- Pat the pickles dry so they don’t leak.
- Chill before slicing or the spirals will smush.
- Use thin deli slices; thick ham makes the rolls bulky and unstable.
Variations on This Dish:
- Turkey Club Roll-Up: Swap ham for turkey and add a little lettuce just before serving.
- Spicy Pickle Pinwheels: Add minced jalapeño and a spoonful of pepper relish.
- Ranch Version: Replace Dijon with 2 tablespoons ranch seasoning mixed into the cream cheese.
Common Mistakes to Avoid with This Dish:
- Don’t pile the filling too thick or the tortilla tears.
- Don’t slice them warm; the cream cheese needs to be firm.
- Don’t use watery pickles unless you enjoy soggy spirals.
4. Lemon Pasta Salad with Peas and Herbs
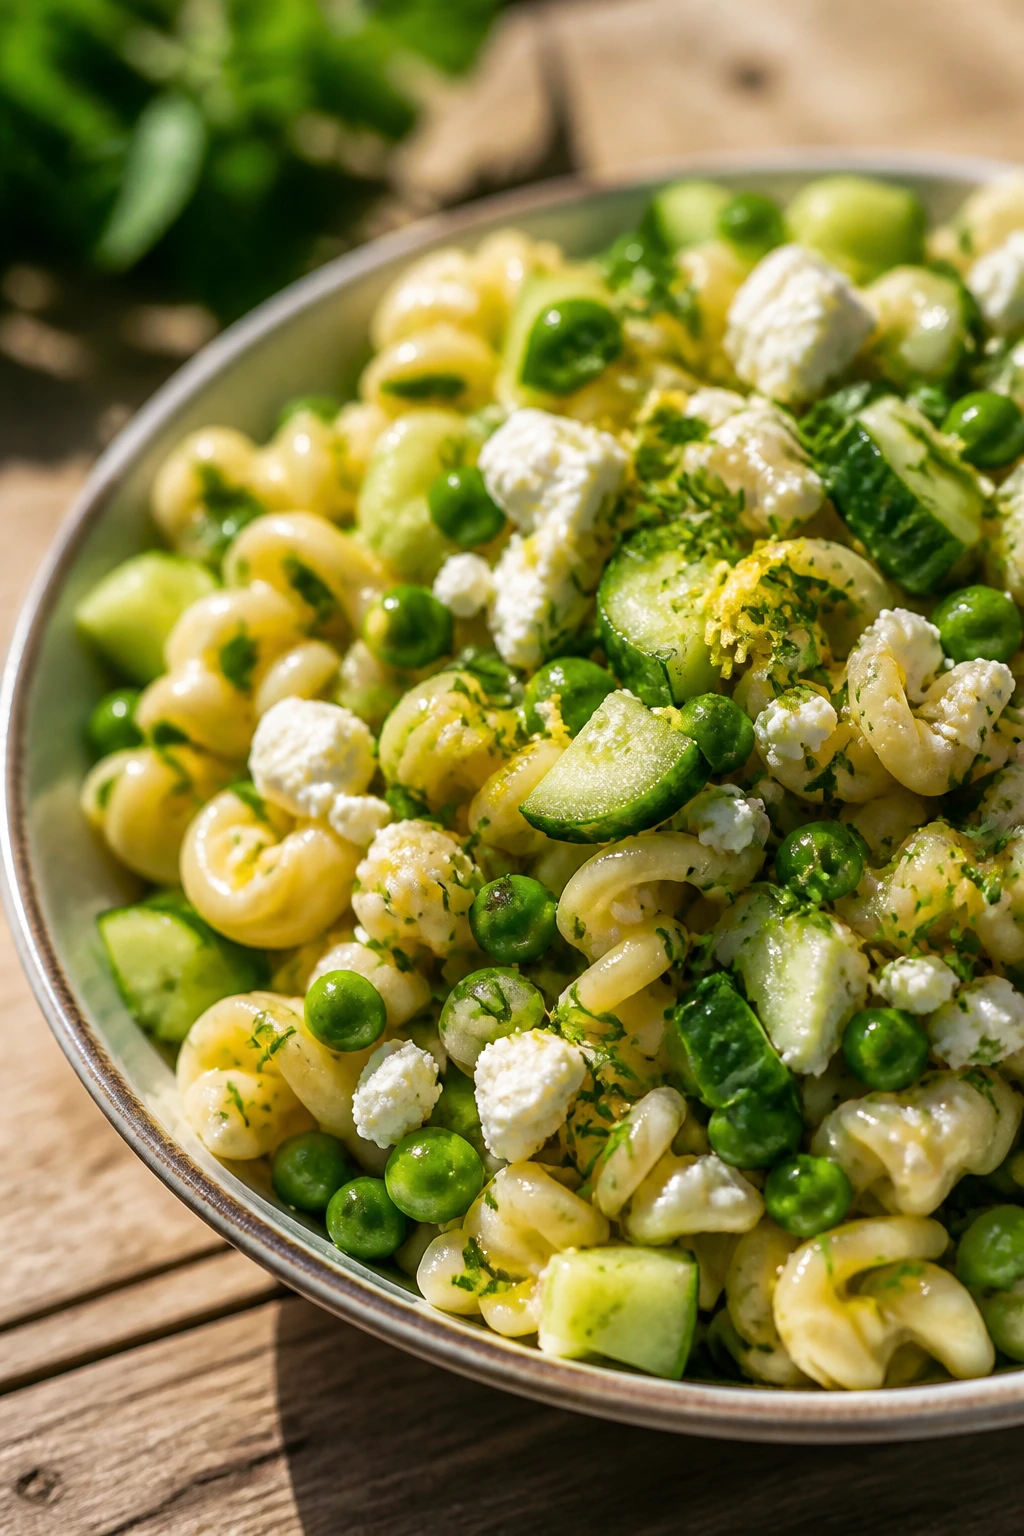
Pasta salad gets boring fast when it tastes like cold mayonnaise and not much else. This one leans bright, with lemon, herbs, and peas giving the noodles a real backbone.
Why It Works:
Short pasta catches the dressing in its ridges, and the peas bring sweetness that keeps the lemon from feeling sharp. It tastes good cold, which is the entire point.
Key Ingredients:
- 12 ounces short pasta, like rotini or fusilli
- 1 1/2 cups frozen peas
- 1 cucumber, diced
- 1/2 cup crumbled feta
- 1/4 cup chopped parsley
- 2 scallions, thinly sliced
- 3 tablespoons olive oil
- 2 tablespoons lemon juice
- 1 teaspoon Dijon mustard
- Salt and black pepper
Quick Steps:
- Boil the pasta in salted water until just tender, then drain and rinse briefly under cool water.
- Add the peas to the hot pasta for the last 30 seconds of draining or thaw them separately.
- Whisk olive oil, lemon juice, Dijon, salt, and pepper.
- Toss the pasta with cucumber, feta, parsley, scallions, and dressing.
- Chill for 30 minutes before packing.
Equipment for This Recipe:
- Large pot
- Colander
- Large bowl
- Whisk
- Cutting board and knife
How to Serve This Dish:
Serve it in a shallow bowl so the herbs and feta stay visible instead of sinking. I like it next to grilled chicken or a pile of sliced tomatoes with flaky salt.
Pro Tips for This Recipe:
- Salt the pasta water well; bland noodles stay bland even with dressing.
- Add a splash more lemon before serving if it tastes muted after chilling.
- Dice the cucumber small so it doesn’t dominate the bowl.
Variations on This Dish:
- Greek-Style Pasta Salad: Add olives and more feta.
- Creamy Version: Stir in 2 tablespoons mayonnaise or Greek yogurt.
- No-Dairy Bowl: Skip the feta and add chopped avocado right before serving.
Common Mistakes to Avoid with This Dish:
- Don’t overcook the pasta or it softens too much in the fridge.
- Don’t dress it only once; cold pasta soaks up flavor.
- Don’t skip the salt in the water, because lemon can’t fix bland noodles.
5. Caprese Skewers with Basil Pesto Drizzle
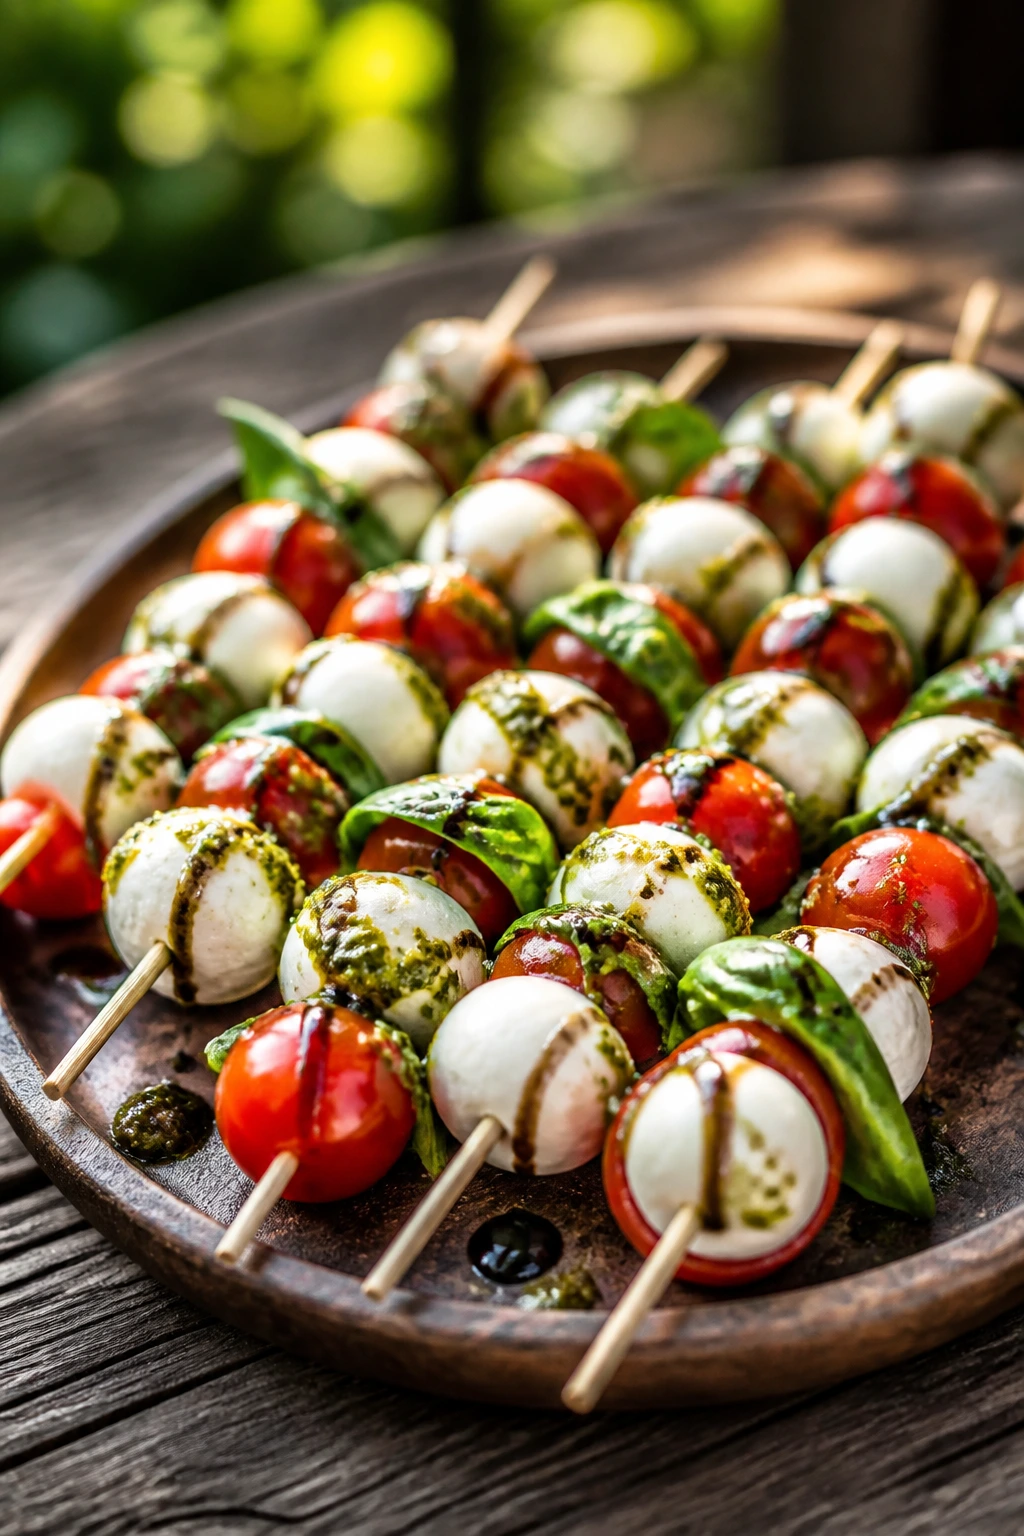
Caprese skewers solve the knife problem. No slicing a whole tomato. No balancing a mozzarella ball on a napkin. Just one clean bite after another with a little basil oil running over the top.
Why It Works:
Cherry tomatoes, mozzarella, and basil already know how to get along. Threading them onto skewers turns that classic flavor trio into something picnic-safe and fast to grab.
Key Ingredients:
- 1 pint cherry tomatoes
- 8 ounces mozzarella balls, drained
- 1 small bunch fresh basil leaves
- 1/4 cup basil pesto
- 1 tablespoon olive oil
- 1 tablespoon balsamic glaze
- Salt and black pepper
- 12 small skewers or toothpicks
Quick Steps:
- Pat the mozzarella dry.
- Thread tomato, basil leaf, and mozzarella onto each skewer.
- Whisk pesto and olive oil until loose enough to drizzle.
- Arrange the skewers on a platter and spoon on the pesto.
- Finish with balsamic glaze, salt, and pepper.
Equipment for This Recipe:
- Small bowl
- Spoon
- Serving platter
- Skewers or toothpicks
- Paper towels
How to Serve This Dish:
Lay them in rows and keep the drizzle light so the basil still shows. They work beside sandwiches, but I also like them with corn chips and a blunt little bowl of olives.
Pro Tips for This Recipe:
- Use dry mozzarella; wet cheese makes the platter messy.
- Pick basil leaves about the same size as the tomatoes for neat stacking.
- Drizzle right before serving so the basil stays bright.
Variations on This Dish:
- Prosciutto Caprese: Add a folded ribbon of prosciutto to each skewer.
- Peach Caprese: Swap half the tomatoes for ripe peach slices.
- Chili Oil Finish: Use chili oil instead of pesto for a sharper bite.
Common Mistakes to Avoid with This Dish:
- Don’t drown them in balsamic glaze.
- Don’t use overripe tomatoes that split when you thread them.
- Don’t make them too early if your basil is delicate; it wilts fast.
6. Dill Deviled Eggs
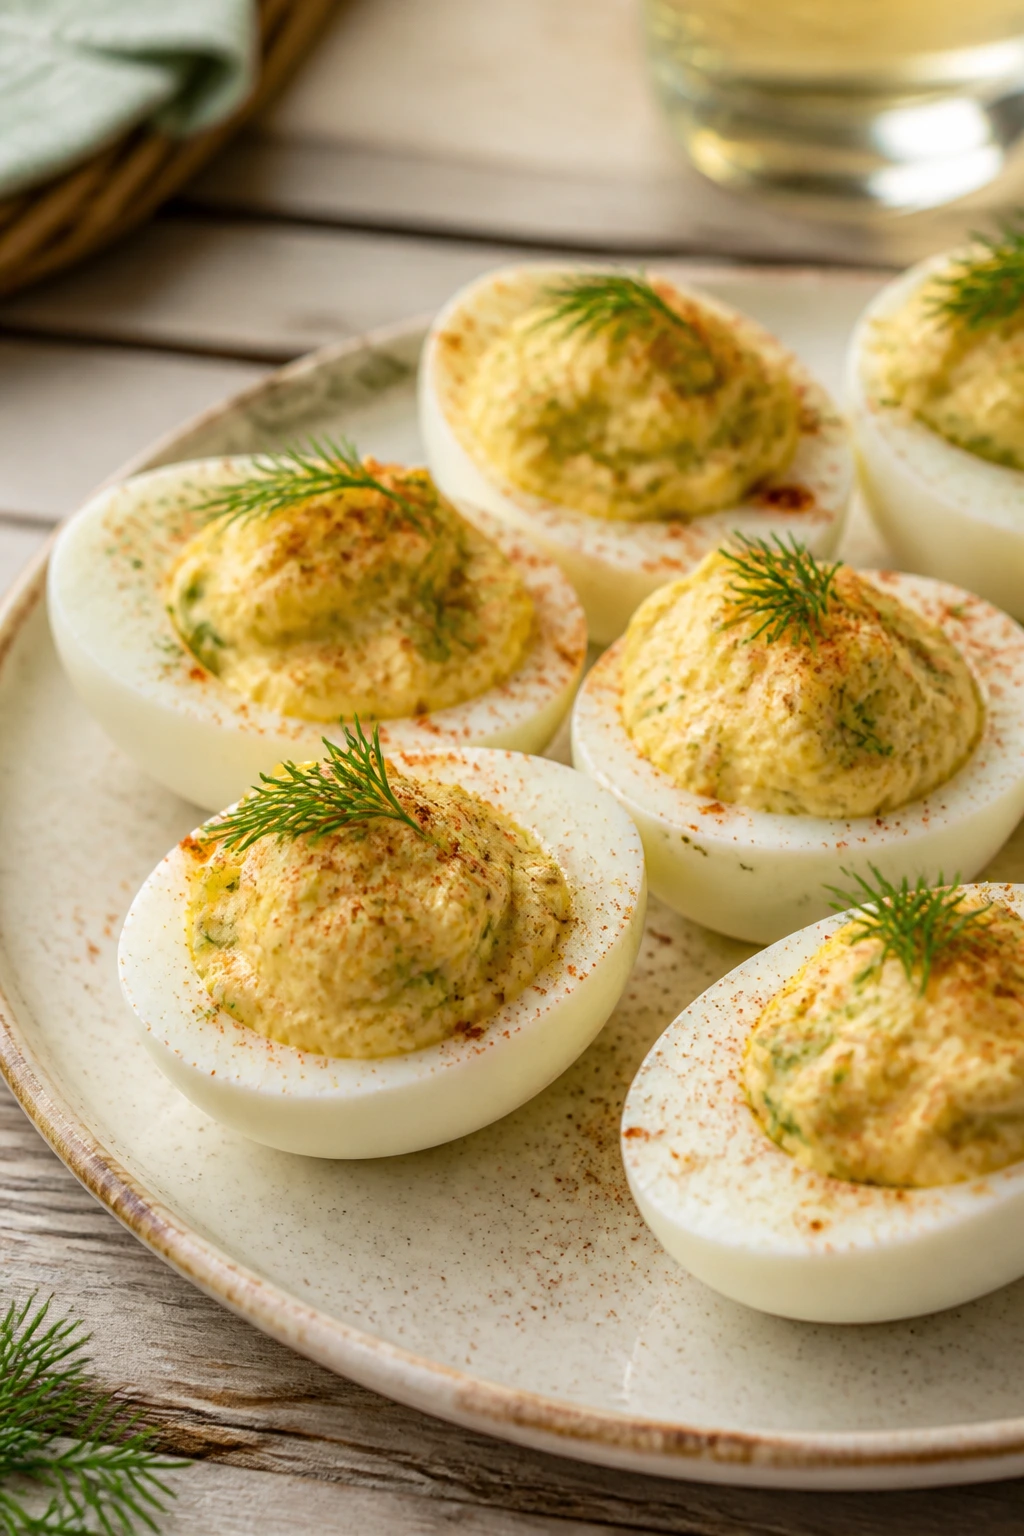
Deviled eggs are fragile in the best way. They look fancy, but the filling comes together from cheap, familiar ingredients and a little patience with the yolks.
Why It Works:
The mustard and vinegar keep the filling from tasting heavy, while dill gives it a clean edge that suits warm weather. They’re small enough to pack tightly, which means fewer disasters in the cooler.
Key Ingredients:
- 6 large eggs
- 3 tablespoons mayonnaise
- 1 teaspoon Dijon mustard
- 1 teaspoon white vinegar
- 1 tablespoon chopped fresh dill
- Salt and black pepper
- Paprika for dusting
Quick Steps:
- Cover the eggs with water and simmer for 10 to 11 minutes.
- Cool them in ice water, peel, and halve lengthwise.
- Mash the yolks with mayonnaise, mustard, vinegar, dill, salt, and pepper.
- Spoon or pipe the filling back into the whites.
- Dust with paprika and chill until serving.
Equipment for This Recipe:
- Small saucepan
- Slotted spoon
- Mixing bowl
- Fork
- Piping bag or spoon
How to Serve This Dish:
Set them on a plate lined with lettuce or parsley so they don’t slide. A few cornichons beside them make a sharp, salty contrast that I never get tired of.
Pro Tips for This Recipe:
- Slightly older eggs peel more cleanly than very fresh ones.
- Chill the filled eggs before packing so the centers stay neat.
- Pipe the filling for a cleaner look if you care about presentation.
Variations on This Dish:
- Pickle Deviled Eggs: Swap the dill for finely chopped relish.
- Smoked Paprika Eggs: Stir smoked paprika into the filling and dust the tops.
- Avocado Filling: Replace half the mayo with mashed avocado and eat them the same day.
Common Mistakes to Avoid with This Dish:
- Don’t boil the eggs hard and fast or the yolks go chalky.
- Don’t leave them in the sun too long.
- Don’t overmix the filling into a gluey paste.
7. Cold Fried Chicken Thighs
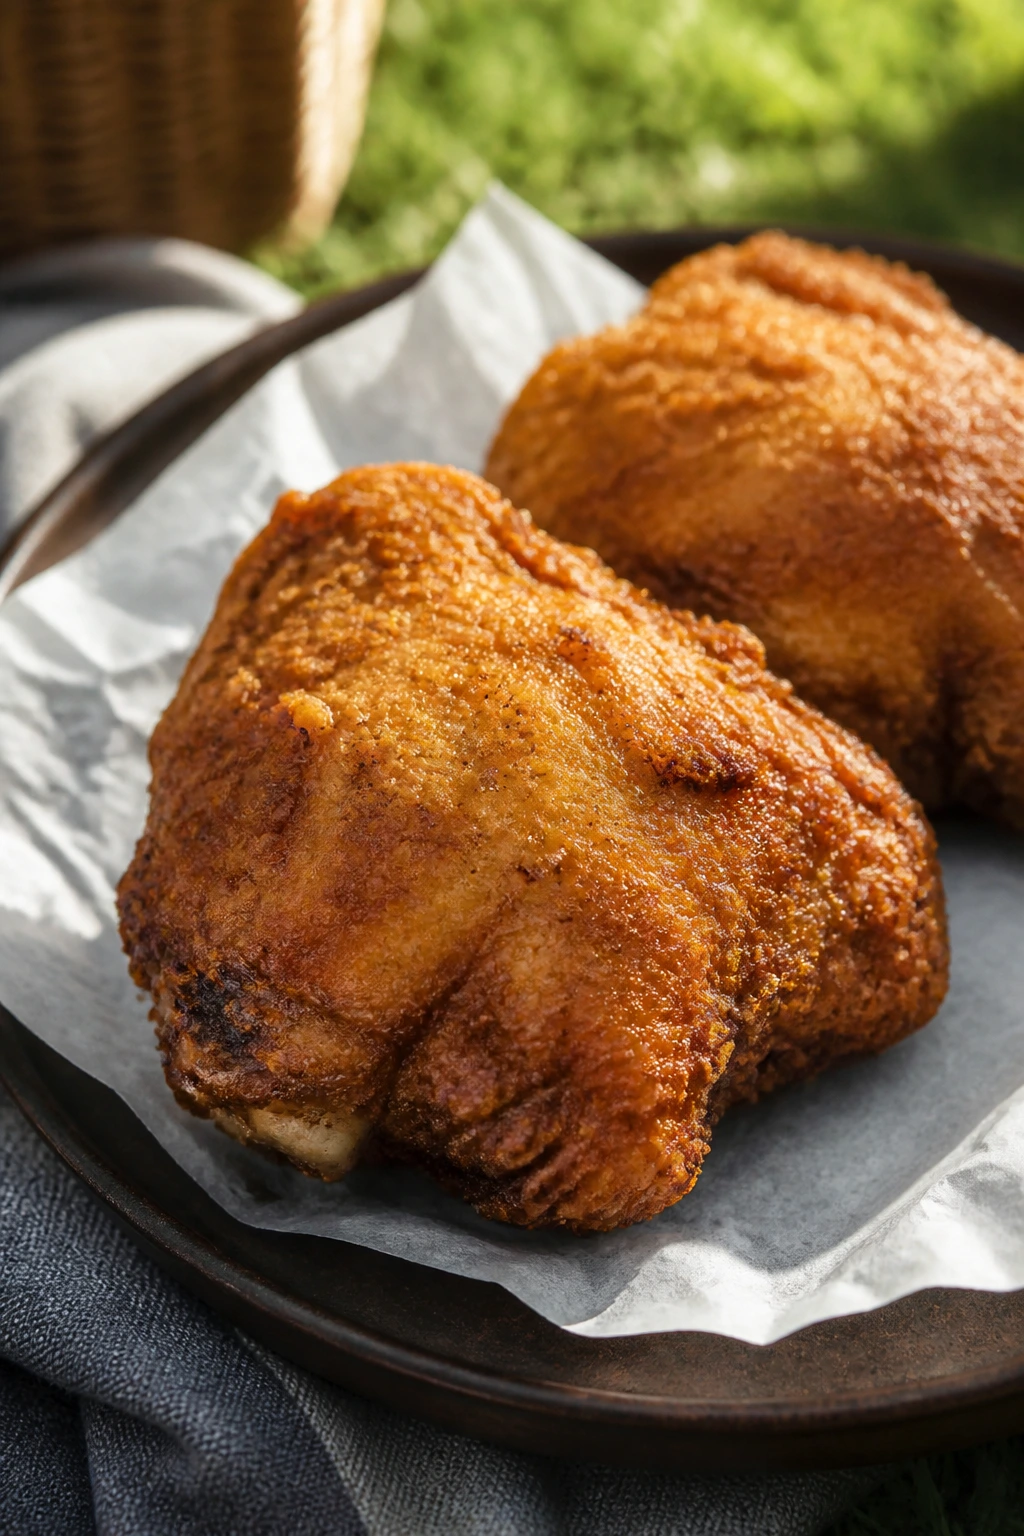
Cold fried chicken has a better picnic record than hot fried chicken. The crust relaxes into a crisp shell, the seasoning settles, and you get all the flavor without the steam turning the coating soft.
Why It Works:
Chicken thighs stay juicy even after chilling, and the buttermilk marinade keeps the meat tender. A little cornstarch in the dredge gives the crust more snap once it cools.
Key Ingredients:
- 2 pounds boneless chicken thighs
- 2 cups buttermilk
- 1 1/2 cups all-purpose flour
- 1/2 cup cornstarch
- 1 tablespoon paprika
- 1 teaspoon garlic powder
- 1 teaspoon salt
- 1/2 teaspoon black pepper
- Neutral oil for frying
Quick Steps:
- Marinate the chicken in buttermilk for at least 1 hour.
- Mix flour, cornstarch, paprika, garlic powder, salt, and pepper.
- Dredge the chicken and press the coating on firmly.
- Fry in 350°F oil until deeply golden and the chicken reaches 165°F inside.
- Cool on a rack, then chill uncovered before packing.
Equipment for This Recipe:
- Large bowl
- Heavy skillet or Dutch oven
- Thermometer
- Wire rack
- Tongs
How to Serve This Dish:
Serve it cold with pickles, potato salad, or a mustardy slaw. I like to pack it in parchment so the crust doesn’t rub off on everything else in the box.
Pro Tips for This Recipe:
- Let the breaded chicken rest 10 minutes before frying so the coating sticks.
- Fry in batches; crowded oil drops the temperature and softens the crust.
- Cool on a rack, not on paper towels, or steam softens the underside.
Variations on This Dish:
- Hot Honey Chicken: Brush the cooled chicken with a thin layer of hot honey.
- Herb-Brined Version: Add chopped dill and parsley to the buttermilk.
- Gluten-Free Coating: Use rice flour instead of all-purpose flour.
Common Mistakes to Avoid with This Dish:
- Don’t pack it warm or the crust goes limp.
- Don’t skip the thermometer; thigh meat should hit 165°F.
- Don’t soak the coating too heavily in marinade before dredging.
8. Tabbouleh with Chickpeas and Mint

Tabbouleh is the herb salad that never turns mushy when you treat it right. The parsley should look generous, almost silly, and the lemon needs to hit hard enough to wake up the bulgur.
Why It Works:
Bulgar soaks up the dressing while staying chewy, and chickpeas add enough heft that this doesn’t feel like garnish. Mint gives it a cold, clean finish that suits a picnic table.
Key Ingredients:
- 1 cup fine bulgur
- 1 1/2 cups boiling water
- 1 can chickpeas, drained and rinsed
- 2 cups chopped parsley
- 1/2 cup chopped mint
- 1 cucumber, diced
- 2 tomatoes, diced
- 1/4 cup olive oil
- 3 tablespoons lemon juice
- Salt and pepper
Quick Steps:
- Pour boiling water over the bulgur and let it stand until tender, about 20 minutes.
- Fluff it with a fork and cool slightly.
- Mix the bulgur with chickpeas, parsley, mint, cucumber, and tomatoes.
- Whisk olive oil, lemon juice, salt, and pepper, then toss everything together.
- Chill for 30 minutes before serving.
Equipment for This Recipe:
- Medium bowl
- Fork
- Knife and cutting board
- Measuring cup
- Spoon
How to Serve This Dish:
Pack it into a shallow container so the herbs don’t compact. It pairs cleanly with grilled meat, falafel, or a wedge of salty feta on the side.
Pro Tips for This Recipe:
- Chop the herbs finely enough that every bite carries them.
- Dice the cucumber small so it blends instead of taking over.
- Taste again after chilling; tabbouleh often wants another pinch of salt.
Variations on This Dish:
- Quinoa Tabbouleh: Replace bulgur with quinoa for a gluten-free bowl.
- Cucumber-Heavy Version: Add an extra cucumber for a cooler crunch.
- Garlic Finish: Grate a small garlic clove into the dressing if you want more bite.
Common Mistakes to Avoid with This Dish:
- Don’t drown it in tomatoes and lose the herb flavor.
- Don’t skip fluffing the bulgur or it clumps.
- Don’t serve it warm, because the lemon tastes sharper after chilling.
9. BLT Sliders
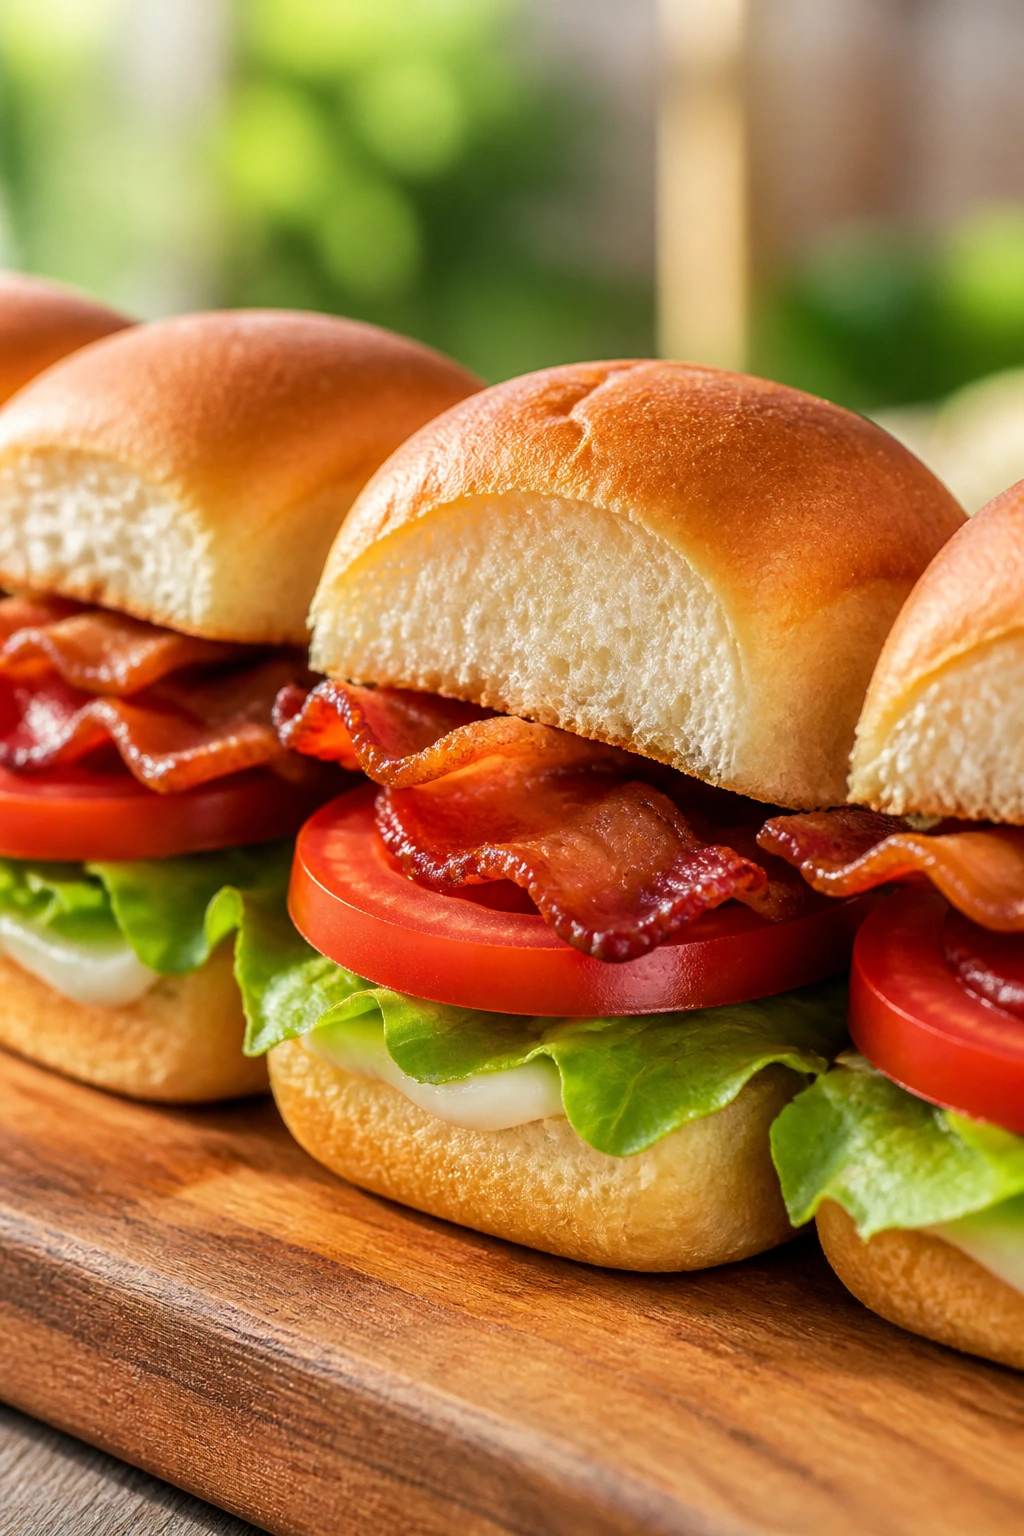
BLT sliders bring the crunch that most picnic bread misses. Bacon, lettuce, and tomato need only a little help: soft buns, a thin mayo layer, and enough salt to make the tomato behave.
Why It Works:
The mini size keeps the sandwich from getting awkward on a blanket, and toasting the buns gives them a buffer against juicy tomatoes. Bacon adds the smoke that makes this feel like more than lunch.
Key Ingredients:
- 12 slider buns
- 8 slices bacon
- 2 tomatoes, sliced and salted
- 2 cups shredded lettuce
- 1/2 cup mayonnaise
- 1 tablespoon lemon juice
- Salt and black pepper
- Optional sliced avocado
Quick Steps:
- Cook the bacon until crisp and drain it well.
- Stir mayo and lemon juice together.
- Toast the slider buns lightly.
- Layer mayo, lettuce, tomato, bacon, and avocado if using.
- Pack the components separately if you’re not eating right away.
Equipment for This Recipe:
- Skillet or oven tray
- Paper towels
- Knife
- Cutting board
- Small bowl
How to Serve This Dish:
Assemble them close to serving time so the buns stay springy. Serve with chips and a pile of pickles; the salt keeps the sandwich from feeling one-note.
Pro Tips for This Recipe:
- Salt the tomato slices and let them sit for 5 minutes, then blot them dry.
- Don’t overstuff the buns; sliders should close without squashing.
- Keep the lettuce cold so it stays crisp.
Variations on This Dish:
- Turkey BLT: Use turkey bacon or sliced turkey breast instead of bacon.
- Fried Green Tomato Slider: Swap the tomato for a thin fried green tomato slice.
- Avocado BLT: Add mashed avocado instead of extra mayo.
Common Mistakes to Avoid with This Dish:
- Don’t assemble too early or the bread softens.
- Don’t skip toasting the buns.
- Don’t use thick tomato slices that slide out on the first bite.
10. Watermelon Feta Mint Salad
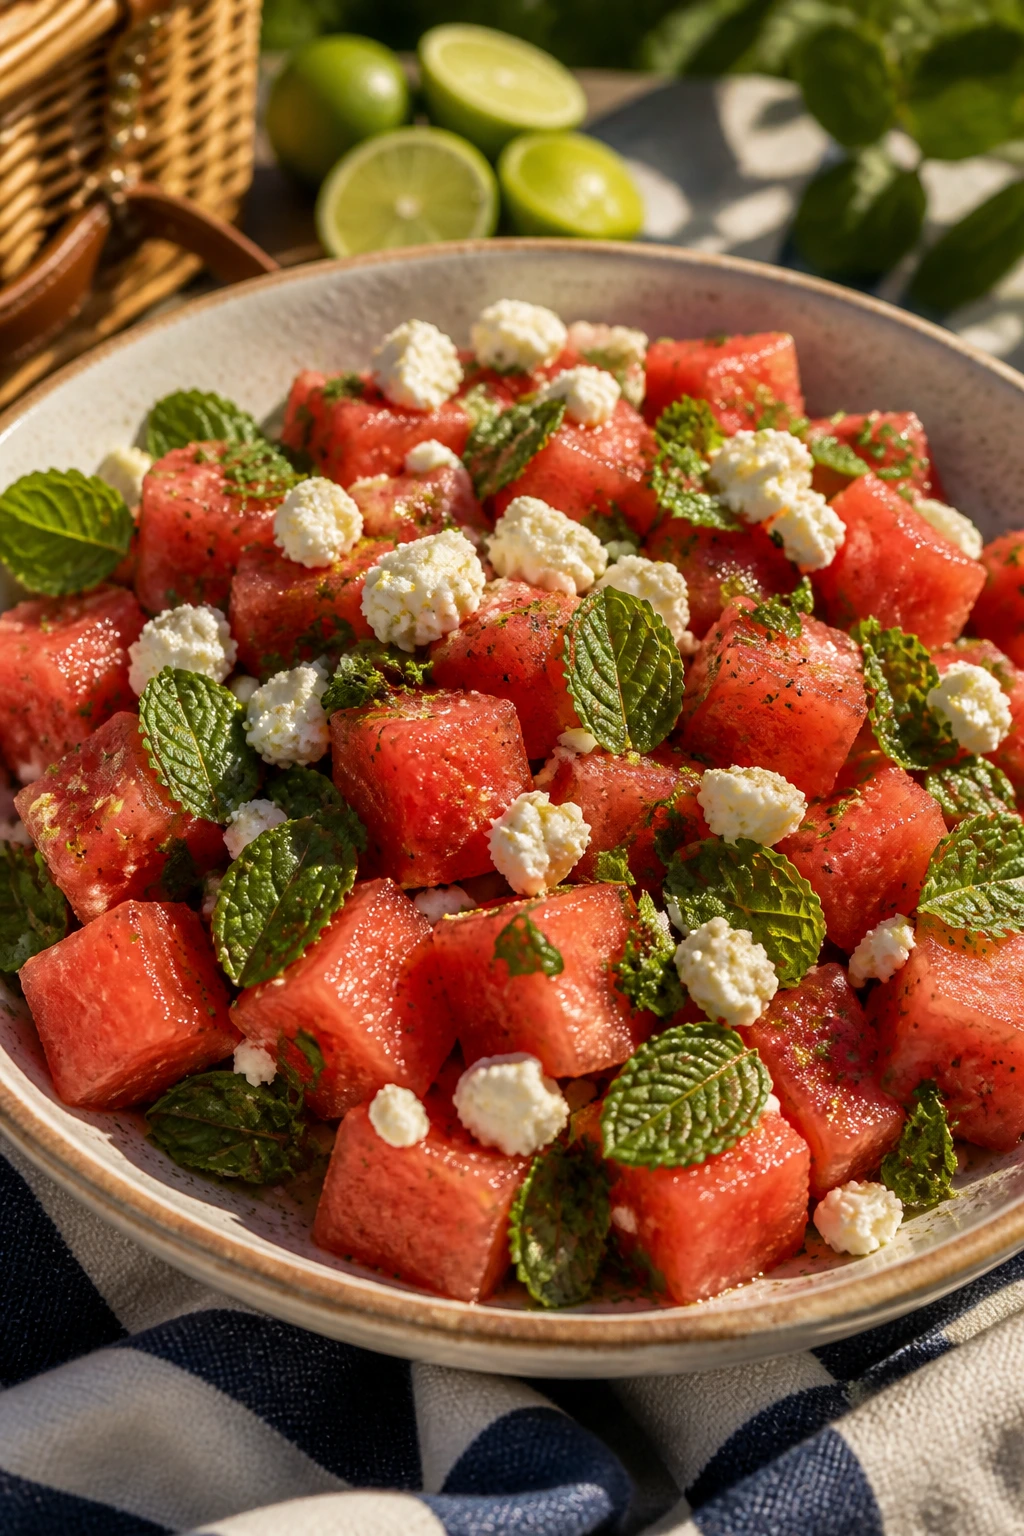
Watermelon and feta always want a little salt. That’s the whole trick. The fruit tastes brighter, the cheese tastes creamier, and mint keeps the bowl from feeling like dessert trying to act like lunch.
Why It Works:
Watermelon brings a ton of juice, so the salad needs ingredients that can stand up to it. Feta and mint do that job, and a little lime keeps the sweetness from taking over.
Key Ingredients:
- 6 cups cubed watermelon
- 1 cup cucumber, diced
- 3/4 cup crumbled feta
- 1/4 cup chopped mint
- 1 tablespoon lime juice
- 1 tablespoon olive oil
- Black pepper
- Pinch of flaky salt
Quick Steps:
- Cube the watermelon and drain off any obvious extra juice.
- Toss it with cucumber and mint in a large bowl.
- Drizzle with lime juice and olive oil.
- Sprinkle feta, pepper, and flaky salt over the top.
- Serve immediately or chill briefly.
Equipment for This Recipe:
- Large bowl
- Sharp knife
- Spoon
- Cutting board
- Serving platter
How to Serve This Dish:
Serve it cold in a shallow bowl so the feta sits on top instead of disappearing. It’s a strong side for grilled chicken, grilled corn, or anything smoky.
Pro Tips for This Recipe:
- Chill the watermelon before cutting if you can.
- Add feta at the last minute so it doesn’t smear pink.
- Use mint leaves that look bright, not dark and bruised.
Variations on This Dish:
- Chili-Lime Version: Add a pinch of chili flakes.
- No-Feta Bowl: Swap in cubed cucumber and toasted almonds.
- Basil Watermelon Salad: Use basil instead of mint for a softer herbal note.
Common Mistakes to Avoid with This Dish:
- Don’t mix it too early or the bowl turns watery.
- Don’t over-salt it; feta already brings plenty.
- Don’t use mealy watermelon. Pick one that sounds hollow when tapped.
11. Sesame Soba Noodle Salad
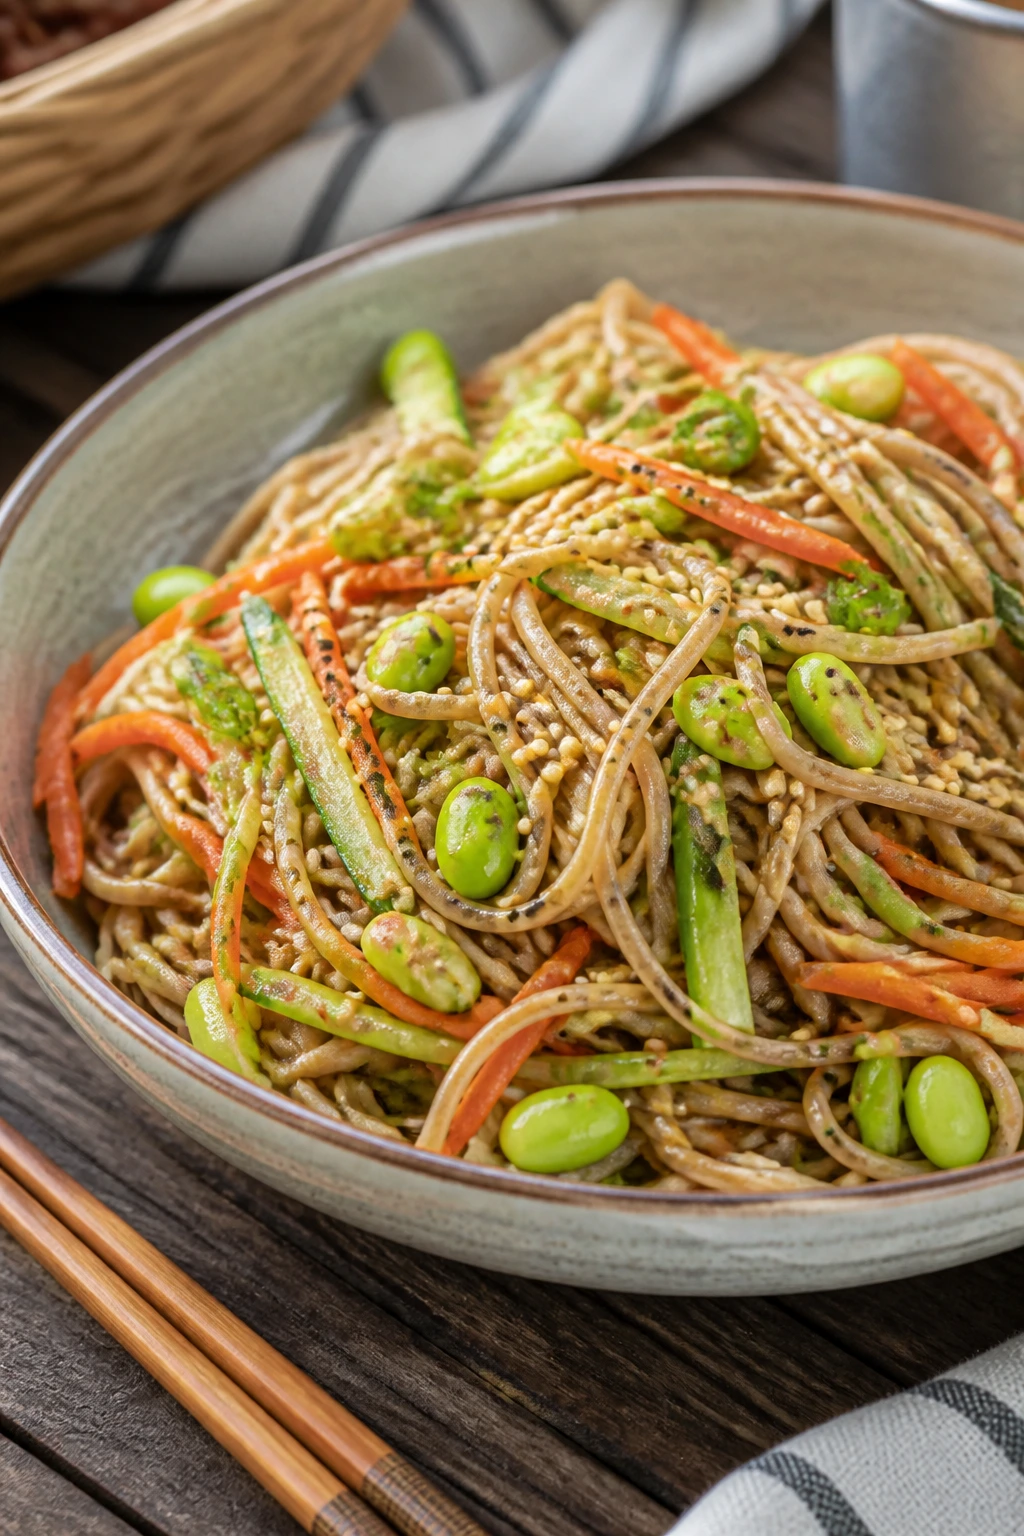
Soba salad is what I make when I want something cold that still feels like dinner. The noodles carry the sesame dressing, the vegetables stay crisp, and the whole bowl eats cleanly from a fork or chopsticks.
Why It Works:
Soba noodles chill quickly and keep a pleasant bite if you rinse them well. The soy, vinegar, and sesame oil dressing keeps the flavors sharp enough to survive a few hours in a cooler.
Key Ingredients:
- 8 ounces soba noodles
- 1 cup shredded carrots
- 1 cucumber, julienned
- 3 scallions, sliced
- 1 cup shelled edamame
- 3 tablespoons soy sauce
- 2 tablespoons rice vinegar
- 1 tablespoon sesame oil
- 1 teaspoon honey
- 1 tablespoon sesame seeds
Quick Steps:
- Cook the soba noodles until just tender, then rinse under cold water.
- Whisk soy sauce, rice vinegar, sesame oil, and honey.
- Toss the noodles with carrots, cucumber, scallions, and edamame.
- Add the dressing and sesame seeds.
- Chill for 20 minutes before packing.
Equipment for This Recipe:
- Pot
- Colander
- Large bowl
- Whisk
- Tongs or forks
How to Serve This Dish:
Pack it in a wide container so the noodles don’t compress into a block. A few extra scallions and sesame seeds on top make it look finished even after chilling.
Pro Tips for This Recipe:
- Rinse the noodles well or they turn gummy.
- Slice the vegetables thin so they mingle with the noodles.
- Taste for salt after chilling; soba loves another splash of soy.
Variations on This Dish:
- Peanut Soba Salad: Add 2 tablespoons peanut butter to the dressing.
- Spicy Version: Stir in chili crisp or sriracha.
- Chicken Soba Bowl: Top it with cold shredded chicken for a fuller meal.
Common Mistakes to Avoid with This Dish:
- Don’t overcook soba or it breaks when tossed.
- Don’t leave the dressing too thin.
- Don’t skip the cold rinse, because starch clings hard to soba.
12. Mini Sausage Rolls

Mini sausage rolls disappear fast because they do the job of a sandwich without the soft middle. Puff pastry gives you crunch, sausage gives you salt and spice, and the whole thing travels better than a hot dinner ever could.
Why It Works:
The pastry seals in the sausage fat as it bakes, which keeps each bite juicy. They’re small enough to serve warm or room temperature without falling apart.
Key Ingredients:
- 1 sheet puff pastry, thawed
- 1 pound ground sausage
- 1 egg
- 1 teaspoon Dijon mustard
- 1/2 teaspoon dried thyme
- 1/4 teaspoon black pepper
- 1 tablespoon milk
- Flour for dusting
Quick Steps:
- Preheat the oven to 400°F and line a baking sheet.
- Mix sausage, Dijon, thyme, and pepper.
- Roll out the pastry and cut it into two long strips.
- Shape the sausage into logs and place them down the center of each strip.
- Roll, seal, brush with egg wash, cut into pieces, and bake until golden, about 20 minutes.
Equipment for This Recipe:
- Baking sheet
- Parchment paper
- Mixing bowl
- Pastry brush
- Sharp knife
How to Serve This Dish:
Serve them with mustard, ketchup, or a sharp pickle relish. They’re good beside a cold salad, and even better tucked into a napkin when everybody is standing around talking.
Pro Tips for This Recipe:
- Keep the pastry cold so it puffs.
- Cut a few steam slits on top.
- Drain off excess grease after baking if the sausage is fatty.
Variations on This Dish:
- Cheddar Sausage Rolls: Add a thin line of shredded cheddar on top of the sausage.
- Caramelized Onion Roll: Mix in finely chopped cooked onion.
- Herb and Garlic Version: Add parsley and a minced garlic clove.
Common Mistakes to Avoid with This Dish:
- Don’t overfill the pastry or the rolls burst.
- Don’t skip chilling the assembled rolls if your kitchen is hot.
- Don’t cut them straight from the oven; give them 5 minutes to settle.
13. Mustard Dill Potato Salad
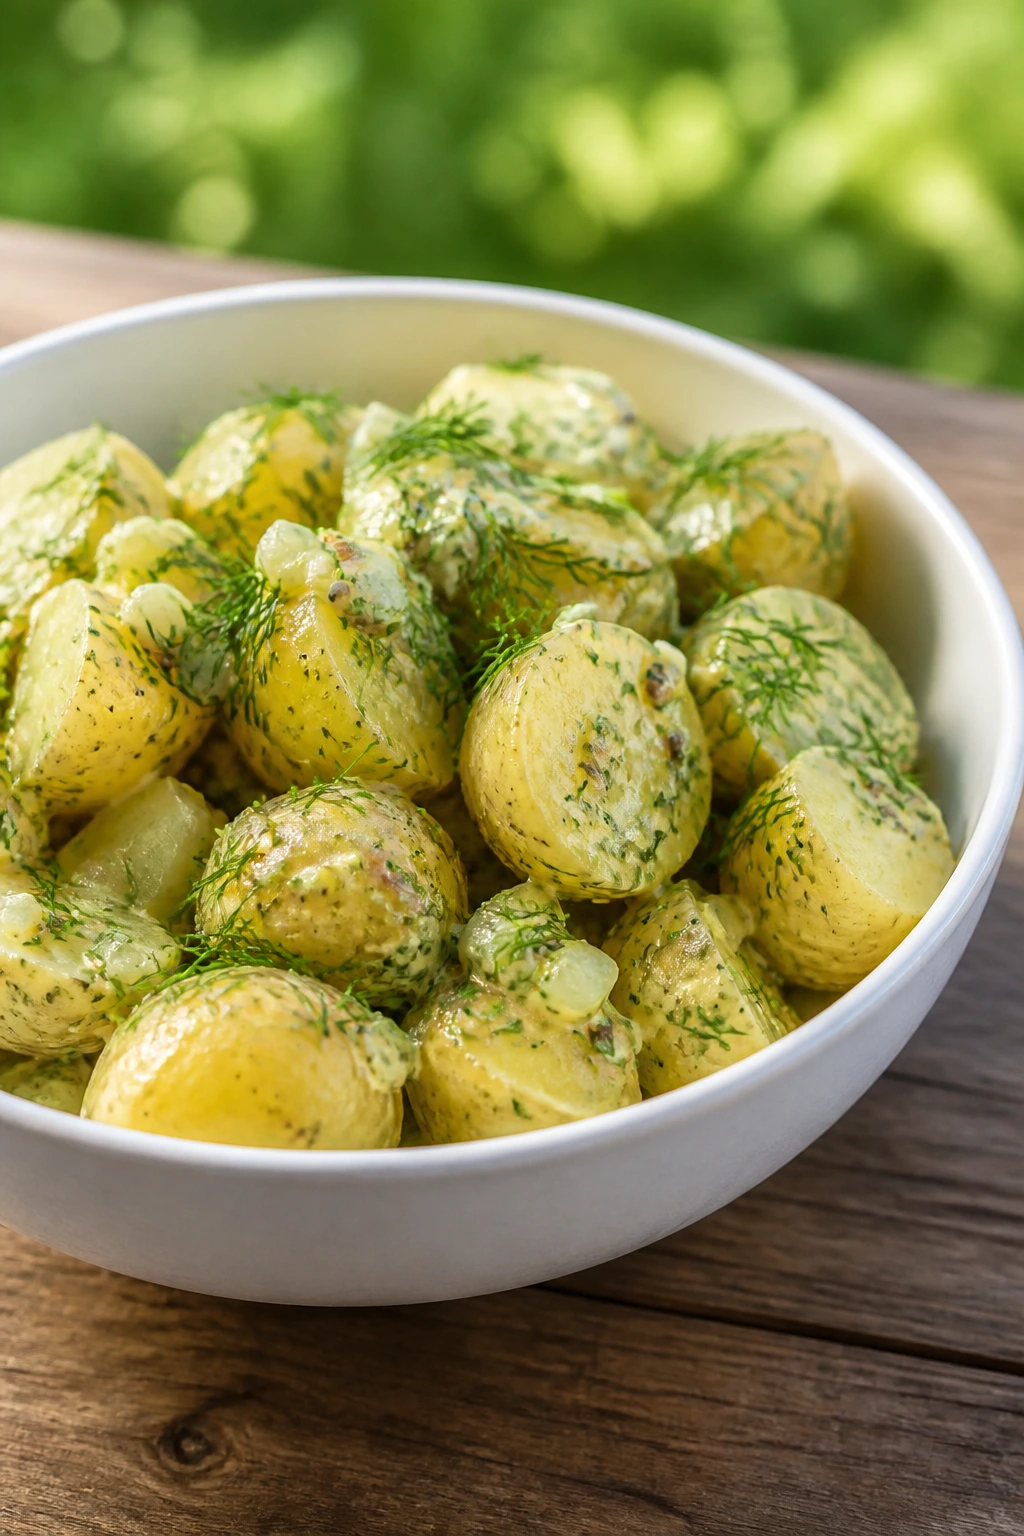
Potato salad should taste like more than mayonnaise. This version leans on mustard, dill, and a bit of vinegar, which keeps the potatoes bright even after they’ve been sitting in the cooler for a while.
Why It Works:
Baby potatoes hold their shape better than big starchy ones, and dressing them while warm helps the flavor sink in. Dill gives it that picnic-salad smell people notice before they take a bite.
Key Ingredients:
- 2 pounds baby potatoes
- 1/2 cup mayonnaise
- 2 tablespoons whole grain mustard
- 1 tablespoon white vinegar
- 1/4 cup chopped dill
- 2 celery stalks, diced
- 1/4 cup finely chopped red onion
- 1 teaspoon salt
- 1/2 teaspoon black pepper
Quick Steps:
- Boil the potatoes until fork-tender, then drain and cool slightly.
- Cut larger potatoes in half.
- Whisk mayo, mustard, vinegar, salt, and pepper.
- Fold in the potatoes, dill, celery, and onion.
- Chill for at least 1 hour before serving.
Equipment for This Recipe:
- Large pot
- Colander
- Mixing bowl
- Knife
- Wooden spoon
How to Serve This Dish:
Serve it in a chilled bowl with extra dill on top. It goes especially well with fried chicken, grilled sausages, or a plate of sliced tomatoes.
Pro Tips for This Recipe:
- Dress the potatoes while they’re still warm, not steaming hot.
- Use whole grain mustard for texture.
- Add a spoonful of pickle brine if you want a sharper edge.
Variations on This Dish:
- German-Style Potato Salad: Swap some mayo for warm bacon vinaigrette.
- Yogurt Dill Salad: Replace half the mayo with Greek yogurt.
- Caper Version: Add chopped capers for a briny hit.
Common Mistakes to Avoid with This Dish:
- Don’t overboil the potatoes or they collapse.
- Don’t serve it straight from the fridge without seasoning check.
- Don’t use watery fresh dill stems; the leaves carry the flavor.
14. Turkey Avocado Wraps
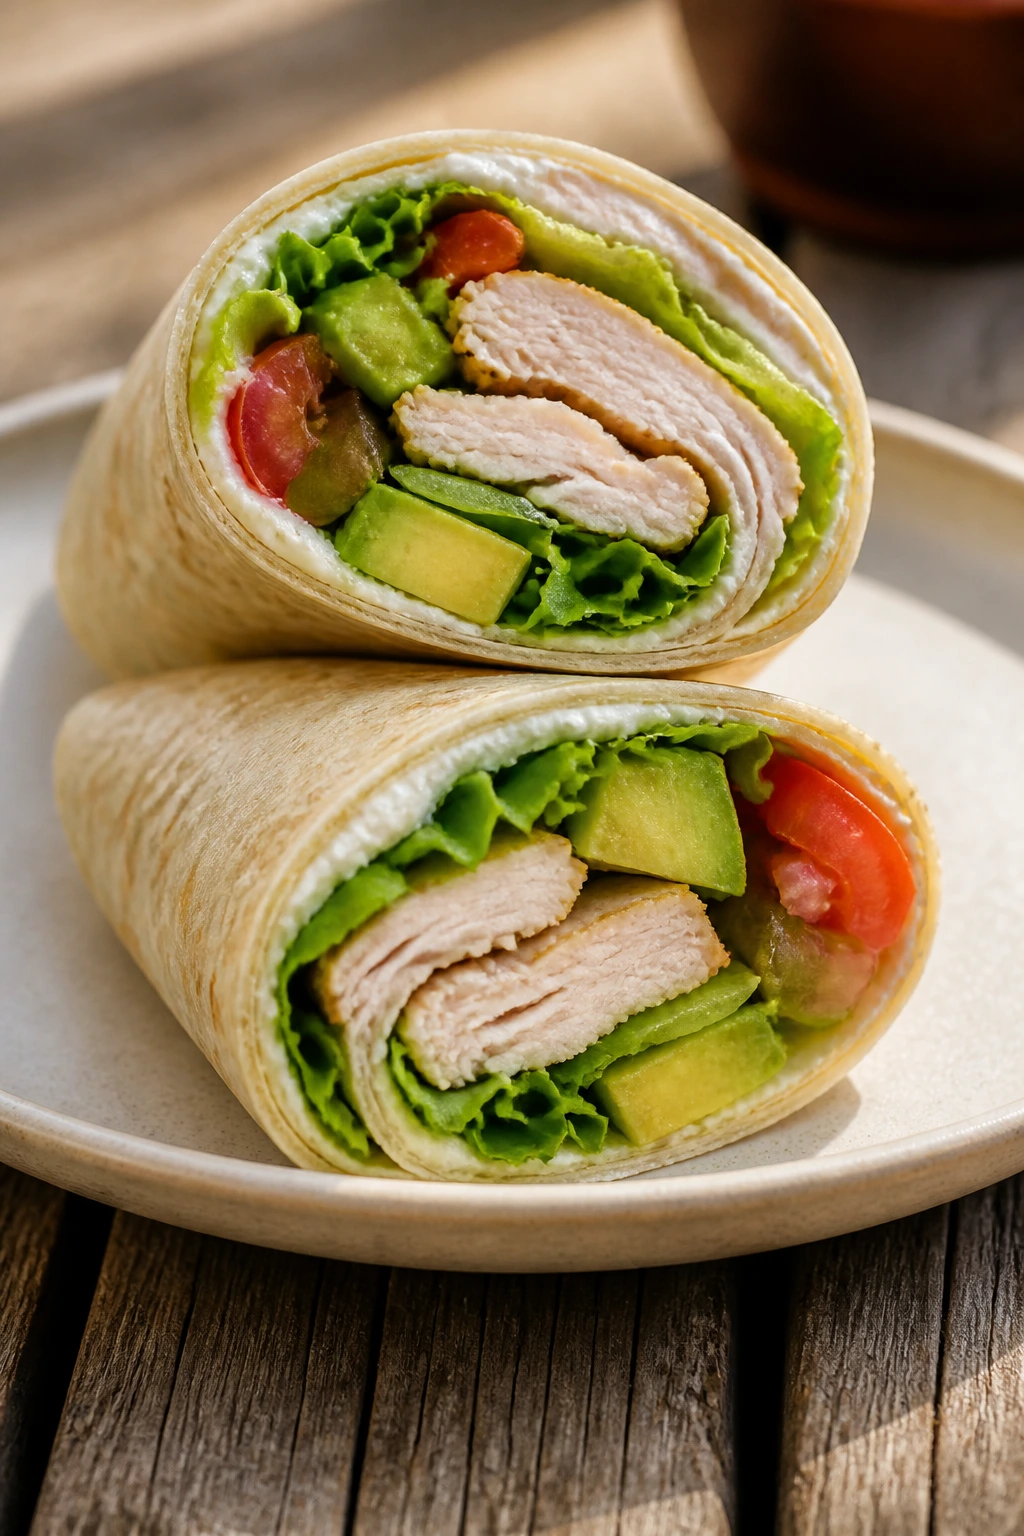
Turkey wraps are the quiet workhorses of picnic nights. They’re easy to pack, easy to eat, and they don’t need much more than a good tortilla and a little restraint with the fillings.
Why It Works:
Cream cheese or mayo creates a barrier that helps keep the tortilla from getting damp. Avocado adds richness, and the turkey gives the wrap enough substance to feel like dinner, not a snack.
Key Ingredients:
- 4 large flour tortillas
- 8 ounces sliced turkey
- 1 avocado, sliced
- 4 leaves romaine lettuce
- 1 tomato, sliced and salted
- 4 tablespoons cream cheese or mayonnaise
- 1 tablespoon lemon juice
- Salt and pepper
Quick Steps:
- Stir lemon juice into the cream cheese or spread the mayo thinly over each tortilla.
- Layer lettuce, turkey, avocado, and tomato down the center.
- Season with salt and pepper.
- Roll tightly, tucking in the sides as you go.
- Wrap in parchment and chill slightly before slicing.
Equipment for This Recipe:
- Cutting board
- Sharp knife
- Parchment or foil
- Spoon or spatula
- Small bowl
How to Serve This Dish:
Slice on the diagonal so the filling shows, then pack the halves seam-side down. A handful of chips or a few baby carrots make this feel complete.
Pro Tips for This Recipe:
- Don’t overfill the wrap or it splits.
- Pat the tomato slices dry so the tortilla doesn’t go soggy.
- Add avocado last if you’re making these ahead.
Variations on This Dish:
- Deli Club Wrap: Add bacon and a little mustard.
- Spicy Turkey Wrap: Stir chipotle sauce into the cream cheese.
- Veggie Version: Skip turkey and add hummus, cucumber, and shredded carrots.
Common Mistakes to Avoid with This Dish:
- Don’t use tiny tortillas; they tear under pressure.
- Don’t leave the wrap unwrapped in the cooler.
- Don’t slice too early or the seam opens.
15. Greek Orzo Salad
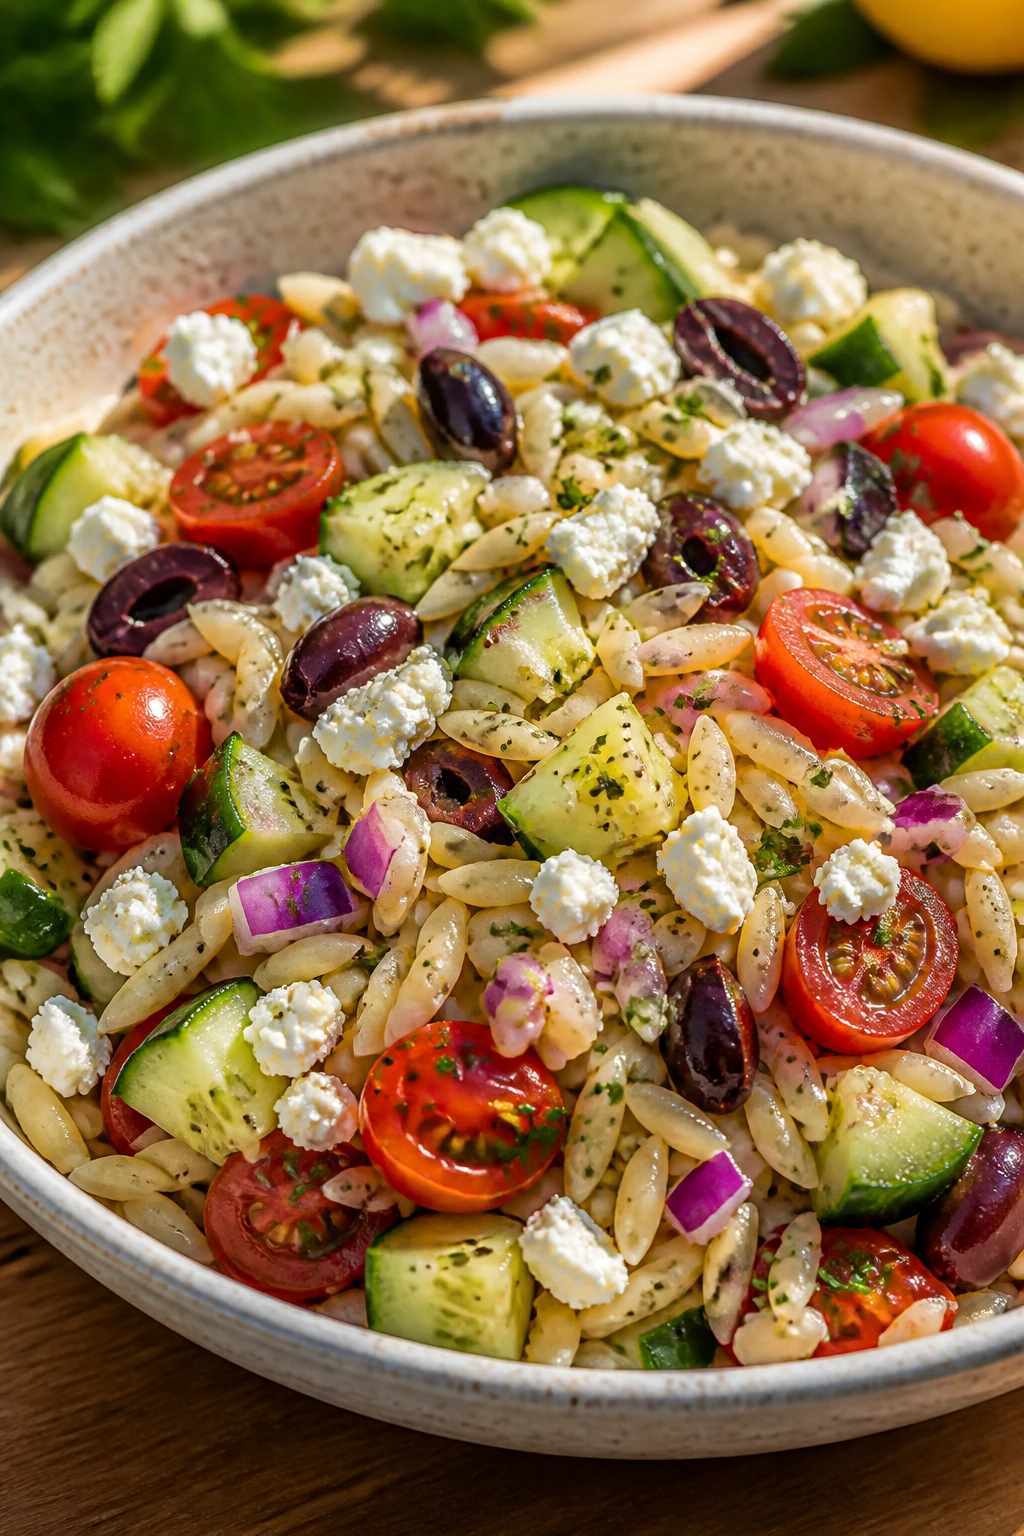
Orzo salad behaves like a pasta salad with better manners. The tiny rice-shaped noodles catch the dressing, and the olives, feta, and cucumber bring enough salt and crunch to keep it interesting.
Why It Works:
Orzo cools quickly and mixes cleanly with chopped vegetables. Lemon and oregano keep the flavor sharp, which matters once the salad has been sitting in a cold container for a while.
Key Ingredients:
- 12 ounces orzo
- 1 cucumber, diced
- 1 pint cherry tomatoes, halved
- 1/2 red onion, finely chopped
- 3/4 cup crumbled feta
- 1/2 cup Kalamata olives, sliced
- 1/4 cup olive oil
- 3 tablespoons lemon juice
- 1 teaspoon dried oregano
- Salt and black pepper
Quick Steps:
- Cook the orzo until tender, then drain and rinse briefly.
- Whisk olive oil, lemon juice, oregano, salt, and pepper.
- Toss the orzo with cucumber, tomatoes, onion, olives, and feta.
- Pour on the dressing and mix gently.
- Chill for 30 minutes before serving.
Equipment for This Recipe:
- Pot
- Colander
- Large bowl
- Whisk
- Spoon
How to Serve This Dish:
Serve it cold with extra feta crumbled over the top. It sits nicely beside grilled lamb, chicken skewers, or even a big bowl of hummus and pita.
Pro Tips for This Recipe:
- Let the orzo cool before adding the feta so it doesn’t melt.
- Salt the dressing enough; the pasta softens the impact.
- Chop the onion very fine unless you want a sharp bite.
Variations on This Dish:
- Spinach Orzo Salad: Toss in baby spinach just before serving.
- Tuna Orzo Salad: Add one drained can of tuna.
- Roasted Pepper Version: Swap half the tomatoes for jarred roasted peppers.
Common Mistakes to Avoid with This Dish:
- Don’t overcook the orzo or it turns sticky.
- Don’t drown the salad in dressing.
- Don’t skip chilling; the flavor gets better after a short rest.
16. Hummus Veggie Cups
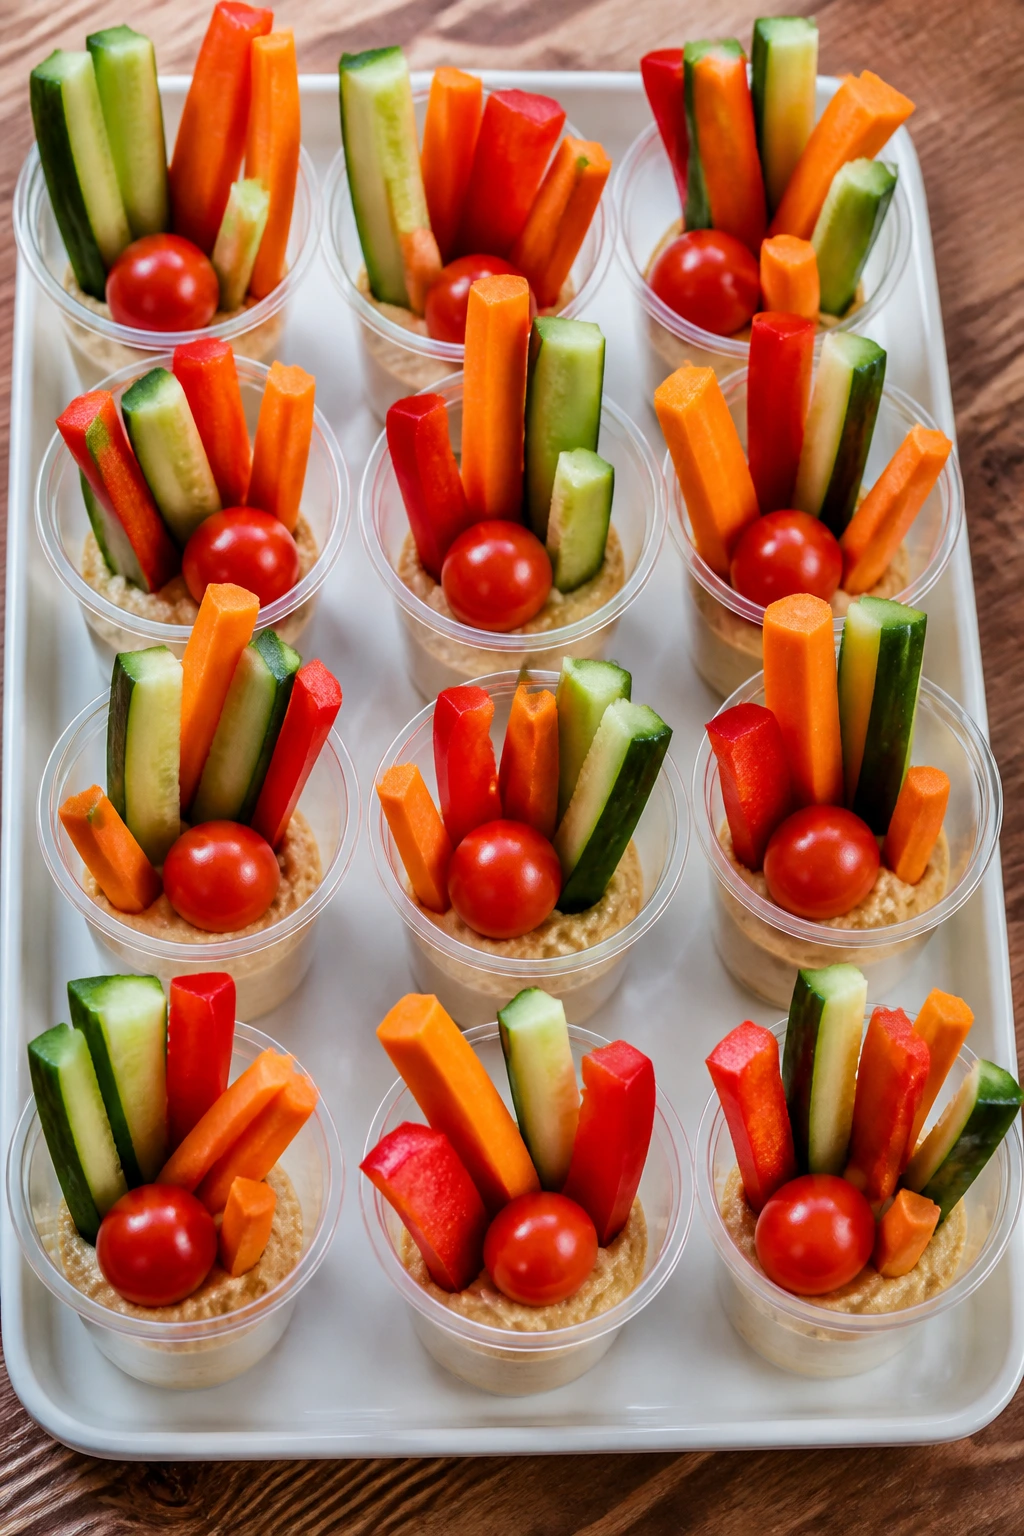
Hummus cups are the cleanest way I know to serve vegetables outside. Nothing slides, nothing leaks, and nobody has to hover over a communal bowl with a soggy carrot stick.
Why It Works:
The hummus acts like a base layer that keeps the cut vegetables upright. Small clear cups also make portioning easy, which is handy when you don’t want a picnic table full of shared hands.
Key Ingredients:
- 2 cups hummus
- 1 cucumber, cut into sticks
- 2 carrots, cut into sticks
- 1 red bell pepper, cut into strips
- 1 cup cherry tomatoes
- 1/2 cup chickpeas, drained and rinsed
- 1 tablespoon olive oil
- Paprika or everything seasoning
- 6 to 8 small cups
Quick Steps:
- Spoon hummus into the bottom of each cup.
- Drizzle lightly with olive oil.
- Arrange the cucumber, carrots, pepper, tomatoes, and chickpeas upright.
- Finish with paprika or seasoning.
- Chill until serving.
Equipment for This Recipe:
- Knife
- Cutting board
- Small cups
- Spoon
- Serving tray
How to Serve This Dish:
Line the cups on a tray so people can grab one without waiting. They work well next to sandwiches or as a first snack when the cooler opens.
Pro Tips for This Recipe:
- Cut the vegetables to similar lengths so the cups look neat.
- Use thicker hummus if you want the veggies to stand straight.
- Dry the chickpeas well so they don’t make the hummus watery.
Variations on This Dish:
- Roasted Red Pepper Hummus Cups: Use flavored hummus for more depth.
- Mediterranean Cups: Add olives and feta.
- Kid-Friendly Cups: Stick to carrots, cucumbers, and a mild hummus.
Common Mistakes to Avoid with This Dish:
- Don’t pack the cups too early if the veggies are wet.
- Don’t make the sticks too thick or they’re awkward to eat.
- Don’t use runny hummus.
17. Egg Salad Tea Sandwiches

Egg salad sandwiches can be dull if you let them. Add enough mustard, a little celery, and soft bread with the crusts trimmed, and they turn into the kind of picnic food people quietly return to.
Why It Works:
Egg yolks make the filling rich, while celery and chives keep it from going heavy. Thin bread makes the bites neat and easy to handle, which is exactly what picnic food should do.
Key Ingredients:
- 6 hard-boiled eggs
- 1/3 cup mayonnaise
- 1 teaspoon Dijon mustard
- 1 celery stalk, finely chopped
- 1 tablespoon chopped chives
- 1 teaspoon lemon juice
- Salt and pepper
- 8 slices soft sandwich bread
- Butter for spreading
Quick Steps:
- Chop the peeled eggs finely.
- Mix eggs with mayo, mustard, celery, chives, lemon juice, salt, and pepper.
- Butter the bread lightly.
- Spread the egg salad on half the slices and top with the rest.
- Trim the crusts and cut into triangles.
Equipment for This Recipe:
- Bowl
- Fork
- Knife
- Cutting board
- Spoon
How to Serve This Dish:
Stack them on a tray and cover them lightly with parchment if you’re carrying them outside. They go nicely with potato chips and sliced radishes.
Pro Tips for This Recipe:
- Mash part of the yolk for a creamier texture.
- Use soft bread that won’t crack when cut.
- Keep the filling chilled until the last minute.
Variations on This Dish:
- Curried Egg Salad: Add 1/2 teaspoon curry powder.
- Pickle Egg Salad: Stir in chopped dill pickles instead of celery.
- Avocado Egg Salad: Replace half the mayo with avocado.
Common Mistakes to Avoid with This Dish:
- Don’t leave the eggs in boiling water too long or they taste sulfurous.
- Don’t make the filling too wet.
- Don’t assemble early unless you’re eating within the hour.
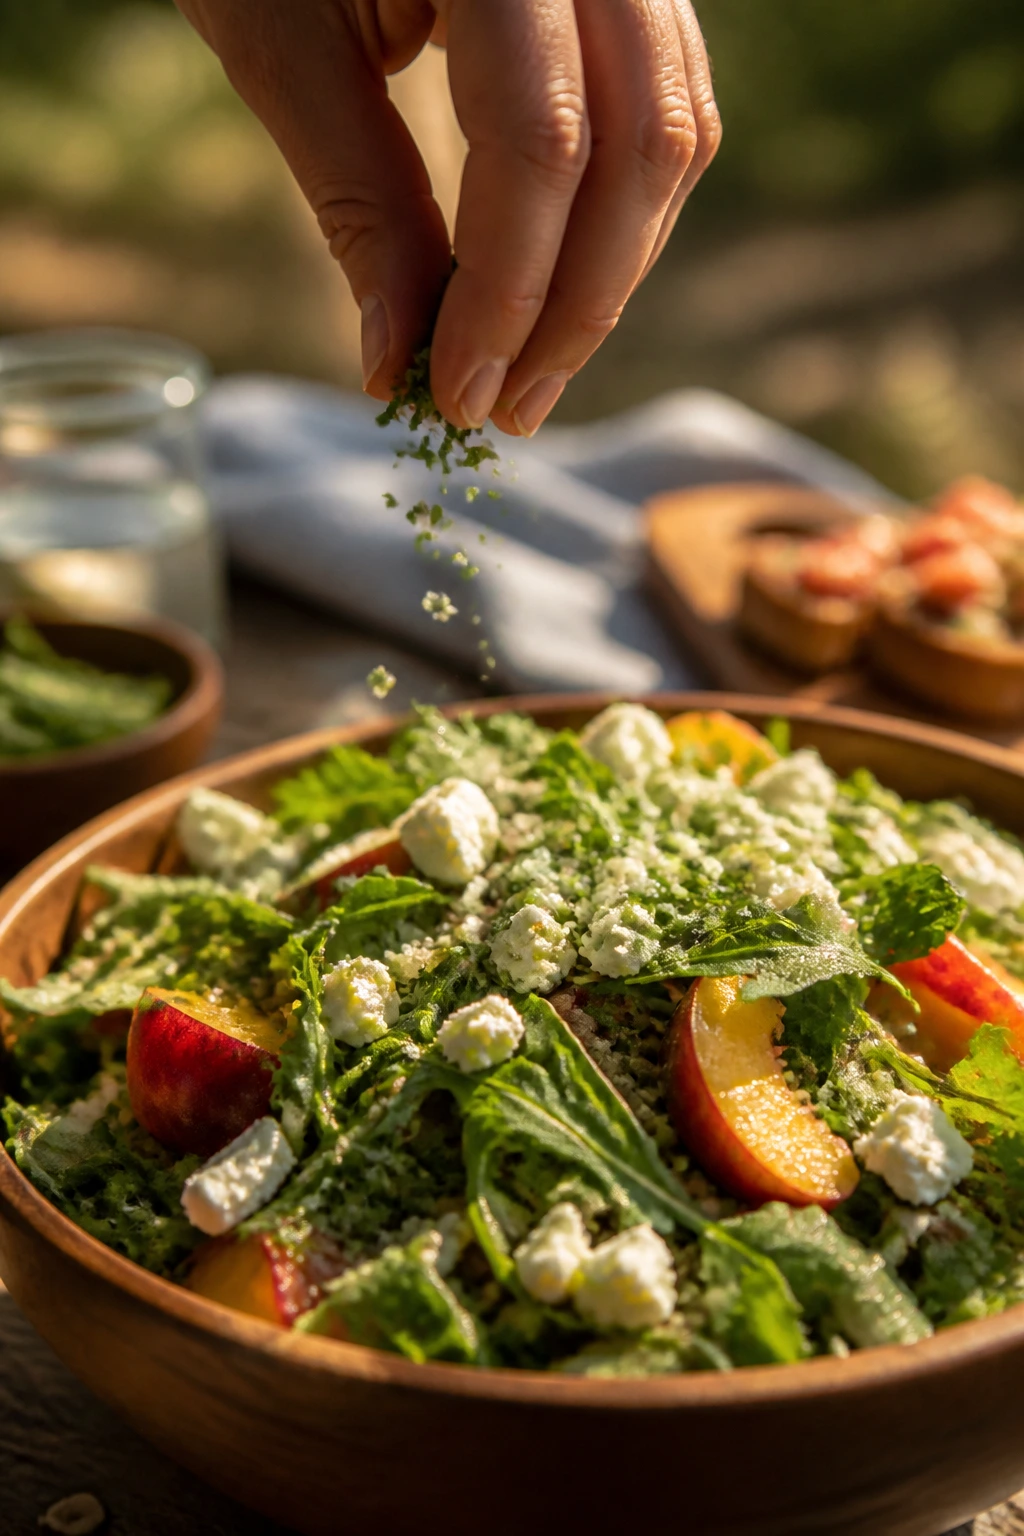
18. Peach Burrata Salad
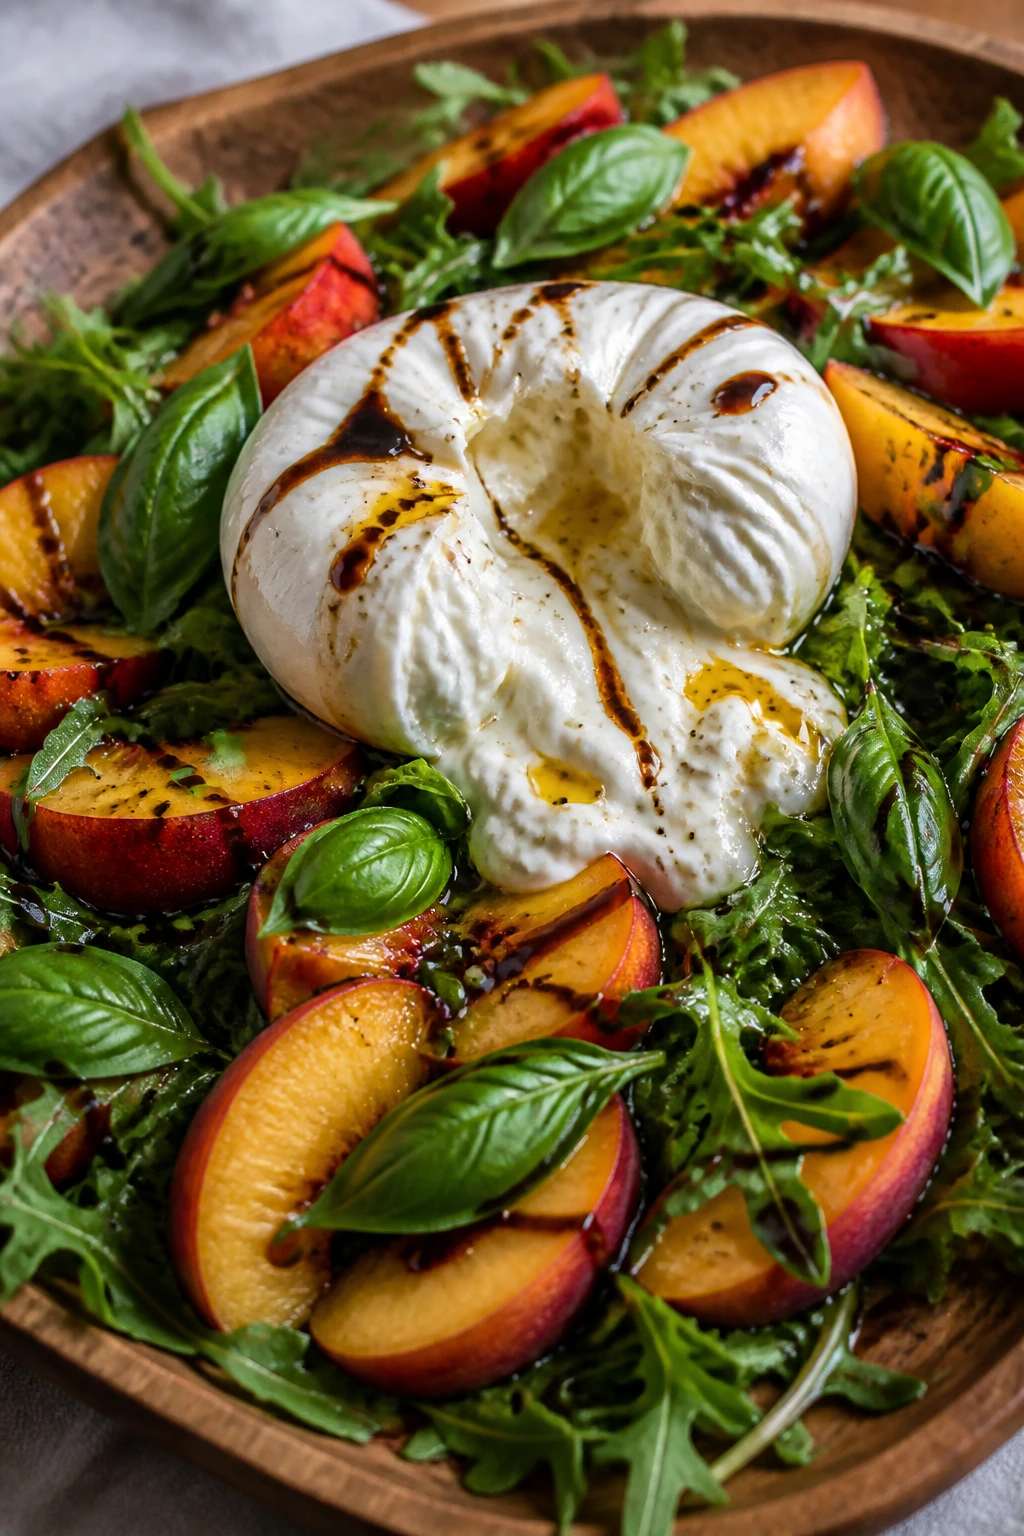
Peach burrata salad is the thing I make when peaches are fragrant and soft enough to perfume the whole counter. The burrata gives it a milky center, and the greens keep it from tipping into dessert territory.
Why It Works:
Ripe peaches need salt and acid to shine, and burrata softens the sharp edges. A peppery green like arugula adds enough bite to keep the dish grounded.
Key Ingredients:
- 3 ripe peaches, sliced
- 8 ounces burrata
- 4 cups arugula
- 1 tablespoon olive oil
- 1 tablespoon balsamic glaze
- Salt and black pepper
- Small basil leaves
- Optional prosciutto, 4 to 6 slices
Quick Steps:
- Arrange arugula on a platter.
- Layer peach slices and burrata over the greens.
- Tear the burrata open gently so the center spills out.
- Drizzle with olive oil and balsamic glaze.
- Finish with salt, pepper, and basil.
Equipment for This Recipe:
- Platter
- Knife
- Spoon
- Paper towels
- Small bowl, if needed for dressing
How to Serve This Dish:
Serve this one immediately after assembling. It works as a first course, a side, or a light dinner with grilled bread.
Pro Tips for This Recipe:
- Use peaches that smell sweet at the stem end.
- Salt the peaches lightly; they need the contrast.
- Keep the burrata cold until the last minute.
Variations on This Dish:
- Tomato-Peach Salad: Add heirloom tomato slices.
- Prosciutto Plate: Layer prosciutto under the peaches.
- Herb Swap: Use mint instead of basil for a cooler finish.
Common Mistakes to Avoid with This Dish:
- Don’t use firm peaches that taste like cardboard.
- Don’t drown the burrata in dressing.
- Don’t assemble too far ahead or the fruit juices spread.
19. BBQ Pulled Pork Sliders
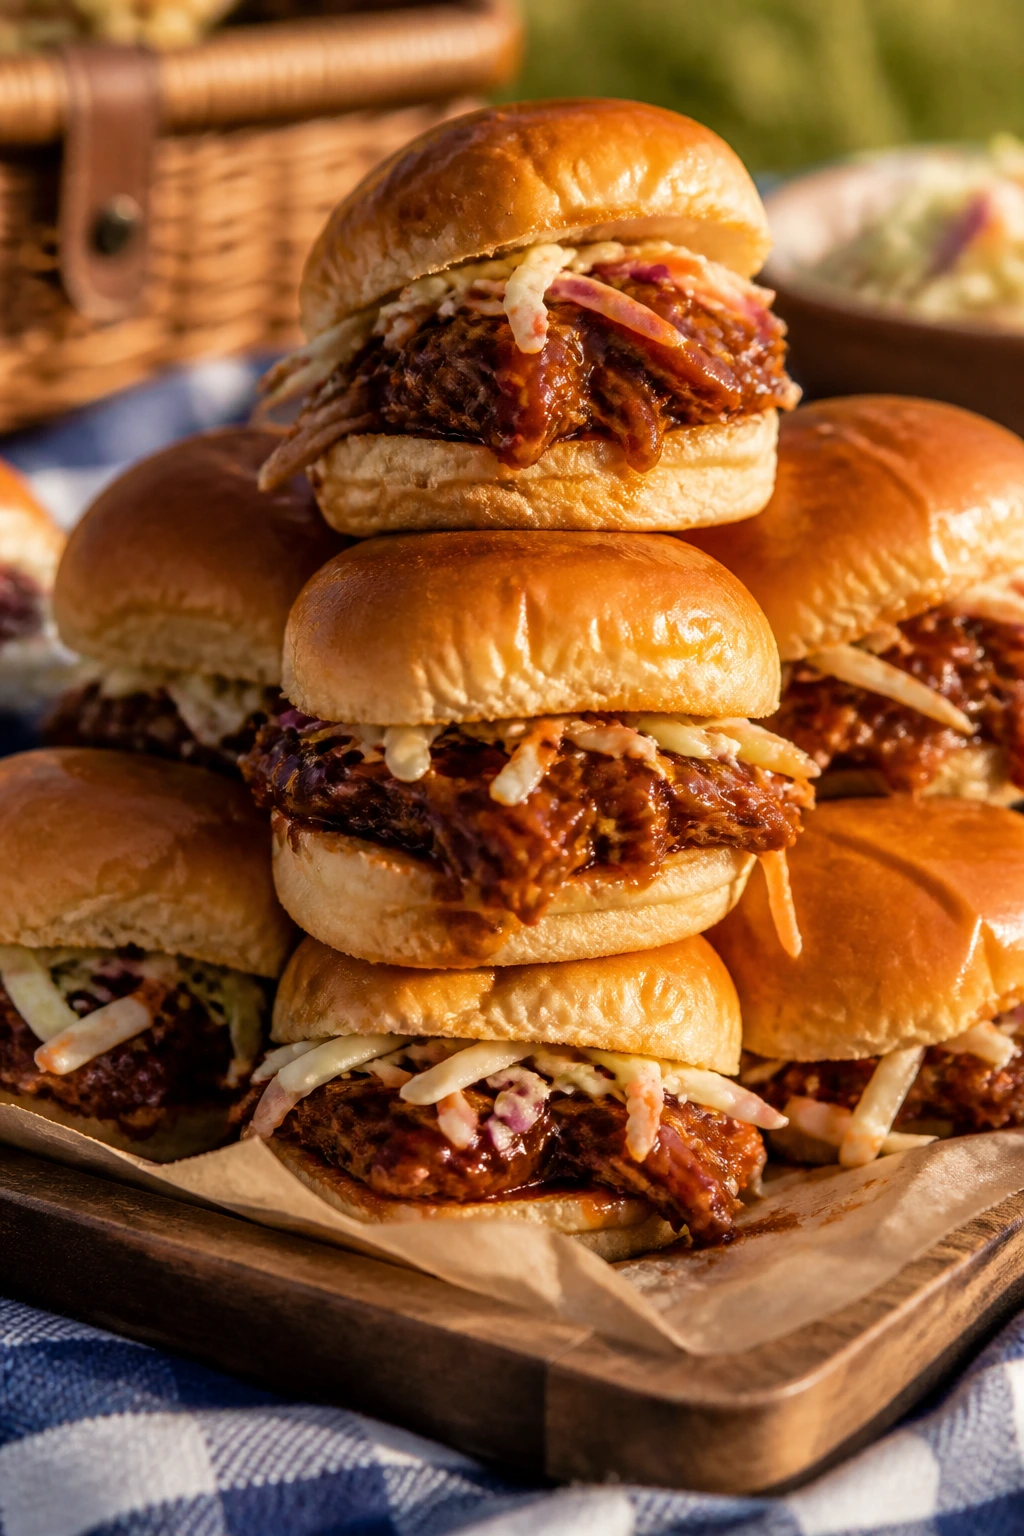
Pulled pork sliders bring a little barbecue energy to a picnic without requiring a smoker on site. Leftover pork, a tangy sauce, and a soft bun are enough.
Why It Works:
The sauced pork stays tender, and the slaw adds crunch so the sandwich doesn’t collapse into mush. Mini buns keep portions sane, which matters when there are five other dishes on the blanket.
Key Ingredients:
- 3 cups cooked pulled pork
- 1/2 cup BBQ sauce
- 12 slider buns
- 2 cups coleslaw mix
- 1/4 cup mayonnaise
- 1 tablespoon apple cider vinegar
- 1 teaspoon sugar
- Dill pickle chips
- Salt and pepper
Quick Steps:
- Warm the pulled pork with BBQ sauce until just hot.
- Toss coleslaw mix with mayo, vinegar, sugar, salt, and pepper.
- Split and lightly toast the slider buns.
- Fill with pork, slaw, and pickles.
- Wrap each slider in parchment if you’re packing them.
Equipment for This Recipe:
- Skillet or saucepan
- Mixing bowl
- Spoon
- Knife
- Baking sheet for toasting buns
How to Serve This Dish:
Serve them stacked and wrapped so they hold together on the way out. A side of chips, baked beans, or corn salad makes them feel complete.
Pro Tips for This Recipe:
- Keep the slaw dry enough that it crunches, not drips.
- Use a sharper BBQ sauce if the pork is rich.
- Toast the buns lightly so they don’t go soft under the filling.
Variations on This Dish:
- Spicy Pork Sliders: Stir hot sauce into the BBQ sauce.
- Carolina-Style Version: Use vinegar-based sauce and no mayo in the slaw.
- Cheesy Slider: Add a thin slice of cheddar under the pork.
Common Mistakes to Avoid with This Dish:
- Don’t overheat the pork or it dries out.
- Don’t pile on too much slaw.
- Don’t skip the parchment wrap if you’re transporting them.
20. Cornbread Muffins with Honey Butter
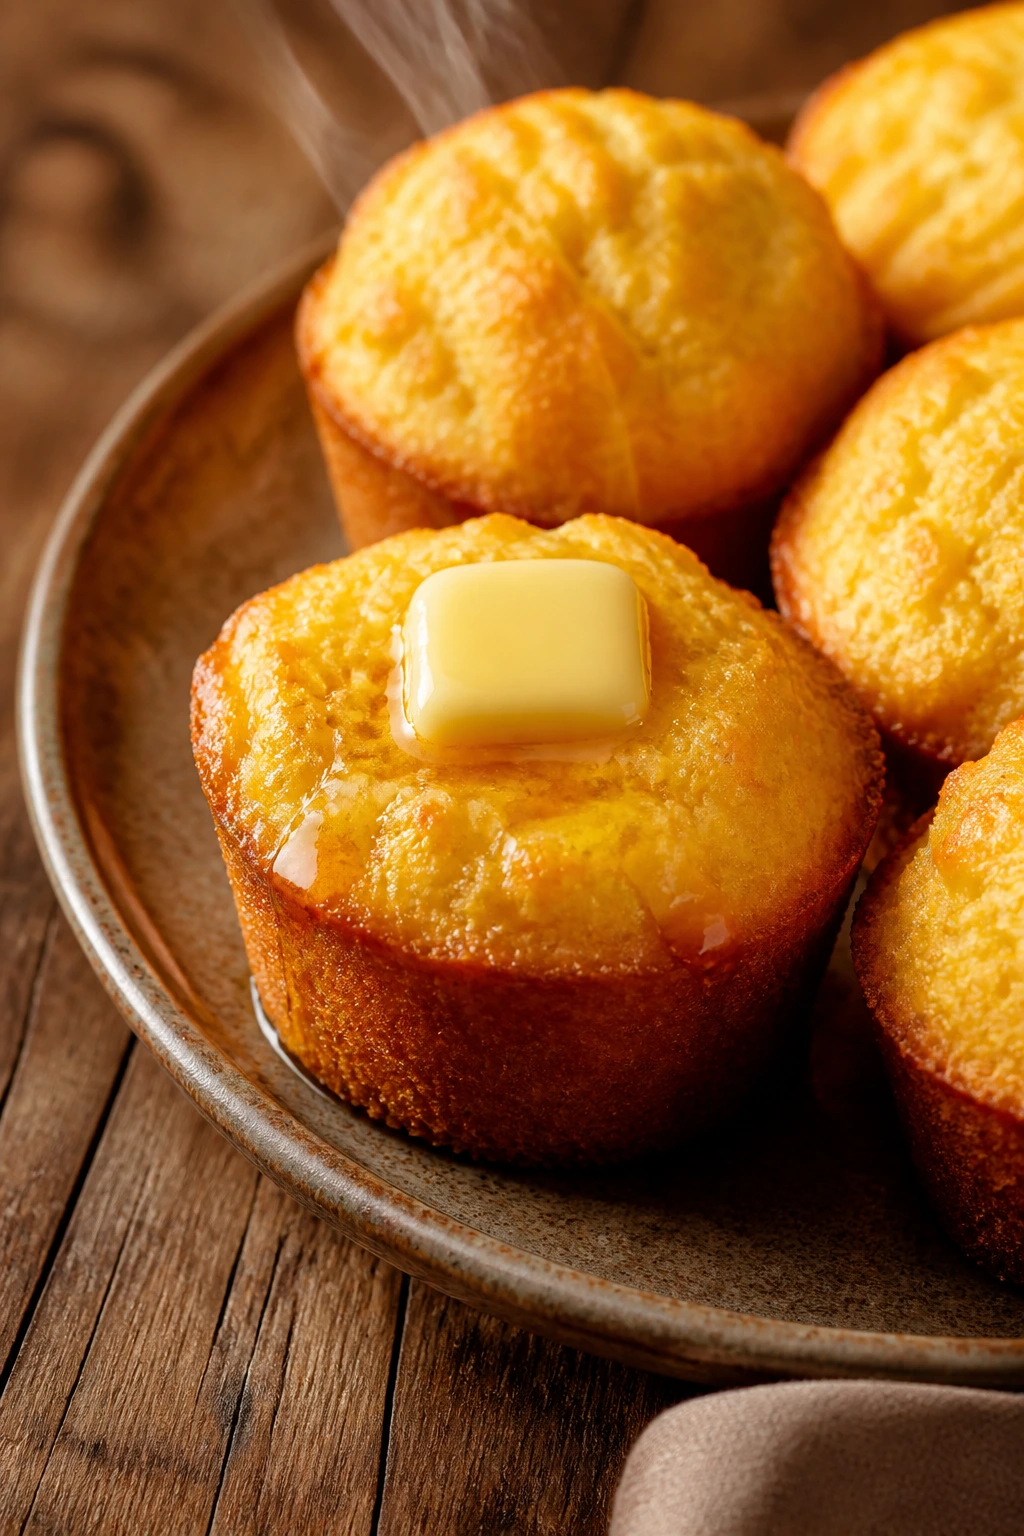
Cornbread muffins bring a little warmth to a picnic without turning it into a baking project. The crumb should be tender, not cakey, and the honey butter should melt into the top if the muffins are still warm.
Why It Works:
Cornmeal gives the muffins texture and a little grit, which pairs well with sweet toppings or savory picnic foods. Honey butter turns them into something people grab without planning to.
Key Ingredients:
- 1 cup cornmeal
- 1 cup all-purpose flour
- 2 teaspoons baking powder
- 1/2 teaspoon salt
- 1 large egg
- 1 cup milk
- 1/3 cup melted butter
- 1/4 cup sugar
- 2 tablespoons honey
- 4 tablespoons softened butter for honey butter
Quick Steps:
- Heat the oven to 375°F and grease a muffin tin.
- Whisk cornmeal, flour, baking powder, salt, and sugar.
- Stir in egg, milk, and melted butter until just combined.
- Divide into muffin cups and bake for 15 to 18 minutes.
- Mix softened butter and honey, then serve with warm muffins.
Equipment for This Recipe:
- Muffin tin
- Mixing bowl
- Whisk
- Spoon
- Small bowl for honey butter
How to Serve This Dish:
Serve them warm if you can, or at room temperature with a small pat of honey butter on top. They’re good beside fried chicken, pulled pork, or a bowl of beans.
Pro Tips for This Recipe:
- Stop mixing as soon as the batter comes together.
- Don’t overfill the muffin cups.
- Brush the tops with a little honey butter while warm for a glossy finish.
Variations on This Dish:
- Jalapeño Cornbread: Fold in chopped jalapeño and cheddar.
- Savory Herb Muffins: Add chives and thyme.
- Gluten-Free Batch: Use a 1:1 gluten-free flour blend.
Common Mistakes to Avoid with This Dish:
- Don’t overbake or they dry out quickly.
- Don’t pack them while piping hot.
- Don’t make the batter smooth; a few lumps are fine.
21. Crispy Baked Tofu Bites
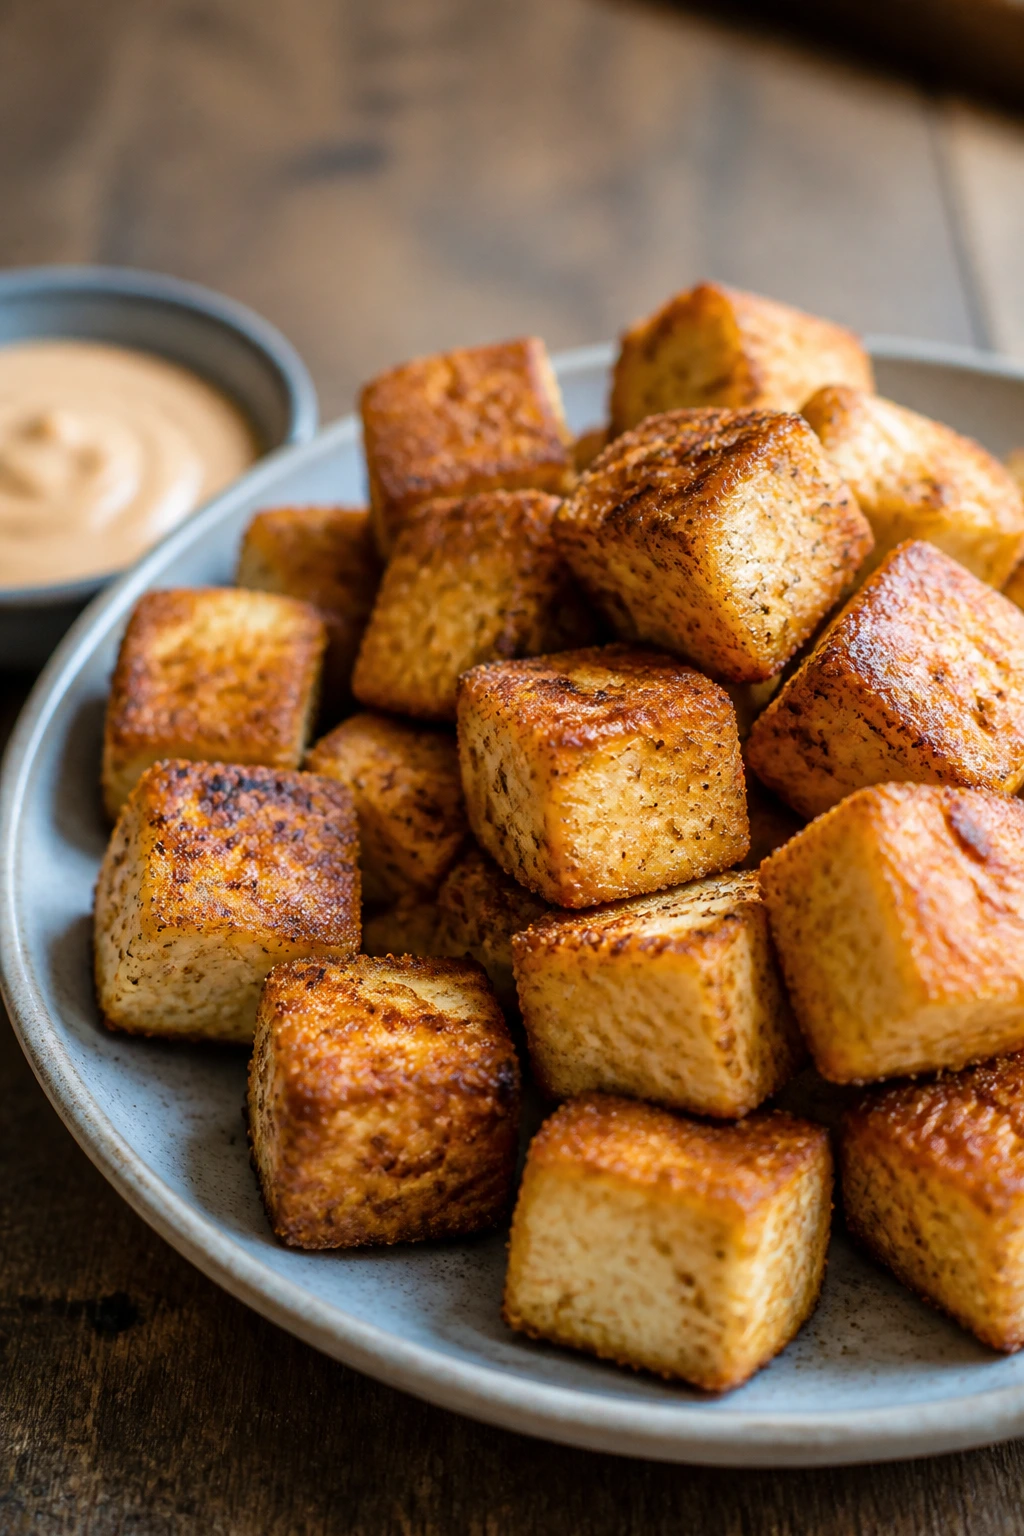
Tofu gets a bad rap from people who have only eaten it when it was pale and soft. Coat it well, bake it until the edges turn crisp, and it becomes one of the better picnic proteins around.
Why It Works:
Extra-firm tofu holds its shape, and cornstarch gives the outside a dry, crisp shell. Because the flavor is in the seasoning, it still tastes good cold with a dipping sauce.
Key Ingredients:
- 1 block extra-firm tofu, about 14 ounces
- 2 tablespoons soy sauce
- 1 tablespoon olive oil
- 2 tablespoons cornstarch
- 1 teaspoon garlic powder
- 1 teaspoon smoked paprika
- 1/2 teaspoon salt
- Sweet chili sauce or peanut sauce for serving
Quick Steps:
- Press the tofu for 15 minutes, then cube it.
- Toss with soy sauce and olive oil.
- Coat with cornstarch, garlic powder, paprika, and salt.
- Bake at 425°F for 25 to 30 minutes, turning halfway through.
- Cool before packing with dipping sauce.
Equipment for This Recipe:
- Baking sheet
- Parchment paper
- Mixing bowl
- Tofu press or towels
- Spatula
How to Serve This Dish:
Pack the sauce separately and serve the tofu with cucumber sticks or rice noodles. It also makes a good protein addition to a salad box.
Pro Tips for This Recipe:
- Press tofu longer if it feels wet.
- Leave space between the cubes so they crisp, not steam.
- Use smoked paprika if you want a grilled flavor without the grill.
Variations on This Dish:
- Buffalo Tofu: Toss the baked cubes in hot sauce and melted butter.
- Sesame Tofu: Swap paprika for sesame oil and sesame seeds.
- Lemon Pepper Tofu: Use lemon zest and cracked pepper.
Common Mistakes to Avoid with This Dish:
- Don’t skip pressing the tofu.
- Don’t overcrowd the pan.
- Don’t drown it in sauce before packing.
22. Shrimp Orzo Salad
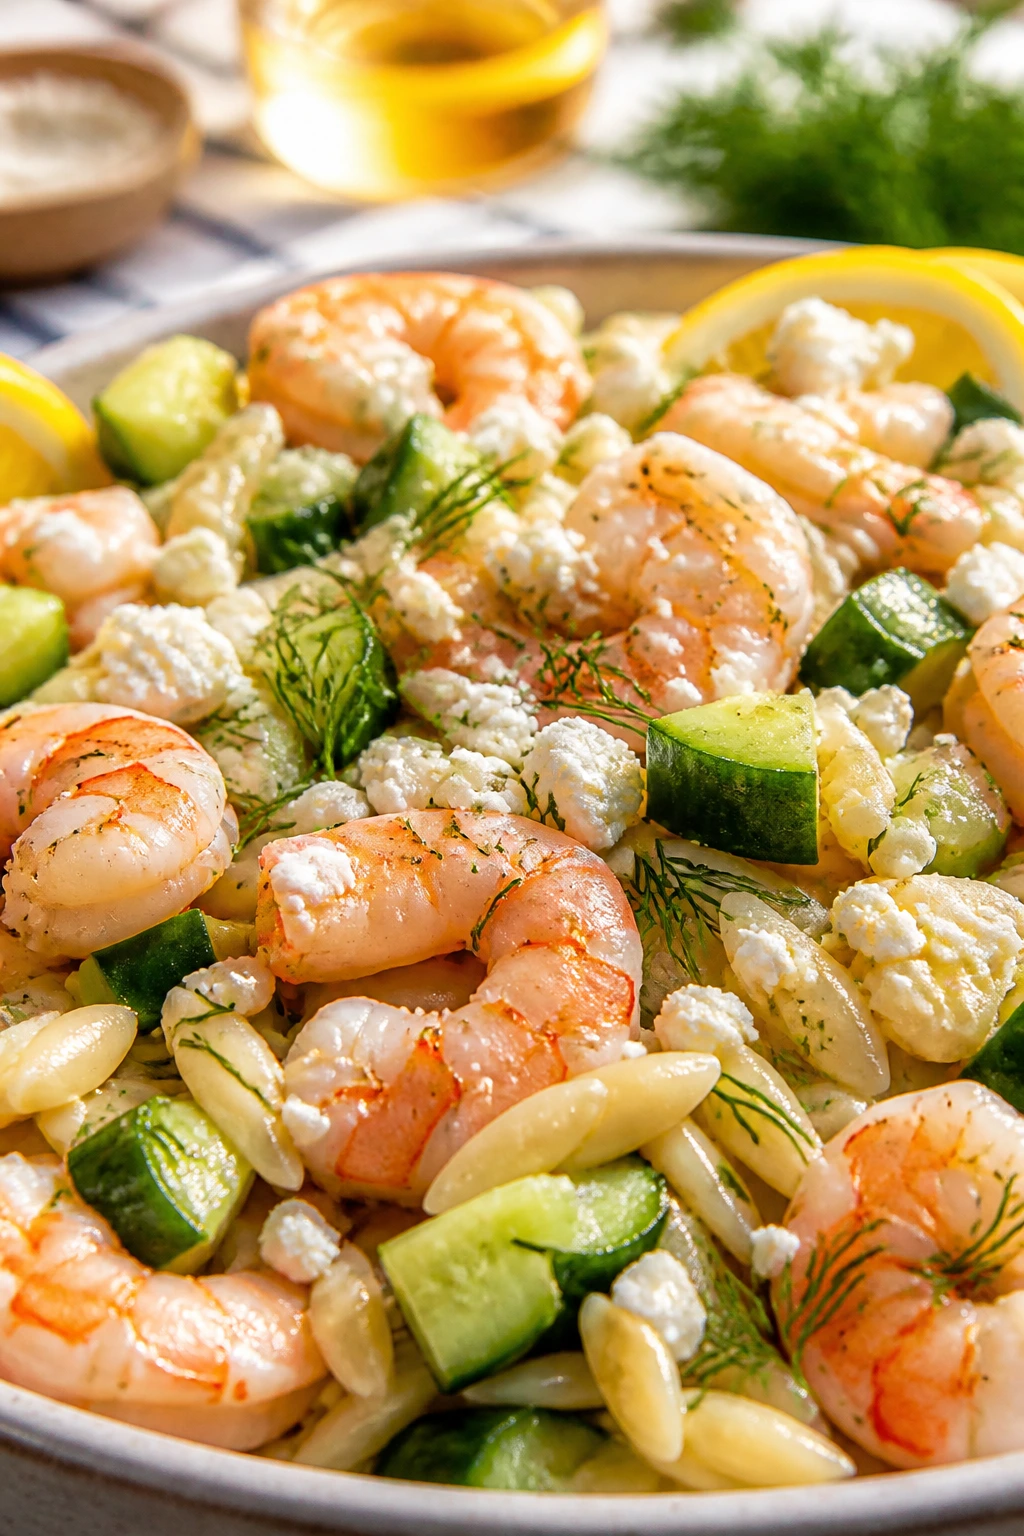
Shrimp orzo salad feels polished without asking for much effort. The shrimp bring sweetness, the orzo holds the dressing, and the lemon keeps the whole bowl tasting clean instead of heavy.
Why It Works:
Shrimp chill quickly and pair well with cucumber, dill, and feta. Orzo gives the salad enough body that it can stand alone as dinner on a hot night.
Key Ingredients:
- 1 pound shrimp, peeled and deveined
- 12 ounces orzo
- 1 cucumber, diced
- 1/2 cup crumbled feta
- 2 tablespoons chopped dill
- 2 tablespoons olive oil
- 2 tablespoons lemon juice
- 1 small garlic clove, grated
- Salt and pepper
Quick Steps:
- Boil the orzo, drain, and rinse briefly.
- Poach or sauté the shrimp until pink and just firm, about 2 to 3 minutes per side.
- Whisk olive oil, lemon juice, garlic, salt, and pepper.
- Toss the orzo with cucumber, dill, feta, and shrimp.
- Chill for 20 minutes before serving.
Equipment for This Recipe:
- Pot
- Skillet
- Mixing bowl
- Whisk
- Slotted spoon
How to Serve This Dish:
Serve it cold or lightly chilled with lemon wedges on the side. It’s strong enough to be the main dish, but I also like it next to grilled vegetables.
Pro Tips for This Recipe:
- Don’t overcook the shrimp; they firm up as they cool.
- Cool the orzo before tossing in the feta.
- Add a small splash more lemon right before serving.
Variations on This Dish:
- Mediterranean Shrimp Bowl: Add olives and cherry tomatoes.
- Spicy Shrimp Orzo: Stir in chili flakes.
- No-Feta Version: Use avocado cubes instead.
Common Mistakes to Avoid with This Dish:
- Don’t leave shrimp sitting in the heat too long.
- Don’t dress the pasta while it’s still steaming hot.
- Don’t skip the chill, because the flavors need a minute.
23. Antipasto Skewers
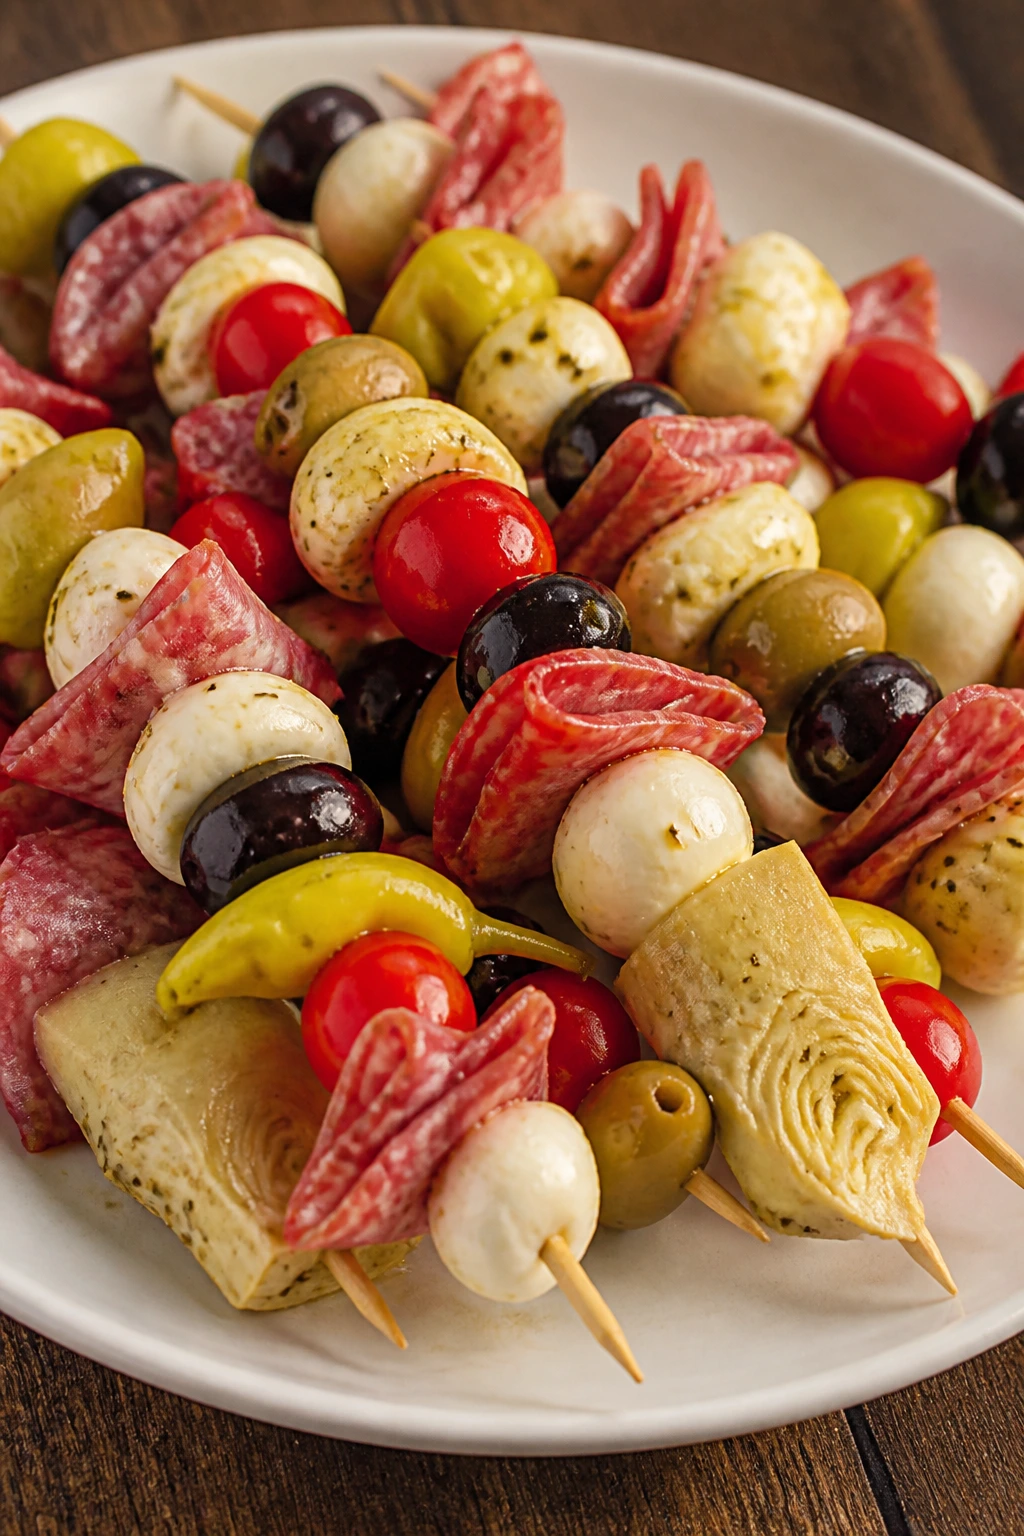
Antipasto skewers are the easiest way to make a picnic table look abundant. Salami, olives, cheese, and peppers already belong together; skewers just keep the whole thing tidy.
Why It Works:
Each bite gets salt, fat, acid, and chew in one line. That balance is why these never seem to linger once people spot them.
Key Ingredients:
- 12 slices salami, folded
- 12 mozzarella balls
- 12 olives
- 12 pepperoncini slices
- 12 cherry tomatoes
- 1/4 cup marinated artichoke hearts
- 2 tablespoons olive oil
- 1 tablespoon red wine vinegar
- 12 skewers
Quick Steps:
- Whisk olive oil and red wine vinegar into a light dressing.
- Thread salami, mozzarella, olives, pepperoncini, tomatoes, and artichoke hearts onto each skewer.
- Arrange on a platter.
- Drizzle lightly with dressing.
- Chill until serving.
Equipment for This Recipe:
- Skewers
- Small bowl
- Spoon
- Cutting board
- Paper towels
How to Serve This Dish:
Serve them on a platter with extra dressing on the side. They work as an appetizer, a snack, or the salty anchor of the whole picnic spread.
Pro Tips for This Recipe:
- Pat the marinated vegetables dry so the skewers don’t slip.
- Fold the salami rather than stacking it flat; it looks better and holds.
- Keep the dressing light.
Variations on This Dish:
- Turkey Antipasto: Swap salami for turkey pepperoni.
- Veggie Skewer: Use more peppers, artichokes, and cheese, no meat.
- Herb Finish: Add a basil leaf between the cheese and tomato.
Common Mistakes to Avoid with This Dish:
- Don’t make the skewers too crowded.
- Don’t use watery mozzarella.
- Don’t drown them in dressing.
24. Strawberry Spinach Salad
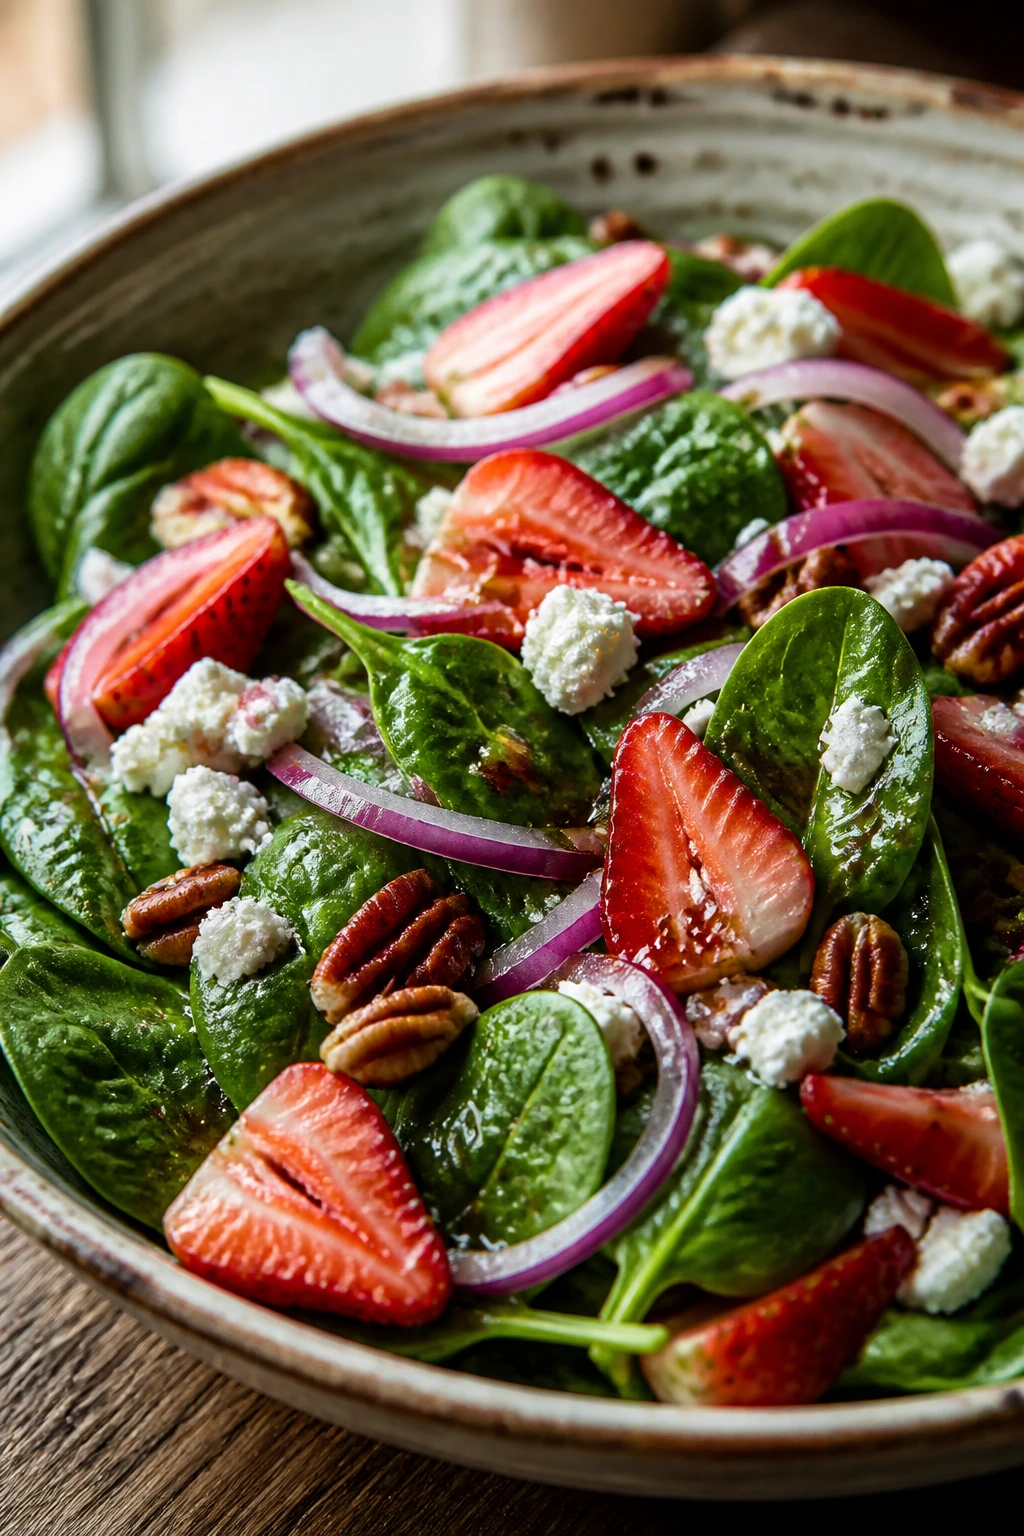
Strawberry spinach salad works because it respects the strawberries. Sweet fruit, tender greens, sharp onion, and a creamy or tangy dressing need enough contrast to keep each bite lively.
Why It Works:
Spinach holds up better than lettuce and doesn’t bruise under a little dressing. Pecans add crunch, and goat cheese brings the salty edge that strawberries need.
Key Ingredients:
- 6 cups baby spinach
- 2 cups sliced strawberries
- 1/4 red onion, thinly sliced
- 1/2 cup crumbled goat cheese
- 1/2 cup candied or toasted pecans
- 3 tablespoons poppy seed dressing
- Black pepper
Quick Steps:
- Wash and dry the spinach well.
- Slice the strawberries and onion.
- Toss the spinach with a small amount of dressing.
- Add strawberries, goat cheese, and pecans.
- Finish with black pepper and serve right away.
Equipment for This Recipe:
- Salad bowl
- Salad spinner or towels
- Knife
- Cutting board
- Tongs
How to Serve This Dish:
Serve the dressing on the side if the salad needs to travel. It looks best in a wide bowl where the strawberries and cheese stay visible.
Pro Tips for This Recipe:
- Dry the spinach thoroughly so the dressing clings.
- Toast the pecans if they aren’t already candied.
- Add onion sparingly unless you like a sharp bite.
Variations on This Dish:
- Feta Strawberry Salad: Swap goat cheese for feta.
- Pecan-Free Version: Use sunflower seeds instead.
- Balsamic Salad: Replace poppy seed dressing with balsamic vinaigrette.
Common Mistakes to Avoid with This Dish:
- Don’t dress it too early or the spinach collapses.
- Don’t use soggy berries.
- Don’t skip drying the greens.
25. Mini Spinach Feta Quiches
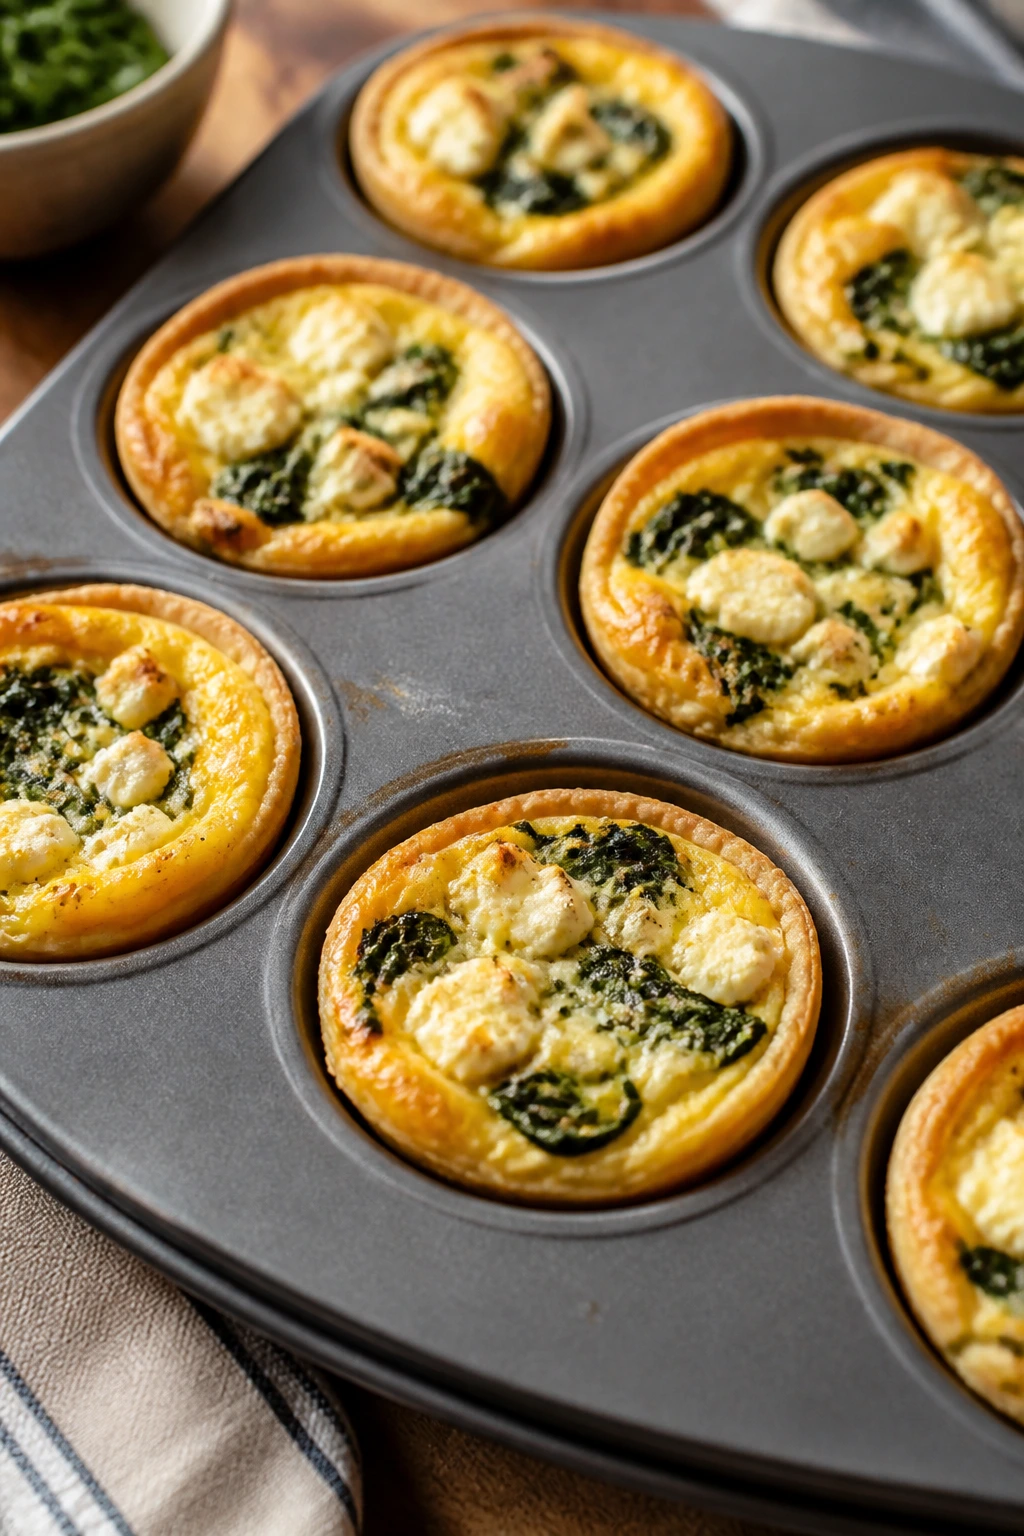
Mini quiches are picnic food with a little structure. The eggs set neatly, the crust gives you something to hold, and spinach and feta keep the filling from tasting bland.
Why It Works:
Baking them in a muffin tin makes them portable and portioned. They’re fine warm, room temperature, or chilled, which gives them a wider use case than most egg dishes.
Key Ingredients:
- 6 large eggs
- 1/2 cup milk
- 1 cup chopped spinach
- 1/2 cup crumbled feta
- 1/4 cup finely diced onion
- 1/4 teaspoon nutmeg
- Salt and pepper
- 1 sheet pie crust or 6 phyllo cups
Quick Steps:
- Heat the oven to 350°F and grease a muffin tin.
- Fit the crust into the cups or use phyllo shells.
- Whisk eggs, milk, nutmeg, salt, and pepper.
- Add spinach, feta, and onion to each cup, then pour in the egg mixture.
- Bake until set and lightly golden, about 18 to 22 minutes.
Equipment for This Recipe:
- Muffin tin
- Mixing bowl
- Whisk
- Knife
- Measuring cup
How to Serve This Dish:
Serve them with a simple tomato salad or a few olives. They’re handy for a picnic brunch, but I’m just as happy eating them at dusk with a cold drink.
Pro Tips for This Recipe:
- Squeeze excess water from the spinach.
- Let the quiches cool for 10 minutes before removing them from the tin.
- Use a little nutmeg; it makes the eggs taste fuller.
Variations on This Dish:
- Mushroom Quiche Cups: Add sautéed mushrooms.
- Cheddar Spinach Quiche: Swap feta for cheddar.
- Crustless Version: Bake directly in greased muffin cups.
Common Mistakes to Avoid with This Dish:
- Don’t overfill the cups or they spill.
- Don’t use wet spinach.
- Don’t pull them too early; the centers should be set, not jiggly.
26. Tuna Pasta Salad
Tuna pasta salad is the picnic version of a dependable old shirt. It’s plain in the best sense: sturdy, familiar, and better than it sounds when you season it properly.
Why It Works:
Tuna brings protein and salt, pasta gives the salad body, and pickle relish wakes the whole thing up. A chilled version holds up well and doesn’t need reheating.
Key Ingredients:
- 12 ounces elbow pasta
- 2 cans tuna, drained
- 1/2 cup mayonnaise
- 2 celery stalks, diced
- 2 tablespoons pickle relish
- 1 tablespoon lemon juice
- 1 teaspoon Dijon mustard
- Salt and pepper
- 1/4 cup chopped parsley
Quick Steps:
- Cook the pasta until tender, then rinse and cool.
- Stir mayonnaise, lemon juice, Dijon, salt, and pepper.
- Fold in tuna, celery, relish, and parsley.
- Toss with the pasta until coated.
- Chill for at least 30 minutes.
Equipment for This Recipe:
- Pot
- Colander
- Large bowl
- Spoon
- Knife
How to Serve This Dish:
Serve it in a shallow bowl with extra parsley over the top. It works alongside sliced cucumbers, bread and butter pickles, or a handful of crackers.
Pro Tips for This Recipe:
- Use solid tuna if you want chunkier texture.
- Cook pasta one minute shy of soft.
- Add a spoonful of relish brine if the salad tastes flat.
Variations on This Dish:
- Dill Tuna Salad: Swap parsley for dill.
- Creamier Version: Add an extra spoonful of mayo.
- No-Mayo Bowl: Use olive oil and lemon instead.
Common Mistakes to Avoid with This Dish:
- Don’t let the pasta get mushy.
- Don’t skip chilling; tuna salad improves after resting.
- Don’t overdo the mayo or it gets heavy.
27. Mason Jar Salad
Mason jar salads are mostly about order. Dressing on the bottom, sturdy ingredients next, greens on top, and suddenly lunch survives the commute without going limp.
Why It Works:
Layering keeps the greens away from the dressing until you shake or dump the jar. The result is cleaner than a lunchbox salad and much less annoying to eat outdoors.
Key Ingredients:
- 3 tablespoons vinaigrette
- 1/2 cup chickpeas
- 1/2 cucumber, diced
- 1 cup cherry tomatoes, halved
- 1/2 cup shredded carrots
- 1/4 cup feta
- 2 cups chopped romaine or mixed greens
- 1 tablespoon sunflower seeds
- 1 quart-size jar
Quick Steps:
- Pour vinaigrette into the bottom of the jar.
- Add chickpeas, cucumber, tomatoes, carrots, feta, seeds, and greens in layers.
- Cap tightly.
- Chill until serving.
- Shake into a bowl or eat directly from the jar if you like the chaos.
Equipment for This Recipe:
- Quart jar
- Spoon
- Knife
- Cutting board
- Funnel, if you want less mess
How to Serve This Dish:
Serve it cold with a fork and a wide mouth jar if you’re being practical. It’s a good one for solo picnics or packed lunches where you don’t want to haul a full bowl.
Pro Tips for This Recipe:
- Put the dressing at the very bottom.
- Keep leafy greens dry before packing.
- Use firmer vegetables first, soft greens last.
Variations on This Dish:
- Southwest Jar: Add black beans, corn, and avocado.
- Greek Jar: Add olives and cucumber with oregano dressing.
- Chicken Jar: Add diced cooked chicken above the veggies.
Common Mistakes to Avoid with This Recipe:
- Don’t put the greens in the middle of the jar.
- Don’t overpack or the lid won’t close well.
- Don’t use a thin dressing that runs into everything.
28. Smashed Potato Salad
Smashed potato salad gives you two textures at once: crisp edges and soft centers. That’s what makes it more interesting than the usual boiled-potato version, especially on a warm night.
Why It Works:
Roasting the potatoes after smashing creates surface area for browning. A tangy dressing clings better to the rough edges than it would to smooth boiled potatoes.
Key Ingredients:
- 2 pounds baby potatoes
- 3 tablespoons olive oil
- 1/3 cup mayonnaise
- 2 tablespoons vinegar
- 2 scallions, sliced
- 2 tablespoons chopped dill
- Salt and pepper
- 1 tablespoon capers, chopped if large
Quick Steps:
- Boil the potatoes until just tender.
- Drain, place on a sheet pan, and smash gently with a cup.
- Drizzle with olive oil and roast at 425°F until crisp, about 20 to 25 minutes.
- Whisk mayo, vinegar, salt, pepper, dill, scallions, and capers.
- Toss the potatoes with the dressing while still warm.
Equipment for This Recipe:
- Pot
- Baking sheet
- Potato masher or cup
- Bowl
- Spoon
How to Serve This Dish:
Serve it warm or room temperature so the crisp edges stay noticeable. It’s a strong side for grilled meat or a tray of sandwiches.
Pro Tips for This Recipe:
- Smash gently so the potatoes stay in one piece.
- Season the potatoes before roasting.
- Add the dressing while they’re still warm enough to absorb it.
Variations on This Dish:
- Garlic Smashed Potatoes: Add minced roasted garlic to the dressing.
- Dairy-Free Version: Use olive oil and lemon instead of mayo.
- Bacon Potato Salad: Fold in crisp bacon right before serving.
Common Mistakes to Avoid with This Dish:
- Don’t overboil or the potatoes fall apart.
- Don’t roast them too close together.
- Don’t dress them ice-cold and expect much flavor absorption.
29. Chicken Caesar Wraps
Chicken Caesar wraps are what I make when I want salad that doesn’t demand a bowl. The romaine gives crunch, the dressing gives salt, and the wrap keeps the whole thing from rolling away.
Why It Works:
The tortilla acts like a portable shell for classic Caesar flavors. Using rotisserie chicken saves time without making the wrap feel cheap or rushed.
Key Ingredients:
- 4 large flour tortillas
- 2 cups cooked chicken, chopped or shredded
- 3 cups romaine lettuce, chopped
- 1/3 cup Caesar dressing
- 1/4 cup grated Parmesan
- 1/2 cup croutons, lightly crushed
- Black pepper
- Lemon wedges
Quick Steps:
- Toss the chicken with a little Caesar dressing.
- Mix romaine with the rest of the dressing and Parmesan.
- Lay chicken and lettuce down the center of each tortilla.
- Add crushed croutons and black pepper.
- Roll tightly and wrap in parchment.
Equipment for This Recipe:
- Bowl
- Knife
- Cutting board
- Parchment
- Spoon
How to Serve This Dish:
Serve the wraps whole or cut in half on the diagonal. A lemon wedge on the side sharpens the dressing and keeps the lettuce tasting fresh.
Pro Tips for This Recipe:
- Add the croutons right before eating if you want real crunch.
- Don’t overdress the lettuce.
- Use a sturdy tortilla so it won’t tear.
Variations on This Dish:
- Buffalo Caesar Wrap: Add hot sauce to the chicken.
- Grilled Chicken Caesar: Use sliced grilled chicken instead of rotisserie.
- Veggie Caesar Wrap: Swap chicken for chickpeas.
Common Mistakes to Avoid with This Dish:
- Don’t use limp romaine.
- Don’t overfill the tortilla.
- Don’t pack it too long before eating if the croutons are inside.
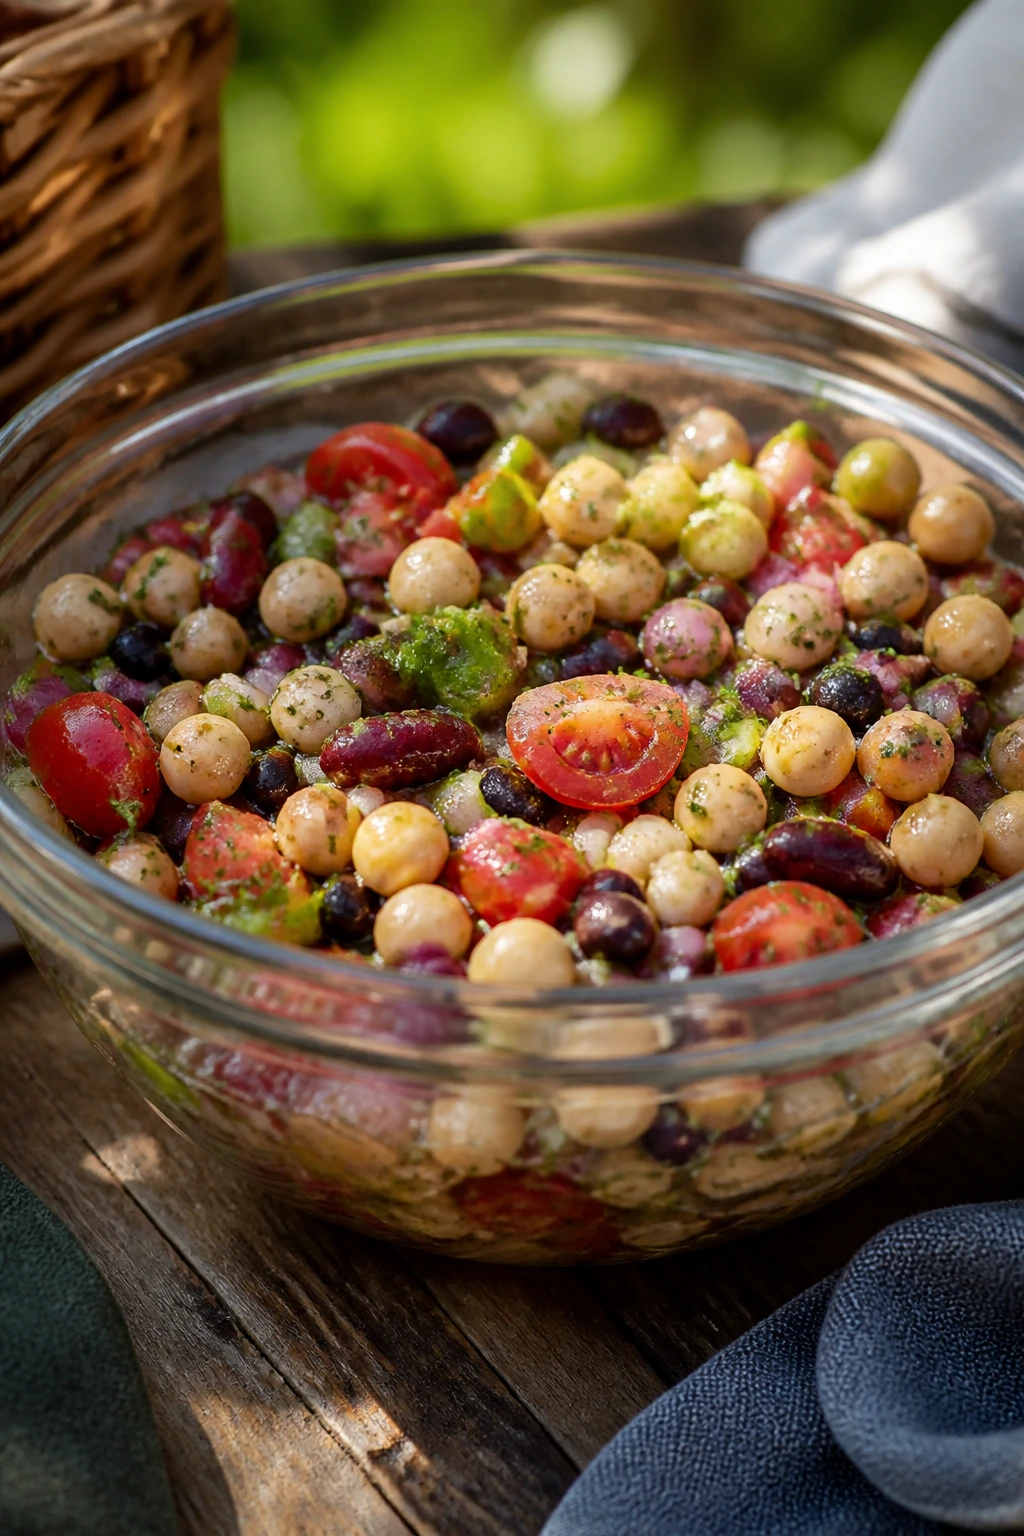
30. Loaded Bean Salad
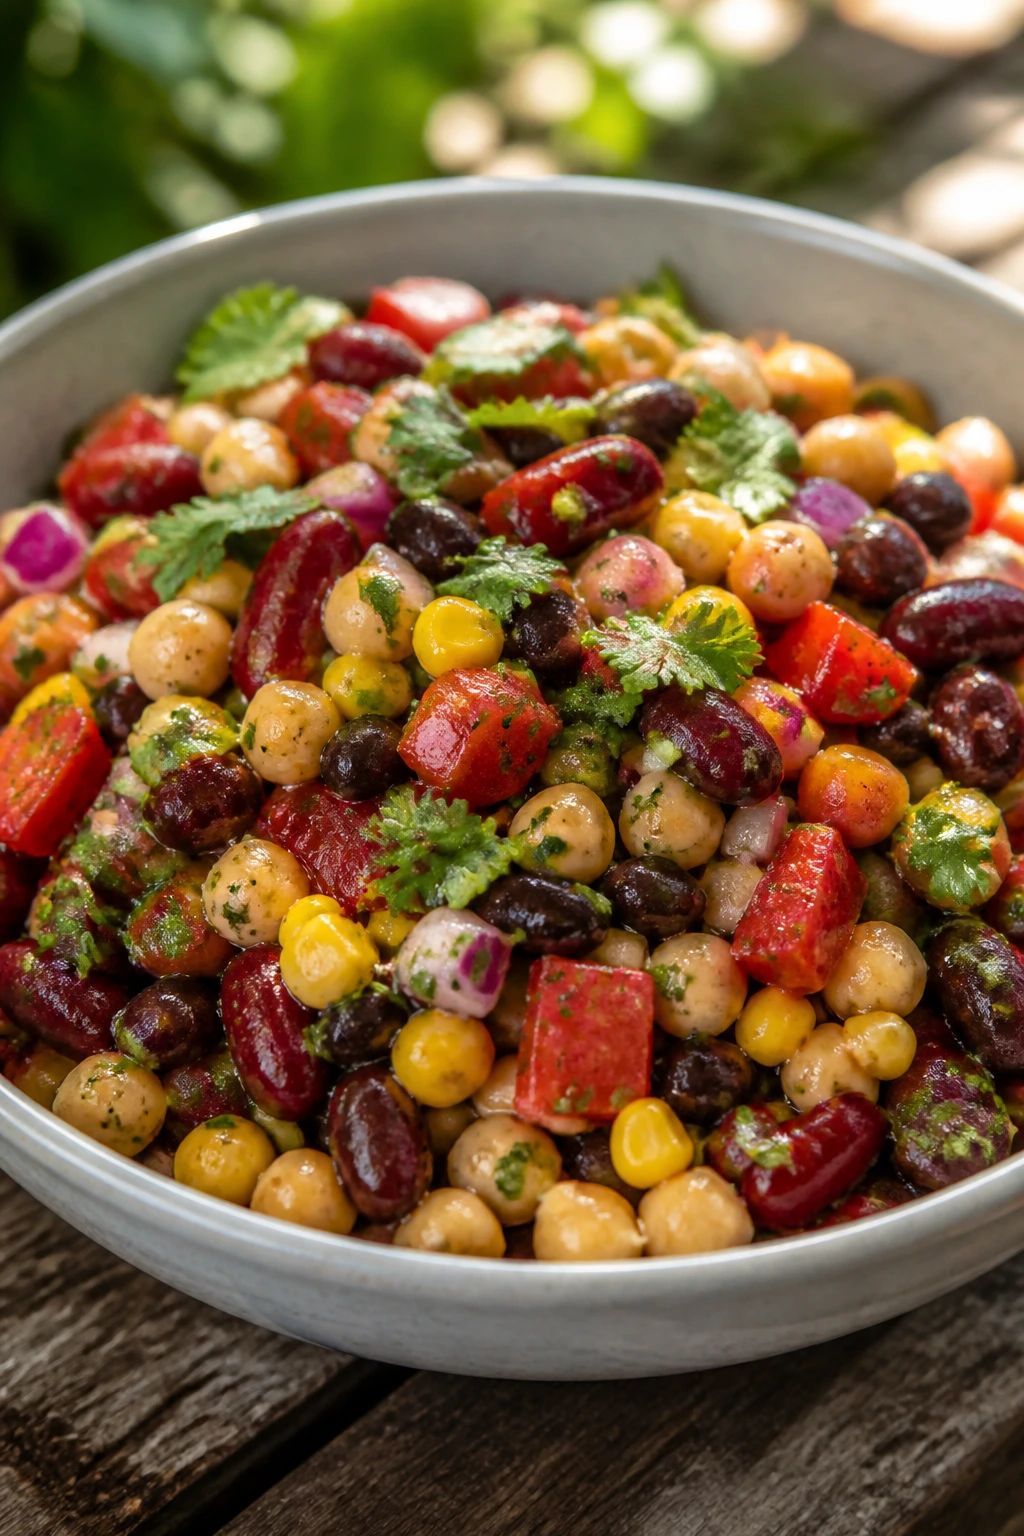
Bean salad is where pantry food gets to act like a side dish with backbone. The beans stay firm, the lime keeps everything awake, and the vegetables give the bowl enough crunch to stop it from feeling heavy.
Why It Works:
Three kinds of beans give you different textures without much work. A cumin-lime dressing holds the salad together and gets better after a short rest.
Key Ingredients:
- 1 can black beans, drained and rinsed
- 1 can kidney beans, drained and rinsed
- 1 can chickpeas, drained and rinsed
- 1 cup corn kernels
- 1 red bell pepper, diced
- 1/4 red onion, finely chopped
- 1/4 cup chopped cilantro
- 3 tablespoons olive oil
- 2 tablespoons lime juice
- 1/2 teaspoon cumin
Quick Steps:
- Rinse and drain the beans well.
- Whisk olive oil, lime juice, cumin, salt, and pepper.
- Toss the beans with corn, pepper, onion, and cilantro.
- Add the dressing and mix gently.
- Chill for 30 minutes before serving.
Equipment for This Recipe:
- Colander
- Large bowl
- Whisk
- Knife
- Spoon
How to Serve This Dish:
Serve it cold as a side or pile it over greens for a more filling plate. It’s also a strong scoop for tortilla chips, which is how it tends to vanish.
Pro Tips for This Recipe:
- Rinse canned beans until the water runs clear.
- Chop the onion small so it doesn’t overpower the bowl.
- Add extra lime right before serving if the beans taste flat.
Variations on This Dish:
- Southwest Bean Salad: Add avocado and jalapeño.
- Feta Bean Salad: Add crumbled feta.
- Herb-Lime Version: Swap cilantro for parsley if cilantro isn’t your thing.
Common Mistakes to Avoid with This Dish:
- Don’t leave bean can liquid on the beans.
- Don’t skip the salt; beans need more than acid.
- Don’t serve it immediately after mixing if you want the flavors to settle.
31. Lemon Bars
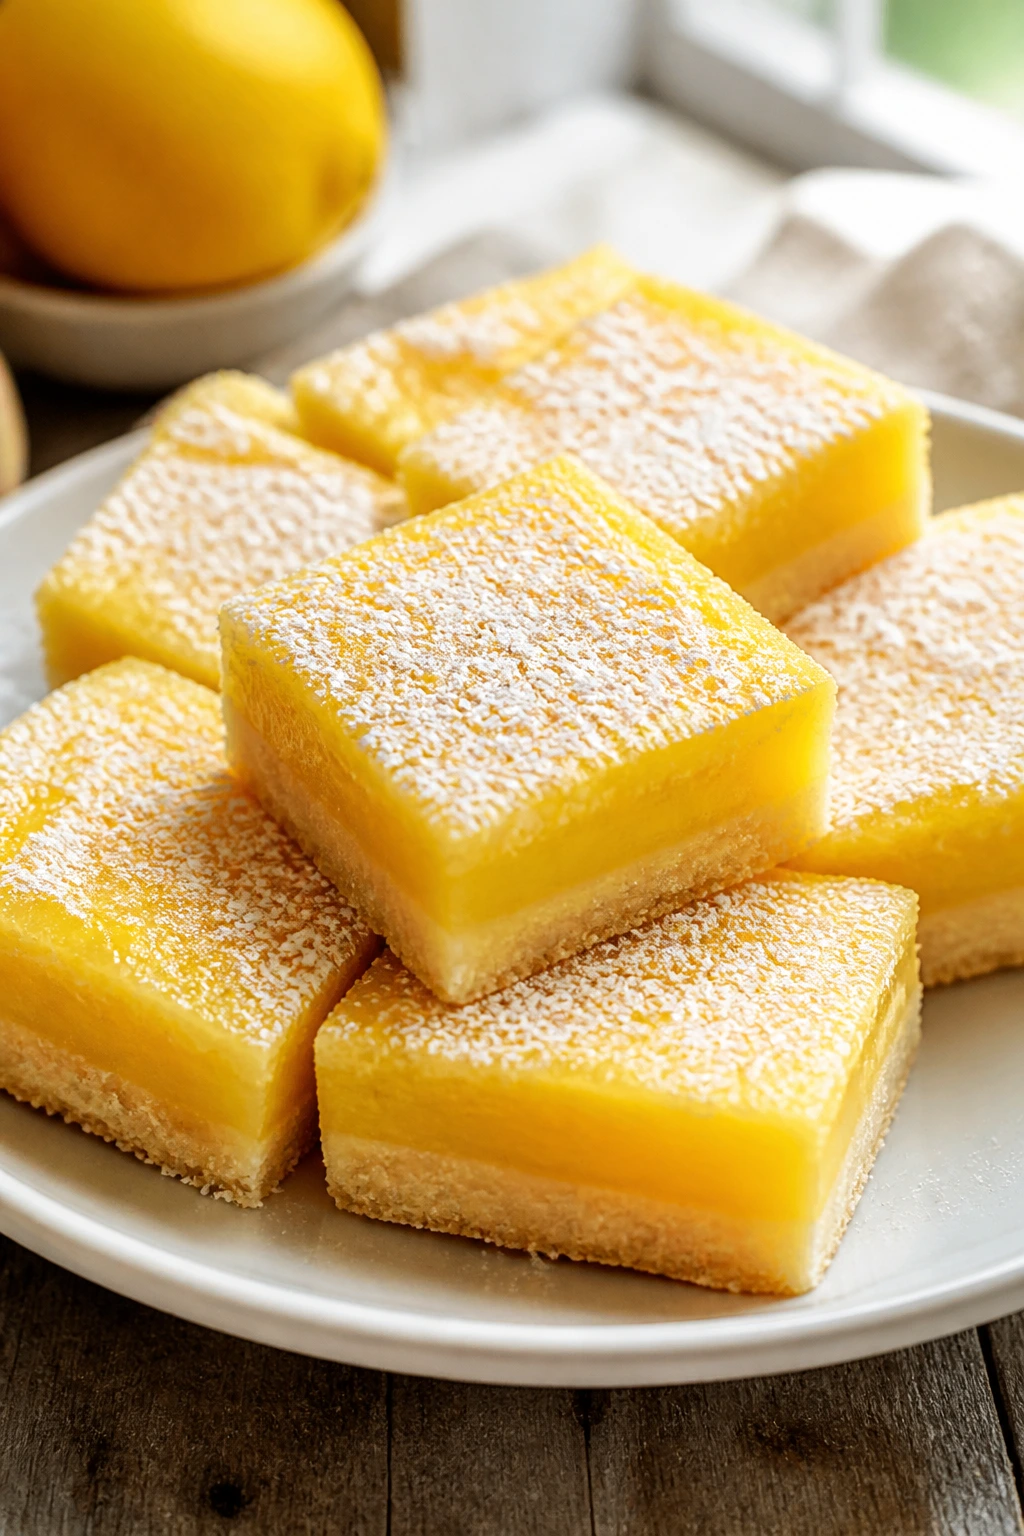
Lemon bars are the dessert I trust when the night is hot and the meal already had enough savory food. The crust should snap a little, and the filling needs to taste tart before it tastes sweet.
Why It Works:
A buttery shortbread base keeps the bars from getting sticky, and the lemon layer bakes into a clean slice that travels better than most pies. Powdered sugar gives the tops a finish without making them heavy.
Key Ingredients:
- 1 cup unsalted butter, softened
- 1/2 cup granulated sugar
- 2 cups all-purpose flour
- 1/4 teaspoon salt
- 4 large eggs
- 1 1/2 cups granulated sugar
- 1/2 cup lemon juice
- 2 tablespoons lemon zest
- 1/4 cup flour
- Powdered sugar for dusting
Quick Steps:
- Heat the oven to 350°F and line a baking pan with parchment.
- Mix butter, sugar, flour, and salt for the crust and press it into the pan.
- Bake the crust until lightly golden, about 18 minutes.
- Whisk eggs, sugar, lemon juice, zest, and flour, then pour over the crust.
- Bake until the center is set, cool completely, and dust with powdered sugar.
Equipment for This Recipe:
- 9×13-inch pan
- Parchment paper
- Mixing bowls
- Whisk
- Sifter or fine mesh strainer
How to Serve This Dish:
Cut them into clean squares and serve chilled or at cool room temperature. I like them beside berries or a cup of coffee if the picnic drifts late.
Pro Tips for This Recipe:
- Line the pan with parchment so you can lift the bars out cleanly.
- Cool before cutting or the filling smears.
- Use fresh lemons; bottled juice tastes flat here.
Variations on This Dish:
- Lime Bars: Swap lemon for lime.
- Berry Lemon Bars: Add a thin layer of mashed berries under the filling.
- Gluten-Free Crust: Use a 1:1 gluten-free flour blend.
Common Mistakes to Avoid with This Dish:
- Don’t underbake the filling.
- Don’t dust with sugar until fully cool.
- Don’t cut them while warm.
32. Fudgy Brownie Bites
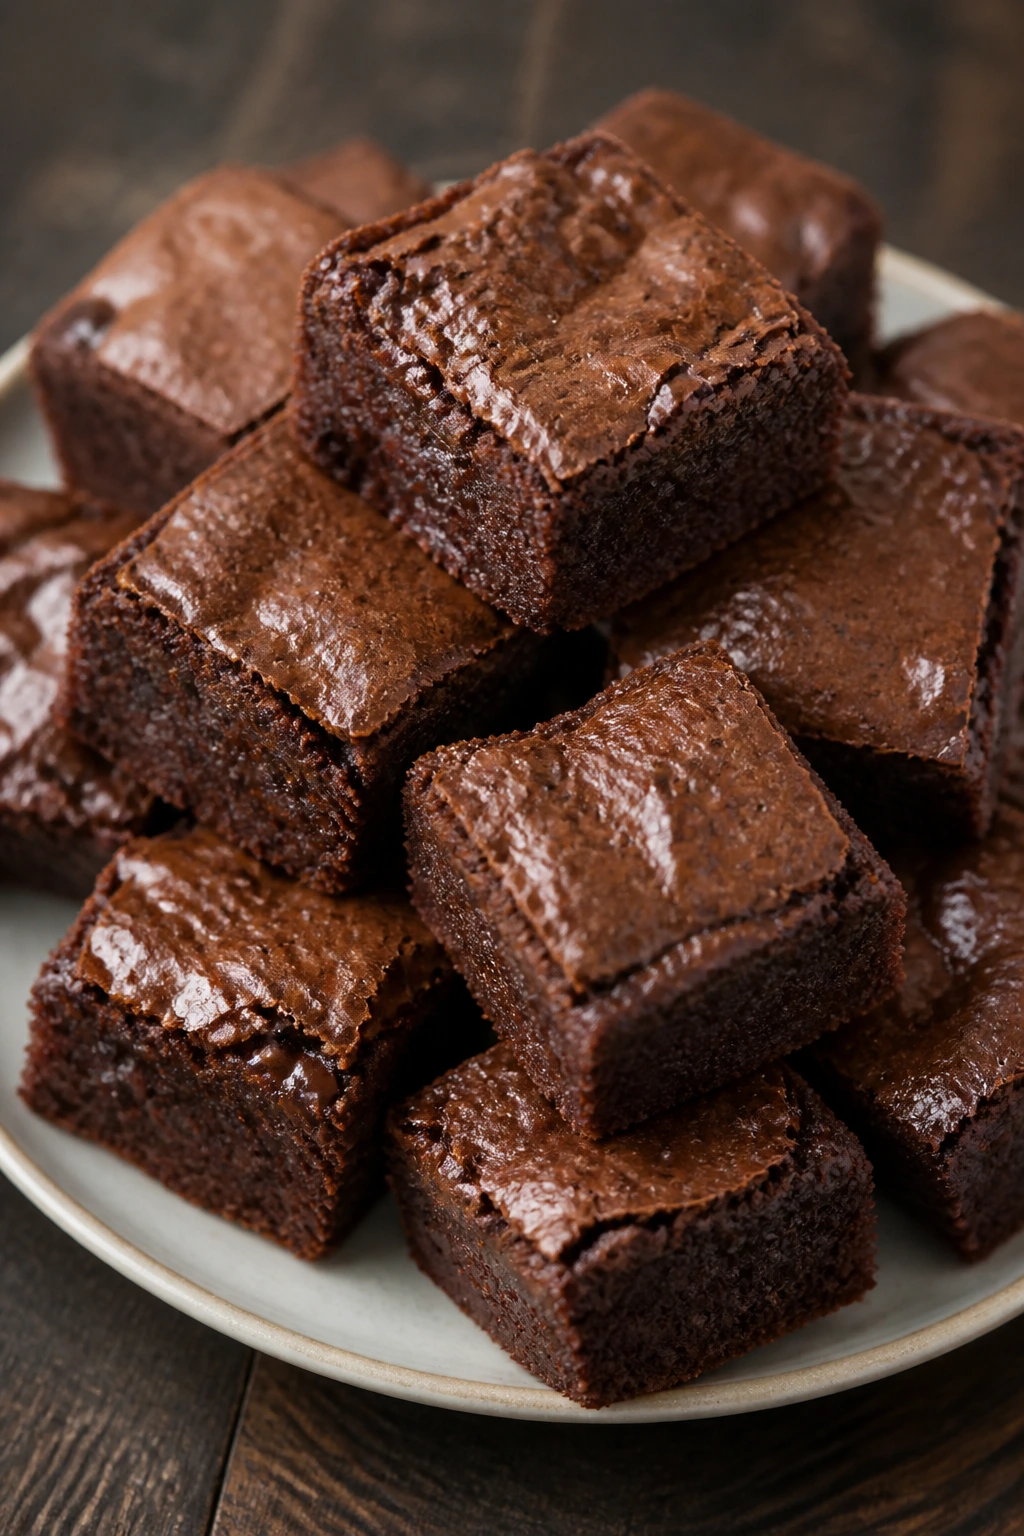
Brownie bites are what you make when you want chocolate to travel well. Small squares stay neat in a container, and a fudgy center keeps them from feeling dry after chilling.
Why It Works:
Brownies with more fat than flour stay dense enough to hold their shape. Cutting them small makes them easier to pack and easier to stop eating, which helps more than you’d think.
Key Ingredients:
- 1/2 cup unsalted butter
- 1 cup granulated sugar
- 2 large eggs
- 1 teaspoon vanilla extract
- 1/2 cup unsweetened cocoa powder
- 1/2 cup all-purpose flour
- 1/4 teaspoon salt
- 1/2 cup chocolate chips
Quick Steps:
- Heat the oven to 350°F and line an 8×8-inch pan.
- Melt butter, then stir in sugar, eggs, and vanilla.
- Mix in cocoa, flour, salt, and chocolate chips until just combined.
- Spread into the pan and bake for 22 to 25 minutes.
- Cool fully, then cut into small squares.
Equipment for This Recipe:
- Mixing bowl
- 8×8-inch pan
- Parchment paper
- Spatula
- Knife
How to Serve This Dish:
Serve them plain or with strawberries if you want a lighter finish. They pack well beside fruit and cheese because they don’t crush easily.
Pro Tips for This Recipe:
- Pull them when the center still has a little softness.
- Cool completely before cutting.
- Use parchment overhang for easy lifting.
Variations on This Recipe:
- Walnut Brownies: Fold in 1/2 cup chopped walnuts.
- Salted Chocolate Version: Sprinkle flaky salt on top before baking.
- Mint Chip Batch: Add a few drops of mint extract and chopped mint chips.
Common Mistakes to Avoid with This Dish:
- Don’t overbake them or they turn cakey.
- Don’t cut while warm.
- Don’t skip the salt; it makes the chocolate taste deeper.
33. No-Bake Cheesecake Cups
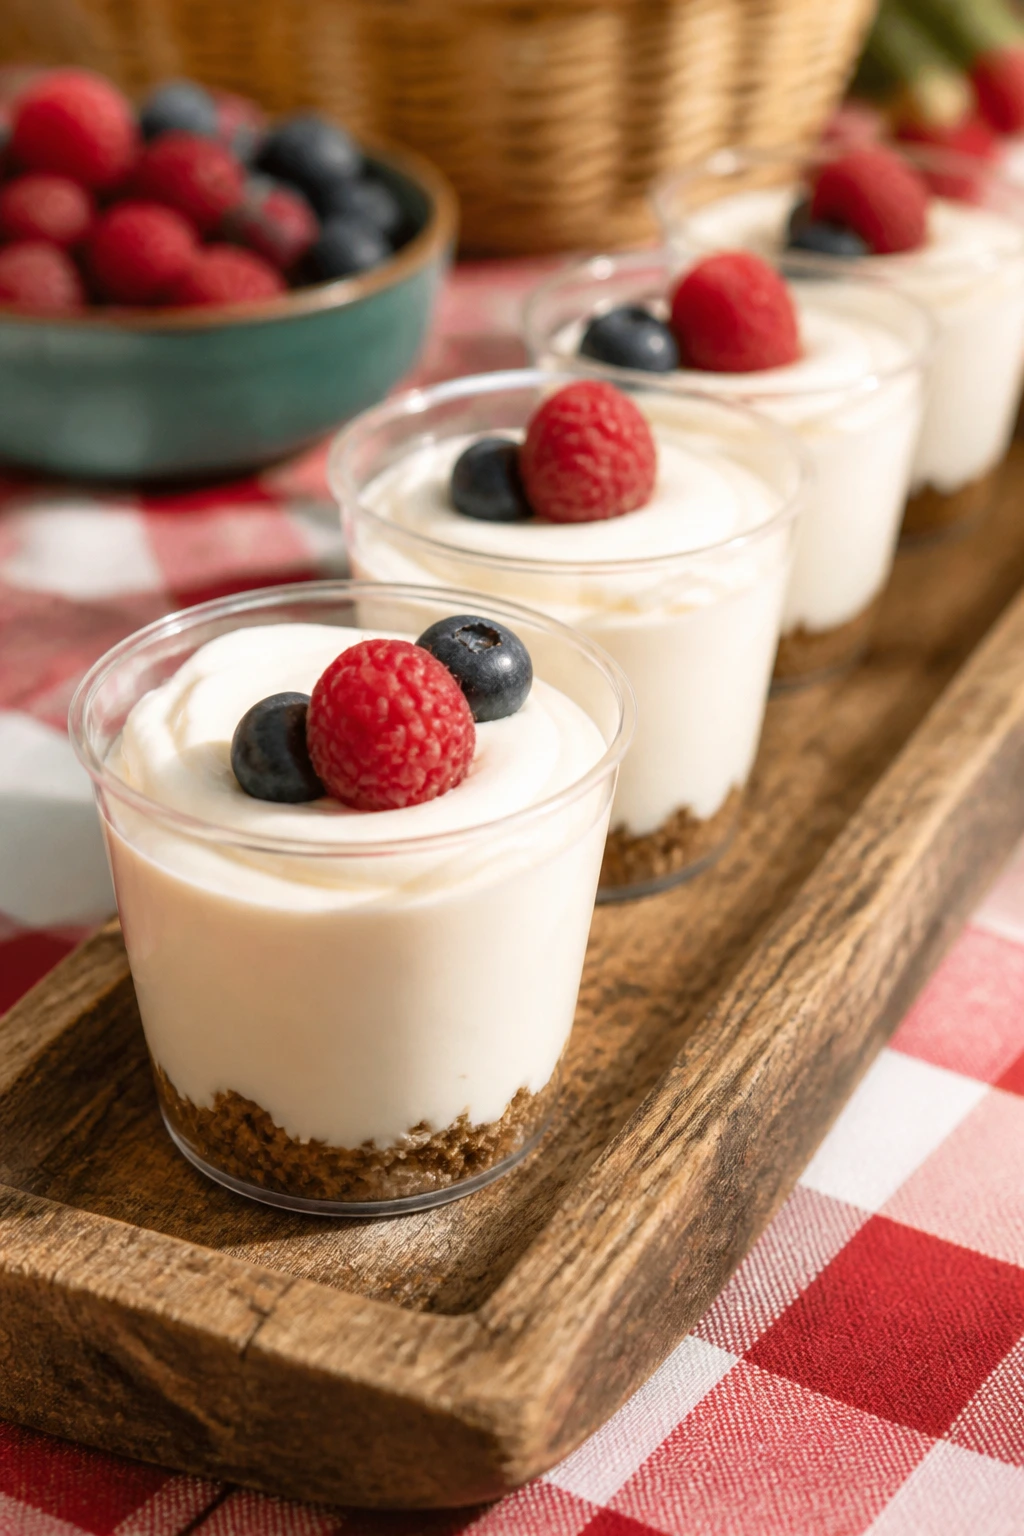
No-bake cheesecake cups are picnic dessert without the risk of a crumbly pie slice. The filling stays cool and creamy, and the little cups keep portioning painless.
Why It Works:
Cream cheese gives the filling structure, Greek yogurt or whipped cream softens it, and a crumb base keeps the spoonfuls from feeling flat. Since there’s no oven, you can make them early and chill them down.
Key Ingredients:
- 8 ounces cream cheese, softened
- 1/2 cup plain Greek yogurt
- 1/3 cup powdered sugar
- 1 teaspoon vanilla extract
- 1 cup graham cracker crumbs
- 3 tablespoons melted butter
- 1 cup berries
- Lemon zest for garnish
Quick Steps:
- Mix graham crumbs and melted butter, then press into the bottom of small cups.
- Beat cream cheese, yogurt, powdered sugar, and vanilla until smooth.
- Spoon the filling over the crumb base.
- Top with berries and lemon zest.
- Chill for at least 2 hours.
Equipment for This Recipe:
- Mixing bowl
- Hand mixer or whisk
- Small cups or jars
- Spoon
- Measuring cups
How to Serve This Dish:
Serve them cold, straight from the cooler if needed. I like the tops to look loose and rustic rather than piped to the moon.
Pro Tips for This Recipe:
- Make sure the cream cheese is fully softened.
- Chill long enough for the base to firm up.
- Use tart berries so the sweetness doesn’t get heavy.
Variations on This Recipe:
- Lemon Cheesecake Cups: Add lemon juice and zest to the filling.
- Chocolate Base Version: Use crushed chocolate cookies instead of graham crumbs.
- Peach Cup: Top with diced peaches and a touch of honey.
Common Mistakes to Avoid with This Recipe:
- Don’t use cold cream cheese or the filling stays lumpy.
- Don’t overfill the cups.
- Don’t pack them loose in a cooler without a level surface.
34. Fruit and Cheese Board
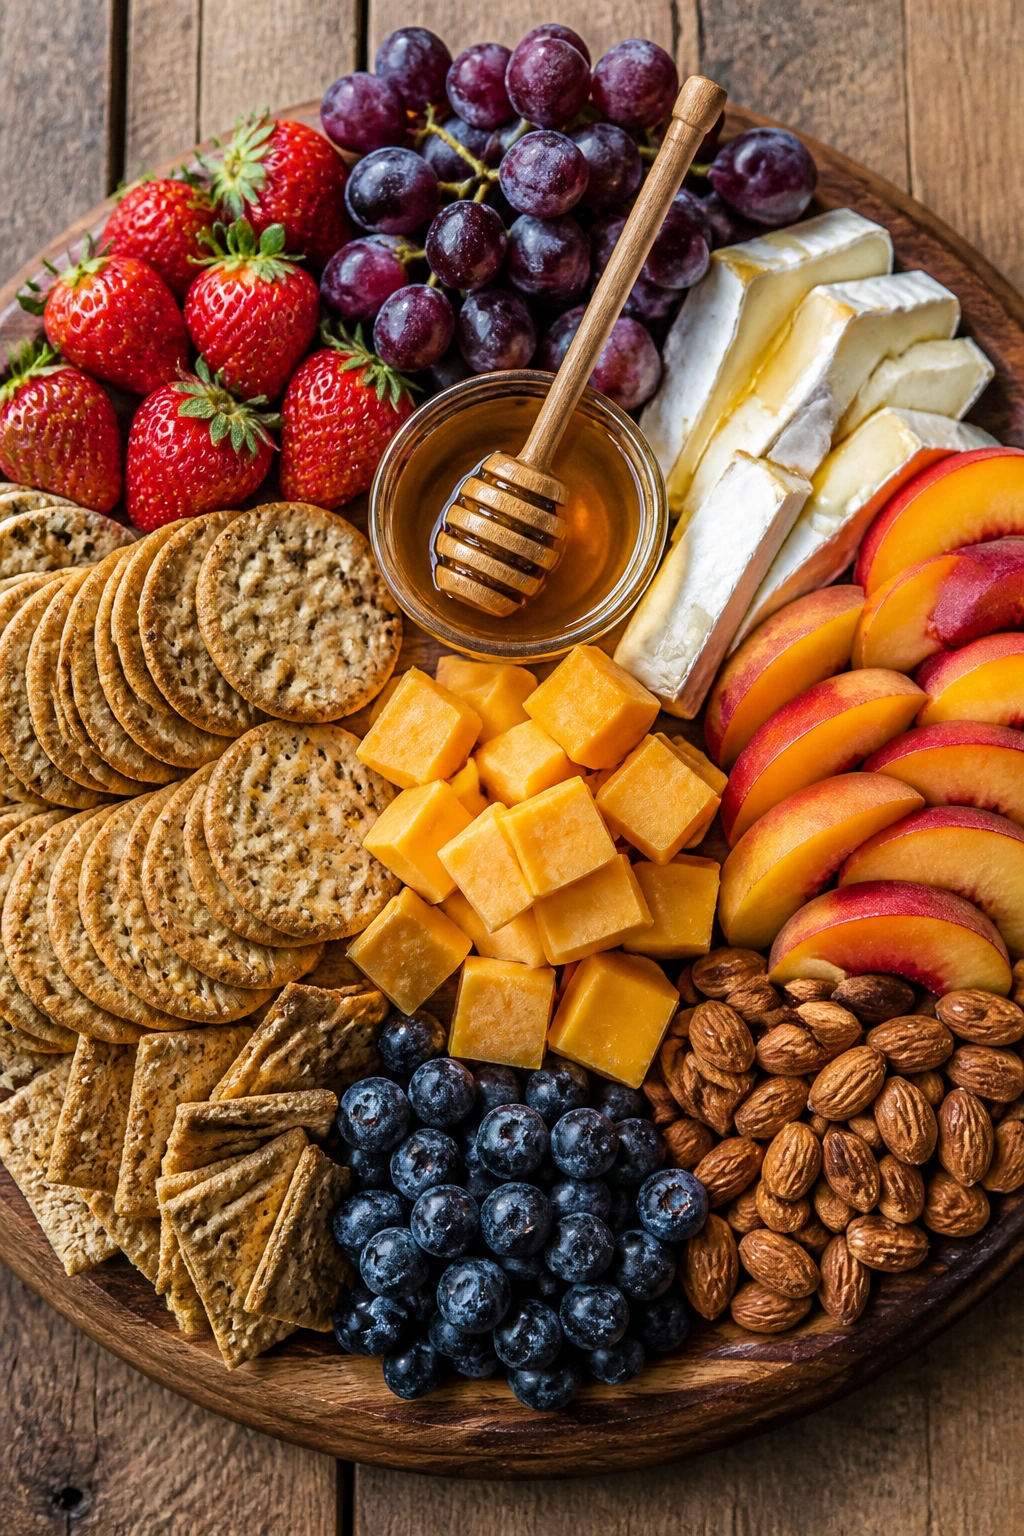
A good fruit and cheese board is less about abundance and more about contrast. Soft next to firm, sweet next to salty, juicy next to dry. That’s what keeps people circling back to the board.
Why It Works:
You can build it from whatever fruit looks best and still make it feel finished. Cheese, crackers, nuts, and a little honey give the platter enough structure to work as a meal or a dessert course.
Key Ingredients:
- 1 bunch grapes
- 2 cups strawberries
- 2 peaches, sliced
- 1 cup blueberries
- 6 ounces sharp cheddar
- 6 ounces brie
- 6 ounces crackers
- 1/2 cup almonds
- 2 tablespoons honey
Quick Steps:
- Wash and dry all the fruit.
- Slice the cheeses into chunks or wedges.
- Arrange the cheeses first on a board or platter.
- Fill in with fruit, crackers, and almonds.
- Drizzle honey over the brie or serve it on the side.
Equipment for This Recipe:
- Cutting board or platter
- Small knife
- Paper towels
- Small bowl for honey
- Serving knife
How to Serve This Dish:
Let the board sit out only long enough to eat, then put it back in the cooler. I like to give the cheese some breathing room and keep the crackers in a separate pile so they stay crisp.
Pro Tips for This Recipe:
- Dry fruit well so the board doesn’t turn slick.
- Use at least one sharp cheese and one soft cheese.
- Keep the crackers separate until serving if possible.
Variations on This Dish:
- Savory Board: Add olives and sliced salami.
- Kid Board: Swap brie for mild cheddar and add apple slices.
- Seasonal Mix: Use whatever ripe fruit is firm enough to slice cleanly.
Common Mistakes to Avoid with This Dish:
- Don’t overpack the board until it looks jammed.
- Don’t use soft fruit that will leak.
- Don’t leave cheese in full sun for long.
35. Lemon Icebox Cookies
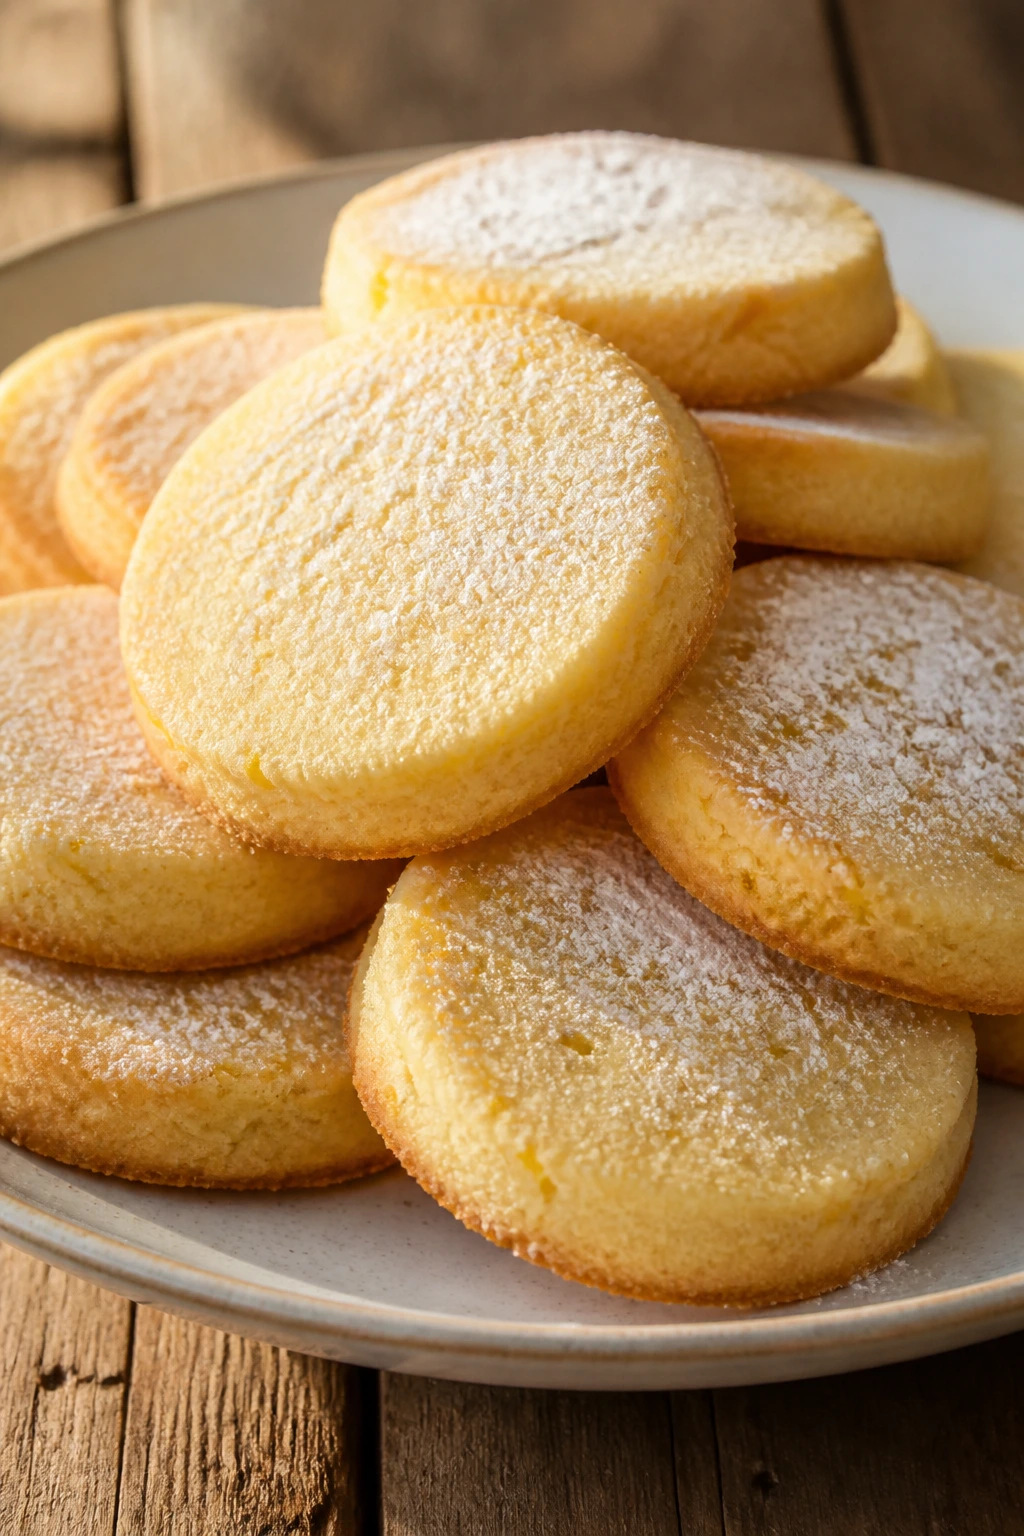
Lemon icebox cookies are the sort of dessert that feels old-fashioned in a good way. The dough chills, slices cleanly, and bakes into crisp-edged cookies with a soft center and a bright citrus smell.
Why It Works:
Chilling the dough gives you neat slices and a better texture. Lemon zest and juice keep the cookie from tasting like plain sugar, which is the trap with a lot of picnic sweets.
Key Ingredients:
- 1 cup unsalted butter, softened
- 3/4 cup granulated sugar
- 1 large egg
- 1 tablespoon lemon zest
- 2 tablespoons lemon juice
- 2 1/4 cups all-purpose flour
- 1/2 teaspoon baking powder
- 1/2 teaspoon salt
- Powdered sugar for dusting
Quick Steps:
- Beat butter and sugar until pale.
- Mix in the egg, lemon zest, and lemon juice.
- Add flour, baking powder, and salt to form a soft dough.
- Shape into a log, wrap, and chill for at least 1 hour.
- Slice, bake at 350°F until lightly golden, and cool before dusting.
Equipment for This Recipe:
- Mixing bowl
- Hand mixer or spoon
- Plastic wrap or parchment
- Baking sheet
- Sharp knife
How to Serve This Dish:
Pack them in a tin with parchment between layers. They work well after a salty picnic meal because the lemon cuts through the richness.
Pro Tips for This Recipe:
- Chill the log until firm enough to slice cleanly.
- Use fine zest from just the yellow part of the lemon.
- Dust with powdered sugar only after cooling.
Variations on This Recipe:
- Lime Icebox Cookies: Swap lemon for lime.
- Poppy Seed Batch: Add 1 tablespoon poppy seeds.
- Glazed Version: Drizzle with a thin lemon glaze instead of sugar.
Common Mistakes to Avoid with This Recipe:
- Don’t slice the dough before it firms up.
- Don’t overbake them; they should stay pale at the center.
- Don’t skip the salt, because citrus needs it.
Why Picnic Food Ideas Need to Taste Good Cold
Cold food has its own rules, and they’re not the same rules you’d use for a dinner that lands on the table straight from the stove. Salt gets quieter when food chills. Fat feels heavier. Herbs can taste brighter or disappear, depending on how they’re handled. That’s why a good picnic spread leans on sharper seasoning, sturdy textures, and a little acidity.
I care a lot about this part because people usually blame the weather when food tastes off outside. Half the time, the real problem is structure. A tomato sandwich made on soft bread with no barrier will fail in fifteen minutes. A chicken salad with enough body, a pasta salad with vinegar, or a potato salad dressed while warm holds up because the ingredients were chosen for the setting, not just the recipe card.
That also explains why some of the best picnic foods are not glamorous. A bean salad with lime and cumin. A deviled egg with mustard. A cookie that was baked from chilled dough. These foods don’t need a stove at the blanket, and they don’t panic when they sit for a while. That’s the real job.
Essential Equipment for These Recipes
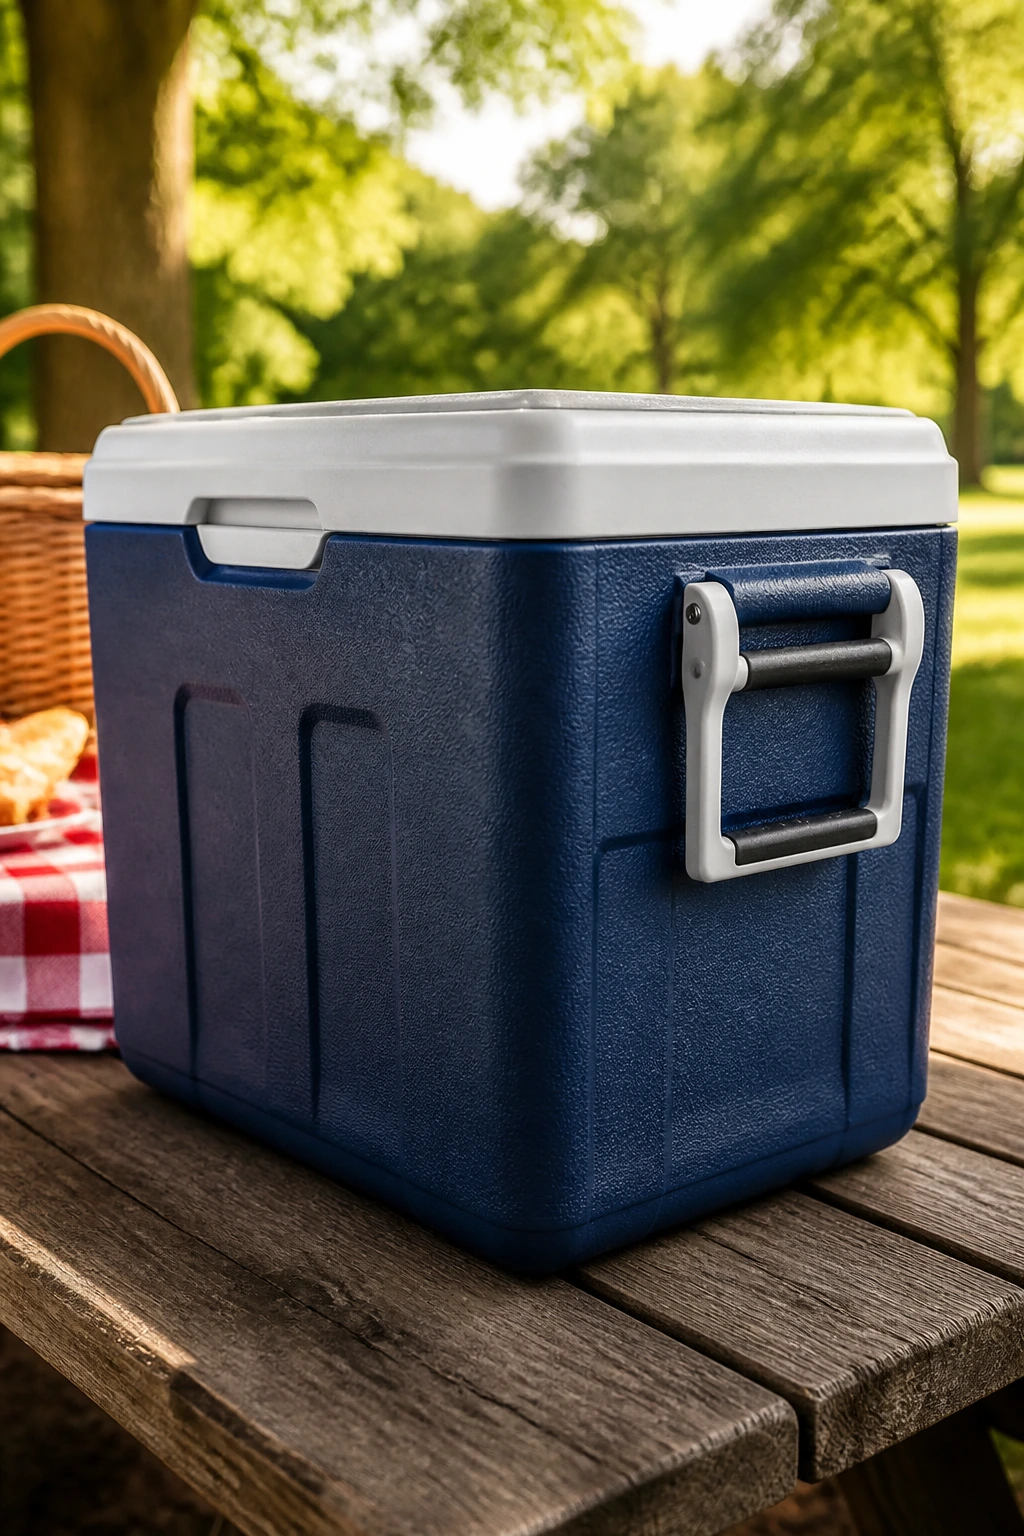
- Large insulated cooler: Keeps dairy, poultry, and egg dishes safe while you travel.
- Ice packs or frozen water bottles: These hold the cold better than a single bag of ice and don’t turn everything soggy.
- Airtight containers in several sizes: Small ones work for dips and dressings; larger ones help with salads and wraps.
- Sharp chef’s knife: Clean cuts matter for tomatoes, herbs, fruit, and sandwiches.
- Cutting board with a damp towel underneath: It stays put on a picnic prep table.
- Mixing bowls: You’ll use them for dressings, fillings, and quick salads.
- Sheet pans: Handy for cooling fried food, roasting potatoes, and baking cookies.
- Muffin tin: Useful for mini quiches and some baked bites.
- Skewers or toothpicks: Needed for skewers, pinwheels, and bite-size items.
- Parchment paper: Keeps buns, cookies, and sliders from sticking together in transit.
Smart Shopping for Picnic Food Ideas
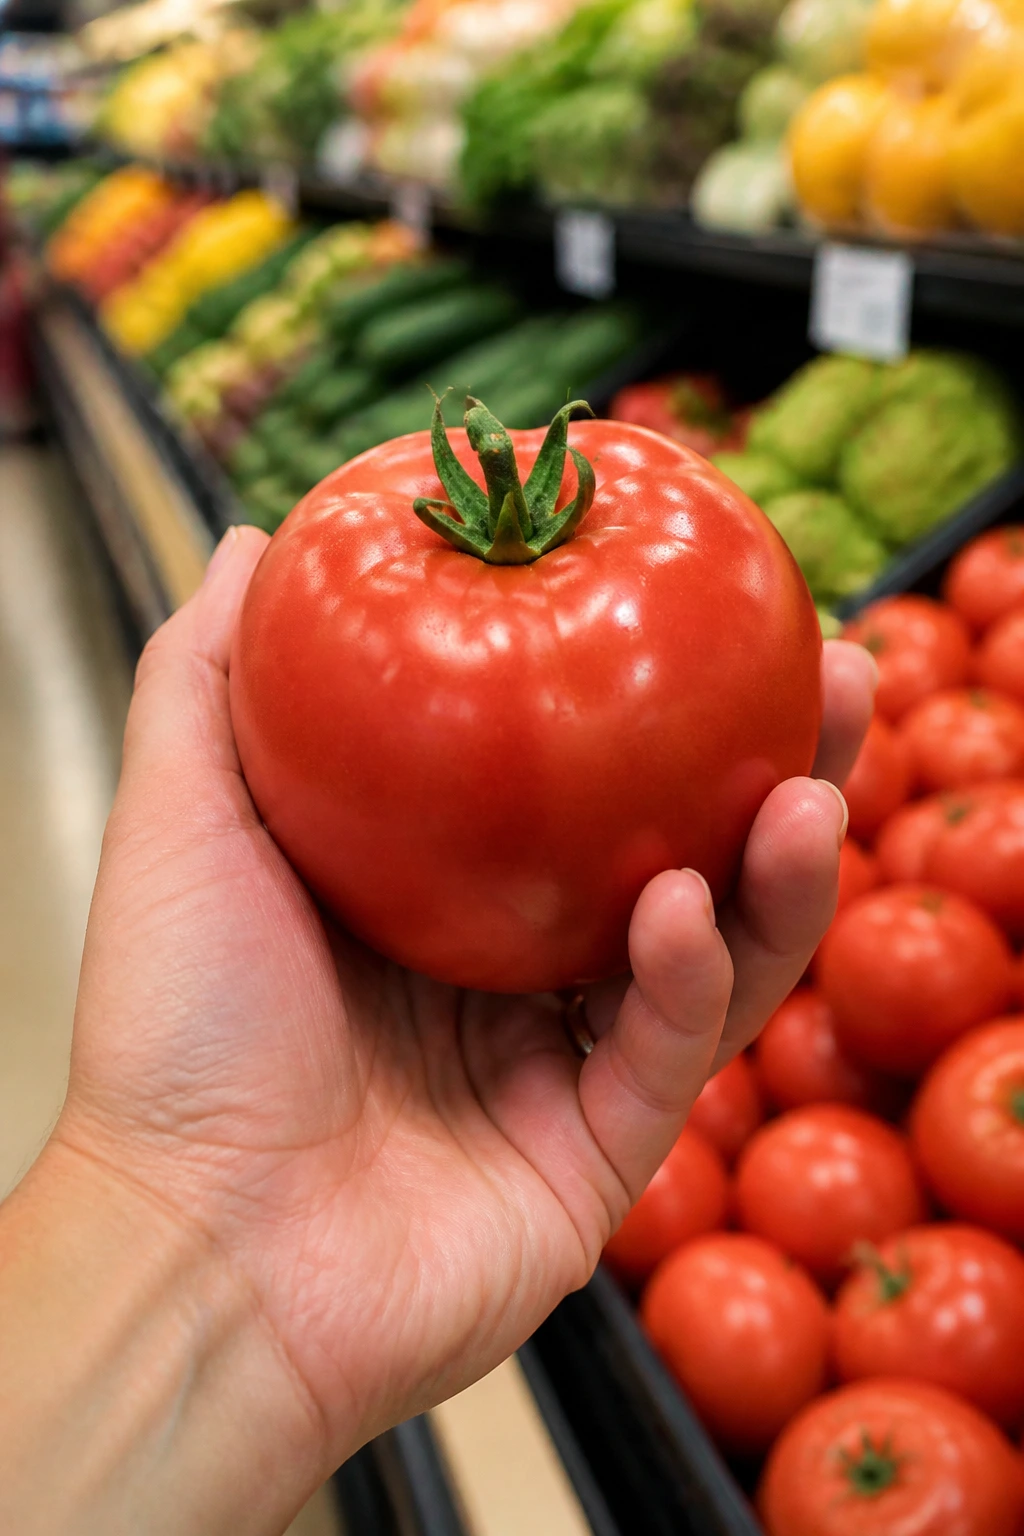
The best picnic foods start at the store, not at the cutting board. Buy produce that’s ripe but still firm. Tomatoes should smell like tomatoes, peaches should give slightly at the stem, and berries should be dry with no crushed bottoms in the container. Mushy fruit is fine for jam. It is not fine for a platter meant to sit outside.
Pay attention to bread. Thin-sliced, soft sandwich bread is good for tea sandwiches, but it’s a bad idea for juicy fillings unless you add butter or mayo as a moisture barrier. Tortillas should be fresh and flexible, not cracked around the edges. Slider buns need enough structure to survive sauce without turning into sponges.
For cheese, go with blocks or balls that can be sliced cleanly. Pre-shredded cheddar works in a pinch, but a block has better flavor and better melt. With deli meats, choose slices that fold well instead of thick slabs that crack your wrap apart. And when a recipe calls for herbs, buy more than you think you need. A half wilted bunch of dill won’t carry a potato salad.
One more thing: check how long the food can safely sit out before you leave the store. If you know the picnic will last a couple of hours, lean harder on chilled salads, sturdy wraps, and foods that are fine at room temperature. Save the fragile stuff for first bites or skip it altogether.
How to Serve These Picnic Food Ideas
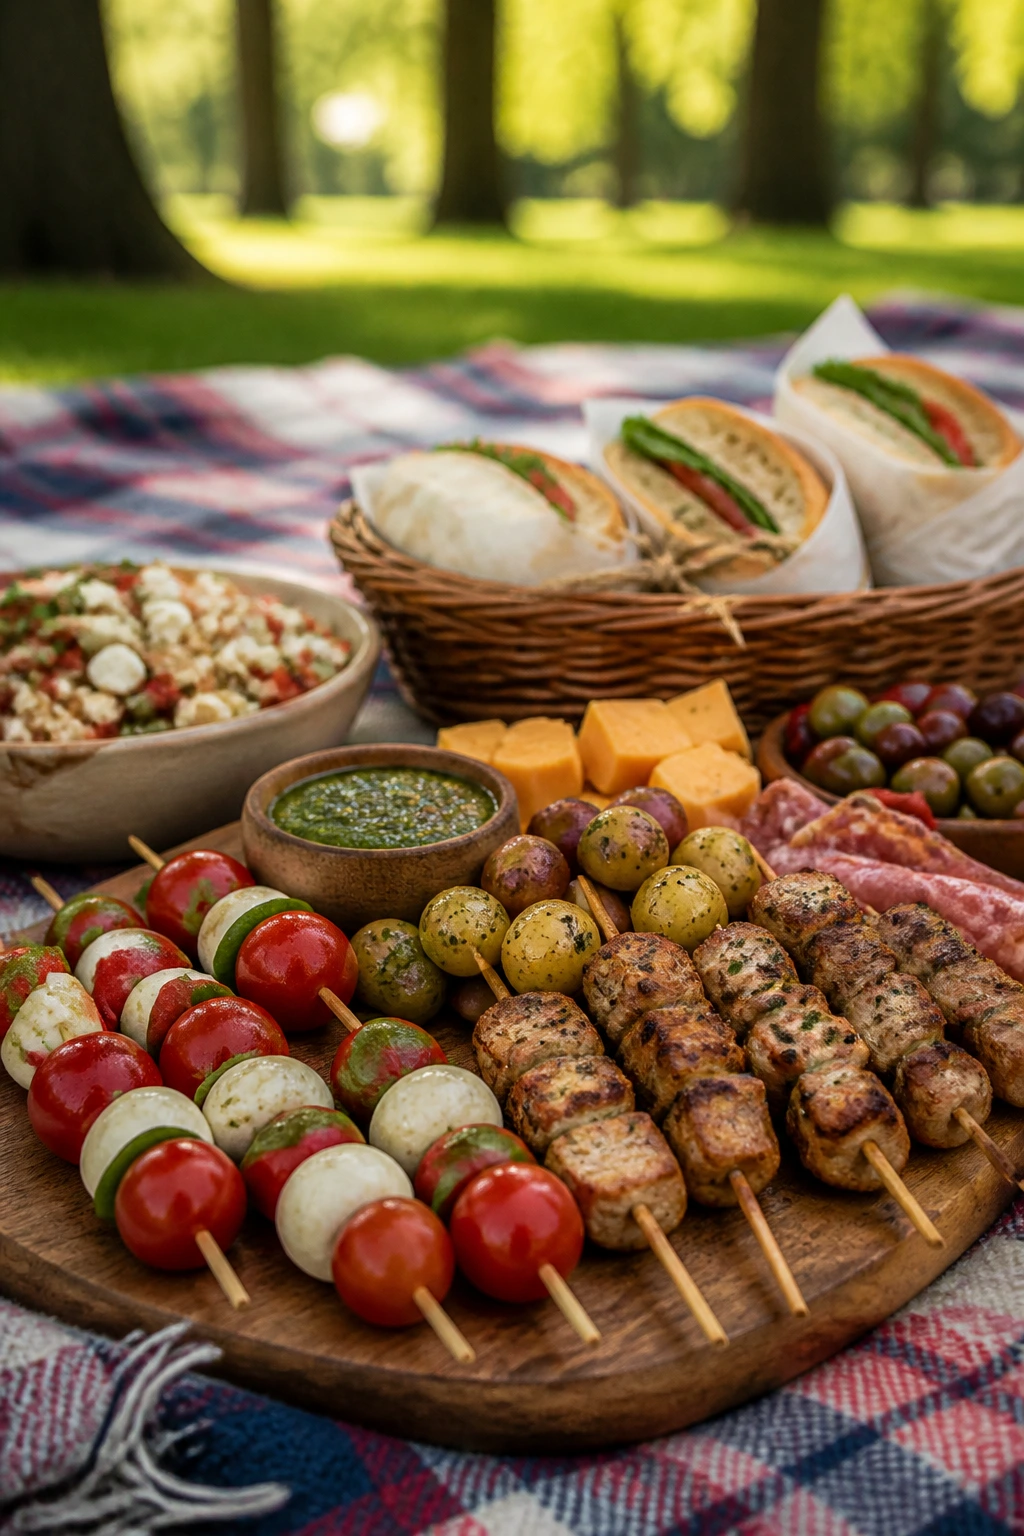
Presentation:
Use shallow bowls, lined platters, and parchment-wrapped sandwiches so the food looks intentional instead of dumped out of containers. Skewers, pinwheels, boards, and bars all photograph nicely on a picnic blanket, but more importantly, they stack and slice cleanly. A little chopped herb or flaky salt on top makes everything feel finished.
Accompaniments:
Mix one rich item with one crisp item. Fried chicken likes potato salad. Chicken salad likes grapes or pickles. Wraps want chips. Fruit salads do better beside something salty, like cheese or crackers. If you’re building a full spread, add one green salad, one starch, one handheld main, and one dessert so the table doesn’t all blur together.
Portions:
Plan on 2 sliders per person, 1 to 1 1/2 cups of pasta or bean salad per person, and 2 to 3 skewers or pinwheels as a side. Deviled eggs disappear faster than people admit, so six eggs for four people is about the right math if the rest of the spread is generous. For sweets, smaller portions win outdoors; hot weather makes people want a bite, not a brick.
Beverage Pairing:
Lemonade, iced tea, and sparkling water with citrus are the safest bets because they reset the palate. For adult gatherings, a crisp lager or a dry rosé works well with salty picnic food and won’t bully the lighter dishes.
Additional Tips and Flavor Boosters
Flavor Enhancement:
A small hit of acid changes almost every one of these recipes. A spoonful of pickle brine in potato salad, extra lemon on pasta salad, balsamic on peaches, or lime on beans can make the whole plate taste less flat. Picnic food lives and dies on seasoning that stays bright after chilling.
Customization:
Use the same basic spread and change the texture, not the whole identity. Add nuts to salads for crunch, swap cucumbers for celery when you need more snap, or turn a wrap into a bowl if bread is a bad idea in the heat. The base recipe can stay the same while the packaging changes.
Serving Suggestions:
Fresh herbs, flaky salt, sesame seeds, and a tiny drizzle of olive oil do more work than elaborate garnishes. Put finishing touches on top right before serving so they stay visible. A handful of chips, crackers, or pickles on the side also helps every dish feel more complete.
Make-It-Yours:
For gluten-free eaters, use lettuce cups, rice noodles, corn tortillas, or gluten-free crackers. For dairy-free versions, lean on vinaigrettes, hummus, and olive oil-based salads. For a milder spread, skip raw onion and hot sauce; for a bolder one, add chili crisp, pepper relish, or extra mustard.
Make-Ahead, Storage, and Reheating Guidance
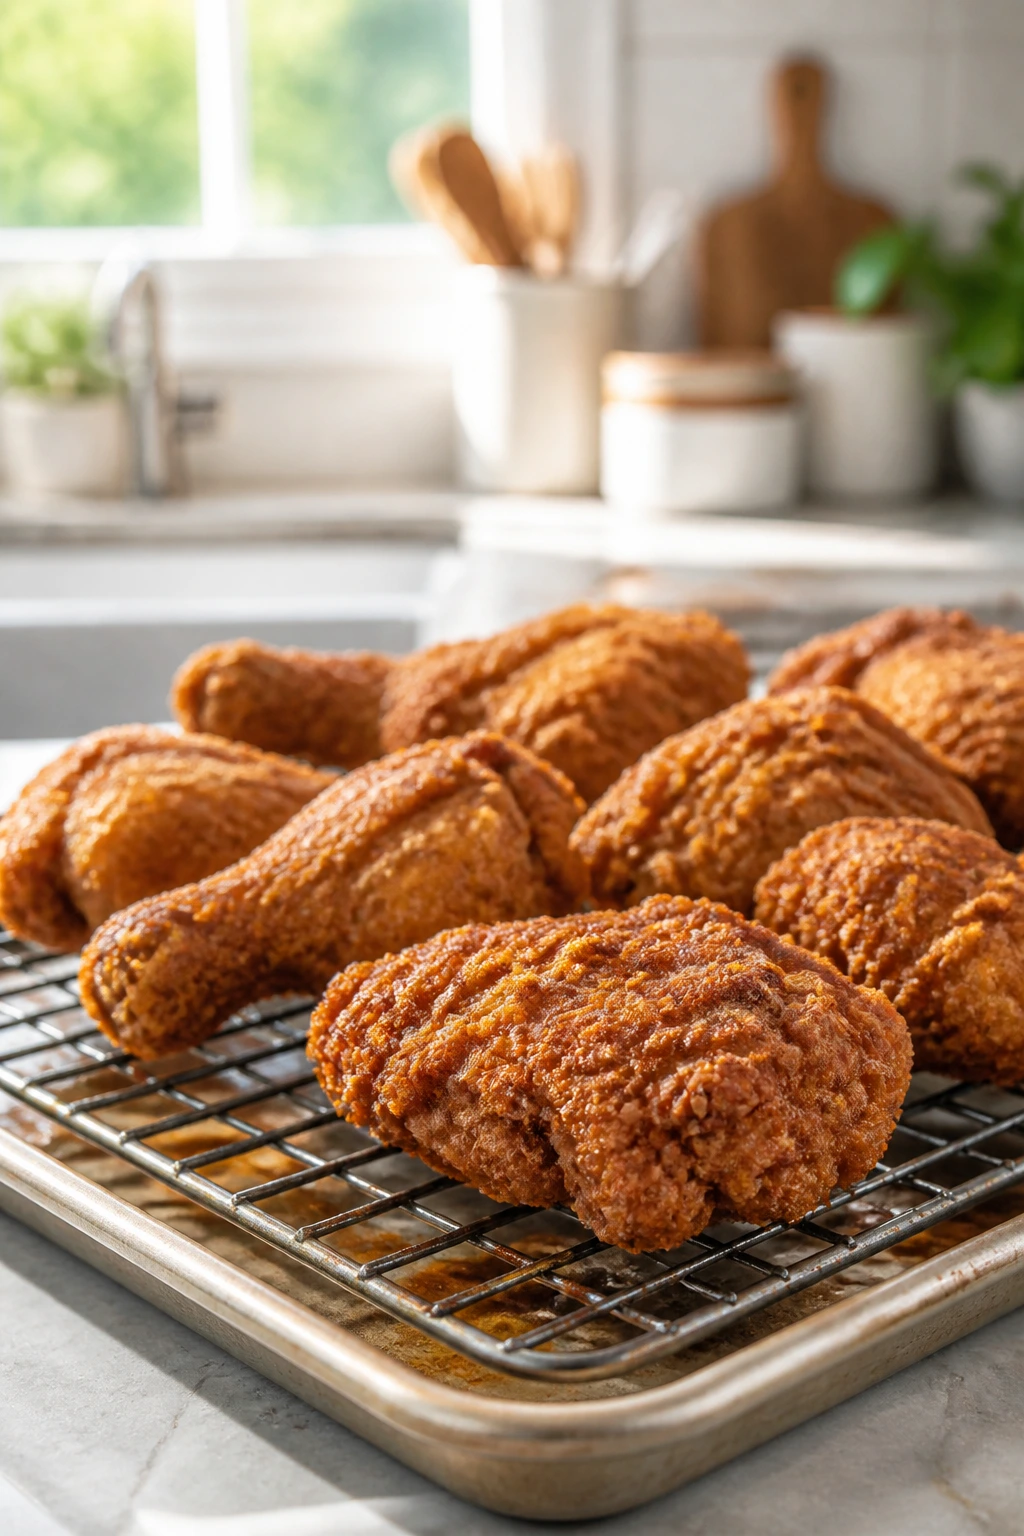
Most of these picnic foods keep well in the fridge for 3 to 4 days, though the delicate ones — lettuce cups, burrata salads, and dressed greens — are best assembled the same day. Pasta salads, bean salads, potato salads, and fillings for wraps usually improve after a few hours of chilling because the salt and acid have time to settle in.
Foods with crisp crusts need a little more care. Fried chicken can be made a day ahead and eaten cold, but if you want to reheat it, place it on a wire rack in a 375°F oven for 12 to 15 minutes until the skin crisps again. Mini sausage rolls and quiches can be rewarmed at 325°F for 10 to 15 minutes. Keep the microwave out of it unless you enjoy soft pastry.
Cookies, brownies, lemon bars, and cheesecake cups usually hold up for 3 to 5 days in the fridge, depending on the topping. Brownies and lemon bars can be frozen for up to 2 months if wrapped tightly. I’d freeze bars before dusting with powdered sugar so the topping stays clean.
For transport, keep dressings, sauces, and crisp toppings separate until the last possible minute. Wrap sandwiches and sliders in parchment, not loose plastic, if you want them to stay neat. And if the dish contains dairy, eggs, chicken, shrimp, or mayo, keep it chilled in the cooler and bring it back out in small batches instead of letting the entire bowl sit in the sun.
Variations and Adaptations to Try
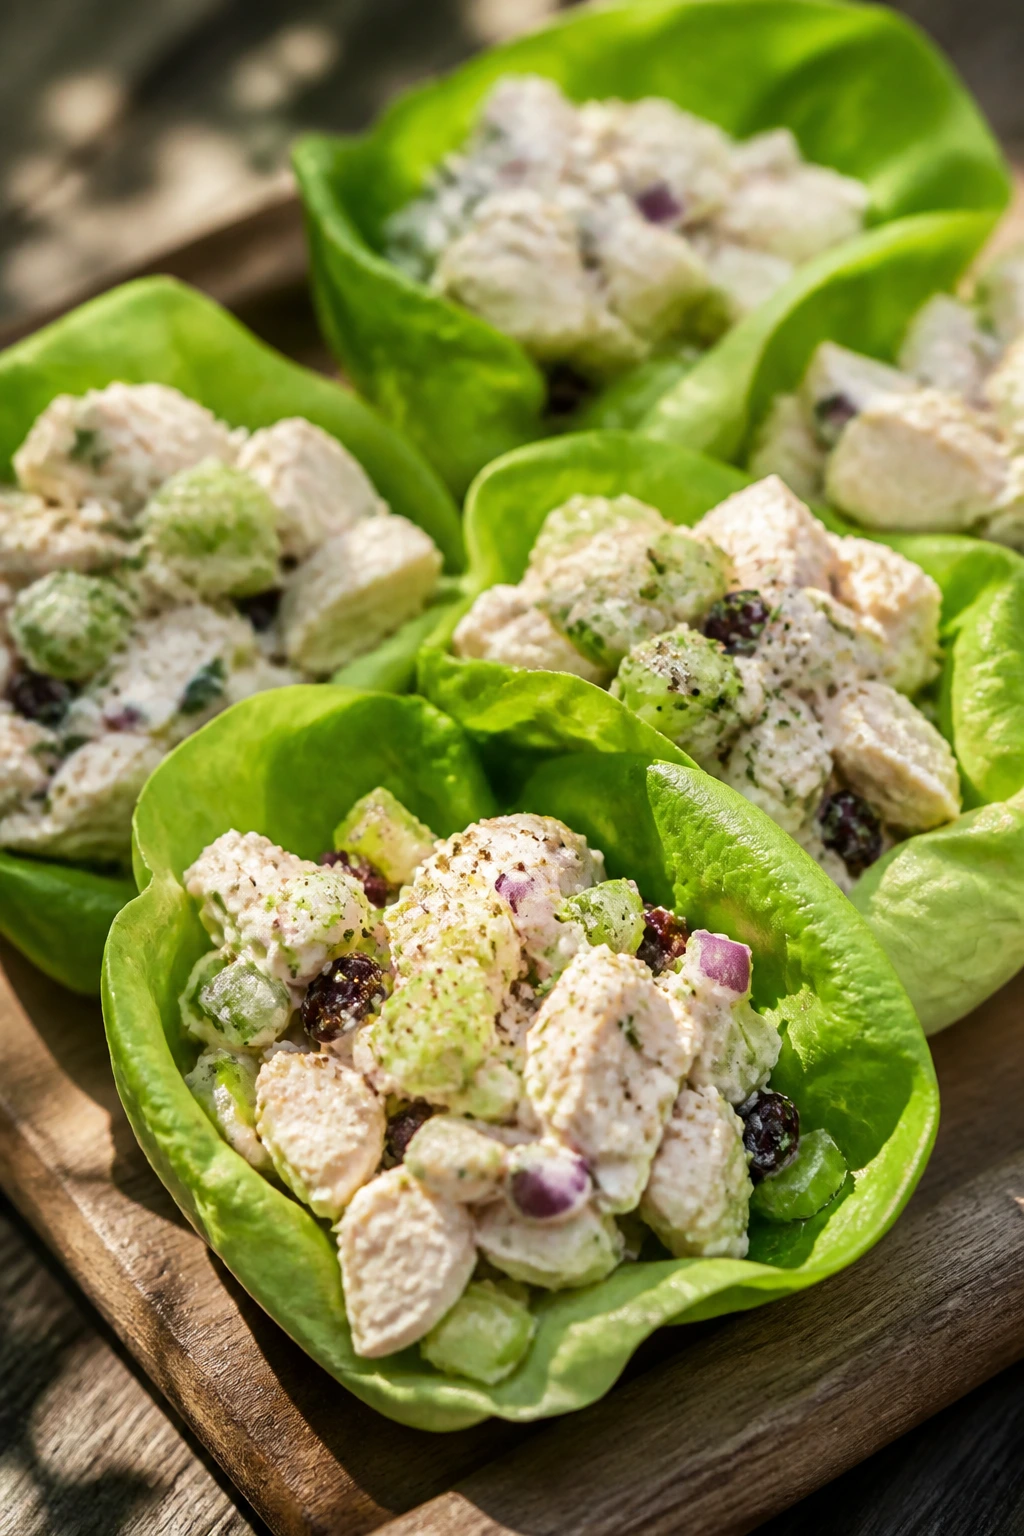
Lettuce-Cup Picnic Box:
Turn any sandwich filling into a lettuce-cup situation when bread is too much in warm weather. Chicken salad, tuna salad, egg salad, and even pulled pork all work this way if the filling is thick enough. Pack crackers on the side for anyone who wants more crunch.
Gluten-Free Basket:
Swap in corn tortillas, rice noodles, quinoa, lettuce wraps, and gluten-free cookies or bars. The main thing is to choose recipes that don’t depend on bread for structure. Fruit, cheese, salads, skewers, and boards naturally fit here.
Dairy-Light Spread:
Use olive oil dressings, hummus, mustard vinaigrettes, and avocado instead of cheese-heavy fillings. Watermelon salad, bean salad, tabbouleh, and sesame noodle salad all work well without changing their personality much. You lose some richness, but you gain a lighter finish.
Heat-Lover’s Picnic:
Add pickled jalapeños, hot honey, chili flakes, pepper relish, or chili crisp to a few dishes so the spread has a little fire. I wouldn’t make every dish spicy. One hot slider, one sharp salad, and one cooling fruit dish is a better balance.
Kid-Friendly Boxes:
Keep the flavors mild and the shapes small. Pinwheels, mini quiches, cheese cubes, fruit, brownies, and slider-size sandwiches are easier for smaller hands. Skip sharp raw onion and heavy pepper unless you know the crowd likes it.
No-Cook Night:
Lean on boards, wraps, salads, hummus cups, fruit, and chilled desserts. You can still make dinner feel complete without heating the kitchen at all. That’s the version I reach for when the air is thick enough to make cooking feel rude.
Common Mistakes to Avoid
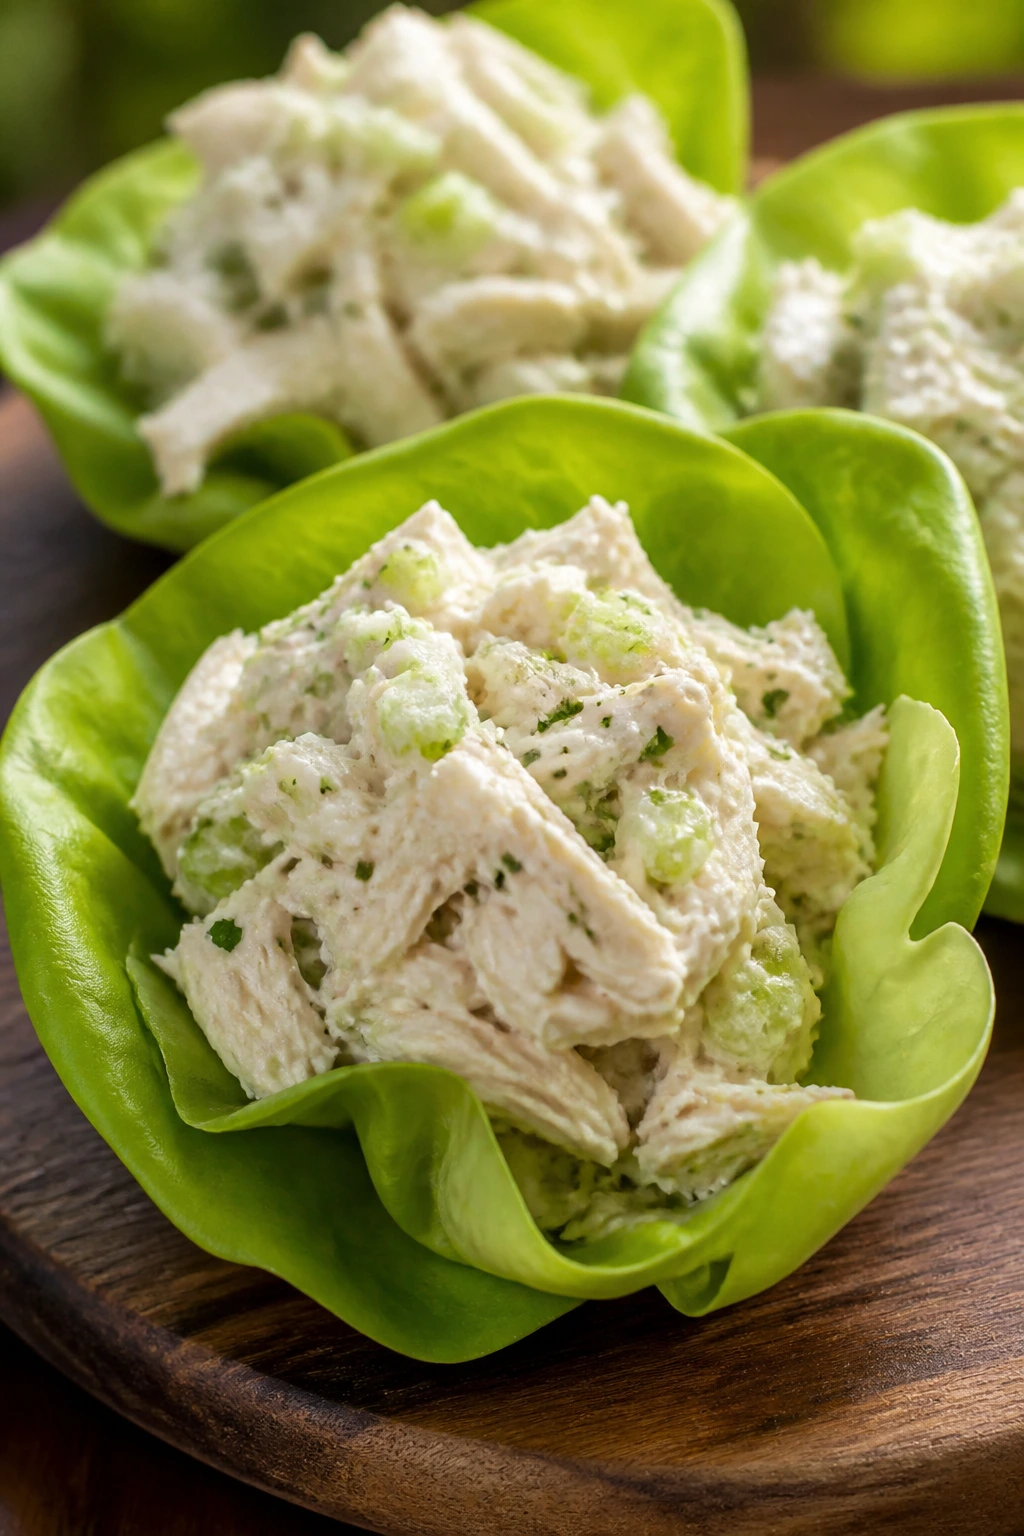
Packing food while it’s still warm:
Warm food creates steam, and steam is the enemy of crisp crusts, dry crackers, and neat sandwiches. Cool fried items, quiches, and roasted potatoes before packing them. If you don’t, the bottom layers go soft and nobody remembers the flavor because they’re too busy dealing with the texture.
Using watery ingredients without draining them:
Tomatoes, pickles, cucumbers, pimentos, and even washed greens can leak into everything around them. Pat them dry, drain them well, and salt juicy tomatoes before assembly if the recipe allows it. A few extra paper towels in the prep stage save the whole cooler.
Under-seasoning cold food:
Cold dulls salt, acid, and spice. A salad that tastes fine on the counter may taste flat once chilled. Taste again after the food has rested, then add lemon, salt, mustard, or herbs until it wakes up.
Putting delicate items together too early:
Lettuce cups, wraps with tomato, slider buns, and fruit-topped desserts need timing. Assemble just before serving when you can, or keep components separate until the last minute. The goal is not perfection. It’s keeping the bread from turning into a sponge.
Ignoring texture balance:
A picnic spread made entirely of soft foods gets boring fast. Pair creamy fillings with crunchy vegetables, soft fruit with salty cheese, or tender meat with something crisp and acidic. That contrast is what keeps people going back for a second plate.
Skipping a backup container plan:
One giant bowl sounds efficient until you realize it’s awkward to carry and impossible to portion neatly. Pack dressings separately, use smaller containers for pieces that need to stay crisp, and label the containers if you’re juggling several dishes. It makes cleanup easier too.
Frequently Asked Questions
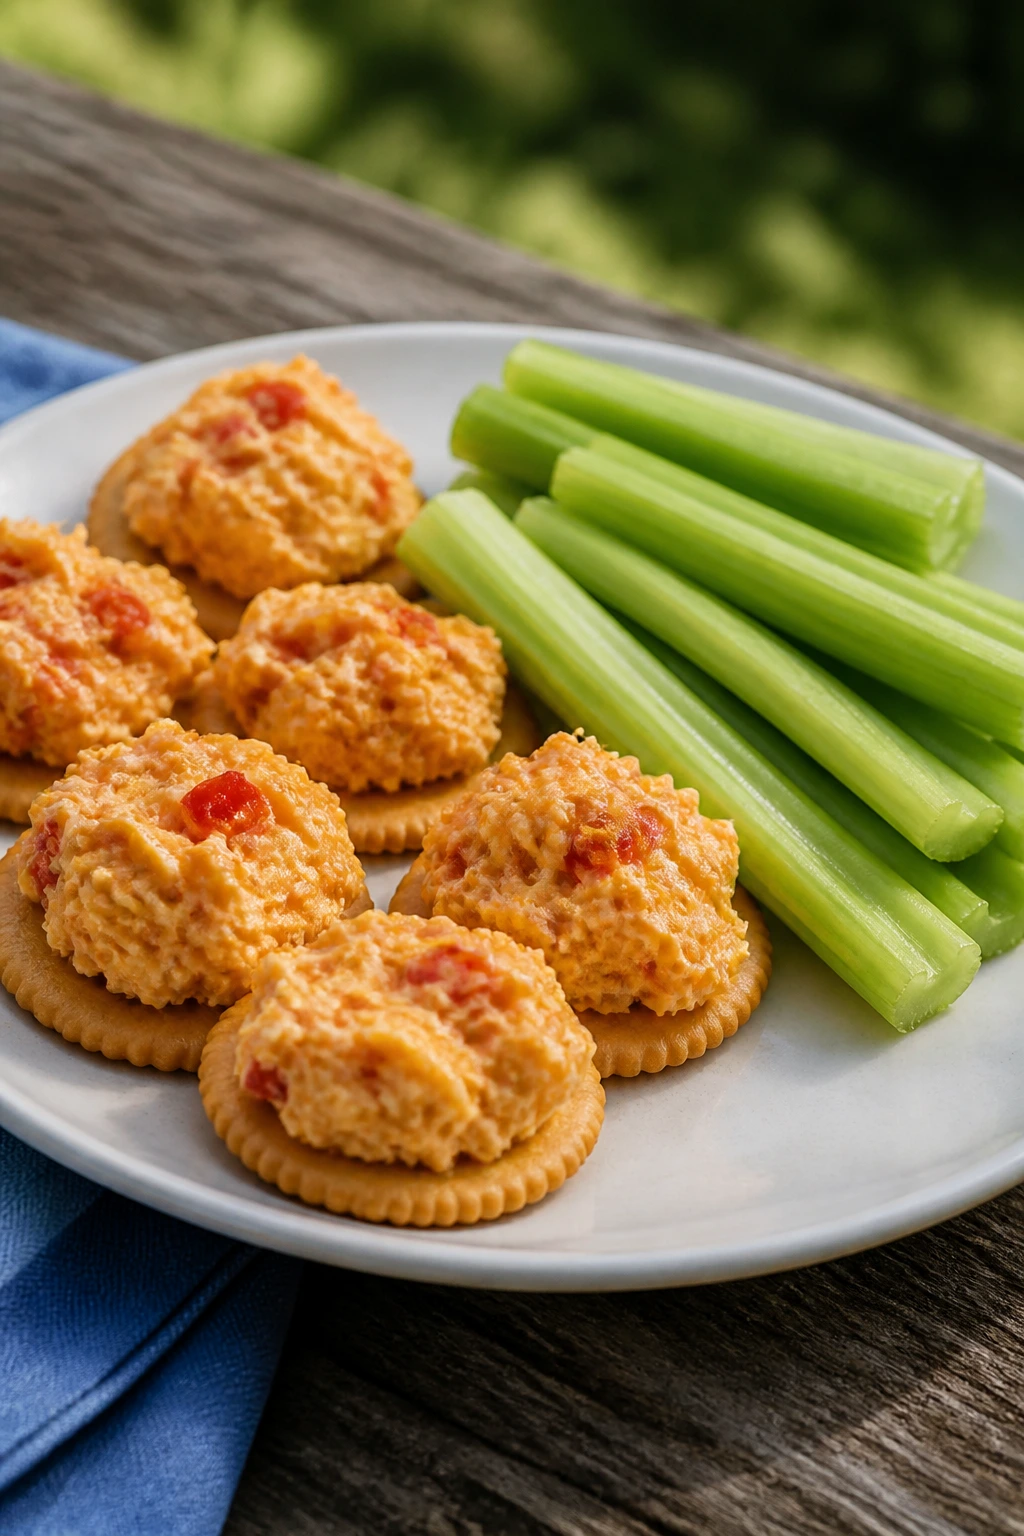
How far ahead can I make picnic food?
A lot of these recipes can be made the day before, especially pasta salads, bean salads, cookies, bars, and fillings for wraps or sandwiches. The more fragile foods — lettuce cups, burrata salads, and anything with fresh tomato on bread — are best assembled close to serving time.
What picnic foods can sit out the longest?
Dishes that are dry or oil-based tend to hold up best: fruit and cheese boards, cookies, crackers with pimento cheese, skewers, and some salads with vinaigrette. Anything with mayo, eggs, dairy, shrimp, or chicken should stay chilled and be out only as long as you can reasonably manage.
How do I keep sandwiches from getting soggy?
Use a barrier. Butter, mayo, or cream cheese goes on the bread first, then add lettuce or another dry layer before juicy fillings. Toasting the bread or using sturdier rolls also helps, and tomatoes should be salted and blotted before they go anywhere near the sandwich.
Can I use store-bought rotisserie chicken?
Yes, and it’s one of the smartest shortcuts here. It works especially well in chicken salad, Caesar wraps, and pasta salads. Pull the skin off if it’s too greasy and shred the meat while it’s still slightly warm so it mixes evenly.
What should I pack if I only have one cooler?
Prioritize the dishes that are most temperature-sensitive: dairy, eggs, chicken, shrimp, and mayo-based salads go in first with ice packs around them. Pack crackers, bread, and cookies in a separate dry bag if you can. If space is tight, choose fewer creamy items and more room-temperature foods.
Which of these recipes travel best in a car?
Pinwheels, wraps, bars, cookies, boards, and skewers usually travel well because they don’t need perfect plating. Pasta salads and potato salads are fine too, as long as the container seals tightly and stays cold. Anything layered with lettuce should be assembled at the destination or held very briefly.
How do I make the spread vegetarian without losing substance?
Use hummus cups, bean salad, caprese skewers, tabbouleh, quiche cups, fruit and cheese boards, and pasta salads with feta or olives. Those dishes have enough protein, salt, and texture to keep the meal feeling full. You don’t need fake meat for a good picnic.
Can I reheat any of these at the picnic site?
Not easily unless you’re bringing a grill, oven access, or a food warmer. Picnic food works best when it’s chosen to be eaten cold or at room temperature. If you want something warm, bring it in a thermal container and eat it early.
A Cooler Full of Small Wins
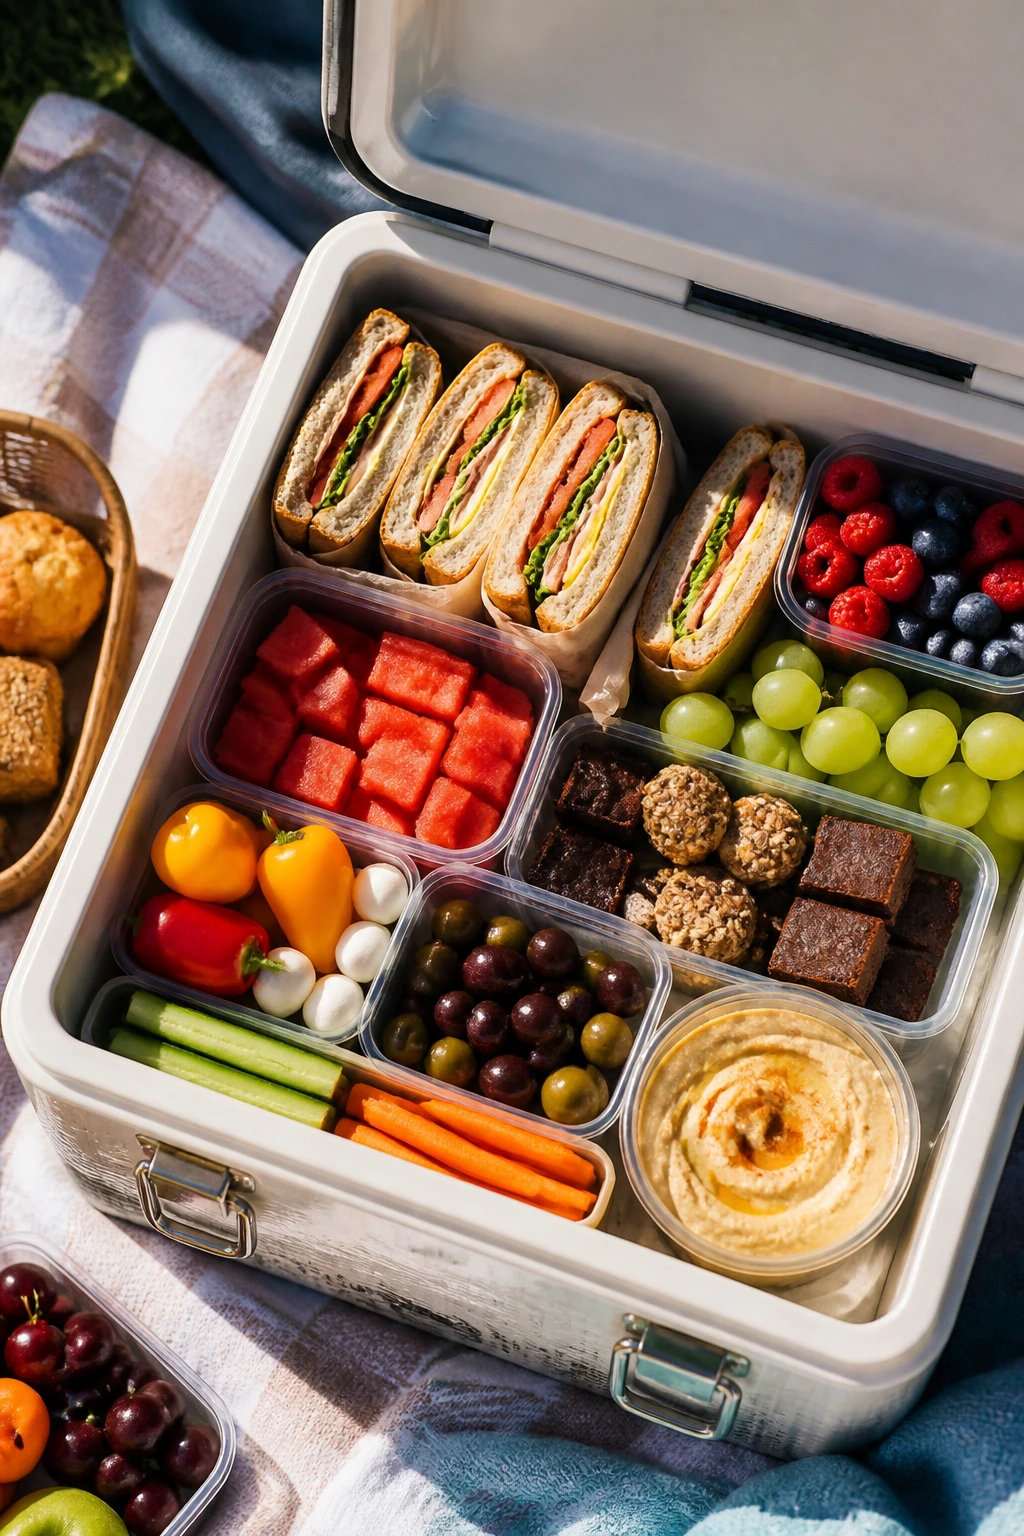
The best picnic spreads don’t look complicated once they’re on the blanket. They look calm. A handful of sturdy sandwiches, a few crisp salads, something salty, something sweet, and one or two dishes that can be eaten with your hands — that’s the rhythm that works.
I’d rather pack food that stays honest than food that tries to impress for five minutes and then falls apart. A good cooler opens like a tiny portable kitchen, and the best dishes inside are the ones that still taste like themselves after the drive, the chatter, and the first round of hungry grabbing.
Choose a couple of these picnic food ideas, keep the textures mixed, and let the cooler do the rest.