
A hot skillet gives teriyaki chicken a gloss you never get from a bottle poured straight from the fridge. The sauce tightens, the edges caramelize, and the whole thing smells like soy, garlic, and brown sugar meeting real heat. That’s the magic of teriyaki chicken made from pantry staples: it tastes deliberate, even when the shopping list is mostly things you already keep around.
I reach for this kind of dinner when the fridge looks unimpressive and I still want something with a little shine on it. A few shelf-stable basics—soy sauce, rice vinegar, brown sugar, cornstarch, ginger, garlic—can turn plain chicken into something sticky, savory, and worth putting over rice. The trick is balance. Too much sweetener and the glaze turns heavy; too little and it tastes like salty steam.
What makes these ideas useful is not just the sauce. It’s the way the same teriyaki backbone behaves differently on thighs, drumsticks, wings, meatballs, noodles, rice, lettuce, cabbage, and peppers. Some versions stay crisp. Some go saucy. Some are built for meal prep, and some are better eaten the second they leave the pan. That range matters when you’re cooking from the pantry, because the best dinner is often the one that fits the night you’re actually having.
Why This Collection Works So Well
- Pantry-first sauce: Soy sauce, brown sugar, garlic, ginger, rice vinegar, and cornstarch show up again and again because they do the job without a special trip to the store.
- Different cuts, different moods: Chicken thighs, breasts, drumsticks, wings, and ground chicken all behave differently, so you can match the cut to the texture you want.
- Sticky without being cloying: A little acid keeps the glaze bright, which is why these recipes taste more like dinner and less like candy.
- Fast cleanup, real flavor: Sheet pans, skillets, air fryers, slow cookers, and one-pot meals all work here, and none of them need fancy marinades.
- Leftovers don’t feel sad: Glazed chicken, fried rice, egg roll bowls, and shredded slow-cooker chicken all hold up well the next day if you reheat them with a small splash of water.
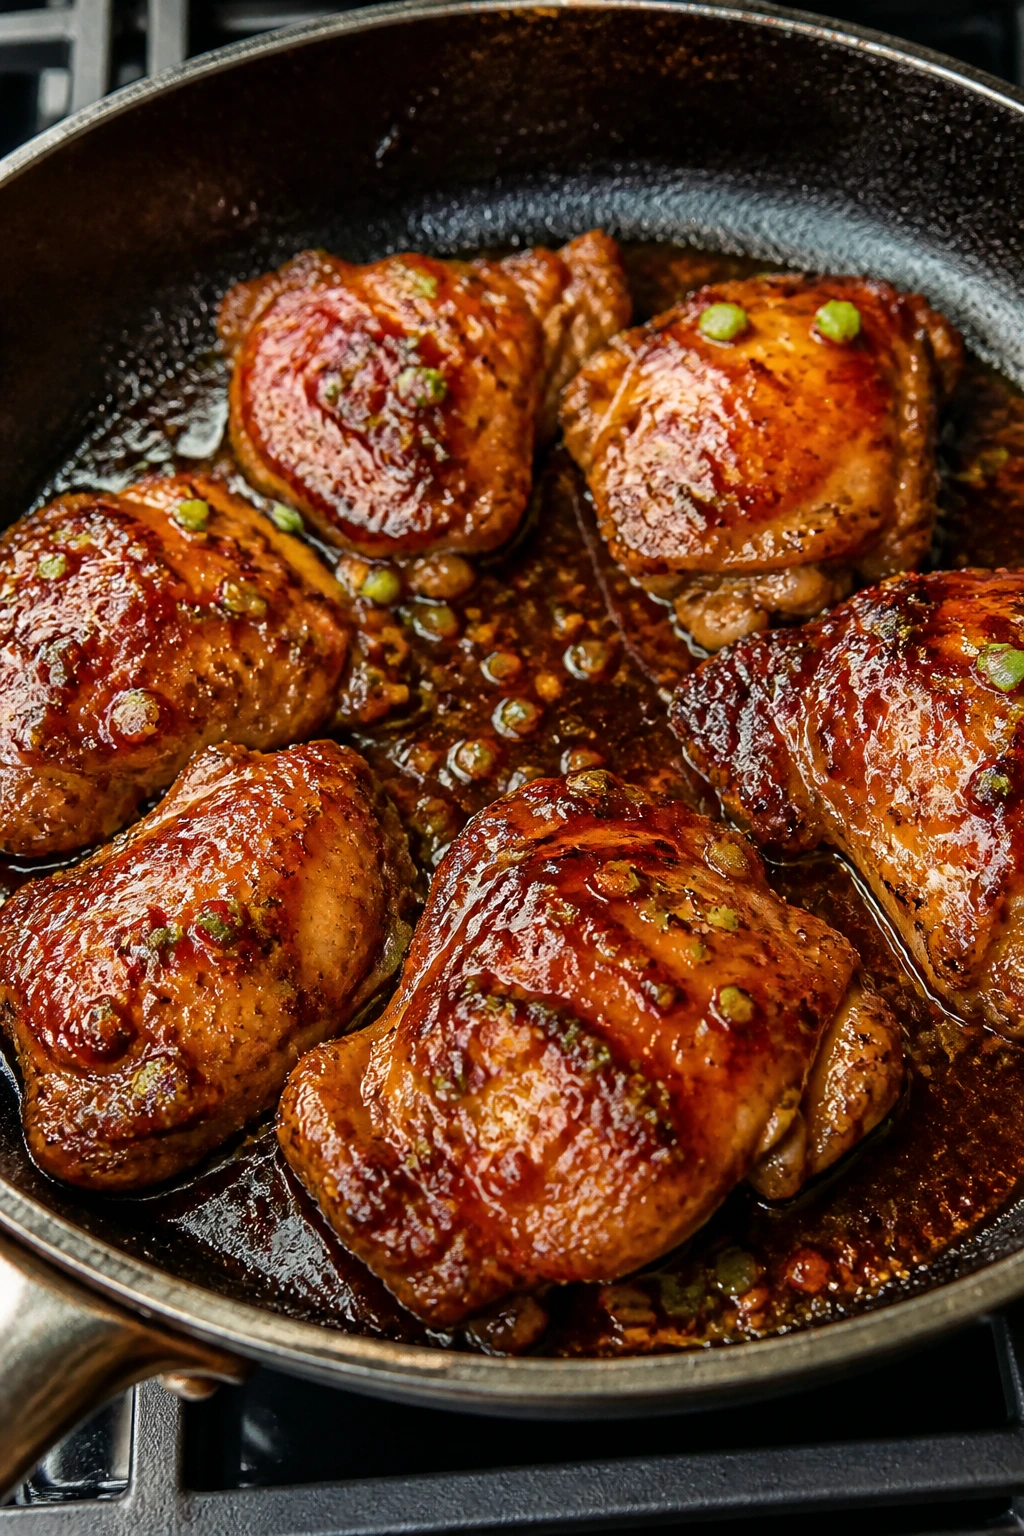
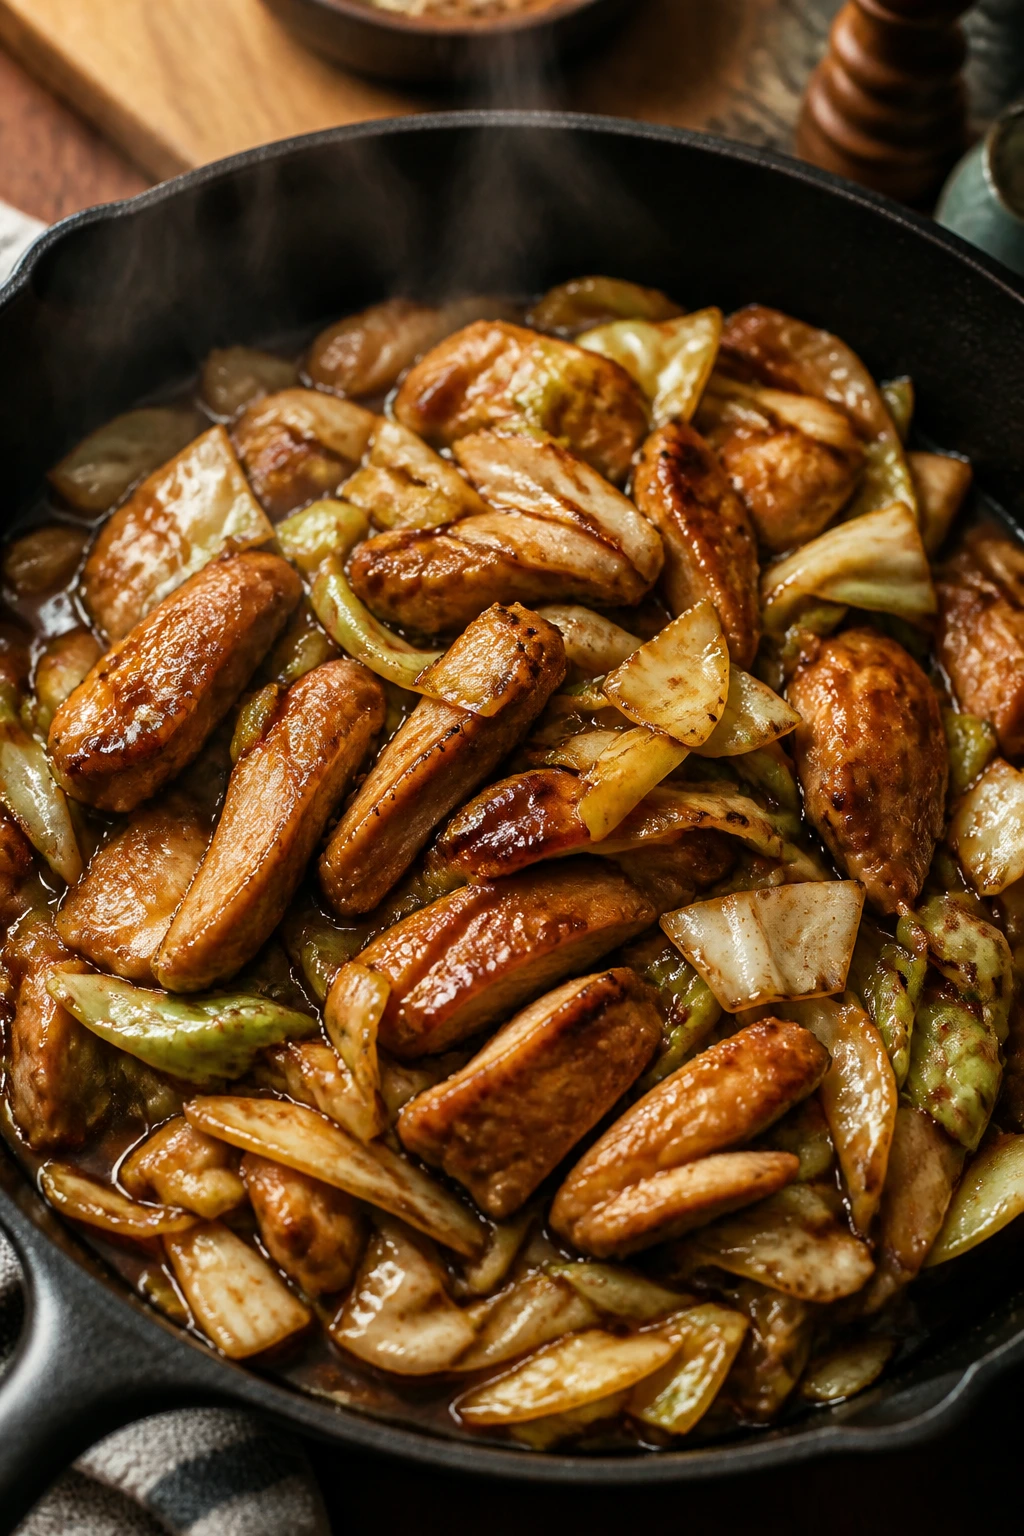
1. Classic Skillet Teriyaki Chicken Thighs
A good skillet teriyaki chicken dinner should sound like a sizzle before it smells sweet. These thighs get browned first, which is half the point; the sauce grabs onto the hot surface and turns glossy instead of sliding off into a puddle.
Why It Works:
Chicken thighs stay juicy long enough to take a proper sear, and that sear gives the sauce a dark edge you can taste. The soy-sugar-vinegar balance keeps the glaze bold without tipping into syrupy territory. A quick cornstarch slurry thickens the pan sauce in under a minute, so you get that clingy finish people usually associate with restaurant takeout.
Key Ingredients:
For the Chicken:
- 2 lb boneless, skinless chicken thighs — choose pieces that are roughly the same thickness so they brown evenly.
- 1 tbsp neutral oil — helps the thighs sear instead of sticking.
- 1/2 tsp black pepper — enough to wake up the meat without fighting the glaze.
For the Teriyaki Glaze:
- 1/3 cup soy sauce — the salty base; regular or low-sodium both work.
- 1/4 cup packed brown sugar — gives the sauce its sticky, caramel note.
- 2 tbsp rice vinegar — keeps the glaze bright.
- 1/4 cup water — loosens the sauce just enough to simmer.
- 2 garlic cloves, minced — adds a sharp, savory edge.
- 1 tsp fresh grated ginger or 1/2 tsp ground ginger — gives the sauce that warm, clean finish.
- 1 tbsp cornstarch mixed with 2 tbsp cold water — thickens the sauce fast.
- 2 sliced scallions and 1 tsp sesame seeds — optional, but they make the plate look finished.
Quick Steps:
Prep the Sauce:
- Whisk soy sauce, brown sugar, rice vinegar, water, garlic, and ginger in a small bowl until the sugar starts to dissolve. Stir the cornstarch and cold water together in a separate cup.
Sear the Chicken:
2. Pat the thighs dry and season them with pepper. Heat the oil in a 12-inch skillet over medium-high heat until it shimmers, then lay the chicken in a single layer. Cook for 5 to 6 minutes per side, until the surface is deep golden and the thickest part reaches 165°F.
Glaze and Finish:
3. Lower the heat to medium. Pour in the sauce and let it bubble for 1 minute, scraping up the browned bits from the pan. Add the cornstarch slurry and stir for 30 to 60 seconds, until the sauce turns shiny and coats the chicken.
4. Rest the chicken for 3 minutes, then spoon the extra glaze over the top.
5. Finish with scallions and sesame seeds.
Equipment for This Recipe:
- 12-inch skillet — wide enough for real browning.
- Small bowl — for the sauce and slurry.
- Tongs — useful for turning the thighs without piercing them.
- Instant-read thermometer — the easiest way to avoid dry chicken.
- Measuring cups and spoons — because teriyaki lives or dies by balance.
How to Serve This Dish:
Pile the chicken over hot jasmine rice and spoon the extra glaze over the grains. A few sliced cucumbers on the side cut the richness fast, and if you have leftover steamed broccoli, it fits right in.
Pro Tips for This Recipe:
- Dry the thighs well before they hit the pan; wet chicken steams, and steamed chicken doesn’t brown.
- Keep the sauce at a simmer, not a furious boil, or the sugar can taste harsh.
- If the glaze tightens too much, add 1 tablespoon water at a time.
- Slice the chicken after a short rest, not immediately, so the juices stay where they belong.
Variations on This Dish:
- Pineapple Shine: Stir 2 tablespoons pineapple juice into the sauce for a softer, fruitier finish.
- Chili Heat: Add 1 teaspoon chili flakes or 1 tablespoon chili crisp to the glaze.
- Sesame-Lime Finish: Swap the scallions for lime zest and an extra drizzle of sesame oil right at the end.
Common Mistakes to Avoid with This Dish:
- Don’t dump the sauce into a cold pan and expect browning; you need heat first.
- Don’t crowd the chicken so tightly that it steams in its own moisture.
- Don’t add the cornstarch directly to the hot sauce or it will clump into tiny gummy bits.
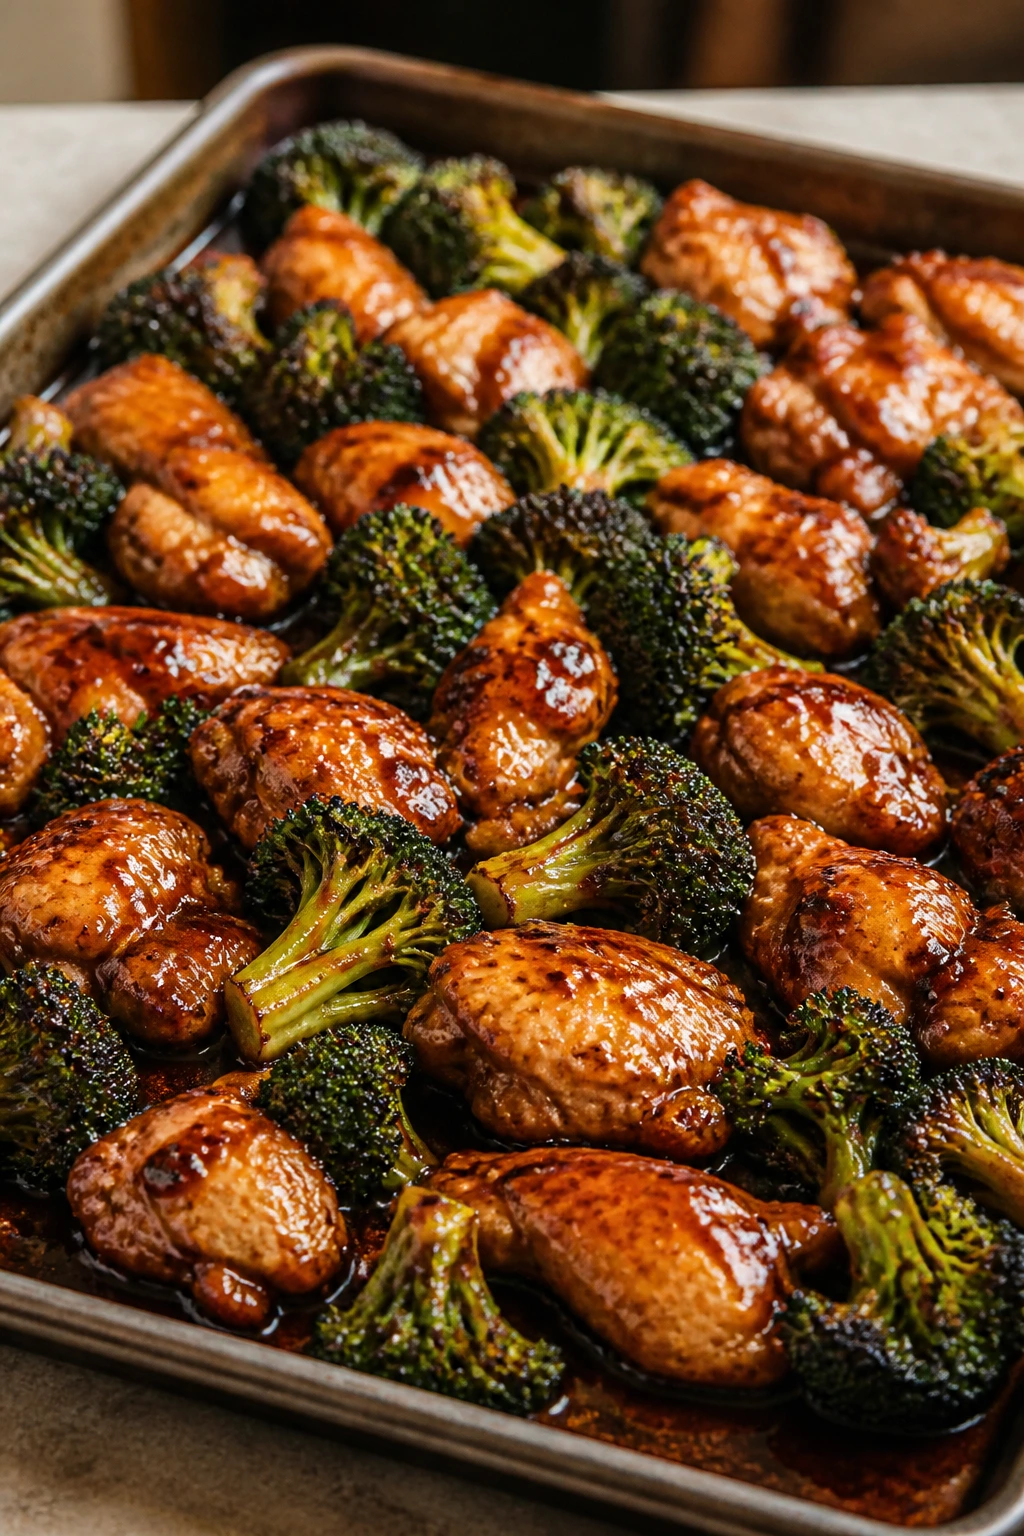
2. Sheet-Pan Teriyaki Chicken and Broccoli
Sheet-pan teriyaki chicken is the version I make when I want dinner with built-in vegetables and no drama. The broccoli picks up toasted edges, the chicken roasts through, and the glaze goes on near the end so it stays glossy instead of scorched.
Why It Works:
Roasting at high heat gives you caramelization on the chicken and little charred points on the broccoli florets. That contrast matters. A separate glaze keeps the sugar from burning before the chicken finishes, and it also lets you control how sticky the final coating gets.
Key Ingredients:
For the Pan:
- 2 lb boneless chicken thighs or breasts, cut into 1 1/2-inch pieces — thighs are forgiving, breasts cook faster.
- 4 cups broccoli florets — cut them small enough to brown at the edges.
- 2 tbsp neutral oil — helps the vegetables roast.
- 1/2 tsp salt and 1/2 tsp black pepper — light seasoning before the sauce.
For the Glaze:
- 1/3 cup soy sauce — the salt and umami base.
- 1/4 cup packed brown sugar or honey — gives the shine.
- 2 tbsp rice vinegar — keeps the glaze from tasting flat.
- 2 garlic cloves, minced — sharpens the whole dish.
- 1 tsp grated ginger — adds warmth.
- 1 tbsp cornstarch mixed with 2 tbsp water — thickens the sauce.
- 1 tbsp sesame seeds — for the finish.
Quick Steps:
Roast the Chicken and Broccoli:
- Preheat the oven to 425°F and line a rimmed sheet pan with foil or parchment.
- Toss the broccoli with 1 tablespoon oil, salt, and pepper. Toss the chicken with the remaining oil and arrange everything in a single layer.
Make the Glaze:
3. Whisk soy sauce, brown sugar, rice vinegar, garlic, and ginger in a small saucepan. Bring it to a simmer over medium heat, then stir in the cornstarch slurry and cook for 30 to 45 seconds until thick.
Finish in the Oven:
4. Roast the chicken and broccoli for 15 minutes. Brush half the glaze over the chicken and broccoli, then return the pan to the oven for 5 to 7 minutes, until the chicken reaches 165°F and the broccoli has browned tips.
5. Spoon on the remaining glaze and sprinkle with sesame seeds before serving.
Equipment for This Recipe:
- Rimmed sheet pan — prevents sauce or juices from spilling.
- Parchment paper or foil — makes cleanup easier.
- Small saucepan — for the glaze.
- Brush or spoon — to coat the chicken near the end.
- Instant-read thermometer — chicken breast dries out fast if you guess.
How to Serve This Dish:
Serve it over steamed rice or scoop it into shallow bowls with a few extra broccoli florets on top. The pan juices are part of the meal, so don’t leave them behind.
Pro Tips for This Recipe:
- Cut the broccoli into even florets so the small pieces don’t burn while the big ones stay pale.
- If you use chicken breasts, cut them a bit larger than the broccoli so they don’t overcook.
- Do not glaze too early; the sugar will darken fast at 425°F.
- A squeeze of lime over the finished pan helps if the sauce tastes heavy.
Variations on This Dish:
- Cauliflower Swap: Use cauliflower florets instead of broccoli and roast them the same way.
- Snap Pea Version: Add snap peas in the last 5 minutes so they stay crisp.
- Garlic-Heavy Glaze: Use 4 garlic cloves if you want a sharper, more savory sauce.
Common Mistakes to Avoid with This Dish:
- Don’t drown the pan in vegetables; the broccoli needs space for the edges to brown.
- Don’t skip the final brush of sauce or the chicken will taste roasted, not teriyaki.
- Don’t forget to line the pan unless you enjoy scraping sugar off metal.
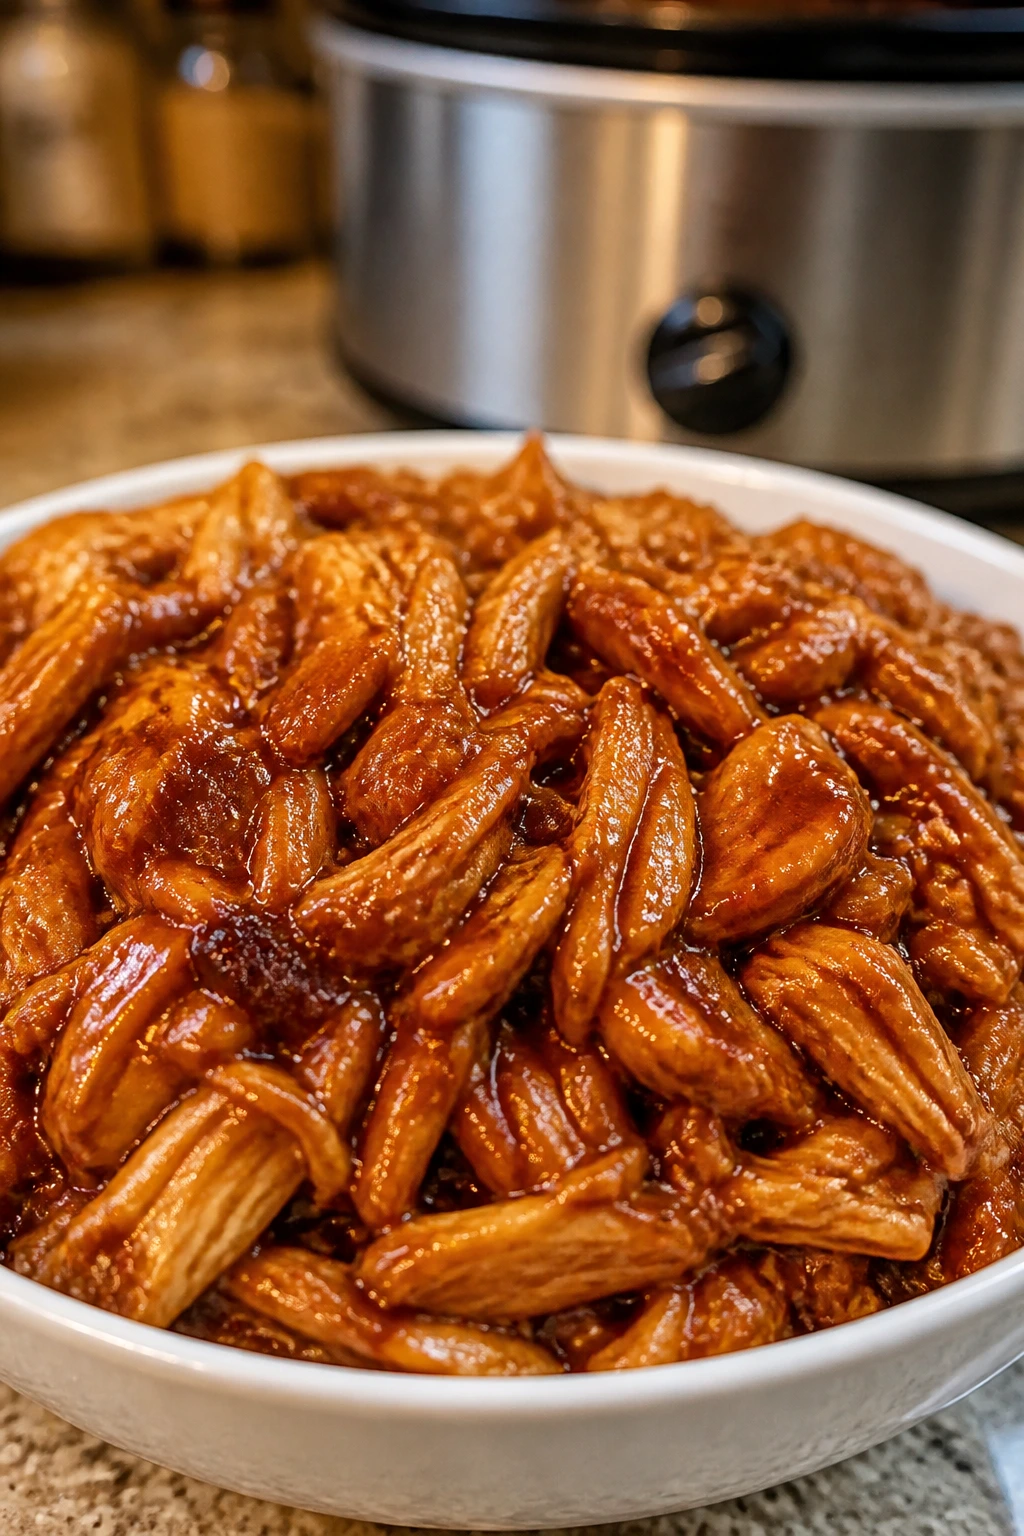
3. Slow Cooker Teriyaki Chicken
Slow cooker teriyaki chicken is the move when you want the house to smell like dinner for hours before you sit down to eat. The chicken turns tender enough to shred with a fork, and the sauce clings better after a quick thickening step at the end.
Why It Works:
Chicken thighs love low, slow heat. They stay moist even after several hours, which means you can walk away and come back to something that tastes like you paid attention. The glaze starts thin so it can penetrate the meat, then gets reduced at the end for the sticky finish people want from teriyaki.
Key Ingredients:
For the Slow Cooker:
- 2 1/2 lb boneless, skinless chicken thighs — the best cut here because they don’t dry out.
- 1/2 cup soy sauce — the seasoning backbone.
- 1/3 cup brown sugar — adds sweetness and color.
- 1/4 cup rice vinegar — keeps the sauce balanced.
- 1/4 cup water — helps the sauce spread around the chicken.
- 1 small onion, sliced — softens into the sauce.
- 4 garlic cloves, minced — gives depth.
- 1 tbsp grated ginger — adds brightness.
For the Finish:
- 1 tbsp cornstarch mixed with 2 tbsp water — thickens the sauce after cooking.
- 1 tbsp sesame oil — a little goes a long way.
- 1 sliced scallion — optional, but nice.
Quick Steps:
Build the Base:
- Add the sliced onion to the bottom of the slow cooker. Set the chicken on top in an even layer.
- Whisk soy sauce, brown sugar, rice vinegar, water, garlic, and ginger until the sugar starts to disappear, then pour it over the chicken.
Cook Low and Slow:
3. Cover and cook on low for 4 to 5 hours or on high for 2 1/2 to 3 hours, until the chicken is tender and reaches 165°F.
Thicken the Sauce:
4. Transfer the chicken to a bowl and keep it warm. Stir the cornstarch slurry into the slow cooker liquid, cover loosely, and cook on high for 10 to 15 minutes until the sauce thickens.
5. Return the chicken to the pot, add sesame oil, and toss it through the sauce.
6. Top with scallions before serving.
Equipment for This Recipe:
- Slow cooker — a 5- to 6-quart size works well.
- Mixing bowl — for the sauce.
- Tongs or a slotted spoon — to lift the chicken out before thickening.
- Small whisk — makes the sauce smooth.
- Measuring cups and spoons — the sauce needs a clean ratio.
How to Serve This Dish:
Serve the chicken over rice, but keep a little extra sauce in a spoonable bowl on the side. It also works tucked into lettuce cups with sliced cucumber if you want something lighter.
Pro Tips for This Recipe:
- Don’t flood the cooker with extra liquid; the chicken releases enough moisture on its own.
- Thicken the sauce after cooking, not before, or it can turn oddly gluey.
- Add sesame oil at the end so its flavor stays fresh.
- Shred the chicken only if you want a looser texture; whole thighs look better on a plate.
Variations on This Dish:
- Pineapple Slow Cooker Version: Add 1/2 cup pineapple chunks for a sweeter, softer glaze.
- Spicy Red Pepper Version: Stir in 1 teaspoon red pepper flakes with the sauce.
- Shredded Sandwich Filling: Shred the chicken and pile it onto toasted buns or slider rolls.
Common Mistakes to Avoid with This Dish:
- Don’t keep lifting the lid; every peek adds time.
- Don’t forget the cornstarch step or the sauce will be watery.
- Don’t use chicken breasts without checking them early, because they can turn stringy in the slow cooker.
4. Air Fryer Teriyaki Chicken Bites
Air fryer teriyaki chicken bites are what I make when I want crisp edges without dragging out a skillet. The chicken comes out in little caramelized cubes that hold glaze well, and the whole dish finishes fast enough to feel almost suspicious.
Why It Works:
Cutting the chicken into bite-size pieces increases surface area, which means more browning in less time. The air fryer mimics hot-oven roasting but with stronger airflow, so the edges dry just enough to take on the glaze. The sauce goes on after cooking, which keeps the sugar from scorching in the basket.
Key Ingredients:
For the Chicken:
- 2 lb chicken breast or thighs, cut into 1-inch cubes — thighs stay juicier, breasts cook faster.
- 1 tbsp neutral oil — helps the surface brown.
- 2 tbsp cornstarch — gives the bites a light crust.
- 1/2 tsp garlic powder — adds flavor without burning.
- 1/2 tsp ground ginger — builds the teriyaki profile.
- 1/4 tsp black pepper — a small amount is enough.
For the Glaze:
- 1/3 cup soy sauce — savory base.
- 1/4 cup brown sugar — the sticky part.
- 2 tbsp water — keeps the glaze pourable.
- 1 tbsp rice vinegar — brightens the finish.
- 1 garlic clove, minced — for freshness.
- 1 tsp cornstarch mixed with 1 tbsp water — thickens quickly.
Quick Steps:
Coat the Chicken:
- Toss the chicken cubes with oil, cornstarch, garlic powder, ginger, and pepper until lightly coated.
Air Fry:
2. Preheat the air fryer to 400°F. Arrange the chicken in a single layer in the basket.
3. Cook for 10 to 12 minutes, shaking halfway through, until the pieces are golden at the edges and reach 165°F.
Make and Toss the Glaze:
4. While the chicken cooks, simmer soy sauce, brown sugar, water, rice vinegar, and garlic in a small pan. Stir in the cornstarch slurry and cook for 30 seconds, until the sauce looks glossy.
5. Toss the hot chicken with the glaze and serve right away.
Equipment for This Recipe:
- Air fryer — basket style or oven style both work.
- Small saucepan — for the glaze.
- Mixing bowl — to coat the chicken.
- Tongs — for shaking and tossing.
- Instant-read thermometer — small pieces cook fast.
How to Serve This Dish:
Pile the bites into rice bowls, or spear them with toothpicks for an appetizer that disappears fast. A side of steamed snap peas or cucumber slices keeps the plate from feeling too sticky.
Pro Tips for This Recipe:
- Don’t overcrowd the basket; the pieces need moving air around them.
- Use thighs if you’re worried about dryness.
- The glaze should be made while the chicken cooks, not after, so the bites stay hot.
- If the sauce thickens too much, add 1 teaspoon water at a time.
Variations on This Dish:
- Sesame Bowl Style: Add extra sesame seeds and serve over rice with scallions.
- Chili-Garlic Bites: Stir a teaspoon of chili garlic sauce into the glaze.
- Orange Edge: Replace 1 tablespoon of the water with orange juice for a softer sweetness.
Common Mistakes to Avoid with This Dish:
- Don’t brush the glaze onto raw chicken before air frying; the sugar can darken too fast.
- Don’t cut the pieces too small or they dry out before they color.
- Don’t skip the cornstarch dusting if you want a little surface texture.
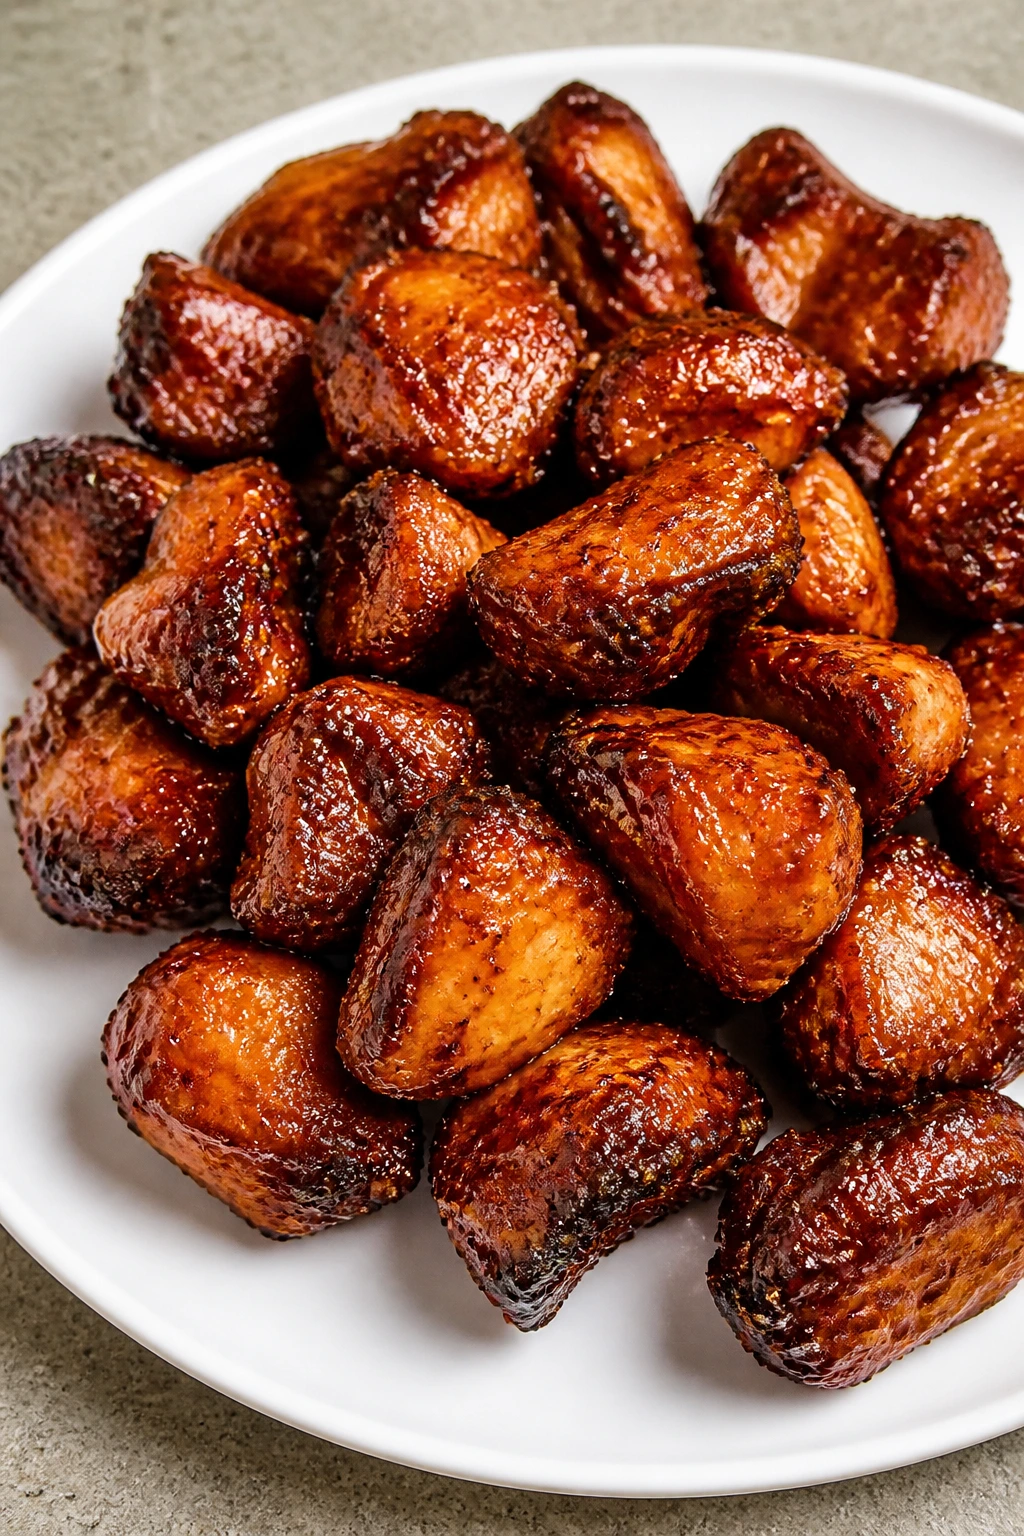
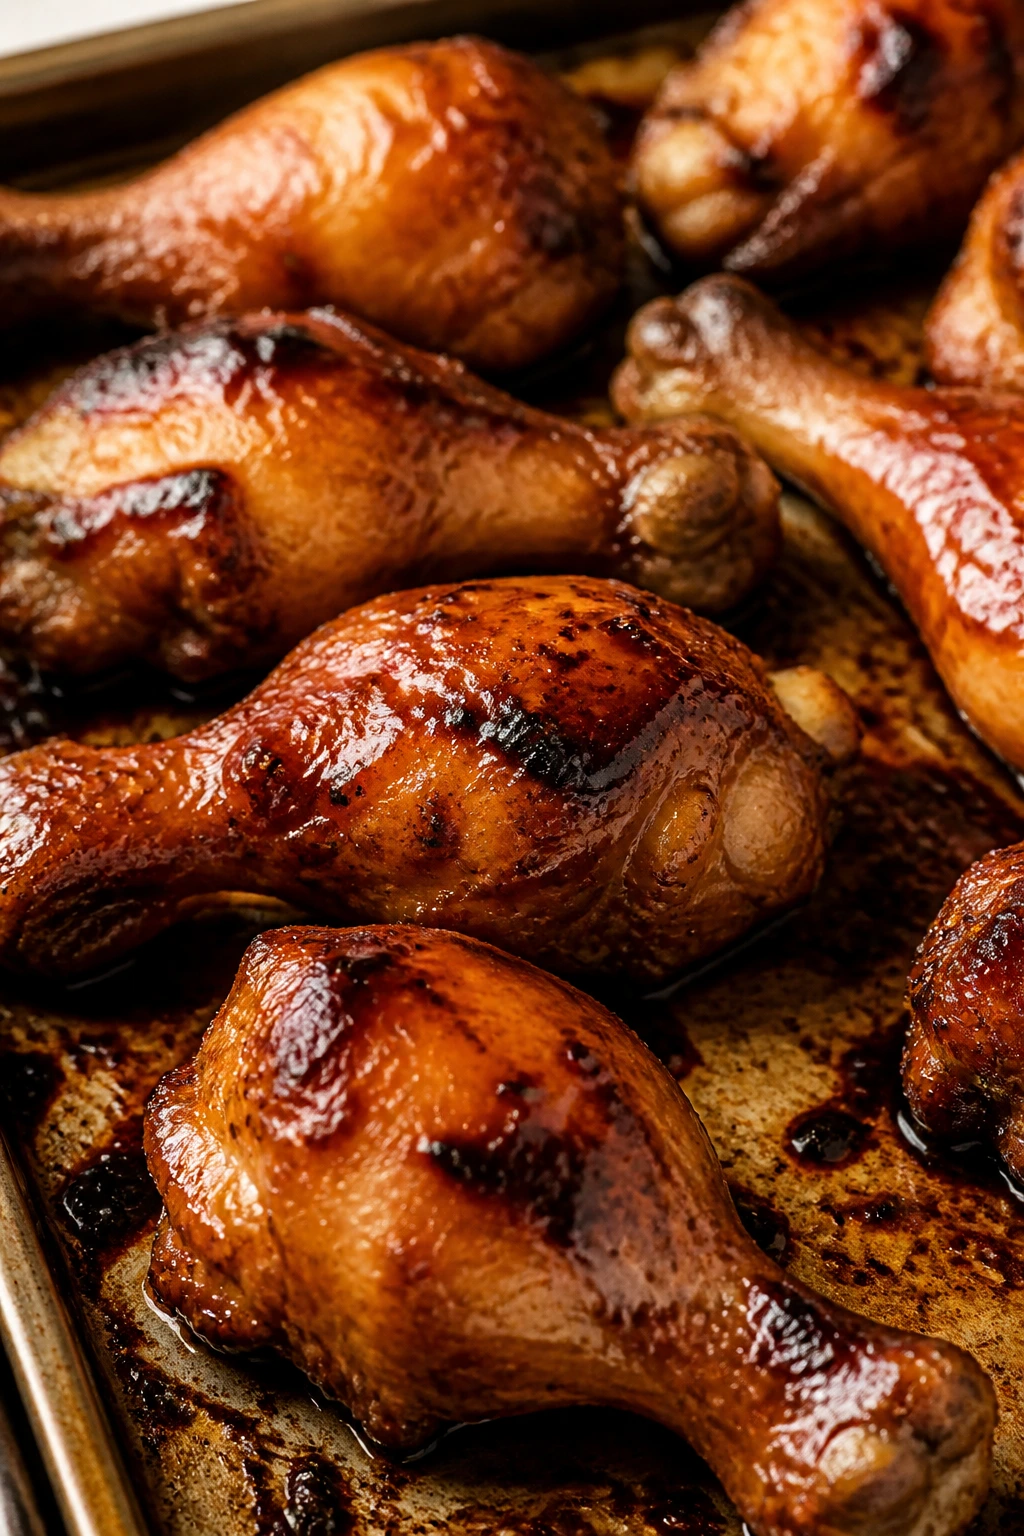
5. Baked Teriyaki Chicken Drumsticks
Drumsticks are the cheap cut nobody talks about enough. They bring flavor, forgive a little overcooking, and look downright good when they come out lacquered and dark from the oven.
Why It Works:
Drumsticks have enough fat and connective tissue to stay juicy through a longer bake. A short marinade seasons them all the way through, while a final brush of reduced sauce gives you the sticky shell you want. Broiling for a minute or two at the end adds the burnished look without drying the meat.
Key Ingredients:
For the Chicken:
- 3 lb chicken drumsticks — choose evenly sized pieces if you can.
- 1 tbsp neutral oil — helps the skin brown.
- 1/2 tsp black pepper — enough to balance the sweetness.
For the Marinade and Glaze:
- 1/2 cup soy sauce — the salty base.
- 1/3 cup brown sugar — gives the lacquer.
- 2 tbsp rice vinegar — keeps the glaze lively.
- 2 tbsp water — loosens the marinade.
- 3 garlic cloves, minced — adds depth.
- 1 tsp grated ginger — keeps the flavor bright.
- 1 tbsp cornstarch mixed with 2 tbsp water — for the final glaze.
Quick Steps:
Marinate the Drumsticks:
- Whisk soy sauce, brown sugar, rice vinegar, water, garlic, and ginger. Add the drumsticks and turn them to coat. Marinate for 30 minutes at room temperature or up to 12 hours in the fridge.
Bake and Glaze:
2. Preheat the oven to 400°F. Arrange the drumsticks on a foil-lined, lightly oiled rack set over a sheet pan.
3. Bake for 35 to 40 minutes, turning once halfway through, until the thickest part reaches 165°F and the juices run clear.
4. Simmer the reserved marinade in a small saucepan, stir in the cornstarch slurry, and cook until thick.
5. Brush the drumsticks with the glaze and broil for 1 to 2 minutes until shiny and deeply browned.
Equipment for This Recipe:
- Rimmed sheet pan — catches drips.
- Wire rack — helps the drumsticks brown all around.
- Small saucepan — for the glaze.
- Brush — useful for the final coat.
- Tongs — easier than chasing slippery drumsticks.
How to Serve This Dish:
Serve two or three drumsticks per person with rice and something sharp, like quick cucumber pickles. The dark glaze looks best against a plain white plate, which sounds fussy until you see how much the sauce shines.
Pro Tips for This Recipe:
- Dry the drumsticks before marinating so the glaze grabs better.
- Use foil on the pan unless you like scrubbing caramelized sugar.
- If the skin is pale after baking, the broiler will fix it fast.
- Save a little uncooked marinade only if you’ve kept the raw chicken separate from the glaze sauce; otherwise, simmer everything thoroughly.
Variations on This Dish:
- Ginger-Forward Drumsticks: Double the ginger and skip the broil for a softer finish.
- Spicy Pantry Version: Add 1 teaspoon chili flakes to the marinade.
- Sticky Party Tray: Finish with extra sesame seeds and scallions for a platter-style dish.
Common Mistakes to Avoid with This Dish:
- Don’t bake at too low a temperature or the skin stays floppy.
- Don’t forget the rack if you want browning on the underside.
- Don’t let the glaze burn under the broiler; one minute can be enough.
6. Crispy Teriyaki Chicken Wings
Wings are where teriyaki gets a little louder. They crackle in the oven, then get tossed in sauce so the skin stays crisp under the glaze instead of going soft and soggy.
Why It Works:
Wings have a lot of skin, and skin is where the crisp lives. Baking powder helps dry and brown the surface, which is a classic trick for oven wings that need to hold up to a sticky sauce. The teriyaki glaze is added after baking, so you get gloss without losing that crunch.
Key Ingredients:
For the Wings:
- 3 lb chicken wings, split and patted dry — dry wings crisp better.
- 1 tbsp aluminum-free baking powder — helps the skin blister and brown.
- 1 tsp salt — wings need seasoning before the sauce.
- 1/2 tsp black pepper — for a small peppery edge.
For the Glaze:
- 1/3 cup soy sauce — salty and savory.
- 1/4 cup brown sugar — the sticky backbone.
- 2 tbsp rice vinegar — keeps the sweetness in check.
- 2 tbsp water — helps the sauce simmer.
- 2 garlic cloves, minced — for depth.
- 1 tsp grated ginger — to keep the flavor clean.
- 1 tbsp cornstarch mixed with 2 tbsp water — thickens quickly.
- 1 tsp sesame oil — optional, but nice at the end.
Quick Steps:
Bake the Wings:
- Preheat the oven to 425°F and line a sheet pan with foil. Set a wire rack on top if you have one.
- Toss the wings with baking powder, salt, and pepper. Arrange them in a single layer and bake for 40 to 45 minutes, flipping once, until crisp and deeply golden.
Make the Glaze:
3. While the wings bake, simmer soy sauce, brown sugar, rice vinegar, water, garlic, and ginger in a small pan. Add the cornstarch slurry and cook until the sauce looks glossy and spoonable.
Finish:
4. Toss the hot wings with the glaze in a large bowl, then return them to the rack for 2 minutes if you want the coating to set a little.
5. Drizzle with sesame oil right before serving.
Equipment for This Recipe:
- Sheet pan — lined for easier cleanup.
- Wire rack — important for crisp skin.
- Large bowl — for tossing the wings.
- Small saucepan — for the glaze.
- Tongs — helps flip and toss without tearing the skin.
How to Serve This Dish:
Serve the wings on a platter with celery or cucumber sticks if you want something cold against the sticky coating. They’re best eaten with fingers, which is really the point.
Pro Tips for This Recipe:
- Dry the wings very well before seasoning; moisture is the enemy here.
- Baking powder, not baking soda, is the move.
- Glaze the wings only after they’re crisp and hot.
- If you like extra shine, brush on a second thin layer of sauce instead of drowning them.
Variations on This Dish:
- Garlic-Sesame Wings: Add one extra garlic clove and extra sesame seeds.
- Chili Crisp Wings: Stir 1 tablespoon chili crisp into the glaze.
- Sweet-Sour Wings: Add 1 extra tablespoon rice vinegar for a sharper finish.
Common Mistakes to Avoid with This Dish:
- Don’t coat wet wings in baking powder; the surface will go patchy.
- Don’t sauce them before baking or the skin softens.
- Don’t crowd the pan, or the wings steam instead of crisp.
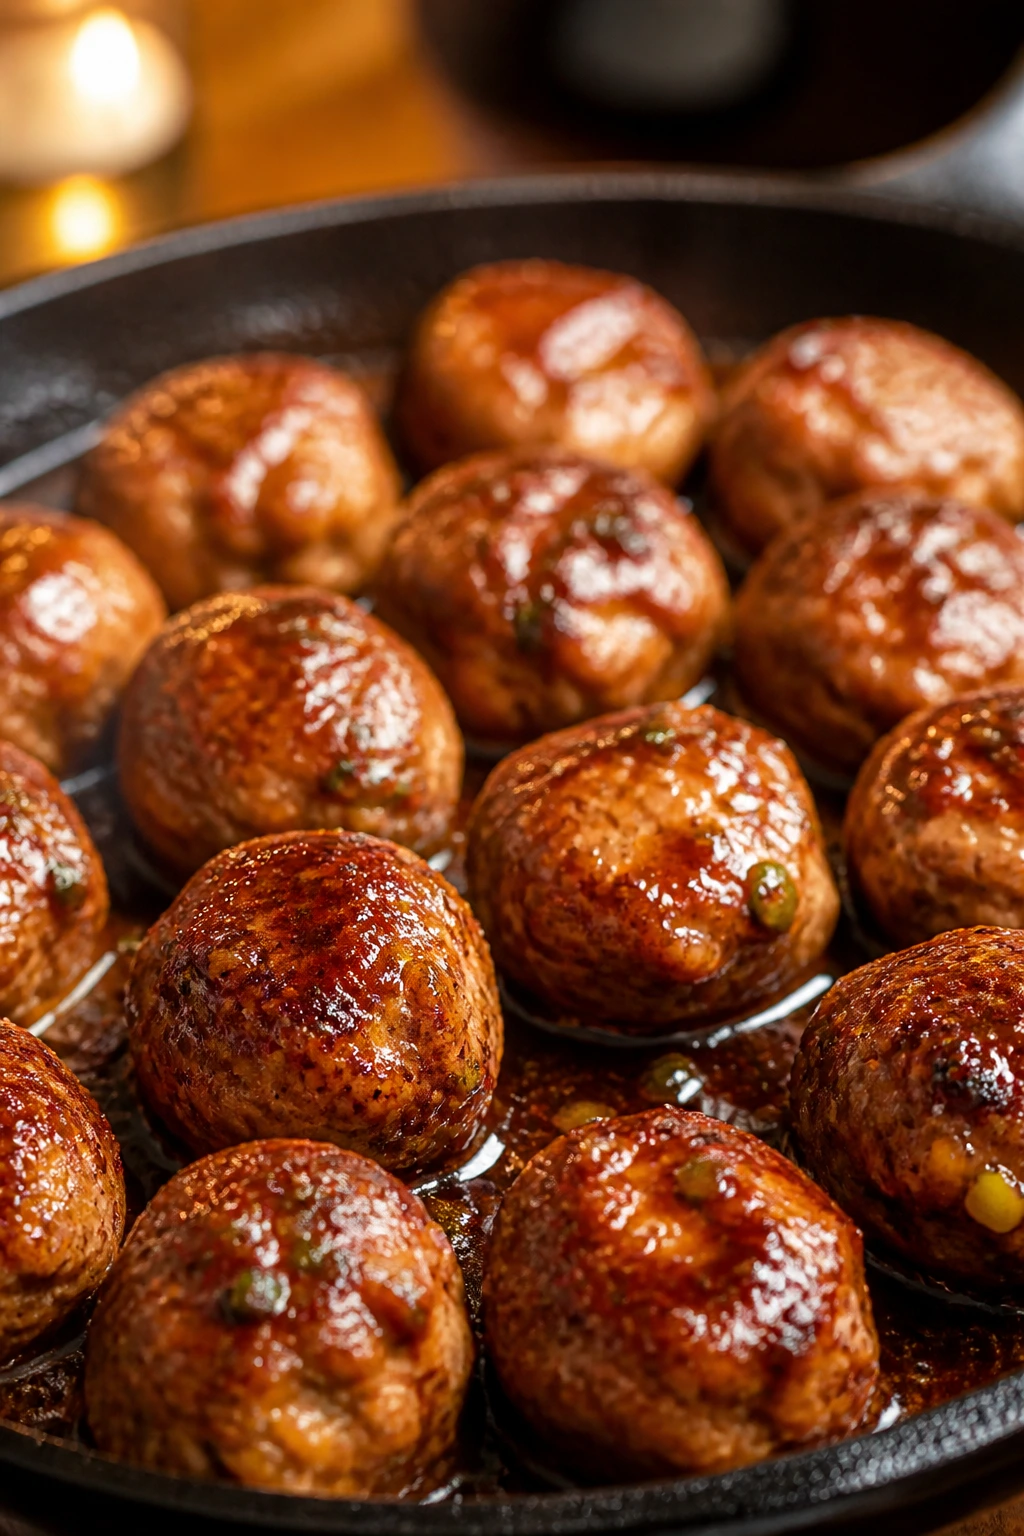
7. Teriyaki Chicken Meatballs
Teriyaki meatballs are one of those recipes that looks like effort and eats like comfort. The outside gets browned, the inside stays tender, and the sauce catches in all the little seams between the meatballs.
Why It Works:
Ground chicken needs help holding together, so breadcrumbs and egg do that job without making the texture heavy. Baking the meatballs gives them shape, and finishing them in sauce means they soak up flavor without getting waterlogged. It’s the cleanest way to get teriyaki into a bite-size form.
Key Ingredients:
For the Meatballs:
- 1 1/2 lb ground chicken — lean, mild, and easy to season.
- 1/2 cup panko breadcrumbs or crushed saltines — keeps the meatballs tender.
- 1 large egg — binds everything together.
- 2 green onions, thinly sliced — adds freshness.
- 2 garlic cloves, minced — builds savory flavor.
- 1 tsp grated ginger — keeps the profile classic.
- 1/2 tsp black pepper — just enough.
For the Glaze:
- 1/3 cup soy sauce — the base.
- 1/4 cup brown sugar — the sticky part.
- 2 tbsp rice vinegar — balances sweetness.
- 1/4 cup water — keeps the sauce from turning harsh.
- 1 tbsp cornstarch mixed with 2 tbsp water — thickens quickly.
Quick Steps:
Mix and Shape:
- Heat the oven to 425°F. In a bowl, mix the ground chicken, breadcrumbs, egg, green onions, garlic, ginger, and pepper until just combined.
- Roll the mixture into 1 1/2-inch balls and place them on a parchment-lined sheet pan.
Bake:
3. Bake for 15 to 18 minutes, until the meatballs are browned and the center reaches 165°F.
Glaze:
4. While they bake, simmer soy sauce, brown sugar, rice vinegar, and water in a skillet. Stir in the cornstarch slurry and cook until glossy.
5. Toss the hot meatballs in the glaze and serve.
Equipment for This Recipe:
- Sheet pan — for baking.
- Parchment paper — keeps the meatballs from sticking.
- Mixing bowl — for the meat mixture.
- Small skillet — for the glaze.
- Spoon or scoop — makes evenly sized meatballs easier.
How to Serve This Dish:
They’re good over rice, but I also like them with toothpicks as a snacky dinner alongside steamed broccoli. A little extra glaze on the plate turns them from simple to polished.
Pro Tips for This Recipe:
- Mix just until combined; overmixing makes meatballs springy.
- Wet your hands slightly when shaping them.
- Don’t skip the glaze reduction or the meatballs will taste underseasoned.
- If the mixture feels loose, chill it for 10 minutes before shaping.
Variations on This Dish:
- Sesame Meatballs: Add 1 tablespoon sesame seeds to the mixture.
- Spicy Meatballs: Stir 1 teaspoon chili flakes into the glaze.
- Mushroom Stretch: Add 1/2 cup finely chopped mushrooms to the meatball mix for a softer texture.
Common Mistakes to Avoid with This Dish:
- Don’t pack the mixture too tightly or the meatballs turn dense.
- Don’t underbake them; ground chicken needs a full 165°F.
- Don’t glaze cold meatballs straight from the fridge if you want the sauce to cling evenly.
8. Teriyaki Chicken Stir-Fry with Frozen Vegetables
Frozen vegetables earn their keep here. They cut prep time, and when the pan is hot enough, they still pick up enough color to taste cooked rather than watery.
Why It Works:
Stir-fry is all about timing. Chicken cooks first so it can brown, then the frozen vegetables go in while the pan is still hot enough to drive off extra moisture. The teriyaki sauce ties everything together at the end, which is exactly where it belongs if you want a stir-fry instead of a soup.
Key Ingredients:
For the Stir-Fry:
- 1 1/2 lb chicken breast or thigh, thinly sliced — thin pieces cook quickly.
- 1 tbsp neutral oil — for the pan.
- 4 cups frozen stir-fry vegetables — no need to thaw fully.
- 2 sliced scallions — optional, for the finish.
For the Sauce:
- 1/3 cup soy sauce — the base.
- 1/4 cup brown sugar — gives body and shine.
- 2 tbsp rice vinegar — keeps the sauce from going flat.
- 1/4 cup water — loosens the glaze.
- 2 garlic cloves, minced — savory backbone.
- 1 tsp grated ginger — classic teriyaki flavor.
- 1 tbsp cornstarch mixed with 2 tbsp water — thickens the sauce.
- 1 tsp sesame oil — finish only.
Quick Steps:
Cook the Chicken:
- Heat the oil in a large skillet or wok over medium-high heat. Add the chicken and cook for 4 to 6 minutes, stirring occasionally, until browned and cooked through.
Add the Vegetables:
2. Pour in the frozen vegetables straight from the bag. Cook for 4 to 5 minutes, stirring often, until the ice is gone and the vegetables are hot.
Sauce and Finish:
3. Whisk the sauce ingredients in a bowl, then pour them into the skillet. Add the cornstarch slurry and cook for 1 to 2 minutes until the sauce coats the chicken and vegetables.
4. Finish with sesame oil and scallions.
Equipment for This Recipe:
- Large skillet or wok — you need room to stir.
- Wooden spoon or spatula — for moving everything around.
- Small bowl — for the sauce.
- Measuring cups and spoons — the glaze needs balance.
How to Serve This Dish:
Serve it over rice or noodles, but don’t bury the vegetables under too much grain. The sauce is part of the appeal, and a shallow bowl shows it off best.
Pro Tips for This Recipe:
- Use high heat and keep stirring so the frozen vegetables don’t sit and steam.
- Slice the chicken thinly across the grain for a softer bite.
- If the pan gets watery, keep cooking until the moisture evaporates before adding sauce.
- A pinch of red pepper flakes gives the stir-fry more bite.
Variations on This Dish:
- Edamame Version: Add frozen shelled edamame in the last 2 minutes.
- Broccoli-Centric Version: Swap in frozen broccoli florets and let them brown a little.
- Spicy Takeout Style: Add 1 tablespoon chili garlic sauce to the glaze.
Common Mistakes to Avoid with This Dish:
- Don’t thaw the vegetables into a wet pile or the skillet will steam.
- Don’t pour the sauce in before the chicken is browned.
- Don’t overcrowd the pan; stir-fry needs open space.
9. Teriyaki Chicken Rice Bowls
Rice bowls are where teriyaki chicken gets a little more finished. You have the sticky chicken, the soft rice, and a crisp side or two to keep each bite moving.
Why It Works:
This setup lets every element do one job. The chicken gives the sauce, the rice catches it, and the quick vegetables bring freshness without another cooking project. It’s the most flexible version in the bunch, which is probably why it gets repeated in my kitchen more than any other.
Key Ingredients:
For the Bowls:
- 2 lb chicken thighs or breasts, cut into bite-size pieces — thighs stay juicier.
- 1 1/2 cups uncooked jasmine rice — fluffier than standard long-grain rice.
- 1 cucumber, thinly sliced — gives the bowl crunch.
- 2 carrots, grated or ribboned — adds color and snap.
- 2 scallions, sliced — for the top.
- 1 tbsp sesame seeds — optional, but useful.
For the Sauce:
- 1/3 cup soy sauce
- 1/4 cup brown sugar
- 2 tbsp rice vinegar
- 1/4 cup water
- 2 garlic cloves, minced
- 1 tsp grated ginger
- 1 tbsp cornstarch mixed with 2 tbsp water
Quick Steps:
Cook the Rice:
- Cook the rice according to the package and keep it covered so it stays fluffy.
Cook the Chicken and Sauce:
2. Brown the chicken in a skillet over medium-high heat for 6 to 8 minutes until cooked through. Add the sauce ingredients and the slurry, then simmer until glossy and thick.
Assemble the Bowls:
3. Toss the cucumber and carrots with a splash of rice vinegar and a pinch of sugar if you want a fast pickle effect.
4. Divide the rice among bowls, top with chicken, vegetables, scallions, and sesame seeds.
Equipment for This Recipe:
- Medium saucepan or rice cooker — for the rice.
- Large skillet — for the chicken.
- Small bowl — for quick vegetables.
- Serving bowls — shallow bowls work best.
How to Serve This Dish:
Keep the chicken in one section, the rice in another, and the crisp vegetables visible. Bowls like this feel more generous when they aren’t mixed into a brown blur.
Pro Tips for This Recipe:
- Use warm rice if you want a cozier bowl, or cool rice if you plan to pack leftovers.
- Add a little extra vinegar to the vegetables if the sauce is sweet.
- Don’t flood the bowl with sauce; you want sticky, not soupy.
- A fried egg on top turns this into a heavier meal without changing much else.
Variations on This Dish:
- Pickled Crunch Bowl: Add quick-pickled onions for sharper contrast.
- Spicy Mayo Bowl: Drizzle with a little mayo mixed with chili sauce.
- Avocado Finish: Add slices of avocado if you want more richness.
Common Mistakes to Avoid with This Dish:
- Don’t overcook the rice or the bowl turns mushy.
- Don’t slice the chicken before it rests.
- Don’t skip the fresh vegetables; they’re what make the bowl feel balanced.
10. Teriyaki Chicken Fried Rice
Fried rice gives leftovers a second life, but it works just as well with fresh chicken if you use cold rice. The grains stay separate, the eggs stay soft, and the teriyaki glaze coats everything without turning the whole pan wet.
Why It Works:
Cold rice fries instead of steaming. That’s the key. Once the chicken and eggs are cooked, the rice can hit the hot pan and pick up a little crust before the sauce goes in. Teriyaki fried rice works because the glaze is lighter here—just enough to coat each grain without making it sticky in the wrong way.
Key Ingredients:
For the Fried Rice:
- 1 lb chicken breast or thighs, diced — small pieces cook fast.
- 3 cups cold cooked rice — day-old rice is best.
- 2 eggs, beaten — adds richness.
- 1 cup frozen peas and carrots — pantry-friendly and quick.
- 2 tbsp neutral oil — for frying.
- 2 scallions, sliced — optional but useful.
For the Sauce:
- 1/4 cup soy sauce — keeps the rice seasoned.
- 2 tbsp brown sugar — gives a subtle glaze.
- 1 tbsp rice vinegar — keeps the flavor sharp.
- 2 tbsp water — stretches the sauce.
- 1 tsp cornstarch — just enough to help it cling.
- 1 garlic clove, minced
- 1 tsp grated ginger
- 1 tsp sesame oil — finish only
Quick Steps:
Cook the Chicken and Eggs:
- Heat 1 tablespoon oil in a large skillet or wok over medium-high heat. Cook the chicken until browned and done, then push it aside and scramble the eggs in the empty space.
Fry the Rice:
2. Add the remaining oil, rice, and frozen vegetables. Stir-fry for 3 to 4 minutes, breaking up clumps and letting the rice sizzle.
Add the Sauce:
3. Whisk the sauce ingredients in a small bowl and pour them over the rice. Stir constantly for 1 to 2 minutes until the grains look evenly coated and the pan smells sweet and savory.
4. Finish with scallions and sesame oil.
Equipment for This Recipe:
- Large skillet or wok — room matters here.
- Spatula — useful for breaking up rice clumps.
- Small bowl — for the sauce.
- Measuring cups and spoons — the rice should not drown.
How to Serve This Dish:
Serve it straight from the skillet while the rice still has a little bite. A side of cucumbers or a simple green salad keeps the meal from feeling too dense.
Pro Tips for This Recipe:
- Use cold rice, not warm rice, or it turns soft fast.
- Cook on medium-high heat so the rice fries instead of steaming.
- Add sesame oil at the end; it disappears if it cooks too long.
- If your rice is very dry, splash in 1 tablespoon water before the sauce.
Variations on This Dish:
- Egg-Heavy Version: Add an extra egg for a softer, richer pan.
- Vegetable-Laden Version: Use mixed frozen vegetables and extra scallions.
- Garlic Rice Version: Double the garlic and let it sizzle in oil before the rice goes in.
Common Mistakes to Avoid with This Dish:
- Don’t use freshly cooked rice unless you’re okay with a softer texture.
- Don’t add all the sauce at once if the pan is small; it can pool.
- Don’t stir too gently. Fried rice likes a little heat and movement.
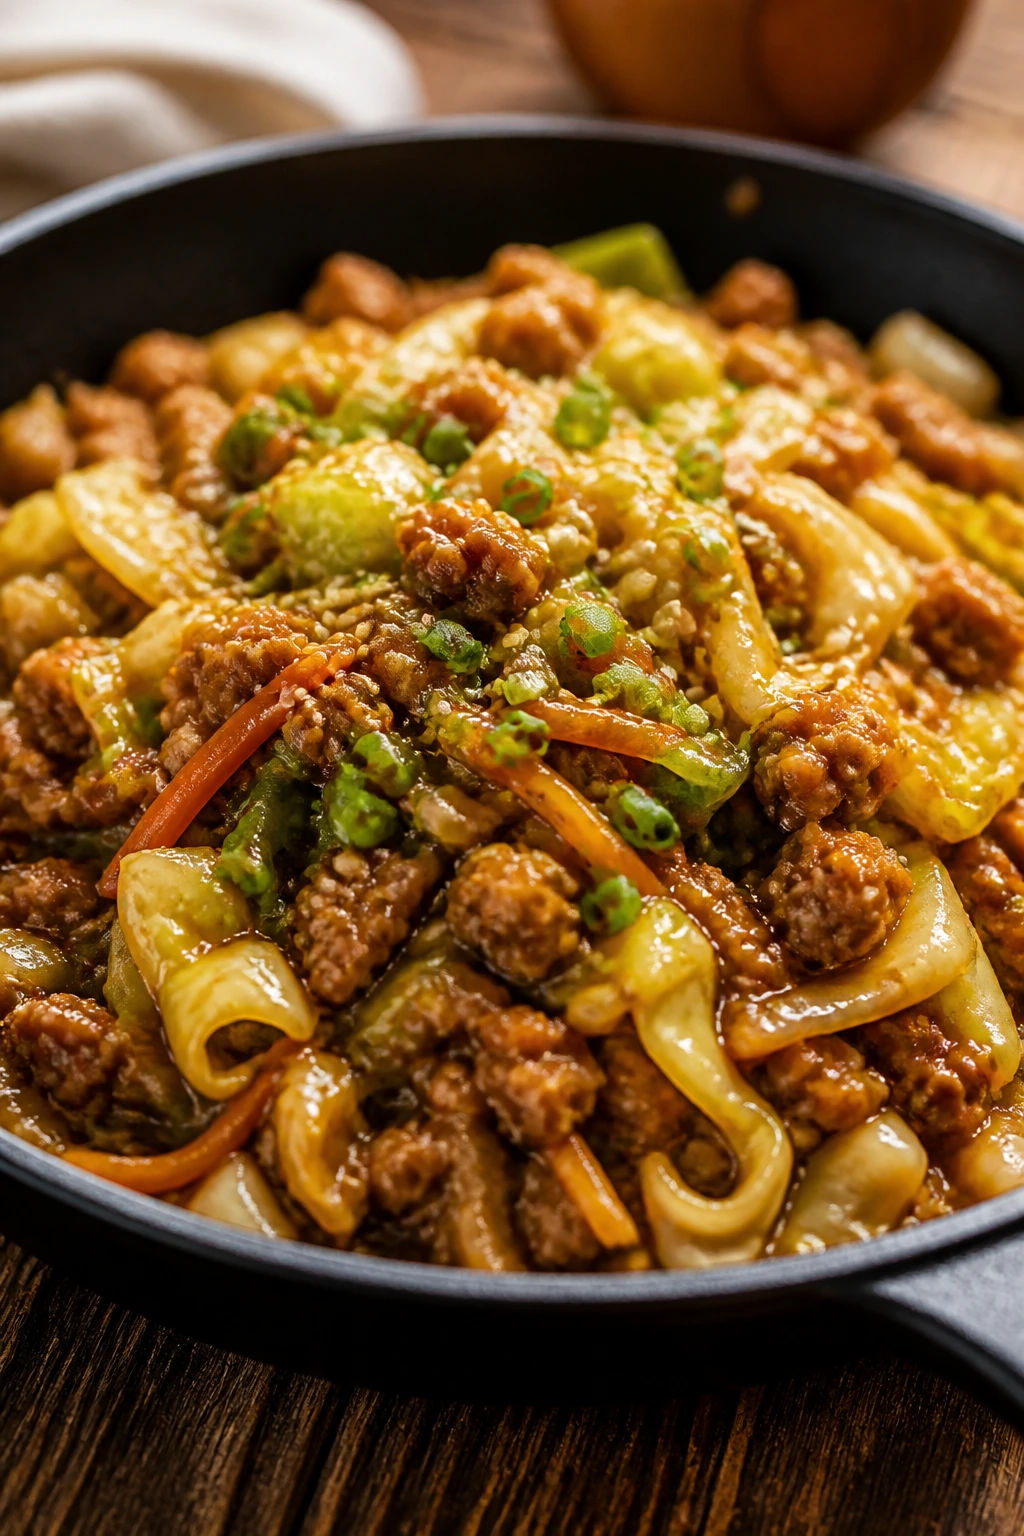
11. Teriyaki Chicken Noodle Skillet
This is the one for when rice feels boring but you still want something saucy. The noodles soak up the glaze, the cabbage softens just enough, and the chicken gives the dish enough heft to pass as a real dinner.
Why It Works:
Spaghetti or linguine stands in for lo mein without asking for special ingredients. The noodle water helps loosen the sauce a little, which is useful because noodles need more movement than rice. Once the glaze hits the hot skillet, it sticks to the noodles and turns them shiny instead of clumpy.
Key Ingredients:
For the Skillet:
- 1 lb chicken thighs, sliced thin — they stay tender in the skillet.
- 8 oz spaghetti or linguine — pantry pasta works well here.
- 2 cups shredded cabbage or coleslaw mix — adds body and crunch.
- 1 carrot, julienned or thinly sliced — for sweetness and color.
- 1 tbsp neutral oil
For the Sauce:
- 1/3 cup soy sauce
- 1/4 cup brown sugar
- 2 tbsp rice vinegar
- 1/4 cup water
- 2 garlic cloves, minced
- 1 tsp grated ginger
- 1 tbsp cornstarch mixed with 2 tbsp water
- 1 tsp sesame oil
Quick Steps:
Cook the Noodles:
- Boil the noodles in salted water until just tender. Reserve 1/2 cup of the pasta water, then drain.
Cook the Chicken and Vegetables:
2. Heat the oil in a large skillet over medium-high heat. Cook the chicken until browned and done, then add the cabbage and carrot and stir for 2 to 3 minutes until just wilted.
Combine:
3. Whisk the sauce ingredients in a bowl. Add the noodles to the skillet, pour in the sauce, and toss everything together for 1 to 2 minutes until glossy. Add a splash of reserved pasta water if the skillet looks dry.
4. Finish with sesame oil and serve.
Equipment for This Recipe:
- Large skillet — the noodles need space.
- Pot for boiling pasta — a basic one is enough.
- Colander — to drain the noodles.
- Tongs — easier for tossing noodles than a spoon.
- Small bowl — for the sauce.
How to Serve This Dish:
Twirl it into shallow bowls and top with scallions if you have them. I like it with a cold cucumber side because the noodles are soft and the crunch keeps things awake.
Pro Tips for This Recipe:
- Undercook the noodles by a minute so they finish in the skillet.
- Shred the cabbage finely; thick pieces take too long.
- If the sauce seems thin, keep tossing for another minute instead of adding more cornstarch.
- Use the pasta water only if the noodles look tight and dry.
Variations on This Dish:
- Ramen-Noodle Version: Use instant ramen noodles without the seasoning packet.
- Pepper Strip Version: Add sliced bell pepper with the cabbage.
- Chili Sesame Version: Stir chili crisp into the finished skillet.
Common Mistakes to Avoid with This Dish:
- Don’t overcook the noodles before they hit the pan.
- Don’t add too much cabbage or you’ll end up with a vegetable skillet.
- Don’t forget the pasta water if the sauce feels too tight.
12. Teriyaki Chicken Lettuce Wraps
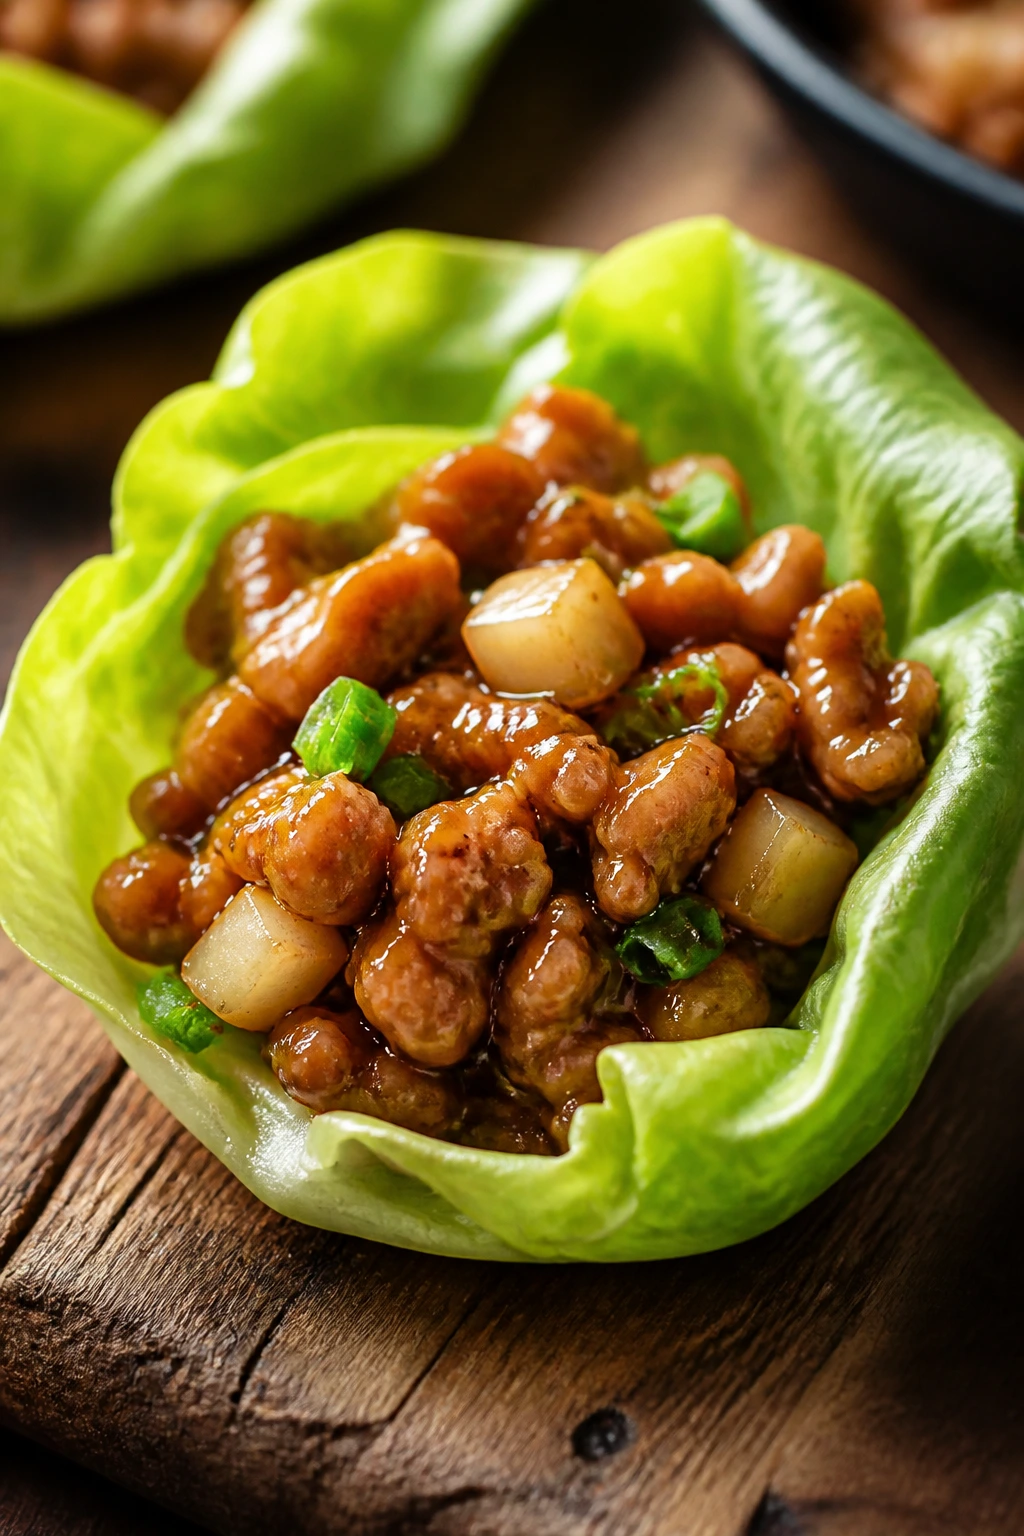
Lettuce wraps make teriyaki chicken feel lighter without making it boring. You still get the sticky filling, but the cold lettuce gives every bite a sharp snap that keeps the sauce from taking over.
Why It Works:
Ground chicken is quick, cheap, and excellent at soaking up sauce. Water chestnuts add a little crunch that stays even after simmering, which matters because the filling itself is soft. The lettuce does the rest—cold leaves keep the savory filling from feeling heavy.
Key Ingredients:
For the Filling:
- 1 1/2 lb ground chicken — quick-cooking and easy to season.
- 1 tbsp neutral oil
- 1 small onion, diced — softens into the filling.
- 2 garlic cloves, minced — adds punch.
- 1 tsp grated ginger — keeps the flavor in the right lane.
- 1 can water chestnuts, drained and chopped — gives crunch.
For the Sauce:
- 1/4 cup soy sauce
- 2 tbsp brown sugar
- 1 tbsp rice vinegar
- 1/4 cup water
- 1 tbsp cornstarch mixed with 2 tbsp water
- 1 tsp sesame oil
- Butter lettuce or iceberg leaves for serving
Quick Steps:
Cook the Filling:
- Heat the oil in a skillet over medium-high heat. Add the onion and cook for 2 minutes, then add the chicken and cook, breaking it up, until no pink remains.
Season and Sauce:
2. Stir in the garlic, ginger, and water chestnuts. Whisk the sauce ingredients together, pour them into the skillet, and simmer for 1 to 2 minutes until the filling looks glossy and lightly sticky.
3. Remove from the heat and stir in sesame oil.
Assemble:
4. Spoon the filling into lettuce leaves and serve immediately.
Equipment for This Recipe:
- Large skillet — for the filling.
- Sharp knife — to chop the onion and chestnuts.
- Spoon — for filling the lettuce cups.
- Salad spinner or paper towels — to dry the leaves if needed.
How to Serve This Dish:
Serve the filling in a bowl and the lettuce on the side so people can build their own wraps. A few extra scallions or sesame seeds on top make them look much more finished than they have any right to.
Pro Tips for This Recipe:
- Dry the lettuce leaves well or the filling slides around.
- Don’t overreduce the sauce; a little looseness makes wrapping easier.
- Use iceberg if you want extra crunch, butter lettuce if you want softer cups.
- Chop the water chestnuts fairly fine so they spread through each bite.
Variations on This Dish:
- Spicy Wraps: Add chili flakes or chili garlic sauce.
- Rice Bowl Version: Serve the same filling over rice instead of lettuce.
- Mushroom Stretch: Stir in finely chopped mushrooms with the onion.
Common Mistakes to Avoid with This Dish:
- Don’t overstuff the leaves or they tear.
- Don’t let the filling go dry in the pan; it should stay spoonable.
- Don’t skip the water chestnuts if you want that classic crunch.
13. Teriyaki Chicken Kabobs with Pineapple
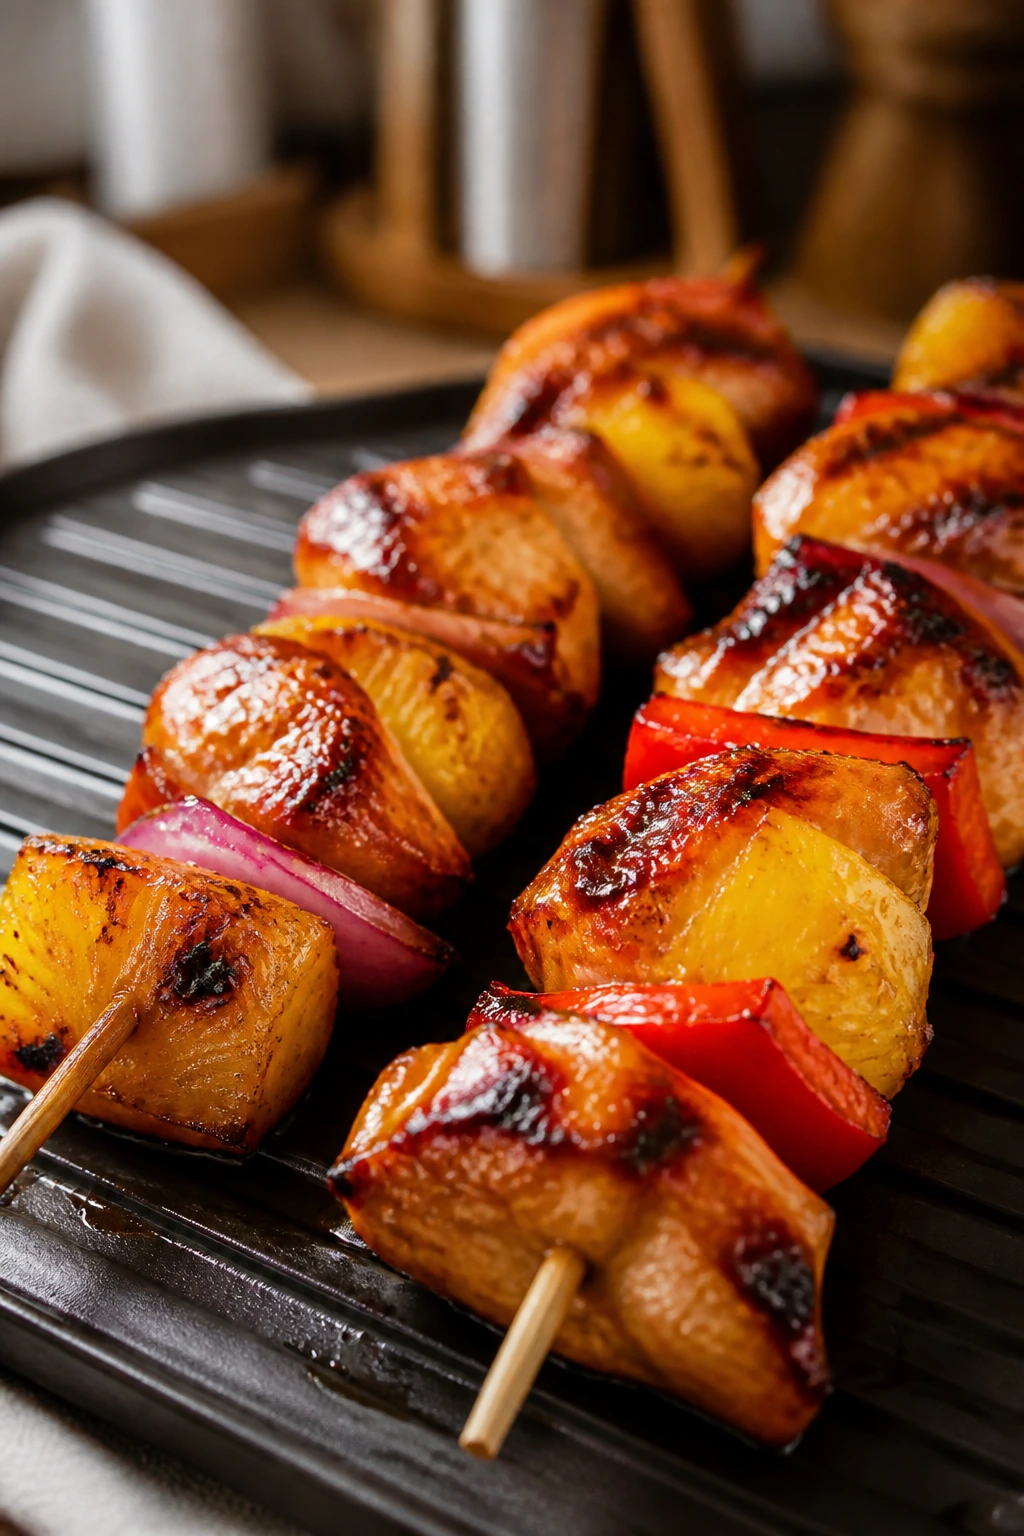
Kabobs feel like a backyard dinner even when you broil them indoors. The pineapple caramelizes, the chicken gets a little char, and the teriyaki glaze turns the skewers into something bright and sticky.
Why It Works:
Pineapple brings natural sweetness and enough acid to wake up the glaze. On skewers, each piece gets direct heat from the oven or grill, so you get browned edges fast. Brushing the kabobs near the end keeps the sugar from burning while still giving you shine.
Key Ingredients:
For the Kabobs:
- 2 lb chicken thighs or breasts, cut into 1 1/2-inch pieces — keep the pieces even.
- 1 cup canned pineapple chunks, drained — or fresh if you have it.
- 1 red bell pepper, cut into squares — for color and sweetness.
- 1 red onion, cut into wedges — adds a little bite.
- 1 tbsp neutral oil
For the Sauce:
- 1/3 cup soy sauce
- 1/4 cup brown sugar
- 2 tbsp rice vinegar
- 2 tbsp pineapple juice from the can
- 2 garlic cloves, minced
- 1 tsp grated ginger
- 1 tbsp cornstarch mixed with 2 tbsp water
Quick Steps:
Prep and Skewer:
- If using wooden skewers, soak them in water for 20 minutes. Whisk the sauce ingredients except the slurry.
- Thread chicken, pineapple, pepper, and onion onto skewers, alternating as you go.
Cook:
3. Preheat the grill or broiler to medium-high. Cook the kabobs for 10 to 12 minutes, turning once, until the chicken reaches 165°F.
4. Simmer the sauce with the cornstarch slurry until thick, then brush it over the kabobs during the last 2 minutes of cooking.
5. Serve with extra sauce on the side.
Equipment for This Recipe:
- Skewers — wooden or metal.
- Grill grate or broiler pan — either works.
- Basting brush — for the glaze.
- Small saucepan — for the sauce.
- Tongs — useful for turning hot skewers.
How to Serve This Dish:
Serve the kabobs over rice or with a quick cabbage slaw to catch the sauce. I like to slide the meat and pineapple off the skewer onto a plate once they’re done; that way the glaze ends up where it should.
Pro Tips for This Recipe:
- Cut the chicken and vegetables to similar sizes so they cook at the same pace.
- Use drained pineapple so the skewers don’t drip too much.
- Don’t brush the sauce on too early or the sugar can scorch.
- If broiling, keep the rack a little lower than you think; sugar burns fast.
Variations on This Dish:
- Spicy Pineapple Kabobs: Add chili flakes to the sauce.
- All-Chicken Version: Skip the vegetables and use only chicken and pineapple.
- Rice Vinegar Boost: Add an extra teaspoon of vinegar if you want a brighter sauce.
Common Mistakes to Avoid with This Dish:
- Don’t pack the skewer too tightly or the chicken won’t brown.
- Don’t forget to soak wooden skewers.
- Don’t let the glaze burn under the broiler.
14. Teriyaki Chicken and Green Beans
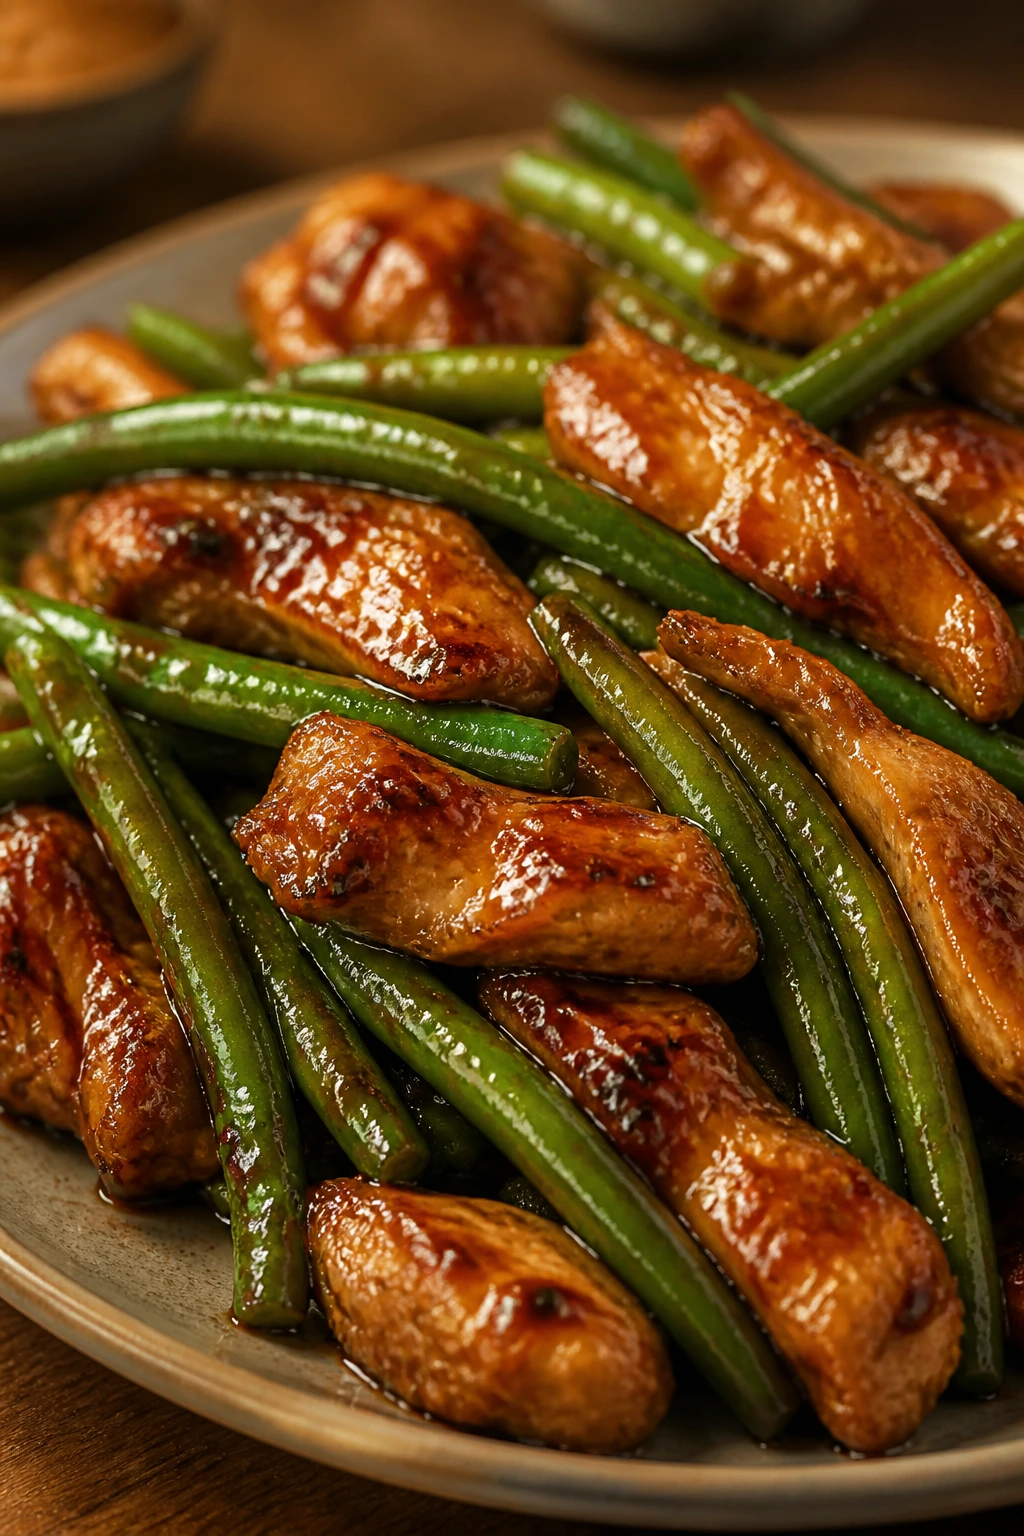
Green beans make a sturdy partner for teriyaki chicken because they stay a little crisp even after a quick simmer. The whole skillet tastes clean and savory, with enough sauce to coat every bean without drowning them.
Why It Works:
Green beans handle heat better than softer vegetables like zucchini. They keep texture after the sauce goes in, which makes the dish feel more complete. Chicken thighs add richness, and the beans cut through it with their fresh snap.
Key Ingredients:
For the Skillet:
- 2 lb chicken thighs, sliced into strips — they stay juicy in the pan.
- 1 lb green beans, trimmed — fresh or frozen both work.
- 1 tbsp neutral oil
- 1/4 cup water — helps steam the beans briefly.
For the Sauce:
- 1/3 cup soy sauce
- 1/4 cup brown sugar
- 2 tbsp rice vinegar
- 1/4 cup water
- 2 garlic cloves, minced
- 1 tsp grated ginger
- 1 tbsp cornstarch mixed with 2 tbsp water
- 1 tsp sesame oil
Quick Steps:
Cook the Chicken:
- Heat the oil in a large skillet over medium-high heat. Brown the chicken for 5 to 6 minutes until almost cooked through.
Add the Beans:
2. Add the green beans and 1/4 cup water. Cover for 2 minutes, then uncover and stir until the beans are bright green and the water is gone.
Sauce and Finish:
3. Whisk the sauce ingredients and pour them into the skillet. Stir in the slurry and cook for 1 to 2 minutes until the sauce coats the chicken and beans.
4. Finish with sesame oil.
Equipment for This Recipe:
- Large skillet — a wide one helps the beans spread.
- Lid — for the quick steam step.
- Tongs or spatula — for stirring.
- Small bowl — for the sauce.
How to Serve This Dish:
Serve it with rice, but not a mountain of it. The beans deserve to stay visible; that green against the dark glaze is half the appeal.
Pro Tips for This Recipe:
- Trim the beans so the ends don’t catch and turn stringy.
- If using frozen beans, skip the water and cook off the extra moisture.
- Stir the sauce after the slurry goes in so it stays smooth.
- A pinch of red pepper flakes sharpens the whole skillet.
Variations on This Dish:
- Garlic Bean Version: Add an extra garlic clove.
- Sesame Finish: Add more sesame oil and sesame seeds at the end.
- Crisp-Bean Version: Cook the beans a little less if you like them snappy.
Common Mistakes to Avoid with This Dish:
- Don’t oversteam the beans or they go dull and soft.
- Don’t add the sauce before the chicken has browned.
- Don’t forget to keep the beans in a single layer when possible.
15. Teriyaki Chicken Cabbage Skillet
Cabbage is one of the best cheap vegetables for a teriyaki skillet because it collapses just enough to take sauce, but it still keeps a little chew. This version feels hearty without needing much rice on the side.
Why It Works:
Cabbage softens quickly and picks up sauce in all its folds. Sliced chicken and cabbage cook in the same pan without fighting each other, which is useful on a night when you want dinner done in one pass. The ginger and vinegar keep the cabbage from tasting flat or boiled.
Key Ingredients:
For the Skillet:
- 1 1/2 lb chicken breasts or thighs, sliced thin — thinner pieces cook evenly.
- 6 cups cabbage ribbons — green cabbage works best.
- 1 carrot, thinly sliced — adds sweetness.
- 1 small onion, sliced — gives the skillet body.
- 1 tbsp neutral oil
For the Sauce:
- 1/3 cup soy sauce
- 1/4 cup brown sugar
- 2 tbsp rice vinegar
- 1/4 cup water
- 2 garlic cloves, minced
- 1 tsp grated ginger
- 1 tbsp cornstarch mixed with 2 tbsp water
- 1 tsp sesame oil
Quick Steps:
Cook the Chicken and Vegetables:
- Heat the oil in a large skillet over medium-high heat. Cook the chicken for 4 to 5 minutes until lightly browned.
- Add the onion and carrot and cook for 2 minutes, then add the cabbage and toss until it starts to soften.
Finish with Sauce:
3. Whisk the sauce ingredients in a bowl. Pour them into the skillet and stir for 1 to 2 minutes, until the cabbage is glossy and the sauce clings.
4. Finish with sesame oil and serve hot.
Equipment for This Recipe:
- Large skillet or sauté pan — enough surface area helps.
- Sharp knife — for the cabbage ribbons.
- Spatula — for tossing.
- Small bowl — for the sauce.
How to Serve This Dish:
This one works as a bowl on its own or over a modest scoop of rice. I like it with a squeeze of lime if I want the cabbage to taste brighter.
Pro Tips for This Recipe:
- Slice the cabbage thin enough to wilt quickly.
- Don’t let the pan dry out before the sauce goes in.
- Use thighs if you want a richer skillet.
- If the cabbage seems too firm, cover the pan for 1 minute before adding sauce.
Variations on This Dish:
- Egg Roll Skillet: Add ground pork or chicken for a fuller version.
- Spicy Cabbage Version: Add chili paste or crushed red pepper.
- Carrot-Heavy Version: Use more carrot if you want extra sweetness.
Common Mistakes to Avoid with This Dish:
- Don’t overcook the cabbage into mush.
- Don’t skip the vinegar or the dish can taste heavy.
- Don’t slice the chicken too thick or it lags behind the vegetables.
16. Teriyaki Chicken Stuffed Peppers
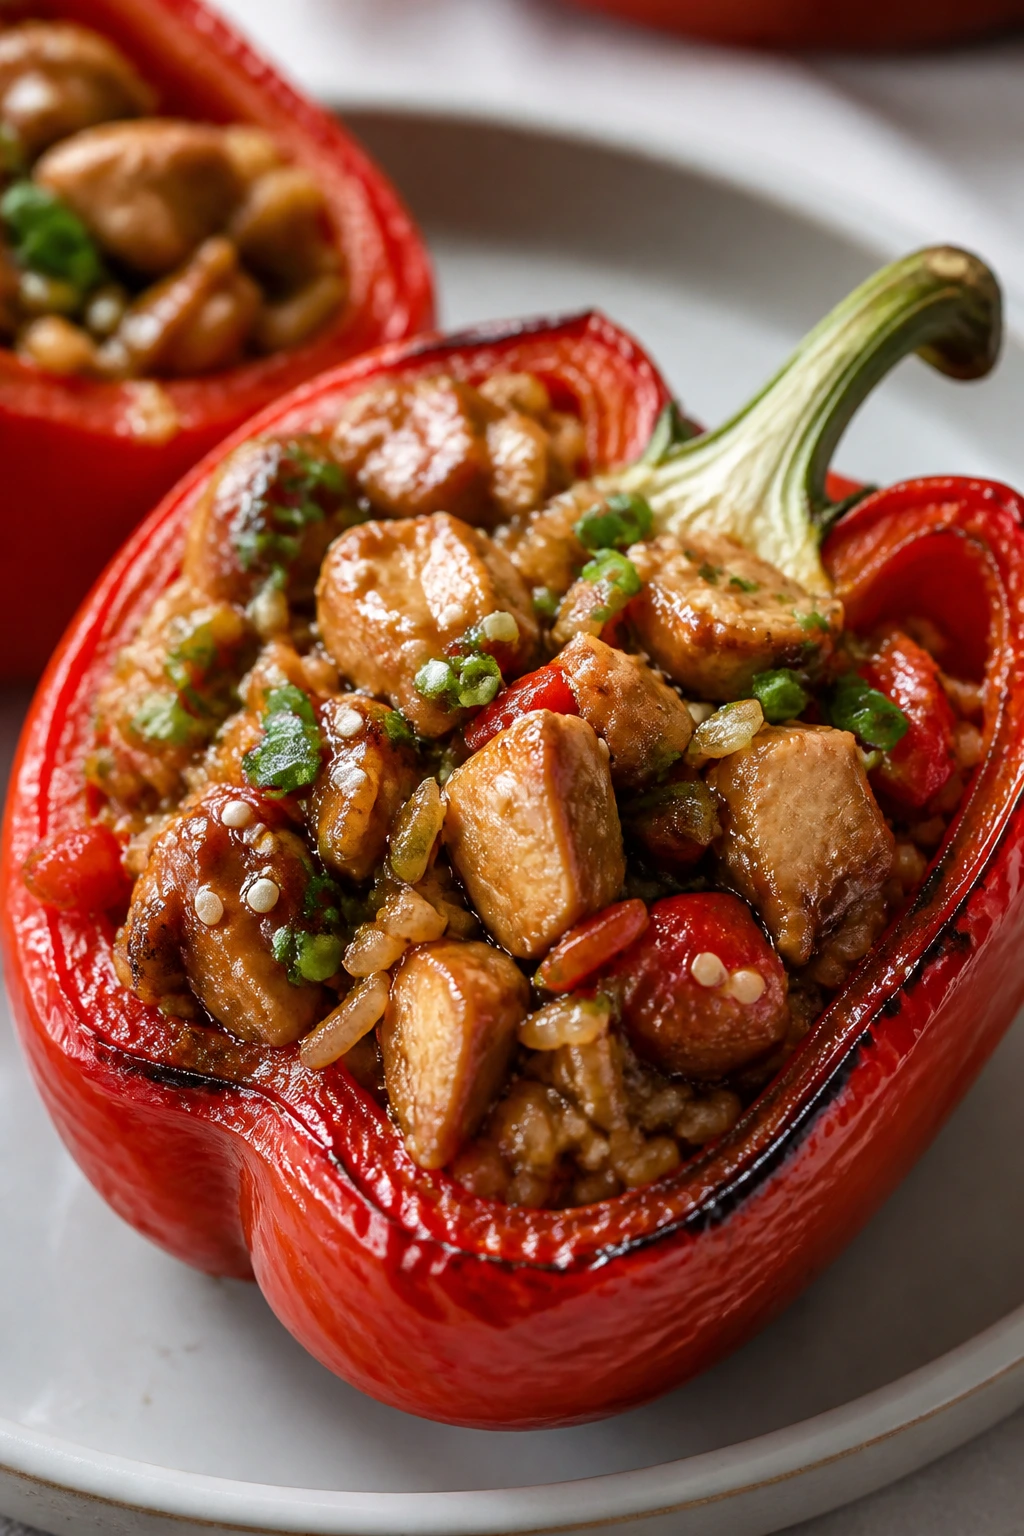
Stuffed peppers are the pantry dinner that quietly feels more composed than it is. The rice absorbs the sauce, the chicken keeps the filling hearty, and the peppers give you a built-in bowl you can eat with a fork.
Why It Works:
Bell peppers soften in the oven without falling apart, which makes them excellent for saucy fillings. Rice catches the teriyaki glaze and keeps the texture from getting loose. A quick pre-cook of the filling prevents the peppers from turning soggy by the time they’re done.
Key Ingredients:
For the Peppers:
- 4 large bell peppers, halved and seeded — choose ones with flat bottoms if possible.
- 1 1/2 lb chicken breast, diced — cooks quickly in the filling.
- 1 1/2 cups cooked rice — helps the filling hold together.
- 1/2 onion, diced — adds flavor.
- 1 cup frozen peas and carrots — pantry-friendly color and sweetness.
- 1 tbsp neutral oil
For the Sauce:
- 1/3 cup soy sauce
- 1/4 cup brown sugar
- 2 tbsp rice vinegar
- 1/4 cup water
- 2 garlic cloves, minced
- 1 tsp grated ginger
- 1 tbsp cornstarch mixed with 2 tbsp water
Quick Steps:
Prep the Peppers:
- Heat the oven to 375°F. Place the pepper halves cut side up in a baking dish.
Make the Filling:
2. Cook the onion and chicken in the oil over medium-high heat until the chicken is nearly done. Stir in the peas and carrots, then add the rice.
Sauce and Fill:
3. Whisk the sauce ingredients in a bowl, pour them into the skillet, and cook for 1 to 2 minutes until the filling looks glossy.
4. Spoon the mixture into the peppers, cover loosely with foil, and bake for 25 to 30 minutes until the peppers are tender but not collapsed.
5. Remove the foil for the last 5 minutes if you want more color.
Equipment for This Recipe:
- Baking dish — big enough to hold the pepper halves snugly.
- Skillet — for the filling.
- Spoon — for stuffing the peppers.
- Foil — helps the peppers soften evenly.
How to Serve This Dish:
Serve one or two pepper halves per person with a little extra sauce spooned over the top. A simple green salad is enough on the side; the filling does the rest.
Pro Tips for This Recipe:
- Choose peppers of similar size so they finish at the same time.
- Don’t overfill the halves or the tops slide off.
- If your rice is plain and dry, the sauce needs to be a little more generous.
- Use red, yellow, or orange peppers if you want a sweeter result.
Variations on This Dish:
- Mushroom Rice Version: Add chopped mushrooms to the filling.
- Spicy Pepper Version: Stir chili flakes into the sauce.
- Mini Pepper Version: Use small peppers and shorten the bake time.
Common Mistakes to Avoid with This Dish:
- Don’t bake the peppers without a little foil coverage or they can dry out.
- Don’t use raw rice in this recipe unless you’ve adjusted the liquid.
- Don’t skip the pre-cooked filling step or the chicken may overcook while the peppers soften.
17. Teriyaki Chicken Sliders
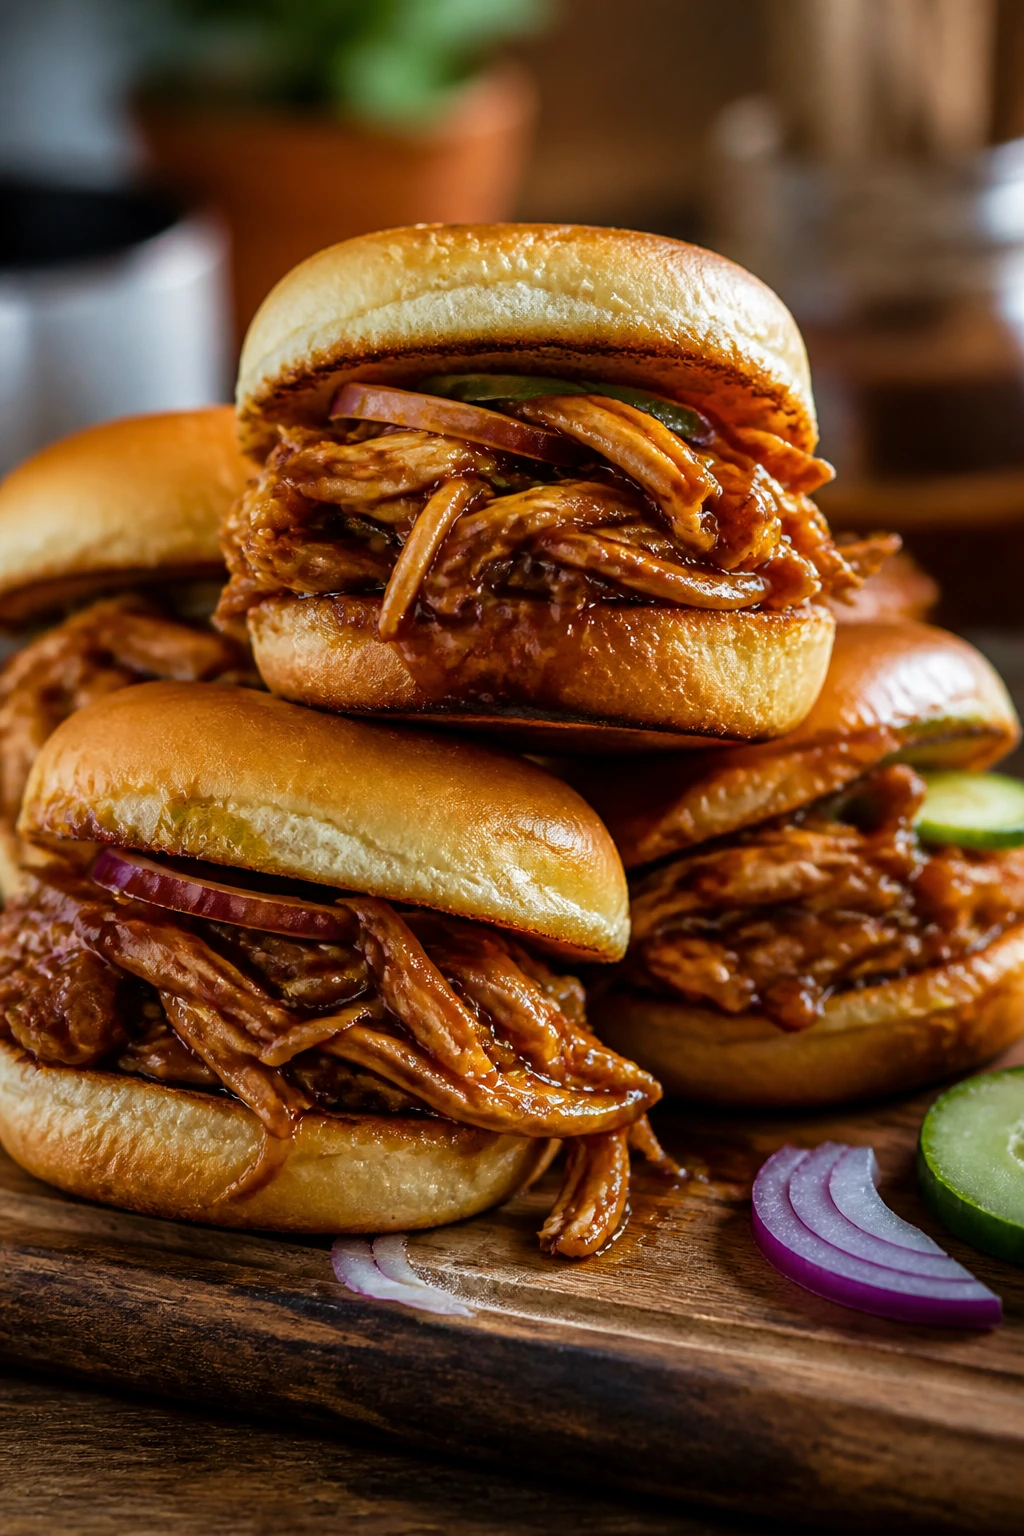
These sliders are sticky, soft, and a little messy in the best way. The chicken shreds into the glaze, the buns soak up just enough sauce, and the whole tray disappears faster than a sensible dinner should.
Why It Works:
Shredded chicken grabs sauce better than sliced chicken when you’re building sandwiches. Slider buns toast quickly, which keeps them from turning to mush once the filling goes in. A few sharp toppings—pickled onions, cucumber, or cabbage—stop the sweetness from taking over.
Key Ingredients:
For the Filling:
- 2 lb boneless chicken thighs or breasts — thighs shred more easily.
- 1/2 cup soy sauce
- 1/3 cup brown sugar
- 2 tbsp rice vinegar
- 1/4 cup water
- 2 garlic cloves, minced
- 1 tsp grated ginger
- 1 tbsp cornstarch mixed with 2 tbsp water
For Assembly:
- 12 slider buns — soft rolls work best.
- 1 red onion, thinly sliced — optional, but sharp.
- 2 tbsp butter, melted — for toasting the buns.
- Pickles or thin cucumber slices — for crunch.
Quick Steps:
Cook the Chicken:
- Put the chicken in a skillet or Dutch oven with the soy sauce, brown sugar, rice vinegar, water, garlic, and ginger. Cover and simmer over medium-low heat for 20 to 25 minutes, until the chicken is tender.
- Shred the chicken with two forks, then stir in the cornstarch slurry and cook for 1 to 2 minutes until the sauce thickens around the meat.
Build the Sliders:
3. Split the buns, brush them with melted butter, and toast them cut side down in a skillet or oven for 2 to 3 minutes.
4. Pile the chicken onto the buns and top with onions or pickles.
Equipment for This Recipe:
- Dutch oven or deep skillet — useful for simmering and shredding.
- Two forks — for pulling the chicken apart.
- Baking sheet or skillet — for toasting buns.
- Spoon — for scooping the filling.
How to Serve This Dish:
Set the sliders on a tray and keep napkins nearby. A cold crunchy side, like cucumber salad or simple slaw, keeps the sweetness in check.
Pro Tips for This Recipe:
- Toast the buns or the filling will win the moisture fight.
- Shred the chicken while it’s hot; it comes apart more cleanly.
- Use thighs if you want a richer sandwich.
- If the filling looks dry, add 1 or 2 tablespoons water before serving.
Variations on This Dish:
- Slaw-Top Sliders: Add a little cabbage slaw on top of the chicken.
- Spicy Slider Version: Mix chili sauce into the shredded filling.
- Sesame Bun Version: Sprinkle sesame seeds over the toasted tops.
Common Mistakes to Avoid with This Dish:
- Don’t skip the bun toast.
- Don’t overfill the sliders or they collapse on the first bite.
- Don’t let the sauce reduce too far before shredding, or the filling gets pasty.
18. Crunchy Teriyaki Chicken Salad
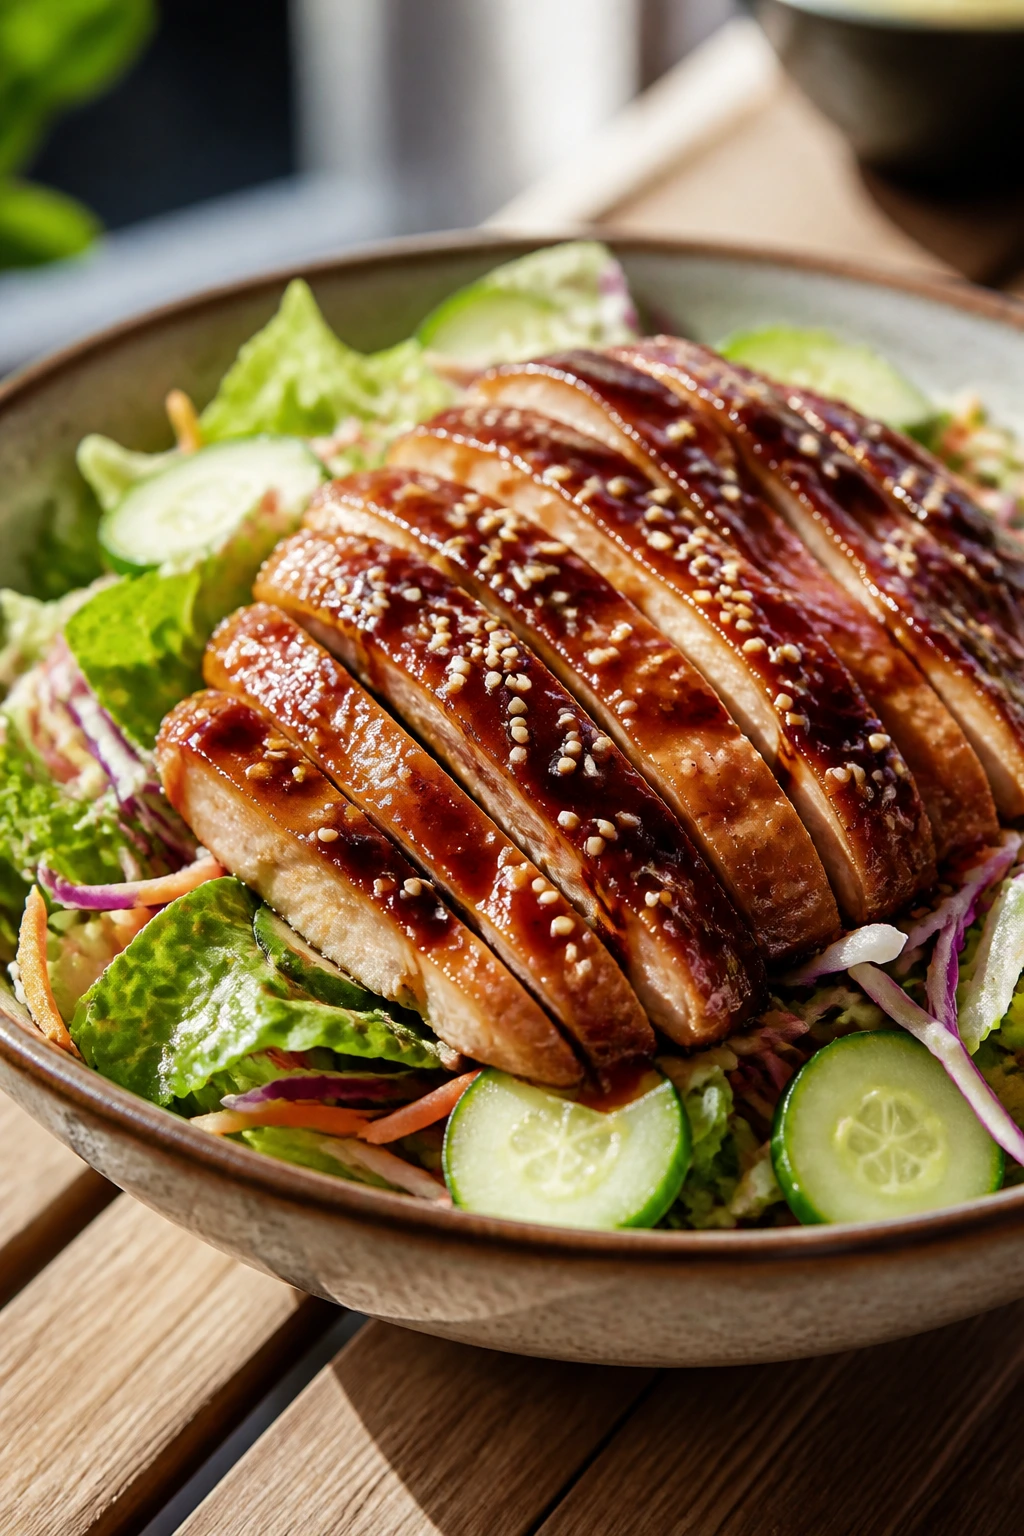
This salad is for the nights when you still want teriyaki chicken, but you want it over something cold and crisp instead of rice. The glazed chicken stays warm, the vegetables stay crunchy, and the whole thing eats more like a proper meal than a side dish.
Why It Works:
The contrast is the whole trick. Sweet-savory chicken on top of crunchy greens and raw vegetables gives you enough texture that each bite feels fresh. A simple sesame dressing ties the bowl together without competing with the teriyaki glaze.
Key Ingredients:
For the Chicken:
- 1 1/2 lb chicken breasts or thighs
- 1/4 cup soy sauce
- 2 tbsp brown sugar
- 1 tbsp rice vinegar
- 1 garlic clove, minced
- 1 tsp grated ginger
- 1 tbsp cornstarch mixed with 2 tbsp water
- 1 tbsp neutral oil
For the Salad:
- 6 cups chopped romaine or shredded cabbage mix — sturdy greens hold up best.
- 1 cucumber, sliced — adds cold crunch.
- 2 carrots, shredded — gives sweetness.
- 2 scallions, sliced — optional.
- 1 tbsp sesame seeds — for the top.
For the Dressing:
- 1 tbsp soy sauce
- 1 tbsp rice vinegar
- 1 tbsp neutral oil
- 1 tsp sesame oil
- 1 tsp honey or brown sugar
- 1 tsp water
Quick Steps:
Cook the Chicken:
- Season the chicken lightly, then cook it in oil over medium-high heat until browned and done.
- Add the soy sauce, brown sugar, rice vinegar, garlic, and ginger to the pan. Stir in the cornstarch slurry and let the sauce thicken around the chicken.
Assemble the Salad:
3. Whisk the dressing ingredients in a small bowl.
4. Toss the greens, cucumber, and carrots with the dressing. Slice the chicken and place it on top, then finish with scallions and sesame seeds.
Equipment for This Recipe:
- Skillet — for the chicken.
- Large salad bowl — for tossing.
- Small bowl — for the dressing.
- Sharp knife — to slice the chicken cleanly.
How to Serve This Dish:
Build the salad in a wide bowl so the chicken sits on top instead of sinking to the bottom. If you want something more filling, add a scoop of rice to the base.
Pro Tips for This Recipe:
- Let the chicken rest before slicing so the glaze stays on the meat.
- Use sturdier greens if you plan to eat leftovers.
- Add the dressing lightly; the teriyaki glaze already does a lot.
- Cold cucumber is the easiest way to sharpen the bowl.
Variations on This Dish:
- Cabbage-Chop Version: Use all cabbage for more crunch and better leftover texture.
- Peanut Finish: Add chopped peanuts if you want extra richness.
- Warm Rice Salad: Add a little rice under the greens for a more filling bowl.
Common Mistakes to Avoid with This Dish:
- Don’t drown the greens in dressing.
- Don’t slice the chicken before the rest.
- Don’t use tender lettuce only; it wilts too fast under warm chicken.
19. Teriyaki Chicken Ramen Soup
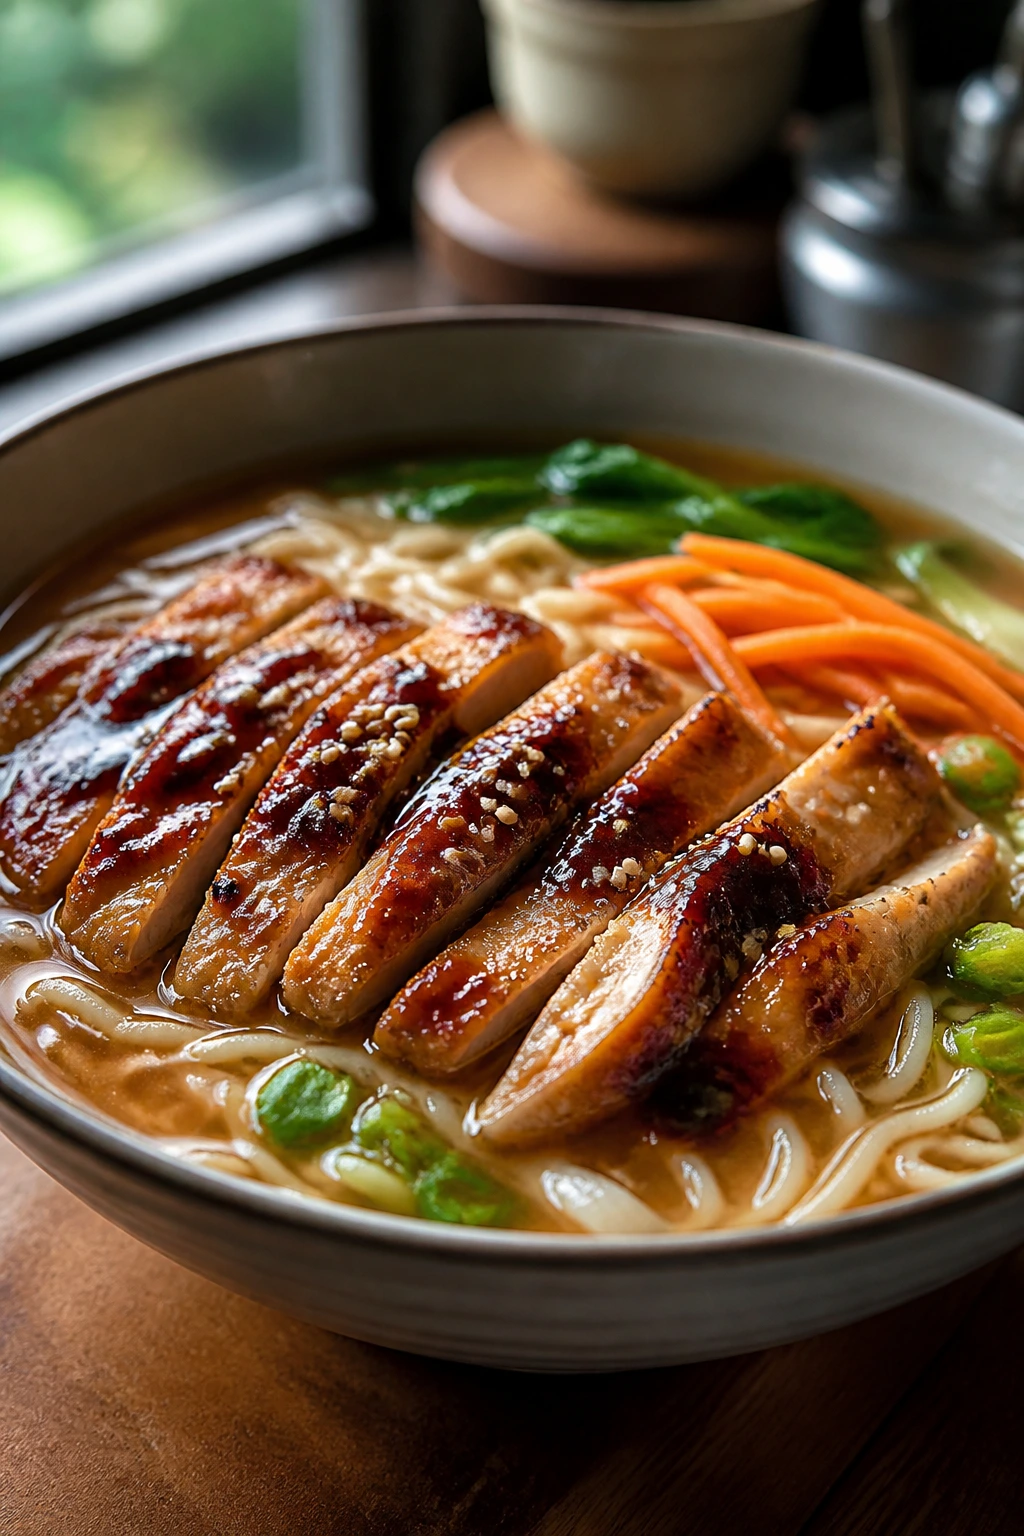
Ramen soup gets a sweet-savory lift from teriyaki chicken, and the broth keeps the noodles from feeling too sticky or heavy. The result lands somewhere between pantry comfort and takeout bowl.
Why It Works:
Broth plus glaze sounds like too much until you taste it. The broth carries the ginger and garlic, while the chicken adds the sweet soy depth that makes the whole bowl taste rounded. Instant ramen noodles are useful here because they cook fast and soak up the seasoned broth without falling apart.
Key Ingredients:
For the Soup:
- 1 lb chicken breasts or thighs, sliced thin — thin cuts cook in the broth.
- 4 cups chicken broth — the soup base.
- 2 packs instant ramen noodles, seasoning packets discarded — the noodles are the useful part.
- 1 cup frozen mixed vegetables — peas, carrots, or corn all work.
- 2 eggs — optional, but good for richness.
- 1 tsp sesame oil — finish only.
For the Broth Seasoning:
- 2 tbsp soy sauce
- 2 tbsp brown sugar
- 1 tbsp rice vinegar
- 2 garlic cloves, minced
- 1 tsp grated ginger
- 1 tbsp cornstarch mixed with 2 tbsp water — optional if you want the broth slightly thicker
Quick Steps:
Build the Broth:
- Bring the chicken broth, soy sauce, brown sugar, rice vinegar, garlic, and ginger to a simmer in a pot.
- Add the chicken and cook for 5 to 6 minutes, until the slices are just cooked through.
Finish the Bowl:
3. Add the noodles and frozen vegetables and simmer for 3 minutes, until the noodles are tender.
4. If you want a fuller broth, stir in the cornstarch slurry and let it bubble for 30 seconds.
5. Finish with sesame oil and soft-boiled or poached eggs if using.
Equipment for This Recipe:
- Medium soup pot — big enough for noodles.
- Ladle — useful for serving.
- Small bowl — for the seasoning mix.
- Chopsticks or tongs — for moving noodles if you like.
How to Serve This Dish:
Serve it in deep bowls so the broth can do its job. A few scallions on top make it look more finished, and the yolk from a soft egg gives the soup a silkier feel.
Pro Tips for This Recipe:
- Slice the chicken thin so it cooks in the broth without toughening.
- Don’t overcook ramen noodles; they keep softening in the hot soup.
- Add sesame oil last so the broth stays clean and aromatic.
- If the broth tastes flat, add a small splash more soy sauce before reaching for more salt.
Variations on This Dish:
- Egg Drop Version: Stir a beaten egg into the simmering broth in a thin stream.
- Mushroom Broth Version: Add sliced mushrooms or canned mushrooms for more body.
- Spicy Soup Version: Add chili paste or flakes to the broth.
Common Mistakes to Avoid with This Dish:
- Don’t add the noodles too early or they turn limp.
- Don’t overseason before tasting; ramen seasoning packets can be salty, but we’re not using them here.
- Don’t skip the sesame oil if you want that familiar finish.
20. Teriyaki Egg Roll Bowls
Egg roll bowls are what happen when you want the flavor of an egg roll without making the wrapper part of the job. Ground chicken, cabbage, and teriyaki glaze all end up in one skillet, and the result is fast, savory, and oddly hard to stop eating.
Why It Works:
Ground chicken breaks down into the cabbage and seasons it from the inside out. Coleslaw mix is already shredded fine enough to soften quickly, so you don’t have to spend time slicing vegetables. The sauce gives you the teriyaki profile, while sesame oil at the end makes the whole skillet taste finished.
Key Ingredients:
For the Bowl:
- 1 1/2 lb ground chicken — lean and quick-cooking.
- 1 tbsp neutral oil
- 1 bag coleslaw mix, about 14 oz — cabbage and carrot already handled for you.
- 2 garlic cloves, minced
- 1 tsp grated ginger
- 2 scallions, sliced — optional.
For the Sauce:
- 1/4 cup soy sauce
- 3 tbsp brown sugar
- 1 tbsp rice vinegar
- 1/4 cup water
- 1 tbsp cornstarch mixed with 2 tbsp water
- 1 tsp sesame oil
Quick Steps:
Brown the Chicken:
- Heat the oil in a large skillet over medium-high heat. Add the ground chicken and cook, breaking it up, until no pink remains and the bits start to brown.
Add the Cabbage:
2. Stir in the garlic and ginger for 30 seconds, then add the coleslaw mix. Cook for 2 to 3 minutes until the cabbage starts to soften but still has structure.
Sauce and Finish:
3. Whisk the sauce ingredients, pour them into the skillet, and cook for 1 to 2 minutes until everything looks glossy.
4. Finish with sesame oil and scallions.
Equipment for This Recipe:
- Large skillet — roomy enough for the cabbage.
- Wooden spoon — useful for breaking up chicken.
- Small bowl — for the sauce.
- Measuring cups and spoons — for the glaze.
How to Serve This Dish:
Spoon it into bowls and top with sesame seeds if you have them. It works with rice, but it’s just as good on its own when you want something lighter.
Pro Tips for This Recipe:
- Let the chicken brown a bit before stirring too often.
- Don’t overcook the cabbage or it goes limp and bland.
- If the skillet looks dry, add 1 tablespoon water before the sauce.
- A few drops of chili oil at the end make the bowl more interesting.
Variations on This Dish:
- Pork Swap: Use ground pork if that’s what’s in the fridge.
- Spicy Bowl: Add chili crisp or sriracha.
- Rice Bowl Version: Serve it over rice for a fuller dinner.
Common Mistakes to Avoid with This Dish:
- Don’t cook the cabbage until it collapses completely.
- Don’t forget to taste for salt at the end if your soy sauce is low-sodium.
- Don’t drown the skillet in sauce; egg roll bowls should stay textured.
21. Teriyaki Chicken and Snap Pea Skillet

Snap peas bring a cleaner kind of crunch than broccoli or beans. They stay bright, and when they meet the teriyaki glaze, the whole skillet tastes sharper and a little greener.
Why It Works:
Snap peas cook fast and keep their shape, which makes them ideal for a short skillet dinner. Chicken breast works well here because the vegetables finish quickly and the glaze goes on at the end. The result is light, crisp, and far less heavy than a saucy noodle dish.
Key Ingredients:
For the Skillet:
- 1 1/2 lb chicken breast, sliced into strips — thin pieces cook quickly.
- 2 cups snap peas, strings removed if needed — fresh and crisp.
- 1 red bell pepper, sliced — adds sweetness and color.
- 1 tbsp neutral oil
For the Sauce:
- 1/3 cup soy sauce
- 1/4 cup brown sugar
- 2 tbsp rice vinegar
- 1/4 cup water
- 2 garlic cloves, minced
- 1 tsp grated ginger
- 1 tbsp cornstarch mixed with 2 tbsp water
- 1 tsp sesame oil
Quick Steps:
Cook the Chicken:
- Heat the oil in a large skillet over medium-high heat. Add the chicken and cook for 4 to 5 minutes until browned and cooked through.
Add the Vegetables:
2. Add the snap peas and bell pepper and stir for 2 minutes, just until bright and hot.
Glaze:
3. Whisk the sauce ingredients together and pour them into the skillet. Stir in the slurry and cook for 1 minute until the sauce clings lightly to the chicken and peas.
4. Finish with sesame oil.
Equipment for This Recipe:
- Large skillet — helps keep the peas crisp.
- Sharp knife — for even slicing.
- Small bowl — for the sauce.
- Spatula or tongs — to keep the vegetables moving.
How to Serve This Dish:
Serve this one over plain rice or alongside noodles. I like the clean crunch of snap peas best when the plate isn’t crowded with too many other textures.
Pro Tips for This Recipe:
- Keep the peas moving so they don’t blister unevenly.
- Use chicken breast if you want a lighter result, thighs if you want more richness.
- Don’t over-thicken the sauce or the peas get sticky.
- Add a squeeze of lime if the skillet needs a little lift.
Variations on This Dish:
- Snow Pea Swap: Snow peas work the same way, with even thinner texture.
- Garlic-Lover’s Version: Add another garlic clove.
- Chili Finish: Add a few drops of chili oil before serving.
Common Mistakes to Avoid with This Dish:
- Don’t overcook snap peas or you lose the snap.
- Don’t cut the chicken too thick or it lags behind the vegetables.
- Don’t reduce the sauce too long; it should stay light.
22. Teriyaki Chicken Rice Casserole
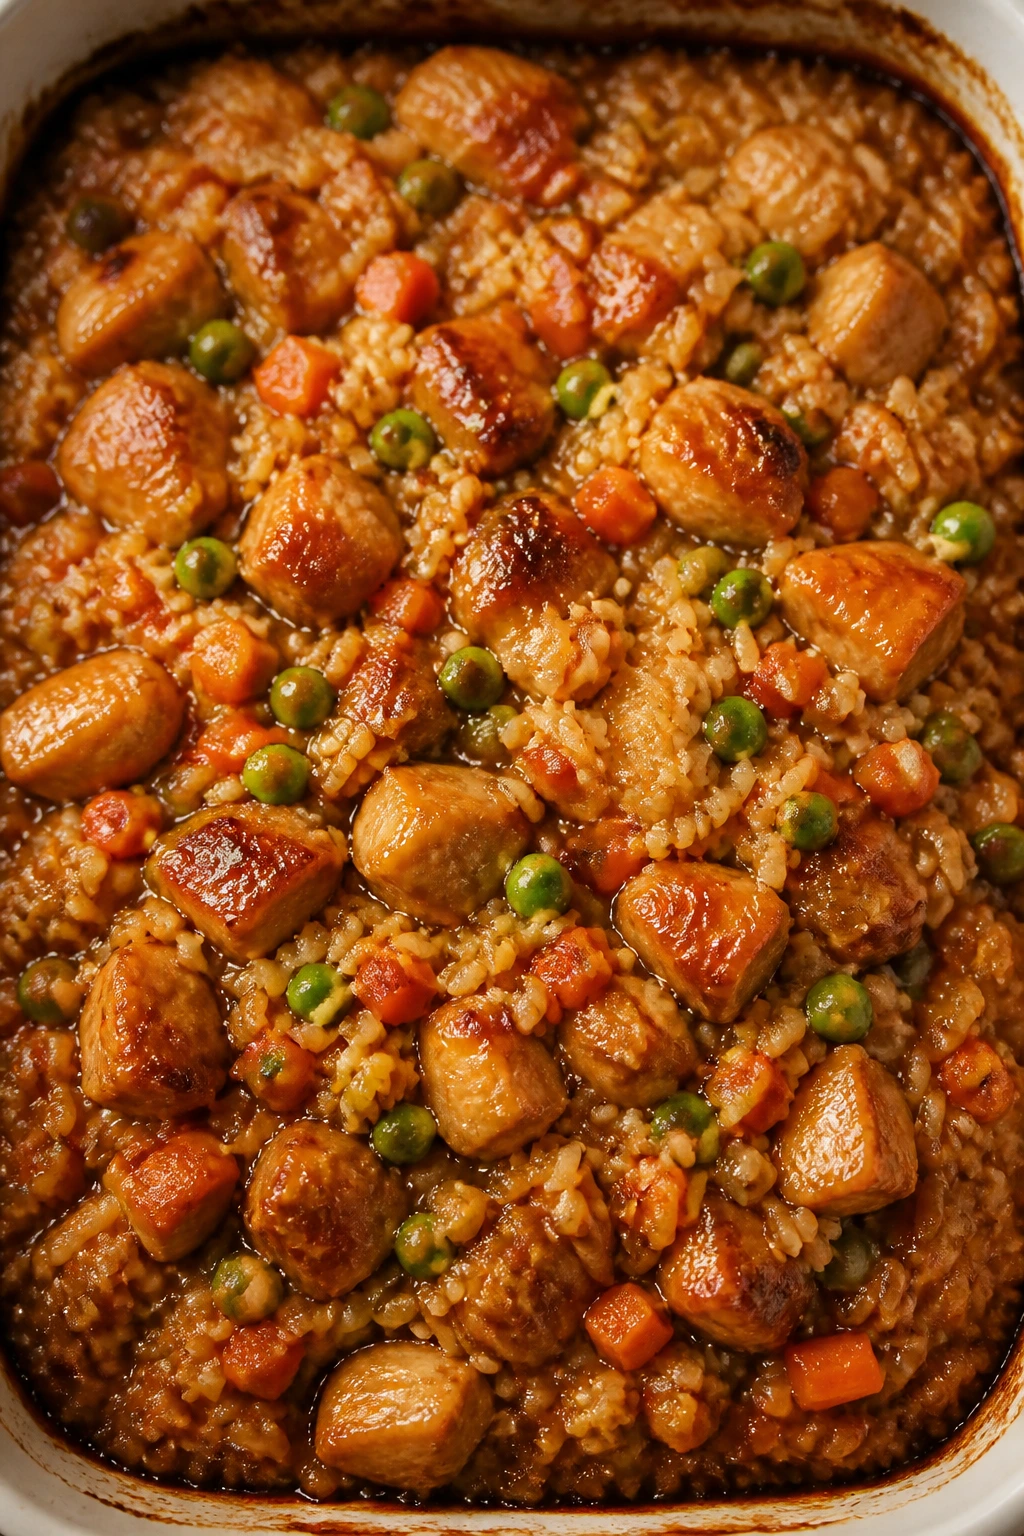
Rice casserole is the slow-bake version of this whole idea. The rice absorbs the broth and glaze, the chicken cooks into the mixture, and the vegetables settle in like they were meant to be there.
Why It Works:
This is the comfort-food version of pantry teriyaki. Instead of cooking each part separately, the oven does the mixing for you. The rice soaks up the soy and sugar as it cooks, which gives every spoonful a deeper flavor than plain steamed rice ever could.
Key Ingredients:
For the Casserole:
- 1 1/2 cups uncooked long-grain rice — absorbs the sauce well.
- 2 lb boneless chicken thighs or breasts, cut into chunks — thighs are a little more forgiving.
- 3 cups chicken broth — cooks the rice.
- 1 cup frozen peas and carrots — easy vegetable add-in.
- 1/2 onion, finely diced — softens into the rice.
- 1 tbsp neutral oil
For the Seasoning:
- 1/3 cup soy sauce
- 1/4 cup brown sugar
- 2 tbsp rice vinegar
- 2 garlic cloves, minced
- 1 tsp grated ginger
- 1 tbsp cornstarch mixed with 2 tbsp water — stir in at the end if you want the sauce thicker.
Quick Steps:
Assemble:
- Heat the oven to 375°F and grease a 9×13-inch baking dish.
- Stir the rice, broth, soy sauce, brown sugar, rice vinegar, garlic, ginger, onion, and oil together in the dish. Nestle the chicken pieces into the rice and scatter the peas and carrots over the top.
Bake:
3. Cover tightly with foil and bake for 45 minutes.
4. Remove the foil and bake for 10 to 15 minutes more, until the rice is tender and the chicken reaches 165°F.
5. If the dish looks a little loose, stir in the cornstarch slurry and bake uncovered for 3 to 5 minutes until the sauce tightens.
Equipment for This Recipe:
- 9×13-inch baking dish — gives the rice room.
- Foil — seals in steam for the rice.
- Mixing spoon — for combining the casserole.
- Instant-read thermometer — useful for the chicken chunks.
How to Serve This Dish:
Scoop it into bowls while it’s hot and a little steamy. A few scallions on top make the casserole look less brown and more intentional.
Pro Tips for This Recipe:
- Use long-grain rice, not instant rice.
- Keep the foil tight during the first bake or the rice can dry out.
- If your chicken pieces are large, cut them smaller so they finish with the rice.
- Let the casserole rest 5 minutes before serving so the grains settle.
Variations on This Dish:
- Broccoli Casserole: Add small broccoli florets with the peas and carrots.
- Pineapple Rice Bake: Stir in drained pineapple chunks for a sweeter version.
- Spicy Bake: Add chili flakes to the seasoning mix.
Common Mistakes to Avoid with This Dish:
- Don’t use too much liquid or the casserole turns mushy.
- Don’t leave the dish uncovered during the first bake.
- Don’t cut the chicken too large or the rice will finish before it does.
Why the Pantry Version of Teriyaki Chicken Works
Teriyaki chicken at home works because the sauce has a job for every ingredient. Soy sauce brings salt and depth. Brown sugar or honey gives you the lacquer. Rice vinegar keeps the whole thing from collapsing into sweetness. Cornstarch is the reason the sauce clings to chicken instead of pooling at the bottom of the pan.
There’s also a practical reason these recipes keep showing up in real kitchens. Chicken is one of the few proteins that can handle a fast sear, a long simmer, a bake, or a glaze without becoming fussy. Thighs forgive you. Breasts need a thermometer and some restraint. Wings and drumsticks want heat and a little patience. Ground chicken needs a binder and a sauce to stay interesting. Same pantry. Different behavior.
That’s what makes the collection so useful. You can cook around what you already have—fresh broccoli, frozen vegetables, a bag of rice, a box of noodles, a head of cabbage that needs to be used before it gives up. No single version is the “correct” one. The point is to keep the sauce handy and pick the format that fits your fridge.
The Tools That Show Up Again and Again
- 12-inch skillet or sauté pan — the workhorse for searing, simmering, and reducing sauce.
- Rimmed sheet pan — necessary for drumsticks, wings, kabobs, and sheet-pan chicken.
- Large wok or deep skillet — useful for fried rice, noodle skillet meals, and egg roll bowls.
- Small saucepan — the easiest place to build a smooth teriyaki glaze.
- Instant-read thermometer — the simplest way to keep chicken juicy and safe.
- Wire rack — especially useful for wings and drumsticks when you want crisp skin.
- Mixing bowls — one for sauce, one for chicken, one for quick vegetables.
- Tongs and a wooden spoon — both earn their spot here.
- Measuring cups and spoons — teriyaki balance is built on ratios, not guesswork.
- Airtight containers — useful if you’re cooking rice bowls, fried rice, or meal-prep portions.
Smart Shopping and Ingredient Tips
Soy sauce is the backbone, so buy one you actually like the taste of. Regular soy sauce gives the boldest flavor; low-sodium soy gives you more room to adjust the sweetness and salt later. If your pantry leans toward tamari, that works too, and it gives you a gluten-free path without changing the texture of the glaze.
Brown sugar matters more than people think. Light brown sugar gives a cleaner, sharper sweetness; dark brown sugar brings a little molasses depth and makes the sauce taste darker and richer. Honey works when you want a softer, rounder glaze, but I still reach for brown sugar when I want that old-school sticky finish.
Rice vinegar is the acid I’d keep on hand for almost all of these recipes. White vinegar can feel too sharp, and lemon juice can push the flavor in a different direction. If you’re missing rice vinegar, a small splash of apple cider vinegar is the next best rescue move.
Chicken thighs are the easiest cut to work with because they stay juicy across skillet, bake, and slow-cooker recipes. Breasts can absolutely work, but they need closer attention and a thermometer. Drumsticks and wings cost less and bring more texture, which is useful when you want something that feels less like plain chopped chicken and more like dinner with personality.
Cornstarch is the thickener I’d buy before anything else. A spoonful stirred into cold water makes the glaze cling without turning it pasty. If you use flour instead, the sauce can go cloudy and heavy; cornstarch keeps the shine.
How to Serve These Recipes
Presentation:
Use shallow bowls for rice, noodles, and teriyaki chicken glazed dishes so the sauce stays visible. For wings and drumsticks, a platter with a sprinkle of sesame seeds and scallions looks finished fast. Salads and lettuce wraps should stay open and loose, not stuffed into a deep bowl where the crunch gets lost.
Accompaniments:
Plain jasmine rice is the easiest anchor, but cucumber salad, steamed broccoli, snap peas, cabbage slaw, and quick-pickled onions all work across this collection. Rice noodles, ramen noodles, and even toasted slider buns fit when you want something different. Keep one crisp side on the plate whenever the chicken is sticky.
Portions:
For rice bowls and skillet dinners, plan on 5 to 6 ounces of cooked chicken per person, plus 1 cup rice or noodles. For wings, figure 6 to 8 wings per person if they’re the main event. Drumsticks land around 2 to 3 per person depending on size. Lettuce wraps and sliders need more pieces than you expect, because people always go back for one more.
Beverage Pairing:
Cold jasmine tea is the cleanest match. If you want something with a little more edge, ginger ale with lime or a crisp lager works nicely against the sweet glaze. Plain sparkling water with cucumber or lemon keeps the meal from feeling too heavy.
Additional Tips and Flavor Boosters

Flavor Enhancement:
A teaspoon of toasted sesame oil at the end does more than another spoonful of soy sauce ever will. It smells deep and nutty the second it hits hot food. If you want more brightness, add a teaspoon of rice vinegar right before serving instead of more sugar.
Customization:
Chili crisp, sriracha, red pepper flakes, or even a spoon of gochujang can push the sauce into a spicier lane without losing the teriyaki feel. Pineapple juice gives a softer sweetness, while a little orange zest makes the sauce smell lighter. You can also throw in frozen edamame, snap peas, shredded cabbage, or carrots depending on what’s in the fridge.
Serving Suggestions:
Scallions and sesame seeds do a lot of work for very little effort. Sliced cucumbers, quick-pickled onions, lime wedges, or a spoon of crunchy slaw give the plate contrast. If the dish is meant to be eaten with rice, keep the rice plain and let the glaze do the talking.
Make-It-Yours:
Use tamari if you need gluten-free sauce. Pick thighs for richer results and breasts when you want a lighter plate. For lower-carb meals, swap rice for cabbage, lettuce cups, or extra vegetables. If you’re feeding kids, lean a little sweeter and keep the heat out of the glaze.
Make-Ahead, Storage, and Reheating Guidance
Most of these teriyaki chicken dishes keep well for 3 to 4 days in the refrigerator as long as they’re cooled before sealing. Shredded chicken, meatballs, fried rice, egg roll bowls, and rice casserole all hold up nicely. Crispy items, like wings and air fryer bites, lose texture faster, so I’d treat those as short-term leftovers and reheat them with care.
For the freezer, aim for up to 2 months in airtight containers or freezer bags. Saucy shredded chicken freezes best because the glaze protects the meat from drying out. Rice bowls and casseroles freeze fairly well too, though rice can get a little softer after thawing. Noodle dishes and salads are the least freezer-friendly, so eat those fresh if you can.
Reheat skillet and saucy dishes in a skillet over medium-low heat with 1 to 2 tablespoons water to loosen the glaze. Covered reheating keeps the chicken from drying out. For wings, drumsticks, and air fryer bites, the oven or air fryer is the better choice—about 350°F for 8 to 12 minutes in the oven, or 375°F for 4 to 6 minutes in the air fryer, until hot through. Microwave reheating works in a pinch, but use short bursts and cover loosely so the sauce doesn’t spatter everywhere.
Rice-based dishes usually improve overnight because the grains absorb the sauce. That’s especially true for fried rice, egg roll bowls, and rice casserole. Crisp salads and lettuce wraps do not improve overnight, and I’d keep their components separate until serving. If you’re meal-prepping, store the sauce-heavy chicken in one container and the greens or rice in another. The difference between decent leftovers and disappointing ones is usually that small.
Variations and Adaptations to Try
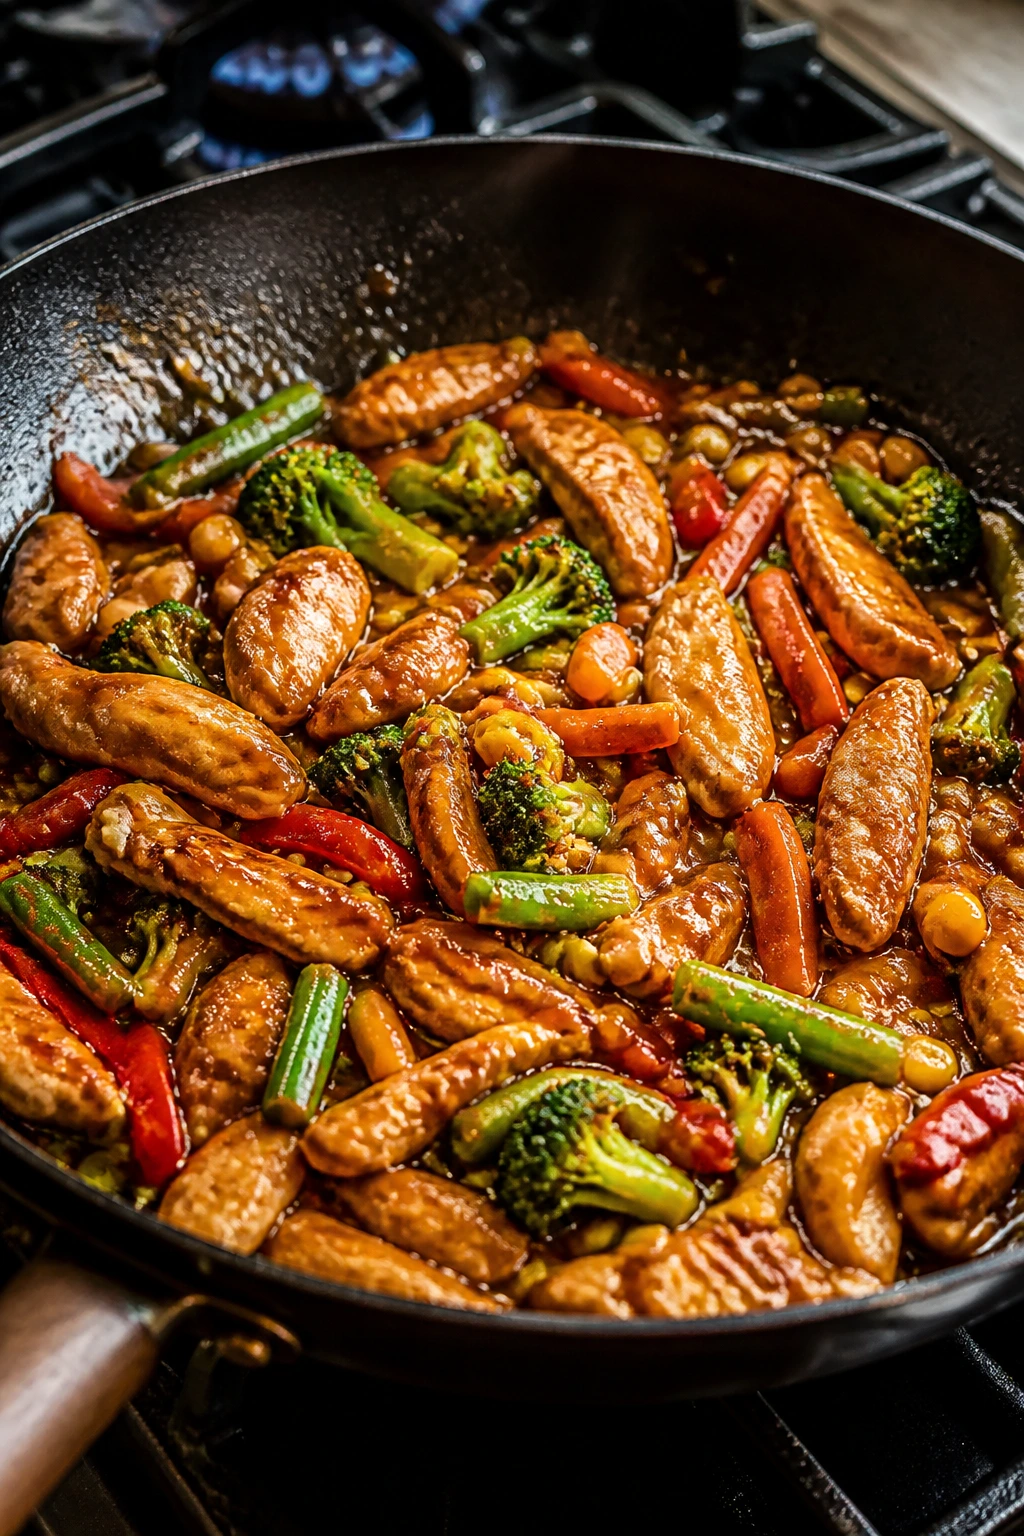
Gluten-Free Tamari Batch:
Swap soy sauce for tamari in every recipe and check the labels on your cornstarch and broth. The flavor stays close, but the sauce can taste a little rounder and less sharp. This works especially well in skillet dishes, stir-fries, and slow-cooker chicken.
Lower-Sugar Sticky Glaze:
Cut the brown sugar by a third and add a little more rice vinegar plus a splash of water. The sauce will still cling, but it won’t lean as sweet. This version fits better on salads, lettuce wraps, and sheet-pan dinners where you want the chicken to taste savory first.
Spicy Chili-Crisp Finish:
Stir chili crisp or chili garlic sauce into the glaze right before serving. That gives the sweet soy base a little heat and crunch. It’s especially good on rice bowls, noodles, and shredded chicken where the texture can handle it.
Vegetable-Heavy Dinner:
Double the broccoli, cabbage, green beans, or snap peas and cut the chicken slightly smaller. The glaze still covers the dish, but the vegetables take center stage. This is the version I’d make when I want the plate to feel lighter without losing the teriyaki flavor.
Kid-Friendly Sweet Soy:
Use honey instead of some of the brown sugar, keep the ginger mild, and skip any heat. Drumsticks, sliders, meatballs, and rice bowls usually win here because they’re easy to eat with your hands or a fork. The sauce should taste sticky and familiar, not spicy or sharp.
Meal-Prep Container Build:
Choose bowls, fried rice, egg roll bowls, or shredded slow-cooker chicken and pack them with rice on one side and vegetables on the other. That keeps texture better than mixing everything together right away. Reheat with a splash of water and the glaze stays friendly instead of stiff.
Common Mistakes to Avoid
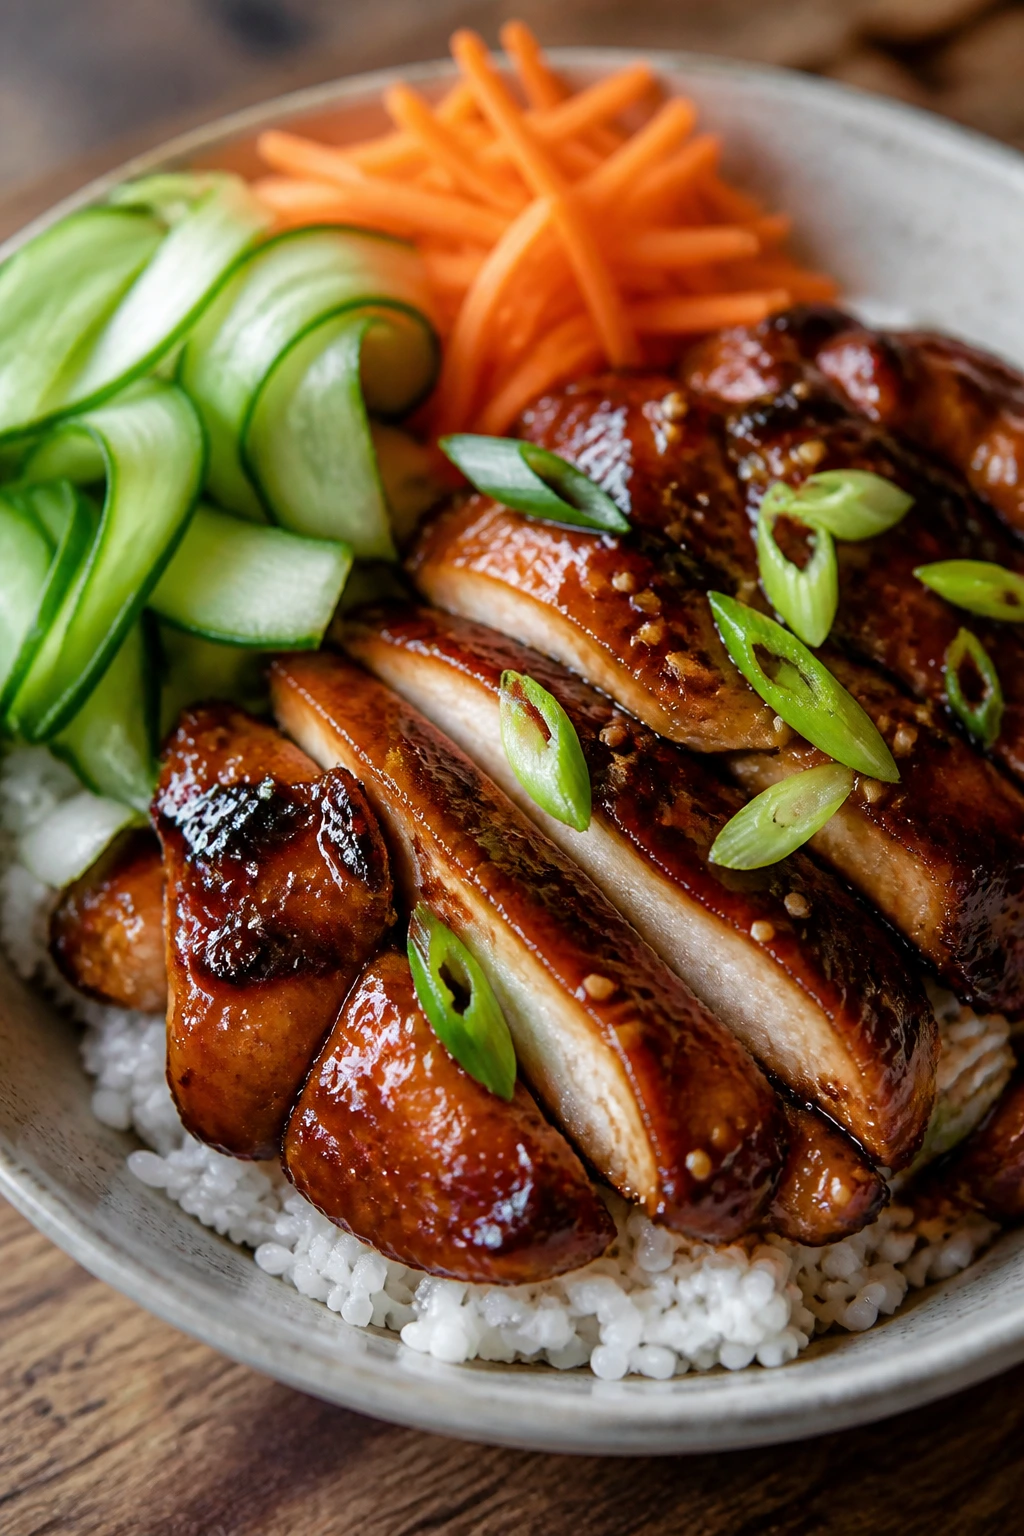
The first mistake is treating every piece of chicken the same. Wings need dry heat and a crisp finish. Drumsticks want longer baking. Thighs love skillet browning or slow cooking. Breasts need shorter cooking times and a thermometer. If you use the same method for all of them, one of two things happens: the chicken dries out, or the glaze burns before the meat is done.
Another common problem is pouring the sauce in too early. Sugar burns. That’s not a warning for dramatic effect; it’s just what happens when sweet glaze sits on hot metal for too long. Add the sauce near the end, or reduce it separately and brush it on at the right moment. If the recipe depends on a sticky finish, let the sauce meet heat at the point where the chicken is already cooked or nearly there.
A third issue is over-thickening. Cornstarch works fast, and a sauce that looks perfect in the pan can turn into glue after a minute or two off the heat. If it gets too tight, loosen it with water in teaspoons, not big splashes. You want a coating sauce, not a spoonful of jam.
Crowding the pan is another one. It seems harmless. It isn’t. Chicken needs space to brown, vegetables need room to lose moisture, and noodles need a pan wide enough to toss without clumping. When the pan is too full, you end up steaming instead of searing, and teriyaki really needs that browned edge to taste complete.
Finally, don’t forget acid. If the sauce tastes flat, it usually needs a little rice vinegar—not more sugar. That tiny sharp note is what keeps the glaze from feeling sticky in the wrong way.
Frequently Asked Questions
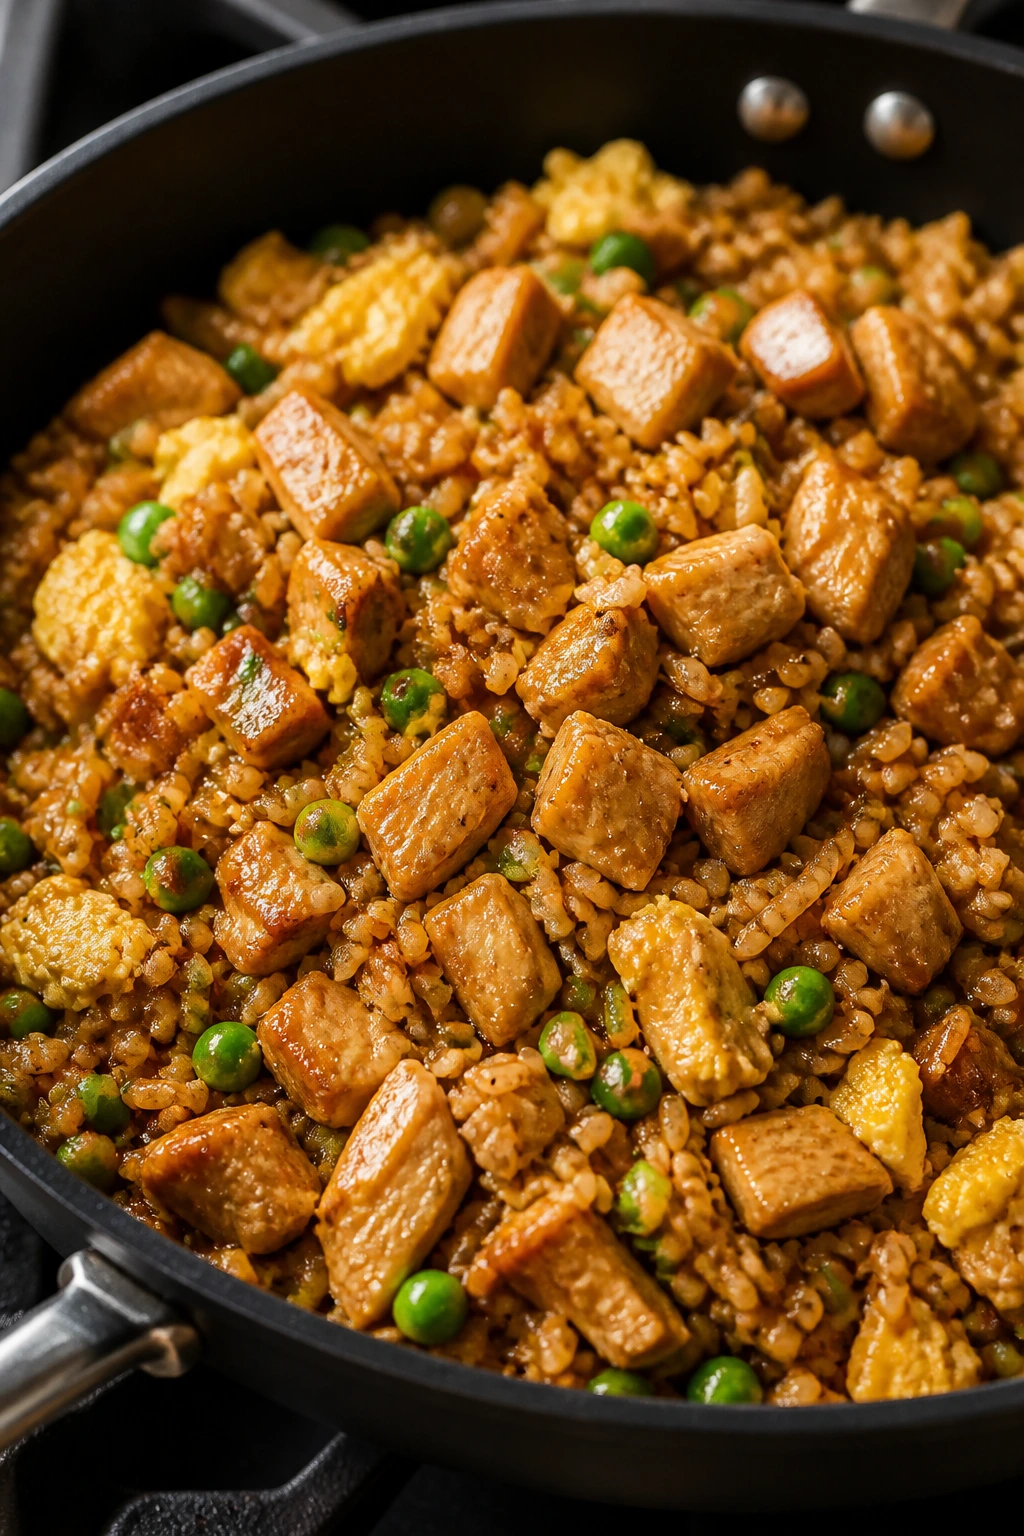
Can I use chicken breasts instead of thighs in most of these recipes?
Yes, but you need to watch the clock. Breasts cook faster and dry out more easily, so pull them as soon as they reach 165°F and let them rest a few minutes before slicing. Thighs are more forgiving if you’re cooking without a lot of attention.
What if I don’t have rice vinegar?
Apple cider vinegar is the closest pantry substitute, and white vinegar can work in a smaller amount. Start with less than the recipe calls for, taste, and adjust. You want a bright edge, not a sharp bite.
Can bottled teriyaki sauce replace the homemade glaze?
It can, but the flavor usually lands flatter and sweeter. If you use bottled sauce, I’d still add garlic, ginger, and a little vinegar so the dish doesn’t taste one-note. Homemade sauce takes about the same time once the pan is hot.
How do I keep the sauce from becoming gummy?
Mix the cornstarch with cold water first, and only add it once the sauce is simmering. If the sauce gets too thick, add water one teaspoon at a time until it loosens. Gummy sauce usually means too much cornstarch or too much reduction.
Which recipes are best for meal prep?
Rice bowls, fried rice, egg roll bowls, slow-cooker chicken, and rice casserole all hold up well for several days. Wings, lettuce wraps, and salads are better fresh because their textures fade faster. Keep crunchy components separate until serving.
Can I freeze teriyaki chicken?
Yes, especially shredded chicken, meatballs, and casserole-style dishes. Freeze them in airtight containers for up to 2 months and thaw in the fridge before reheating. Crispy items don’t reheat as well from frozen, so I’d avoid freezing those.
What vegetables work best with teriyaki chicken?
Broccoli, green beans, cabbage, snap peas, carrots, onions, and bell peppers all fit the sauce nicely. Frozen stir-fry vegetables are fine when you need speed. Softer vegetables like zucchini can work, but they need careful timing or they turn soft fast.
How can I make teriyaki chicken less sweet?
Reduce the brown sugar a little and increase the rice vinegar slightly. You can also add more garlic or ginger so the sauce tastes sharper rather than sweeter. Low-sodium soy helps too, because it gives you more control over the salt-sugar balance.
A Sticky, Shelf-Stable Dinner Habit
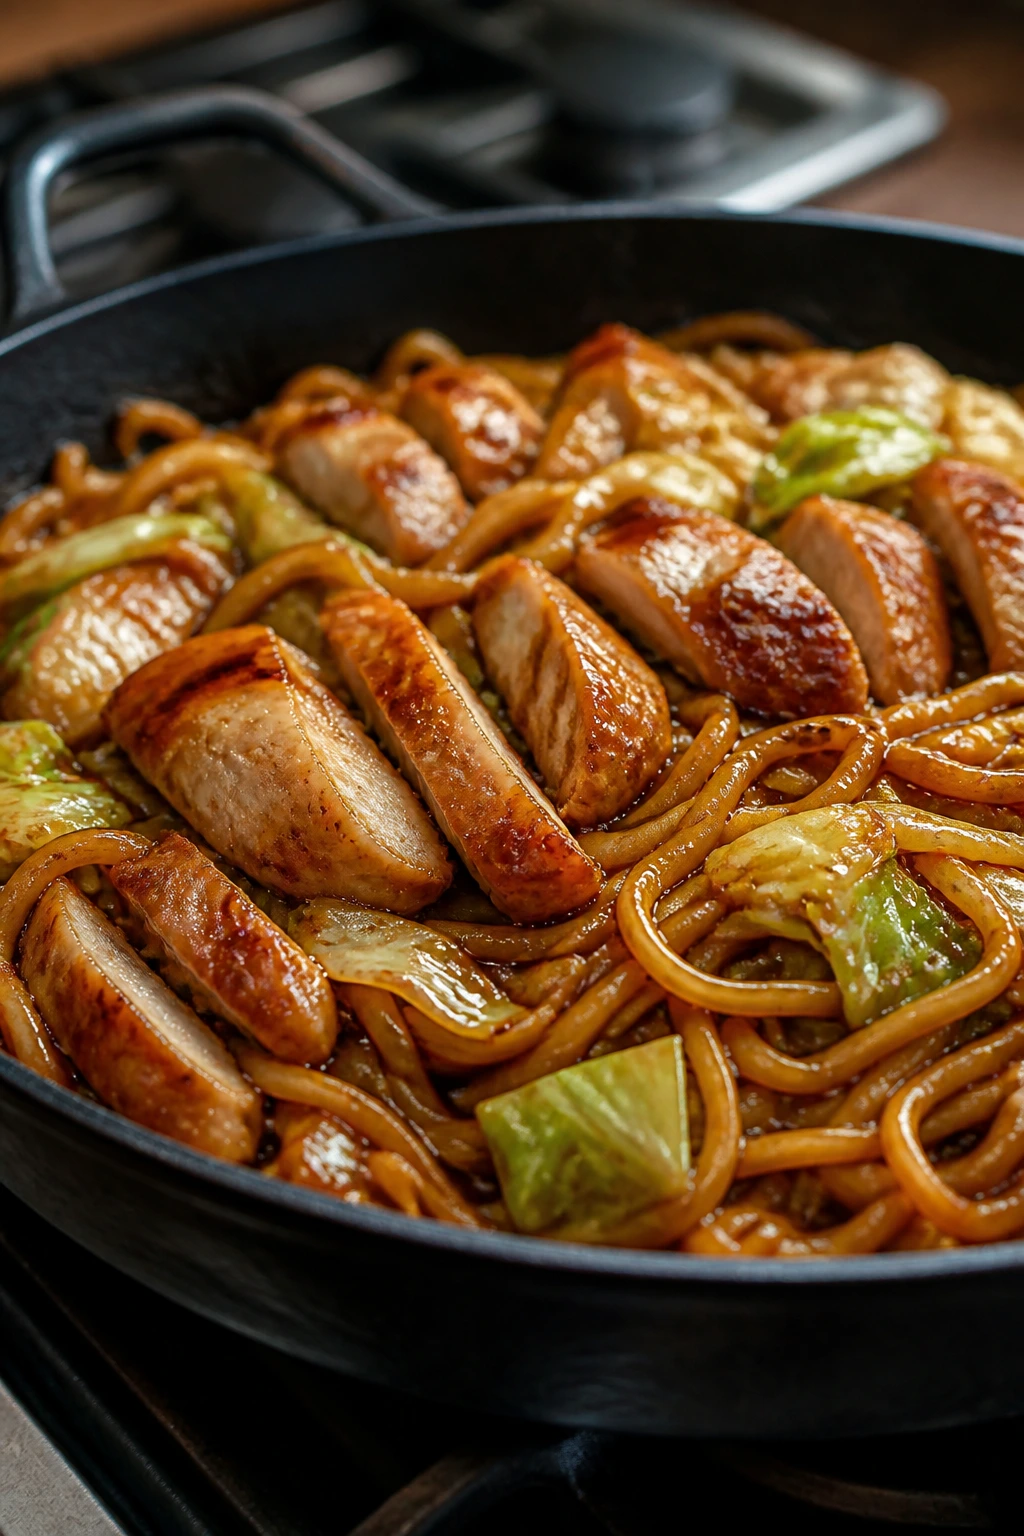
The nicest thing about teriyaki chicken made from pantry staples is that it doesn’t ask for a special mood. It works in a skillet, in the oven, in a slow cooker, in an air fryer, and in a bowl with whatever vegetables are hanging around. That kind of flexibility is why the sauce earns its place in the cupboard.
Keep soy sauce, brown sugar, rice vinegar, garlic, ginger, and cornstarch close by, and half of these dinners become available on a weeknight without planning. That’s the real appeal here: not novelty, but repeatability. And once you’ve got one version that fits your kitchen, the rest start looking less like separate recipes and more like different ways to keep dinner interesting.