
A weeknight dessert doesn’t need a full sink of bowls or a long spell in the oven to feel worth making. Coconut happens to be one of the rare ingredients that pulls real weight in a hurry: shredded coconut brings chew and toast, canned coconut milk brings richness, and coconut extract gives you that unmistakable bakery smell with hardly any effort.
That’s why coconut desserts keep sneaking back into my kitchen. They’re flexible in a way most sweets aren’t. A bag of coconut flakes can become cookies, bars, fudge, pudding, cake, frozen treats, or a bowl of something cold and creamy that tastes like you planned ahead even when you didn’t. The texture range is the fun part. Coconut can be crisp, soft, custardy, chewy, or icy, and it plays well with lime, chocolate, berries, banana, mango, coffee, and vanilla without needing a lot of extra fuss.
These 25 coconut desserts lean toward the kind of treats you can make after dinner without turning the kitchen into a project site. Some are baked. Some are no-bake. A few chill while you eat dinner, which is the sort of dessert timing I trust most.
Why These Coconut Treats Earn a Spot in the Rotation
- Pantry-friendly: Most of these recipes start with coconut milk, shredded coconut, flour, eggs, or chocolate you probably already have tucked away.
- Fast payoff: Several desserts are in the oven or the fridge in under 15 minutes, which matters when you want a sweet finish without a long cleanup.
- Texture variety: Coconut gives you chew in macaroons, creaminess in puddings, crunch in bars, and a toasted top on cookies and cakes.
- Easy to scale: Half the list is easy to double for a small gathering, and the rest cut cleanly into bars, squares, or bite-size pieces.
- Flavor pairing built in: Coconut likes lime, pineapple, banana, berries, vanilla, dark chocolate, and coffee, so you can keep the ingredient list short and still get a full dessert.
- Make-ahead friendly: A lot of coconut sweets hold well overnight, which is useful when the goal is dessert that doesn’t need babysitting.
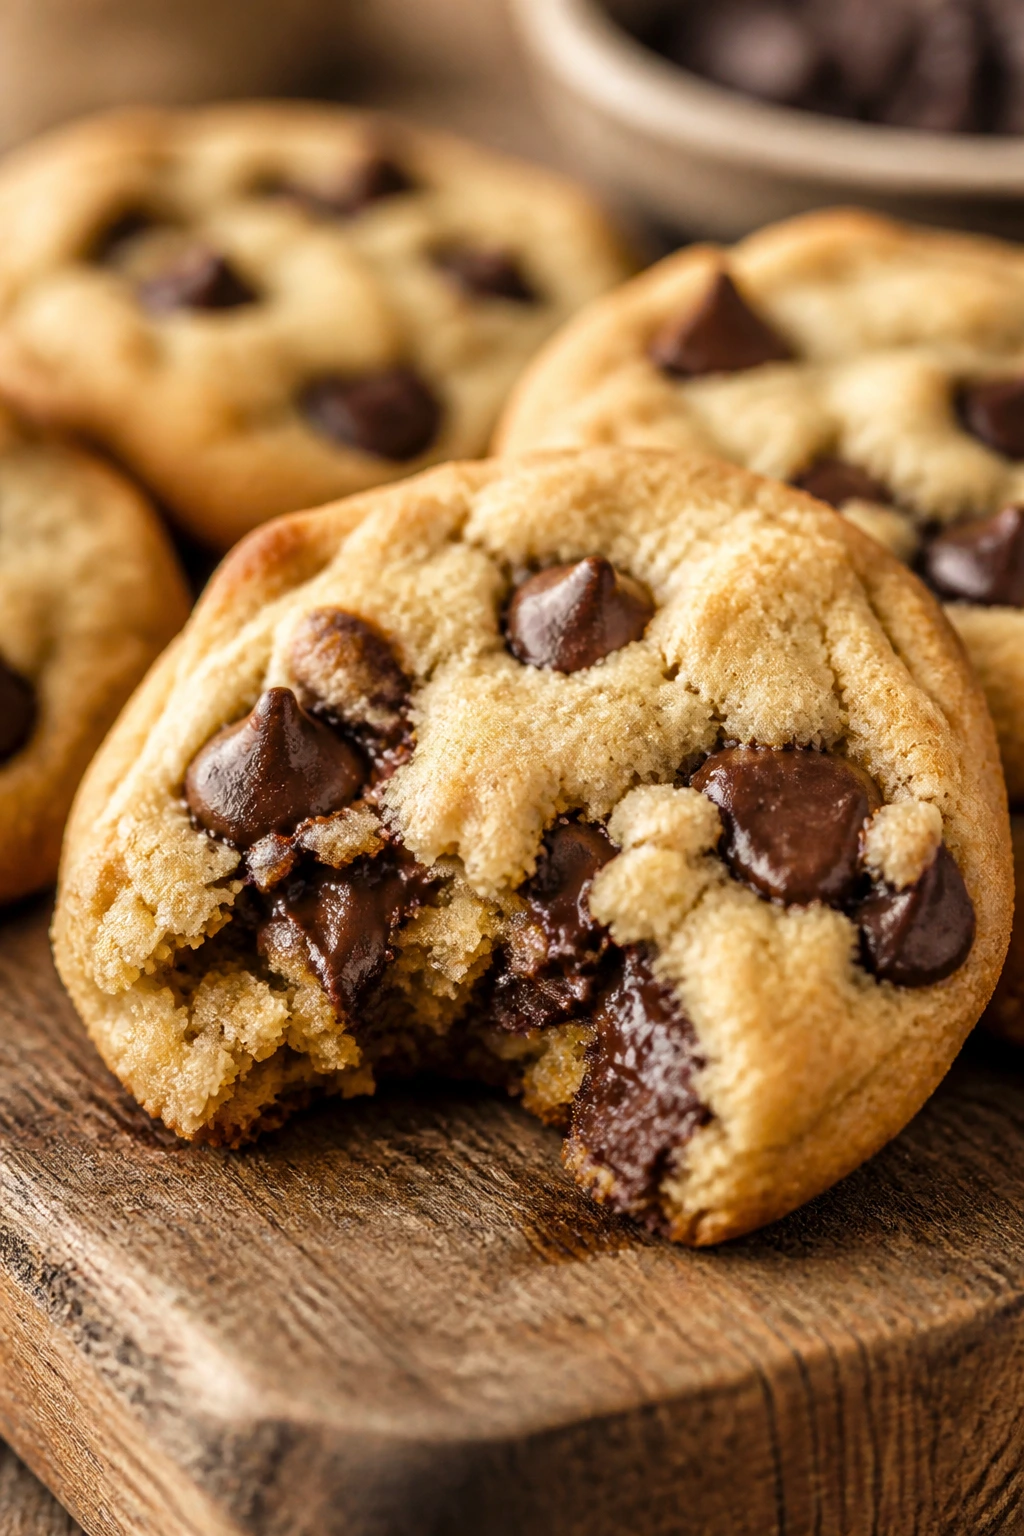
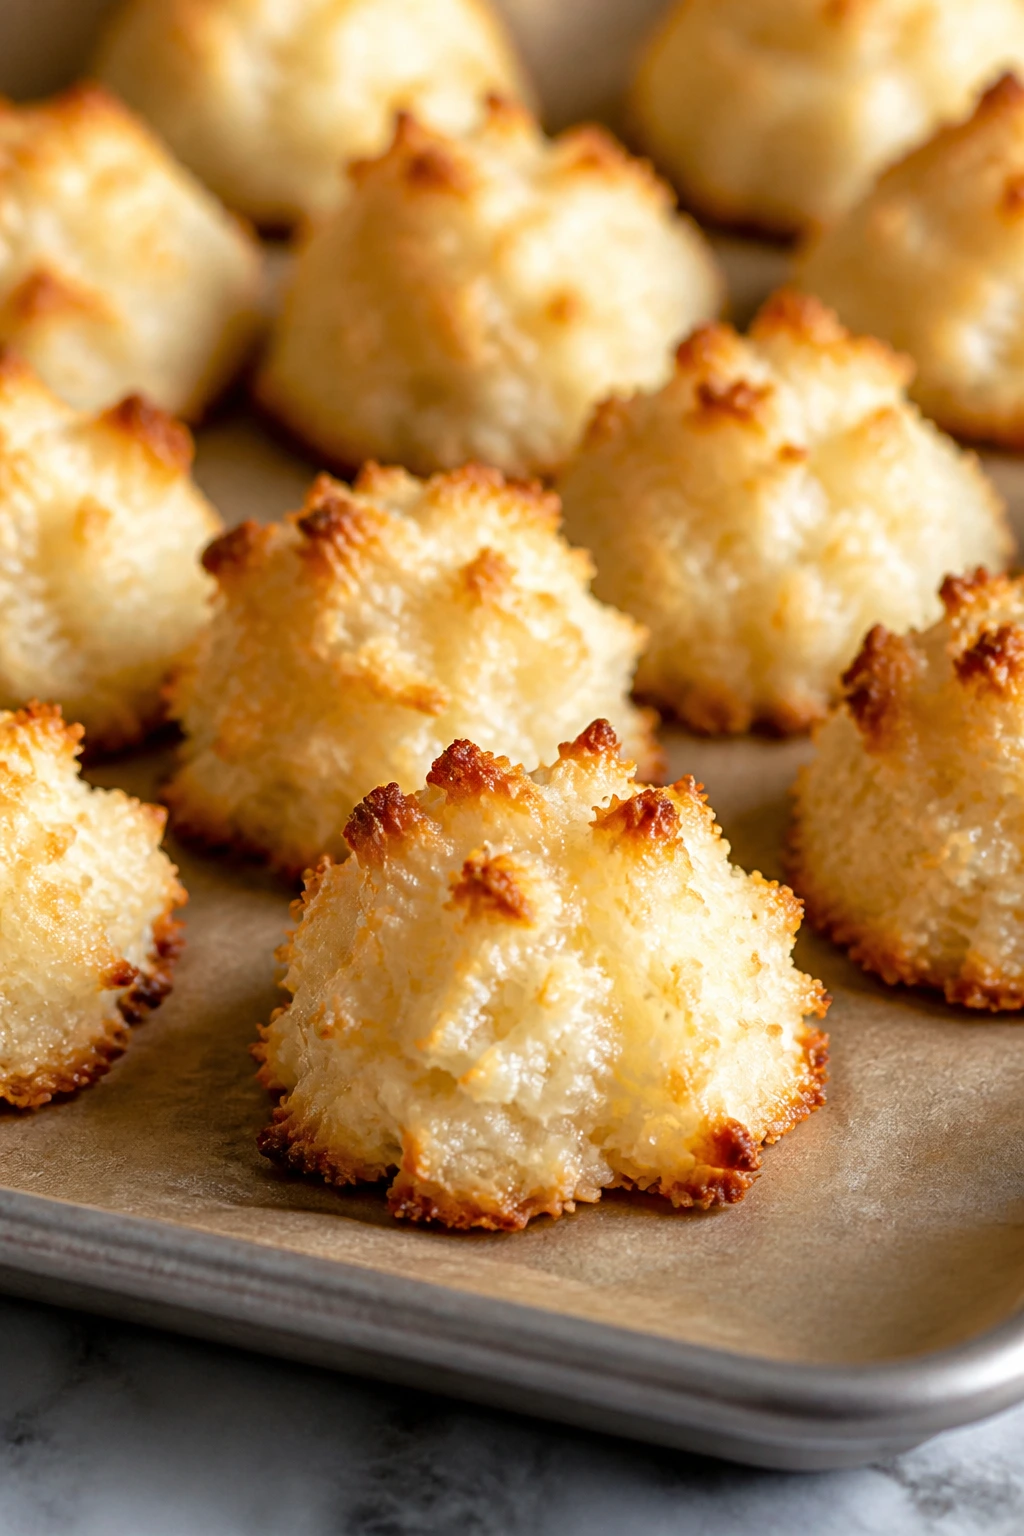
1. Classic Coconut Macaroons
A tray of macaroons smells like toasted sugar and warm coconut long before the timer goes off. The tops turn pale gold, the bottoms get a little deeper, and the centers stay chewy instead of dry when you keep the batch small and the oven modest.
Why It Works: Sweetened condensed milk binds the coconut without making the cookies cakey. Egg whites keep the mounds from collapsing, and a 325°F oven gives the edges color before the coconut burns. That low heat is the difference between chewy and tired.
Key Ingredients:
- 2 large egg whites, lightly beaten — gives the mounds structure.
- 1 (14-ounce) can sweetened condensed milk — the sticky base that holds everything together.
- 1 teaspoon vanilla extract — softens the dairy sweetness.
- 1/4 teaspoon fine salt — keeps the flavor from flattening out.
- 4 1/2 cups sweetened shredded coconut — use fluffy shreds, not finely ground coconut.
- 1 cup semisweet chocolate chips, melted, optional — for drizzling or dipping after baking.
Quick Steps:
- Preheat the oven to 325°F and line two baking sheets with parchment paper.
- In a large bowl, stir together the condensed milk, egg whites, vanilla, and salt until smooth.
- Fold in the shredded coconut until every strand looks coated and sticky.
- Scoop 2-tablespoon mounds onto the sheets, spacing them about 1 inch apart.
- Bake for 18 to 22 minutes, until the edges are deep gold and the tops are set. Cool completely on the pan before moving them.
Equipment for This Recipe:
- 2 parchment-lined baking sheets
- Large mixing bowl
- 2-tablespoon cookie scoop
- Rubber spatula
How to Serve This Dish: Serve them with black coffee, strong tea, or a few raspberries on the side. A tiny drizzle of dark chocolate is enough; these already carry plenty of sweetness.
Pro Tips for This Recipe:
- Let the coconut sit in the condensed milk for 2 minutes before scooping. It helps the shreds hydrate and pack together.
- If your macaroons spread, the coconut was packed too loosely or the egg whites were overmixed.
- Cool them fully before lifting. Warm macaroons stick to parchment like glue.
Variations on This Dish:
- Chocolate-Drizzled Finish: Dip the bottoms in melted semisweet chocolate for a cleaner, richer edge.
- Lemon Zest Lift: Add 1 teaspoon finely grated lemon zest to the base for a brighter flavor.
- Toasted Coconut Edge: Toast 1 cup of the coconut in a skillet first for a deeper, nuttier cookie.
Common Mistakes to Avoid with This Dish:
- Don’t crank the oven to speed things up. The tops brown before the centers set.
- Don’t use unsweetened coconut without adjusting the liquid. The cookies turn dry and crumbly.
- Don’t move them while they’re warm. They need time to firm up.
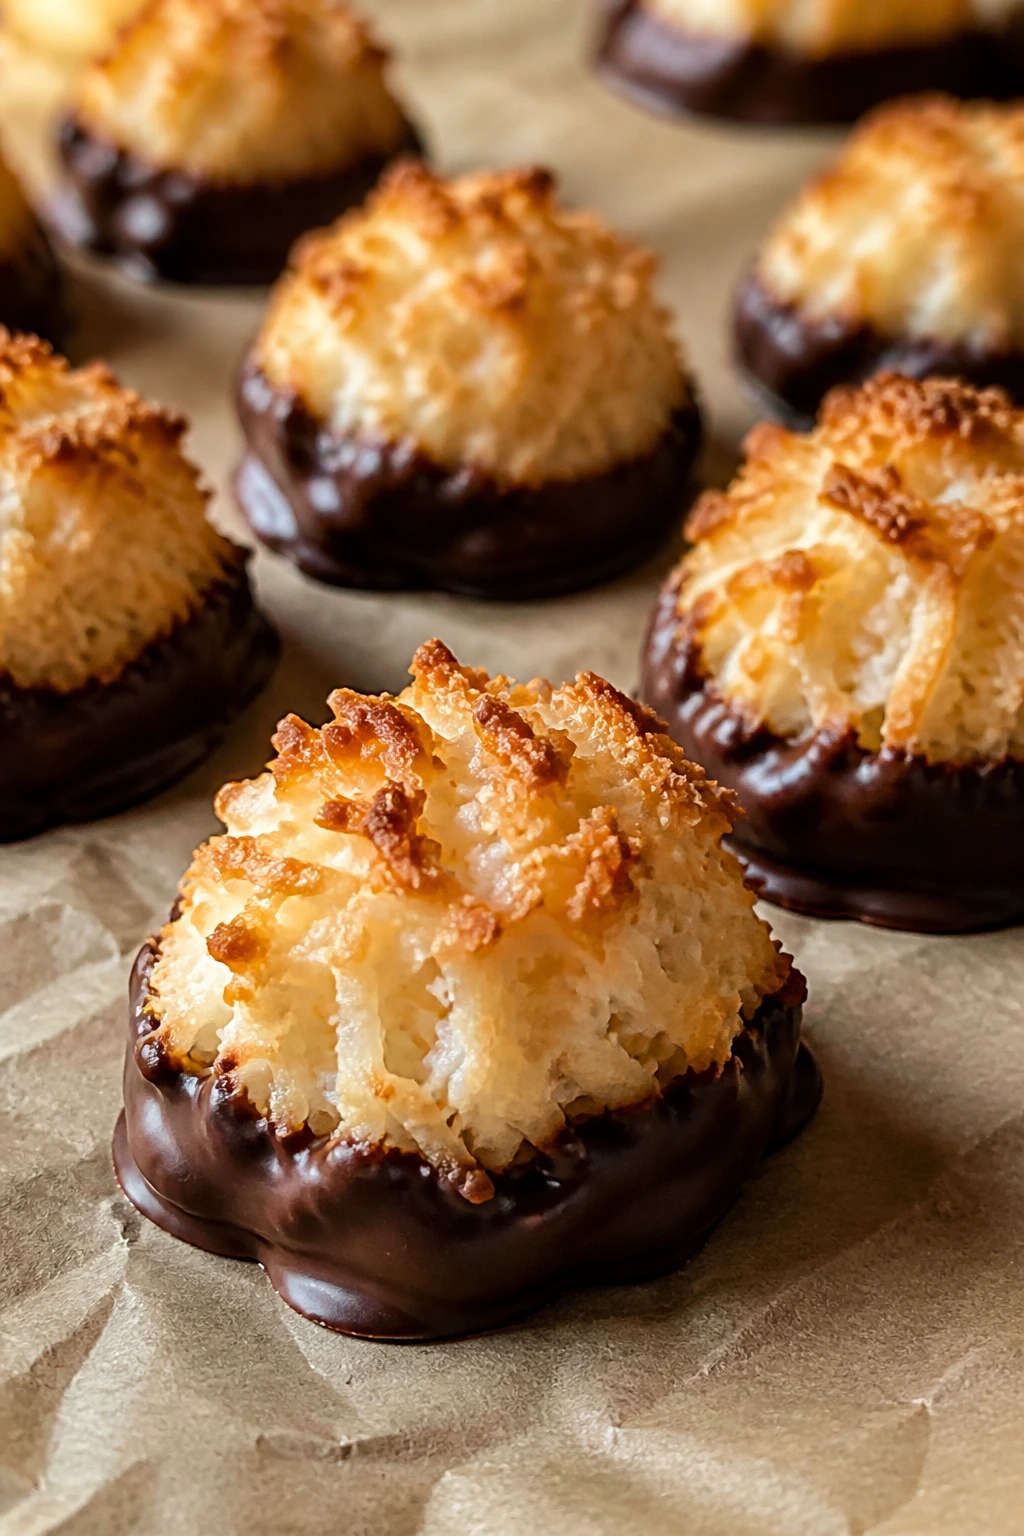
2. Chocolate-Dipped Coconut Macaroons
These are the macaroons I make when I want the same chewy coconut bite with a little more drama. The dip of dark chocolate hardens into a thin shell, so each bite gives you crunch first, then that sticky coconut center.
Why It Works: A small amount of almond extract sharpens the coconut flavor without turning the cookie into marzipan. Whipped egg whites add lift, and the chocolate dip hides any rough edges on the bottom. The bake stays short, so the center doesn’t dry out.
Key Ingredients:
- 4 large egg whites — whisked until foamy for structure.
- 1/2 cup granulated sugar — sweetens and lightly stabilizes the whites.
- 1 teaspoon vanilla extract — rounds out the cookie.
- 1/2 teaspoon almond extract — optional, but it wakes up the coconut.
- 1/4 teaspoon fine salt — keeps the flavor from going flat.
- 4 cups sweetened shredded coconut — the main body of the cookie.
- 8 ounces dark chocolate, chopped — for dipping once the cookies cool.
Quick Steps:
- Heat the oven to 325°F and line a baking sheet with parchment.
- Whisk the egg whites, sugar, vanilla, almond extract, and salt until foamy and slightly thick.
- Fold in the shredded coconut and let the bowl sit for 2 minutes.
- Scoop rounded tablespoons onto the sheet and bake for 17 to 20 minutes, until the tops are golden and the bottoms are just browned.
- Cool fully, then dip the bottoms in melted chocolate and set them on clean parchment until the chocolate firms.
Equipment for This Recipe:
- Baking sheet
- Parchment paper
- Medium mixing bowl
- Heatproof bowl for melting chocolate
How to Serve This Dish: Pile these on a plate with sliced strawberries or orange segments. They’re rich enough to stand alone, but the fruit keeps the plate from feeling heavy.
Pro Tips for This Recipe:
- Melt the chocolate slowly. A dry, overheated bowl makes it grainy fast.
- Use a fork to dip the bottoms cleanly, then tap off extra chocolate before setting them down.
- If you want a firmer cookie, chill the dipped macaroons for 10 minutes.
Variations on This Dish:
- Espresso Edge: Stir 1 teaspoon instant espresso powder into the chocolate before dipping.
- Orange-Coconut Pairing: Add 1 teaspoon orange zest to the batter for a citrus note.
- Almond Joy Style: Press one toasted almond into the top before baking.
Common Mistakes to Avoid with This Dish:
- Don’t dip the cookies before they cool. The chocolate slides right off.
- Don’t overwhip the egg whites into stiff peaks. Foamy is enough here.
- Don’t pack the coconut down too hard when scooping. Air helps the centers stay chewy.
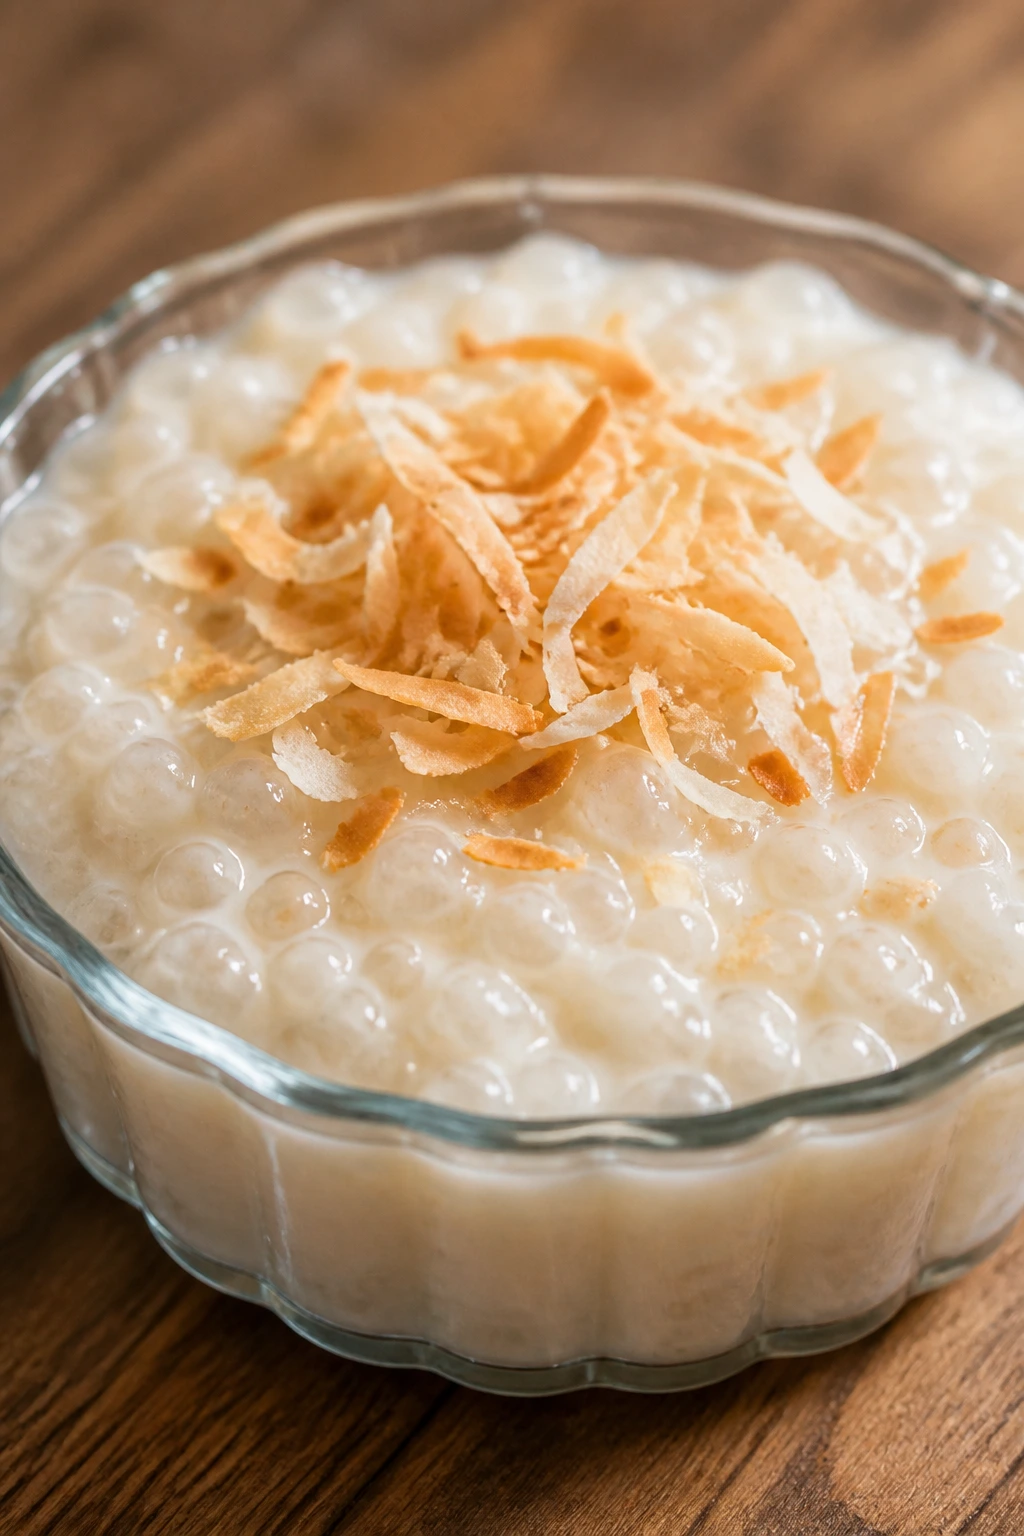
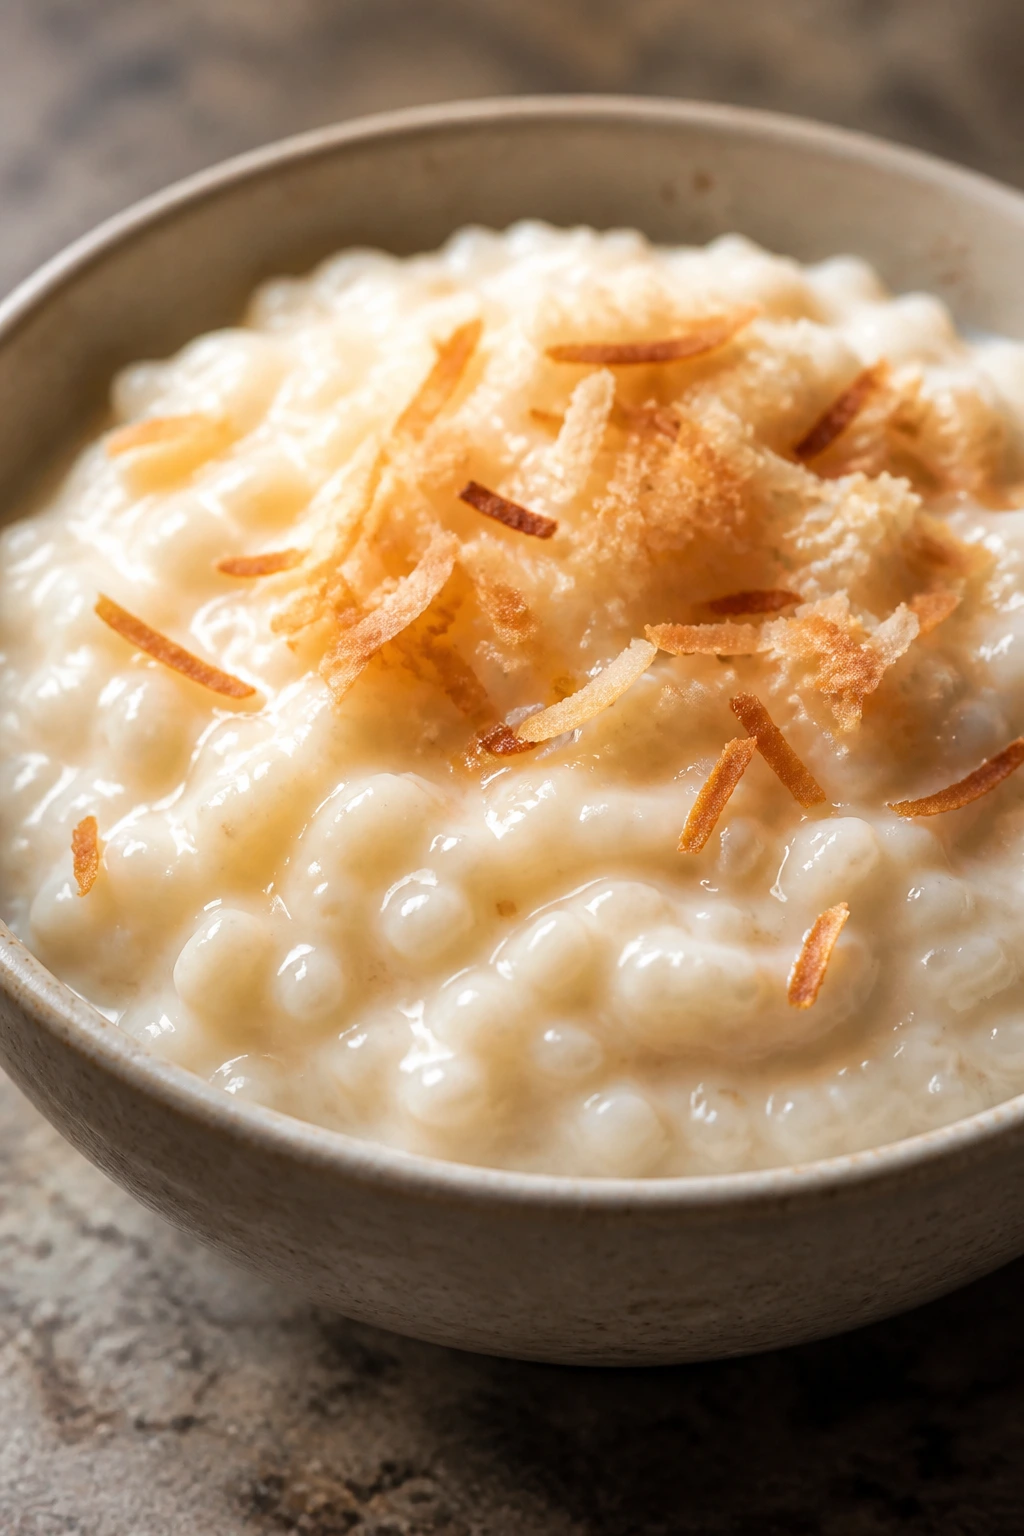
3. Coconut Cream Rice Pudding
Rice pudding can be a little dull if it’s made thin and rushed. Coconut changes that. The milk turns the pot creamy, the rice softens into a spoonable custard, and the toasted coconut on top gives you a little crackle with every bite.
Why It Works: Short-grain rice releases starch as it simmers, which thickens the pot without flour or cornstarch. Full-fat coconut milk brings body, and a pinch of salt keeps the sweetness from drifting into candy territory. Warm or cold, it settles into a soft, rich bowl.
Key Ingredients:
- 3/4 cup arborio rice — the starchier grain gives the pudding its body.
- 2 cups water — starts the rice cooking without scorching.
- 1 (13.5-ounce) can full-fat coconut milk — the main source of richness.
- 2 cups whole milk — loosens the coconut milk just enough for spooning.
- 1/3 cup granulated sugar — keeps the pudding gently sweet.
- 1/4 teaspoon fine salt — sharpens the flavor.
- 1 teaspoon vanilla extract — added at the end so it stays fragrant.
- 1/2 teaspoon cinnamon or toasted coconut, for topping — optional but useful.
Quick Steps:
- Rinse the rice once, then combine it with the water in a medium saucepan.
- Simmer over medium-low heat for 10 minutes, stirring once or twice, until most of the water is absorbed.
- Add the coconut milk, whole milk, sugar, and salt, then cook over low heat for 20 to 25 minutes, stirring every few minutes, until the mixture looks creamy and the rice is tender.
- Stir in the vanilla, then let the pudding sit for 5 minutes to thicken.
- Spoon into bowls and top with toasted coconut or cinnamon.
Equipment for This Recipe:
- Medium saucepan
- Wooden spoon
- Measuring cups
- Serving bowls
How to Serve This Dish: Warm pudding tastes nicest in shallow bowls with a spoonful of mango or banana on top. Chilled pudding works too, especially with a bit of grated nutmeg.
Pro Tips for This Recipe:
- Stir from the bottom of the pan. Coconut milk can catch if you wander off.
- If the pudding gets too thick, splash in 2 to 4 tablespoons of milk.
- Toast the coconut topping in a dry skillet for 2 to 3 minutes until pale gold.
Variations on This Dish:
- Cardamom Cream: Add 1/4 teaspoon ground cardamom with the sugar.
- Mango Bowl: Fold in diced mango after cooling for a tropical finish.
- Brown Sugar Version: Swap the white sugar for packed light brown sugar for a deeper taste.
Common Mistakes to Avoid with This Dish:
- Don’t boil it hard. The milk can split and the rice turns uneven.
- Don’t skip the resting time. The pudding thickens as it cools.
- Don’t use carton coconut milk here. It’s too thin for a proper creamy texture.
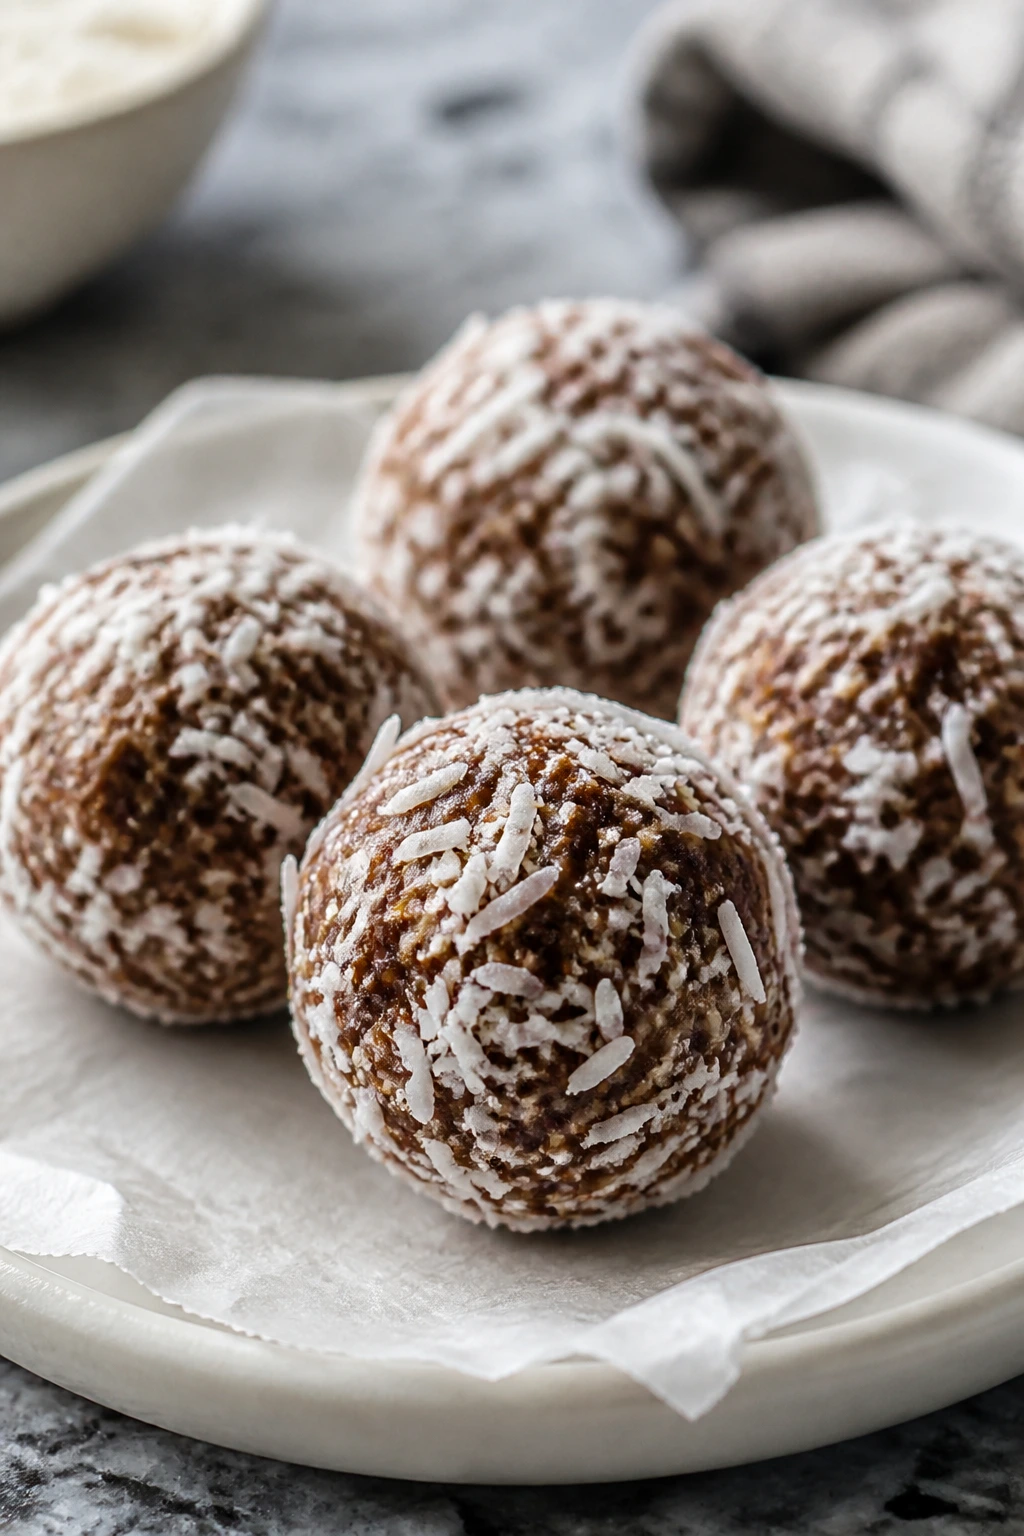
4. No-Bake Coconut Chocolate Oat Balls
If you want dessert without turning on the oven, this is the move. They taste like a cross between a chocolate cookie and a granola bar, except softer, saltier, and a lot more satisfying when you’ve had a long day.
Why It Works: Oats give the balls enough structure to hold shape, while peanut butter and honey bind them without baking. Coconut adds chew and keeps the texture from turning pasty. A short chill is enough to firm the mixture.
Key Ingredients:
- 2 cups old-fashioned oats — hold up better than quick oats.
- 1 cup sweetened shredded coconut — for chew and flavor.
- 1/2 cup creamy peanut butter — binds the mixture.
- 1/3 cup honey — sweetens and helps the balls set.
- 1/2 cup mini chocolate chips — for little pockets of melt.
- 1 teaspoon vanilla extract — rounds out the flavor.
- 1/4 teaspoon fine salt — keeps the sweetness in check.
Quick Steps:
- Stir the oats, coconut, chocolate chips, and salt together in a bowl.
- Add the peanut butter, honey, and vanilla, then mix until a thick dough forms.
- Chill the bowl for 15 minutes so the mixture is easier to roll.
- Roll into 1-inch balls and set them on a parchment-lined plate.
- Chill for another 20 minutes before serving.
Equipment for This Recipe:
- Mixing bowl
- Rubber spatula
- Parchment-lined plate
- Small cookie scoop, optional
How to Serve This Dish: Stack them in a small bowl and keep them cold if the kitchen is warm. A few fresh blueberries on the side make the sweetness feel lighter.
Pro Tips for This Recipe:
- If the mixture feels sticky, add 2 tablespoons more oats.
- If it feels dry, add 1 tablespoon more peanut butter.
- Wet your hands lightly before rolling; it stops the dough from clinging.
Variations on This Dish:
- Sunflower Seed Swap: Use sunflower seed butter for a nut-free version.
- Chocolate Brownie Angle: Add 1 tablespoon cocoa powder for a darker, trufflier flavor.
- Cranberry-Coconut Mix: Stir in 1/4 cup chopped dried cranberries for tart bites.
Common Mistakes to Avoid with This Dish:
- Don’t use instant oats if you want a clean chew. They go mushy.
- Don’t skip the chilling step. Warm dough sticks and rolls badly.
- Don’t add too many chocolate chips. They can make the balls fall apart.
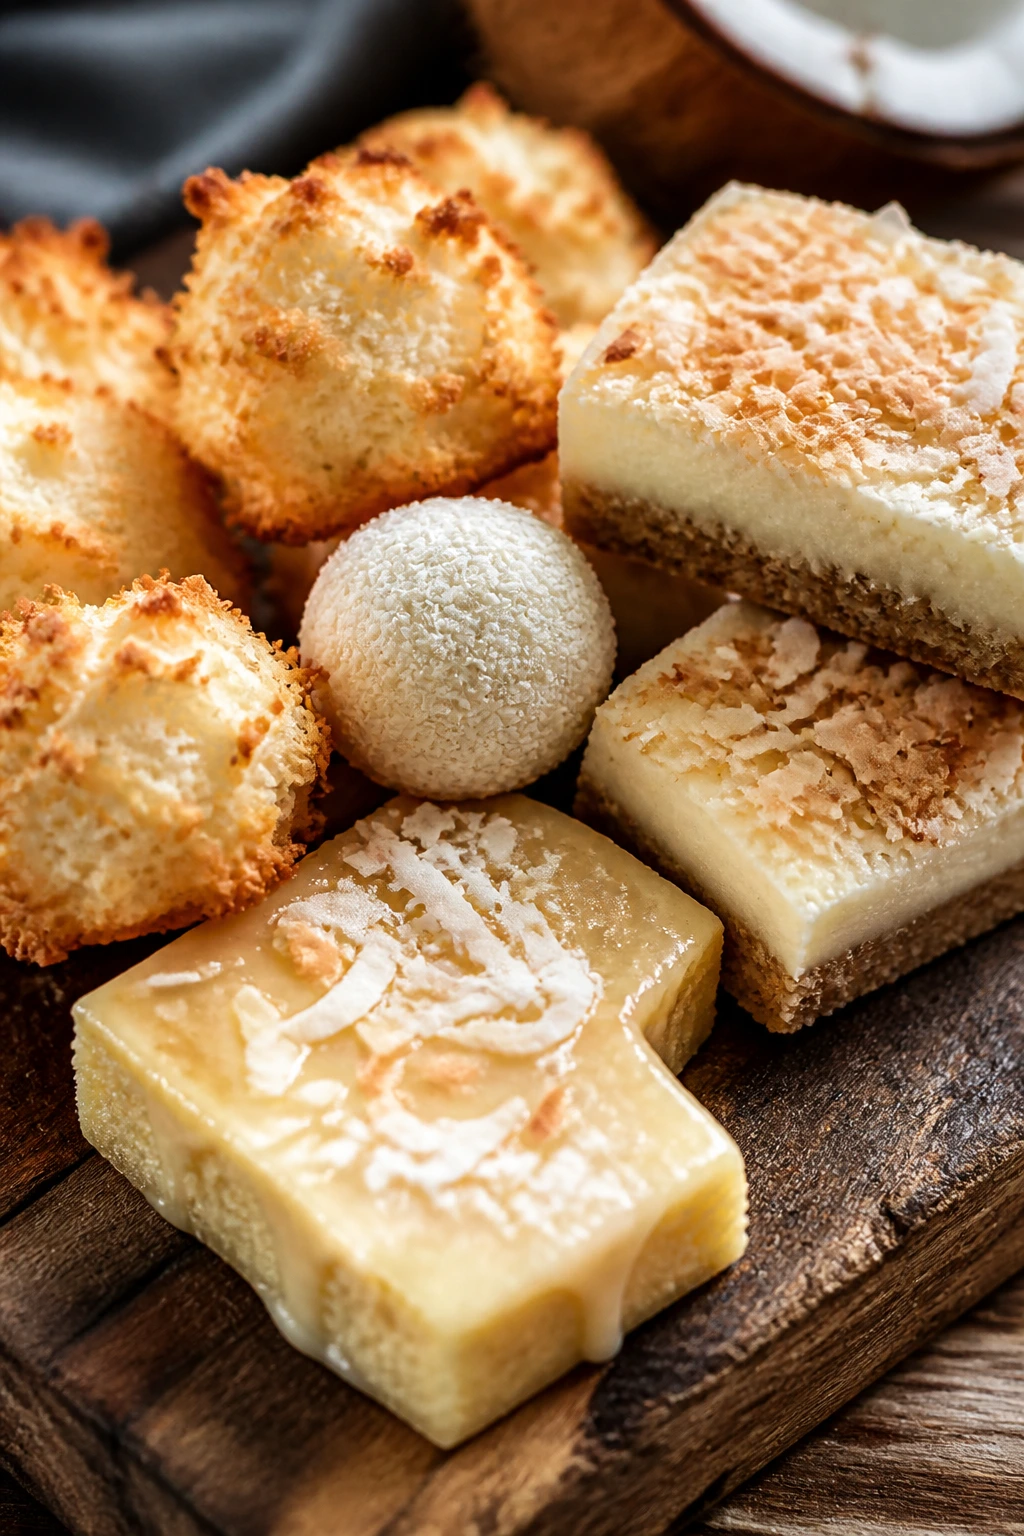
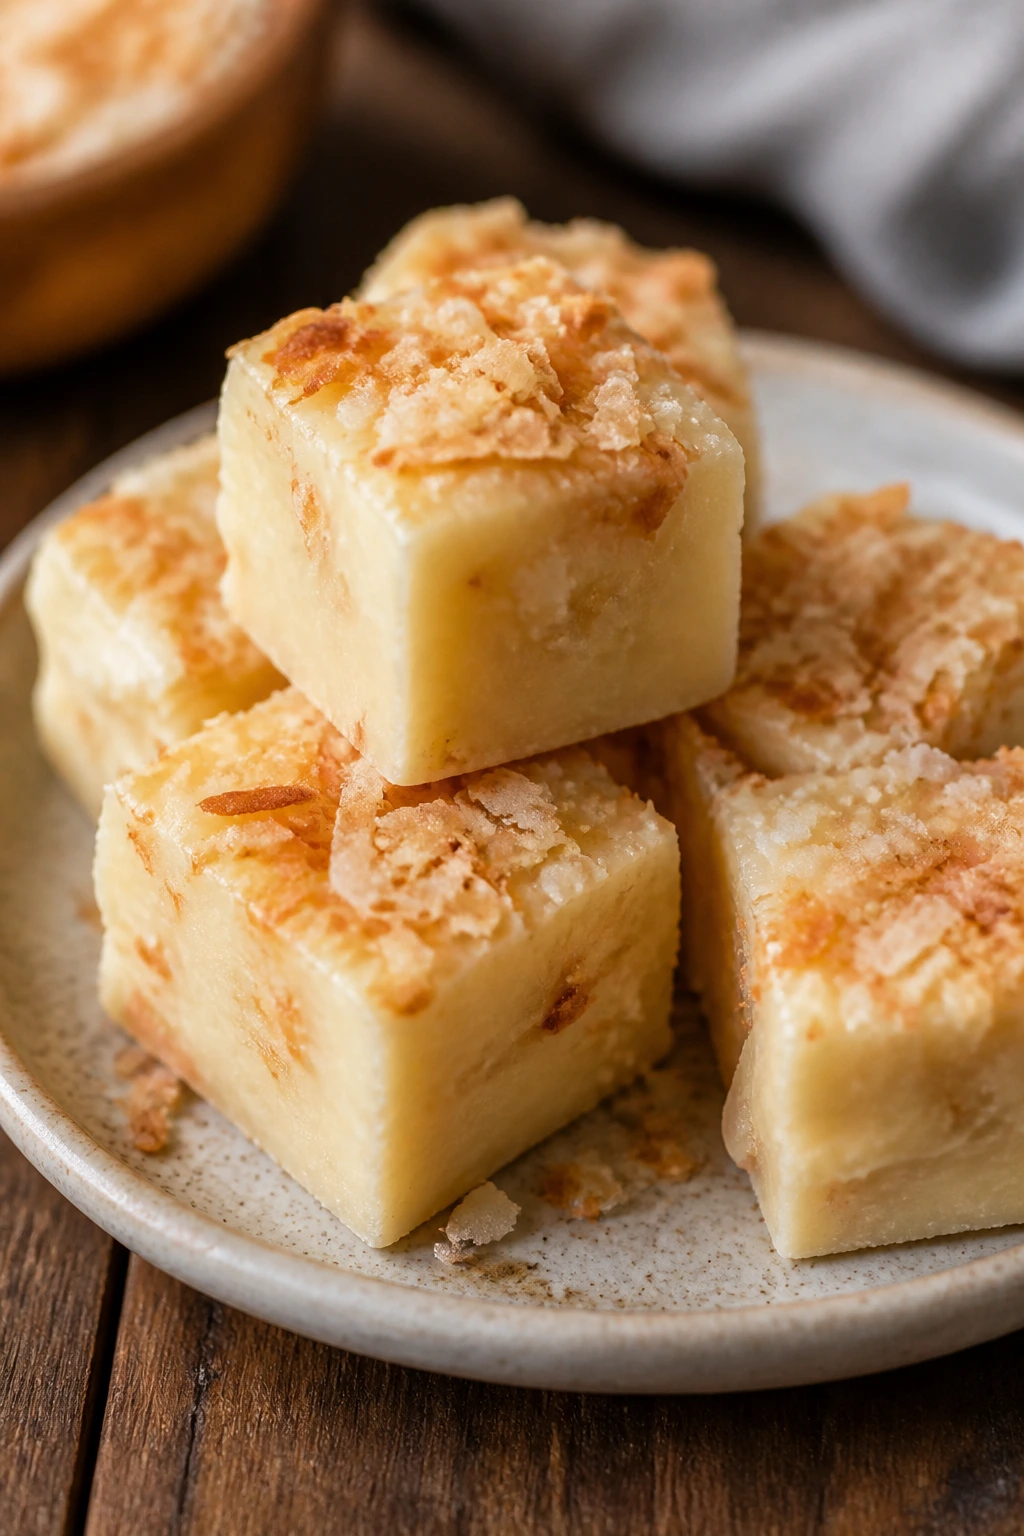
5. Toasted Coconut Fudge
This fudge looks like something that came from a candy shop, but the method is straightforward. White chocolate and condensed milk make a smooth base, and toasted coconut gives each square a warm, nutty snap.
Why It Works: White chocolate melts into the sweetened condensed milk without needing a candy thermometer. Toasted coconut adds a second texture, so the squares don’t feel soft from edge to edge. A pinch of salt keeps the whole thing from reading one-note.
Key Ingredients:
- 2 cups white chocolate chips — the main body of the fudge.
- 1 (14-ounce) can sweetened condensed milk — gives the fudge its creamy set.
- 1 1/2 cups sweetened shredded coconut, toasted — use half in the fudge and half on top.
- 1 teaspoon vanilla extract — makes the sweetness taste rounder.
- 1/4 teaspoon fine salt — sharpens the flavor.
- 1/2 cup chopped macadamia nuts, optional — good if you want crunch.
Quick Steps:
- Line an 8×8-inch pan with parchment, leaving overhang on two sides.
- Warm the white chocolate chips and condensed milk in a saucepan over low heat, stirring constantly until smooth.
- Remove the pan from the heat and stir in the vanilla, salt, and 1 cup of the toasted coconut.
- Scrape the mixture into the prepared pan and smooth the top.
- Sprinkle the remaining coconut over the surface and chill for at least 2 hours before cutting.
Equipment for This Recipe:
- 8×8-inch baking pan
- Parchment paper
- Saucepan
- Heatproof spatula
How to Serve This Dish: Cut it into small squares; the sweetness lands better that way. It’s good with espresso or a cold glass of milk.
Pro Tips for This Recipe:
- Keep the heat low. White chocolate seizes fast if you rush it.
- Toast the coconut in a dry skillet for 3 to 4 minutes and stir often.
- Press the top coconut lightly into the fudge so it does not fall off when sliced.
Variations on This Dish:
- Dark Chocolate Drift: Swap half the white chocolate for semisweet chips.
- Macadamia Crunch: Add the nuts for a more buttery bite.
- Lime-Salt Finish: Add 1 teaspoon lime zest and a pinch of flaky salt on top.
Common Mistakes to Avoid with This Dish:
- Don’t boil the mixture. It can turn grainy.
- Don’t cut it early. Warm fudge smears and sticks to the knife.
- Don’t use overly wet coconut. Freshly toasted, dry flakes give the best texture.
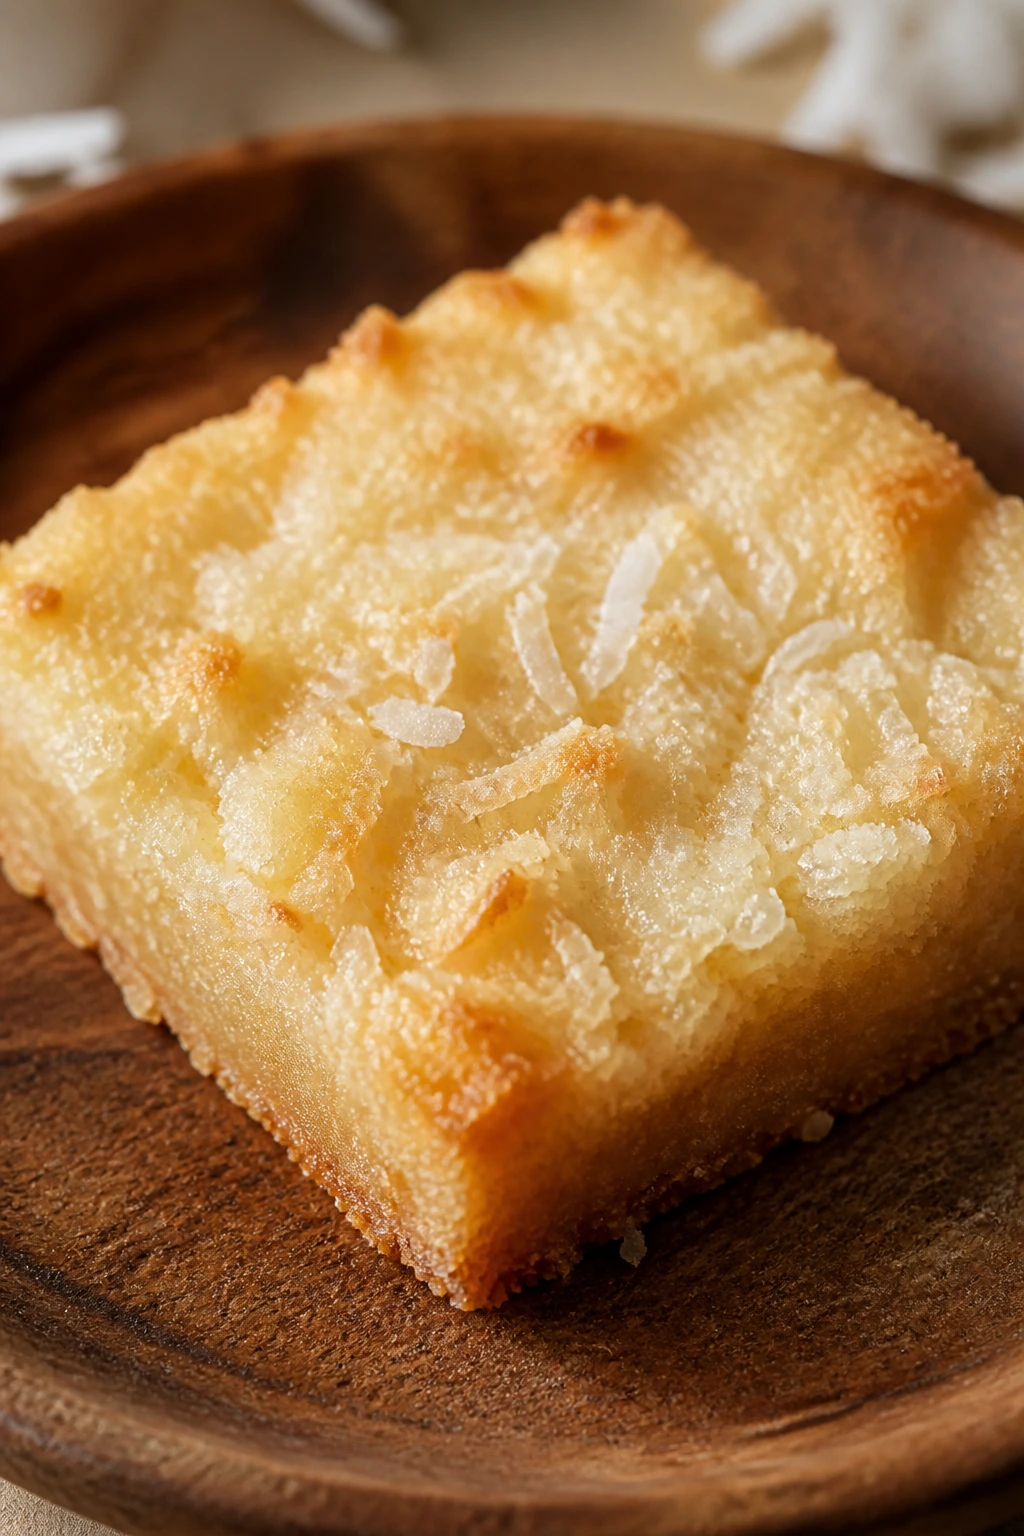
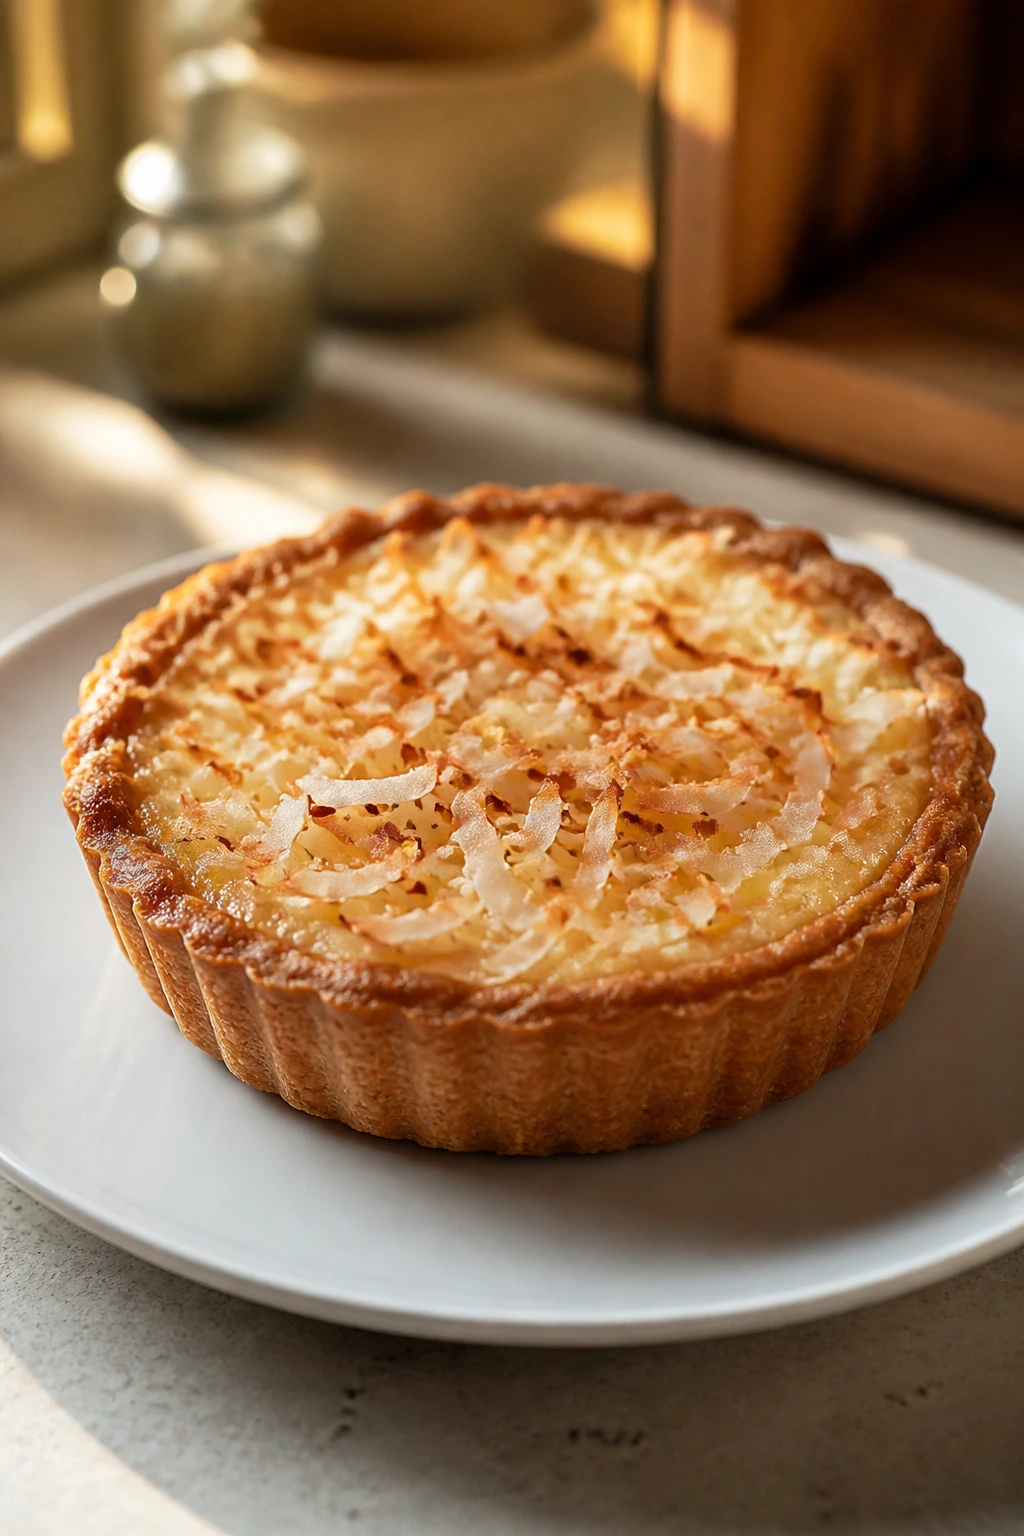
6. Coconut Lime Bars
These bars land somewhere between tart and creamy, which is the sweet spot for coconut desserts that need a little bite. The crust stays sandy and buttery, and the lime filling sets up just firm enough to cut into neat squares.
Why It Works: Lime juice cuts through the richness of coconut milk and sweetened condensed milk, so the bars stay bright rather than heavy. The crumb crust gives the base a little bite, and the coconut in the filling keeps each square from feeling flat.
Key Ingredients:
- 1 1/2 cups graham cracker crumbs — makes a fast crust.
- 1/2 cup sweetened shredded coconut — folded into the crust.
- 1/4 cup granulated sugar — sweetens the base.
- 6 tablespoons melted butter — binds the crust.
- 1 (14-ounce) can sweetened condensed milk — sweet, creamy filling.
- 1/2 cup fresh lime juice — do not use bottled if you can help it.
- 2 teaspoons finely grated lime zest — gives the bars a sharp citrus note.
- 2 large eggs — help the filling set.
Quick Steps:
- Heat the oven to 350°F and line an 8×8-inch pan with parchment.
- Mix the crumbs, coconut, sugar, and butter, then press firmly into the pan.
- Bake the crust for 8 minutes, just until it smells toasty.
- Whisk the condensed milk, lime juice, lime zest, and eggs until smooth, then pour over the crust.
- Bake for 18 to 22 minutes, until the center looks set with a slight wobble. Cool completely, then chill for 1 hour before slicing.
Equipment for This Recipe:
- 8×8-inch baking pan
- Parchment paper
- Mixing bowl
- Whisk
How to Serve This Dish: Dust the tops with a little powdered sugar and extra lime zest. A small plate of these bars next to strawberries looks tidy and bright.
Pro Tips for This Recipe:
- Zest the limes before juicing them. It’s annoying to do in the wrong order.
- Chill before cutting. A warm bar turns into a soft square with no edges.
- Use fresh limes for the best flavor; the filling depends on that sharpness.
Variations on This Dish:
- Key Lime Direction: Swap regular lime juice for key lime juice if you like a sharper edge.
- Coconut Custard Top: Add 2 tablespoons coconut milk to the filling for a softer set.
- Berry Scatter: Serve with raspberries on top for color and acidity.
Common Mistakes to Avoid with This Dish:
- Don’t overbake the filling. It firms as it cools.
- Don’t skip the parchment sling. These bars are easier to lift and slice that way.
- Don’t use stale graham crumbs. The crust will taste dusty.
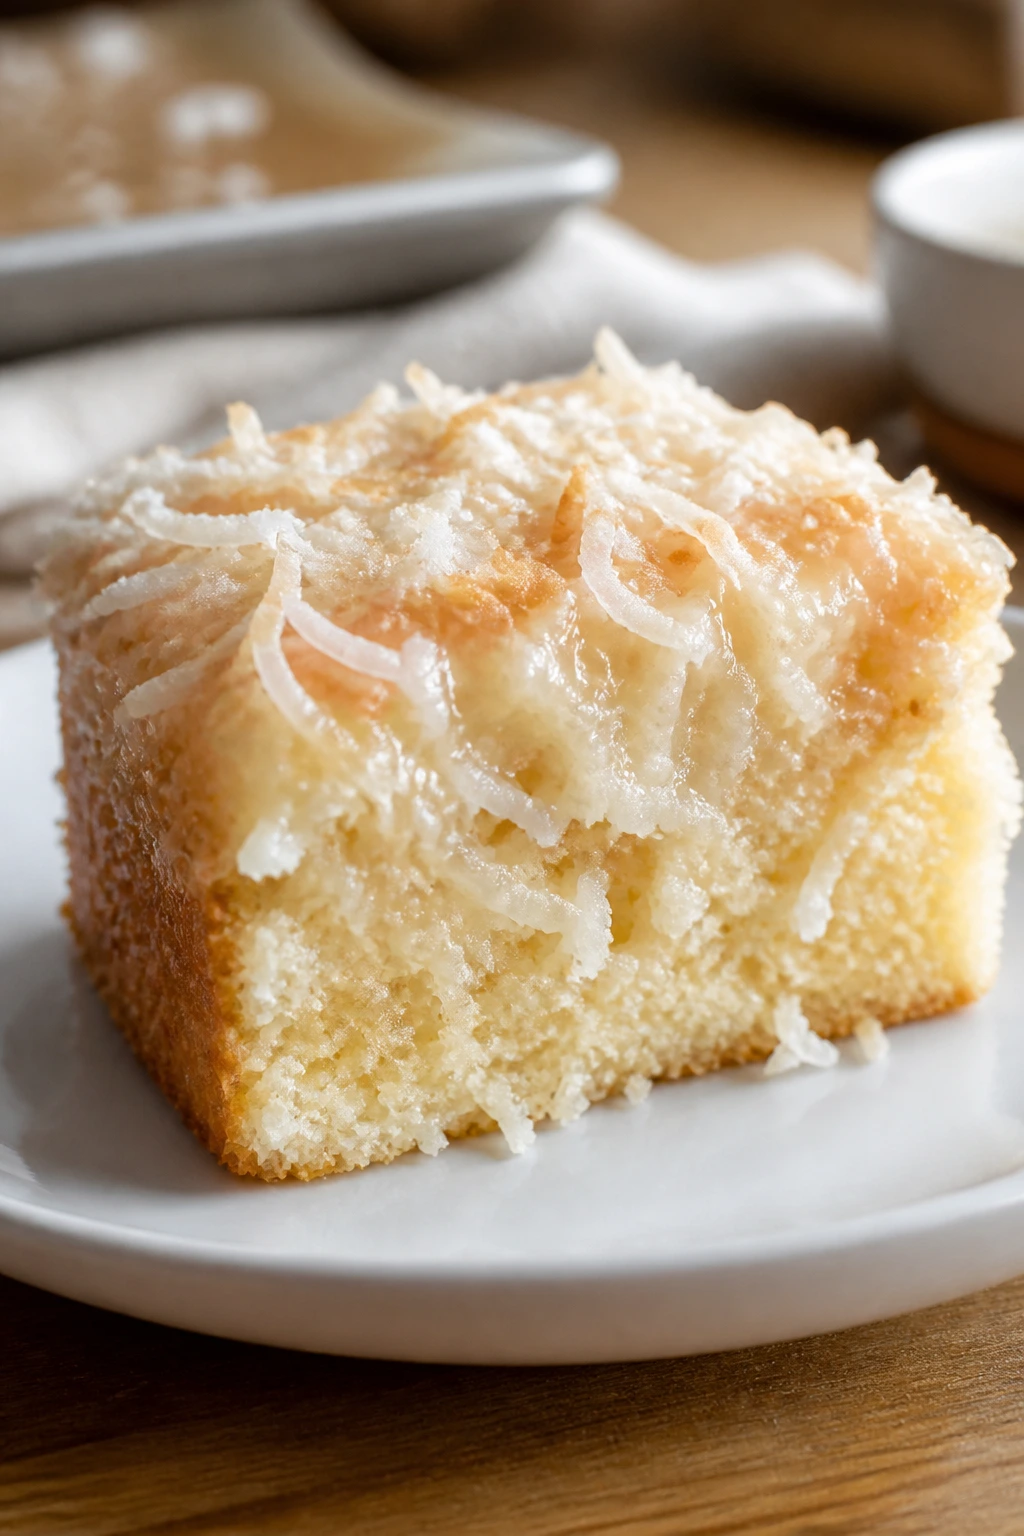
7. One-Bowl Coconut Sheet Cake
This is the kind of cake you make when you want dessert to look generous without making your evening messy. The crumb is soft, the coconut flavor is clear but not loud, and the glaze soaks into the top just enough to keep every slice moist.
Why It Works: Coconut milk brings more body than regular milk, and melted butter keeps the cake tender without a mixer. Baking it in a 9×13 pan means the batter cooks evenly and the glaze lands on a flat surface, which makes the whole thing easy to portion.
Key Ingredients:
- 2 cups all-purpose flour — gives the cake its structure.
- 1 1/2 cups granulated sugar — keeps the crumb soft.
- 2 teaspoons baking powder — helps it rise.
- 1/2 teaspoon fine salt — balances the sweetness.
- 2 large eggs — hold the batter together.
- 1 cup full-fat coconut milk — adds richness.
- 1/2 cup melted butter — keeps the crumb tender.
- 1 teaspoon vanilla extract — rounds out the flavor.
- 1 teaspoon coconut extract — optional, but useful.
- 1 cup sweetened shredded coconut — folded into the batter.
Quick Steps:
- Heat the oven to 350°F and grease a 9×13-inch pan.
- Whisk the flour, sugar, baking powder, and salt in a large bowl.
- Add the eggs, coconut milk, melted butter, vanilla, and coconut extract, then stir until smooth.
- Fold in the shredded coconut and spread the batter in the pan.
- Bake for 28 to 32 minutes, until the center springs back and a toothpick comes out clean. Whisk together powdered sugar and 2 to 3 tablespoons coconut milk for the glaze, then drizzle over the warm cake.
Equipment for This Recipe:
- 9×13-inch baking pan
- Large mixing bowl
- Whisk
- Offset spatula or spoon
How to Serve This Dish: Slice it into tidy rectangles and serve with berries or a spoonful of whipped cream. The glaze firms into a thin shell after 20 minutes.
Pro Tips for This Recipe:
- Stir only until the flour disappears. Overmixing tightens the crumb.
- Let the cake cool for 10 minutes before glazing so the top absorbs some of the sugar.
- If your coconut extract is strong, use half the amount and taste the batter.
Variations on This Dish:
- Lemon-Coconut Cake: Add 1 tablespoon lemon zest to the batter.
- Chocolate Coconut Sheet Cake: Dust the top with shaved chocolate after glazing.
- Toasted Coconut Finish: Sprinkle toasted coconut on the glaze while it is still tacky.
Common Mistakes to Avoid with This Dish:
- Don’t forget to grease the corners of the pan. That’s where cake likes to stick.
- Don’t glaze a scorching-hot cake. The sugar runs off.
- Don’t use low-fat coconut milk; the crumb comes out thinner and drier.
8. Pineapple Coconut Dump Cake
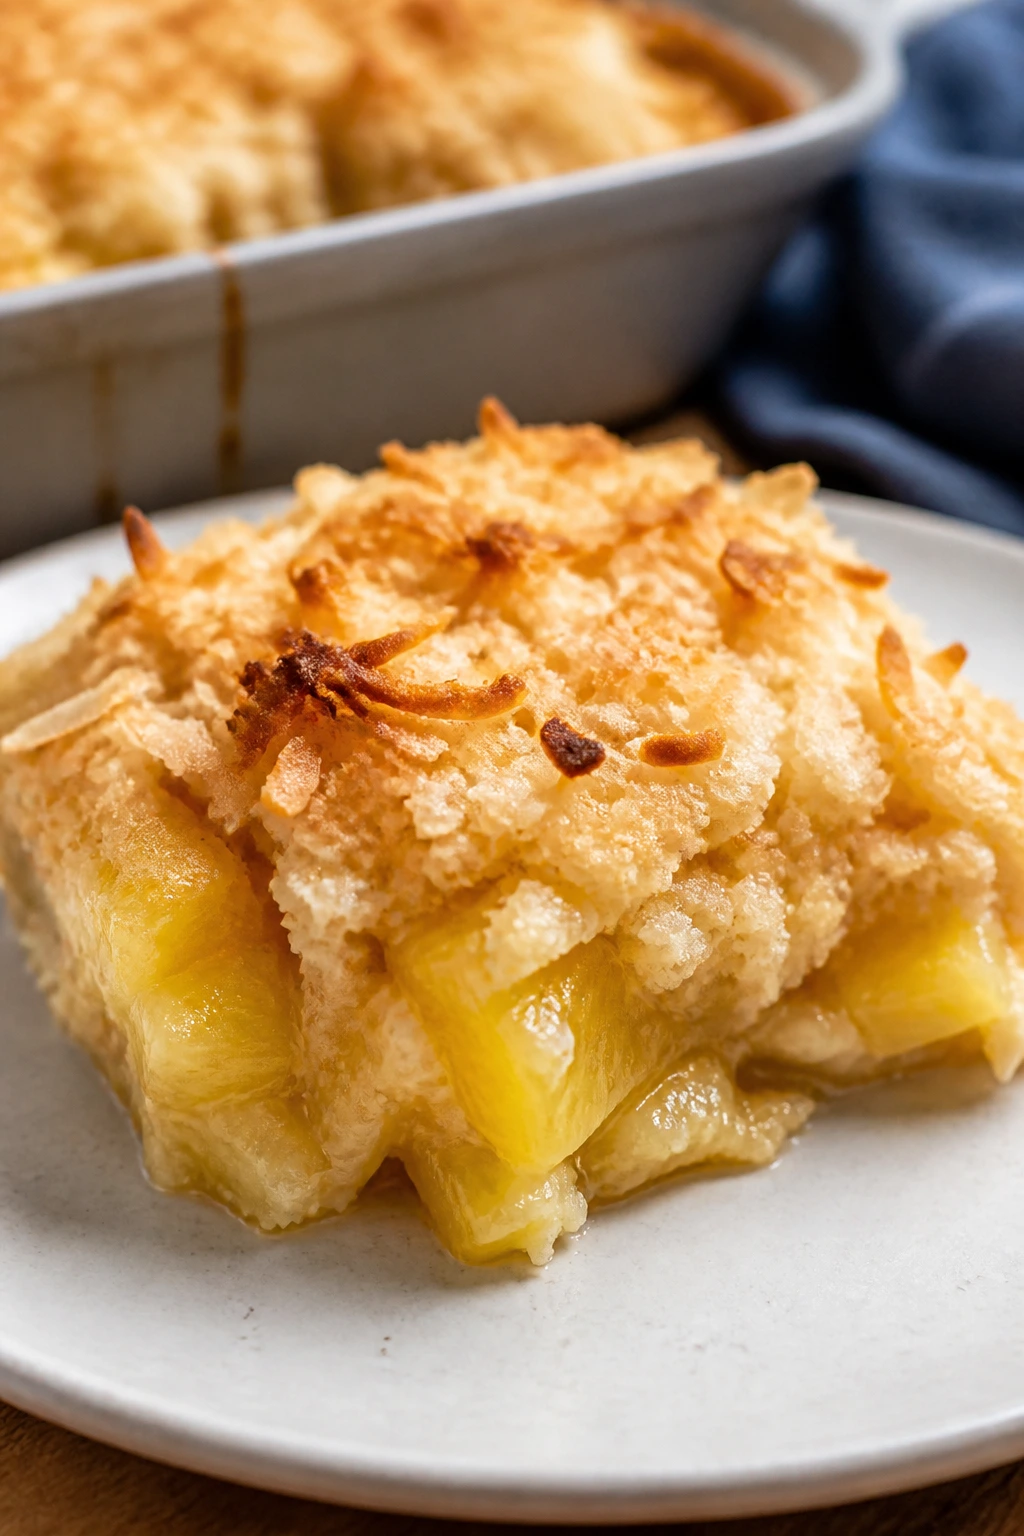
This one is all about layers you don’t have to fuss over. Pineapple sinks into the bottom, cake mix turns golden on top, and the coconut browns into little crisp spots that taste better than they have any right to.
Why It Works: The fruit juices steam the cake from below, while the butter on top melts through the dry mix and creates a cobbler-like crust. Coconut adds texture and a toasty finish, so the dessert feels more deliberate than the name suggests.
Key Ingredients:
- 1 (20-ounce) can crushed pineapple with juice — the juicy base.
- 1/2 cup canned coconut cream — adds body and richness.
- 1 box yellow cake mix, about 15 ounces — the fast topping.
- 1 1/2 cups sweetened shredded coconut — scattered over the cake mix.
- 1/2 cup unsalted butter, melted — helps the dry mix bake into a crust.
- 1/2 cup chopped pecans, optional — adds crunch.
- Pinch of fine salt — keeps the sweetness from turning flat.
Quick Steps:
- Heat the oven to 350°F and grease a 9×13-inch baking dish.
- Spread the crushed pineapple and coconut cream across the bottom of the dish.
- Sprinkle the dry cake mix evenly over the fruit without stirring.
- Scatter the shredded coconut and pecans over the top, then drizzle with melted butter.
- Bake for 38 to 45 minutes, until the top is golden and the edges bubble. Rest for 10 minutes before scooping.
Equipment for This Recipe:
- 9×13-inch baking dish
- Wooden spoon
- Measuring cups
- Serving spoon
How to Serve This Dish: Spoon it warm into bowls and add vanilla ice cream if you want the contrast. A little extra toasted coconut on top gives the bowl some crunch.
Pro Tips for This Recipe:
- Spread the butter as evenly as possible or you’ll get dry patches.
- Don’t stir the layers. The “dump” part matters for the texture.
- If the top browns too fast, tent loosely with foil for the last 10 minutes.
Variations on This Dish:
- Mango-Pineapple Mix: Swap half the pineapple for diced mango.
- Pecan-Free Version: Skip the nuts and add 2 tablespoons extra coconut instead.
- Spiced Angle: Add 1/2 teaspoon ground ginger to the pineapple layer.
Common Mistakes to Avoid with This Dish:
- Don’t use pineapple packed in syrup unless you want it very sweet.
- Don’t under-bake it. Dry cake mix in the middle feels rough and chalky.
- Don’t serve it right away. A short rest helps the juices settle.
9. Coconut Banana Bread Pudding
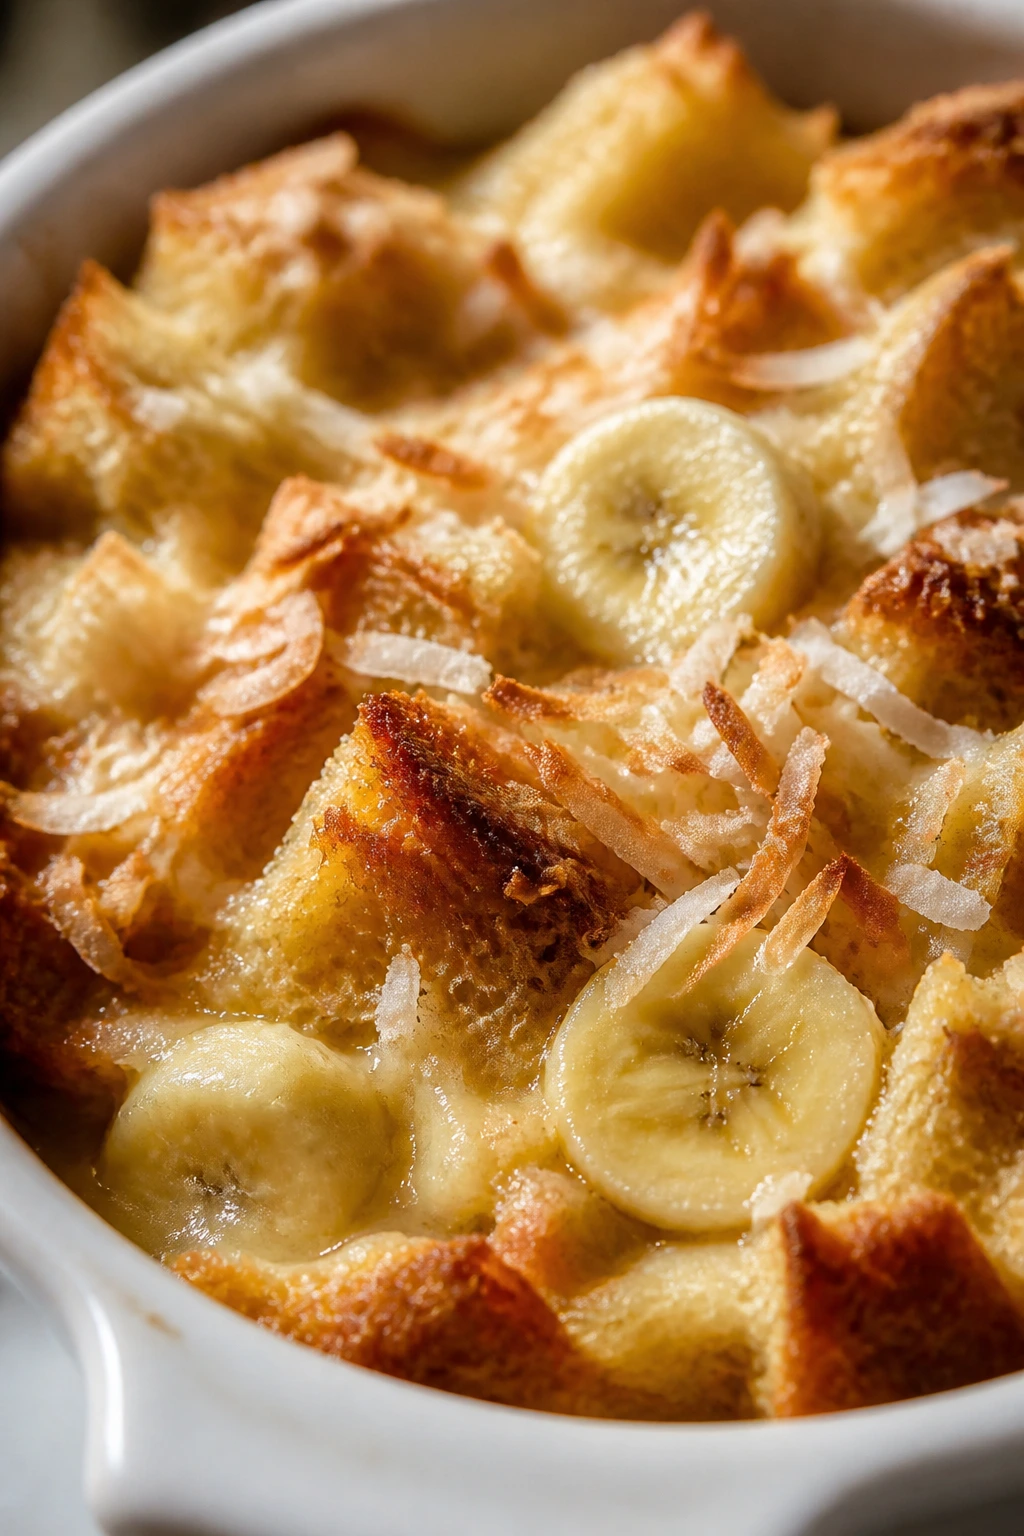
Banana bread pudding is already soft and comforting; coconut makes it richer and a little more fragrant. The bananas melt into the custard, the bread edges turn gold, and the coconut keeps the whole pan from tasting too familiar.
Why It Works: Stale bread drinks up the coconut-milk custard without collapsing. Bananas add natural sweetness and a thick texture, and the coconut shreds create little chewy streaks that keep every bite a bit different.
Key Ingredients:
- 6 cups cubed brioche or sandwich bread — day-old is best.
- 3 ripe bananas, sliced — the softer, the better.
- 4 large eggs — help the custard set.
- 1 (13.5-ounce) can full-fat coconut milk — the rich base.
- 1 cup whole milk — loosens the custard.
- 1/2 cup granulated sugar — keeps it dessert-level sweet.
- 1 teaspoon vanilla extract — for balance.
- 1 teaspoon cinnamon — works well with banana.
- 1 1/2 cups sweetened shredded coconut — folded through the pan.
- 2 tablespoons melted butter — for the dish.
Quick Steps:
- Heat the oven to 350°F and butter an 8×8-inch baking dish.
- Scatter the bread cubes and banana slices into the dish, then sprinkle the coconut over them.
- Whisk the eggs, coconut milk, whole milk, sugar, vanilla, and cinnamon until smooth.
- Pour the custard over the bread and press down lightly so the cubes soak up the liquid.
- Bake for 35 to 40 minutes, until the center is set and the top is browned in spots. Rest for 10 minutes before serving.
Equipment for This Recipe:
- 8×8-inch baking dish
- Mixing bowl
- Whisk
- Measuring cups
How to Serve This Dish: Serve it warm with whipped cream or plain yogurt. A few toasted coconut flakes on top make the surface look finished without adding another sauce.
Pro Tips for This Recipe:
- If your bread is very fresh, toast the cubes in a 300°F oven for 8 minutes first.
- Press a few banana slices into the top before baking if you want a prettier finish.
- Let it sit after baking. The custard firms as it cools.
Variations on This Dish:
- Chocolate Chip Route: Add 1/2 cup mini chocolate chips between the bread layers.
- Rum-Extract Note: Add 1/2 teaspoon rum extract for a bakery-style smell.
- Berry Swap: Fold in 1 cup blueberries for a brighter pan.
Common Mistakes to Avoid with This Dish:
- Don’t use super-soft sandwich bread that turns to paste.
- Don’t drown the pan in custard. The bread should be soaked, not swimming.
- Don’t cut immediately. The slices fall apart before the custard sets.
10. Coconut Oatmeal Cookies
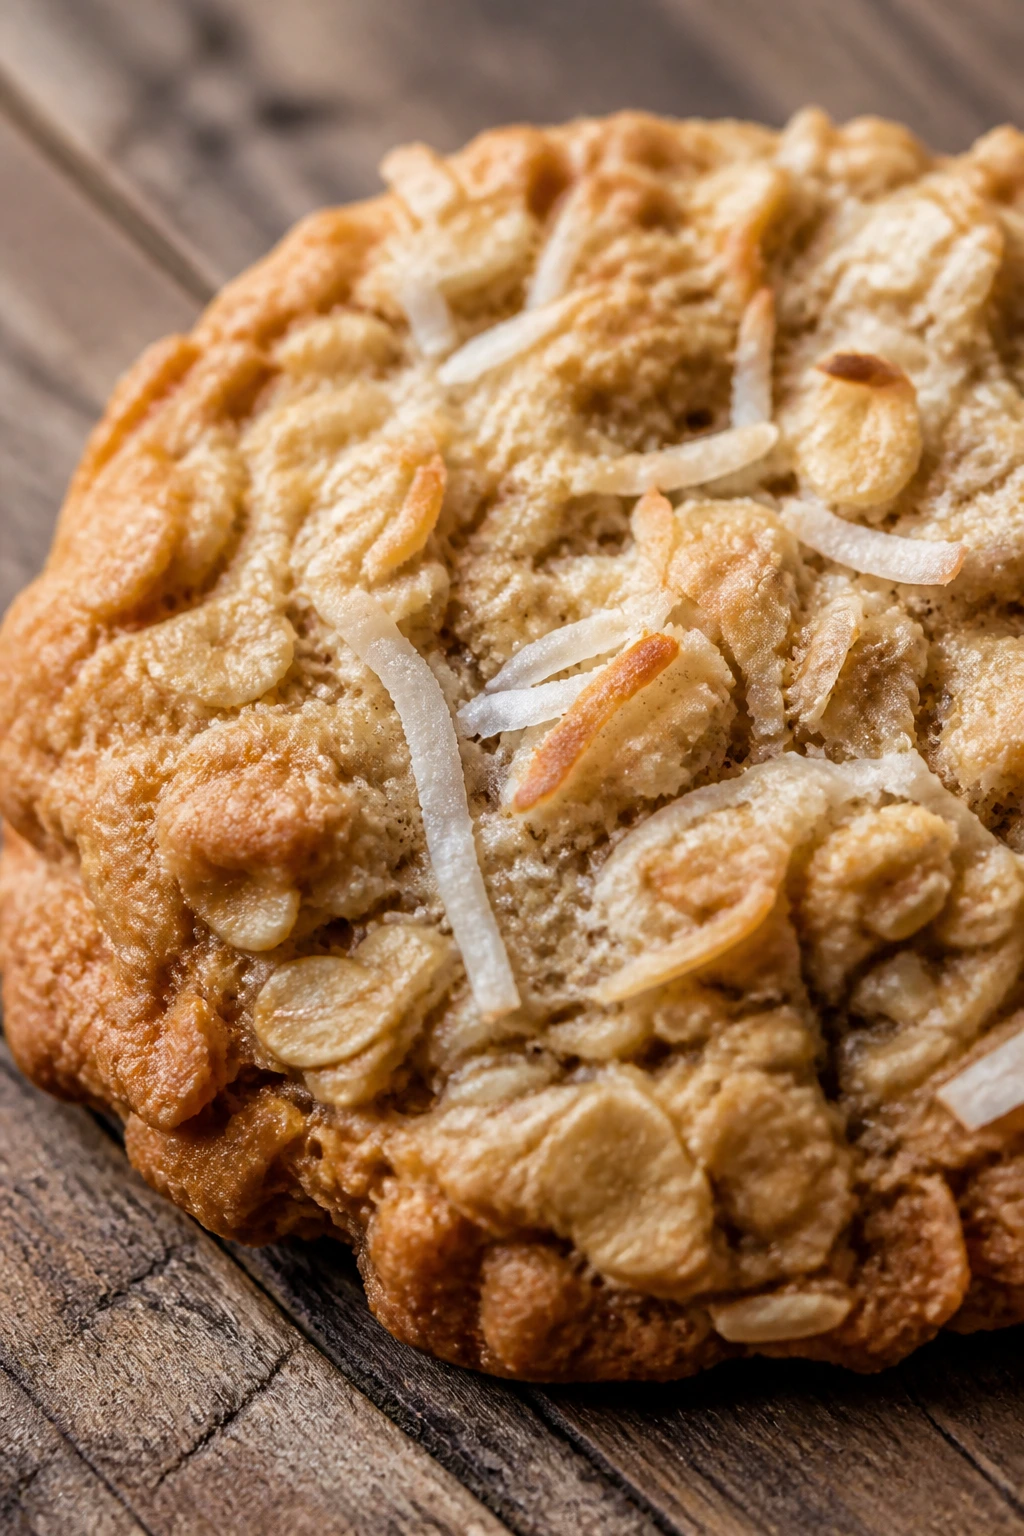
These cookies taste like a smarter version of a grocery-store oatmeal cookie. Coconut makes the edges a little crisper and the centers more chewy, and chocolate chips or raisins can come along if you want them.
Why It Works: Oats bring chew, brown sugar keeps the centers soft, and coconut adds both texture and aroma. A short bake at 350°F gives you bronzed edges without drying the cookies into little discs.
Key Ingredients:
- 1/2 cup unsalted butter, softened — creamed for lift.
- 1/2 cup packed light brown sugar — for chew.
- 1/4 cup granulated sugar — for a little crispness.
- 1 large egg — binds the dough.
- 1 teaspoon vanilla extract — rounds it out.
- 3/4 cup all-purpose flour — gives the cookies shape.
- 1/2 teaspoon baking soda — for spread.
- 1/2 teaspoon fine salt — sharpens the flavor.
- 1 1/2 cups old-fashioned oats — the main texture.
- 1 cup sweetened shredded coconut — the coconut body.
- 1/2 cup chocolate chips or raisins, optional — pick one.
Quick Steps:
- Heat the oven to 350°F and line two baking sheets with parchment.
- Cream the butter and sugars until smooth, then beat in the egg and vanilla.
- Stir in the flour, baking soda, and salt, then fold in the oats, coconut, and chocolate chips if using.
- Scoop tablespoon-sized mounds onto the sheets and flatten them slightly.
- Bake for 10 to 12 minutes, until the edges are set and the centers still look a touch soft. Cool on the pan for 5 minutes before moving.
Equipment for This Recipe:
- Mixing bowl
- Hand mixer or sturdy spoon
- Baking sheets
- Parchment paper
How to Serve This Dish: These go well with milk, coffee, or tucked beside vanilla ice cream. They also work nicely broken over yogurt if you want a fast dessert bowl.
Pro Tips for This Recipe:
- Chill the dough for 15 minutes if your kitchen is warm.
- Scoop with a small cookie scoop so the cookies bake at the same rate.
- Pull them when the centers still look pale; they finish setting on the pan.
Variations on This Dish:
- Raisin Oat Style: Use raisins and a pinch of cinnamon.
- Chocolate Chunk Version: Swap chips for chopped semisweet chocolate.
- Macadamia Upgrade: Add 1/3 cup chopped macadamias for crunch.
Common Mistakes to Avoid with This Dish:
- Don’t overbake them. Coconut cookies go dry fast.
- Don’t use quick oats if you want a hearty chew.
- Don’t skip the parchment; the sugar can stick to bare pans.
11. Coconut Tapioca Pudding
Tapioca pudding is one of those desserts people either forget about or remember with an odd amount of affection. Coconut gives it a deeper, creamier flavor, and the little pearls turn glossy and tender instead of gummy if you let them cook slowly.
Why It Works: Small pearl tapioca softens as it simmers and releases starch into the coconut milk. The milk mixture thickens on its own, so you get a pudding with a clean spoonable texture rather than a flour-thickened one.
Key Ingredients:
- 1/2 cup small pearl tapioca — do not grab instant tapioca by mistake.
- 2 cups whole milk — helps the pearls cook through.
- 1 (13.5-ounce) can full-fat coconut milk — gives richness.
- 1/3 cup granulated sugar — a gentle sweetness.
- 1/4 teaspoon fine salt — keeps the flavor grounded.
- 1 teaspoon vanilla extract — added at the end.
- Toasted coconut, for topping — optional but worth it.
Quick Steps:
- Soak the tapioca in 1 cup of the milk for 20 minutes.
- Combine the soaked tapioca, remaining milk, coconut milk, sugar, and salt in a saucepan.
- Cook over medium-low heat for 18 to 22 minutes, stirring often, until the pearls turn translucent and the pudding thickens.
- Stir in the vanilla and let the pudding stand for 5 minutes.
- Spoon into cups and chill or serve warm with toasted coconut on top.
Equipment for This Recipe:
- Medium saucepan
- Wooden spoon
- Measuring cups
- Serving bowls or glasses
How to Serve This Dish: Serve it warm when you want comfort, or cold when you want something more refreshing. A spoonful of mango on top fits the texture well.
Pro Tips for This Recipe:
- Stir often, especially near the bottom of the pan, where tapioca likes to stick.
- If the pudding thickens too much after chilling, loosen it with 2 tablespoons of milk.
- Don’t rush the soak. The pearls need time to hydrate before cooking.
Variations on This Dish:
- Cinnamon Cloud: Add 1/2 teaspoon cinnamon to the pot.
- Citrus Finish: Stir in 1 teaspoon lime zest before chilling.
- Brown Sugar Batch: Use light brown sugar for a deeper caramel note.
Common Mistakes to Avoid with This Dish:
- Don’t boil it hard or the milk can scorch.
- Don’t stop cooking early; the pearls should be clear at the center.
- Don’t confuse small pearl tapioca with instant. They behave very differently.
12. Fudgy Coconut Brownies
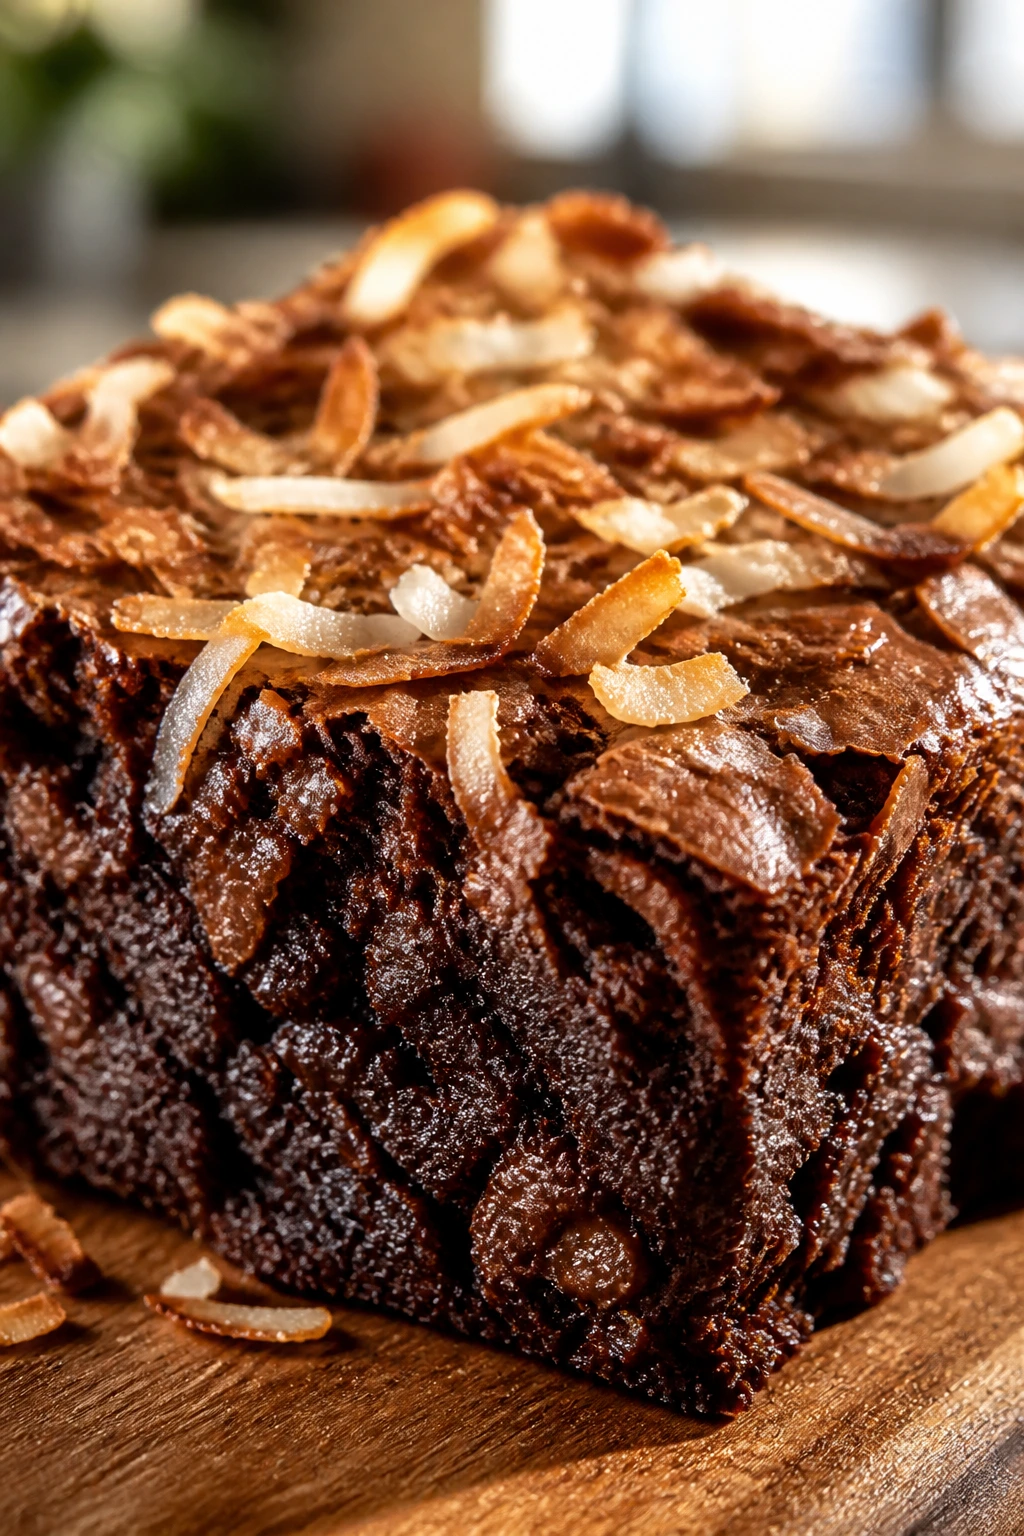
Brownies are already one of the easiest desserts to pull off on a weeknight, and coconut gives them a better texture than the plain version. The flakes soften into the batter, the top crackles, and the coconut on the surface toasts into little bronzed edges.
Why It Works: Cocoa and coconut like each other because the coconut adds chew where brownies can sometimes turn dense. A modest bake keeps the center fudgy, while the extra coconut on top toasts just enough to smell nutty.
Key Ingredients:
- 1/2 cup unsalted butter, melted — for a dense, fudgy crumb.
- 1 cup granulated sugar — keeps the brownies soft.
- 2 large eggs — bind the batter.
- 1 teaspoon vanilla extract — smooths the chocolate.
- 1/2 cup unsweetened cocoa powder — the chocolate base.
- 1/2 cup all-purpose flour — enough to hold the square together.
- 1/4 teaspoon fine salt — deepens the chocolate.
- 1 1/2 cups sweetened shredded coconut — folded in and scattered on top.
- 1/2 cup chocolate chips — optional but welcome.
Quick Steps:
- Heat the oven to 350°F and line an 8×8-inch pan with parchment.
- Whisk the melted butter and sugar, then whisk in the eggs and vanilla until glossy.
- Stir in the cocoa, flour, and salt, then fold in 1 cup of the coconut and the chocolate chips.
- Spread the batter in the pan and sprinkle the remaining coconut over the top.
- Bake for 22 to 28 minutes, until a toothpick comes out with moist crumbs. Cool fully before cutting.
Equipment for This Recipe:
- 8×8-inch baking pan
- Parchment paper
- Mixing bowl
- Whisk and spatula
How to Serve This Dish: These are good plain, but a spoonful of whipped cream and a few berries turn them into a more finished dessert. Cut small; they are rich.
Pro Tips for This Recipe:
- Pull them before the center looks fully done. They finish as they cool.
- Use unsweetened cocoa for a deeper chocolate flavor.
- Chill for cleaner slices if you want neat squares.
Variations on This Dish:
- Walnut-Coconut Edge: Add 1/3 cup chopped walnuts.
- Dark Chocolate Swirl: Drop a few melted chocolate lines over the batter before baking.
- Flaky Salt Finish: Sprinkle salt on top right after baking.
Common Mistakes to Avoid with This Dish:
- Don’t overbake until the center is dry.
- Don’t cut warm brownies unless you want a mess.
- Don’t forget the parchment sling; it saves the corners.
13. Coconut Cream Pie Cups
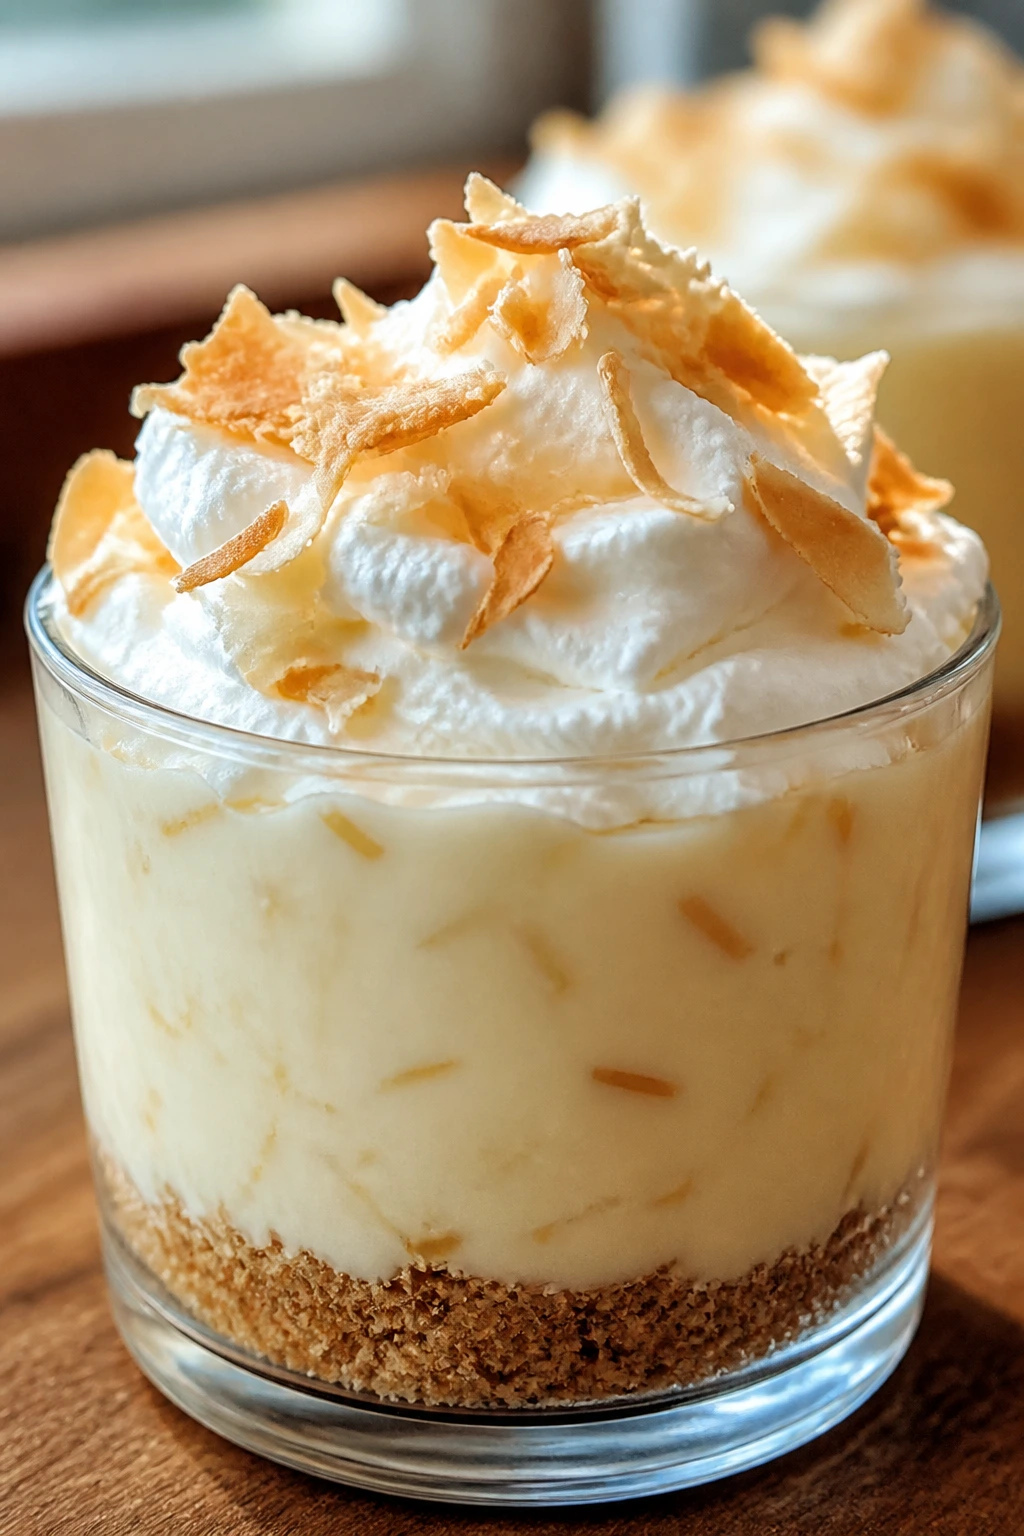
These little cups give you the flavor of coconut cream pie without a full pie shell to wrestle with. The filling is silky, the graham layer stays crisp enough, and toasted coconut on top makes the whole thing look more polished than it is.
Why It Works: Instant pudding keeps the method short, while coconut milk and whipped cream make the filling taste less like a box mix and more like actual pie. Small jars or cups are handy because they chill quickly and serve cleanly.
Key Ingredients:
- 1 1/2 cups graham cracker crumbs — for the base.
- 4 tablespoons melted butter — binds the crumbs.
- 2 tablespoons sugar — sweetens the crust.
- 1 (3.4-ounce) box instant vanilla pudding mix — fast set.
- 1 cup cold whole milk — helps the pudding thicken.
- 1/2 cup full-fat coconut milk — adds coconut flavor.
- 1 cup whipped cream or whipped topping — folds into the filling.
- 3/4 cup sweetened shredded coconut, toasted — for flavor and garnish.
Quick Steps:
- Mix the crumbs, butter, and sugar, then divide among 6 small cups or jars.
- Whisk the pudding mix, milk, and coconut milk for 2 minutes until thick.
- Fold in the whipped cream and 1/2 cup of the toasted coconut.
- Spoon the filling over the crusts and chill for at least 30 minutes.
- Top with the remaining coconut before serving.
Equipment for This Recipe:
- Mixing bowl
- Whisk
- 6 small cups or jars
- Measuring spoons
How to Serve This Dish: Serve them cold with a spoon. A few curls of white chocolate or a thin lime zest garnish make them look finished.
Pro Tips for This Recipe:
- Chill the cups in the fridge while you mix the filling; it helps the crust stay crisp.
- Toast the coconut before folding it in. Raw coconut tastes flatter here.
- Use a piping bag or zip-top bag with the corner snipped if you want tidy layers.
Variations on This Dish:
- Banana Slice Layer: Add a thin banana layer between crust and filling.
- Chocolate Crumb Bottom: Swap graham crumbs for chocolate cookie crumbs.
- Pineapple Top: Add a spoonful of crushed pineapple on top for brightness.
Common Mistakes to Avoid with This Dish:
- Don’t use warm milk. The pudding won’t set properly.
- Don’t overfold the whipped cream or the filling gets loose.
- Don’t add the coconut topping too early; it softens.
14. Strawberry Coconut Chia Parfaits

This is the dessert I reach for when I want something cold, sweet, and a little lighter without drifting into “health food” territory. The chia pudding turns creamy, the strawberries bring juice and acid, and the coconut flakes keep the layers from feeling soft all the way through.
Why It Works: Chia seeds absorb liquid and thicken the coconut milk into a spoonable pudding overnight or after a short chill. Strawberries break up the richness, and a crunchy layer of granola or toasted coconut gives the parfait a better finish.
Key Ingredients:
- 1/2 cup chia seeds — the thickening agent.
- 2 cups full-fat coconut milk — makes the base creamy.
- 2 tablespoons honey or maple syrup — sweetens the pudding.
- 1 teaspoon vanilla extract — smooths the flavor.
- 2 cups sliced strawberries — fresh and juicy.
- 1/2 cup toasted coconut flakes — for texture.
- 1 cup granola or plain yogurt, optional — for layering.
Quick Steps:
- Whisk the coconut milk, honey, and vanilla in a bowl.
- Stir in the chia seeds and let the bowl sit for 5 minutes.
- Stir again so the seeds do not clump, then chill for at least 30 minutes or overnight.
- Layer the chia pudding, strawberries, and granola or yogurt in glasses.
- Finish with toasted coconut and a few extra strawberry slices.
Equipment for This Recipe:
- Mixing bowl
- Whisk
- 4 glasses or jars
- Spoon
How to Serve This Dish: Serve in clear glasses so the layers show. A small spoon and a cold fridge are all it takes.
Pro Tips for This Recipe:
- Stir twice in the first 10 minutes; chia clumps when it sits too still.
- If the pudding gets too thick, add 2 to 3 tablespoons coconut milk.
- Slice the strawberries just before layering so they keep their shine.
Variations on This Dish:
- Mango Layer: Swap strawberries for diced mango.
- Chocolate Chia Cup: Add 1 tablespoon cocoa powder to the coconut milk.
- Yogurt Parfait: Add a spoonful of Greek yogurt between layers for extra tang.
Common Mistakes to Avoid with This Dish:
- Don’t skip the second stir. It makes a huge difference.
- Don’t use too little liquid or the pudding turns pasty.
- Don’t build the parfaits too far ahead if the granola needs to stay crunchy.
15. Coconut Mug Cake
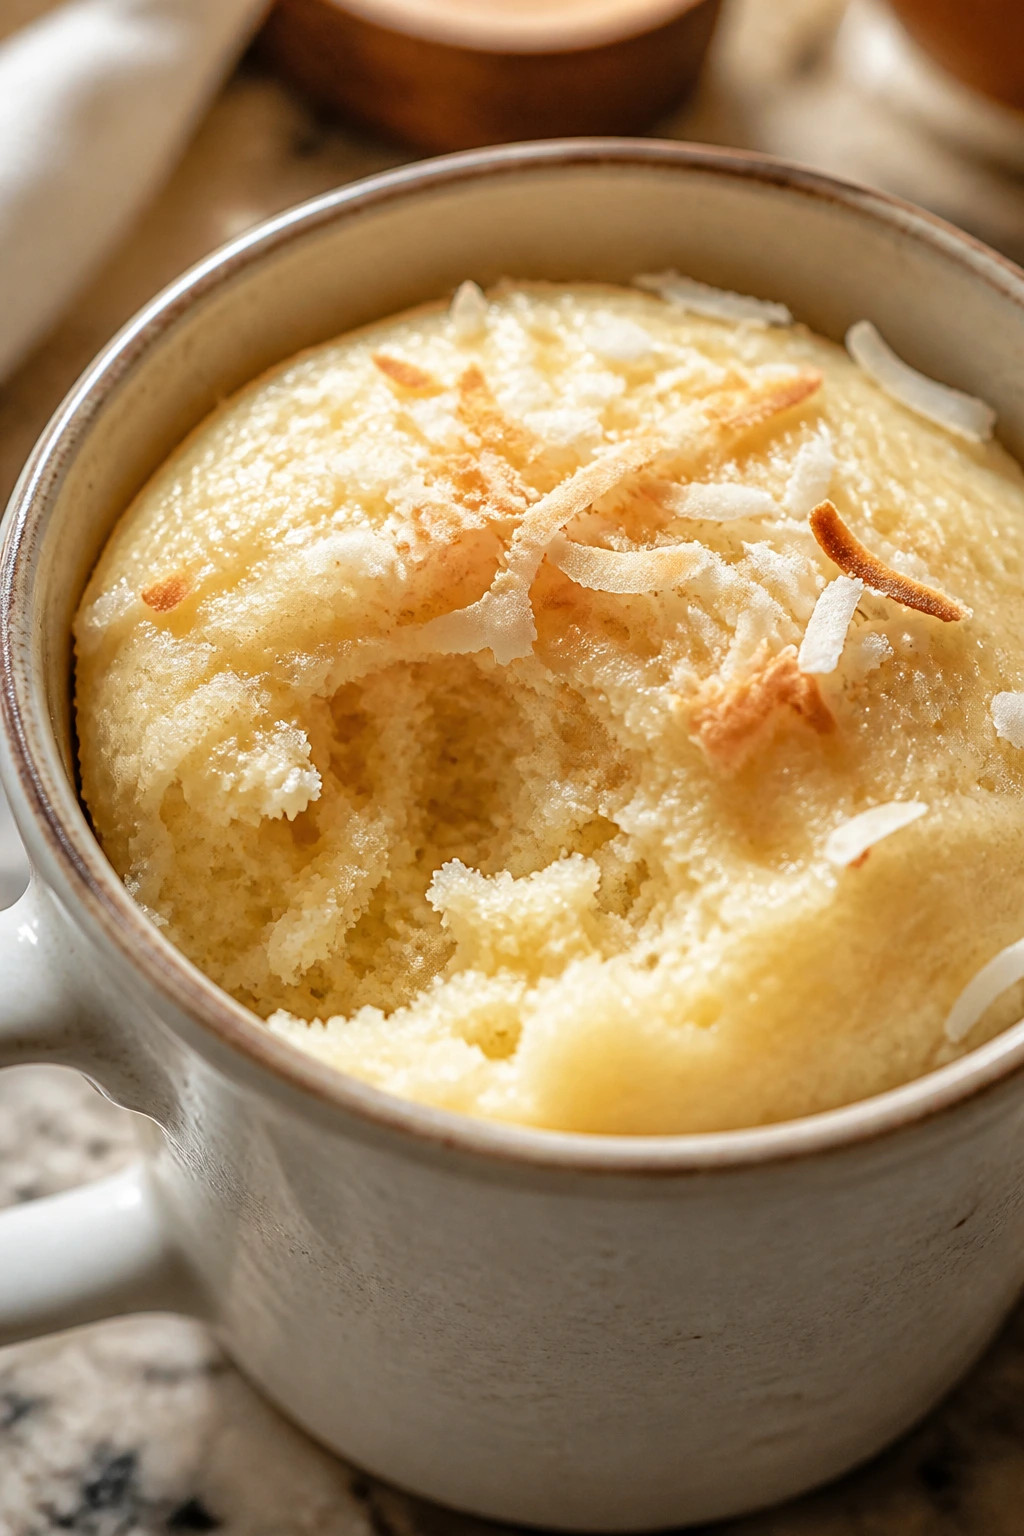
This is the emergency dessert. The batter comes together in the mug you’ll eat from, the microwave does the work, and the coconut makes the cake feel more interesting than a plain chocolate mug cake ever does.
Why It Works: Coconut milk keeps the crumb soft in the microwave, where cakes can turn dry fast. A small amount of shredded coconut gives texture, and a tiny hit of coconut extract makes the flavor come through in a single serving.
Key Ingredients:
- 4 tablespoons all-purpose flour — the base.
- 2 tablespoons granulated sugar — enough for dessert without making it cloying.
- 1/2 teaspoon baking powder — for a bit of lift.
- Pinch of fine salt — sharpens the sweetness.
- 3 tablespoons coconut milk — keeps the crumb moist.
- 1 tablespoon melted butter — helps with tenderness.
- 1/4 teaspoon vanilla extract — for roundness.
- 1/4 teaspoon coconut extract — optional, but useful.
- 2 tablespoons sweetened shredded coconut — for texture.
Quick Steps:
- Grease a 12-ounce mug lightly with butter or spray.
- Stir the flour, sugar, baking powder, and salt in the mug.
- Add the coconut milk, melted butter, vanilla, coconut extract, and shredded coconut, then mix until smooth.
- Microwave for 60 to 75 seconds, until the top looks set and the center is just firm.
- Let it sit for 1 minute before eating.
Equipment for This Recipe:
- 12-ounce microwave-safe mug
- Spoon
- Measuring spoons
- Small microwave-safe bowl, optional
How to Serve This Dish: Top with a spoonful of whipped cream or a scoop of vanilla ice cream if you want a warmer-and-colder contrast. A few toasted flakes on top help it feel less plain.
Pro Tips for This Recipe:
- Use a big mug. Small mugs overflow fast.
- Stop microwaving when the center still looks slightly soft; carryover heat finishes it.
- If the coconut extract is strong, use half the amount.
Variations on This Dish:
- Chocolate Chip Mug Cake: Add 1 tablespoon mini chocolate chips.
- Banana Coconut Mug Cake: Fold in 1 tablespoon mashed banana.
- Lime Zest Twist: Add 1/2 teaspoon lime zest for a brighter finish.
Common Mistakes to Avoid with This Dish:
- Don’t overcook it. The difference between tender and rubbery is about 10 seconds.
- Don’t use a tiny mug.
- Don’t expect a deep cake flavor from a huge amount of batter; this is a quick fix, not a layered dessert.
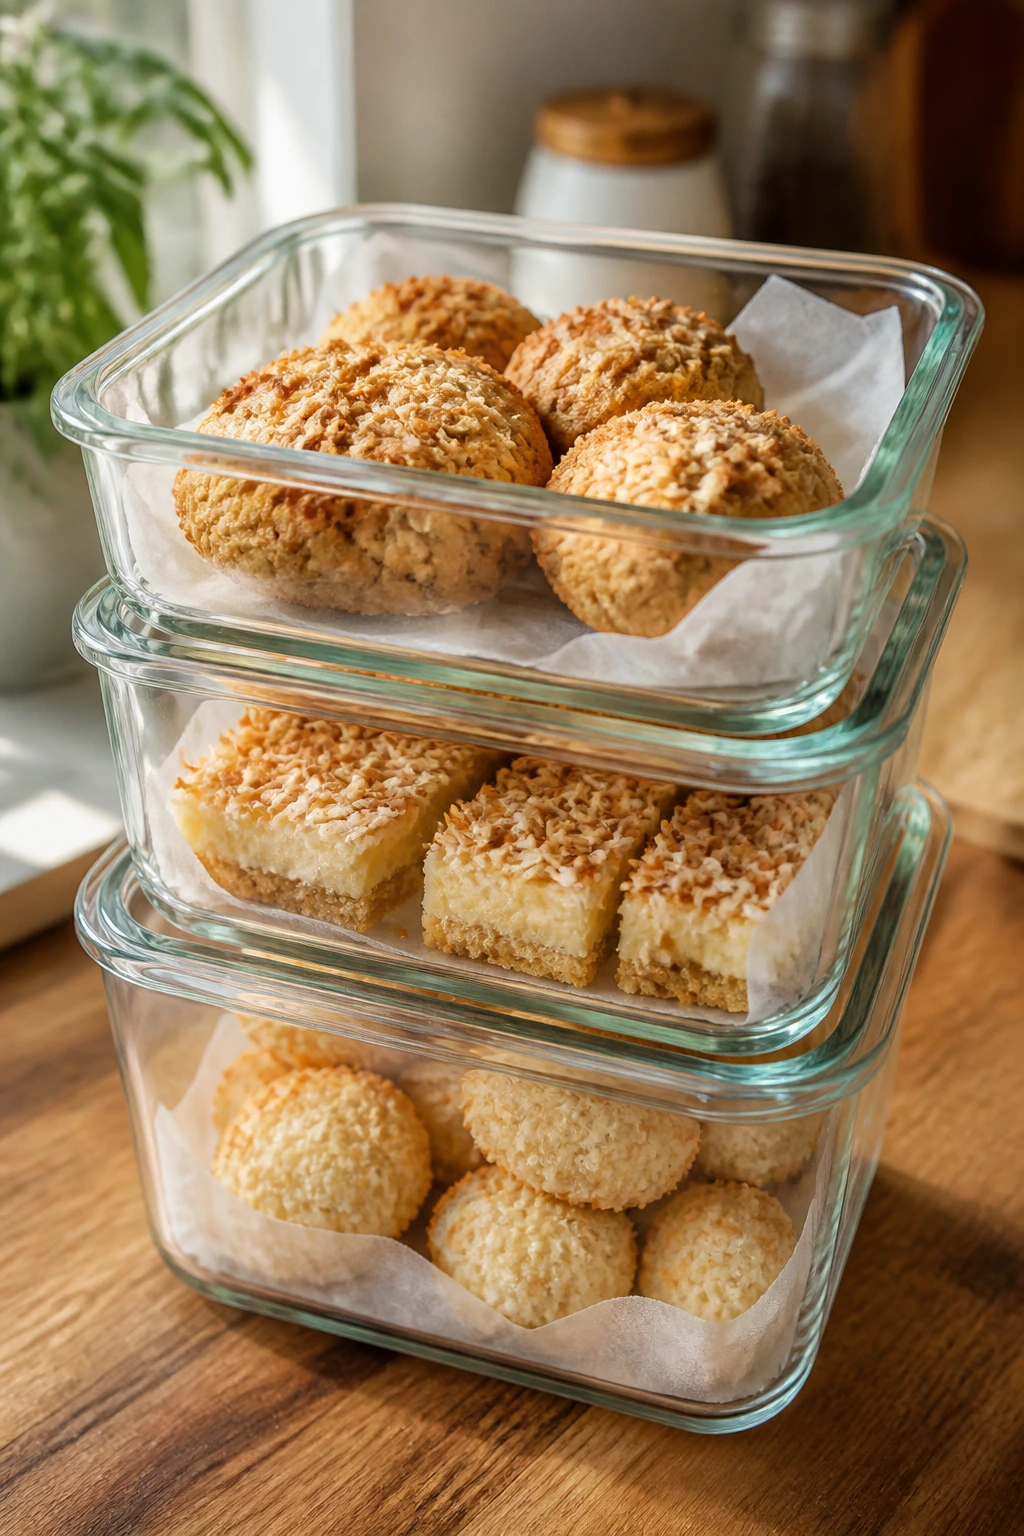
16. Coconut Shortbread Squares
Shortbread already has a good thing going: butter, salt, and a clean snap. Coconut gives it a softer fragrance and a little more texture, which keeps each square from feeling too plain.
Why It Works: Cornstarch makes the shortbread tender, while shredded coconut adds tiny bits of chew. Pressing the dough into one pan means you get a tidy dessert with no shaping or cutting before baking.
Key Ingredients:
- 1 cup unsalted butter, softened — the flavor foundation.
- 1/2 cup powdered sugar — gives the shortbread a fine crumb.
- 1 3/4 cups all-purpose flour — the structure.
- 1/4 cup cornstarch — keeps the texture delicate.
- 1/2 teaspoon fine salt — important here.
- 1 cup sweetened shredded coconut — folded into the dough.
- 1 teaspoon vanilla extract — rounds out the butter.
- 1/2 cup white chocolate drizzle, optional — for finishing.
Quick Steps:
- Heat the oven to 325°F and line an 8×8-inch pan with parchment.
- Beat the butter and powdered sugar until smooth, then mix in the vanilla.
- Stir in the flour, cornstarch, salt, and coconut until the dough comes together.
- Press the dough evenly into the pan and prick the surface with a fork.
- Bake for 24 to 28 minutes, until the edges are pale gold. Cool before cutting into squares.
Equipment for This Recipe:
- 8×8-inch baking pan
- Parchment paper
- Mixing bowl
- Fork
How to Serve This Dish: Cut into small squares and set them beside coffee or tea. A thin drizzle of melted white chocolate makes them feel more finished.
Pro Tips for This Recipe:
- Press the dough firmly so it bakes into a clean slab.
- Don’t brown the whole top; shortbread should stay light.
- Chill the pan for 10 minutes before cutting if you want sharp edges.
Variations on This Dish:
- Lemon Shortbread: Add 1 teaspoon lemon zest to the dough.
- Almond Note: Swap vanilla for 1/2 teaspoon almond extract.
- Dark Chocolate Dip: Dip half of each square in melted dark chocolate.
Common Mistakes to Avoid with This Dish:
- Don’t overmix once the flour goes in.
- Don’t bake until deeply golden or the texture gets hard.
- Don’t cut warm shortbread unless you want crumbs everywhere.
17. Coconut Popsicles with Vanilla Swirl
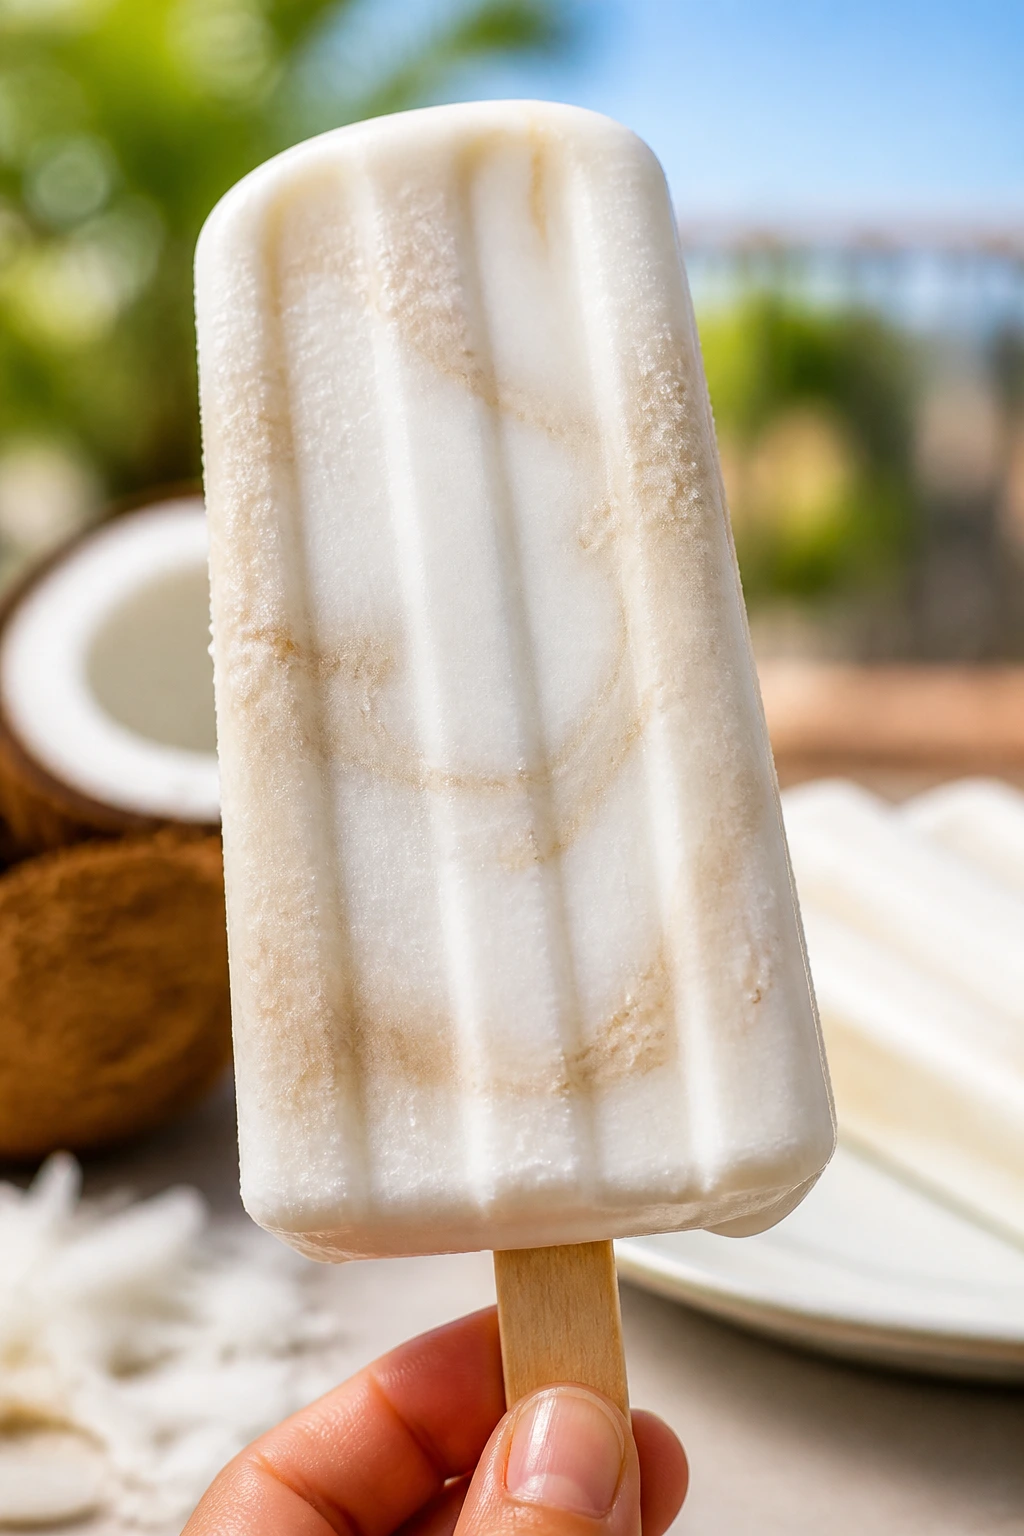
Cold coconut desserts have a way of disappearing faster than the rest. These popsicles are creamy, lightly sweet, and streaked with vanilla yogurt, which gives you a look that feels a little fancy even though the work is minimal.
Why It Works: Coconut milk freezes with a softer texture than plain milk, and a little condensed milk keeps the pops from tasting icy. The vanilla swirl breaks up the monotony, so each bite changes slightly as you chew.
Key Ingredients:
- 2 cups full-fat coconut milk — the main base.
- 1/2 cup sweetened condensed milk — keeps the pops creamy.
- 1 teaspoon vanilla extract — for the swirl and the base.
- 1/4 teaspoon fine salt — sharpens the flavor.
- 1/2 cup vanilla yogurt — swirled in.
- 1/2 cup toasted coconut, optional — for a crunchy coating after unmolding.
Quick Steps:
- Whisk the coconut milk, condensed milk, vanilla, and salt until smooth.
- Spoon the mixture into popsicle molds, filling them about three-quarters full.
- Add a small spoonful of vanilla yogurt to each mold and swirl with a skewer.
- Insert sticks and freeze for at least 4 hours, until solid.
- Run the molds under warm water for a few seconds to release the pops, then roll the edges in toasted coconut if using.
Equipment for This Recipe:
- Popsicle molds
- Skewer or thin knife
- Whisk
- Measuring cups
How to Serve This Dish: Serve them straight from the freezer on a hot day or after a heavy dinner. The toasted coconut coating is optional, but it gives a better first bite.
Pro Tips for This Recipe:
- Don’t over-swirl. Two or three passes are enough.
- If your molds are wide, add the sticks after freezing for 30 minutes so they stay upright.
- Use full-fat coconut milk; light versions freeze icy.
Variations on This Dish:
- Mango Ripple: Swirl in 1/4 cup mango purée.
- Chocolate Shell: Dip the frozen pops in melted chocolate and re-freeze for 5 minutes.
- Berry Swirl: Use raspberry yogurt instead of vanilla for a tart edge.
Common Mistakes to Avoid with This Recipe:
- Don’t skip the salt. Frozen desserts taste flatter without it.
- Don’t fill the molds to the top; the mixture expands.
- Don’t rush the unmolding or the sticks can pull out.
18. Coconut Cheesecake Bites

These bite-size squares hit the cheesecake note without asking for a springform pan or a water bath. The filling is tangy and soft, the coconut coating adds a little fuzz, and the whole batch chills cleanly in the fridge.
Why It Works: Cream cheese gives these bites enough body to slice or roll, and powdered sugar keeps the filling smooth instead of gritty. Coconut on the outside keeps the texture from reading too rich, which is the main problem with little cheesecake snacks.
Key Ingredients:
- 8 ounces cream cheese, softened — the base.
- 1/2 cup powdered sugar — sweetens smoothly.
- 1 teaspoon vanilla extract — for balance.
- 1 teaspoon lemon zest — optional, but it brightens the filling.
- 1 cup graham cracker crumbs — helps form the bites.
- 1 cup sweetened shredded coconut — for coating.
- 2 tablespoons melted butter — helps the crumbs hold together.
Quick Steps:
- Beat the cream cheese, powdered sugar, vanilla, and lemon zest until smooth.
- Stir in the graham crumbs and chill the mixture for 15 minutes.
- Scoop into 1-inch balls or press into a small lined pan for squares.
- Roll each bite in shredded coconut.
- Chill for 30 minutes before serving.
Equipment for This Recipe:
- Mixing bowl
- Hand mixer or sturdy spatula
- Small cookie scoop
- Parchment-lined tray
How to Serve This Dish: Serve cold from the fridge with berries or a thin chocolate drizzle. They also pack well onto a dessert platter because they hold their shape.
Pro Tips for This Recipe:
- Let the cream cheese soften fully or the filling stays lumpy.
- If the mixture is loose, add another tablespoon of graham crumbs.
- Roll the bites when the filling is cold but not frozen.
Variations on This Dish:
- Chocolate Crumb Version: Use chocolate cookie crumbs instead of graham crumbs.
- Lime Cheesecake Bite: Swap lemon zest for lime zest.
- Toasted Coconut Coat: Toast the coconut lightly before rolling.
Common Mistakes to Avoid with This Dish:
- Don’t over-sweeten the filling. Cheesecake needs tang.
- Don’t coat the bites while the filling is warm.
- Don’t skip chilling or the shapes flatten.
19. Berry Coconut Crumble Bars
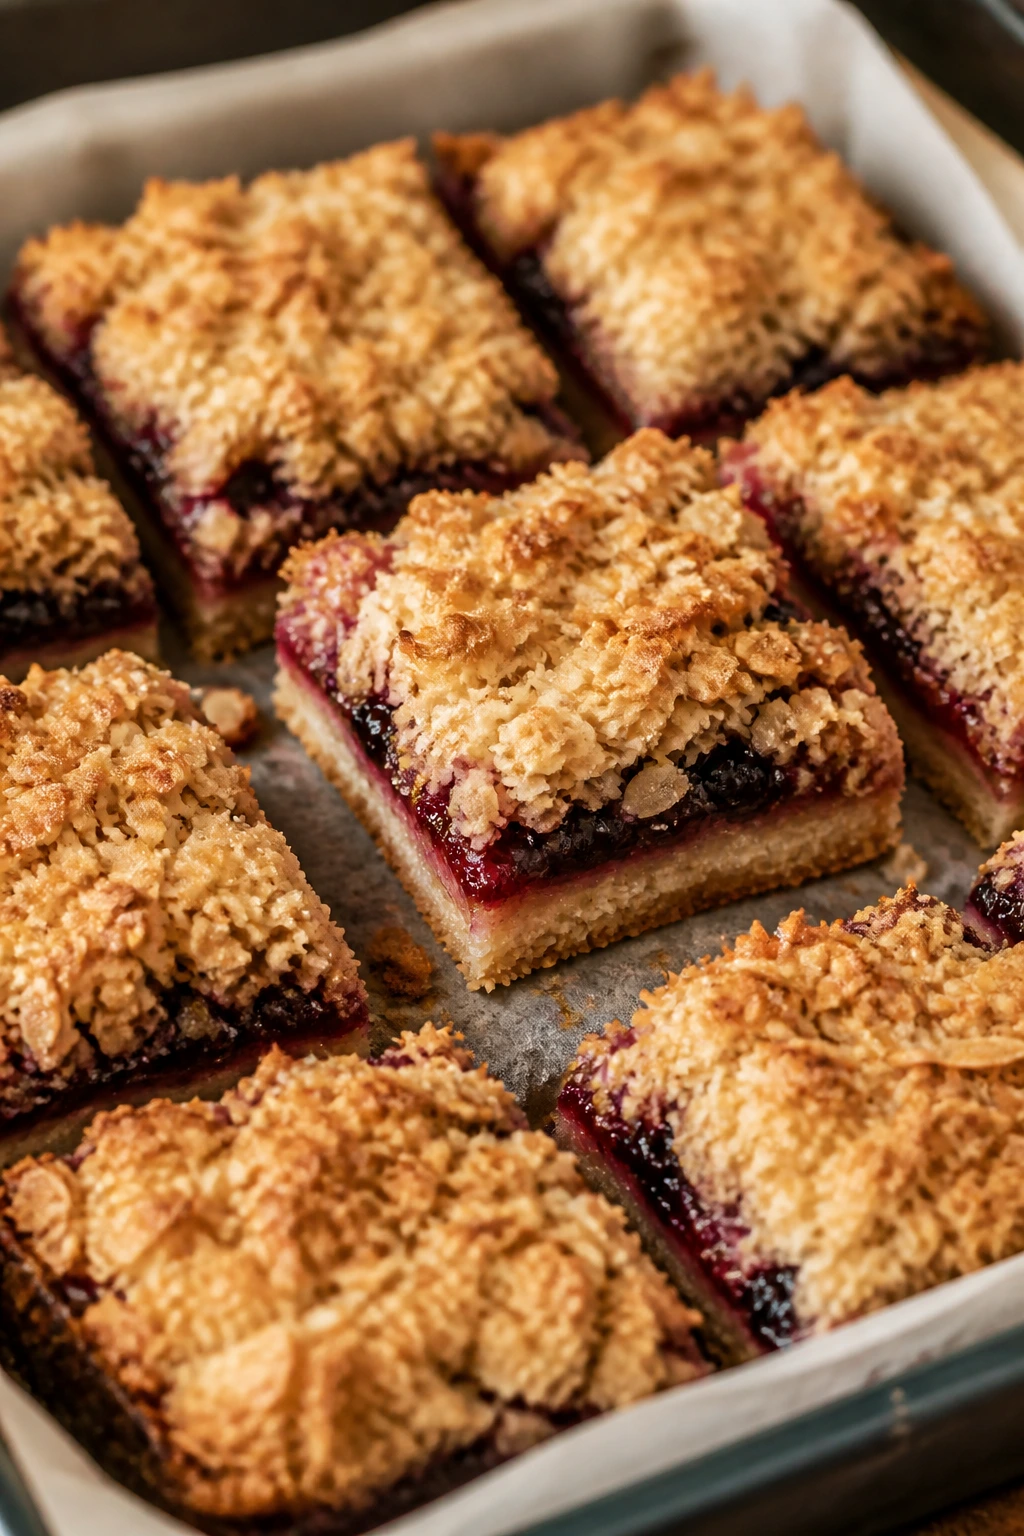
This is the bar I make when berries are on hand and I want something cut into squares instead of scooped into bowls. The oat-coconut crumble bakes into a crisp top, and the fruit layer turns jammy without a long simmer.
Why It Works: Coconut in the crumble adds texture that oats alone do not give. Cornstarch thickens the berry layer as it bakes, so the bars slice cleanly after cooling instead of leaking fruit everywhere.
Key Ingredients:
- 1 1/2 cups all-purpose flour — for the crumble.
- 1 cup old-fashioned oats — adds chew.
- 3/4 cup sweetened shredded coconut — keeps the topping crisp.
- 3/4 cup packed light brown sugar — for flavor and browning.
- 3/4 cup unsalted butter, melted — binds the crumble.
- 2 cups mixed berries, fresh or frozen — the filling.
- 1/4 cup granulated sugar — sweetens the fruit.
- 2 tablespoons cornstarch — thickens the juices.
- 1 tablespoon lemon juice — sharpens the berry flavor.
Quick Steps:
- Heat the oven to 350°F and line an 8×8-inch pan with parchment.
- Mix the flour, oats, coconut, brown sugar, and melted butter until crumbly.
- Press half the mixture into the pan and bake for 8 minutes.
- Toss the berries with sugar, cornstarch, and lemon juice, then spread over the crust.
- Scatter the remaining crumble on top and bake for 30 to 35 minutes, until the topping is golden and the filling bubbles. Cool fully before cutting.
Equipment for This Recipe:
- 8×8-inch pan
- Parchment paper
- Mixing bowl
- Spatula
How to Serve This Dish: Serve at room temperature with a spoonful of yogurt or whipped cream. The bars hold together best after a full chill.
Pro Tips for This Recipe:
- Frozen berries work fine; do not thaw them first.
- Press the bottom crust firmly so it does not crumble apart.
- Let the bars cool completely before slicing or the fruit runs.
Variations on This Dish:
- Blueberry-Lemon Version: Use all blueberries and a little more zest.
- Raspberry Almond Note: Add 1/2 teaspoon almond extract to the fruit.
- Peach Coconut Swap: Use chopped peaches in place of half the berries.
Common Mistakes to Avoid with This Dish:
- Don’t skip the cornstarch in a juicy fruit filling.
- Don’t cut hot bars.
- Don’t leave the coconut out of the crumble; that texture matters here.
20. Thai Coconut Sticky Rice with Mango
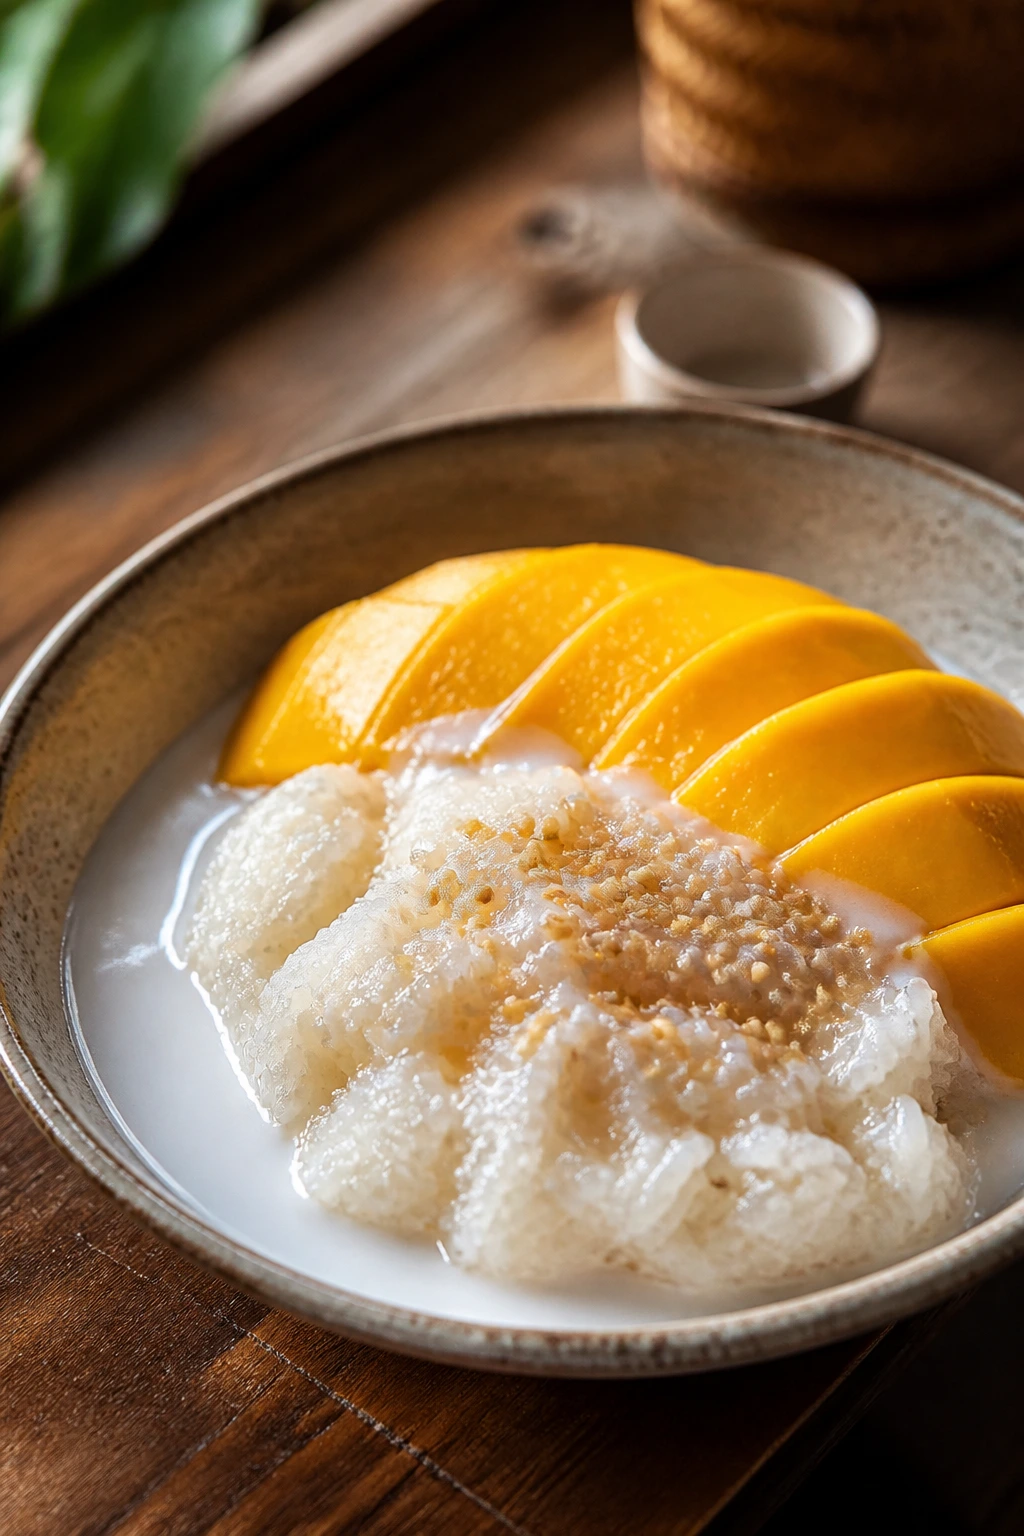
Sticky rice with mango feels a little more deliberate than the average weeknight sweet, but it still comes together with a short ingredient list. The coconut sauce soaks into the rice, the mango cools the richness, and the whole bowl lands between dessert and a very good snack.
Why It Works: Glutinous rice turns glossy and tender when steamed and then rested in coconut milk. Sugar and salt in the coconut sauce create the classic sweet-salty pull, and ripe mango slices keep the bowl from feeling heavy.
Key Ingredients:
- 1 1/2 cups glutinous rice — also called sweet rice.
- 1 (13.5-ounce) can full-fat coconut milk — for the sauce.
- 1/3 cup granulated sugar — sweetens the rice.
- 1/4 teaspoon fine salt — keeps the sauce balanced.
- 2 ripe mangoes, sliced — the fresh part of the plate.
- 1 tablespoon toasted sesame seeds or coconut flakes — for garnish.
Quick Steps:
- Soak the rice in cold water for at least 2 hours, then drain well.
- Steam the rice in a lined steamer basket for 25 to 30 minutes, until tender and glossy.
- Warm the coconut milk, sugar, and salt in a saucepan just until the sugar dissolves.
- Pour about two-thirds of the coconut sauce over the hot rice and let it rest for 15 minutes.
- Spoon onto plates with mango slices and drizzle the remaining sauce over the top.
Equipment for This Recipe:
- Fine-mesh strainer
- Steamer basket or rice cooker
- Saucepan
- Serving plates
How to Serve This Dish: Serve it slightly warm with mango at room temperature. A small sprinkle of toasted sesame seeds adds a little surprise.
Pro Tips for This Recipe:
- Use glutinous rice, not sushi rice; the texture is different.
- Don’t skip the resting time after pouring on the sauce.
- Slice the mango close to serving so it stays bright.
Variations on This Dish:
- Black Sesame Finish: Sprinkle black sesame seeds on top.
- Pineapple Swap: Use ripe pineapple if mango isn’t around.
- Extra Creamy Bowl: Stir 2 tablespoons coconut cream into the sauce.
Common Mistakes to Avoid with This Dish:
- Don’t boil the coconut sauce hard.
- Don’t use regular rice; it will not give the same sticky texture.
- Don’t serve the rice dry. It needs that final soak.
21. Coconut Flour Chocolate Chip Cookies
Coconut flour can be tricky if you treat it like regular flour. Handle it right, though, and the cookies come out soft, fragrant, and a little cakier than standard chocolate chip cookies in a way that makes sense here.
Why It Works: Coconut flour drinks up liquid fast, so the dough needs more eggs and a short rest before baking. That high absorption is what gives the cookie structure without a long ingredient list.
Key Ingredients:
- 1/2 cup coconut flour — do not pack it down.
- 1/2 cup unsalted butter, softened — keeps the cookie tender.
- 1/2 cup packed light brown sugar — adds chew.
- 3 large eggs — necessary for moisture and structure.
- 1 teaspoon vanilla extract — for flavor.
- 1/2 teaspoon baking soda — gives lift.
- 1/4 teaspoon fine salt — balances the sweetness.
- 3/4 cup chocolate chips — the finish.
Quick Steps:
- Heat the oven to 350°F and line a baking sheet with parchment.
- Beat the butter and brown sugar until smooth.
- Add the eggs and vanilla, then stir in the coconut flour, baking soda, and salt.
- Let the dough rest for 5 minutes, then fold in the chocolate chips.
- Scoop tablespoon mounds onto the sheet and bake for 9 to 11 minutes, until the edges are set and the tops look dry. Cool for 10 minutes before moving.
Equipment for This Recipe:
- Mixing bowl
- Baking sheet
- Parchment paper
- Cookie scoop
How to Serve This Dish: Serve them warm with milk or coffee. They’re nice with a scoop of vanilla ice cream when you want a fast dessert plate.
Pro Tips for This Recipe:
- Measure coconut flour carefully. Extra flour makes the cookies dry and gritty.
- Let the dough rest so the flour can absorb the eggs.
- Do not overbake; they firm up as they cool.
Variations on This Dish:
- Walnut Chocolate Version: Add 1/3 cup chopped walnuts.
- Cinnamon Cookie Note: Add 1/2 teaspoon cinnamon.
- White Chocolate Coconut: Swap the chips for white chocolate and add extra shredded coconut.
Common Mistakes to Avoid with This Dish:
- Don’t substitute coconut flour 1:1 for all-purpose flour in other recipes.
- Don’t skip the rest time.
- Don’t expect these to spread much; coconut flour cookies stay compact.
22. Coconut Custard Cups
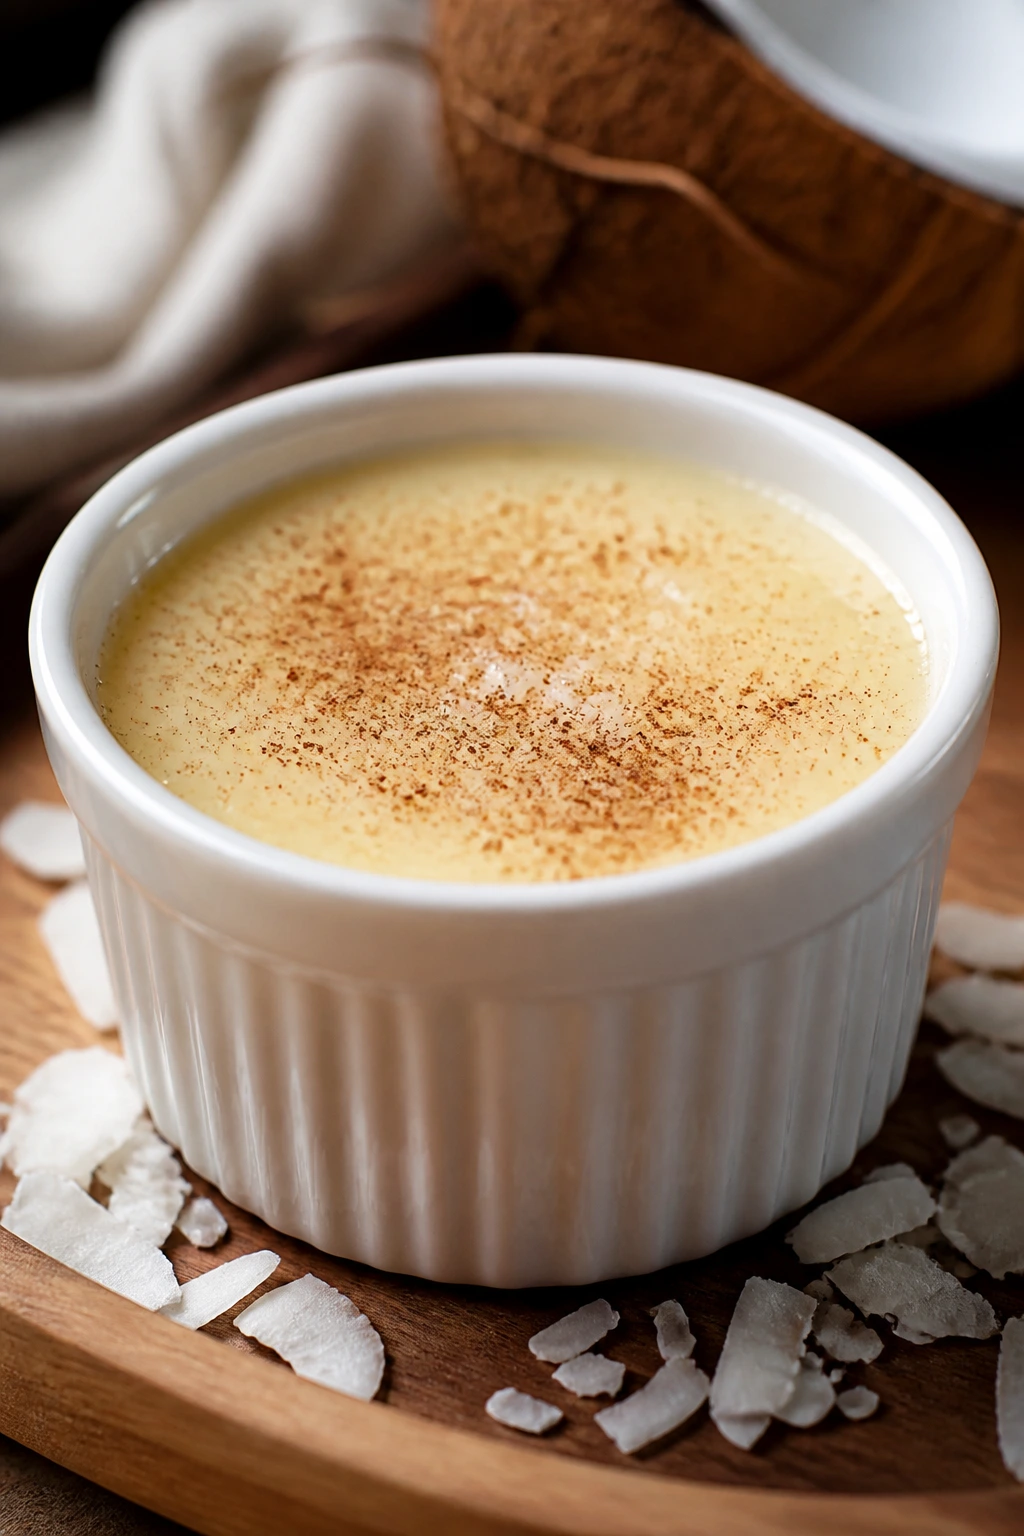
Custard cups are one of those desserts that feel quiet in the best way. The texture is silky, the coconut flavor is soft and creamy, and a little nutmeg on top gives the cups a warm bakery smell.
Why It Works: Eggs set the custard gently in the oven, and coconut milk gives it a richer body than regular milk alone. Baking the cups in a water bath keeps the edges from overcooking before the centers are done.
Key Ingredients:
- 4 large eggs — the custard base.
- 2 large egg yolks — add extra richness.
- 1/2 cup granulated sugar — sweetens the custard.
- 1 (13.5-ounce) can full-fat coconut milk — for body.
- 1 cup whole milk — keeps the custard pourable.
- 1 teaspoon vanilla extract — rounds it out.
- 1/4 teaspoon fine salt — sharpens the flavor.
- 1/3 cup sweetened shredded coconut — folded in or sprinkled on top.
- Pinch of grated nutmeg — optional but nice.
Quick Steps:
- Heat the oven to 325°F and place 4 to 6 ramekins in a baking dish.
- Whisk the eggs, yolks, sugar, coconut milk, milk, vanilla, and salt until smooth.
- Stir in the shredded coconut if using, then divide the mixture among the ramekins.
- Pour hot water into the baking dish until it reaches halfway up the sides of the ramekins.
- Bake for 30 to 35 minutes, until the centers wobble slightly. Cool, then chill before serving.
Equipment for This Recipe:
- Ramekins
- Baking dish
- Whisk
- Large measuring cup or pitcher
How to Serve This Dish: Serve cold with a few toasted coconut flakes on top. If you want a cleaner dessert, unmold the custards after chilling and plate them with fruit.
Pro Tips for This Recipe:
- Strain the custard if you want a silkier finish.
- Don’t let the water bath boil hard; a gentle bake is the goal.
- Bake until the center jiggles like set gelatin, not liquid.
Variations on This Dish:
- Lime Custard: Add 1 teaspoon lime zest.
- Cinnamon Nutmeg Cup: Add a pinch of cinnamon with the nutmeg.
- Coconut-Caramel Topping: Spoon caramel over the chilled custard.
Common Mistakes to Avoid with This Dish:
- Don’t overbake until the custard puffs and cracks.
- Don’t skip the water bath.
- Don’t serve it hot if you want a smooth, firm texture.
23. Coconut Tres Leches Squares

Tres leches cake already leans rich, and coconut makes the soak taste lighter and more fragrant. The sponge drinks in the milk mixture, the top stays fluffy, and toasted coconut gives the squares a little edge.
Why It Works: A boxed cake mix keeps the base fast and dependable. The coconut milk soak softens the crumb without turning it soggy, and chilling gives the cake time to absorb the liquid evenly.
Key Ingredients:
- 1 box yellow cake mix, about 15 ounces — the base.
- Eggs, oil, and water called for on the box — for the cake batter.
- 1 (13.5-ounce) can full-fat coconut milk — part of the soak.
- 1 (14-ounce) can sweetened condensed milk — the sweet soak.
- 1 cup evaporated milk or whole milk — loosens the soak.
- 1 teaspoon vanilla extract — for the milk mixture.
- 1 1/2 cups whipped cream — the topping.
- 1/2 cup toasted coconut — for garnish.
Quick Steps:
- Bake the cake in a greased 9×13-inch pan according to the box directions.
- Cool for 10 minutes, then poke holes across the surface with a skewer or fork.
- Whisk the coconut milk, condensed milk, evaporated milk, and vanilla, then slowly pour it over the cake.
- Chill for at least 2 hours, until the cake absorbs the soak.
- Spread whipped cream over the top and finish with toasted coconut.
Equipment for This Recipe:
- 9×13-inch baking pan
- Mixing bowl
- Fork or skewer
- Offset spatula
How to Serve This Dish: Cut cold squares straight from the pan. A few berries on the plate help cut the richness.
Pro Tips for This Recipe:
- Pour the soak slowly so it has time to sink in.
- Chill longer if the cake still feels dry in the center.
- Toast the coconut before topping; raw flakes feel out of place here.
Variations on This Dish:
- Mango Tres Leches: Add diced mango on top of the whipped cream.
- Chocolate Cake Swap: Use chocolate cake mix for a darker base.
- Coconut-Lime Finish: Add lime zest to the whipped cream.
Common Mistakes to Avoid with This Dish:
- Don’t rush the chill. The cake needs time to drink the milk.
- Don’t drown the cake so much that it turns mushy.
- Don’t frost before the soak settles.
24. Coconut Sorbet
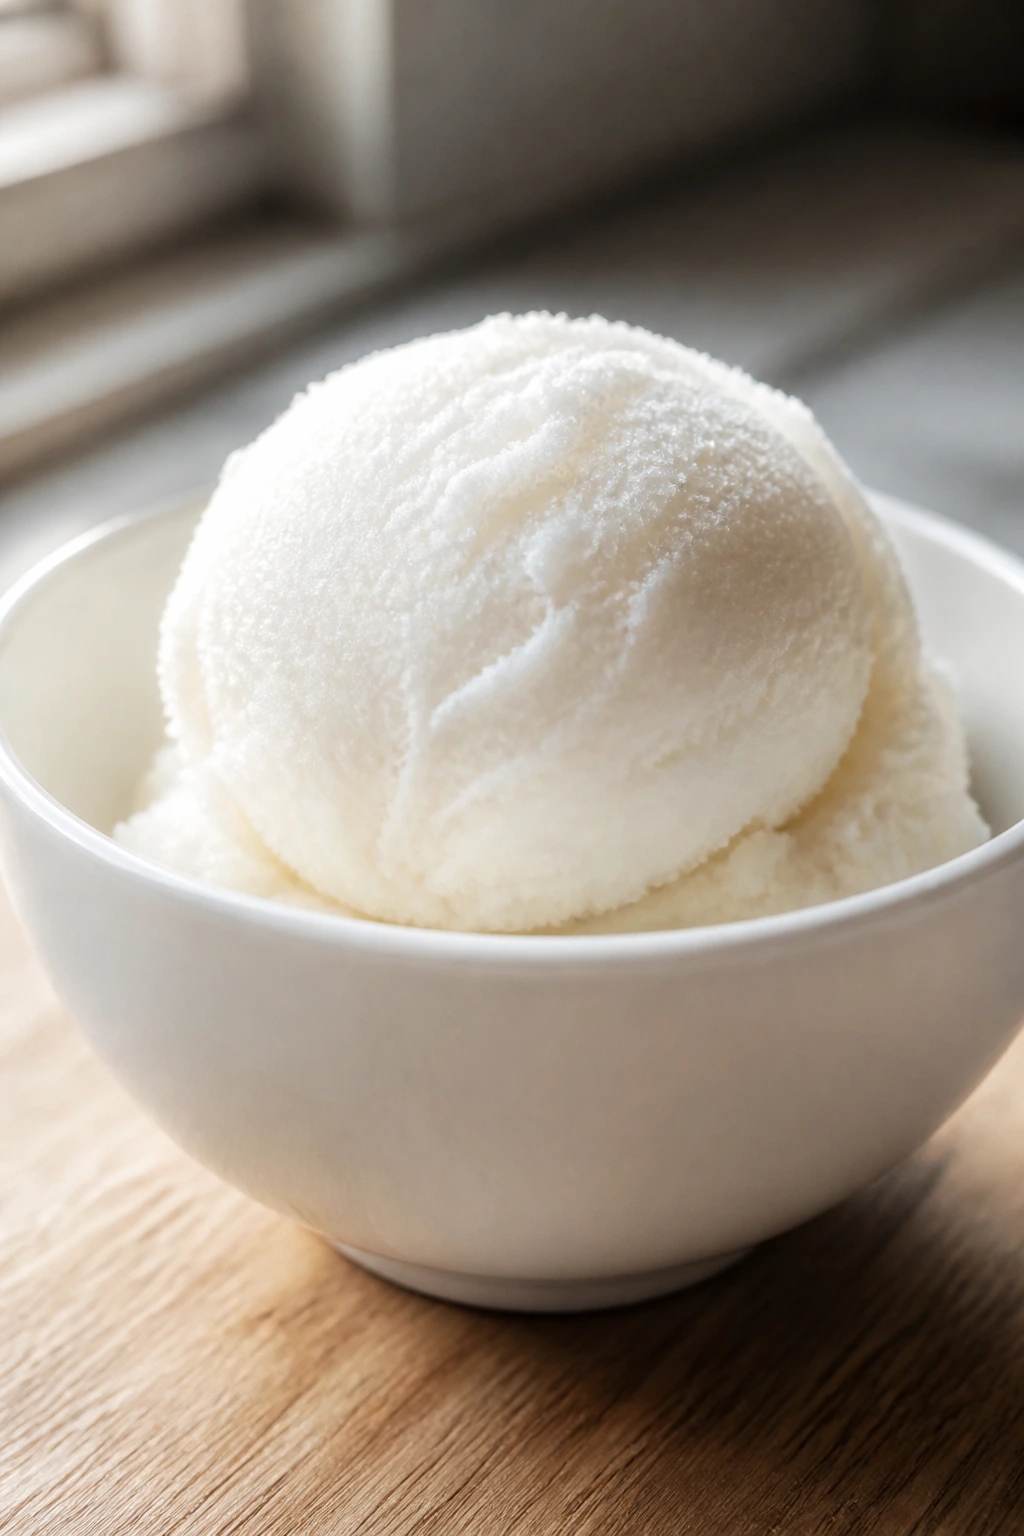
Sorbet is the coldest kind of dessert, and coconut gives it a creamy feel without turning it into ice cream. The texture lands between shaved ice and gelato, especially if you give it a little time to soften before scooping.
Why It Works: Coconut milk freezes with more body than fruit juice alone, and sugar keeps the texture from turning into a hard block. A little lime juice cuts the richness and keeps each spoonful lively.
Key Ingredients:
- 2 cups full-fat coconut milk — the base.
- 3/4 cup granulated sugar — needed for a scoopable texture.
- 1/2 cup water — dissolves the sugar.
- 1 tablespoon lime juice — adds brightness.
- 1 teaspoon vanilla extract — softens the coconut.
- Pinch of fine salt — keeps the flavor clean.
Quick Steps:
- Heat the water and sugar in a small saucepan until the sugar dissolves.
- Stir in the coconut milk, lime juice, vanilla, and salt.
- Chill the mixture for 1 hour.
- Churn in an ice cream maker according to the machine directions, or pour into a shallow pan and freeze, stirring with a fork every 30 minutes for 3 hours.
- Freeze until firm, then let it sit at room temperature for 5 minutes before scooping.
Equipment for This Recipe:
- Small saucepan
- Whisk
- Freezer-safe container
- Ice cream maker, optional
How to Serve This Dish: Scoop it into small bowls and top with toasted coconut or sliced mango. A thin wafer cookie beside it gives the bowl some crunch.
Pro Tips for This Recipe:
- Chill the base fully before freezing. Warm mix freezes grainy.
- Use full-fat coconut milk or the sorbet turns icy.
- Let it soften a few minutes before scooping.
Variations on This Dish:
- Mango Coconut Sorbet: Blend in 1 cup mango purée.
- Pineapple-Lime Sorbet: Add pineapple juice and a little extra lime.
- Toasted Coconut Version: Fold in toasted flakes after churning.
Common Mistakes to Avoid with This Dish:
- Don’t cut the sugar too far; sorbet needs it for texture.
- Don’t freeze it in a deep container if you want quicker softening.
- Don’t scoop straight from the freezer without resting it first.
25. Coconut Rice Krispie Treats
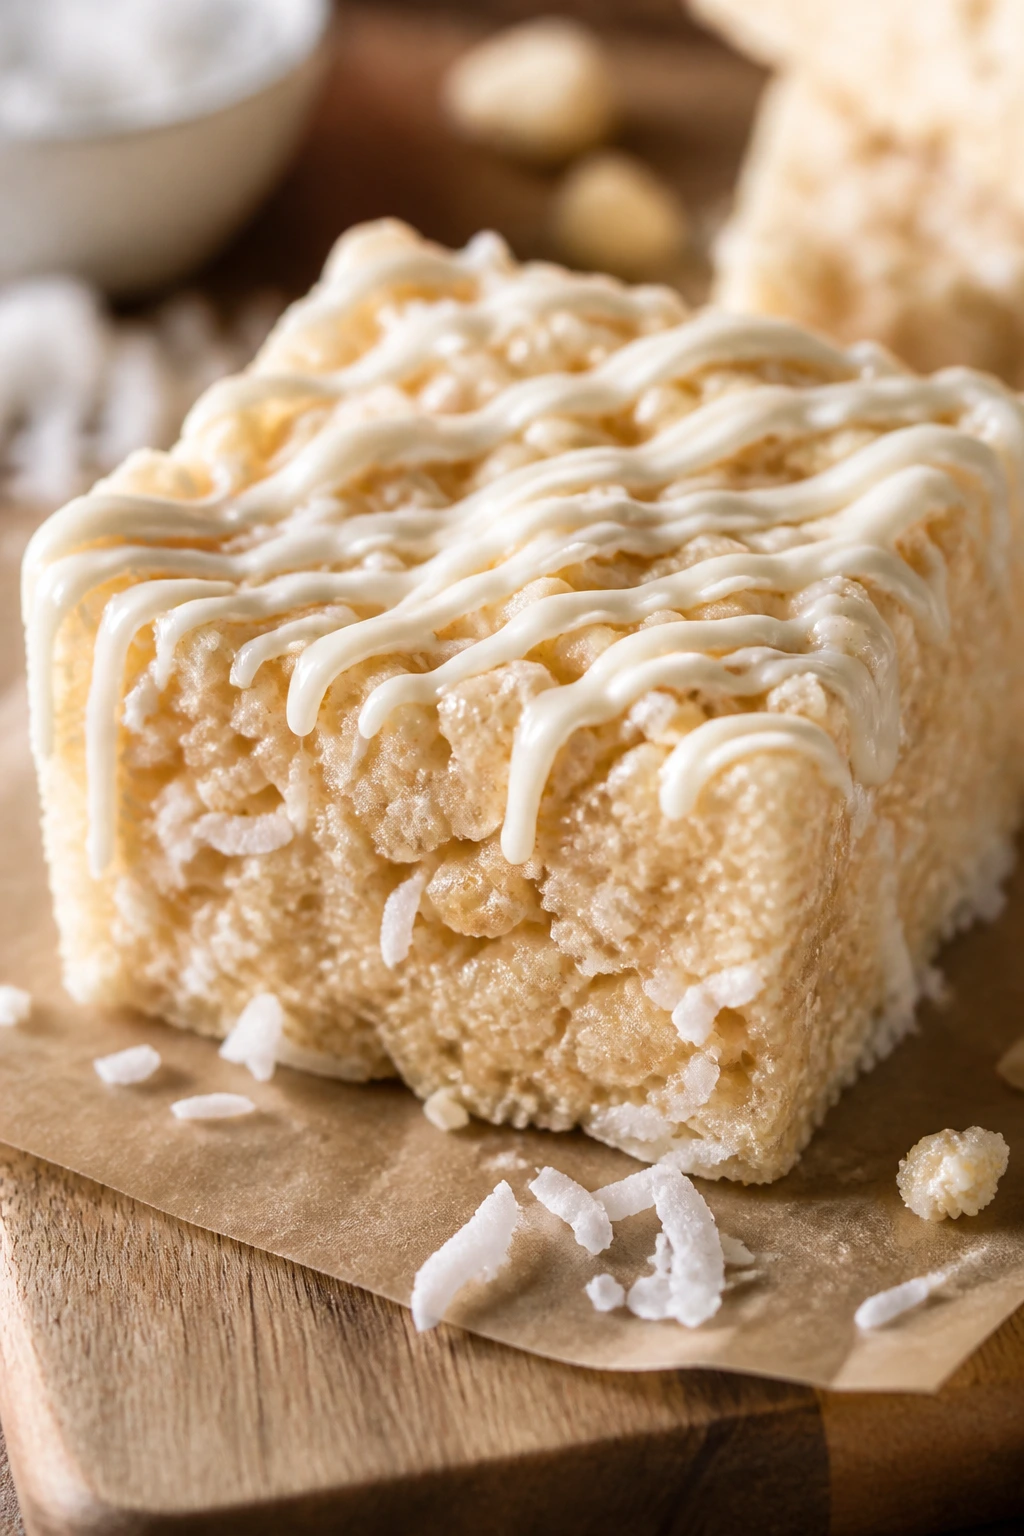
These are the easiest sweet squares in the bunch, and coconut gives them a little more body than the standard version. The marshmallow binds everything, the coconut adds chew, and a white chocolate drizzle turns a snacky pan into actual dessert.
Why It Works: The marshmallow coating grabs the cereal and coconut fast, so you can press the pan in minutes. A little vanilla keeps the flavor from tasting flat, and salt keeps the sweetness from taking over.
Key Ingredients:
- 4 tablespoons unsalted butter — coats the marshmallows.
- 1 (10-ounce) bag mini marshmallows — the glue.
- 6 cups crisp rice cereal — gives the treats their snap.
- 1 1/2 cups sweetened shredded coconut — folded in for chew.
- 1/2 teaspoon vanilla extract — rounds the flavor.
- 1/4 teaspoon fine salt — important here.
- 1/2 cup melted white chocolate, optional — for drizzling.
Quick Steps:
- Grease an 8×8-inch or 9×9-inch pan lightly with butter.
- Melt the butter in a large saucepan, then stir in the marshmallows over low heat until smooth.
- Remove from the heat and stir in the vanilla, salt, coconut, and cereal until coated.
- Press the mixture into the pan with buttered hands or parchment.
- Cool for 20 minutes, then drizzle with white chocolate if using and cut into squares.
Equipment for This Recipe:
- Large saucepan
- Mixing spoon
- Greased square pan
- Parchment or wax paper
How to Serve This Dish: Cut them into small squares and stack them on a plate with coffee or milk. They travel well and hold shape better than many no-bake bars.
Pro Tips for This Recipe:
- Keep the heat low or the marshmallows get stiff.
- Press gently. Packing too hard makes the treats dense.
- Toast some of the coconut first if you want more flavor.
Variations on This Dish:
- Chocolate Coconut Treats: Stir in 1/2 cup mini chocolate chips after cooling slightly.
- Pineapple Coconut Angle: Add 1/4 cup finely chopped dried pineapple.
- Salted Top: Sprinkle flaky salt over the drizzle before it sets.
Common Mistakes to Avoid with This Dish:
- Don’t overcook the marshmallows.
- Don’t press the mixture down with a heavy hand.
- Don’t cut before the pan cools or the squares smear.
Why Coconut Desserts Work So Well on a Busy Night
Coconut is one of those ingredients that behaves like it knows you’re tired. Shredded coconut keeps for ages in the pantry. Canned coconut milk waits in the cabinet without complaint. Even the desserts that look a little fancier—custards, bars, sheet cakes, pie cups—still rely on ingredient lists that stay short and manageable.
The texture is the real reason I keep coming back to it. Coconut can thicken a pudding, crisp a cookie edge, soften a cake crumb, or give a frozen dessert enough body to feel smooth instead of icy. That means one ingredient supports a lot of different moods. If you want to bake, you can. If you want to chill something, that works too. If you want to make a pan dessert and walk away, coconut is willing.
There’s also a practical side that gets overlooked. Toasted coconut hides little imperfections. A glaze covers a sheet cake in a minute. A handful of berries or a few lime zest shavings makes a coconut dessert look finished without dragging the process out. That’s useful on ordinary nights, not just special ones.
Essential Equipment for These Recipes
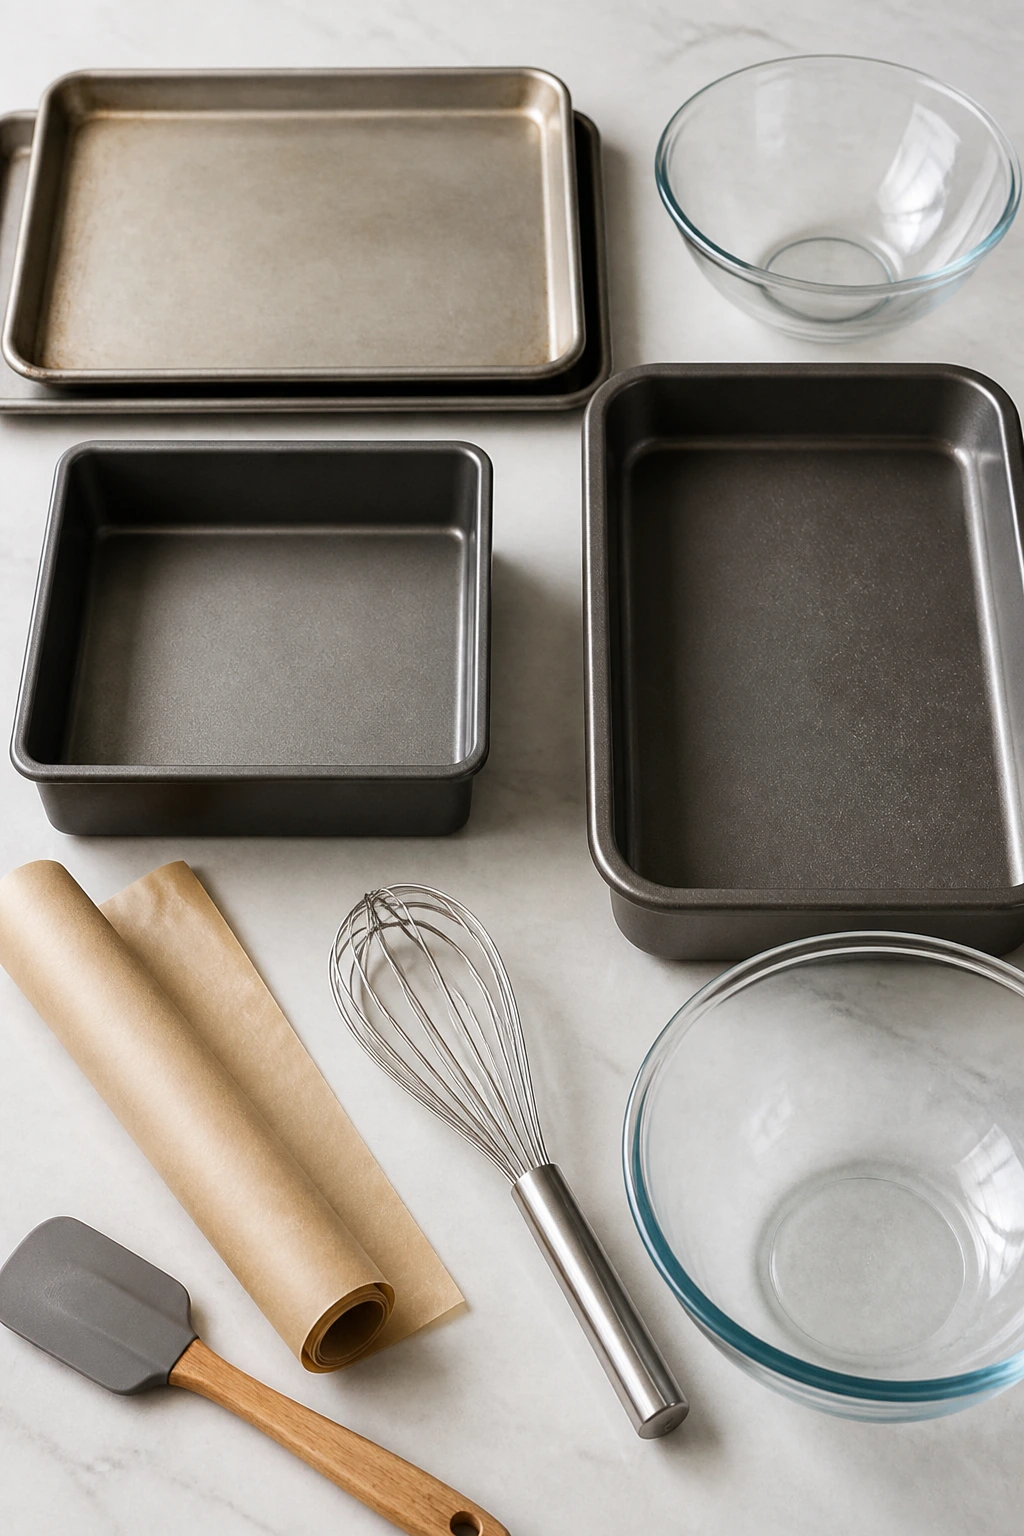
- Rimmed baking sheets: Needed for macaroons, cookies, shortbread, and Rice Krispie treats that need parchment-lined space.
- Parchment paper: Keeps coconut cookies and bars from sticking and makes cleanup faster.
- 8×8-inch baking pan: Good for fudge, brownies, crumble bars, and shortbread squares.
- 9×13-inch baking pan: The workhorse size for sheet cake, tres leches squares, and dump cake.
- Medium saucepan: Useful for pudding, custard, sorbet syrup, and fudge.
- Whisk: Helps keep pudding bases smooth and eggs blended.
- Rubber spatula: Better than a spoon for folding coconut evenly through batter.
- Mixing bowls: At least two, since several of these recipes need wet and dry ingredients separate for a moment.
- Cookie scoop: Handy for macaroons, brownie batter, and coconut balls that need even portions.
- Ramekins or small jars: Needed for custard cups and cream pie cups.
- Popsicle molds: The only non-negotiable for frozen coconut pops.
- Steamer basket or rice cooker: Needed for sticky rice with mango if you want the grain to cook correctly.
Smart Shopping and Ingredient Tips
The coconut aisle is more confusing than it should be, so a little label-reading saves a lot of disappointment. Sweetened shredded coconut is the version I reach for most often in macaroons, cookies, bars, and fudge because it stays chewy and bakes with enough sugar to brown lightly. Unsweetened shredded coconut is useful when you want a drier, less sugary texture, but it usually needs a little extra sweetener or moisture to avoid tasting blunt.
For recipes that rely on creaminess, buy full-fat canned coconut milk, not the carton version sold as a drinking milk. The canned stuff should slosh slowly when you shake it and look thick when poured. If a recipe calls for coconut cream, that’s even richer and usually thicker at the top of the can. Cream of coconut is different again: it’s sweetened and often used in cocktails or very sweet desserts. That one can change a recipe fast, so read carefully.
Toasting coconut is worth the few minutes it takes. A dry skillet over medium-low heat usually does the job in 3 to 5 minutes, and the switch from pale beige to golden happens fast. Stir often and pull it when it smells nutty. It keeps browning from the carryover heat after it leaves the pan.
Limes, lemons, bananas, mangoes, and berries all pair well with coconut, but freshness matters more than the label on the package. Use ripe bananas with brown speckles, mangoes that give slightly at the stem, and limes that feel heavy for their size. Those small details show up in the final dessert more than people expect.
How to Serve These Recipes
Presentation: Coconut desserts look best when you give them one clean finishing move rather than a pile of toppings. A dusting of powdered sugar over bars, a line of toasted flakes on pudding, or a thin chocolate drizzle over macaroons is enough. Clear glasses help with parfaits and pie cups because the layers do the work.
Accompaniments: Fresh berries, sliced mango, lime wedges, whipped cream, vanilla ice cream, and plain yogurt all sit nicely beside coconut sweets. For richer treats like brownies, fudge, and tres leches, a tart fruit on the plate keeps the dessert from feeling dense. Coffee and tea are the easiest match, but cold milk works better than people give it credit for.
Portions: Small squares, half-cups, and two-cookie servings usually feel right for coconut desserts because the flavor carries richness even when the portion is modest. For bars and cakes, cut narrower than you think; the sweetness lands better that way. For puddings and custards, 1/2 cup to 3/4 cup portions are enough after dinner.
Beverage Pairing: Strong coffee, black tea, and espresso are the cleanest matches for macaroons, shortbread, and brownies. For fruit-forward desserts, iced tea with lemon or a sparkling water with lime keeps the plate feeling light.
Additional Tips and Flavor Boosters
Flavor Enhancement: Toasting the coconut first is the fastest upgrade in the whole list. It takes the edge off raw sweetness and gives you a better smell the second the dessert hits the table. A tiny pinch of flaky salt on chocolate coconut desserts does more work than another spoonful of sugar.
Customization: Add lime zest to bars and puddings, chopped macadamias to macaroons, or dark chocolate chunks to cookies and brownies. Coconut likes friends with contrast. Sour fruit, dark chocolate, and salty nuts keep the desserts from going flat.
Serving Suggestions: Keep a jar of toasted coconut around for finishing. Sprinkle it over custards, ice cream, chia parfaits, and sheet cake slices. A little extra texture on top makes even a simple dessert feel thought through.
Make-It-Yours: For gluten-free versions, coconut flour cookies, macaroons, custards, pudding, popsicles, and sorbet are the easiest places to start. For dairy-free desserts, use canned coconut milk, coconut cream, and dairy-free chocolate where the recipe allows. For a less-sweet finish, lean on unsweetened coconut, fruit toppings, and dark chocolate instead of white chocolate or extra glaze.
Make-Ahead, Storage, and Reheating Guidance
Most of these desserts keep well, which is one reason coconut keeps showing up on my weeknight shortlist. Cookies, macaroons, shortbread squares, and Rice Krispie treats stay good in an airtight container at room temperature for 3 to 4 days. If your kitchen runs warm, move them to the fridge after the first day so the coconut and chocolate do not soften too much.
Bars, fudge, brownies, tres leches squares, cheesecake bites, and crumble bars keep best in the fridge for 4 to 5 days. Line the layers with parchment so the tops do not stick together. Brownies and bars freeze well for up to 2 months if you wrap the pieces tightly and stash them in a freezer bag. Thaw them in the fridge overnight or on the counter for an hour.
Puddings, custards, rice pudding, tapioca pudding, and chia parfaits should stay refrigerated and eaten within 3 days. The texture is best in the first two days, especially for custard and chia. If rice pudding thickens too much in the fridge, stir in a splash of milk before serving. Custards should not be frozen; they split.
Cakes and sheet cake slices can sit wrapped at room temperature for 1 day, then move to the fridge for up to 4 days. To rewarm a slice, use a 300°F oven for 8 to 10 minutes or a microwave for 10 to 15 seconds. Coconut toppings stay nicer when you warm gently instead of blasting the slice.
Frozen treats like popsicles and sorbet need a deep freeze in a covered container to avoid ice crystals. Sorbet softens after about 5 minutes on the counter; popsicles usually need only a brief warm-water release from the mold.
Variations and Adaptations to Try
Dairy-Free Coconut Switch
Use canned coconut milk, coconut cream, and dairy-free butter or chocolate where needed. This works especially well for puddings, sorbet, popsicles, fudge, and bars. Keep an eye on sweetness, because many dairy-free versions taste flatter if you do not add a pinch more salt.
Chocolate-Heavy Route
Fold dark chocolate chips into cookies, drizzle melted chocolate over macaroons, or top fudge with cocoa nibs. Coconut and bittersweet chocolate give you a sharper, less sugary dessert. That swap helps the richer recipes feel more balanced.
Lower-Sugar Finish
Choose unsweetened shredded coconut, use less glaze, and lean on fruit for sweetness. This is useful for custards, puddings, and parfaits where a ripe mango or strawberries can carry more of the flavor. It will not make the dessert “light,” but it will keep it from tasting sticky.
Tropical Fruit Turn
Pineapple, mango, banana, and lime all work with coconut without much adjustment. Add fruit to bars, puddings, cake, or parfaits, or serve it on the side so the coconut stays the main event. This route works best when the fruit is ripe and fragrant.
Gluten-Free Pantry Swap
Macaroons, puddings, custards, popsicles, sorbet, and coconut flour cookies already fit nicely. For bars and cakes, use a good 1:1 gluten-free flour blend and watch the bake time closely. Coconut flour behaves differently from a standard blend, so use it only where the recipe already calls for it.
Toast-and-Salt Finish
This is the simplest tweak and maybe the one I use most. Toast the coconut, then finish the dessert with flaky salt or a salted chocolate drizzle. That tiny contrast makes even a plain square of cake feel more grown-up.
Common Mistakes to Avoid
One mistake shows up again and again: using the wrong coconut product. Sweetened shredded coconut, unsweetened coconut, canned coconut milk, coconut cream, cream of coconut, and carton coconut milk do not behave the same way. If a recipe needs richness and set, the canned milk matters. If a recipe needs chew, the shredded coconut matters.
Another slip is baking coconut desserts too long. Coconut browns fast, and once the top turns too dark, the flavor gets bitter. Macaroons, shortbread, sheet cake, and brownies should all come out when the center is set but not dry. A few moist crumbs are better than a chalky edge.
Skipping the cool-down is another common problem. Bars, fudge, brownies, puddings, and custards all slice or spoon better after time in the fridge or on the counter. The dessert usually looks underdone the minute it leaves the oven or saucepan. It firms as it settles. Patience pays off here, even on a weeknight.
People also forget the salt. Coconut and sugar can taste heavy together if nothing sharpens them. Even 1/4 teaspoon in a batch can keep the flavor awake.
Last, packing mixtures too tightly causes trouble in cookies, macaroons, Rice Krispie treats, and coconut bites. Dense packing pushes out air and turns the final texture heavy. Gentle pressing is enough.
Frequently Asked Questions

Can I use unsweetened coconut instead of sweetened shredded coconut?
Yes, but the texture and sweetness change. Unsweetened coconut works best in recipes where the base already has condensed milk, glaze, or plenty of sugar. If you swap it into cookies or macaroons, expect a drier, less sweet result unless you add a little more moisture.
What coconut milk should I buy for desserts?
Use full-fat canned coconut milk for puddings, cakes, custards, popsicles, fudge, and rice dishes. Carton coconut milk is too thin for most of these recipes. If the can has separated, that’s normal; shake it or stir it before measuring.
How do I toast coconut without burning it?
Use a dry skillet over medium-low heat and stir often. Coconut can go from pale to overdone in a minute or two, so stay near the pan. Pull it when it turns light gold and smells nutty, then spread it on a plate so the heat stops carrying through.
Which of these desserts can I make ahead?
Almost all of them can, but puddings, bars, fudge, and cakes are the best make-ahead choices. Macaroons, shortbread, and Rice Krispie treats hold well for a few days, and sorbet or popsicles need the freezer anyway. Mug cake is the one to make fresh.
Can I freeze coconut desserts?
Bars, brownies, fudge, cookies, and cake slices freeze well if wrapped tightly. Custards and chia parfaits do not freeze well because the texture breaks when thawed. Sorbet and popsicles are built for the freezer, so those are the exception.
Why did my macaroons spread?
Usually the coconut was packed too loosely, the egg whites were overbeaten, or the oven ran too hot. The fix is simple: keep the oven at 325°F, scoop tightly, and cool the cookies fully before moving them.
Can I make these recipes less sweet?
Yes. Start by choosing unsweetened coconut where the recipe allows, then lean on fruit, citrus zest, dark chocolate, or a little flaky salt for contrast. That works especially well in bars, puddings, custards, and frozen desserts.
Do I need special equipment for any of these?
A few recipes need a popsicle mold, ramekins, or a steamer basket, but most use basic tools: bowls, a whisk, a baking pan, and parchment. An ice cream maker is optional only for sorbet. You can still make the no-churn version without one.
A Sweet Little Coconut Habit
Coconut desserts tend to reward small efforts. Toast a little coconut, add a pinch of salt, let the bars cool fully, and the whole tray tastes more deliberate than the work suggests. That’s the kind of cooking I like on an ordinary night: not complicated, not precious, but specific enough that you can taste the care.
Keep one can of coconut milk, one bag of shredded coconut, and one dessert from this list in your back pocket, and the weeknight sweet problem stops being a problem. The next time you want something warm, cold, chewy, or creamy, you already know where to start.