
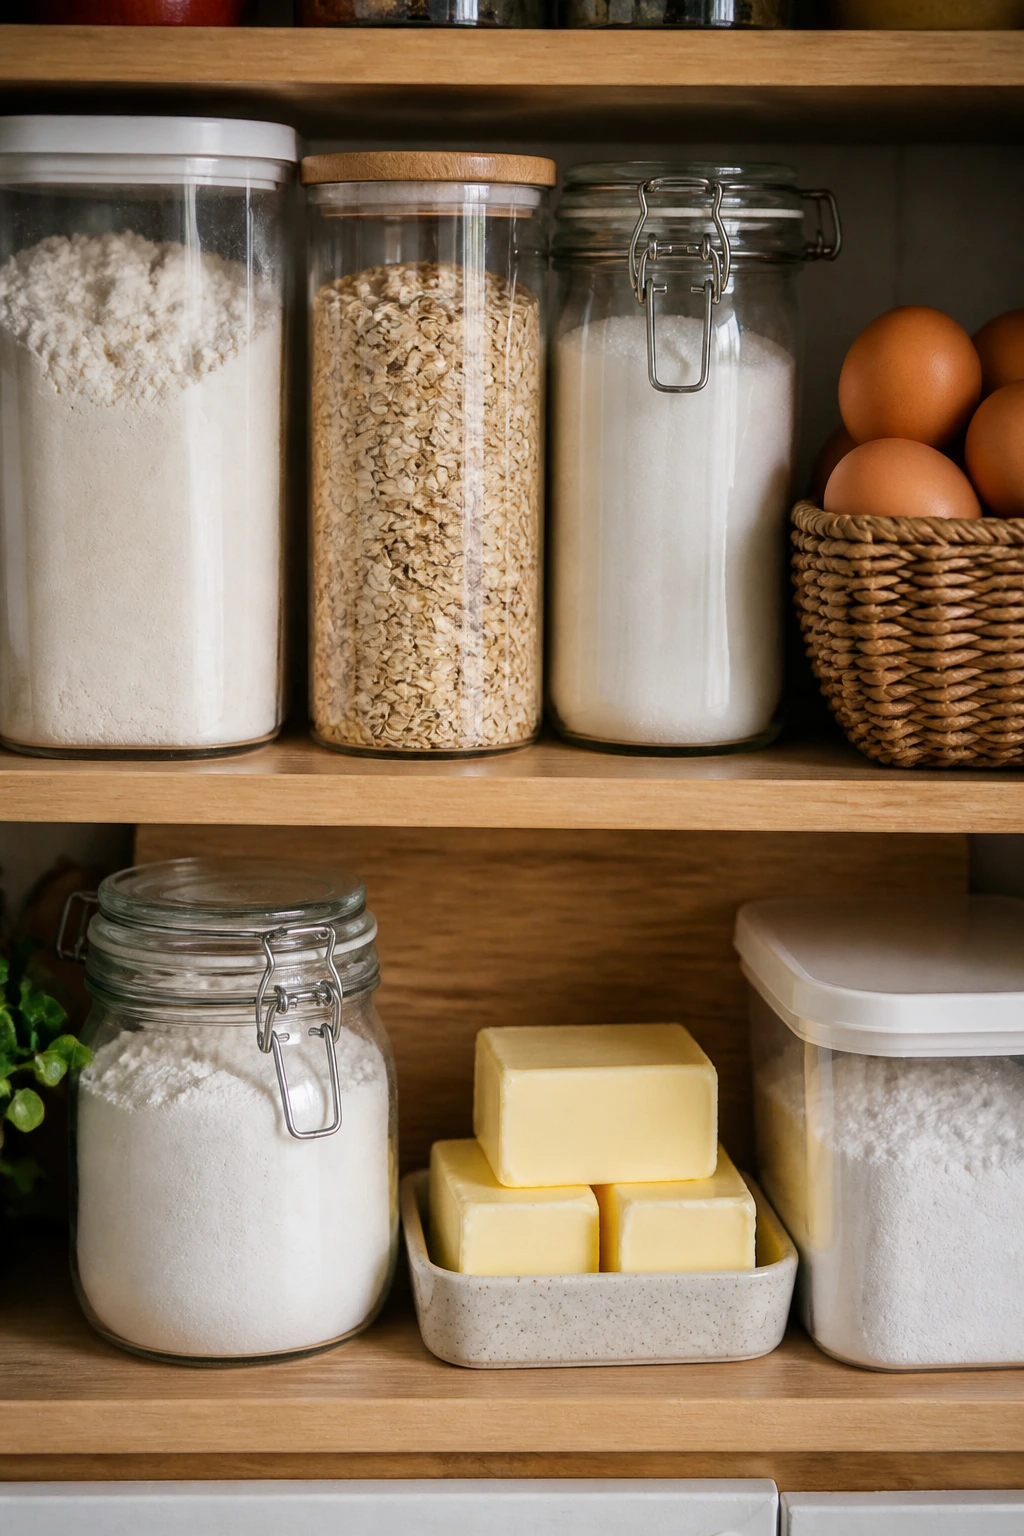
Easy fruit desserts have a funny habit of making a kitchen feel more generous than it really is. A few bruised apples, a can of peaches, a bag of frozen berries, or a jar of jam can turn into something warm, glossy, and far more polished than the ingredients suggest — especially when you’ve got flour, sugar, oats, butter, and a little cinnamon on hand. That’s the charm of pantry staples: they don’t fight the fruit; they give it a frame.
What I like most about fruit desserts is how little fuss they ask for when the formula is right. Fruit brings moisture, acidity, and sweetness. Pantry ingredients bring structure, browning, crunch, and that soft, buttery middle everybody goes back for after the first spoonful. If your fruit is overripe, frozen, canned, or a little uneven, that’s not a problem here. It’s the point.
And because these are the kinds of desserts people actually make in real kitchens — not just photograph and admire — the best versions need to be practical. No specialty flour. No obscure sweeteners. No hard-to-find garnish you’ll use once and forget in the back of the fridge. Just straightforward, dependable fruit desserts that work because the ratios are sensible and the method respects what fruit does in the oven.
Why These Pantry Fruit Desserts Keep Working
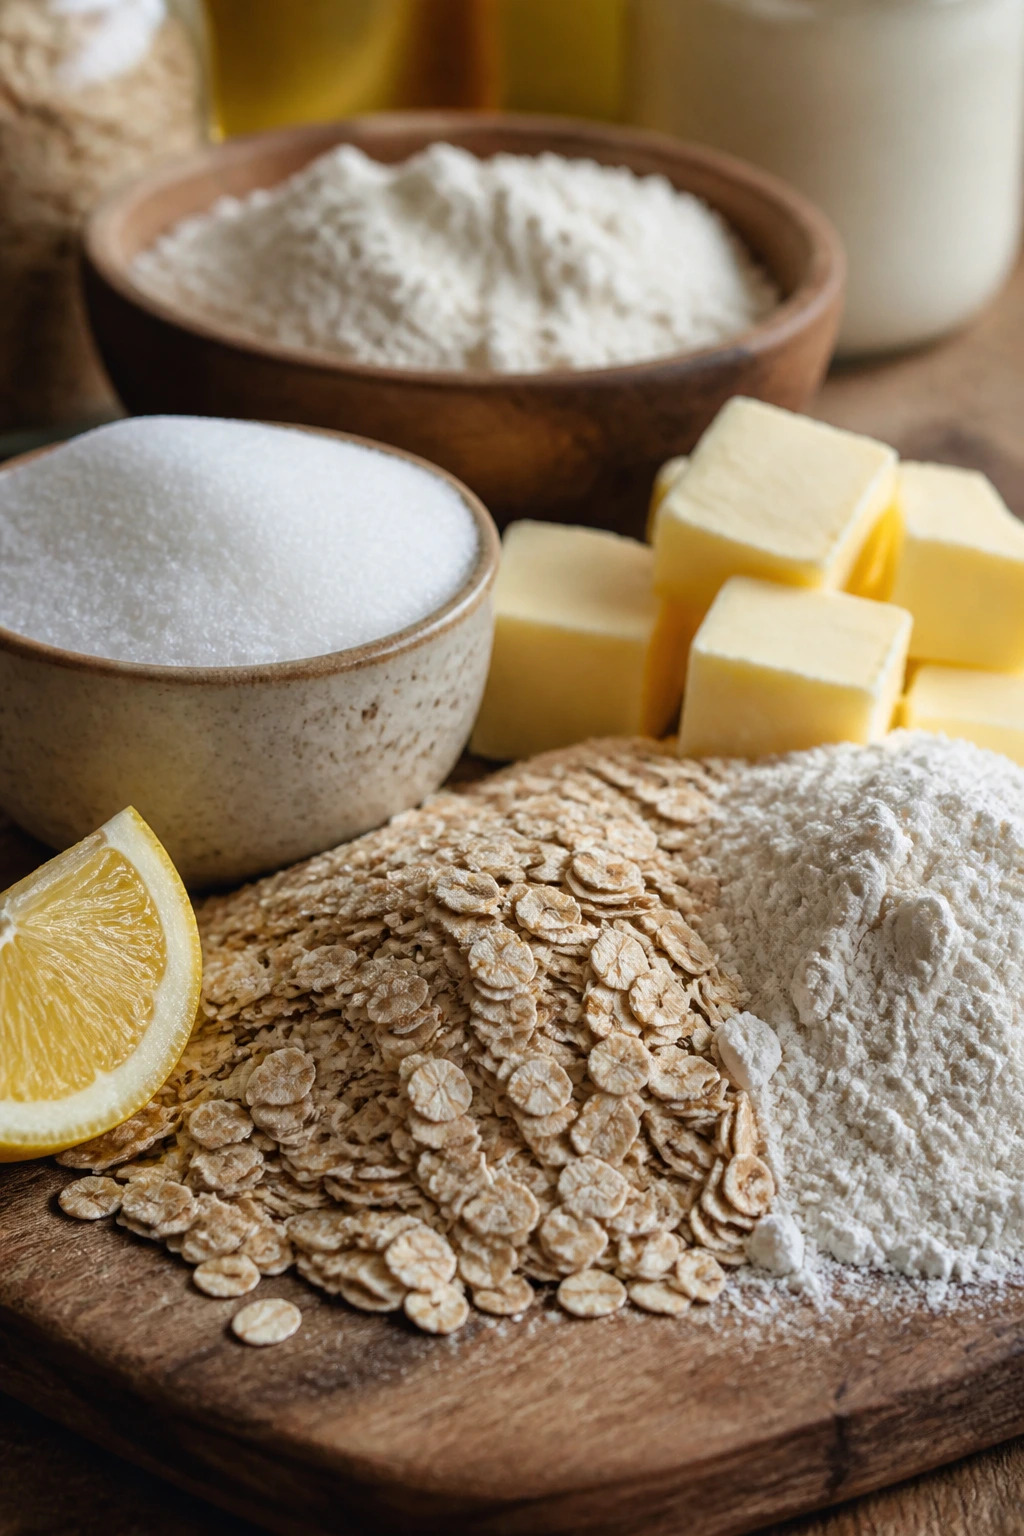
- Pantry-first: Most of these recipes lean on flour, oats, sugar, butter, eggs, and cornstarch, so you can start baking without a special grocery run.
- Fruit-flexible: Fresh, frozen, canned, or dried fruit all show up here, which means you can bake with what’s actually in your kitchen.
- Low-drama methods: Crisps, cobblers, bars, loaf cakes, and skillet bakes forgive a lot more than delicate pastries do.
- Texture matters: The recipes balance soft fruit with crumbly topping, tender cake, or crisp edges, so every bite has contrast.
- Good for imperfect fruit: Slightly soft peaches, wrinkled berries, and spotty bananas all have a job here.
- Dessert without excess: Most of these lean on one bowl, one pan, or one skillet, which keeps cleanup from becoming the main event.
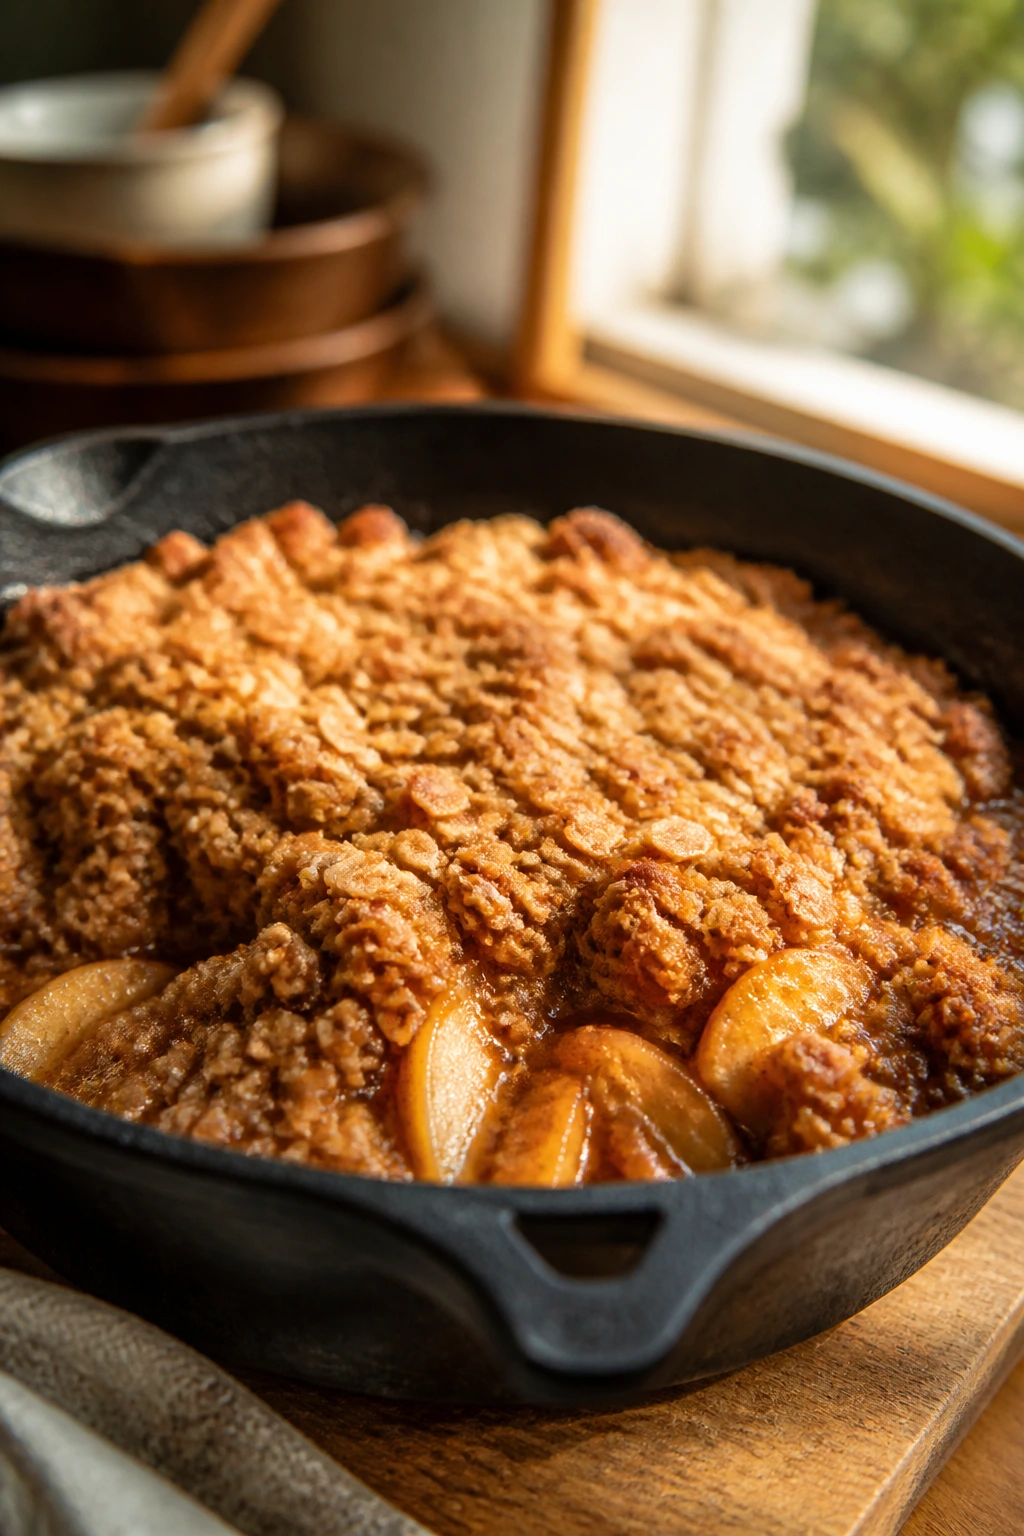
1. Cinnamon Apple Crisp with Oat Streusel
The best apple crisp smells like a bakery and a cider stand had a very tidy meeting. Soft apple slices bubble under a rough oat topping that turns bronze at the edges, and the whole pan lands somewhere between pie and breakfast — which is probably why people keep sneaking seconds before it cools.
Why It Works:
Apples release juice as they bake, and the cornstarch catches that liquid so the filling stays saucy instead of watery. The oat streusel brings crunch, and cold butter gives you little pockets that melt into crisp, sandy crumbles in the oven. I prefer tart apples here; they keep the dessert from tasting flat.
Key Ingredients:
- 6 medium apples, peeled and sliced about 1/4 inch thick
- 2 tablespoons lemon juice, to keep the apples bright
- 1/3 cup granulated sugar, for the filling
- 1 tablespoon cornstarch, to thicken the juices
- 3/4 cup rolled oats, for the topping
- 3/4 cup all-purpose flour, for structure
- 1/2 cup brown sugar, packed
- 1/2 cup cold unsalted butter, cubed
- 1 teaspoon ground cinnamon
- 1/2 teaspoon fine salt
Quick Steps:
- Preheat the oven to 350°F and butter an 8×8-inch baking dish.
- Toss the apples with lemon juice, sugar, cornstarch, cinnamon, and salt until evenly coated.
- Mix oats, flour, brown sugar, cinnamon, and salt in a bowl, then cut in the cold butter until the mixture looks like damp crumbs.
- Spread the apples in the dish and scatter the topping over them in an even layer.
- Bake for 40 to 45 minutes, until the juices bubble at the edges and the topping is deep golden brown.
- Let it rest for 15 minutes so the filling thickens before serving.
Equipment for This Recipe:
- 8×8-inch baking dish
- Mixing bowl
- Pastry cutter or fork
- Peeler and sharp knife
How to Serve This Dish:
A warm scoop in a shallow bowl is the right move, especially with vanilla ice cream melting into the edges. If you want to keep it lighter, spoon on plain yogurt and let the tartness do some work.
Pro Tips for This Recipe:
- Use a mix of apples if you can — one tart variety and one sweeter one keep the flavor from going one-note.
- If your apples are very juicy, add another 1/2 tablespoon cornstarch.
- The topping should look uneven; that’s what makes it craggy after baking.
- Don’t skip the rest time. Hot crisp looks done before the juices set.
Variations on This Dish:
- Pear-Apple Crisp: Swap half the apples for pears if you want a softer, perfume-like filling.
- Nutty Streusel: Add 1/3 cup chopped walnuts or pecans to the topping for more crunch.
- Gluten-Free Crisp: Use a cup-for-cup gluten-free flour blend in the topping and keep the oats certified gluten-free.
Common Mistakes to Avoid with This Dish:
- Cutting the apples too thick: Big chunks stay hard in the center. Slice them about 1/4 inch so they soften in the bake time.
- Using melted butter in the topping: You’ll get paste instead of crumbs. Cold butter is what makes the crisp.
- Serving too soon: The filling will run all over the plate. Let it sit long enough to settle.
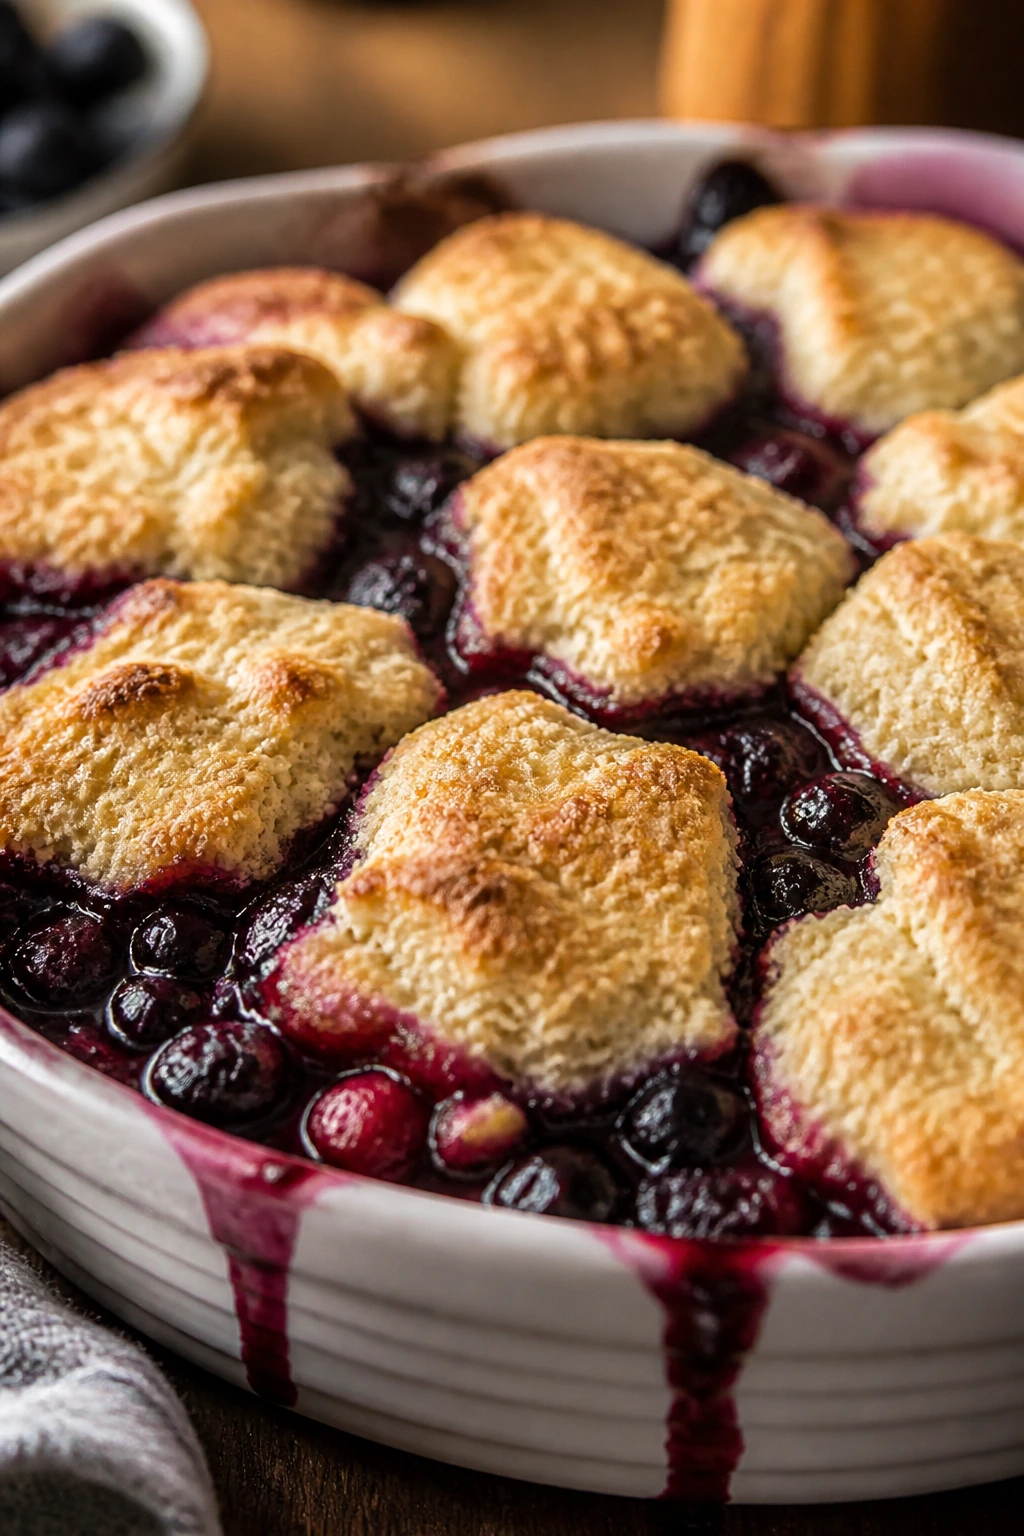
2. Berry Cobbler with Biscuit Topping
This one smells like summer even when you’re using frozen berries from the back of the freezer. The fruit turns jammy under tender biscuit dough, and the edges of the topping soak up just enough juice to go soft without losing their shape.
Why It Works:
Berries cook fast, which is why a cobbler makes more sense than a pie crust here. A little cornstarch thickens the juices, and biscuit dough gives you a top that’s part fluffy, part bronzed, part biscuit-skin where it touches the fruit. I like this because it handles mixed berries, and mixed berries are usually what people actually have.
Key Ingredients:
- 6 cups mixed berries, fresh or frozen
- 1/3 cup granulated sugar
- 2 tablespoons cornstarch
- 1 tablespoon lemon juice
- 1 teaspoon vanilla extract
- 1 1/2 cups all-purpose flour
- 2 tablespoons sugar
- 2 teaspoons baking powder
- 6 tablespoons cold unsalted butter, cubed
- 1/2 cup milk
Quick Steps:
- Heat the oven to 375°F and lightly grease a 9×13-inch baking dish.
- Toss the berries with sugar, cornstarch, lemon juice, vanilla, and a pinch of salt.
- Mix flour, sugar, baking powder, and salt, then cut in the butter until pea-size bits form.
- Stir in the milk just until the dough comes together, then drop rough spoonfuls over the berries.
- Bake for 35 to 40 minutes, until the topping is golden and the filling is bubbling thickly.
- Rest for 10 minutes before scooping.
Equipment for This Recipe:
- 9×13-inch baking dish
- Large mixing bowl
- Measuring cups and spoons
- Two spoons for dropping the dough
How to Serve This Dish:
Serve it warm in bowls so the berry syrup stays where it belongs. A spoonful of whipped cream or cold cream is enough; the cobbler already brings the comfort.
Pro Tips for This Recipe:
- Frozen berries can go straight in. Don’t thaw them first, or you’ll get too much liquid.
- Keep the biscuit dough rough. Smooth dough bakes into a tougher lid.
- If the berries are very tart, add another 1 to 2 tablespoons sugar.
- A tiny pinch of black pepper in the fruit filling sounds odd and tastes right.
Variations on This Dish:
- Peach-Berry Cobbler: Replace half the berries with sliced peaches for a softer, sweeter filling.
- Buttermilk Biscuit Top: Swap the milk for buttermilk if you want a tangier, richer top.
- Oat Cobbler Crust: Stir 1/2 cup oats into the biscuit dough for a more rustic finish.
Common Mistakes to Avoid with This Dish:
- Overmixing the biscuit dough: It gets chewy fast. Stir only until the dry spots disappear.
- Skipping the thickener: Without cornstarch, the fruit turns into soup.
- Using a shallow pan that’s too small: The filling bubbles up, and nobody wants a sticky oven floor.
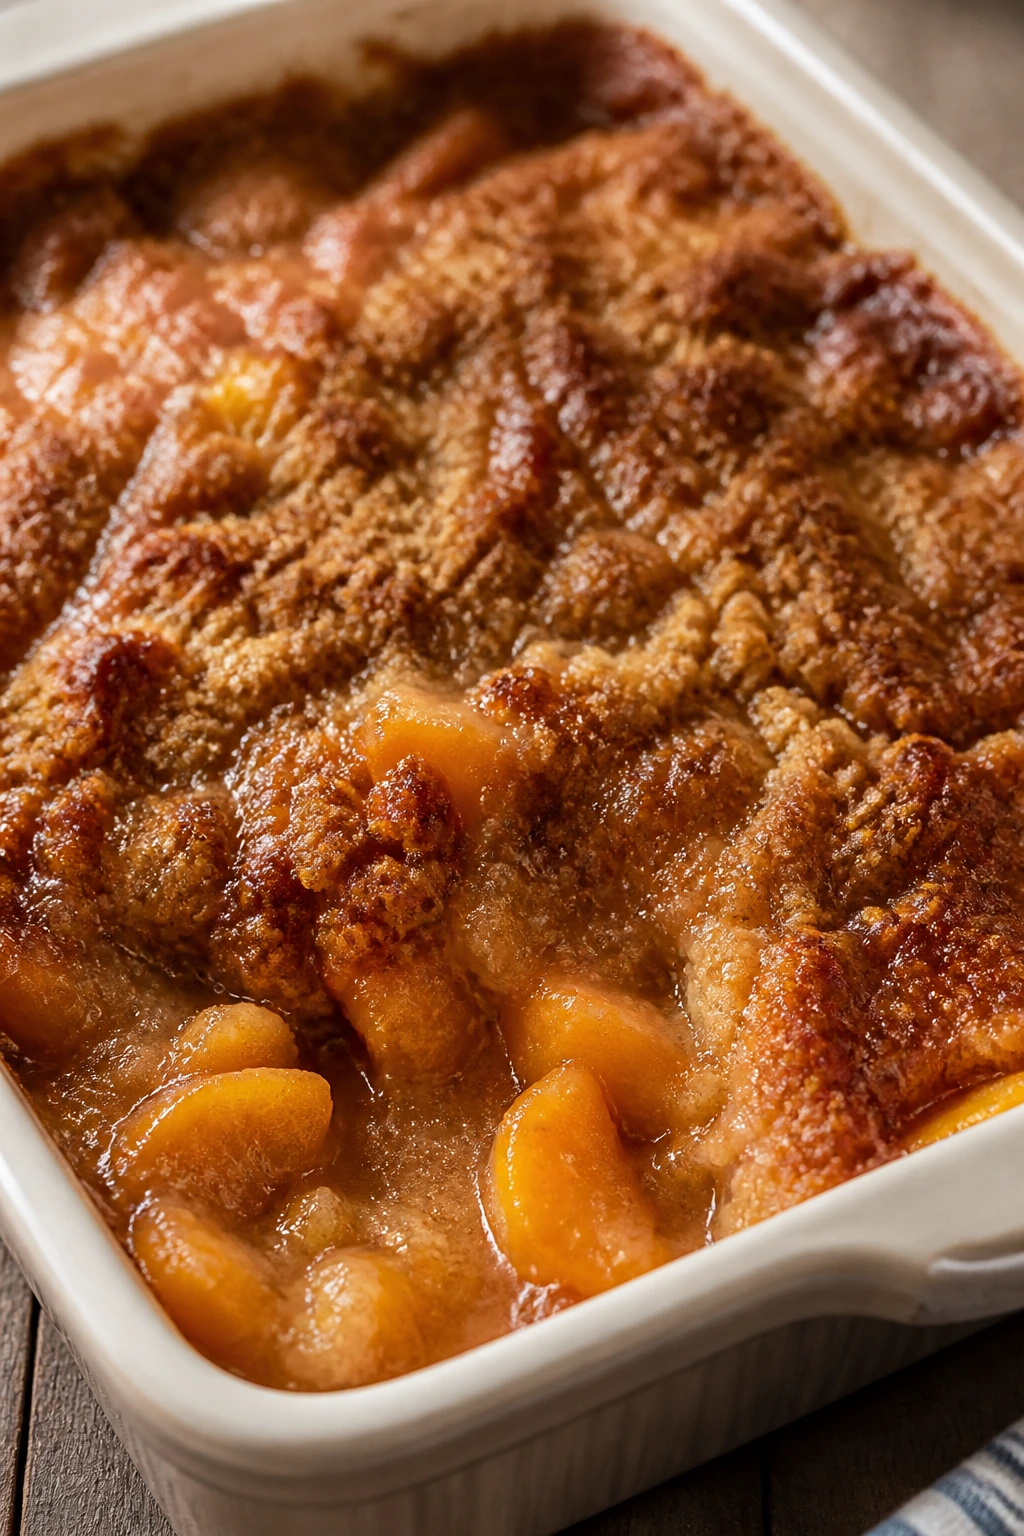
3. Peach Dump Cake with Brown Sugar Crunch
Dump cake is a terrible name for a dessert that tastes this good. It’s a layered, buttery mess in the best possible way: peaches underneath, cake mix above, melted butter seeping through, and the top turning into a caramelized crust that cracks when you spoon into it.
Why It Works:
Canned peaches bring sweetness and juice without any peeling or chopping. Cake mix is the shortcut, but the real trick is spacing out the butter so the dry mix can hydrate evenly in the oven. The edges get crisp, the center stays tender, and the whole thing tastes like someone spent more time on it than they did.
Key Ingredients:
- 2 cans sliced peaches in juice, 15 to 20 ounces each
- 1/4 cup brown sugar
- 1 teaspoon cinnamon
- 1 box yellow cake mix
- 1/2 cup unsalted butter, melted
- 1/2 cup chopped pecans, optional
- Pinch of salt
Quick Steps:
- Preheat the oven to 350°F and grease a 9×13-inch baking dish.
- Spread the peaches and their juice in the dish, then sprinkle on the brown sugar, cinnamon, and salt.
- Scatter the cake mix evenly over the fruit without stirring.
- Drizzle the melted butter over as much of the surface as you can, then add pecans if you’re using them.
- Bake for 40 to 45 minutes, until the top is deeply golden and the peach juices are bubbling around the edges.
- Cool for 15 minutes before serving so it doesn’t collapse into molten sugar.
Equipment for This Recipe:
- 9×13-inch baking dish
- Large spoon
- Measuring cup
- Oven mitts, because the fruit bubbles hot
How to Serve This Dish:
I like it warm with vanilla ice cream because the contrast between cold and hot is half the point. If you want less sweetness, a spoonful of unsweetened whipped cream reins it in.
Pro Tips for This Recipe:
- Use peaches packed in juice, not heavy syrup, or the dessert tastes sticky instead of fruit-forward.
- Leave the cake mix dry. Stirring turns it into paste.
- If a patch looks dry before baking, add a few more spoonfuls of melted butter.
- A pinch of nutmeg works well here, but go easy.
Variations on This Dish:
- Bourbon Peach Dump Cake: Add 1 tablespoon bourbon to the peaches for a deeper caramel note.
- Berry-Peach Version: Swap one can of peaches for 2 cups berries if you want more tartness.
- Coconut Crunch Top: Sprinkle 1/2 cup sweetened coconut over the cake mix before baking.
Common Mistakes to Avoid with This Dish:
- Uneven butter coverage: Dry floury pockets stay underbaked. Drizzle slowly and cover the surface as evenly as possible.
- Using a cold oven: The topping needs steady heat from the start to crisp properly.
- Serving before it settles: It looks loose at first, then firms into proper spoonable dessert after a short rest.
4. Banana Bread Pudding with Vanilla Custard
If you’ve got bananas turning spotted on the counter and stale bread nobody wants, this dessert is your friend. The bananas melt into the custard, the bread drinks everything up, and the top bakes to a soft, browned lid with a few sticky edges that are the first thing to disappear.
Why It Works:
Bread pudding is built for leftovers, which makes it one of the most practical fruit desserts around. The bananas add body and natural sweetness, so you can keep the sugar moderate. Day-old bread soaks without disintegrating, especially if you toast it first and give the custard a minute to settle in.
Key Ingredients:
- 6 cups day-old bread cubes
- 3 ripe bananas, mashed
- 3 large eggs
- 2 cups milk
- 1/2 cup granulated sugar
- 3 tablespoons melted butter
- 1 teaspoon vanilla extract
- 1 teaspoon cinnamon
- Pinch of salt
- 1/2 cup raisins, optional
Quick Steps:
- Preheat the oven to 350°F and butter an 8×8-inch baking dish.
- Spread the bread cubes on a baking sheet and toast them for 8 minutes if they’re very soft.
- Whisk the bananas, eggs, milk, sugar, melted butter, vanilla, cinnamon, and salt until smooth.
- Pour the custard over the bread and press the cubes down so they soak for 10 minutes.
- Fold in raisins if using, then bake for 40 to 45 minutes, until the center is set and the top is golden.
- Let it stand for 15 minutes before spooning.
Equipment for This Recipe:
- 8×8-inch baking dish
- Whisk
- Large bowl
- Baking sheet
How to Serve This Dish:
Serve it warm with a dusting of powdered sugar or a thin pour of warm cream. It also works at breakfast the next day, which is part of its quiet charm.
Pro Tips for This Recipe:
- Toast soft bread first; otherwise it can turn mushy.
- Very ripe bananas make the flavor deeper, not too sweet, which is exactly what you want.
- Press the bread into the custard, but don’t mash it.
- A little rum extract gives it a bakery-style smell without turning it boozy.
Variations on This Dish:
- Chocolate Chip Banana Pudding: Add 1/2 cup chocolate chips for a dessert that leans richer.
- Cinnamon-Raisin Version: Use cinnamon raisin bread and skip the raisins.
- Dairy-Free Bread Pudding: Swap in oat milk and coconut milk, and use melted coconut oil instead of butter.
Common Mistakes to Avoid with This Dish:
- Using fresh bread straight away: It won’t absorb enough custard. Stale or toasted bread holds the texture better.
- Overbaking: The pudding should wobble a little in the center when it comes out.
- Not letting it soak: Those 10 minutes matter. Dry bread leaves dry pockets.
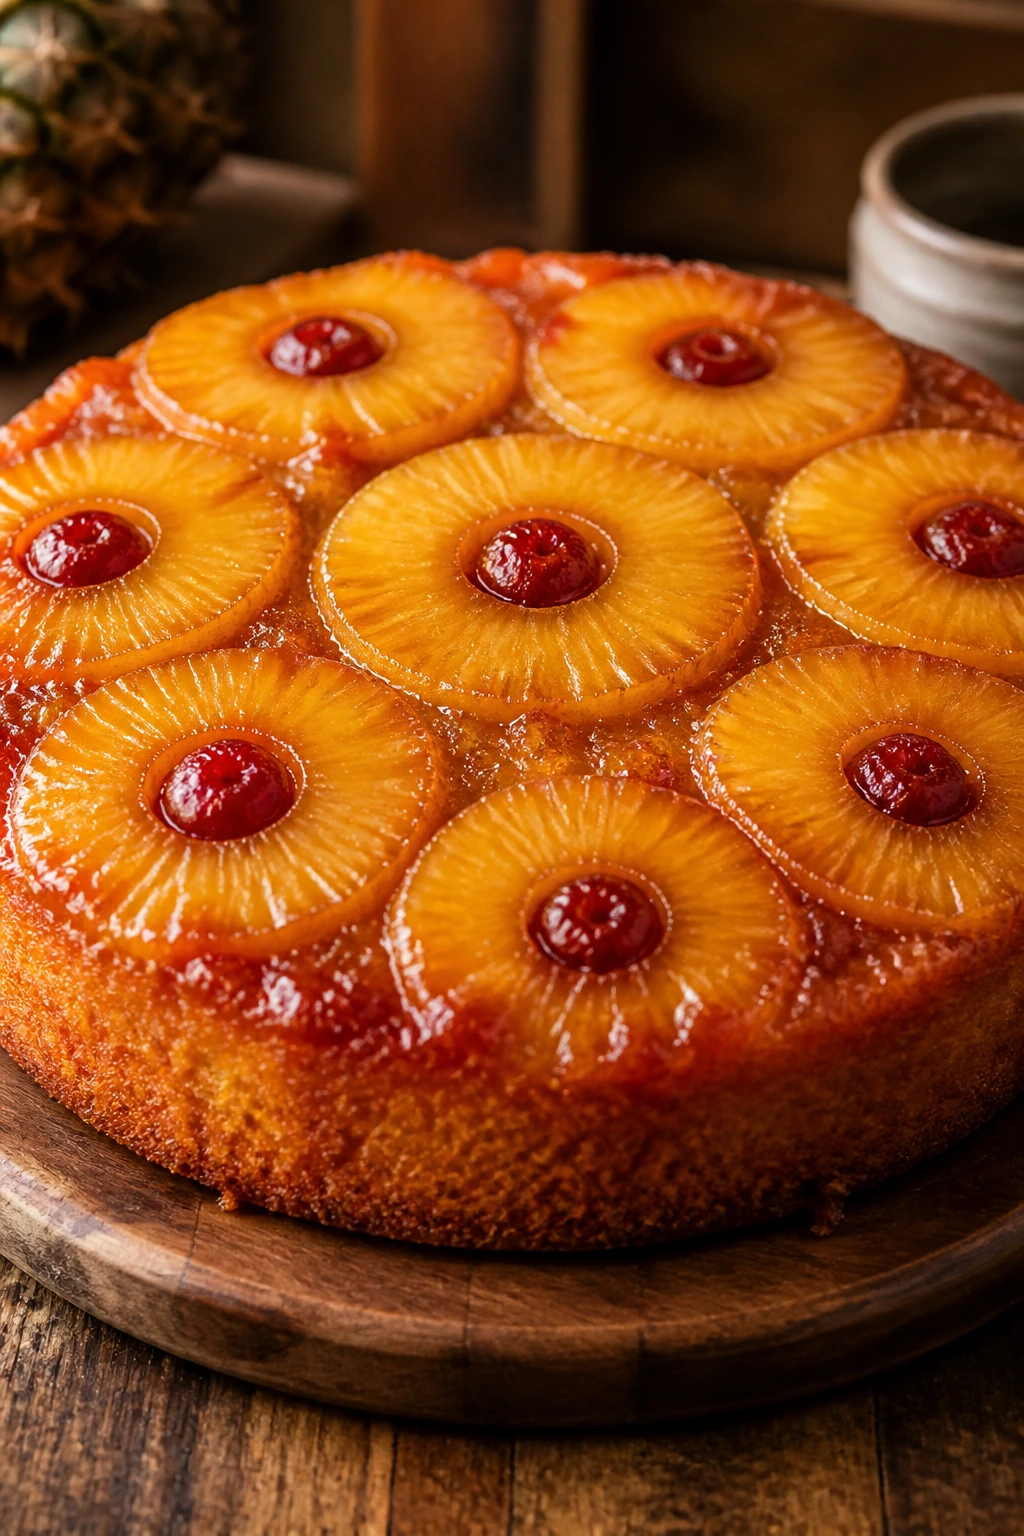
5. Pineapple Upside-Down Cake
There’s a reason this cake still shows up on church tables and family tables and, honestly, any table that can handle a little retro drama. The caramelized brown sugar under the pineapple turns glossy and sticky, and when you flip it out, the fruit already looks arranged for you.
Why It Works:
Pineapple brings enough acidity to keep the cake from tasting heavy, while the brown sugar and butter make a syrup that coats the fruit rather than disappearing into it. Using a simple vanilla batter underneath means the fruit stays the star. The cake needs no frosting because the top does all the talking.
Key Ingredients:
- 1/2 cup unsalted butter
- 3/4 cup packed brown sugar
- 1 can pineapple rings, about 20 ounces
- Maraschino cherries, optional
- 1 1/2 cups all-purpose flour
- 1 cup granulated sugar
- 2 teaspoons baking powder
- 1/2 teaspoon salt
- 2 large eggs
- 1/2 cup milk
- 1 teaspoon vanilla extract
- 1/2 cup pineapple juice, reserved from the can
Quick Steps:
- Preheat the oven to 350°F and melt the butter in a 9-inch round cake pan.
- Sprinkle the brown sugar evenly over the butter, then arrange the pineapple rings and cherries if using.
- Whisk the flour, sugar, baking powder, and salt in a bowl.
- Add eggs, milk, vanilla, and pineapple juice, stirring until smooth, then pour over the fruit.
- Bake for 35 to 40 minutes, until the cake springs back and a toothpick comes out clean.
- Cool for 10 minutes, then invert onto a serving plate while the caramel is still loose.
Equipment for This Recipe:
- 9-inch round cake pan
- Mixing bowl
- Whisk
- Serving plate with a rim, just in case the syrup runs
How to Serve This Dish:
Slice it while still warm so the caramel stays glossy and the pineapple doesn’t cling to the pan. A small scoop of ice cream works, but the cake is rich enough to stand alone.
Pro Tips for This Recipe:
- Drain the pineapple well before arranging it, or the topping gets watery.
- Flip the cake while warm, not hot and not fully cool.
- A few extra pineapple bits tucked between the rings make the top look fuller.
- If your pan is dark metal, start checking a few minutes early.
Variations on This Dish:
- Coconut Pineapple Cake: Replace 1/4 cup of the milk with coconut milk for a softer tropical note.
- Skillet Version: Bake it in a cast-iron skillet for a more caramelized edge.
- Mini Cakes: Use a muffin tin with pineapple tidbits for individual portions.
Common Mistakes to Avoid with This Dish:
- Waiting too long to invert it: The caramel sets fast and can glue the cake to the pan.
- Using too much juice under the fruit: You want syrup, not a shallow pool.
- Underbaking the center: The top may look done before the middle is set, so test the cake, not just the color.
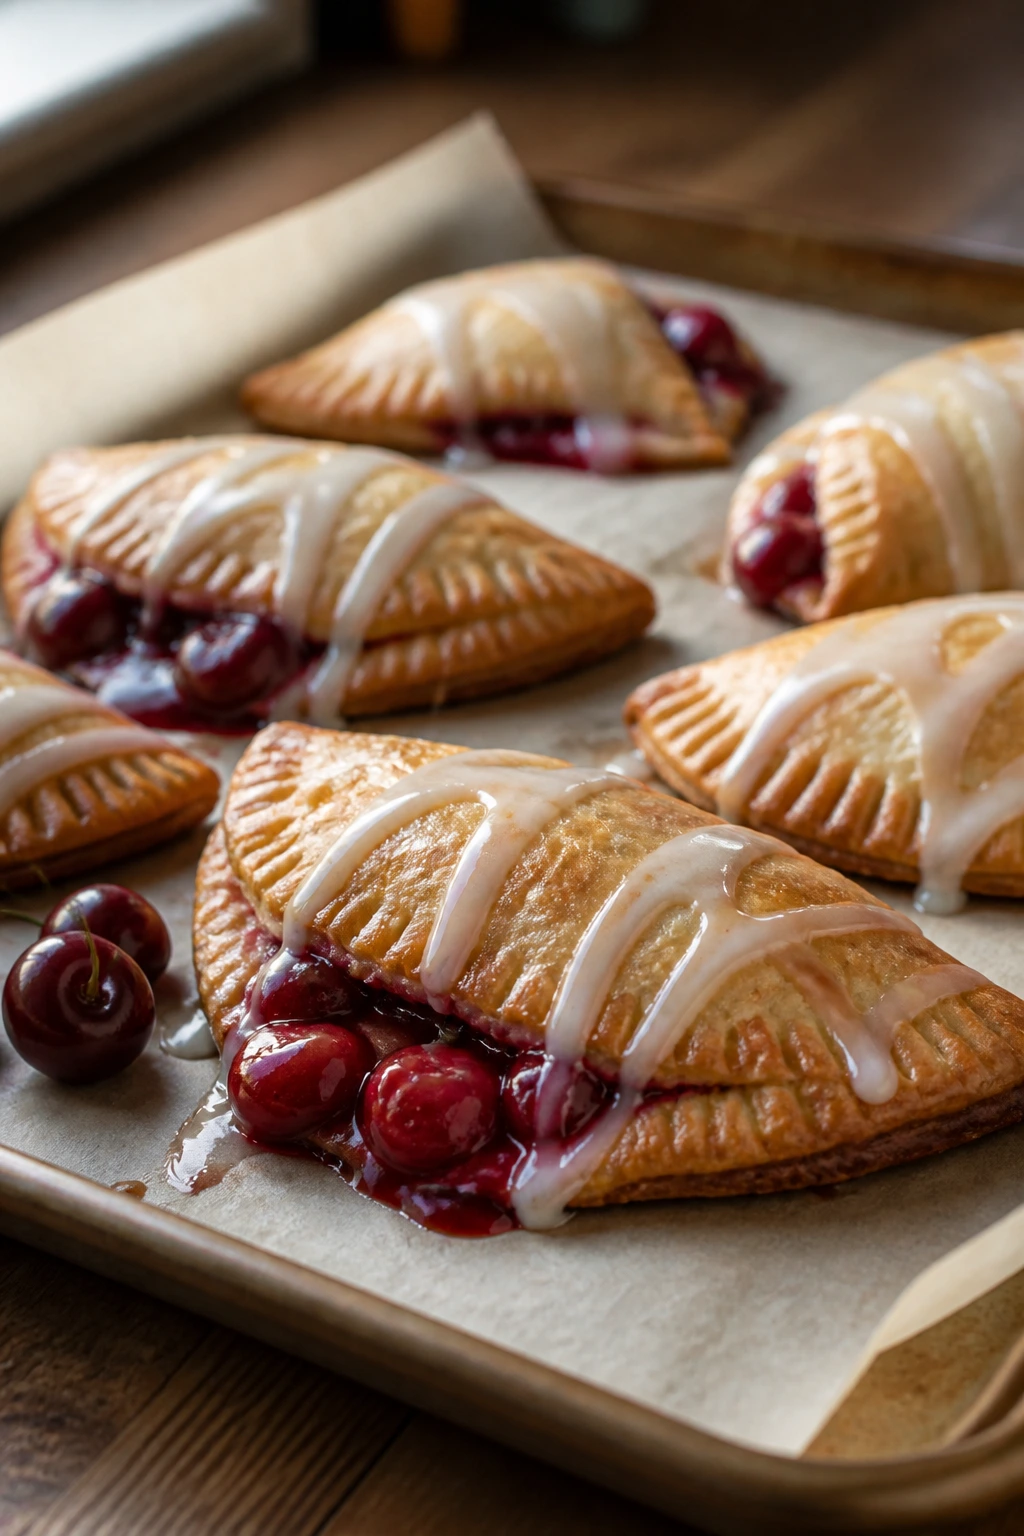
6. Cherry Hand Pies with Simple Glaze
Hand pies have the sort of charm that makes people pick one up before they ask what’s inside. The crust shatters slightly, the cherry filling runs hot if you’re impatient, and the glaze gives the tops a faint shine that looks fancier than the recipe really is.
Why It Works:
Pie dough and cherry filling are already a classic match, but making them small solves the hardest part of pie: serving neat slices. The fruit cooks inside its own little parcel, so the filling thickens in place instead of spilling across a plate. I like canned cherry filling here when I want speed, but a quick stovetop filling works too.
Key Ingredients:
- 2 refrigerated pie crusts or homemade dough for 2 crusts
- 2 cups pitted cherries, fresh or frozen, or 1 can cherry pie filling
- 1/4 cup sugar
- 1 tablespoon cornstarch
- 1 tablespoon lemon juice
- 1 egg
- 1 tablespoon milk
- 2 tablespoons coarse sugar, optional
- 1/2 cup powdered sugar
- 1 to 2 tablespoons milk, for glaze
- 1/4 teaspoon vanilla extract
Quick Steps:
- Preheat the oven to 400°F and line a baking sheet with parchment.
- If making the filling, simmer cherries, sugar, cornstarch, and lemon juice for 3 to 4 minutes until thick.
- Roll the dough and cut it into 4-to-5-inch circles.
- Spoon 1 to 2 tablespoons filling onto each round, fold over, and crimp the edges with a fork.
- Brush with egg wash, sprinkle with coarse sugar, and cut a small steam vent on top.
- Bake for 18 to 22 minutes, until deeply golden.
- Stir the glaze ingredients together and drizzle over cooled pies.
Equipment for This Recipe:
- Baking sheet
- Parchment paper
- Rolling pin
- Fork and pastry brush
How to Serve This Dish:
Serve them warm enough that the filling is still soft but not so hot that it leaks everywhere. They’re easy to pack for picnics or tuck onto a platter with coffee.
Pro Tips for This Recipe:
- Keep the filling thick before it goes into the dough.
- Chill the assembled pies for 10 minutes if your kitchen is warm.
- Don’t overfill them; the fruit expands and the seams split.
- Seal the edges well or the glaze ends up on the pan instead of the pastry.
Variations on This Dish:
- Mixed Berry Hand Pies: Use blueberries and raspberries when cherries aren’t around.
- Almond Cherry Version: Add 1/4 teaspoon almond extract to the filling.
- Air Fryer Hand Pies: Bake at 375°F in batches for a slightly faster finish.
Common Mistakes to Avoid with This Dish:
- Wet filling: Excess juice weakens the crust and causes leaks.
- Skipping the vent: Steam needs a way out, or the pies puff and split.
- Glazing too soon: Warm pies need a few minutes first, or the glaze melts off.
7. Strawberry Shortcake Biscuits
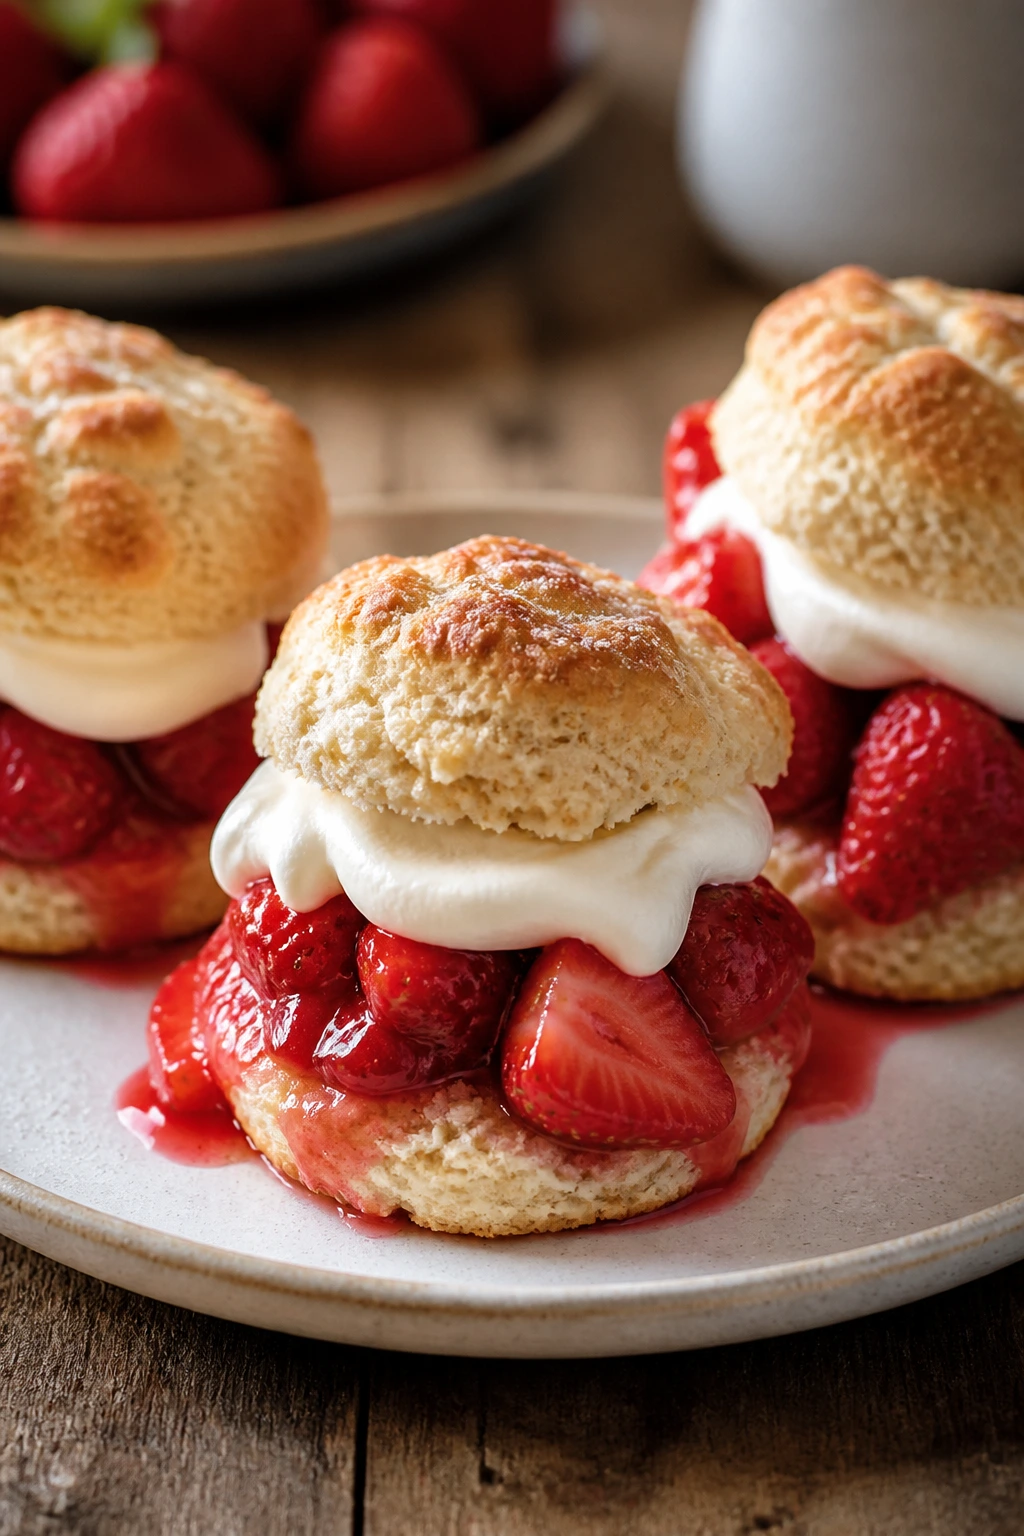
Shortcake should not be fussy. The biscuit should be tender, a little rough at the edges, and sturdy enough to catch strawberry juice without turning soggy before the first bite is gone. That’s the sweet spot.
Why It Works:
The biscuit gives the dessert structure, while macerated strawberries create their own syrup with almost no help. Sugar and lemon draw out the berry juices, and whipped cream smooths the whole thing together. You get contrast: cold cream, soft berries, warm biscuit if you serve it right away.
Key Ingredients:
- 4 cups strawberries, hulled and sliced
- 2 tablespoons sugar
- 1 teaspoon lemon juice
- 2 cups all-purpose flour
- 1/4 cup granulated sugar
- 1 tablespoon baking powder
- 1/2 teaspoon salt
- 1/2 cup cold unsalted butter, cubed
- 3/4 cup milk or buttermilk
- 1 cup heavy cream
- 1 tablespoon powdered sugar
- 1 teaspoon vanilla extract
Quick Steps:
- Heat the oven to 425°F and line a baking sheet with parchment.
- Toss strawberries with sugar and lemon juice, then let them sit while you make the biscuits.
- Whisk flour, sugar, baking powder, and salt, then cut in the butter until the mixture looks like coarse crumbs.
- Stir in the milk just until the dough comes together, then pat it into a 1-inch-thick round and cut biscuits.
- Bake for 12 to 15 minutes, until the tops are golden and the centers spring back.
- Whip the cream with powdered sugar and vanilla.
- Split the biscuits, spoon on strawberries, and finish with cream.
Equipment for This Recipe:
- Baking sheet
- Mixing bowl
- Biscuit cutter or glass
- Whisk or hand mixer
How to Serve This Dish:
Build each one right before serving so the biscuits keep their edges. A little extra strawberry syrup over the top makes the plate look generous and keeps the cream from feeling heavy.
Pro Tips for This Recipe:
- Freeze the butter for 10 minutes if the kitchen is warm.
- Handle the biscuit dough as little as possible.
- Let the strawberries sit at least 15 minutes so the syrup gets going.
- Split the biscuits with your hands, not a knife, if you want a crumbier edge.
Variations on This Dish:
- Blueberry Shortcake: Swap in blueberries and keep the same biscuit base.
- Lemon Shortcake Biscuits: Add 1 teaspoon lemon zest to the dough.
- Cream Cheese Layer: Beat 4 ounces cream cheese into the whipped cream for a thicker topping.
Common Mistakes to Avoid with This Dish:
- Using soft, steamy biscuits: They need to cool slightly or the cream melts right off.
- Overworking the dough: Tough shortcake is a waste of good strawberries.
- Assembling too early: The biscuits absorb the berry juices and go soggy fast.
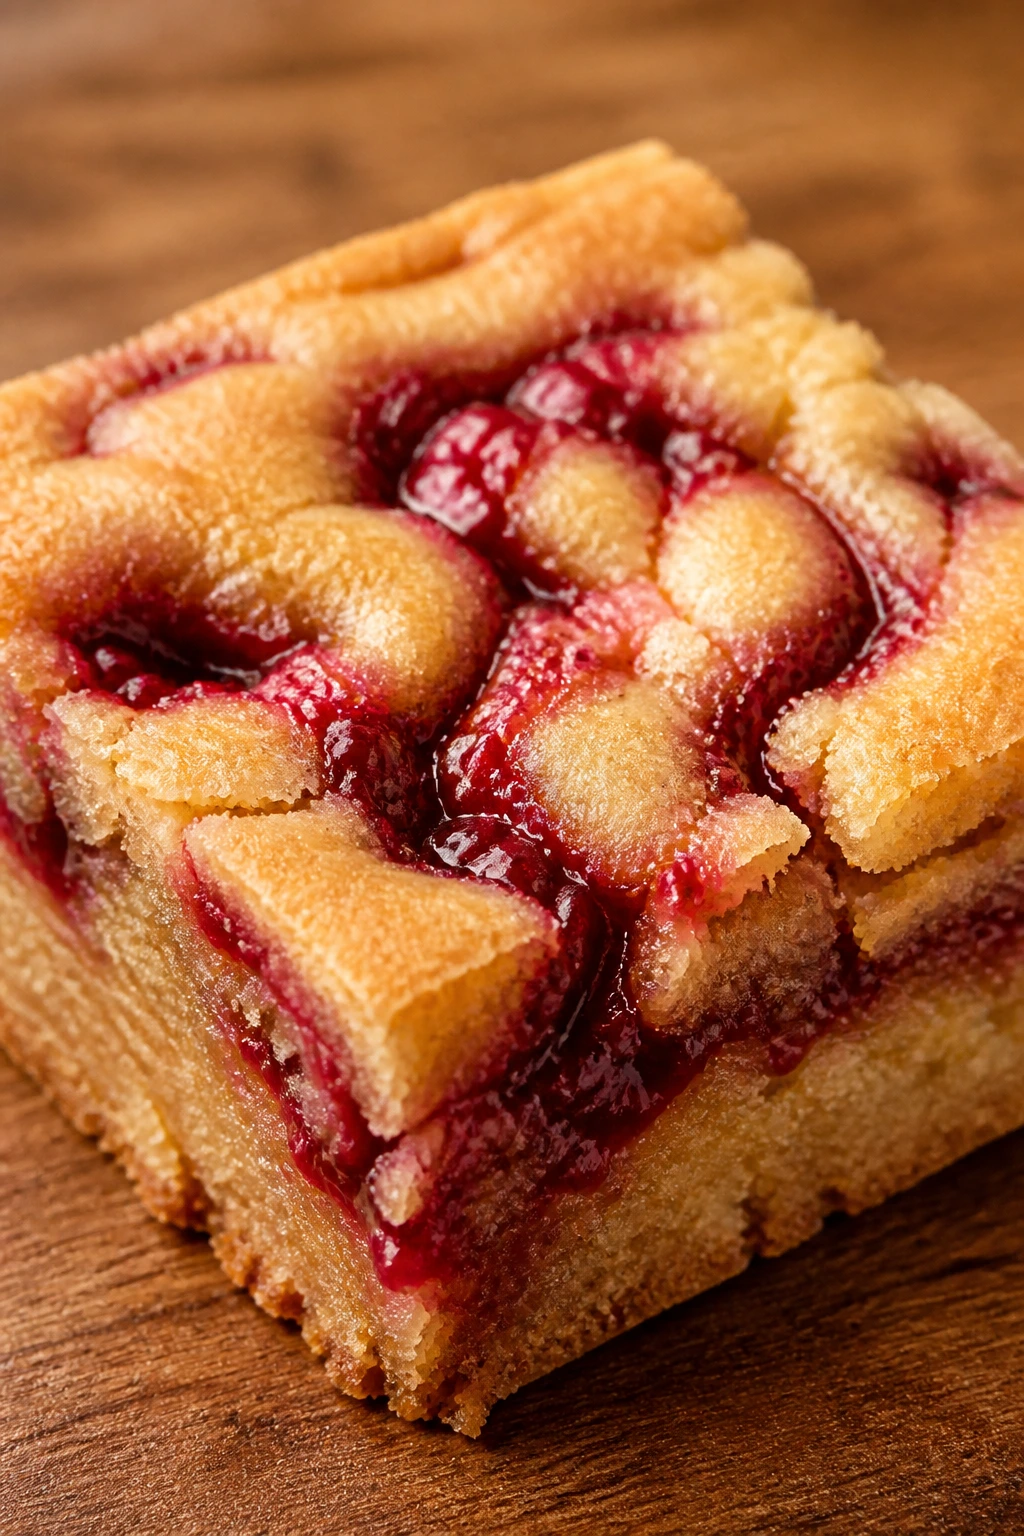
8. Mixed Berry Crumble Bars
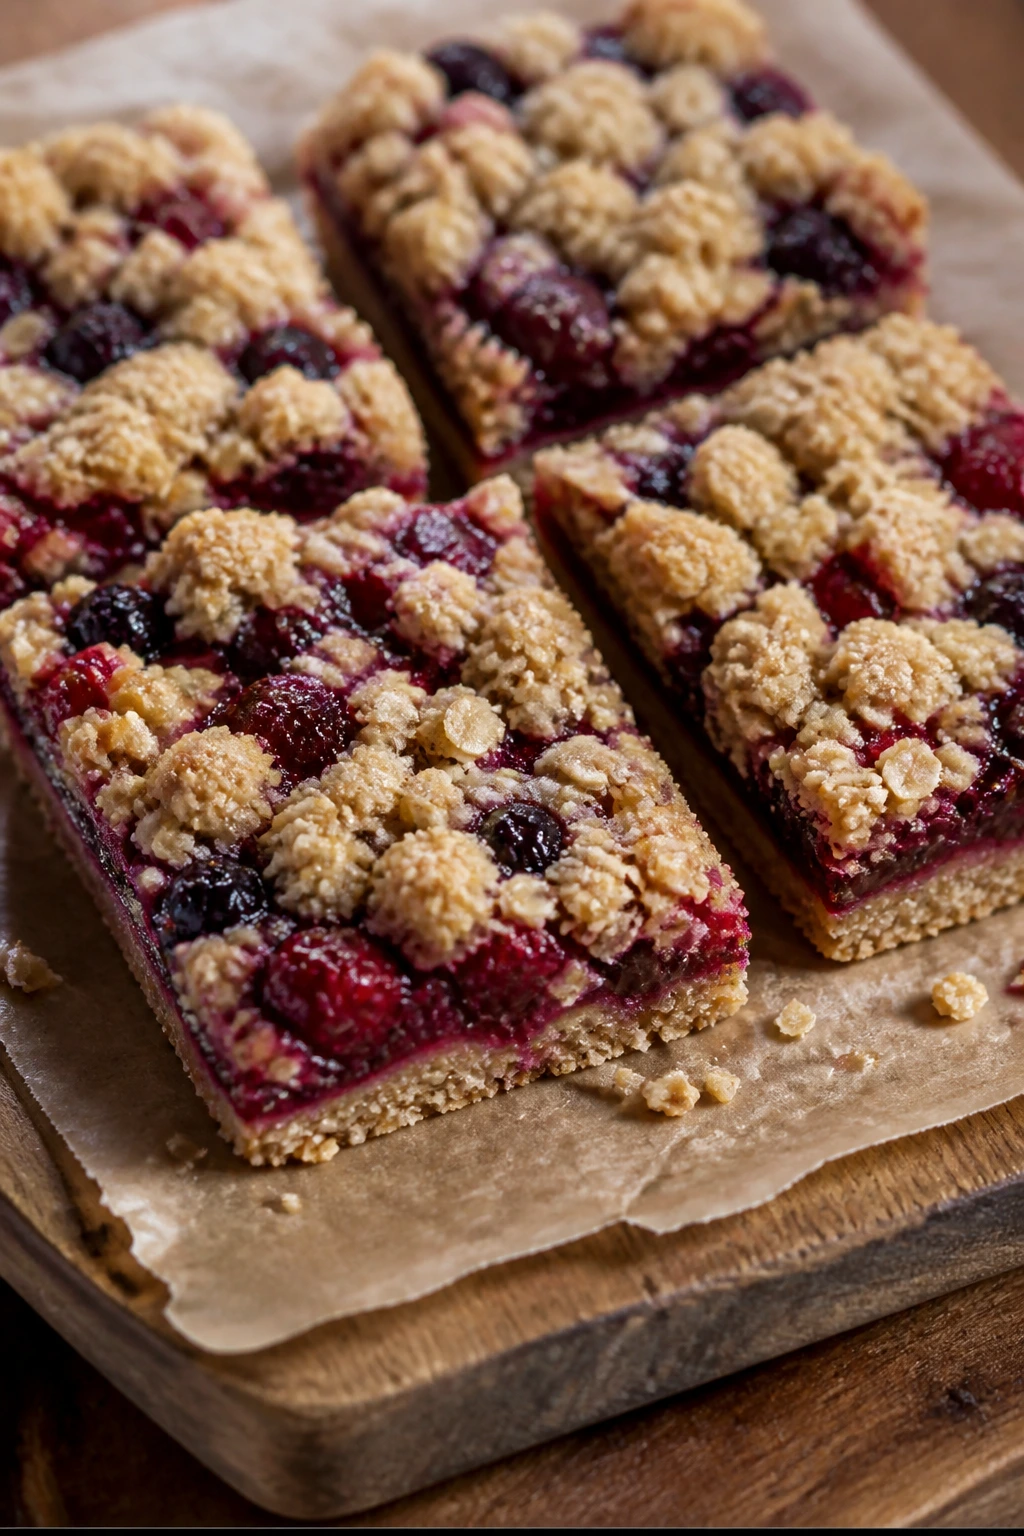
These are the kind of bars that slice cleanly enough for a lunchbox but still taste like dessert you’d eat with a spoon if nobody was watching. The bottom is buttery and sturdy, the fruit layer turns jammy, and the crumb on top gives you that dry, sandy contrast people love in a good fruit bar.
Why It Works:
Oats help the crust and topping stay crisp longer than plain flour would. Cornstarch keeps the berry filling from leaking across the pan, and lemon juice keeps the sweetness from becoming one-note. The bars also work with frozen berries, which is a huge plus.
Key Ingredients:
- 2 cups all-purpose flour
- 1 cup rolled oats
- 3/4 cup packed brown sugar
- 1 teaspoon baking powder
- 1/2 teaspoon salt
- 1 cup cold unsalted butter, cubed
- 3 cups mixed berries
- 1/3 cup granulated sugar
- 1 tablespoon cornstarch
- 1 tablespoon lemon juice
- 1 teaspoon vanilla extract
Quick Steps:
- Preheat the oven to 350°F and line an 8×8-inch pan with parchment.
- Mix flour, oats, brown sugar, baking powder, and salt, then cut in the butter until crumbly.
- Press two-thirds of the mixture into the pan for the crust.
- Toss the berries with sugar, cornstarch, lemon juice, and vanilla, then spread over the crust.
- Sprinkle the remaining crumb mixture on top.
- Bake for 40 to 45 minutes, until the fruit is bubbling and the top is golden.
- Cool completely before slicing, or the bars will crumble apart.
Equipment for This Recipe:
- 8×8-inch baking pan
- Parchment paper
- Mixing bowl
- Fork or pastry cutter
How to Serve This Dish:
Serve them at room temperature for the cleanest cuts, or chill them for neater squares. They’re good plain, but a little whipped cream turns them from snacky into proper dessert.
Pro Tips for This Recipe:
- Line the pan with parchment overhang so you can lift the bars out.
- Frozen berries work well, but keep the filling thick.
- Press the bottom crust firmly; loose crumbs make for messy slices.
- Let the bars cool all the way through before cutting.
Variations on This Dish:
- Strawberry-Raspberry Bars: Use mostly red berries for a brighter flavor.
- Jam Swirl Bars: Replace half the fruit with a thick jam if fresh berries are sparse.
- Walnut Crumble: Add 1/2 cup chopped walnuts to the topping for more bite.
Common Mistakes to Avoid with This Dish:
- Cutting warm bars: They haven’t set yet and will fall apart.
- Too much filling: It looks generous, then leaks everywhere.
- Skipping parchment: You’ll fight the pan for every square.
9. Pear Galette with Cinnamon Sugar Crust
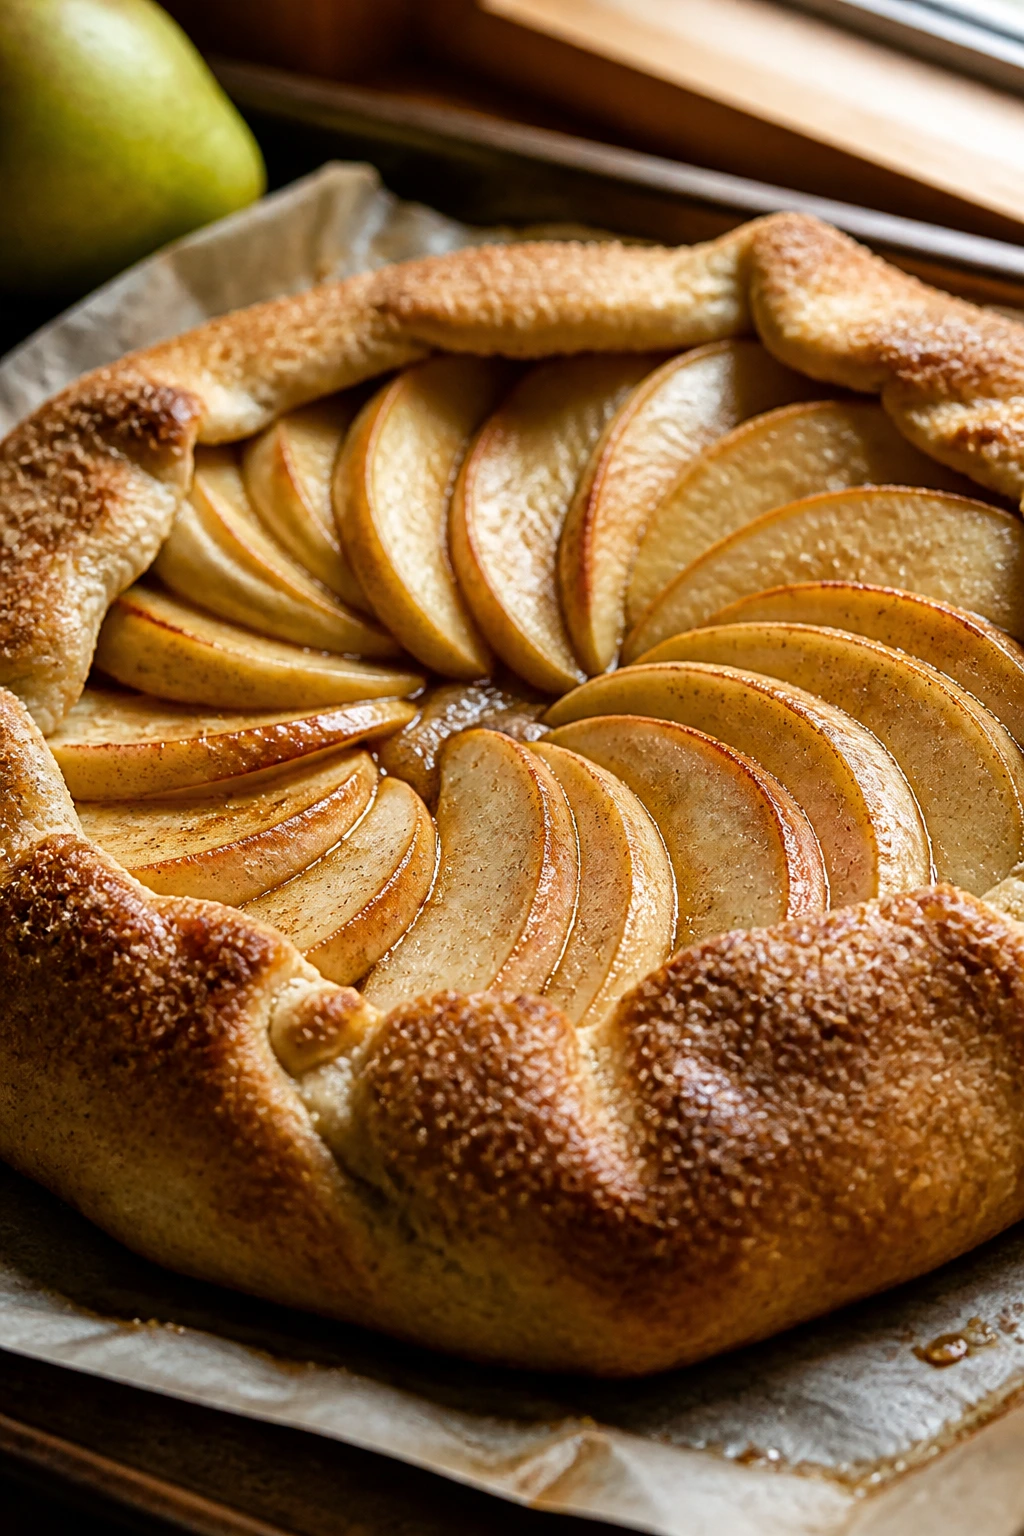
A galette looks relaxed, which is exactly why it’s useful. No crimping, no pie plate, no panic. Just pears fanned over pastry, edges folded over like they were meant to be casual, and a golden crust that can take a little rustic roughness.
Why It Works:
Pears soften into a silky filling without needing much sugar, especially when they’re ripe. A little flour under the fruit catches the juices, and the exposed crust browns hard at the rim while staying tender underneath. The result lands somewhere between pie and pastry shop tart.
Key Ingredients:
- 1 sheet or disk pie dough, about 9 to 10 inches
- 4 ripe pears, peeled if desired and sliced
- 1/3 cup sugar
- 1 tablespoon flour or cornstarch
- 1 teaspoon cinnamon
- 1 tablespoon lemon juice
- 2 tablespoons unsalted butter, cut into bits
- 1 egg, beaten with 1 tablespoon water
- 1 tablespoon coarse sugar, optional
Quick Steps:
- Heat the oven to 400°F and line a baking sheet with parchment.
- Toss the pears with sugar, flour, cinnamon, and lemon juice.
- Roll the dough into a 12-inch circle and move it to the baking sheet.
- Spoon the pears into the center, leaving a 2-inch border, then dot with butter.
- Fold the edges up over the fruit, brush with egg wash, and sprinkle with coarse sugar.
- Bake for 35 to 40 minutes, until the crust is deep golden and the fruit is tender.
- Cool for at least 20 minutes before slicing.
Equipment for This Recipe:
- Baking sheet
- Parchment paper
- Rolling pin
- Pastry brush
How to Serve This Dish:
Serve the slices slightly warm with crème fraîche, whipped cream, or a spoon of plain yogurt if you want something less sweet. It’s pretty enough for company but easy enough for a Tuesday.
Pro Tips for This Recipe:
- Use pears that are ripe but still firm or they collapse into mush.
- Chill the shaped galette for 10 minutes before baking if the dough feels soft.
- A little turbinado sugar on the edge gives the crust a rough, crackly finish.
- Don’t mound the fruit too high or the center turns watery.
Variations on This Dish:
- Apple-Pear Galette: Swap in half apples for a firmer, brighter filling.
- Ginger Pear Version: Add 1/2 teaspoon ground ginger to the fruit.
- Almond Galette: Sprinkle 2 tablespoons almond flour under the fruit for extra flavor.
Common Mistakes to Avoid with This Dish:
- Warm dough: It shrinks and leaks. Keep it cold.
- Overfilling the center: Too much fruit makes the crust soggy.
- Skipping the egg wash: The edges bake pale and a little dull without it.
10. Blueberry Yogurt Sheet Cake
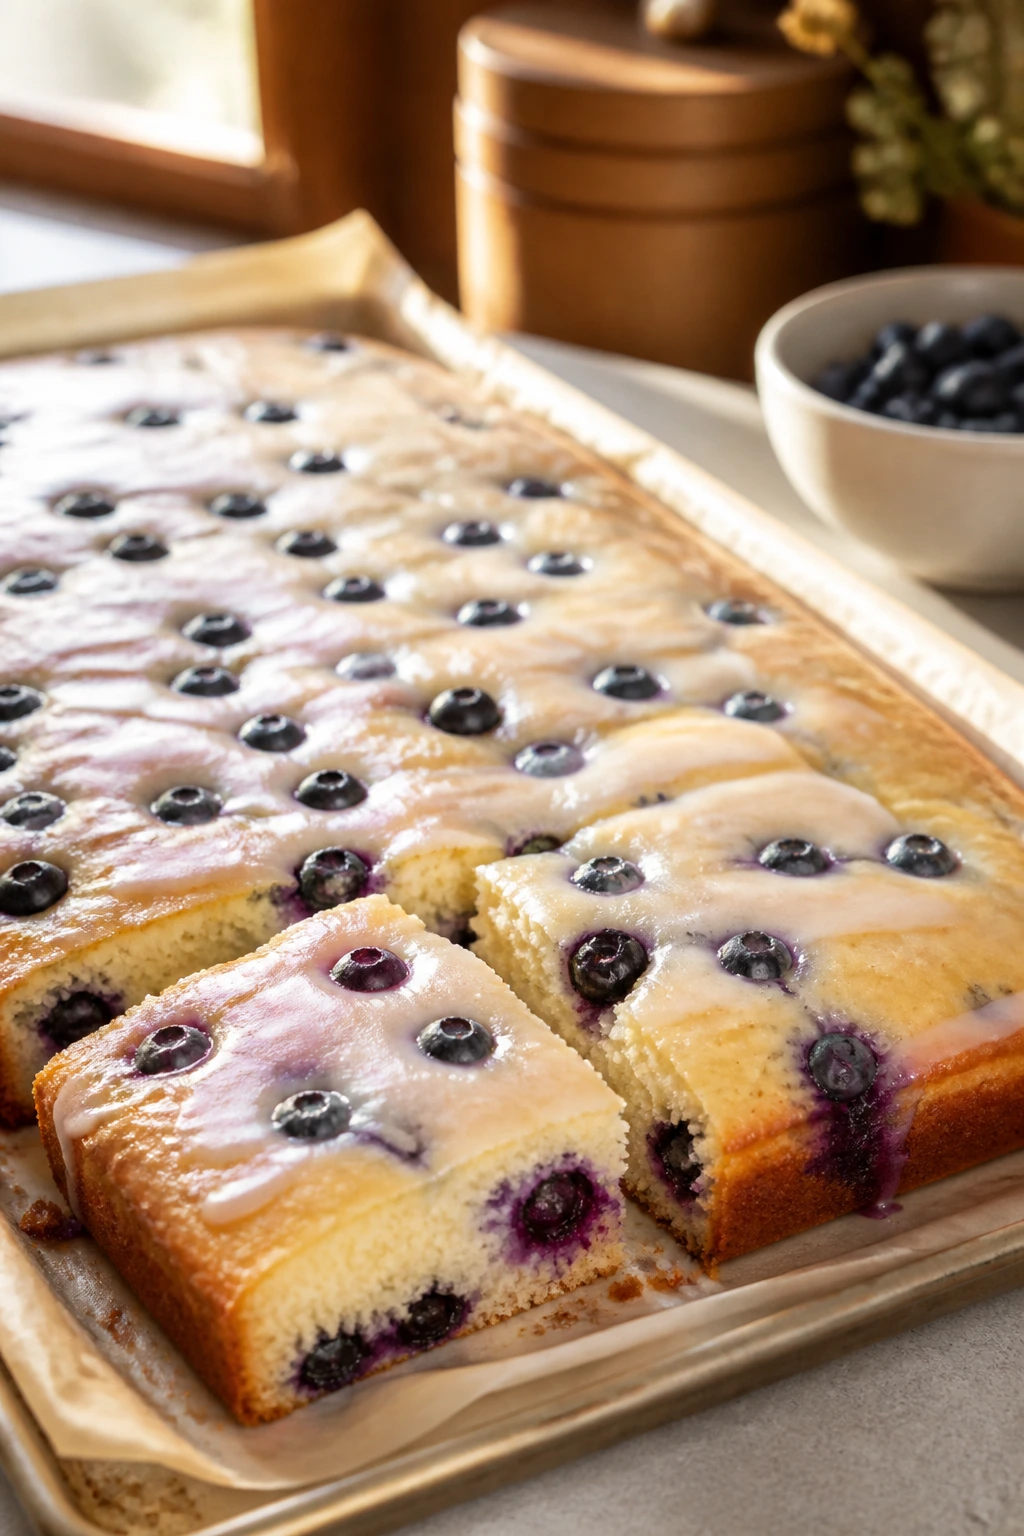
This is the sort of cake that disappears slice by slice on the counter because it feels too easy to be special. It’s soft, lightly tangy, and studded with blueberries that burst into dark little pockets through the crumb.
Why It Works:
Yogurt keeps the crumb moist without making it heavy, and the berries stay suspended better when you toss them with a bit of flour first. A sheet cake bakes evenly and cuts cleanly, which is handy when you want dessert without frosting a layer cake. Lemon zest wakes up the blueberries in a way plain vanilla can’t.
Key Ingredients:
- 1 3/4 cups all-purpose flour
- 1 teaspoon baking powder
- 1/2 teaspoon baking soda
- 1/2 teaspoon salt
- 1/2 cup unsalted butter, softened
- 1 cup granulated sugar
- 2 large eggs
- 1 cup plain yogurt
- 1 teaspoon vanilla extract
- 1 tablespoon lemon zest
- 2 cups blueberries
- 1 tablespoon flour, for tossing berries
Quick Steps:
- Preheat the oven to 350°F and grease a 9×13-inch pan.
- Whisk flour, baking powder, baking soda, and salt.
- Beat butter and sugar until pale, then add eggs one at a time, followed by yogurt, vanilla, and lemon zest.
- Stir in the dry ingredients, then fold in the blueberries tossed with flour.
- Spread the batter in the pan and bake for 30 to 35 minutes, until the center springs back and a toothpick comes out with a few moist crumbs.
- Cool before slicing.
Equipment for This Recipe:
- 9×13-inch baking pan
- Mixing bowls
- Hand mixer or wooden spoon
- Rubber spatula
How to Serve This Dish:
Dust it with powdered sugar and cut it into neat squares. A spoonful of lemon whipped cream makes it feel like a bakery tray cake.
Pro Tips for This Recipe:
- Toss the blueberries with flour so they don’t sink.
- Use full-fat yogurt for the best texture.
- Don’t overbeat after adding the flour or the cake gets tight.
- The top should look set and lightly golden before you pull it.
Variations on This Dish:
- Raspberry Yogurt Cake: Use raspberries for a sharper, tarter slice.
- Lemon Glaze Finish: Drizzle powdered sugar glaze over the cooled cake.
- Vanilla Bean Version: Use vanilla bean paste if you want a deeper vanilla note.
Common Mistakes to Avoid with This Dish:
- Frozen berries without flour: They sink and streak the batter.
- Too much stirring: That makes the crumb dense.
- Trying to slice it hot: The cake needs time to firm up.
11. Baked Cinnamon Apples with Oat Streusel
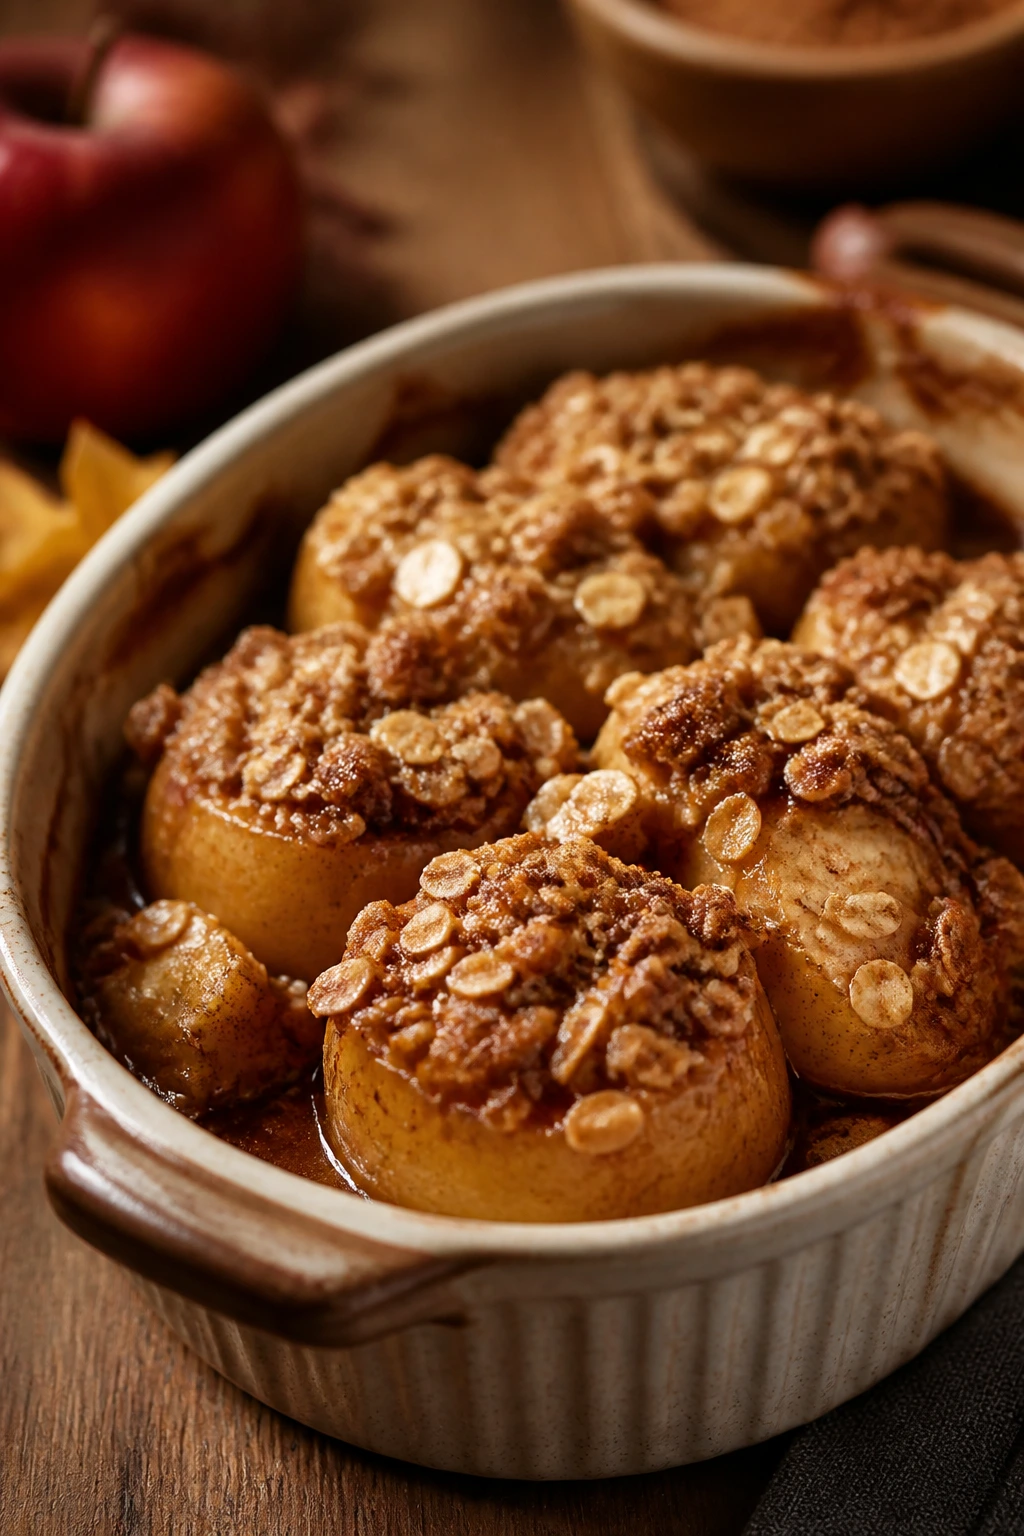
This is what I make when I want dessert to feel like a small, sensible act. The apples soften into spoonable wedges, the streusel turns toasty, and the kitchen smells like cinnamon sticks and melted butter for the next hour.
Why It Works:
Halved or sliced apples bake evenly and keep their shape better than chunks. The oat streusel gives the fruit something crunchy to sit under, and a bit of brown sugar helps the edges caramelize. It’s a simple dessert, but the texture contrast keeps it from feeling plain.
Key Ingredients:
- 6 medium apples, cored and sliced
- 1/4 cup brown sugar
- 1 teaspoon cinnamon
- 2 tablespoons butter, melted
- 1/4 cup rolled oats
- 2 tablespoons flour
- 2 tablespoons sugar
- Pinch of salt
- 2 tablespoons raisins, optional
Quick Steps:
- Heat the oven to 375°F and grease a small baking dish.
- Toss the apples with brown sugar, cinnamon, and raisins if using.
- Mix oats, flour, sugar, salt, and melted butter until crumbly.
- Arrange the apples in the dish and scatter the streusel over the top.
- Bake for 30 to 35 minutes, until the apples are tender and the topping is lightly crisp.
- Rest for 10 minutes before serving.
Equipment for This Recipe:
- Small baking dish
- Mixing bowl
- Sharp knife
- Spoon
How to Serve This Dish:
Serve it as-is when you want something simple, or top it with ice cream if you want the syrup to run a little. It also works beside pancakes if dessert-for-breakfast sounds appealing.
Pro Tips for This Recipe:
- Tart apples hold shape better than very soft ones.
- If the topping browns too fast, cover loosely with foil near the end.
- Slice the apples evenly so they soften at the same pace.
- Add a tiny pinch of nutmeg if you like the filling warmer.
Variations on This Dish:
- Apple-Raisin Bake: Increase the raisins and add 1 tablespoon orange juice.
- Pecan Streusel: Replace half the oats with chopped pecans.
- Maple Finish: Drizzle a teaspoon of maple syrup over the top after baking.
Common Mistakes to Avoid with This Dish:
- Uneven apple slices: Some pieces turn mushy while others stay hard.
- Too much streusel: It can block the fruit from softening.
- Serving right away: A short rest lets the juices settle into a syrup.
12. Plum Skillet Cake
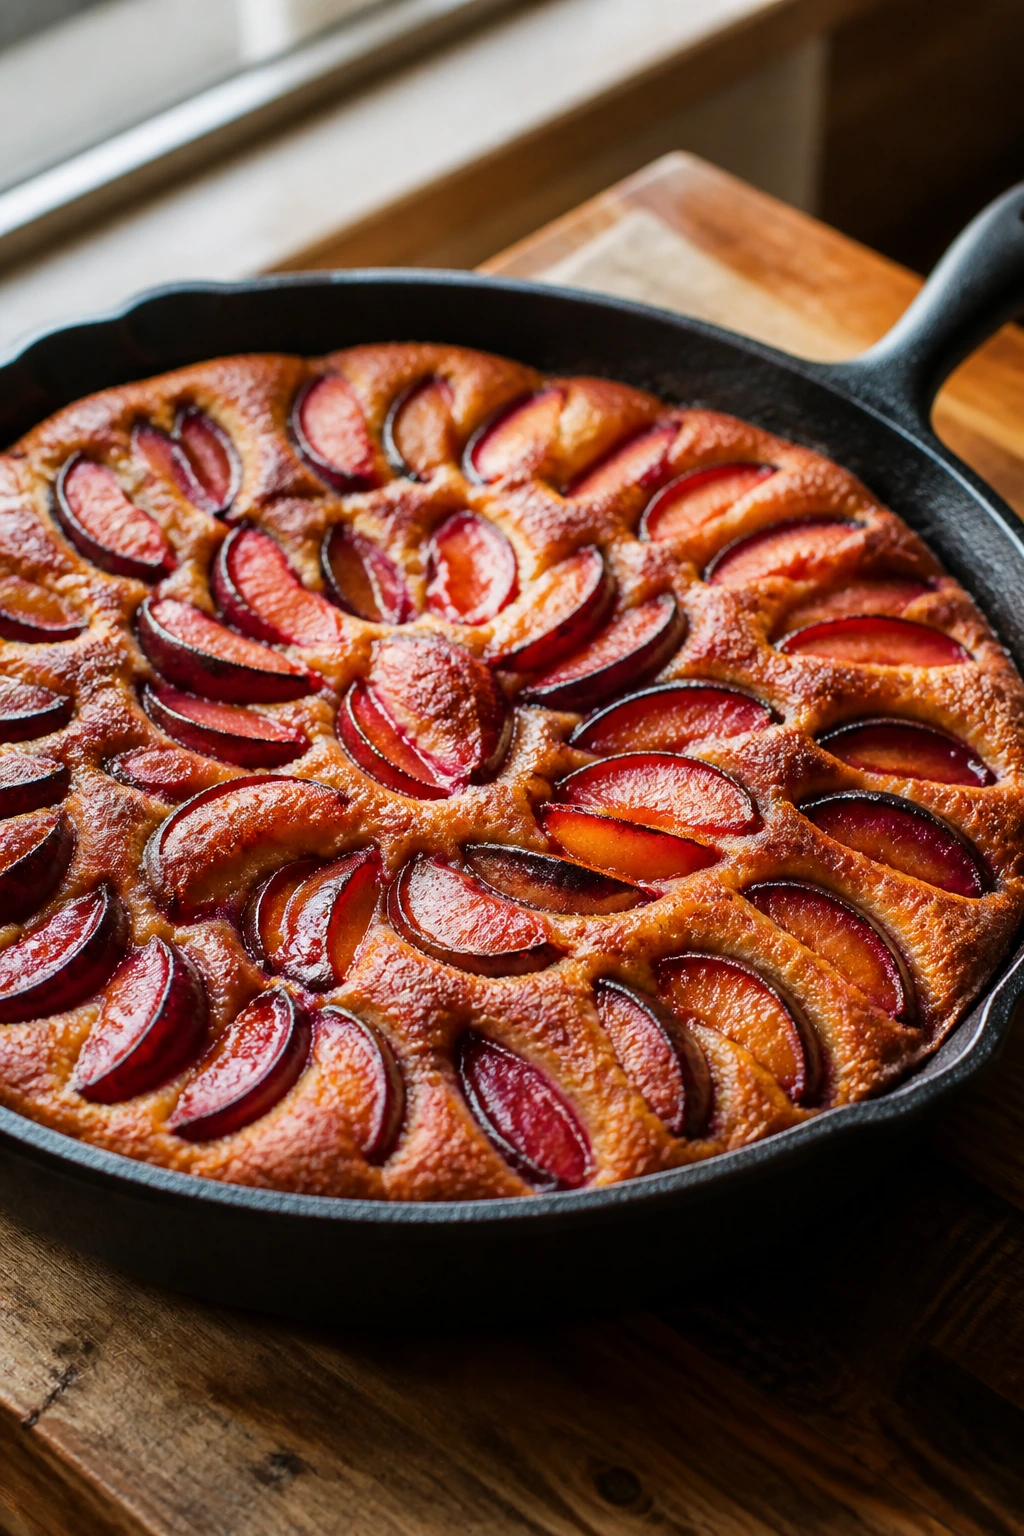
Plums do something magical in the oven. Their tart edges sharpen the sweetness of the batter, and the juices seep into the top of the cake so each slice has a soft, almost jammy surface under the bronzed crust.
Why It Works:
A simple vanilla cake is the right base because it lets the fruit drive the flavor. Baking it in a skillet helps the edges brown and gives the plums a little extra caramelization where they touch the pan. The fruit slices also look beautiful in a way that doesn’t need much arranging.
Key Ingredients:
- 6 ripe plums, pitted and sliced
- 1 tablespoon lemon juice
- 1/3 cup sugar, for the fruit
- 1 1/2 cups all-purpose flour
- 1 cup granulated sugar
- 1 1/2 teaspoons baking powder
- 1/2 teaspoon salt
- 1/2 cup unsalted butter, softened
- 2 large eggs
- 1/2 cup milk
- 1 teaspoon vanilla extract
Quick Steps:
- Preheat the oven to 350°F and butter a 10-inch cast-iron skillet.
- Toss the plum slices with lemon juice and 1/3 cup sugar.
- Whisk the flour, remaining sugar, baking powder, and salt.
- Beat in the butter, eggs, milk, and vanilla until the batter is smooth.
- Spread the batter in the skillet, arrange the plum slices on top, and bake for 35 to 40 minutes.
- Cool for 15 minutes before slicing so the fruit juices settle.
Equipment for This Recipe:
- 10-inch cast-iron skillet
- Mixing bowl
- Hand mixer or whisk
- Spatula
How to Serve This Dish:
Slice it straight from the skillet if you like a rustic look, or turn it onto a plate for cleaner wedges. A scoop of sour cream ice cream is a nice match if you want the tartness to stay sharp.
Pro Tips for This Recipe:
- Use plums that are ripe but not collapsing.
- Don’t bury the fruit in batter; it should sit partly exposed.
- A dusting of sugar over the fruit before baking helps the top glisten.
- Skillet cakes can brown quickly, so check early if your oven runs hot.
Variations on This Dish:
- Plum-Almond Cake: Add 1/4 teaspoon almond extract to the batter.
- Berry-Plum Skillet Cake: Tuck in a handful of berries between the plum slices.
- Upside-Down Version: Scatter sugar under the plums and invert after baking.
Common Mistakes to Avoid with This Dish:
- Using a pan that’s too small: The batter rises, and the fruit needs room.
- Underbaking the center: The edges can fool you; test the middle.
- Overloading with fruit juice: Too much liquid makes the crumb dense.
13. Apricot Crumble Bars
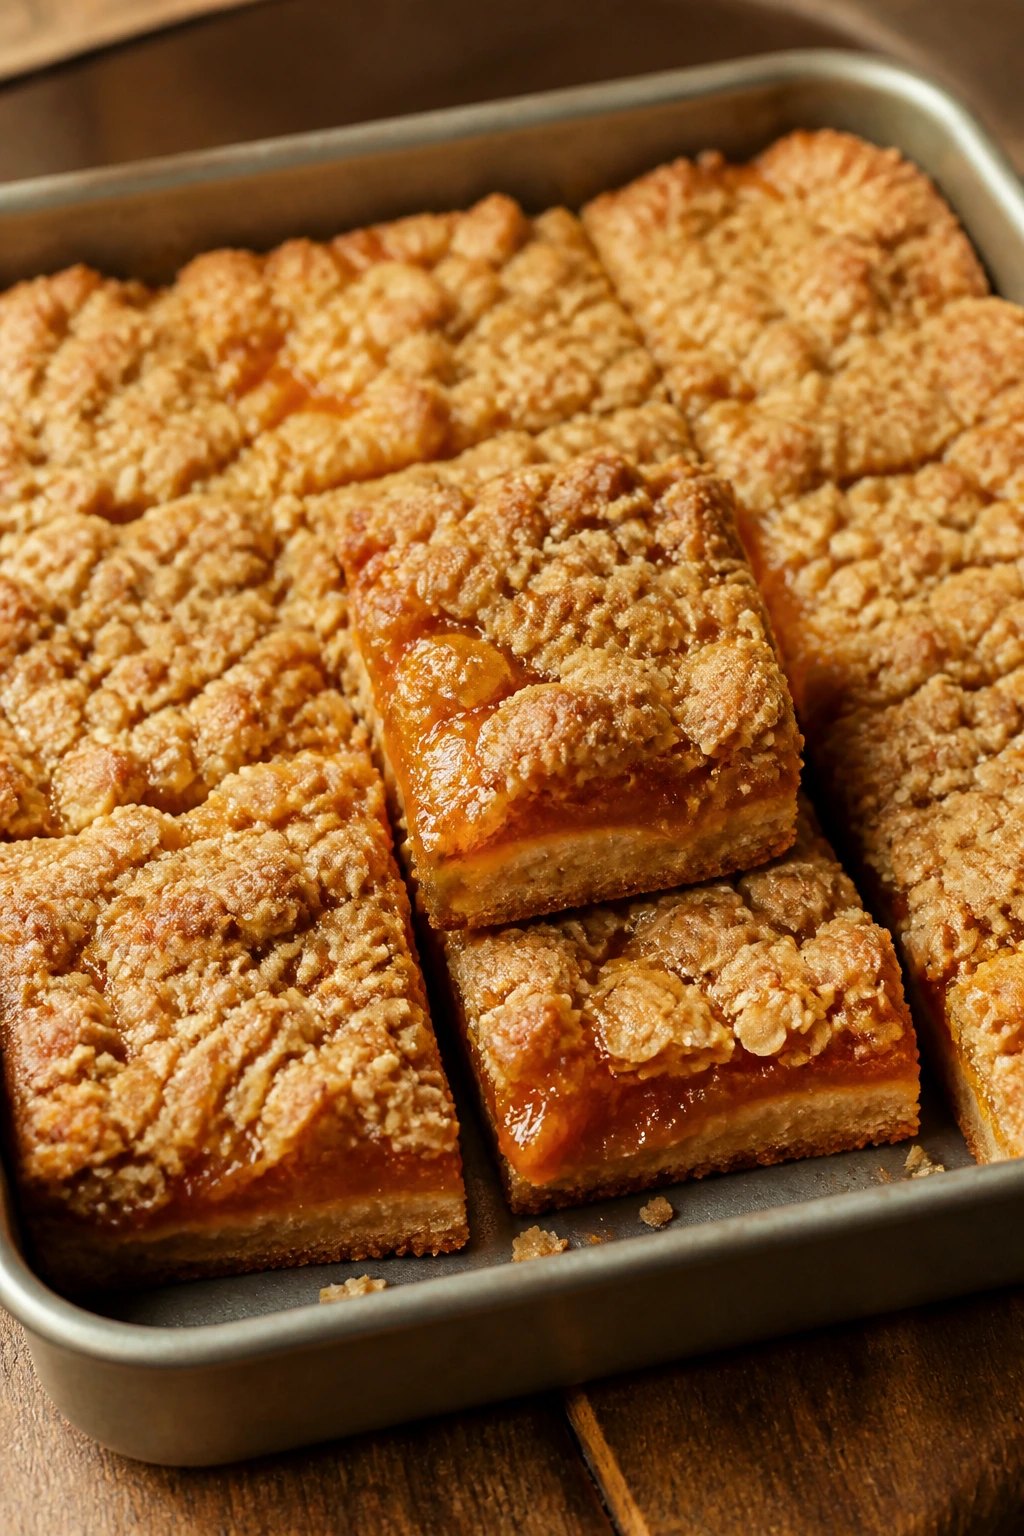
Apricots can be a little shy on their own, but with a buttery oat crumb and a spoonful of sugar, they turn into something bright and concentrated. These bars split the difference between pie and square, and the filling stays tidy enough to slice after cooling.
Why It Works:
Dried apricots are pantry-friendly and bring a deep, almost honeyed flavor once they’re simmered with water. The crumb base does double duty as a topping, which keeps the ingredient list short and the texture consistent. You get a dense, chewy middle with a crisp edge.
Key Ingredients:
- 2 cups chopped dried apricots
- 1 cup water
- 1/4 cup sugar
- 1 tablespoon lemon juice
- 1 tablespoon cornstarch
- 1 teaspoon vanilla extract
- 2 cups all-purpose flour
- 1 cup rolled oats
- 1 cup packed brown sugar
- 1/2 teaspoon cinnamon
- 1 cup cold unsalted butter, cubed
- 1/2 teaspoon salt
Quick Steps:
- Preheat the oven to 350°F and line an 8×8-inch pan with parchment.
- Simmer apricots, water, sugar, and lemon juice for 8 to 10 minutes until soft.
- Stir in cornstarch and vanilla, then cook 1 minute more until thick.
- Mix flour, oats, brown sugar, cinnamon, and salt, then cut in the butter until crumbly.
- Press two-thirds of the crumb mixture into the pan, spread on the apricot filling, and top with the remaining crumbs.
- Bake for 35 to 40 minutes, until golden and set.
- Cool fully before slicing.
Equipment for This Recipe:
- Saucepan
- 8×8-inch pan
- Parchment paper
- Mixing bowl
How to Serve This Dish:
They’re good plain, but a little whipped cream softens the apricot’s edge. I also like them with tea because the bars aren’t cloying.
Pro Tips for This Recipe:
- Chop the apricots small so the filling spreads neatly.
- Simmer until the fruit is soft enough to mash with a spoon.
- Let the bars cool completely for the cleanest squares.
- If the crumb looks dry, press it gently rather than packing it hard.
Variations on This Dish:
- Apricot-Jam Bars: Replace half the filling with apricot preserves for a faster version.
- Ginger Apricot Bars: Add 1/2 teaspoon ground ginger to the filling.
- Nutty Crumb: Add chopped almonds to the topping.
Common Mistakes to Avoid with This Dish:
- Thin filling: If it doesn’t thicken on the stove, it leaks later.
- Cutting early: Warm bars collapse at the edges.
- Packing the crumb too hard: It turns the crust dense instead of tender.
14. Cranberry Orange Bread Pudding
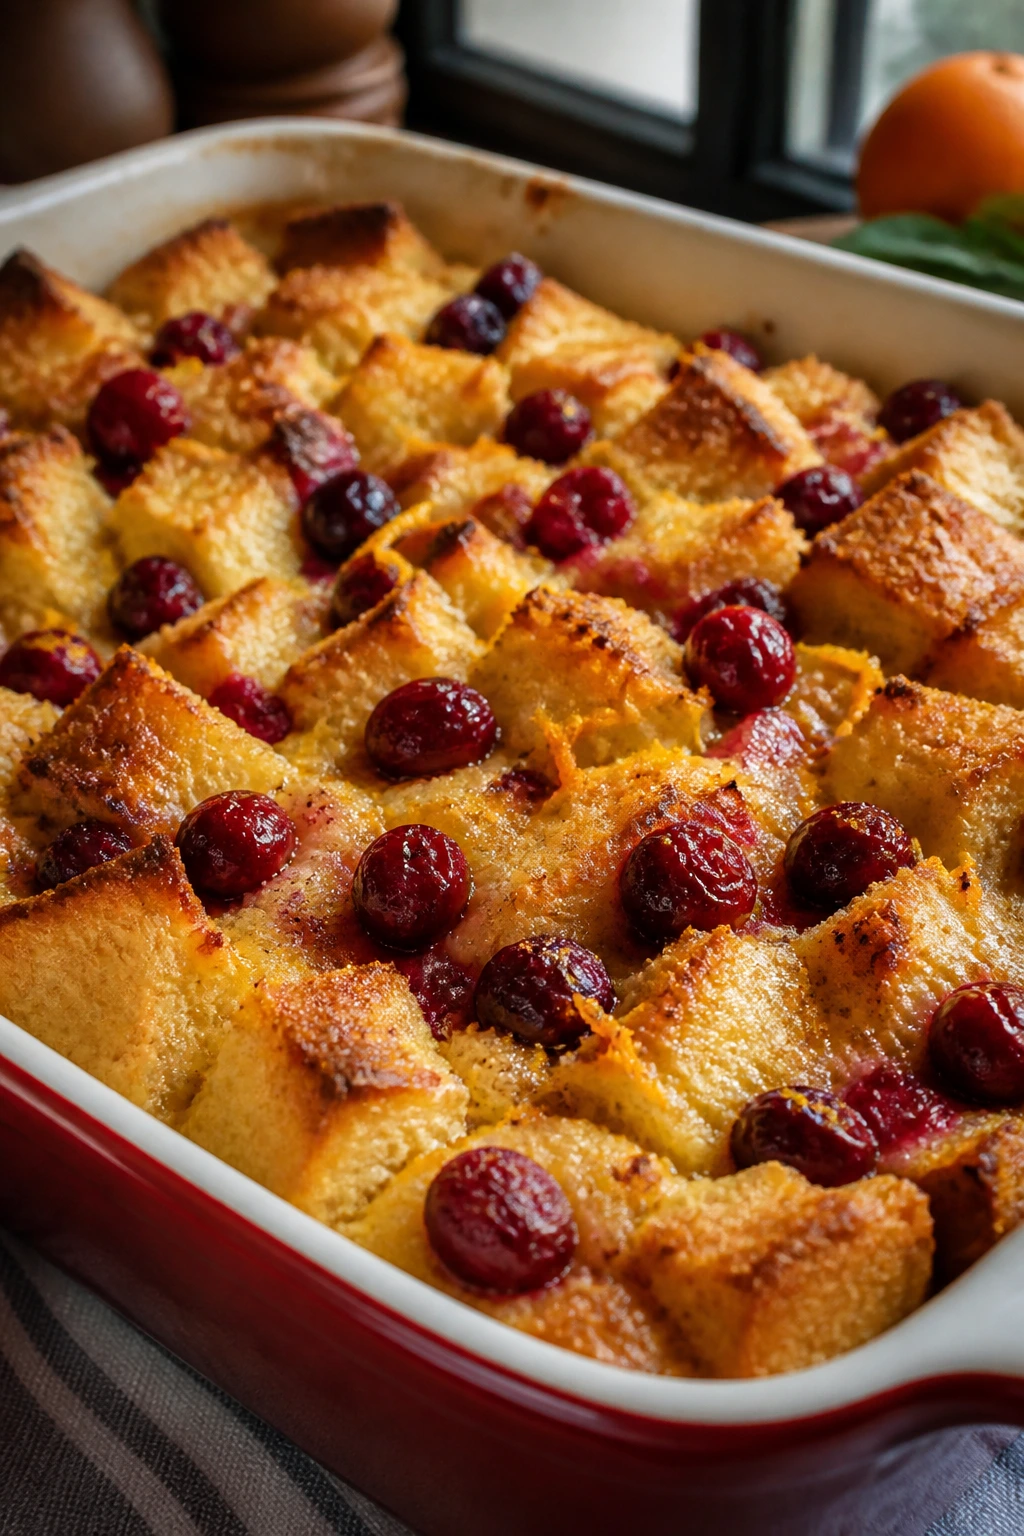
Cranberries can taste stern if they’re left alone, but inside bread pudding they turn bright and sharp, almost like little pockets of jam. Orange zest rounds them out, and the top bakes into a soft, bronzed crust that’s best eaten warm.
Why It Works:
This is a smart way to use stale bread when you want something more cheerful than plain custard. The dried cranberries rehydrate in the pudding, while orange juice and zest keep the flavor lively. It’s one of those desserts that improves as it rests a little, because the flavors have time to settle.
Key Ingredients:
- 6 cups day-old bread cubes
- 1 cup dried cranberries
- 3 large eggs
- 2 cups milk
- 1/2 cup sugar
- 1/4 cup orange juice
- 1 tablespoon orange zest
- 1 teaspoon vanilla extract
- 1 teaspoon cinnamon
- 3 tablespoons melted butter
- Pinch of salt
Quick Steps:
- Preheat the oven to 350°F and butter an 8×8-inch baking dish.
- Toss the bread cubes and cranberries together in the dish.
- Whisk eggs, milk, sugar, orange juice, orange zest, vanilla, cinnamon, melted butter, and salt.
- Pour the custard over the bread and press lightly so everything absorbs the liquid.
- Bake for 40 to 45 minutes, until puffed, set, and lightly browned.
- Rest for 10 to 15 minutes before serving.
Equipment for This Recipe:
- Baking dish
- Mixing bowl
- Whisk
- Zester or fine grater
How to Serve This Dish:
A little powdered sugar on top is enough if you want to keep it simple. For a richer plate, add warm cream or a spoonful of vanilla yogurt.
Pro Tips for This Recipe:
- Use bread with some structure, not sandwich bread that turns pasty.
- Let the custard soak in before baking.
- A pinch of nutmeg plays well with the orange.
- Bake until the center is just set, not watery.
Variations on This Dish:
- Cranberry-Apple Pudding: Add a diced apple to the bread mix.
- Citrus Heavy Version: Use lemon zest and a little lemon juice for a brighter finish.
- Dairy-Free Pudding: Replace milk with almond or oat milk and use coconut oil.
Common Mistakes to Avoid with This Dish:
- Using too much liquid: Bread pudding should be moist, not soupy.
- Skipping the rest: The custard needs time to soak before it hits the oven.
- Overbaking: It gets rubbery once the eggs set too firmly.
15. Fig Oatmeal Squares
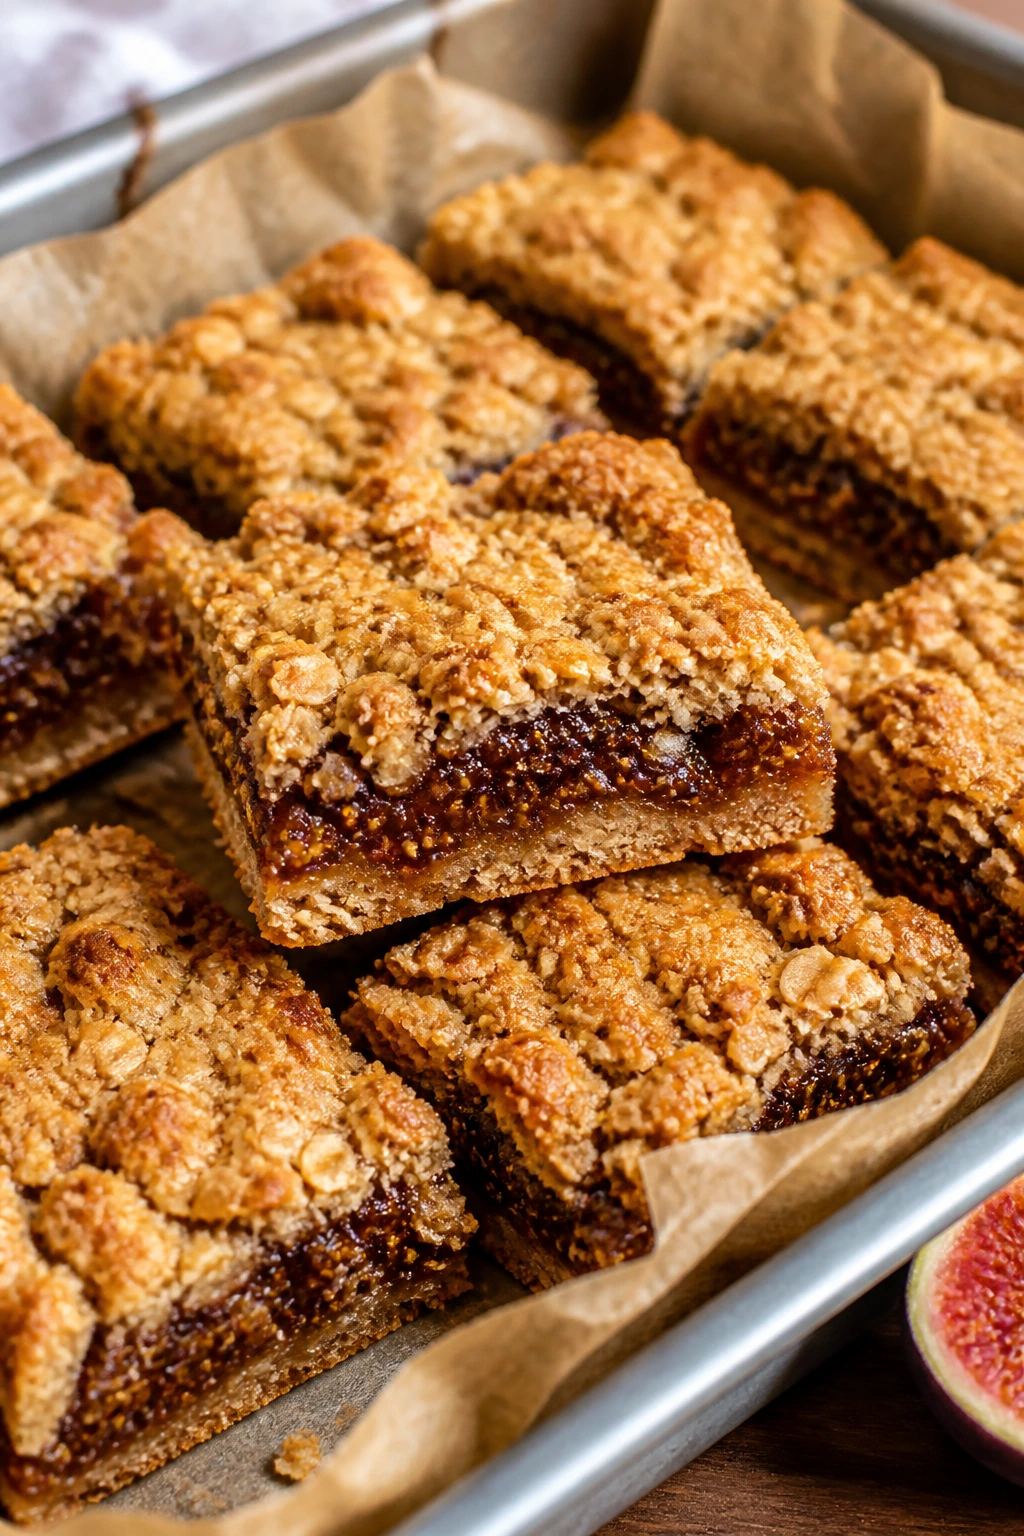
Dried figs have a deep, almost molasses-like sweetness that feels at home in a bar cookie. They soften into a thick filling, and the oat base gives the whole thing a chewy, sturdy bite that holds up in a tin or lunchbox.
Why It Works:
The fig layer cooks down into a spreadable paste with almost no effort, which makes it perfect for a pantry dessert. Oats and brown sugar give the crust enough heft to support the filling without turning dry. The flavor tastes old-fashioned in the best sense.
Key Ingredients:
- 2 cups chopped dried figs
- 1 cup water
- 1 tablespoon lemon juice
- 2 tablespoons sugar
- 1 teaspoon vanilla extract
- 1 1/2 cups rolled oats
- 1 cup all-purpose flour
- 1/2 cup brown sugar
- 1/2 teaspoon cinnamon
- 1/2 teaspoon salt
- 3/4 cup unsalted butter, melted
- 1 egg
Quick Steps:
- Heat the oven to 350°F and line an 8×8-inch pan with parchment.
- Simmer the figs, water, lemon juice, and sugar for 10 minutes until thick, then stir in vanilla.
- Mix oats, flour, brown sugar, cinnamon, salt, melted butter, and egg into a crumbly dough.
- Press half into the pan, spread the fig filling over it, and top with the remaining dough in loose clumps.
- Bake for 30 to 35 minutes, until golden at the edges.
- Cool completely before slicing into squares.
Equipment for This Recipe:
- Saucepan
- 8×8-inch pan
- Mixing bowl
- Parchment paper
How to Serve This Dish:
Serve the squares at room temperature so the fig filling stays dense and chewy. They’re good beside coffee, but they also travel well if you need a packable dessert.
Pro Tips for This Recipe:
- Chop the figs finely so the filling spreads without tearing the crust.
- If the filling seems stiff, add a spoonful more water.
- Press the bottom crust firmly so it bakes into a neat base.
- Let them cool all the way; fig bars need time to set.
Variations on This Dish:
- Date-Fig Squares: Swap half the figs for chopped dates for a softer filling.
- Walnut Fig Bars: Add 1/2 cup chopped walnuts to the crust.
- Spiced Fig Squares: Add a pinch of cloves or cardamom to the filling.
Common Mistakes to Avoid with This Dish:
- Filling too dry: It should spread easily or the bars will crumble.
- Cutting warm squares: The layers won’t hold.
- Skipping the parchment: Sticky fig filling can cling hard to the pan.
16. Mango Coconut Rice Pudding
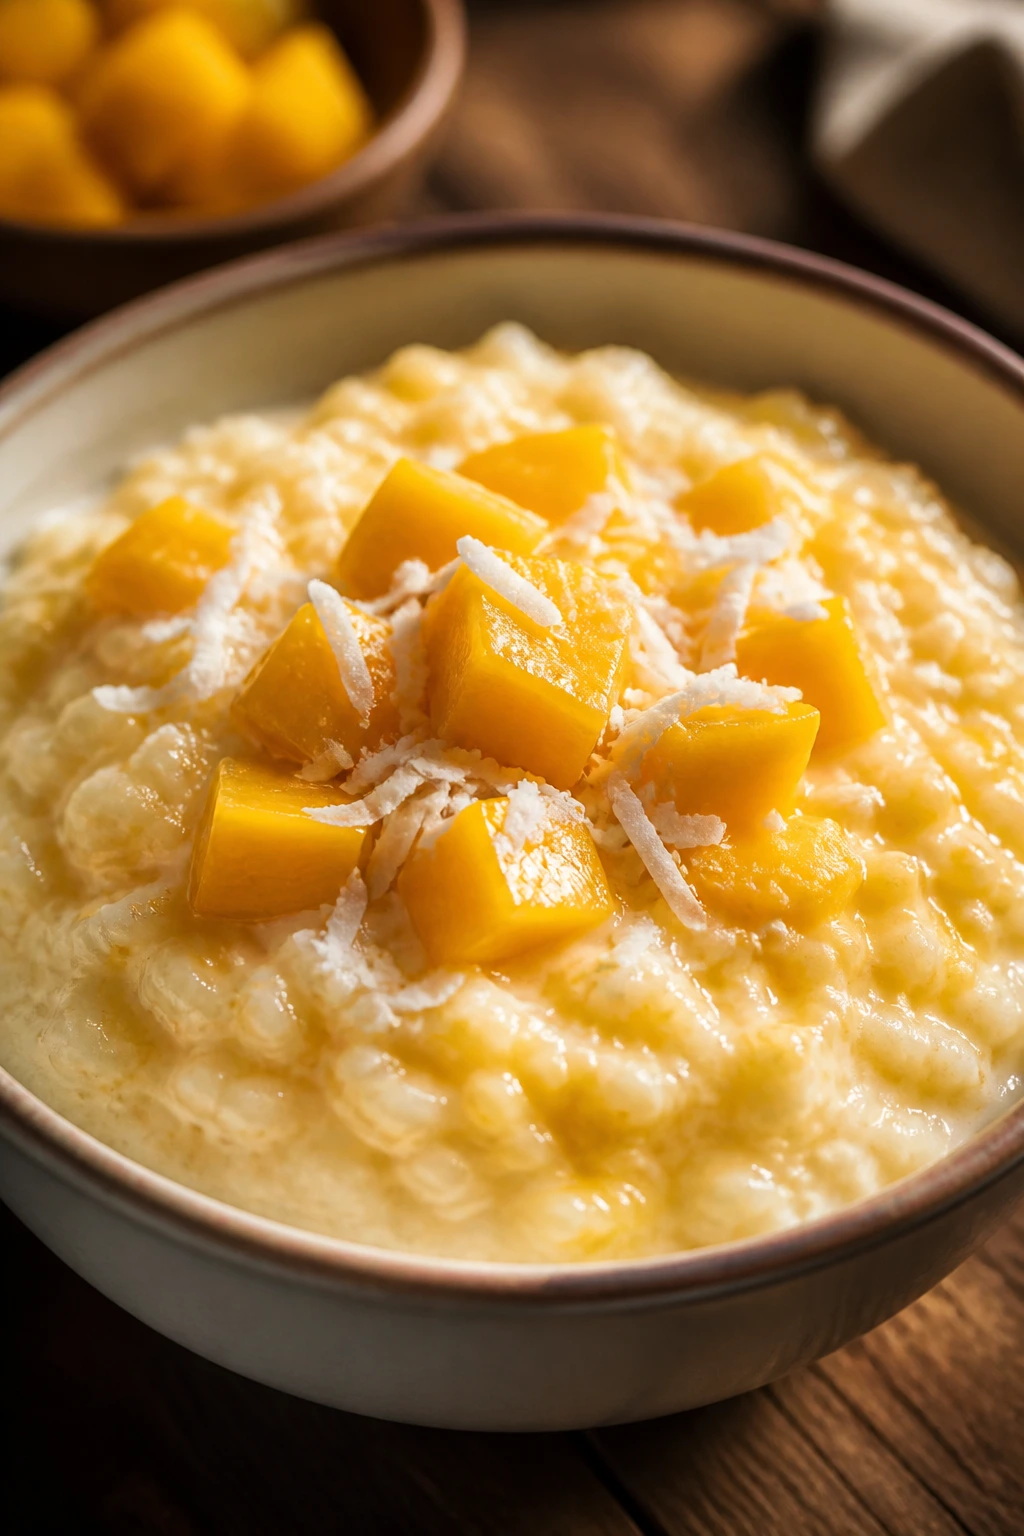
This dessert is creamy, slow, and a little tropical without asking for special tricks. Rice pudding can taste plain if you rush it, but the coconut milk and mango give it a glossy sweetness that feels richer than the ingredient list suggests.
Why It Works:
Rice releases starch as it simmers, which naturally thickens the pudding. Coconut milk adds body, while mango brings a sharp, sunny finish that keeps the bowl from feeling heavy. I like this one because it can be eaten warm or cold without losing its shape.
Key Ingredients:
- 1/2 cup arborio rice or short-grain white rice
- 3 cups whole milk
- 1 can coconut milk, about 13.5 ounces
- 1/3 cup sugar
- Pinch of salt
- 1 teaspoon vanilla extract
- 1/2 teaspoon ground cinnamon or cardamom
- 1 1/2 cups diced mango, fresh or thawed frozen
Quick Steps:
- Combine rice, milk, coconut milk, sugar, salt, and cinnamon in a saucepan.
- Bring to a gentle simmer over medium-low heat, stirring often.
- Cook for 30 to 35 minutes, until the rice is tender and the mixture coats a spoon thickly.
- Stir in vanilla and half the mango.
- Spoon into bowls and top with the remaining mango.
- Serve warm or chill until cold and spoonable.
Equipment for This Recipe:
- Saucepan with a heavy bottom
- Wooden spoon
- Measuring cups
- Serving bowls
How to Serve This Dish:
A few toasted coconut flakes or sesame seeds on top give it extra texture. I like it in small bowls, because rice pudding gets richer with every spoonful.
Pro Tips for This Recipe:
- Stir often so the bottom doesn’t scorch.
- Use ripe mango; underripe fruit doesn’t soften into the pudding as well.
- If it gets too thick, splash in a little more milk.
- Don’t let it boil hard or the milk can separate.
Variations on This Dish:
- Pineapple Coconut Rice Pudding: Swap the mango for pineapple tidbits.
- Cardamom Mango Pudding: Use cardamom instead of cinnamon for a brighter note.
- Cold Pudding Cups: Chill the pudding and layer it with extra fruit.
Common Mistakes to Avoid with This Dish:
- Heat too high: The milk scorches fast.
- Adding all the fruit too early: Some of it should stay fresh on top.
- Serving before it thickens: Rice pudding needs time to settle.
17. Chocolate Banana Mug Cake
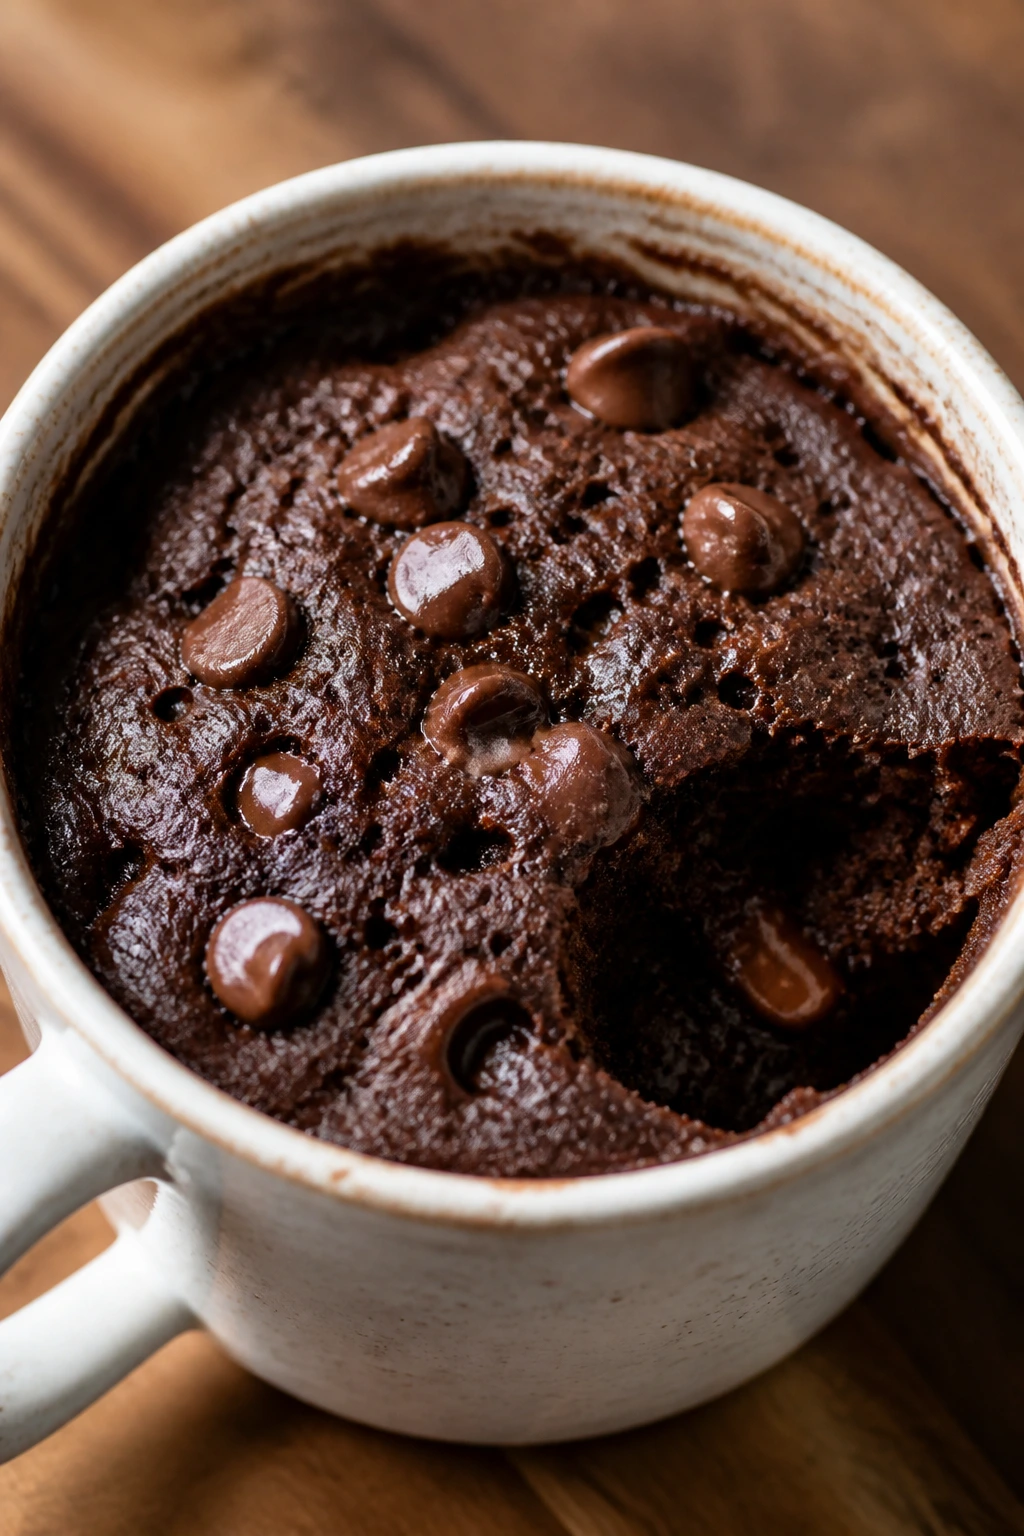
A mug cake sounds like a shortcut, and it is, but a good one still tastes like dessert rather than an emergency snack. The banana keeps the crumb soft, the cocoa gives it depth, and the chocolate chips melt into little streaks if you time the microwave right.
Why It Works:
Banana brings moisture and sweetness, which lets the batter stay tiny and fast. A small amount of baking powder gives lift, while cocoa keeps it from tasting like sugary banana bread in disguise. The whole thing finishes in the microwave, so it scratches the dessert itch without turning on the oven.
Key Ingredients:
- 1 ripe banana, mashed
- 4 tablespoons all-purpose flour
- 2 tablespoons sugar
- 1 tablespoon cocoa powder
- 1/4 teaspoon baking powder
- Pinch of salt
- 3 tablespoons milk
- 1 tablespoon neutral oil
- 2 tablespoons chocolate chips
Quick Steps:
- Mash the banana in a large microwave-safe mug.
- Stir in flour, sugar, cocoa, baking powder, salt, milk, and oil until smooth.
- Fold in the chocolate chips.
- Microwave on high for 60 to 90 seconds, until the top looks set but still soft in the middle.
- Let it rest for 1 minute before eating, because the center keeps cooking.
Equipment for This Recipe:
- Large microwave-safe mug
- Fork
- Spoon
- Microwave
How to Serve This Dish:
Eat it straight from the mug with a spoon. A tiny scoop of ice cream on top turns it into a proper late-night dessert, if you’re feeling generous with yourself.
Pro Tips for This Recipe:
- Use a mug with room to spare; the batter rises.
- Start with 60 seconds and add time in 10-second bursts.
- Don’t overmix or the cake gets rubbery.
- A pinch of espresso powder deepens the chocolate flavor.
Variations on This Dish:
- Peanut Butter Banana Mug Cake: Swirl in 1 tablespoon peanut butter before microwaving.
- Nutty Chocolate Version: Add chopped walnuts for crunch.
- Gluten-Free Mug Cake: Use a 1:1 gluten-free flour blend.
Common Mistakes to Avoid with This Dish:
- Microwaving too long: The cake goes dry in seconds.
- Using a tiny mug: Overflow is annoying and unnecessary.
- Eating immediately: The center needs a minute to settle.
18. Frozen Berry Parfaits with Graham Crumble
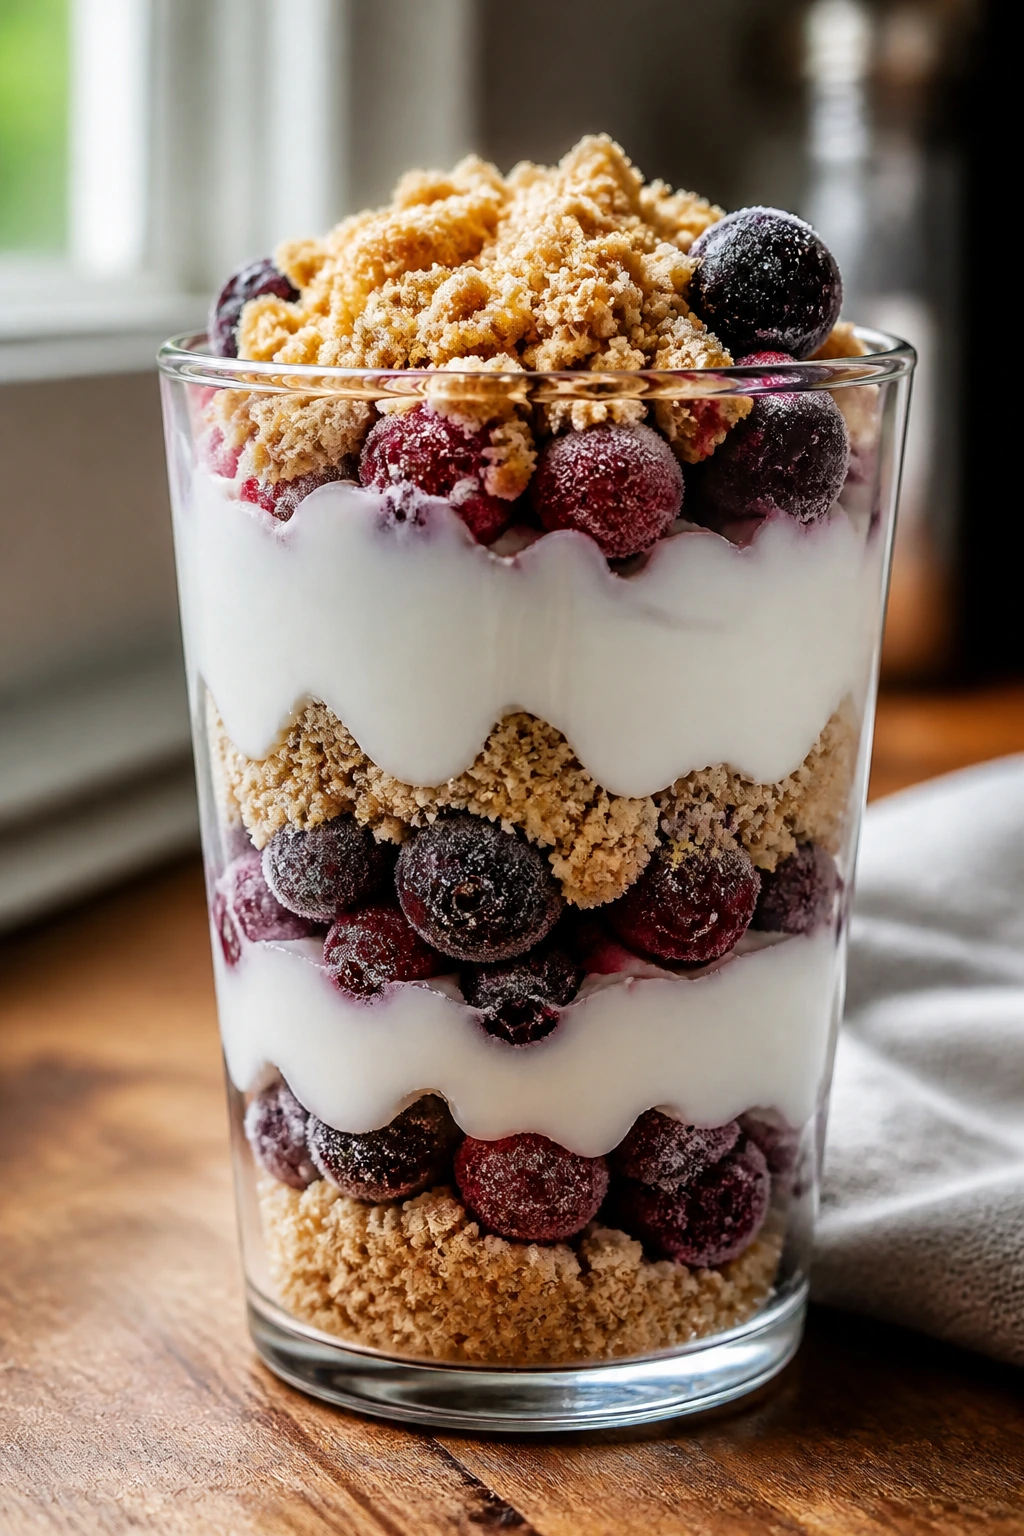
This is the no-bake dessert I reach for when the oven is already busy or I want something that looks layered and intentional without much effort. The berries thaw into a syrupy tangle, the graham crumbs stay sandy and crisp, and the yogurt or cream adds a cool, soft middle.
Why It Works:
Frozen fruit softens into a sauce as it sits, which gives you built-in flavor without cooking. A little sugar and lemon sharpen the berries, and graham cracker crumbs bring that familiar pie-crust taste without rolling dough. It’s the fastest way to make fruit dessert feel like a composed plate.
Key Ingredients:
- 3 cups frozen berries
- 2 tablespoons sugar
- 1 teaspoon lemon juice
- 2 cups plain Greek yogurt or lightly sweetened whipped cream
- 1 tablespoon honey
- 1 cup graham cracker crumbs
- 3 tablespoons melted butter
- Pinch of cinnamon
Quick Steps:
- Toss the frozen berries with sugar and lemon juice and let them sit for 15 to 20 minutes.
- Mix the graham crumbs, melted butter, and cinnamon until they resemble damp sand.
- Combine yogurt with honey if using yogurt.
- Layer crumbs, berries, and yogurt or cream in glasses.
- Repeat the layers and finish with a spoonful of berries on top.
- Chill for 10 minutes if you want cleaner layers.
Equipment for This Recipe:
- Mixing bowl
- Small glasses or dessert cups
- Spoon
- Measuring cups
How to Serve This Dish:
Serve in clear glasses if you want the layers to show. A mint leaf is optional, but a few extra crumbs on top are not.
Pro Tips for This Recipe:
- Let the berries thaw enough to make syrup.
- Don’t soak the crumbs in too much butter or they turn greasy.
- Use thick yogurt for neater layers.
- Assemble close to serving time so the crumbs stay crunchy.
Variations on This Dish:
- Peach Parfaits: Use thawed frozen peaches instead of berries.
- Chocolate Graham Parfaits: Add 1 tablespoon cocoa to the crumb mix.
- Lemon Cream Version: Stir lemon zest into the yogurt.
Common Mistakes to Avoid with This Dish:
- Using berries straight from the freezer: They won’t make enough syrup.
- Overloading the glass: The layers get muddled and slide.
- Assembling too far ahead: The crumbs soften fast.
19. Sour Cherry Clafoutis
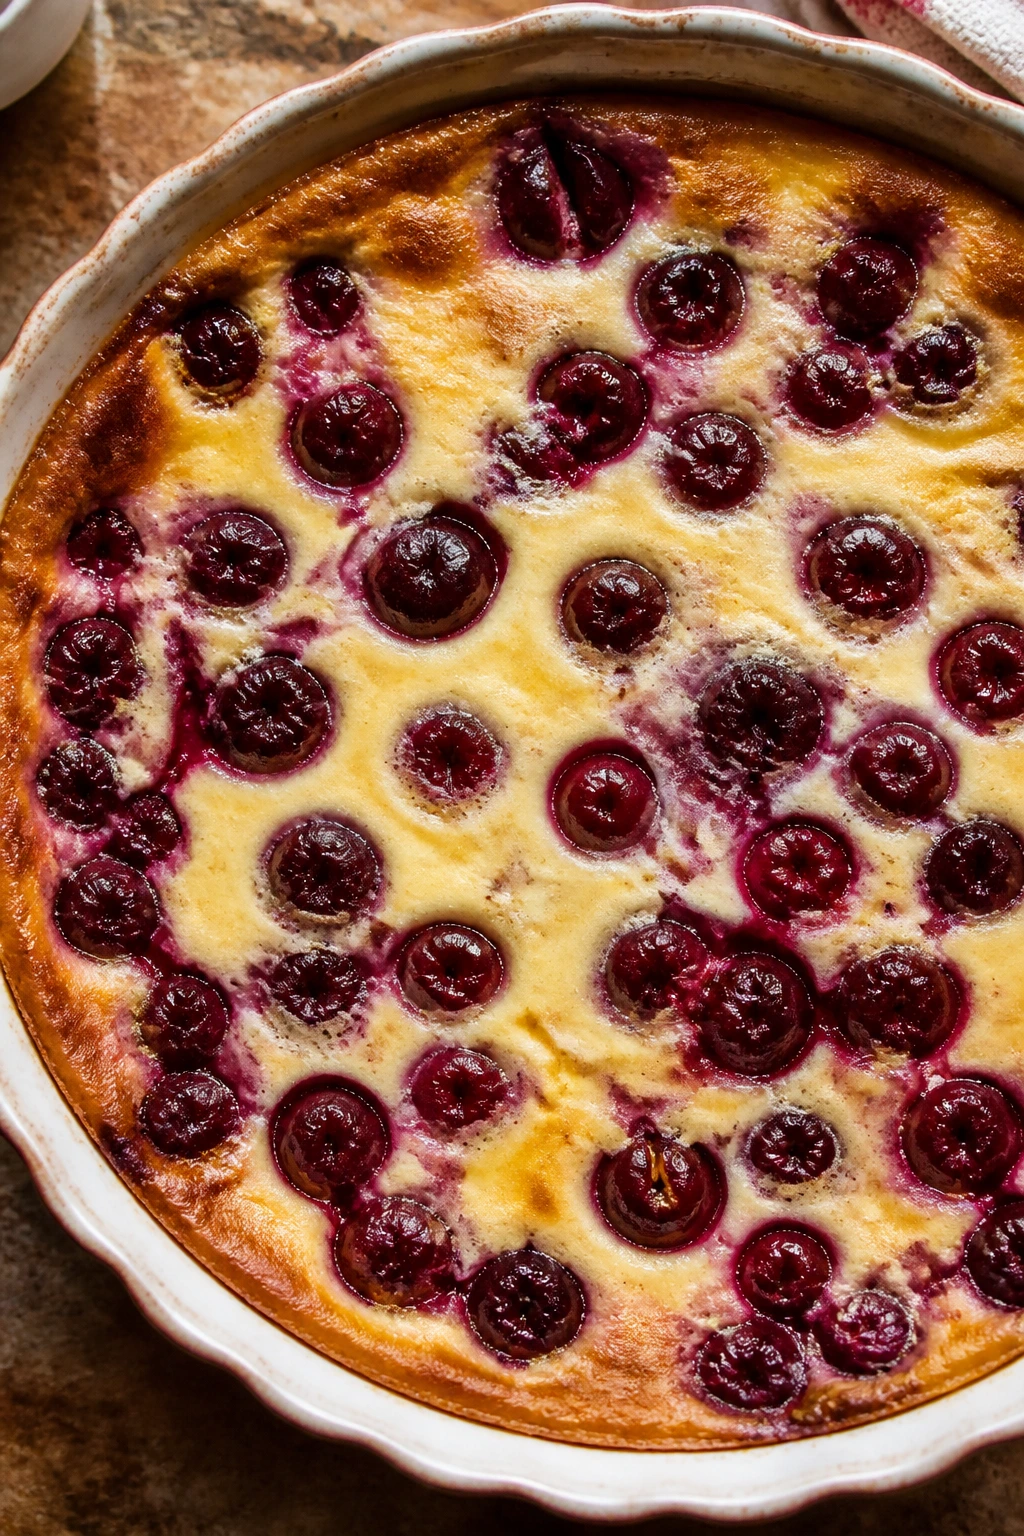
Clafoutis looks like a custard pancake wearing cherries as jewelry. It puffs in the oven, sinks a bit as it cools, and leaves you with a tender, eggy dessert that feels old-world without being fussy.
Why It Works:
The batter is thin on purpose, so it wraps around the fruit and bakes into a soft custard. Sour cherries bring enough tartness to stop the sugar from taking over, and the result lands somewhere between flan and pancake. If you’ve never made one, this is the kind of recipe that rewards a careful eye more than a fancy technique.
Key Ingredients:
- 2 cups pitted sour cherries, fresh or frozen
- 3 large eggs
- 1/2 cup granulated sugar
- 1 cup milk
- 1/2 cup all-purpose flour
- 1 teaspoon vanilla extract
- Pinch of salt
- 2 tablespoons unsalted butter, melted
- Powdered sugar, for dusting
Quick Steps:
- Preheat the oven to 350°F and butter a 9-inch pie dish.
- Scatter the cherries in the dish.
- Whisk eggs, sugar, milk, flour, vanilla, salt, and melted butter until smooth.
- Pour the batter over the cherries.
- Bake for 30 to 35 minutes, until puffed, set, and lightly browned.
- Cool for 10 minutes, then dust with powdered sugar.
Equipment for This Recipe:
- 9-inch pie dish
- Mixing bowl
- Whisk
- Sieve for powdered sugar, optional
How to Serve This Dish:
Serve it warm or room temperature, cut into wedges. A spoon of whipped cream helps, but the custard is delicate enough to stand by itself.
Pro Tips for This Recipe:
- A blender makes the batter extra smooth, though a whisk works.
- If using frozen cherries, don’t thaw them first.
- Dust with sugar only after the clafoutis has cooled a bit.
- The center should jiggle slightly when you pull it out.
Variations on This Dish:
- Blueberry Clafoutis: Swap the cherries for blueberries.
- Almond Clafoutis: Add 1/4 teaspoon almond extract.
- Individual Ramekins: Bake in smaller dishes for faster servings.
Common Mistakes to Avoid with This Dish:
- Batter too thick: It should pour like cream, not cake batter.
- Overbaking: Clafoutis turns dry if the custard sets hard.
- Using too much fruit: The batter needs room to puff around it.
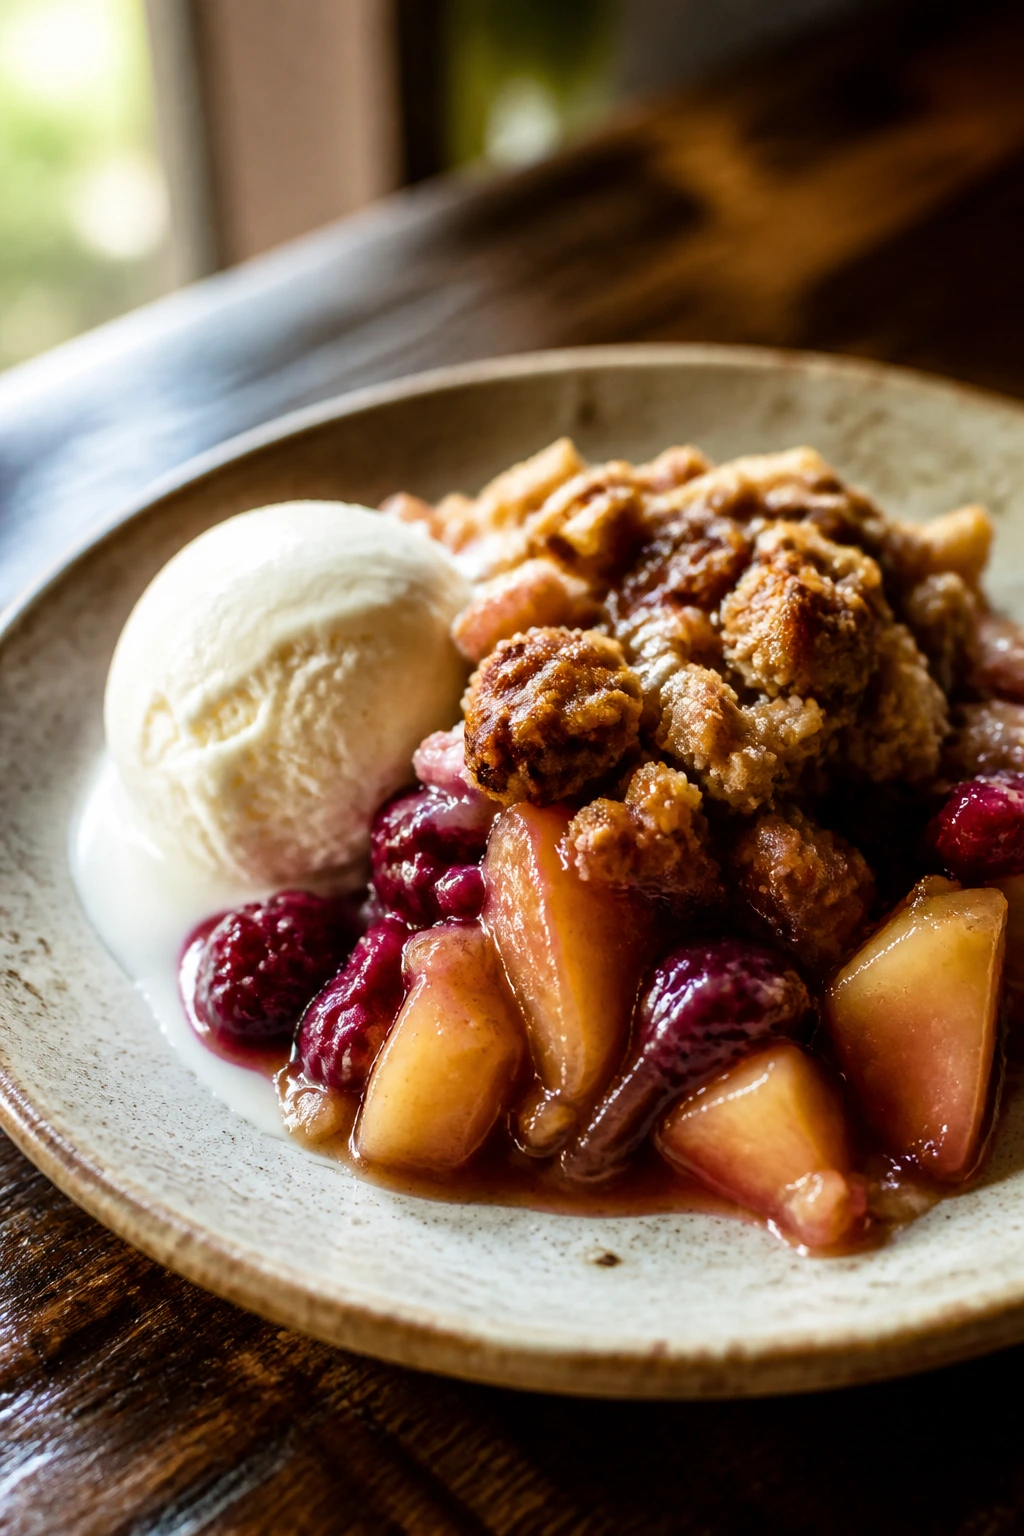
20. Strawberry Rhubarb Crisp
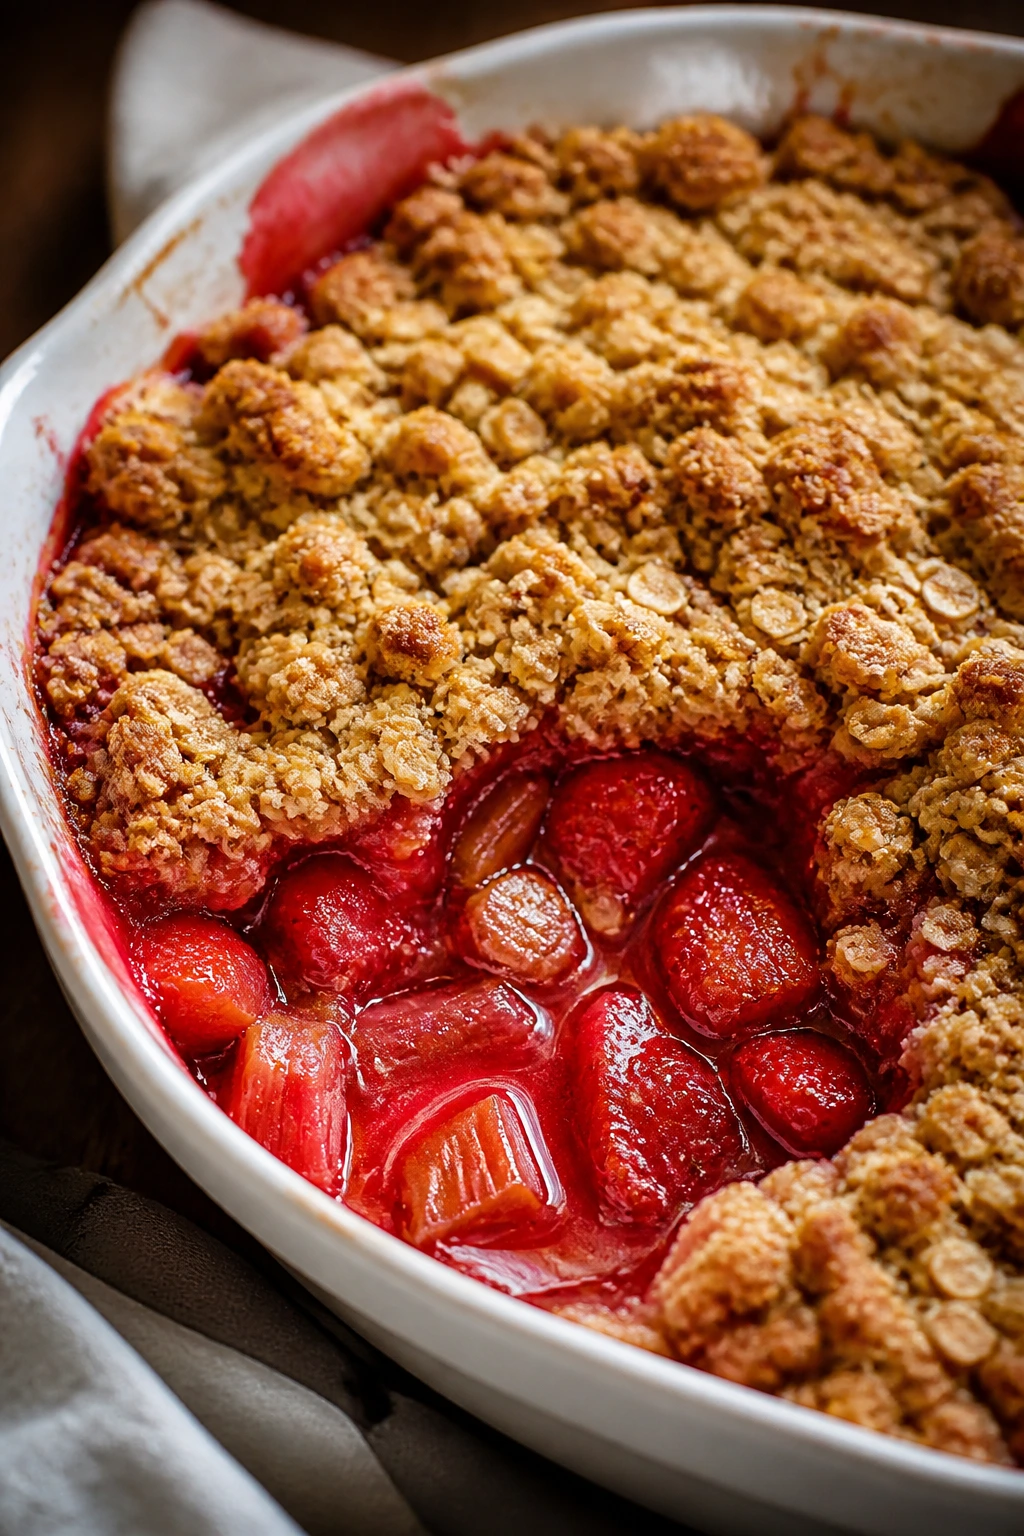
Strawberry rhubarb crisp has that sharp-sweet push-pull that makes people keep spooning. The rhubarb softens into something silky, the strawberries melt down around it, and the oat topping catches the juices just enough to stay crisp at the edges.
Why It Works:
Rhubarb needs sugar and a little fruit sweetness to keep it from tasting aggressively tart, and strawberries do that job beautifully. The cornstarch thickens the filling so it doesn’t flood the dish, and the oat topping adds the crunch rhubarb desserts deserve. It’s a bright, old-fashioned dessert that still feels easy.
Key Ingredients:
- 3 cups rhubarb, sliced into 1/2-inch pieces
- 3 cups strawberries, hulled and halved
- 1/2 cup granulated sugar
- 2 tablespoons cornstarch
- 1 teaspoon vanilla extract
- 3/4 cup rolled oats
- 3/4 cup all-purpose flour
- 1/2 cup packed brown sugar
- 1/2 cup cold unsalted butter, cubed
- 1/2 teaspoon cinnamon
- Pinch of salt
Quick Steps:
- Heat the oven to 375°F and butter a baking dish.
- Toss rhubarb, strawberries, sugar, cornstarch, and vanilla in the dish.
- Mix oats, flour, brown sugar, cinnamon, salt, and butter until crumbly.
- Sprinkle the topping over the fruit.
- Bake for 40 to 45 minutes, until the fruit is bubbling and the top is golden.
- Rest for 15 minutes before serving.
Equipment for This Recipe:
- Baking dish
- Mixing bowl
- Measuring cups
- Fork or pastry cutter
How to Serve This Dish:
Serve it warm with vanilla ice cream, which softens the tartness without covering it. If you want to lean less sweet, a spoonful of lightly sweetened yogurt works too.
Pro Tips for This Recipe:
- Rhubarb slices should be even so they soften at the same rate.
- Frozen strawberries work, but add a little more cornstarch if they’re very wet.
- The topping should be rough, not compact.
- Taste the fruit before baking and adjust sugar if needed.
Variations on This Dish:
- Raspberry Rhubarb Crisp: Replace some strawberries with raspberries.
- Ginger Crisp: Add 1/2 teaspoon ground ginger to the fruit.
- Nut Topping: Mix chopped almonds or pecans into the crumble.
Common Mistakes to Avoid with This Dish:
- Too little sugar: Rhubarb can taste harsh if it isn’t balanced.
- Cutting immediately: The filling needs time to thicken.
- Using melted butter in the topping: Cold butter gives better crumbs.
21. Lemon Blackberry Loaf Cake
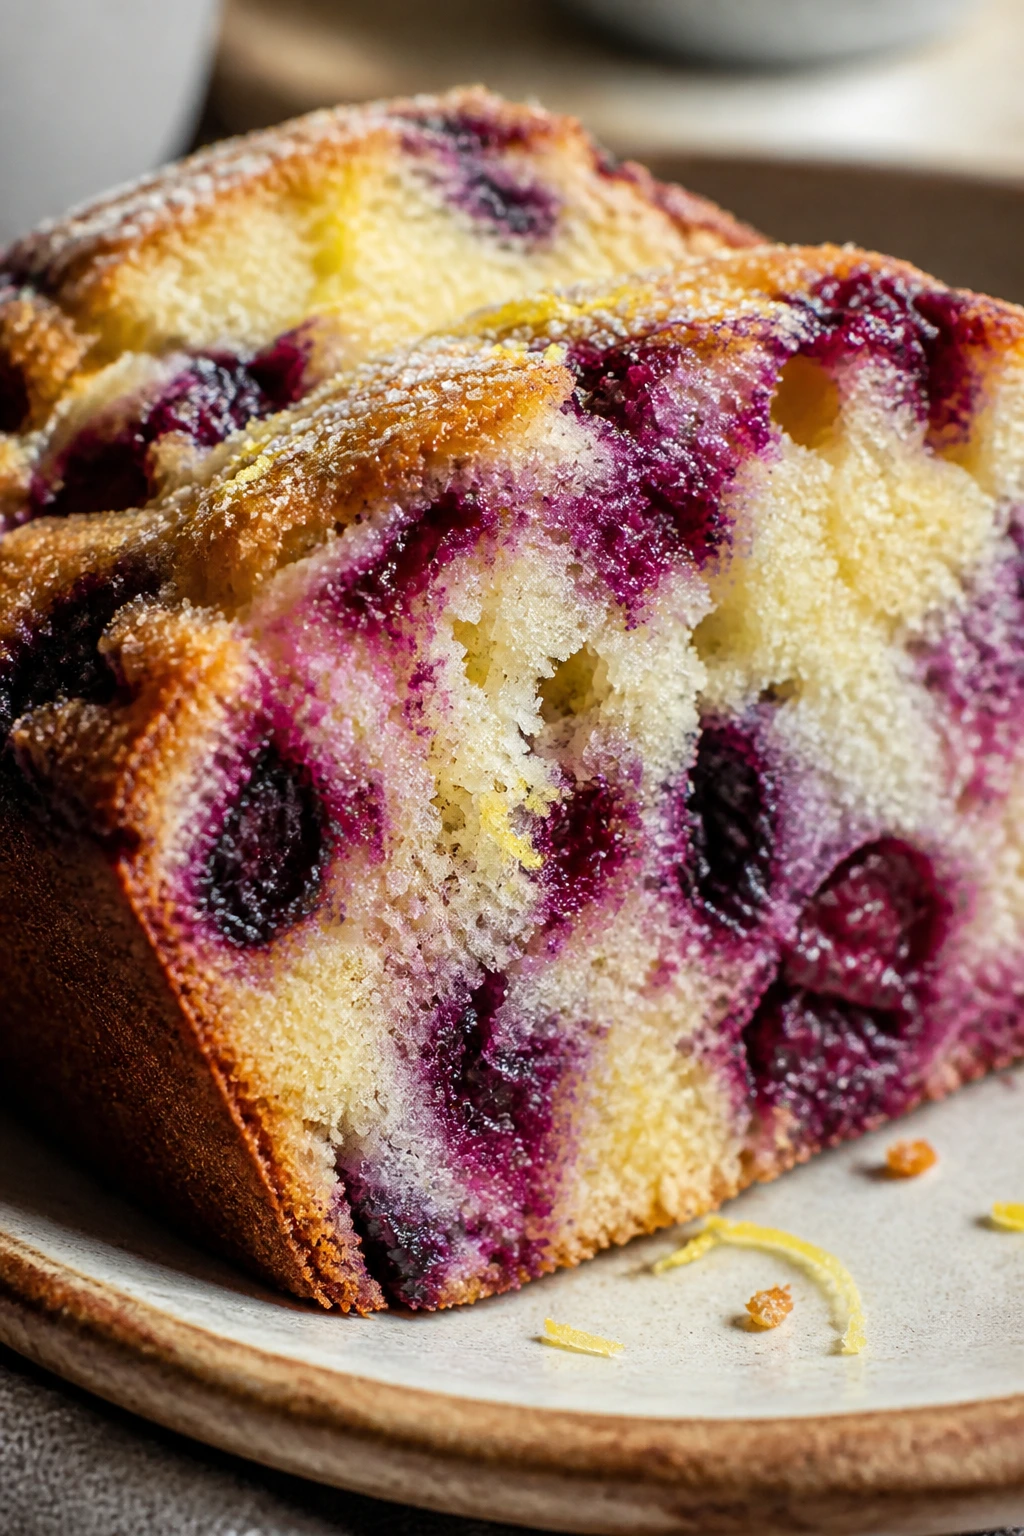
This cake slices like a proper tea loaf but tastes bright enough to feel special on its own. The blackberries bleed purple into the crumb, the lemon keeps things lively, and the edges bake to a fine, lightly crisp crust that makes each slice worth cutting thick.
Why It Works:
Loaf cakes are forgiving, which is why they’re such a good home for fruit. Lemon zest wakes up the batter, and tossing the blackberries in flour helps keep them from sinking into the bottom. The result is moist but not heavy, which is harder to get than it sounds.
Key Ingredients:
- 1 1/2 cups all-purpose flour
- 1 teaspoon baking powder
- 1/2 teaspoon salt
- 1/2 cup unsalted butter, softened
- 1 cup granulated sugar
- 2 large eggs
- 1/2 cup milk or plain yogurt
- Zest of 2 lemons
- 2 tablespoons lemon juice
- 1 1/2 cups blackberries
- 1 tablespoon flour, for berries
Quick Steps:
- Preheat the oven to 350°F and line a 9×5-inch loaf pan with parchment.
- Whisk flour, baking powder, and salt.
- Beat butter and sugar until fluffy, then add eggs one at a time.
- Stir in milk or yogurt, lemon zest, and lemon juice, then fold in the dry ingredients.
- Toss the blackberries with flour and fold them in gently.
- Bake for 50 to 55 minutes, until the top is golden and a tester comes out clean.
- Cool completely before slicing.
Equipment for This Recipe:
- 9×5-inch loaf pan
- Parchment paper
- Mixing bowls
- Hand mixer or sturdy spoon
How to Serve This Dish:
Serve thick slices with tea, coffee, or a thin glaze if you want a sweeter finish. It’s just as good plain the next day, maybe better, because the lemon settles in.
Pro Tips for This Recipe:
- Use room-temperature butter and eggs for a smoother batter.
- Don’t stir hard after adding the flour.
- If the berries are huge, cut them in half so they distribute better.
- Tent with foil if the top browns before the center is done.
Variations on This Dish:
- Blueberry Lemon Loaf: Swap in blueberries for a softer berry note.
- Glazed Version: Mix powdered sugar and lemon juice for a quick drizzle.
- Poppy Seed Loaf: Add 1 tablespoon poppy seeds for a little crunch.
Common Mistakes to Avoid with This Dish:
- Berries not tossed in flour: They sink and leave a wet bottom.
- Underbaking the center: Loaf cakes need time; the tester matters.
- Slicing too soon: The crumb tears while it’s still warm.
22. Raspberry Jam Blondies
These blondies are proof that jam deserves more respect. The base is buttery and brown-sugary, the raspberry swirls bake into ruby streaks, and each square lands somewhere between cookie bar and tea cake.
Why It Works:
Blondie batter is sturdy enough to hold jam without dissolving into a mess. Raspberry jam gives you fruit flavor without extra chopping or juice management, which is useful when you want dessert fast. White chocolate chips are optional, but they soften the sharpness of the berries if you like a sweeter finish.
Key Ingredients:
- 1/2 cup unsalted butter, melted
- 1 cup packed brown sugar
- 1 large egg
- 1 teaspoon vanilla extract
- 1 cup all-purpose flour
- 1/2 teaspoon baking powder
- 1/4 teaspoon salt
- 1/3 cup raspberry jam
- 1/2 cup white chocolate chips, optional
Quick Steps:
- Preheat the oven to 350°F and line an 8×8-inch pan with parchment.
- Stir melted butter and brown sugar together, then mix in the egg and vanilla.
- Fold in flour, baking powder, and salt just until combined.
- Spread the batter in the pan and drop spoonfuls of jam over the top.
- Swirl lightly with a knife and sprinkle on white chocolate chips if using.
- Bake for 22 to 26 minutes, until the edges are set and the center has a slight soft give.
- Cool completely before cutting.
Equipment for This Recipe:
- 8×8-inch pan
- Parchment paper
- Mixing bowl
- Knife for swirling
How to Serve This Dish:
Cut them into small squares if you want a plate of assorted desserts, or larger bars if this is the main sweet. They hold well, so they’re useful for lunchboxes, bake sales, and the kind of late-night sugar situation nobody admits to.
Pro Tips for This Recipe:
- Use thick jam, not runny preserves.
- Don’t overbake; blondies finish setting as they cool.
- A pinch of flaky salt on top sharpens the raspberry flavor.
- Chill before slicing if you want the cleanest edges.
Variations on This Dish:
- Apricot Jam Blondies: Swap in apricot preserves for a softer, honeyed flavor.
- Chocolate Raspberry Blondies: Add cocoa nibs or dark chocolate chips.
- Nutty Blondies: Fold in chopped pecans for extra crunch.
Common Mistakes to Avoid with This Dish:
- Too much jam: It turns the center wet and sticky.
- Cutting while warm: The squares need time to firm up.
- Mixing the batter too long: That makes blondies cakier than chewy.
Why Pantry Staples Make Fruit Desserts So Forgiving
Fruit is forgiving in ways pastry purists sometimes forget. It can be a little bruised, a little soft, a little overripe, and still taste good once sugar, heat, and a little starch do their work. That’s why these desserts keep delivering: they don’t ask the fruit to be perfect. They ask it to be sweet, juicy, and willing to bake.
The pantry side matters more than it gets credit for. Flour sets the frame. Oats give chew. Cornstarch keeps the filling from turning into fruit soup. Butter carries flavor and browns into those edges everyone chases with a spoon. Even the simplest fruit dessert depends on the same small group of ingredients working together, and when that ratio is right, the result tastes more composed than the effort suggests.
Frozen and canned fruit belong here too. Frozen berries can go straight into a cobbler. Canned peaches make dump cake fast. Dried apricots, dates, figs, and raisins bring a deep sweetness that fresh fruit can’t always provide in winter or during the dead quiet of an empty fridge. The trick is not to treat those ingredients as second-best.
They’re just different tools.
Essential Equipment for These Recipes
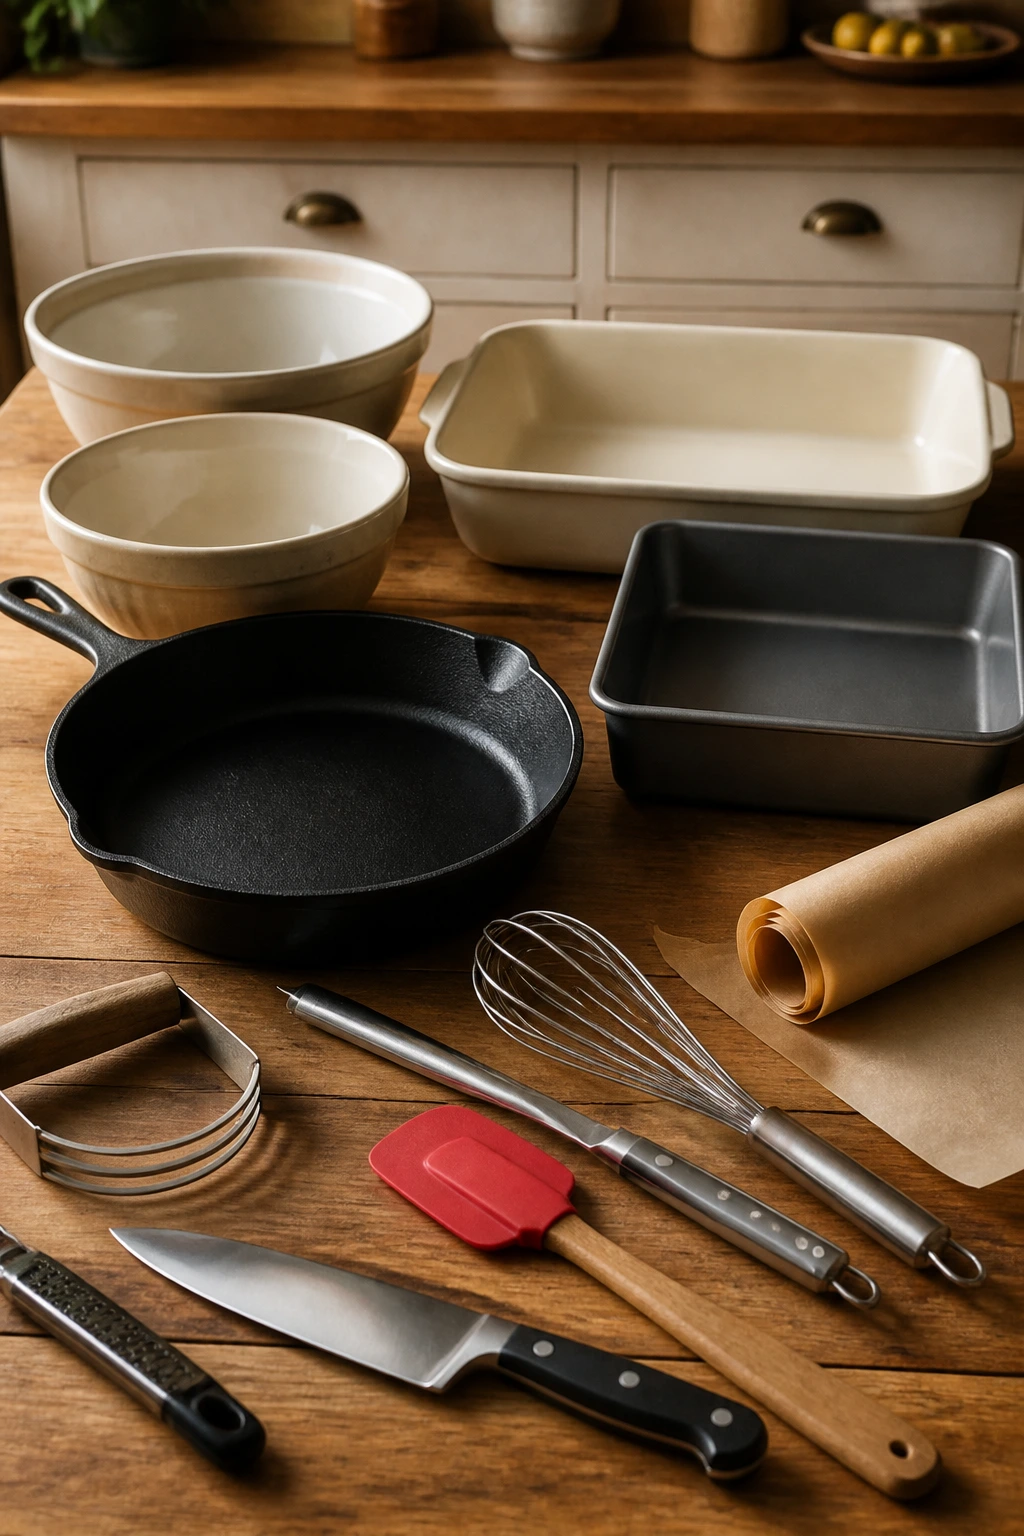
- Mixing bowls in at least two sizes — One for the fruit filling and one for the batter or topping keeps sticky hands from turning every bowl into the same mess.
- 9×13-inch baking dish — The workhorse size for cobblers, dump cakes, sheet cakes, and bread puddings.
- 8×8-inch baking pan — Best for bars, crisps, blondies, and smaller batches that need a little more height.
- Cast-iron skillet, 10-inch or 12-inch — Useful for skillet cakes and rustic bakes with a browned edge.
- Whisk — Essential for custards, cake batters, and clafoutis; a fork works in a pinch.
- Rubber spatula — Better than a spoon for folding berries and scraping batter into corners.
- Sharp paring knife and chef’s knife — You need both for peeling, slicing, and trimming fruit quickly and evenly.
- Parchment paper — Keeps bars and blondies from sticking and makes lifting a square batch much easier.
- Pastry cutter or fork — Helpful for crisps, crumbles, and biscuit toppings when butter needs to stay cold.
- Microplane or fine grater — Not flashy, but it’s the easiest way to get lemon or orange zest into batter without bitter chunks.
Smart Shopping and Ingredient Tips

The easiest way to make fruit desserts taste better is to shop with the dessert in mind, not just the fruit bowl. Apples for crisp want firmness and acidity. Pears should give a little near the stem but still hold shape. Peaches can be fresh if they’re ripe, but canned peaches in juice are usually better than hard, flavorless fruit that never fully softens. And if berries are expensive or underwhelming, frozen ones often bake more reliably anyway.
For canned fruit, look for fruit packed in juice or water rather than heavy syrup unless the recipe specifically calls for the syrup. Syrup can make cobblers and dump cakes cloying fast. Drain only when the recipe tells you to; in some desserts, that liquid is part of the sauce. With jams and preserves, choose the thick kind. Runny jam tends to disappear into batters instead of leaving those good ribboned streaks.
Pantry staples deserve a little attention too. Old flour works in a pinch, but if it smells stale, the dessert will too. Brown sugar should be soft enough to pack with a spoon, not a brick. Rolled oats are better than instant oats for crumbles and bars because they keep their shape. Cornstarch is the quiet hero in nearly every juicy fruit filling here, and it needs heat to work, so don’t expect it to thicken anything before baking or simmering.
One last thing: taste the fruit before you bake. Tart strawberries need more sugar than sweet ones. Apples vary a lot. Ripe mango can be almost candy-sweet, while canned fruit may bring its own sweetness already. That tiny taste test saves a lot of guessing.
How to Serve These Recipes
Presentation:
Fruit desserts look best when they keep a little texture at the top. Serve crisps and cobblers in shallow bowls so the topping stays visible, cut bars and blondies after they’ve cooled completely, and use a rimmed plate for anything syrupy like upside-down cake or clafoutis. A light dusting of powdered sugar goes a long way on loaf cakes and hand pies.
Accompaniments:
Vanilla ice cream is the obvious partner for crisps, cobblers, and dump cakes because it melts into the fruit and softens the edges. Whipped cream works better for shortcake, hand pies, loaf cake, and clafoutis. Yogurt or crème fraîche is worth trying when the dessert is already rich and you want a little tang to wake it up.
Portions:
Most of these desserts serve 6 to 10 depending on the pan and how generous you slice. Bars and blondies cut cleanest into 12 smaller pieces, which is handy if you want a little plate of several desserts instead of one huge square. For skillet cakes and crisps, plan on fewer, larger servings; people tend to take more when it’s spooned warm.
Beverage Pairing:
Coffee works with nearly every dessert here, especially bread pudding, loaf cake, and blondies. Black tea or chai is a good match for apple, pear, and plum bakes. If you want something cold, milk is still one of the best drinks for a bar cookie or crisp, because it cuts the sugar and keeps the fruit flavor in front.
Additional Tips and Flavor Boosters
Flavor Enhancement:
A little citrus zest changes more than you’d think. Lemon in berry desserts, orange in cranberry bakes, and a tiny bit of lime in mango pudding all keep the fruit from flattening out under sugar. If you want depth, add a pinch of salt to the fruit itself, not just the topping.
Customization:
Jam, dried fruit, and frozen fruit are all fair game for swapping when the fresh version is out of reach. You can move from blueberry to blackberry, apple to pear, raspberry to apricot jam, and keep the method almost unchanged. That flexibility is the whole point of pantry desserts; the framework should hold.
Serving Suggestions:
For warm desserts, a pinch of flaky salt or a spoon of cream on top makes the flavor read cleaner. For bars and loaf cakes, a thin glaze gives the surface a polished finish without making them sweeter than necessary. For crisps and cobblers, toasted nuts on the topping are a small move with a big payoff.
Make-It-Yours:
If you’re baking for a dairy-free table, use coconut oil in crumbs and oat milk or almond milk in custards. For gluten-free baking, use a 1:1 flour blend in bars and cakes, and keep oats certified gluten-free if needed. For a less sweet version, cut the sugar by about 1/4 cup in most fruit fillings and lean on the fruit’s own ripeness.
Make-Ahead, Storage, and Reheating Guidance
Most of these desserts hold well, but they don’t all want the same treatment. Crisps, cobblers, and skillet cakes are best the day they’re baked, though they keep in the fridge for 3 to 4 days. Bars, blondies, and loaf cakes often improve after a night covered at room temperature or in the fridge because the crumb settles and the fruit flavor spreads through the slice.
Fruit desserts with custard, like bread pudding and clafoutis, should go into the refrigerator once they’re cool. They keep for about 3 days and taste best reheated gently — a low oven at 300°F for 10 to 15 minutes works better than blasting them in the microwave. If you microwave, do it in short bursts so the eggs don’t turn spongy.
Bars and blondies freeze well for up to 2 months if you wrap them tightly and tuck parchment between layers. Crisps and cobblers can also be frozen, though the topping softens a bit after thawing. Reheat them in a 325°F oven until the filling bubbles again and the topping firms back up. That usually takes 15 to 25 minutes for a pan that’s been chilled, a little longer if it came from the freezer.
Hand pies freeze nicely before baking. Assemble them, freeze them on a tray, then move them to a bag once solid. Bake from frozen and add a few extra minutes. That trick is worth keeping around, because it turns a future dessert into a nearly instant one without changing the recipe.
For fruit that needs a last-minute finish — parfaits, shortcake, skillet fruit, and warm compotes — assembly matters more than storage. Keep the parts separate until serving if you want the crunchy layers to stay crunchy. Nobody likes a soggy crumb that used to be crisp.
Variations and Adaptations to Try

Gluten-Free Shelf Swap:
Use a good 1:1 gluten-free flour blend in crisps, bars, cakes, and blondies. Oats need to be certified gluten-free if that matters for your kitchen, and the texture usually holds up better in crumb toppings than in delicate pastry.
Dairy-Free Dessert Shelf:
Coconut oil can replace butter in many crumbles, and oat milk works well in bread pudding, clafoutis, sheet cake, and rice pudding. The flavor shifts a little, but often in a good direction, especially with pineapple, mango, or berry desserts.
Lower-Sugar Fruit Finish:
If your fruit is ripe and sweet, cut the sugar in the filling by a few tablespoons and rely on cinnamon, citrus zest, or vanilla to keep the flavor lively. Don’t slash sugar in a custard or cake batter too far; those desserts need some structure from the sugar, not just sweetness.
Frozen-Fruit Shortcut:
Frozen berries, cherries, mango, and peaches are excellent in baked fruit desserts. Use them straight from the freezer in cobblers, crisps, and bars, but give them a little extra cornstarch if the fruit is especially juicy.
Pantry-Jam Rescue:
When fresh fruit is scarce, jam and preserves can stand in for part of the filling in bars, blondies, and hand pies. Thick jam gives more flavor than a loose spread, and you usually need less sugar because the preserves have already done some of that work.
Common Mistakes to Avoid
The first mistake is treating every fruit like every other fruit. Apples can bake for 40 minutes and still hold shape; berries collapse fast; peaches leak a lot of juice; pears can go from firm to mushy if they’re too ripe. The fix is to match the fruit to the method and adjust the thickener when the fruit is extra wet.
The second mistake is under-thickening fillings. If you skip cornstarch in a cobbler, crisp, hand pie, or bar, the fruit juices have nowhere to go but the bottom of the pan. The symptom is a shiny pool around the edges instead of a glossy, spoonable filling. Add the thickener, and don’t expect it to do its job until it’s heated.
Another common miss is overmixing batters and biscuit doughs. That turns shortcake, sheet cake, and loaf cake tighter than they should be, and it can make biscuits tough instead of tender. Stop as soon as the flour disappears. The batter does not need your full attention for an extra three minutes.
People also cut bars, crisps, and bread puddings before they’ve settled. Hot fruit desserts look finished because they’re bubbling and fragrant, but the structure is still loose. Let them rest, even if it’s only 10 to 20 minutes. That pause is what turns a pan of hot ingredients into a dessert that holds a spoon.
Finally, there’s the temptation to bury everything in sugar because fruit desserts seem easy to sweeten. That works for about ten seconds, then the dessert tastes dull and heavy. A better trick is to use salt, lemon, orange zest, vanilla, or a bitter note like cocoa to make the fruit taste more like itself.
Frequently Asked Questions
Can I use frozen fruit instead of fresh fruit in most of these desserts?
Yes, and in several of them I’d rather you did. Frozen berries, cherries, peaches, and mangoes are usually picked and frozen at a decent stage of ripeness, so they bake with good flavor. Use them straight from frozen in crisps, cobblers, and bars unless the recipe tells you otherwise.
Do I need to thaw frozen fruit before baking?
Usually no. Thawing can dump extra liquid into the filling and make the dessert watery, especially in cobblers and crisps. If you do thaw fruit for a no-bake dessert or parfait, drain off excess liquid first so the layers stay clean.
What pantry staple thickener works best for juicy fruit fillings?
Cornstarch is the easiest and most reliable. It thickens quickly once heated and stays fairly clear, which is useful in berry and stone-fruit desserts. Flour works too, but it can make the filling cloudy and a little heavier.
How do I keep crumble toppings crisp instead of soggy?
Use cold butter, don’t pack the topping down hard, and bake until the filling bubbles at the edges. Once the dessert is baked, let it cool slightly so steam doesn’t soften the topping too fast. If you cover it tightly while hot, the crisp will fade.
Can I cut the sugar without ruining the dessert?
A little, yes. Fruit desserts can usually take a modest reduction, especially if the fruit is ripe and sweet. Don’t cut too much from cakes or custards, though, because sugar affects texture, not just sweetness.
What if my fruit is very tart?
Add sugar gradually and taste the filling before baking if the recipe allows for it. Apples, rhubarb, cranberries, and sour cherries often need a firmer hand with sweetening than peaches or mango. Citrus zest can help, but it won’t replace sugar in a tart filling.
How far ahead can I make these desserts?
Bars, blondies, and loaf cakes can be made a day ahead and often slice better after resting. Crisps and cobblers are best warm, but they reheat well. Hand pies can be assembled and frozen before baking, which is one of the few make-ahead tricks I never get tired of using.
What’s the best way to reheat a fruit crisp or cobbler?
A 325°F oven is the safest bet. Cover loosely with foil at first if the topping is already dark, then uncover near the end so it crisps back up. Microwaving works in a hurry, but it softens the topping and muddies the texture.
Can I use canned fruit in syrup if that’s what I have?
Yes, but drain it well and cut back on added sugar in the recipe. Heavy syrup can make some desserts taste sticky rather than fruity. If the canned fruit is in juice, you’re in better shape from the start.
A Sweet Shelf That Works Hard
Fruit desserts do not need much convincing when the pantry is stocked with the right basics. Flour, oats, sugar, butter, eggs, and cornstarch can take an apple, a pear, a berry, or a spoonful of jam and turn it into something that feels planned, even when it started as a rescue mission.
That’s the part I keep coming back to: these recipes are practical without tasting practical. They’re the kind of desserts that let you use what you’ve got, skip the specialty store, and still put a warm dish on the table that people lean toward before it cools. Keep a few of them in rotation, and you’ll never look at a bruised peach or a half-empty jar of jam the same way again.