
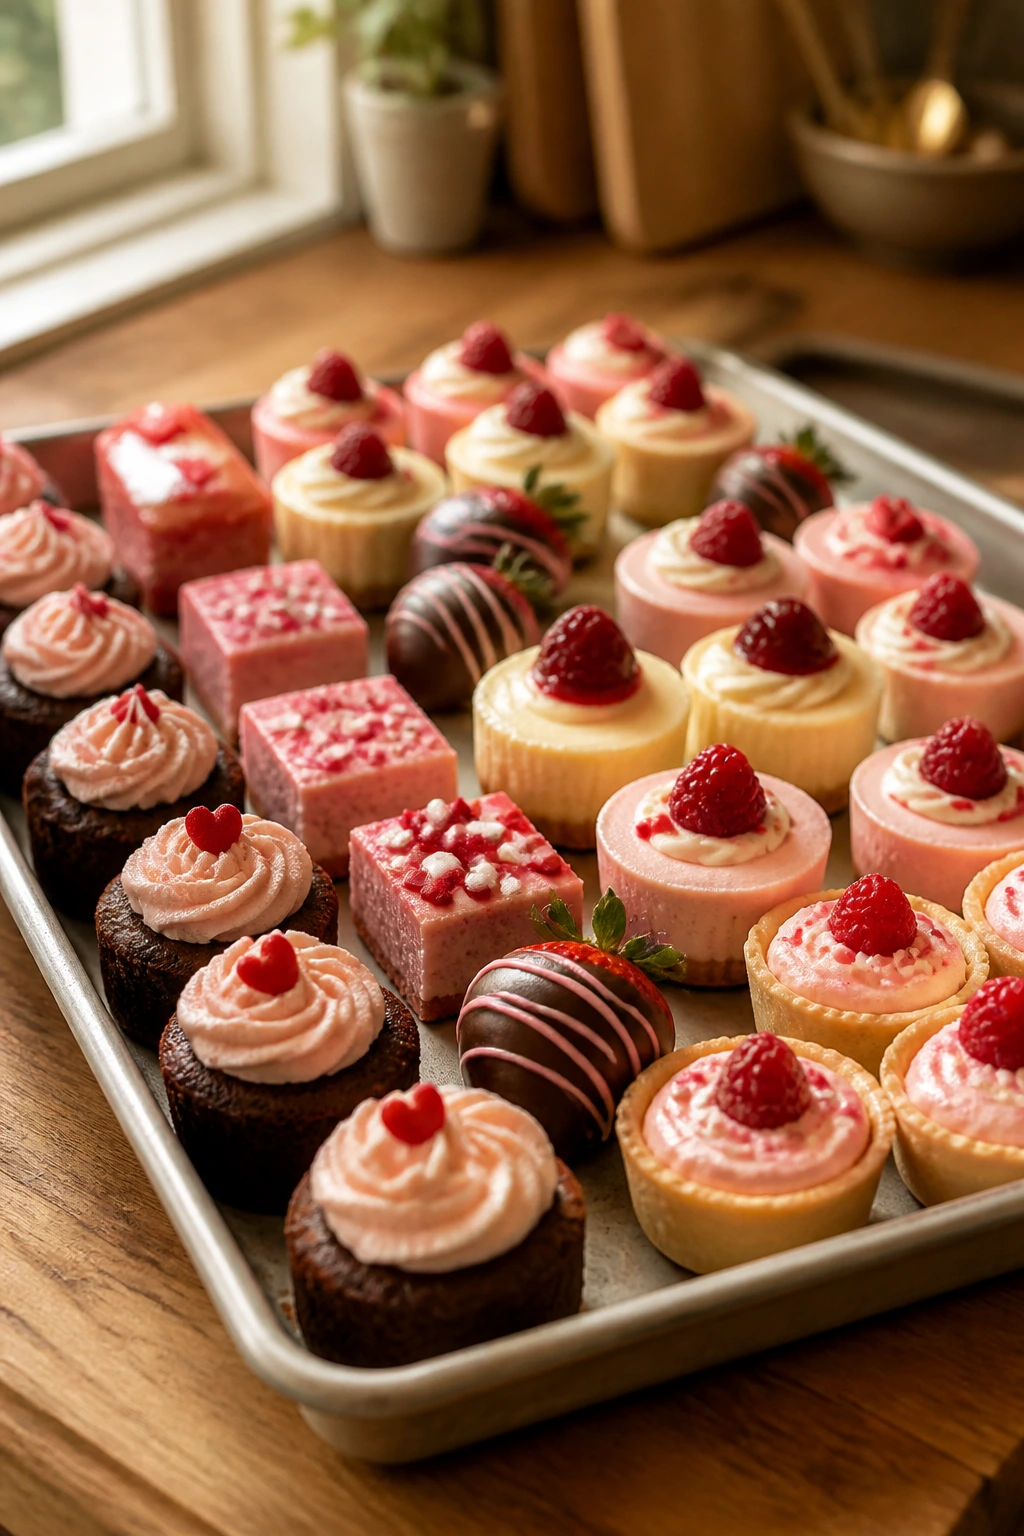
A Galentines dessert table lives or dies on one thing: can the sweets survive a room full of chatting, laughing, grazing people without falling apart on the first napkin? That’s why I always lean toward Galentines party dessert ideas for beginner bakers that are cute without being fussy, sturdy without feeling dull, and easy to portion while someone is balancing a drink in the other hand.
I like desserts that behave. Bars that cut cleanly. Cookies that don’t need a pastry degree. Little cups, truffles, bark, hand pies, sheet cake squares — the kinds of treats that look charming on a platter and don’t demand a last-minute panic when the frosting starts sliding or the berries weep across the tray.
There’s a sweet spot here, and it’s narrower than people think. Too simple, and the spread feels flat. Too ambitious, and you’re stuck piping roses while the rest of the party is already opening the bubbly. The best Galentines desserts give you pink, red, chocolate, berry brightness, and a little sparkle from sprinkles or powdered sugar, but they stay firmly in beginner-baker territory. Good news: there are a lot of ways to get there.
Why These Galentines Desserts Work So Well
-
Low-Stress Assembly: Most of these desserts use one bowl, one pan, or one chill time, which means you spend less time babysitting the oven and more time actually hosting.
-
Party-Ready Portions: Bars, cups, bites, truffles, and mini cakes make it easy to serve a crowd without a knife fight over slices.
-
Pink-and-Red Without the Fuss: You can get the Galentines color palette from strawberries, raspberries, pink glaze, white chocolate, and a few sprinkles — no elaborate decorating needed.
-
Beginner-Friendly Methods: These recipes lean on simple steps like stirring, chilling, baking in a sheet pan, or dipping in melted chocolate instead of tricky techniques.
-
Mix of Fresh and Make-Ahead: Some desserts are best assembled the day of, while others taste even better after a night in the fridge, which helps when your guest list gets longer than expected.
-
Easy to Scale Up: If the table grows, you can double most of these with a second pan, a second carton of berries, or a second bag of chocolate chips.
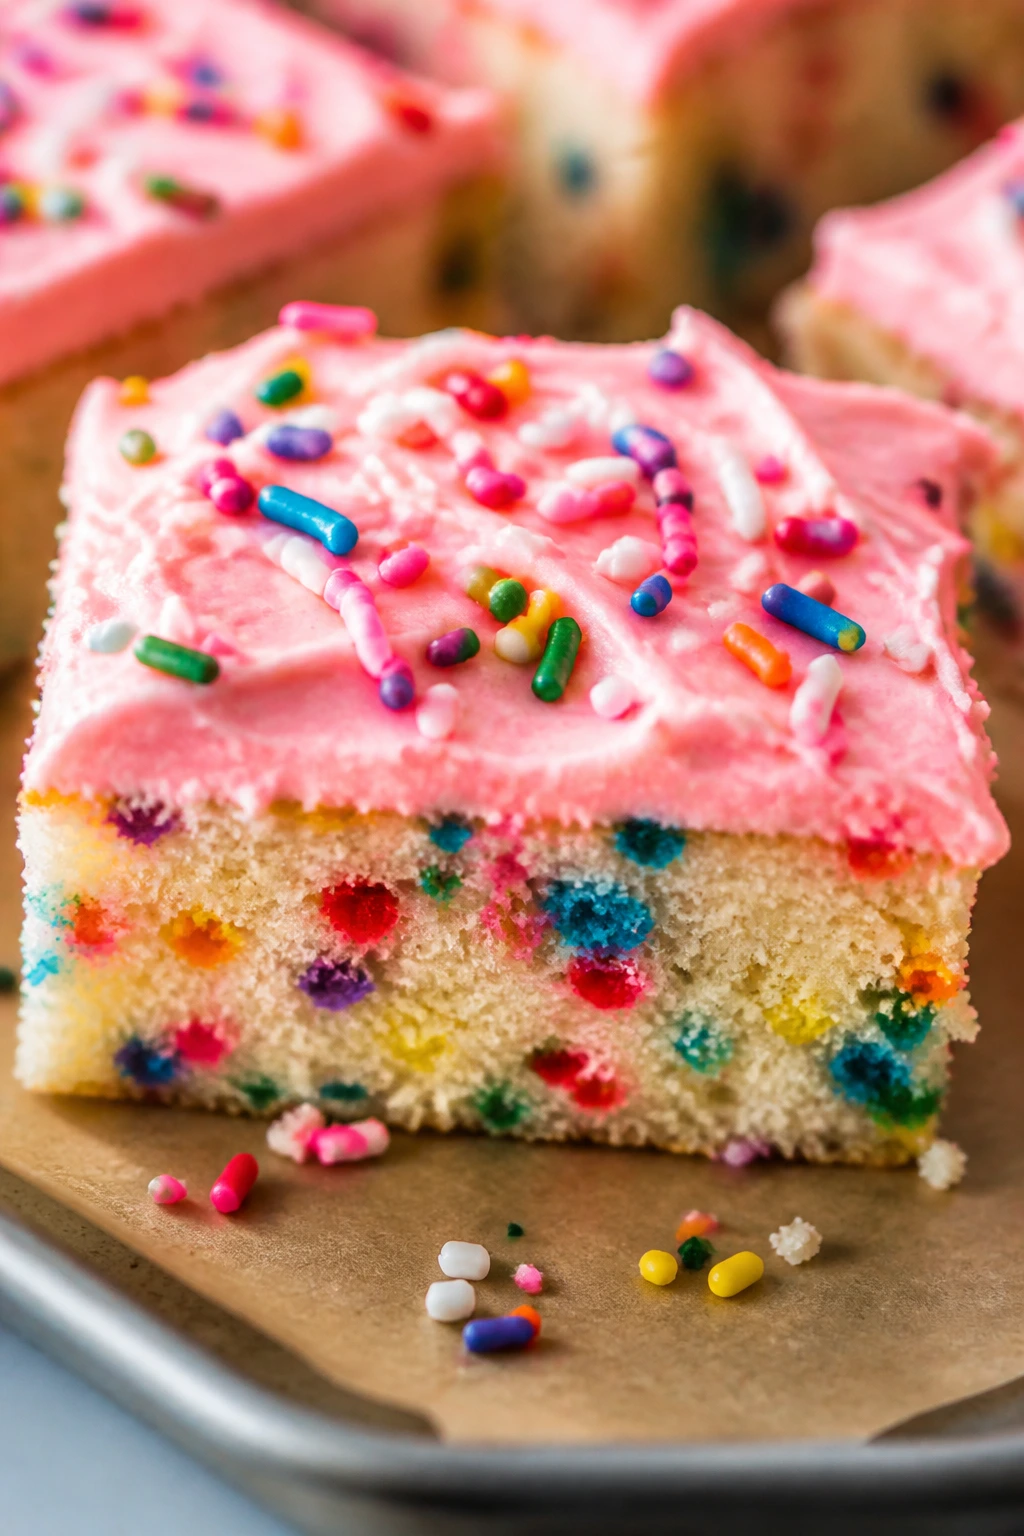
1. Pink Velvet Sheet Cake Squares
Soft, tender, and tinted a cheerful blush, these sheet cake squares give you all the drama of a layered cake without the stress. I like them because they cut into neat little party pieces and hold their shape on a dessert tray.
Why It Works: A 9×13-inch pan bakes evenly and feeds a crowd fast. The cream cheese frosting sets up enough to slice cleanly after chilling.
Key Ingredients:
- 2 1/2 cups all-purpose flour
- 1 1/2 cups granulated sugar
- 1 cup buttermilk
- 2 large eggs
- 1/2 cup unsalted butter, softened
- 1 teaspoon vanilla extract
Quick Steps:
- Preheat the oven to 350°F and line a 9×13-inch pan with parchment.
- Whisk the dry ingredients, then beat in butter, eggs, buttermilk, vanilla, and pink coloring.
- Bake 28 to 32 minutes until a toothpick comes out clean.
- Cool, frost with cream cheese icing, chill 20 minutes, and cut into squares.
Equipment for This Recipe:
- 9×13-inch baking pan
- Mixing bowls
- Hand mixer
- Offset spatula
How to Serve This Dish: Stack the squares on a white platter and add a few fresh raspberries around the edges. They’re easy to grab with a fork or even a napkin.
Pro Tips for This Recipe:
- Use gel coloring, not liquid, so the batter stays balanced.
- Chill before slicing or the frosting will drag.
- Cut with a warm knife for cleaner edges.
Variations on This Dish:
- Strawberry Swirl: Add 1/3 cup strawberry jam in ribbons over the batter.
- Chocolate Lover’s Version: Swap 1/4 cup flour for cocoa powder.
Common Mistakes to Avoid with This Dish:
- Overbaking: Dry cake squares crumble. Pull them when the center springs back lightly.
- Warm Frosting: The icing will slide. Cool the cake fully first.
2. Chocolate-Dipped Strawberries with Crunch Toppings
These are the easiest dessert on the table, and they disappear first when the strawberries are ripe and the chocolate is glossy. You get fresh fruit, a clean snap of chocolate, and a little crunch from nuts or cookie crumbs.
Why It Works: The contrast is doing all the work here. Cold strawberries and room-temperature chocolate make a neat, shiny shell.
Key Ingredients:
- 1 1/2 pounds fresh strawberries, dry and whole
- 8 ounces semi-sweet chocolate chips
- 4 ounces white chocolate chips
- 1/4 cup crushed freeze-dried strawberries
- 1/4 cup chopped pistachios or almonds
- 2 tablespoons sprinkles
Quick Steps:
- Wash strawberries and dry them completely.
- Melt the chocolate in short bursts until smooth.
- Dip each berry, then roll the tip in toppings.
- Set on parchment and chill 15 to 20 minutes.
Equipment for This Recipe:
- Baking sheet
- Parchment paper
- Microwave-safe bowl
- Small spoon or fork
How to Serve This Dish: Arrange them in concentric circles on a chilled plate. Serve the same day so the berries stay juicy, not soggy.
Pro Tips for This Recipe:
- Dry the berries well or the chocolate will seize.
- Use a fork for a thinner, cleaner coating.
- Keep toppings in shallow bowls for faster dipping.
Variations on This Dish:
- Pink Dip: Use white chocolate tinted with a little gel color.
- Crunchy Cookie Finish: Roll the tips in crushed vanilla wafers.
Common Mistakes to Avoid with This Dish:
- Wet Strawberries: Water makes the chocolate clump. Pat every berry dry.
- Overheating Chocolate: Stop microwaving before it looks done; stir the rest smooth.
3. Strawberry Pretzel Bars
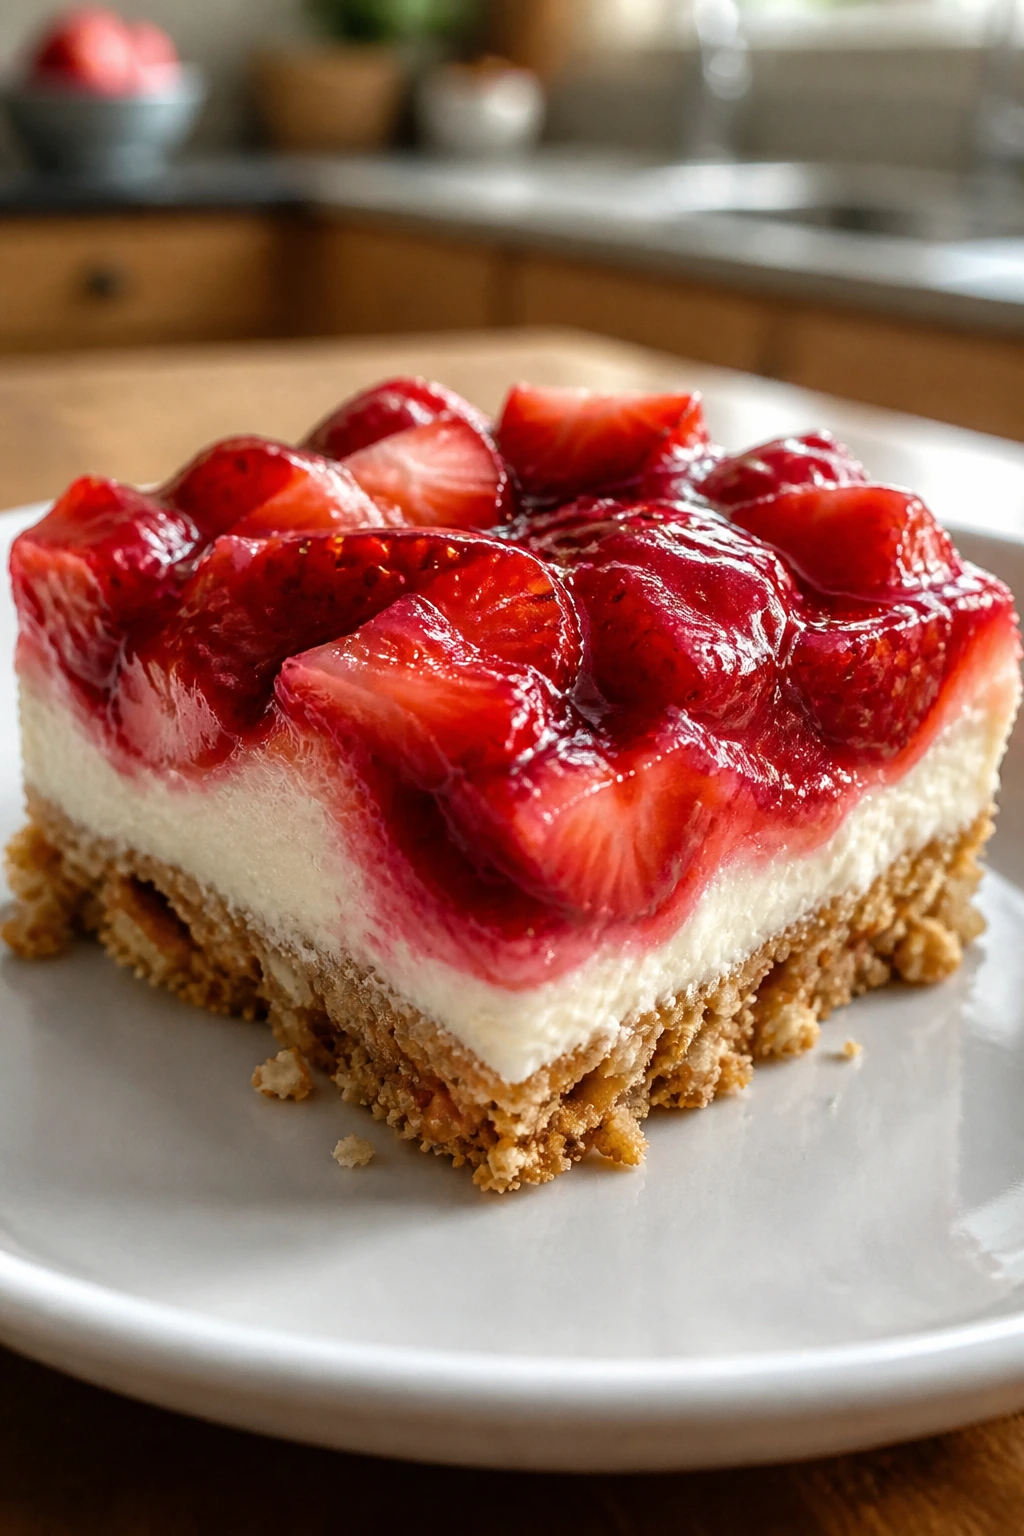
Salty pretzel crust, tangy cream cheese middle, strawberry topping — this is the dessert people pretend to “just taste” and then eat three squares of. It’s bright, sweet, and a little old-school in the best way.
Why It Works: The crust stays crisp if you let it cool before adding the filling. The creamy layer balances the sweet gelatin topping.
Key Ingredients:
- 2 cups crushed pretzels
- 3/4 cup melted butter
- 1/4 cup granulated sugar
- 8 ounces cream cheese, softened
- 1 cup powdered sugar
- 2 cups sliced strawberries
Quick Steps:
- Mix pretzel crumbs with butter and sugar, then bake 10 minutes at 350°F.
- Cool the crust completely.
- Beat cream cheese and powdered sugar, spread it on, then top with strawberries and strawberry glaze.
- Chill 2 hours before cutting.
Equipment for This Recipe:
- 8×8-inch baking pan
- Mixing bowls
- Rubber spatula
- Hand mixer
How to Serve This Dish: Cut into small bars; they’re rich enough that a little square goes far. A chilled metal serving tray keeps them tidy.
Pro Tips for This Recipe:
- Seal the cream layer to the edges so the crust doesn’t get soggy.
- Use fresh strawberries only after the cream layer has set.
- Chill fully before slicing.
Variations on This Dish:
- Raspberry Swap: Replace strawberries with raspberries for a sharper finish.
- Chocolate Pretzel Base: Add 2 tablespoons cocoa to the crust.
Common Mistakes to Avoid with This Dish:
- Skipping the Cool-Down: Warm crust melts the filling. Wait until it’s fully cool.
- Too Much Glaze: Flooding the top makes bars slide apart.
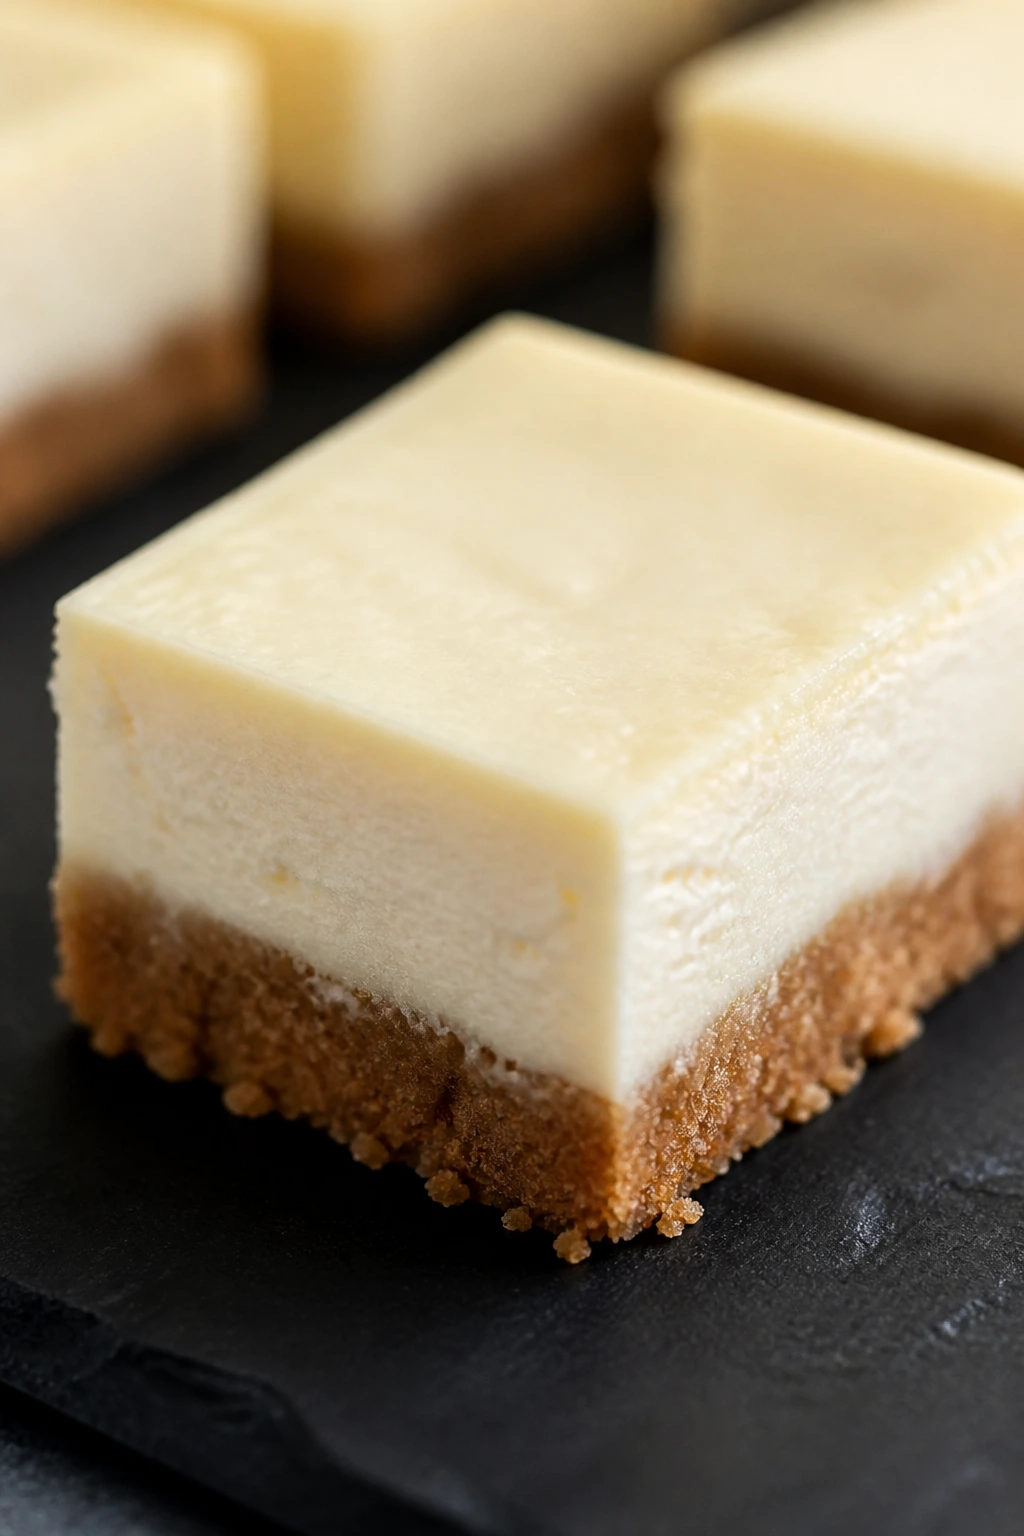
4. No-Bake Cheesecake Cups
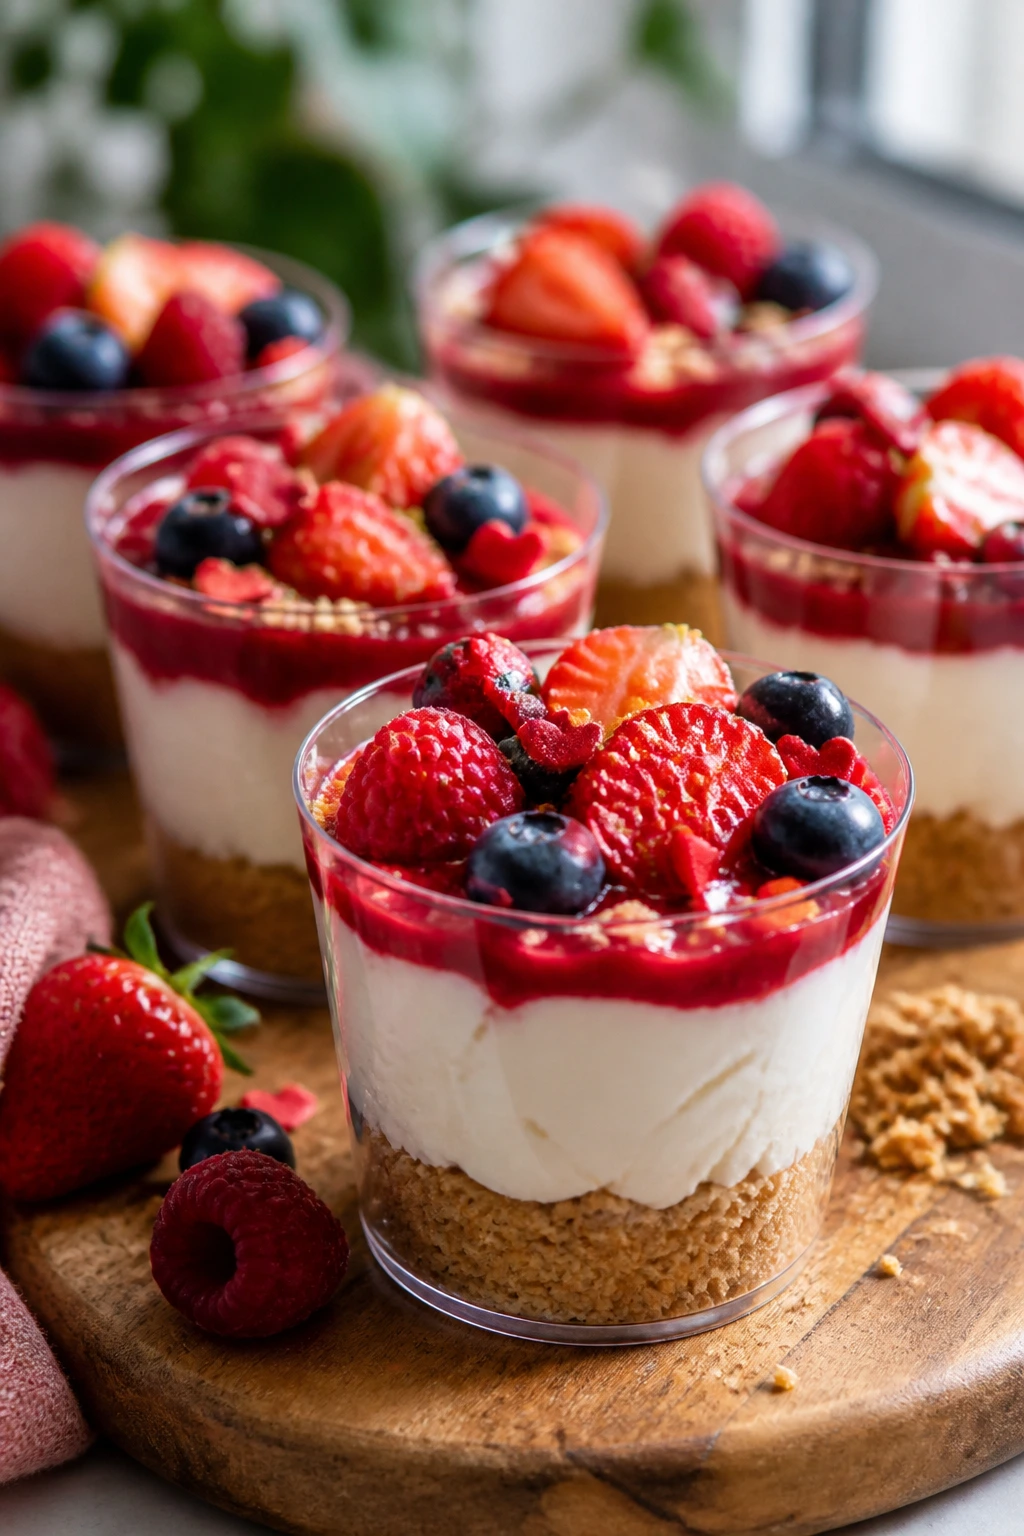
These little cups are the dessert version of a neat, polished outfit — simple, tidy, and easy to carry with a spoon. The buttery crumb base and fluffy cheesecake layer feel richer than the effort suggests.
Why It Works: Individual cups cut out slicing and keep the crust crisp. A cold cheesecake filling sets fast in the fridge.
Key Ingredients:
- 1 1/2 cups graham cracker crumbs
- 4 tablespoons melted butter
- 8 ounces cream cheese, softened
- 1/2 cup powdered sugar
- 1 cup whipped topping or whipped cream
- 1/2 cup berry jam
Quick Steps:
- Stir crumbs and butter, then press into cups.
- Beat cream cheese, powdered sugar, and vanilla until smooth.
- Fold in whipped topping and spoon over the crust.
- Top with jam or berries and chill 1 hour.
Equipment for This Recipe:
- Small cups or jars
- Hand mixer
- Mixing bowls
- Spoon or piping bag
How to Serve This Dish: Use clear cups so the layers show. A few mint leaves or sliced strawberries on top make them look finished.
Pro Tips for This Recipe:
- Soften the cream cheese fully or the filling stays lumpy.
- Pipe the filling for a cleaner top.
- Chill before adding juicy fruit toppings.
Variations on This Dish:
- Lemon Version: Add 1 tablespoon lemon zest to the filling.
- Chocolate Crust: Swap graham crumbs for chocolate cookie crumbs.
Common Mistakes to Avoid with This Dish:
- Undersoftened Cream Cheese: You’ll get tiny lumps. Let it sit out first.
- Runny Toppings: Spoon on jam right before serving if it’s loose.
5. Raspberry Thumbprint Cookies
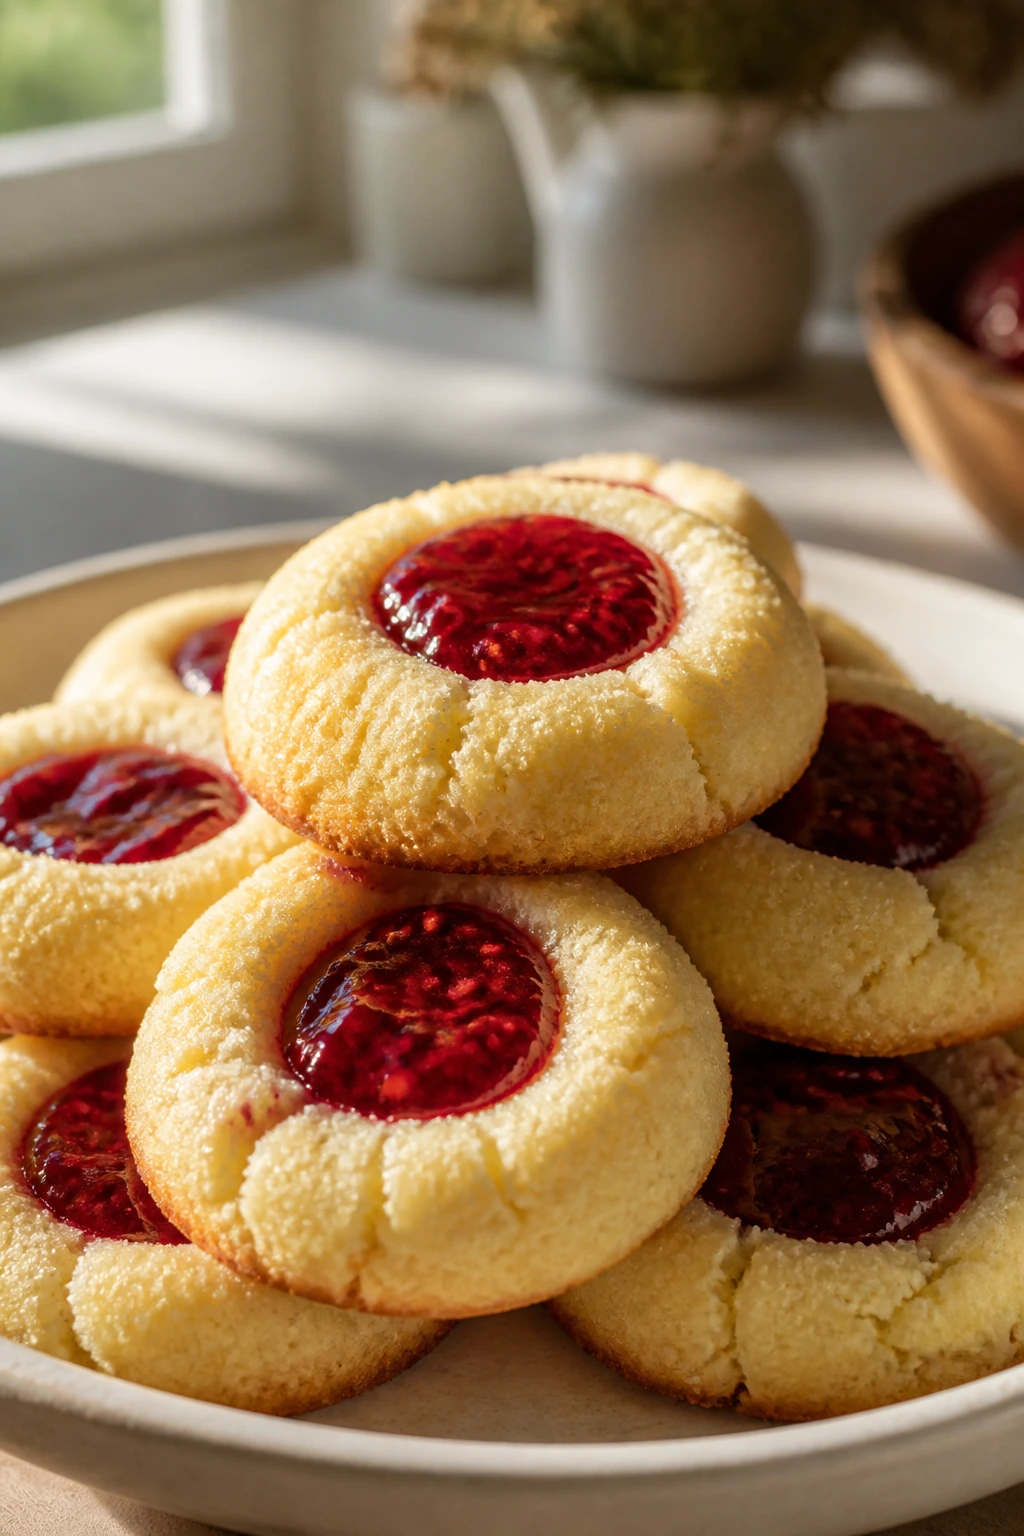
These are tiny, buttery cookies with a jam center that bakes into a glossy little pool. They look charming on a plate and they taste like the kind of cookie someone’s aunt would bring in a tin.
Why It Works: The shortbread-style dough is forgiving, and the thumbprint keeps the jam from leaking across the tray.
Key Ingredients:
- 1 cup unsalted butter, softened
- 2/3 cup granulated sugar
- 2 1/2 cups all-purpose flour
- 1/2 teaspoon salt
- 1/2 cup raspberry jam
- 1 teaspoon vanilla extract
Quick Steps:
- Cream butter and sugar, then mix in vanilla.
- Add flour and salt until a soft dough forms.
- Roll into balls, press centers, and fill with jam.
- Bake at 350°F for 12 to 14 minutes.
Equipment for This Recipe:
- Baking sheet
- Parchment paper
- Mixing bowl
- Measuring spoon
How to Serve This Dish: Pile them into a shallow bowl and dust with powdered sugar. They work well beside coffee or tea.
Pro Tips for This Recipe:
- Chill the dough 15 minutes if it feels sticky.
- Use a 1/2-teaspoon measure to make even wells.
- Don’t overfill; jam expands as it warms.
Variations on This Dish:
- Strawberry Center: Swap raspberry jam for strawberry preserves.
- Almond Note: Add 1/4 teaspoon almond extract.
Common Mistakes to Avoid with This Dish:
- Cracked Edges: The dough was too dry. Add 1 teaspoon milk if needed.
- Overflowing Jam: Use less than you think; a little goes far.
6. Cupid Bark with White Chocolate and Pretzels
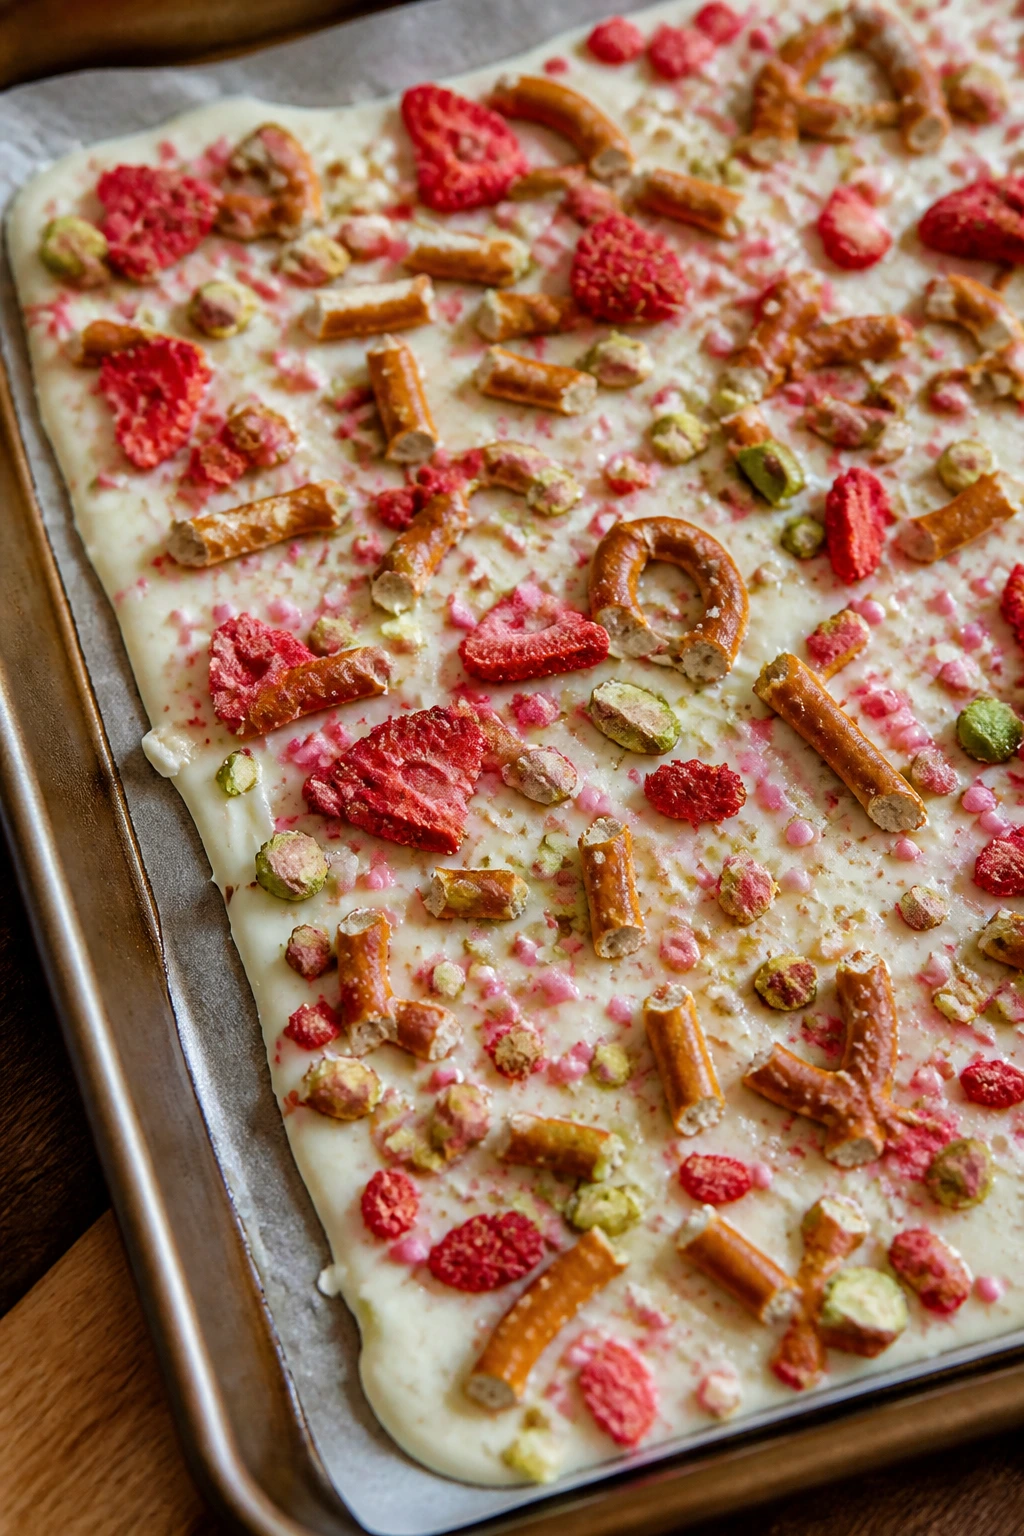
Bark is the fastest way to make a dessert tray look busy in the best way. White chocolate, pretzels, dried berries, and sprinkles give you sweet-salty bites with almost no effort.
Why It Works: Melted chocolate sets in one flat sheet, then breaks into irregular pieces that look handmade. The toppings stay put if you press them in while the chocolate is still soft.
Key Ingredients:
- 12 ounces white chocolate chips
- 1 cup mini pretzels, broken
- 1/4 cup freeze-dried strawberries
- 2 tablespoons pink sprinkles
- 2 tablespoons chopped pistachios
- Pinch of flaky salt
Quick Steps:
- Line a sheet pan with parchment.
- Melt the chocolate and spread it thin.
- Scatter toppings over the surface and press gently.
- Chill until firm, then break into pieces.
Equipment for This Recipe:
- Rimmed sheet pan
- Parchment paper
- Heatproof bowl
- Offset spatula
How to Serve This Dish: Put the shards in paper candy cups or pile them in a bowl with the broken edges facing up. It’s easy to snack on while people mingle.
Pro Tips for This Recipe:
- Keep the chocolate layer thin for a cleaner snap.
- Freeze-dried strawberries stay crisp; fresh ones do not.
- Add flaky salt at the end, not before.
Variations on This Dish:
- Dark Chocolate Version: Use half dark, half white chocolate.
- Cookie Crunch: Replace pretzels with crushed wafer cookies.
Common Mistakes to Avoid with This Dish:
- Wet Toppings: Fresh fruit makes bark soft. Stick to dry toppings.
- Thick Chocolate: A heavy layer makes awkward chunks. Spread it thin.
7. Simple Sugar Cookies with Pink Glaze
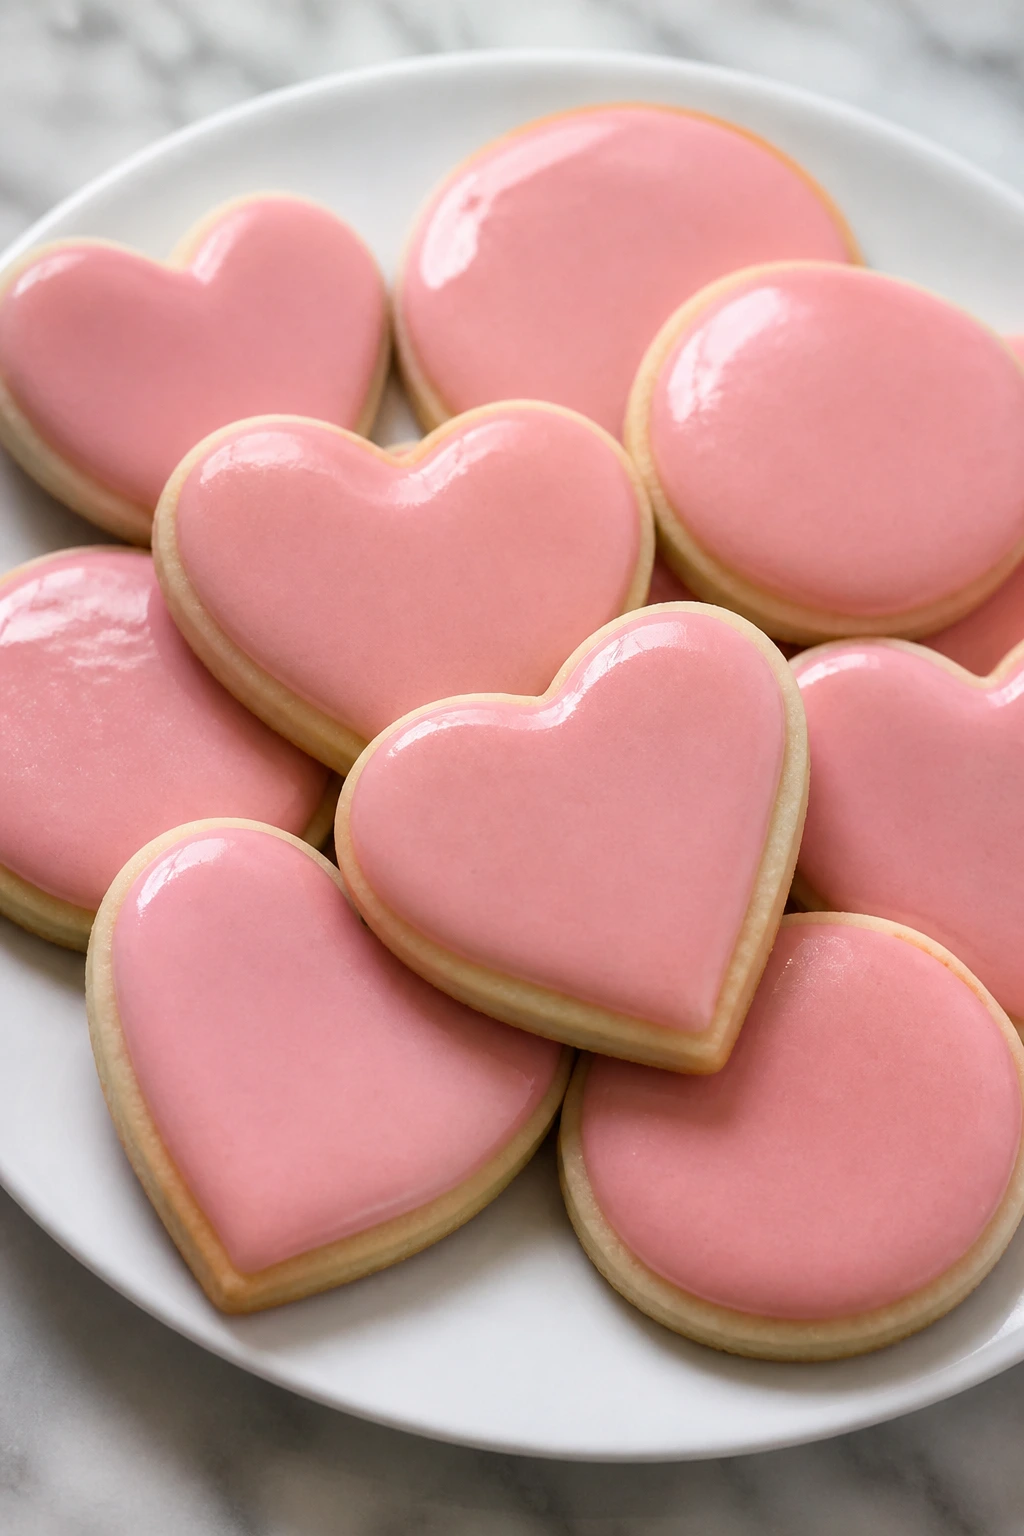
If you want one cookie that can wear any outfit, this is it. The dough rolls out smoothly, bakes flat enough for decorating, and takes pink glaze like it was made for the job.
Why It Works: Sugar cookie dough is sturdy and easy to cut into hearts, circles, or letters. A quick glaze dries faster than buttercream.
Key Ingredients:
- 2 3/4 cups all-purpose flour
- 1 cup unsalted butter, softened
- 1 cup granulated sugar
- 1 large egg
- 1 teaspoon vanilla extract
- 1 1/2 cups powdered sugar
Quick Steps:
- Cream butter and sugar, then beat in egg and vanilla.
- Mix in flour until the dough forms.
- Roll, cut shapes, and bake at 350°F for 8 to 10 minutes.
- Cool and drizzle with pink glaze.
Equipment for This Recipe:
- Rolling pin
- Cookie cutters
- Baking sheets
- Cooling rack
How to Serve This Dish: Stack them in a fan on a platter and let the glaze dry before layering. They pack well in a tin if you need to transport them.
Pro Tips for This Recipe:
- Chill the dough so the shapes stay sharp.
- Dust the cutter with flour between cuts.
- Add glaze only after cookies are fully cool.
Variations on This Dish:
- Lemon Glaze: Stir 1 teaspoon lemon juice into the icing.
- Sparkle Finish: Add sanding sugar before baking.
Common Mistakes to Avoid with This Dish:
- Overbaking: Pale edges are the goal. Brown cookies taste dry here.
- Warm Decorating: Glaze slides on warm cookies.
8. Brownie Bites with Raspberry Jam
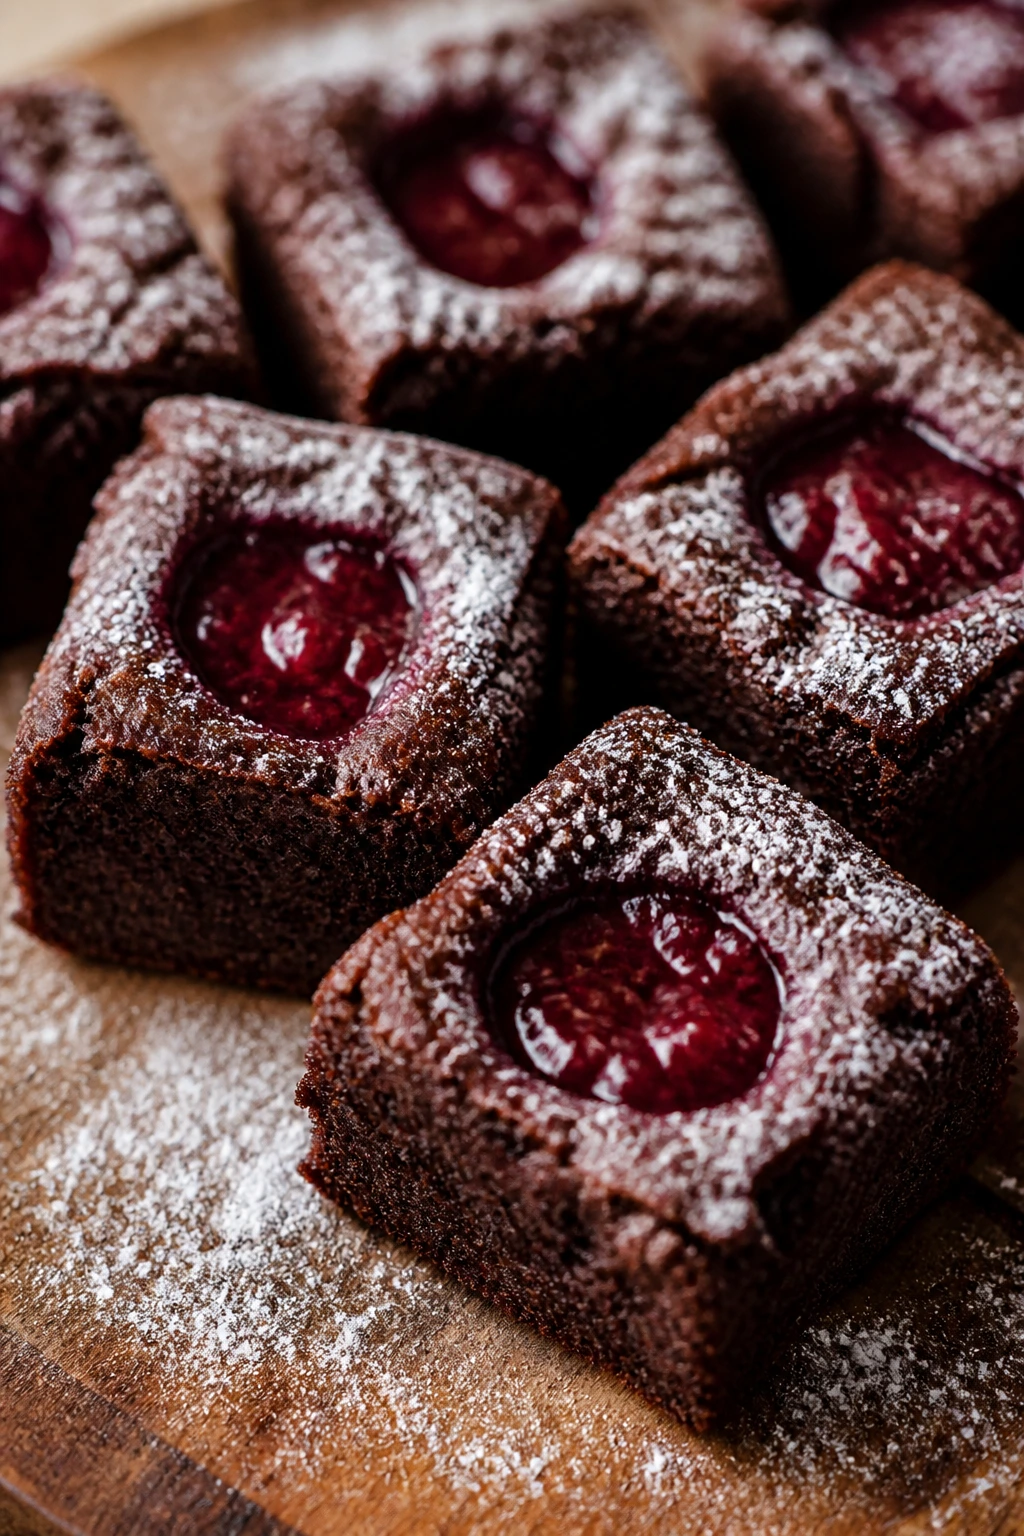
These are dense, fudgy brownie squares with a little red berry sparkle in the middle. A spoonful of jam cuts through the chocolate and keeps the bite from feeling heavy.
Why It Works: Small pans bake brownies faster and give you more crisp edge pieces. Jam adds a tart note without needing extra frosting.
Key Ingredients:
- 1/2 cup unsalted butter
- 1 cup granulated sugar
- 2 large eggs
- 1/3 cup cocoa powder
- 3/4 cup all-purpose flour
- 1/3 cup raspberry jam
Quick Steps:
- Melt butter, then whisk in sugar and eggs.
- Stir in cocoa and flour until just combined.
- Spread in an 8×8-inch pan and dot with jam.
- Bake at 350°F for 20 to 24 minutes.
Equipment for This Recipe:
- 8×8-inch pan
- Mixing bowl
- Whisk
- Parchment paper
How to Serve This Dish: Cut them into small bites and dust with powdered sugar. They’re strongest at room temperature, not hot from the oven.
Pro Tips for This Recipe:
- Stop mixing as soon as the flour disappears.
- Swirl the jam lightly so it doesn’t sink.
- Cool before cutting or the center smears.
Variations on This Dish:
- White Chocolate Chips: Fold in 1/2 cup chips.
- Cherry Swirl: Use cherry preserves instead of raspberry.
Common Mistakes to Avoid with This Dish:
- Dry Brownies: Pull them when the center is set but still soft.
- Too Much Jam: Large spoonfuls make wet pockets.
9. Mini Strawberry Shortcakes
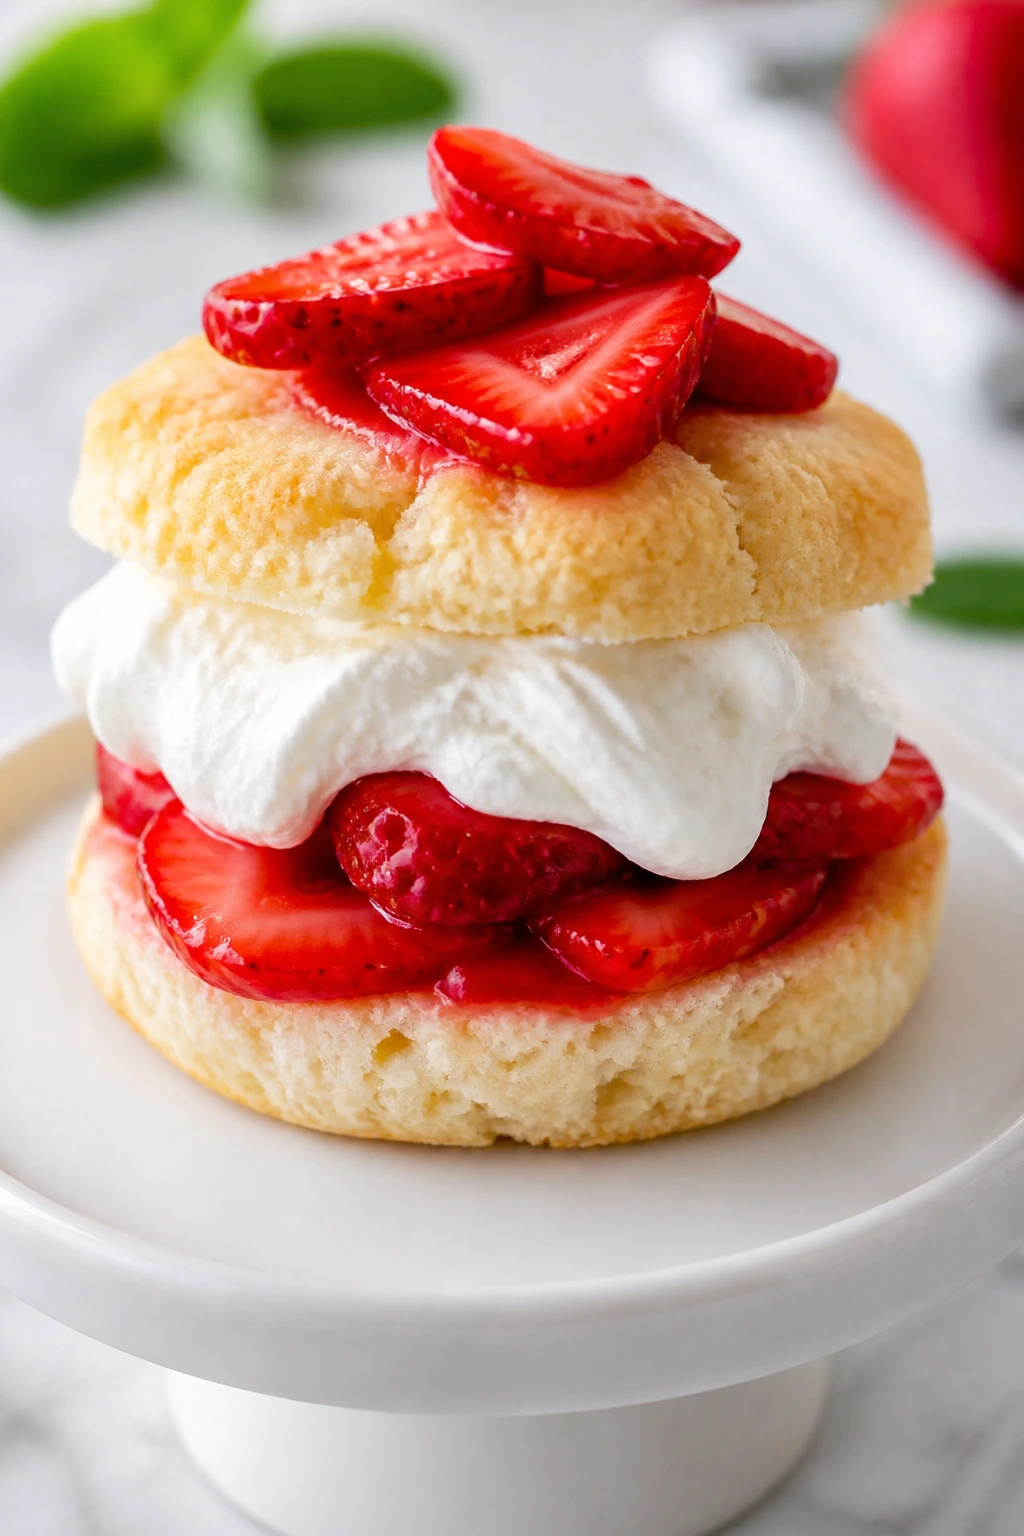
These are the kind of desserts that make a tray look sunny. Tender cakes, sugared strawberries, and a spoonful of whipped cream turn into a dessert that feels fresh instead of heavy.
Why It Works: Small cakes bake faster and portion neatly. Macerated strawberries give off juice that soaks into the cake in a good way.
Key Ingredients:
- 2 cups sliced strawberries
- 2 tablespoons sugar
- 2 cups biscuit or shortcake mix
- 3/4 cup milk
- 1 cup whipped cream
- 2 tablespoons melted butter
Quick Steps:
- Toss strawberries with sugar and let them sit 20 minutes.
- Mix the shortcake batter and bake in muffin tins at 400°F.
- Split the cakes once cooled.
- Fill with strawberries and whipped cream.
Equipment for This Recipe:
- Muffin tin
- Mixing bowl
- Spoon
- Knife
How to Serve This Dish: Build them right before serving so the cakes stay fluffy. A small sprig of mint makes them feel finished.
Pro Tips for This Recipe:
- Don’t assemble too early or the cakes go soggy.
- Use ripe strawberries for the best juice.
- Split with a serrated knife, not a steak knife.
Variations on This Dish:
- Mixed Berry: Add blueberries and raspberries to the bowl.
- Lemon Cream: Fold a little lemon zest into the whipped cream.
Common Mistakes to Avoid with This Dish:
- Wet Cakes: Assemble at the last minute.
- Under-Soaked Fruit: Sugar the berries long enough to draw out juice.
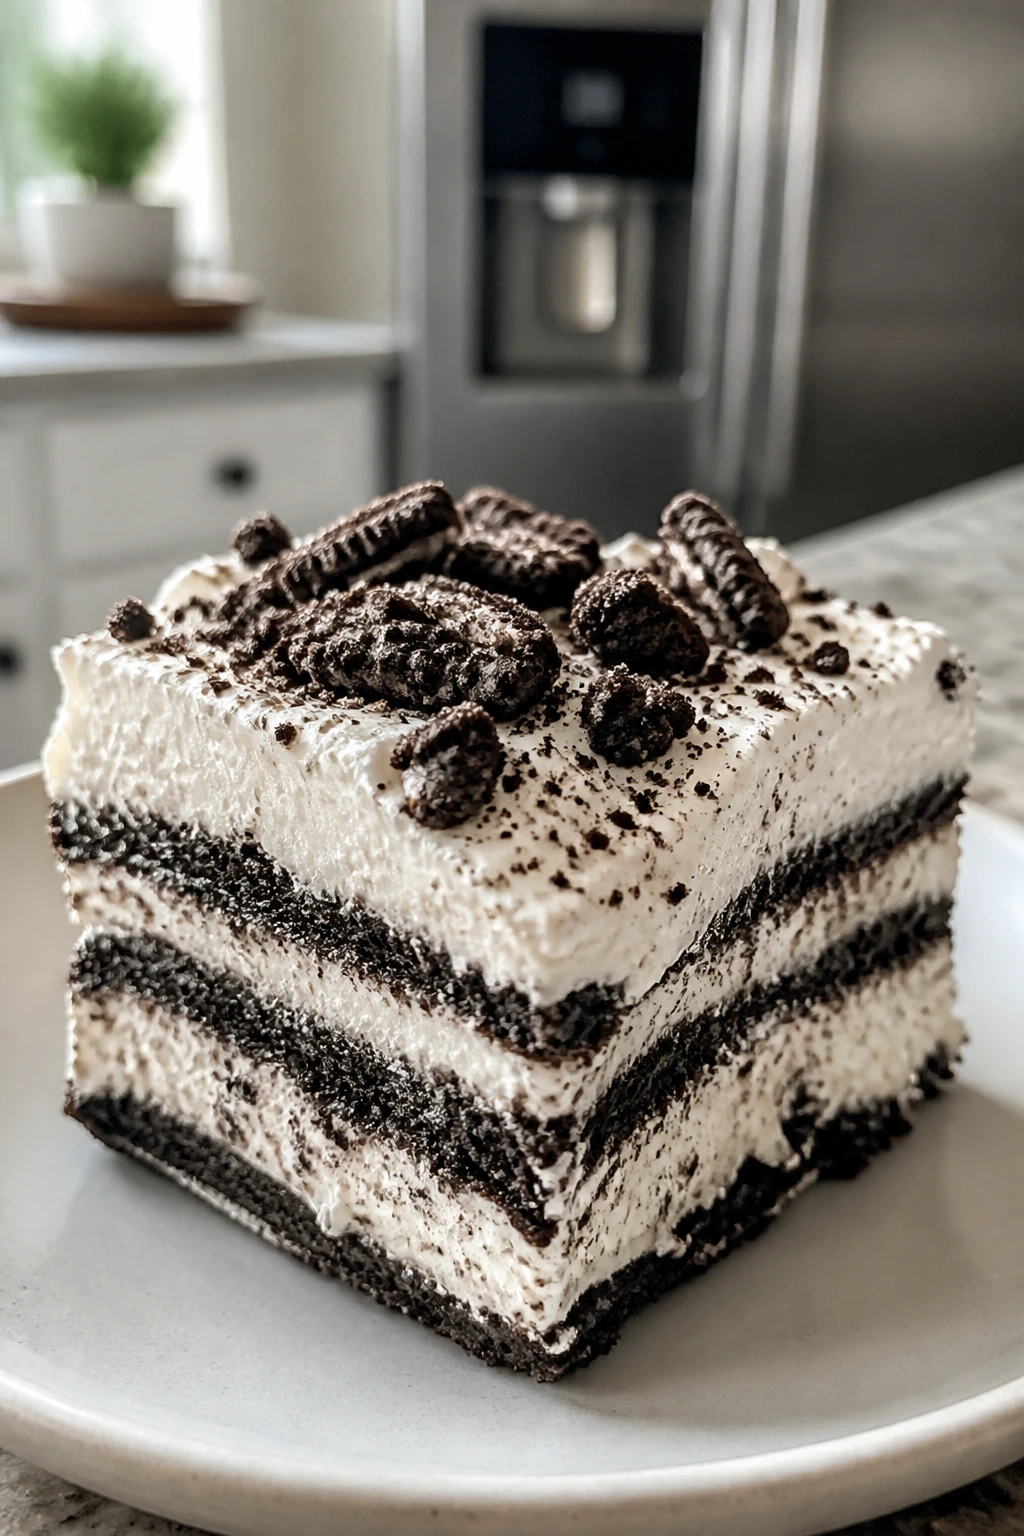
10. Oreo Truffles with Strawberry Dust
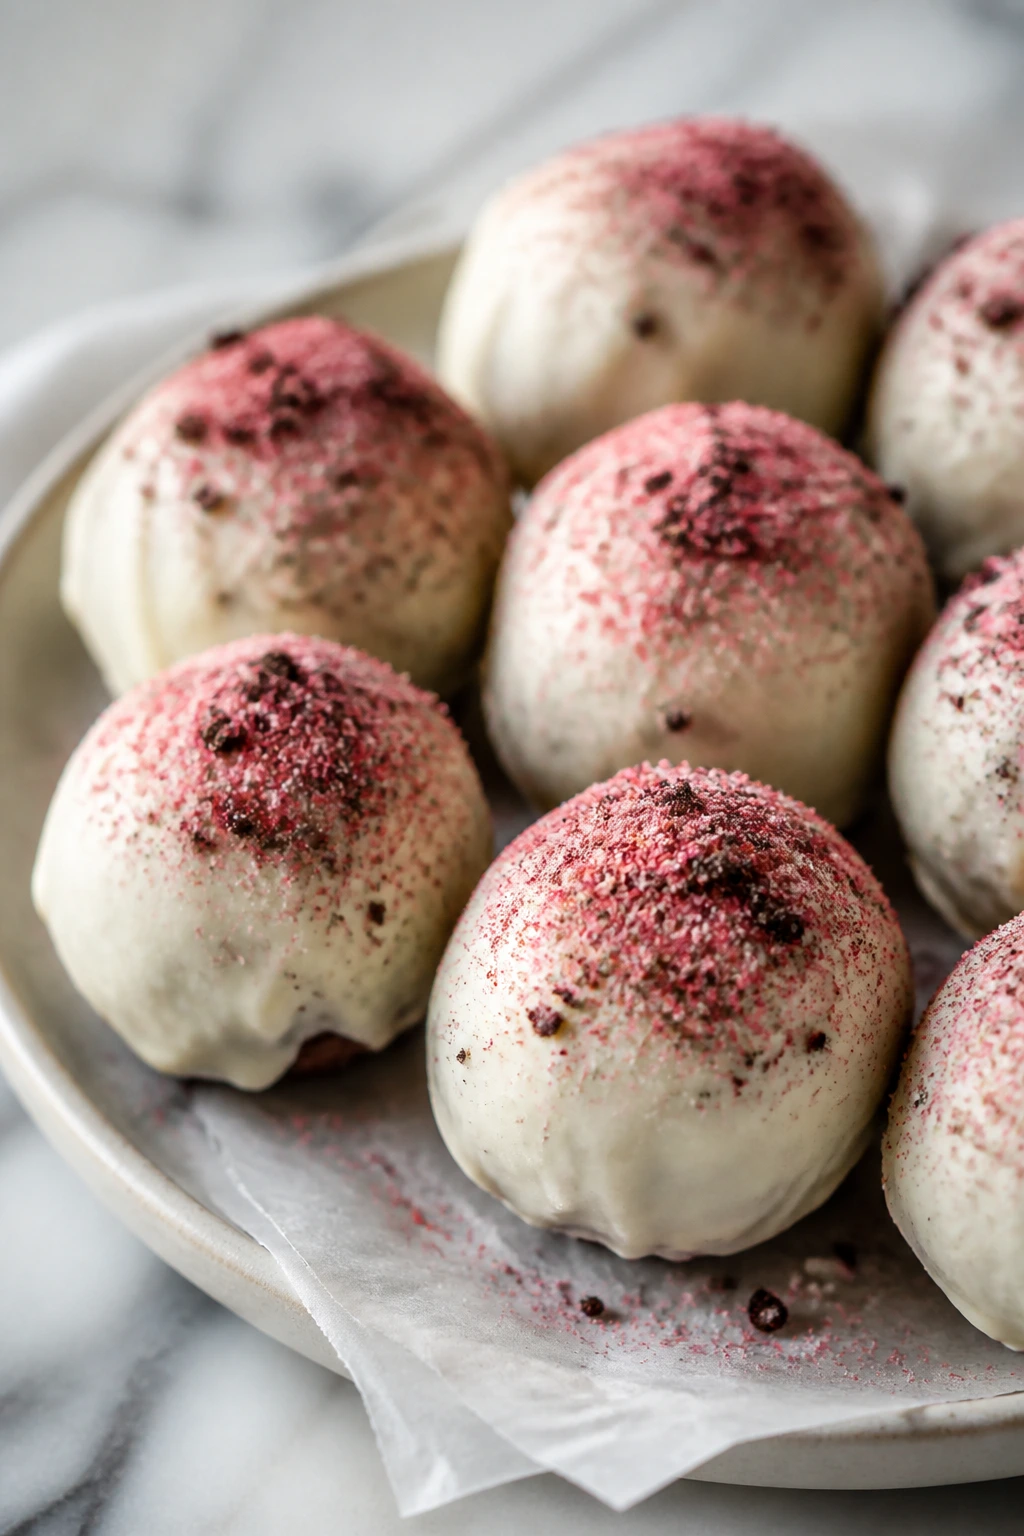
These are rich, cold, and dangerously easy to pop by the handful. Cream cheese and crushed cookies make a smooth center, and the strawberry dust gives them a pink finish that fits the party.
Why It Works: The truffle base sets hard in the fridge, so the coating stays neat. Freeze-dried strawberry powder gives color without adding moisture.
Key Ingredients:
- 1 package Oreo cookies, crushed
- 8 ounces cream cheese, softened
- 12 ounces white chocolate chips
- 2 tablespoons freeze-dried strawberry powder
- 1 teaspoon coconut oil
- 1/4 cup extra crumbs
Quick Steps:
- Mix cookie crumbs with cream cheese.
- Roll into balls and chill 30 minutes.
- Dip in melted white chocolate.
- Dust with strawberry powder after the coating sets.
Equipment for This Recipe:
- Food processor or zip-top bag
- Mixing bowl
- Baking sheet
- Fork
How to Serve This Dish: Put each truffle in a mini paper cup. They’re rich, so one or two per person is plenty.
Pro Tips for This Recipe:
- Chill the balls before dipping or they’ll fall apart.
- Melt chocolate slowly to keep it smooth.
- Roll between cold hands for cleaner shapes.
Variations on This Dish:
- Dark Coating: Use dark chocolate instead of white.
- Mint Cookie Truffles: Swap in mint Oreos.
Common Mistakes to Avoid with This Dish:
- Too Much Filling Softness: Add more crumbs if the mixture feels sticky.
- Thick Coating: Tap off extra chocolate for a cleaner shell.
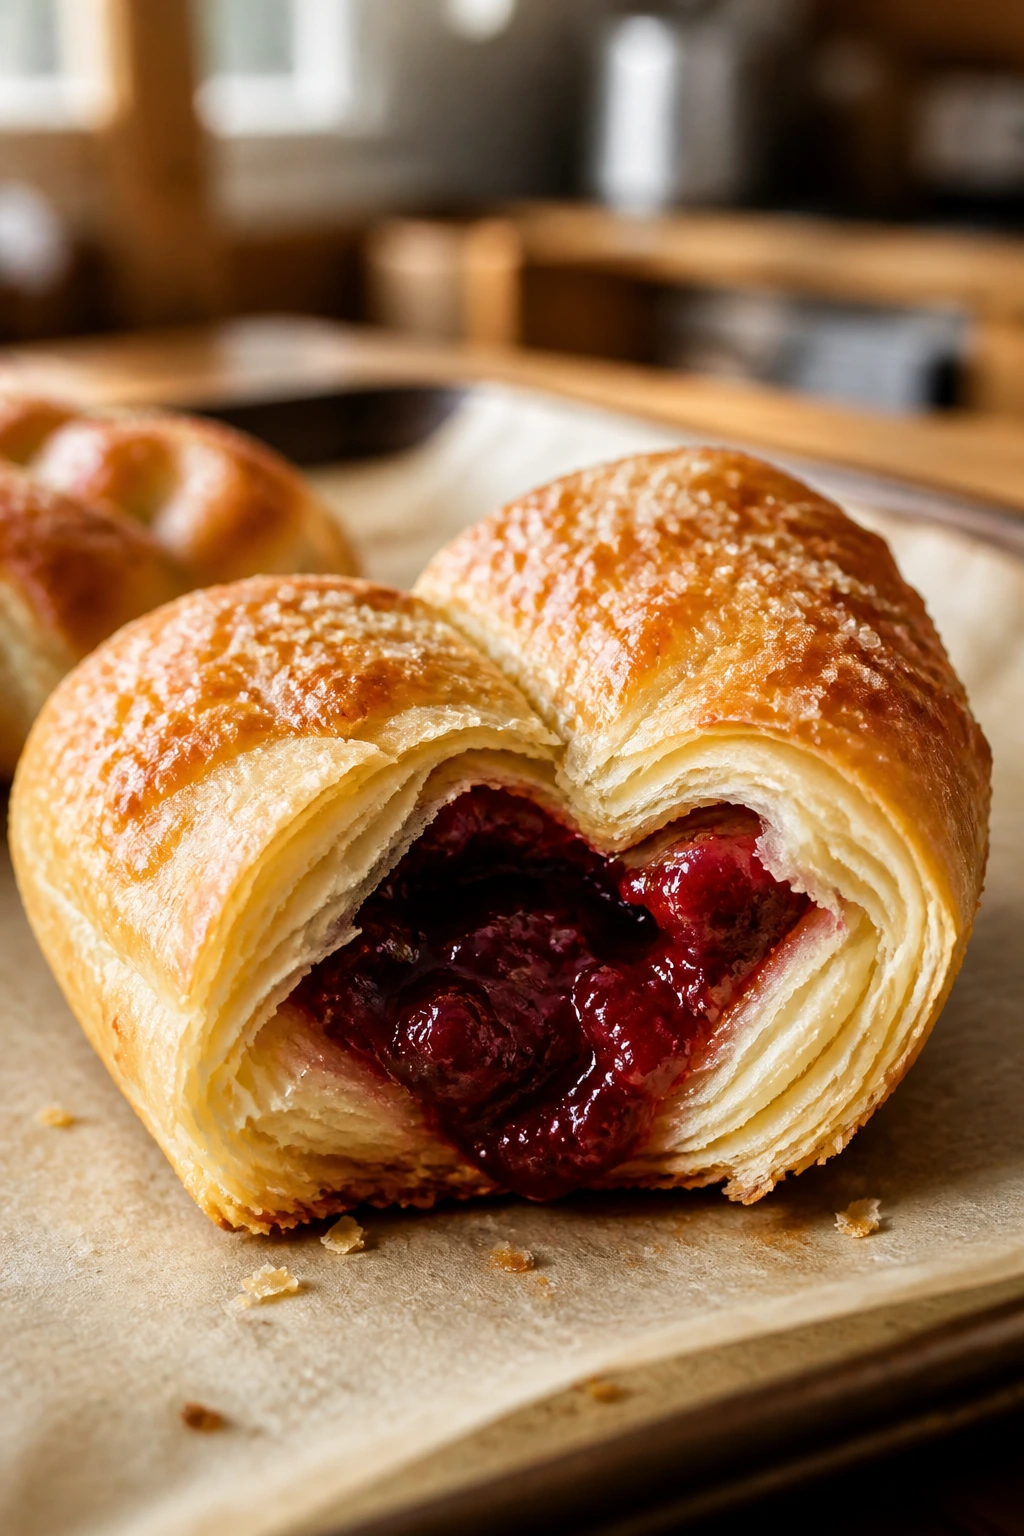
11. Cherry Hand Pies
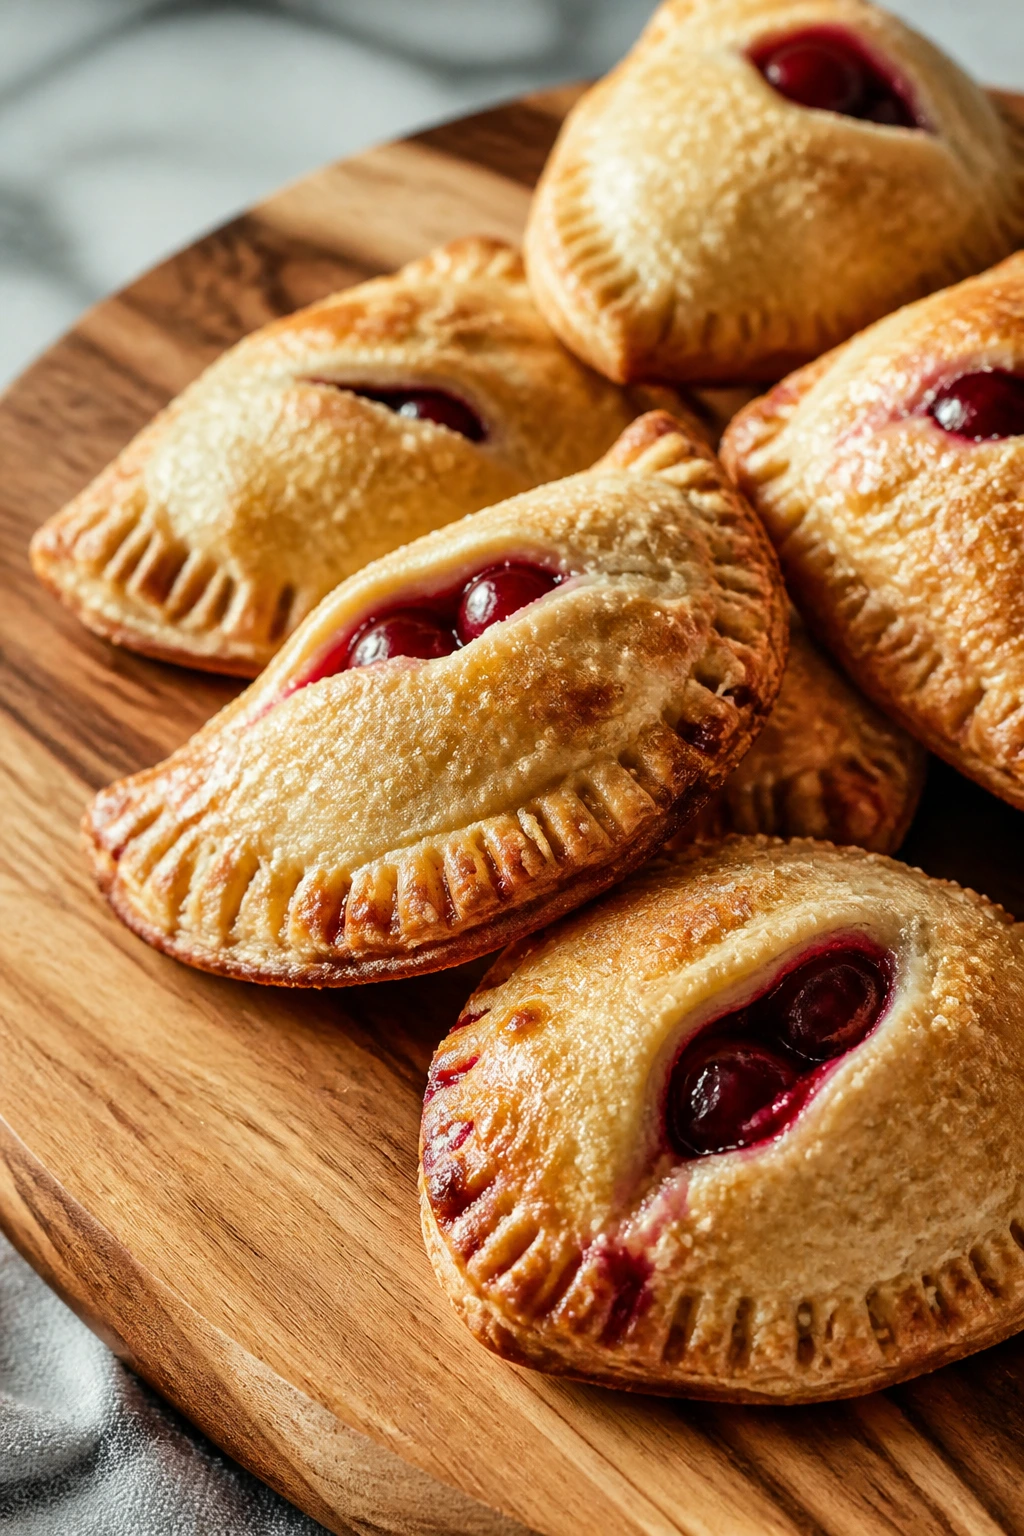
Hand pies are my pick when I want something pie-like without dragging out a full pie dish. The crust bakes flaky, the filling stays tucked inside, and every piece feels like its own little gift.
Why It Works: Small pies bake faster than one large pie and cool quickly enough for a party tray. Cherry filling gives you a strong red center with almost no decorating needed.
Key Ingredients:
- 1 package refrigerated pie crusts
- 1 1/2 cups cherry pie filling
- 1 egg, beaten
- 2 tablespoons coarse sugar
- 1 tablespoon flour
- 1 teaspoon lemon juice
Quick Steps:
- Roll out the crust and cut hearts or circles.
- Fill each piece with cherry filling.
- Seal, crimp, brush with egg, and sprinkle sugar.
- Bake at 375°F for 18 to 22 minutes.
Equipment for This Recipe:
- Baking sheet
- Parchment paper
- Pastry brush
- Fork
How to Serve This Dish: Serve warm or room temperature with a little powdered sugar. They’re easy to hold, which matters when everyone’s standing around talking.
Pro Tips for This Recipe:
- Don’t overfill or the pies will burst.
- Cut small vents for steam.
- Chill shaped pies 10 minutes before baking.
Variations on This Dish:
- Apple-Cherry Mix: Add diced apple to the filling.
- Cream Cheese Center: Add a teaspoon of sweetened cream cheese before sealing.
Common Mistakes to Avoid with This Dish:
- Leaky Seams: Press edges firmly with a fork.
- Soggy Bottoms: Bake on a hot, lined sheet pan.
12. Pink Lemonade Bars
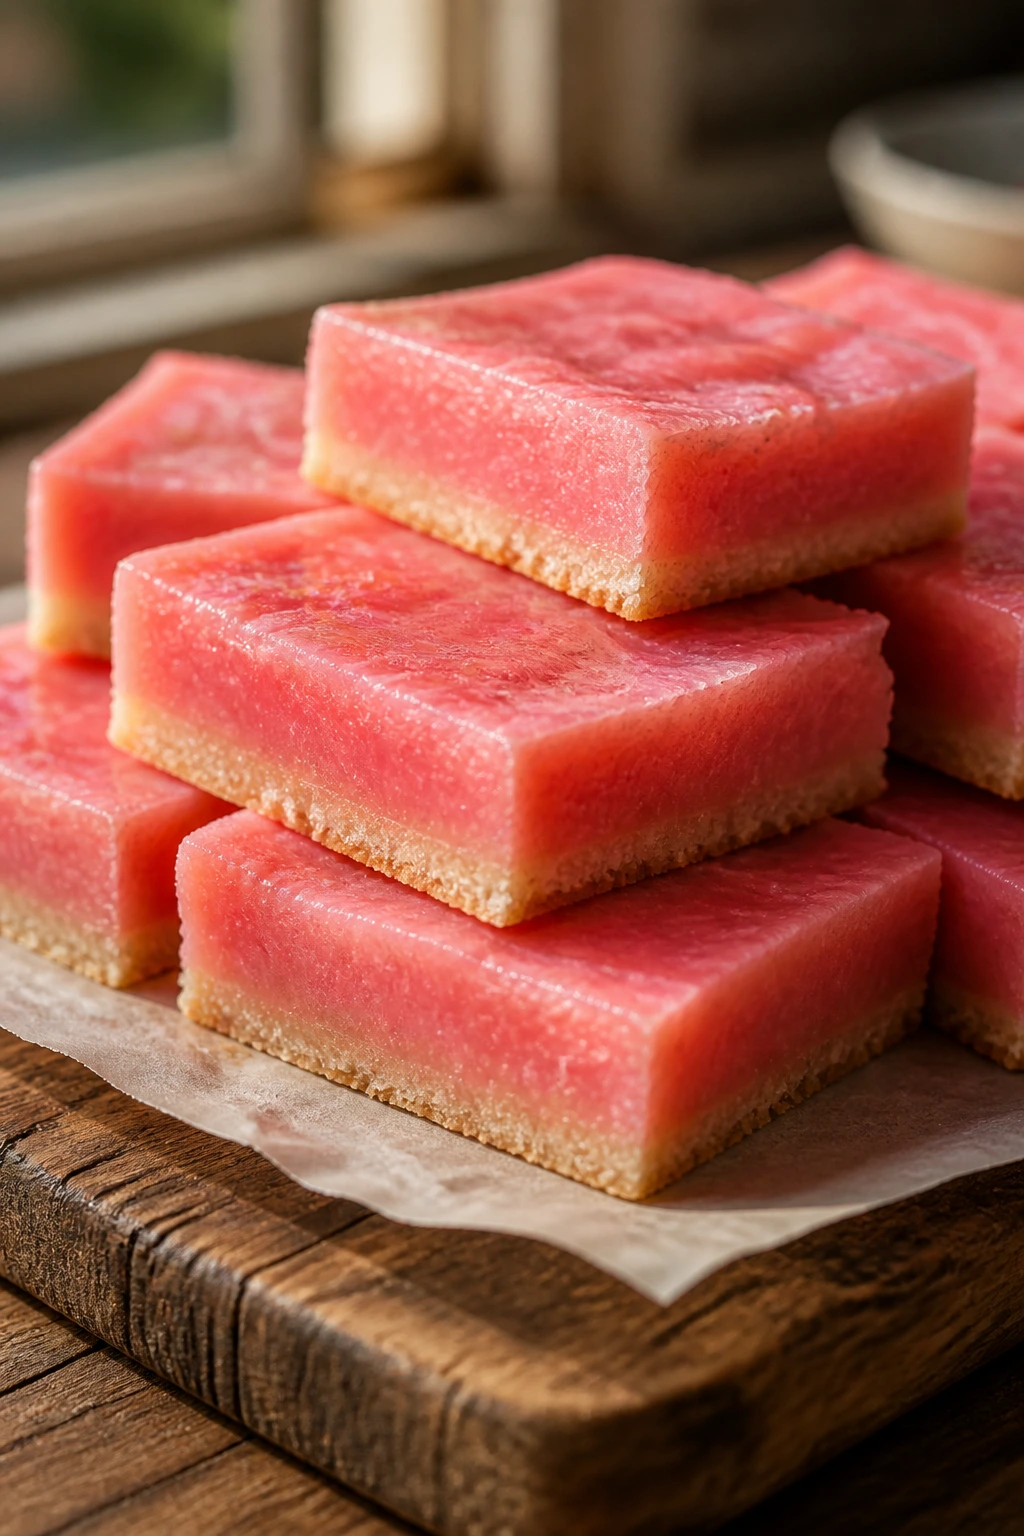
These bars taste bright, sweet-tart, and a little playful, with a soft lemon layer sitting on a buttery crust. The pink tint makes them look right at home on a Galentines tray.
Why It Works: Lemon bars need only a short bake and a full chill to set. Powdered sugar finishes the top without making the bars fussy.
Key Ingredients:
- 1 cup all-purpose flour
- 1/2 cup unsalted butter, softened
- 1/4 cup sugar
- 3 large eggs
- 3/4 cup sugar
- 1/3 cup lemon juice
Quick Steps:
- Press crust ingredients into an 8×8-inch pan and bake 15 minutes.
- Whisk eggs, sugar, lemon juice, and a little pink coloring.
- Pour over the crust and bake 20 minutes more.
- Chill, then dust with powdered sugar.
Equipment for This Recipe:
- 8×8-inch pan
- Whisk
- Mixing bowls
- Parchment paper
How to Serve This Dish: Cut into narrow bars so the citrus stays bright, not overwhelming. They’re good with iced tea or sparkling water.
Pro Tips for This Recipe:
- Chill fully before cutting.
- Line the pan for easy lifting.
- Use fresh lemon juice, not bottled.
Variations on This Dish:
- Raspberry Lemon: Swirl in 2 tablespoons raspberry jam.
- Graham Crust: Swap in graham crumbs for the crust.
Common Mistakes to Avoid with This Dish:
- Undercooked Center: The middle should jiggle slightly, not slosh.
- Warm Slicing: The bars need chilling to set.
13. Rice Krispie Heart Treats
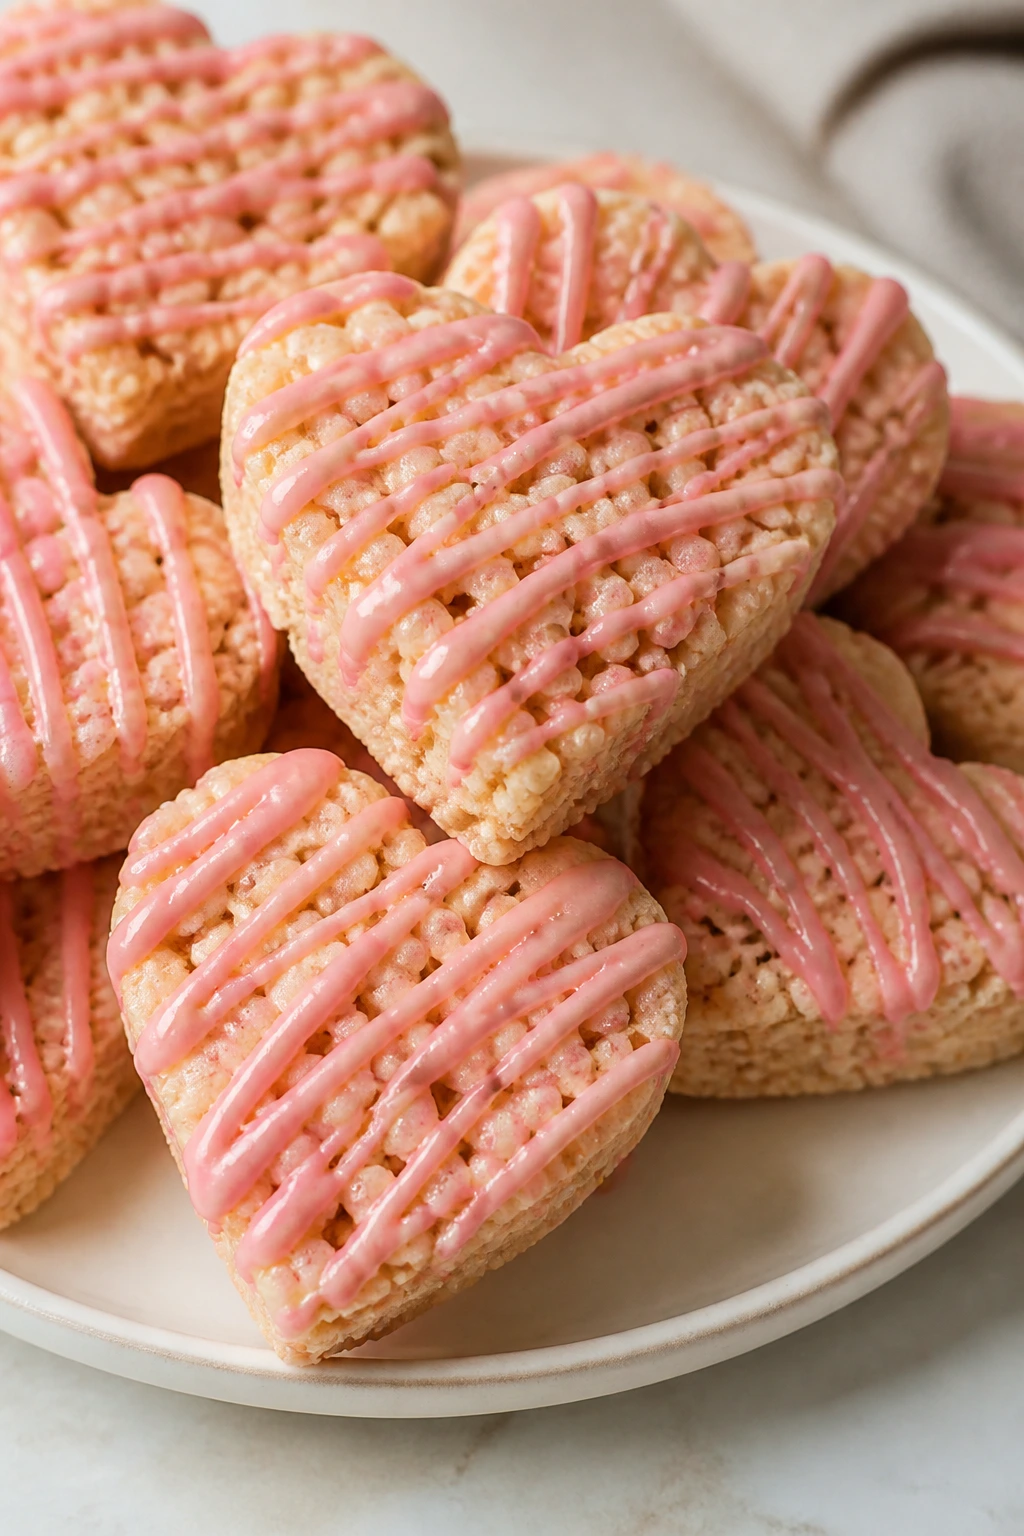
If you need a dessert that can be made in one saucepan and decorated by hand, this is the move. Sticky marshmallow cereal treats become cute once you cut them with a heart cutter and drizzle them with pink chocolate.
Why It Works: Marshmallow treats set quickly and hold their shape well. Their neutral flavor makes them a good base for sprinkles, candy melts, or freeze-dried berries.
Key Ingredients:
- 6 cups crispy rice cereal
- 1 package (10 ounces) mini marshmallows
- 3 tablespoons butter
- 1/2 teaspoon vanilla extract
- 1/2 cup pink candy melts
- Sprinkles, as needed
Quick Steps:
- Melt butter and marshmallows on low heat.
- Stir in vanilla and cereal.
- Press into a buttered pan and cool 20 minutes.
- Cut hearts and drizzle with melted candy.
Equipment for This Recipe:
- Large saucepan
- 9×13-inch pan
- Heart cutter
- Spatula
How to Serve This Dish: Wrap each heart in parchment for easy passing. They’re best the day they’re made, when the edges are still a little chewy.
Pro Tips for This Recipe:
- Keep the heat low so marshmallows don’t harden.
- Grease your hands for pressing the mixture.
- Cut while still slightly warm for cleaner edges.
Variations on This Dish:
- Chocolate Drizzle: Use melted dark chocolate instead of candy melts.
- Cereal Mix-In: Add 1 cup crushed freeze-dried strawberries.
Common Mistakes to Avoid with This Dish:
- Hard Treats: Too much heat dries them out.
- Sticking Cutter: Warm the cutter or grease it lightly.
14. Mini Fruit Pizzas

These are the dessert equivalent of a pretty little appetizer board, except sweeter. A sugar cookie base, cream cheese spread, and tidy fruit slices give you color without needing a piping bag.
Why It Works: Individual rounds bake fast and stay easy to top. Fruit gives the color, so you can keep the frosting layer simple.
Key Ingredients:
- 1 roll refrigerated sugar cookie dough
- 8 ounces cream cheese, softened
- 1/4 cup powdered sugar
- 1 teaspoon vanilla extract
- 1 cup sliced strawberries
- 1/2 cup blueberries
Quick Steps:
- Bake cookie rounds and cool fully.
- Beat cream cheese, powdered sugar, and vanilla.
- Spread on cookies and arrange fruit on top.
- Chill briefly so the topping sets.
Equipment for This Recipe:
- Baking sheet
- Round cutter or glass
- Mixing bowl
- Spatula
How to Serve This Dish: Serve on a large platter with the fruit arranged by color. They look especially nice in tight circles or flower shapes.
Pro Tips for This Recipe:
- Dry the fruit after slicing.
- Spread the cream layer thin so it doesn’t slide.
- Assemble close to serving time.
Variations on This Dish:
- Chocolate Base: Use chocolate cookie dough.
- Tropical Version: Add kiwi and raspberries.
Common Mistakes to Avoid with This Dish:
- Warm Cookies: The topping melts. Cool completely first.
- Juicy Fruit Puddles: Pat fruit dry before arranging.
15. Red Velvet Cake Pops
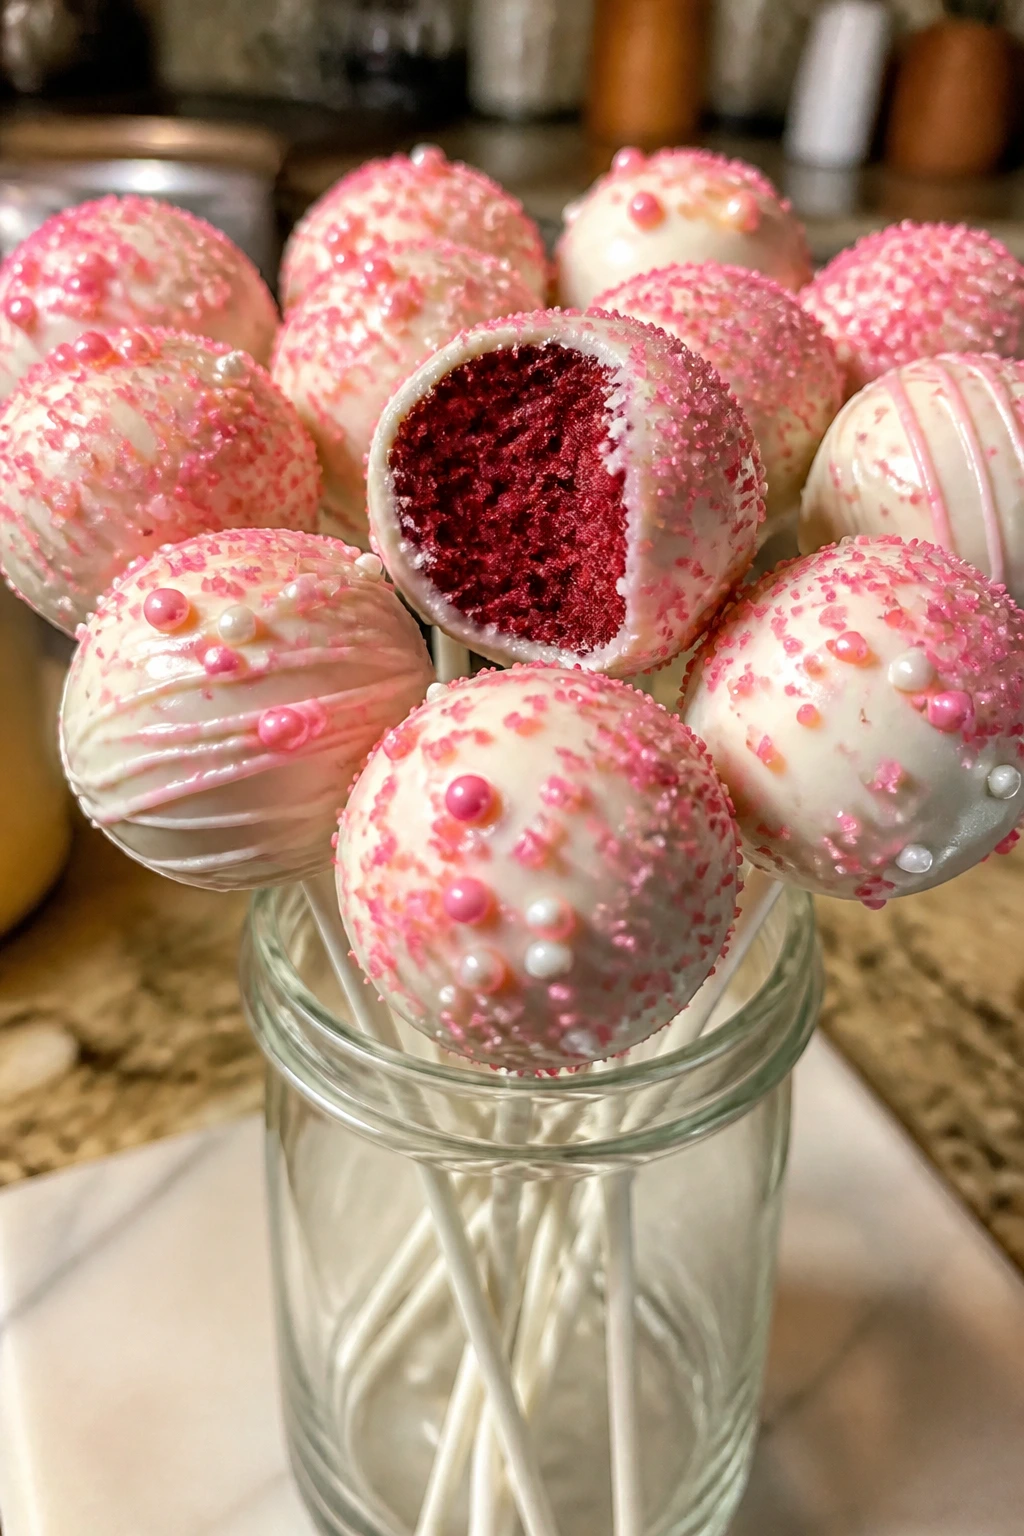
Cake pops always look more complicated than they are, which is useful at a party. Crumbled cake, frosting, and a chocolate shell make little bites that stand up in a cup or jar.
Why It Works: The cake-to-frosting ratio creates a moldable dough that holds on the stick. The coating seals them and keeps the centers soft.
Key Ingredients:
- 1 baked 9×13-inch red velvet cake, cooled
- 1/2 cup cream cheese frosting
- 12 ounces white chocolate
- 1 tablespoon coconut oil
- Lollipop sticks
- Pink sprinkles
Quick Steps:
- Crumble the cake and mix with frosting.
- Roll into balls and chill 30 minutes.
- Dip sticks in chocolate, insert, then coat each pop.
- Set upright and decorate.
Equipment for This Recipe:
- Baking sheet
- Bowl
- Parchment or foam block
- Spoon
How to Serve This Dish: Stand them in a jar or glass so the sticks stay visible. They work best in small portions because they’re rich.
Pro Tips for This Recipe:
- Chill the balls before dipping.
- Don’t make them too large or they’ll slide.
- Thin the chocolate a bit for smoother coating.
Variations on This Dish:
- Chocolate Shell: Use dark chocolate outside.
- Sprinkle Bomb: Roll in pink nonpareils before the coating sets.
Common Mistakes to Avoid with This Dish:
- Too Much Frosting: The mixture gets greasy and soft.
- Warm Pops: The coating cracks if the centers are not cold.
16. Vanilla Pudding Parfaits

These parfaits are all about layers you can see through the cup — crumb, cream, fruit, repeat. They feel polished but stay easy enough for a beginner with a spoon and a whisk.
Why It Works: Pudding thickens in the fridge and supports the fruit. Clear cups make the layering look intentional even when the assembly is quick.
Key Ingredients:
- 1 package instant vanilla pudding mix
- 2 cups cold milk
- 1 cup whipped cream
- 1 cup sliced strawberries
- 1 cup crushed vanilla wafers
- 1 tablespoon powdered sugar
Quick Steps:
- Whisk pudding mix and milk until thick.
- Fold in whipped cream.
- Layer crumbs, pudding, and strawberries in cups.
- Chill 30 minutes before serving.
Equipment for This Recipe:
- Small cups
- Whisk
- Mixing bowl
- Spoon
How to Serve This Dish: Finish with a berry and a tiny wafer on top. They’re easy to make in batches of six or ten.
Pro Tips for This Recipe:
- Chill the pudding before layering if it feels loose.
- Use ripe berries for color and juice.
- Crush the wafers coarsely for texture.
Variations on This Dish:
- Chocolate Version: Swap in chocolate pudding.
- Berry Mix: Add raspberries between the layers.
Common Mistakes to Avoid with This Dish:
- Runny Pudding: Let it thicken before assembling.
- Soggy Crumbs: Add the crumb layer right before serving if needed.
17. Churro Biscuit Bites
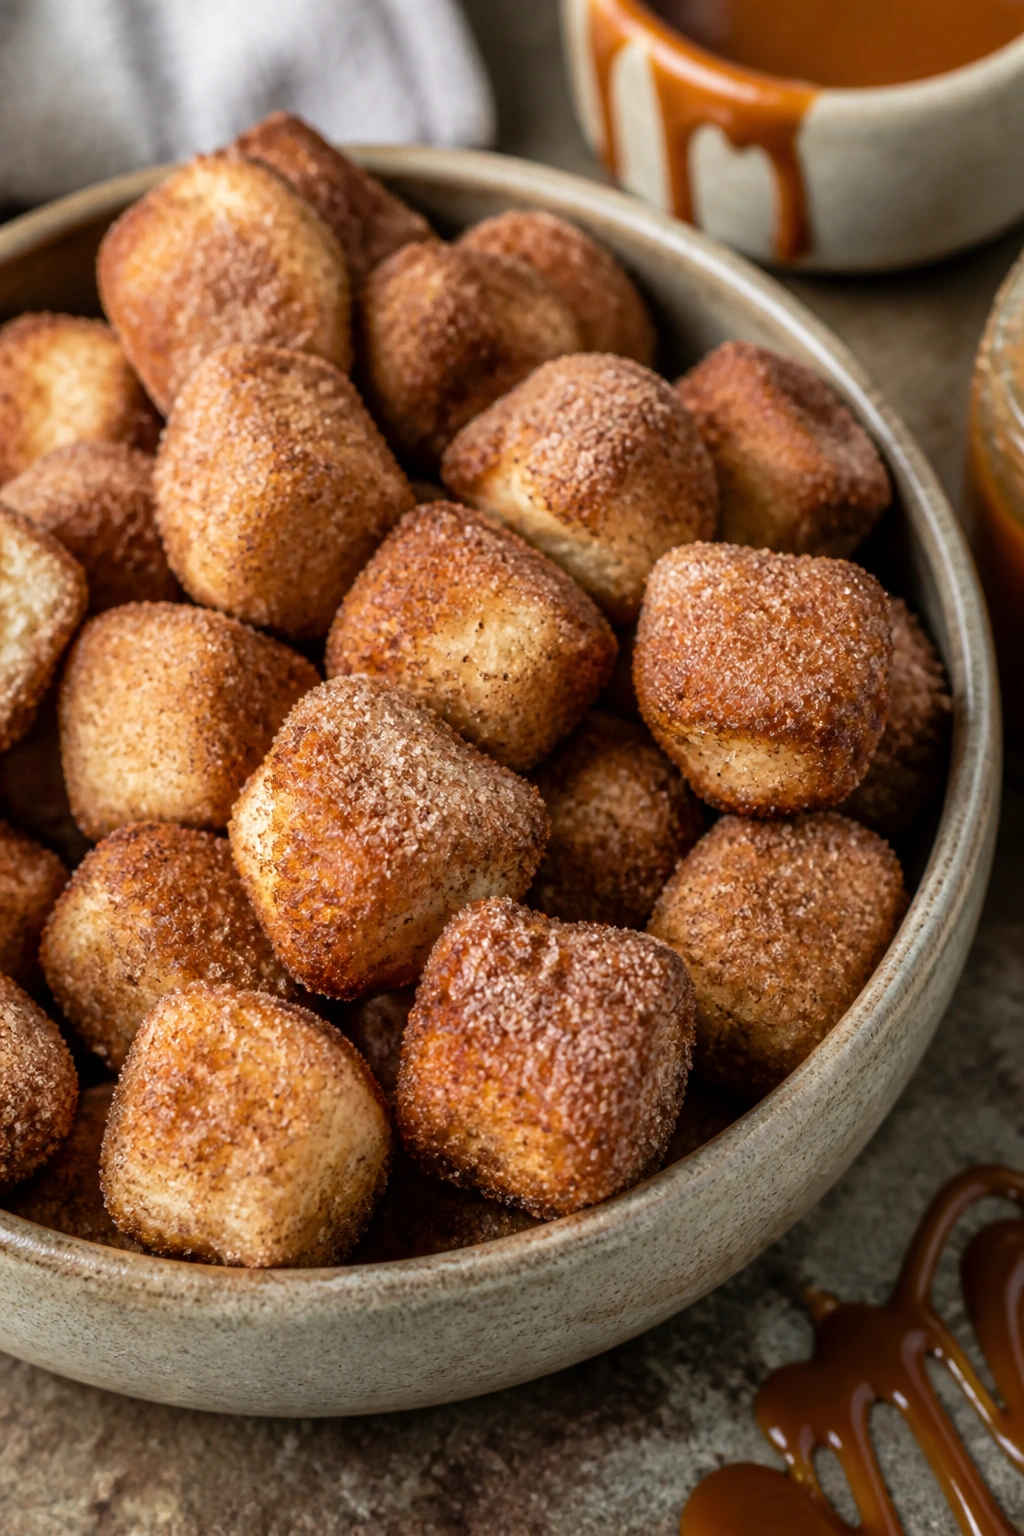
These taste like the cinnamon-sugar part of a fair dessert, minus the frying pot. Biscuit dough turns into warm, bite-size pieces that are easy to coat and pass around.
Why It Works: Refrigerated biscuits bake fast and puff nicely. Butter and cinnamon sugar cling to the hot pieces while they’re still soft.
Key Ingredients:
- 1 can refrigerated biscuit dough
- 4 tablespoons melted butter
- 1/2 cup sugar
- 2 teaspoons cinnamon
- 1/4 teaspoon salt
- 1/4 cup caramel sauce
Quick Steps:
- Cut biscuit dough into bite-size pieces.
- Bake at 375°F until golden, about 10 to 12 minutes.
- Toss hot bites with butter.
- Roll in cinnamon sugar and drizzle with caramel.
Equipment for This Recipe:
- Baking sheet
- Parchment paper
- Mixing bowl
- Tongs or spoon
How to Serve This Dish: Serve in a warm bowl or paper tray while the sugar is still glossy. They’re best eaten soon after baking.
Pro Tips for This Recipe:
- Coat while warm so the sugar sticks.
- Don’t crowd the pan or they steam.
- Serve with extra caramel on the side.
Variations on This Dish:
- Chocolate Drizzle: Add melted chocolate after coating.
- Orange Sugar: Mix orange zest into the cinnamon sugar.
Common Mistakes to Avoid with This Dish:
- Undercooked Centers: Pull only when the bites are fully puffed and golden.
- Dry Coating: Brush with enough butter to make the sugar cling.
18. Strawberry Mousse Cups

Light, cold, and blush pink, these mousse cups feel airy after a table full of chocolate. They’re a smart pick when you want something spoonable that still looks dressed up.
Why It Works: Whipped cream folded into strawberry base keeps the texture soft and cloudlike. Individual cups mean the mousse can chill and set without fuss.
Key Ingredients:
- 1 cup strawberry puree
- 8 ounces cream cheese, softened
- 1/2 cup powdered sugar
- 1 cup heavy cream
- 1 teaspoon vanilla extract
- Crushed cookies for the base
Quick Steps:
- Beat cream cheese, sugar, and vanilla until smooth.
- Mix in strawberry puree.
- Fold in whipped cream.
- Spoon into cups over cookie crumbs and chill 1 hour.
Equipment for This Recipe:
- Mixing bowls
- Hand mixer
- Cups or jars
- Spatula
How to Serve This Dish: Garnish with a strawberry slice and a pinch of cookie crumbs. They’re best very cold.
Pro Tips for This Recipe:
- Purée ripe strawberries for the best flavor.
- Fold the whipped cream gently to keep the mousse light.
- Chill long enough to firm up.
Variations on This Dish:
- Raspberry Mousse: Use raspberry puree instead.
- Lemon Strawberry: Add lemon zest to brighten the base.
Common Mistakes to Avoid with This Dish:
- Overmixing: The mousse turns loose. Fold, don’t beat.
- Warm Fruit Puree: Cool it first so the filling stays thick.
19. Lemon Raspberry Loaf Slices
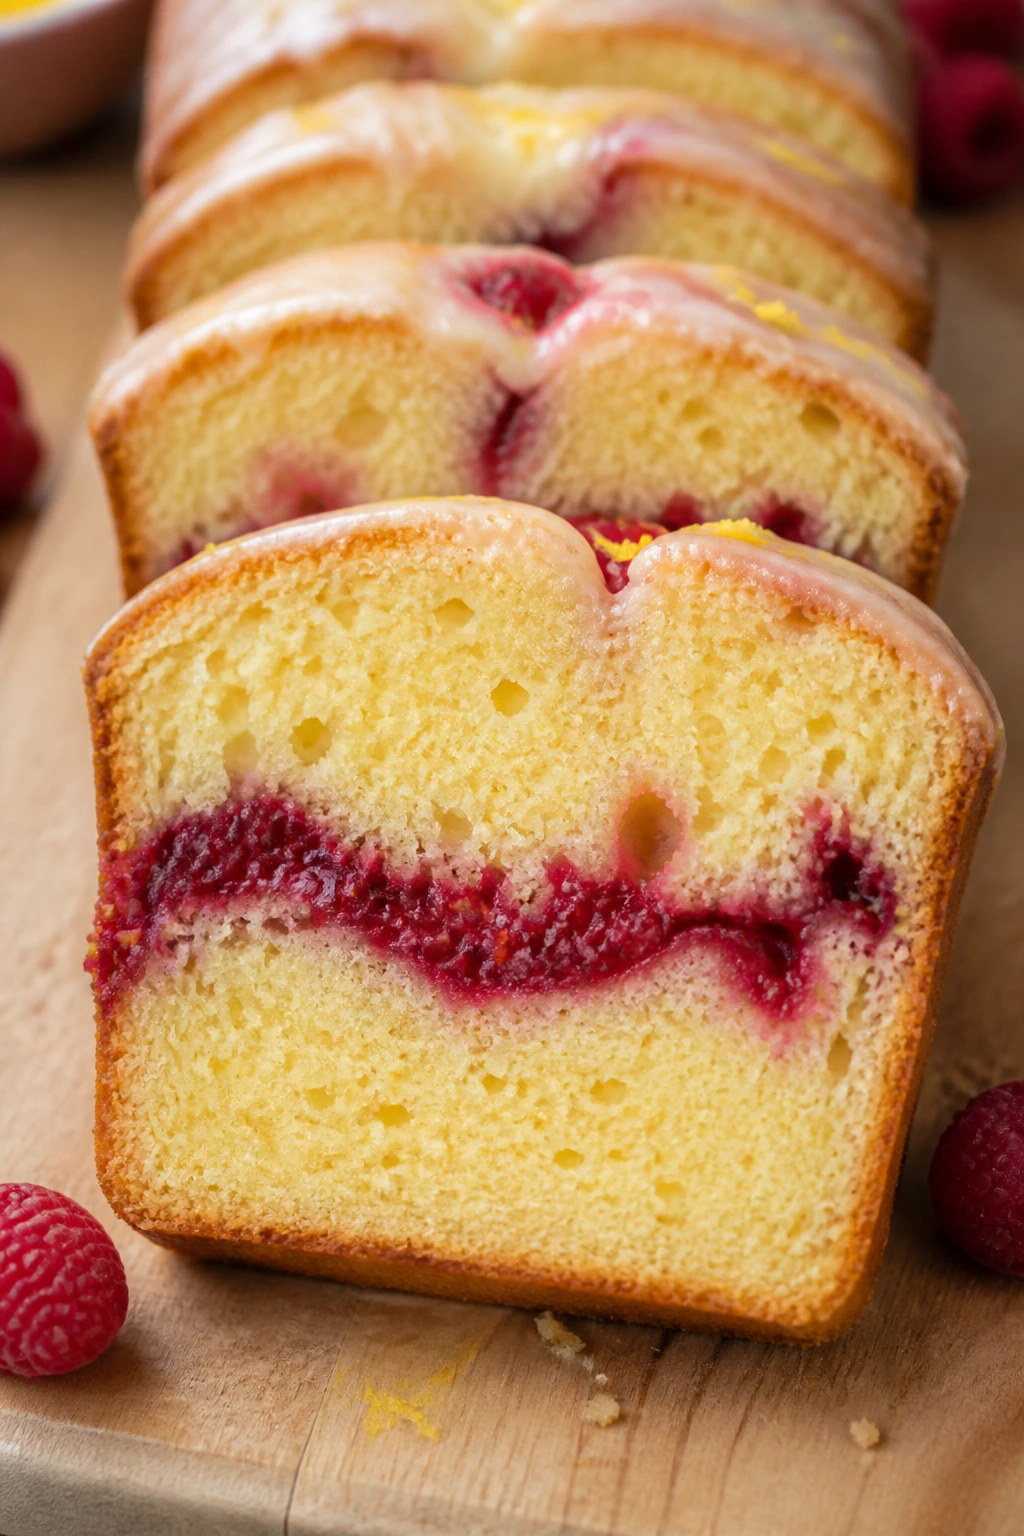
A loaf cake is a nice middle ground between casual and pretty. This one slices neatly, carries a bright lemon scent, and gets extra charm from a raspberry ribbon running through the middle.
Why It Works: Loaf pans give you tidy slices that travel well. The fruit swirl keeps the crumb from feeling one-note.
Key Ingredients:
- 1 1/2 cups all-purpose flour
- 1/2 cup butter, softened
- 3/4 cup sugar
- 2 large eggs
- 1/4 cup milk
- 1/3 cup raspberry jam
Quick Steps:
- Cream butter and sugar, then beat in eggs, lemon zest, and milk.
- Fold in flour.
- Layer batter and jam in a loaf pan, then swirl lightly.
- Bake at 350°F for 45 to 50 minutes.
Equipment for This Recipe:
- 9×5-inch loaf pan
- Mixing bowl
- Whisk or mixer
- Parchment paper
How to Serve This Dish: Slice thin and add a drizzle of simple glaze if you want extra shine. It’s good with tea or a glass of cold milk.
Pro Tips for This Recipe:
- Don’t over-swirl or the jam disappears.
- Line the pan so the loaf lifts out cleanly.
- Cool fully before slicing.
Variations on This Dish:
- Blueberry Swap: Use blueberry jam for a darker streak.
- Poppy Seed Version: Add 1 tablespoon poppy seeds.
Common Mistakes to Avoid with This Dish:
- Dense Crumb: Overmixing after flour goes in causes toughness.
- Raw Center: Test the middle with a skewer before pulling it out.
20. Chocolate Chip Cookie Cups
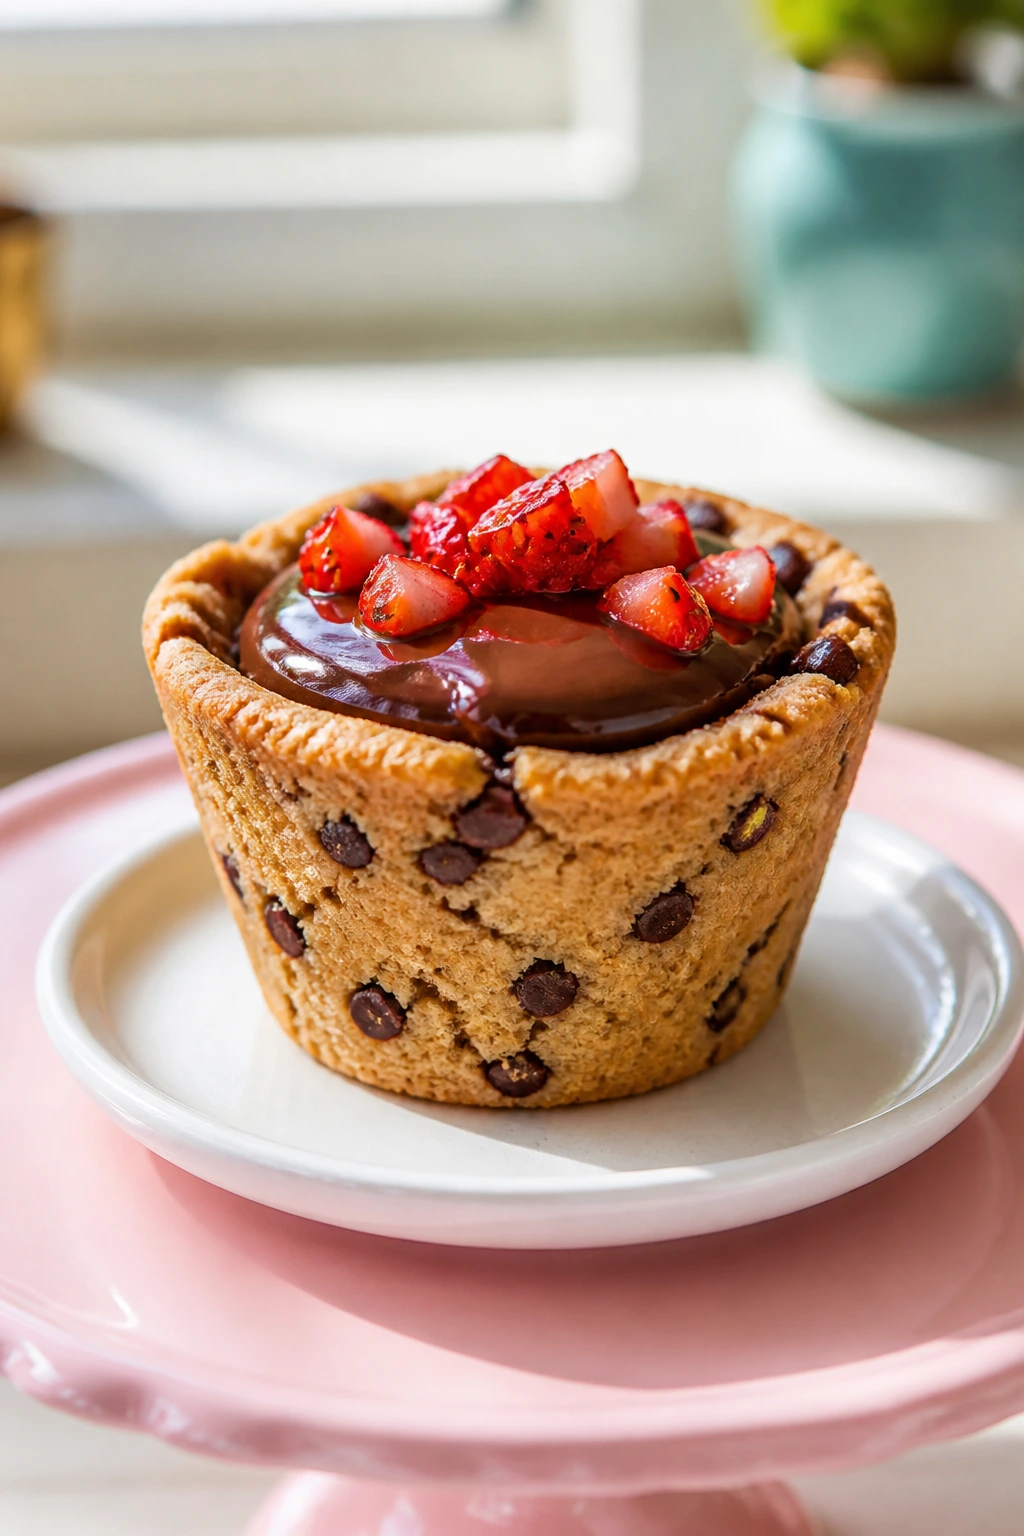
Cookie cups are small, sturdy, and highly useful when you need a dessert that can hold filling without falling apart. A mini muffin tin does most of the heavy lifting.
Why It Works: The dough bakes around the pan shape, creating a built-in edible bowl. The center stays soft enough to hold whipped cream or ganache.
Key Ingredients:
- 1 package chocolate chip cookie dough
- 1 tablespoon butter, softened
- 1/2 cup chocolate ganache or frosting
- 1/2 cup strawberries, diced
- Mini chocolate chips
- Whipped cream
Quick Steps:
- Press dough into mini muffin cups.
- Bake at 350°F until golden, about 10 minutes.
- Press centers down while warm.
- Cool and fill with ganache, fruit, or cream.
Equipment for This Recipe:
- Mini muffin pan
- Spoon
- Cooling rack
- Small bowl
How to Serve This Dish: Fill them right before the party so the shells stay crisp. A little whipped cream and strawberry dice make them look finished.
Pro Tips for This Recipe:
- Press centers down while warm, not after they cool.
- Use chilled dough if it sticks.
- Don’t overbake the edges.
Variations on This Dish:
- Peanut Butter Center: Fill with peanut butter mousse.
- Berry Cream: Add berry jam under the whipped cream.
Common Mistakes to Avoid with This Dish:
- Broken Cups: Let them cool slightly before removing.
- Soft Shells: Bake until the edges are fully set.
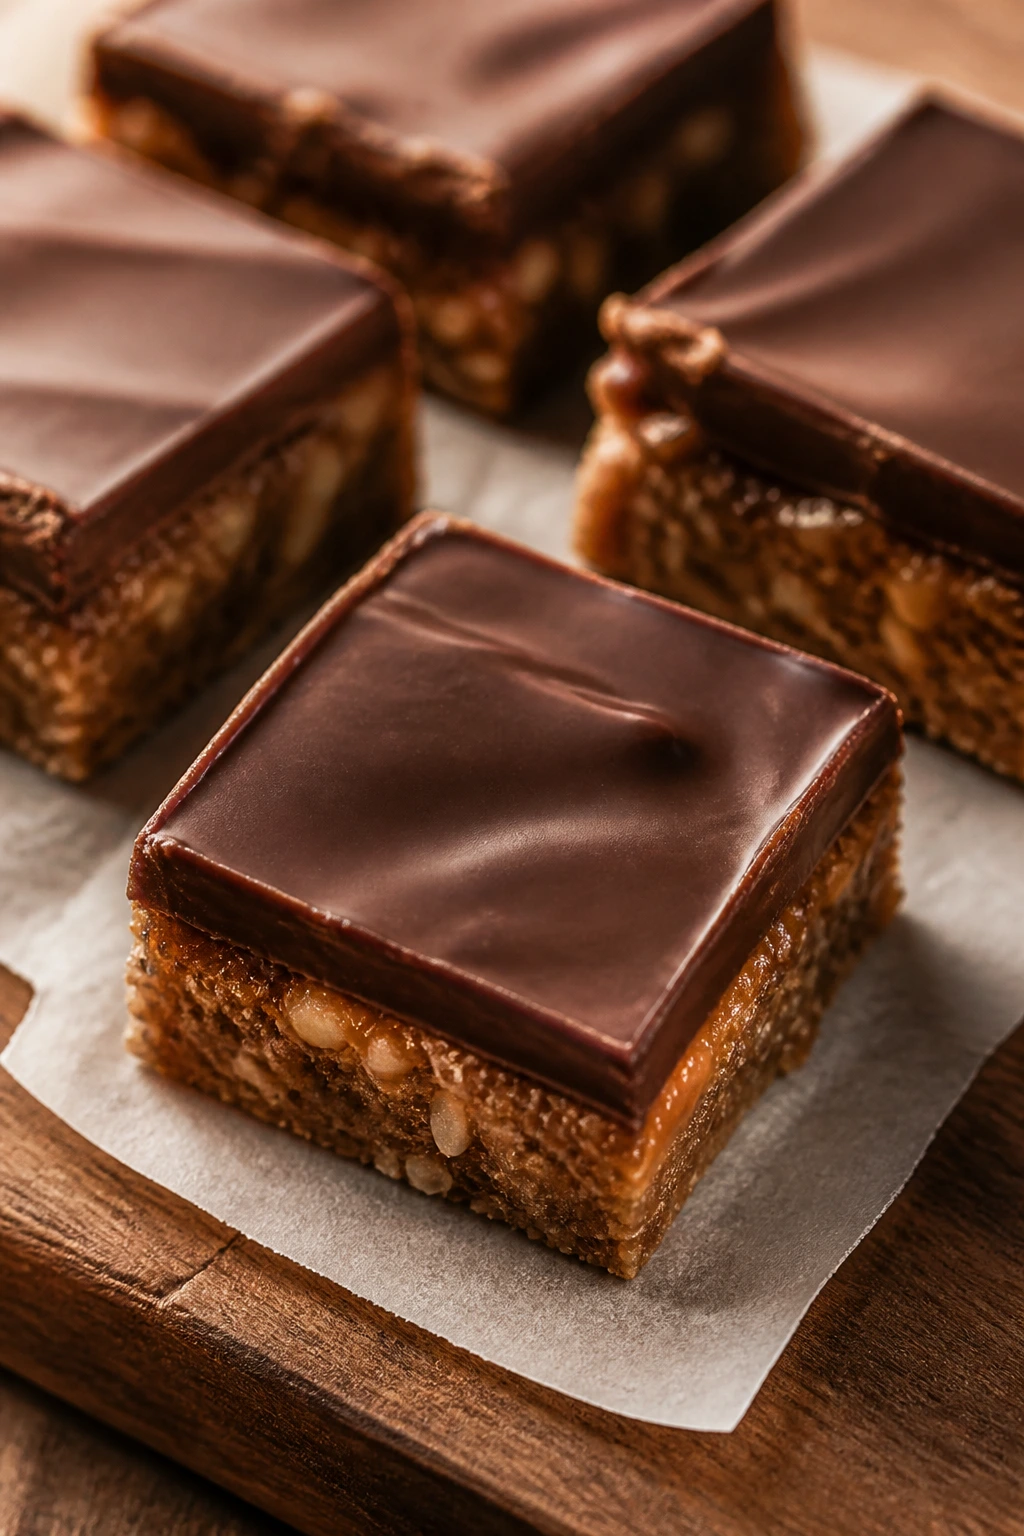
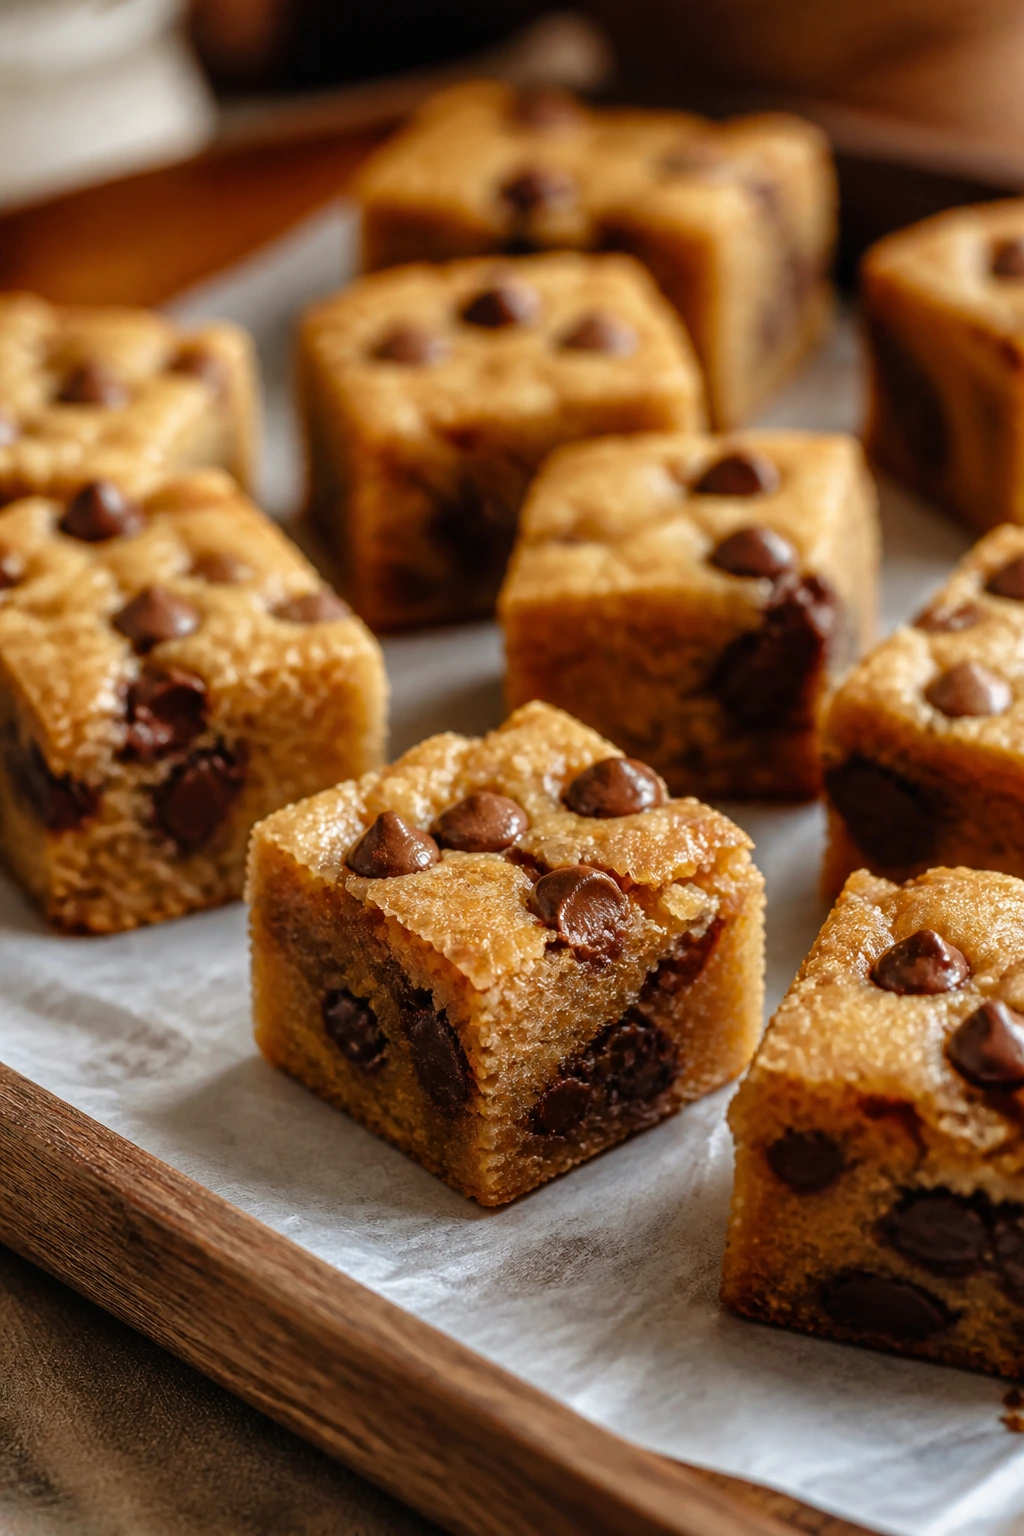
21. Salted Caramel Blondie Bars
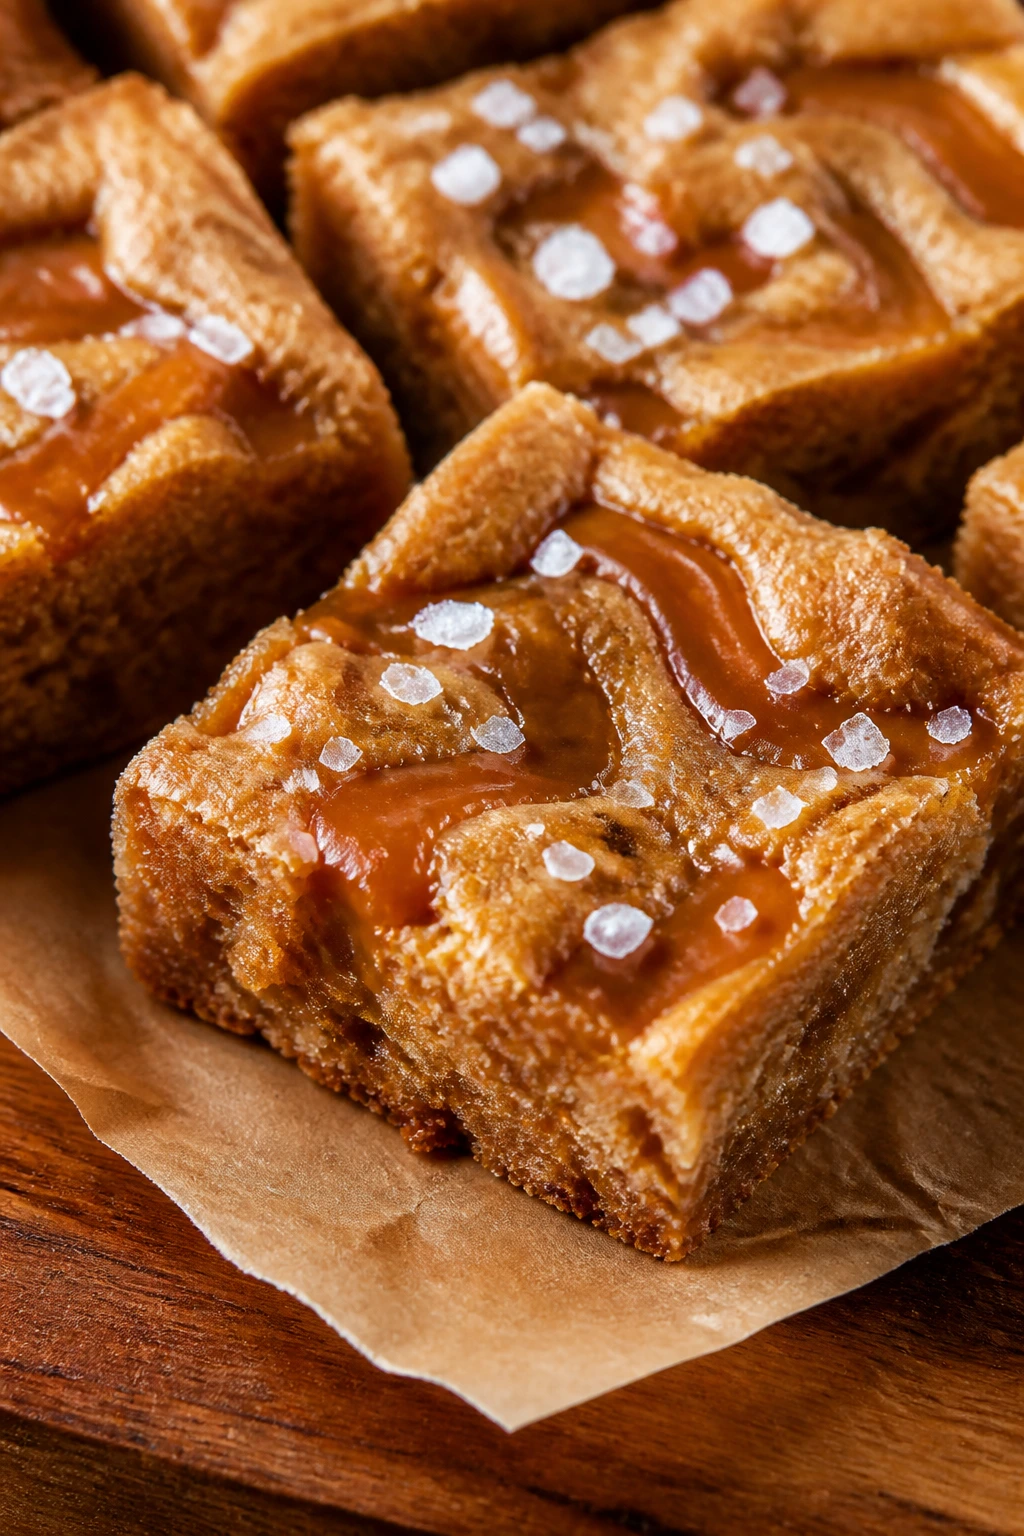
Blondies are the quieter cousin of brownies, but they know how to show up. Brown sugar and caramel give these bars a butterscotch depth that works well with a little flaky salt on top.
Why It Works: Blondies slice neatly once cooled. Caramel swirls keep them soft in the center without making them cakey.
Key Ingredients:
- 1 cup unsalted butter, melted
- 1 1/2 cups brown sugar
- 2 large eggs
- 2 cups all-purpose flour
- 1 teaspoon vanilla extract
- 1/3 cup caramel sauce
Quick Steps:
- Stir butter and brown sugar together.
- Mix in eggs and vanilla, then fold in flour.
- Swirl caramel through the batter.
- Bake at 350°F for 25 to 30 minutes.
Equipment for This Recipe:
- 9×13-inch pan
- Mixing bowl
- Spatula
- Parchment paper
How to Serve This Dish: Cut into small squares and finish with flaky salt. They’re rich, so tiny portions work best.
Pro Tips for This Recipe:
- Cool completely before slicing.
- Use thick caramel, not thin syrup.
- Line the pan for easy lifting.
Variations on This Dish:
- Chocolate Chip Blondies: Fold in 1 cup chips.
- Pecan Caramel: Add 1/2 cup chopped pecans.
Common Mistakes to Avoid with This Dish:
- Overbaking: Blondies dry out fast. Pull them when the center is set.
- Thin Caramel: It sinks if it’s too loose.
22. Cinnamon Sugar Donut Holes
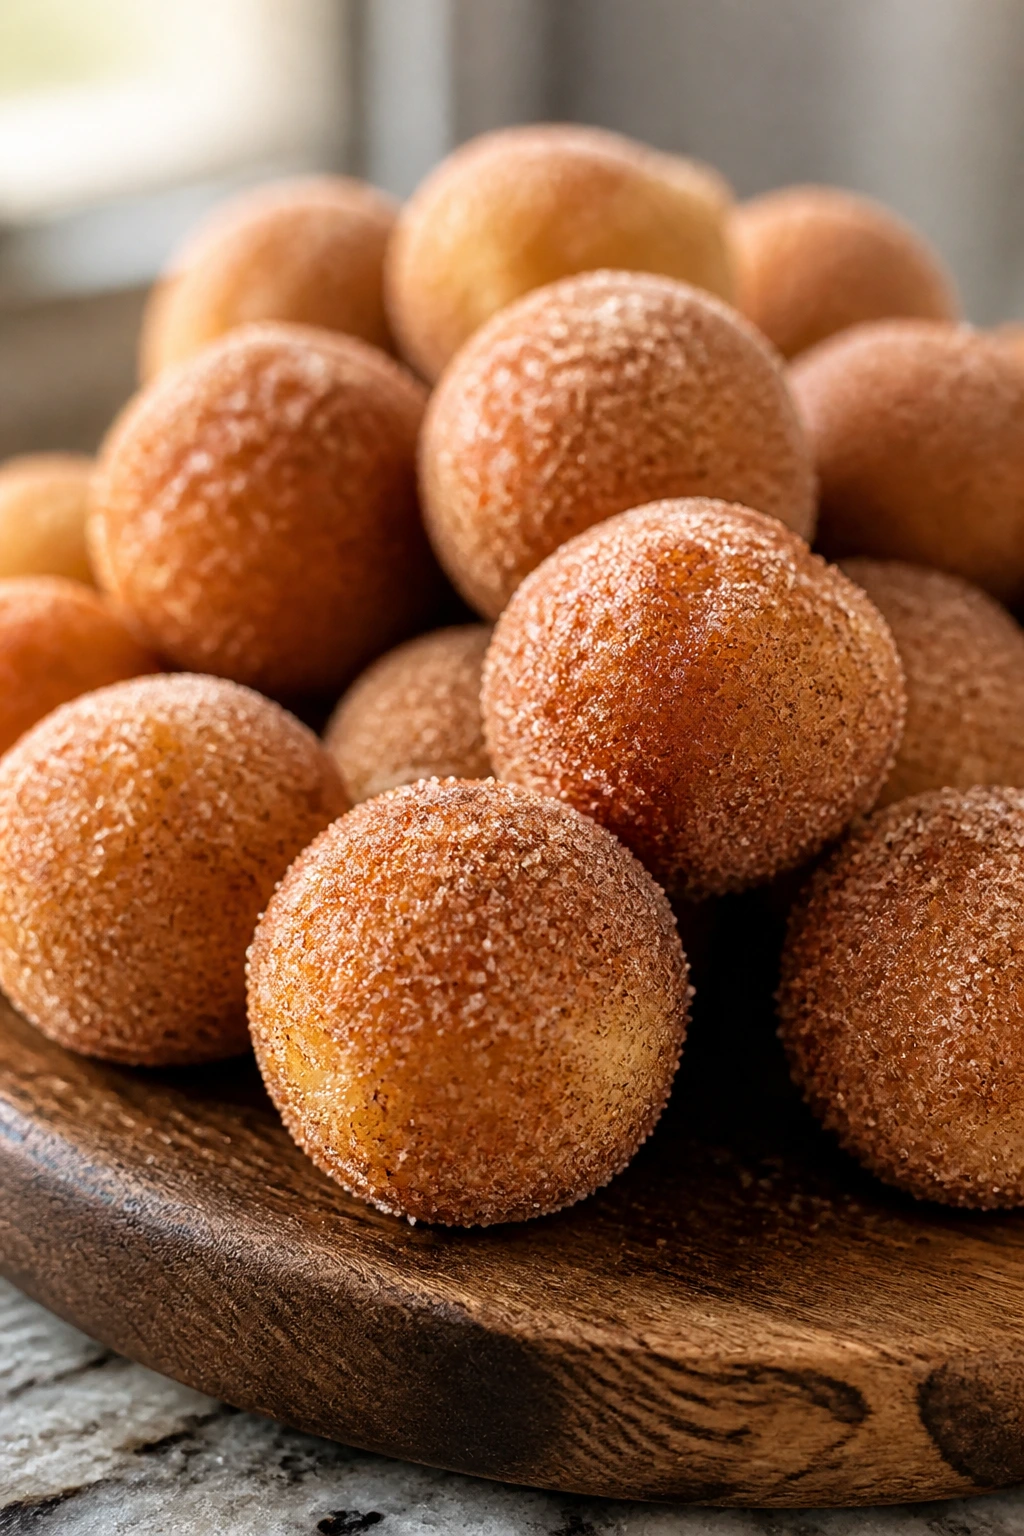
These are the fast, cheerful little bites that make people smile before they even sit down. They bake in a mini muffin pan, then get rolled in butter and cinnamon sugar while still warm.
Why It Works: Mini muffin pans create a rounded shape without frying. The sugar coating sticks best when the bites are hot from the oven.
Key Ingredients:
- 2 cups all-purpose flour
- 3/4 cup sugar
- 1 tablespoon baking powder
- 1 cup milk
- 1 egg
- 4 tablespoons melted butter
Quick Steps:
- Stir dry ingredients together.
- Mix in milk, egg, and melted butter.
- Bake in a mini muffin pan at 375°F for 12 to 14 minutes.
- Roll warm donut holes in butter and cinnamon sugar.
Equipment for This Recipe:
- Mini muffin pan
- Mixing bowl
- Small bowl for coating
- Cooling rack
How to Serve This Dish: Serve in a bowl lined with parchment, almost like candy. They’re nicest while the sugar is still sandy and warm.
Pro Tips for This Recipe:
- Don’t overfill the mini cups.
- Coat immediately after baking.
- Add a pinch of nutmeg if you want a bakery feel.
Variations on This Dish:
- Orange Sugar: Add orange zest to the coating.
- Chocolate Dip: Dip one side in melted chocolate.
Common Mistakes to Avoid with This Dish:
- Dry Bites: Pull them as soon as a tester comes out clean.
- Uneven Coating: Butter them while they’re still hot.
23. Puff Pastry Strawberry Roses
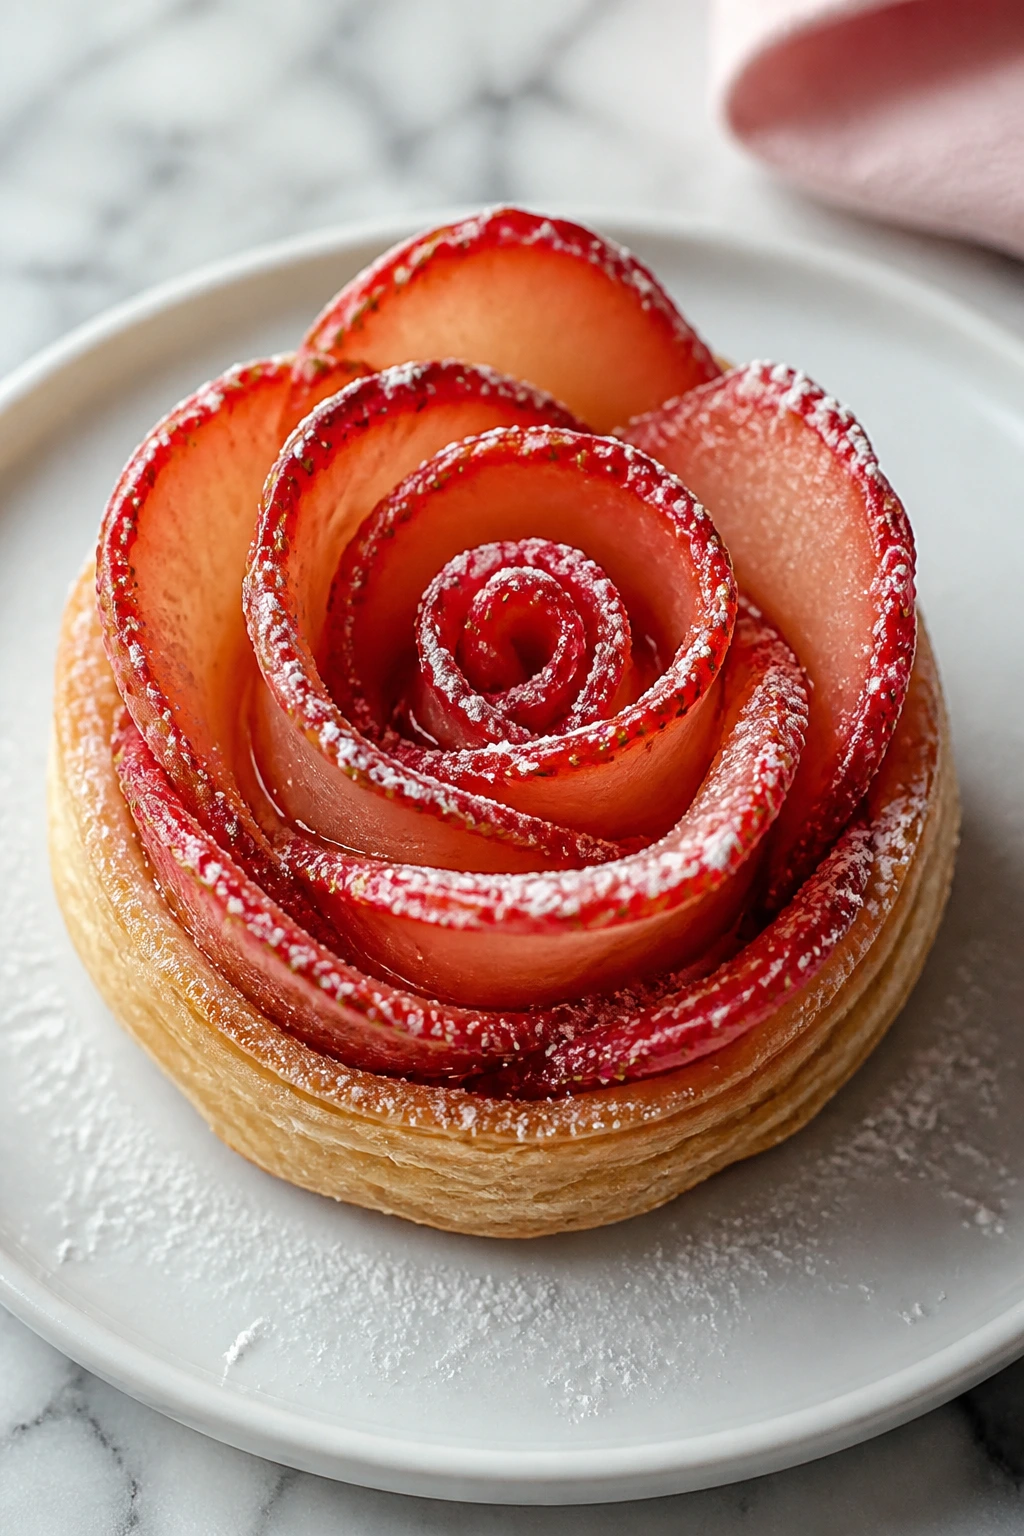
If you want a dessert that looks like a fancy pastry case but takes almost no skill, this is the one. Thin apple? No — strawberry slices curled in puff pastry make little roses that puff into pretty spirals.
Why It Works: Store-bought puff pastry bakes into crisp layers with very little effort. Thin strawberry slices soften just enough to roll neatly.
Key Ingredients:
- 1 sheet puff pastry, thawed
- 1 cup strawberries, thinly sliced
- 2 tablespoons sugar
- 1 tablespoon apricot jam
- 1 tablespoon flour
- Powdered sugar, for finishing
Quick Steps:
- Roll pastry and cut into strips.
- Brush with jam, add strawberry slices, and roll into spirals.
- Bake at 400°F for 20 to 25 minutes.
- Cool slightly and dust with powdered sugar.
Equipment for This Recipe:
- Muffin tin
- Knife
- Rolling pin
- Pastry brush
How to Serve This Dish: Use a muffin tin so the roses hold their shape. They’re best warm, when the pastry is crisp and the fruit smells jammy.
Pro Tips for This Recipe:
- Slice strawberries thin so they bend.
- Keep pastry cold until it goes into the oven.
- Use jam sparingly or the pastry turns sticky.
Variations on This Dish:
- Apple Rose: Swap in thin apple slices.
- Berry Mix: Add raspberries for a deeper color.
Common Mistakes to Avoid with This Dish:
- Thawed Pastry Too Long: Warm pastry gets hard to handle.
- Thick Fruit Slices: They crack while rolling.
24. Easy Tiramisu Cups
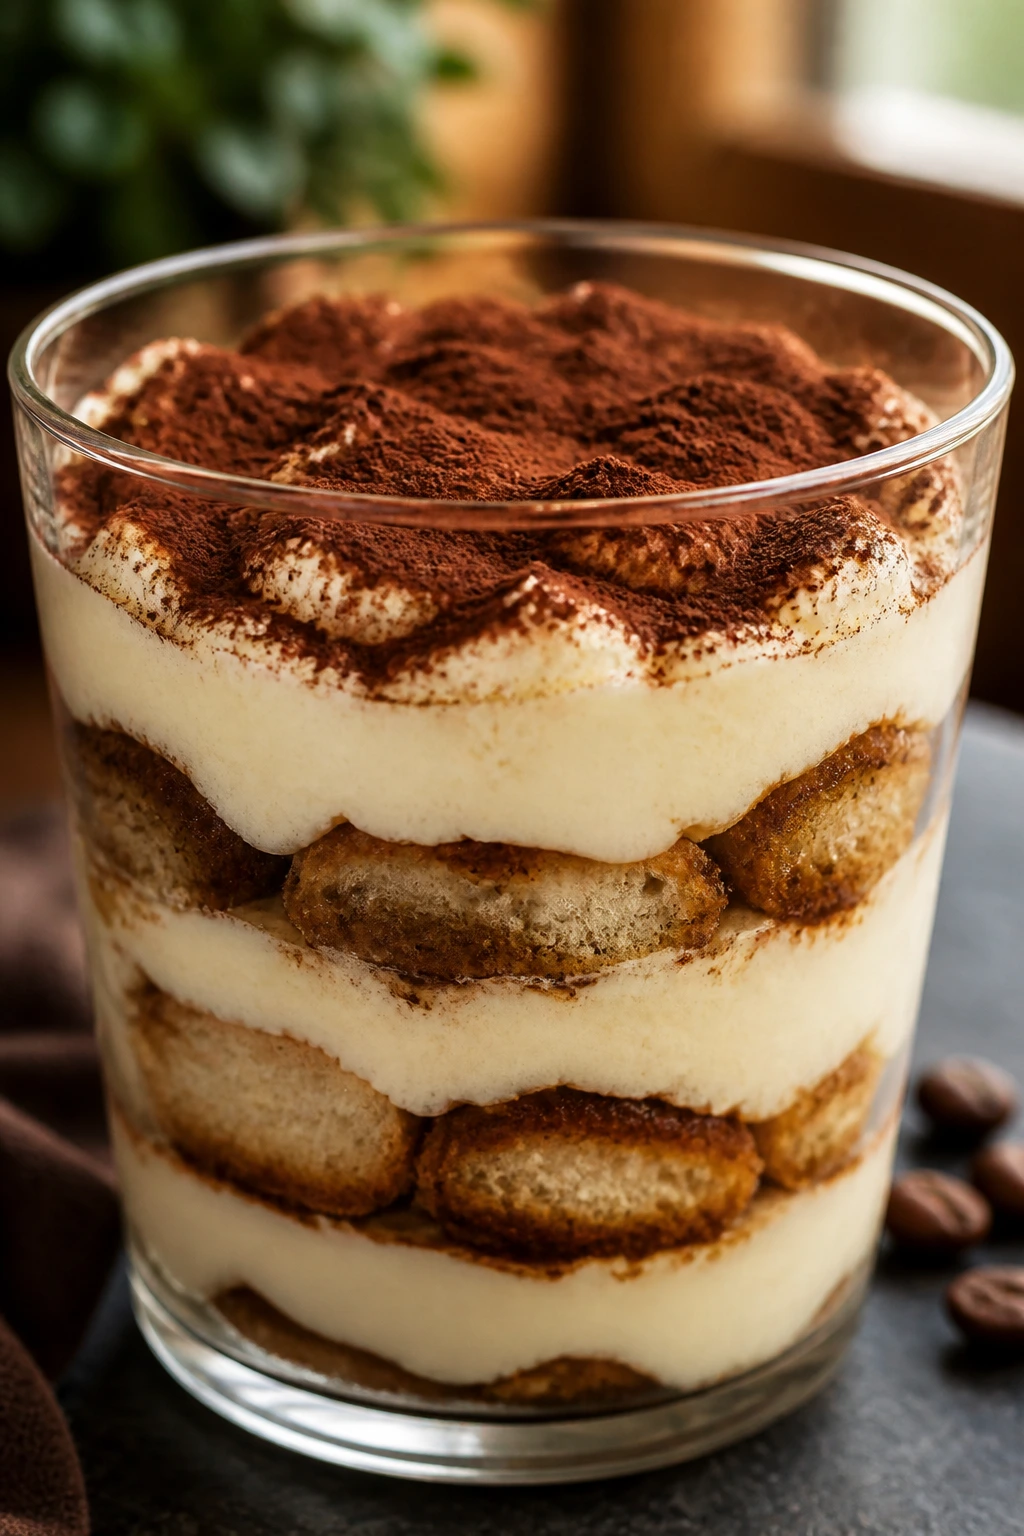
Tiramisu in cups is one of those desserts that feels much more elaborate than it is. Espresso-soaked cookies, mascarpone cream, and cocoa dusting make a layered dessert that settles beautifully in the fridge.
Why It Works: Small cups keep the layers neat and skip the messy slice. The cookies soften at the right pace after a short chill.
Key Ingredients:
- 1 cup strong coffee, cooled
- 2 tablespoons sugar
- 8 ounces mascarpone
- 1 cup whipped cream
- 1 package ladyfingers
- 2 tablespoons cocoa powder
Quick Steps:
- Mix coffee and sugar.
- Beat mascarpone with whipped cream.
- Dip ladyfingers quickly and layer in cups with cream.
- Chill 2 hours, then dust with cocoa.
Equipment for This Recipe:
- Small cups
- Hand mixer
- Bowl
- Sifter
How to Serve This Dish: Dust the cocoa right before serving so it stays dark on top. They’re best eaten cold, with a spoon that can reach all the layers.
Pro Tips for This Recipe:
- Dip ladyfingers fast or they’ll fall apart.
- Chill long enough for the flavors to settle.
- Use a fine mesh strainer for the cocoa.
Variations on This Dish:
- Berry Tiramisu: Add a layer of strawberries.
- Chocolate Tiramisu: Fold cocoa into the cream.
Common Mistakes to Avoid with This Dish:
- Soggy Layers: Brief dips only.
- Loose Cream: Whip until the filling holds soft peaks.
25. Funfetti Sheet Cake Bars
These are the birthday-party cousin of Galentines desserts: soft, colorful, and easy to cut into neat squares. A pink frosting layer and extra sprinkles make them feel festive without being complicated.
Why It Works: Sheet cake bars bake evenly and feed a crowd from one pan. Sprinkles inside the batter and on top keep the look playful.
Key Ingredients:
- 2 1/2 cups cake flour
- 1 1/2 cups sugar
- 1 cup milk
- 1/2 cup butter, softened
- 2 eggs
- 1/2 cup rainbow sprinkles
Quick Steps:
- Cream butter and sugar, then beat in eggs and milk.
- Fold in flour and sprinkles.
- Bake in a sheet pan at 350°F for 25 minutes.
- Frost, chill, and cut into bars.
Equipment for This Recipe:
- Sheet pan
- Mixer
- Spatula
- Parchment paper
How to Serve This Dish: Cut into small squares and let the frosting be thick and simple. They stack well for a buffet.
Pro Tips for This Recipe:
- Add sprinkles at the very end so the batter doesn’t streak.
- Cool fully before frosting.
- Chill before cutting for cleaner bars.
Variations on This Dish:
- Strawberry Funfetti: Add 2 tablespoons strawberry powder.
- Chocolate Confetti: Use chocolate frosting.
Common Mistakes to Avoid with This Dish:
- Bleeding Sprinkles: Overmixing makes the colors fade.
- Warm Frosting: It slides off the bars.
26. Coconut Macaroon Nests with Berries
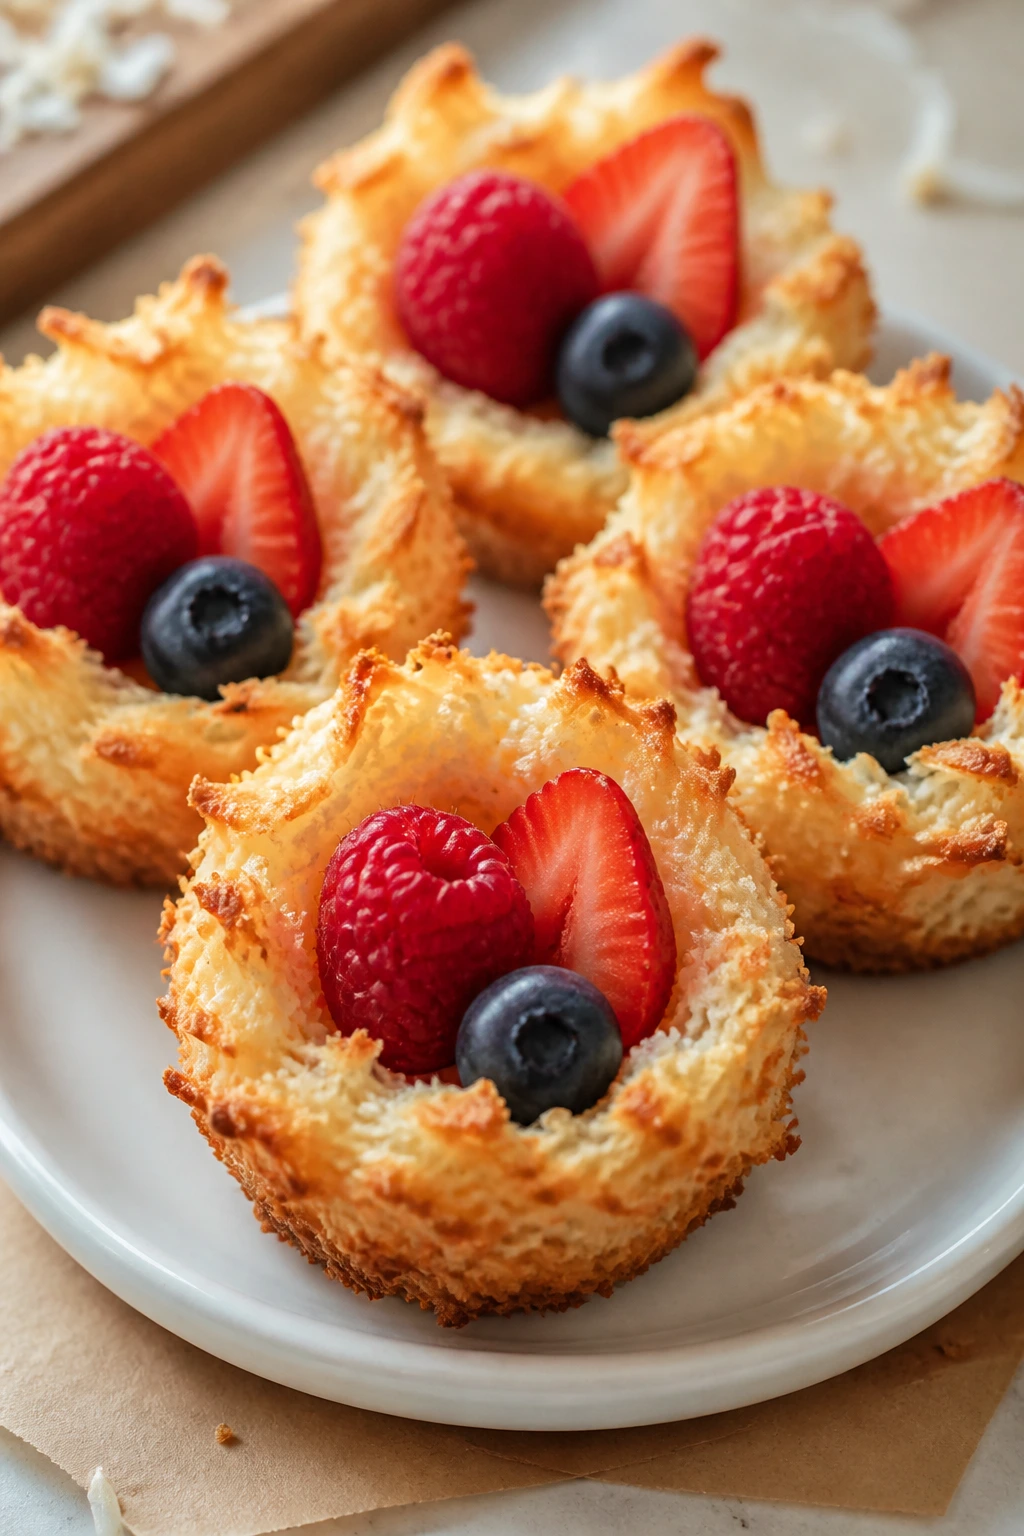
These are crisp on the outside, chewy in the middle, and tiny enough to look elegant without any actual decorating skills. A berry in the center turns each nest into a little finished dessert.
Why It Works: Coconut bakes into tidy little mounds that hold their shape. The center dip gives you a place for berries or jam.
Key Ingredients:
- 3 cups shredded sweetened coconut
- 2 egg whites
- 1/2 cup sugar
- 1 teaspoon vanilla extract
- 1/4 teaspoon salt
- 1/2 cup berries or jam
Quick Steps:
- Mix coconut, egg whites, sugar, vanilla, and salt.
- Form mounds on a lined sheet pan.
- Bake at 325°F for 18 to 20 minutes.
- Cool and fill centers with berries.
Equipment for This Recipe:
- Baking sheet
- Parchment paper
- Mixing bowl
- Spoon
How to Serve This Dish: Put them in mini paper cups so the bottoms stay neat. Fresh raspberries work especially well here.
Pro Tips for This Recipe:
- Press a dip in the center before baking if you want a deeper nest.
- Let them cool before filling.
- Use parchment, not foil, for easier release.
Variations on This Dish:
- Chocolate Center: Add a chocolate ganache dot.
- Lemon Coconut: Mix lemon zest into the batter.
Common Mistakes to Avoid with This Dish:
- Flat Cookies: The mixture was too wet.
- Burned Edges: Watch the last few minutes closely.
27. Strawberry Jam Crumb Bars
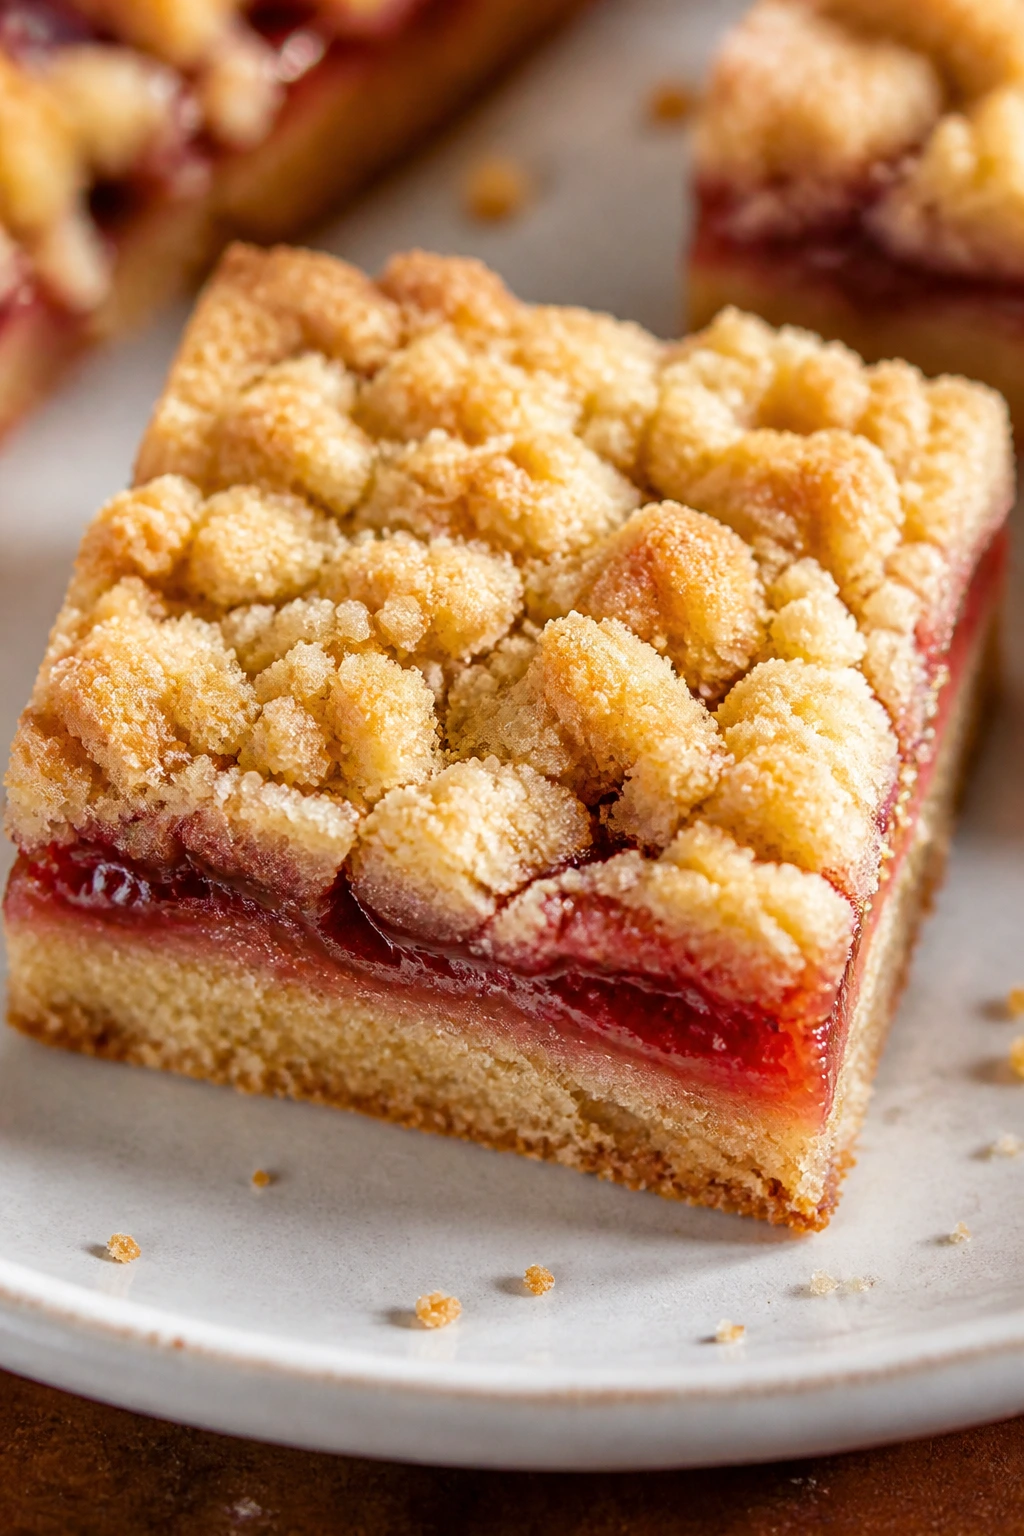
These bars hit the sweet spot between cookie and pie, which is exactly what you want on a crowded dessert table. The buttery crumb topping looks rustic in a nice, homey way.
Why It Works: One dough becomes both the base and the topping, so there’s less measuring and fewer dirty bowls. Jam bakes into a soft center that holds together after chilling.
Key Ingredients:
- 2 cups all-purpose flour
- 1 cup rolled oats
- 3/4 cup brown sugar
- 1 cup butter, melted
- 1 cup strawberry jam
- 1 teaspoon vanilla extract
Quick Steps:
- Mix flour, oats, sugar, butter, and vanilla.
- Press half into a pan.
- Spread jam and scatter the rest of the crumb on top.
- Bake at 350°F for 30 to 35 minutes.
Equipment for This Recipe:
- 8×8-inch pan
- Mixing bowl
- Spatula
- Parchment paper
How to Serve This Dish: Cut into tight squares and dust lightly with powdered sugar. They’re good at room temperature and travel well.
Pro Tips for This Recipe:
- Use thick jam so the center stays put.
- Chill before cutting.
- Press the base firmly for a sturdy bottom.
Variations on This Dish:
- Raspberry Bars: Use raspberry preserves instead.
- Lemon Crumb Bars: Add lemon zest to the crumb.
Common Mistakes to Avoid with This Dish:
- Loose Bottom Layer: Pack it down well.
- Warm Slicing: The jam needs time to set.
28. Peanut Butter Blossom Hearts
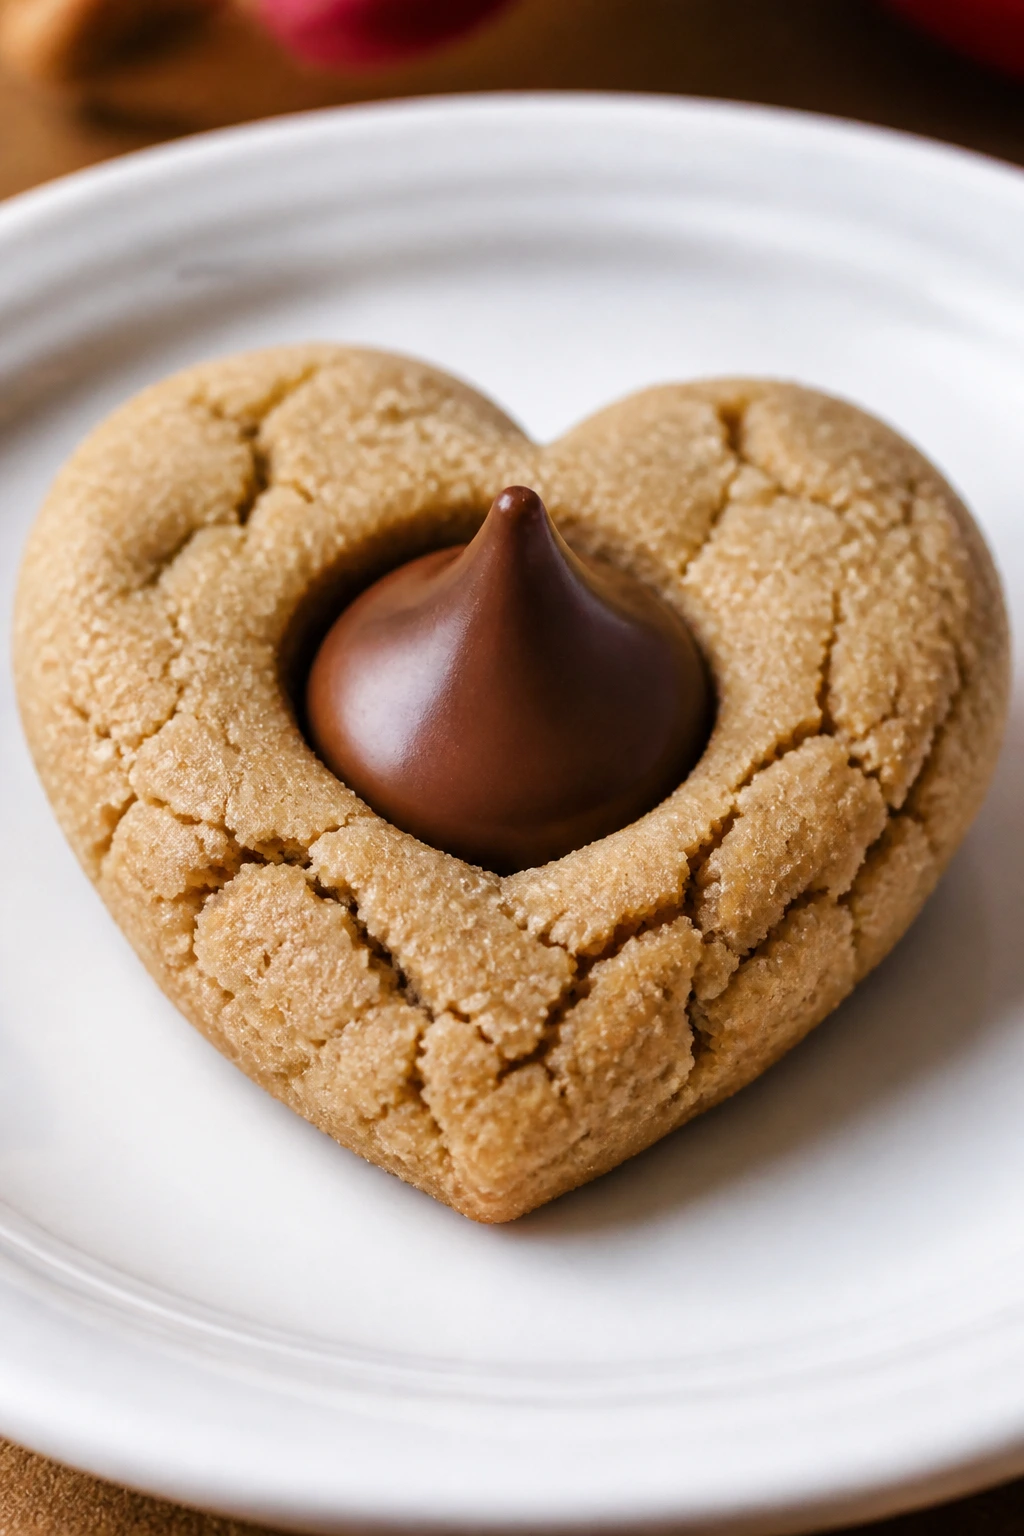
Heart-shaped peanut butter cookies with a chocolate center are basically a party trick that tastes like a classic lunchbox cookie grown up a little. The salty-sweet bite works especially well among fruitier desserts.
Why It Works: Peanut butter dough is sturdy and easy to shape. Pressing the chocolate in while the cookies are hot helps it stick without melting into a puddle.
Key Ingredients:
- 1/2 cup butter, softened
- 1/2 cup peanut butter
- 1 cup sugar
- 1 egg
- 1 1/2 cups flour
- Chocolate hearts or kisses
Quick Steps:
- Cream butter, peanut butter, and sugar.
- Beat in egg, then flour.
- Roll into balls and bake at 350°F for 10 minutes.
- Press chocolate into the center while warm.
Equipment for This Recipe:
- Baking sheet
- Parchment paper
- Mixing bowl
- Cooling rack
How to Serve This Dish: Stack them in a single layer so the chocolate tops stay neat. A little flaky salt on the peanut butter edge works well.
Pro Tips for This Recipe:
- Use room-temperature dough for smoother rolling.
- Press the chocolate in gently.
- Let them cool fully before stacking.
Variations on This Dish:
- Pretzel Center: Replace chocolate with mini pretzel twists.
- Dark Chocolate Version: Use dark chocolate hearts.
Common Mistakes to Avoid with This Dish:
- Cracked Dough: The mixture was too dry.
- Flattened Chocolate: Insert the candy after baking, not before.
29. Icebox Cake Squares
Icebox cake is one of those old-fashioned desserts that still earns its keep. Layers of cookies and whipped cream soften overnight into a sliceable square with almost no baking at all.
Why It Works: The fridge does the work. Cookie layers absorb just enough cream to turn cake-like without getting mushy.
Key Ingredients:
- 1 box chocolate wafer cookies
- 2 cups heavy cream
- 1/2 cup powdered sugar
- 1 teaspoon vanilla extract
- 1 cup sliced strawberries
- 1 tablespoon cocoa powder
Quick Steps:
- Whip cream with sugar and vanilla.
- Layer cookies, cream, and strawberries in a pan.
- Chill overnight.
- Slice into squares and dust with cocoa.
Equipment for This Recipe:
- Loaf or square pan
- Mixer
- Spatula
- Plastic wrap
How to Serve This Dish: Serve cold, straight from the fridge, with a sharp knife for neat slices. The layers show best after a full chill.
Pro Tips for This Recipe:
- Don’t skimp on chill time.
- Use even cream layers.
- Line the pan if you want to lift it out cleanly.
Variations on This Dish:
- Berry Mix: Use mixed berries between the layers.
- Chocolate-Only: Skip the fruit and add shaved chocolate.
Common Mistakes to Avoid with This Dish:
- Not Enough Chill Time: The cake falls apart. Give it overnight if you can.
- Overwhipped Cream: It turns grainy and hard to spread.
30. Jam-Filled Puff Pastry Hearts
These are the easiest “fancy” pastry I know. Puff pastry bakes into crisp layers, and a little jam center makes the whole thing look like you spent far more time than you did.
Why It Works: Frozen puff pastry is reliable and beginner-proof when kept cold. The jam stays contained inside folded hearts.
Key Ingredients:
- 1 sheet puff pastry, thawed
- 1/3 cup strawberry or raspberry jam
- 1 egg, beaten
- 1 tablespoon sugar
- 1 tablespoon flour
- Powdered sugar, for dusting
Quick Steps:
- Roll pastry and cut heart pairs.
- Add a small spoonful of jam to half.
- Seal, brush with egg, sprinkle sugar, and bake at 400°F.
- Cool slightly and dust with powdered sugar.
Equipment for This Recipe:
- Baking sheet
- Parchment paper
- Pastry brush
- Knife or cutter
How to Serve This Dish: Serve warm, when the pastry flakes at the edges. A little extra jam on the side doesn’t hurt.
Pro Tips for This Recipe:
- Keep the pastry cold.
- Use very small amounts of jam.
- Crimp edges firmly with a fork.
Variations on This Dish:
- Apricot Heart: Swap in apricot preserves.
- Cream Cheese Heart: Add a dab of sweetened cream cheese.
Common Mistakes to Avoid with This Dish:
- Leaky Filling: Too much jam forces seams open.
- Soft Pastry: Bake on a hot pan for more lift.
31. Apple Cinnamon Hand Pies
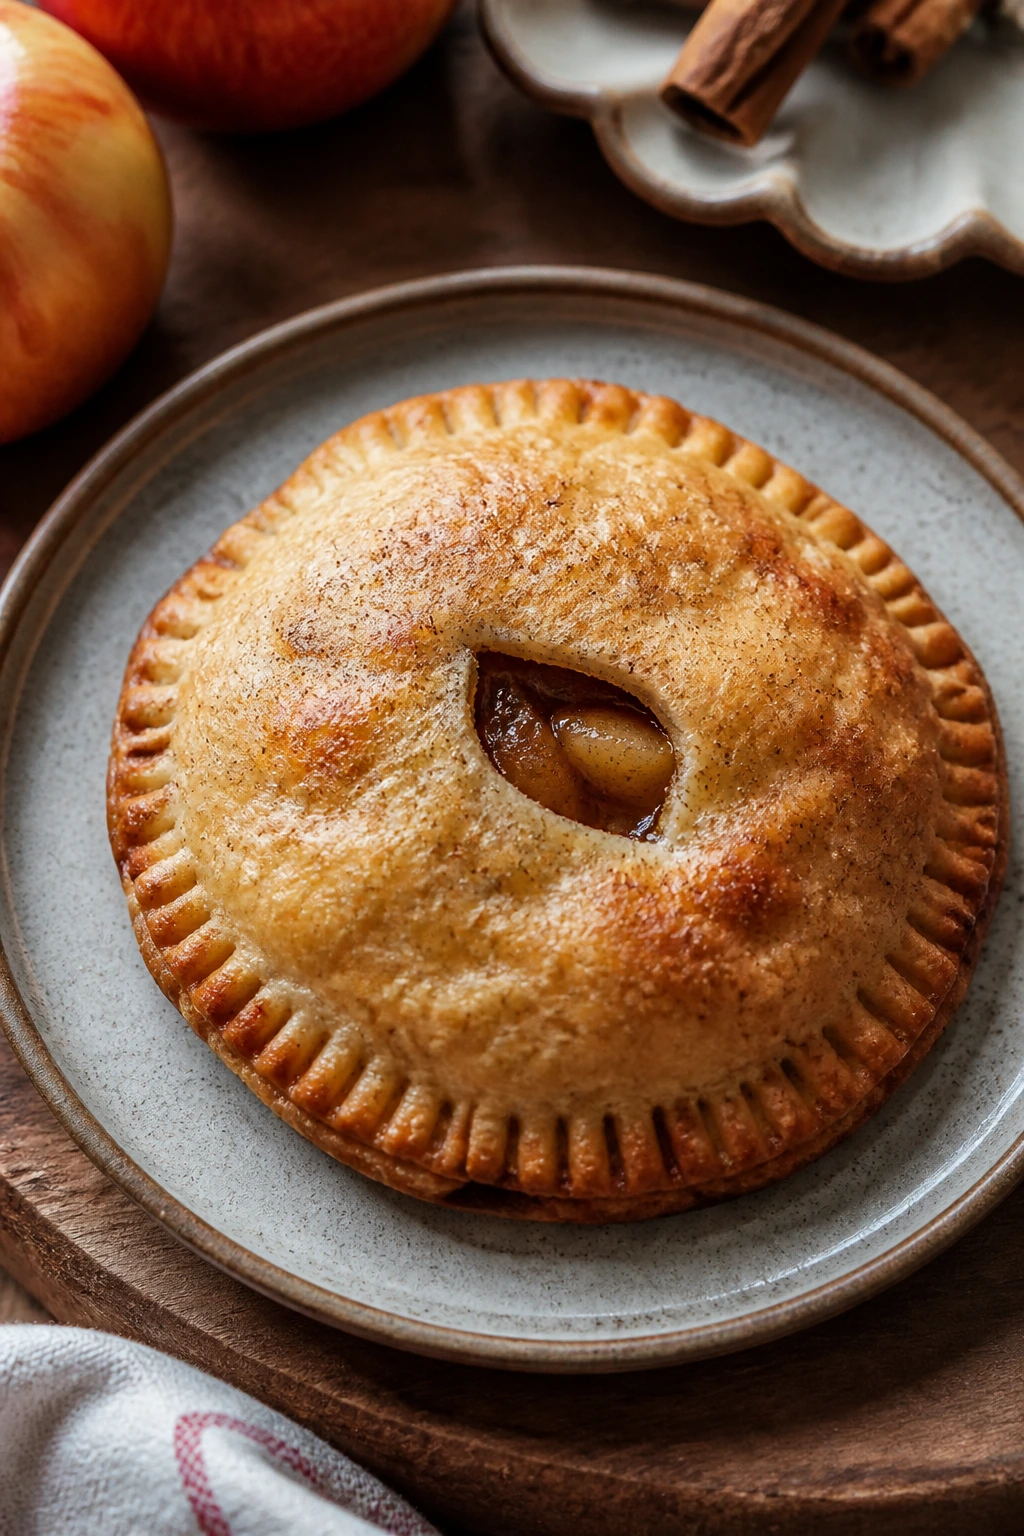
Not everything on a Galentines table has to be pink to belong there. These little pies bring warm cinnamon, soft apples, and buttery crust, which is a nice break from all the berry and chocolate energy.
Why It Works: Small hand pies bake faster and cool faster than a full pie. The filling thickens as it bakes, so the centers stay tidy.
Key Ingredients:
- 2 cups peeled diced apples
- 2 tablespoons sugar
- 1 teaspoon cinnamon
- 1 package pie crusts
- 1 tablespoon flour
- 1 egg, beaten
Quick Steps:
- Toss apples with sugar, cinnamon, and flour.
- Cut crust circles and fill them.
- Seal, brush with egg, and cut vents.
- Bake at 375°F for 18 to 20 minutes.
Equipment for This Recipe:
- Baking sheet
- Rolling pin
- Fork
- Pastry brush
How to Serve This Dish: Dust with sugar and serve warm or room temperature. They hold up well on a buffet.
Pro Tips for This Recipe:
- Dice apples small so they cook through.
- Use tart apples for better balance.
- Let the filling cool before sealing.
Variations on This Dish:
- Caramel Apple: Add a spoonful of caramel to the filling.
- Cranberry Apple: Mix in dried cranberries.
Common Mistakes to Avoid with This Dish:
- Runny Filling: Add flour to thicken it.
- Burst Seams: Don’t overfill the pies.
32. Chocolate Peanut Butter No-Bake Bars
These bars are for the person who wants something rich, chocolatey, and fast. A peanut butter base plus a chocolate top makes a candy-bar style dessert that chills into neat squares.
Why It Works: No oven means no timing stress. The chilled bars slice cleanly after the chocolate sets.
Key Ingredients:
- 1 1/2 cups graham cracker crumbs
- 1 cup powdered sugar
- 1 cup peanut butter
- 1/2 cup melted butter
- 1 1/2 cups chocolate chips
- 1 teaspoon vanilla extract
Quick Steps:
- Mix crumbs, sugar, peanut butter, butter, and vanilla.
- Press into a lined pan.
- Melt chocolate and spread over the top.
- Chill 2 hours and cut into bars.
Equipment for This Recipe:
- 8×8-inch pan
- Mixing bowl
- Spatula
- Parchment paper
How to Serve This Dish: Cut into narrow bars, because they’re dense. A few flakes of salt on top help.
Pro Tips for This Recipe:
- Press the base firmly so it doesn’t crumble.
- Chill fully before cutting.
- Use parchment to lift the slab out.
Variations on This Dish:
- Pretzel Crunch: Add crushed pretzels to the base.
- White Chocolate Top: Swap the chocolate layer.
Common Mistakes to Avoid with This Dish:
- Soft Base: The bars need the full chill.
- Thick Chocolate Layer: A thin top slices better.
33. Strawberry Poke Cake
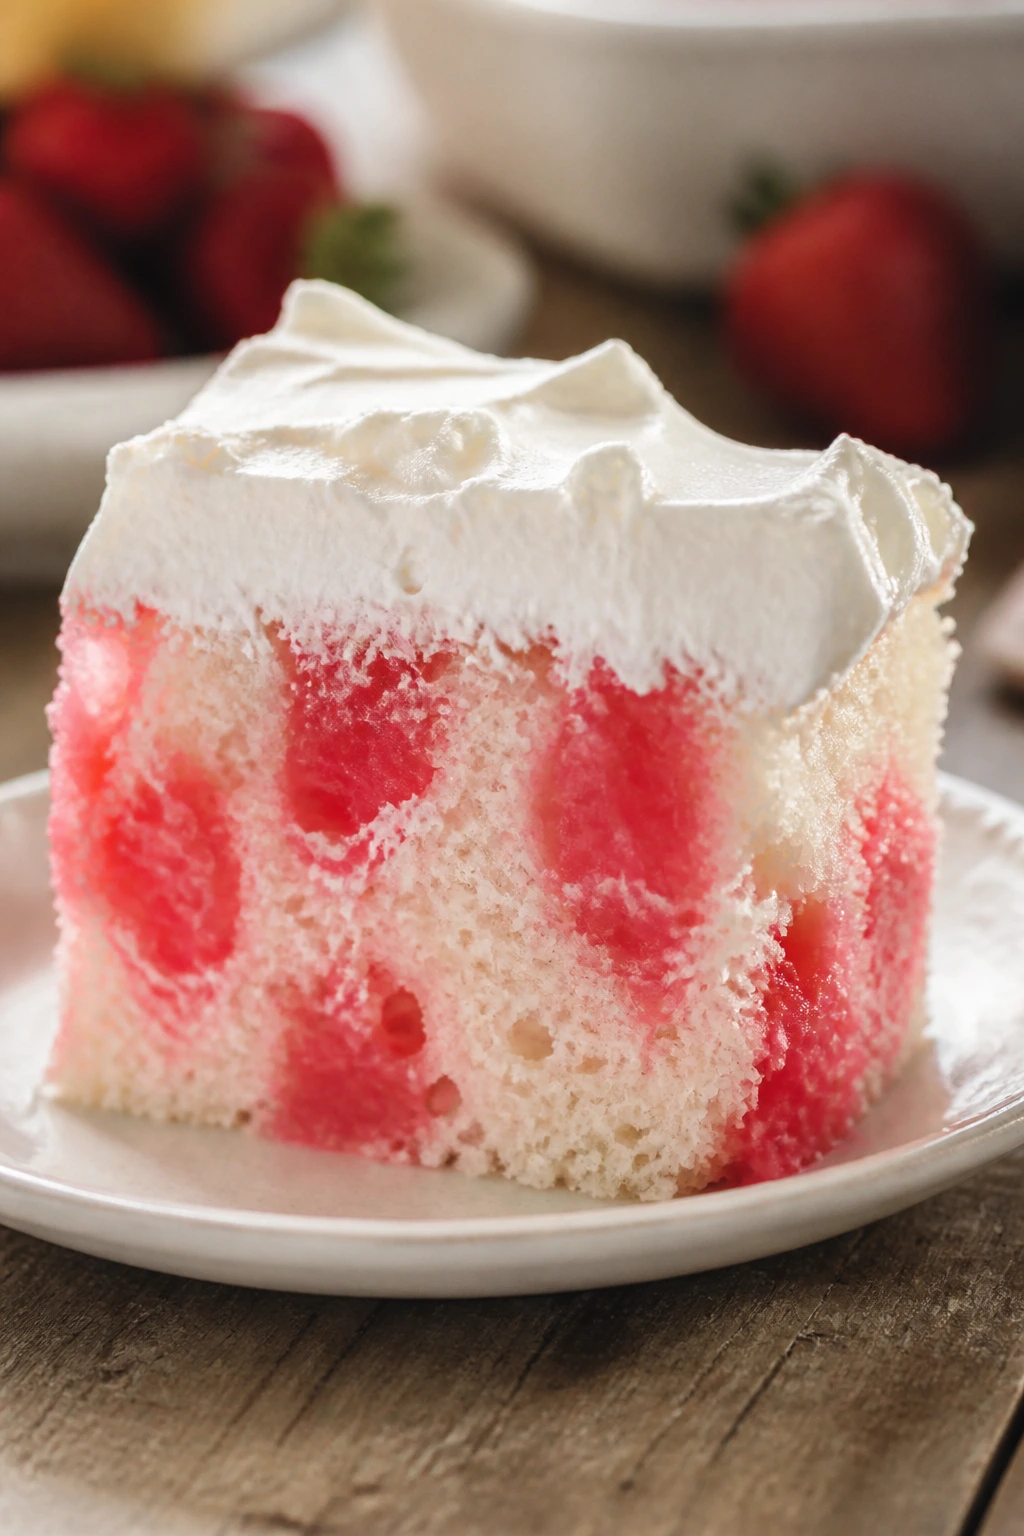
Poke cake is messy in theory and neat on the plate, which is my favorite kind of dessert math. Strawberry filling sinks into the cake and turns every slice pink and juicy.
Why It Works: The holes let the flavor soak through instead of sitting on top. Whipped topping keeps the finish light.
Key Ingredients:
- 1 box white cake mix
- 3 large eggs
- 1 cup water
- 1 package strawberry gelatin
- 1 cup boiling water
- 1 tub whipped topping
Quick Steps:
- Bake the cake in a 9×13-inch pan.
- Poke holes across the warm cake.
- Pour in strawberry gelatin mixture.
- Chill, then frost with whipped topping.
Equipment for This Recipe:
- 9×13-inch pan
- Wooden spoon handle
- Mixing bowl
- Spatula
How to Serve This Dish: Cut into generous squares and add sliced strawberries on top. It looks best cold.
Pro Tips for This Recipe:
- Poke while warm so the liquid soaks in.
- Chill long enough for the gelatin to set.
- Add fruit right before serving.
Variations on This Dish:
- Lemon Poke Cake: Use lemon gelatin.
- Berry Mix: Add raspberry or cherry gelatin.
Common Mistakes to Avoid with This Dish:
- Shallow Holes: The filling won’t go deep enough.
- Warm Frosting: Chill the cake first.
34. Almond Joy Cookie Bars
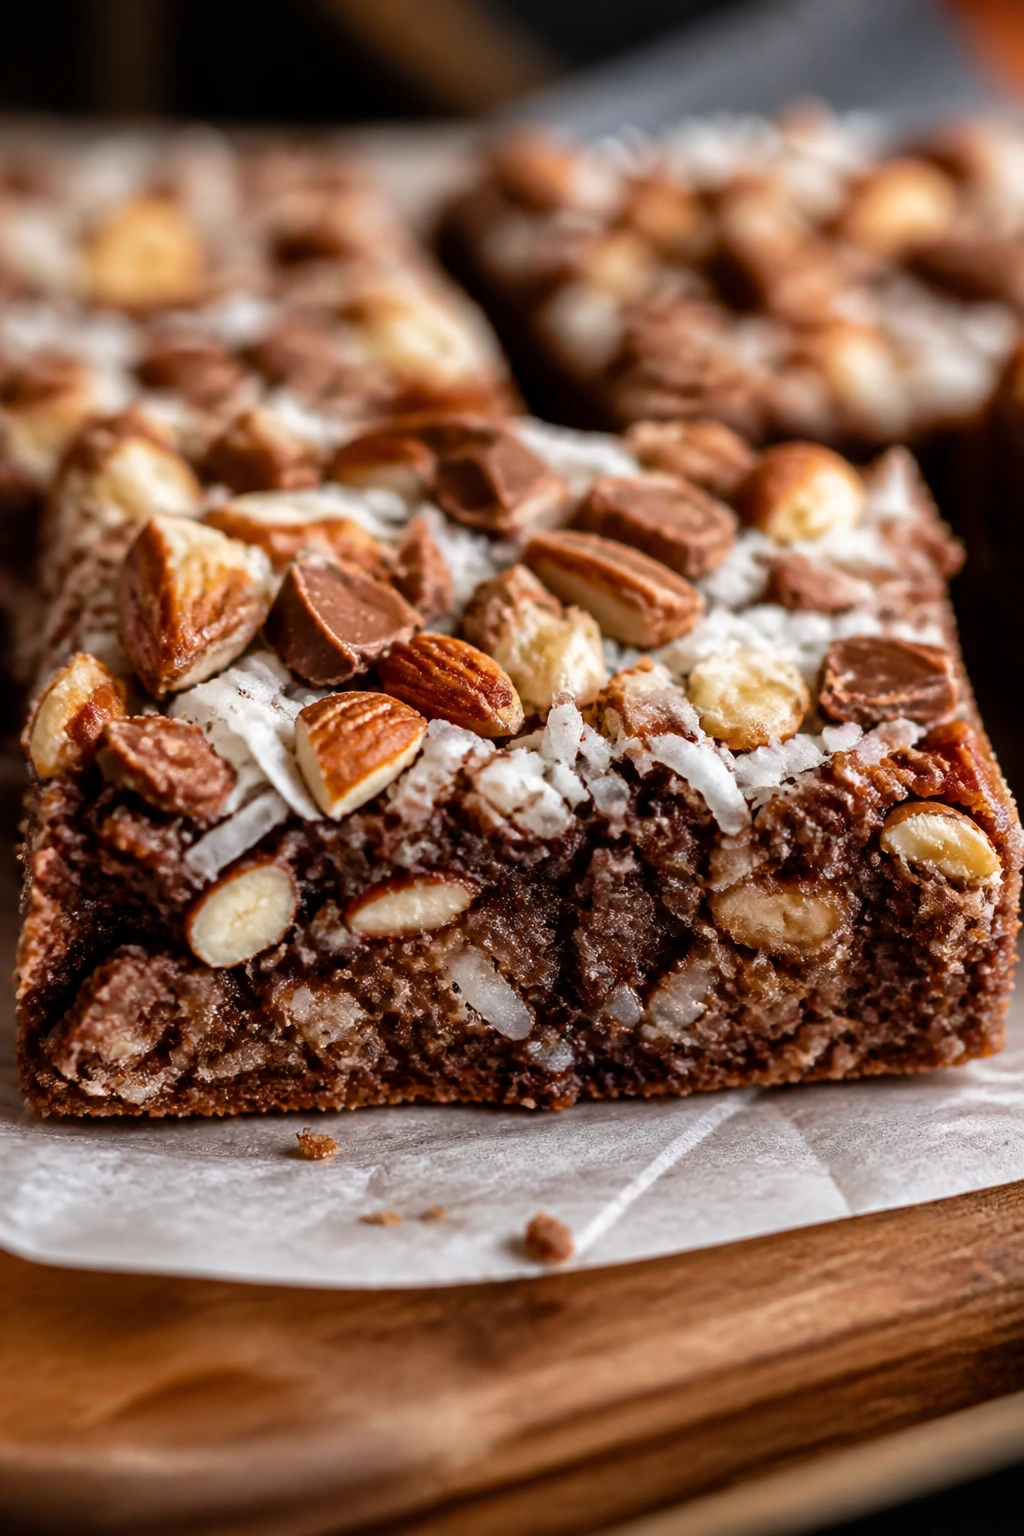
Chocolate, coconut, and almond make these bars taste like a candy bar in square form. They’re chewy in the middle, crisp at the edges, and easy to cut into neat little serving pieces.
Why It Works: One pan makes a thick bar with a soft center. Coconut adds chew, and almonds bring a clean crunch.
Key Ingredients:
- 1/2 cup butter, melted
- 1 cup brown sugar
- 1 egg
- 1 1/2 cups flour
- 1 cup shredded coconut
- 1/2 cup chocolate chips
Quick Steps:
- Mix butter, sugar, and egg.
- Stir in flour, coconut, and chocolate chips.
- Spread in a pan and top with almonds.
- Bake at 350°F for 22 to 25 minutes.
Equipment for This Recipe:
- 8×8-inch pan
- Mixing bowl
- Spatula
- Parchment paper
How to Serve This Dish: Cut into small squares and keep them at room temperature. They’re dense enough that a little piece satisfies.
Pro Tips for This Recipe:
- Press the topping lightly into the batter.
- Cool before slicing.
- Toast the almonds first if you want more flavor.
Variations on This Dish:
- Dark Chocolate: Use dark chips instead.
- Cherry Coconut: Add chopped dried cherries.
Common Mistakes to Avoid with This Dish:
- Dry Bars: Pull them before the center looks stiff.
- Loose Topping: Press nuts into the batter before baking.
35. Raspberry White Chocolate Scones

Scones can be dry if they’re handled badly, but these stay tender when you keep the dough cold and stop mixing early. Raspberry and white chocolate make them feel just sweet enough for a brunch-table dessert.
Why It Works: Cold butter creates flaky pockets. The fruit and chips add pockets of flavor so the scone doesn’t need heavy frosting.
Key Ingredients:
- 2 cups all-purpose flour
- 1/3 cup sugar
- 1 tablespoon baking powder
- 1/2 cup cold butter
- 1/2 cup raspberries
- 1/2 cup white chocolate chips
Quick Steps:
- Cut butter into dry ingredients.
- Fold in raspberries and chips.
- Shape the dough and cut triangles.
- Bake at 400°F for 15 to 18 minutes.
Equipment for This Recipe:
- Baking sheet
- Pastry cutter or fork
- Bowl
- Knife or bench scraper
How to Serve This Dish: Serve them warm with a little glaze or plain. They’re nice for a more brunch-y Galentines table.
Pro Tips for This Recipe:
- Keep fruit frozen if fresh berries are too soft.
- Handle the dough lightly.
- Bake on a lined sheet for easier cleanup.
Variations on This Dish:
- Lemon Raspberry: Add lemon zest.
- Dark Chocolate Cranberry: Swap the fruit and chips.
Common Mistakes to Avoid with This Dish:
- Overworking Dough: That’s how scones turn tough.
- Wet Berries: Too much juice streaks the dough.
36. Brown Sugar Pop-Tart Bites
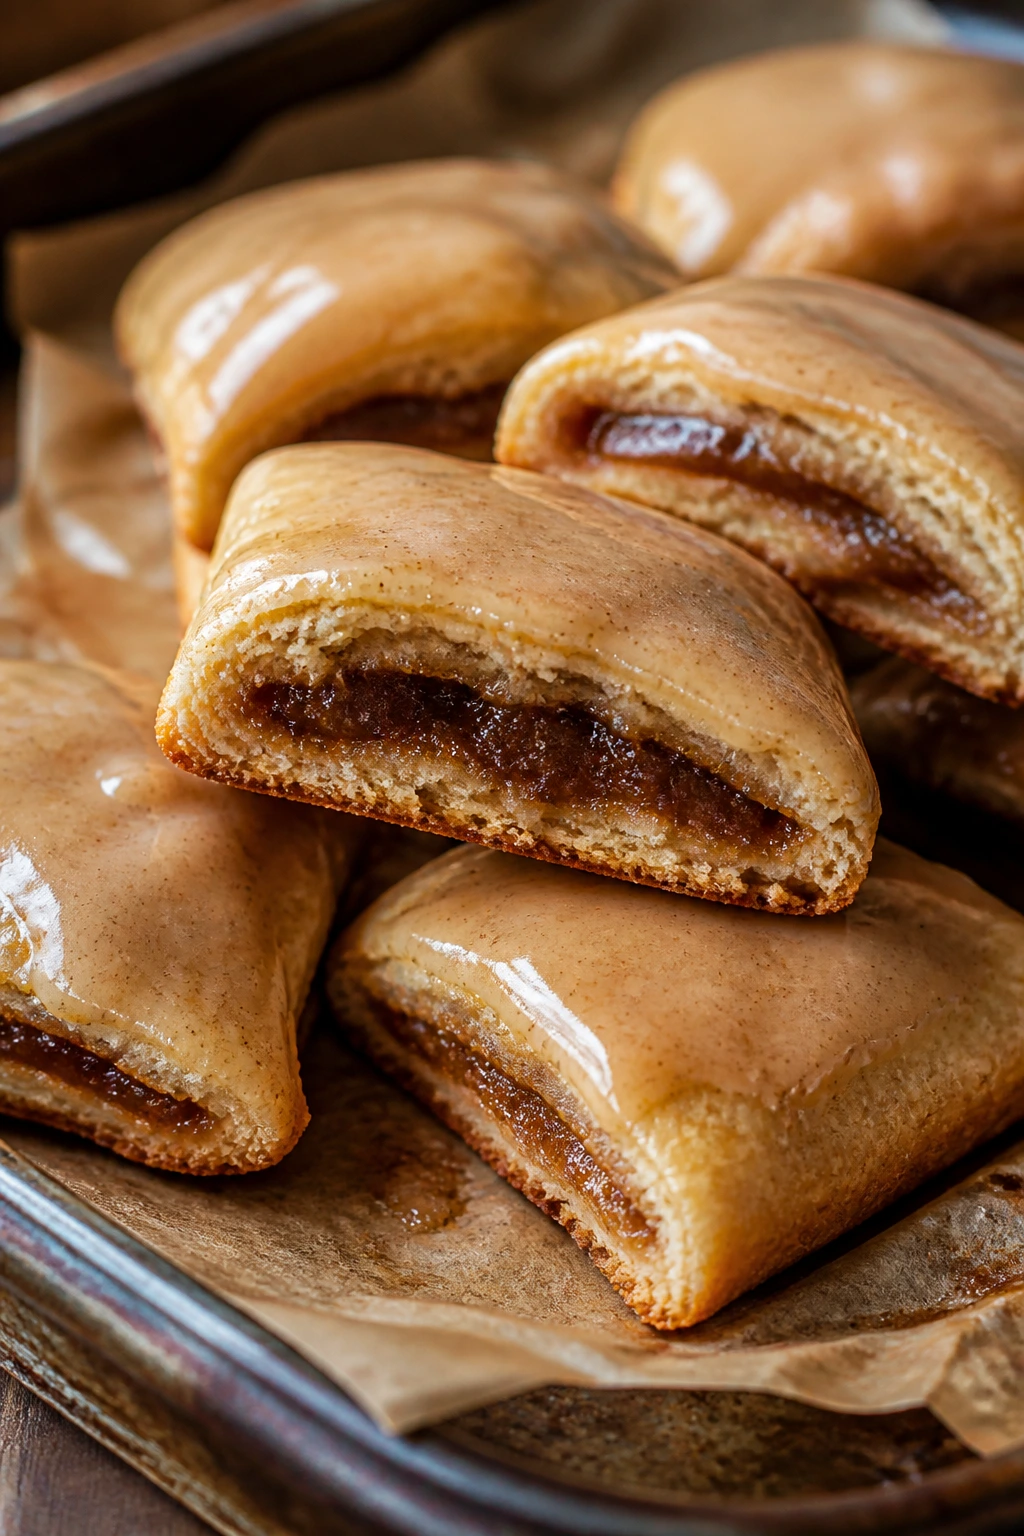
These little bites taste like the toaster pastry people remember, only warmer and a bit more homemade. The filling is sweet and cinnamon-heavy, and the glaze gives you the fun finish.
Why It Works: Small sealed pastries bake fast. A thick filling stays put when you keep the edges crimped well.
Key Ingredients:
- 1 package pie crusts
- 1/2 cup brown sugar
- 1 teaspoon cinnamon
- 2 tablespoons softened butter
- 1 egg
- 1/2 cup powdered sugar
Quick Steps:
- Mix brown sugar, cinnamon, and butter.
- Cut crust into small rectangles and fill.
- Seal edges, brush with egg, and bake at 375°F.
- Drizzle with glaze after cooling.
Equipment for This Recipe:
- Baking sheet
- Fork
- Pastry brush
- Knife
How to Serve This Dish: Stack them in a shallow bowl and let the glaze drip a little. They’re good warm, but not hot enough to burn fingers.
Pro Tips for This Recipe:
- Keep the filling thin.
- Vent the tops so steam can escape.
- Cool before glazing or it melts off.
Variations on This Dish:
- Strawberry Filling: Use jam instead of cinnamon sugar.
- Maple Finish: Replace glaze with maple icing.
Common Mistakes to Avoid with This Dish:
- Burst Pockets: Too much filling causes leaks.
- Soft Crust: Bake until the bottoms are fully golden.
37. Berry Cobbler Cups
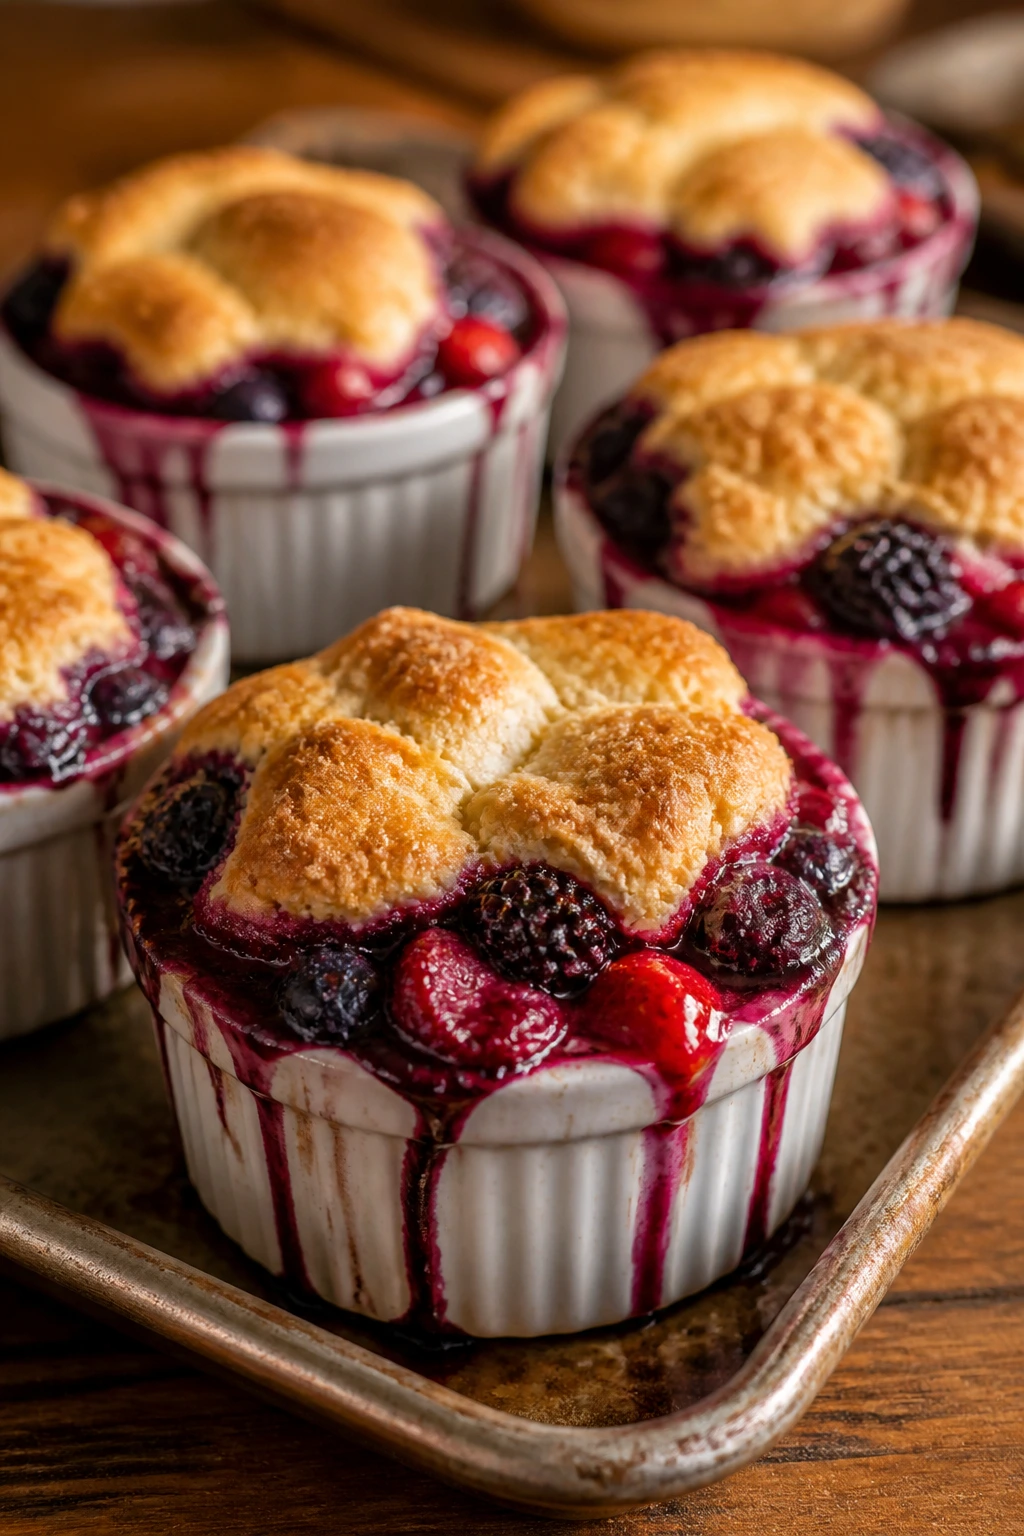
Cobbler in little cups feels cozy but still party-friendly. The fruit bubbles under a biscuit topping, and each serving comes with its own spoon, which makes cleanup easier.
Why It Works: Individual ramekins bake more evenly than one large cobbler. The topping stays crisp enough when portions are small.
Key Ingredients:
- 2 cups mixed berries
- 2 tablespoons sugar
- 1 tablespoon cornstarch
- 1 cup biscuit mix
- 1/2 cup milk
- 2 tablespoons melted butter
Quick Steps:
- Toss berries with sugar and cornstarch.
- Spoon into small ramekins.
- Mix biscuit topping and drop it over the fruit.
- Bake at 375°F until bubbly and golden.
Equipment for This Recipe:
- Ramekins
- Baking sheet
- Bowl
- Spoon
How to Serve This Dish: Serve warm with a spoonful of whipped cream or vanilla ice cream. The fruit should bubble at the edges.
Pro Tips for This Recipe:
- Don’t pack the topping flat.
- Use a baking sheet under the ramekins.
- Let them rest 10 minutes before serving.
Variations on This Dish:
- Peach-Berry: Add diced peaches.
- Cherry Cobbler: Use cherries and a little almond extract.
Common Mistakes to Avoid with This Dish:
- Too Much Liquid: Add cornstarch to thicken the fruit.
- Undercooked Top: The biscuit topping should be golden.
38. Mini Cheesecake Bars
Cheesecake bars are easier than a full cheesecake because the pan does the shaping for you. The result is creamy, dense, and neat enough to cut into tiny square bites.
Why It Works: Bars cool faster than a whole cheesecake and slice more cleanly. A crumb crust keeps the bottom sturdy.
Key Ingredients:
- 1 1/2 cups graham cracker crumbs
- 5 tablespoons melted butter
- 16 ounces cream cheese, softened
- 1/2 cup sugar
- 2 eggs
- 1 teaspoon vanilla extract
Quick Steps:
- Press crust into a lined pan and bake 8 minutes.
- Beat filling ingredients until smooth.
- Pour over crust and bake at 325°F.
- Chill 3 hours, then cut.
Equipment for This Recipe:
- 8×8-inch or 9×9-inch pan
- Mixer
- Parchment paper
- Spatula
How to Serve This Dish: Top each square with a berry or a thin smear of jam. They taste best cold and firm.
Pro Tips for This Recipe:
- Use room-temperature cream cheese.
- Don’t overbake the center.
- Chill before slicing.
Variations on This Dish:
- Strawberry Swirl: Add strawberry jam on top.
- Chocolate Crust: Use chocolate cookie crumbs.
Common Mistakes to Avoid with This Dish:
- Lumpy Filling: Beat the cream cheese first.
- Cracked Tops: Avoid overbaking.
39. Chocolate Chip Blondie Bites
These are buttery, chewy, and a little caramel-like, with chocolate chips scattered through every bite. Cut small, they make a solid party dessert that does not need a fork.
Why It Works: Blondie batter bakes into a dense bar that travels well. Chocolate chips melt into little pockets without making the bars fragile.
Key Ingredients:
- 1 cup melted butter
- 1 1/2 cups brown sugar
- 2 eggs
- 2 cups flour
- 1 cup chocolate chips
- 1 teaspoon vanilla extract
Quick Steps:
- Stir butter and brown sugar together.
- Mix in eggs and vanilla.
- Fold in flour and chips.
- Bake in a lined pan at 350°F for 25 minutes.
Equipment for This Recipe:
- 9×13-inch pan
- Bowl
- Spatula
- Parchment paper
How to Serve This Dish: Cut them into tiny squares so people can sample more than one dessert. A dusting of powdered sugar works if you want them to look dressed up.
Pro Tips for This Recipe:
- Cool fully before cutting.
- Use parchment for clean edges.
- Add extra chips on top before baking.
Variations on This Dish:
- White Chocolate Cranberry: Swap the mix-ins.
- Salted Pretzel: Add crushed pretzels for crunch.
Common Mistakes to Avoid with This Dish:
- Too Much Flour: Pack it lightly when measuring.
- Overbaking: They should still feel a little soft in the center.
40. Cherry Chocolate Muffins
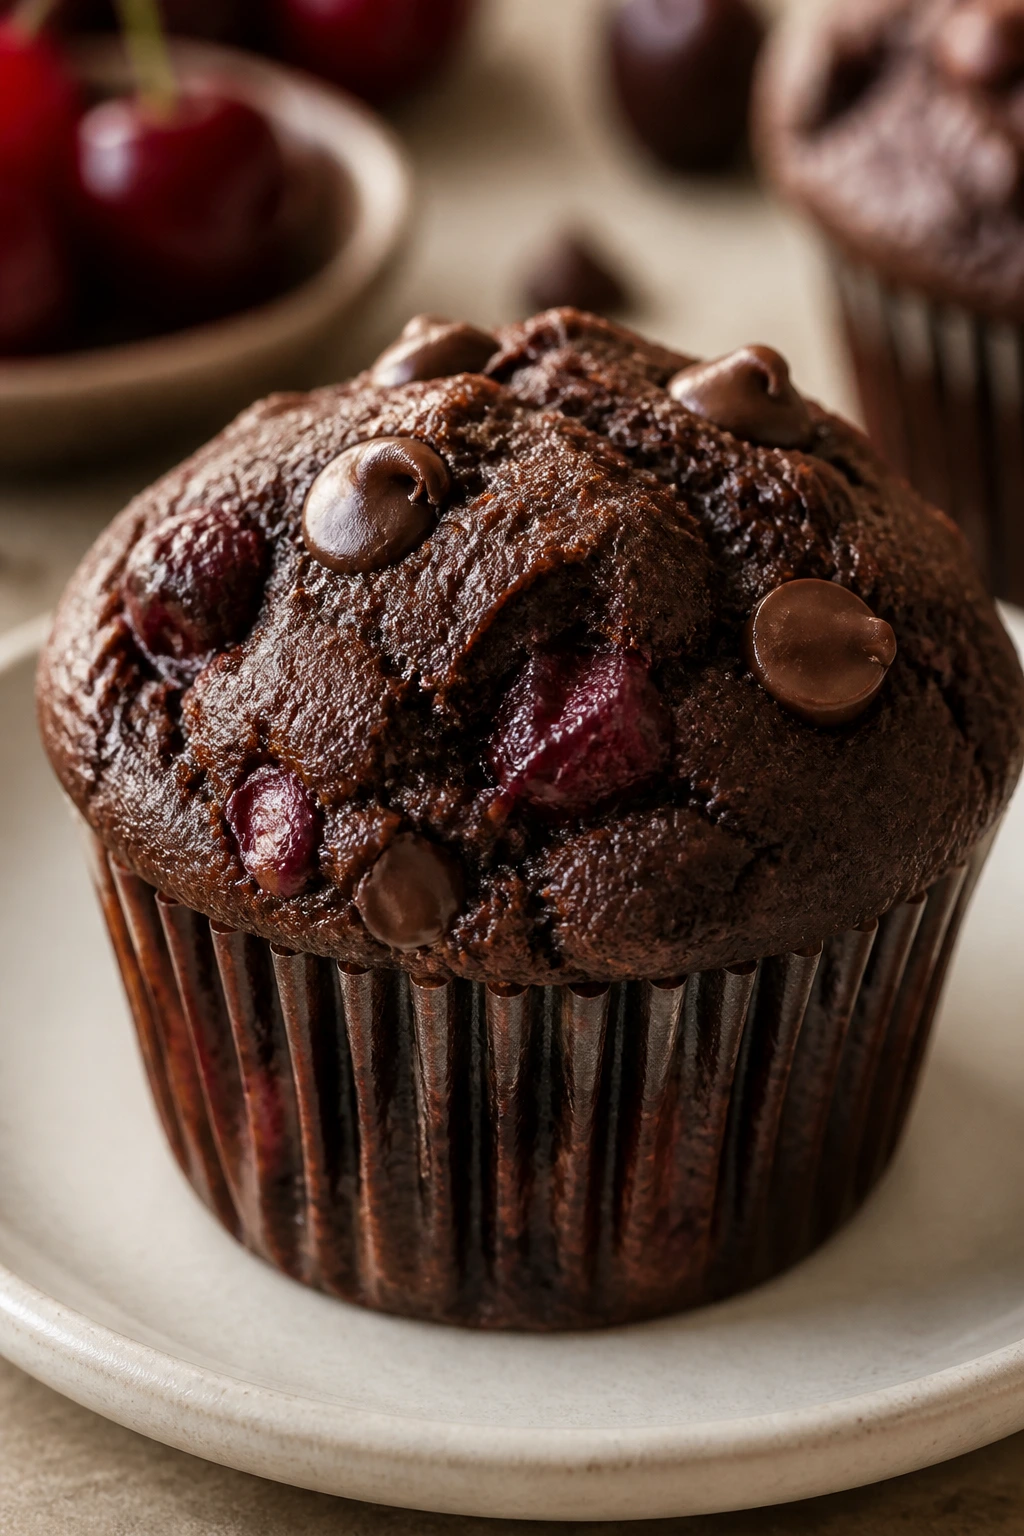
These are dessert muffins, not breakfast muffins pretending to be dessert. Cherries and chocolate chips give them enough richness to land nicely on a sweet table.
Why It Works: Muffins bake quickly and portion easily. Cherries add a tart pop that keeps the chocolate from going flat.
Key Ingredients:
- 2 cups flour
- 3/4 cup sugar
- 2 teaspoons baking powder
- 1 cup milk
- 1 egg
- 1 cup cherries, chopped
- 3/4 cup chocolate chips
Quick Steps:
- Mix dry ingredients.
- Whisk milk and egg, then stir into the dry mix.
- Fold in cherries and chocolate chips.
- Bake at 375°F for 18 to 20 minutes.
Equipment for This Recipe:
- Muffin tin
- Paper liners
- Mixing bowls
- Spoon
How to Serve This Dish: Serve them warm or at room temperature with a little cocoa powder dusted over the tops. They work well on brunch tables too.
Pro Tips for This Recipe:
- Pat cherries dry after chopping.
- Don’t overmix the batter.
- Sprinkle chips on top for better presentation.
Variations on This Dish:
- Raspberry Chocolate: Use raspberries instead.
- Mini Loaves: Bake the same batter in mini loaf pans.
Common Mistakes to Avoid with This Dish:
- Soggy Fruit: Wet cherries make tunnels in the crumb.
- Tough Muffins: Stir only until the flour disappears.
41. Strawberry Pound Cake Trifle
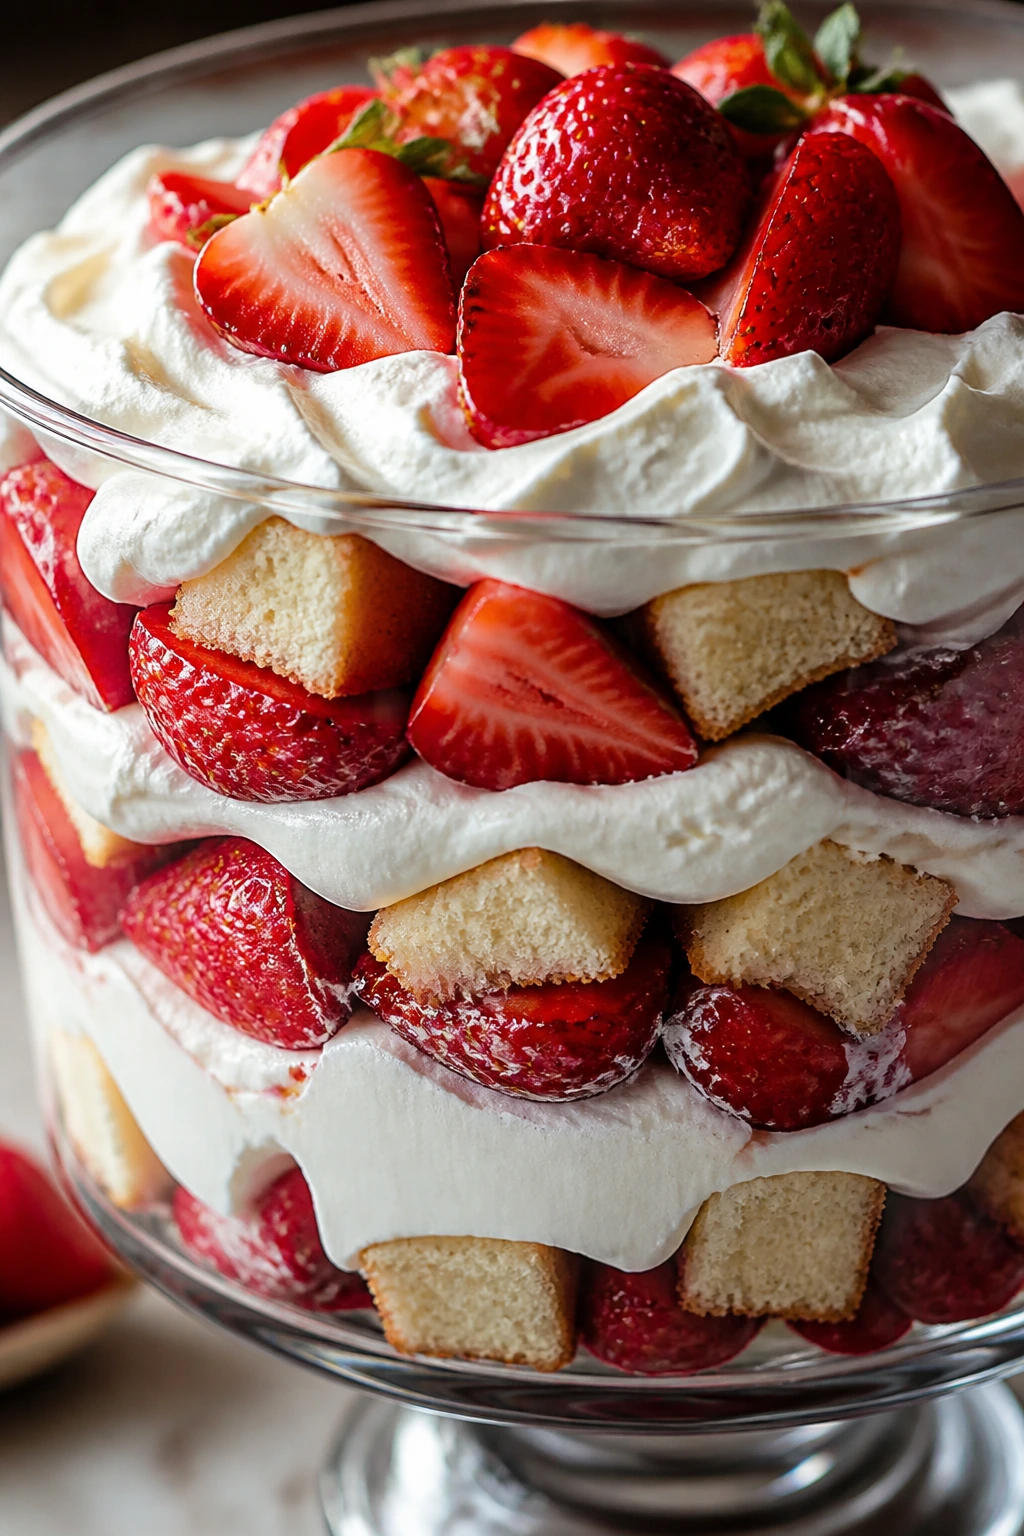
A trifle is what I make when I want to look organized without actually doing difficult work. Pound cake, whipped cream, and strawberries layer into a dessert that feels abundant and a little old-fashioned.
Why It Works: Pound cake holds up under cream and juice better than a softer sponge. A clear bowl shows the layers, which is half the charm.
Key Ingredients:
- 1 loaf pound cake, cubed
- 2 cups sliced strawberries
- 2 tablespoons sugar
- 2 cups whipped cream
- 1 teaspoon vanilla extract
- 1 tablespoon lemon juice
Quick Steps:
- Toss strawberries with sugar and lemon juice.
- Layer cake, cream, and berries in a bowl.
- Repeat the layers.
- Chill 30 minutes before serving.
Equipment for This Recipe:
- Trifle bowl or large glass bowl
- Knife
- Spoon
- Mixing bowl
How to Serve This Dish: Spoon it into cups or serve from a large bowl. The layers should stay visible right through the glass.
Pro Tips for This Recipe:
- Let the berries sit long enough to release juice.
- Use day-old pound cake if it’s a little firm.
- Assemble close to serving.
Variations on This Dish:
- Mixed Berry: Add blueberries and raspberries.
- Chocolate Trifle: Use chocolate cake cubes.
Common Mistakes to Avoid with This Dish:
- Too Much Cream: The layers blur. Keep them even.
- Dry Cake: Let some berry juice soak in.
42. Fudge Squares with Sea Salt
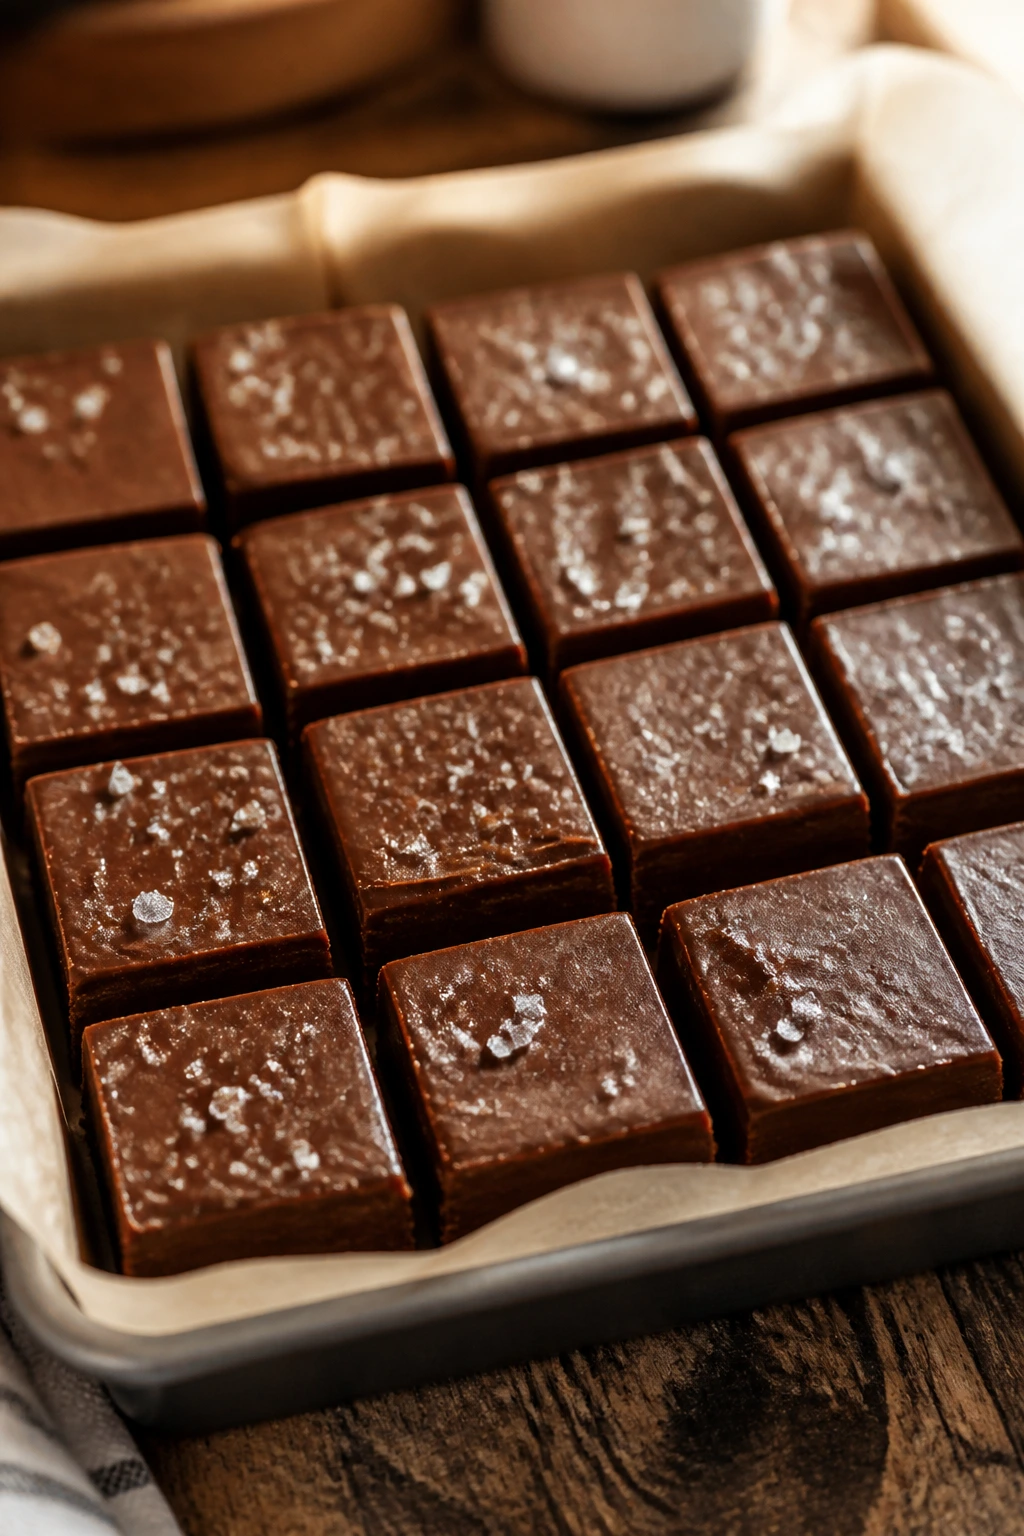
If the table needs a deep chocolate note, these dense fudge squares do the job. A little flaky salt on top keeps the sweetness from getting sticky.
Why It Works: Fudge sets firmly when cooled in a lined pan. Small squares give you an intense bite without needing frosting.
Key Ingredients:
- 3 cups semi-sweet chocolate chips
- 1 can sweetened condensed milk
- 2 tablespoons butter
- 1 teaspoon vanilla extract
- 1/2 teaspoon salt
- Flaky sea salt for finishing
Quick Steps:
- Melt chocolate chips, condensed milk, and butter together.
- Stir in vanilla and salt.
- Spread into a lined pan.
- Chill until firm, then cut and top with sea salt.
Equipment for This Recipe:
- Saucepan or microwave bowl
- 8×8-inch pan
- Spatula
- Parchment paper
How to Serve This Dish: Cut tiny squares and let them sit at room temperature for a few minutes before serving. Cold fudge can taste harder than it should.
Pro Tips for This Recipe:
- Line the pan well.
- Work fast before the fudge starts to set.
- Add salt after chilling, not before.
Variations on This Dish:
- Peanut Butter Swirl: Add dollops of peanut butter.
- Mint Fudge: Use mint extract sparingly.
Common Mistakes to Avoid with This Dish:
- Overheating Chocolate: It can seize or turn grainy.
- Thick Squares: Small bites are easier to eat.
43. Berry Galette Hearts
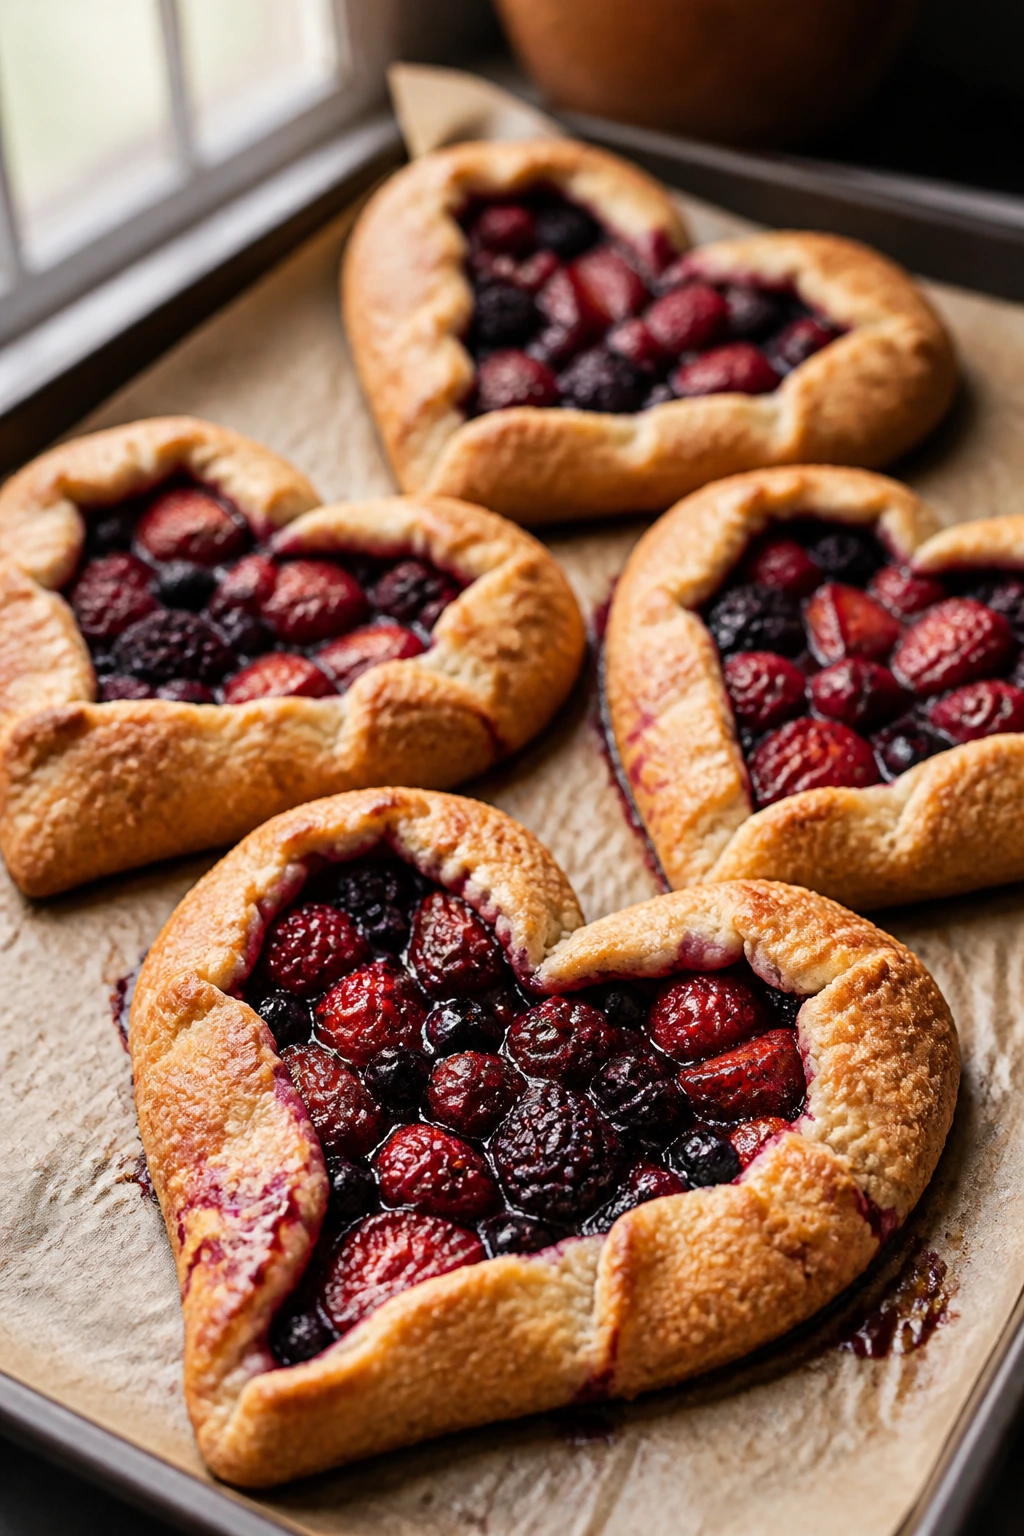
A galette sounds fancy, but it’s just a free-form tart with the edges folded in. Cutting the crust into hearts makes it feel tailor-made for the party without adding much work.
Why It Works: The rustic shape hides imperfections. The fruit bakes in its own juice while the crust stays crisp at the edges.
Key Ingredients:
- 1 pie crust or pastry round
- 2 cups mixed berries
- 2 tablespoons sugar
- 1 tablespoon cornstarch
- 1 egg, beaten
- 1 tablespoon coarse sugar
Quick Steps:
- Roll out dough and cut heart shapes.
- Toss berries with sugar and cornstarch.
- Fill, fold edges, brush with egg, and sprinkle sugar.
- Bake at 400°F until browned and bubbly.
Equipment for This Recipe:
- Baking sheet
- Knife or cutter
- Pastry brush
- Parchment paper
How to Serve This Dish: Serve warm with a spoonful of whipped cream or vanilla ice cream. The juices should still be glossy.
Pro Tips for This Recipe:
- Keep the dough cold.
- Don’t use too much filling.
- Bake on parchment for easy release.
Variations on This Dish:
- Stone Fruit: Swap in peaches or plums.
- Lemon Berry: Add lemon zest to the filling.
Common Mistakes to Avoid with This Dish:
- Leaky Centers: Cornstarch keeps the filling in place.
- Soft Crust: Bake until the bottom is browned.
44. Marshmallow Popcorn Clusters
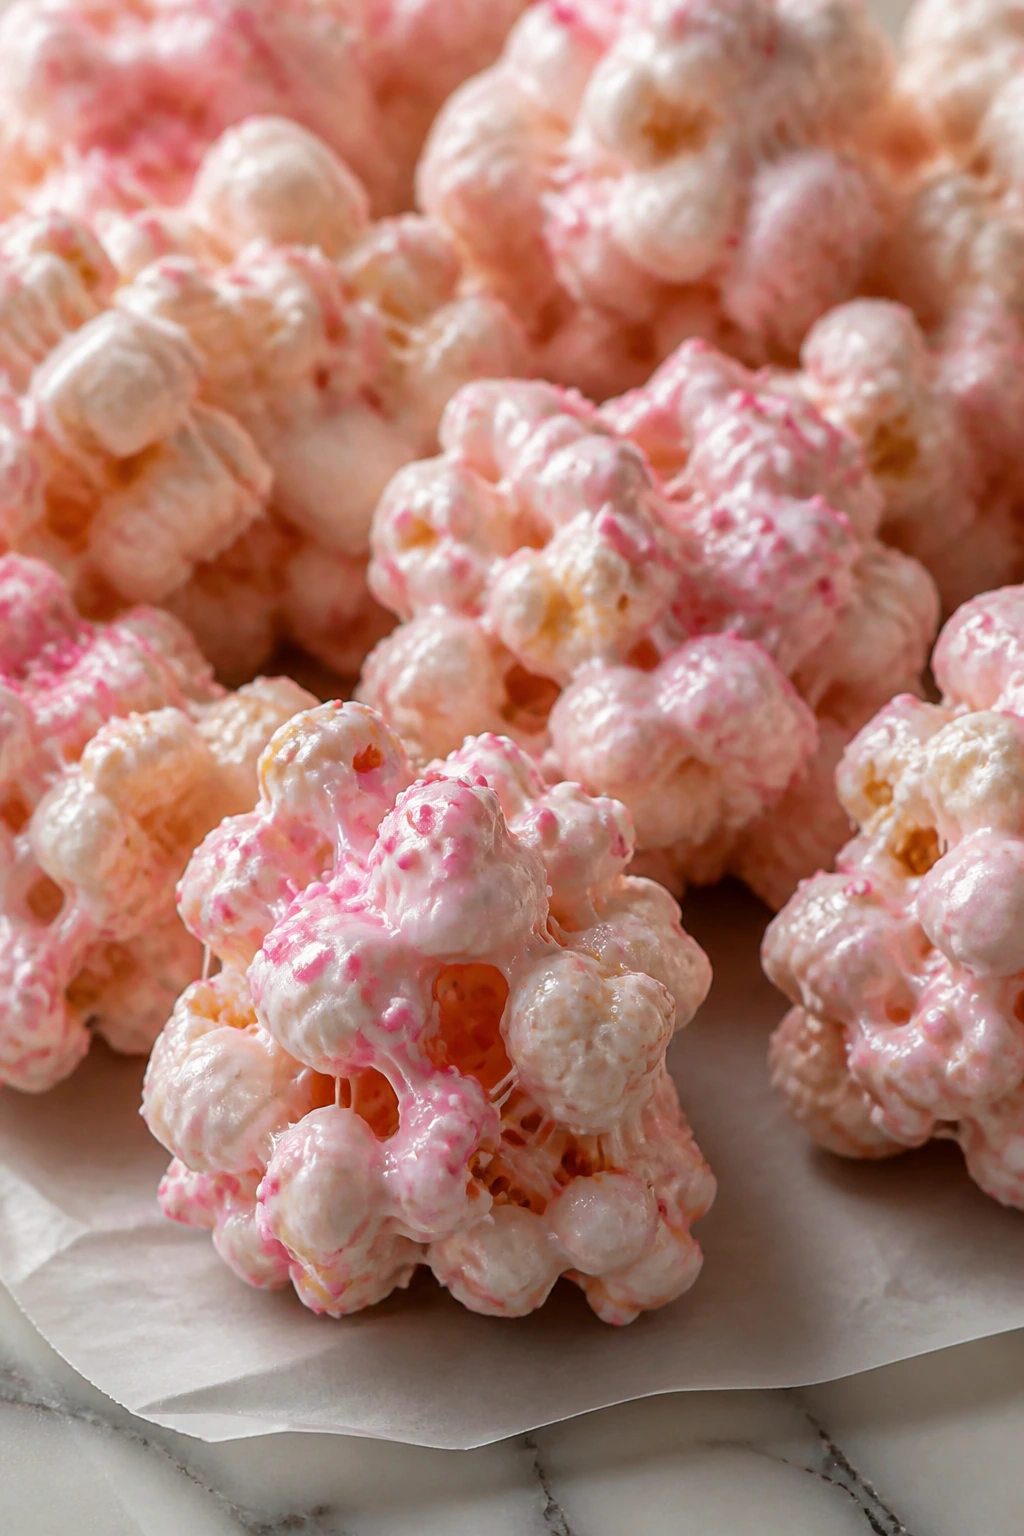
These are a sweet-salty nibble that works when you need something you can make fast and pile into a bowl. The marshmallow glue holds the popcorn together, and pink sprinkles make them look party-ready.
Why It Works: Popcorn gives you volume with very little cost. Marshmallow binds the clusters without needing baking.
Key Ingredients:
- 8 cups popped popcorn
- 3 cups mini marshmallows
- 3 tablespoons butter
- 1/2 teaspoon vanilla extract
- 2 tablespoons pink sprinkles
- 1/4 teaspoon salt
Quick Steps:
- Melt butter and marshmallows on low heat.
- Stir in vanilla and salt.
- Toss with popcorn and sprinkles.
- Scoop into clusters and cool on parchment.
Equipment for This Recipe:
- Large pot or bowl
- Spoon
- Parchment paper
- Measuring cups
How to Serve This Dish: Serve in a wide bowl so people can grab clusters by hand. They’re best the day they’re made, when the popcorn is still crisp.
Pro Tips for This Recipe:
- Use plain popcorn, not heavily buttered.
- Work quickly once the marshmallow melts.
- Grease your spoon so the mixture doesn’t stick.
Variations on This Dish:
- Chocolate Drizzle: Add melted chocolate on top.
- Cereal Mix: Mix in a cup of puff cereal.
Common Mistakes to Avoid with This Dish:
- Burned Marshmallows: Keep the heat low.
- Soggy Popcorn: Don’t cover while cooling.
45. Pink Lemonade Cookies
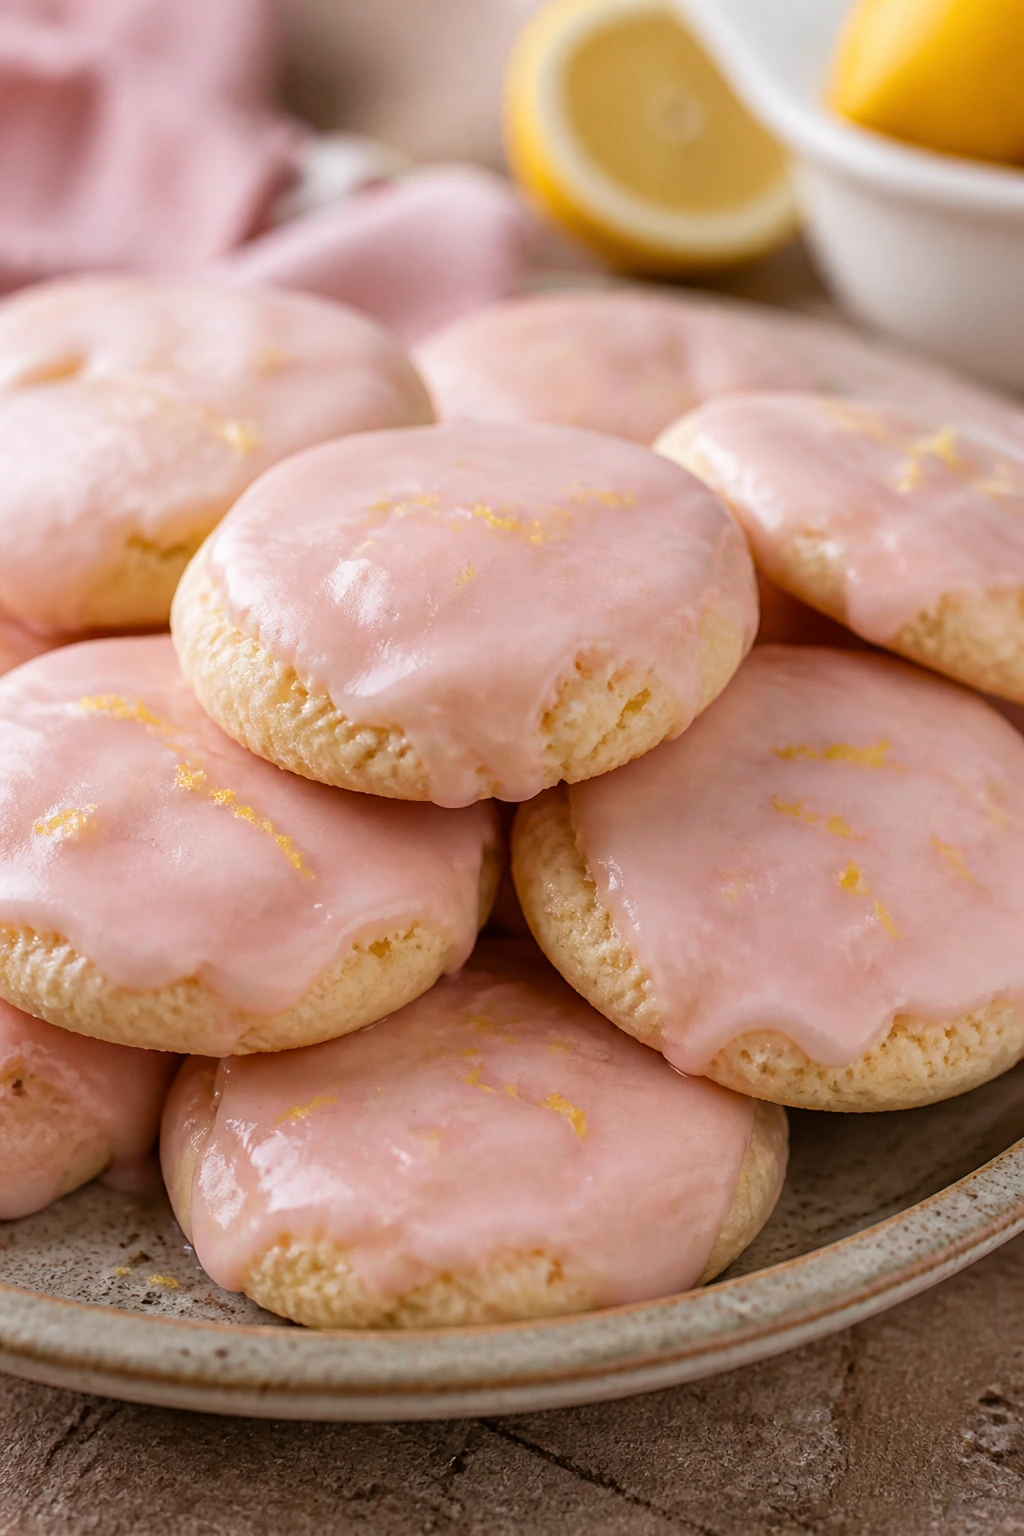
These cookies taste bright and soft with a citrus note that cuts through the sweetness. A pale pink glaze gives them the Galentines look without much decorating.
Why It Works: Lemon zest and a little juice give the dough its flavor, while glaze adds the color and finish. The cookies stay tender if you don’t overbake them.
Key Ingredients:
- 2 1/4 cups flour
- 1/2 cup butter, softened
- 1 cup sugar
- 1 egg
- 1 tablespoon lemon zest
- 1 cup powdered sugar
Quick Steps:
- Cream butter and sugar, then beat in egg and zest.
- Fold in flour.
- Scoop, bake at 350°F for 10 to 12 minutes.
- Cool and glaze with pink icing.
Equipment for This Recipe:
- Baking sheet
- Mixing bowl
- Cookie scoop
- Cooling rack
How to Serve This Dish: Stack them in loose piles on a platter and let the glaze set before storing. They’re pretty with a few zest curls on top.
Pro Tips for This Recipe:
- Use fresh lemon zest.
- Don’t overbake; pale is good here.
- Add the glaze only when cooled.
Variations on This Dish:
- Raspberry Lemon: Add a spoonful of raspberry jam to the glaze.
- Lime Version: Swap in lime zest.
Common Mistakes to Avoid with This Dish:
- Dry Cookies: Pull them as soon as the edges set.
- Runny Glaze: Add powdered sugar until it thickens.
46. White Chocolate Cranberry Oat Bars
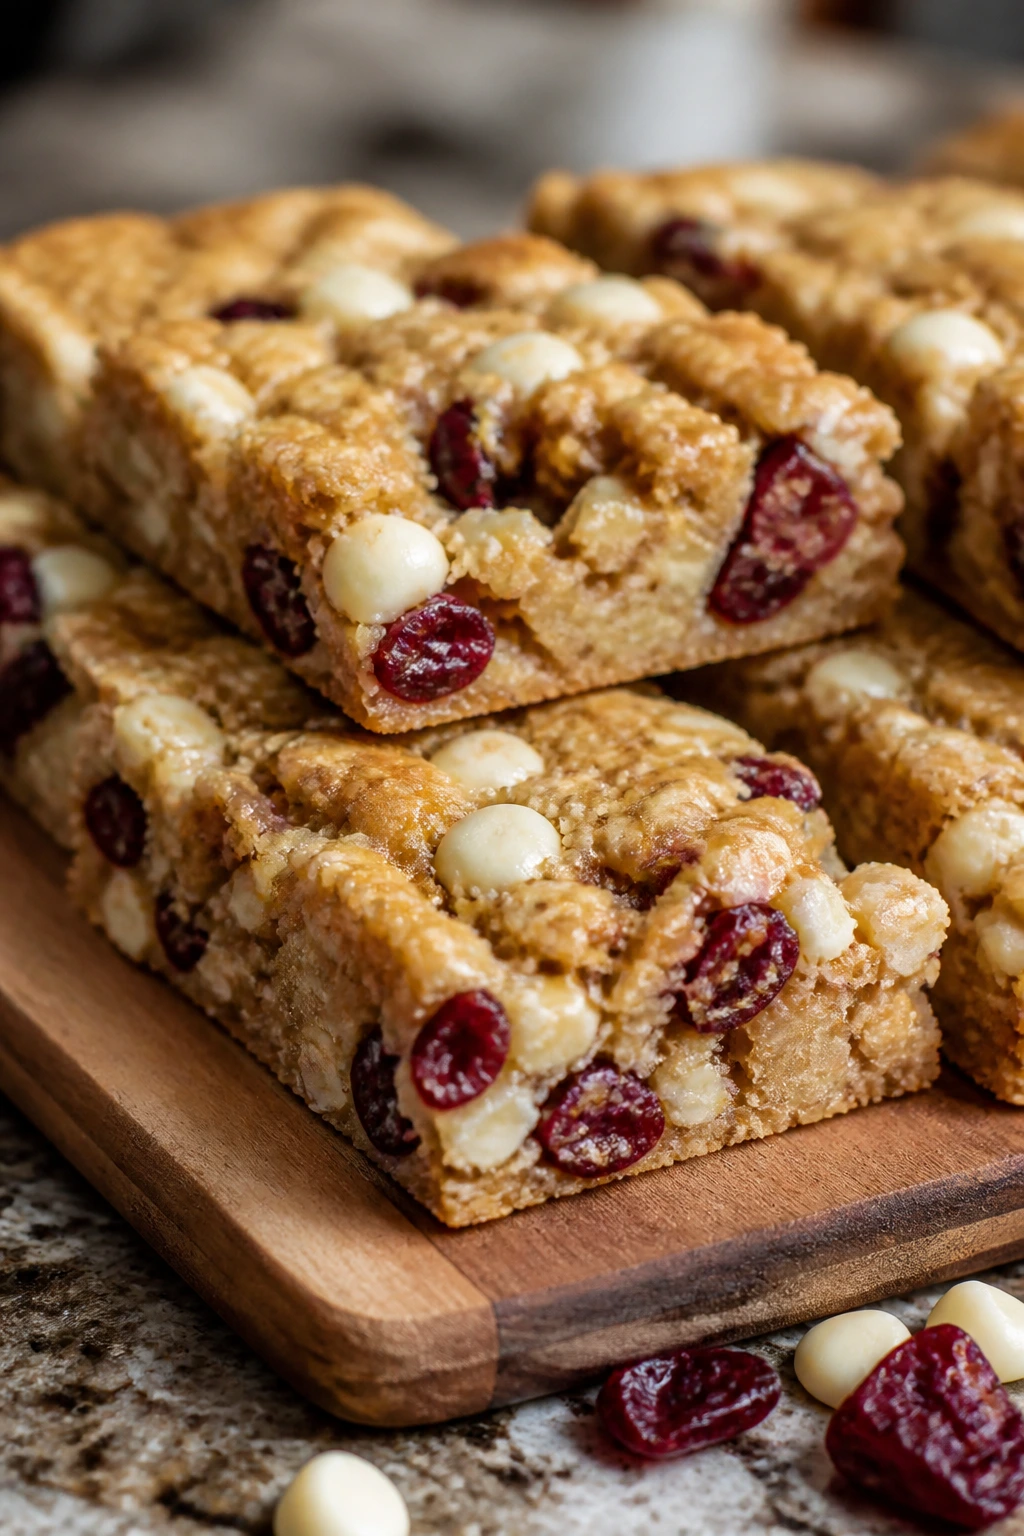
These bars give you a chewy base, tart fruit, and little pockets of creamy white chocolate. They feel a bit more grown-up than sprinkle-heavy sweets, which is useful if your crowd likes less frosting and more bite.
Why It Works: Oats hold the bar together and add chew. Dried cranberries stay bright without adding extra moisture.
Key Ingredients:
- 1 cup butter, melted
- 1 cup brown sugar
- 2 cups oats
- 1 1/2 cups flour
- 3/4 cup dried cranberries
- 1 cup white chocolate chips
Quick Steps:
- Stir butter and sugar, then mix in oats and flour.
- Fold in cranberries and chips.
- Press into a pan and bake at 350°F for 22 to 25 minutes.
- Cool and cut into bars.
Equipment for This Recipe:
- 9×13-inch pan
- Mixing bowl
- Spatula
- Parchment paper
How to Serve This Dish: Cut into slim bars and serve at room temperature. They’re sturdy enough to stack on a tray.
Pro Tips for This Recipe:
- Press the dough evenly so the bars bake evenly.
- Cool fully before slicing.
- Toast the oats first if you want deeper flavor.
Variations on This Dish:
- Cherry White Chocolate: Swap cranberries for cherries.
- Chocolate Chip Oat Bars: Use semi-sweet chips instead.
Common Mistakes to Avoid with This Dish:
- Crumbly Bars: Press the base firmly.
- Overbaked Edges: Pull when the center is set but still soft.
47. Strawberry Crumble Muffins
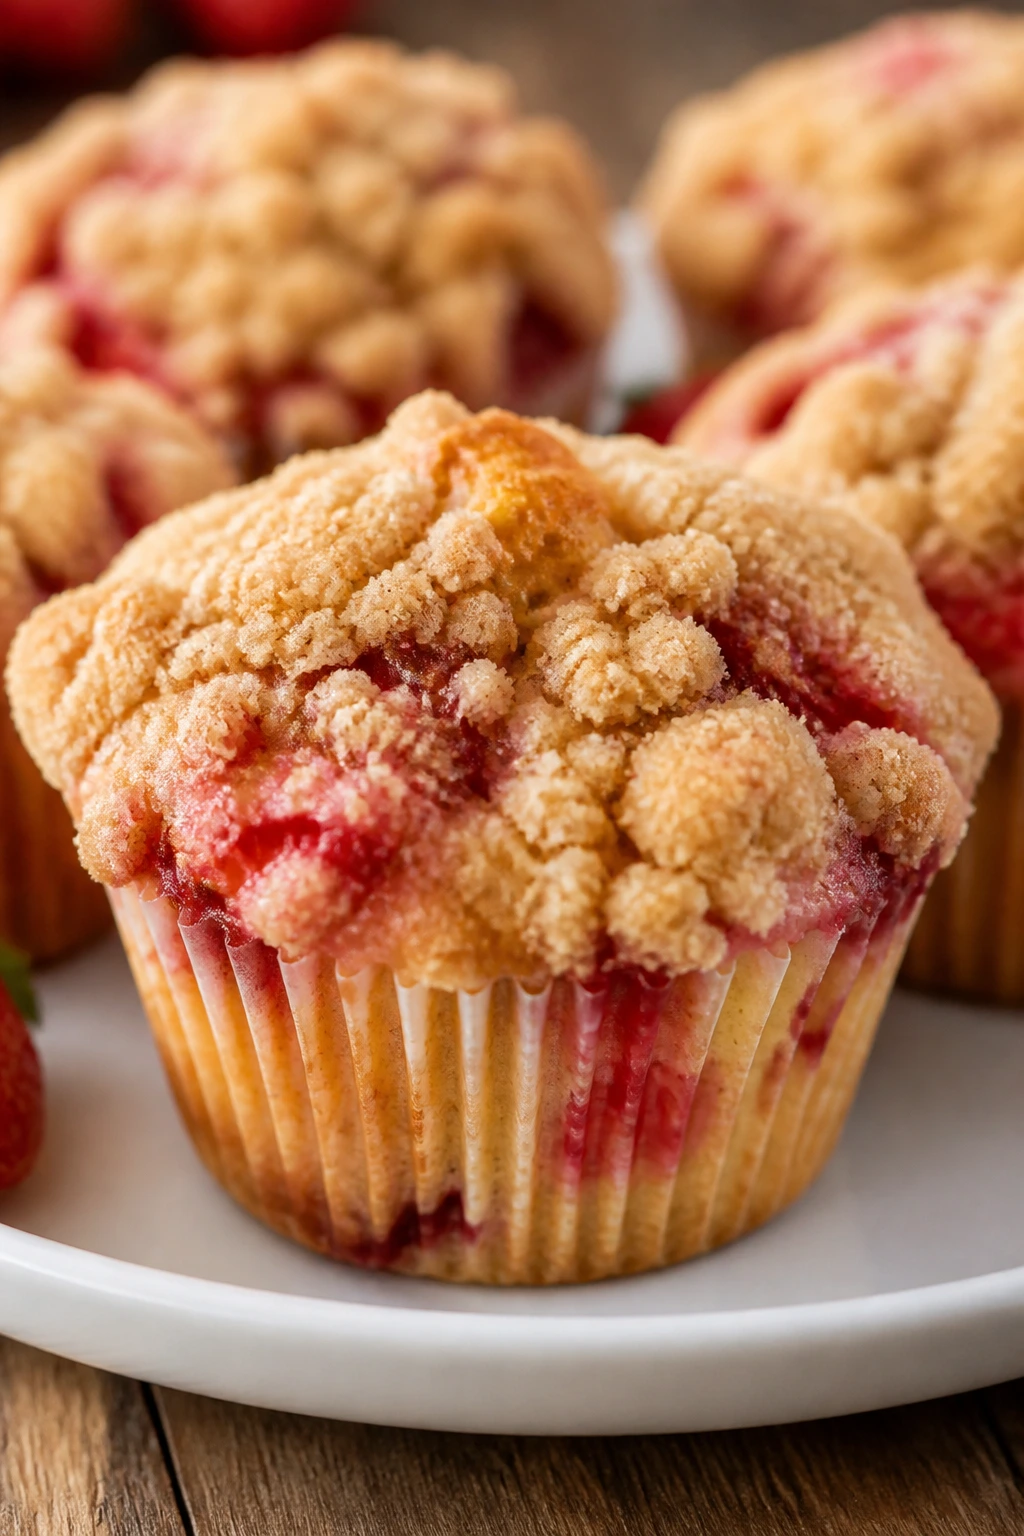
These are halfway between a muffin and a dessert, which makes them useful when you want something sweet that still feels easy to eat standing up. The crumb topping gives them a bakery look without much work.
Why It Works: Muffin batter is forgiving and fast. Strawberries keep the crumb moist, while the streusel adds texture on top.
Key Ingredients:
- 2 cups flour
- 3/4 cup sugar
- 1 tablespoon baking powder
- 1 cup milk
- 1 egg
- 1 1/2 cups chopped strawberries
Quick Steps:
- Mix dry ingredients.
- Stir in milk and egg, then fold in strawberries.
- Top with crumb mixture.
- Bake at 375°F for 18 to 20 minutes.
Equipment for This Recipe:
- Muffin tin
- Liners
- Mixing bowl
- Spoon
How to Serve This Dish: Serve warm or at room temperature with a dusting of sugar. They work nicely on a brunch-plus-dessert spread.
Pro Tips for This Recipe:
- Coat strawberries lightly in flour if they’re very juicy.
- Don’t overfill the muffin cups.
- Add the crumb topping generously.
Variations on This Dish:
- Blueberry Crumble: Swap the fruit.
- Lemon Strawberry: Add lemon zest to the batter.
Common Mistakes to Avoid with This Dish:
- Sinking Fruit: Toss berries with a little flour.
- Flat Tops: Check your baking powder.
48. Banana Split Parfait Cups
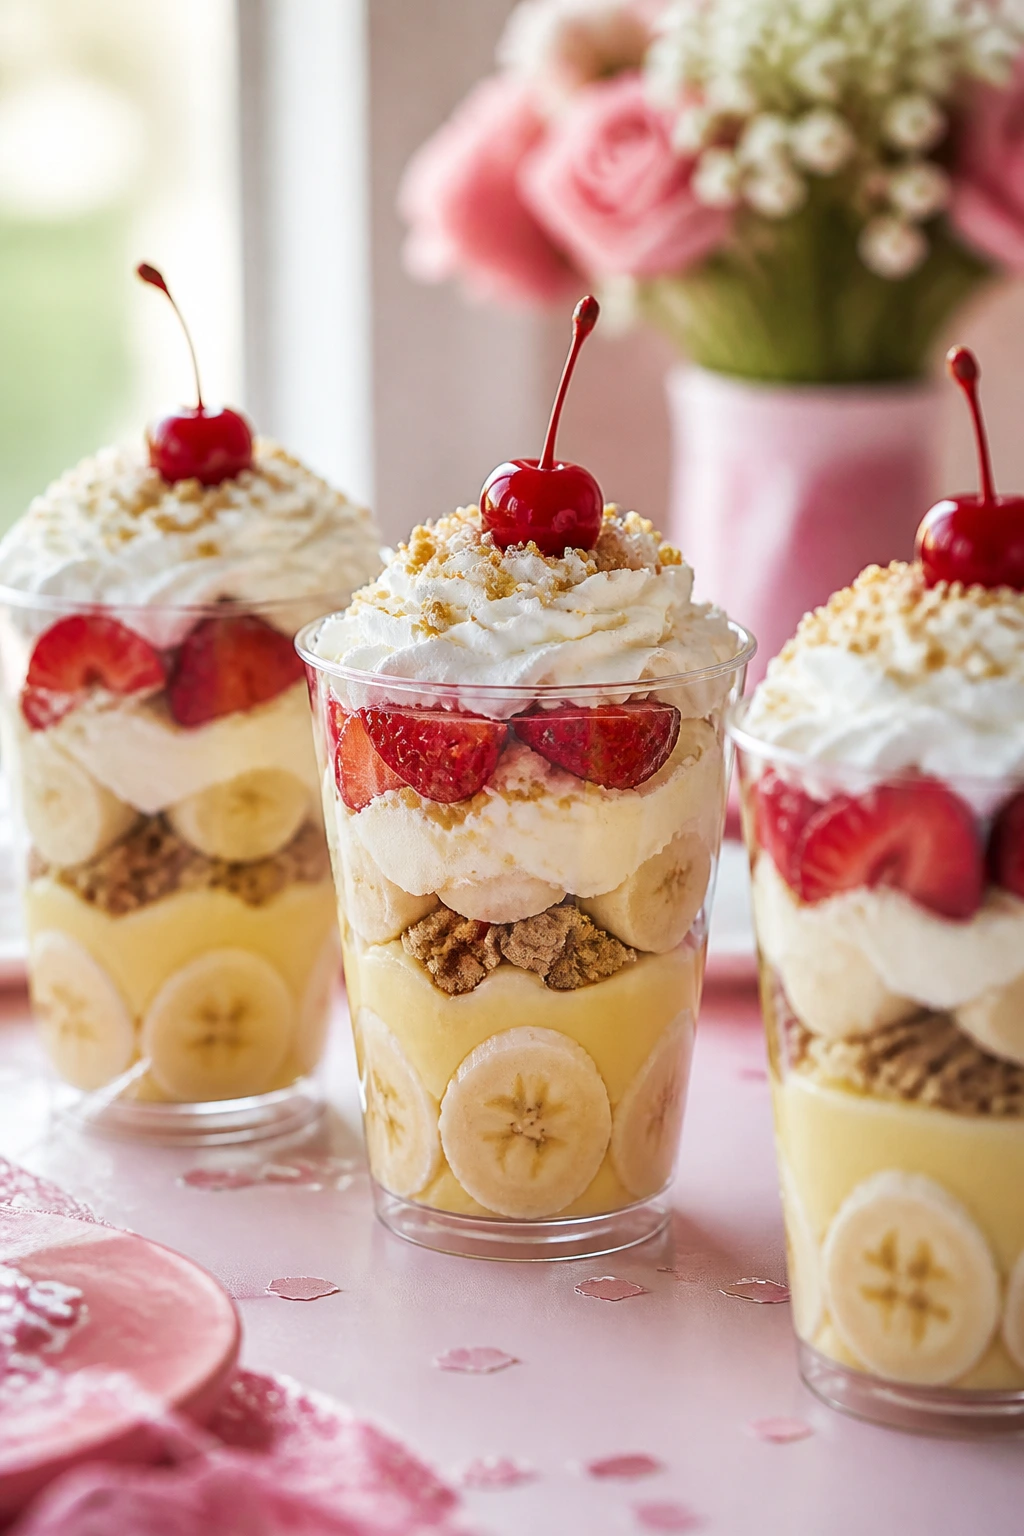
These cups bring the banana split idea into party-friendly form, minus the melting ice cream. Layers of banana, chocolate, cream, and berries make them playful and easy to spoon.
Why It Works: Parfait cups separate the textures so nothing gets soggy too fast. The fruit keeps the dessert from leaning all the way into candy territory.
Key Ingredients:
- 2 bananas, sliced
- 1 cup strawberries, sliced
- 1 cup vanilla pudding
- 1 cup whipped cream
- 1/2 cup crushed cookies
- 2 tablespoons chocolate sauce
Quick Steps:
- Layer cookie crumbs and pudding in cups.
- Add bananas and strawberries.
- Spoon in whipped cream.
- Drizzle with chocolate sauce and chill briefly.
Equipment for This Recipe:
- Clear cups
- Spoon
- Mixing bowl
- Knife
How to Serve This Dish: Add a cherry on top if you want the classic banana split look. Serve cold and soon after assembling.
Pro Tips for This Recipe:
- Slice bananas right before assembly.
- Use a little lemon juice if they sit too long.
- Keep layers even for a neat look.
Variations on This Dish:
- Chocolate Pudding: Swap the vanilla layer.
- Peanut Butter Split: Add a peanut butter drizzle.
Common Mistakes to Avoid with This Dish:
- Browning Bananas: Assemble close to serving.
- Overfilled Cups: Leave room for the whipped cream.
49. Heart-Shaped Palmiers with Jam
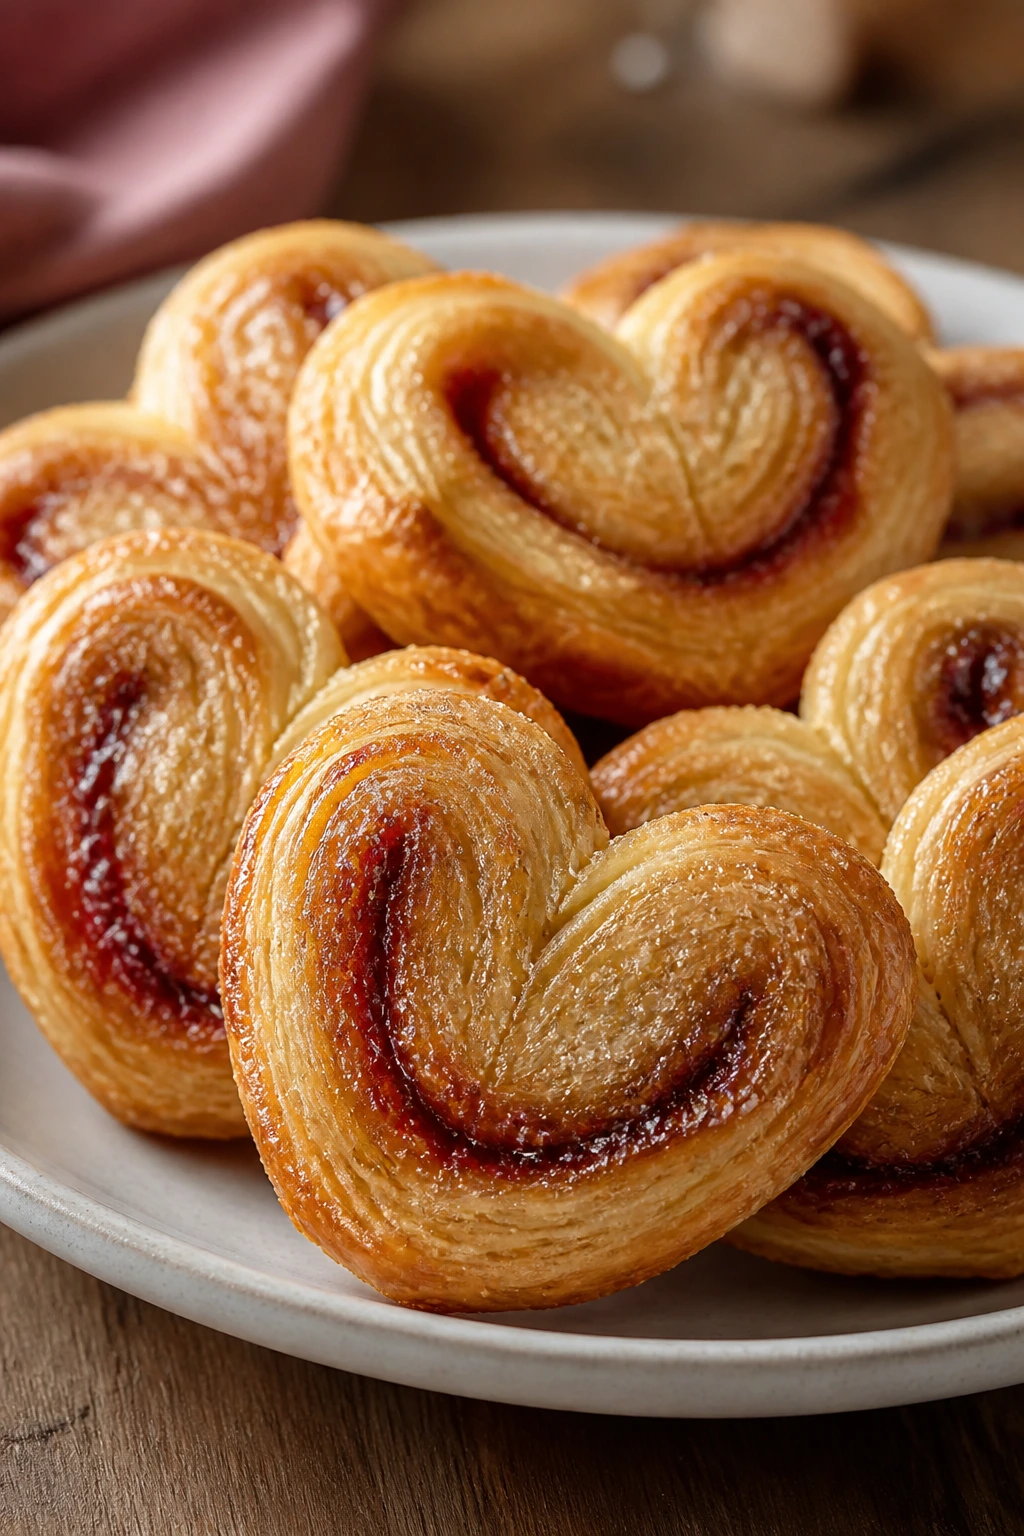
Palmiers are one of the easiest puff pastry desserts, and shaping them into hearts makes them fit the theme without extra work. The sugar caramelizes at the edges while jam adds a soft fruit note.
Why It Works: Folded puff pastry creates crisp layers with almost no effort. The heart shape is made by the folds, not by any tricky cutting.
Key Ingredients:
- 1 sheet puff pastry, thawed
- 1/3 cup sugar
- 1/4 cup strawberry jam
- 1 tablespoon flour
- 1 egg, beaten
- Extra sugar for sprinkling
Quick Steps:
- Roll pastry with sugar and a thin layer of jam.
- Fold both sides toward the center, then chill briefly.
- Slice and bake at 400°F for 15 to 18 minutes.
- Cool on the pan so they crisp.
Equipment for This Recipe:
- Baking sheet
- Parchment paper
- Knife
- Pastry brush
How to Serve This Dish: Fan them out on a tray so the heart shape shows. They’re best crisp and still slightly warm.
Pro Tips for This Recipe:
- Keep the pastry cold before slicing.
- Use a thin layer of jam so they caramelize well.
- Flip once during baking if one side browns faster.
Variations on This Dish:
- Cinnamon Sugar: Skip jam and use cinnamon sugar.
- Raspberry Heart: Use raspberry preserves.
Common Mistakes to Avoid with This Dish:
- Sticky Pastry: Too much jam will glue the folds together.
- Soft Centers: Let them cool fully to crisp.
50. Chocolate Lava Mug Cakes
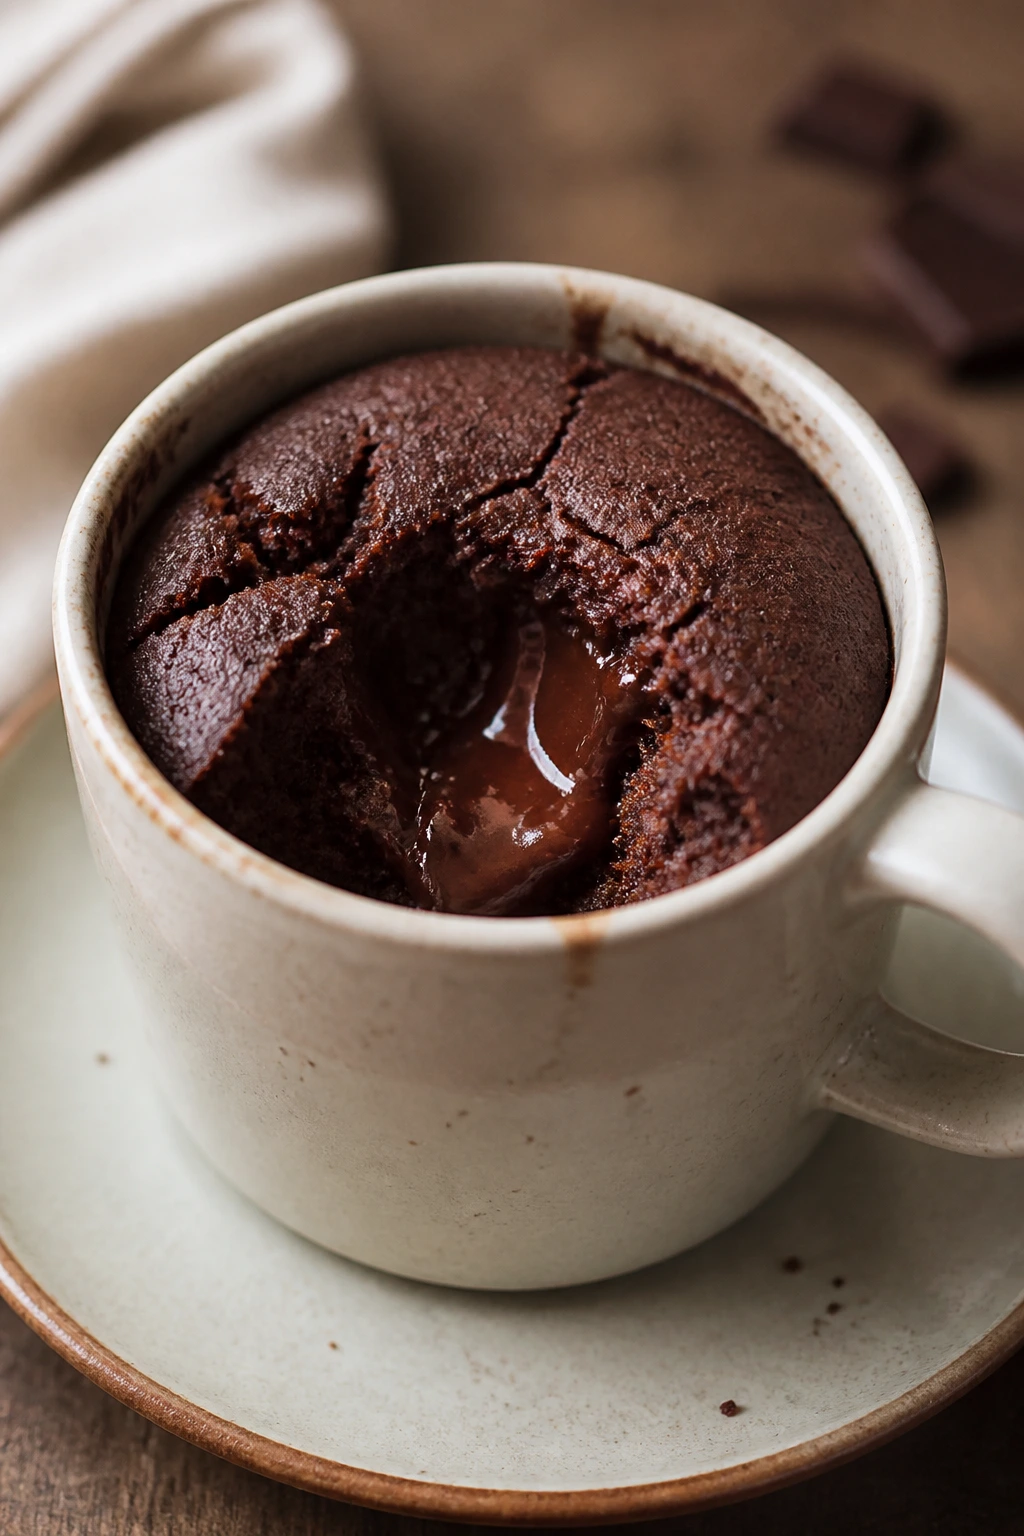
Sometimes the best party dessert is the one you can make one cup at a time while the movie is starting. Mug cakes give you a warm chocolate center and only ask for a microwave and a spoon.
Why It Works: A small batter portion cooks fast and stays tender. A spoonful of chocolate in the center melts into a lava-like middle if you stop microwaving at the right time.
Key Ingredients:
- 4 tablespoons all-purpose flour
- 3 tablespoons sugar
- 2 tablespoons cocoa powder
- 3 tablespoons milk
- 2 tablespoons oil
- 1 tablespoon chocolate chips
Quick Steps:
- Stir flour, sugar, cocoa, milk, and oil in a mug.
- Add chocolate chips in the center.
- Microwave 45 to 60 seconds, until the top looks set.
- Let it sit 1 minute before serving.
Equipment for This Recipe:
- Microwave-safe mug
- Spoon
- Measuring spoons
- Small plate
How to Serve This Dish: Top with a spoonful of whipped cream or a few berries. Serve it warm, right in the mug, for a last-minute treat.
Pro Tips for This Recipe:
- Stop early; mug cakes overcook fast.
- Use a large mug so the batter doesn’t overflow.
- Let it rest before digging in.
Variations on This Dish:
- Peanut Butter Center: Add a teaspoon of peanut butter in the middle.
- Berry Chocolate: Serve with raspberries on top.
Common Mistakes to Avoid with This Dish:
- Overcooking: The cake turns rubbery in seconds.
- Small Mug: Leave plenty of space for the batter to rise.
What Makes a Beginner-Friendly Galentines Dessert Table Work
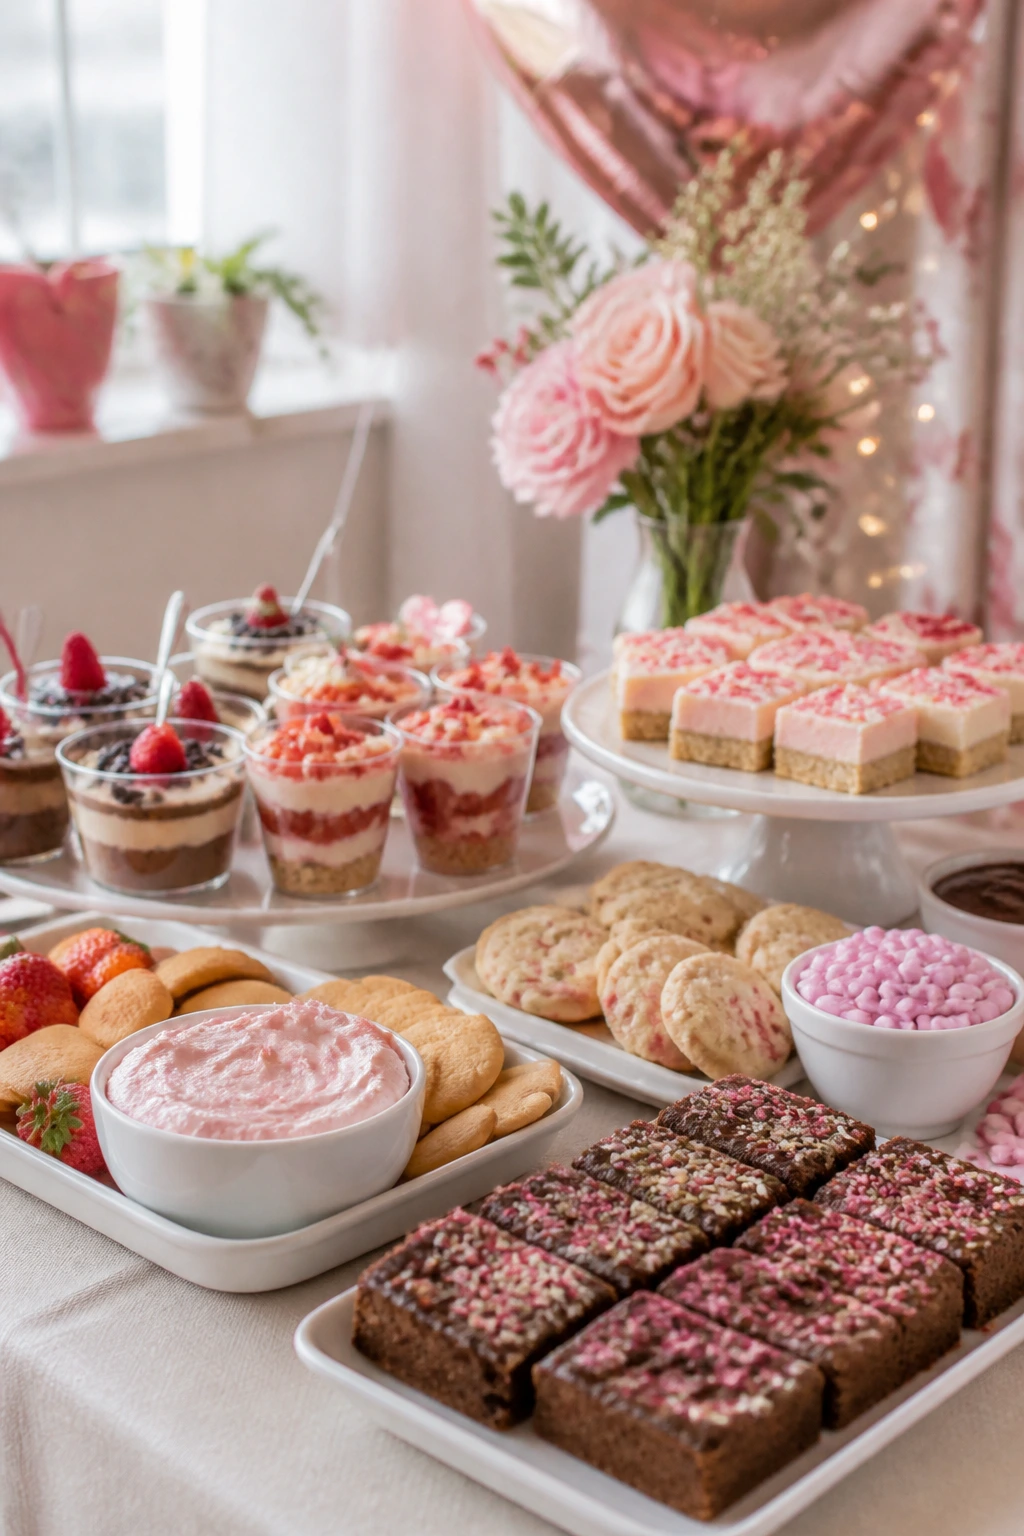
The trick with a dessert spread like this is not variety for its own sake. It’s texture control. You want a few crisp items, a few creamy ones, a few fruit-forward bites, and at least one or two chocolate anchors so the table doesn’t feel one-note.
A beginner baker usually gets into trouble by choosing desserts that all need the same finishing move — a glaze, a frosting bag, a sticky caramel drizzle, a last-minute cut. That’s a recipe for chaos. Better to mix sheet cakes, bars, no-bake cups, dip-and-set treats, and one or two warm bakes that can come out of the oven early and sit politely on the counter.
I also like a spread that uses the refrigerator as a helper, not an enemy. Cheesecake cups, truffles, icebox cake, poke cake, and pudding parfaits can all be made ahead, which means you’re not trying to frost and decorate while guests are walking in with coats on their arms. That alone is worth planning around.
Essential Equipment for These Recipes
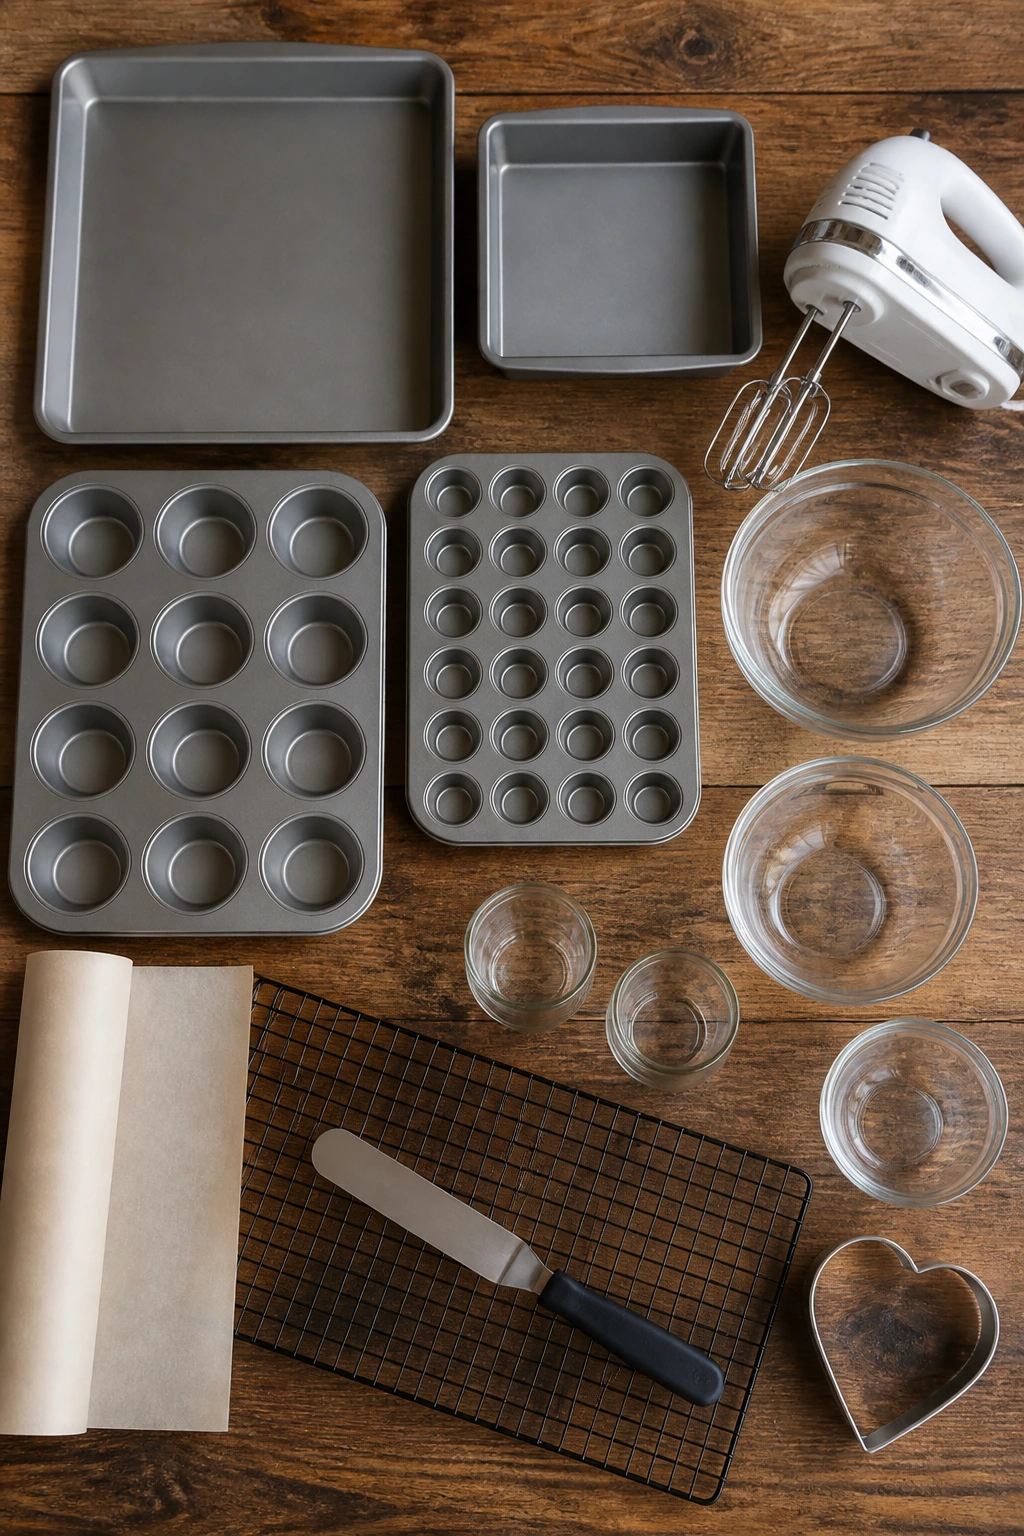
- 9×13-inch baking pan: The workhorse for sheet cakes, bars, brownies, poke cake, and blondies.
- 8×8-inch pan: Better for thicker bars and small batches that need clean edges.
- Muffin tin and mini muffin tin: Useful for scones, donut holes, cookie cups, and hand pie-shaped bites.
- Mixing bowls in 2 to 3 sizes: You’ll move faster if you aren’t washing the same bowl between steps.
- Hand mixer: Helpful for cheesecake fillings, whipped cream, and smooth batters.
- Parchment paper: Makes lifting bars and bark much easier.
- Cooling rack: Keeps bottoms from getting soggy.
- Offset spatula or rubber spatula: One for frosting, one for scraping every last bit from the bowl.
- Cookie cutters and a heart cutter: Optional, but useful if you want the Galentines theme to show up fast.
- Small cups or jars: Perfect for parfaits, mousse, and cheesecake cups.
- Microwave-safe bowls: Useful for chocolate, candy melts, and bark.
Smart Shopping and Ingredient Tips
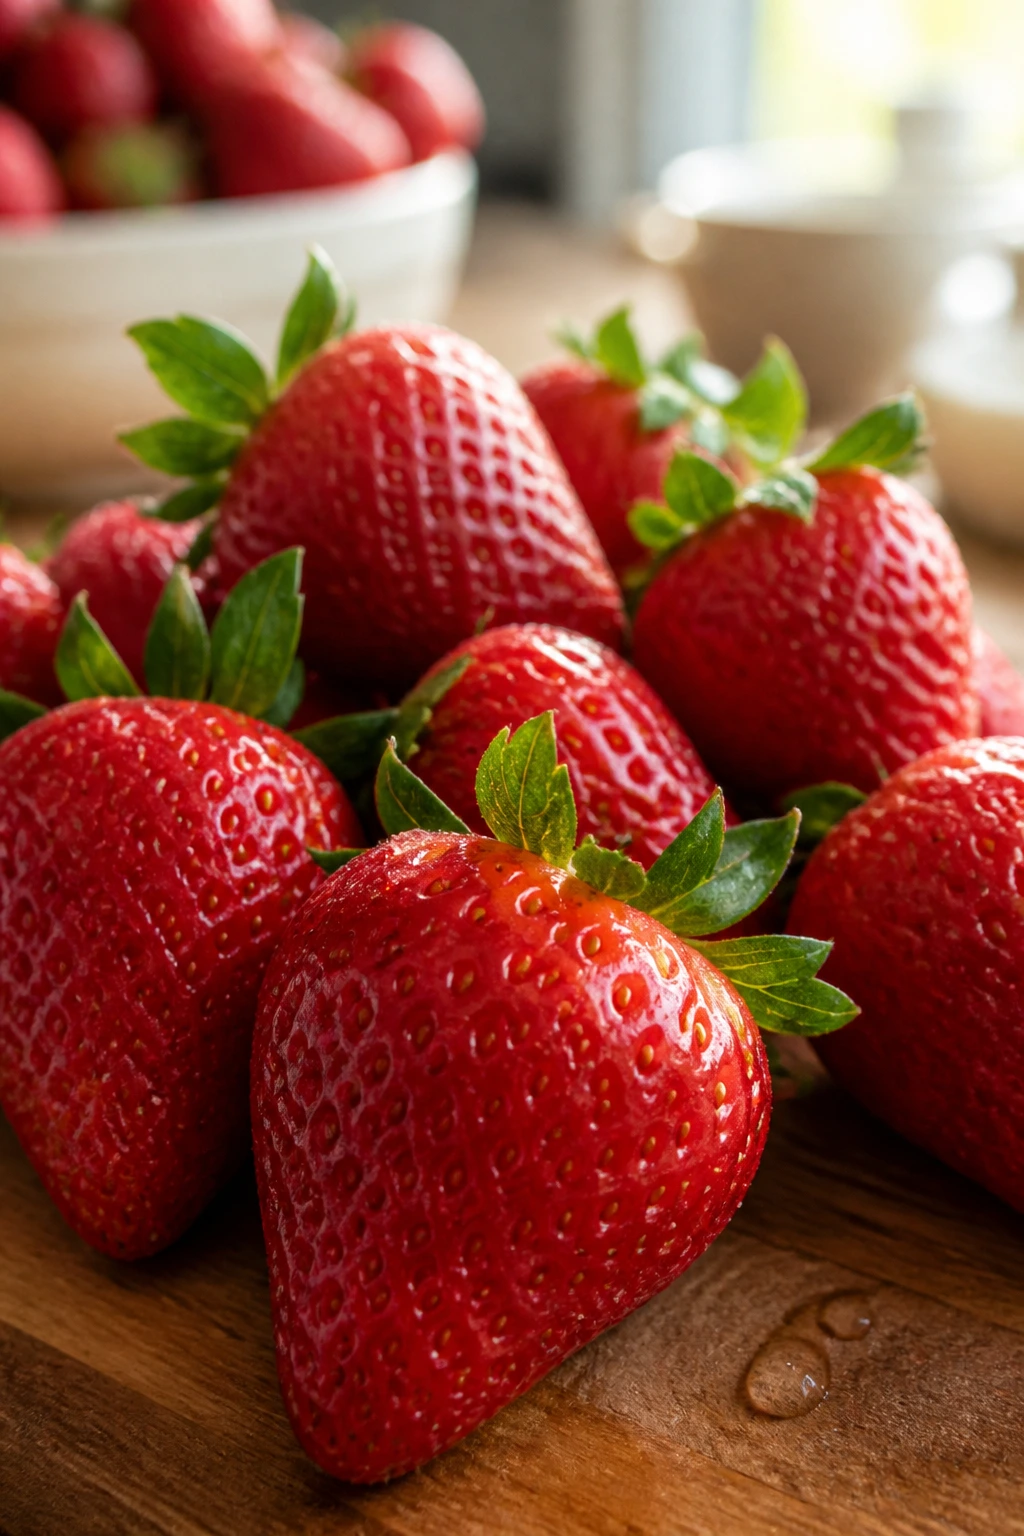
Fresh strawberries matter more than almost any other ingredient in this whole lineup. Look for berries that smell like berries, not just red plastic. If they’re going into chocolate-dipped strawberries or shortcake, dry them carefully and use them the same day if you can. Soggy berries ruin a good-looking dessert faster than anything.
For chocolate, choose chips or bars that melt smoothly and don’t have a chalky finish. White chocolate can be finicky, so if the bag says candy melts or melting wafers, that’s often the easier route for beginners. Semi-sweet chocolate tends to behave better than super-dark chocolate when you’re dipping, drizzling, or making bark.
Cream cheese should be softened before you start. Cold cream cheese turns cheesecake filling into little lumps that never fully smooth out, and you’ll feel it immediately when you try to spread or pipe it. Butter should be softened for cookies and bars unless the recipe specifically says to keep it cold for a flaky dough.
Puff pastry, pie crust, cookie dough, and biscuit dough are useful shortcuts here. I’m not precious about using store-bought versions for a party tray; they save time, and they’re often more reliable than trying to do everything from scratch in one afternoon. The point is a dessert table that gets finished, not a personal baking audition.
Freeze-dried strawberries are worth buying if you want pink color without extra moisture. They crush into powder for bark, truffles, glaze, and cookie decorations. A little bag goes a long way, and the flavor is sharper than food coloring alone.
How to Serve These Desserts So the Table Looks Full
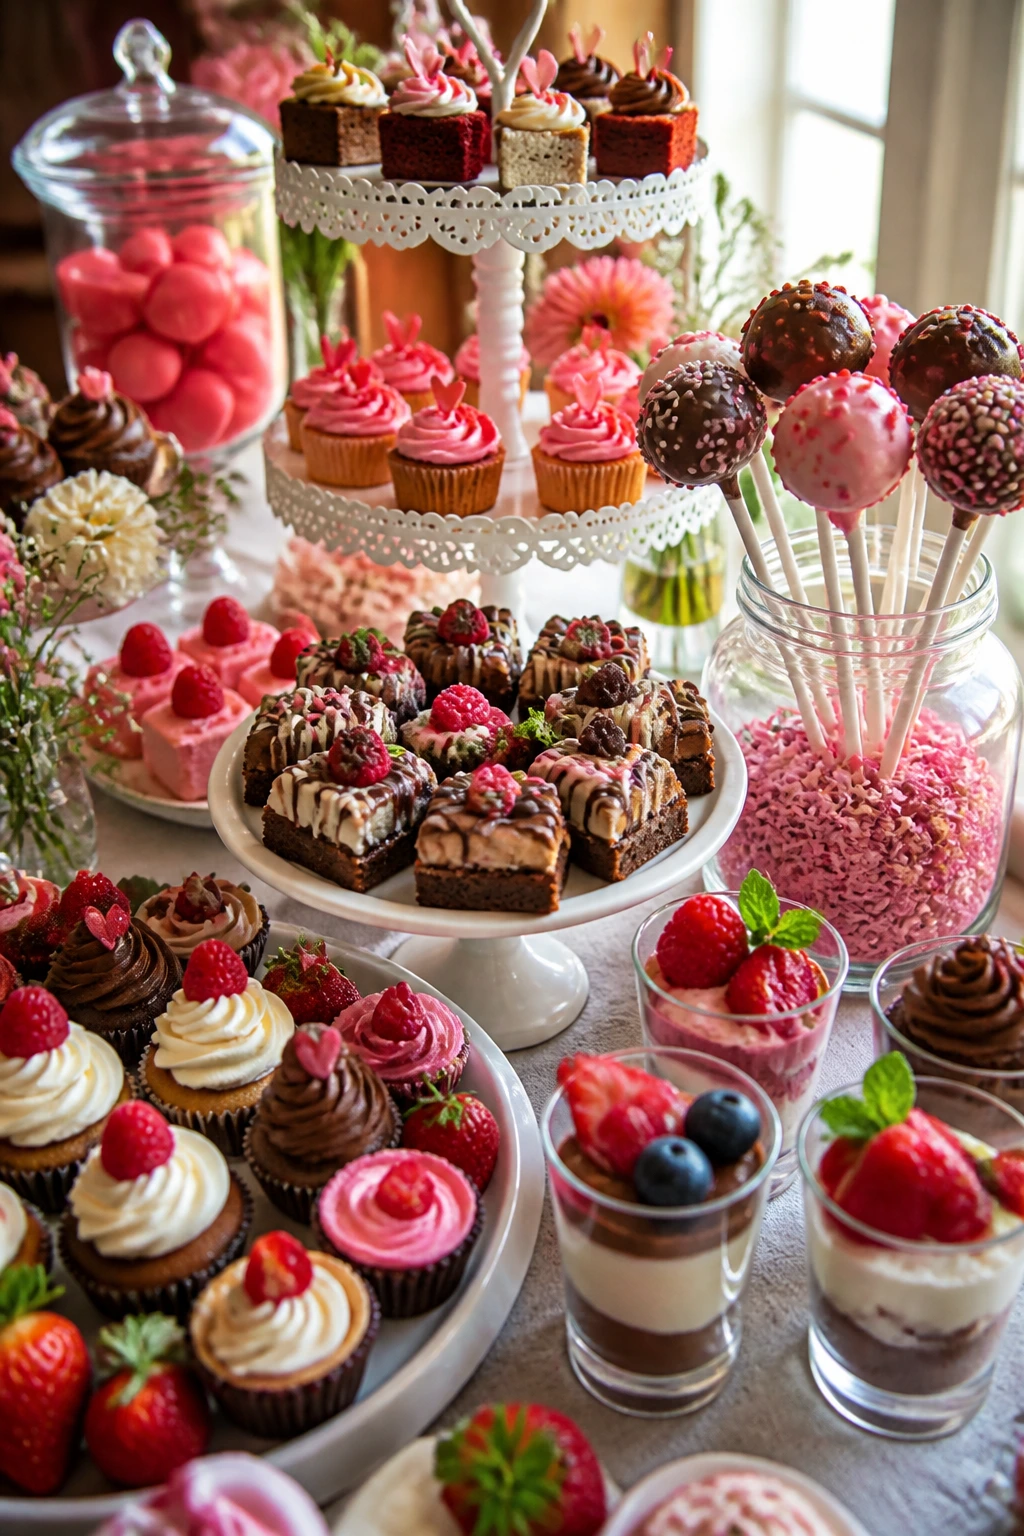
Presentation: Start with height and color. Put the bars and sheet cakes on platters, stand the cake pops in jars, tuck cups and parfaits into a tray with little spoons, and scatter the bark or truffles in paper cups so the table does not look flat. A few fresh strawberries, raspberries, or mint leaves around the edges can do more than extra frosting ever will.
Accompaniments: Keep the sides simple. Whipped cream, vanilla ice cream, coffee, sparkling water, and one bowl of fresh berries are enough to support almost everything here. If you’re serving richer desserts like fudge, brownies, blondies, or cheesecake bars, a tart fruit cup or citrusy cookie beside them helps keep the table balanced.
Portions: Most of these desserts work best in smaller pieces than you might think. Bars cut into 1 1/2-inch squares, cookies at 2 to 3 inches wide, and truffles or bark in bite-size pieces make it easier for guests to sample more than one thing. If you’re feeding a larger group, make a few dishes in small portions instead of one giant showpiece.
Beverage Pairing: I’d set out coffee, tea, sparkling rosé, or a berry spritz. Chocolate desserts like brownie bites and fudge like coffee best; citrus bars, lemonade cookies, and berry parfaits lean toward sparkling drinks or a light tea with no heavy tannins.
Additional Tips and Flavor Boosters
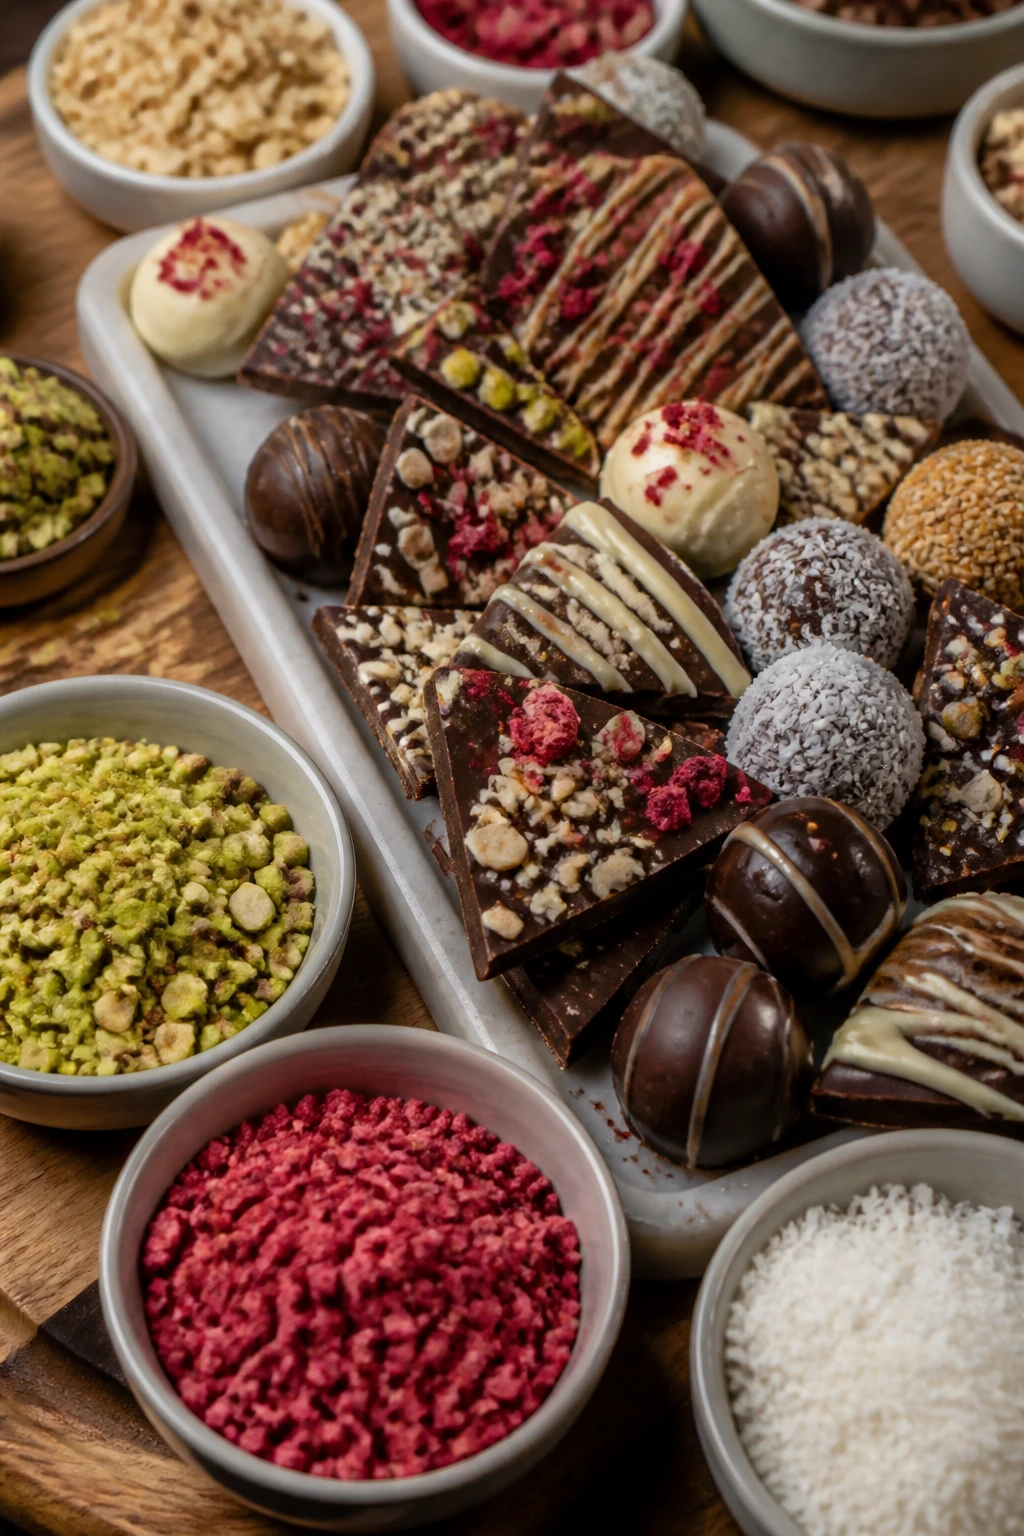
Flavor Enhancement: A pinch of flaky salt on chocolate bark, brownie bites, blondies, and fudge makes the sweetness taste cleaner. It’s one of those tiny moves that sounds minor until you notice how quickly people go back for another piece.
Customization: Keep a few toppings on the side — chopped pistachios, sprinkles, freeze-dried berries, shredded coconut, mini chips — and let people dress up bark, truffles, or cheesecake cups after serving. That gives the table a little interactive feel without turning dessert into a project.
Serving Suggestions: Powdered sugar is your friend for hand pies, palmiers, cookie bars, and scones. It gives you a finished look fast. For creamier desserts, a single strawberry slice or a little curl of lemon zest is often enough.
Make-It-Yours: If you need dairy-free options, use coconut whipped topping, plant-based butter, or dairy-free chocolate in the bark, truffles, and no-bake bars. For gluten-free guests, swap in gluten-free cookie crumbs, flour blends, or almond flour where the structure supports it — bars and cups handle those swaps better than delicate cakes.
Make-Ahead, Storage, and Reheating Guidance
A lot of these desserts actually improve after a little rest. Cheesecake cups, truffles, bark, icebox cake, poke cake, brownie bars, blondies, crumb bars, and fudge all hold well in the fridge for 3 to 4 days. Store them in airtight containers with parchment between layers if you need to stack them. Truffles and bark can also freeze for up to 2 months; thaw in the fridge so the chocolate doesn’t sweat.
Cookies, cookie cups, sugar cookies, thumbprints, peanut butter blossoms, and blondies usually keep at room temperature for 2 to 4 days in a sealed tin. If the room is warm, move them to the fridge after the first day, especially if they have cream cheese or chocolate filling. Puff pastry items and hand pies are best the day they’re baked, but you can rewarm them in a 325°F oven for 5 to 8 minutes to bring back the crisp edges.
Cream-based cups and parfaits should stay refrigerated until serving. Assemble them up to 1 day ahead if the fruit is dry and the crumb layer can handle moisture, but save the final garnish for the last minute. Banana desserts are the exception here; bananas brown fast, so those need same-day assembly.
Sheet cakes, bars, and loaf slices are easier to portion once chilled, then you can bring them back to room temperature for 15 to 20 minutes before serving. That little rest softens the butter in the crumb and makes the flavor read better.
Variations and Adaptations to Try
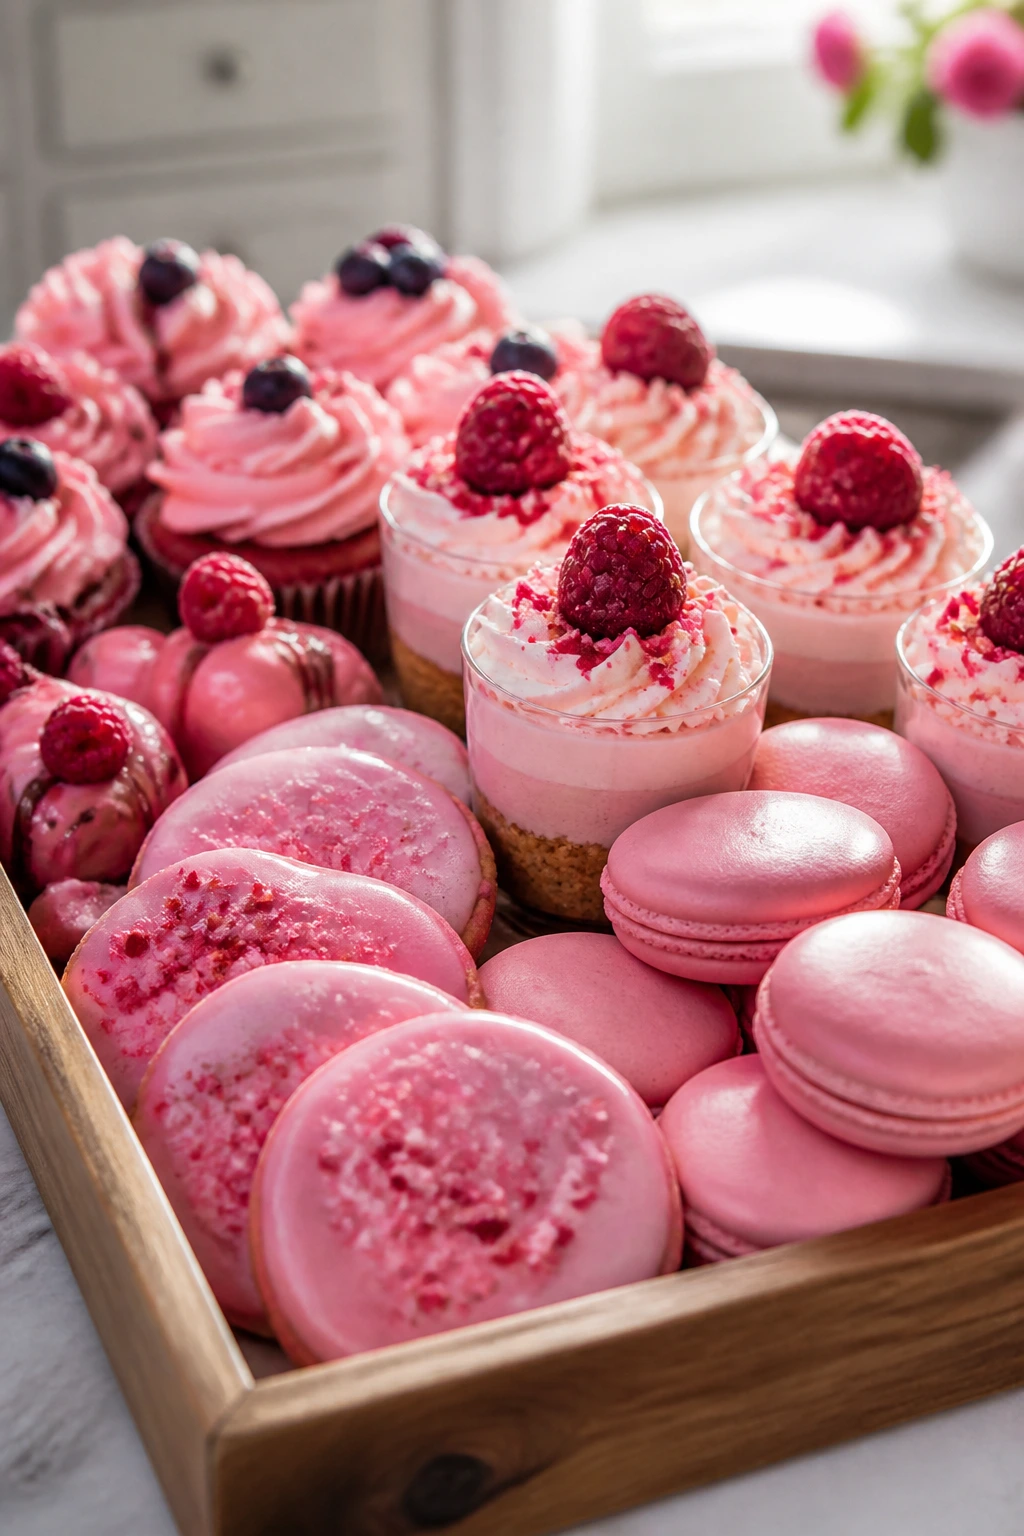
The All-Pink Tray: Stick with strawberries, raspberries, pink glaze, white chocolate, and strawberry dust. It creates a cohesive table without forcing every dessert to be the same. This is the simplest route if you want the spread to look intentional with very little planning.
The Chocolate-First Spread: Use brownie bites, fudge squares, chocolate bark, cookie cups, and lava mug cakes as the anchors, then add one or two berry-forward items for contrast. The darker palette makes the berries and pink sprinkles pop harder.
The Citrus Break: If you want something lighter between the rich desserts, bring in lemon bars, pink lemonade cookies, and lemon raspberry loaf slices. They cut through the heavier items and keep people from getting dessert fatigue halfway through the party.
The Gluten-Free Mix: Chocolate-dipped strawberries, cheesecake cups with gluten-free crumbs, mousse cups, bark, and fruit parfaits are the easiest places to start. Bars and cookies can be adapted too, but the texture matters more there, so keep those changes for recipes that already rely on a crumb or a soft center.
The Dairy-Free Path: Use coconut whipped topping, dairy-free cream cheese, and dairy-free chocolate for truffles, cups, bark, and parfaits. You still get the theme and the color without sacrificing dessert variety.
The Kid-Friendly Table: Lean on Rice Krispie hearts, popcorn clusters, donut holes, cookie cups, and simple sugar cookies. Kids tend to go for clear shapes, easy bites, and anything with sprinkles that doesn’t drip.
Common Mistakes to Avoid With a Galentines Dessert Spread

One mistake shows up over and over: picking desserts that all need the same last-minute finish. If everything needs glaze, piping, or a chocolate dip right before guests arrive, you’ve made yourself a second job. Balance the table with at least half the desserts fully finished a few hours ahead.
Another problem is moisture. Fresh berries can turn bark soft, crusts soggy, and whipped layers sloppy if you put them on too early. Dry berries well, assemble fruit desserts close to serving, and keep anything cream-based chilled until the moment it comes out.
People also underestimate how fast rich desserts can feel heavy. A table of only blondies, brownies, fudge, and truffles gets dull after a few bites. Add lemon bars, strawberry cups, or fruit-forward cookies so the sweetness has some lift.
The last big one is serving everything in pieces that are too large. Galentines desserts are social food. Guests want to try three or four things, not commit to a brick of cake. Smaller cuts make the spread look fuller and help people enjoy more without leaving half a slice on the plate.
Frequently Asked Questions
Can I make most of these desserts the day before?
Yes, and many are better that way. Bars, fudge, truffles, cheesecake cups, icebox cake, and poke cake all benefit from a chill overnight, while fruit-heavy desserts and puff pastry items are better finished closer to serving.
What if I do not have a mixer?
You can still make plenty of these with a whisk, a spatula, and some patience. No-bake bars, bark, hand pies, cookie cups from store-bought dough, and many bar desserts don’t need electric mixing at all.
Which desserts travel best to a party?
Bars, cookies, truffles, bark, hand pies, and sheet cake squares usually travel the cleanest. Anything with layers of whipped cream or fresh fruit should stay chilled until you get there.
How do I keep chocolate from seizing when I dip strawberries or make bark?
Make sure your fruit is dry and your bowl is dry. Melt chocolate slowly in short bursts, stir often, and stop heating before it looks completely finished — residual heat usually takes it the rest of the way.
What desserts are easiest if I have only one afternoon?
Chocolate-dipped strawberries, bark, truffles, cookie cups from packaged dough, popcorn clusters, and mug cakes are the fastest options. They give you a full dessert table feel without stretching you thin.
Can I make these desserts less sweet?
Yes. Use dark chocolate, add flaky salt, keep frosting layers thin, and lean into lemon, raspberry, or fresh strawberry desserts. Those small changes pull the sweetness back without making the dessert feel plain.
What should I do if my bars or cakes crumble when I cut them?
Chill them first and use a sharp knife wiped clean between cuts. If they’re still crumbly, they probably needed a little more bake time or a longer cool-down before slicing.
How many desserts should I put out for a small Galentines party?
Four to six is plenty for a small group, especially if you mix textures. I’d pick one bar, one cookie, one fruit dessert, one chocolate dessert, and one no-bake cup or truffle so the table feels varied without becoming overwhelming.
The Sweet Spot
A good Galentines dessert table doesn’t need a pastry chef’s résumé. It needs a smart mix of flavors, a few make-ahead wins, and enough visual charm that people want to hover around it. That’s the whole trick. Keep some desserts crisp, some creamy, some fruity, and some unapologetically chocolate-heavy, and the table starts doing the work for you.
I’m partial to the desserts that cut cleanly, hold their shape, and taste better after a short rest in the fridge. Those are the ones that make hosting feel calm instead of frantic. Pick a handful from different categories, lean on the easy shortcuts when they help, and the tray will look like you thought about every detail even when you kept the actual work simple.