
A good protein bar should not feel like drywall. If it cracks your teeth, leaves a dusty aftertaste, and somehow still tastes sweet and stale at the same time, it’s not a snack — it’s a chore in bar form. The best post-workout protein bar recipes fix that problem with a softer chew, a little salt, enough body to hold together, and flavors that actually make you want a second bite.
These post-workout protein bar recipes are built for lazy Sundays, which is exactly when homemade bars make the most sense. You mix, press, chill, and slice while the kitchen stays calm and the workout bag is still half-unpacked by the door. Some of these are no-bake and set in the fridge. A few go into the oven for a cleaner crumb and a more baked-cereal flavor. All of them are the kind of batch that saves you from standing in front of a vending machine later, annoyed and underfed.
The detail that matters most is balance. Too much protein powder and the bars taste chalky. Too much honey and they turn sticky and soft. Too many mix-ins and they crumble before you even get them out of the pan. Get the ratio right, though, and you end up with a bar that slices cleanly, travels well, and tastes like a real snack instead of a compromise.
Why This Batch Is Worth Making on a Slow Sunday
-
Mix-and-slice simplicity: Most of these bars use one bowl, one pan, and a 10-minute prep window, which is exactly the pace a Sunday afternoon can handle.
-
Better texture than store-bought bars: Homemade bars can stay chewy instead of waxy because you control the binder, the salt, and the amount of powder that goes in.
-
Recovery-friendly balance: These recipes lean on protein plus oats, fruit, nuts, or seeds, so the result is more filling than a pure candy-style snack.
-
Flavor variety without extra work: Once you know the base formula, you can swing from peanut butter to lemon coconut to mocha without changing the whole method.
-
Meal-prep payoff: A single pan usually gives you 8 to 12 bars, which makes the fridge feel organized in a way that most lazy Sundays do not.
-
Easy to adapt: Dairy-free, nut-free, higher-carb, lower-sugar — the structure still holds if you swap smartly and keep enough binder in the mix.
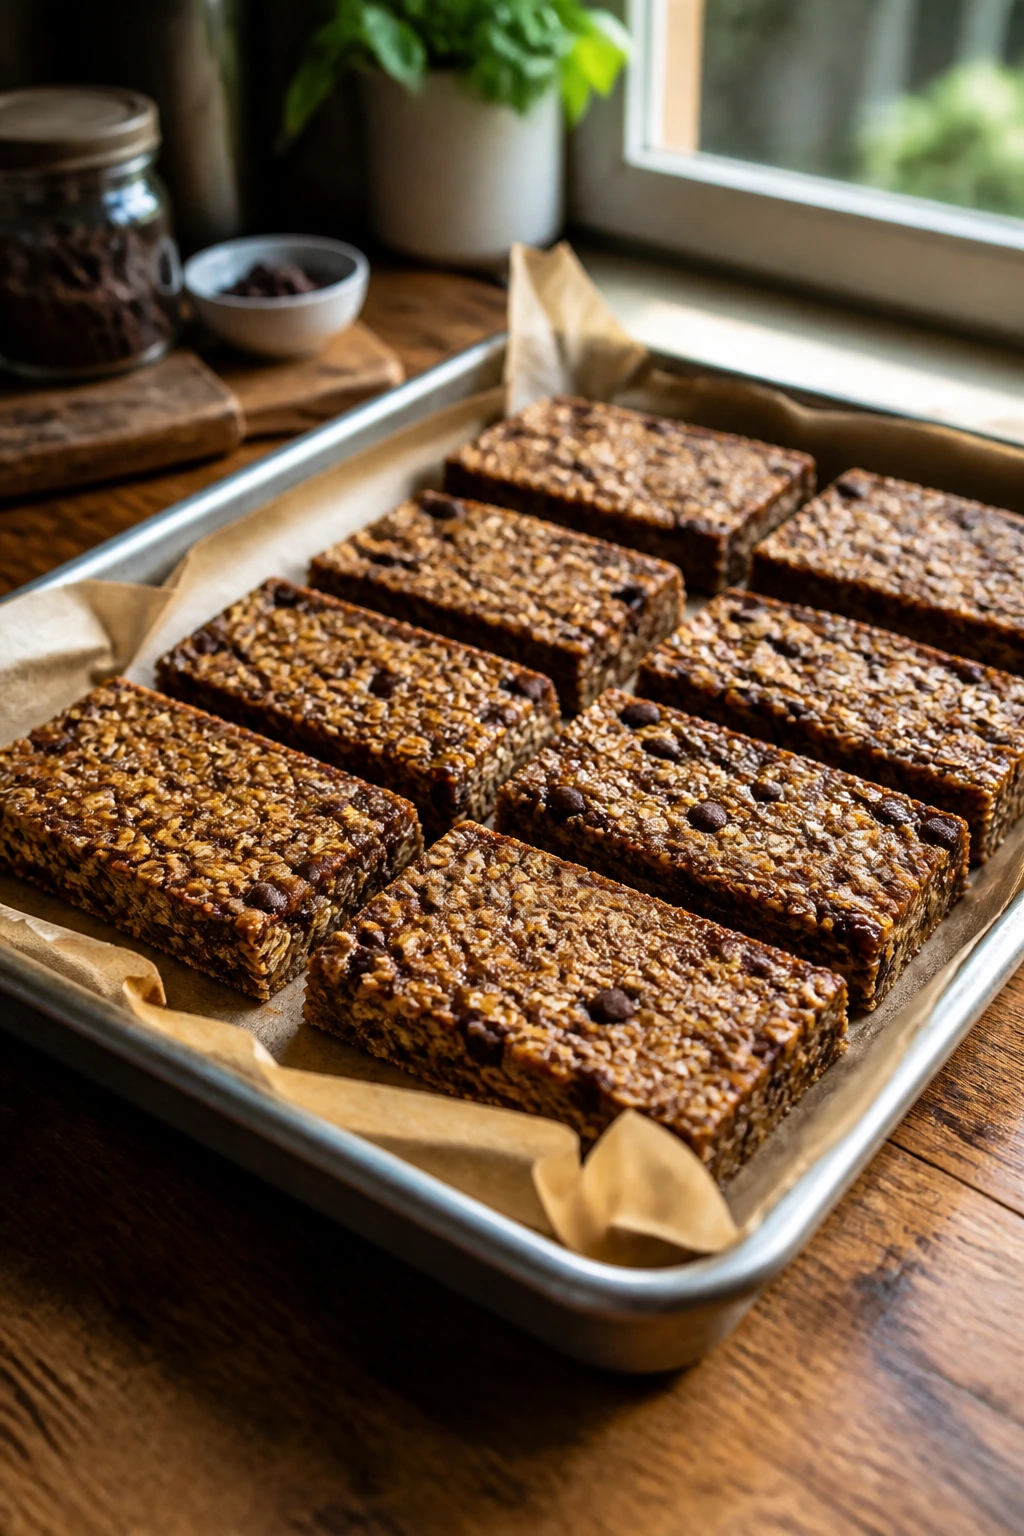
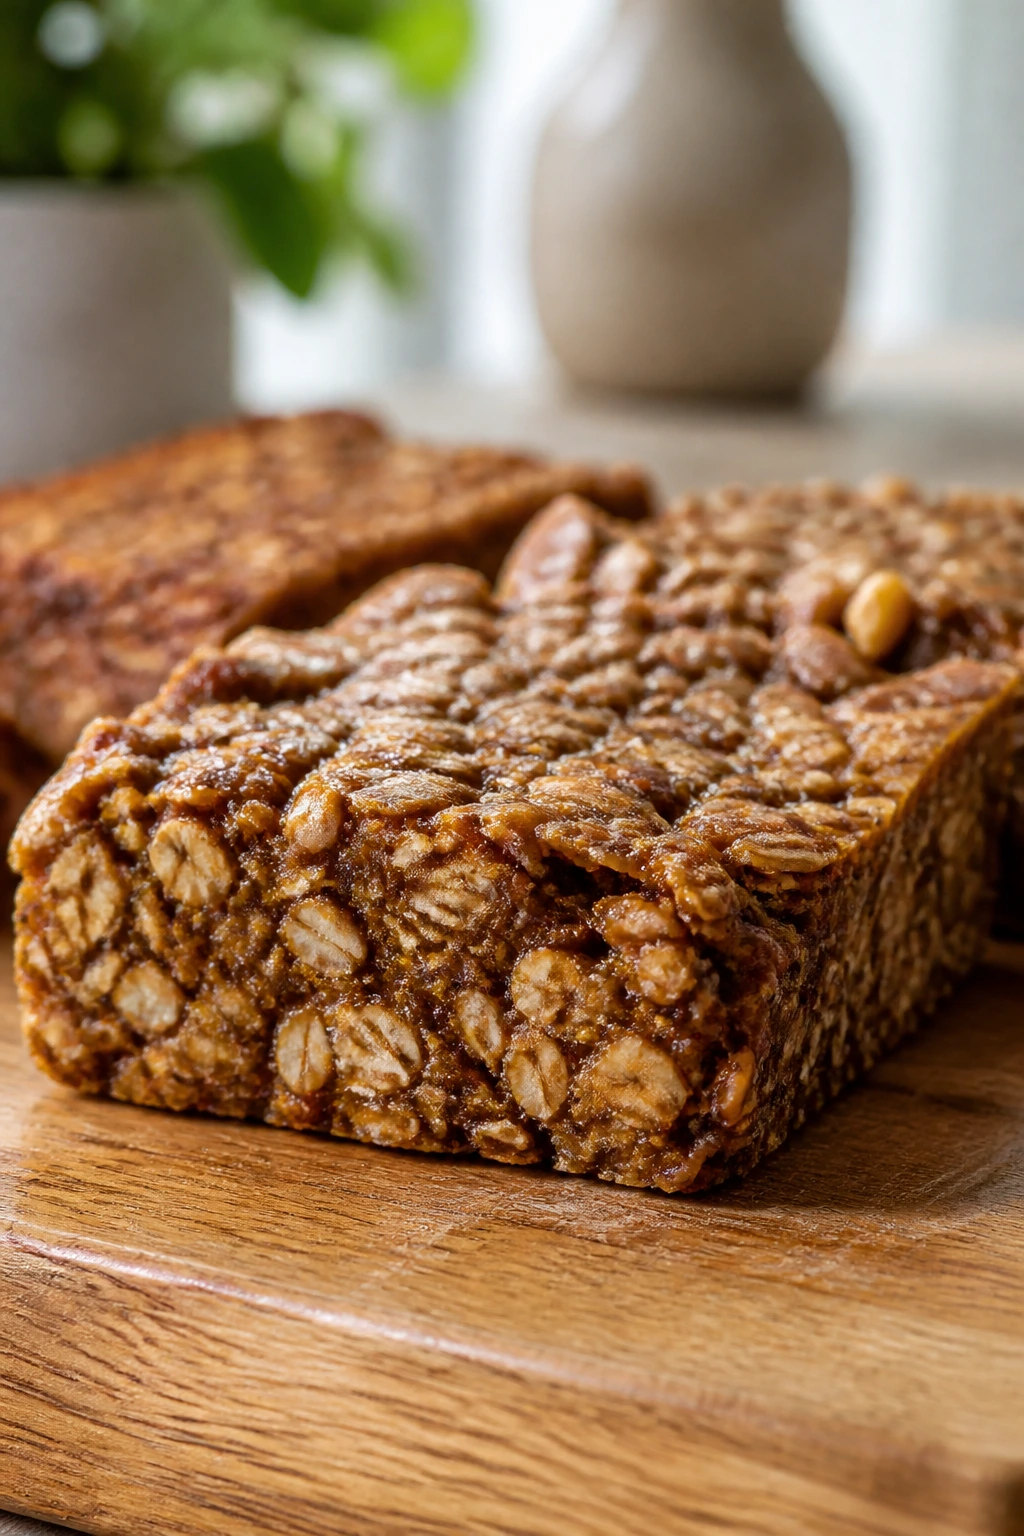
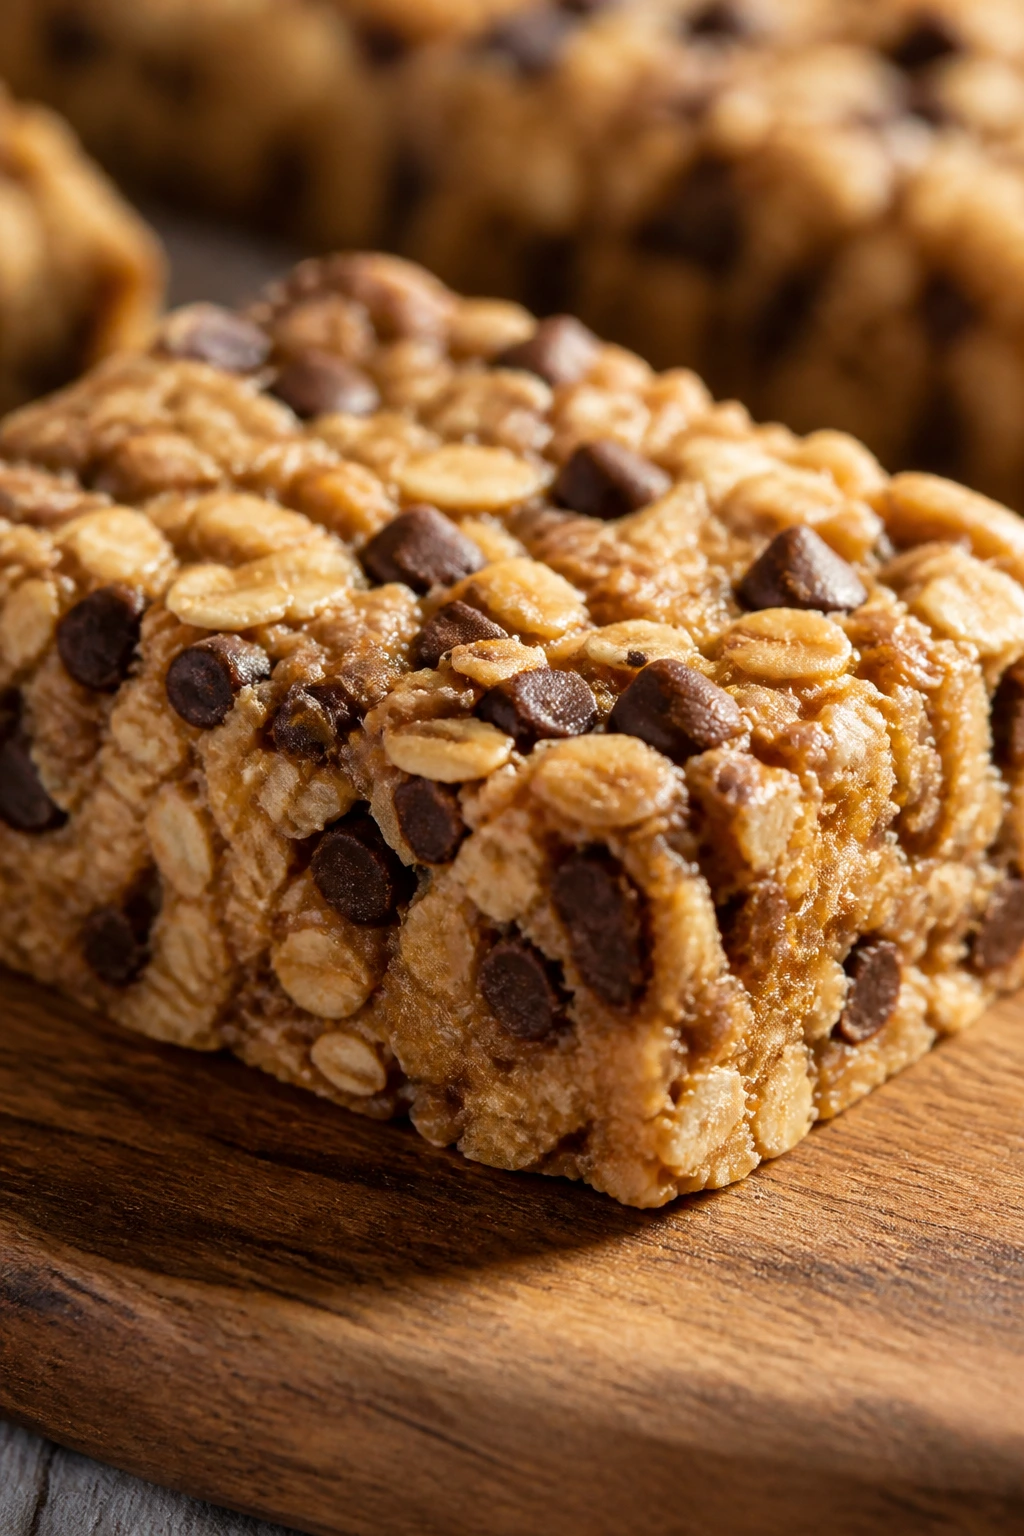
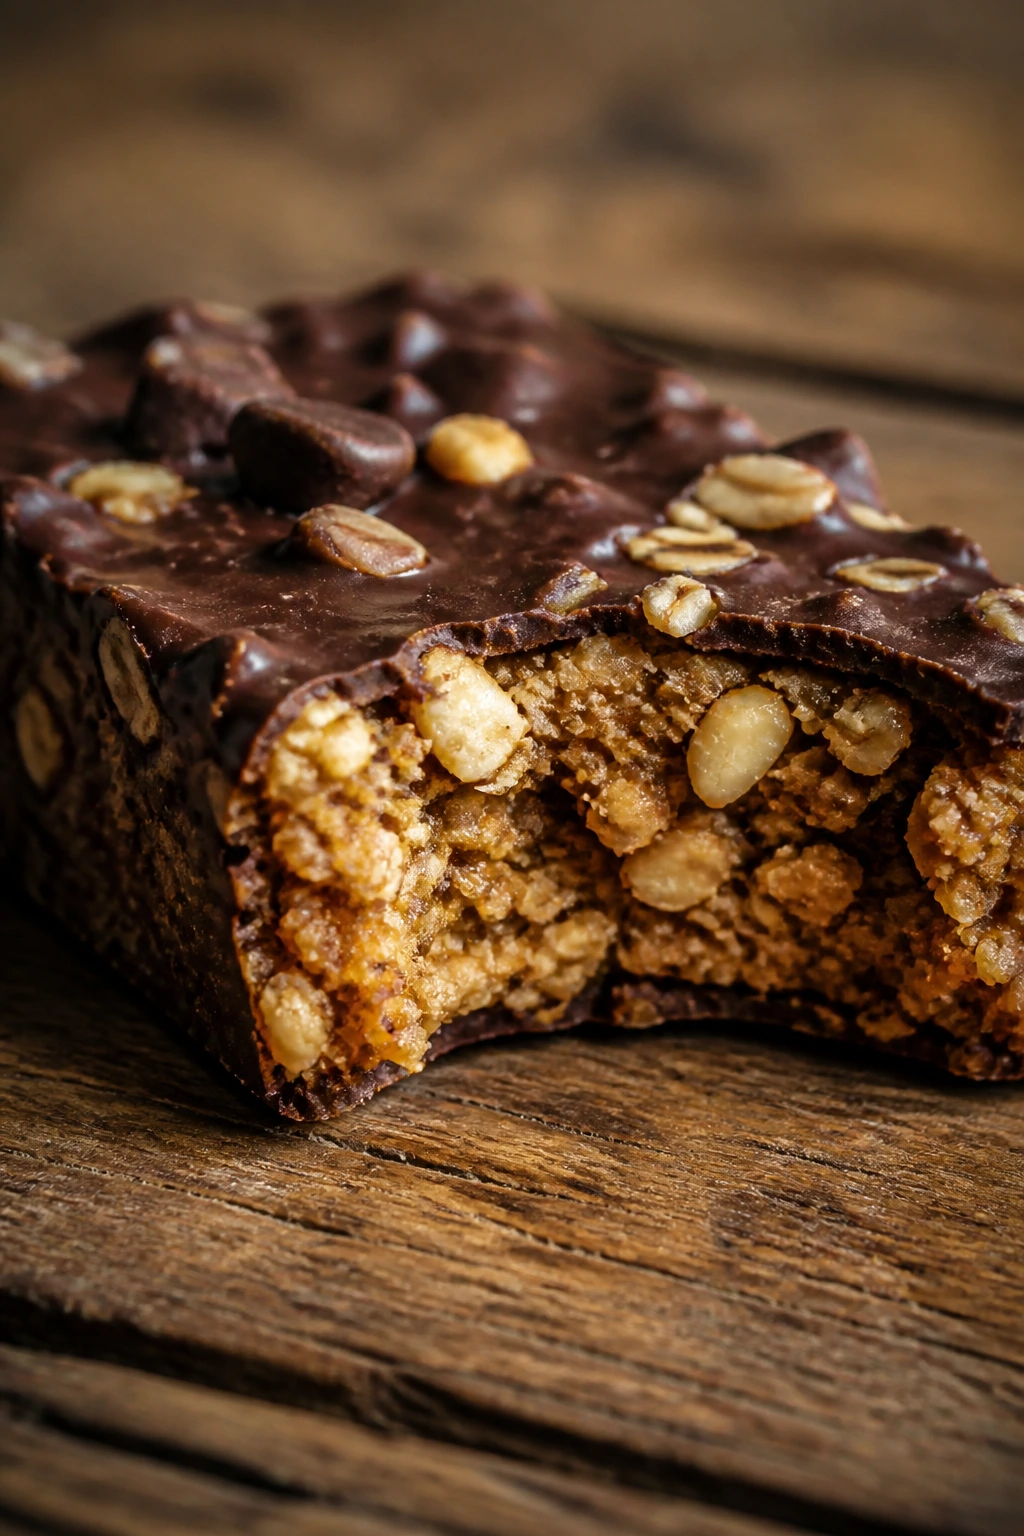
1. Peanut Butter Chocolate Chip Oat Bars
These taste like the bar you wish the gas-station version could be: soft in the middle, a little salty, and full of peanut butter flavor that actually shows up. The mini chocolate chips matter here. So does the pinch of salt, which keeps the sweetness from flattening out.
Why It Works:
Peanut butter gives these bars their chew and keeps the protein powder from drying them out into a gritty slab. Oats add structure, honey binds the whole thing, and the chocolate chips give you small cold pockets if you eat one straight from the fridge. The texture lands somewhere between a chewy granola bar and a soft breakfast square, which is exactly the point.
A little vanilla rounds off the edges. A little salt keeps them from tasting like dessert pretending to be useful.
Key Ingredients:
- 2 cups old-fashioned rolled oats — the base that gives the bars chew and body.
- 1 cup vanilla protein powder — whey or plant-based both work, though plant powder usually needs a splash more milk.
- 1/2 cup ground flaxseed — adds fiber and helps the bars slice cleanly.
- 1/2 teaspoon fine salt — keeps the peanut flavor from tasting flat.
- 1/2 cup natural peanut butter, stirred smooth — use the runny kind, not the stiff end of the jar.
- 1/3 cup honey — the main binder and sweetness.
- 1/4 cup milk or unsweetened almond milk — enough to loosen the mixture without making it soupy.
- 1 teaspoon vanilla extract — sharpens the peanut butter flavor.
- 1/2 cup mini chocolate chips — small chips distribute better than big ones.
Quick Steps:
- Line an 8×8-inch pan with parchment, leaving overhang on two sides for easy lifting.
- Stir the oats, protein powder, flaxseed, and salt in a large bowl until the dry mix looks even.
- Warm the peanut butter and honey together for 20 to 30 seconds in the microwave, then whisk in the milk and vanilla.
- Pour the wet mixture over the dry ingredients, fold until no dry patches remain, and stir in the chocolate chips.
- Press the mixture firmly into the pan with the back of a spoon or a second sheet of parchment. Chill for 1 hour, then slice into 8 bars.
Equipment for This Recipe:
- 8×8-inch baking pan
- Parchment paper
- Large mixing bowl
- Rubber spatula
- Measuring cups and spoons
How to Serve This Dish:
These bars are best with cold milk, strong coffee, or a banana you can eat in two bites on the way out the door. They hold together neatly in a lunch box, and one square is plenty if you’re pairing it with yogurt or fruit.
Pro Tips for This Recipe:
- Warm the peanut butter first so it blends instead of clumping.
- If the mix seems crumbly, add milk 1 tablespoon at a time.
- Press hard. A loose pack gives you bars that fall apart at the first cut.
- Use mini chips; full-size chips can make the slice break in rough lines.
Variations on This Dish:
- Crunchy Jar Version: Use crunchy peanut butter and add 1/4 cup chopped peanuts for a louder bite.
- Dark Chocolate Swirl: Swap the mini chips for 2 tablespoons cocoa powder and drizzle melted dark chocolate over the chilled bars.
- Sunflower Swap: Use sunflower seed butter and skip the peanuts for a nut-free version with the same chew.
Common Mistakes to Avoid with This Dish:
- Adding too much milk: The bars turn sticky and won’t set firmly. Stop once the mixture holds together when squeezed.
- Cutting before chilling: Warm bars smear and break. Give them the full hour in the fridge, or longer if your kitchen runs warm.
- Using dry, old protein powder: Stale powder tastes chalky fast. Fresh powder makes a noticeable difference here.
2. Almond Joy Protein Bars
Coconut, almond, and dark chocolate make this one feel like a candy-bar memory that grew up and started lifting weights. The shredded coconut gives a softer chew than oats alone, and the toasted almonds bring the crunch that keeps each bite from going mushy.
Why It Works:
This bar leans on three flavor anchors: almond butter for richness, coconut for texture, and cocoa for depth. The chocolate protein powder ties the whole thing together so it tastes intentional, not like three separate snacks glued into a pan. Coconut oil helps the bars firm up in the fridge without making them greasy.
A quick chocolate drizzle on top is not mandatory. It’s just the kind of finishing move that makes a Tuesday snack feel a little less plain.
Key Ingredients:
- 1 1/2 cups old-fashioned rolled oats — gives body and helps absorb moisture.
- 3/4 cup chocolate protein powder — keeps the coconut and almond flavors grounded.
- 1/2 cup unsweetened shredded coconut — brings the almond-joy feel and a little chew.
- 1/2 cup almond butter — the glue and the nutty backbone.
- 1/4 cup honey — enough sweetness to balance the cocoa.
- 3 tablespoons coconut oil, melted — helps the bars set cleanly.
- 1 teaspoon vanilla extract — softens the cocoa edge.
- 1/2 teaspoon fine salt — the one thing that keeps this from tasting flat.
- 1/3 cup chopped toasted almonds — for crunch.
- 1/2 cup dark chocolate chips — fold in or melt for a drizzle.
Quick Steps:
- Line an 8×8-inch pan with parchment paper.
- Stir the oats, protein powder, coconut, and salt in a bowl.
- Whisk the almond butter, honey, melted coconut oil, and vanilla together until smooth.
- Combine wet and dry, then fold in the almonds and most of the chocolate chips.
- Press firmly into the pan, scatter the remaining chips on top, and chill for 1 to 2 hours until set. Slice into 8 bars.
Equipment for This Recipe:
- 8×8-inch pan
- Parchment paper
- Mixing bowl
- Whisk or sturdy spoon
- Spatula
How to Serve This Dish:
These bars are good cold, which is how the chocolate stays a little snappy. I like them with black coffee after a workout because the bitterness cuts the sweetness, but they also pair well with sliced strawberries.
Pro Tips for This Recipe:
- Toast the almonds for 5 to 7 minutes at 325°F if you want a deeper, nuttier flavor.
- Don’t overmix once the chocolate chips go in; they’ll streak the batter and make the cut look messy.
- If your coconut is coarse, pulse it once or twice in a food processor so the bars hold together better.
Variations on This Dish:
- Extra-Coconut Cut: Add 2 tablespoons coconut flour for a firmer, more candy-bar-like slice.
- Peanut-Almond Mashup: Swap half the almond butter for peanut butter and keep the almond pieces on top.
- White Chocolate Finish: Replace the dark chips with white chocolate chips if you want a sweeter, softer edge.
Common Mistakes to Avoid with This Dish:
- Skipping the salt: Without it, the coconut and chocolate blur together. The flavor gets muddy.
- Using oily separated nut butter without stirring: You’ll get a slick top and a dry bottom layer. Stir until smooth before measuring.
- Slicing while warm: Coconut oil softens fast. Chill fully or the bars will squish instead of cut.
3. Banana Bread Protein Bars
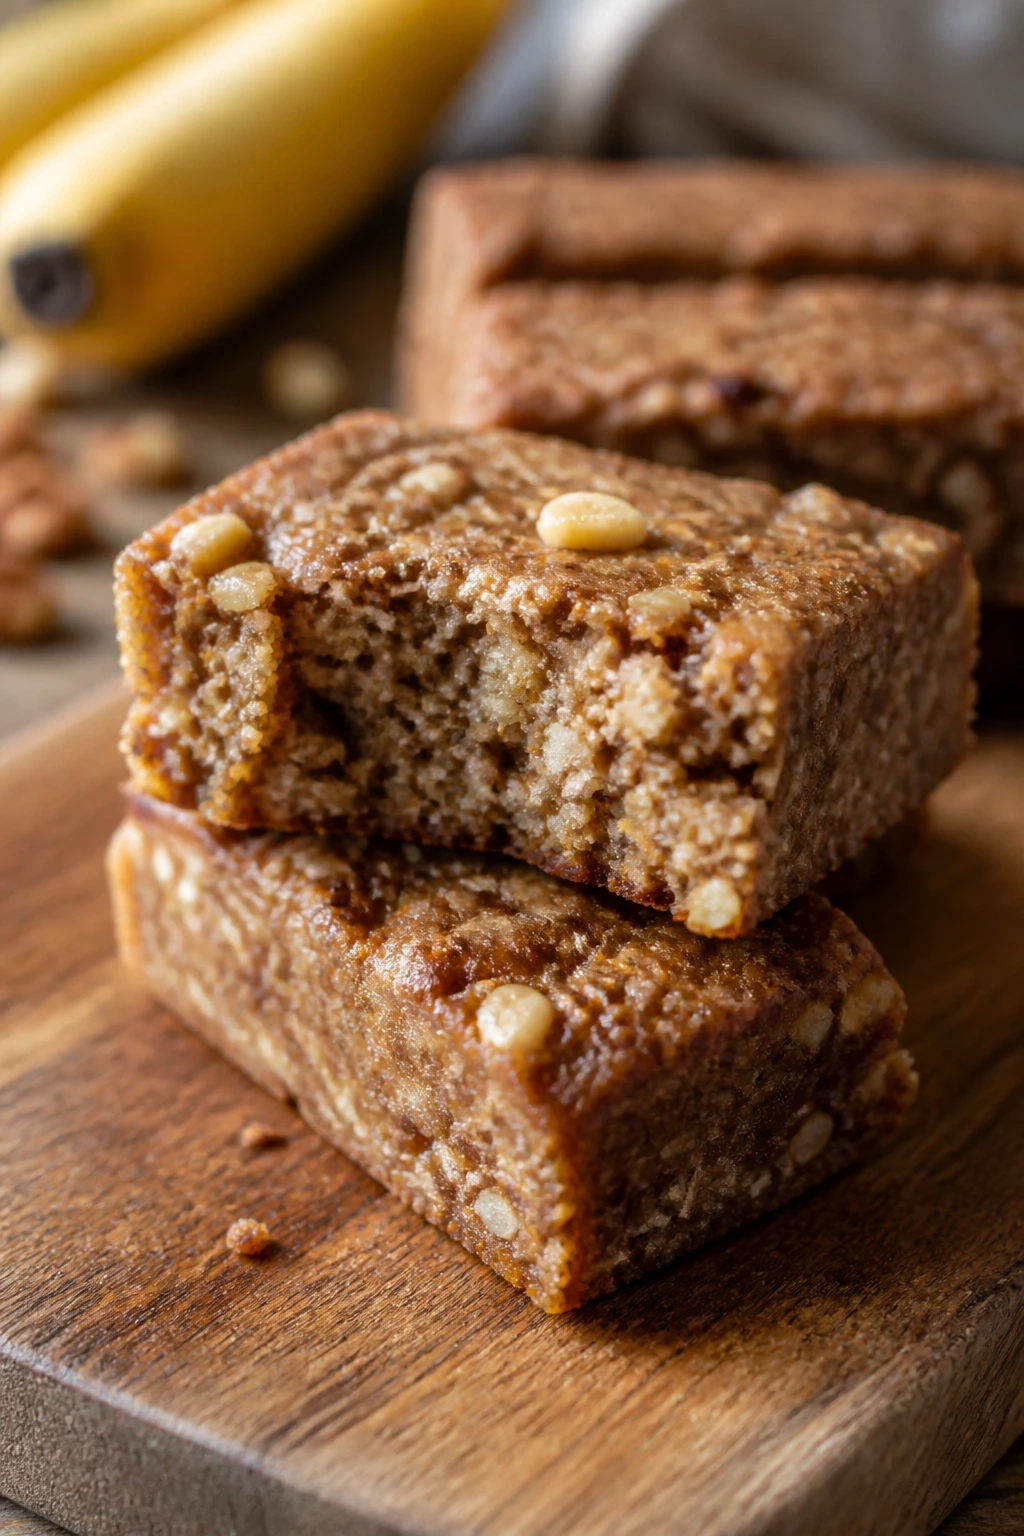
If you have two spotty bananas on the counter, this is where they should go. The bars come out soft and fragrant, with cinnamon in the background and walnuts giving the crumb a little bite. They eat like banana bread that decided to be more portable.
Why It Works:
Bananas do three jobs at once here: they sweeten, moisten, and help bind the batter. That means you can use less honey than you would in a standard no-bake bar, which keeps the texture more bread-like and less sticky. Oat flour gives the bars a tender bite, while protein powder boosts the nutrition without taking over.
The key is not overbaking. Pull them when the center still has a slight spring, or they dry out and lose the banana-bread feel.
Key Ingredients:
- 2 medium ripe bananas, mashed — about 1 cup; the spottier, the better.
- 2 large eggs — provide structure and help the bars rise a little.
- 1/3 cup maple syrup — keeps the banana flavor round and mellow.
- 1/4 cup plain Greek yogurt — adds moisture and a small tang.
- 1 teaspoon vanilla extract — makes the banana smell louder.
- 1 1/2 cups oat flour — gives a soft, bread-like crumb.
- 3/4 cup vanilla protein powder — adds protein without too much bitterness.
- 1 teaspoon cinnamon — the standard banana-bread move.
- 1 teaspoon baking powder — helps lift the bars.
- 1/2 teaspoon fine salt — keeps the sweetness from collapsing.
- 1/2 cup chopped walnuts — for texture.
- 1/3 cup mini chocolate chips — optional, but I like them here.
Quick Steps:
- Preheat the oven to 350°F and line an 8×8-inch pan with parchment.
- Whisk the bananas, eggs, maple syrup, yogurt, and vanilla until smooth.
- Stir in the oat flour, protein powder, cinnamon, baking powder, and salt until just combined.
- Fold in the walnuts and chocolate chips, then spread the batter into the pan.
- Bake for 18 to 22 minutes, until the top is set and a toothpick comes out with a few moist crumbs. Cool fully before slicing.
Equipment for This Recipe:
- 8×8-inch pan
- Parchment paper
- Mixing bowl
- Whisk
- Silicone spatula
How to Serve This Dish:
These are good warm or cold. I like them with plain yogurt and a few banana slices if I’m eating them at home, or plain and wrapped if they’re going into a gym bag.
Pro Tips for This Recipe:
- Use bananas that are soft enough to mash with almost no effort.
- Don’t pack the oat flour; spoon it into the cup and level it off.
- If the batter looks thick but spreadable, leave it alone. Banana batter often looks denser than it bakes.
Variations on This Dish:
- Nut-Free Banana Bread: Swap the walnuts for pumpkin seeds and use sunflower seed yogurt if needed.
- Banana Chocolate Chip: Double the mini chips and skip the walnuts for a sweeter version.
- Higher-Protein Slice: Add 2 tablespoons hemp hearts for extra protein and a slightly nuttier bite.
Common Mistakes to Avoid with This Dish:
- Using under-ripe bananas: You lose sweetness and need extra sugar to cover it.
- Overbaking until the center is dry: Banana bars should stay tender; pull them as soon as the middle sets.
- Cutting before cool: The crumb needs time to firm up or the slices will tear.
4. Brownie Batter Protein Bars
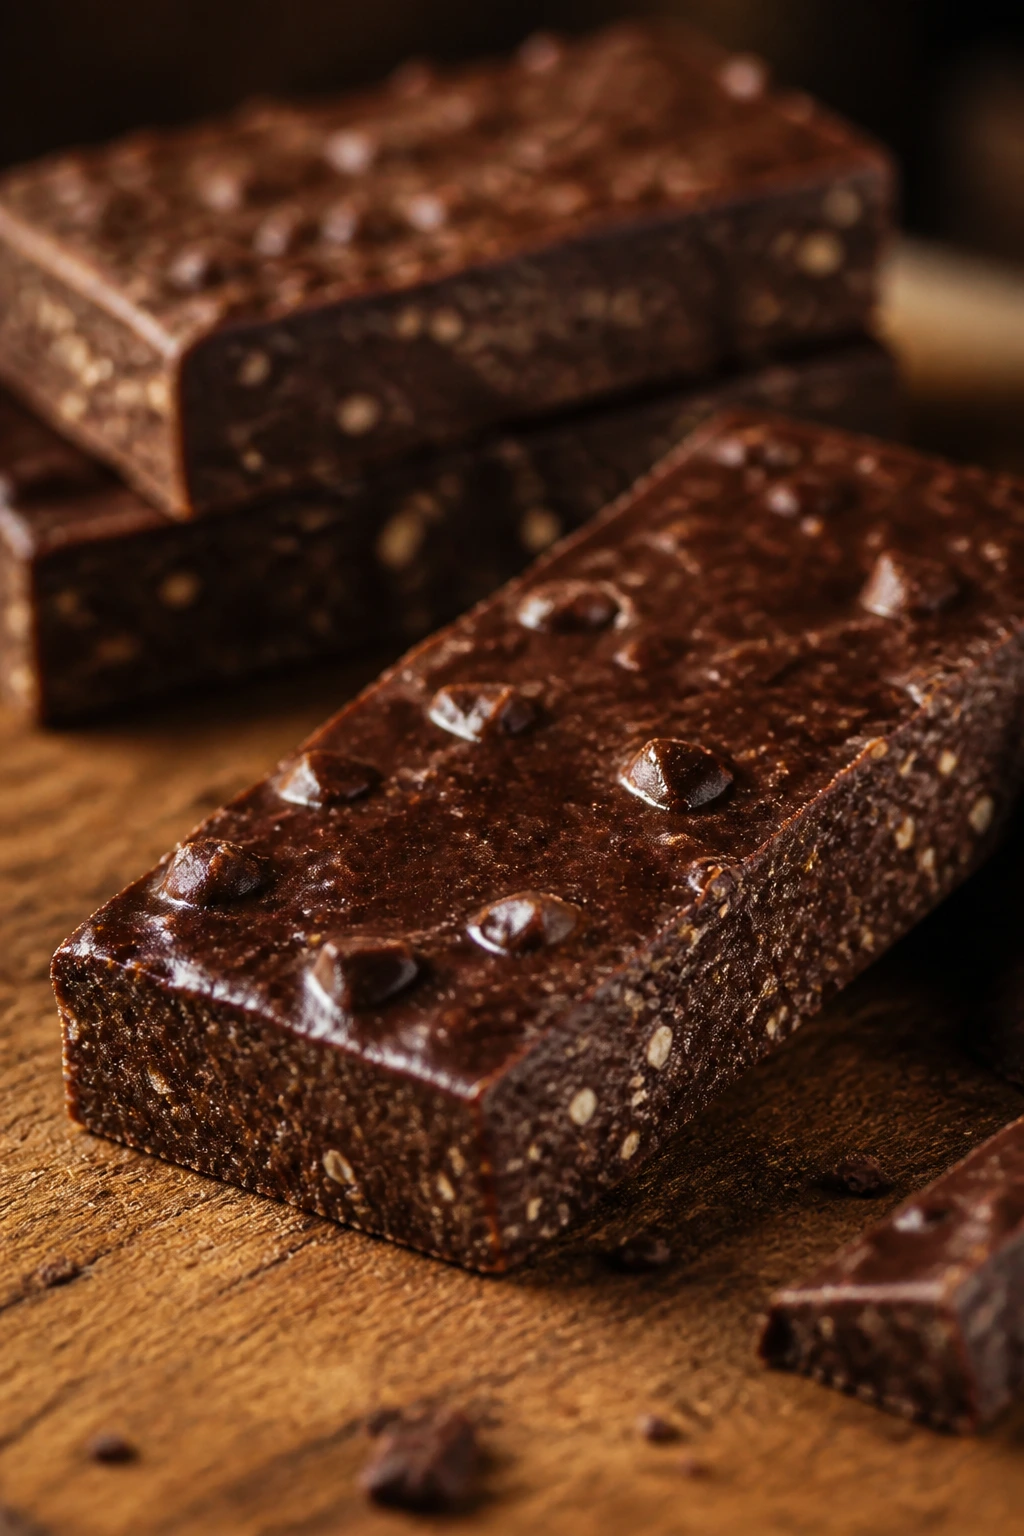
These are for the days you want chocolate first and “healthy snack” second. They taste like a soft brownie edge, with cocoa and espresso making the flavor darker and less candy-sweet. A little extra salt on top is not subtle, but it works.
Why It Works:
Cocoa powder gives the bars their deep brownie taste, while chocolate protein powder reinforces the flavor without making the texture chalky if you keep the wet ingredients generous. A small amount of brewed coffee sharpens the chocolate and makes the bars taste more like dessert than supplement food. Oats and almond butter give the bars enough structure to slice cleanly after chilling.
The coffee doesn’t make them taste like coffee unless you go overboard. It just pushes the chocolate farther forward.
Key Ingredients:
- 2 cups old-fashioned rolled oats — the backbone.
- 3/4 cup chocolate protein powder — use one you already like the taste of.
- 1/2 cup unsweetened cocoa powder — for the brownie base.
- 1/2 teaspoon fine salt — sharpens the chocolate.
- 1/2 cup almond butter — keeps the bars chewy.
- 1/3 cup maple syrup — the binder and sweetener.
- 1/4 cup strong brewed coffee, cooled — makes the chocolate taste darker.
- 1 teaspoon vanilla extract — rounds the cocoa.
- 1/2 cup chocolate chips — for melty pockets.
- 2 tablespoons hemp hearts — optional, but they disappear nicely into the mix.
Quick Steps:
- Line an 8×8-inch pan with parchment paper.
- Mix the oats, protein powder, cocoa, salt, and hemp hearts in a bowl.
- Stir the almond butter, maple syrup, coffee, and vanilla in another bowl until smooth.
- Combine the two mixtures and fold in the chocolate chips.
- Press into the pan with firm, even pressure and chill for 1 hour. Cut into 8 bars.
Equipment for This Recipe:
- 8×8-inch pan
- Two mixing bowls
- Parchment paper
- Rubber spatula
- Measuring cups
How to Serve This Dish:
I like these with a glass of cold milk or a small bowl of Greek yogurt and berries. They’re rich enough that a half bar after a workout can hold you over if dinner is still a few hours away.
Pro Tips for This Recipe:
- Use cooled coffee, not hot, or it will make the nut butter greasy.
- Taste the batter before pressing it in; some protein powders need a little more syrup or a pinch more salt.
- If the mix feels dry, add 1 tablespoon of coffee or milk at a time.
Variations on This Dish:
- Fudgy Freeze Version: Freeze the bars and eat them straight from the freezer for a firmer, truffle-like bite.
- Mint Brownie Cut: Add 1/4 teaspoon peppermint extract if you want a sharper, cooler finish.
- Walnut Brownie: Fold in 1/3 cup chopped walnuts for a real brownie-edge crunch.
Common Mistakes to Avoid with This Dish:
- Too much cocoa: The bars turn dusty and bitter. Stick to the measured amount.
- No salt: Chocolate needs salt or the flavor falls flat.
- Pressing loosely into the pan: Brownie bars need firm packing or they crumble on the knife.
5. Lemon Coconut Protein Bars
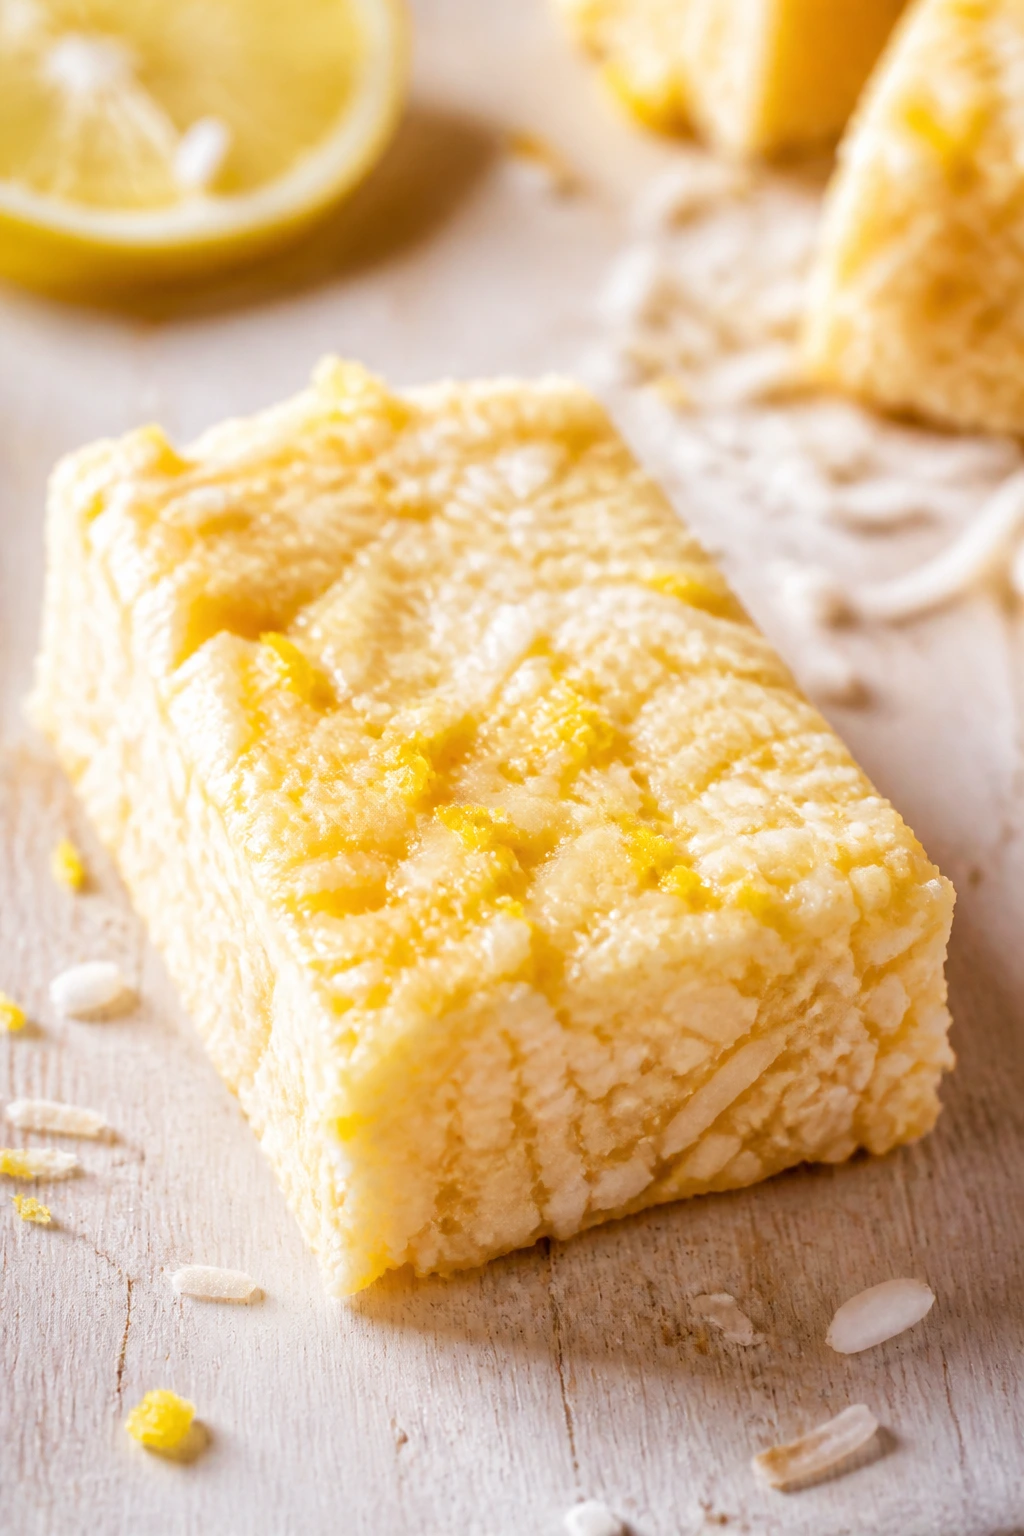
Bright lemon, soft coconut, and a creamy chew make this one feel closer to a chilled bakery bar than a standard gym snack. The lemon zest does most of the heavy lifting; the juice adds a little brightness, but the zest is where the real flavor lives.
Why It Works:
Lemon and coconut are a useful pair because one brings sharpness and the other brings softness. Cashew butter gives these bars a smooth, almost frosting-like base, while oat flour keeps them sliceable after chilling. The protein powder stays in the background if you don’t overpack it, which is exactly what you want here.
A small amount of coconut oil helps the bars set without making them greasy. The result should feel cool, slightly dense, and pleasantly fragrant when you open the container.
Key Ingredients:
- 1 3/4 cups oat flour — gives a tender, soft bite.
- 3/4 cup vanilla protein powder — keeps the lemon from tasting too tart.
- 1/2 cup unsweetened shredded coconut — for texture.
- 1/2 cup cashew butter — smoother than peanut butter and better with citrus.
- 1/4 cup honey — enough sweetness to support the lemon.
- 2 tablespoons coconut oil, melted — helps the bars firm up.
- Zest of 2 lemons — the real flavor source.
- 2 tablespoons lemon juice — brightens the mix.
- 1 teaspoon vanilla extract — softens the citrus edge.
- 1/4 teaspoon fine salt — keeps the flavor balanced.
Quick Steps:
- Line an 8×8-inch pan with parchment paper.
- Stir the oat flour, protein powder, coconut, and salt together.
- Whisk the cashew butter, honey, coconut oil, lemon zest, lemon juice, and vanilla until smooth.
- Combine the wet and dry ingredients, pressing and folding until the mixture sticks together.
- Press firmly into the pan and chill for 1 to 2 hours, then slice into 8 bars.
Equipment for This Recipe:
- 8×8-inch pan
- Parchment paper
- Two bowls
- Whisk
- Spatula
How to Serve This Dish:
These bars are excellent with iced tea or a plain latte. For a more finished plate, I’d add a few extra curls of lemon zest on top and a small handful of toasted coconut on the side.
Pro Tips for This Recipe:
- Zest the lemons before juicing them; it’s much easier that way.
- If the dough feels too sticky, let it sit for 5 minutes before pressing.
- Toasting the coconut for 4 to 5 minutes gives the bars a warmer, less raw flavor.
Variations on This Dish:
- White Chocolate Lemon: Fold in 1/3 cup white chocolate chips for a sweeter finish.
- Lime Coconut Switch: Use lime zest and juice instead of lemon for a sharper profile.
- Extra-Tropical Cut: Add 2 tablespoons finely chopped dried pineapple if you want a fruitier bar.
Common Mistakes to Avoid with This Dish:
- Using too much lemon juice: The bars get loose and soft. Keep the juice measured.
- Skipping zest: Juice alone tastes thin. The peel is where the flavor lives.
- Not chilling long enough: Coconut bars need time to set or the slice will slump.
6. Blueberry Muffin Protein Bars
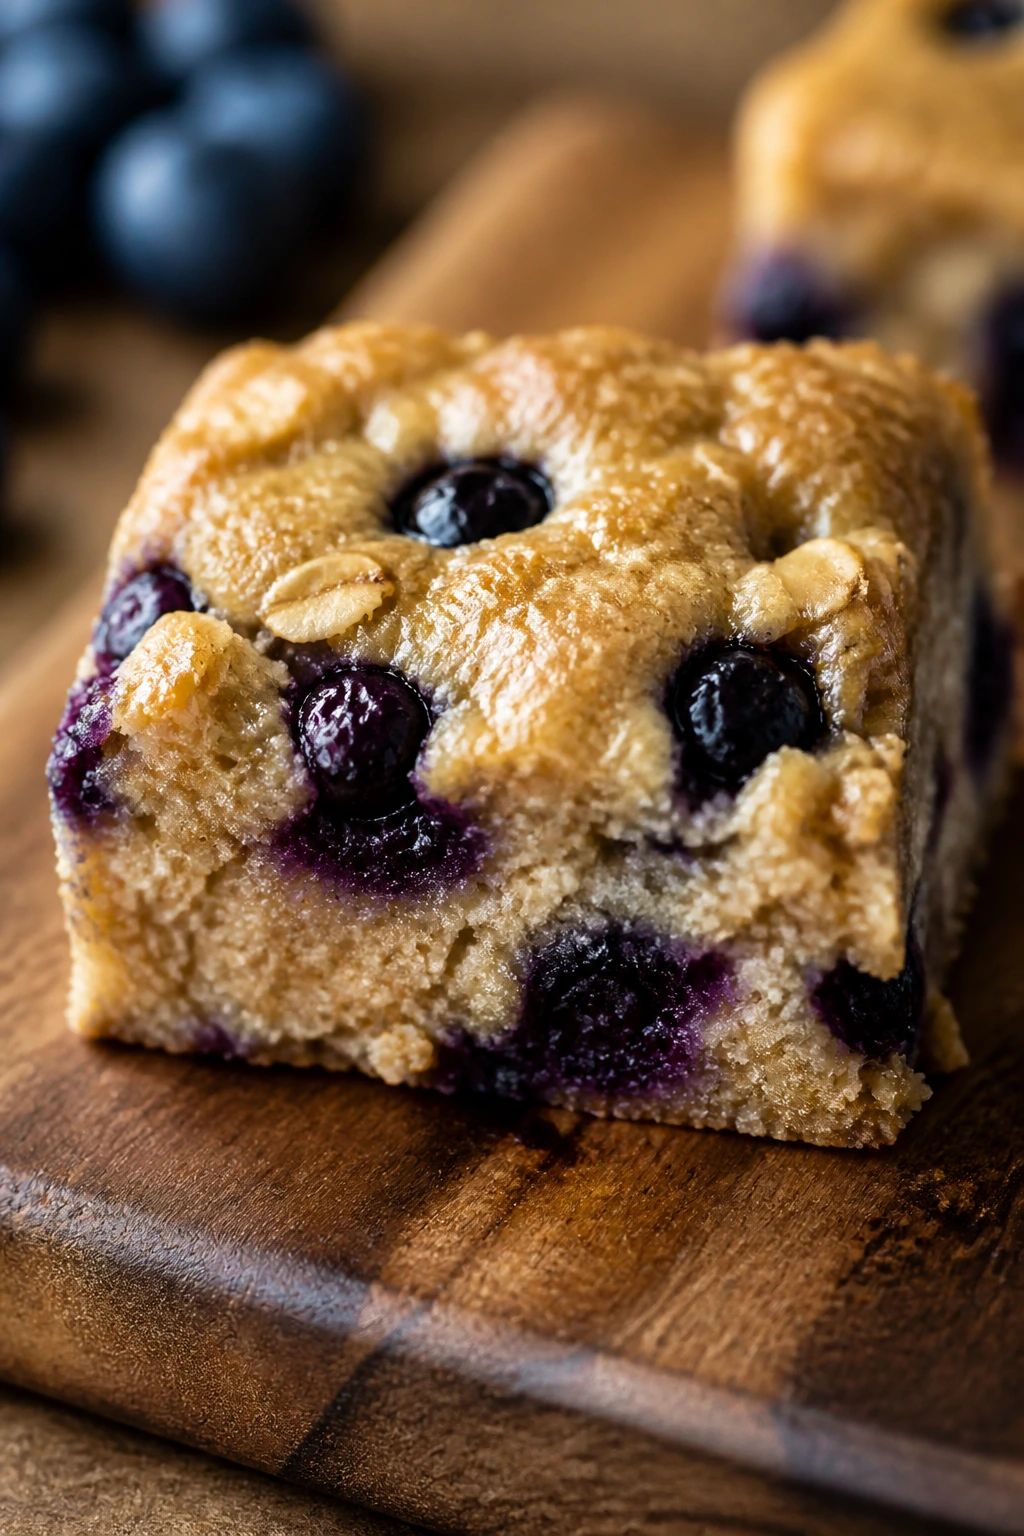
This one gives you the bakery smell without the muffin tin. Blueberries burst into the batter, the cinnamon stays quiet in the background, and the top bakes into something that looks a little like a tender oat square from a cafe case.
Why It Works:
Blueberries add moisture, so this recipe needs more dry structure than the no-bake bars. Oat flour and rolled oats work together to keep the crumb sturdy but not brick-like, while Greek yogurt gives the bars a soft, muffin-style tenderness. Protein powder fits in here best when it’s vanilla, because berry flavors get weird fast if the powder is too aggressive.
Frozen blueberries work too. In fact, they’re often easier, because they don’t burst quite as early and bleed as much into the batter.
Key Ingredients:
- 1 cup oat flour — for structure and a tender crumb.
- 1 cup old-fashioned rolled oats — adds texture.
- 3/4 cup vanilla protein powder — keeps the flavor clean.
- 1 teaspoon baking powder — helps the bars rise a little.
- 1/2 teaspoon cinnamon — small but important.
- 1/2 teaspoon fine salt — keeps the sweetness balanced.
- 2 large eggs — bind the batter.
- 1/2 cup plain Greek yogurt — moisture and softness.
- 1/3 cup maple syrup — sweetness that won’t bully the berries.
- 1/4 cup milk — loosens the batter.
- 1 teaspoon vanilla extract — rounds everything out.
- 1 cup blueberries, fresh or frozen — the whole point.
Quick Steps:
- Preheat the oven to 350°F and line an 8×8-inch pan with parchment.
- Whisk the oat flour, oats, protein powder, baking powder, cinnamon, and salt in a bowl.
- In another bowl, whisk the eggs, Greek yogurt, maple syrup, milk, and vanilla until smooth.
- Stir the dry ingredients into the wet mixture, then fold in the blueberries gently.
- Spread into the pan and bake for 20 to 24 minutes, until the center is set and the edges turn light gold. Cool fully before slicing.
Equipment for This Recipe:
- 8×8-inch pan
- Parchment paper
- Two bowls
- Whisk
- Rubber spatula
How to Serve This Dish:
These bars go nicely with plain yogurt, and they’re especially good cold from the fridge. Add a few fresh blueberries on the plate if you want them to look a little more finished.
Pro Tips for This Recipe:
- Toss frozen blueberries with 1 teaspoon oat flour before folding them in.
- Don’t overmix once the berries are in, or the batter turns gray-blue and heavy.
- Let the bars cool completely before cutting or the blueberry pockets will smear.
Variations on This Dish:
- Lemon Blueberry: Add 1 tablespoon lemon zest for a brighter muffin flavor.
- Streusel Top: Sprinkle 2 tablespoons chopped oats and 1 tablespoon coconut sugar over the batter before baking.
- Extra-Fiber Version: Add 1 tablespoon chia seeds if you want a denser bar with more chew.
Common Mistakes to Avoid with This Dish:
- Too much liquid from thawed berries: Pat frozen berries dry if they’re icy or wet.
- Underbaking the center: The middle should feel set when lightly pressed.
- Cutting too soon: Warm blueberry bars tear instead of slicing.
7. Mocha Espresso Protein Bars
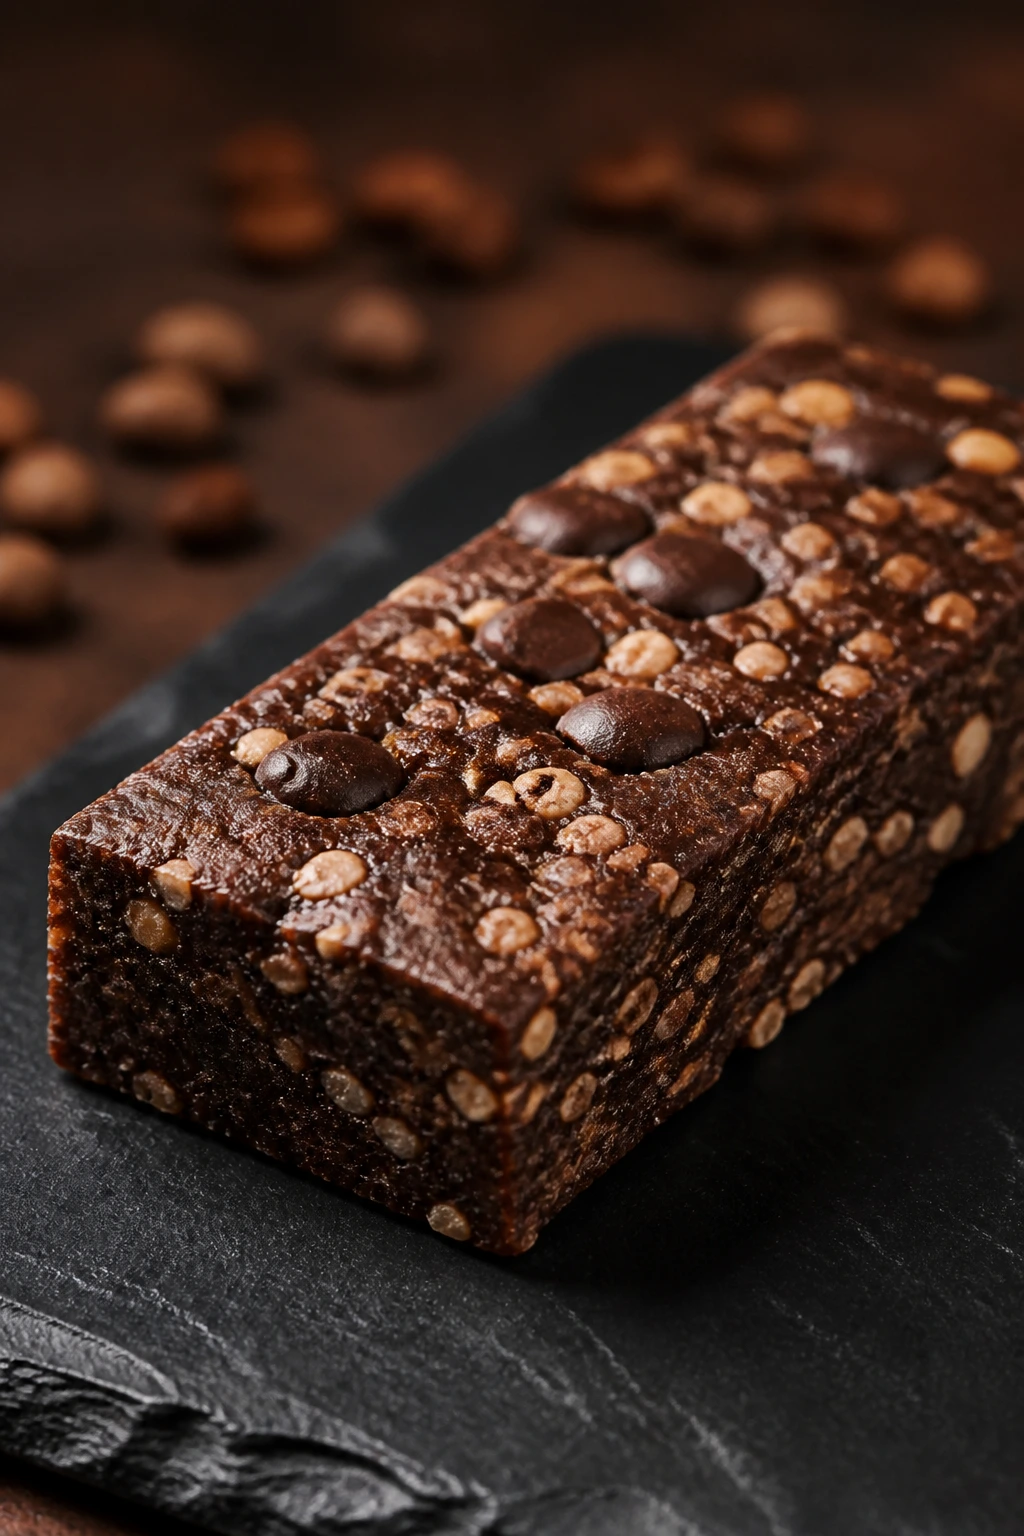
If your idea of a snack should include coffee, cocoa, and a little bitterness, this is the bar to make. The flavor is deep and adult, not sugary. The texture stays chewy, and the espresso note lands in the back of the palate instead of screaming for attention.
Why It Works:
Chocolate and coffee boost each other, which is why these bars taste richer than the ingredient list suggests. Almond butter gives the base enough fat to stay soft, while rolled oats keep the slices sturdy after chilling. The espresso powder matters more than you’d think; even a teaspoon can make the cocoa taste darker and less flat.
These are especially good cold. The flavor sharpens, the chocolate chips stay a little firm, and the whole bar feels more polished than a room-temperature snack usually does.
Key Ingredients:
- 2 cups old-fashioned rolled oats — the structure.
- 3/4 cup chocolate protein powder — reinforces the mocha profile.
- 1/4 cup unsweetened cocoa powder — deepens the chocolate.
- 1 teaspoon instant espresso powder — the coffee note.
- 1/2 teaspoon fine salt — balances the bitterness.
- 1/2 cup almond butter — keeps the bars soft.
- 1/3 cup maple syrup — the binder.
- 1/4 cup strong espresso or coffee, cooled — adds a smoother coffee flavor.
- 1 teaspoon vanilla extract — rounds the cocoa.
- 1/2 cup dark chocolate chunks — for texture and pockets of melt.
Quick Steps:
- Line an 8×8-inch pan with parchment paper.
- Mix the oats, protein powder, cocoa, espresso powder, and salt in a bowl.
- Stir the almond butter, maple syrup, coffee, and vanilla until smooth.
- Combine, fold in the chocolate chunks, and press the mixture into the pan.
- Chill for 1 hour, then slice into 8 bars.
Equipment for This Recipe:
- 8×8-inch pan
- Mixing bowl
- Parchment paper
- Spatula
- Measuring spoons
How to Serve This Dish:
These pair well with an extra cup of coffee, obviously, but they’re also good with a handful of raspberries. If you want a sharper finish, dust the top lightly with cocoa before slicing.
Pro Tips for This Recipe:
- Don’t use hot coffee; it loosens the almond butter too much.
- Taste the mixture before pressing. Some protein powders need a touch more syrup.
- Chop the chocolate if the chunks are huge; smaller pieces spread more evenly.
Variations on This Dish:
- Hazelnut Mocha: Swap almond butter for hazelnut butter if you want a Ferrero-style note.
- Cinnamon Mocha: Add 1/2 teaspoon cinnamon for a warmer finish.
- Double Espresso Cut: Add another 1/2 teaspoon espresso powder if you want the coffee flavor louder.
Common Mistakes to Avoid with This Dish:
- Too much espresso powder: The bars get harsh and bitter fast.
- Skipping the salt: Coffee and cocoa need it.
- Pressing the mix too loosely: You’ll get crumbly slices with rough edges.
8. Chai Spice Cashew Bars
These smell like a spice drawer in the best way. Cardamom and ginger do most of the talking, with cashew butter making the texture soft and creamy instead of gritty. They’re not loud bars. They’re warm, calm, and oddly satisfying after a hard workout.
Why It Works:
Chai spices work well in protein bars because they add a lot of flavor without adding moisture. Cashew butter has a milder taste than peanut butter, so the spices stay front and center. Rolled oats give the bars enough chew to hold up, and honey smooths the edges so the spices don’t feel dusty.
A tiny pinch of cloves changes the whole smell when you open the container. That’s the kind of detail that makes homemade bars worth the effort.
Key Ingredients:
- 2 cups old-fashioned rolled oats — chewy base.
- 3/4 cup vanilla protein powder — keeps the spice mix from feeling thin.
- 1/2 cup cashew butter — creamy and mild.
- 1/3 cup honey — the binder.
- 1/4 cup milk — to soften the mix.
- 1 teaspoon cinnamon — the main chai note.
- 1/2 teaspoon ground ginger — for warmth.
- 1/4 teaspoon ground cardamom — unmistakable chai flavor.
- Pinch of ground cloves — a little goes a long way.
- 1/2 teaspoon fine salt — keeps the sweetness in check.
- 1/2 cup chopped cashews — for crunch.
Quick Steps:
- Line an 8×8-inch pan with parchment paper.
- Combine the oats, protein powder, spices, and salt in a bowl.
- Whisk the cashew butter, honey, and milk until smooth.
- Mix the wet and dry ingredients, then fold in the chopped cashews.
- Press into the pan, chill for 1 hour, and slice into 8 bars.
Equipment for This Recipe:
- 8×8-inch pan
- Parchment paper
- Bowl
- Whisk
- Spatula
How to Serve This Dish:
These are excellent with tea, especially black tea or masala chai if you want to lean in. They also work well with sliced pear on the side, which sounds fussy and isn’t.
Pro Tips for This Recipe:
- Grind whole cardamom pods if you have them; the flavor is sharper than pre-ground.
- Warm the cashew butter slightly so it mixes more evenly.
- If the bars taste too mild after chilling, dust the top with cinnamon before serving.
Variations on This Dish:
- Dirty Chai Cut: Add 1 teaspoon espresso powder for a coffee-chai twist.
- Vanilla Chai: Increase vanilla to 2 teaspoons if you want the spices softer.
- Nutty Crunch: Swap half the cashews for chopped pistachios for a different texture.
Common Mistakes to Avoid with This Dish:
- Too much clove: It can take over fast and make the bars taste medicinal.
- Dry mix that never comes together: Add milk 1 teaspoon at a time until it holds when squeezed.
- Skipping the chill: Chai bars need time to firm up or the slices sag.
9. Strawberry Shortcake Protein Bars
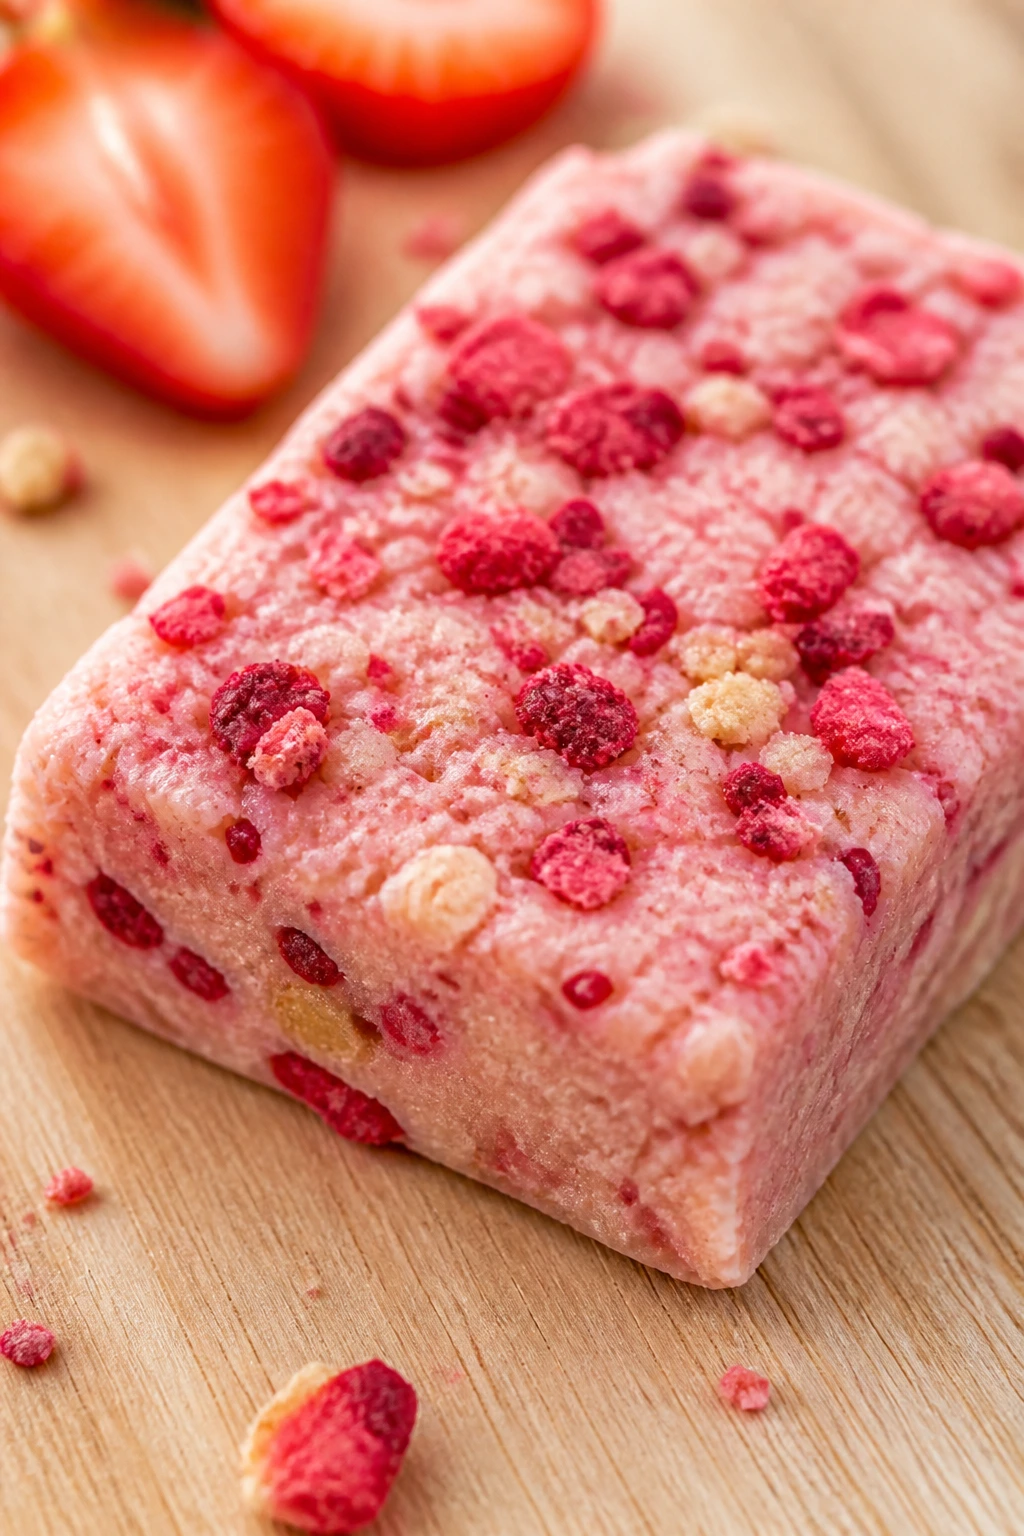
These taste like strawberries after they’ve been chilled, not cooked down into jam. That’s the trick. Freeze-dried strawberries keep the fruit flavor bright, and white chocolate gives the bars a creamy finish that feels dessert-like without going overboard.
Why It Works:
Shortcake flavor depends on contrast: soft base, berry brightness, and a creamy note to tie everything together. Freeze-dried strawberries are the smart move because they bring concentrated fruit flavor without watering down the batter. Almond or cashew butter keeps the texture soft, while oat flour gives the bars enough structure to hold the strawberry pieces.
If you want the bars to look good, reserve a little strawberry dust for the top. It gives the whole pan a pale pink finish that’s more appealing than plain beige.
Key Ingredients:
- 1 3/4 cups oat flour — soft but sturdy.
- 3/4 cup vanilla protein powder — keeps the base clean.
- 1/2 cup freeze-dried strawberries, crushed — the main flavor.
- 1/3 cup almond butter or cashew butter — creamy binder.
- 1/4 cup honey — sweetness.
- 3 tablespoons coconut oil, melted — helps them set.
- 1 teaspoon vanilla extract — for the shortcake note.
- 1/4 teaspoon fine salt — sharpens the strawberry flavor.
- 1/3 cup white chocolate chips — optional, but they fit here.
- 2 tablespoons extra crushed freeze-dried strawberries — for topping.
Quick Steps:
- Line an 8×8-inch pan with parchment paper.
- Stir the oat flour, protein powder, crushed strawberries, and salt together.
- Whisk the nut butter, honey, coconut oil, and vanilla until smooth.
- Combine the two mixtures, fold in the white chocolate chips, and press into the pan.
- Chill for 1 to 2 hours, top with more strawberry crumbs, and slice.
Equipment for This Recipe:
- 8×8-inch pan
- Parchment paper
- Bowl
- Whisk
- Spatula
How to Serve This Dish:
These bars look best with a few sliced fresh strawberries on the plate. They’re good chilled and make a tidy desk snack if you need something sweet after a lifting session.
Pro Tips for This Recipe:
- Crush the freeze-dried strawberries lightly so you still get some texture.
- Keep the white chocolate chips small; big chunks make the slice messy.
- If the mix seems too dry, add 1 tablespoon milk, not more.
Variations on This Dish:
- Strawberry Cheesecake Cut: Add 2 tablespoons powdered milk or dairy-free creamer for a softer, creamier note.
- Berry Mix Version: Swap half the strawberries for freeze-dried raspberries.
- Extra-Vanilla Shortcake: Add 1/2 teaspoon almond extract for a bakery-style finish.
Common Mistakes to Avoid with This Dish:
- Using fresh strawberries in a no-bake bar: They leak water and soften the whole batch.
- Over-crushing the fruit: You lose the strawberry bits that make the texture interesting.
- Cutting too soon: The coconut oil needs time to firm up.
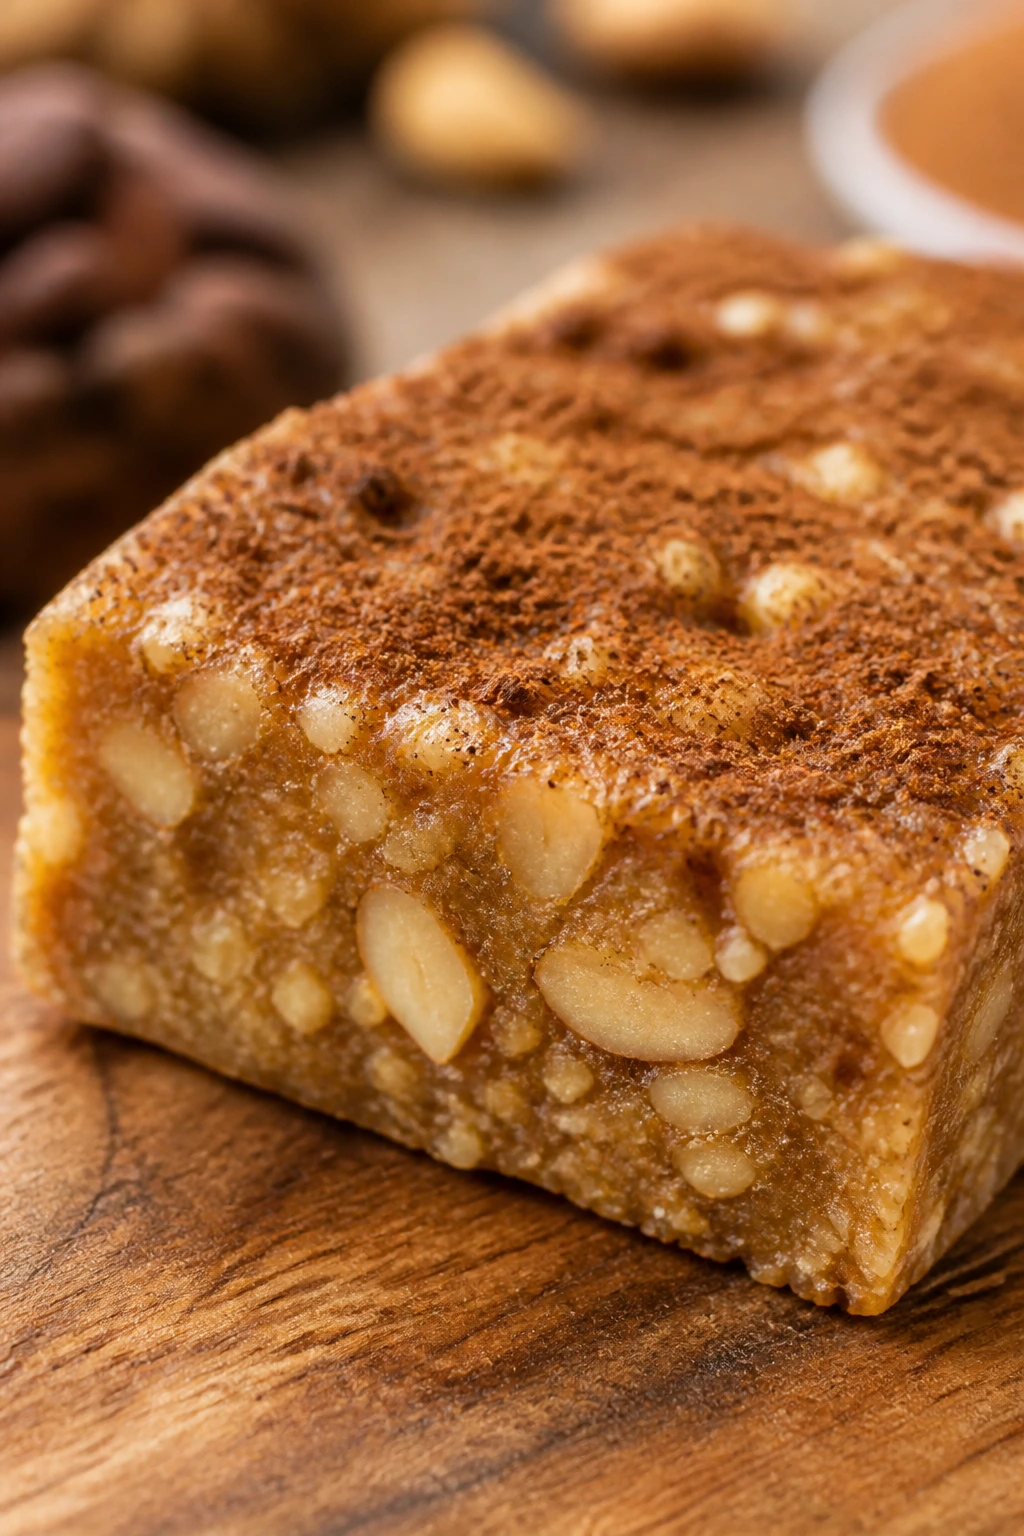
10. Pumpkin Seed Maple Bars
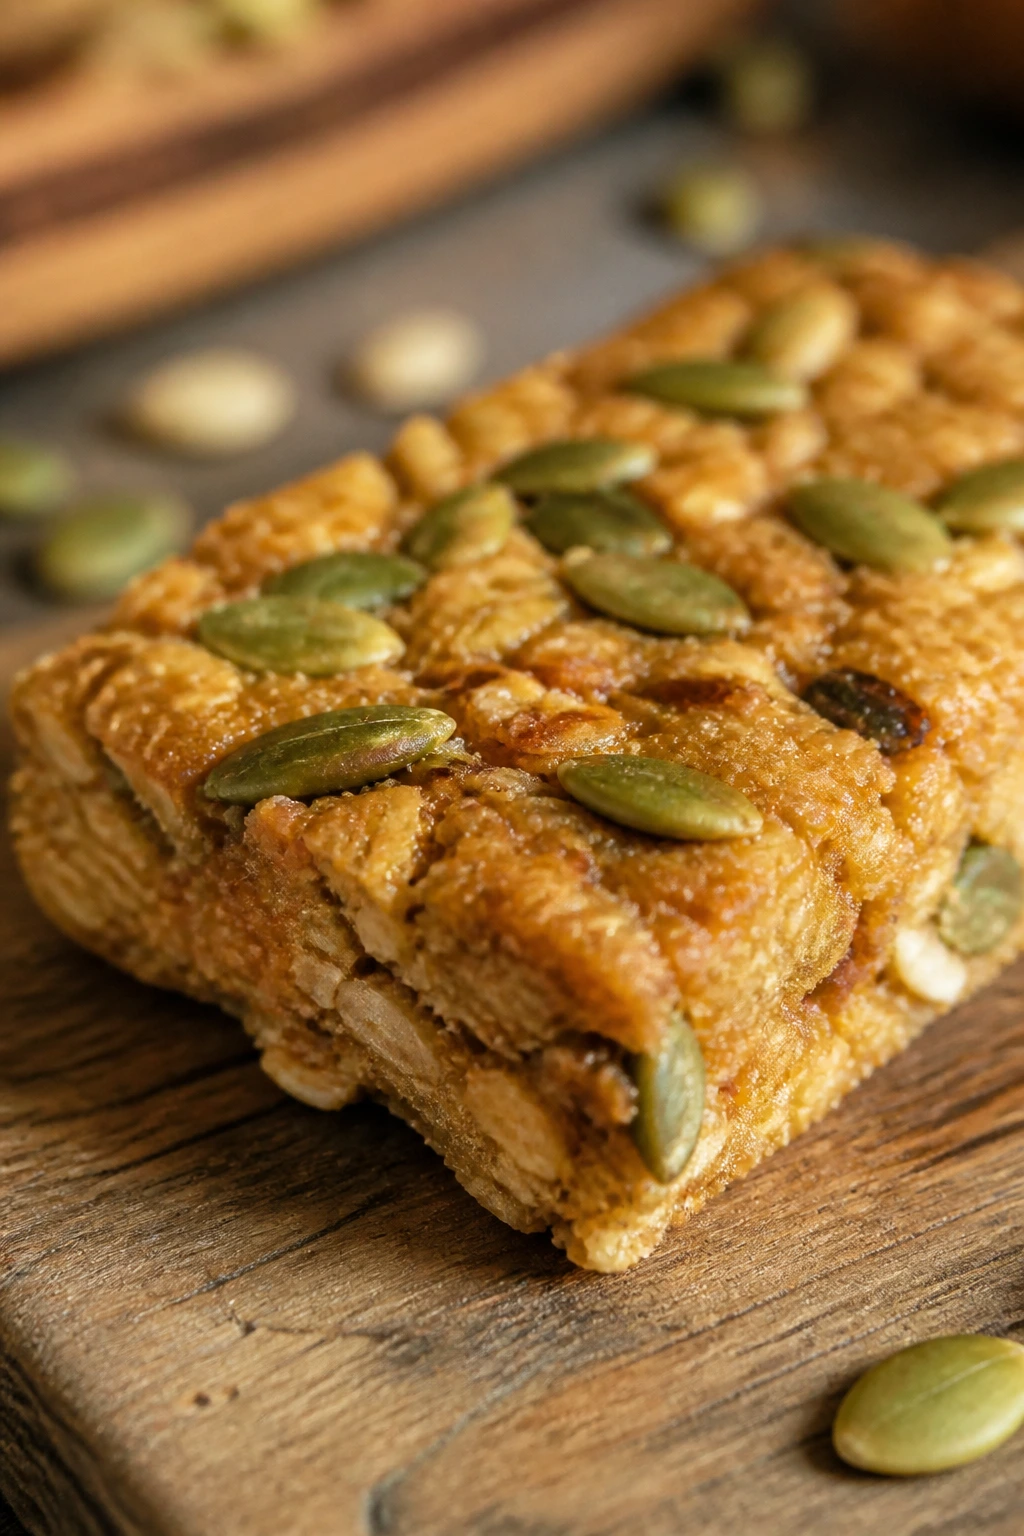
Green pepitas give these bars a nutty, earthy flavor that feels a little different from the usual peanut butter routine. Maple keeps them round and mellow, and the roasted pumpkin seeds add a snap that makes each bite feel more complete.
Why It Works:
Pumpkin seed butter has enough fat to carry protein powder without turning the bars dry, and the seeds themselves give you a second layer of texture. Cinnamon and nutmeg pull the maple flavor forward without making the bars taste like pie. This is the sort of recipe that benefits from a clean, salty finish because the seed flavor can go flat if you skip it.
If you can find roasted pumpkin seed butter, use it. The flavor is deeper and less raw-tasting than some seed butters.
Key Ingredients:
- 2 cups old-fashioned rolled oats — gives the bars structure.
- 3/4 cup vanilla protein powder — smooths the seed flavor.
- 1/2 cup pumpkin seed butter — the binder.
- 1/3 cup maple syrup — sweetness with a darker note.
- 1/4 cup milk — adjusts the texture.
- 1/2 cup roasted pumpkin seeds — crunch.
- 1 teaspoon cinnamon — warm spice.
- 1/4 teaspoon nutmeg — a small background note.
- 1/2 teaspoon fine salt — keeps the maple from getting too sweet.
- 2 tablespoons chia seeds — helps the bars firm up.
Quick Steps:
- Line an 8×8-inch pan with parchment paper.
- Stir the oats, protein powder, cinnamon, nutmeg, salt, and chia seeds together.
- Whisk the pumpkin seed butter, maple syrup, and milk until smooth.
- Combine everything, fold in the pumpkin seeds, and press firmly into the pan.
- Chill for at least 1 hour before slicing into 8 bars.
Equipment for This Recipe:
- 8×8-inch pan
- Parchment paper
- Bowl
- Whisk
- Spatula
How to Serve This Dish:
These bars are solid with plain yogurt or a sliced apple on the side. They also work well as an afternoon snack when you want something less sweet than chocolate.
Pro Tips for This Recipe:
- Stir the pumpkin seed butter well before measuring; it separates fast.
- Toast the pumpkin seeds for 3 to 4 minutes if they aren’t already roasted.
- If the dough feels loose, let it sit 5 minutes so the chia seeds can swell.
Variations on This Dish:
- Tahini Seed Cut: Swap half the pumpkin seed butter for tahini for a slightly more savory bar.
- Cranberry Seed Bars: Add 1/3 cup dried cranberries if you want a sweeter finish.
- Spiced Maple Version: Add 1/4 teaspoon ginger for a warmer flavor.
Common Mistakes to Avoid with This Dish:
- Using raw pumpkin seeds only: The flavor can taste grassy. Toasted seeds are better.
- Too much milk: Seed butters loosen fast. Add liquid slowly.
- Cutting before the chia has time to work: The bars won’t hold clean edges.
11. Coconut Date Macadamia Bars
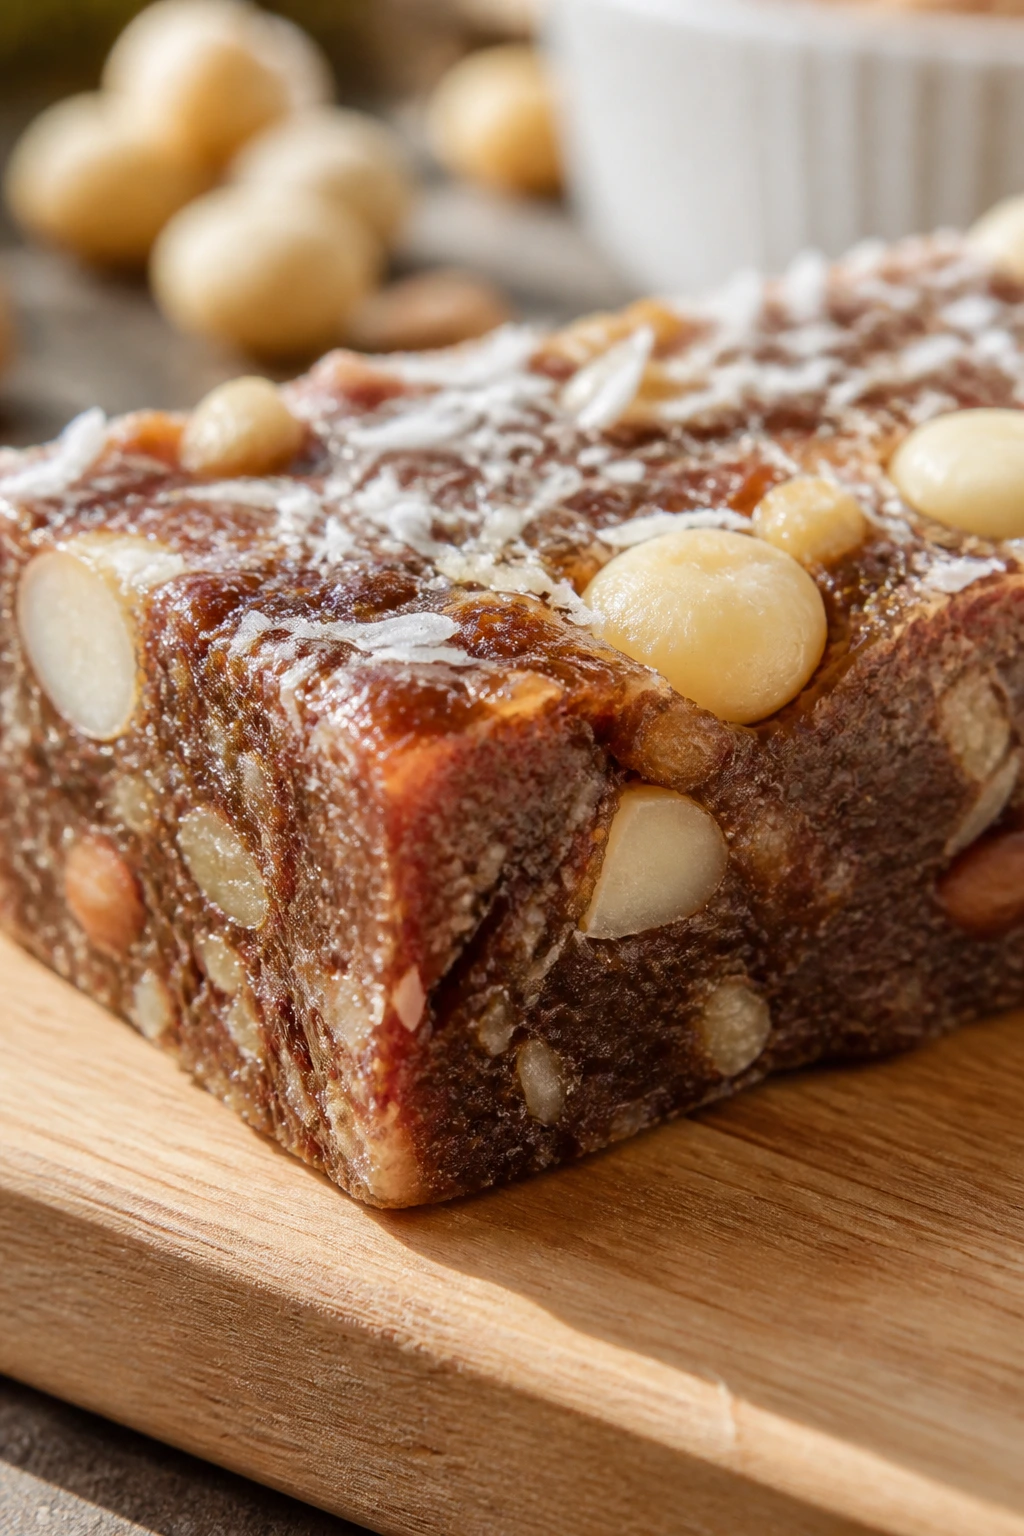
This one leans into the natural sweetness of dates, so the bar tastes richer and less processed than a lot of protein snacks. Macadamias bring a soft crunch, and the coconut makes the whole thing smell like a tropical bakery without turning syrupy.
Why It Works:
Dates act as both sweetener and glue, which means you can keep the added honey low or skip it entirely. That’s useful when you want a bar that tastes like fruit and nuts instead of a dessert masquerading as fuel. Macadamias are soft enough to blend with the date paste but still give the slice some bite.
A food processor does most of the work here. If you have one, this recipe feels almost unfairly easy.
Key Ingredients:
- 1 1/2 cups pitted Medjool dates, packed — the binder and sweetener.
- 1 cup old-fashioned rolled oats — structure.
- 3/4 cup vanilla protein powder — boosts protein without fighting the date flavor.
- 1/2 cup macadamia nuts — creamy crunch.
- 1/2 cup unsweetened shredded coconut — texture and aroma.
- 1/4 cup almond butter — helps the blend stay soft.
- 1 teaspoon vanilla extract — adds roundness.
- 1/4 teaspoon fine salt — sharpens the sweetness.
- 2 to 3 tablespoons hot water — only if the dates are dry.
Quick Steps:
- Line an 8×8-inch pan with parchment paper.
- Process the dates with almond butter, vanilla, salt, and hot water until a thick paste forms.
- Add the oats, protein powder, coconut, and most of the macadamias, then pulse until combined.
- Press into the pan, scatter the remaining nuts on top, and chill for 1 hour.
- Slice once firm.
Equipment for This Recipe:
- Food processor
- 8×8-inch pan
- Parchment paper
- Spatula
- Measuring cups
How to Serve This Dish:
These bars are good with plain coffee or a few slices of mango if you want to lean into the tropical feel. They also pack well because the date paste keeps them moist.
Pro Tips for This Recipe:
- Soak very dry dates in hot water for 5 minutes before processing.
- Don’t overprocess the nuts; a little texture is what keeps the bars interesting.
- Press the mixture down with parchment, not your bare hands, or it sticks like glue.
Variations on This Dish:
- Coconut Almond Cut: Swap macadamias for sliced almonds for a cheaper version.
- Chocolate Date Bars: Add 2 tablespoons cocoa powder for a darker, more brownie-like flavor.
- Salted Date Finish: Sprinkle flaky salt on top before chilling if you want the sweetness to pop more.
Common Mistakes to Avoid with This Dish:
- Dates that are too dry: The mix turns crumbly and never blends.
- Overloading with water: You’ll get sticky paste that won’t slice well.
- Skipping the processor: This recipe is much harder by hand.
12. Chocolate Tahini Sesame Bars
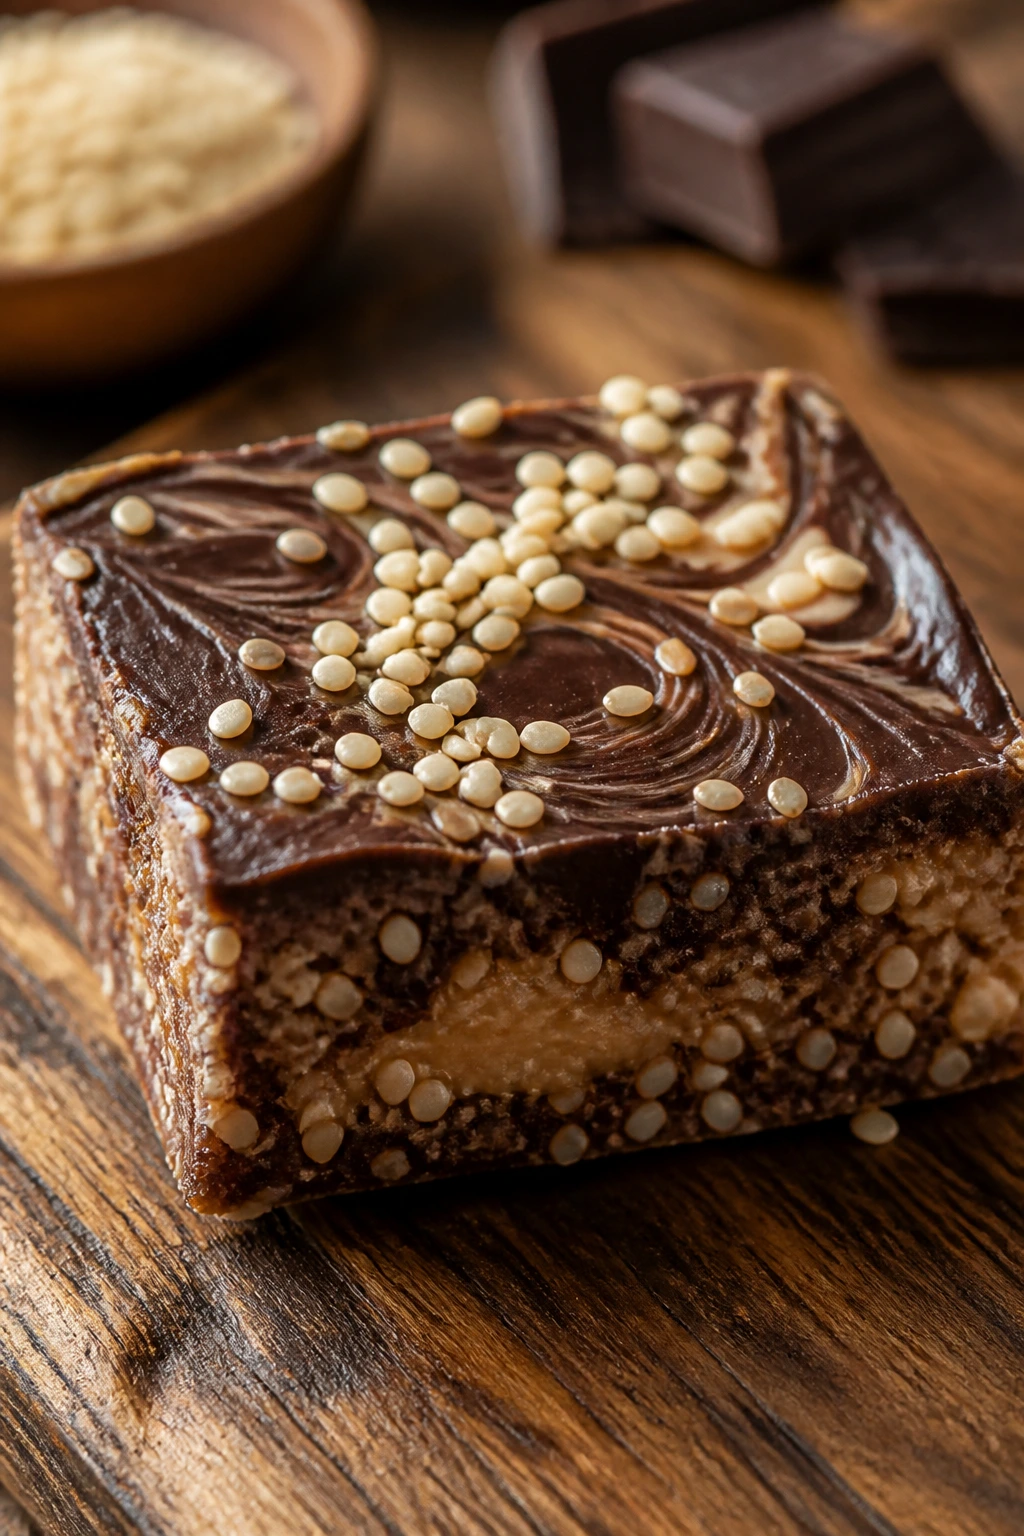
Tahini gives these bars a grown-up, almost savory edge that keeps them from tasting like every other chocolate snack in the pantry. Toasted sesame seeds and cocoa make a deep, nutty flavor that lingers a little after the bite is gone.
Why It Works:
Tahini is one of the best binders for protein bars because it has a smooth texture and a slightly bitter note that plays well with cocoa. Maple syrup softens that bitterness, while sesame seeds add a clean crunch instead of a sticky chew. If you like your snacks less sweet and more grounded, this is the one to make.
It also slices cleanly after chilling because tahini firms up better than many nut butters. That matters more than people think.
Key Ingredients:
- 2 cups old-fashioned rolled oats — structure.
- 3/4 cup chocolate protein powder — reinforces the cocoa flavor.
- 2 tablespoons unsweetened cocoa powder — for depth.
- 1/2 cup tahini — smooth binder.
- 1/4 cup maple syrup — sweetness.
- 1/4 cup milk — to loosen the mixture.
- 2 tablespoons toasted sesame seeds — crunch and aroma.
- 1 teaspoon vanilla extract — softens the cocoa.
- 1/2 teaspoon fine salt — balances the tahini.
- Flaky salt for the top — optional, but useful.
Quick Steps:
- Line an 8×8-inch pan with parchment paper.
- Stir the oats, protein powder, cocoa, sesame seeds, and fine salt together.
- Whisk the tahini, maple syrup, milk, and vanilla until smooth.
- Combine the mixtures, press into the pan, and top with flaky salt if you like.
- Chill for 1 hour before slicing.
Equipment for This Recipe:
- 8×8-inch pan
- Parchment paper
- Two bowls
- Whisk
- Spatula
How to Serve This Dish:
These bars are better with coffee than milk, in my opinion. They’re also good with a few orange slices if you want to brighten the sesame flavor.
Pro Tips for This Recipe:
- Warm the tahini slightly so it stirs into the syrup without clumping.
- Choose a smoother tahini; the dry, grainy ones make the bars harder to press.
- A pinch of flaky salt on top gives the chocolate a sharper edge.
Variations on This Dish:
- Black Sesame Version: Swap 1 tablespoon of the sesame seeds for black sesame seeds if you want a deeper flavor.
- Date-Sweetened Cut: Replace half the maple syrup with date paste for a chewier bar.
- Orange Tahini: Add 1 teaspoon orange zest for a brighter finish.
Common Mistakes to Avoid with This Dish:
- Using bitter tahini without balancing it: The bars can taste sharp and dry.
- Too much cocoa: It can overpower the sesame note.
- Under-chilling: Tahini bars need a full set or they slump.
13. Apple Pie Cinnamon Bars
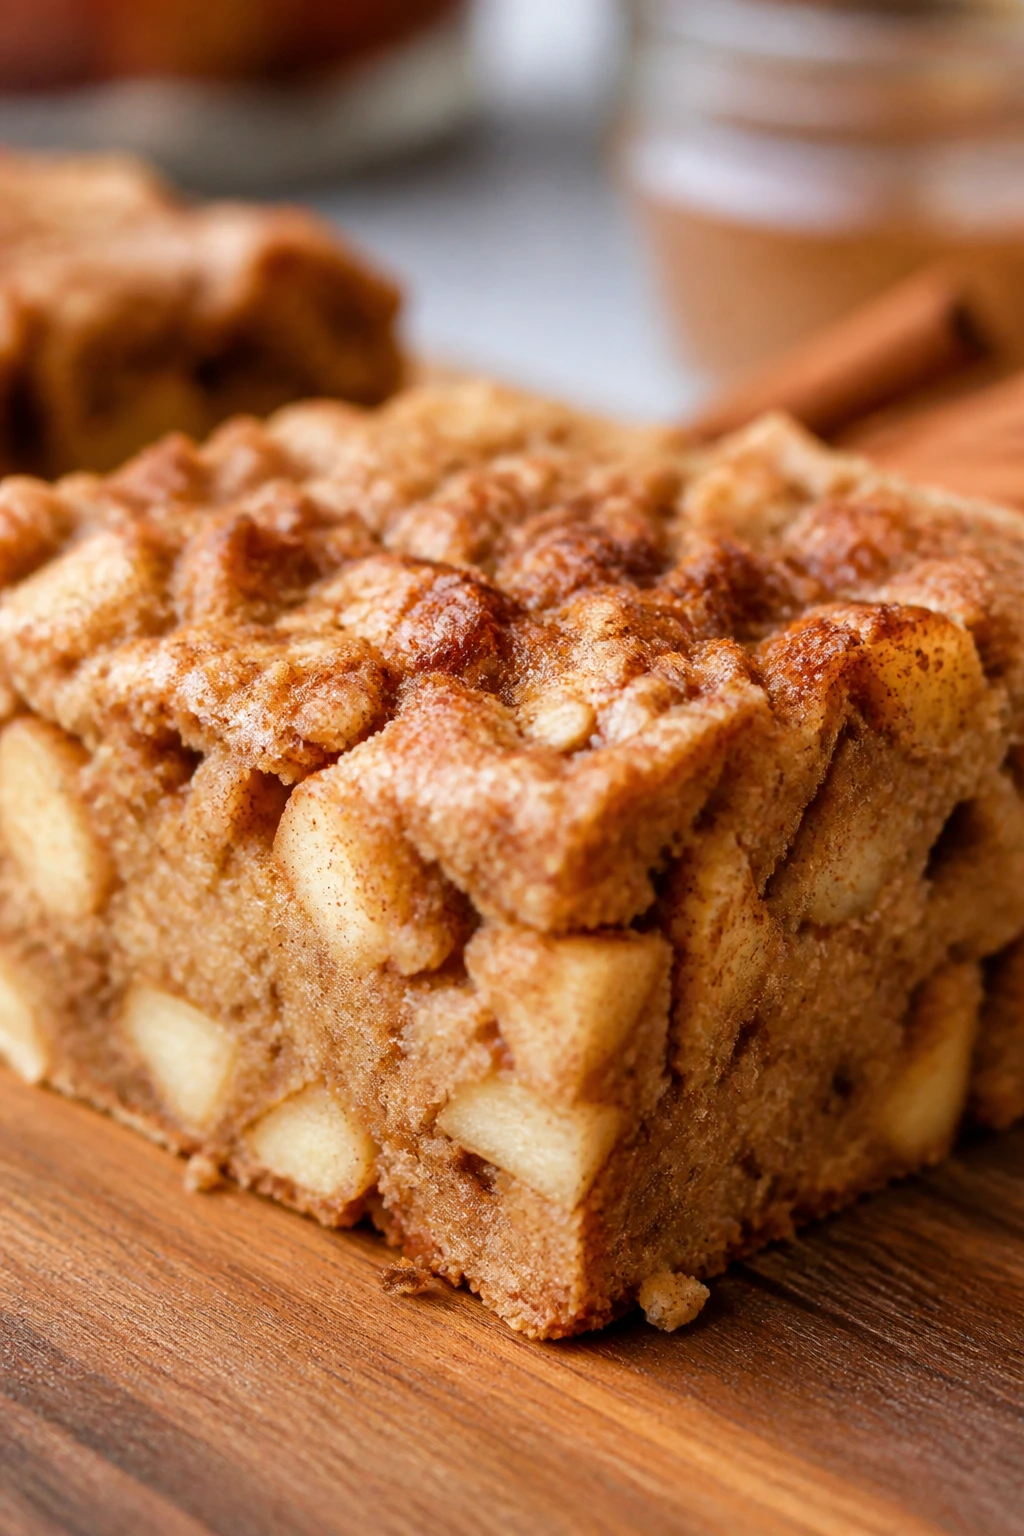
These bake up smelling like a warm kitchen, which is more than enough reason to make them on a Sunday. Small pieces of apple soften into the batter, and walnuts give each bite a little edge so the bars don’t turn mushy.
Why It Works:
Apple sauce and grated apple do different jobs here. Applesauce keeps the crumb moist, while the fresh chopped apple gives you actual texture instead of a uniform soft square. Oat flour keeps the bars tender, and a measured hit of cinnamon makes the flavor read as apple pie without needing a full crust and filling situation.
The trick is squeezing excess moisture from the chopped apple. If you skip that, the bars bake up wet in the middle and the edges overcook while you wait.
Key Ingredients:
- 2 cups oat flour — the main structure.
- 3/4 cup vanilla protein powder — gives body and boosts protein.
- 1 teaspoon cinnamon — the pie flavor.
- 1/2 teaspoon baking powder — light lift.
- 1/2 teaspoon fine salt — balances the fruit.
- 2 large eggs — binding.
- 1/2 cup unsweetened applesauce — moisture.
- 1/3 cup maple syrup — sweetness.
- 1/4 cup milk — loosens the batter.
- 1 cup peeled apple, finely chopped — about 1 medium apple.
- 1/2 cup chopped walnuts — crunch.
- 2 tablespoons raisins — optional, but they fit.
Quick Steps:
- Preheat the oven to 350°F and line an 8×8-inch pan with parchment.
- Whisk the oat flour, protein powder, cinnamon, baking powder, and salt.
- In a second bowl, whisk the eggs, applesauce, maple syrup, and milk.
- Stir in the dry ingredients, then fold in the apple, walnuts, and raisins.
- Spread into the pan and bake for 20 to 24 minutes, until the center is set. Cool fully before cutting.
Equipment for This Recipe:
- 8×8-inch pan
- Parchment paper
- Two bowls
- Whisk
- Knife and cutting board
How to Serve This Dish:
These are nice with plain yogurt or a spoonful of ricotta if you’re eating at home. They also hold up well in a lunch bag because the apple keeps them from drying out too fast.
Pro Tips for This Recipe:
- Dice the apple small so it bakes evenly.
- Pat the chopped apple dry if it’s very juicy.
- Let the bars cool fully; warm fruit bars cut badly.
Variations on This Dish:
- Apple Cranberry Cut: Swap raisins for dried cranberries for a brighter tart note.
- Maple Walnut Version: Add 1 extra tablespoon maple syrup and another 2 tablespoons walnuts if you want it richer.
- Apple Spice Version: Add a pinch of ginger and nutmeg for a deeper pie flavor.
Common Mistakes to Avoid with This Dish:
- Using watery applesauce plus juicy apple pieces without balance: The bars bake soggy.
- Overbaking until the apple dries out: The bars should stay tender.
- Skipping the cool-down: Fruit bars need time to firm before slicing.
14. Gingerbread Oat Bars
These bring winter-spice energy into a snack that still makes sense after a workout. Molasses gives the bars a dark, almost toasty sweetness, and the ginger keeps them from feeling heavy. They’re chewy, a little sticky in the best way, and very good with coffee.
Why It Works:
Molasses does more than sweeten here; it gives depth and a soft chew that pairs well with oats. Ginger, cinnamon, cloves, and nutmeg build a flavor that reads instantly as gingerbread, even without frosting. Almond butter smooths out the molasses and keeps the bars from getting hard in the fridge.
This recipe is one of the few where a stronger spice hand works. Gingerbread wants to be heard.
Key Ingredients:
- 2 cups old-fashioned rolled oats — chewy base.
- 3/4 cup vanilla protein powder — keeps the bars balanced.
- 1 teaspoon ground ginger — the main spice.
- 1 teaspoon cinnamon — warmth.
- 1/4 teaspoon ground cloves — small but necessary.
- 1/4 teaspoon nutmeg — rounds out the spice blend.
- 1/2 teaspoon fine salt — sharpens the molasses.
- 1/3 cup molasses — the signature flavor.
- 1/3 cup almond butter — creamy binder.
- 1/4 cup maple syrup — softens the molasses edge.
- 1/4 cup milk — adjusts the texture.
- 1/3 cup chopped pecans — crunch.
Quick Steps:
- Line an 8×8-inch pan with parchment paper.
- Stir the oats, protein powder, spices, and salt together.
- Whisk the molasses, almond butter, maple syrup, and milk until smooth.
- Mix the wet and dry ingredients, then fold in the pecans.
- Press into the pan and chill for 1 hour before slicing.
Equipment for This Recipe:
- 8×8-inch pan
- Parchment paper
- Two bowls
- Whisk
- Spatula
How to Serve This Dish:
These are very good with tea, and they make sense alongside a small bowl of yogurt if you want more protein at the same meal. A dusting of cinnamon on top looks right without trying too hard.
Pro Tips for This Recipe:
- Measure molasses carefully; a little too much changes the texture fast.
- Warm the almond butter so it blends with the molasses.
- If the mixture feels stiff, add milk 1 teaspoon at a time.
Variations on This Dish:
- Molasses-Heavy Cut: Use 1 extra tablespoon molasses for a darker flavor.
- Ginger Snap Style: Add 2 tablespoons finely chopped crystallized ginger if you want more bite.
- Pecan-Free Version: Swap pecans for sunflower seeds if nuts are off the table.
Common Mistakes to Avoid with This Dish:
- Too much clove: It can overpower the whole batch.
- Not enough sweetness to balance molasses: The bars can taste bitter.
- Skipping the chill: Gingerbread bars are sticky when warm.
15. Mint Chocolate Protein Bars
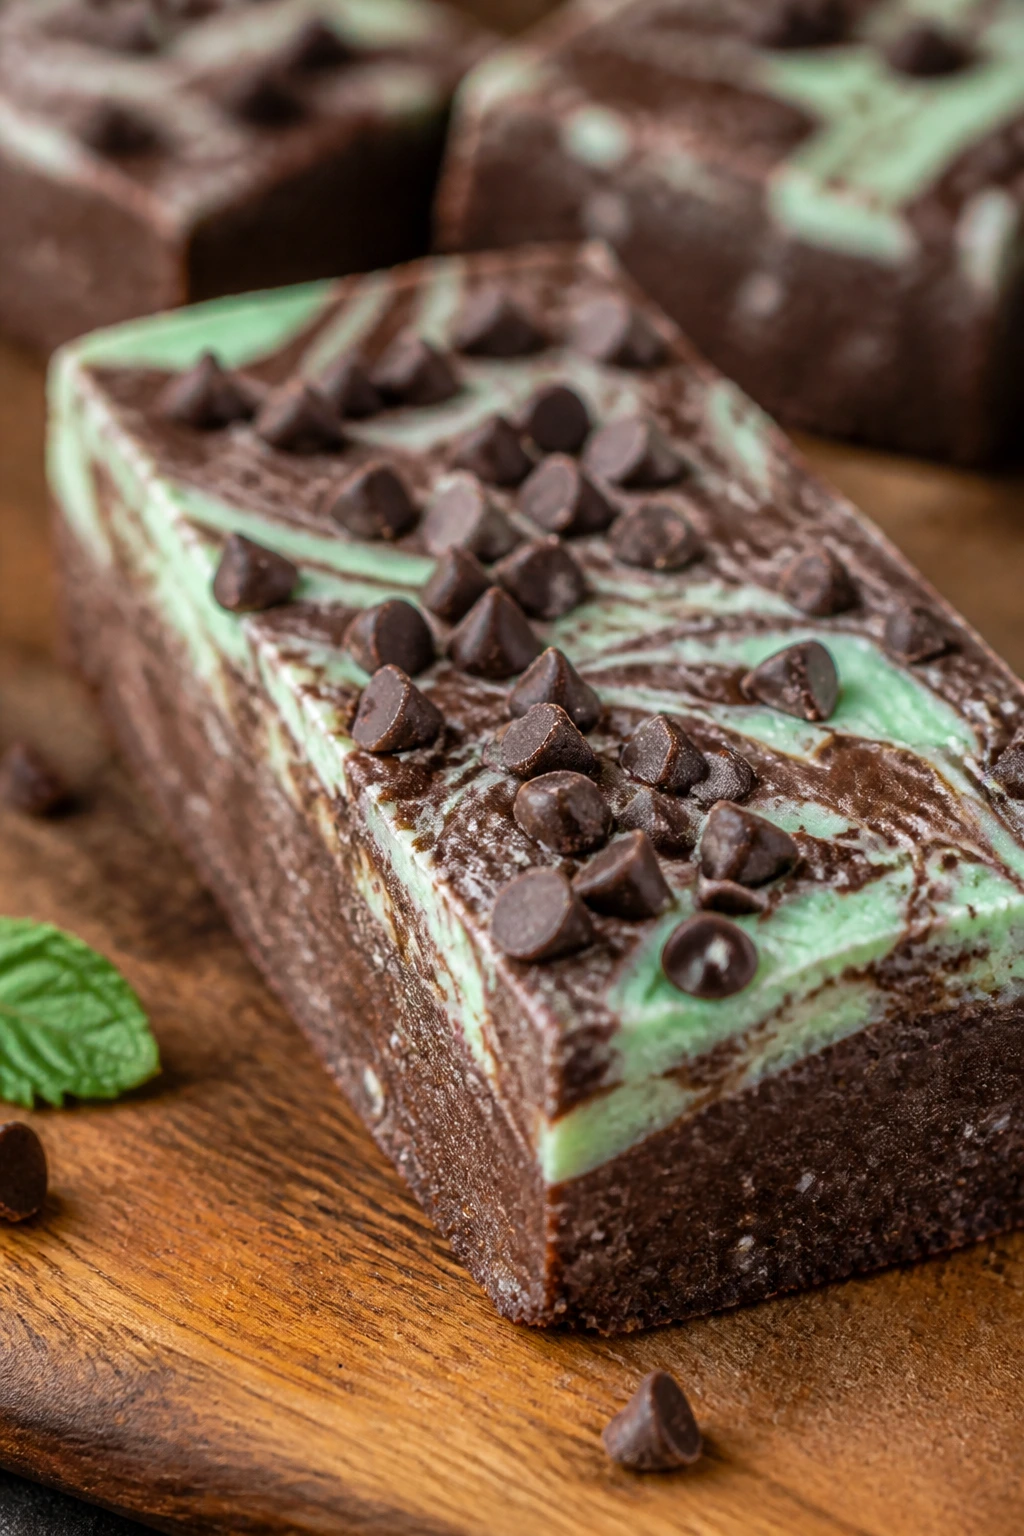
Mint and chocolate can go toothpaste-fast if you’re careless, but a small hand with the mint extract keeps these bars cool and clean. The cocoa is deep, the chocolate chips give you texture, and the mint lands on the back end where it should.
Why It Works:
This recipe needs a careful dose of mint because extract is powerful. The cocoa and chocolate protein powder create a strong base, while almond butter keeps the bars soft and prevents the powder from feeling dusty. A little mint makes the whole thing taste fresh after a sweaty workout, which is a pleasant trick when you do not want another heavy snack.
The bars also hold up well in the fridge. Mint and cold storage get along.
Key Ingredients:
- 2 cups old-fashioned rolled oats — base and chew.
- 3/4 cup chocolate protein powder — reinforces the cocoa flavor.
- 1/4 cup unsweetened cocoa powder — deeper chocolate.
- 1/2 cup almond butter — binds and softens.
- 1/3 cup honey — sweetness.
- 1/4 cup milk — moisture.
- 1/2 teaspoon peppermint extract — go easy; it’s strong.
- 1/2 teaspoon fine salt — keeps the flavor from flattening.
- 1/2 cup mini chocolate chips — texture.
- 2 tablespoons cacao nibs — optional crunch.
Quick Steps:
- Line an 8×8-inch pan with parchment paper.
- Mix the oats, protein powder, cocoa, and salt in a bowl.
- Whisk the almond butter, honey, milk, and peppermint extract until smooth.
- Combine the mixtures and fold in the chocolate chips and cacao nibs.
- Press into the pan, chill for 1 hour, and cut into 8 bars.
Equipment for This Recipe:
- 8×8-inch pan
- Parchment paper
- Bowl
- Whisk
- Spatula
How to Serve This Dish:
These are good straight from the fridge, especially if you want the mint to feel sharper. I’d pair them with a banana or a handful of berries rather than anything too rich.
Pro Tips for This Recipe:
- Start with less peppermint extract than you think you need.
- Taste the batter before chilling; mint can surprise you.
- If the mix is too soft, add 1 to 2 tablespoons oats.
Variations on This Dish:
- Thin-Mint Style: Add 1 tablespoon coconut oil and a few extra chocolate chips on top.
- Mocha Mint: Add 1 teaspoon espresso powder for a café-style version.
- Peppermint Dark Cut: Use dark chocolate chunks instead of mini chips for a bolder bar.
Common Mistakes to Avoid with This Dish:
- Overdoing the mint extract: The bars taste harsh and medicinal.
- No salt: Chocolate mint needs contrast.
- Cutting before firm: Mint bars slice better after a full chill.
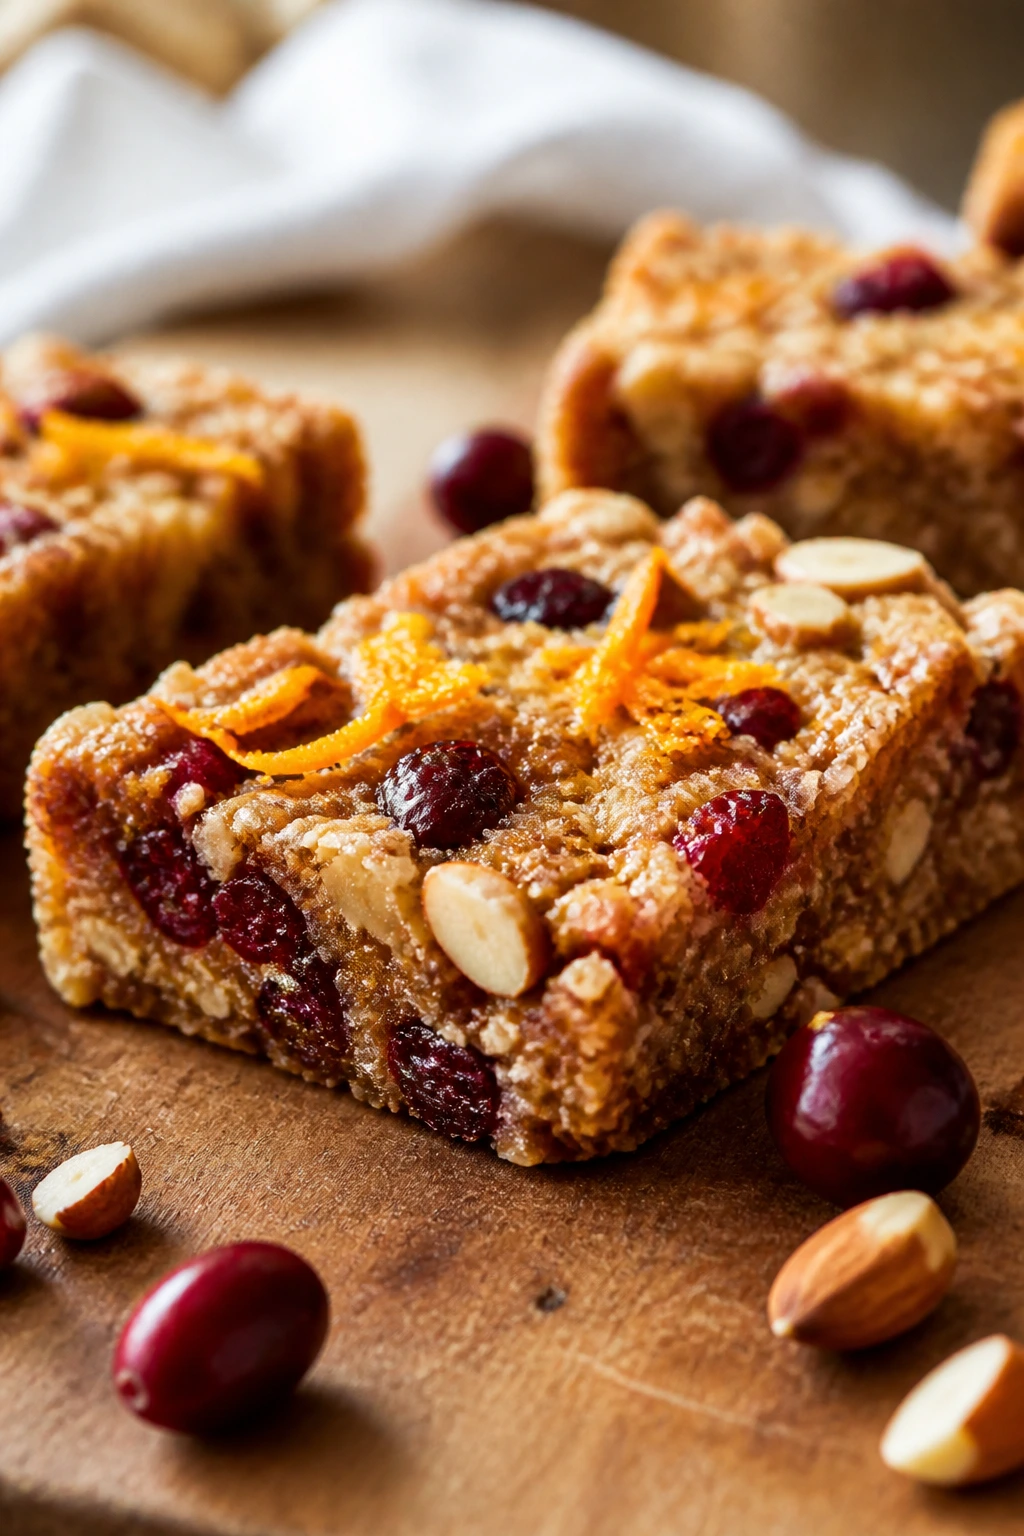
16. Orange Cranberry Almond Bars
This one tastes bright in a way that most protein bars don’t even try to be. Orange zest gives the first hit, cranberry brings a little tart chew, and sliced almonds keep the bars from feeling soft all the way through.
Why It Works:
Citrus zest is a very efficient flavor trick. You get a lot of aroma without adding liquid, which matters in bar recipes where too much moisture turns the pan into paste. Almond butter and vanilla protein powder create a mellow base, while cranberries give pops of sweetness that break up the nuttiness.
If you chop the cranberries, the bars slice more cleanly. Whole dried cranberries can tug at the knife and make the edges ragged.
Key Ingredients:
- 1 3/4 cups oat flour — soft structure.
- 3/4 cup vanilla protein powder — keeps the citrus clean.
- 1/2 cup almond butter — creamy binder.
- 1/4 cup honey — sweetness.
- 2 tablespoons orange zest — the main flavor.
- 2 tablespoons orange juice — just enough to brighten the mix.
- 1/2 cup dried cranberries, chopped — tart chew.
- 1/3 cup sliced almonds — crunch.
- 1/4 cup milk — to loosen the batter.
- 1/2 teaspoon fine salt — balances the fruit.
Quick Steps:
- Line an 8×8-inch pan with parchment paper.
- Stir the oat flour, protein powder, cranberries, almonds, and salt together.
- Whisk the almond butter, honey, orange zest, orange juice, and milk until smooth.
- Combine, press into the pan, and chill until firm, about 1 hour.
- Slice into 8 bars.
Equipment for This Recipe:
- 8×8-inch pan
- Parchment paper
- Bowl
- Whisk
- Spatula
How to Serve This Dish:
These bars are nice with tea or with a cup of plain yogurt on the side. A few extra ribbons of orange zest on top make them feel finished without much effort.
Pro Tips for This Recipe:
- Zest the orange before juicing it.
- Chop the cranberries so the knife doesn’t drag through the bars.
- If the mix is dry, use more orange juice only by the teaspoon.
Variations on This Dish:
- Cranberry Pistachio: Swap almonds for chopped pistachios for a greener, saltier bar.
- Orange Vanilla Cream: Add 2 tablespoons powdered milk or dairy-free creamer for a softer flavor.
- Darker Citrus Cut: Add a pinch of cardamom for a more aromatic finish.
Common Mistakes to Avoid with This Dish:
- Too much juice: The bars lose their shape.
- Using old dried cranberries that are hard as pebbles: Chop or soak them briefly.
- Skipping the chill: Citrus bars need time to set cleanly.
17. Birthday Cake Protein Bars

These are the kind of bars that make a mundane Sunday batch feel a little more fun. Vanilla, almond extract, and rainbow sprinkles create the birthday-cake effect, but the base is still sturdy enough to actually eat like a snack, not frosting in a pan.
Why It Works:
Birthday cake flavor is mostly about vanilla and a small almond note. The sprinkles are there for texture and mood, not because they add much taste, so the base has to do the real work. Cashew butter gives these bars a smooth, mild flavor that doesn’t fight the extracts, and oat flour keeps them sliceable after chilling.
A little coconut flour helps absorb moisture in no-bake bars, which is useful here because the sprinkles themselves don’t give you any structure at all.
Key Ingredients:
- 1 3/4 cups oat flour — main base.
- 3/4 cup vanilla protein powder — keeps the vanilla profile strong.
- 2 tablespoons coconut flour — helps the bars firm up.
- 1/2 cup cashew butter — smooth binder.
- 1/4 cup honey — sweetness.
- 1/4 cup milk — for texture.
- 1 teaspoon vanilla extract — the real birthday cake note.
- 1/2 teaspoon almond extract — use a light hand.
- 1/4 teaspoon fine salt — keeps the sweetness balanced.
- 1/4 cup rainbow sprinkles — fold in gently.
Quick Steps:
- Line an 8×8-inch pan with parchment paper.
- Stir the oat flour, protein powder, coconut flour, and salt together.
- Whisk the cashew butter, honey, milk, vanilla, and almond extract until smooth.
- Mix the wet and dry ingredients, fold in the sprinkles, and press into the pan.
- Chill for 1 hour, then slice.
Equipment for This Recipe:
- 8×8-inch pan
- Parchment paper
- Bowl
- Whisk
- Spatula
How to Serve This Dish:
These bars are the most fun if you cut them into neat rectangles and keep the top visible. They’re a good one for a lunchbox or a post-gym snack when you want something sweet without heading into full dessert territory.
Pro Tips for This Recipe:
- Add sprinkles last and fold gently so the colors don’t bleed.
- Don’t overdo almond extract; it can overpower the vanilla fast.
- Use a mild protein powder here, not a strongly flavored one.
Variations on This Dish:
- Confetti White Chocolate: Fold in 1/4 cup white chocolate chips with the sprinkles.
- Funfetti Lemon: Add 1 teaspoon lemon zest for a brighter finish.
- Chocolate Birthday Cut: Replace 2 tablespoons oat flour with cocoa powder for a cake-batter-chocolate hybrid.
Common Mistakes to Avoid with This Dish:
- Too much almond extract: The bars start tasting like soap.
- Overmixing the sprinkles: The colors streak through the batter.
- Using coarse coconut flour measure: It can make the bars dry if packed too heavily.
18. Carrot Cake Protein Bars
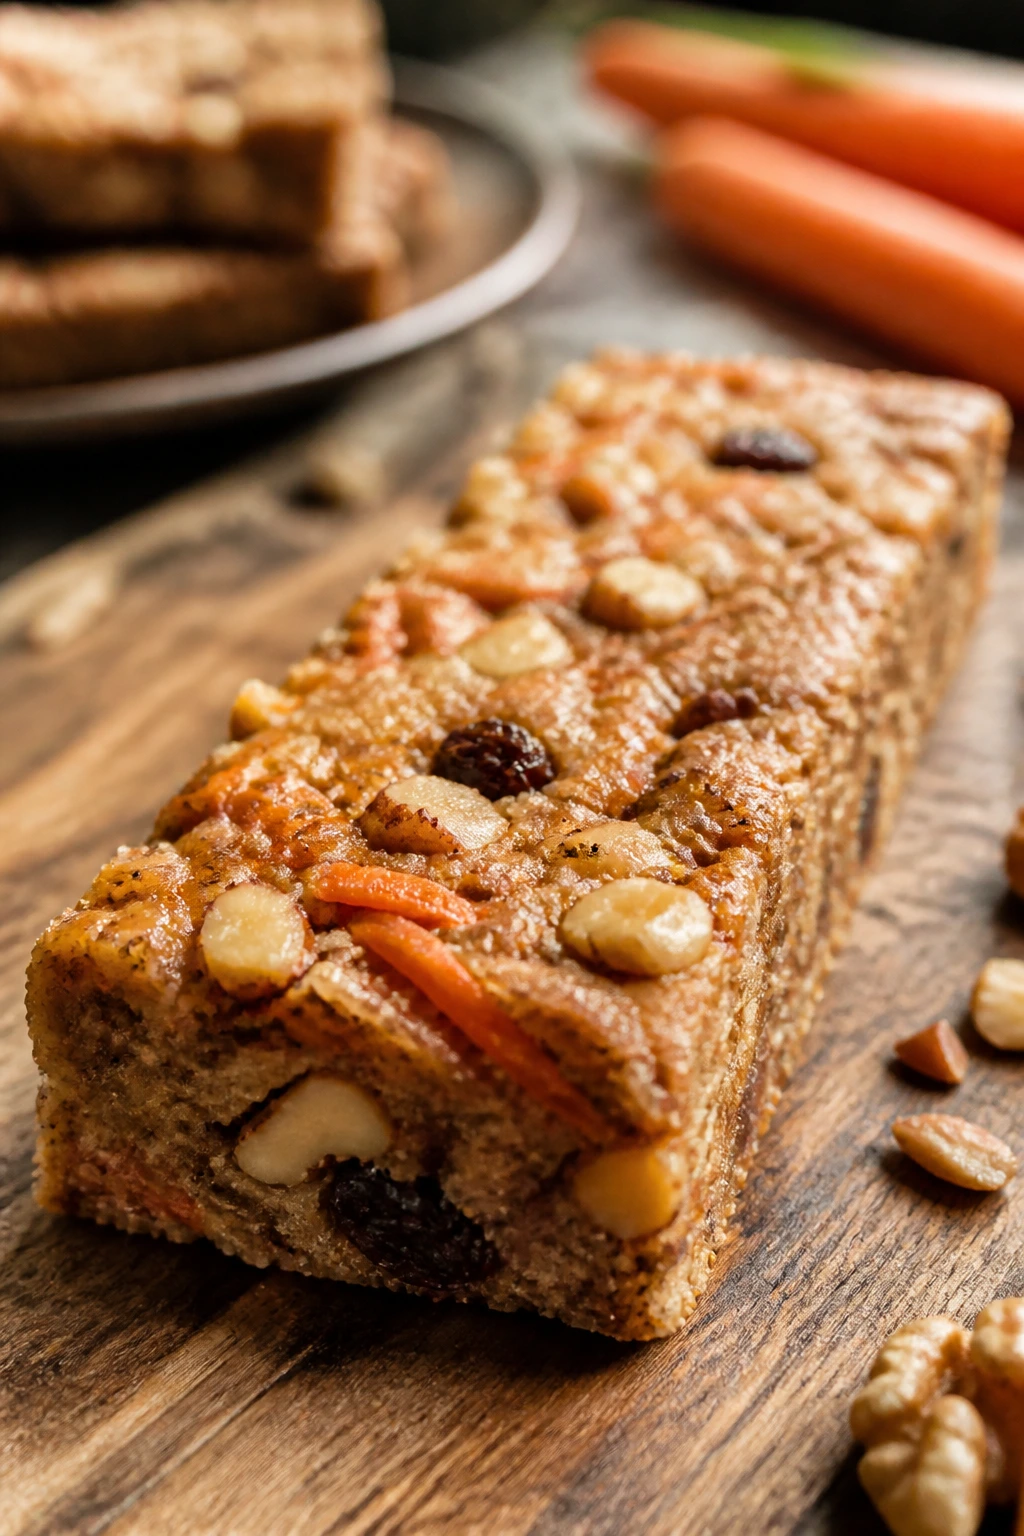
Shredded carrot gives these bars a soft, lightly sweet crumb that feels more substantial than the average no-bake square. Cinnamon, nutmeg, walnuts, and raisins pull it squarely into carrot-cake territory, and the Greek yogurt keeps the texture moist after baking.
Why It Works:
Carrot cake bars need a balance of moisture and structure because carrots bring a lot of water. Greek yogurt and eggs handle the moisture side, while oat flour and protein powder keep the bars from collapsing into a soft bake. The grated carrot should be fine and squeezed a bit dry so it blends into the crumb rather than steam the batter from within.
Walnuts add a useful bitterness, and raisins bring small sticky pockets of sweetness. The result feels closer to a snack cake than a strict protein bar, which is why people keep reaching back for another piece.
Key Ingredients:
- 1 1/2 cups oat flour — tender structure.
- 3/4 cup vanilla protein powder — boosts the protein.
- 1 cup finely grated carrot, squeezed dry — the main flavor.
- 1 teaspoon cinnamon — classic carrot cake spice.
- 1/4 teaspoon nutmeg — warmth.
- 1/2 teaspoon baking powder — helps the bars rise.
- 1/2 teaspoon fine salt — balance.
- 2 large eggs — bind the batter.
- 1/3 cup maple syrup — sweetness.
- 1/4 cup plain Greek yogurt — moisture.
- 1/4 cup chopped walnuts — crunch.
- 2 tablespoons raisins — optional but fitting.
Quick Steps:
- Preheat the oven to 350°F and line an 8×8-inch pan with parchment.
- Whisk the oat flour, protein powder, cinnamon, nutmeg, baking powder, and salt.
- In another bowl, whisk the eggs, maple syrup, and Greek yogurt until smooth.
- Stir in the dry ingredients, then fold in the carrot, walnuts, and raisins.
- Spread in the pan and bake for 20 to 25 minutes, until the center sets. Cool completely before cutting.
Equipment for This Recipe:
- 8×8-inch pan
- Parchment paper
- Two bowls
- Whisk
- Box grater or food processor
How to Serve This Dish:
These bars are good plain, but I like them with a spoonful of yogurt on the side if I’m eating them at home. If you want them to feel more like carrot cake, a light drizzle of cream cheese glaze works too.
Pro Tips for This Recipe:
- Grate the carrots finely; large shreds don’t bake as evenly.
- Squeeze out excess carrot moisture with a clean towel.
- Let the bars cool all the way or the crumb tears.
Variations on This Dish:
- Pineapple Carrot Cut: Add 2 tablespoons crushed pineapple, well drained, for a sweeter twist.
- Pecan Version: Swap walnuts for pecans if you want a softer crunch.
- Dairy-Free Carrot Bars: Replace Greek yogurt with thick coconut yogurt.
Common Mistakes to Avoid with This Dish:
- Wet carrots straight from the grater: They make the batter soggy.
- Too much spice: Carrot cake should taste warm, not like a spice drawer exploded.
- Cutting before cool: The bars need to set before you slice.
19. S’mores Protein Bars
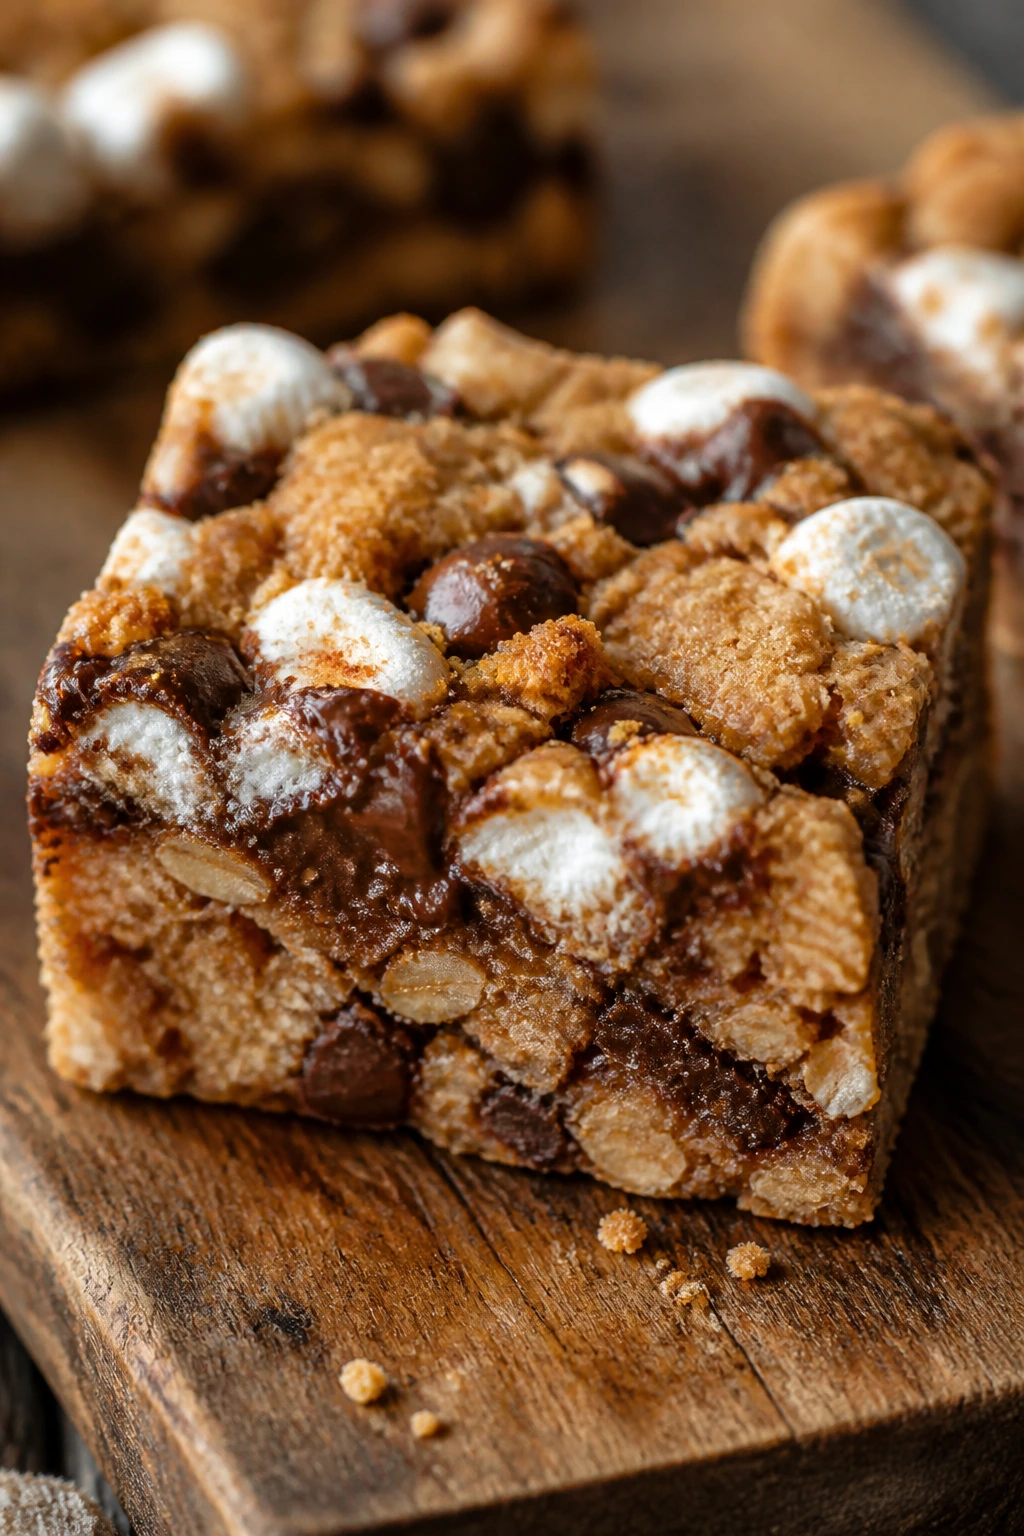
These taste like a campfire memory that got trapped in a fridge-friendly square. Graham cracker crumbs, chocolate, and marshmallow bits work together fast, and the oats keep the whole thing from turning into a sugar bomb with no shape.
Why It Works:
S’mores flavor depends on recognizable pieces, not just “chocolate vibe.” Graham crumbs provide that dry biscuit note, chocolate protein powder gives depth, and marshmallow bits add little chewy hits without melting into a mess. Almond butter holds everything together while oats keep the bar from going gooey.
The trick is not to overload the marshmallow bits. Too many and the bars fall apart; too few and the flavor disappears.
Key Ingredients:
- 2 cups old-fashioned rolled oats — structure.
- 3/4 cup chocolate protein powder — supports the chocolate flavor.
- 1/2 cup graham cracker crumbs — the s’mores base note.
- 1/2 cup almond butter — binder.
- 1/3 cup honey — sweetness and stick.
- 1/4 cup milk — keeps the texture workable.
- 1/2 cup mini marshmallows or marshmallow bits — the s’mores cue.
- 1/2 cup mini chocolate chips — more chocolate texture.
- 1/2 teaspoon fine salt — keeps the bar from tasting like kid cereal.
- 1 teaspoon vanilla extract — rounds the flavor.
Quick Steps:
- Line an 8×8-inch pan with parchment paper.
- Stir the oats, protein powder, graham crumbs, and salt in a bowl.
- Whisk the almond butter, honey, milk, and vanilla until smooth.
- Combine the mixtures, then fold in the marshmallows and chocolate chips.
- Press into the pan and chill for 1 hour before slicing.
Equipment for This Recipe:
- 8×8-inch pan
- Parchment paper
- Bowl
- Whisk
- Spatula
How to Serve This Dish:
These are best eaten cold so the marshmallow bits stay in place. I like them after a workout when I want something sweet that still feels like a snack bar, not a dessert plate.
Pro Tips for This Recipe:
- If you use mini marshmallows, cut the bars before they sit too long or they can get sticky.
- Use fine graham crumbs so the slice holds together.
- A pinch of extra salt on top helps the chocolate taste less flat.
Variations on This Dish:
- Dark Chocolate S’mores: Use dark chocolate chips for a less sweet bar.
- Peanut Butter Campfire Cut: Swap almond butter for peanut butter for a louder flavor.
- Toasted Coconut S’mores: Add 2 tablespoons toasted coconut for a little extra chew.
Common Mistakes to Avoid with This Dish:
- Too many marshmallows: The bars turn loose and sticky.
- Using coarse crumbs only: They won’t pack tightly.
- Not chilling fully: S’mores bars need time to set or they collapse.
20. Matcha White Chocolate Bars
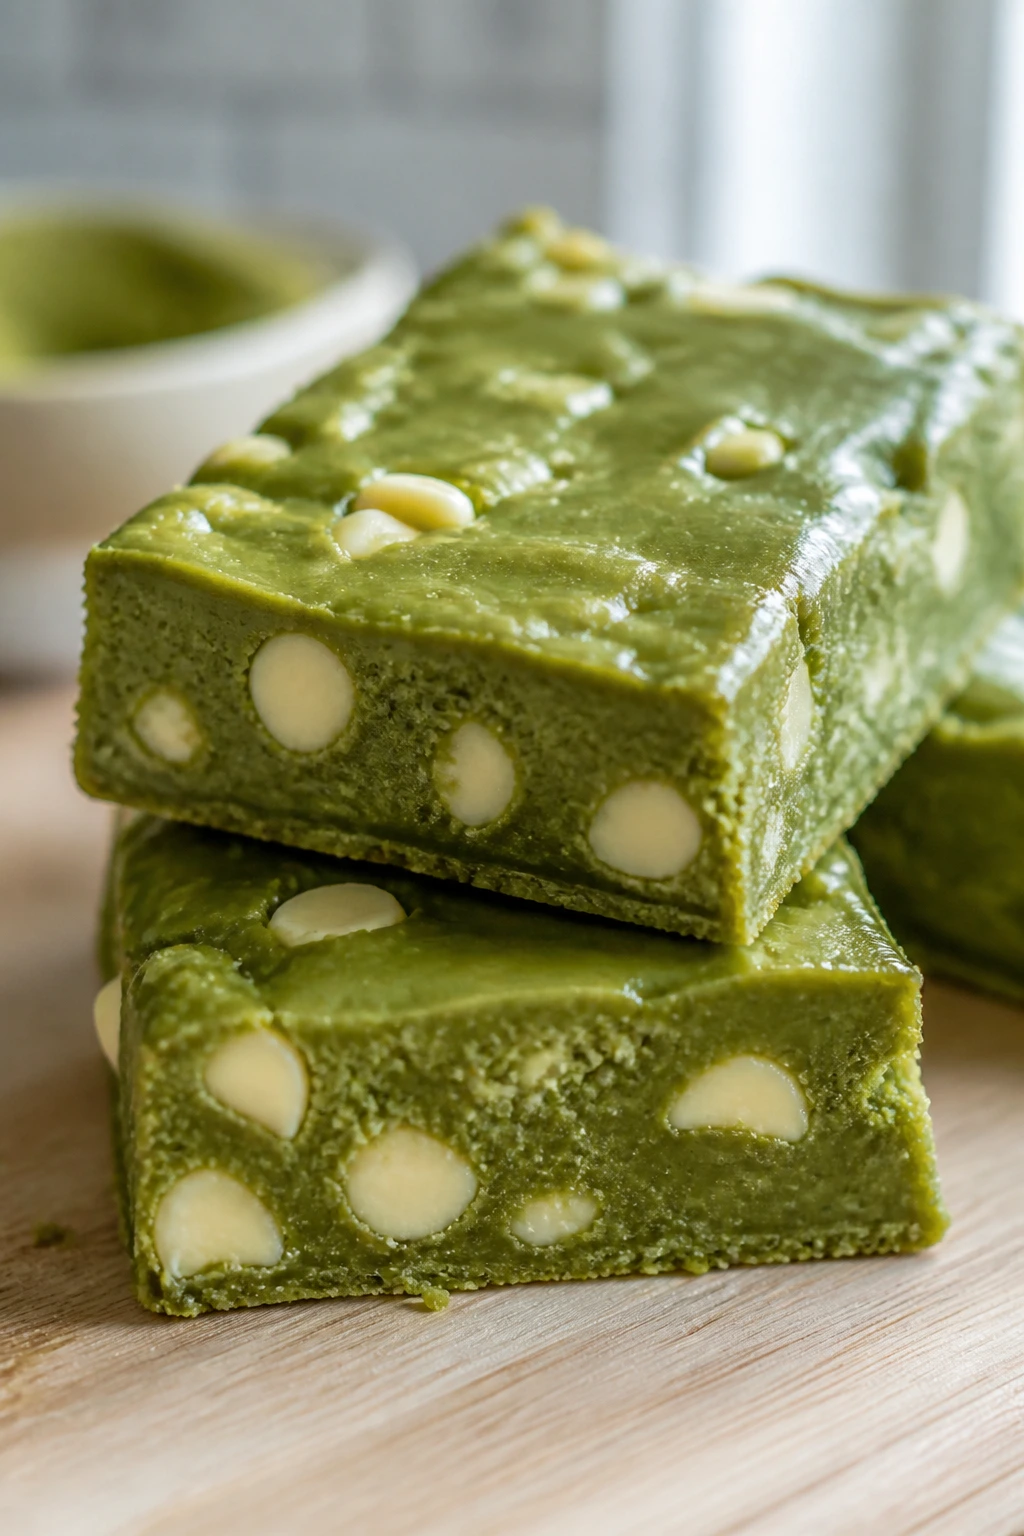
This is the green bar for people who like their snacks a little less obvious. Matcha brings a grassy, clean note, white chocolate softens it, and cashew butter gives the whole thing a creamy finish that feels almost luxurious after a workout.
Why It Works:
Matcha is strong and can taste sharp if you don’t give it enough sweetness and fat to stand on. Cashew butter is perfect here because it’s mild, creamy, and doesn’t fight the tea flavor. White chocolate chips round out the edges and make the bars feel smoother than most protein snacks.
Use a matcha powder you actually like drinking. If it tastes dusty in a latte, it will taste dusty here too.
Key Ingredients:
- 1 3/4 cups oat flour — soft structure.
- 3/4 cup vanilla protein powder — keeps the green tea flavor clean.
- 1 to 1 1/2 tablespoons matcha powder — start with 1 tablespoon if yours is intense.
- 1/2 cup cashew butter — smooth binder.
- 1/4 cup honey — sweetness.
- 3 tablespoons coconut oil, melted — helps set the bars.
- 1/4 cup milk — just enough to make the mix workable.
- 1/2 teaspoon vanilla extract — softens the matcha.
- 1/4 teaspoon fine salt — balances the sweetness.
- 1/3 cup white chocolate chips — the creamy contrast.
Quick Steps:
- Line an 8×8-inch pan with parchment paper.
- Stir the oat flour, protein powder, matcha, and salt together.
- Whisk the cashew butter, honey, coconut oil, milk, and vanilla until smooth.
- Combine the mixtures and fold in the white chocolate chips.
- Press into the pan and chill for 1 to 2 hours before slicing.
Equipment for This Recipe:
- 8×8-inch pan
- Parchment paper
- Bowl
- Whisk
- Spatula
How to Serve This Dish:
These bars look good with a clean cut and no extra garnish at all. If you want a pairing, go with hot green tea or a cold almond milk latte.
Pro Tips for This Recipe:
- Sift the matcha if it’s lumpy.
- Start with the smaller amount, then taste before adding more.
- Store these away from strong-smelling foods; matcha picks up fridge smells fast.
Variations on This Dish:
- Coconut Matcha: Add 2 tablespoons shredded coconut for a softer chew.
- Lemon Matcha Cut: Add 1 teaspoon lemon zest for a brighter top note.
- Double White Chocolate: Fold in extra chips if you want the matcha more mellow.
Common Mistakes to Avoid with This Dish:
- Using too much matcha: The bars get bitter and chalky.
- Skipping the salt: Matcha can taste flat without it.
- Cutting too early: Coconut oil needs time to firm up the slice.
21. Pistachio Cardamom Bars
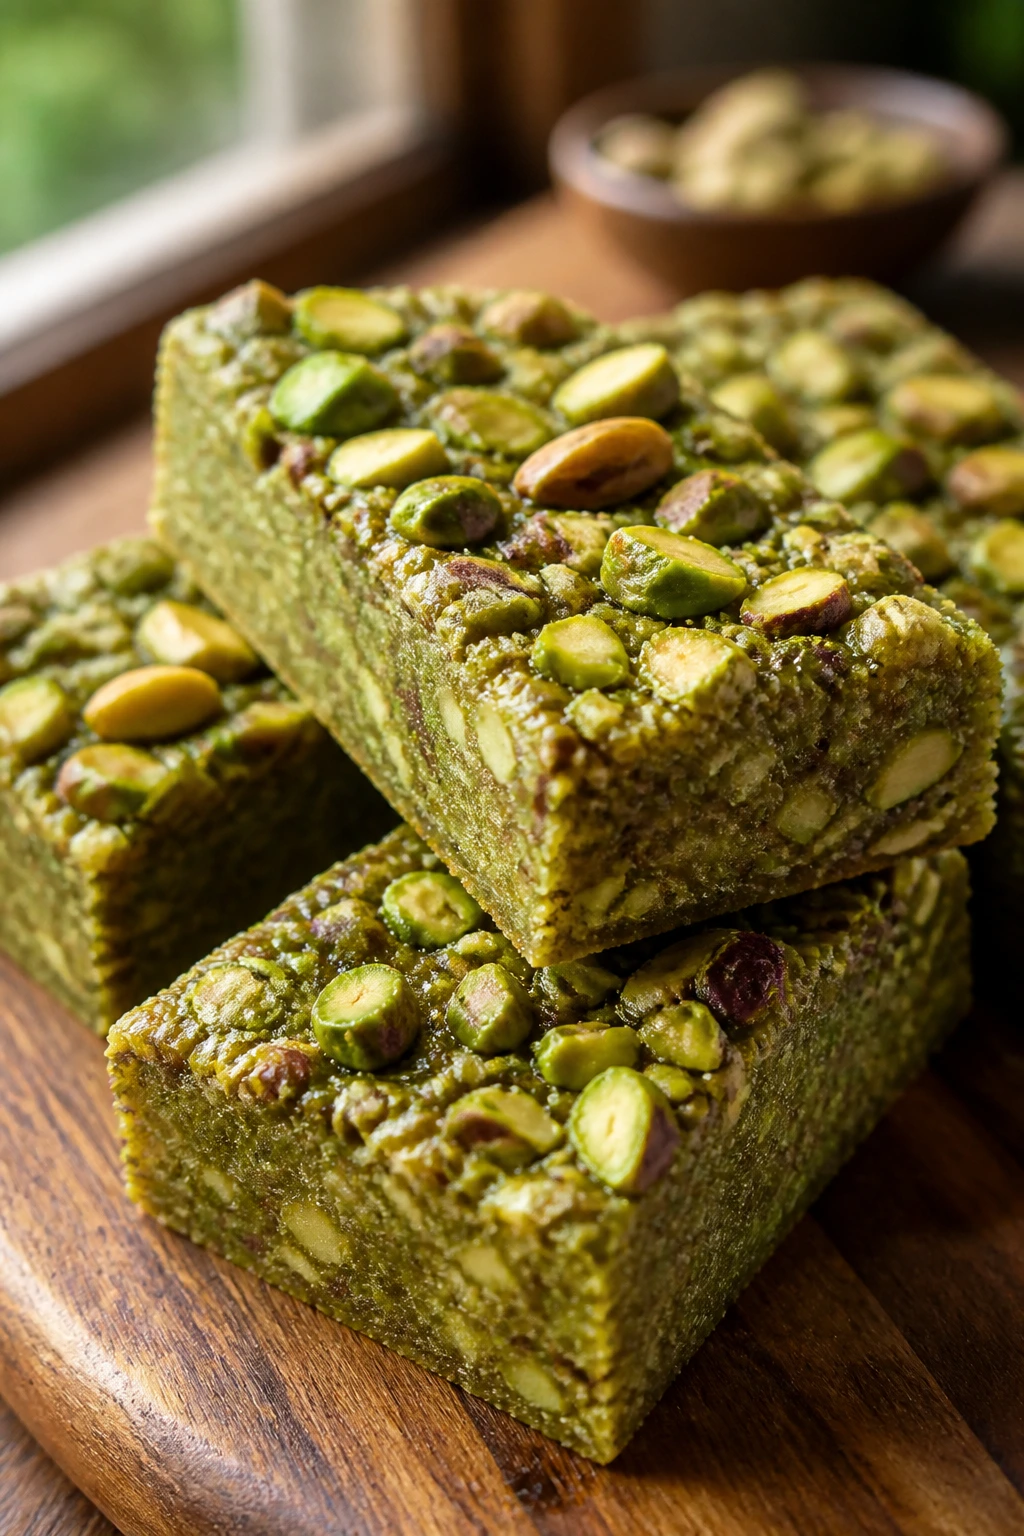
Pistachios make these bars feel richer and more textured than the usual pantry snack. Cardamom gives them a floral lift that keeps the nuttiness from getting heavy, and the green-gold color has a nice quiet drama to it.
Why It Works:
Pistachio butter or a well-blended pistachio mix gives the bars an earthy, slightly sweet base that works beautifully with vanilla protein powder. Cardamom adds aroma without making the bars taste like dessert spice cake. Chopped pistachios on top give a clean crunch and make the bars feel more finished with almost no effort.
This is one of those recipes where the ingredient quality matters a little more. Fresh pistachios taste sweet; stale ones taste dusty.
Key Ingredients:
- 2 cups old-fashioned rolled oats — the structural base.
- 3/4 cup vanilla protein powder — keeps the flavor bright.
- 1/2 cup pistachio butter or almond butter — binder.
- 1/3 cup honey — sweetness.
- 1/4 cup milk — to loosen the mixture.
- 1/2 teaspoon ground cardamom — signature flavor.
- 1/2 teaspoon vanilla extract — rounds the nuttiness.
- 1/2 teaspoon fine salt — keeps the bars from tasting flat.
- 1/2 cup chopped pistachios — crunch and color.
- 1/4 cup chopped white chocolate — optional, but pretty good.
Quick Steps:
- Line an 8×8-inch pan with parchment paper.
- Stir the oats, protein powder, cardamom, and salt together.
- Whisk the nut butter, honey, milk, and vanilla until smooth.
- Combine, fold in the pistachios and white chocolate if using, then press into the pan.
- Chill for 1 hour and slice.
Equipment for This Recipe:
- 8×8-inch pan
- Parchment paper
- Bowl
- Whisk
- Spatula
How to Serve This Dish:
These are nice with tea or a small cup of coffee. If you want a snack that feels a little more polished, top each bar with a few extra chopped pistachios right before serving.
Pro Tips for This Recipe:
- Chop the pistachios finely enough that they don’t tear through the slice.
- Use cardamom sparingly; too much turns perfumey.
- Warm the nut butter slightly so it mixes smoothly.
Variations on This Dish:
- Rose Pistachio Cut: Add 1/4 teaspoon rose water for a floral note.
- Honey-Only Version: Skip the white chocolate and use an extra tablespoon honey for a cleaner flavor.
- Salted Pistachio Crunch: Add flaky salt on top for a sharper finish.
Common Mistakes to Avoid with This Dish:
- Old pistachios: They taste flat fast.
- Too much cardamom: The bars become sharp and soapy.
- Not pressing firmly: Nutty bars need a compact pack to cut well.
22. Salted Honey Pretzel Bars
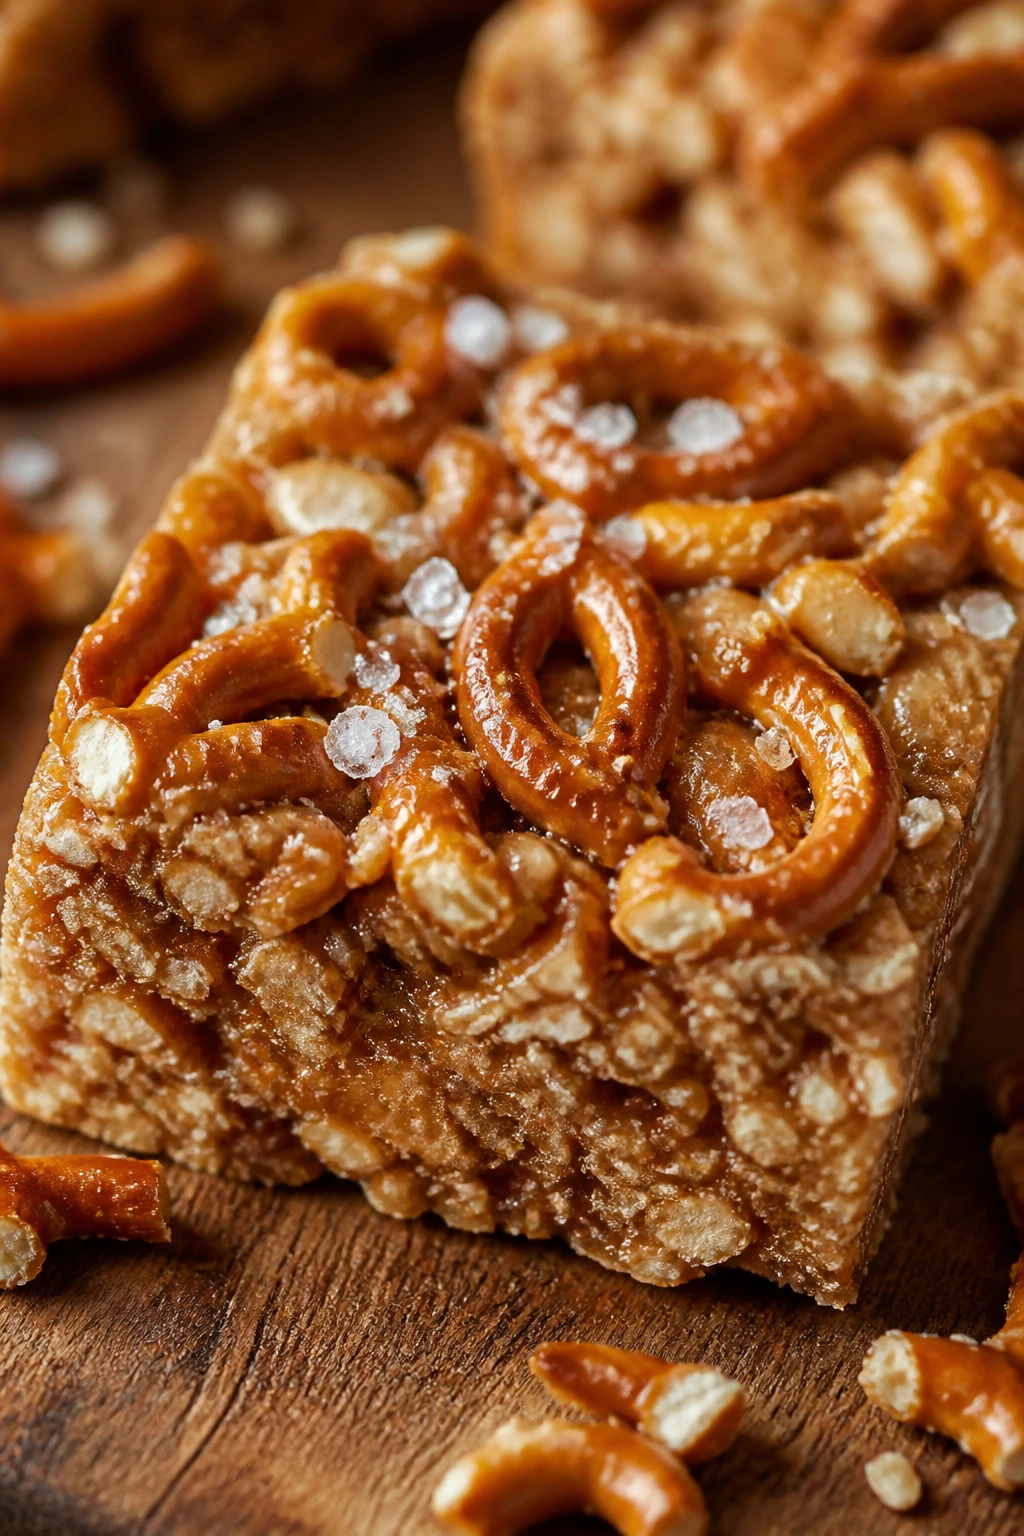
Salty, sweet, and a little crunchy, this is the bar I’d make when I want something that tastes more like a snack I chose on purpose. Pretzels bring the salt and crunch, honey gives the chew, and peanut butter pulls the whole thing together with almost no drama.
Why It Works:
Pretzels are doing a lot of work here. They add salt, texture, and a dry crunch that keeps the bars from feeling soft all the way through. Peanut butter and honey create the glue, while protein powder keeps the bars from becoming candy in a pan.
A little flaky salt on top seals the deal. It makes each bite taste cleaner and sharper, especially if your protein powder leans sweet.
Key Ingredients:
- 2 cups old-fashioned rolled oats — the base.
- 3/4 cup vanilla protein powder — the protein anchor.
- 1/2 cup peanut butter — smooth binder.
- 1/3 cup honey — sweetness and stick.
- 1/4 cup milk — just enough to bring the mix together.
- 1 cup pretzel twists, lightly crushed — crunch and salt.
- 1/2 cup mini chocolate chips — a little contrast.
- 1/2 teaspoon fine salt — to sharpen the sweet-salty balance.
- Flaky salt, for topping — optional but worth it.
Quick Steps:
- Line an 8×8-inch pan with parchment paper.
- Mix the oats, protein powder, and fine salt in a bowl.
- Warm the peanut butter and honey, then whisk in the milk until smooth.
- Combine the wet and dry ingredients, fold in the pretzels and chocolate chips, and press into the pan.
- Scatter flaky salt on top and chill for 1 hour before slicing.
Equipment for This Recipe:
- 8×8-inch pan
- Parchment paper
- Bowl
- Whisk
- Spatula
How to Serve This Dish:
These bars are good on their own, but they’re especially nice after a run or lift because the sweet-salty hit feels satisfying fast. I like them with cold milk or a plain apple for a little freshness.
Pro Tips for This Recipe:
- Crush the pretzels lightly; you want chunks, not dust.
- Add the chocolate chips after the mixture cools a bit so they don’t melt.
- Don’t skip the flaky salt if your peanut butter is unsalted.
Variations on This Dish:
- Chocolate Pretzel Cut: Use chocolate protein powder and keep the mini chips.
- Honey-Cinnamon Pretzel Bars: Add 1/2 teaspoon cinnamon for a warmer finish.
- Nut-Free Pretzel Version: Use sunflower butter and keep everything else the same.
Common Mistakes to Avoid with This Dish:
- Pretzels crushed too fine: You lose the crunch.
- Too much milk: The bars won’t hold their shape.
- Slicing before chill: The pretzels will shift and the bars will crumble.
Why These Bars Work So Well on a Lazy Sunday

A successful protein bar needs three things: enough dry bulk to slice cleanly, enough sticky binder to hold, and enough salt to taste like food. Miss any one of those, and the bar goes off the rails. Too dry, and you get chalky crumbs. Too wet, and you’re eating a sticky tray square with a spoon. Too sweet, and it tastes like candy that’s trying too hard.
That’s why these post-workout protein bar recipes lean on oats, nut or seed butter, a measured sweetener, and protein powder that’s pulled back from the edge. Protein powder varies a lot. Some brands are thirsty and absorb liquid like a sponge; others stay softer and need less binder. If you’ve ever made a batch that looked fine in the bowl and then dried out into a brick after chilling, that’s usually the powder talking.
Lazy Sunday is the right time for this because the method is forgiving. You can warm the nut butter, taste the mix, add a spoonful of milk, press the whole thing into a pan, and let the fridge do the tedious part. Baked versions still stay simple. They’re one bowl, one pan, and not much more. The real win is Monday: a fridge that already holds eight or ten ready-to-go snacks instead of a frantic grocery stop.
The bars also give you room to be picky, which is the right way to do it. Want brighter flavor? Add zest. Want a firmer slice? Add a tablespoon of flaxseed or chia. Want less sweetness? Pull back the honey and add a pinch more salt. Those small adjustments matter more here than they do in a lot of recipes. Bars are geometry as much as they are food.
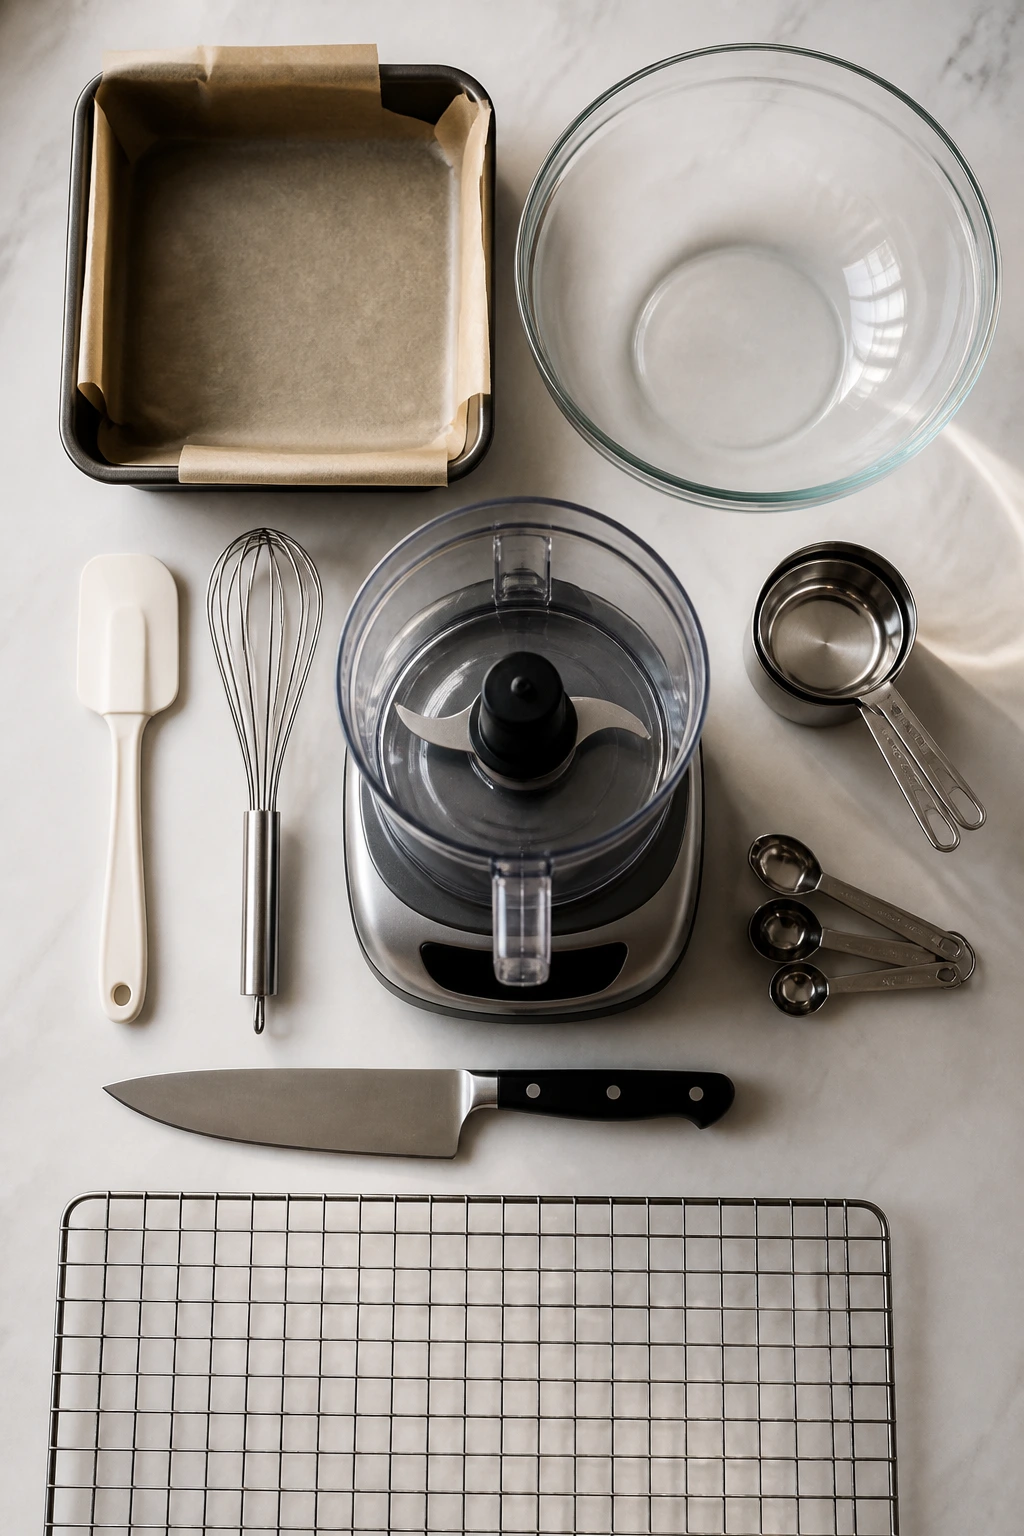
Essential Equipment for These Recipes
-
8×8-inch baking pan: The sweet spot for most of these batches; it gives you bars thick enough to hold together without taking forever to chill or bake.
-
Parchment paper: Leave an overhang on two sides so you can lift the slab out cleanly instead of prying at the corners.
-
Large mixing bowl: A wide bowl makes it easier to fold oats, powder, and sticky binders without half the mix ending up on the counter.
-
Rubber spatula or sturdy spoon: Spatulas are better for scraping the bowl clean, but a strong spoon works when the mixture gets dense.
-
Whisk: Useful for blending nut butters, syrups, eggs, and yogurt into a smooth base before they meet the dry ingredients.
-
Food processor: Not required for every recipe, but it’s a real help for date-based bars and anything using chopped nuts that need to be broken down a little.
-
Measuring cups and spoons: Protein powder is not the place to eyeball it. A dry scoop too full or too short can change the whole texture.
-
Wire cooling rack: Helpful for baked bars so the bottoms don’t steam and turn soggy.
-
A sharp chef’s knife: Clean slices matter. Wipe the blade between cuts if the bars are sticky or fruit-based.
-
Airtight storage containers: Shallow containers are better than deep ones because they keep the bars from sliding around and getting crushed.
Smart Shopping and Ingredient Tips
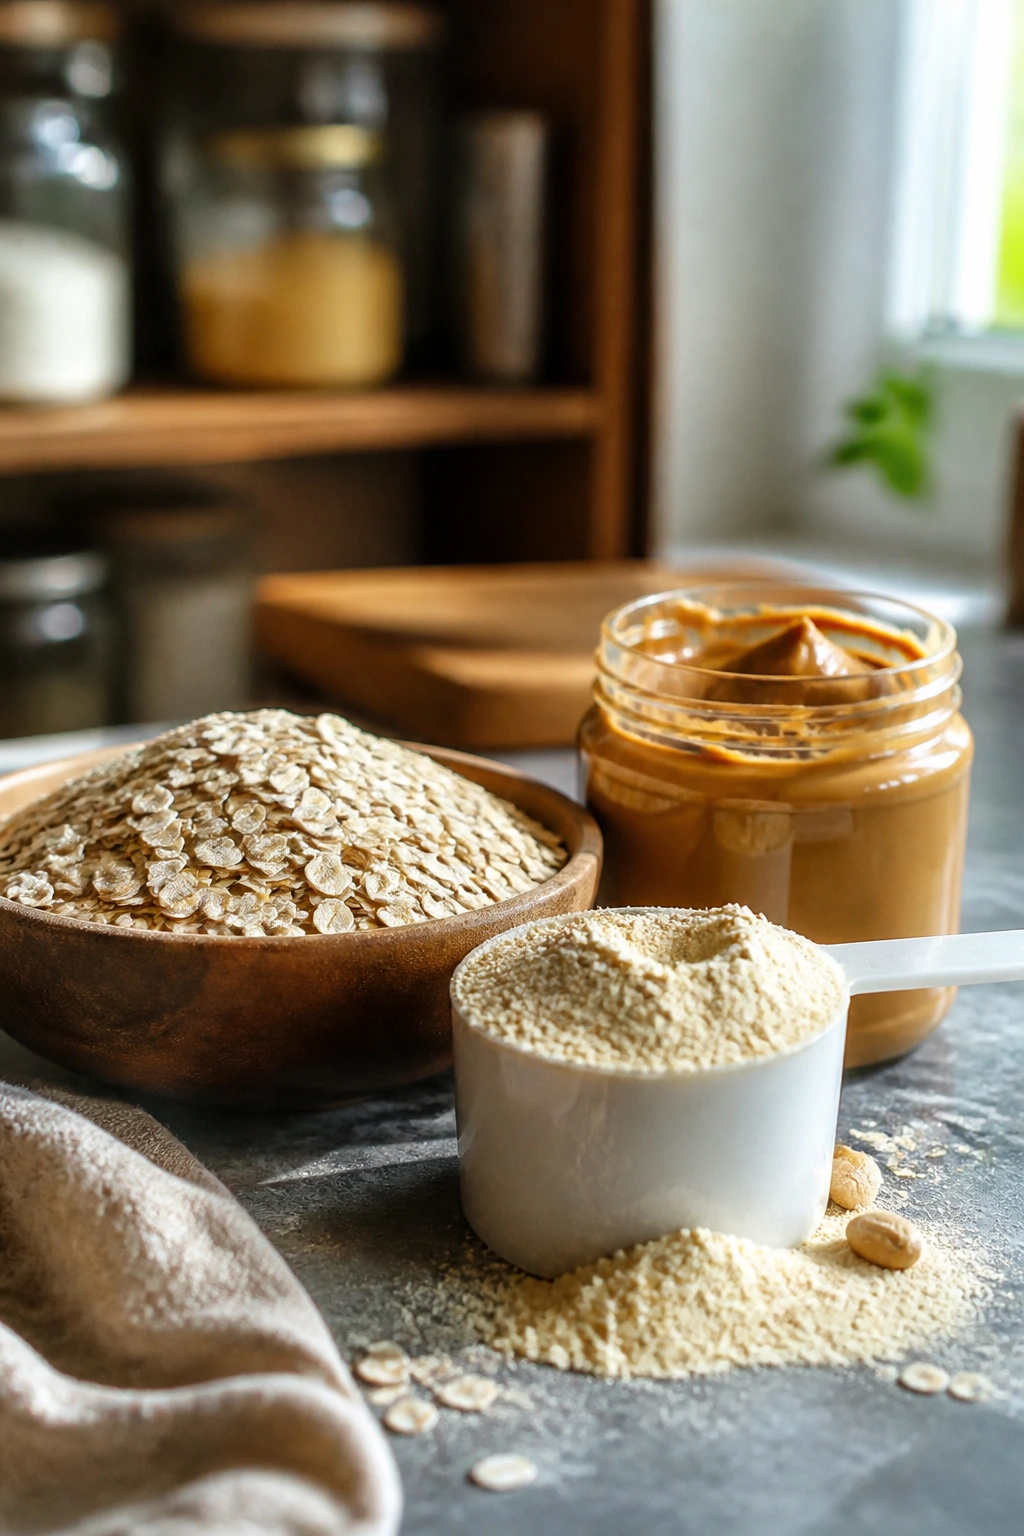
Oats matter more than people think. Old-fashioned rolled oats give you chew and structure, while quick oats make the bars denser and a little pasty. If a recipe uses oat flour, you can make your own by blitzing rolled oats in a blender until powdery. That’s often better than buying flour that’s sat around open for months.
Protein powder is the other ingredient worth paying attention to. Whey powder usually blends smoothly and keeps bars softer, while plant-based powders can taste drier and may need an extra tablespoon or two of milk. Chocolate and vanilla are the safest flavors, but unflavored powder is useful in bars where you want the fruit, spice, or citrus to lead.
Nut and seed butters should be stirred before measuring. The oil on top and the paste at the bottom are not the same thing, and scooping from an unstirred jar can throw off the ratio badly. If you need a nut-free batch, sunflower seed butter and pumpkin seed butter both work, though they bring a slightly earthier taste.
For fruit, dried and freeze-dried versions do different jobs. Freeze-dried strawberries or raspberries bring bright flavor without extra moisture. Dried cranberries, dates, and raisins give chew and sweetness. Fresh fruit is better in baked bars where the moisture can cook off a bit; in no-bake bars, it usually causes trouble unless you keep the amount tiny.
Honey and maple syrup both work as binders, but they don’t behave exactly the same. Honey is stickier and helps bars set a little firmer. Maple syrup tastes rounder and lighter. If a recipe is already on the soft side, honey usually gives you a more reliable slice.
How to Serve These Recipes

Presentation:
Cut the bars with a sharp knife, then wipe the blade after each slice if the filling is sticky or fruit-heavy. A neat rectangle on parchment looks better than a rough square, and a few toppings — chocolate drizzle, chopped nuts, citrus zest, or flaky salt — make the batch look finished without a lot of fuss.
Accompaniments:
Plain Greek yogurt, cold milk, iced coffee, and a piece of fruit all work across this collection. If you want a bigger snack, pair one bar with a hard-boiled egg or a bowl of yogurt for a more complete post-workout plate. Fruit-forward bars like blueberry or orange cranberry also play nicely with a handful of fresh berries.
Portions:
Most of these recipes make 8 bars in an 8×8-inch pan, though a few can be cut into 10 or 12 smaller pieces if you want lighter snacks. After a workout, one bar is usually enough with a drink, but a bigger training day might call for two of the less dense varieties, especially the fruit-based or oat-heavy ones.
Beverage Pairing:
Coffee suits the mocha, brownie, mint, and gingerbread bars. Tea works well with lemon coconut, chai, matcha, and pistachio. If you want the cleanest all-purpose pairing, cold milk or unsweetened almond milk keeps the sweetness in check and makes the texture feel softer.
Additional Tips and Flavor Boosters
Flavor Enhancement:
A pinch of flaky salt on the top of chocolate, caramel, or peanut butter bars changes the flavor more than most extra mix-ins. It’s a small move, but it makes the sweetness feel sharper and the protein powder less dusty.
Customization:
Want more chew? Add 1 to 2 tablespoons chia seeds or ground flaxseed. Want a firmer slice? Use a little less milk and press harder into the pan. Want sweeter bars without turning them sticky? Fold in chopped dates or a small handful of mini chocolate chips instead of adding more syrup.
Serving Suggestions:
A thin drizzle of melted chocolate, a dusting of cocoa, or a line of extra chopped nuts on top can make a plain batch look deliberate. For fruit bars, keep a little fruit powder or zest back for the finish; it makes the flavor show up the second the lid comes off the container.
Make-It-Yours:
For dairy-free bars, use plant protein, almond or oat milk, and skip yogurt unless the recipe specifically bakes it in. For nut-free bars, sunflower seed butter is the easiest swap, though you may need a touch more honey because seed butters can taste drier. For a higher-carb recovery snack, add 1/4 cup extra oats or crushed pretzels and reduce the protein powder by a tablespoon or two.
Make-Ahead, Storage, and Reheating Guidance
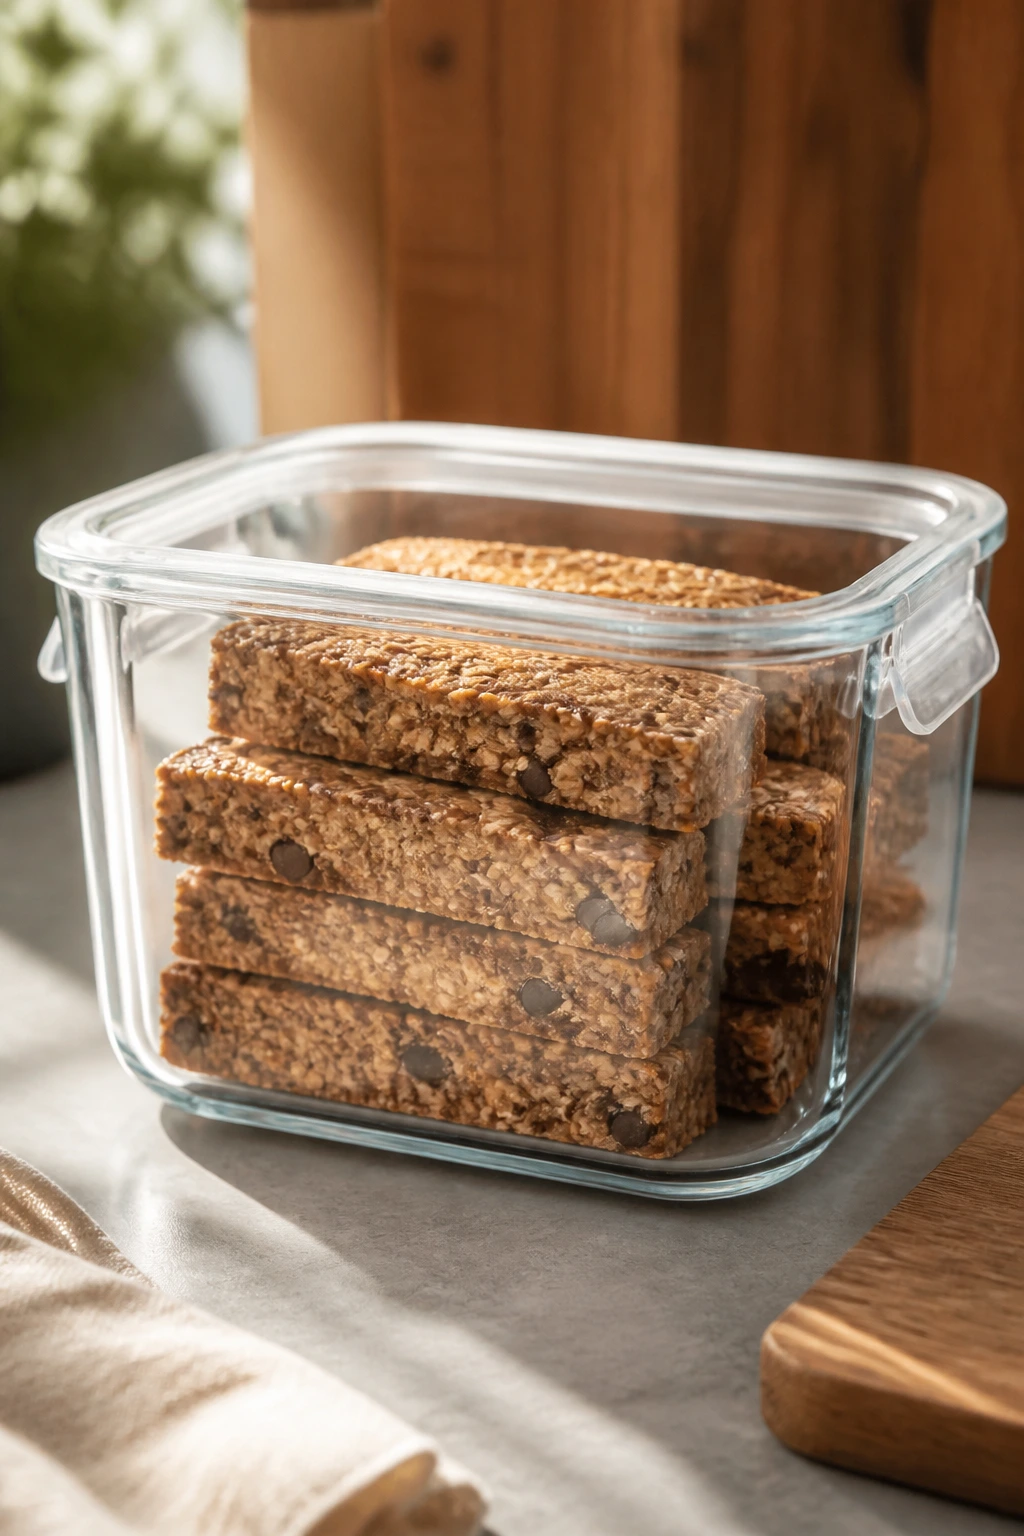
Most no-bake protein bars keep well in an airtight container in the refrigerator for 4 to 5 days, and many stay pleasant for up to 1 week if the ingredients are dry enough and the fridge is cold. Fruit-heavy or yogurt-based baked bars are better within 3 to 4 days. If the batch includes fresh fruit, I’d stay conservative and treat it like a short-week snack.
Freezing works well. Slice the bars first, wrap them individually if you want grab-and-go convenience, and freeze for up to 2 months. No-bake bars thaw in about 20 to 30 minutes at room temperature or overnight in the fridge. Baked bars can go straight from freezer to microwave for 10 to 20 seconds, which is enough to take the chill off without making them soggy.
If you’re making ahead for the week, press no-bake bars into the pan on Sunday, chill them fully, and cut them once they’re firm. For baked bars, cool them completely before storing or trapped steam will soften the bottoms. I also like to place parchment between layers if the bars are sticky or topped with chocolate chips, because nothing ruins a tidy batch faster than two bars welding themselves together.
Reheating is only worth it for the baked recipes. Banana bread, blueberry muffin, apple pie, and carrot cake bars can take a brief warm-up in a microwave or a low oven. Most no-bake bars are better cold. They hold their shape, the texture stays tighter, and the flavors feel cleaner.
Swaps and Adaptations Worth Trying
Whey-to-Plant Swap:
If you’re using plant protein instead of whey, expect the mix to drink more liquid. Add milk 1 tablespoon at a time until the dough holds together when pressed, not when stirred. Pea-based powders and blends with rice protein usually need the extra help.
Lower-Sugar Batch:
Pull the honey or maple syrup back by 1 to 2 tablespoons and lean harder on dates, ripe banana, or fruit powder for flavor. This works best in peanut butter, mocha, and gingerbread bars, where the strong flavors can carry a less sweet base.
Nut-Free School Safe Version:
Use sunflower seed butter or pumpkin seed butter and swap the nuts for pumpkin seeds or pretzels. The flavor goes a little earthier, but the texture usually stays good if you keep the binder measured and the bar well chilled.
Higher-Carb Recovery Cut:
Add a half cup of oats, graham crumbs, crushed pretzels, or dried fruit to the more basic bars if you want extra carbs after longer training. That helps especially in the banana bread, s’mores, and salted honey pretzel versions, which can handle the extra bulk without getting weird.
Fruit-Forward Summer Style:
Use freeze-dried strawberries, orange zest, blueberries, or lemon zest to make the bars taste brighter and lighter. These ingredients add a lot of flavor without watering down the mixture, which is why they work better than trying to stuff fresh fruit into every no-bake recipe.
Dark Chocolate and Salt Cut:
For the chocolate bars, reduce the sweetener slightly and finish with flaky salt. The bars taste less like dessert and more like a serious snack, which is useful if you don’t want every batch to lean sugary.
Common Mistakes to Avoid
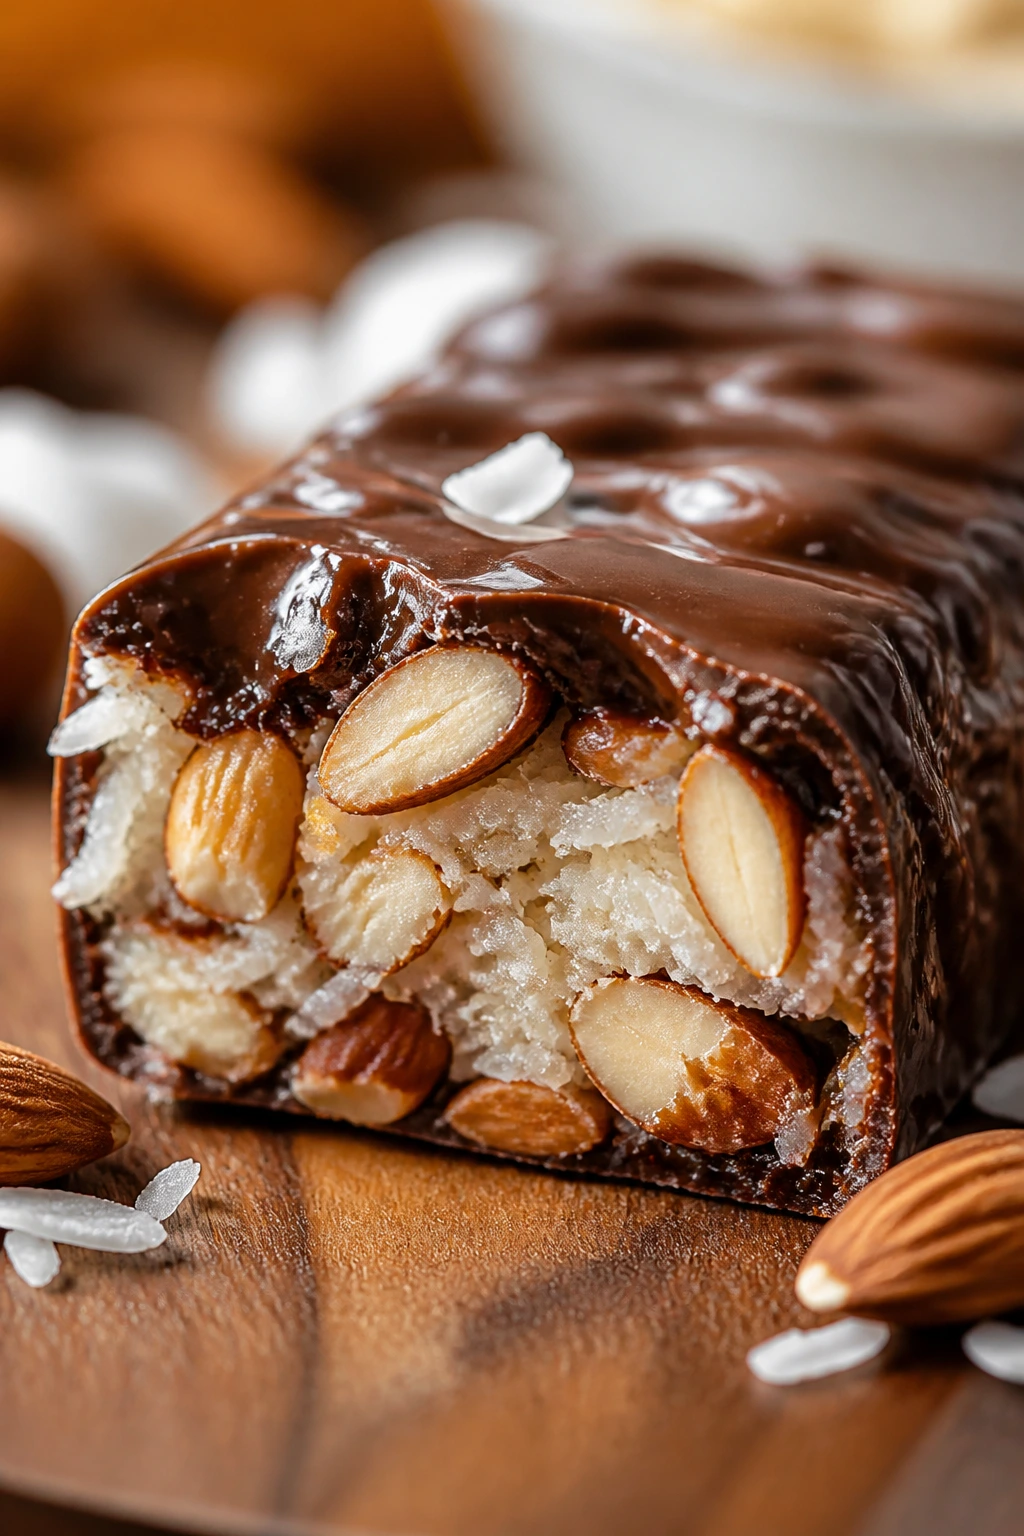
One common mistake is treating protein powder like flour. It isn’t. Different powders absorb liquid at different rates, and a bar that looks perfect with one brand can come out dry with another. If the mixture crumbles when you squeeze it, it needs more binder or a spoonful of milk — not more dry powder.
Another problem is under-salting. Bars with peanut butter, chocolate, dates, or oats need salt to taste alive. Without it, the sweetness turns flat and the protein flavor sits in the front. Even a half teaspoon can change the whole batch.
People also rush the chill. No-bake bars need time for the fats and binders to set, and cutting them too early usually means torn edges and a soft middle. A full hour in the fridge is the minimum for most of these recipes; longer is fine. Cold bars cut better, period.
Overloading the mix-in pile causes trouble too. A few chopped nuts, some chips, or a handful of fruit is fine. Stuff the pan full of add-ins and the base can’t hold them, which leads to crumbling slices that look better than they eat. The mix-ins should support the bar, not hold it together.
Finally, there’s the pan press. Loose packing gives you bars that fall apart at the knife. Press hard, use parchment if the mix is sticky, and pay attention to the corners, where gaps usually hide. The whole batch is only as good as the way it’s packed down.
Questions People Ask Before Making These Bars

Can I use any protein powder?
Mostly, yes, but not without adjusting the liquid. Whey isolate, whey blend, pea protein, and plant mixes all absorb differently, so start with the recipe amounts and add milk only if the dough feels dry. The brand matters more than the label.
Do these bars need to be refrigerated?
The no-bake versions do, especially if they include nut butter, coconut oil, fruit, or yogurt. Most baked bars can sit out for a day or two if your kitchen is cool, but refrigeration gives them a firmer bite and better shelf life.
What if my bars keep falling apart?
That usually means one of three things: not enough binder, too much dry powder, or not enough compression in the pan. Add 1 tablespoon milk or honey, press again with firm pressure, and chill longer before cutting.
Can I make them without oats?
Yes, but the texture changes a lot. Almond flour, oat flour, coconut flour, or crushed graham crumbs can stand in for some or all of the oats, though coconut flour needs much less because it drinks liquid fast. Bars without oats usually need a different binder balance.
How much protein should one bar have?
That depends on the powder and the size of the bar, but most of these recipes land in the useful-snack range if you cut them into 8 pieces. If you want a higher-protein bar, use a stronger powder, add hemp hearts, or cut the batch into fewer, larger squares.
Can I freeze the baked bars too?
Yes. Wrap them individually or stack them with parchment between layers, then freeze for up to 2 months. Thaw in the fridge or warm briefly in the microwave if you want the crumb softer.
What if the mix tastes too sweet before chilling?
Wait. Chill it first. Cold bars taste less sweet than the raw mixture, and cocoa, protein powder, and salt all settle down after the set. If it’s still too sweet later, reduce the syrup in the next batch by 1 to 2 tablespoons.
Can I make these in a bigger pan?
You can, but the bars will be thinner and may set faster or bake faster. A 9×9-inch pan works if you’re okay with a flatter slice, though you may want to shorten the chill a bit or shave a few minutes off the bake time for the oven versions.
Sunday Batch, Weeklong Backup
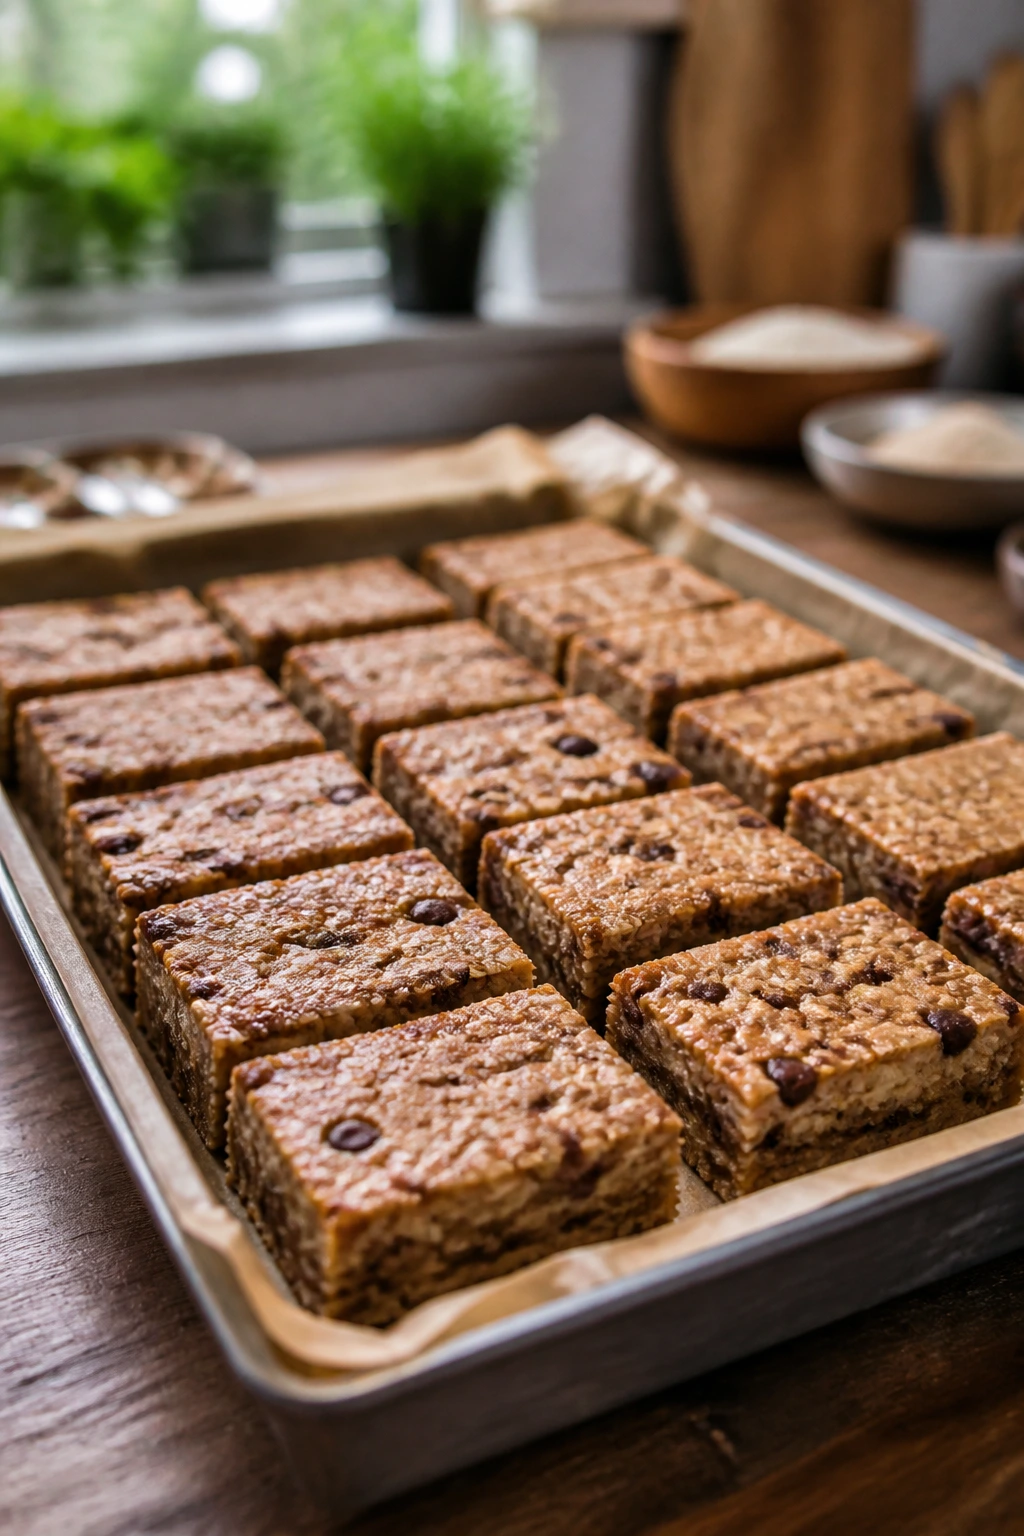
A tray of homemade protein bars changes the way the week feels. The fridge stops being a blank space full of vague intentions and starts holding actual options: chocolate bars for coffee breaks, fruit bars for afternoon slumps, spiced bars for the kind of day that needs a little comfort with its calories.
That’s the real advantage of making them on a lazy Sunday. The work is low, the payoff is steady, and the flavors can be as plain or as strange as you want them to be. Peanut butter and chocolate will always have their place, but there’s also room for matcha, orange zest, tahini, or a proper gingerbread bite.
If you keep the ratios honest and the chill time intact, these bars do their job without much fuss. And honestly, that’s what makes them worth repeating.