
A family coming in from the driveway after a hard workout does not want a delicate dinner. They want salt, carbs, protein, and something that feels like real food the second it lands on the table. That’s the sweet spot for a good post-workout meal: enough fuel to help tired bodies recover, enough volume to quiet the kind of hunger that turns people impatient, and enough flavor that nobody starts negotiating with the dinner plate.
I’m partial to meals that can handle that job without turning the kitchen into a mess. Bowls, wraps, skillet dinners, baked potatoes, pasta bakes — the useful stuff. The kind of food that still tastes good when one kid wants extra cheese, another wants no sauce, and the grown-up who just got back from the gym wants a second serving before the pan is cool.
A recovery dinner does not need to be fancy. It needs to be practical, filling, and sturdy enough to survive a family table full of different appetites. That usually means a mix of protein and carbs, a little fat for flavor, and ingredients that are easy to keep around. The recipes below lean hard into that idea, and the best ones pull double duty as leftovers, lunch boxes, or next-day breakfasts.
Why These Meals Earn Their Keep
-
Protein Shows Up Where It Counts: Most of these dinners land in the 20-to-35-gram protein range per serving, which is a comfortable target after a training session without making the plate feel clinical.
-
Carbs Are Treated Like Fuel, Not Filler: Rice, pasta, potatoes, tortillas, oats, and beans do the heavy lifting here because tired muscles want glycogen back on board.
-
They Feed Hungry People, Not Just Athletes: Every recipe is built to scale for families, which means fewer separate pans and fewer “I’m still hungry” complaints.
-
Leftovers Actually Hold Up: These meals use sauces, grains, and sturdy proteins that taste good after a night in the fridge and a quick reheat.
-
The Cleanup Stays Manageable: Most of the dishes are one-pan, one-pot, or sheet-pan friendly, which matters when you’re cooking after practice, not before a dinner party.
-
Picky Eaters Get a Say: Bowls, wraps, pasta, and potatoes let everyone build their own plate without turning dinner into a custom-order operation.
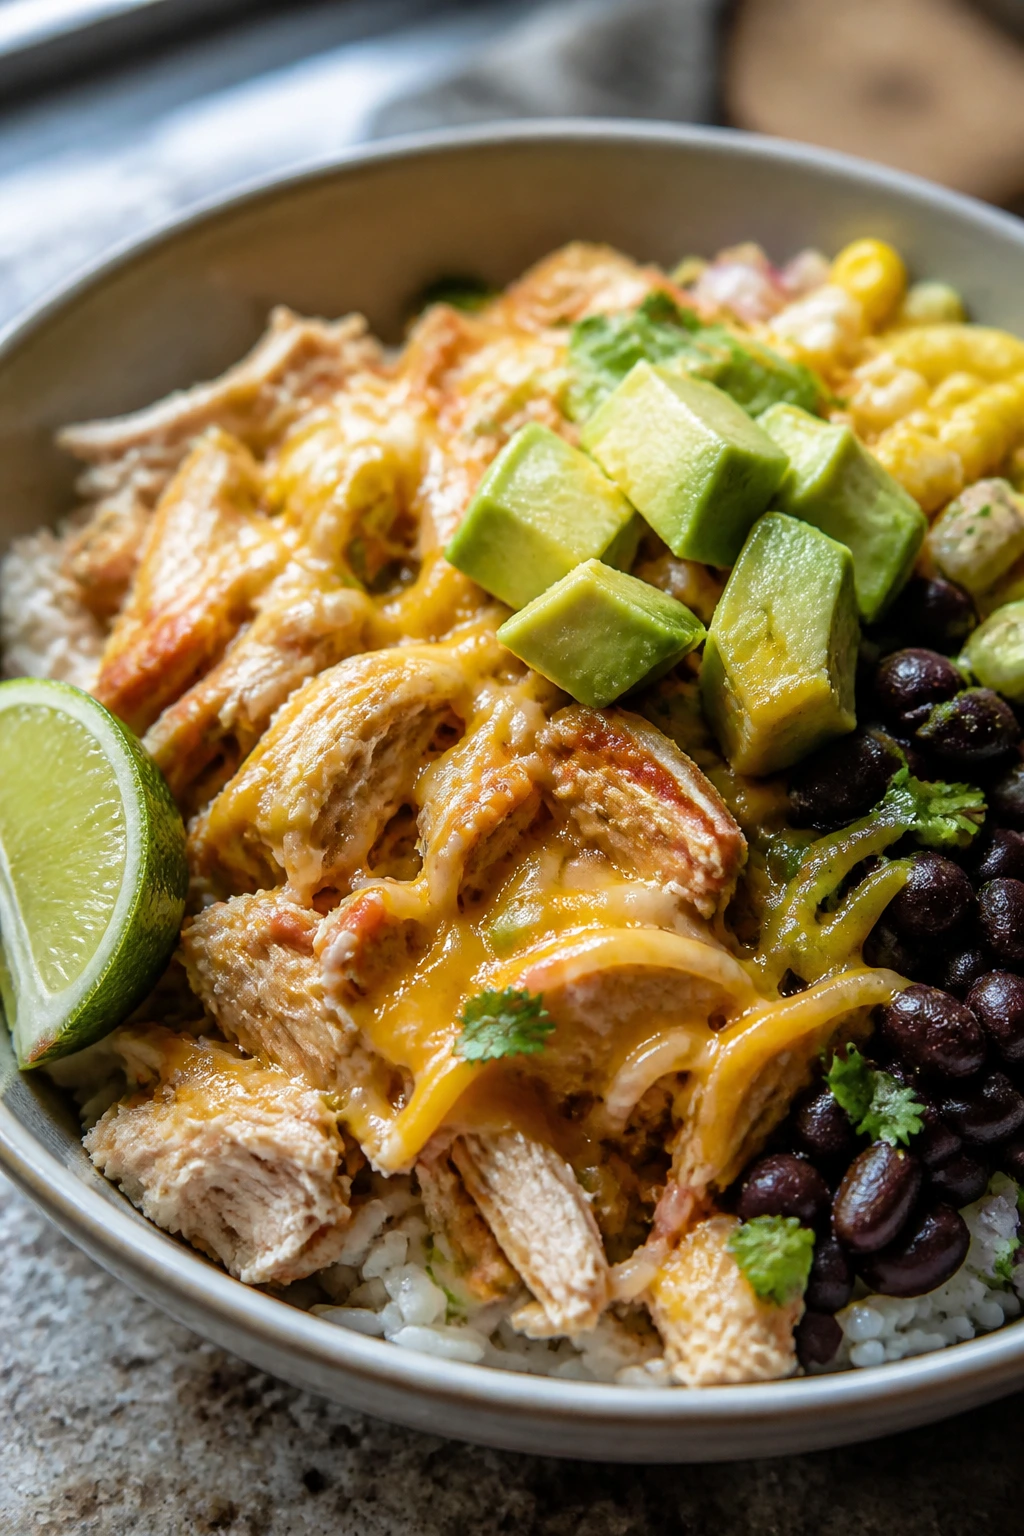
1. Rotisserie Chicken Burrito Bowls
A good burrito bowl should look messy in the best way: warm rice on the bottom, smoky chicken on top, melted cheese slipping into the beans, and a squeeze of lime making everything wake up. This version leans on rotisserie chicken because it is already cooked, already seasoned, and already one less thing to worry about when the family walks in starving.
Why It Works:
The rice gives you fast carbs, the chicken covers protein, and the beans add a second layer of staying power. Salsa does the job of both sauce and seasoning, which keeps the ingredient list short. I like this bowl after a workout because it feels substantial without requiring a long simmer or a lot of stovetop babysitting.
Key Ingredients:
- 3 cups shredded rotisserie chicken
- 2 cups cooked white or brown rice
- 1 can (15 oz) black beans, drained and rinsed
- 1 cup frozen corn
- 1 cup salsa
- 1 cup shredded Monterey Jack or cheddar
- 1 avocado, sliced
- 1 lime, cut into wedges
- 2 tablespoons chopped cilantro, optional
Quick Steps:
- Warm the rice in a covered bowl with 1 tablespoon water for 1 to 2 minutes in the microwave until steamy.
- Heat the chicken, beans, corn, and half the salsa in a skillet over medium heat for 4 to 5 minutes until hot.
- Taste the mixture and add a pinch of salt if the salsa is mild.
- Divide the rice among bowls and spoon the chicken mixture over the top.
- Finish with cheese, avocado, the remaining salsa, cilantro, and a squeeze of lime.
Equipment for This Recipe:
- Large skillet
- Microwave-safe bowl
- Cutting board and sharp knife
- Serving bowls
How to Serve This Dish:
Pile it high and let the toppings spill. I like adding a few tortilla chips on the side for crunch, plus a bowl of extra salsa for the people who want more heat. One bowl is plenty for most adults; a second half-bowl goes fast after a hard workout.
Pro Tips for This Recipe:
- Use rotisserie chicken that still has some moisture under the skin; the dry, over-trimmed stuff shreds into dust.
- Warm the beans with the chicken so they taste seasoned, not like they were dumped in cold.
- If your salsa is thin, drain off a spoonful before adding it or the rice will get soggy.
- Add the avocado at the very end so it stays green and firm.
Variations on This Dish:
- Creamy Chipotle Bowl: Stir 2 tablespoons chipotle mayo into the chicken mixture for a smoky finish.
- Fajita-Style Bowl: Swap the corn for sautéed bell peppers and onions.
- Bean-Heavy Bowl: Double the black beans and cut the chicken to 2 cups for a more budget-friendly plate.
Common Mistakes to Avoid with This Dish:
- Putting the salsa on too early: The rice absorbs too much liquid and turns wet. Add half during heating, not all of it.
- Skipping the lime: The bowl tastes flat without acid. Lime sharpens the beans and cuts the cheese.
- Using cold rice straight from the fridge: It clumps. Warm it with a splash of water first.
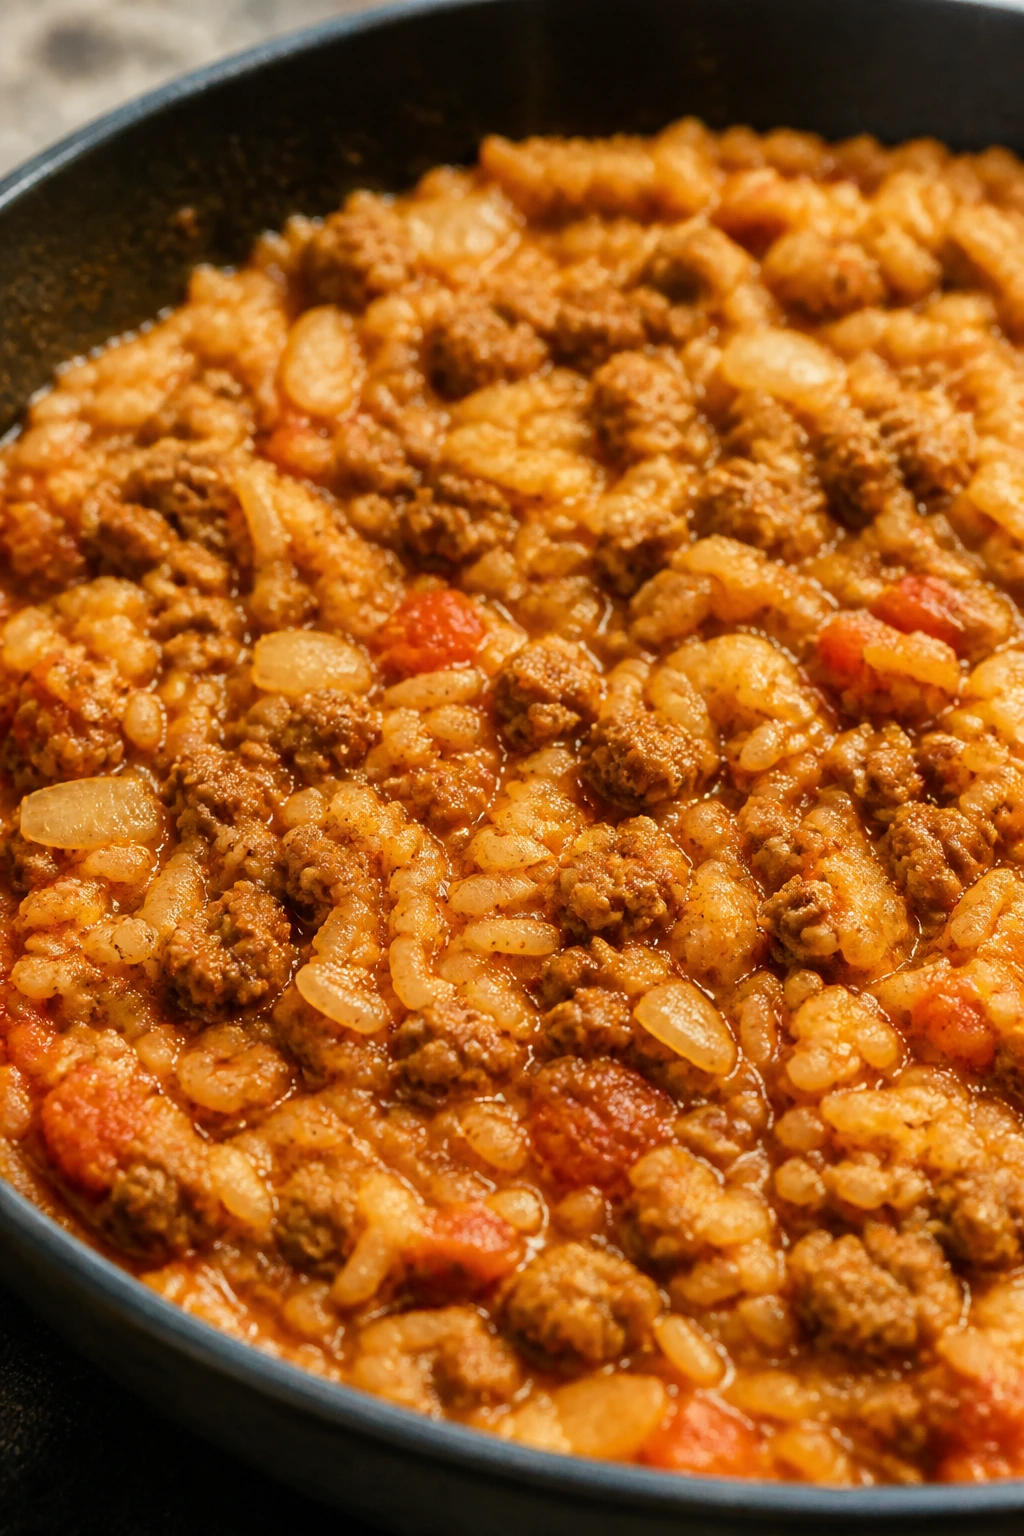
2. Turkey Taco Skillet with Rice
This skillet has the flavor of taco night and the practical side of a one-pan supper. The rice cooks right in the seasoned tomato mixture, which means the pan ends with a saucy, spoonable texture instead of a pile of separate parts.
Why It Works:
Ground turkey gives you lean protein without needing a long cook time. The rice absorbs broth and tomatoes, so every bite carries seasoning instead of sitting there plain. I like this one when the family needs dinner fast but also needs enough food to stop the post-practice scavenging.
Key Ingredients:
- 1 pound ground turkey
- 1 tablespoon olive oil
- 1 small yellow onion, diced
- 2 cloves garlic, minced
- 2 tablespoons taco seasoning
- 1 cup long-grain white rice, rinsed
- 1 can (14.5 oz) diced tomatoes
- 2 cups low-sodium chicken broth
- 1 cup shredded cheddar
- 2 scallions, sliced
Quick Steps:
- Heat the olive oil in a large skillet over medium-high heat.
- Add the turkey and onion, breaking up the meat, and cook for 5 to 6 minutes until the turkey loses its pink color.
- Stir in the garlic and taco seasoning and cook for 30 seconds until fragrant.
- Add the rice, tomatoes, and broth, then bring the skillet to a simmer.
- Cover, reduce the heat to low, and cook for 18 minutes until the rice is tender and the liquid is mostly absorbed.
- Sprinkle on the cheese, cover for 2 minutes, and finish with scallions.
Equipment for This Recipe:
- Large deep skillet with a lid
- Wooden spoon
- Measuring cups
- Cheese grater, optional
How to Serve This Dish:
Serve it straight from the skillet with a spoon, because no one needs extra dishes here. A little sour cream or plain yogurt on top cools the spice, and shredded lettuce on the side gives the plate some crunch. It feeds four generously, five if the appetites are normal instead of feral.
Pro Tips for This Recipe:
- Rinse the rice so it cooks more evenly and stays fluffy.
- Keep the lid tight once the rice goes in; steam is doing most of the work.
- If the skillet looks dry before the rice is tender, add 1/4 cup broth and keep cooking.
- Let it rest for 5 minutes before serving so the grains settle.
Variations on This Dish:
- Bean Booster: Stir in a can of black beans with the tomatoes for more fiber and extra bulk.
- Spicy Green Version: Use green salsa instead of diced tomatoes and add chopped jalapeño.
- Cheesy Enchilada Style: Swap half the broth for enchilada sauce.
Common Mistakes to Avoid with This Dish:
- Using instant rice without reducing liquid: It can go mushy. Stick with regular long-grain rice.
- Cranking the heat after covering: The bottom scorches before the rice cooks through. Keep it low.
- Adding cheese too early: It can glue itself to the pan. Wait until the rice is done.
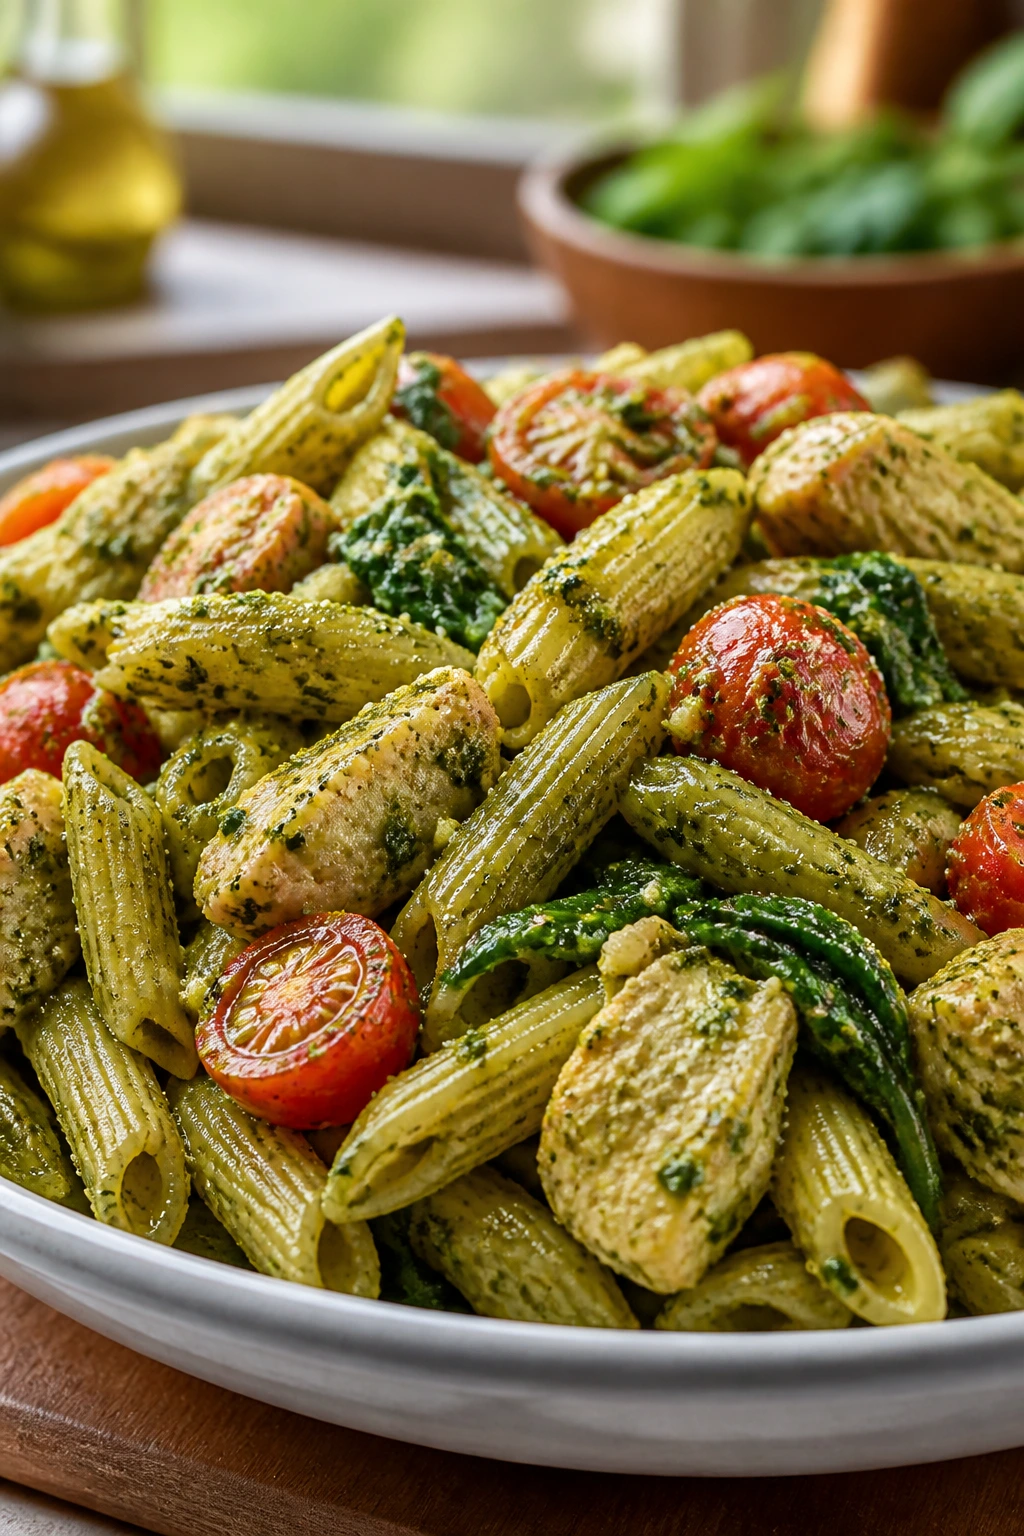
3. Pesto Chicken Pasta
Pesto chicken pasta is one of those meals that looks more polished than it is. The sauce clings to penne, the chicken stays juicy if you don’t overcook it, and the tomatoes pop just enough to keep the basil from feeling heavy.
Why It Works:
Pasta gives the carbs, chicken gives the protein, and pesto brings fat and salt in one move. That combination is handy after exercise because it feels filling without being a brick on the plate. I like this version because the spinach wilts right into the sauce, which makes the whole thing taste greener and fresher than the ingredient list suggests.
Key Ingredients:
- 12 ounces penne or rotini
- 1 pound boneless chicken thighs or breasts, cut into bite-size pieces
- 2 tablespoons olive oil
- 1 cup basil pesto
- 1 cup cherry tomatoes, halved
- 3 cups baby spinach
- 1/2 cup grated Parmesan
- 1/2 cup reserved pasta water
- Salt and black pepper
Quick Steps:
- Cook the pasta in salted water until al dente, then reserve 1/2 cup pasta water and drain.
- Heat the olive oil in a large skillet over medium-high heat.
- Season the chicken with salt and pepper, then cook for 6 to 8 minutes until browned and cooked through.
- Add the tomatoes and spinach and cook for 1 to 2 minutes until the spinach collapses.
- Stir in the pesto and pasta water, then toss in the pasta and Parmesan until the sauce coats everything.
- Taste and add more black pepper if needed.
Equipment for This Recipe:
- Large pot
- Large skillet
- Colander
- Wooden spoon
How to Serve This Dish:
Spoon it into shallow bowls and top with more Parmesan if the family likes the salty edge. A simple cucumber salad or a pile of roasted broccoli keeps the plate from feeling too soft. This makes about four hearty servings.
Pro Tips for This Recipe:
- Pull the chicken the moment it reaches 165°F; pesto pasta punishes overcooked meat.
- Save the pasta water before draining or you’ll lose the easiest sauce fixer in the kitchen.
- Use refrigerated pesto if you want a brighter basil flavor.
- Halve the cherry tomatoes so they burst fast and add little hits of acid.
Variations on This Dish:
- Creamy Pesto Pasta: Stir in 1/4 cup heavy cream for a richer sauce.
- Sun-Dried Tomato Version: Swap the fresh tomatoes for 1/3 cup chopped sun-dried tomatoes.
- Meatless Bowl: Replace the chicken with 2 cups white beans.
Common Mistakes to Avoid with This Dish:
- Overcooking the pasta: It keeps softening in the pan. Pull it a minute early.
- Using dry pesto straight from the jar: Loosen it with pasta water so it coats instead of clumping.
- Skipping the salt in the pasta water: The whole dish tastes flatter without it.
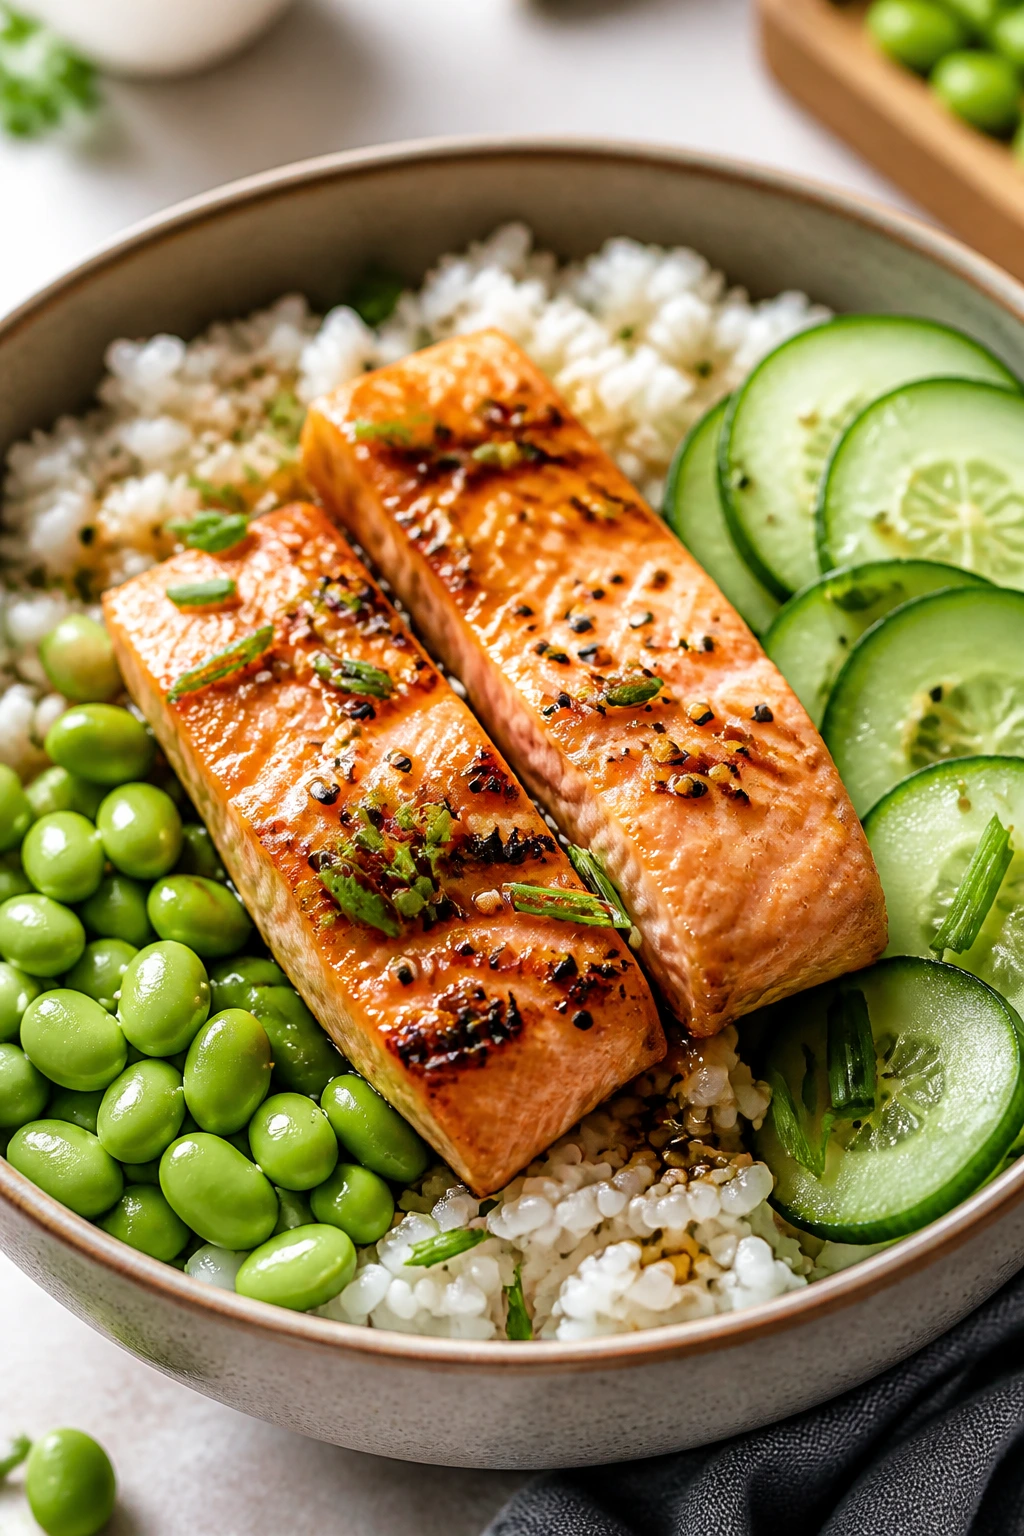
4. Salmon Rice Bowls with Cucumber and Edamame
Cold cucumber against warm rice is one of those contrasts that makes a simple bowl feel complete. Salmon brings a richer flavor than chicken or turkey, and the edamame gives the bowl a green, slightly nutty bite that keeps it from getting one-note.
Why It Works:
Salmon offers protein and omega-3 fats, while the rice refills carbs after training. Edamame and cucumber add texture without making the bowl heavy. I like this one because it can be assembled fast, and the sauce stays light enough that nobody feels weighed down.
Key Ingredients:
- 4 salmon fillets, about 5 ounces each
- 2 cups cooked jasmine rice
- 1 cup shelled edamame, thawed
- 1 cucumber, thinly sliced
- 2 tablespoons soy sauce
- 1 tablespoon rice vinegar
- 1 tablespoon mayonnaise or Greek yogurt
- 1 teaspoon sriracha, optional
- 1 teaspoon sesame seeds
Quick Steps:
- Season the salmon with salt and pepper.
- Cook the salmon in a skillet over medium heat for 3 to 4 minutes per side, or bake at 400°F for 10 to 12 minutes, until it flakes easily.
- Stir the soy sauce, rice vinegar, mayonnaise, and sriracha together.
- Divide the rice into bowls and top with salmon, edamame, and cucumber.
- Drizzle with sauce and finish with sesame seeds.
Equipment for This Recipe:
- Skillet or sheet pan
- Mixing bowl
- Rice cooker or saucepan
- Sharp knife
How to Serve This Dish:
Serve it while the rice is still warm so the salmon loosens into the grains a little. A few pickled carrots or a small pile of shredded cabbage on the side gives the bowl a sharper edge. One bowl is enough for most people; a second fillet on top never hurts after a heavy session.
Pro Tips for This Recipe:
- Pat the salmon dry before cooking so it browns instead of steaming.
- Keep the sauce light; too much mayo turns the bowl sleepy.
- If you’re using frozen edamame, thaw it in warm water for 5 minutes.
- Add the cucumber last so it stays crisp.
Variations on This Dish:
- Teriyaki Bowl: Swap the sauce for bottled teriyaki and a squeeze of lime.
- Spicy Crunch Bowl: Add shredded cabbage and crushed peanuts.
- Oven-Baked Version: Roast the salmon on a lined sheet pan for less stovetop mess.
Common Mistakes to Avoid with This Dish:
- Overcooking salmon: It dries out fast. Pull it as soon as it flakes at the thickest point.
- Drowning the bowl in sauce: The rice turns soggy. Drizzle, don’t flood.
- Using ice-cold rice: Warm it first or the whole bowl feels flat.
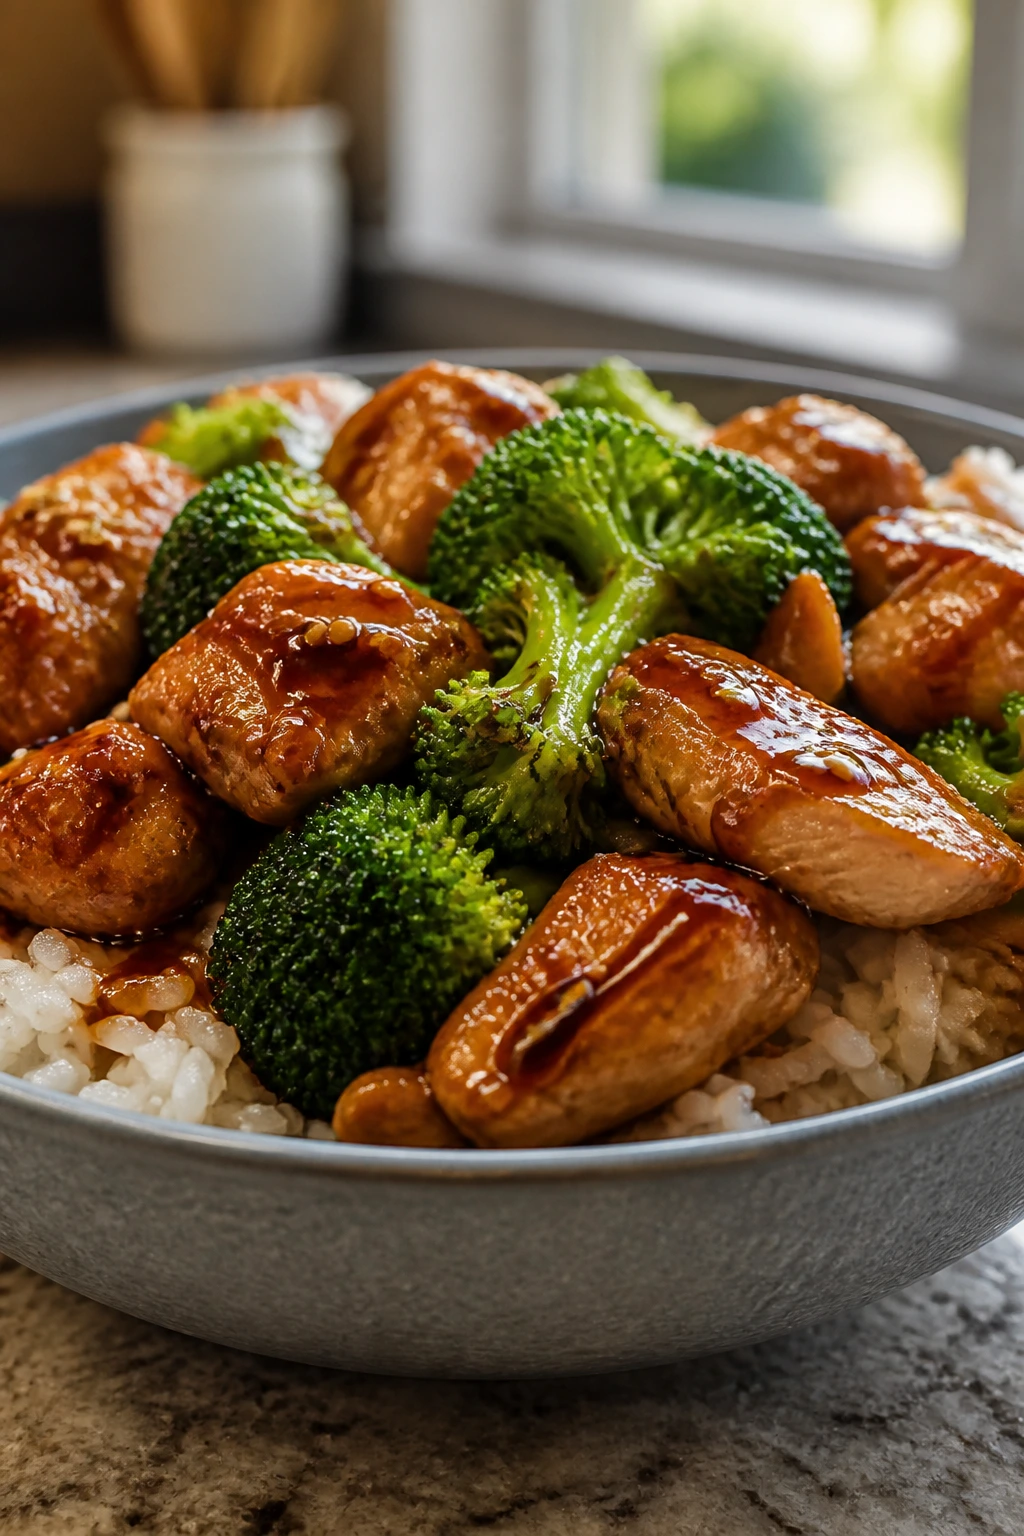
5. Beef and Broccoli Stir-Fry
Beef and broccoli has a built-in advantage: it tastes like takeout, but it cooks faster than most takeout delivery times. A glossy sauce, thin slices of beef, and broccoli that still has a little bite — that’s the texture you want.
Why It Works:
Thin beef cooks in minutes, broccoli brings fiber and crunch, and rice finishes the plate with quick carbs. This is one of my favorite post-workout dinners because it lands in the sweet spot between light and filling. You get enough protein to matter and enough sauce to keep the rice from feeling like an afterthought.
Key Ingredients:
- 1 pound flank steak or sirloin, sliced thin against the grain
- 3 cups broccoli florets
- 2 tablespoons cornstarch
- 3 tablespoons soy sauce
- 2 tablespoons honey
- 2 cloves garlic, minced
- 1 teaspoon grated fresh ginger
- 2 tablespoons neutral oil
- 2 cups cooked rice
Quick Steps:
- Toss the beef with 1 tablespoon cornstarch and 1 tablespoon soy sauce.
- Mix the remaining soy sauce, honey, garlic, ginger, and 1/2 cup water in a bowl.
- Heat 1 tablespoon oil in a skillet over high heat and sear the beef for 1 to 2 minutes per side, then remove it.
- Add the remaining oil and broccoli, plus 2 tablespoons water, and cook for 3 to 4 minutes until bright green.
- Return the beef to the pan, pour in the sauce, and simmer for 1 to 2 minutes until glossy and slightly thickened.
- Serve over rice.
Equipment for This Recipe:
- Large skillet or wok
- Sharp knife
- Mixing bowls
- Measuring spoons
How to Serve This Dish:
Pour the sauce over the rice so it sinks into the grains instead of sitting on top. A sprinkle of sesame seeds or sliced scallions makes the bowl look finished without adding work. It serves four, though active teenagers can make that seem optimistic.
Pro Tips for This Recipe:
- Freeze the beef for 15 minutes before slicing; it cuts much thinner.
- Don’t crowd the pan or the beef will steam.
- Keep the broccoli just tender enough to pierce with a fork.
- Add a splash of water if the sauce tightens too fast.
Variations on This Dish:
- Garlic-Heavy Version: Add another clove of garlic and finish with a little toasted sesame oil.
- Spicy Takeout Style: Stir in 1 teaspoon chili flakes or chili crisp.
- Chicken Swap: Use the same method with thin-sliced chicken thighs.
Common Mistakes to Avoid with This Dish:
- Cutting the beef with the grain: It turns chewy. Slice across the grain.
- Cooking broccoli until dull: Bright green means it still has some life.
- Adding the sauce too early: The beef can overcook while the sauce reduces.
6. Egg Fried Rice with Edamame
Leftover rice turns into something much better the second it hits a hot pan. Add eggs, edamame, a few vegetables, and a little soy sauce, and dinner stops looking like a backup plan.
Why It Works:
Eggs bring fast protein, rice fills out the plate, and edamame keeps the bowl from leaning too heavily on starch. This meal is especially useful after evening workouts because it cooks in one pan and doesn’t ask much from you. Cold rice is the secret; it fries instead of collapsing.
Key Ingredients:
- 4 cups cooked, cold rice
- 4 large eggs
- 1 cup shelled edamame
- 1 cup frozen peas and carrots
- 3 scallions, sliced
- 2 tablespoons soy sauce
- 1 tablespoon butter or neutral oil
- 1 teaspoon sesame oil
Quick Steps:
- Whisk the eggs with a pinch of salt.
- Heat the butter or oil in a large skillet over medium-high heat and scramble the eggs just until set, then remove them.
- Add the peas, carrots, and edamame and cook for 2 to 3 minutes until hot.
- Add the cold rice and break up any clumps with a spatula.
- Pour in the soy sauce and sesame oil, then stir-fry for 3 to 4 minutes until the rice is hot and lightly toasted.
- Fold the eggs back in and finish with scallions.
Equipment for This Recipe:
- Large skillet or wok
- Spatula
- Mixing bowl
- Measuring cups
How to Serve This Dish:
Serve it in wide bowls with a small dish of chili crisp or extra soy sauce on the table. It pairs well with sliced cucumbers or leftover chicken if someone wants more protein. This is a flexible dinner, which is part of its charm.
Pro Tips for This Recipe:
- Use day-old rice if you can; fresh rice clumps and steams.
- Keep the heat up so the rice fries, not soaks.
- Scramble the eggs softly. They’ll finish in the pan later.
- Salt lightly at first; soy sauce can get loud fast.
Variations on This Dish:
- Chicken Fried Rice: Add 1 cup diced cooked chicken with the vegetables.
- Kimchi Version: Stir in 1/2 cup chopped kimchi for tang and heat.
- Brown Rice Bowl: Use chilled brown rice for a nuttier result.
Common Mistakes to Avoid with This Dish:
- Using wet rice: It turns gummy. Chill it first.
- Overloading the pan: The rice needs room to fry.
- Adding too much soy sauce: The bowl gets muddy and salty fast.
7. Sheet Pan Chicken Fajitas
The best thing about chicken fajitas is the smell when the pan comes out of the oven: cumin, peppers, onion, and browned chicken all in one shot. You get all the fajita night drama with very little actual drama.
Why It Works:
Chicken gives the protein, tortillas give the carbs, and the peppers bring sweetness and a little bite. Roasting everything together means the vegetables caramelize at the edges instead of going limp in a skillet. I like sheet pan fajitas after practice because they feel loud and festive even though they are practically low-effort.
Key Ingredients:
- 1 1/2 pounds boneless chicken thighs, sliced
- 3 bell peppers, sliced
- 1 large onion, sliced
- 2 tablespoons olive oil
- 2 tablespoons fajita seasoning
- 8 small flour or corn tortillas
- 1 lime
- 1/2 cup sour cream or Greek yogurt
Quick Steps:
- Heat the oven to 425°F and line a sheet pan with parchment.
- Toss the chicken, peppers, onion, olive oil, and fajita seasoning together.
- Spread everything in a single layer and roast for 20 to 22 minutes, stirring once halfway through.
- Check that the chicken is cooked through and the edges of the peppers are browned.
- Warm the tortillas and serve with lime wedges and sour cream.
Equipment for This Recipe:
- Rimmed sheet pan
- Large bowl
- Tongs
- Small skillet or microwave for tortillas
How to Serve This Dish:
Set the pan in the middle of the table and let everyone build their own tacos. A bowl of shredded lettuce, salsa, or avocado slices makes the spread feel complete without much extra work. Three fajitas is a normal adult portion; four if the workout was rough.
Pro Tips for This Recipe:
- Slice the vegetables thick enough that they char, not shrink.
- Don’t pile the pan. A crowded sheet pan steams.
- Warm tortillas in a dry skillet for better flavor than the microwave.
- Add lime after roasting, not before, so the peppers keep their sweetness.
Variations on This Dish:
- Steak Fajitas: Swap the chicken for flank steak and roast just until medium.
- Bean Addition: Add a drained can of black beans for more bulk.
- Smoky Version: Use smoked paprika in the seasoning mix.
Common Mistakes to Avoid with This Dish:
- Cutting the chicken too small: It dries out before the vegetables finish.
- Skipping the parchment: The roasted bits stick hard to the pan.
- Forgetting to warm tortillas: Cold tortillas make the whole meal feel flat.
8. Greek Chicken Pitas
Greek chicken pitas are all about contrast: warm chicken, cool cucumber, tangy yogurt, salty feta, and soft pita that soaks up the juices before the first bite is gone. It feels like a sandwich, but it eats more like a proper dinner.
Why It Works:
Chicken and yogurt together bring a lot of protein without a heavy sauce. The pita gives quick carbs, and the vegetables keep the whole thing bright. I reach for this one when I want the family to eat something that feels fresh but still fills the gap after exercise.
Key Ingredients:
- 1 1/2 pounds boneless chicken breasts or thighs
- 2 tablespoons olive oil
- 1 teaspoon dried oregano
- 1 teaspoon garlic powder
- 4 pitas
- 1 cucumber, diced
- 1 cup cherry tomatoes, halved
- 1/2 cup crumbled feta
- 3/4 cup plain Greek yogurt
- 1 tablespoon lemon juice
Quick Steps:
- Season the chicken with olive oil, oregano, garlic powder, salt, and pepper.
- Cook in a skillet over medium-high heat for 6 to 8 minutes per side, until browned and cooked through.
- Whisk the Greek yogurt and lemon juice together with a pinch of salt.
- Warm the pitas in a dry skillet or oven for 1 minute.
- Slice the chicken and stuff the pitas with chicken, cucumber, tomatoes, feta, and yogurt sauce.
Equipment for This Recipe:
- Skillet
- Cutting board and knife
- Small bowl
- Tongs
How to Serve This Dish:
Serve the pitas wrapped in parchment or foil if the family likes hand-held dinners. A side of olives or carrot sticks gives the plate a little more bite. Two stuffed pitas usually lands as a full meal for most adults.
Pro Tips for This Recipe:
- Use chicken thighs if you want more forgiveness on the stove.
- Warm the pita or it tears at the fold.
- Salt the cucumber lightly and let it sit for 5 minutes if it tastes bland.
- Keep the yogurt sauce thick so it does not leak everywhere.
Variations on This Dish:
- Lemony Herb Version: Add chopped dill and parsley to the yogurt sauce.
- Chicken Shawarma Style: Swap oregano for cumin and paprika.
- Grain Bowl Version: Serve the fillings over rice instead of in pita.
Common Mistakes to Avoid with This Dish:
- Overstuffing the pita: It splits and dumps the filling.
- Using watery yogurt sauce: Thin sauce makes the pita soggy.
- Slicing the chicken too soon: Let it rest for 5 minutes first.
9. Tuna Melt Quesadillas
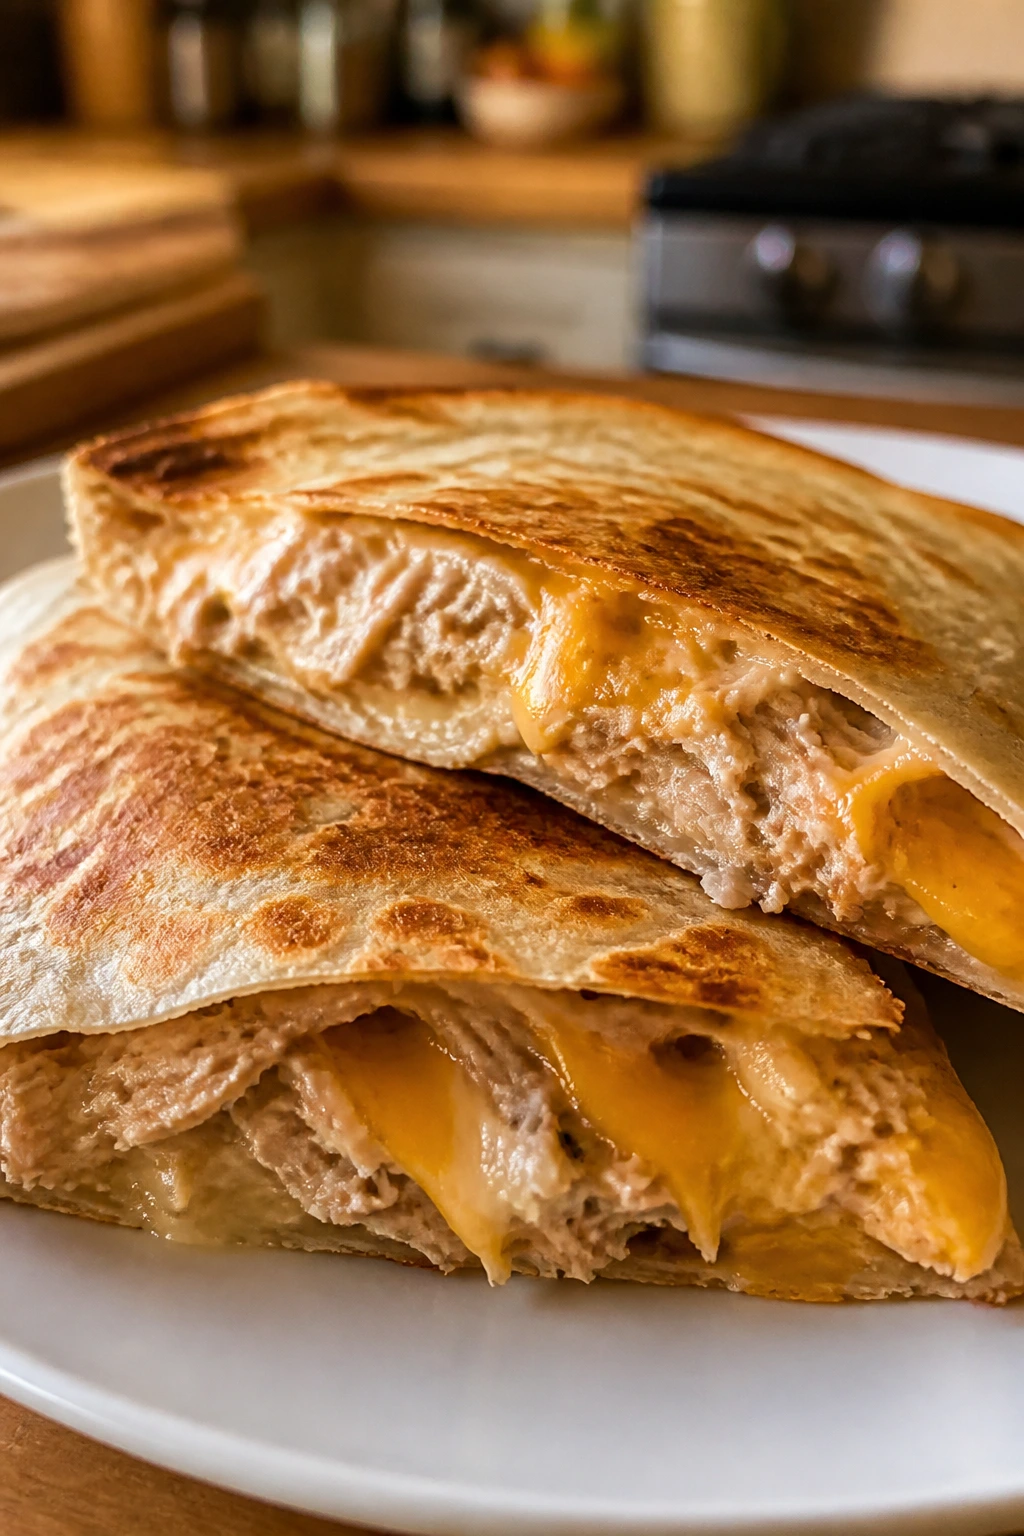
Tuna melt quesadillas sound like a pantry hack, and that’s exactly why I like them. The tortilla gives you a crisp shell, the tuna filling stays creamy, and the cheese melts into all the little corners that need help.
Why It Works:
Canned tuna brings fast protein and a long shelf life, while tortillas and cheese add the carb-and-fat base that makes the meal feel finished. It’s a fast post-workout option when the fridge is thin and everyone is already hungry. The filling also holds together better than a regular sandwich, which matters when little hands are involved.
Key Ingredients:
- 2 cans (5 oz each) tuna, drained
- 1/4 cup mayonnaise or plain Greek yogurt
- 1 tablespoon diced pickle or relish
- 1 tablespoon finely diced celery
- 1/2 teaspoon Dijon mustard
- 1 1/2 cups shredded cheddar
- 4 large flour tortillas
- 1 tablespoon butter
Quick Steps:
- Mix the tuna, mayo or yogurt, pickle, celery, and mustard in a bowl.
- Heat a skillet over medium heat and melt half the butter.
- Lay down one tortilla, sprinkle with cheese, spread on the tuna mixture, add more cheese, and top with a second tortilla.
- Cook for 2 to 3 minutes per side until golden and the cheese melts.
- Repeat with the remaining tortillas, then cut into wedges.
Equipment for This Recipe:
- Skillet
- Mixing bowl
- Spatula
- Knife
How to Serve This Dish:
Serve the wedges with sliced tomatoes or a crisp green salad so the plate does not feel too heavy. A bowl of soup turns it into a bigger dinner, but the quesadilla stands alone if the workout was the main event. Four wedges usually feed one adult nicely.
Pro Tips for This Recipe:
- Drain the tuna well or the filling leaks.
- Use medium heat so the tortilla browns before the cheese burns.
- Put cheese on both sides of the tuna filling to glue the quesadilla together.
- Let it sit for 1 minute before cutting or the filling runs out.
Variations on This Dish:
- Spicy Tuna Melt: Add a few dashes of hot sauce or chopped jalapeño.
- Pizza-Style: Stir in a spoonful of marinara and use mozzarella.
- Open-Faced Version: Fold once and cook like a giant half-moon if you want less cheese.
Common Mistakes to Avoid with This Dish:
- Using high heat: The tortilla burns before the filling warms.
- Skipping the cheese barrier: The tuna falls out too easily.
- Too much mayo: The quesadilla turns wet in the center.
10. Turkey Meatball Subs
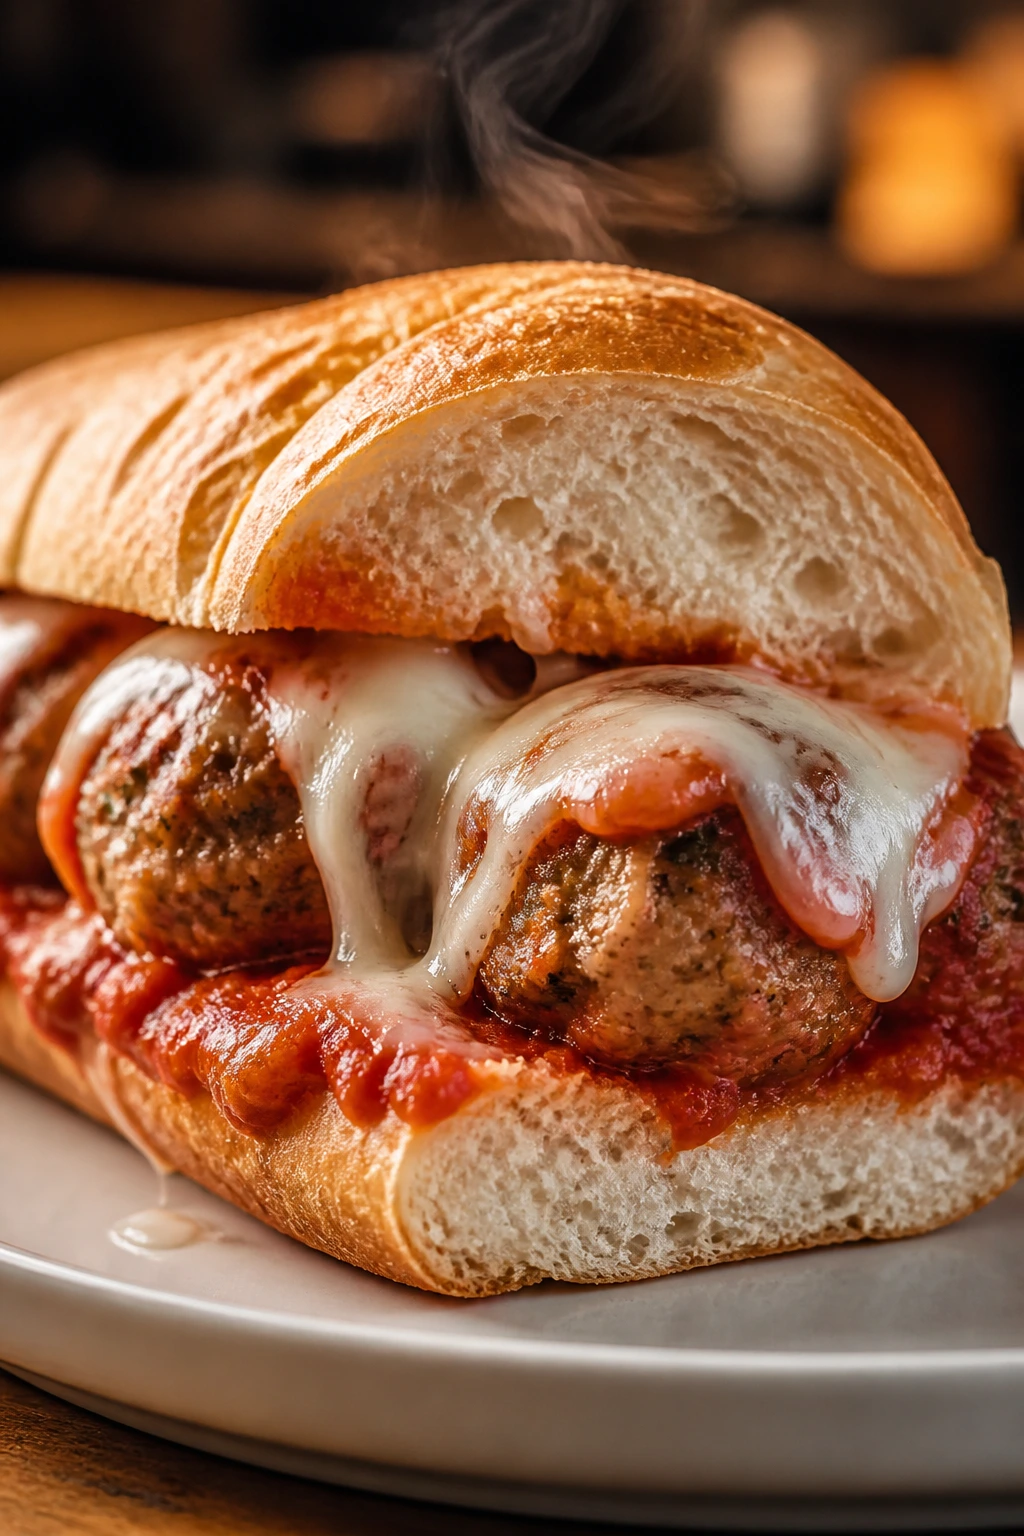
Meatball subs bring a little old-school comfort, but turkey keeps them from feeling too heavy after a workout. The sauce soaks into the roll, the mozzarella stretches, and the whole thing tastes like it took longer than it did.
Why It Works:
Turkey meatballs are lean, but they still stay juicy if you handle them gently and don’t overbake them. The roll provides enough carbs to make the meal feel complete, and the tomato sauce adds salt and acid. I like this one for hungry families because it’s familiar, filling, and easy to portion.
Key Ingredients:
- 1 pound ground turkey
- 1/2 cup breadcrumbs
- 1 egg
- 2 tablespoons grated Parmesan
- 1 teaspoon Italian seasoning
- 2 cups marinara sauce
- 4 hoagie rolls
- 1 cup shredded mozzarella
Quick Steps:
- Heat the oven to 400°F.
- Mix the turkey, breadcrumbs, egg, Parmesan, Italian seasoning, salt, and pepper until just combined.
- Roll into 16 meatballs and bake for 12 to 14 minutes until cooked through.
- Warm the marinara in a saucepan and toss in the meatballs.
- Split the rolls, fill with meatballs and sauce, top with mozzarella, and broil for 1 to 2 minutes until melted.
Equipment for This Recipe:
- Rimmed baking sheet
- Mixing bowl
- Saucepan
- Spoon
How to Serve This Dish:
Serve with a side salad or roasted peppers if you want something green next to the bread. One sub is a full meal for most people; half a sub with fruit works for smaller appetites. Keep napkins nearby. Seriously.
Pro Tips for This Recipe:
- Mix the meatball mixture lightly so it stays tender.
- Wet your hands before rolling; it keeps the meat from sticking.
- Use sturdy rolls so they do not collapse under the sauce.
- Broil just until the cheese melts, not until the bread blackens.
Variations on This Dish:
- Spicy Marinara Subs: Add red pepper flakes to the sauce.
- Mozzarella-Stuffed Meatballs: Tuck a small cube of cheese inside each meatball.
- Gluten-Free Version: Use gluten-free breadcrumbs and rolls.
Common Mistakes to Avoid with This Dish:
- Overmixing the meat: It turns dense and bouncy.
- Using soft sandwich bread: It disintegrates under sauce.
- Skipping the broiler finish: The cheese never gets that proper pull.
11. Loaded Baked Potatoes with Cottage Cheese and Chili
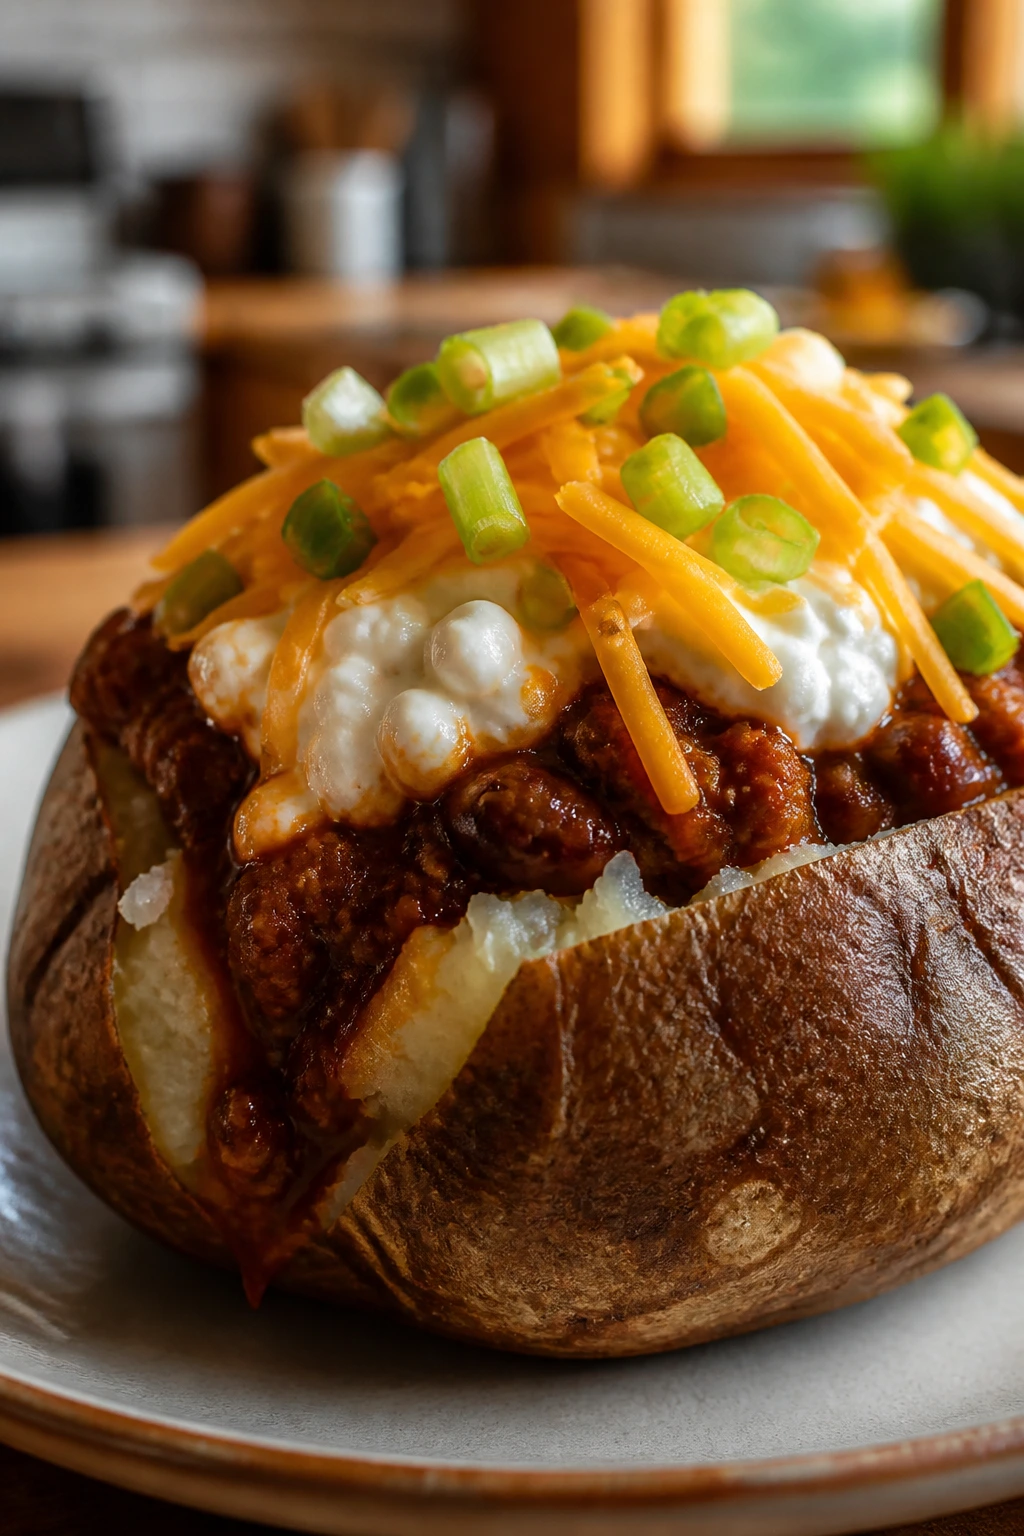
A baked potato after a workout is not a compromise. It is a giant edible carb anchor, and when you load it with chili, cottage cheese, and cheddar, it turns into a full dinner with almost no attitude.
Why It Works:
Potatoes refill glycogen fast, chili brings protein and extra salt, and cottage cheese adds a cool, creamy layer that feels more substantial than sour cream alone. This meal is a lifesaver when people are ravenous and you need something built from pantry staples. It also lets each person control the toppings, which is handy.
Key Ingredients:
- 4 large russet potatoes
- 2 tablespoons olive oil
- 2 cups canned or homemade chili
- 1 cup cottage cheese
- 1 cup shredded cheddar
- 3 scallions, sliced
- Salt and black pepper
Quick Steps:
- Heat the oven to 425°F.
- Scrub the potatoes, dry them, prick with a fork, rub with olive oil, and salt the skins.
- Bake for 50 to 60 minutes until the centers are soft when squeezed with a towel.
- Heat the chili until steaming.
- Split the potatoes, fluff the insides with a fork, and top with chili, cottage cheese, cheddar, and scallions.
Equipment for This Recipe:
- Baking sheet
- Fork
- Sharp knife
- Small saucepan
How to Serve This Dish:
Set up a topping station and let people build their own. A green salad on the side keeps the plate from leaning all the way into carb territory. One potato is a big serving; half a potato plus extra chili can work for smaller eaters.
Pro Tips for This Recipe:
- Salt the skin before baking so it tastes like part of the meal.
- Use russets; waxy potatoes do not fluff the same way.
- Split the potato while hot so the steam escapes and the texture stays light.
- If you’re short on time, microwave the potatoes first and finish in the oven.
Variations on This Dish:
- Broccoli Cheddar Potato: Swap the chili for steamed broccoli and extra cheese.
- BBQ Chicken Version: Top with shredded chicken and barbecue sauce.
- Vegetarian Chili Potato: Use bean chili and add avocado.
Common Mistakes to Avoid with This Dish:
- Undercooking the potato: A hard center ruins the whole thing.
- Using watery chili: It makes the skin soggy.
- Skipping the fluff step: The insides stay dense and gummy.
12. Peanut Butter Banana Protein Oatmeal
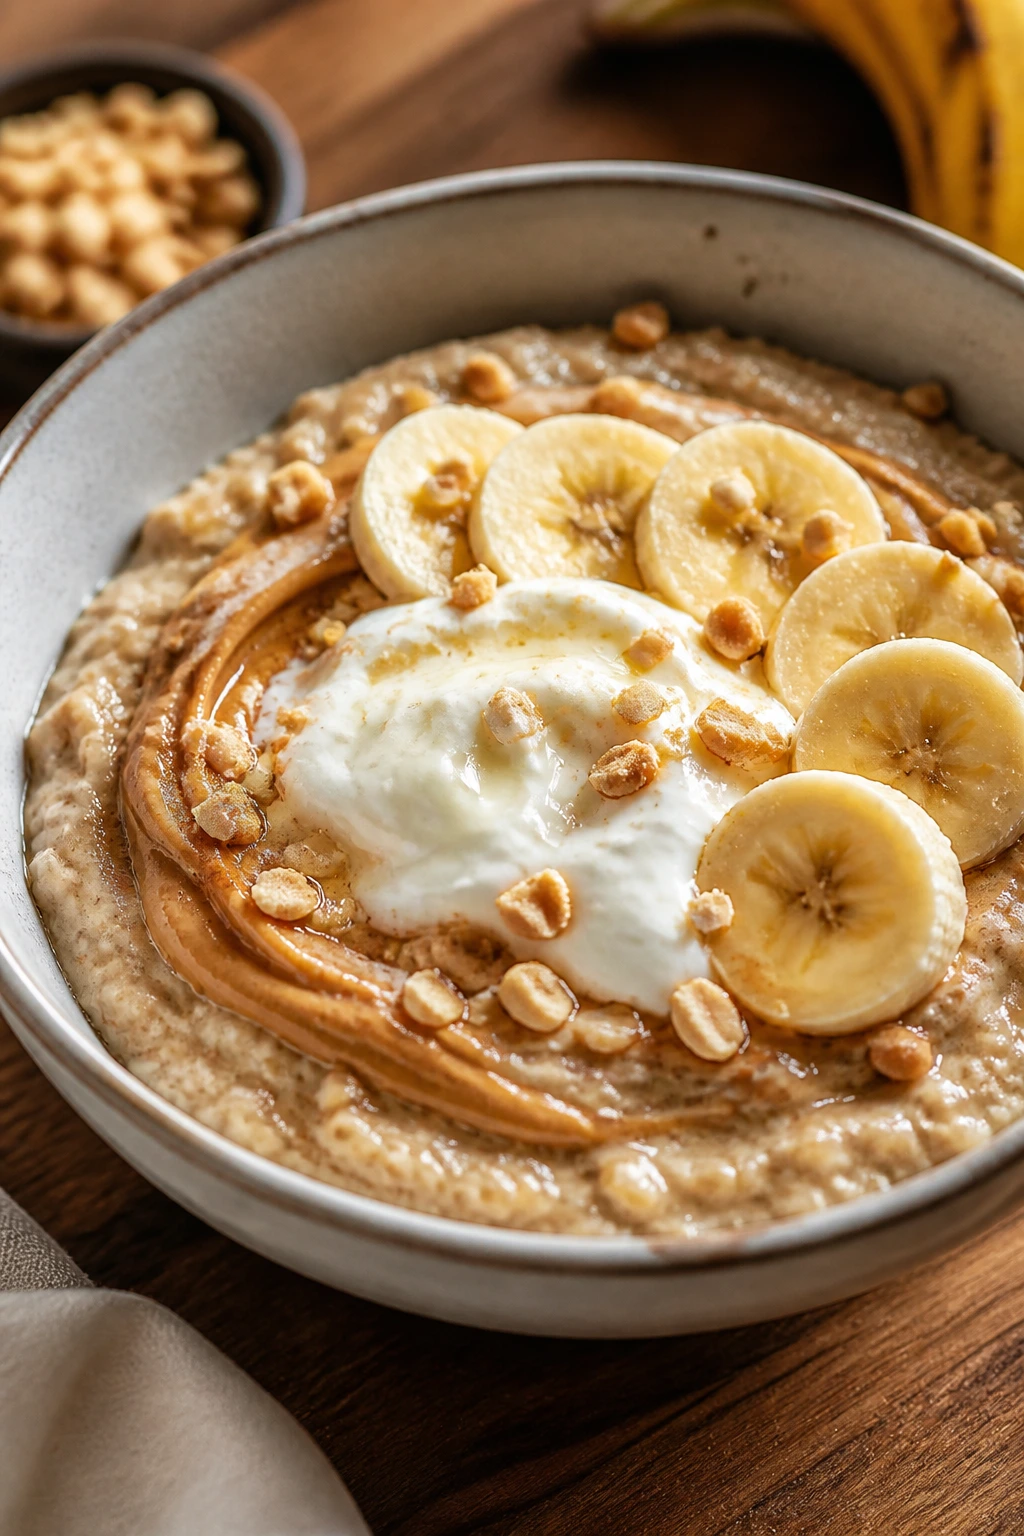
This is breakfast food with enough heft to stand in as dinner when the family comes home hungry and a little cranky. Creamy oats, peanut butter, banana, and yogurt give you a bowl that eats like comfort food but still behaves like a recovery meal.
Why It Works:
Oats bring slow carbs, peanut butter adds fat and flavor, and Greek yogurt bumps the protein without making the bowl weirdly dry. Bananas soften into the oats and give the whole bowl a sweet, almost pudding-like feel. I like this one after evening runs or early-morning lifts because it cooks in one saucepan and disappears fast.
Key Ingredients:
- 2 cups old-fashioned oats
- 4 cups milk, dairy or unsweetened non-dairy
- 2 ripe bananas, sliced
- 1/3 cup peanut butter
- 1 cup plain Greek yogurt
- 2 tablespoons chia seeds
- 1 teaspoon cinnamon
- Pinch of salt
Quick Steps:
- Bring the milk, oats, chia seeds, cinnamon, and salt to a gentle simmer in a saucepan.
- Cook for 5 to 7 minutes, stirring often, until thick and creamy.
- Stir in one sliced banana and the peanut butter until melted through.
- Spoon into bowls and top with the remaining banana and Greek yogurt.
- Add an extra splash of milk if you want it looser.
Equipment for This Recipe:
- Medium saucepan
- Wooden spoon
- Measuring cups
- Bowls
How to Serve This Dish:
Serve it warm, with a drizzle of extra peanut butter if the family wants more richness. A handful of berries or chopped walnuts adds contrast, though it is perfectly fine plain. This is a deep bowl, not a dainty one.
Pro Tips for This Recipe:
- Stir often so the oats do not stick on the bottom.
- Use ripe bananas with brown freckles; they mash into the oats better.
- Add yogurt after cooking so it stays creamy, not curdled.
- If the bowl thickens too much, loosen it with milk a tablespoon at a time.
Variations on This Dish:
- Chocolate Banana Bowl: Stir in 1 tablespoon cocoa powder.
- Apple Cinnamon Version: Swap the banana for diced sautéed apples.
- Higher-Protein Bowl: Add an extra 1/2 cup yogurt on top.
Common Mistakes to Avoid with This Dish:
- Boiling the oats hard: They can turn gluey. Keep the simmer gentle.
- Adding peanut butter too late: It stays in greasy blobs.
- Using under-ripe bananas: The bowl loses sweetness and softness.
13. Lentil Sloppy Joes
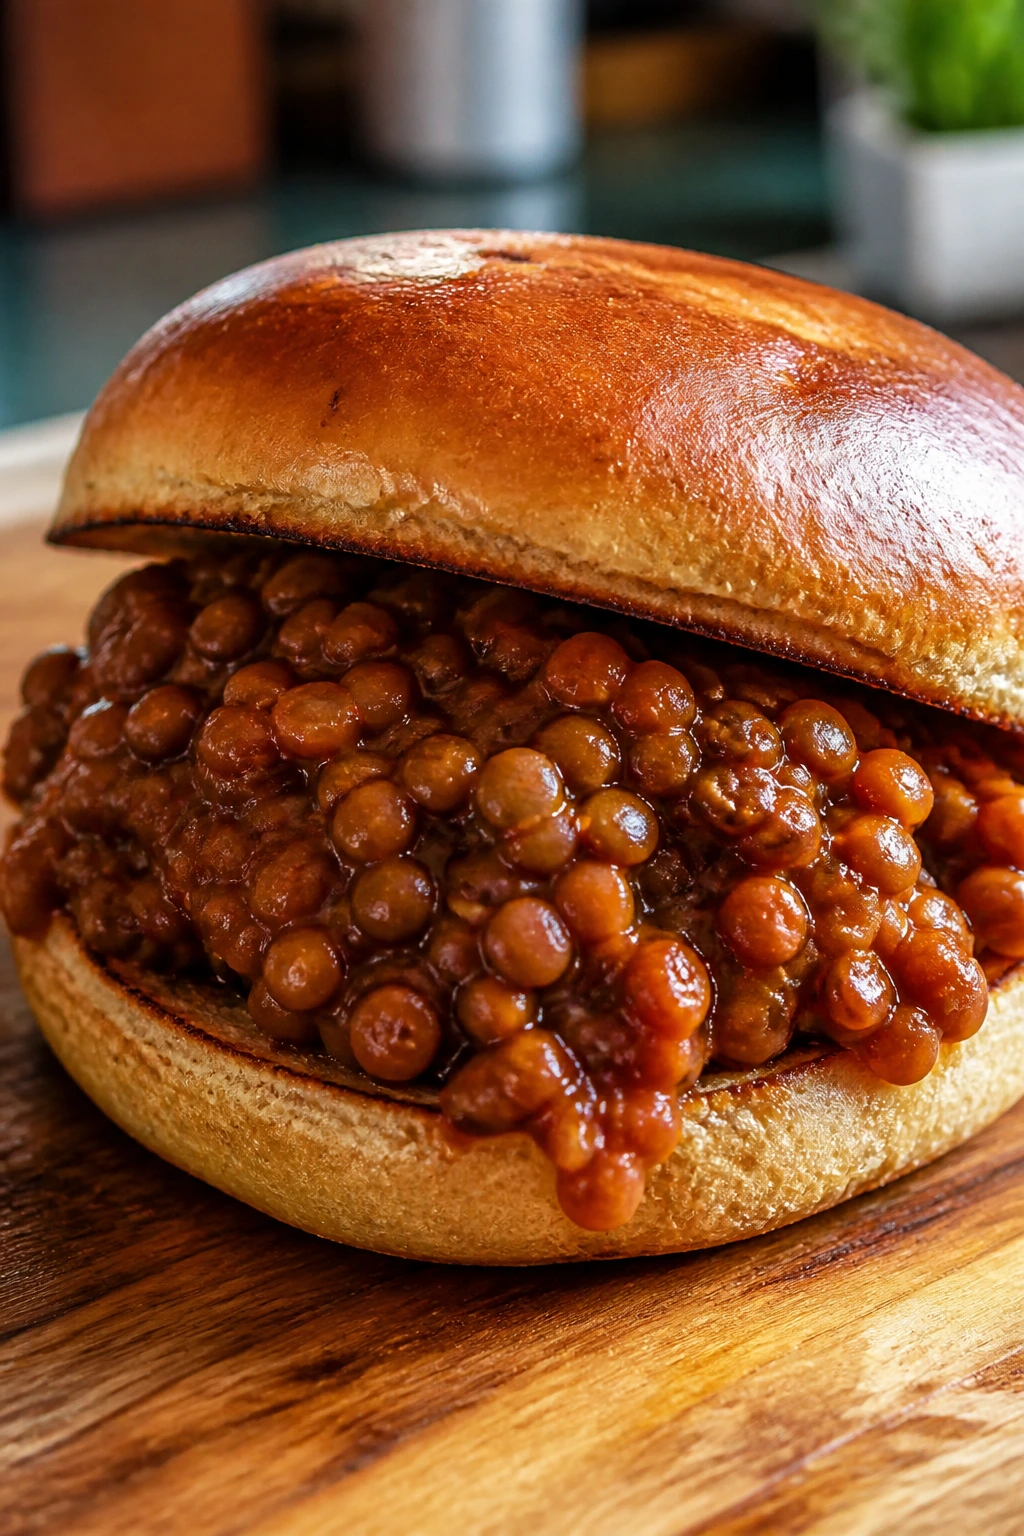
Lentil sloppy joes are the kind of meal that surprises people in a good way. They’re saucy, sweet, tangy, and a little messy, which is exactly what a sloppy joe should be, even when the protein comes from lentils instead of meat.
Why It Works:
Lentils cook into a hearty base with enough texture to mimic the old-school version. The buns bring the carbs, and the sauce keeps the whole sandwich moist after a long day. I like these when I want one dinner that can quietly feed vegetarians and meat-eaters without making a separate pan.
Key Ingredients:
- 1 cup dry brown or green lentils
- 1 tablespoon olive oil
- 1 small onion, diced
- 1 bell pepper, diced
- 2 tablespoons tomato paste
- 1/4 cup ketchup
- 1 tablespoon mustard
- 1 tablespoon Worcestershire sauce or vegan alternative
- 4 hamburger buns
Quick Steps:
- Simmer the lentils in water until tender, about 20 to 25 minutes, then drain.
- Heat the oil in a skillet and cook the onion and bell pepper for 5 minutes until soft.
- Stir in the tomato paste, ketchup, mustard, and Worcestershire sauce.
- Add the lentils and 1/2 cup water, then simmer for 5 minutes until saucy.
- Spoon onto toasted buns.
Equipment for This Recipe:
- Saucepan
- Skillet
- Colander
- Spoon
How to Serve This Dish:
Serve with carrot sticks, pickles, or a simple slaw so the plate has some crunch. These sandwiches are messy, so I prefer them with napkins and no white shirts in sight. One sandwich is enough for many adults, though post-workout appetites may ask for a second.
Pro Tips for This Recipe:
- Don’t overcook the lentils or they’ll turn to mush.
- Toast the buns so they can handle the sauce.
- Taste before serving and add a pinch more salt if the mixture feels flat.
- A splash of apple cider vinegar wakes the sauce up if it tastes too sweet.
Variations on This Dish:
- BBQ Lentil Joes: Swap ketchup for barbecue sauce.
- Tex-Mex Version: Add cumin and chopped jalapeño.
- Meat Blend: Mix half lentils with half ground turkey.
Common Mistakes to Avoid with This Dish:
- Making the filling too wet: It slides out of the bun. Simmer it until thick.
- Underseasoning the sauce: Lentils need a decent amount of salt and acid.
- Using soft buns: They collapse fast.
14. BBQ Chicken Sweet Potato Skins
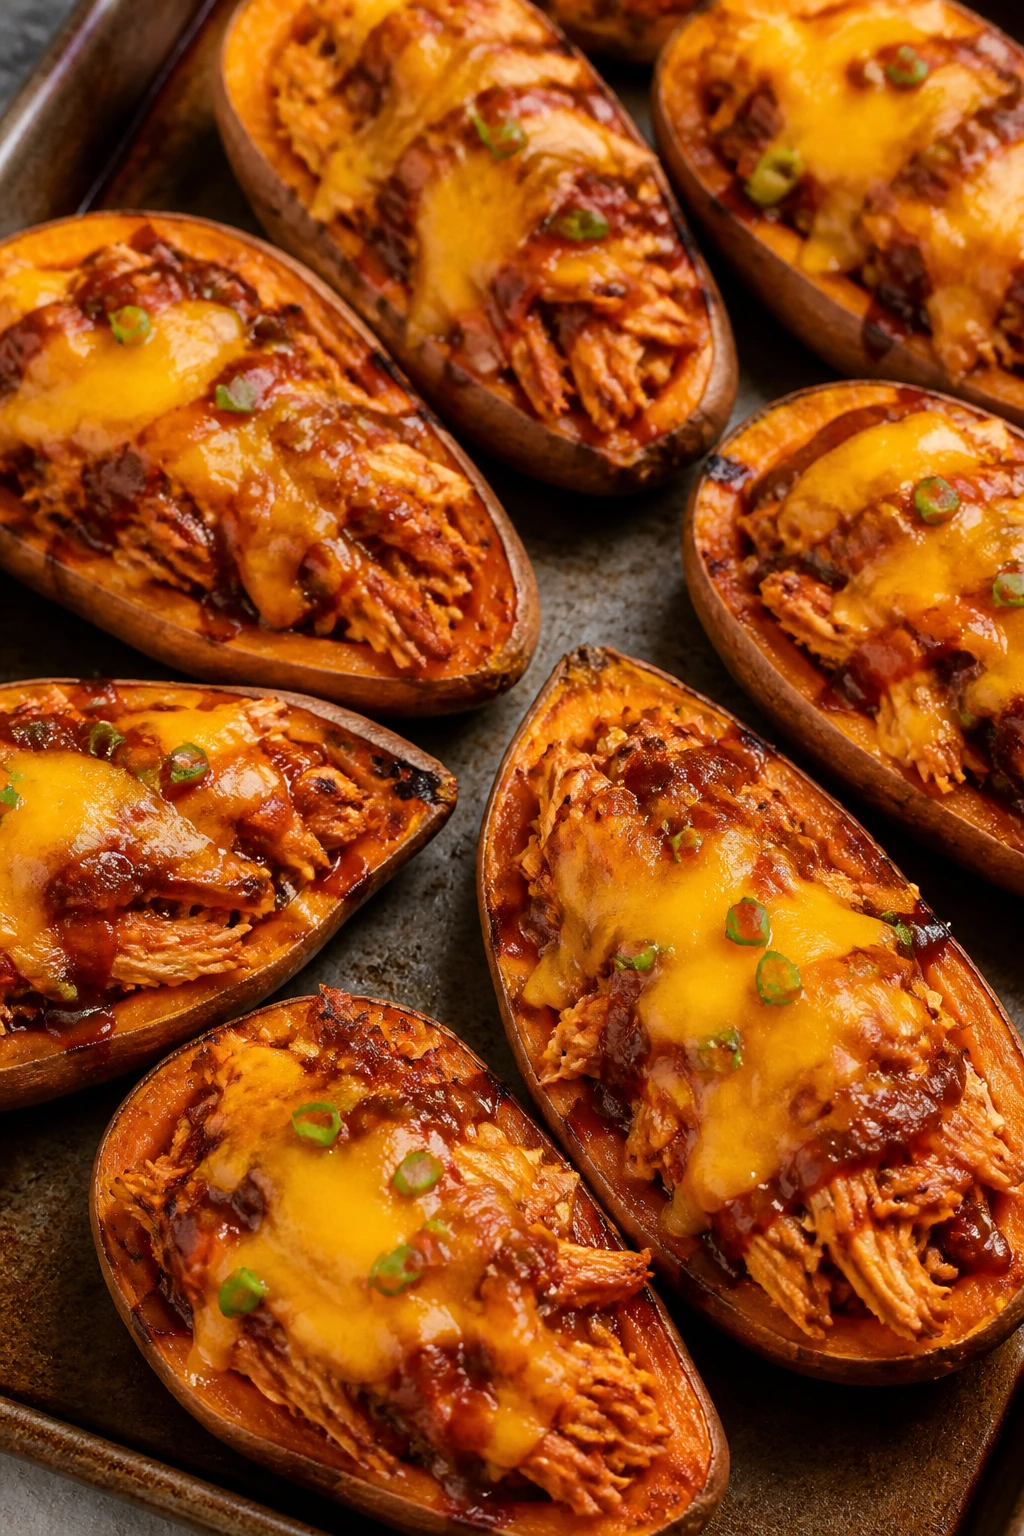
Sweet potato skins are a little more playful than plain baked potatoes, and that helps when you need a meal that feels fun enough for the kids but still makes sense after the gym. Smoky barbecue chicken tucked into the orange flesh is the good part.
Why It Works:
Sweet potatoes bring carbs plus a little natural sweetness, and chicken keeps the protein high. Barbecue sauce gives the filling its main flavor, so there is no long ingredient list or fussy sauce to make. I like this one because the skins crisp back up in the oven and the whole tray looks more special than the work involved.
Key Ingredients:
- 4 medium sweet potatoes
- 2 cups shredded cooked chicken
- 1/2 cup barbecue sauce
- 1 cup shredded cheddar
- 2 tablespoons chopped green onions
- 1 tablespoon olive oil
- Salt and pepper
Quick Steps:
- Heat the oven to 400°F and bake the sweet potatoes until tender, about 40 to 50 minutes.
- Slice them open lengthwise and scoop out most of the flesh, leaving a thin wall.
- Brush the skins lightly with olive oil and return them to the oven for 10 minutes.
- Mix the chicken with barbecue sauce and spoon it into the skins.
- Top with cheddar and bake for 5 more minutes until melted.
- Finish with green onions.
Equipment for This Recipe:
- Baking sheet
- Fork
- Spoon
- Mixing bowl
How to Serve This Dish:
Serve two halves per adult and one half per younger kid. A crisp salad or some sliced cucumbers balances the sweetness and keeps the plate from leaning too far toward snack food. They also reheat well, which is handy.
Pro Tips for This Recipe:
- Leave a little flesh in the skin so it stays sturdy.
- Brush the skins with oil before the second bake for better texture.
- Use thick barbecue sauce so the filling doesn’t run.
- Add the cheese after the chicken is hot so it melts fast.
Variations on This Dish:
- Buffalo Version: Swap barbecue sauce for buffalo sauce and use blue cheese.
- Pulled Pork Version: Use leftover pulled pork instead of chicken.
- Bean-and-Cheese Version: Replace the chicken with black beans for a vegetarian option.
Common Mistakes to Avoid with This Dish:
- Scooping too aggressively: The skins tear. Leave a border.
- Skipping the second bake: The skins stay soft.
- Using thin sauce: It puddles inside the potato.
15. Pork Tenderloin with Apples and Potatoes
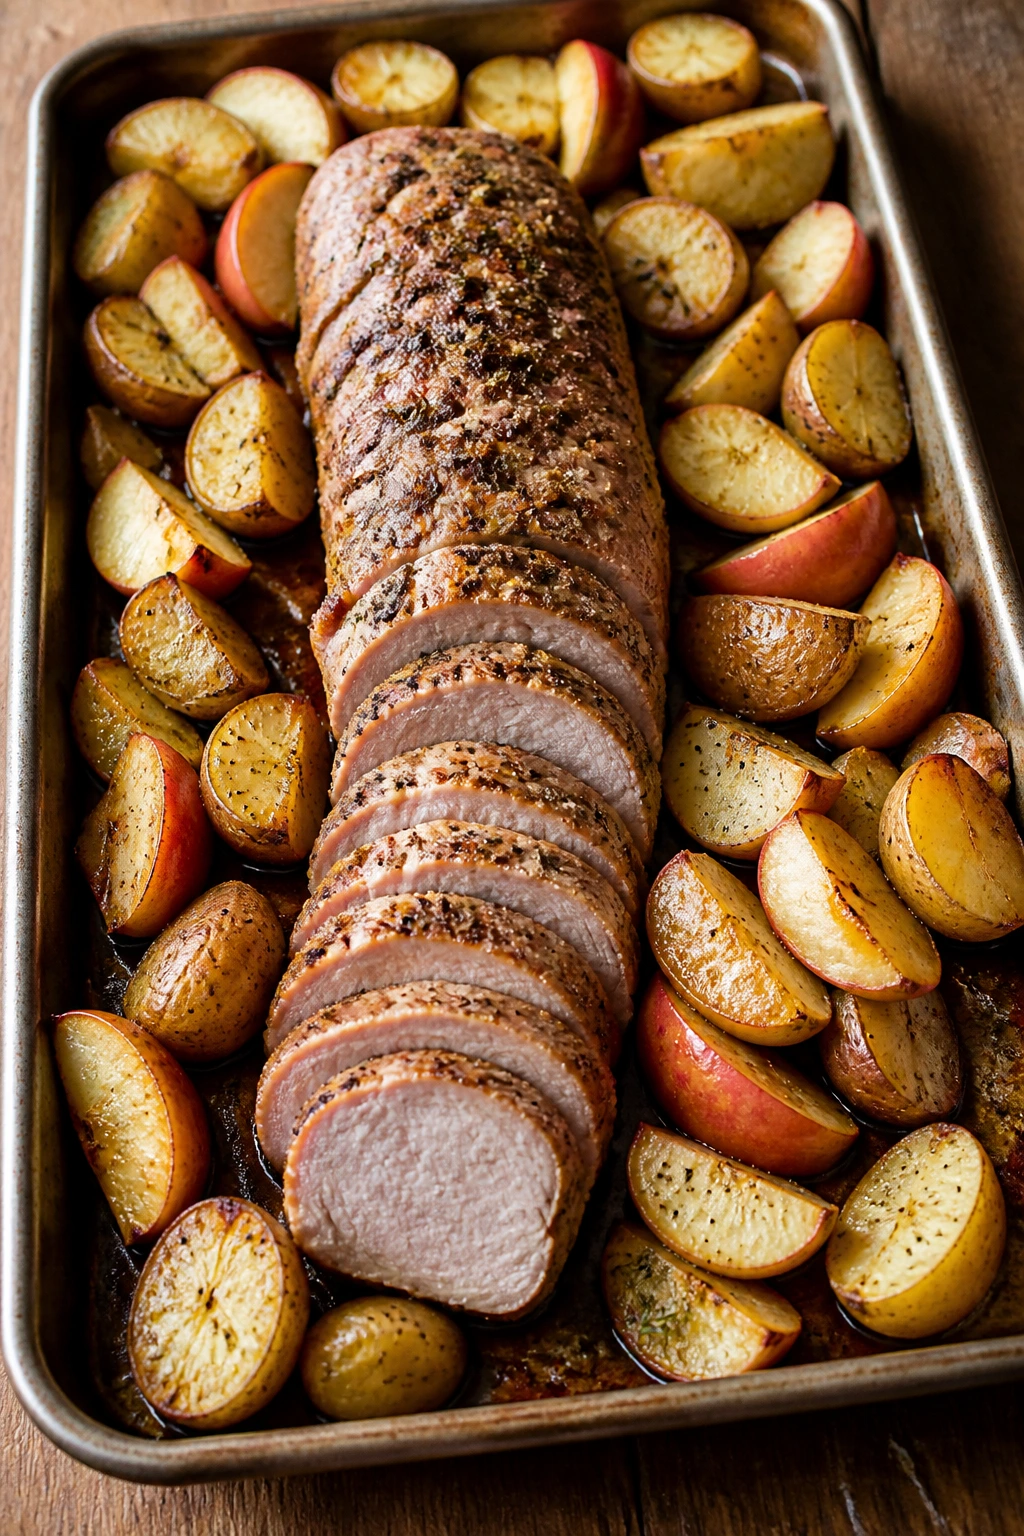
Pork tenderloin is one of the easiest “looks fancy, isn’t fancy” proteins around. Roast it with apples and potatoes, and you get a sweet-savory pan full of juices that make the vegetables taste like they were cooked with more effort than they were.
Why It Works:
Tenderloin cooks fast, which is why it fits a post-workout meal so well. Potatoes bring the starch, apples bring acid and sweetness, and the pan juices tie everything together. I like this one when I want a sheet-pan dinner that feels more complete than a pile of separate parts.
Key Ingredients:
- 1 1/2 pounds pork tenderloin
- 1 1/2 pounds baby potatoes, halved
- 2 apples, cored and sliced
- 2 tablespoons olive oil
- 1 tablespoon Dijon mustard
- 1 teaspoon dried thyme
- 1/2 cup chicken broth
Quick Steps:
- Heat the oven to 425°F.
- Toss the potatoes with 1 tablespoon oil, salt, pepper, and thyme, then roast for 15 minutes.
- Rub the pork with the remaining oil and Dijon mustard.
- Add the pork and apples to the pan and roast for 18 to 22 minutes more, until the pork reaches 145°F.
- Rest the pork for 5 to 10 minutes, then slice and serve with the potatoes and pan juices.
Equipment for This Recipe:
- Rimmed sheet pan
- Meat thermometer
- Knife
- Cutting board
How to Serve This Dish:
Slice the pork thinly and spoon the apples and potatoes beside it. A small handful of arugula or green beans works well if you want a sharper side. This is a calm, balanced dinner that still feeds hungry people.
Pro Tips for This Recipe:
- Use a thermometer. Pork tenderloin overcooks fast.
- Roast the potatoes first so they get a head start.
- Pick apples that hold shape, like Honeycrisp or Fuji.
- Let the pork rest before slicing or the juices spill out.
Variations on This Dish:
- Mustard-Herb Version: Add rosemary and extra Dijon.
- Sausage Swap: Use thick sliced chicken sausage if pork is not on hand.
- Fall Spice Version: Add a pinch of cinnamon to the apples.
Common Mistakes to Avoid with This Dish:
- Cooking the pork until dry: Pull it at 145°F, not when it feels “safe” by guesswork.
- Using soft apples: They collapse into mush.
- Skipping the rest time: The slices dry out.
16. Shrimp Fried Rice
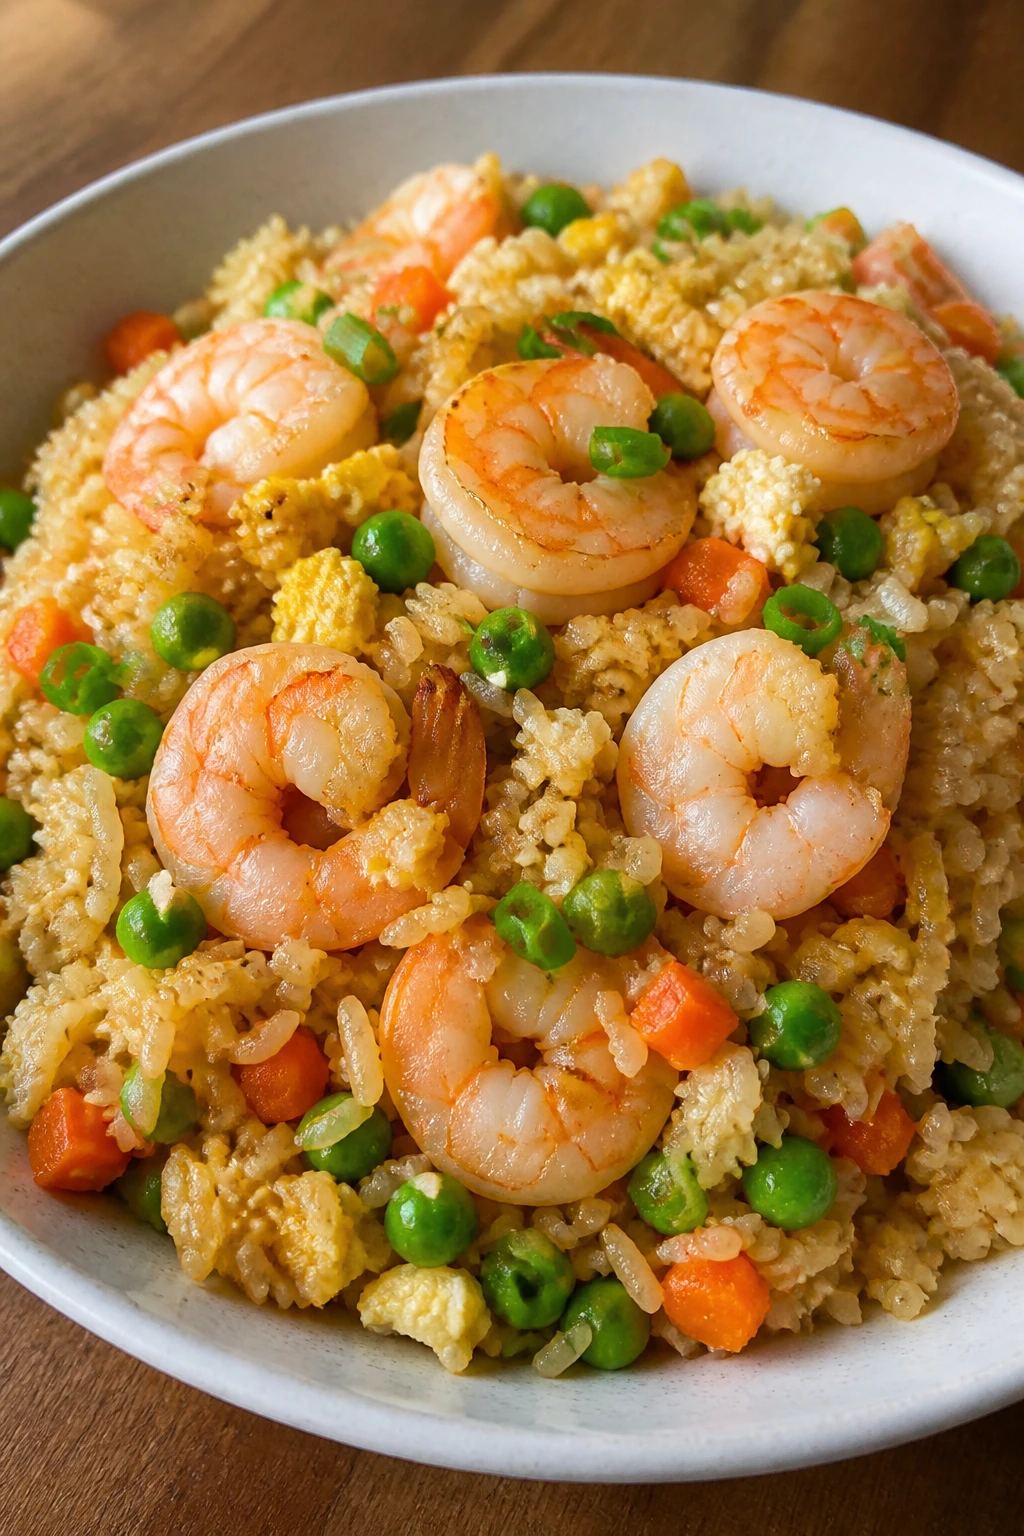
Shrimp fried rice is fast enough for nights when the workout runs late and everyone still expects dinner to appear. The shrimp cook in minutes, the rice fries up from leftovers, and the vegetables keep the bowl from tasting like a shortcut.
Why It Works:
Shrimp gives you lean protein with almost no waiting, and rice makes the meal feel complete. Eggs, peas, and carrots add color and a little more staying power. I like this one because it uses the same basic fried-rice logic as the egg version, but the shrimp make it feel more like a proper dinner.
Key Ingredients:
- 1 pound shrimp, peeled and deveined
- 4 cups cold cooked rice
- 3 large eggs
- 1 cup frozen peas and carrots
- 3 scallions, sliced
- 3 tablespoons soy sauce
- 1 tablespoon butter or oil
- 1 teaspoon sesame oil
Quick Steps:
- Pat the shrimp dry and season lightly with salt.
- Scramble the eggs in a hot skillet, then remove them.
- Cook the shrimp for 1 to 2 minutes per side until pink, then remove.
- Add the peas and carrots, then the cold rice, breaking up clumps as you go.
- Stir in the soy sauce and sesame oil and cook until the rice is hot and slightly crisp at the edges.
- Fold in the eggs, shrimp, and scallions.
Equipment for This Recipe:
- Large skillet or wok
- Spatula
- Bowl
- Measuring spoons
How to Serve This Dish:
Serve it with lime wedges or a spoonful of chili crisp if the family likes heat. A simple bowl of sliced cucumbers cools the plate down. This is one of those dinners where a second helping appears before the first one is finished.
Pro Tips for This Recipe:
- Dry the shrimp well so they sear, not steam.
- Use cold rice or the texture gets sticky.
- Cook the shrimp first and pull them early.
- Keep the pan hot enough that the rice fries.
Variations on This Dish:
- Garlic Shrimp Fried Rice: Add another clove or two of garlic with the vegetables.
- Pineapple Version: Fold in small pineapple chunks for a sweet edge.
- Brown Rice Version: Use chilled brown rice for more chew.
Common Mistakes to Avoid with This Dish:
- Overcooking shrimp: They turn rubbery fast.
- Using warm rice: It clumps and turns soft.
- Adding too much sauce: The rice gets wet instead of fried.
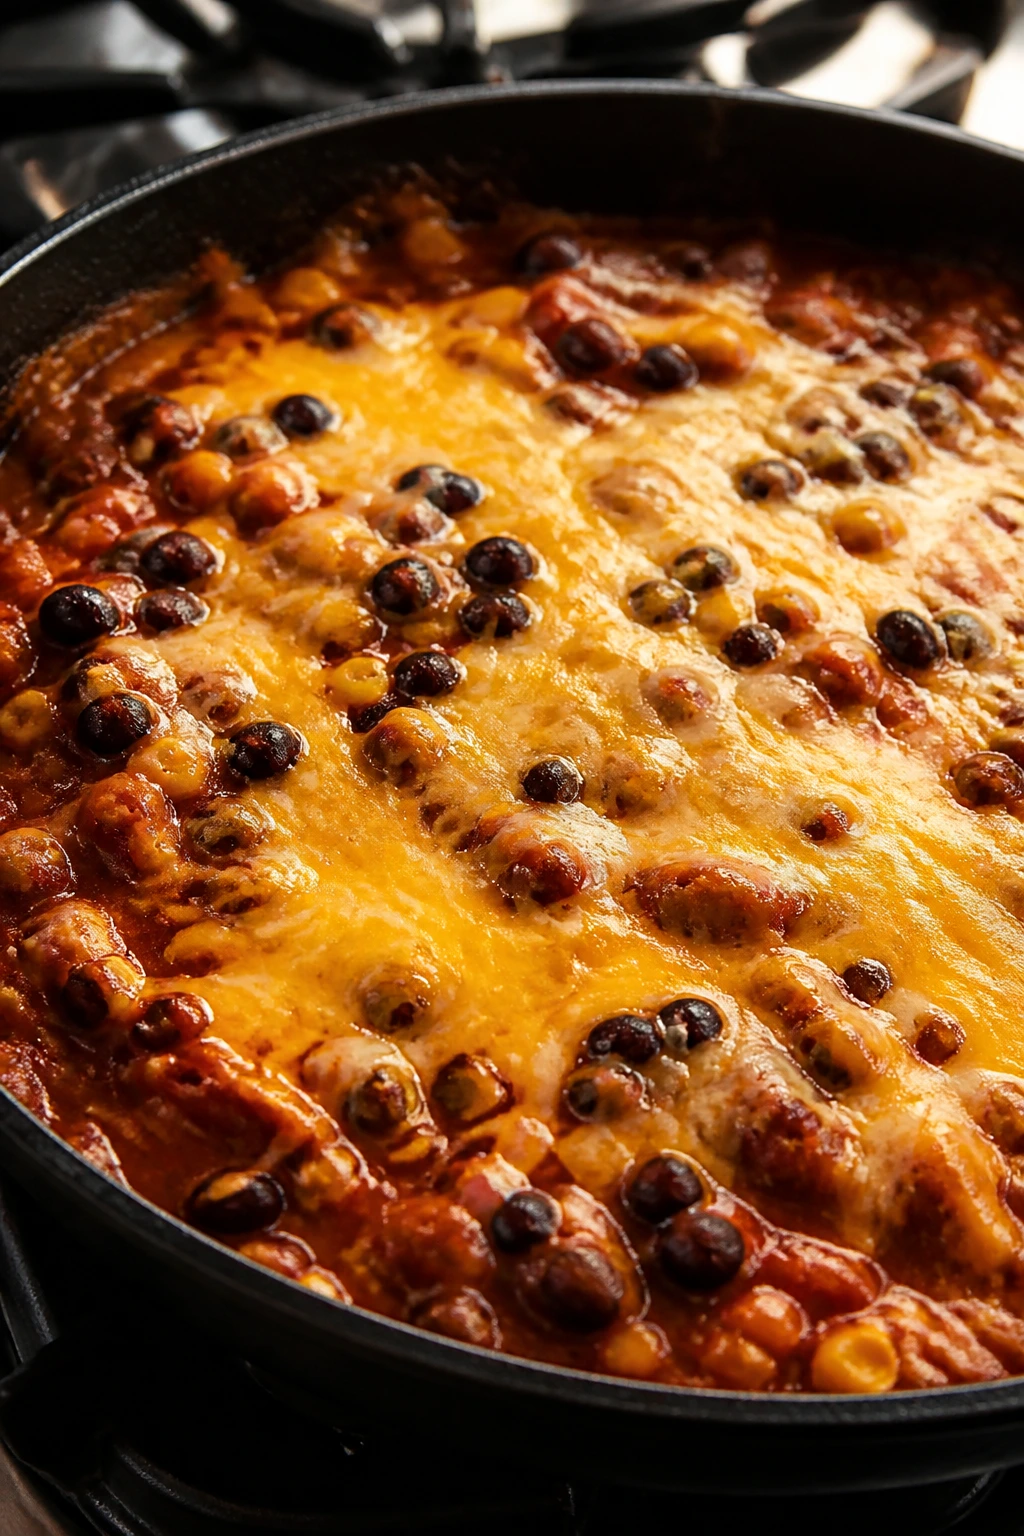
17. Chili Mac Skillet
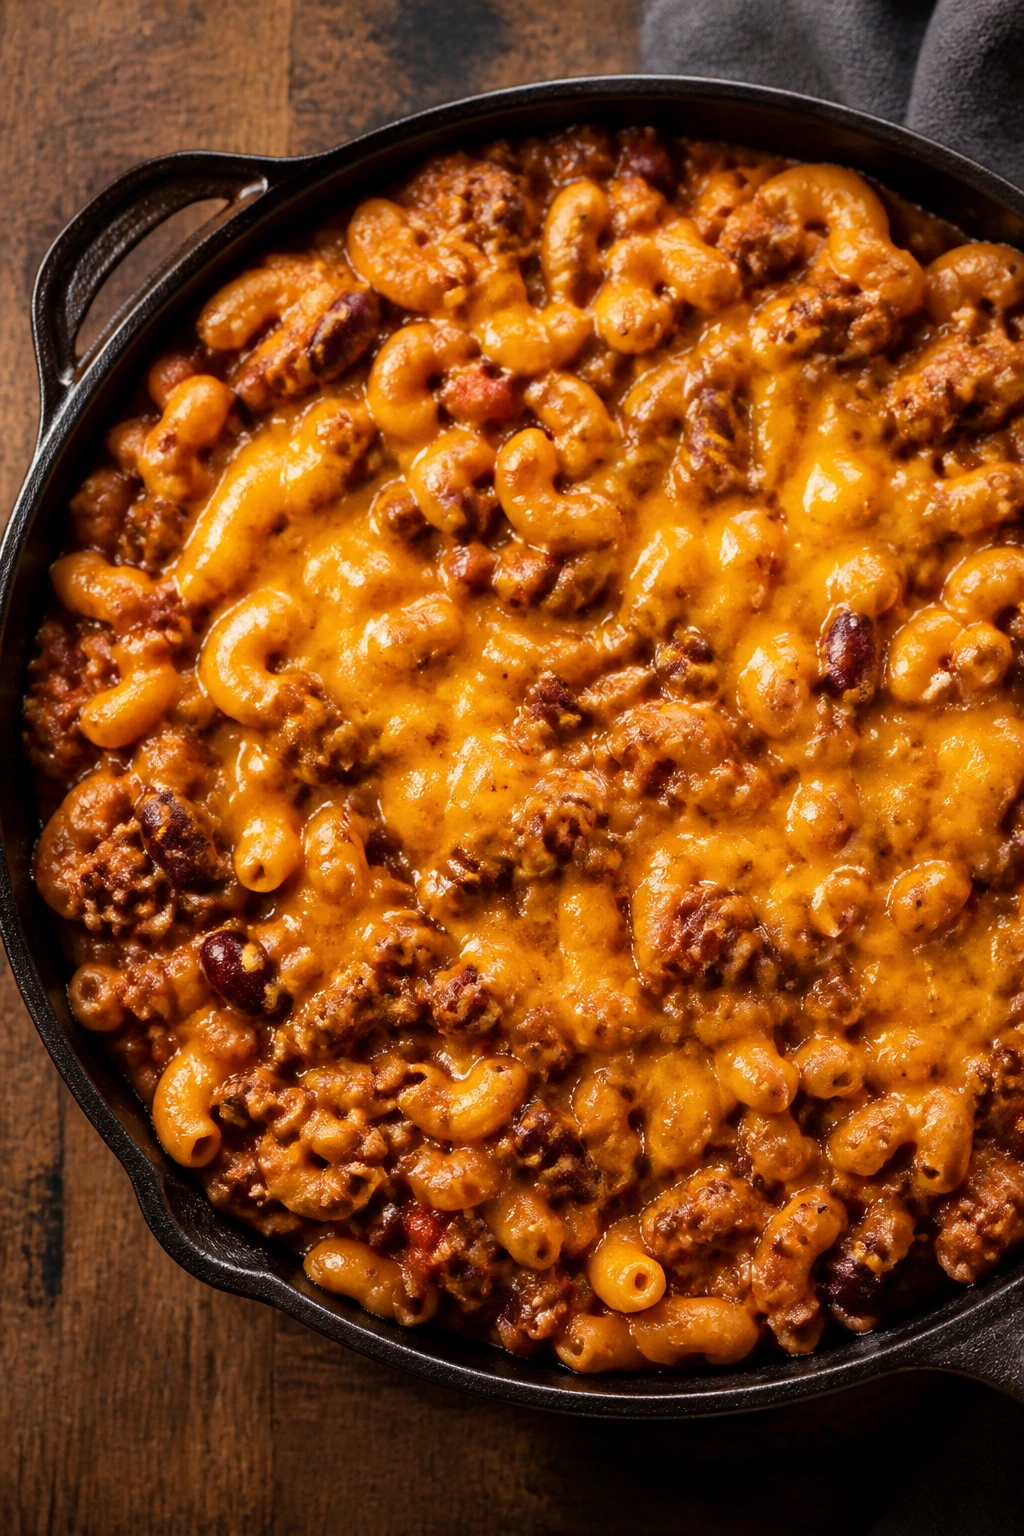
Chili mac is what happens when comfort food decides to do a little more work. You get beef, beans, pasta, and cheese all in one pan, and the sauce ends up thick enough to cling to every elbow macaroni curve.
Why It Works:
The pasta supplies carbs, the beef supplies protein, and the beans stretch the meal so it feeds a crowd without feeling thin. It’s also easy to make spicy or mild. I like this one for families because it has the punch of chili and the familiarity of mac and cheese in the same bowl.
Key Ingredients:
- 1 pound ground beef or turkey
- 1 small onion, diced
- 2 cloves garlic, minced
- 2 cups beef broth
- 1 can (15 oz) diced tomatoes
- 2 cups elbow macaroni
- 1 can (15 oz) kidney or black beans, drained
- 1 1/2 cups shredded cheddar
- 2 tablespoons chili powder
Quick Steps:
- Brown the beef with the onion in a large skillet, then drain excess fat.
- Stir in the garlic and chili powder for 30 seconds.
- Add the broth, tomatoes, macaroni, and beans.
- Simmer covered for 10 to 12 minutes, stirring once or twice, until the pasta is tender.
- Stir in the cheddar until melted and glossy.
Equipment for This Recipe:
- Large deep skillet or Dutch oven
- Wooden spoon
- Measuring cups
- Lid
How to Serve This Dish:
Serve it in bowls with chopped scallions or a little sour cream on top. A side of steamed broccoli keeps the meal from turning into pure beige comfort, though honestly, a bowl of this after training does not need much help. It serves four to six, depending on how hungry people are.
Pro Tips for This Recipe:
- Stir near the bottom so the pasta does not stick.
- Add a splash more broth if the skillet tightens too quickly.
- Use sharp cheddar for a stronger finish.
- Let it rest 5 minutes before serving so it thickens.
Variations on This Dish:
- Turkey Chili Mac: Use ground turkey and a touch more oil.
- White Chili Mac: Swap the tomatoes for green chiles and white beans.
- Milder Family Version: Cut the chili powder in half and serve hot sauce on the side.
Common Mistakes to Avoid with This Dish:
- Letting the pasta run dry: Keep broth handy.
- Adding cheese while boiling hard: It can get grainy. Turn off the heat first.
- Undersalting the sauce: Pasta drinks up seasoning.
18. Breakfast Hash with Eggs, Sausage, and Potatoes

Breakfast hash for dinner is the kind of move that works because nobody argues with crispy potatoes and runny eggs. Sausage adds savoriness, and the vegetables keep it from feeling like a plate of pure recovery fuel wearing a breakfast hat.
Why It Works:
Potatoes bring carbs, sausage and eggs bring protein, and the whole skillet cooks in stages so each piece gets its own texture. This is a strong post-workout meal when the family wants something hot and hearty without waiting for a roast or a bake. It’s also easy to scale up by using a bigger skillet.
Key Ingredients:
- 1 pound breakfast sausage
- 3 medium russet potatoes, diced small
- 1 bell pepper, diced
- 1 small onion, diced
- 4 to 6 large eggs
- 2 cups baby spinach
- 2 tablespoons oil
- Salt and pepper
Quick Steps:
- Par-cook the potatoes in the microwave for 4 to 5 minutes, or boil briefly until just barely tender.
- Brown the sausage in a large skillet, then remove it.
- Add the oil, potatoes, onion, and bell pepper and cook over medium-high heat until the potatoes crisp and the onions soften, about 10 minutes.
- Stir the sausage back in and add the spinach until wilted.
- Make little wells, crack in the eggs, cover, and cook until the whites set but the yolks are still soft.
Equipment for This Recipe:
- Large skillet with lid
- Knife and cutting board
- Spatula
- Bowl for pre-cooking potatoes
How to Serve This Dish:
Serve the hash straight from the skillet with toast or warm tortillas on the side. Hot sauce belongs here. A lot of it, if that’s how your house runs. Four people eat well from this pan.
Pro Tips for This Recipe:
- Dice the potatoes small so they crisp before the eggs overcook.
- Pre-cook the potatoes or the skillet gets sluggish.
- Don’t stir the eggs once they go in.
- Use a lid to trap steam and set the whites evenly.
Variations on This Dish:
- Turkey Sausage Version: Use turkey breakfast sausage for a lighter pan.
- Cheesy Hash: Sprinkle cheddar over the eggs right before covering.
- No-Egg Version: Add black beans instead for a different protein source.
Common Mistakes to Avoid with This Dish:
- Throwing raw potatoes straight in: They brown outside and stay hard inside.
- Overcrowding the pan: The potatoes steam instead of crisp.
- Breaking the yolks too early: You lose the rich finish.
19. Teriyaki Turkey Rice Bowls
Teriyaki turkey bowls are a clean, sweet-savory answer to “what can I make that every kid will actually eat?” The sauce clings to the turkey, the rice catches the extra glaze, and the broccoli gives the bowl some shape and crunch.
Why It Works:
Ground turkey cooks quickly and takes on flavor well. Rice and broccoli make the bowl feel balanced, and teriyaki sauce gives enough sweetness to keep the dinner friendly without needing a pile of extras. I like this one because it tastes like a takeout bowl but starts with a pound of ground meat and a bag of frozen vegetables.
Key Ingredients:
- 1 pound ground turkey
- 2 cups cooked rice
- 3 cups broccoli florets
- 1/3 cup teriyaki sauce
- 2 cloves garlic, minced
- 1 teaspoon grated ginger
- 1 tablespoon neutral oil
- 1 tablespoon sesame seeds
Quick Steps:
- Steam or microwave the broccoli until just tender.
- Heat the oil in a skillet, then cook the turkey until browned.
- Add the garlic and ginger and cook for 30 seconds.
- Pour in the teriyaki sauce and simmer for 2 minutes until glossy.
- Divide the rice into bowls, top with turkey and broccoli, and finish with sesame seeds.
Equipment for This Recipe:
- Skillet
- Microwave-safe bowl or steamer
- Rice cooker or saucepan
- Spoon
How to Serve This Dish:
Serve with extra teriyaki sauce on the side for the people who want a sweeter bowl. A few cucumber slices or shredded carrots make it look less like a pantry rescue mission. This is a reliable four-serving dinner.
Pro Tips for This Recipe:
- Use a thicker teriyaki sauce so it coats instead of disappearing.
- Drain any excess fat from the turkey if the pan gets greasy.
- Keep the broccoli a little firm.
- Add scallions at the end for freshness.
Variations on This Dish:
- Spicy Teriyaki Bowl: Add chili garlic sauce.
- Sesame Chicken Swap: Use diced chicken instead of turkey.
- Cauliflower Rice Base: Serve over half rice, half cauliflower rice if you want to lighten the carb load.
Common Mistakes to Avoid with This Dish:
- Using too much sauce: The bowl turns sticky instead of glazed.
- Overcooking the broccoli: It gets dull and soft.
- Serving the rice cold: The bowl feels disconnected.
20. Chicken Caesar Wraps
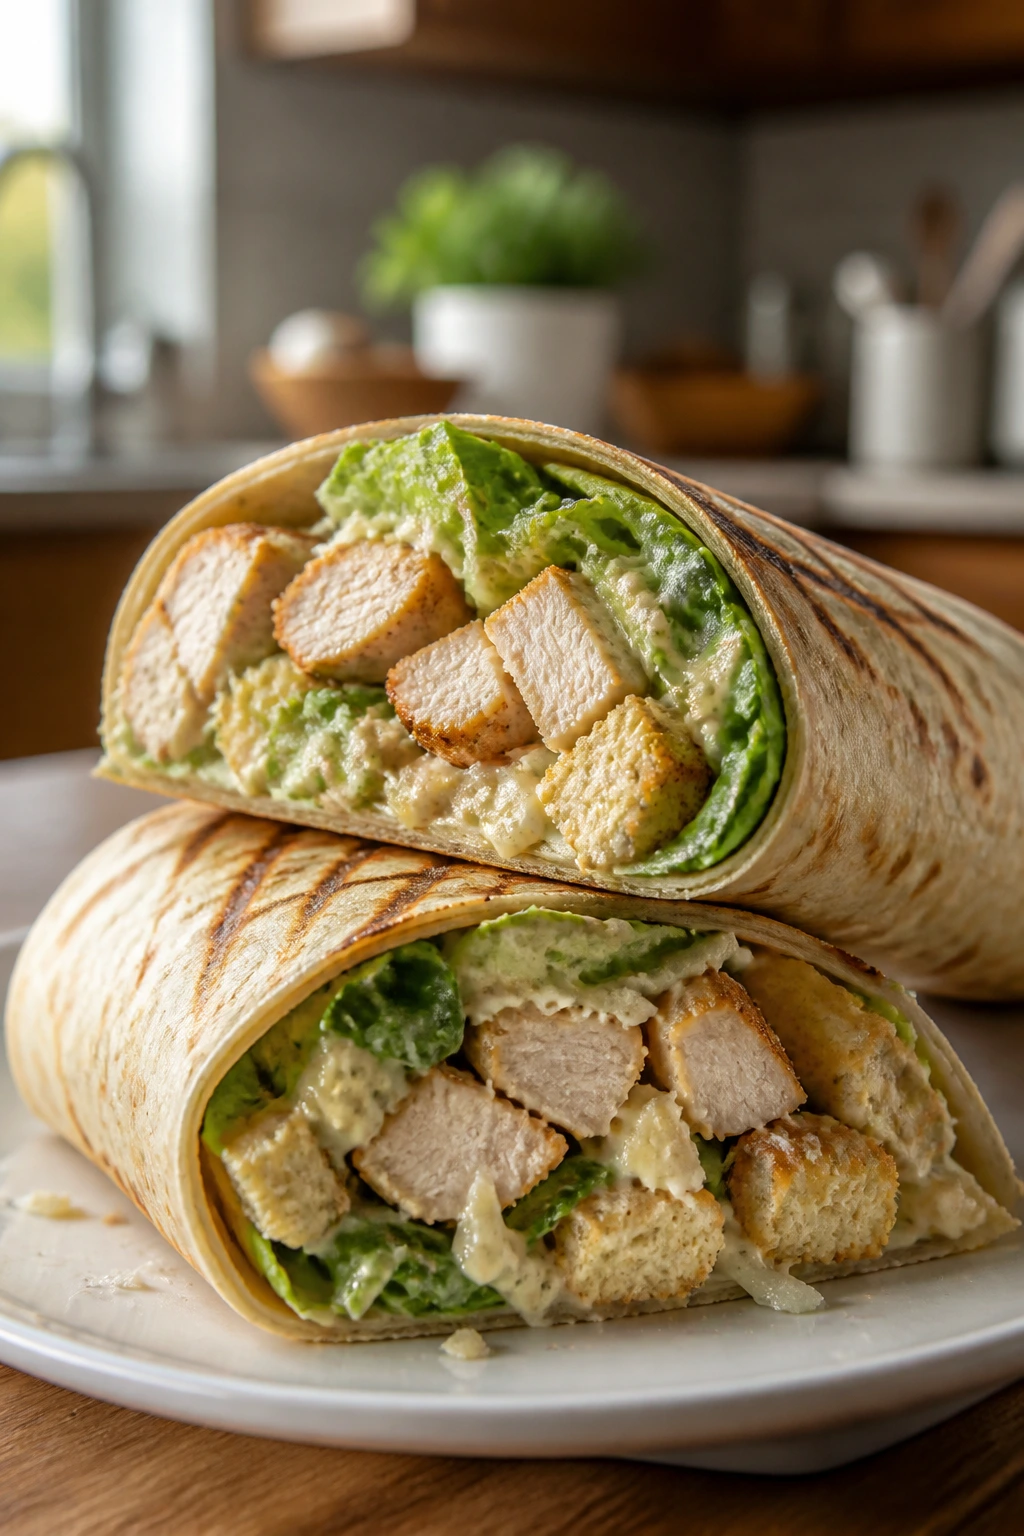
Chicken Caesar wraps are the kind of meal that works because the structure is easy: chicken, lettuce, dressing, cheese, roll it up, done. The crunch matters. So does the salt.
Why It Works:
You get protein from the chicken and Parmesan, carbs from the tortilla, and enough fat in the dressing to make the wrap satisfying. It is a smart post-workout choice when the fridge has leftovers but you do not want a reheated plate. I especially like it when the lettuce is cold and the chicken is still slightly warm.
Key Ingredients:
- 3 cups cooked chicken, chopped or shredded
- 4 large tortillas
- 4 cups chopped romaine lettuce
- 1/2 cup Caesar dressing
- 1/3 cup grated Parmesan
- 1 cup croutons, lightly crushed
- Black pepper
Quick Steps:
- Toss the chicken with Caesar dressing and Parmesan.
- Add romaine and crushed croutons and toss gently.
- Warm the tortillas for 15 seconds so they bend without tearing.
- Divide the filling among the tortillas and roll tightly.
- Slice in half and serve immediately.
Equipment for This Recipe:
- Large bowl
- Knife
- Cutting board
- Skillet or microwave for warming tortillas
How to Serve This Dish:
Serve with grapes, carrot sticks, or tomato soup if you want the wrap to feel more like a full plate. Wrap each one in parchment if the family is eating on the go. Two wraps make a substantial meal; one wrap plus fruit works for lighter appetites.
Pro Tips for This Recipe:
- Don’t overdress the lettuce or the wrap gets limp.
- Add croutons just before rolling so they stay crunchy.
- Chop the romaine small so the wrap closes cleanly.
- Use sturdy tortillas, not the flimsy thin ones.
Variations on This Dish:
- Buffalo Caesar Wrap: Mix buffalo sauce into the chicken before assembling.
- Grilled Version: Grill the wrap seam-side down for 1 to 2 minutes.
- Whole-Wheat Swap: Use whole-wheat tortillas for a little more fiber.
Common Mistakes to Avoid with This Dish:
- Overfilling the wrap: It splits open.
- Using wet lettuce: The tortilla softens fast.
- Letting it sit too long before serving: The croutons go soggy.
21. Black Bean Enchilada Skillet
This skillet has the soul of enchiladas without the patience required to roll thirty tortillas. Black beans, corn, sauce, and melted cheese make a dinner that is meatless but still sturdy enough to feel like a recovery meal.
Why It Works:
Black beans bring protein and fiber, tortillas add carbs, and enchilada sauce gives the whole skillet a smoky red depth. This is especially useful when some people want meatless dinner and nobody wants a separate dish. It tastes rich enough that the absence of meat is not the point.
Key Ingredients:
- 2 cans (15 oz each) black beans, drained and rinsed
- 1 cup frozen corn
- 1 small onion, diced
- 2 cups enchilada sauce
- 6 small corn tortillas, cut into strips
- 1 1/2 cups shredded cheddar or Monterey Jack
- 1 tablespoon oil
- 1 avocado, sliced, optional
Quick Steps:
- Heat the oil in a skillet and cook the onion for 4 minutes until soft.
- Add the beans, corn, and enchilada sauce and simmer for 3 minutes.
- Stir in the tortilla strips and cook until they soften.
- Sprinkle the cheese over the top, cover, and cook for 2 to 3 minutes until melted.
- Finish with avocado if you want a creamy top.
Equipment for This Recipe:
- Large skillet with lid
- Knife
- Cutting board
- Spoon
How to Serve This Dish:
Serve it straight from the pan with extra tortilla chips or a spoonful of sour cream. A simple green salad or shredded cabbage on the side gives the meal some crunch. It feeds four very well, especially if there’s avocado on top.
Pro Tips for This Recipe:
- Use medium-thick enchilada sauce so the skillet does not get soupy.
- Cut the tortillas into strips before they go in; they soften more evenly.
- Taste the beans before salting hard, since enchilada sauce already brings plenty.
- Let the pan rest for a couple of minutes so the filling settles.
Variations on This Dish:
- Chicken Enchilada Skillet: Add 2 cups shredded chicken.
- Green Sauce Version: Use salsa verde instead of red enchilada sauce.
- Extra Veggie Version: Add diced zucchini or bell pepper with the onion.
Common Mistakes to Avoid with This Dish:
- Using too much sauce: The tortillas dissolve into mush.
- Skipping the lid at the end: The cheese does not melt evenly.
- Forgetting the acid or garnish: A little avocado or lime makes the skillet pop.
22. Turkey Bolognese Spaghetti
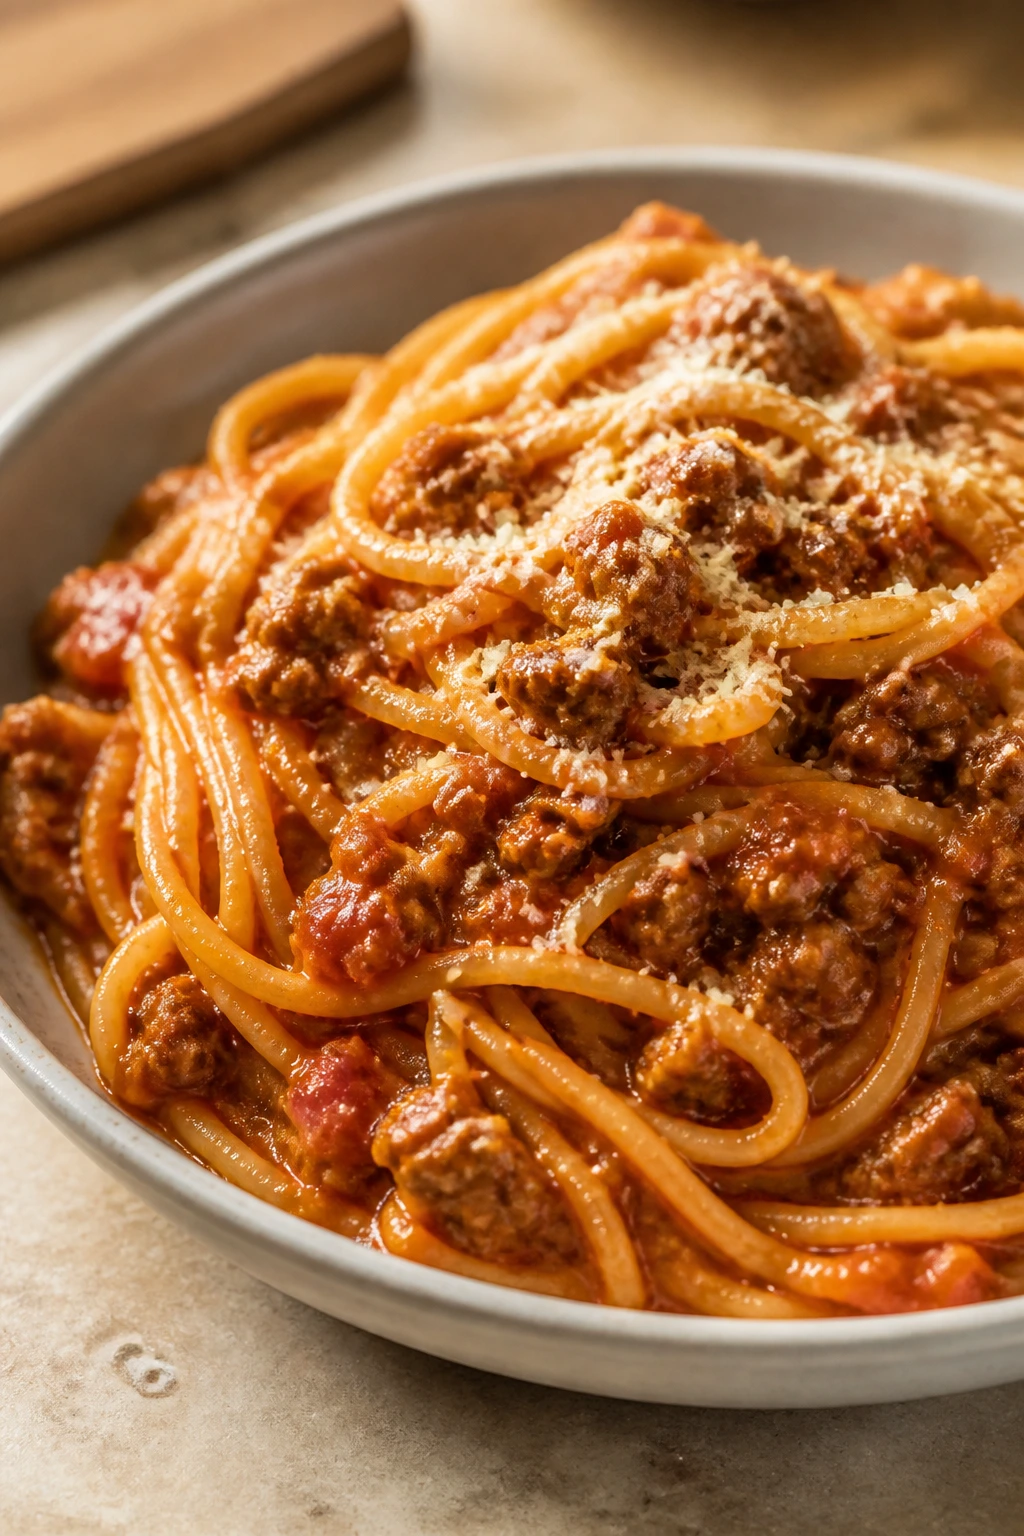
Turkey bolognese has the deep, slow-cooked feel of a Sunday sauce, but it can get onto the table on a weeknight without much fuss. The meat sauce clings to spaghetti in a way that keeps the bowl from feeling dry.
Why It Works:
Turkey keeps the protein high without the heaviness of a rich beef sauce. Spaghetti gives the carbs, and the tomato base brings enough acid to keep the dish awake. I like this one after a workout because it feels like a full dinner that happens to be easy, not like a compromise.
Key Ingredients:
- 1 pound ground turkey
- 1 small onion, finely diced
- 1 carrot, finely diced
- 2 cloves garlic, minced
- 1 can (28 oz) crushed tomatoes
- 1 tablespoon tomato paste
- 12 ounces spaghetti
- 1/2 cup milk or broth
- 1/3 cup grated Parmesan
Quick Steps:
- Cook the spaghetti until al dente and save 1/2 cup pasta water.
- Brown the turkey with the onion and carrot in a skillet.
- Stir in the garlic and tomato paste and cook for 1 minute.
- Add the crushed tomatoes and milk or broth, then simmer for 10 to 15 minutes.
- Toss the sauce with the spaghetti and Parmesan, loosening with pasta water if needed.
Equipment for This Recipe:
- Large pot
- Deep skillet
- Colander
- Wooden spoon
How to Serve This Dish:
Serve with extra Parmesan and black pepper. Garlic bread is not required, but it never hurts. A green salad keeps the plate from getting too soft and red.
Pro Tips for This Recipe:
- Chop the carrot small so it melts into the sauce.
- Simmer long enough for the sauce to taste rounded, not raw.
- Use milk if you want a slightly softer sauce; broth if you want it leaner.
- Save pasta water. It gives the sauce body.
Variations on This Dish:
- Penne Bolognese: Use short pasta if the family likes easier scooping.
- Veggie-Heavy Version: Add chopped mushrooms and zucchini.
- Spicy Version: Stir in red pepper flakes with the garlic.
Common Mistakes to Avoid with This Dish:
- Making the sauce too watery: Simmer it down.
- Overcooking the spaghetti: Keep some bite or it turns mushy in the sauce.
- Using too little salt: Tomato sauces need a firm hand.
23. Greek Yogurt Chicken Salad Sandwiches
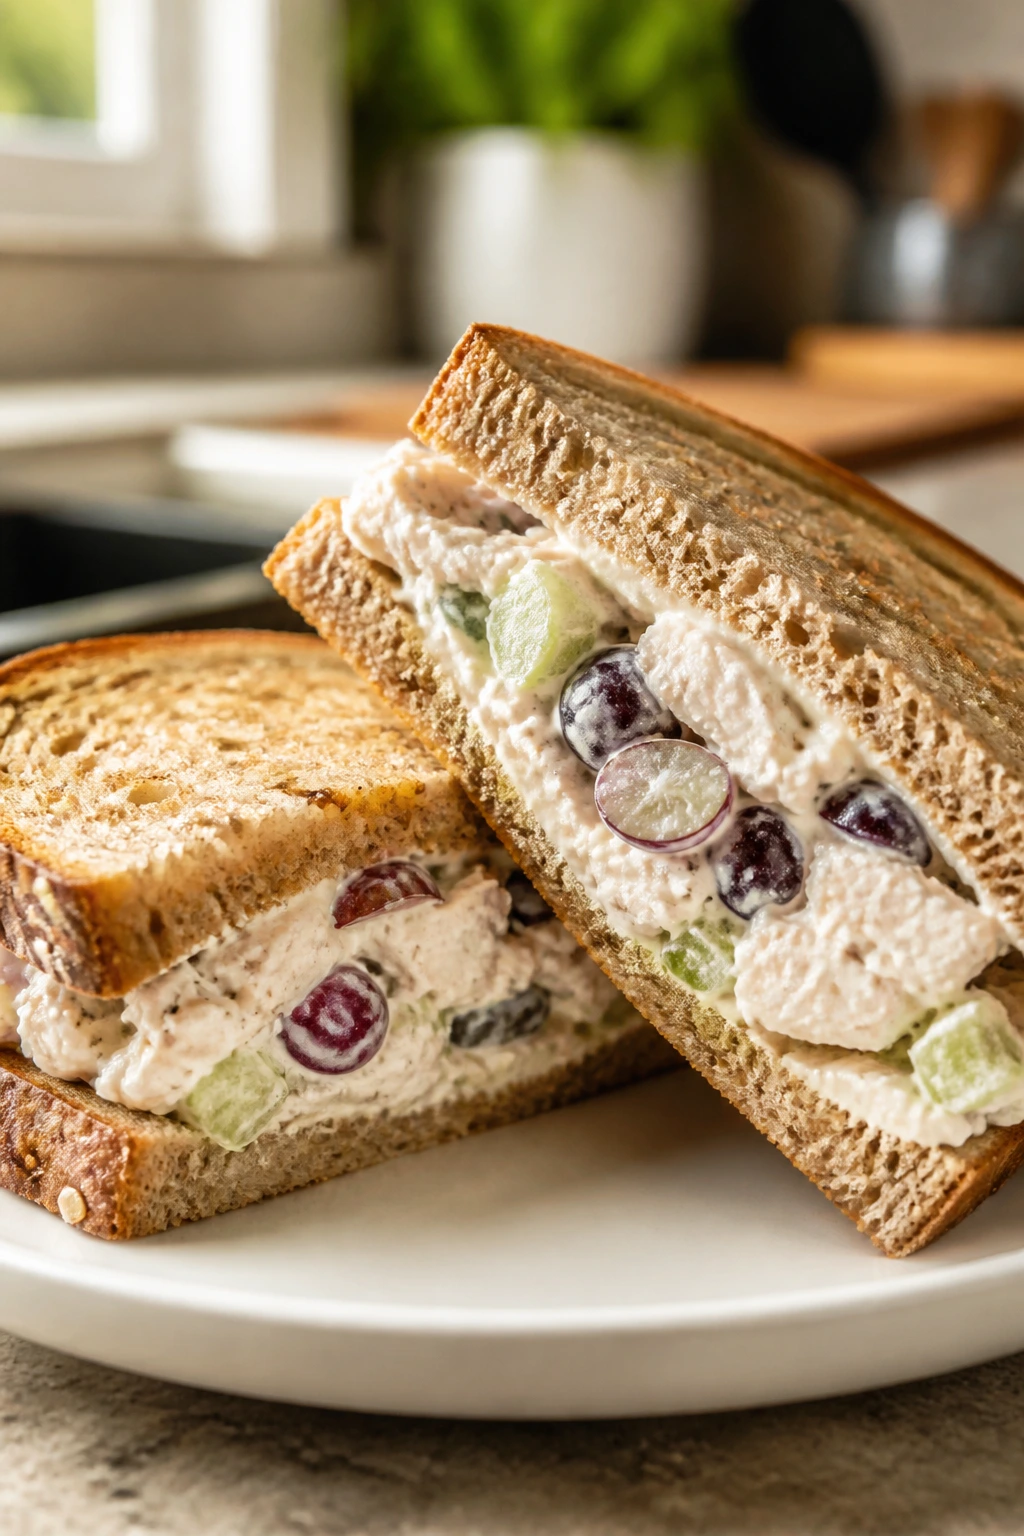
Chicken salad can be a lazy lunch, but when you brighten it with Greek yogurt, grapes, celery, and a little mustard, it becomes a proper dinner sandwich. Cold, creamy, and crunchy at once. That’s the point.
Why It Works:
The chicken gives protein, the bread gives carbs, and the yogurt keeps the filling lighter than a mayo-only version without making it thin. Grapes add sweet spots that keep people interested, which matters when everybody is tired after a workout. It’s also one of the easiest meals to make ahead.
Key Ingredients:
- 3 cups cooked chicken, chopped or shredded
- 1/2 cup plain Greek yogurt
- 2 tablespoons mayonnaise
- 1/2 cup celery, finely diced
- 1/2 cup red grapes, halved
- 1 tablespoon Dijon mustard
- 8 slices bread or 4 sandwich rolls
- Salt and black pepper
Quick Steps:
- Mix the yogurt, mayo, mustard, salt, and pepper in a bowl.
- Fold in the chicken, celery, and grapes.
- Chill for 10 minutes if you have time, or serve right away.
- Spoon onto bread or rolls and close the sandwiches.
Equipment for This Recipe:
- Mixing bowl
- Spoon
- Knife
- Cutting board
How to Serve This Dish:
Serve with potato chips, apple slices, or a handful of crackers if you want a no-fuss plate. Lettuce leaves make it feel a little fresher, but the filling is the star. Two modest sandwiches will do the job after training.
Pro Tips for This Recipe:
- Cut the celery fine so it crunches without poking out of the sandwich.
- Use chilled chicken for the best texture.
- Add chopped dill if you want a more classic deli flavor.
- Toast the bread lightly if you want it to hold up better.
Variations on This Dish:
- Curry Chicken Salad: Add 1 teaspoon curry powder and swap grapes for raisins.
- Nutty Version: Stir in chopped almonds or pecans.
- Wrap Version: Roll the salad in tortillas instead of bread.
Common Mistakes to Avoid with This Dish:
- Using too much mayo: It turns heavy fast.
- Skipping seasoning: Cold chicken salad needs salt and pepper.
- Making the grapes too large: They slip out of the sandwich.
24. Tuna Pasta Bake
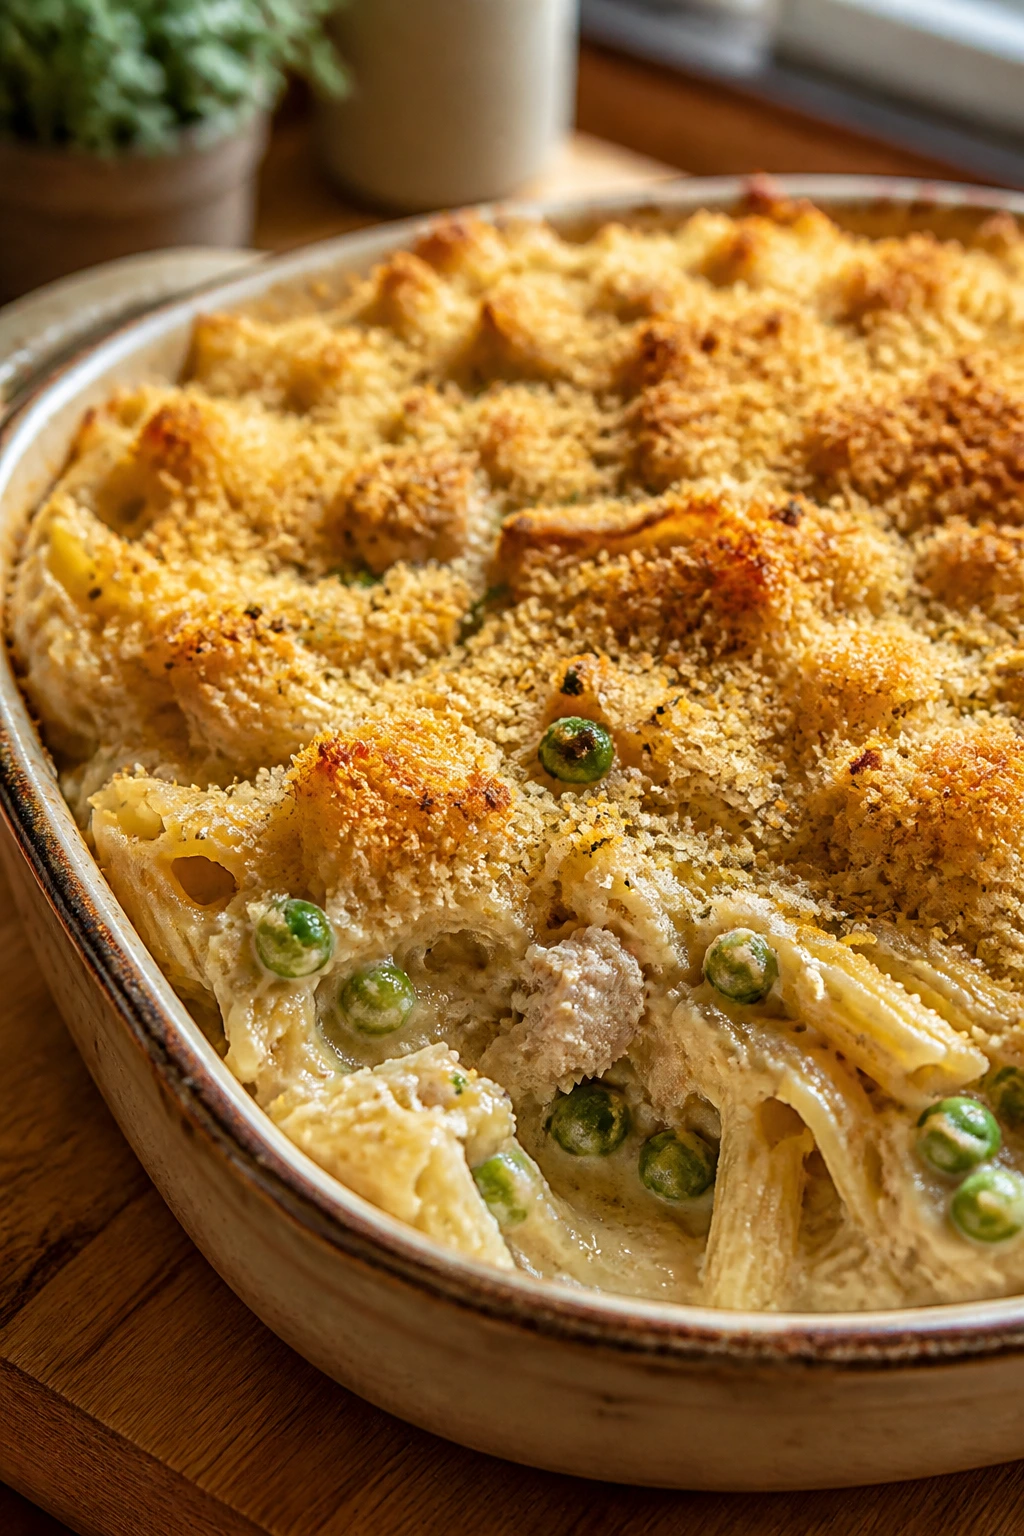
Tuna pasta bake is pantry food with enough structure to feel like a real dinner. Creamy sauce, noodles, peas, and a crisp breadcrumb top make it more interesting than a plain tuna casserole and more useful than a bowl of plain pasta.
Why It Works:
Tuna supplies protein, pasta supplies carbs, and cheese plus milk turn the sauce into something that coats the noodles instead of sitting under them. It is especially good for feeding a family after a late workout because it can be assembled while the pasta boils. The leftovers hold up, too.
Key Ingredients:
- 12 ounces pasta shells or elbows
- 2 cans (5 oz each) tuna, drained
- 1 1/2 cups frozen peas
- 2 cups milk
- 2 tablespoons butter
- 2 tablespoons flour
- 1 1/2 cups shredded cheddar
- 1/2 cup breadcrumbs
Quick Steps:
- Cook the pasta until just shy of al dente.
- Melt the butter in a saucepan, whisk in the flour, and cook for 1 minute.
- Slowly whisk in the milk and cook until thick enough to coat a spoon.
- Stir in the tuna, peas, half the cheddar, and the pasta.
- Pour into a baking dish, top with the remaining cheddar and breadcrumbs, and bake at 400°F for 15 to 20 minutes until bubbling.
Equipment for This Recipe:
- Saucepan
- Casserole dish
- Whisk
- Colander
How to Serve This Dish:
Serve with a crisp salad or steamed green beans to give the plate some brightness. It’s a square or rectangular casserole kind of meal, and that’s part of its appeal. One scoop goes a long way.
Pro Tips for This Recipe:
- Undercook the pasta slightly so it doesn’t go soft in the oven.
- Whisk the milk in slowly to avoid lumps.
- Use tuna packed in water if you want a lighter result, oil if you want more richness.
- Let it rest after baking so it slices more cleanly.
Variations on This Dish:
- Mushroom Tuna Bake: Add sautéed mushrooms to the sauce.
- Lemon-Dill Version: Stir in lemon zest and dill for brightness.
- No-Bake Skillet Version: Skip the oven and cover the pan to melt the cheese.
Common Mistakes to Avoid with This Dish:
- Overbaking: The pasta turns soft and the sauce dries out.
- Using dry breadcrumbs only on top: Toss them with a little melted butter first.
- Making the sauce too thin: The casserole won’t hold.
25. Salmon Cakes with Rice and Peas
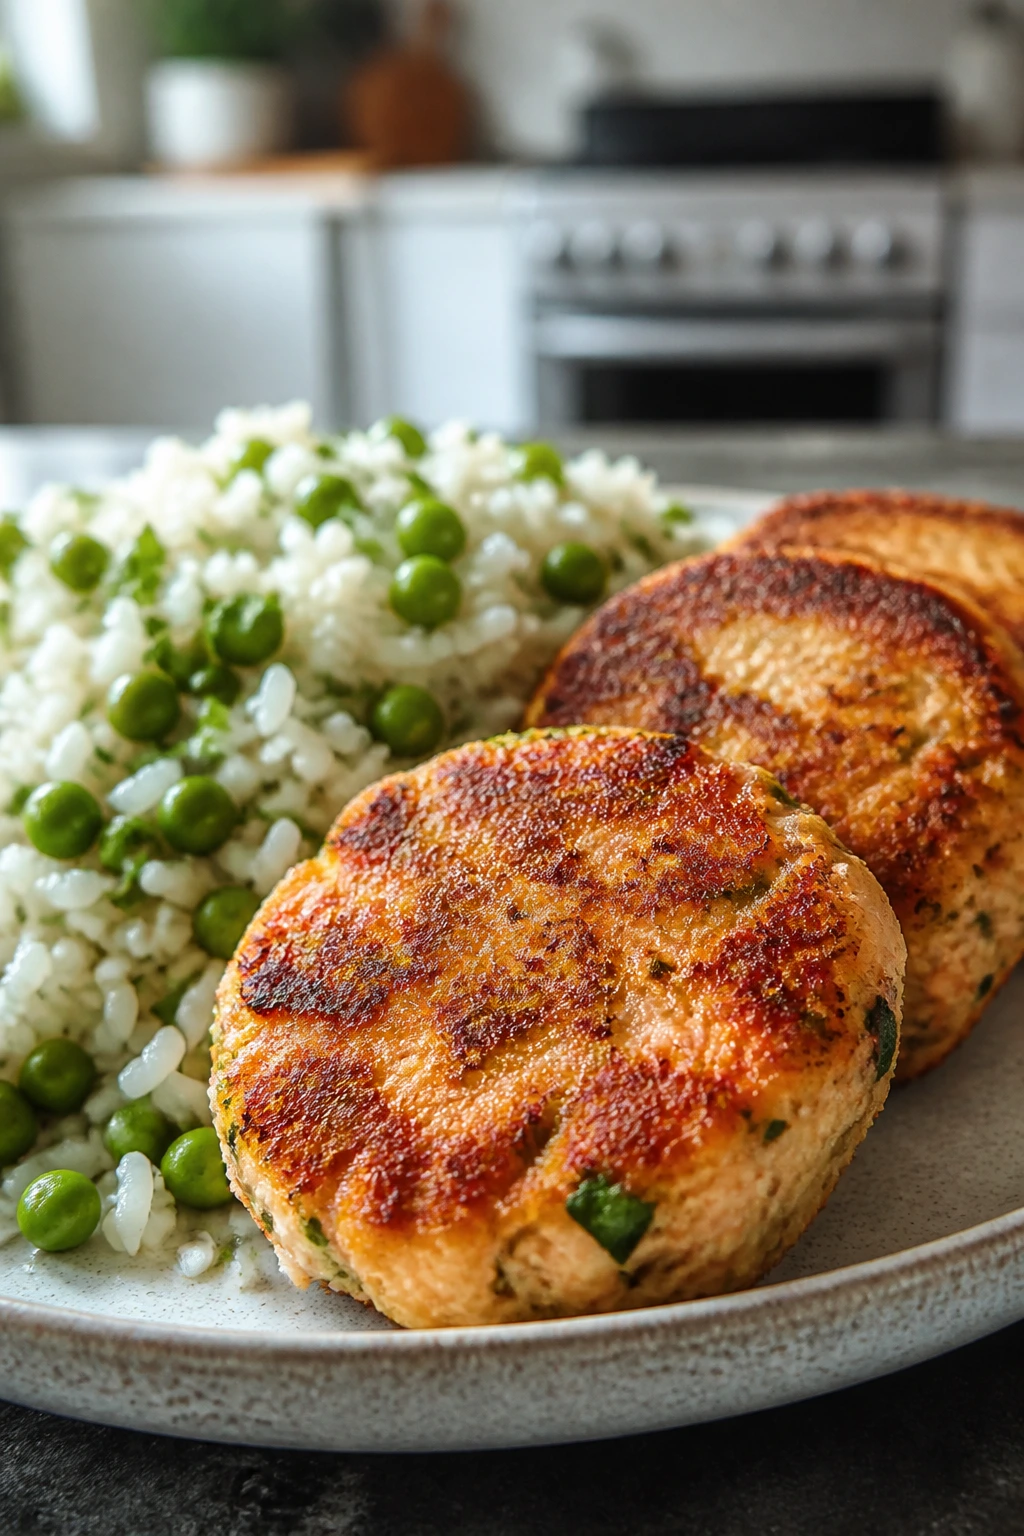
Salmon cakes are one of those meals that makes canned fish feel clever instead of desperate. Crisp on the outside, tender inside, and very good with a pile of rice and peas beside them.
Why It Works:
Canned salmon gives protein without any prep beyond draining. Rice and peas provide the carbs and volume that make the meal satisfy a hungry family after exercise. I like this one because it feels lighter than fried fish but still has enough texture to feel like dinner, not a snack in disguise.
Key Ingredients:
- 2 cans (15 oz each) salmon, drained and flaked
- 1 egg
- 1/2 cup breadcrumbs
- 2 tablespoons mayonnaise
- 1 tablespoon Dijon mustard
- 2 tablespoons chopped dill or parsley
- 2 cups cooked rice
- 1 cup peas
- 2 tablespoons oil
- Lemon wedges
Quick Steps:
- Mix the salmon, egg, breadcrumbs, mayo, mustard, herbs, salt, and pepper.
- Form into 6 to 8 patties and chill for 10 minutes if the mixture feels soft.
- Heat the oil in a skillet over medium heat and cook the cakes for 3 to 4 minutes per side until golden.
- Warm the rice and peas together with a little butter or salt.
- Serve the cakes with rice, peas, and lemon.
Equipment for This Recipe:
- Mixing bowl
- Skillet
- Spatula
- Plate for shaping patties
How to Serve This Dish:
Serve the salmon cakes with a squeeze of lemon and a spoonful of tartar sauce or yogurt sauce if you like. The rice and peas make the plate feel complete without extra work. Two cakes and a good scoop of rice is a full serving.
Pro Tips for This Recipe:
- Drain the salmon well so the cakes hold shape.
- Chill soft patties before frying.
- Keep the heat at medium; high heat burns the crust before the center sets.
- A squeeze of lemon at the end fixes a lot.
Variations on This Dish:
- Spicy Salmon Cakes: Add a pinch of cayenne or hot sauce.
- Herb-Heavy Version: Use dill, parsley, and chives together.
- Baked Version: Bake at 425°F for 15 minutes, flipping once.
Common Mistakes to Avoid with This Dish:
- Making the mixture too wet: Add a few more breadcrumbs.
- Flipping too soon: The first side needs time to set.
- Serving without acid: The cakes taste flatter than they should.
26. Chickpea Spinach Curry with Rice
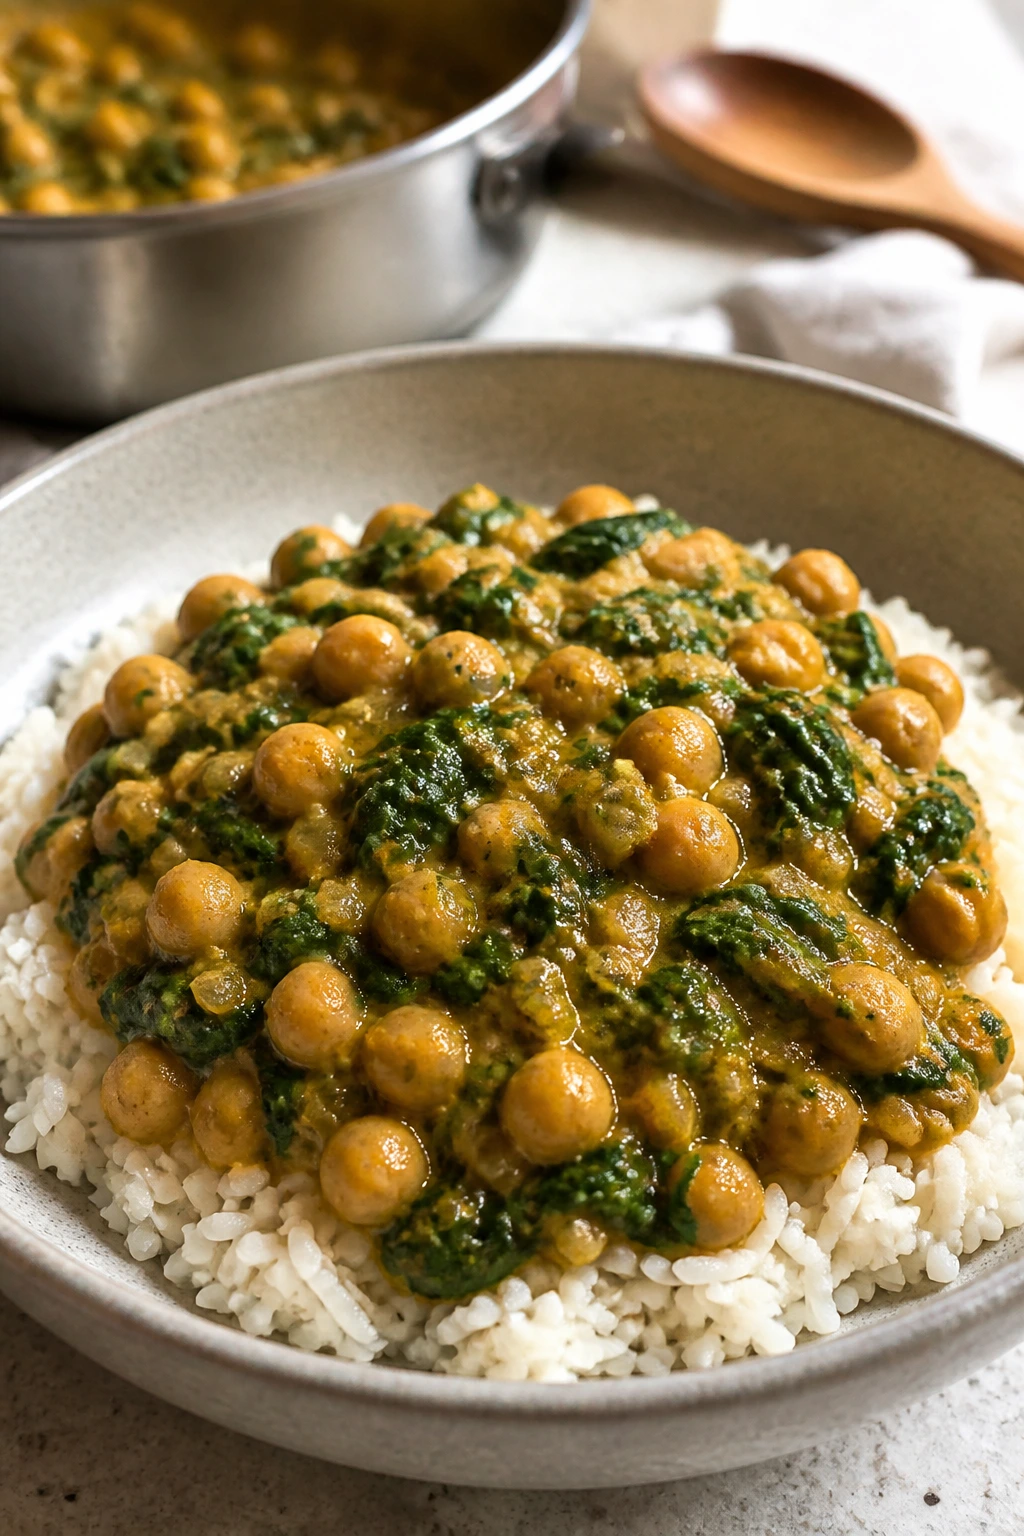
This curry is creamy, fast, and sturdy enough to count as a meal after a workout. Chickpeas carry the protein, rice handles the carbs, and spinach disappears into the sauce in a way that makes the whole pot feel greener and fuller.
Why It Works:
Chickpeas bring fiber and protein, while coconut milk or tomato-based curry sauce gives enough richness to make the dish satisfying. It is one of the easiest meatless recovery meals in the pile because it still feels substantial and spoonable. I like it especially when the family wants comfort food that isn’t all cheese.
Key Ingredients:
- 2 tablespoons oil
- 1 onion, diced
- 2 cloves garlic, minced
- 1 tablespoon curry powder or curry paste
- 2 cans (15 oz each) chickpeas, drained and rinsed
- 1 can (13.5 oz) coconut milk
- 3 cups baby spinach
- 2 cups cooked rice
- Salt and lime juice
Quick Steps:
- Cook the onion in oil over medium heat until soft.
- Stir in the garlic and curry powder for 30 seconds.
- Add the chickpeas and coconut milk and simmer for 8 minutes.
- Stir in the spinach until wilted.
- Taste, season with salt, and finish with lime juice.
- Serve over rice.
Equipment for This Recipe:
- Medium pot or deep skillet
- Spoon
- Measuring cups
- Rice cooker or saucepan
How to Serve This Dish:
Serve it in bowls over rice, with extra lime on the side. A spoonful of yogurt or chopped cilantro cools the spices if your crowd needs that. This is one of those meals that tastes even better the next day.
Pro Tips for This Recipe:
- Toast the curry powder briefly so it smells fragrant before the liquid goes in.
- Don’t skip the lime. Curry needs a bright finish.
- Use full-fat coconut milk if you want a silkier sauce.
- Add spinach at the end so it stays green.
Variations on This Dish:
- Tomato Curry: Use crushed tomatoes instead of coconut milk.
- Sweet Potato Version: Add diced sweet potato at the start and simmer until tender.
- Mild Family Curry: Cut the curry powder in half and serve hot sauce separately.
Common Mistakes to Avoid with This Dish:
- Underseasoning the chickpeas: They need salt and acid.
- Cooking the spinach too long: It fades and turns soft.
- Serving the curry without rice: It needs the starch to feel complete.
27. Cheeseburger Pasta Skillet
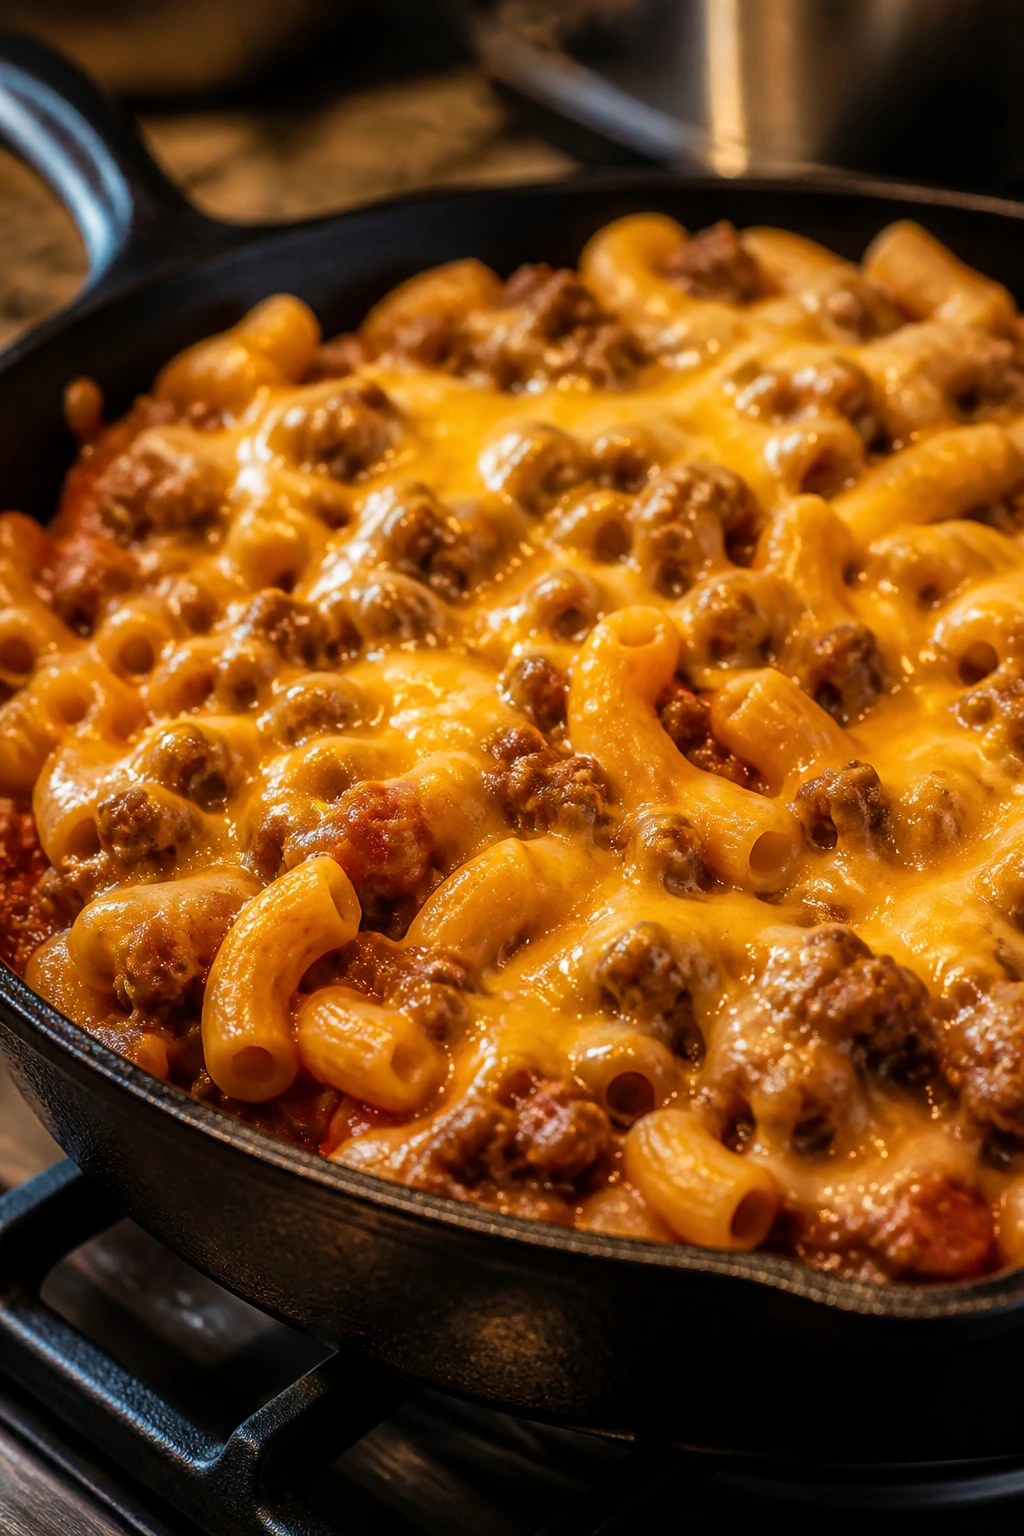
Cheeseburger pasta skillet tastes like the burger joint met the pantry and decided to stay for dinner. It is savory, a little tangy, very cheesy, and exactly the sort of thing a family will eat fast after a busy training day.
Why It Works:
Ground beef brings protein and flavor, pasta gives the carbs, and a tomato-cheese sauce wraps everything together. Pickle bits are optional, but I like them because they make the bowl taste closer to the burger it’s pretending to be. It is filling without needing a side dish parade.
Key Ingredients:
- 1 pound ground beef
- 1 small onion, diced
- 2 cups dry pasta shells or elbows
- 2 cups beef broth
- 1 cup tomato sauce
- 1 cup shredded cheddar
- 2 tablespoons ketchup
- 1 tablespoon chopped pickles, optional
Quick Steps:
- Brown the beef with the onion in a deep skillet and drain excess fat.
- Add the pasta, broth, tomato sauce, and ketchup.
- Simmer covered for 10 to 12 minutes, stirring once or twice, until the pasta is tender.
- Stir in the cheddar until melted.
- Top with pickles if you want the burger angle to come through.
Equipment for This Recipe:
- Deep skillet or Dutch oven
- Spoon
- Measuring cups
- Lid
How to Serve This Dish:
Serve it in bowls with a little extra cheddar on top and maybe a side of sliced tomatoes or cucumbers. It’s rich enough to stand alone. A small spoonful of mustard on the side is strange in a good way if you like a sharper finish.
Pro Tips for This Recipe:
- Use a deep skillet so the pasta has room to move.
- Stir once or twice while it simmers to prevent sticking.
- Add the cheese off the heat for the smoothest melt.
- Pickles are optional, but a small amount changes the whole flavor.
Variations on This Dish:
- Bacon Cheeseburger Version: Stir in cooked chopped bacon at the end.
- Turkey Burger Pasta: Use ground turkey and add a touch more seasoning.
- Mushroom Burger Version: Add sautéed mushrooms with the onions.
Common Mistakes to Avoid with This Dish:
- Letting the pasta scorch on the bottom: Stir during simmering.
- Adding too much ketchup: It tips sweet fast.
- Forgetting to drain the beef: The sauce gets greasy.
28. Honey Garlic Chicken Noodles
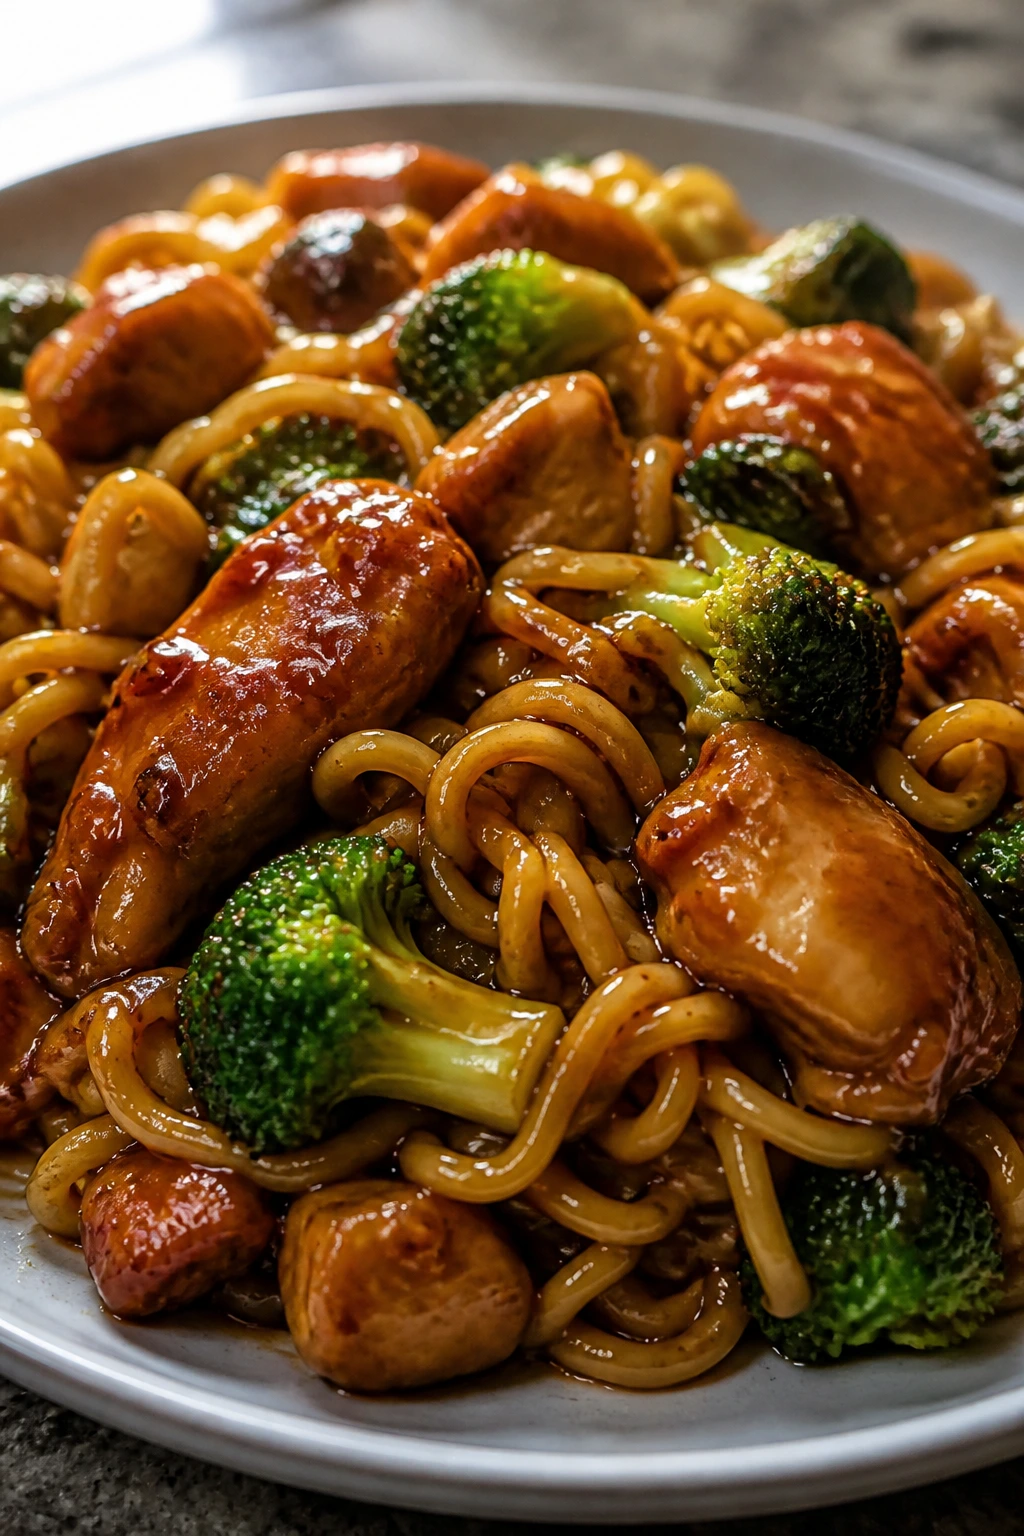
Honey garlic chicken noodles are glossy, sticky in a good way, and built for people who want dinner to feel like a reward. The sauce clings to the noodles, the chicken stays juicy, and the broccoli gives the bowl enough structure to keep it from going limp.
Why It Works:
Chicken gives the protein, noodles bring quick carbs, and the honey-garlic sauce makes the whole thing feel finished without needing a long simmer. It’s a strong post-workout meal because it looks generous and eats fast. I also like that you can build it from standard pantry ingredients without feeling like you skimped.
Key Ingredients:
- 1 1/2 pounds boneless chicken thighs, sliced
- 12 ounces noodles or spaghetti
- 3 cups broccoli florets
- 1/3 cup honey
- 1/4 cup soy sauce
- 3 cloves garlic, minced
- 1 tablespoon cornstarch
- 2 tablespoons oil
- 1 teaspoon sesame seeds
Quick Steps:
- Cook the noodles until al dente and reserve 1/2 cup pasta water.
- Whisk the honey, soy sauce, garlic, cornstarch, and 1/2 cup water together.
- Cook the chicken in oil over medium-high heat until browned and cooked through, about 6 to 8 minutes.
- Add the broccoli and 2 tablespoons water, then cover for 2 minutes to steam it.
- Pour in the sauce and simmer until glossy and thick.
- Toss in the noodles and loosen with pasta water if needed, then finish with sesame seeds.
Equipment for This Recipe:
- Large skillet or wok
- Pot for noodles
- Whisk
- Colander
How to Serve This Dish:
Pile it into shallow bowls and let the sauce pool a little at the bottom. A side of sliced cucumbers or edamame keeps the plate from feeling too heavy. This is a dinner that tends to disappear before people have time to say much about it.
Pro Tips for This Recipe:
- Cut the chicken into even pieces so it cooks at the same pace.
- Whisk the cornstarch well or the sauce turns lumpy.
- Don’t oversteam the broccoli; it should still have a little snap.
- Add the noodles last so they stay glossy, not sticky.
Variations on This Dish:
- Sesame Noodle Bowl: Add more sesame oil and thinly sliced scallions.
- Spicy Honey Garlic: Stir in chili flakes or sriracha.
- Vegetable-Heavy Version: Add carrots, snow peas, or mushrooms with the broccoli.
Common Mistakes to Avoid with This Dish:
- Using too much heat in the sauce: Honey can go from glossy to burned fast.
- Overcooking the noodles: They get mushy once tossed with sauce.
- Skipping the pasta water: It helps the sauce cling instead of tightening up.
Why These Recovery Dinners Work
The trick with post-workout meals for hungry families is not some mystical nutrition formula. It’s a plate that lands with enough protein to matter, enough carbs to refill the tank, and enough salt and flavor that people stop circling the kitchen like ravens.
A lot of recipes fail because they chase one of those goals and ignore the others. Pure protein can feel dry and punishing. Carb-heavy food without enough protein leaves everyone hungry again in an hour. These dinners do better because they stay practical: rice bowls, wraps, pasta, potatoes, skillet meals, and bakes are easy to portion, easy to scale, and easy to keep moving from stove to table.
I also like that most of them use ingredients you can keep around without a special trip. Rice, canned beans, pasta, tortillas, potatoes, yogurt, eggs, frozen vegetables, rotisserie chicken — ordinary things, handled well. That’s usually what feeds real families after a workout, not a perfect menu built around extra shopping.
Essential Equipment for These Recipes
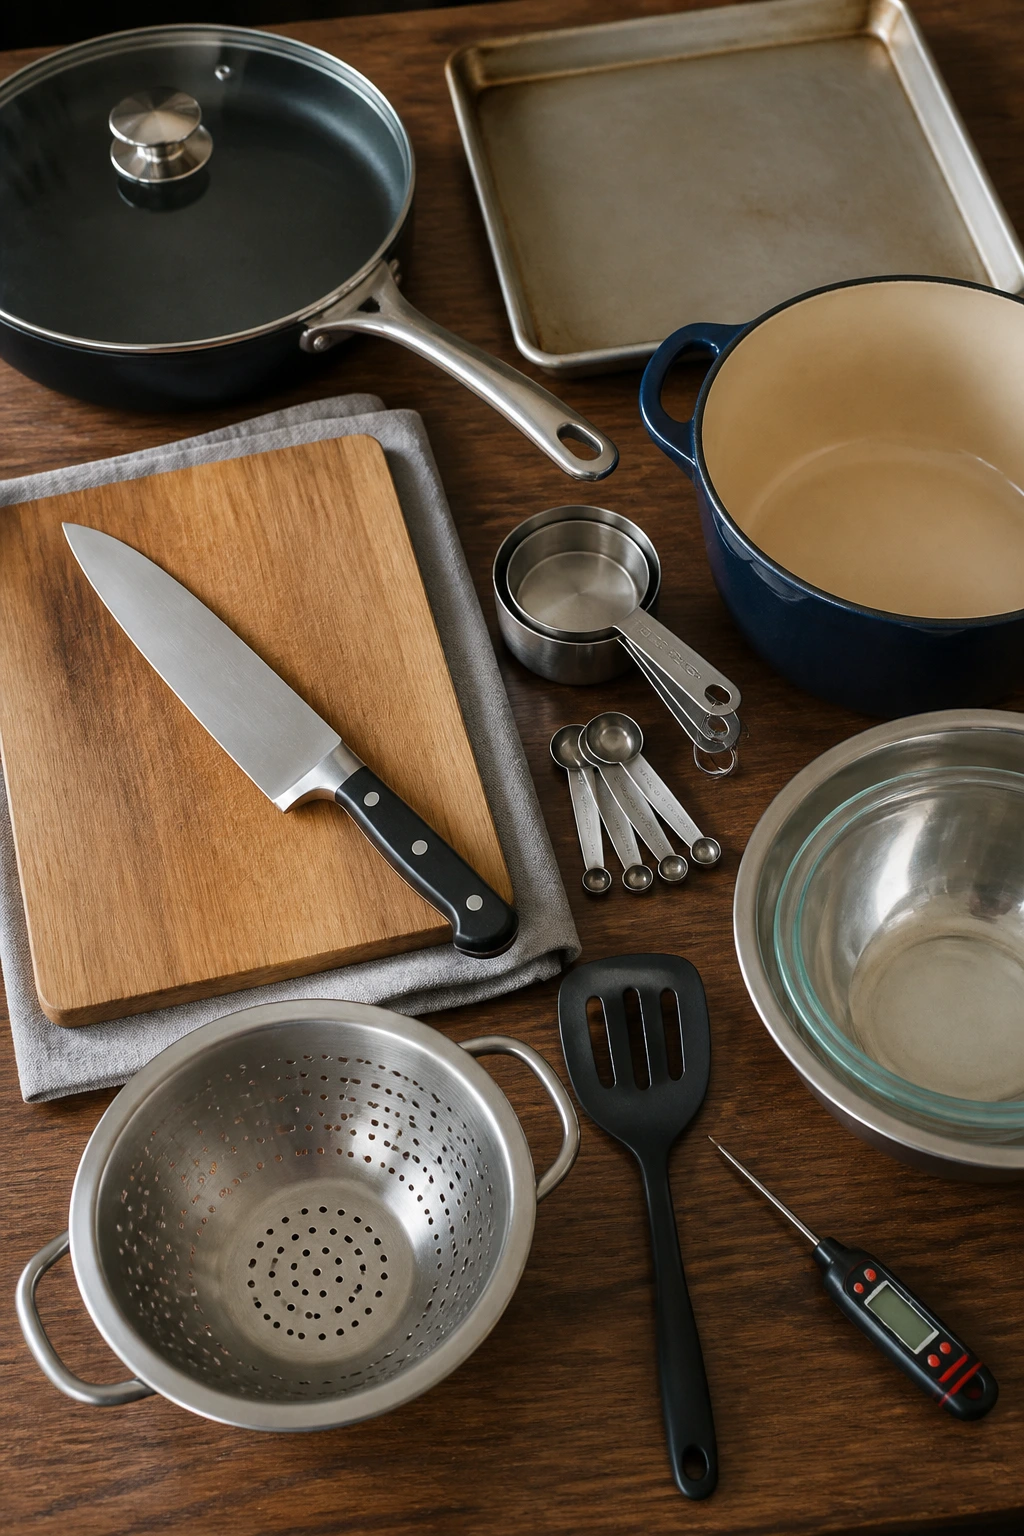
- 12-inch skillet with a lid: The workhorse for taco skillets, stir-fries, fried rice, and saucy noodle meals.
- Rimmed sheet pans: Useful for fajitas, salmon, pork tenderloin, sweet potatoes, and anything that needs roasting.
- Large pot or Dutch oven: Best for pasta bakes, chili mac, bolognese, and anything with a long simmer.
- Sharp chef’s knife: Slicing chicken, peppers, onions, apples, and potatoes goes faster and cleaner.
- Cutting board with a damp towel underneath: Stops sliding when the kitchen gets busy.
- Measuring cups and spoons: Helpful for sauces, seasonings, and not overdoing the salt.
- Mixing bowls: One large bowl can handle chicken salad, meatballs, or saucy bowls.
- Colander: Needed for pasta, rice rinsing, and canned beans.
- A good spatula or wooden spoon: You want something sturdy enough to scrape browned bits without tearing up the pan.
- A meat thermometer: Especially useful for chicken, turkey, pork, and salmon when you want the center right without guessing.
Smart Shopping and Ingredient Tips
The best shopping move for this kind of cooking is to buy ingredients that can carry two or three jobs. A rotisserie chicken can become burrito bowls, chicken salad, wraps, or quesadillas. A bag of rice does the same kind of work across bowls, stir-fries, and curry. Canned beans and frozen vegetables are not “backup” ingredients here; they are the reason these dinners happen on tired nights.
For proteins, I lean toward cuts that stay forgiving. Chicken thighs are cheaper and more tolerant of a few extra minutes than breasts. Ground turkey works well when it’s mixed with sauce, because lean meat can taste flat if you treat it too gently. Salmon and shrimp are worth buying if they’re fresh or frozen solid, but they reward careful cooking more than the others.
Pantry sauces matter more than people think. Pick salsa, teriyaki, marinara, enchilada sauce, or barbecue sauce with a flavor you’d actually eat from a spoon. Thin, weak sauce makes a whole skillet feel under-seasoned. Same with cheese. A block you grate yourself melts well, but pre-shredded cheese is perfectly fine for busy dinners and saves time when the house is loud.
How to Serve These Post-Workout Meals
Presentation:
Put the main food in a wide bowl, shallow plate, or open-faced serving dish when you can. Post-workout food looks best when it’s obvious what it is: rice under the chicken, cheese on top of the skillet, lemon on the salmon, herbs on the pasta. A little color on the side — lime wedges, scallions, cucumber slices, herbs — makes even a plain dinner feel intentional.
Accompaniments:
Keep the sides simple and textured. A green salad, sliced fruit, roasted broccoli, cucumbers, carrot sticks, coleslaw, or a handful of chips can round out a heavy training meal without adding another full recipe. Bread shows up well with soups, pasta, and meatballs. Tortillas, pitas, buns, and wraps already handle part of the carb load.
Portions:
A normal adult serving after exercise often looks like 4 to 6 ounces of cooked protein plus a solid portion of starch. For these recipes, that usually means one full bowl, one stuffed pita, one loaded potato, or a generous scoop from a skillet. If the workout was long or intense, don’t be shy about adding a second helping of rice, pasta, or potatoes.
Beverage Pairing:
Water is fine, obviously, but a cold sparkling water with lime or a lightly sweetened iced tea fits these dinners well. For something more substantial, milk works nicely with the pasta, potatoes, and breakfast-style dishes. Citrus-forward drinks pair especially well with the bowls and fajitas because they cut through the salt.
Additional Tips and Flavor Boosters
Flavor Enhancement:
A squeeze of lime, lemon, or vinegar at the end does more work than another half teaspoon of spice in most of these recipes. Acid wakes up rice bowls, beans, roasted potatoes, and creamy sauces fast. If a dish tastes “fine” but not exciting, that’s usually the fix.
Customization:
Let the family finish their own plates. Hot sauce on the side, extra cheese in a bowl, chopped herbs, sliced avocado, crushed chips, pickled onions, or a dollop of yogurt lets each person steer their own serving without rebuilding dinner from scratch. That matters when one person wants mild and another wants heat.
Serving Suggestions:
Fresh herbs are worth the trouble when you have them. Scallions, cilantro, dill, parsley, and basil each change the feel of a meal in a small but real way. Toasted sesame seeds, crushed tortilla chips, and lemon zest also help dinners feel more finished with almost no effort.
Make-It-Yours:
For gluten-free eating, lean on rice bowls, baked potatoes, corn tortillas, and rice noodles. For dairy-free dinners, use yogurt-style alternatives or skip the cheese and lean harder on salsa, herbs, and citrus. For a higher-protein plate, add extra beans, an extra egg, or a second helping of chicken rather than trying to make every recipe feel like a supplement shake.
Make-Ahead, Storage, and Reheating Guidance
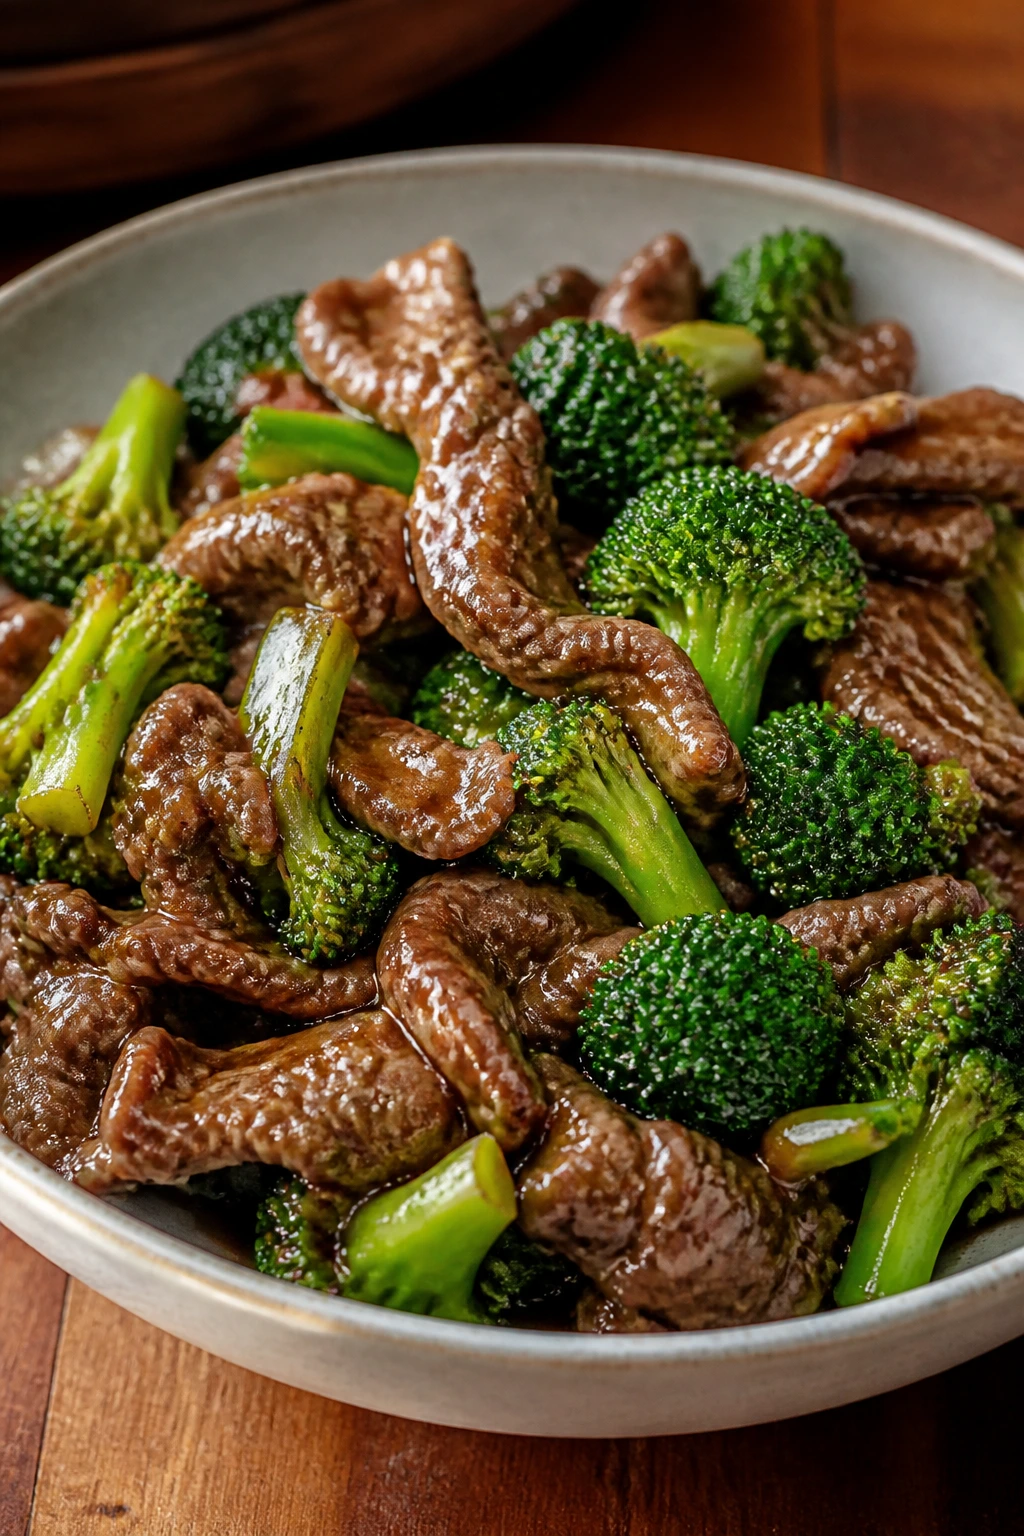
Most of these meals keep 3 to 4 days in the refrigerator if you cool them quickly and store them in airtight containers. The seafood dishes are the exception: salmon cakes, salmon bowls, and shrimp fried rice are best eaten within 1 to 2 days for better texture. Rice, pasta, and potatoes should be cooled and refrigerated within 2 hours of cooking so they stay safe and taste better later.
Freezing works well for the saucy, sturdy meals: turkey taco skillet, chili mac, bolognese, sloppy joes, curry, meatballs, and chicken-based skillet dinners can usually be frozen for up to 2 to 3 months. Pasta bakes and rice bowls freeze, too, though the texture softens a bit on thawing. Creamy yogurt-based fillings, lettuce-heavy wraps, and cucumber bowls are better made fresh or assembled only after thawing the cooked parts.
For reheating, use the method that matches the dish. Skillets and saucy meals reheat well in a pan over medium-low heat with a splash of water, broth, or salsa. Pasta and rice bowls do well in the microwave if you cover them and stop to stir once. Baked potatoes and meatballs reheat best in a 350°F oven until hot through. Seafood needs a gentler touch; use low heat and stop as soon as it’s warmed, because aggressive reheating makes salmon and shrimp dry in a hurry.
A smart make-ahead move is to cook the proteins and grains separately, then combine them only when serving. That keeps chicken from drying out and rice from turning gummy. It also gives you more control when you’re feeding a family with different schedules.
Variations and Adaptations to Try
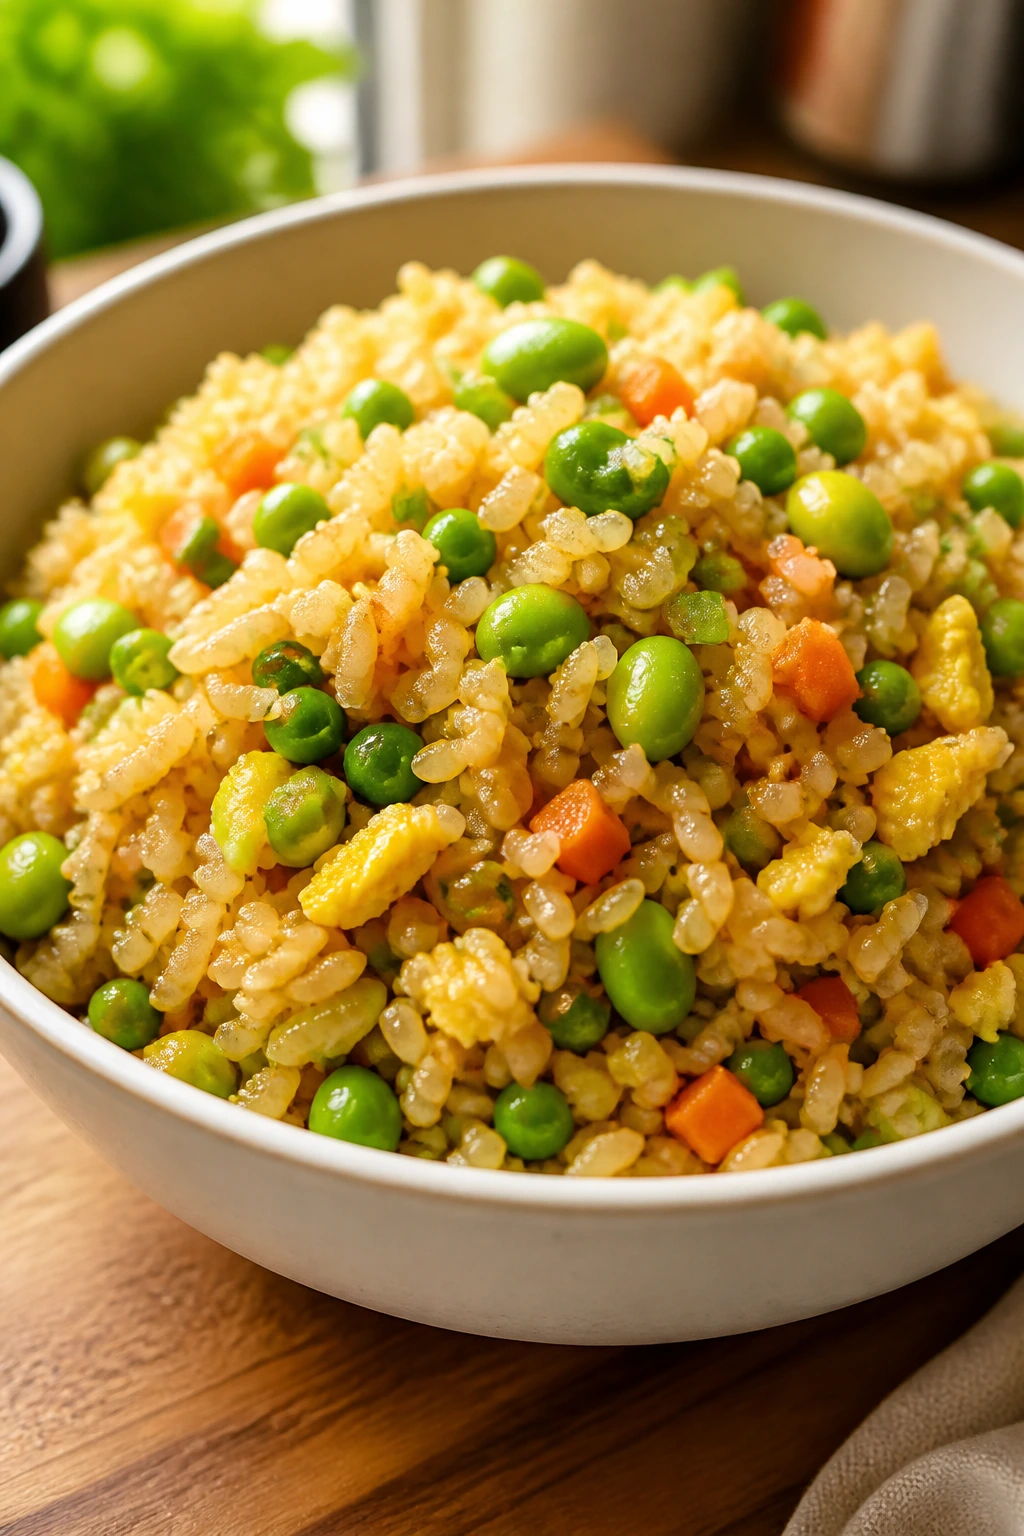
Gluten-Free Plate Night:
Use rice bowls, potatoes, corn tortillas, gluten-free pasta, and lettuce wraps as your base. Most of the recipes above already live close to gluten-free territory, and the easiest fixes are usually bread and sauce swaps. Check labels on broth, teriyaki, and enchilada sauce, because those are the sneaky places gluten hides.
Dairy-Light Recovery Meals:
Skip the cheese-heavy finish and lean on yogurt sauces, salsa, lemon, herbs, and olive oil. Burrito bowls, curry, fajitas, and stir-fries do fine without much dairy, and nobody misses it if the seasoning is strong enough. A little avocado helps replace the creamy feel.
Higher-Protein Boosts:
Add an extra egg, another cup of beans, a second chicken breast, or a scoop of cottage cheese on the side. I prefer real food additions over pretending every meal needs a powder. The meal gets more staying power without changing its shape.
Kid-Friendly Mild Versions:
Keep the spice in the sauce on the side and let adults add heat at the table. Use familiar textures — wraps, pasta, meatballs, quesadillas, baked potatoes — and the acceptance rate goes up. Kids tend to be less suspicious when they can see every part of the dinner instead of one mixed-up pan.
Vegetarian Recovery Swaps:
Black beans, chickpeas, lentils, eggs, and Greek yogurt carry a lot of weight here. The chickpea curry, lentil sloppy joes, black bean enchilada skillet, egg fried rice, and baked potatoes are especially easy to adapt, and they keep the meal from feeling like a side dish pretending to be dinner.
Spice-Forward Versions:
Add chili crisp, sriracha, jalapeños, hot sauce, or red pepper flakes only at the end. That way the base recipe stays family-friendly, and the heat can be dialed up per plate. A little control at the table beats making the whole pan too hot for half the family.
Common Mistakes to Avoid
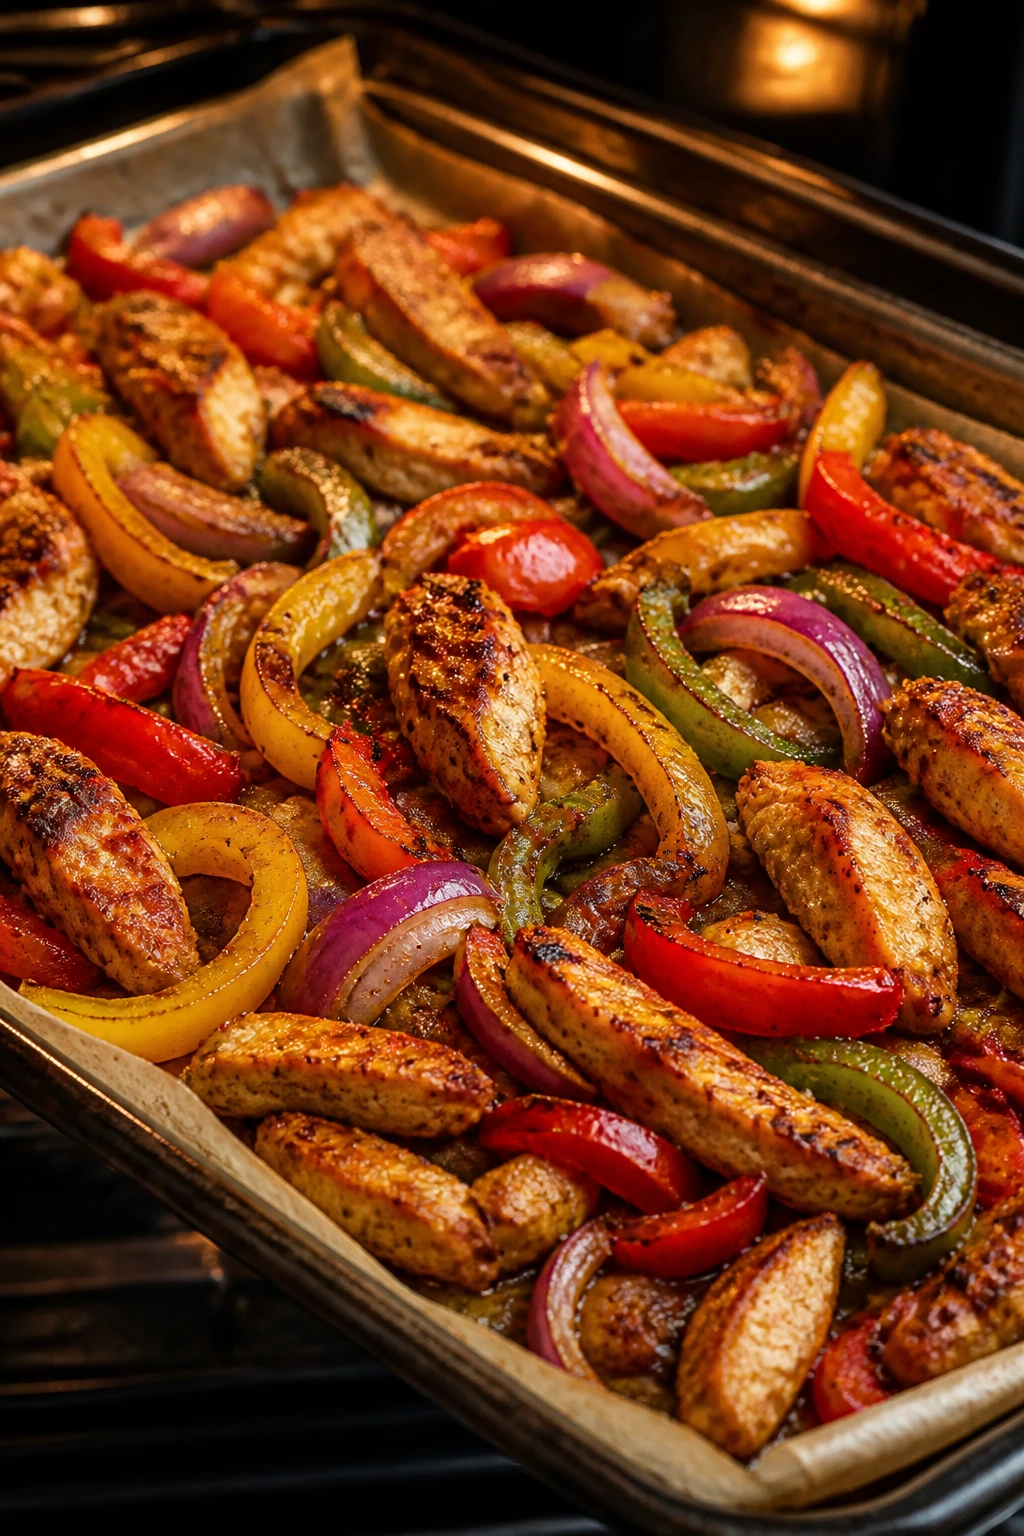
Forgetting the carb side of recovery:
A lot of people make a high-protein plate and then wonder why everyone is still hungry. After a workout, the starch matters just as much as the meat or eggs. Rice, potatoes, pasta, tortillas, oats, and buns are not filler here; they are part of what makes the meal work.
Overcooking the protein:
Chicken breast goes dry, shrimp turns rubbery, salmon loses its softness, and turkey can get chalky if you chase “done” too aggressively. Pull proteins a little early and let carryover heat finish the job. A meat thermometer saves dinner more often than heroic guessing does.
Making the sauce too thin:
Many of these meals rely on sauce to bind the starch and protein together. If the sauce is watery, the bowl feels broken. Simmer it down, use reserved pasta water, or reduce the broth before serving.
Skipping the acid or bright finish:
Lime, lemon, vinegar, pickles, yogurt, herbs, and mustard are the things that stop a heavy dinner from tasting dull. A small hit of acid wakes up beans, cheese, chicken, and rice better than another spoonful of salt.
Reheating everything the same way:
Seafood, rice, pasta, and baked potatoes all behave differently. High heat is fine for a skillet chili or bolognese, but not for salmon cakes. Match the heat to the food or the leftovers will feel worse than the original meal.
Using the same bland seasonings for every dish:
A little cumin does not fix a pesto pasta, and Italian seasoning does not rescue a teriyaki bowl. Match the flavor profile to the recipe, then adjust salt and acid at the end. The details matter here.
Frequently Asked Questions
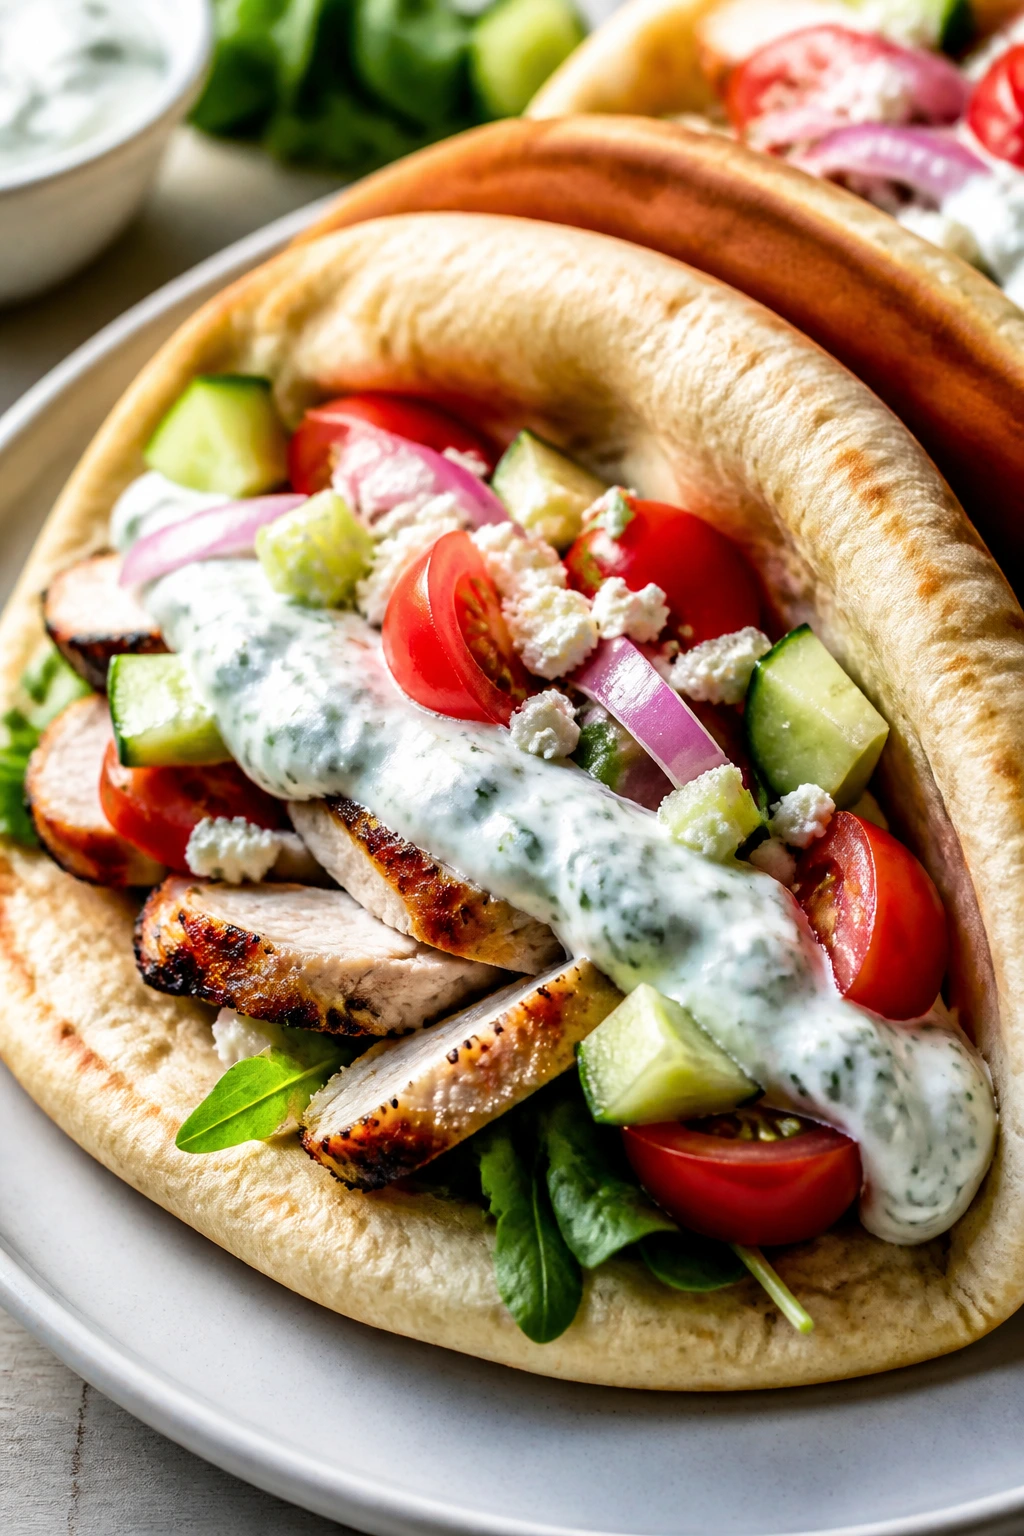
How much protein should a post-workout meal have?
A practical plate usually lands somewhere around 20 to 40 grams of protein, depending on the size of the person and the workout. You do not need to hit a magic number every time, but the meals here are built to give you a real chunk of protein instead of a token sprinkle.
Can I make these meals ahead for the whole week?
Yes, with a little sorting. Saucy skillet meals, meatballs, chili mac, curry, and pasta bakes are the best make-ahead choices because they reheat cleanly. Keep delicate toppings like avocado, lettuce, cucumber, and yogurt sauces separate until serving.
Which recipes freeze best?
Turkey bolognese, sloppy joes, chili mac, enchilada skillet filling, meatballs in sauce, curry, and taco-style turkey are the easiest freezer wins. Seafood and lettuce-heavy wraps are weaker candidates because they lose texture after thawing.
What if my family wants different spice levels?
Keep the base mild and put the heat on the table. Hot sauce, chili crisp, sliced jalapeños, and red pepper flakes can all be added at the end. That gives you one dinner instead of two.
Are canned beans and frozen vegetables okay here?
Absolutely. They are part of what makes these meals realistic. Canned beans should be rinsed to cut the sodium load, and frozen vegetables often work better than tired fresh ones that have been sitting in the crisper drawer.
Can I use leftover chicken in most of these recipes?
Yes. Leftover chicken works especially well in burrito bowls, wraps, quesadillas, pesto pasta, fajita bowls, chicken salad, and BBQ sweet potato skins. Add it near the end so it heats through without drying out.
What’s the best meal here after a late-night workout?
The fastest wins are burrito bowls, egg fried rice, tuna quesadillas, Greek chicken pitas, and the turkey taco skillet. They come together quickly, reheat well, and still feel like dinner instead of a snack with a fork.
How do I keep rice from getting clumpy in bowls and fried rice?
Cool it quickly, refrigerate it, and break it up before reheating. A tiny splash of water in the microwave helps with bowl-style rice, while a hot pan helps fried rice develop texture instead of paste.
Plates After Practice
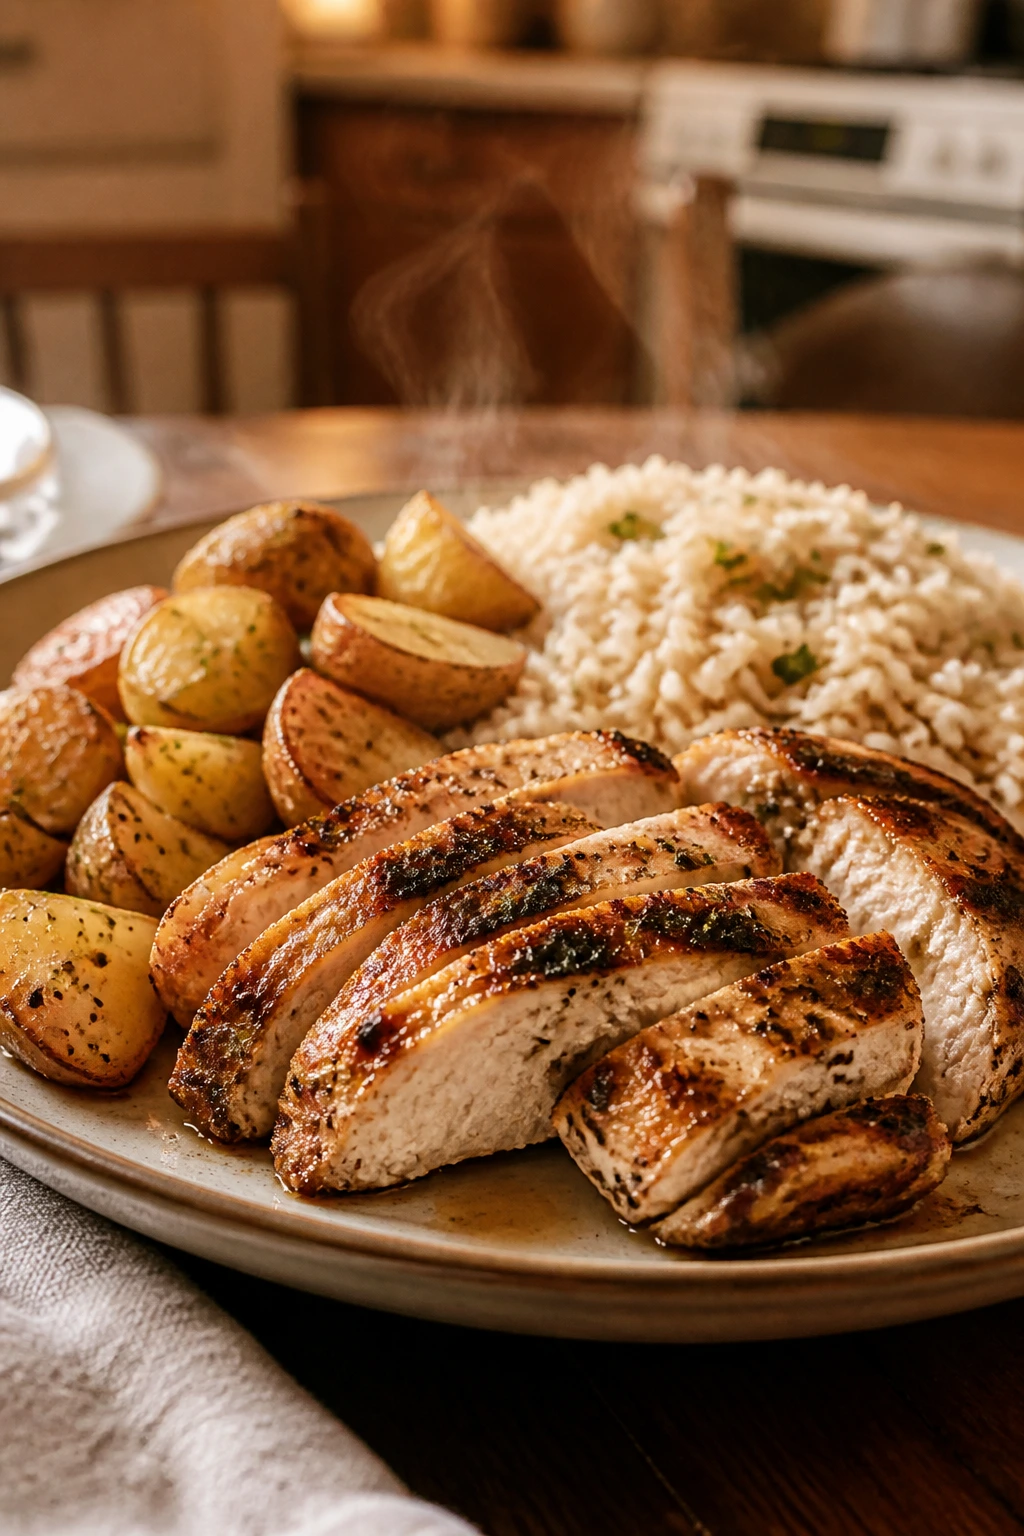
The useful thing about a good family post-workout meal is that it doesn’t need to announce itself. It just needs to show up hot, fill the table, and give people enough fuel to stop raiding the pantry an hour later. That’s what these recipes do best: they keep the cooking realistic and the food sturdy.
Some nights call for bowls. Some call for a pan of pasta, a stack of pitas, or a tray of potatoes loaded past reason. The format changes, but the goal stays the same — real food that helps tired bodies recover and hungry people calm down.
Pick two or three of these and make them your regulars. That’s where the real payoff lives.