
A tray of tea party desserts does not need a pastry shop’s pantry. It needs a steady hand, a few bowls, and the kind of ingredients that sit behind the flour canister or in the back of the baking cupboard: sugar, butter, jam, cocoa, oats, vanilla, eggs, and a couple of lemons that have gone a little soft on the counter. That’s the quiet trick here. The prettiest sweets for afternoon tea are often the ones built from plain shelves, then sharpened with good timing and a little care.
That’s also why these desserts work so well together. They’re small enough to serve on a china saucer, sturdy enough to make the day before, and varied enough that one tray can hold something crisp, something chewy, something jammy, and something buttery without turning into a sugar brick. I’ve always liked that balance. Tea asks for desserts with restraint. Not bland, not timid. Just enough richness to make the sip afterward taste cleaner.
So the lineup below leans on pantry staples but never feels like an emergency bake. These are the kinds of sweets that can carry a table even when the fridge is sparse and the fruit bowl is empty. And once you start mixing and matching them, you’ll notice something useful: the best tea table is usually the one that looks effortless because the baking was done with good sense, not fancy shopping.
Why You’ll Love This Collection
-
Shelf-stable ingredients do the heavy lifting: Flour, sugar, butter, jam, oats, cocoa, and condensed milk do most of the work here, which means you can bake without a long shopping list.
-
Every dessert is easy to portion neatly: Tea desserts should cut cleanly or hold their shape on a small plate, and these recipes are built for that.
-
The textures stay interesting: You get crisp cookies, soft bars, tender loaves, chewy macaroons, and a few desserts that need a spoon instead of a fork.
-
Most of them improve after resting: Bars firm up, cookies settle, and loaf cakes slice better after a short cool-down, which makes planning less frantic.
-
They travel well: A lot of tea party baking is really portability in disguise, and these desserts can handle a tin, a tray, or a cake box without drama.
-
You can mix them into a menu without repeating flavors: Lemon, jam, chocolate, spice, coconut, and peanut butter all show up, but none of them crowd the others.
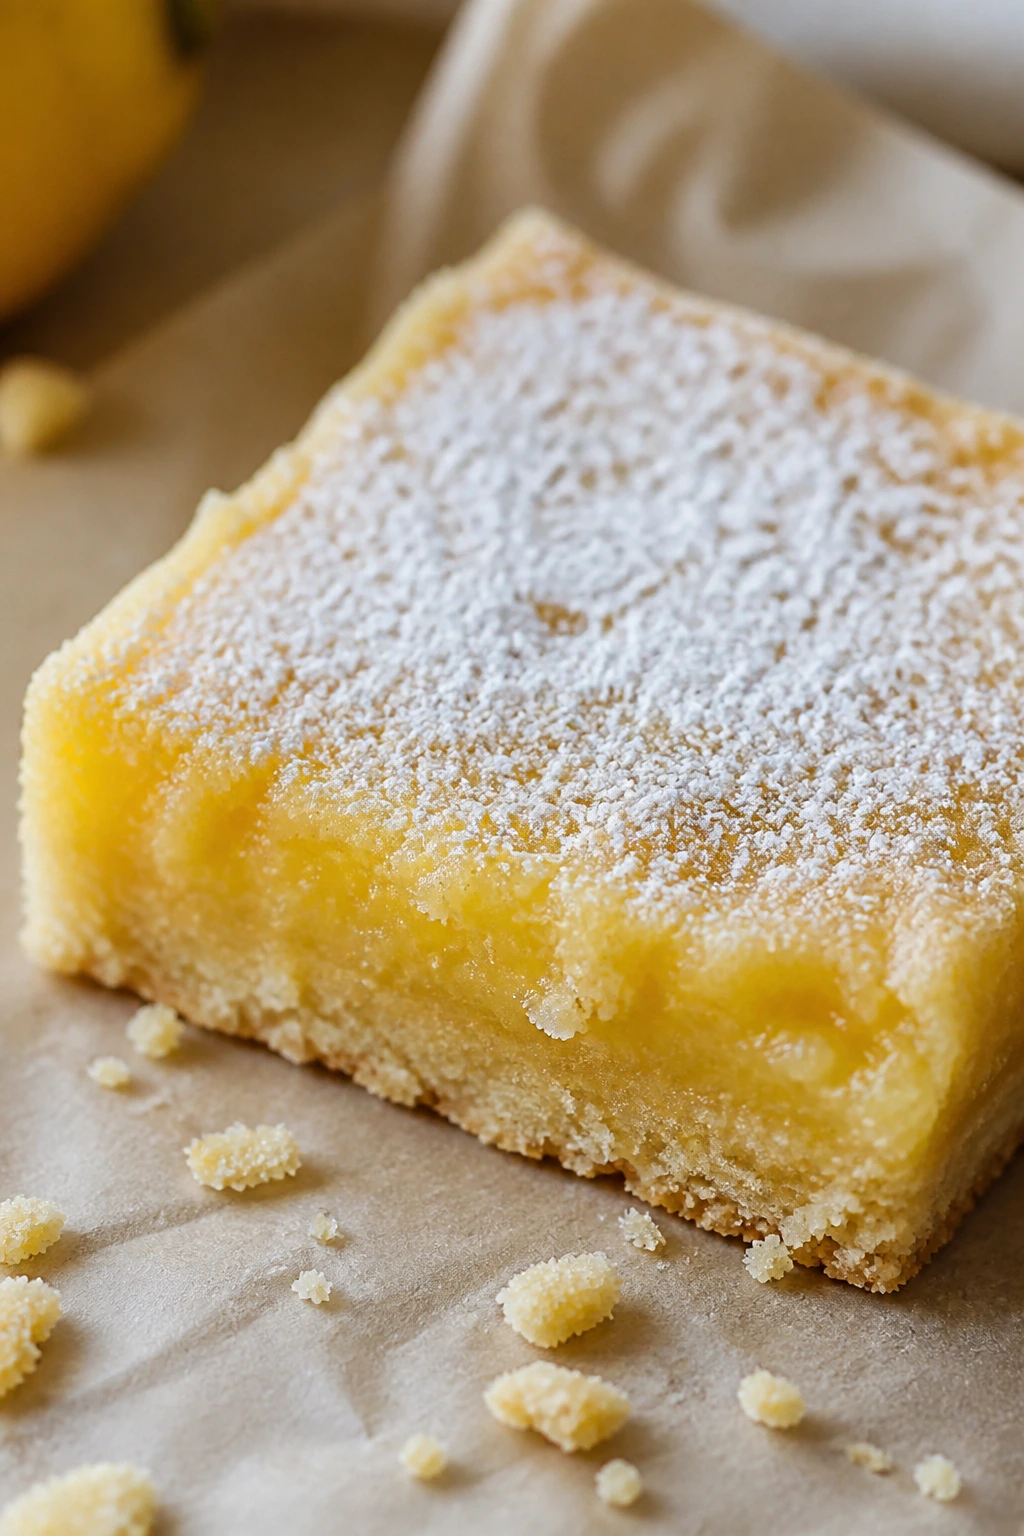
1. Lemon Shortbread Bars
A good lemon bar should taste like bright sunlight on butter. These are crumbly at the edges, soft in the middle, and sharp enough to wake up the palate after a sip of black tea. I like them cut small for tea service, with a little powdered sugar sifted over the top right before serving.
Why It Works:
Shortbread gives you a firm base that does not buckle under a custardy citrus layer. The crust stays sandy and rich, while the filling bakes into a sliceable top that shivers only a little when it comes out of the oven. The lemon juice keeps the sweetness honest. The whole pan sets best after a full cool-down, which means you can bake it early and cut neat squares later.
Key Ingredients:
- 1 1/2 cups all-purpose flour
- 1/2 cup powdered sugar
- 1/4 teaspoon fine salt
- 3/4 cup unsalted butter, cold and cubed
- 2 teaspoons finely grated lemon zest
- 2 large eggs
- 3/4 cup granulated sugar
- 2 tablespoons all-purpose flour
- 1/3 cup fresh lemon juice
- 1/2 teaspoon vanilla extract
- Extra powdered sugar for dusting
Quick Steps:
- Preheat the oven to 350°F and line an 8×8-inch pan with parchment, leaving overhang on two sides.
- Mix the crust flour, powdered sugar, salt, and lemon zest, then cut in the cold butter until the dough looks like damp crumbs.
- Press the crust firmly into the pan and bake for 18 to 20 minutes, until the top looks pale gold at the edges.
- Whisk the eggs, granulated sugar, flour, lemon juice, and vanilla until smooth, then pour over the hot crust.
- Bake 20 to 24 minutes more, until the center no longer wobbles when you tap the pan.
- Cool completely, chill if you want razor-clean cuts, then dust with powdered sugar and slice.
Equipment for This Recipe:
- 8×8-inch baking pan
- Parchment paper
- Mixing bowl
- Whisk
- Citrus zester
How to Serve This Dish:
Cut them into slender squares or tidy rectangles so they fit a small plate without crowding the rest of the table. A mint sprig is optional, but a light dusting of sugar is usually enough. These are sharp and buttery, so they sit nicely beside unsweetened tea or a cup with a splash of milk.
Pro Tips for This Recipe:
- Press the crust down with the bottom of a measuring cup; loose crumbs make a weak base.
- Cool the pan before cutting. Warm lemon bars look fine and fall apart fast.
- If your lemons are small, add a little extra zest before you reach for more juice. The zest carries the perfume.
Variations on This Dish:
- Orange-Sugar Bars: Swap the lemon juice and zest for orange juice and orange zest for a softer, rounder flavor.
- Ginger Lemon Bars: Add 1 teaspoon ground ginger to the crust for a warmer finish that works especially well with strong tea.
Common Mistakes to Avoid with This Dish:
- Cutting too soon: The filling needs time to set or the slices slump. Cool fully before moving the knife.
- Underbaking the base: Pale floury crusts taste chalky. Wait for faint golden edges.
- Using bottled lemon juice: The flavor lands flat and tinny. Fresh juice is the whole point here.
2. Raspberry Jam Thumbprint Cookies
These are the cookies people reach for first because they look like you spent more effort than you did. Buttery rounds, a little dimple, a glossy spoonful of jam. They’re neat, friendly, and just sweet enough to keep a tea tray from feeling too serious.
Why It Works:
The dough is rich enough to hold a thumbprint without cracking apart, but not so soft that it spreads into flat puddles. Jam gives you fruit flavor without needing fresh berries, and raspberry keeps the sweetness sharp. A short chill before baking helps the cookies keep their shape, which is worth the extra few minutes.
Key Ingredients:
- 2 cups all-purpose flour
- 1/4 teaspoon fine salt
- 1 cup unsalted butter, softened
- 2/3 cup granulated sugar
- 1 large egg yolk
- 1 teaspoon vanilla extract
- 1/2 teaspoon almond extract, optional
- 1/2 cup raspberry jam
- 1 tablespoon milk, only if the dough feels dry
Quick Steps:
- Heat the oven to 350°F and line two baking sheets with parchment.
- Cream the butter and sugar until pale and fluffy, about 2 minutes.
- Beat in the egg yolk, vanilla, and almond extract.
- Stir in the flour and salt until the dough comes together, then chill for 20 minutes if it feels sticky.
- Roll into 1-inch balls, place on the tray, and press a deep thumbprint into each center.
- Fill each well with about 1/2 teaspoon jam.
- Bake 12 to 14 minutes, until the edges are set and the bottoms are barely golden.
- Cool on the tray for 10 minutes before moving to a rack.
Equipment for This Recipe:
- Baking sheets
- Parchment paper
- Mixing bowl
- Hand mixer or sturdy spoon
- Small teaspoon for filling
How to Serve This Dish:
Put them on a shallow plate rather than stacking them; the jam centers look better in a single layer. They’re excellent with Earl Grey or a tea that has a citrus note. If you’re serving several sweets, tuck these near the center of the tray so the color breaks up the brown-gold cookies around them.
Pro Tips for This Recipe:
- Make the thumbprint before baking, then press again halfway through if the centers puff up.
- Warm jam flows easier, but only use a teaspoon or it will bubble over the edges.
- If the cookies spread too much, the butter was too soft. Chill the dough longer next time.
Variations on This Dish:
- Apricot Glow: Swap raspberry jam for apricot preserves and dust the finished cookies with a pinch of powdered sugar.
- Chocolate Center Version: Fill with chocolate hazelnut spread after baking for a richer, softer finish.
Common Mistakes to Avoid with This Dish:
- Using too much jam: The cookies need a small well, not a crater. Overflow burns on the pan.
- Skipping the chill: Warm dough spreads before it sets.
- Overbaking the bottoms: They should stay pale with only a little color under the edges.
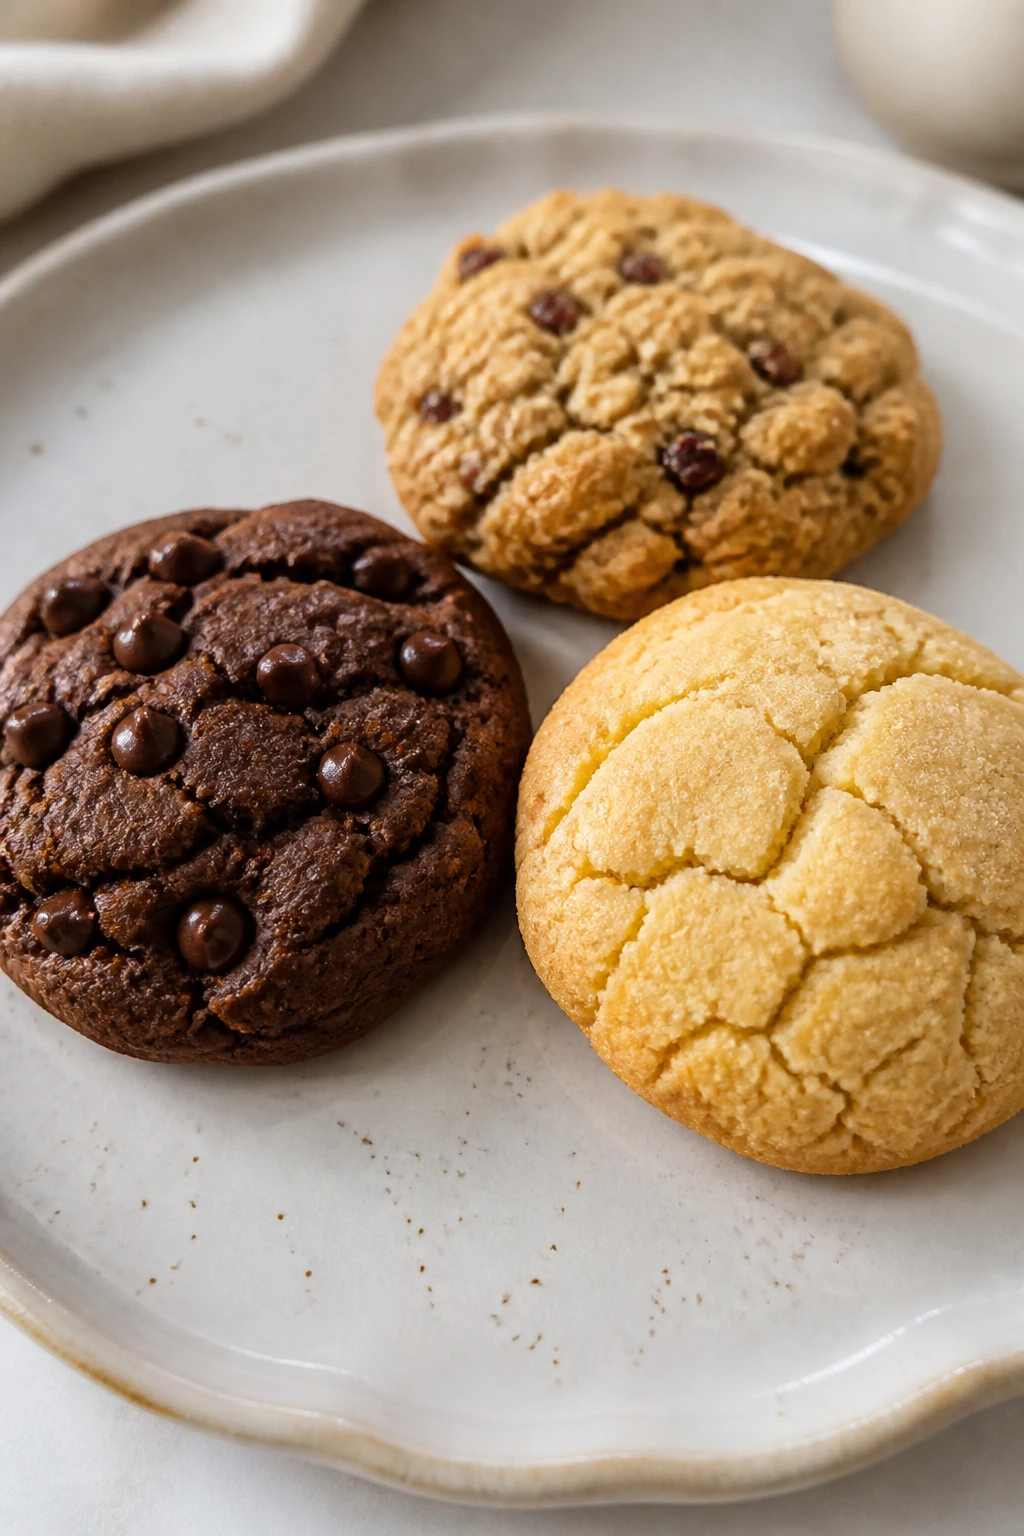
3. Chocolate Crinkle Cookies
If you want one dessert that looks like it came from a better bakery than your actual kitchen, make these. The outside turns matte and cracked, while the center stays dense and fudgy. A good crinkle cookie should break cleanly with a soft middle and a snowy coat of powdered sugar.
Why It Works:
Oil keeps the crumb moist and gives the cookies that brownie-like middle. Cocoa supplies the deep flavor, and the powdered sugar coating splits as the dough expands in the oven. The contrast is the whole show. These are at their best when the dough is chilled enough to scoop cleanly, because warm dough melts into squat domes.
Key Ingredients:
- 1/2 cup vegetable oil
- 1 cup granulated sugar
- 2 large eggs
- 1 teaspoon vanilla extract
- 1 cup all-purpose flour
- 1/2 cup unsweetened cocoa powder
- 1 teaspoon baking powder
- 1/4 teaspoon fine salt
- 1/2 cup powdered sugar, for coating
Quick Steps:
- Whisk the oil, granulated sugar, eggs, and vanilla until glossy.
- Stir in the flour, cocoa, baking powder, and salt until the dough is thick and sticky.
- Chill the bowl for 30 to 45 minutes, until the dough is firm enough to scoop.
- Heat the oven to 350°F and line baking sheets with parchment.
- Scoop tablespoons of dough, roll into balls, and coat heavily in powdered sugar.
- Bake 10 to 12 minutes, until the tops crack and the centers still feel a little soft.
- Cool for 5 minutes on the pan before moving them.
Equipment for This Recipe:
- Mixing bowl
- Whisk
- Cookie scoop or spoon
- Baking sheet
- Parchment paper
How to Serve This Dish:
They look best with a few crumbs around them and nothing fussy on the plate. Pair them with plain black tea or a milky tea that can stand up to the cocoa. They also make a nice dark note on an otherwise pale tea tray.
Pro Tips for This Recipe:
- Coat the dough balls heavily in powdered sugar; a light dusting disappears.
- Pull them when they still look slightly underdone in the center.
- If your kitchen runs warm, chill the shaped dough between batches so the sugar coating stays crisp.
Variations on This Dish:
- Peppermint Crinkle: Add 1/4 teaspoon peppermint extract and skip the vanilla for a sharper finish.
- Espresso Crinkle: Mix in 1 teaspoon instant espresso powder with the cocoa for a deeper chocolate note.
Common Mistakes to Avoid with This Dish:
- Not chilling the dough: Sticky dough refuses to roll and spreads too much.
- Baking until fully firm: These should stay soft in the center.
- Using old cocoa: Stale cocoa tastes dusty. Fresh cocoa makes the difference here.
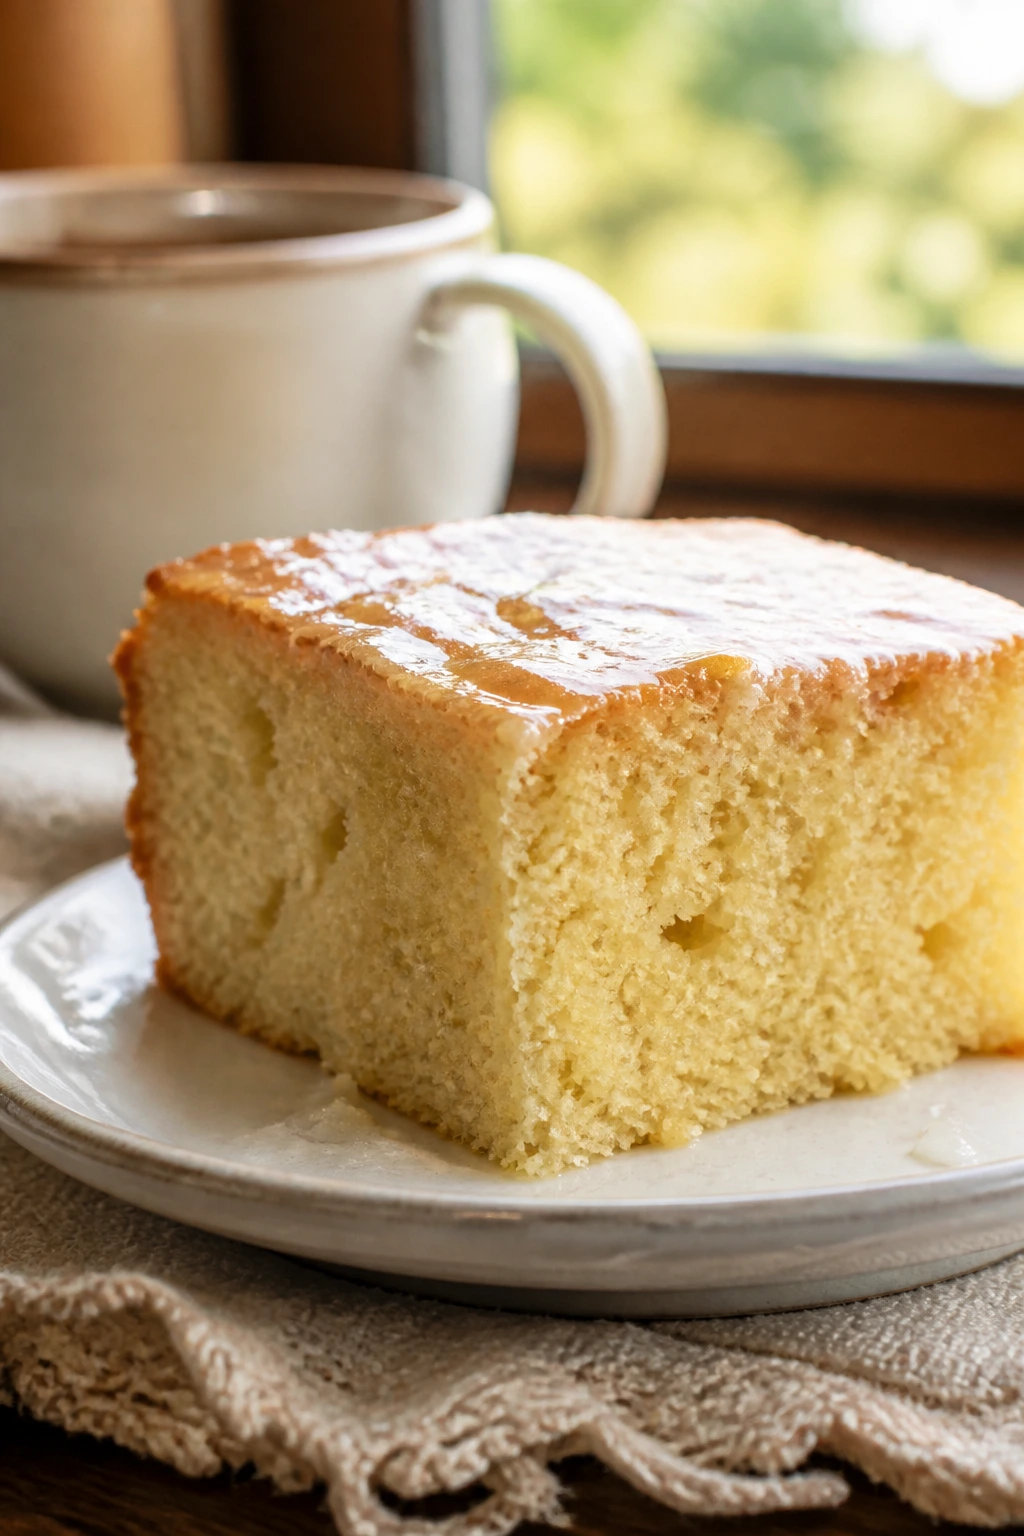
4. Vanilla Mini Tea Cakes

These are the sort of cakes I reach for when I want something gentle and tidy on a tea table. Soft crumb, clean vanilla flavor, and a pale golden top that can take a light glaze or stay plain if you want the butter to do all the talking. Cut into small squares or baked in mini muffin cups, they feel proper without trying too hard.
Why It Works:
A simple butter cake gives you enough structure to slice neatly, but enough tenderness to feel fine with tea. Milk keeps the crumb moist, and a little vanilla turns a plain slice into something that tastes finished. Because the batter is mild, it works as a base for glaze, jam, or a dusting of sugar.
Key Ingredients:
- 2 cups all-purpose flour
- 2 teaspoons baking powder
- 1/2 teaspoon fine salt
- 1/2 cup unsalted butter, softened
- 3/4 cup granulated sugar
- 2 large eggs
- 1 teaspoon vanilla extract
- 3/4 cup whole milk
- 1 tablespoon powdered sugar, optional for dusting
Quick Steps:
- Heat the oven to 350°F and grease a loaf pan, 8×8-inch pan, or mini muffin tin.
- Whisk the flour, baking powder, and salt in one bowl.
- Beat the butter and sugar for 2 to 3 minutes, until light and slightly fluffy.
- Add the eggs one at a time, then mix in the vanilla.
- Alternate the flour mixture and milk, stirring just until the batter looks smooth.
- Bake in a loaf pan for 40 to 45 minutes, an 8×8-inch pan for 28 to 32 minutes, or mini muffins for 12 to 14 minutes, until a toothpick comes out clean.
- Cool before slicing or glazing.
Equipment for This Recipe:
- Mixing bowls
- Hand mixer
- Loaf pan, square pan, or mini muffin tin
- Wire rack
- Offset spatula
How to Serve This Dish:
Serve the loaf in thin slices or the mini cakes whole, with a tiny smear of butter if you want them richer. They’re especially good with milky tea because they don’t fight the tea’s flavor. A stripe of jam on the side works if you want a little color.
Pro Tips for This Recipe:
- Beat the butter and sugar well; that air helps the cake rise without turning heavy.
- Stop mixing once the flour disappears. Extra stirring makes the crumb tough.
- If you glaze them, wait until they’re fully cool or the glaze turns thin and sticky.
Variations on This Dish:
- Almond Vanilla Tea Cakes: Add 1/2 teaspoon almond extract and top with sliced almonds before baking.
- Lemon-Sugar Tea Cakes: Fold in 1 teaspoon lemon zest and finish with powdered sugar.
Common Mistakes to Avoid with This Dish:
- Cold butter in the batter: It won’t cream properly and leaves little butter pockets.
- Overbaking the edges: Pull the cake when the center springs back lightly.
- Serving warm slices too soon: The crumb needs time to settle or it tears.
5. Peanut Butter Blossoms
These are the cookies people remember from school bake sales and church tables, and for good reason. The peanut butter base is soft and salty, the sugar shell gives a faint crunch, and the chocolate kiss in the middle melts just enough to look glossy without losing its shape. They are cheerful little things.
Why It Works:
Peanut butter makes the dough tender and gives it a deeper, more savory sweetness than plain sugar cookies. Rolling the dough in granulated sugar before baking keeps the surface crackly and gives the chocolate a clean nest. Pressing the kiss in while the cookies are still warm lets it settle without disappearing into the dough.
Key Ingredients:
- 1 3/4 cups all-purpose flour
- 1 teaspoon baking soda
- 1/2 teaspoon fine salt
- 1/2 cup unsalted butter, softened
- 1/2 cup creamy peanut butter
- 1/2 cup brown sugar
- 1/2 cup granulated sugar
- 1 large egg
- 1 teaspoon vanilla extract
- 1/3 cup granulated sugar, for rolling
- 24 chocolate kisses, unwrapped
Quick Steps:
- Heat the oven to 375°F and line baking sheets with parchment.
- Whisk the flour, baking soda, and salt.
- Beat the butter, peanut butter, brown sugar, and granulated sugar until smooth, then add the egg and vanilla.
- Stir in the dry ingredients until a soft dough forms.
- Roll into 1-inch balls, coat in sugar, and place 2 inches apart.
- Bake 8 to 10 minutes, until the tops are puffed and the edges are set.
- Press one chocolate kiss into each cookie right away.
- Cool on the sheet until the chocolate firms up again.
Equipment for This Recipe:
- Baking sheets
- Parchment paper
- Mixing bowl
- Cookie scoop
- Wire rack
How to Serve This Dish:
These belong near the front of the tray because everyone recognizes them. They pair well with strong tea, since the peanut butter and chocolate can handle a brisk cup. Keep them in a single layer if you can; stacked kisses smudge easily.
Pro Tips for This Recipe:
- Use creamy peanut butter, not the natural kind that separates.
- If the cookies crack too much before you press the kisses in, they baked a minute too long.
- Chill the dough for 15 minutes if the kitchen is warm and the balls flatten too fast.
Variations on This Dish:
- Dark Chocolate Kiss Version: Swap in dark chocolate candies for a less sweet finish.
- Salted Peanut Blossom: Sprinkle a tiny pinch of flaky salt over the chocolate while it is still soft.
Common Mistakes to Avoid with This Dish:
- Pressing the chocolate too hard: It sinks through the cookie. Gentle pressure is enough.
- Overbaking: The centers should stay soft or the cookies dry out fast.
- Skipping the sugar coating: That outer crunch is part of the cookie’s texture.
6. Spiced Oatmeal Raisin Cookies
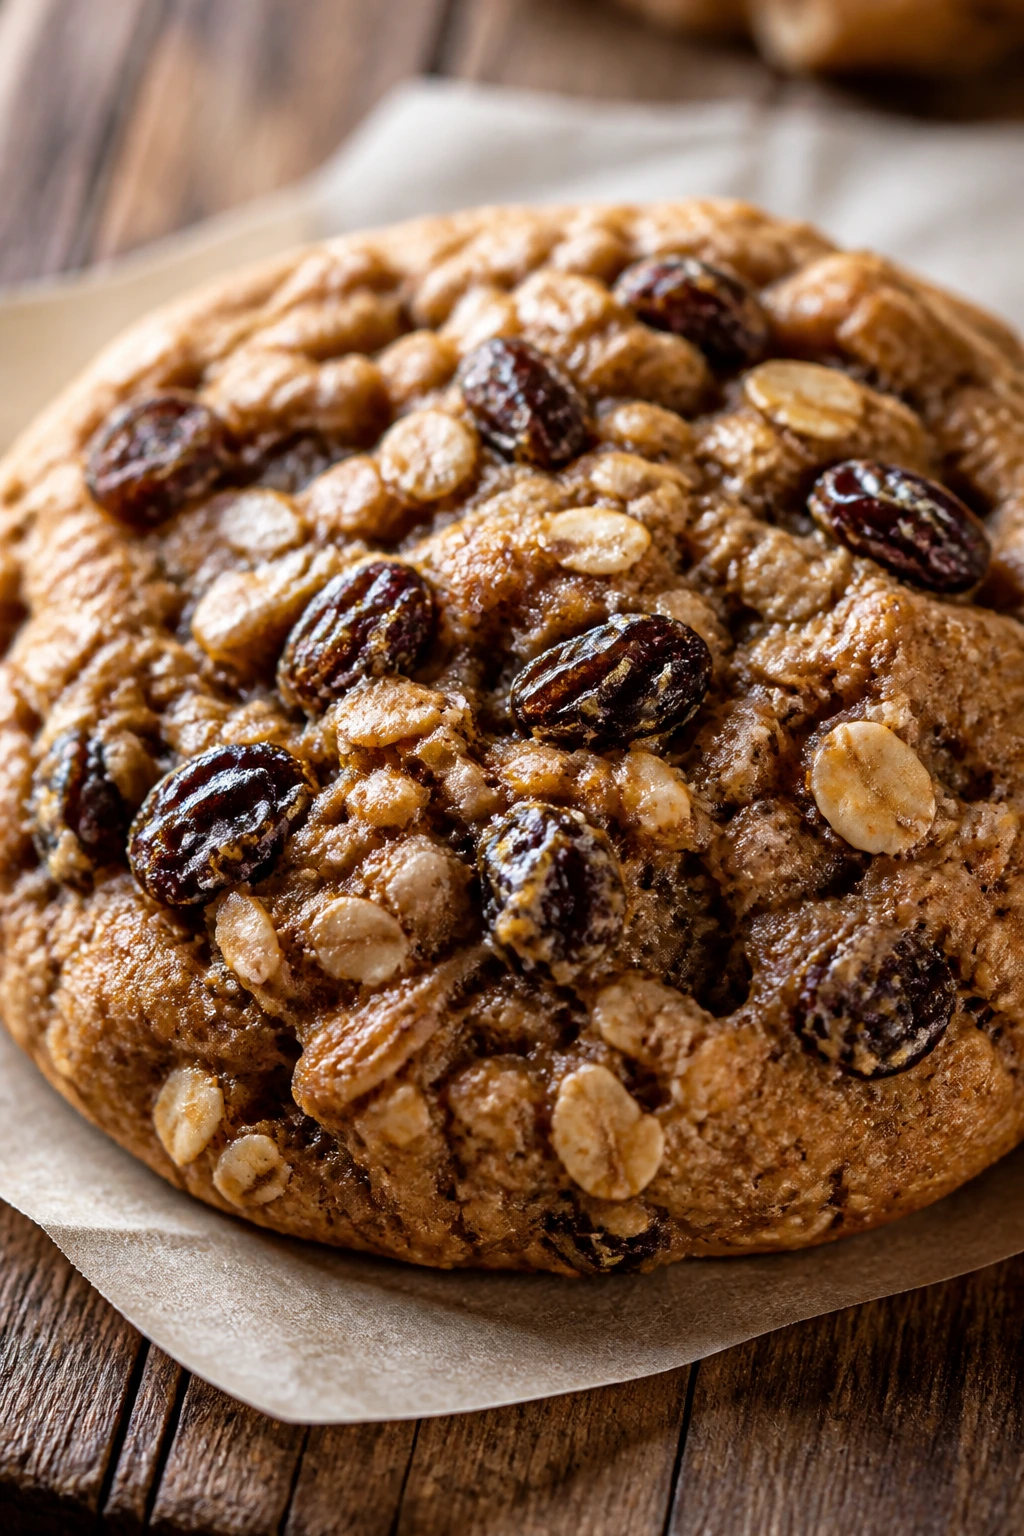
These are the cookies I trust when I want something homey but not heavy. They’re chewy in the middle, nubbly at the edges, and warm with cinnamon and a little molasses-like depth from the brown sugar. Raisins keep them moist in a way plain oatmeal cookies never quite manage.
Why It Works:
Rolled oats bring chew and a rough, hearty texture that stands up well beside tea. Brown sugar helps keep the centers soft, while cinnamon makes the sweetness taste older and fuller. The dough benefits from a short rest, because oats soak up moisture and the cookies bake up thicker after 10 or 15 minutes on the counter.
Key Ingredients:
- 1 cup unsalted butter, softened
- 1 cup brown sugar
- 1/2 cup granulated sugar
- 2 large eggs
- 1 teaspoon vanilla extract
- 1 1/2 cups all-purpose flour
- 1 teaspoon ground cinnamon
- 1/2 teaspoon baking soda
- 1/2 teaspoon fine salt
- 3 cups rolled oats
- 1 cup raisins
Quick Steps:
- Heat the oven to 350°F and line baking sheets with parchment.
- Cream the butter, brown sugar, and granulated sugar until fluffy.
- Beat in the eggs and vanilla.
- Stir together the flour, cinnamon, baking soda, and salt, then add to the bowl with the oats and raisins.
- Rest the dough for 15 minutes, then scoop rounded tablespoons onto the tray.
- Bake 11 to 13 minutes, until the edges are golden and the centers still look a bit soft.
- Cool on the sheet for 5 minutes before moving to a rack.
Equipment for This Recipe:
- Mixing bowl
- Baking sheet
- Parchment paper
- Wooden spoon or mixer
- Cookie scoop
How to Serve This Dish:
These sit nicely beside a plate of lighter sweets because they bring chew and spice. I like them with Assam or another malty tea. Stack them only after they cool; warm oatmeal cookies smear and stick in a way that makes the whole tray look rushed.
Pro Tips for This Recipe:
- Use old-fashioned rolled oats, not instant oats, or the texture turns mushy.
- Soak very dry raisins in hot water for 5 minutes, then drain and pat dry.
- Let the dough rest before baking so the cookies don’t spread like pancakes.
Variations on This Dish:
- Apricot Oat Cookies: Swap the raisins for chopped dried apricots and add a pinch of nutmeg.
- Walnut Spice Version: Add 3/4 cup chopped walnuts for a little crunch and a more savory finish.
Common Mistakes to Avoid with This Dish:
- Using instant oats: They collapse into the dough and lose the chewy bite.
- Baking until crisp: These should stay soft in the middle.
- Packing the flour too tightly: Dry flour makes stiff cookies, so spoon and level it.
7. Coconut Macaroons
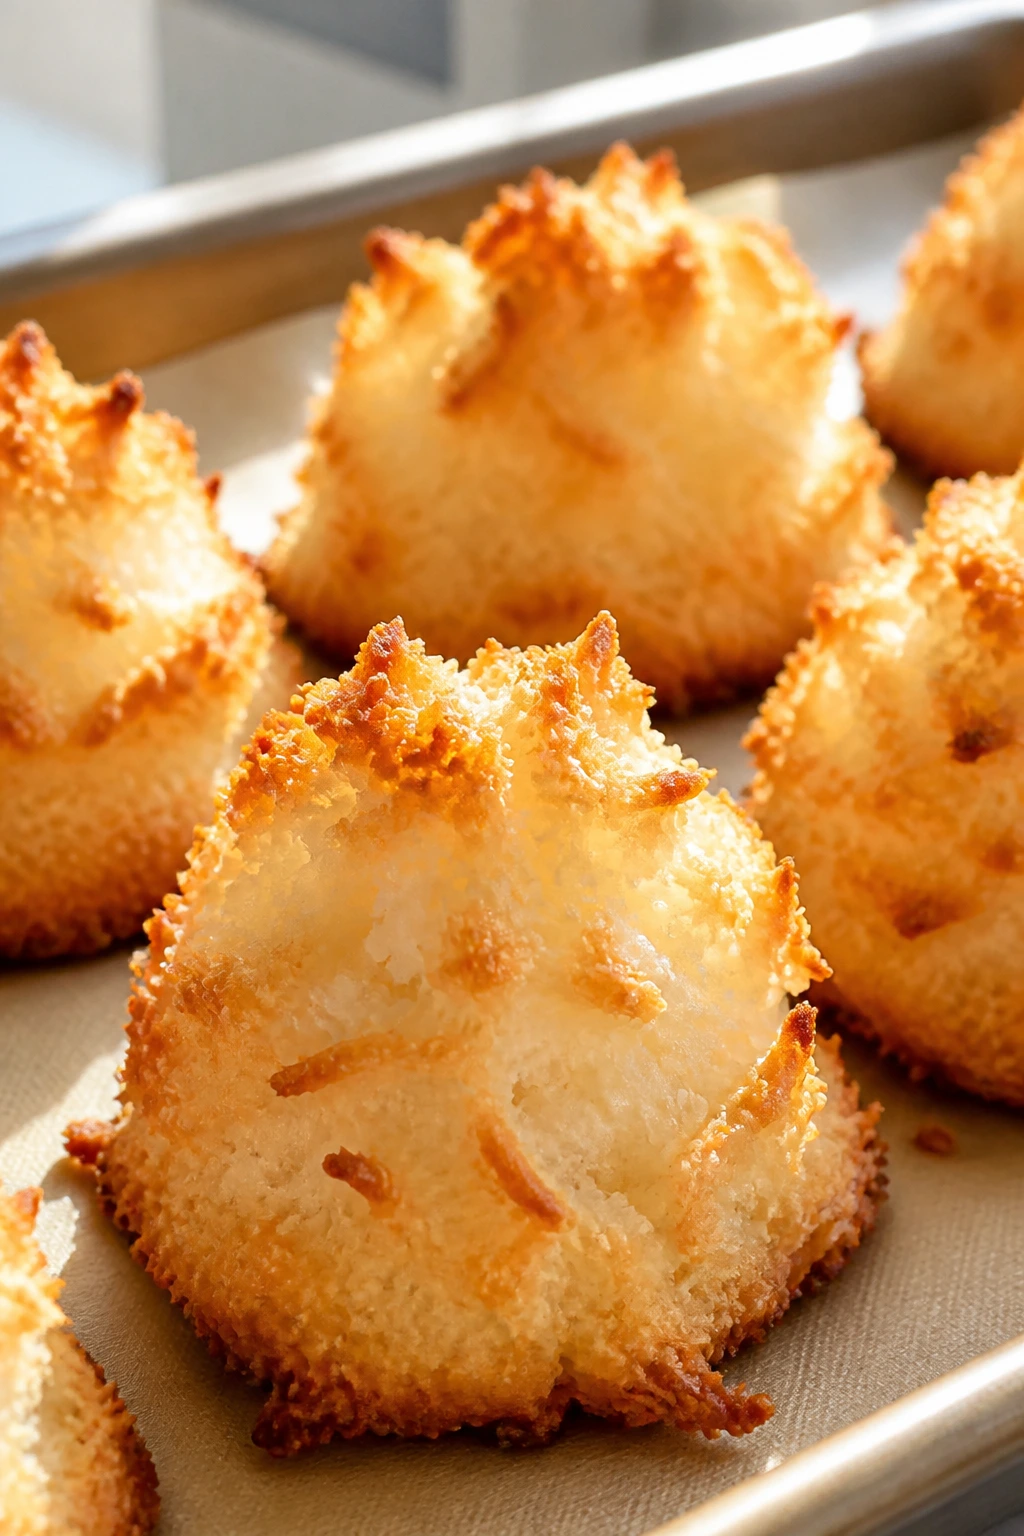
Coconut macaroons are one of the easiest desserts on this list to underestimate. They start as a shaggy bowl of coconut and end up as golden little towers with crisp edges and a chewy center. If you like sweets that taste a little toasted and a little marshmallow-soft, these are your thing.
Why It Works:
Sweetened condensed milk binds the coconut without needing a separate syrup or a complicated sugar stage. Egg whites help the mounds hold shape and brown at the edges. Because the ingredient list is short, texture matters more than flair, which is part of the pleasure here.
Key Ingredients:
- 14 ounces sweetened shredded coconut
- 1 can sweetened condensed milk, 14 ounces
- 2 large egg whites
- 1 teaspoon vanilla extract
- 1/4 teaspoon fine salt
Quick Steps:
- Heat the oven to 325°F and line a baking sheet with parchment.
- Stir the coconut, condensed milk, vanilla, and salt together.
- Whisk the egg whites until foamy, then fold them into the coconut mixture.
- Scoop heaping tablespoonfuls onto the sheet and mound them slightly.
- Bake 20 to 24 minutes, until the tops are deeply golden at the edges.
- Cool on the pan for 10 minutes before moving them.
Equipment for This Recipe:
- Baking sheet
- Parchment paper
- Mixing bowl
- Spoon or small scoop
- Whisk
How to Serve This Dish:
Serve them in paper cups or on a small oval plate; they’re messy in a charming way, not a delicate one. A cup of strong tea cuts the sweetness well. If you want a cleaner finish, dip the bottoms in melted chocolate after cooling.
Pro Tips for This Recipe:
- Don’t overwhip the egg whites; foamy is enough.
- Use parchment, not bare metal, or the bottoms can stick hard.
- Let them cool before lifting; warm macaroons fall apart at the base.
Variations on This Dish:
- Chocolate-Dipped Macaroons: Dip half of each cooled macaroon in melted dark chocolate.
- Lemon Coconut Macaroons: Add 1 teaspoon lemon zest for a brighter aroma.
Common Mistakes to Avoid with This Dish:
- Using unsweetened coconut without adjusting the recipe: The texture and sweetness change a lot.
- Baking too long: They should be golden, not dark brown.
- Skipping the salt: A tiny pinch keeps the coconut from tasting flat.
8. Brown Sugar Pound Cake
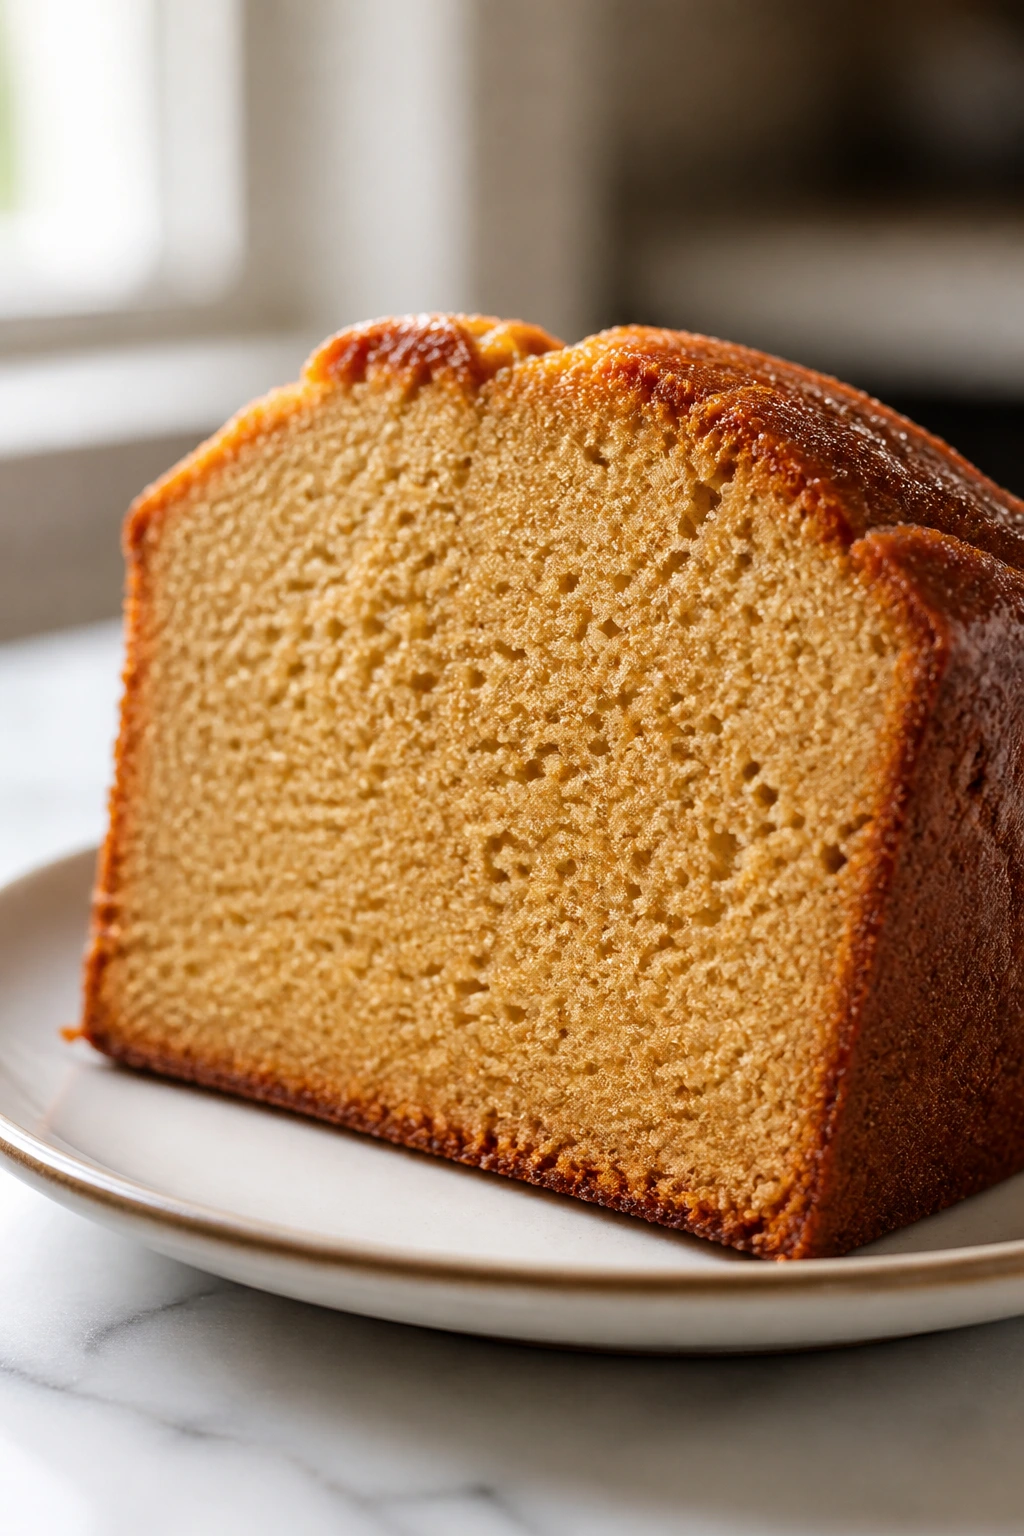
Pound cake has a way of making a tea table feel settled. Brown sugar gives this version a deeper color and a faint caramel note, and the crumb slices cleanly into little slabs that can be served plain or with jam. It is sturdy, but not dry, which is a harder balance than it sounds.
Why It Works:
Butter and sugar create the dense, fine crumb that pound cake is known for, while brown sugar adds moisture and a warmer flavor than white sugar alone. The cake bakes slowly, which keeps the outside from racing ahead of the middle. It’s one of those recipes that rewards patience instead of cleverness.
Key Ingredients:
- 1 cup unsalted butter, softened
- 1 1/2 cups brown sugar
- 1/2 cup granulated sugar
- 4 large eggs
- 2 1/2 cups all-purpose flour
- 1 teaspoon baking powder
- 1/2 teaspoon fine salt
- 1 cup whole milk
- 2 teaspoons vanilla extract
Quick Steps:
- Heat the oven to 325°F and grease a loaf pan or small bundt pan well.
- Cream the butter, brown sugar, and granulated sugar for 3 minutes, until the mixture looks lighter.
- Beat in the eggs one at a time, scraping the bowl after each one.
- Stir together the flour, baking powder, and salt, then alternate it with the milk and vanilla.
- Bake for 50 to 60 minutes in a loaf pan, or 40 to 50 minutes in a small bundt, until a skewer comes out clean.
- Cool in the pan for 15 minutes, then turn out and cool fully before slicing.
Equipment for This Recipe:
- Loaf pan or small bundt pan
- Mixer
- Mixing bowls
- Wire rack
- Rubber spatula
How to Serve This Dish:
Slice it thin for tea service. A little jam on the side makes it less plain, but the cake should still taste finished on its own. I like it with milk tea or Ceylon, which keeps the buttery crumb from feeling too rich.
Pro Tips for This Recipe:
- Grease the pan thoroughly; pound cake likes to cling.
- Stop mixing when the flour disappears or the crumb turns tight.
- Let the cake cool completely before slicing or the middle can tear.
Variations on This Dish:
- Cinnamon Brown Sugar Cake: Add 1 teaspoon cinnamon to the flour for a warmer slice.
- Glazed Tea Cake: Drizzle with a thin vanilla glaze made from powdered sugar and milk.
Common Mistakes to Avoid with This Dish:
- Baking too hot: The outside browns before the middle sets.
- Rushing the cooling time: Warm pound cake crumbles at the knife.
- Under-creaming the butter and sugar: You’ll miss the fine, even crumb.
9. Apple Hand Pies
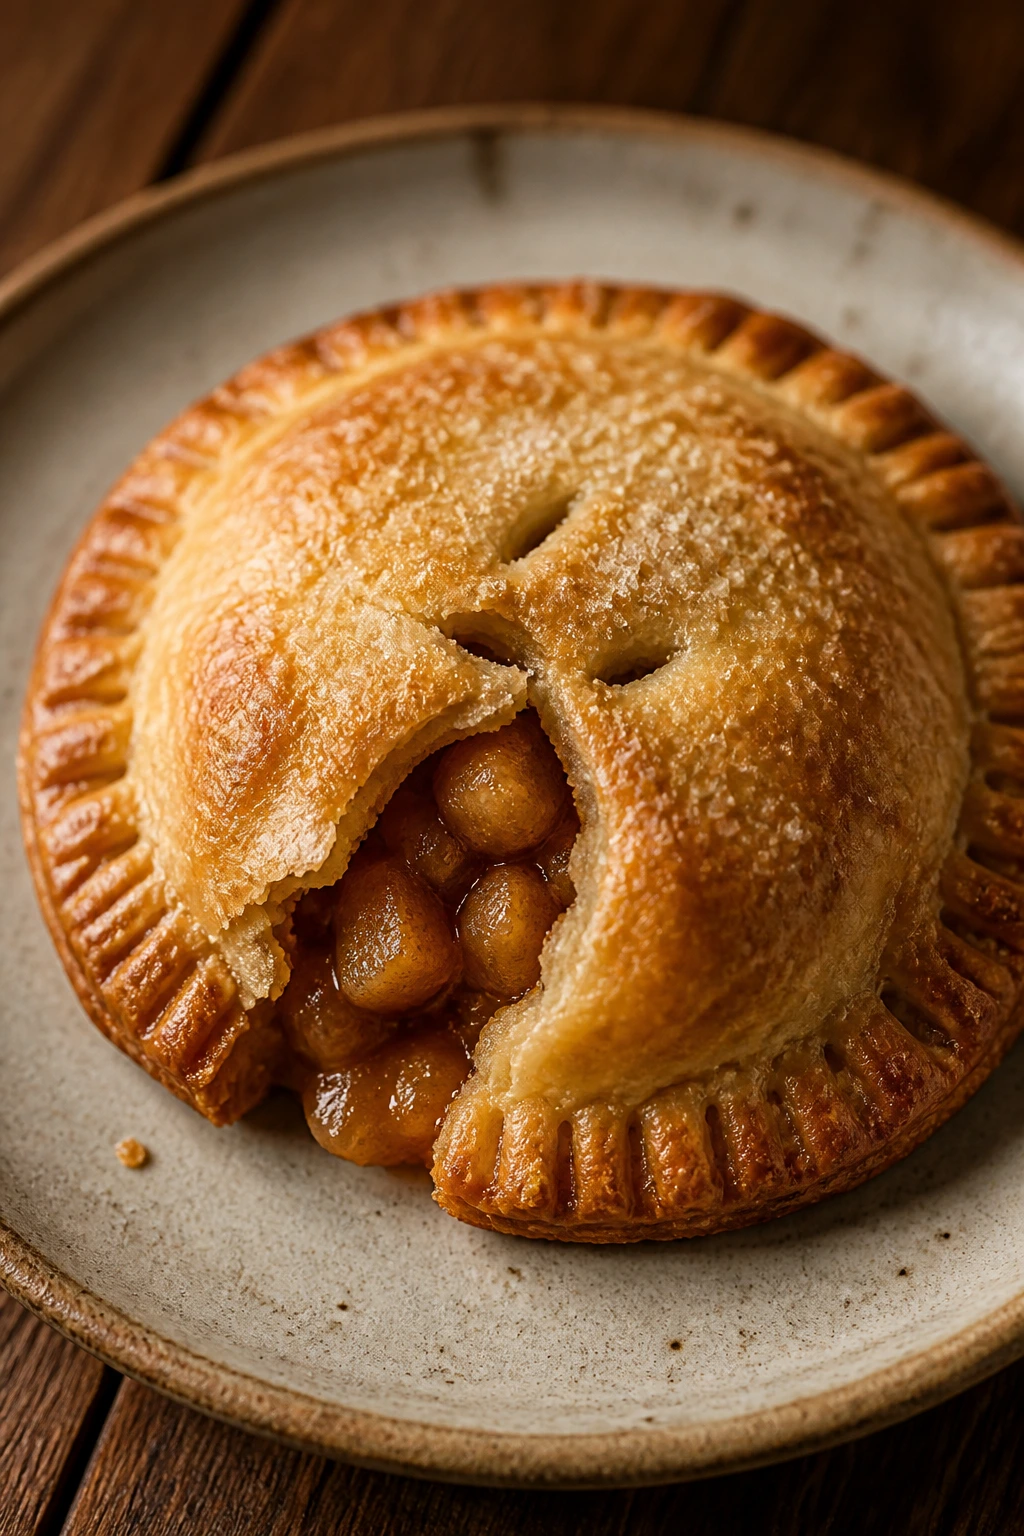
These are the kind of hand-held dessert that saves a tea table from needing forks everywhere. Flaky crust, soft apple filling, and a sugared top that crackles a little when you bite through it. I prefer them small and sealed well, because a neat edge matters more than a dramatic one here.
Why It Works:
A small pie is easier to bake evenly than a full pie, and the filling has fewer chances to leak. Using canned apple pie filling keeps the flavor steady and the prep short. Cinnamon and lemon juice keep the apples from tasting canned, which is the real job.
Key Ingredients:
- 2 1/2 cups all-purpose flour
- 1 teaspoon granulated sugar
- 1 teaspoon fine salt
- 1 cup cold unsalted butter, cubed
- 6 to 8 tablespoons ice water
- 1 can apple pie filling, about 21 ounces, chopped a bit
- 1 teaspoon ground cinnamon
- 1 tablespoon all-purpose flour
- 1 teaspoon lemon juice
- 1 large egg, beaten with 1 tablespoon water
- Granulated sugar, for sprinkling
Quick Steps:
- Mix the flour, sugar, and salt, then cut in the cold butter until the pieces are pea-sized.
- Drizzle in ice water, 1 tablespoon at a time, until the dough holds together.
- Chill the dough for 30 minutes.
- Stir the filling, cinnamon, flour, and lemon juice together.
- Roll the dough to 1/8 inch thick and cut circles about 4 to 5 inches across.
- Spoon filling onto half of each round, fold, seal with a fork, and brush with egg wash.
- Sprinkle sugar over the tops and bake at 400°F for 18 to 22 minutes, until golden and crisp.
- Cool before serving so the filling doesn’t spill out.
Equipment for This Recipe:
- Rolling pin
- Baking sheet
- Parchment paper
- Fork
- Pastry brush
How to Serve This Dish:
Serve them warm or room temperature, but not hot enough to ooze. They look tidy on a round platter with a little sugar on top. If you’re using them on a tea tray, give each guest one and let the other desserts be softer.
Pro Tips for This Recipe:
- Keep the butter cold for a flaky crust.
- Cut a steam vent if your seals are weak; it helps prevent blowouts.
- Don’t overfill them. A teaspoon too much filling causes trouble fast.
Variations on This Dish:
- Pear Spice Hand Pies: Swap the apple filling for canned pear filling and add a pinch of nutmeg.
- Glazed Hand Pies: Brush with a thin powdered sugar glaze after baking for a bakery finish.
Common Mistakes to Avoid with This Dish:
- Warm dough: It shrinks and tears. Chill it.
- Wet filling: Drain excess syrup if the canned filling is very loose.
- Forcing the seal with too much pressure: You want a tight edge, not a smashed one.
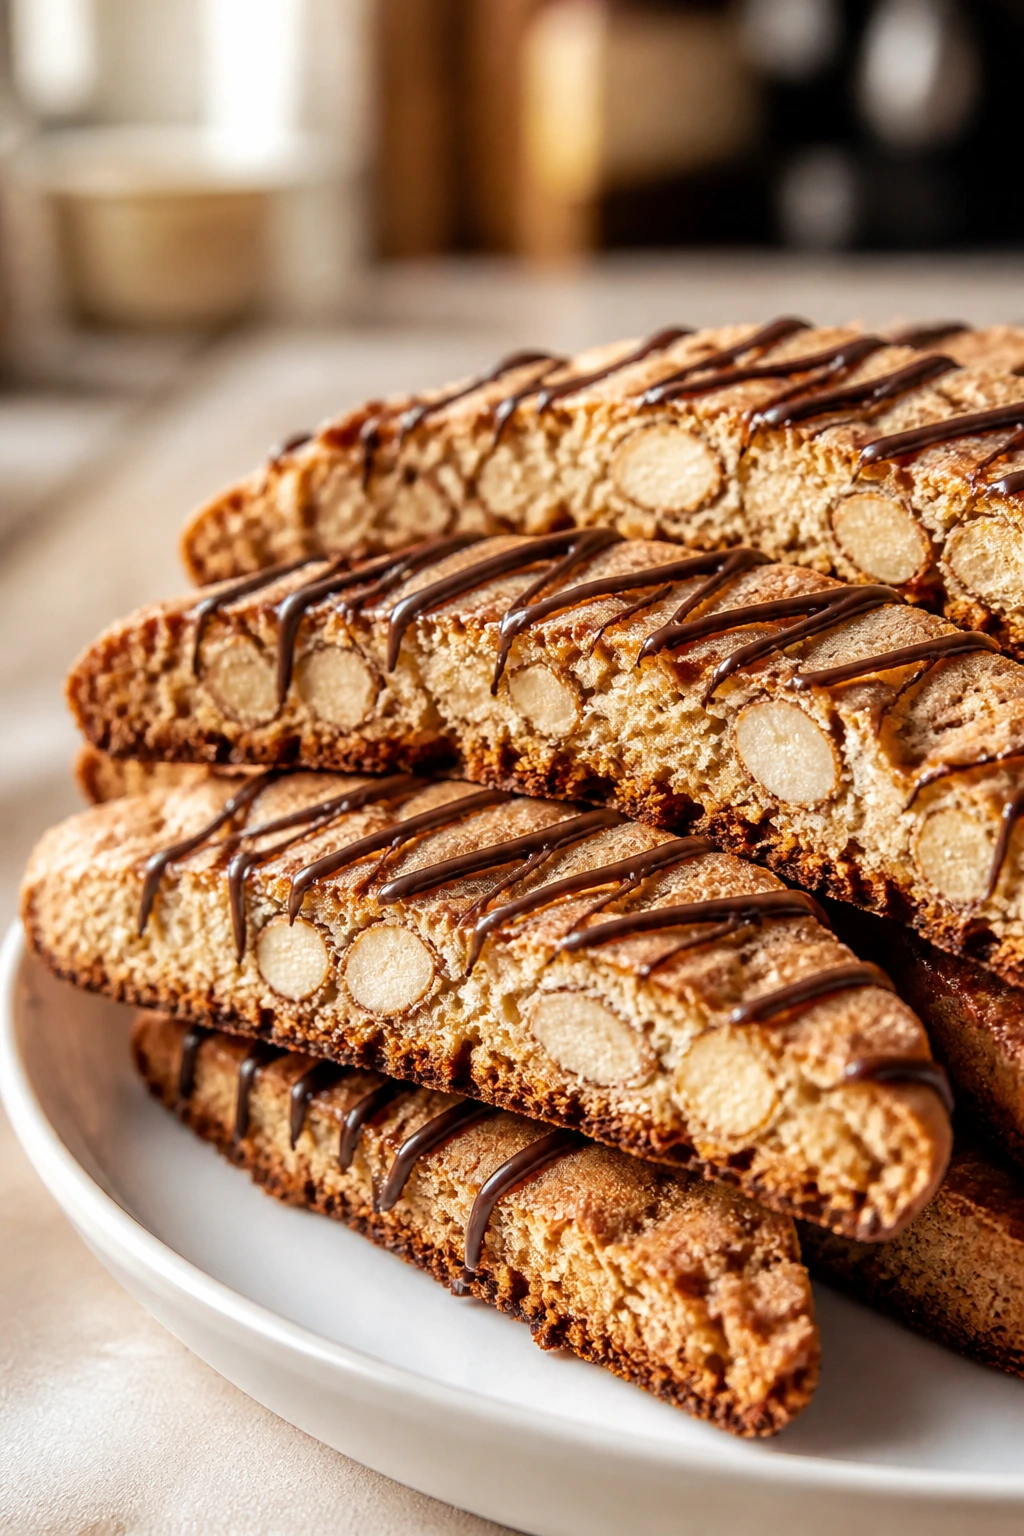
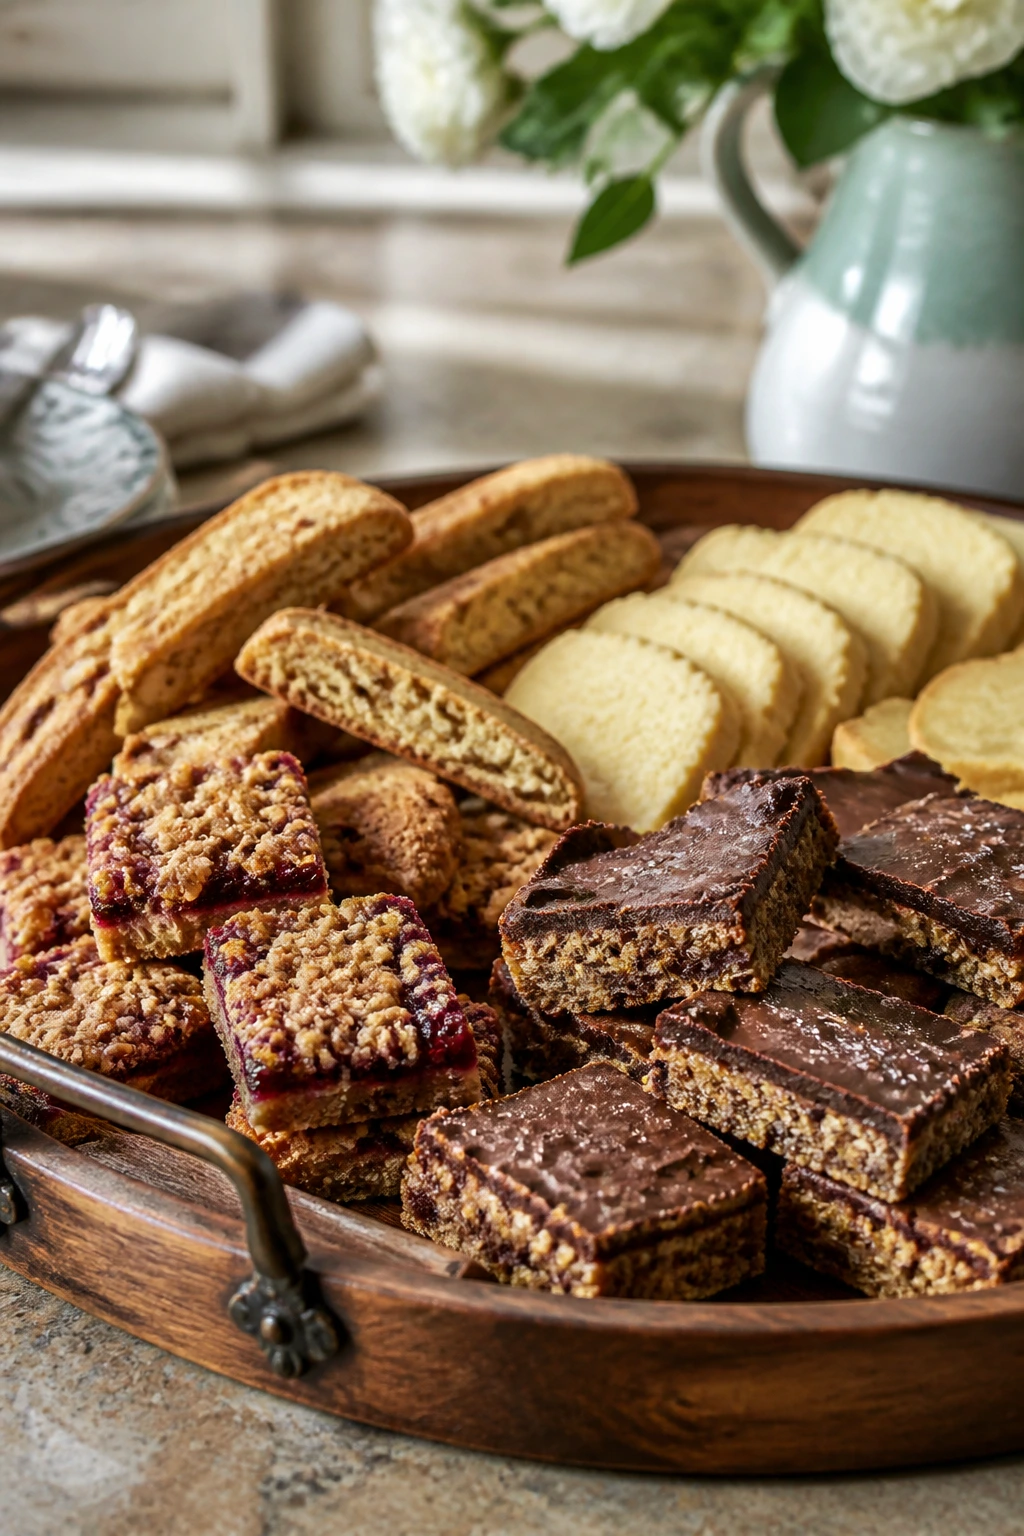
10. Chocolate Biscotti
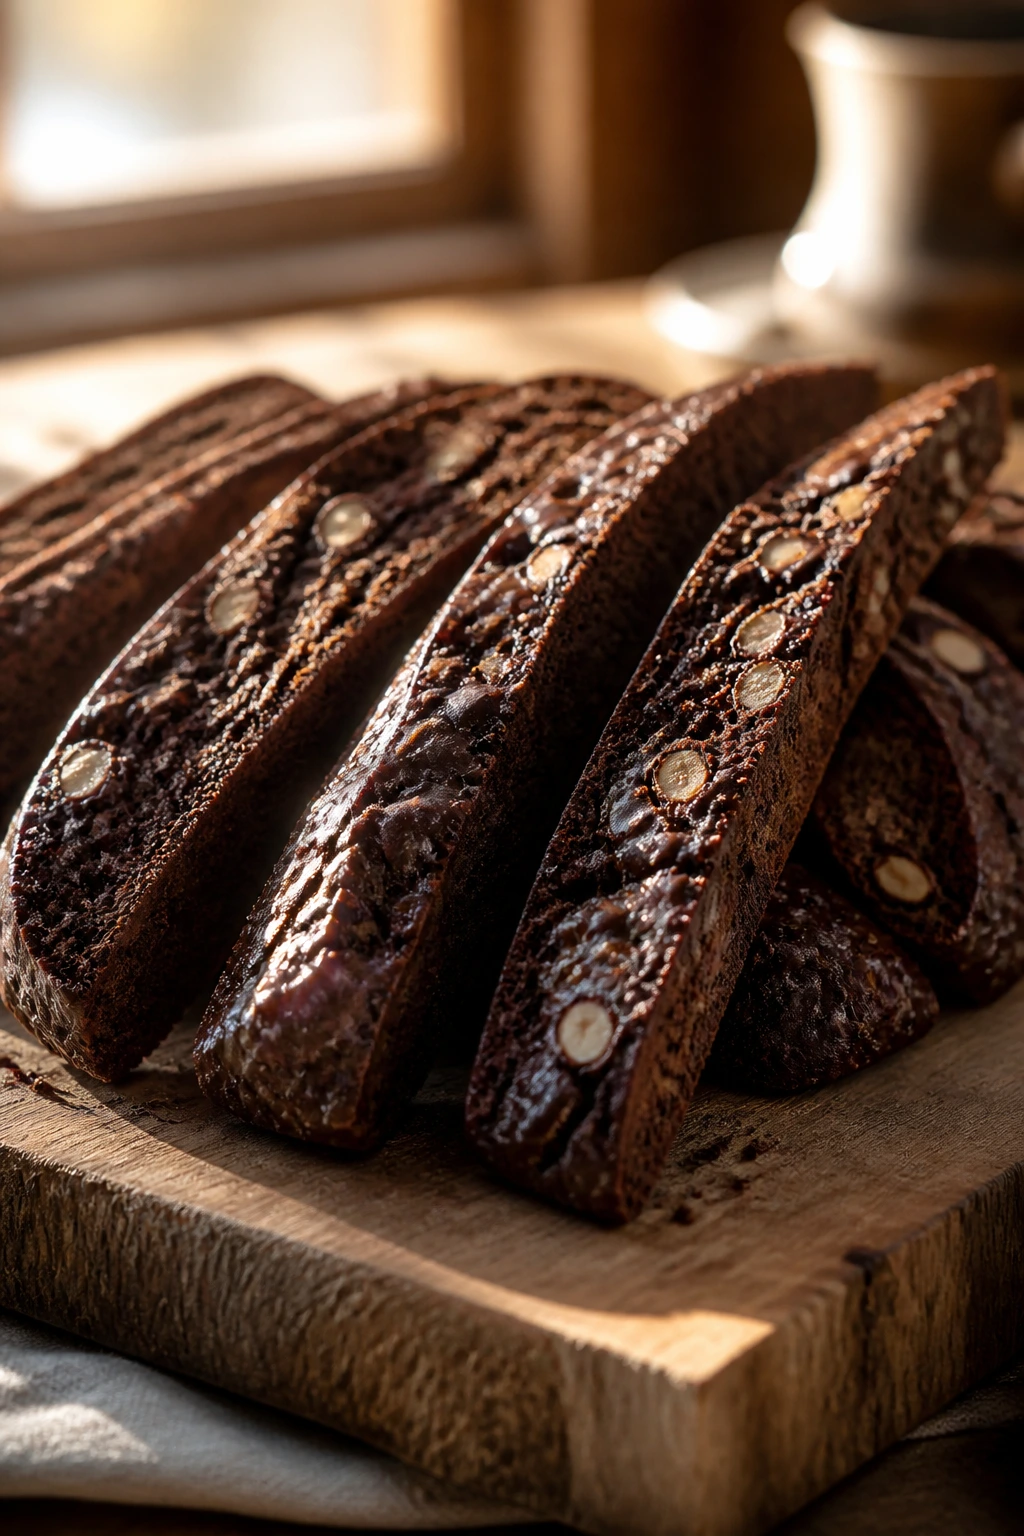
Biscotti are the tea party cookie for people who like to dunk. They’re crisp, twice-baked, and firm enough to stand up to a hot cup without collapsing into sludge. This chocolate version is less austere than the almond-only kind and feels more like a treat than a task.
Why It Works:
The first bake sets the loaf, the second dries it out into that clean snap biscotti needs. Cocoa gives the dough a darker, richer flavor, and a little almond extract keeps the chocolate from tasting flat. If you slice while the loaf is still slightly warm, you get cleaner edges and fewer crumbs.
Key Ingredients:
- 2 cups all-purpose flour
- 1/2 cup unsweetened cocoa powder
- 1 cup granulated sugar
- 1 teaspoon baking powder
- 1/4 teaspoon fine salt
- 2 large eggs
- 1 teaspoon vanilla extract
- 1/2 teaspoon almond extract
- 1/2 cup chopped almonds or walnuts, optional
- 3 ounces melted chocolate, for drizzle
Quick Steps:
- Heat the oven to 350°F and line a baking sheet with parchment.
- Mix the flour, cocoa, sugar, baking powder, and salt.
- Beat in the eggs, vanilla, and almond extract until a thick dough forms.
- Fold in nuts if you’re using them, then shape the dough into a 10-inch log.
- Bake 25 to 28 minutes, until the log feels set and slightly firm.
- Cool for 10 minutes, slice on a diagonal into 1/2-inch pieces, and lay them cut-side down.
- Bake 10 minutes, flip, then bake 8 to 10 minutes more until crisp.
- Cool fully and drizzle with melted chocolate if you like.
Equipment for This Recipe:
- Baking sheet
- Parchment paper
- Sharp serrated knife
- Mixing bowl
- Wire rack
How to Serve This Dish:
Serve biscotti standing in a glass or fanned on a plate. They belong with tea that has enough body to handle repeated dipping. They also make a clean visual break between softer sweets, which is useful on a crowded tray.
Pro Tips for This Recipe:
- Slice while the log is still a little warm; waiting too long makes it crumble.
- Use a serrated knife and a gentle sawing motion.
- If you want a darker flavor, add 1 teaspoon instant espresso powder to the dry ingredients.
Variations on This Dish:
- Orange Chocolate Biscotti: Add orange zest to the dough and skip the almond extract.
- Hazelnut Biscotti: Swap almonds for chopped hazelnuts and drizzle with dark chocolate.
Common Mistakes to Avoid with This Dish:
- Slicing the loaf cold: It shatters at the edges.
- Underbaking the second time: You want dry, crisp edges.
- Making the loaf too flat: Shape it into a thick log so the slices have enough structure.
11. No-Bake Chocolate Oat Cookies

These are a kitchen-counter cookie, not a formal bakery cookie, and I mean that as praise. They set fast, taste like cocoa and peanut butter, and bring a chewy, almost fudge-like texture that people always underestimate until they bite one. They’re useful when the oven is full or the day is already hot.
Why It Works:
Boiling the sugar, butter, milk, and cocoa creates a syrup that firms up as it cools, which is why the cookies set without baking. Oats absorb that mixture and give the cookies body. Peanut butter smooths out the chocolate and helps them hold together better after cooling.
Key Ingredients:
- 2 cups granulated sugar
- 1/2 cup unsalted butter
- 1/2 cup whole milk
- 1/4 cup unsweetened cocoa powder
- 1/2 cup creamy peanut butter
- 3 cups quick oats
- 1 teaspoon vanilla extract
- Pinch of fine salt
Quick Steps:
- Line two trays with parchment.
- Bring the sugar, butter, milk, cocoa, and salt to a full boil in a saucepan.
- Boil for exactly 60 seconds, then remove from the heat.
- Stir in the peanut butter and vanilla until smooth, then fold in the oats.
- Scoop spoonfuls onto the parchment quickly.
- Let them set at room temperature for 20 to 30 minutes before moving them.
Equipment for This Recipe:
- Saucepan
- Wooden spoon
- Parchment paper
- Spoon or cookie scoop
- Mixing bowl, optional for oats
How to Serve This Dish:
These are sweet enough that a small square goes a long way. Stack them in a shallow dish, because they do not love being piled high. A cup of milky tea or a gentler black tea keeps the cocoa from taking over.
Pro Tips for This Recipe:
- Start timing the boil only once the mixture hits a true rolling boil.
- Work fast when you add the oats; the mixture sets quickly.
- Use quick oats, not steel-cut or old-fashioned oats, or the texture gets rough and dry.
Variations on This Dish:
- Coconut No-Bake Cookies: Replace 1 cup of oats with shredded coconut for a sweeter, softer chew.
- Espresso Cocoa Cookies: Add 1 teaspoon instant espresso powder to the syrup for a deeper chocolate note.
Common Mistakes to Avoid with This Dish:
- Boiling too long: The cookies turn dry and crumbly.
- Underboiling: They never set properly.
- Leaving them in a heap on the tray: They stick together into one big mass.
12. Banana Bread Slices
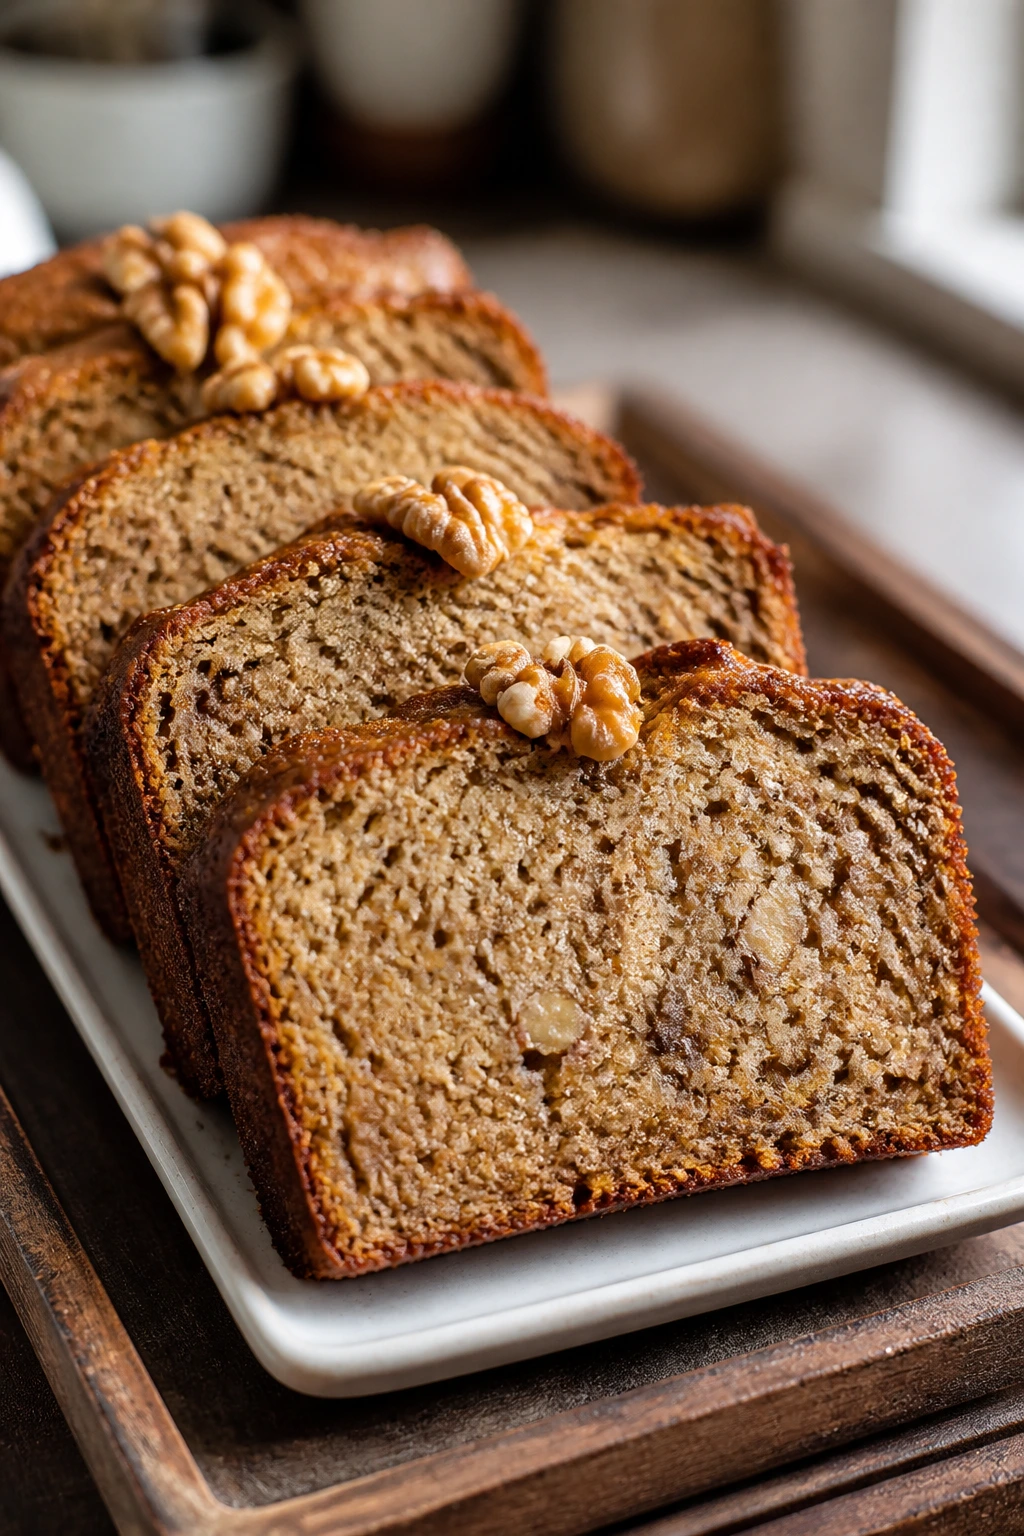
Banana bread deserves a place on a tea tray more often than it gets one. Cut small and served on a narrow plate, it behaves like a cake, but it keeps that mellow banana flavor that feels calm next to tea. I like it with walnuts, though plain slices are fine if your pantry is bare.
Why It Works:
Very ripe bananas bring sweetness and moisture, which means the loaf stays tender without needing much else. Baking soda gives the batter a gentle lift and helps the top crack in that familiar way. The loaf tastes even better after a few hours, once the crumb has settled.
Key Ingredients:
- 3 very ripe bananas, mashed
- 1/2 cup unsalted butter, melted
- 1 cup granulated sugar
- 2 large eggs
- 1 teaspoon vanilla extract
- 2 cups all-purpose flour
- 1 teaspoon baking soda
- 1/2 teaspoon fine salt
- 1 teaspoon ground cinnamon
- 1/2 cup chopped walnuts, optional
Quick Steps:
- Heat the oven to 350°F and grease a loaf pan.
- Whisk the bananas, melted butter, sugar, eggs, and vanilla.
- Stir in the flour, baking soda, salt, and cinnamon until just combined.
- Fold in walnuts if using.
- Bake 55 to 65 minutes, until a toothpick comes out mostly clean and the top springs back lightly.
- Cool in the pan for 10 minutes, then move to a rack and let it finish cooling before slicing.
Equipment for This Recipe:
- Loaf pan
- Mixing bowl
- Fork or masher
- Rubber spatula
- Wire rack
How to Serve This Dish:
Slice it thin and trim the crust if you want a more tea-room look. It pairs well with black tea or chai, since the banana and cinnamon both play nicely with spice. A little butter on the side is optional, but not unreasonable.
Pro Tips for This Recipe:
- Use bananas with black spots and soft skins. Pale bananas won’t do much.
- Don’t overmix after adding the flour.
- If the top browns too fast, tent loosely with foil for the last 15 minutes.
Variations on This Dish:
- Chocolate Chip Banana Bread: Fold in 3/4 cup chocolate chips for a sweeter slice.
- Banana Walnut Tea Loaf: Add a pinch of nutmeg and toast the walnuts first for a deeper flavor.
Common Mistakes to Avoid with This Dish:
- Under-ripe bananas: The loaf tastes flat and needs extra sugar.
- Cutting too early: Warm banana bread squashes under the knife.
- Overbaking: Dry banana bread feels sandy instead of soft.
13. Honey Tea Cake
This loaf has one of the nicest aromas on the list. Honey, vanilla, and a little brewed tea make the kitchen smell soft and toasty, and the crumb comes out pale, moist, and almost satin-like. It’s the kind of slice that feels made for a small plate and a slow pour.
Why It Works:
Honey keeps the cake moist longer than plain sugar alone, and brewed black tea adds a faint tannic note that keeps the sweetness from turning heavy. The flavor is subtle, which is a strength here. It tastes like cake that knows it’s being served with tea and politely stays in its lane.
Key Ingredients:
- 1 1/2 cups all-purpose flour
- 1 teaspoon baking powder
- 1/2 teaspoon baking soda
- 1/2 teaspoon fine salt
- 1/2 cup unsalted butter, softened
- 1/2 cup granulated sugar
- 1/2 cup honey
- 2 large eggs
- 1/2 cup strongly brewed black tea, cooled
- 1 teaspoon vanilla extract
- 1 teaspoon lemon zest, optional
Quick Steps:
- Heat the oven to 350°F and grease a loaf pan.
- Whisk the flour, baking powder, baking soda, and salt.
- Cream the butter, sugar, and honey until light, then beat in the eggs one at a time.
- Stir in the tea, vanilla, and lemon zest if using.
- Add the dry ingredients and mix only until the batter is smooth.
- Bake 45 to 55 minutes, until the top is golden and a toothpick comes out clean.
- Cool in the pan for 10 minutes, then turn out and cool fully.
Equipment for This Recipe:
- Loaf pan
- Mixing bowls
- Hand mixer
- Whisk
- Wire rack
How to Serve This Dish:
Slice it thin and serve it plain, or brush the cut sides with a little honey if you want extra shine. It goes well with strong breakfast tea, but it also makes sense beside chamomile if you want the honey to lead. Keep the slices small; this cake is richer than it looks.
Pro Tips for This Recipe:
- Brew the tea strong and let it cool before adding it.
- Measure honey with a lightly oiled spoon so it slides out cleanly.
- If your honey is very dark, the cake will taste deeper and less floral.
Variations on This Dish:
- Orange Honey Cake: Replace the lemon zest with orange zest for a rounder aroma.
- Spiced Honey Cake: Add 1/2 teaspoon cinnamon and a pinch of ginger.
Common Mistakes to Avoid with This Dish:
- Hot tea in the batter: It can melt the butter and make the crumb greasy.
- Too much flour: The loaf turns dry fast.
- Overbaking: Honey cakes can look done before they really are.
14. Apricot Almond Bars
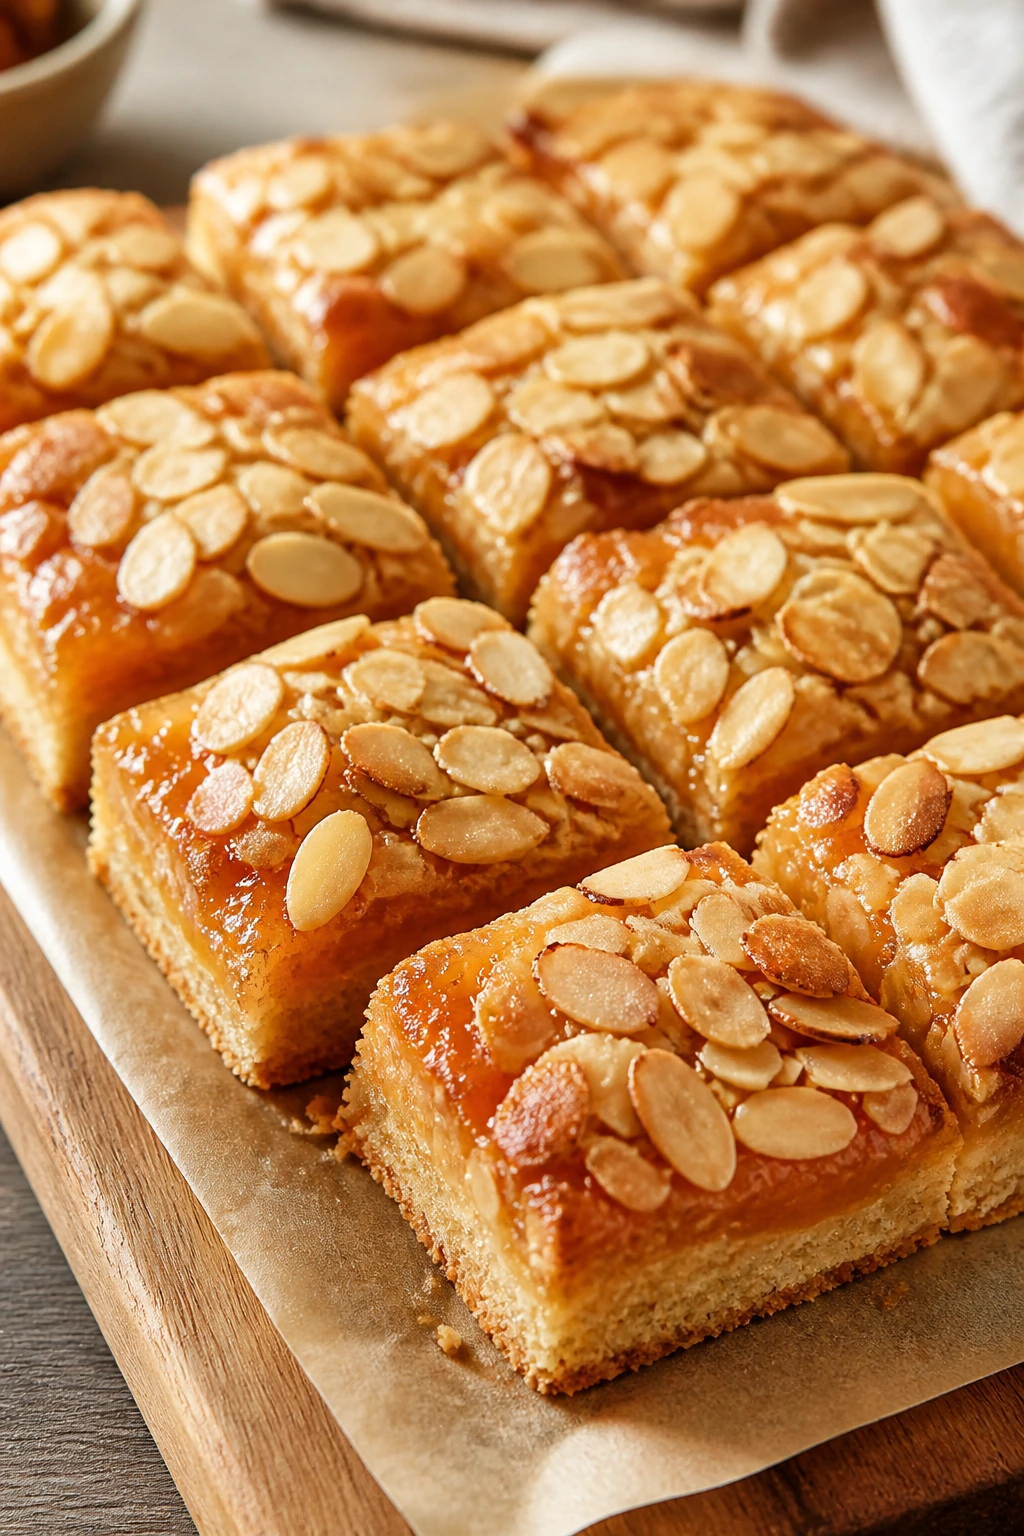
These bars feel a little dressier than jam bars without asking for much more effort. The oats and butter make a crumb that tastes toasted, while apricot preserves add a tart, amber sweetness that feels sharp enough to keep the bars lively. Sliced almonds on top give them a gentle crackle.
Why It Works:
Preserves spread easily and stay bright after baking, which makes them a smart pantry filling. Oats in the crust and topping keep the texture from becoming too soft. Almond and apricot are old friends; the pairing tastes calm and familiar rather than flashy.
Key Ingredients:
- 1 1/2 cups all-purpose flour
- 1 cup rolled oats
- 3/4 cup brown sugar
- 1/2 teaspoon baking powder
- 1/2 teaspoon fine salt
- 1 cup unsalted butter, melted
- 1 teaspoon vanilla extract
- 1 cup apricot preserves
- 1/2 cup sliced almonds
- 1 tablespoon lemon juice
Quick Steps:
- Heat the oven to 350°F and line an 8×8-inch pan with parchment.
- Stir the flour, oats, brown sugar, baking powder, and salt together.
- Mix in the melted butter and vanilla until the crumbs look evenly damp.
- Press half the mixture into the pan.
- Stir the preserves with lemon juice, spread them over the crust, and scatter almonds on top.
- Sprinkle the remaining crumb mixture over the surface and press lightly.
- Bake 30 to 35 minutes, until the top is golden and the filling bubbles at the edges.
- Cool fully before slicing.
Equipment for This Recipe:
- 8×8-inch pan
- Parchment paper
- Mixing bowl
- Spoon or spatula
- Cooling rack
How to Serve This Dish:
These cut into neat squares if they cool long enough, which is half the battle. They’re good with tea that has a little malt or smoke, because the apricot keeps the sweetness from feeling one-note. A tiny dusting of powdered sugar can make them look finished, but I often leave them plain.
Pro Tips for This Recipe:
- Warm preserves spread more evenly than cold ones.
- Press the bottom crust firmly so it does not crumble when sliced.
- Use a sharp knife and wipe it between cuts for clean edges.
Variations on This Dish:
- Raspberry Almond Bars: Swap apricot preserves for raspberry jam if you want a brighter, more tart bar.
- Cherry Almond Bars: Use cherry preserves and add a pinch of almond extract to the crumb.
Common Mistakes to Avoid with This Dish:
- Thin filling layer: If you skimp on the preserves, the bars taste dry.
- Cutting while warm: They fall apart before the crumb sets.
- Burning the almonds: If your oven runs hot, tent loosely with foil near the end.
15. Molasses Spice Cookies
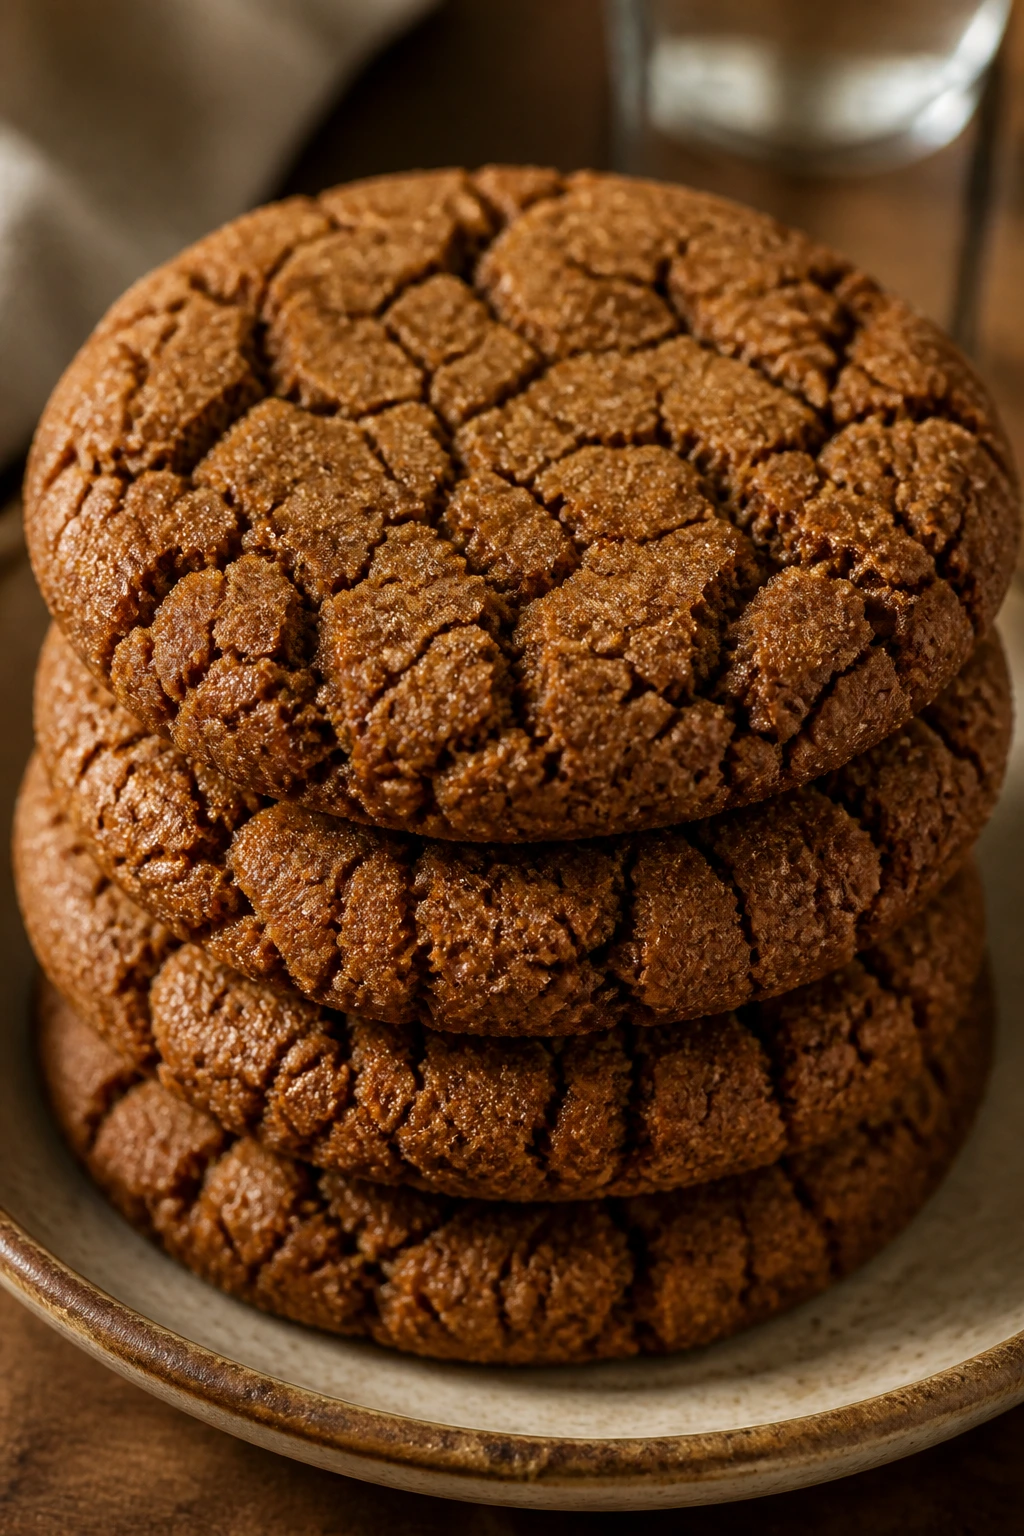
These are the dark, fragrant cookies that make a tea tray smell like a good bakery before anyone even sits down. They’re chewy in the middle, crackly at the edges, and full of ginger, cinnamon, and clove. Molasses gives them depth that plain brown sugar never can.
Why It Works:
Molasses keeps the dough moist and gives the cookies their deep color and soft chew. The spices bloom in the oven, and the sugar coating creates a crisp shell that breaks just before the center. These cookies taste better after they’ve cooled, which makes them easy to bake ahead.
Key Ingredients:
- 2 1/4 cups all-purpose flour
- 2 teaspoons ground ginger
- 1 teaspoon ground cinnamon
- 1/2 teaspoon ground cloves
- 2 teaspoons baking soda
- 1/2 teaspoon fine salt
- 3/4 cup unsalted butter, softened
- 1 cup brown sugar
- 1/2 cup molasses
- 1 large egg
- 1/3 cup granulated sugar, for rolling
Quick Steps:
- Heat the oven to 350°F and line baking sheets with parchment.
- Whisk the flour, ginger, cinnamon, cloves, baking soda, and salt.
- Beat the butter and brown sugar until fluffy, then add molasses and the egg.
- Stir in the dry ingredients until a soft dough forms.
- Chill for 20 minutes, then roll into balls and coat in granulated sugar.
- Bake 10 to 12 minutes, until the tops crack and the centers look set but still soft.
- Cool on the tray for 5 minutes before moving them.
Equipment for This Recipe:
- Mixing bowl
- Baking sheets
- Parchment paper
- Cookie scoop
- Cooling rack
How to Serve This Dish:
These belong with strong tea and a little distance from your lightest desserts. They’re bold, and that’s the point. I like them on the edge of the tray with a few lemon bars nearby so the sharp citrus can cut through the spice.
Pro Tips for This Recipe:
- Chill the dough; molasses cookies spread more than people expect.
- Roll them generously in sugar so the tops crack attractively.
- Use dark molasses for a deeper flavor, not blackstrap, which can turn bitter fast.
Variations on This Dish:
- Orange Spice Cookies: Add 1 teaspoon orange zest to the dough for a brighter top note.
- Ginger-Heavy Version: Increase the ginger to 3 teaspoons if you want a sharper bite.
Common Mistakes to Avoid with This Dish:
- Overbaking: They should stay a little soft in the center.
- Using too little spice: Molasses needs strong seasoning or it tastes flat.
- Skipping the chill: Warm dough spreads and loses its crackle.
16. Vanilla Pudding Cups with Cookie Crumbs
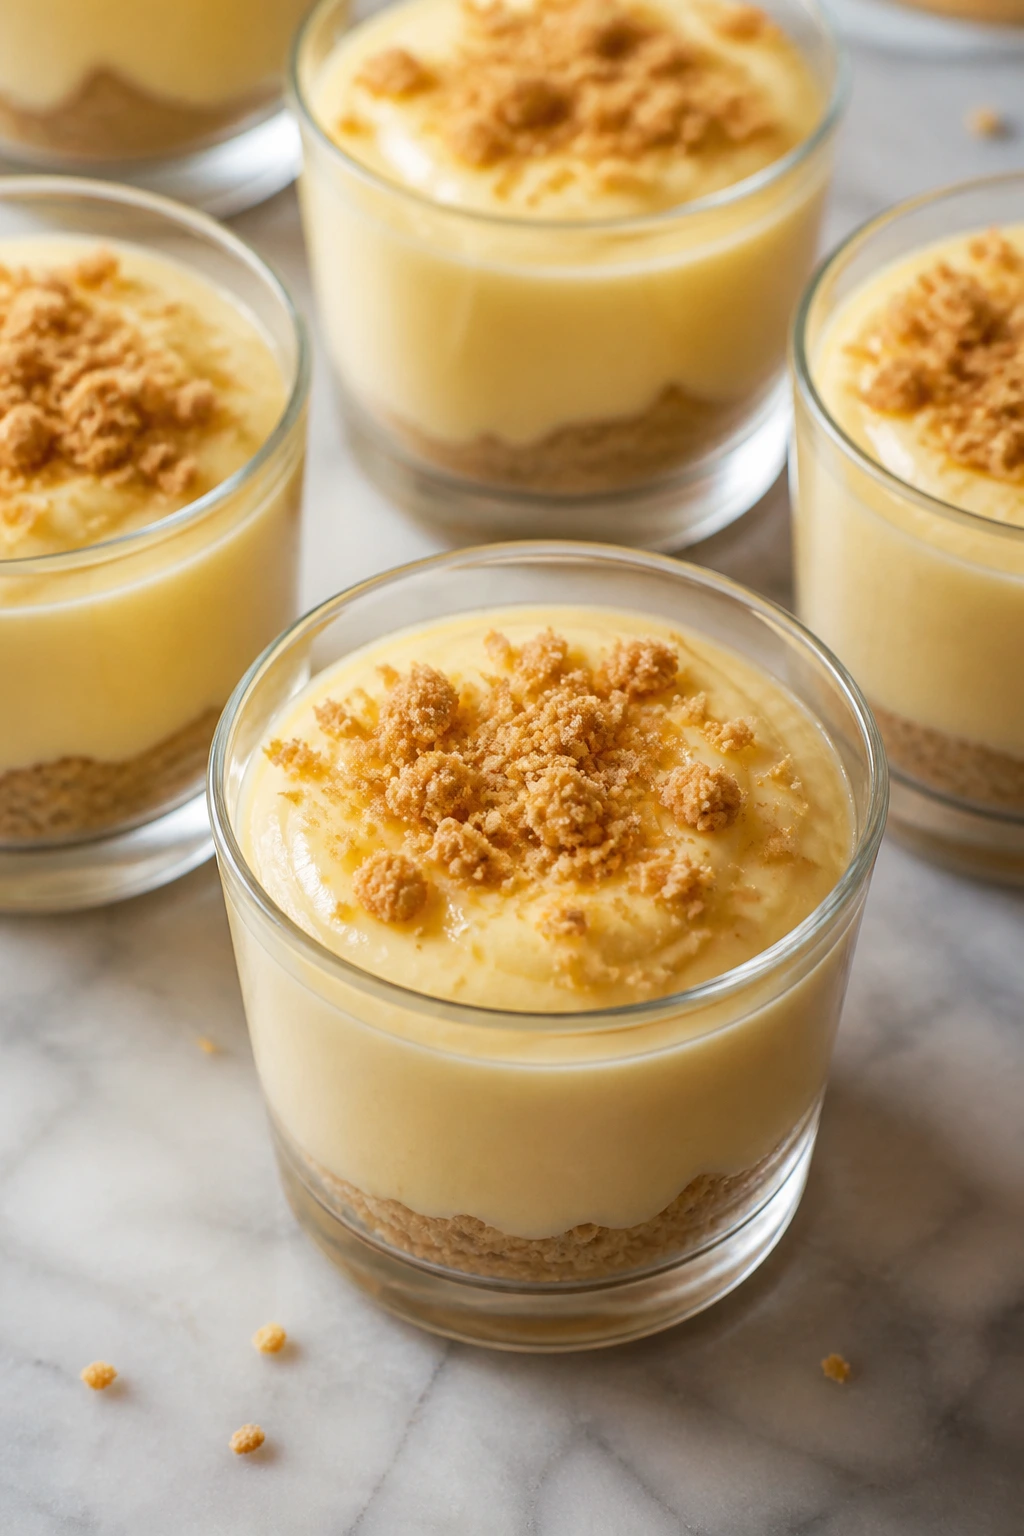
Sometimes the tea table needs a spoon dessert, and this one does the job without asking for anything fancy. The pudding is silky and plain in the best way, with a buttery crumb underneath that tastes a little like pie crust without the rolling. It’s the quiet dessert on the tray, and it often disappears first.
Why It Works:
Cornstarch thickens the milk into a clean custard without eggs scrambling in the pot if you whisk carefully. Cookie crumbs give you texture and make the pudding feel composed rather than loose. If you chill the cups long enough, the surface turns smooth and the spoon goes in with a neat little drag.
Key Ingredients:
- 2 1/2 cups whole milk
- 1/2 cup granulated sugar
- 3 tablespoons cornstarch
- 3 large egg yolks
- 1 tablespoon unsalted butter
- 2 teaspoons vanilla extract
- Pinch of fine salt
- 1 1/2 cups crushed graham crackers or vanilla wafers
- 3 tablespoons melted butter
- 1 tablespoon sugar
Quick Steps:
- Stir the crushed cookies with melted butter and sugar, then spoon into small cups.
- Whisk the milk, sugar, cornstarch, egg yolks, and salt in a saucepan.
- Cook over medium heat, whisking constantly, until the mixture thickens and bubbles lazily, about 6 to 8 minutes.
- Keep whisking for 30 seconds more, then remove from the heat and stir in butter and vanilla.
- Pour over the crumbs, press plastic wrap directly onto the pudding surface, and chill for 2 hours.
- Serve cold.
Equipment for This Recipe:
- Small saucepan
- Whisk
- Measuring cups
- Small cups or ramekins
- Plastic wrap
How to Serve This Dish:
Use clear cups if you want the crumb layer to show, because the contrast looks tidy. Add a single cookie on the side or a few berries if the pantry happens to cooperate. These pair well with lighter teas, since the pudding is gentle and can get lost beside a heavy cup.
Pro Tips for This Recipe:
- Whisk constantly while the pudding cooks or the bottom will scorch.
- Press wrap directly on the surface to stop a skin from forming.
- If the pudding gets too thick, whisk in a tablespoon or two of milk while it’s still warm.
Variations on This Dish:
- Chocolate Pudding Cups: Replace 2 tablespoons cornstarch with 1/4 cup cocoa for a richer version.
- Lemon Pudding Cups: Add 1 teaspoon lemon zest and swap vanilla wafers for shortbread crumbs.
Common Mistakes to Avoid with This Dish:
- Stopping the whisk: Pudding can turn lumpy fast.
- Skipping the chill: It needs time to set or it stays loose.
- Overcooking the custard: The texture turns gluey instead of silky.
17. Cocoa Brownies Cut Small
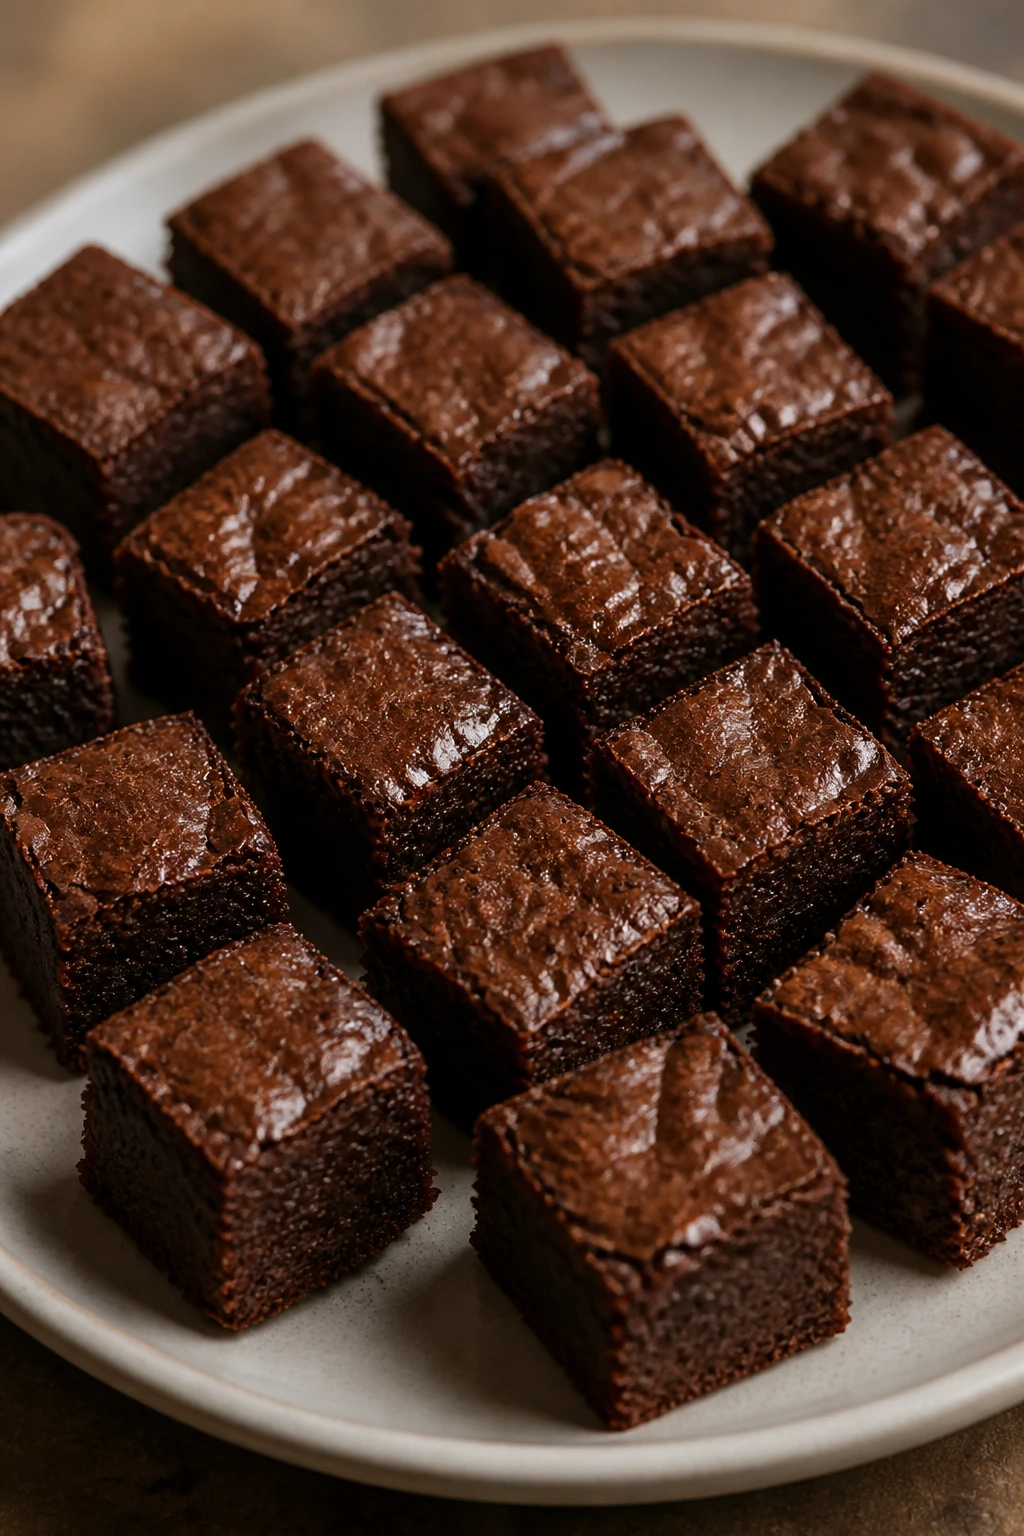
Brownies are not the daintiest tea dessert, and that is exactly why they work when you cut them properly. Small squares give you a dense, chocolatey bite that sits comfortably beside more delicate cookies and bars. These are fudgy enough to feel like a treat, but not so rich that one square knocks out the rest of the tray.
Why It Works:
Cocoa provides deep flavor without making the batter heavy, and the butter-and-sugar base keeps the crumb moist. Eggs give the brownies structure, and a short bake leaves the center soft instead of cakey. I prefer brownies for tea when they’re cut into postage-stamp squares; anything larger starts to feel like lunch.
Key Ingredients:
- 1 cup unsalted butter
- 2 cups granulated sugar
- 4 large eggs
- 1 teaspoon vanilla extract
- 1 cup all-purpose flour
- 3/4 cup unsweetened cocoa powder
- 1/2 teaspoon fine salt
- 1/2 teaspoon baking powder
- 1 cup chocolate chips, optional
Quick Steps:
- Heat the oven to 350°F and line an 8×8-inch pan with parchment.
- Melt the butter and stir in the sugar.
- Whisk in the eggs one at a time, then add the vanilla.
- Fold in the flour, cocoa, salt, and baking powder just until combined.
- Stir in chocolate chips if using, then spread the batter into the pan.
- Bake 24 to 28 minutes, until the center is set but still soft when pressed lightly.
- Cool completely before cutting into small squares.
Equipment for This Recipe:
- 8×8-inch pan
- Parchment paper
- Mixing bowl
- Whisk
- Offset spatula or knife
How to Serve This Dish:
Cut them smaller than you think you should. Brownies are dense, and tea service works better with two-bite portions. A pinch of flaky salt on top can sharpen the chocolate, but plain brownies are fine if you want the table calmer.
Pro Tips for This Recipe:
- Line the pan so you can lift the whole slab out for clean cutting.
- Pull them early if you want fudgy centers.
- Chill before slicing for the sharpest edges.
Variations on This Dish:
- Walnut Brownies: Fold in 3/4 cup chopped walnuts for crunch.
- Mocha Brownies: Add 1 teaspoon instant espresso powder to the melted butter.
Common Mistakes to Avoid with This Dish:
- Overbaking: Dry brownies turn chalky fast.
- Cutting warm brownies: The edges crumble and the center smears.
- Using too much flour: The texture turns cake-like instead of fudgy.
18. Peanut Butter Fudge Squares

This is the kind of dessert that disappears from a tray when people think they’re “just having a small piece.” Peanut butter fudge is soft, sweet, and slightly salty, with a melt that sits somewhere between candy and frosting. It’s not elegant in a fragile way, but it is elegant in a square, tidy, no-mess way.
Why It Works:
Powdered sugar firms the fudge without cooking it, which makes it fast and dependable. Butter and peanut butter carry the flavor, and a little salt keeps the sweetness from sticking to your tongue. Because it sets in the fridge, you can make it early and slice it into neat squares when you’re ready.
Key Ingredients:
- 1/2 cup unsalted butter
- 1 cup creamy peanut butter
- 1 teaspoon vanilla extract
- 1/4 teaspoon fine salt
- 3 cups powdered sugar
Quick Steps:
- Line an 8×8-inch pan with parchment.
- Melt the butter and peanut butter together in a saucepan over low heat.
- Stir in the vanilla and salt.
- Remove from the heat and mix in the powdered sugar until the mixture looks thick and smooth.
- Press the fudge into the pan and smooth the top.
- Chill for 1 hour, then lift out and cut into small squares.
Equipment for This Recipe:
- Small saucepan
- Mixing bowl
- Parchment-lined pan
- Rubber spatula
- Sharp knife
How to Serve This Dish:
Serve tiny squares. Really tiny. This is rich candy, not a cake slice. It pairs best with plain tea or something brisk, because the peanut butter needs a clean sip afterward.
Pro Tips for This Recipe:
- Sift the powdered sugar if it looks clumpy.
- Press the fudge into the pan firmly so it doesn’t crumble at the cut edge.
- Let it chill fully before slicing or the pieces smear.
Variations on This Dish:
- Chocolate Swirl Fudge: Stir 2 tablespoons cocoa into half the mixture and marble it before chilling.
- Crunchy Peanut Fudge: Fold in 1/2 cup chopped roasted peanuts.
Common Mistakes to Avoid with This Dish:
- Adding the sugar to a mixture that’s too hot: It can go grainy.
- Skipping the parchment: Fudge sticks like glue.
- Serving large squares: The richness hits hard when the portions are too big.
19. Jam Crumble Bars
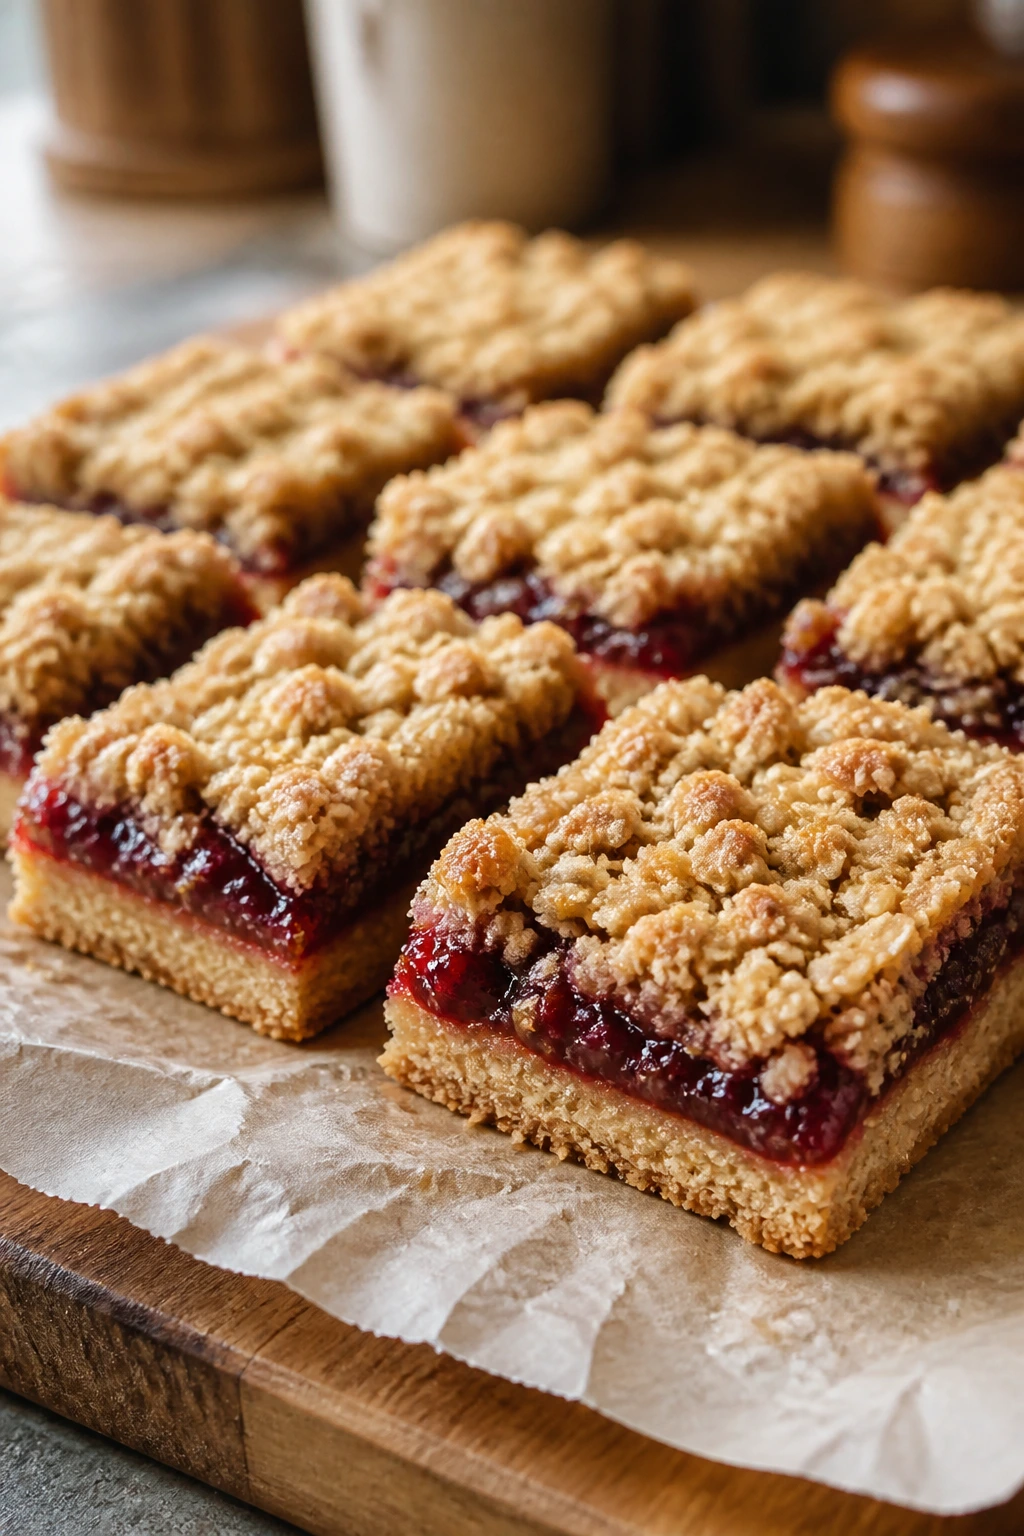
Jam crumble bars are the pantry dessert I make when I need something unfussy that still looks baked with intent. The base is buttery and oat-heavy, the center is sweet and glossy, and the top turns into a crumbly lid that slices cleanly once cooled. They taste like a cross between a cookie and a pie bar, which is a very useful place to be.
Why It Works:
Oats make the crumb sturdy, so the bars don’t collapse the second you pick them up. Jam brings fruit without any chopping, peeling, or simmering. A little lemon juice keeps the flavor bright, especially if the jam is very sweet.
Key Ingredients:
- 1 1/2 cups all-purpose flour
- 1 cup rolled oats
- 3/4 cup brown sugar
- 1/2 teaspoon baking soda
- 1/2 teaspoon fine salt
- 1 cup unsalted butter, melted
- 1 teaspoon vanilla extract
- 1 cup strawberry or cherry jam
- 1 tablespoon lemon juice
Quick Steps:
- Heat the oven to 350°F and line an 8×8-inch pan with parchment.
- Stir the flour, oats, brown sugar, baking soda, and salt together.
- Mix in the melted butter and vanilla until the crumbs are evenly damp.
- Press two-thirds of the mixture into the pan.
- Stir the jam with lemon juice, spread it over the crust, and scatter the remaining crumbs on top.
- Bake 30 to 34 minutes, until the top is golden and the jam bubbles at the edges.
- Cool fully before slicing.
Equipment for This Recipe:
- 8×8-inch pan
- Parchment paper
- Mixing bowl
- Spoon or spatula
- Cooling rack
How to Serve This Dish:
Cut them into slim bars or small squares for a tea tray. They’re good at room temperature and travel well, which makes them a practical favorite. The red jam layer gives the tray one bright color without requiring fresh fruit.
Pro Tips for This Recipe:
- Stir the jam with lemon juice before spreading it so the flavor tastes less sticky-sweet.
- Press the base firmly and keep the top crumb loose for better texture.
- Let the bars cool all the way or the jam layer slides around.
Variations on This Dish:
- Blueberry Jam Bars: Use blueberry jam and add a pinch of cinnamon to the crumb.
- Mixed Berry Bars: Combine two jam flavors for a layered look without more work.
Common Mistakes to Avoid with This Dish:
- Too much jam: The bars can’t hold it and leak everywhere.
- Removing them too early: They need cooling time to set.
- Using instant oats: They make the crumb pasty instead of nubby.
20. Meringue Kisses
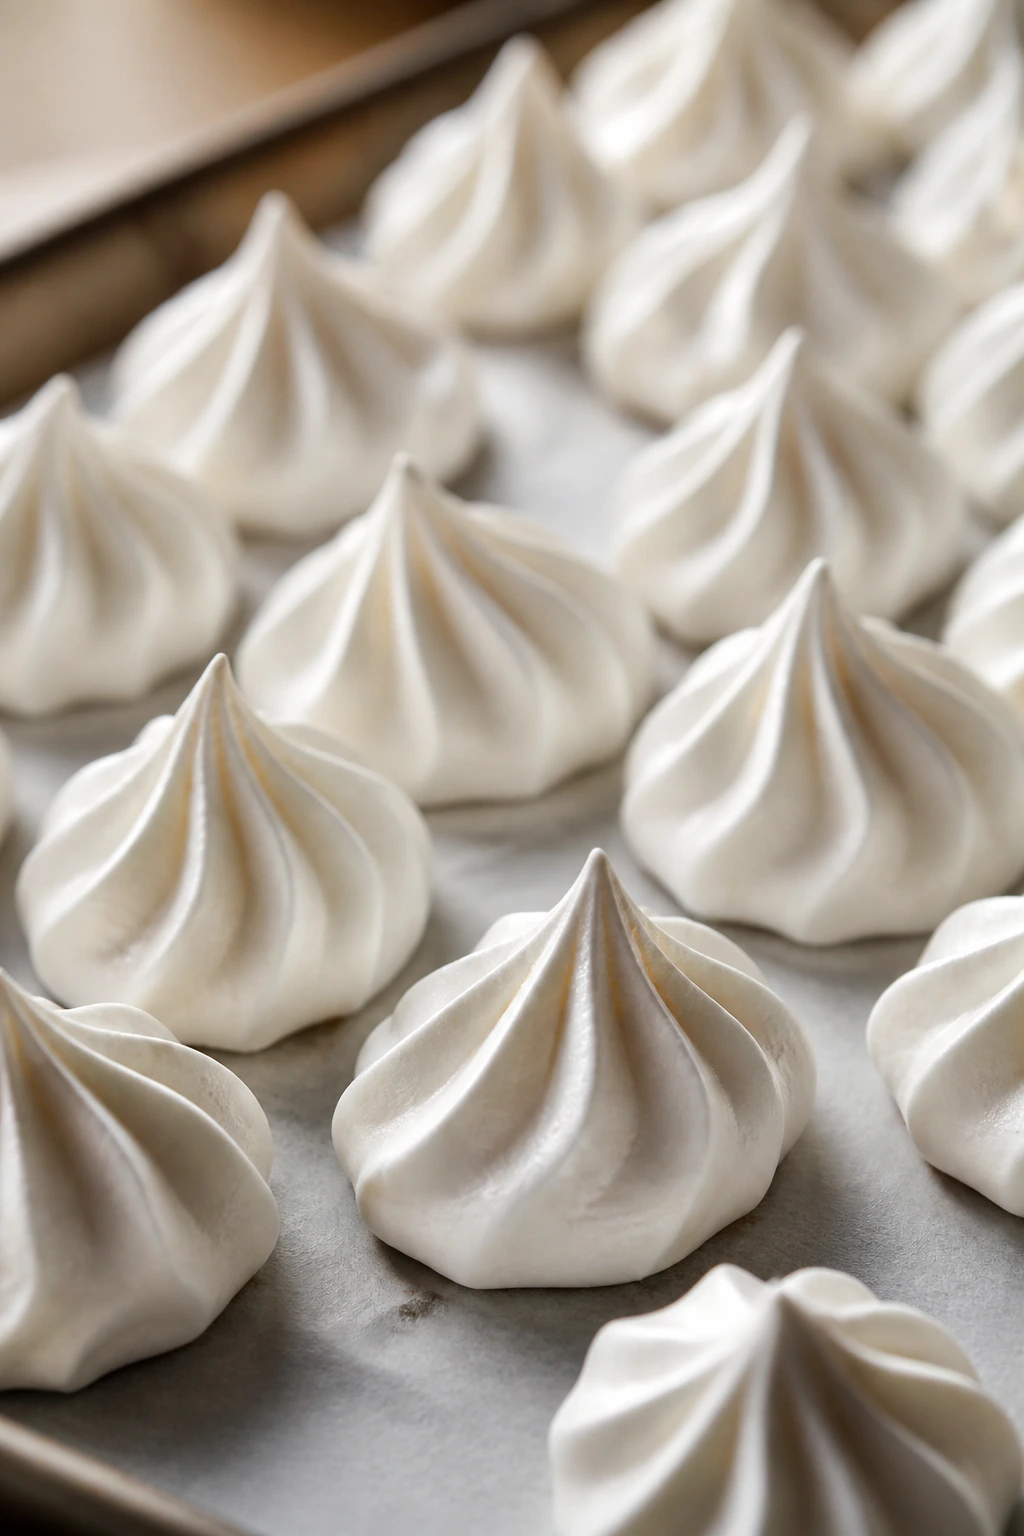
Meringue kisses are the lightest thing on the tray and maybe the most deceptive. They look like air and sugar, then crunch and dissolve on the tongue with a faint vanilla note. If you want a dessert that brings lift to a heavy spread, these do it without needing flour or butter.
Why It Works:
Egg whites and sugar turn into a stable foam when whipped long enough, and a touch of acid helps that foam hold. Slow baking dries the meringues instead of browning them, which gives you the crisp shell and slightly marshmallow-like center people expect. They are fragile, but not difficult once you understand that they need dryness more than heat.
Key Ingredients:
- 4 large egg whites
- 1 cup granulated sugar
- 1/4 teaspoon cream of tartar or 1 teaspoon lemon juice
- 1 teaspoon vanilla extract
- Pinch of fine salt
Quick Steps:
- Heat the oven to 225°F and line a baking sheet with parchment.
- Beat the egg whites with the salt and cream of tartar until foamy.
- Add the sugar slowly, a spoonful at a time, and beat until the mixture is glossy and stiff.
- Beat in the vanilla.
- Pipe or spoon small kisses onto the tray.
- Bake 60 to 75 minutes, then turn off the oven and leave them inside for 30 minutes more.
- Cool fully before moving.
Equipment for This Recipe:
- Stand mixer or hand mixer
- Mixing bowl
- Baking sheet
- Parchment paper
- Piping bag, optional
How to Serve This Dish:
Pile them in a shallow bowl or scatter them around a larger dessert tray as edible decoration. They work best with tea that does not need sugar added, since the meringues bring plenty of sweetness already. If humidity is high, serve them the same day.
Pro Tips for This Recipe:
- Make sure the bowl and beaters are spotless and grease-free.
- Add the sugar slowly so the meringue stays smooth instead of grainy.
- Leave them in the turned-off oven to dry fully.
Variations on This Dish:
- Cocoa Meringues: Fold in 1 tablespoon cocoa with a light hand for a striped finish.
- Lemon Meringues: Add 1/2 teaspoon lemon zest for a brighter flavor.
Common Mistakes to Avoid with This Dish:
- Baking at too high a temperature: The shells brown and crack badly.
- Opening the oven too soon: A sudden temperature drop can make them collapse.
- Storing them in a humid kitchen: They soften fast.
21. Almond Biscotti with Chocolate Drizzle
These are the biscotti I’d put beside the strongest pot of tea on the table. They snap cleanly, smell like toasted almonds, and look finished with a thin drizzle of chocolate that dries into fine lines. They’re sturdier and less sweet than cookies, which is part of their charm.
Why It Works:
Almond extract gives the dough a clear, distinct flavor that survives the two-bake process. The dough bakes into a loaf first, then gets sliced and dried, which is what produces the hard, dunkable texture. Chocolate on top adds a little softness and visual contrast without making the biscotti fragile.
Key Ingredients:
- 2 cups all-purpose flour
- 3/4 cup granulated sugar
- 1 teaspoon baking powder
- 1/4 teaspoon fine salt
- 2 large eggs
- 1 teaspoon vanilla extract
- 1/2 teaspoon almond extract
- 3/4 cup chopped almonds
- 3 ounces melted chocolate
Quick Steps:
- Heat the oven to 350°F and line a baking sheet with parchment.
- Whisk the flour, sugar, baking powder, and salt.
- Beat in the eggs, vanilla, and almond extract until a stiff dough forms.
- Fold in the almonds and shape the dough into a long log.
- Bake 25 to 30 minutes, until lightly golden and set.
- Cool for 10 minutes, slice diagonally, and lay the pieces cut-side down.
- Bake 10 minutes, flip, then bake 8 to 10 minutes more until crisp.
- Cool and drizzle with melted chocolate.
Equipment for This Recipe:
- Baking sheet
- Parchment paper
- Serrated knife
- Mixing bowl
- Spoon or offset spatula
How to Serve This Dish:
Stand them in a cup or lean them against a small dessert bowl. They look neat, and they travel well in a tin. Serve with tea that can handle a dunk, not with something so delicate that it gets lost.
Pro Tips for This Recipe:
- Slice while the loaf is still warm enough to give a little.
- Use a serrated knife and a gentle sawing motion.
- Cool fully before drizzling the chocolate or it won’t set cleanly.
Variations on This Dish:
- Cranberry Almond Biscotti: Fold in 1/2 cup dried cranberries before the first bake.
- Chocolate Chip Biscotti: Add 1/2 cup mini chocolate chips for a sweeter version.
Common Mistakes to Avoid with This Dish:
- Trying to slice the loaf cold: It shatters.
- Skipping the second bake: Then it’s just sliced cake.
- Making the log too thin: The biscotti end up fragile instead of crisp.
22. Simple Jam Swirl Loaf Cake
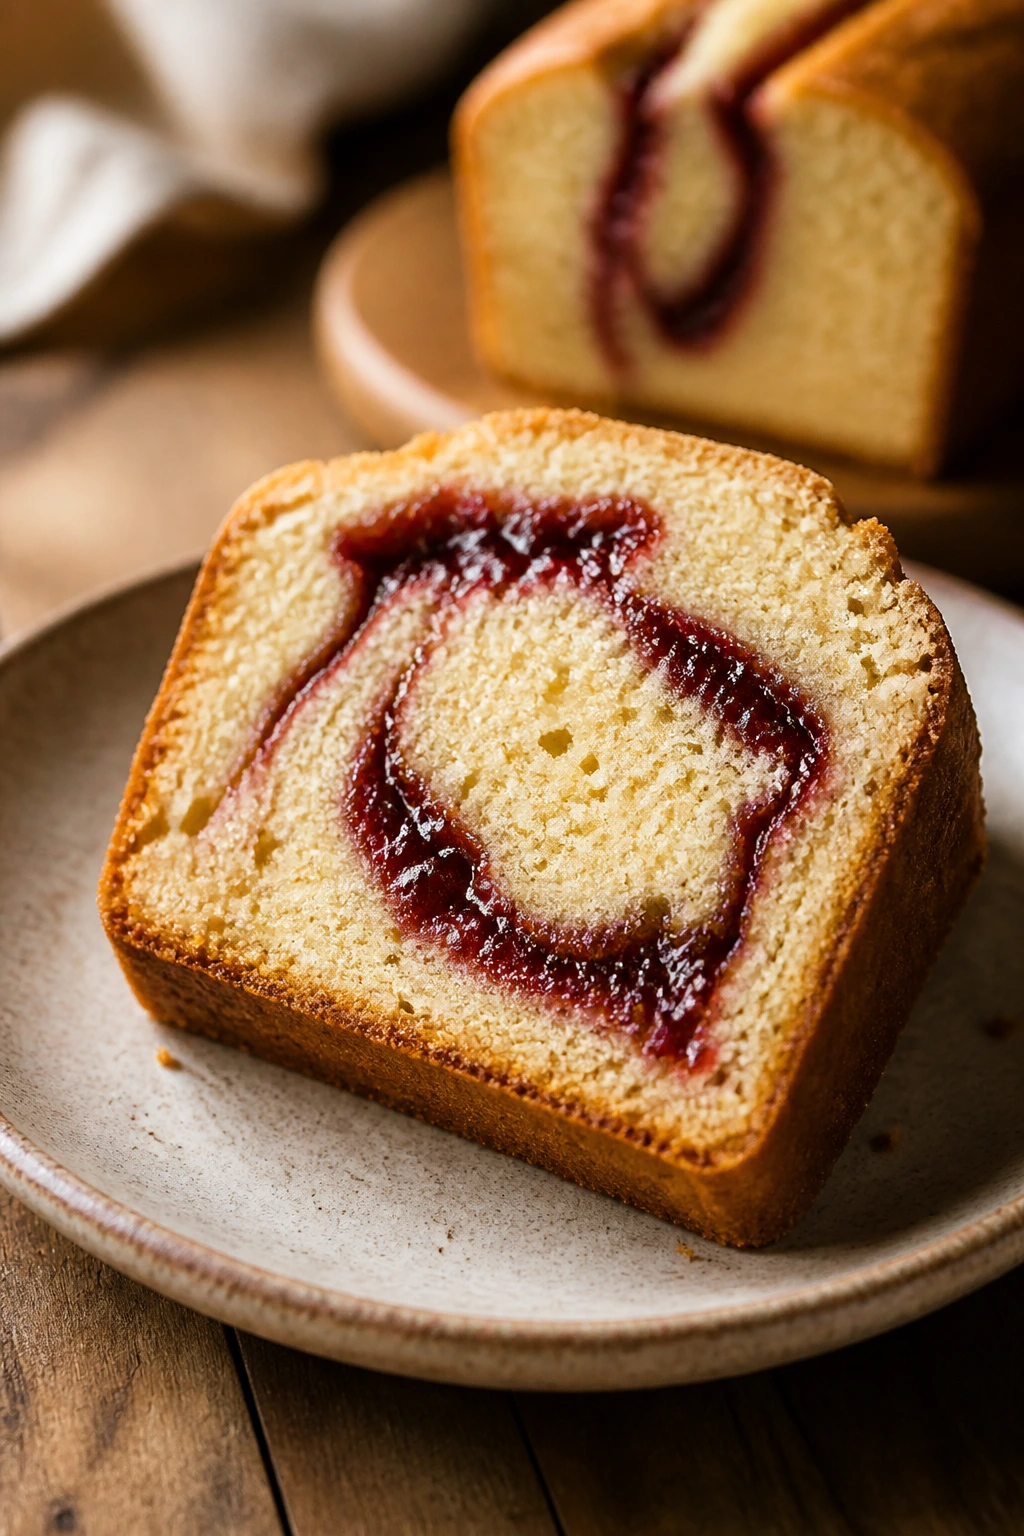
This is the kind of loaf cake that looks unassuming in the pan and then slices into something prettier than expected. The jam runs through the crumb in ribbons, the top browns gently, and every slice gets a little burst of fruit without needing frosting. It belongs on a tea table because it can be cut thin and still feel complete.
Why It Works:
A plain butter loaf gives you a reliable structure, and the jam introduces color and sweetness without making the batter wet from top to bottom. Swirling only part of the jam through the batter keeps the pattern visible and stops the loaf from turning dense. It’s a clever use of pantry jam that doesn’t feel like a compromise.
Key Ingredients:
- 1 1/2 cups all-purpose flour
- 1 teaspoon baking powder
- 1/2 teaspoon baking soda
- 1/2 teaspoon fine salt
- 1/2 cup unsalted butter, softened
- 3/4 cup granulated sugar
- 2 large eggs
- 1/2 cup whole milk
- 1 teaspoon vanilla extract
- 3/4 cup jam, any smooth flavor
- 1 tablespoon flour, for swirling the jam
Quick Steps:
- Heat the oven to 350°F and grease a loaf pan.
- Whisk the flour, baking powder, baking soda, and salt.
- Cream the butter and sugar, then beat in the eggs one at a time.
- Mix in the milk and vanilla, then add the dry ingredients just until combined.
- Spread half the batter in the pan, dollop over half the jam mixed with the flour, then repeat with the remaining batter and jam.
- Swirl once or twice with a knife.
- Bake 45 to 55 minutes, until the top is golden and a toothpick comes out clean from the cake part.
- Cool before slicing.
Equipment for This Recipe:
- Loaf pan
- Mixing bowls
- Hand mixer
- Knife for swirling
- Wire rack
How to Serve This Dish:
Slice it thin and let the jam stripe show. It needs little else, though a light glaze or a dusting of sugar will make it feel a touch dressier. It pairs well with tea that has a fruit note or a mild black tea with milk.
Pro Tips for This Recipe:
- Use a thick jam so it doesn’t sink to the bottom.
- Swirl lightly; too much knife work muddles the pattern.
- Wait until fully cool before slicing or the jam layer drags through the crumb.
Variations on This Dish:
- Raspberry Swirl Loaf: Use raspberry jam for a sharper, more vivid slice.
- Orange Jam Loaf: Swap in orange marmalade for a bitter-sweet edge.
Common Mistakes to Avoid with This Dish:
- Using runny jam: It pools at the bottom.
- Over-swirling: The cake loses its marbled look.
- Cutting warm slices: The crumb tears around the jam pockets.
Why Pantry Staples Make Tea Party Desserts Feel Generous
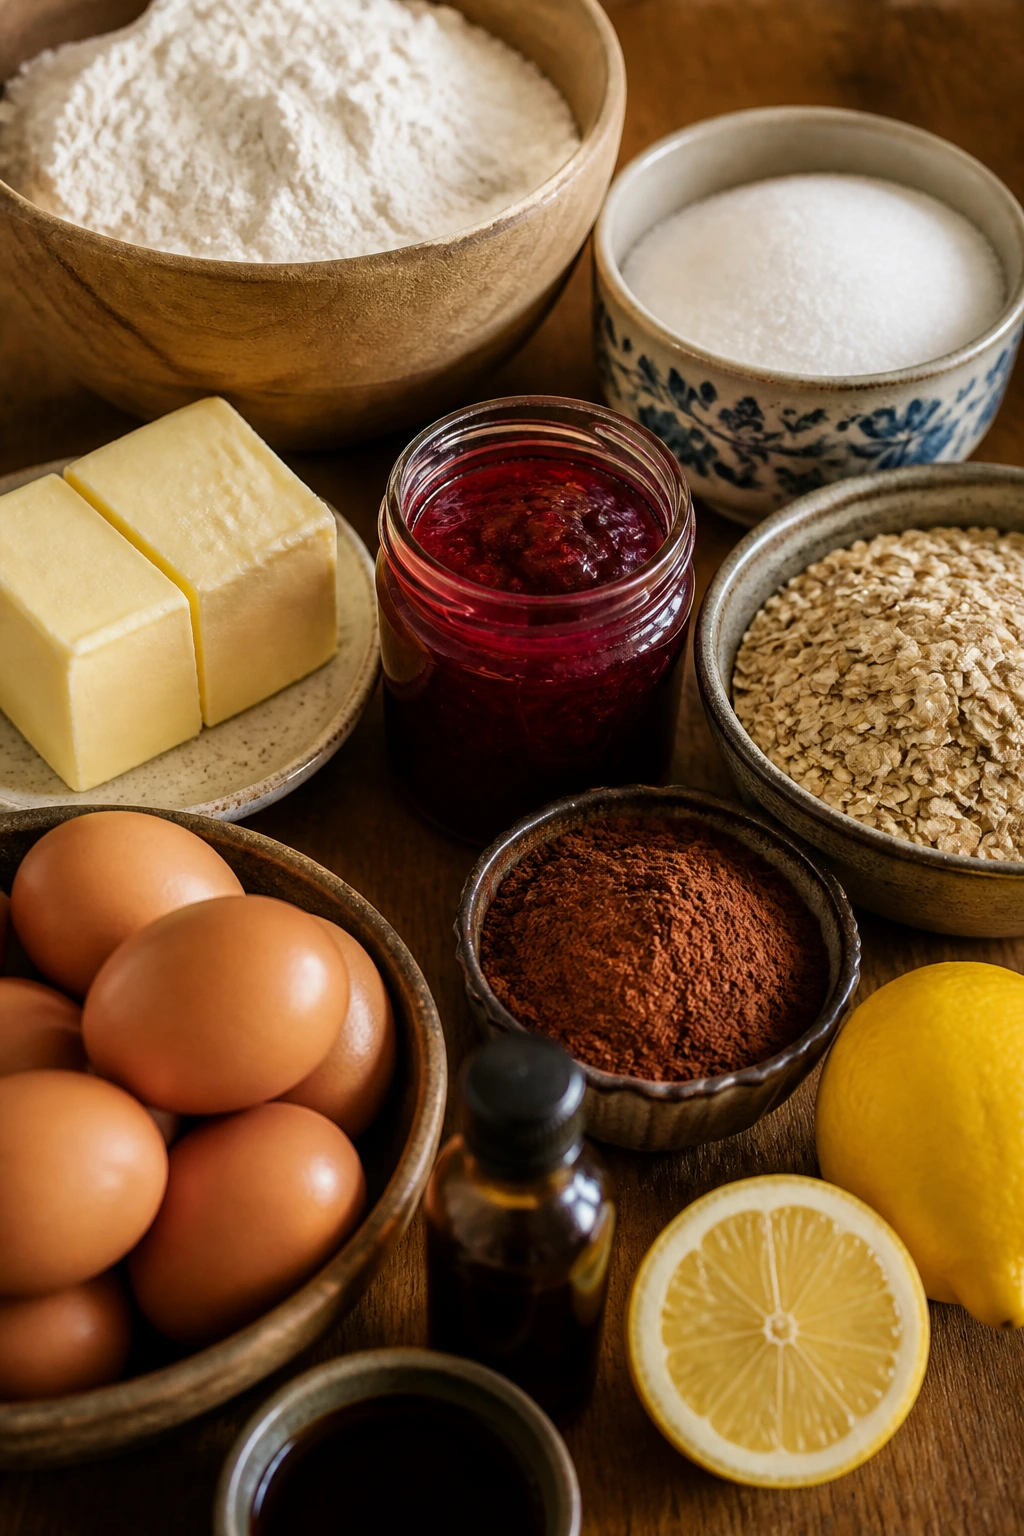
Pantry baking has a reputation for being practical, and that’s fair. But practical is not the same as plain. When you work with flour, sugar, butter, jam, oats, cocoa, eggs, honey, and spices, you have enough tools to make sweets that look composed and taste thoughtful. The trick is not exotic ingredients. The trick is knowing which shapes suit tea service and which textures hold up after cooling.
Tea party desserts do their best work when they are small, neat, and easy to portion. That’s why bars, cookies, loaf cakes, biscotti, and hand pies show up so often in this kind of menu. A delicate little square or a crisp cookie feels more polished than a huge wedge of cake, even if the recipe came together from ordinary shelves. I like that tension. It keeps the table from feeling fussy.
There’s also a practical side that matters more than people admit. Pantry desserts are easier to repeat, easier to scale, and less likely to collapse if you have to bake them the day before. Jam bars hold. Biscotti stay crisp. Pound cake slices cleanly. Meringues dry slowly and quietly in the oven while you make the tea. That kind of calm is worth something.
Essential Equipment for These Recipes
-
Two rimmed baking sheets: Cookies, biscotti, macaroons, and meringues all need a flat surface with enough room for air to move.
-
Parchment paper: It keeps sticky sweets from welding themselves to the pan, especially jam bars, fudge, and macaroons.
-
8×8-inch square pan: The workhorse pan for bars, brownies, and fudge that need tidy, even cuts.
-
Loaf pan: Useful for banana bread, honey tea cake, and jam swirl loaf cake.
-
Hand mixer: Not mandatory for every recipe, but it makes creaming butter and sugar a lot easier.
-
Mixing bowls in two or three sizes: You’ll want room for dry ingredients, wet ingredients, and crumb mixtures without splashing flour everywhere.
-
Whisk and rubber spatula: The whisk handles puddings and batters; the spatula scrapes down the bowl and keeps you from wasting batter on the sides.
-
Sharp serrated knife: Biscotti and loaf cakes cut cleaner with a serrated blade than a straight one.
-
Wire cooling rack: Baked goods finish setting properly on a rack instead of steaming on the pan.
-
Small scoop or teaspoon: Helpful for uniform cookies, meringues, macaroons, and fudge portions.
Smart Shopping for Shelf-Stable Baking
Start with the dry ingredients that do the most work. Flour should smell neutral, not dusty or stale, and baking powder should still have enough lift to puff a spoonful of hot water. Old leavener is one of the easiest ways to end up with flat cookies or heavy loaf cakes. If the can has been open forever, replace it. Cheap fix. Big difference.
Jam and preserves matter more than the label suggests. Thick preserves work better in bars and hand pies because they stay put and bake into visible layers instead of leaking into the crust. If all you have is a loose, very sweet jam, add a teaspoon of lemon juice or a little flour to tame it. The same goes for cocoa: use the freshest tin you’ve got, because cocoa that has sat too long tastes dry and strangely hollow.
Butter should be unsalted unless the recipe says otherwise, and if you’re baking tea party desserts often, keep a block in the freezer. It gives you cold pie crusts and clean shortbread texture without a last-minute trip to the shop. Eggs should be fresh enough to whip well for meringues and puddings, and if you’re using canned fruit filling, look for one that still shows actual fruit pieces rather than syrup with guesses in it.
Oats, coconut, peanut butter, and condensed milk are pantry heroes here. Buy old-fashioned oats for cookies and bars, quick oats for no-bake cookies, and creamy peanut butter for anything that needs smooth structure. On the spice shelf, cinnamon, ginger, cloves, and vanilla should be the jars you replace before they go flat. They’re small things. They carry the whole dessert.
How to Serve These Tea Party Desserts on a Tea Tray
Presentation:
Keep the plate small and the spacing generous. A tea tray looks best when each dessert has room to breathe, so cut bars into narrow rectangles, brownies into little squares, and loaf cakes into thin slices. A mix of heights helps too: stand biscotti upright, stack cookies in a shallow pile, and tuck meringues into the open spots.
Accompaniments:
Strong black tea handles chocolate brownies, crinkle cookies, and peanut butter desserts. Earl Grey works with lemon bars, honey cake, and jam cookies because the bergamot pulls them in a cleaner direction. Assam or Ceylon suits the buttery cakes and pound cake slices. If you want a softer cup on the tray, a milk tea or a lightly sweetened chai can sit beside oatmeal cookies and spice cookies without any trouble.
Portions:
Tea desserts should run small. One lemon bar square, one or two cookies, one narrow slice of loaf cake, or a pair of biscotti is enough for most guests if the table has variety. If you’re serving a full spread, aim for 2 to 3 bites per dessert rather than full bakery portions. That keeps the tray moving and prevents one rich item from taking over.
Beverage Pairing:
For a classic menu, go with Earl Grey and Assam; they cover citrus, butter, chocolate, and spice without fighting the desserts. If your table leans sweeter, Darjeeling and plain black tea give the strongest contrast. I’d skip heavily flavored herbal teas unless they’re deliberate; the desserts already bring plenty of personality.
Flavor Boosters That Never Feel Fussy

Flavor Enhancement:
A little citrus zest goes a long way. Lemon zest in shortbread, orange zest in cookies, or a whisper of zest in pound cake brightens the whole tray without turning anything sour. Keep the zest fine and use it in the butter or sugar so the oils spread evenly.
Customization:
Jam is your easiest switch. Apricot, raspberry, cherry, strawberry, and orange marmalade all change the mood of the tray without changing the baking method much. Chocolate can do the same thing: cocoa in cookies, melted chocolate drizzled over biscotti, or a few chips in banana bread are all low-effort moves with a real payoff.
Serving Suggestions:
Powdered sugar is useful, but use it like seasoning, not snow. A light sift over lemon bars, pound cake, or hand pies is enough. For a more polished finish, add a single toasted almond, a few sesame seeds, or a small brush of warmed jam on top of fruit bars so they shine a little.
Make-It-Yours:
If you need a dairy-free tray, use plant butter in cookies and bars, then lean on meringues, fruit bars, and jam cookies rather than custards. For a gluten-free version, the easiest wins are meringues, macaroons, pudding cups, and fudge; cookie and bar recipes need a reliable 1:1 baking blend. For a less sweet menu, pick biscotti, pound cake, or spice cookies and keep the glaze off the table.
Make-Ahead and Storage Guidance for Tea Table Baking
Most of these desserts behave well if you bake them ahead, which is one reason they suit a tea party so nicely. Cookies usually keep for 3 to 5 days in an airtight tin at room temperature, though jam-filled cookies and macaroons are best within 2 to 3 days before they lose their freshest texture. Bars hold for about 4 days, and loaf cakes stay moist for 3 to 4 days wrapped tightly once they’re fully cool.
Freezing works for several of them. Shortbread bars, brownies, biscotti, pound cake, loaf cakes, and many cookies freeze for up to 2 months if wrapped well and packed in a freezer bag or container. Put parchment between layers so they do not freeze into one block. Meringues do not love the freezer once they’re baked; they soften when they thaw, so make those closer to serving day.
Reheating depends on the dessert. Cookies and brownies can sit on the counter for 20 minutes to soften after chilling, or go into a 300°F oven for 4 to 6 minutes if you want the edges to wake up a little. Hand pies and biscotti are better warmed briefly in a low oven. Loaf cakes and pound cake are usually fine at room temperature, but a 10-second microwave burst can make a slice taste fresh again if it’s a day or two old. Pudding cups need to stay chilled and covered with plastic wrap right on the surface.
For make-ahead planning, I’d bake bars and loaf cakes the day before, cookies two days ahead, and meringues as close to serving time as possible. Fruit bars and jam slices often taste better after resting overnight because the filling settles into the crumb. That’s not true for everything, but it’s true often enough to plan around.
Easy Adaptations for Different Diets and Pantry Limits
Gluten-Free Pantry Swap:
Use a good 1:1 gluten-free baking blend in the cookies, bars, and loaf cakes, then let those batters rest for 15 to 20 minutes before baking. Biscotti and shortbread respond well, but hand pies need a little more care because gluten-free dough can crack when rolled too thin.
Dairy-Free Tea Table:
Plant butter works best in shortbread, cookies, bars, and loaf cakes because it behaves like real butter in the oven. Use oat milk or almond milk in pudding cups and some cakes, and lean harder on fruit, jam, cocoa, and spice so the flavor still feels full.
Lower-Sugar Approach:
Pick biscotti, pound cake, meringues, or plain tea cakes and skip the heavy glaze. In jam bars and thumbprints, reduce the filling slightly rather than cutting the sugar in the dough too aggressively; the structure matters. A small cookie with a clean tea pairing often tastes sweeter than it is.
Egg-Free Baking:
Cookies, bars, brownies, and some quick breads can work with a flax egg or commercial egg replacer, though meringues and custards are out. The safest bets are the sturdier bar-style desserts where the eggs mostly help with binding rather than lifting.
Chocolate-Forward Tray:
If you know your crowd leans dark and rich, shift the menu toward crinkle cookies, biscotti, brownies, fudge squares, and no-bake oat cookies. Keep one bright item on the tray, though. Chocolate tastes better next to lemon or fruit.
Common Mistakes That Flatten Tea Party Desserts
The first mistake is letting everything get too sweet. Tea desserts can absolutely be sweet, but they need contrast or the tray turns blunt. That’s why lemon bars need a tart edge, spice cookies need molasses, and chocolate desserts need a little salt or a clean cup of tea beside them. If you taste the batter and it feels one-note, it probably will not improve in the oven.
The second mistake is baking until the desserts look finished in the center. Brownies, cookies, tea cakes, and loaf cakes keep setting as they cool. Pulling them a little early is often the difference between tender and dry. You want color at the edges, not a dry, brittle middle.
The third mistake is cutting bars and cakes while they’re still warm. A lemon bar or jam square that hasn’t cooled will smear, sink, and make the whole tray look rough. Give them time. This is the kind of restraint that pays off in clean edges and easier serving.
The fourth mistake is ignoring texture changes during storage. Meringues soften in humidity. Biscotti lose crispness if they sit next to a moist dessert. Cookies with jam or pudding need different containers than dry spice cookies. Separate the soft from the crisp, or your careful baking gets muddy overnight.
The last mistake is using stale pantry ingredients and hoping the recipe will save them. Old cocoa tastes dull, weak baking powder leaves cakes flat, and tired spices disappear inside the batter. Tea party desserts are small enough that the flavor has nowhere to hide.
Tea Party Dessert Questions People Ask All the Time

Can I make most of these desserts the day before?
Yes, and a lot of them are better that way. Bars, loaf cakes, biscotti, brownies, and cookies usually settle into cleaner texture after a night at room temperature, as long as they’re stored airtight. I’d save meringues and pudding cups for closer to serving time.
Which desserts travel best to another house?
Thumbprint cookies, biscotti, jam bars, pound cake slices, hand pies, and fudge squares all travel well because they keep their shape. Pack them in flat layers with parchment in between if needed. Skip anything very soft or creamy unless you can carry it cold.
What is the best dessert if I only have one hour?
No-bake chocolate oat cookies, peanut butter fudge squares, chocolate crinkle cookies, and some bar cookies are the fastest wins. If the oven needs to stay on, a tray of cookies or a simple fudge square is easier than a loaf cake. Choose the dessert that matches the pantry, not the one that asks for a shopping trip.
Can I use salted butter instead of unsalted?
You can, but dial back the added salt in the recipe. In cookies and bars, salted butter is usually fine if you’re careful. In pound cake, shortbread, and fudge, too much salt can tilt the flavor sharper than you want.
How do I keep cookies from spreading too much?
Chill the dough, measure the flour accurately, and make sure the butter is soft rather than melted. If a dough feels greasy before baking, it needs to rest in the fridge. A tray of cookies that starts warm will usually bake flatter than one that goes in cool.
Do these desserts need special tea pairings?
Not special, but thoughtful ones help. Citrus desserts like lemon bars like Earl Grey or Darjeeling. Chocolate and spice desserts do well with stronger black tea, while plain tea cakes and pound cake can sit beside almost anything.
Which desserts should I avoid if the kitchen is humid?
Meringues are the main one. They absorb moisture quickly and lose their crisp shell. If the air feels heavy, stick to bars, cookies, cakes, or fudge instead.
What if my jam bars or thumbprints come out too soft?
Let them cool longer before judging the texture. If they still seem loose the next day, the filling may have been too wet or the bake too short. Thick preserves and fully cooled bars usually solve the problem.
A Tray Worth Setting Out
There’s something satisfying about putting a tea tray together from ingredients you already trust. No special flour. No decorative molds unless you want them. Just pantry sweets built carefully enough to feel considered, and small enough to make people linger instead of lurching through dessert.
The best part is how flexible the whole idea is. You can lean bright with lemon and jam, dark with chocolate and molasses, or light with meringues and tea cakes, and the table still makes sense because the portions stay modest and the flavors stay distinct. That’s the real shape of good tea party baking. Not fancy. Not flat. Just composed.
If you have flour, sugar, butter, jam, oats, and a little patience, you already have the bones of a very good spread. Pick three or four of these, bake them the day before, and let the tea do the rest.