
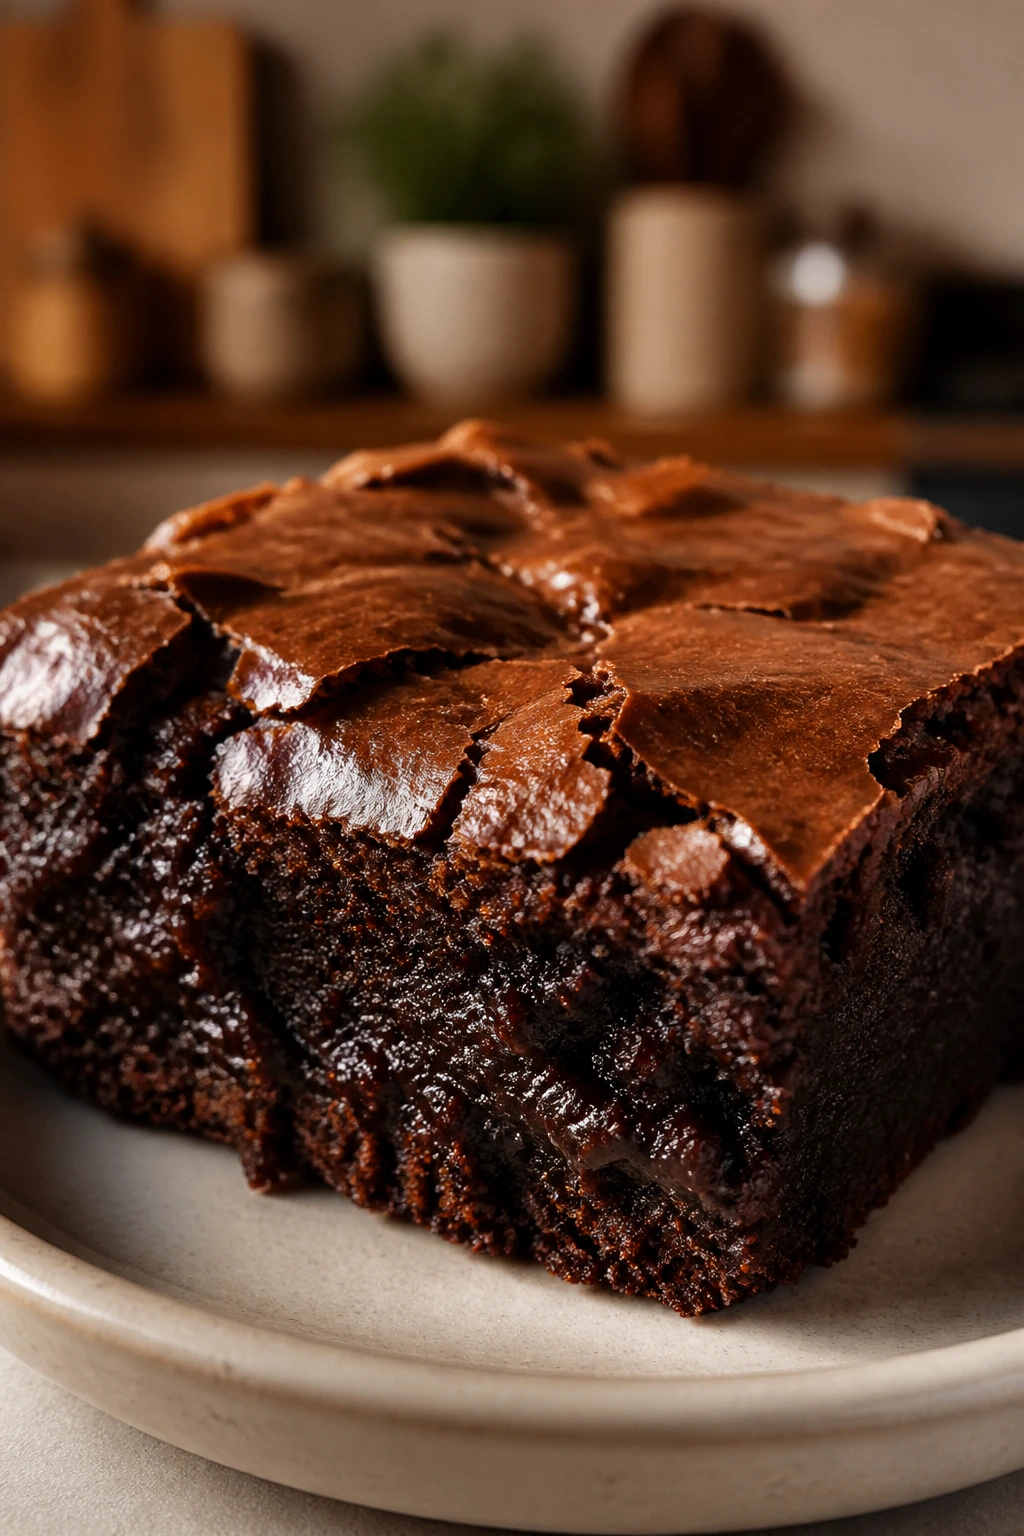
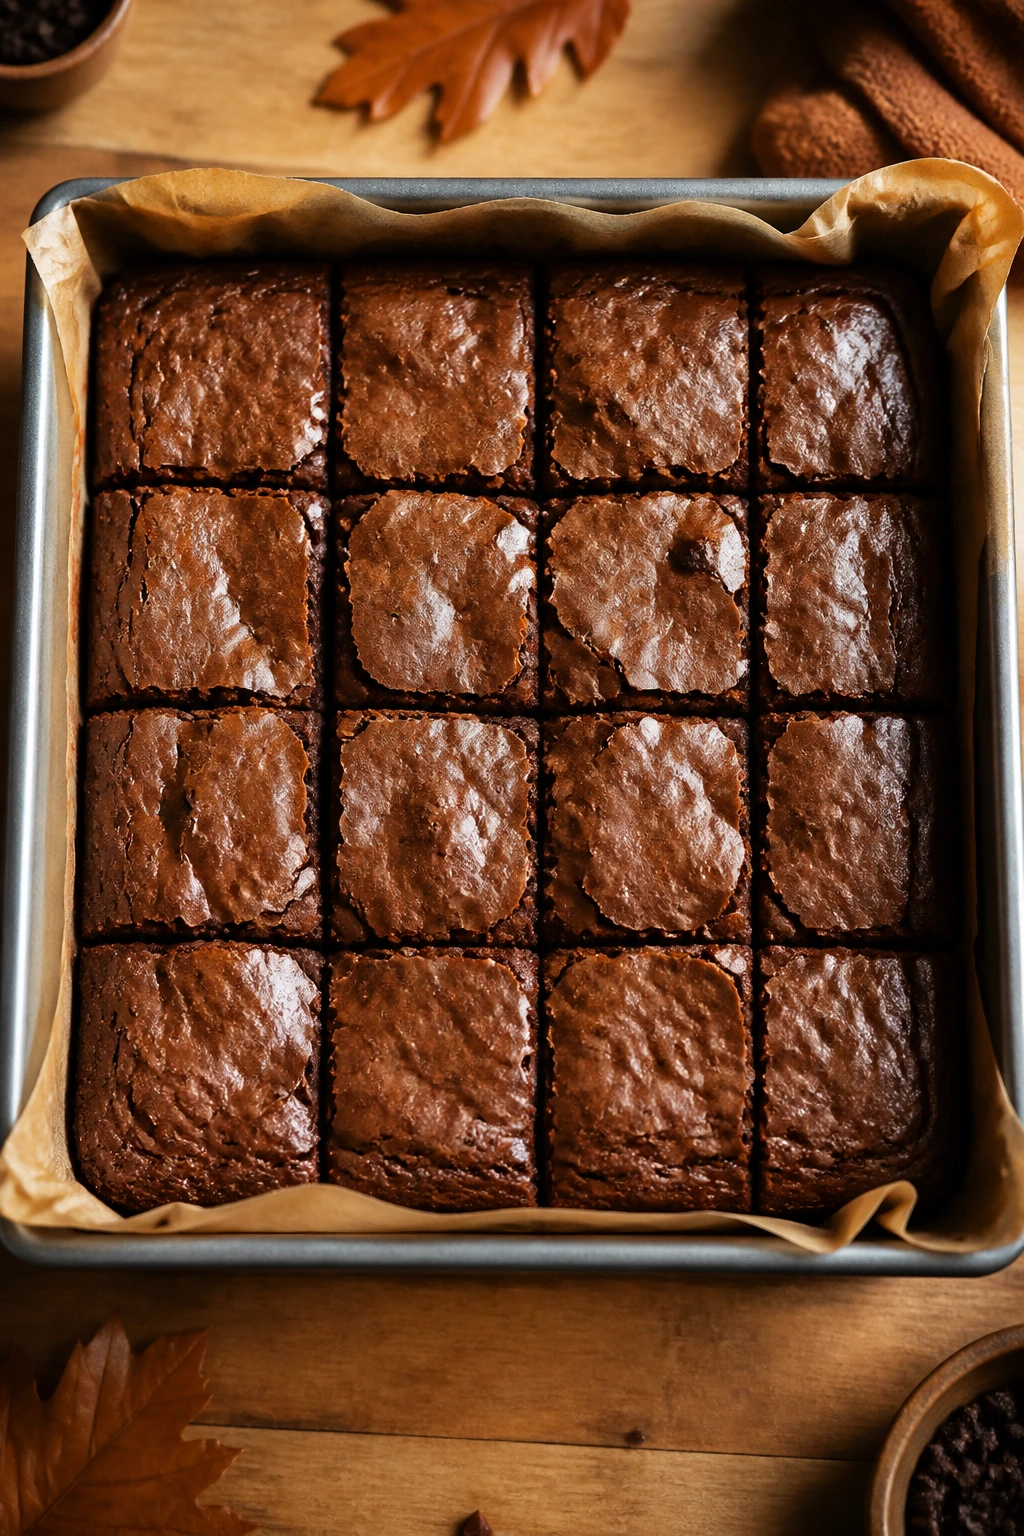
Halloween brownies have a way of solving three problems at once: dessert, decoration, and the question of what to do with the tired box of cocoa sitting in the back of the pantry. A pan of brownies can slide into the oven while homework finishes, shoes get found, or someone debates whether a sheet ghost counts as a costume. That’s the sweet spot here — fast chocolate, a little theater, and no elaborate cleanup.
What I like most about Halloween brownies is that they can look playful without asking for pastry-school precision. A white-chocolate spiderweb drawn with a toothpick. A marshmallow ghost with two chocolate-chip eyes. A smear of orange frosting that looks like you planned it, even if you absolutely didn’t. Brownies are forgiving that way. They hide shaky decorating hands better than cupcakes ever will.
And because these are built for busy nights, the recipes lean on pantry ingredients, one-bowl mixing, and toppings that set up fast. A shiny crackly top, a fudgy center, a few clever decorations, and you’re done. That’s enough to make the kitchen smell like melted chocolate and butter, which is honestly half the point anyway.
Why These Halloween Brownies Work on a Busy Night
- Fast Base: Most of these start with a simple brownie batter, so the oven does the heavy lifting while you deal with the rest of the evening.
- Easy Decorating: Candy eyes, white-chocolate drizzles, and marshmallow toppers take minutes, not a piping-bag apprenticeship.
- Pantry-Friendly: Cocoa, flour, sugar, eggs, chocolate chips, peanut butter, jam, and pretzels show up again and again, which keeps the shopping list short.
- Party-Ready: These cut into clean squares, bars, or bite-size pieces, so they travel well to school events and casual get-togethers.
- Flexible: You can keep a plain brownie base and change the topping for a completely different look and flavor.
- Make-Ahead Friendly: Bake the brownie base earlier in the day, then decorate once it’s cool so the toppings stay sharp and tidy.
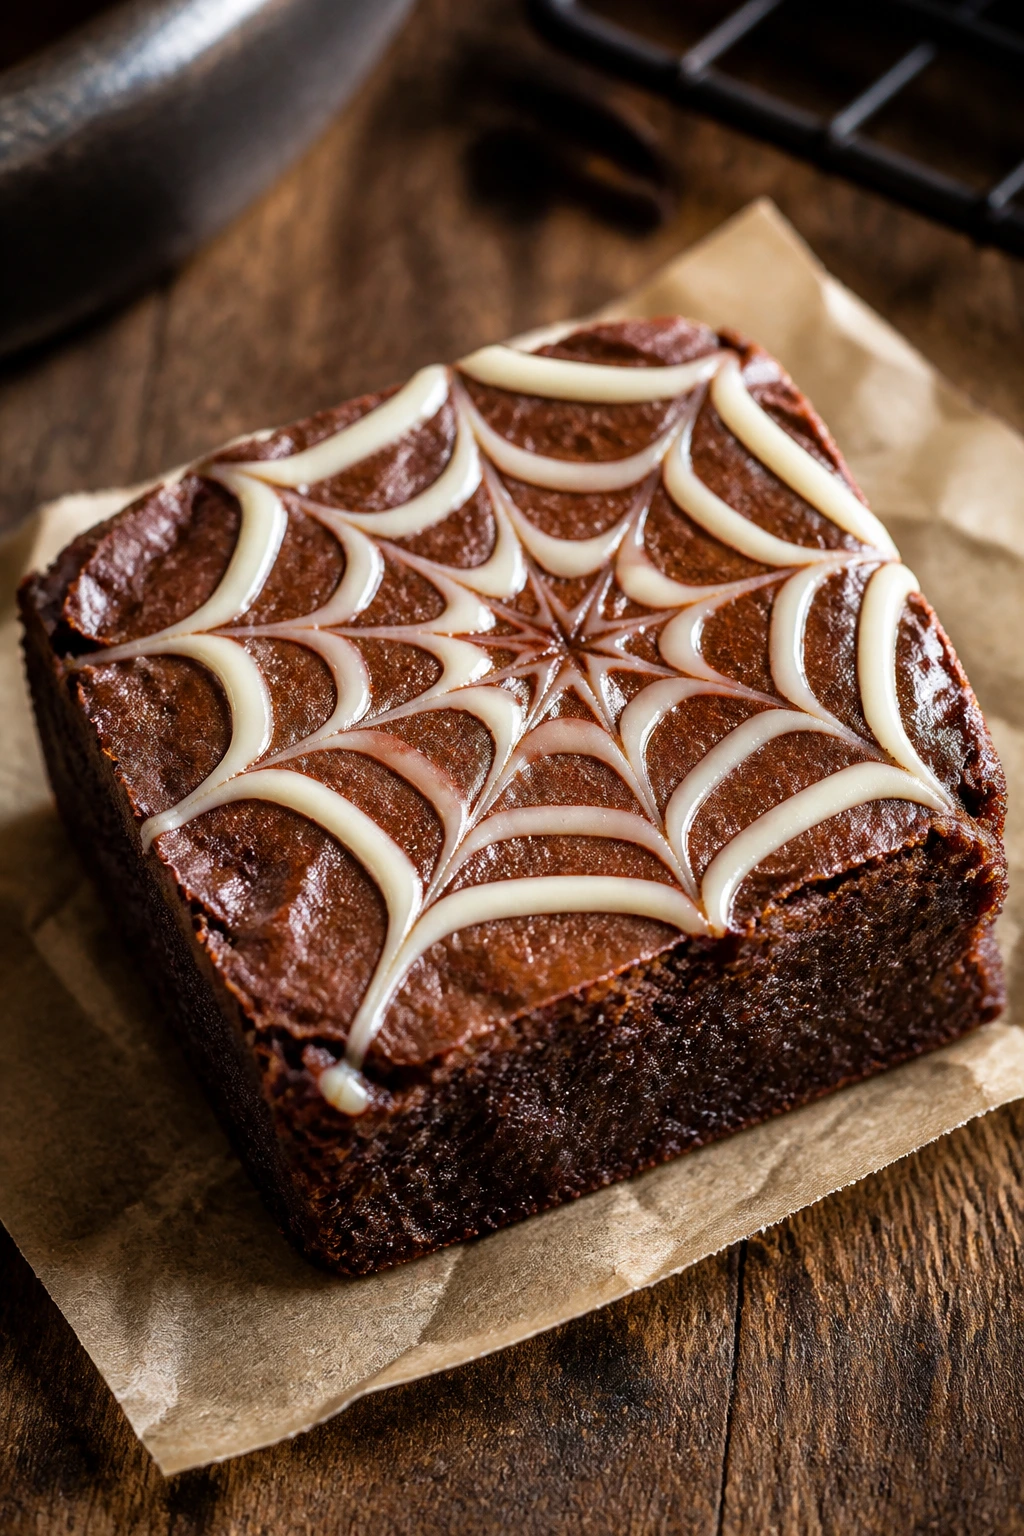
1. Spiderweb Fudge Brownies
A glossy chocolate brownie with a white-chocolate web on top looks more complicated than it is. That’s the whole charm. The fudgy center stays dense enough to hold the pattern, and the contrast between dark brownie and bright white drizzle makes every square look deliberate, even if you drew the web with a toothpick and a prayer.
Why It Works: The brownie base is rich and compact, so it supports the thin white-chocolate lines without crumbling. A slightly underbaked center gives you that soft bite that makes the decoration feel like more than just decoration.
Key Ingredients:
- 1/2 cup unsalted butter, melted and slightly cooled
- 1 cup granulated sugar
- 2 large eggs
- 1 teaspoon vanilla extract
- 1/3 cup unsweetened cocoa powder
- 1/2 cup all-purpose flour
- 1/4 teaspoon fine salt
- 1/2 cup semi-sweet chocolate chips
- 1/4 cup white chocolate chips, melted for the web
Quick Steps:
- Preheat the oven to 350°F and line an 8×8-inch pan with parchment.
- Whisk the butter, sugar, eggs, and vanilla until glossy.
- Stir in cocoa, flour, salt, and chocolate chips just until combined.
- Bake for 22 to 25 minutes, until the center is set but still soft.
- Cool completely, drizzle with melted white chocolate in concentric circles, then drag a toothpick outward to form the web.
Equipment for This Recipe:
- 8×8-inch baking pan
- Parchment paper
- Mixing bowl and whisk
- Small microwave-safe bowl
- Toothpick or skewer
How to Serve This Dish: Cut into neat squares and serve on a dark plate so the web stands out. A scoop of vanilla ice cream beside one warm square looks especially good when the chocolate is still a little soft.
Pro Tips for This Recipe:
- Let the brownies cool all the way before adding the web or the drizzle will bleed.
- Warm the white chocolate in short bursts; seized chocolate makes messy lines.
- Use a zip-top bag with the corner snipped if you do not have a piping bag.
Variations on This Dish:
- Milk-Chocolate Web: Swap the white chocolate for milk chocolate if you want a softer, less stark look.
- Peppermint Web: Add 1/4 teaspoon peppermint extract to the brownie batter and top with crushed peppermint candies after baking.
Common Mistakes to Avoid with This Dish:
- Decorating too soon: Warm brownies melt the web into a smudge. Cool them first.
- Overbaking: A dry brownie cracks when sliced and makes the pattern look broken.
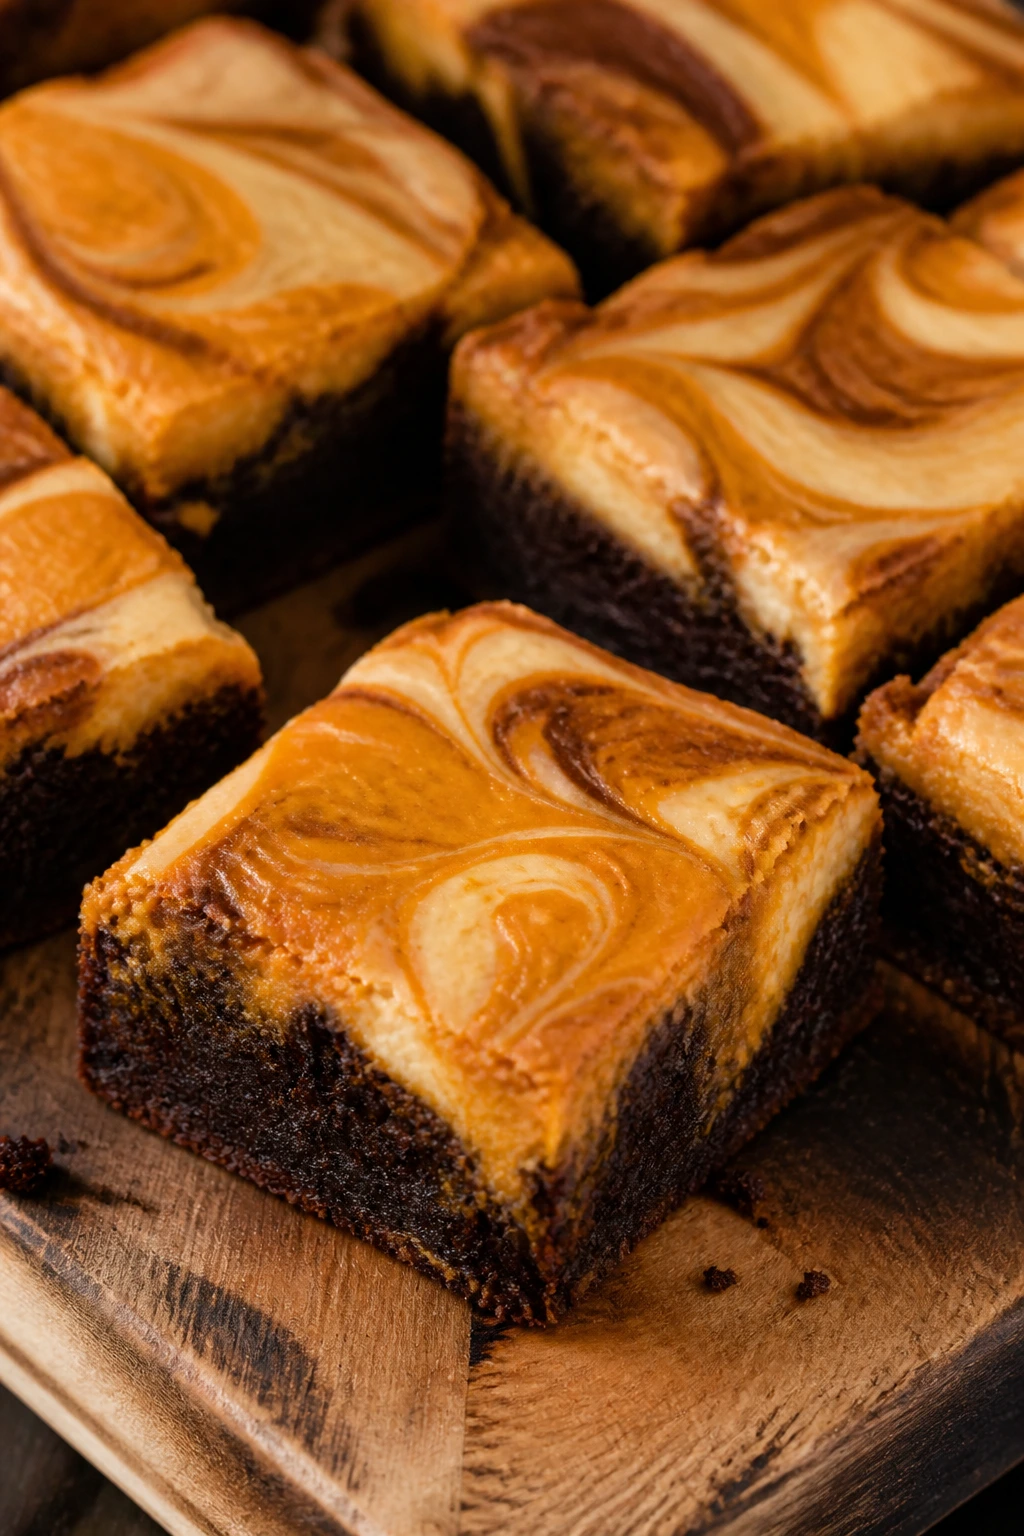
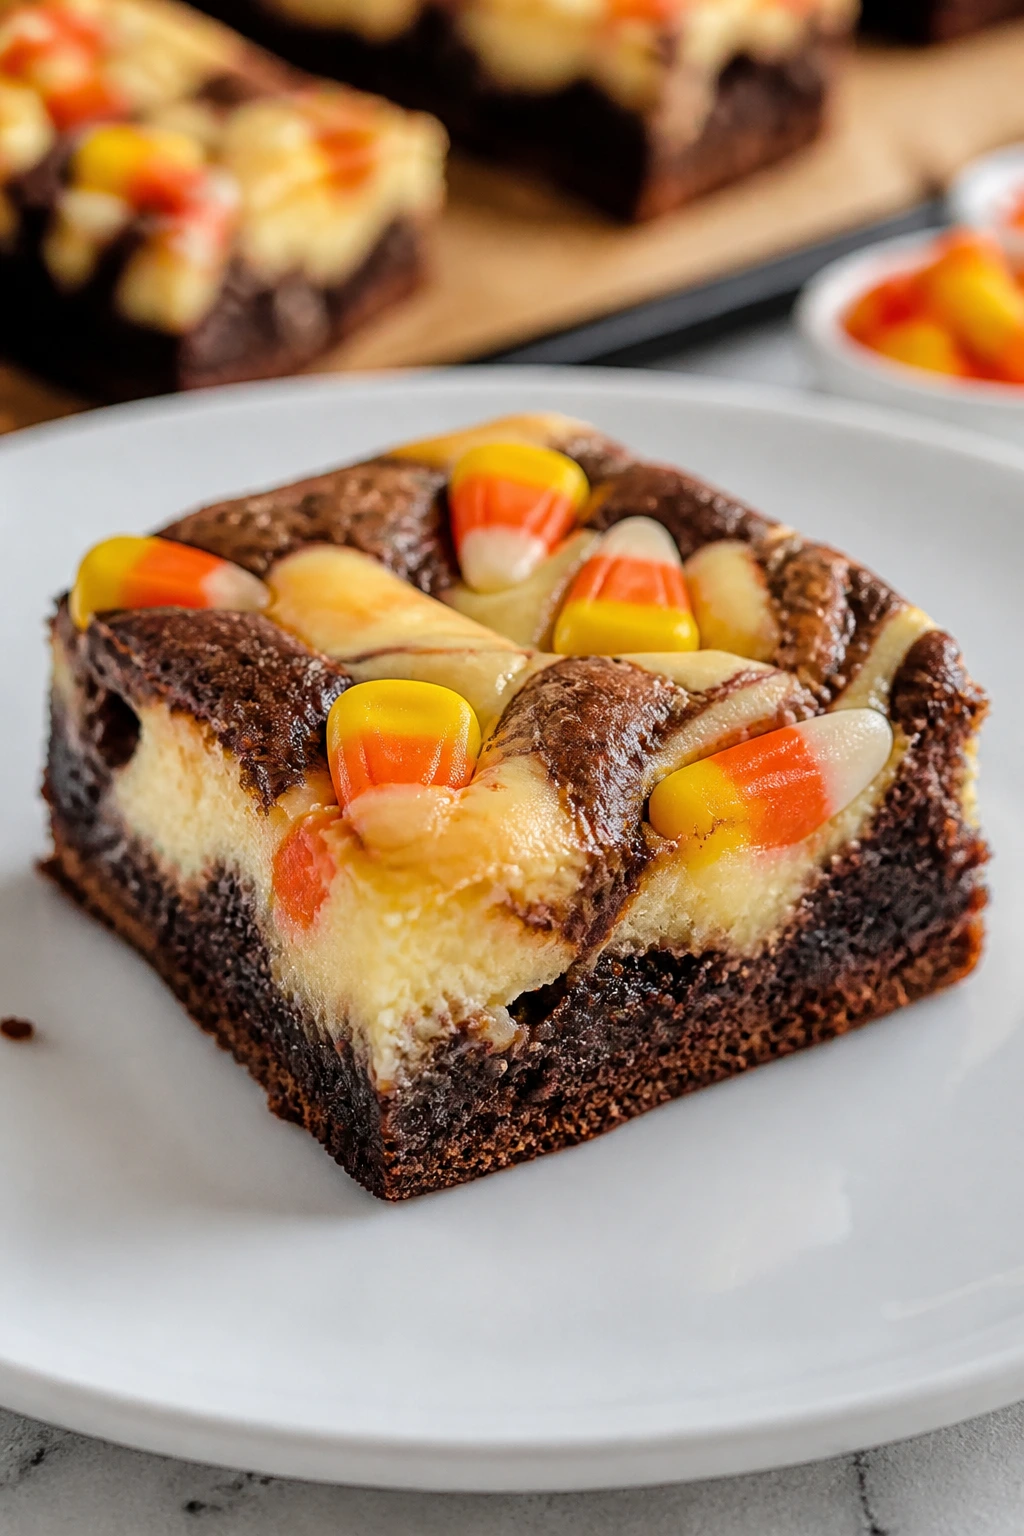
2. Candy Corn Cheesecake Brownies
Candy corn gets loud opinions, but in a brownie pan it makes sense. The sweet little triangles give you the Halloween colors everyone recognizes, and the cream cheese swirl keeps the whole thing from turning cloying. You get chocolate, tang, and that bright orange-yellow look in one square.
Why It Works: The cheesecake layer adds a pale swath that looks good against the dark brownie base, and the candy corn is best used as a finish rather than baked into the batter. That keeps the candy from turning hard and waxy.
Key Ingredients:
- 1/2 cup unsalted butter, melted
- 1 cup sugar
- 2 large eggs
- 1 teaspoon vanilla
- 1/3 cup cocoa powder
- 1/2 cup flour
- 1/4 teaspoon salt
- 4 ounces cream cheese, softened
- 2 tablespoons sugar
- 1 egg yolk
- 1/2 teaspoon vanilla
- 1/2 cup candy corn for topping
Quick Steps:
- Preheat to 350°F and line an 8×8-inch pan.
- Mix the brownie batter and spread two-thirds of it into the pan.
- Beat the cream cheese, sugar, yolk, and vanilla until smooth.
- Dollop the cheesecake mixture and remaining brownie batter on top, then swirl lightly with a knife.
- Bake 24 to 28 minutes, cool, and scatter candy corn over the top.
Equipment for This Recipe:
- 8×8-inch pan
- Two mixing bowls
- Hand mixer or sturdy whisk
- Offset spatula
- Butter knife for swirling
How to Serve This Dish: These slice best after chilling for 20 minutes in the fridge, which gives the cheesecake layer a cleaner cut. Serve them with cold milk; the candy corn makes them feel festive enough on its own.
Pro Tips for This Recipe:
- Use room-temperature cream cheese or you’ll get tiny lumps in the swirl.
- Add the candy corn after baking so the colors stay bright.
- Chill before slicing if you want the cheesecake pattern to show clearly.
Variations on This Dish:
- Salted Caramel Candy Corn: Drizzle 2 tablespoons caramel sauce over the cooled bars and finish with a pinch of flaky salt.
- Orange-Swirled Version: Tint half the cheesecake mixture with orange gel coloring for a sharper Halloween look.
Common Mistakes to Avoid with This Dish:
- Using cold cream cheese: It leaves lumps that do not melt out in the oven.
- Baking candy corn inside the bars: The candy turns tough and sticky instead of decorative.
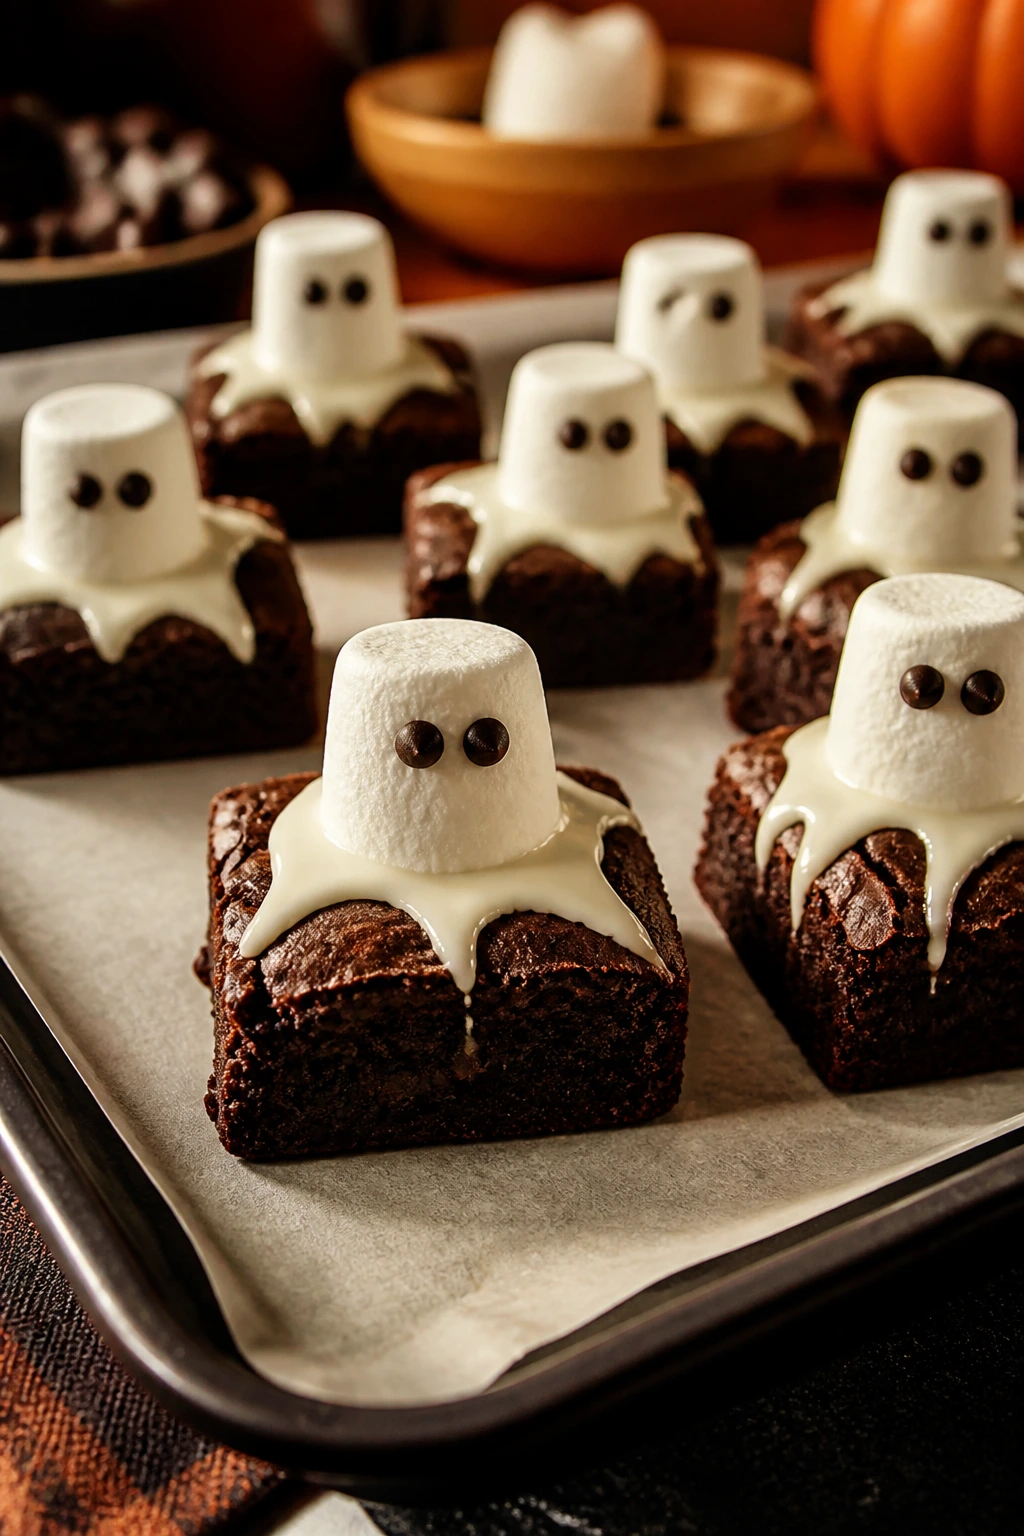
3. Ghost Marshmallow Brownies
If you want brownies that make kids stop and grin, this is the one. Soft marshmallow ghosts sit on top of a fudgy square, and two tiny chocolate-chip eyes do most of the work. It’s a little goofy. That’s the point.
Why It Works: Marshmallows soften in the heat of the baked brownie without disappearing completely, so they can be dressed up as ghosts while still holding shape. The chocolate-chip eyes stick best when the brownie is warm, not hot.
Key Ingredients:
- 1/2 cup butter, melted
- 1 cup sugar
- 2 eggs
- 1 teaspoon vanilla
- 1/3 cup cocoa powder
- 1/2 cup flour
- 1/4 teaspoon salt
- 12 large marshmallows
- 24 mini chocolate chips
- 2 tablespoons melted white chocolate, optional
Quick Steps:
- Heat the oven to 350°F and line the pan.
- Mix the brownie batter and spread it evenly.
- Bake for 20 to 23 minutes, then press one marshmallow half into each square while the brownies are still warm.
- Add mini chocolate chips for eyes and a dot of white chocolate if needed to hold them in place.
- Cool before slicing.
Equipment for This Recipe:
- 8×8-inch pan
- Parchment paper
- Small spoon
- Toothpick
- Tiny offset spatula or butter knife
How to Serve This Dish: Put these on a white platter so the ghost shapes read clearly. They’re best with hot chocolate or milk, which feels a bit on-the-nose in the best way.
Pro Tips for This Recipe:
- Cut the marshmallows with kitchen scissors so they sit flatter.
- Add the eyes while the brownies are warm enough to tack the chips in place.
- If the marshmallows brown too fast, tent the pan with foil for the last 5 minutes.
Variations on This Dish:
- Marshmallow Frost Ghosts: Pipe a small swirl of vanilla frosting over each square instead of using plain marshmallows.
- S’more Ghosts: Add crushed graham crackers to the batter and use chocolate chips under the marshmallow.
Common Mistakes to Avoid with This Dish:
- Waiting until the brownies are cold: The eyes will not stick as well.
- Using giant marshmallows whole: They slide around; halved marshmallows behave much better.
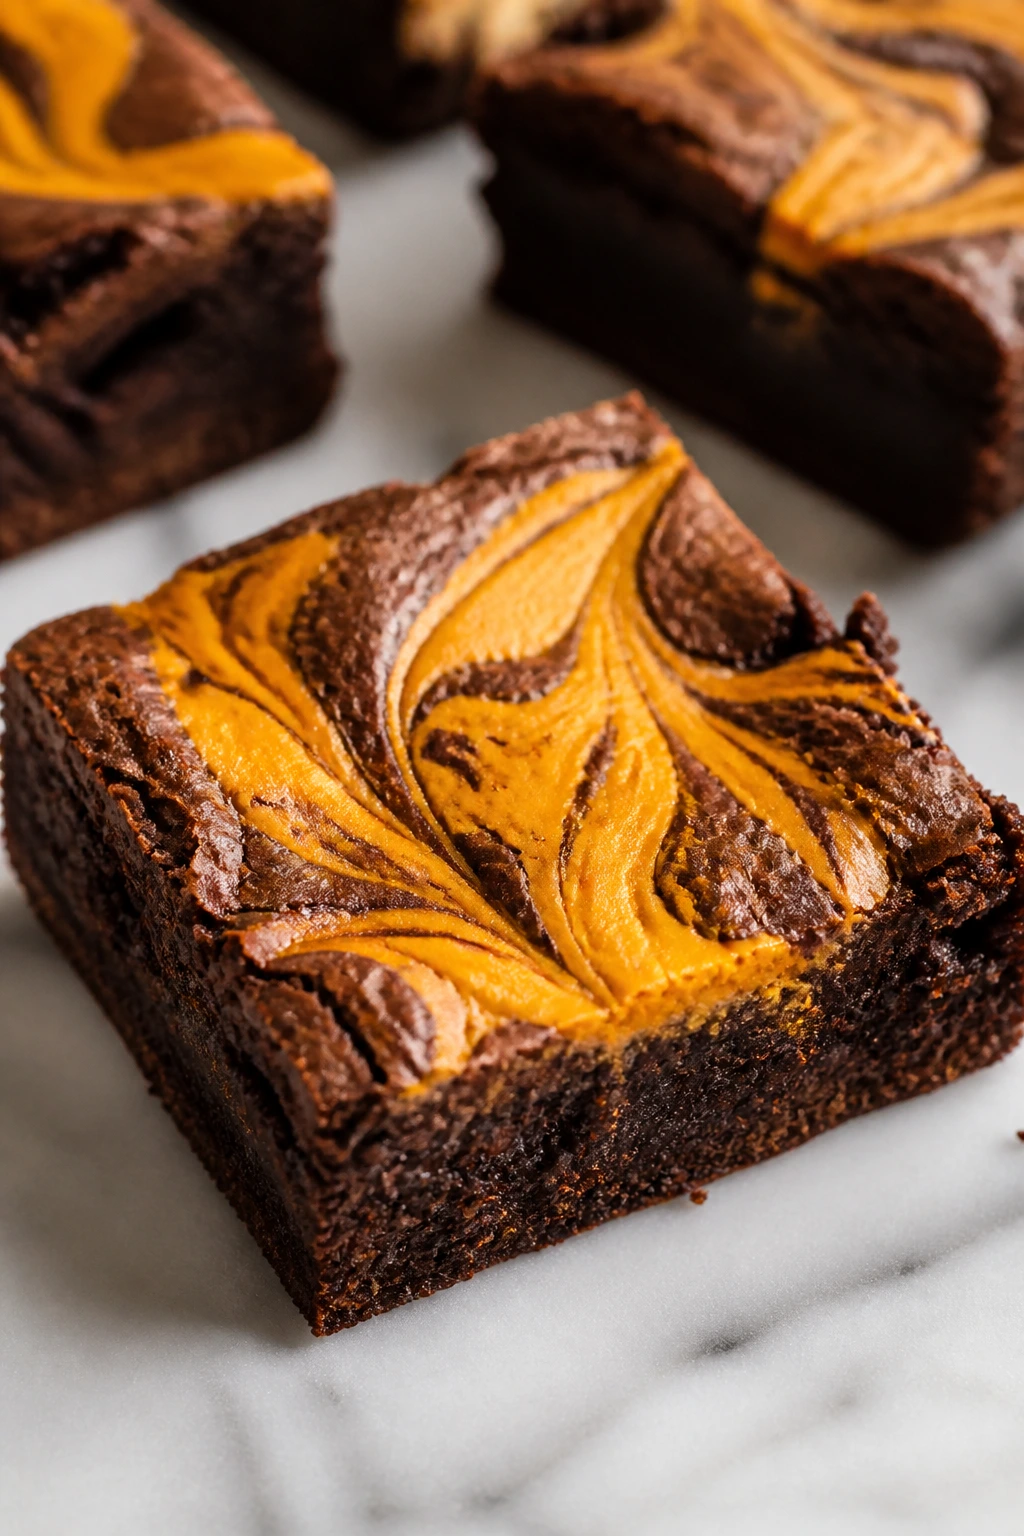
4. Pumpkin Swirl Brownies
Pumpkin and chocolate are one of those pairings that sounds predictable until you taste them side by side. The pumpkin swirl softens the brownie’s sweetness and gives the top a marbled look that feels very October, even if you made it on a random Tuesday with a can from the pantry.
Why It Works: Pumpkin puree can make brownies heavy if you use too much, so the small cheesecake-style swirl keeps the flavor clear without watering down the batter. A little pumpkin pie spice goes a long way here.
Key Ingredients:
- 1/2 cup butter, melted
- 1 cup sugar
- 2 eggs
- 1 teaspoon vanilla
- 1/3 cup cocoa powder
- 1/2 cup flour
- 1/4 teaspoon salt
- 4 ounces cream cheese, softened
- 1/3 cup pumpkin puree
- 3 tablespoons sugar
- 1 egg yolk
- 1/2 teaspoon pumpkin pie spice
Quick Steps:
- Preheat to 350°F and line the pan.
- Mix the brownie batter and spread it into the pan.
- Beat the cream cheese, pumpkin, sugar, yolk, and spice until smooth.
- Spoon the pumpkin mixture over the batter and swirl with a knife.
- Bake 25 to 28 minutes, then cool before cutting.
Equipment for This Recipe:
- 8×8-inch baking pan
- Two bowls
- Whisk or hand mixer
- Knife for swirling
- Cooling rack
How to Serve This Dish: These brownies are good plain, but a spoonful of whipped cream beside the square turns the pumpkin swirl into a full dessert. I’d serve them slightly chilled if you want the marble pattern to stay clean.
Pro Tips for This Recipe:
- Use pure pumpkin puree, not pumpkin pie filling.
- Keep the swirl light so the two batters stay separate in the pan.
- If your pumpkin puree looks watery, blot it with paper towels first.
Variations on This Dish:
- Maple Pumpkin Swirl: Replace 1 tablespoon of the sugar in the swirl with maple syrup for a deeper fall flavor.
- Gingersnap Crust: Press 1/2 cup crushed gingersnap crumbs into the pan before adding the brownie batter.
Common Mistakes to Avoid with This Dish:
- Adding too much pumpkin: The brownies can turn soft and muddy.
- Over-swirling: You want ribbons, not a pale brown pan.
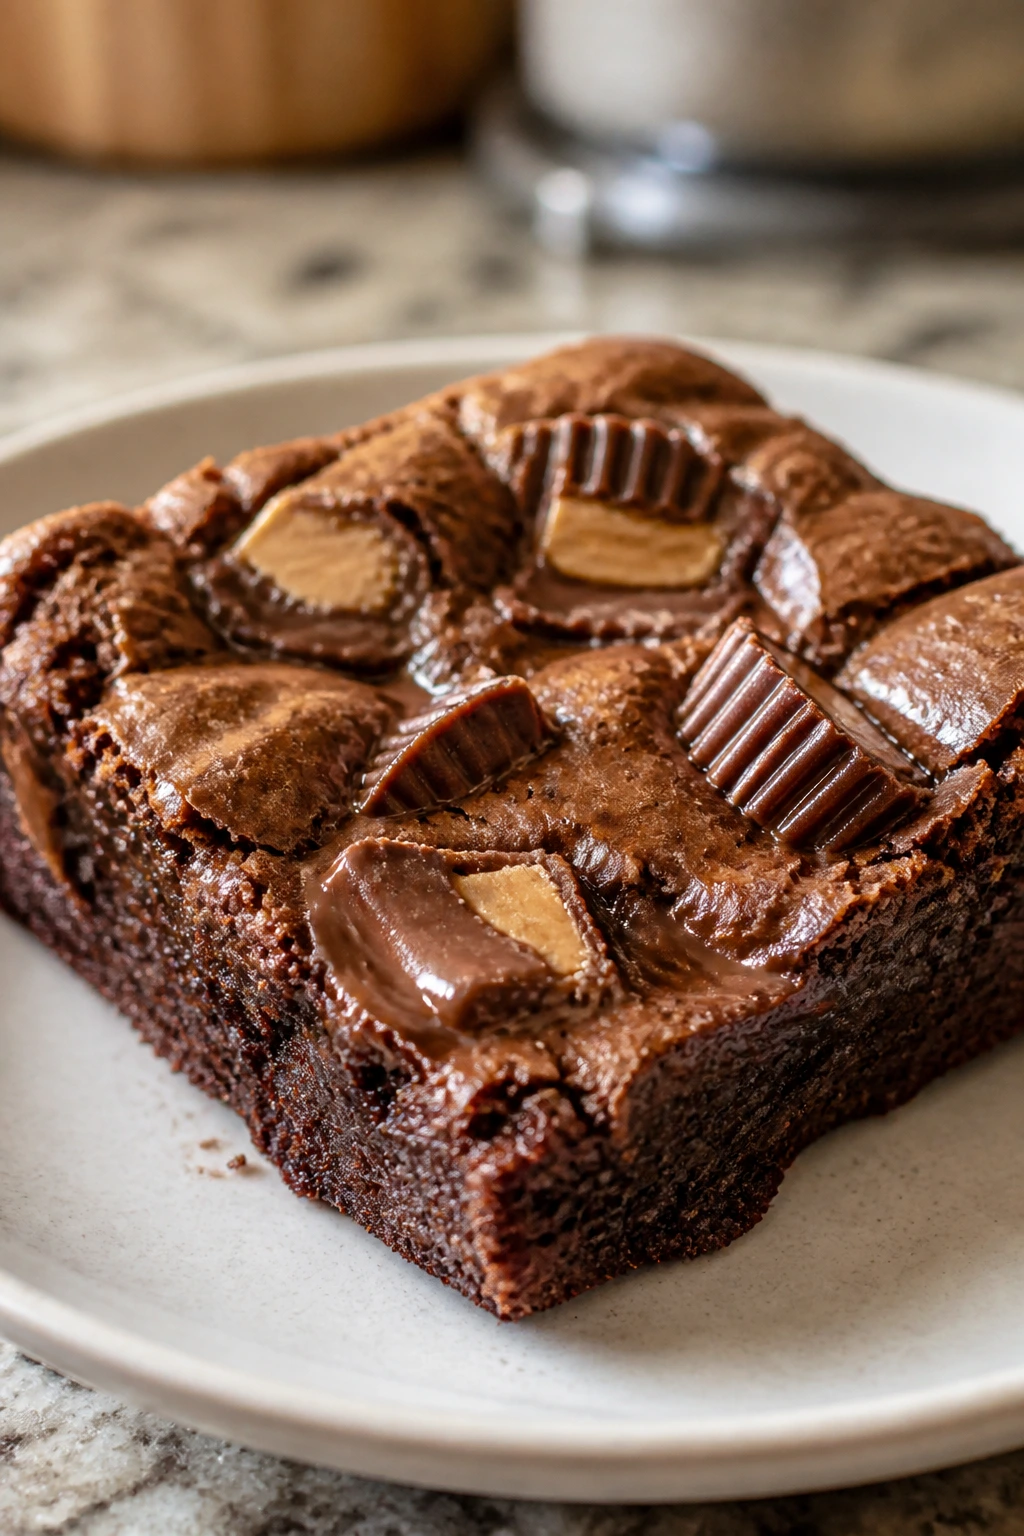
5. Peanut Butter Cup Brownies
This is the pan I make when I want the brownies to disappear faster than they cool. Peanut butter cuts through the chocolate, and the chopped peanut butter cups melt into little pockets that feel a lot fancier than they are. The whole thing smells like a candy shop and a bakery had a very good idea.
Why It Works: Peanut butter adds salt and fat, which keeps the brownie base from tasting one-note. Chopped cups melt into soft edges, while a few on top stay recognizable enough to sell the idea.
Key Ingredients:
- 1/2 cup butter, melted
- 1 cup sugar
- 2 eggs
- 1 teaspoon vanilla
- 1/3 cup cocoa powder
- 1/2 cup flour
- 1/4 teaspoon salt
- 1/2 cup creamy peanut butter
- 1/4 cup powdered sugar
- 10 to 12 mini peanut butter cups, halved
Quick Steps:
- Preheat the oven to 350°F and line the pan.
- Whisk the brownie batter and spread it into the pan.
- Mix the peanut butter and powdered sugar, then dollop it over the batter.
- Press the peanut butter cups into the top.
- Bake 24 to 27 minutes, cool, and cut.
Equipment for This Recipe:
- 8×8-inch pan
- Mixing bowl
- Spoon for dolloping
- Offset spatula
- Sharp knife
How to Serve This Dish: Serve these at room temperature so the peanut butter stays creamy instead of sticky. A cold glass of milk is the obvious pairing, and for once, obvious is the right word.
Pro Tips for This Recipe:
- Use creamy peanut butter that stirs smooth; the natural kind can separate in the swirl.
- Press the peanut butter cups in halfway so they do not tumble off when sliced.
- Chill the pan for 15 minutes before cutting if you want cleaner squares.
Variations on This Dish:
- Crunchy Version: Swap the creamy peanut butter for crunchy and add 2 tablespoons chopped peanuts.
- Dark-Chocolate Cup Version: Use dark chocolate peanut butter cups for a deeper cocoa note.
Common Mistakes to Avoid with This Dish:
- Using too much peanut butter swirl: It can sink and make the center greasy.
- Overbaking: Peanut butter brownies dry out faster than plain ones.
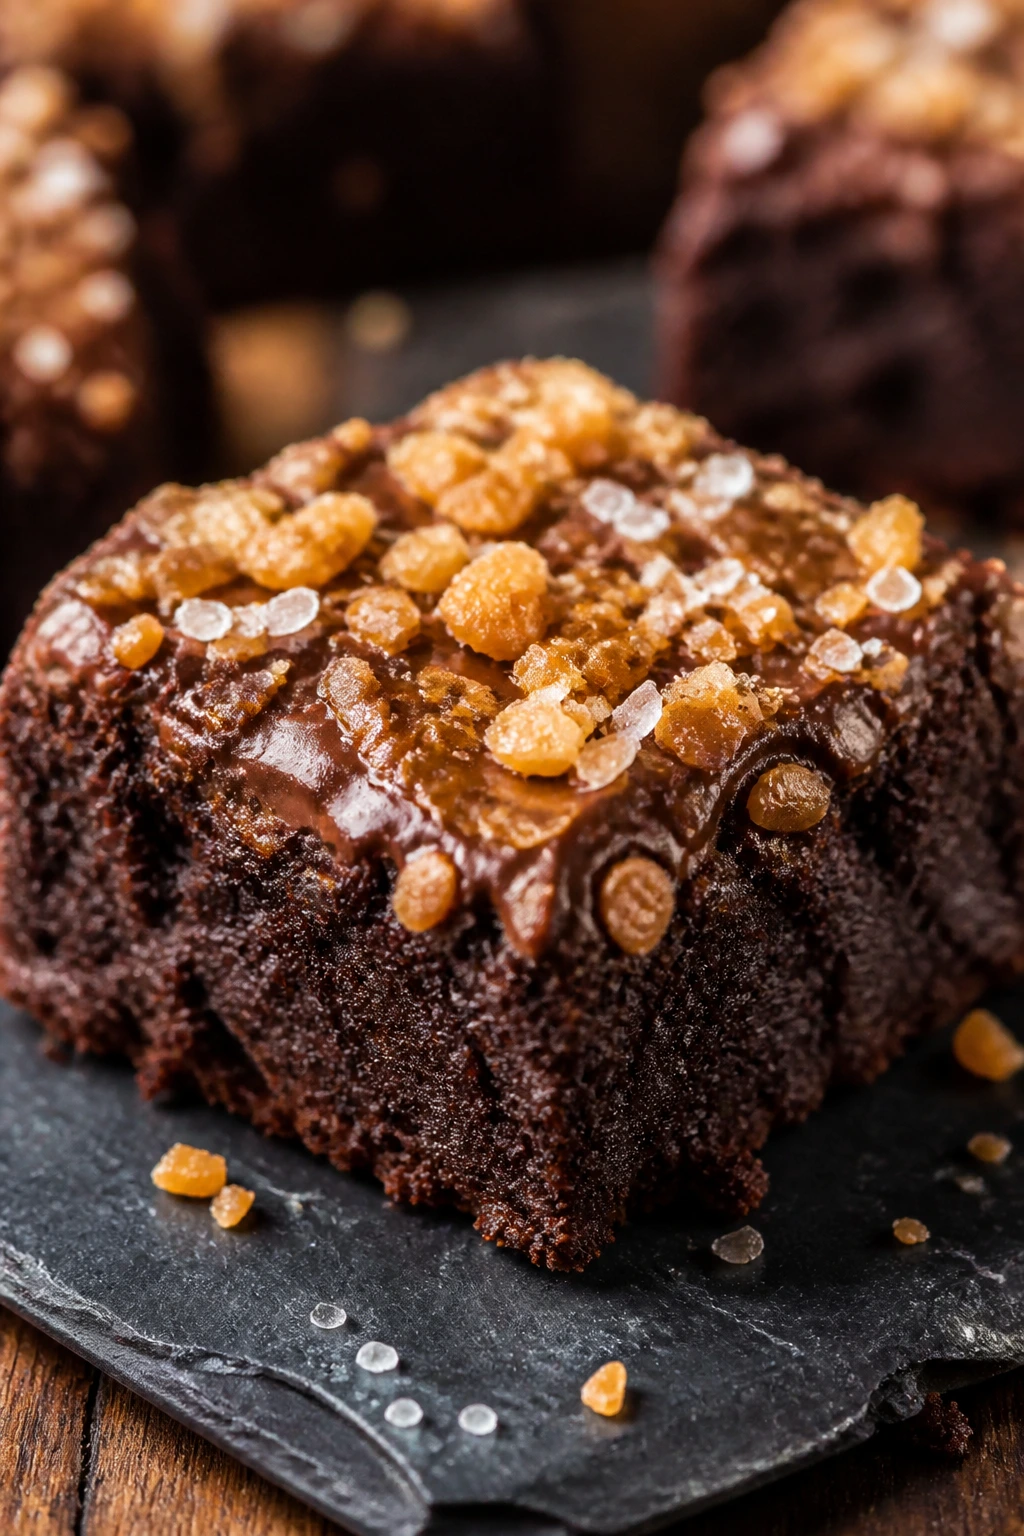
6. Salted Caramel Pretzel Brownies
Sweet, salty, chewy, crunchy. That’s the whole argument, and it’s a strong one. Pretzels keep the topping from feeling syrupy, while caramel slides into the cracks of the brownie top and makes every bite a little messy in the good way.
Why It Works: Pretzels add snap and salt, which wakes up the chocolate base. Caramel softens the top just enough to look glossy without soaking the pan.
Key Ingredients:
- 1/2 cup butter, melted
- 1 cup sugar
- 2 eggs
- 1 teaspoon vanilla
- 1/3 cup cocoa powder
- 1/2 cup flour
- 1/4 teaspoon salt
- 1/2 cup mini pretzels, lightly crushed
- 1/3 cup caramel sauce
- 1/2 teaspoon flaky salt
Quick Steps:
- Preheat to 350°F and line the pan.
- Make the brownie batter and spread it in the pan.
- Scatter pretzels over the top and drizzle on the caramel.
- Bake for 22 to 25 minutes.
- Finish with flaky salt after cooling.
Equipment for This Recipe:
- 8×8-inch pan
- Small saucepan or microwave-safe bowl for caramel
- Bowl for mixing
- Spoon
- Cooling rack
How to Serve This Dish: Cut these into small squares; the caramel and pretzels are rich enough that a little goes a long way. I like them next to apple slices or a scoop of vanilla ice cream.
Pro Tips for This Recipe:
- Crush the pretzels lightly so you get shards, not dust.
- Drizzle thick caramel, not thin syrup, or it will disappear into the batter.
- Add flaky salt after baking so it stays crisp on top.
Variations on This Dish:
- Chocolate-Toffee Pretzel Bars: Add 1/4 cup toffee bits with the pretzels.
- Peanut Butter Caramel: Swirl 2 tablespoons peanut butter into the caramel before drizzling.
Common Mistakes to Avoid with This Dish:
- Using too much caramel: The center turns gummy.
- Baking with whole pretzels buried in batter: They lose their crunch and get chewy.
7. Oreo Graveyard Brownies
This one is pure Halloween theater. A dark brownie base becomes the dirt, crushed Oreos make the graveyard look believable, and little cookie tombstones turn a plain pan into a dessert you can carry into a room and watch people lean over it. It’s a bit silly. Good.
Why It Works: Oreo crumbs mimic soil in both color and texture, so the topping looks intentional instead of random. A cookie “tombstone” gives height, which helps the pan feel finished without needing fancy frosting work.
Key Ingredients:
- 1/2 cup butter, melted
- 1 cup sugar
- 2 eggs
- 1 teaspoon vanilla
- 1/3 cup cocoa powder
- 1/2 cup flour
- 1/4 teaspoon salt
- 10 Oreo cookies, crushed
- 1 cup chocolate frosting
- 8 Milano cookies or similar rectangular cookies
- 2 tablespoons white chocolate chips, melted
- 12 candy pumpkins
Quick Steps:
- Bake the brownies in a lined pan at 350°F for 22 to 25 minutes.
- Cool completely, then spread chocolate frosting over the top.
- Cover with Oreo crumbs.
- Insert cookie tombstones and pipe “RIP” with melted white chocolate.
- Add candy pumpkins around the graves.
Equipment for This Recipe:
- 8×8-inch pan
- Offset spatula
- Zip-top bag for piping
- Food processor or rolling pin for Oreos
- Knife
How to Serve This Dish: These are best cut into larger squares so the tombstone stays in place. Serve them on a tray with a few extra Oreo crumbs scattered around the plate; that little mess is part of the joke.
Pro Tips for This Recipe:
- Frost only when the brownies are fully cool or the crumbs sink.
- Push the cookie tombstones in at a slight angle so they look planted.
- Use thick frosting; thin frosting will not hold the Oreo “soil.”
Variations on This Dish:
- White Chocolate Graveyard: Use vanilla frosting and dark cookie crumbs for a brighter contrast.
- Mint Graveyard: Add 1/4 teaspoon peppermint extract to the frosting and use mint Oreos.
Common Mistakes to Avoid with This Dish:
- Cutting before decorating: The crumbs slide all over the place.
- Using stale tombstone cookies: They crack the second you press them in.
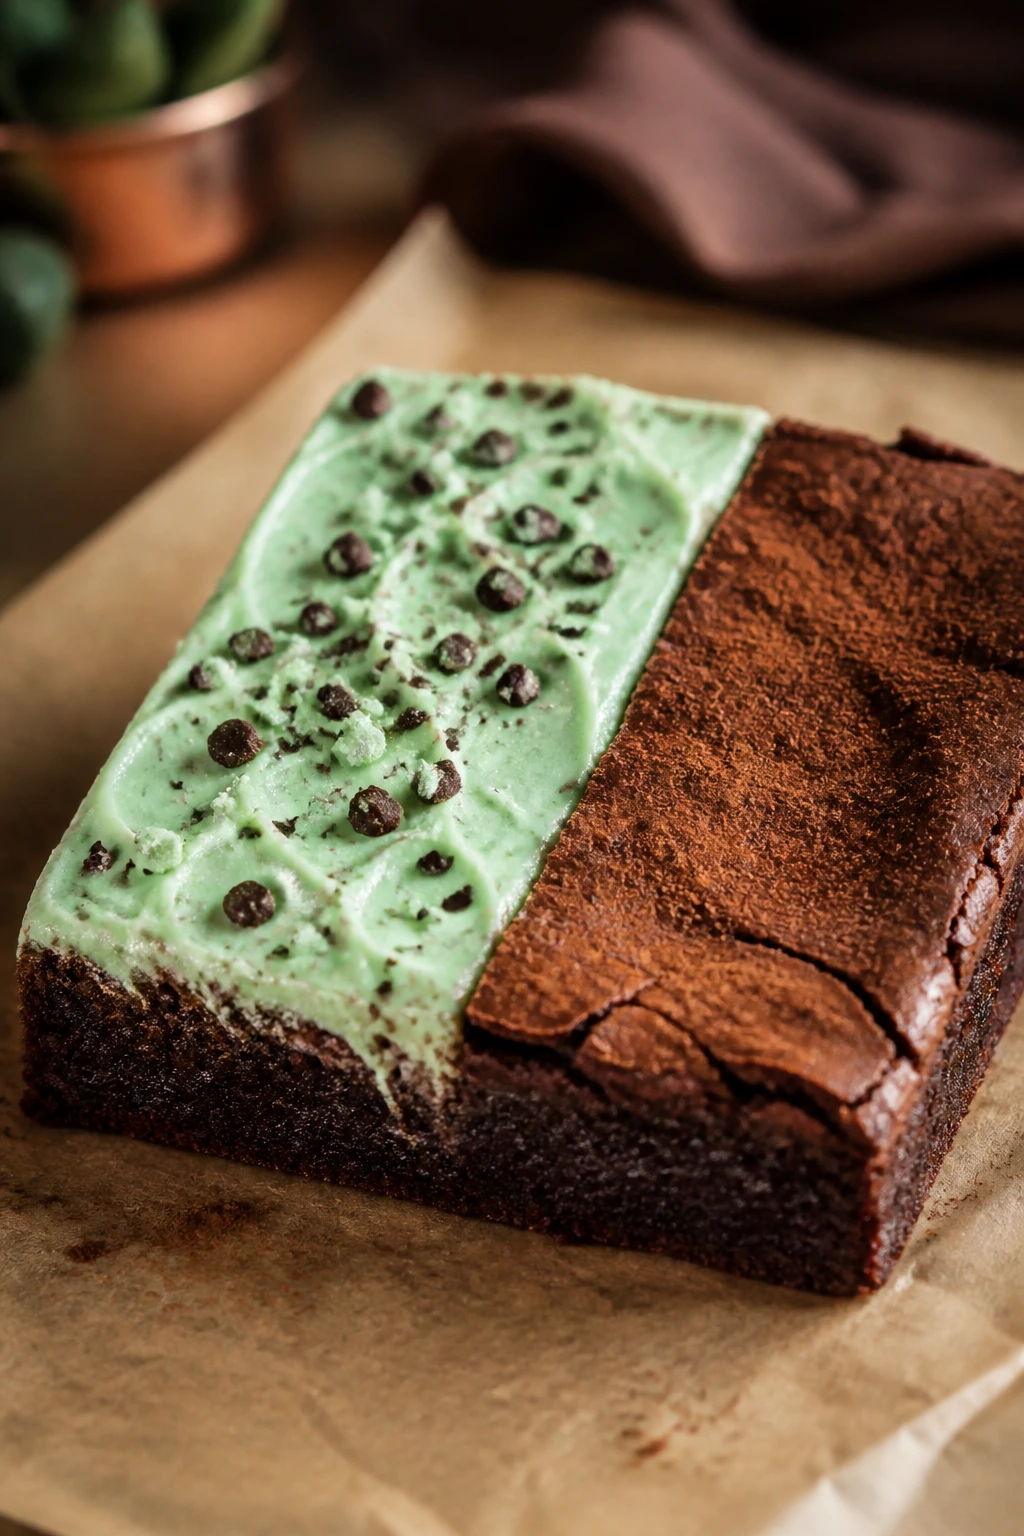
8. Mint Chocolate Spiderweb Brownies
Mint and chocolate do not need a holiday to make sense, but the green-and-white topping gives them a clear Halloween angle. The mint comes through as cool and clean, not toothpaste-y, which matters more than people admit. Too much mint and the whole pan tastes like gum.
Why It Works: A small amount of peppermint extract sharpens the chocolate without overwhelming it. White chocolate drizzle over a darker base gives you a spiderweb or striped effect, and a tiny bit of green tint makes the whole pan pop.
Key Ingredients:
- 1/2 cup butter, melted
- 1 cup sugar
- 2 eggs
- 1 teaspoon vanilla
- 1/4 teaspoon peppermint extract
- 1/3 cup cocoa powder
- 1/2 cup flour
- 1/4 teaspoon salt
- 1/2 cup mint chocolate chips
- 1/4 cup white chocolate chips, melted
- 1 drop green gel coloring, optional
Quick Steps:
- Preheat to 350°F and line the pan.
- Mix the batter and fold in mint chips.
- Bake for 22 to 24 minutes.
- Cool, then drizzle with white chocolate and a tiny bit of green tint if using.
- Drag a toothpick through the drizzle for a web look.
Equipment for This Recipe:
- 8×8-inch pan
- Mixing bowl
- Toothpick
- Microwave-safe bowl
- Spatula
How to Serve This Dish: These taste best with cold milk or black coffee, which keeps the mint from feeling too sweet. Slice them into tidy squares; the decoration does the talking.
Pro Tips for This Recipe:
- Use peppermint extract sparingly; 1/4 teaspoon is enough.
- Melt the white chocolate slowly so it stays smooth.
- If you want a stronger green look, tint only the drizzle, not the batter.
Variations on This Dish:
- Crushed Candy Cane Version: Skip mint chips and add 1/4 cup crushed peppermint candies on top.
- Dark Mint Overload: Use dark chocolate chips instead of semi-sweet for a sharper finish.
Common Mistakes to Avoid with This Dish:
- Overdoing the peppermint extract: The brownies stop tasting like dessert.
- Adding candy before the brownies cool: The decorations melt into the top.
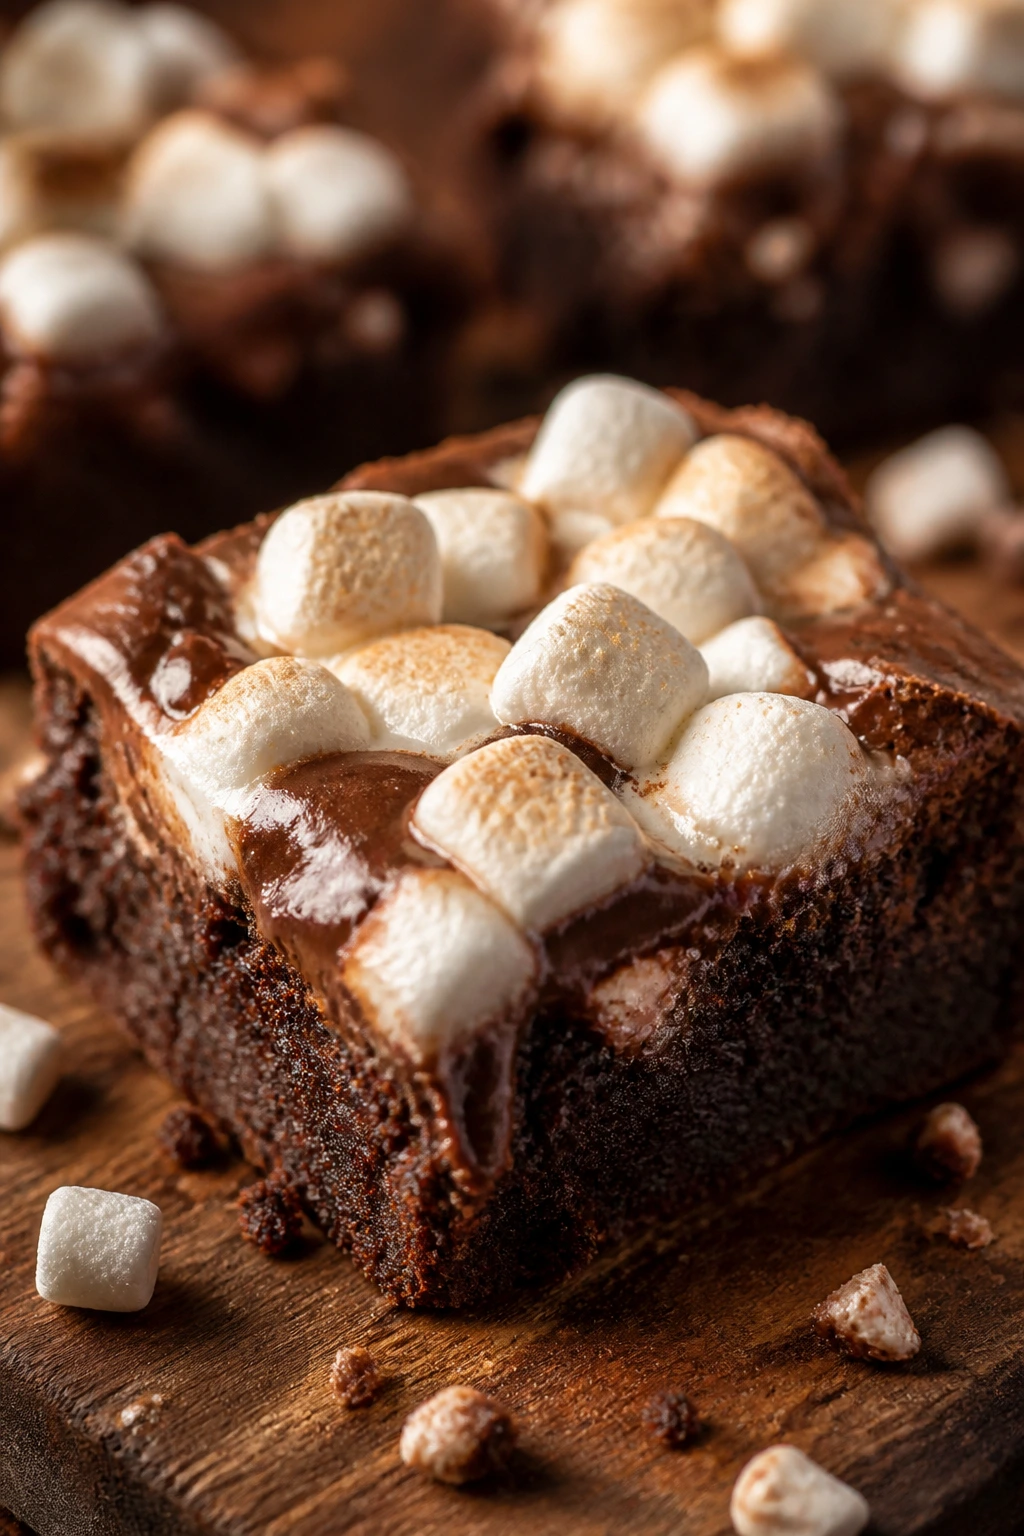
9. S’mores Brownies

These brownies taste like a campfire dessert that never needed a bonfire. Graham crumbs, chocolate, and marshmallow all show up, but the brownie pan keeps the whole thing neat enough for a weekday. That’s the trick — familiar flavors, less chaos.
Why It Works: A thin graham crust adds structure and a toasted edge, while marshmallows on top bubble without needing a torch. The chocolate base gives the dessert enough depth to keep the sweetness in check.
Key Ingredients:
- 1/2 cup graham cracker crumbs
- 3 tablespoons melted butter
- 1/2 cup butter, melted
- 1 cup sugar
- 2 eggs
- 1 teaspoon vanilla
- 1/3 cup cocoa powder
- 1/2 cup flour
- 1/4 teaspoon salt
- 1/2 cup milk chocolate chunks
- 1 cup mini marshmallows
Quick Steps:
- Preheat to 350°F and press the graham crumbs with melted butter into the lined pan.
- Mix the brownie batter and spread it over the crust.
- Scatter chocolate chunks on top and bake 20 minutes.
- Add mini marshmallows for the last 3 to 4 minutes.
- Cool until the marshmallows set slightly, then slice.
Equipment for This Recipe:
- 8×8-inch pan
- Two bowls
- Spoon
- Parchment paper
- Sharp knife
How to Serve This Dish: Serve these slightly warm so the marshmallows are soft but not sliding off the top. A drizzle of melted chocolate over the final squares makes them feel deliberate.
Pro Tips for This Recipe:
- Press the graham crust firmly or it will crumble at the first cut.
- Add marshmallows near the end so they puff rather than vanish.
- Use milk chocolate if you want a sweeter s’more flavor; dark chocolate makes it more grown-up.
Variations on This Dish:
- Peanut Butter S’mores: Add 2 tablespoons peanut butter to the brownie batter.
- Oven-Toasted Version: Broil for 20 to 30 seconds at the end if you want browned marshmallow tops, but watch it closely.
Common Mistakes to Avoid with This Dish:
- Adding marshmallows too early: They melt into strings and disappear.
- Skipping the crust press: Loose crumbs make rough slices.
10. Raspberry Ribbon Brownies
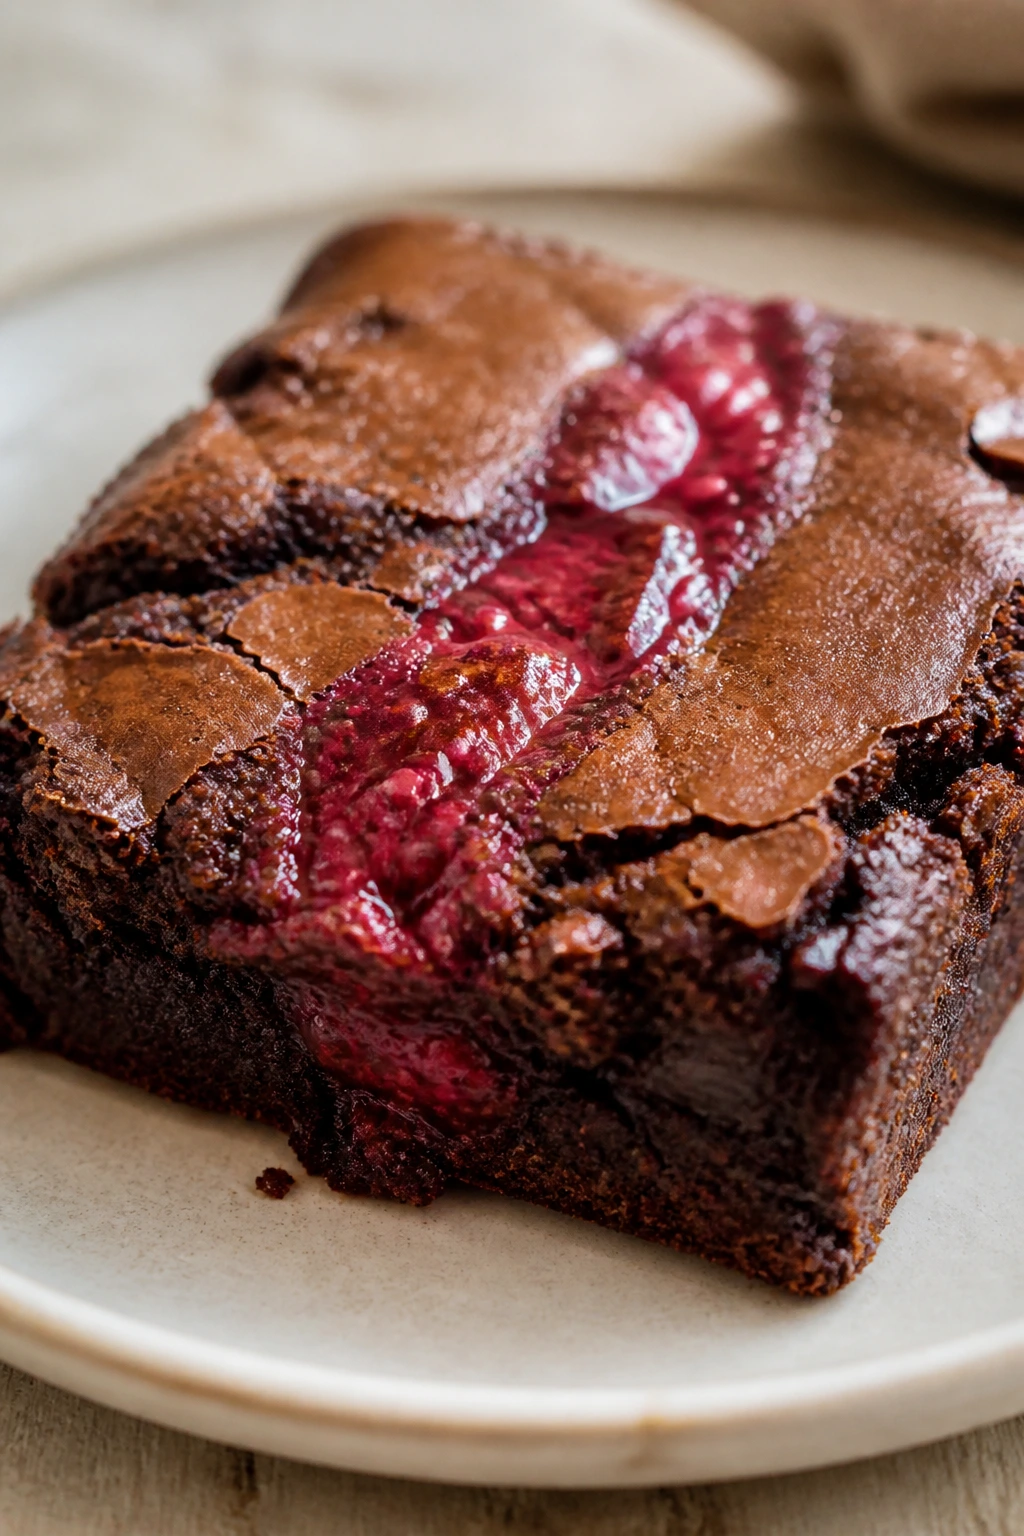
Raspberry and chocolate can swing jammy or sharp depending on how much fruit you use. I like the line right down the middle of the brownie better than chunks mixed through the batter, because the ribbon keeps each bite clear and bright. Less mess. More flavor.
Why It Works: Seedless raspberry jam gives you color and fruit flavor without adding extra liquid. The ribbon technique keeps the batter rich and dense, so the tart fruit stays visible instead of vanishing.
Key Ingredients:
- 1/2 cup butter, melted
- 1 cup sugar
- 2 eggs
- 1 teaspoon vanilla
- 1/3 cup cocoa powder
- 1/2 cup flour
- 1/4 teaspoon salt
- 1/3 cup seedless raspberry jam, warmed
- 1/2 cup dark chocolate chunks
Quick Steps:
- Preheat to 350°F and line the pan.
- Mix the brownie batter and spread half of it into the pan.
- Spoon on half the jam, add the rest of the batter, then dollop the remaining jam on top.
- Swirl lightly with a knife.
- Bake 24 to 26 minutes, cool, and cut.
Equipment for This Recipe:
- 8×8-inch pan
- Mixing bowl
- Knife for swirling
- Small saucepan or microwave bowl to warm jam
- Spatula
How to Serve This Dish: These are good with a little powdered sugar on top, which makes the red ribbon stand out. I’d serve them with tea or coffee rather than milk; the fruit likes a little bitterness beside it.
Pro Tips for This Recipe:
- Warm the jam first so it swirls instead of clumping.
- Use seedless jam for the smoothest finish.
- Do not over-swirl or the ribbon disappears into the brownie.
Variations on This Dish:
- Blackberry Ribbon: Use seedless blackberry jam for a darker, more gothic look.
- Raspberry-White Chocolate: Add 1/4 cup white chocolate chips to the batter.
Common Mistakes to Avoid with This Dish:
- Using watery fruit preserves: The center gets slick and can sink.
- Mixing the jam into the batter completely: You lose the ribbon effect.
11. Orange Zest Dark Chocolate Brownies
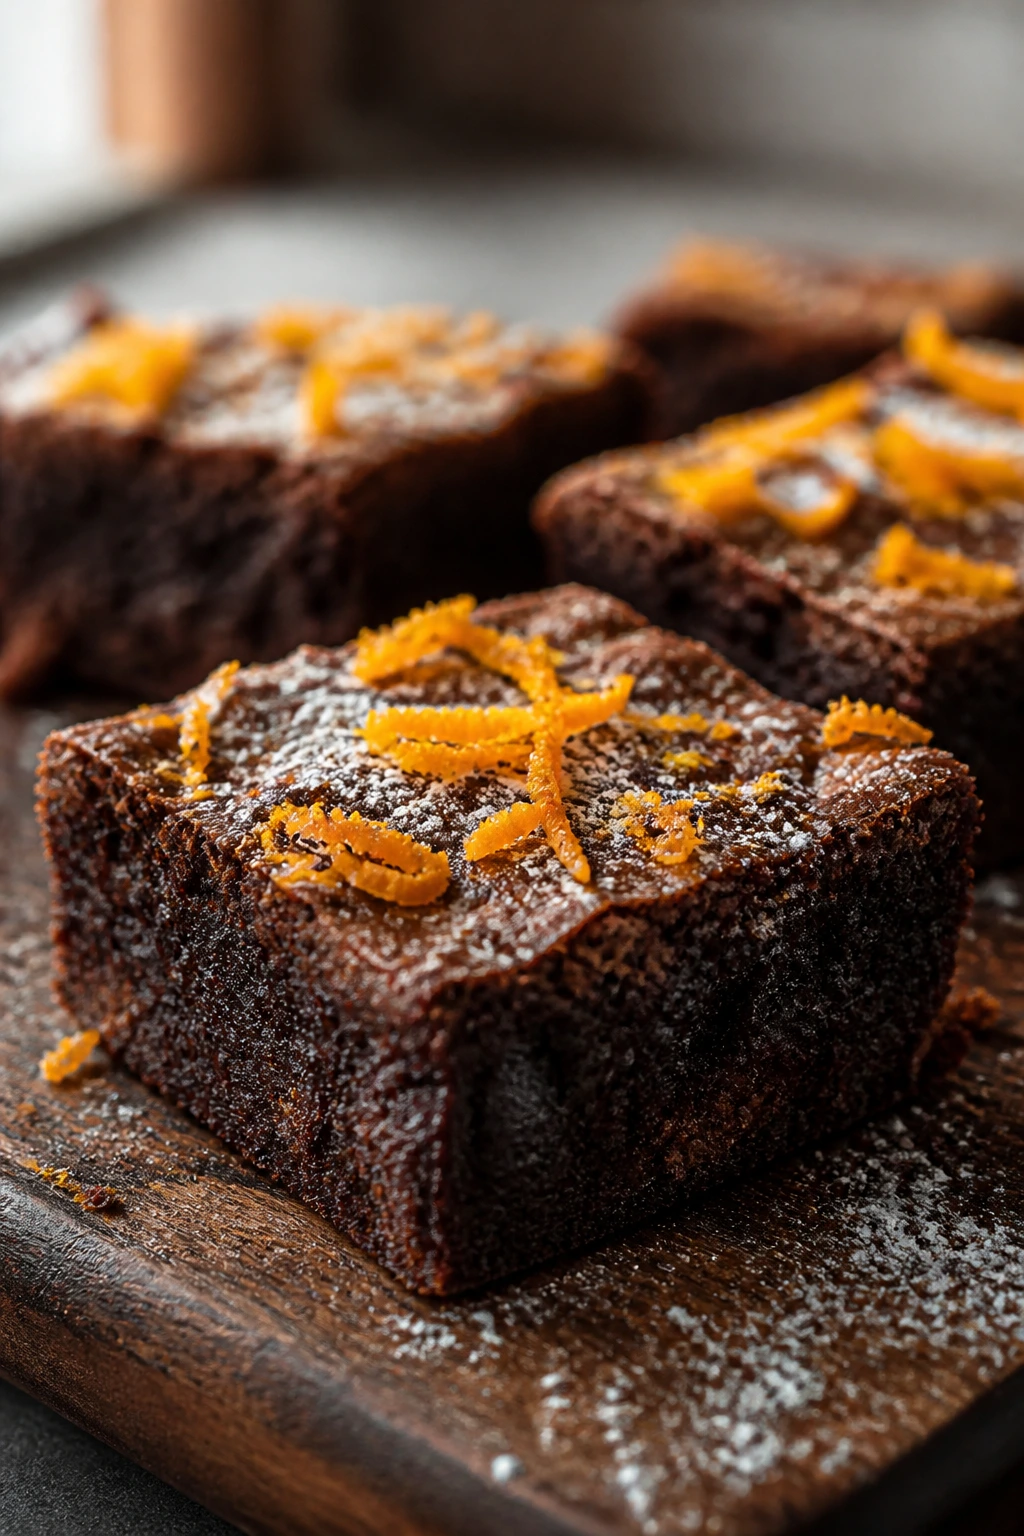
Orange peel and dark chocolate bring a grown-up note to the Halloween tray. The scent is the first thing you notice — bright, almost sharp — and then the brownie comes through with deep cocoa. It feels a little cleaner than the candy-heavy versions, which is handy if you want something less sweet.
Why It Works: Orange zest carries perfume without extra liquid, and dark chocolate chunks keep the flavor from getting flat. A tiny hit of salt at the end sharpens both.
Key Ingredients:
- 1/2 cup butter, melted
- 1 cup sugar
- 2 eggs
- 1 teaspoon vanilla
- Zest of 1 orange
- 1/3 cup cocoa powder
- 1/2 cup flour
- 1/4 teaspoon salt
- 1/2 cup dark chocolate chunks
- 1 teaspoon powdered sugar, optional for dusting
Quick Steps:
- Preheat to 350°F and line the pan.
- Mix the batter with the orange zest folded in at the end.
- Spread in the pan and bake 22 to 25 minutes.
- Cool, dust with powdered sugar if you like, and cut into squares.
Equipment for This Recipe:
- 8×8-inch pan
- Zester or microplane
- Mixing bowl
- Cooling rack
- Fine sieve for sugar
How to Serve This Dish: These are good after dinner with coffee because the orange keeps them from feeling too heavy. A few curls of orange zest on top make the squares look more finished than they are.
Pro Tips for This Recipe:
- Zest only the orange skin, not the bitter white pith.
- Use a dark chocolate that tastes good on its own; the orange won’t hide a flat chocolate.
- Add the zest to the sugar first if you want a stronger orange scent.
Variations on This Dish:
- Orange-Espresso Brownies: Add 1 teaspoon instant espresso powder to deepen the chocolate.
- Cranberry Orange: Scatter 1/3 cup chopped dried cranberries on top before baking.
Common Mistakes to Avoid with This Dish:
- Using orange juice instead of zest: Too much liquid changes the texture.
- Dusting sugar before the brownies cool: The sugar melts into the surface.
12. Mummy Brownies
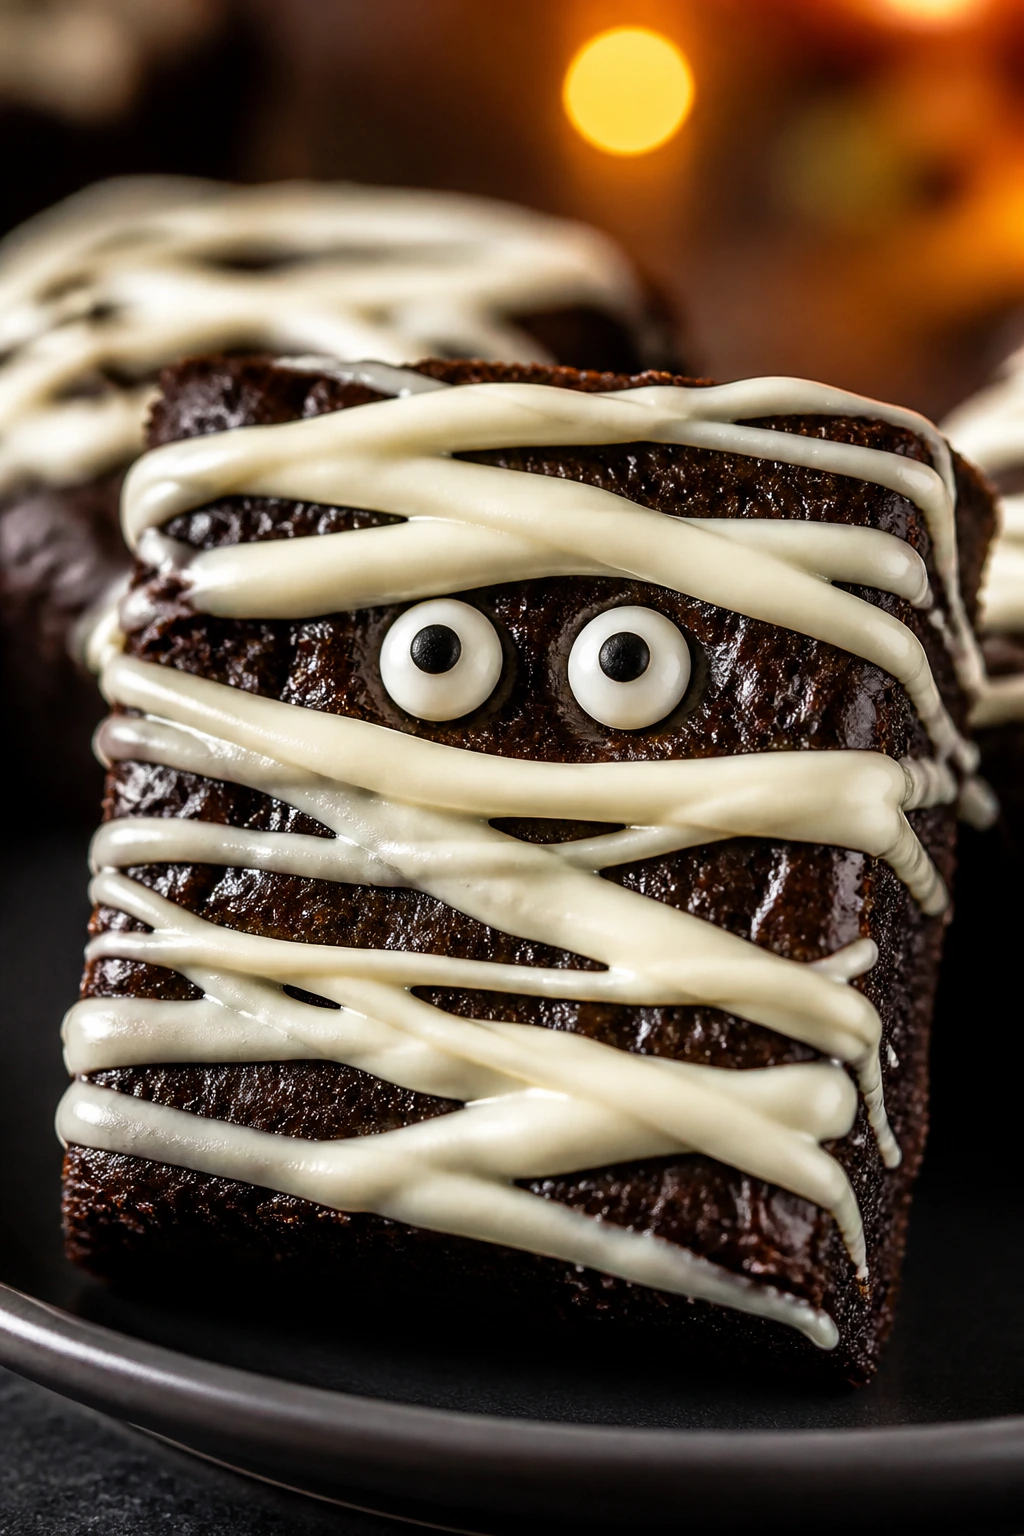
A mummy brownie needs two things: a dark base and a sloppy-but-charming white topping that reads as bandages. White chocolate drizzled back and forth across the surface does the job fast. Add candy eyes and the pan suddenly looks like it belongs at a Halloween party instead of on a regular cooling rack.
Why It Works: The contrast between dark brownie and white drizzle is strong enough to read from across the room. Because the “bandages” are just melted chocolate, this stays simple enough for a weeknight.
Key Ingredients:
- 1/2 cup butter, melted
- 1 cup sugar
- 2 eggs
- 1 teaspoon vanilla
- 1/3 cup cocoa powder
- 1/2 cup flour
- 1/4 teaspoon salt
- 1 cup white chocolate chips, melted
- 24 candy eyes
Quick Steps:
- Bake the brownie base in a lined 8×8-inch pan at 350°F for 22 to 24 minutes.
- Cool completely.
- Drizzle the white chocolate in uneven lines across the top.
- Press on candy eyes before the drizzle sets.
- Slice into rectangles so the mummy look stays visible.
Equipment for This Recipe:
- 8×8-inch pan
- Microwave-safe bowl
- Spoon or piping bag
- Toothpick
- Sharp knife
How to Serve This Dish: Cut these into long rectangles if you want the mummy lines to show. They’re the kind of brownies that make a plain paper plate look funny in a good way.
Pro Tips for This Recipe:
- Keep the white chocolate warm enough to drizzle, not so hot that it runs away.
- Press the eyes in right after drizzling so they stick.
- If you want more texture, add a few crushed chocolate wafers before the drizzle.
Variations on This Dish:
- Vanilla Frosting Mummies: Swap melted white chocolate for thick vanilla frosting.
- Gluten-Free Mummies: Use a gluten-free brownie mix or your favorite GF flour blend for the base.
Common Mistakes to Avoid with This Dish:
- Drawing perfect lines: Real mummies look messy. Messy is good here.
- Waiting too long to add eyes: The drizzle sets before they can stick.
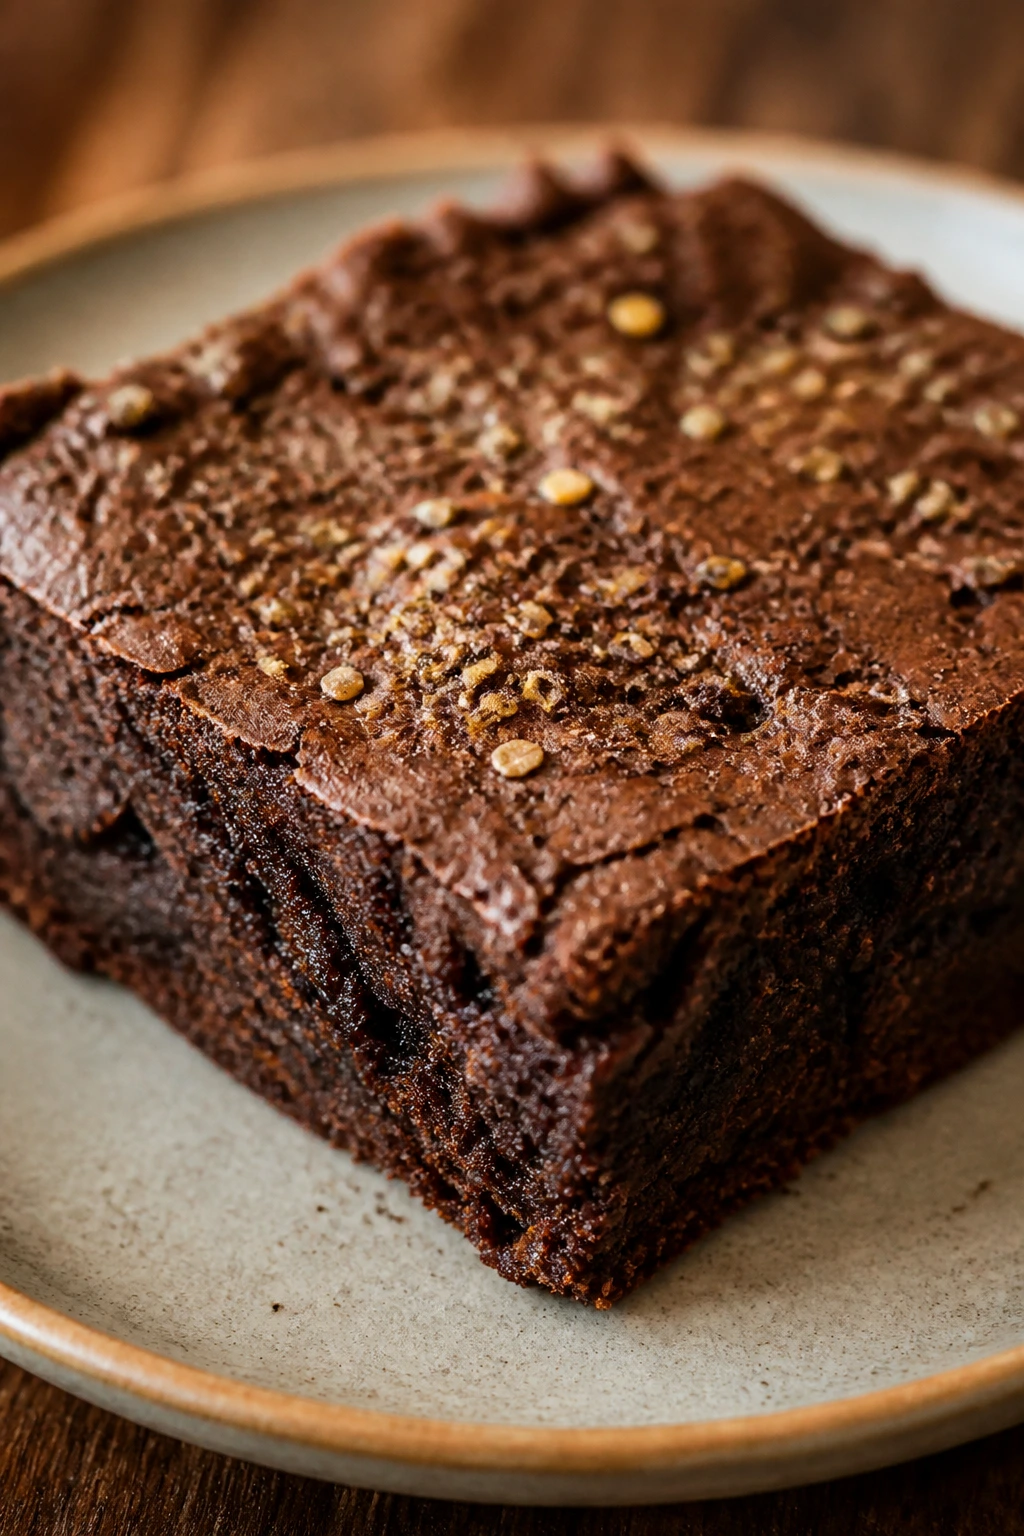
13. Espresso Fudge Brownies
Coffee in brownies is not about making them taste like coffee. It’s about making the chocolate taste deeper. Espresso powder disappears into the batter and leaves behind a darker, almost toasted edge that makes the whole pan taste more deliberate.
Why It Works: Espresso sharpens cocoa without adding extra moisture, which is exactly what you want in a fudgy brownie. A little vanilla keeps the flavor from getting too stern.
Key Ingredients:
- 1/2 cup butter, melted
- 1 cup sugar
- 2 eggs
- 1 teaspoon vanilla
- 1 tablespoon instant espresso powder
- 1/3 cup cocoa powder
- 1/2 cup flour
- 1/4 teaspoon salt
- 1/2 cup semi-sweet chocolate chips
Quick Steps:
- Preheat the oven to 350°F and line the pan.
- Whisk the butter, sugar, eggs, vanilla, and espresso powder.
- Stir in cocoa, flour, salt, and chocolate chips.
- Bake for 22 to 25 minutes.
- Cool fully before slicing.
Equipment for This Recipe:
- 8×8-inch pan
- Mixing bowl
- Whisk
- Spatula
- Cooling rack
How to Serve This Dish: Serve these with coffee if you want the flavors to echo each other, or with vanilla ice cream if you want contrast. A pinch of flaky salt on the top makes the espresso note stand out.
Pro Tips for This Recipe:
- Dissolve the espresso powder into the wet ingredients so it spreads evenly.
- Use good cocoa here; the coffee amplifies whatever cocoa you buy.
- Pull the brownies when the center still has a slight wobble.
Variations on This Dish:
- Mocha Chip Brownies: Add 1/4 cup chopped chocolate-covered espresso beans.
- Orange Mocha Brownies: Add 1 teaspoon orange zest for a brighter finish.
Common Mistakes to Avoid with This Dish:
- Using brewed coffee instead of espresso powder: It adds liquid you do not need.
- Overbaking: Coffee-flavored brownies taste bitter if they dry out.
14. Cherry Almond Brownies
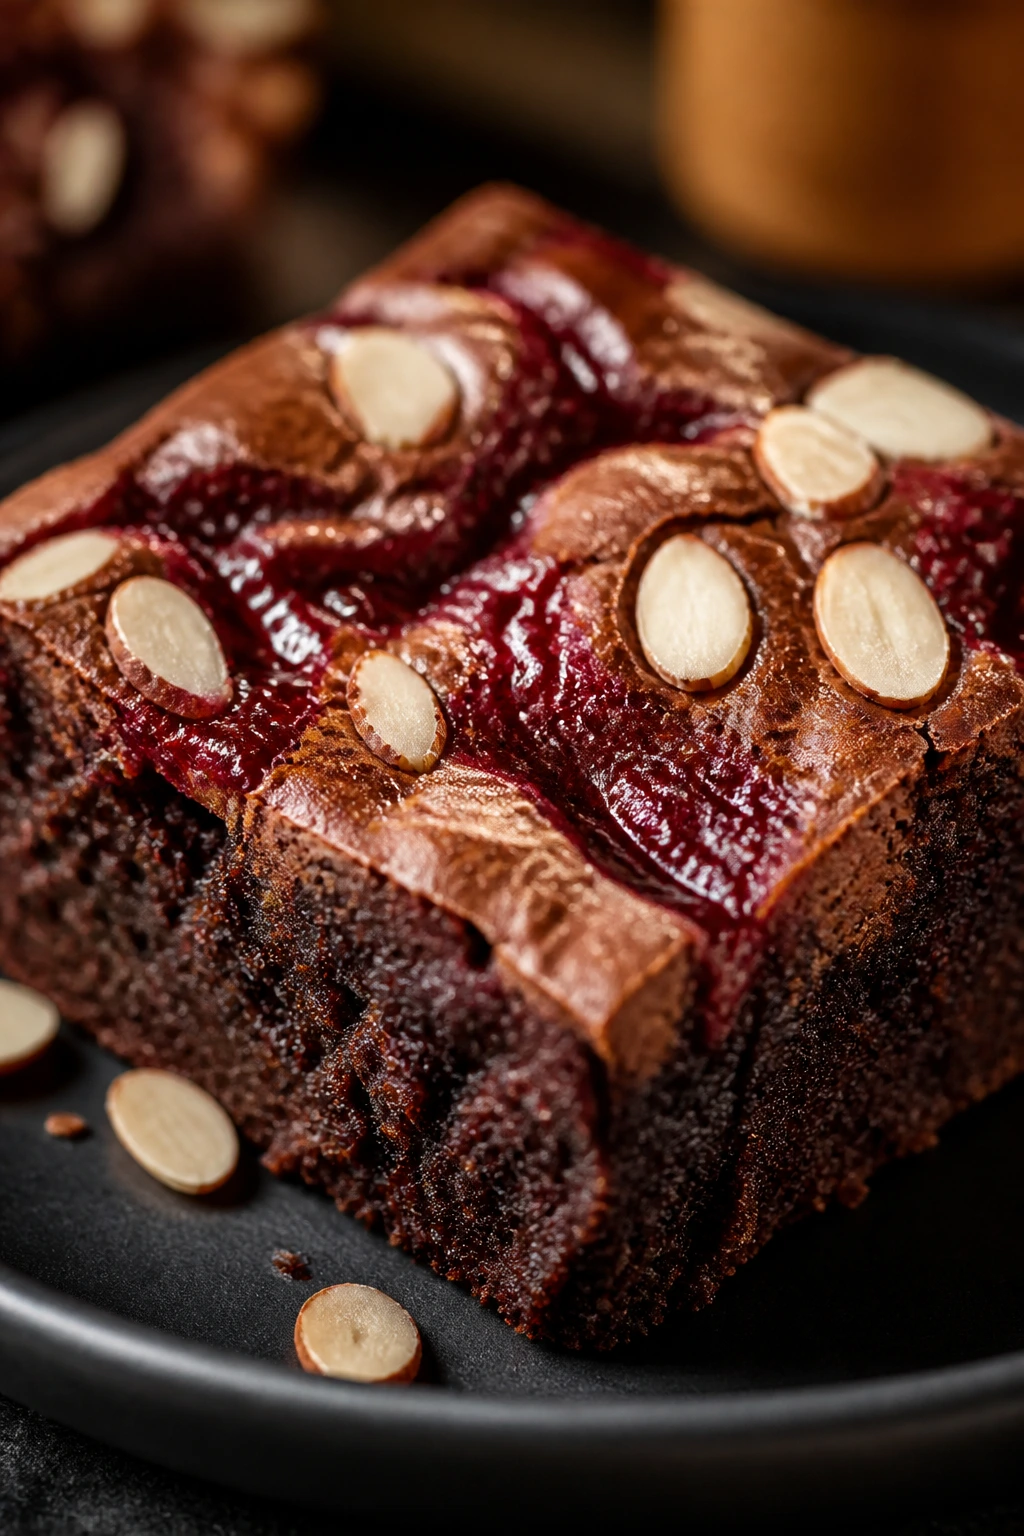
Cherry and almond feel a little old-school, which is part of the appeal. Cherry preserves give the brownies a ruby streak, and almond extract brings a bakery scent that makes the whole pan smell like a fancy cookie tray. It’s a neat trick with very few moving parts.
Why It Works: Almond extract is strong, so a tiny amount does a lot of work. Cherry preserves give color and tartness without thinning the batter, which keeps the brownies dense.
Key Ingredients:
- 1/2 cup butter, melted
- 1 cup sugar
- 2 eggs
- 1/2 teaspoon almond extract
- 1/3 cup cocoa powder
- 1/2 cup flour
- 1/4 teaspoon salt
- 1/3 cup cherry preserves
- 1/3 cup sliced almonds
- 1/2 cup dark chocolate chunks
Quick Steps:
- Preheat to 350°F and line the pan.
- Mix the brownie batter with almond extract.
- Spread half the batter, add spoonfuls of cherry preserves, then finish with the rest of the batter.
- Swirl lightly and scatter almonds on top.
- Bake 24 to 26 minutes.
Equipment for This Recipe:
- 8×8-inch pan
- Mixing bowl
- Knife for swirling
- Spoon
- Cooling rack
How to Serve This Dish: These look elegant sliced into narrow bars and plated with a few extra almonds beside them. A small spoonful of whipped cream works if you want a softer dessert.
Pro Tips for This Recipe:
- Use preserves, not watery jam, so the swirl stays defined.
- Almond extract is potent; do not pour with a heavy hand.
- Toast the almonds briefly if you want a deeper nutty flavor.
Variations on This Dish:
- Black Cherry Version: Swap cherry preserves for black cherry preserves.
- Cherry Coconut: Add 1/4 cup toasted coconut to the top.
Common Mistakes to Avoid with This Dish:
- Too much almond extract: It can taste like soap if you overdo it.
- Dumping the preserves in one blob: You want ribbons, not one sticky center.
15. Tahini Swirl Brownies
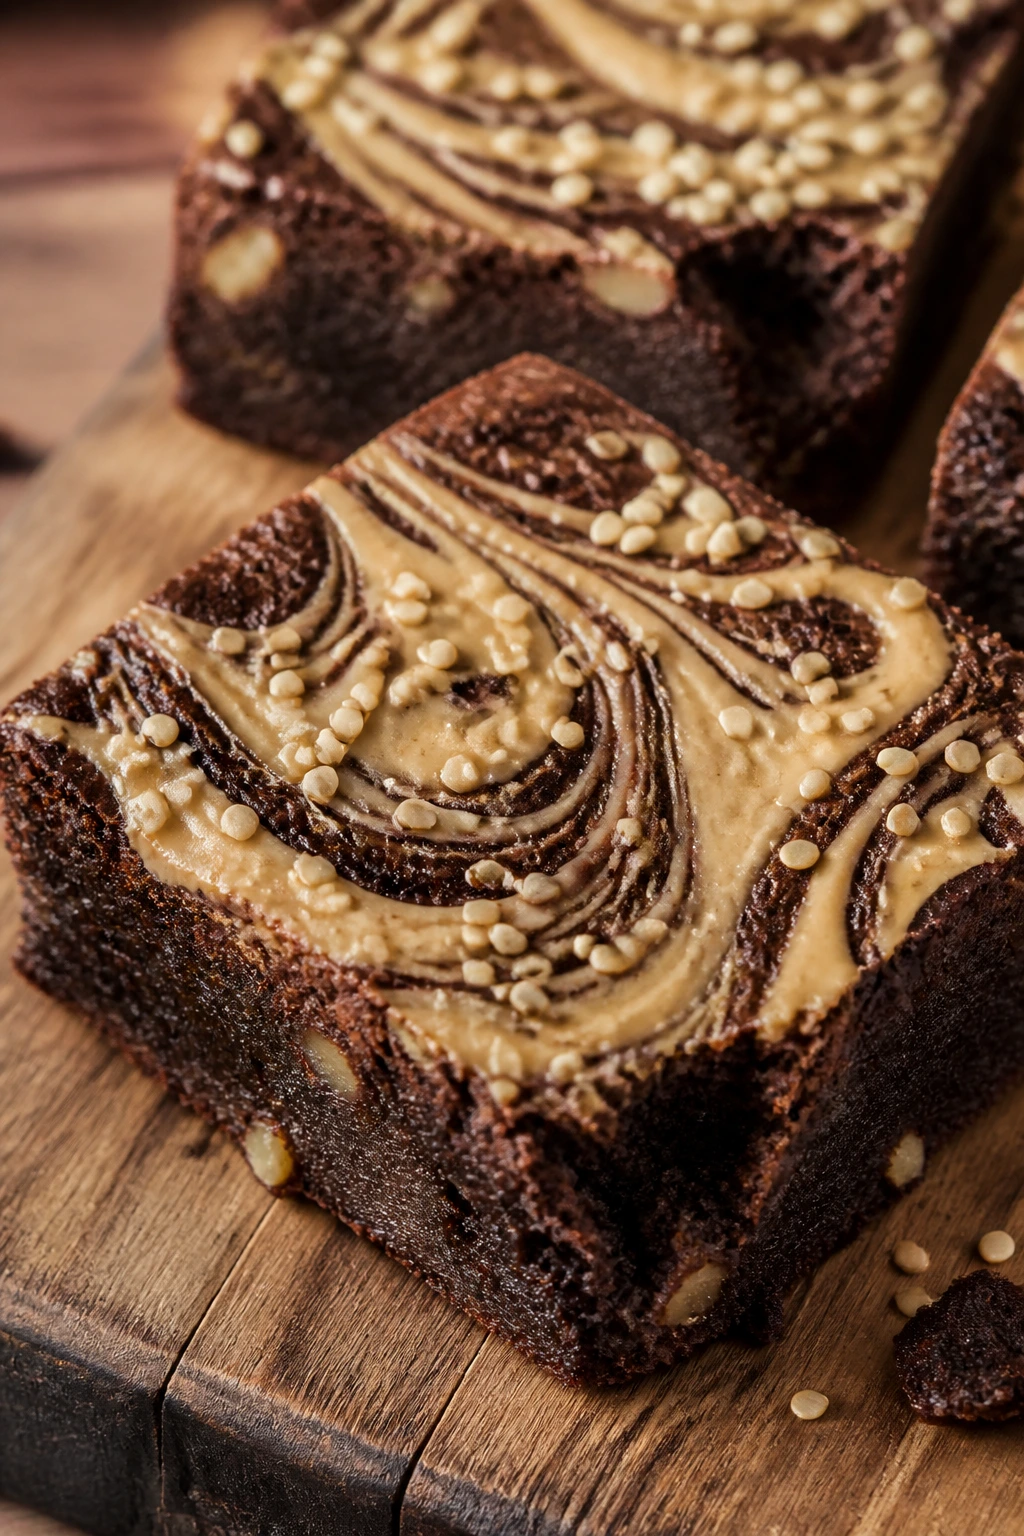
Tahini in brownies sounds like a detour, but it works because sesame brings a nutty bitterness that chocolate loves. The swirl on top gives the brownies that marbled look without adding a second full batter. It also makes the pan taste less sweet, which I appreciate.
Why It Works: Tahini has enough fat to swirl smoothly and enough savoriness to cut through chocolate. A little honey or sugar helps it stay spreadable instead of pasty.
Key Ingredients:
- 1/2 cup butter, melted
- 1 cup sugar
- 2 eggs
- 1 teaspoon vanilla
- 1/3 cup cocoa powder
- 1/2 cup flour
- 1/4 teaspoon salt
- 1/4 cup tahini
- 2 tablespoons powdered sugar
- 1 tablespoon honey
- 1 tablespoon sesame seeds
Quick Steps:
- Preheat the oven to 350°F and line the pan.
- Mix the brownie batter and spread it in the pan.
- Stir tahini, powdered sugar, and honey until smooth.
- Dollop the tahini mixture over the batter and swirl.
- Bake 23 to 25 minutes, then scatter sesame seeds on top.
Equipment for This Recipe:
- 8×8-inch pan
- Bowl for the tahini swirl
- Spoon
- Knife
- Cooling rack
How to Serve This Dish: These are good with tea, especially something black and plain. I’d cut them into smaller squares than usual because the flavor is richer than it first looks.
Pro Tips for This Recipe:
- Warm the tahini slightly if it feels thick.
- Keep the swirl close to the surface so it stays visible.
- Use a smooth, runny tahini rather than a dry, chalky one.
Variations on This Dish:
- Tahini Chocolate Chip: Fold 1/3 cup chocolate chips into the brownie batter.
- Sesame Crunch: Add a tablespoon of toasted sesame seeds on top after baking.
Common Mistakes to Avoid with This Dish:
- Using dry tahini straight from the jar: It tears instead of swirling.
- Over-sweetening the swirl: Tahini loses its edge if it tastes like frosting.
16. Brown Butter Pecan Brownies
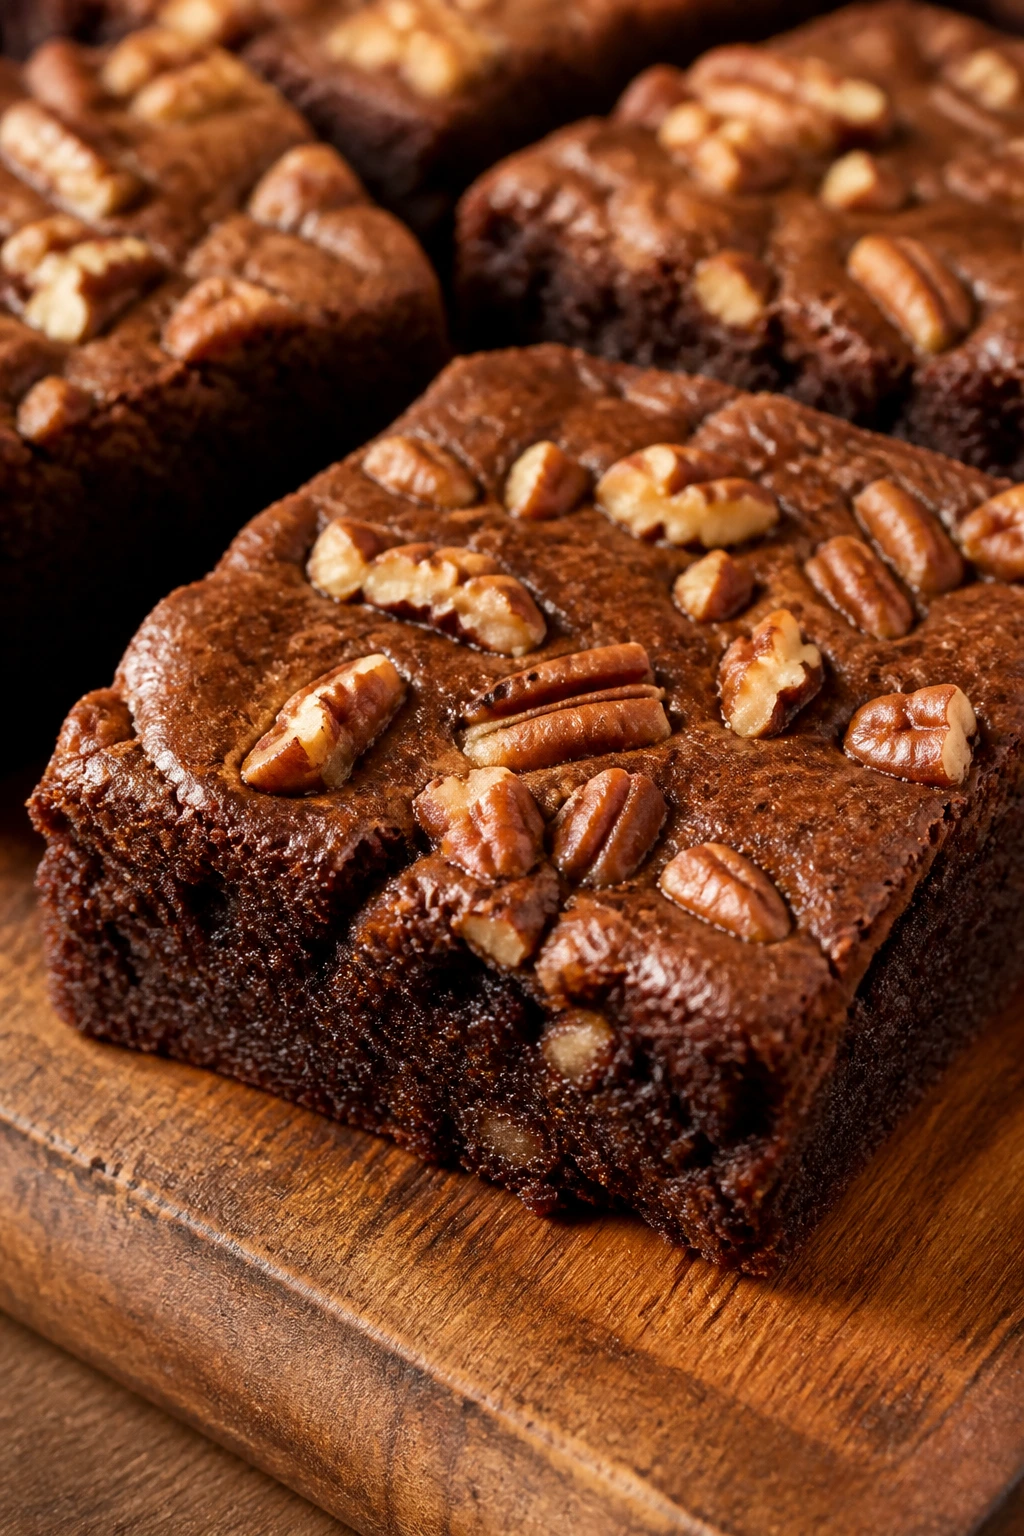
Brown butter makes the whole pan smell toasted before the brownies even go into the oven. Pecans add crunch and a little woodsy warmth, which feels right when Halloween is drifting toward fall flavors anyway. This is one of the few brownies here that tastes like it spent time thinking about itself.
Why It Works: Browning the butter gives the batter a nutty edge that plain melted butter cannot match. Pecans stay crisp if you fold them in lightly and keep the bake short.
Key Ingredients:
- 1/2 cup unsalted butter
- 1 cup sugar
- 2 eggs
- 1 teaspoon vanilla
- 1/3 cup cocoa powder
- 1/2 cup flour
- 1/4 teaspoon salt
- 3/4 cup chopped pecans
- 1/2 cup semi-sweet chocolate chips
Quick Steps:
- Brown the butter in a small pan until it smells nutty, then cool slightly.
- Preheat the oven to 350°F and line the pan.
- Whisk the browned butter, sugar, eggs, and vanilla.
- Stir in cocoa, flour, salt, pecans, and chocolate chips.
- Bake 23 to 26 minutes and cool before slicing.
Equipment for This Recipe:
- Small saucepan
- 8×8-inch pan
- Mixing bowl
- Wooden spoon or spatula
- Cooling rack
How to Serve This Dish: Serve these with a little flake of salt on top and, if you’re feeling generous, a scoop of butter pecan ice cream. They cut into tidy squares, but the toasted butter scent makes people crowd around the pan first.
Pro Tips for This Recipe:
- Watch the butter closely; it can go from brown to burnt fast.
- Cool the butter a bit before adding eggs so they do not scramble.
- Toast the pecans first if you want more crunch.
Variations on This Dish:
- Walnut Brown Butter: Swap pecans for walnuts if that’s what you have.
- Cinnamon Pecan: Add 1/2 teaspoon cinnamon for a warmer finish.
Common Mistakes to Avoid with This Dish:
- Not cooling the browned butter: It can cook the eggs on contact.
- Overbaking: Brown butter makes the flavor richer, not tougher.
17. Black Forest Brownies

Cherry and chocolate show up together for a reason, and this pan leans into that pairing hard. The fruit breaks up the brownie’s density, while the dark chocolate keeps it from tasting like pie filling in disguise. It’s dramatic in the old-fashioned way, which suits Halloween better than a lot of gimmicks.
Why It Works: Cherry pie filling or thick cherry preserves add fruit flavor without needing extra prep. Dark chocolate chunks keep the brownies from becoming too sweet, which matters when fruit is in the mix.
Key Ingredients:
- 1/2 cup butter, melted
- 1 cup sugar
- 2 eggs
- 1 teaspoon vanilla
- 1/3 cup cocoa powder
- 1/2 cup flour
- 1/4 teaspoon salt
- 1/2 cup dark chocolate chunks
- 1/3 cup cherry pie filling, drained slightly
- 1/4 cup mini chocolate chips
Quick Steps:
- Preheat to 350°F and line the pan.
- Spread half the brownie batter into the pan.
- Spoon cherry filling over the batter, then add the remaining batter in dollops.
- Scatter chocolate chips on top and swirl lightly.
- Bake 24 to 27 minutes.
Equipment for This Recipe:
- 8×8-inch pan
- Mixing bowl
- Spoon for filling
- Knife for swirling
- Cooling rack
How to Serve This Dish: These are lovely with whipped cream, but plain works too. A cherry on top is a little extra, and this is one place where extra does not annoy me.
Pro Tips for This Recipe:
- Drain the cherry filling a bit so the center does not go wet.
- Leave a few visible cherry streaks; they look better than full mixing.
- Use dark chocolate with enough bitterness to balance the fruit.
Variations on This Dish:
- Chocolate Cherry Almond: Add 1/2 teaspoon almond extract to the batter.
- Black Forest Bites: Bake in a mini muffin tin for bite-size party pieces.
Common Mistakes to Avoid with This Dish:
- Using too much cherry filling: The brownies can turn soggy.
- Over-swirling the batter: The cherry color disappears.
18. Marshmallow Swirl Brownies
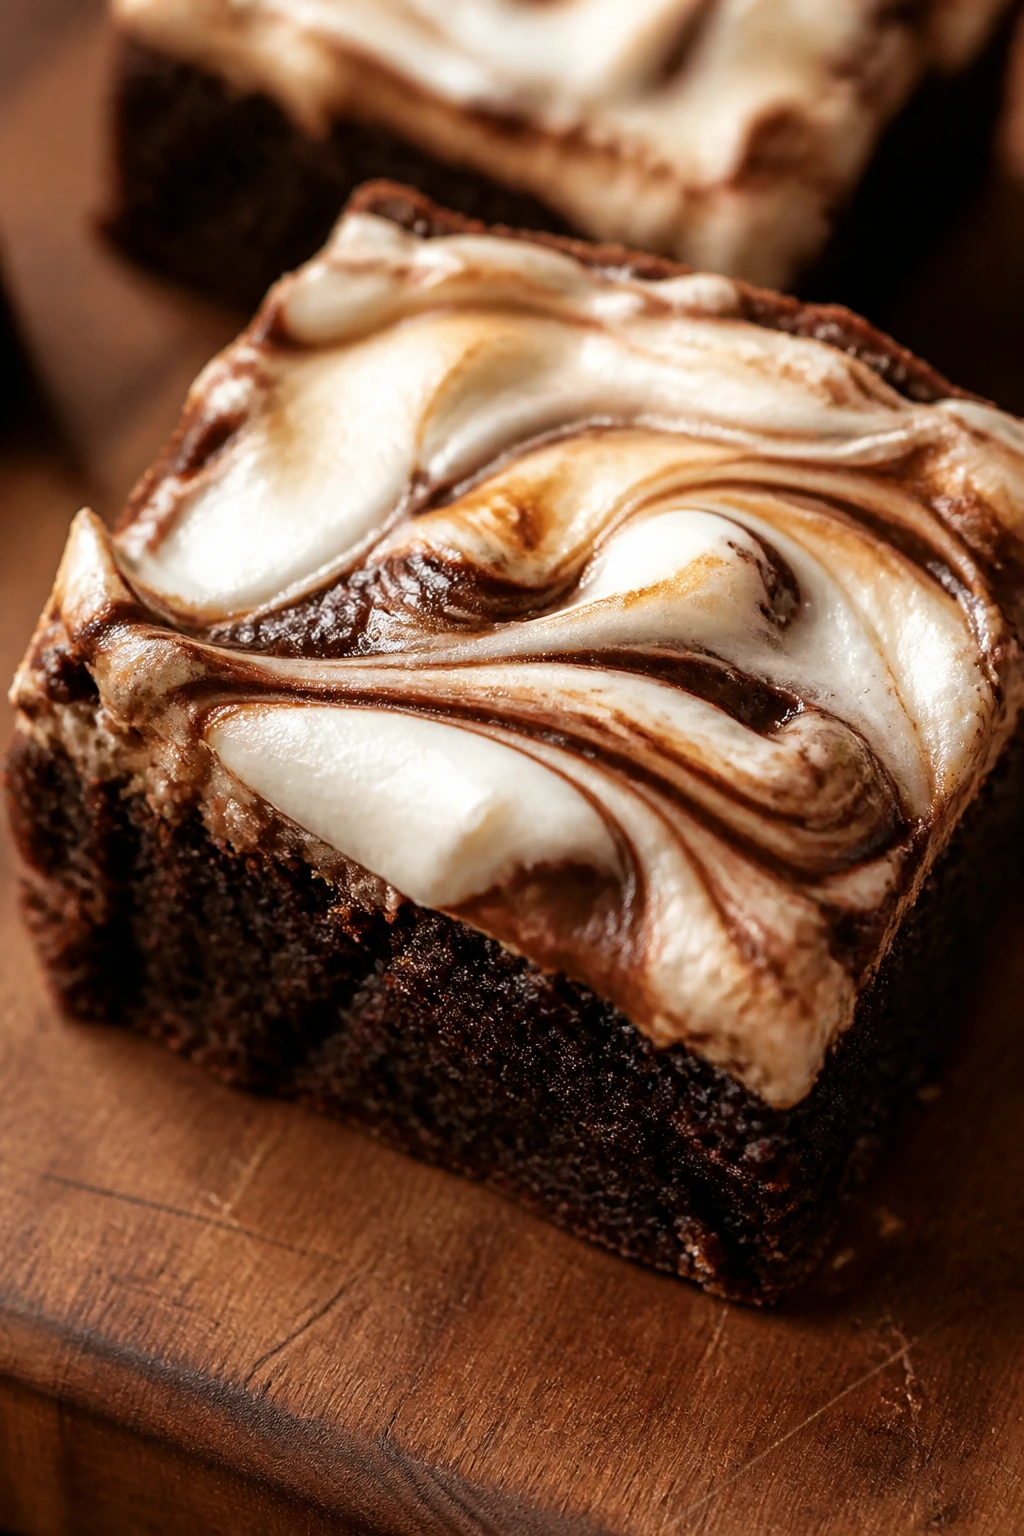
Some brownies need toppings. This one needs a swirl. Marshmallow creme melts into the top and leaves behind glossy streaks that look almost like smoke. It’s a softer Halloween look, less costume-shop, more late-night treat.
Why It Works: Marshmallow creme stays smooth under heat and gives you shiny ribbons across a dark base. Because it is already sweet, you do not need much — and that restraint helps.
Key Ingredients:
- 1/2 cup butter, melted
- 1 cup sugar
- 2 eggs
- 1 teaspoon vanilla
- 1/3 cup cocoa powder
- 1/2 cup flour
- 1/4 teaspoon salt
- 1 cup marshmallow creme
- 1/2 cup chocolate chips
Quick Steps:
- Preheat to 350°F and line the pan.
- Mix the brownie batter and spread it in the pan.
- Drop spoonfuls of marshmallow creme over the top.
- Drag a knife through it once or twice for a loose swirl.
- Bake 22 to 25 minutes and cool before slicing.
Equipment for This Recipe:
- 8×8-inch pan
- Spoon
- Knife
- Mixing bowl
- Cooling rack
How to Serve This Dish: These are best eaten the day they’re baked, while the marshmallow top is still soft. A pinch of flaky salt keeps the sweetness from running away with the whole pan.
Pro Tips for This Recipe:
- Use marshmallow creme, not stiff frosting, or the swirl won’t move.
- Keep the swirl loose; too much knife work blends the layers.
- Let the brownies cool before cutting so the top holds.
Variations on This Dish:
- Chocolate Chip Marshmallow: Fold extra chips into the batter for more texture.
- Toasted Marshmallow Finish: Broil for 20 seconds at the end, watching closely.
Common Mistakes to Avoid with This Dish:
- Over-swirling the creme: You lose the pattern.
- Baking too long: Marshmallow turns sticky and tough.
19. Toffee Crunch Brownies
Toffee bits are one of the easiest ways to make brownies taste more expensive than they are. They melt a little at the edges, stay crisp in the middle, and give each bite a brittle snap that plain chocolate can’t manage alone. Very little drama. Good payoff.
Why It Works: Toffee adds both sugar and crunch, which makes the brownie top more interesting without requiring a separate frosting. A small pinch of salt keeps the sweetness under control.
Key Ingredients:
- 1/2 cup butter, melted
- 1 cup sugar
- 2 eggs
- 1 teaspoon vanilla
- 1/3 cup cocoa powder
- 1/2 cup flour
- 1/4 teaspoon salt
- 3/4 cup toffee bits
- 1/2 cup milk chocolate chips
- 1/2 teaspoon flaky salt
Quick Steps:
- Preheat the oven to 350°F and line the pan.
- Mix the batter and fold in most of the toffee bits.
- Spread into the pan and scatter the rest on top with the chocolate chips.
- Bake for 22 to 25 minutes.
- Finish with flaky salt once cool.
Equipment for This Recipe:
- 8×8-inch pan
- Mixing bowl
- Spatula
- Cooling rack
- Sharp knife
How to Serve This Dish: These slice neatly into small squares and hold up well on a dessert tray. They go well with coffee, especially if the coffee is black and unsweetened.
Pro Tips for This Recipe:
- Reserve some toffee bits for the top so they stay visible.
- Cool fully before slicing, or the toffee can pull.
- Use milk chocolate if you want a sweeter bar; semi-sweet gives more balance.
Variations on This Dish:
- Salted Caramel Toffee: Drizzle caramel sauce across the cooled bars.
- Toffee Pretzel: Add 1/4 cup crushed pretzels for extra salt and crunch.
Common Mistakes to Avoid with This Dish:
- Adding all the toffee only to the batter: You lose the crunchy top.
- Cutting too early: Warm toffee sticks to the knife and smears.
20. Red Velvet Cheesecake Brownies

These are the most theatrical brownies in the batch, and they earn that attitude. The red batter gives you the color, while the cheesecake swirl cuts through the sweetness and keeps the texture soft. It’s the pan I’d bring out when I want people to think I spent more time than I did.
Why It Works: Red velvet brownie batter sits between cake and fudge, which makes it a good host for the tangy cream cheese layer. The swirl adds moisture and that sharp white contrast that always looks good in a square pan.
Key Ingredients:
- 1/2 cup unsalted butter, melted
- 1 cup sugar
- 2 large eggs
- 1 teaspoon vanilla extract
- 1 tablespoon red food coloring
- 1/4 cup unsweetened cocoa powder
- 3/4 cup all-purpose flour
- 1/4 teaspoon fine salt
- 4 ounces cream cheese, softened
- 2 tablespoons sugar
- 1 egg yolk
- 1/2 teaspoon vanilla
Quick Steps:
- Preheat to 350°F and line the pan.
- Mix the red velvet brownie batter and spread most of it into the pan.
- Beat the cream cheese, sugar, yolk, and vanilla until smooth.
- Dollop the cheesecake mixture on top and swirl gently.
- Bake 24 to 28 minutes, then cool before slicing.
Equipment for This Recipe:
- 8×8-inch pan
- Hand mixer or sturdy whisk
- Two bowls
- Spatula
- Butter knife for swirling
How to Serve This Dish: These are best chilled for a cleaner slice, then served with a small fork because the swirl looks better when it isn’t squashed. A few white chocolate curls on top make the red color pop.
Pro Tips for This Recipe:
- Use gel food coloring if you want a stronger red with less liquid.
- Keep the swirl shallow so it stays visible after baking.
- Chill before cutting for the cleanest marbling.
Variations on This Dish:
- Black Velvet Version: Use black cocoa for a darker, moodier pan.
- Red Velvet Oreo: Press crushed Oreo crumbs onto the top before baking.
Common Mistakes to Avoid with This Dish:
- Too much food coloring: The batter can start tasting off.
- Overmixing the cheesecake swirl: It blends into the red batter and loses the contrast.
21. Hot Cocoa Brownies
Hot cocoa mix belongs in brownies more often than it does. The marshmallow flavor, the chocolate powder, the little bit of sweetness — it all translates cleanly to a pan dessert. Add a handful of mini marshmallows and the whole thing tastes like a mug you can cut into squares.
Why It Works: Hot cocoa mix brings built-in flavor and sugar, so you do not need to doctor the batter much. Mini marshmallows melt just enough to give the top a soft, bumpy finish.
Key Ingredients:
- 1/2 cup butter, melted
- 3/4 cup sugar
- 2 eggs
- 1 teaspoon vanilla
- 1/4 cup hot cocoa mix
- 1/4 cup cocoa powder
- 1/2 cup flour
- 1/4 teaspoon salt
- 1/2 cup mini marshmallows
- 1/2 cup chocolate chips
Quick Steps:
- Preheat to 350°F and line the pan.
- Mix the wet ingredients, then stir in the cocoa powder and hot cocoa mix.
- Fold in flour and chocolate chips.
- Bake 20 minutes, top with marshmallows, then bake 2 to 3 minutes more.
- Cool before cutting.
Equipment for This Recipe:
- 8×8-inch pan
- Mixing bowl
- Spatula
- Cooling rack
- Knife
How to Serve This Dish: These are made for cold milk or a mug of coffee on the side, which makes the whole thing feel like dessert and drink at once. A few extra marshmallows on the plate never hurt.
Pro Tips for This Recipe:
- Pick a hot cocoa mix you already like the flavor of.
- Add the marshmallows near the end so they puff instead of dissolving.
- Watch the salt; cocoa mixes can be sweeter than you expect.
Variations on This Dish:
- Peppermint Cocoa Brownies: Add 1/4 teaspoon peppermint extract to the batter.
- Mocha Cocoa: Add 1 teaspoon espresso powder for a deeper chocolate flavor.
Common Mistakes to Avoid with This Dish:
- Using flavored cocoa mix with tons of filler: The brownies can taste thin.
- Leaving marshmallows in too long: They melt away or turn chewy.
22. Chai Spice Brownies
Chai spice gives brownies a warmer, quieter kind of Halloween feel. Cinnamon, ginger, cardamom, and clove pull the chocolate in a different direction, almost like a spice cookie got folded into a brownie pan. The result is deeper than plain chocolate and less sweet than candy-heavy versions.
Why It Works: Spices need fat to bloom, and the brownie batter gives them that. The flavor comes through more cleanly if you use a measured blend instead of dumping in random shakes from the jar.
Key Ingredients:
- 1/2 cup butter, melted
- 1 cup sugar
- 2 eggs
- 1 teaspoon vanilla
- 1 1/2 teaspoons chai spice blend
- 1/3 cup cocoa powder
- 1/2 cup flour
- 1/4 teaspoon salt
- 1/2 cup white chocolate chips
- 1 tablespoon chopped pistachios, optional
Quick Steps:
- Preheat to 350°F and line the pan.
- Whisk the butter, sugar, eggs, vanilla, and chai spice.
- Stir in cocoa, flour, salt, and white chocolate chips.
- Bake for 22 to 24 minutes.
- Cool and top with pistachios if using.
Equipment for This Recipe:
- 8×8-inch pan
- Mixing bowl
- Whisk
- Cooling rack
- Knife
How to Serve This Dish: These pair well with tea, especially black tea or anything with milk. I’d cut them into thin bars rather than fat squares because the spice flavor is more noticeable in smaller bites.
Pro Tips for This Recipe:
- Use a chai blend that includes cardamom; it keeps the flavor from tasting flat.
- White chocolate helps soften the spices.
- If your spice blend is strong, start with 1 teaspoon and taste the batter.
Variations on This Dish:
- Chai-Honey Brownies: Add 1 tablespoon honey for a softer edge.
- Chocolate Orange Chai: Mix in 1 teaspoon orange zest.
Common Mistakes to Avoid with This Dish:
- Using too much clove: It can take over the pan.
- Skipping the salt: Spiced chocolate needs it to keep the flavors balanced.
23. Chili Dark Chocolate Brownies
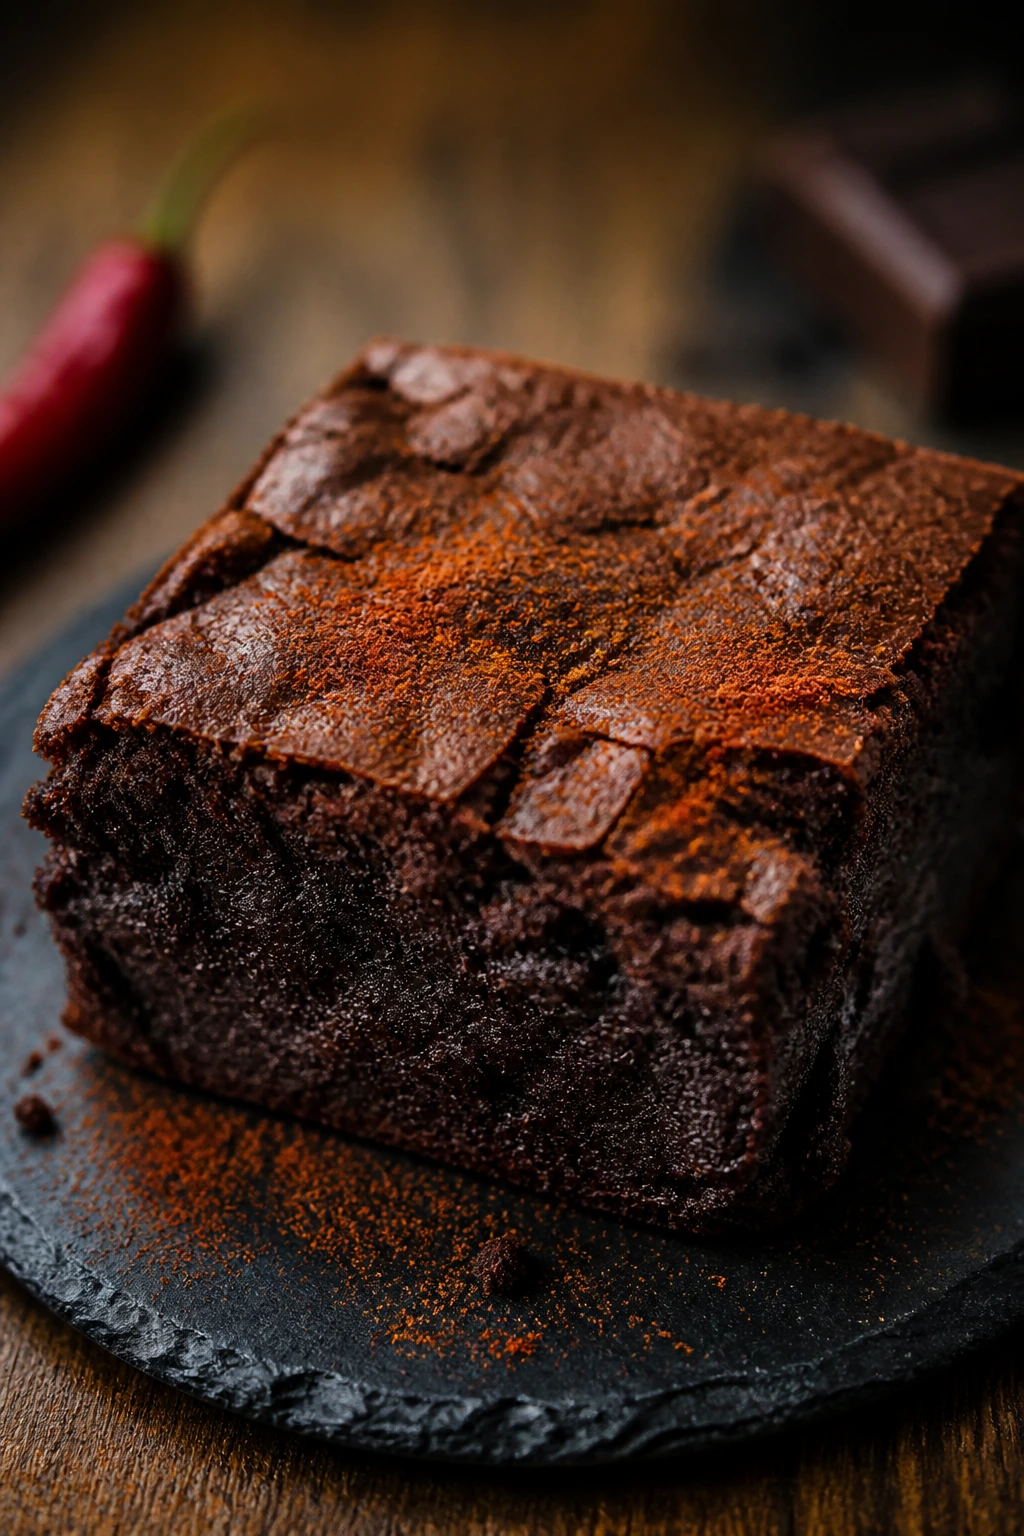
This one is for people who like their chocolate with a little backbone. The chili does not make the brownies hot-hot; it adds a slow, warm finish that shows up after the chocolate. That tiny burn at the end can make a square feel much more grown-up than the ingredients suggest.
Why It Works: Dark chocolate already has a slight bitterness, and chili leans into that instead of fighting it. A small amount of cinnamon rounds the edge so the heat feels warm, not sharp.
Key Ingredients:
- 1/2 cup butter, melted
- 1 cup sugar
- 2 eggs
- 1 teaspoon vanilla
- 1/3 cup cocoa powder
- 1/2 cup flour
- 1/2 teaspoon ancho chili powder
- 1/4 teaspoon cayenne
- 1/2 teaspoon cinnamon
- 1/2 cup dark chocolate chunks
- 1/4 teaspoon flaky salt
Quick Steps:
- Preheat the oven to 350°F and line the pan.
- Mix the batter with the spices whisked in evenly.
- Fold in the dark chocolate chunks.
- Bake 22 to 25 minutes.
- Cool, then finish with flaky salt.
Equipment for This Recipe:
- 8×8-inch pan
- Mixing bowl
- Whisk
- Cooling rack
- Sharp knife
How to Serve This Dish: Serve these in smaller squares than the sweeter brownies; the heat builds a little. A scoop of vanilla ice cream helps if someone at the table is spice-shy.
Pro Tips for This Recipe:
- Start with less cayenne if you’re unsure; you can always make the next batch hotter.
- Use ancho chili powder for a smoky warmth instead of straight heat.
- The salt on top makes the chocolate taste darker.
Variations on This Dish:
- Mexican Hot Chocolate Brownies: Add 1/4 teaspoon espresso powder and a bit more cinnamon.
- Chipotle Brownies: Swap cayenne for chipotle powder if you want a smokier finish.
Common Mistakes to Avoid with This Dish:
- Over-spicing the batter: Heat should linger, not punch you in the mouth.
- Skipping the ice cream pairing for sensitive eaters: It softens the finish nicely.
24. Pumpkin Cheesecake Brownies
Pumpkin cheesecake brownies are what happens when October shows up in a square pan. The chocolate layer stays dense, the pumpkin layer stays pale and tangy, and the whole thing slices into a marbled bar that looks like you worked much harder than you did. That’s a useful trick.
Why It Works: Pumpkin puree and cream cheese together make a swirl that’s thick enough to hold shape, but soft enough to bake into ribbons. The chocolate base gives the bars structure so the pumpkin layer doesn’t sink.
Key Ingredients:
- 1/2 cup butter, melted
- 1 cup sugar
- 2 eggs
- 1 teaspoon vanilla
- 1/3 cup cocoa powder
- 1/2 cup flour
- 1/4 teaspoon salt
- 4 ounces cream cheese, softened
- 1/3 cup pumpkin puree
- 3 tablespoons sugar
- 1 egg yolk
- 1/2 teaspoon pumpkin pie spice
Quick Steps:
- Preheat to 350°F and line the pan.
- Mix the brownie batter and spread it in the pan.
- Beat the cream cheese, pumpkin, sugar, yolk, and spice until smooth.
- Dollop the pumpkin mixture over the batter and swirl gently.
- Bake 25 to 28 minutes, then cool fully.
Equipment for This Recipe:
- 8×8-inch pan
- Two mixing bowls
- Hand mixer
- Knife for swirling
- Cooling rack
How to Serve This Dish: These are best chilled because the swirl slices cleaner when cold. I like them plain, but a tiny dusting of cinnamon sugar gives the top a little extra warmth.
Pro Tips for This Recipe:
- Keep the swirl thick; thin pumpkin mixtures spread too far.
- Use a light hand with the knife so the marbling stays visible.
- Chill before slicing if you want a sharp pattern.
Variations on This Dish:
- Maple Pumpkin Cheesecake: Swap 1 tablespoon sugar for maple syrup in the swirl.
- Chocolate Chip Pumpkin Cheesecake: Fold 1/3 cup chips into the brownie batter.
Common Mistakes to Avoid with This Dish:
- Using pumpkin pie filling: It’s already seasoned and too loose for this batter.
- Cutting while warm: The layers smear and lose definition.
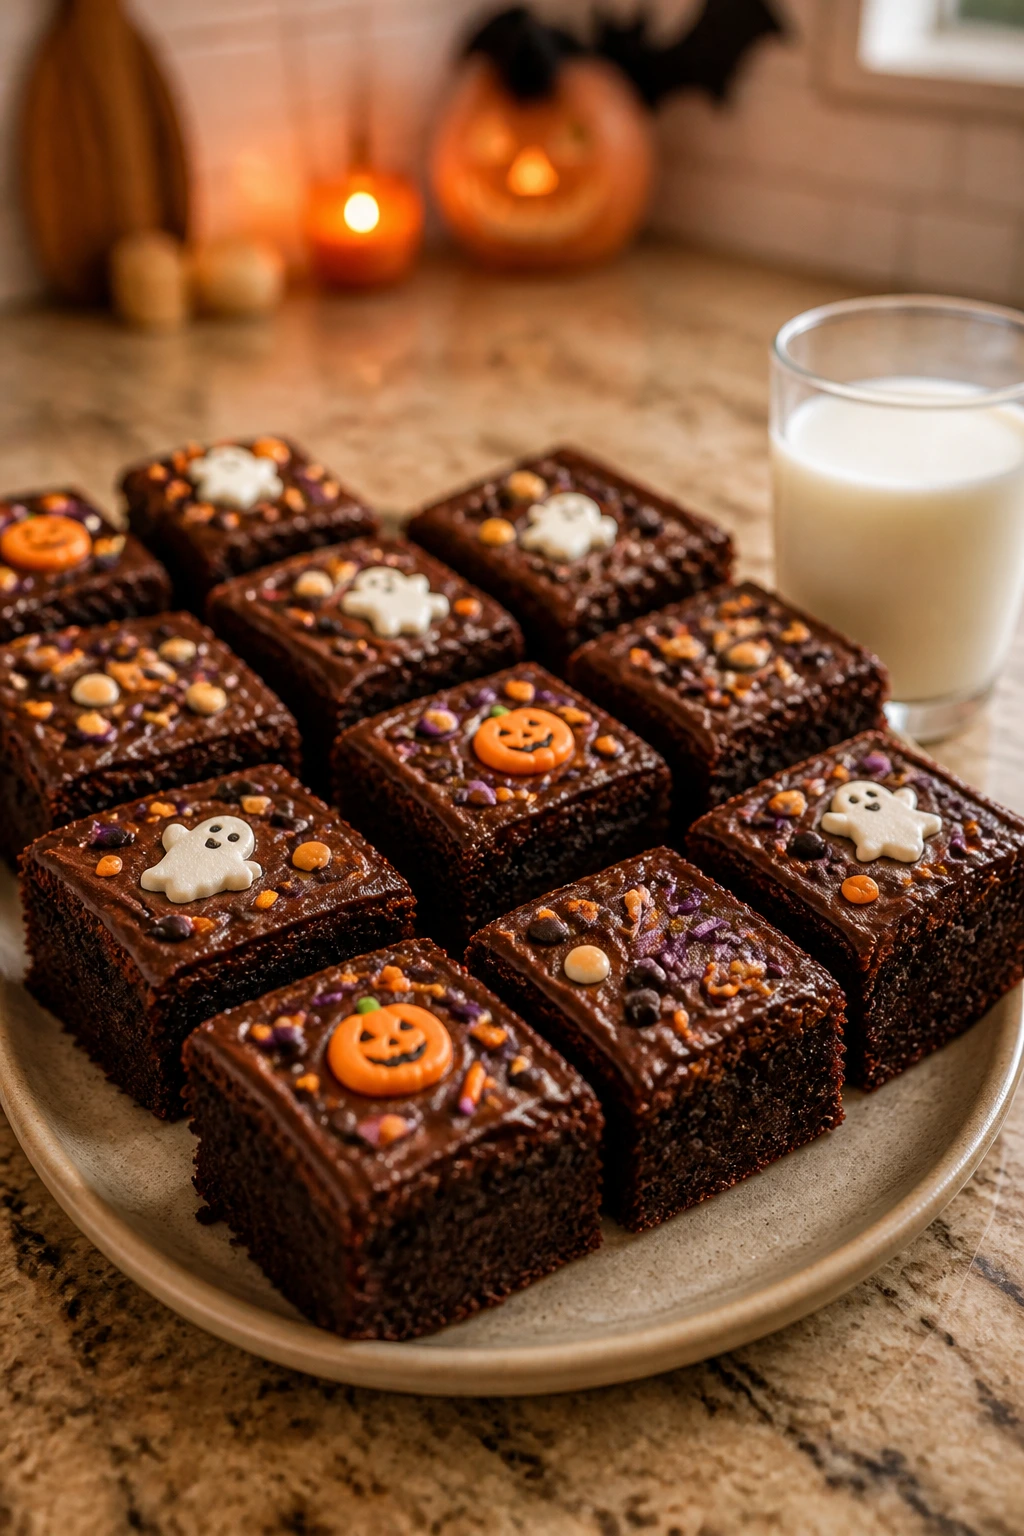
25. Monster Eye Brownie Bars

These are the brownies that make people laugh before they even take a bite. A smear of green frosting, a scatter of candy eyes, and a handful of sprinkles can turn a plain square into a goofy little monster face. No skill points required. Just enough confidence to make them look slightly unhinged.
Why It Works: Frosting gives the candy eyes something to cling to, and the dark brownie base makes the colors pop. This is the easiest way to get a high Halloween payoff from a very ordinary pan of brownies.
Key Ingredients:
- 1/2 cup butter, melted
- 1 cup sugar
- 2 eggs
- 1 teaspoon vanilla
- 1/3 cup cocoa powder
- 1/2 cup flour
- 1/4 teaspoon salt
- 1 cup vanilla frosting, tinted green
- 24 candy eyes
- 1/4 cup Halloween sprinkles
Quick Steps:
- Bake the brownies in a lined 8×8-inch pan at 350°F for 22 to 25 minutes.
- Cool fully, then spread on the green frosting.
- Press candy eyes into the frosting in odd clusters.
- Scatter sprinkles around the eyes.
- Chill briefly so the frosting firms up before slicing.
Equipment for This Recipe:
- 8×8-inch pan
- Offset spatula
- Small bowl for tinting frosting
- Spoon
- Knife
How to Serve This Dish: Cut these into larger squares so the monster faces stay intact. They look best stacked loosely on a platter, with a few stray sprinkles scattered around the edges like the tray got away from you.
Pro Tips for This Recipe:
- Tint the frosting a shade brighter than you think you need; it dulls a little on the brownie.
- Add the candy eyes before the frosting crusts over.
- Use odd numbers of eyes for a more monster-like look.
Variations on This Dish:
- Purple Monster Bars: Tint the frosting purple and use orange sprinkles.
- Gluten-Free Monster Bars: Use a gluten-free brownie base and keep the frosting decorations the same.
Common Mistakes to Avoid with This Dish:
- Frosting warm brownies: The topping slides off.
- Pressing eyes too hard: They crack or sink into the frosting.
Why a Brownie Pan Wins on Halloween Nights
Brownies do one thing better than most Halloween desserts: they stay cooperative. Cookie dough wants scooping, cupcakes want frosting precision, and layered desserts want more counter space than most weeknights can spare. A brownie pan gives you a single bowl, one bake, and a dessert that still looks festive once you add a drizzle or a handful of candy eyes.
The other advantage is texture. Brownies cut cleanly when they cool, which matters when you’re trying to make spiderwebs, mummies, or graveyards that still read as designs after slicing. A tray of cupcakes can look charming and then collapse the second someone grabs a liner. Brownies hold their shape. They forgive a crooked web line, a slightly lopsided ghost, and a frosting smear that was supposed to be a pumpkin stem.
I also like the way brownies let you decide how far you want to go. Keep them plain and fudgy with a few candy corn pieces on top, or dress them up until they look like a costume party in a pan. The base never argues. That’s a rare quality in dessert.
Essential Equipment for These Recipes
- 8×8-inch baking pan: The best size for most of these recipes because it gives thick, fudgy squares that cool quickly.
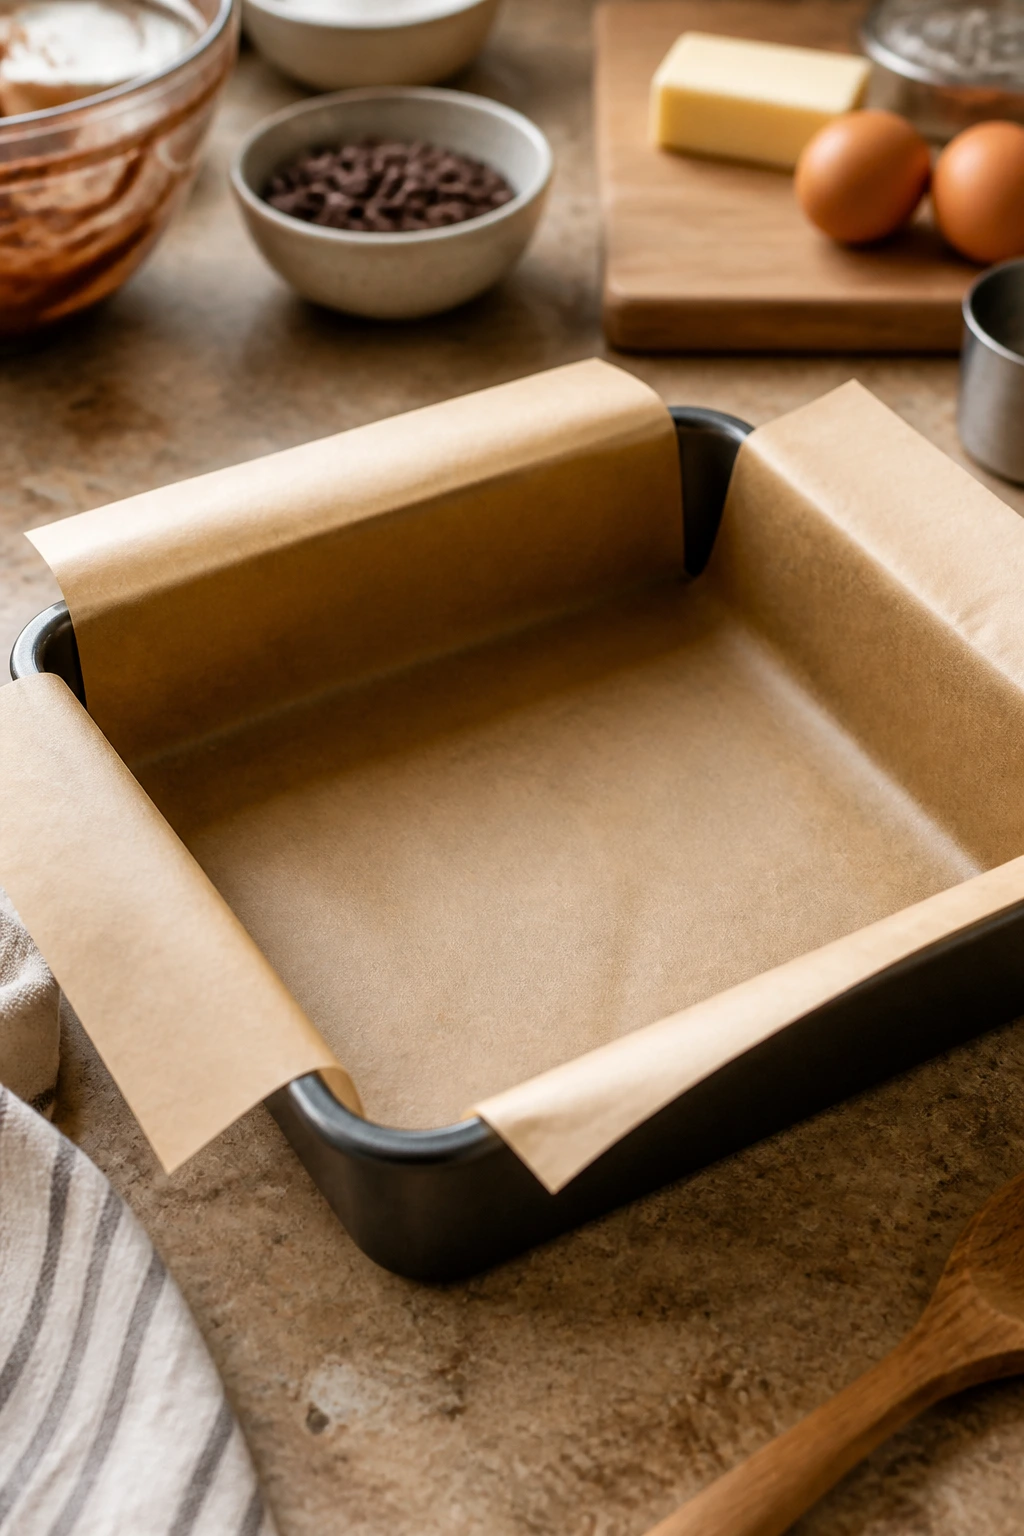
- Parchment paper: Leave an overhang so you can lift the brownies out without tearing the edges.
- Mixing bowls: One medium bowl usually does the job; a second bowl helps for swirls and frostings.
- Whisk or hand mixer: A whisk is enough for basic batters, but a hand mixer helps with cream cheese swirls.
- Rubber spatula: Good for scraping the bowl and spreading batter into corners.
- Toothpick or skewer: Handy for spiderwebs and quick swirl patterns.
- Offset spatula or butter knife: Useful for frosting, candy crumbs, and clean topping layers.
- Microwave-safe bowl: Best for melting white chocolate, caramel, or frosting thins.
- Cooling rack: Brownies set better when air can move underneath the pan.
- Sharp knife: Warm water and a dry towel help here more than fancy gadgets do.
Smart Shopping and Ingredient Tips
Brownies are simple, but the ingredients still matter. I’d spend attention on the cocoa first. A good unsweetened cocoa powder gives the base depth, while Dutch-process cocoa makes the brownies taste darker and a little smoother. Either works, but if you use one brand for the whole batch, don’t swap midstream. That’s how flavors drift.
Chocolate chips also behave differently. Semi-sweet chips hold their shape, which is useful for swirl brownies and chunked bars. White chocolate chips melt softer and are better for drizzles and mummy bandages than for mixing into the batter. If the white chocolate you buy feels waxy in the package, it will probably be waxy in the bowl too.
For the Halloween toppings, choose decorations that stay bright and firm. Candy eyes, candy pumpkins, pretzels, toffee bits, and Oreos are reliable. Pumpkin puree should always be pure pumpkin, not pumpkin pie filling. And for peanut butter brownies, choose a creamy peanut butter that stirs smooth; the oily natural jars can separate and make the swirl look patchy.
Cream cheese is worth buying in blocks, not tubs, when you plan a swirl. Block cream cheese softens more evenly and bakes into clean ribbons. Tubs can be too loose. Same with caramel sauce: thicker sauce clings to the top; thin ice-cream topping tends to sink or slide. Tiny detail. Big difference.
How to Serve These Recipes
Presentation: Brownies look best when cut after chilling for 15 to 20 minutes, wiped clean between slices, and stacked a little unevenly on a platter. If you’ve used candy eyes, spiderwebs, or mummy drizzles, leave the squares broad enough for the decoration to show.
Accompaniments: Cold milk is the easy answer, but vanilla ice cream, black coffee, hot chocolate, and even salted popcorn work across this whole batch. For fruitier brownies like raspberry or cherry, a spoonful of whipped cream sharpens the edges. For the richer ones, a small scoop of ice cream keeps the plate from feeling heavy.
Portions: An 8×8-inch pan usually gives 9 large squares or 16 smaller party pieces. For school events or trick-or-treat tables, I’d cut them smaller than you think; Halloween tends to involve a lot of sampling. For home dessert, 2-inch squares are the sweet spot.
Beverage Pairing: Coffee pairs well with the espresso, orange, chai, and chili brownies. Milk is still the best all-purpose match for the peanut butter, Oreo, and marshmallow versions. If you want one drink that covers the whole spread, iced milk or cold brew both do the job without fighting the chocolate.
Additional Tips and Flavor Boosters
Flavor Enhancement: A pinch of instant espresso powder improves almost every chocolate brownie in this set, even the ones that don’t advertise it. It doesn’t make the brownies taste like coffee; it makes the chocolate taste fuller.
Customization: If you want a darker Halloween palette, use black cocoa in part of the batter for spiderweb, mummy, or Oreo brownies. If you want a sweeter, kid-friendlier tray, lean on white chocolate, marshmallow, and candy eye toppings instead of fruit or spice.
Serving Suggestions: I like a little flaky salt on the brownies with caramel, pretzels, peanut butter, and toffee. For the fruit versions, a few fresh berries or a dollop of whipped cream is enough. For the spooky ones, a few crumbs or a stray candy pumpkin on the platter helps the presentation look lived-in rather than staged.
Make-It-Yours: For nut-free guests, skip peanut butter, pecans, and almond extract and move toward mint, marshmallow, raspberry, or orange. For gluten-free baking, use a trusted one-to-one flour blend or a gluten-free boxed brownie mix and keep the toppings the same. For dairy-free versions, use plant butter, dairy-free chocolate chips, and a non-dairy frosting that sets firm enough to hold candy eyes.
Make-Ahead, Storage, and Reheating Guidance
Plain brownies keep well at room temperature for about 2 days in an airtight container, as long as the toppings are dry and not dairy-heavy. Frosted brownies, cream cheese swirls, and fruit-topped bars belong in the fridge and usually hold for 4 to 5 days. If you’ve used marshmallows or candy eyes, store them in a single layer when you can, because stacked decorations get crushed fast.
For freezing, plain brownies freeze cleanly for up to 2 months. I wrap the whole slab tightly in parchment and foil, then freeze it before slicing. That keeps the edges from drying out. Brownies with caramel drizzles, frosting, or candy eyes can be frozen, but the decorations may shift or soften when thawed, so I prefer to freeze the plain base and decorate later.
To reheat, use a microwave for 8 to 12 seconds if you want that just-baked softness back. For a whole pan or a few thick squares, 300°F for 5 to 7 minutes works well, loosely covered with foil so the top doesn’t dry out. Brownies with marshmallows or white chocolate need gentler reheating; too much heat melts the decorations into a puddle. If you’re making ahead for a party, bake the brownies the day before and finish with toppings the next day. That’s the cleanest path.
Variations and Adaptations to Try
Gluten-Free Halloween Bars: Use a 1-to-1 gluten-free flour blend or a gluten-free boxed brownie mix in any of these recipes. The fudgy versions work especially well because they rely more on eggs and fat than on flour structure.
Dairy-Free Trick-or-Treat Brownies: Swap in plant butter and dairy-free chocolate chips, then use coconut-based whipped topping or dairy-free frosting for the decorated versions. The spiderweb and monster-eye brownies are the easiest to adapt because the topping is mostly decoration.
Lower-Sugar Pan: Cut the sugar in the base by 1/4 cup and lean on toppings like peanut butter, espresso, mint, or orange zest rather than extra candy. The brownies will be a little less shiny on top, but the flavor stays balanced.
Nut-Free Party Tray: Skip peanut butter, pecans, almonds, and tahini. Go heavy on marshmallow, candy corn, Oreos, raspberry, and pumpkin swirl bars instead. That gives you a full Halloween spread without worrying about cross-contact from the obvious nut-based choices.
Kid-First Monster Bars: Use a mild vanilla frosting tinted green or purple, then pile on candy eyes and sprinkles. Kids tend to care more about the face than the flavor profile, and honestly, that’s fine here.
Dark and Serious Brownies: Use dark cocoa, espresso powder, and a pinch of salt, then keep the decorations minimal. A spiderweb or a single white drizzle line is enough when the chocolate is doing the heavy lifting.
Common Mistakes to Avoid
Baking until the center feels firm: Brownies keep cooking after they leave the oven. If you wait for a dry center, you’ll end up with bars that slice like fudge brick. Pull them when the middle still has a slight softness and a toothpick comes out with moist crumbs, not wet batter.
Decorating before the brownies cool: White chocolate webs melt, frosting slides, and candy eyes tumble into a sticky mess. A cool brownie surface holds decorations much better, and chilling for a short stretch makes slicing cleaner too.
Using too many wet toppings: Jam, pumpkin puree, and caramel are useful, but they need restraint. If you pile on too much, the brownies can go gooey in the middle and lose their structure. Keep swirls thin and toppings balanced.
Skipping parchment overhang: A lined pan with no overhang sounds harmless until you try to lift sticky brownies out in one piece. Leave a couple inches hanging over the sides, and the whole slab comes out much more neatly.
Cutting with a dull knife: Sticky toppings drag and smear if the knife is blunt. Wipe the blade between cuts, and if the pan is very fudgy, dip the knife in hot water, dry it fast, and slice. Small effort. Better squares.
Frequently Asked Questions
Can I use a boxed brownie mix for these Halloween brownies?
Yes, and for some of these toppings, a boxed mix is the smartest move. Use the mix as your base, bake it in an 8×8 or 9×9 pan, then add the decorations once it cools. The spooky toppings carry most of the visual weight anyway.
How do I keep candy eyes and frosting from sliding off?
Let the brownies cool completely before decorating, and use a frosting layer that’s thick enough to act like glue. If the frosting feels soft, chill the brownies for 15 minutes after spreading it, then add the eyes.
What’s the best pan size for fudgy Halloween brownies?
An 8×8-inch pan gives you thicker squares and a better chew. A 9×9-inch pan works too, but the brownies bake faster and come out a little thinner, which can help if you want party-size pieces.
Can I freeze brownies with decorations on top?
Plain brownies freeze best. Decorated brownies can freeze, but candy eyes, marshmallows, and frosting can look a little rough after thawing. If you want the cleanest result, freeze the base and decorate after it comes back to room temperature.
How do I get neat slices with swirls and drizzles?
Cool the pan completely, then chill it for 15 to 20 minutes before cutting. Use a sharp knife, wipe it after each cut, and keep the squares small if the topping is heavy. That keeps the design from dragging across the blade.
Can I make these brownies dairy-free?
Yes. Use plant butter, dairy-free chocolate chips, and a dairy-free frosting or drizzle where needed. The recipes with jam, orange zest, raspberry, or chili are especially easy to adapt because they rely less on cream cheese or marshmallow toppings.
Why did my brownies turn dry even though I followed the recipe?
They were probably in the oven a little too long, or the pan was a different size than the one the recipe expected. Brownies should come out when the center is still soft, then finish setting as they cool.
Can I make brownie bites instead of bars?
Absolutely. A mini muffin tin works well for spiderwebs, monster eyes, peanut butter cups, and Oreo crumbs. Just shorten the bake time and start checking a few minutes early, since small pans cook much faster.
Final Squares
A Halloween brownie pan is the kind of dessert that earns its place without making a scene. It can be spooky, cute, messy, polished, or slightly ridiculous. That flexibility is what makes it useful on a weeknight when nobody has the patience for a fussy layered cake.
Keep the base simple, choose one decoration that makes you smile, and let the chocolate do the rest. A pan like this disappears fast, and that’s usually the best compliment a brownie can get.